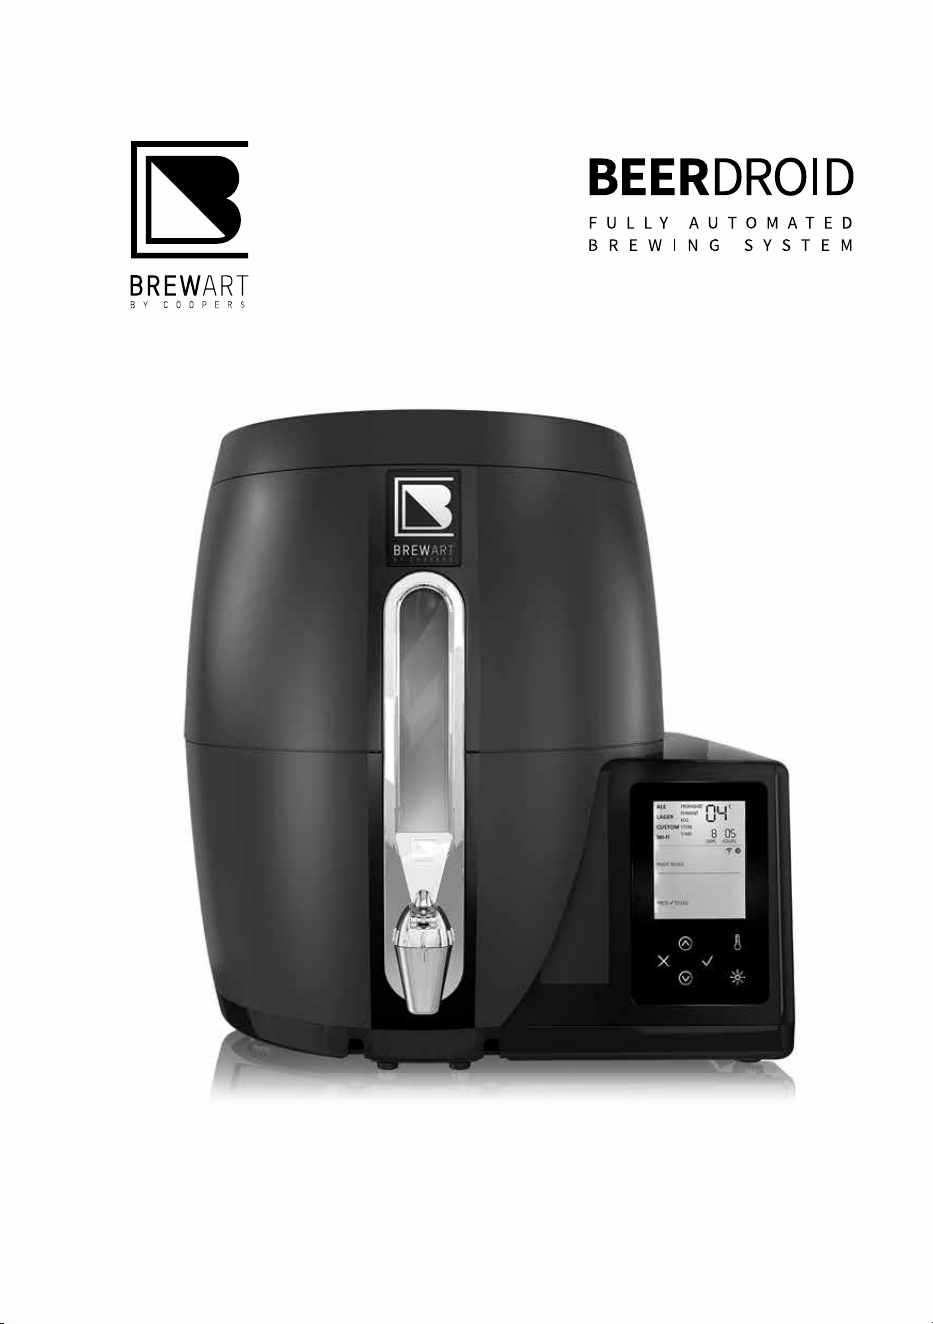
OPERATING MANUAL
BREWART BY COOPERS
2
WARNING: Keep your
BeerDroid upright in a
cool, dry position out of
direct sunlight and other
heat sources. Designed for
household use only.
WARNING: Keep plastic
bag out of reach of children.
NOTE: When not in use turn
o at the rear power switch.
Welcome to the
art of brewing!
Congratulations on the purchase
of your BrewArt BeerDroid.
This manual covers the
basic setup and operation
of your BeerDroid.
To discover the full
BrewArt experience head
to BREWART.COM
Did you know?
BREWART.COM/101 has lots
of great how-to videos, FAQs
and tips.
Contents
Safety 4
Customer Service 5
BrewArt Customer Service 5
Product Specifications 5
Provided in the box 5
Getting to know your
BrewArt BeerDroid 6
LCD Display Screen
& Control Panel 8
Control Panel 10
Getting started 11
OPTION 1: Setting up your
BeerDroid with the BrewArt App 11
OPTION 2:
Setting up your
BeerDroid via the Internet 11
Before Use 12
Prepare and sanitise
your equipment 12
Ready to Brew 14
Preparation 14
Adding Ingredients 15
Controlling BeerDroid
with the BrewArt App 15
BEERDROID INSTRUCTIONS
3
Controlling BeerDroid
from Control Panel 16
Starting a LAGER Program 16
Starting an ALE Program 16
Starting your own CUSTOM Program 16
Brewing Program Zones 18
Propagate 18
Ferment 18
Keg 19
Store 20
Kegging 21
Equipment required for Kegging 21
Clean & Sanitise the following
kegging equipment 22
Assembly of valves 22
Kegging using the Keg Caddy 23
Congratulations, you have
kegged your first brew 26
Secondary Fermentation 26
Bottling 27
Equipment required for bottling 27
Clean & Sanitise the following
bottling equipment 27
Bottling Process 27
Cleaning 29
Troubleshooting 29
Appendix A –
Wi-Fi Set-up and Use 30
Wi-Fi Compatibility 30
Wi-Fi Set-up 31
Option 1 – Setup BeerDroid's
Wi-Fi via the BrewArt App 32
Part 1 – On your Device 32
Part 2 – On your BeerDroid 32
Part 3 – On your Device 33
Option 2 – WPS Setup 34
Before you start 34
Part 1 – On your BeerDroid 34
Part 2 – On your Wi-Fi modem 34
Part 3 – On your BeerDroid 34
Option 3 – Wi-Fi
Manual Set-up 35
Before you start 35
Part 1 – On your BeerDroid 35
Part 2 – On your Wi-Fi enabled
computer or smart device 35
Part 3 – On your BeerDroid 36
Wi-Fi Operation 37
Wi-Fi Set-up Error Codes 38
Operating Error Codes 40
Error Code E1 40
Appendix B –
Linking your BeerDroid 41
Option 1 – Linking via the
BrewArt App 41
Option 2 – Linking via the
BrewArt Website 42
Warranty 43
Disposal 43
Correct Disposal of this product 43
BREWART BY COOPERS
4
Safety
Your BrewArt BeerDroid has been designed and manufactured
to the highest safety specifications and all relevant Australian
and New Zealand Standards (AS/NZS 60335.2.24:2010 Inc A1,
AS/NZS 60335.1:2011 Inc A1-2, AS/NZS 4268:2012).
To ensure a safe, successful and rewarding experience please read these instructions
fully prior to use, and if you have any queries, do not hesitate to contact BrewArt
support on 1300 240 242 or at info@brewart.com
To prevent injury:
k Read all instructions before use.
k Always keep the unit upright.
k Remove packaging and safely
discard packing material.
k Do not li the unit by the
handle on the lid.
k When not in use, keep machine
turned o at the power point.
k Keep all vents clear.
k Do not disassemble the
unit for any reason.
k Do not use any other accessories
other than those provided
with your BrewArt BeerDroid
or available from BrewArt.
k Do not use this BeerDroid for
anything other than what it
has been designed for.
k Keep the unit away from
children and pets.
k Li and transport the unit
with care. Never li, move or
transport unless empty. Always
use safe liing techniques.
k Do not store explosive
substances such as aerosol
cans with a flammable
propellant in your BeerDroid.
k If the power cord is damaged,
it must be replaced by the
manufacturer, its service agent
or similarly qualified persons
in order to avoid a hazard.
k The BeerDroid is intended for
household and domestic use only.
k The BeerDroid is not intended for
use by persons (including children)
with reduced physical, sensory
or mental capabilities, or lack
of experience and knowledge,
unless they are supervised or
given instruction concerning the
use of the BeerDroid by a person
responsible for their safety.
k Only use a so damp cloth to wipe
down external surfaces. Do not
use solvents or harsh chemicals.
A mild detergent may be used.
k Failure to keep your BeerDroid
upright may result in damage to
its compressor cooling system.

BEERDROID INSTRUCTIONS
5
Customer Service
BrewArt Customer Service
Phone: 1300 240 242
Email: info@brewart.com
brewart.com
BrewArt is a registered trademark
of Coopers Brewery Ltd.
ABN 13 007 871 409
Coopers Brewery Ltd.
461 South Road,
Regency Park
South Australia 5010
Product Specifications
Model Number: BE642-AU
Class: I
Capacity: 10L
Voltage: 220-240V AC
Frequency: 50Hz
Cooling Power: 120W
Heating Power: 43W
Climate Type: SN/N/T/ST
Refrigerant: R134a (40g)
Vesicant: Cyclopentane (C
5
H
10
)
Provided in the box
k BrewArt BeerDroid
k Quick lock lid
k Two piece snap tap
k Drain plug
k Power cord
k Instruction manual
To view the complete BrewArt System
including the full range of BrewPrints
and Accessories visit brewart.com
BREWART BY COOPERS
6
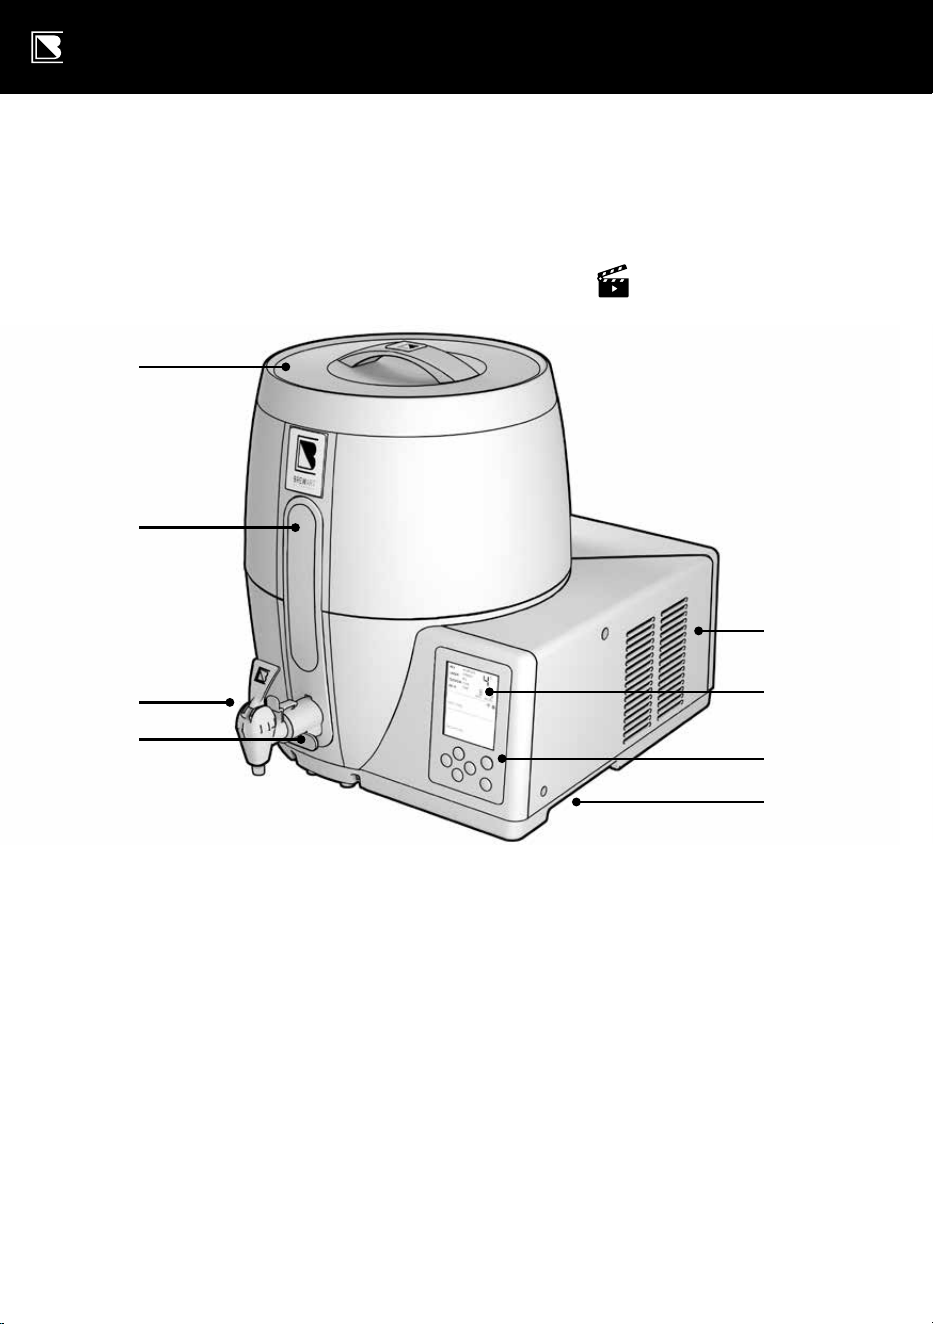
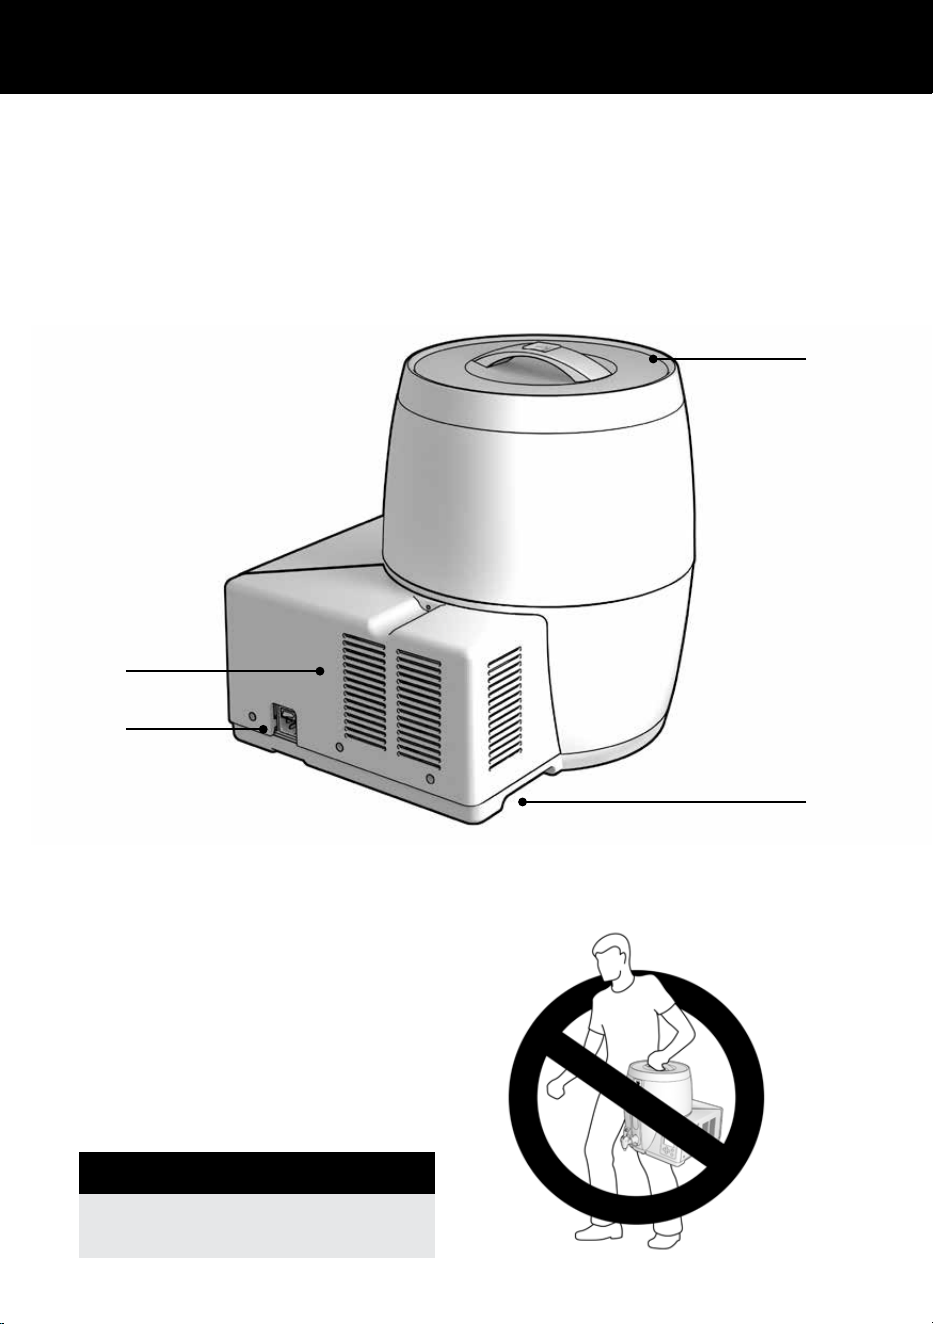
A. Quick lock lid:
Lid that locks into position. Keeps
your brew contaminant free
whilst still allowing CO
2
to vent.
B. Viewing window:
LED light to check brew
during fermentation
C. Tap:
Two piece snap tap that pulls
apart for easy cleaning
D. Drain plug:
Allows residual fluid to drain
away for easier cleaning
E. Vents:
For cooling the compressor.
Keep clear at all times.
F. LCD screen:
Displays menu, status and
brewing notifications
Getting to know your
BrewArt BeerDroid
A
B
C
F
D
G
H
E
Did you know?
Brewart.com/101 has lots
of great how-to videos, FAQs
and tips.
BEERDROID INSTRUCTIONS
7
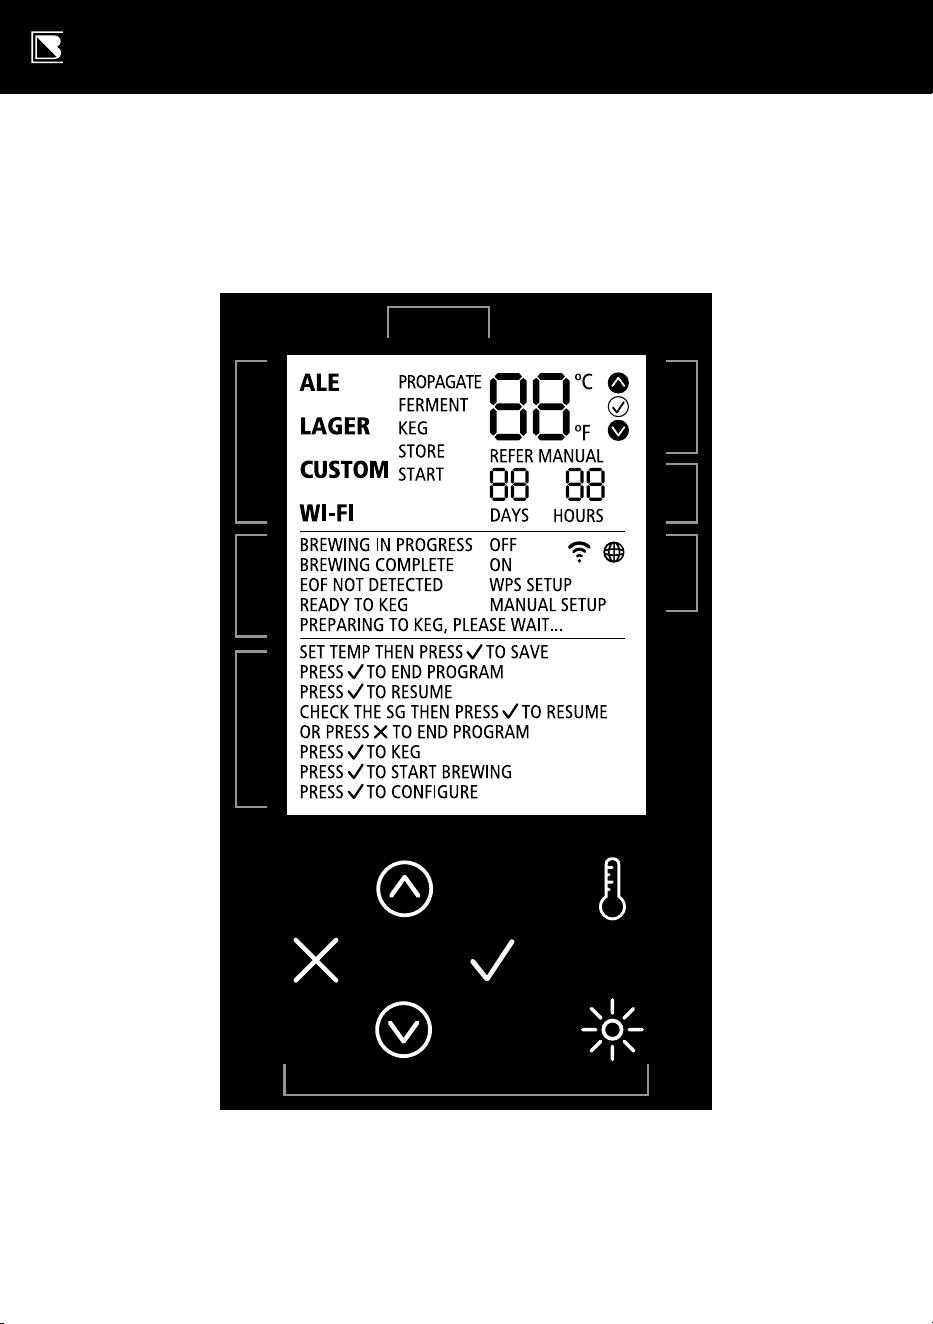
G. Control panel:
To control the BeerDroid
H. Carry handles:
For liing the unit. Do not li
using the handle on the lid.
I. Power cord connection
and ON/OFF switch
A
E
I
H
WARNING
Never li the unit by the lid handle.
BREWART BY COOPERS
8
LCD Display Screen & Control Panel
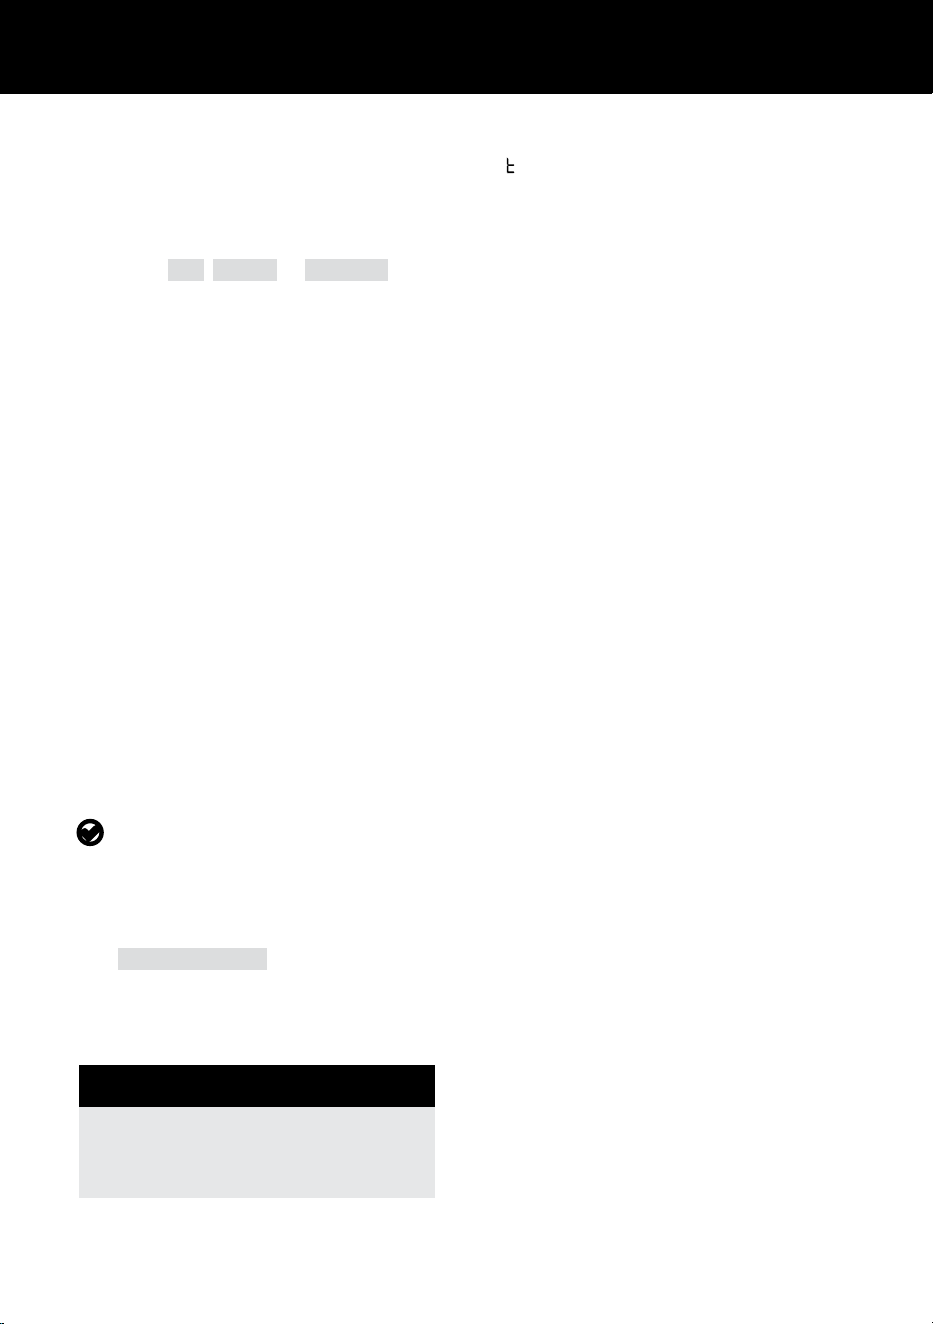
B. Brewing Zones
H. Control Buttons
A. Main
Menu
F. Brew
Status Panel
G. User
Prompt
Panel
C. Temperature
Display
D. Time
Display
E. Wi-Fi
Information
BEERDROID INSTRUCTIONS
9
A. Main Menu
Use this menu, together with the
control panel, to choose a brewing
program (ALE, LAGER or CUSTOM)
and to set-up the Wi-Fi connection.
B. Brewing Zones
Each brewing zone will be displayed
as brewing progresses.
Brewing zones will also be used
to set custom brewing programs.
C. Temperature Display
Indicates current brew temperature and
is used to set custom temperatures.
brew is being heated towards
its target temperature
brew is being cooled towards
its target temperature
brew is within an acceptable
target temperature range
If a fault occurs, an error code will
display instead of temperature digits,
and REFER MANUAL will flash.
-- indicates temperature
more than 34°C
WARNING
Contact with hot fluids
may cause serious injury.
F indicates a fermentation test is in
progress, brew temperature is not
displayed but within acceptable
limits of the fermentation target.
D. Time Display
Indicates the total time that the
brewing program has been running.
If an error occurs, these digits may
be used to display additional error
information.
E. Wi-Fi Information
Indicates Wi-Fi and BrewArt Server
connectivity. For more information
on how to configure Wi-Fi refer to
Appendix A.
F. Brew Status Panel
Indicates overall brewing status.
G. User Prompts
Displays prompts to guide the
user through operation.
BREWART BY COOPERS
10
Control Panel
H. Control Buttons
Arrows
Navigate the menus and set the
temperature in custom programs.
Note
Press and hold arrow buttons
for key repeat when adjusting
temperature.
Cancel
Cancels or exits the current
program or menu.
Confirm
Confirm or selects the current
menu or action.
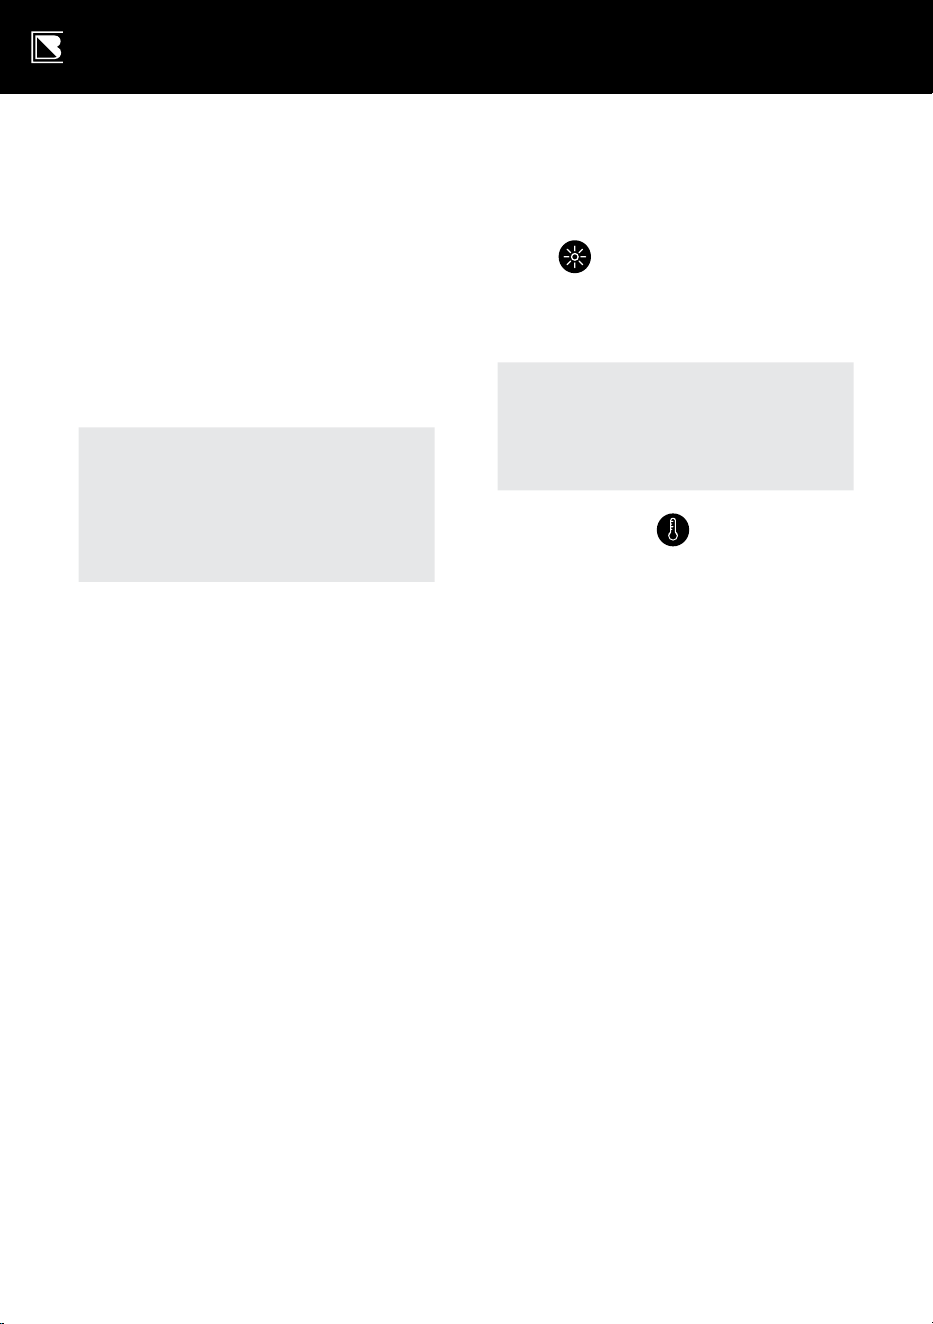
Light
Turns on the light in the BeerDroid to
view the brew from the viewing window.
Note
The light automatically turns
o aer 15 seconds.
Thermometer
Toggles the temperature display
between Celsius and Fahrenheit.

BEERDROID INSTRUCTIONS
11
Getting started
To receive expert help from our Customer Support Team, we
recommend that you create a BrewArt Account and configure
your BeerDroid for Wi-Fi operation.
Note
You do not need to connect the
BeerDroid to Wi-Fi for operation
but doing so enables you to take
advantage of additional features.
OPTION 1:
Setting up your BeerDroid
with the BrewArt App
k Visit the Apple iTunes store or the
Google Play store and download the
BrewArt App from the app section.
k Follow the BrewArt App prompts to
setup a BrewArt Account, configure
your BeerDroid for Wi-Fi and link
your BrewArt Account to your
BeerDroid – see Appendix A.
OPTION 2:
Setting up your BeerDroid
via the Internet
k If you have set up your BeerDroid
with the BrewArt App you do not
need to set up via the internet.
k Visit brewart.com/register and
click "LINK YOUR BEERDROID"
to create a BrewArt Account.
k Follow the prompts to choose
a username and password, and
complete all other fields.
k Ensure the BeerDroid is
connected to the Wi-Fi network
either using WPS or Manual
Method – see Appendix A.
k Enter the serial number found at the
rear of the BeerDroid. Follow the
prompts to "Link a new BeerDroid".
Note
For security reasons linking
requires the BeerDroid and
your device or computer
to be connected to the
same Wi-Fi network.
BREWART BY COOPERS
12
Before Use
Did you know?
The number one cause of brew
failure is infection. Sanitising your
BrewArt equipment is a vital part
of successful brewing.
Prepare and sanitise
your equipment
WARNING
DO NOT tilt or lay BeerDroid on
its back or side as this can cause
damage to the compressor.
k Position near a sink or
somewhere you can drain the
contents of your BeerDroid.
k Thoroughly rinse the inside of
the BeerDroid, the lid, drain plug
and tap (pulling tap apart).
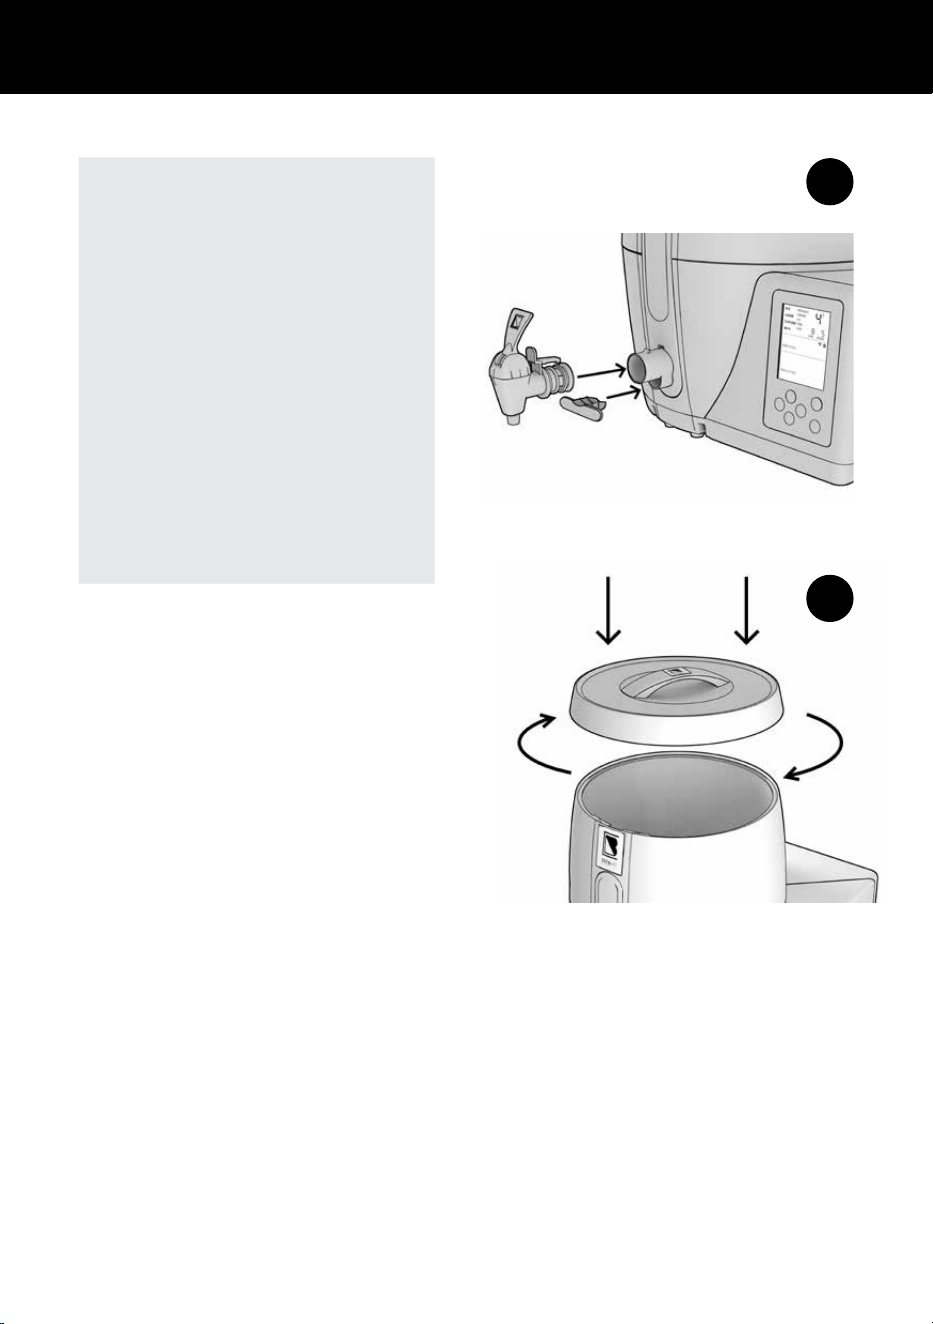
k Assemble the tap and insert
the tap and drain plug into the
BeerDroid – see Diagram E.
Note
To install your tap and drain plug,
you should lubricate the rubber
seal before inserting into the
BeerDroid. This can be done with a
small amount of olive oil.
k Fill your BrewArt BeerDroid
with warm water to within
5mm of the brim.
k Add BrewArt sanitising tablet.
k Fasten the lid into the lock
position – see Diagram F.
Note
The lid may be tight for the first
few uses, if so, lubricate the face
of the seal with a small amount of
olive oil.
k Leave for one hour.
k Open the tap and release half a
cup of liquid through the tap.
k Leave for a further hour.
k Drain the water through the tap
until no more water flows out.
k Remove drain plug and allow the
remaining water to flow out.
k Lightly rinse with clean water.
BEERDROID INSTRUCTIONS
13
E
F
Important
When brewing is complete, we
recommend you thoroughly clean
and rinse the BeerDroid, lid, tap
and plug while the residue is still
moist and leave to completely dry.
Before each use all equipment
must be sanitised.
If there is any residue (foam)
trapped inside the rubber seal,
remove the seal, clean thoroughly
and sanitise before replacing the
seal in the lid.
10cm
BREWART BY COOPERS
14
Ready to Brew
WARNING
For the BeerDroid to operate as
designed it must be filled to 10
litres. A brew with less than 10
litres of water, unless otherwise
specified in the BrewPrint, may
cause error codes to display.
Preparation
k Place the unit on a clean, flat
surface in a dry, cool place away
from direct sunlight or other heat
and where it won’t be bumped
or aected by vibrations.
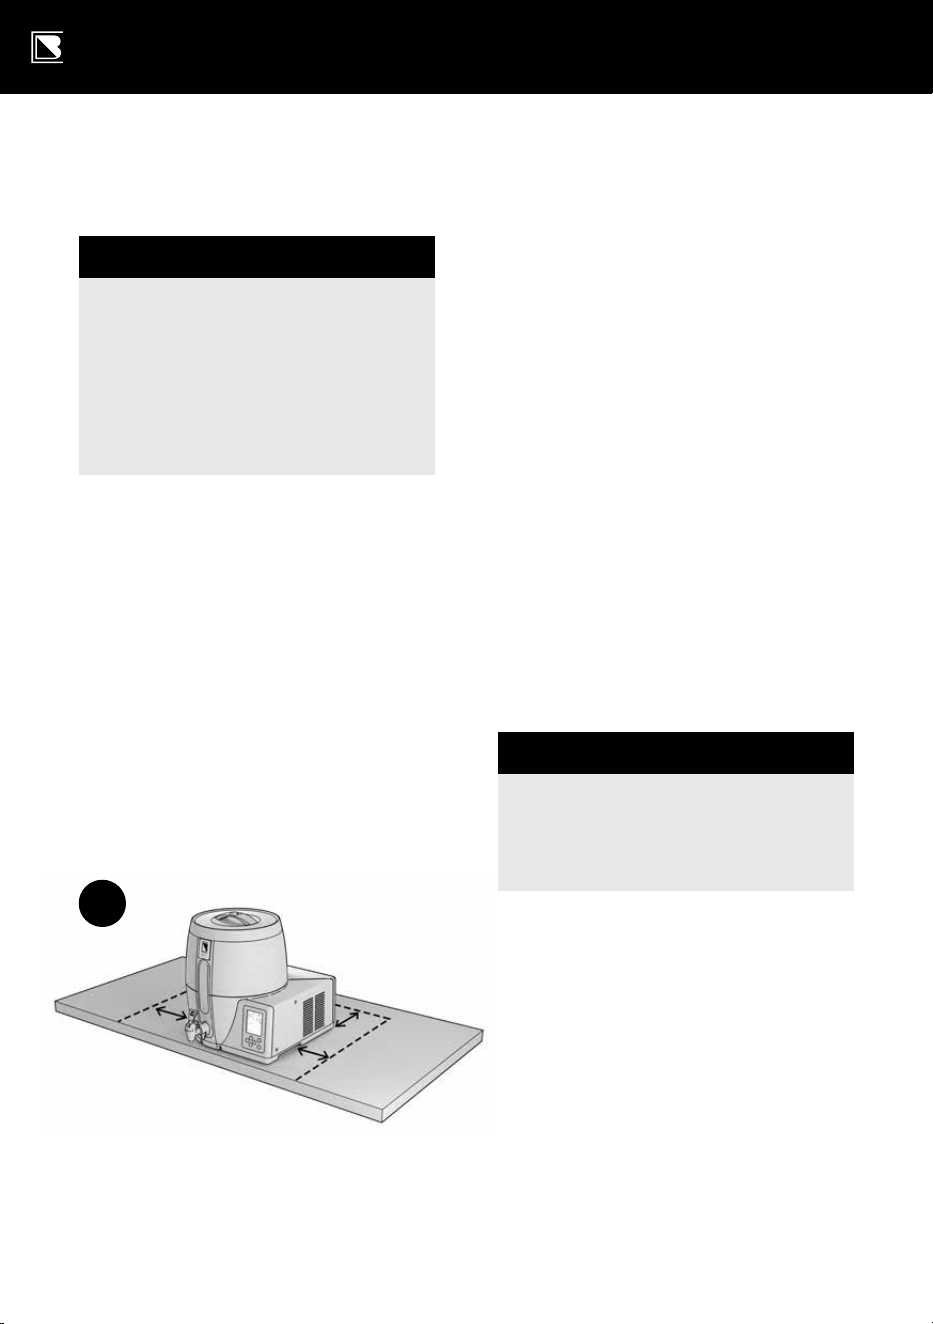
k Ensure you can access the tap
without having to move the unit
when it’s time to keg the beer
(e.g. position it at the edge of
a bench) – see Diagram G.
k Ensure all vents are free of
obstructions and the unit is at
least 10cm away from walls and
other objects – see Diagram G.
k Attach the power cord to the rear
of the unit, then into a power point
and turn on at the power point.
k Switch power to ON, at ON/OFF
switch at the rear of the BeerDroid.
k The LCD display screen will light
up, firstly showing all data and
icons, then the current soware
operating version, and finally the
main menu with the ale program
flashing. The fan will also start
up and run for a short duration.
WARNING
Do not start a program on
your BeerDroid until all
ingredients have been added.
k Ensure that the Wi-Fi is in
the desired operating state
as this may not be changed
while a program is running.
G
BEERDROID INSTRUCTIONS
15
Adding Ingredients
k Ensure the tap and drain plug
are both firmly in place.
k Follow the directions included
in your BrewPrint and any 'Brew
Notes' on the BrewPrint web page.
k Fill BeerDroid with 10 litres of
cool water, unless otherwise
directed by the BrewPrint.
k Sprinkle yeast over the
top of the water
k Add all Elements and Enhancers
(DO NOT add Hops or Primer)
Note
Do not stir the ingredients.
Note
Use potable water free
of chlorine odour.
k Immediately fit the lid again
to the lock position.
k To prevent spoilage, do not open
the lid once the program has begun.
WARNING
Do not move the BrewArt
BeerDroid during operation
or stir the contents once the
program has commenced.
Also ensure the unit is not
bumped or affected by
vibration during operation.
Controlling
BeerDroid with
the BrewArt App
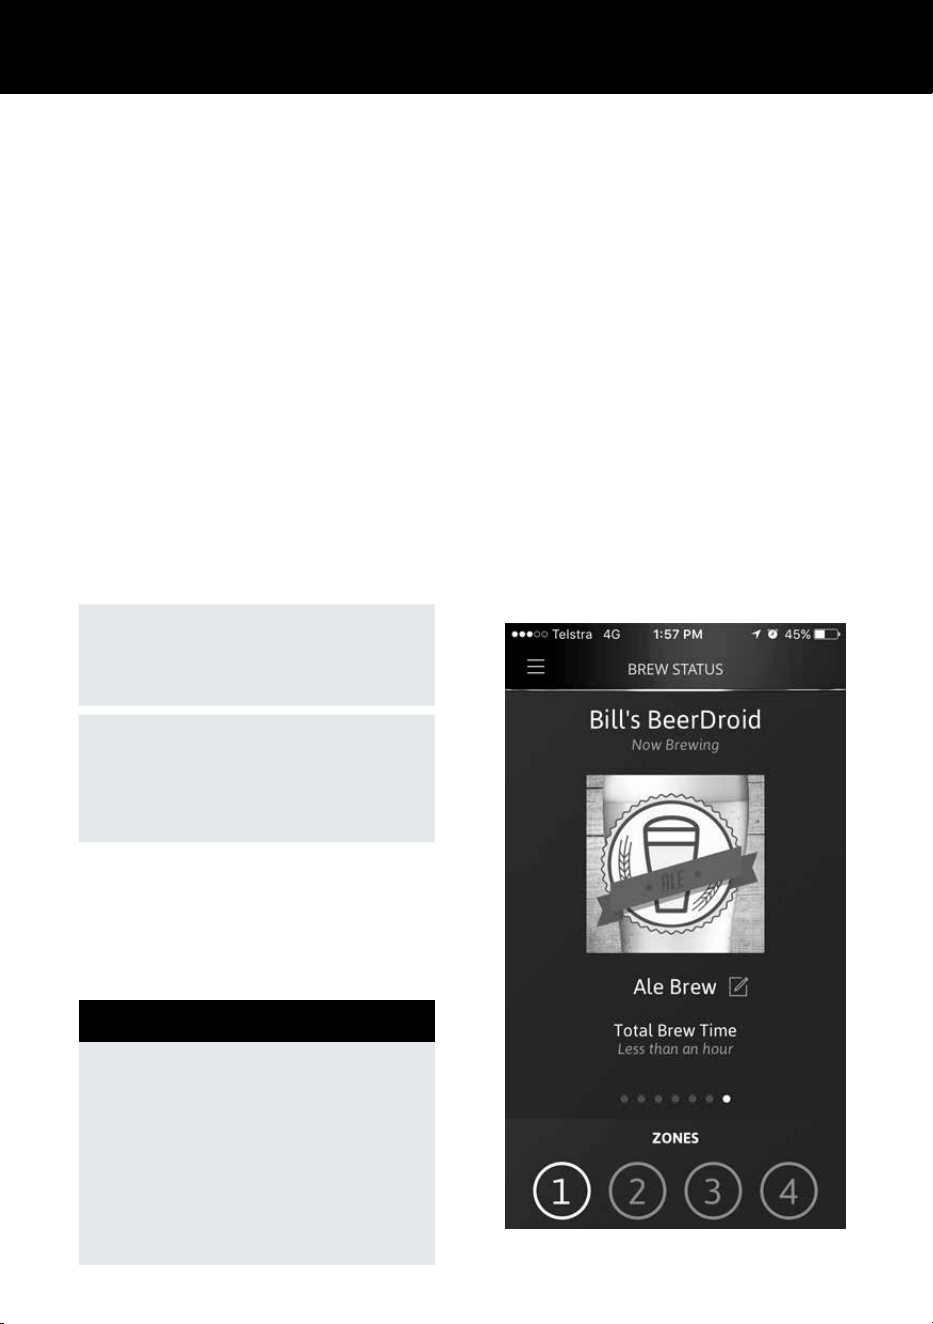
k You can use the BrewArt App to
monitor and control your BeerDroid
provided that you have connected
your BeerDroid to Wi-Fi and linked
it to your BrewArt Account.
k To start a brew using the
BrewArt App, go to Brew Status
and "SELECT A BREW", or to
Shelf to start a BrewPrint.
BREWART BY COOPERS
16
Controlling BeerDroid
from Control Panel
Starting a LAGER Program
k Using the control panel arrows,
scroll through to the lager
program. The word lager will
flash on the display screen.
k press to start brewing
will appear on the user
user prompt panel.
k Press the
on the control
panel to commence brewing.
k lager program will begin.
Starting an ALE Program
k Using the control panel arrows,
scroll through to the ale
program. The word ale will
flash on the display screen.
k press to start brewing will
appear on the user prompt panel.
k Press the
on the control
panel to commence brewing.
k ale program will begin.
Starting your own
CUSTOM Program
k Using the control panel arrows,
scroll through to the custom
program. The word custom will
flash on the display screen.
k press to configure will appear
on the user prompt panel.
k Press the
on the control
panel to configure the custom
temperature profile.
k The brewing program zones
and start will appear on the
screen with the propagate zone
and temperature flashing.
Set propagation temperature
k Use the
and
arrows on
the control panel to adjust the
propagate temperature (max:
30°C/86°F, and min: 5°C/41°F). The
temperature will stop flashing if
the temperature is adjusted.
k When the desired propagate
temperature has been
reached press the
on the
control panel to save.

BEERDROID INSTRUCTIONS
17
Set fermentation temperature
k The ferment zone and
temperature will now flash.
k Use the
and
arrows on
the control panel to adjust the
ferment temperature (max:
30°C/86°F, and min: 5°C/41°F).
The temperature will stop flashing
if the temperature is adjusted.
k When the desired ferment
temperature has been
reached press the
on the
control panel to save.
Set kegging temperature
k The keg zone and temperature
will now flash.
k Use the
and
arrows on
the control panel to adjust
the keg temperature (max:
30°C/86°F, and min: 5°C/41°F). The
temperature will stop flashing if
the temperature is adjusted.
k When the desired keg temperature
has been reached press the
on the control panel to save.
Set storage temperature
k The store zone and
temperature will now flash.
k Use the
and
arrows on
the control panel to adjust
the store temperature (max:
7°C/45°F, and min: 3°C/37°F). The
temperature will stop flashing if
the temperature is adjusted.
k When the desired store
temperature has been
reached press the
on the
control panel to save.
k start will now begin to flash.
k press to start brewing will
appear on the user prompt panel.
k Press the
on the control panel to
start your custom brew program.
k Your custom program will begin.
Note
At any time while configuring
the custom profile, pressing
on the control panel will
return you to the main menu.
Note
The main menu and program
zones cannot be changed or
accessed while a brew program
is in operation.

BREWART BY COOPERS
18
Brewing Program Zones
Propagate
The propagate zone runs for 12 hours,
during which time your BeerDroid
maintains an optimal temperature
for yeast propagation (growth of
yeast cells). Your BeerDroid will then
transition to the ferment zone.
k During the propagate zone,
brewing in progress will be
displayed on the screen.
k The brew temperature will also
appear on the screen and will
gradually rise or drop to 21°C
(70°F) for ale and 22°C (72°F)
for lager programs, or to the
configured propagate temperature
in a custom program.
k The total elapsed time will show on
the screen, above days and hours.
Ferment
During the ferment zone, the yeast
is busy converting sugars into alcohol
and releasing CO
2
as a by-product.
The duration of the ferment zone is
dependent on many factors, such as,
the recipe, the yeast strain used, and
the fermentation temperature.
k The target temperature during
the ferment zone in the lager
program is pre-set to 12°C
(54°F) and in the ale program
it is pre-set to 17°C (63°F). In a
custom program it will be the
temperature you set manually.
k The temperature displayed
on the screen indicates the
current brew temperature.
Note
If your BeerDroid is configured for
Wi-Fi operation, you may adjust
the fermentation temperature
during the ferment zone via the
BrewArt App.
Your BeerDroid will monitor the
fermentation progress of your brew.
When it detects the end of fermentation
it will transition to the keg zone.
If it does not detect end of fermentation
aer 20 days in the ferment zone, it will
automatically transition to the keg zone
and report that end of fermentation was
not detected.

BEERDROID INSTRUCTIONS
19
Keg
The Keg Zone brings your brew to
optimum temperature for kegging or
bottling, this is pre-set to 18°C (64°F) for
ale and lager programs. In a custom
program it will be the temperature you
set manually.
k The display screen will
indicate brewing complete.
k The display screen will read:
preparing to keg, please wait.
When the brew is within 1°C
(2°F) of this target temperature,
it will read: ready to keg.
k The temperature displayed
on the screen indicates the
current brew temperature
k When your BeerDroid indicates
ready to keg, press
to end
program on the control panel.
This will end the current program.
k Turn unit o at the rear
power switch.
k Keg or bottle your beer.
Note
Before Kegging or Bottling we
recommend pouring a small
amount of brew (100ml or
less) into a glass through the
tap. Smell and taste the brew
sample to ensure brew quality.
End of Fermentation
(EOF) not detected
If eof has not been detected during the
ferment zone then:
k eof not detected will appear
on the display screen, and
k check the sg then press to
resume or to end program
in the user prompt panel.
End of fermentation will need to be
tested manually with a hydrometer over
two consecutive days to determine
if fermentation is complete – go to
brewart.com/101 for information on
how to use a hydrometer when EOF is
not detected.
If no action is taken within 2 days in the
keg zone the unit will automatically
move to the store zone. Your brew can
safely stay in the store zone until you
are ready to keg.
Note
If your BeerDroid is configured
for Wi-Fi operation, you may
transition between the store
zone and the keg zone at any
time by using the BrewArt app.
Note
If you have manually transitioned
the unit from store to keg, it
will not automatically transition
to store again.

BREWART BY COOPERS
20
Store
The store zone brings your brew
to optimum temperature for
storage, this is pre-set to 4°C (39°F)
for ale and lager programs. In
a custom program it will be the
temperature you set manually.
k The display screen will indicate
brewing complete .
k The temperature on the
display screen indicates the
current brew temperature.
k press to keg will appear
on the display screen.
k Press
on the control panel to
transition the unit to keg zone.
Note
If your BeerDroid automatically
transitioned into store zone
and eof was not detected
during the ferment zone,
see previous section 'End of
Fermentation not detected'.
Cancel & Leave a Program
To cancel and leave a program
at any time:
k Press
on the control panel.
k press to end program will
appear on the display screen.
k To confirm cancellation, press
on
the control panel within 5 seconds
otherwise the program will resume.
Note
To change temperature
display units (C & F) press
the thermometer button
on the control panel.
To illuminate the viewing
window, press the light
button on the control panel.
The light will automatically
switch o aer 15 seconds.
BEERDROID INSTRUCTIONS
21
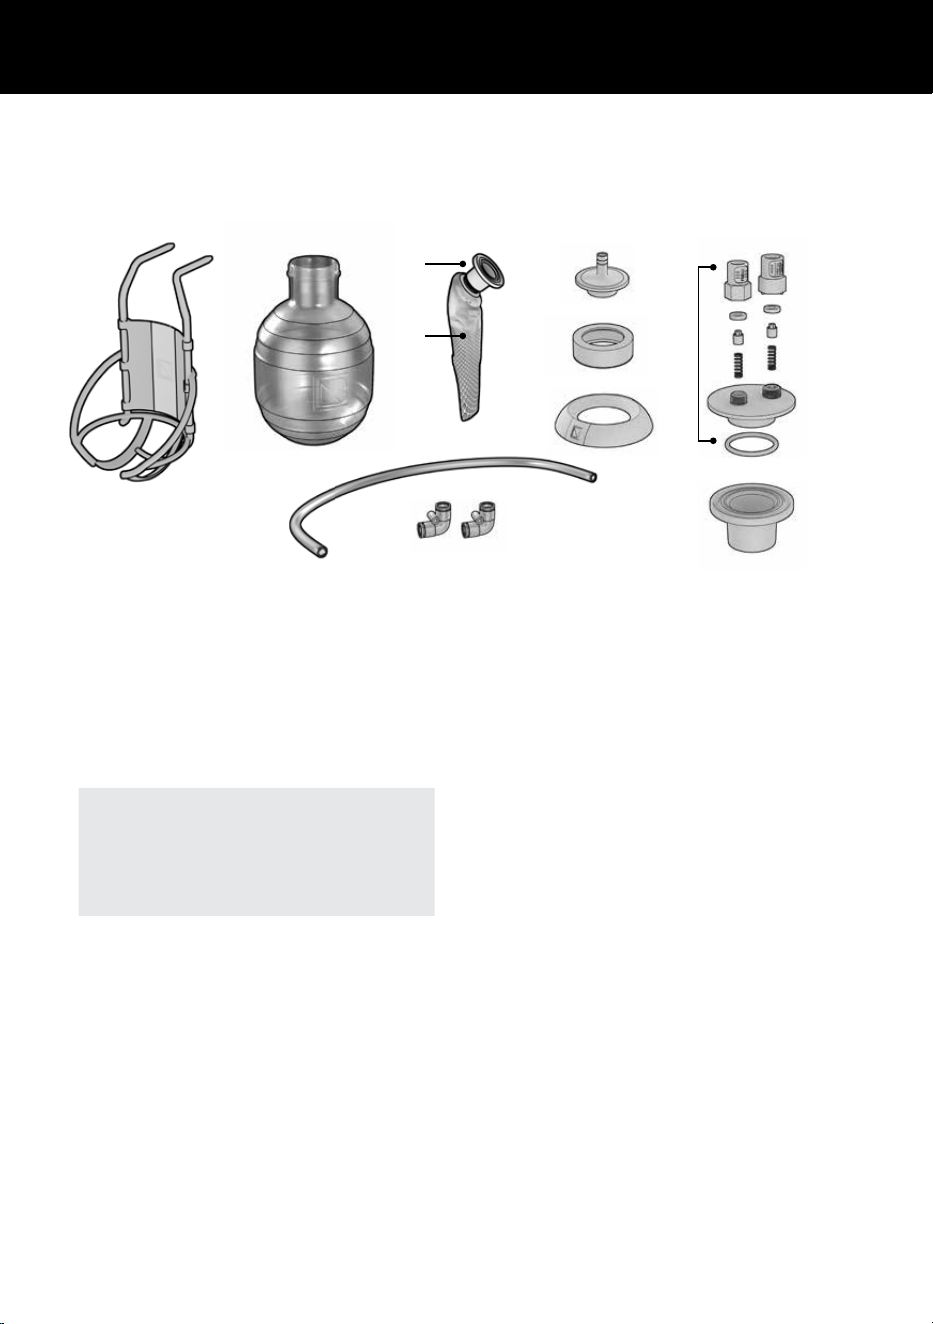
Equipment required for Kegging
A. Keg Caddy
Attaches to the base of the
BeerDroid to hold BrewArt
5 Litre Keg while filling
Note
The Keg Caddy is an
optional accessory.
B. Keg
5 litre PET Keg to store brew
C. Keg Liner Connector
Attaches to the foil keg liner
for filling and dispensing
D. Keg Liner
Foil Keg Liner for storing
brew inside the keg
E. Keg Filling Tube & Connectors
Food grade filling tube with 2 x
connectors for filling for Keg
F. Keg Filling Cap
For filling your keg.
G. Cap Collar
Holds the Keg Caps onto the keg
H. Keg Hold
Holds BrewArt Kegs upright
in fridge or cupboard
I. Keg Dispensing Cap
Connects the keg to the BrewFlo
for dispensing the beer
Kegging
A B C
D
F
I
E
G
C
H
BREWART BY COOPERS
22
Clean & Sanitise
the following
kegging equipment
k Keg Liner Connector (C)
k Keg Filling Cap (F)
k Keg Filling Tube & Connectors (E)
k Keg Dispensing Cap (I)
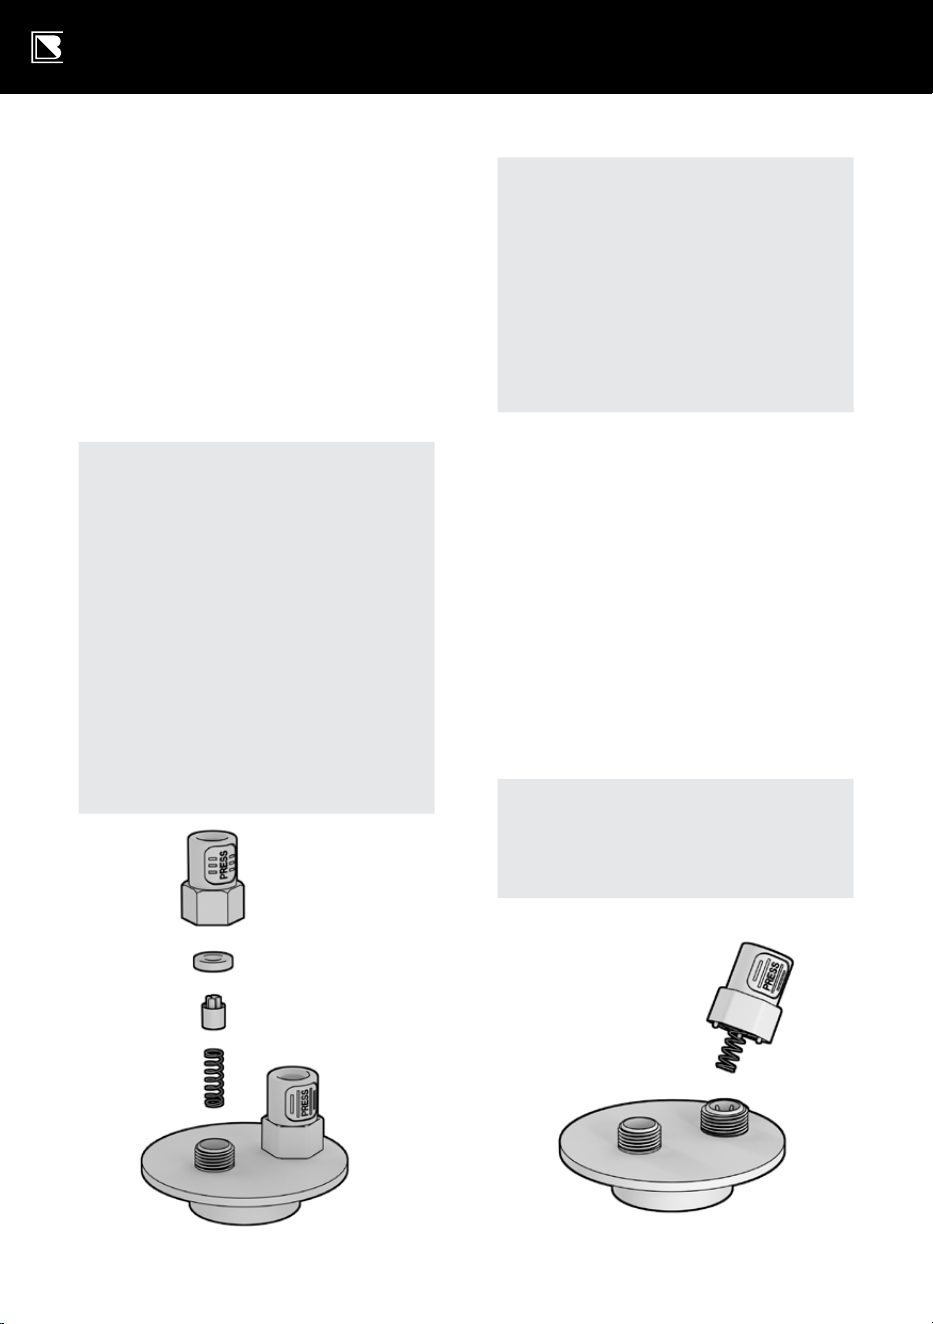
Note
The Dispensing Cap and
Orange Beer Valve should be
disassembled for cleaning and
sanitisation, see exploded view.
The black air valve does not
require disassembly and cleaning.
Ensure black air valve is done up
finger tight.
Take care not to lose small items
when cleaning and sanitising.
Note
The orange o-ring must be fitted
in the orange valve head.
The white o-ring must be fitted
in the black valve head.
The springs and poppets
are interchangeable.
Assembly of valves
k Fit the Valve O-ring into
the Valve Head.
k Insert the Valve Spring
into the Valve Poppet.
k Insert the Valve Poppet and
Spring into the Valve O-ring.
k Screw the valve assembly into the
Dispensing Cap Housing as shown.
Note
Do not over tighten. Finger tight is
suicient.
BEERDROID INSTRUCTIONS
23
Kegging using
the Keg Caddy
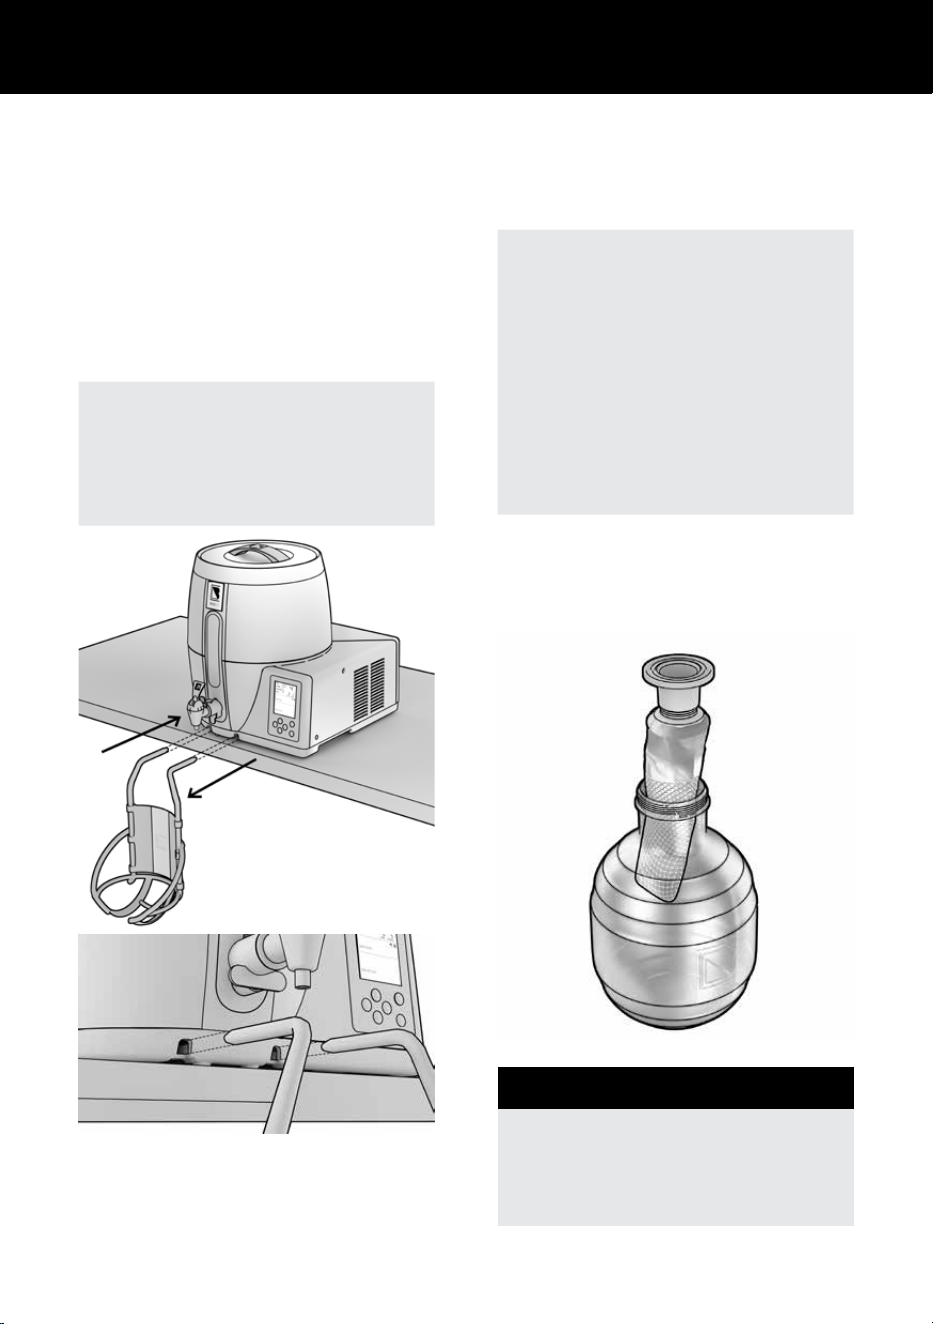
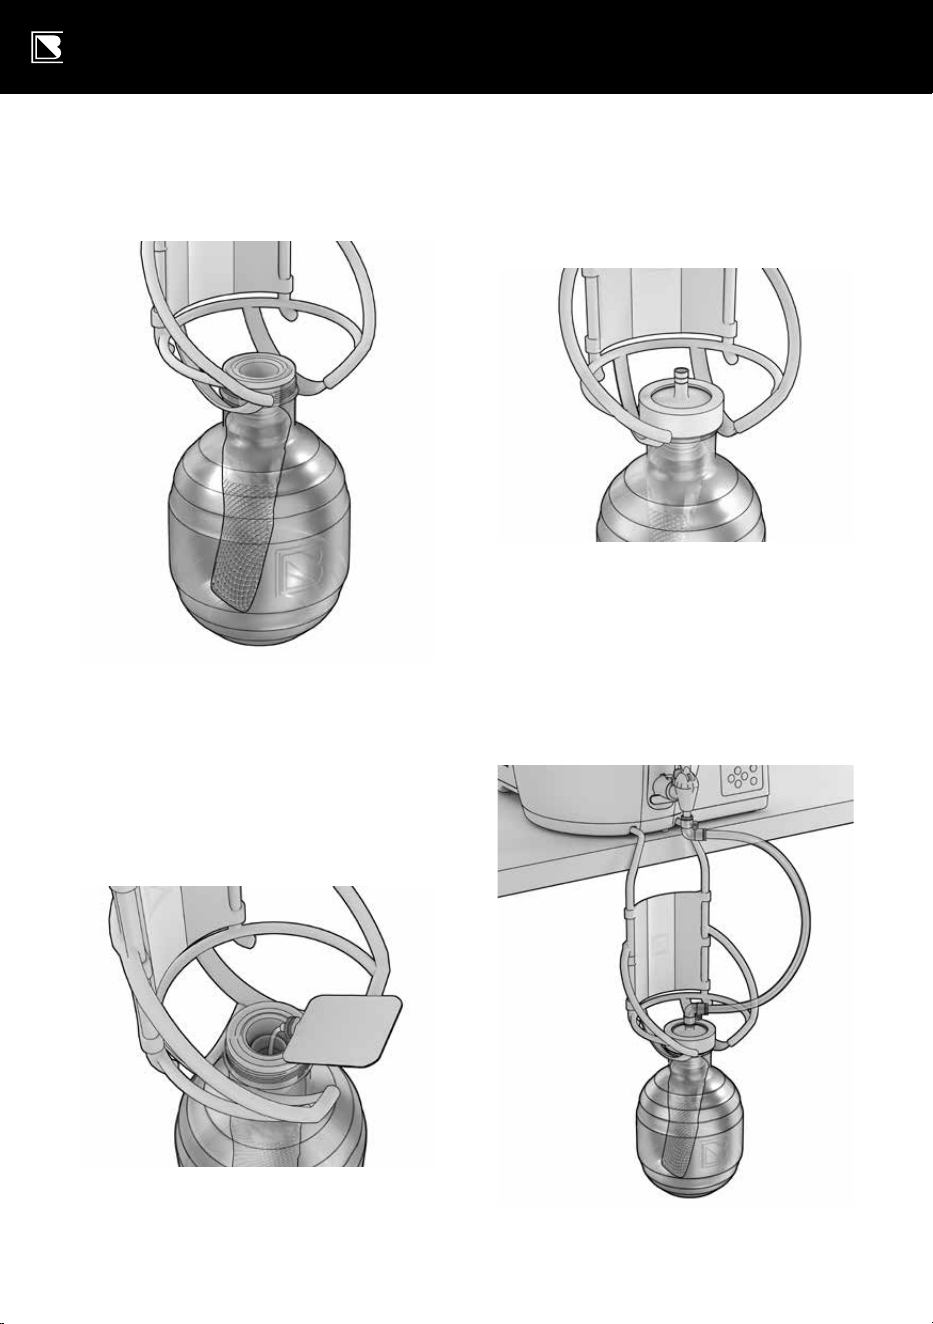
1. Insert the Keg Caddy into the
two slots at the bottom of the
BeerDroid as shown; Ensure that
the Caddy is fully inserted into
the slots and securely engaged.
Note
To keg without the use of the Keg
Caddy, please see how-to video at
BREWART.COM/101
2. Remove the yellow dust cap from
the keg liner and FIRMLY screw
on the Connector as shown.
3. The sleeve must remain
on the keg liner.
Note
Take care not to allow any
unnecessary air into the Keg Liner.
The sleeve assists with this and
also plays an important role while
filling, do not remove it.
Be careful not to cross thread
the Connector, or damage the
Keg Liner.
4. Place the keg liner and connector
into the keg. Ensure the sleeve
remains on.
WARNING
Do not twist counter clockwise,
this may loosen the seal
and result in leakage.
BREWART BY COOPERS
24
5. Slide the neck of the Keg into
the bottom of the Keg Caddy.
6. Add Primer and any Hops: Note
take care not to spill any on
the top surface of the keg liner
connector, if you do, carefully wipe
it clean with a clean dry cloth.
7. Add the Filling Cap (with O-Ring in
place) and screw on the Cap Collar.
Be careful not to cross thread.
8. Attach the two connectors to
each end of the Filling Tube.
9. Attach one end to the
BeerDroid Tap and the other
end to the Filling Cap.
BEERDROID INSTRUCTIONS
25
Note
Place a bucket on the floor under
the keg to catch any drips/spill
while kegging.
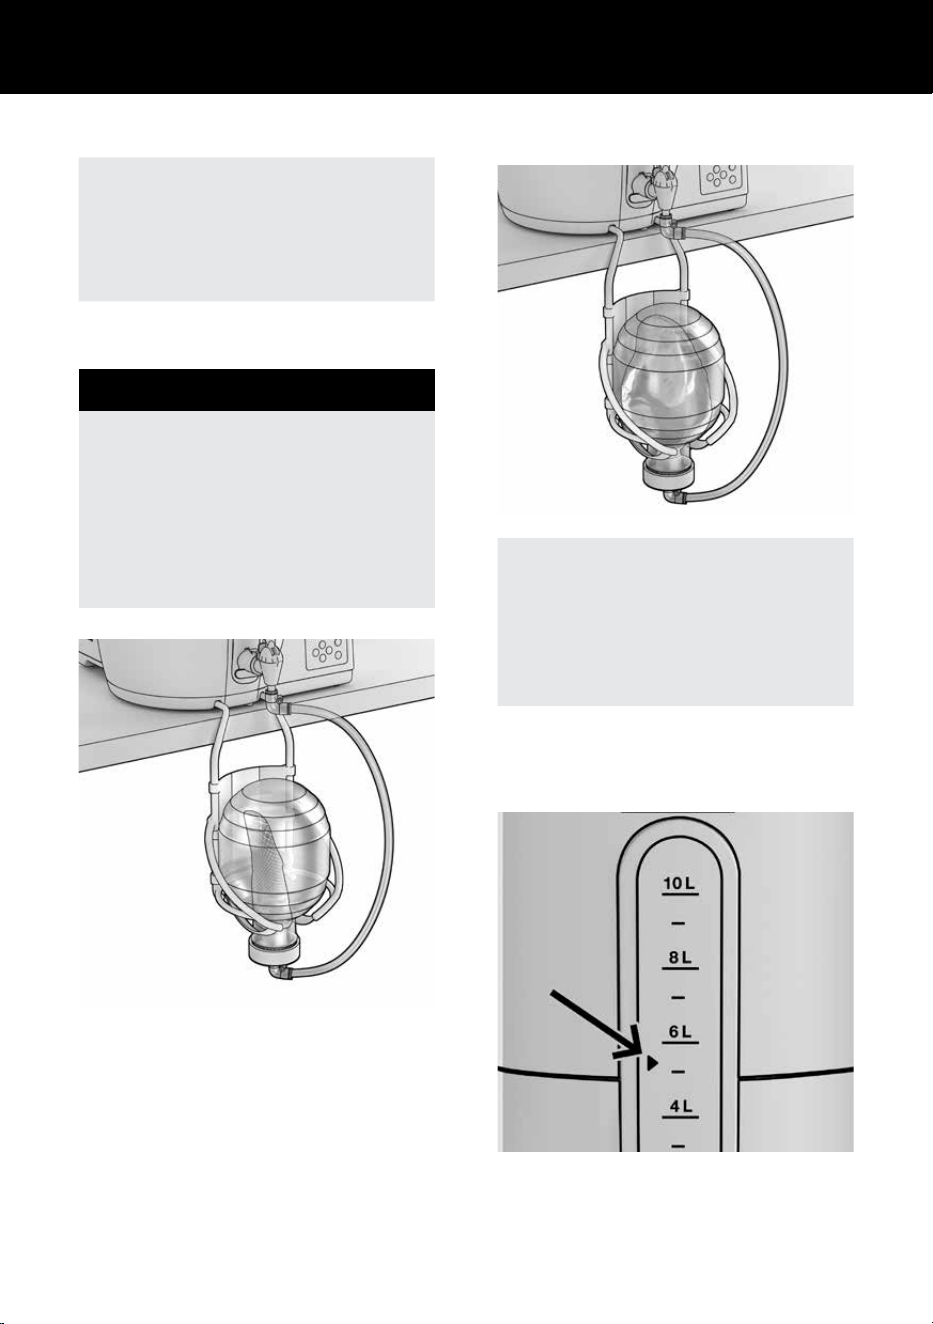
10. Invert the Keg in the Caddy.
WARNING
Ensure the Filling Tube is
connected to the Filling cap
before inverting. Some primer
will run into the tube, this is
ok as it will be flushed back
into the keg when filling.
11. Fully open the Tap and
let the keg fill.
Note
If your BrewDroid was filled to the
10L mark then your first keg is full
when the level reaches the triangle
marker in the window.
12. Turn o the Tap when the level
reaches this mark. Do not overfill.
BREWART BY COOPERS
26
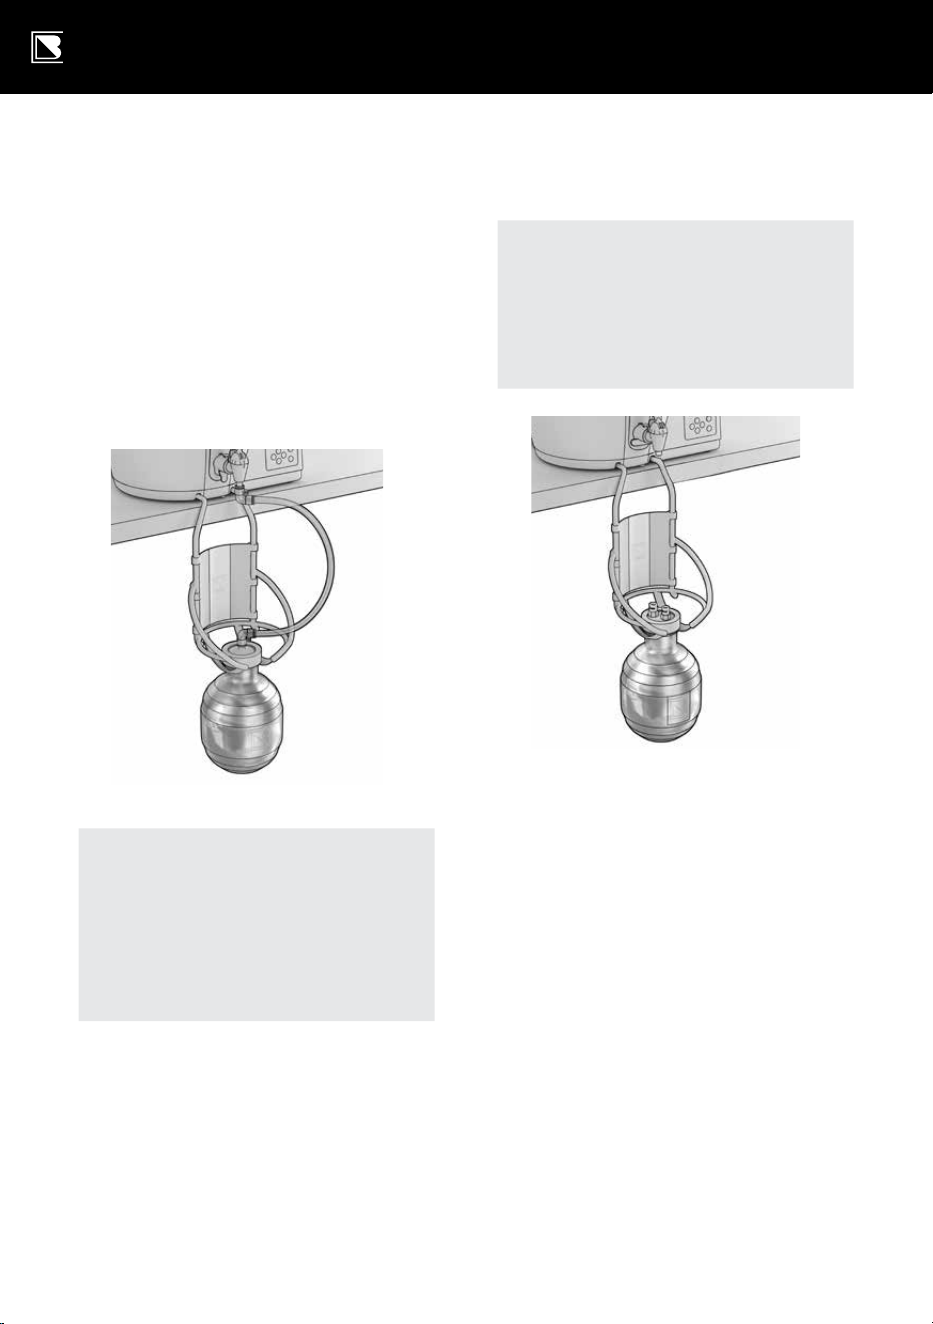
13. Aer turning o the tap,
invert the Keg in the Caddy to
hang upright, see below.
14. Gently loosen the connector
from the tap to allow the beer in
the tube to drain into the keg.
15. Remove the Filling Tube from
the tap and hold the tube up
to allow all remaining beer
to drain into the keg.
Note
If you have over filled your Keg the
beer will not drain from the tube.
Place a small bucket on the ground
and drain the residual beer into it
from the tap end connector.
16. Remove the Filling Tube and
connector from the filling
cap and place on a clean dry
surface for filling the next keg.
17. While the Keg is still hanging
in the Keg Caddy, replace the
Keg Filling Cap with the Keg
Dispensing Cap and fasten
with the Cap Collar firmly.
Note
Remember to insert the white
O-Ring on the Keg Dispensing
Cap before fastening with
the Cap Collar!
Congratulations, you have
kegged your first brew
Repeat the process for the second Keg.
Note the second keg is full when the
beer stops flowing from the BeerDroid
into the Bag.
Secondary Fermentation
Store your kegs upright on Keg Holds
for a minimum of 14 days at room
temperature 18–25°C (65–77°F) to
secondary ferment/condition – this
carbonates your beer!
BEERDROID INSTRUCTIONS
27
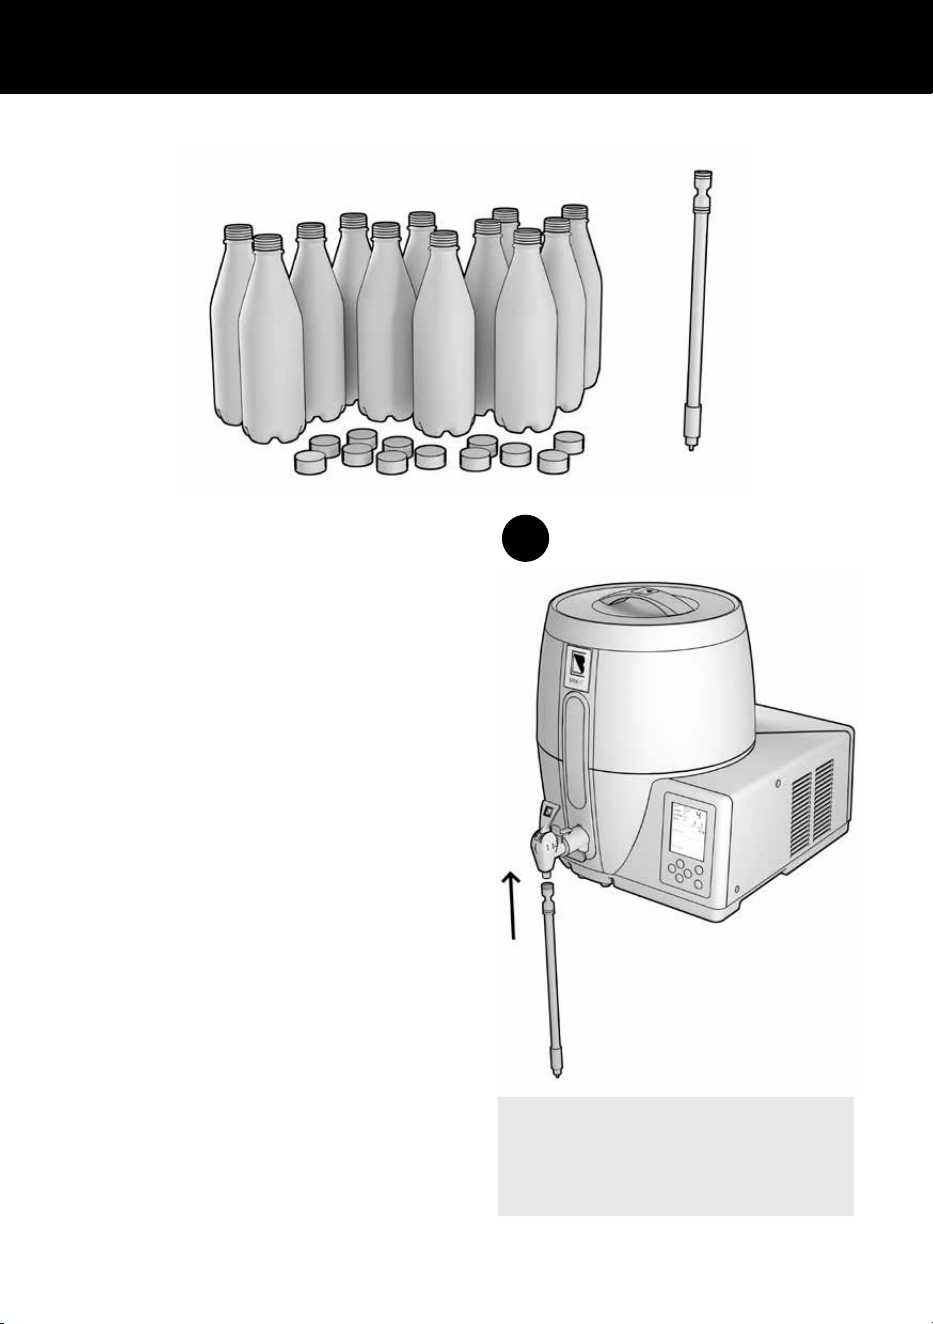
Equipment required
for bottling
k 12 x BrewArt PET bottles and caps:
740ml bottle designed
specifically for BrewArt
k Bottling valve:
For easy, controlled filling of bottles
Clean & Sanitise
the following
bottling equipment
k Clean and sanitise bottles, caps,
bottling valve and connector. The
bottling valve should be disassembled
for cleaning and sanitising.
Bottling Process
k Fit the bottling valve, by attaching
the connector to the opposite end
of the bottling valve and fitting it to
the BeerDroid tap – see Diagram O.
k Add two BrewArt carbonation
drops to each 740ml bottle.
Note
Place a bucket on the floor to catch
any drips or spills while bottling.
Bottling
O
BREWART BY COOPERS
28
k Switch the tap on full to
fill the bottling valve.
k Place a bottle over the bottling
valve until the base of the
valve touches the base of the
bottle and starts to flow.
k Fill each bottle to within
approximately 5mm from brim and
then lower the bottle. This will leave
the correct head space in the bottle
when the bottling valve is removed.
k The flow will stop automatically.
k Repeat the process until all
your bottles are filled.
k Screw the caps onto the bottles
ensuring they are tight.
k Disconnect bottling valve from tap.
k Store bottles upright for a
minimum of 14 days at room
temperature 18–25°C (65–77°F)
to secondary ferment/condition –
this carbonates your beer!
WARNING
Do not tilt your BrewArt
BeerDroid to finish bottling.
Note
There will be yeast sediment
remaining at the bottom of your
BrewArt BeerDroid. Bottling this
sediment is not recommended.

BEERDROID INSTRUCTIONS
29
Cleaning
WARNING
ONLY USE A SOFT CLOTH WHEN
CLEANING YOUR BEERDROID.
Do not use any abrasive materials
or detergent as these may damage
your BeerDroid and aect the
quality of your next brew.
k Ensure the power is turned o
and the power cord is removed
from the power point.
k Aer kegging, and once your
BeerDroid is empty, move the
unit to a sink or draining area
using the liing handles.
k Remove the lid and rinse it
under a tap, using a so cloth
to remove any residue.
k Remove the Tap and Drain
Plug and flush the residue
inside the chamber with
warm water into the sink.
k Using a so cloth and warm water,
remove all remaining residue
from within the chamber.
k Clean the drain plug and tap
(dissassemble the two piece
tap for cleaning) thoroughly
with warm water.
k Rinse your BeerDroid
with clean water.
k Sponge out any remaining water.
k Once the entire unit is dry, re-fit
the plug, tap and lid to prevent
anything from falling into your
BeerDroid when not in use.
Troubleshooting
For the most current
troubleshooting information
go to brewart.com/101 where
you will also find FAQs and
instructional videos.
BREWART BY COOPERS
30
Appendix A – Wi-Fi Set-up and Use
Your BrewArt BeerDroid is internet enabled, however it must first be
connected to a compatible Wi-Fi network with internet access, before
you can use its internet features.
The internet and Wi-Fi capabilities
allow you to:
1. Upgrade your BeerDroid’s
soware when new versions
become available.
2. Remotely monitor and
control your BeerDroid.
3. Receive notifications and alerts
on your mobile device.
4. Have greater control over your brew
temperature profile than is possible
via your BeerDroid’s control panel.
5. Get support to diagnose
problems with your brew.
6. Access new features as
they become available.
Important
When using the internet
capabilities, BrewArt collects data
about your brew temperature
in order to be able to provide
some of these services, please
refer to our privacy policy.
Two icons are used to indicate your
BeerDroid’s Wi-Fi connectivity:
k
indicates your BeerDroid’s
connection to a Wi-Fi network.
k w
indicates your BeerDroid’s
connection to the BrewArt Server.
Wi-Fi Compatibility
k The BeerDroid is compatible
with IEEE 802.11b/g networks.
k While every eort has been
made to test the BeerDroid with
a wide range of popular Wi-Fi
modems, we cannot guarantee
it is compatible with all makes
and models of modem.

BEERDROID INSTRUCTIONS
31
Wi-Fi Set-up
k In order to use the internet
capability of your BeerDroid you
must connect your BeerDroid
with your Wi-Fi network.
k You can set up your Wi-Fi
network settings via:
k The BrewArt App
k Wi-Fi Protected Setup (WPS)
k Manual Setup process.
k You only need to use one
of the above options.
Important
Wi-Fi set-up cannot be performed
while a program is active.
Configure the Wi-Fi prior to
starting a brewing program.
k Ensure that your BeerDroid
is within the coverage area of
your home Wi-Fi network for
both set-up and operation.
BREWART BY COOPERS
32
Option 1 – Setup BeerDroid's
Wi-Fi via the BrewArt App
Note
Setting up your BeerDroid’s
Wi-Fi using this option will
also automatically link your
BeerDroid’s Serial Number to
your BrewArt Account.
Part 1 – On your Device
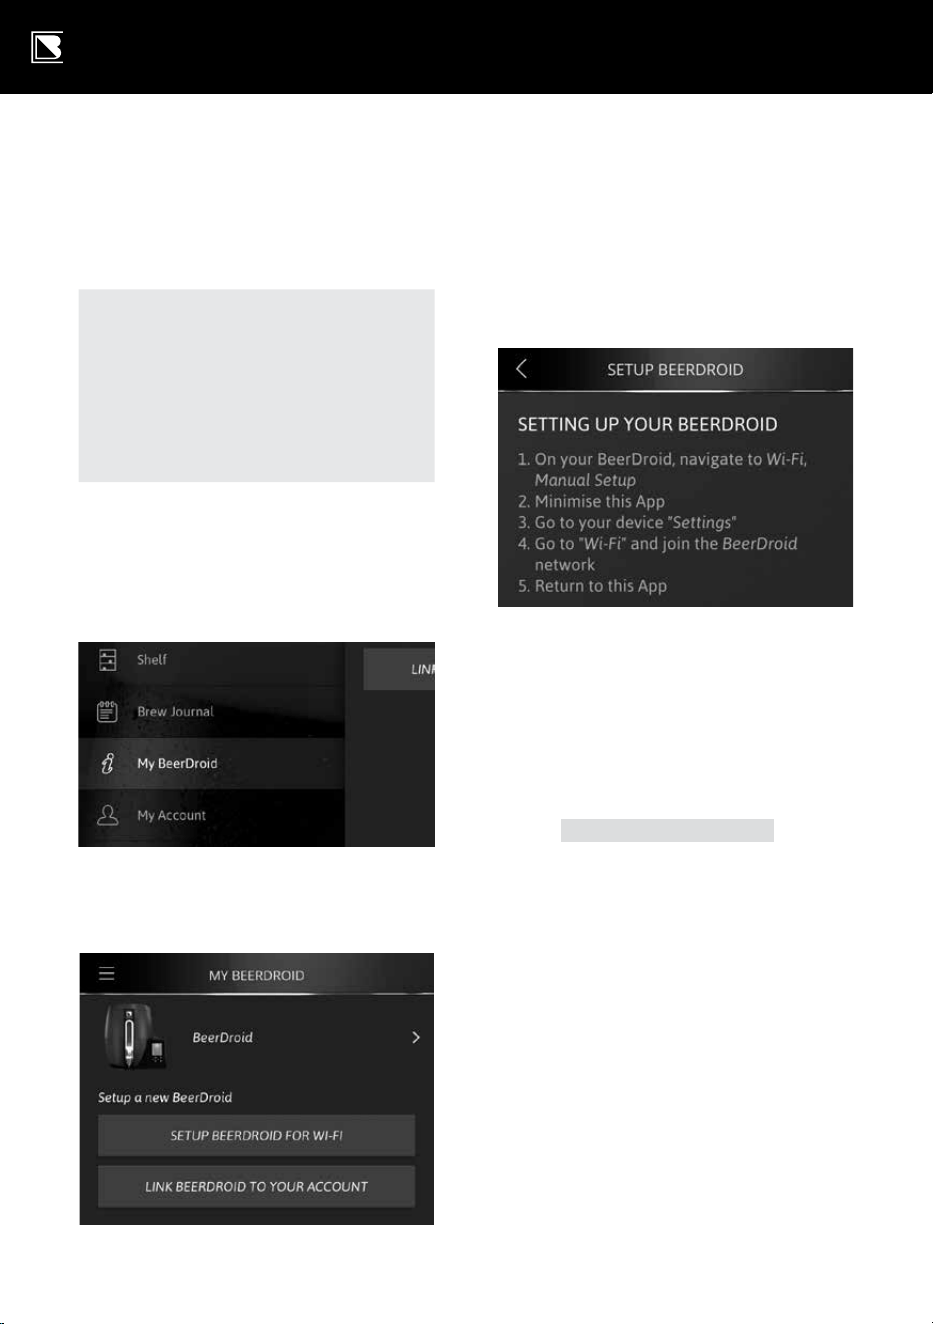
a. Using the App’s menu,
navigate to "My BeerDroid".
b. Select button – "SETUP
BEERDROID FOR WI-FI".
c. Following instructions to
"Setting up your BeerDroid".
Part 2 – On your BeerDroid
d. On your BeerDroid, navigate
to Wi-Fi, Manual Setup.
k Use the
and
arrows on
the control panel to scroll to
Wi-Fi in the main menu.
k press to configure
will appear on the user
prompt panel.
k Press
on the control
panel to enter the Wi-Fi
configuration menu.
k Use the
and
arrows scroll
through to manual setup.
k Press
on the control
panel to start setup.
k Wait for the
icon to
start flashing (this could
take 10 or more seconds),
then proceed to Part 3.
BEERDROID INSTRUCTIONS
33
Part 3 – On your Device
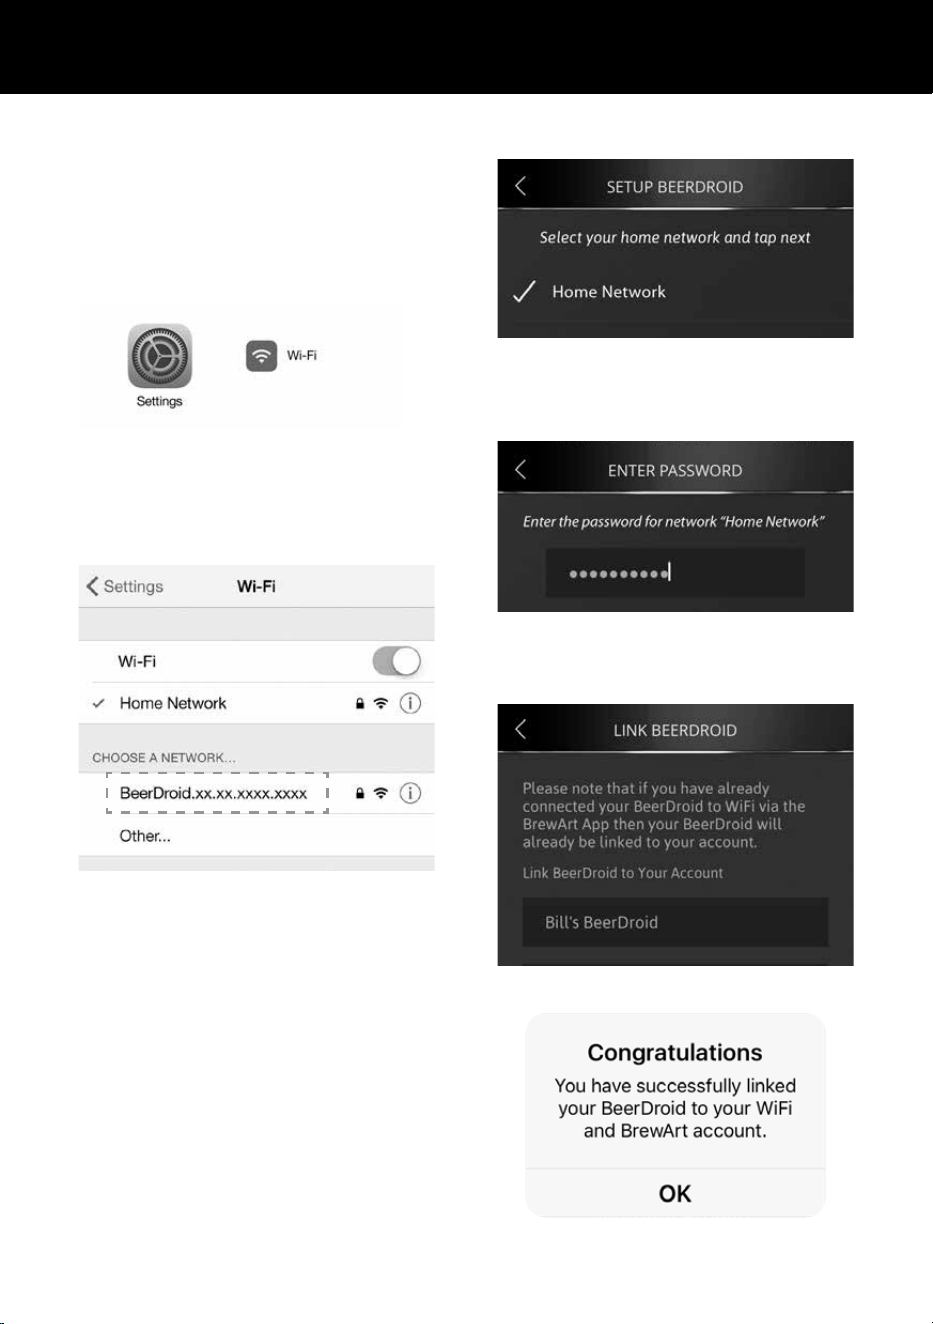
e. Minimise the App on your device.
f. Open Setting App on your
device and select Wi-Fi.
g. Choose the network
BeerDroid.xx.xx.xxxx.xxxx
where the x’s are your
units serial number.
h. Return to Brewart App. And
click the Next button.
i. Select your "Home Network"
from the List and tap next
button. The "Home Network"
would be the network name
(SSID) of your Wi-Fi device.
j. Enter Password to your
"Home Network".
k. Complete the Setup by giving
your BeerDroid a name.
l. Setup is now complete.

BREWART BY COOPERS
34
Option 2 – WPS Setup
Before you start
Make sure that your Wi-Fi modem (or
access point) supports WPS. Consult
its user manual.
If WPS is supported, confirm that WPS
is enabled (or turned on). Consult the
user manual to see if it is enabled
by default, if not, log in to the Wi-Fi
modem and enable it.
Part 1 – On your BeerDroid
a. Use the
and
arrows on
the control panel to scroll to
Wi-Fi in the main menu.
b. press
to configure will appear
on the user prompt panel.
c. Press
on the control panel to
enter the Wi-Fi configuration menu.
d. Navigate to wps setup.
e. Press
to start setup.
f. Wait for the icon to start
flashing, then proceed to
Part 2 immediately!
Part 2 – On your
Wi-Fi modem
Press its WPS button (some devices
require you to press and hold the button
for a few seconds), then proceed to Part 3.
Part 3 – On your BeerDroid
Wait for the
icon to stop flashing
indicating that configuration is complete.
This could take up to 3 minutes.
If the configuration is successful, your
BeerDroid display screen will return
to the main menu and the
and
w
icons will initially appear o. Aer
a few seconds the
and
w
icons
will turn on aer it has successfully
connected to the Wi-Fi network and
contacted the BrewArt Server.
If the configuration failed, your
BeerDroid will display an e error code
and flash refer manual. An additional
error code c
d xx may appear. Refer to
the error code section for a list of errors.
Press
on the control panel to resume
or return to the main menu.
Note
To use, monitor and control
your BeerDroid with the
BrewArt App you must link
your BeerDroid to your BrewArt
Account – see Appendix B –
Linking your BeerDroid.

BEERDROID INSTRUCTIONS
35
Option 3 – Wi-Fi Manual Set-up
Before you start
Make sure you know your:
k Wi-Fi network name (SSID)
k Wi-Fi network password
k Wi-Fi encryption type,
(e.g. WEP, WPA, WPA2) if
your network is hidden.
Also ensure you have access to a Wi-Fi
enabled computer or smart device
(e.g. iPad, smart phone, etc.)
Part 1 – On your BeerDroid
a. Use the
and
arrows on
the control panel to scroll to
Wi-Fi in the main menu.
b. press
to configure will appear
on the user prompt panel.
c. Press
on the control panel to
enter the Wi-Fi configuration menu.
d. Use the
and
arrows scroll
through to manual setup.
e. Press
on the control
panel to start setup.
f. Wait for the
icon to start
flashing (this could take 10 or more
seconds), then proceed to Part 2.
Part 2 – On your Wi-Fi
enabled computer
or smart device
g. Go to your Wi-Fi
configuration setting and
view available networks.
h. Connect to the "BeerDroid.
xx.xx.xxxx.xxxx" (where the xx
are your units serial numbers)
network. Ignore any limited
connectivity or security warnings.
i. Open a browser window,
e.g. Internet Explorer, Safari,
Firefox, Chrome etc. Ignore any
message about not being able
to load your default page.
j. In the browser address bar
type http://192.168.1.1
k. The browser will request a
username and password,
enter brewart for each one.
l. You should now see the
"Overview" page.
m. Click either the "Configure Network"
link or menu item in the sidebar.
n. You should now see the
"Configure Network" page.
o. Click the "Display Wireless
Networks" button.
BREWART BY COOPERS
36
p. You should see a list of
available networks, including
your home network.
q. If your network is hidden, click
the "Specify Network" button and
enter the required details manually
and then skip to Part 3 below.
r. Click on your Network in the list
s. Enter your Password (or
Passphrase) in the pop
up box and click the "OK"
button or press "Enter".
t. You should see the "Network
Connection in Progress" page.
Part 3 – On your BeerDroid
u. The
icon should turn
o for a few seconds, and
then start flashing.
v. Wait for the
icon to stop
flashing, which indicates that
configuration is complete – this
can take up to 1 minute.
If the configuration is successful, your
BeerDroid display screen will return
to the main menu and the
and
w
icons will initially appear o. Aer a
few seconds the
and
w
icons will
turn on again aer it has successfully
connected to the Wi-Fi network and
contacted the BrewArt Server.If the
configuration failed, your BeerDroid
will display an e error code and flash
refer manual.
An additional error code c
d xx may
appear. Refer to the error code section
for a list of errors.
Note
To use, monitor and control
your BeerDroid with the
BrewArt App you must link
your BeerDroid to your BrewArt
Account – see Appendix B –
Linking your BeerDroid.
BEERDROID INSTRUCTIONS
37
Wi-Fi Operation
Before starting a brewing program,
Wi-Fi may be switched on and o via the
display screen main menu without the
need to reconfigure the Wi-Fi settings.
However, the Wi-Fi can not be turned on
or o while a brewing program is running.
Your BeerDroid will try to connect
to the BrewArt Server via your Wi-Fi
network once Wi-Fi is configured and
on. If your BeerDroid encounters any
connection issues it will continue to try
and connect until successful, without
interrupting or disrupting any brew
program that is running.
You can determine the status of your
BeerDroid’s internet connection by
the checking the
and
w
icons
on the display screen.
If your BeerDroid’s Wi-Fi
icon is blinking:
k Check that your Wi-Fi network
is operating correctly.
k Make sure your BeerDroid
is within the coverage area
of your Wi-Fi network.
k You may have changed your Wi-Fi
set-up since configuring your
BeerDroid – e.g. network name,
security settings, DHCP settings etc.
If your BeerDroid’s internet
w
icon is
blinking, check that your Wi-Fi modem
has internet access.
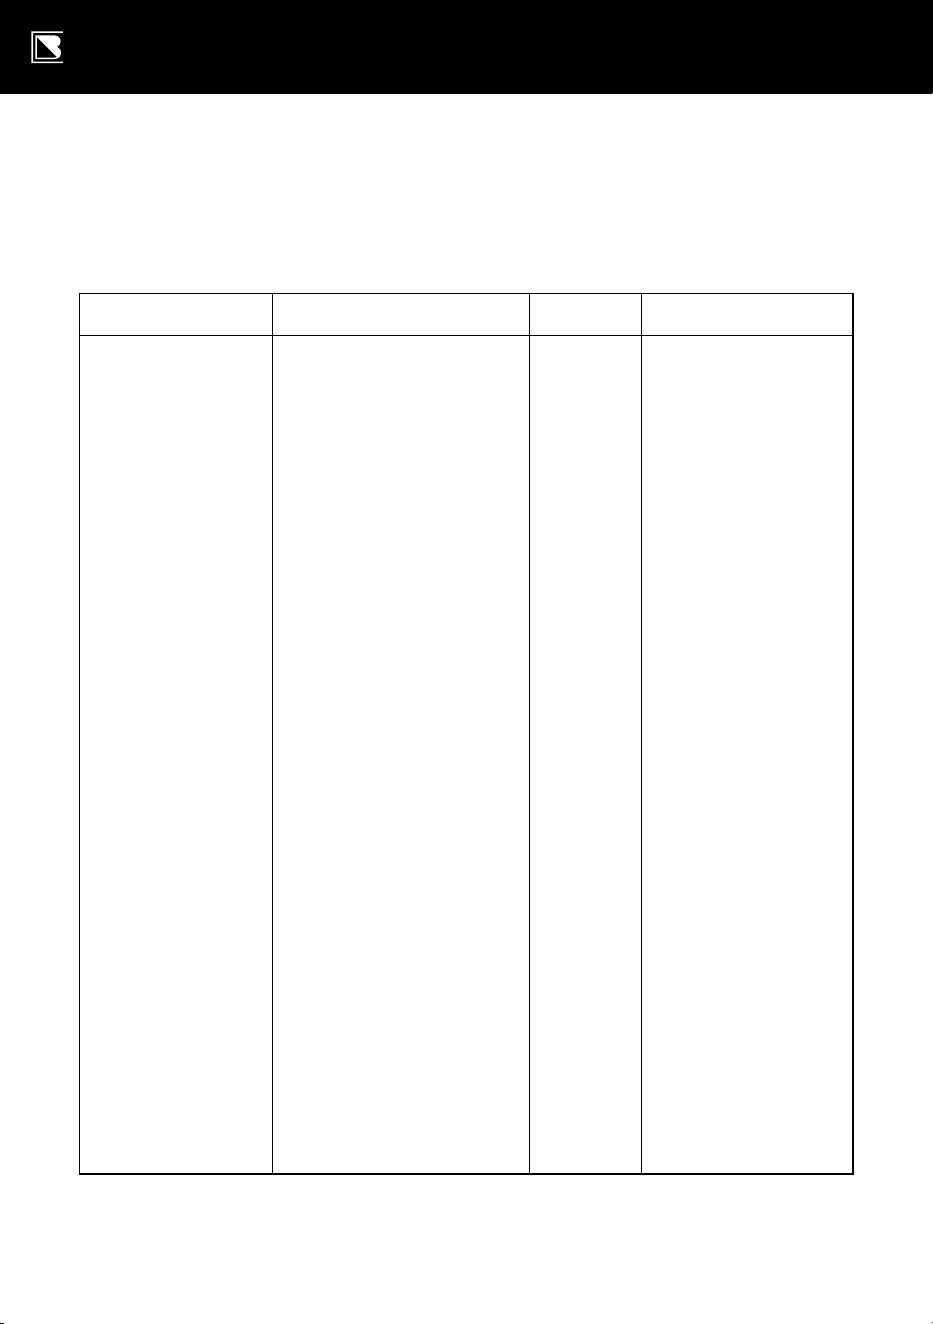
ICON STATUS EXPLANATION
Both Blank Your BeerDroid’s Wi-Fi is o.
Icon On: BeerDroid is connected to your Wi-Fi network
Icon Blinking: BeerDroid is attempting
to connect to your Wi-Fi network.
w
Icon On: BeerDroid is connected to the
BrewArt server via your Wi-Fi network.
Icon Blinking: BeerDroid is attempting
to connect to the BrewArt Server.
BREWART BY COOPERS
38
Wi-Fi Set-up Error Codes
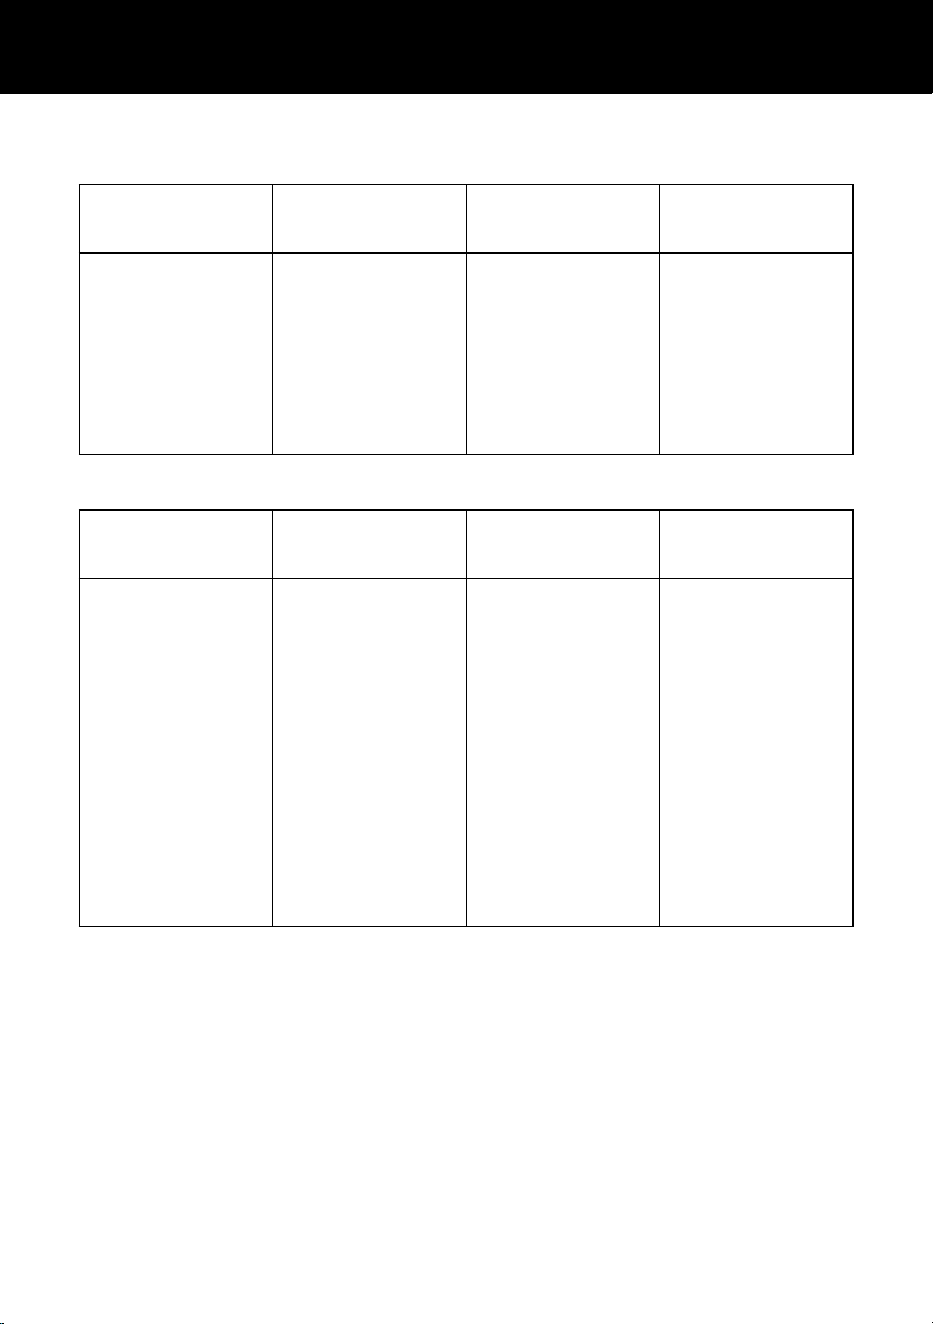
During Wi-Fi setup, you may receive one of the following errors:
Error Code E2
Description Additional "Cd" code Cause User Action
May appear
when configuring
Wi-Fi and your
BeerDroid fails
to join the Wi-Fi
network.
2: JOIN FAILURE
3: AUTHENTICATION
FAILURE
4: ASSOCIATION FAILURE
5: WEP HANDSHAKE
FAILURE
6: PSK CALCULATION
FAILURE
7: PSK HANDSHAKE
FAILURE
9: SECURITY MISMATCH
FAILURE
10: NO SUITABLE AP
FOUND FAILURE
12: LINK LOST
14: RSN MIXED MODE
NOT SUPPORTED
15: RECEIVED
DEAUTHORISATION
16: RECEIVED
DISASSOCIATION
17: WPS FAILURE
19: LINK DOWN
Various Consult your Wi-Fi
modem’s manual
and try again.
Some Wi-Fi modems
do not implement
RSN Mixed
mode correctly.
If you receive
this error code
we recommend
that you set your
network security to
one of WPA or WPA2
not mixed mode.
Note WPA2 is the
more secure option.
BEERDROID INSTRUCTIONS
39
Error Code E3
Description Additional "Cd"
code
Cause User Action
May appear
when configuring
Wi-Fi and your
BeerDroid does
not receive an IP
address from your
Wi-Fi modem.
1: DHCP FAILURE Wi-Fi modem has
not issued an IP
address to your
BeerDroid.
Check modem
settings for DHCP
and try again.
Error Code E4
Description Additional "Cd"
code
Cause User Action
May appear when
configuring Wi-Fi
using WPS and
your BeerDroid
times-out waiting
for WPS protocols
from the Wi-Fi
access point or
modem.
N/A WPS button on
Wi-Fi access point
or modem is not
pressed within
60 seconds of
entering WPS
Set-up on your
BeerDroid.
WPS mode not
enabled on your
Wi-Fi access point
or modem.
Try again.
Enable WPS and
try again.
BREWART BY COOPERS
40
Operating Error Codes
During operation you may receive the following error codes
Error Code E1
Description Cause User Action
A heating or
cooling error has
been detected
Cause 1: The unit has failed
to heat or cool your brew to
the target temperature within
an acceptable time limit.
Cause 2: The level of your
brew is too low. Note the unit
must be filled to the 10L level
for correct operation.
1. Check liquid level
2. Accept error and
continue the program,
if error re-occurs please
visit brewart.com/101
where you will find FAQs
and trouble shooting
information. If this does
not help resolve your
issue, please contact
customer service.
BEERDROID INSTRUCTIONS
41
Appendix B – Linking your BeerDroid
In order to use your BeerDroid with the BrewArt App and/or BrewArt
website you must link your BeerDroid’s serial number to your BrewArt
Account. We recommend that you register your hardware items
for warranty.
You can register your BeerDroid one of
two ways, via the BrewArt App or via
the BrewArt Website.
If you used the BrewArt App to
configure your BeerDroid’s Wi-Fi then
you have already linked your BeerDroid
to your BrewArt account and you’re
ready to start using the BrewArt App.
If you configured your BeerDroid’s
Wi-Fi using WPS or Manual Setup,
then you must link your BeerDroid’s
Serial Number to your BrewArt
Account so that you can access full
BrewArt support and upgrade your
BeerDroid's firmware. To link this
way go to brewart.com/register
Option 1 – Linking via
the BrewArt App
Note
For security reasons the
BrewArt App must be
connected to the same Wi-Fi
network as your BeerDroid
during the link process.
If your BeerDroid is already
configured for Wi-Fi, follow these
steps to link your BeerDroid to
your Account
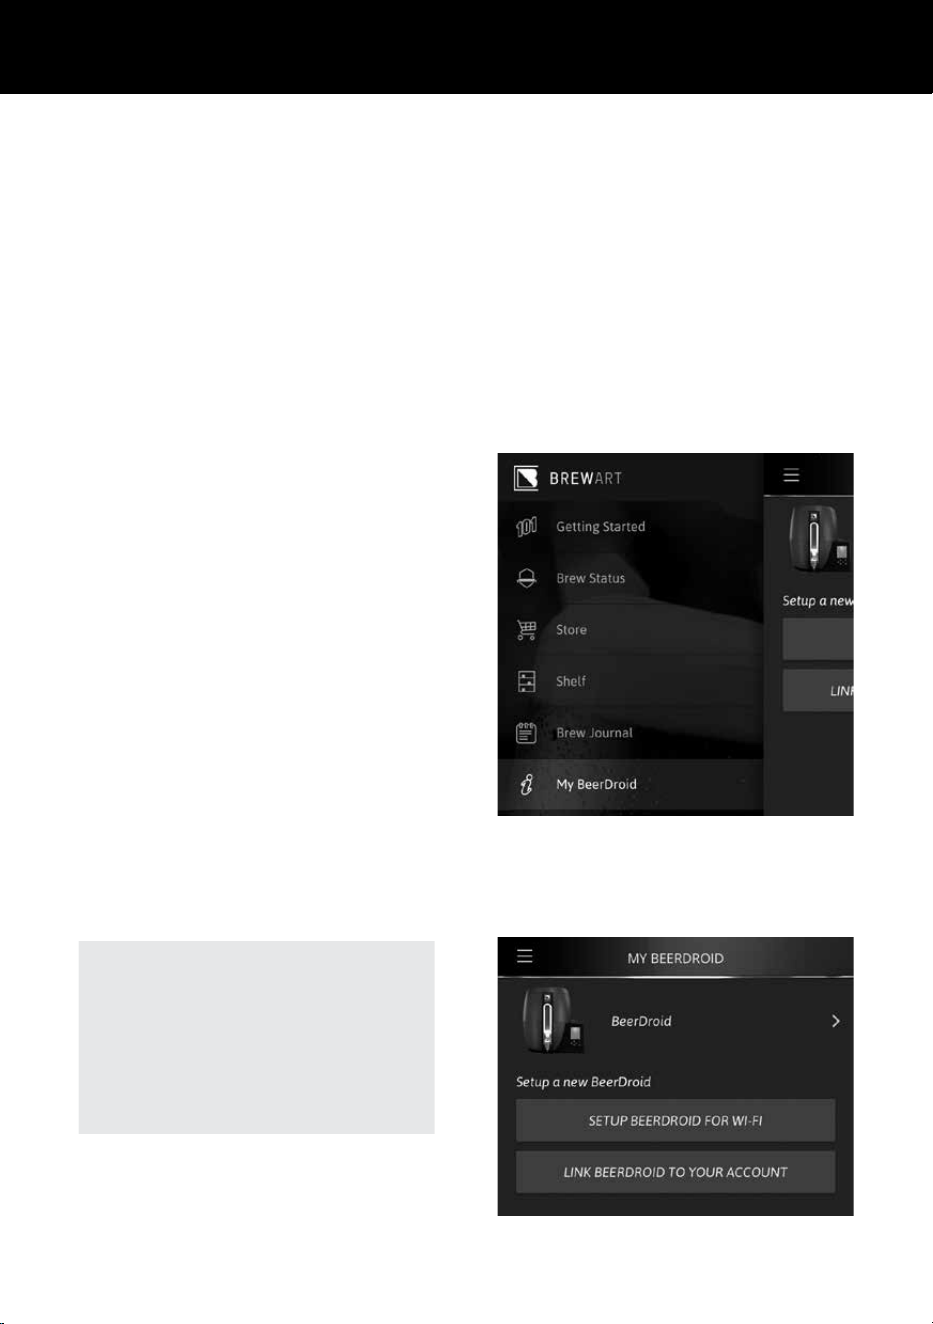
a. Using the App’s menu,
navigate to "My BeerDroid".
b. Within "My BeerDroid",
click on "LINK BEERDROID
TO YOUR ACCOUNT".
BREWART BY COOPERS
42
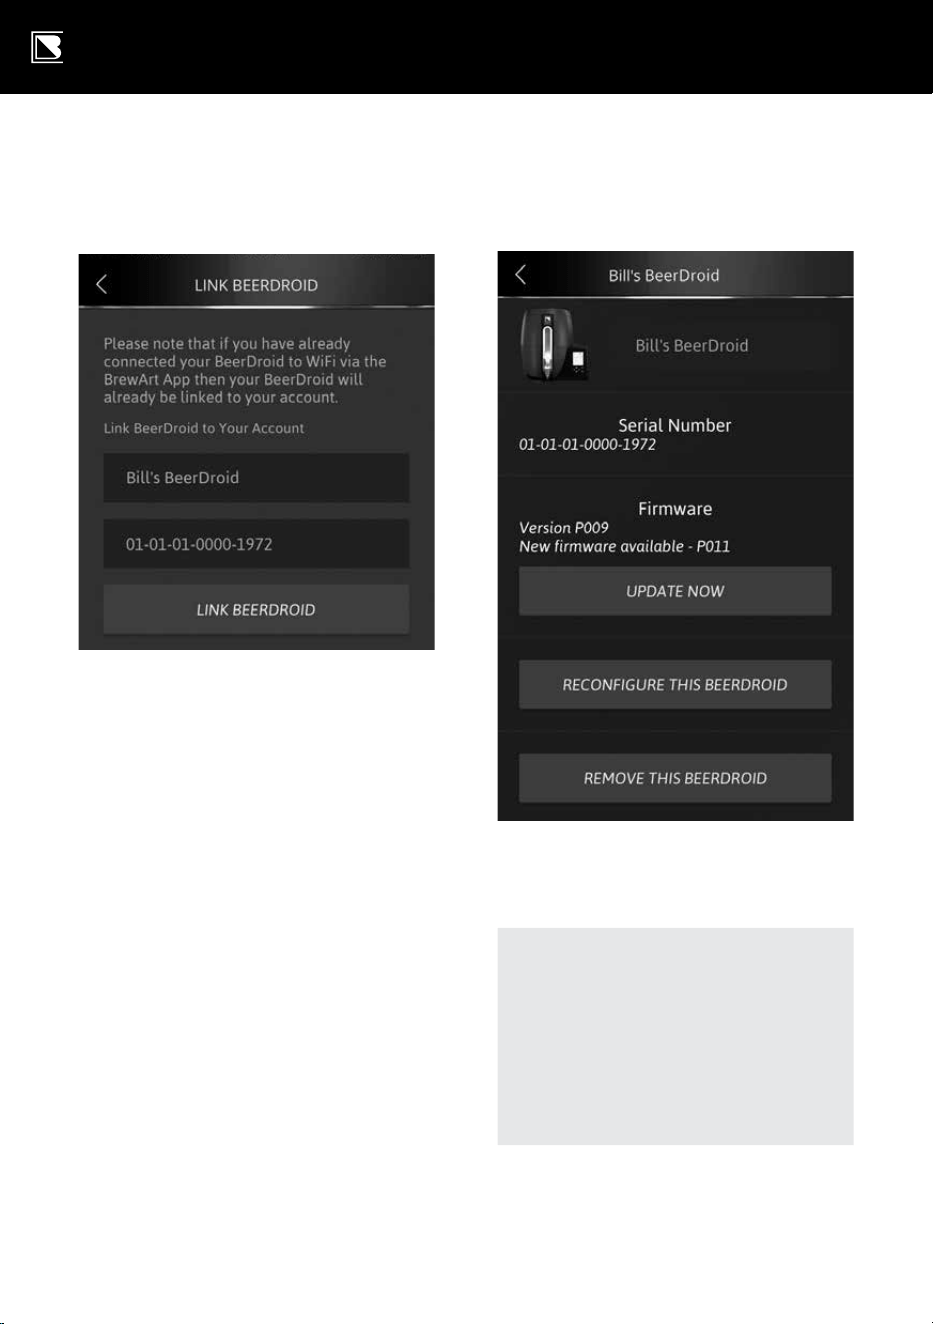
c. Give your BeerDroid a name, leave
pre-populated serial number and
click on "LINK BEERDROID".
d. Your BeerDroid is now linked
to your BrewArt Account.
Option 2 – Linking via
the BrewArt Website
Note
For security reasons the
computer/device you are using
to link your BeerDroid must be
connected to the same Wi-Fi
network as your BeerDroid
during the linking process.
Please go to brewart.com/register
to link your BeerDroid.
BEERDROID INSTRUCTIONS
43
Warranty
BrewArt BeerDroid and BrewFlo
come with a 12 month Limited
Replacement Warranty.
We recommend that you register your
hardware items for warranty.
To view full Terms and Conditions of Sale,
including Limited Replacement Warranty
details go to brewart.com/register
Disposal
Correct Disposal
of this product
k This marking indicates that this
product should not be disposed
of with other household waste.
k To prevent harm to the
environment or human health from
uncontrolled waste disposal, please
recycle this product responsibly.
k Please contact your local municipal
authority or the retailer you
purchased the product from for
advice on your closest collection
depot that can recycle this product
in an environmentally responsible
and sustainable manner.

© Coopers 2016 / AU – V1.1
BrewArt, BeerDroid and
BrewFlo are registered
trademarks of Coopers.
Due to continued product
improvement, the products
illustrated/photographed in
this brochure may vary slightly
from the actual product.
Updates to this manual
may be found at
brewart.com