Charging cable: Type-C
Charging Suggestion: Use low output current
such as computer or power bank
Charging indicator:
Charging indicator: The charging indicator in the upper
right corner of the screen shows a flowing charging
pattern and remains stationary when fully charged.
Low battery indicator: The charging bar in the
upper right corner of the screen flashes.
(When the voltage is below 3.32V,
the charging bar flashes, indicating
charging is needed; the device will shut
1. DPI: 800-1600-2400-3200-6400-12000 DPI
2. Charging Voltage/Current: 5V/>=0.2-0.25A
3. Battery Capacity: 500mAh
4. Weight: Approx. 61±2 grams (including receiver)
5. Dimensions: 127*72*42mm
6. Charging Method: Type-C
7. Transmission Method: Wired + 2.4G + BT1
8. Bluetooth Name: G9Pro Mouse
9. Image Sensor: PAW3311
10. Polling Rate: 125-250-500-1000Hz
11. System Requirements: Windows Vista, Win7/8/10/11,
or macOS X10.5 or Later
12. Model: G9Pro
down when the voltage drops below 3.11V.)
Charging instructions
Wireless Mouse
English
Wired connection method:
2.4G wireless connection:
1. Connect the Type-C cable to the computer. After connection, the mouse
BT1connection method:
1. Switch the power switch to "BT". The display will show "BT1" flashing. Press and hold
the DPI button for 3 seconds. The screen will then display "BT1" flashing rapidly,
1. Switch the power switch to "2.4G", remove the receiver, and insert it into the
computer's USB port.If there is no response after inserting the receiver,
pairing is required.
2. Press and hold the DPI button for 3 seconds. The display will show
"2.4G" flashing rapidly, indicating pairing mode. Then insert the receiver.
Once the connection is successful, the display will show a solid "2.4G" light,
and it is ready to use.
indicating that the device has entered pairing mode.
2. Once the device finds the corresponding Bluetooth name [G9Pro mouse] and pairs
successfully, the screen will display "BT1" on a solid light to indicate a successful
connection. The device is then ready to use.
will automatically switch to wired mode.
2. Move the mouse pointer. If the computer screen shows that the pointer
can be moved, it is ready to use.
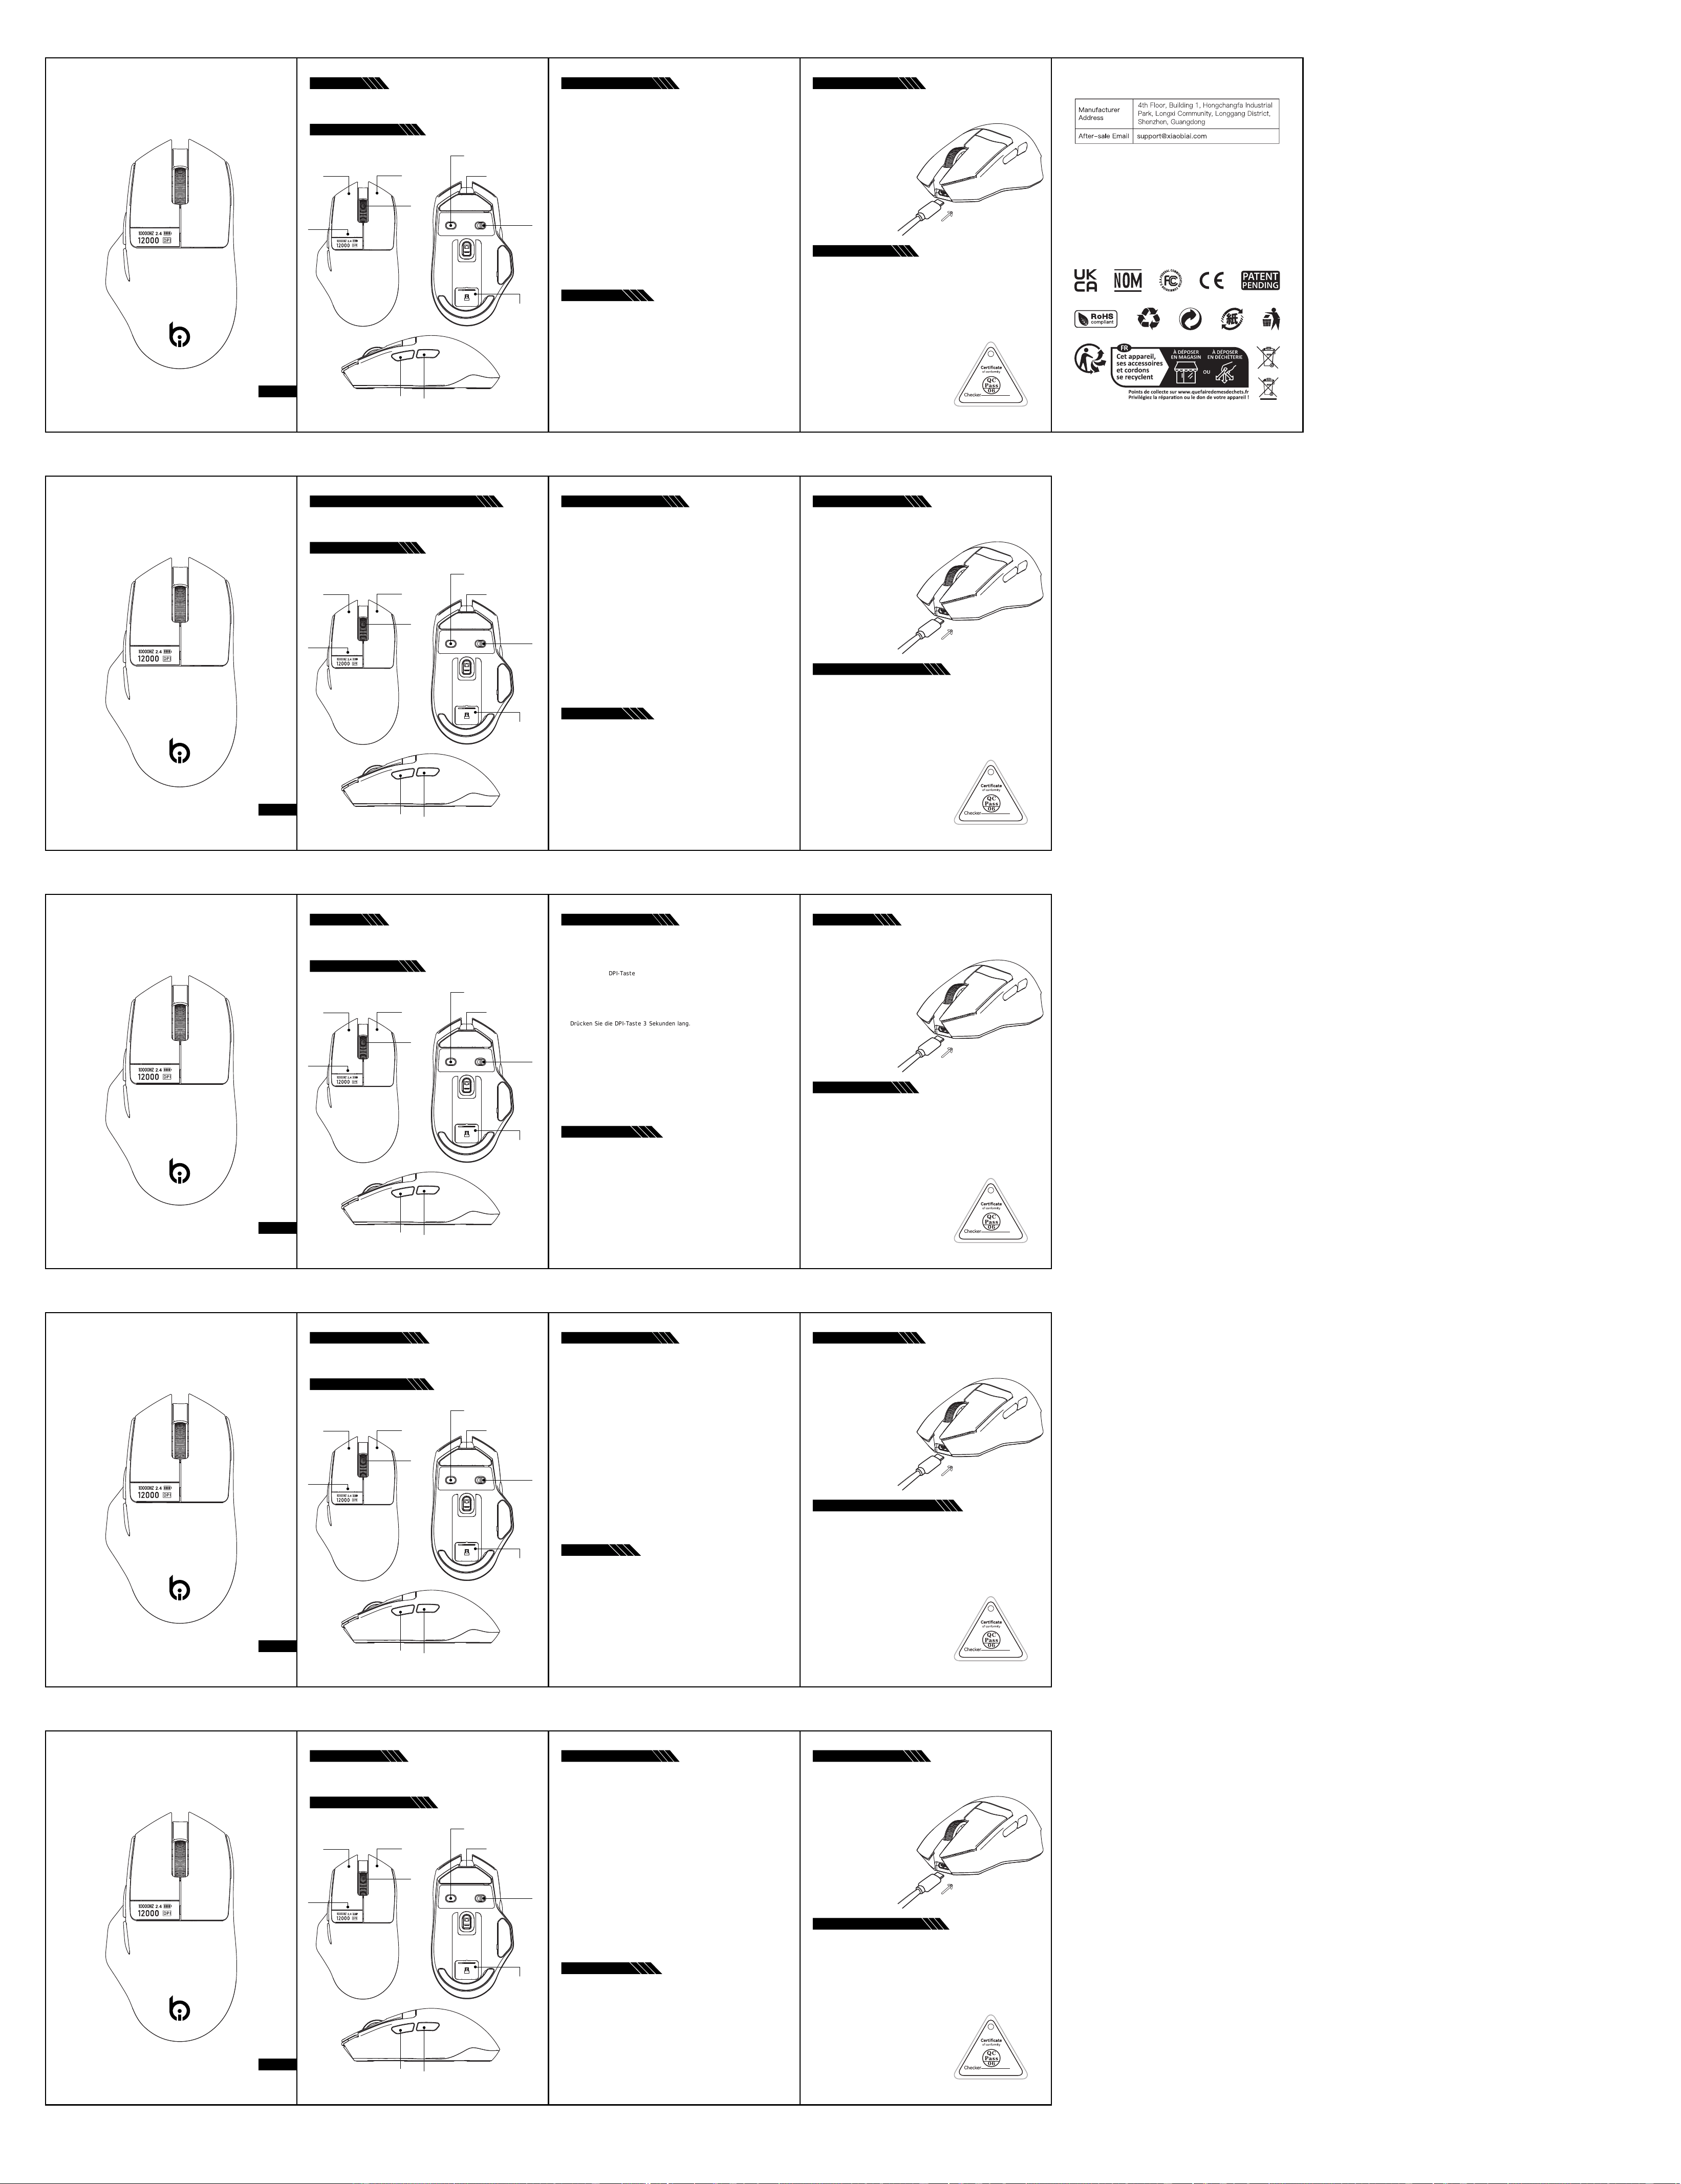
Left Button
Display
Forward
Button
Backward
Button
Right Button
Receiver
Storage
Middle
Button
Slot
DPI+/- keys / Long press
to force pairing key
Type-C interface
OFF/2.4G/BT
OFF 2.4G BT
DPI
User's Manual
Please read the instructions carefully before use
Packing List Connection Methods
1. Mouse*1
2. User's Manual*1
3. USB-C Cable*1
4. USB Receiver*1
Product Description
Specification
Solution Difficulties
Q1: Why can't my device search for the mouse?
A: Please make sure the mouse is turned on, and press and hold the
pairing button for 5 seconds.
Q2: Does this mouse support Huawei computer?
A: Yes, this mouse is compatible with all phones, tablets and computers including iOS,
Mac, Android and Microsoft.
Q3: How often does this mouse charge?
A: The mouse can be used for about 15 days
under normal conditions and up to
22 hours under backlighting.
If you encounter any problems, please consult
us promptly.We will help you solve it as
soon as possible!
Câble de charge: Type-C
Suggestion de charge: utilisez une source à faible
courant comme un ordinateur ou une batterie externe.
Indicateur de charge:
L'icône de batterie en haut à droite de l'écran affiche une
aninnation pendant la charge et reste fixelorsque la
batterie est pleine. Indicateur de batterie faible:
La barre de batterie clignote lorsque la tension
est inférieure à3.32V, indiquant que la souris
doitêtre rechargée. L'appareil s'éteindra
automatiquement lorsque latension
1. DPI : 800/1600/2400/3200/6400/12000DPI
2. Tension / Courant de charge : 5V / ≥0.2-0.25A
3. Capacité de la batterie : 500mAh
4. Poids:env.61+2g(récepteur inclus)
5. Dimensions:127×72×42mm
6.Méthodedecharge:Type-C
7. Mode de connexion : Filaire + 2.4G + BT1
8. Nom Bluetooth : G9Pro Mouse
9. Capteur optique : PAW3311
10. Taux d'interrogation : 125/250/500/1000 / 1000Hz
11. Systèmes compatibles : Windows Vista / Win7/8/ 10 /11 ou
macOS X10.5 et versions ultérieures
12. Model: G9Pro
desccend en dessous de 3.11V.
Instructions de charge
Méthode de connexion filaire:
FR
Connexion sans fil 2.4G:
1. Placez l’interrupteur d’alimentation sur « 2.4G », retirez le récepteur et insérez-le
dans le port USB de l’ordinateur. Si aucune réponse n’apparaît après l’insertion
du récepteur, un appairage est nécessaire.
2. Appuyez et maintenez DPI bouton de commutation pendant 3 secondes. L’écran
affichera « 2.4G » clignotant rapidement, indiquant le mode d’appairage.
Une fois la connexion établie, « 2.4G » restera allumé en continu et la souris sera
prête à l’emploi.
1. Connectez le câble Type-C à l'ordinateur. Une fois connectée, la souris passe
2. Une fois que l’appareil trouve le nom Bluetooth correspondant [G9Pro mouse]
et que l’appairage est réussi, l’écran affichera « BT1 » en lumière fixe, indiquant
Méthode de connexion BT1:
1. Placez l’interrupteur sur « BT ». L’écran affichera « BT1 » clignotant.
Appuyez et maintenez le dpi bouton pendant 3 secondes jusqu’à ce que « BT1 »
clignote rapidement, indiquant le mode d’appairage.
une connexion réussie. La souris est alors prête à l’emploi.
automatiquement en mode filaire.
2. Déplacez le pointeur de la souris. Si l'écran de l'ordinateur indique que le pointeur
peut être déplacé, la souris est prête à être utilisée.
Bouton gauche
Écran
d'affichage
Bouton
avant
Bouton
arrière
Bouton droit
Bouton
central
Receiver
Storage
Slot
Touches DPI+/- / Appui long
pour forcer le couplage
Interface Type-C
OFF/2.4G/BT
OFF 2.4G BT
DPI
Mode d'emploi
Veuillez lire attentivement les instructions avant utilisation
Liste des éléments inclus dans l'emballage Méthodes de connexion
1. Souris*1
2. Manuel d'utilisation*1
3. Câble USB-C*1
4. Récepteur USB*1
Description du produit
Spécifications
Difficultés liées à la solution
Q1 : Pourquoi mon appareil ne parvient-il pas à détecter la souris ?
R: Assurez-vous que la souris est allumée, puis appuyez sur le bouton d'appairage
et maintenez-le enfoncé pendant 5 secondes.
Q2 : Cette souris est-elle compatible avec les ordinateurs Huawei ?
R: Oui, cette souris est compatible avec tous les téléphones, tablettes et ordinateurs,
y compris iOS, Mac, Android et Microsoft.
Q3 : À quelle fréquence cette souris se recharge-t-elle ?
R : La souris peut être utilisée pendant environ 15 jours dans
des conditions normales et jusqu'à 22 heures avec le
rétroéclairage.
If you encounter any problems, please consult
us promptly.We will help you solve it as
soon as possible!
Ladekabel: Type-C
Ladeempfehlung: Verwenden Sie eine Stromquelle mit geringer
AAusgangsleistung, z. B. Computer oder Powerbank.
Ladeanzeige:
Das Batteriesymbol oben rechts zeigt während des
Ladevorgangseine Animation an und bleibt beivoller
Ladung konstant. Anzeige bei niedrigem
Batteriestand: Wenn die Spannung unter 3,32V
fällt, blinkt die Batterieanzeige. Bei einer
Spannung unter 3,11V schaltet sich das
1. DPI: 800/1600/2400/3200/6400/12000 / 12000 DPI
2. Ladespannung / Strom: 5V/ ≥0,2-0,2-0,25A
3. Batteriekapazität: 500mAh
4. Gewicht: ca.61+2g(inkl.Empfänger)
5. Abmessungen: 127 x 72 x 42 mm
6. Ladeanschluss: Type-C
7. Übertragungsmodus: Kabel / 2.4G / Bluetooth
8. Bluetooth-Name: G9Pro Mouse
9. Sensor: PAW3311
10. Abtastrate:125/250/500/500 / 1000Hz
11. Systemanforderungen: Windows Vista / Win7/8/ 10 /11 oder
macOS X10.5 und höher
12. Model: G9Pro
Gerät automatiisch aus.
Ladeanleitung
DE
2.4G Funkverbindung:
1. Schalten Sie den Netzschalter auf ,2.4G", entfernen Sie denEmpfänger und
stecken Sie ihn inden USB-Anschluss des Computers. Wenn nach dem
Einstecken keine Reaktion erfolgt, ist eine Kopplung erforderlich.
2. Bewegen Sie den Mauszeiger. Wenn sich der Zeiger auf derm Bildschirm bewegt,
Kabelgebundene Verbindung:
1. Verbinden Sie das Type-C-Kabel mit dem Computer. Die Maus wechselt automatisch
BT1 Verbindung:
1. Schalten Sie den Netzschalter auf ,BT". Das Display zeigt , BBT1" blinkend an
Drücken Sie die DPI-Taste 3 Sekunden lang.bis „BT1" schnell blinkt und der
2. Halten Sie die DPI-Taste 3 Sekunden gedrückt. Auf derm Display blinkt "2.4G"
schnell und zeigt den Pairing-Modus an. Sobald die Verbindung erfolgreich hergestellt
wurde, leuchtet"2.4G" dauerhaft und die Maus ist einsatzbereit.
Pairing-Modus aktiviert ist.
2. Sobald das Gerät den Bluetooth-Namen [G9Pro mouse] firndet und erfolgreich koppelt,
leuchtet ,BT1" dauerhaft und zeigt eine erfolgreiche Verbindurng an.
in den kabelgebundenen Modus.
ist die Maus einsatzbereit.
Linke Taste
Display
Vorwärts-Taste Rückwärts-Taste
Rechte Taste
Mittlere
Taste
Aufbewahrungsfach
für Empfänger
DPI+/- Tasten / Langes Drücken
zum Erzwingen der Kopplung
Typ-C-Schnittstelle
AUS/2,4 G/BT
OFF 2.4G BT
DPI
Bedienungsanleitung
Bitte lesen Sie die Anweisungen vor der Verwendung sorgfältig durch
Packliste Verbindungsmethoden
1. Maus*1
2. Benutzerhandbuch*1
3. USB-C-Kabel*1
4. USB-Empfänger*1
Produktbeschreibung
Technische Daten
Lösungsprobleme
F1: Warum kann mein Gerät die Maus nicht finden?
A: Bitte stellen Sie sicher, dass die Maus eingeschaltet ist, und halten Sie die
Pairing-Taste 5 Sekunden lang gedrückt.
F2: Unterstützt diese Maus Huawei-Computer?
A: Ja, diese Maus ist mit allen Smartphones, Tablets und Computern kompatibel,
einschließlich iOS, Mac, Android und Microsoft.
F3: Wie oft muss diese Maus aufgeladen werden?
A: Die Maus kann unter normalen Bedingungen etwa 15
Tage lang und bei Hintergrundbeleuchtung bis zu 22
Stunden lang verwendet werden.
If you encounter any problems, please consult
us promptly.We will help you solve it as
soon as possible!
Cavo di ricarica: Type-C
Suggerimento: utilizzare fonti di alimentazione a bassa
correntee come computer o power bank.
Indicatore di carica:
L'icona della batteria nell'angolo superiore destro mostra
un'animazione durante la ricarica e rimane
fissa quando è completamente carica.
Batteria scarica: Quando la tensione scende
sotto 3,32V, l'indicatore lanmpeggia.
ll dispositivo si spegnerà automaticamente
1. DPI: 800/1600/2400/3200/6400/12000DPI
2. Tensione / corrente di rica: 5V/ ≥0,2-0,2-0,2-0,25A
3. Capacità batteria: 500mAh
4. Peso: circa 61+2g(con ricevitore)
5. Dimensioni: 127 x 72 x 42 mm
6.Metododiricarica:Type-C
7. Metodo di trasmissione: Cavo + 2.4G + Bluetootth
8. Nome Bluetooth: G9Pro Mouse
9. Sensore ottico: PAW3311
10. Polling rate: 125/250/500/1000 / 1000Hz
11. Sistema operativo: Windows Vista / Win7/8/ 10/ 11
o nhacOS X10.5 e versioni successive
12. Model: G9Pro
sotto 3,11V.
Istruzioni di ricarica
IT
Connessione wireless 2.4G:
1. Impostare l'interruttore su "2.4G", rimuovere il ricevitore e inserirlo nella porta
USB delcomputer. Se non c'è risposta dopo l'inserimento del ricevitore, è necessario
effettuare l'associazione.
2. Tenere premuto il pulsante di DPI per 3 secorndi. Il display mostrerà
"2.4G"lampeggiante rapidamente, indicando la modalità di associazione. Quando la
connessione è stabilita, "2.4G" rimarrà acceso fisso e il mouse sarà pronto all'uso.
Metodo di connessione BT1:
1. Impostare l'interruttore su "BT". Il display mostrerà "BT1"lampeggiante.
Tenere premuto il DPI pulsante per 3 secondi finché "BT1" lamppeggia rapidam
ente, indicando lamodalità di associazione.
2. Muovere il puntatore del mouse. Se il puntatore si muove sulloschermo,
Connessione cablata:
1. Collegare il cavo Type-Cal computer. Il mouse passerà automaticamente
2. Quando il dispositivo trova il nome Bluetooth [G9Pro meouse] e l'associazione è
completata,"BT1" rimarrà acceso fisso sul display indicando una connessione riuscita.
alla modalità cablata.
il mouse è prontoall'uso.
Pulsante sinistro
Display
Pulsante
avanti
Pulsante
indietro
Pulsante destro
Pulsante
centrale
Slot di archiviazione
del ricevitore
Tasti DPI+/- / Premere a lungo
per forzare l'accoppiamento
Interfaccia Type-C
OFF/2.4G/BT
OFF 2.4G BT
DPI
Manuale d'uso
Leggere attentamente le istruzioni prima dell'uso
Elenco dei componenti Metodi di connessione
1. Mouse*1
2. Manuale utente*1
3. Cavo USB-C*1
4. Ricevitore USB*1
Descrizione del prodotto
Specifiche
Difficoltà relative alla soluzione
D1: Perché il mio dispositivo non riesce a rilevare il mouse?
R: Assicurati che il mouse sia acceso, quindi tieni premuto il pulsante di
accoppiamento per 5 secondi.
D2: Questo mouse è compatibile con i computer Huawei?
R: Sì, questo mouse è compatibile con tutti i telefoni, tablet e computer,
inclusi iOS, Mac, Android e Microsoft.
D3: Con quale frequenza si ricarica questo mouse?
R: Il mouse può essere utilizzato per circa 15 giorni in
condizioni normali e fino a 22 ore con retroilluminazione.
If you encounter any problems, please consult
us promptly.We will help you solve it as
soon as possible!
Cable de carga: Type-C
Sugerencia: utilice una fuente de alimentación de baja
corriente comoordenador o power bank.
Indicador de carga:
El icono de batería en la esquina superior derecha muestra
una aanimación durante la carga y permanece fijo
cuando está completamente cargado.
Indicador de batería baja: Cuando el voltaje baja
de 3.32V, el indicador parpadea.
El dispositivo se apagará automáticamente
1. DPI: 800/1600/2400/3200/6400/12000 / 12000 DPI
2. Voltaje / corriente de carga: 5V/ ≥0.2-0.25A
3. Capacidad de la batería: 500mAh
4. Peso: aprox.61+2g(incluido el receptor)
5. Dimensiones: 127 x 72 x 42 mm
6. Método de carga: Type-C
7. Método de transmisión: Cable / 2.4G / Bluetooth
8. Nombre Bluetooth: G9Pro Mouse
9. Sensor óptico: PAW3311
10. Frecuencia de sondeo: 125/250 / 500/1000Hz
11. Sistemas compatibles: Windows Vista / Win7/8/ 10/ 11
omacos X10.5 o superior
12. Model: G9Pro
cuando el voltaje sea inferior a 3.11V.
Instrucciones de carga
ES
Conexión por cable:
Conexión inalámbrica 2.4G:
1. Cambie el interruptor de encendido a "2.4G", retire el receptor e insértelo en el
puerto USB delordenador. Si no hay respuesta después de insertarlo,
será necesario realizzar el emparejamiento
1. Conecte el cable Type-Cal ordenador. El mouse cambiará aautomáticamente al
2. Cuando el dispositivo encuentre el nombre Bluetooth[G9Pro mouse] y se empareje
2. Mantenga presionado el botón DPI durante 3 seguridos. La pantalla mostrará "2.4
G"parpadeando rápidamente, indicando el modo de emparejamiento Cuando la con
exión sea exitosa, "2.4G" permanecerá encendido de foorma fija y el mouse estarális
to para usarse.
Método de conexión BT1:
1. Cambie el interruptor a "BT". La pantalla mostrará "BT1" paarpadeando.
Mantenga presionado el botón DPI durante 3 segundos hasta que"BT1" parp
adee rápidamente, indicando el modo de emparejamiento.
correctamente, "BT1" permanecerá encendido de forma fija indicando conexión exitosa.
modo cableado.
2. Mueva el cursor del mouse. Si el cursor se mueve en la panttalla,
el dispositivo está listo parausarse.
Botón izquierdo
Pantalla
Botón de
avance
Botón de
retroceso
Botón derecho
Botón
central
Ranura de
almacenamiento
del receptor
Teclas DPI+/- / Pulsar
prolongadamente para
forzar el emparejamiento
Interfaz tipo C
OFF/2.4G/BT
OFF 2.4G BT
DPI
Manual del usuario
Lea atentamente las instrucciones antes de utilizar el producto
Lista de embalaje Métodos de conexión
1. Ratón*1
2. Manual del usuario*1
3. Cable USB-C*1
4. Receptor USB*1
Descripción del producto
Especificaciones
Dificultades con la solución
P1: ¿Por qué mi dispositivo no puede buscar el ratón?
R: Asegúrese de que el ratón esté encendido y mantenga pulsado el botón de
emparejamiento durante 5 segundos.
P2: ¿Este ratón es compatible con los ordenadores Huawei?
R: Sí, este ratón es compatible con todos los teléfonos, tabletas y ordenadores,
incluidos iOS, Mac, Android y Microsoft.
P3: ¿Con qué frecuencia se carga este ratón?
R: El ratón se puede utilizar durante unos 15 días en
condiciones normales y hasta 22 horas con
retroiluminación.
If you encounter any problems, please consult
us promptly.We will help you solve it as
soon as possible!

FCC Statement
This device complies with part 15 of the FCC Rules. Operation is subject to the following two conditions: ( 1) This device may not cause harmful interference, and (2) this device must
accept any interference received, including interference that may cause undesired operation.
This equipment has been tested and found to comply with the limits for a Class B digital device, pursuant to Part 15 of the FCC Rules. These limits are designed to provide reasonable
protection against harmful interference in a residential installation. This equipment generates uses and can radiate radio frequency energy and, if not installed and used in accordance with the instructions, may cause harmful interference to radio communications. However, there is no guarantee that interference will not occur in a particular installation. If this equipment does cause harmful interference to radio or television reception, which can be determined by turning the equipment off and on, the user is encouraged to try to correct the interference by one or more of the following measures:-- Reorient or relocate the receiving antenna.
-- Increase the separation between the equipment and receiver.
-- Connect the equipment into an outlet on a circuit different from that to which the receiver is connected.
-- Consult the dealer or an experienced radio/TV technician for help.
Any Changes or modifications not expressly approved by the party responsible for compliance could void the user's authority to operate the equipment.
This equipment complies with the FCC radiation exposure limits set forth for an uncontrolled environment, This transmitter must not be co-located or operating in conjunction with any other antenna or transmitter.
FCC Statement
This device complies with part 15 of the FCC Rules. Operation is subject to the following two conditions: (1)
This device may not cause harmful interference, and (2) this device must
accept any interference received, including interference that may cause undesired operation.
This equipment has been tested and found to comply with the limits for a Class B digital device, pursuant to
Part 15 of the FCC Rules. These limits are designed to provide reasonable
protection against harmful interference in a residential installation. This equipment generates uses and can
radiate radio frequency energy and, if not installed and used in accordance with the instructions, may cause
harmful interference to radio communications. However, there is no guarantee that interference will not
occur in a particular installation. If this equipment does cause harmful interference to radio or television
reception, which can be determined by turning the equipment off and on, the user is encouraged to try to
correct the interference by one or more of the following measures:-- Reorient or relocate the receiving
antenna.
-- Increase the separation between the equipment and receiver.
-- Connect the equipment into an outlet on a circuit different from that to which the receiver is connected.
-- Consult the dealer or an experienced radio/TV technician for help.
Any Changes or modifications not expressly approved by the party responsible for compliance could void
the user's authority to operate the equipment.
This equipment complies with the FCC radiation exposure limits set forth for an uncontrolled environment,
This transmitter must not be co-located or operating in conjunction with any other antenna or transmitter.
The device can be used in portable exposure conditions without restriction.