
意大利语
法语
西班牙语
德语
俄语
波兰语
土耳其语
阿拉伯语
希伯来语
葡萄牙语
乌克兰语
捷克语
希腊语
罗马尼亚语
瑞典语
泰语
R
obot Vacuum X20 Pro User Manual

01
Safety Information
Usage Restrictions
Read this manual carefully before use, and retain it for future reference.
· This product is for floor cleaning in a home environment only. Do not use it outdoors, on non-floor surfaces, or in a
commercial or industrial setting.
· This appliance can be used by children aged from 8 years and above and persons with reduced physical, sensory or
mental capabilities or lack of experience and knowledge if they have been given supervision or instruction
concerning use of the appliance in a safe way and understand the hazards involved. Children shall not play with the
appliance. Cleaning and user maintenance shall not be made by children without supervision.
· If the cord set is damaged, it must be replaced by a special cord set available from the manufacturer or its service
agent.
· This appliance contains batteries that are only replaceable by skilled persons.
· Ensure children and pets are kept at a safe distance from the robot vacuum while it is operating.
· Do not use the robot vacuum in an area suspended above ground level without a protective barrier.
· Do not place the robot vacuum upside down. Do not move the robot vacuum by using its LDS laser sensor cover,
cover, or bumper as a handle.
· Do not install, charge, or use this robot vacuum outdoors, in bathrooms, or near a pool.
· A hazard may occur if the appliance runs over the supply cord.
· Remove fragile or small items from the floor to prevent the robot vacuum from bumping into and damaging them.
· Do not place children, pets, or any item on top of the robot vacuum regardless of whether it is stationary or moving.
· Keep hair, fingers, and other body parts away from the suction opening of the robot vacuum.
· Do not use the robot vacuum to clean any burning substances.
· Do not vacuum up hard or sharp objects.
· The plug must be removed from the socket-outlet before cleaning or maintaining the appliance.
· Do not wipe the robot vacuum or omni station with a wet cloth or rinse them with any liquid. After cleaning washable
parts, fully dry the parts before reinstalling and using them.
· Make sure the robot vacuum is turned off when being transported and kept in its original packaging if possible.

02 03
· Please use this product in accordance with the instructions in the user manual. Users are responsible for any loss or
damage arising from improper use of this product.
· For additional protection, the appliance is to be supplied through a residual current device (RCD) having a rated
residual operating current not exceeding 30 mA. The installation of a residual current device (RCD) having a rated
residual operating current not exceeding 30 mA is advisable in the electrical circuit supplying. Ask your installer for
advice.
· This appliance is considered to be suitable for use in countries having a tropical climate. It may also be used in other
countries.
· Do not use the robot vacuum at an ambient temperature above 40°C or below 0°C or on a floor with liquids or
sticky substances.
Batteries and Charging
· Do not use any third-party battery, cord set, or omni station. The robot vacuum can only be used with the D102-JZEU
omni station.
· No action needed from users to shift the omni station between 50 Hz and 60 Hz, and the product can adapt itself for
both 50 Hz and 60 Hz.
· Do not attempt to disassemble, repair, or modify the battery or omni station on your own.
· Do not place the omni station near a heat source.
· Do not use a wet cloth or wet hands to wipe or clean the omni station's charging contacts.
· Do not expose the appliance or battery to excessive temperatures.
· Be aware of the risk of terminals of the battery-operated appliance or battery being short-circuited by metal objects.
· If the robot vacuum won't be used for an extended period, fully charge it, then turn it off and store in a cool, dry
place.
· Recharge the robot vacuum at least once every 3 months to avoid over-discharging the battery.
WARNING:
· Do not damage the battery when removing it to avoid short circuits or liquid leakage. If the battery leaks, keep the
fluid from touching your skin or clothes, and wipe it away immediately with a dry cloth. Then send the battery to an
appropriate recycling facility or the designated after-sales service team to properly dispose of it.
· The lithium-ion battery pack contains substances that are hazardous to the environment. Before disposing of the
robot vacuum, please first remove the battery pack, then discard, or recycle it in accordance with local laws and
regulations of the country or region it is used in.
· When removing the batteries from the product, it is better to use up the batteries and make sure your product is
disconnected from power.
1. Uninstall the screw on the bottom, then remove the cover.
2. Unplug the battery connector, then remove the batteries. Do not damage the battery case to avoid any risk of
injuries.
3. Return the batteries to a professional recycling organization.
– The battery must be removed from the appliance before it is scrapped.
– The appliance must be disconnected from the supply mains when removing the battery.
– The battery is to be disposed of safely.
The laser sensor in this product meets the IEC 60825-1: 2014 Standard for Class 1 laser products. Please avoid
direct eye contact with it during use.
Laser Safety Information
EU Declaration of Conformity
Xiaomi Communications Co., Ltd. declares that the radio equipment type D102GL is in compliance with Directive 2014/53/EU. The full text of the EU declaration of conformity isavailable at
the following internet address: http://www.mi.com/global/service/support/declaration.html
For detailed e-manual, please go to www.mi.com/global/support/user-guide

04 05
Pre-installed Accessories
Robot Vacuum
Other Accessories
Brush Brush Cover Dust Compartment Filter (Pre-installed on the
dust compartment)
Note: Illustrations of product, accessories,
and user interface in the user manual are
for reference purposes only. Actual product
and functions may vary due to product
enhancements.
Product Overview
Robot Vacuum
Press and hold for 3 seconds to turn on or off
Press to start cleaning or pause while turned on
Press to pause while running
Press while paused to return the robot vacuum to the omni station for charging
Press to stop docking while returning to the omni station
Press and hold for three seconds to enable or disable the child lock
Indicator
White: Cleaning/Cleanup completed/Fully charged
Blinking white: Returning to charge/Repositioning/Updating firmware
Breathing white: Charging
Orange: Wi-Fi disconnected
Blinking orange: Error/Awaiting connection/Connecting to Wi-Fi
Robot Vacuum Omni Station
Side Brush Cord Set Disposable Bag
(Pre-installed in
the omni station)
Washboard Base
Extender
Mop Pad × 2
(Pre-installed on the
mop pad holder)
Mop Pad
Holder × 2
Omni Station (with a pre-installed
disposable bag, clean water tank,
dirty water tank, and washboard)
Wi-Fi Indicator
Reset Button
Cover
Dust
Compartment
Charging
Contact
Dust Compartment
Filter Clip
Dust
Compartment Clip
Filter
Auto-empty
Vent
Auto-empty
Vent
LDS Laser Sensor
Cover
LDS Laser Sensor
Bumper
Line Laser Sensor
Caster Wheel
Side Brush
Ultrasonic
Sensor
Brush
Main Wheel
Brush Cover
Brush Cover Clip
Cliff Sensor
Main Wheel
Mop Pad
Holder
Mounting
Hole
Handle
Dirty Water Tank
Handle
Clean Water Tank
Cover
Washboard
Water Tank Clip
Float Ball
Water Tank Clip
Water Pipe
Filter
Floater
Clean Water Tank
Dirty Water Tank
Press and hold for
three seconds to
restore factory
settings
Press and hold for
10 seconds to turn
it off forcefully
On: Wi-Fi connected
Blinking: Awaiting Wi-Fi
connection/Connecting
to Wi-Fi
Off: Wi-Fi not
connected
·
·
·
·
·
Accessories�
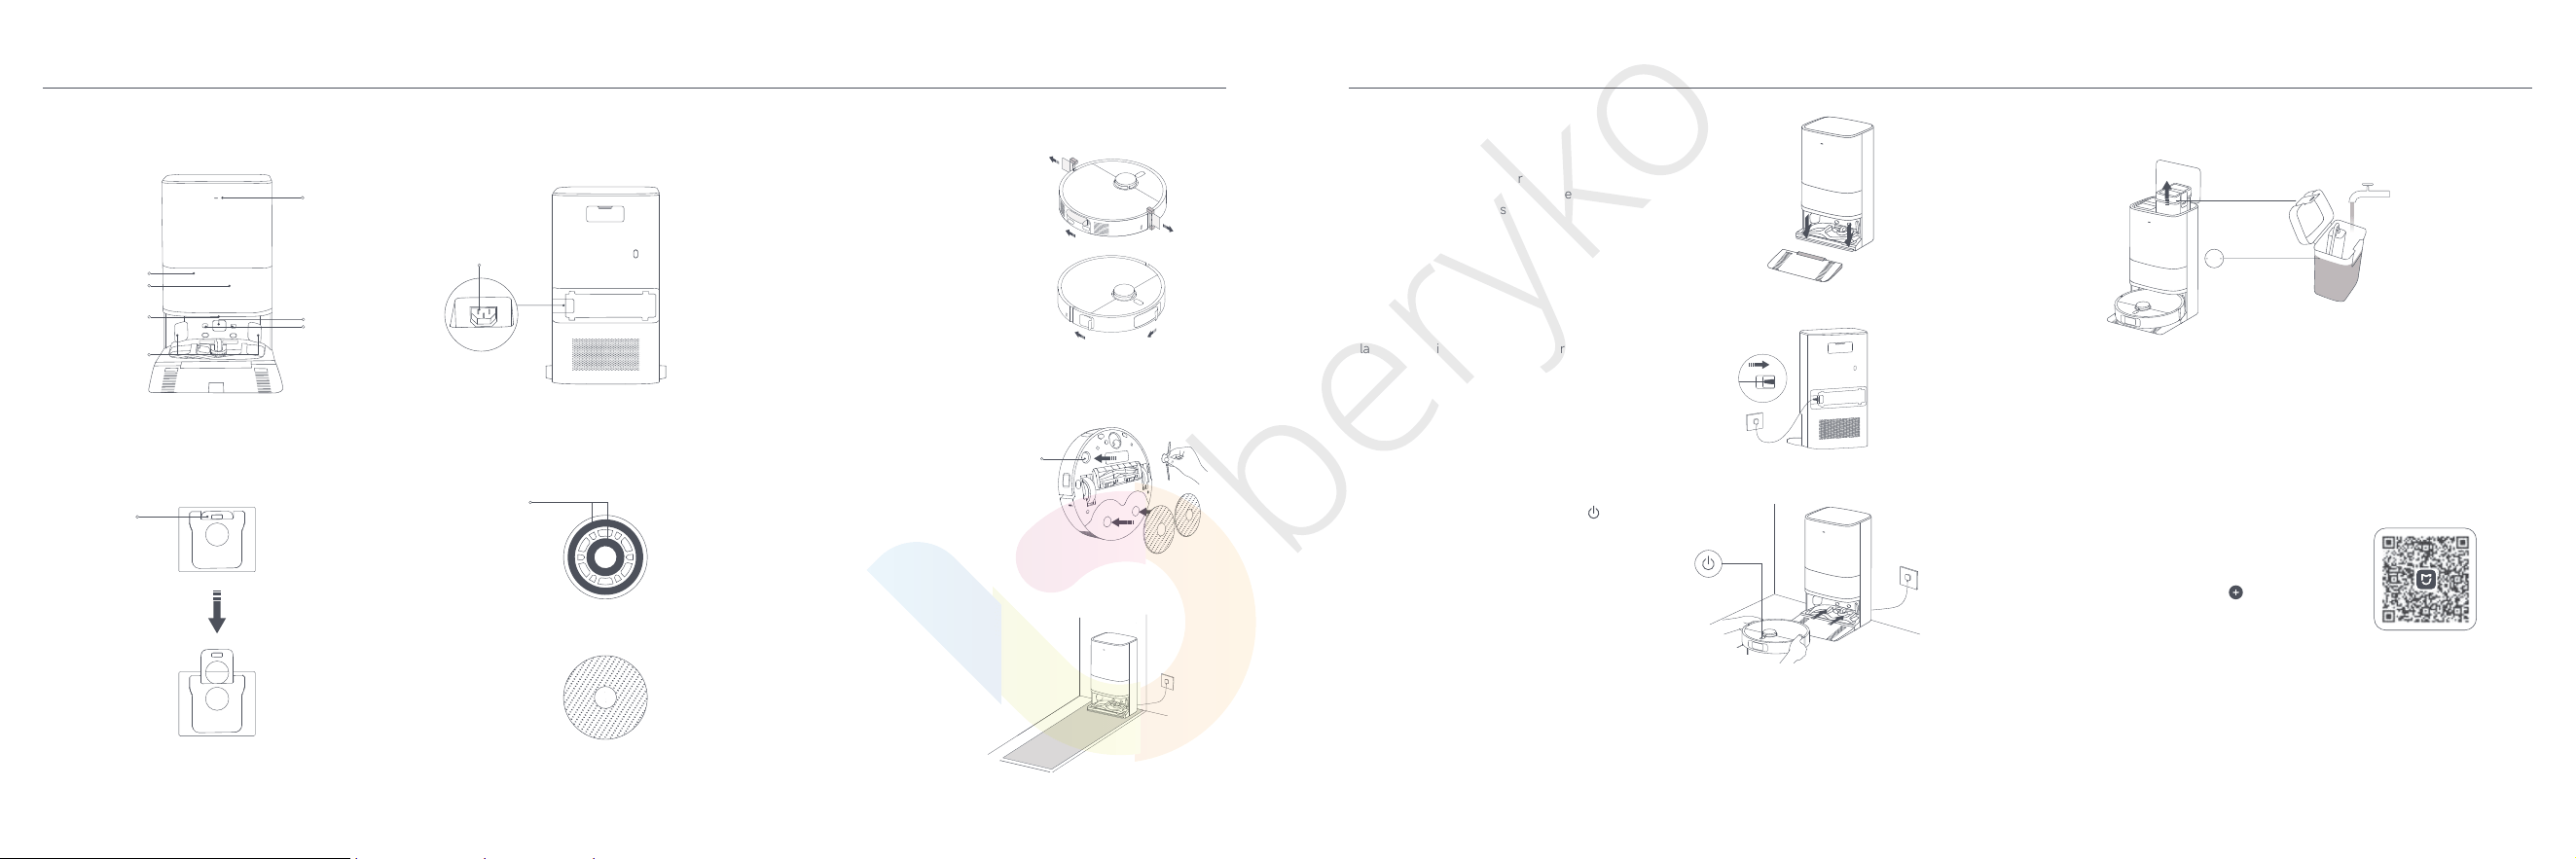
How to Install How to Use
Omni Station
Before using the robot vacuum, remove the
protective strips 1 and 2 from both sides and
protective films 3, 4 and 5.
Install the side brush and the mop assembly
respectively as illustrated. They are properly
installed when you hear a "click".
Front View Rear View
Indicator
White: Omni station
works properly
Blinking orange:
Omni station has an
error
Signaling Area
Charging Contacts
Dust Cabinet
Dust Cabinet
Cover
Dust Cabinet
Opening
Auto-empty
Vent
Power Port
Disposable Bag
Handle
Mop Pad Attachment Area
Mop Pad Holder
Mop Pad
>1.93 m
>0.44 m
>0.82 m
· Place the omni station against a wall on
a flat and hard-surfaced floor, such as
a wooden or tiled floor.
· Make sure there is empty space of more
than 0.82 meters in height, more than
1.93 meters in length, and more than
0.44 meters in width. Ensure the omni
station is in an area with a good Wi-Fi
signal near an electrical outlet.
Note: The omni station is pre-installed with a disposable
bag when leaving the factory.
Installing the Washboard Base Extender Adding Water to the Clean Water Tank
Connecting with the Mi Home/Xiaomi Home App
· Install the washboard base extender to the omni station
along the direction as illustrated.
· Make sure the washboard base extender is flush with
the bottom of the omni station, and the bottom surface
is even.
Removing Protective Coverings
Place the omni station in an appropriate area, connect
the cord set to it, and plug the cord set into an electrical
outlet.
Note: Firmly plug the connector of the cord set into the
power port of the omni station until the indicator stays
white.
Connecting to Power
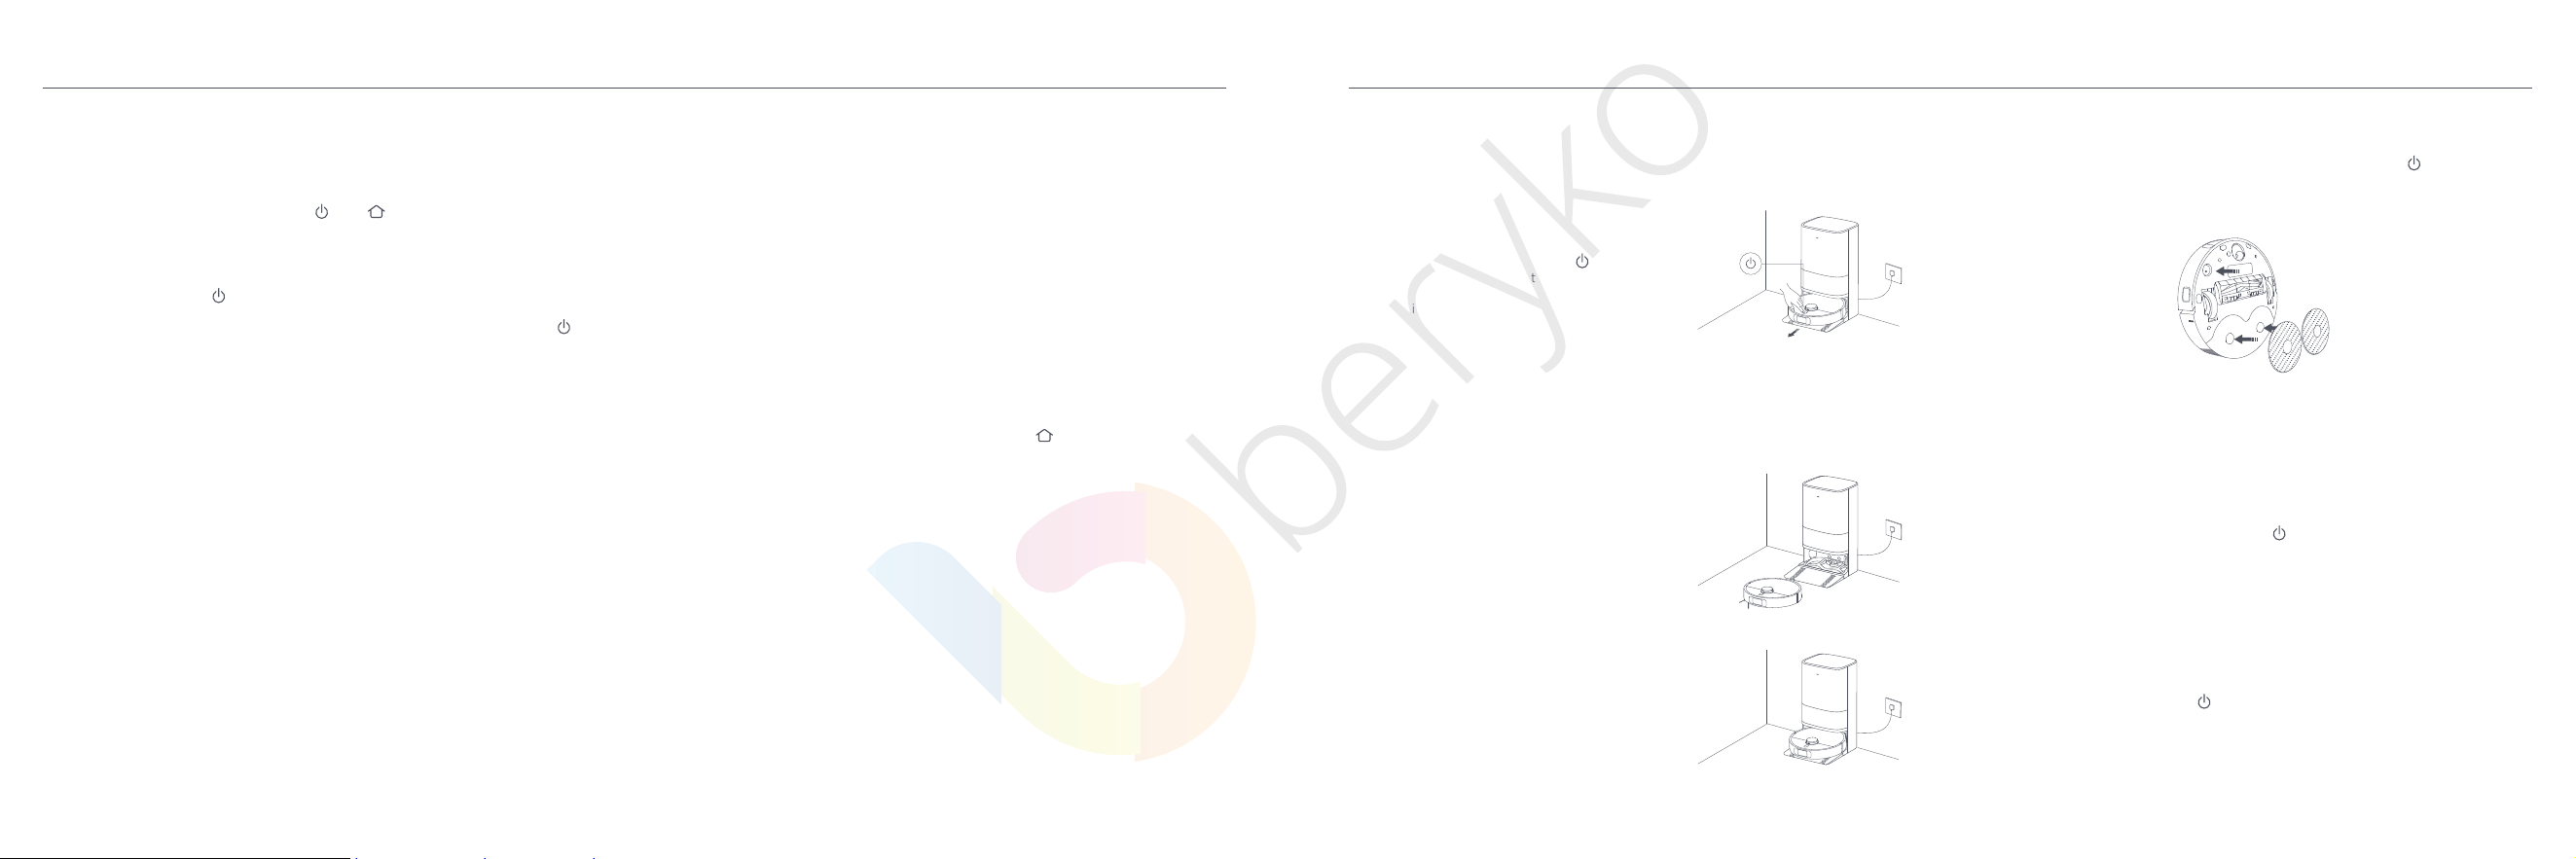
· Before use, press and hold the button on the
robot vacuum for three seconds to turn it on.
· Once the robot vacuum is on, place it onto the
omni station, and make sure the charging contacts
on the robot vacuum and the station are fully
aligned.
· The robot vacuum connects to the omni station
successfully when you hear a voice prompt for
starting charging.
· Before the first use, it is recommended to fully charge the robot vacuum.
· If the robot vacuum cannot be turned on due to low battery level, manually place the robot
vacuum onto the omni station to charge it for a while.
· When the robot vacuum is being charged, it will automatically turn on and cannot be
turned off.
· The robot vacuum works with the Mi Home/Xiaomi Home app, and it supports Android 9.0 &
iOS 12.0 or above.
· Only 2.4 GHz Wi-Fi networks are supported.
· The version of the app might have been updated, please follow the instructions based on
the current app version.
Placing the Robot Vacuum
Notes:
· Do not add water above the maximum water level mark (MAX).
· Do not add hot water to the water tank, as this may cause the tank to become deformed.
· Do not add any substance like detergents other than clean water to avoid damaging the
robot vacuum.
This product works with the Mi Home/Xiaomi Home app*. Use the Mi Home/Xiaomi Home
app to control your device, and to interact with other smart home devices.
Scan the QR code to download and install the app. You will be
directed to the connection setup page if the app is installed
already. Or search for "Mi Home/Xiaomi Home" in the app store to
download and install it.
Open the Mi Home/Xiaomi Home app, tap on the upper right,
and then follow the instructions to add your device.
* The app is referred to as Xiaomi Home app in Europe (except for
Russia). The name of the app displayed on your device should be
taken as the default.
Notes:
Notes:
Placing the Omni Station
Installing the Side Brush and the Mop Assembly
1
2
3
4
5
Side Brush
Disposable bag Mop Assembly
C629E33F
06 07
Maximum Water Level Mark
Water Tank Capacity: 4 L
- MAX -
MAX
Resetting Wi-Fi
Take the following steps if the robot vacuum cannot be connected to the network because the
router is reset, the password is forgotten, or for other reasons:
1. Open the cover of the robot vacuum so that you can see the Wi-Fi indicator.
2. Simultaneously press and hold the buttons and for 7 seconds until you hear a voice
prompt to indicate that the robot vacuum is waiting for the network configuration.
3. When the Wi-Fi indicator blinks, the Wi-Fi connection has been reset successfully.
Turning On/Off
· Press and hold the button for three seconds to turn the robot vacuum on. When the
indicator on the robot vacuum lights up, it means the robot vacuum enters the standby mode.
· When the robot vacuum is paused and not being charged, press and hold the button for
three seconds to turn it off.
Note: When the robot vacuum is charging, it will automatically turn on and cannot be turned off.
Quick Map Creation
· After configuring the network for the first time, follow the instructions in the app to quickly
create a map, and the robot vacuum will start mapping without cleaning.
· The mapping process will be completed when the robot vacuum returns to the omni station,
and the map will be saved automatically.
Notes:
· Make sure the robot vacuum is fully charged and starts from the omni station.
·
Before mapping, remove the items on the floor, open the doors of the rooms, and block the
areas unsuitable for the robot vacuum to enter.
·
During mapping, do not follow, move, or interrupt the robot vacuum, and do not move the omni
station.
·
After mapping, set up virtual walls or restricted areas in areas unsuitable for the robot vacuum to
enter, such as the areas where it may get stuck or be scraped.
·
Set up virtual walls or restricted areas in areas with long-hair or fringe carpets to prevent the
robot vacuum from getting entangled.
·
Set up virtual walls or restricted areas to exclude carpeted areas before mopping to prevent
the carpet from getting wet.
Pausing
When the robot vacuum is running, press any button to pause it.
Note: Do not lift or move the robot vacuum while it is paused. Otherwise, it may have positioning
errors that could prevent the robot vacuum from returning to the omni station or cause the loss
of the map.
Sleep Mode
The robot vacuum will automatically enter sleep mode after it is paused for 10 minutes, and its
indicator will go out. To wake it up, press any button on the robot vacuum.
Note: The robot vacuum will automatically turn off after being in sleep mode for 12 hours.
Resuming Cleanup
If the robot vacuum starts running low on battery during a cleaning task, it will automatically
return to the omni station to charge. When the robot vacuum is appropriately charged, it will
resume cleanup where it left off.
Child Lock Settings
To enable or disable the child lock, press and hold the button on the robot vacuum for
three seconds.
Note: When the child lock function is enabled, the buttons on the robot vacuum will not work.
Instead, you can control the robot vacuum via the app.
Dust Emptying
When the robot vacuum automatically returns to the omni station to charge after completing a
vacuuming and mopping task, a vacuuming before mopping task, or a vacuuming task, the
omni station will automatically start to empty the dust compartment.
Notes:
· When the robot vacuum returns midway to the omni station to clean mop pads, the station
will not automatically empty the dust compartment.
· If the function of auto dust emptying is disabled in the app, the omni station will not
automatically empty the dust compartment.
· If you change the auto-empty frequency in the app, the omni station will empty dust at the
set frequency.
Vacuuming and Mopping Vacuuming
Mopping
· The robot vacuum will moisten the mop pads before starting, please wait with patience.
Before starting, ensure the omni station is connected to power and the robot vacuum is
connected to the omni station.
· To ensure that the robot vacuum can return to the omni station successfully after completing
vacuuming and mopping, it is recommended to make the robot vacuum start from the omni
station. Do not move the omni station, the clean water tank, the dirty water tank, or the
washboard during cleaning.
During cleaning, the robot vacuum may automatically return to
the omni station to wash the mop pads after it cleans certain
squares of area. Once the mop pads have been washed, the
robot vacuum will resume its cleaning task.
Notes:
Notes: lf the mop assembly is not installed, the robot vacuum will automatically perform the
vacuuming after starting.
· Before starting, ensure the mop assembly and other
necessary parts have been installed onto the robot
vacuum and the clean water tank has been added water.
· Select the vacuuming and mopping mode in the app,
and use the app or press the button on the robot
vacuum to make it start from the station. Then the robot
vacuum will plan the optimal cleaning route and perform
the cleaning task based on the created map.
Select the vacuuming mode in the app, then use the app or press the button on the robot
vacuum to start cleaning, and the robot vacuum will lift the mop assembly and start from the
omni station to vacuum. Once it finishes vacuuming, it will return to the omni station to
automatically empty the dust compartment.
Before starting, ensure the mop assembly and other necessary parts have been installed
onto the robot vacuum and the clean water tank has been added water. Select the mopping
mode in the app, and use the app or press the button on the robot vacuum to start
cleaning. Then the robot vacuum will automatically moisten the mop pads first and leave the
omni station to start mopping. Once it finishes mopping, it will return to the omni station to
wash and air-dry the mop pads.
08 09
When the robot vacuum has completed its cleaning task
and returned to the omni station to charge, the omni
station will automatically start emptying dust and then
clean and air-dry the mop pads.
After the mop pads have been cleaned and air-dried,
please clean the dirty water tank in time to prevent odors.
Start cleaning
Automatically return to clean mop pads midway
Auto dust emptying & mop pad cleaning and air-drying
Clean the dirty water tank
Vacuuming before Mopping
Before starting, ensure the mop assembly has been installed onto the robot vacuum and the
clean water tank has been added water. Select the vacuuming before mopping mode in the
app, and use the app or press the button on the robot vacuum to start the cleaning task,
then the robot vacuum will lift the mop assembly to vacuum. Once it finishes vacuuming, it
will return to the omni station to automatically empty the dust and moisten the mop pads,
then it will lower the mop assembly to start mopping.
.
10 11
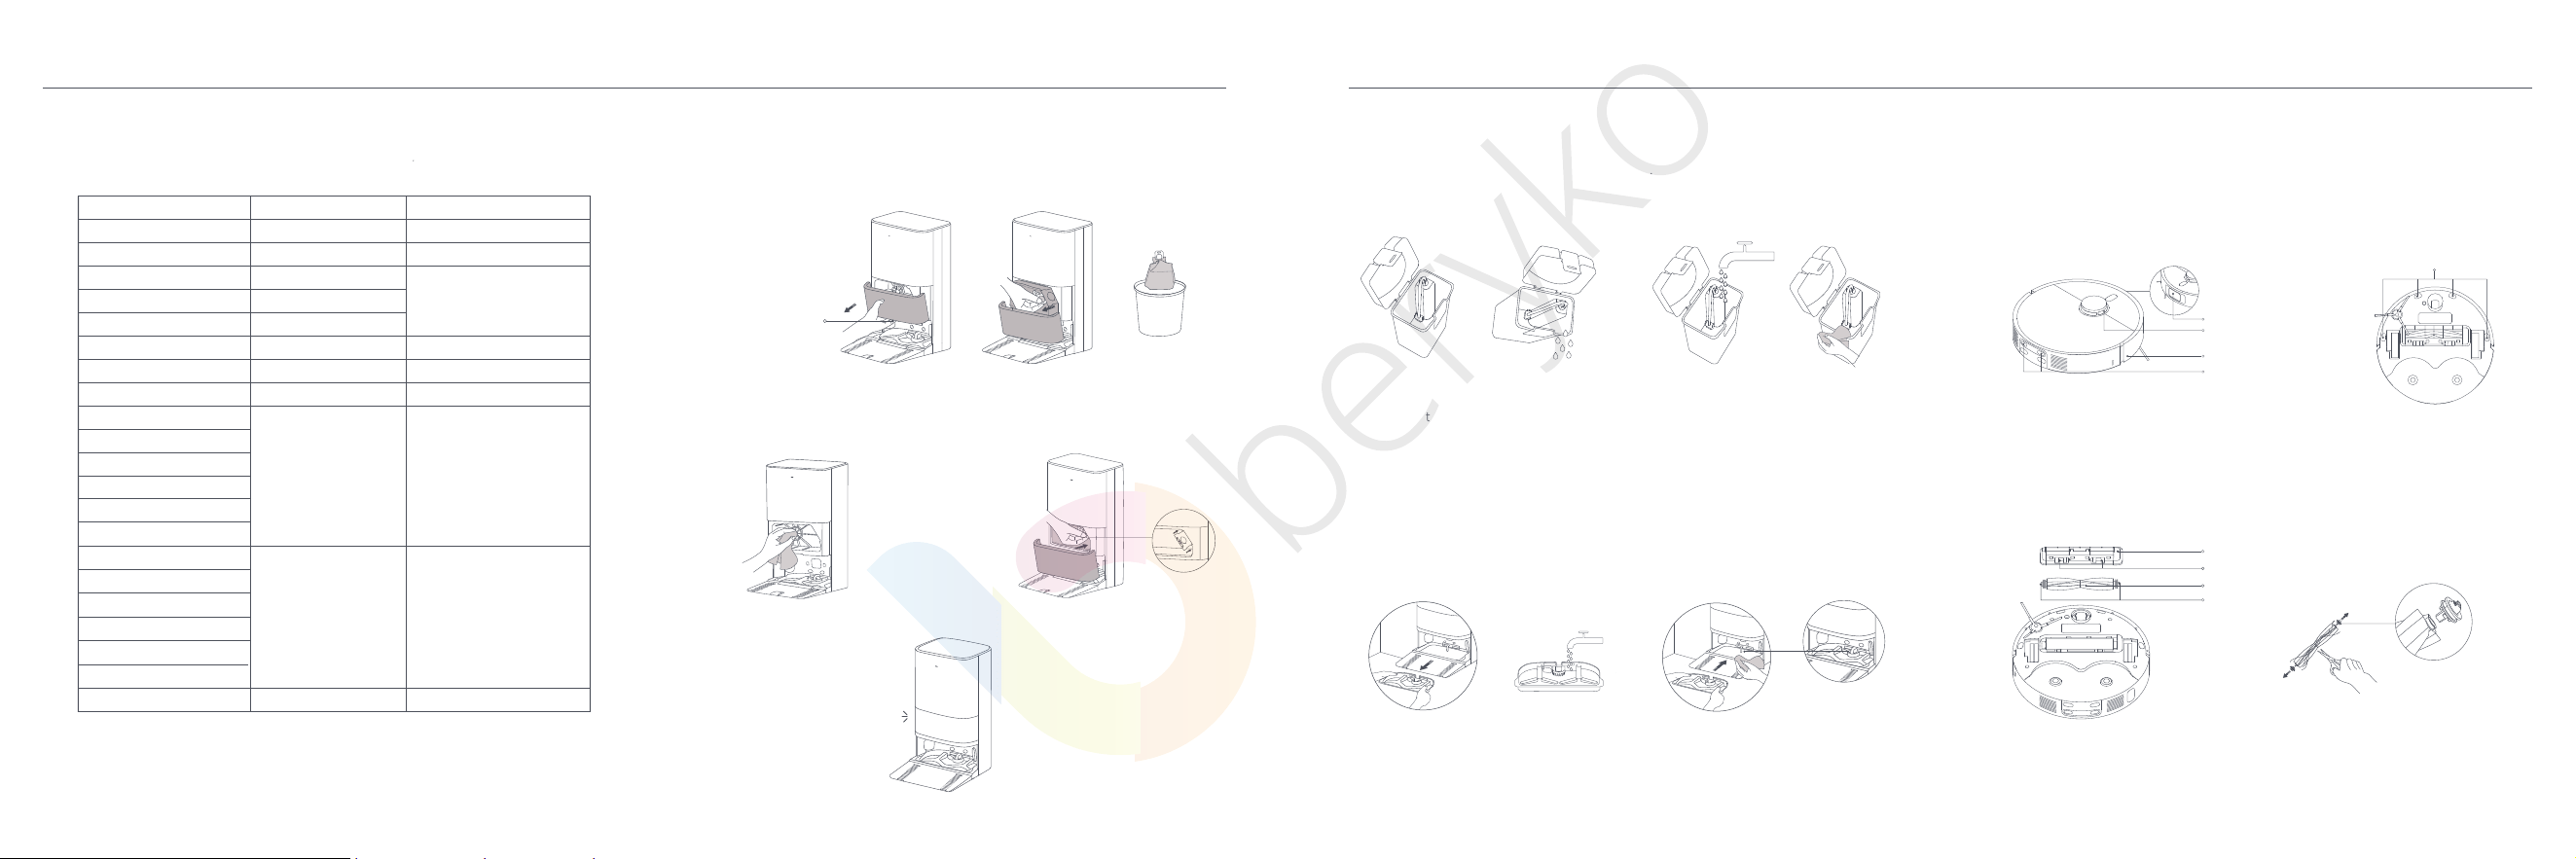
Replacing the disposable bag
Note: Pull the handle of the disposable bag to seal it to prevent the dust and debris from getting
out.
Dust Cabinet Opening
Click
Cleaning the clean and dirty water tanks
Cleaning the washboard and washboard base
Note: Both the floater in the clean water tank and the float ball in the dirty water tank are
movable parts. Do not apply too much force when cleaning them to avoid damaging them.
Note: Do not tilt the omni station during daily use or cleaning. If water collects in the
washboard base, wipe it dry with a cloth.
Cleaning sensors and charging contacts
CAUTION: If too much hair is tangled in the brush, or if the hair is tightly tangled, do not forcibly
pull on it, as this could damage the brush.
· The cliff sensors on the bottom of the robot vacuum.
· The charging contacts on the back of the robot vacuum.
· The LDS laser sensor on the top of the robot vacuum.
· The bumper and the line laser sensor on the front of the robot vacuum.
Use a soft cloth to clean all sensors and charging contacts in the robot vacuum:
Cleaning the brush
· Flip the robot vacuum over and pinch the clips to remove the brush cover. Lift the brush out,
remove the bearings on both ends, and clean the brush's axle.
· Use scissors to cut any hair tangled around the brush, and remove any debris.
· Reinstall the brush bearing, brush and brush cover, and clip them in place.
Cliff Sensor
Brush Cover
Release Button
Brush
Brush Bearings
Line Laser Sensor
LDS Laser Sensor
Charging Contacts
Bumper
Care & Maintenance
Parts
To keep the robot vacuum in good condition, it is recommended to refer to the following table for
routine maintenance.
· The replacement frequency is for reference only. If a part is damaged, it should be
replaced promptly to ensure efficient cleaning.
· To move or ship the robot vacuum, please empty the clean and dirty water tanks to
avoid the robot vacuum getting damaged in transit.
Notes:
Replace about every 2.5 months
depending on actual use
Parts
Cleaning Frequency
Replacement Frequency
Cliff Sensor
Bumper
Robot Vacuum's Charging Contacts
Auto-empty Vents of Robot Vacuum
Bottom of the Robot Vacuum
Omni Station
Omni Station's Charging Contacts
Omni Station's Signaling Area
Disposable Bag
Depending on actual use
/
/
Dust Compartment
Clean as required
Clean every two weeks
3–6 months
3–6 months
1–3 months
6–12 months
Clean every two weeks
Recommended to clean after
each use
Clean every 1–2 weeks
Clean every two weeks
Clean every two weeks
Clean every month
Ultrasonic Sensor
Filter
Clean Water Tank
Dirty Water Tank
Washboard
Brush
Side Brush
Mop Pad
Caster Wheel
LDS Laser Sensor
Line Laser Sensor
/
/
/
/
1. When the disposable bag is full, pull the cover out from the dust cabinet opening. Remove
the disposable bag using the handle, and discard it.
1. Remove both the clean and dirty water
tanks, open their covers, and pour out the
water.
1. Remove the washboard, and clean it with a
brush using the tap water.
2. Use clean water to completely wash the
tanks, then wipe the outside of the tanks dry
before reinserting them into the omni
station.
2. Wipe the washboard with a dry cloth,
and reinstall it to the omni station. Make
sure the water pipe is inside the groove of
the washboard; otherwise, it may affect
normal use.
2. Use a dry cloth to wipe away any dirt
from the filter.
3. Install a new disposable bag as illustrated
and insert the handle of the bag into the slot.
4. Put the dust cabinet cover back, and it is properly installed when you hear a "click".
12 13
Replacing the mop pad
· Do not attempt to clean the filter with a hard object, such as a brush
or your fingers.
· Frequent rinse is not recommended, otherwise the filter may be
damaged.
· Only use clean water to clean the dust compartment and filter. Do
not use detergent.
Notes:
Remove the mop pad from the mop pad holder, and replace
it with a new one.
Cleaning the omni station
Battery maintenance
Clean the charging contacts, the auto-empty vents, and the signaling
area of the omni station with a soft, dry cloth.
The robot vacuum contains a high-performance lithium-ion battery pack. Please ensure that it
remains well-charged during daily use to maintain optimal battery performance.
Note: If the robot vacuum is not used for an extended period, turn it off and put it away. To prevent
damage from over-discharging, the robot vacuum should be recharged at least once every three
months.
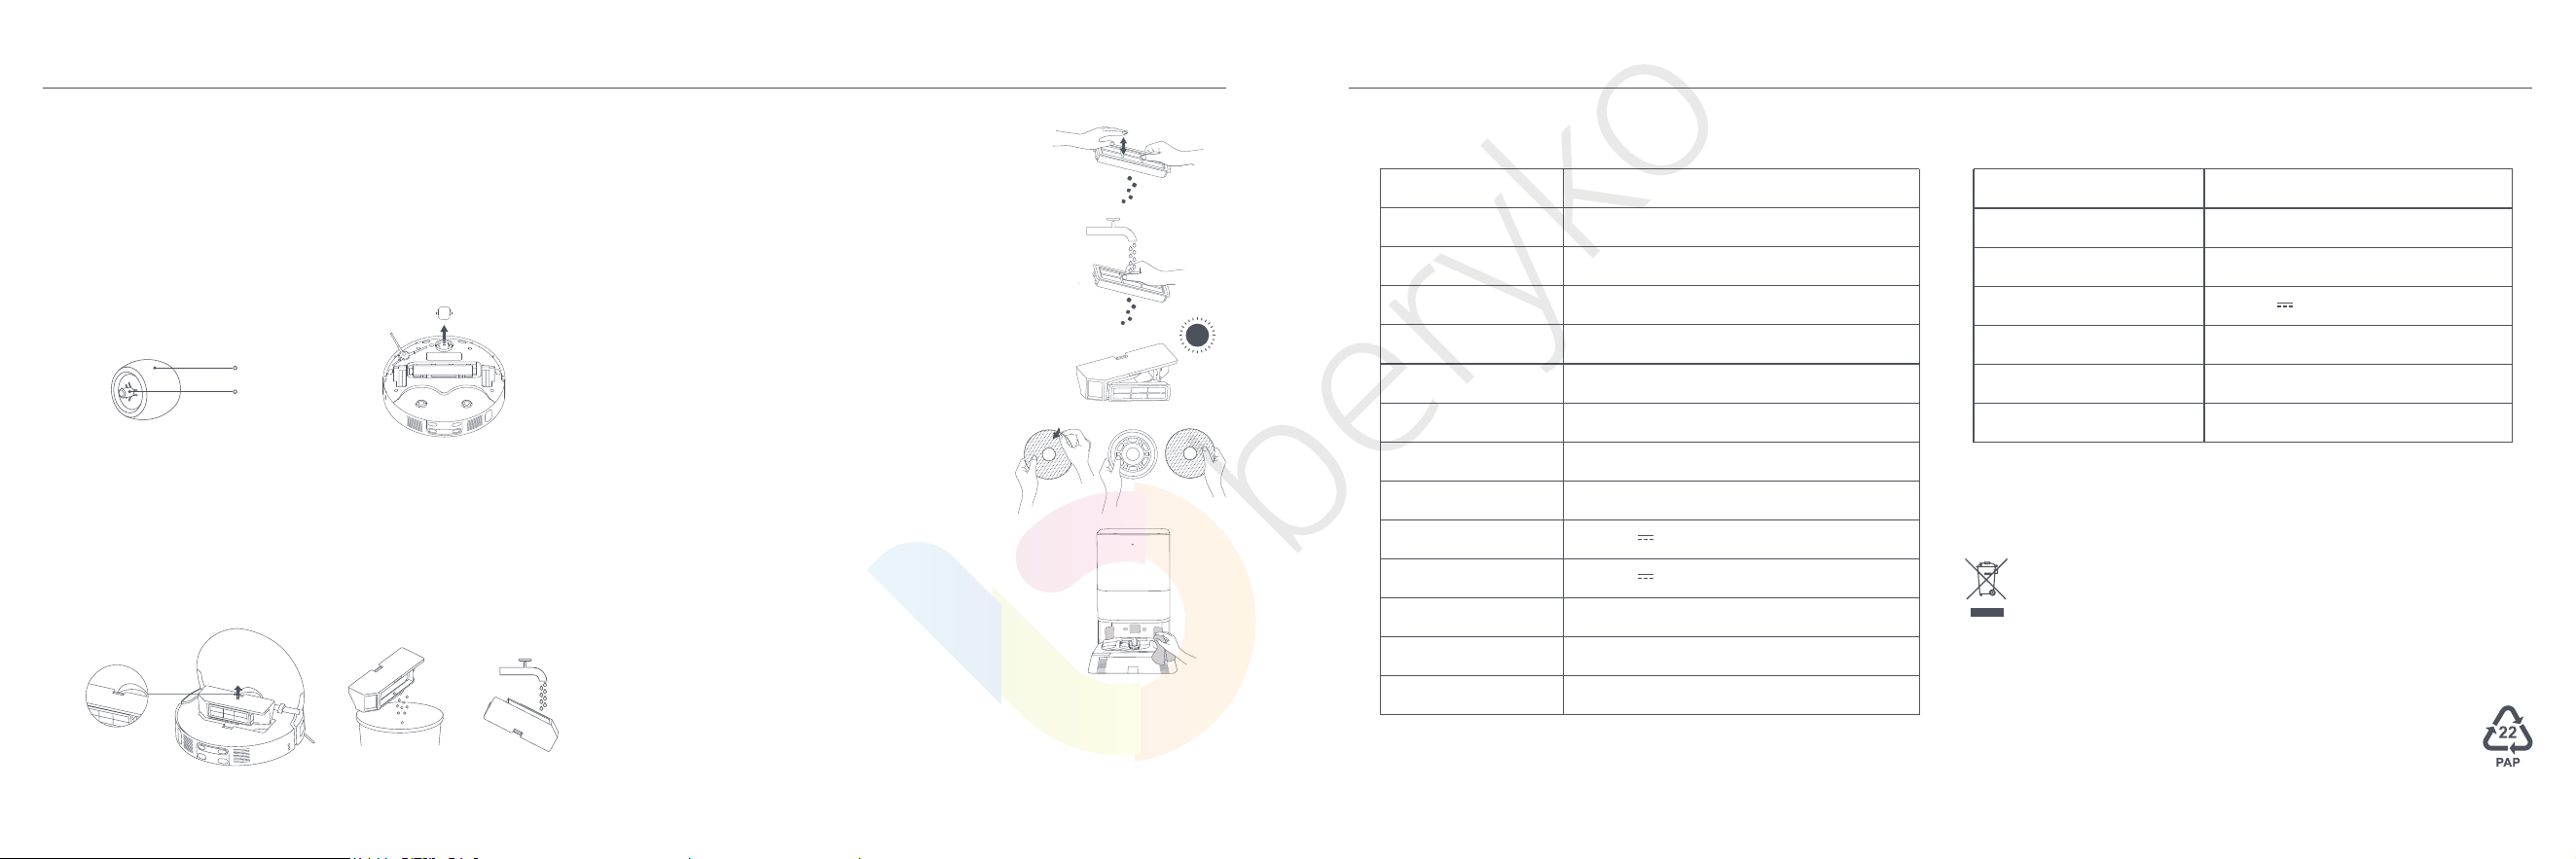
1. Press and hold the dust compartment release button to take out the dust
compartment, remove the filter from the filter clip, and empty the dust compartment.
You can rinse the dust compartment if needed.
2. Gently tap the filter frame to remove dirt, or clean the filter with
tap water.
3. Fully dry the dust compartment and filter before reinstalling
them.
For further information, please go to www.mi.com
Manufactured by: Xiaomi Communications Co., Ltd.
Address: #019, 9th Floor, Building 6, 33 Xi'erqi Middle Road, Haidian District, Beijing, China
Made in China
Importer:
Beryko s.r.o.
Pod Vinicemi 931/2, 301 00 Plzeň
www.beryko.cz
Specifications
All products bearing this symbol are waste electrical and electronic equipment (WEEE as in
directive 2012/19/EU) which should not be mixed with unsorted household waste. Instead, you
should protect human health and the environment by handing over your waste equipment to
a designated collection point for the recycling of waste electrical and electronic equipment,
appointed by the government or local authorities. Correct disposal and recycling will help
prevent potential negative consequences to the environment and human health. Please contact
the installer or local authorities for more information about the location as well as terms and
conditions of such collection points.
WEEE Disposal and Recycling Information
Cleaning the side brush
· If needed, you can use a tool such as a small screwdriver to gently pry out the axle
from the caster wheel, and clean it.
· The wheel can be cleaned with water and reinstalled after drying.
1. Turn the robot vacuum over, pull out the side brush upwards, and clean it.
2. Reinstall the side brush into the robot vacuum.
Cleaning the dust compartment and filter
Notes:
Cleaning the caster wheel
1. Flip the robot vacuum over and pull out the caster wheel.
2. Remove hair, dirt, and other debris from the wheel and axle.
3. Reinsert the caster wheel and press it firmly back into place.
Wheel
Axle
Robot Vacuum Omni Station
Name
Model
Item Dimensions
Battery
Charging Time
Net Weight
Compatible with
Wireless Connectivity
Rated Voltage
Charging Voltage
Rated Power
Operation Frequency
Maximum Output Power
Net Weight (with Accessories)
Robotic Vacuum Cleaner
D102GL
Φ350 × 97 mm
4800 mAh (rated capacity)
5200 mAh (nominal capacity)
Approx. 6.5 hours
3.6 kg
12.3 kg
Android 9.0 & iOS 12.0 or above
Wi-Fi IEEE 802.11 b/g/n 2.4 GHz, Bluetooth 4.2
14.4 V
19.6 V
55 W
2400–2483.5 MHz
< 20 dBm
Model
Item Dimensions
Rated Input
Rated Output
Power (during dust emptying)
Power (during cleaning)
Power (during air-drying + charging)
D102-JZEU
563 × 420 × 340 mm
200–240 V ~ 50/60 Hz
19.6 V 1.2 A
1000 W
30 W
80 W
Under normal use of condition, this equipment should be kept a separation distance of at least 20 cm between
the antenna and the body of the user.