installation instructions
Top-Mount
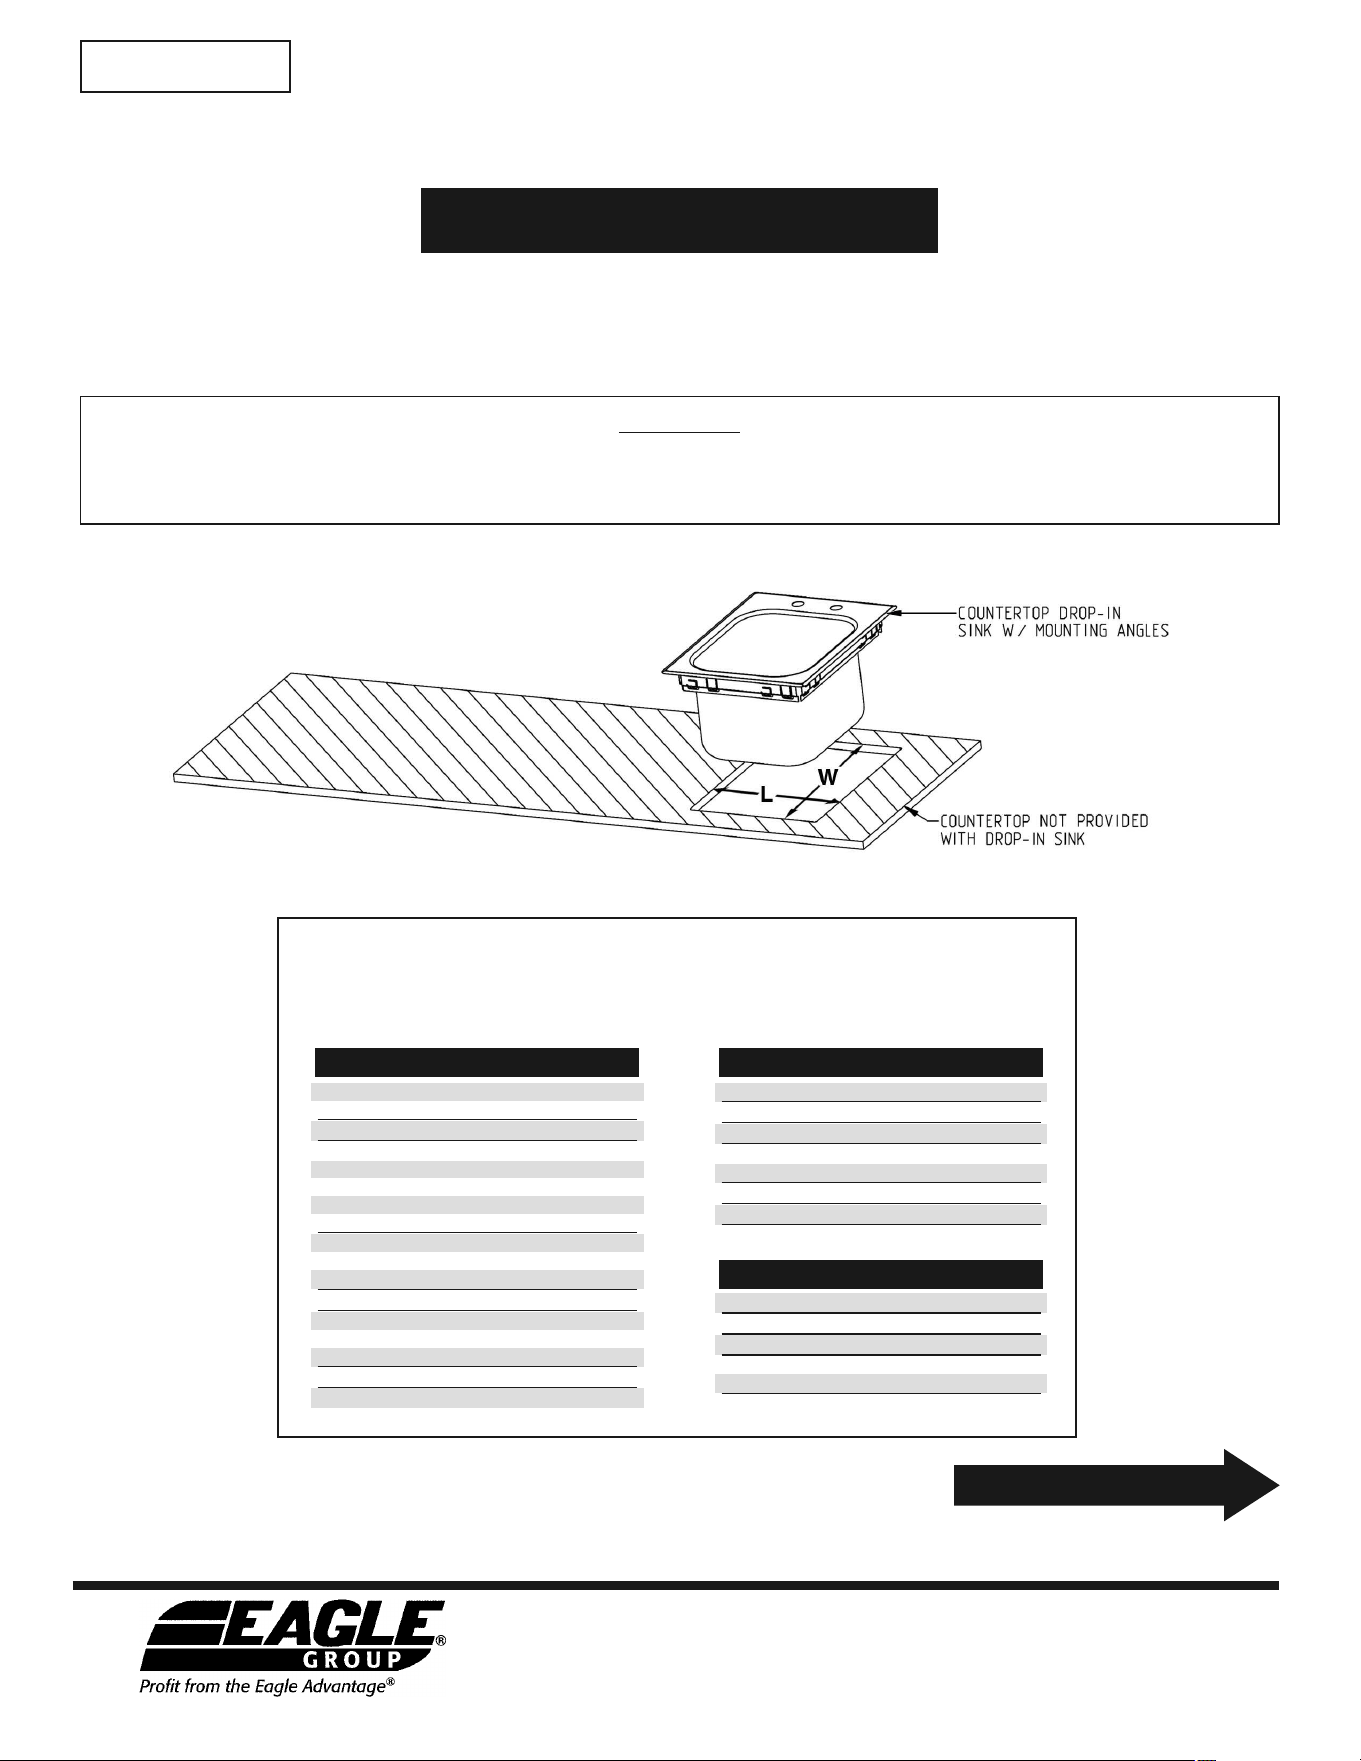
Countertop Drop-In
Self-Rim Design Sinks
eG10056 revised 09/13
top-mount cutout dimensions
eagle Foodservice equipment, eagle Mhc, specFAB
®
, and retail Display are divisions of eagle Group. ©2013 by the eagle Group
• 100 Industrial Boulevard, Clayton, Delaware 19938-8903 U.S.A. • www.eaglegrp.com
• Phone: 302/653-3000 • (Foodservice) 800/441-8440 • (MHC/Retail) 800/637-5100
• Fax: 302/653-2065
caution
insPect contents iMMeDiAteLY AnD FiLe cLAiM With DeLiVerinG cArrier For AnY DAMAGe.
saVe Your boX and all packing materials.
You Are resPonsiBLe For DAMAGe to Your unit iF returneD iMProPerLY PAcKeD.
For mounting sink onto underside oF countertop
(also known as “bottom mount”), see page 3.
(continued on page 2)
instruction sheet
#319266
SR10-14-5-1 17
5
⁄8˝ x 11
1
⁄4˝
SR10-14-9.5-1 17
1
⁄2˝ x 11
1
⁄4˝
SR12-14-9.5-1 17
5
⁄8˝ x 13
1
⁄4˝
SR14-10-5-1 13
5
⁄8˝ x 15
1
⁄4˝
SRU14-10-5-1 13
5
⁄8˝ x 15
1
⁄4˝
SR14-10-9.5-1 13
5
⁄8˝ x 15
1
⁄8˝
SR14-12-9.5-1 15
5
⁄8˝ x 15
1
⁄4˝
SR14-16-9.5-1 19
5
⁄8˝ x 15
1
⁄4˝
SR16-14-9.5-1 17
5
⁄8˝ x 17
1
⁄4˝
SR16-19-8-1 23
3
⁄8˝ x 17˝
SR16-19-13.5-1 23
3
⁄8˝ x 17˝
SR18-24-13.5-1 27
3
⁄8˝ x 19˝
SR19-16-8-1 19
3
⁄8˝ x 21˝
SR19-16-13.5-1 19
3
⁄8˝ x 21˝
SR20-12-6.5-1 15
5
⁄8˝ x 21
1
⁄4˝
SR22-22-13.5-1 25
5
⁄8˝ x 23
1
⁄4˝
SR24-18-13.5-1 21
3
⁄8˝ x 25˝
SR24-24-13.5-1 27
3
⁄8˝ x 25˝
SR10-14-9.5-2 17
1
⁄2˝ x 23
1
⁄4˝
SR12-14-9.5-2 17
5
⁄8˝ x 27
1
⁄4˝
SR14-16-9.5-2 19
5
⁄8˝ x 31
1
⁄4˝
SR16-19-8-2 23
3
⁄8˝ x 34
3
⁄4˝
SR16-19-13.5-2 23
3
⁄8˝ x 34
3
⁄4˝
SR18-24-13.5-2 27
3
⁄8˝ x 38
3
⁄4˝
SR22-22-13.5-2 25
5
⁄8˝ x 47
1
⁄4˝
SR24-24-13.5-2 27
3
⁄8˝ x 50
5
⁄8˝
cutout dimensions
model # (width x length)
cutout dimensions
model # (width x length)
Three-Compartment Sinks
SR10-14-9.5-3 17
1
⁄2˝ x 35
1
⁄4˝
SR12-14-9.5-3 17
5
⁄8˝ x 41
1
⁄4˝
SR14-16-9.5-3 19
5
⁄8˝ x 47
1
⁄4˝
SR16-19-8-3 23
3
⁄4˝ x 52
1
⁄2˝
SR16-19-13.5-3 23
3
⁄4˝ x 52
1
⁄2˝
SR18-24-13.5-3 27
3
⁄4˝ x 58
1
⁄2˝
One-Compartment Sinks
Two-Compartment Sinks

Step 2 - Caulk under the outside edge
of the top flange.
outside edge
of top flange
ca
ulk
Step 3 - Carefully place the sink inside the cutout.
cutout
countertop
sink
Step 4 - Secure sink.
Using a flat screwdriver, twist applicable tabs out and up
to secure the sink.
These tabs are for
3
⁄4˝- to
1˝-thick countertops.
These tabs are
for sheet metal.
countertop
drop-in sink
tab
(shown twisted
out and up)
tab
(End)
Step 1 - Cut the hole for the sink.
Refer to the “Cutout Dimensions” chart on front page.
countertop
Mark and cut hole.
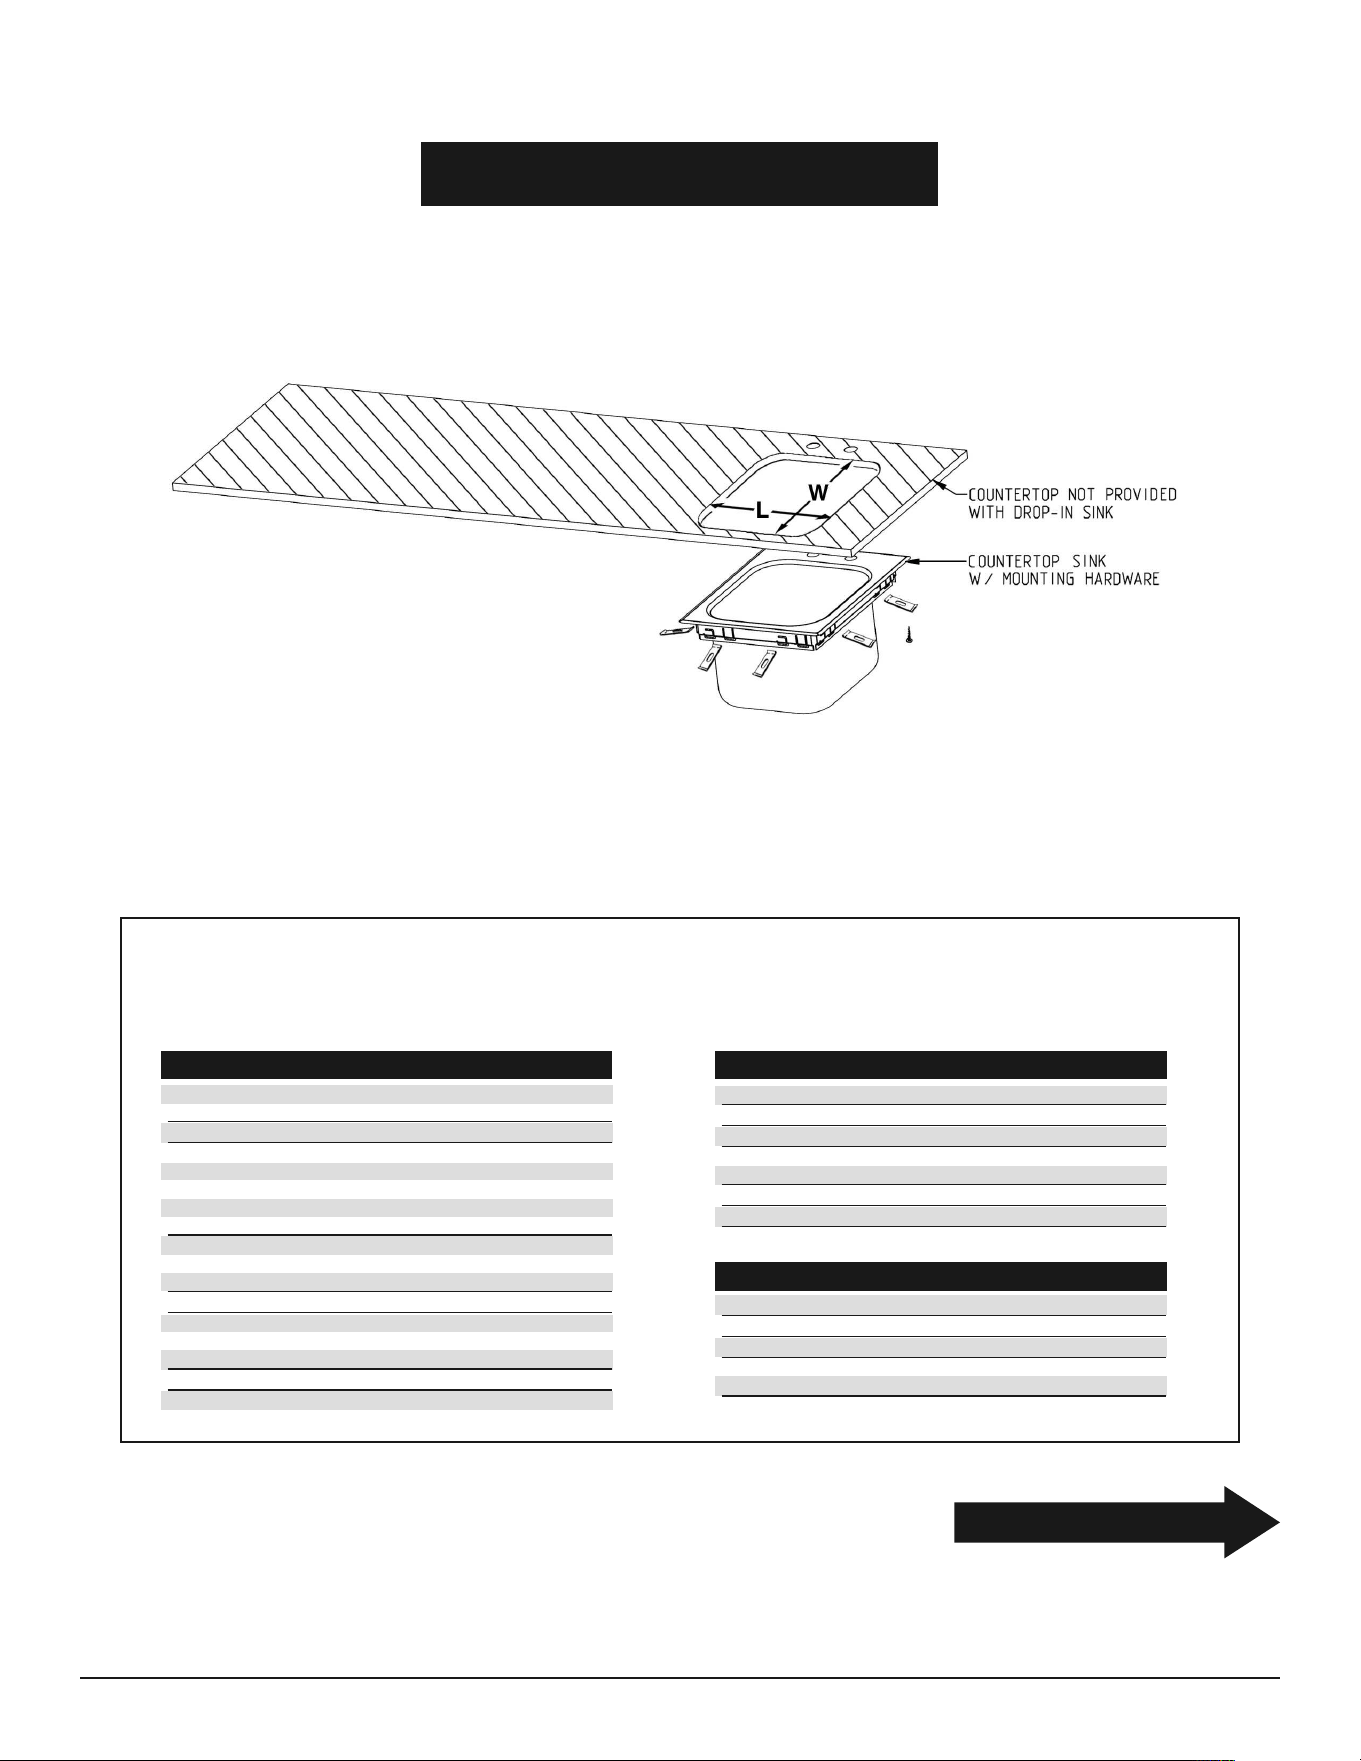
installation instructions
Top-Mount
Countertop Drop-In
Self-Rim Design Sinks
2
installation instructions
Bottom-Mount Countertop
Self-Rim Design Sinks
For mounting sink onto top side oF countertop
(also known as “top mount”), see Front page.
(continued on back page)
bottom-mount cutout dimensions
SR10-14-5-1 14
13
⁄16˝ x 10
13
⁄16˝3
5
⁄8˝
SR10-14-9.5-1 14
13
⁄16˝ x 10
13
⁄16˝3
5
⁄8˝
SR12-14-9.5-1 14
3
⁄8˝ x 12
3
⁄8˝3
1
⁄4˝
SR14-10-5-1 10
13
⁄16˝ x 14
13
⁄16˝3
5
⁄8˝
SRU14-10-5-1 n/a n/a
SR14-10-9.5-1 10
13
⁄16˝ x 14
13
⁄16˝3
5
⁄8˝
SR14-12-9.5-1 12
3
⁄8˝ x 14
3
⁄8˝3
1
⁄4˝
SR14-16-9.5-1 16
5
⁄8˝ x 14
5
⁄8˝3
5
⁄8˝
SR16-14-9.5-1 14
5
⁄8˝ x 16
5
⁄8˝3
5
⁄8˝
SR16-19-8-1 20
5
⁄8˝ x 16
5
⁄8˝ 4˝
SR16-19-13.5-1 20
5
⁄8˝ x 16
5
⁄8˝ 4˝
SR18-24-13.5-1 24
5
⁄8˝ x 18
5
⁄8˝ 4˝
SR19-16-8-1 16
5
⁄8˝ x 20
5
⁄8˝ 4˝
SR19-16-13.5-1 16
5
⁄8˝ x 20
5
⁄8˝ 4˝
SR20-12-6.5-1 12
3
⁄16˝ x 20
1
⁄8˝1
1
⁄8˝
SR22-22-13.5-1 see template
SR24-18-13.5-1 18
5
⁄8˝ x 24
5
⁄8˝ 4˝
SR24-24-13.5-1 24
11
⁄16˝ x 24
11
⁄16˝4
1
⁄4˝
sink cutout dimensions corner
model # (width x length) radius
sink cutout dimensions corner
model # (width x length) radius
Three-Compartment Sinks
SR10-14-9.5-3 14
13
⁄16˝ x 35˝ 3
5
⁄8˝
SR12-14-9.5-3 14
3
⁄8˝ x 40
5
⁄8˝3
1
⁄4˝
SR14-16-9.5-3 16
5
⁄8˝ x 46
5
⁄8˝3
5
⁄8˝
SR16-19-8-3 20
5
⁄8˝ x 52
1
⁄4˝ 4˝
SR16-19-13.5-3 20
5
⁄8˝ x 52
1
⁄4˝ 4˝
SR18-24-13.5-3 24
5
⁄8˝ x 58
1
⁄4˝ 4˝
One-Compartment Sinks
Two-Compartment Sinks
3
SR10-14-9.5-2 14
13
⁄16˝ x 23˝ 3
5
⁄8˝
SR12-14-9.5-2 14
3
⁄8˝ x 26
5
⁄8˝3
1
⁄4˝
SR14-16-9.5-2 16
5
⁄8˝ x 30
5
⁄8˝3
5
⁄8˝
SR16-19-8-2 20
5
⁄8˝ x 34
1
⁄4˝ 4˝
SR16-19-13.5-2 20
5
⁄8˝ x 34
1
⁄4˝ 4˝
SR18-24-13.5-2 24
5
⁄8˝ x 38
1
⁄2˝ 4˝
SR22-22-13.5-2 see template
SR24-24-13.5-2 24
13
⁄16˝ x 50
1
⁄4 ˝4
1
⁄4˝

eagle Foodservice equipment, eagle Mhc, specFAB
®
, and retail Display are divisions of eagle Group. ©2013 by the eagle Group
• 100 Industrial Boulevard, Clayton, Delaware 19938-8903 U.S.A. • www.eaglegrp.com
• Phone: 302/653-3000 • (Foodservice) 800/441-8440 • (MHC/Retail) 800/637-5100
• Fax: 302/653-2065
Step 2 - Caulk the top of the flange.
top of the flange
caul
k
cutout
countertop
sink
Step 4 - Secure sink.
Use kit #362188 (sold separately) as shown.
Screws, washers, etc. not included.
(End)
Step 1 - Cut the hole for the sink.
• Refer to the cutout template included with sink.
• Referring to “BOTTOM MOUNTING” verbiage on the template, transfer the dimensions to
the countertop (do not forget the faucet holes).
• Cut the hole.
• Finish the edge of the cutout, using a router and desired router bit.
countertop
Mark and cut holes.
countertop
sink
hardware
(not included)
clip from kit
#362188
Step 3 - Place the sink under the cutout.
A second person, or a temporary prop, might be needed to hold
the sink in place.
sink
installation instructions
Bottom-Mount Countertop
Self-Rim Design Sinks