MANUAL 14-0268-SB REV 1 (07/22)
$21.00
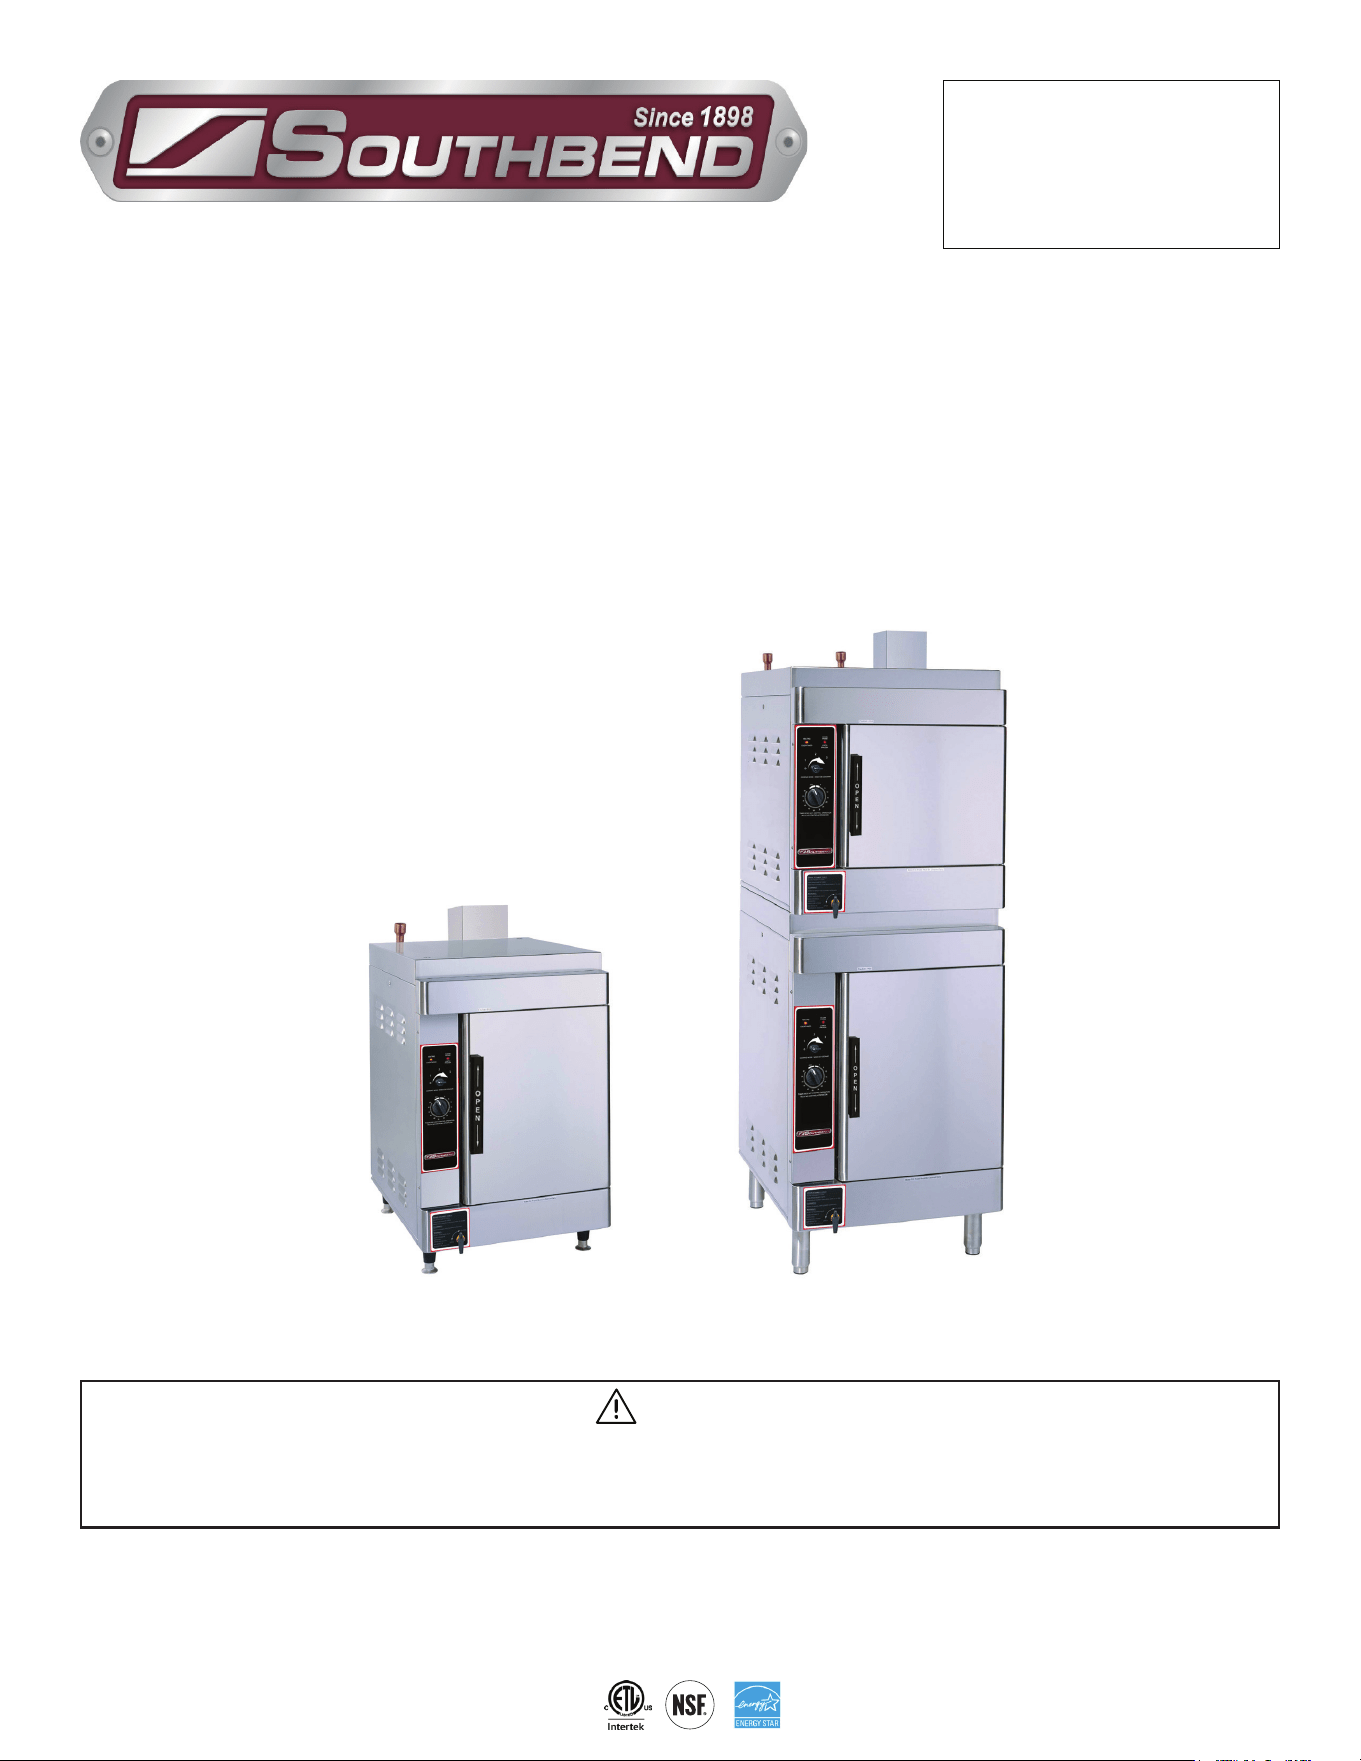
SIRIUS II - SB GAS BOILERLESS
CONVECTION STEAMER
MANUAL SECTION CO
IMPORTANT FOR FUTURE REFERENCE
Please complete this information and retain this
manual for the life of the equipment:
Model #:
___________________________
Serial #:
___________________________
Date Purchased:
_____________________
WARNING
Improper installation, adjustment, alteration, service or maintenance can cause property damage, injury
or death. Read the installation, operating and maintenance instructions thoroughly before installing or
servicing this equipment.
SIRIUS II-SB
Gas Boilerless Convection Steamer
SIRIUS II-(4, 6, 8, 10 & 12)-SB
Installation & Operation Manual
SIRIUS II-SB - 6
SIRIUS II-SB - 10
SOUTHBEND STEAM
1100 Old Honeycutt Road Fuquay-Varina, North Carolina 27526 USA
www.southbendnc.com
INSTALLATION & OPERATION MANUAL 14-0268-SB REV 1 (07/22)
PAGE
2
OF 20
SIRIUS II - SB Gas Boilerless Convection Steamer
SAFETY PRECAUTIONS
Copyright © 2021 by Southbend Steam. All rights reserved. Published in the United States of America.
Safety Precautions
WARNING
Improper installation, operation, adjustment, alteration, service or maintenance can cause property damage, injury or death.
Read the installation, operating and maintenance instructions thoroughly before installing, operating or servicing this equipment.
NOTICE
This manual should be retained for future reference.
NOTICE
This product is intended for commercial use only. NOT FOR HOUSEHOLD USE.
WARNING
This is the safety alert symbol. It is used to alert you to potential personal injury hazards. Obey all safety messages
that follow this symbol to avoid possible injury or death.
WARNING
FOR YOUR SAFETY:
Do not store or use gasoline or other ammable vapors or liquids in the vicinity of this or any other appliance.
IMPORTANT
PURCHASER: Instructions to be followed in the event the operator of this appliance smells gas must be posted in a
prominent location. This information shall be obtained by consulting the local gas supplier.
The information contained in this manual is important for the proper installation, use, and maintenance of this steamer.
Adherence to these procedures and instructions will result in years of trouble-free service.
Please read this manual carefully and retain it for future reference.
ERRORS: Descriptive, typographic or pictorial errors are subject to correction. Specications are subject to change
without notice.
Before installing and operating this equipment, be sure everyone involved in its operation is fully trained and aware of
precautions. Accidents and problems can be caused by failure to follow fundamental rules and precautions.
The following symbols, found throughout this manual, alert you to potentially dangerous conditions to the operator,
service personnel, or to the equipment.
CAUTION
WARNING
NOTICE
This symbol warns of immediate hazards that will result in severe injury or death.
This symbol refers to a potential hazard or unsafe practice that could result in injury or death.
This symbol refers to a potential hazard or unsafe practice that could result in injury, product
damage, or property damage.
This symbol refers to information that needs special attention or must be fully
understood, even though not dangerous.
DANGER
IMPORTANT NOTES FOR INSTALLATION AND OPERATION

INSTALLATION & OPERATION MANUAL 14-0268-SB REV 1 (07/22)
PAGE
3
OF 20
SIRIUS II - SB Gas Boilerless Convection Steamer
RETAIN THIS MANUAL FOR FUTURE REFERENCE.
Table of Contents
Important Notes For Installation and Operation .................................................................... 2
Service Connections ............................................................................................................. 4
Introduction ........................................................................................................................... 6
Installation ............................................................................................................................. 8
Operation .............................................................................................................................. 12
Maintenance ......................................................................................................................... 16
Table of Contents
INSTALLATION & OPERATION MANUAL 14-0268-SB REV 1 (07/22)
PAGE
4
OF 20
SIRIUS II - SB Gas Boilerless Convection Steamer
SERVICE CONNECTIONS
Service Connections
As continued product improvement is a policy of Southbend Steam, specications are subject to changge without notice.
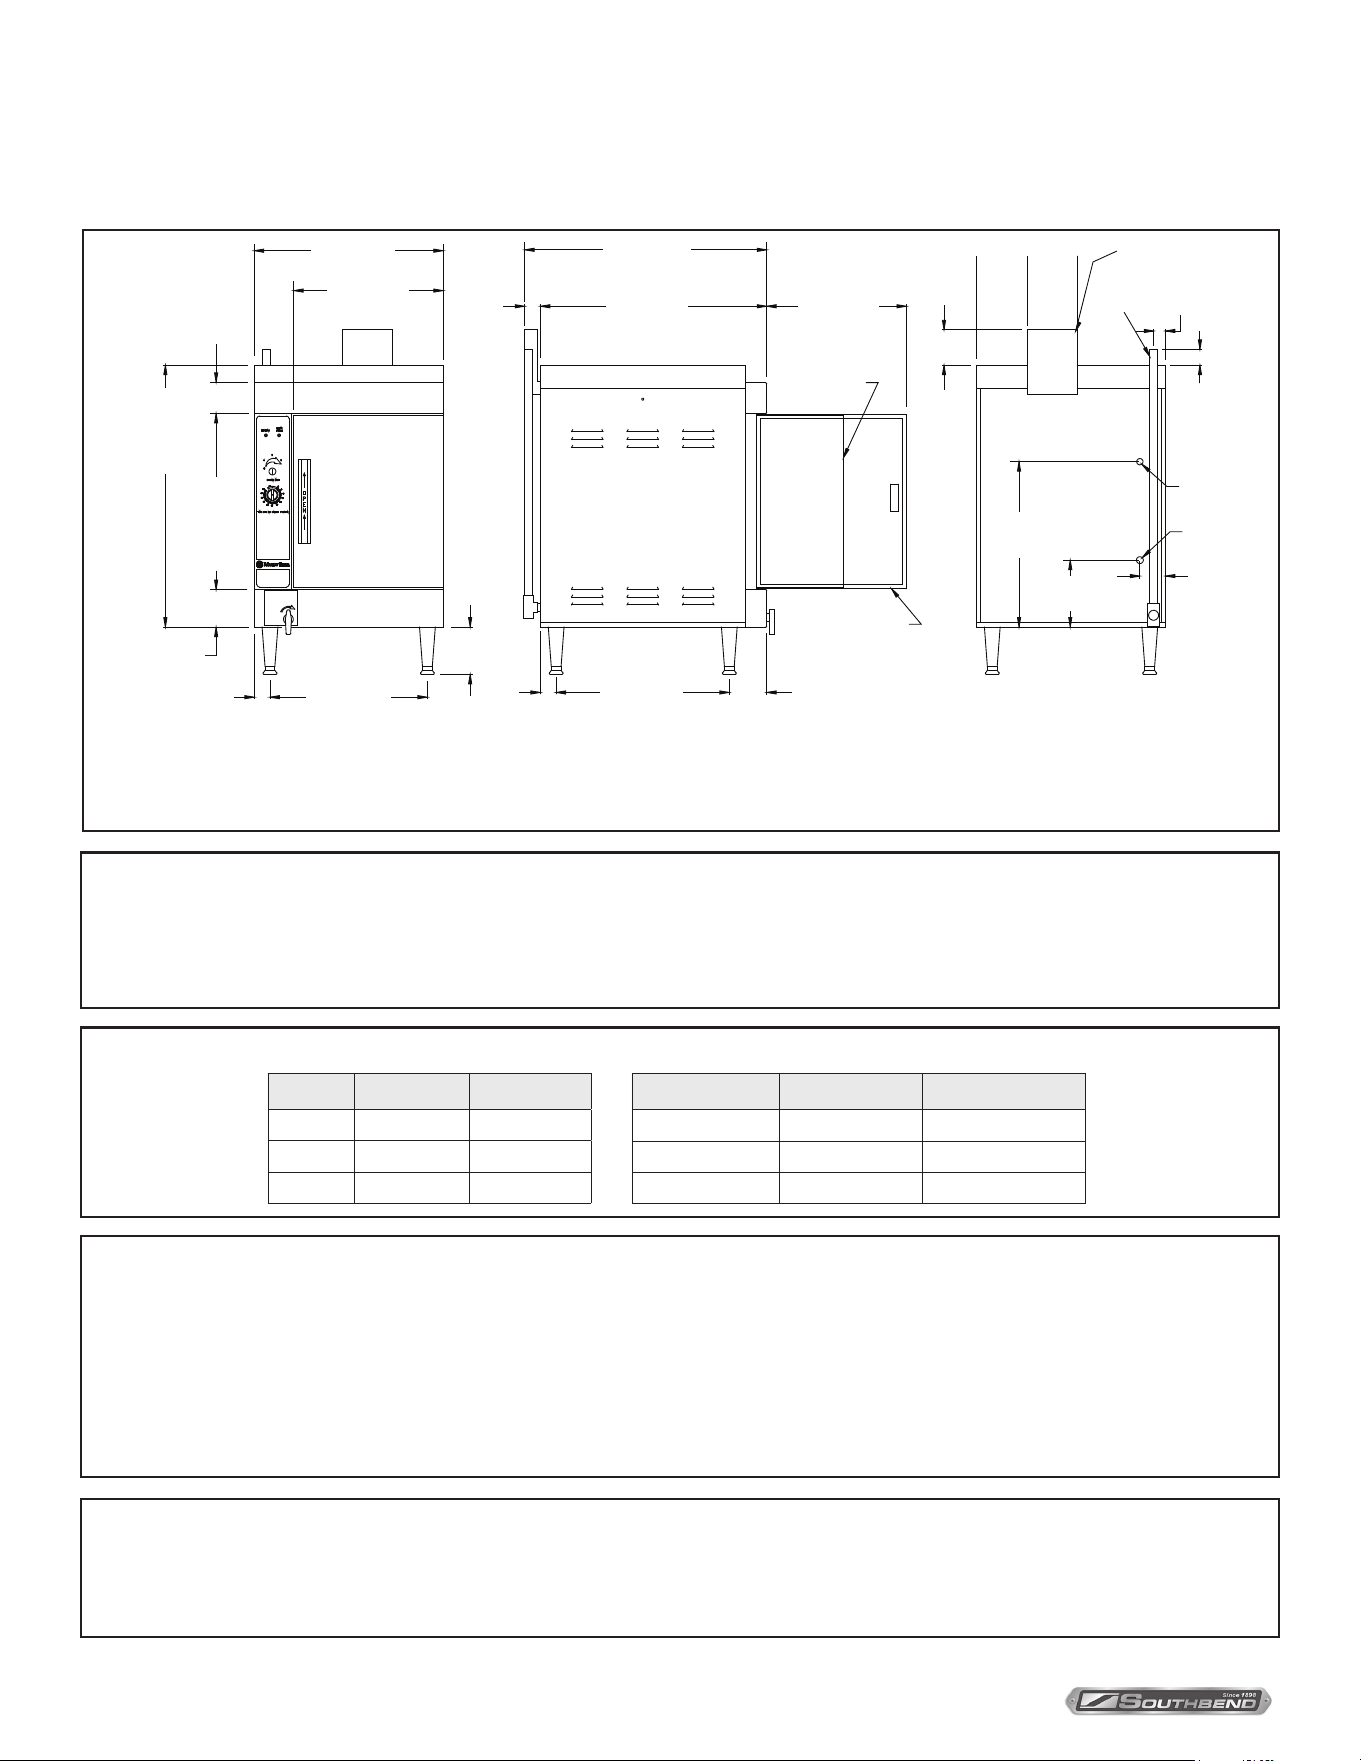
WATER SUPPLY AND DRAIN SPECIFICATIONS
Each single compartment has one rear drain connection
4” clearance left mandatory, right and rear is recommended.
Location near a floor drain is recommended.
NOTES
Good quality water feed is the responsibility of the owner. Water quality must be within the following general guidelines.
TDS: 40-125 ppm Hardness: 35-100 ppm pH: 7.0 - 8.5 Silica: <13 ppm Chlorides: <25 ppm Chlorine: <0.2 ppm Chloramine: <0.2 ppm
The best defense against poor water quality is a water treatment system designed to meet your water quality conditions.
Pressure: 25(min)-50(max) PSI Connections: Trough drain: 1/2 MNTP Drain out: 1” FNPT Water: 3/4” male garden hose
Appliance to be installed with backflow protection according to federal, state or local codes.
The drain piping must consist of temperature resistant material, greater than 160°F, and be of adequate diameter not to cause flow
restriction. Improper materials may deform and cause restrictions, thus affecting performance.
Single and stacked units require hood for ventilation of ue products
Each compartment requires separate electrical & water connection.
The manufacturer reserves the right to modify materials and specifications without notice.
GAS PRESSURE AND CONNECTIONS
Natural - 3.5” WC required, not to exceed 13.5”
Propane - 9” WC required, not to exceed 13.5”
Gas pipe size: 1/2” NPT required as a minimum
DIMENSIONS ARE IN INCHES [MM]
24.00 [610]
19.00 [483]
6.00
[152]
20.00 [508]
FRONT VIEW
3.88
[98]
4.75 [121]
2.00 [51]
Sirius II-4-SB
26.25 [667]
Sirius II-6-SB
33.25 [845]
Sirius II-4-SB
15.38 [391]
Sirius II-6-SB
22.38 [568]
30.75 [781]
28.75 [730]2.00
[51]
17.75 [451]
Pull out service
drawer
Door in open
position
2.00
[51]
22.00 [559]
SIDE VIEW
4.75
[121]
REAR VIEW
5
[127]
6.50
[165]
6.25
[159]
Steam
Vent
Flue
1.50
[38]
2.00
[51]
21.00
[533]
8.50
[216]
3.25
[83]
Water in
Gas in
1/2” NPT
Pans Sirius II-4-SB Sirius II-6-SB
12” x 20” x 2.5” 4 6
12” x 20” x 4” 2 4
12” x 20” x 6” 1 2
Sirius II-4-SB Sirius II-6-SB
Voltage 120V 120V
BTU’s 27,000* 27,000*
Gas NPT 1/2” 1/2”
SPECIFICATIONS AND COMPARTMENT PAN CAPACITY
DIMENSIONS ARE IN INCHES [MM]
FRONT VIEW SIDE VIEW REAR VIEW
INSTALLATION & OPERATION MANUAL 14-0268-SB REV 1 (07/22)
PAGE
5
OF 20
SIRIUS II - SB Gas Boilerless Convection Steamer Service Connections
NOTES
As continued product improvement is a policy of Southbend Steam, specications are subject to changge without notice.
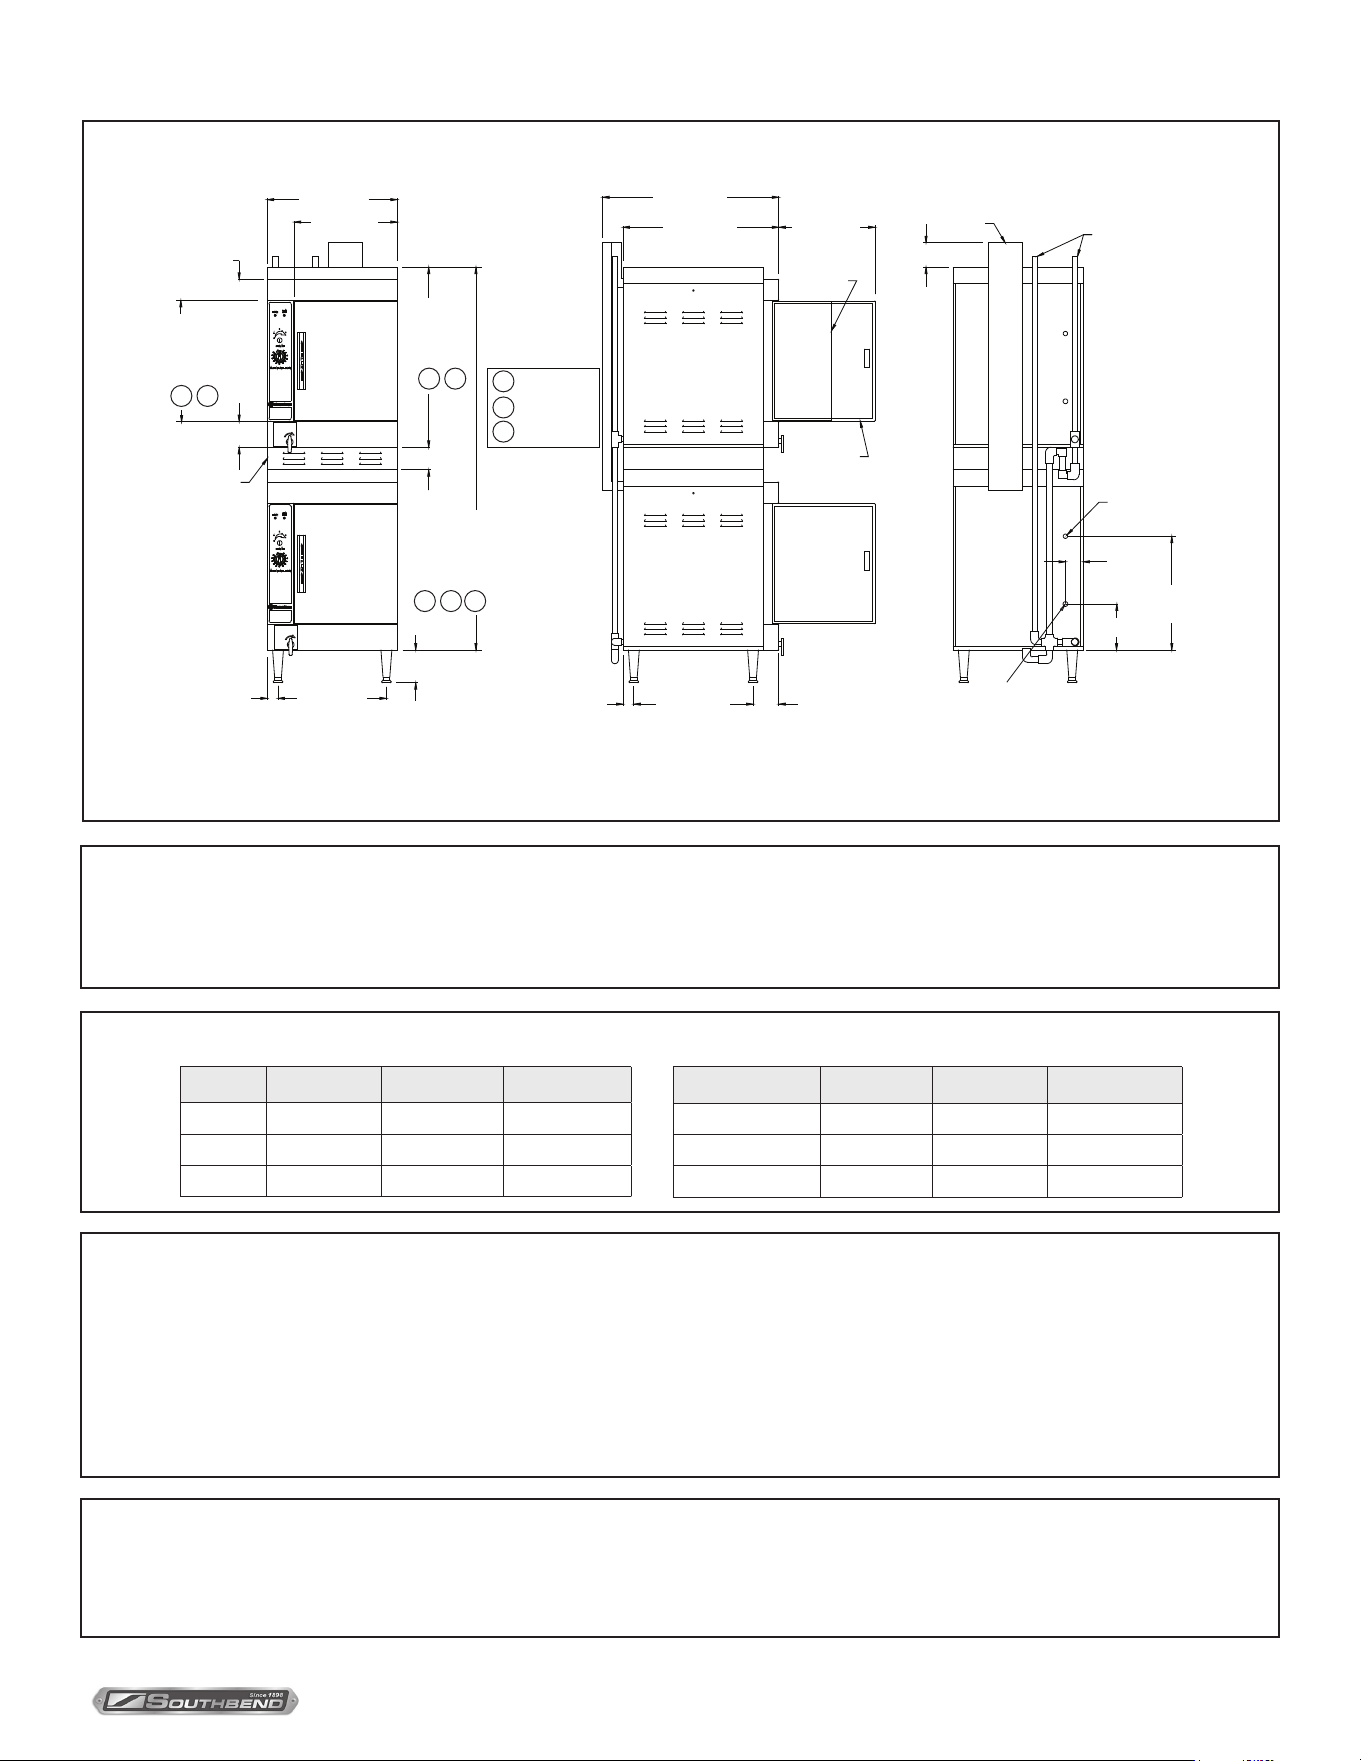
WATER SUPPLY AND DRAIN SPECIFICATIONS
A
Sirius II-8-SB
Sirius II-10-SB
Sirius II-12-SB
B
C
24.00 [610]
19.00 [483]
3.88 [98]
Stacking
Collor
4.75 [121]
4.13 [105]
A
56.63 [1438]
63.63 [1616]
70.63 [1794]
B
C
A/B
15.38 [391]
22.38 [568]
C
A/B
26.25 [667]
33.25 [845]
C
6.00 [152]
2.00 [51] 20.00 [508]
FRONT VIEW
LEFT SIDE VIEW
32.50 [826]
28.75 [730]
17.75 [451]
Pull out service
drawer
Door in
open position
2.00 [51] 22.00 [559]
4.75 [121]
DIMENSIONS ARE IN INCHES [MM]
5
[127]
Flue
Steam Vents
REAR VIEW
Gas in
1/2” NPT
(each unit
required
gas line)
3.25 [83]
Water in (each unit
requires water line)
21.00
[533]
8.50 [216]
SPECIFICATIONS AND COMPARTMENT PAN CAPACITY
GAS PRESSURE AND CONNECTIONS
Pans Sirius II-8-SB Sirius II-10-SB Sirius II-12-SB
12” x 20” x 2.5” 8 10 12
12” x 20” x 4” 4 6 8
12” x 20” x 6” 2 3 4
Sirius II-8-SB Sirius II-10-SB Sirius II-12-SB
Voltage 120V 120V 120V
BTU’s 27,000* 27,000* 27,000*
Gas NPT 1/2” 1/2” 1/2”
Natural - 3.5” WC required, not to exceed 13.5”
Propane - 9” WC required, not to exceed 13.5”
Gas pipe size: 1/2” NPT required as a minimum
Good quality water feed is the responsibility of the owner. Water quality must be within the following general guidelines.
TDS: 40-125 ppm Hardness: 35-100 ppm pH: 7.0 - 8.5 Silica: <13 ppm Chlorides: <25 ppm Chlorine: <0.2 ppm Chloramine: <0.2 ppm
The best defense against poor water quality is a water treatment system designed to meet your water quality conditions.
Pressure: 25(min)-50(max) PSI Connections: Trough drain: 1/2 MNTP Drain out: 1” FNPT Water: 3/4” male garden hose
Appliance to be installed with backflow protection according to federal, state or local codes.
The drain piping must consist of temperature resistant material, greater than 160°F, and be of adequate diameter not to cause flow
restriction. Improper materials may deform and cause restrictions, thus affecting performance.
Each single compartment has a separate rear exiting drain
plumbed directly into the stacked steamers main drain/vent line.
4” clearance left mandatory, right and rear is recommended.
Location near a floor drain is recommended.
4” stacking collar between units (included when ordered)
Single and stacked units require hood for ventilation of ue products.
The manufacturer reserves the right to modify materials and specifications without notice.
DIMENSIONS ARE IN INCHES [MM]
FRONT VIEW SIDE VIEW REAR VIEW
INSTALLATION & OPERATION MANUAL 14-0268-SB REV 1 (07/22)
PAGE
6
OF 20
SIRIUS II - SB Gas Boilerless Convection Steamer
Product Description
Congratulations on purchasing the Southbend Steam SIRIUS II-SB. The SIRIUS II-SB is a single compartment countertop
or two compartment oor model steamer featuring pressureless steam cooking, a circulating fan inside the cooking
chamber to speed cooking and an automatic preheated waterll mechanism. SIRIUS II-SB also features a clean water
reservoir system. The cooking chamber of the SIRIUS II-SB is treated with a scratch resistant, non-stick surface. A drain
from the rear of the steamer is provided for easy safe draining.
The SIRIUS II-SB steamer has a burner ring rate of 27,000 BTU/hr at a pressure of 3.5” W.C. for natural gas and 9” W.C.
for propane gas.
INTRODUCTION
Introduction
CAUTION
Do not use utensils, steel wool, or other harsh abrasives to clean your steamer. Scratching of the non-stick surface
and stainless steel casing may occur.
Safety Features
As with any cooking process, or with any piece of commercial cooking equipment, there are potential hazards to both
the operator and the piece of equipment if care is not taken. In designing the SIRIUS II-SB steamer, safety features have
been built in to protect against many of these potential hazards, but TRAINING OF EACH OPERATOR AND CAREFUL
ADHERENCE TO ALL WARNINGS ARE NECESSARY TO ENSURE THE SAFETY OF USERS.
Diagnostic Sensor Shut-o: The thermostat controller has a built in diagnostic feature that will automatically shut down
the burner if the sensor probe fails, which will avoid overheating.
High Limit Shut-o: If the steamer runs dry the burner will shut down.
Overow: An overow standpipe incorporated into the reservoir drain allows water to ow out the back drain of the
steamer in case of a waterll malfunction.
WARNING
Failure to keep the overow outlets clear and unobstructed may result in hot water owing out the door of the
steamer. A blocked overow and drain could allow water to ow to the countertop or oor, which can cause slippery
conditions. Modifying the steamer to operate without the overow standpipe could cause dangerous situations and
will void the warranty.
High Water Sensor: Two water level sensors are located on the lower backside of the steamer. The lower sensor
activates the waterll mechanism. The upper sensor will shut o water ow if an overow situation occurs. It is important
that both sensors are kept clean so that the stainless part is shiny.
WARNING
Failure to keep both water level sensors clean may result in hot water owing out the overow or the front door of
the steamer.
Door Open Safety Switch: There is a safety switch built into the door frame that shuts down the burner, fan and lights
when the door is opened. Once the door is closed, all functions return. THE DOOR MUST BE FIRMLY CLOSED IN
ORDER FOR THE STEAMER TO FUNCTION. IF STEAM IS ESCAPING, DOOR IS NOT PROPERLY SHUT AND MAY
AFFECT COOK TIMES, PRODUCT QUALITY AND WATER CONSUMPTION.
INSTALLATION & OPERATION MANUAL 14-0268-SB REV 1 (07/22)
PAGE
7
OF 20
SIRIUS II - SB Gas Boilerless Convection Steamer Introduction
Time Delay Relay: The steamer has two timers built into the electrical system to shut down should the water level system
fail. When the steamer is rst turned on and the reservoir is empty two countdown timers will begin to count. If it takes
longer than 60 seconds for the level of the water to come into contact with the lower water sensor probe, the burner and
the heating light will turn o. After the water comes in contact with the lower probe the burner and heating light will come
back on.
Ignition Control: In the event of ame failure, the ignition control will lock out. It can be reset by turning the steamer o.
Wait 5 minutes and turn on again.
WARNING
Failure to shut the steamer door adequately can cause the door to pop open when in operation. Close door rmly.
Dimensions
• 4-pan: External dimensions are 24” wide x 26¼” high (plus 4”-6” adjustable legs) x 28¾“ deep (plus vent pipe).
• 6-pan: External dimensions are 24” wide x 33¼” high (plus 4”-6” adjustable legs) x 28¾” deep (plus vent pipe).
• 8-pan: External dimensions are 24” wide x 52½” high (plus 6”-9” adjustable legs) x 28¾” deep (plus vent pipe).
• 10-pan: External dimensions are 24” wide x 59½” high (plus 6”-9” adjustable legs) x 28¾” deep (plus vent pipe).
• 12-pan: External dimensions are 24” wide x 66½” high (plus 6”-9” adjustable legs) x 28¾” deep (plus vent pipe).
Service Contacts
Should repairs be required, a network of authorized agencies is available to assist with prompt service.
A current Directory of Authorized Service Agencies may be obtained by contacting the factory or visiting our website at
www.mi.com.
INSTALLATION & OPERATION MANUAL 14-0268-SB REV 1 (07/22)
PAGE
8
OF 20
SIRIUS II - SB Gas Boilerless Convection Steamer
INstallation
Delivery and Inspection
Damage Inspection: Reporting shipping damage is the responsibility of the purchaser.
Do not discard packaging if ling a freight damage claim. Upon receipt of steamer immediately inspect the exterior of
packaging for damage. Remove wrapping. Inspect the exterior of the SIRIUS II-SB for visible shipping damage.
Unpacking / Removal from Pallet: To remove the steamer from the pallet, carefully cut the strapping. Make sure the pan
racks, water reservoir cover and standpipe installed inside the steamer have not become dislodged during shipping.
Assembly
Legs / Caster Installation: Install 4 legs or casters (shipped inside the steamer) into the threaded mounting holes located
on the base of the unit. If casters are supplied, locking casters should be on the front of the steamer.
Bottom Heat Shield: The heat shield needs to be installed as follows for proper operation.
1. Position the heat shield so that the notch in the shield is in the front right of the unit.
2. Use screw, lockwasher, washer and spacer to secure the heat shield as shown.
Location
98% of all maintenance and service can be done from the front or left side. The SIRIUS II-SB steamer must be installed
under a properly designed ventilation hood. (See Venting). A minimum of 6” clearance from adjacent equipment on the left
side and rear is recommended. A 4” clearance from bottom of steamer to countertop or oor must be maintained.
WARNING
Do not store any ammable vapors or liquids in the vicinity of this appliance.
Installation
INSTALLATION & OPERATION MANUAL 14-0268-SB REV 1 (07/22)
PAGE
9
OF 20
SIRIUS II - SB Gas Boilerless Convection Steamer
Venting
The SIRIUS II-SB must be installed in an adequately ventilated area under a properly designed exhaust hood. Failure to do so
could result in component failure and the introduction of unwanted ue gasses into the work area. A properly designed hood
system is one that exhausts 100% of grease-laden vapor and ue products and replenishes at least 80% of the air it exhausts.
Vent Pipe Installation (double & single compartment steamers): Steamers come with the vent piping in rear of unit
completely assembled. Two 90° elbows are shipped loose for your convenience that may be useful in running a drain line
to your oor trough (if applicable). DO NOT BLOCK VENT PIPE.
Air Intake: The air intake to the burner in the bottom of the unit should not be obstructed in any manner. The
installation of the unit must comply with local codes or, in the lack of local codes, with the ANSI Z223.1 (latest edition)
and the National Fuel Gas Code.
Gas Connection
The gas inlet to the SIRIUS II-SB is 1/2” NPT. The ring rate is 27,000 BTU’s; the required supply pressure for natural gas
is 3.5” W.C. For LP or propane gas the required supply pressure is 9” of W.C. Consult your local gas supplier or installing
agency to properly size the gas pipe supplying gas to the appliance. For installation in Canada the unit installation must
conform to the Canadian Gas Code: CAN 1 – B149 Installation for Gas Burning Appliances.
NOTICE
A qualified electrician must perform all electrical hookups and meet all local codes. Installation is the
responsibility of the purchaser.
Electrical Connection
The SIRIUS II-SB steamer is equipped with a 120 volt cord and three- prong (grounding) plug for your protection against
shock hazard and should be plugged directly into a properly grounded three-prong receptacle. Do not cut or remove the
grounding prong from this plug.
The appliance must be electrically grounded in accordance with local codes, or in the absence of local codes, with the
National Electric Code (ANSI/NFPA70), or the Canadian Electric Code (CSA C22.2) as applicable.
NOTICE
A qualied electrician must perform all electrical hookups and meet all local codes.
Installation is the responsibility of the purchaser.
NOTICE
Stacked units will require 2 separate electrical connections.
Installation
Water and Drain Connection
Water Hookup: Steamer requires 1/2” water line. Termination is 3/4” male garden hose connection. Make sure waterline is
ushed to remove grit and soldering particles prior to connecting steamer. Dirty water lines may aect solenoid operation.
Double (stacked) compartment steamers require separate water connections, which may be manifolded. Inadequate
water supply may cause one steamer not to ll properly when both steamers are turned on at the same time. If that
happens turn on one steamer a few minutes after the rst.
Appliance is to be installed with backow prevention in accordance with applicable federal, province and local codes.
Do not connect to de-ionized water. Probes will not sense the level of the water. Recommended water pressure is 30 – 35 lbs.
CAUTION
Flush incoming water line prior to connecting to steamer. Debris in water lines may cause solenoid valve to
malfunction. If solenoid valve is stuck open water must be turned o at the source.
INSTALLATION & OPERATION MANUAL 14-0268-SB REV 1 (07/22)
PAGE
10
OF 20
SIRIUS II - SB Gas Boilerless Convection Steamer
Recommended Water Quality: Refer to Service Connections in this Manual for the recommended water quality criteria.
NOTICE
Water level probes will not sense water level if steamer is connected to a de-ionized water or reverse osmosis system.
WARNING
The water may be very hot. It is advisable to allow the water to cool down before draining. Leaving the door open
will aid cooling.
WARNING
Failure to keep the overow standpipe and drain pipe clear and unobstructed may result in an unsafe condition.
WARNING
The steamer must be level in order for the water sensors and overow outlet to function properly.
Rear Drain: Make sure the 1” rear drain is plumbed to a oor trough or air gap drain. Customer supplies plumbing.
However, one 90° elbow is shipped with the steamer to be used as needed. The drip trough located under the door is
plumbed to the main drain internally.
The drain piping must consist of temperature resistant material, greater than 160°F, and be of adequate diameter not to
cause ow restriction. Improper materials may deform and cause restrictions, thus aecting performance.
Customer supplies plumbing, however, one 90° elbow is supplied with the steamer to be used as needed. The drip trough
located under the door is plumbed to the main drain internally.
Overow Pipe: An overow incorporated into the reservoir drain standpipe allows water to ow into the drain line out the
back of the steamer in case of a waterll malfunction.
Leveling
Once the legs have been installed and the steamer has been placed in its nal location, the unit must be leveled. This is
done by turning the base of the leg. Use the top of the steamer casing as a reference. It is recommended to use a level to
ensure proper installation.
Installation
Rack Installation
Two pan support racks have been included with the steamer. Both racks are identical; there is no specic left or right side
rack. To install, position a rack inside the cooking chamber so that the mounting bracket, with the ‘tear-drop’ shaped hole,
ts over the pre-installed rack screws at the top of the cooking chamber wall. The curved wires on the rack should be
facing to the front of the steamer. Repeat this process for the rack mounted on the other side. These racks are designed
to be removed easily for cleaning.
Testing and Inspection
Once your steamer is in place and properly leveled, plumbed and wired, test unit to make sure it is functioning properly.
INSTALLATION & OPERATION MANUAL 14-0268-SB REV 1 (07/22)
PAGE
11
OF 20
SIRIUS II - SB Gas Boilerless Convection Steamer
Startup Procedure
1. Make sure water line is ushed prior to connecting steamer.
2. Make sure water is connected and supplied to the steamer.
3. Make sure appropriate gas is connected and supplied to the steamer.
4. Using a soft sponge and mild detergent, wipe out the interior of the cooking chamber to remove shipping debris prior
to use. Rinse with clean water.
CAUTION
Do not use any abrasive cleaners, utensils or scrubbers on the non-stick coating. Use vinegar and water to clean
reservoir. Nylon bristle brushes or soft sponges are recommended.
5. Make sure drain/overow standpipe is tted rmly into cooking compartment drain opening.
6. Install reservoir cover with left side drain tted into hole at side of steamer – tip cover slightly to insert drain tting into
side drain hole. Lip at front of reservoir cover ts over base of door opening.
7. Power On/Heat Up: Make sure the door is closed, then turn the cooking mode selector to the 1 position. The Amber
HEATING light on the upper left corner of the control panel will turn on. If the burner does not light, turn power switch
o, wait 5 minutes and try again. If the burner still does not light, contact your local service agent or the factory.
NOTICE
The burner can be seen from the underside of the steamer. When the HEATING light goes out (it takes less than 25
minutes) you are ready to test the steamer.
WARNING
If during the operation of this appliance, the smell of gas is present, turn o the main switch on the front of the unit
and contact your gas company and service agent.
WARNING
Do not attempt operation of this unit during a power failure.
WARNING
Your steamer is equipped with an electronic ignition; never attempt to light your steamer with a ame.
Installation
8. Turn the cooking mode selector switch to the 2 position. The HEATING light will go on as heat is called for. You may
open the door and inspect the steaming process (note that the HEATING light goes out and the burner is turned o
when the door is opened). You may see or smell smoke from the oils left from manufacturing – don’t be alarmed, they
will burn o quickly.
9. To shut down your steamer, turn the cooking mode selector to the OFF position (Φ).
10. Drain Steamer: Make sure that the drain line exiting from the rear of the steamer is plumbed either to a oor trough or
air gap drain. To drain, turn the drain valve handle 90 degrees.
INSTALLATION & OPERATION MANUAL 14-0268-SB REV 1 (07/22)
PAGE
12
OF 20
SIRIUS II - SB Gas Boilerless Convection Steamer
OPERATION
Operating Information
Electrical Connection: Make sure unit is plugged into a proper receptacle or wired properly and the breaker for the circuit is on.
Water Connection: Make sure the steamer is properly connected to a water source. Do not connect the unit to de-ionized
water; the water probes will not sense the water level. Make sure the water lines are open.
Gas Connection: Make sure the unit is properly connected to the gas supply line and that all gas valves prior to the unit
are open.
Install drain/overow standpipe and reservoir cover. Make sure drain/overow standpipe is tted into cooking compartment
bottom drain opening and reservoir cover drain is tted into side drain hole. Lip at front of reservoir cover ts over base of
door opening.
Automatic Waterll: Water will be added to the steamer as needed periodically and it should not run dry until turned o
and manually drained.
Clean Probe Indicator: If the CLEAN PROBE indicator comes on and stays on the system has detected a fault and will
shut down the burners until the fault has been cleared. Most commonly, this requires cleaning the water sensor probes.
CAUTION
Do not manually rell hot, dry reservoir with cold water. Damage to the interior may result if cold water is added
to a hot, dry reservoir.
Condensate Trough: The trough under the door catches water dripping from the door and exits the steamer at the rear.
Power On / Heat Up: Make sure the door is closed then turn the cooking mode selector to the desired temperature setting
(1, 2 or 3) position. If the burner does not light, turn power switch o, wait 5 minutes and try again. If the burner still does
not light, contact your local service agent or the factory.
NOTICE
The burner can be seen from the underside of the steamer.
The Amber HEAT indicator will light up. When pre-heating is completed, the HEATING indicator light will turn o. The
HEAT light will continue to go on and o as the burner cycles to maintain the set temperature.
WARNING
If during the operation of this appliance, the smell of gas is present, turn o the main switch on the front of the unit
and contact your gas company and service agent.
WARNING
Do not attempt operation of this unit during a power failure.
WARNING
Your steamer is equipped with an electronic ignition; never attempt to light your steamer with a ame.
Operation
INSTALLATION & OPERATION MANUAL 14-0268-SB REV 1 (07/22)
PAGE
13
OF 20
SIRIUS II - SB Gas Boilerless Convection Steamer Operation
Door Operation: The door must be closed at all times while cooking. If the door is opened during cooking, the burner will
shut down and the amber HEAT light will go o until the door is closed. You may open the door at any time to check the
progress of cooking, stir product and add or remove cooking pans. If the door handle is loose the door is not rmly shut;
re-shut the door by slamming rmly.
Pan Combinations: The SIRIUS II-SB steamer accommodates 4” and 6” deep pans. However, for best steam cooking
performance 1 1/4” or 2 1/2” deep pans work best. Other combinations of these pan sizes will t in your steamer.
The steamer will accommodate gastronorm pans.
Pan Size Quantity per 4-pan steamer Quantity per 6-pan steamer
12 × 20 × 1¼ 8 12
12 × 20 × 2½ 4 6
12 × 20 × 4 2 4
Steam Cooking Guidelines
COOKING WITH ATMOSPHERIC / PRESSURELESS STEAM
• Atmospheric or pressureless steaming is perfect for a la carte cooking. The door can always be opened during
cooking to add or remove pans of food, to season food or to check on its progress.
• Multiple products can be cooked at one time because there is no crossover of cooking avors in atmospheric steam.
Large and small portions of food can be cooked at the same time.
• Less attention is required to cooking foods and overcooking is rare.
Recommended Uses
A La Carte Preserving Stewing
Thawing Blanching Rethermalizing
Simmering Poaching
Typical Foods
Casseroles, Fresh or Frozen Vegetables, Fresh or Frozen Seafood, Fresh or Frozen
Desserts Pasta Rice
Fruits Potatoes Cereals
Eggs Meats Poultry
Prepared Foods Sauces And Much More
Tips On Cooking Frozen Product
• Preheat cooking compartment.
• Break up frozen vegetables or product, if possible.
• If product is an ice block, set it in the pan on its narrowest side. This allows the steam to contact a greater surface area.
• Thawing is faster and better for the food in atmospheric steaming.
• Make sure frozen product is uniform in size to get best results.
• Season vegetables AFTER steaming.
• Less seasoning is required because steaming preserves natural avors.
• When reheating prepared foods, stir occasionally to speed heating.
• Shallower pans will allow faster cooking times.
NOTICE
If the door is open, nothing will happen. Close the door and the steamer will turn on and begin warming up.

INSTALLATION & OPERATION MANUAL 14-0268-SB REV 1 (07/22)
PAGE
14
OF 20
SIRIUS II - SB Gas Boilerless Convection Steamer
Blanching
Many foods can be blanched in atmospheric steam before being nished in ovens, fryers, or on grills and griddles. This
reduces total cooking time, helps ensure complete cooking and a moist product. Potatoes, poultry and seafood are
excellent examples. Blanching before frying reduces grease absorption by food products.
Tips On Pan Use
• For faster cook times, 2 1/2” deep perforated pans are recommended.
• It is not necessary and we do not recommend covering most pans of product. When cooking with only one pan, place
it in the center of the cooking chamber.
• Use solid pans where appropriate: scrambled eggs, rice, beans, dehydrated foods, prepared casseroles, sauces, cake or
other desserts (you can bake a cake in atmospheric steam), and when you want to prevent food from dripping on a lower pan.
• When cooking proteins (meat, poultry or seafood) use a solid catch pan under the perforated pan. Accumulated juices
can be used for soup stock, gravy or broth.
• Protein foods (meat, poultry or seafood) can be cooked in perforated or solid pans. If you are batch-cooking protein
foods use perforated pans and place a solid pan on the bottom rail. All the juices will then accumulate in this pan for
later use and to keep them out of the water reservoir.
• When atmospheric steaming, a pan cover can increase the cooking time up to 400%. Items such as frozen
casseroles, meat loaf, or sauces can be covered to avoid excess condensation.
• Root vegetables should be steamed in a perforated pan.
• Eggs can be hard cooked out of the shell and then chopped to avoid peeling shells.
• Always cook potatoes in perforated pans. This allows steam to circulate properly.
Other Helpful Hints
• Got a tough cleaning problem, pot, pan, utensil? Put it in your steamer to loosen burned-on food; it makes washing
much easier.
• Stale or frozen bread can be thawed or renewed in your steamer.
• Allow adequate spacing between pans for even steam circulation. Your pan rails and the shape of the steamer walls
are designed to maximize steam ow. Do not try to load more than the rack is designed for. Maximum capacity loads
cook best with perforated pans.
• Loosely packed pans will cook faster than tightly packed pans.
• To skin tomatoes, oranges etc. more easily, steam for a short time, then chill in cold water.
• When steaming pasta, shrimp, or ground meat, nesting a perforated pan in a solid pan works well. Lift out the
perforated pan to drain.
• Never have the water high enough or a pan low enough to touch water. Allow enough space for steam circulation.
Steam has 6 times more energy than boiling water – use the steam to cook.
Other Helpful Hints (continued)
• When possible, cook in two shallow pans instead of one deeper pan – it cooks faster and you avoid bruising the product.
• If using 1/2 size or smaller pans on one level, with dierent products, load the faster cooking items last, this will make
unloading easier.
• In steam cooking, load size has little eect on the cooking time. For the highest eciency cook with full loads.
• Pre-cook roasts, especially fat-encrusted roasts, in steam for 1/3 of their cooking time, then place in oven. Juices are
sealed in, there is more avor, more nutrients are retained and the roast shrinks less.
• Cook whole poultry the same way, only cook it until it is nearly completed and allow just enough time in the oven to
nish and brown.
Operation
INSTALLATION & OPERATION MANUAL 14-0268-SB REV 1 (07/22)
PAGE
15
OF 20
SIRIUS II - SB Gas Boilerless Convection Steamer Operation
Warnings & Cautions
Warnings
• Failure to keep the overow outlets clear and unobstructed may result in hot water owing out the door of the steamer. A
blocked overow and drain could allow water to ow to the countertop or oor, which can cause slippery conditions. Modifying
the steamer to operate without the overow standpipe could cause dangerous situations and will void the warranty.
• Failure to keep both water level sensors clean may result in hot water owing out the rear overow or the front door of
the steamer.
• A qualied electrician must perform all electrical hookups and meet all local codes. Installation is the responsibility of
the purchaser.
• Failure to keep the overow standpipe and drain clear and unobstructed may result in an unsafe condition.
• The steamer must be level in order for the water sensor and overow outlet to function properly.
• The reservoir water may still be hot. It is advisable to let the water cool down prior to draining.
• The cooking chamber is designed to retain heat. It may still be hot to the touch when cleaning. Wear protective
gloves, or wait for the surface to cool before cleaning. Do not add cold water to a hot empty cooking chamber until unit
has cooled down or damage may result.
Cautions
• Do not use utensils, steel wool, or other harsh abrasives to clean your steamer. Scratching of the non-stick surface
and stainless steel casing may occur.
• Flush incoming water line prior to connecting to steamer. Debris in water lines may cause solenoid valve to
malfunction. If solenoid valve is stuck open water must be turned o at the source.
• Do not use any abrasive cleaners, utensils or scrubbers on the non-stick coating – this will damage the coating. Use
vinegar and water to clean reservoir. Nylon bristle brushes or soft sponges are recommended.
• Do not manually rell hot, dry reservoir with cold water. Damage to the interior may result if cold water is added to a
hot, dry reservoir.
Cooking: When ready to cook turn the cooking mode selector dial to the desired setting.
Setting Temperature Use for
1 180 °F
11,069 ohms
Green vegetables, delicate egg dishes, and seafood for higher
yield. Cook times will be slower than steaming.
2 212 °F
6,311 ohms
Steam cooking
3 Steam Plus Radiant Heat
230 °F
4,695 ohms
Heavy dense foods like meat or potatoes, retherm frozen foods.
Shut down, draining and cleaning of steamer.
1. Shut Down: To shut down the steamer at the end of the day just turn the cooking mode selector dial to Φ (OFF).
2. Water Reservoir Draining: To drain, turn the drain valve handle 90 degrees.
NOTICE
If starchy food products (potatoes, pasta) cause water to get frothy add 2 tablespoons of cooking oil to the
water to control foaming.
WARNING
The reservoir water may still be hot. It is advisable to let the water cool down prior to cleaning.
NOTICE
Opening the steamer door will speed the cooling process. It is also advisable to leave the steamer door open
when not in use. This will lengthen the life of the door gasket.
INSTALLATION & OPERATION MANUAL 14-0268-SB REV 1 (07/22)
PAGE
16
OF 20
SIRIUS II - SB Gas Boilerless Convection Steamer
Maintenance
Cleaning Guidelines
Daily Cleaning
Once the power is o and the reservoir has been drained, a simple cleaning process should be followed:
WARNING
The cooking chamber is designed to retain heat. It may still be hot to the touch when cleaning. Wear protective gloves,
or wait for the surface to cool before cleaning. Do not add cold water to a hot, empty cooking chamber until it has
cooled down, or damage may result.
NOTICE
Only use mild soap, white vinegar, and water to clean your steamer. Do not use abrasive utensils, caustic cleaners,
or products containing chlorine, lye, or phosphorus (such as Lime-A-Way). After cleaning, rinse thoroughly by wiping
with a wet cloth dampened with fresh water. Never spray water on your steamer.
FAILURE TO FOLLOW PROPER INSTRUCTIONS MAY CAUSE AN UNSAFE CONDITION AND/OR DAMAGE
YOUR STEAMER, AND WILL VOID YOUR WARRANTY.
NOTICE
It is always advisable to leave the steamer door open when the unit is shut down for the evening. This will extend the life of
your gasket.
NOTICE
It is normal for the white lime to collect at the water line and in the reservoir area. Liming is easily removed with daily cleaning
– white vinegar is very eective and will not damage the cooking chamber. Use only white vinegar and water to clean
reservoir on a daily basis.
1. Lift the pan racks up and o mounting screws, and remove from the steamer for cleaning.
2. Lift reservoir cover out of cooking chamber compartment, clean cover.
3. Remove the drain/overow standpipe, clean, making sure overow holes are clear and open.
4. Using a soft sponge, clean the non-stick coating on the interior of the cooking chamber.
5. Clean the door gasket with gentle soap and water and allow to air dry.
6. Rinse the cooking chamber and door area with clean water. Rinse the cavity.
7. Wipe with clean towel or soft sponge.
8. To remove the white mineral deposits at and below the water line, spray white vinegar directly on the mineral build-up
using a spray bottle. For heavy mineral deposits, replace drain/overow standpipe, pour two cups of white vinegar in the
water reservoir and turn on steamer to add enough water to cover the white minerals, let soak for half an hour or overnight.
Loosen mineral deposits with a nylon bristled brush. Drain, wipe and rinse. Use water and white vinegar to clean reservoir.
9. Make sure two stainless probes on lower backside of cooking chamber interior are clean.
10. Wipe out the condensate trough located under the door. Remove food particles. Make sure the drain is kept clear.
11. Make sure the drain is kept clear.
12. Replace the drain/overow standpipe and the reservoir cover. The reservoir cover and the drain/overow standpipe
must be replaced or the steamer will not function properly.
13. Your steamer is now ready for another day’s work!
Maintenance
INSTALLATION & OPERATION MANUAL 14-0268-SB REV 1 (07/22)
PAGE
17
OF 20
SIRIUS II - SB Gas Boilerless Convection Steamer Maintenance
Weekly Cleaning
In addition to the daily cleaning it is necessary to clean the air intakes on a weekly basis. Air intakes provide necessary cooling air
to the internal components. They are generally located on the rear and sides of the equipment.
Monthly Cleaning
Southbend Steam recommends using Optipure DSP descaling powder to clean your steamer on a monthly basis or
whenever necessary.
NOTICE
Optipure DSP is an acid based descaler that is eective in dissolving and removing build up caused by hard water.
DSP is a non-hazardous, biodegradable citrus based powder that when mixed with water becomes a powerful lime
scale remover. For additional information contact Optipure at 800-535-5035.
NOTICE
One pound is equal to 16 scoops (measuring scoop included), or one-half of a 2 lb. jar of descaling powder.
1. Make sure the steamer is o and cool.
2. Drain water from the cooking cavity and wipe away any food debris.
3. Make sure the drain is plugged.
4. Pour one pound of Optipure DSP per steamer into the bottom of the cooking cavity.
5. Set the control to Steam (#2) position. This will automatically ll the unit with water.
6. Allow the unit to reach steaming temperature and continue steaming for one hour.
7. Turn the unit o, and allow it to cool for one hour.
8. Drain the unit, and rinse the entire cooking chamber thoroughly.
9. If the unit is heavily scaled, it may be necessary to repeat the process.

INSTALLATION & OPERATION MANUAL 14-0268-SB REV 1 (07/22)
PAGE
18
OF 20
SIRIUS II - SB Gas Boilerless Convection Steamer
Notes

INSTALLATION & OPERATION MANUAL 14-0268-SB REV 1 (07/22)
PAGE
19
OF 20
SIRIUS II - SB Gas Boilerless Convection Steamer
Notes
INSTALLATION & OPERATION MANUAL 14-0268-SB REV 1 (07/22)
PAGE
20
OF 20
SIRIUS II - SB Gas Boilerless Convection Steamer
Notes
SIRIUS II-(4, 6, 8, 10 & 12)-SB
SIRIUS II Gas Boilerless
Convection Steamer
A product with the Southbend Steam name incorporates the best in durability and low maintenance. We all recognize,
however, that replacement parts and occasional professional service may be necessary to extend the useful life of this
appliance. When service is needed, contact a Southbend Steam Authorized Service Agency, or your dealer. To avoid
confusion, always refer to the model number, serial number, and type of your appliance.
SOUTHBEND STEAM
1100 Old Honeycutt Road Fuquay-Varina, North Carolina 27526 USA
www.southbendnc.com