www.auna-multimedia.com
Vertico Swing DAB
DAB+-Radio mit CD-Player
DAB+ radio with CD player
Radio DAB+ avec lecteur CD
Radio DAB+ con reproductor de CD
Radio DAB+ con lettore CD
10041137 10041138


3
DE
English 25
Français 43
Español 63
Italiano 83
Sehr geehrter Kunde,
wir gratulieren Ihnen zum Erwerb Ihres Gerätes.
Lesen Sie die folgenden Hinweise sorgfältig durch
und befolgen Sie diese, um möglichen Schäden
vorzubeugen. Für Schäden, die durch Missachtung der
Hinweise und unsachgemäßen Gebrauch entstehen,
übernehmen wir keine Haftung. Scannen Sie den
folgenden QR-Code, um Zugri auf die aktuellste
Bedienungsanleitung und weitere Informationen rund
um das Produkt zu erhalten:
INHALTSVERZEICHNIS
Technische Daten 4
Sicherheitshinweise 5
Geräteübersicht 6
Fernbedienung 8
Inbetriebnahme und Bedienung 9
DAB+-Radio 14
FM-Radio 16
Senderspeicher (DAB+/FM-Radio) 18
BT 19
AUX-Eingang 19
USB-Anschluss 19
CD-Wiedergabe 20
Schlummerfunktion 21
Spezielle Entsorgungshinweise für Verbraucher in Deutschland 22
Hinweise zur Entsorgung 24
Konformitätserklärung 24

4
DE
TECHNISCHE DATEN
Artikelnummer 10041137, 10041138
Stromversorgung 220-240 V ~ 50/60 Hz
Eingangsleistung 2 A
Ausgangsleistung 2 x 10 W RMS
Leistungsaufnahme (Standby) < 1 W
DAB-Frequenz 174,928-239,200 MHz
FM-Frequenz 87,5-108,0 MHz
WiFi-Standard
802.11 b/g/n
WiFi-Frequenz
2402-2480 MHz
WiFi-Sendeleistung (max.)
< 20 dBm
BT Version 5.0
BT-Frequenz 2402-2480 MHz
BT-Sendeleistung (max.) 2 dBm

5
DE
SICHERHEITSHINWEISE
Schutz vor Feuchtigkeit
• Um das Risiko eines Brandes oder elektrischen Schlages zu verringern,
setzen Sie dieses Produkt nicht Wasser oder Feuchtigkeit aus.
• Verwenden Sie es nicht an Orten, an denen es ins Wasser fallen oder
von Wasser bespritzt werden könnte.
Gerät nicht önen
• Versuchen Sie nicht, das Gerät zu önen, um einen Kontakt mit
Hochspannungsbauteilen oder eine gefährliche Strahlenbelastung zu
vermeiden.
Elektrostatische Entladung
• Wenn es zu einer elektrostatischen Entladung (ESD) an der Vorderseite
oder in der Nähe eines Teils oder einer Taste dieses Geräts kommt,
besteht die Möglichkeit, dass das Gerät den Betrieb unterbricht und/
oder sich sofort abschaltet. Dies ist ein normaler Zustand und dient
dazu, das Gerät und die internen Komponenten vor Schäden zu
schützen. In einem solchen Fall setzen Sie das Gerät bitte zurück (indem
Sie das Radio aus- und wieder einschalten), um den normalen Betrieb
wieder aufzunehmen.
Schutz vor Hitze
• Dieses Radio sollte nicht übermäßiger Hitze wie Sonnenschein, Feuer
oder Ähnlichem ausgesetzt werden.

6
DE
GERÄTEÜBERSICHT
1 LCD-Anzeige
2 Netzteil-Anschluss (DC)
3 Antenne
7
DE
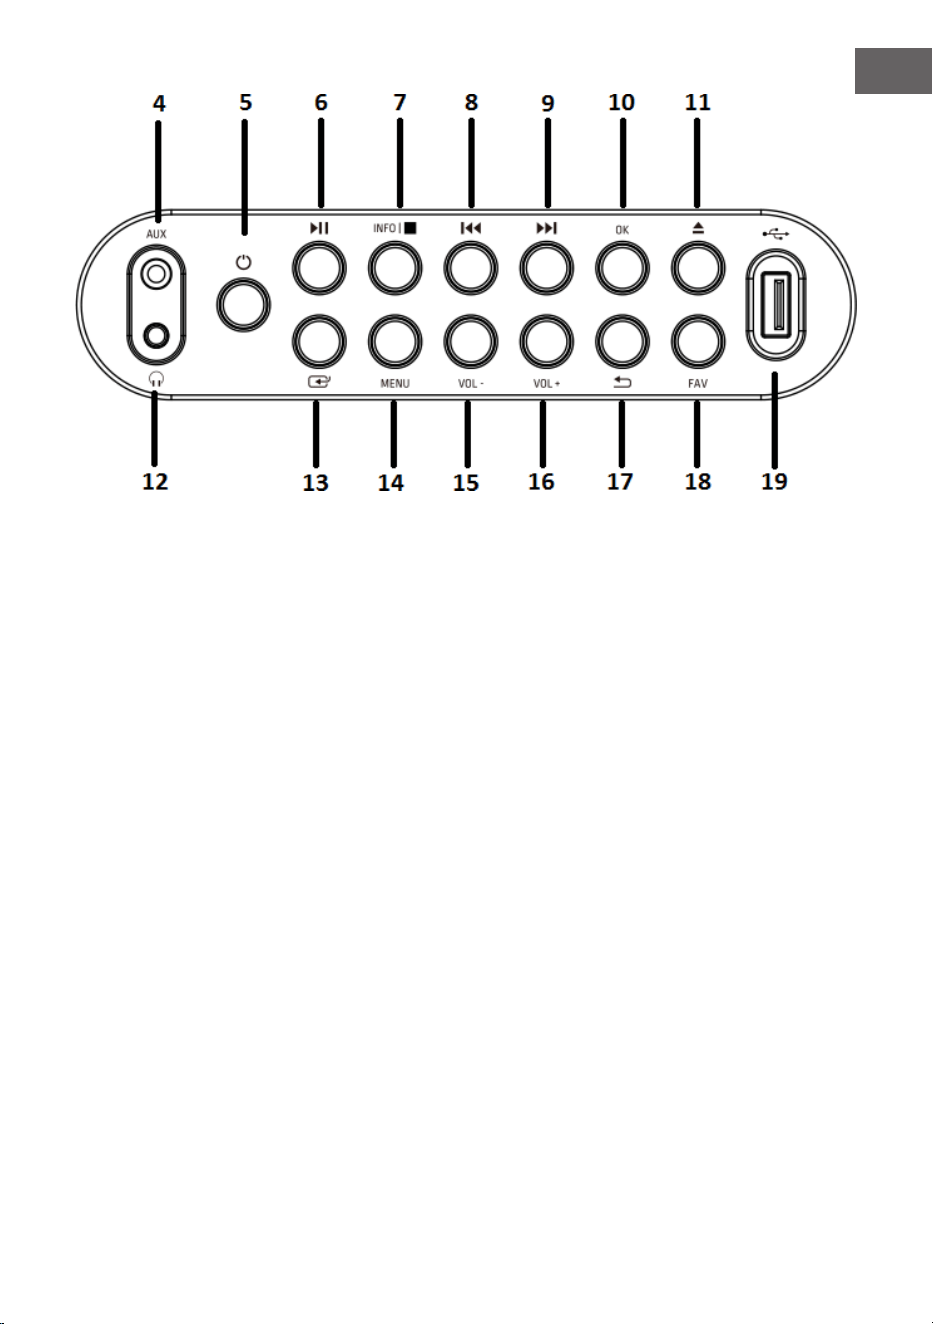
4 AUX-Eingang
5 EIN-Taste
6 Play/Pause-Taste
7 Info/Stopp-Taste
8 Zurück-Taste
9 Vorwärts-Taste
10 OK-Taste
11 Eject-Taste (CD-Auswurf)
12 Kopfhörerbuchse
13 Modus-Taste
14 Menü-Taste
15 Volume (-)-Taste:
Lautsärke senken
16 Volume (+)-Taste:
Lautstärke erhöhen
17 Menü zurück-Taste
18 Favoriten-Taste
19 USB-Anschluss

8
DE
FERNBEDIENUNG
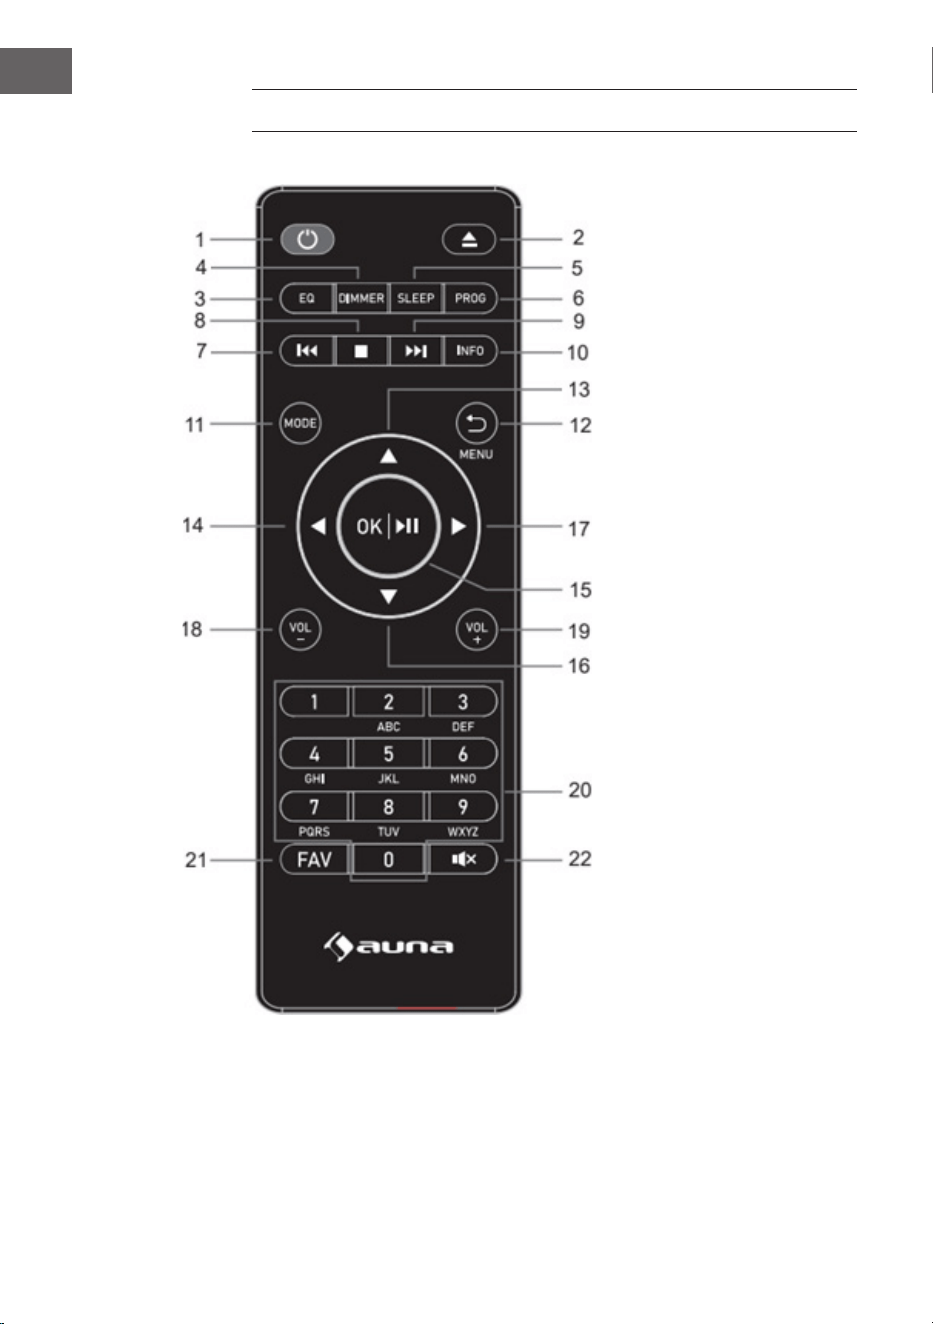
1 Standby-Taste
2 Eject-Taste (CD-
Auswurf): Drücken
zum Önen/
Schließen der CD-
Klappe
3 Equalizer-Taste
4 Dimmer-Taste
5 Schlafmodus-Taste
6 Programm-Taste
7 Rückwärts/
vorheriger Titel
8 Stop-Taste
9 Vorwärts/nächster
Titel
10 Info-Taste
11 Modus-Taste
12 Menü-/Zurück-Taste
13 Aufwärts-Cursortaste
14 Linke Cursortaste
15 OK und Play/Pause-
Taste
16 Abwärts-Cursortaste
17 Rechte Cursortaste
18 Volume (-)-Taste
19 Volume( +)-Taste
20 Eingabe von
Buchstaben und
Zahlen
21 FAV-Taste
22 Stumm-Taste

9
DE
INBETRIEBNAHME UND BEDIENUNG
Erstinbetriebnhame
• Vergewissern Sie sich vor der Inbetriebnahme, dass die auf dem
Typenschild des Netzteils angegebene Spannung mit der Spannung
in Ihrem Haushalt übereinstimmt. Verwenden Sie das mitgelieferte
Netzteil, um das DAB-Radio an eine Steckdose anzuschließen.
Grundlegende Bedienung - erste Schritte
• Schließen Sie das Gerät an die Stromversorgung an und fahren Sie die
Teleskopantenne vollständig aus. Das Radio wechselt in den Standby-
Modus und „01/01/2020 00:00“ wird auf dem Display angezeigt.
Drücken Sie dann kurz die „MODE“-Taste, um das Radio einzuschalten.
Systemeinstellungen
1. Drücken Sie die „MENU“-Taste, um in einem beliebigen Modus auf das
Menü zuzugreifen.
2. Drücken Sie die „Vorwärts“- und „Rückwärts“-Tasten am Gerät
oder die „Auf“- oder „Ab“-Tasten auf der Fernbedienung, um die
Systemeinstellungen auszuwählen, und drücken Sie dann zur
Bestätigung die „OK“-Taste.
Schlafmodus
• Das Gerät verfügt über eine Sleep-Timer-Funktion, die das Radio nach
einer bestimmten Zeit ausschaltet, wenn bis dahin keine Aktionen
durchgeführt wurden.
• Drücken Sie die „Vorwärts“-Taste oder „Rückwärts“-Taste, um „Sleep
time o“ (Schlafmodus aus) > „15“> „30“> „45“ > „60“ > „90“ >
„120“ > „150“> „180“ Minuten auszuwählen und drücken Sie dann zur
Bestätigung die „OK“-Taste.
Alarm
HINWEIS: Vergewissern Sie sich, dass die richtige Uhrzeit und das richtige
Datum eingestellt sind, bevor Sie einen Alarm einstellen.
1. Drücken Sie die „MENU“-Taste und wählen Sie „Alarm“ aus, „Alarm1“
wird angezeigt. Drücken Sie die „OK“-Taste, um die Einstellung für
Alarm 1 zu bestätigen.
2. Drücken Sie wiederholt die „OK“-Taste, um den „Alarm 1“ ein- oder
auszuschalten.

10
DE
3. Wählen Sie die Häugkeit von „Alarm 1“ aus, drücken Sie die „OK“-
Taste und wählen Sie mit den „Vorwärts“- und „Rückwärts“-Tasten
am Gerät (oder den „Auf“- und „Ab“-Tasten auf der Fernbedienung)
die gewünschte Einstellung aus: „Daily“ (Täglich) > „Once“ (Einmal)>
„Weekends“ (Wochenende) > „Weekdays“ (Wochentage). Drücken Sie
die „OK“-Taste zur Bestätigung und Sie gelangen zurück ins Menü.
4. Stellen Sie die Weckzeit ein: Drücken Sie die „Vorwärts“- und
„Rückwärts“-Tasten am Gerät (oder die „Auf“- und „Ab“-Tasten auf
der Fernbedienung), um „hour“ (Stunde) auszuwählen, und drücken
Sie zur Bestätigung die „OK“-Taste. Drücken Sie die „Vorwärts“- und
„Rückwärts“-Tasten am Gerät (oder die „Auf“- und „Ab“-Tasten auf der
Fernbedienung), um „minutes“ (Minuten) auszuwählen, und drücken Sie
zur Bestätigung die „OK“-Taste.
5. Wählen Sie die Alarmquelle: Drücken Sie die „OK“-Taste und wählen Sie
mit den „Vorwärts“- und „Rückwärts“-Tasten am Gerät (oder den „Auf“-
und „Ab“-Tasten auf der Fernbedienung) die gewünschte Einstellung
aus: „Buzzer“ (Summer) > „Digital Radio“> „FM Radio“. Drücken Sie zur
Bestätigung die „OK“-Taste und Sie gelangen zurück ins Menü.
6. Wählen Sie die Dauer des Alarms: Drücken Sie die „OK“-Taste und
wählen Sie mit den „Vorwärts“- und „Rückwärts“-Tasten am Gerät (oder
den „Auf“- und „Ab“-Tasten auf der Fernbedienung) die gewünschte
Einstellung aus: „15“ > „30“ > „45“ > „60“ > „90“ > „120“ Minuten.
Drücken Sie die „OK“-Taste zur Bestätigung und Sie gelangen zurück ins
Menü.
7. Wählen Sie „Volume“ (Lautstärke) und drücken Sie die „OK“-Taste, um
die Lautstärke des Alarms einzustellen.
8. „Alarm 2“: Um „Alarm 2“ einzustellen, wiederholen Sie bitte die Schritte
1-7.
HINWEIS: Die Alarmlautstärke wird schrittweise erhöht, bis sie die von
Ihnen eingestellte Alarmlautstärke erreicht.
Alarm stoppen
• Wenn der Alarm ertönt, können Sie ihn durch Drücken der „EIN“-Taste
sofort stoppen.
• Wenn der Wecker ertönt, können Sie eine beliebige Taste (außer der
„EIN“-Taste) drücken, um die Schlummerfunktion zu aktivieren. Die
Standardzeit für diese Funktion beträgt 9 Minuten.
HINWEIS: Drücken Sie die „EIN“-Taste, um die Schlummerfunktion zu
beenden.

11
DE
Equalizer
• Unter „EQUALISER“ können Sie ein Standard-Tonformat auswählen
oder Ihr eigenes kongurieren. Wählen Sie eines der folgenden
Tonformate aus: „Normal“ > „Classic“ (Klassisch) > „Jazz“ > „Pop“ >
„Rock“> „Speech“ (Sprache) > „My EQ“ (Mein EQ) und bestätigen Sie
mit der „OK“-Taste. Die Einstellung wird sofort wirksam.
• Wenn Sie unter dem folgenden Eintrag ein personalisiertes Tonformat
gewählt haben, wählen Sie „My EQ“ (Mein EQ), um das Tonformat
direkt zu übernehmen. Gehen Sie dann in die „My EQ“-EInstellungen,
um Höhen und Bässe einzustellen.
Uhrzeit/Datum
Drücken Sie die „Vorwärts“- und „Rückwärts“-Tasten am Gerät (oder die
„Auf“- und „Ab“-Tasten auf der Fernbedienung), um die gewünschten
Menüeinträge auszuwählen: „Time/Date“ (Zeit/Datum) > „Auto update“
(Automatische Aktualisierung) > „Set 12/24 hour“ (12/24 Stunden einstellen)
> „Set date format“ (Datumsformat einstellen). Drücken Sie die „OK“-Taste,
um die jeweiligen Einstellungen zu bestätigen.
Uhrzeit/Datum manuell einstellen:
• Drücken Sie die „OK“-Taste, nun beginnt die Datumszier zu blinken.
Drücken Sie die „Vorwärts“- und „Rückwärts“-Tasten am Gerät (oder die
„Auf“- und „Ab“-Tasten auf der Fernbedienung), um das aktuelle Datum
auszuwählen, und drücken Sie zur Bestätigung die „OK“-Taste.
• Dann beginnt die Monatszier zu blinken. Drücken Sie die „Vorwärts“-
und „Rückwärts“-Tasten am Gerät (oder die „Auf“- und „Ab“-Tasten
auf der Fernbedienung), um den aktuellen Monat auszuwählen, und
drücken Sie zur Bestätigung die „OK“-Taste.
• Dann beginnt die Jahreszier zu blinken. Drücken Sie die „Vorwärts“-
und „Rückwärts“-Tasten am Gerät (oder die „Auf“- und „Ab“-Tasten auf
der Fernbedienung), um das aktuelle Jahr auszuwählen, und drücken Sie
zur Bestätigung die „OK“-Taste.
• Dann beginnt die „Stundenzier“ zu blinken. Drücken Sie die
„Vorwärts“- und „Rückwärts“-Tasten am Gerät (oder die „Auf“- und „Ab“-
Tasten auf der Fernbedienung), um die aktuelle Stunde auszuwählen,
und drücken Sie zur Bestätigung die „OK“-Taste.
• Drücken Sie die „Vorwärts“- und „Rückwärts“-Tasten am Gerät (oder die
„Auf“- und „Ab“-Tasten auf der Fernbedienung), um die aktuelle Minute
auszuwählen, und drücken Sie zur Bestätigung die „OK“-Taste. Jetzt sind
Uhrzeit und Datum eingestellt und gespeichert.

12
DE
Automatisches Uhrzeit-Aktualisierung: Sie können in den
Systemeinstellungen „from Any“ (von DAB und UKW) > „from Digital
Radio“ (von Digitalradio) > „from FM“ (von UKW) oder „No Update“ (keine
Aktualisierung) wählen.
Automatisches Update: Wählen Sie „Update from any“ (Update von einem
beliebigen Sender) > „Update from DAB“ (Update von DAB) > „Update form
FM“ (Update von UKW)“ > „No update“ (Kein Update) und bestätigen Sie
mit der „OK“-Taste.
12/24 Stunden einstellen: Drücken Sie die „Vorwärts“- und „Rückwärts“-
Tasten am Gerät (oder die „Auf“- und „Ab“-Tasten auf der Fernbedienung),
um „set 24 hour“ (24Stunden einstellen) oder „set 12 hour“ (12 Stunden
einstellen) auszuwählen. Drücken Sie zur Bestätigung die „OK“-Taste.
Datumsformat einstellen: Drücken Sie die „Vorwärts“- und „Rückwärts“-
Tasten am Gerät (oder die „Auf“- und „Ab“-Tasten auf der Fernbedienung),
um „DD-MM-YYYY“ (TT-MM-JJJJ) oder „MM-DD-YYYY“ (MM-TT-JJJJ)
auszuwählen. Drücken Sie zur Bestätigung die „OK“-Taste.
Hintergrundbeleuchtung
Unter „BACKLIGHT“ (Hintergrundbeleuchtung) können Sie die Beleuchtung
des Displays einstellen:
• Dimmen Sie das Display im Standby-Modus nach einer bestimmten
Zeit.
• Stellen Sie die Display-Helligkeit ein.
Einstellung der Dimmzeit: Wählen Sie „Timeout“ (Zeitüberschreitung) >
„on“ (ein) > „10“ > „20“ > „30“ > „45“ > „60“ > „90“ > „120“ > „180“ Sekunden
aus und drücken Sie zur Bestätigung die „OK“-Taste.
Display-Helligkeit während des Betriebs: Wählen Sie „On“ (Ein) und
anschließend die gewünschte Einstellung aus: „High“ (Hoch)> „Medium“
(Mittel) > „Low“ (Niedrig). Bestätigen Sie die Auswahl mit der „OK“-Taste.
Helligkeit des Displays im Standby-Modus: Wählen Sie die „DIM“-
Stufe und anschließend die gewünschte Einstellung aus: „High“ (Hoch) >
„Medium“ (Mittel) > „Low“ (Niedrig). Bestätigen Sie die Auswahl mit der
„OK“-Taste.

13
DE
Sprache
• Sie können die Menüsprache unter „LANGUAGE“ (Sprache) einstellen.
• Drücken Sie im Betriebsmodus lange auf die „MENU“-Taste, um die
Systemeinstellungen aufzurufen. Wählen Sie mit den „Vorwärts“- und
„Rückwärts“-Tasten am Gerät (oder den „Auf“- und „Ab“-Tasten auf
der Fernbedienung „LANGUAGE“ (Sprache) aus, und drücken Sie zur
Bestätigung die „OK“-Taste.
• Folgende Sprachen können ausgewählt werden: Englisch, Französisch,
Deutsch, Italienisch, Norwegisch, Polnisch, Portugiesisch, Spanisch,
Schwedisch, Türkisch, Dänisch, Niederländisch, Finnisch.
Auf Werkseinstellungen zurücksetzen
Um die Werkseinstellungen des Geräts wiederherzustellen, gehen Sie bitte
wie folgt vor:
• Drücken Sie im Radiomodus die MENU-Taste, bis „System setting“
(Systemeinstellung) auf dem Display erscheint. Drücken Sie die
„Vorwärts“- und „Rückwärts“-Tasten am Gerät (oder die „Auf“- und „Ab“-
Tasten auf der Fernbedienung), um das Untermenü „FACTORY RESET“
(auf Werkseinstellungen zurücksetzen) auszuwählen.
• Drücken Sie die „OK“-Taste und bestätigen Sie die folgende Abfrage mit
„YES“ (Ja).
• Das Gerät wird nun auf die Werkseinstellungen zurückgesetzt, d.h. alle
Weckzeiten, Sleep-Timer-Einstellungen etc. gehen verloren.
Software-Version (SW version)
Drücken Sie die „OK“-Taste, um sich bei Bedarf die Systemsoftware-Version
anzeigen zu lassen.

14
DE
DAB+-RADIO
• Der DAB-Modus wird automatisch ausgewählt, und wenn das Radio
zum ersten Mal an die Stromversorgung angeschlossen wird, führt das
Radio einen vollständigen Suchlauf durch. Auf dem Display erscheint
„Scanning“ und ein Balken, der den Fortschritt des Suchlaufs anzeigt,
sowie die Gesamtzahl der bisher gefundenen Sender.
• Wenn der Suchlauf beendet ist, spielt das Radio den ersten gefundenen
alphanumerischen Sender ab. Stellen Sie die Lautstärke mit den Tasten
„VOL +“ und „VOL -“ auf den gewünschten Wert ein.
Senderliste
1. Drücken Sie im DAB-Modus die „MENU-Taste, um das DAB-Menü
aufzurufen.
2. Drücken Sie die „Rückwärts“-Taste oder die „Vorwärts“-Taste, um die
Senderliste auszuwählen, und drücken Sie dann zur Bestätigung die
„OK“-Taste.
3. Eine Liste der DAB-Sender wird auf dem Display angezeigt. Sobald Sie
den gewünschten Sender gefunden haben, drücken Sie die „OK“-Taste,
um den Sender auszuwählen.
Vollständiger Suchlauf
Mit dieser Funktion kann das Radio nach allen DAB-Sendern in Ihrer
Umgebung suchen.
• Drücken Sie im DAB-Modus die „MENU“-Taste, um das DAB-Menü
aufzurufen. Drücken Sie die „Rückwärts“-Taste oder die „Vorwärts“-
Taste, um „Full Scan“ (Vollständiger Suchlauf) auszuwählen, drücken Sie
die „OK“-Taste, um den vollständigen Suchlauf zu starten.
Manuelle Senderwahl
Mit dieser Funktion kann ein bestimmter oder ein neuer Sender manuell zu
den bereits im Radio verfügbaren Sendern hinzugefügt werden.
1. Halten Sie im DAB-Modus die „MENU“-Taste gedrückt, um das
DAB-Menü aufzurufen, und drücken Sie die „Rückwärts“-Taste oder
die „Vorwärts“-Taste, um „Manual tune“ (Manuelle Senderwahl)
auszuwählen. Drücken Sie die „OK“-Taste, um die Auswahl zu
bestätigen.
2. Drücken Sie die „Rückwärts“-Taste oder die „Vorwärts“-Taste, bis die
gewünschte Frequenz im Display angezeigt wird, und drücken Sie dann
die „OK“-Taste. Die Frequenz und der Name des Radiosenders sowie
die Signalstärke werden im Display angezeigt.

15
DE
3. Drücken Sie erneut die „OK“-Taste, um den Radiosender in die
Senderliste aufzunehmen und automatisch zu starten.
Sender löschen
Mit dieser Funktion können Sie Sender aus der Senderliste löschen, die
entweder nicht mehr senden oder die Frequenz gewechselt haben.
1. Halten Sie die „MENU“-Taste gedrückt, um in das Sender einstellungs-
menü zu wechseln.
2. Drücken Sie die „Rückwärts“-Taste oder die „Vorwärts“-Taste, bis „Prune
Invalid“ (Entfernen ungültiger Sender) angezeigt wird, und bestätigen
Sie mit der „OK“-Taste.
3. Drücken Sie die „Rückwärts“-Taste oder die „Vorwärts“-Taste, um „YES“
(Ja) zur Bestätigung und zum Löschen auszuwählen. Wenn Sie „NO“
(Nein) wählen, wird der Vorgang abgebrochen.
DRC (Dynamic Range Control)
Mit dieser Funktion können Sie nicht verfügbare Sender aus der Senderliste
entfernen.
1. Halten Sie im „DAB“-Modus die „MENU“-Taste gedrückt und drücken
Sie dann die „Rückwärts“-Taste oder die „Vorwärts“-Taste, bis „DRC“
angezeigt wird. Drücken Sie zur Bestätigung die „OK“-Taste.
2. Drücken Sie die „Rückwärts“-Taste oder die „Vorwärts“-Taste, um
zwischen den Stufen „O“ (Aus)“, „High“ (Hoch)“ und „Low“ (Niedrig)
umzuschalten. Drücken Sie dann die „OK“-Taste, um Ihre Auswahl zu
bestätigen.
DAB-Senderspeicher abrufen
1. Sie können Ihre voreingestellten Sender abrufen, indem Sie die
„FAV“-Taste drücken. Drücken Sie anschließend die „Rückwärts“- oder
„Vorwärts“-Tasten am Gerät (oder die „Auf“- und „Ab“-Tasten auf der
Fernbedienung), um durch die voreingestellten Sender zu scrollen.
Drücken Sie die „OK“-Taste, um den ausgewählten Radiosender zu
hören.
2. Wenn Sie einen Speicherplatz wählen, dem kein Radiosender
zugewiesen wurde, wird die Meldung „preset empty“ (Speicherplatz
leer) angezeigt.

16
DE
FM-RADIO
• Schalten Sie das Radio ein, drücken Sie mehrmals die „MODE“-Taste
und wählen Sie den „FM-Modus“ aus. Auf dem Display wird „FM“
angezeigt und das Radio stellt automatisch den nächsten UKW-
Radiosender ein. Es wird der Sendername (RDS) oder die Frequenz
angezeigt, wenn RDS nicht verfügbar ist.
• Für die manuelle Suche nach einem beliebigen Radiosender drücken
Sie die „Rückwärts“-Taste oder die „Vorwärts“-Taste. MIt jedem
Tastendruck ändert sich die Frequenz um 0,05 MHz.
• Drücken Sie im FM-Modus lange die „MENU“-Taste und drücken Sie
anschließend die „Vorwärts“- und „Rückwärts“-Tasten am Gerät (oder
die „Auf“- und „Ab“-Tasten auf der Fernbedienung), bis „Scan“ (Suchlauf)
angezeigt wird. Drücken Sie dann die „OK“-Taste, um den Start des
Suchlaufs zu bestätigen. Das Radio beginnt nun, das Frequenzband
abwärts oder aufwärts zu durchsuchen, und stoppt automatisch, wenn
ein Radiosender gefunden wurde.
• Drücken Sie im FM-Modus lange die „MENU“-Taste und drücken Sie
anschließend die „Vorwärts“- und „Rückwärts“-Tasten am Gerät (oder
die „Auf“- und „Ab“-Tasten auf der Fernbedienung), bis „Auto Scan“
(automatischer Suchlauf) angezeigt wird. Drücken Sie zur Bestätigung
die „OK“-Taste, um den automatischen Suchlauf zu starten. Das Radio
beginnt, das gesamte UKW-Band (87,5-108 MHz) zu durchsuchen, und
speichert automatisch alle gefundenen Radiosender in der „Preset list
memory“ (Speicher für Voreinstellungslisten).
HINWEIS: Jedes Mal, wenn Sie einen „Auto Scan“ (automatischen Suchlauf)
durchführen und das gesamte Frequenzband durchsuchen, wird die
Senderliste im „Preset list memory“ (Speicher für Voreinstellungslisten)
automatisch aktualisiert.
Senderinformationen im FM-Modus
Mit dieser Funktion können Informationen über den aktuellen Sender im
Display angezeigt werden. Durch mehrmaliges Drücken der „MENU“-Taste
können Sie durch die folgenden Informationen scrollen:
RDS (Lauftext): Der Sender kann eine Lauftextmeldung über das aktuelle
Programm einblenden.
Program type (Programmtyp): Hier wird die Art des ausgestrahlten
Programms beschrieben.
Audio Mode (Audiomodus): Auf dem Display wird angezeigt, ob der
empfangene Radiosender in Stereo oder Mono ausgestrahlt wird.

17
DE
Time/date (Uhrzeit/Datum): Die Uhrzeit und das Datum werden
automatisch durch das Zeitsignal des Radios aktualisiert (wenn RDS
verfügbar ist).
Suchlaufeinstellung (wie Sie nach Radiosendern suchen können)
1. Drücken Sie im FM-Modus lange auf die „MENU“-Taste und drücken Sie
anschließend die „Vorwärts“- und „Rückwärts“-Tasten am Gerät (oder
die „Auf“- und „Ab“-Tasten auf der Fernbedienung), um die Einstellung
„Scan“ (Suchlauf) zu wählen, und drücken Sie auf die „OK“-Taste, um
den Suchlauf zu starten.
2. Drücken Sie die „Vorwärts“- und „Rückwärts“-Tasten am Gerät (oder
die „Auf“- und „Ab“-Tasten auf der Fernbedienung), um „Strong station
only“ (nur starke Sender) oder „All stations“ (alle Sender) zu wählen.
Drücken Sie dann die „OK“-Taste, um den Start des Suchlaufs zu
bestätigen. Wenn Sie „Strong station only“ (nur starke Sender) wählen,
sucht und spielt das Radio nur Sender mit einem starken Signal. Wenn
Sie „All stations“ (alle Sender) wählen, sucht das Radio auch nach
Sendern mit schwachem Signal und gibt diese wieder.
Audio-Einstellungen
1. Drücken Sie im FM-Modus lange auf die „MENU“-Taste und drücken
Sie anschließend die „Vorwärts“- und „Rückwärts“-Tasten am Gerät
(oder die „Auf“- und „Ab“-Tasten auf der Fernbedienung), um „Auto“
zu wählen, und drücken Sie die „OK“-Taste, um die Einstellung zu
bestätigen.
2. Drücken Sie die „Vorwärts“- und „Rückwärts“-Tasten am Gerät (oder
die „Auf“- und „Ab“-Tasten auf der Fernbedienung), um „Forced mono“
(erzwungenes Mono) oder „Stereo allowed“ (Stereo erlaubt) zu wählen.
Wenn das Radiosignal schwach ist, wählen Sie bitte „Forced mono“
(erzwungenes Mono), um eine bessere Tonqualität zu erhalten.

18
DE
SENDERSPEICHER (DAB+/FM-RADIO)
Speicher für voreingestellte Radiosender
Mit dieser Funktion können bis zu 99 Radiosender in den Speicher
programmiert und im DAB- und FM-Modus gespeichert werden.
Speichern von DAB-/FM-Sendern als voreingestellte Sender
1. Folgen Sie den Anweisungen in der Bedienungsanleitung, um einen
Radiosender auszuwählen.
2. Halten Sie dann die „FAV“-Taste gedrückt. Im Display wird „X
(Empty)“ [X (Leer)] angezeigt, wenn kein vorheriger Sender im
Voreinstellungsspeicher gespeichert wurde.
3. Drücken Sie die „Vorwärts“- und „Rückwärts“-Tasten am Gerät
(oder die „Auf“- und „Ab“-Tasten auf der Fernbedienung), um durch
die Speicherplatz-Nummern zu scrollen und den gewünschten
Speicherplatz für die Radiosender auszuwählen. Sie können zwischen
den Speicherplätzen 1-99 wählen.
4. Drücken Sie die „OK“-Taste, um den Radiosender zu speichern. Auf dem
Display erscheint die Meldung „Preset XX saved“ (Speicherplatz XX
gespeichert).
Lieblingssender abrufen
Mit der „FAV“-Taste können Sie Ihre Lieblingssender abrufen. Drücken Sie
die FAV-Taste, um die Liste der von Ihnen voreingestellten Lieblingssender
aufzurufen. Wenn Sie Radio hören, drücken Sie die „FAV“-Taste und dann
die „OK“-Taste, um den aktuellen Sender als einen Ihrer Lieblingssender
voreinzustellen.

19
DE
BT
So verbinden Sie das DAB-Radio mit Ihrem Smartphone:
1. Drücken Sie die „MODE“-Taste, bis im Display „BT“ angezeigt wird.
2. Schalten Sie dann die BT-Funktion auf Ihrem Smartphone ein, suchen
Sie nach dem Pairing-Namen „Vertico Swing DAB“ und wählen Sie ihn
aus, um Ihr Smartphone mit dem DAB-Radio zu verbinden.
3. Nachdem die beiden Geräte erfolgreich gekoppelt wurden, ertönt ein
Benachrichtigungston. Sie können nun Musik über die BT-Verbindung
abspielen und die Lautstärke einstellen, sowohl über das Radio als auch
über Ihr Smartphone.
AUX-EINGANG
Im „AUX IN“-Modus werden Audiosignale von einer externen Quelle
wiedergegeben, die über ein Audiokabel angeschlossen ist, z. B. von einem
MP3-Player. So geben Sie Audiosignale über den „AUX IN“-Modus wieder:
1. Drehen Sie zuerst die Lautstärke am Radio herunter. Schließen Sie dann
die externe Audioquelle an die AUX-In-3,5-mm-Stereo-Buchse an.
2. Drücken Sie die „MODE“-Taste, bis im Display „Aux In“ angezeigt wird.
3. Stellen Sie nun die Lautstärke des Radios ein (und, falls erforderlich,
auch die Lautstärke des Audioquellengeräts).
USB-ANSCHLUSS
1. Drücken Sie die „MODE“-Taste, bis im Display „USB“ angezeigt wird,
um Musik von einem USB-Stick abzuspielen.
2. Stecken Sie den USB-Stick in den USB-Anschluss und das Gerät beginnt
automatisch mit der Wiedergabe des ersten Titels auf dem USB-Stick.
3. Verwenden Sie die „Rückwärts“-Taste oder die „Vorwärts“-Taste, um
den vorherigen oder nächsten Titel abzuspielen.
4. Auf dem Display wird der Dateiname angezeigt.
HINWEIS: Der USB-Anschluss unterstützt nicht das Auaden von Geräten
oder die Datenübertragung von einem Computer.

20
DE
CD-WIEDERGABE
1. Drücken Sie die „MODE“-Taste, bis im Display „CD“ angezeigt wird, um
Musik von einer CD abzuspielen.
2. Im Display des Radios wird nun „Reading...“ (Lesen) gefolgt von „No
Disc“ (Keine Disk) angezeigt.
3. Drücken Sie die „Eject“-Taste am Gerät oder auf der Fernbedienung, um
das CD-Fach zu önen. Legen Sie die CD in das Fach ein und drücken
Sie erneut die „Eject“-Taste. Das CD-Fach schließt sich wieder und der
erste Titel auf der CD wird nun abgespielt.
CD-Funktionen
• Um zwischen den Titeln zu springen, verwenden Sie die „Rückwärts“-
Taste oder die „Vorwärts“-Taste am Gerät oder auf der Fernbedienung.
• Die Wiedergabe und das Pausieren der Musik erfolgt durch Drücken der
„Play/Pause“-Taste am Gerät oder auf der Fernbedienung.
• Um während der Wiedergabe eines Titels vor- oder zurückzuspringen,
halten Sie die „Rückwärts“-Taste oder die „Vorwärts“-Taste auf der
Fernbedienung gedrückt und lassen Sie die Taste los, wenn Sie das
Springen beenden möchten.
• Um die CD wieder auszuwerfen, drücken Sie die „Eject“-Taste am Gerät
oder auf der Fernbedienung, um das CD-Fach zu önen.
• Halten Sie die „OK“-Taste am Gerät oder auf der Fernbedienung
gedrückt, um die Musikwiedergabe der CD zu stoppen. Dabei wird auch
angezeigt, wie viele Titel sich auf der CD benden und wie lange die
Wiedergabe insgesamt dauert. Drücken Sie die „Play/Pause“-Taste, um
die Musikwiedergabe von der CD erneut zu starten.
Ein CD-Titelprogramm zusammenstellen
1. Wenn die CD gestoppt ist und keine Musik abgespielt wird, können Sie
den CD-Player so programmieren, dass die Titel in einer bestimmten
Reihenfolge abgespielt werden.
2. Drücken Sie dazu einfach die „FAV“-Taste am Gerät oder auf der
Fernbedienung, um in den „Programming mode“ (Programmiermodus)
zu gelangen.
3. Sobald Sie den „Programming mode“ (Programmiermodus) aktiviert
haben, erscheint auf dem Display „T001“, um den ersten Titel auf der
CD als „P01“ anzuzeigen. Sie können nun auswählen, welchen Titel
Sie als Programmnummer „P01“ in der Wiedergabeliste speichern
möchten, indem Sie mit den Tasten „<<“ und „>>“ zu dem Titel blättern,
den Sie auswählen möchten. Wenn Sie den Titel gefunden haben,
den Sie für „P01“ ausgewählt haben, drücken Sie die „OK“-Taste, um
den Titel auszuwählen, und werden dann aufgefordert, den nächsten
programmierten Titel zu wählen.

21
DE
4. Für den nächsten Song wird auf dem Display „P02“ angezeigt, um das
Programm 2 anzuzeigen. Verwenden Sie nun die „Rückwärts“-Taste
oder die „Vorwärts“-Taste, um zu dem Lied zu scrollen, das Sie als „P02“
auswählen möchten. Wenn Sie den Titel für Programm 2 gefunden
haben, drücken Sie die „OK“-Taste, um den Titel auszuwählen, und
werden dann aufgefordert, den nächsten programmierten Titel zu
wählen.
5. Nachdem Sie die vollständige Programmierung Ihrer Titelauswahl
abgeschlossen haben, drücken Sie die „Play/Pause“-Taste, um die
programmierten Titel abzuspielen.
6. Wenn die Programmwiedergabe aktiviert ist, drücken Sie die „Eject“-
Taste, um den Programmwiedergabemodus wieder zu verlassen.
SCHLUMMERFUNKTION
Wenn der Alarm ertönt, können Sie eine beliebige Taste (außer der „EIN“-
Taste) drücken, um die Schlummerfunktion zu aktivieren. Die Standardzeit
für diese Funktion beträgt 9 Minuten.
HINWEIS: Drücken Sie die „Standby“-Taste, um die Schlummerfunktion zu
beenden.

22
DE
SPEZIELLE ENTSORGUNGSHINWEISE FÜR
VERBRAUCHER IN DEUTSCHLAND
Entsorgen Sie Ihre Altgeräte fachgerecht. Dadurch wird gewährleistet,
dass die Altgeräte umweltgerecht verwertet und negative Auswirkungen
auf die Umwelt und menschliche Gesundheit vermieden werden. Bei der
Entsorgung sind folgende Regeln zu beachten:
• Jeder Verbraucher ist gesetzlich verpichtet, Elektro- und
Elektronikaltgeräte (Altgeräte) sowie Batterien und Akkus
getrennt vom Hausmüll zu entsorgen. Sie erkennen die
entsprechenden Altgeräte durch folgendes Symbol der
durchgestrichene Mülltonne (WEEE-Symbol).
• Sie haben Altbatterien und Altakkumulatoren, die nicht vom Altgerät
umschlossen sind, sowie Lampen, die zerstörungsfrei aus dem
Altgerät entnommen werden können, vor der Abgabe an einer
Entsorgungsstelle vom Altgerät zerstörungsfrei zu trennen.
• Bestimmte Lampen und Leuchtmittel fallen ebenso unter das Elektro-
und Elektronikgesetz und sind dementsprechend wie Altgeräte zu
behandeln. Ausgenommen sind Glühbirnen und Halogenlampen.
Entsorgen Sie Glühbirnen und Halogenlampen bitte über den Hausmüll,
sofern sie nicht das WEEE-Symbol tragen.
• Jeder Verbraucher ist für das Löschen von personenbezogenen Daten
auf dem Elektro- bzw. Elektronikgerät selbst verantwortlich.
Rücknahmepicht der Vertreiber
Vertreiber mit einer Verkaufsäche für Elektro- und Elektronikgeräte von
mindestens 400 Quadratmetern sowie Vertreiber von Lebensmitteln mit
einer Gesamtverkaufsäche von mindestens 800 Quadratmetern, die
mehrmals im Kalenderjahr oder dauerhaft Elektro- und Elektronikgeräte
anbieten und auf dem Markt bereitstellen, sind verpichtet,
1 bei der Abgabe eines neuen Elektro- oder Elektronikgerätes an einen
Endnutzer ein Altgerät des Endnutzers der gleichen Geräteart, das
im Wesentlichen die gleichen Funktionen wie das neue Gerät erfüllt,
am Ort der Abgabe oder in unmittelbarer Nähe hierzu unentgeltlich
zurückzunehmen und
2 auf Verlangen des Endnutzers Altgeräte, die in keiner äußeren
Abmessung größer als 25 Zentimeter sind, im Einzelhandelsgeschäft
oder in unmittelbarer Nähe hierzu unentgeltlich zurückzunehmen; die
Rücknahme darf nicht an den Kauf eines Elektro- oder Elektronikgerätes
geknüpft werden und ist auf drei Altgeräte pro Geräteart beschränkt.

23
DE
• Bei einem Vertrieb unter Verwendung von Fernkommunikationsmitteln
ist die unentgeltliche Abholung am Ort der Abgabe auf Elektro- und
Elektronikgeräte der Kategorien 1, 2 und 4 gemäß § 2 Abs. 1 ElektroG,
nämlich „Wärmeüberträger“, „Bildschirmgeräte“ (Oberäche von mehr
als 100 cm²) oder „Großgeräte“ (letztere mit mindestens einer äußeren
Abmessung über 50 Zentimeter) beschränkt. Für andere Elektro- und
Elektronikgeräte (Kategorien 3, 5, 6) ist eine Rückgabemöglichkeit in
zumutbarer Entfernung zum jeweiligen Endnutzer zu gewährleisten.
• Altgeräte dürfen kostenlos auf dem lokalen Wertstohof oder in
folgenden Sammelstellen in Ihrer Nähe abgegeben werden: www.take-
e-back.de
• Für Elektro- und Elektronikgeräte der Kategorien 1, 2 und 4 bieten
wir auch die Möglichkeit einer unentgeltlichen Abholung am Ort der
Abgabe. Beim Kauf eines Neugeräts haben Sie die Möglichkeit, eine
Altgerätabholung über die Webseite auszuwählen.
• Batterien können überall dort kostenfrei zurückgegeben werden, wo sie
verkauft werden (z. B. Super-, Bau-, Drogeriemarkt). Auch Wertsto- und
Recyclinghöfe nehmen Batterien zurück. Sie können Batterien auch per
Post an uns zurücksenden. Altbatterien in haushaltsüblichen Mengen
können Sie direkt bei uns von Montag bis Freitag zwischen 07:30 und
15:30 Uhr unter der folgenden Adresse unentgeltlich zurückgeben:
Chal-Tec GmbH
Member of Berlin Brands Group
Handwerkerstr. 11
15366 Dahlwitz-Hoppegarten
Deutschland
• Wichtig zu beachten ist, dass Lithiumbatterien aus Sicherheitsgründen
vor der Rückgabe gegen Kurzschluss gesichert werden müssen (z. B.
durch Abkleben der Pole).
• Finden sich unter der durchgestrichenen Mülltonne auf der Batterie
zusätzlich die Zeichen Cd, Hg oder Pb ist das ein Hinweis darauf, dass
die Batterie gefährliche Schadstoe enthält. (»Cd« steht für Cadmium,
»Pb« für Blei und »Hg« für Quecksilber).
Hinweis zur Abfallvermeidung
Indem Sie die Lebensdauer Ihrer Altgeräte verlängern, tragen Sie dazu
bei, Ressourcen eizient zu nutzen und zusätzlichen Müll zu vermeiden.
Die Lebensdauer Ihrer Altgeräte können Sie verlängern, indem Sie defekte
Altgeräte reparieren lassen. Wenn sich Ihr Altgerät in gutem Zustand
bendet, könnten Sie es spenden, verschenken oder verkaufen.

24
DE
HINWEISE ZUR ENTSORGUNG
Wenn es in Ihrem Land eine gesetzliche Regelung
zur Entsorgung von elektrischen und elektronischen
Geräten gibt, weist dieses Symbol auf dem Produkt
oder auf der Verpackung darauf hin, dass dieses
Produkt nicht im Hausmüll entsorgt werden darf.
Stattdessen muss es zu einer Sammelstelle für
das Recycling von elektrischen und elektronischen
Geräten gebracht werden. Durch regelkonforme
Entsorgung schützen Sie die Umwelt und die
Gesundheit Ihrer Mitmenschen vor negativen
Konsequenzen. Informationen zum Recycling
und zur Entsorgung dieses Produkts, erhalten
Sie von Ihrer örtlichen Verwaltung oder Ihrem
Hausmüllentsorgungsdienst.
Dieses Produkt enthält Batterien. Wenn es in Ihrem
Land eine gesetzliche Regelung zur Entsorgung
von Batterien gibt, dürfen die Batterien nicht im
Hausmüll entsorgt werden. Informieren Sie sich
über die örtlichen Bestimmungen zur Entsorgung
von Batterien. Durch regelkonforme Entsorgung
schützen Sie die Umwelt und die Gesundheit Ihrer
Mitmenschen vor negativen Konsequenzen.
KONFORMITÄTSERKLÄRUNG
Hersteller:
Chal-Tec GmbH, Wallstraße 16, 10179 Berlin,
Deutschland.
Importeur für Großbritannien:
Berlin Brands Group UK Limited
PO Box 42
272 Kensington High Street
London, W8 6ND
United Kingdom
Hiermit erklärt Chal-Tec GmbH, dass der
Funkanlagentyp Vertico Swing DAB der Richtlinie
2014/53/EU entspricht. Der vollständige Text der
EU-Konformitätserklärung ist unter der folgenden
Internetadresse verfügbar: use.berlin/10041137

25
EN
Dear customer,
Congratulations on your purchase. Please read the
following instructions carefully and follow them to
prevent potential damage. We accept no liability for
damage caused by disregarding the instructions or
improper use. Please scan the QR code to access the
latest operating instructions and for further information
about the product.
CONTENTS
Technical data 26
Safety instructions 27
Device overview 28
Remote control 30
Setup and operation 31
DAB+ radio 35
FM radio 37
Station memory (DAB+/FM radio) 39
BT 39
AUX input 40
USB connection 40
CD playback 40
Snooze function 41
Disposal considerations 42
Declaration of conformity 42

26
EN
TECHNICAL DATA
Article number 10041137, 10041138
Power supply 220-240 V ~ 50/60 Hz
Input power 2 A
Output power 2 x 10 W RMS
Power consumption (standby) < 1 W
DAB frequency 174.928-239.200 MHz
FM frequency 87.5 - 108.0 MHz
WiFi standard
802.11 b/g/n
WiFi frequency
2402-2480 MHz
WiFi transmission power (max.)
< 20 dBm
BT Version 5.0
BT frequency 2402-2480 MHz
BT transmission power (max.) 2 dBm

27
EN
SAFETY INSTRUCTIONS
Protection from moisture
• To reduce the risk of re or electric shock, do not expose this product to
water or moisture.
• Do not use it in places where it could fall into water or be splashed by
water.
Do not open unit
• To avoid contact with high voltage components or hazardous radiation
exposure, do not attempt to open the unit.
Electrostatic discharge
• If an electrostatic discharge (ESD) occurs on the front panel or near any
part or button of this unit, there is a possibility that the unit will stop
operating and/or shut down immediately. This is a normal condition
and serves to protect the unit and internal components from damage.
In such a case, please reset the unit (by switching the radio o and on
again) to resume normal operation.
Protection from heat
• This radio shall not be exposed to excessive heat such as sunshine, re
or similar.

28
EN
DEVICE OVERVIEW
1 LCD display
2 Power supply connection (DC)
3 Antenna

29
EN
4 AUX input
5 ON button
6 Play/pause button
7 Info/stop button
8 Backward button
9 Forward button
10 OK button
11 Eject button (CD eject)
12 Headphone jack
13 Mode button
14 Menu button
15 Volume (-) button:
Decrease volume
16 Volume (+) button:
Increase volume
17 Menu back button
18 Favourites button
19 USB connection
30
EN
REMOTE CONTROL
1 Standby button
2 Eject button (CD
eject): Press to open/
close the CD door
3 Equaliser button
4 Dimmer button
5 Sleep button
6 Program button
7 Backward/Previous
track
8 Stop button
9 Forward/next track
10 Info button
11 Mode button
12 Menu/Back button
13 Up cursor button
14 Left cursor button
15 OK and Play/Pause
button
16 Down cursor button
17 Right cursor button
18 Volume (-) button
19 Volume (+) button
20 Input letters and
numbers
21 FAV button
22 Mute button

31
EN
SETUP AND OPERATION
Initial operation
• Before using the device for the rst time, make sure that the voltage
specied on the type plate of the mains adapter corresponds to the
voltage in your household. Use the supplied mains adapter to connect
the DAB radio to a mains socket.
Basic operation - rst steps
• Connect the unit to the power supply and extend the telescopic antenna
fully. The radio switches to standby mode and "01/01/2020 00:00" is
shown on the display. Then briey press the "MODE" button to switch
on the radio.
System settings
1. Press the "MENU" button to access the menu in any mode.
2. Press the "Forward" and "Backward" buttons on the unit or the "Up" or
"Down" buttons on the remote control to select the system settings,
then press the "OK" button to conrm.
Sleep mode
• The unit has a sleep timer function that switches the radio o after a
certain time if no action has been taken by then.
• Press the "Forward" button or "Backward" button to select "Sleep time
o" > "15" > "30" > "45" > "60" > "90" > "120" > "150" > "180" minutes, then
press the "OK" button to conrm.
Alarm
NOTE: Make sure that the correct time and date are set before setting an
alarm.
1. Press the "MENU" button and select "Alarm", "Alarm 1" is displayed.
Press the "OK" button to conrm the setting for alarm 1.
2. Press the "OK" button repeatedly to switch "Alarm 1" on or o.
3. Select the frequency of "Alarm 1", press the "OK" button and use the
"Forward" and "Backward" buttons on the unit (or the "Up" and "Down"
buttons on the remote control) to select the desired setting: "Daily" >
"Once" > "Weekends" > "Weekdays". Press the "OK" button to conrm
and you will return to the menu.

32
EN
4. Set the alarm time: Press the “Forward” and “Backward” buttons on the
device (or the “Up” and “Down” buttons on the remote control) to select
“hour” and press the "OK" button to conrm. Press the “Forward” and
“Backward” buttons on the device (or the “Up” and “Down” buttons on
the remote control) to select "minutes" and press the "OK" button to
conrm.
5. Select the alarm source: Press the "OK" button and use the "Forward"
and "Backward" buttons on the device (or the "Up" and "Down" buttons
on the remote control) to select the desired setting from: "Buzzer"
(summer) > "Digital Radio" > "FM Radio". Press the "OK" button to
conrm and you will return to the menu.
6. Select the duration of the alarm: Press the "OK" button and use the
"Forward" and "Backward" buttons on the device (or the "Up" and
"Down" buttons on the remote control) to select the desired setting
from: "15" > "30" > "45" > "60" > "90" > "120" minutes. Press the "OK"
button to conrm and you will return to the menu.
7. Select "Volume" and press the "OK" button to adjust the volume of the
alarm.
8. "Alarm 2": To set "Alarm 2", please repeat steps 1-7.
NOTE: The alarm volume will gradually increase until it reaches the alarm
volume you set.
Stop alarm
• When the alarm sounds, you can stop it immediately by pressing the
"ON" button.
• When the alarm sounds, you can press any button (except the "ON"
button) to activate the snooze function. The default time for this
function is 9 minutes.
NOTE: Press the "ON" button to stop the snooze function.
Equaliser
• Under "EQUALISER" you can select a standard sound format or
congure your own. Select one of the following sound formats:
"Normal" > "Classic" > "Jazz" > "Pop" > "Rock" > "Speech" > "My EQ" and
conrm with the "OK" button. The setting takes eect immediately.
• If you have selected a personalised sound format under the following
entry, select "My EQ" to apply the sound format directly. Then go into
the "My EQ" settings to adjust treble and bass.

33
EN
Time/date
Press the "Forward" and "Backward" buttons on the unit (or the "Up" and
"Down" buttons on the remote control) to select the desired menu items:
"Time/Date" > "Auto update" > "Set 12/24 hour" > "Set date format". Press
the "OK" button to make the individual settings.
Setting time/date manually:
• Press the "OK" button, now the date digit will start ashing. Press
the "Forward" and "Backward" buttons on the device (or the "Up" and
"Down" buttons on the remote control) to select the current date and
press the "OK" button to conrm.
• Then the month digit will start ashing. Press the "Forward" and
"Backward" buttons on the device (or the "Up" and "Down" buttons
on the remote control) to select the current month and press the "OK"
button to conrm.
• Then the year digit will start ashing. Press the "Forward" and
"Backward" buttons on the device (or the "Up" and "Down" buttons on
the remote control) to select the current year and press the "OK" button
to conrm.
• Then the "hour digit" will start ashing. Press the "Forward" and
"Backward" buttons on the device (or the "Up" and "Down" buttons on
the remote control) to select the current hour and press the "OK" button
to conrm.
• Press the "Forward" and "Backward" buttons on the device (or the "Up"
and "Down" buttons on the remote control) to select the current minute
and press the "OK" button to conrm. Now the time and date are set
and saved.
Auto time update: You can choose “from Any”, “from Digital Radio”, “from
FM”, or “No Update” in the system setting.
Automatic update: Select “Update from any” > Update from DAB” >
“Update from FM” > “No update” and conrm with the “OK” button.
Set 12/24 hours: Press the "Forward" and "Backward" buttons on the unit (or
the "Up" and "Down" buttons on the remote control) to select "set 24 hour"
or "set 12 hour". Press the "OK" button to conrm.
Set the date format: Press the "Forward" and "Backward" buttons on the
unit (or the "Up" and "Down" buttons on the remote control) to select "DD-
MM-YYYY" (DD-MM-YYYY) or "MM-DD-YYYY" (MM-DD-YYYY). Press the
"OK" button to conrm.

34
EN
Backlight
Under "BACKLIGHT" you can set the illumination of the display:
• Dim the display in standby mode after a certain time.
• Set the display brightness.
Setting the dimming time: select "Timeout" > "On" > "10" > "20" > "30"
> "45" > "60" > "90" > "120" > "180" seconds and press the "OK" button to
conrm.
Display brightness during operation: Select "On" and then the desired
setting: "High" > "Medium" > "Low". Conrm your selection with the "OK"
button.
Display brightness in standby mode: Select the "DIM" level and then
select the desired setting: "High" > "Medium" > "Low". Conrm your
selection with the "OK" button.
Language
• You can set the menu language under "LANGUAGE".
• In operating mode, press and hold the "MENU" button to access the
system settings. Use the "Forward" and "Backward" buttons on the
device (or the "Up" and "Down" buttons on the remote control to select
"LANGUAGE" and press the "OK" button to conrm.
• The following languages can be selected: English, French, German,
Italian, Norwegian, Polish, Portuguese, Spanish, Swedish, Turkish,
Danish, Dutch, Finnish.
Restoring factory settings
To restore the factory settings of the unit, please proceed as follows:
• In radio mode, press the MENU button until "System setting" appears
on the display. Press the "Forward" and "Backward" buttons on the
device (or the "Up" and "Down" buttons on the remote control) to select
the "FACTORY RESET" submenu.
• Press the "OK" button and conrm the following query with "YES".
• The unit is now reset to the factory settings, i.e. all alarm times, sleep
timer settings etc. are lost.
Software version
Press the "OK" button to display the system software version if required.

35
EN
DAB+ RADIO
• DAB mode is automatically selected and when the radio is connected
to the power supply for the rst time, the radio performs a full scan. The
display shows "Scanning" and a bar indicating the progress of the scan
and the total number of stations found so far.
• When the search is nished, the radio plays the rst alphanumeric
station found. Set the volume to the desired value using the "VOL +" and
"VOL -" buttons.
Channel list
1. In DAB mode, press the "MENU" button to enter the DAB menu.
2. Press the "Backward" button or the "Forward" button to select the
channel list, and then press the "OK" button to conrm.
3. A list of DAB stations is shown on the display. Once you have found the
desired station, press the "OK" button to select the station.
Full channel scan
This function allows the radio to search for all DAB stations in your area.
• In DAB mode, press the "MENU" button to enter the DAB menu. Press
the "Backward" button or the "Forward" button to select "Full Scan",
press the "OK" button to start the full scan.
Manual station selection
With this function, a specic station or a new station can be added manually
to the stations already available on the radio.
1. In DAB mode, press and hold the "MENU" button to enter the DAB menu
and press the "Backward" button or the "Forward" button to select
"Manual tune". Press the "OK" button to conrm the selection.
2. Press the "Backward" button or the "Forward" button until the desired
frequency is shown in the display and then press the "OK" button.
The frequency and the name of the radio station as well as the signal
strength are shown in the display.
3. Press the "OK" button again to add the radio station to the station list
and start it automatically.

36
EN
Delete station
This function allows you to delete stations from the station list that are
either no longer broadcasting or have changed frequency.
1. Press and hold the "MENU" button to switch to the station settings
menu.
2. Press the "Backward" button or the "Forward" button until "Prune
Invalid" is displayed and conrm with the "OK" button.
3. Press the "Backward" button or the "Forward" button to select "YES" to
conrm and delete. If you select "NO", the process is cancelled.
DRC (Dynamic Range Control)
This function allows you to remove unavailable channels from the channel
list.
1. In "DAB" mode, press and hold the "MENU" button, then press the
"Backward" button or the "Forward" button until "DRC" is displayed.
Press the "OK" button to conrm.
2. Press the "Backward" button or the "Forward" button to switch between
the levels "O", "High" and "Low". Press the "OK" button to conrm the
selection.
Recalling DAB station presets
1. You can recall your preset stations by pressing the "FAV" button. Then
press the "Backward" or "Forward" buttons on the unit (or the "Up" and
"Down" buttons on the remote control) to scroll through the preset
stations. Press the "OK" button to listen to the selected radio station.
2. If you select a preset to which no radio station has been assigned, the
message "Preset empty" is displayed.

37
EN
FM RADIO
• Switch on the radio, press the "MODE" button several times and select
"FM mode". The display shows "FM" and the radio automatically tunes
to the next FM radio station. The station name (RDS) or the frequency is
displayed if RDS is not available.
• To search manually for any radio station, press the "Backward" button
or the "Forward" button. Each time the button is pressed, the frequency
changes by 0.05 MHz.
• In FM mode, press and hold the "MENU" button and then press the
"Forward" and "Backward" buttons on the unit (or the "Up" and "Down"
buttons on the remote control) until "Scan" is displayed. Then press
the "OK" button to conrm the start of the search. The radio now
starts searching the frequency band downwards or upwards and stops
automatically when a radio station is found.
• In FM mode, press and hold the “MENU” button, and then press the
“Forward” and “Backward” buttons on the unit (or the “Up” and “Down”
buttons on the remote control) until “Auto Scan” is displayed. Press the
"OK" button to conrm and start the automatic search. The radio starts
searching the entire FM band (87.5-108 MHz) and automatically stores
all found radio stations in the "Preset list memory".
NOTE: Each time you perform an "Auto scan" and scan the entire frequency
band, the station list in the "Preset list memory" is automatically updated.
Station information in FM mode
With this function, information about the current station can be shown in
the display. By pressing the "MENU" button several times, you can scroll
through the following information:
RDS (scrolling text): The station can display a scrolling text message about
the current programme.
Programme type: This describes the type of programme being broadcast.
Audio mode: The display shows whether the received radio station is
broadcast in stereo or mono.
Time/date (time/date): The time and date are automatically updated by
the radio's time signal (if RDS is available).

38
EN
Search setting (how to search for radio stations)
1. In FM mode, press and hold the “MENU” button and then press the
“Forward” and “Backward” buttons on the unit (or the “Up” and “Down”
buttons on the remote control) to switch select the “Scan” setting and
press the “OK” button to start the scan.
2. Press the "Forward" and "Backward" buttons on the unit (or the "Up" and
"Down" buttons on the remote control) to select "Strong station only"
or "All stations". Then press the "OK" button to conrm the start of the
search. If you select "Strong station only", the radio will only search and
play stations with a strong signal. If you select "All stations", the radio
also searches for stations with a weak signal and plays them.
Audio settings
1. In FM mode, press and hold the “MENU” button and then press the
“Forward” and “Backward” buttons on the unit (or the “Up” and “Down”
buttons on the remote control) to switch to select "Auto" and press the
"OK" button to conrm the setting.
2. Press the "Forward" and "Backward" buttons on the unit (or the "Up"
and "Down" buttons on the remote control) to select "Forced mono"
or "Stereo allowed". If the radio signal is weak, please select "Forced
mono" to get better sound quality.

39
EN
STATION MEMORY (DAB+/FM RADIO)
Memory for preset radio stations
This function allows up to 99 radio stations to be programmed into memory
and stored in DAB and FM mode.
Storing DAB/FM stations as preset stations
1. Follow the instructions in the user manual to select a radio station.
2. Then press and hold the "FAV" button. The display shows "X (Empty)" if
no previous station has been stored in the preset memory.
3. Press the "Forward" and "Backward" buttons on the device (or the "Up"
and "Down" buttons on the remote control) to scroll through the preset
numbers and select the radio station preset you want. You can choose
between the memory locations 1-99.
4. Press the "OK" button to save to the radio station. The message "Preset
XX saved" appears on the display.
Recalling favourite stations
The “FAV” button allows you to recall your favourite stations. Press the
FAV button to call up the list of favourite stations you have preset. When
listening to the radio, press the “FAV” button and then the “OK” button to
preset the current station as one of your favourite stations.
BT
To connect the DAB radio to your smartphone:
1. Press the "MODE" button until "BT" appears in the display.
2. Then switch on the BT function on your smartphone, search for the
pairing name "Vertico Swing DAB" and select it to connect your
smartphone to the DAB radio.
3. After the two devices have been successfully paired, a notication tone
sounds. You can now play music via the BT connection and adjust the
volume, both via the radio and your smartphone.

40
EN
AUX INPUT
In "AUX IN" mode, audio signals are played back from an external source
connected via an audio cable, e.g. from an MP3 player. To play back audio
signals via the "AUX IN" mode:
1. First turn down the volume on the radio. Then connect the external
audio source to the AUX-In 3.5 mm stereo jack.
2. Press the "MODE" button until "AUX in" appears in the display.
3. Now adjust the volume of the radio (and, if necessary, the volume of the
audio source device).
USB CONNECTION
1. Press the "MODE" button until the display shows "USB" to play music
from a USB stick.
2. Insert the USB stick into the USB port and the unit automatically starts
playing the rst track on the USB stick.
3. Use the "Backward" button or the "Forward" button to play the previous
or next track.
4. The le name is shown on the display.
NOTE: The USB port does not support device charging or data transfer from
a computer.
CD PLAYBACK
1. Press the "MODE" button until the display shows "CD" to play music
from a CD.
2. The radio display will now show "Reading..." followed by "No disc".
3. Press the "Eject" button on the device or on the remote control to open
the CD compartment. Insert the CD into the tray and press the "Eject"
button again. The CD compartment closes again and the rst track on
the CD is now played.
CD functions
• To jump between titles, use the "Backward" button or the "Forward"
button on the unit or on the remote control
• Play and pause the music by pressing the "Play/pause" button on the
unit or on the remote control.

41
EN
• To skip forward or back during playback of a track, press and hold the
"Backward" button or the "Forward" button on the remote control and
release the button when you want to stop skipping.
• To eject the CD again, press the "Eject" button on the device or on the
remote control to open the CD compartment.
• Press and hold the "OK" button on the unit or on the remote control to
stop the music playback of the CD. This also shows how many tracks are
on the CD and how long the playback will take in total. Press the "Play/
pause" button to restart music playback from the CD.
Putting together a CD track programme
1. When the CD is stopped and no music is playing, you can programme
the CD player to play the tracks in a specic order.
2. To do this, simply press the "FAV" button on the unit or on the remote
control to enter "Programming mode".
3. Once you have activated "Programming mode", the display will show
"T001" to indicate the rst track on the CD as "P01". You can now select
which title you want to save as programme number "P01" in the playlist
by scrolling to the title you want to select with the "<<" and ">>"
buttons. When you have found the title you selected for "P01", press the
"OK" button to select the title and you will be prompted to select the
next programmed title.
4. For the next song, the display shows "P02" to indicate programme 2.
Now use the "Backward" button or the "Forward" button to scroll to the
song you want to select as "P02". When you have found the track for
programme 2, press the "OK"' button to select the track and you will
then be prompted to select the next programmed track.
5. After you have completed the full programming of your track selection,
press the "Play/pause" button to play the programmed tracks.
6. When programme playback is activated, press the "Eject" button to exit
programme playback mode again.
SNOOZE FUNCTION
When the alarm sounds, you can press any button (except the "ON" button)
to activate the snooze function. The default time for this function is 9
minutes.
NOTE: Press the "ON/standby" button to stop the snooze function.

42
EN
DISPOSAL CONSIDERATIONS
If there is a legal regulation for the disposal of
electrical and electronic devices in your country,
this symbol on the product or on the packaging
indicates that this product must not be disposed of
with household waste. Instead, it must be taken to
a collection point for the recycling of electrical and
electronic equipment. By disposing of it in accordance
with the rules, you are protecting the environment and
the health of your fellow human beings from negative
consequences. For information about the recycling
and disposal of this product, please contact your local
authority or your household waste disposal service.
This product contains batteries. If there is a legal
regulation for the disposal of batteries in your country, the
batteries must not be disposed of with household waste.
Find out about local regulations for disposing of batteries.
By disposing of them in accordance with the rules, you are
protecting the environment and the health of your fellow
human beings from negative consequences.
DECLARATION OF CONFORMITY
Manufacturer:
Chal-Tec GmbH, Wallstrasse 16, 10179 Berlin,
Germany.
Importer for Great Britain:
Berlin Brands Group UK Limited
PO Box 42
272 Kensington High Street
London, W8 6ND
United Kingdom
Hereby, Chal-Tec GmbH declares that the radio
equipment type Vertico Swing DAB is in compliance with
Directive 2014/53/EU. The full text of the EU declaration
of conformity is available at the following internet
address: use.berlin/10041137
For Great Britain: Hereby, Chal-Tec GmbH declares
that the radio equipment type Vertico Swing DAB is in
compliance with the relevant statutory requirements. The
full text of the declaration of conformity is available at the
following internet address: use.berlin/10041137

43
FR
Cher client, chère cliente,
Toutes nos félicitations pour l’acquisition de ce nouvel
appareil. Lisez attentivement les indications suivantes
et suivez-les pour éviter d'éventuels dommages.
Nous ne saurions être tenus pour responsables des
dommages dus au non-respect des consignes et à la
mauvaise utilisation de l’appareil. Scannez le QR-Code
pour obtenir la dernière version du mode d'emploi
ainsi que d'autres informations concernant le produit :
SOMMAIRE
Fiche technique 44
Consignes de sécurité 45
Descriptif de l’appareil 46
Télécommande 48
Mise en marche et utilisation 49
Radio DAB+ 54
Radio FM 56
Mémorisation des stations (DAB+/radio FM) 58
BT 59
Entrée AUX 59
Port USB 59
Lecture d’un CD 60
Fonction répétition de l’alarme 61
Informations sur le recyclage 62
Déclaration de conformité 62

44
FR
FICHE TECHNIQUE
Numéro d'article 10041137, 10041138
Alimentation 220-240V ~ 50/60Hz
Puissance d'entrée 2 A
Puissance de sortie 2 x 10 W RMS
Puissance consommée (en veille) < 1 W
Fréquence DAB 174,928 - 239,200 MHz
Fréquence FM 87,5 – 108 MHz
Norme WiFi
802.11 b/g/n
Fréquence de Wi-Fi
2402-2480 MHz
Puissance d'émission de WiFi (max)
< 20 dBm
BT Version 5.0
Fréquence de BT 2402-2480 MHz
Puissance d'émission BT (max) 2 dBm

45
FR
CONSIGNES DE SÉCURITÉ
Protection contre l'humidité
• Pour réduire le risque d'incendie ou d'électrocution, n'exposez pas ce
produit à l'eau ou à l'humidité.
• Ne l'utilisez pas dans des endroits où il pourrait tomber dans l'eau ou
être éclaboussé.
Ne pas ouvrir l'appareil
• N'essayez pas d'ouvrir l'appareil an d'éviter tout contact avec
des composants haute tension ou une exposition dangereuse aux
radiations.
Décharge électrostatique
• Si une décharge électrostatique (ESD) se produit à l'avant ou à
proximité d'une pièce ou d'un bouton de cet appareil, il est possible que
l'appareil cesse de fonctionner et/ou s'éteigne immédiatement. Il s'agit
d'une situation normale qui vise à protéger l'appareil et les composants
internes de tout dommage. Dans un tel cas, veuillez réinitialiser
l'appareil (en éteignant et en rallumant la radio) an de reprendre un
fonctionnement normal.
Protection contre la chaleur
• La pile ne doit pas être exposée à une chaleur excessive telle que le
soleil, le feu ou équivalent.

46
FR
DESCRIPTIF DE L'APPAREIL
1 Aichage LCD
2 Prise de l'adaptateur secteur (CC)
3 Antenne

47
FR
4 Entrée AUX
5 Bouton Marche
6 Touche PLAY/PAUSE
7 Touche info/stop
8 Touche Retour
9 Touche Suivant
10 Touche OK
11 Touche Eject (éjection du
CD)
12 Prise casque
13 Touche mode
14 Touche menu
15 Touche Volume (-) :
Diminuer le volume
16 Touche Volume (+) :
Augmenter le volume
17 Touche Retour menu
18 Touche Favoris
19 Port USB

48
FR
TÉLÉCOMMANDE
1 Touche de veille
2 Touche Eject
(éjection du CD) :
Appuyez pour ouvrir/
fermer la trappe à
CD
3 Touche d'égaliseur
4 Touche de réglage
de la luminosité
5 Touche de mode
veille
6 Touche Programme
7 Retour/Titre
précédent
8 Touche Stop
9 Avance / Titre
suivant
10 Touche Info
11 Touche mode
12 Touche Menu/Retour
13 Touche de curseur
vers le haut
14 Touche de curseur
gauche
15 Touche OK et PLAY/
PAUSE
16 Touche de curseur
vers le bas
17 Touche de curseur
droite
18 Touche Volume (-)
19 Touche Volume (+)
20 Saisie de lettres et
de chires
21 Touche FAV
22 Touche de sourdine

49
FR
MISE EN MARCHE ET UTILISATION
Première mise en marche
• Avant la mise en marche, assurez-vous que la tension indiquée sur
la plaque signalétique correspond à celle de votre domicile. Utilisez
l'adaptateur secteur fourni pour brancher la radio DAB ans une prise.
Fonctionnement de base - premiers pas
• Branchez l'appareil à l'alimentation électrique et déployez
complètement l'antenne télescopique. La radio passe en mode veille et
l'écran aiche « 01/01/2020 00:00 ». Appuyez ensuite brièvement sur la
touche «MODE» pour allumer la radio.
Paramètres système
1. Appuyez sur la touche «MENU» pour accéder au menu à partir de
n'importe quel mode.
2. Appuyez sur les touches «Avance» et «Retour» de l'appareil ou sur
les touches «Haut» ou «Bas» de la télécommande pour sélectionner
les paramètres du système, puis appuyez sur la touche «OK» pour
conrmer.
Mode veille
• L'appareil dispose d'une fonction de minuterie de mise en veille qui
éteint la radio après un certain temps si aucune action n'a été eectuée
entre-temps.
• Appuyez sur la touche «Avance» ou «Retour» pour sélectionner
«Sleep time o (mode mise en veille désactivé) > « 15 » > « 30 »>
«45»> « 60 » > «90 » > « 120 » > « 150» > « 180 » minutes, puis
appuyez sur la touche «OK» pour conrmer.
Alarme
REMARQUE : assurez-vous que l'heure et la date sont exactes avant de
régler une alarme.
1. Appuyez sur la touche «MENU» et sélectionnez Alarme, « Alarme 1»
s'aiche. Appuyez sur la touche «OK» pour conrmer le réglage de
l'Alarme1.
2. Appuyez plusieurs fois sur la touche «OK» pour activer ou désactiver
l'Alarme 1.

50
FR
3. Sélectionnez la fréquence de l'Alarme 1, appuyez sur la touche «OK» et
utilisez les touches «Avance» et «Retour» de l'appareil (ou les touches
«Haut» et «Bas» de la télécommande) pour sélectionner le réglage
souhaité: «Daily» (tous les jours) > «Once» (une fois) > «Weekends»
(le week-end)> «Weekdays» (jours de la semaine). Appuyez sur la
touche «OK» pour conrmer et retourner au menu.
4. Pour régler l'heure de l'alarme, appuyez sur les touches « Avance » et
« Retour » de l'appareil ou sur les touches « Haut » ou « Bas » de la
télécommande pour sélectionner « hour » (l'heure), puis appuyez sur
la touche «OK» pour conrmer. Appuyez sur les touches «Avance»
et «Retour» de l'appareil (ou les touches «Haut» et «Bas» de la
télécommande) pour sélectionner les minutes et appuyez sur «OK»
pour conrmer.
5. Sélectionnez la source de l'Alarme : appuyez sur la touche «OK» et
utilisez les touches «Avance» et «Retour» de l'appareil (ou les touches
«Haut» et «Bas» de la télécommande) pour sélectionner le réglage
souhaité : «Buzzer» > «Radio numérique» > «Radio FM». Appuyez sur
la touche «OK» pour conrmer et retourner au menu.
6. Sélectionnez la durée de l'Alarme : appuyez sur la touche «OK» et
utilisez les touches «Avance» et «Retour» de l'appareil (ou les touches
«Haut» et «Bas» de la télécommande) pour sélectionner le réglage
souhaité : «15» > «30» > «45» > «60» > «90» > «120» minutes.
Appuyez sur la touche «OK» pour conrmer et retourner au menu.
7. Sélectionnez Volume et appuyez sur la touche «OK» pour régler le
volume de l'alarme.
8. «Alarme 2» : pour régler l'Alarme 2, veuillez répéter les étapes 1 à 7.
REMARQUE : Le volume de l'alarme augmente progressivement jusqu'à
atteindre le volume d'alarme que vous avez déni.
Arrêter l'alarme
• Lorsque l'alarme retentit, vous pouvez l'arrêter immédiatement en
appuyant sur le bouton «Marche».
• Lorsque le réveil retentit, appuyez sur n'importe quelle touche (sauf la
touche «Marche») pour activer la fonction de répétition de l'alarme. La
durée par défaut de cette fonction est de 9 minutes.
REMARQUE : appuyez sur la touche de Marche pour annuler la fonction de
répétition de l'alarme.

51
FR
Égaliseur
• Sous «EQUALISER», vous pouvez sélectionner un format audio
standard ou congurer le vôtre. Sélectionnez l'un des formats sonores
suivants: «Normal» > «Classique» > «Jazz» > «Pop» > «Rock»>
«Speech» (Discours) > «My EQ» (mon égaliseur) et conrmez en
appuyant sur «OK». Le réglage prend eet immédiatement.
• Si vous avez choisi un format audio personnalisé sous l'entrée suivante,
sélectionnez «My EQ» (Mon EQ) pour appliquer directement le format
audio. Allez ensuite dans les paramètres «My EQ» pour régler les aigus
et les basses.
Heure / date
Appuyez sur les touches «Avance» et «Retour» de l'appareil (ou sur les
touches «Haut» et «Bas» de la télécommande) pour sélectionner les
éléments de menu souhaités : «Time/Date» (heure/date) > «Auto update»
(mise à jour automatique)»> «Set 12/24 hour» (régler format de l'heure
12/24) > «Set date format» (régler le format de la date). Appuyez sur la
touche «OK» pour conrmer chaque réglage.
Régler l'heure et la date manuellement :
• Appuyez sur la touche «OK», le chire de la date se met à clignoter.
Appuyez sur les touches «Avance» et «Retour» de l'appareil (ou les
touches «Haut» et «Bas» de la télécommande) pour sélectionner la
date actuelle et appuyez sur «OK» pour conrmer.
• Le chire du mois se met alors à clignoter. Appuyez sur les touches
«Avance» et «Retour» de l'appareil (ou les touches «Haut» et «Bas»
de la télécommande) pour sélectionner le mois en cours et appuyez sur
«OK» pour conrmer.
• Le chire de l'année se met alors à clignoter. Appuyez sur les touches
«Avance» et «Retour» de l'appareil (ou les touches «Haut» et «Bas»
de la télécommande) pour sélectionner l'année en cours et appuyez sur
«OK» pour conrmer.
• Le chire de l'heure se met alors à clignoter. Appuyez sur les touches
«Avance» et «Retour» de l'appareil (ou les touches «Haut» et «Bas»
de la télécommande) pour sélectionner l'heure exacte et appuyez sur
«OK» pour conrmer.
• Appuyez sur les touches «Avance» et «Retour» de l'appareil (ou les
touches «Haut» et «Bas» de la télécommande) pour sélectionner les
minutes exactes et appuyez sur «OK» pour conrmer. L'heure et la date
sont maintenant réglées et enregistrées.

52
FR
Mise à jour automatique de l'heure : vous pouvez sélectionner « from
Any» (de DAB et FM) > « from Digital Radio » (de la radio numérique)>
« from FM » (de la FM) ou « No Update » (pas de mise à jour) dans les
paramètres du système.
Mise à jour automatique : sélectionnez « Update from any » (mise à jour
à partir de n'importe quelle station) > « Update from DAB » (mise à jour à
partir du DAB) > « Update form FM » (mise à jour à partir de la FM) > « No
update » (pas de mise à jour) et conrmez en appuyant sur «OK».
Réglage du format 12/24 heures : Appuyez sur les touches «Avance»
et «Retour» de l'appareil (ou sur les touches «Haut» et «Bas» de la
télécommande) pour sélectionner « set 24 hour » (format 24 heures) ou
«set 12 hour » (format 12 heures). Conrmez en appuyant sur «OK».
Réglage du format de la date : Appuyez sur les touches «Avance»
et «Retour» de l'appareil (ou sur les touches «Haut» et «Bas» de la
télécommande) pour sélectionner «DD-MM-YYYY» (JJ-MM-AAAA) ou «MM-
DD-YYYY» (MM-JJ-AAAA). Conrmez en appuyant sur «OK».
Rétroéclairage
Sous «BACKLIGHT» (rétroéclairage), vous pouvez régler l'éclairage de
l'écran :
• Diminuez l'intensité de l'écran en mode veille après un certain temps.
• Réglez la luminosité de l'écran.
Réglage du temps avant atténuation : Sélectionnez «Timeout» (délai
d'attente) > «on» (activé) > «10» > «20» > «30» > «45» > «60» > «90»
> «120» > «180» secondes et appuyez sur «OK» pour conrmer.
Luminosité de l'écran en cours d'utilisation : Sélectionnez «ON» (activé),
puis le réglage souhaité : «High» (élevé) > «Medium» (moyen) > «Low»
(faible). Appuyez sur la touche «OK» pour conrmer votre sélection.
Luminosité de l'écran en cours d'utilisation : Sélectionnez «ON» (activé),
puis le réglage souhaité : «High» (élevé) > «Medium» (moyen) > «Low»
(faible). Appuyez sur la touche «OK» pour conrmer votre sélection.

53
FR
Langue
• Vous pouvez régler la langue du menu sous «LANGUAGE» (langue).
• En mode utilisation, appuyez longuement sur la touche «MENU» pour
accéder aux paramètres système. Appuyez sur les touches «Avance»
et «Retour» de l'appareil (ou les touches «Haut» et «Bas» de la
télécommande) pour sélectionner «LANGUAGE» (langue) et appuyez
sur «OK» pour conrmer.
• Vous pouvez sélectionner les langues suivantes : Anglais, français,
allemand, italien, norvégien, polonais, portugais, espagnol, suédois,
turc, danois, néerlandais, nlandais.
Réinitialisation aux paramètres d'usine
Pour restaurer les paramètres d'usine de l'appareil, veuillez procéder
comme suit :
• En mode radio, appuyez sur la touche «MENU» jusqu'à ce que «
System setting » (Paramètres système) s'aiche à l'écran. Appuyez
sur les touches «Avance» et «Retour» de l'appareil (ou les touches
«Haut» et «Bas» de la télécommande) pour sélectionner le sous-menu
«FACTORY RESET » (réinitialisation aux paramètres d'usine).
• Appuyez sur la touche «OK» et conrmez la demande suivante par
«YES» (oui).
• L'appareil est alors réinitialisé aux réglages d'usine, c'est-à-dire que
toutes les heures de réveil, les réglages de la minuterie de sommeil, etc.
sont perdus.
Version de logiciel (SW version)
Appuyez sur la touche «OK» pour aicher la version du logiciel système si
nécessaire.

54
FR
RADIO DAB+
• Le mode DAB est automatiquement sélectionné et lorsque vous
branchez la radio pour la première fois sur le secteur, elle eectue une
recherche complète. L'écran aiche Scanning et une barre indiquant
la progression de la recherche, ainsi que le nombre total de stations
trouvées jusqu'à présent.
• Lorsque la recherche est terminée, la radio lit la première station
alphanumérique trouvée. Réglez le volume à la valeur souhaitée à l'aide
des touches «VOL+» et «VOL -».
Liste des stations
1. En mode DAB, appuyez sur la touche «MENU» pour accéder au menu
DAB.
2. Appuyez sur les touches «Retour» ou «Avance» de l'appareil pour
sélectionner la liste des stations, puis appuyez sur «OK» pour
conrmer.
3. Une liste de stations DAB s'aiche à l'écran. Une fois que vous avez
trouvé la station souhaitée, appuyez sur la touche «OK» pour la
sélectionner.
Recherche complète
Cette fonction permet à la radio de rechercher toutes les stations DAB dans
votre région.
• En mode DAB, appuyez sur la touche «MENU» pour accéder au menu
DAB. Appuyez sur la touche «Retour» ou «Avance» pour sélectionner
«Full Scan» (recherche complète), appuyez sur la touche «OK» pour
lancer la recherche complète.
Sélection manuelle des stations
Cette fonction permet d'ajouter manuellement une station spécique ou
une nouvelle station à celles déjà disponibles sur la radio.
1. En mode DAB, maintenez la touche «MENU» pour accéder au
menu DAB, puis appuyez sur la touche «Retour» ou «Avance» pour
sélectionner « Manual tune » (réglage manuel). Appuyez sur la touche
«OK» pour conrmer la sélection.
2. Appuyez sur la touche «Retour» ou «Avance» jusqu'à ce que la
fréquence souhaitée s'aiche à l'écran, puis appuyez sur la touche
«OK». La fréquence et le nom de la station de radio ainsi que l'intensité
du signal s'aichent à l'écran.

55
FR
3. Appuyez à nouveau sur la touche «OK» pour ajouter la station de radio
à la liste des stations et la lancer automatiquement.
Pour supprimer une station
Cette fonction permet d'eacer de la liste les statons qui n'émettent plus ou
ont changé de fréquence.
1. Maintenez la touche «MENU» pour accéder au menu de réglage des
stations.
2. Appuyez sur la touche «Retour» ou «Avance» jusqu'à ce que « Prune
Invalid» (suppression des stations non valides) s'aiche et conrmez en
appuyant sur la touche «OK».
3. Appuyez sur la touche «Retour» ou «Avance» pour sélectionner
«YES» (Oui), conrmer et supprimer. Sélectionnez «NO» (non) pour
annuler l'opération.
DRC (Dynamic Range Control)
Cette fonction vous permet de supprimer tous les stations indisponibles de
la liste.
1. En mode DAB, maintenez la touche «MENU», puis appuyez sur la
touche «Retour» ou «Avance» jusqu'à ce que DRC s'aiche. Conrmez
en appuyant sur «OK».
2. Appuyez sur «Retour» ou «Avance» pour basculer entre les niveaux
«O» (désactivé), «High» (élevé) et «Low» (bas). Appuyez sur la
touche «OK» pour conrmer votre sélection.
Rappel des stations DAB préréglées
1. Vous pouvez rappeler vos stations présélectionnées en appuyant sur la
touche «FAV». Appuyez ensuite sur les touches «Retour» ou «Avance»
de l'appareil (ou sur les touches «Haut» et «Bas» de la télécommande)
pour faire déler les stations présélectionnées. Appuyez sur la touche
«OK» pour écouter la station de radio sélectionnée.
2. Si vous sélectionnez un emplacement mémoire auquel aucune station
de radio n'a été attribuée, le message « preset empty » (emplacement
mémoire vide) s'aiche.

56
FR
RADIO FM
• Allumez la radio, appuyez plusieurs fois sur la touche «MODE» et
sélectionnez le mode FM. L'écran aiche FM et la radio se règle
automatiquement sur la station de radio FM la plus proche. Le nom de
la station (RDS) ou la fréquence s'aiche si le RDS n'est pas disponible.
• Pour rechercher manuellement n'importe quelle station de radio,
appuyez sur la touche «Retour» ou «Avance». À chaque pression sur la
touche, la fréquence change de 0,05 MHz.
• En mode FM, appuyez longuement sur la touche «MENU», puis
appuyez sur les touches «Avance» et «Retour» de l'appareil (ou sur
les touches «Haut» et «Bas» de la télécommande) jusqu'à ce que
Scan (recherche) s'aiche. Appuyez ensuite sur la touche «OK» pour
démarrer la recherche. La radio commence alors à balayer la bande
de fréquences vers le bas ou vers le haut et s'arrête automatiquement
lorsqu'une station de radio est trouvée.
• En mode FM, appuyez longuement sur la touche «MENU», puis
appuyez sur les touches «Avance» et «Retour» de l'appareil (ou sur
les touches «Haut» et «Bas» de la télécommande) jusqu'à ce que
«Auto Scan» (recherche automatique) s'aiche. Appuyez ensuite sur
la touche «OK» pour démarrer la recherche automatique. La radio
commence à balayer toute la bande FM (87,5-108 MHz) et enregistre
automatiquement toutes les stations de radio trouvées dans la « Preset
list memory » (mémoire des listes de présélections).
REMARQUE : chaque fois que vous eectuez un Auto Scan (balayage
automatique) et que vous balayez toute la bande de fréquences, la
liste des stations dans la « Preset list memory » (mémoire des listes de
présélections) est automatiquement mise à jour.
Informations sur les stations en mode FM
Cette fonction permet d'aicher à l'écran des informations sur la station
actuelle. Appuyez plusieurs fois sur la touche «MENU» pour faire déler les
informations suivantes :
RDS (texte délant) : La station peut aicher un message délant sur le
programme en cours.
Program type (type de programme) : Le type de programme diusé est
décrit ici.
Audio Mode (mode audio) : L'écran indique si la station de radio reçue est
diusée en stéréo ou en mono.

57
FR
Time/date (heure/date) : L'heure et la date sont automatiquement mises à
jour par le signal horaire de la radio (si le RDS est disponible).
Réglage de la recherche (mode de recherche des stations de radio)
1. En mode FM, appuyez longuement sur la touche «MENU», puis
appuyez sur les touches «Avance» et «Retour» de l'appareil (ou sur les
touches «Haut» et «Bas» de la télécommande) pour sélectionner le
réglage « Scan » et appuyez sur «OK» pour lancer la recherche.
2. Appuyez sur les touches «Avance» et «Retour» de l'appareil (ou sur
les touches «Haut» et «Bas» de la télécommande) pour sélectionner
« Strong station only » (stations fortes uniquement) ou « All stations
» (toutes les stations). Appuyez ensuite sur la touche «OK» pour
démarrer la recherche. Si vous sélectionnez «Strong station only»
(uniquement les stations fortes), la radio ne recherche et ne lit que les
stations avec un signal fort. Si vous sélectionnez «All stations» (toutes
les stations), la radio recherche et diuse également les stations avec
un signal faible.
Paramètres audio
1. En mode FM, appuyez longuement sur la touche «MENU», puis
appuyez sur les touches «Avance» et «Retour» de l'appareil (ou sur
les touches «Haut» et «Bas» de la télécommande) pour sélectionner
«Auto» et appuyez sur «OK» pour conrmer le réglage.
2. Appuyez sur les touches «Avance» et «Retour» de l'appareil (ou sur
les touches «Haut» et «Bas» de la télécommande) pour sélectionner
«Forced Mono » (Mono forcé) ou « Stereo allowed » (Stéréo autorisée).
Si le signal radio est faible, veuillez sélectionner « Forced mono » (mono
forcé) pour obtenir une meilleure qualité de son.

58
FR
MÉMORISATION DES STATIONS
(DAB+/RADIO FM)
Mémoire des stations de radio présélectionnées
Cette fonction permet de programmer jusqu'à 99 stations de radio en
mémoire et de les enregistrer en mode DAB et FM.
Mémorisation des stations DAB/FM en tant que stations
présélectionnées
1. Suivez les instructions du mode d'emploi pour sélectionner une station
de radio.
2. Maintenez ensuite la touche FAV. L'écran aiche « X (Empty) » [X (vide)]
si aucune station précédente n'a été enregistrée dans la mémoire de
présélection.
3. Appuyez ensuite sur les touches «Avance» ou «Retour» de l'appareil
(ou sur les touches «Haut» et «Bas» de la télécommande) pour faire
déler les numéros de présélection et choisir l'emplacement mémoire
souhaité pour la station de radio. Vous pouvez choisir entre les
emplacements de mémoire 1-99.
4. Appuyez sur la touche «OK» pour mémoriser la station de radio. Le
message « Preset XX saved » (emplacement de mémoire XX enregistré)
s'aiche à l'écran.
Consulter ses stations préférées
La touche «FAV» vous permet d'accéder à vos stations préférées. Appuyez
sur la touche «FAV» pour aicher la liste de vos stations préférées
présélectionnées. Lorsque vous écoutez la radio, appuyez sur la touche
«FAV» puis sur la touche «OK» pour ajouter la station actuelle comme
l'une de vos stations préférées.

59
FR
BT
Connexion de la radio DAB à votre smartphone :
1. Appuyez sur la touche «MODE» jusqu'à ce que l'écran aiche BT.
2. Activez ensuite la fonction BT sur votre smartphone, recherchez le nom
d'appairage «Vertico Swing DAB» et sélectionnez-le pour connecter
votre smartphone à la radio DAB.
3. Une fois que les deux appareils ont été couplés avec succès, un son de
notication retentit. Vous pouvez maintenant écouter de la musique par
connexion BT et régler le volume sur la radio aussi bien que sur votre
smartphone.
ENTRÉE AUX
En mode «AUX IN», les signaux audio sont lus à partir d'une source externe
connectée par câble audio, par exemple un lecteur MP3. Pour lire des
signaux audio avec le mode «AUX IN » :
1. Baissez le volume sur la radio. Connectez la source audio externe à la
prise jack 3,5 mm AUX IN.
2. Appuyez sur la touche «MODE» jusqu'à ce que l'écran aiche «Aux In».
3. Réglez maintenant le volume de la radio (et si nécessaire celui de
l'appareil source audio).
PORT USB
1. Appuyez sur la touche «MODE» jusqu'à ce que USB s'aiche à l'écran
pour lire la musique d'une clé USB.
2. Insérez la clé USB dans le port USB et l'appareil commencera
automatiquement à lire le premier titre de la clé USB.
3. Utilisez la touche «Retour» ou «Avance» pour lire le titre précédent ou
suivant.
4. L'écran aiche le nom du chier.
REMARQUE : le port USB ne prend pas en charge le chargement d'appareils
ou le transfert de données depuis un ordinateur.

60
FR
LECTURE D'UN CD
1. Appuyez sur la touche «MODE» jusqu'à ce que CD s'aiche à l'écran
pour lire la musique d'un CD.
2. L'écran de la radio aiche maintenant «Reading...» (lecture...) suivi de
«No Disc » (pas de disque).
3. Appuyez sur la touche «Eject » de l'appareil ou de la télécommande
pour ouvrir le compartiment CD. Insérez le CD dans le compartiment
et appuyez à nouveau sur la touche «Eject ». Le compartiment CD se
referme et la première piste du CD est maintenant lue.
Fonctions CD
• Pour passer d'une piste à l'autre, utilisez les touches «Retour» ou
«Avance» de l'appareil ou de la télécommande.
• Pour lire ou mettre en pause la musique, appuyez sur la touche « Play/
Pause » de l'appareil ou de la télécommande.
• Pour avancer ou reculer d'une piste pendant la lecture, maintenez la
touche «Retour» ou «Avance» de la télécommande et relâchez-la
lorsque vous souhaitez arrêter de sauter des pistes.
• Appuyez sur la touche « Eject » de l'appareil ou de la télécommande
pour éjecter le CD en ouvrant le compartiment.
• Maintenez la touche «OK» de l'appareil ou de la télécommande pour
arrêter la lecture de la musique du CD. Le nombre de pistes sur le CD
et la durée totale de la lecture sont également indiqués. Appuyez sur la
touche « Play/Pause » pour redémarrer la lecture de la musique du CD.
Création d'un programme de titres de CD
1. Si le CD est arrêté et qu'aucune musique n'est lue, vous pouvez
programmer le lecteur de CD pour qu'il lise les pistes dans un ordre
choisi.
2. Pour cela, appuyez sur la touche « FAV » de l'appareil ou de la
télécommande pour accéder au « Programming mode » (mode de
programmation).
3. Dès que vous avez activé le « Programming mode » (mode de
programmation), l'écran aiche « T001 » pour indiquer la première piste
du CD sous la forme « P01 ». Vous pouvez maintenant sélectionner le
titre que vous souhaitez enregistrer comme numéro de programme
« P01 » dans la liste de lecture en faisant déler la liste à l'aide des
touches « << » et « >> » jusqu'au titre que vous souhaitez sélectionner.
Une fois que vous avez trouvé le titre que vous avez choisi pour « P01 »,
appuyez sur la touche «OK» pour sélectionner le titre, puis vous serez
invité à choisir le titre programmé suivant.

61
FR
4. Pour le titre suivant, « P02 » s'aiche à l'écran pour indiquer le
programme2. Utilisez maintenant la touche «Retour» ou « Avance»
pour faire déler jusqu'à la chanson que vous souhaitez sélectionner
comme « P02 ». Une fois que vous avez trouvé le titre que vous avez
choisi le Programme 2, appuyez sur la touche «OK» pour sélectionner
le titre, puis vous serez invité à choisir le titre programmé suivant.
5. Une fois terminée la programmation complète de votre sélection
de titres, appuyez sur la touche « Play/Pause » pour lire les titres
programmés.
6. Si la lecture programmée est activée, appuyez sur la touche « Eject »
pour quitter le mode de lecture programmée.
FONCTION RÉPÉTITION DE L'ALARME
Lorsque le réveil retentit, appuyez sur n'importe quelle touche (sauf la
touche « Marche ») pour activer la fonction de répétition de l'alarme. La
durée par défaut de cette fonction est de 9 minutes.
REMARQUE : Appuyez sur la touche de Veille pour annuler la fonction de
répétition de l'alarme.

62
FR
CONSEILS POUR LE RECYCLAGE
S‘il existe une réglementation pour l‘élimination ou le
recyclage des appareils électriques et électroniques
dans votre pays, ce symbole sur le produit ou sur
l‘emballage indique que cet appareil ne doit pas
être jeté avec les ordures ménagères. Vous devez le
déposer dans un point de collecte pour le recyclage
des équipements électriques et électroniques.
La mise au rebut conforme aux règles protège
l‘environnement et la santé de vos semblables des
conséquences négatives. Pour plus d‘informations
sur le recyclage et l‘élimination de ce produit, veuillez
contacter votre autorité locale ou votre service de
recyclage des déchets ménagers.
Ce produit contient des piles. S‘il existe une
réglementation pour l‘élimination ou le recyclage
des piles dans votre pays, vous ne devez pas les
jeter avec les ordures ménagères. Renseignez-vous
sur les dispositions locales relatives à la collecte
des piles usagées. La mise au rebut conforme aux
règles protège l‘environnement et la santé de vos
semblables des conséquences négatives.
DÉCLARATION DE CONFORMITÉ
Fabricant :
Chal-Tec GmbH, Wallstraße 16, 10179 Berlin,
Allemagne.
Importateur pour la Grande Bretagne :
Berlin Brands Group UK Limited
PO Box 42
272 Kensington High Street
London, W8 6ND
United Kingdom
Le soussigné, Chal-Tec GmbH, déclare
que l’équipement radioélectrique du type
Vertico Swing DAB est conforme à la directive
2014/53/UE. Le texte complet de la déclaration UE de
conformité est disponible à l’adresse internet suivante
: use.berlin/10041137

63
ES
Estimado cliente:
Le felicitamos por la adquisición de este producto.
Lea atentamente el siguiente manual y siga
cuidadosamente las instrucciones de uso con el n de
evitar posibles daños. La empresa no se responsabiliza
de los daños ocasionados por un uso indebido del
producto o por haber desatendido las indicaciones
de seguridad. Escanee el siguiente código QR para
obtener acceso al manual de usuario más reciente y
otra información sobre el producto.
ÍNDICE
Datos técnicos 64
Indicaciones de seguridad 65
Descripción general del aparato 66
Mando a distancia 68
Puesta en funcionamiento y control 69
Radio DAB+ 74
Radio FM 76
Memoria de emisoras (radio DAB+/FM) 78
BT 79
Entrada AUX 79
Conexión USB 79
Reproducción de CD 80
Posponer la alarma 81
Indicaciones sobre la retirada del aparato 82
Declaración de conformidad 82
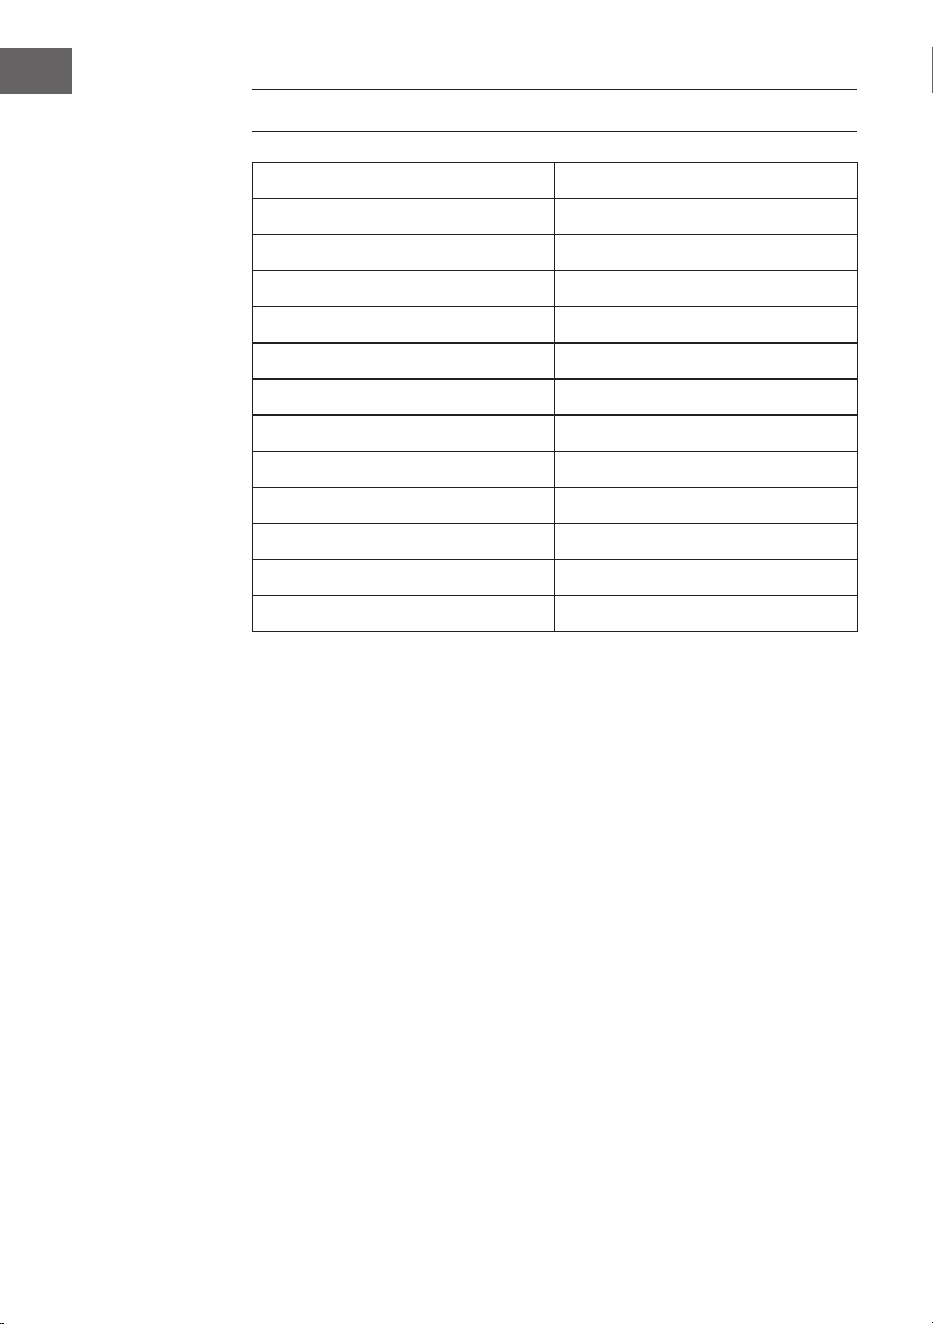
64
ES
DATOS TÉCNICOS
Número del artículo 10041137, 10041138
Suministro eléctrico 220-240 V ~ 50/60 Hz
Potencia de entrada 2 A
Potencia de salida 2 x 10 W RMS
Consumo eléctrico (modo reposo) < 1 W
Frecuencia DAB 174,928 - 239,200 MHz
Frecuencia FM 87,5 - 108,0 MHz
Estándar wi
802.11 b/g/n
Frecuencia wi
2402 - 2480 MHz
Potencia de transmisión wi (máx.)
< 20 dBm
BT Versión 5.0
Frecuencia BT 2402 - 2480 MHz
Potencia de transmisión BT (máx.) 2 dBm

65
ES
INDICACIONES DE SEGURIDAD
Protección contra la humedad
• Para reducir el riesgo de incendio o descarga eléctrica, no exponga este
aparato al agua o a la humedad.
• No utilice el aparato en lugares donde se pueda caer al agua o ser
salpicado por esta.
No abra el aparato
• No intente abrir el aparato para evitar el contacto con componentes de
alta tensión o la exposición a radiaciones peligrosas.
Descarga electrostática
• Si se produce una descarga electrostática (ESD) en el panel frontal o
cerca de cualquier pieza o botón de este aparato, existe la posibilidad
de que el aparato deje de funcionar o se apague inmediatamente.
Es una condición normal destinada para proteger el aparato y los
componentes internos de daños. En este caso, reinicie el aparato
(apague y encienda la radio) para reanudar el funcionamiento normal.
Protección contra el calor
• No exponga este aparato a un calor excesivo como el del sol, el fuego
o similares.
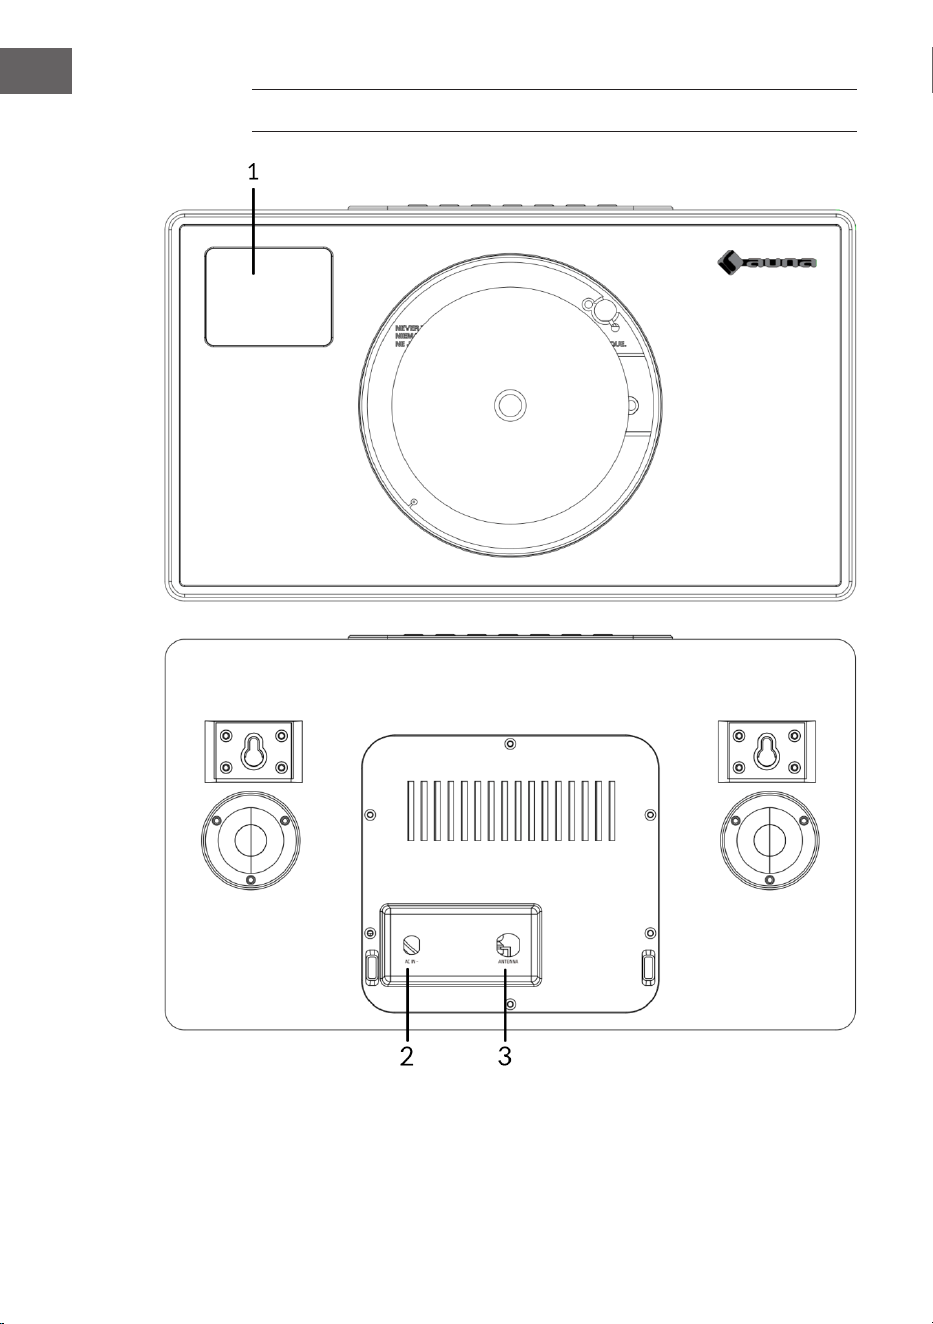
66
ES
DESCRIPCIÓN GENERAL DEL APARATO
1 Pantalla LCD
2 Conexión a la red eléctrica (CC)
3 Antena

67
ES
4 Entrada AUX
5 Botón «ON»
6 Botón «PLAY/PAUSE»
7 Botón «Información/Parada»
8 Botón «Atrás»
9 Botón «Siguiente»
10 Botón «OK»
11 Botón de expulsión
(expulsión de CD)
12 Toma de auriculares
13 Botón «Modo»
14 Botón «MENÚ»
15 Botón «Volumen (-)»:
Disminuye el nivel de
volumen
16 Botón «Volumen (+)»:
Aumenta el nivel de
volumen
17 Botón «Menú atrás»
18 Botón «Favoritos»
19 Puerto USB

68
ES
MANDO A DISTANCIA
1 Botón Standby
2 Botón de expulsión
(expulsión del
CD): pulse para
abrir/cerrar el
compartimento de
CD
3 Botón «Ecualizador»
4 Botón de regulación
de intensidad
5 Botón de modo de
reposo
6 Tecla de
programación
7 Título anterior/
posterior
8 Botón de stop
9 Adelantar/pista
siguiente
10 Botón INFO
11 Botón «MODE»
12 Botón de menú/
retroceso
13 Tecla del cursor
hacia arriba
14 Tecla del cursor
izquierdo
15 Ok y «PLAY/PAUSE»
16 Tecla del cursor
hacia abajo
17 Tecla del cursor
derecho
18 Botón de volumen (-)
19 Botón de volumen
(+)
20 Introducir números
y letras
21 Botón FAV
22 Botón de silencio

69
ES
PUESTA EN FUNCIONAMIENTO Y CONTROL
Puesta en marcha por primera vez
• Antes de la puesta en marcha, asegúrese de que la tensión indicada
en la placa de características coincide con la de su hogar. Utilice el
adaptador de red suministrado para conectar la radio DAB a una toma
de corriente.
Funcionamiento básico. Primeros pasos
• Conecte el aparato a la red eléctrica y extienda por completo la antena
telescópica. La radio pasa al modo de espera y en la pantalla aparece
«01/01/2020 00:00». A continuación, pulse brevemente el botón
«MODE» para encender la radio.
Conguración del sistema
1. Pulse el botón «MENU» para acceder al menú en cualquier modo.
2. Pulse el botón de «Atrás» del aparato o los botones «Arriba» y «Abajo»
del mando a distancia para seleccionar los ajustes del sistema y, a
continuación, pulse el botón «OK» para conrmar.
Modo Reposo
• El aparato tiene una función de temporizador que apaga la radio
después de un tiempo determinado si no se ha realizado ninguna
acción para entonces.
• Pulse el botón «Siguiente» o «Atrás» para seleccionar «Sleep time o»
(Tiempo de reposo) > «15» > «30» > «45» > «60» > «90» > «120» >
«150» > «180» minutos, y luego pulse el botón «OK» para conrmar.
Alarma
NOTA: Asegúrese de que la hora y la fecha del aparato son correctas antes
de programar una alarma.
1. Pulse el botón «MENU» y seleccione «Alarm» (Alarma). En la
pantalla aparecerá «Alarm 1». Pulse el botón «OK» para conrmar la
conguración de la alarma 1.
2. Pulse varias veces el botón «OK» para activar o desactivar la alarma 1.

70
ES
3. Seleccione la frecuencia de la «alarma 1», pulse el botón «OK» y utilice
los botones «Siguiente» y «Atrás» del aparato (o los botones «Arriba»
y «Abajo» del mando a distancia) para seleccionar la conguración
deseada: Daily (Diario) > Once (Una vez)> Weekends (Fines de semana)
> Weekdays (Días laborales). Pulse el botón «OK» para conrmar y
volver al menú.
4. Si desea congurar el despertador, pulse los botones «Siguiente» y
«Atrás» del aparato (o los botones «Arriba» y «Abajo» del mando a
distancia) para seleccionar «Hour» (Hora) y, a continuación, pulse el
botón «OK» para conrmar. Pulse los botones «Siguiente» y «Atrás» del
aparato (o los botones «Arriba» y «Abajo» del mando a distancia) para
seleccionar el minuto actual y, a continuación, pulse el botón «OK» para
conrmar.
5. Seleccione la fuente de la alarma: pulse el botón «OK» y utilice los
botones «Siguiente» y «Atrás» del aparato (o los botones «Arriba»
y «Abajo» del mando a distancia) para seleccionar la conguración
deseada: «Buzzer» > «Radio digital» > «Radio FM». Pulse el botón «OK»
para conrmar y volver al menú.
6. Seleccione la duración de la alarma: pulse el botón «OK» y utilice los
botones «Siguiente» y «Atrás» del aparato (o los botones «Arriba»
y «Abajo» del mando a distancia) para seleccionar la conguración
deseada: «15» > «30» > «45» > «60» > «90» > «120» minutos. Pulse el
botón «OK» para conrmar y volver al menú.
7. Seleccione «Volume» (Volumen) y pulse el botón «OK» para ajustar el
volumen de la alarma.
8. «Alarma 2»: Para ajustar la «Alarma 2», repita los pasos 1-7.
NOTA: El volumen de la alarma aumentará gradualmente hasta alcanzar el
volumen de la alarma que usted haya establecido.
Apagar la alarma
• Cuando suene la alarma, puede apagarla inmediatamente pulsando el
botón «ON».
• Cuando suene la alarma, puede pulsar cualquier botón (excepto el
botón «ON») para activar la función de repetición. El tiempo por defecto
para esta función es de 9 minutos.
NOTA: Pulse el botón «ON» para detener la función de repetición.

71
ES
Ecualizador
• En modo «EQUALISER» puede seleccionar un formato de sonido
estándar o congurar el suyo propio. Seleccione uno de los siguientes
formatos de sonido: «Normal» > «Classic» (Clásico) > «Jazz» > «Pop» >
«Rock»> «Speech» (Habla) > «My EQ» (Mi EQ) y conrme con el botón
«OK». La conguración tiene efecto inmediato.
• Si ha seleccionado el formato de sonido personalizado en la siguiente
entrada, seleccione «My EQ» (Mi EQ) para aplicar el formato de sonido
directamente. A continuación, entre en la conguración de «My EQ»
para ajustar los agudos y los graves.
Fecha/Hora
Pulse los botones «Siguiente» y «Atrás» del aparato (o los botones «Arriba»
y «Abajo» del mando a distancia) para seleccionar las entradas de menú
deseadas: «Time/Date» (Hora/Fecha) > «Auto update» (Actualización
automática) > «Set 12/24 hour» (Ajustar hora 12/24 h) > «Set date format»
(Ajustar formato de fecha). Pulse el botón «OK» para conrmar los ajustes.
Ajustar la hora/hora manualmente:
• Pulse el botón «OK». Ahora el dígito de la fecha empieza a parpadear.
Pulse los botones «Siguiente» y «Anterior» del aparato (o los botones
«Arriba» y «Abajo» del mando a distancia) para seleccionar el día actual
y, a continuación, pulse el botón «OK» para conrmar.
• Ahora, el dígito del mes empieza a parpadear. Pulse los botones
«Siguiente» y «Anterior» del aparato (o los botones «Arriba» y «Abajo»
del mando a distancia) para seleccionar el mes actual y, a continuación,
pulse el botón «OK» para conrmar.
• Ahora, el dígito del año empieza a parpadear. Pulse los botones
«Siguiente» y «Anterior» del aparato (o los botones «Arriba» y «Abajo»
del mando a distancia) para seleccionar el año actual y, a continuación,
pulse el botón «OK» para conrmar.
• Ahora, el dígito de la hora empieza a parpadear. Pulse los botones
«Siguiente» y «Anterior» del aparato (o los botones «Arriba» y «Abajo»
del mando a distancia) para seleccionar la hora actual y, a continuación,
pulse el botón «OK» para conrmar.
• Pulse los botones «Siguiente» y «Anterior» del aparato (o los botones
«Arriba» y «Abajo» del mando a distancia) para seleccionar el minuto
actual y, a continuación, pulse el botón «OK» para conrmar. Ahora la
hora y la fecha están conguradas y guardadas.

72
ES
Actualización automática de la hora: Puedes seleccionar «from Any»
(desde DAB y FM) > «from Digital Radio» (desde Radio Digital) > «from FM»
(desde FM) o «No Update» (Sin actualización) en los ajustes del sistema.
Actualización automática: Seleccione «Update from any» (Actualizar desde
cualquier) > «Update from DAB» (Actualizar desde DAB) > «Update from
FM» (Actualizar desde UKW) > «No update» (No actualizar) y conrme con
el botón «OK».
Congurar 12/24 h: Pulse los botones «Siguiente» y «Anterior» del aparato
(o los botones «Arriba» y «Abajo» del mando a distancia) para seleccionar
«Set 24 hour» (Congurar 24 h) o «Set 12 hour» (Congurar 12 h). Para
conrmar, pulse el botón «OK».
Congurar el formato de la fecha: Pulse los botones «Siguiente» y
«Anterior» del aparato (o los botones «Arriba» y «Abajo» del mando a
distancia) para seleccionar «DD-MM-YYYY» (DD-MM-AAAA) o «MM-DD-
YYYY» (MM-DD-AAAA). Para conrmar, pulse el botón «OK».
Iluminación de fondo
En «BACKLIGHT» (Luz de fondo) puede ajustar la iluminación de la pantalla:
• Atenuar la pantalla en modo de espera después de un tiempo
determinado.
• Ajustar el brillo de la pantalla.
Ajuste del tiempo de atenuación: seleccione «Timeout» (Tiempo de
espera) > «ON» (Activado) > «10» > «20» > «30» > «45» > «60» > «90» >
«120» > «180» segundos y pulse el botón «OK» para conrmar.
Brillo de la pantalla durante el funcionamiento: Seleccione «ON»
(Activado) y luego el ajuste deseado: «High» (Alto)> «Medium» (Medio) >
«Low» (Bajo). Para conrmar la selección, pulse el botón «OK».
Brillo de la pantalla en modo reposo: Seleccione el nivel «DIM» y luego
el ajuste deseado: «High» (Alto) > «Medium» (Medio) > «Low» (Bajo). Para
conrmar la sección, pulse el botón «OK».

73
ES
Idioma
• Puede congurar el idioma del menú en la sección «LANGUAGE»
(IDIOMA).
• Cuando el aparato esté encendido, mantenga pulsado el botón
«MENU» para acceder a los ajustes del sistema. Seleccione con
los botones «Siguiente» y «Anterior» del aparato (o los botones
«Arriba» y «Abajo» del mando a distancia) «LANGUAGE» (Idioma) y, a
continuación, pulse el botón «OK» para conrmar.
• Se pueden seleccionar los siguientes idiomas: inglés, francés, alemán,
italiano, noruego, polaco, portugués, español, sueco, turco, danés,
neerlandés y nés.
Restablecer los valores de fábrica
Para restablecer los valores de fábrica del aparato, siga estos pasos:
• En el modo «Radio», pulse varias veces el botón «MENU» hasta que
aparezca «System setting» (Ajuste del sistema) en la pantalla. Pulse los
botones «Siguiente» y «Anterior» del aparato (o los botones «Arriba» y
«Abajo» del mando a distancia) para seleccionar el submenú «FACTORY
RESET» (Restablecer los valores de fábrica).
• Pulse el botón «OK» y conrme la siguiente consulta con «YES» (Sí).
• A continuación, se restablecerán los valores. Es decir, se perderán todas
las horas de alarma, los ajustes del temporizador de apagado, etc.
Versión de software
Pulse el botón «OK» para mostrar la versión del software del sistema si es
necesario.

74
ES
RADIO DAB+
• El modo DAB se selecciona automáticamente. Además, cuando la radio
se conecta a la alimentación por primera vez, realiza una exploración
completa. La pantalla muestra «Scanning» (Escaneando) y una barra
que indica el progreso de la exploración y el número total de estaciones
encontradas hasta el momento.
• Al nalizar la búsqueda, la radio reproduce la primera emisora
alfanumérica encontrada. Ajuste el volumen al nivel deseado con los
botones «VOL +» y «VOL -».
Lista de emisoras
1. En el modo DAB, pulse el botón «MENU» para acceder al menú DAB.
2. Pulse los botones «Siguiente» o «Anterior» para seleccionar la lista de
emisoras y, a continuación, pulse el botón «OK» para conrmar.
3. Una lista de emisoras DAB+ aparece en la pantalla. Cuando
haya encontrado la emisora deseada, pulse el botón «OK» para
seleccionarla.
Exploración completa de emisoras
Esta función permite a la radio buscar todas las emisoras DAB de su zona.
• En el modo DAB, pulse el botón «MENU» para acceder al menú DAB.
Pulse el botón «Anterior» o «Siguiente» para seleccionar «Full scan»
(Escaneo completo) y luego el botón «OK» para iniciar el escaneo
completo.
Selección manual de la emisora
Con esta función, puede añadir manualmente una emisora determinada o
una nueva emisora a las emisoras ya disponibles en la radio.
1. En el modo DAB, mantenga pulsado el botón «MENU» para entrar en el
menú DAB y pulse el botón «Anterior» o «Siguiente» para seleccionar
«Manual tune» (Sintonización manual). Pulse el botón «OK» para
conrmar la selección.
2. Pulse varias veces el botón «Anterior» o «Siguiente» hasta que aparezca
la frecuencia deseada en la pantalla y luego pulse el botón «OK». La
frecuencia y el nombre de la emisora de radio, así como la intensidad
de la señal, se muestran en la pantalla.

75
ES
3. Pulse de nuevo el botón «OK» para añadir la emisora de radio a la lista
de emisoras e iniciarla automáticamente.
Borrar una emisora
Esta función permite eliminar de la lista de emisoras las que ya no emiten o
han cambiado de frecuencia.
1. Mantenga pulsado el botón «MENU» para pasar al menú de ajustes de
la emisora.
2. Pulse varias veces el botón «Anterior» o «Posterior» hasta que aparezca
«Prune invalid» (eliminar emisoras no válidas) y conrme la selección
con el botón «OK».
3. Pulse el botón «Anterior» o «Siguiente» para seleccionar «YES» (Sí) para
conrmar y eliminar una emisora. Si selecciona «NO», el proceso se
cancela.
Control de Rango Dinámico (DRC)
Esta función le permite eliminar los canales no disponibles de la lista de
canales.
1. En el modo DAB, mantenga pulsado el botón «MENU» y luego pulse
varias veces el botón «Anterior» o «Siguiente» hasta que aparezca
«DRC» en la pantalla. Para conrmar, pulse el botón «OK».
2. Pulse el botón «Atrás» o «Siguiente» para cambiar entre los niveles
«O» (Desactivado), «High» (Alto) y «Low» (Bajo). Pulse el botón «OK»
para conrmar la selección.
Acceder a las emisoras DAB preseleccionadas
1. Puede recuperar sus emisoras preseleccionadas pulsando el botón
«FAV». A continuación, pulse los botones «Anterior» o «Siguiente» del
aparato (o los botones «Arriba» y «Abajo» del mando a distancia) para
navegar por las emisoras preseleccionadas. Pulse el botón «OK» para
escuchar la emisora de radio seleccionada.
2. Si selecciona una preselección a la que no se ha asignado ninguna
emisora de radio, aparece el mensaje «Preset empty» (preselección
vacía).

76
ES
RADIO FM
• Encienda la radio, pulse varias veces el botón «MODE» y seleccione
«FM Modus» (modo FM). La pantalla muestra «FM» y la radio sintoniza
automáticamente la siguiente emisora de radio FM. Se muestra
el nombre de la emisora (RDS) o la frecuencia si el RDS no está
disponible.
• Para buscar manualmente cualquier emisora de radio, pulse los botones
«Anterior» o «Siguiente». Cada vez que pulsa el botón, la frecuencia
cambia en 0,05 MHz.
• En el modo FM, mantenga pulsado el botón «MENU» y, a continuación,
pulse varias veces los botones «Anterior» o «Siguiente» del aparato
(o los botones «Arriba» y «Abajo» del mando a distancia) hasta que
aparezca «Scan». Pulse el botón «OK» para conrmar la búsqueda de
emisoras. La radio comienza ahora a buscar la banda de frecuencias
hacia abajo o hacia arriba y se detiene automáticamente cuando
encuentra una emisora.
• En el modo FM, mantenga pulsado el botón «MENU» y, a continuación,
pulse varias veces los botones «Anterior» o «Siguiente» del aparato
(o los botones «Arriba» y «Abajo» del mando a distancia) hasta
que aparezca «Auto scan» (escaneo automático). Pulse el botón
«OK» para conrmar la búsqueda automática de emisoras. La radio
comienza a buscar en toda la banda de FM (87,5-108 MHz) y almacena
automáticamente todas las emisoras de radio encontradas en la «Preset
list memory» (memoria de la lista de presintonías).
NOTA: Cada vez que se realiza un «Auto scan» (escaneo automático)
y se explora toda la banda de frecuencias, la lista de emisoras de la
«Preset list memory» (memoria de la lista de presintonías) se actualiza
automáticamente.
Información sobre el transmisor en el modo FM
Con esta función, puede ver en la pantalla información sobre la estación
actual. Pulse varias veces el botón «MENU» para desplazarse por la
siguiente información:
RDS (texto desplazado): La emisora muestra un mensaje de texto
desplazado sobre el programa actual.
Program type (Tipo de programa): Describe el tipo de programa que se
emite.
Audio Mode (Modo de audio): La pantalla muestra si la emisora de radio
recibida se emite en estéreo o en mono.

77
ES
Audio Mode (hora/fecha): La hora y la fecha se actualizan
automáticamente mediante la señal horaria de la radio (si se dispone de
RDS).
Conguración de la búsqueda (cómo buscar emisoras de radio)
1. En el modo FM, mantenga pulsado el botón «MENU» y, a continuación,
pulse los botones «Anterior» o «Siguiente» del aparato (o los botones
«Arriba» y «Abajo» del mando a distancia) para seleccionar «Scan»
(escaneo) y pulse el botón «OK» para iniciar el escaneo.
2. Pulse los botones «Anterior» o «Siguiente» del aparato (o los botones
«Arriba» y «Abajo» del mando a distancia) para seleccionar «Strong
station only» (Sólo emisora con señal fuerte) o «All stations» (Todas
las emisoras). Pulse el botón «OK» para conrmar la búsqueda de
emisoras. Si selecciona «Strong station only» (Sólo emisora con
señal fuerte), la radio sólo buscará y reproducirá emisoras con una
señal fuerte. Si selecciona «All stations» (Todas las emisoras), la radio
también busca emisoras con una señal débil y las reproduce.
Conguración de audio
1. En el modo FM, mantenga pulsado el botón «MENU» y, a continuación,
pulse los botones «Anterior» o «Siguiente» del aparato (o los botones
«Arriba» y «Abajo» del mando a distancia) para seleccionar «Auto» y
pulse el botón «OK» para conrmar.
2. Pulse los botones «Anterior» o «Siguiente» del aparato (o los botones
«Arriba» y «Abajo» del mando a distancia) para seleccionar «Forced
mono» (Mono forzado) o «Stereo allowed» (Estéreo permitido). Si la
señal de radio es débil, seleccione «Forced mono» (Mono forzado) para
obtener una mejor calidad de sonido.

78
ES
MEMORIA DE EMISORAS (RADIO DAB+/FM)
Memoria para las emisoras de radio preseleccionadas
Esta función permite almacenar hasta 99 emisoras en la memoria y en
modo DAB y FM.
Almacenamiento de emisoras DAB/FM como emisoras preseleccionadas
1. Siga las instrucciones del manual de usuario para seleccionar una
emisora de radio.
2. Mantenga pulsado el botón «FAV». La pantalla muestra «X (Empty)» (X
(Vacío)) si no se ha almacenado ninguna emisora anterior en la memoria
de preselección.
3. A continuación, pulse los botones «Anterior» o «Siguiente» del
aparato (o los botones «Arriba» y «Abajo» del mando a distancia)
para desplazarse por los números de preselección y seleccionar la
preselección deseada para las emisoras de radio. Puede elegir entre las
posiciones de memoria 1-99.
4. Pulse el botón «OK» para almacenar una emisora. En la pantalla
aparece el mensaje «Preset XX saved» (Preselección XX guardada).
Obtenga sus canales favoritos
Con la tecla «FAV» puedes llamar a tus emisoras favoritas. Pulse el botón
FAV para acceder a la lista de emisoras favoritas que ha preseleccionado.
Cuando escuche la radio, pulse el botón «FAV» y luego el botón «OK» para
preseleccionar la emisora actual como una de sus emisoras favoritas.

79
ES
BT
Para conectar la radio DAB a su teléfono inteligente:
1. Pulse varias veces el botón «MODE» hasta que aparezca «BT» en la
pantalla.
2. A continuación, active la función BT en su teléfono inteligente, busque
el nombre «Vertico Swing DAB» y selecciónelo para conectar su
dispositivo a la radio DAB.
3. Después de que los dos dispositivos se han emparejado con éxito,
suena un tono de noticación. Ahora puede reproducir música a través
de la conexión BT y ajustar el volumen, tanto a través de la radio como
de su teléfono inteligente.
ENTRADA AUX
En el modo «AUX IN», las señales de audio se reproducen desde una fuente
externa conectada mediante un cable de audio, por ejemplo, desde un
reproductor de MP3. Para reproducir señales de audio a través del modo
«AUX IN»:
1. Baje el volumen de la radio. Conecte la fuente de audio externa a la
entrada auxiliar jack de 3,5 mm.
2. Pulse varias veces el botón «MODE» hasta que aparezca «AUX IN» en la
pantalla.
3. Ajuste el volumen de la radio (y si es necesario en el dispositivo de la
fuente de audio).
CONEXIÓN USB
1. Pulse varias veces el botón «MODE» hasta que la pantalla muestre
«USB» para reproducir música desde un lápiz USB.
2. Inserte el lápiz USB en el puerto USB y la radio empezará a reproducir
automáticamente la primera pista del lápiz USB.
3. Utilice los botones «Anterior» o «Siguiente» para reproducir la pista
anterior o la siguiente.
4. En la pantalla aparece el nombre del archivo.
NOTA: El puerto USB no admite la carga de dispositivos ni la transferencia
de datos desde un ordenador.

80
ES
REPRODUCCIÓN DE CD
1. Pulse varias veces el botón «MODE» hasta que la pantalla muestre
«CD» para reproducir música desde un CD.
2. La pantalla de la radio mostrará ahora «Reading...» (Lectura) seguido de
«No Disc» (No hay disco).
3. Para abrir el compartimento de CD, pulse el botón «Eject» de la radio
o del mando a distancia. Introduzca el CD en el compartimento y pulse
de nuevo el botón «Eject». El compartimento del CD se cierra y ahora se
reproduce la primera pista del CD.
Funciones del CD
• Para pasar de una pista a otra, utilice los botones «Atrás» o «Siguiente»
de la radio o del mando a distancia.
• Reproduzca y ponga en pausa la música pulsando el botón «Play/
Pause» del aparato o del mando a distancia.
• Para saltar hacia delante o hacia atrás dentro de una pista, mantenga
pulsados los botones «Anterior» o «Siguiente» del mando a distancia y
suéltelos cuando quiera dejar de saltar.
• Para extraer el CD, pulse el botón «Eject» de la radio o del mando a
distancia.
• Mantenga pulsado el botón «OK» del aparato o del mando a
distancia para detener la reproducción de música del CD. La pantalla
también muestra cuántas pistas hay en el CD y cuánto tiempo dura la
reproducción en total. Pulse el botón «Play/Pause» para reiniciar la
reproducción de música desde el CD.
Congurar un programa de pistas de CD
1. Cuando el CD está parado y no hay música, puede programar el
reproductor de CD para que reproduzca las pistas en un orden
determinado.
2. Para ello, basta con pulsar el botón «FAV» del aparato o del
mando a distancia para entrar en «Programming mode» (Modo de
programación).
3. Una vez que haya activado el «Programming mode» (Modo de
programación), la pantalla mostrará «T001» para indicar la primera
pista del CD como «P01». Ahora puede seleccionar la pista que desea
guardar como «P01» en la lista de reproducción, desplazándose hasta
el título que desea seleccionar con los botones «<<» y «>>». Cuando
haya encontrado la pista deseada para «P01», pulse el botón «OK»
para seleccionarla. Se le pedirá que seleccione la siguiente pista
programada.

81
ES
4. Para la siguiente canción, la pantalla mostrará «P02» para indicar
«Programa 2». Ahora utilice los botones «Anterior» o «Siguiente» para
desplazarse hasta la canción que desea seleccionar como «P02».
Cuando haya encontrado la pista para el programa 2, pulse el botón
«OK» para seleccionarla y se le pedirá que seleccione la siguiente pista.
5. Una vez que haya completado la programación de las pistas, pulse el
botón «Play/Pause» para reproducirlas.
6. Cuando la reproducción de programas está activada, pulse el botón
«Eject» para salir del modo de reproducción de programas.
POSPONER LA ALARMA
Cuando suene la alarma, puede pulsar cualquier botón (excepto el botón
«ON») para activar la función de repetición. El tiempo por defecto para esta
función es de 9 minutos.
NOTA: Pulse el botón «Standby» para detener la función de repetición.

82
ES
RETIRADA DEL APARATO
Si en su país existe una disposición legal relativa a
la eliminación de aparatos eléctricos y electrónicos,
este símbolo estampado en el producto o en
el embalaje advierte que no debe eliminarse
como residuo doméstico. En lugar de ello, debe
depositarse en un punto de recogida de reciclaje
de aparatos eléctricos y electrónicos. Una gestión
adecuada de estos residuos previene consecuencias
potencialmente negativas para el medio ambiente
y la salud de las personas. Puede consultar más
información sobre el reciclaje y la eliminación de este
producto contactando con su administración local o
con su servicio de recogida de residuos.
Este producto contiene baterías. Si en su país existe
una disposición legal relativa a la eliminación de
baterías, estas no deben eliminarse como residuo
doméstico. Infórmese sobre la normativa vigente
relacionada con la eliminación de baterías. Una
gestión adecuada de estos residuos previene
consecuencias potencialmente negativas para el
medio ambiente y la salud de las personas.
DECLARACIÓN DE CONFORMIDAD
Fabricante:
Chal-Tec GmbH, Wallstraße 16, 10179 Berlín, Alemania.
Importador para Gran Bretaña:
Berlin Brands Group UK Limited
PO Box 42
272 Kensington High Street
London, W8 6ND
United Kingdom
Por la presente, Chal-Tec GmbH declara que el tipo de
equipo radioeléctrico Vertico Swing DAB es conforme
con la Directiva 2014/53/UE. El texto completo de la
declaración UE de conformidad está disponible en la
dirección Internet siguiente: use.berlin/10041137

83
IT
Gentile cliente,
La ringraziamo per l'acquisto del dispositivo. La
preghiamo di leggere attentamente le seguenti
indicazioni e di seguirle per prevenire eventuali danni.
Non ci assumiamo alcuna responsabilità per danni
scaturiti da una mancata osservanza delle indicazioni
relative alla sicurezza e da un uso improprio del
dispositivo. Scansionare il codice QR seguente per
accedere al manuale d'uso più attuale e ricevere
informazioni sul prodotto.
INDICE
Dati tecnici 84
Avvertenze di sicurezza 85
Descrizione del dispositivo 86
Telecomando 88
Messa in funzione e utilizzo 89
Radio DAB+ 94
Radio FM 96
Memoria delle emittenti (radio DAB+/FM) 98
BT 99
Ingresso AUX 99
Connessione USB 99
Riproduzione CD 100
Funzione snooze 101
Avviso di smaltimento 102
Dichiarazione di conformità 102

84
IT
DATI TECNICI
Numero articolo 10041137, 10041138
Alimentazione 220-240 V ~ 50/60 Hz
Potenza di ingresso 2 A
Potenza di uscita 2 x 10 W RMS
Potenza assorbita (standby) < 1 W
Frequenza DAB 174,928-239,200 MHz
Frequenza FM 87,5-108,0 MHz
Standard WiFi
802.11 b/g/n
Frequenza WiFi
2402-2480 MHz
Potenza di trasmissione WiFi (max.)
< 20 dBm
BT Versione 5.0
Frequenza BT 2402-2480 MHz
Potenza di trasmissione BT (max.) 2 dBm

85
IT
AVVERTENZE DI SICUREZZA
Protezione dall'umidità
• Per ridurre il rischio di incendi o scosse elettriche, non esporre il
prodotto all'umidità o all'acqua.
• Non utilizzarlo in luoghi in cui potrebbe cadere in acqua o ricevere
schizzi.
Non aprire il dispositivo
• Non tentare di aprire il dispositivo, in modo da evitare il contatto con
componenti ad alta tensione o l'esposizione a radiazioni pericolose.
Scarica elettrostatica
• Se si verica una scarica elettrostatica (ESD) sul lato anteriore o in
prossimità di qualsiasi componente o tasto di questo dispositivo, è
possibile che smetta di funzionare e/o si spenga immediatamente.
Questa è una condizione normale e serve a proteggere il dispositivo e i
componenti interni da eventuali danni. In tal caso, si prega di resettare
il dispositivo (spegnendo e riaccendendo la radio) per ripristinare il
normale funzionamento.
Protezione dal calore
• Questa radio non deve essere esposta a calore eccessivo come sole,
fuoco o simili.

86
IT
DESCRIZIONE DEL DISPOSITIVO
1 Schermo LCD
2 Connessione dell'alimentatore (DC)
3 Antenna

87
IT
4 Ingresso AUX
5 Tasto ON
6 Tasto Play/Pausa
7 Tasto Info/Stop
8 Tasto Indietro
9 Tasto Avanti
10 Tasto OK
11 Tasto Eject (espulsione
del CD)
12 Connessione per le cuie
13 Tasto Modalità
14 Tasto Menu
15 Tasto Volume (-):
abbassare il volume
16 Tasto Volume (+): alzare il
volume
17 Tasto Indietro nel menu
18 Tasto Preferiti
19 Connessione USB

88
IT
TELECOMANDO
1 Tasto Standby
2 Tasto Eject
(espulsione del CD):
premerlo per aprire/
chiudere il vano CD
3 Tasto Equalizzatore
4 Tasto Dimmer
5 Tasto Modalità
notturna
6 Tasto
Programmazione
7 Indietro/Titolo
precedente
8 Tasto Stop
9 Avanti/Titolo
successivo
10 Tasto Info
11 Tasto Modalità
12 Tasto Menu/Indietro
13 Cursore In alto
14 Cursore sinistro
15 Tasto OK e Play/
Pausa
16 Cursore In basso
17 Cursore destro
18 Tasto Volume (-)
19 Tasto Volume (+)
20 Inserire lettere e
numeri
21 Tasto FAV
22 Tasto Muto

89
IT
MESSA IN FUNZIONE E UTILIZZO
Primo utilizzo
• Prima della messa in funzione, assicurarsi che la tensione indicata sulla
targhetta dell'alimentatore corrisponda a quella della rete domestica.
Utilizzare l'alimentatore in dotazione per collegare la radio DAB a una
presa elettrica.
Funzioni basilari - primi passaggi
• Collegare il dispositivo all'alimentazione ed estendere completamente
l'antenna telescopica. La radio passa in modalità standby e sul display
compare "01/01/2020 00:00". Premere brevemente il tasto "MODE" per
accendere la radio.
Impostazioni di sistema
1. Premere il tasto "MENU" per accedere al menu in qualsiasi modalità.
2. Premere i tasti "Avanti" e "Indietro" sul dispositivo o i tasti "In alto" o "In
basso" sul telecomando per selezionare le impostazioni di sistema e
premere poi il tasto "OK" per confermare.
Modalità notturna
• Il dispositivo è dotato di una funzione Sleep Timer che spegne la radio
dopo un certo periodo di tempo se non è stata intrapresa alcuna azione.
• Premere il tasto "Avanti" o "Indietro" per selezionare "Sleep timer o"
(modalità notturna spenta) > "15" > "30" > "45" > "60" > "90" > "120" >
"150" > "180" minuti e premere poi il tasto "OK" per confermare.
Sveglia
NOTA: prima di impostare una sveglia, accertarsi che l'ora e la data siano
corrette.
1. Premere il tasto "MENU" e selezionare "Alarm". Compare "Alarm 1".
Premere OK per confermare l'impostazione per la sveglia 1.
2. Premere ripetutamente il tasto "OK" per attivare o disattivare "Alarm 1".

90
IT
3. Selezionare la frequenza di "Alarm 1", premere "OK" e utilizzare i
tasti "Avanti" e "Indietro" sul dispositivo (o "In alto" e "In basso" sul
telecomando) per selezionare l'impostazione desiderata: "Daily" (tutti i
giorni) > "Once" (una volta) > "Weekends" (ne settimana) > "Weekdays"
(giorni feriali). Premere il tasto "OK" per confermare e tornare al menu.
4. Impostare l'ora della sveglia: premere i tasti "Avanti" e "Indietro"
sul dispositivo (o i tasti "In alto" o "In basso" sul telecomando) per
selezionare "hour" (ora) e premere poi il tasto "OK" per confermare.
Premere i tasti "Avanti" e "Indietro" sul dispositivo (o i tasti "In alto" o "In
basso" sul telecomando) per selezionare "minutes" (minuti) e premere
poi il tasto "OK" per confermare.
5. Selezionare la fonte per la sveglia: premere "OK" e utilizzare i tasti
"Avanti" e "Indietro" sul dispositivo (o "In alto" e "In basso" sul
telecomando) per selezionare l'impostazione desiderata: "Buzzer"
(segnale acustico) > "Digital Radio" (radio digitale) > "FM Radio" (radio
FM). Premere il tasto "OK" per confermare e si ritorna al menu.
6. Selezionare la durata della sveglia: premere "OK" e utilizzare i
tasti "Avanti" e "Indietro" sul dispositivo (o "In alto" e "In basso" sul
telecomando) per selezionare l'impostazione desiderata: "15" > "30"
> "45" > "60" > "90" > "120". Premere il tasto "OK" per confermare e
tornare al menu.
7. Selezionare "Volume" e premere il tasto "OK" per impostare il volume
della sveglia.
8. "Alarm 2": per impostare "Alarm 2", ripetere i passaggi 1-7.
NOTA: il volume della sveglia aumenta gradualmente no a raggiungere il
volume impostato.
Interrompere la sveglia
• Quando la sveglia suona, è possibile interromperla immediatamente
premendo il tasto "ON".
• Quando la sveglia suona, è possibile premere un tasto qualsiasi (tranne
"ON") per attivare la funzione snooze. La durata predenita per questa
funzione è di 9 minuti.
NOTA: premere il tasto "ON" per interrompere la funzione snooze.

91
IT
Equalizzatore
• Alla voce "EQUALISER" è possibile selezionare un formato audio
standard o congurarne uno personale. Selezionare uno dei seguenti
formati audio: "Normal" (normale) > "Classic" (musica classica) > "Jazz"
> "Pop" > "Rock" > "Speech" (conversazione) > "My EQ" (equalizzazione
personalizzata) e confermare con il tasto "OK". L'impostazione ha
eetto immediato.
• Se è stato selezionato un formato audio personalizzato, selezionare "My
EQ" per utilizzarlo direttamente. Quindi accedere alle impostazioni di
"My EQ" per regolare gli alti e i bassi.
Ora/Data
Premere i tasti "Avanti" e "Indietro" sul dispositivo (o i tasti "In alto" e "In
basso" sul telecomando) per selezionare le voci del menu desiderate:
"Time/Date" (ora/data) > "Auto update" (aggiornamento automatico) > "Set
12/24 hour" (impostare il formato 12/24 ore) > "Set date format" (impostare
il formato della data). Premere OK per confermare le relative impostazioni.
Impostazione manuale di ora/data:
• Premere il tasto "OK" e la cifra del giorno inizia a lampeggiare. Premere
i tasti "Avanti" e "Indietro" sul dispositivo (o i tasti "In alto" o "In basso"
sul telecomando) per selezionare la data del giorno corrente e premere
poi il tasto "OK" per confermare.
• Ora inizia a lampeggiare la cifra del mese. Premere i tasti "Avanti" e
"Indietro" sul dispositivo (o i tasti "In alto" o "In basso" sul telecomando)
per selezionare il mese corrente e premere poi il tasto "OK" per
confermare.
• Ora inizia a lampeggiare la cifra dell'anno. Premere i tasti "Avanti" e
"Indietro" sul dispositivo (o i tasti "In alto" o "In basso" sul telecomando)
per selezionare l'anno corrente e premere poi il tasto "OK" per
confermare.
• Ora inizia a lampeggiare la cifra delle ore. Premere i tasti "Avanti" e
"Indietro" sul dispositivo (o i tasti "In alto" o "In basso" sul telecomando)
per selezionare l'ora corrente e premere poi il tasto "OK" per
confermare.
• Premere i tasti "Avanti" e "Indietro" sul dispositivo (o i tasti "In alto" o
"In basso" sul telecomando) per selezionare i minuti correnti e premere
poi il tasto "OK" per confermare. Ora l'ora e la data sono impostate e
salvate.

92
IT
Aggiornamento automatico dell'ora: nelle impostazioni di sistema è
possibile selezionare "from any" (da DAB e FM) > "from Digital Radio" (dalla
radio digitale) > "from FM" (da FM) o "No update" (nessun aggiornamento).
Aggiornamento automatico: selezionare "Update from any"
(aggiornamento da qualsiasi emittente) > "Update from DAB"
(aggiornamento da DAB) > "Update from FM" (aggiornamento da FM) > "No
update" (nessun aggiornamento) e confermare con il tasto "OK".
Impostare il formato 12/24 ore: premere i tasti "Avanti" e "Indietro" sul
dispositivo (o "In alto" e "In basso" sul telecomando) per selezionare "Set 24
hour" (impostare il formato a 24 ore) o "Set 12 hour" (impostare il formato a
12 ore). Premere OK per confermare.
Impostare il formato della data: premere i tasti "Avanti" e "Indietro" sul
dispositivo (o "In alto" e "In basso" sul telecomando) per selezionare "DD-
MM-YYYY" (GG-MM-AAAA) o "MM-DD-YYYY" (MM-GG-AAAA). Premere OK
per confermare.
Retroilluminazione
Alla voce "BACKLIGHT" è possibile impostare l'illuminazione del display:
• Ridurre la luminosità del display in modalità standby dopo un certo
tempo.
• Impostare la luminosità del display.
Impostazione del tempo prima della riduzione dell'illuminazione:
selezionare "Timeout" (tempo scaduto) > "on" (accesa) > "10" > "20" > "30"
> "45" > "60" > "90" > "120" > "180" secondi e premere il tasto "OK" per
confermare.
Luminosità del display durante il funzionamento: selezionare "On" e poi
l'impostazione desiderata: "High" (alta) > "Medium" (media) > "Low" (bassa).
Confermare la selezione con il tasto OK.
Luminosità del display in modalità standby: selezionare il livello "DIM"
e poi l'impostazione desiderata: "High" (alto) > "Medium" (medio) > "Low"
(basso). Confermare la selezione con il tasto OK.

93
IT
Lingua
• È possibile impostare la lingua del menu in "LANGUAGE" (lingua).
• In modalità operativa, premere a lungo il tasto "MENU" per accedere
alle impostazioni del sistema. Selezionare “LANGUAGE” (lingua) con i
tasti "Avanti" e "Indietro" sul dispositivo (o i tasti "In alto" o "In basso" sul
telecomando) e premere poi il tasto "OK" per confermare.
• È possibile selezionare le seguenti lingue: inglese, francese, tedesco,
italiano, norvegese, polacco, portoghese, spagnolo, svedese, turco,
danese, olandese, nlandese.
Ripristinare le impostazioni di fabbrica
Per ripristinare le impostazioni di fabbrica del dispositivo, procedere in
questo modo:
• In modalità radio, premere il tasto MENU nché sul display compare
"System setting" (impostazioni di sistema). Premere i tasti "Avanti" e
"Indietro" sul dispositivo (o i tasti "In alto" o "In basso" sul telecomando)
per selezionare "FACTORY RESET" (ripristinare le impostazioni di
fabbrica) e premere poi il tasto "OK" per confermare.
• Premere il tasto "OK" e confermare la seguente richiesta con "YES" (sì).
• Le impostazioni di fabbrica del dispositivo sono ora ripristinate, vale
a dire che tutti gli orari delle sveglie, le impostazioni del timer di
spegnimento, ecc. vengono persi.
Versione del software (SW version)
Se necessario, premere il tasto "OK" per visualizzare la versione del
software del sistema.

94
IT
RADIO DAB+
• La modalità DAB viene selezionata automaticamente e, quando la
radio viene collegata all'alimentazione per la prima volta, esegue una
scansione completa. Il display mostra "Scanning" e una barra che indica
l'avanzamento della scansione e il numero totale di emittenti trovate
nora.
• Al termine della ricerca, la radio riproduce la prima emittente
alfanumerica trovata. Impostare il volume sul valore desiderato con i
tasti "VOL +" e "VOL -".
Elenco emittenti
1. In modalità DAB, premere il tasto "MENU" per accedere al menu DAB.
2. Premere "Indietro" o "Avanti" sul dispositivo per selezionare l'elenco
delle emittenti e premere poi il tasto "OK" per confermare.
3. Sul display compare un elenco di emittenti DAB. Una volta individuata
l'emittente desiderata, premere il tasto "OK" per selezionarla.
Ricerca completa
Questa funzione consente alla radio di cercare tutte le emittenti DAB della
zona.
• In modalità DAB, premere il tasto "MENU" per accedere al menu DAB.
Premere il tasto "Indietro" o "Avanti" per selezionare "Full Scan" (ricerca
completa) e premere il tasto "OK" per avviare la ricerca.
Selezione manuale dell'emittente
Con questa funzione è possibile aggiungere manualmente un'emittente
specica o una nuova a quelle già disponibili sulla radio.
1. In modalità DAB, tenere premuto il tasto "MENU" per accedere al menu
DAB e premere "Indietro" o "Avanti" per selezionare "Manual tune"
(selezione manuale dell'emittente). Premere OK per confermare la
selezione.
2. Premere il tasto "Indietro" o "Avanti" nché sul display compare la
frequenza desiderata e premere il tasto "OK". Sul display compaiono la
frequenza, il nome dell'emittente radio e l'intensità del segnale.

95
IT
3. Premere nuovamente il tasto "OK" per aggiungere l'emittente radio
all'elenco e avviarla automaticamente.
Cancellare le emittenti
Questa funzione consente di eliminare dall'elenco delle emittenti quelle che
non trasmettono più o che hanno cambiato frequenza.
1. Tenere premuto il tasto "MENU" per passare al menu delle impostazioni
dell'emittente.
2. Premere il tasto "Indietro" o "Avanti" nché viene mostrato "Prune
Invalid" (cancellare emittenti non valide) e confermare con il tasto "OK".
3. Premere il tasto "Indietro" o "Avanti" per selezionare "YES" (sì) e
confermare la cancellazione. Se si seleziona "NO", il processo viene
annullato.
DRC (Dynamic Range Control)
Con questa funzione si possono eliminare dall'elenco le emittenti non
disponibili.
1. In modalità DAB, tenere premuto il tasto "MENU" e premere poi
"Indietro" o "Avanti" nché compare "DRC". Premere OK per confermare.
2. Premere "Indietro" o "Avanti" per passare tra i livelli "O" (spento),
"High" (alto) e "Low" (basso). Premere OK per confermare la selezione.
Accedere alla memoria delle emittenti DAB
1. È possibile accedere alle emittenti predenite premendo il tasto "FAV".
Premere poi "Indietro" o "Avanti" sul dispositivo (o "In alto" e "In basso"
sul telecomando) per scorrere tra le emittenti predenite. Premere il
tasto "OK" per ascoltare l'emittente radio selezionata.
2. Se si seleziona una posizione della memoria a cui non è stata assegnata
alcuna emittente radio, compare il messaggio "preset empty" (posizione
vuota).

96
IT
RADIO FM
• Accendere la radio, premere più volte il tasto "MODE" e selezionare
"Modalità FM". Il display mostra "FM" e la radio si sintonizza
automaticamente sull'emittente radio FM successiva. Se la funzione
RDS non è disponibile, viene mostrato il nome dell'emittente o la
frequenza.
• Per cercare manualmente un'emittente radio, premere "Indietro" o
"Avanti". Ogni volta che si preme il tasto, la frequenza cambia di 0,05
MHz.
• In modalità FM, premere a lungo il tasto "MENU", quindi premere i
tasti "Avanti" e "Indietro" sul dispositivo (o "In alto" e "In basso" sul
telecomando) no a quando compare "Scan" (ricerca). Premere OK
per confermare l'inizio della ricerca. La radio inizia a cercare la banda
di frequenza verso il basso o verso l'alto e si ferma automaticamente
quando trova un'emittente radio.
• In modalità FM, premere a lungo il tasto "MENU", quindi premere i
tasti "Avanti" e "Indietro" sul dispositivo (o "In alto" e "In basso" sul
telecomando) no a quando compare "Auto Scan" (ricerca automatica).
Premere OK per confermare l'inizio della ricerca automatica. La
radio inizia la ricerca nell'intera banda FM (87,5-108 MHz) e salva
automaticamente tutte le emittenti radio trovate nella "Preset list
memory" (memoria dell'elenco di emittenti predenite).
NOTA: ogni volta che si esegue la funzione "Auto Scan" (ricerca automatica)
e si cerca sull'intera banda di frequenza, l'elenco delle emittenti nella
"Preset list memory" (memoria dell'elenco di emittenti predenite) viene
aggiornato automaticamente.
Informazioni sull'emittente in modalità FM
Con questa funzione è possibile visualizzare sul display le informazioni
relative all'emittente corrente. Premendo più volte il tasto "MENU", è
possibile scorrere tra le seguenti informazioni:
RDS (testo scorrevole): l'emittente può mostrare un messaggio di testo
scorrevole sul programma in corso.
Program type (tipo di programma): descrive il tipo di programma
trasmesso.
Audio Mode (modalità audio): il display indica se l'emittente radio ricevuta
è trasmessa in stereo o in mono.
Time/Date (ora/data): l'ora e la data vengono aggiornate automaticamente
dal segnale orario della radio (se l'RDS è disponibile).

97
IT
Impostazione della ricerca (come cercare le emittenti radio)
1. In modalità FM, premere a lungo il tasto "MENU", quindi premere i
tasti "Avanti" e "Indietro" sul dispositivo (o "In alto" e "In basso" sul
telecomando) per selezionare "Scan" (ricerca) e premere "OK" per
avviare la ricerca.
2. Premere i tasti "Avanti" e "Indietro" sul dispositivo (o i tasti "In alto"
e "In basso" sul telecomando) per selezionare "Strong stations only"
(solo emittenti con segnale intenso) o "All stations" (tutte le emittenti).
Premere OK per confermare l'inizio della ricerca. Se si seleziona "Strong
stations only" (solo emittenti con segnale intenso), la radio cercherà
e riprodurrà solo le emittenti con un segnale intenso. Se si seleziona
"All stations" (tutte le emittenti), la radio cercherà e riprodurrà anche le
emittenti con un segnale debole.
Impostazioni audio
1. In modalità FM, premere a lungo il tasto "MENU", quindi premere i
tasti "Avanti" e "Indietro" sul dispositivo (o "In alto" e "In basso" sul
telecomando) per selezionare "Auto" e premere "OK" per confermare
l'impostazione.
2. Premere i tasti "Avanti" e "Indietro" sul dispositivo (o "In alto" e "In
basso" sul telecomando) per selezionare "Forced mono" (mono forzato)
o "Stereo allowed" (stereo consentito). Se il segnale radio è debole,
selezionare "Forced mono" (mono forzato) per ottenere una migliore
qualità del suono.

98
IT
MEMORIA DELLE EMITTENTI (RADIO DAB+/FM)
Memoria delle emittenti radio predenite
Questa funzione consente di programmare no a 99 emittenti radio in
memoria e di salvarle in modalità DAB e FM.
Salvataggio delle stazioni DAB/FM come emittenti predenite
1. Per selezionare un'emittente radio, seguire le istruzioni del manuale
d'uso.
2. Tenere premuto il tasto "FAV". Il display mostra "X (Empty)" [X (vuoto)]
se nella posizione di memoria non è stata salvata alcuna emittente
precedente.
3. Premere "Indietro" o "Avanti" sul dispositivo (o "In alto" e "In basso" sul
telecomando) per scorrere tra le posizioni di memoria e sceglierne una
per l'emittente. È possibile scegliere tra le posizioni 1-99.
4. Premere il tasto "OK" per salvare l'emittente radio. Sul display compare
il messaggio "Preset XX saved" (posizione di memoria XX salvata).
Accedere alle emittenti preferite
Con il tasto "FAV" è possibile accedere alle emittenti preferite. Premere
il tasto FAV per accedere all'elenco delle emittenti preferite predenite.
Durante l'ascolto della radio, premere il tasto "FAV" e poi "OK" per
aggiungere l'emittente corrente a quelle preferite.

99
IT
BT
Per collegare la radio DAB allo smartphone:
1. Premere il tasto "MODE" nché sul display compare "BT".
2. Quindi attivare la funzione BT sullo smartphone, cercare il nome per
l'accoppiamento "Vertico Swing DAB" e selezionarlo per collegare lo
smartphone alla radio DAB.
3. Dopo che i due dispositivi sono stati accoppiati correttamente, viene
emesso un segnale acustico di avviso. Ora è possibile riprodurre musica
tramite la connessione BT e regolare il volume sia tramite la radio che
tramite lo smartphone.
INGRESSO AUX
In modalità "AUX IN", i segnali audio vengono riprodotti da una sorgente
esterna collegata con un cavo audio, ad esempio un lettore MP3. Per
riprodurre i segnali audio con la modalità "AUX IN":
1. Abbassare il volume della radio. Collegare la fonte audio esterna
all'ingresso stereo AUX IN da 3,5 mm.
2. Premere il tasto "MODE" nché sul display compare "Aux In".
3. Regolare ora il volume della radio (e, se necessario, del dispositivo
della fonte audio).
CONNESSIONE USB
1. Premere il tasto "MODE" nché il display mostra "USB" per riprodurre
musica da una chiavetta USB.
2. Inserendo la chiavetta USB nell'apposita porta, il dispositivo avvia
automaticamente la riproduzione del primo brano sulla chiavetta USB.
3. Utilizzare "Indietro" o "Avanti" per riprodurre il brano precedente o
successivo.
4. Sul display compare il nome del le.
NOTA: la porta USB non supporta la ricarica di dispositivi o il trasferimento
di dati da un computer.

100
IT
RIPRODUZIONE CD
1. Premere il tasto "MODE" nché il display mostra "CD" per riprodurre
musica da un CD.
2. Il display della radio mostra ora "Reading..." (lettura) seguito da "No
Disc" (nessun CD).
3. Per aprire il vano CD, premere il tasto "Eject" sul dispositivo o sul
telecomando. Inserire il CD nel vano e premere nuovamente il tasto
"Eject". Il vano CD si chiude e viene riprodotto il primo brano del CD.
Funzioni CD
• Per passare da un titolo all'altro, utilizzare "Indietro" o "Avanti" su
dispositivo o telecomando.
• Riprodurre e mettere in pausa la musica premendo il tasto "Play/Pause"
su dispositivo o telecomando.
• Per saltare il titolo precedente o successivo durante la riproduzione,
tenere premuto "Indietro" o "Avanti" sul telecomando e lasciarlo andare
quando si desidera terminare la procedura.
• Per aprire il vano ed estrarre il CD, premere il tasto "Eject" sul
dispositivo o sul telecomando.
• Tenere premuto il tasto "OK" su dispositivo o telecomando per
interrompere la riproduzione del CD. Vengono mostrati anche il numero
di tracce presenti sul CD e la durata totale della riproduzione. Premere il
tasto "Play/Pause" per riavviare la riproduzione del CD.
Creare una playlist da CD
1. Quando il CD è fermo e non c'è musica in riproduzione, è possibile
programmare i brani in un ordine specico.
2. A tal ne, è suiciente premere il tasto "FAV" su dispositivo o
telecomando per accedere a "Programming mode" (modalità di
programmazione).
3. Una volta attivata la funzione "Programming mode" (modalità di
programmazione), il display mostra "T001" per indicare la prima traccia
del CD come "P01". Ora è possibile selezionare il titolo che si desidera
salvare come primo brano "P01" nella playlist, scorrendo no al titolo
che desiderato con i tasti "<<" e ">>". Una volta trovato il titolo per "P01",
premere il tasto "OK" per selezionarlo e verrà richiesto di scegliere il
titolo successivo per la playlist.

101
IT
4. Per il brano successivo compare "P02" sul display per indicare la traccia
2. A questo punto, utilizzare il tasto "Indietro" o "Avanti" per scorrere
no al brano che si desidera selezionare come "P02". Una volta trovato
il titolo per "P02", premere il tasto "OK" per selezionarlo e verrà
richiesto di scegliere il titolo successivo per la playlist.
5. Dopo aver completato la programmazione completa dei brani, premere
il tasto "Play/Pausa" per riprodurre la playlist.
6. Quando la riproduzione della playlist è attivata, premere "Eject" per
uscire nuovamente dalla modalità di riproduzione programmata.
FUNZIONE SNOOZE
Quando la sveglia suona, è possibile premere un tasto qualsiasi (tranne
"ON") per attivare la funzione snooze. La durata predenita per questa
funzione è di 9 minuti.
NOTA: premere il tasto "Standby" per interrompere la funzione snooze.

102
IT
SMALTIMENTO
Se nel proprio paese si applicano le
regolamentazioni inerenti lo smaltimento di
dispositivi elettrici ed elettronici, questo simbolo
sul prodotto o sulla confezione segnala che questi
prodotti non possono essere smaltiti con i riuti
normali e devono essere portati a un punto di
raccolta di dispositivi elettrici ed elettronici. Grazie
al corretto smaltimento dei vecchi dispositivi si
tutela il pianeta e la salute delle persone da possibili
conseguenze negative. Informazioni riguardanti
il riciclo e lo smaltimento di questi prodotti si
ottengono presso l’amministrazione locale oppure il
servizio di gestione dei riuti domestici.
Il prodotto contiene batterie. Se nel proprio
paese si applicano le regolamentazioni inerenti
lo smaltimento di batterie, non possono essere
smaltite con i normali riuti domestici. Preghiamo
di informarvi sulle regolamentazioni vigenti sullo
smaltimento delle batterie. Grazie al corretto
smaltimento dei vecchi dispositivi si tutela l’ambiente
e la salute delle persone da conseguenze negative.
DICHIARAZIONE DI CONFORMITÀ
Produttore:
Chal-Tec GmbH, Wallstraße 16, 10179 Berlino,
Germania.
Importatore per la Gran Bretagna:
Berlin Brands Group UK Limited
PO Box 42
272 Kensington High Street
London, W8 6ND
United Kingdom
Il fabbricante, Chal-Tec GmbH, dichiara che il tipo di
apparecchiatura radio Vertico Swing DAB è conforme
alla direttiva 2014/53/UE. Il testo completo della
dichiarazione di conformità UE è disponibile al
seguente indirizzo Internet: use.berlin/10041137