EN
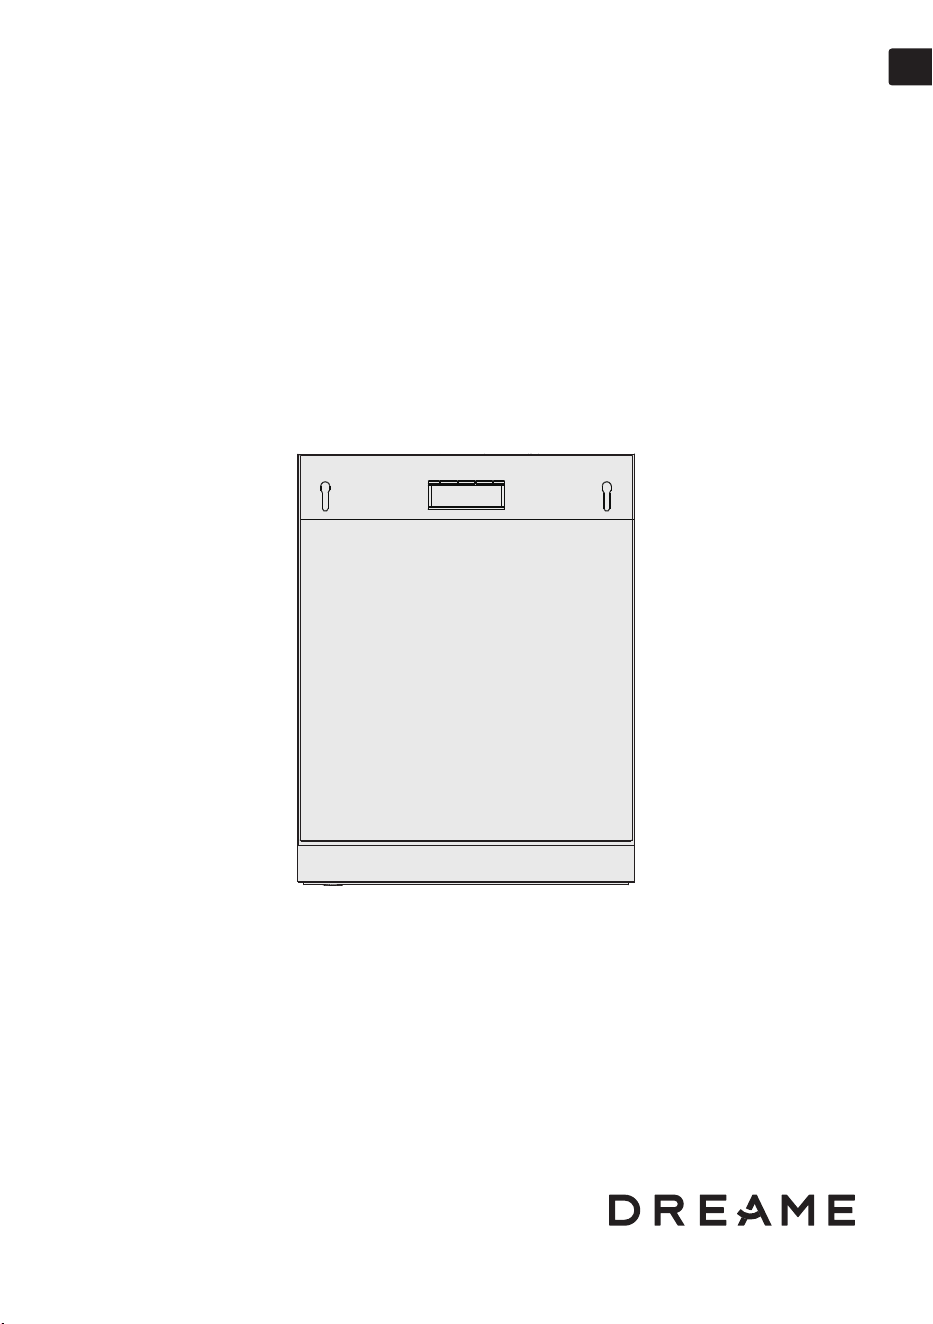
Dishwasher
User Manual
Model Number: DN15-DQ86Z6P01EUA
Please read this manual carefully before using the product and
keep it for future reference.
Dreame DZ60 Pro Built-in Dishwasher
EN
Contents
Safety information
1
Important safety symbols
Safety precautions to follow
03
04
05
05
Installation instructions
2
Precautions before installation
Installation diagram
Structural components
Wi-Fi setup guide
3
4
06
07
Operations
5
Touch panel
Control panel
Auto door opening
09
10
12
Program chart
6
13
Using your dishwasher
7
Precautions for washing special tableware
Tableware pretreatment
Adjustment
Loading dishes
Detergent guidelines
Rinse aid
Dishwasher salt adding
14
15
16
17
20
22
24
Maintenance
8
Cleaning
26
Troubleshooting
9
Solutions for common issue
Error codes
29
33
Appendix
10
Helping the environment
Specifications
34
34
02
35
36
Warranty Terms
Warranty Card
11
12
EN
Safety information
Dear User,
Thank you for using our dishwasher. To avoid personal injury, property damage,
or other safety hazards, please read this manual carefully before use.
Important safety symbols
Hazards or unsafe practices that may result in severe personal injury or
death.
Hazards or unsafe practices that may result in minor personal injury or
property damage.
For indoor use only
Read operator's manual
WEEE Information
All products bearing this symbol are waste electrical and electronic equipment (WEEE as in directive
2012/19/EU) which should not be mixed with unsorted household waste. Instead, you should protect
human health and the environment by handing over your waste equipment to a designated collection
point for the recycling of waste electrical and electronic equipment, appointed by the government or
local authorities. Correct disposal and recycling will help prevent potential negative consequences to
the environment and human health. Please contact the installer or local authorities for more information
about the location as well as terms and conditions of such collection points.
We, Zhiyue Youchuang Technology (Suzhou) Co., Ltd. hereby declares that this equipment is in
compliance with the applicable Directives, European Norms, and amendments. The full text of the EU
declaration of conformity is available at the following internet address:
https://global.dreametech.com/pages/declaration-of-conformity
For detailed e-manual, please go to https://global.dreametech.com/pages/user-manuals-and-faqs
WARNING:
1. Never expose the appliance to intense heat or humidity.
2. Only use detergents or rinse aids recommended for dishwasher and keep them
out of the reach of children.
3. Arrange knives and utensils with sharp points in the cutlery basket with the
points downwards, on the knife shelf or in the cutlery drawer.
4. When connecting or disconnecting the power supply, do not plug or unplug
with wet hands and do not pull on the power cord.
5. Do not wash plastic items unless they are marked "dishwasher safe" or the
equivalent. For plastic items not so marked, check them anufacturer"
srecommend ations.
6. Do not operate your dishwasher unless all enclosure panels are properly in
place. Do not tamper with the controls.
7. Do not abuse, sit on, or stand on the door or dish rack of the dishwasher.
8. To reduce the risk of injury, do not allow children to play in or on the
dishwasher.
9. To prevent the risk of entrapment, remove the door of the dishwasher before
discarding it.
03
1 .Never expose the appliance to intense heat or humidity.
2.Only use detergents or rinse aids recommended for dishwasher and
keep them out of the reach of children.
3.Arrange knives and utensils with sharp points in the cutlery basket with
the points downwards, on the knife shelf or in the cutlery drawer.
4. When connecting or disconnecting the power supply, do not plug
or unplug with wet hands and do not pull on the power cord.
5. Do not wash plastic items unless they are marked "dishwasher safe"or
the equivalent. For plastic items not so marked, check them
anufacturer" srecommend a
tions.
6. Do not operate your dishwasher unless all enclosure panels
are properly in place. Do not tamper with the controls.
7. Do not abuse, sit on, or stand on the door or dish rack of the
dishwasher.
8. To reduce the risk of injury, do not allow children to play in or on
the dishwasher.
9.To prevent the risk of entrapment, remove the door of the dishwasher
before discarding it.
After unpacking the dishwasher, keep the packaging out of the reach of children.
The appliance is heavy. Do not attempt to lift or move it alone. Always use two or
more people to avoid personal injury.
As with any equipment usi
ng eleclricity, water, and moving parts.potential
hazards may exist.
Do not open the door directly during the washing process to avoid scalding by
the high temperature steam inside the dishwasher.
If the power cord is damaged, it must be replaced or repaired by a quali
ed
technician to avoid the risk of electric shock. Do not install the dishwasher near
electrioal components. Keep the dishwasher away from open fames.
Install and level your dishwasher on an uncarpeted foor that can support its
weight.
After the dishwasher is installed, check that the drain hose is properly
c
onnected and that there is no leakage from the hose connectors. lf the drain
hose is loose, it may cause property damage.
-The water supply hose may degrade over time and become prone to breakage
or reduce
exibility. Inspect it regularly. If it becomes swollen, cracked, cut, or
shows signs of leakage, replace it immediately.
-Always use the new hose set provided with the appliance. Do not reuse old or
previously installed hose sets.Water pressure:0.04-1 .00MPa.
Non-professionals should not repair or replace any parts of the dishwasher by
themsewes to avoid personal i
njury or property damage.
When discarding an old dishwasher, follow local disposal regulations.
To prevent accidents, make the appliance permanently unusable (e.g., cut the
power cord, de
stroy the door lock, or remove the door) to prevent entrapment of
children or pets.
1 .
2.
3.
4.
5.
6.
7.
8.
9.
EN
Safety information
CAUTION
1. After unpacking the dishwasher, keep the packaging out of the reach of children.
2. The appliance is heavy. Do not attempt to lift or move it alone. Always use two
or more people to avoid personal injury.
3. As with any equipment using eleclricity, water, and moving parts. potential
hazards may exist.
4. Do not open the door directly during the washing process to avoid scalding by
the high temperature steam inside the dishwasher.
5. If the power cord is damaged, it must be replaced or repaired by a qualified
technician to avoid the risk of electric shock.
6. Do not install the dishwasher near electrioal components. Keep the dishwasher
away from open fames.
7. Install and level your dishwasher on an uncarpeted foor that can support its
weight.
8. After the dishwasher is installed, check that the drain hose is properly connected
and that there is no leakage from the hose connectors. If the drain hose is loose,
it may cause property damage.
-The water supply hose may degrade over time and become prone to breakage
or reduced flexibility. Inspect it regularly. If it becomes swollen, cracked, cut, or
shows signs of leakage, replace it immediately.
-Always use the new hose set provided with the appliance. Do not reuse old or
previously installed hose sets. Water pressure: 0.04-1.00MPa.
9. Non-professionals should not repair or replace any parts of the dishwasher by
themsewes to avoid personal injury or property damage.
10. When discarding an old dishwasher, follow local disposal regulations. To prevent
accidents, make the appliance permanently unusable (e.g., cut the power cord,
destroy the door lock, or remove the door) to prevent entrapment of children or
pets.
11. Keep dishwasher detergent out of reach of children. Detergent is corrosive and
may cause harm to skin, eyes, or internal organs. Avoid direct contact.
12. Do not put gasoline, solvents, or other flammable materials inside thedishwasher,
Do not wash dishes exposed to these materials.
13. Do not lean on or apply pressure to the open door, as this may cause damage or
personal injury.
14. Do not leave the appliance door open unattended, as this poses a tripping
hazard.
15. Children should be supervised to ensure that they do not play with theappliance.
16. If the dishwasher is left unused for an extended period of time, turn offthe water
supply.
17. This dishwasher is intended for residential use only.
18. This appliance can be used by children aged from 8 years and above and
persons with reduced physical, sensory or mental capabilities or lack of
experience and knowledge if they have been given supervision or instruction
concerning use of the appliance in a safe way and understand the hazards
involved. Children shall not play with the appliance. Cleaning and user
maintenance shall not be made by children without supervision.
04
EN
Installation instructions
Precautions before installation.
Installation diagram
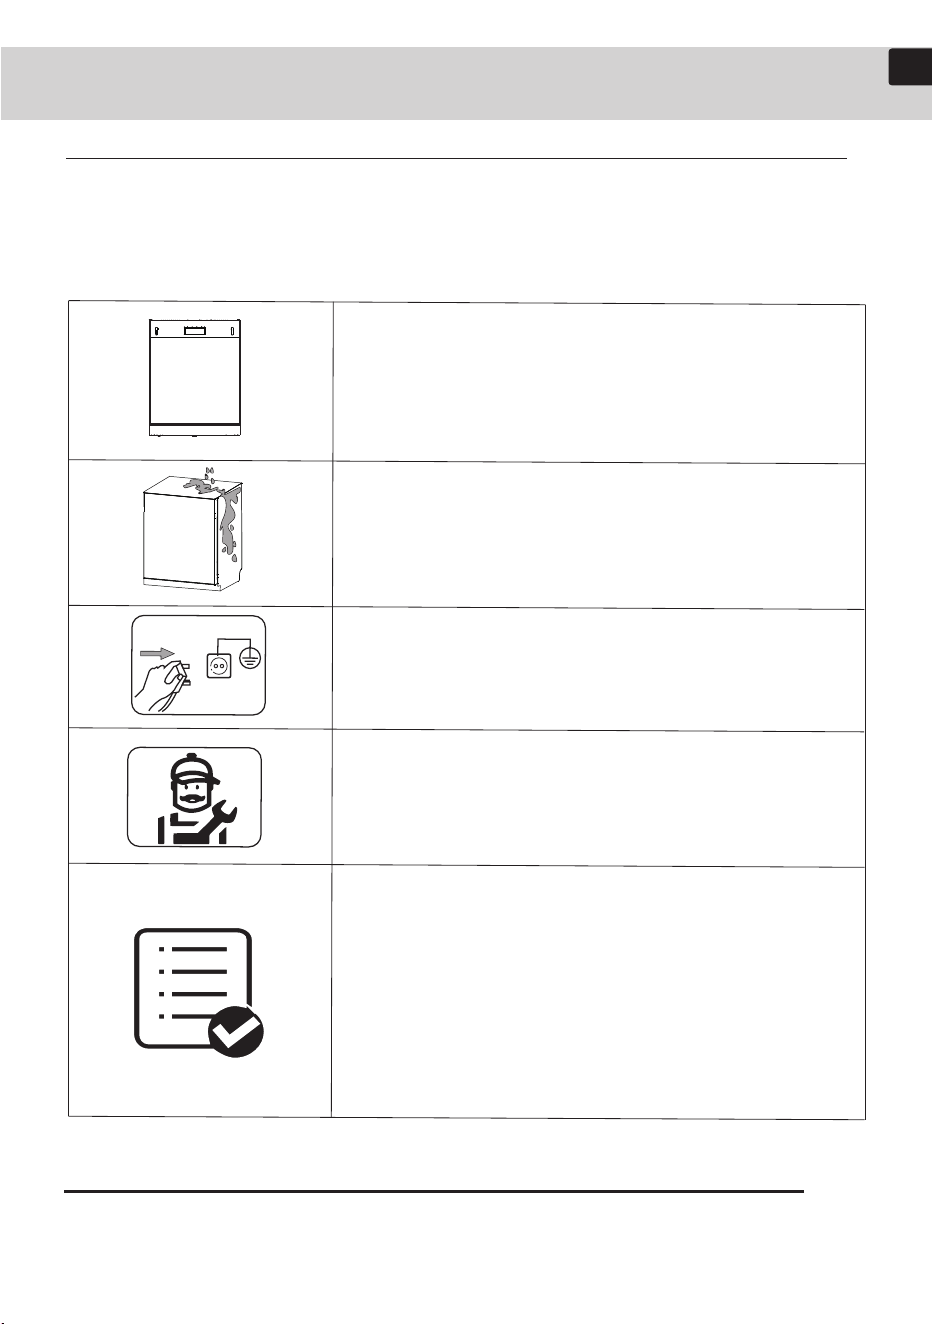
The dishwasher had been tested through water during production to ensure that
the machine are qualified. When you unpack the dishwasher, there may be water
droplets in it. This will not affect the performance of the product.
For installation, refer to the Quick Installation Guide in the attached package.
• The dishwasher should be installed smoothly in a
place where operation and maintenance are
convenient and firm, and be careful to stay away
from high temperature open flame.
• Do not install dishwashers and electrical outlets in
places that may be damp or wet.
• Ensure that the grounding pole of the power
outlet is effectively grounded.
• Necessity to allow disconnection of the appliance
from the supply after installation.
• It must be installed or moved by professionals.
Forbidden to disassemble, refit and repair without
authorization.
• Check whether the voltage meets the
requirements.
• Check whether the length of the drainage hose
meets the use requirements.
• Check whether the materials required for use, the
platform for placing the machine or other
accessories are ready. Special required accessories
can be customized if needed.
05
01
08
09
05
06
02
04
07
03
50°
45° -65° 75 ° 65° 50°
EN
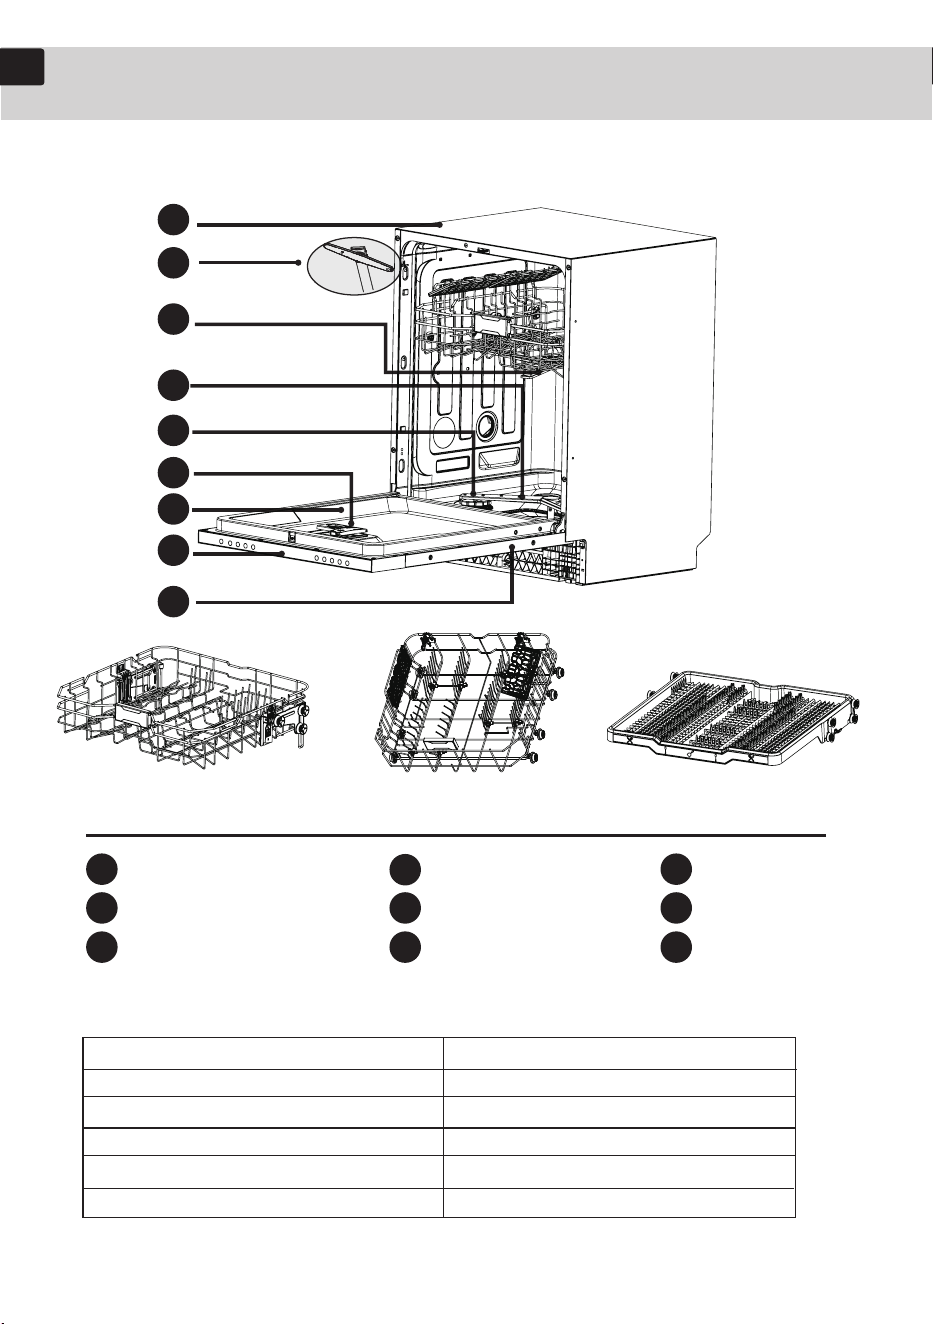
Structural components
When you unpack your dishwasher, make sure you receive all the parts as shown
below.
Upper basket
Lower basket Tray
Top panel
Lower arm
Inner door
Top arm
Softener
Control panel
Upper arm
Dispenser
Outer door
Accessories
Name
Salt Funnel
Vapor-Proof Stickers
Round Plastic Buckle
Metal Fixing Plate
Suction cup
Quantity
1
1
2
2
1
Name
Kick Plate Bracket
Screw ST 3.5x45
Screw ST 3.5x25
Screw ST 4x14
Quantity
2
4
6
16
The actual accessories and quantities may vary. Please refer to the actual product.
06
01
04
07
02
05
08
03
06
09
1
2
3
4
Register Now
Register Now
Add
Add
45°
45°-65° 75° 65°50°
Half Load
Stora ge
Hygien e Plus
Machin e Care
Dela y
EN
Wi-Fi Setup Guide
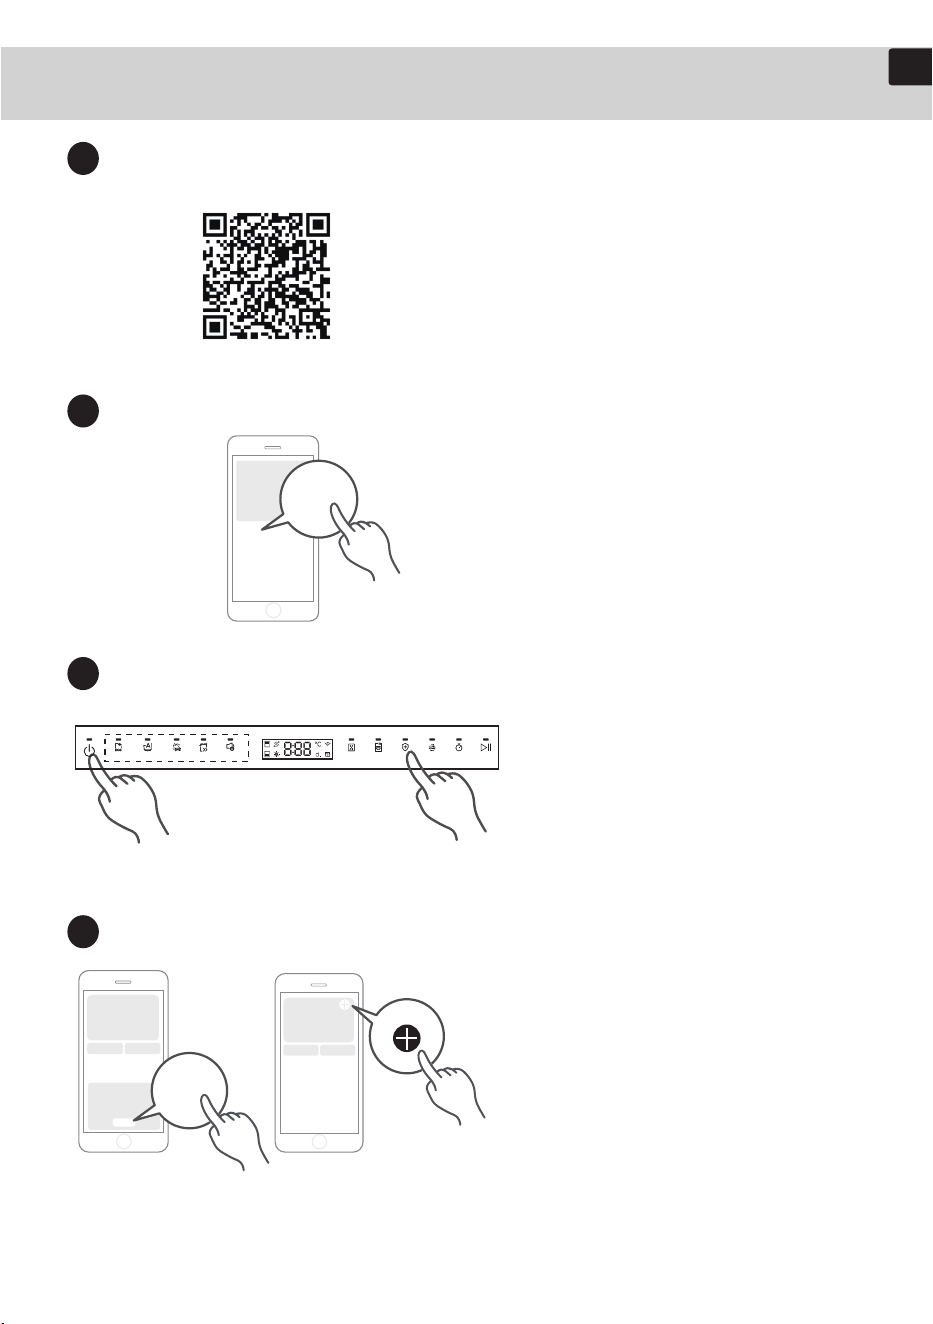
Download and Install the Dreame App - DREAME
Scan the QR code on the left or search for
"Dreame" in your app store to download
and install the Dreame App.
Register and Log In
Open the App and tap "Register Now" on
the main screen. Follow the instructions to
complete your account registration and log
in.
Set Up the Dishwasher
Press and hold the "Power" and "Hygiene
Plus" button simultaneously for 3 seconds
to enter Wi-Fi pairing mode. The buzzer
will beep, and the Wi-Fi indicator light will
start flashing. Complete the network setup
within 3 minutes after the Wi-Fi indicator
light starts flashing.
Add Device
Method A: After powering on the
dishwasher, if the App homepage detects a
nearby device, tap the "Add" button to
begin pairing.
Method B: If the device is not automatically
detected, tap the "+" icon in the top right
corner of the homepage and select "Add
Device." You may scan the QR code on the
dishwasher or select the model from the
nearby devices list to complete the pairing
process.
Method A Method B
07
EN
Wi-Fi Setup Guide
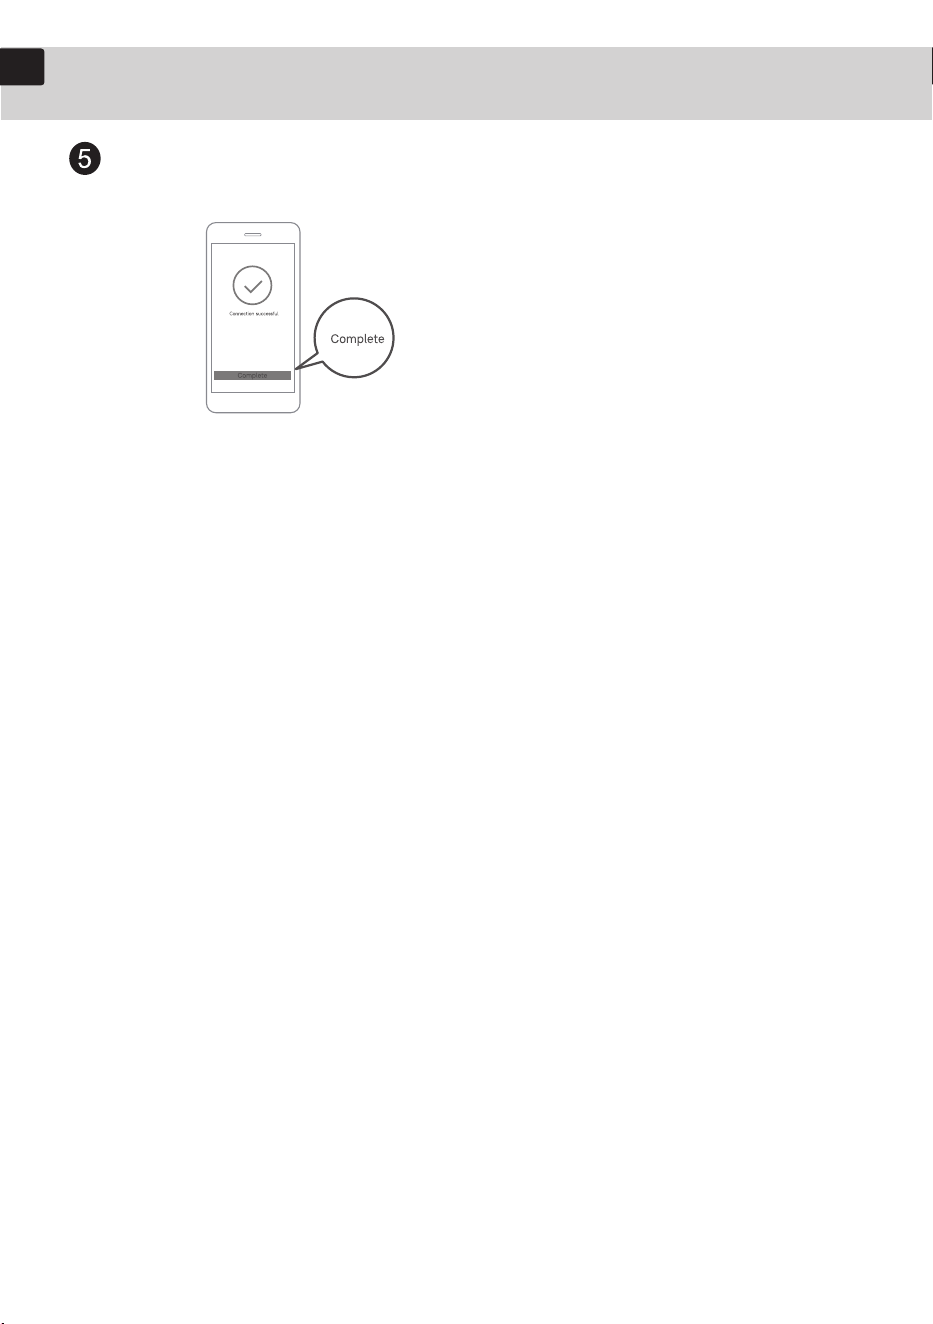
Connect the Appliance to Wi-Fi
Follow the in-app instructions to connect
the appliance to your home Wi-Fi
network.
If the dishwasher loses power, it must
be reconnected by following the steps
outlined above.
Notes & Troubleshooting Tips for Network Connection Failure:
1. Ensure your mobile phone is placed close to the product during the pairing
process.
2. If the App indicates that your product only supports 2.4GHz Wi-Fi, make sure to
select a 2.4GHz network from your home Wi-Fi. This product does not support
5GHz Wi-Fi.
3. It is recommended that your router name (SSID) and password do not contain
Chinese characters or special symbols (including punctuation marks, spaces,
etc.).
4. It is advised that the number of connected devices on the same router does
not exceed 10, to prevent signal instability that may affect pairing.
5. If the Wi-Fi name or password has been changed, please repeat the setup
process to reconnect.
6. If connection fails, clear cache data within the App interface and try the pairing
process again.
7. Due to continuous software updates, the interface or content of the Dreame
App may be subject to change. Please refer to the actual display within the
App for accurate instructions.
08
EN
Operations
Knock-to-Open Function
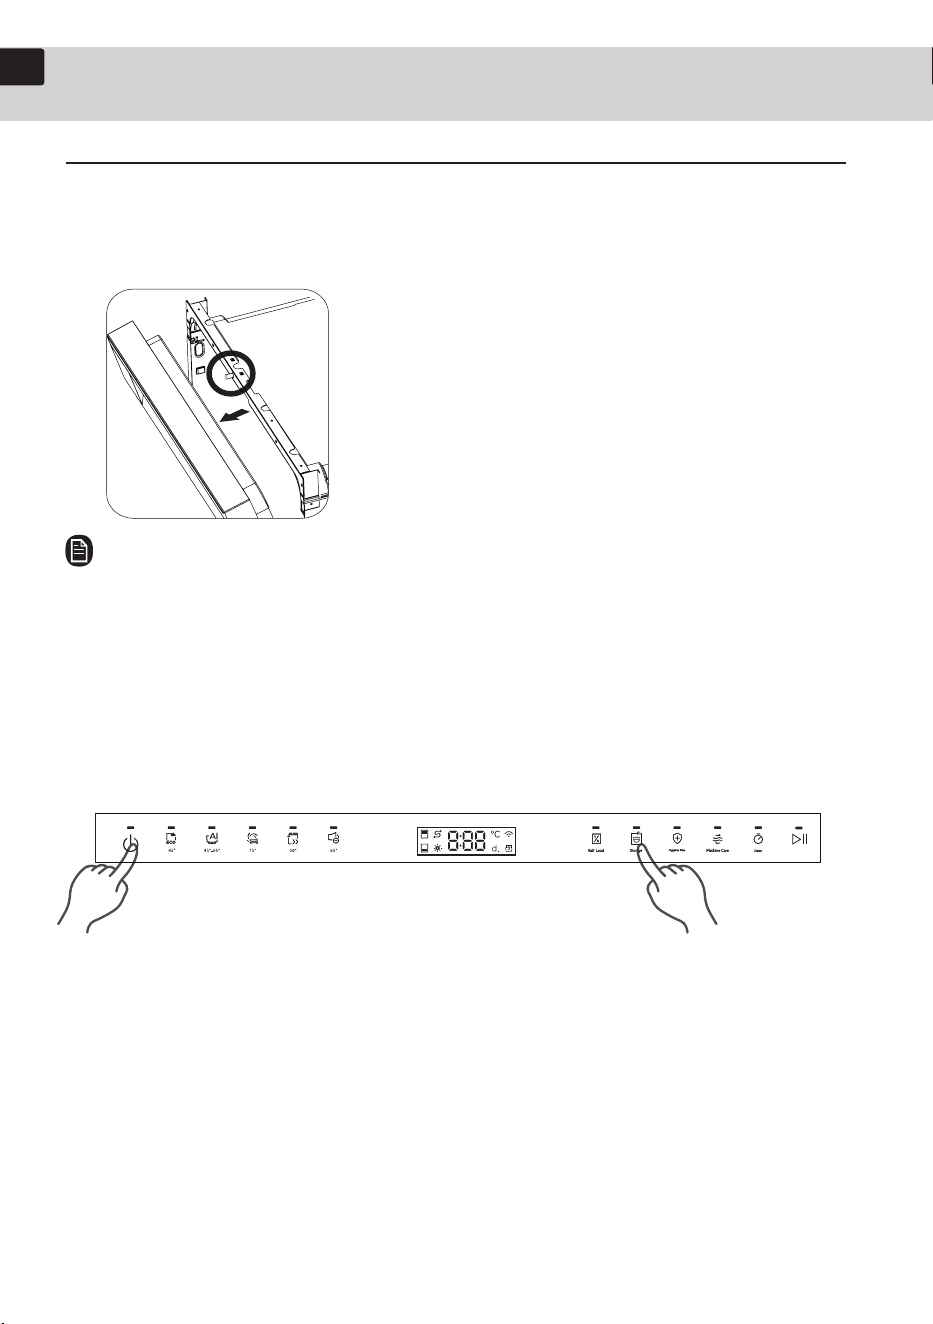
Gently knock twice on the upper right corner of the door panel to automatically
open the door.
The knock-to-open feature is disabled during the wash cycle. You may either use
the suction cup to open the door, or pause the wash cycle to open the door via
the app.
Touch panel
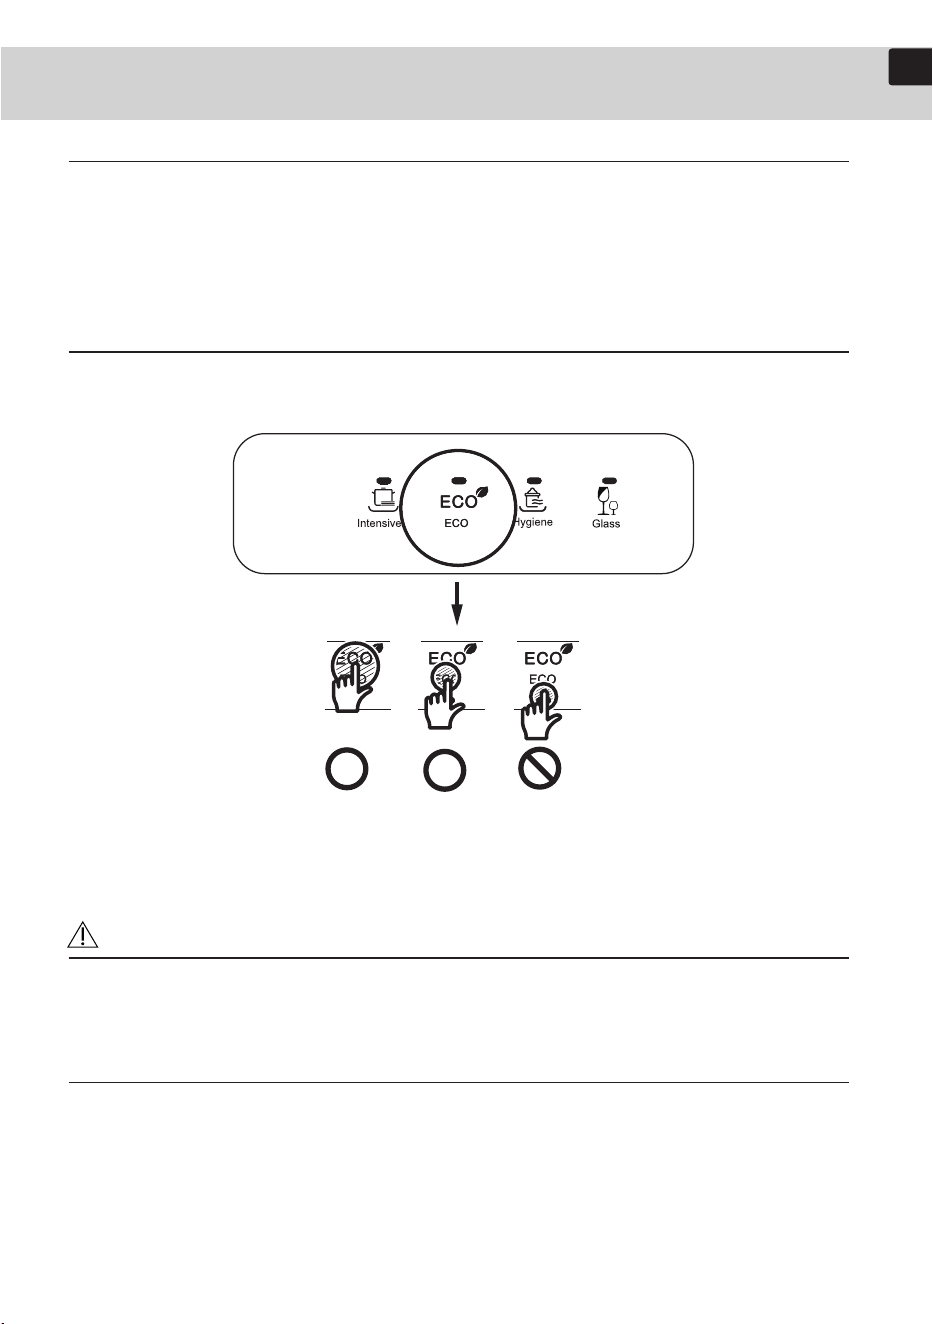
To prevent the touch-enabled controls from losing responsiveness, follow these
instructions.
• Touch the center of each button with one finger.
• Do not touch more than one button at a time, except as directed.
• Clean the surface of the control panel regularly with a soft, damp cloth.
WARNING
To reduce the risk of fire, electric shock, or personal injury, read the IMPORTANT
SAFETY INSTRUCTIONS before operating this appliance.
Simple steps to start your dishwasher
1. Open the door and load your dishes. Ensure all dishes have been emptied of
food residues.
2. If applicable, place dishes in the lower basket.
3. Add detergent to the detergent dispenser. For optimal drying performance, also
fill the rinse aid compartment.
09
EN
Operations
Control panel
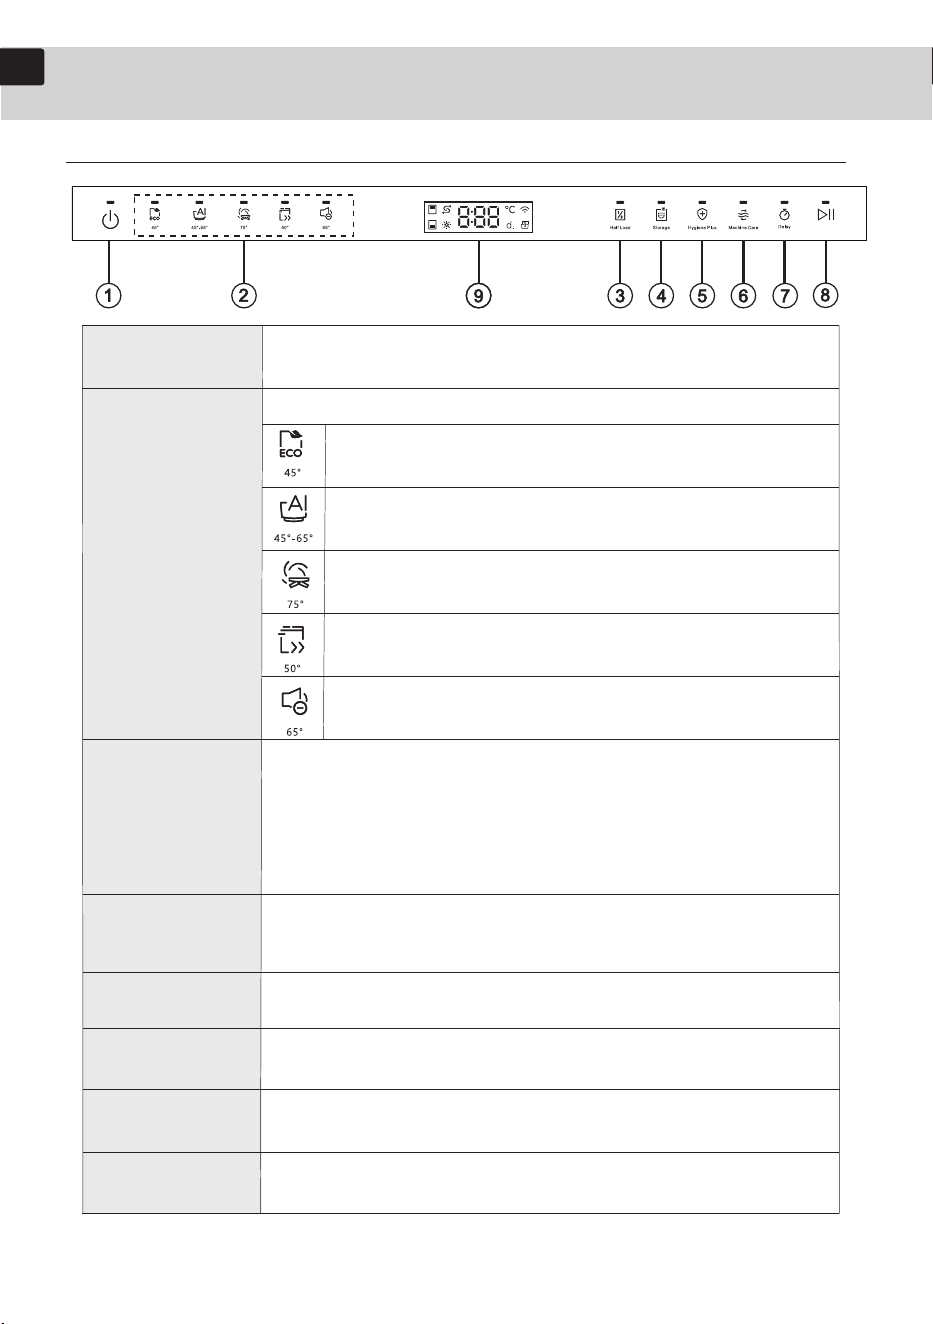
1-Power
2-Program
3-Half Load
5-Hygiene Plus
6-Machine Care
7-Delay
8-Start
4-Storage
When standby, press this button to realize the function of power on and power
off; under the state of opening the door, it can be shut down by long-pressing the
power button for 3 seconds while forcibly turning on the drain for 30 seconds.
Select any program, the corresponding indicator lights up.
Tap this button in standby to select the wash program as a Silence program.
Note: Default Hot Air Drying
Tap this button in standby mode and the wash program is selected as Express
program.
Note: Default automatic door opening
Tap this button in standby mode and the wash program is selected as intensive
program in standby mode, press and hold for 6 seconds to start the Glass mode.
Note: Default automatic door opening
Tap this button in standby mode and the wash program is selected as an Auto
program in standby mode, press and hold for 6 seconds to start the Universal mode.
Note: Default automatic door opening
Tap this button in standby mode, the wash program is selected as Eco program in
standby mode, press and hold for 6 seconds to start the Pre-rinse mode.
Note: Default automatic door opening
Storage Selection: The digital display shows the selected number of storage days in the initial
state, tap the "Storage" button to cycle through durations from "01, 02 ... 14, 15" Long press the
"Storage" button for 1.5 seconds to exit storage mode and switch to standby.
Note: Forcibly closing the door during storage will activate PTC drying.
Half Load & Layered Wash Function
Half Load: Dishes can be placed in both upper and lower racks Wash time will be reduced accordingly.
Layered Wash:
Select Upper Wash to clean only the upper rack (place all dishes in the upper rack).
Select Lower Wash to clean only the lower rack (place all dishes in the lower rack).
Tap to enter function selection:
①in standby mode, tap the Half Load button to enter Half Load mode (indicator light on).
②Tap again to switch to Upper Wash (Half Load light off, upper rack indicator on).
③Tap again to switch to Lower Wash (lower rack indicator on).
④Tap once more to exit and return to standby.
Note: Forcibly closing the door during storage will activate PTC drying.
Tap the Hygiene Plus button to activate this function as an additional function to the main
program, ensuring more thorough sterilization.
Tap to select the Machine Care program, which defaults to non-automatic door opening and
cannot be stacked with any additional functions;
Note: This program is only for cleaning the dishwasher cavity.
The display shows the delayed start time, beginning at "1H" Short press the "Delay" button to
cycle through the delay options: "1H, 2H ... 23H, 24H" Long press the "Delay" button for 1.5
seconds to exit delay mode and return to standby.
After each setting, press this button to start the program During startup, washing, or pause,
press and hold this button for more than 3 seconds to cancel the current program and return
to program selection mode After cancellation, close the door to initiate 30 seconds of forced
drainage.
10
EN
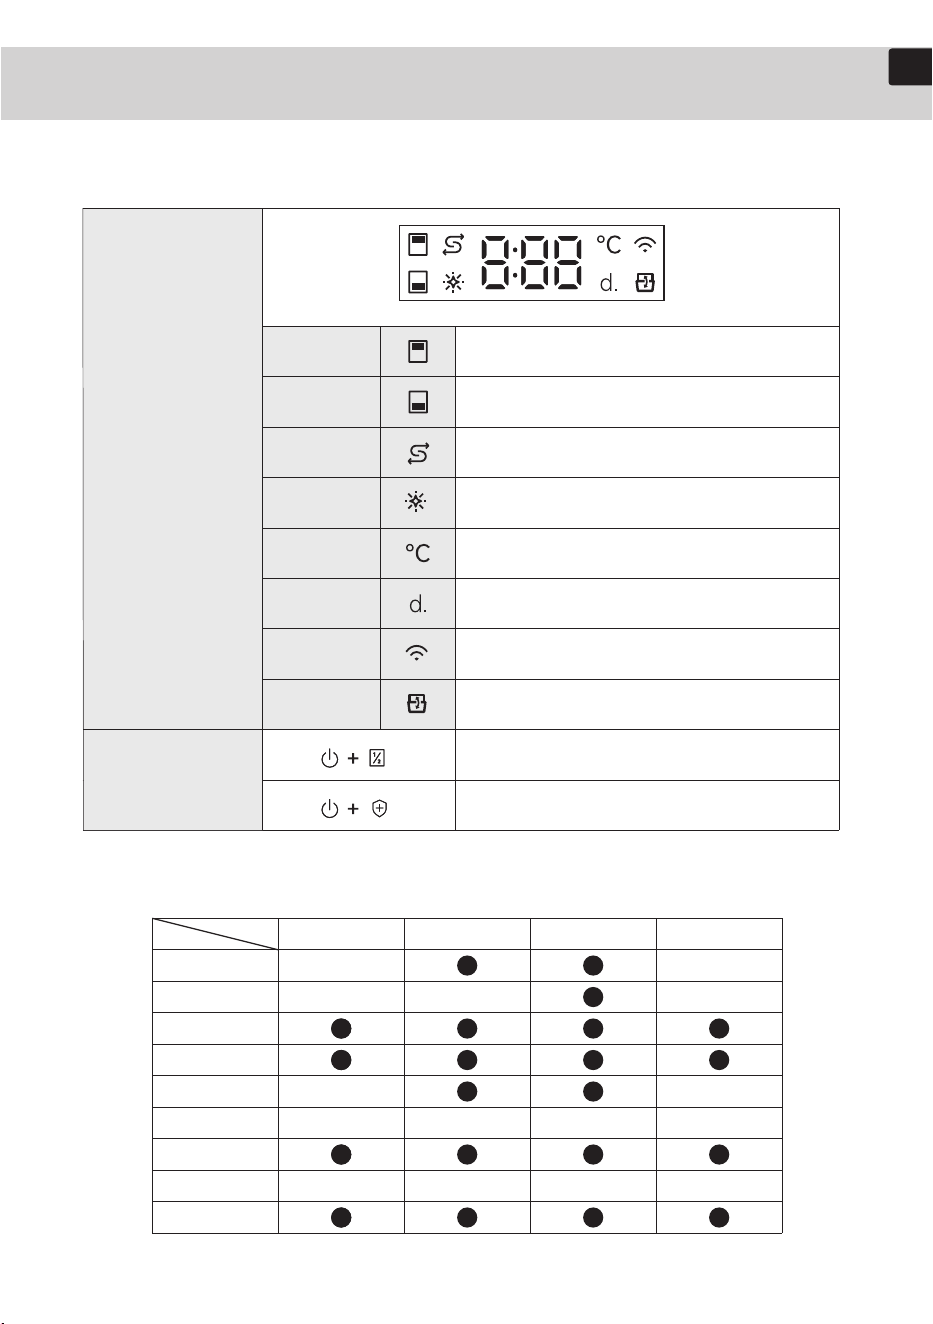
9-Indicators
Operations
Description of
key combinations
When the Upper Wash indicator light is on, it means that Upper
Wash is selected.
Upper wash
indicator
When the Lower Wash indicator light is on, it means that Lower
Wash is selected.
Lower wash
indicator
The indicator light comes on when there is a shortage of soft
water salt.
Salt deficiency
indicator
Rinse Aid Refill indicator: The indicator light turns on when the
rinse aid needs to be refilled.
Lack of bright
disk agent
indicator
When the temperature indicator light is on, it means that the
digital tube display content is the working temperature of the
machine.
Temperature
indicator
Lights up when the device enters the storage-days setting mode.
When this indicator is on, the display shows the number of days
set for the storage-and-care function.
Storage-days
indicator
When the indicator light is blinking, it indicates that WFI pairing
is in progress, and a constant light indicates successful WIFI
networking.
WIFI indicator
When the automatic door opening indicator is on, it means that
the main program has the automatic door opening function.
After powering on, press and hold "Power" + "Half Load" for 3
seconds at the same time to cancel the auto door opening
function.
After powering on, press and hold "Power" +"Hygiene Plus" for 3
seconds at the same time to enter WIFI pairing mode.
Automatic door
opening indicator
Note: The table below shows the additional functions that can be combined with
each main program. Half Load and Hygiene Plus functions are mutually exclusive and
cannot be enabled at the same time.
ECO
Auto
Intensive
Silence
Express
Machine Care
Glass(APP)
Pre-rinse(APP)
Universal(APP)
Half Load Hygiene Plus Storage Layered Wash
11
may cause harm to skin, eyes, or internal organs. Avoid direct contact.
Do not put gasoline, solvents, or othe
ammable materials inside
thedishwasher, Do not wash dishes exposed to these materials.
Do not lean on or apply pressure to the open door, as this may cause damage or
personal injury.
Do not leave the appliance door open unattended, as this poses a tripping
hazard.
Children should be supervised to ensure that they do not play with theappliance.
lf the dishwasher is left unused for an extended period of time, turn o
the water
supply.
This dishwasher is intended for reside
ntial use only.
This appliance can be used by children aged from 8 years and above and
persons with reduced physical, sensory or mental capabilities or lack of
experience and knowledge if they have been given supervision or instruction
concerning use of the appliance in a safe way and understand the hazards
involved. Children shall not play with the appliance. Cleaning and user
maintenance shall not be made by children without supervision.
EN
Operations
Auto door opening
The Auto door opening function, which is designed to improve drying
performance. After the washing is finished, let it stand for 15 minutes and then
automatically open the door to make the water vapor in the chamber run out to
achieve the rapid drying effect of the tableware.
▪ All programs, excluding quick wash,
will automatically open the door for
drying after the wash cycle ends.
Note
• Once the door opens on the Auto door opening mode, the door cannot be
closed manually for the next 65 -75minutes.
• Enable "Auto door opening" for better drying result. Please close the door
manually as soon as possible after the screen is turned off to prevent mosquitoes
from entering the cavity.
• After a cycle is complete, the door automatically opens to let steam out. This is
normal and not a product malfunction.
12
Tap-to-Open Sensitivity Adjustment Procedure:
1. With the appliance powered off, press and hold Power + Storage simultaneously
for 3 seconds to enter the tap-to-open sensitivity adjustment mode. The factory
default is Level 3. Press the Storage button to adjust the sensitivity. The
adjustment sequence is 3 → 4 → 5 → 1 → 2. After selecting the desired level,
press the Start button to confirm and save the setting.
2. After entering the sensitivity adjustment mode, if no operation is performed
within 30 seconds, the appliance will automatically exit this mode and return to
standby.
3. After adjusting the sensitivity level, you must press the Start button to confirm
and save the setting. If the Start button is not pressed, the setting will not be
saved.
4. Not all models support tap-to-open sensitivity adjustment. Please refer to the
actual appliance for availability.
EN
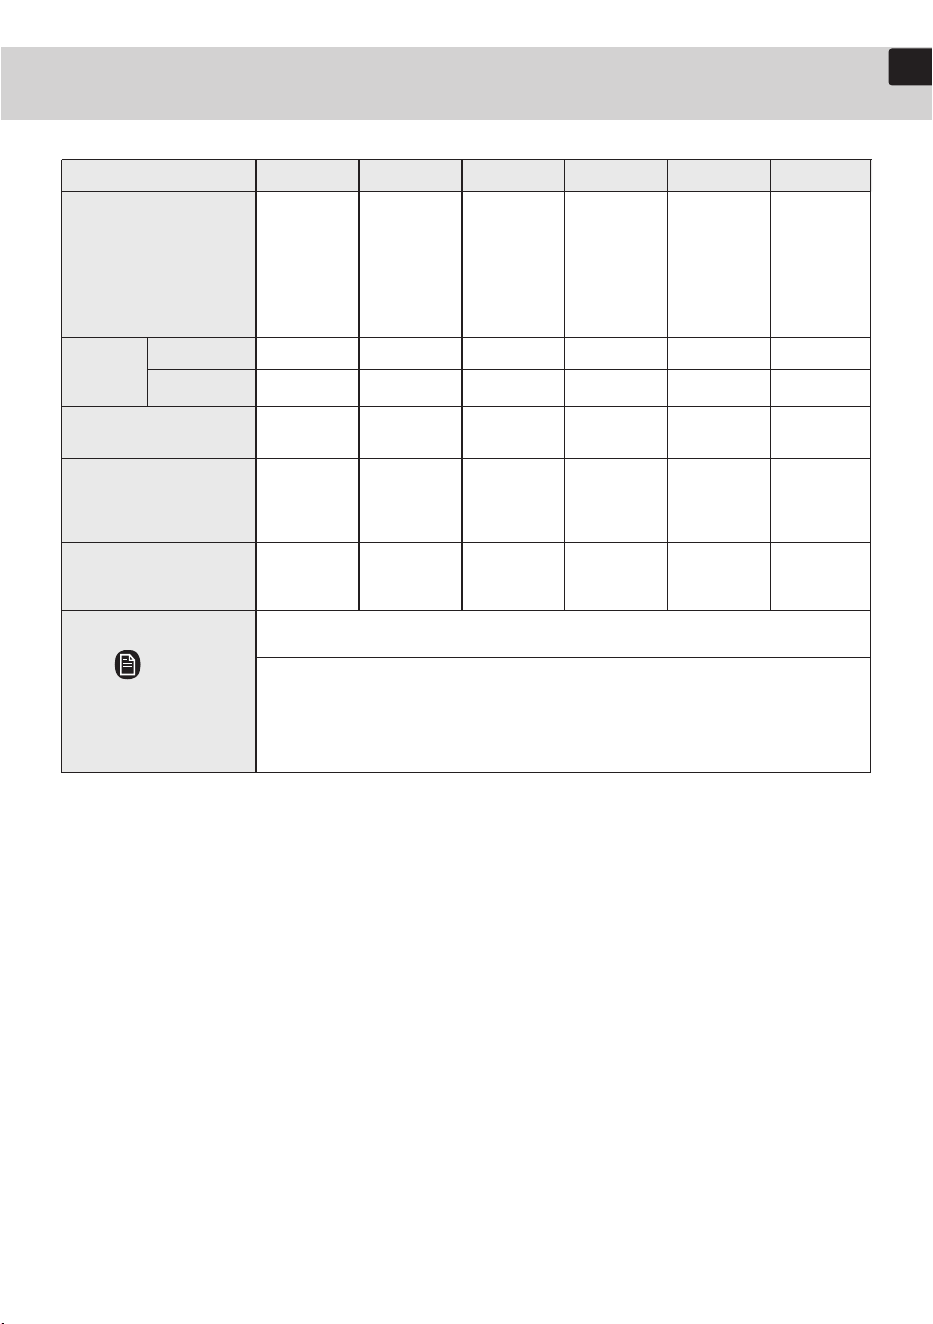
Program chart
Mainwash
Hot Rinse
Dry End
Program
Cycle sequence
Water consumption (L)
Cycle time (min)
Detergent
Main wash
Silence
Prewash
Mainwash
Rinse
Hot Rinse
Dry End
ExpressIntensive
Prewash
Mainwash
Rinse
Hot Rinse
Dry End
Auto
Prewash
Mainwash
Rinse
Hot Rinse
Dry End
ECO
Mainwash
Rinse
Hot Rinse
Dry End
Mainwash
Rinse
Hot Rinse
Dry End
Machine Care
7+16g
Prewash+
Mainwash
4+18g
Prewash+
Mainwash
22g
1 or 2 tabs
22g
1 tab
22g
1 or 2 tabs
/
Temp
(℃)
Hot Rinse
36
45
45~65
65
55
75
50
50
55
65
60
68
10.8 11~19.2 14.8 10.3 14.8 14.3
289 189~209 209 119 225 169
Testing program is "ECO", add detergent 7+16g, rinse aid gear set to "d7",
upper basket are on the down position.
"ECO" is the recommended program for a normally soiled tablewaare at rated
dishwasher capacity".
Express Wash programs shut off after washing, without auto door opening
Note
13
EN
Using your dishwasher
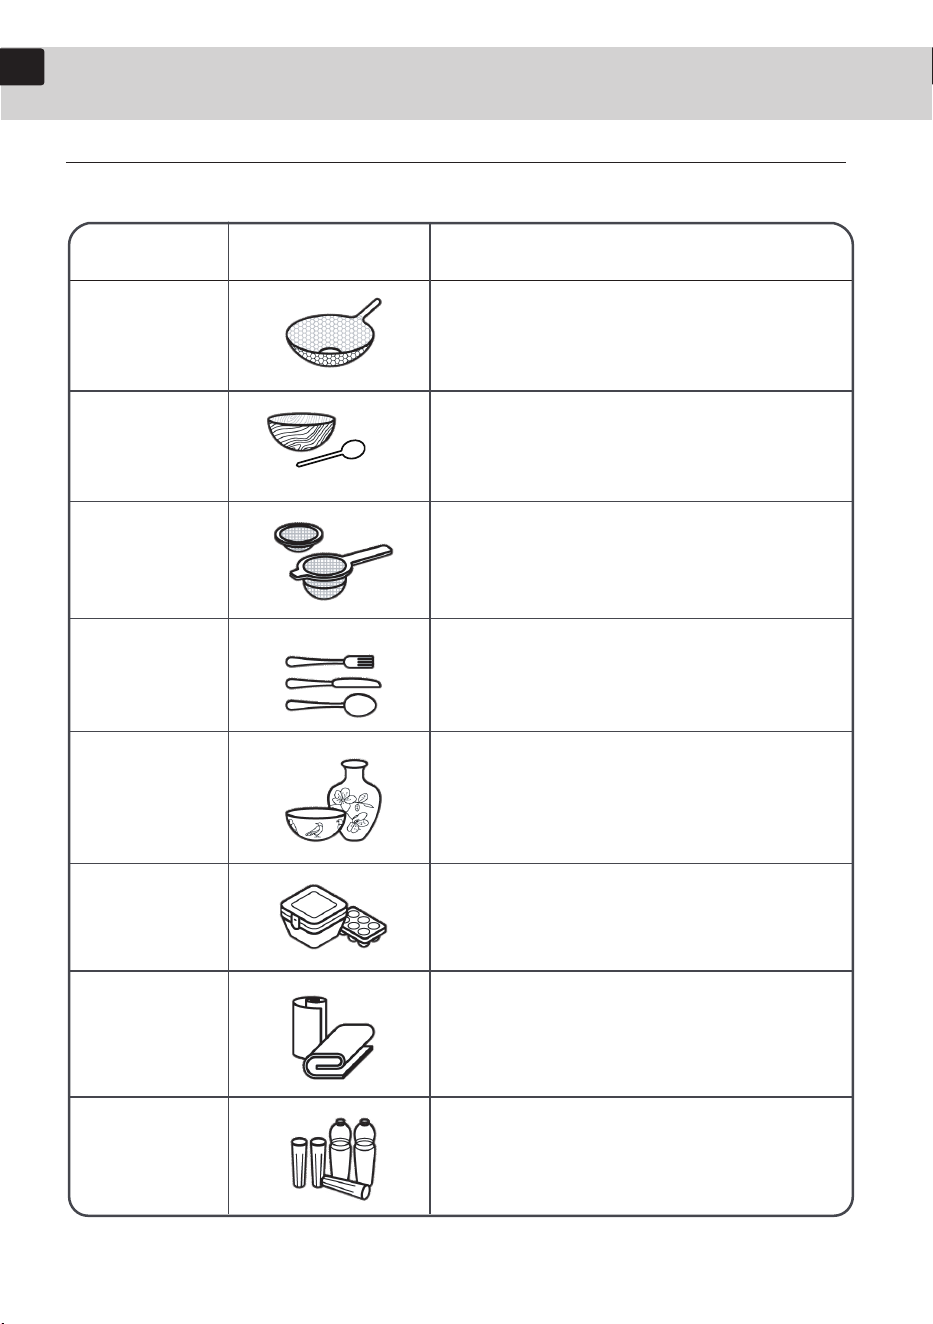
Precautions for washing special tableware
Items not recommended for washing in the machine
Item Image Remarks
Metal ableware
Wooden tableware
Adhesive items
tableware
Silver-made cutlery
Decoration Items
Plastic tableware
Textile
Small-caliber
tableware
Copper, brass, tin, lead or aluminum products are
easily contaminated and lose their luster when exposed
to high temperatures, resulting in discoloration or
deterioration
Wooden utensils are often sensitive to heat and water,
and frequent dishwasher washing may cause
deterioration or deformation
Some adhesives may soften or dissolve in the
dishwasher
Silver tableware should be rinsed with clean water and
dried immediately after use. It is not recommended to
put it in the dishwasher for mixed washing. High
temperature may cause spots
Antiques or prizes with patterns, gold edges.
hand-painted glazes are not suitable for washing in the
dishwasher.
Plastic products that are not heat-resistant may be
deformed or faded when exposed to hot water. Please
refer to the recommendations of the tableware
manufacturer. When washing plastic tableware, care
should be taken to fix it so that it will not turn over or
fall during the washing process.
Textiles are prone to falling off shelves, which can
cause smoke. burns. and odors
Small-caliber tableware is not easy to be spraved into
the interior, which has an impact on the washing effect
14
EN
Using your dishwasher
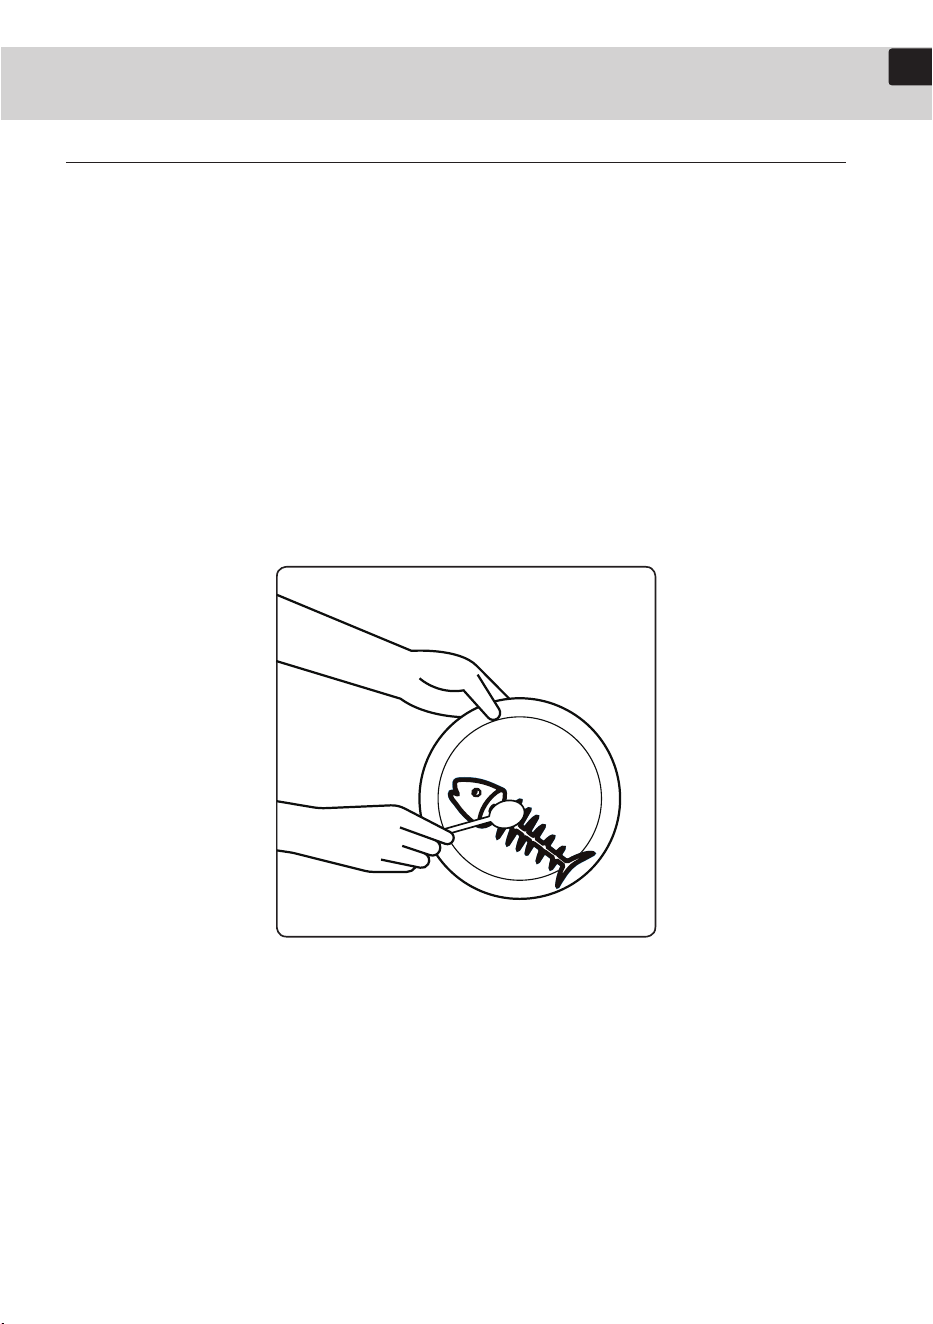
Tableware pretreatment
1. To prevent filter blockage and ensure optimal dishwasher performance,
remove large food residues from the tableware before placing them into the
dishwasher. Liquids such as oil and soup, or their solidified forms, do not
require special treatment.
2. If cookware or tableware has burnt or scorched residues that are difficult to
remove, wipe them with a dishcloth before loading, as such items are difficult
to clean in the dishwasher.
15
EN
Using your dishwasher
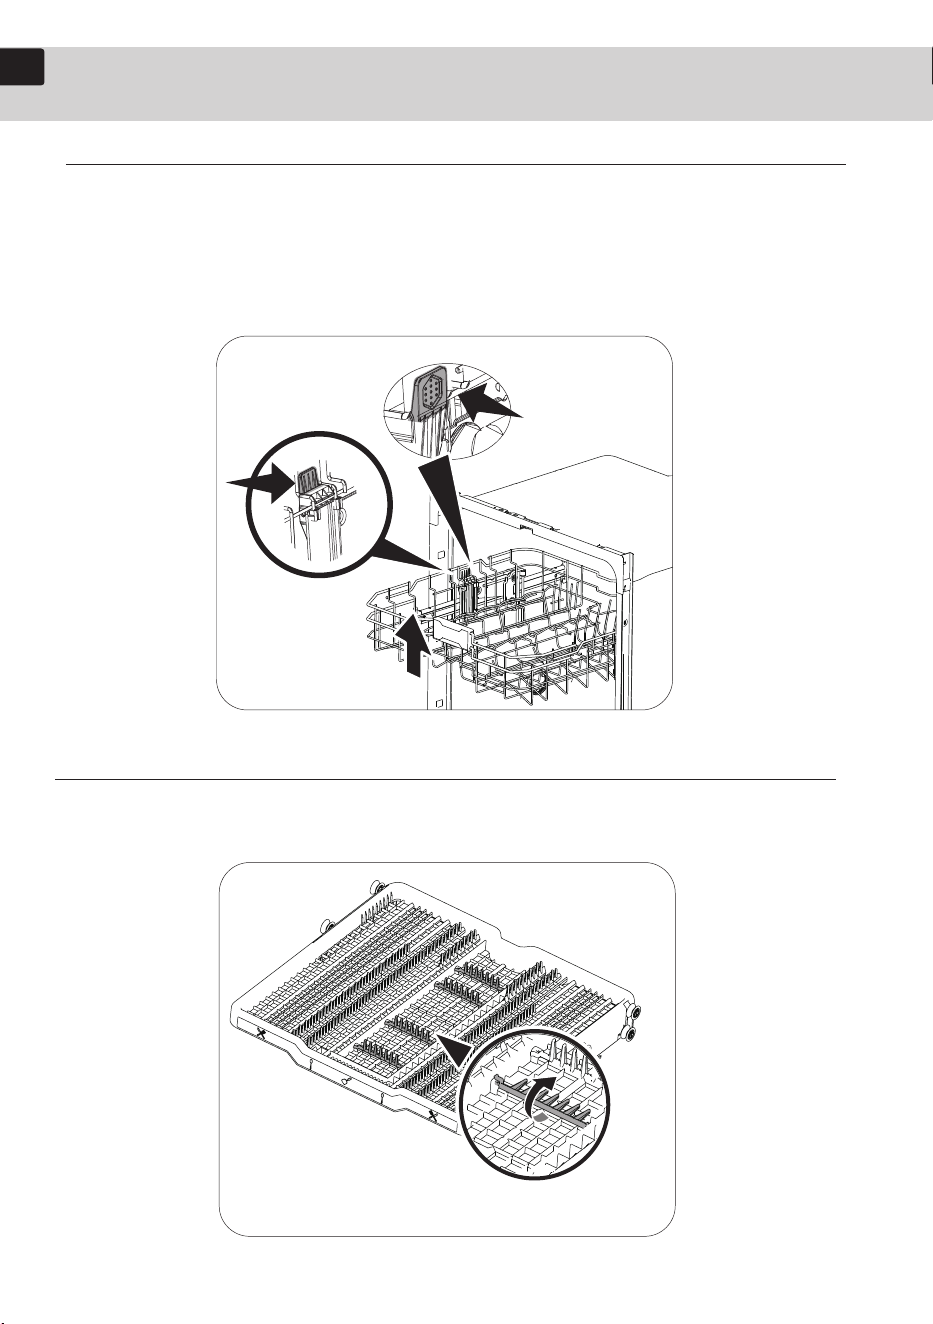
Height adjustment
You can adjust the height of the upper basket in your dishwasher so that the lower
basket can accommodate larger sized dishes. Pull out the upper basket, hold the
wire of the basket and lift it up, so that the basket can be adjusted upwards. Press
and hold the button to adjust the basket down.
Tray adjustment
When putting spatulas, serving spoons and similar items in the Tray. You can put
the movable row down as shown.
16
1
3
5
6
7 9
11
10
2
4
8
EN
Using your dishwasher
Loading dishes
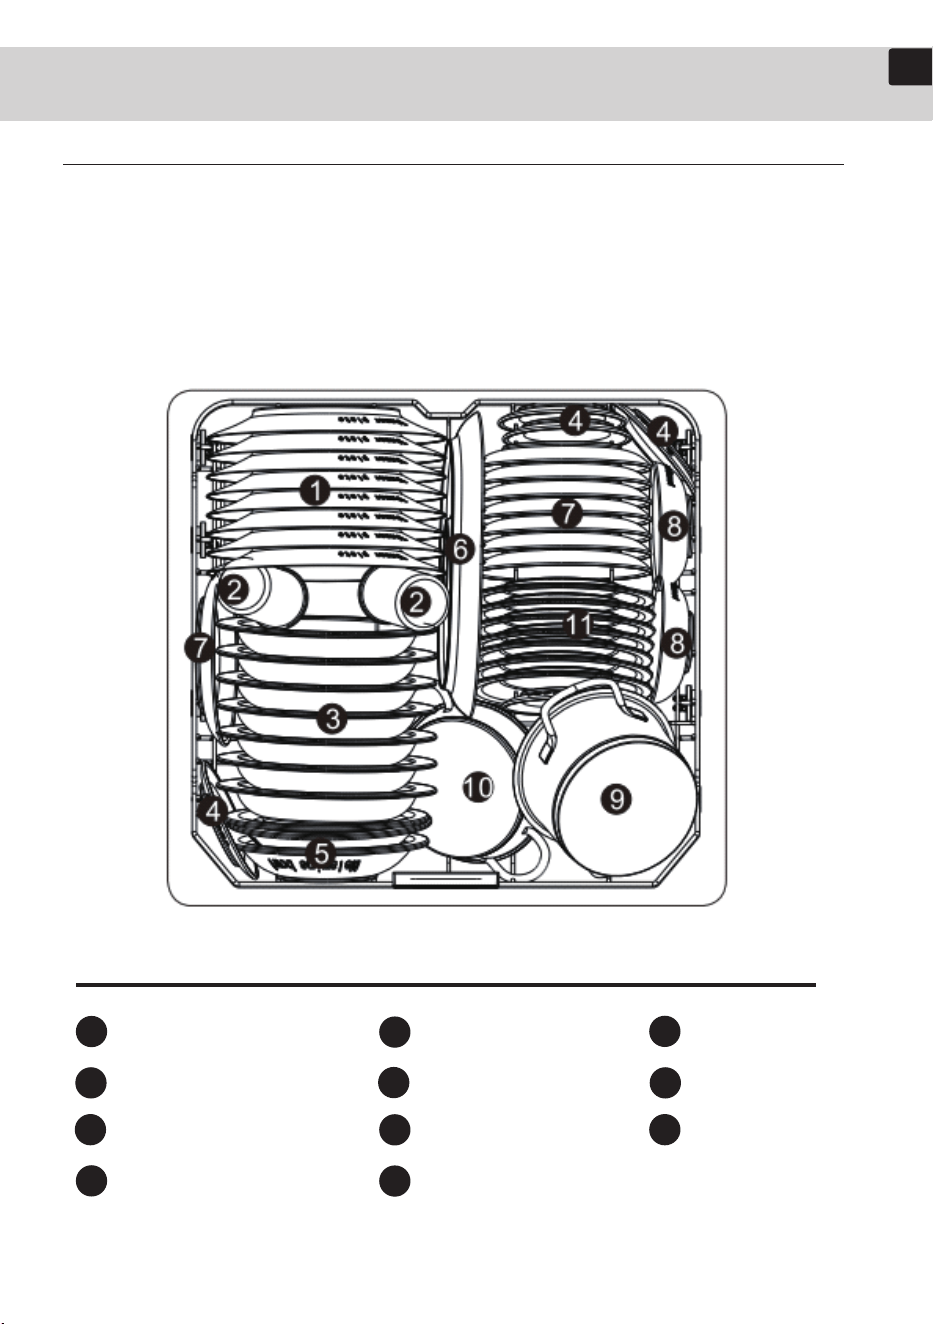
Loading the lower basket
The lower rack has been especially designed for dinner dishes, soup bowls, plates,
pots, lids, casserole dishes, and plates. Load large items such as pans and pots
into the dishwasher so their open sides face downwards. We recommend loading
cups, stemware, and small plates into the upper rack See the recommended
loading patterns below.
Dinner plate
Saucer
Dessert plate
Oven pot
Glass
Melamine bowl
Dessert bowl
Melamine dessert plate
Soup plate
Oval platter
Small pot
17
1 3
5
6
2
4
EN
Using your dishwasher
Loading dishes
Loading the upper basket
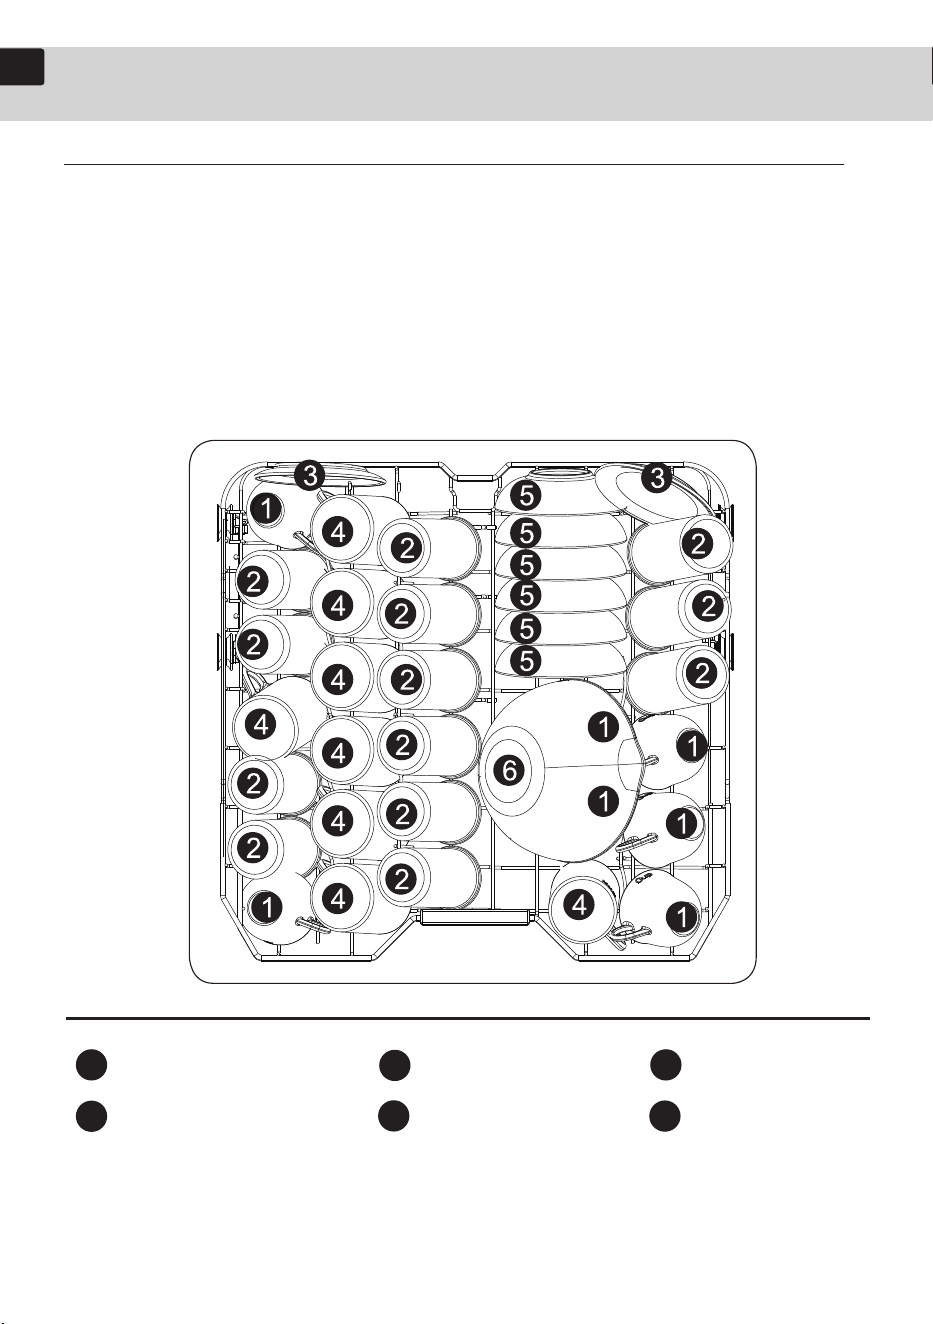
The upper rack has been designed for small plates, mugs, glasses, and plastic
items marked "dishwasher safe". Load your plates into the dishwasher in two half
rows, so that the front of each plate faces the back of the plate in front of it, and
the open sides of the plates at the center of the dishwasher face each other. See
the illustrations below. Make sure the loaded dishes do not interfere with the
rotation of the nozzle which is located at the bottom of the upper basket. (Check
this by rotating the nozzle by hand.) When loading dishes, pull the upper basket
out sufficiently so you can load it without striking the counter above.
Cup
Mug
Glass
Dessert bowl
Saucer
Glass bowl
18
EN
Using your dishwasher
Loading dishes
Loading the tray
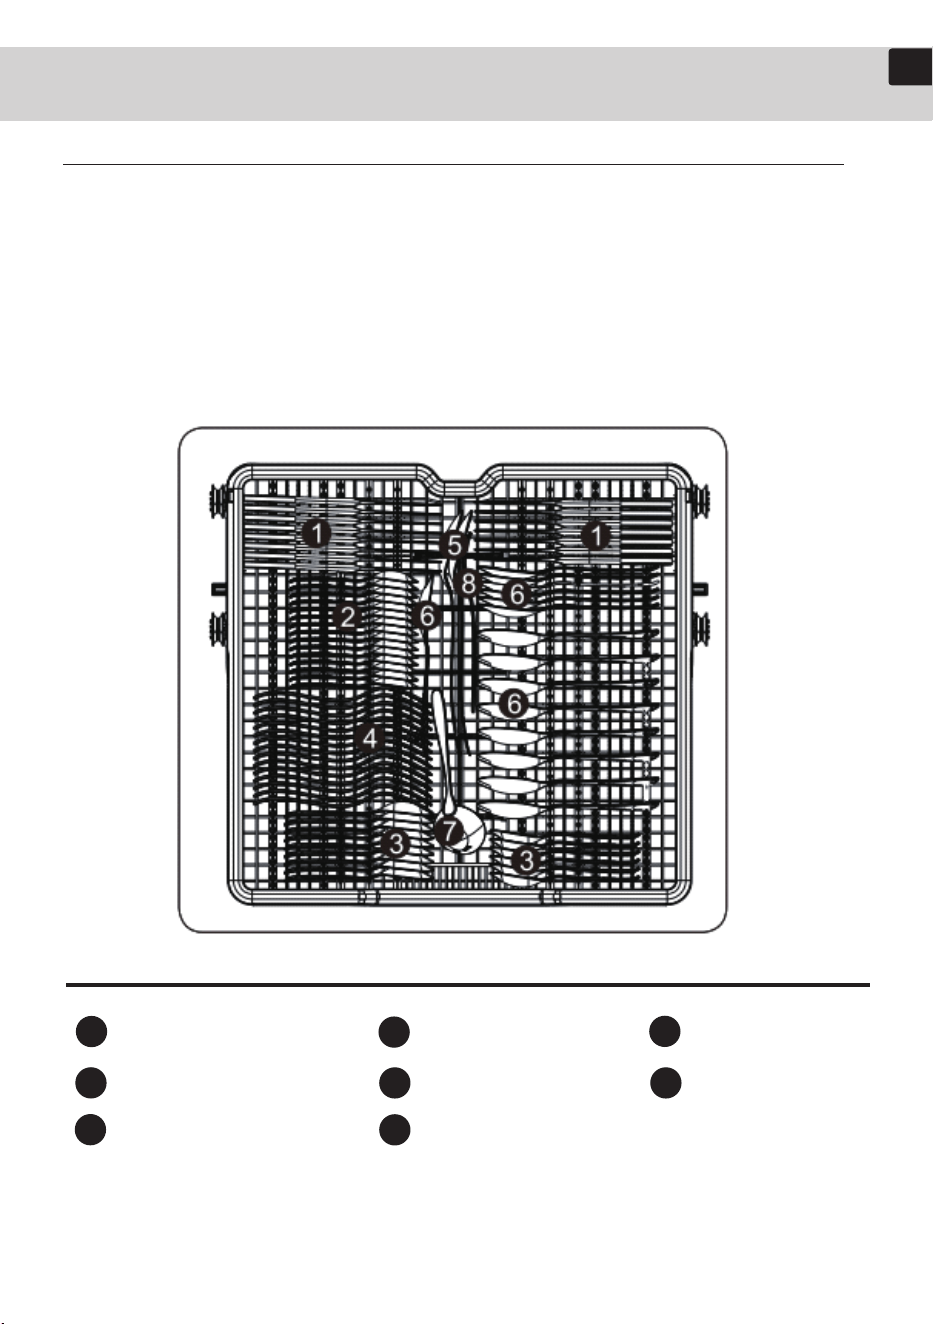
The cutlery tray is best suited for flatware and cooking or serving utensils. You can
place cutlery and utensils randomly or regularly on the cutlery rack. Heavily soiled
utensils or items with baked on foods should be placed in the lower cutlery basket
for the most effective cleaning.
Removing the Cutlery Tray
The entire cutlery tray can be removed if more space is needed on the upper
basket for larger items.
Knife
Fork
Gravy ladle
Tea spoon
Serving spoon
Serving fork
Dessert spoon
Soup spoon
1
4
7
2
5
8
3
6
19
ENEN
Using your dishwasher
All dishwasher cycles require detergent in the detergent compartment. Apply
detergent as appropriate for the selected cycle to ensure best performance.
Detergent guidelines
WARNING
• Do not consume dishwasher detergent. Avoid breathing in detergent fumes.
Dishwasher detergent contains irritants and caustic chemicals that can induce
respiratory conditions. If you have consumed dishwasher detergent or inhaled
detergent fumes, seek medical attention immediately.
• Keep dishwasher detergent out of children's reach.
CAUTION
Use dishwasher detergent only. Other types of detergent produce excessive foam,
which may decrease the dishwasher's performance or cause it to malfunction.
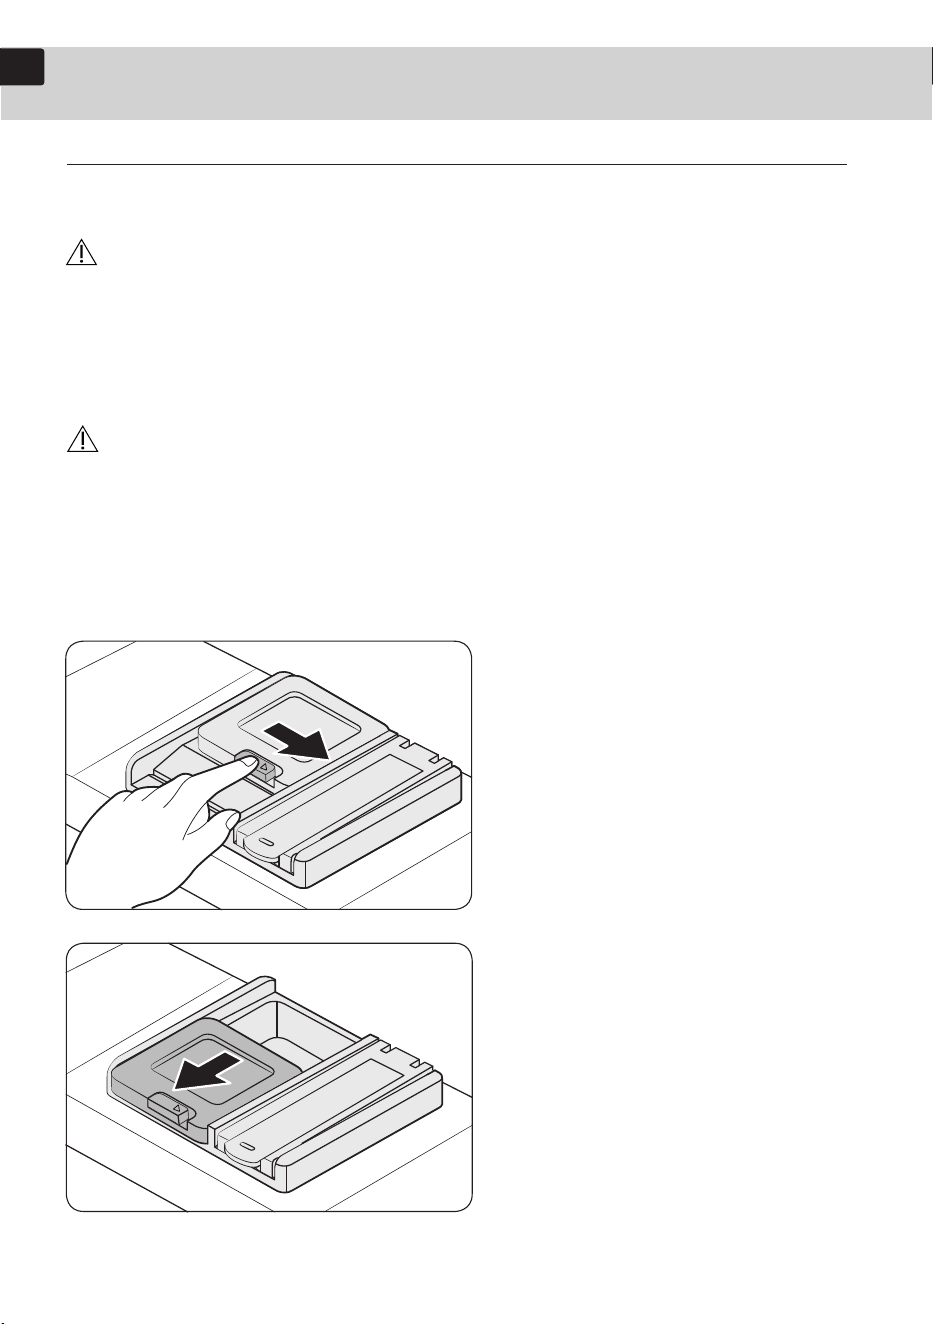
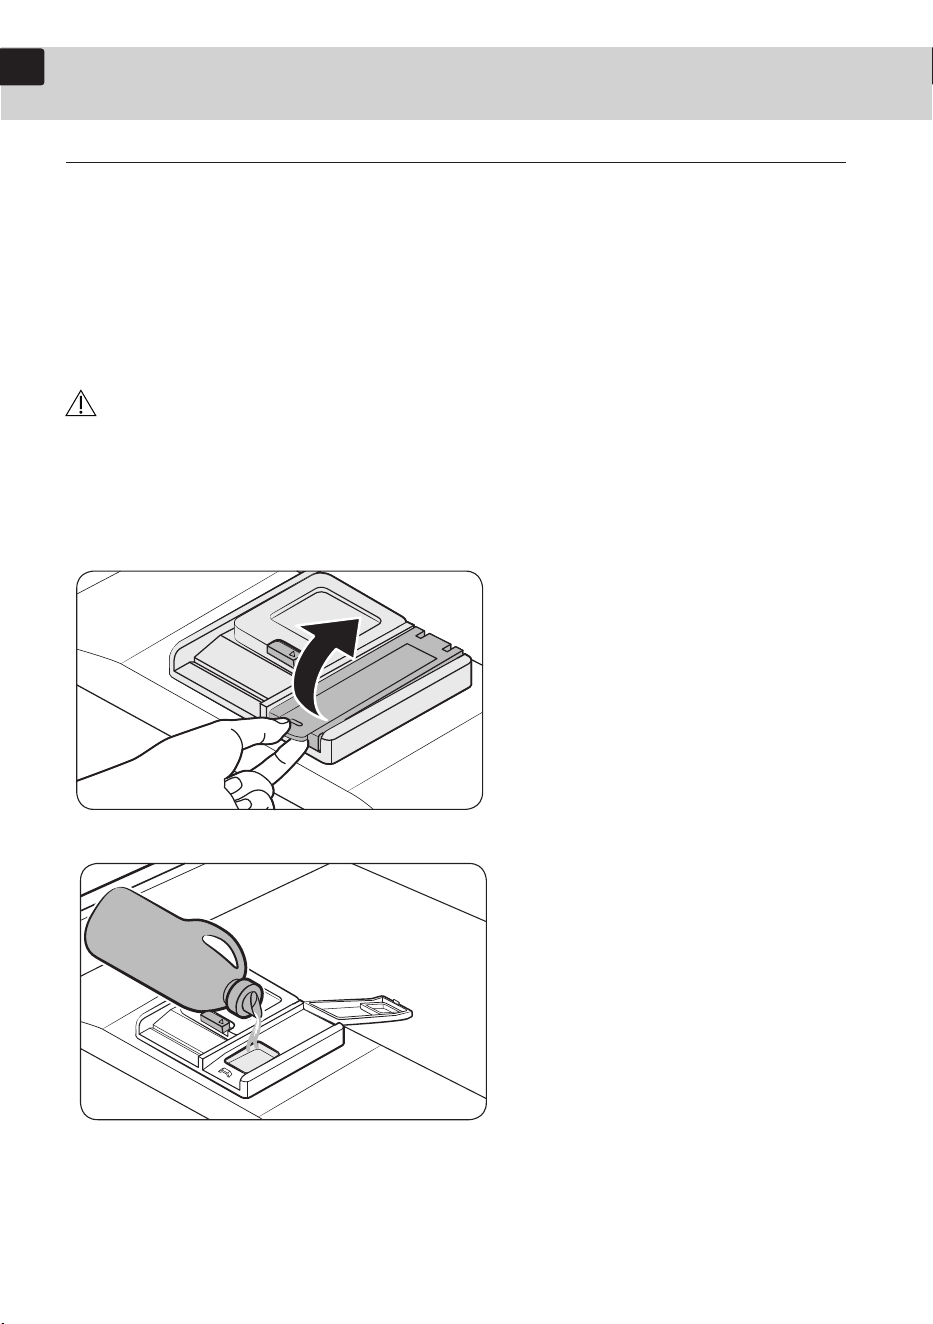
To fill the detergent dispenser
1. Gently press the dispenser flap to
unlock, and then slide it open. Note
that the dispenser flap opens at the
end of each cycle.
20
EN
Using your dishwasher
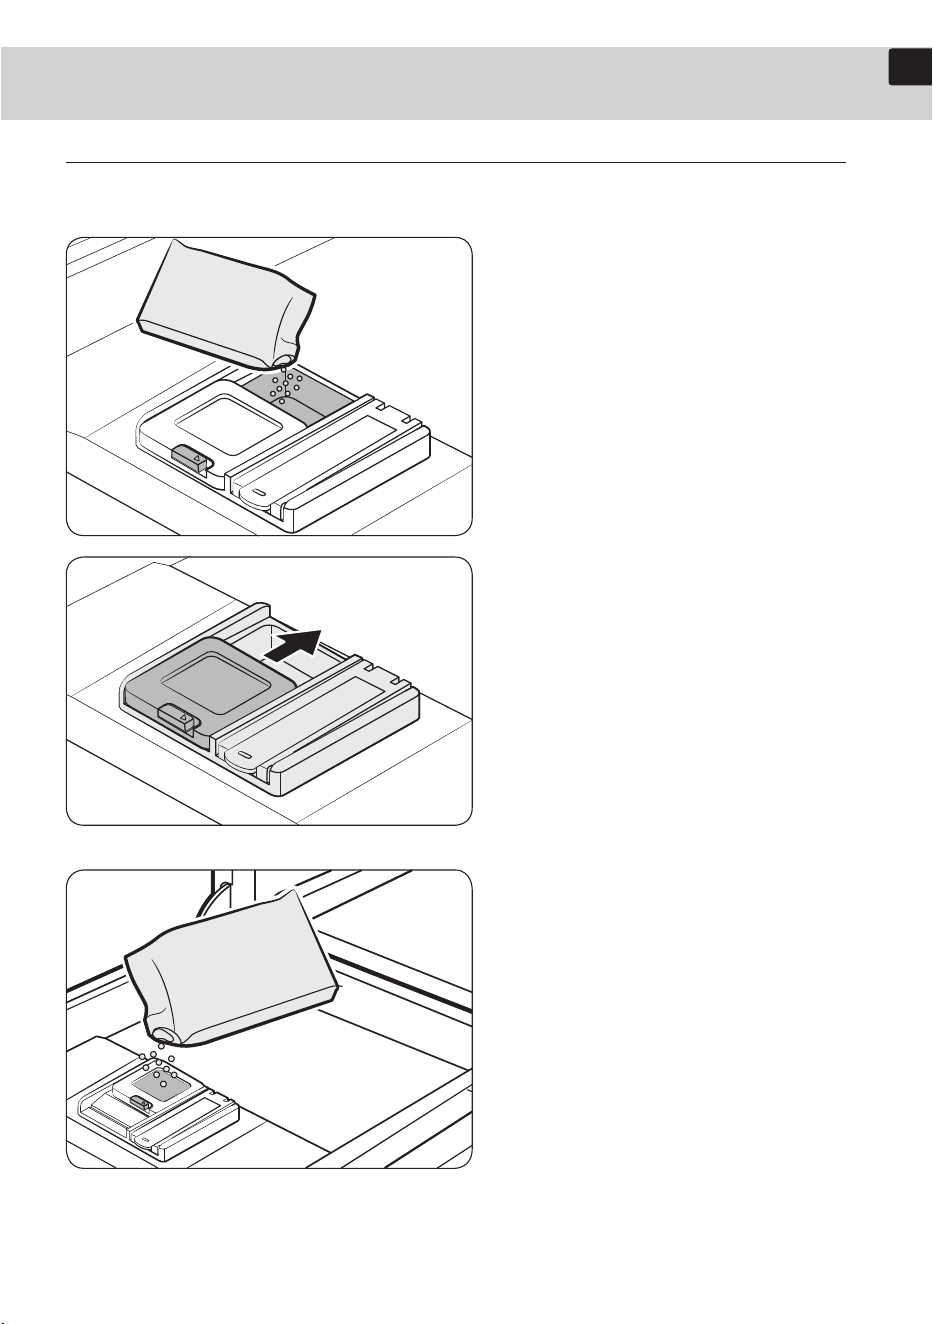
The cover opens automatically to dispense the detergent during the wash.
2. Apply the recommended amount
of detergent to the main
compartment.
3. Close the flap, and then press
down to lock.
4. For better performance, pour a
small amount of detergent onto the
dispenser prewash chamber to clean
heavily soiled items more effectively.
The additional detergent will activate
during the pre-wash process.
21
EN
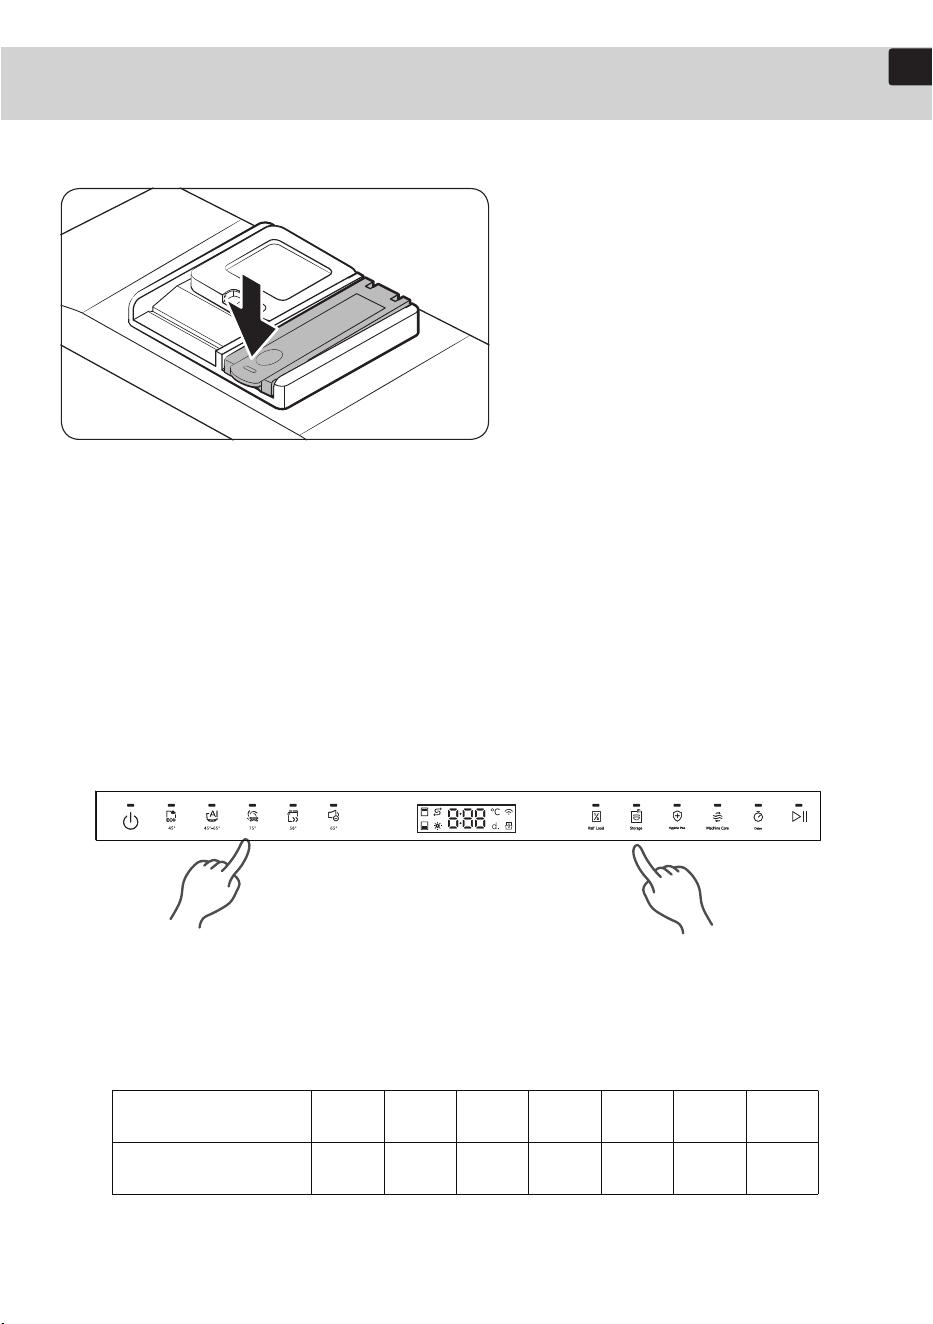
2. Fill the compartment with
rinse aid as specified by the
rinse aid manufacturer.
Using your dishwasher
Rinse aid
CAUTION
• Do not apply any type of detergent to the rinse aid compartment.
• Do not overfill the compartment. Excessive rinse aid may overflow during a cycle.
Rinse aid improves the drying performance of the dishwasher When the Rinse Refill
indicator lights u p on the control panel, refill with rinse aid .Use only liquid rinse
aid. Powdered rinse aid may clog the compartment and cause the appliance to
malfunction.
1. Pull up the cap of the rinse
compartment to open.
22
EN
Using your dishwasher
3. Press down the circle area of
the cap to close.
Rinse aid amount
1. In power-off state, press and hold the "Intensive" and "Storage" buttons for 5
seconds to enter rinse aid level setting mode. The default level is d7. Press
"Intensive" repeatedly to cycle through the levels (d7 to d1), then press the Power
button to confirm.
2. The higher the number, the more rinse aid the dishwasher uses. To improve
drying performance, select a higher number. If your dishes appear discolored after
a wash, switch to a lower number. The factory default level is 'd7'.
The dishwasher has 7 levels, and the amount of rinse aid for each level is shown in
the table below:
Level
Volume (ml) 1.2 2.4 3.6 4.8 7. 2
d1
0 6
d2 d3 d4 d5 d6 d7
23
EN
Using your dishwasher
Dishwasher salt adding
In order to achieve the ideal cleaning effect, the dishwasher needs to use soft
water. Due to the different water hardness in different places, this product is
equipped with a softener. When is on, special salt needs to be added to the
salt filling port.
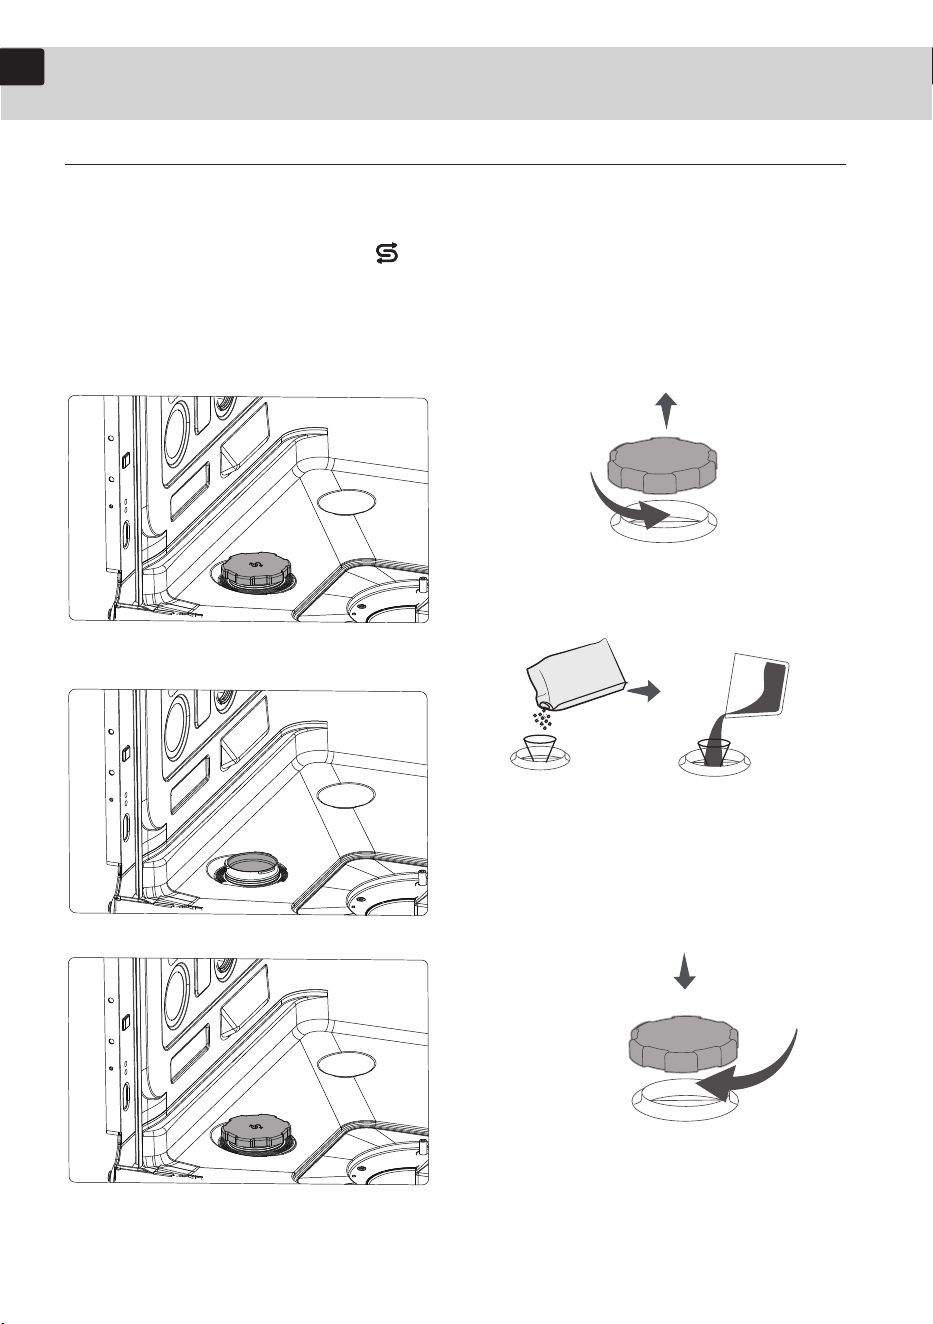
1. Rotate counterclockwise to take out
the softener cover.
2. Add about 1000g of dishwasher salt.
(can be used more times one adding)
3. After adding salt, fill the softener
with water to mix them.
4. Turn clockwise to tighten the water
softener cap to prevent salt leakage.
24
EN
Using your dishwasher
Dishwasher salt adding
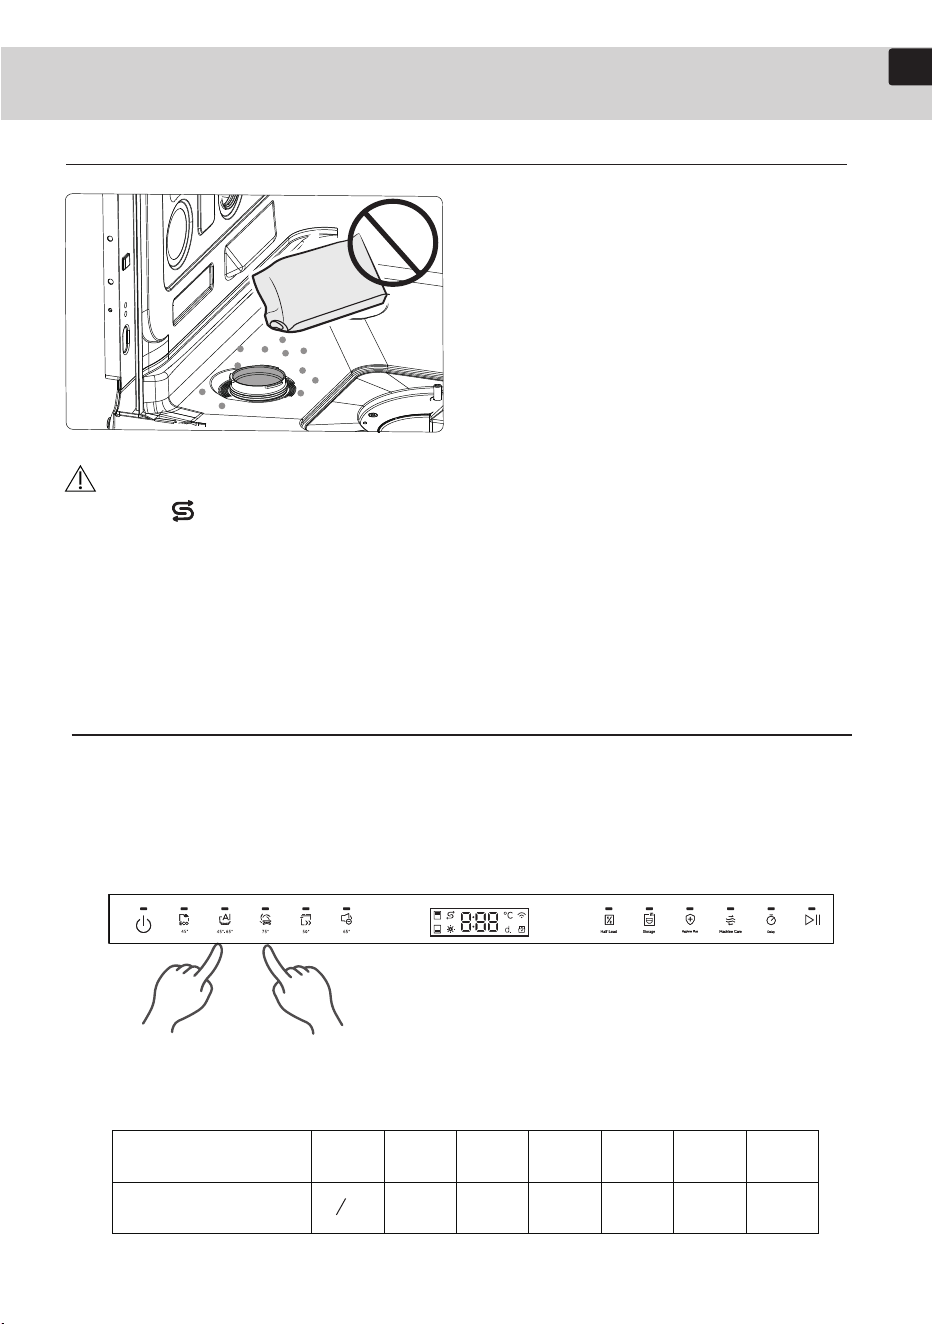
5. During the process of adding
dishwasher salt, if salt is spilled on the
stainless steel tank of the dishwasher, it
must be rinsed once with the washing
program, otherwise it may corrode the
stainless steel tank, filter, motor. etc.,
and cause damage to the dishwasher. It
is recommended to add dishwasher salt
using a salt-adding funnel.
CAUTION
1. When " " is on in the alarm display area, dishwasher salt needs to be added.
Dishwasher salt for dishwasher must be used.
2. If salt overflows during filling, wipe away any excess. It is recommended to refill
the salt before starting a wash cycle, so that any remaining salt can be rinsed
away and will not cause corrosion to the inner tub.
Softener setting
1. Set the salt level: In power-off state, press and hold the "Intensive" and "Auto"
buttons for 5S to enter the hardness parameter setting. Press the "Intensive" to
switch the hardness level from H4-H5-H6-H7-H1-H2 Cycle display, press the power
button for confirmation. The factory default level is 'H4'.
2. Select the appropriate salt level based on your local water hardness to optimize
salt usage.
Level
mg/L (CaCO₃)
H2
0-100
101-200
201-300 301-450 451-650 ≥651
H1 H3 H4 H5 H6 H7
25
EN
Maintenance
Cleaning
Keep the dishwasher clean to improve performance, reduce unnecessary repairs,
and lengthen its lifecycle.
Exterior
Clean spills on the surface of the dishwasher as they occur. Use a soft, damp cloth
on the control panel to gently wipe away spills and dust.
CAUTION
• Do not use benzene, wax, thinner, chlorine bleach, alcohol, or other chemical
substances. These materials may discolour the surface of the dishwasher and
cause stains.
• The dishwasher has electric parts inside. Do not sprinkle water directly onto the
dishwasher. Protect electrical components from coming in contact with water.
• For a stainless-steel door panel, clean using a stainless steel cleaner for home
appliances and a clean, soft cloth.
Interior
Clean the interior of the dishwasher on a regular basis to remove any dirt or food
particles. Wipe inside the dishwasher and inside the door with a wet dishcloth.
CAUTION
• Do not remove the front seal (the long rubber seal enclosing the opening of the
dishwasher). The seal keeps the inner side of the dishwasher sealed.
• Use a damp cloth to remove lime scale or grease deposits inside the dishwasher.
Alternatively, apply some detergent, and then run an empty cycle using the
highest rinse temperature.
26
EN
Maintenance
Cleaning spray arms
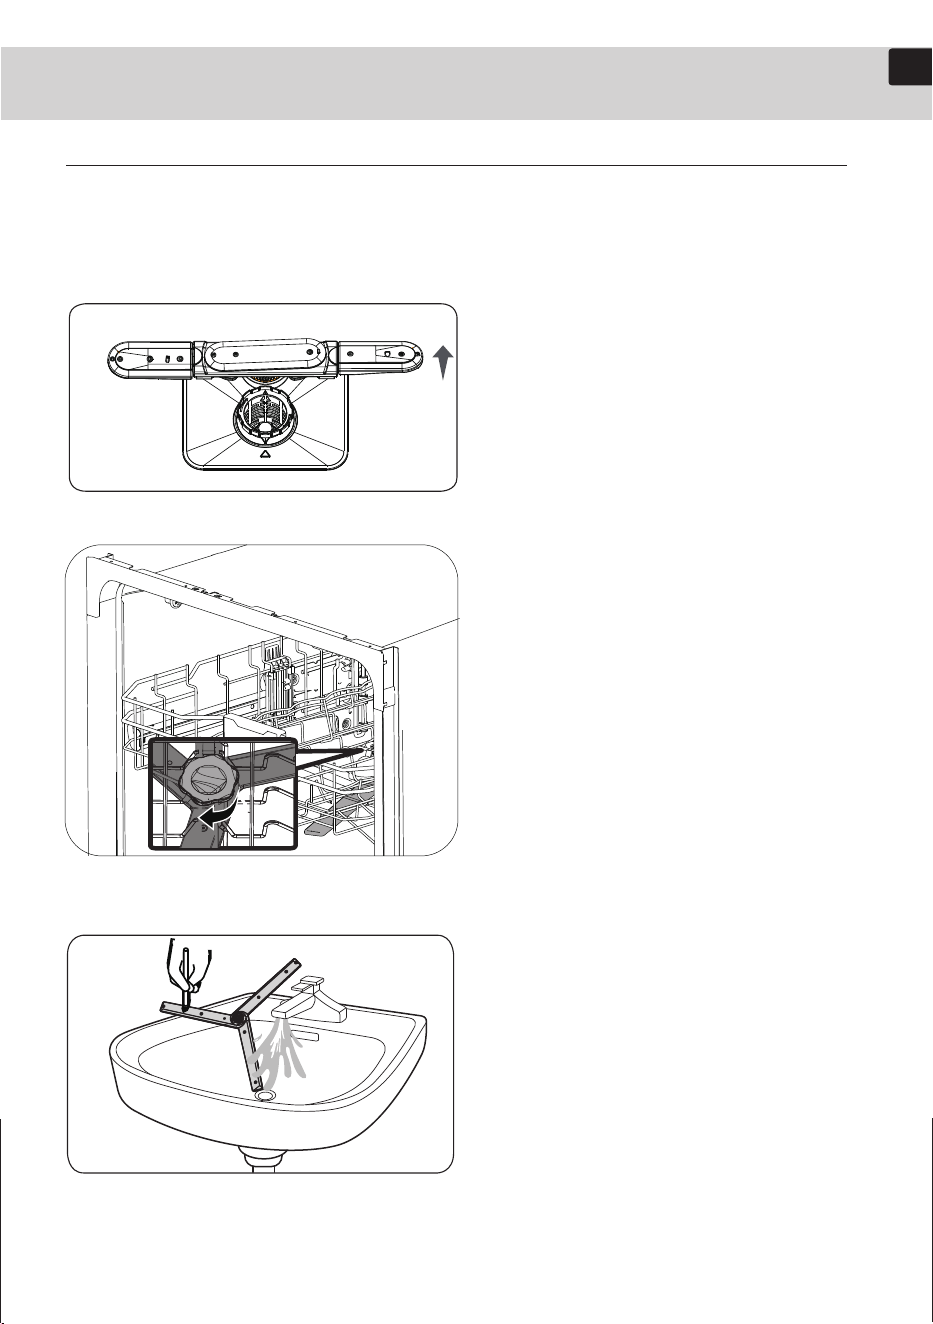
To prevent the nozzles from being clogged, or if the nozzles are clogged, remove
the spray arms and clean each nozzle. Use caution when removing the spray arms
as they may break.
1. Open the door, and then pull out the
upper basket and lower basket to reveal
the upper and lower spray arm.
2. Lower Spray Arm Removal: Pull straight
upward to remove.
Upper Spray Arm Removal: Rotate the
locking clip clockwise and remove the
upper spray arm.
3. Unclog the spray nozzles using a
pointed tool, and rinse them thoroughly
with running water.
4. Lower Spray Arm Installation: Press the
lower spray arm firmly downward until it
is fully seated.
Upper Spray Arm Installation: Reinsert the
spray arm, then rotate the locking clip
counterclockwise to secure it in place.
5. Rotate the spray arm by hand to make
sure it is engaged correctly.
27
EN
Maintenance
Cleaning filter
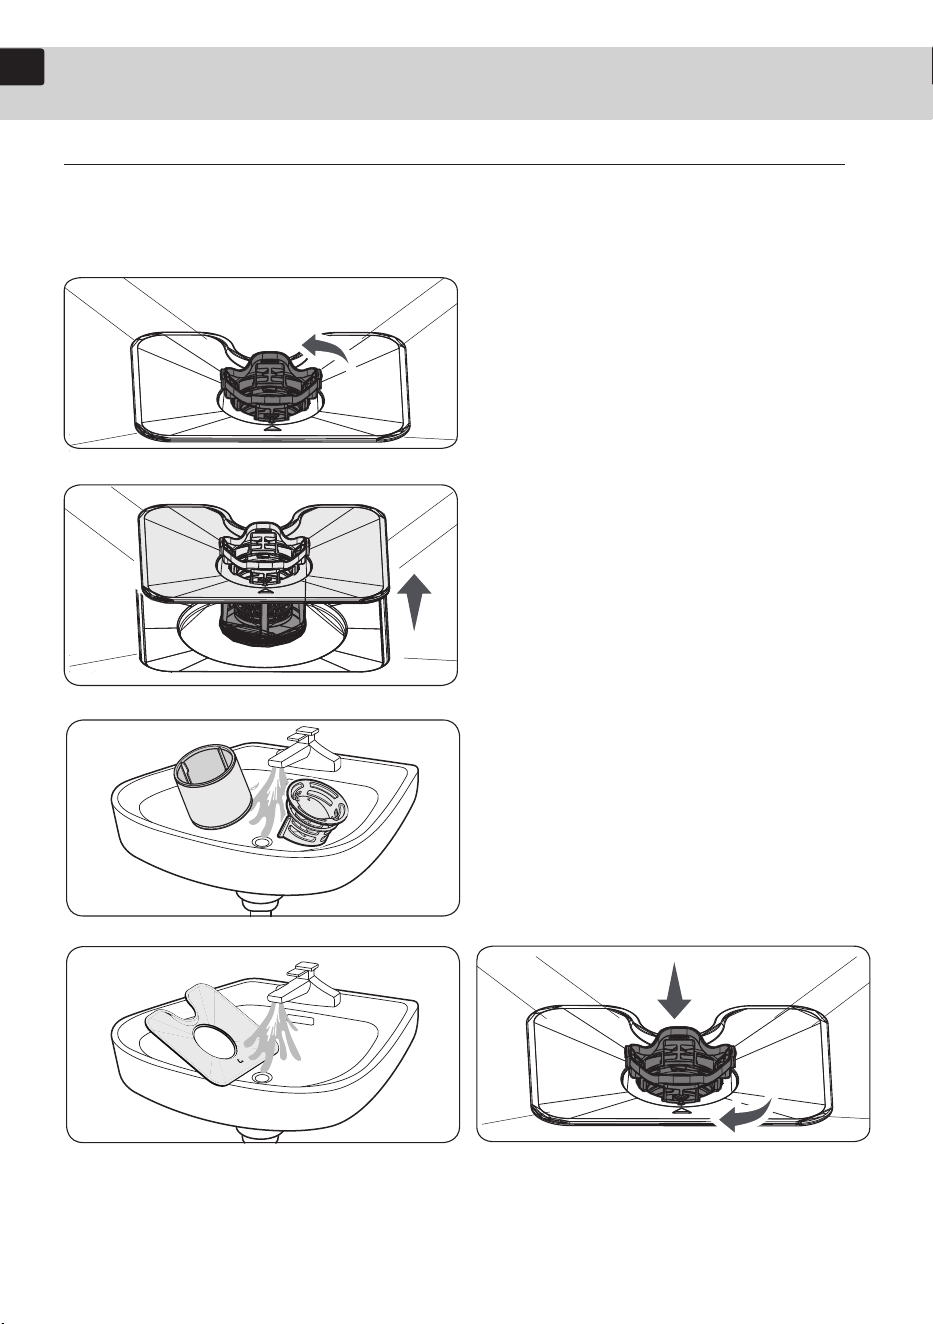
We recommend cleaning the filter every month.
1. Open the door, and then
remove the lower basket.
2. Turn the filter handle counter
clockwise to unlock the filter
cover.
3. Remove the filter cover, and
then the cylindrical micro filter
underneath.
4. Remove any dirt and impurities
from the micro filter and the filter
cover.
5. Rinse them with running water,
and then dry well.
6. Reinsert the filter, and then the
filter cover.
7. Turn the filter handle clockwise
to lock.
28
EN
Troubleshooting
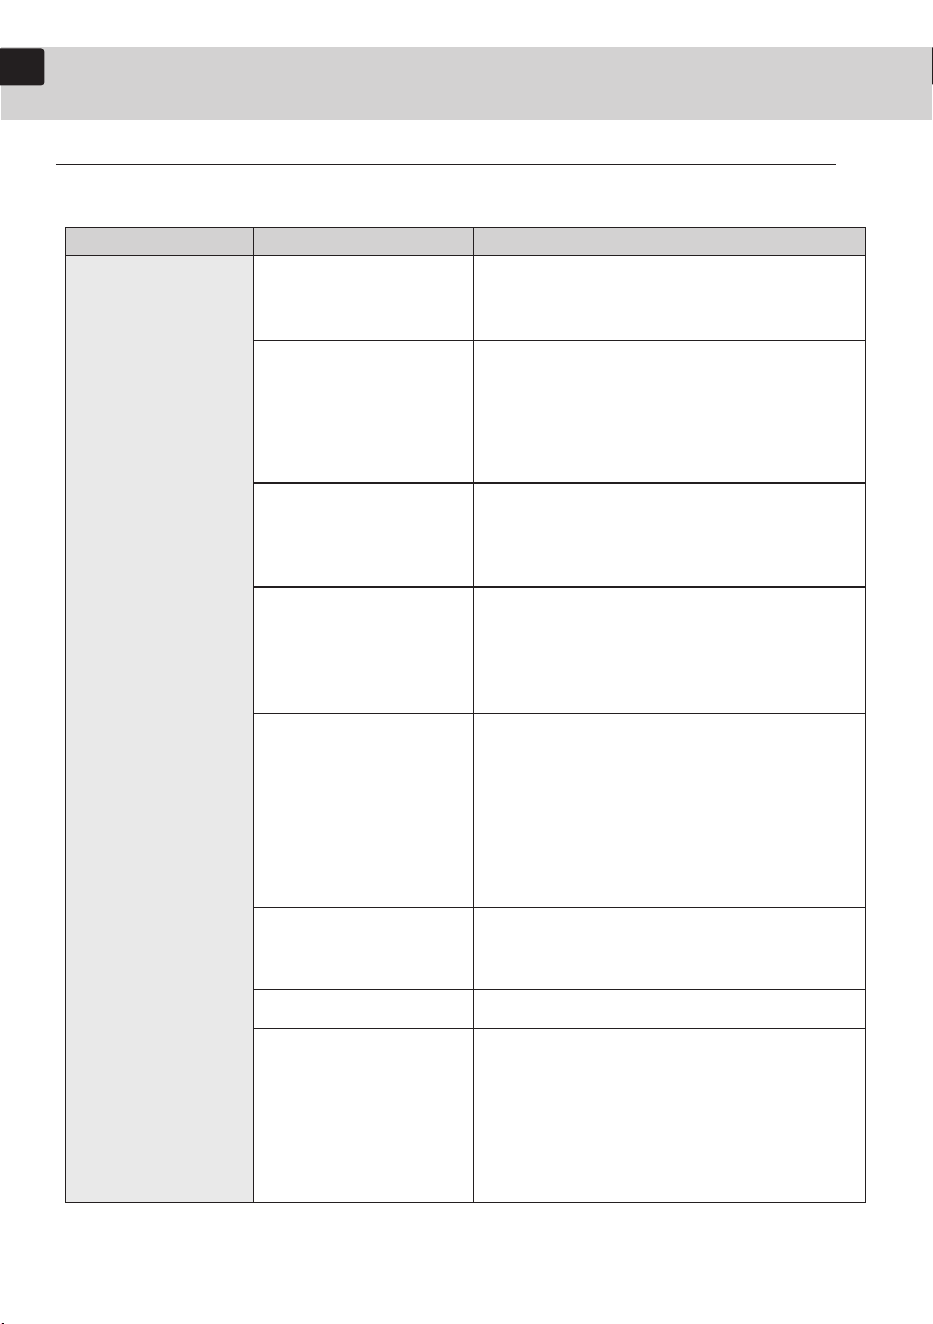
Solutions for common issue
Problem Possible cause Solution
The door is not closed
completely.
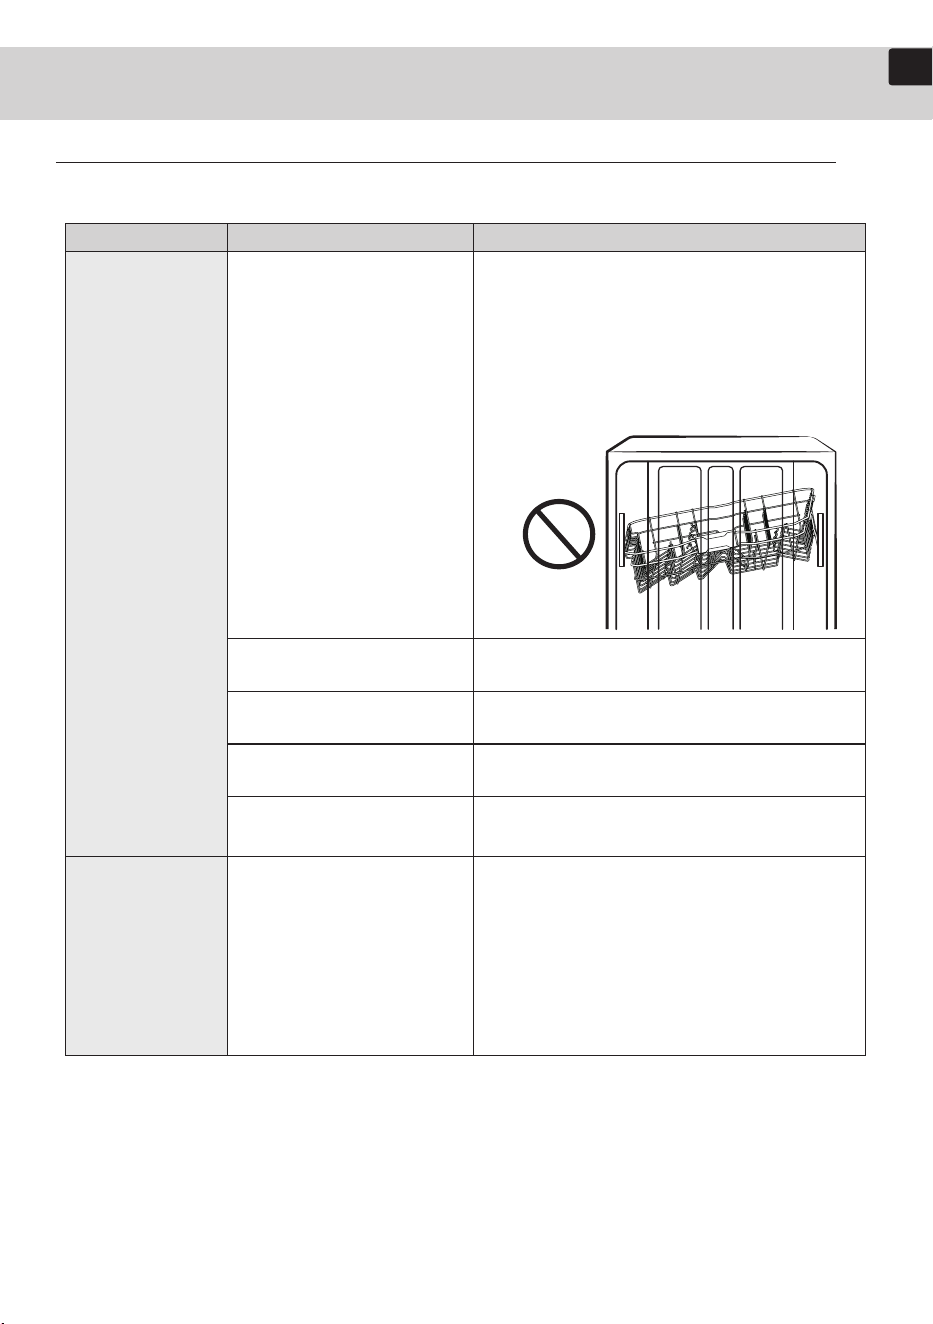
• Check if the door is latched and closed
completely. Check whether the Upper
Basket is properly joined to the Duct
Nozzle.
• Also, check if the Upper Rack is crooked
or unbalanced.
Will not start.
Excessive foam
during washing
The S/P button was not
pressed.
Doesn't operate at all.
The water supply does not
work.
A circuit breaker is open.
Use wrong detergent.
• After selecting the program, you need to
press the S/P button.
• Make sure the power cable is connected
properly.
• Check if the water supply valve is open.
• Reset the circuit breaker.
• Do not use handwash dishwashing
liquid! Run any washing program
without loading and use dishwasher
detergent.
29
EN
Troubleshooting
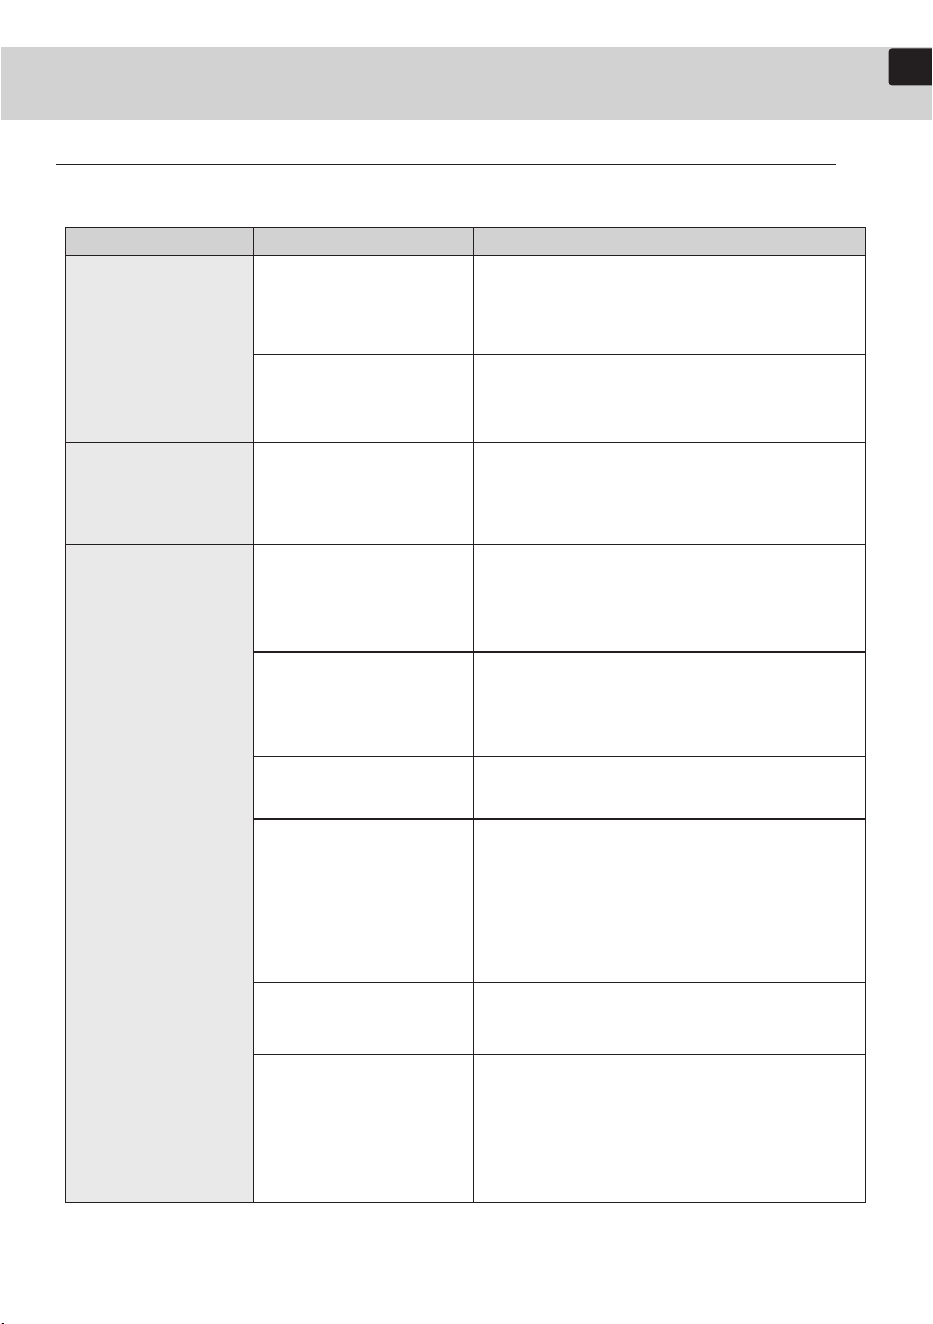
Solutions for common issue
Problem Possible cause Solution
• Select a cycle according to the number
and soil level of the dishes, as directed in
this manual.
• Scrape food from dishes prior to loading.
(Do not pre-rinse.)
• Clean the filter. (See page 25)
• Make sure the filters are correctly
fastened.
• Use a commercial dishwasher cleaner.
• Use high-quality, fresh detergent with
rinse aid.
• Use automatic dishwasher detergent.
• We recommend a powder type or
multi-function tablet dishwasher
detergent.
• Make sure large items such as cookie
sheets, cutting boards, or contaners, etc.
are not blocking the detergent dispenser
and preventing it from opening properly.
• Rearrange the dishes so they do not
interfere with detergent dispenser
operation.
• Check the dispenser and add rinse aid.
• Use liquid type rinse aid.
• Clean the nozzle See page 23.
• Rearrange the dishes so they do not
interfere with nozzle rotation and
detergent dispenser operation.
• Load only an appropriate number of
dishes.
• Load your dishes as recommended. (See
page14-16.)
There are food
particles remaining
on dishes.
(Not cleaning
properly.)
The cycle selected was
unsuitable.
The filters are clogged
or not correctly
fastened(Food soils
remain on the filter.)
The water is too hard.
Dishwasher detergent
was not used.
Detergent remains in
the dispenser.
There is no rinse aid.
A nozzle is clogged.
The dishes are
improperly loaded.
30
EN
Troubleshooting
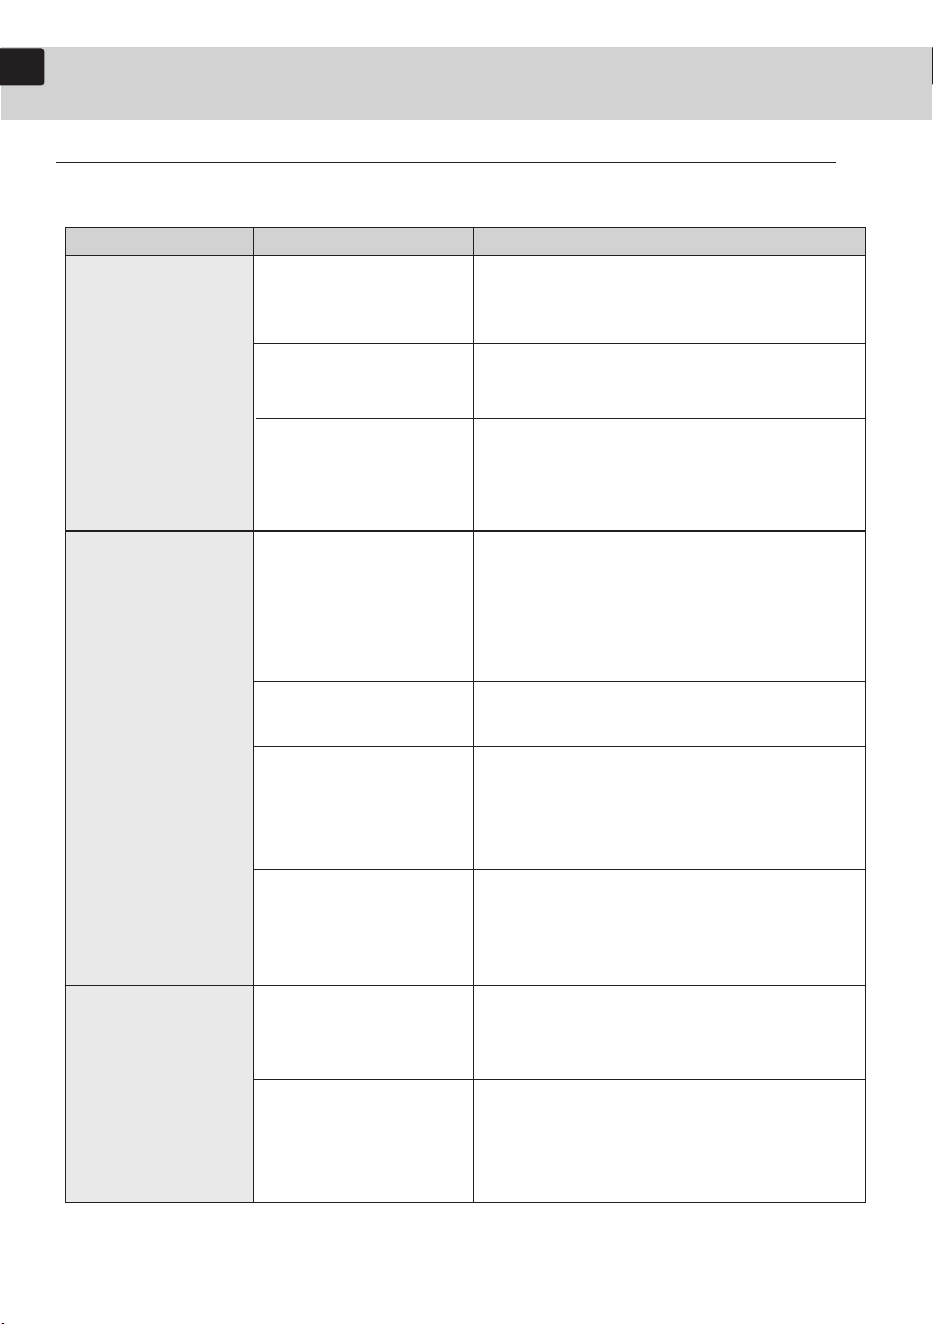
Solutions for common issue
Problem Possible cause Solution
Leaves glasses
with a light film.
Leaves glasses
with a light film.
Does not dry
dishes well.
The water supplied is
soft and too much
detergent was used.
Aluminum dishes were
included in the wash
load.
This is caused by coffee
and tea soils.
There is no rinse aid in
the dispenser or not
enough rinse aid was
used.
The temperature of the
water is low when the
dishwasher is running.
Too many dishes have
been loaded.
Glasses and cups with
concave bottoms hold
water. This water may
spill onto other items
when you unload.
Auto door opening is
turned off.
Multiple detergent
tablets were used
without selecting the
Hygiene option.
• Underload the dishwasher and use a rinse
aid to minimize this.
• Remove the marks on the dishes using a
low sensitivity cleaner.
• Remove the soils using a spot cleaner.
• Use a cycle with a higher temperature.
• Check the dispenser and add rinse aid.
• Use a liquid type rinse aid.
• Check the rinse aid settings.
• Connect the water supply line to a hot
water supply.
• Use rinse aid with the Hygiene option.
• Proper loading of items can affect drying.
• After finishing the cycle, empty the lower
basket first and then the upper basket.
This will prevent water dripping from the
upper basket onto the dishes in the lower
basket.
• Automatic door failure, please contact
after-sales personnel.
• Select the Hygiene option or use rinse aid.
31
EN
Troubleshooting
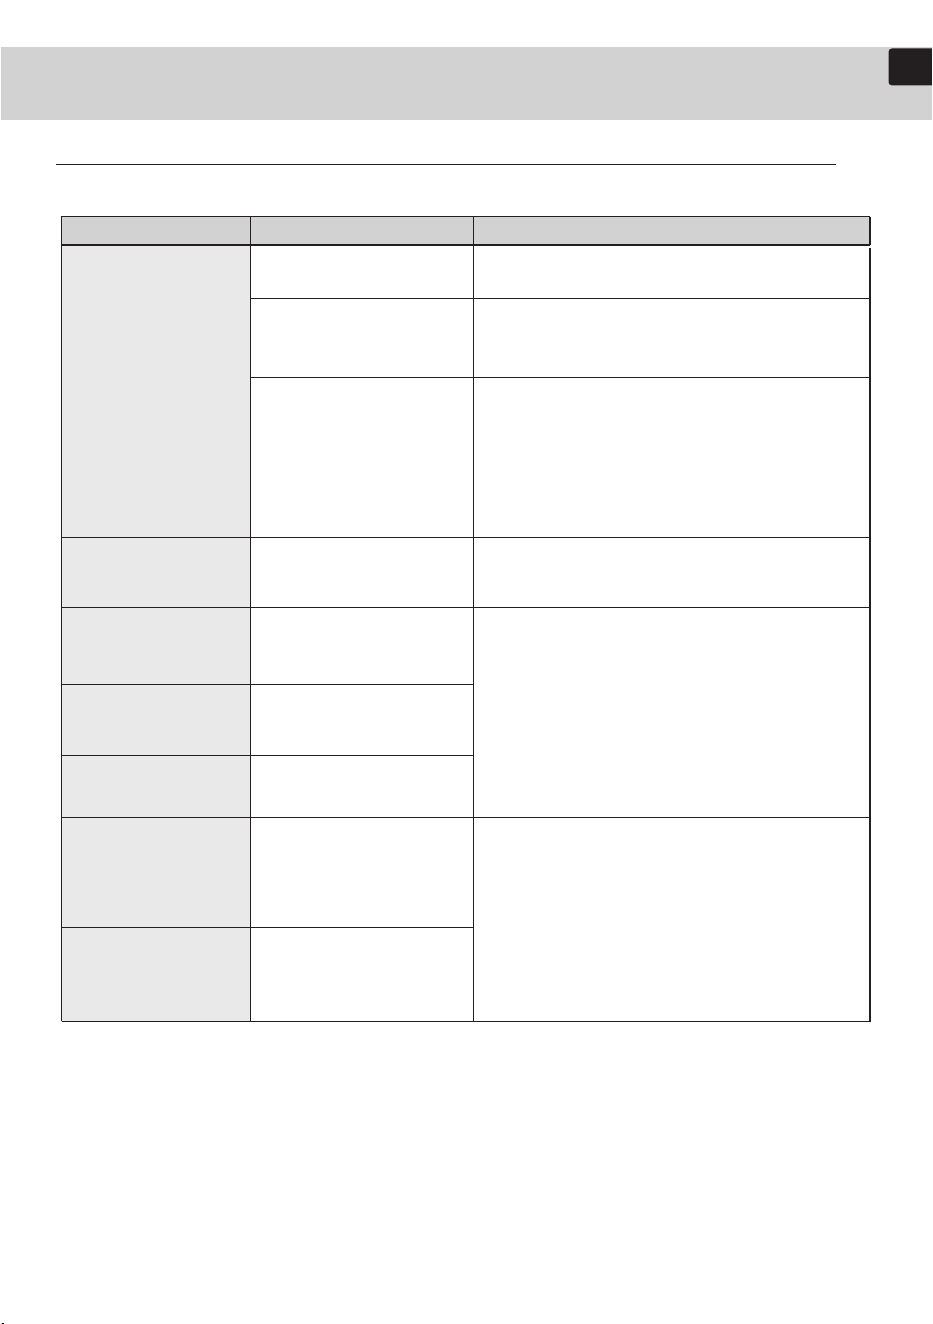
Solutions for common issue
Problem Possible cause Solution
Has a bad odor.
Is too noisy.
Does not have a
smoothly rotating
nozzle.
Water was left over
from an incomplete
cycle.
• With the dishwasher empty and no
detergent, place a glass with 8 ounces of
vinegar upright into the lower basket and
then run a program.
The Drain Hose is
obstructed.
The dishwasher is not
used daily or soiled
dishes are left in unit
too long.
Sound is generated
when the dispenser
cover is open and the
drain pump is operating
in an early stage.
The dishwasher is not
level.
Foreign material(a screw
a plastic piece) is in the
pump chamber.
Nozzle holes are
clogged with food
particles.
The nozzle is blocked by
a dish or pot and
cannot rotate.
• Clean the dishwasher by running a
program with the dishwasher empty and
no detergent.
• Contact a qualified service technician
remove any obstruction from the drain
hose.
• Contact a qualified service technician
remove foreign material from the pump
chamber.
There is a 'chopping'
sound because a nozzle
is bumping against the
dishes.
• This is normal operation.
• Ensure the dishwasher is level.
• Rearrange the dishes.
• Clean the nozzle holes.(See page 23 .)
• After placing the dishes into the racks
rotate the nozzles by hand to check
whether any of the dishes interfere with
them.
32
EN
Troubleshooting
Error codes.
Error Code Possible cause Solution
Inlet valve is not
opened.
Inlet hose is broken or
leaking.
Failure of flow meter or
solenoid valve.
Overflow.
Failure of temperature
sensor.
Failure of
communication.
Failure of heater.
Failure of water diverter
valve.
Failure of BLDC Pump.
• Open inlet valve.
• Check the inlet hose. If it is damaged,
please contact the customer service for
replacement.
• Press the S/P key to restart. If it still
occurs, press the power key for 3 seconds
to shut down and power on again. If this
problem occurs again, please contact the
after-sales service personnel.
• Please contact the after-sales service
personnel.
• Power on again after unplugging if the
same error code still appears in the
process.
• Please contact the after-sales service
personnel and tell the error code.
(Some models have this code)
• Please contact the after-sales service
personnel and tell the error code.
E10
E05
E01/E02
E12
E03
E11
E08
33
EN
Appendix
Environmentally Friendly Disposal
• Your dishwasher is manufactured from recyclable materials. If you decide to
dispose of it, please observe local waste disposal regulations. Cut off the power
cable so that the appliance cannot be connected to a power source.
• Remove the door so that animals and small children cannot get trapped inside
the appliance.
• Do not exceed the detergent quantities recommended in the detergent
manufacturer's instructions.
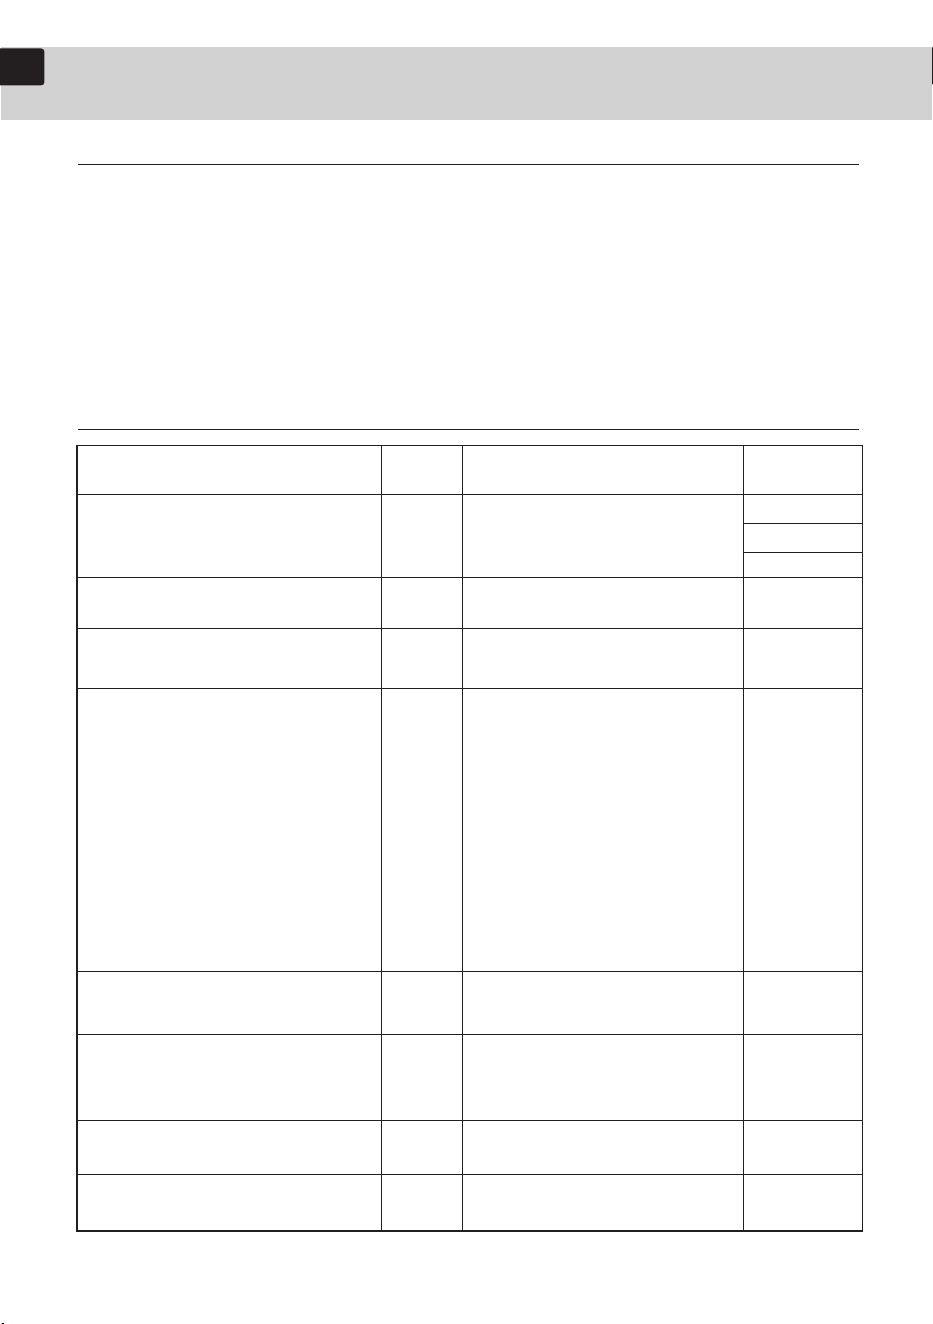
Specifications.
Parameter
Rated capacity
(a)
(ps)
EEI
(a)
Cleaning performance index
(a)
Energy consumption in kWh [per
cycle],based on the eco
programme using cold water fill.
Actual energy consumption will
depend on how the appliance is
used.
Programme duration
(a)
(h: min)
Airborne acoustical noise
emissions
(a)
(dB(A) re 1 pW)
Off-mode (W) (if applicable)
Delay start (W) (if applicable)
Value Parameter Value
Dimensions in mm
Energy efficiency class
(a)
Drying performance index
(a)
Water consumption in
litres[per cycle], based on the
eco programme. Actual water
consumption will de pend on
how the appliance is used
and on the hardness of the
water. programme using cold
water fill. Actual energy
consumption will depend on
how the appliance is used.
Type
Airborne acoustical noise
emission class
(a)
Standby mode (W)
(if applicable)
Networked standby (W)
(if applicable)
Height: 815
Width: 598
Depth: 550
Built-in
(a)
for the eco programme.
31.3
15
1.154
4:49
42
-
4
0.540
2.00
10.8
1.123
A
B
1
34

EN
35
Warranty Terms
Dear Customer,
Thank you for choosing Dreame products. In accordance with the provisions of the
Consumer Protection Law and our sincere commitment to users, we will provide the
following services based on this warranty card and valid proof of purchase:
Warranty Policy
This product provides a warranty period in accordance with the legal and regulatory
requirements of the place of sale. Defects that occur within this warranty period under
normal use and care can get related warranty service. lf your product is faulty or you are
experiencing difficulties to use this product and require assistance, please also contact with
your local dealers or authorized after service center for help.
Warranty Does Not Cover the Following Parts
• Dishwasher water supply and drainage hoses;
• Built-in steam oven trays, steam plates, grill racks, and baking racks;
• Gas stove pot supports and inner/outer burner caps;
• Range hood decorative covers.
Warranty service does not apply under the following conditions
• Use of the machine outside a household environment or in public places;
• Product defects caused by the consumer’s violation of product operation, storage, or
transportation conditions;
• Consumable wear and tear of the product, such as battery capacity loss;
• Damage and defects caused by the following reasons:
- Use, storage, or maintenance inconsistent with the operating instructions, as well as
installation not in accordance with installation guidelines;
- Consumable materials used during operation, such as detergents, cleaning agents,
regeneration salts, rinse aids, maintenance agents, or other consumables not suitable for
the product;
- Repairs, modifications, alterations, or structural changes performed by the user or
unauthorized personnel that cause product defects;
- Damage caused by external factors unrelated to the manufacturer, including force
majeure events (natural disasters, fire, lightning, etc.);
- Intentional or negligent acts by consumers or third parties, including those causing
mechanical damage to the product;
- Consumable and wear parts.
• Installation and connection of electrical wiring, water supply, drainage, or gas must be
performed by qualified professionals; otherwise, the warranty will be void.
If the equipment is transported and used in other EU/European Free Trade
Association countries, its technical specifications (such as voltage,
frequency, gas type, etc.) must be the same as in the original country of
purchase. Provided that Dreame has a service network in the area,
warranty terms can be consulted with the local representative in the
country of use; otherwise, the warranty will be invalid.
EN
Warranty Card
Warranty Card
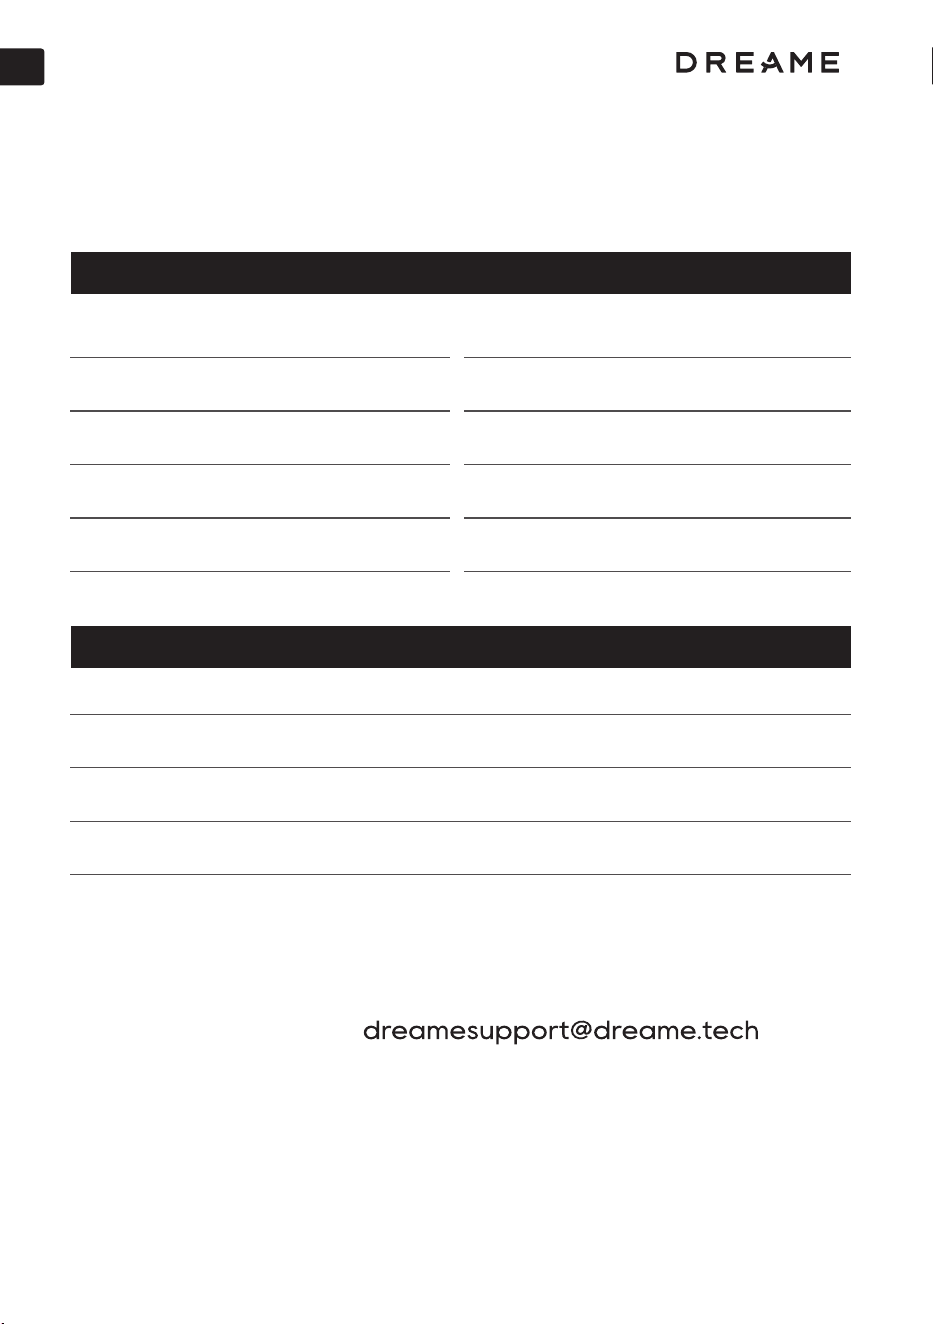
To access Dreame’s after-sales services, please fill out this warranty card carefully
before purchase. We will establish a user profile based on your information to
provide better service.
Repair Records
Product Name:
Product Model:
Manufacturing Serial No.:
Purchase Date:
Contract No.:
Customer Name:
Customer Phone No.:
Customer Address:
Purchase Store:
Store Phone No.:
Repair Date:
Fault Description:
Handling Details:
Technician Signature:
After-sales Contact:
Please complete this warranty card immediately upon purchasing Dreame products.
Keep the warranty card safe; consumers do not need to mail it back to the company.
Please bring the warranty card and the original valid invoice for any repairs.
Zhiyue Youchuang Technology (Suzhou) Co., Ltd.
36
EN
Scan the QR Code
Please contact:
Contact us
•To view the Digital User Manual
•If you encounter any problems
during use, you can scan the QR
code on the left to obtain the
service hotline number and call for
consultation.
Manufacturer: Zhiyue Youchuang Technology (Suzhou) Co., Ltd.
Address: Room 552, Unit 5010, No.282 Dongping Street, Suzhou Industrial Park, Suzhou Area,
China (Jiangsu) Pilot Free Trade Zone
Website: global.dreametech.com
Version No.: 251216A1