Operating Instructions and Parts Manual
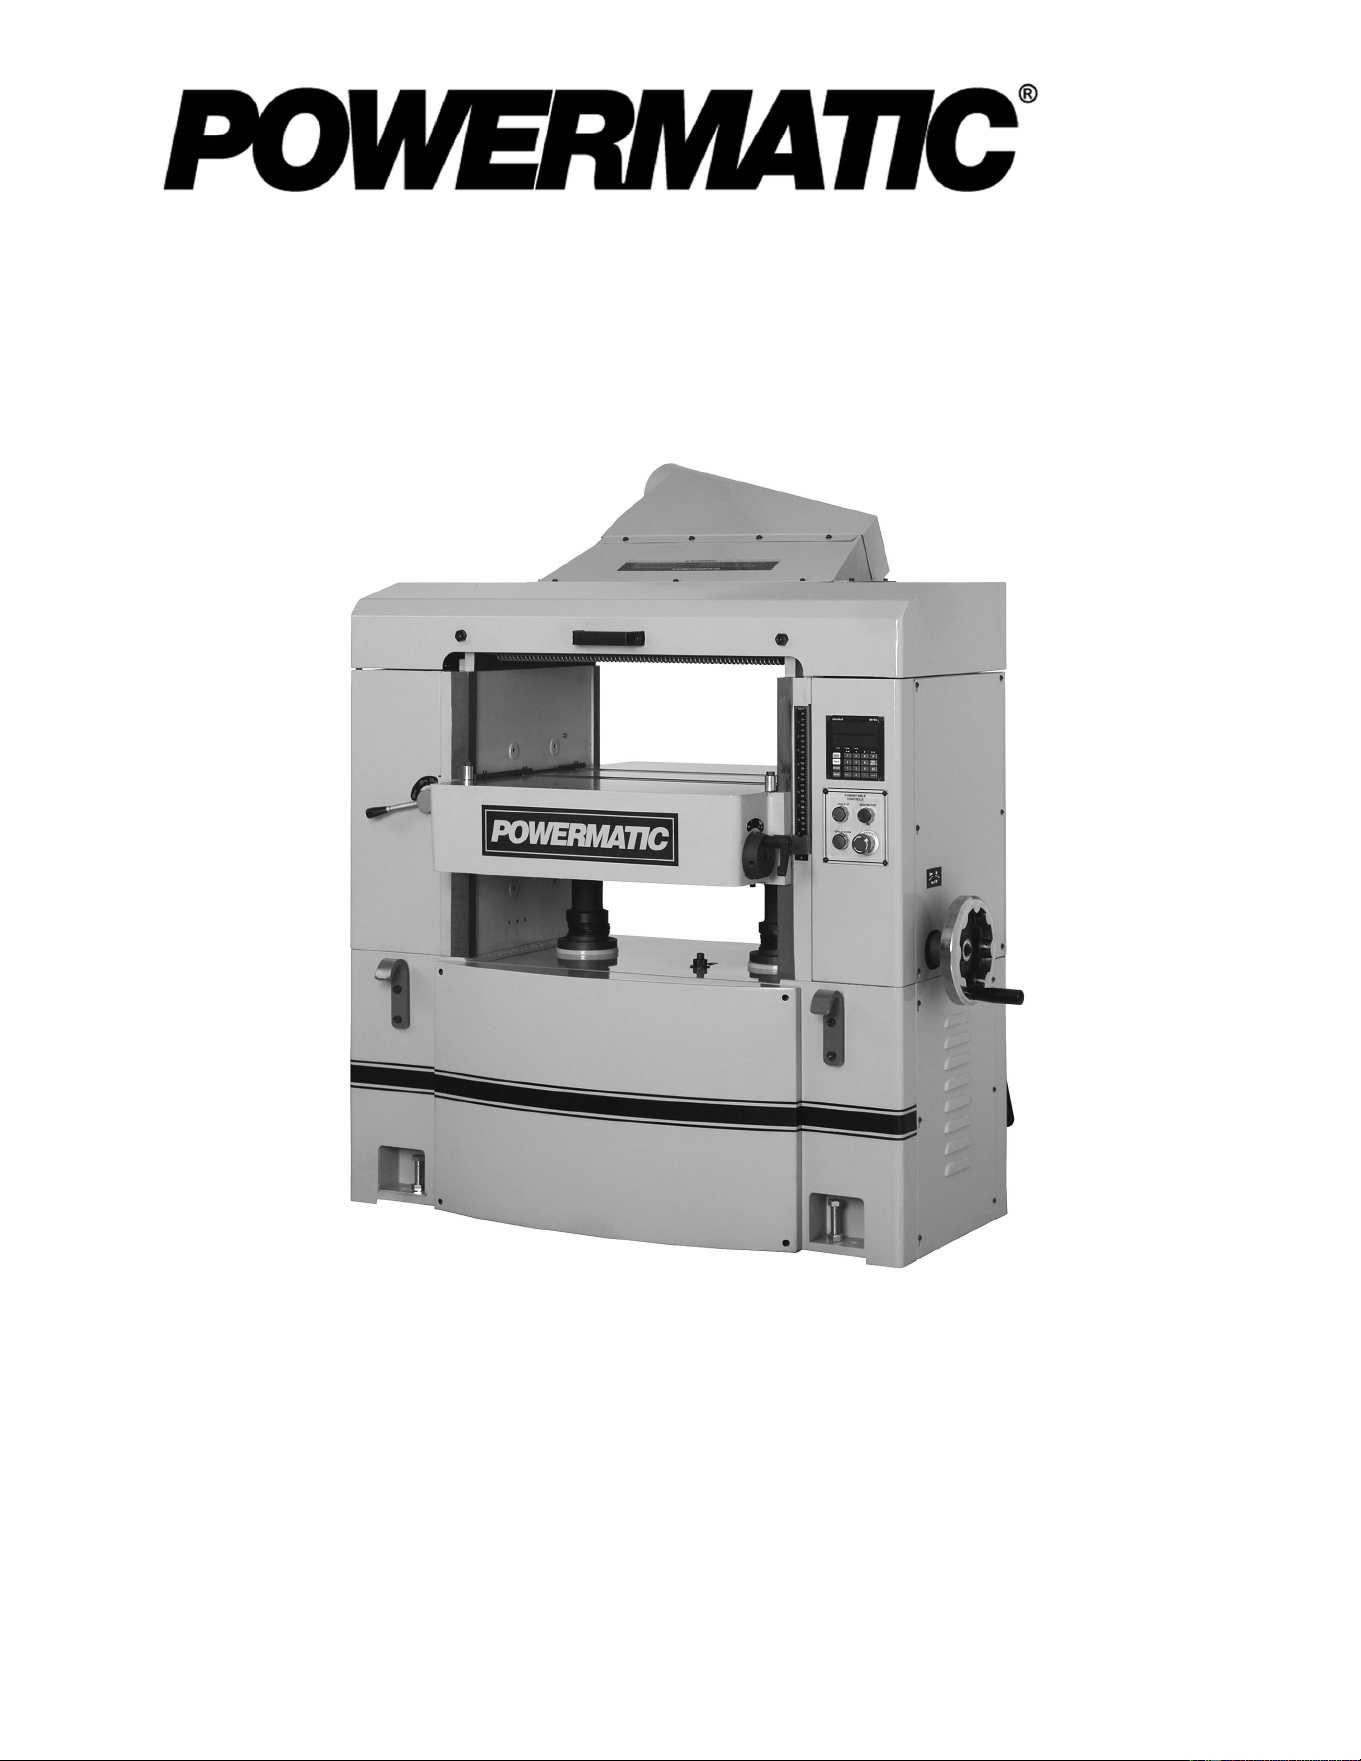
25-inch Planer
Model WP2510
For machines with serial no. 7050141 and higher
Powermatic
427 New Sanford Road
LaVergne, Tennessee 37086 Part No. M-1791303
Ph.: 800-274-6848 Revision D1 03/2019
www.powermatic.com Copyright © 2017 Powermatic
This .pdf document is bookmarked

2
Warranty and Service
Powermatic warrants every product it sells against manufacturers’ defects. If one of our tools needs service or repair,
please contact Technical Service by calling 1-800-274-6846, 8AM to 5PM CST, Monday through Friday.
Warranty Period
The general warranty lasts for the time period specified in the literature included with your product or on the official
Powermatic branded website.
Powermatic products carry a limited warranty which varies in duration based upon the product. (See chart
below)
Accessories carry a limited warranty of one year from the date of receipt.
Consumable items are defined as expendable parts or accessories expected to become inoperable within a
reasonable amount of use and are covered by a 90 day limited warranty against manufacturer’s defects.
Who is Covered
This warranty covers only the initial purchaser of the product from the date of delivery.
What is Covered
This warranty covers any defects in workmanship or materials subject to the limitations stated below. This warranty
does not cover failures due directly or indirectly to misuse, abuse, negligence or accidents, normal wear-and-tear,
improper repair, alterations or lack of maintenance. Powermatic woodworking machinery is designed to be used with
Wood. Use of these machines in the processing of metal, plastics, or other materials outside recommended
guidelines may void the warranty. The exceptions are acrylics and other natural items that are made specifically for
wood turning.
Warranty Limitations
Woodworking products with a Five Year Warranty that are used for commercial or industrial purposes default to a
Two Year Warranty. Please contact Technical Service at 1-800-274-6846 for further clarification.
How to Get Technical Support
Please contact Technical Service by calling 1-800-274-6846. Please note that you will be asked to provide proof
of initial purchase when calling. If a product requires further inspection, the Technical Service representative will
explain and assist with any additional action needed. Powermatic has Authorized Service Centers located throughout
the United States. For the name of an Authorized Service Center in your area call 1-800-274-6846 or use the Service
Center Locator on the Powermatic website.
More Information
Powermatic is constantly adding new products. For complete, up-to-date product information, check with your local
distributor or visit the Powermatic website.
How State Law Applies
This warranty gives you specific legal rights, subject to applicable state law.
Limitations on This Warranty
POWERMATIC LIMITS ALL IMPLIED WARRANTIES TO THE PERIOD OF THE LIMITED WARRANTY FOR EACH
PRODUCT. EXCEPT AS STATED HEREIN, ANY IMPLIED WARRANTIES OF MERCHANTABILITY AND FITNESS
FOR A PARTICULAR PURPOSE ARE EXCLUDED. SOME STATES DO NOT ALLOW LIMITATIONS ON HOW
LONG AN IMPLIED WARRANTY LASTS, SO THE ABOVE LIMITATION MAY NOT APPLY TO YOU.
POWERMATIC SHALL IN NO EVENT BE LIABLE FOR DEATH, INJURIES TO PERSONS OR PROPERTY, OR
FOR INCIDENTAL, CONTINGENT, SPECIAL, OR CONSEQUENTIAL DAMAGES ARISING FROM THE USE OF
OUR PRODUCTS. SOME STATES DO NOT ALLOW THE EXCLUSION OR LIMITATION OF INCIDENTAL OR
CONSEQUENTIAL DAMAGES, SO THE ABOVE LIMITATION OR EXCLUSION MAY NOT APPLY TO YOU.
Powermatic sells through distributors only. The specifications listed in Powermatic printed materials and on the official
Powermatic website are given as general information and are not binding. Powermatic reserves the right to effect at
any time, without prior notice, those alterations to parts, fittings, and accessory equipment which they may deem
necessary for any reason whatsoever.
Product Listing with Warranty Period
90 Days – Parts; Consumable items
1 Year – Motors, Machine Accessories
2 Year – Woodworking Machinery used for industrial or commercial purposes
5 Year – Woodworking Machinery
NOTE: Powermatic is a division of JPW Industries, Inc. References in this document to Powermatic also apply to
JPW Industries, Inc., or any of its successors in interest to the Powermatic brand.

3
Table of Contents
Warranty and Service ............................................................................................................................................ 2
Table of Contents .................................................................................................................................................. 3
Warning ................................................................................................................................................................. 4
Introduction ........................................................................................................................................................... 6
WP-2510 floor diagram ......................................................................................................................................... 6
Specifications ........................................................................................................................................................ 7
Unpacking ............................................................................................................................................................. 8
Contents of the Shipping Container .................................................................................................................. 8
Installation and Assembly ..................................................................................................................................... 9
Dust Hood ......................................................................................................................................................... 9
Grounding Instructions ........................................................................................................................................ 10
230 Volt Operation .......................................................................................................................................... 10
Converting from 230 Volt to 460 Volt .............................................................................................................. 11
Test Run .......................................................................................................................................................... 11
Controller Set-Up ............................................................................................................................................. 11
Adjustments ........................................................................................................................................................ 11
Depth of Cut .................................................................................................................................................... 11
Feed Rate ........................................................................................................................................................ 12
Belt Tension .................................................................................................................................................... 12
Opening Hood ................................................................................................................................................. 12
Replacing or Rotating Knife Inserts ................................................................................................................. 12
The Planer’s Feed System .................................................................................................................................. 13
Table Adjustments ........................................................................................................................................... 16
Test Cutting and Troubleshooting ....................................................................................................................... 17
Operation ............................................................................................................................................................ 19
Maintenance ........................................................................................................................................................ 19
Lubrication ....................................................................................................................................................... 19
Controller (M15S) Operating Instructions ............................................................................................................ 20
1. Front Panel Overview .................................................................................................................................. 20
2. Operation Modes ......................................................................................................................................... 21
3. Fast Program (10 sets) ................................................................................................................................ 24
4. Select Counting direction ............................................................................................................................ 26
5. Select Positioning Mode .............................................................................................................................. 26
6. Set Software Limit (Hi/Lo End) .................................................................................................................... 27
7. Set Tolerances ............................................................................................................................................ 27
8. Set Low Speed Limit ................................................................................................................................... 28
9. Set Linear Correction .................................................................................................................................. 29
10. Enter Parameter Setttings Mode ............................................................................................................... 29
11. Check Software Version ............................................................................................................................ 30
12. Load Datum Values ................................................................................................................................... 30
13. IN/MM Conversion ..................................................................................................................................... 32
14. Set Device Resolution ............................................................................................................................... 32
15. Calibration ................................................................................................................................................. 32
16. M15S Troubleshooting .............................................................................................................................. 33
17. M15S Specifications .................................................................................................................................. 34
18. M15S Parameters ..................................................................................................................................... 35
Troubleshooting: Planer Operating Problems ..................................................................................................... 36
Troubleshooting: Mechanical and Electrical Problems ....................................................................................... 37
Replacement Parts .............................................................................................................................................. 38
Column Assembly ........................................................................................................................................... 39
Parts List: Column Assembly .......................................................................................................................... 40
Gearbox Assembly .......................................................................................................................................... 42
Parts List: Gearbox Assembly ......................................................................................................................... 43
Parts List: Cutterhead Assembly ..................................................................................................................... 44
Table Assembly ............................................................................................................................................... 46
Parts List: Table Assembly .............................................................................................................................. 47
Base Assembly ................................................................................................................................................ 48
Parts List: Base Assembly ............................................................................................................................... 49
Parts List: Top Cover Assembly ...................................................................................................................... 52
Parts List: Electrical Box Assembly ................................................................................................................. 53
Electrical Connections – 230Volt ........................................................................................................................ 54
Electrical Connections – 460Volt ........................................................................................................................ 55

4
Warning
1. Read and understand the entire owner’s manual before attempting assembly or operation.
2. Read and understand the warnings posted on the machine and in this manual. Failure to comply with
all of these warnings may cause serious injury.
3. Replace the warning labels if they become obscured or removed.
4. This planer is designed and intended for use by properly trained and experienced personnel only. If
you are not familiar with the proper and safe operation of a planer, do not use until proper training and
knowledge have been obtained.
5. Do not use this planer for other than its intended use. If used for other purposes, Powermatic
disclaims any real or implied warranty and holds itself harmless from any injury that may result from
that use.
6. Always wear approved safety glasses/face shields while using this planer. Everyday eyeglasses only
have impact resistant lenses; they are not safety glasses.
7. Before operating this planer, remove tie, rings, watches and other jewelry, and roll sleeves up past
the elbows. Remove all loose clothing and confine long hair. Non-slip footwear or anti-skid floor strips
are recommended. Do not wear gloves.
8. Wear ear protectors (plugs or muffs) during extended periods of operation.
9. Do not operate this machine while tired or under the influence of drugs, alcohol or any medication.
10. Make certain the machine is properly grounded.
11. With the exception of feed rate adjustment, make all machine adjustments or maintenance with the
machine disconnected from the power source. A machine under repair should be RED TAGGED to
show it should not be used until the maintenance is complete.
12. Remove adjusting keys and wrenches. Form a habit of checking to see that keys and adjusting
wrenches are removed from the machine before turning it on.
13. Keep safety guards in place at all times when the machine is in use. If removed for maintenance
purposes, use extreme caution and replace the guards immediately.
14. Check damaged parts. Before further use of the machine, a guard or other part that is damaged
should be carefully checked to determine that it will operate properly and perform its intended
function. Check for alignment of moving parts, binding of moving parts, breakage of parts, mounting
and any other conditions that may affect its operation. A guard or other part that is damaged should
be properly repaired or replaced.
15. Provide for adequate space surrounding work area and non-glare, overhead lighting.
16. Keep the floor around the machine clean and free of scrap material, oil and grease.
17. Keep visitors a safe distance from the work area. Keep children away.
18. Make your workshop child proof with padlocks, master switches or by removing starter keys.
19. Give your work undivided attention. Looking around, carrying on a conversation and “horse-play” are
careless acts that can result in serious injury.
20. Maintain a balanced stance at all times so that you do not fall or lean against moving parts. Do not
overreach or use excessive force to perform any machine operation. Stand to the side out of line with
the table and make sure no one else is standing in line with the table.
21. Use the right tool at the correct speed and feed rate. Do not force a tool or attachment to do a job for
which it was not designed. The right tool will do the job better and safer.
22. Maintain tools with care. Keep knife inserts sharp and clean for the best and safest performance.
Follow instructions for lubricating machine and changing accessories. Use recommended
accessories; improper accessories may be hazardous.
5
23. Do not attempt to plane boards shorter than 10” in length without butting a board of equal thickness
behind it to help it through the planer. Be sure the last board of a butted sequence is 12” or longer.
24. Do not feed stacked boards through a planer; a kickback may occur causing severe or fatal injury.
25. Do not plane boards with loose knots or with nails or any foreign material on its surface. Twisted,
warped, or wind-in stock should first be jointed on one surface before attempting to plane a parallel
surface on the planer. Serious stock flaws cannot be removed by use of a planer alone.
26. Disconnect machine from power source before cleaning. Use a brush or compressed air to remove
chips or debris — do not use your hands.
27. Do not stand on the machine. Serious injury could occur if the machine tips over.
28. Never leave the machine running unattended. Turn the power off and do not leave the machine until it
comes to a complete stop.
29. Remove loose items and unnecessary work pieces from the area before starting the machine.
Familiarize yourself with the following safety notices used in this manual:
This means that if precautions are not heeded, it may result in minor injury and/or
possible machine damage.
This means that if precautions are not heeded, it may result in serious injury or possibly
even death.
- - SAVE THESE INSTRUCTIONS - -
WARNING: Drilling, sawing, sanding or machining wood products generates wood dust and other
substances known to the State of California to cause cancer. Avoid inhaling dust generated from wood
products or use a dust mask or other safeguards for personal protection.
Wood products emit chemicals known to the State of California to cause birth defects or other
reproductive harm. For more information go to http://www.p65warnings.ca.gov/wood.
WARNING: This product can expose you to chemicals including lead which is known to the State of
California to cause cancer and birth defects or other reproductive harm. For more information go to
http://www.p65warnings.ca.gov.
6
Introduction
This manual is provided by Powermatic, covering the safe operation and maintenance procedures for a
Powermatic Model WP2510 Planer. This manual contains instructions on installation, safety precautions,
general operating procedures, maintenance instructions and parts breakdown. This machine has been
designed and constructed to provide consistent, long-term operation if used in accordance with
instructions set forth in this manual. If there are any questions or comments, please contact either your
local supplier or Powermatic. Powermatic can also be reached at our web site: www.powermatic.com.
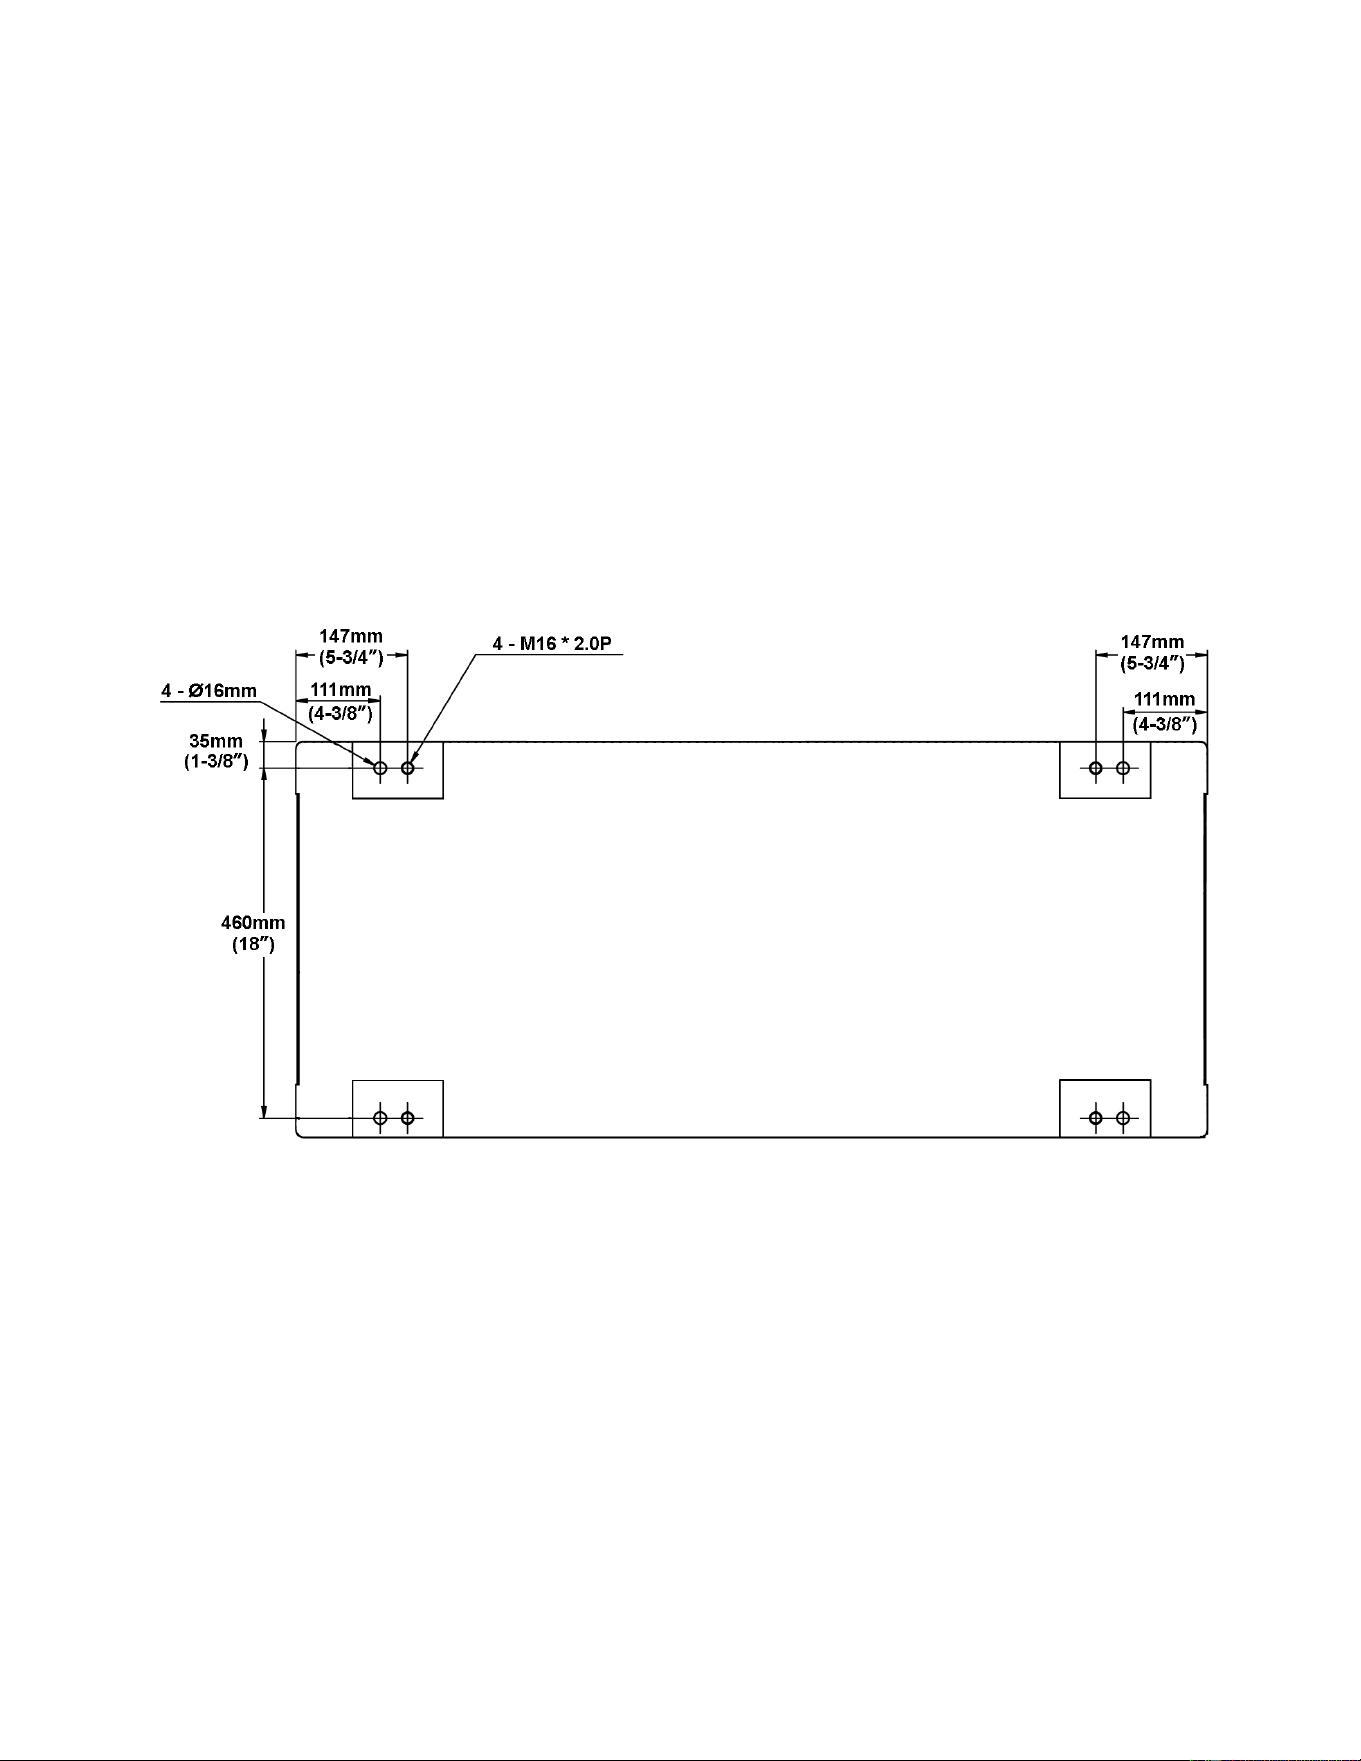
WP-2510 floor diagram

7
Specifications
Model Number ................................................................................................................................... WP2510
Stock Number ................................................................................................................................... 1791303
Main Drive Motor ........................................ TEFC induction, 15HP, 3PH, 230/460V (pre-wired 230V), 60Hz
Full Load Amperage ................................................................................................................... 37/18.5A
Idle Running Amperage (230V) .......................................................................................................... 10A
Table Hoist Motor .................................................................................... TEFC induction, 1/2HP, 3PH, 60Hz
Maximum Cutting Width .......................................................................................................... 25 in. (635mm)
Maximum Cutting Thickness ..................................................................................................... 9 in. (230mm)
Full Width Cutting Depth ............................................................................................................ 1/8 in. (3mm)
Maximum Cutting Depth ............................................................................................................. 1/4 in. (6mm)
Minimum Planing Length ......................................................................................................... 10 in. (250mm)
Board Thickness Capacity:
Using controller software ........................................ minimum 0.16 in. (7mm) / maximum 9 in. (230mm)
Manually using handwheel ................................. minimum 0.157 in. (4mm) / maximum 10 in. (240mm)
Number of Knives, Helical Head ................................................................... 174 (four-sided carbide inserts)
Segmented Infeed Roll Diameter ................................................................................................ 3 in. (76mm)
Steel Outfeed Roll Diameter .............................................................................................. 2-1/2 in. (63.5mm)
Cutterhead Speed ......................................................................................................................... 5,000 RPM
Cutterhead Diameter ............................................................................................................. 3-3/8 in. (86mm)
Feed Rate................................................................................................................................... 30-25-20 fpm
Table Size (L x W) ......................................................................................... 32-3/16 x 26 in. (818 x 660mm)
Dust Port Diameter .................................................................................................................... 5 in. (127mm)
Capacity, Main Gearbox ........................................................................................................ 3.042 L (0.8 gal)
Capacity, Table Hoist Motor Gearbox ................................................................................... 1.524 L (0.4 gal)
Shipping Weight ................................................................................................................... 1,760 lb (798 kg)
Net Weight................................................................................................................................ 1,585 (719 kg)
Overall Dimensions (L x W x H) .............................................. 42 x 53-1/2 x 60 in. (1067 x 1360 x 1524mm)
The above specifications were current at the time this manual was published, but because of our policy of
continuous improvement, Powermatic reserves the right to change specifications at any time and without
prior notice, without incurring obligations.
8
Unpacking
Open shipping container and any smaller boxes
and check for shipping damage. Report any
damage immediately to your distributor and
shipping agent. Do not discard any shipping
material until the planer is installed and running
properly.
Compare the contents of your container with the
following parts list to make sure all parts are
intact. Missing parts, if any, should be reported
to your distributor. Read the instruction manual
thoroughly for assembly, maintenance and
safety instructions.
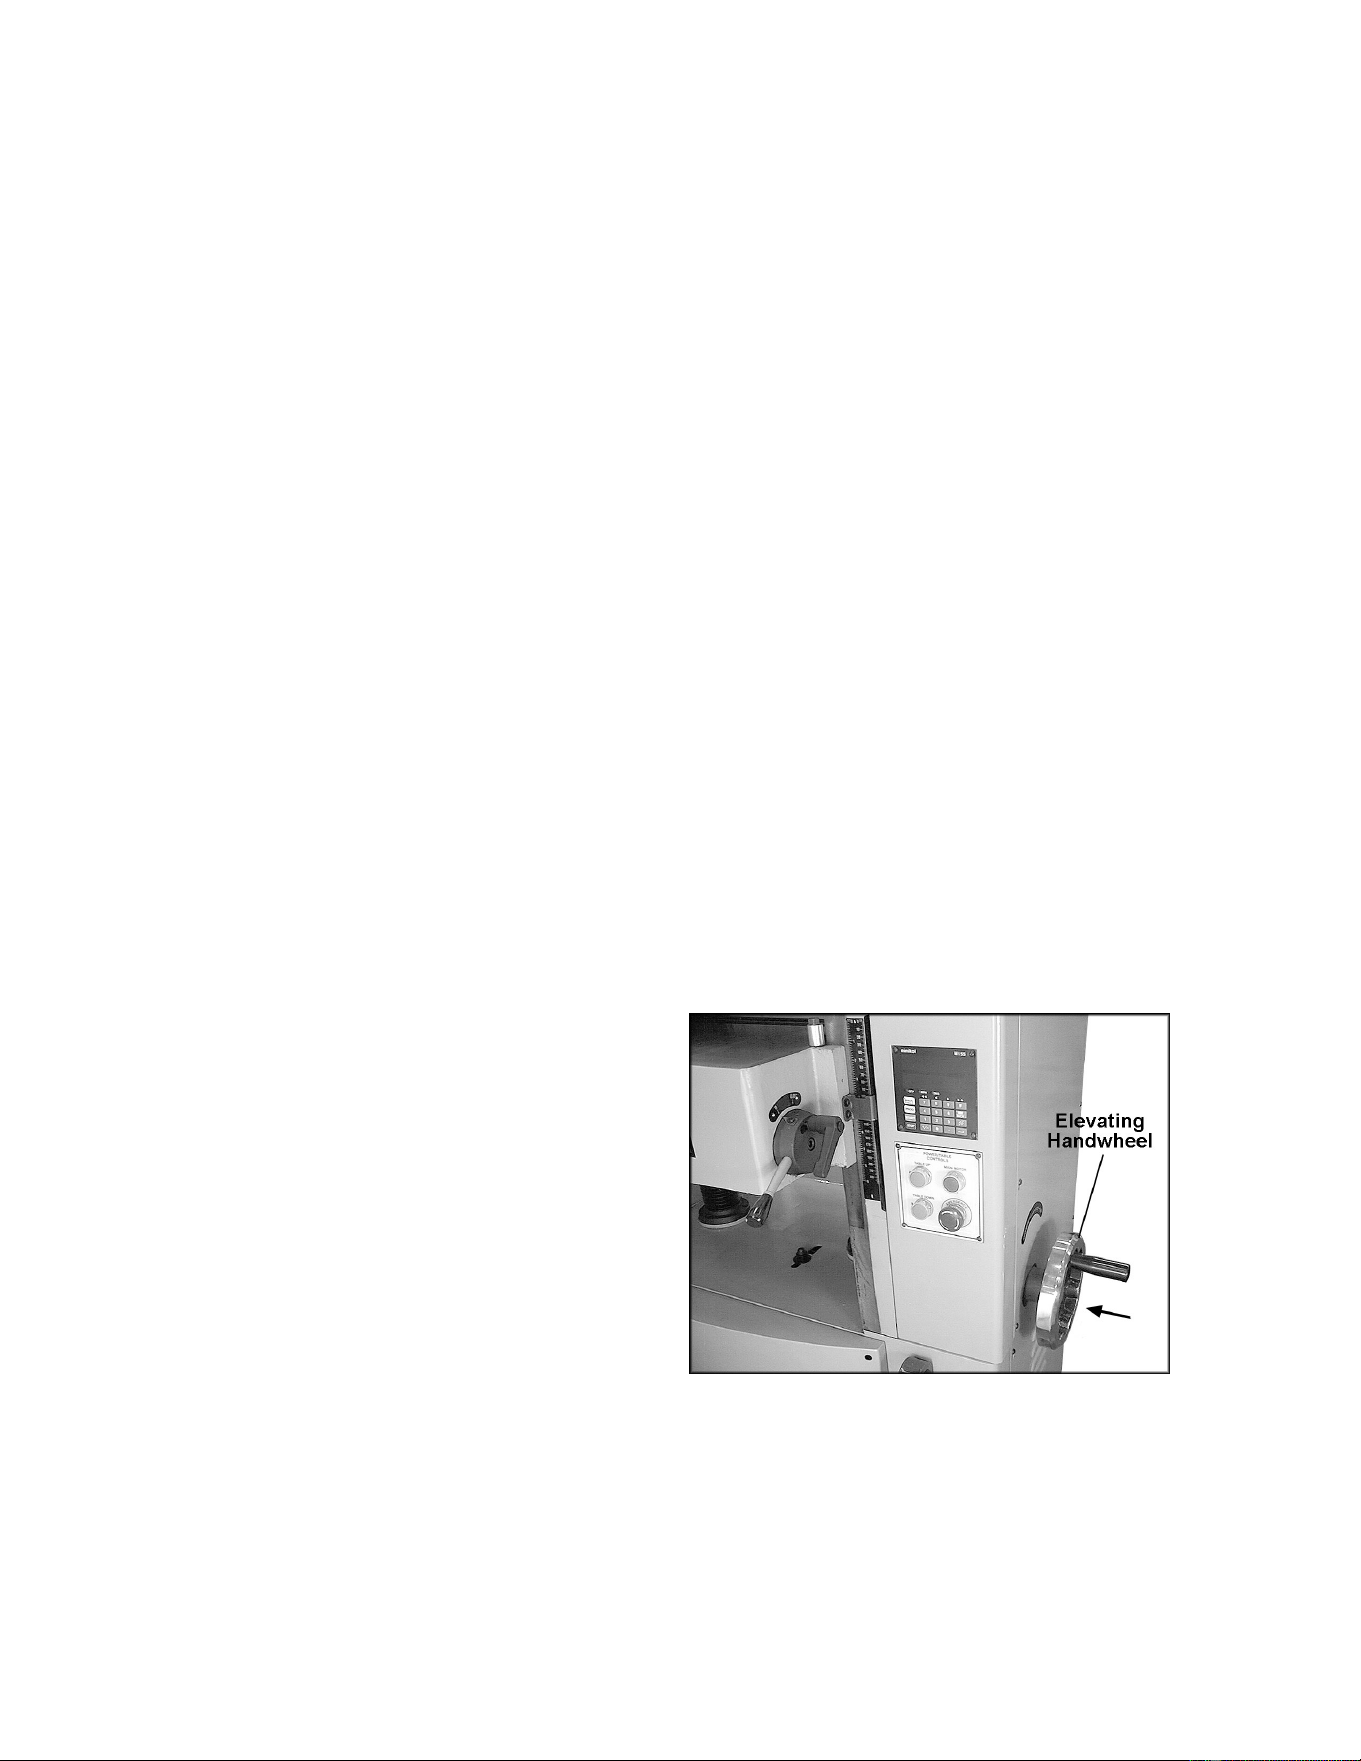
NOTE: To remove the box from atop the planer
table, loosen the table lock handle, push in the
elevating handwheel (see Figure 3) and rotate
the handwheel to lower the table.
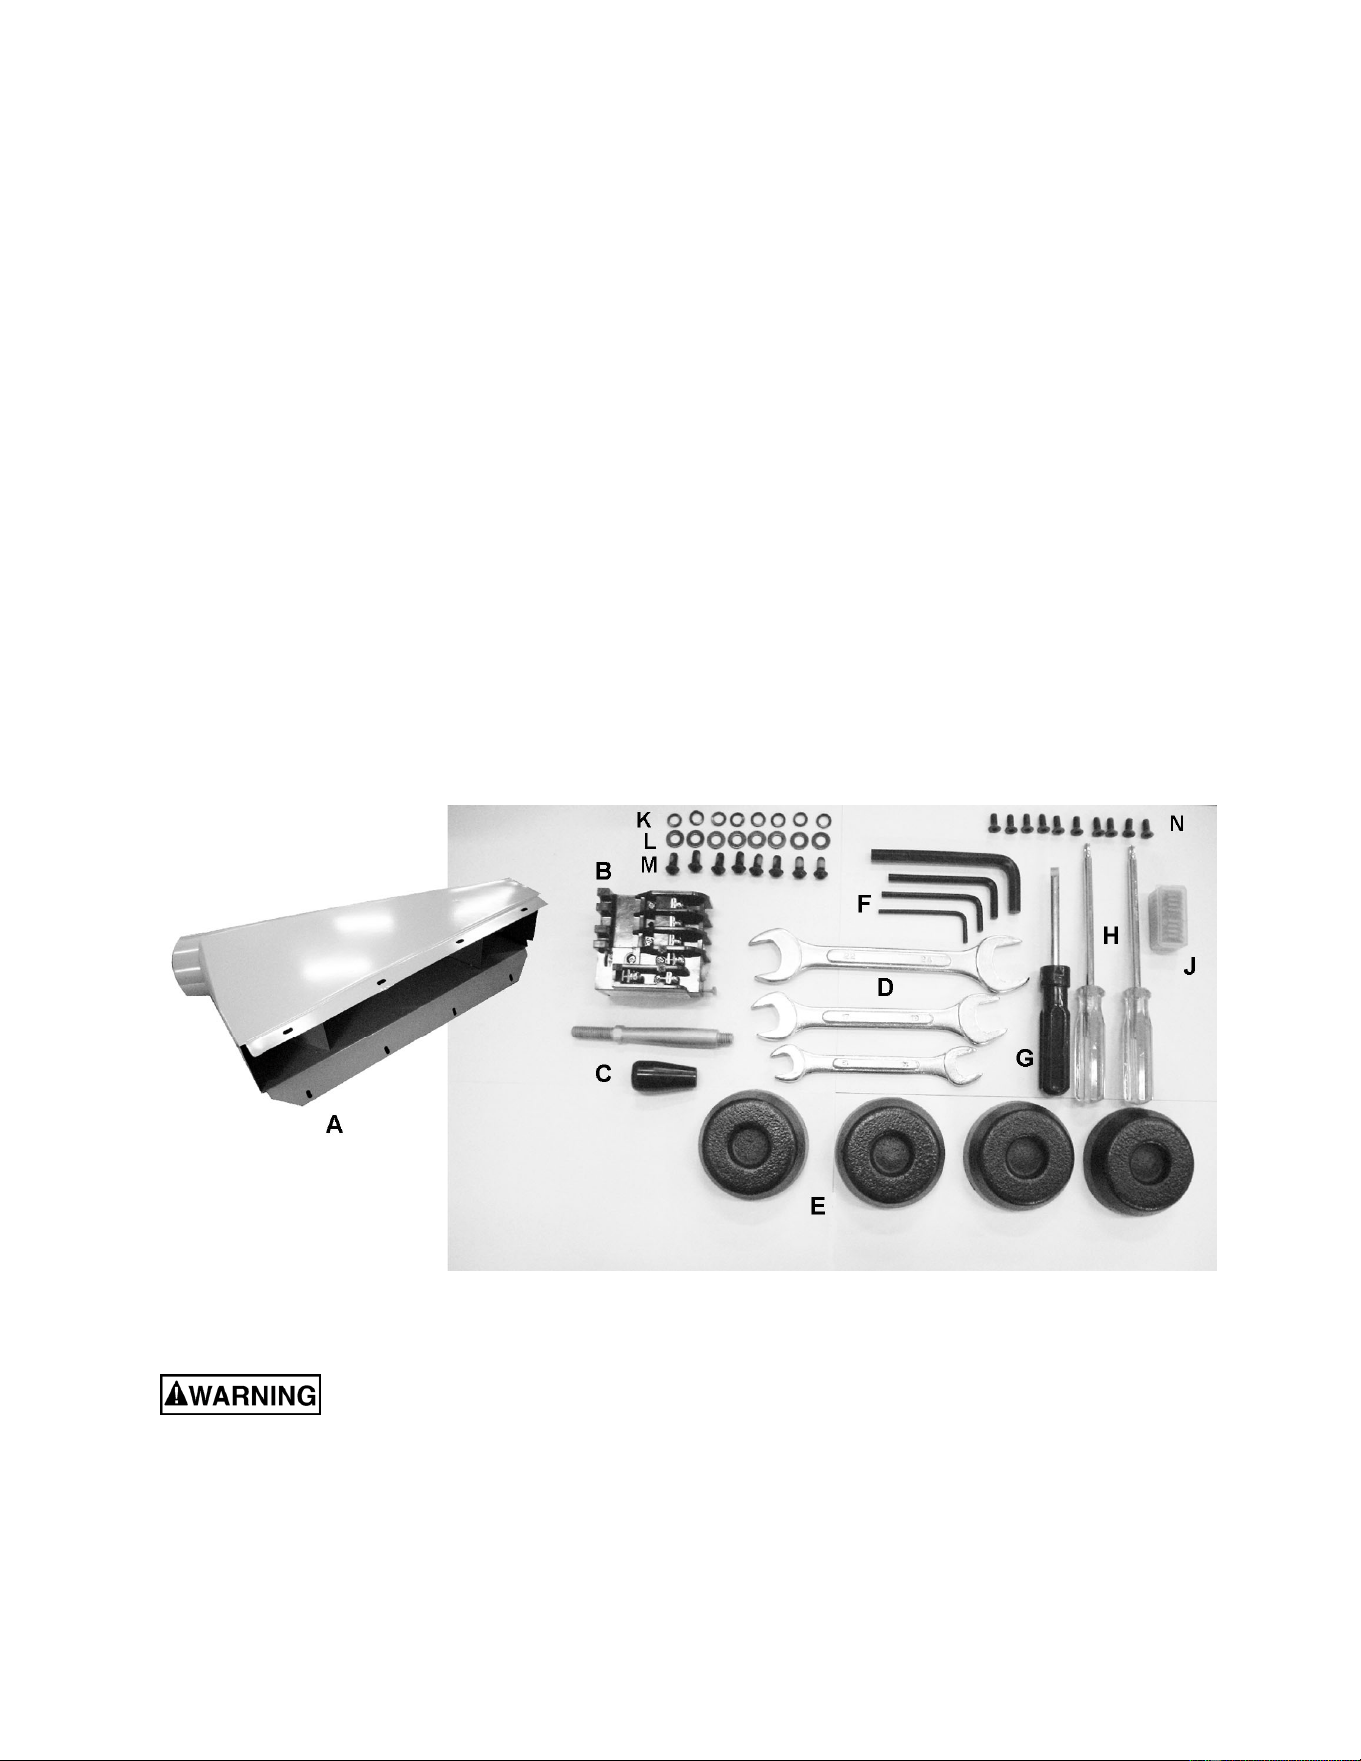
Contents of the Shipping Container
1 Planer
1 Dust Hood – (A)
1 RA-30E 460V Overload Relay – (B)
1 Handle with Knob – (C)
3 Open End Wrenches, 17-19, 22-24, and 12-
14 mm – (D)
4 Foot Pads – (E)
4 Hex Wrenches, 3, 4, 5, and 8mm – (F)
1 Reversible Screwdriver – (G)
2 Star Point Screwdrivers – (H)
10 Replacement Knife Inserts – (J)
8 Lock Washers, M6 – (K)
8 Flat Washers, M6 – (L)
8 Button Head Socket Screws, M6x12 – (M)
10 Knife Insert Screws, #10-32 x 1/2” (N)
1 Operating Instructions and Parts Manual
1 Warranty Card
Read and understand the entire contents of this manual before attempting set-up
or operation! Failure to comply may cause serious injury.
9
Installation and Assembly
Tools Required for Installation:
Forklift or hoist, with lifting straps
4mm hex wrench (provided)
22mm combination wrench (provided)
Remove any straps or boards holding the planer
to the pallet. Place straps under the four lifting
hooks at front and back to raise the planer off
the pallet and move it to location.
Make sure the straps will not
damage buttons or levers on the front of the
planer.
The planer should be installed on a solid
foundation, preferably a concrete floor. The
machine area should be clean, dry, well
ventilated, and well lit. Since planers can create
noise problems, the site selection should be one
which minimizes reverberant sound from walls,
ceilings and other equipment. Electricals should
be installed so that they are protected from
damage and exposure. Be sure to properly
ground the machine.
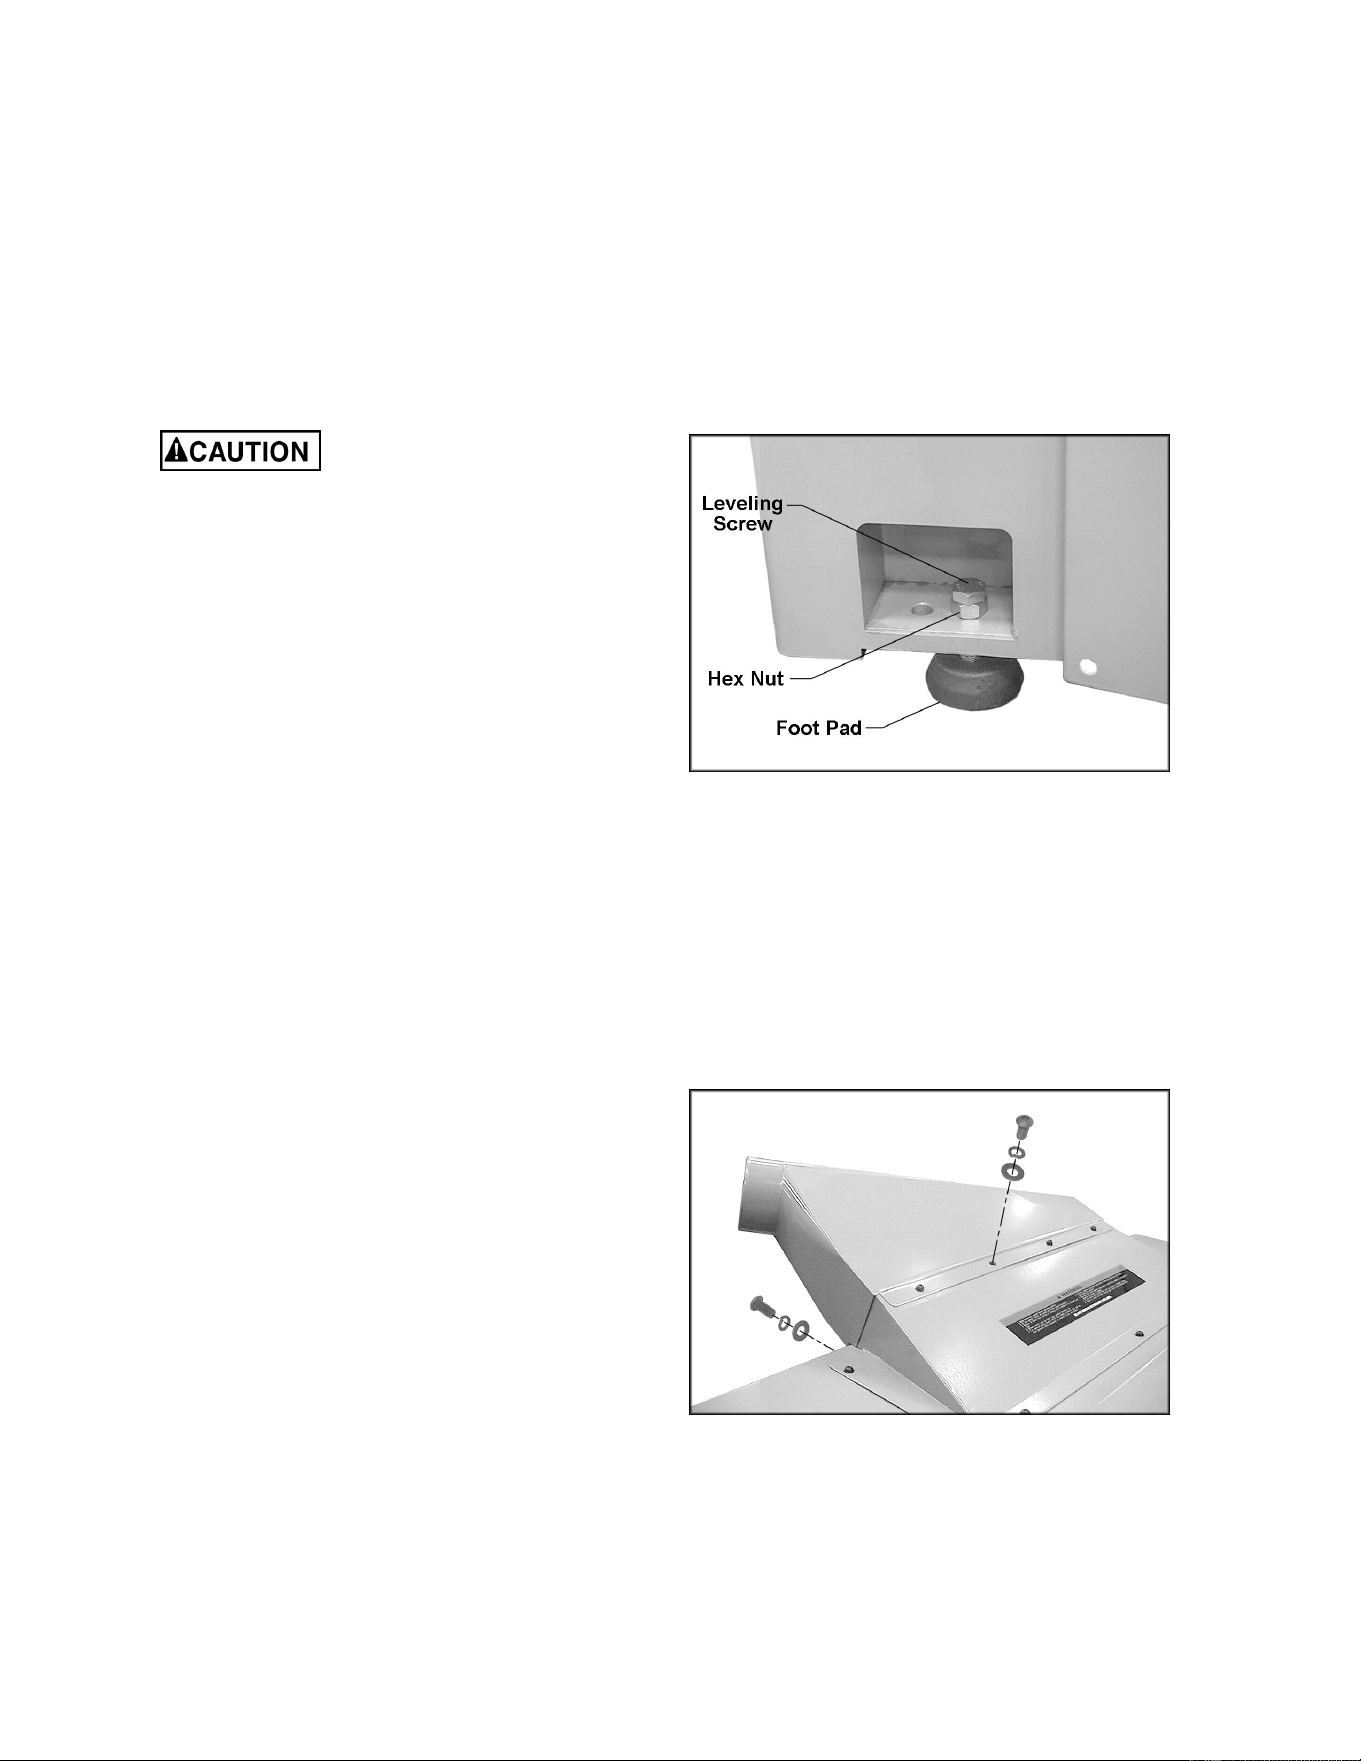
Lower the leveling screws, and place the four
foot pads beneath the leveling screws. See
Figure 1. Lower the machine slowly onto the foot
pads. The screws can be turned as necessary
until the planer table is level. Tighten the hex
nuts against the base to secure the screw
settings.
Exposed metal parts have been coated with a
rust preventative. This should be removed with a
soft cloth moistened with kerosene or a good
commercial cleaner/degreaser. Do not use an
abrasive pad, and do not get solvents near
plastic parts or painted areas.
Dust Hood
Use a 4mm hex wrench to mount the dust hood
to the planer with eight M6 x 12 button head
socket screws, eight M6 lock washers and eight
M6 flat washers, as shown in Figure 2.
It is strongly recommended that a dust collection
system be used with this machine. It should be
of sufficient volume for this size planer. If a dust
collector is not used, the user is cautioned
against the health hazard and the limitations in
the OSHA regulation for employee or student
exposure to dust particles.
IMPORTANT: All knife inserts on the
cutterhead should be checked for tightness
before operating the planer.
Figure 1
Figure 2

10
Grounding Instructions
Electrical connections must
be made by a qualified electrician in
compliance with all relevant codes. This
machine must be properly grounded to help
prevent electrical shock and possible fatal
injury.
This machine must be grounded. In the event of
a malfunction or breakdown, grounding provides
a path of least resistance for electric current to
reduce the risk of electric shock.
Improper connection of the equipment-
grounding conductor can result in a risk of
electric shock. The conductor with insulation
having an outer surface that is green with or
without yellow stripes, is the equipment-
grounding conductor. If repair or replacement of
the electric cord or plug is necessary, do not
connect the equipment-grounding conductor to a
live terminal.
Check with a qualified electrician or service
personnel if the grounding instructions are not
completely understood, or if in doubt as to
whether the tool is properly grounded.
Repair or replace a damaged or worn cord
immediately.
Make sure the voltage of your power supply
matches the specifications on the motor plate of
the Planer. The machine should be connected to
a dedicated circuit.
The use of an extension cord is not
recommended for the WP2510 Planer.
230 Volt Operation
The Planer is factory wired for 230 volt, but can
be converted to 460 volt if so desired (see
“Converting From 230 Volt to 460 Volt”). You
may either install a plug or “hard-wire” the
Planer directly to a control panel.
If you are connecting a plug, use a proper
UL/CSA listed 3-pole, 4-wire grounding plug
suitable for 230 volt operation.
If the Planer is to be hard-wired to a panel,
make sure a disconnect is available for the
operator.
During hard-wiring of the Planer, make sure the
fuses have been removed or the breakers have
been tripped in the circuit to which the Planer
will be connected. Place a warning placard on
the fuse holder or circuit breaker to prevent it
being turned on while the machine is being
wired.
11
Converting from 230 Volt to 460 Volt
Consult the diagrams on pages 54 and 55 for
specific information on the following changes.
1. Disconnect machine from power source.
2. Change the lead connections to the main
motor and to the table hoist motor.
3. Replace the RA-30 (230V) overload relay
with the provided RA-30E (460V) overload
relay.
4. Switch the “R” wire on the transformer from
the 230V to the 460V terminal.
5. If using a plug, install a proper UL/CSA
listed plug suitable for 460V operation.
Test Run
After wiring has been completed, confirm that
the wires have been connected properly:
1. Connect machine to power source and
press the “Main Motor” button for just an
instant, then press the Stop button.
2. The cutterhead should rotate clockwise as
viewed from the handwheel side of the
machine. If cutterhead rotation is incorrect,
disconnect machine from power source
and switch any two of the three wires at
"R,S,T" (see “Electrical Connections”, pages
54 and 55).
3. Re-connect machine to power source.
Controller Set-Up
To program settings in the Controller for table
movement, refer to the Controller Operating
Instructions beginning on page 20. Please note
that the controller operates on a battery which
must be replaced if the relevant error message
arises. See Controller Operating Instructions for
more information.
Adjustments
Depth of Cut
Depth of cut is adjusted by raising or lowering
the table using the elevating handwheel or the
push buttons for rough positioning; or the
keypad on the Controller. The Controller is used
for very precise positioning and for remembering
your settings (for more information on the
Controller see the section beginning on page
20).
To move the table with the elevating handwheel
(Figure 3), push the handwheel in to engage the
sprocket on the table elevating mechanism.
Figure 3
12
One revolution of the handwheel equals 1/32”
change in table height. Use the scale or digital
readout to determine distance from the
cutterhead.
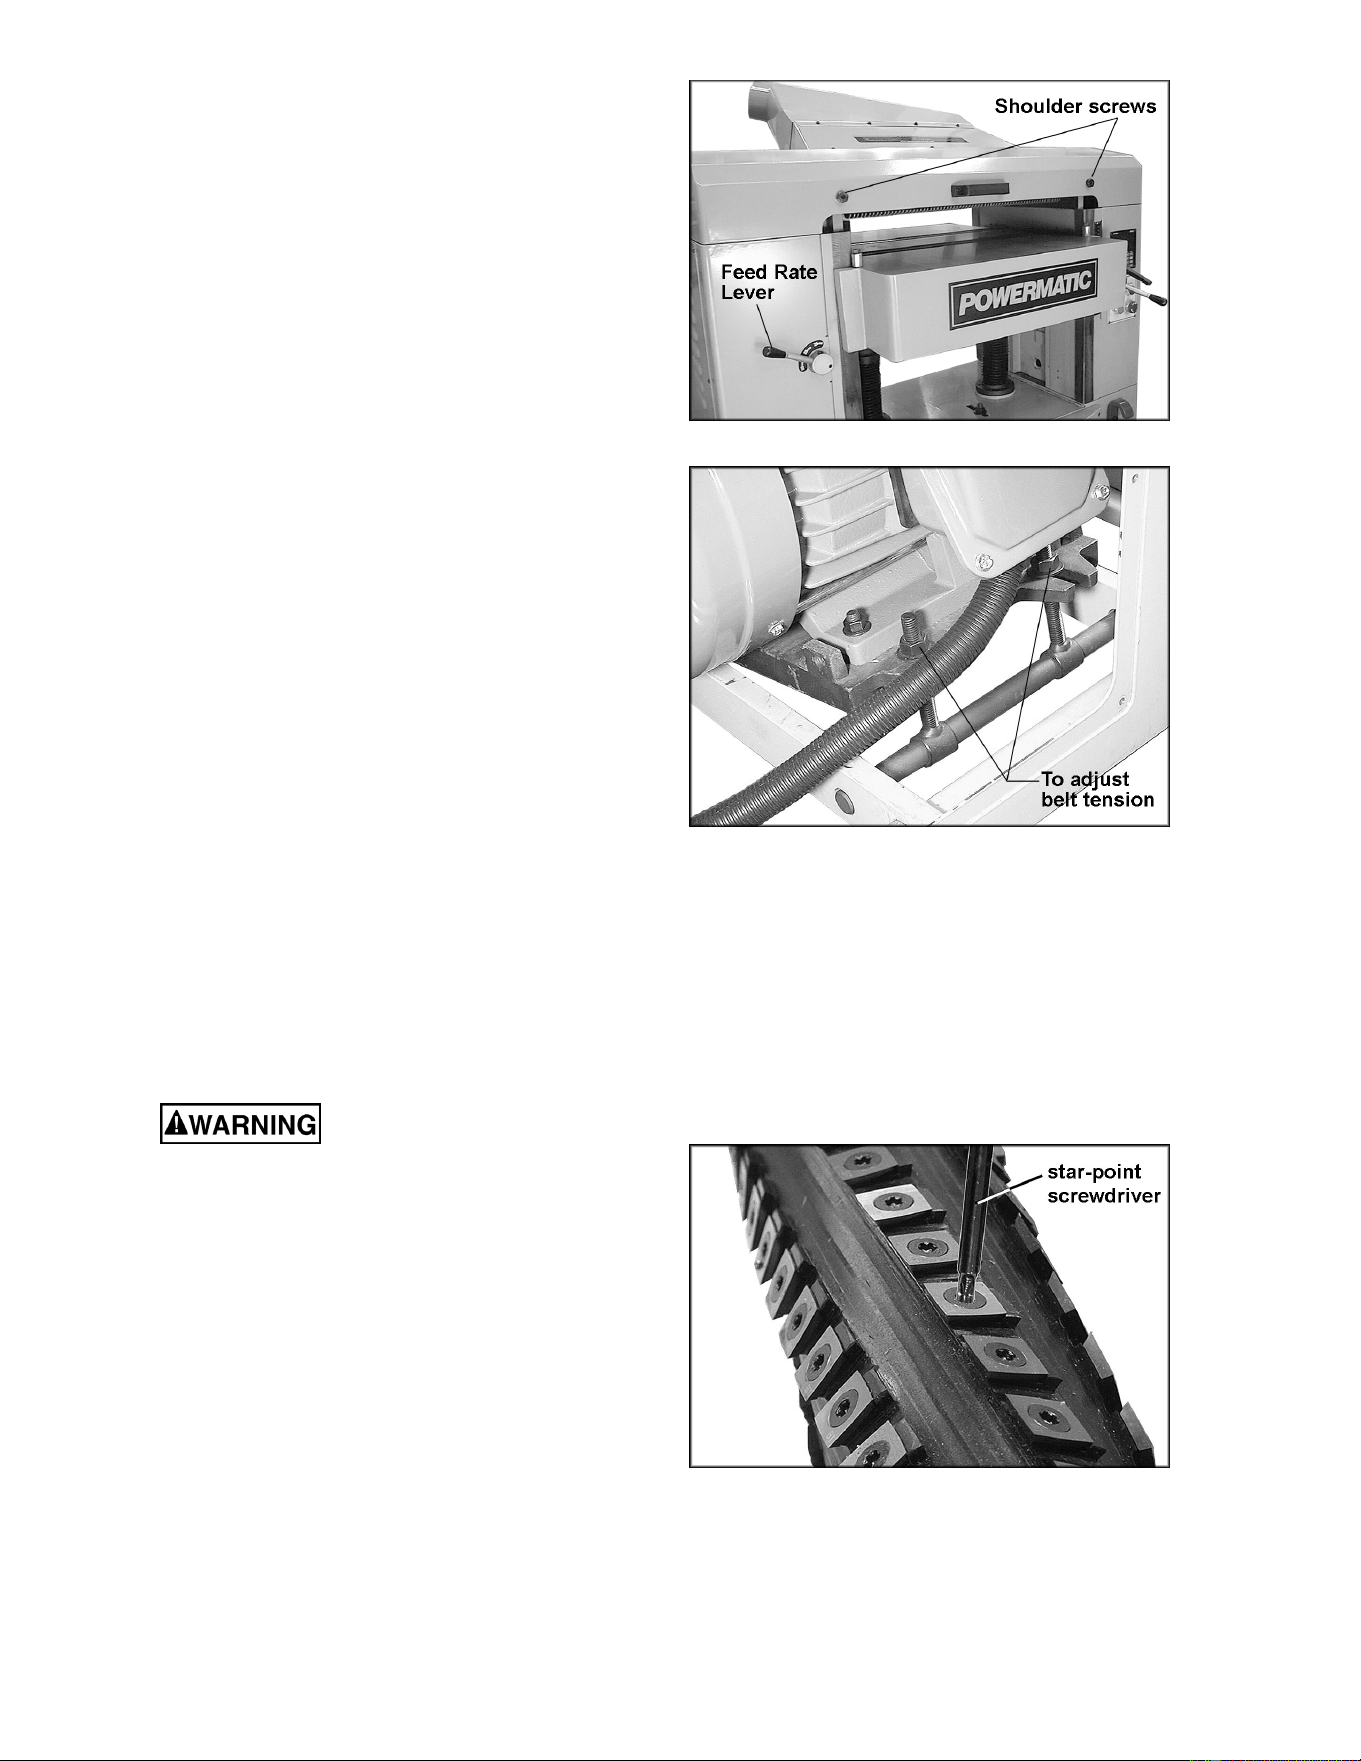
Feed Rate
The planer is equipped with selectable feed rate
rollers that feed stock at 20, 25 or 30 feet per
minute. To adjust speed, rotate the lever shown
in Figure 4.
IMPORTANT: Change feed rate only while
the machine is running.
Belt Tension
1. Disconnect machine from power source.
2. Remove the lower rear panel and use the
four hex nuts on the motor mount to adjust
belt tension. See Figure 5. Adjust motor
plate up or down until correct belt tension is
achieved. To lower the motor plate, loosen
lower nuts and tighten upper nuts. To raise
the motor plate, do the opposite.
3. Correct tension is obtained when there is
approximately 1/4” deflection in the center
span of the belt using light finger pressure.
4. Re-tighten hex nuts and install lower rear
panel.
Opening Hood
To open the hood for access to the cutterhead,
remove the two shoulder screws (Figure 4).
NOTE: The planer has a limit switch which
prevents operation while the hood is open.
Replacing or Rotating Knife Inserts
Knife inserts are extremely
sharp. Use caution when working with or
around the cutterhead.
Knife inserts on the WP-2510 are four-sided.
When dull, simply remove each insert, rotate it
90° for a fresh edge, and re-install it.
Use the provided star point screwdrivers to
remove the knife insert screw. See Figure 6.
One screwdriver can be used to help hold the
cutterhead in position while the other one is
used to remove the screw.
It is advisable to rotate all inserts at the same
time to maintain consistent cutting. However, if
one or more knife inserts develops a nick, rotate
only those inserts that are affected.
Each knife insert has an etched reference mark
so you can keep track of the rotations.
Figure 4
Figure 5
Figure 6
13
IMPORTANT: When removing or rotating
inserts, clean saw dust from the screw, the
insert, and the cutterhead platform. Dust
accumulation between these elements can
prevent the insert from seating properly, and
may affect the quality of the cut.
Before installing each screw, lightly coat the
screw threads with machine oil and wipe off any
excess.
Securely tighten each screw which holds the
knife inserts before operating the planer!
Make sure all knife insert
screws are tightened securely. Loose inserts
can be propelled at high speed from a
rotating cutterhead, causing injury.
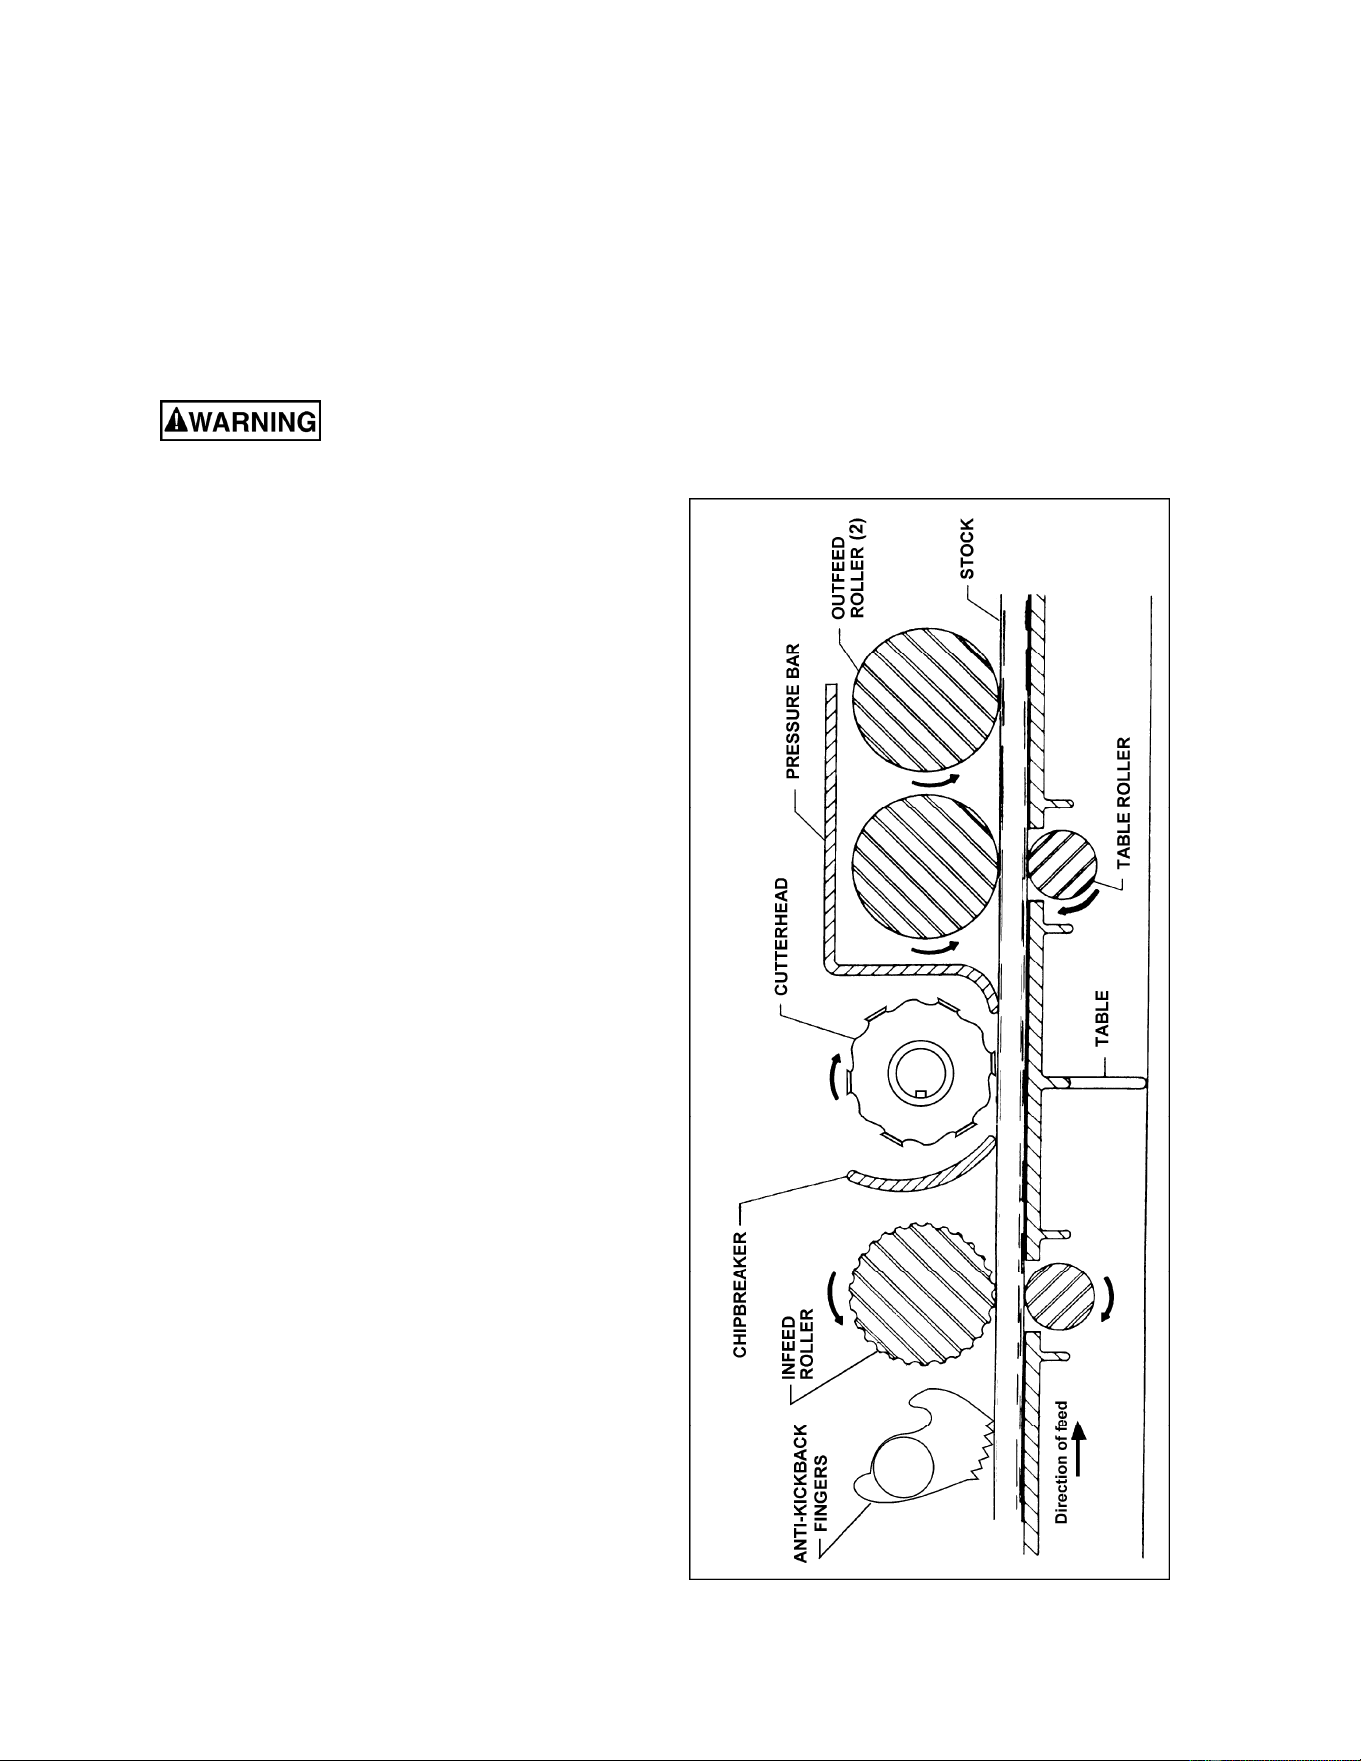
The Planer’s Feed System
(Figure 8)
1. Anti-Kickback Fingers
2. Infeed Roller
3. Chipbreaker
4. Cutterhead
5. Pressure Bar
6. Outfeed Rollers
Anti-Kickback Fingers
Anti-kickback fingers help prevent stock from
being thrown from the machine. These fingers
operate by gravity and should be inspected for
pitch or gum buildup before each day’s use. The
fingers must operate freely and move
independently for correct operation.
Infeed Roller
The function of the infeed roller is to feed the
material into the machine. It is a corrugated,
sectional roller with approximately 1/4”
independent movement of each section to
accommodate multiple board surfacing.
To provide proper drive, the infeed roller should
be set so that the bottom of its arc is 1/16” below
the arc of the cutterhead knife inserts. The
infeed roller is under spring tension and this
tension must be sufficient to feed the stock
uniformly through the planer without slipping but
should not be so tight that it causes damage to
the boards. The tension should be equal at both
ends of the roller.
Figure 8
14
To adjust the infeed roller:
1. Disconnect machine from power source.
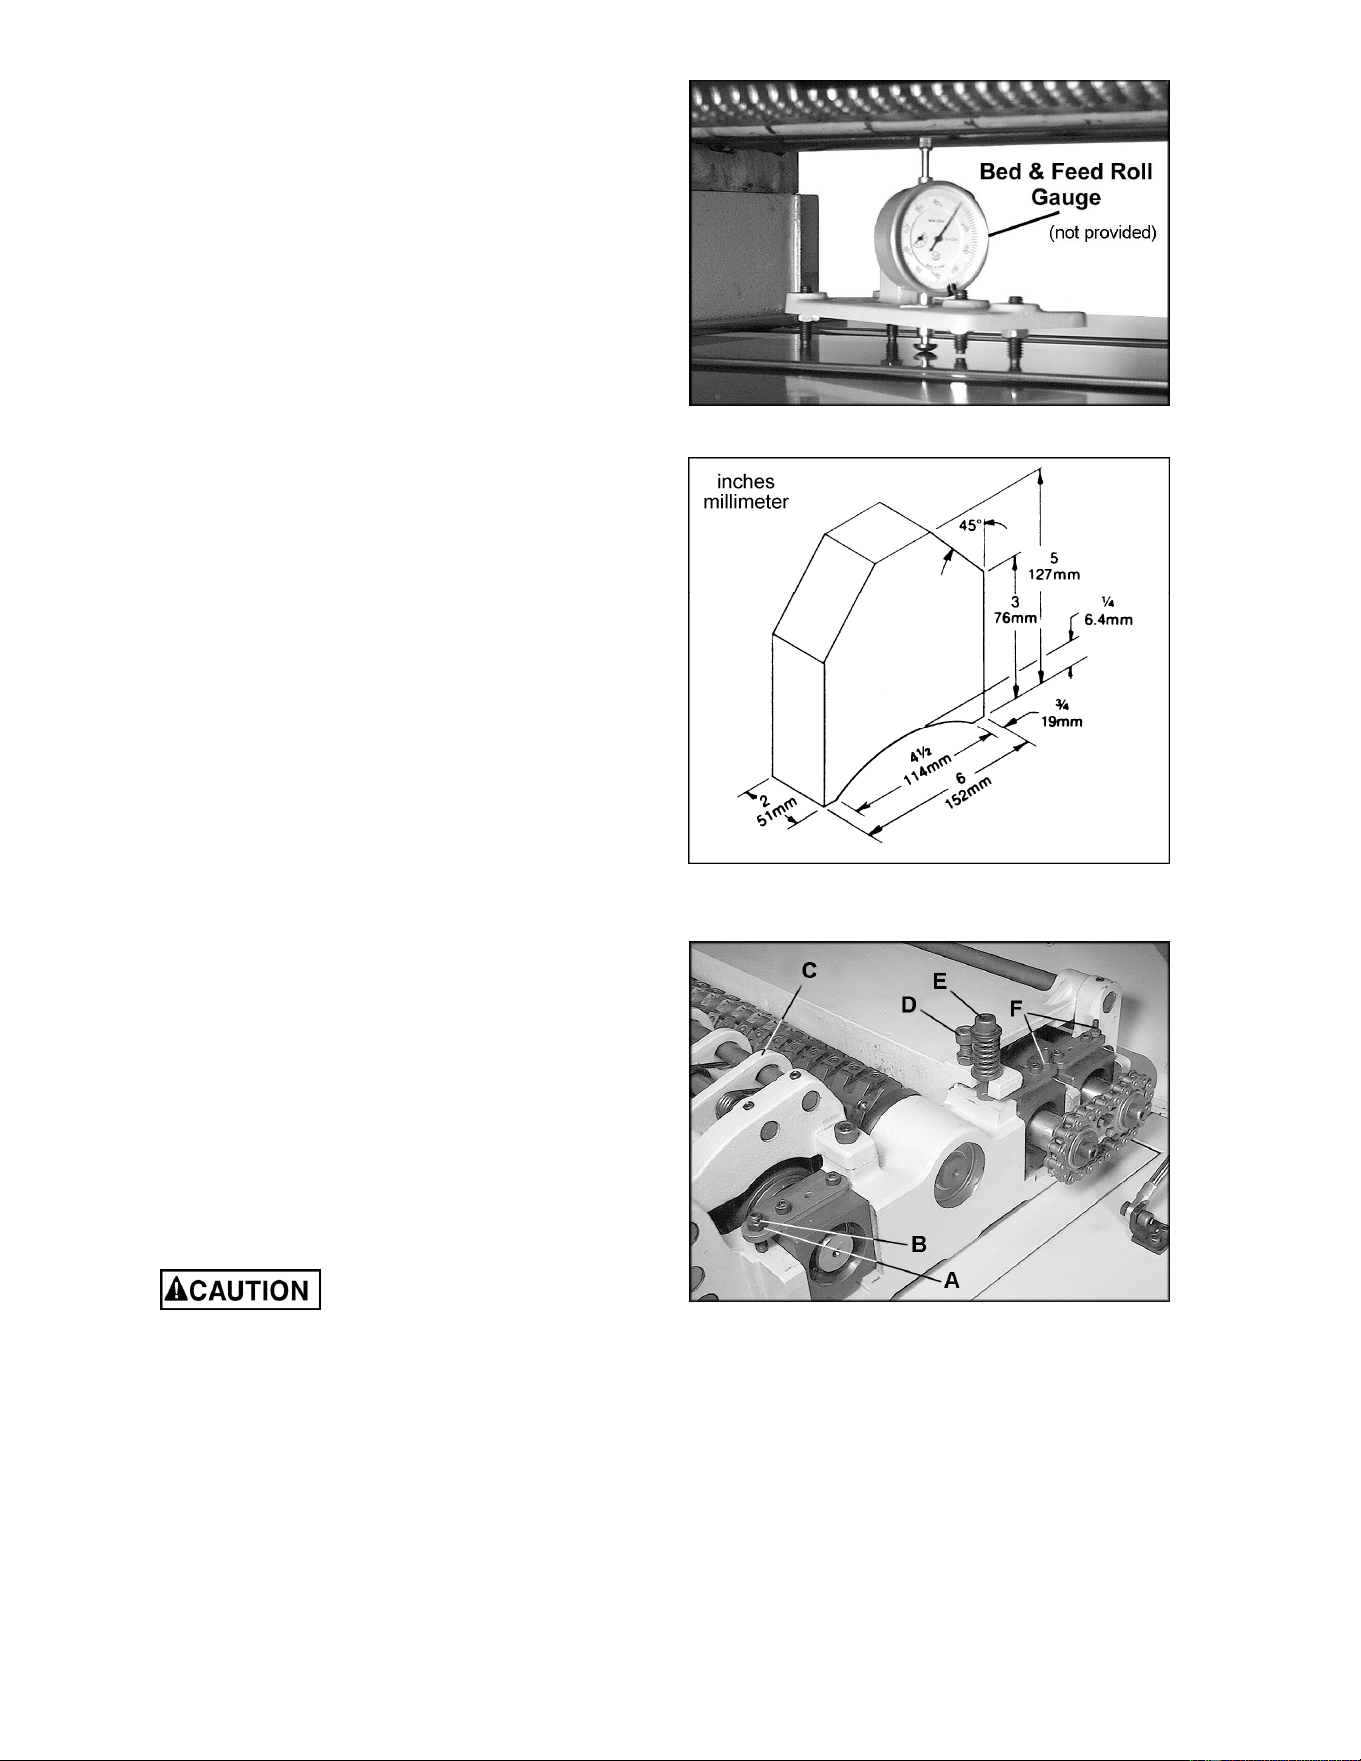
2. Place a dial gauge (not provided) under a
knife insert in the cutterhead. If a dial gauge
is not available, use a finished block of
wood with notches cut out for the table
rollers, in conjunction with a feeler gauge.
See Figure 10 for an example of a wood
block you can make and use as a gauge.
3. Raise the table with the handwheel until the
gauge contacts a knife insert at the apex of
its curve. Zero the gauge at that position.
4. Move the gauge to the extreme left side of
the infeed roller and check the
measurement. It should be 1/16” below the
knife measurement.
5. If it is not 1/16”, correct by loosening the hex
nut (A, Figure 11) and turning the
adjustment screw (B, Figure 11) with a hex
wrench.
6. Move the gauge to the extreme opposite
end of the infeed roller and check. Make
necessary adjustments. Tighten hex nuts
(A, Figure 11) when finished.
IMPORTANT: The setting on both sides of the
infeed roller must be the same to avoid skewing
of the material as it is fed through the machine.
Chipbreaker
The chipbreaker (C, Figure 11) is a
sectionalized type made of spring-loaded
sections mounted on a bar, which complements
the sectional infeed roller. The functions of the
chipbreaker are to break chips into small pieces,
help avoid splintering of the wood, help avoid
board bounce on thinner boards, to direct the
flow of chips out of the machine, and to permit
multiple board surfacing.
The chipbreaker has been factory set at 1/32”
below the cutting arc of the knives, and has
been spring-tensioned properly.
A chipbreaker set too low or
with excessive tension may prevent stock
from feeding into the machine.
Figure 9
Figure 10
User-made Gauge Block
Figure 11
15
Pressure Ba
r
Most planing problems can be traced to
improper setting of the pressure bar. Its function
is to hold down the material after it passes under
the cutterhead and throughout the remainder of
the cut. Its basic setting is to be in line with the
arc of the cutterhead knives.
If it is too high, a shallow “clip” will occur at each
end of the board. If it is too low, stock will not
feed through.
Use a gauge to set the full length of the
pressure bar to be .000-.001” (.02mm) below the
arc of the cutterhead. Figure 11 shows the
height adjustment screw (D) and the spring
tension adjustment screw (E) for the pressure
bar. This initial setup is a starting point and final
adjustment may have to be made during a test
cut.
Outfeed Rollers
The two outfeed rollers are of smooth, one-piece
construction to help avoid marring the finished
surface of the material being cut. Their function
is to continue to feed the material through the
machine after it leaves the infeed roller. The
correct free position setting is 1/32” (.8mm)
below the arc of the cutterhead knives.
Use a gauge, such as a bed and feed roll gauge
or wood gauge block, to check the outfeed
rollers in the same manner as the infeed roller.
Adjust as necessary using the screws (F, Figure
11). When finished adjusting, tighten the hex
nuts on the screws (F, Figure 11).
Table Rollers
The Planer has two table rollers which help
reduce friction of the stock on the table as it
feeds through the machine. It is not possible to
give exact height setting of the table rollers
because each type of wood behaves differently.
As a general rule, however, the table rollers
should be set high when planing rough stock,
and set low for finish cuts.
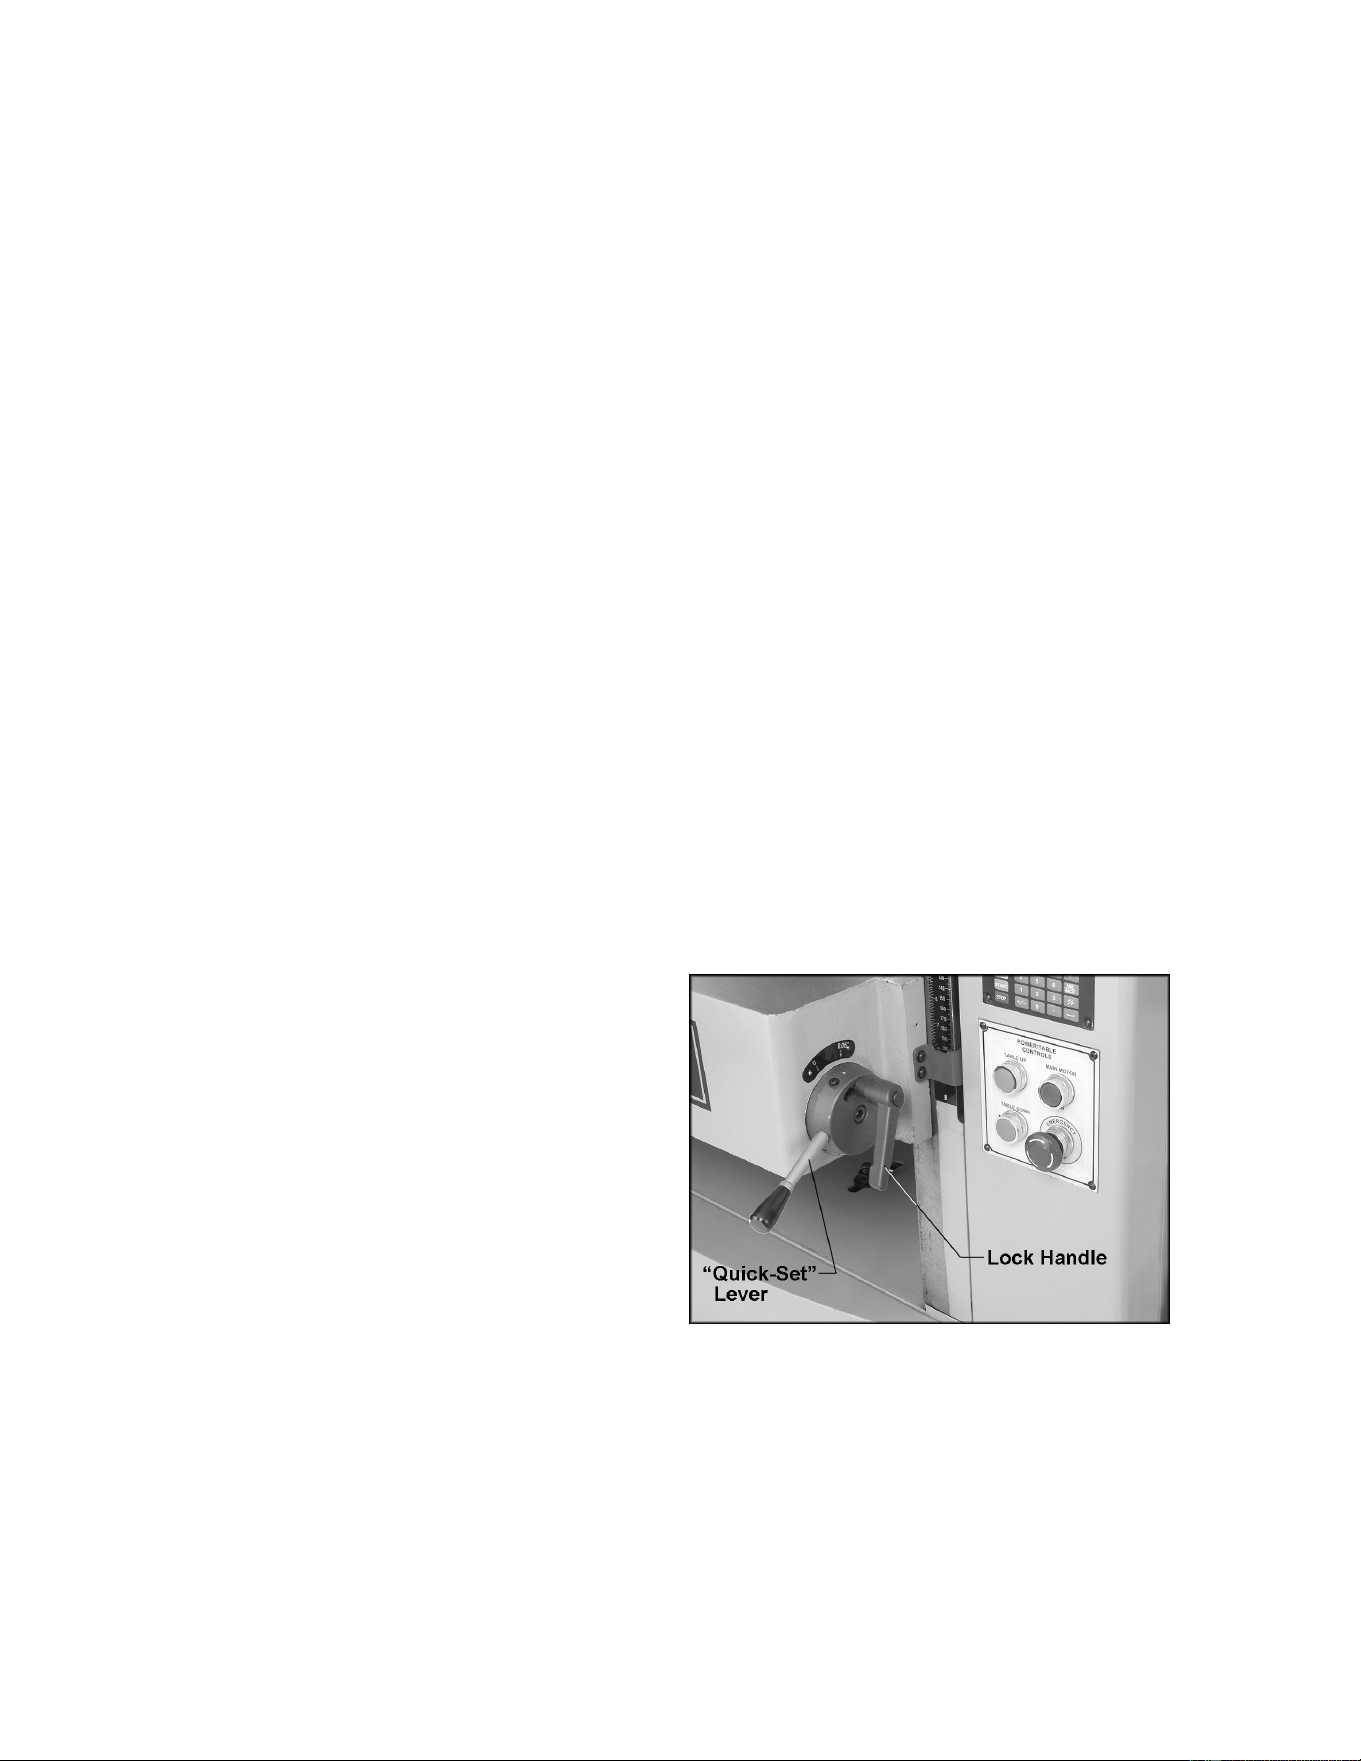
The planer is equipped with a quick-set table
roller adjustment. With a single lever, you can
raise the rollers from their finishing board height
to a roughing board height. See Figure 12. The
range is 0.00 to 0.05”.
To adjust the height of the table rollers, loosen
the lock handle (Figure 12) and turn the quick-
set lever. Re-tighten the lock handle to lock the
setting.
Figure 12
16
The table rollers are adjusted at the factory. If
they should need further or “fine” adjustment:
1. Disconnect machine from power source.
2. Loosen lock handle and position the quick-
set lever (Figure 12) to zero.
3. Use a dial gauge (not provided) to find the
distance from table top to the apex of the
table roller. Zero the gauge at this position.
4. Place the gauge over the extreme right side
of the table roller and find the high point of
the table roller arc. The gauge should still
read zero.
5. If the gauge reading is greater or less than
zero, reach beneath the table with a wrench
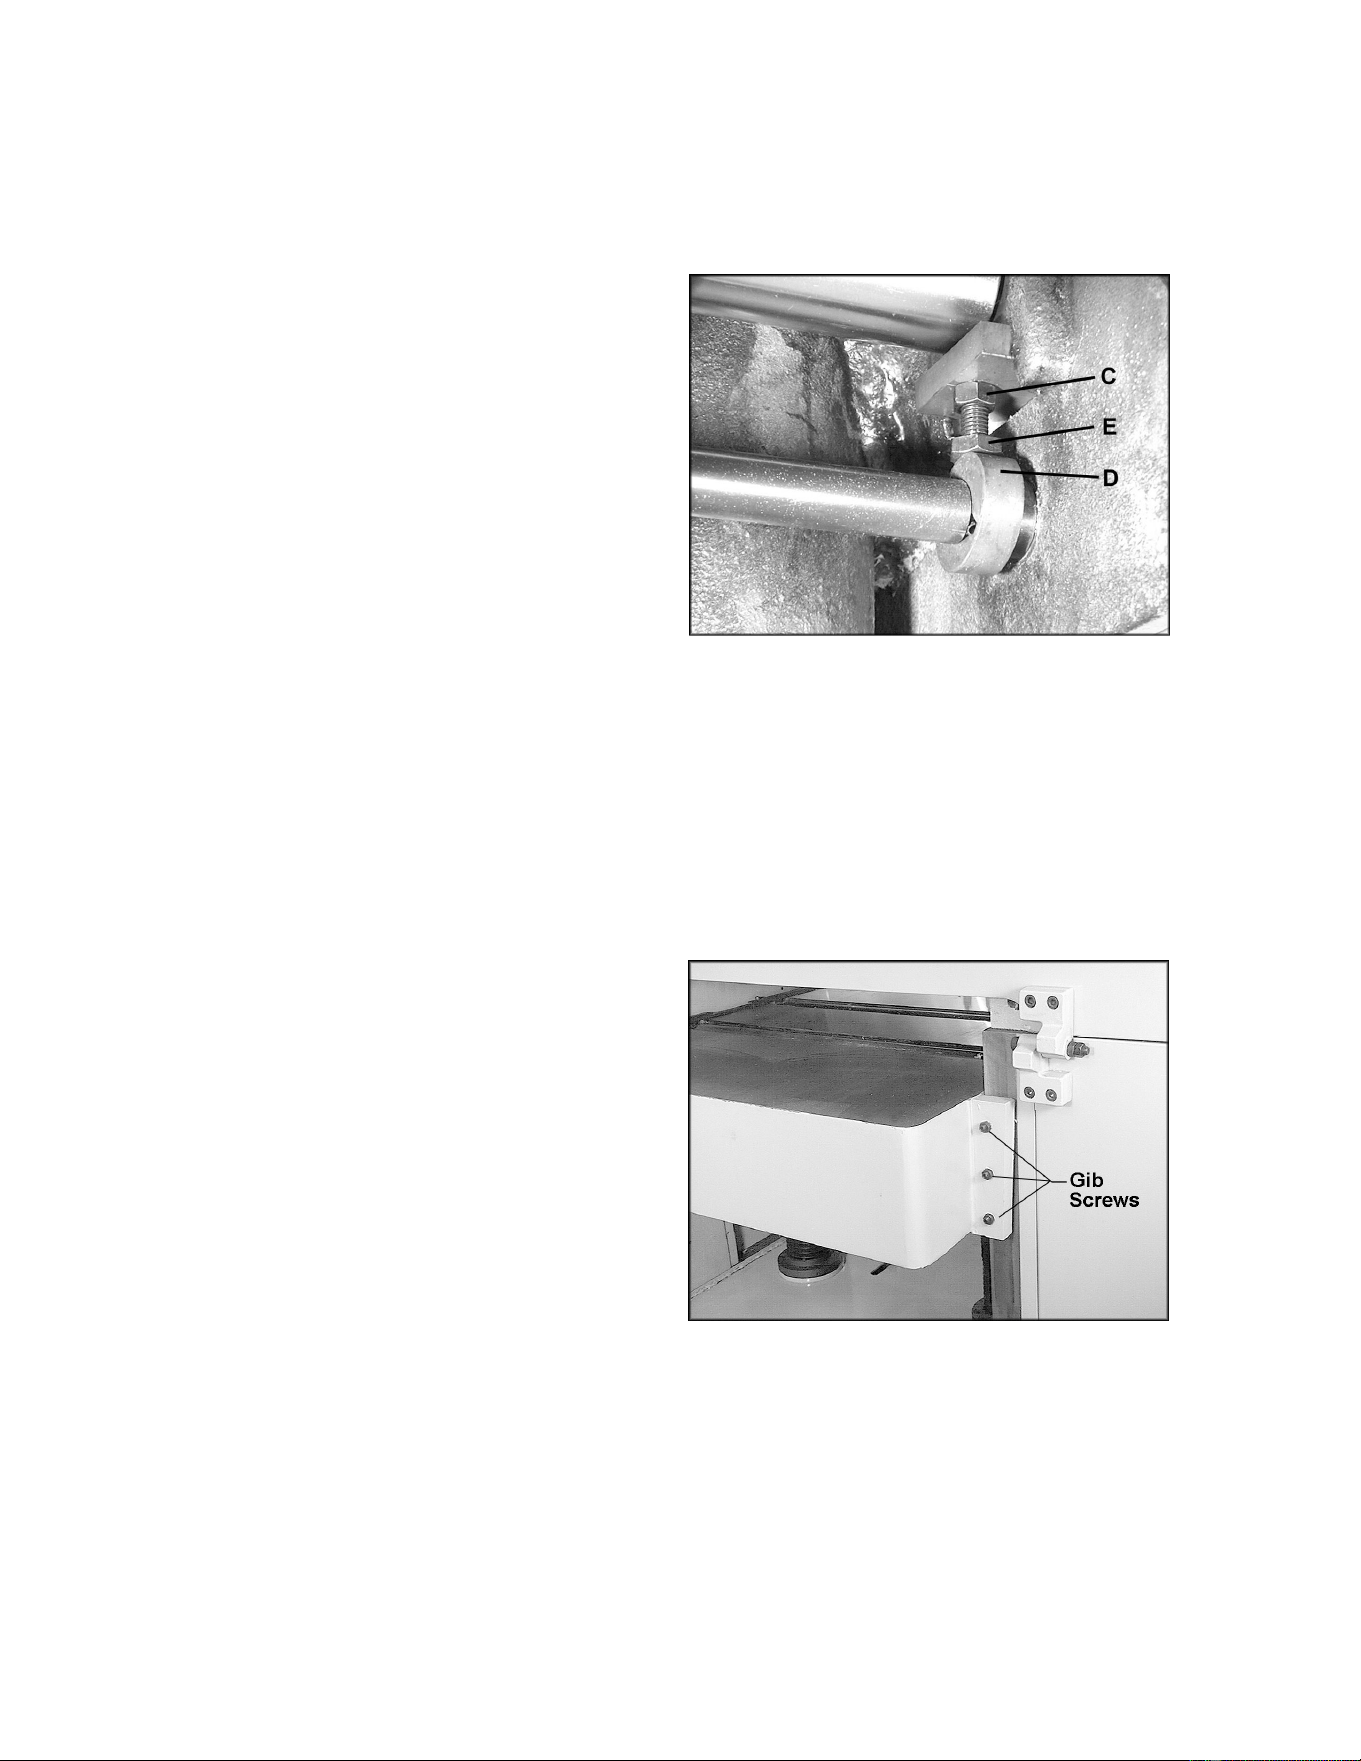
and loosen the hex nut (C, Figure 13) which
is above the cam (D, Figure 13) near the
end of the roller that needs adjusting. Rotate
the hex cap screw (E, Figure 13) until the
gauge reads zero.
6. Repeat the process for the left side of the
table roller, and then recheck the right side.
It is important that both ends of the table
rollers be the same height to help prevent
skewing of the board as it feeds through the
machine.
7. Re-tighten the hex nuts (C, Figure 13) on
both ends of the table roller.
8. Repeat the procedure for the second table
roller.
Table Adjustments
The planer table is raised and lowered by twin
screws supported on bearings, and is guided by
machined surfaces on the side panels. The fit-
up to prevent the table from rocking is controlled
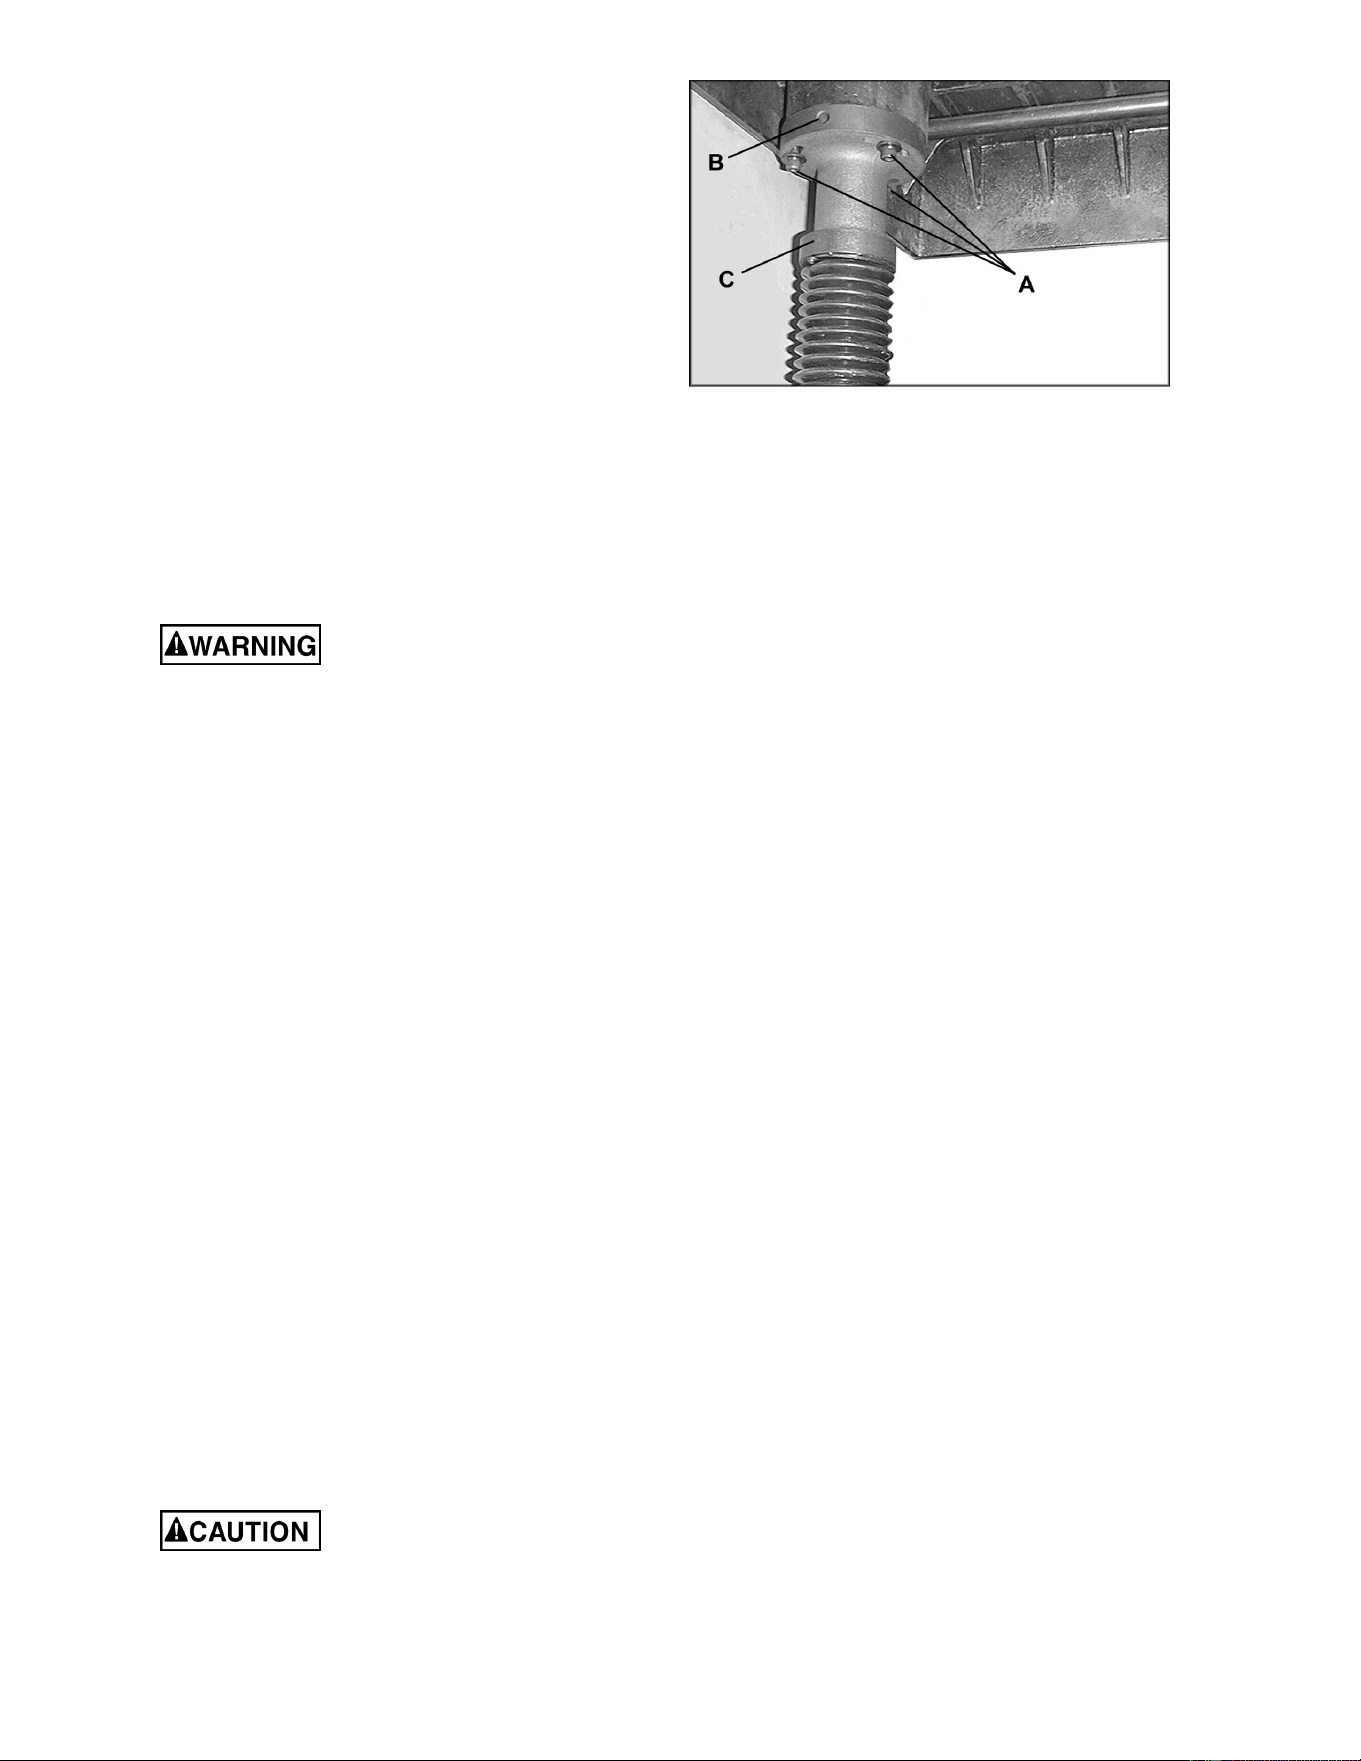
by gibs. See Figure 14. These gibs should be
adjusted individually using the three gib screws
provided so that the ways are lightly contacting
on all four surfaces. The gibs should be tight
enough to prevent rocking or movement of the
table when the planer is in operation.
To perform accurate planing the table must be
parallel with the cutterhead. Lack of parallelism
results in a taper over the width of the board. To
check parallelism do the following:
1. Place a gauge on the table and contacting a
knife insert at the apex of its arc, Do this at
each end of the cutterhead and compare the
measurements.
2. If the table is not parallel to the cutterhead,
place the gauge at the end that needs to be
raised.
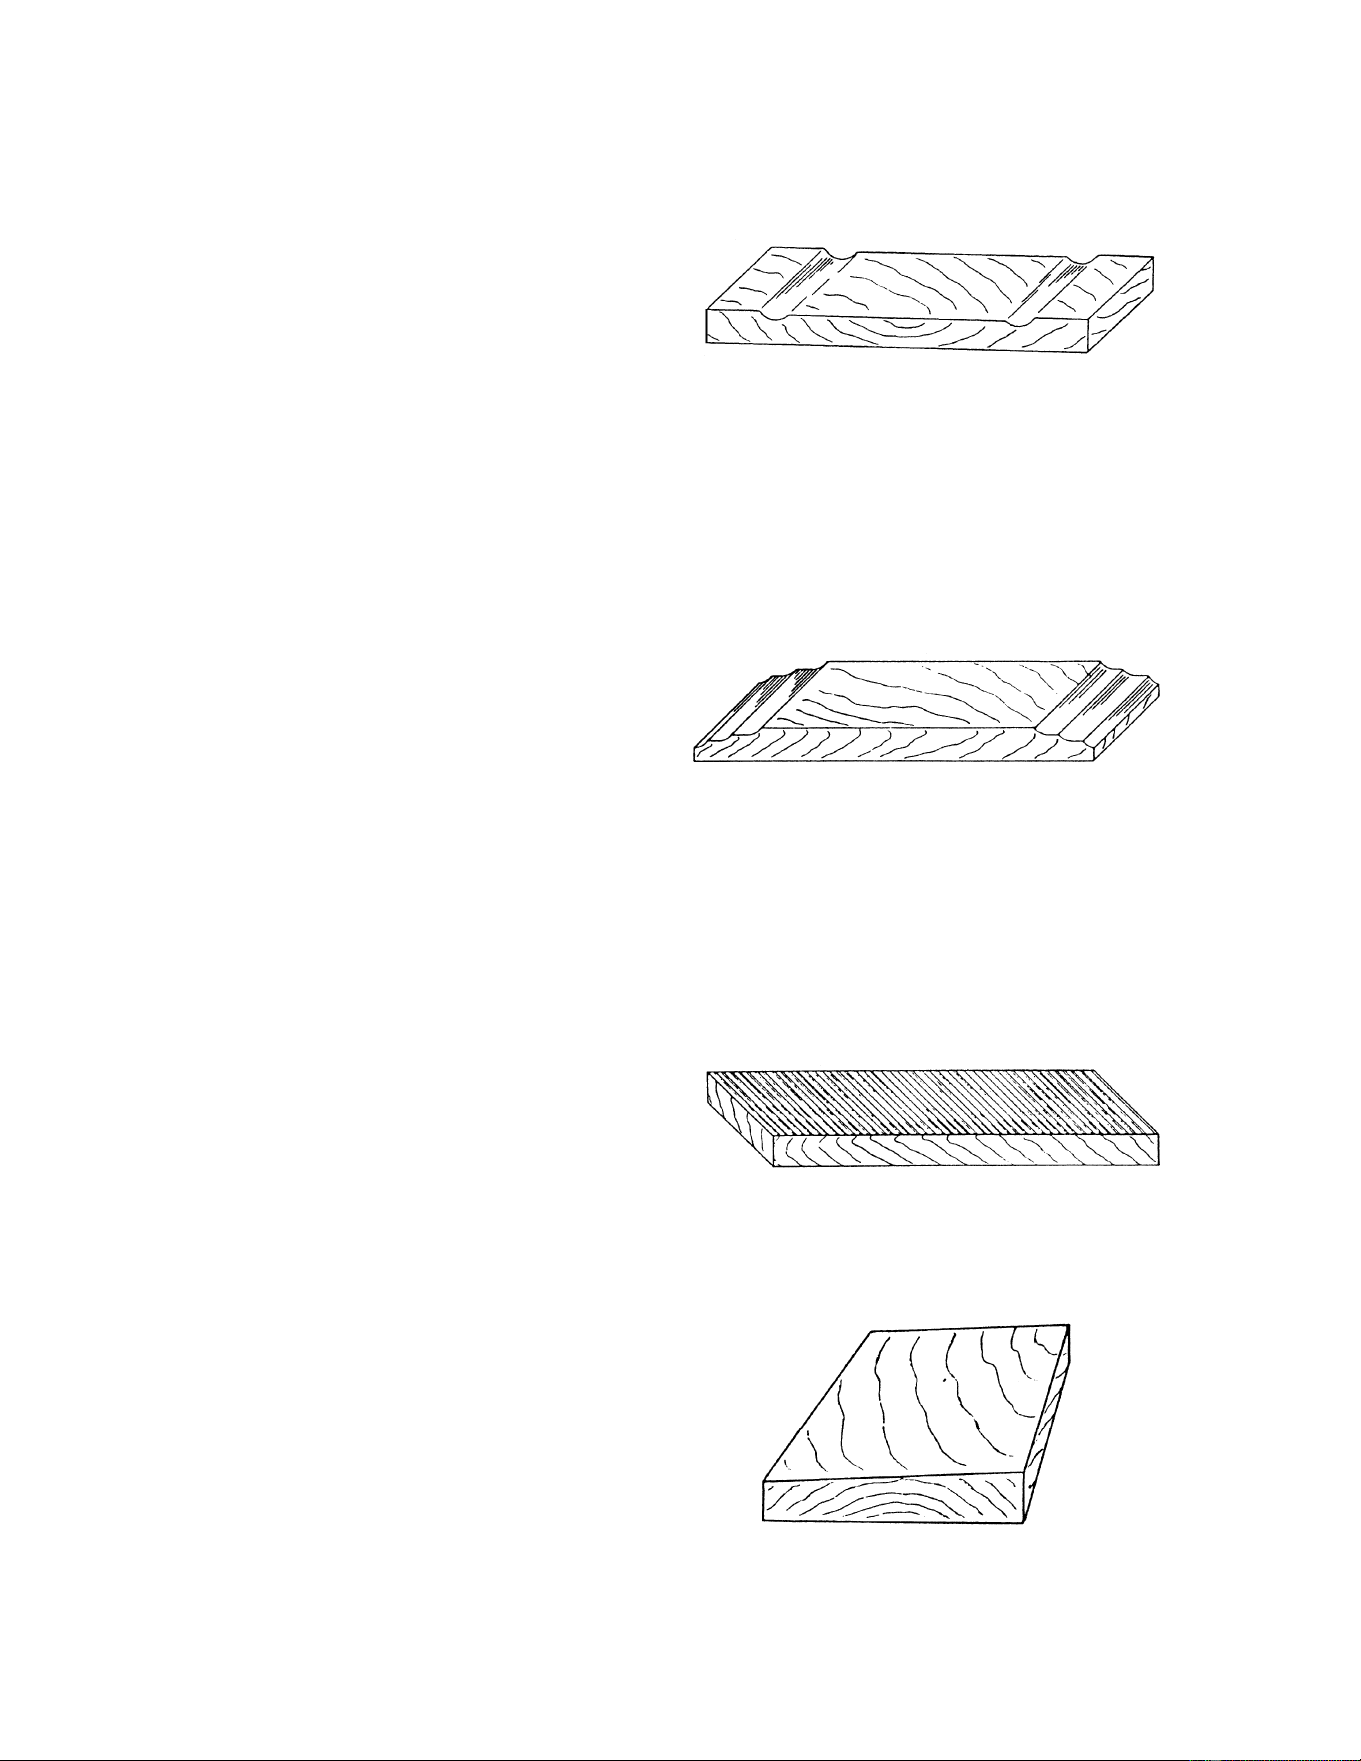
3. Loosen the three socket head cap screws
Figure 13
Figure 14
17
(A, Figure 15) beneath the table.
4. Place a rod-like object (such as a hex
wrench) into one of the open holes (B,
Figure 15) and turn the shaft (C, Figure 15)
to raise the table until the gauge reads the
proper measurement. Or, the same effect
can be achieved by lowering the other side
of the table.
5. Re-tighten the socket head cap screws (A,
Figure 15).
Test Cutting and
Troubleshooting
Using a piece of semi-finished stock, set up for a
1/16” (1.59mm) deep cut with the quick-set table
roller setting at zero. Start the machine and,
standing to one side of the table, begin feeding
the stock into the machine.
Never stand directly behind
stock or allow anyone else to do so, and do
not bend down to see how stock is feeding.
Should a kickback occur, serious or fatal
injury could result.
The infeed roller should take the material and
force it under the chipbreaker and cutterhead. If
the material feeds through effortlessly, examine
the finished cut carefully for imperfections.
Learning to read a board for imperfections will
save hours in adjusting a planer to operate
properly.
Following are some problems that may arise
and their probable remedies. The illustrations
are exaggerated for clarity. (Pages 36-38 also
contain Troubleshooting remedies).
Feed Restriction
This is caused either by the table rollers being
set too low for roughing operations or from a low
pressure bar. About 90 percent of the time, the
pressure bar is too low. As the sharp edge of the
knife inserts wear, you must compensate for this
wear by slightly raising the pressure bar an
equal amount on each side. Your first indication
of knife wear is hesitation in feed of the material
through the machine after it leaves the
corrugated infeed roller on its way out of the
machine. Disconnect machine from power
and adjust the pressure bar accordingly. The
material will free up and feed through smoothly
when the planer is restarted.
Never attempt pressure bar
adjustment while the machine is connected
to power.
Figure 15
18
Feed restriction can also occur due to pitch
buildup on the table. Be sure the table surface is
clean. Dusting the surface with talc occasionally
will aid in smoother feeding and help prevent
pitch buildup.
Clip Marks
If clip marks occur 6” (152mm) in from each end
of the board, the pressure bar is too high. See
Figure 16. Turn both right and left hand
adjusting screws (see Figure 11) the same
amount, 1/4 turn clockwise or less, and take
another 1/16” (1.59mm) deep cut. Re-examine
the board.
Continue the operate-adjust procedure until the
clip marks disappear. Should the board fail to
feed through, back off slightly on both adjusting
screws until feeding is smooth and the
imperfections do not re-appear. Lock the
pressure bar adjusting screws with the jam nuts
provided.
Snipe
Some amount of snipe may be inevitable with
many planer operations, but proper planer
adjustments can so minimize snipe as to make it
negligible.
If noticeable snipes appear on each end of the
material, as shown in Figure 17, a table roller is
too high causing a slight lift of the material as it
passes through the machine. Normally these
snipes are more noticeable on the trailing end of
the board than on the lead end, and most often
occur during planing of rough lumber.
Table rollers must be elevated for running rough
or resaw lumber through the machine. When
material is turned over to surface the other side,
and you neglect to lower the table rollers for a
finish cut, then definite snipes will appear on the
ends of the material.
Chatter
Chatter marks usually appear on thin material.
See Figure 18. Even at their lowest point, the
table rollers are too high to handle thin material.
Solve the problem by either using a slave board
or making an auxiliary table out of Formica
countertop material with cleating at each end of
the table to keep it stationary over the planer
table.
Tapers
If the machine planes a taper across the full
width of the board, as shown in Figure 19, the
table is not parallel with the cutterhead. First
check that all knife inserts are properly installed.
If they are, then the table itself must be
adjusted. See “Table Adjustments” on page 16.
Figure 16
(clip marks)
Figure 17
(snipe)
Figure 18
(chatter)
Figure 19
(taper)
19
Twisting
If material twists while feeding through the
planer, either the table rollers, pressure bar, or
outfeed roller may be out of level. Refer to
adjustment settings on pages 14 and 15.
Halted Feeding
If the infeed roller takes the stock, the
chipbreaker lifts, and just as you hear the knives
contact the material, the workpiece stops
feeding; then the pressure bar is too low. Re-set
the pressure bar (see page 15).
Operation
NOTE: For detailed explanation of the
Controller, refer to the section beginning on
page 20.
The emergency stop button shuts down all
operations on the planer. To re-start the planer,
twist the knurled ring on the stop button until it
pops back out.
Maintenance
Disconnect planer from
electrical supply before performing
maintenance.
Periodic inspections are required to ensure that
the machine is in proper adjustment, that all
screws are tight, that belts are in good condition,
that dust has not accumulated in the electrical
enclosures, and that there are no loose or worn
electrical connections.
Buildup of sawdust and other debris can cause
your machine to plane inaccurately. Periodic
cleaning is not only recommended but
mandatory for accurate planing.
Close fitting parts, such as the link plates below
the table and the platforms on the cutterhead
which seat the knife inserts, should be cleaned
with a rag or brush and non-flammable solvent
and freed from clinging foreign matter.
Use caution when working
with or around the cutterhead.
Remove resin and other accumulations from
feed rollers and table with a non-flammable
solvent.
Figure 20
Lubrication
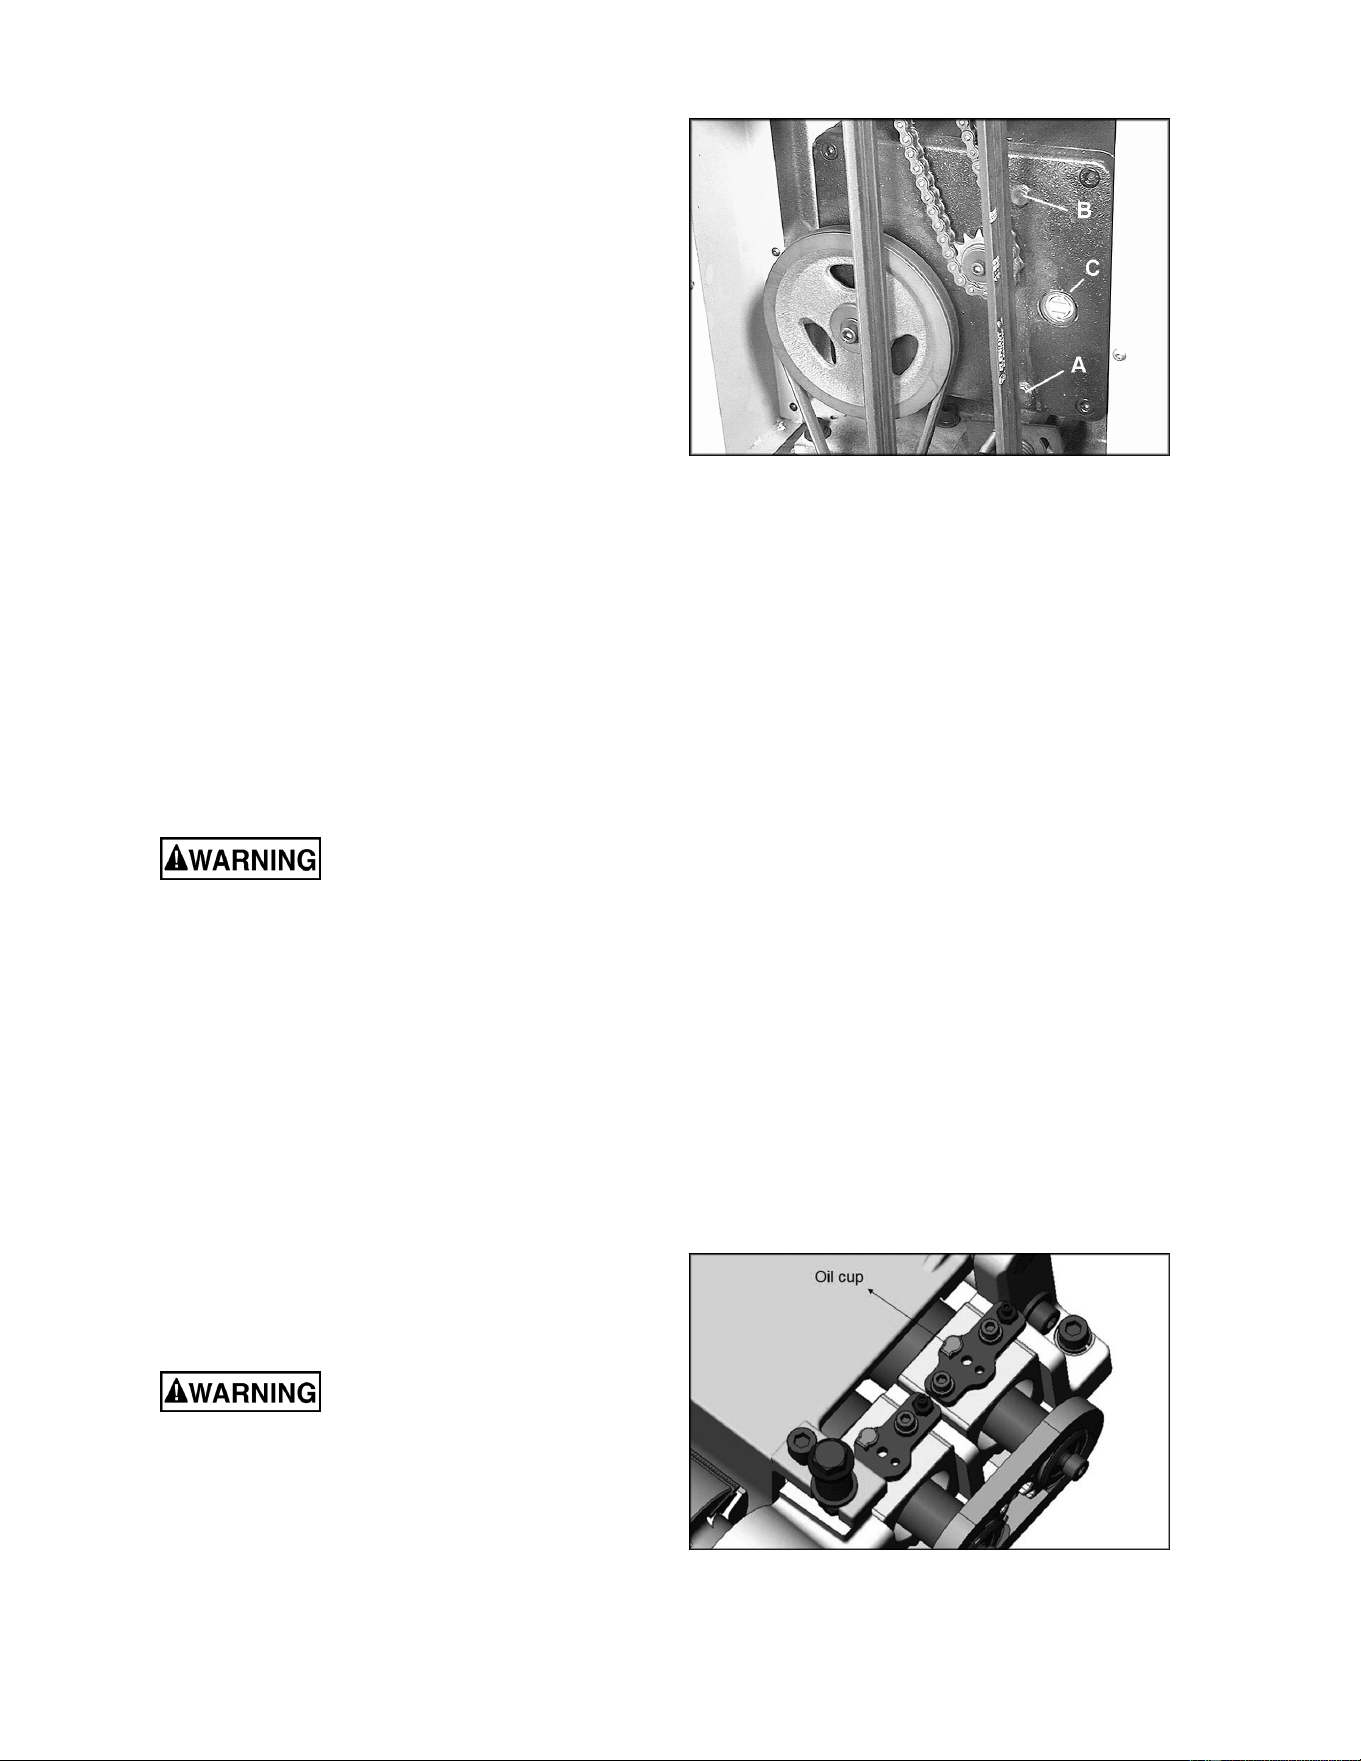
The oil in the main gear box should be changed
at least once a year. Remove the drain plug (A,
Figure 20) to drain the oil into an appropriate
container. Replace the drain plug and fill the
gear box with 3.042 liters (0.8 gallon) of 60 to 90
weight gear oil through the fill hole (B). The sight
glass (C) should be checked periodically and oil
topped off as necessary. Always re-install the
screw in the fill hole when finished.
The recommended lubrication for roller chains
used in medium to slow speed operation is to
simply wipe the chain clean. When there is an
appreciable buildup of dust, dirt or wood
shavings, use an oil cloth but never pour the oil
directly on the chain. Over-oiling defeats the
purpose of the lubrication, since it tends to invite
the collection of dust, shavings, etc. and works
into members of the chain. This hastens wear
and leads to premature replacement.
The bearings on the cutterhead are factory
lubricated and sealed. They require no further
attention.
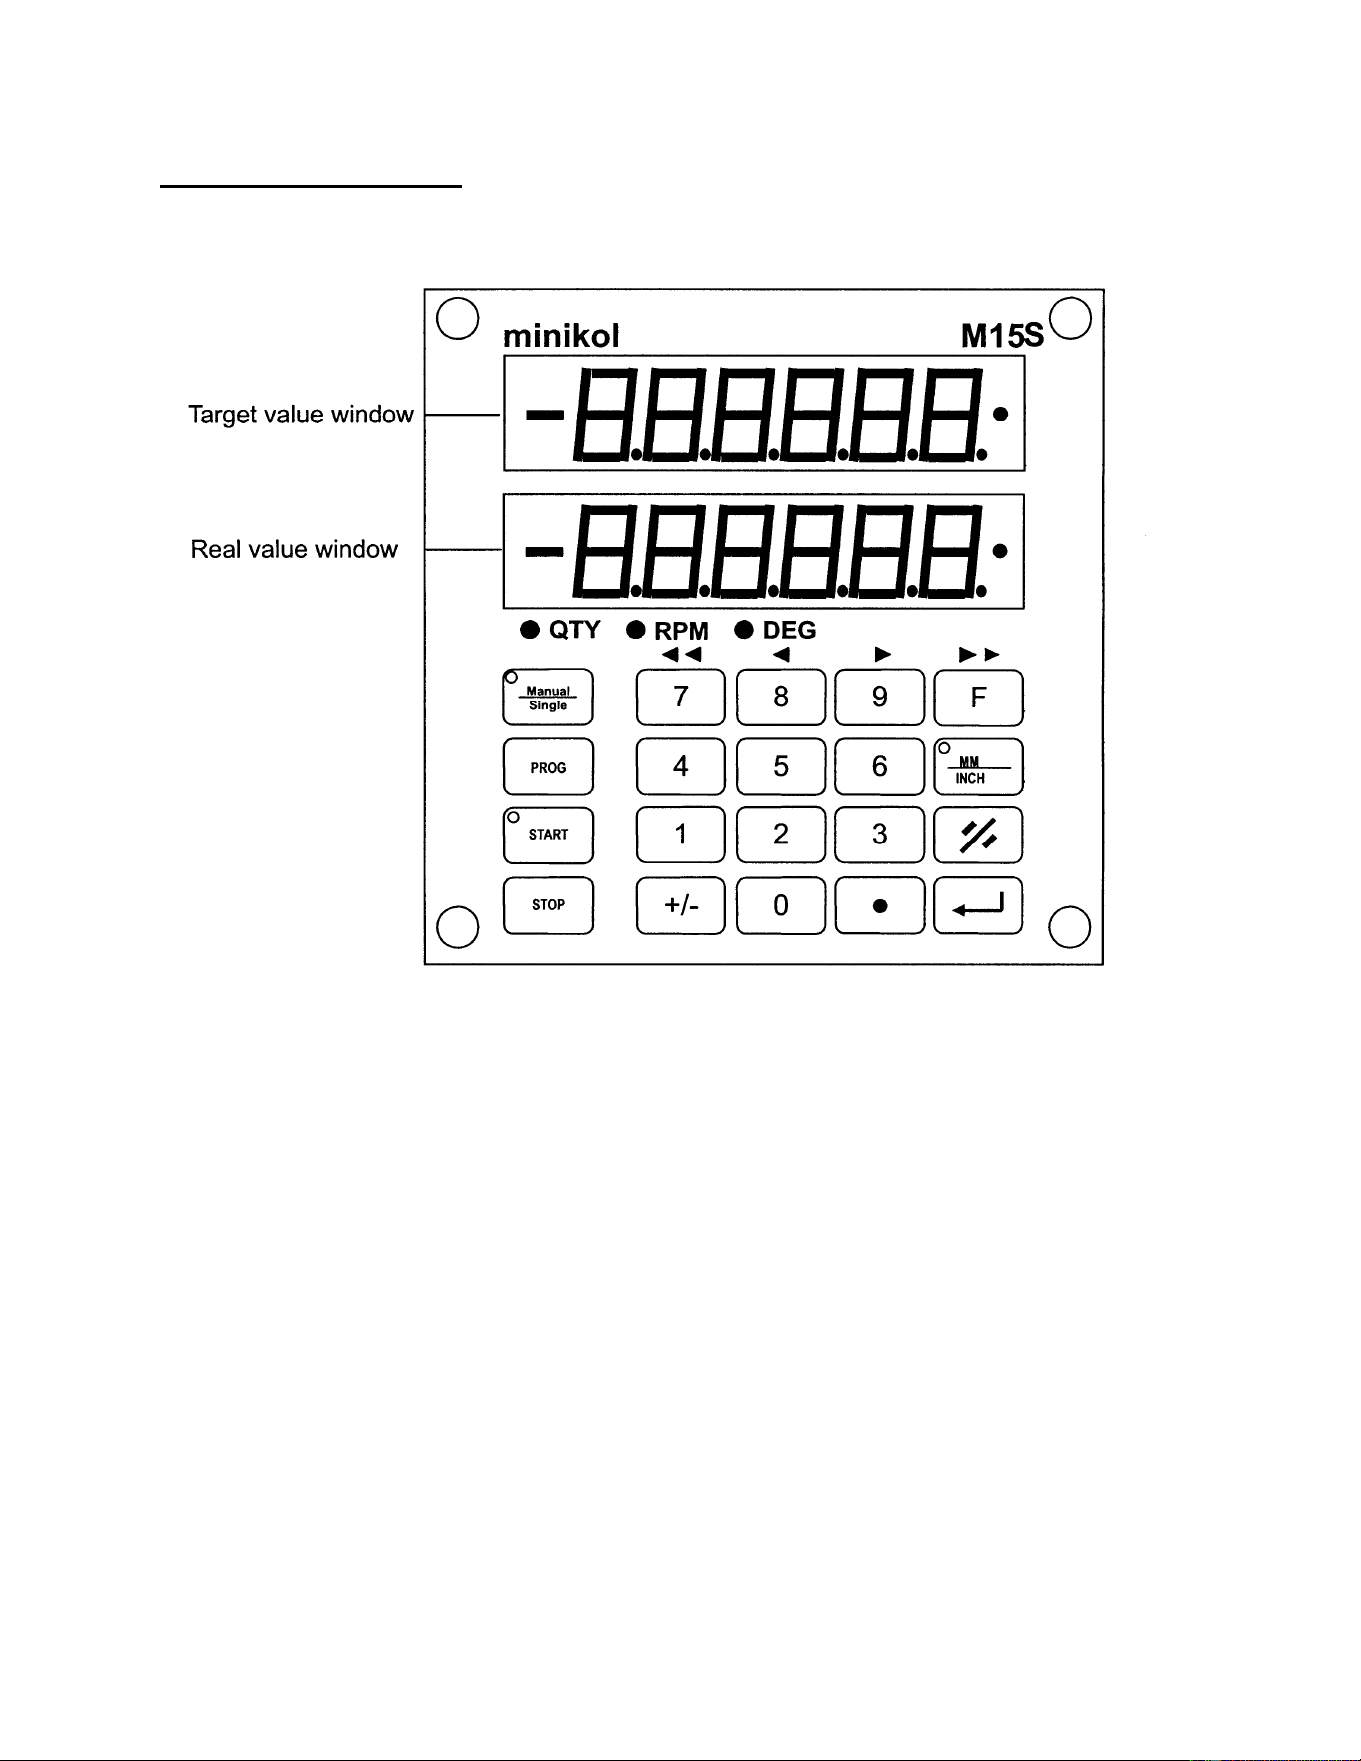
Periodically oil the bearings on the infeed and
outfeed rollers, through the oil cups located on
the bearing blocks (Figure 21).
Figure 21
20
Controller (M15S) Operating Instructions
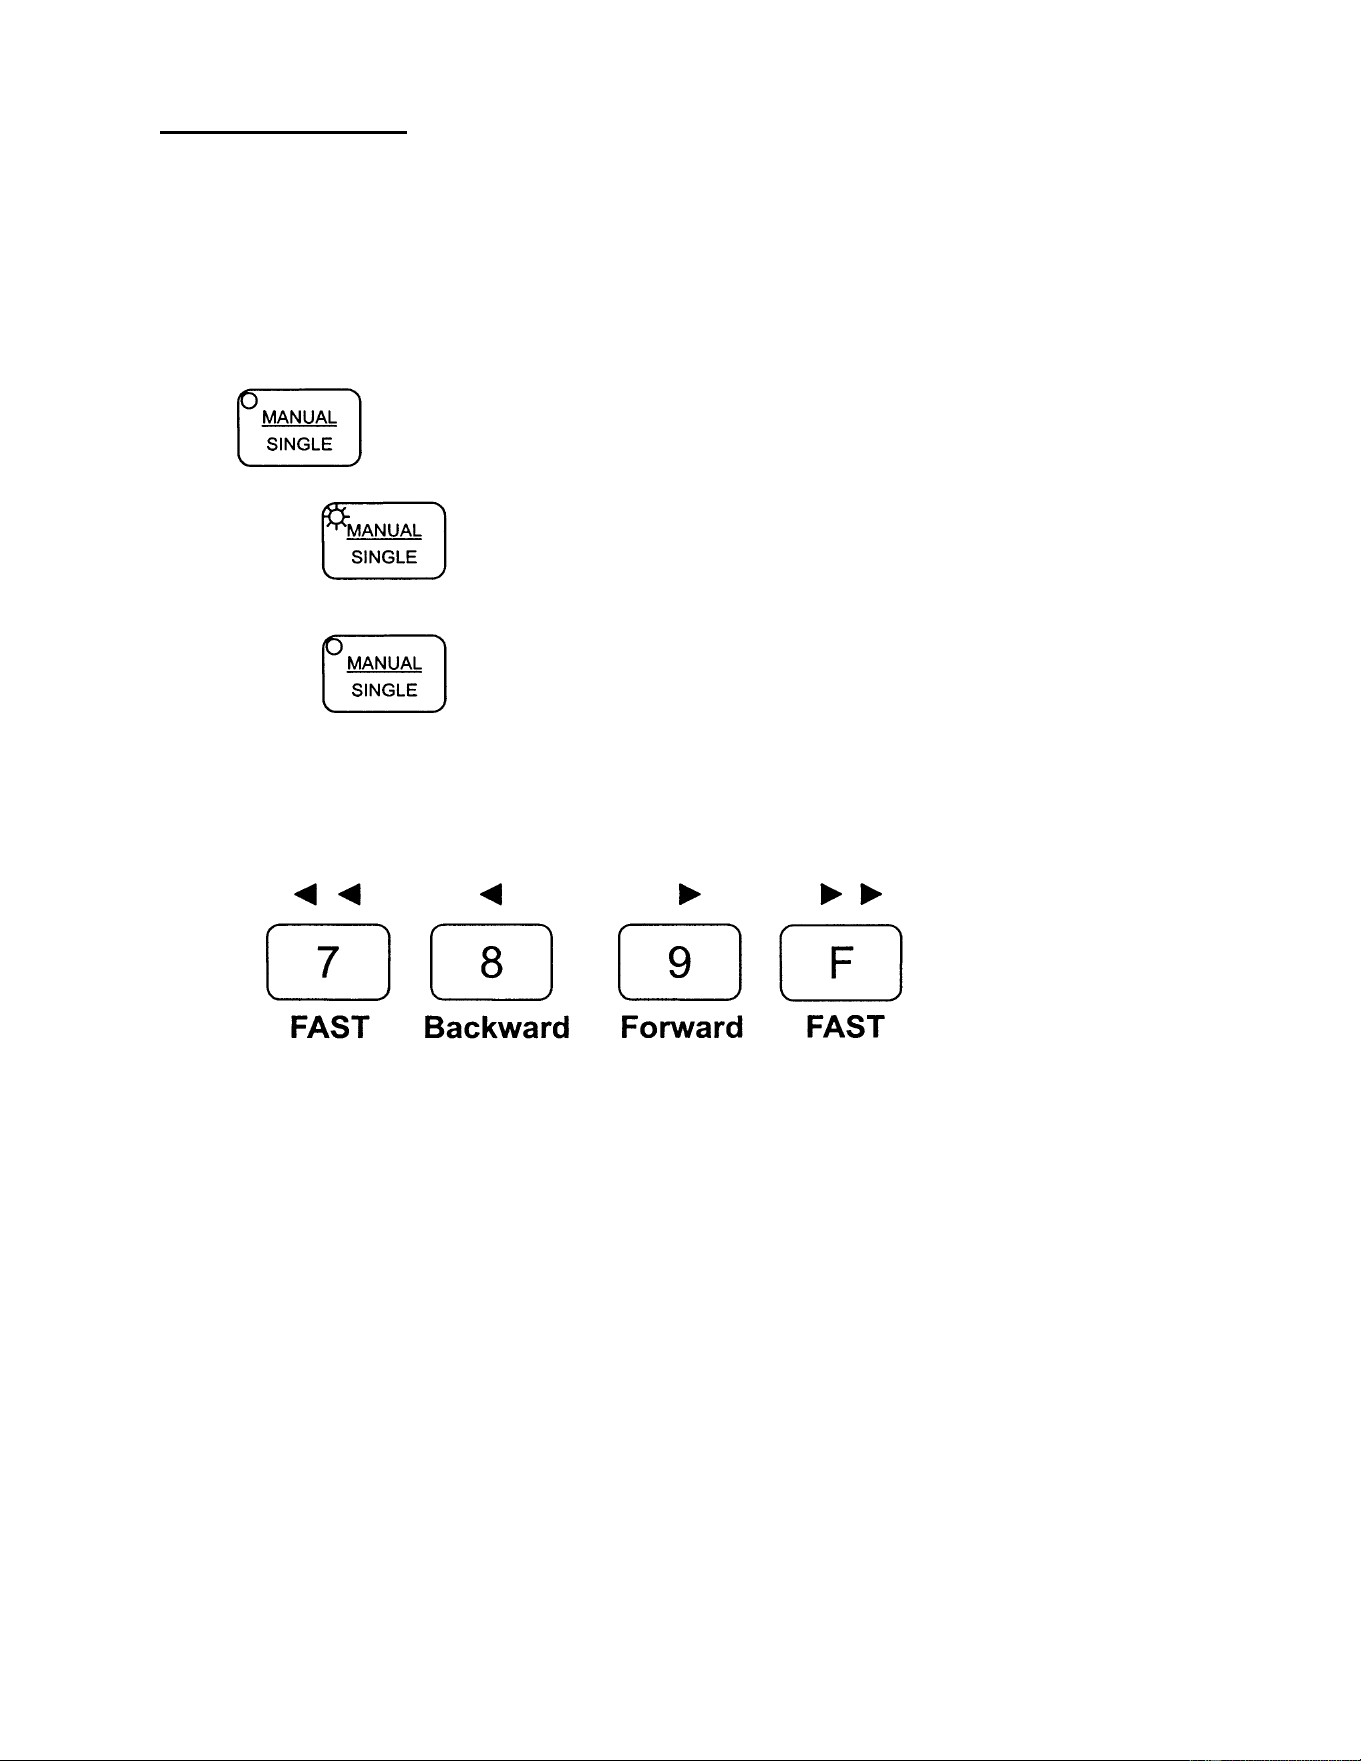
1. Front Panel Overview
21
2. Operation Modes
There are two base operating modes – MANUAL and SINGLE.
In MANUAL mode, the operator can raise or lower the table using the Controller
keypad.
In SINGLE mode, the table will move to the pre-set value when you push the “Table Up”
or “Table Down” buttons on the planer’s control panel.
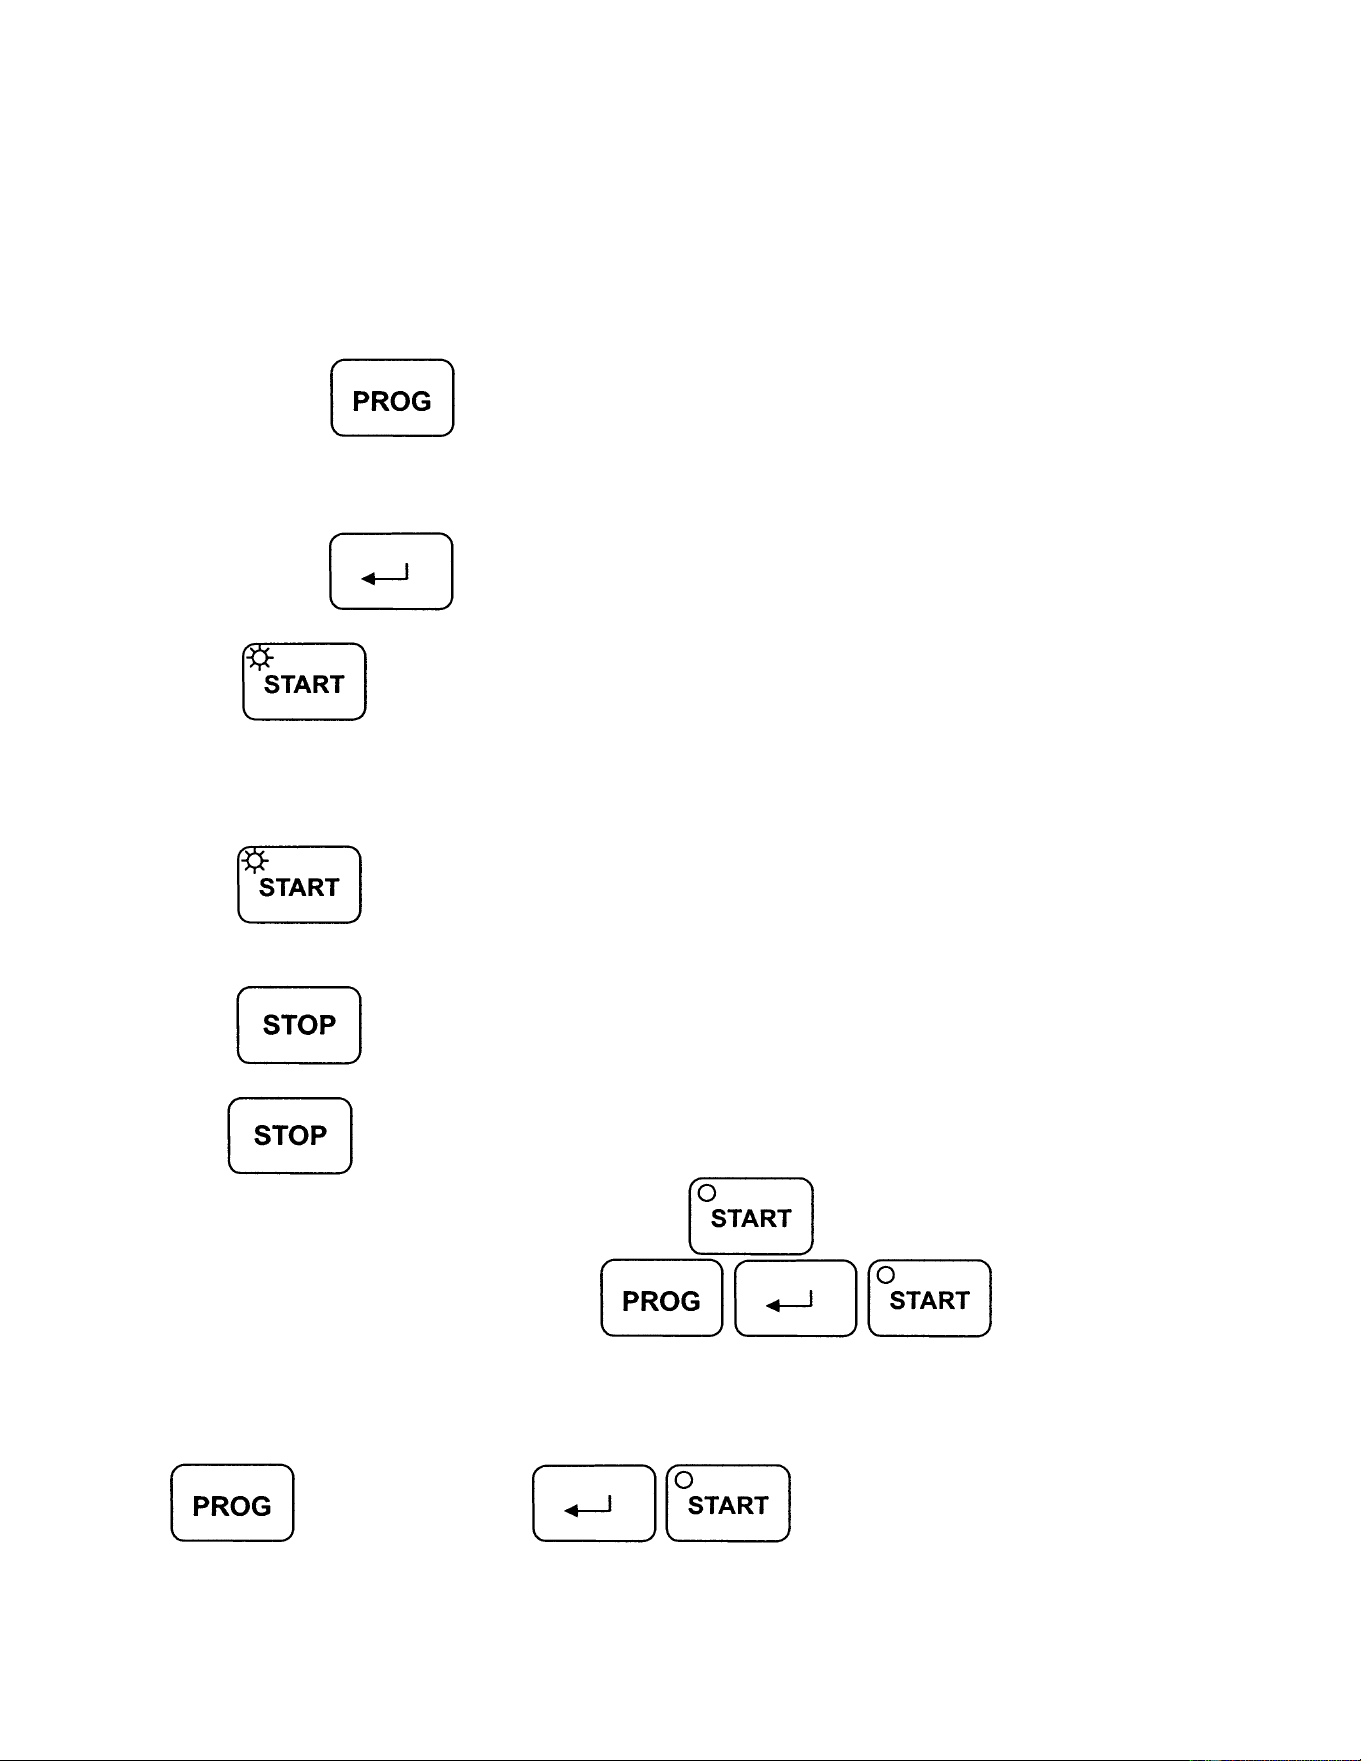
Press
to select Manual mode or Single mode:
When
LED lamp is on – Manual mode.
When
LED lamp is off – Single mode.
MANUAL MODE
Keyboard Function:
For planer table operations, the fast forward and fast backward keys have the same
function as the forward and backward keys.
When the forward key is pressed, the planer table moves down. (This is also achieved
using the “Table Down” push button on the planer).
When the backward key is pressed, the planer table moves up. (This is also achieved
using the “Table Up” push button on the planer).
In Manual Mode, the planer table moves as long as a key is pressed and held. When
the key is released, the table stops.
This mode can be used for manual positioning, or adjusting procedures.
22
SINGLE MODE
In single mode, the device performs automatic positioning of the table to the
programmed target position. The “Table Up” or “Table Down” button on the planer
should be pushed and held; when the table has fully adjusted to the target position, the
table will automatically stop in position. Release the push button.
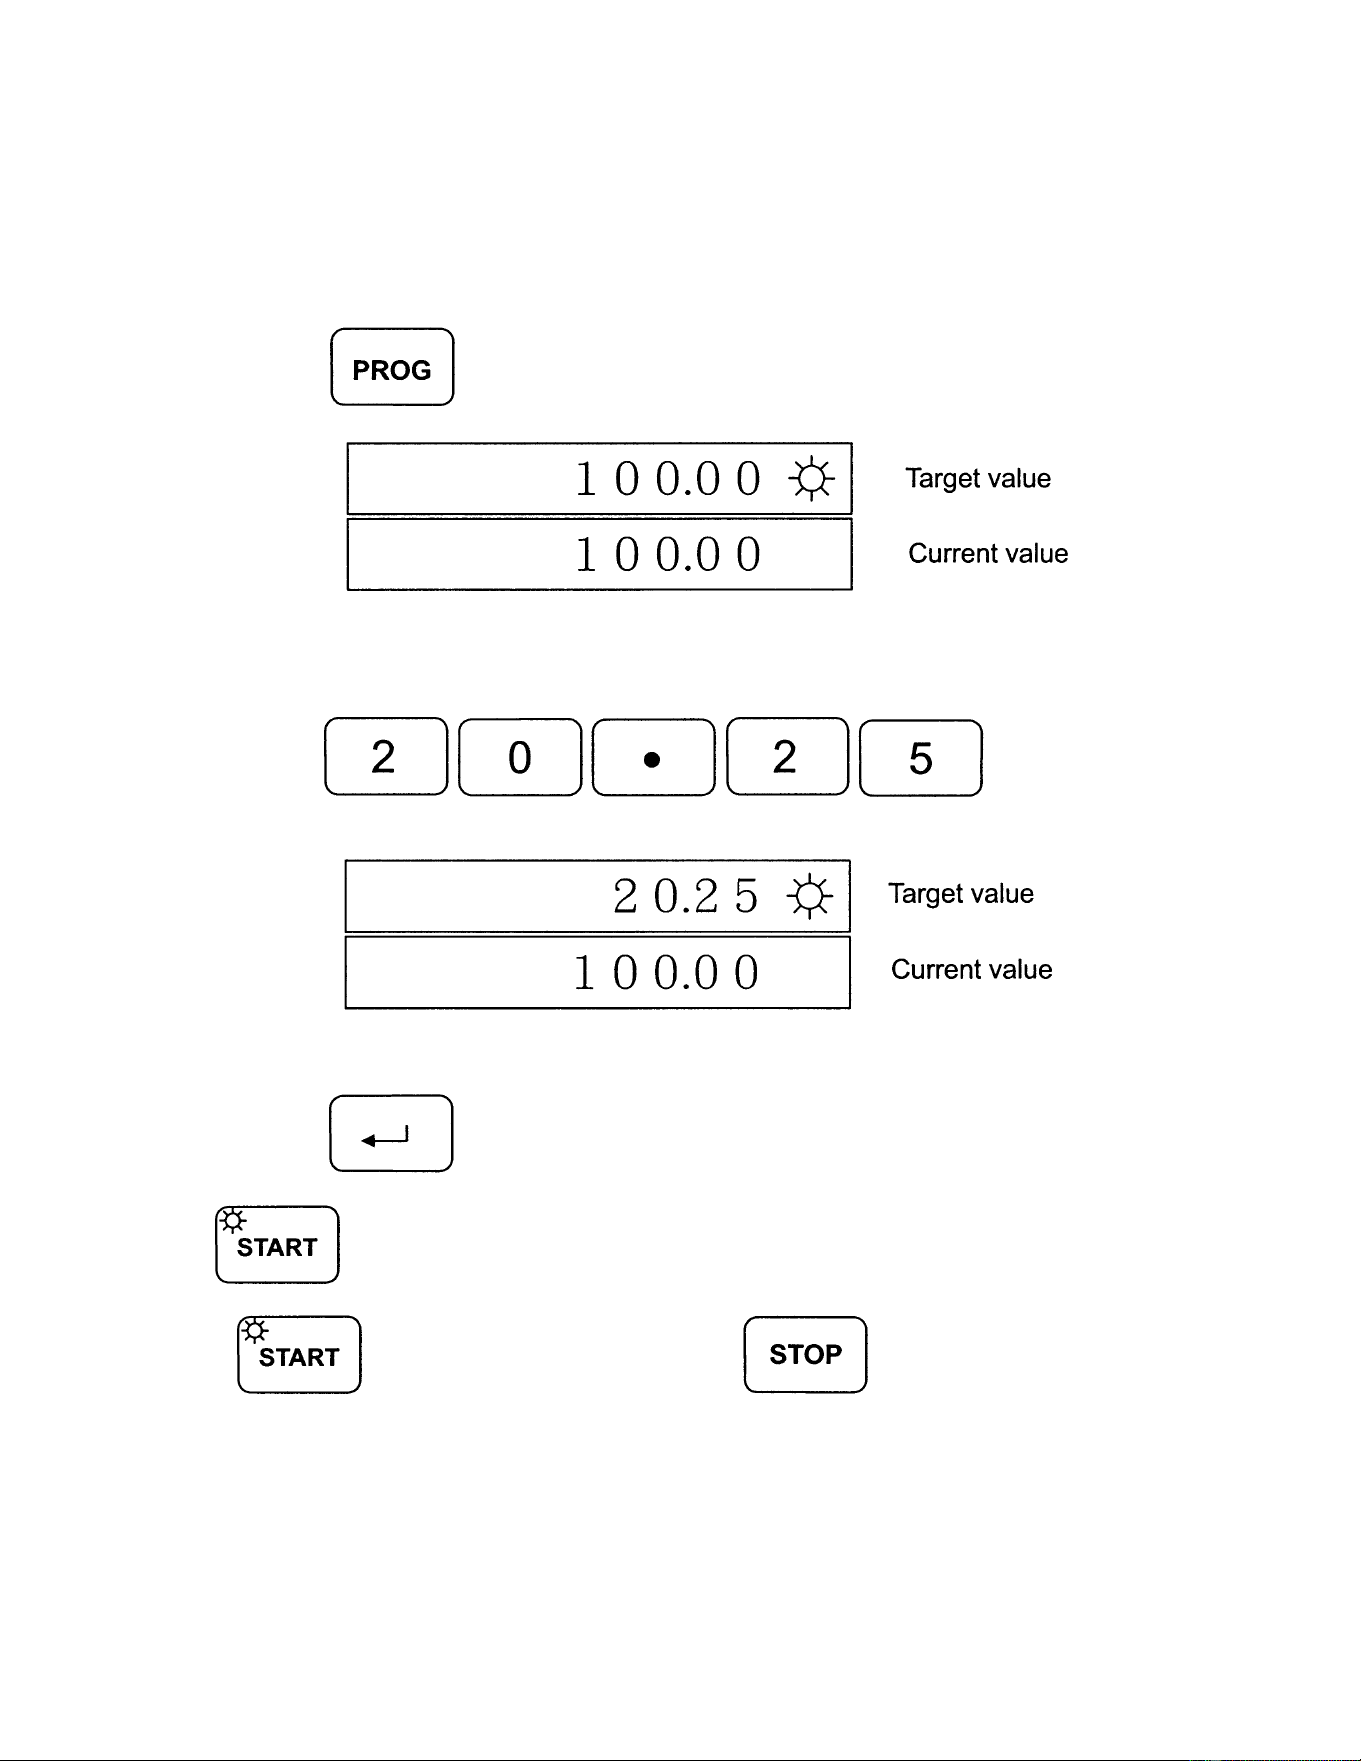
Setting Target Value
Step 1: Press
(Target window LED starts blinking)
Step 2: Enter the target value using numerical keypad.
Step 3: Press
to complete.
LED lamp starts blinking – the device is ready to start the positioning.
Start/Stop/Cancel
Press
to start the positioning. The LED lamp now stops blinking and remains
on during the procedure.
Press
to cancel the positioning. The LED lamp is turned off.
If the
key is pressed while the positioning is running, the procedure is
interrupted, the machine is stopped, and the
LED is turned off. To repeat the
positioning of the same target, press
.
To program another target value, press
- enter new value -
.
23
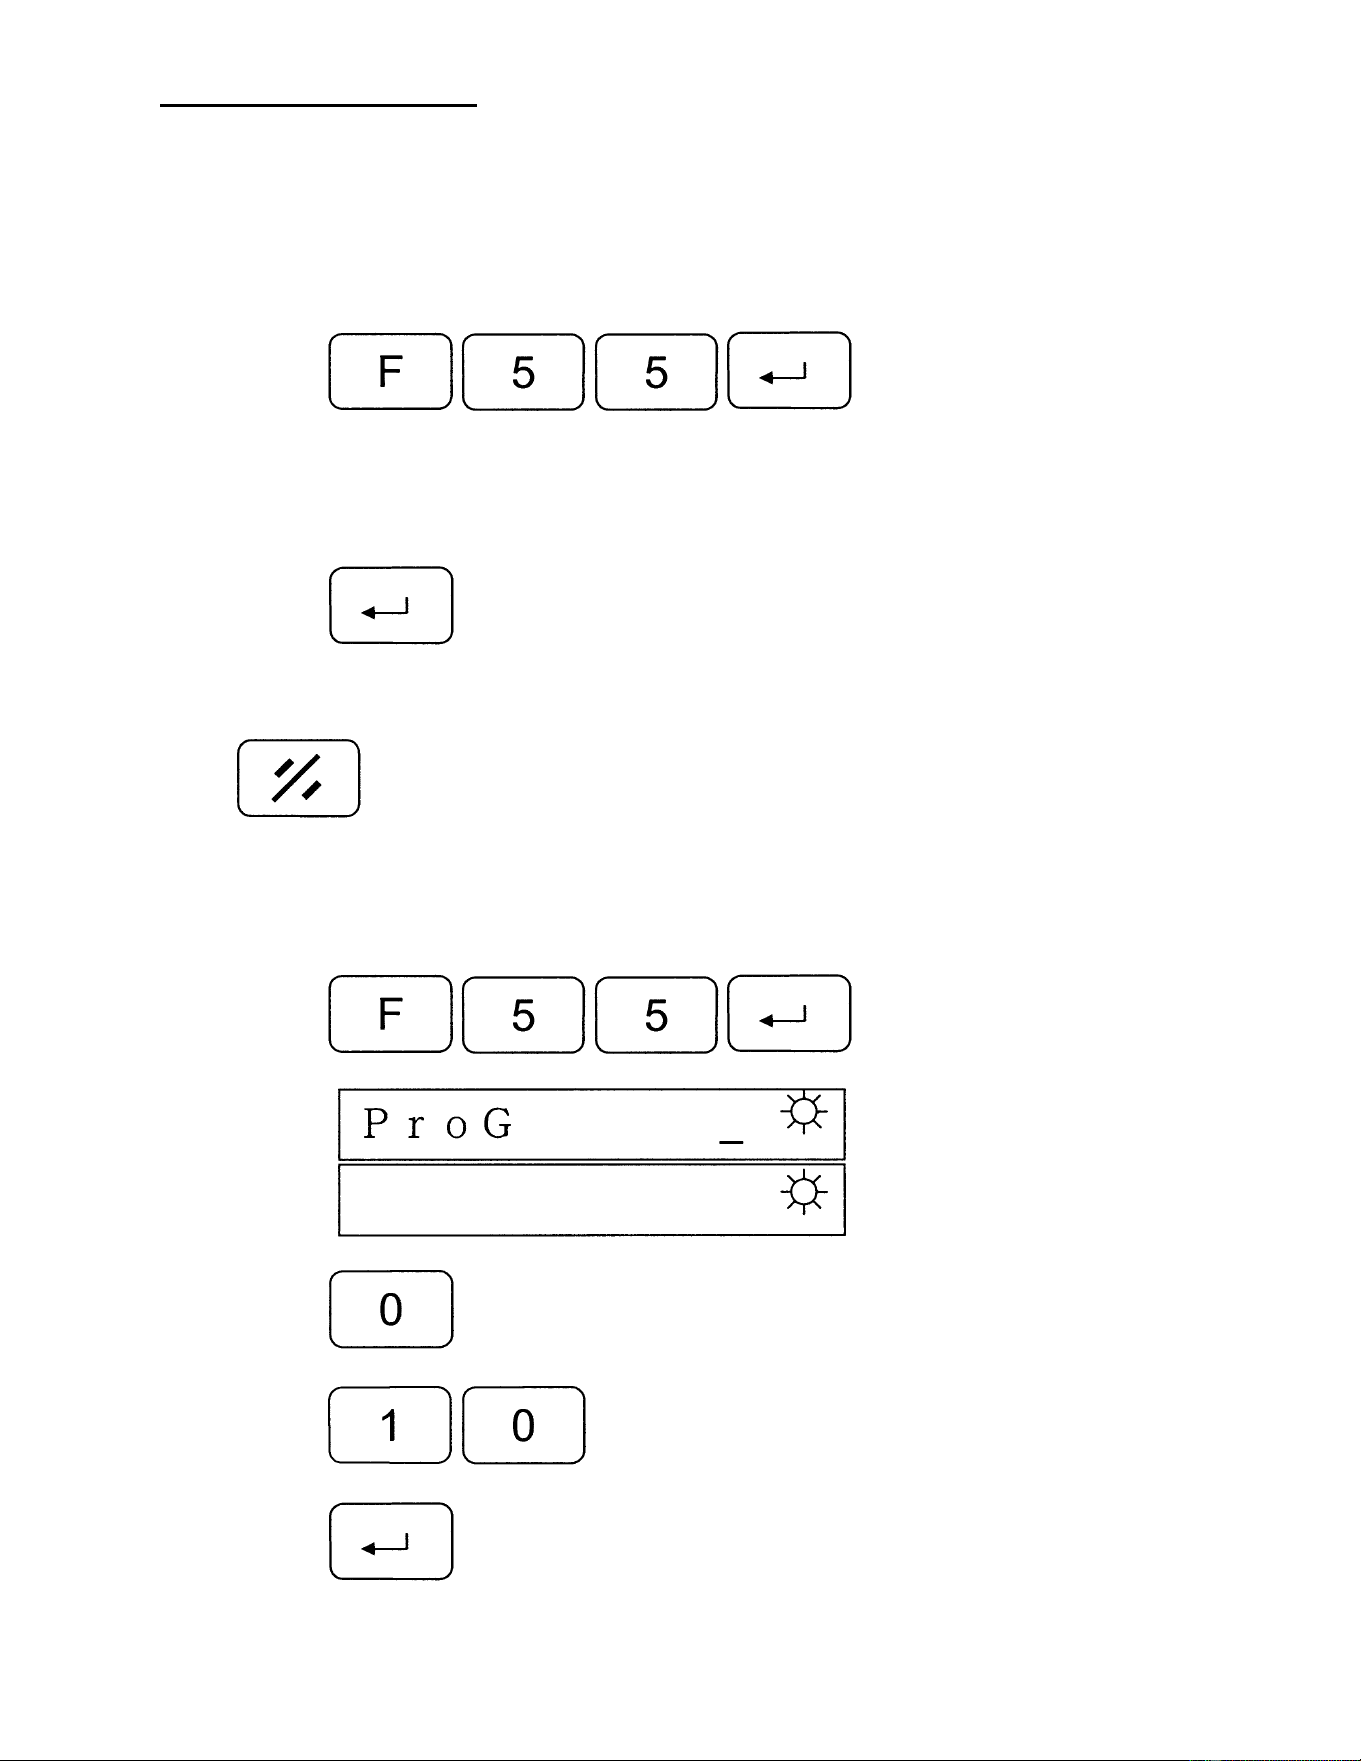
Example:
Assume:
target value on display = 100.00mm
real value on display = 100.00mm
To change the target value to 20.25mm,
Step 1: Press
, the LED lamp on Target window is blinking.
Display
Step 2: Enter new target value (example: 20.25mm)
Press
Display
Step 3: Press
to complete.
The
LED lamp is blinking – ready for positioning.
Press
to start the positioning or press
to cancel.
24
3. Fast Program (10 sets)
To facilitate frequently used positions, such as different board thicknesses, the keys 0 to
9 have associated preset target values. By pressing one of these keys, its target value
is loaded automatically, and the positioning can be started immediately.
Entering preset target values:
Step 1: Press
Step 2: Select a key 0 to 9 (total of 10 values).
Step 3: Enter the target value.
Step 4: Press
to confirm.
Follow the same procedure for entering the other preset target values.
Press
to exit.
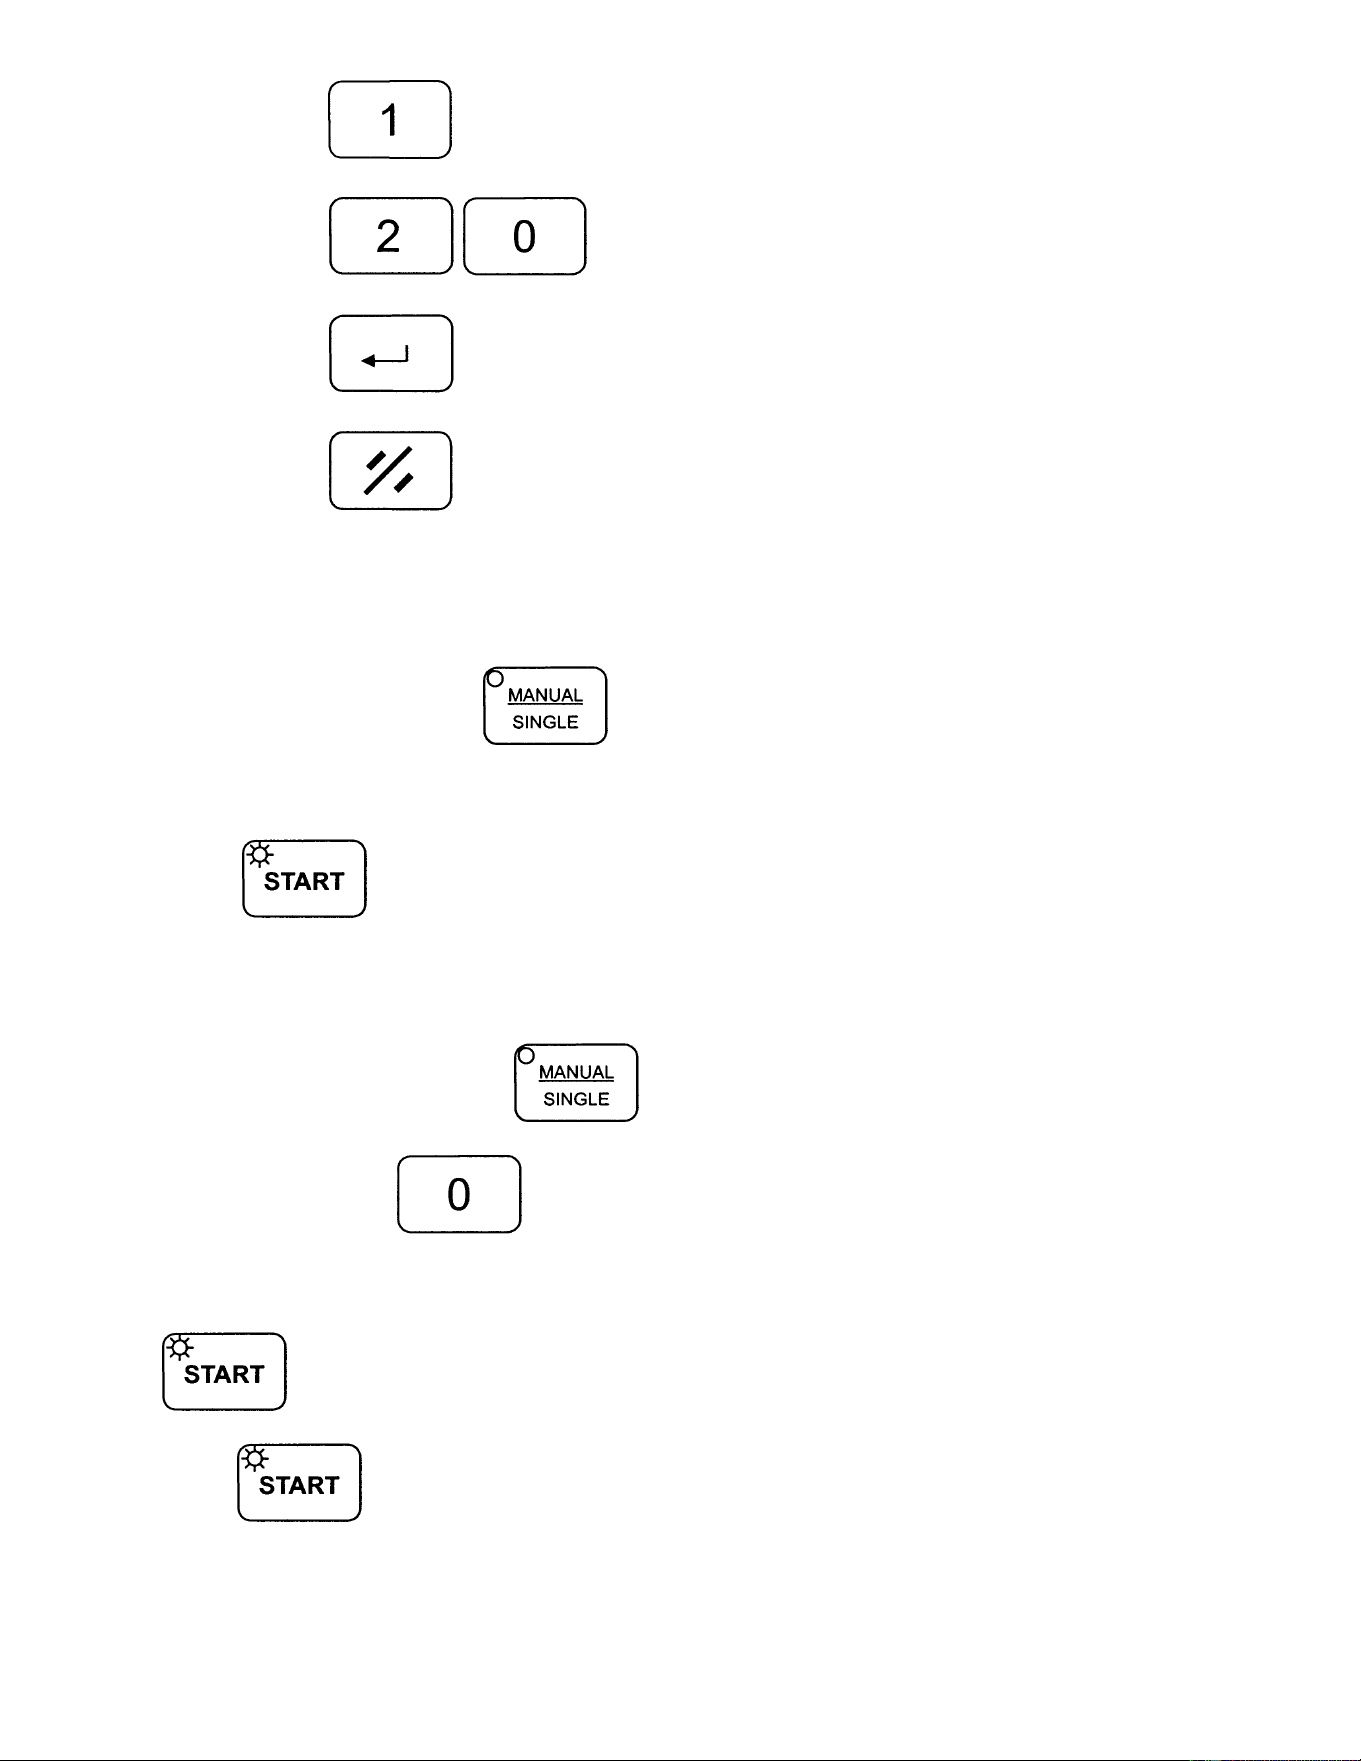
Example: Program 0 = 10.00mm; Program 1 = 20.00mm
Step 1: Press
Display
Step 2: Press
............................................. .[select program key 0]
Step 3: Press
............................................[enter value]
Step 4: Press
.................................................................[complete]
25
Step 5: Press ...............................................[select program key 1]
Step 6: Press
............................................[enter value]
Step 7: Press
..................................................................[complete]
Step 8: Press
to exit.
Execute:
Step 1: Enter single mode,
LED lamp is off.
Step 2: Press a key 0 to 9.
LED lamp is blinking, ready for start.
Example: Program 0 = 10.00mm; Program 1 = 20.00mm.
Step 1: In Single Mode,
LED lamp is off.
Step 2: Press
...................................................[Program 0]
Now you will see the preset value: 10.00mm (Program 0]
LED lamp is blinking, complete.
Press
to begin positioning.
26
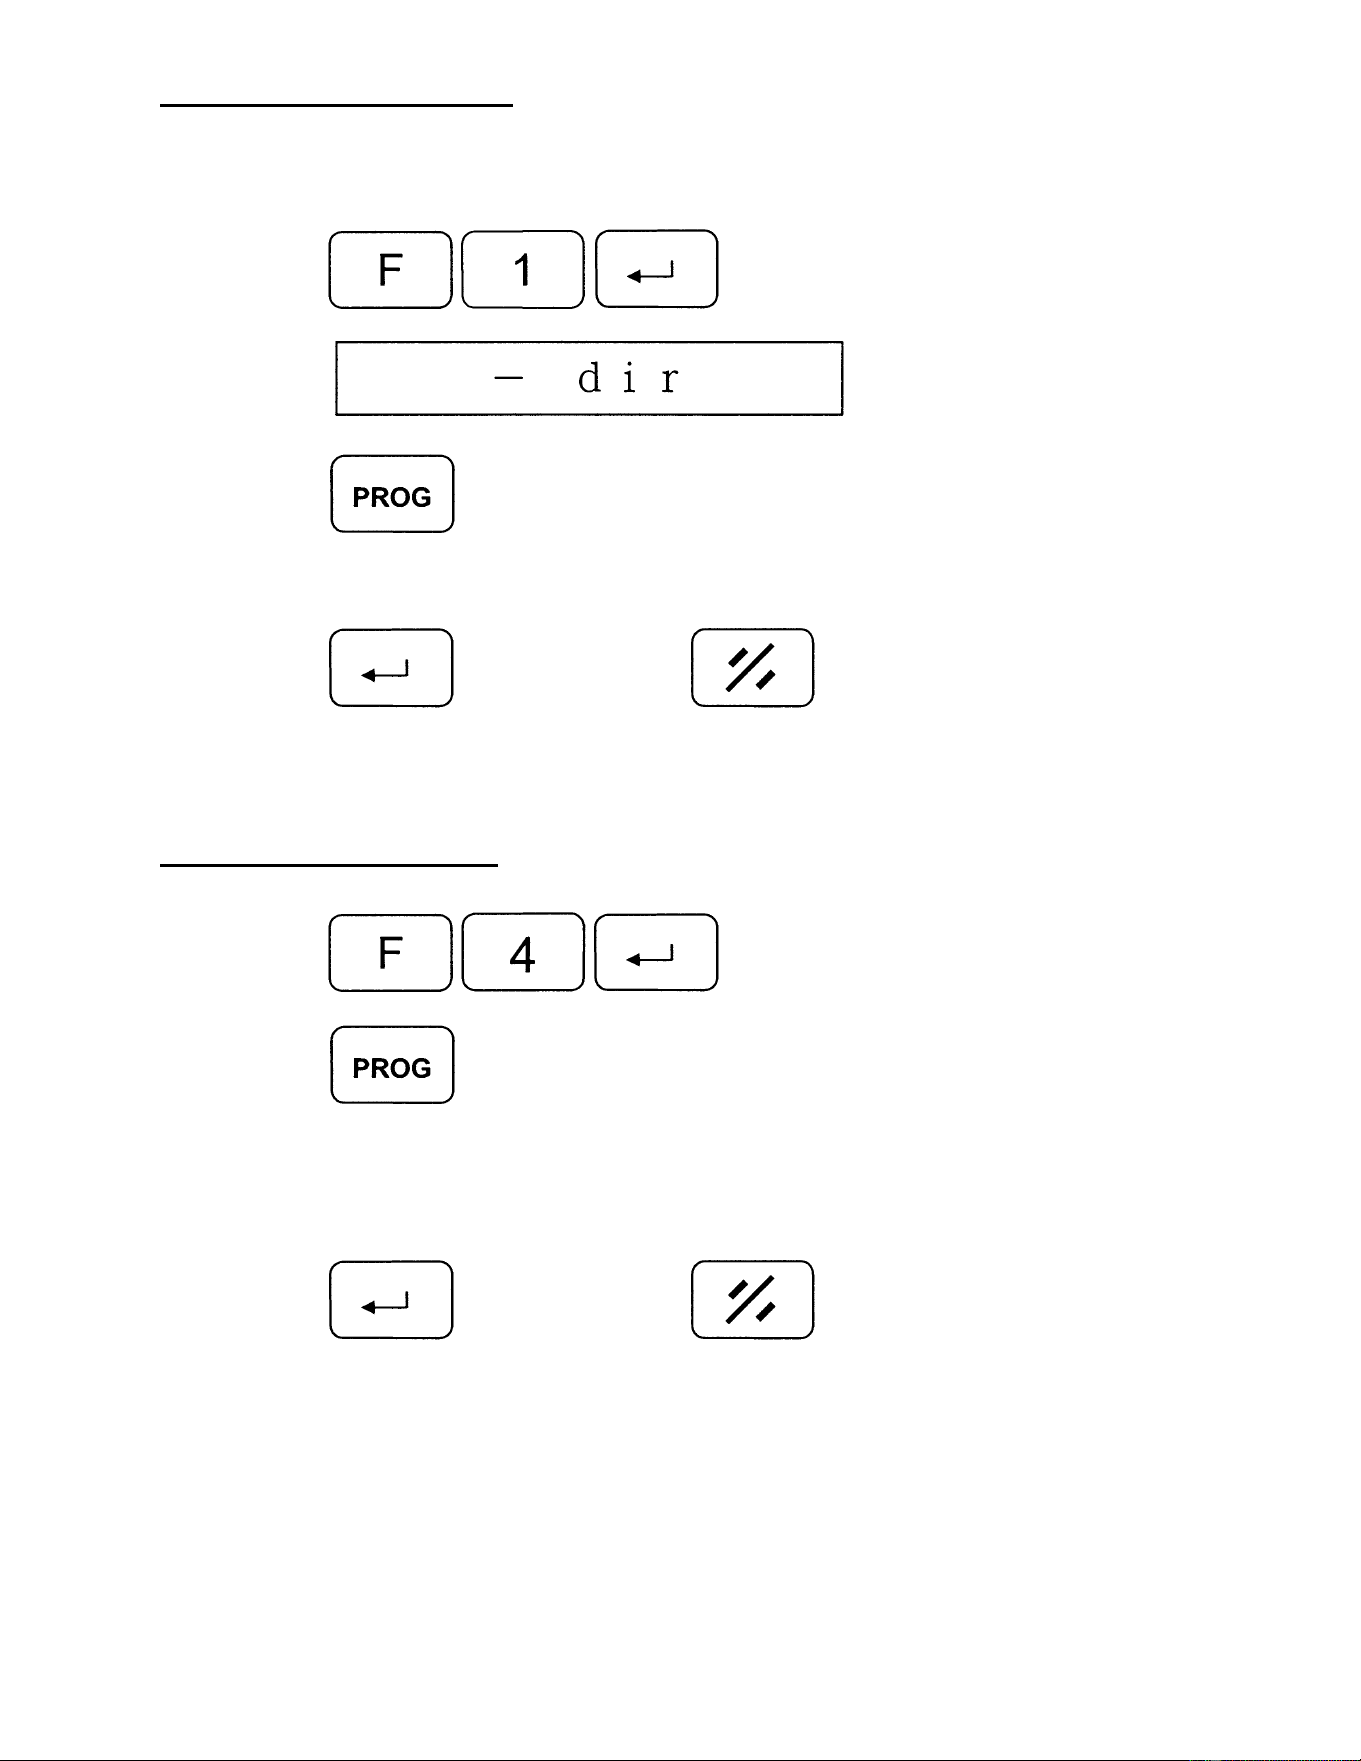
4. Select Counting direction
You can select the counting direction according to the table movement.
Step 1: Press
Display
.......................[default]
Step 2: Press
to change the direction.
“-dir” numbers decrease as table rises (accords with scale on planer).
“dir-“ numbers increase as table rises.
Step 3: Press
to confirm or press
to clear.
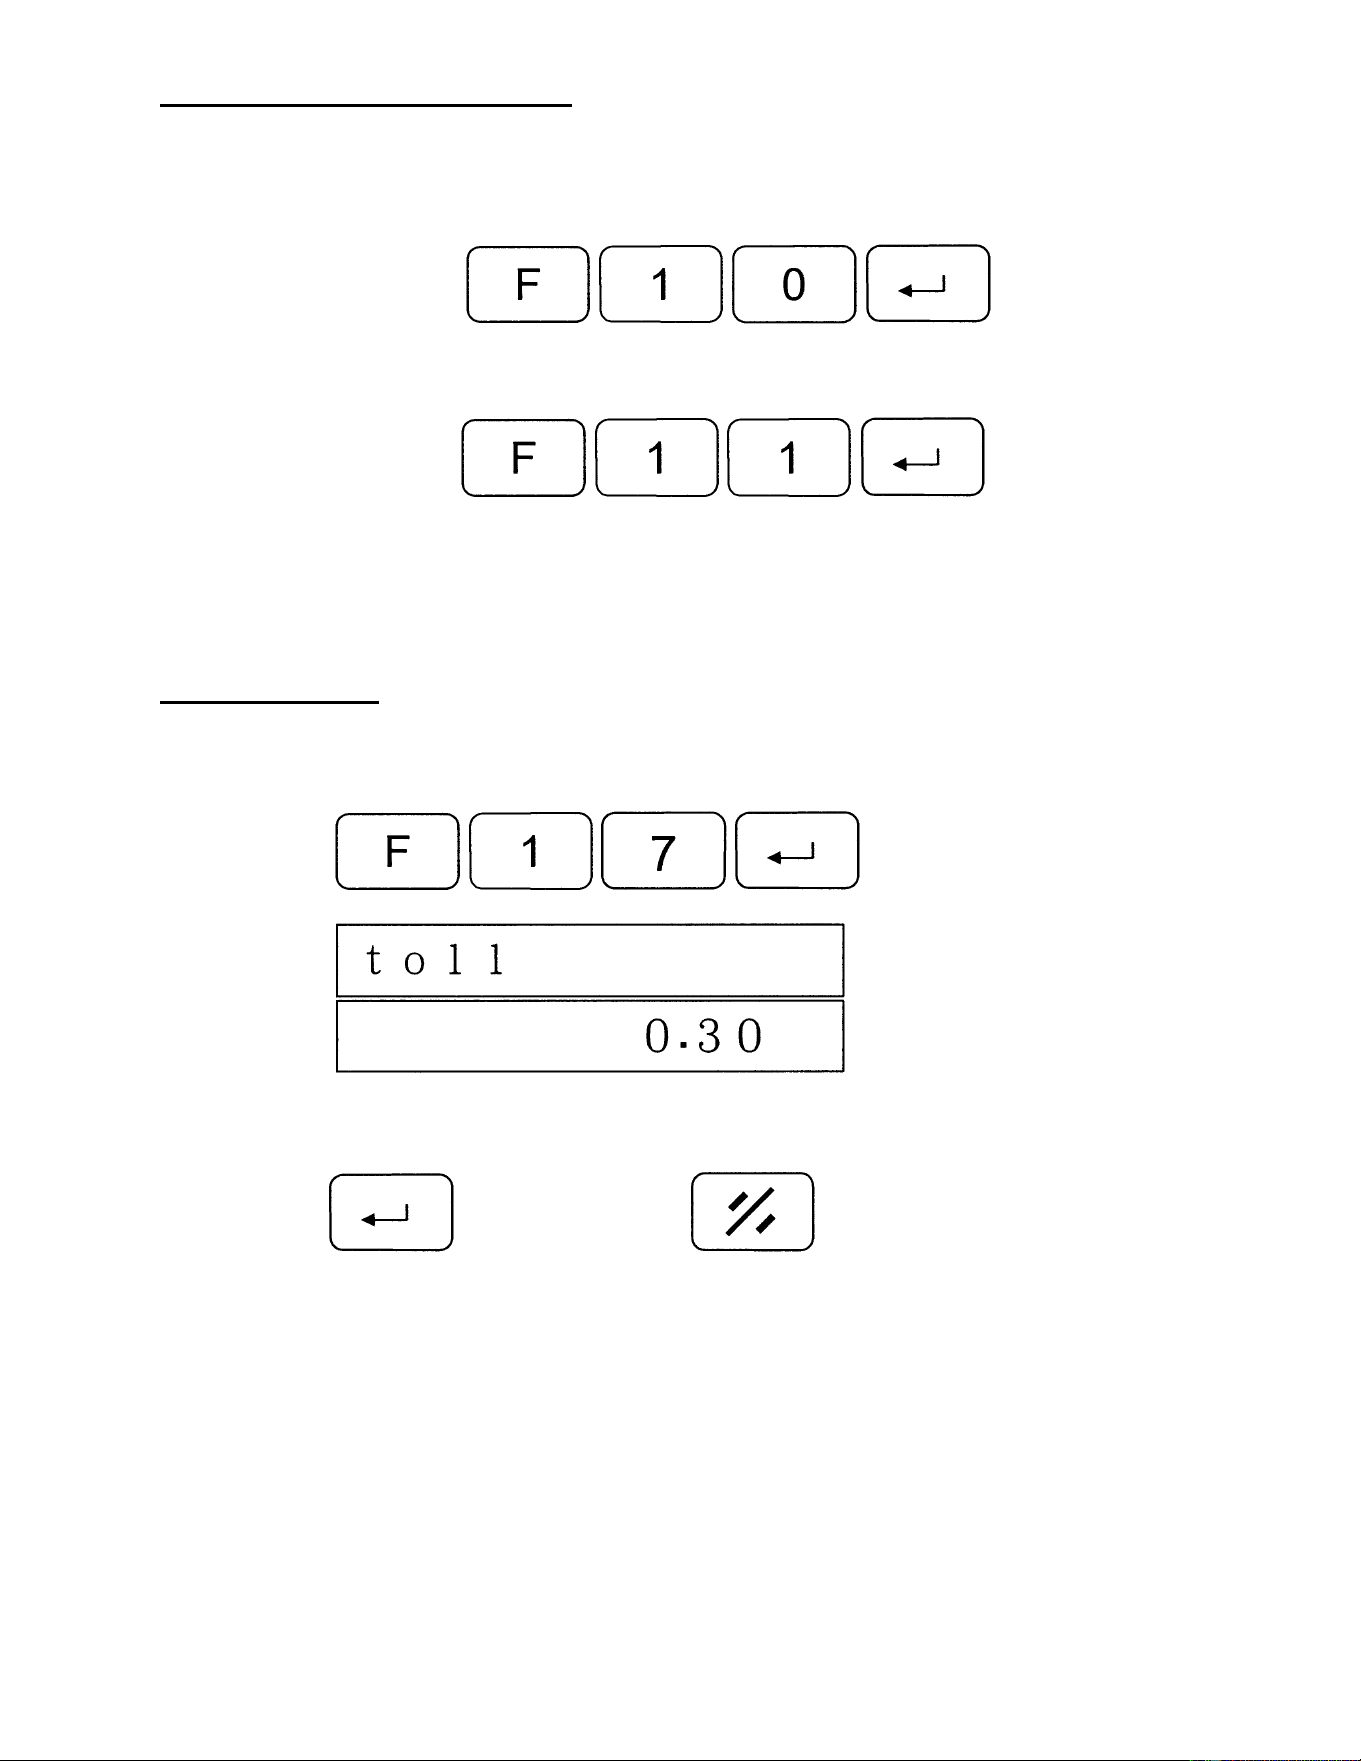
5. Select Positioning Mode
Step 1: Press
Step 2: Press
to select.
a. ---| |--- both directions
b. ---| left
c. |--- right
Step 3: Press
to confirm or press
to clear.
27
6. Set Software Limit (Hi/Lo End)
There are High and Low software limits. If these are exceeded, the display will give an
error message.
To set the Lo_End press
(Default setting is 7mm)
To set the Hi_End press
(Default setting is 230mm)
7. Set Tolerances
The tolerance defines the accuracy of the positioning.
Step 1: Press
Display
.........................[default]
Step 2: Enter the value for tolerance.
Step 3: Press
to confirm or press
to clear.
28
8. Set Low Speed Limit
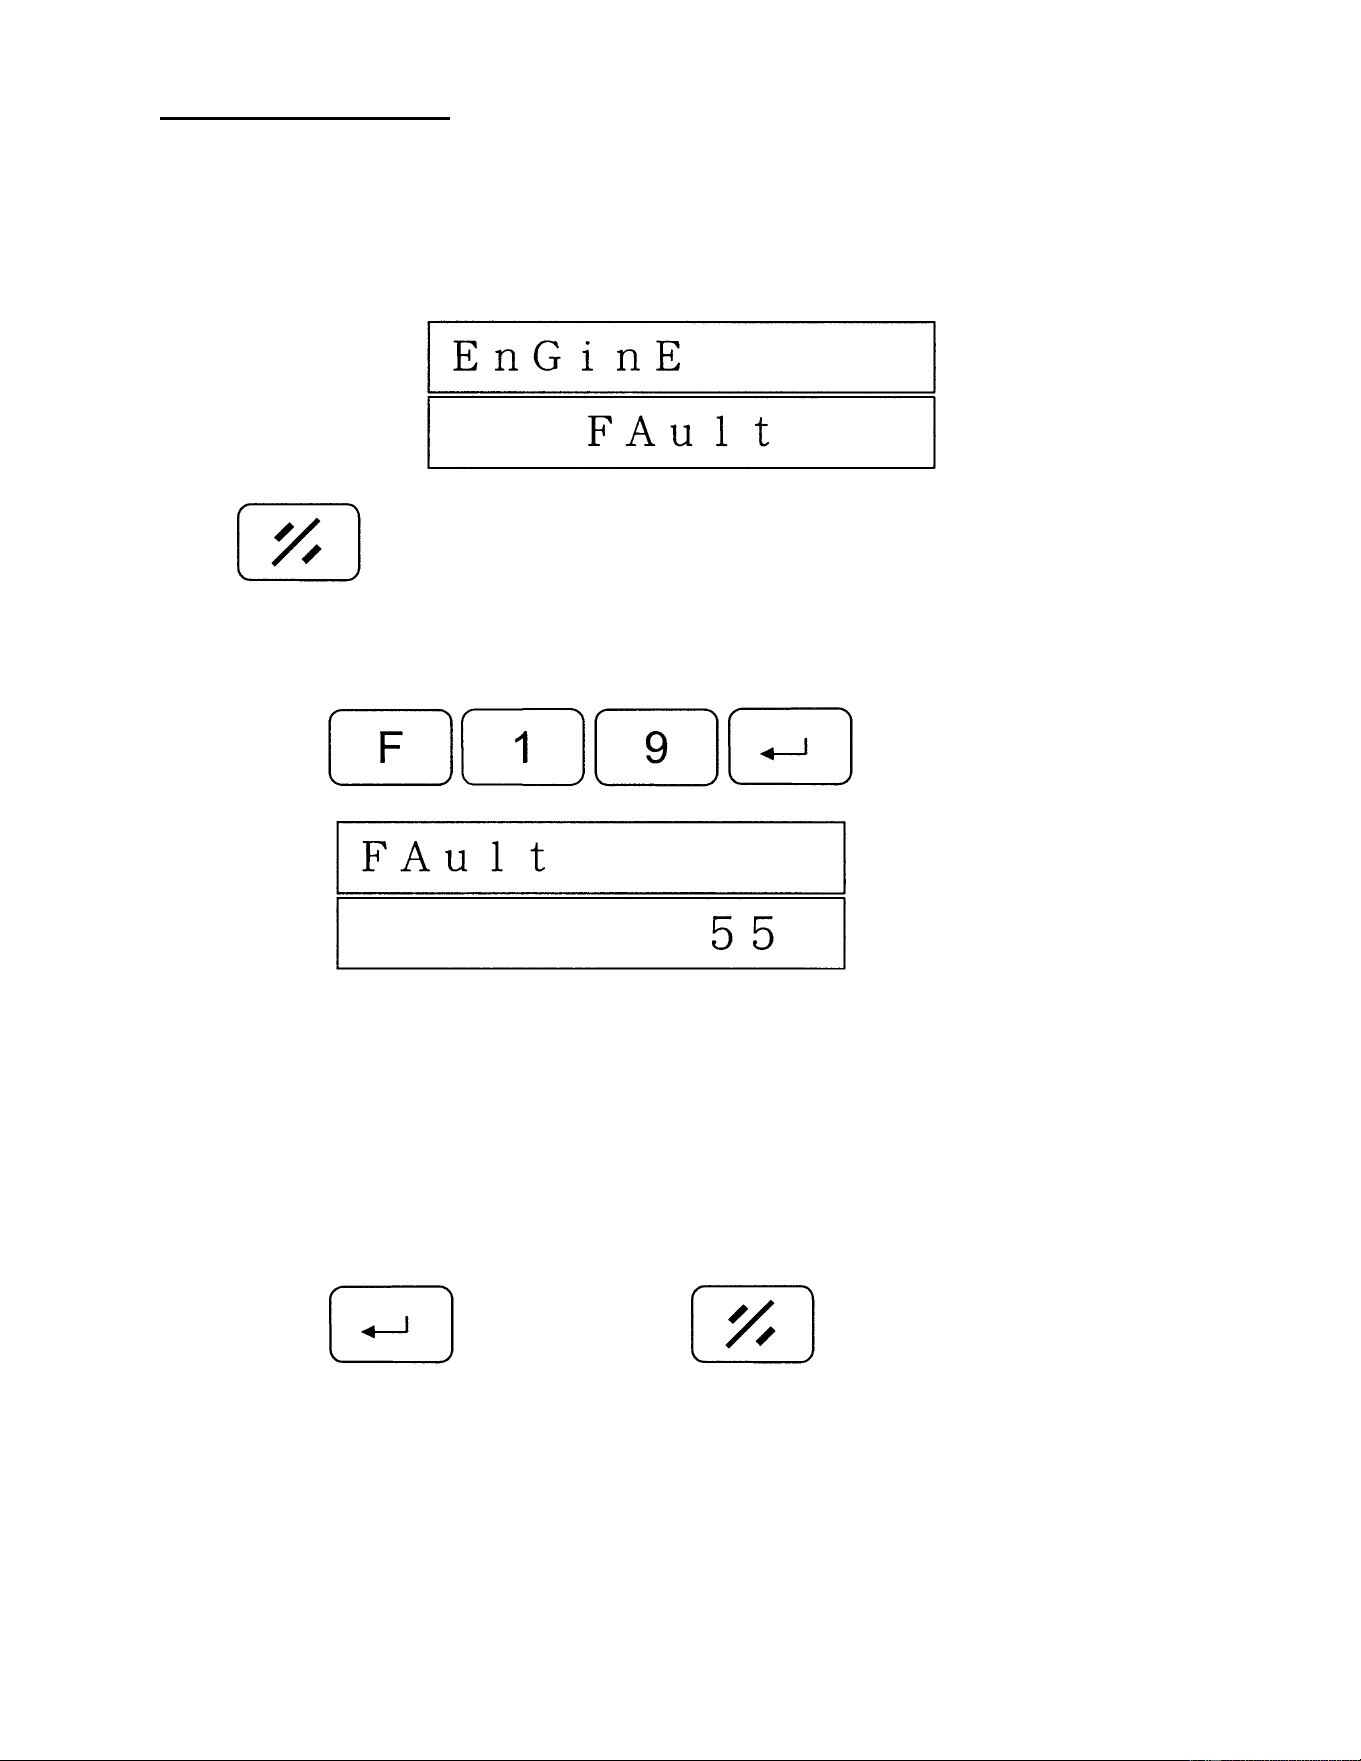
This function defines the speed level which is considered abnormal for the machine.
When the Controller starts the table movement up or down, and the table does not
move, or moves with a speed lower than defined, it stops the machine and displays:
Press
to clear.
To set low speed limit:
Step 1: Press
Display
..........................[default]
Step 2: Enter the low speed level 0 to 99
0 = Machine test is disabled
1 = very low
:
:
99 = high
Step 3: Press
to confirm or press
to clear.
29
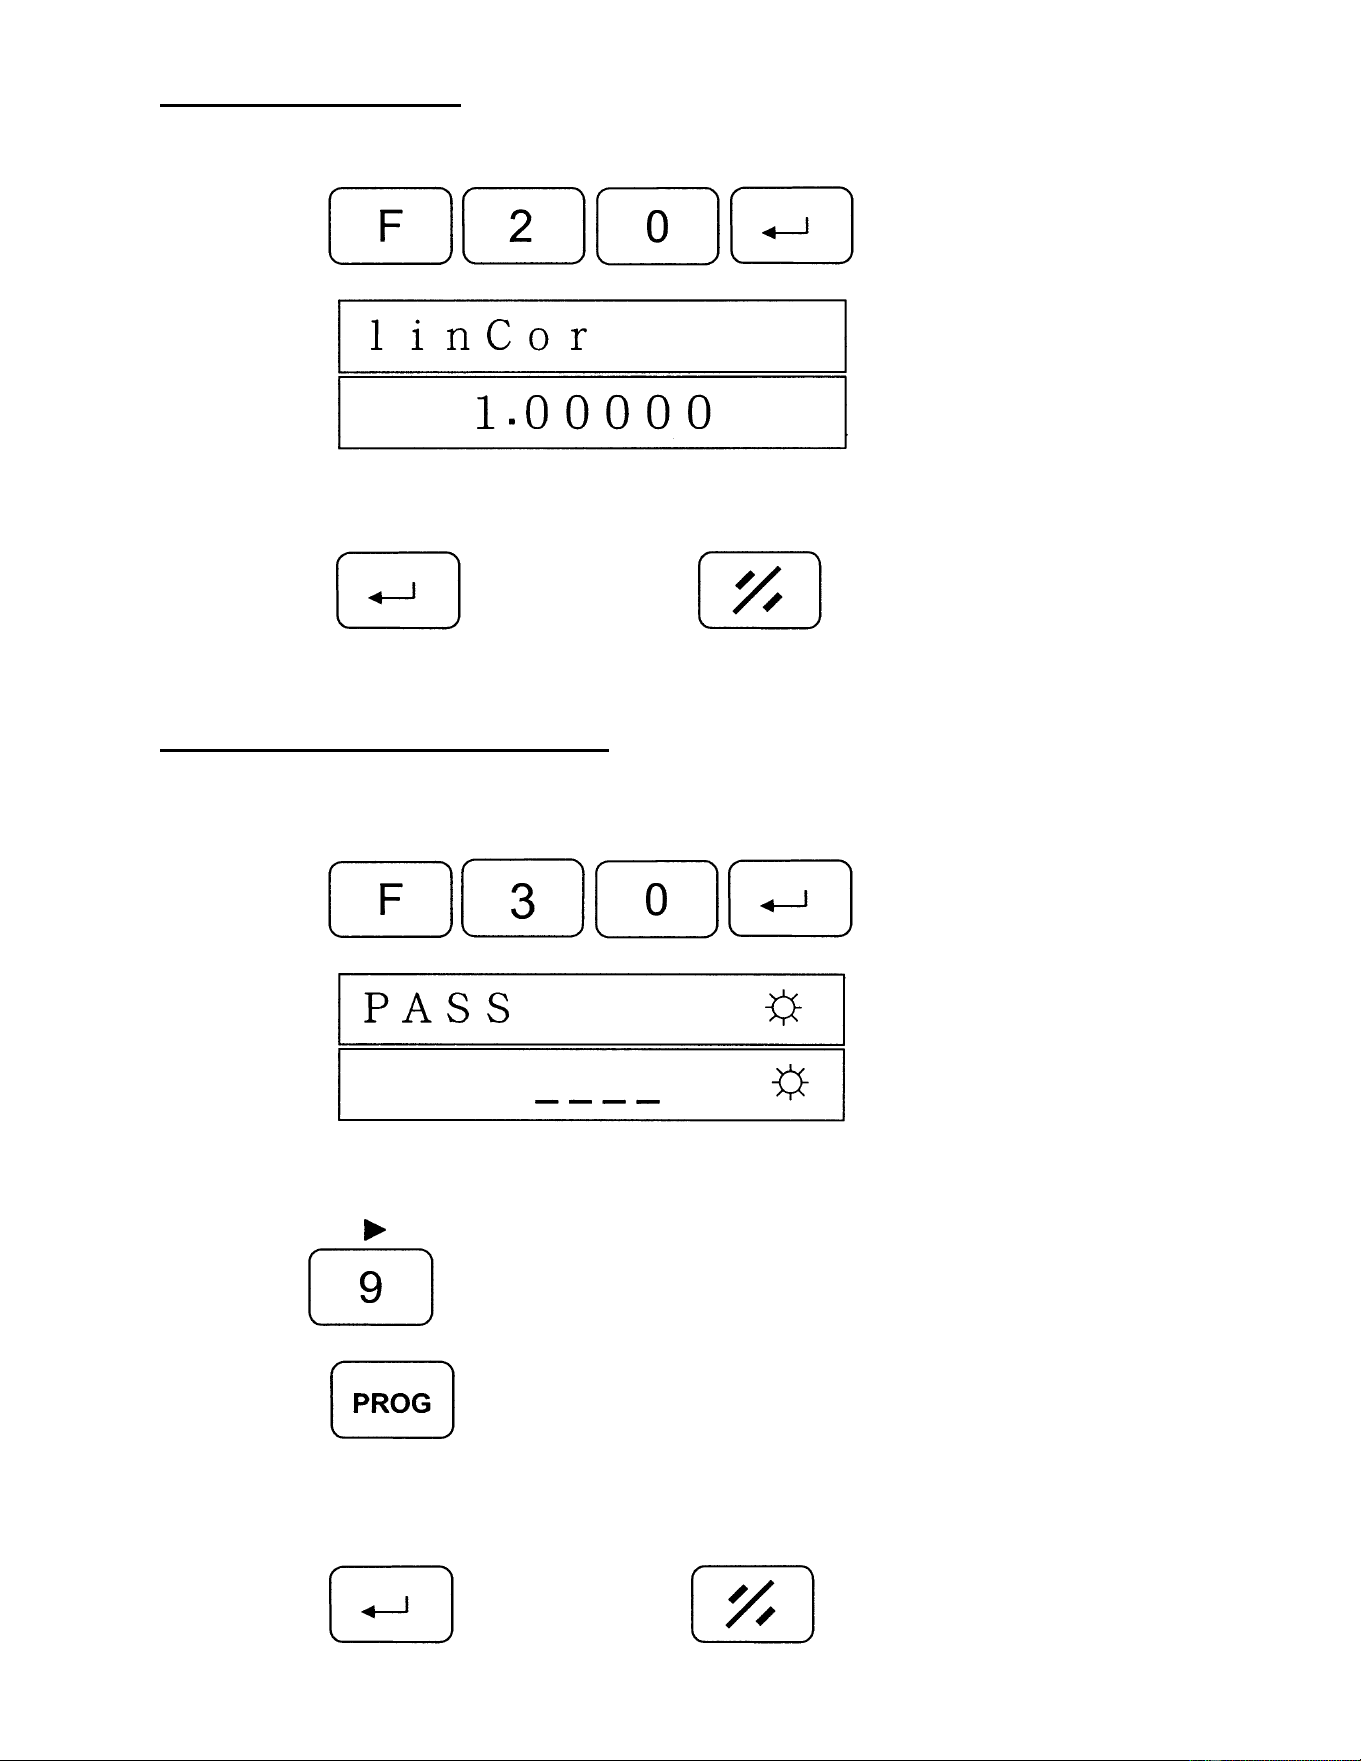
9. Set Linear Correction
NOTE: Setting Linear Correction should be done in MM (metric) mode, not inches. This will ensure
accurate readings for table movement.
Step 1: Press
Display
......................[default]
Step 2: Enter the value between 0.0001 and 9.9999.
Step 3: Press
to confirm or press
to clear.
10. Enter Parameter Setttings Mode
With this function, you can select each parameter to be locked or unlocked. When a
parameter is locked, then the end-user can only see the value, but cannot change it.
Step 1: Press
Display
Step 2: Enter the password.
Step 3: Use
to scroll through the parameters.
Step 4: Press
to lock or unlock.
On = unlock
Off = lock
Step 5: Press
to confirm or press
to clear.
30
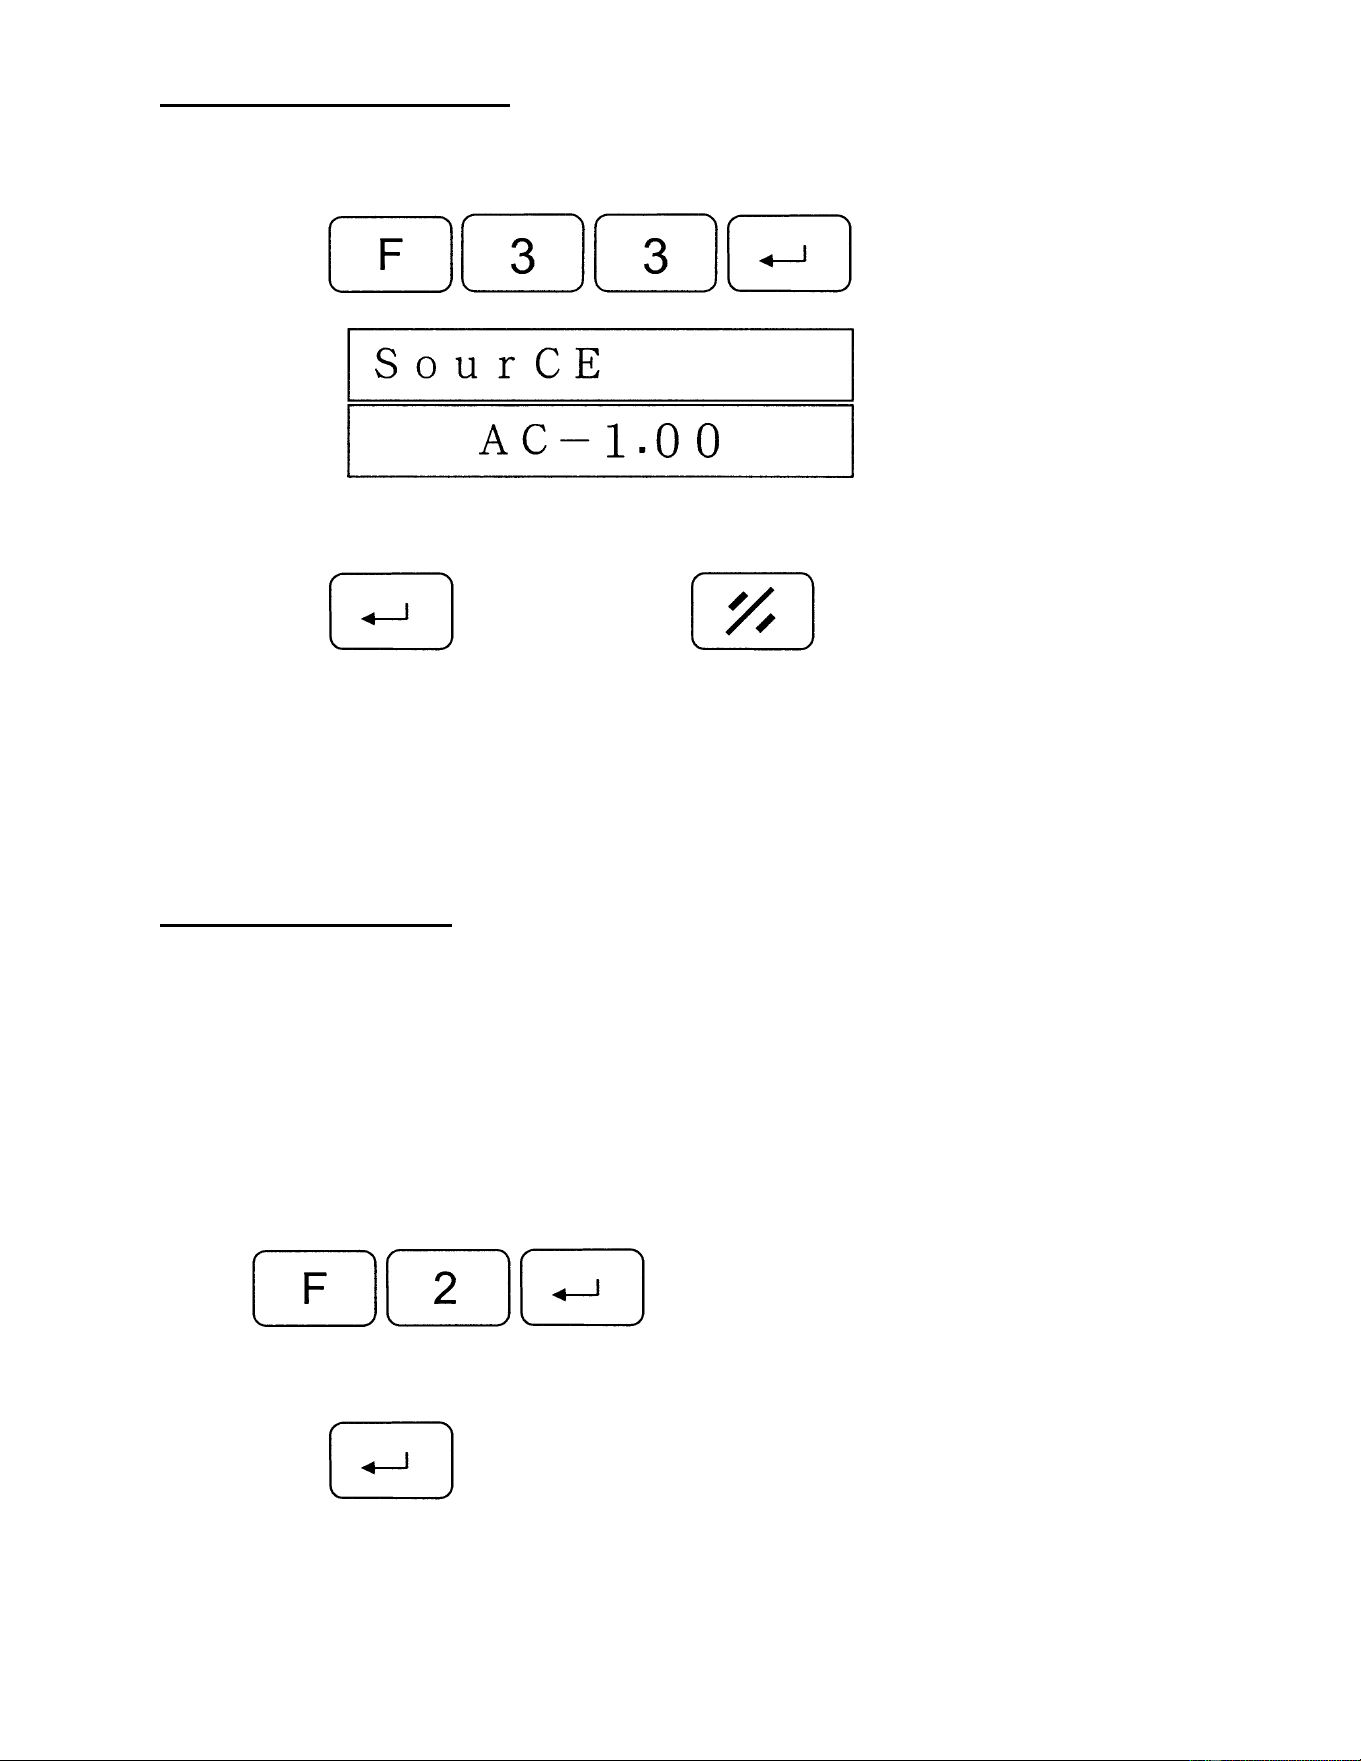
11. Check Software Version
To check the released version of the M15S Controller program:
Step 1: Press
Display
In the real value window, you will see the released version.
Step 2: Press
to confirm or press
to clear.
12. Load Datum Values
The real value refers to the distance between the machine table and the cutterhead.
Thus, the cutterhead defines the zero point of the machine. It is, however, difficult or
impossible to move the planer table to this point. Therefore, the zero point should be
identified by either placing a gauge between table and cutterhead knife insert, or by
planing a test board then measuring the board thickness with calipers. Program this real
value into the Controller as follows.
Preset the real value:
Step 1:
Step 2: Enter the value.
Step 3: Press
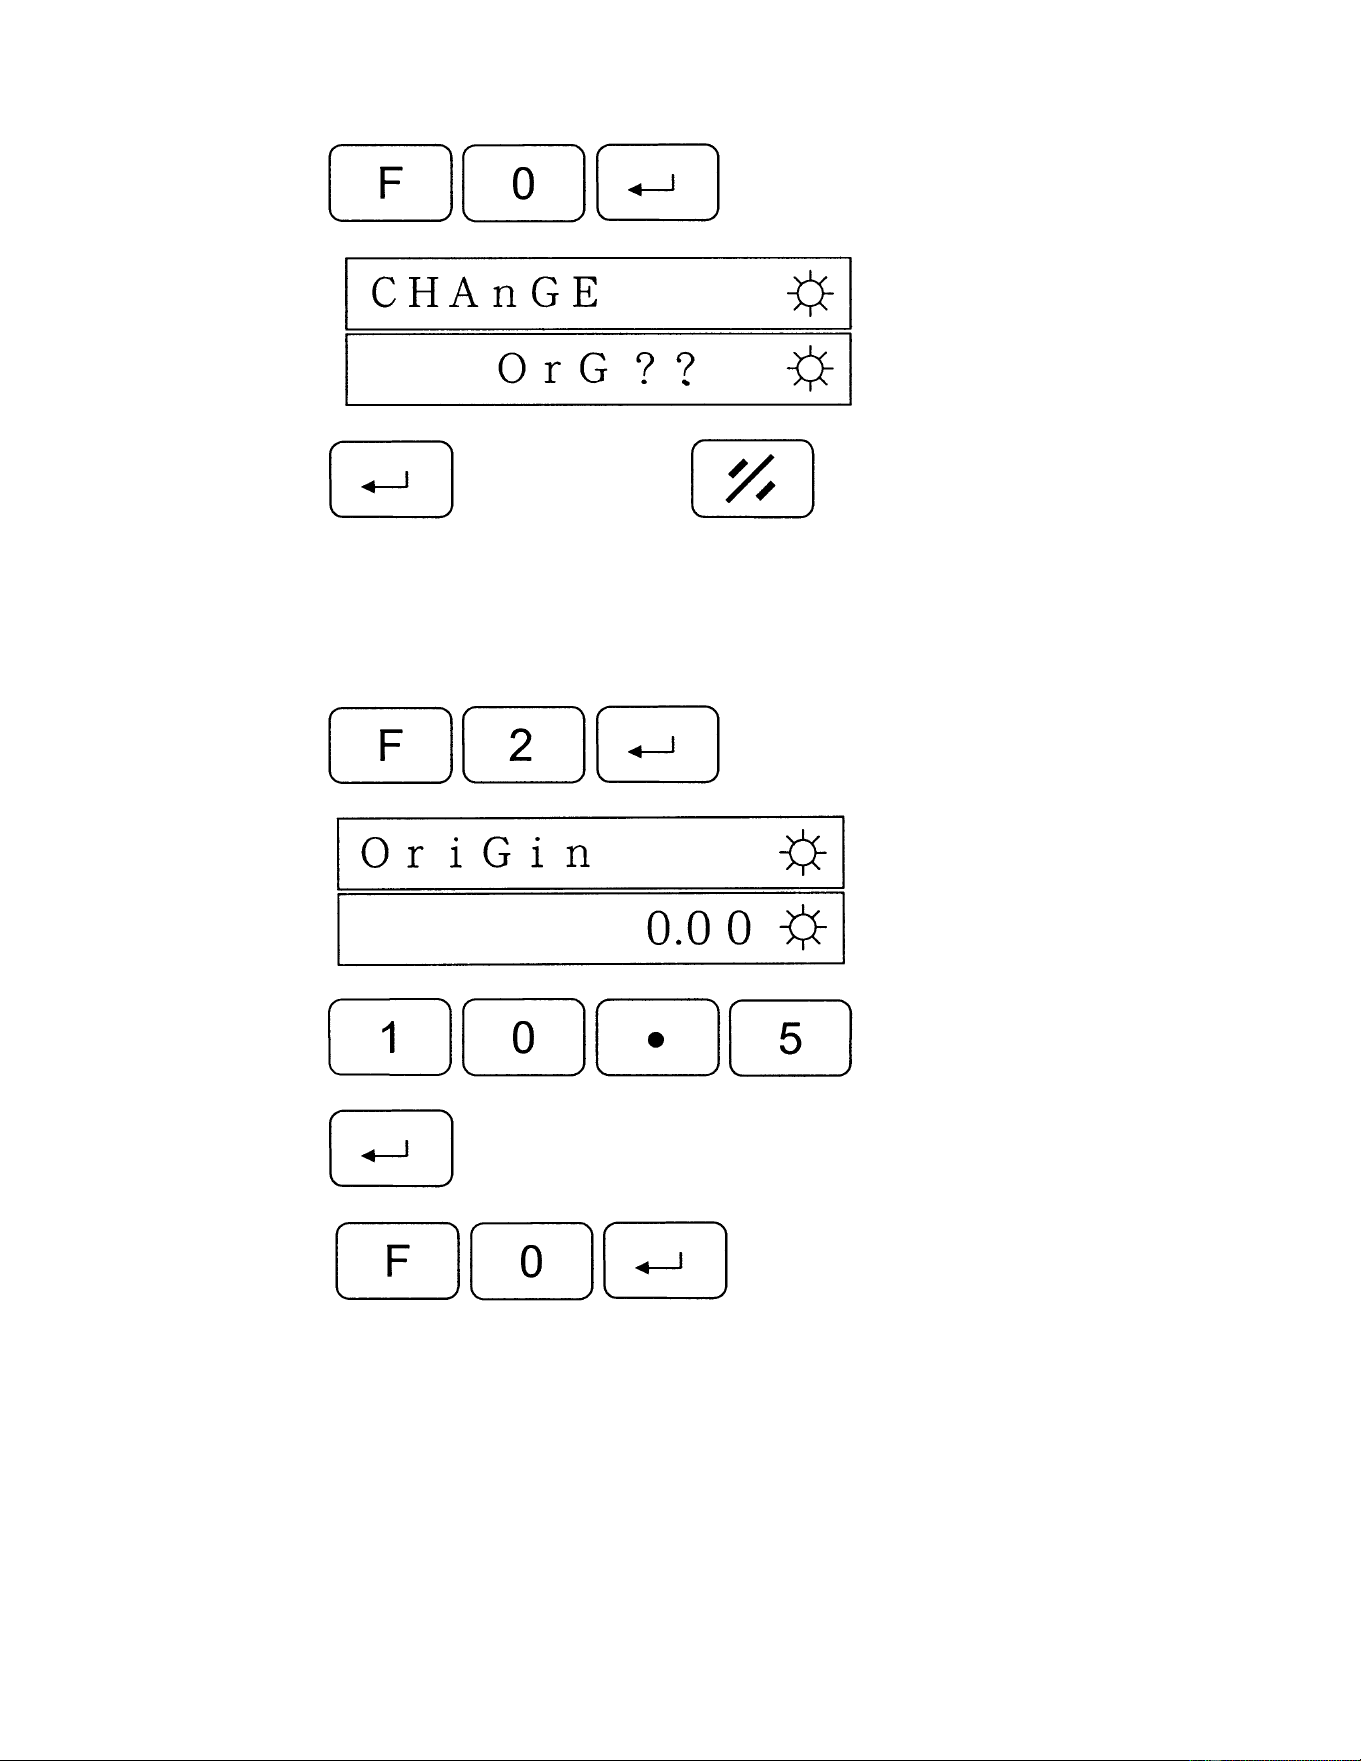
31
Load the real value:
Step 1: Press
Display
Step 2: Press
to confirm or press
to cancel.
Example:
The current value is 10.00mm but the actual thickness is 10.50mm.
Step 1: Press
Display
Step 2: Press
Step 3: Press
Step 4: Press
32
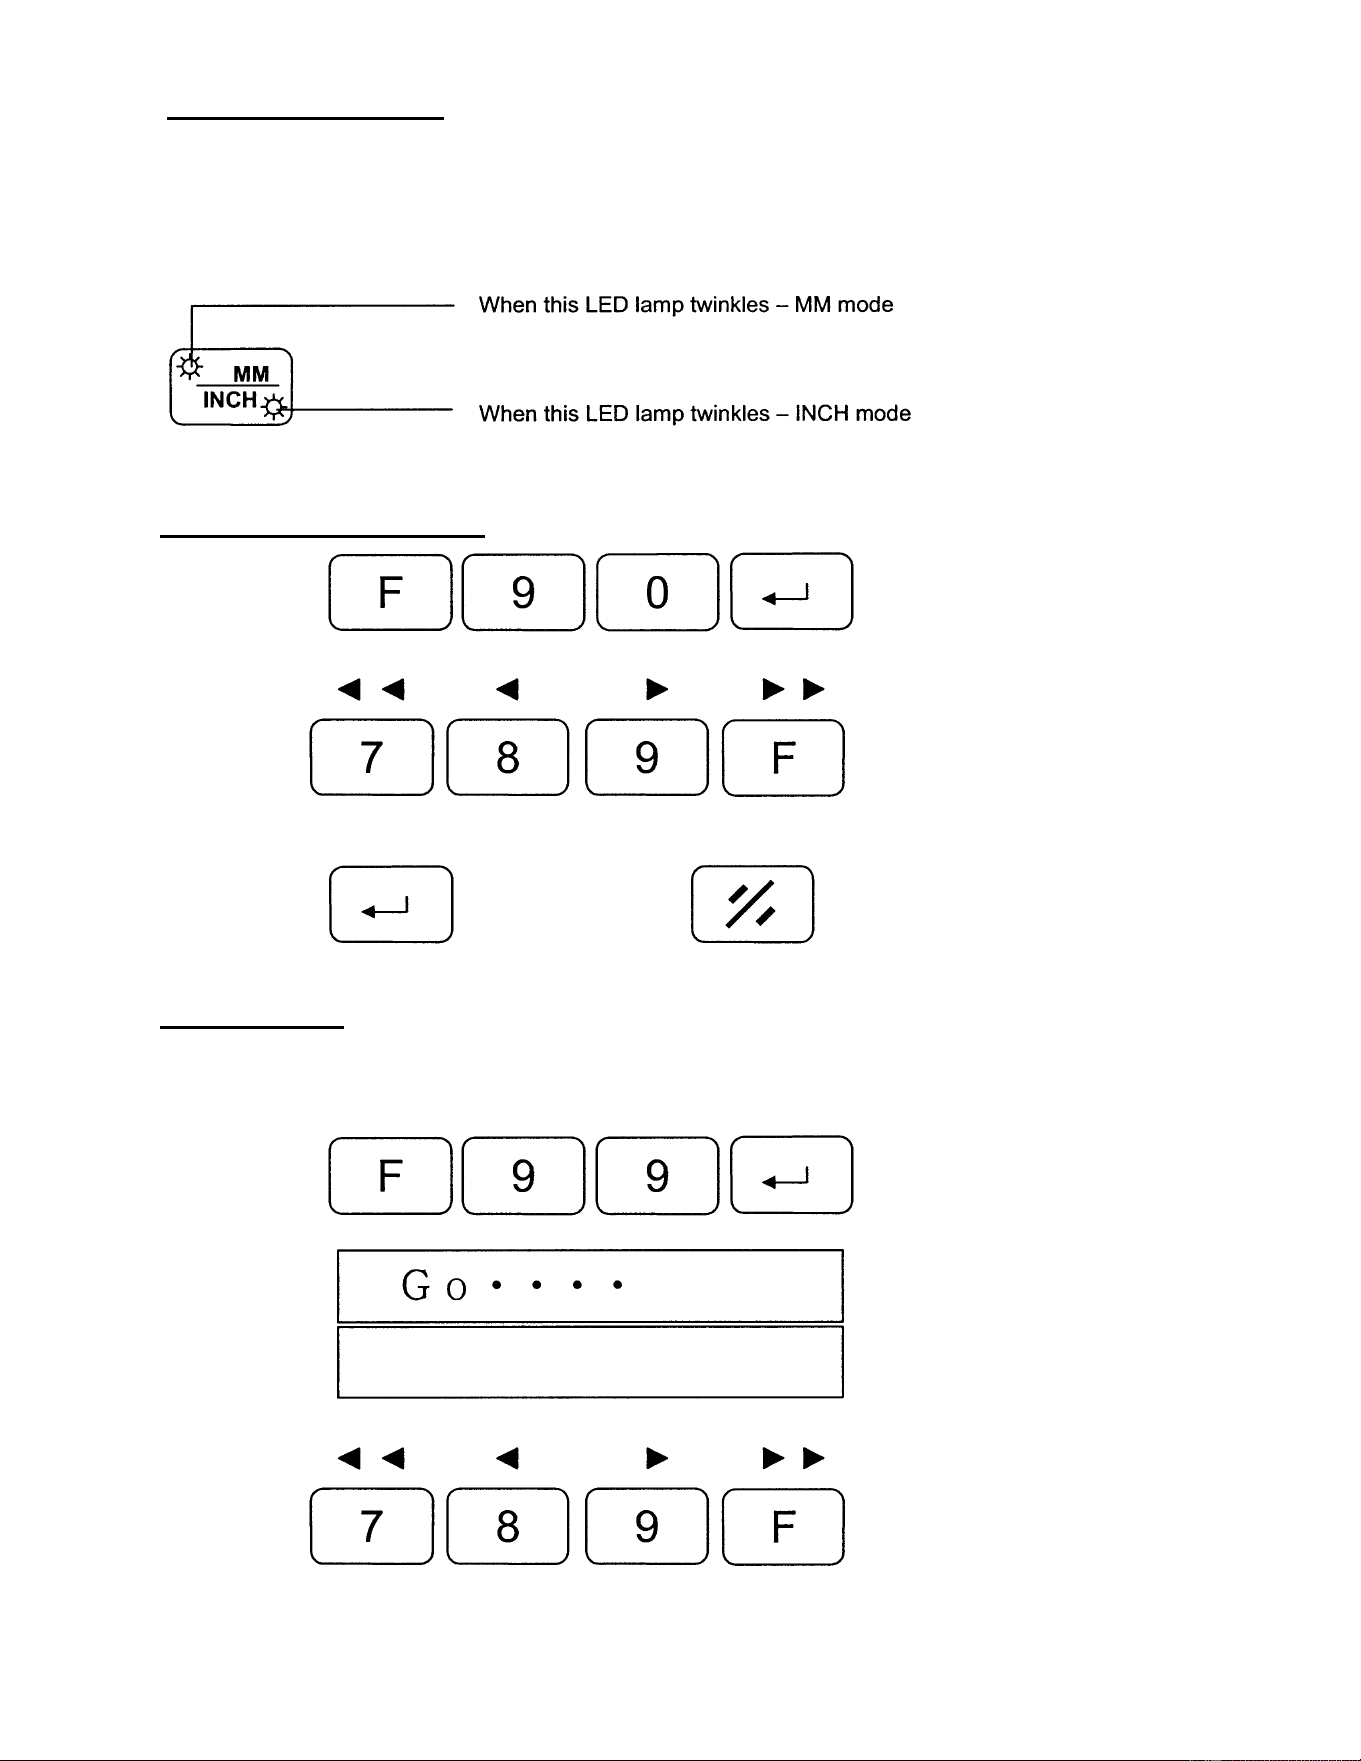
13. IN/MM Conversion
The dedicated mm/inch key allows for immediate switch of the units between millimeters
and inches. The LEDs on the key indicate the selected unit. Switching between MM and
INCHES has no effect on the control functions.
14. Set Device Resolution
Step 1: Press
Step 2: Use
to select resolution.
Step 3: Press
to confirm or press
to clear.
15. Calibration
This procedure calibrates read head to magnetic scale if adjustment/replacement of
either part has been made.
Step 1: Press
Display
Step 2: Use
to move the planer table until
M15S terminates the calibration and restarts.
33
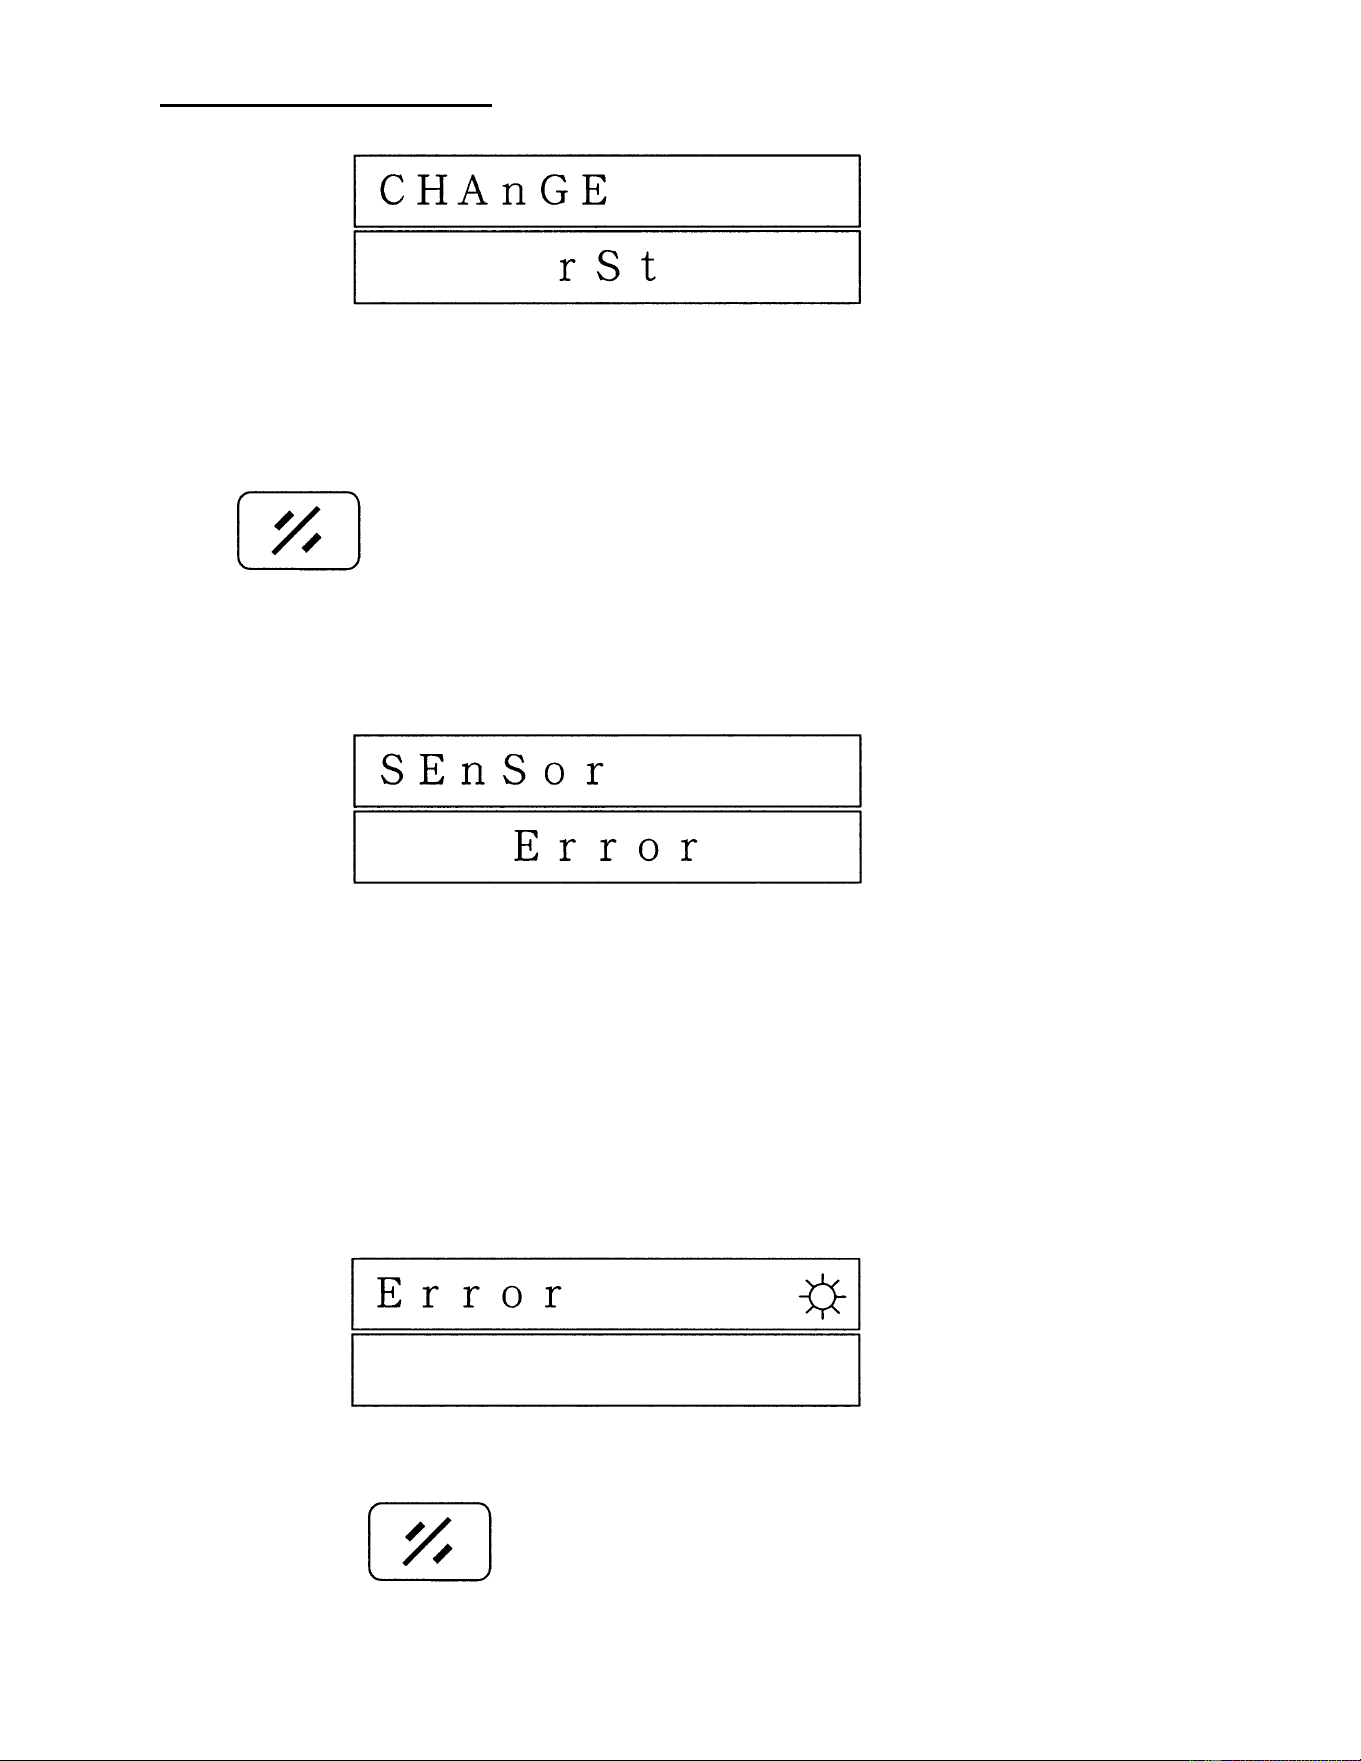
16. M15S Troubleshooting
Display
“Change RST” message appears when the Controller detects a motion in the wrong
direction. For example, the Controller switches the outputs to move upward but the table
starts moving in reverse direction. Usually this is caused by incorrect wiring of the three
phase motor.
Press to clear.
Check the wiring and change if necessary.
Display
Possible cause:
a. no sensor
b. 9-pin connector is loose
c. wire broken
d. the gap between sensor and tape is too large
Excluding: Check the sensor, sensor cable, sensor connector, and adjust gap (if
necessary).
Display
Possible cause: Incorrect operation; check parameter setting.
Excluding: Press to clear.
34
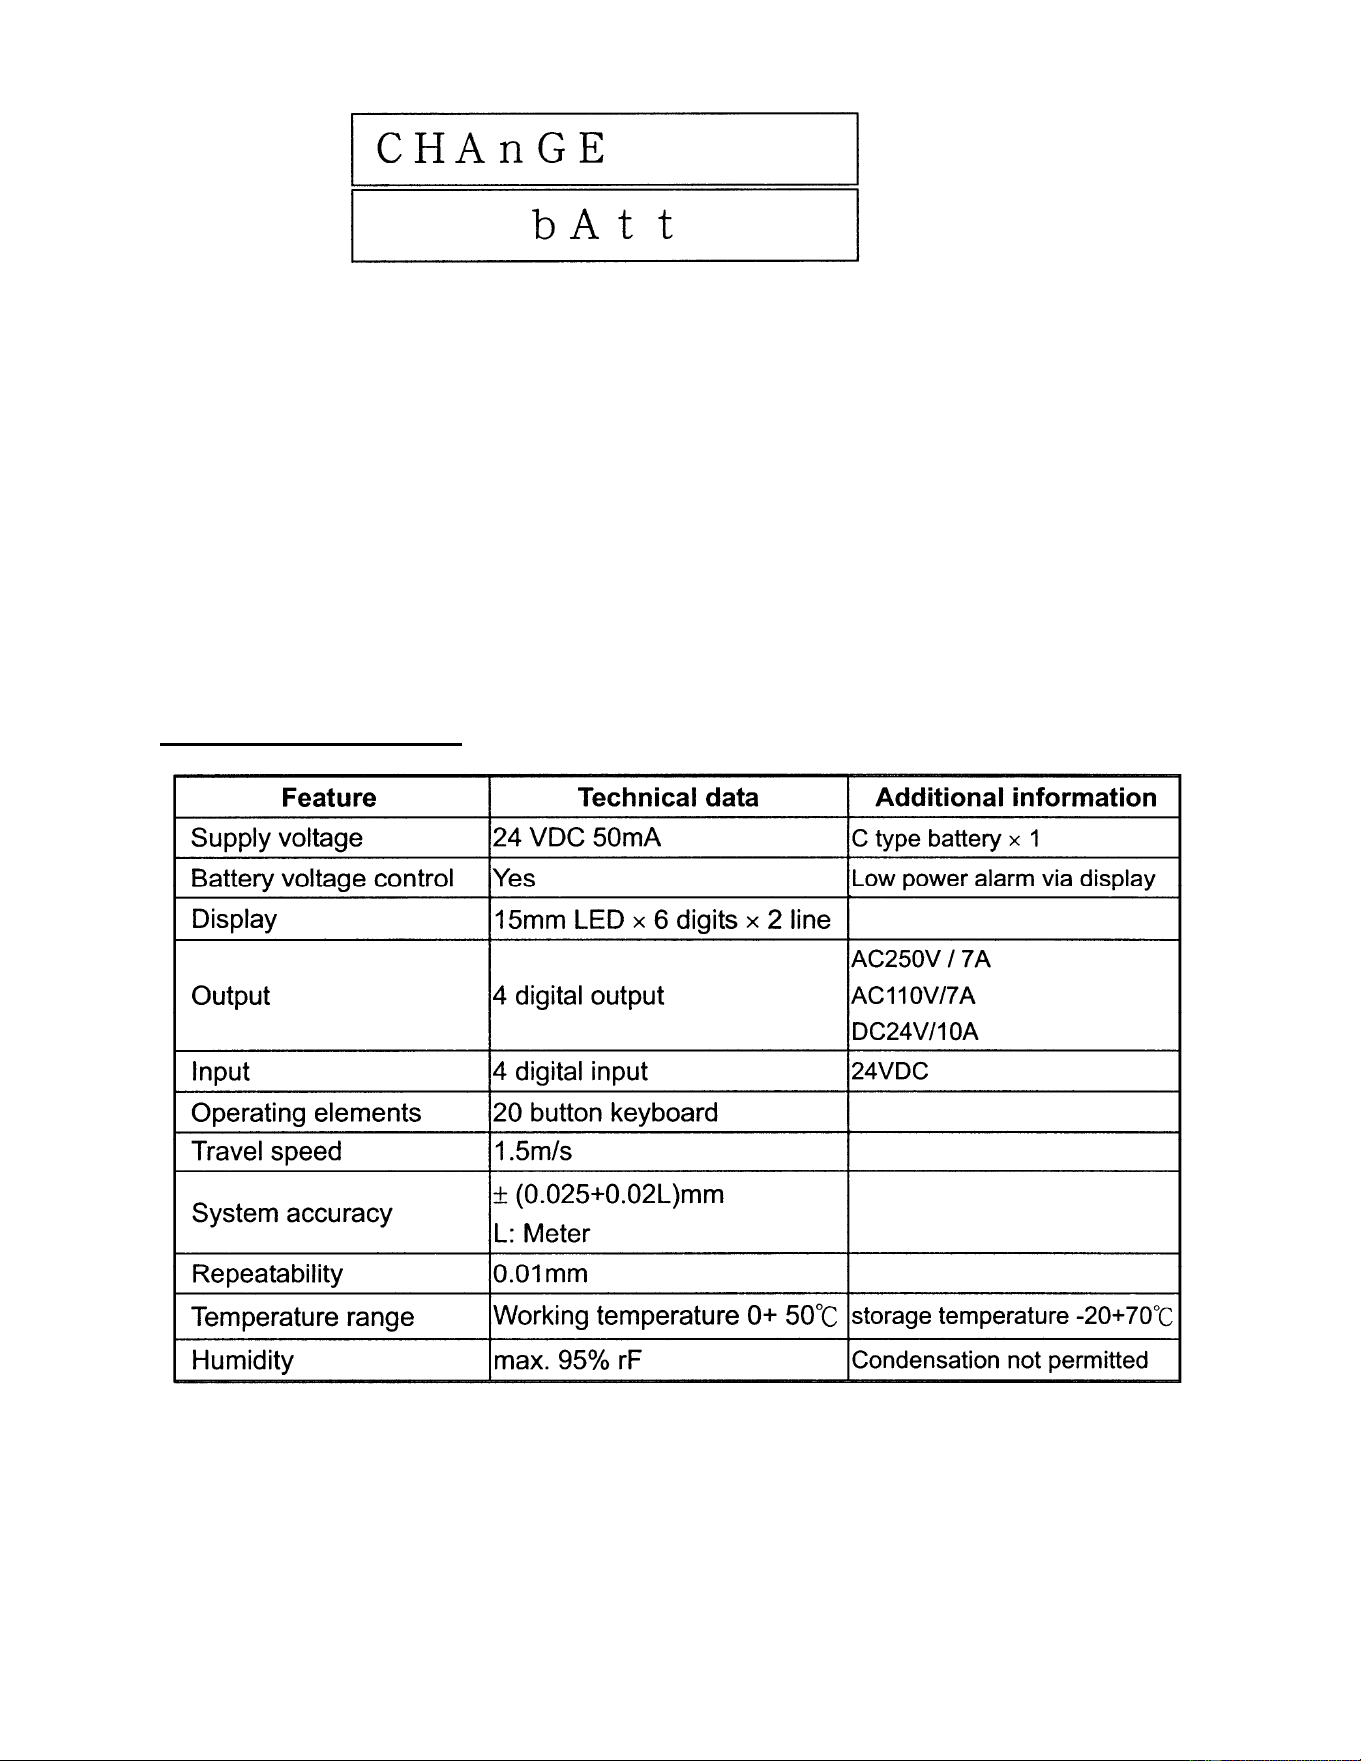
Display
This message appears after power-on and indicates battery discharged. The C-type
battery MUST be replaced to resume the operation of the device. Change as follows:
1. Open the planer’s top right side panel to access the rear of the Controller.
2. Turn the power off. Be careful not to move the table during power off. Replace the
battery and turn the power on. The device will resume normal operation.
17. M15S Specifications
35
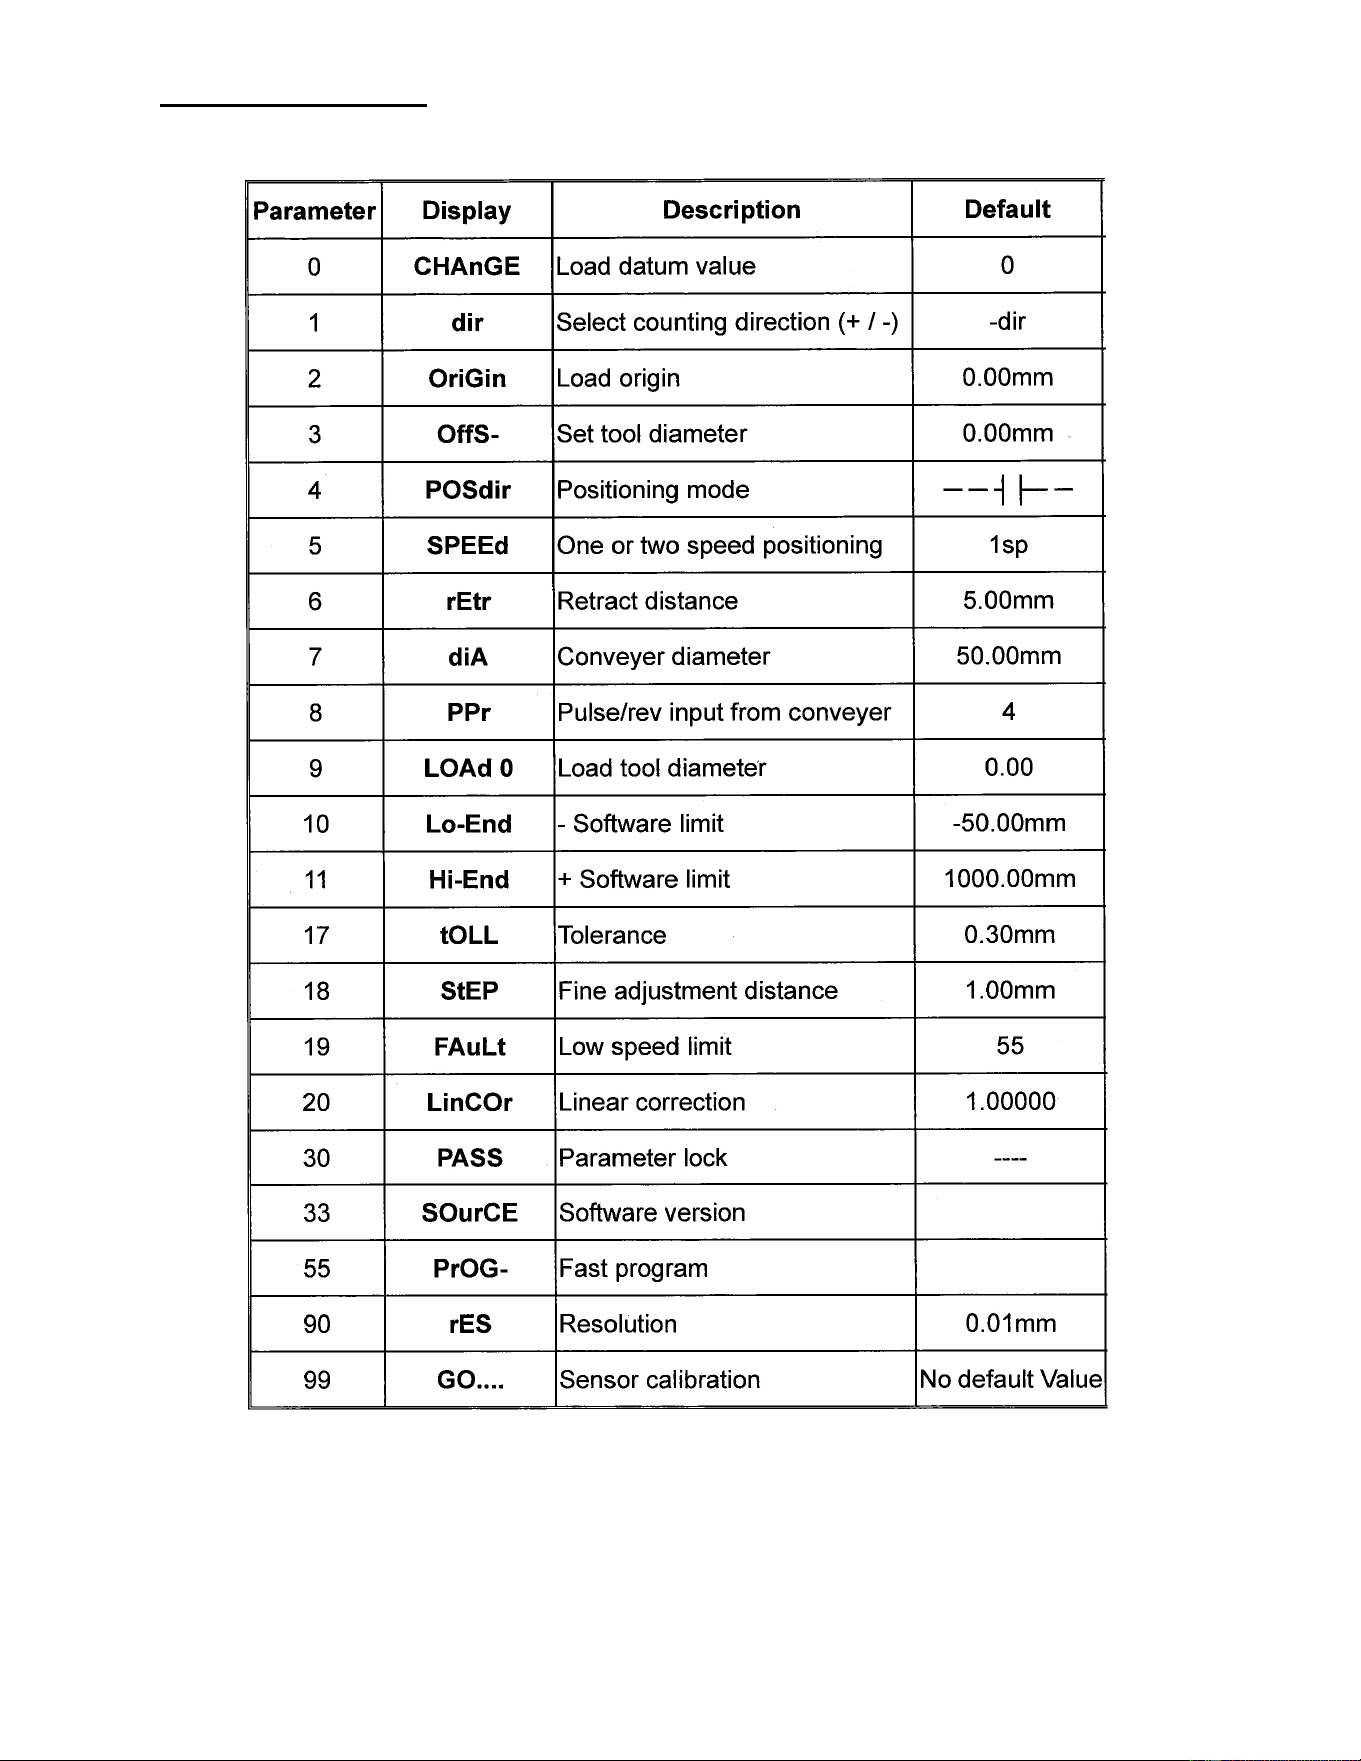
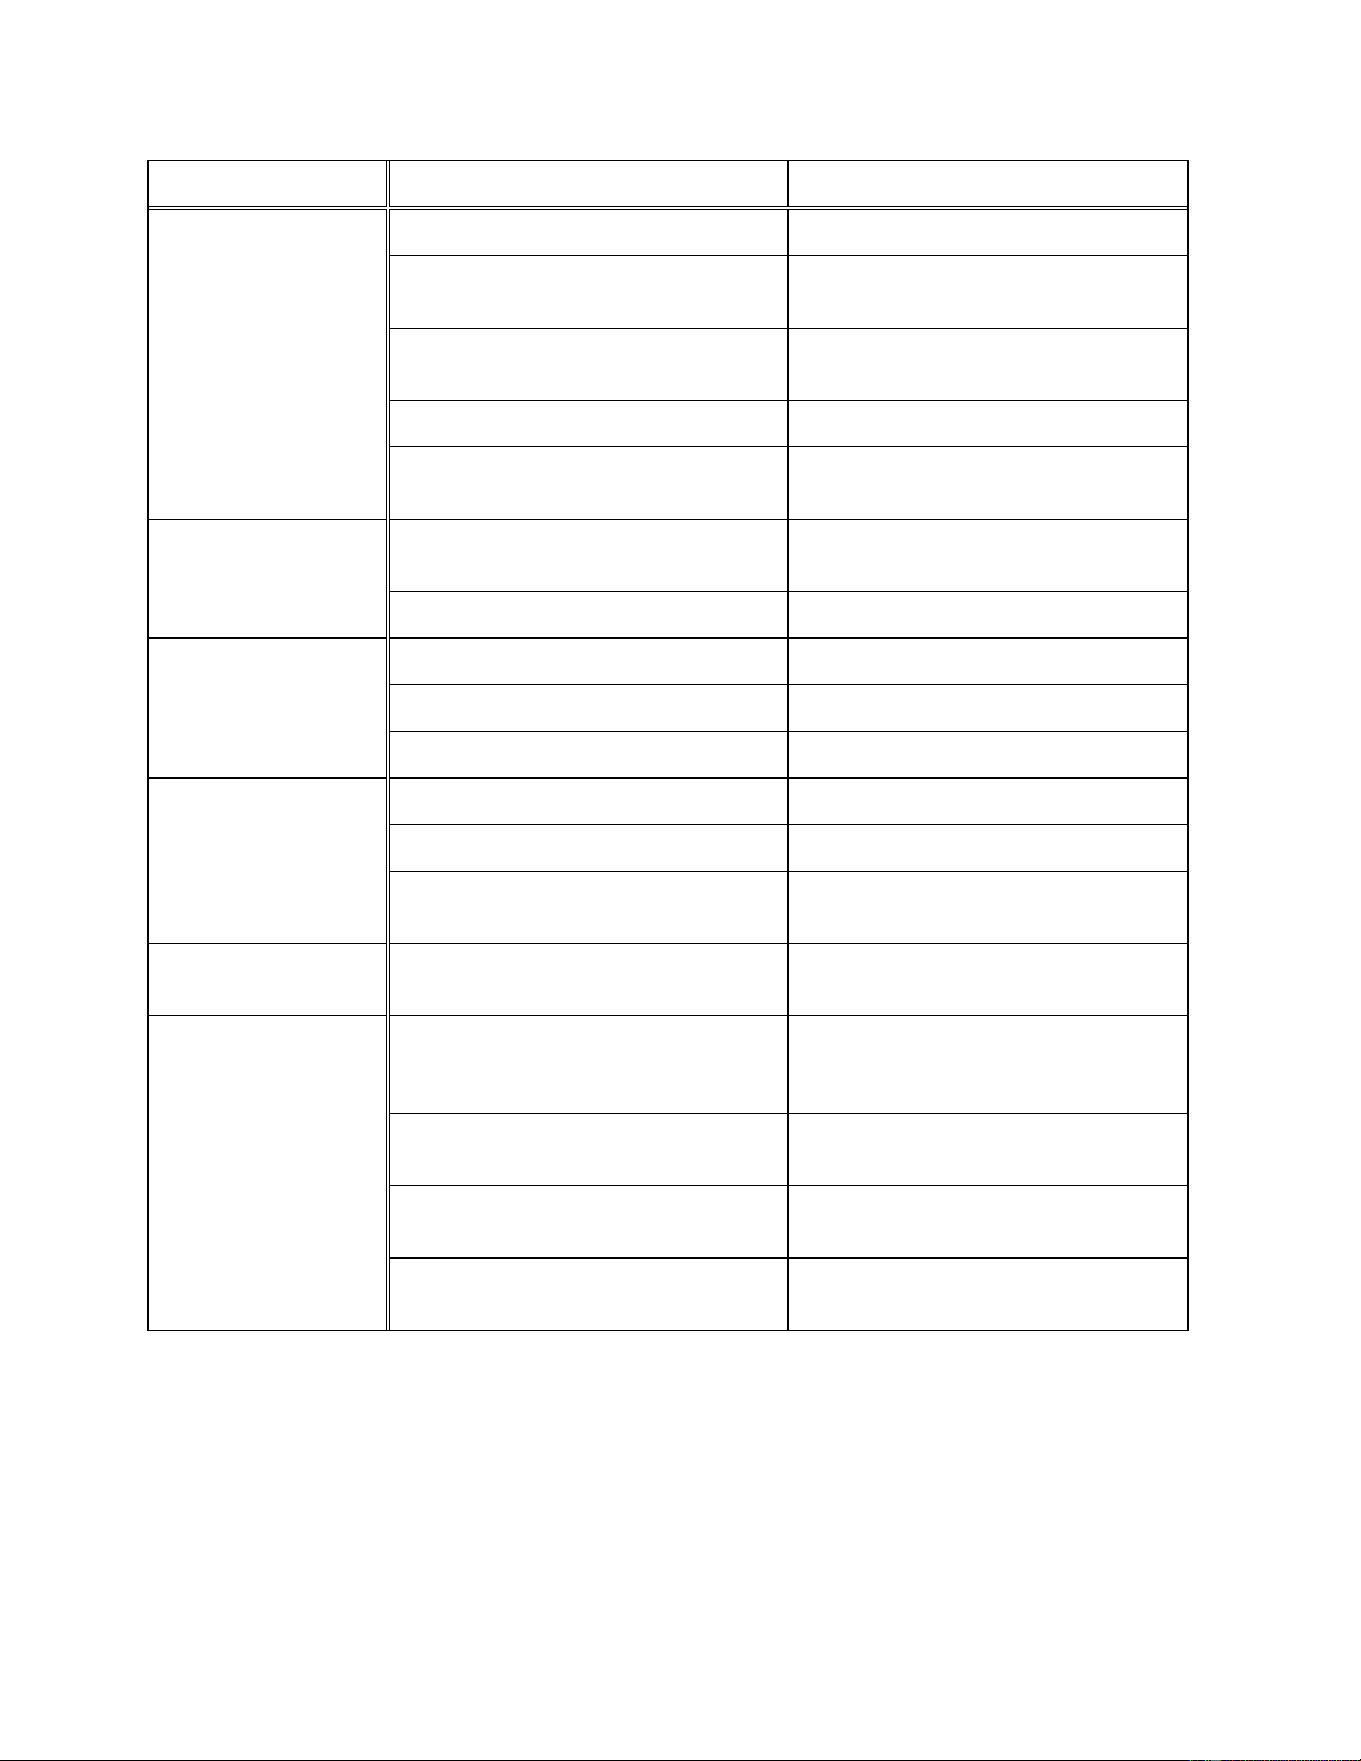
18. M15S Parameters
`
36
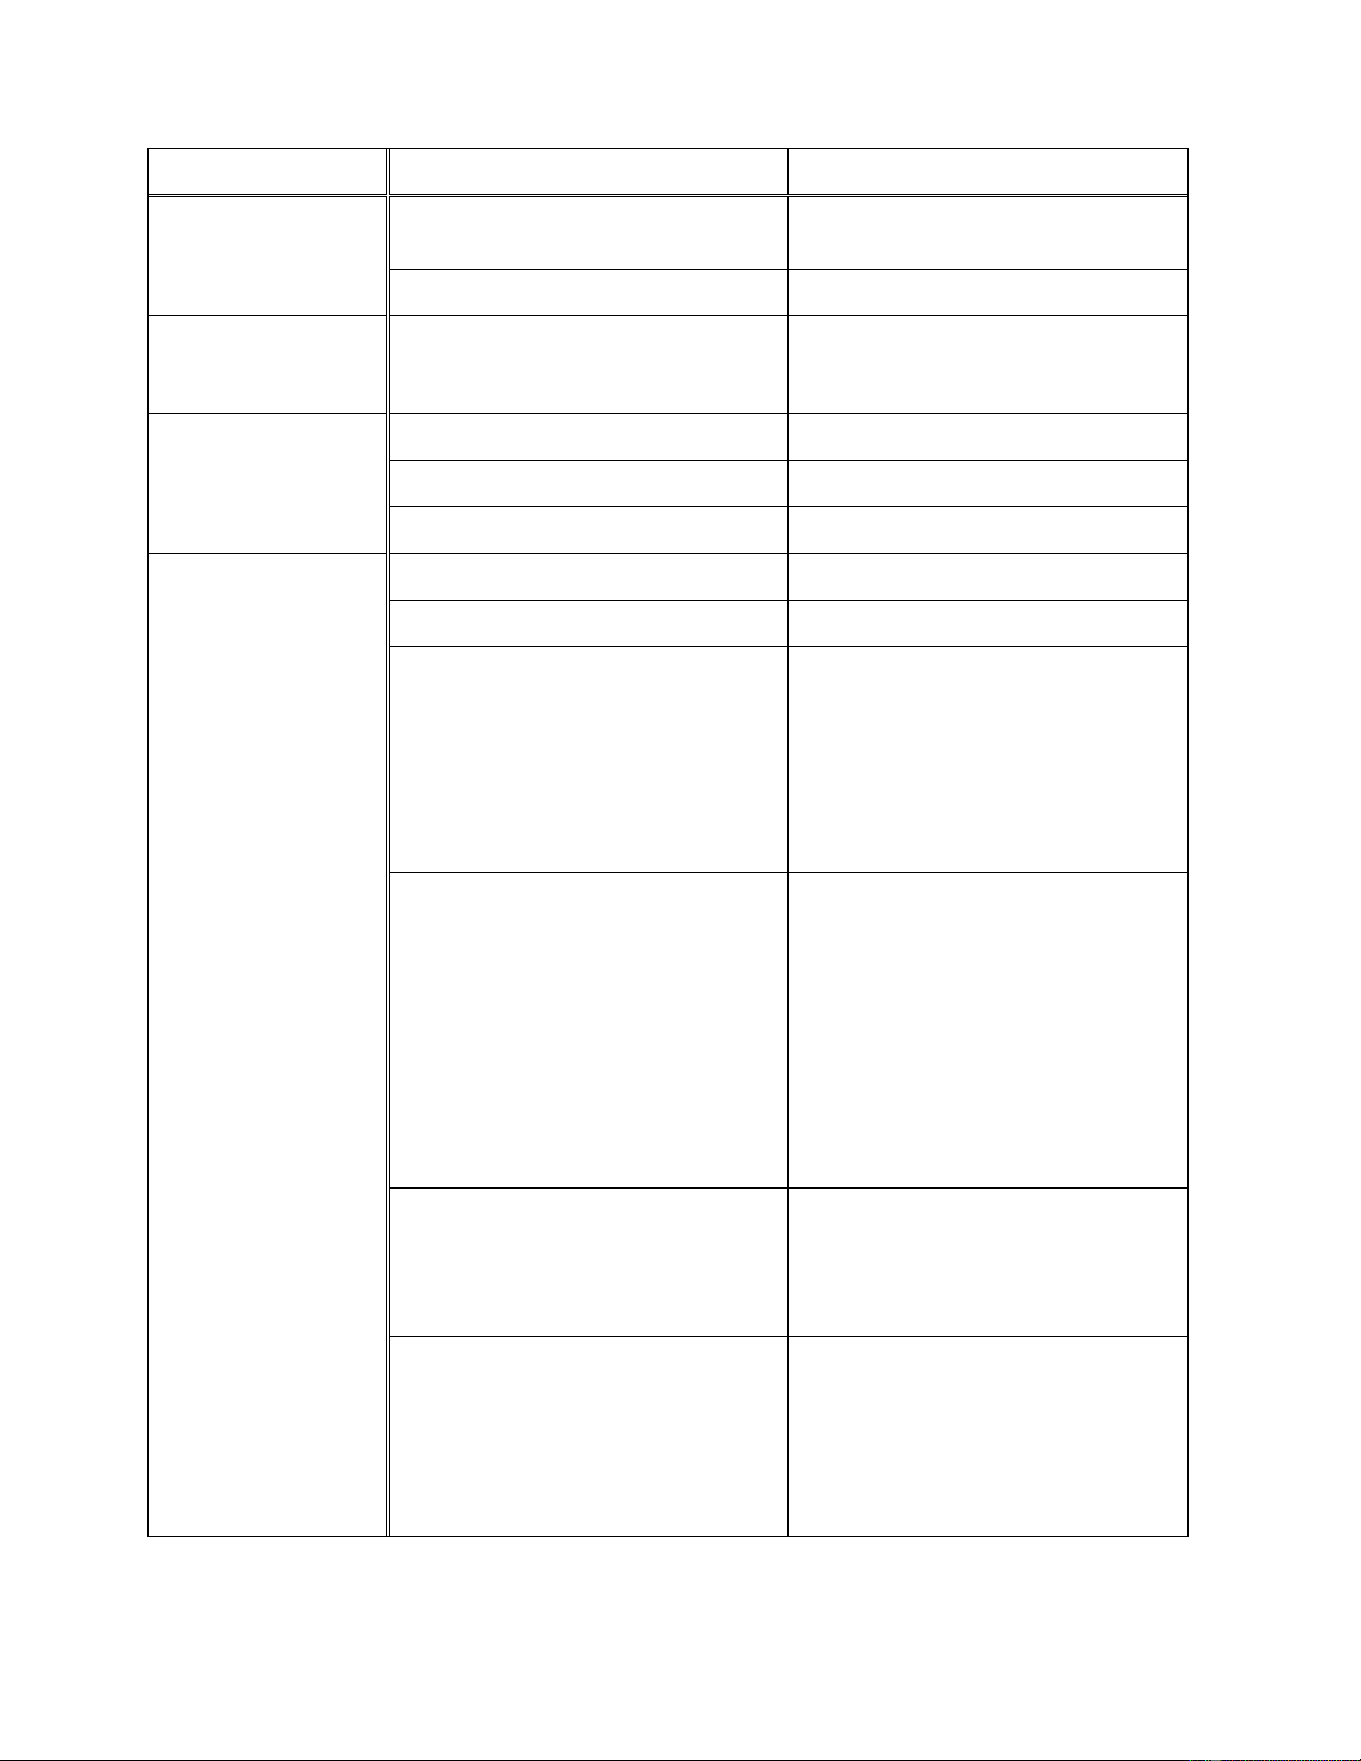
Troubleshooting: Planer Operating Problems
Trouble Probable Cause Remedy
Snipe.
Table rollers not set properly. Adjust table rollers to proper height.
Inadequate support of long boards.
Support long boards with a roller
stand.
Uneven feed roller pressure front to
back.
Adjust feed roller tension.
Dull knife inserts. Rotate or replace knife inserts.
Lumber not butted properly.
Butt end-to-end each piece of stock
as they pass through.
Fuzzy grain.
Planing wood with a high moisture
content.
Remove high moisture content from
wood by drying, or use different stock.
Dull knife inserts. Rotate or replace knife inserts.
Torn grain.
Too heavy a cut. Adjust proper depth of cut.
Knife inserts cutting against grain. Try to cut with the grain for finish cut.
Dull knife inserts. Rotate or replace knife inserts.
Rough/raised grain.
Dull knife inserts. Rotate or replace knife inserts.
Excessive depth of cut. Decrease cutting depth.
Moisture content too high.
Remove high moisture content from
wood by drying, or use different stock.
Rounded, glossy
surface.
Dull knife inserts. Rotate or replace knife inserts.
Poor feeding of
lumber.
Inadequate feed roller pressure.
Adjust feed roller tension. If proper
tension cannot be achieved, replace
feed rollers.
Planer bed rough or dirty.
Clean off pitch and residue; apply
light coat of paste wax to planer bed.
V-belts are slipping.
Check V-belt tension and make any
needed adjustments.
Surface of feed rollers has been worn
too smooth.
Lightly roughen the feed roller surface
with sandpaper.
37
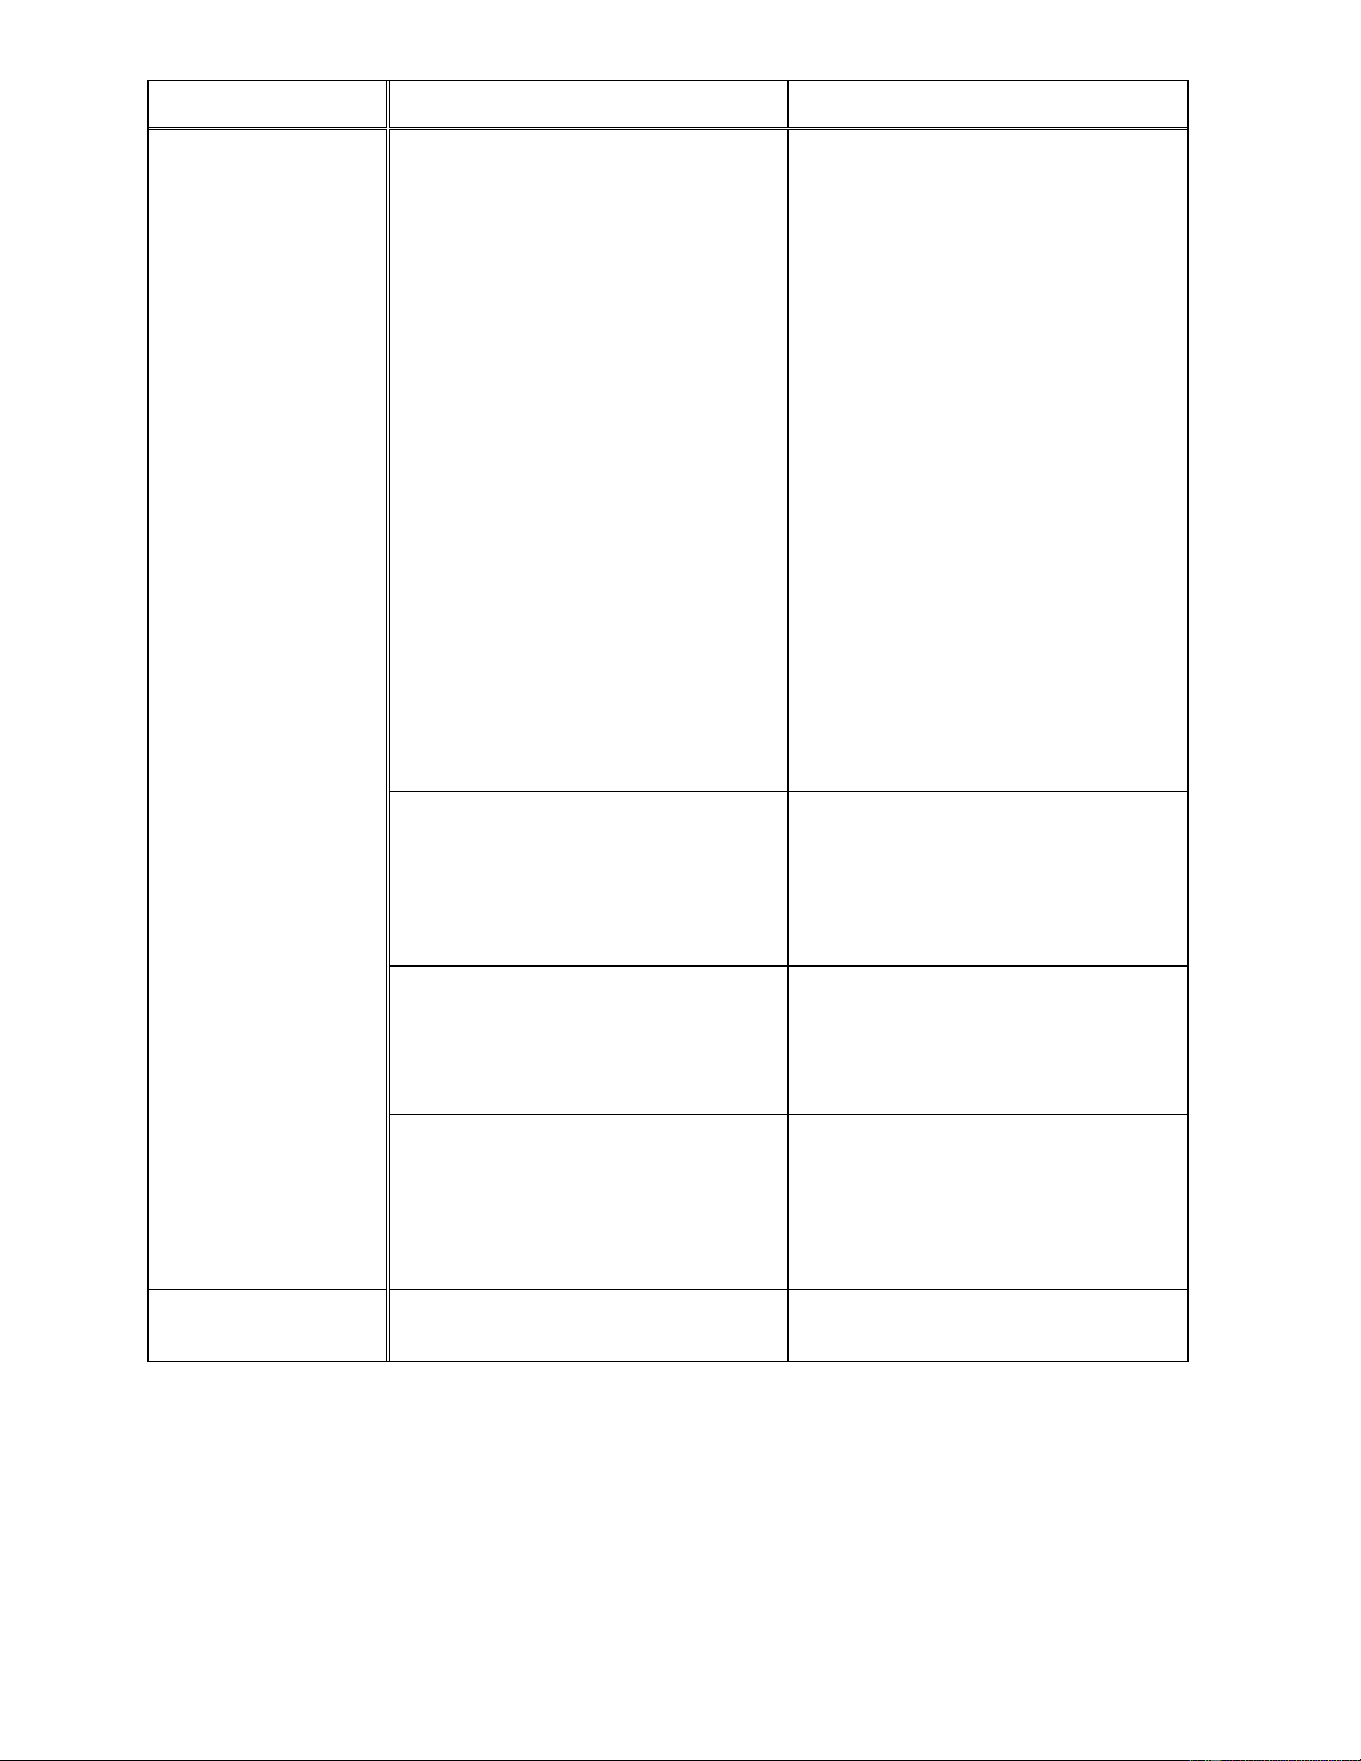
Troubleshooting: Mechanical and Electrical Problems
Trouble Probable Cause Remedy
Uneven depth of cut
side to side.
Knife inserts not set correctly.
Make sure knife inserts are set
correctly and securely in cutterhead.
Planer table not level with cutterhead. Level the table. See pages 16-17.
Board thickness does
not match depth of
cut scale.
Depth of cut scale is incorrect.
Adjust depth of cut scale. Use LED
control panel for greater precision.
Chain is jumping.
Inadequate chain tension. Adjust chain tension.
Sprockets misaligned. Align sprockets.
Sprockets worn. Replace sprockets.
Machine will not
start/restart or
repeatedly trips
circuit breaker or
blows fuses.
No incoming power. Verify machine is connected to power.
Stop button is still engaged. Rotate stop button to disengage.
Overload automatic reset has not
reset.
When the planer overloads on the
circuit breaker built into the motor
starter, it takes time for the machine
to cool down before restart. Allow
machine to adequately cool before
attempting restart. If problem persists,
check amp setting on the motor
starter inside the electrical box.
Planer frequently trips.
One cause of overload trips which are
not electrical in nature is too deep a
cut. The solution is to take a lighter
cut. If too deep a cut is not the
problem, check the amp setting on
the overload relay. Match the full load
amps on the motor as noted on the
motor plate.
If amp setting is correct, then there is
probably a loose electrical lead or a
failed component. See items below.
Building circuit breaker trips or fuse
blows.
Verify that planer is on a circuit of
correct size. If circuit size is correct,
there is probably a loose electrical
lead. Check amp setting on motor
starter.
Loose electrical connections.
Go through all of the electrical
connections on the planer including
motor connections, verifying the
tightness of each. Look for any signs
of electrical arcing which is a sure
indicator of loose connections or
circuit overload.
38
Trouble Probable Cause Remedy
Machine will not
start/restart or
repeatedly trips
circuit breaker or
blows fuses.
Motor starter failure. Examine motor starter for burned or
failed components. If damage is
found, replace motor starter. If motor
starter looks okay but is still suspect,
you have two options: have a
qualified electrician test the motor
starter for function, or purchase a new
starter and establish if that was the
problem on changeout.
If you have access to a voltmeter, you
can separate a starter failure from a
motor failure by first, verifying
incoming voltage at 220+/-20 and
second, checking the voltage
between starter and motor at 220+/-
20.
If incoming voltage is incorrect, you
have a power supply problem.
If voltage between starter and motor
is incorrect, you have a starter
problem.
If voltage between starter and motor
is correct, you have a motor problem.
Motor failure. If electric motor is suspect, you have
two options: Have a qualified
electrican test the motor for function
or remove the motor and take it to a
quality electrical motor repair shop
and have it tested.
Miswiring of the machine.
Double check to confirm all electrical
connections are correct. Refer to
appropriate wiring diagrams on pages
54 and 55 to make any needed
corrections.
Switch failure. If a start, stop, or table movement
switch is suspect, you have two
options: Have a qualified electrical
test the switch for function, or
purchase a new switch and establish
it that was the problem on changeout.
Planer does not
come up to speed.
Low current. Contact a qualified electrician.
Replacement Parts
Replacement parts are listed on the following pages. To order parts or reach our service department, call
1-800-274-6848 Monday through Friday, 8:00 a.m. to 5:00 p.m. CST. Having the Model Number and
Serial Number of your machine available when you call will allow us to serve you quickly and accurately.
Non-proprietary parts, such as fasteners, can be found at local hardware stores, or may be ordered from
Powermatic. Some parts are shown for reference only, and may not be available individually.
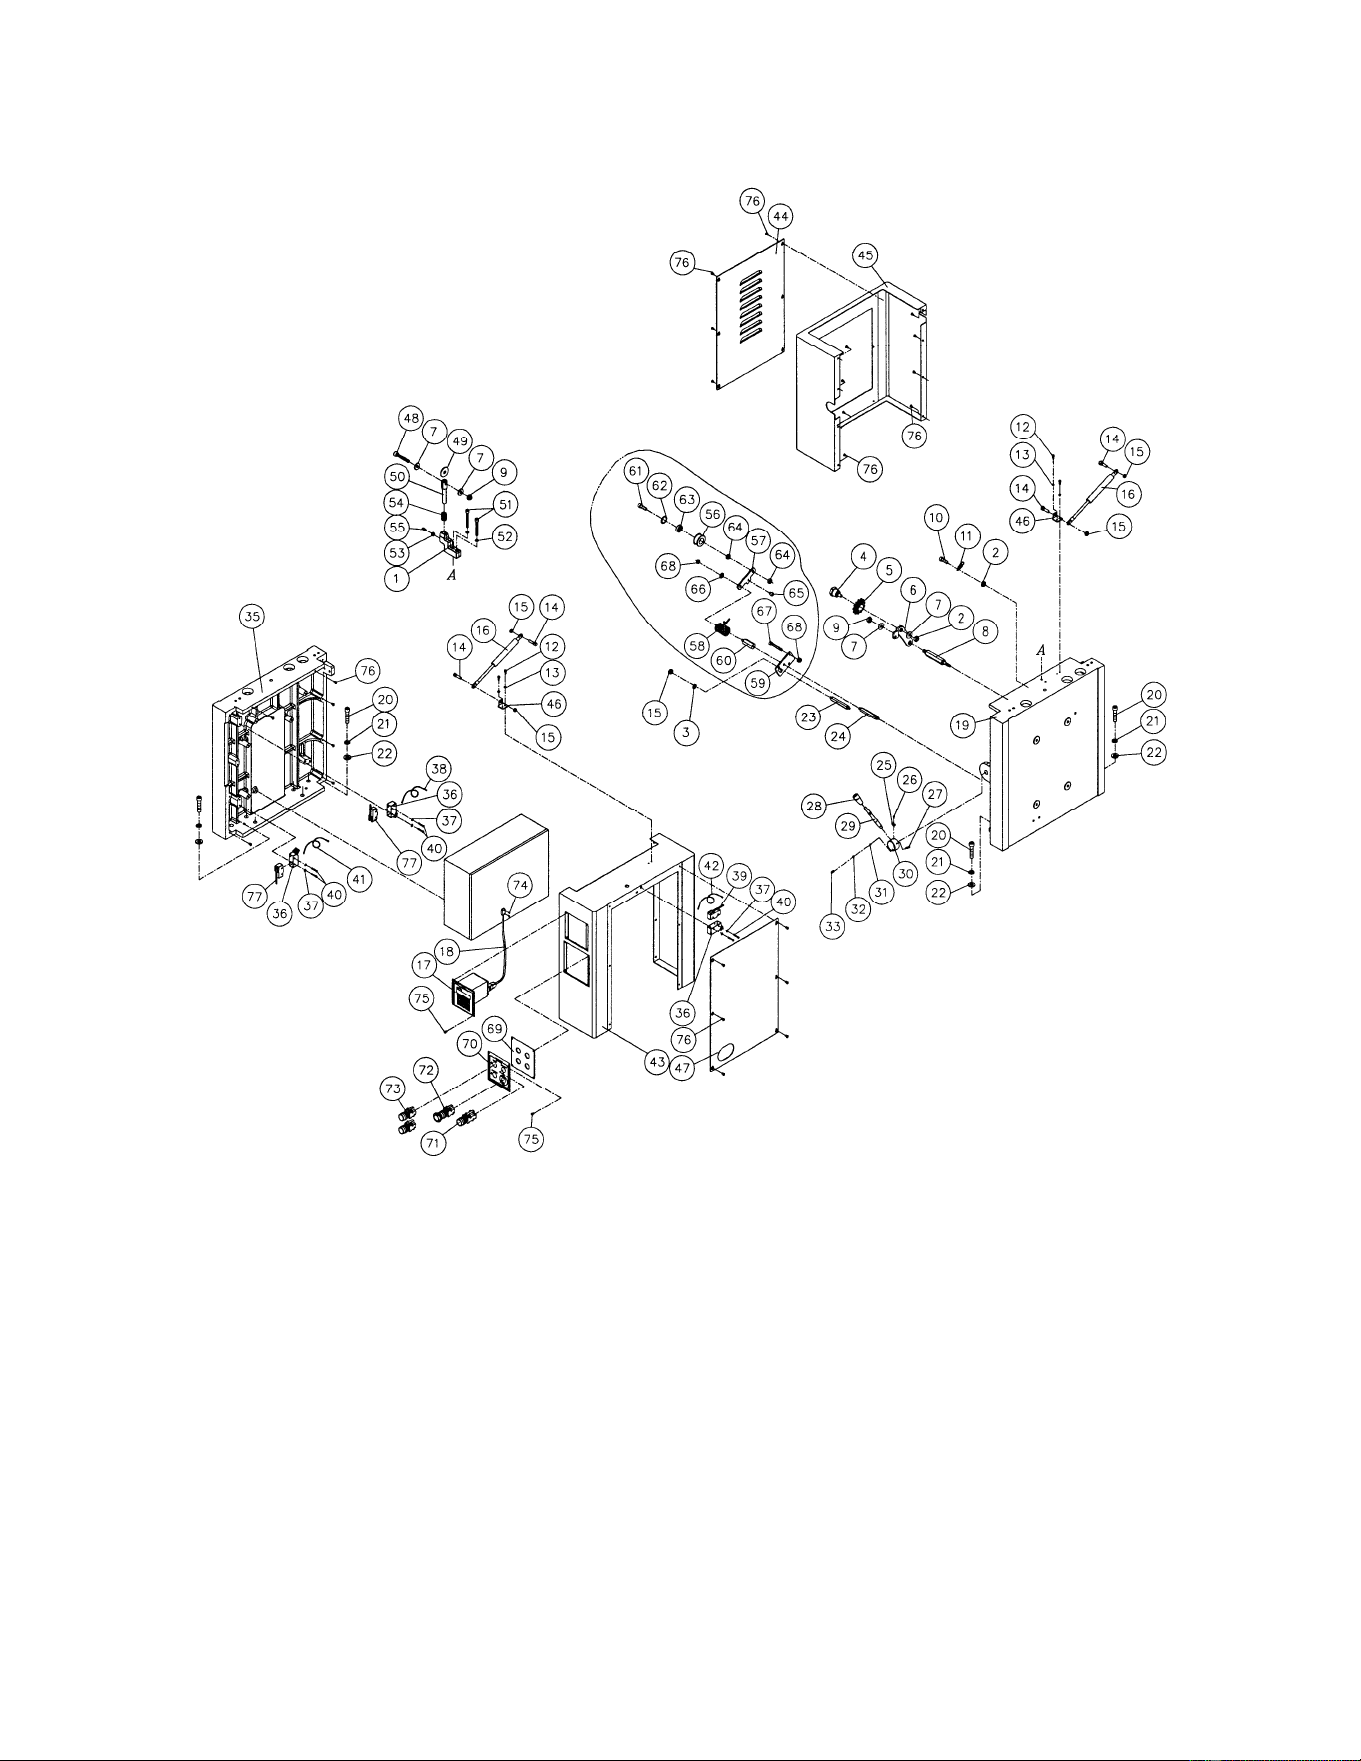
39
Column Assembly

40
Parts List: Column Assembly
Index No. Part No. Description Size Qty
1 ............... WP2510-401 ............ Idler Support Base ............................................... .................................... 1
2 ............... TS-1540071 ............. Hex Nut ................................................................ M10 ............................. 2
3 ............... TS-1550061 ............. Flat Washer .......................................................... M8 ............................... 1
4 ............... 6012082 ................... Shaft ..................................................................... .................................... 1
5 ............... 6012286 ................... Sprocket ............................................................... .................................... 1
6 ............... 6012287 ................... Sprocket Bracket .................................................. .................................... 1
7 ............... TS-1550071 ............. Flat Washer .......................................................... M10 ............................. 4
8 ............... WP2510-408 ............ Shaft ..................................................................... .................................... 1
9 ............... TS-1541041 ............. Nylon Insert Lock Nut ........................................... M10 ............................. 2
10 ............. TS-1505071 ............. Socket Head Cap Screw ...................................... M10x45 ....................... 1
11 ............. WP2510-411 ............ Spring ................................................................... .................................... 1
12 ............. TS-1502031 ............. Socket Head Cap Screw ...................................... M5x12 ......................... 4
13 ............. TS-1551031 ............. Lock Washer ........................................................ M5 ............................... 4
14 ............. WP2510-414 ............ Shoulder Screw .................................................... .................................... 4
15 ............. TS-1541031 ............. Nylon Insert Lock Nut ........................................... M8 ............................... 4
16 ............. WP2510-416 ............ Cylinder ................................................................ .................................... 2
17 ............. WP2510-417 ............ Controller .............................................................. .................................... 1
18 ............. WP2510-418 ............ Cord ..................................................................... .................................... 1
19 ............. WP2510-419 ............ Left Column .......................................................... .................................... 1
20 ............. TS-1506051 ............. Socket Head Cap Screw ...................................... M12x40 ..................... 12
21 ............. TS-1551081 ............. Lock Washer ........................................................ M12 ........................... 12
22 ............. TS-2360121 ............. Flat Washer .......................................................... M12 ........................... 12
23 ............. WP2510-423 ............ Shaft ..................................................................... .................................... 1
24 ............. WP2510-424 ............ Shaft ..................................................................... .................................... 1
25 ............. WP2510-425 ............ Pointer .................................................................. .................................... 1
26 ............. TS-2171012 ............. Pan Head Screw .................................................. M4x6 ........................... 1
27 ............. WP2510-427 ............ Pin ........................................................................ .................................... 1
28 ............. 6012214 ................... Handle Knob ........................................................ .................................... 1
29 ............. 6012213 ................... Handle Shaft ........................................................ .................................... 1
30 ............. WP2510-430 ............ Shift Hub .............................................................. .................................... 1
31 ............. WP2510-431 ............ Steel Ball .............................................................. .................................... 1
32 ............. WP2510-432 ............ Spring ................................................................... .................................... 1
33 ............. TS-1524031 ............. Set Screw ............................................................. M8x12 ......
................... 1
35 ............. WP2510-435 ............ Right Column ....................................................... .................................... 1
36 ............. WP2510-436 ............ Plastic Cover ........................................................ .................................... 3
37 ............. TS-1550021 ............. Flat Washer .......................................................... M4 ............................... 6
38 ............. WP2510-438 ............ Limit Switch Cord..................................18AWG x 2C x 750mm ............... 1
39 ............. WP2510-439 ............ Limit Switch .......................................................... .................................... 1
40 ............. TS-2284302 ............. Pan Head Screw .................................................. M4x30 ......................... 6
41 ............. WP2510-441 ............ Limit Switch Cord..................................18AWG x 2C x 400mm ............... 1
42 ............. WP2510-442 ............ Limit Switch Cord..................................18AWG x 2C x 900mm ............... 1
43 ............. WP2510-443 ............ Right Cover .......................................................... .................................... 1
44 ............. WP2510-444 ............ Left Panel ............................................................. .................................... 1
45 ............. WP2510-445 ............ Left Cover ............................................................. .................................... 1
46 ............. WP2510-446 ............ Cylinder Bracket ................................................... .................................... 2
47 ............. WP2510-447 ............ Right Panel........................................................... .................................... 1
48 ............. TS-1505061 ............. Socket Head Cap Screw ...................................... M10x40 ....................... 1
49 ............. WP2510-449 ............ Washer ................................................................. .................................... 1
50 ............. WP2510-450 ............ Shaft ..................................................................... .................................... 1
51 ............. TS-1504081 ............. Socket Head Cap Screw ...................................... M8x40 ......................... 2
52 ............. TS-1551061 ............. Lock Washer ........................................................ M8 ............................... 2
53 ............. TS-1540041 ............. Hex Nut ................................................................ M6 ............................... 1
54 ............. WP2510-454 ............ Spring ................................................................... .................................... 1
55 ............. TS-1523061 ............. Set Screw ............................................................. M6x20 ......................... 1
................. WP2510-IA ............... Idler Assembly (Items 56 thru 68) ........................ .................................... 1
56 ............. WP2510-456 ............ Idler ...................................................................... .................................... 1
57 ............. WP2510-457 ............ Idler Bracket ......................................................... .................................... 1

41
Index No. Part No. Description Size Qty
58 ............. WP2510-458 ............ Spring ................................................................... .................................... 1
59 ............. WP2510-459 ............ Plate ..................................................................... .................................... 1
60 ............. WP2510-460 ............ Bolt ....................................................................... .................................... 1
61 ............. TS-1505041 ............. Socket Head Cap Screw ...................................... M10x30 ....................... 1
62 ............. WP2510-462 ............ C-Ring .................................................................. .................................... 1
63 ............. BB-6200ZZ ............... Ball Bearing .......................................................... 6200ZZ........................ 1
64 ............. TS-1540071 ............. Hex Nut ................................................................ M10 ............................. 2
65 ............. WP2510-465 ............ Socket Head Cap Screw ...................................... M8x8 ........................... 1
66 ............. TS-1550061 ............. Flat Washer .......................................................... M8 ............................... 1
67 ............. TS-1504121 ............. Socket Head Cap Screw ...................................... M8x60 ......................... 1
68 ............. TS-1540061 ............. Hex Nut ................................................................ M8 ............................... 1
69 ............. WP2510-469 ............ Inner Plate ............................................................ .................................... 1
70 ............. WP2510-470 ............ Outer Plate (Controls) .......................................... .................................... 1
71 ............. WP2510-471 ............ Main Motor Pushbutton Switch ............................ .................................... 1
72 ............. WP2510-472 ............ Emergency Stop Pushbutton Switch ................... .................................... 1
73 ............. WP2510-473 ............ Table Pushbutton Switch ..................................... .................................... 2
74 ............. WP2510-474 ............ Screw .................................................................. M3x15 ......................... 2
75 ............. TS-2244102 ............. Button Head Socket Screw .................................. M4x10 ......................... 8
76 ............. TS-2246102 ............. Button Head Socket Screw .................................. M6x10 ....................... 28
77 ............. WP2510-477 ............ Limit Switch .......................................................... .................................... 2
................. 6012230 ................... Scale (not shown) ................................................ .................................... 1
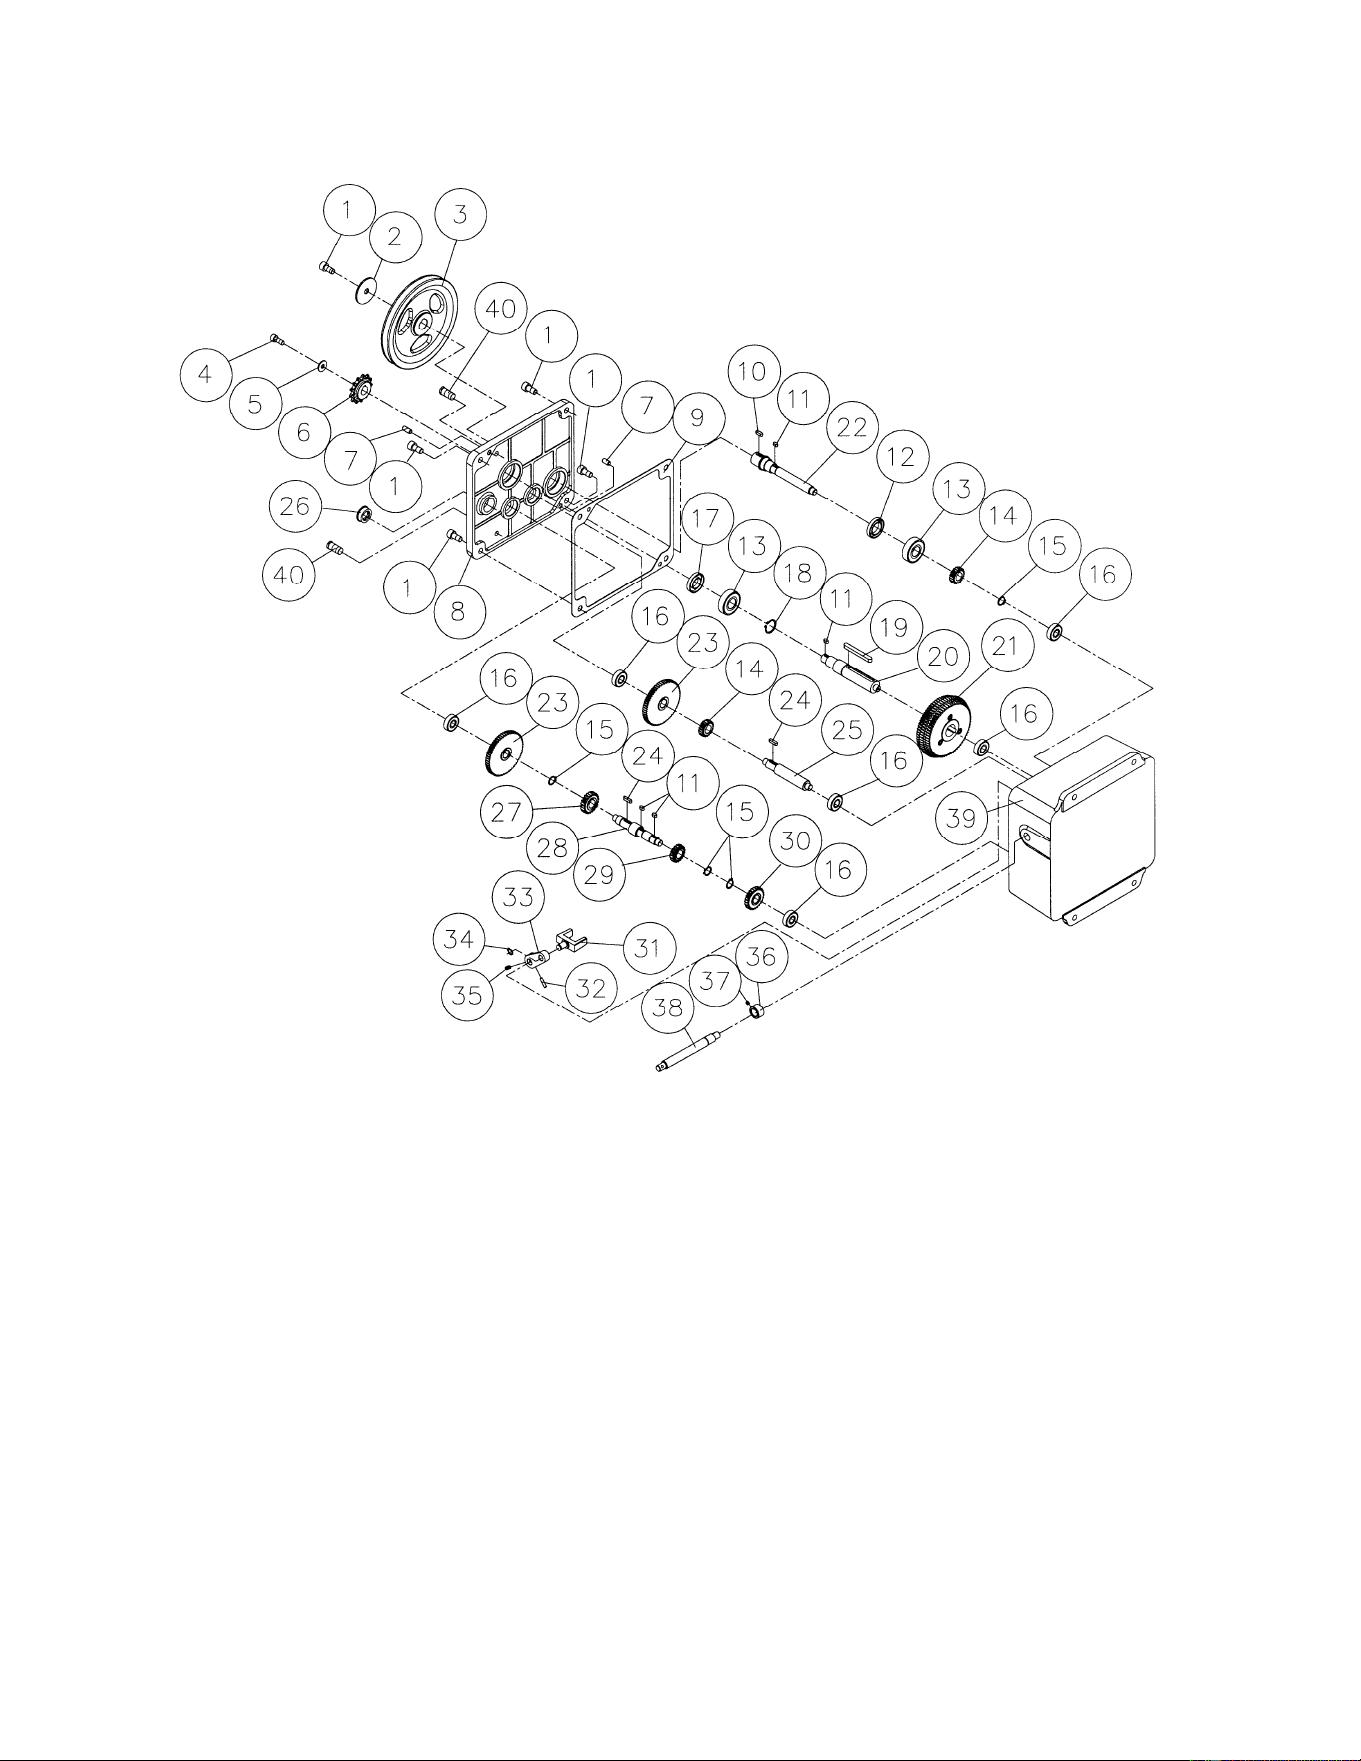
42
Gearbox Assembly

43
Parts List: Gearbox Assembly
Index No. Part No. Description Size Qty
................. WP2510-100 ............ Gearbox Assembly (index nos. 1 through 40) ..... .................................... 1
1 ............... TS-1505021 ............. Socket Head Cap Screw ...................................... M10x20 ....................... 5
2. .............. 6012047 ................... Washer ................................................................. .................................... 1
3 ............... 6012046 ................... Pulley ................................................................... .................................... 1
4 ............... TS-1504041 ............. Socket Head Cap Screw ...................................... M8x20 ......................... 1
5 ............... TS-1550061 ............. Flat Washer .......................................................... M8 ............................... 1
6 ............... 6012050 ................... Sprocket ............................................................... .................................... 1
7 ............... WP2510-107 ............ Pin ........................................................................ .................................... 2
8 ............... WP2510-108 ............ Gearbox Cover ..................................................... .................................... 1
9 ............... WP2510-109 ............ Gasket .................................................................. .................................... 1
10 ............. WP2510-110 ............ Key ....................................................................... 5x5x16 ........................ 1
11 ............. WP2510-111 ............ Key ....................................................................... 5x5x10 ........................ 4
12 ............. WP2510-112 ............ Oil Seal ................................................................. .................................... 1
13 ............. BB-6204VV .............. Ball Bearing .......................................................... 6204VV ....................... 2
14 ............. 6012037 ................... Gear ..................................................................... 20T .............................. 2
15 ............. WP2510-115 ............ S-Ring .................................................................. .................................... 4
16 ............. BB-6201VV .............. Ball Bearing ......................................................... 6201VV ....................... 6
17 ............. WP2510-117 ............ Oil Seal ................................................................. .................................... 1
18 ............. WP2510-118 ............ S-Ring .................................................................. .................................... 1
19 ............. WP2510-119 ............ Key ....................................................................... 8x7x72 ........................ 1
20 ............. WP2510-120 ............ Shaft ..................................................................... .................................... 1
21 ............. WP2510-121 ............ Gear ..................................................................... .................................... 1
22 ............. WP2510-122 ............ Shaft ..................................................................... .................................... 1
23 ............. 6012041 ................... Gear ..................................................................... 60T .............................. 2
24 ............. WP2510-124 ............ Key ....................................................................... 5x5x20 ........................ 2
25 ............. WP2510-125 ............ Shaft ..................................................................... .................................... 1
26 ............. WP2510-126 ............ Oil Level Sight Glass ............................................ .................................... 1
27 ............. WP2510-127 ............ Gear ..................................................................... .................................... 1
28 ............. WP2510-128 ............ Shaft ..................................................................... .................................... 1
29 ............. WP2510-129 ............ Gear ..................................................................... .................................... 1
30 ............. WP2510-130 ............ Gear ..................................................................... .................................... 1
31 ............. WP2510-131 ............ Shift Fork .............................................................. .................................... 1
32 ............. WP2510-132 ............ Pin ........................................................................ .................................... 1
33 ............. 6012061 ................... Lever .................................................................... .....
............................... 1
34 ............. WP2510-134 ............ S-Ring .................................................................. .................................... 1
35 ............. TS-1523021 ............. Set Screw ............................................................. M6x8 ........................... 1
36 ............. WP2510-136 ............ Bushing ................................................................ .................................... 1
37 ............. TS-1523011 ............. Set Screw ............................................................. M6x6 ........................... 1
38 ............. WP2510-138 ............ Shift Shaft ............................................................. .................................... 1
39 ............. WP2510-139 ............ Gearbox ............................................................... .................................... 1
40 ............. WP2510-140 ............ Oil Plug ................................................................. .................................... 2

44
Parts List: Cutterhead Assembly
Index No. Part No. Description Size Qty
1 ............... WP2510-201 ............ Socket Head Cap Screw ...................................... M10x75 ....................... 2
2. .............. TS-1550071 ............. Flat Washer .......................................................... M10 ........................... 12
3 ............... 6012132 ................... Spring ................................................................... .................................... 2
4 ............... WP2510-204 ............ Wave Washer....................................................... .................................... 1
5 ............... TS-1505061 ............. Socket Head Cap Screw ...................................... M10x40 ....................... 4
6 ............... WP2510-206 ............ Pressure Bar ........................................................ .................................... 1
7 ............... TS-1540071 ............. Hex Nut ................................................................ M10 ........................... 10
................. WP2510-BHA ........... Bearing Housing Assembly (index #8-13,18,71) . .................................... 6
(s/n 13050398 and higher)
8 ............... WP2510-208 ............ Needle Bearing .................................................... NA-6906 ...................... 6
9 ............... WP2510-209 ............ Set Screw ............................................................. M6x30 ......................... 6
10 ............. TS-1540041 ............. Hex Nut ................................................................ M6 ............................... 6
11 ............. 6012141 ................... Bearing Housing
(s/n 12070395 and lower) ............ .................................... 6
................. 6012141A ................. Bearing Housing (s/n 13050398 and higher) ........... .................................... 6
12 ............. TS-1503041 ............. Socket Head Cap Screw ...................................... M6x16 ....................... 12
13 ............. WP2510-213 ............ Plate
(s/n 12070395 and lower) ............................... .................................... 6
................. 6012139A ................. Plate (s/n 13050398 and higher) .............................. .................................... 6
14 ............. WP2510-214 ............ Rear Outfeed Roller ............................................. .................................... 1
15 ............. WP2510-215 ............ Key ....................................................................... 5x5x12 ........................ 2
16 ............. WP2510-216 ............ C-Ring .................................................................. .................................... 6
17 ............. 6012177 ................... Spacer .................................................................. .................................. 79
18 ............. WP2510-218 ............ C-Ring .................................................................. .................................... 6
19 ............. WP2510-219 ............ Sprocket ............................................................... .................................... 2
20 ............. TS-1550061 ............. Flat Washer .......................................................... M8 ............................... 3
21 ............. TS-1504041 ............. Socket Head Cap Screw ...................................... M8x20 ......................... 2
22 ............. WP2510-222 ............ Key ....................................................................... 8x7x35 ........................ 2
23 ............. WP2510-223 ............ Front Outfeed Roller ............................................ .................................... 1
24 ............. WP2510-224 ............ Socket Head Cap Screw (Left Thread) ................ M8x20 ......................... 1
25 ............. WP2510-225 ............ Sprocket ............................................................... 22T .............................. 2
26 ............. WP2510-226 ............ S-Ring .................................................................. .................................... 1
27 ............. WP2510-227 ............ Ball Bearing .......................................................... 6210VV ....................... 2
28 ............. WP2510-228 ............ Bushing ................................................................ .................................... 1
................. WP2510-HCA .......... Helical Cutterhead Assembly (includes #29, 68, 69) ................................ 1
29 ............. WP2510-829 ............ Helical Cutterhead ............................................... .................................... 1
30 ............. BB-6008VV .............. Ball Bearing .......................................................... 6008VV ....................... 1
31 ............. BB-6007VV .............. Ball Bearing .......................................................... 6007VV ....................... 1
32 ............. WP2510-232A .......... S-Ring .................................................................. .................................... 1
33 ............. WP2510-233 ............ Chain .................................................................... #40 x 58P .................... 1
34 ............. WP2510-234 ............ Chain .................................................................... #40 x 74P .................... 1
35 ............. TS-1505081 ............. Socket Head Cap Screw ...................................... M10x50 ....................... 4
36 ............. TS-1551071 ............. Lock Washer ........................................................ M10 ............................. 6
37 ............. WP2510-237 ............ Pin ........................................................................ .................................... 4
38 ............. TS-1505021 ............. Socket Head Cap Screw ...................................... M10x20 ....................... 7
39 ............. WP2510-239 ............ Spring Support Shaft ............................................ .................................... 2
40 ............. TS-1524021 ............. Set Screw ............................................................. M8x10 ....................... 12
41 ............. WP2510-241A .......... Left Cutterhead Base
(s/n 9090287 and higher) ...... .................................... 1
42 ............. WP2510-242 ............ Cutterhead Base Support Shaft ........................... .................................... 2
43 ............. WP2510-243 ............ Chipbreaker Support Shaft .................................. .................................... 1
44 ............. 6012167 ................... Infeed Roller ......................................................... .................................. 24
45 ............. 6012168 ................... Shaft ..................................................................... ................................ 144
46 ............. 6012169 ................... Spring ................................................................... ................................ 144
47 ............. WP2510-247 ............ Anti-Kickback Finger Support Shaft ..................... .................................... 2
48 ............. 6012164 ................... Infeed Roller Spacer ............................................ .................................... 2
49 ............. WP2510-249B .......... Right Cutterhead Base
(s/n 9090287 and higher) ... .................................... 1
50 ............. 6012116 ................... Washer ................................................................. .................................... 1
51 ............. WP2510-251 ............ Cutterhead Pulley ................................................ .................................... 1
52 ............. WP2510-252 ............ Socket Head Cap Screw (Left Thread) ................ M10x20 ....................... 1
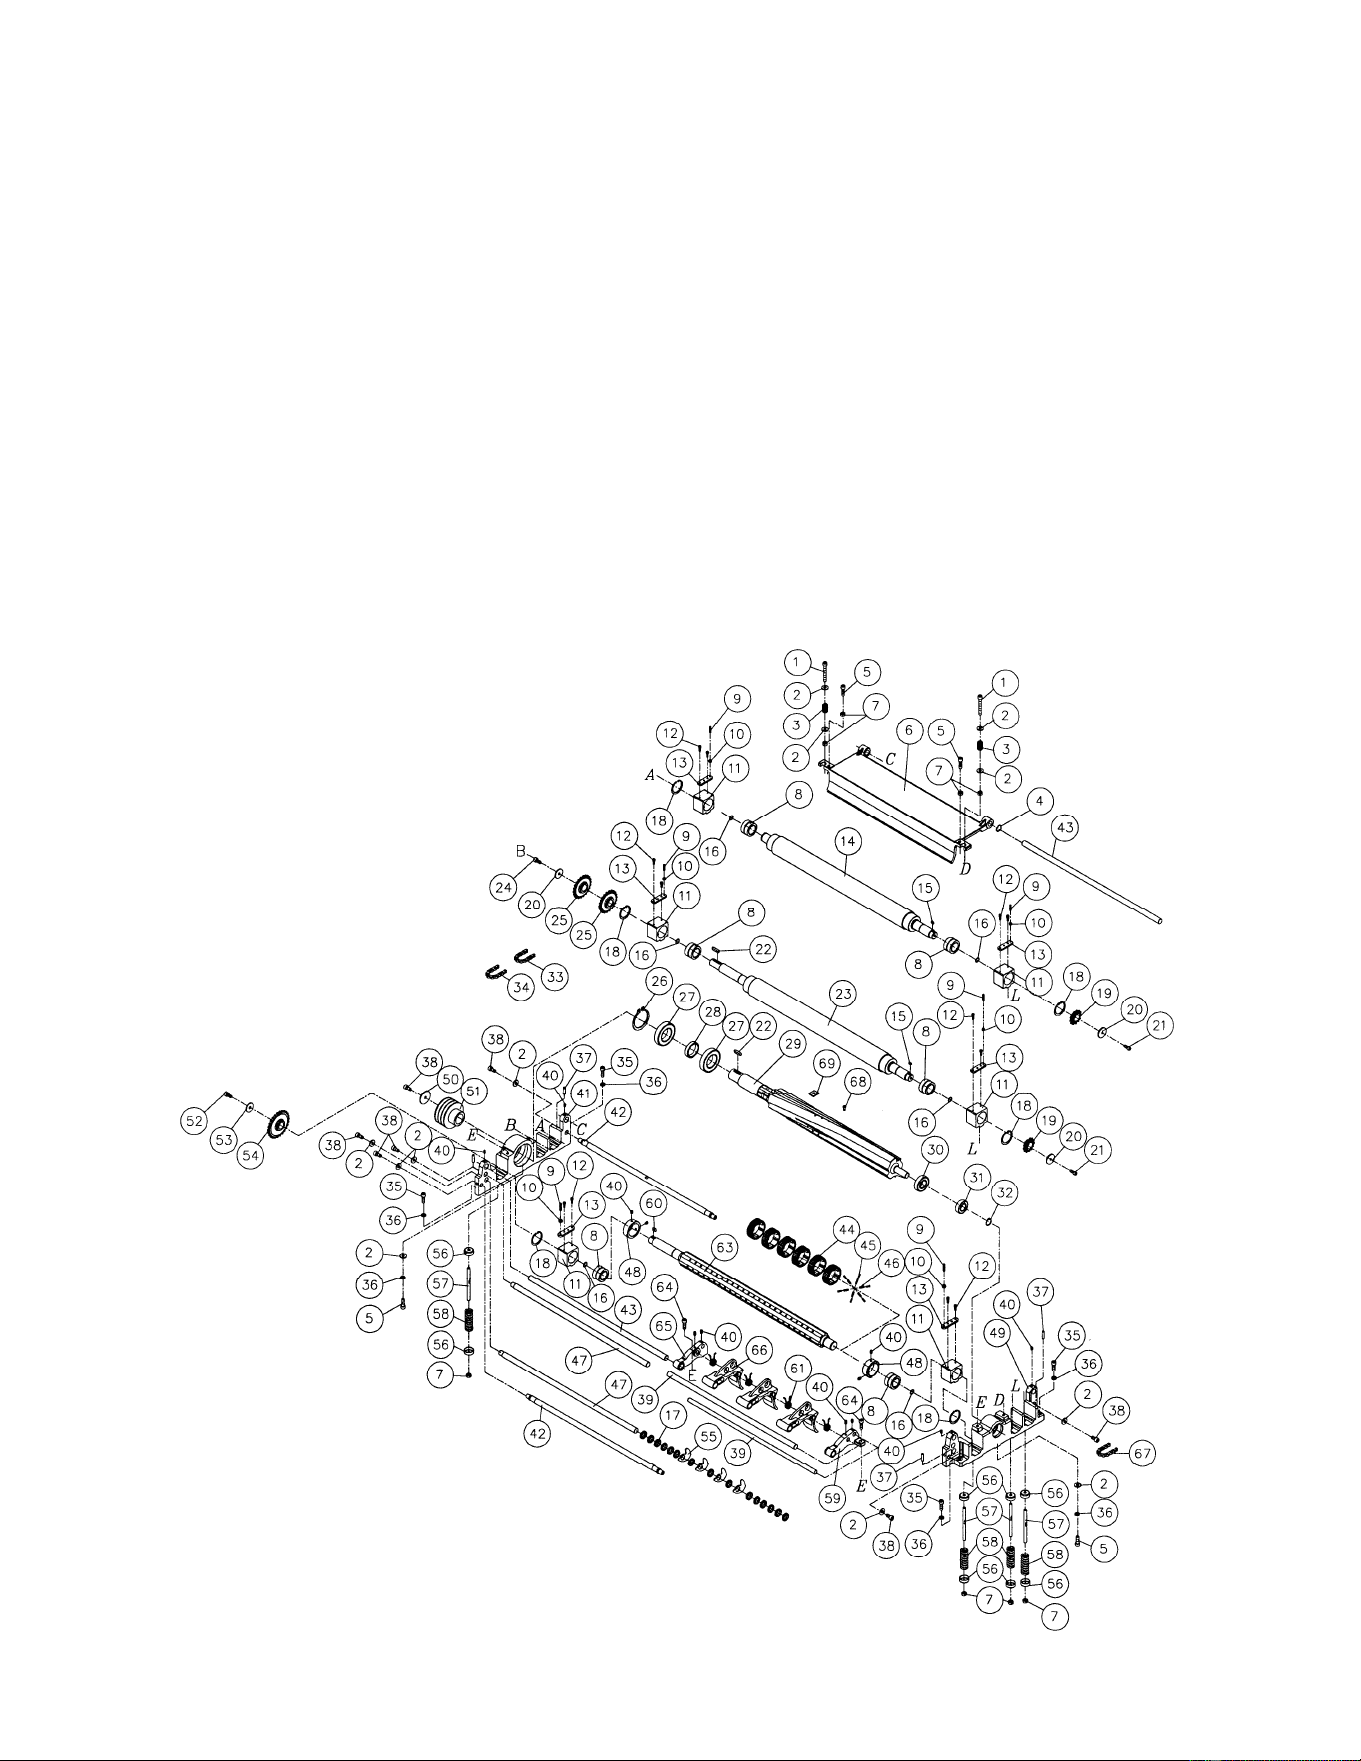
45
Index No. Part No. Description Size Qty
53 ............. TS-1550071 ............. Flat Washer .......................................................... M10 ............................. 1
54 ............. WP2510-254 ............ Sprocket ............................................................... 26T .............................. 1
55 ............. 6012178 ................... Anti-Kickback Finger ............................................ .................................. 70
56 ............. 6012161 ................... Washer ................................................................. .................................. 12
57 ............. 6012163 ................... Shaft ..................................................................... .................................... 6
58 ............. 6012162 ................... Spring ................................................................... .................................... 6
59 ............. WP2510-259 ............ Right Bracket........................................................ .................................... 1
60 ............. WP2510-260 ............ Key ....................................................................... 8x7x16 ........................ 1
61 ............. 6012175 ................... Spring ................................................................... .................................. 11
63 ............. WP2510-263 ............ Infeed Roller Shaft ............................................... .................................... 1
64 ............. TS-1505041 ............. Socket Head Cap Screw ...................................... M10x30 ....................... 2
65 ............. WP2510-265 ............ Left Bracket .......................................................... .................................... 1
66 ............. 6012174 ................... Chipbreaker.......................................................... .................................. 11
67 ............. WP2510-267 ............ Chain .................................................................... #40 x 24P .................... 1
68 ............. JWP208HH-111 ....... Knife Insert Screw ................................................ #10-32 x 1/2” ........... 174
69 ............. 1791212 ................... Knife Insert (sold as set of 10) ............................. ................................ 174
70 ............. JJ6HH-113 ............... Star Point Screwdriver (not shown) ..................... .................................... 2
71 ............. WP2510-71 .............. Oil Cup (not shown)
(s/n 13050398 and higher) ...... .................................... 6
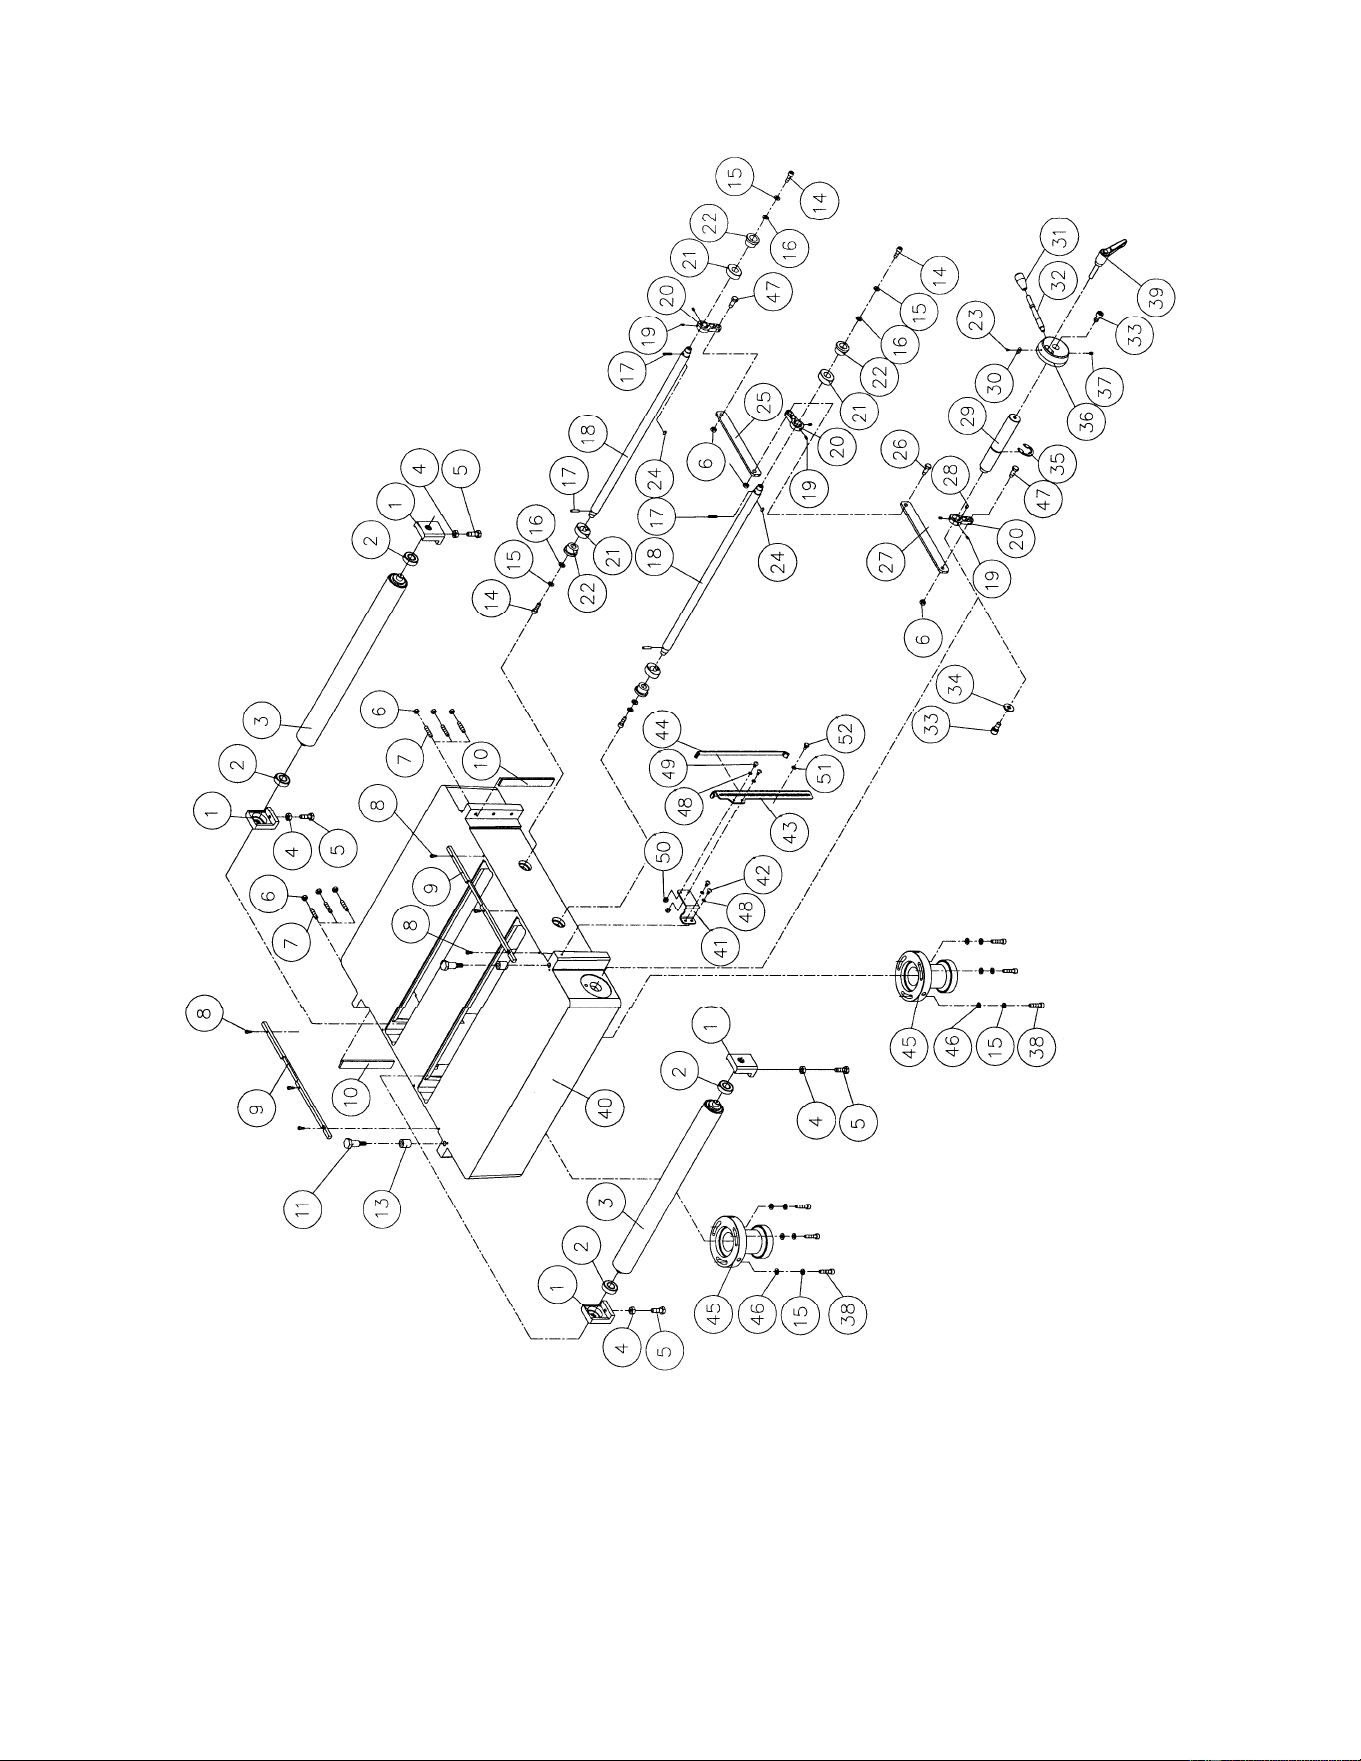
46
Table Assembly

47
Parts List: Table Assembly
Index No. Part No. Description Size Qty
1 ............... WP2510-501 ............ Roller Bracket....................................................... .................................... 4
2 ............... BB-6203VV .............. Ball Bearing .......................................................... 6203VV ....................... 4
3 ............... WP2510-503 ............ Roller .................................................................... .................................... 2
4 ............... TS-1540071 ............. Hex Nut ................................................................ M10 ............................. 4
5 ............... TS-1491041 ............. Hex Cap Screw .................................................... M10x30 ....................... 4
6 ............... TS-1540061 ............. Hex Nut ................................................................ M8 ............................... 9
7 ............... WP2510-507 ............ Set Screw ............................................................. M8x40 ......................... 6
8 ............... TS-1502091 ............. Socket Head Cap Screw ...................................... M5x40 ......................... 6
9 ............... WP2510-509 ............ Guide .................................................................... .................................... 2
10 ............. 6012241 ................... Plate ..................................................................... .................................... 2
11 ............. WP2510-511 ............ Shoulder Screw .................................................... .................................... 2
13 ............. 6012239 ................... Sleeve .................................................................. .................................... 2
14 ............. TS-1504051 ............. Socket Head Cap Screw ...................................... M8x25 ......................... 4
15 ............. TS-1551061 ............. Lock Washer ........................................................ M8 ............................. 10
16 ............. TS-1550061 ............. Flat Washer .......................................................... M8 ............................... 4
17 ............. WP2510-517 ............ Pin ........................................................................ .................................... 4
18 ............. WP2510-518 ............ Transfer Roller ..................................................... .................................... 2
19 ............. TS-1522021 ............. Set Screw ............................................................. M5x8 ........................... 6
20 ............. 6012248 ................... Linking Plate......................................................... .................................... 3
21 ............. 6012261 ................... Eccentric Cam ...................................................... .................................... 4
22 ............. 6012260 ................... Shaft ..................................................................... .................................... 4
23 ............. TS-2171012 ............. Pan Head Screw .................................................. M4x6 ........................... 1
24 ............. WP2510-111 ............ Key ....................................................................... 5x5x10 ........................ 2
25 ............. WP2510-525 ............ Rear Linking Plate ................................................ .................................... 1
26 ............. 6012258 ................... Shoulder Screw .................................................... .................................... 1
27 ............. WP2510-527 ............ Front Linking Plate ............................................... .................................... 1
28 ............. WP2510-528 ............ Key ....................................................................... 5x5x8 .......................... 1
29 ............. 6012249 ................... Shaft ..................................................................... .................................... 1
30 ............. WP2510-530 ............ Pointer .................................................................. .................................... 1
31 ............. 6012214 ................... Handle Knob ........................................................ .................................... 1
32 ............. 6012213 ................... Handle Shaft ........................................................ .................................... 1
33 ............. TS-1505021 ............. Socket Head Cap Screw ...................................... M10x20 ....................... 2
34 ............. TS-1550071 ............. Flat Washer .......................................................... M10 ............................. 1
35 ............. WP2510-535 ............ E-Clip ................................................................... .........
........................... 1
36 ............. 6012252 ................... Hub ....................................................................... .................................... 1
37 ............. TS-1523021 ............. Set Screw ............................................................. M6x8 ........................... 1
38 ............. TS-1504081 ............. Socket Head Cap Screw ...................................... M8x40 ......................... 6
39 ............. 6012253 ................... Locking Handle .................................................... .................................... 1
40 ............. WP2510-540 ............ Table .................................................................... .................................... 1
41 ............. WP2510-541 ............ Pointer .................................................................. .................................... 1
42 ............. TS-2245102 ............. Button Head Socket Screw .................................. M5x10 ......................... 2
43 ............. WP2510-543 ............ Slide Bracket ........................................................ .................................... 1
44 ............. WP2510-544 ............ Magnetic Bar ........................................................ .................................... 1
45 ............. 6012244 ................... Table Adjusting Hub ............................................. .................................... 2
46 ............. TS-1550061 ............. Flat Washer .......................................................... M8 ............................... 6
47 ............. 6012247 ................... Shoulder Screw .................................................... .................................... 1
48 ............. TS-2361051 ............. Lock Washer ........................................................ M5 ............................... 4
49 ............. WP2510-549 ............ Screw ................................................................... M5x15 ......................... 2
50 ............. TS-1541011 ............. Lock Nut ............................................................... M5 ............................... 2
51 ............. WP2510-551 ............ Wave Washer....................................................... M5 ............................... 1
52 ............. WP2510-552 ............ Shoulder Screw .................................................... .................................... 1
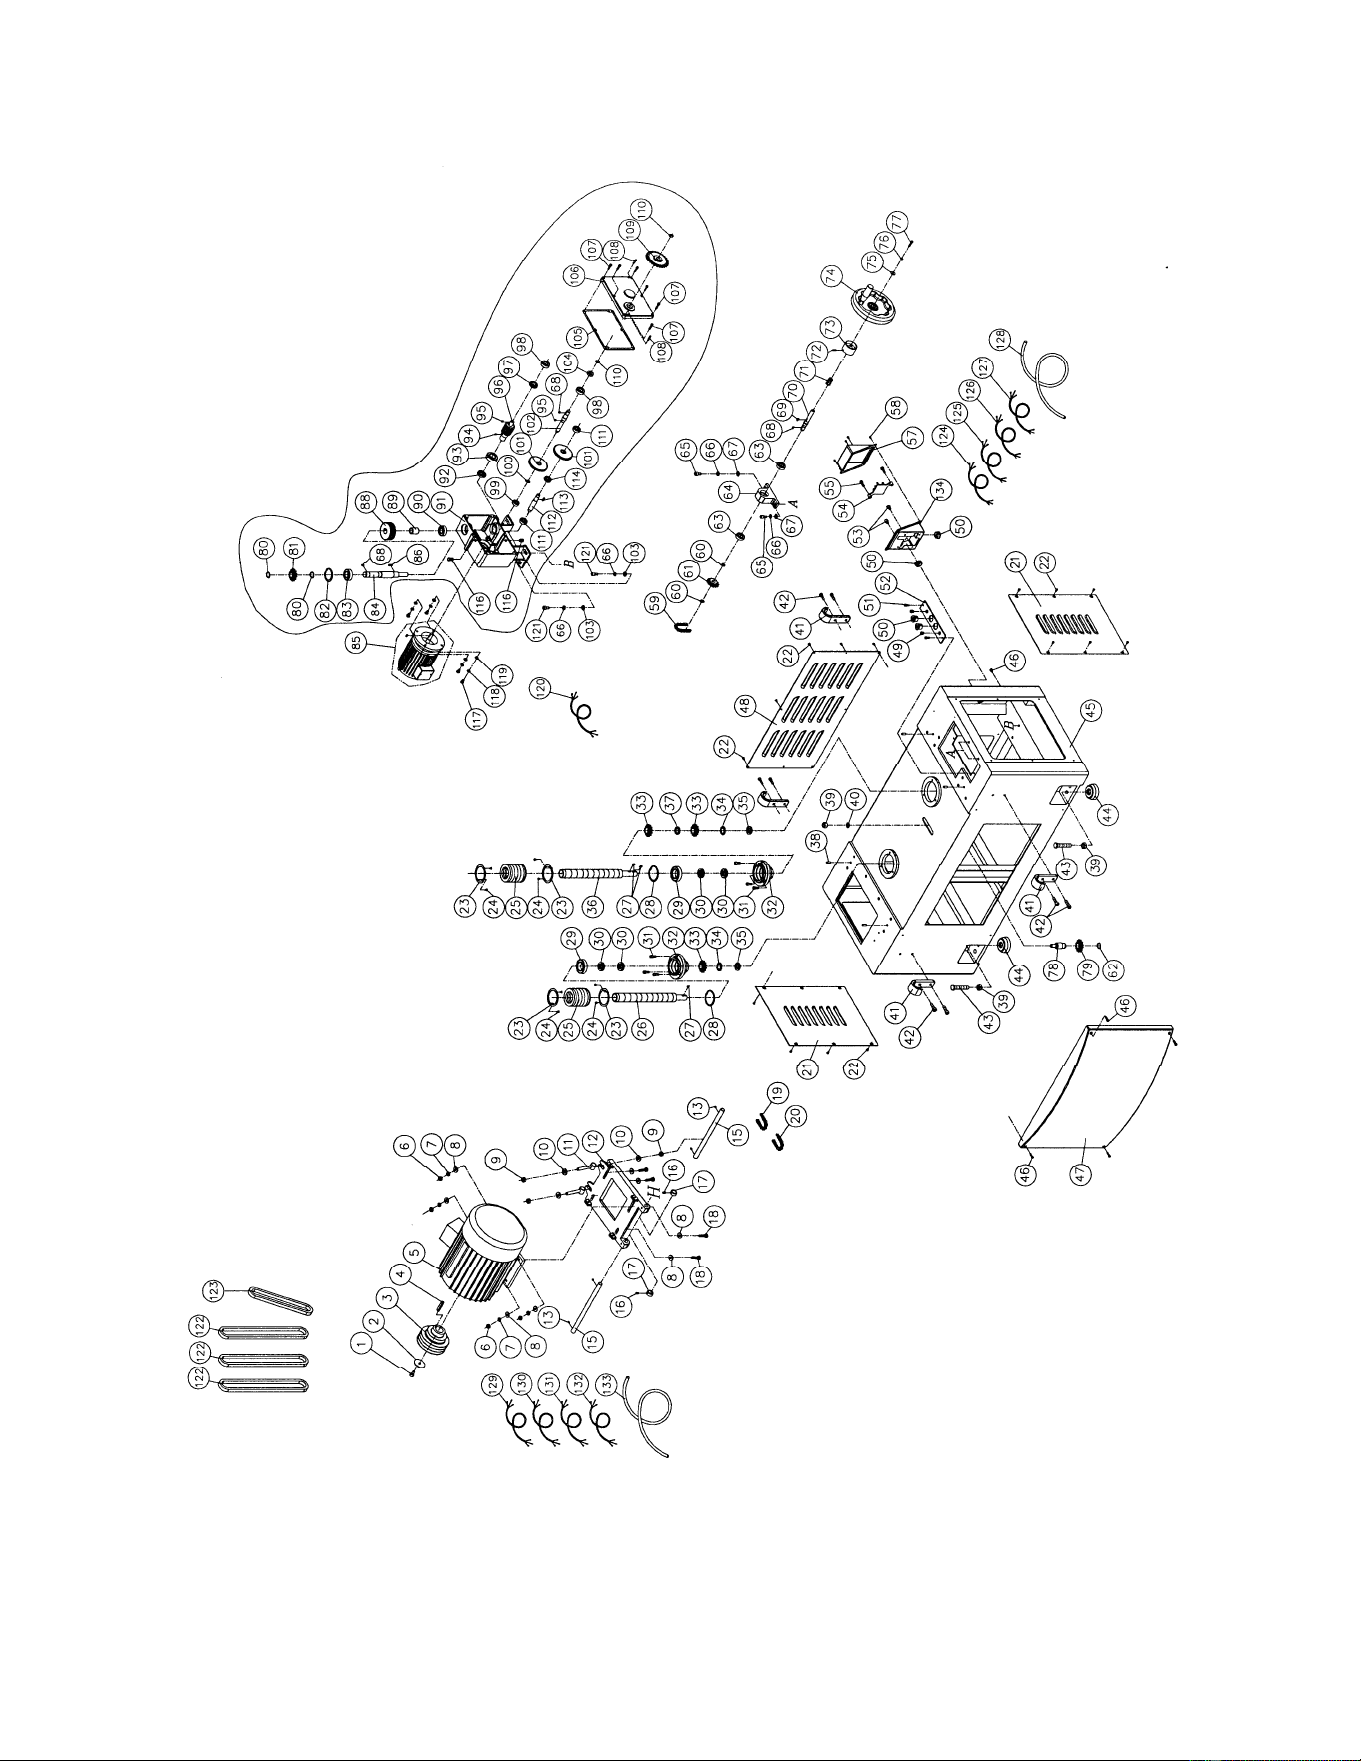
48
Base Assembly

49
Parts List: Base Assembly
Index No. Part No. Description Size Qty
1 ............... TS-1504031 ............. Socket Head Cap Screw ...................................... M8x16 ......................... 1
2 ............... TS-1550061 ............. Flat Washer .......................................................... M8 ............................... 1
3 ............... WP2510-603 ............ Motor Pulley ......................................................... .................................... 1
4 ............... WP2510-604 ............ Key ....................................................................... 10x8x56 ...................... 1
5 ............... WP2510-605 ............ Main Motor........................................15HP, 230/460V, 3Ph ..................... 1
6 ............... TS-1540071 ............. Hex Nut ................................................................ M10 ............................. 4
7 ............... TS-2361101 ............. Lock Washer ........................................................ M10 ............................. 4
8 ............... TS-1550071 ............. Flat Washer .......................................................... M10 ............................. 8
9 ............... TS-1540081 ............. Hex Nut ................................................................ M12 ............................. 4
10 ............. TS-2360121 ............. Flat Washer .......................................................... M12 ............................. 4
11 ............. 6012123 ................... Adjusting Bolt ....................................................... .................................... 2
12 ............. WP2510-612 ............ Motor Plate ........................................................... .................................... 1
13 ............. TS-1523051 ............. Set Screw ............................................................. M6x16 ......................... 4
15 ............. 6012126 ................... Shaft ..................................................................... .................................... 2
16 ............. TS-1524021 ............. Set Screw ............................................................. M8x10 ......................... 2
17 ............. 6012125 ................... Spacer .................................................................. .................................... 2
18 ............. TS-1491081 ............. Hex Cap Screw .................................................... M10x50 ....................... 4
19 ............. WP2510-619 ............ Chain .................................................................... #40 x 54P .................... 1
20 ............. WP2510-620 ............ Chain .................................................................... #40 x 84P .................... 1
21 ............. WP2510-621 ............ Side Cover ........................................................... .................................... 2
22 ............. TS-2246102 ............. Button Head Socket Screw .................................. M6x10 ....................... 20
23 ............. 6012071 ................... Bushing ................................................................ .................................... 4
24 ............. 6012070 ................... Washer Head Screw ............................................ M4x8 ........................... 8
25 ............. 6012068 ................... Rubber Boot ......................................................... .................................... 2
26 ............. 6012069 ................... Driven Lead Screw ............................................... .................................... 1
27 ............. WP2510-111 ............ Key ....................................................................... 5x5x10 ........................ 3
28 ............. WP2510-628 ............ C-Ring .................................................................. .................................... 2
29 ............. BB-6008VV .............. Ball Bearing .......................................................... 6008VV ....................... 2
30 ............. BB-51105 ................. Thrust Bearing ..................................................... 51105 .......................... 4
31 ............. TS-1504041 ............. Socket Head Cap Screw ...................................... M8x20 ......................... 6
32 ............. 6012075 ................... Bracket ................................................................. .................................... 2
33 ............. WP2510-633 ............ Sprocket ............................................................... .................................... 3
34 ............. WP2510-634 ............ Star Washer ......................................................... M25 ............................. 2
35 ............. WP2510-635 ............ Special Nut ........................................................... .................................... 2
36 ............. WP2510-636 ............ Drive Lead Screw ................................................. .................................... 1
37 ............. WP2510-637 ............ Washer ................................................................. .................................... 1
38 ............. WP2510-638 ............ Pin ........................................................................ .................................... 4
39 ............. TS-154010 ............... Hex Nut ................................................................ M16 ............................. 5
40 ............. TS-155010 ............... Flat Washer .......................................................... M16 ............................. 1
41 ............. WP2510-641 ............ Hanger ................................................................. .................................... 4
42 ............. TS-1505041 ............. Socket Head Cap Screw ...................................... M10x30 ....................... 4
43 ............. WP2510-643 ............ Leveling Screw ..................................................... M16x80 ....................... 4
44 ............. 6012095 ................... Pad ....................................................................... .................................... 4
45 ............. WP2510-645 ............ Base ..................................................................... .................................... 1
46 ............. TS-1503021 ............. Socket Head Cap Screw ...................................... M6x10 ......................... 5
47 ............. WP2510-647 ............ Front Cover .......................................................... .................................... 1
48 ............. WP2510-648 ............ Rear Cover ........................................................... .................................... 1
49 ............. WP2510-649 ............ Strain Relief.......................................................... .................................... 2
50 ............. WP2510-650 ............ Strain Relief.......................................................... .................................... 4
51 ............. TS-1503041 ............. Socket Head Cap Screw ...................................... M6x16 ......................... 2
52 ............. WP2510-652 ............ Plate ..................................................................... .................................... 1
53 ............. TS-1504011 ............. Socket Head Cap Screw ...................................... M8x10 ......................... 2
54 ............. WP2510-654 ............ Terminal Plate ...................................................... .................................... 1
55 ............. TS-1504051 ............. Socket Head Cap Screw ...................................... M8x25 ......................... 2
57 ............. WP2510-657 ............ Junction Box Cover .............................................. .................................... 1
58 ............. TS-1533032 ............. Pan Head Screw .................................................. M5x10 ......................... 4
59 ............. WP2510-233 ............ Chain .................................................................... #40 x 58P .................... 1

50
Index No. Part No. Description Size Qty
60 ............. WP2510-660 ............ S-Ring .................................................................. .................................... 2
61 ............. WP2510-661 ............ Sprocket ............................................................... .................................... 1
62 ............. WP2510-662 ............ S-Ring .................................................................. .................................... 1
63 ............. BB-6203VV .............. Ball Bearing .......................................................... 6203VV ....................... 2
64 ............. WP2510-664 ............ Housing ................................................................ .................................... 1
65 ............. TS-1505021 ............. Socket Head Cap Screw ...................................... M10x20 ....................... 2
66 ............. TS-1551071 ............. Lock Washer ........................................................ M10 ............................. 6
67 ............. TS-1550071 ............. Flat Washer .......................................................... M10 ............................. 2
68 ............. WP2510-215 ............ Key ....................................................................... 5x5x12 ........................ 2
69 ............. WP2510-669 ............ Key ....................................................................... 5x5x15 ........................ 1
70 ............. WP2510-670 ............ Hand Wheel Shaft ................................................ .................................... 1
71 ............. WP2510-671 ............ Spring ................................................................... .................................... 1
72 ............. TS-1523051 ............. Set Screw ............................................................. M6x16 ......................... 1
73 ............. WP2510-673 ............ Bushing ................................................................ .................................... 1
74 ............. WP2510-674 ............ Hand Wheel Assembly ......................................... .................................... 1
75 ............. TS-1550041 ............. Flat Washer .......................................................... M6 ............................... 1
76 ............. TS-1551041 ............. Lock Washer ........................................................ M6 ............................... 1
77 ............. TS-1503051 ............. Socket Head Cap Screw ...................................... M6x20 ......................... 1
78 ............. WP2510-678 ............ Shaft ..................................................................... .................................... 1
79 ............. WP2510-679 ............ Sprocket ............................................................... .................................... 1
................. WP2510-GBA .......... Gearbox Assembly (#68, 80-84, 86, 88-102, 104-114, 116) ................... 1
80 ............. WP2510-680 ............ S-Ring .................................................................. .................................... 2
81 ............. WP2510-681 ............ Sprocket ............................................................... .................................... 1
82 ............. WP2510-682 ............ C-Ring .................................................................. .................................... 1
83 ............. BB-6205ZZ ............... Ball Bearing .......................................................... 6205ZZ........................ 1
84 ............. WP2510-684 ............ Shaft ..................................................................... .................................... 1
85 ............. WP2510-685 ............ Motor.............................................1/2HP, 230/460V, 3Ph ........................ 1
86 ............. WP2510-686 ............ Key ....................................................................... 5x5x22 ........................ 1
88 ............. WP2510-688 ............ Gear ..................................................................... .................................... 1
89 ............. WP2510-689 ............ Bushing ................................................................ .................................... 1
90 ............. BB-6204ZZ ............... Ball Bearing .......................................................... 6204ZZ........................ 1
91 ............. WP2510-691 ............ Gearbox ............................................................... .................................... 1
92 ............. WP2510-692 ............ Oil Seal ................................................................. .................................... 1
93 ............. BB-6205ZZ ............... Ball Bearing .......................................................... 6205ZZ.....
................... 1
94 ............. TS-1524011 ............. Set Screw ............................................................. M8x8 ........................... 1
95 ............. WP2510-111 ............ Key ....................................................................... 5x5x10 ........................ 2
96 ............. WP2510-696 ............ Worm .................................................................... .................................... 1
97 ............. WP2510-697 ............ Gear ..................................................................... 24T .............................. 1
98 ............. BB-6203ZZ ............... Ball Bearing .......................................................... 6203ZZ........................ 2
99 ............. BB-6201ZZ ............... Ball Bearing .......................................................... 6201ZZ........................ 1
100 ........... WP2510-6100 .......... S-Ring .................................................................. .................................... 1
101 ........... WP2510-6101 .......... Gear ..................................................................... 60T .............................. 1
102 ........... WP2510-6102 .......... Shaft ..................................................................... .................................... 1
103 ........... TS-1550071 ............. Flat Washer .......................................................... M10 ............................. 4
104 ........... WP2510-6104 .......... Oil Seal ................................................................. .................................... 1
105 ........... WP2510-6105 .......... Gasket .................................................................. .................................... 1
106 ........... WP2510-6106 .......... Gearbox Cover ..................................................... .................................... 1
107 ........... TS-1503061 ............. Socket Head Cap Screw ...................................... M6x25 ......................... 6
108 ........... WP2510-6108 .......... Pin ........................................................................ .................................... 2
109 ........... WP2510-6109 .......... Sprocket ............................................................... .................................... 1
110 ........... WP2510-6110 .......... S-Ring .................................................................. .................................... 2
111 ........... BB-6202ZZ ............... Ball Bearing .......................................................... 6202ZZ........................ 1
112 ........... WP2510-6112 .......... Shaft ..................................................................... .................................... 1
113 ........... WP2510-124 ............ Key ....................................................................... 5x5x20 ........................ 1
114 ........... WP2510-6114 .......... Gear ..................................................................... 20T .............................. 1
116 ........... WP2510-6116 .......... Oil Plug ................................................................. .................................... 2
117 ........... TS-1490041 ............. Hex Cap Screw .................................................... M8x25 ......................... 4
118 ........... TS-2361081 ............. Lock Washer ........................................................ M8 ............................... 4
119 ........... TS-1550061 ............. Flat Washer .......................................................... M8 ............................... 4

51
Index No. Part No. Description Size Qty
120 ........... WP2510-6120 .......... Motor Cord ........................................................... .................................... 1
121 ........... TS-1505041 ............. Socket Head Cap Screw ...................................... M10x30 ....................... 4
122 ........... VB-A86 ..................... V-Belt ................................................................... A86 .............................. 3
123 ........... VB-A57 ..................... V-Belt ................................................................... A57 .............................. 1
................. WP2510-PCA ........... Power Cord Assembly (#124 - #128) ................... .................................... 1
124 ........... WP2510-6124 .......... Red Cord .............................................................. .................................... 1
125 ........... WP2510-6125 .......... White Cord ........................................................... .................................... 1
126 ........... WP2510-6126 .......... Black Cord ............................................................ .................................... 1
127 ........... WP2510-6127 .......... Grounding Cord ................................................... .................................... 1
128 ........... WP2510-6128 .......... Casing .................................................................. .................................... 1
................. WP2510-MCA .......... Main Motor Cord Assembly (#129 - #133) ........... .................................... 1
129 ........... WP2510-6129 .......... Red Cord .............................................................. .................................... 1
130 ........... WP2510-6130 .......... White Cord ........................................................... .................................... 1
131 ........... WP2510-6131 .......... Black Cord ............................................................ .................................... 1
132 ........... WP2510-6132 .......... Grounding Cord ................................................... .................................... 1
133 ........... WP2510-6133 .......... Casing .................................................................. .................................... 1
134 ........... WP2510-6134 .......... Junction Box......................................................... .................................... 1
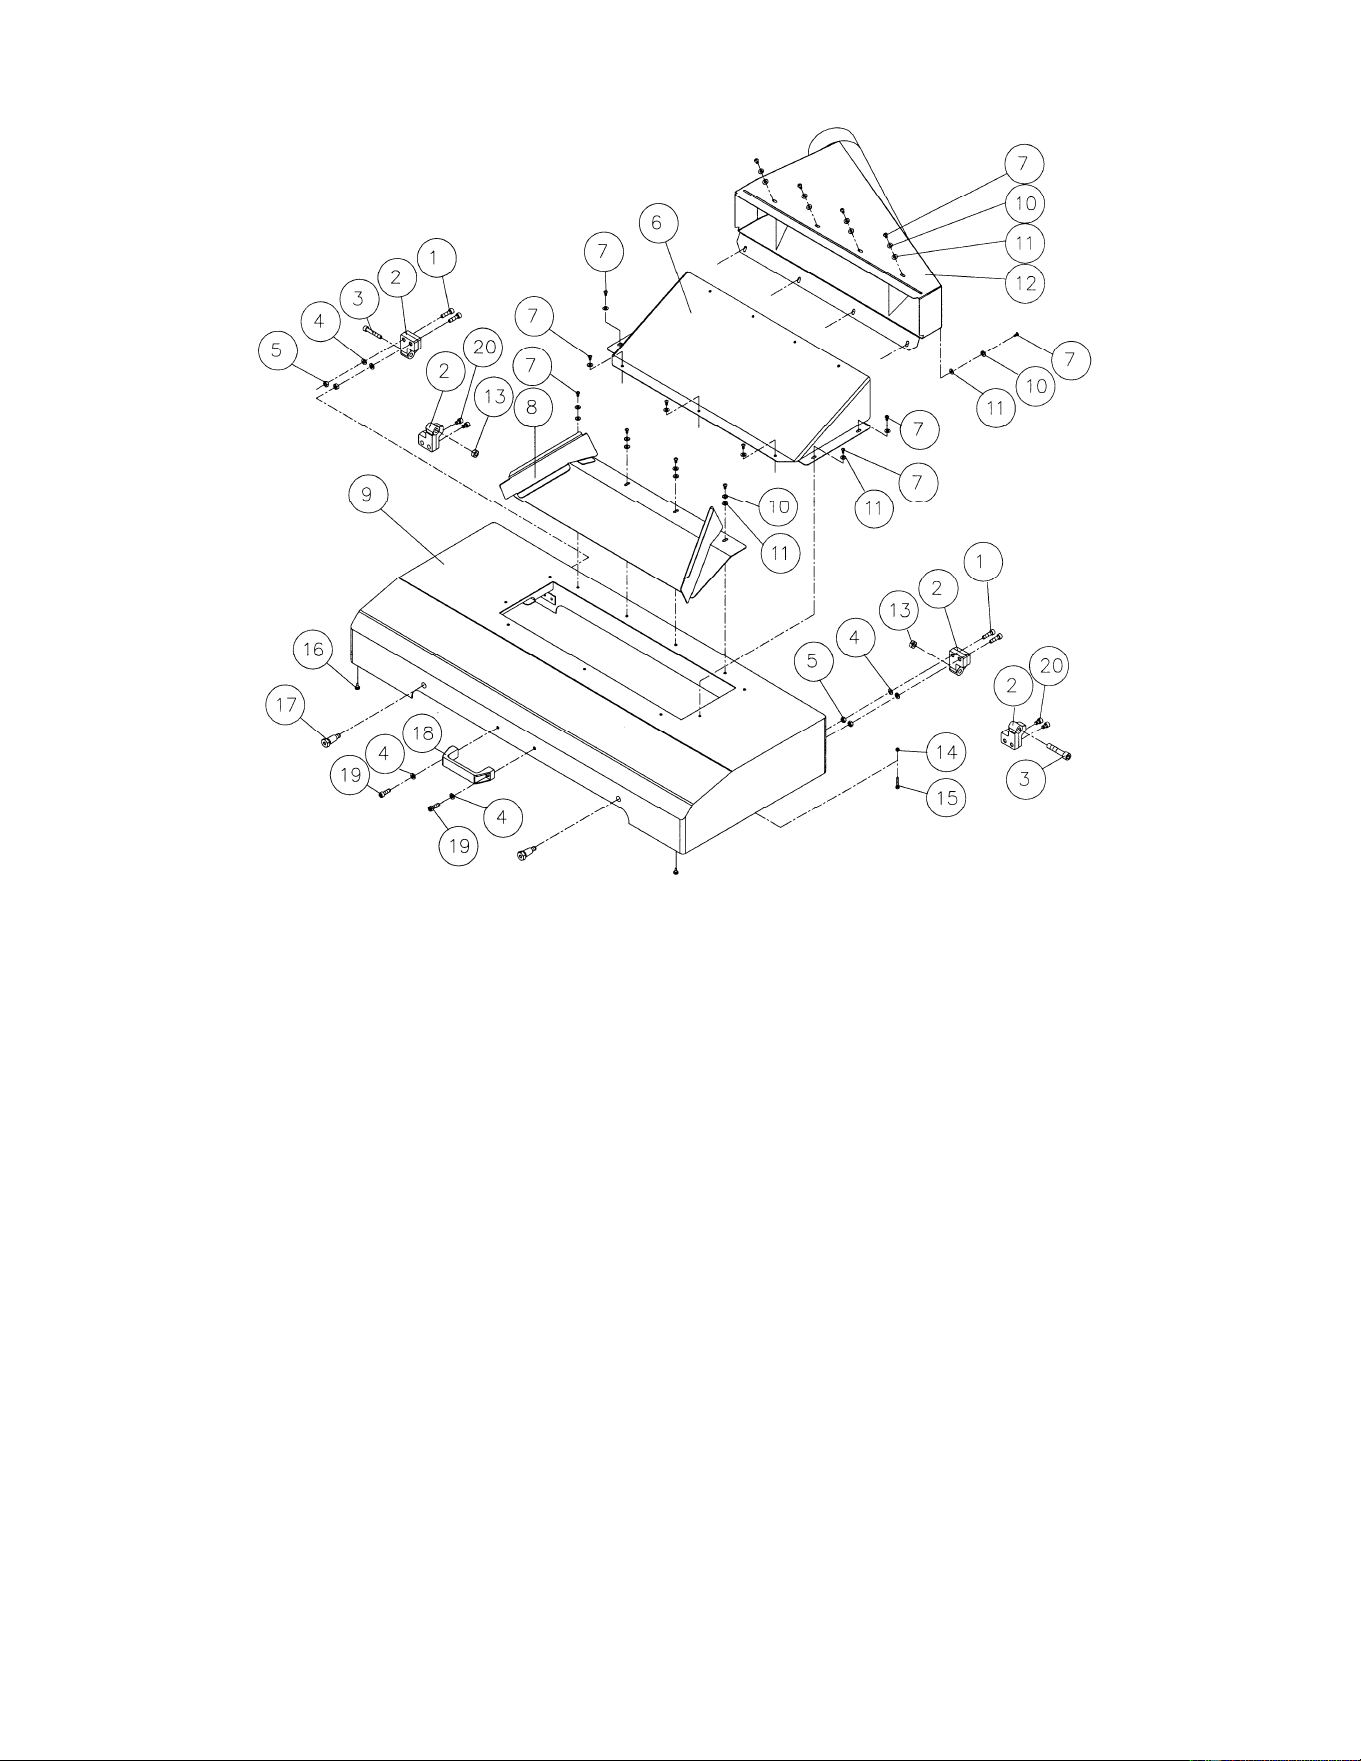
52
Parts List: Top Cover Assembly
Index No. Part No. Description Size Qty
1 ............... TS-1504061 ............. Socket Head Cap Screw ...................................... M8x30 ......................... 4
2 ............... WP2510-302 ............ Hinge .................................................................... .................................... 4
3. .............. TS-1505111 ............. Socket Head Cap Screw ...................................... M10x70 ....................... 2
4 ............... TS-1551061 ............. Lock Washer ........................................................ M8 ............................... 6
5 ............... TS-1540061 ............. Hex Nut ................................................................ M8 ............................... 4
6 ............... WP2510-306 ............ Upper Cover ......................................................... .................................... 1
7 ............... TS-2246122 ............. Button Head Socket Screw .................................. M6x12 ....................... 19
8 ............... WP2510-308 ............ Deflection Plate .................................................... .................................... 1
9 ............... WP2510-309 ............ Top Cover ............................................................ .................................... 1
10 ............. TS-2361061 ............. Lock Washer ........................................................ M6 ............................. 19
11 ............. TS-1550041 ............. Flat Washer .......................................................... M6 ............................. 19
12 ............. 6012181 ................... Dust Chute ........................................................... .................................... 1
13 ............. TS-1541041 ............. Nylon Insert Lock Nut ........................................... M10 ............................. 2
14 ............. TS-1540031 ............. Hex Nut ................................................................ M5 ............................... 4
15 ............. TS-1481061 ............. Hex Cap Screw .................................................... M5x25 ......................... 2
16 ............. WP2510-316 ............ Pad ....................................................................... .................................... 2
17 ............. 6012190 ................... Shoulder Screw .................................................... .................................... 2
18 ............. 6012189 ................... Handle .................................................................. .................................... 1
19 ............. TS-1504051 ............. Socket Head Cap Screw ...................................... M8x25 ......................... 2
20 ............. TS-1504071 ............. Socket Head Cap Screw ...................................... M8x35 ......................... 4
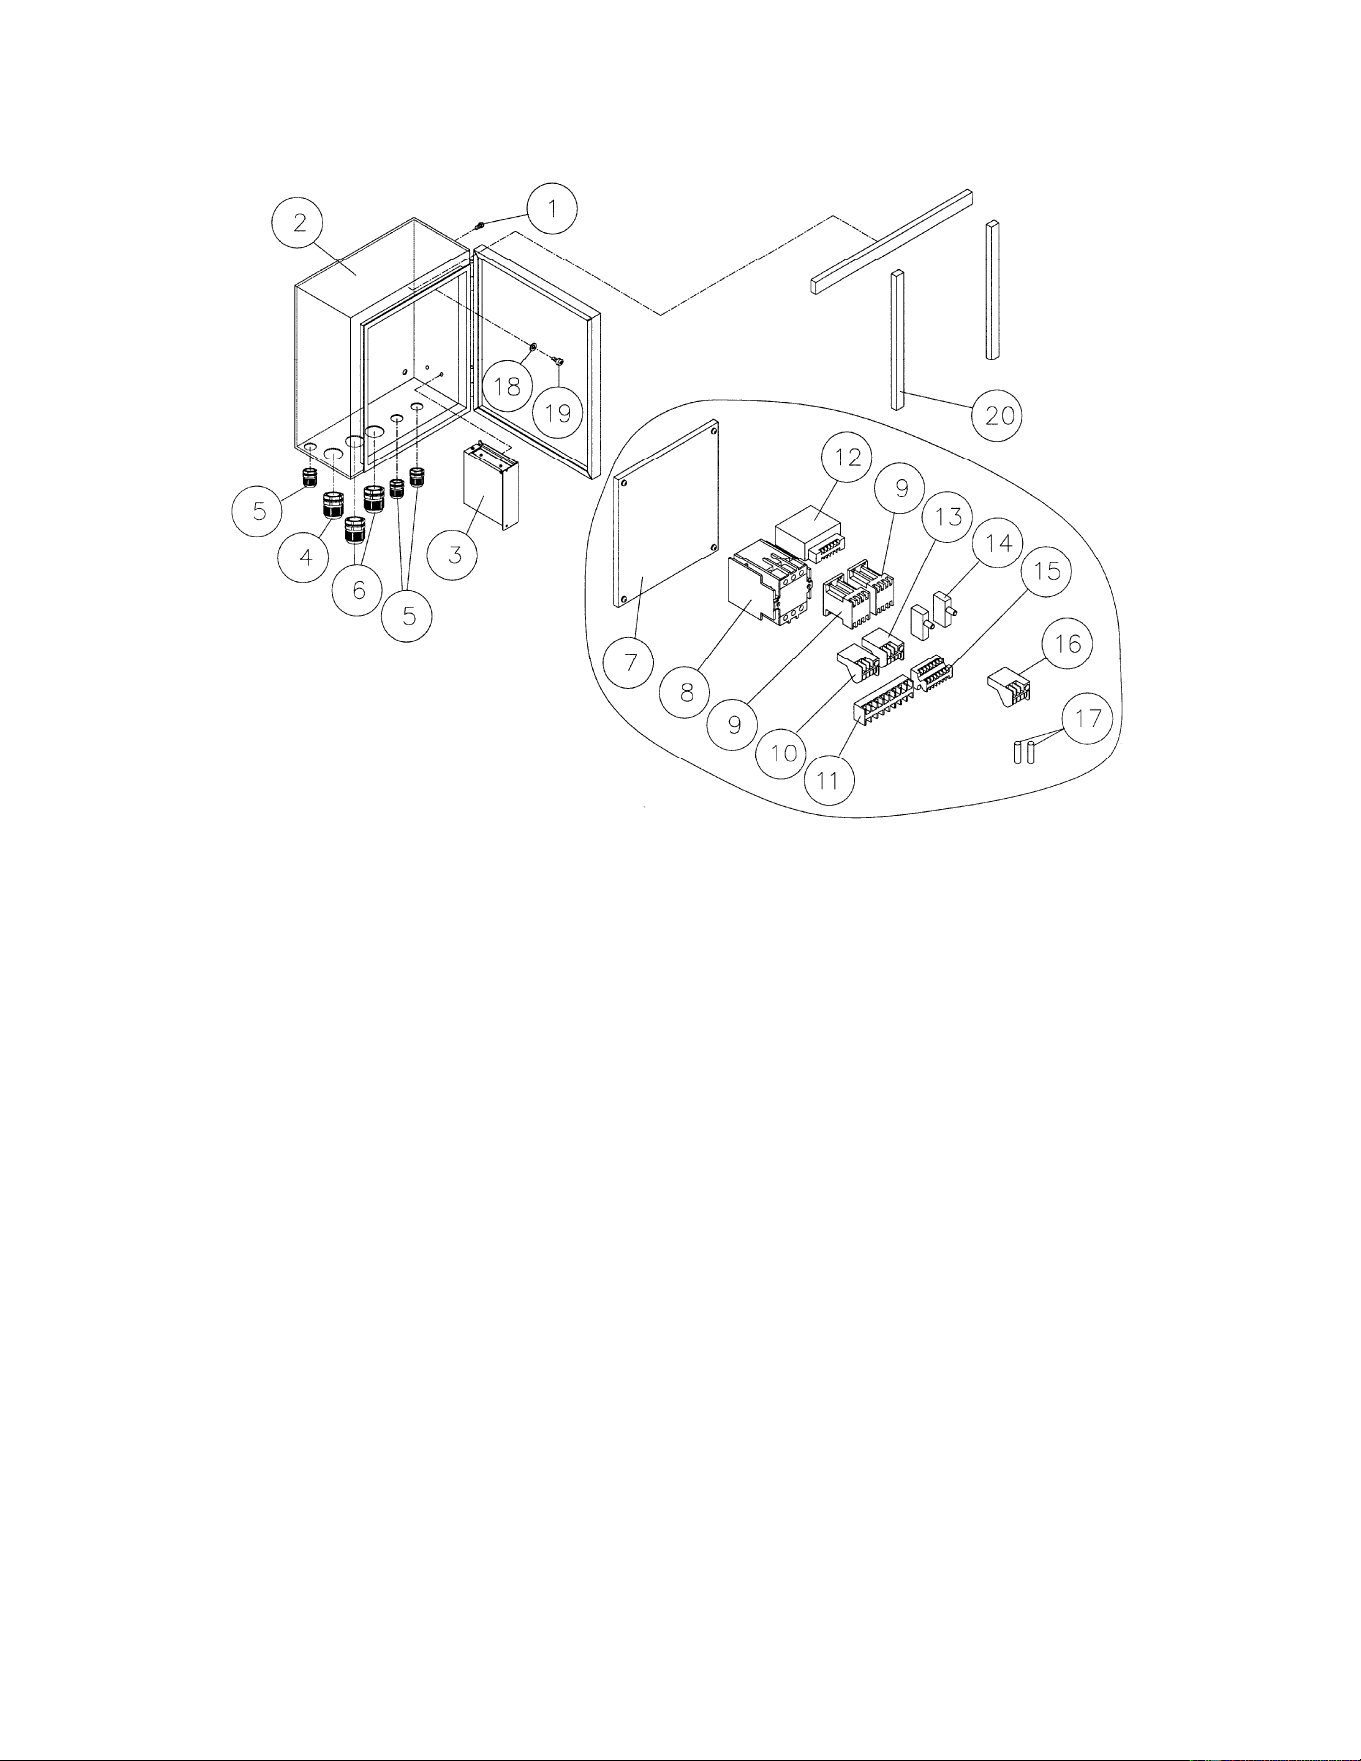
53
Parts List: Electrical Box Assembly
Index No. Part No. Description Size Qty
1 ............... TS-1531012 ............. Screw ................................................................... M3x6 ........................... 2
2 ............... WP2510-702 ............ Electrical Box ....................................................... .................................... 1
3 ............... WP2510-703 ............ Power Supply ....................................................... .................................... 1
4 ............... WP2510-704 ............ Strain Relief.......................................................... .................................... 1
5 ............... WP2510-705 ............ Strain Relief.......................................................... .................................... 3
6 ............... WP2510-706 ............ Strain Relief.......................................................... .................................... 2
................. WP2610-EBA ........... Electrical Board Assembly (#7 - #17) .................. .................................... 1
7 ............... WP2510-707 ............ Electrical Board .................................................... .................................... 1
8 ............... WP2510-708 ............ Contactor (for 15HP Motor) .................................. .................................... 1
9 ............... WP2510-709 ............ Contactor (for 1/2HP Motor) ................................. .................................... 2
10 ............. WP2510-710 ............ Overload (for 230V, Big Conductor) ................... RA-30 (32-50A) ........... 1
11 ............. WP2510-711 ............ Terminal Board .................................................... .................................... 1
12 ............. WP2510-712 ............ Transformer.......................................................... .................................... 1
13 ............. WP2510-713 ............ Overload (for Small Conductor) ........................... RA-20 (1.6-2.5A) ......... 1
14 ............. WP2510-714 ............ Fuse Support Base .............................................. .................................... 2
15 ............. WP2510-715 ............ Terminal Board .................................................... .................................... 1
16 ............. WP2510-716 ............ Overload (for 460V, Big Conductor) .................... RA-30E (18-26A) ........ 1
17 ............. WP2510-717 ............ Fuse ..................................................................... 250V, 2A ..................... 4
18 ............. TS-1550041 ............. Flat Washer .......................................................... M6 ............................... 4
19 ............. TS-1503031 ............. Socket Head Cap Screw ...................................... M6x12 ......................... 4
20 ............. WP2510-720 ............ Padding ................................................................ .................................... 3
................. WP2510-721 ............ Capacitor
(not shown) ............................................ 1F 120V .................... 2
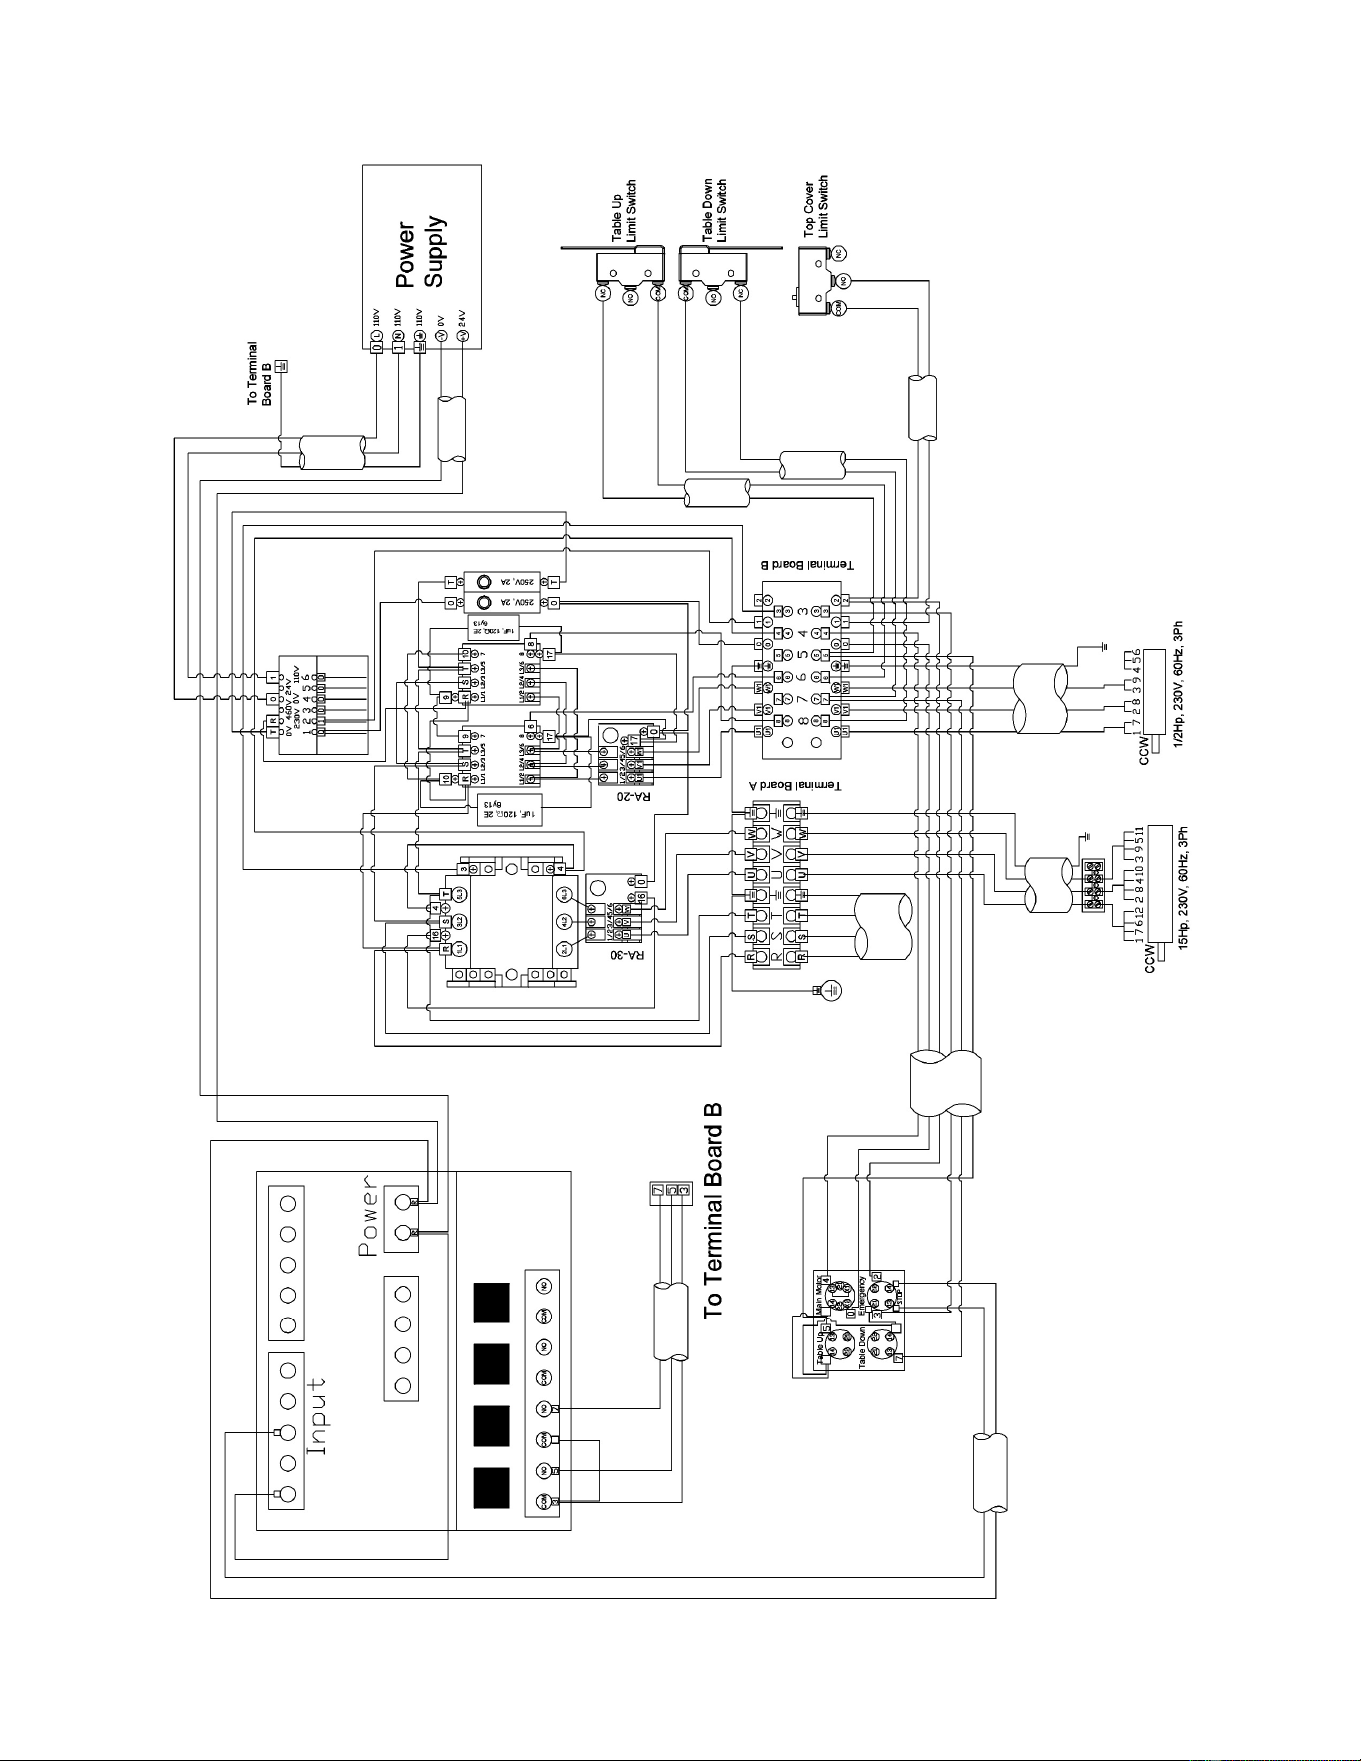
54
Electrical Connections – 230Volt
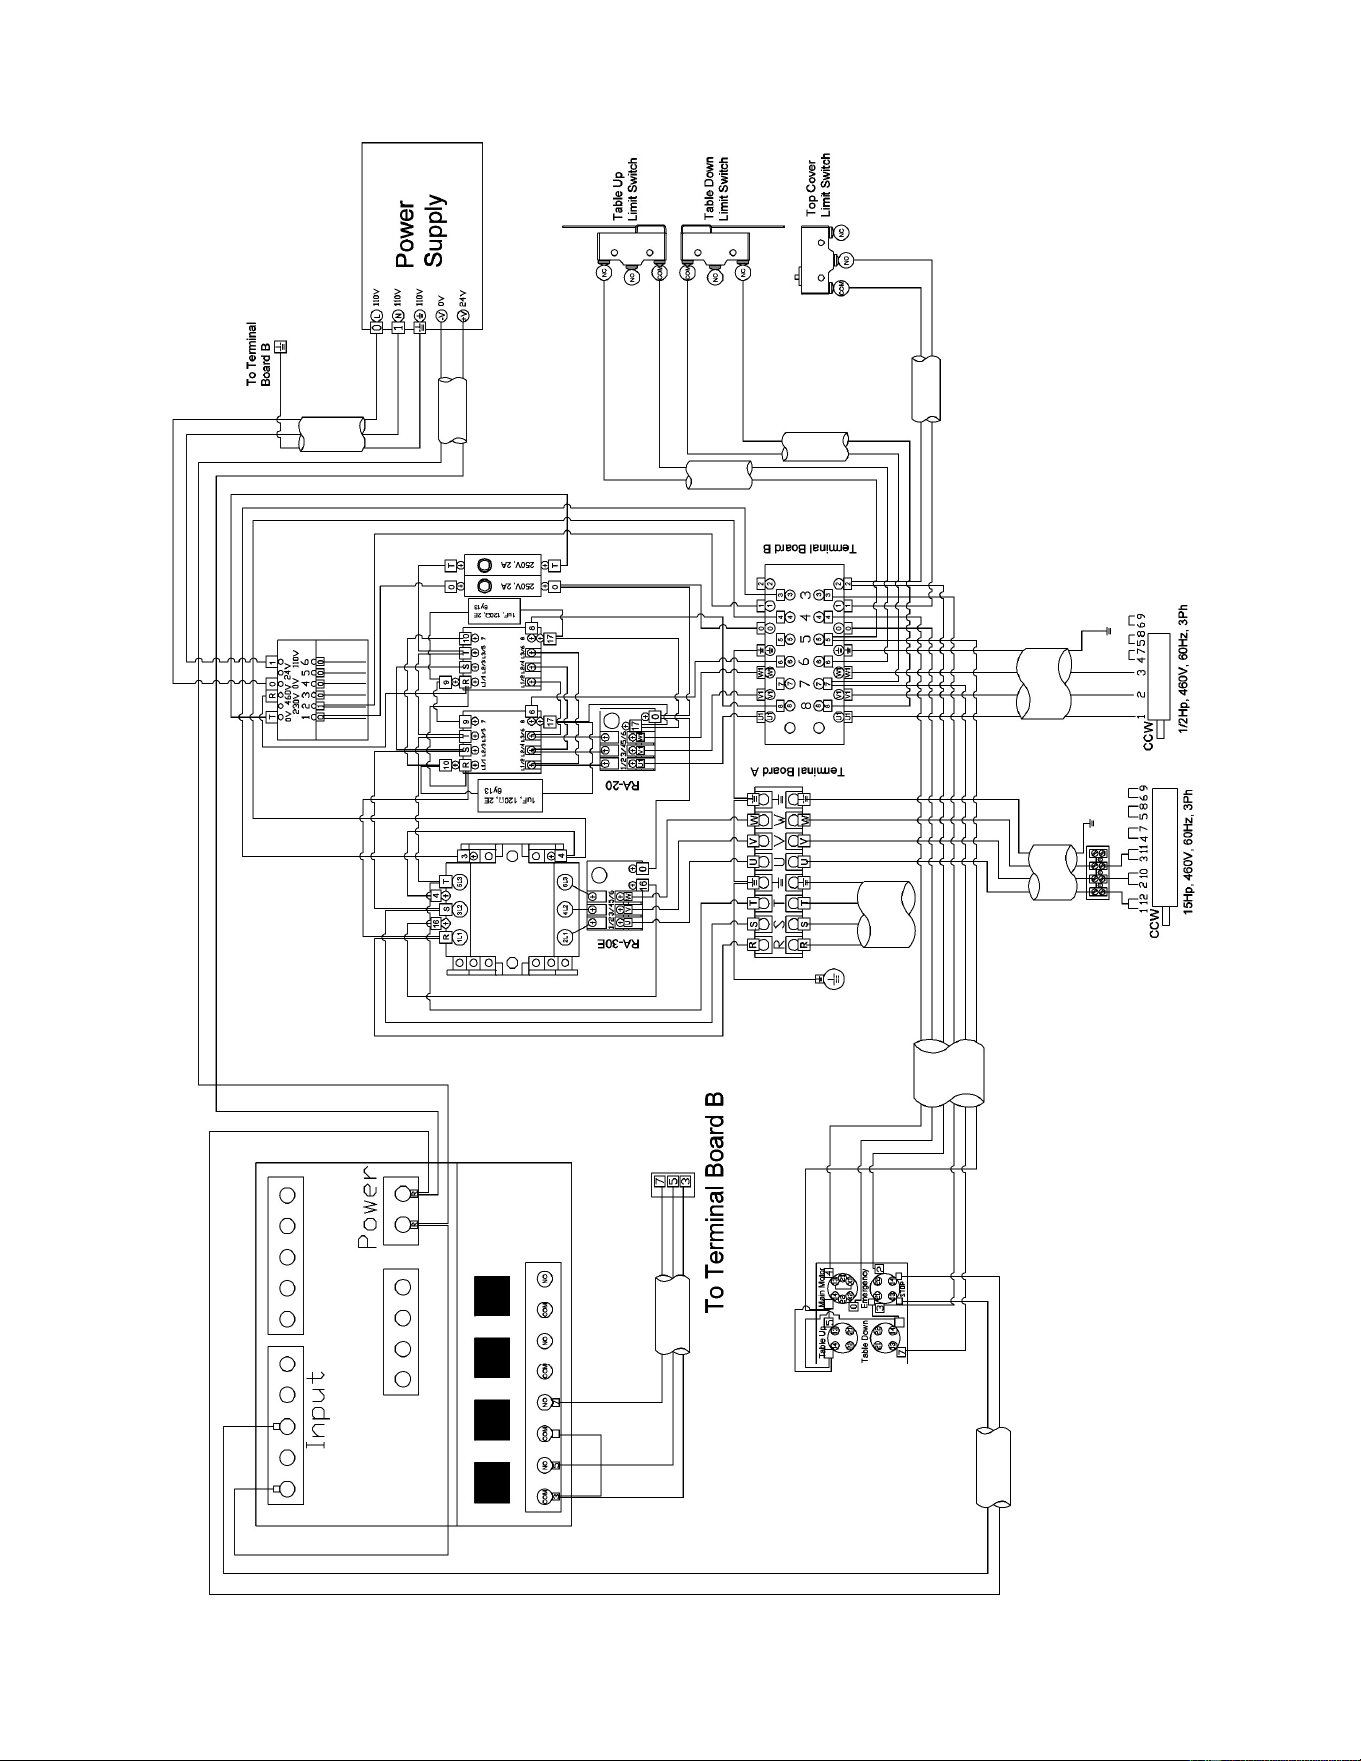
55
Electrical Connections – 460Volt

56
427 New Sanford Rd.
LaVergne, Tennessee 37086
Phone: 800-274-6848
www.powermatic.com