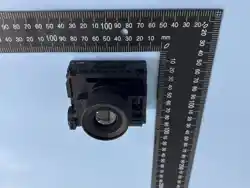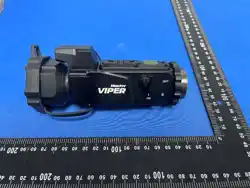

Thermal Imaging Multifunctional Device
VIPER 35 HUNTER/TAC
INSTRUCTION MANUAL

SAFETY INSTRUCTIONS
Important Usage Instructions
1.Read Before Use: Carefully read this manual before using the device to ensure safe and proper operation.
2.Testing: Thoroughly test the device before use, especially if it has been in storage for an extended period.
3.Disassembly: Do not disassemble the device. Repairs should only be performed at authorized service
centers.
4.Optical Surfaces:
1. Always keep the external optical surfaces clean.
2. Avoid touching the optical surfaces with bare hands.
3. Protect the device from sand and seawater, as they can damage the optical coatings.
5.Sunlight: Never point the device directly at the sun.
6.Image Performance:
1. Image quality depends on the environment and atmospheric conditions.
2. Contrast may vary based on the time of day. For instance, at sunset, temperature differences
between objects are more pronounced, resulting in better contrast.
7.Storage:
1. Remove the battery if the device will be stored for a long period.
2. Store the battery in polyethylene bags to prevent contact with metal.
3. Recharge the battery every 2–3 months to maintain its condition.
8.Condensation:
1. Condensation may form on external optical surfaces in the following cases:
1. When moving the device between cold and warm environments.
2. If the device’s temperature differs significantly from the ambient temperature.
3. In high-humidity conditions.
2. Condensation typically disappears once the device’s temperature equalizes with the environment.
Use the provided cleaning cloth to remove any moisture. Anti-fog sprays or the included rubber
accessories can help prevent condensation.
3. Note: Condensation on the objective lens does not affect the device’s performance.
9.Cleaning: Clean lens surfaces gently with the provided cleaning cloth.

Content
1. Delivery set
2. Device overview
3. Description of Controls
3.1 Three position toggle switch
3.2 Controls
4. Basic Operation
4.1 Power On/Off/Standby
4.2 Interface Display
4.3 Digital Zoom
4.4 AI SRF
4.5 Snapshot
4.6 NUC
4.7 Video Recording
4.8 Display Luminance Adjustment
4.9 Palette Mode
4.10 Switch Between Clip-on Mode and Observation Mode
5. MENU
5.1 Navigation
5.2 Image Settings
5.2.1 Brightness
5.2.2 Contrast
5.2.3 Scene
5.2.4 Weather
5.2.5 Filter
5.2.6 Palette
5.2.7 Reset

Content
5.3 Features
5.3.1 Features
5.3.2 Auto BPR
5.3.3 MBPR
5.3.4 Leveler
5.3.5 Compass
5.3.6 Fast Switching Mode
5.3.7 Target Lock
5.3.8 Back
5.4 Media
5.5 Settings
5.5.1 NUC Type
5.5.2 Alignment
5.5.3 Bluetooth
5.5.4 WiFi
5.5.5 ICON BRIGHTNESS
5.5.6 Date & Time
5.5.7 Language
5.5.8 Info Box
5.5.9 Factory Reset
6. Battery Use
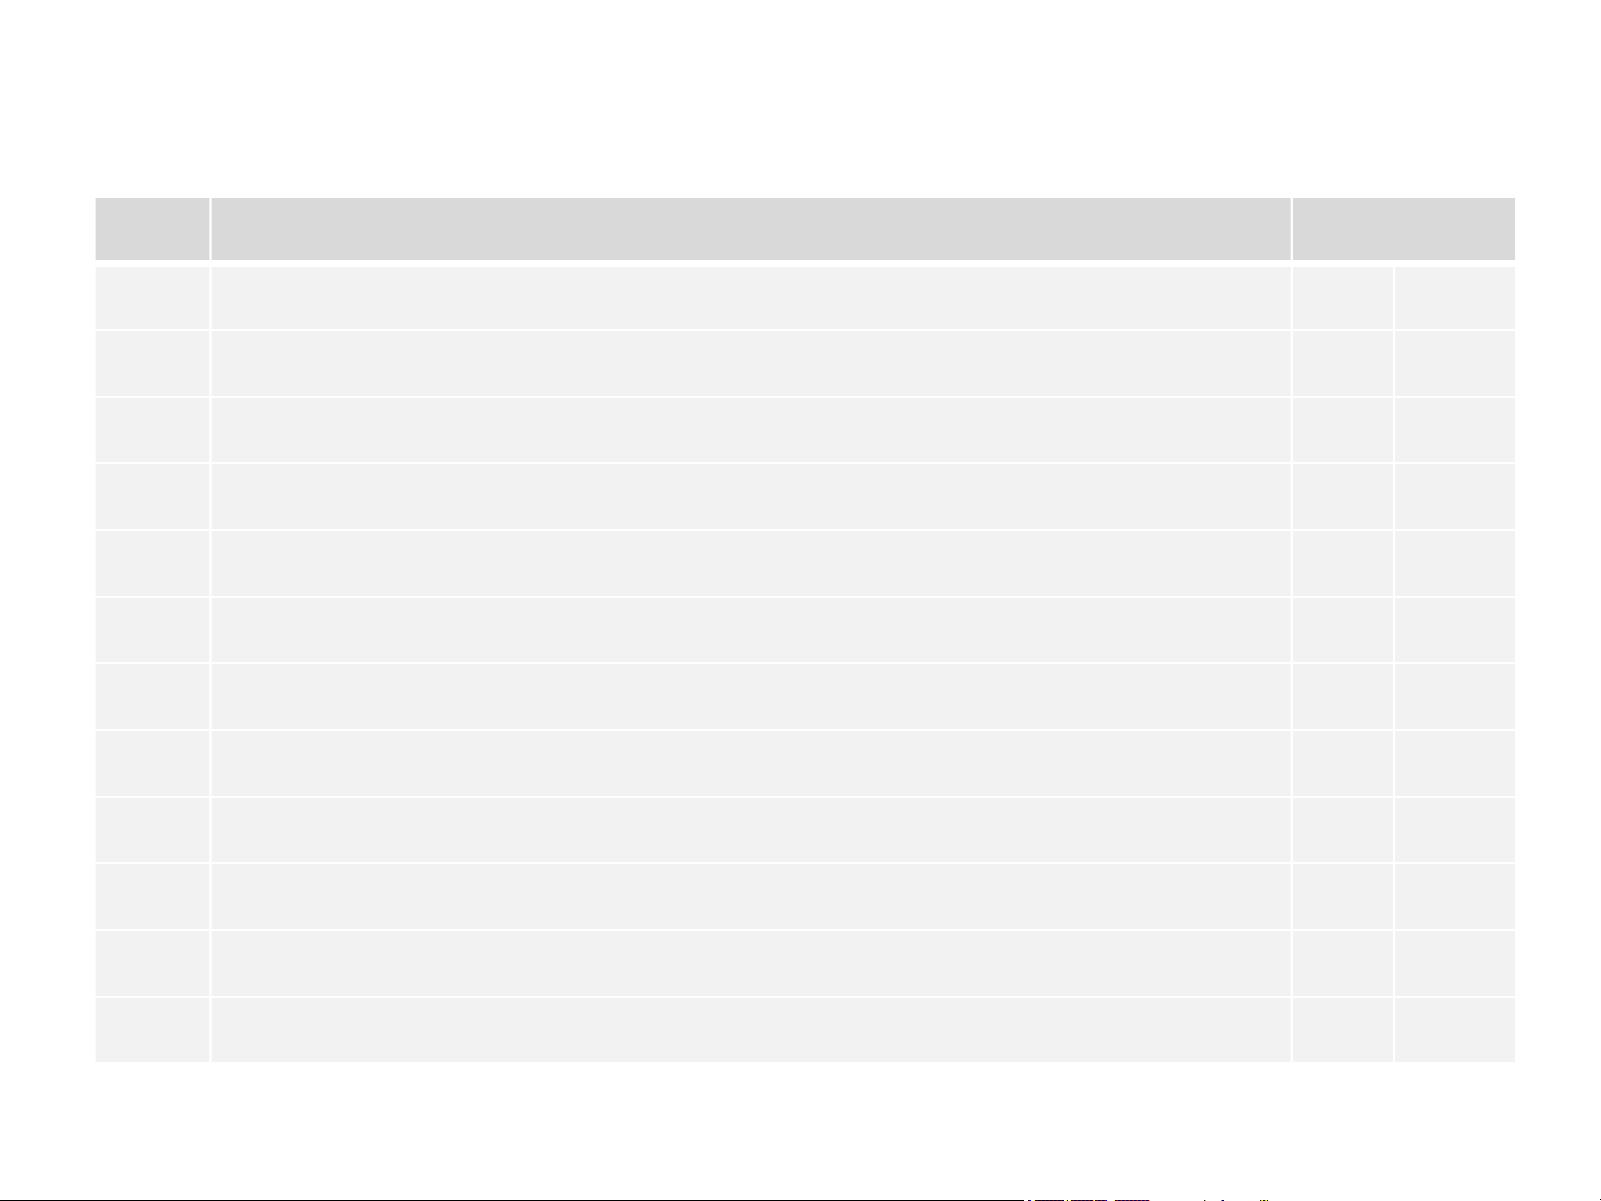
1 Delivery Set
N
Description
QTY.
1
Thermal imaging multifunctional device Viper 35 Hunter
1
2
Transport Box
1
3
Accessories Box
1
4
Soft bag
1
5
Rechargeable battery 18650
1
6
Protective rubber lens cap
1
7
USB cable
1
8
Focusing ring
1
9
Counter ring
1
10
Cleaning cloth
1
11
User manual
1
12
Warranty card
1
NOTE: All images used in this instruction manual are for illustrative purpose only. Actual product may
vary due to product enhancement.
2 Device Overview
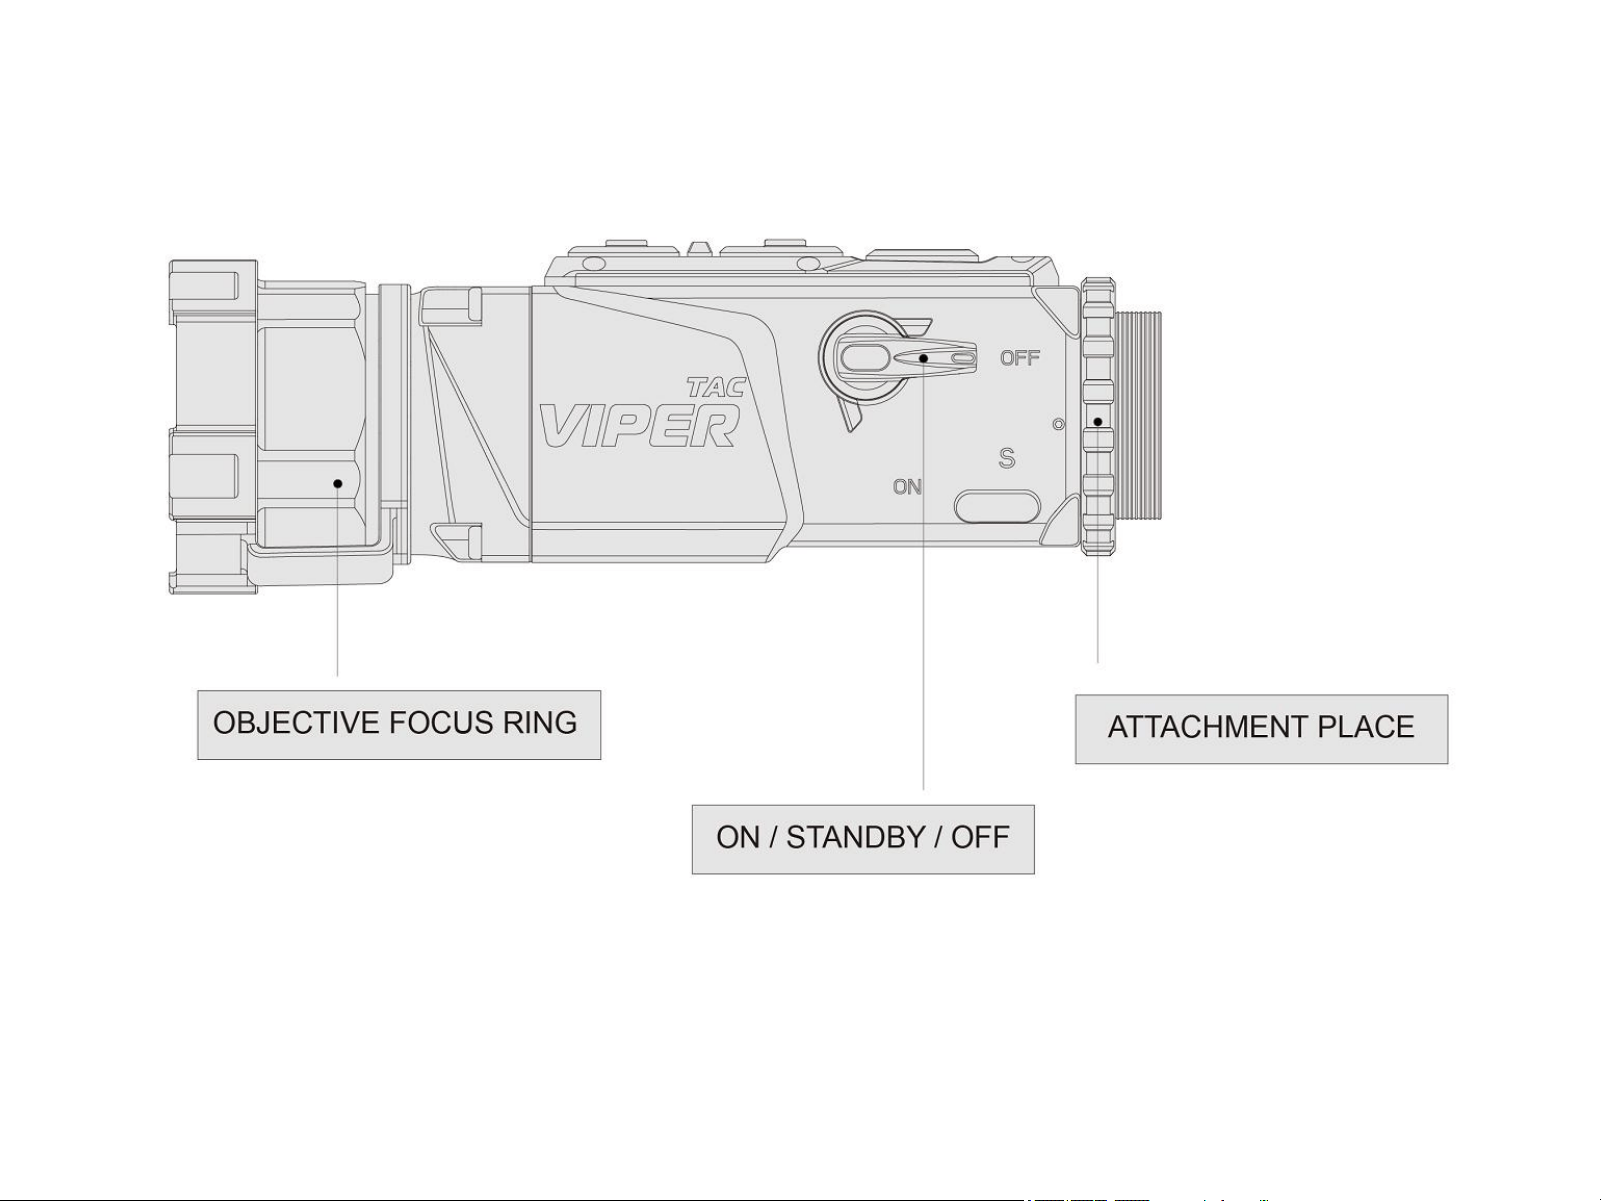
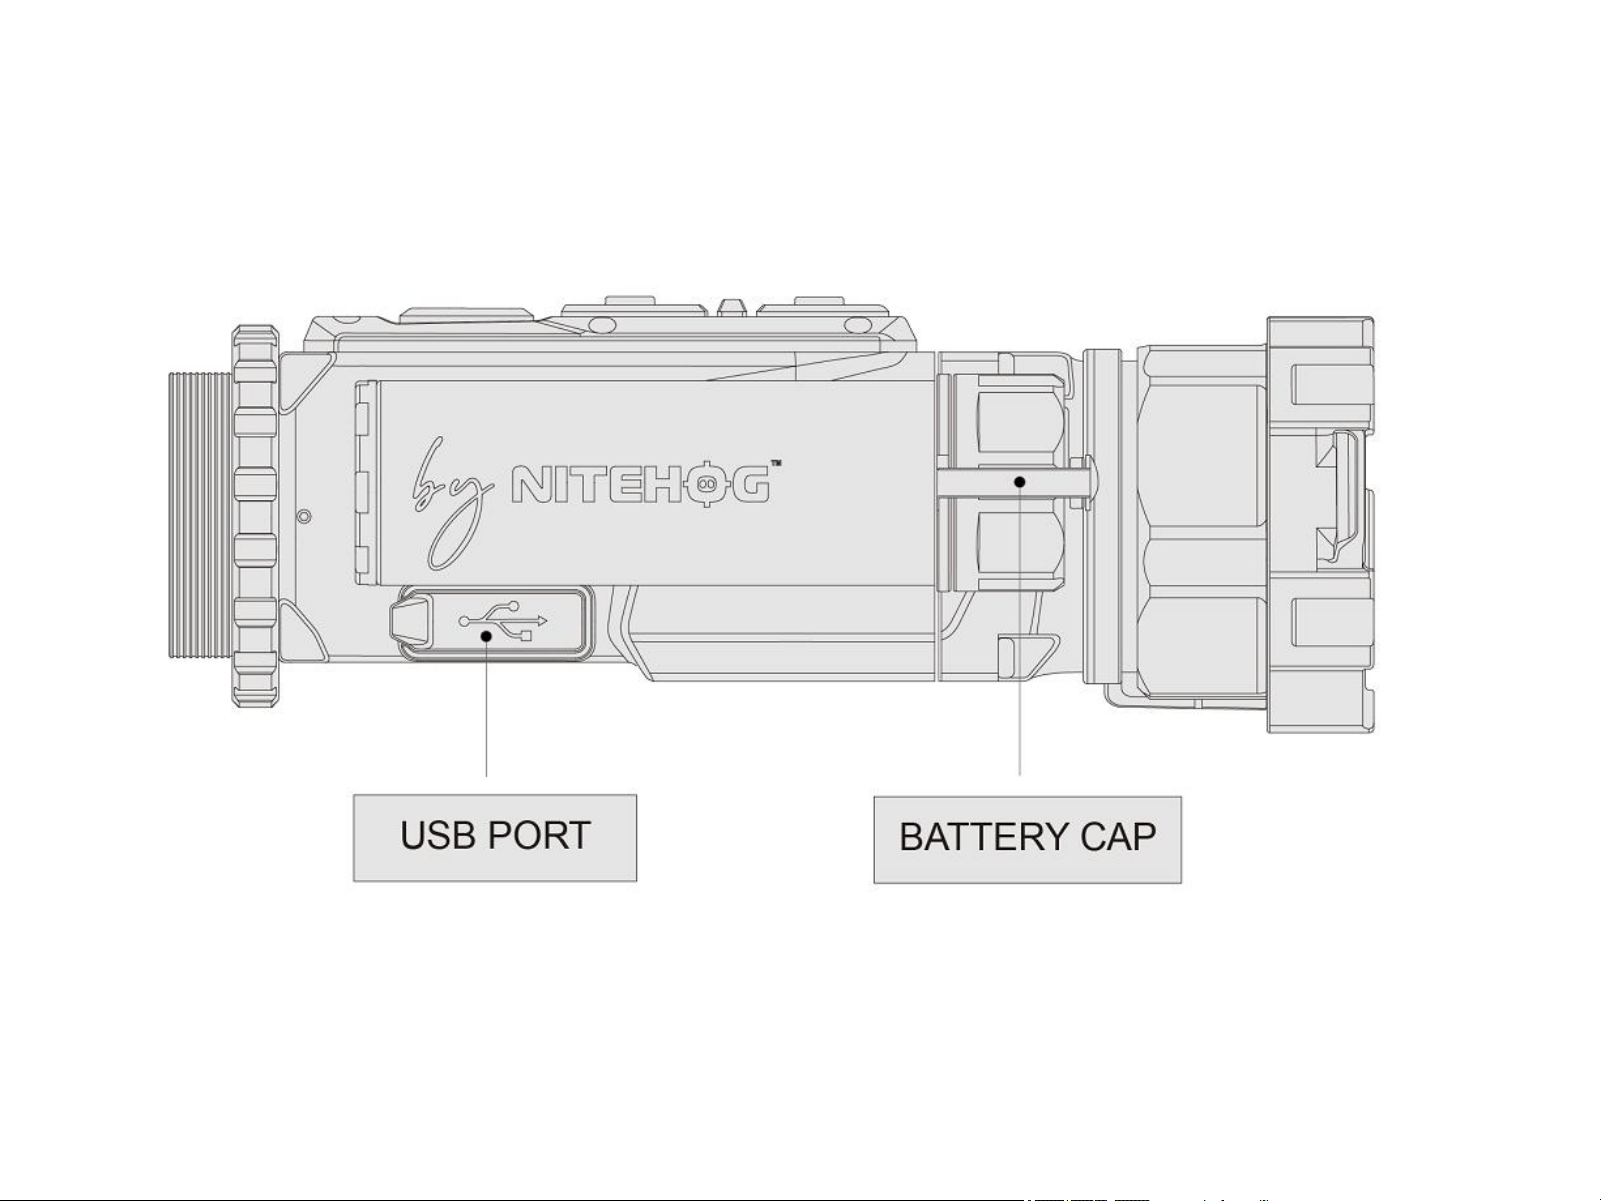
3 Description of Controls
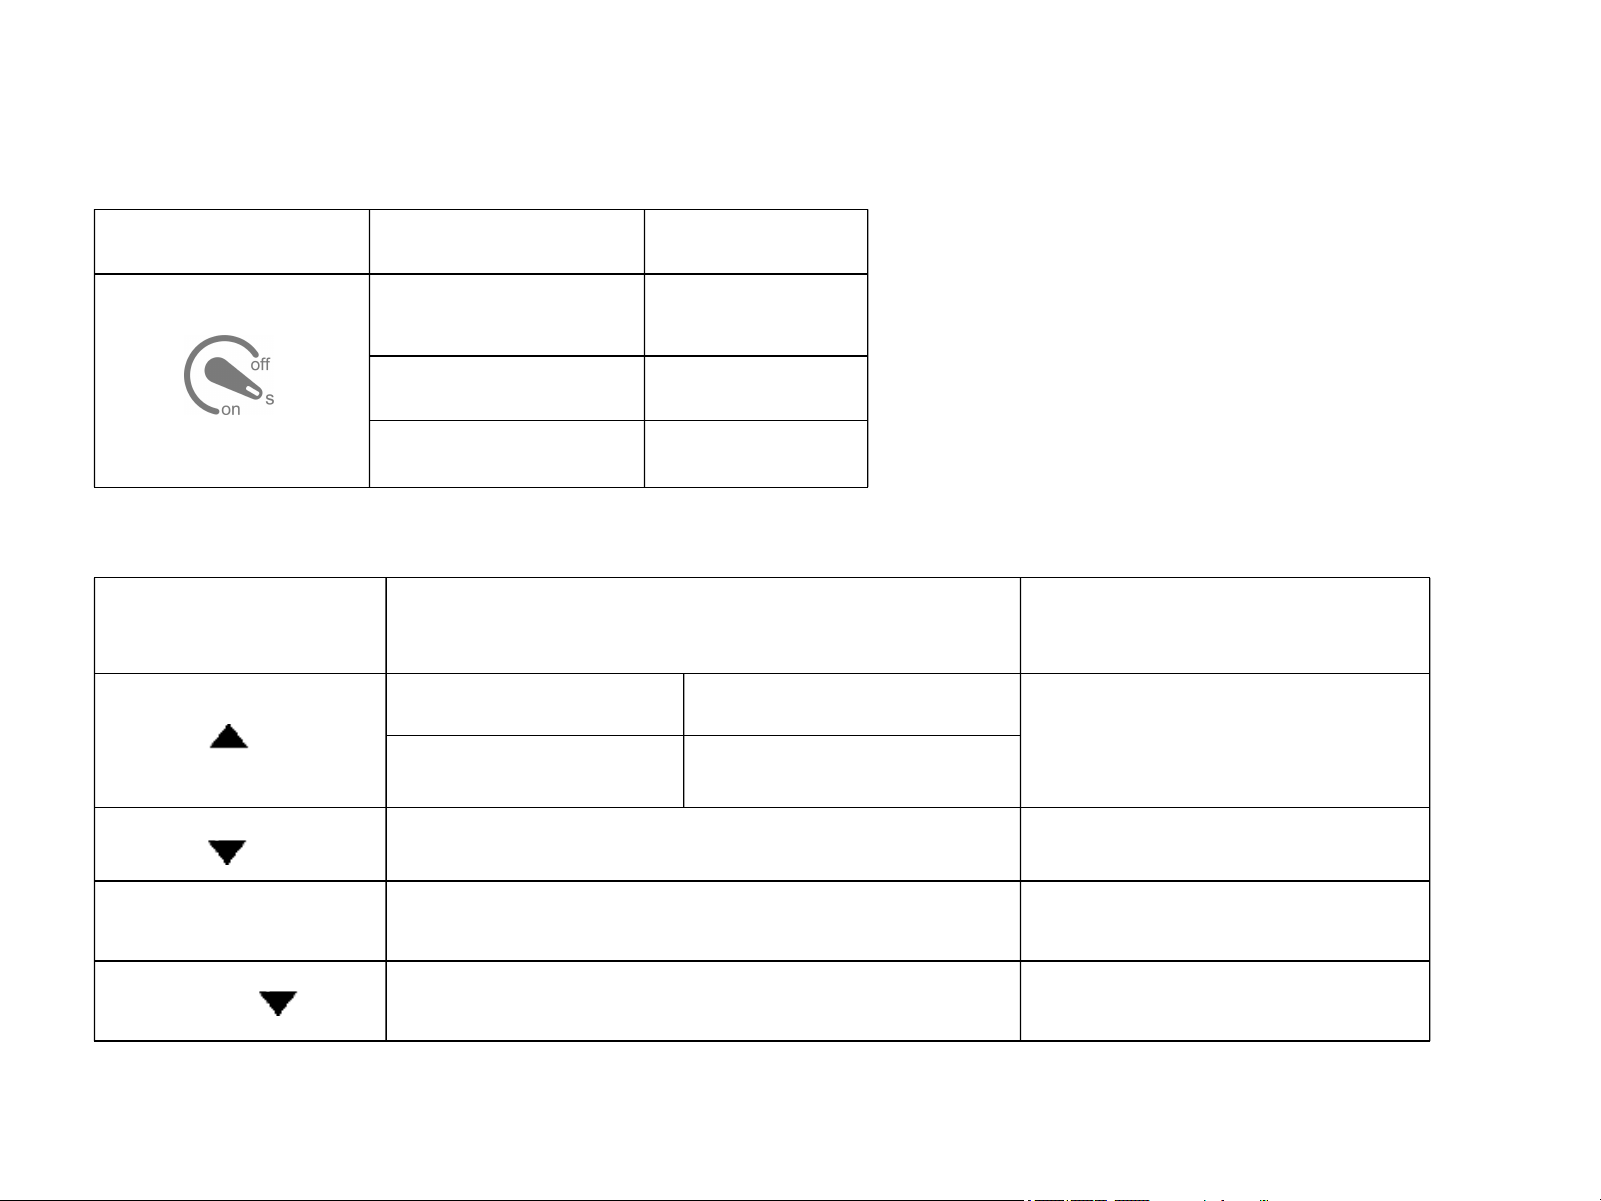
3.1 Three position toggle switch
Toggle switch
Postion
Status
ON
Power on
S
Standby
OFF
Power off
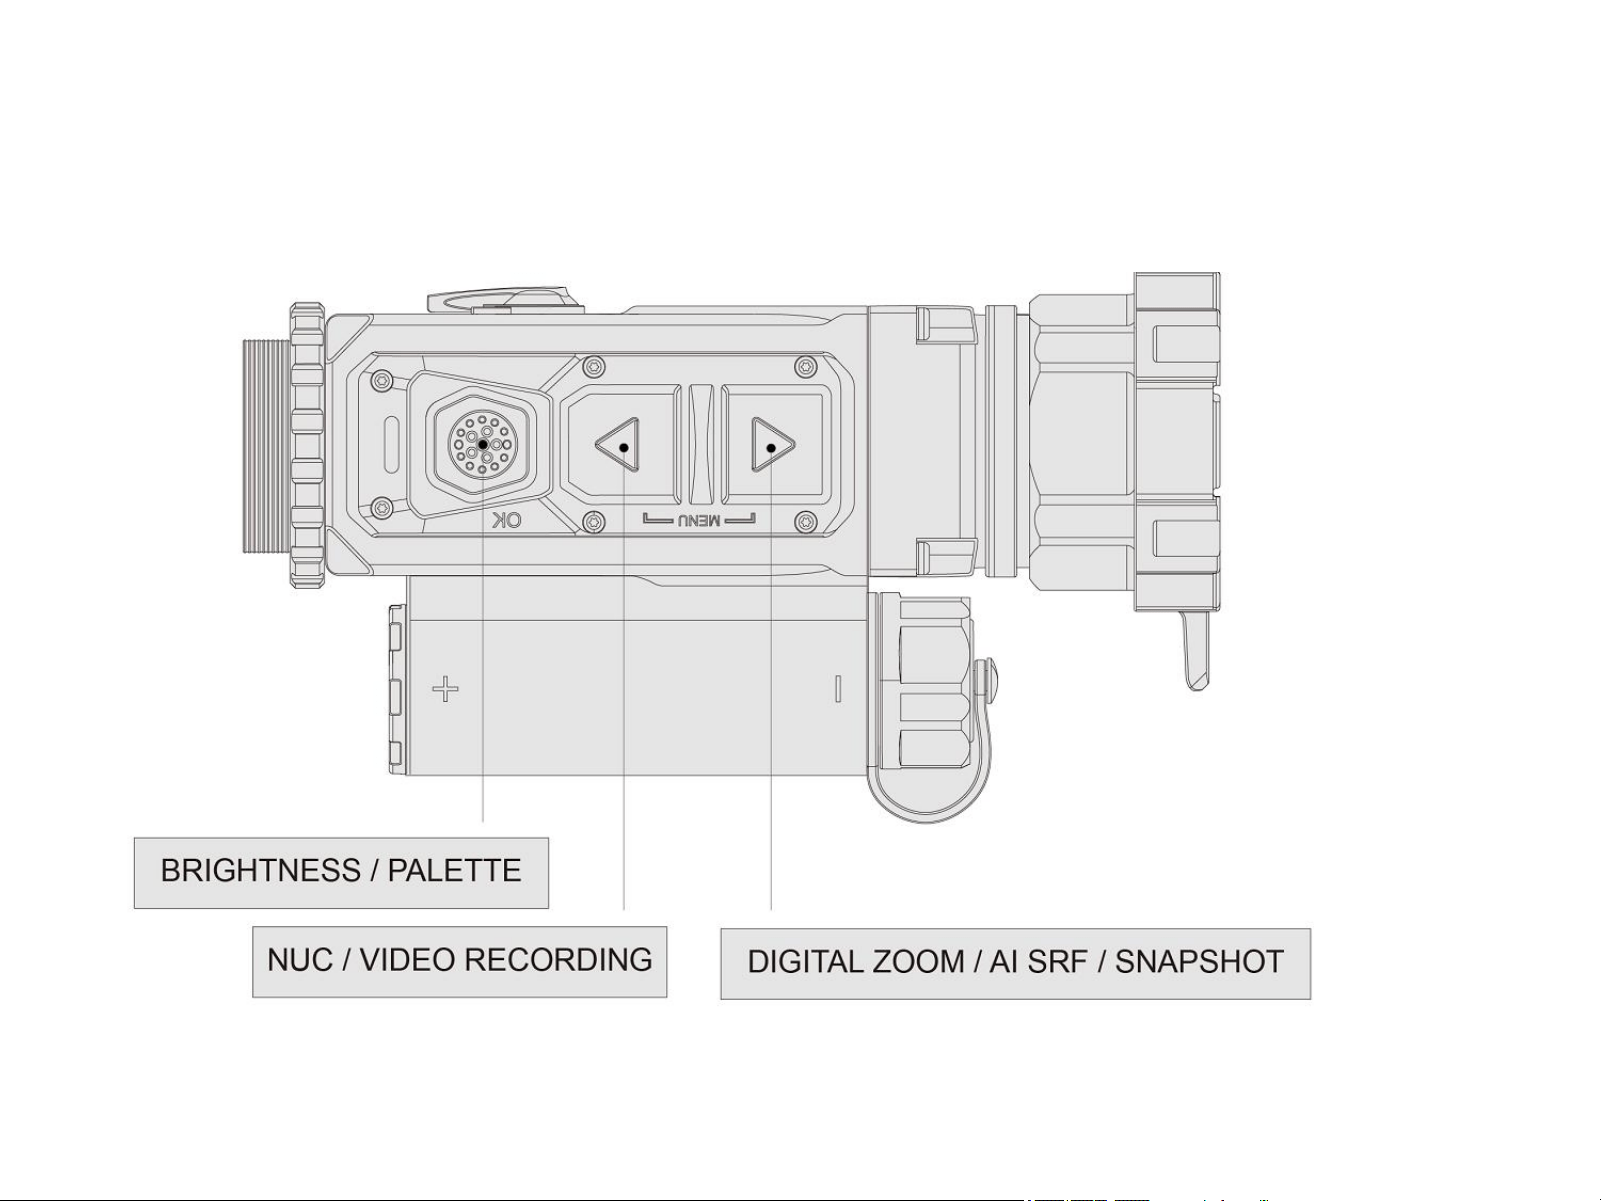
3.2 Controls
BUTTONS
SHORT PRESS
LONG PRESS
Observation Mode
Clip-on Mode
Snapshot
Digital zoom
AI SRF
( only SRF is ON)
NUC activating
Video recording on/off
OK
Change between four values of the diplay luminance
Fast access to palette mode menu
OK +
Switch between clip-on and observation mode
(only available when fast switching mode is on)
4. Basic Operation
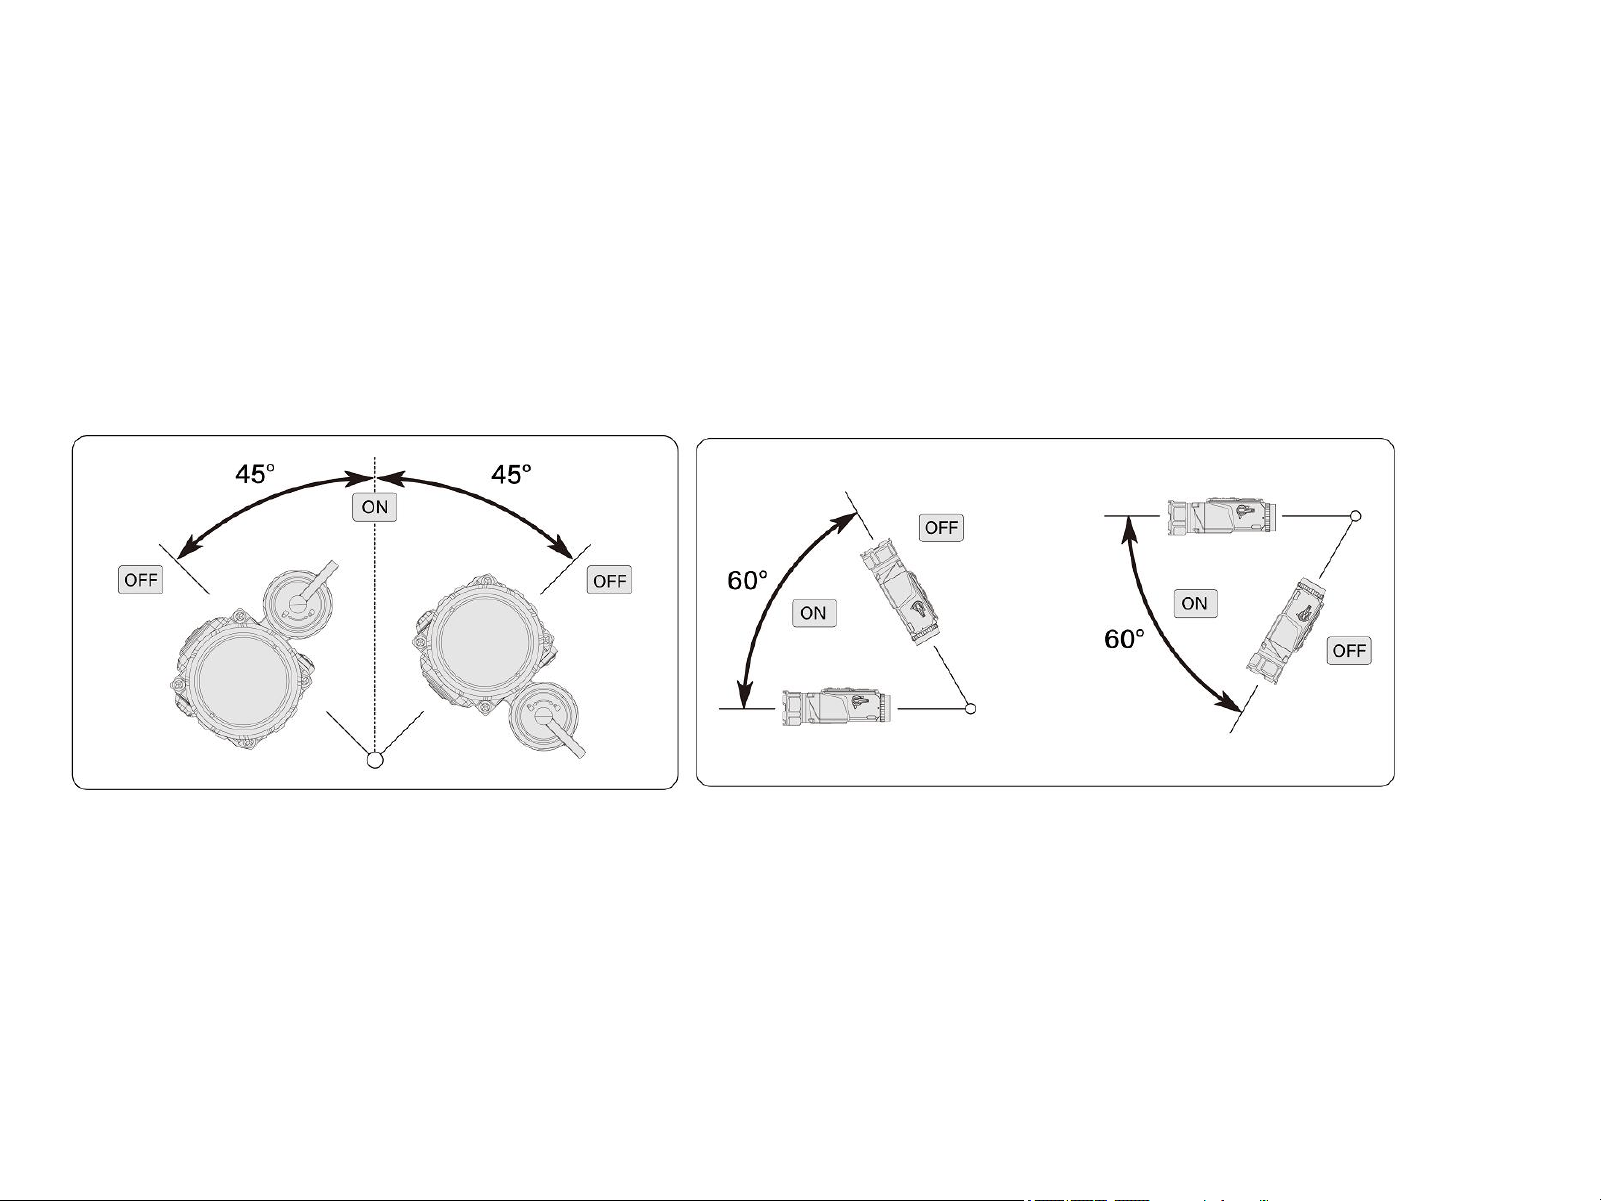
4.1 Power On/Off/Standby
Move the toggle switch to the desired position for ON, S (Standby) and OFF settings.
NOTE: When the toggle switch is in the Standby position, the device will remain powered on if the
tilt range is within 45° to either side and 60° upwards or downwards. The device will automatically
enter Standby mode if the tilt exceeds 45° to either side or 60° upwards or downwards.
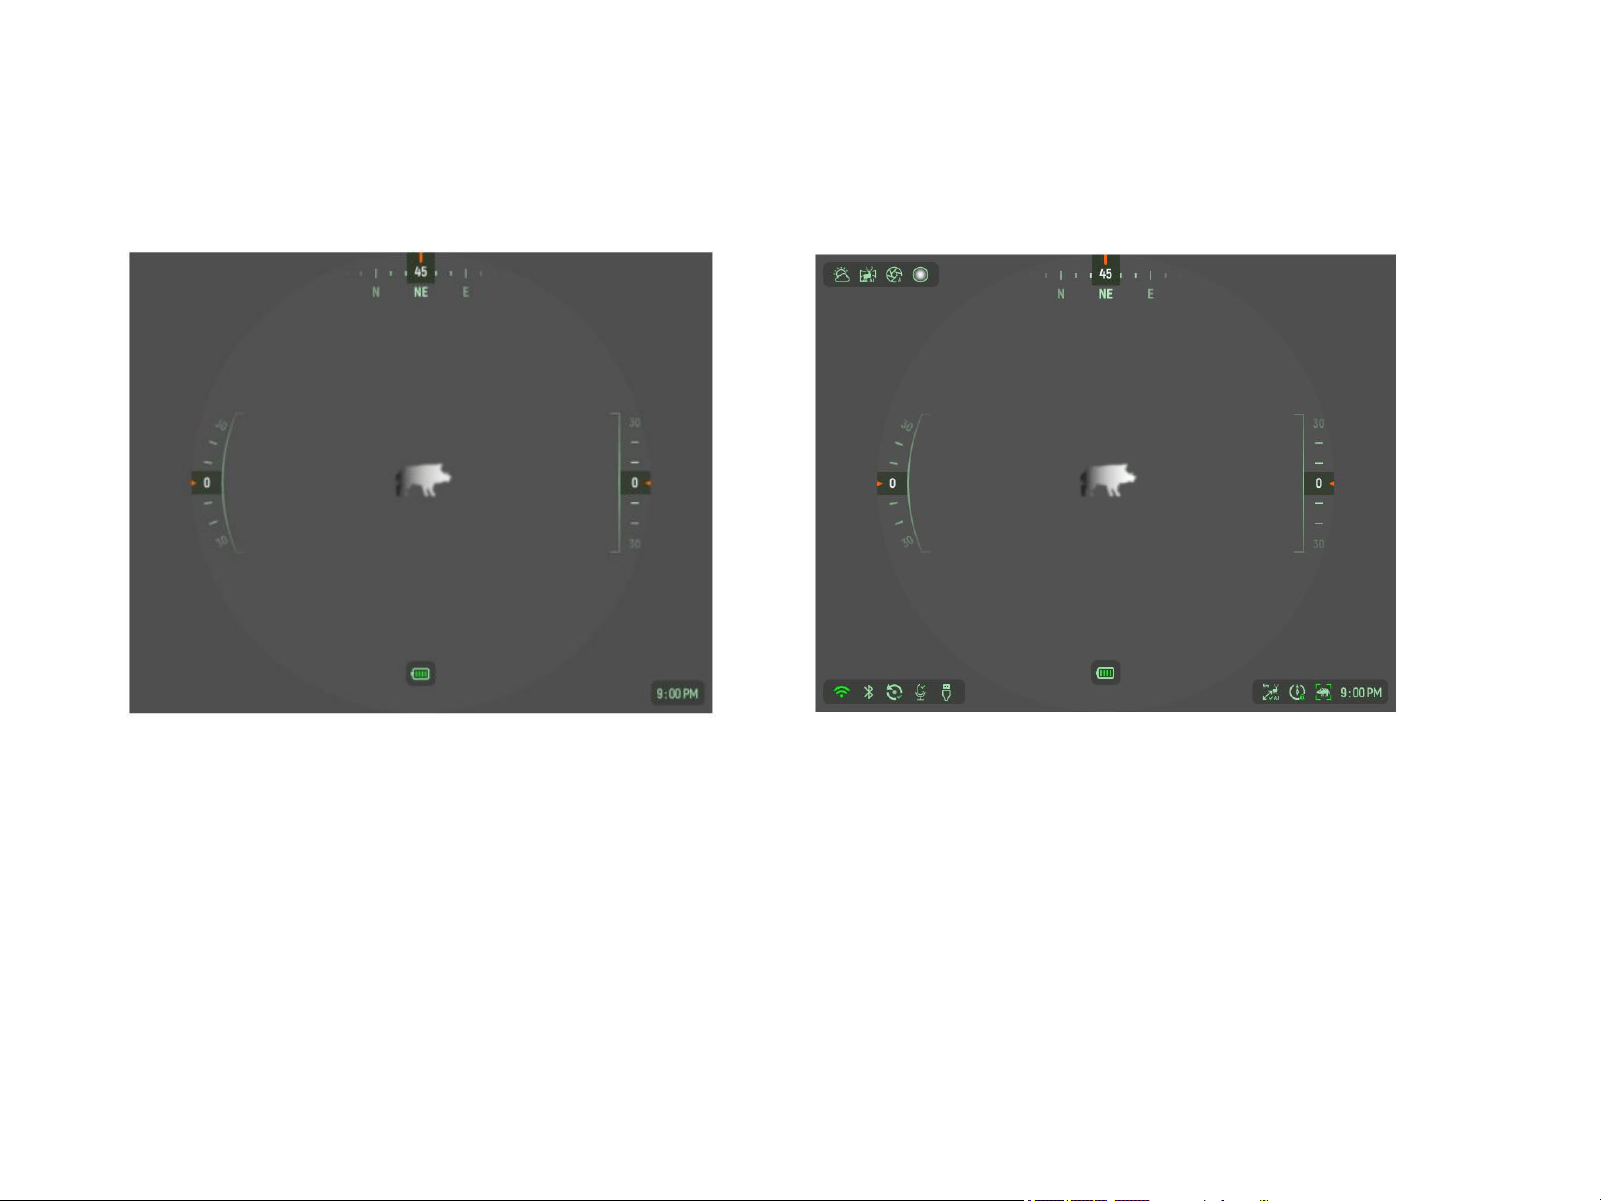
4.2 Interface Display
After powering on, the basic OSD is displayed. Pressing any button will switch to the full OSD.
If no operation is performed within 3 seconds under full OSD, the full OSD will automatically revert to the basic
OSD.
Basic OSD in Clip-on Mode
Full OSD in clip-on Mode
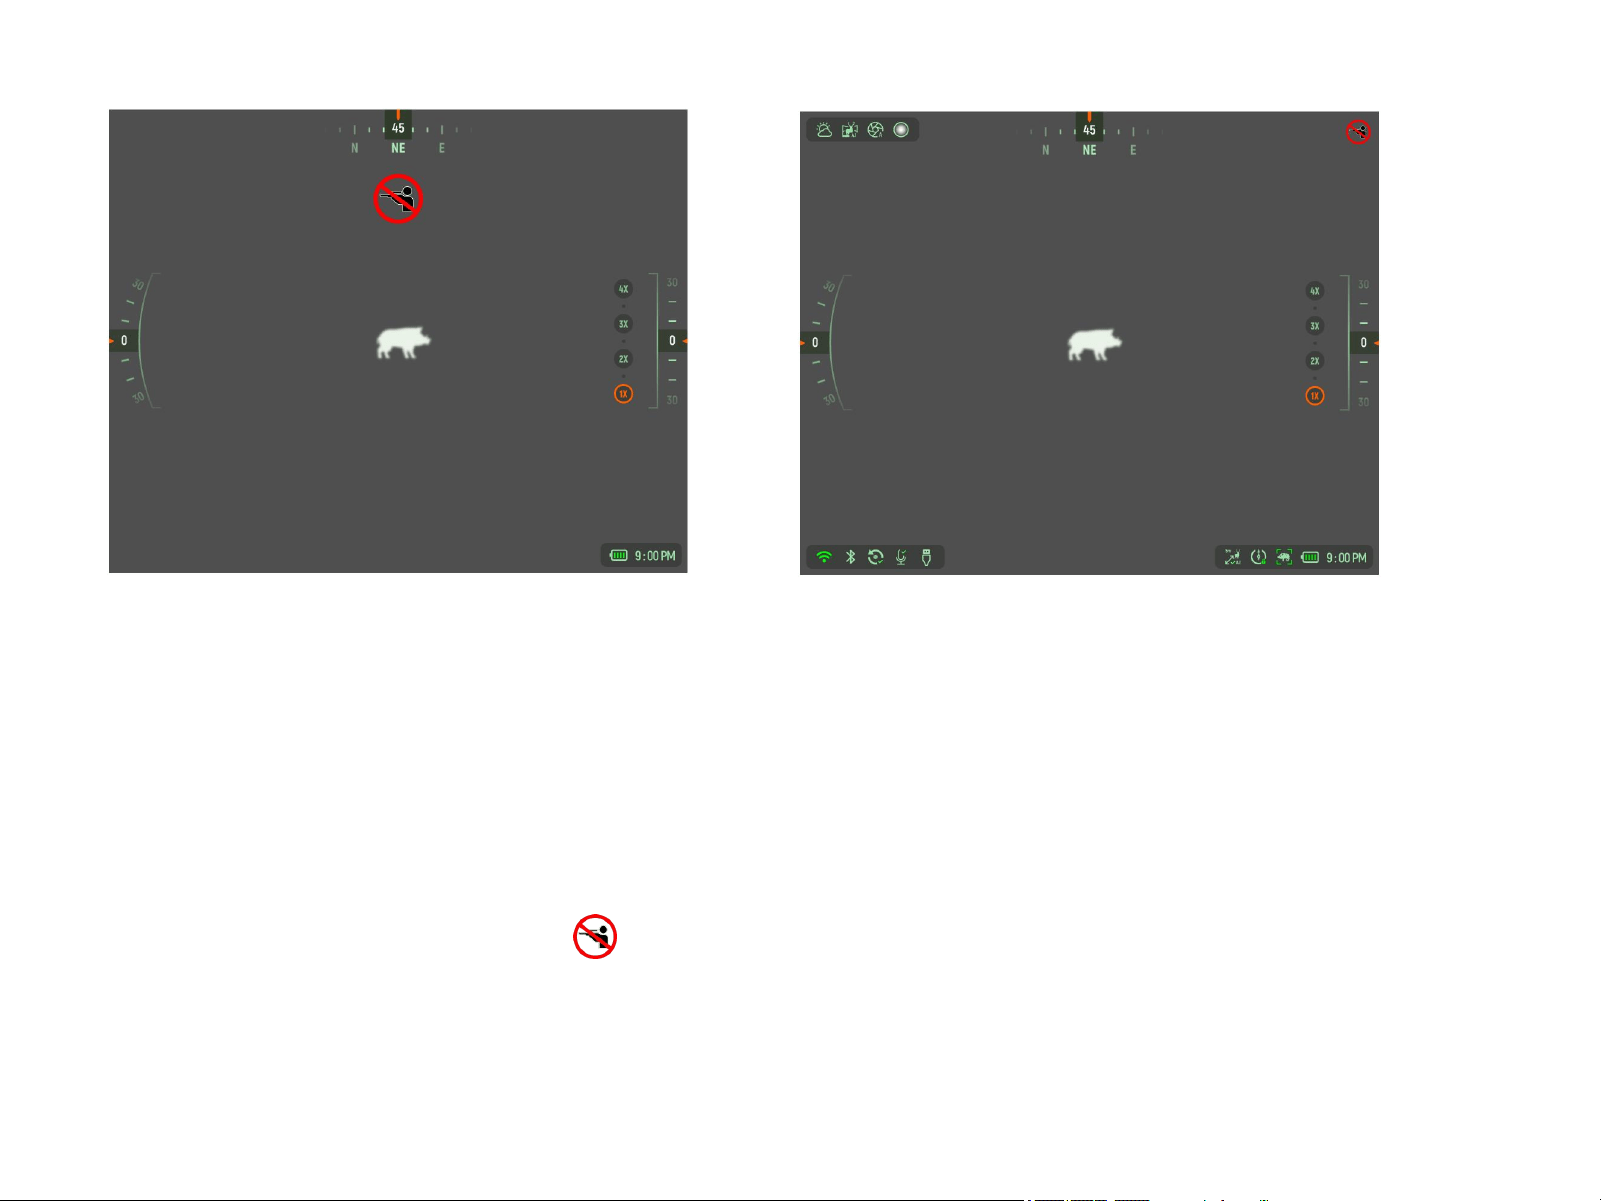
Basic OSD in Observation Mode
Full OSD in Observation Mode
ATTENTION!
When the device is powered on, the basic OSD is displayed in both clip-on mode and observation mode.
Pressing any button will trigger the full OSD, which will remain on-screen for 3 seconds before disappearing
automatically.
NOTE
When entering Observation Mode, the will be displayed in the center of the screen for 15 seconds.
After 15 seconds, it will automatically move to the top-right corner of the screen.
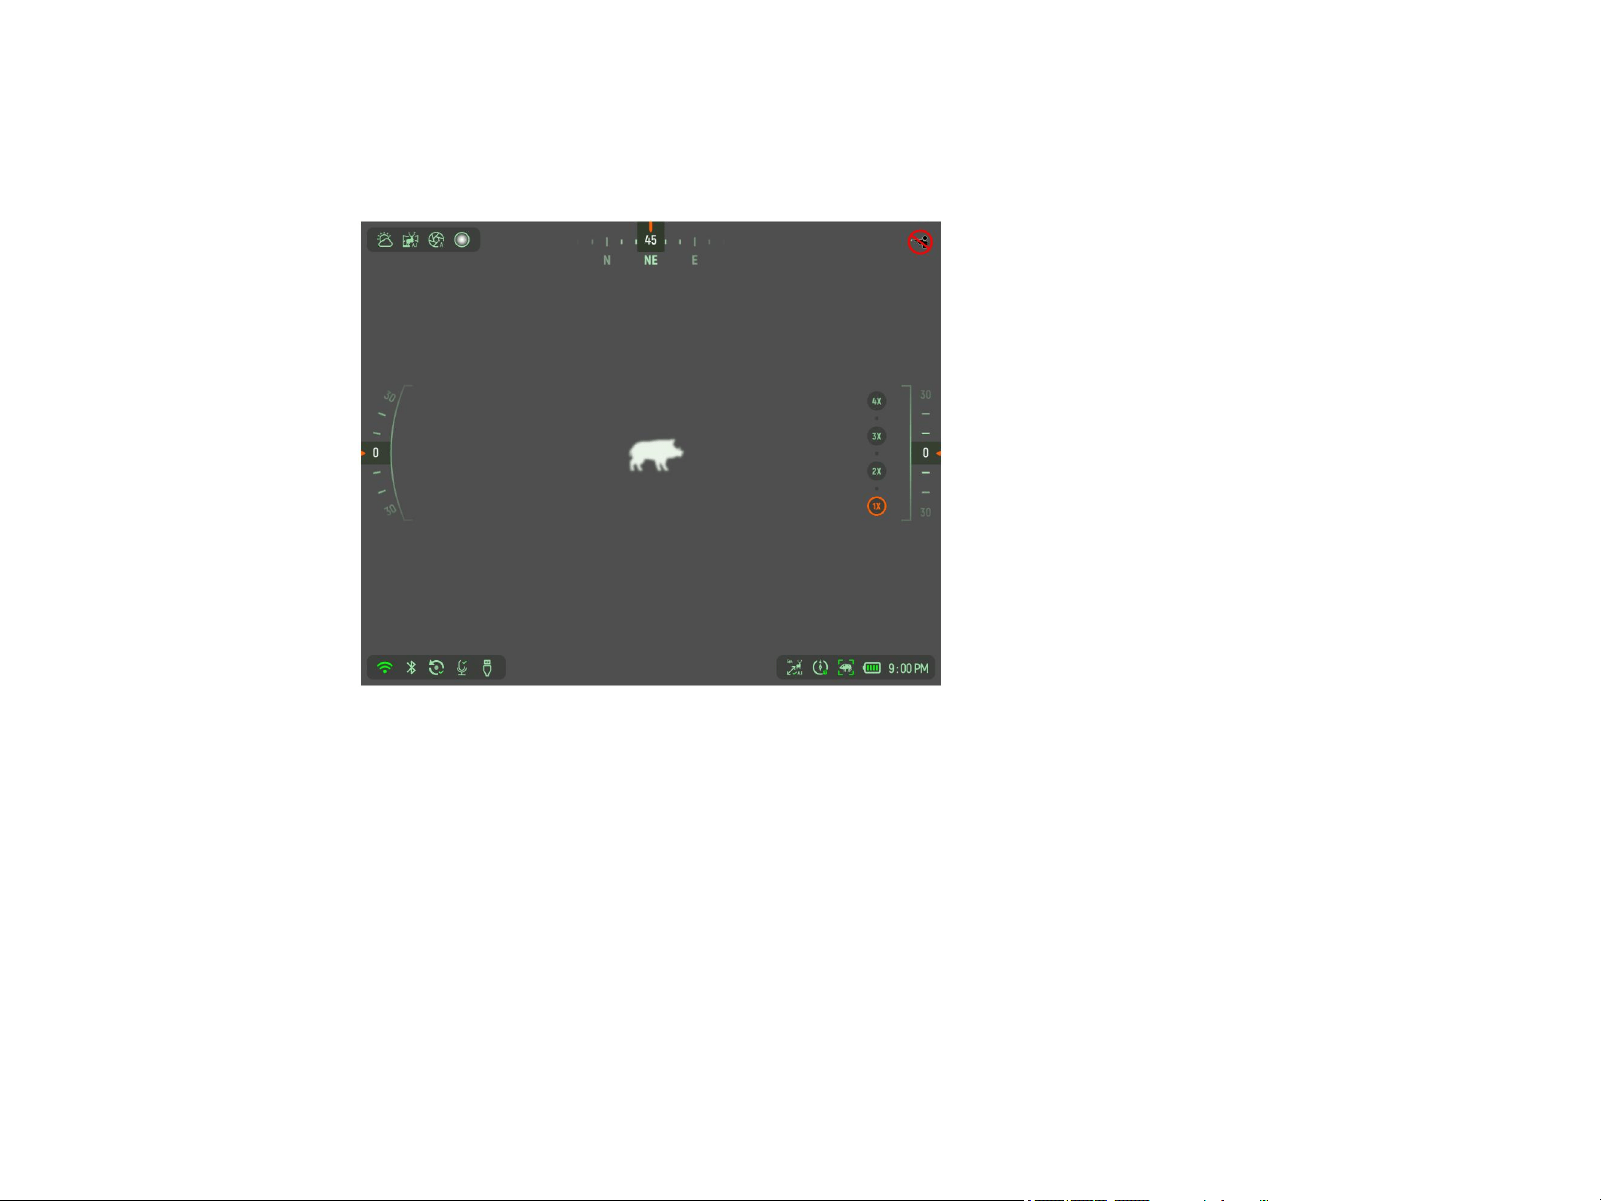
4.3 Digital Zoom (Only available in Observation mode)
Short press the Up button in Observation mode to zoom in or zoom out between 1x/2x/3x/4x.
The current digital zoom is shown on the righ side of the screen.
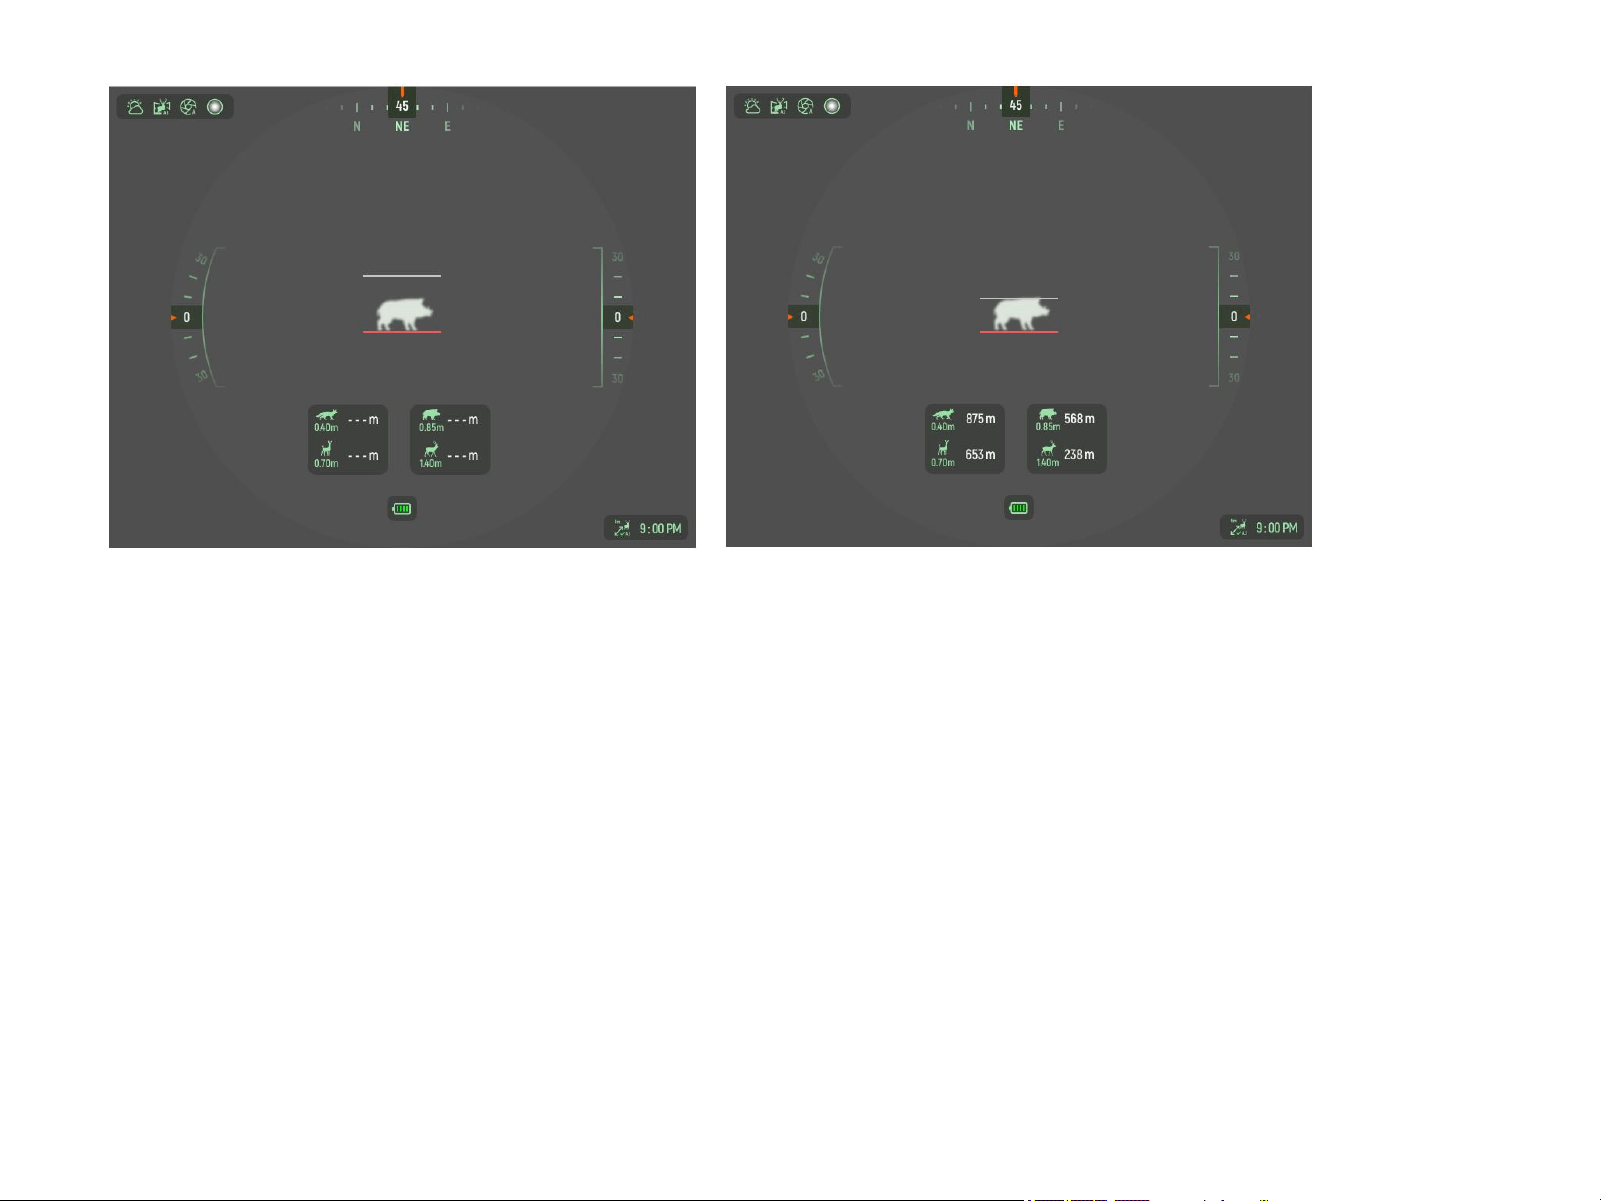
4.4 AI SRF (Only available in Clip-on mode)
The AI SRF function uses algorithm to automatically calculate the distance to an object of known size
helping users quickly estimate the approximate distance to the animal.
when AI SFR is activated in main menu, short press the Up button to turn on the AI SRF function in Clip-
on mode.
Align the lower horizontal bar with the base of object, the upper horizontal bar will automatically align and
calcuate the distances for the four reference objects automatically.
Users select the corresponding distance based on the size of object.
Press and hold the OK button to exit AI SRF function.
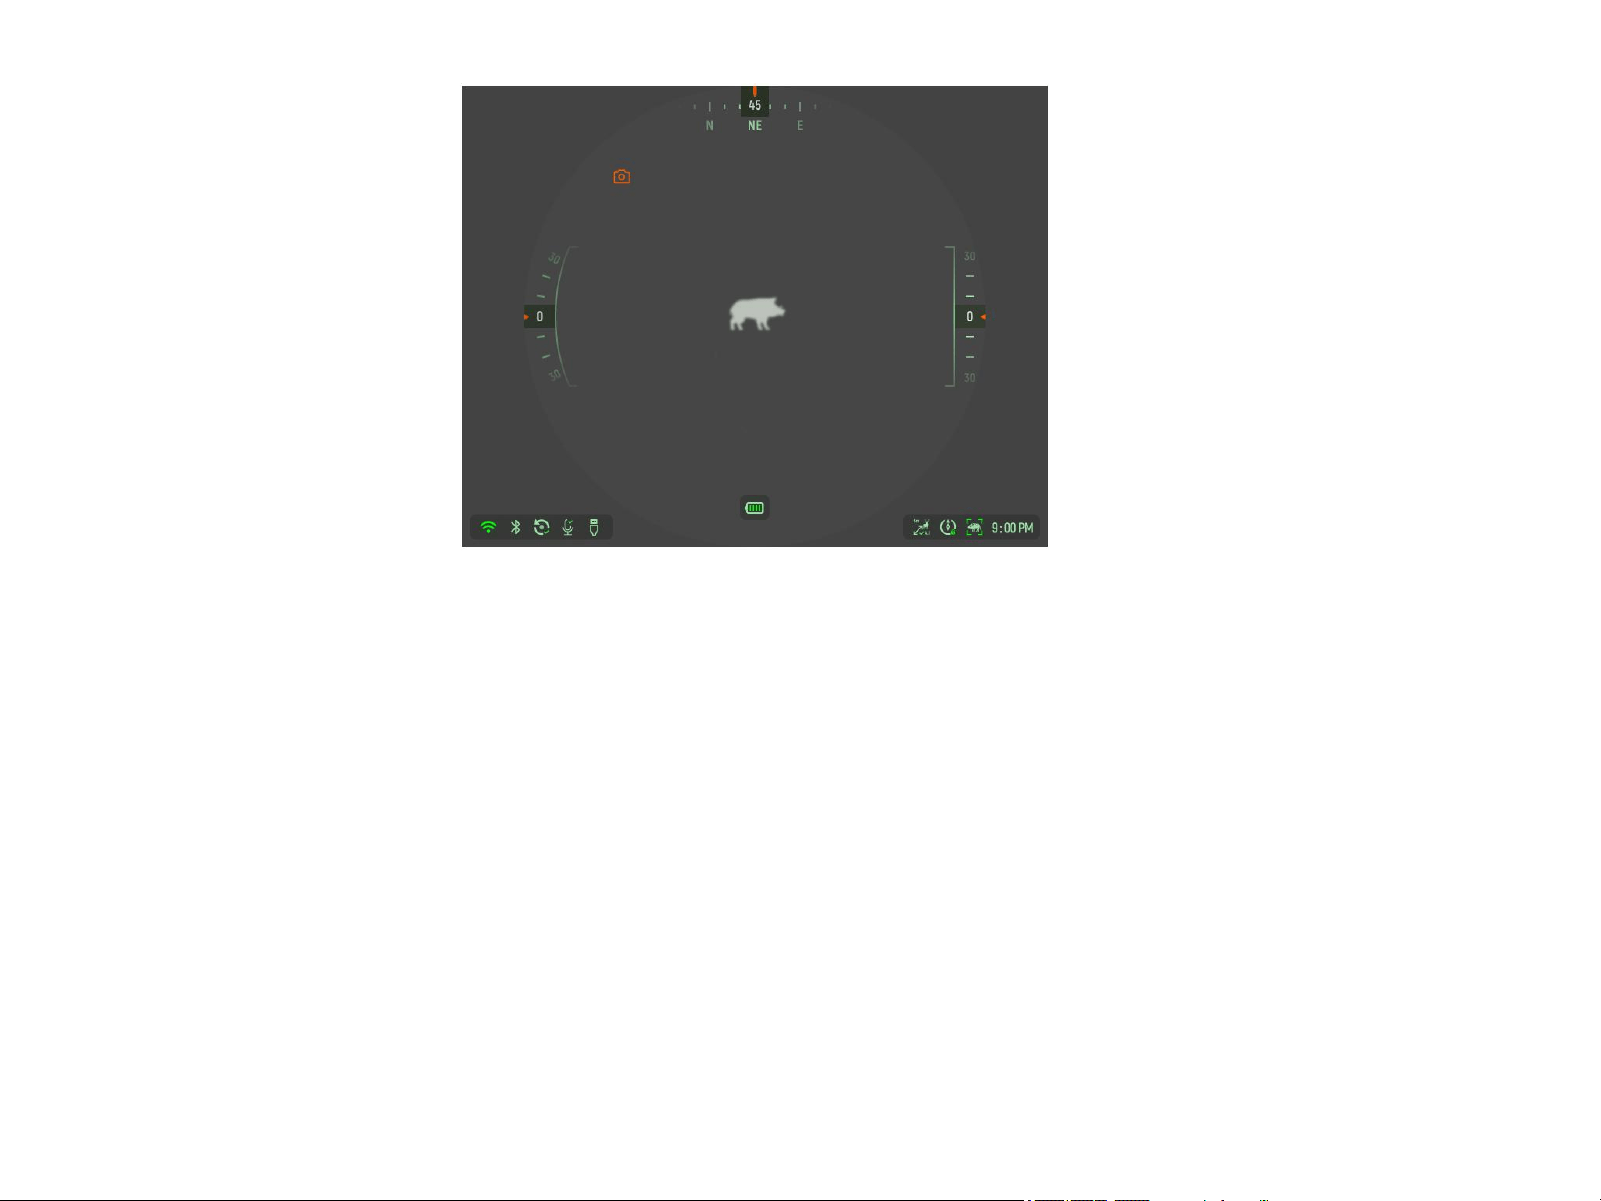
4.5 Snapshot
Long press the Up button to take a photo, the capture icon appears on the screen for 1s before
disappearing.
IMPORTANT!
Users can select 4 silhouettes to be displayed on the screen from 18 predefined silhouettes.
4.6 NUC
Short press the Down button to do non-uniformity correction.
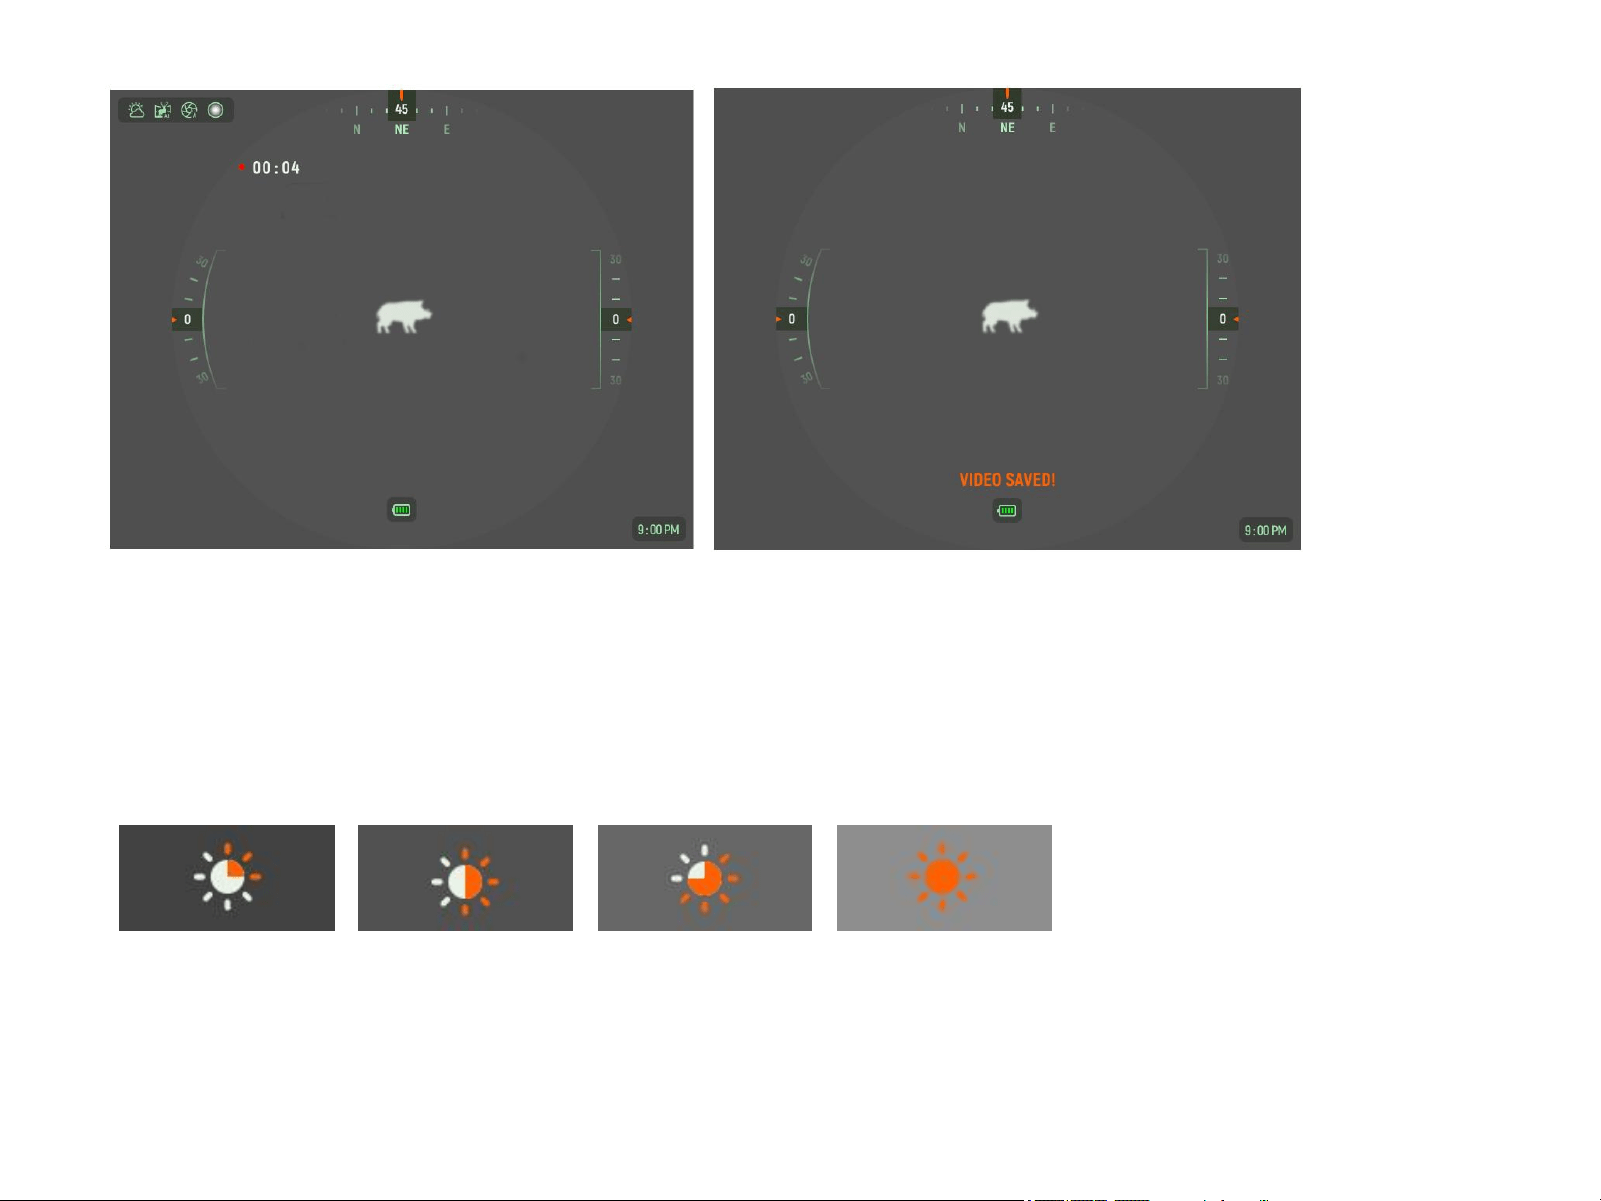
4.7 Video Recording
Long press the Down button to start a video recording.
A recording timer displays on the screen.
Long press the Down button to stop and save the video recording.
4.8 Display Luminance Adjustment
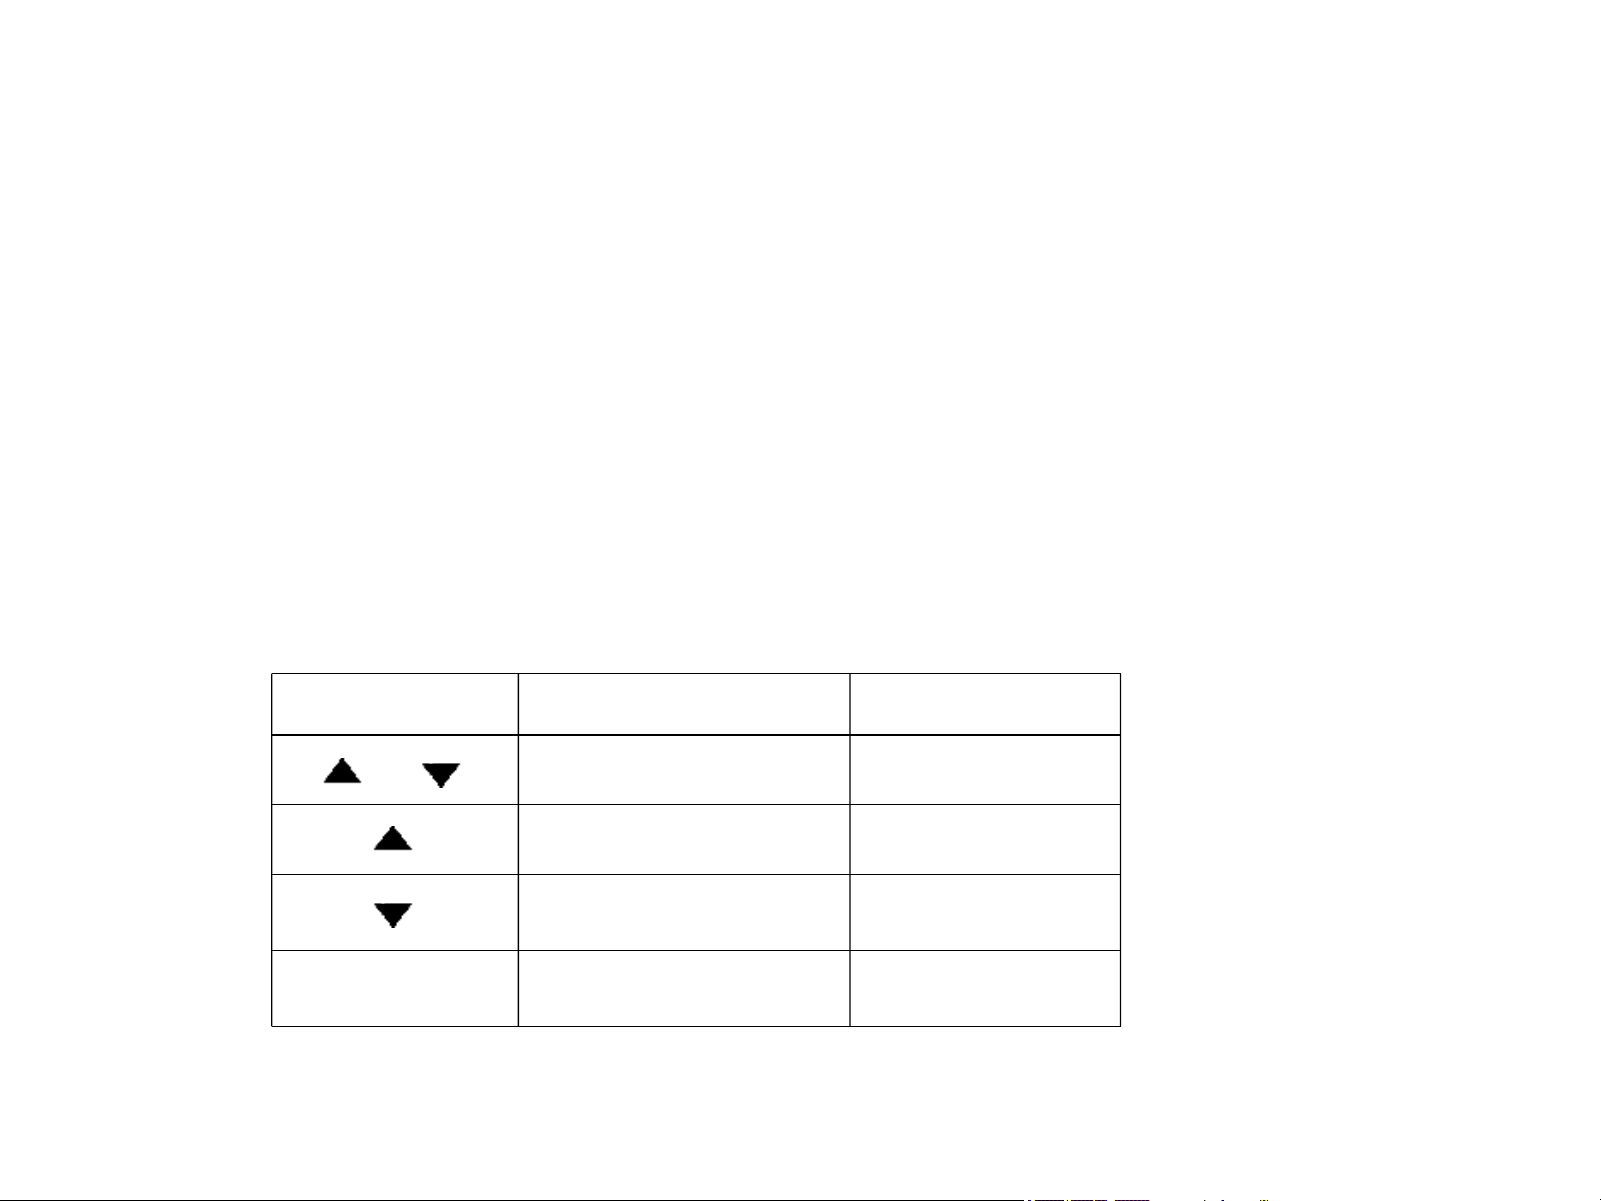
Short press the OK button to change between four values of the display luminance.
NOTE
When Auto Isotherm is activated, short press OK button to perform sampling.
4.9 Palette Mode
Long press the OK button to switch the palette from Black hot, White hot, Red hot, Isotherm, Auto
Isotherm, Ironbow and Rainbow.
4.10 Switch Between Clip-on Mode and Observation Mode
Press the OK button and the Down button simultaneously to quick switch between Clip-on Mode and
Observation Mode.
NOTE
The quick switch function can only be performed when it is activated from the main menu.
5. MENU
5.1 Navigation
BUTTONS
SHORT PRESS
LONG PRESS
+
Enter menu
/
Move the curse up
/
Move the curse down
/
OK
Function select
Exit menu
5.2 Image Settings
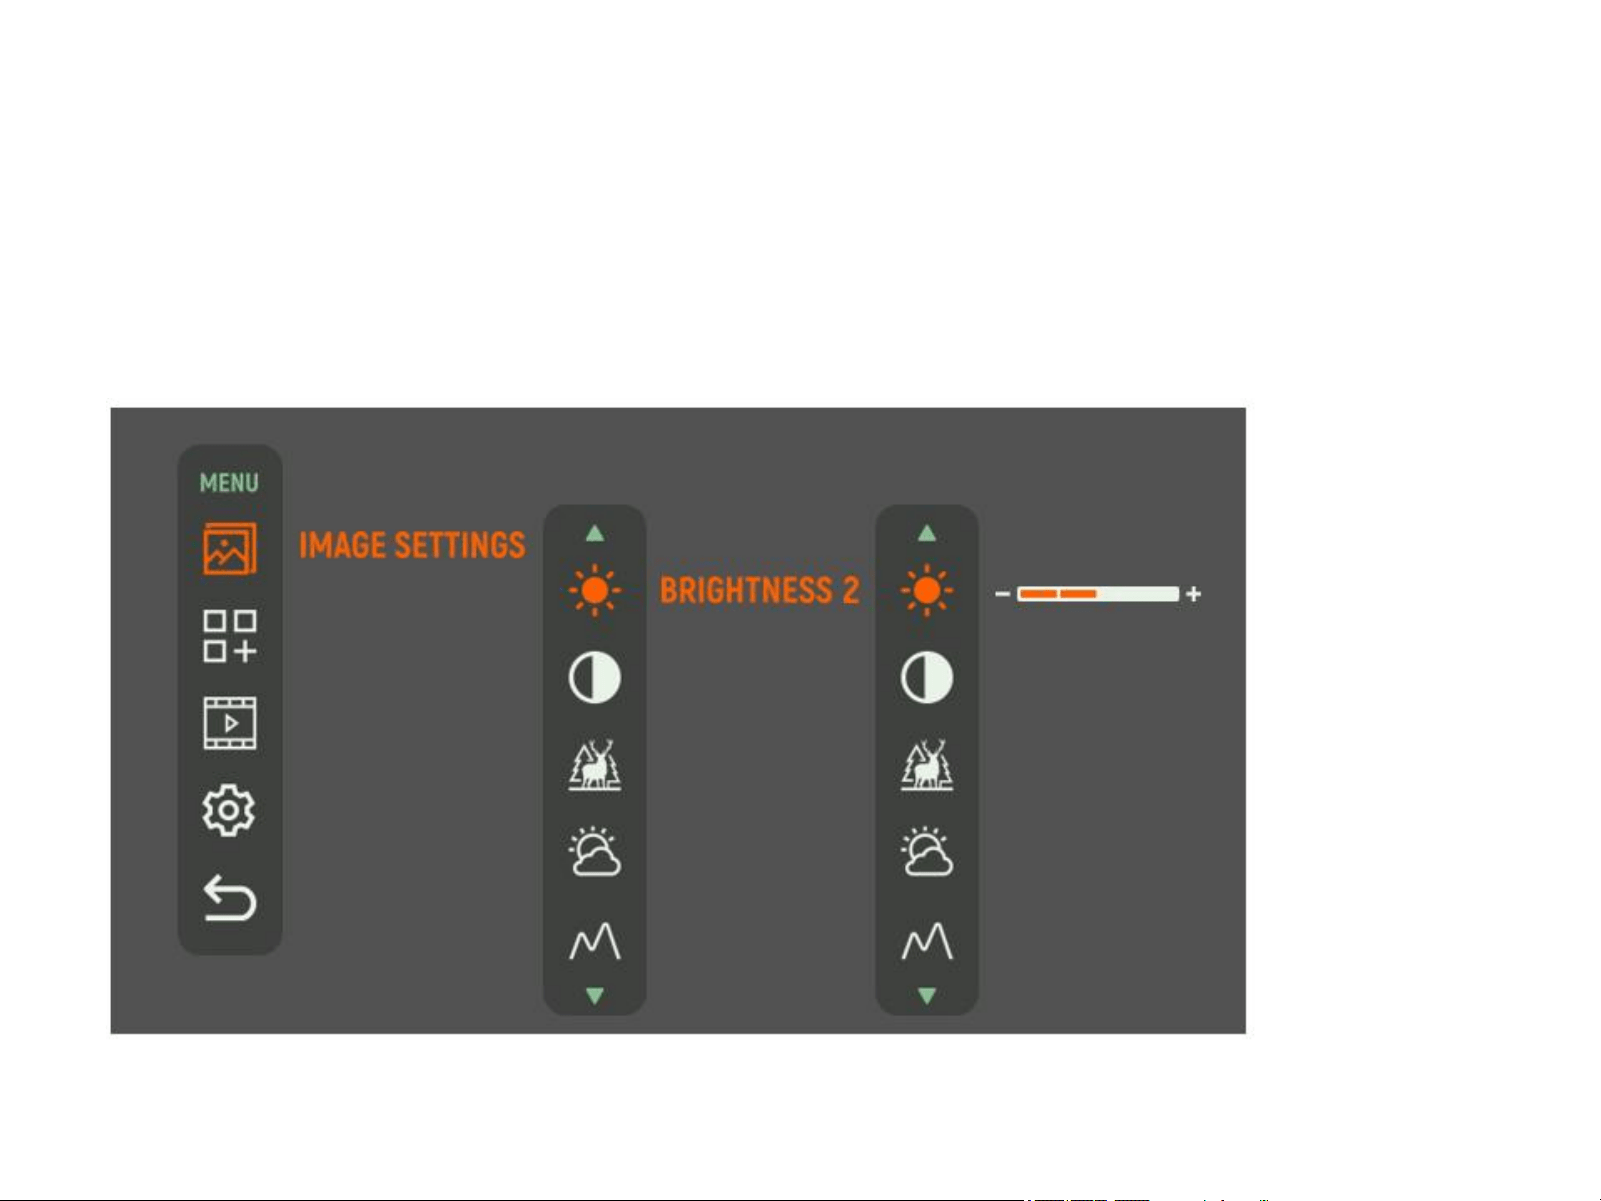
Press the Up button and the Down button simultaneously to enter Menu, press Up and Down button to
select Image Settings and Press the OK button to enter its secondary menu to adjust the parameters of
current option.
5.2.1 Brightness
Select Brightness to adjust the level of image brightness from 1 to 4 by pressing Up or Down button,
press the OK button to save and exit to upper interface.
NOTE
Brightness in Image Setting is not related with the Luminance adjustment.
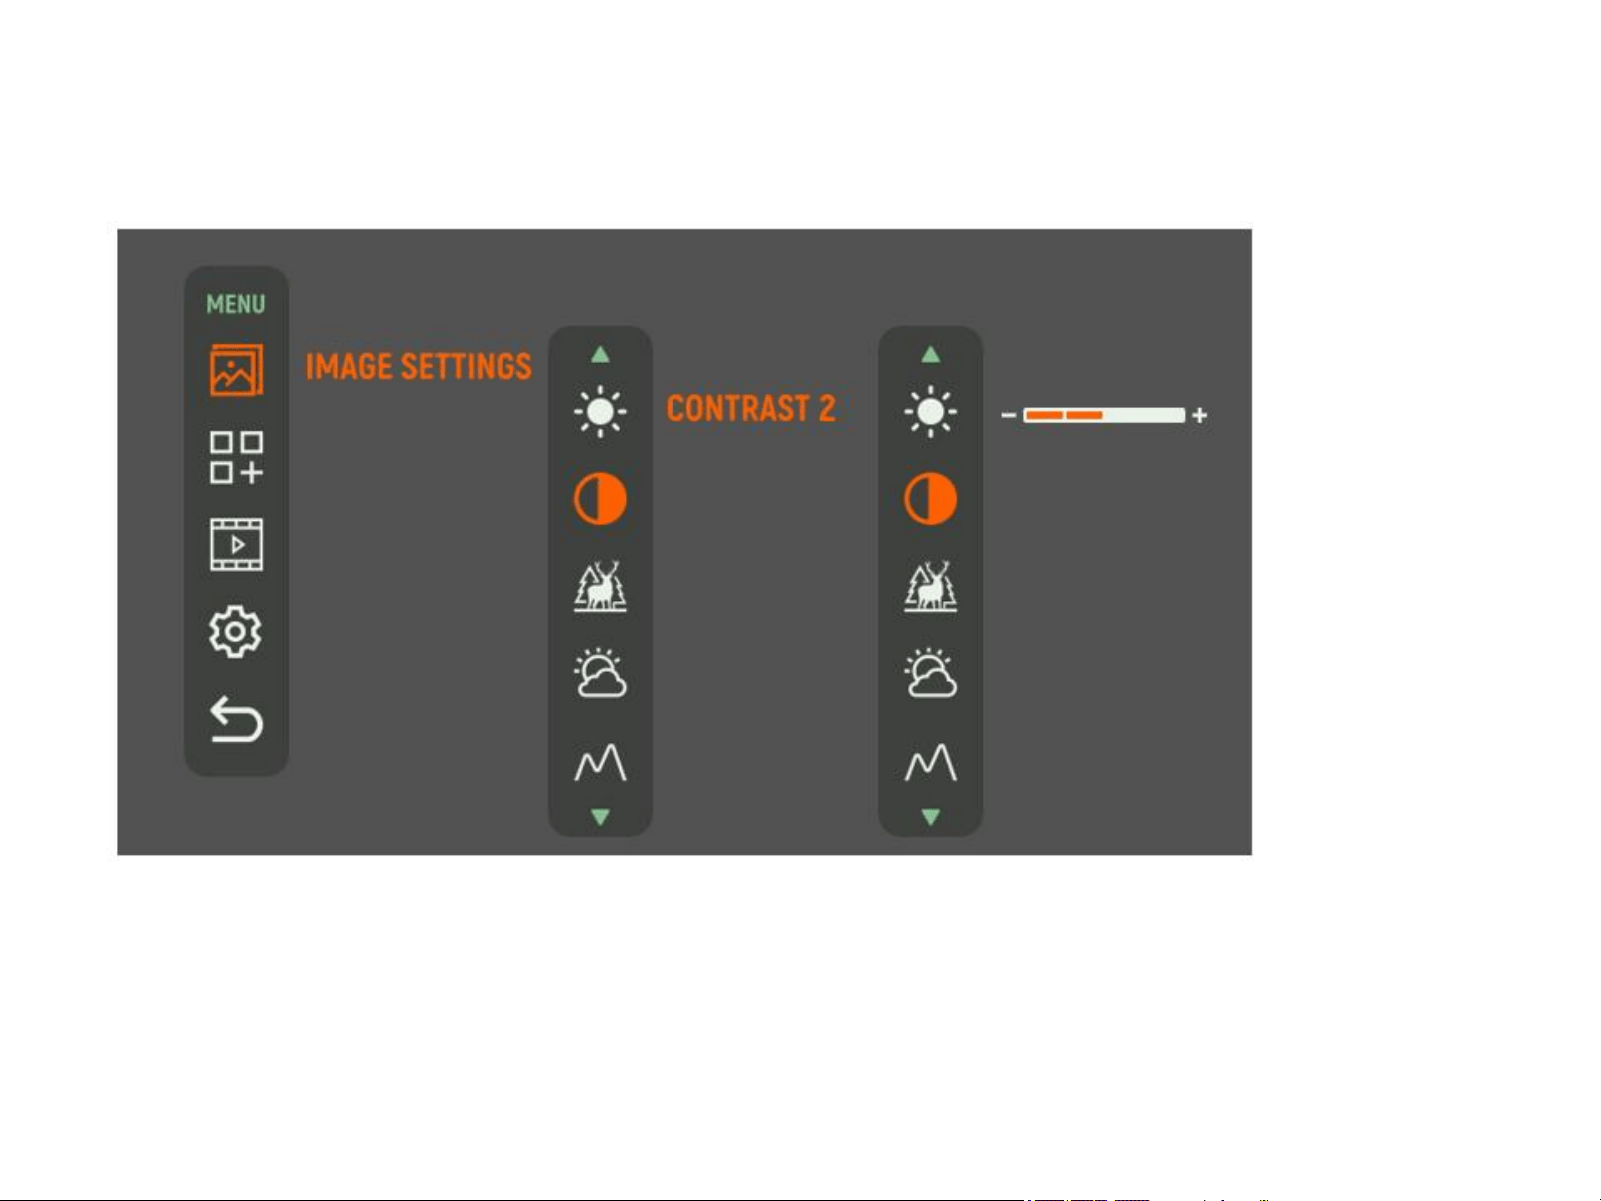
5.2.2 Contrast
Select Contrast to adjust the level of image contrast from 1 to 4 by pressing the Up
or the Down button, press the OK button to save and exit to upper interface.
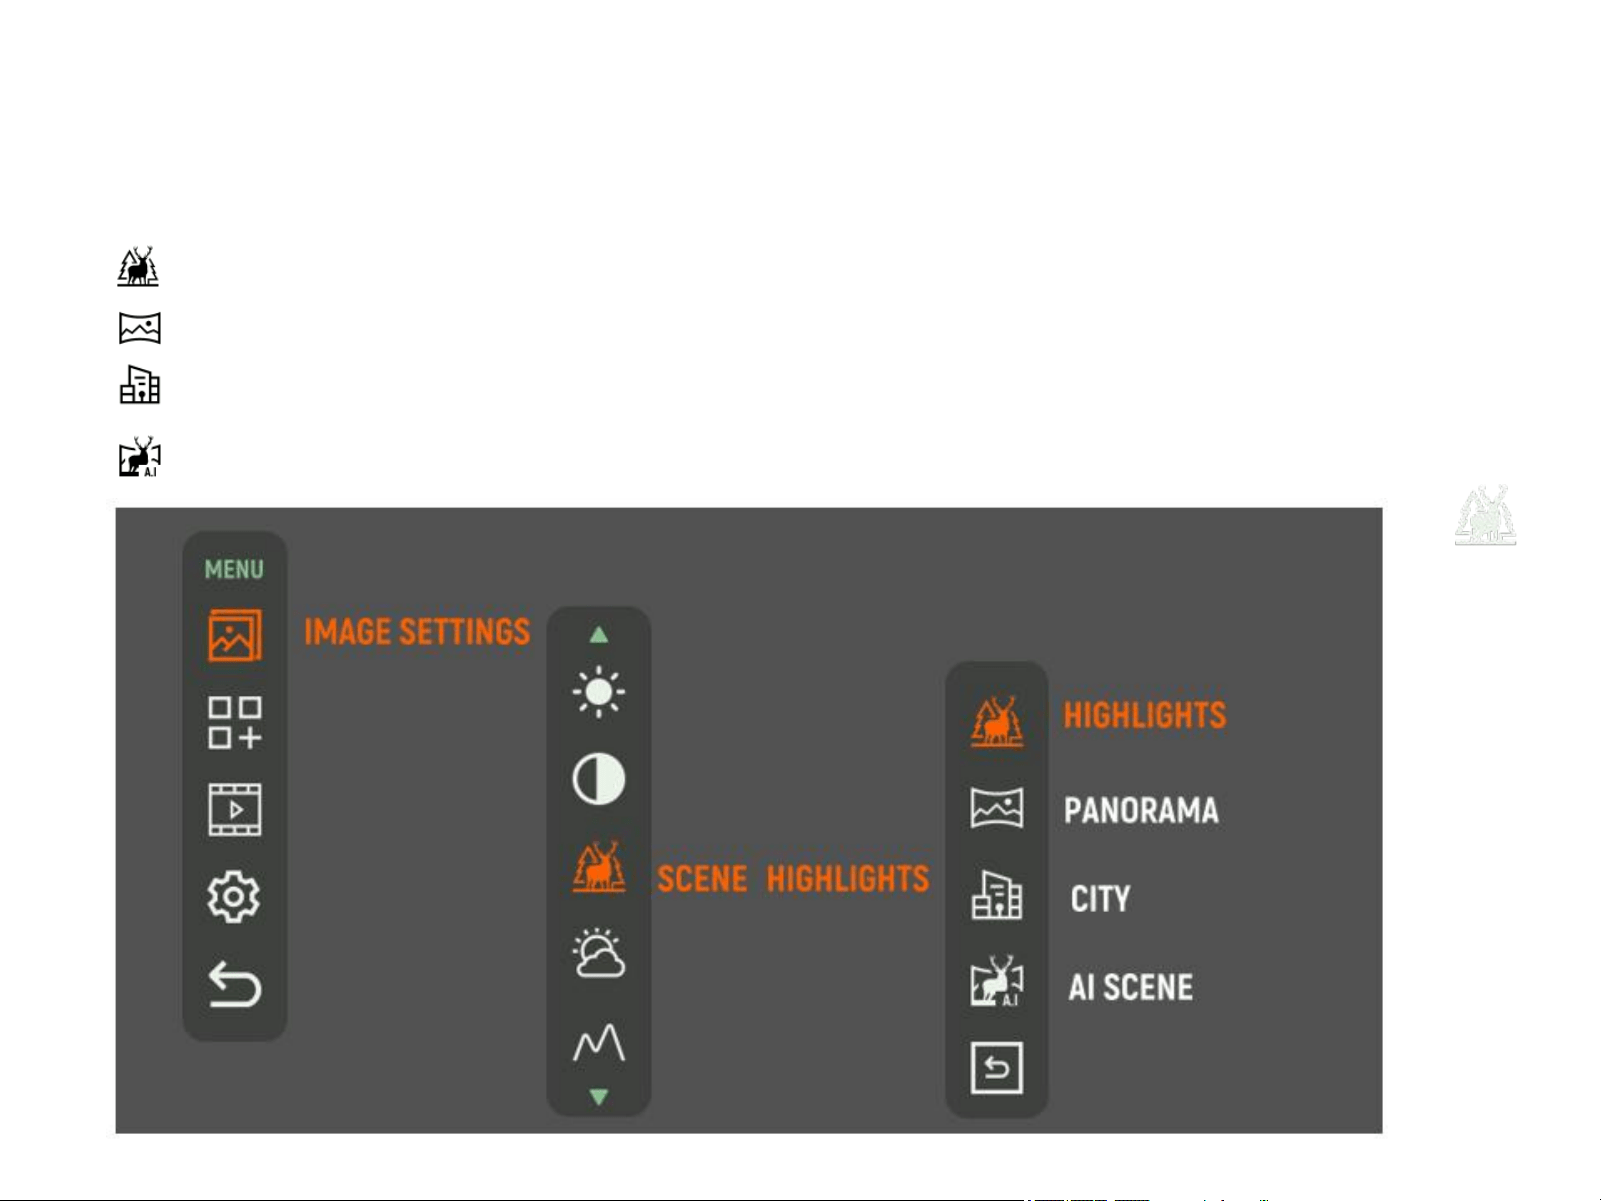
5.2.3 Scene
Select a scene mode based on the properties of the scene and your preferences.
Short press the Up or Down button to switch the scene mode among Highlights, Panorama, City and AI Scene.
Short press the OK button to save and exit to upper interface.
Highlights - this type of image contrasting is suitable for detection and observation.
Panorama - this type of image contrasting is suitable for observing panoramic scenes with combination
of: forest and sky, earth and sky, scenes on the horizon.
City - this type of image contrasting is suitable for high temperature scene.
AI Scene - Adaptive Scene Mode, automatically selecte and switch among Highlights, Panorama and
City based on the environmental conditions.
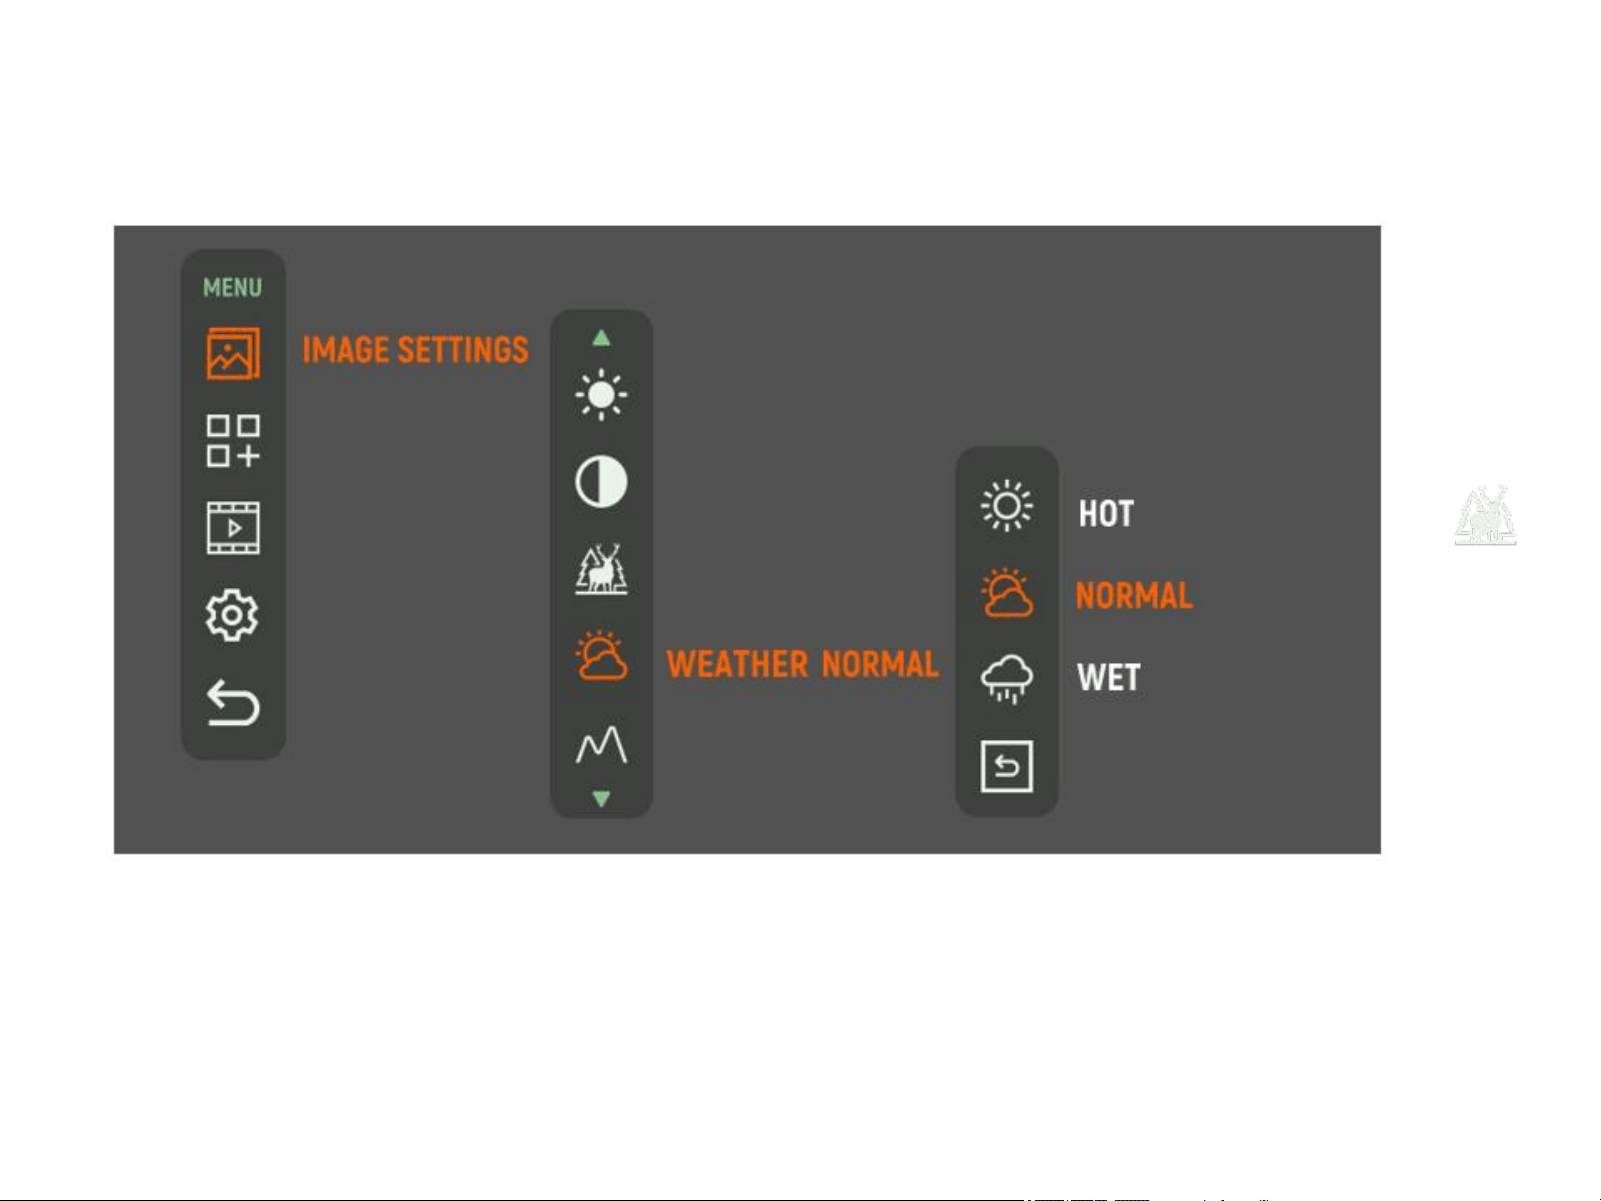
5.2.4 Weather
Select the Weather mode and switch among Normal, Wet and Hot by short pressing the Up or Down
button. Press the OK button to save and exit to upper interface.
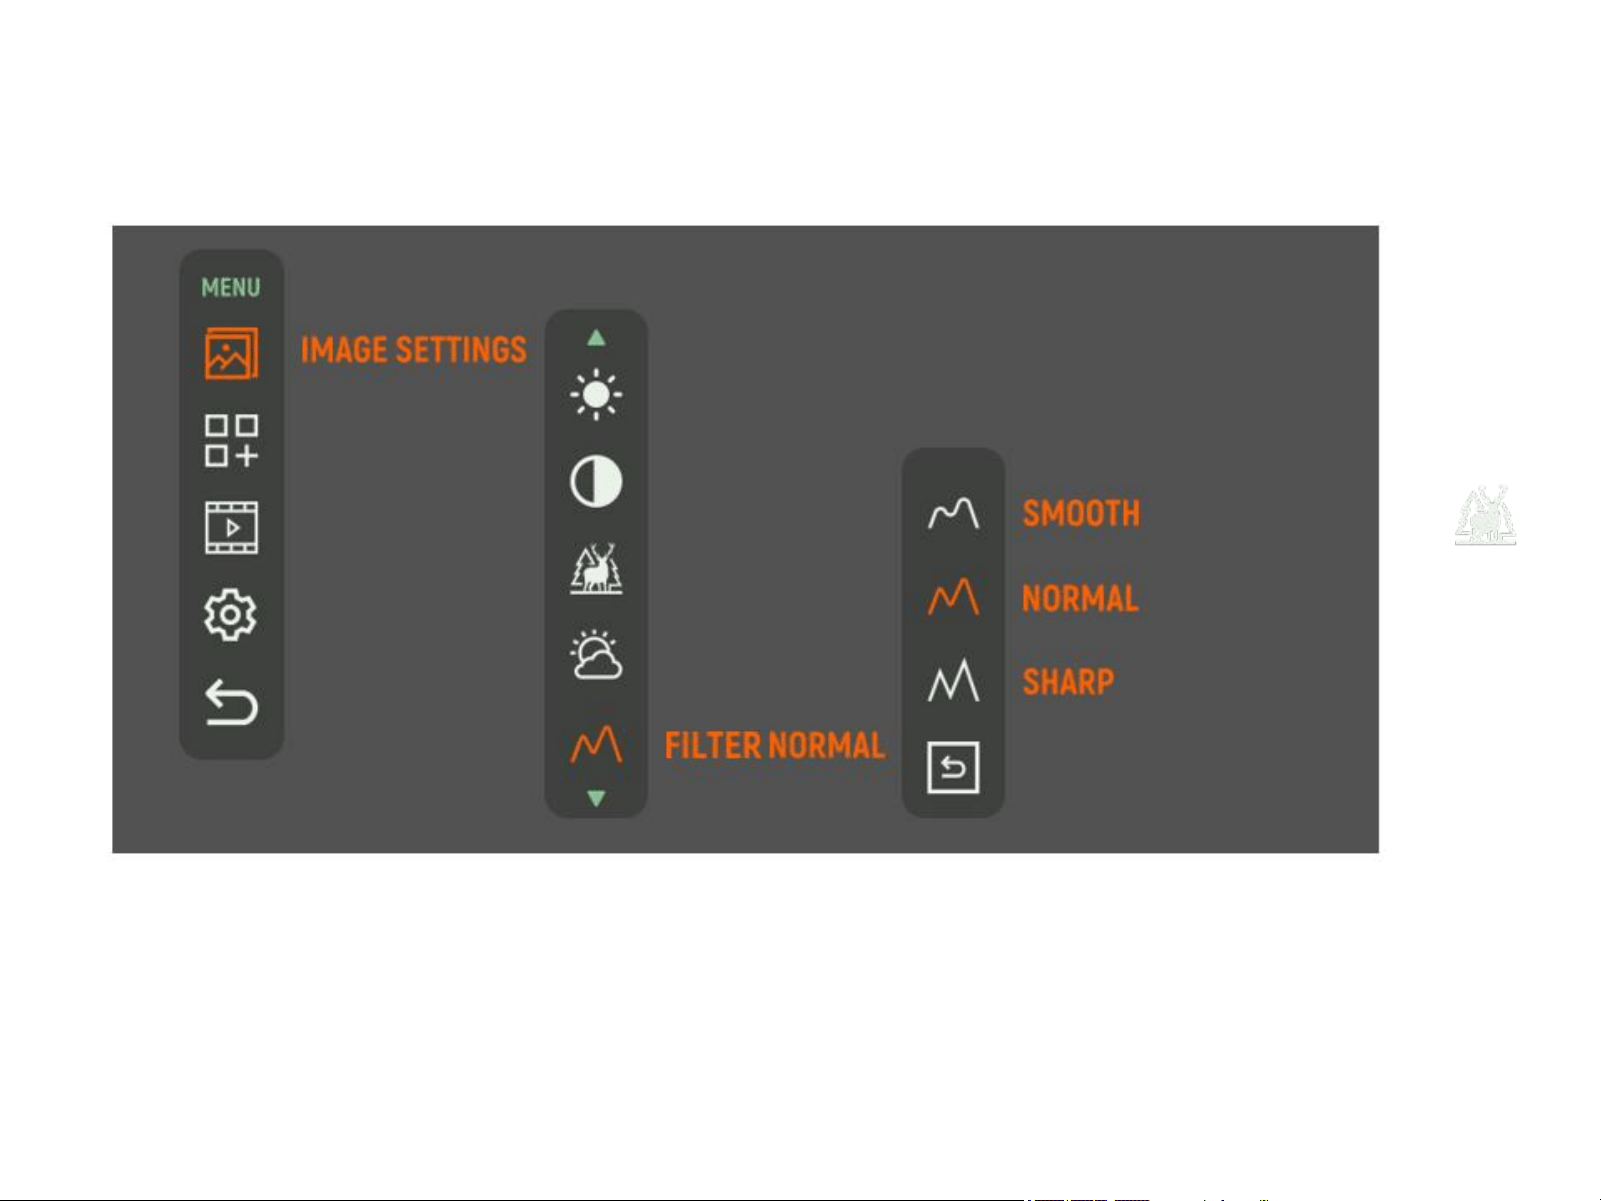
5.2.5 Filter
Select the Filter mode and switch among Smooth, Normal and Sharp by short pressing the Up or Down
button. Press the OK button to save and exit to upper interface.
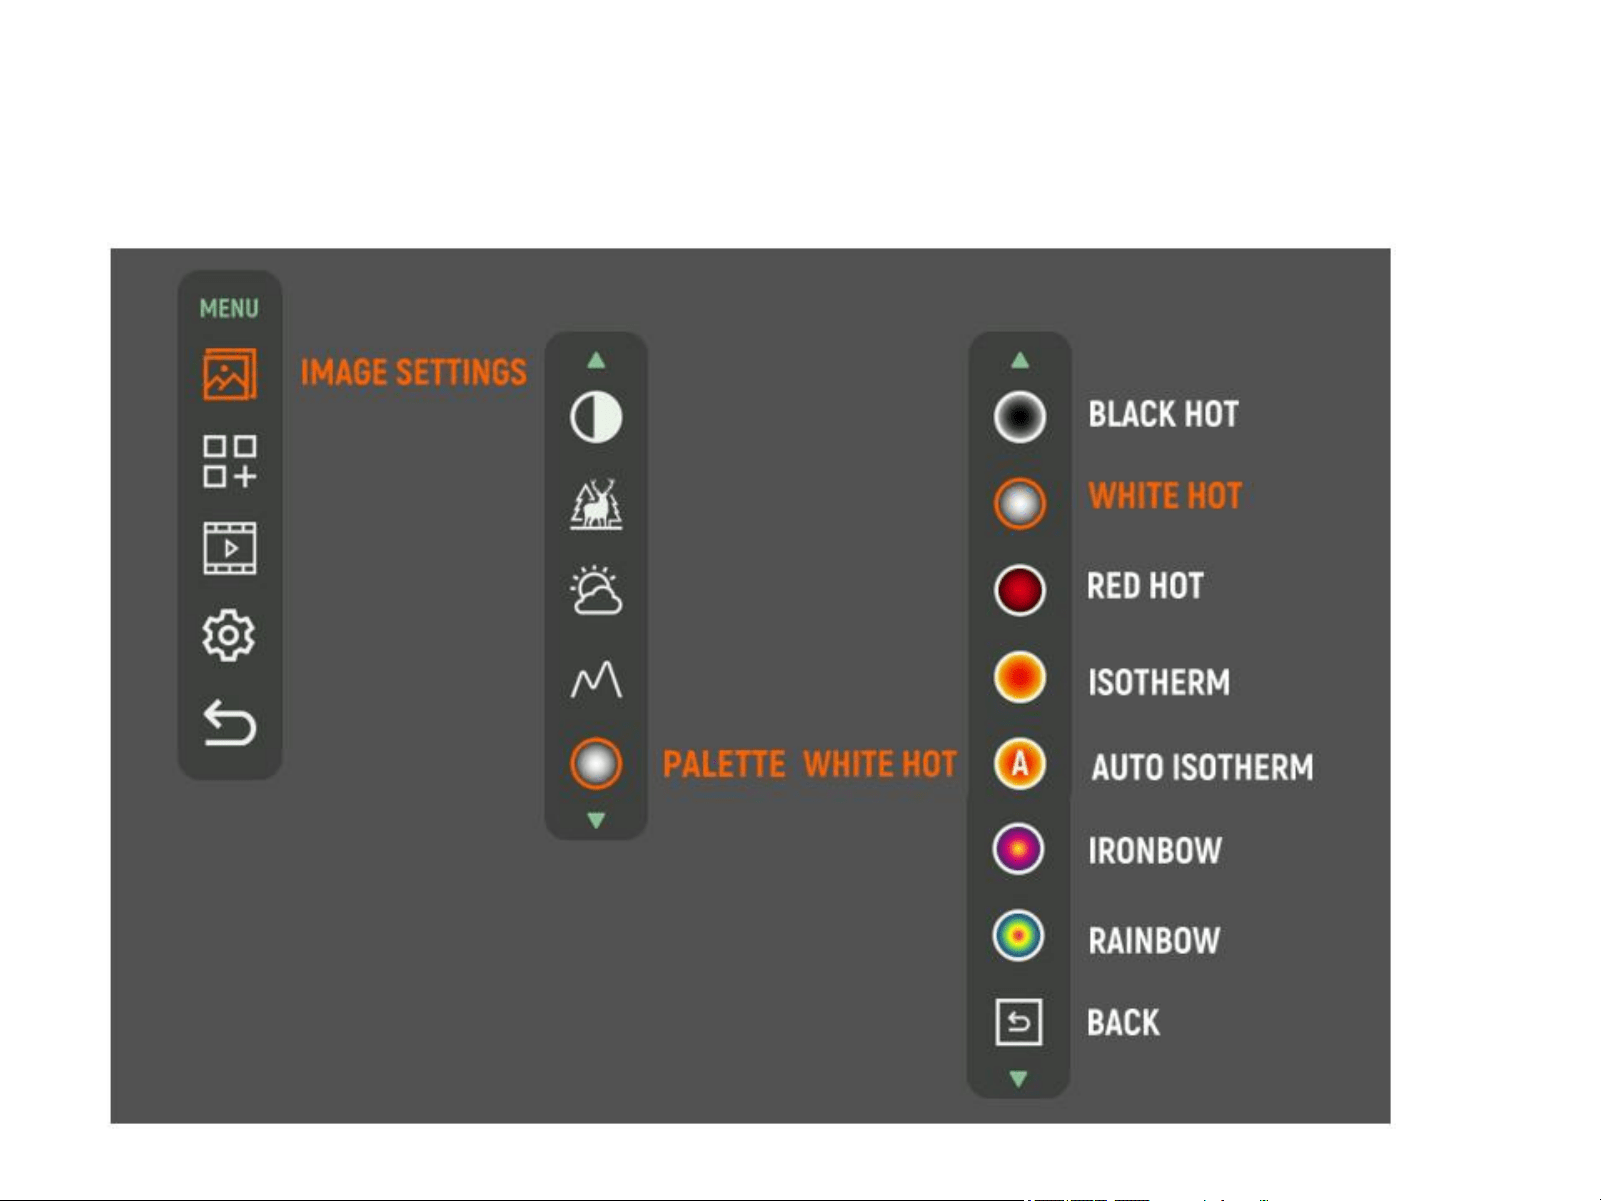
5.2.6 Palette
Select the Palette mode and switch among Black Hot, White Hot, Red Hot, Smooth, Isotherm, Auto Isotherm,
Ironbow, and Rainbow by short pressing the Up or Down button. Press the OK button to save and exit to upper
interface.

Black hot - Warmer object appears in black.
White hot - Warmer object appears in White.
Red hot -The image is red black to minimize the blue light mitting from the display and is more
comfortable on the eyes.
Isotherm - the objects above the threshold temperature are colored in different shades of red.
The temperature threshold can be set (increase/decrease) by the temperature scale shown.
Increasing the threshold value ignores the colorizatton of the colder objects. This optton is highly
dependent from the distance to the object. It is highly recommended to try different values of the
threshold in the daily usage to ffnd the right value for your personal preference.
Short press the OK button to adjust the temperate threshold, decrease or increase the value by short
pressing Up or Down button.
Auto Isotherm - the AUTO Isotherm mode enables a marked object to be set as the lowest temperature
object in the scene, and the other objects in the scene with higher temperatures are highlighted with
yellow-red colors with graduatton to this temperature threshold automattcally.
When Auto Isotherm is actived, short press the OK button to set the value (marking the object).
Ironbow - It helps increase chances for recognition & identification of the objects.
Rainbow - It helps increase chances for recognition & identification of the objects.
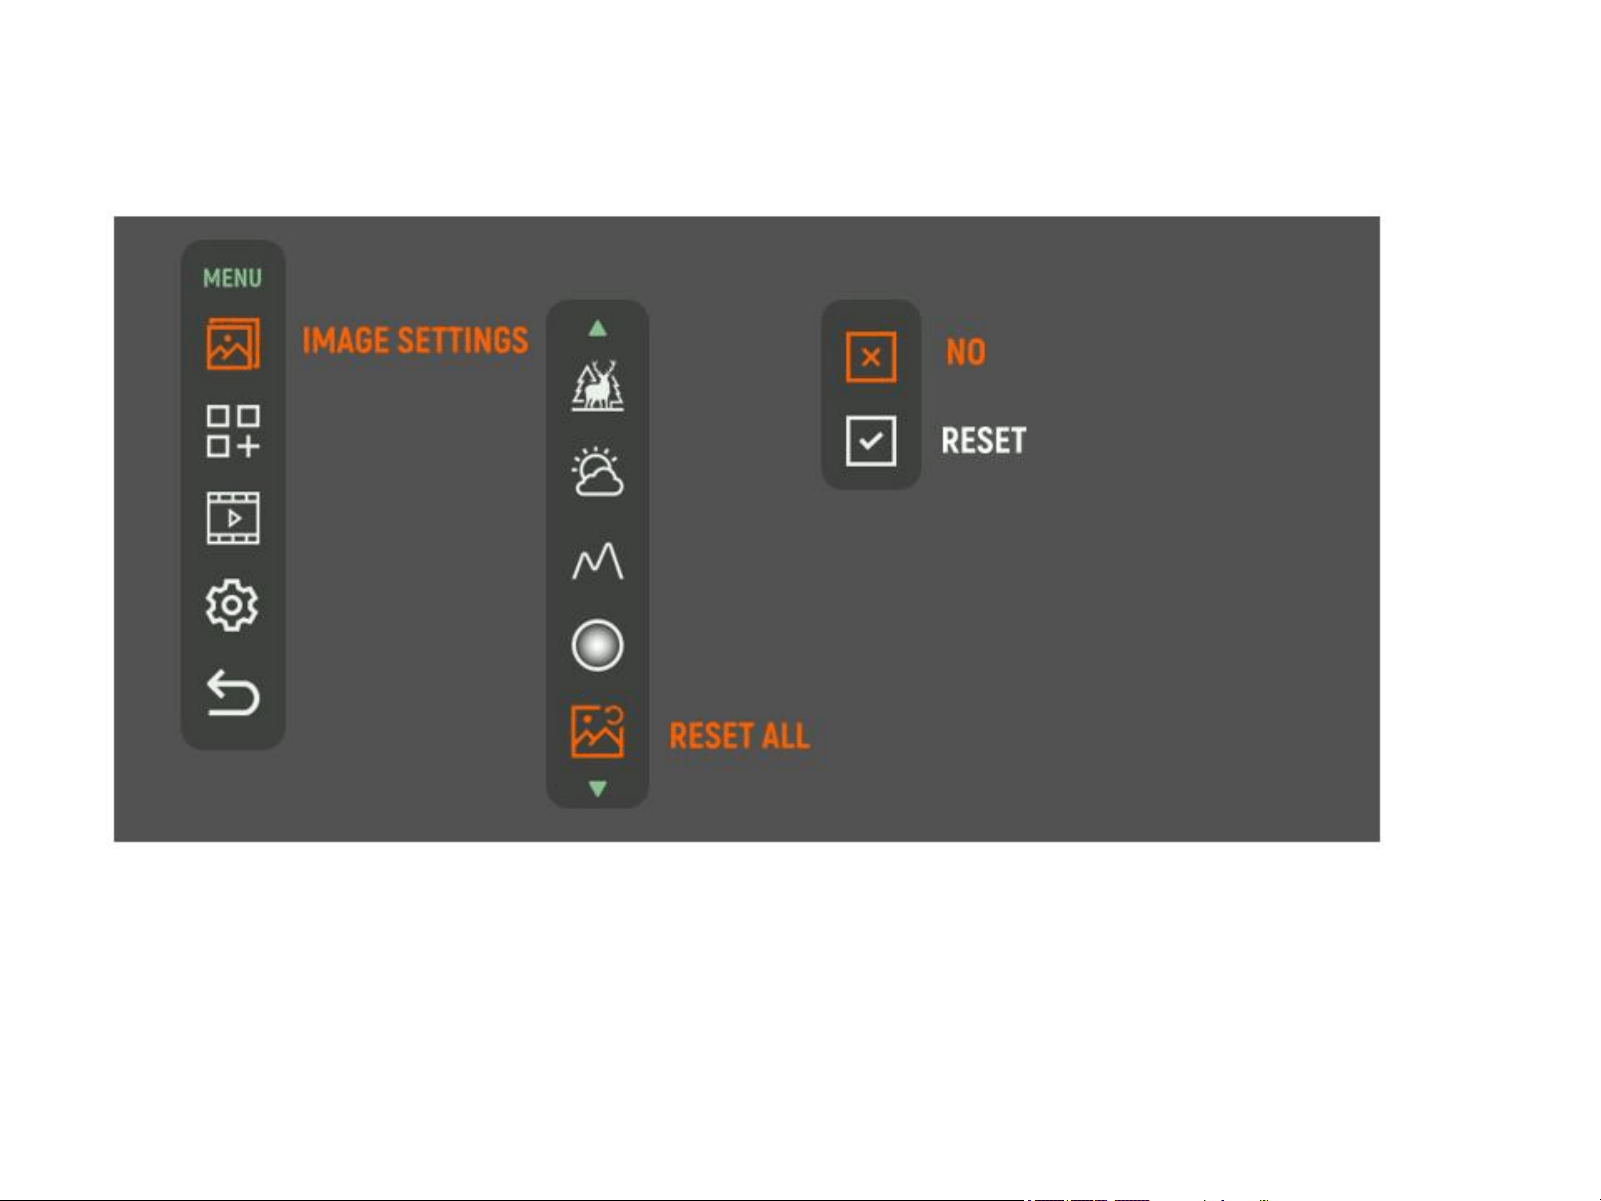
5.2.7 Image Settings Reset
Select Rest All and switch between No or Reset by sort pressing the Up or Down button. Press the OK button
to confirm and it will exit to upper interface automatically.
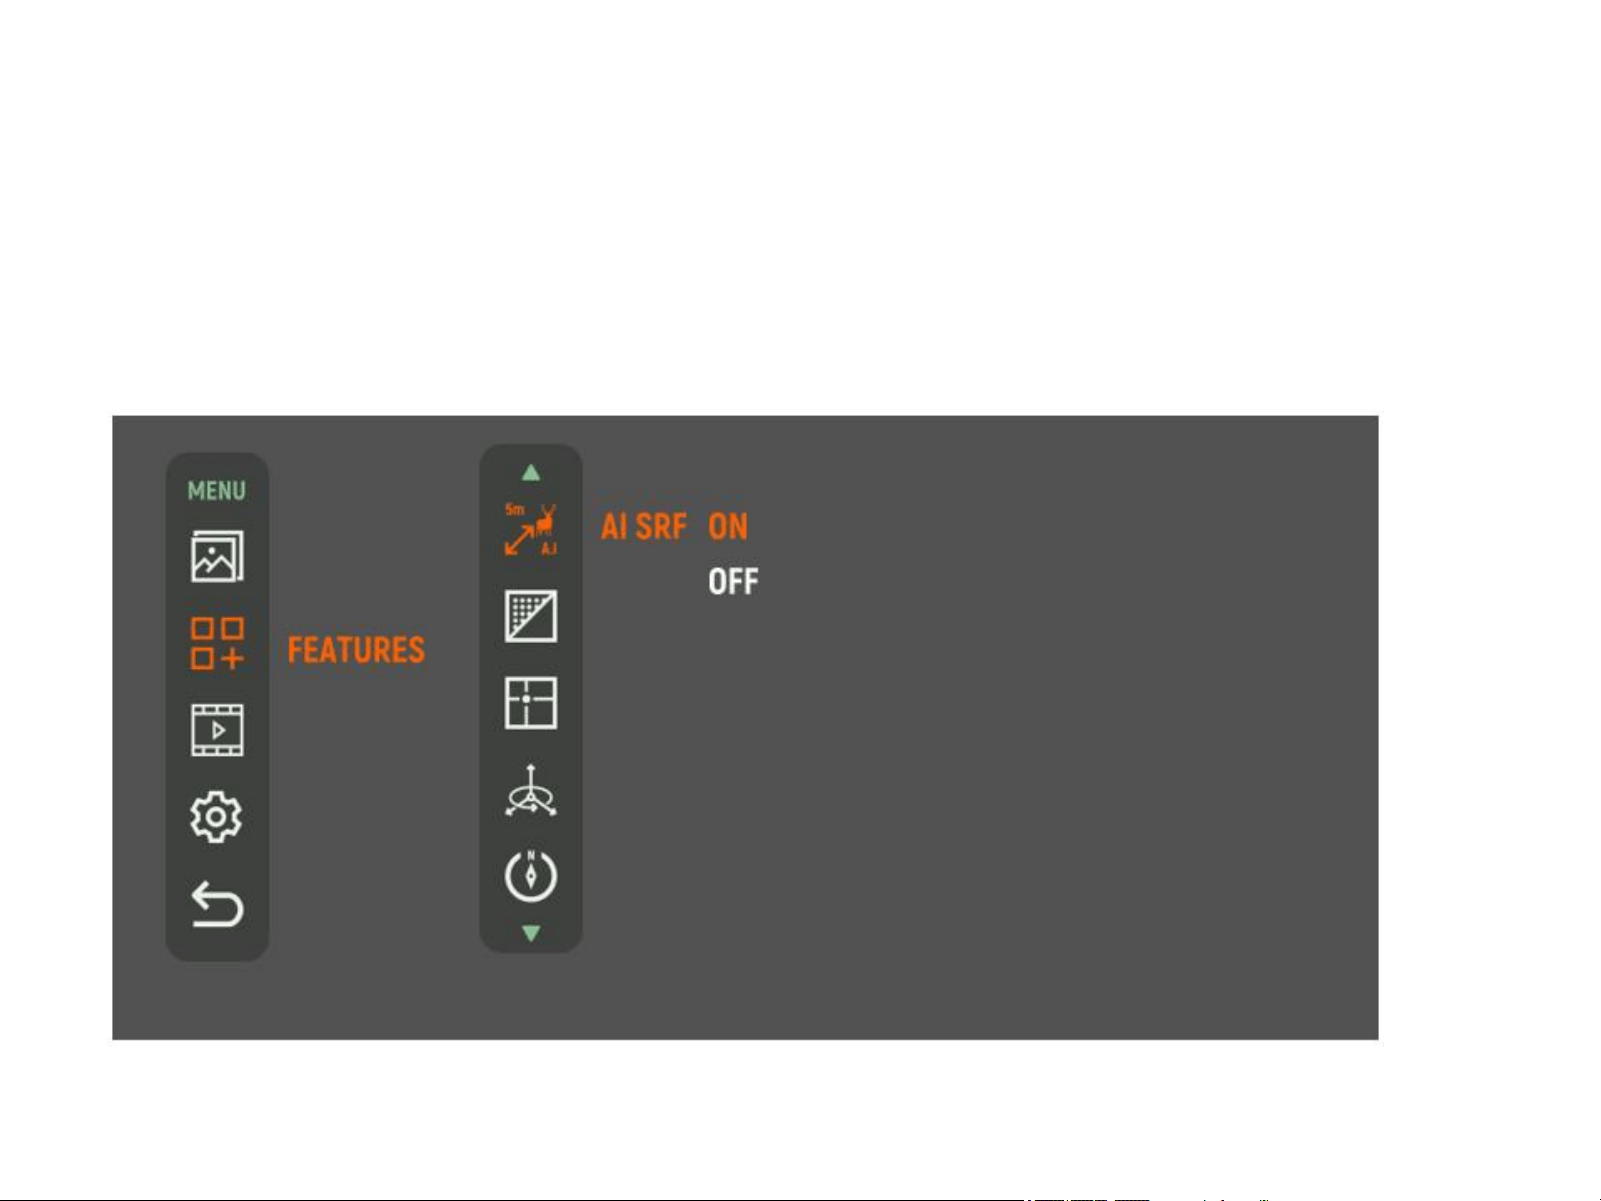
5.3 Features
Select AI SRF function, short press the OK button to switch between On or Off, long press the OK button
to exit to upper interface.
5.3.1 Features
Press the Up and Down buttons simultaneously to access the Menu. Use the Up and Down buttons to
navigate to the Features option, and press the OK button to enter its submenu for various functions.
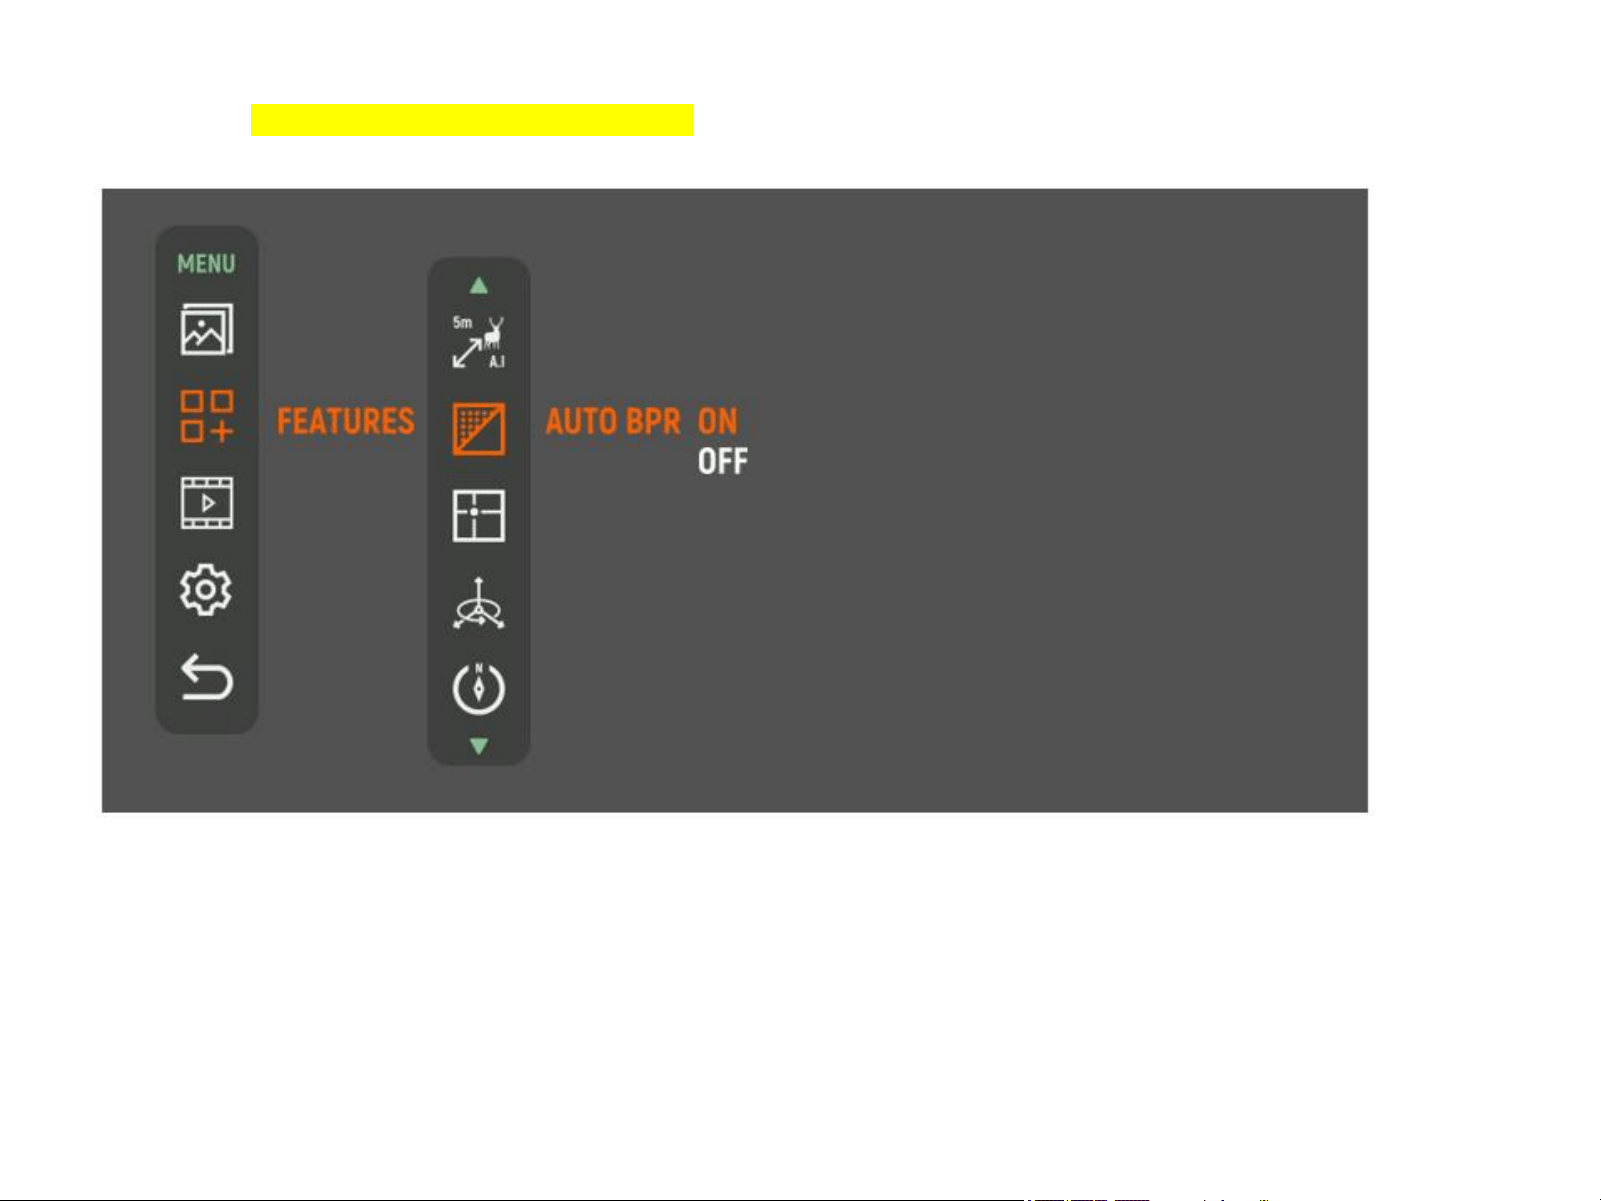
Select Auto BRP (automatic bad pixel correction) function, short press the OK button to switch between
On or Off, long press the OK button to exit to upper interface.
5.3.2 Auto BPR
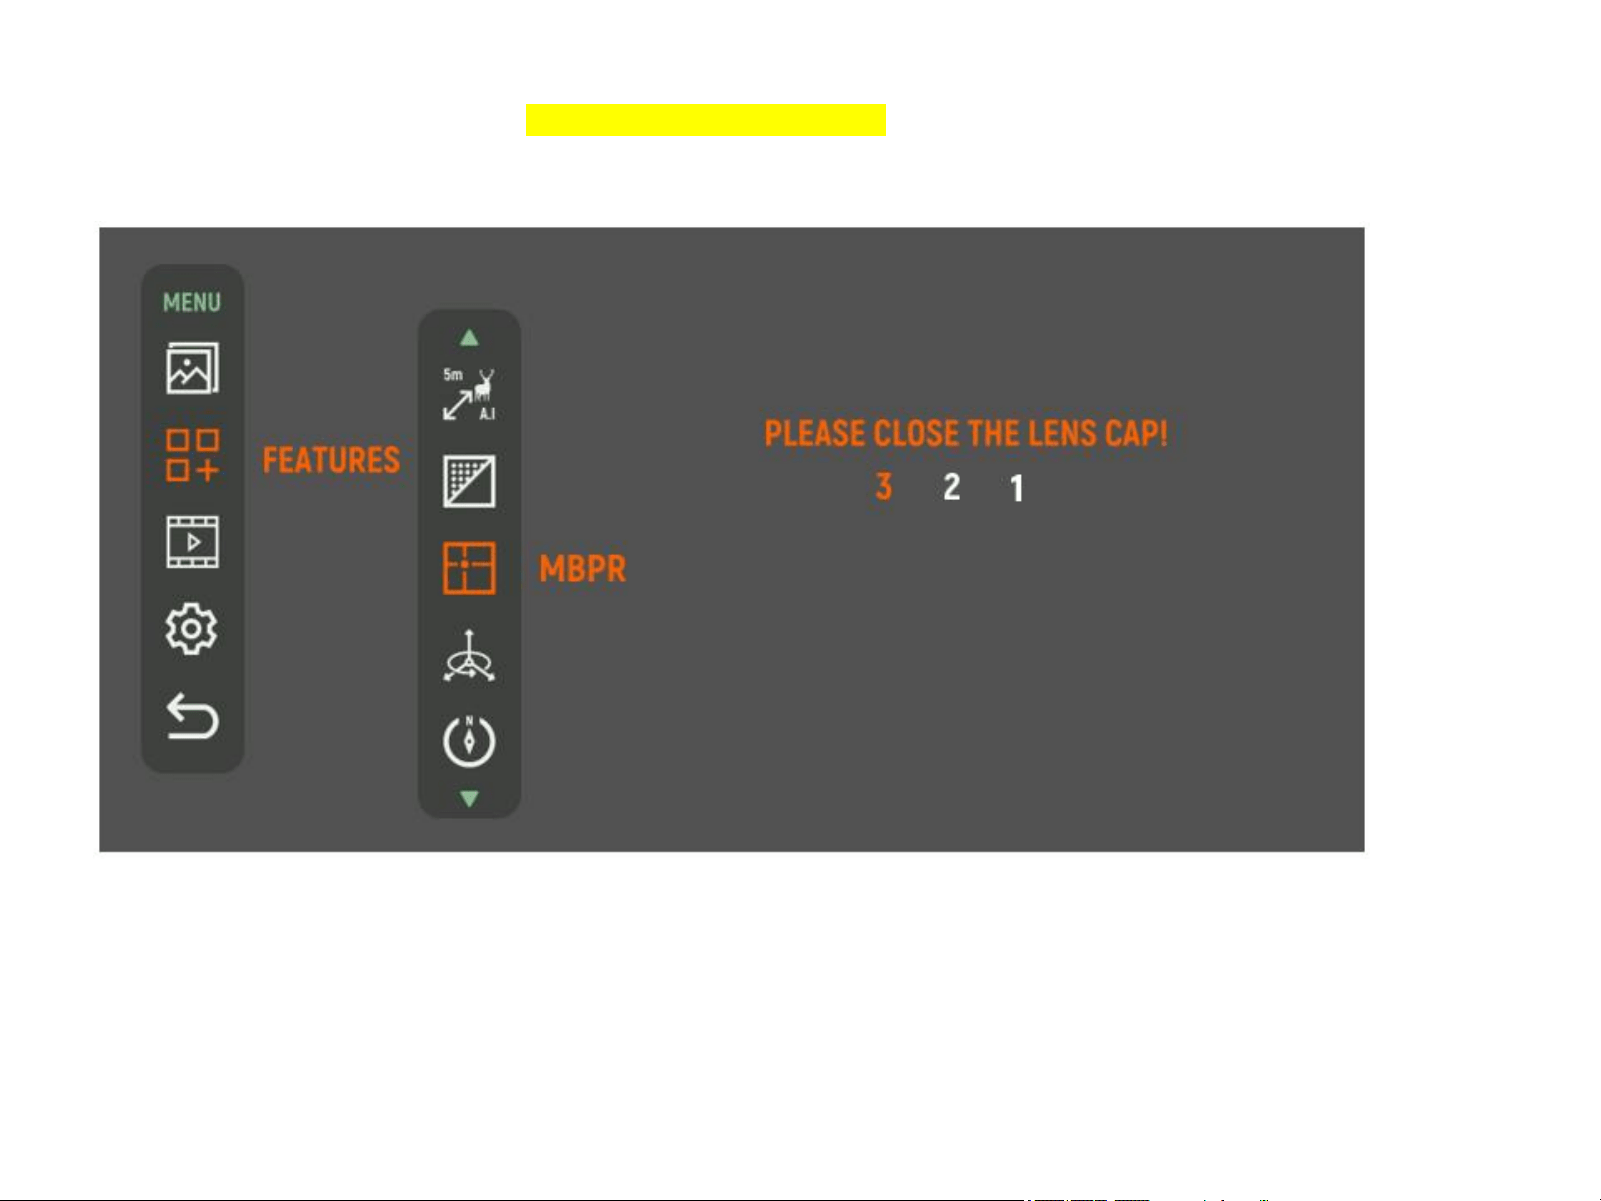
Select MBRP function to do MBPR (manual bad pixel correction), close the lens cover, complete after
counting down 3-2-1, and it will exit to upper interface automatically.
5.3.3 MBPR
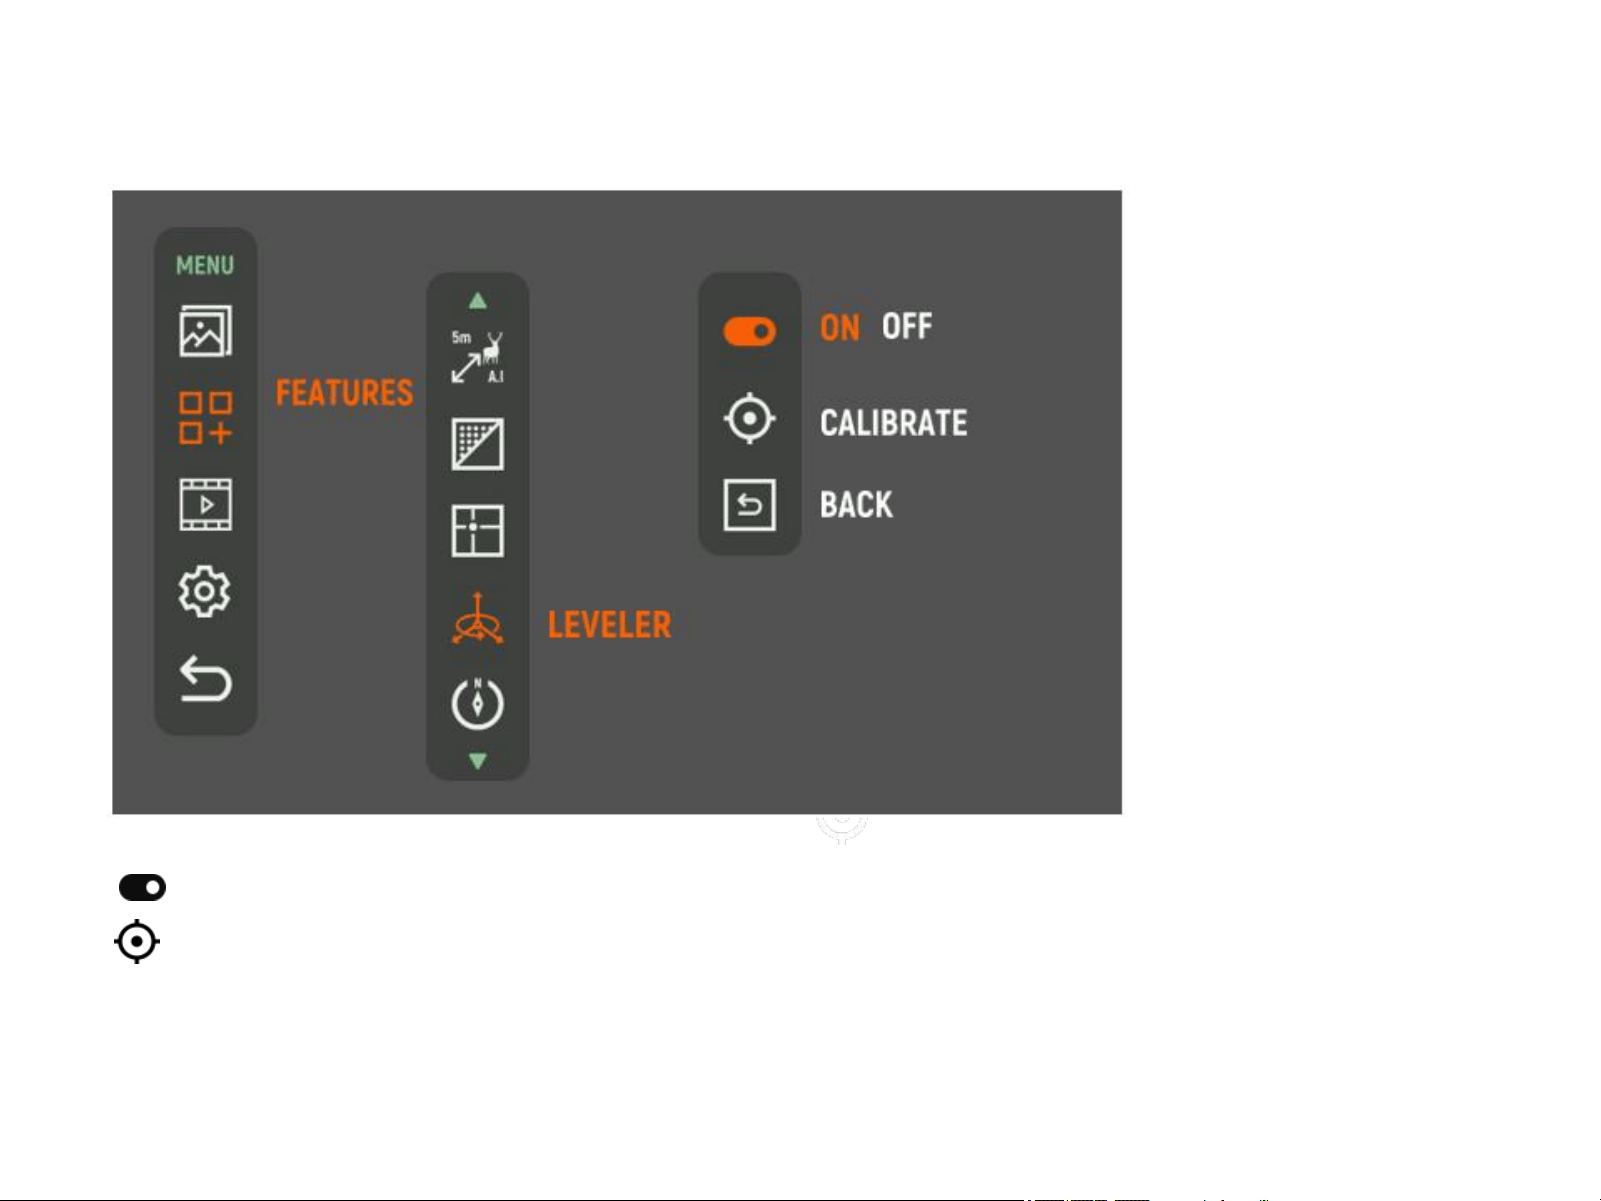
Select Leveler function, short press the OK button to enter its secondary menu, switch among On/Off,
Calibrate and Back by short pressing Up or Down button.
5.3.4 Leveler
Select On/Off, short press the OK button to turn on/off the Leveler.
Select Calibrate, short press the OK button to perform Calibrate. A progress bar will appear on the
screen, rotate the device in all directions (front, back, left, and right) until the progress bar reaches
100%. Once the calibration is complete, it will automatically exit to upper interface.
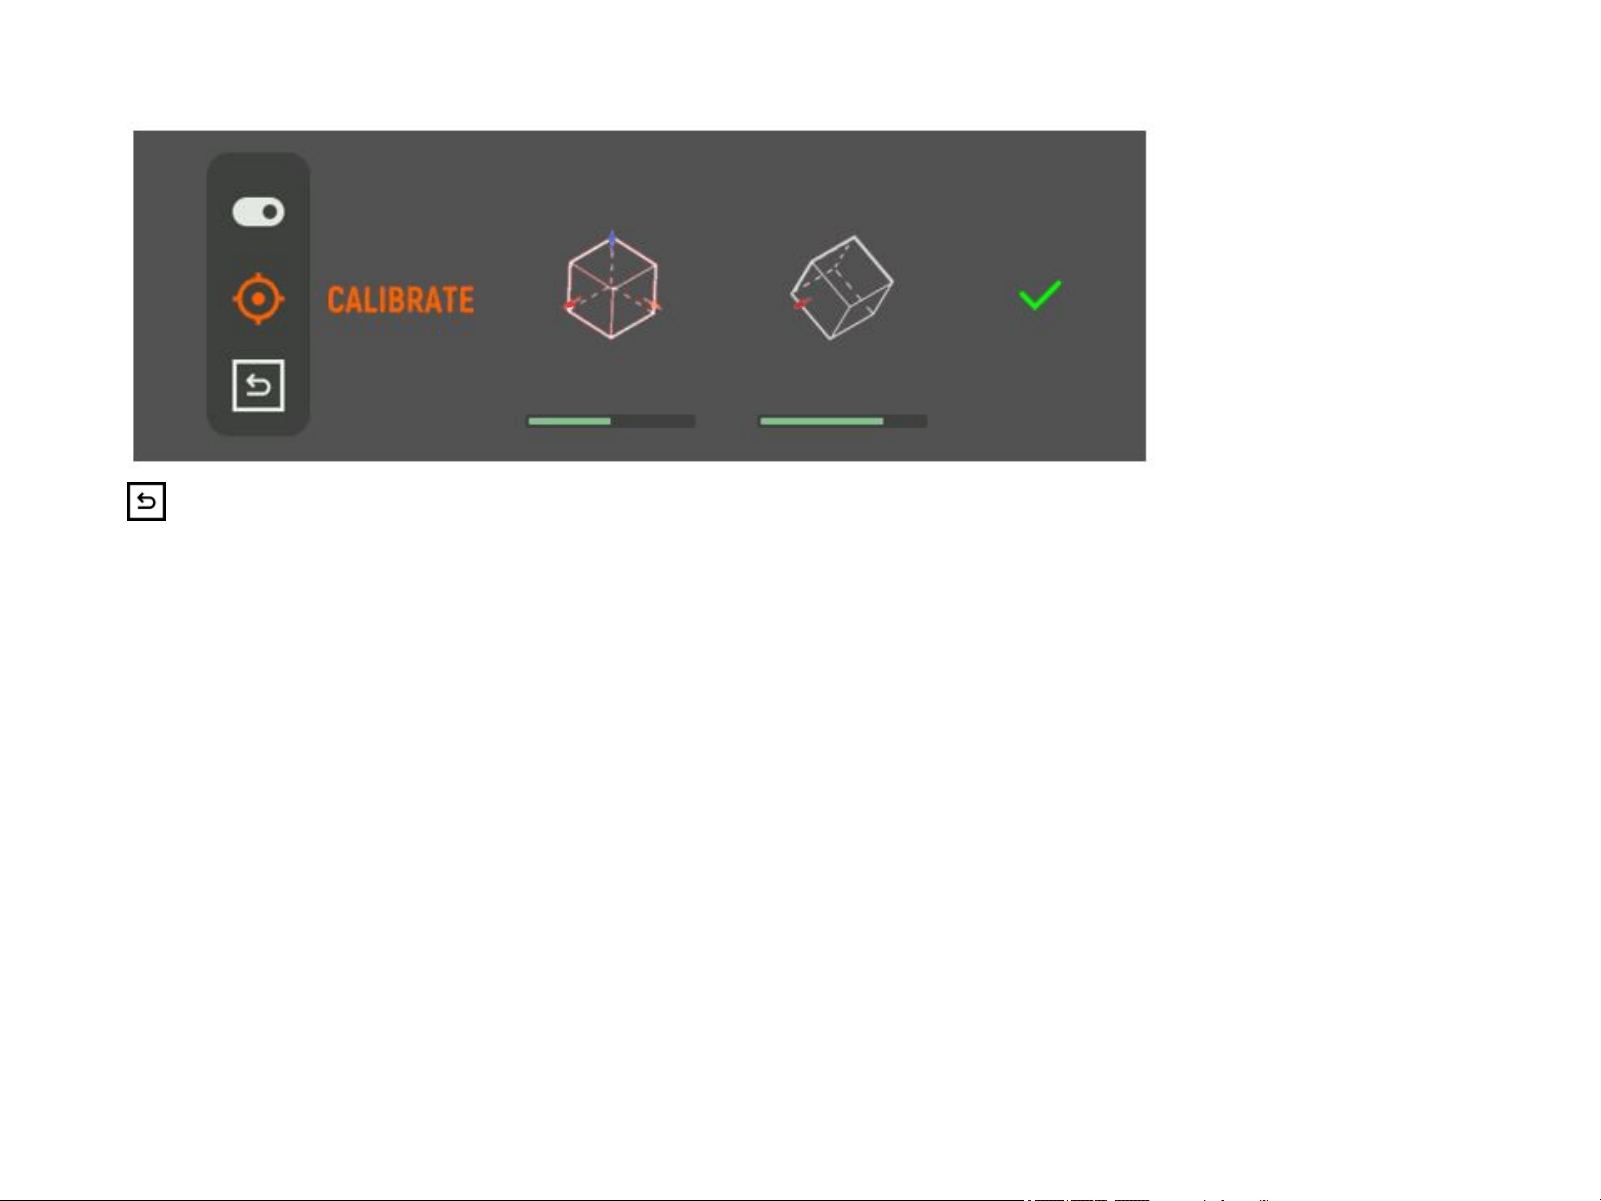
Select Back, short press the OK button to exit to upper interface.
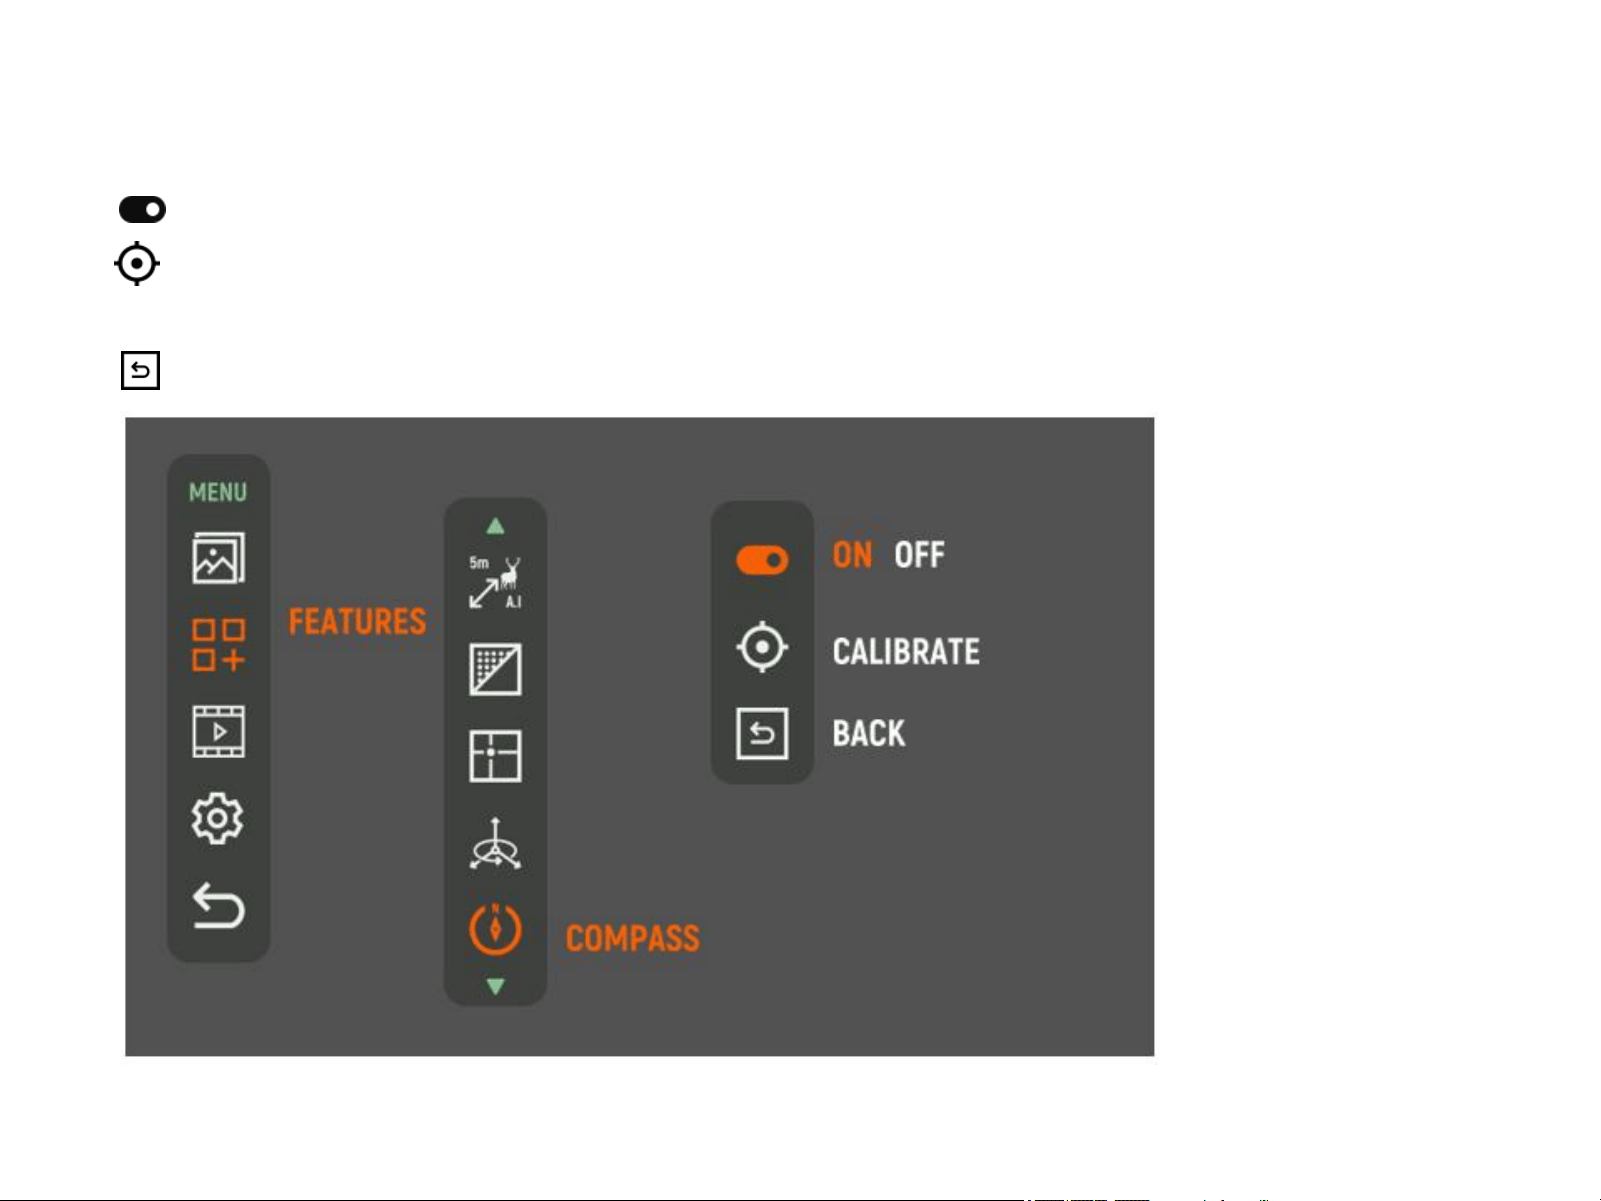
Select Compass function, short press the OK button to enter its secondary menu, switch among On/Off,
Calibrate and Back by short pressing Up or Down button.
5.3.5 Compass
Select On/Off, short press the OK button to turn on/off the Compass.
Select Calibrate, short press the OK button to perform Calibrate. A progress bar will appear on the
screen, rotate the device in all directions (front, back, left, and right) until the progress bar reaches
100%. Once the calibration is complete, it will automatically exit to upper interface.
Select Back, short press the OK button to exit to upper interface.
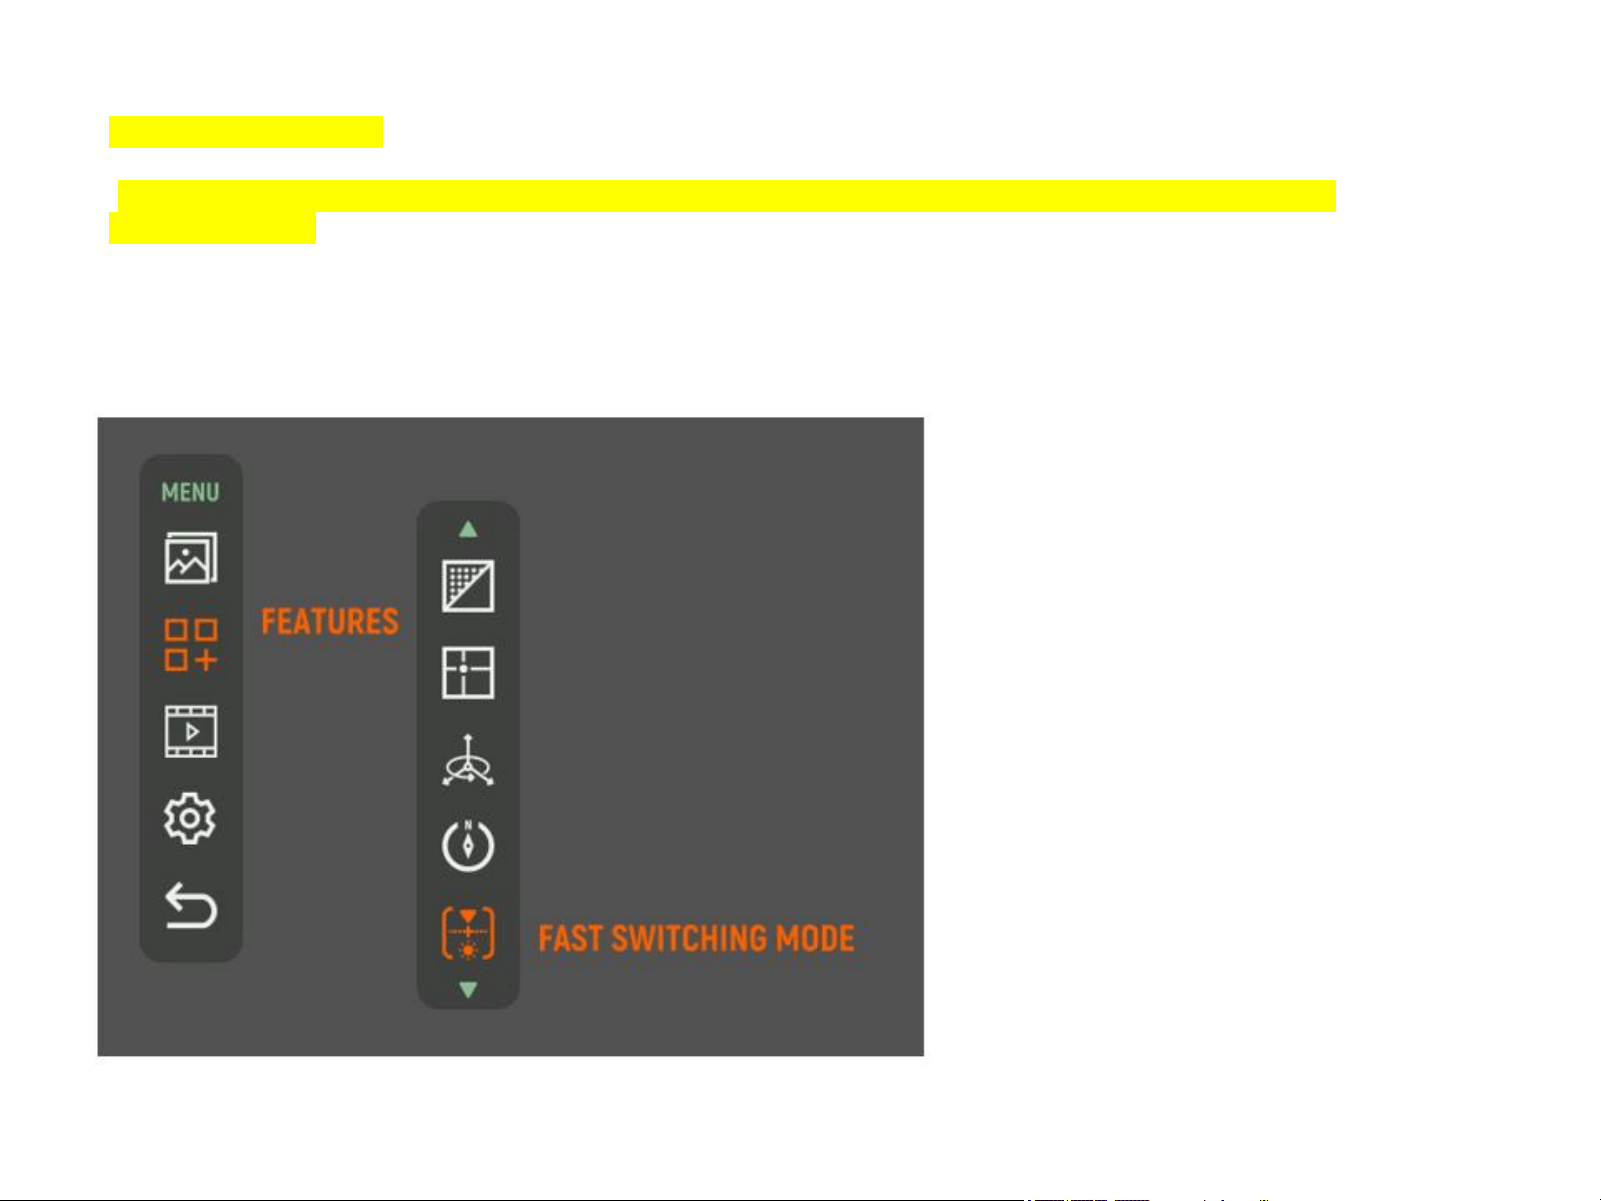
5.3.6 Fast Switching Mode
Fast Switching Mode:
•To activate or deactivate the Fast-Switching Mode between Observation and Clip-On Mode, press the
OK button briefly.
•To return to the previous menu (upper interface), press and hold the OK button.
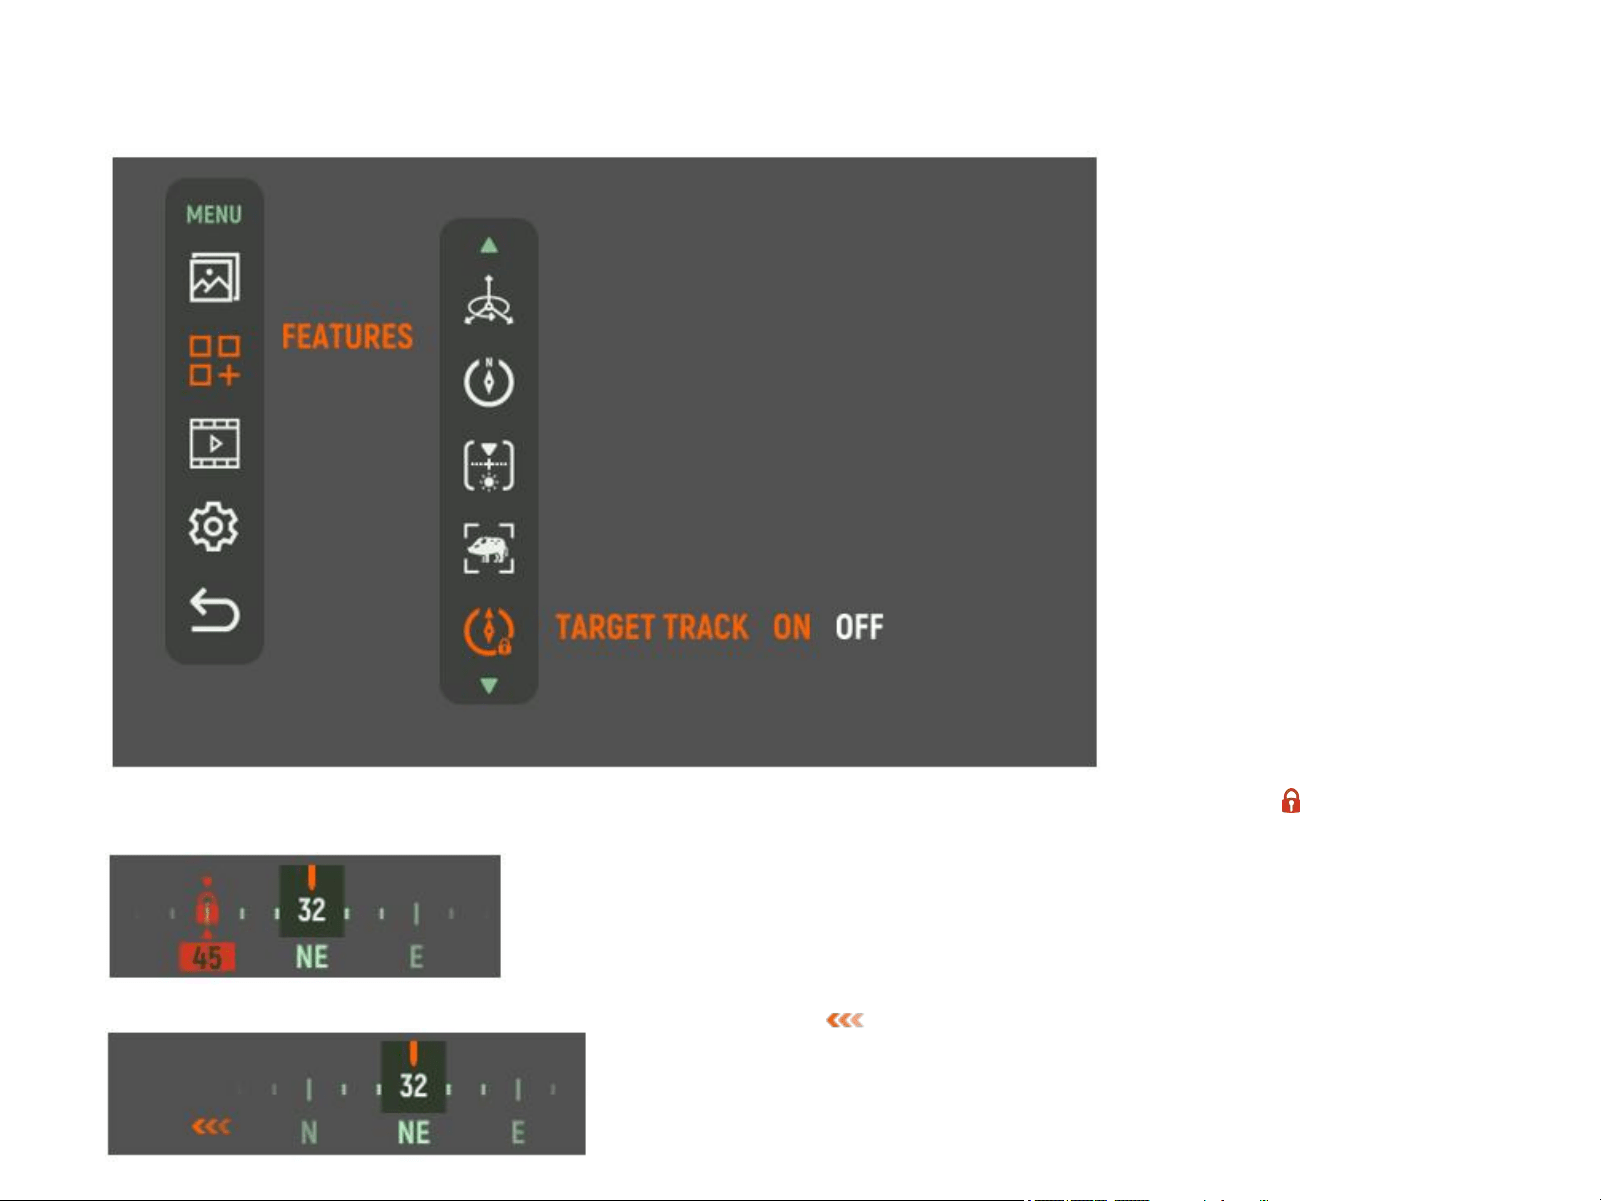
5.3.7 Target Lock
Select Target Lock, short press the OK button to turn on or turn off Target Lock.
When Target Lock is On, the device will automatically mark the current position with a red lock icon
when it detects a shot.
When the target moves out of the field of view, the arrow icon will point to the marked position.
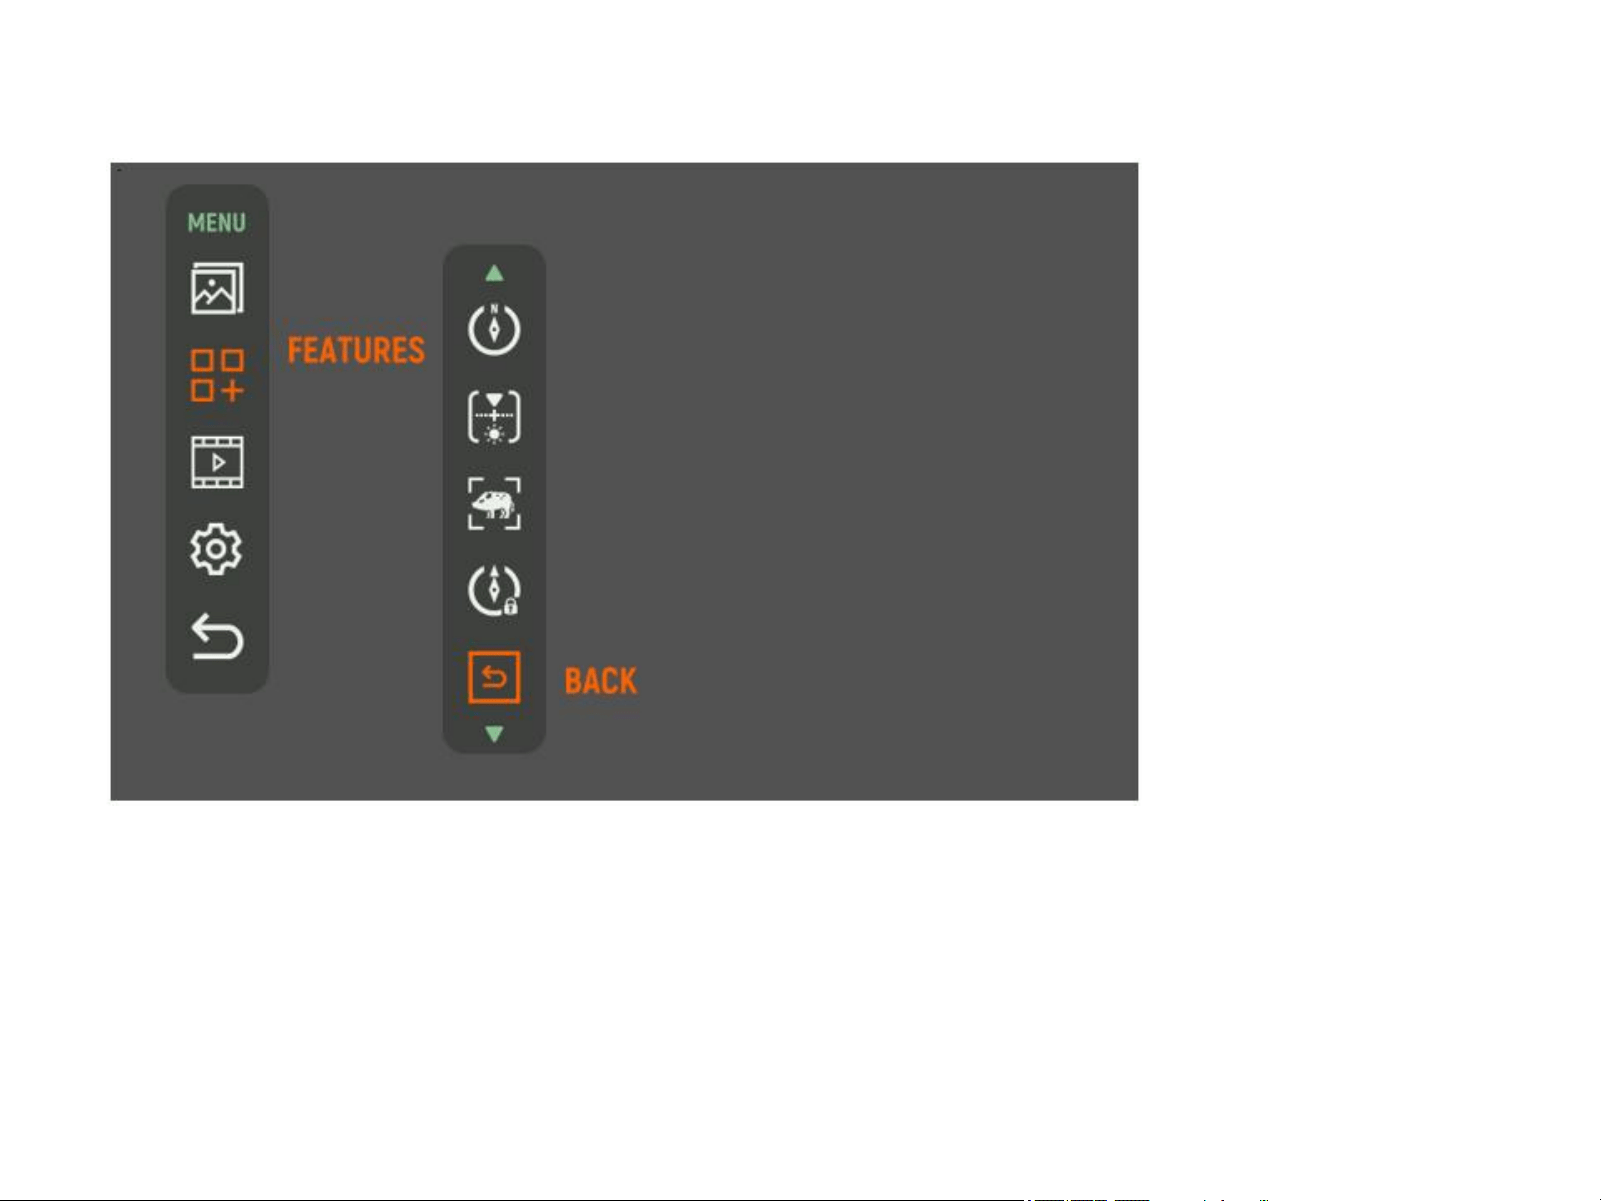
5.3.8 Back
Select Back, short press the OK button to exit to upper interface.
.
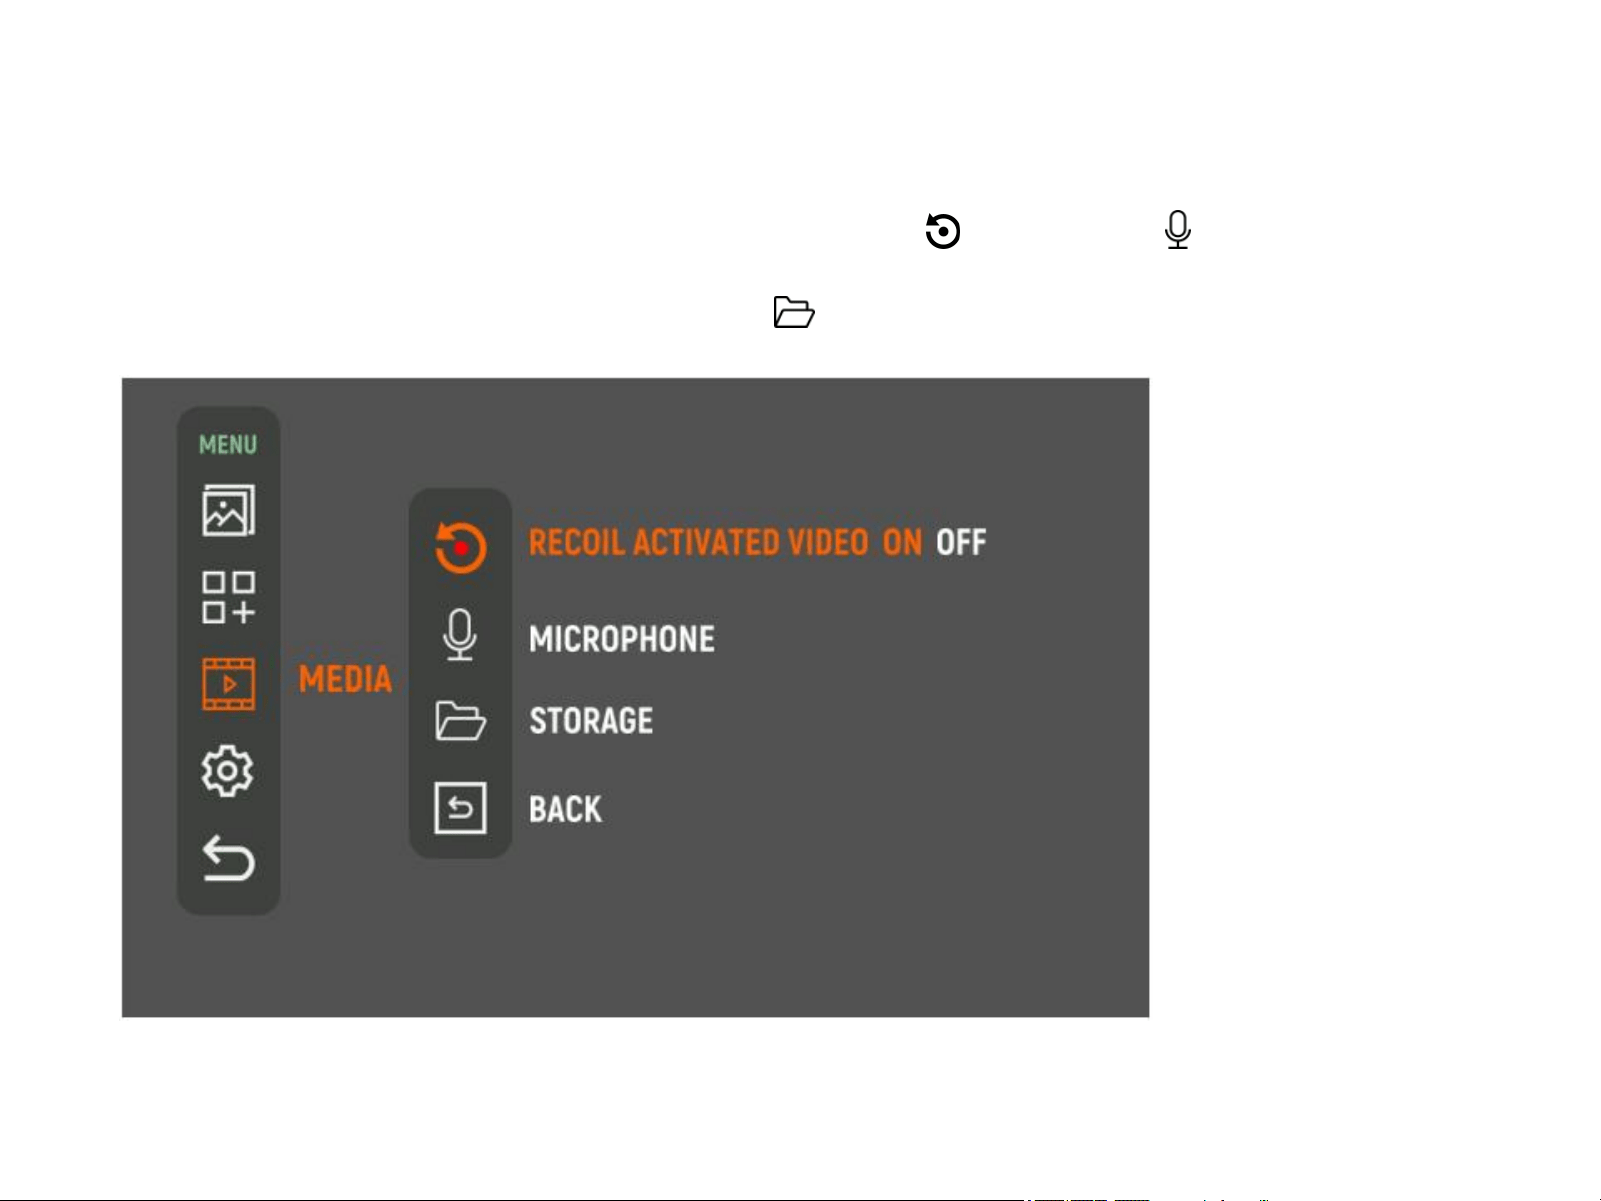
5.4 Media
Press the Up and Down buttons simultaneously to access the Menu. Use the Up and Down buttons to
navigate to the Media option, and press the OK button to enter its submenu.
Short press OK button to turn on or turn off Recoil Activated Video or Microphone function.
Viper series is built-in 64GB storage space for photography and video recording.
User can check the used memory through the Storage function. If the used memory reaches 63GB,
it will display “INTERNAL STORAGE SPACE IS INSUFFICIENT AND NEEDS TO BE CLEARED IMMEDIATELY ”.
5.5 Settings
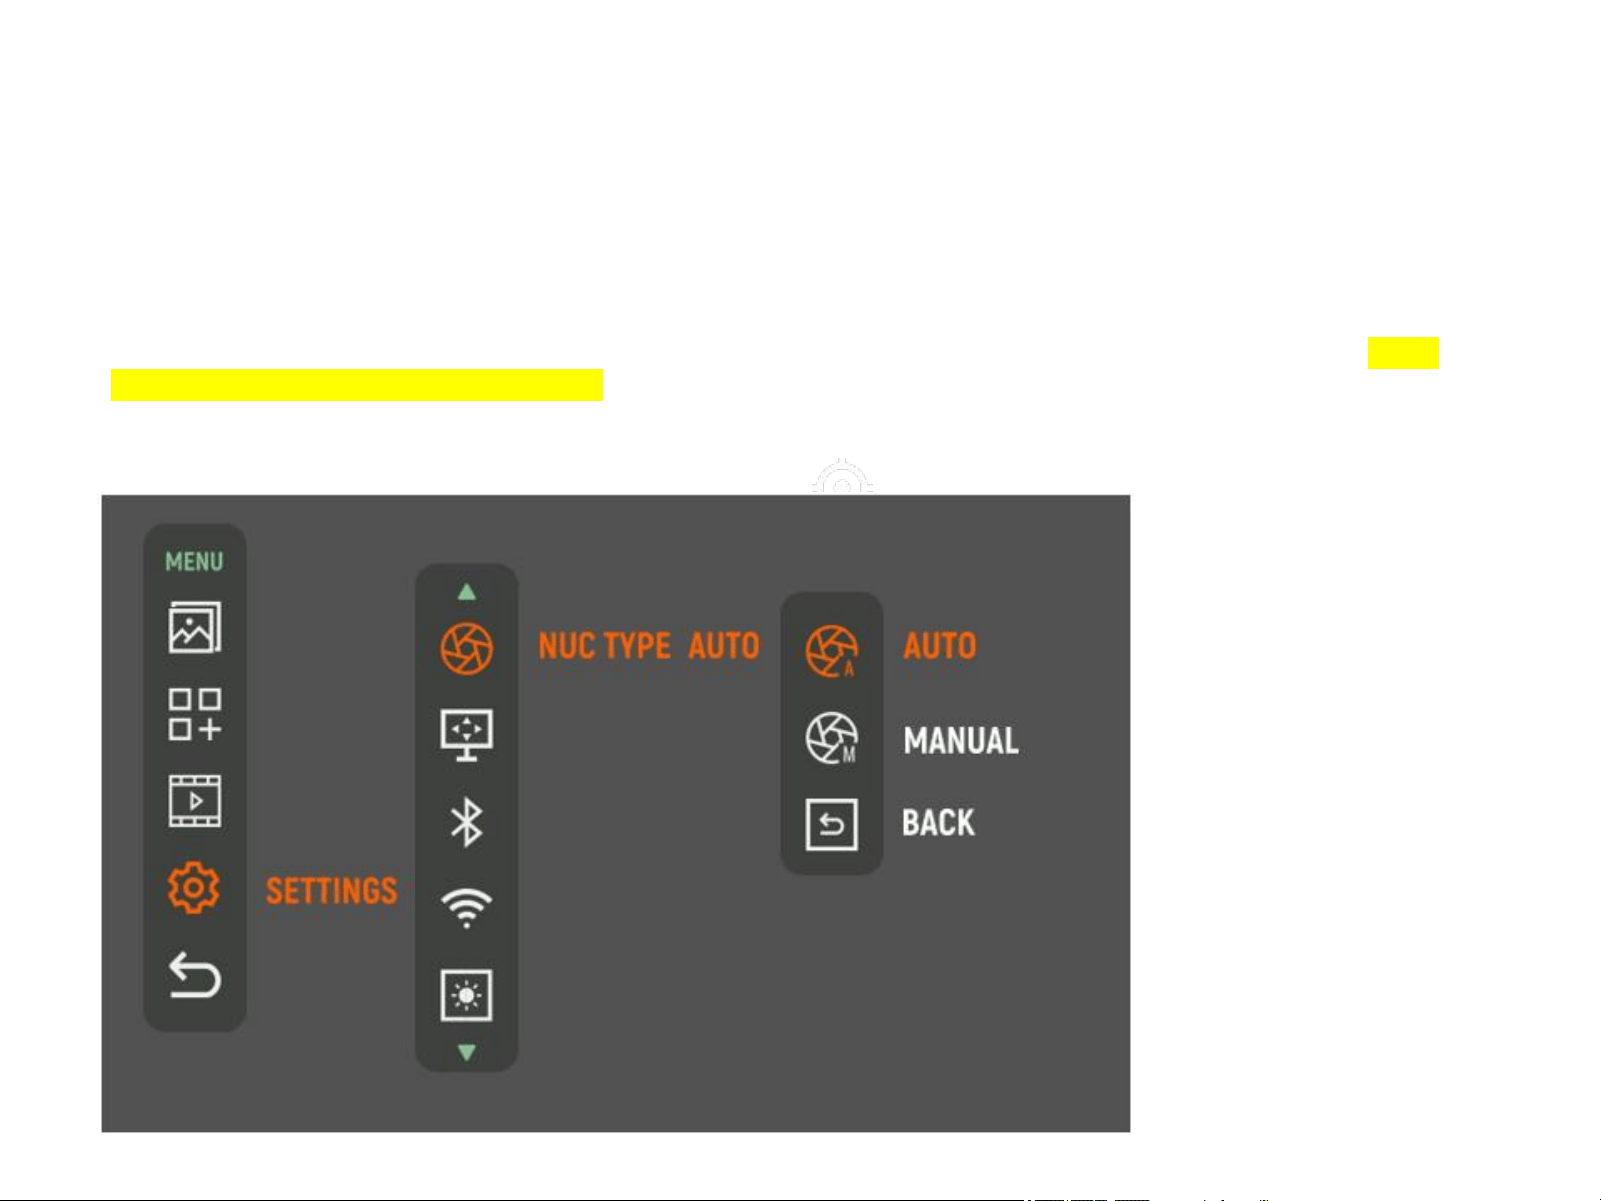
5.5.1 NUC Type
Select NUC Type, short press the OK button to enter its secondary menu, switch among Auto NUC,
Manual NUC and Back by short pressing Up or Down button.
Auto mode - The calibration is performed automatically at regular intervals and with a shutter mechanism located in
the device.
Manual mode - The calibration is performed by the user, by pressing the Down button at desired intervals with a
shutter mechanism located in the device. It is not necessary for the user to close the lens cap.
5.5 Settings
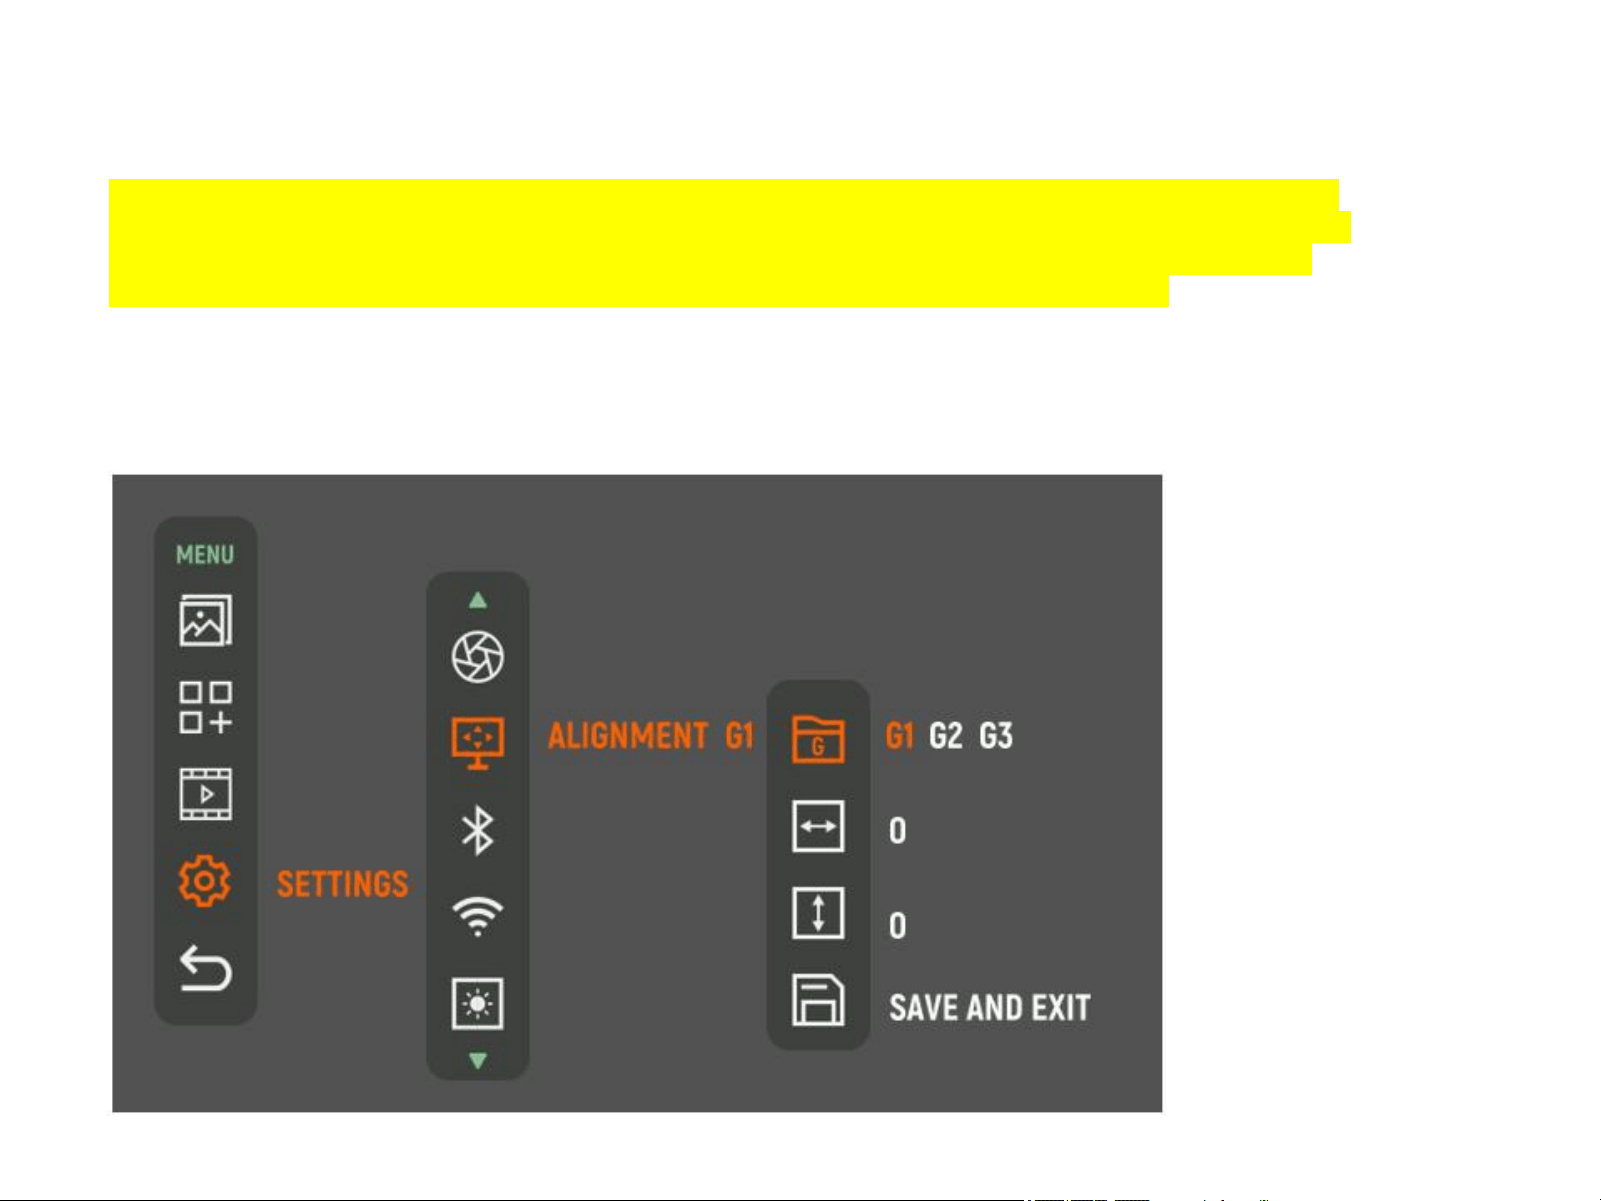
5.5.2 Alignment
The Viper series is factory-calibrated to ensure perfect alignment with your riflescope's line of sight when
used as a clip-on. However, adding another device can change the scope's vibrations and sag, potentially
shifting the point of impact. To counter this, the Alignment Function enables precise adjustments to the
optical axis of the day sight and clip-on attachment for optimal accuracy and performance.
Short press the OK button to select among Alignment file, Reset X value, Reset Y value, Save and exit by
short pressing Up and Down button.
There are 3 types of alignment file: G1, G2, G3.
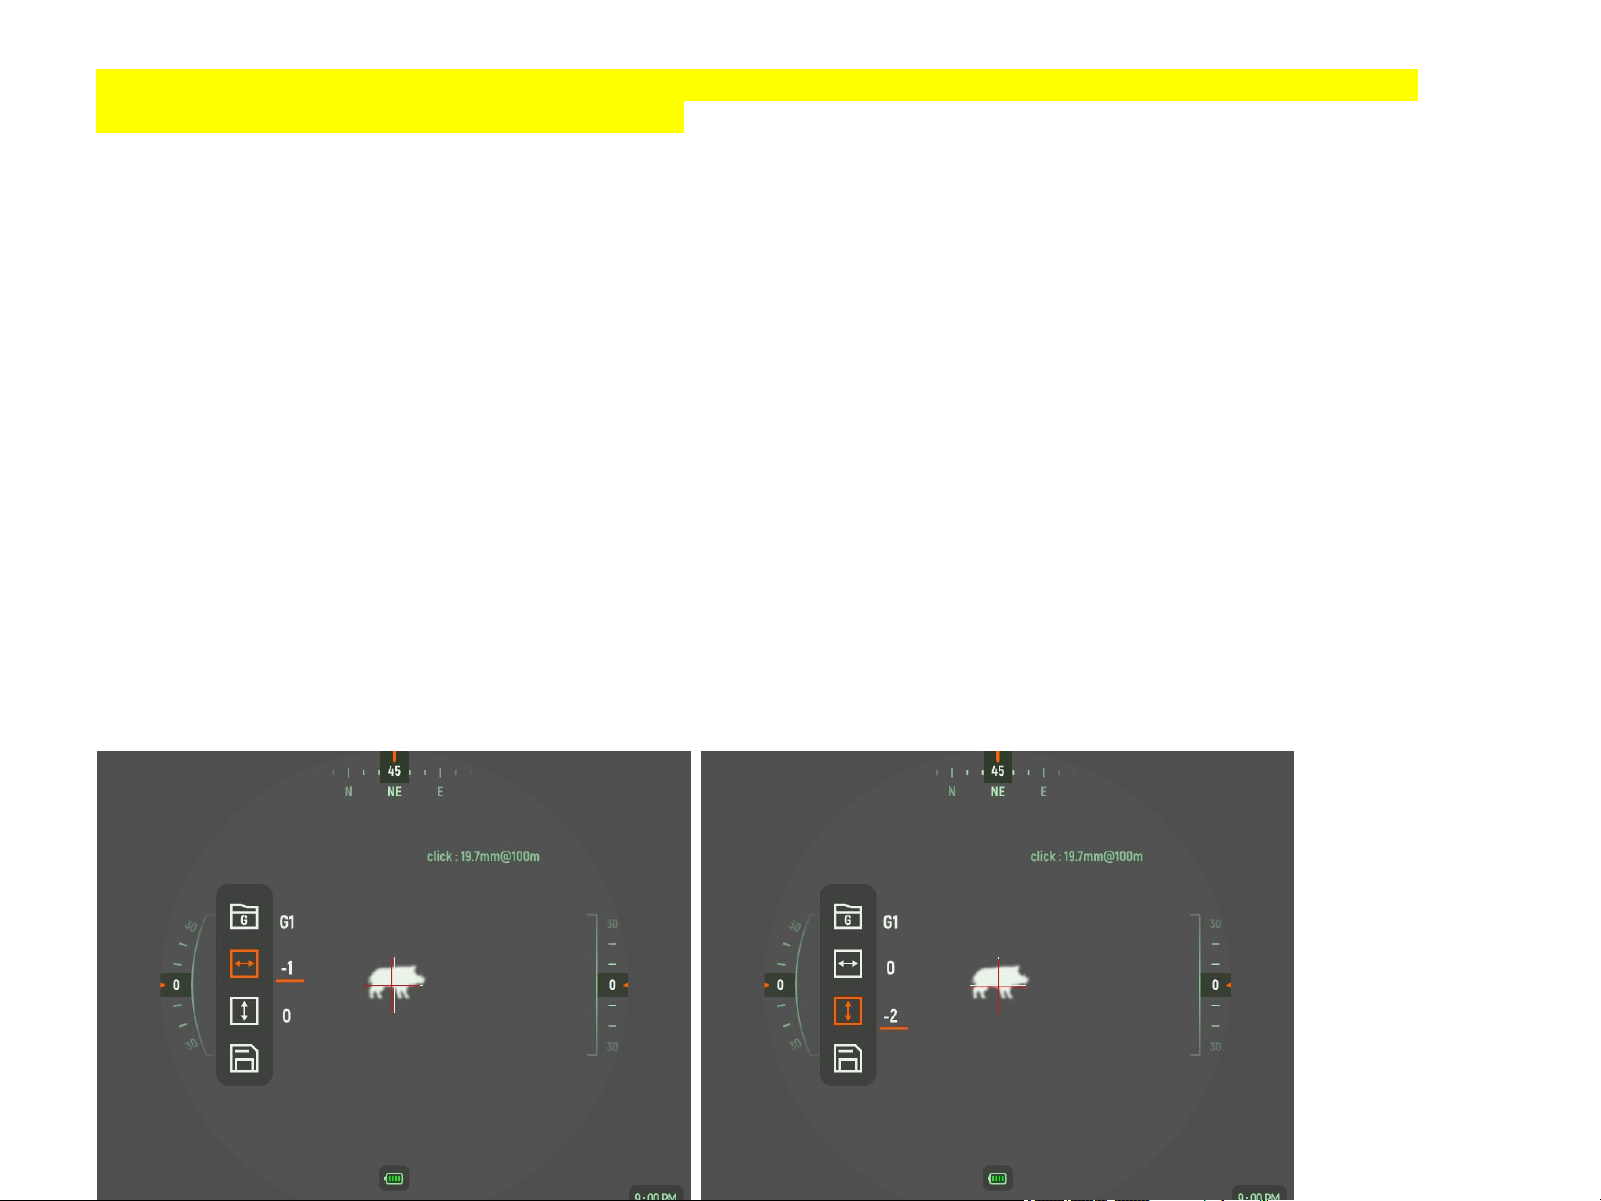
Aiming at the target at 100 meters and shoot. Measure the horizontal distance and vertical distance between the
bullet hitting point and the aiming point afterwards.
1Click X=19.7mm@100m
1Click Y=19.7mm@100m
Short press the OK button to select an alignment profile, reset X value option or reset Y value option. Short
press Up or Down button to increase or reduce the X/Y value. Short Press the OK button to confirm.
For example, if the bullet hitting point is 40 mm below the aiming point and 20 mm to the left of aiming point,
X = -20mm / 19.7 mm = -1, it means 1 click to the left.
Y = -40mm / 19.7 mm = -2, it means 2 clicks downward.
Press the OK button to select the alignment profile G1, then press the OK button to confirm.
Next, press the Down button to navigate to the X Value Reset option and press OK button to enter the X
value reset interface, press the Up or Down button to adjust the X value to -1, then press OK button to
confirm.
Similarly, press the Down button to select the Y Value Reset option and press OK button to enter the Y
value reset interface, adjust the value to -2 by pressing the Up or Down button, and press OK button to
confirm.
NOTE
Once the Alignment Profile, X Value Reset, and Y Value Reset settings are completed, it is essential
to short press the OK button to perform the Save and Exit option to ensure that the values you have
configured are saved.
5.5.3 Bluetooth
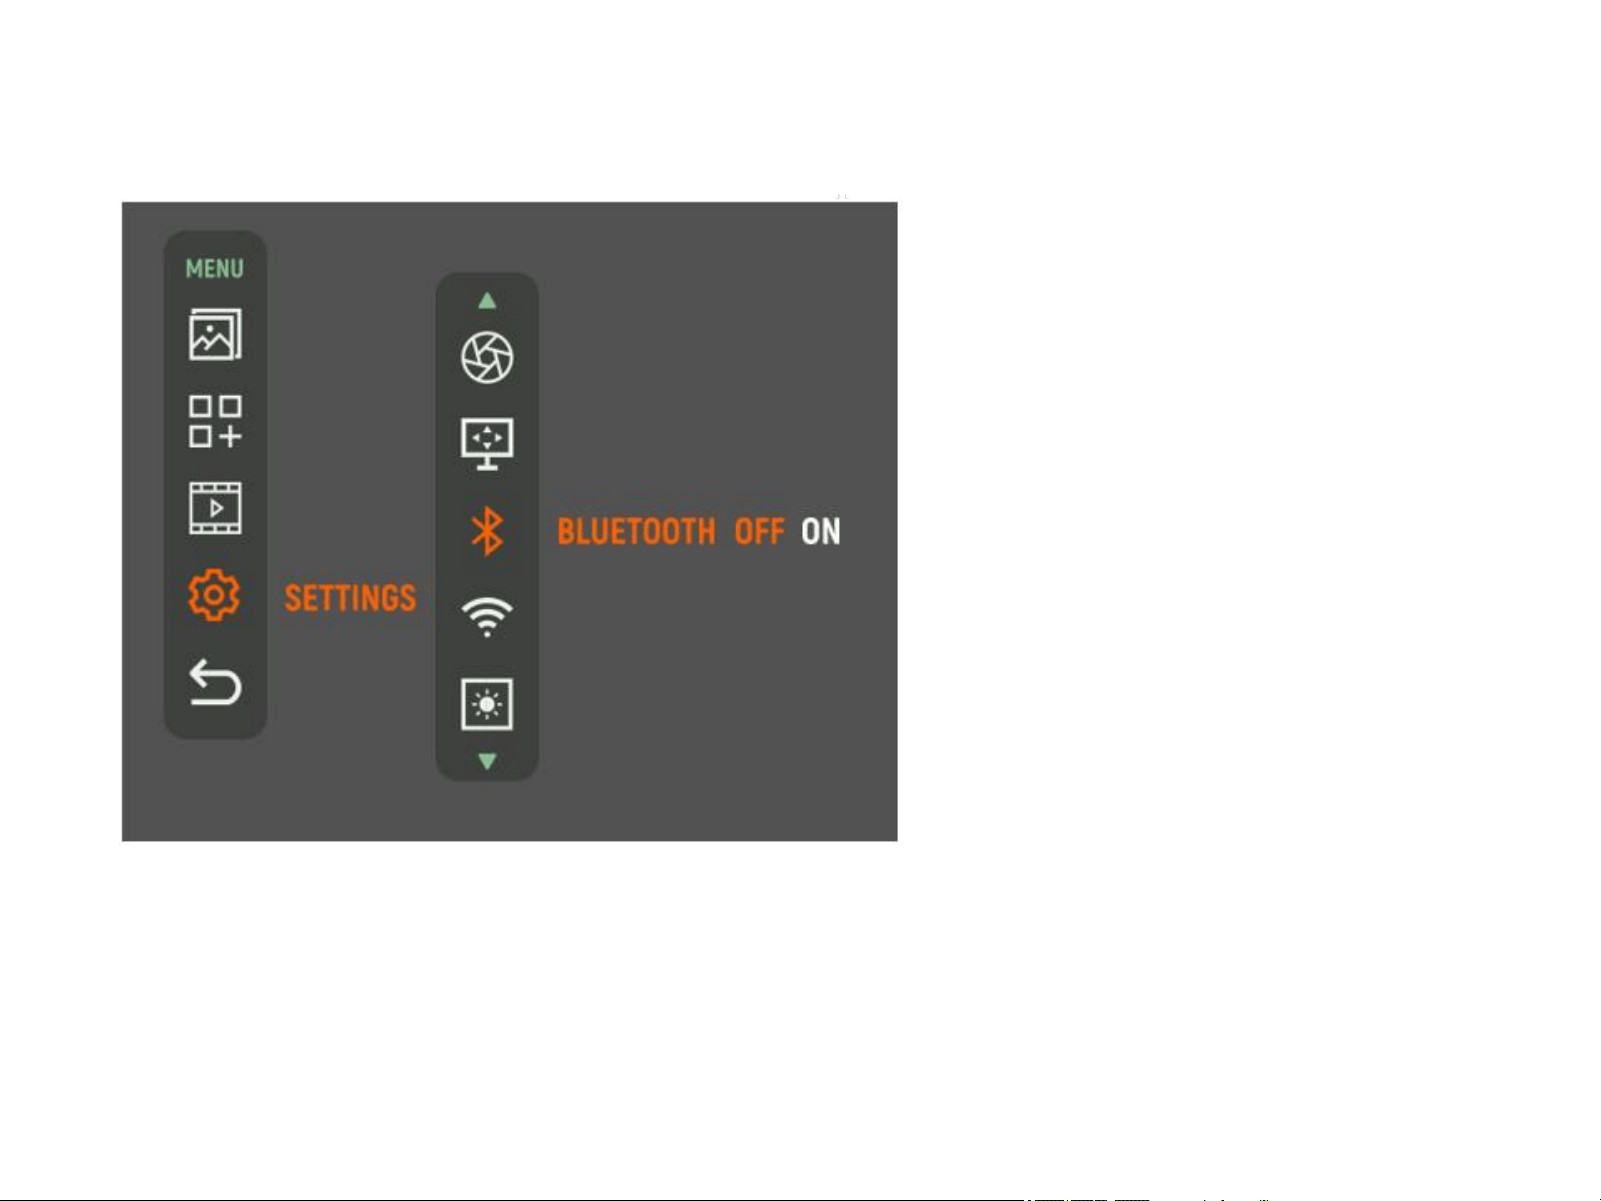
Short press the OK button to select between turn on or turn off the Bluetooth.
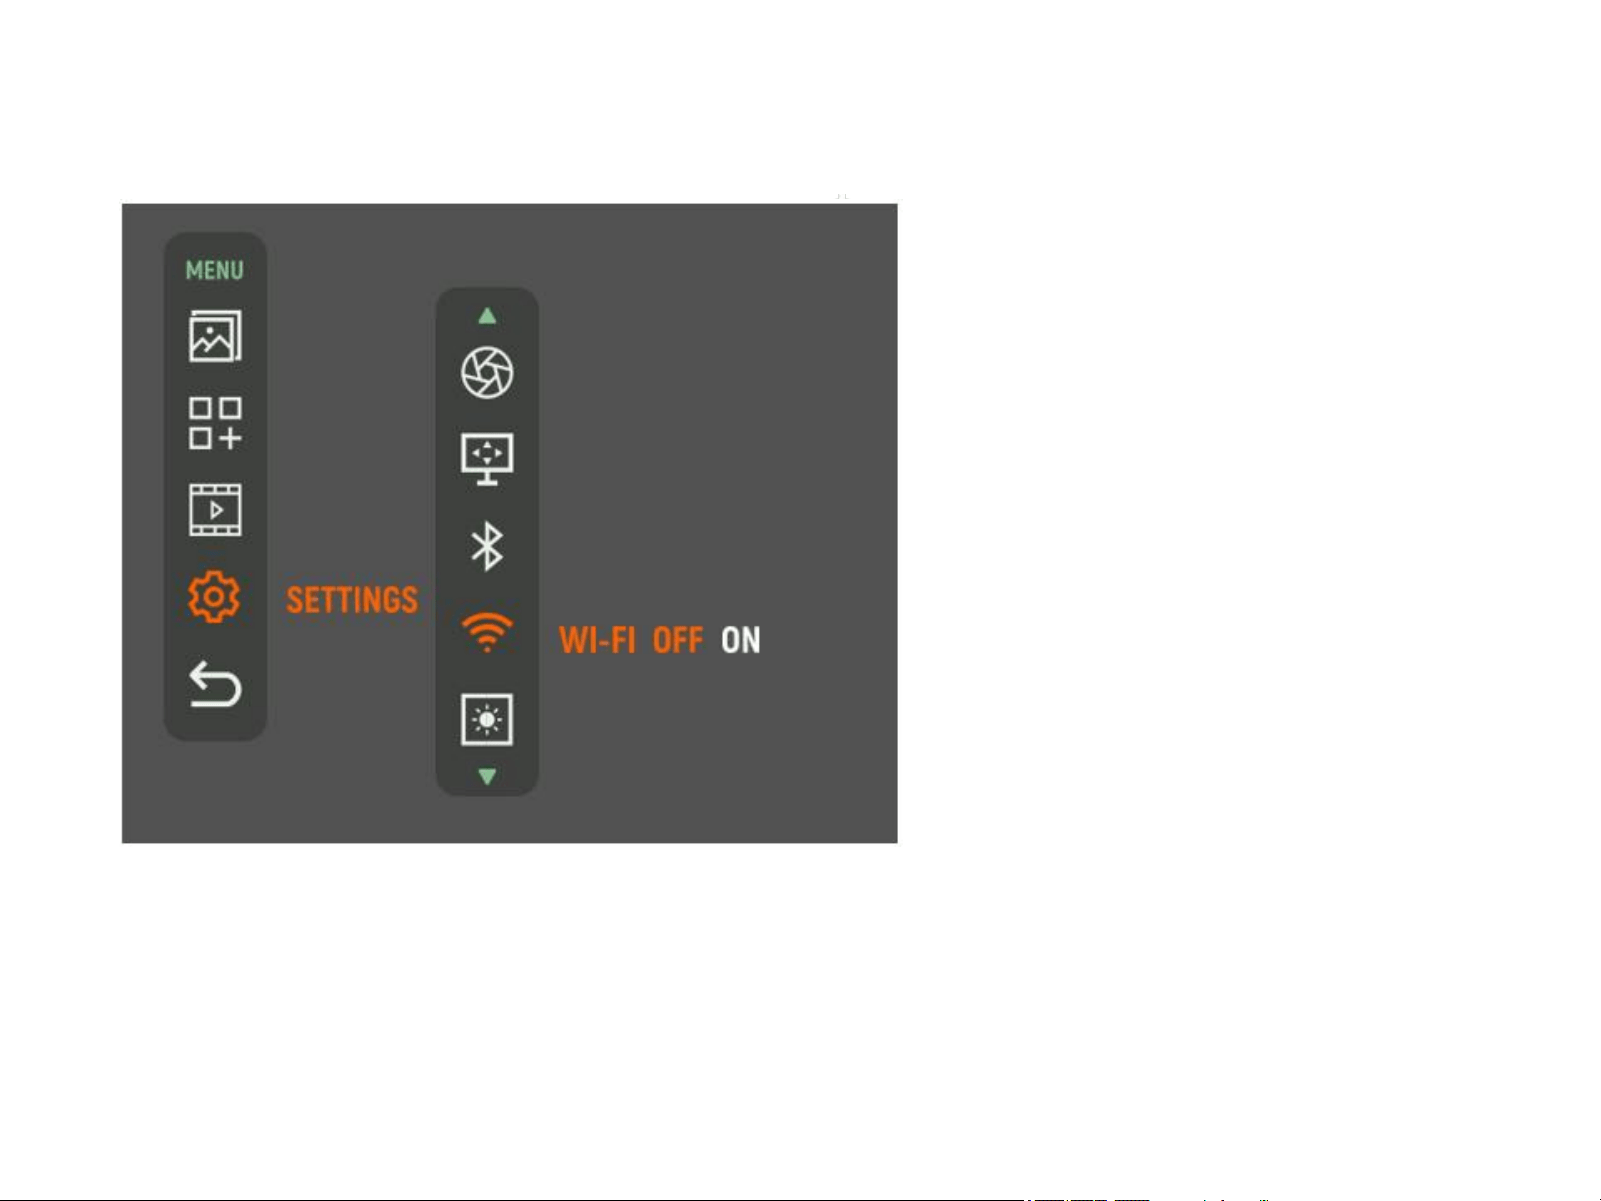
5.5.4 Wi-Fi
Short press the OK button to select between turn on or turn off Wi-Fi.
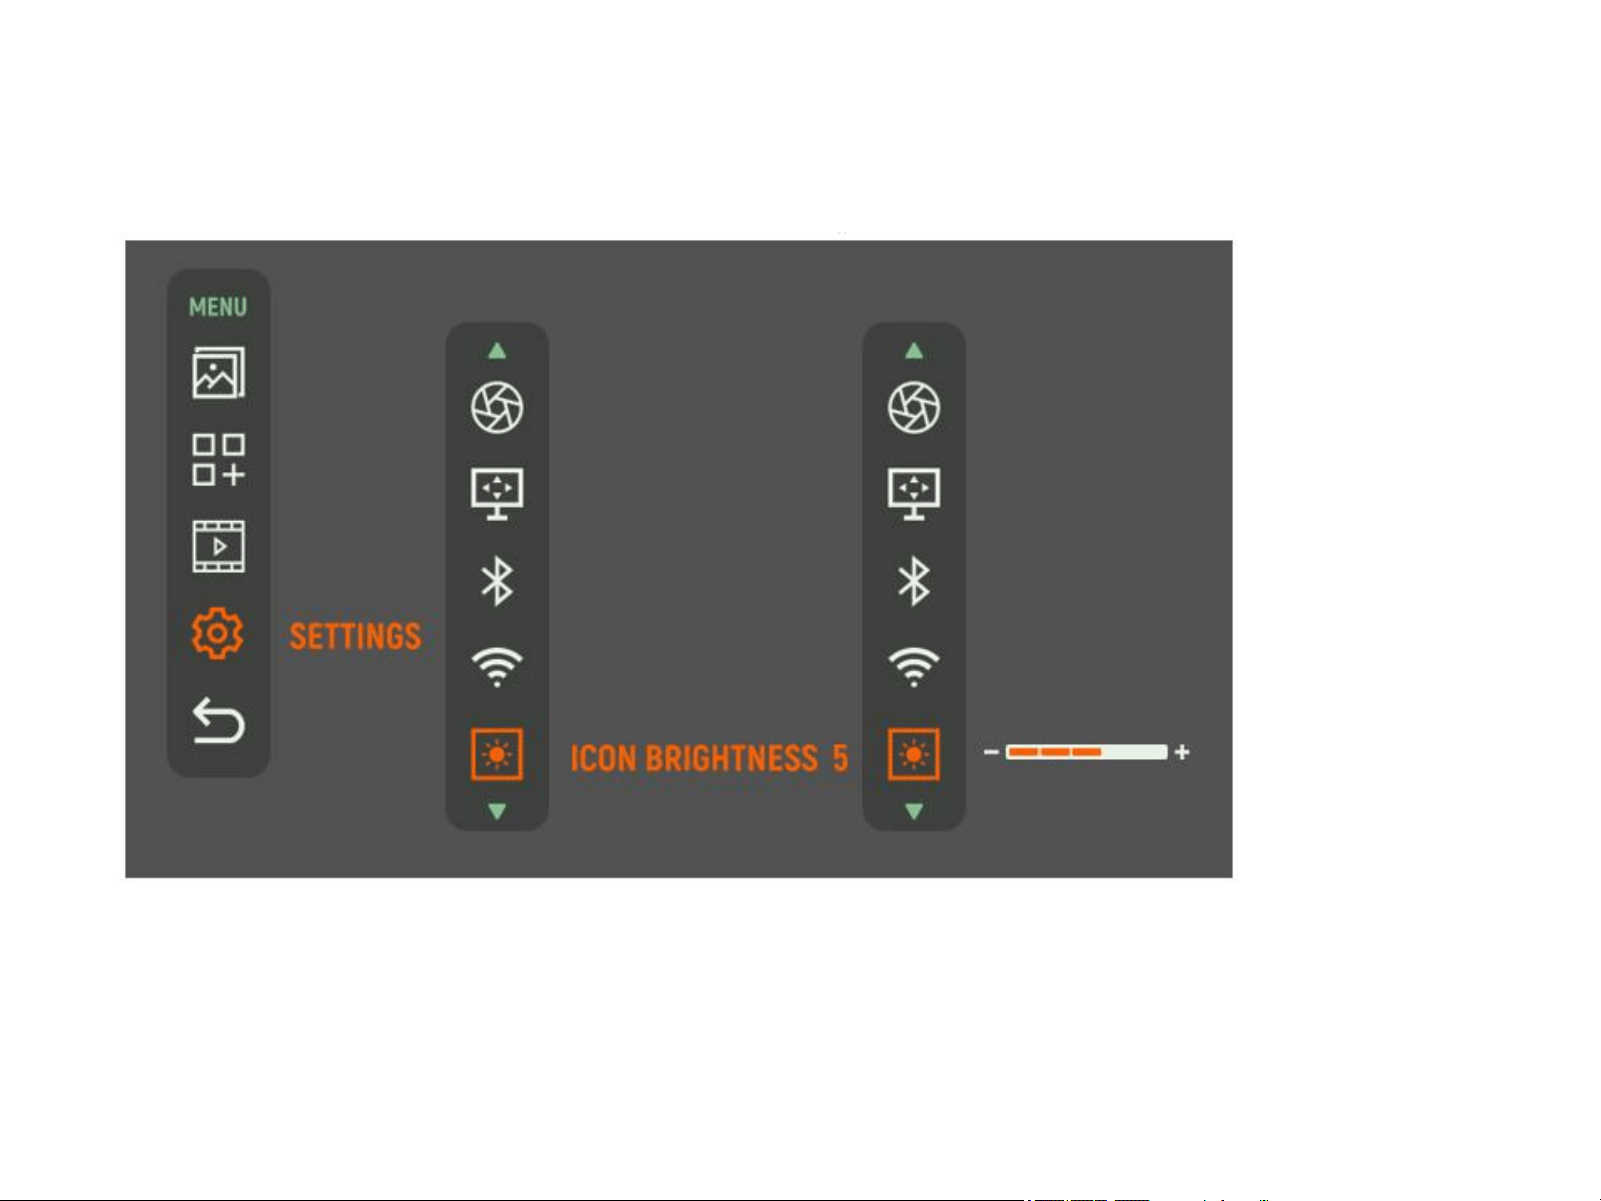
5.5.5 ICON BRIGHTNESS
Short press the OK button to adjust the Icon Brightness from 1 to 5 by pressing the Up
or the Down button, short press the OK button to save and exit to upper interface.
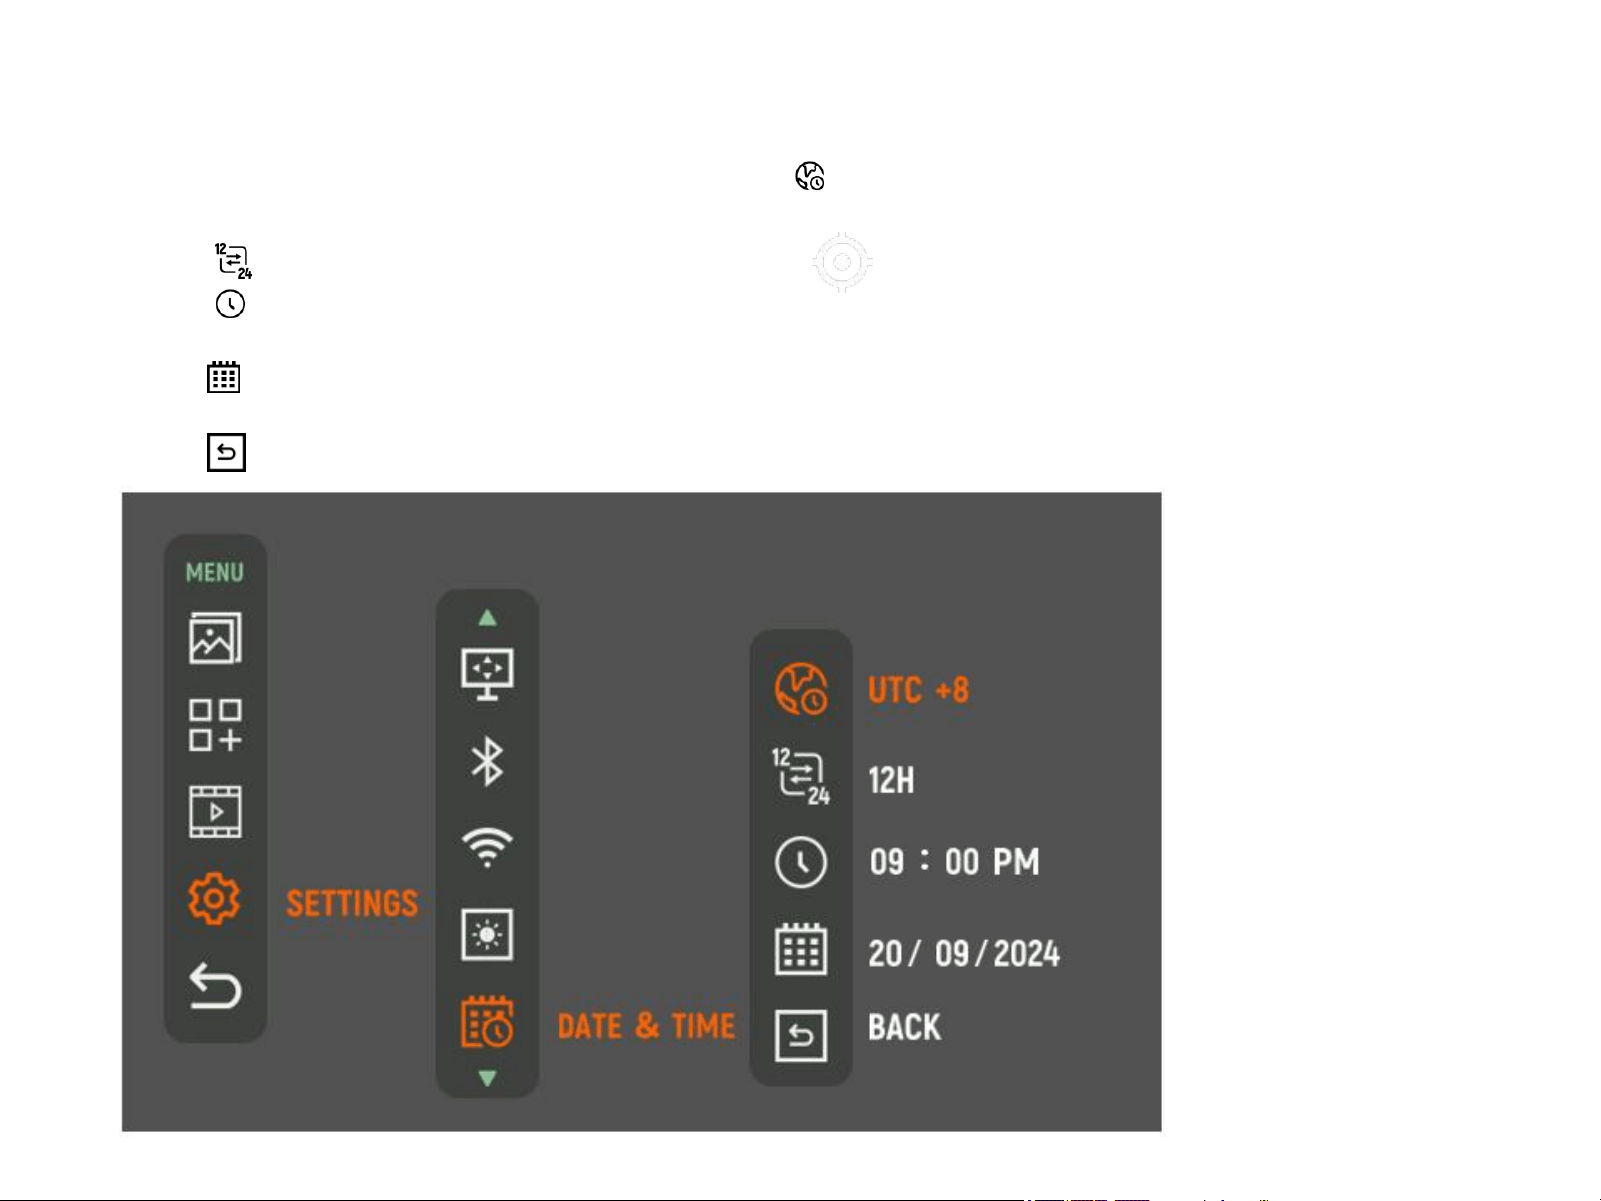
5.5.6 Date & Time
In the DATE&TIME submenu interface, select Time zone , short press the Up or Down button to change
time zone and press the OK button to confirm.
Select , short press the OK button to switch between the 12-hour and 24-hour formats.
Select , short press the OK button to activate time reset function, press the UP or Down button to set
the number, and short press the OK button to save and switch among Hour, Minute and AM&PM settings.
Select , short press the OK button to activate the date reset function, press the UP or Down button
to set the number, and short press the OK button to save and switch between Day, Month and Year.
Select , short press the OK button to exit to upper interface.
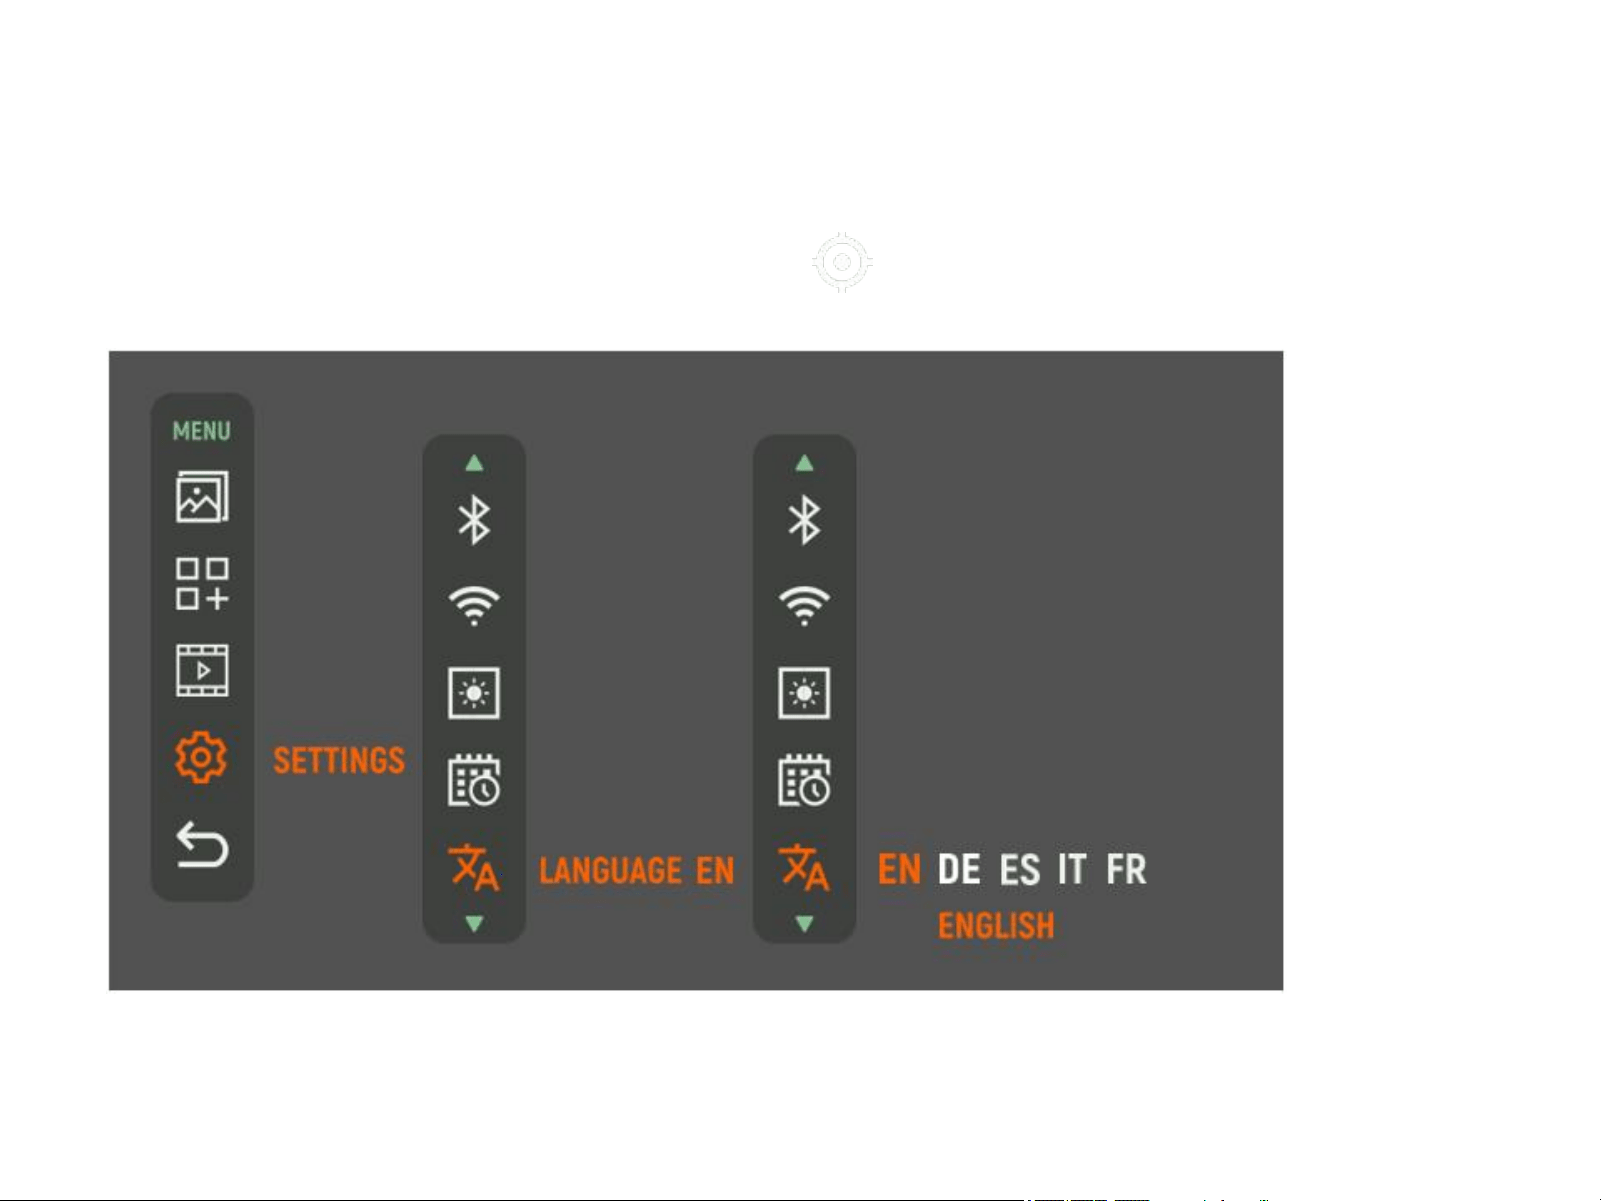
5.5.7 Language
Select a language by briefly pressing the OK button to access the Language submenu, then use the Up or
Down button to choose from EN, DE, ES, IT, or FR.
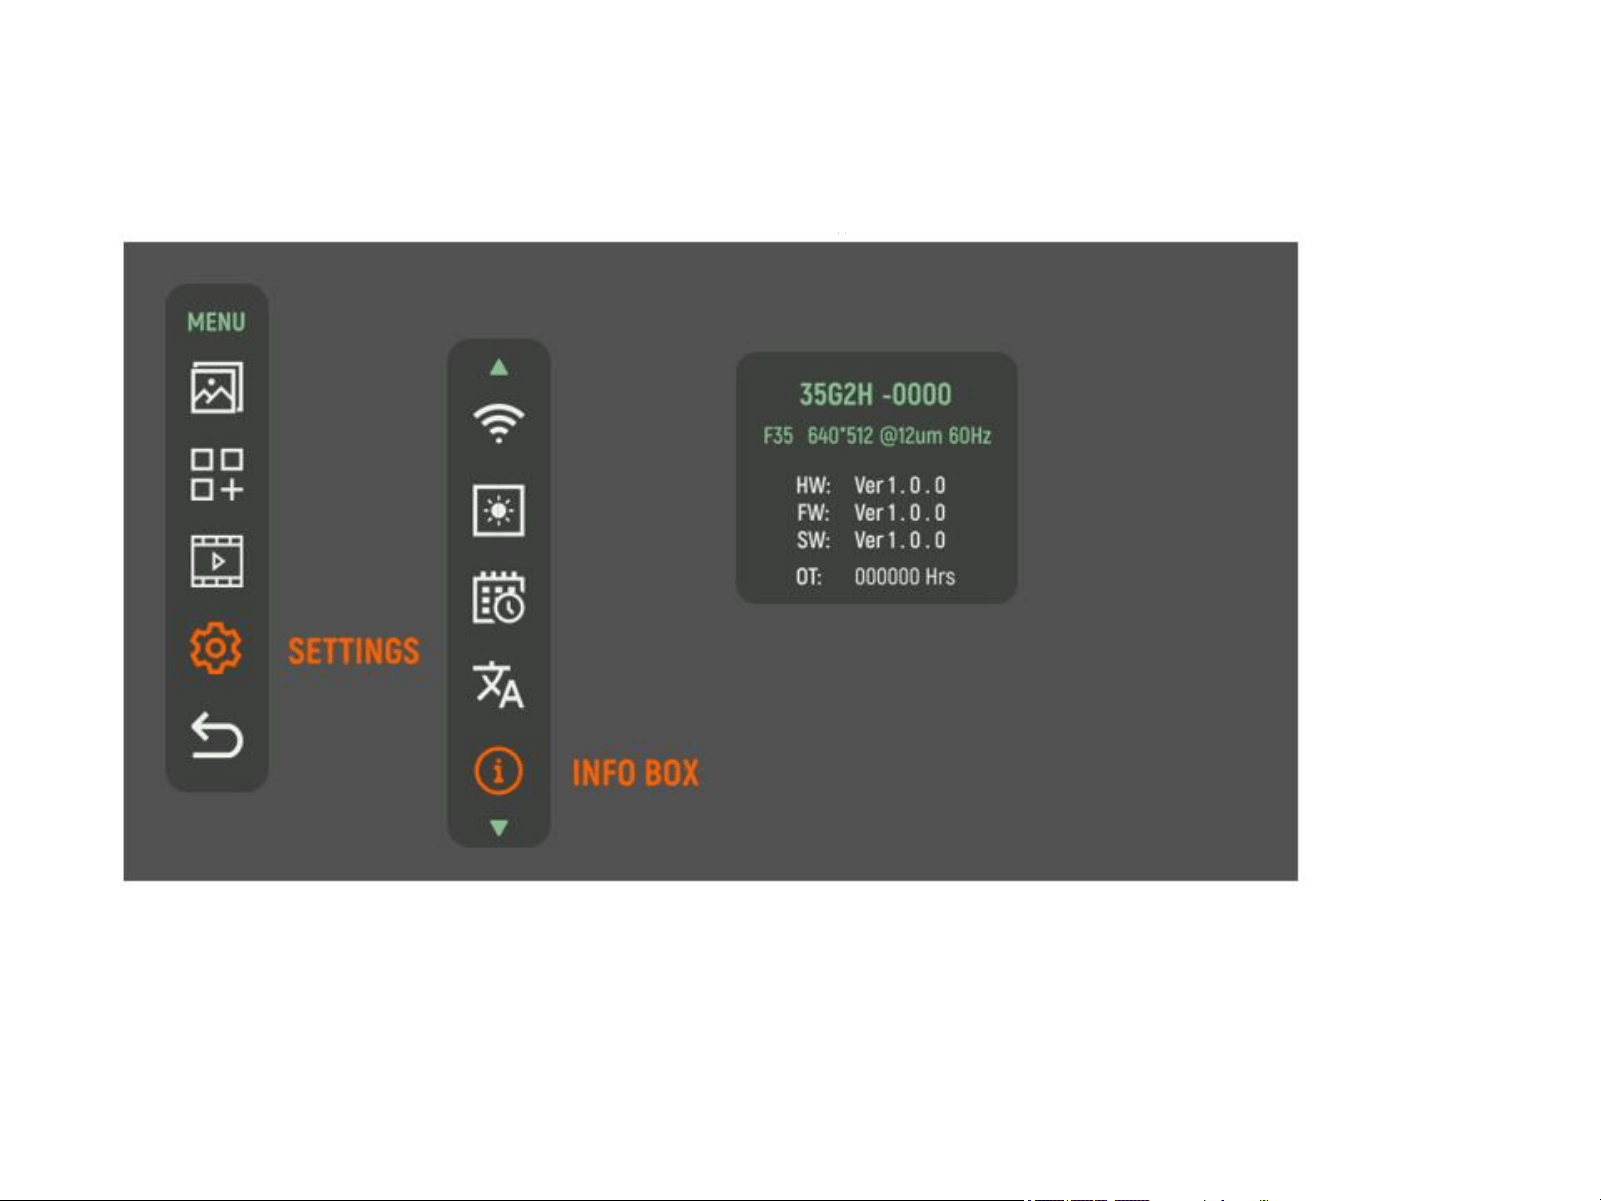
5.5.8 Info Box
Select Info Box, short press the OK button to show the relevant information including device model, main
technical characteristics, hardware version, firmware version and actual operation time of the device.
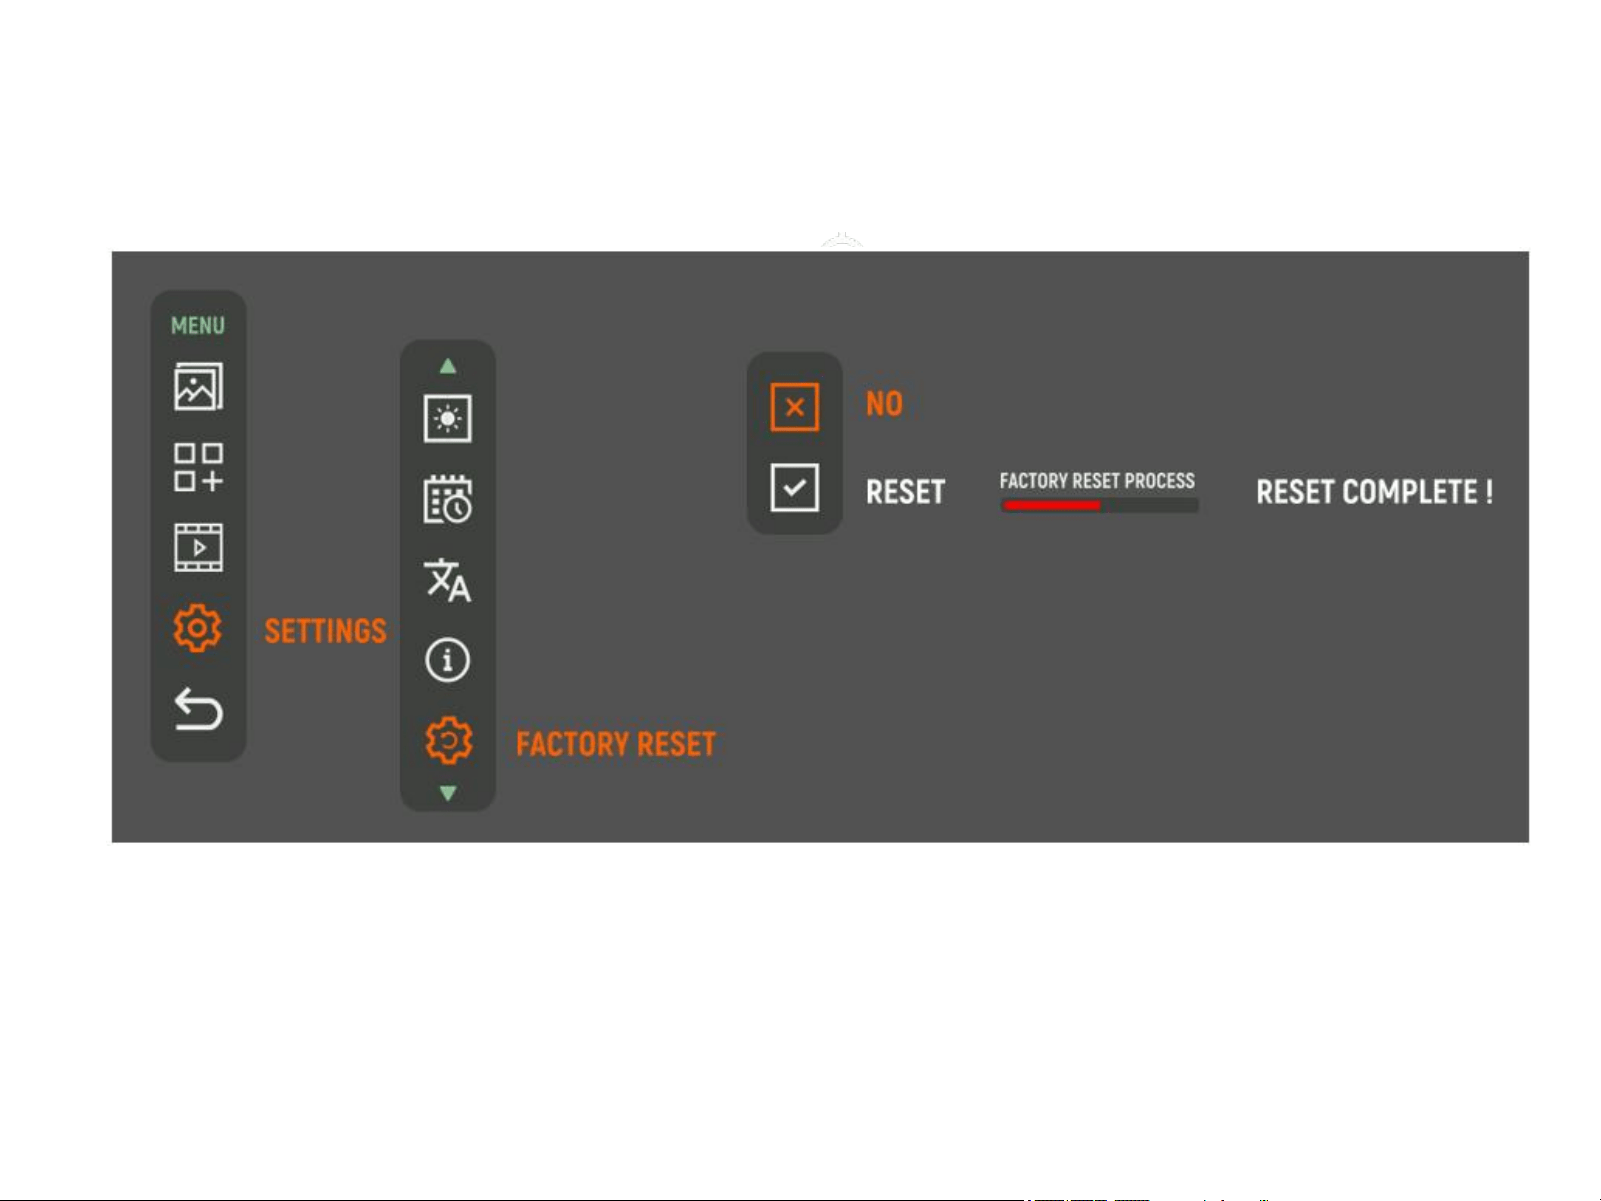
5.5.9 Factory Reset
Select Factory select, short press the OK button to enter Factory Reset interface, short press Up or Down
button to select No or Reset , confirm your selection by short press the OK button.
NOTE:
By performing the Factory Reset procedure, you will delete the settings saved on the device including
alignment with the day optical sight. However, any on-boarding videos and photos will remain unaffected and
will not be deleted
6. Battery use
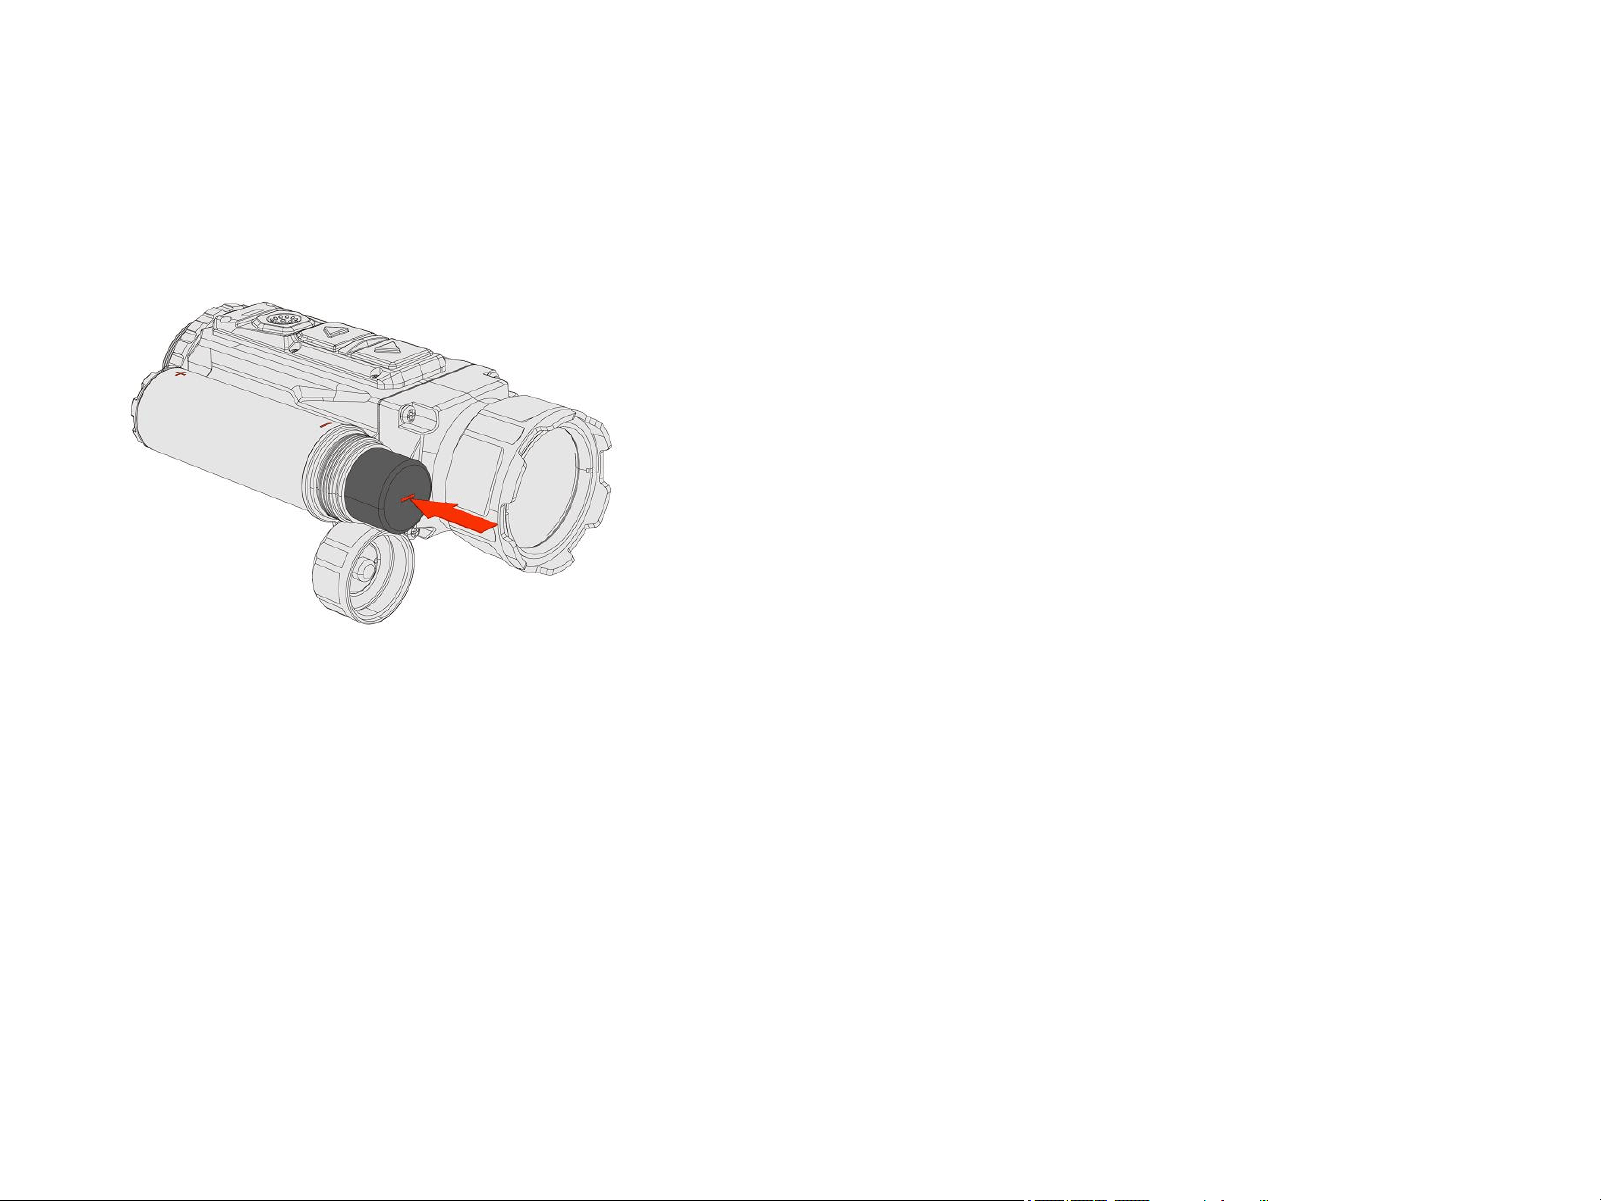
6.1 Battery replacement
The device is powered through 1 piece of 18650 Li-Ion rechargeable battery.
The battery replacement instructtons are presented below.
Please remove the protecttve rubber lens cap before opening the battery compartment and replacing the battery.
NOTE
Attempttng to power on the device, when the battery is fully depleted, will cause a red indicator to blink for a
few seconds.
IMPORTANT!
Always place the battery using the correct battery orientatton (shown in the battery holder) to avoid damaging the device.
NOTE
The batteries are not covered by the warranty!
IMPORTANT!
Please keep all batteries away from moisture.
NOTE
Make sure the device is turned off before replacing the battery.
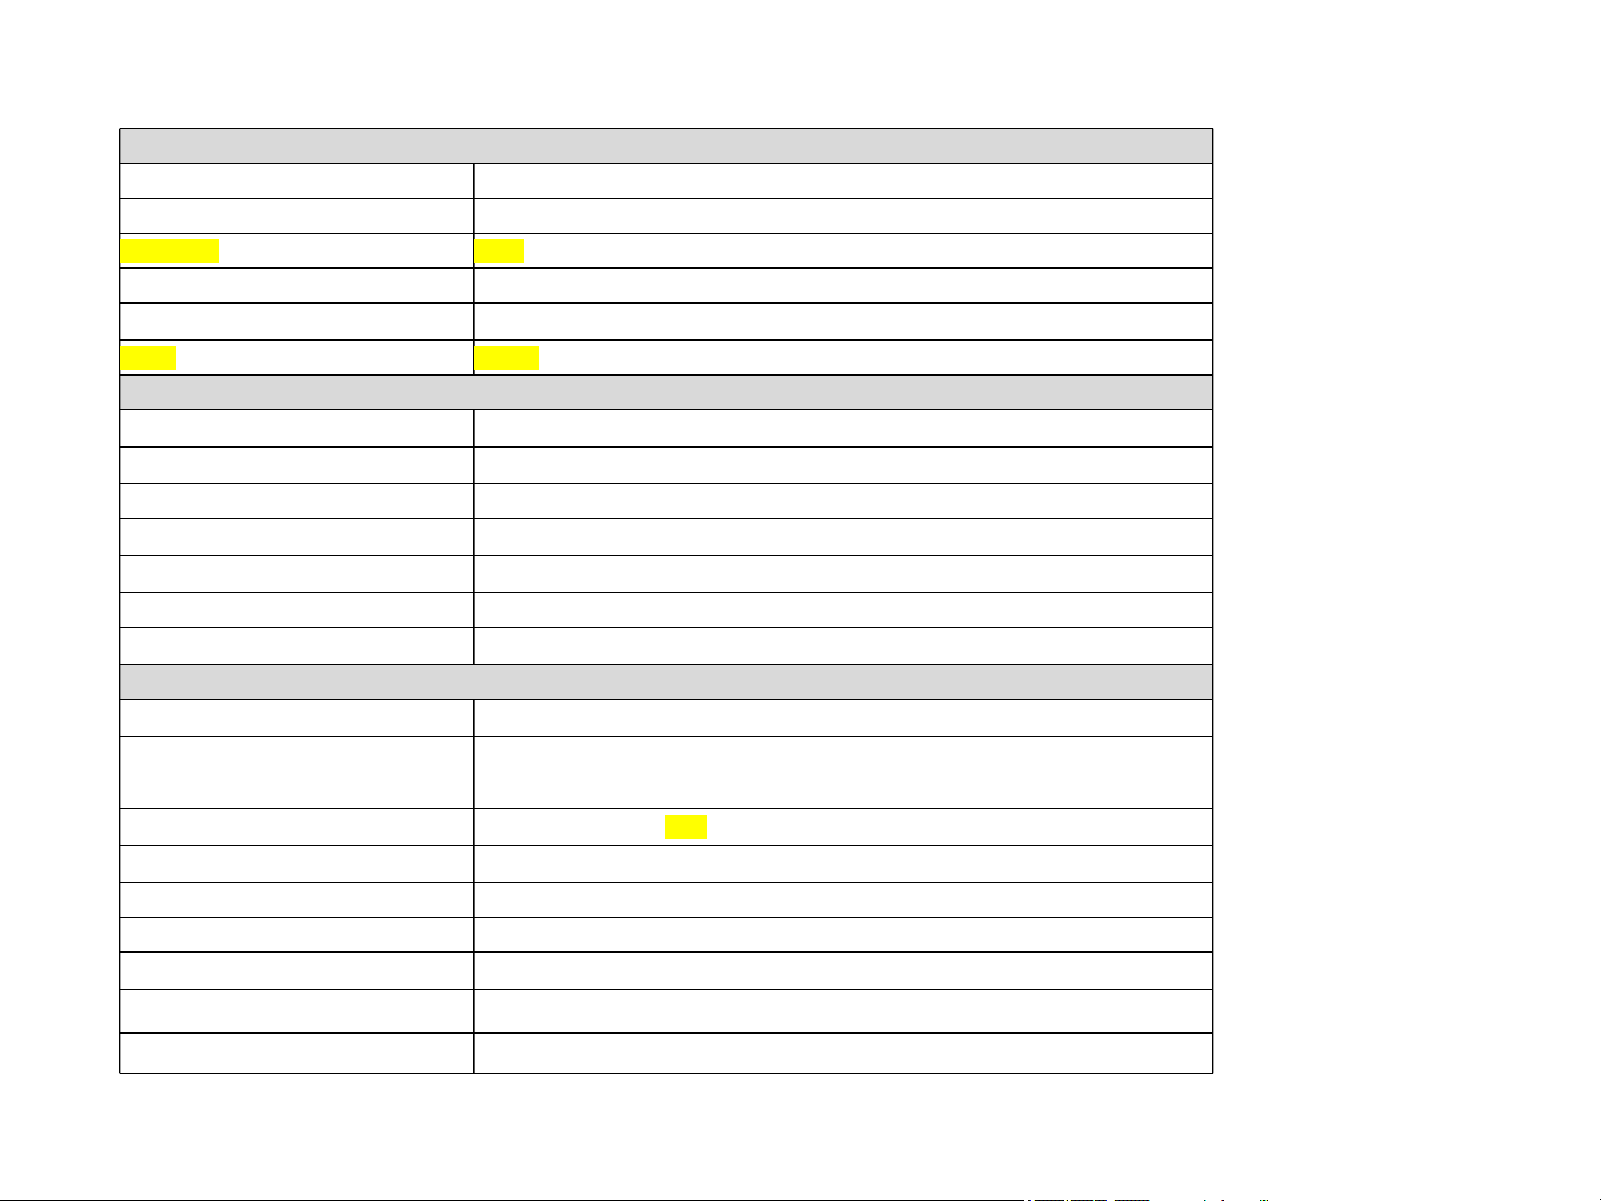
7. Technical Parameters
DETECTOR
Detector
Uncooled Vox
Resolution
640x512
Frame rate
60HZ
Pixel
12um
Spectral range
8-14um
NETD
≤15mK
OPTICS
Objective lens
35mm F1.1
(
non-athermalized
)
Magnification
1x
FOV
12.57
°
x10
°
FOV(H
×
V), m @100m
22mx17.5m(100m)
Close-up range
3m
Eye relief
25mm
Exit pupil diameter
20mm
THERMAL IMAGING PERFORMANCE
Digital zoom
1x (Clip-on mode) / 1x 2x 3x 4x (Observation mode)
Palettes
Black hot / White hot / Red hot / Isotherm / Auto Isotherm / Ironbow / Rainbow
Scene
Highlights/Panorama/City/AI scene
Weather Type
Hot/Normal/Wet
Filter
Smooth/Normal/Sharp
Startup time
<
6s
Menu and Information
GUI
Image enhancement
DDE
Brightness and contrast
AGC
FUNCTIONS
Controls
Togger switch + 3 buttons
Target track
Support
Target lock
Support
AI SRF
Support
Auto/Manual BRP
Support
Lever & Compass
Support
Recoil activated video
10s before/after shooting
Microphone
Support
Bluetooth
Support
Storage
64G
Upgrade
APP online upgrade / Serial port upgrade
DISPLAY
Type
Micro OLED MDP03C
Resolution
1024x768
Output video
WI-FI
POWER SUPPLY
Battery type
1x18650
Type-C
5V2A
Operation time
≥5h
PHYSICAL CHARACTERISTICS
Weight
≤330g
(
without battery
)
Dimension
140*70*46mm
Thread
M33.5x0.75
ENVIRONMENTAL COMPATIBILITY
Working temperature
-20℃
~
+50℃
Storage temperature
-40℃
~
+70℃
Shock resistance
>
6000J

FCC Warnning:
This equipment has been tested and found to comply with the limits for a Class B digital device,
pursuant to part 15 of the FCC Rules. These limits are designed to provide
reasonable
protection against harmful interference in a residential installation. This equipment generates,
uses and can radiate radio
frequency
energy
and,
if
not
installed
and
used
in
accordance
with
the
instructions,
may cause
harmful
interference
to
radio
communications.
However,
there
is
no
guarantee
that interference
will
not
occur
in
a
particular
installation.
If
this
equipment
does
cause
harmful interference to radio or television reception, which can be
determined by turning the equipment off
and
on,
the
user
is
encouraged
to
try
to
correct
the interference
by
one
or
more
of
the following measures:
•
Reorient or relocate the receiving antenna.
•
Increase the separation between the equipment and receiver.
•
Connect the equipment into an outlet on a circuit different from that to which the receiver is
connected.
• Consult the dealer or an experienced radio/TV technician for help.
Caution:
Any
changes
or
modifications
to
this
device
not
explicitly
approved
by
manufacturer
could void your authority to operate this equipment.
This
device
complies
with
part
15
of
the
FCC
Rules.
Operation
is
subject
to
the
following
two
conditions:
(1)This
device
may
not
cause
harmful
interference,
and
(2)
this
device
must
accept
any
interference received, including interference that may cause undesired operation.
This
equipment
complies
with
FCC
radiation
exposure
limits
set
forth
for
an
uncontrolled
environment.
This
equipment
should
be
installed
and
operated
with
minimum
distance
0cm
between the radiator and your body.