
SPARK ONE
User Manual

Model: SPARK ONE
Makers:Guangdong Laureii Intelligent Technology Co., Ltd.
Address:5B, Building F2, TCL Science Park, No.1001 Zhongshan Garden Road, Liuxian-dong, Xili Street, Nanshan
District, Shenzhen
Mail: qiulx@laureii.com/laureiitechnology@gmail.com

Download the APP for SPARK ONE [LAUREII]
To protect your privacy, when you connect your iPhone to the SPARK ONE WiFi for the first time, you need to manually
select the"laureii_xxxx" network in the settings, and the password is 123456789.

1 .Product description .......................................................................................................................................................... 1
2.Use of equipment .............................................................................................................................................................. 5
3.APP connection ................................................................................................................................................................. 9
4.APP software .................................................................................................................................................................. 11
5.Appendix ........................................................................................................................................................................ 21

1
1 .Product description
1.1 Products
SPARK ONE is a new type of clip intelligent Thermal imager, it through WIF connection android and IOS devices "LAUREII" APP
(hereinafter referred to as "APP").It can measure the temperature of objects, take photos, record videos, and also switch image colors. It has
functions such as point, line, rectangular box temperature measurement and so on.
1.2 Product Description
Take apart Spark One packaging of the whole machine, inventory the components of the whole machine according to the packing list
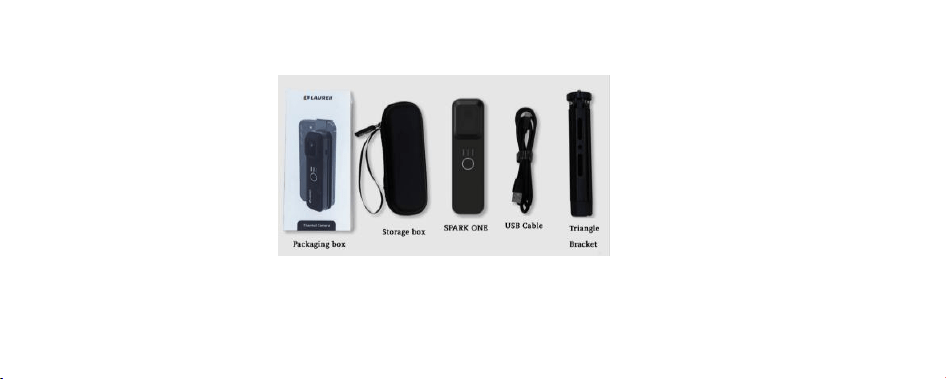
2
(include thermal imager with clamping bracket), USB cable,storage box,packaging box,triangle bracket (Buy it yourself).
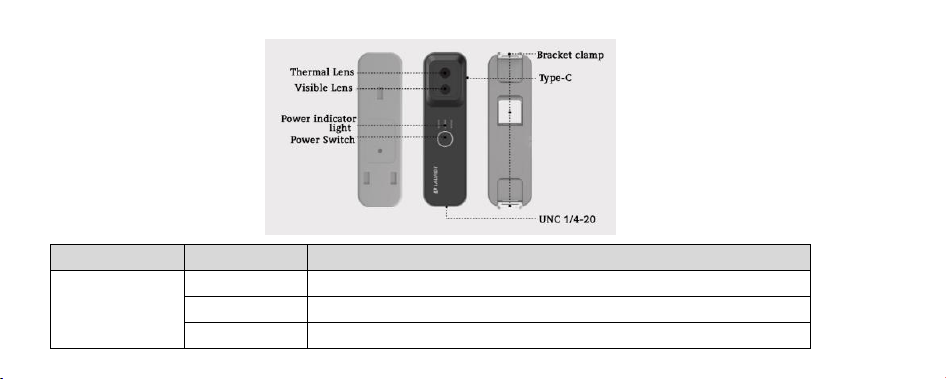
1.3 Introduction to equipment
The SPARK ONE is mainly divided into two parts: the thermal imager camera and the clamping bracket.
3
Name
Parts
Explain
Thermal Lens
Capture Thermal imaging images
Visible Lens
Capture Visible images
The indicator light is always on: the number of always-on indicator lights

4
the main body of
the equipment
Power indicator
light
indicates the remaining power.
The last indicator light flashes: the battery is less than 15%, and the device
is about to shut down.
Red indicator light: the device is charging
Blue indicator light: the battery is full
Power Switch
Long press to turn on or off.
Type-C charging
port
Used for charging
UNC 1/4-20.
Use it with the tripod installation method
Mobile phone
clamp holder
Bracket clamp
Support vertical and horizontal clamping methods

5
2.Use of equipment
To ensure that the product has sufficient power, long press the key 3S, and the device will be turned on. After using the device, you can turn
off the device by pressing the Power Switch button 3S for a long time.
2.1 Device charging
When you use the device for the first time or the battery is low, please charge the device to ensure that the battery is sufficiently charged.
Connect one end of the data cable to the Thermal imager and the other end to the adapter to charge the device. Please use the DC5V 1A
adapter to charge.
6
Description:
Red indicator light: the device is charging
Blue indicator light: fully charged.
2.2 Separate use
After the phone APP is connected to the Thermal imager, it can be used normally.
The Thermal imager can be mobile to detect the temperature in a narrow space and
transmitted to the APP in real time to achieve abnormal
7
situation detection.
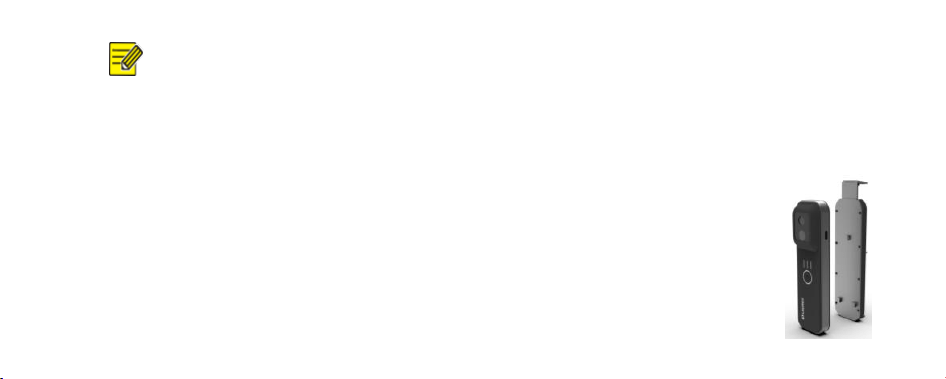
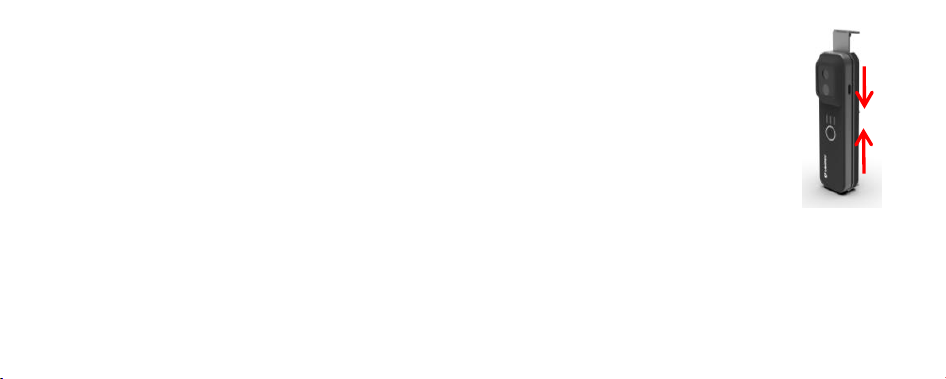
2.3 Clamping use
After installing the Thermal imager through the clamping bracket, the mobile device can be clamped.
Step 1: Aiming the mounting hole of the Thermal imager at the bracket Snap, connect the Thermal imager and the bracket.
Step 2 :The Thermal imager is pushed from the bottom up, and the bracket is pushed from the top to the bottom, fixed Bracket and
Thermal imager.
Step 3:Adjust the stretch rod of the bracket according to the size of the mobile device to fix the mobile device.
8
Description:
Support vertical clamping and horizontal clamping of mobile phone.
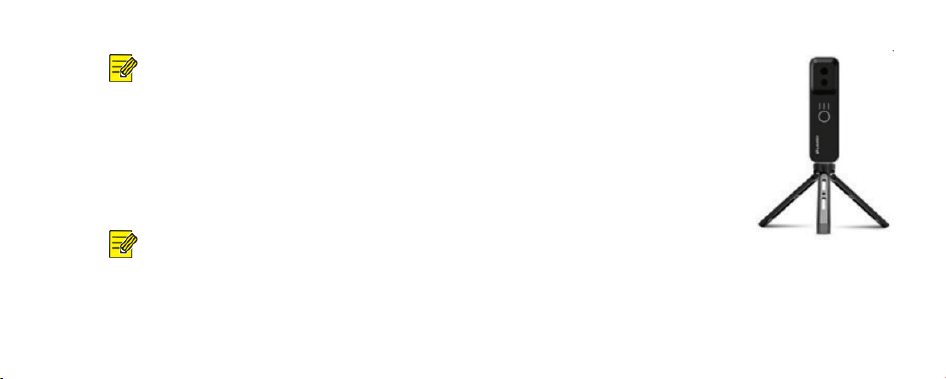
2.4 Fixed use of tripods
Mount the camera to the tripod via the UNC 1/4-20 threaded hole and use it by connecting a mobile device via WIFI.
Description:
The tripod can be optionally purchased.

9
3.APP connection
Mobile devices use WIFI to connect to the Thermal imager. After the WiFi connection is correct, the image can be displayed normally on the
software of Spark one after opening the heat map connection 3s.
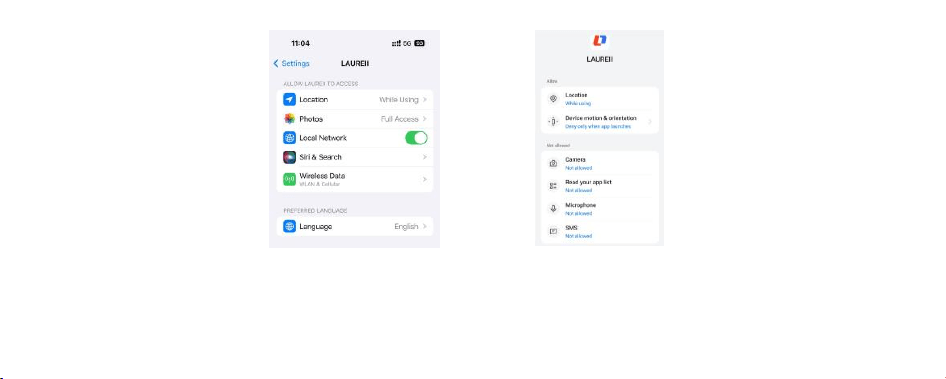
Description:
The “LAUREII” app needs to run on mobile devices (mobile phones/tablets) of Android 6.0 or iOS 11 and above.
Make sure your phone has WIFI authorization enabled. Android and iOS systems request different permissions.
10
iOS
Android
11
4.APP software
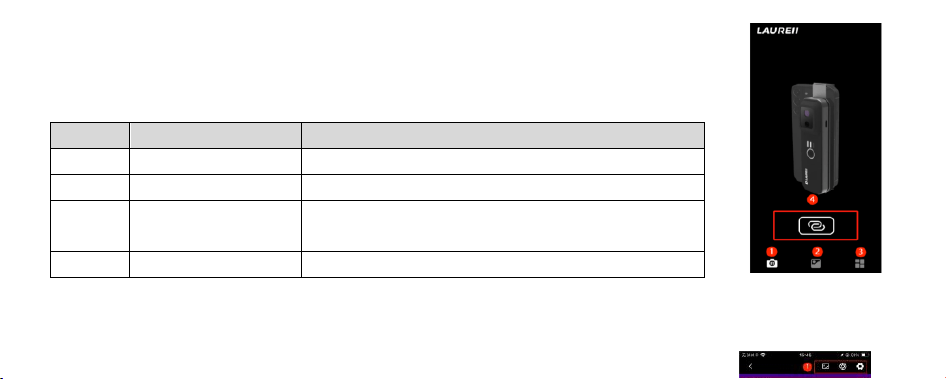
4.1 Main interface introduction
Number
Function name
Function description
①
Device preview
Display the currently used device
②
Material library
Store captured pictures and videos, as well as generated reports
③
setting
Support language, temperature, time format , report basic
information, help and other functions
④
Video connection
Click to enter the real-time video interface.
4.2 Video Preview
After the mobile phone successfully connects to the device using WIFI, click the connection button on the device preview page,
12
and the infrared image interface will be presented.
Number
Function name
Function description
①
Parameter configuration
area
Includes image mode button, shutter button, and device Settings
button
②
Thermal imaging area
Display the real-time picture of Thermal imaging temperature
measurement video
③
Functional menu area
Click "+" to expand the setting image mode, temperature
measurement mode and pseudo-color.
Captureable images and video image recording
Click the lower left corner to view the stored pictures or videos.
Description:

13
Turn the mobile device to the horizontal direction or click the flip button under the pseudo-color bar, and the status bar of the
Thermal camera will be displayed from the vertical direction to the horizontal direction.
4.2.1 Parameter configuration area
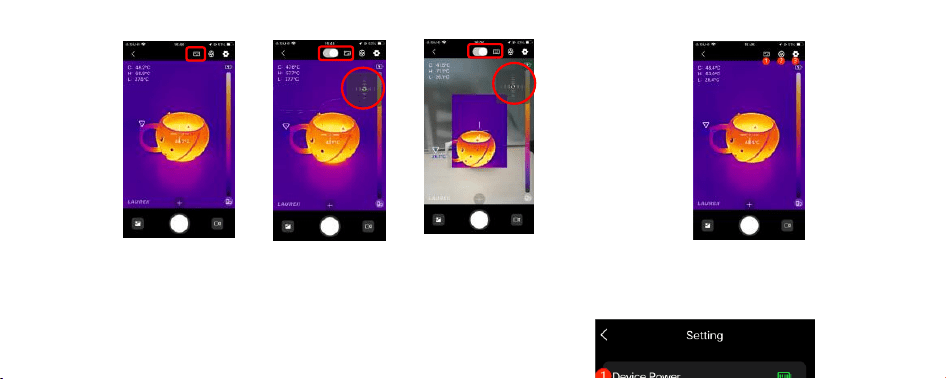
【Image mode ①】Click the image button to switch the video mode,which are as follows:Thermal image/ Thermal image fusion/ PIP mode.
14
Note: If visible and Thermal do not fully coincide in fusion mode and picture-in-picture mode, you can drag the direction button on the upper
right of the image to adjust the horizontal and vertical offset, so that it is aligned with the Thermal horizontal direction.

15
【Shutter ②】Click the shutter button and the software automatically image
calibrates for sharper images, and more accurate temperatures.
【Setting ③】Enter the device configuration interface through the setup button.

16
Number
Icon name
Icon description
①
Device power
Display the current real-time power of the device
②
Device
information
You can view the software version, WIFI name, device name, firmware version number, serial
number and other device-related information.
③
Temp parameters
Adjust the temperature measurement parameters, and you can set the detection distance and
radiation rate according to the actual situation of the measured object to improve the accuracy of
temperature measurement.
④
OSD switch
Turn on/off the corresponding maximum temperature/lowest temperature/central temperature
button in the OSD setting interface, the Thermal real-time image will display the global
temperature measurement results in the upper left corner after the global temperature
measurement, such as: the highest temperature (H: 51.7℃), the lowest temperature (L: 23.0℃),
the central point temperature (C: 28.3℃), and it will not be displayed if it is unchecked; and
17
corresponds to the cursor of the cancel screen
⑤
Factory Restore
Reset all the parameters of the device and restore it to the initial state.
⑥
Auto Power off
The automatic shutdown time can be set to none/5 minutes/10 minutes. Confirm that the mobile
phone has not transmitted the image within 5 minutes/10 minutes of connecting to the device
WIFI, and the device will automatically turn on the shutdown mechanism. To use it again, you
need to restart it.
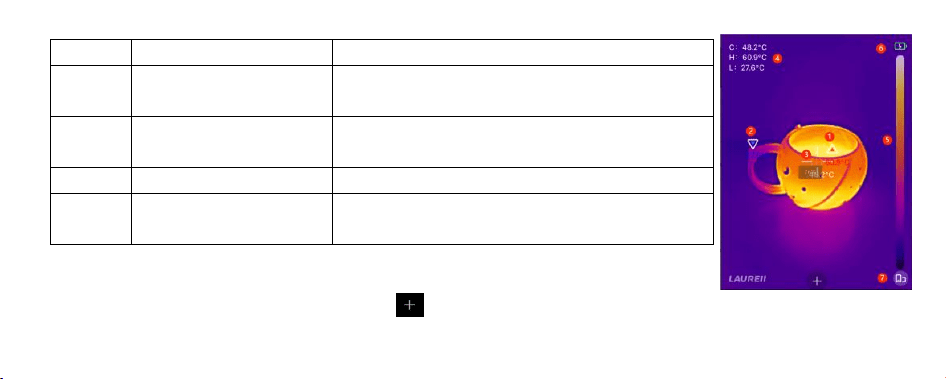
4.2.2 Thermal imaging area
Number
Icon name
Icon description
①
The highest temperature
cursor
Indicates the highest temperature in full width
②
The lowest temperature cursor
Indicate the lowest temperature of the full range
18
③
Center temperature cursor
Indicates full center temperature
④
Full-width temperature
Full-width maximum temperature (H), full-width minimum
temperature (L), full-width center temperature (C)
⑤
Pseudo-color strip
Reflect the color distribution of the high and low temperature
areas of the picture.
⑥
Battery identification
Displays the remaining power of the device
⑦
Flip button
Press horizontally or vertically to switch the image display
direction of the Thermal imaging area
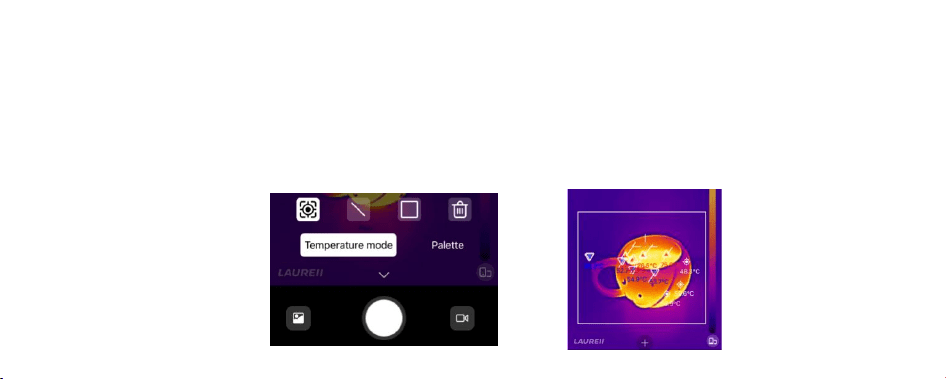
4.2.3 Functional menu area
Open the folding symbol below the real-time video interface. ,You can expand the menu bar of all functions.
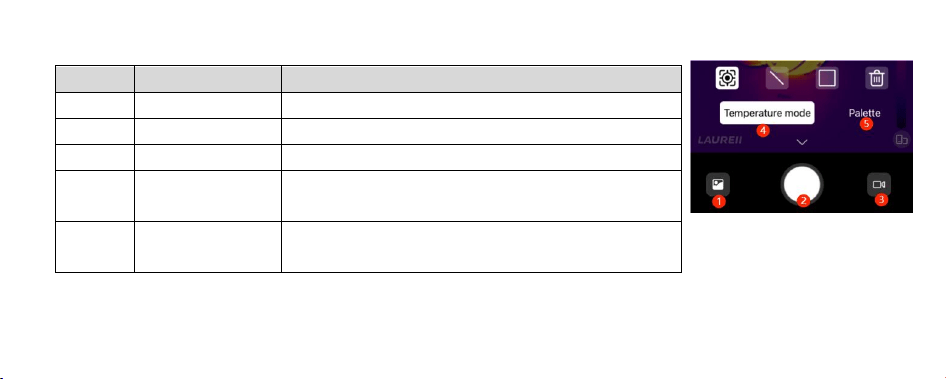
19
【Temperature mode】Click the temperature measurement button to switch the temperature measurement mode, followed by three types of
Number
Icon name
Icon description
①
Material library
Store captured pictures and videos, as well as generated reports
②
snapshot
Capture the current picture
③
Video
Switch the recording mode to record the current video screen.
④
Temperature mode
Support points, lines, frames and other temperature
measurement rules, which can support up to 9 rules.
⑤
Palette
Support 10 color display such as iron red, rainbow, white heat,
etc.
20
temperature measurement points/line/area; after clicking on the corresponding temperature measurement mode, click to confirm the temperature
measurement point on the image, and long press and drag animation lines, picture frames, and area/line types can set the area size according to the
scene. Each type supports up to 3, and up to 9 support settings. After clicking the delete button, click the temperature measurement point/line/area
drawn on the screen will delete the set temperature measurement method.

21
【Snapshot】 Click the software button on the mobile phone to capture the current picture and automatically save it to the material folder of
the software, keep the current image, and use it for subsequent report generation and image sharing.
【Video】 Click the software button to enter the recording function, and click the open button. ,The video begins. Click the start button
again, and the default recording stops.
5.Appendix
Precautions for safe use
During the installation and use of equipment, the electrical safety regulations of the country or region must be strictly observed.

22
If the equipment does not work properly, please contact the store where you bought the equipment or the nearest service center. Don't
Disassemble in any way.Remove or modify the equipment.
Please do not aim the lens of the device at strong light sources, such as the sun, incandescent lamps and other high-temperature targets,
otherwise it will cause damage to the Thermal imaging detector.
Please do not use hard objects to touch the product lens to avoid damaging the lens.
When the device is not in use, put the device into a carrying bag.
Device access to the Internet may face network security problems. Please strengthen the protection of personal information and data

23
security. When you find that the device may have a potential network security risk, please contact us in time.
Please keep all the original packaging materials of the equipment properly, so that if there is a problem, use the packaging materials to
package the equipment, send it to the agent or return to the manufacturer for processing. The company is not responsible for accidental
damage in transit caused by non-original packaging materials.
Battery
If the wrong model of battery is used, it may cause the danger of explosion.
Replacing the wrong model of battery (such as some types of lithium batteries) may cause the failure of safety protection.

24
Do not put the battery into the fire or in the heating furnace, and do not squeeze, bend or cut the battery, which may cause an explosion.
Do not place the battery in an environment of very high temperature or very low pressure, which may cause the battery to explode or leak
flammable liquid or gas.
Discarded batteries will cause pollution to the environment. Please follow the instructions to dispose of used batteries.
Lens maintenance instructions
The surface of the lens is coated with anti-reflective coating, stained with dust and grease., fingerprints, etc. will produce harmful
substances and lead to their performance.If it falls or causes scratches, mold, etc., once dirt is found, please deal with it according to the following

25
methods:
A. Dust-stained: Use an oil-free soft brush or a blower ball to gently bounce off the dust.
B. Oil-stained: Use a soft cloth to gently wipe it dry, and then clean it with an oil-free cotton cloth or lens.The paper is stained with alcohol or
Lens cleaning liquid, Wipe outward from the center of the lens.
Warranty card
Product Name: ;Device serial number: ;
Purchase Date: ;Customer Name: ;

26
Order Number: ;Contact Number: ;
Mailing Address: ;
Thank you very much for choosing our products. Please read the product manual and this warranty regulations carefully before use.
1. Our company will replace the product within three months if there is any quality problem from the date of sale (based on the order date);
2. Our company implements a one-year free warranty (except for considered damage) from the date of sale (based on the order date)
3. For products that have expired, our company will provide you with paid repair services;
4. Damage caused by considered reasons (such as breakage, scratches, water ingress, etc.) or force majeure is not within the scope of free

27
warranty;
5. If the body label is altered or torn without permission, the product is disassembled or repaired by personnel other than our company, it is
not within the scope of free warranty;
6. The shell, manual, packaging, accessories and application software of our products are not within the scope of warranty.
FCC WARNING

28
This device complies with part 15 of the FCC Rules. Operation is subject to the following two conditions: (1) This device may not cause har
mful interference, and (2) this device must accept any interference received, including interference that may cause undesired operation.
FCC warning:
Any Changes or modifications not expressly approved by the party responsible for compliance could void the user's authority to operate the e
quipment.

29
Note: This equipment has been tested and found to comply with the limits for a Class B digital device, pursuant to part 15 of the FCC Rules.
These limits are designed to provide reasonable protection against harmful interference in a residential installation. This equipment generates
uses and can radiate radio frequency energy and, if not installed and used in accordance with the instructions, may cause harmful interferenc
e to radio communications. However, there is no guarantee that interference will not occur in a particular installation. If this equipment does
cause harmful interference to radio or television reception, which can be determined by turning the equipment off and on, the user is encoura
ged to try to correct the interference by one or more of the following measures:
-Reorient or relocate the receiving antenna.

30
-Increase the separation between the equipment and receiver.
-Connect the equipment into an outlet on a circuit different from that to which the receiver is connected.
-Consult the dealer or an experienced radio/TV technician for help.
The device has been evaluated to meet general RF exposure requirement. The device can be used in portable exposure condition without
restriction.

