BT Series
User Manual

1
INTRODUCTION
Thank you for your continued support and for choosing PARD BT Series thermal
imaging camera. Please read this manual carefully before using the device for the
first time. Please follow the instructions in this manual to avoid any damage
caused by improper use and to ensure that your device operates properly.
After reading, please keep this manual in a safe place, for future reference. This
manual provides step-by-step instructions on how to use your multi-spectral
digital camera and is intended for your reference only.
Please note that PARD reserves the right to update this manual without prior
individual notifications. For the latest information and updates, we recommend
you to visit our official website. Additionally, PARD reserves the final right of
interpretation of this manual.

2
PRECAUTIONS
Please remove the insulating tape on the battery before first use. It is
recommended to use a fully charged lithium-ion battery with a rated voltage
of 3.7V.
Please turn off the device and remove the battery when it’s not in use for more
than 10 days, and store the device & battery in a dry and safe place.
Be extra cautious and handle the device with care during use or
transportation. It is recommended to use the original packaging during
transportation.
Do not use the device to focus directly on strong sources of light such as the
sun or electric welding. The detector may be damaged and it will void the
warranty.
Avoid lens scratches and damage caused by oil or chemical contamination of
the lens. Keep the lens cap on when not in use.
The device should be placed in a cool, dry, and ventilated environment
without strong electromagnetic fields, and the storage environment
temperature should not be lower than (-30℃/-22℉) or higher than (55℃/131
℉).
Do not disassemble the device without authorization. If you encounter any
problems, please contact our after-sales team and report them on our official

3
website. Failure to do so will render the warranty service null and void.
Attention! All PARD night-vision and thermal imaging devices require a license
when exported to outside your country.

4
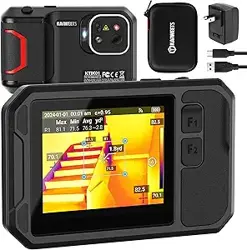
PACKAGE CONTENTS
Icons
Contents
Quantity
Thermal Imaging Device
1
3.7V 18650 Rechargeable Lithium-Ion
Battery
1
Type-C Cable
1
Allen Wrench
2
User’s Manual
1
After Sales Card
1

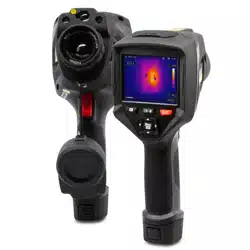
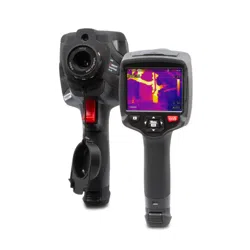
5
SPECIFICATIONS
Model
BT 52
BT 56
Classification
Thermal Imaging scope
Sensor
Type
Uncooled Vox IR Sensor
Resolution(pixel)
256*192
640*512
Pixel Size(µm)
12*12
12*12
NETD
≤25mK(0.025℃)
≤18mK(0.018℃)
Frame Rate(Hz)
50
50
Human Detection Distance(m)
600
1800
Vehicle Detection Distance(m)
800
2200
Image Engine
PARD IREA
PARD IREA
Objective lens(mm)
13
35
Optical Magnification(x)
1
1.2
Digital Zoom(x)
2/4/6/8
2/4/6/8
Field of View (HxV)
Horizontal
13.5
12.5
Vertical
10.1
10
Diagonal
16.8
16
Display

6
Type
LCD
Resolution(pixel)1024*768
Reticle Style
6
Reticle Color
4(Red/White/Yellow/Green)
Scene Mode
City/Rain/Forest
Image Mode
WT-HOT/BK-HOT/EDGE/RD-HOT/IN-HOT/SKY
Photo / Video
Photo Resolution(pixel)
1536*1536
Photo Format.JPG
Video Resolution(pixel)
768*768
Video Format
.mp4
Storage(GB)
Micro SD card (Max. 128)
Main Function
LRF Detection Range(yd/m)
1200/1000
PIPYes
Gyroscope
Yes
Loop Recording
Yes
Hot track
Yes
E-compass
Yes
Shutter
Mechanical shutter
Microphone
Yes

7
Firmware Upgrade
Yes
Connections
USB Type-C
Yes
HDMI OutputYes
WiFi
Yes
Supported Apps
PardVision2
Power Supply
Battery type
Li-ion 18650*1
Output Voltage(V)3.7
Operating Time(h)
≤5
External Power Supply Type
Type-C
Environmental characteristic
Degree of Protection
IP67
Operating Temp(°C/°F)-30 ~ +55 / -22 ~ +131
Recoil Resistance(J)
6000
Material
Housing
Aluminum Alloy
Objective lensAll-glass multi-coated lens

8
INSTALLATION
1.
Unboxing
Before using this device, please do the following:
Open the box and remove the device.
Check to ensure that the package contents listed above are all included in the
box.
Check the device for any damage to the display, body, lens, buttons, etc.
Make sure that the objective lens and eyepiece are clean & functioning properly.
Note: If any accessories are missing or damaged, please contact our after sales
service.
2. Battery Installation
anStartup
The battery installation steps are as follows:
(1) Unscrew the battery cap button
until it opens and remove the
battery.
(2) Remove the insulating tape.

9
(3) Put the positive pole (+) of the
battery inwards, and then screw
the battery cap until the battery
cap is locked.
(4) To turn on the device, press and hold
the power button for about 3
seconds. (When the power light
illuminates and the PARD Logo
appears on the screen, the device is
ready for use.
Note:
Please use a single 18650 rechargeable lithium-ion battery rated 3.7V voltage.
Do not expose the battery pack to high temperature or to a naked flame.
Do not put the device into water when the battery cover is open;
Do not expose disassemble the device without authorization;
Do not pierce the device with sharp objects;
Battery should be kept out of reach of children, and the positive and negative
terminals of the battery should be installed correctly;
Whilst charging the battery do not leave the battery unattended.
When using the battery at cold(low) temperatures, the battery capacity
decreases, this is normal and not a defect.
Do not use the battery if it has been damaged in any way.
After charging is complete do not leave the battery on charge connected to the

10
network.
Please act responsibly and recycle or dispose of all used batteries according to the
law.
3. Objective Lens
Focusing
Before you focus the objective lens, ensure that the diopter focusing has been
completed.
Aim at the target you want to see, and turn the focus lever of the objective lens
until you can see the target image clearly.
4. Compass
Calibration
After the eyepiece is focused, please use the "figure 8 pattern method" to
calibrate the electronic compass. Users are required to tilt and move the device in
a figure 8 motion until the compass is calibrated as shown in picture 7.

11
Fig. 7
Shortcut Mode
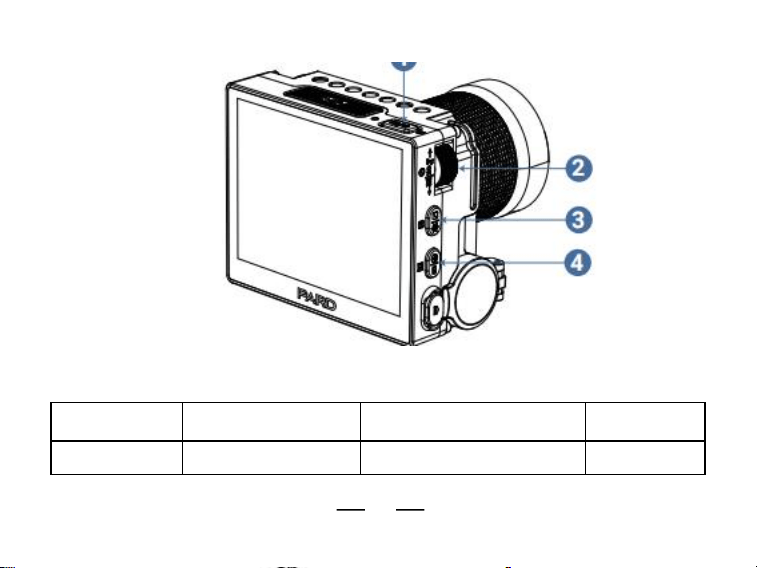
12
Fig. 10
Keypad
Rotate
Counterclockwise
Rotate Clockwise
Knob
Down/-/Zoom out
Up/+/Zoom in
-

13
(Key 1)
Single press
Press and hold
Double
press
Quick Menu/Ok key
Full Menu
PIP
Single press
Press and hold
Double
press
Key 2
Color Palettes
Switch Scenes
-
Key 3
Take a Photo
Record Video
Files
Key 4
LRF/Back
WiFi
Shutter
Correction

14
Explanation:
Knob (key 1)
1. Single press:
Home screen mode: press [Key 1] to enter the shortcut menu;
Menu mode: press [Key 1] means confirm;
2. Press and hold:
Home screen mode: press and hold [Key 1] to enter the full menu;
3. Double press:
Home screen mode: double press [Key 1] to open/close the PIP function;
4. Rotate counterclockwise:
Home screen mode: rotate the [knob] counterclockwise to zoom out;
Menu mode: rotate the [knob] counterclockwise to scroll down between menu
options. In the parameter setting interface under the sub menu, rotate the [knob]
counterclockwise to decrease the values;
5. Rotate clockwise:
Home screen mode: rotate the [knob] clockwise to zoom in;

15
② Rotate the [knob] clockwise in the menu option interface to switch menu
options upward. In the parameter setting interface under the sub menu, rotate
the [knob] clockwise to increase the values.
Key 2:
1. Single press:
Home screen mode: press [Key 2] to switch between image mode:
WT-HOT/BK-HOT/EDGE/RD-HOT/IN-HOT/SKY;
2. Press and hold:
Home screen mode: press and hold [Key 2] to switch between city/forest/rain
scene modes.
Key 3:
1. Single press:
Home screen mode: press [Key 3] to take a photo;
2. Press and hold:
Home screen mode: press and hold [Key 3] to record a video. Press and hold
[Key 3] again to save the video and exit;

16
3. Double press:
Home screen mode: double press [Key 3] to enable the playback function. After
entering this interface, the video and picture files in the memory card will be
displayed.
a) Rotate the [Knob] to switch between files.
b) Press [Knob] to play/pause the saved videos.
c) When playing videos, rotate the [Knob] to fast forward or rewind 2x/4x/8x
times.
d) Press [Key 4] to access the following settings:
1)Delete:
2)File Protection:
3)Slide Show:
Delete Current
Delete All
Lock Current
Unlock Current
Lock All
Unlock All
2 seconds
5 seconds
8 seconds
e) Press [Key 4] again to return to the files interface, then press and hold [Key
4] to return to the home screen.
Key 4:
1. Single press:

17
Home screen mode:
a) Press [Key4] to start the range detection function(For LRF version, the
distance will be measured and displayed automatically. For non LRF version,
the distance is not measured automatically and will display "[0]m or [0]yds".
You need to manually input the target distance value by pressing [Key1]).
b) Press [Key 4] a second time to turn on the ballistic indicator (when the
ballistic calculator is turned off, the range indicator is turned off);
c) Press [Key 4] a third time to turn off the ballistic indicator; (when the
ballistic calculator is turned on);
Menu mode: press [Key 4] to return to the previous page;
2. Press and hold:
Home screen mode: turn on/off the Wi-Fi function;
Note: When the WiFi is turned on, you cannot access the menu. Press and hold
[Key 4] to turn off the Wi-Fi and then enter the menu interface;
3. Double press:
Home screen mode: double press [Key 4] to start the shutter correction
function (To use this short cut key function, you must first enable the auto
shutter in the menu).

18
FCC WARNING
This device complies with part 15 of the FCC Rules. Operation is subject to the
following two conditions:
(1) This device may not cause harmful interference, and
(2) this device must accept any interference received, including interference that
may cause undesired operation.
Note: This equipment has been tested and found to comply with the limits for a
Class B digital device, pursuant to part 15 of the FCC Rules. These limits are
designed to provide reasonable protection against harmful interference in a
residential installation. This equipment generates, uses and can radiate radio
frequency energy and, if not installed and used in accordance with the instructions,
may cause harmful interference to radio communications. However, there is no
guarantee that interference will not occur in a particular installation. If this
equipment does cause harmful interference to radio or television reception, which
can be determined by turning the equipment off and on, the user is encouraged to
try to correct the interference by one or more of the following measures:
—Reorient or relocate the receiving antenna.
—Increase the separation between the equipment and receiver.

19
—Connect the equipment into an outlet on a circuit different from that to which
the receiver is connected.
—
Consult the dealer or an experienced radio/TV technician for help.
Note: The Grantee is not responsible for any changes or modifications not
expressly approved by the party responsible for compliance. such modifications
could void the user's authority to operate the equipment. The device has been
evaluated to meet general RF exposure requirement. This equipment complies
with FCC's RF radiation exposure limits set forth for an uncontrolled environment.
This device and its antenna(s) must not be co-located or conjunction with any
other antenna or transmitter.
The device can be used in portable exposure conditions without restriction.