
Contents
User manual-EN............................................................................................1
Benutzerhandbuch-DE...............................................................................15
Manuel d'utilisation-FR..............................................................................29
Manual de usuario-ES................................................................................43
Manuale utente-IT......................................................................................57
Руководство пользователя.....................................................................71

1
Contents-EN
Precautions ..................................................................................................................................2
Chapter 1 List of Items.............................................................................................................5
Chapter 2 Appearance..............................................................................................................6
Chapter 3 Basic Operations.....................................................................................................7
Chapter 4 Others.....................................................................................................................12
Chapter 5 Analysis of Common Problems...........................................................................13
PC Analysis Software................................................................................................................14
EN

2
Precautions
Please always follow the following precautions strictly:
• Keep the device as stable as possible to prevent shaking violently.
• Do not use the device at operating temperatures not allowed nor place it in an environment at a storage
temperature not allowed.
• Do not align the device with strong thermal emitters, such as the sun, lasers, and spot welders.
• Do not expose the device to a dusty or moist environment. Prevent water from splashing onto the device
when using it in an environment with water.
• Place the device and all its accessories into a special packing box when not using it.
• Do not block any holes in the device.
• Do not knock at, throw or vibrate the device or its accessories so as to prevent damage.
• Please do not disassemble the device so as to prevent it from being damaged possibly and you from
losing the warranty.
• Do not use the device in an environment exceeding its operating temperature so as to prevent possible
damages.
• Do not apply the dissolvable or similar liquid to the device and cables so as to prevent possible damages.
• The device is powered by a lithium-ion battery so users must follow the following precautions strictly in

3
order to use it safely:
a) Never try to open or dismantle the battery.
b) Do not place the battery in a high-temperature environment or nearby a high-temperature object.
c) Do not short-circuit the battery.
d) Do not put the battery in a moist environment or in water.
e) Once the liquid leaked from the battery enters the eyes, flush the eyes with clear water immediately and
take corresponding medical care.
f) Please charge the battery as introduced in the manual and follow the charging steps and precautions.
Wrong charging may heat or damage the battery or even cause injuries.
• Wipe the device as described below:
a) Non-optical surfaces: Use a clean and soft cloth to wipe non-optical surfaces of the thermal imager
when necessary.
b) Optical surfaces: Please avoid staining the optical surface of the lens when using the thermal imager,
especially avoid touching the lens with your hands since the sweat on the hands may leave traces on the
lens and corrode the optical coating on the lens surface. When the optical lens surface is stained, wipe it
with special lens wiping paper.

4
Precautions for the use of batteries:
• The battery can be charged repeatedly. However, the battery is a vulnerable part. If the standby time of the
device is largely shortened, please replace its battery with an original one provided by the company.
• If the device operates for a long time, especially at high temperatures, its surface will warm up normally.
When it’s hot, please stop charging it and move it to the shade. Please avoid touching hot surfaces for a long
time.
• When charging the device, it's suggested to use original batteries and charge cables provided by
the company.
• Battery charging time varies with temperatures and its use.
• When the battery level is low, the system will give a low battery level prompt.
• When the battery level is too low, the system will be turned off automatically.
• If the device gives no response when the power button is pressed, the battery has run out and the
device can be launched only after being charged with an original charger for more than 10 minutes.
5
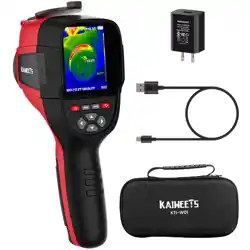
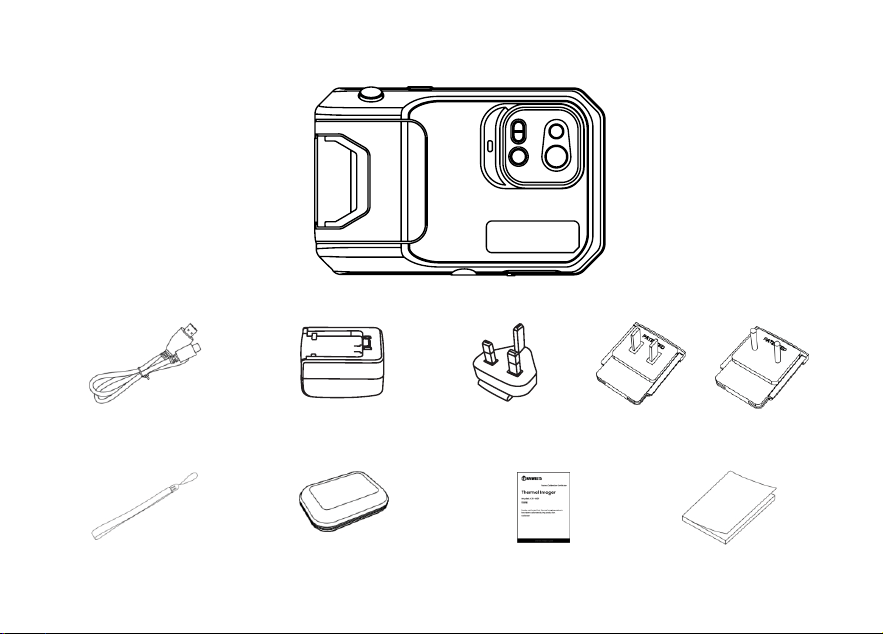
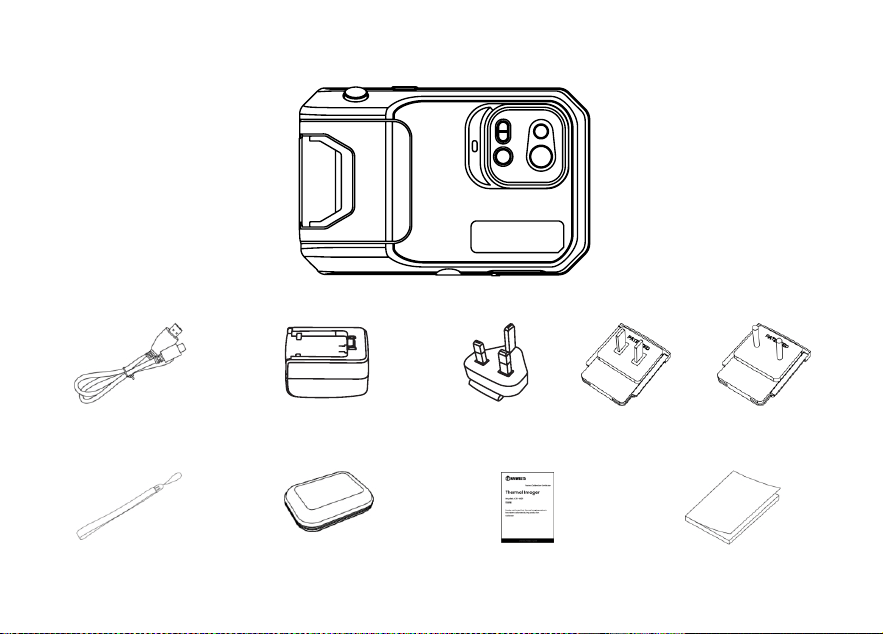
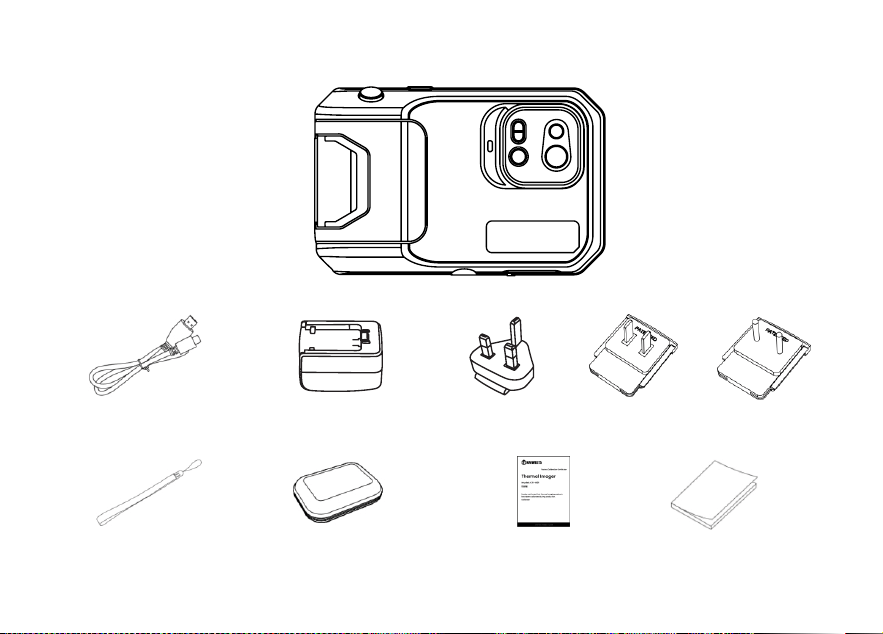
Chapter 1 List of Items
Thermal Camera
USB Cable
Power Adapter
Plug(plug type depends on the delivery country)
Wrist Strap
Flexible Package
Calibration Card
User Manual
6
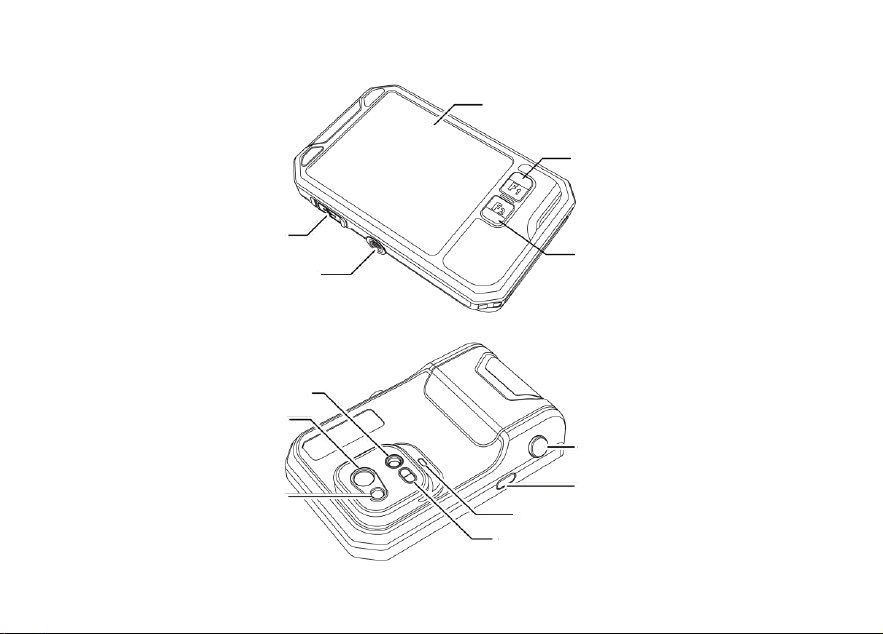
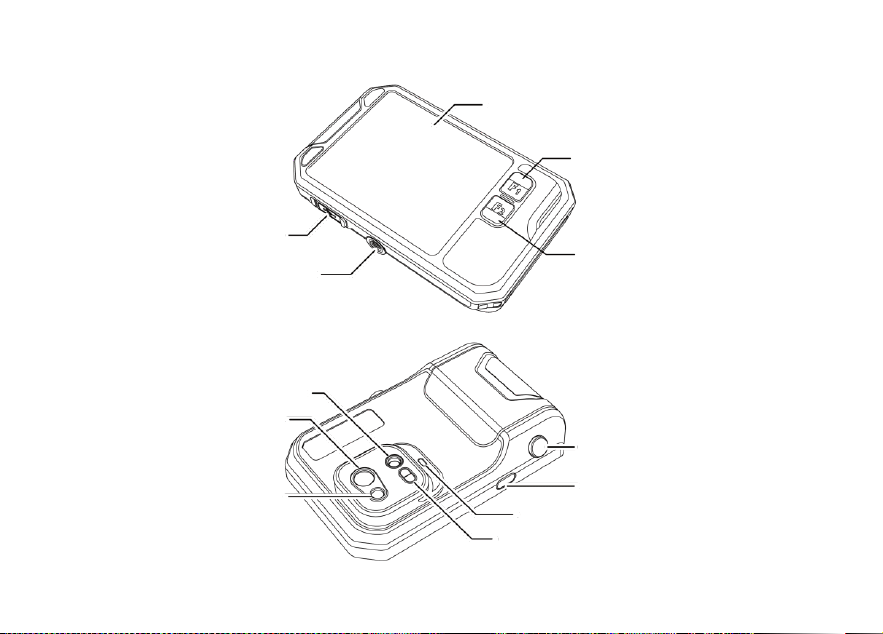
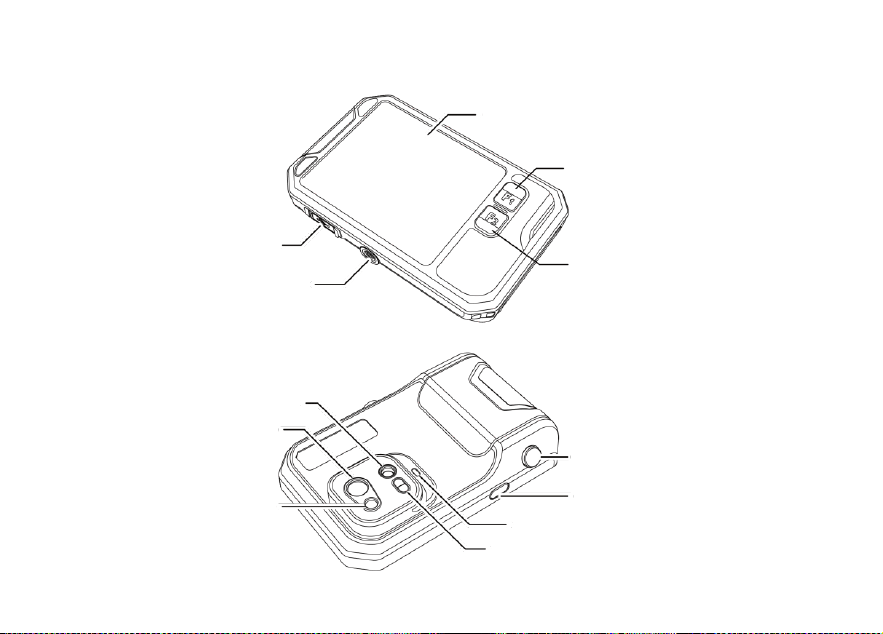
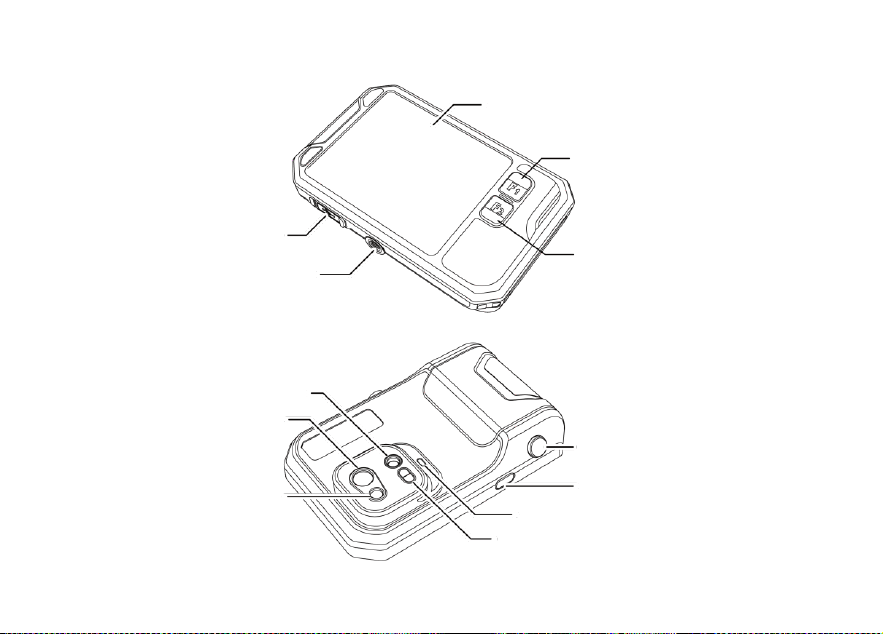
Chapter 2 Appearance
Display Screen
F1 Accessibility Button
F2 Accessibility Button
Tripod Connector
Type-C Port
Visible Light Lens
Infrared Lens
Laser
Shutter Button
Power Button
Flash/Lighting
Laser Ranging

7
Chapter 3 Basic Operations
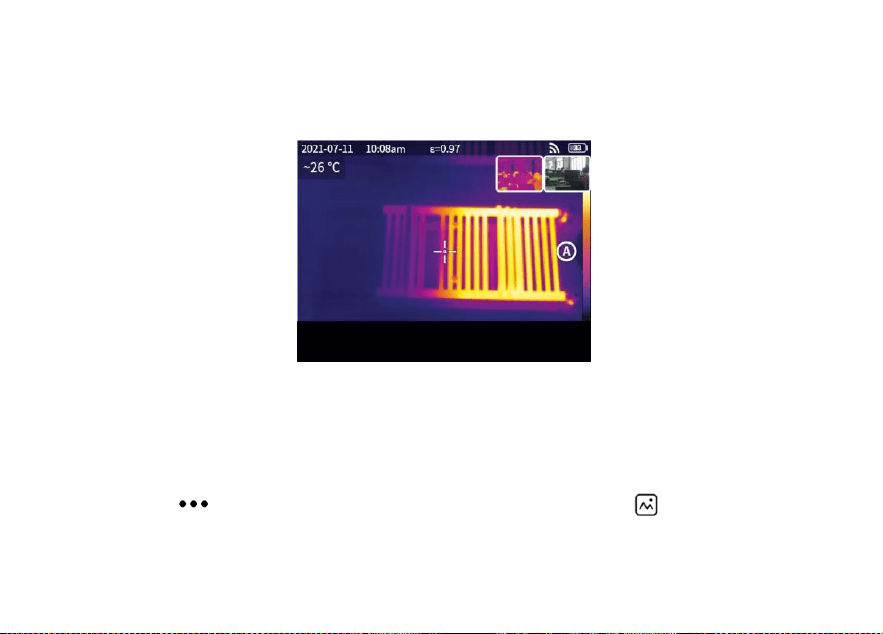
3.1 Photo and album
3.1.1 Photo
Press the shutter button in the real-time preview interface, “Image saved" appears and a 2s thumbnail is
displayed in the top right corner.
3.1.2 Photo view
1. Click the thumbnail in the top right corner for a quick view of the photo.
2. Click to open the hidden status bar, and then click to enter the album to view the photos in the
local gallery.
Image saved
8
3.1.3 Photo operation
1. Selecting photos: Enter the local gallery and click "Select" to open the selection menu, and then click
to select all /deselect all the photos. Click to upload the selected photos to the cloud service and
click to delete the photos.
2. Photo zoom: Enter the local gallery and zoom the photo by double clicking the photo or with two fingers.
3. Photo details: Enter the album and click a photo to enter the details, and then click in the top right
corner to view the shooting time, date and emissivity of the photo; click “ VL " to view the visible photos; click
for smart calibration and manual calibration; click to delete the photo.
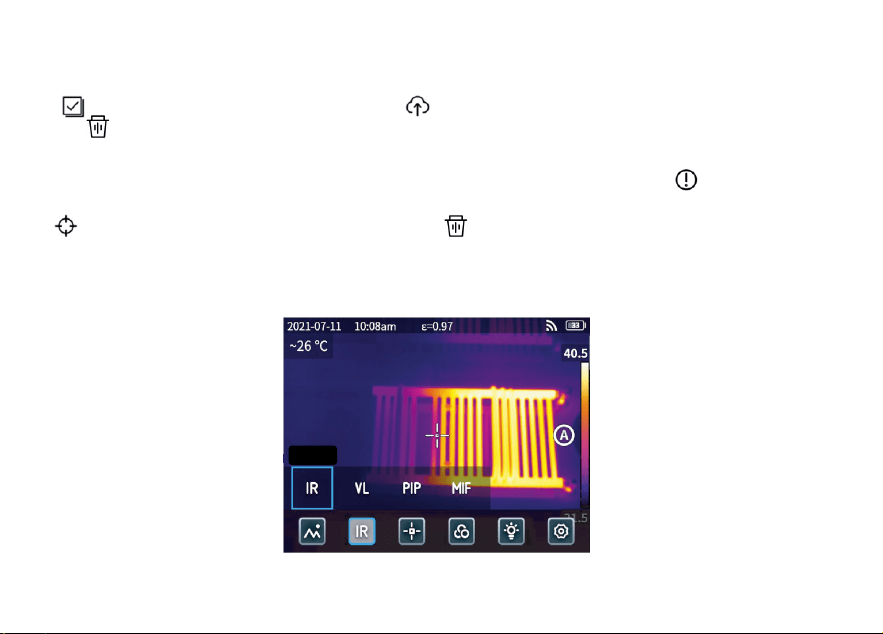
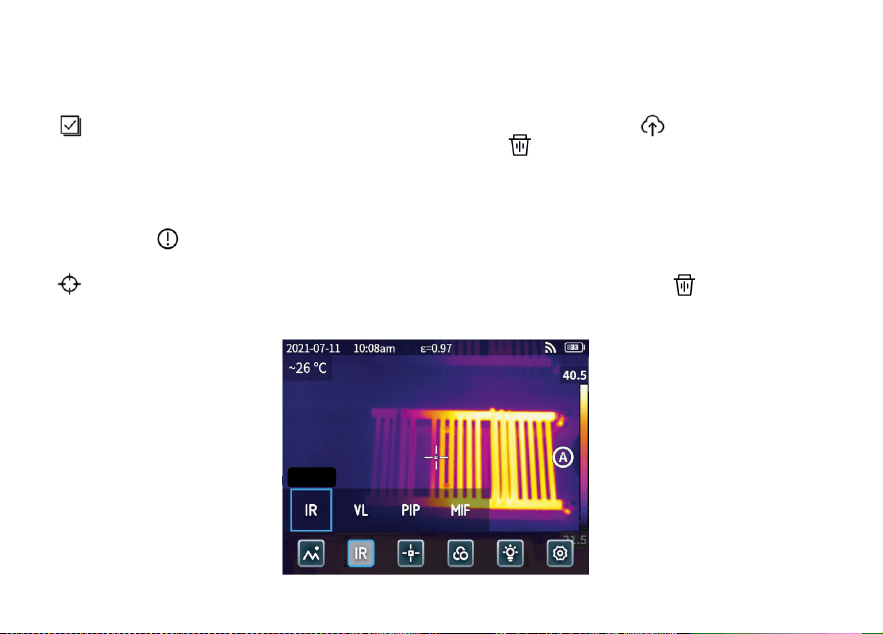
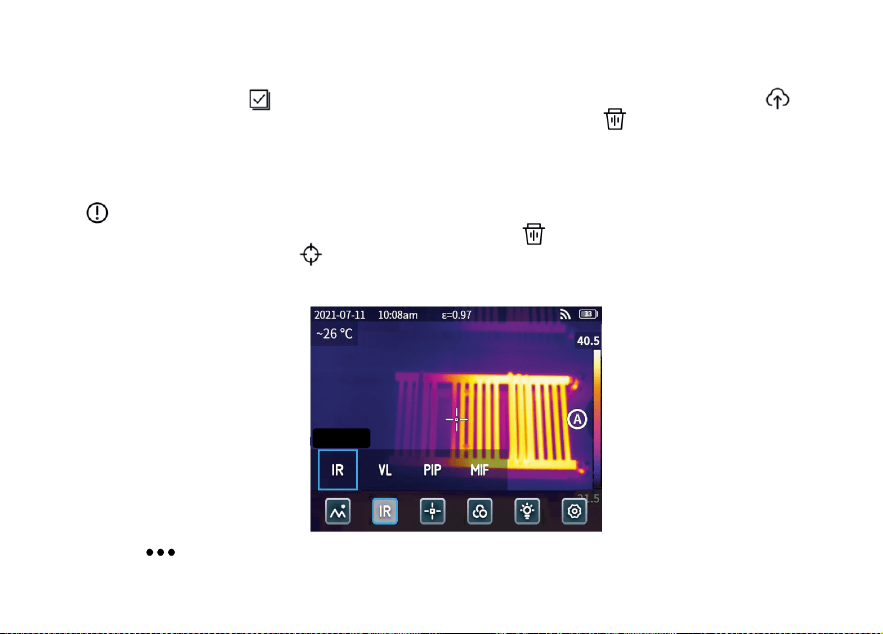
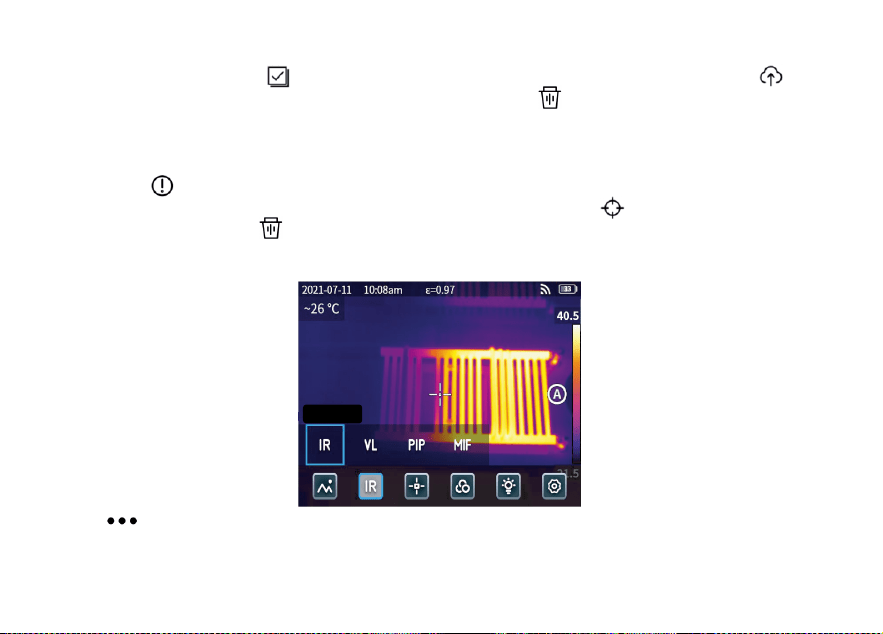
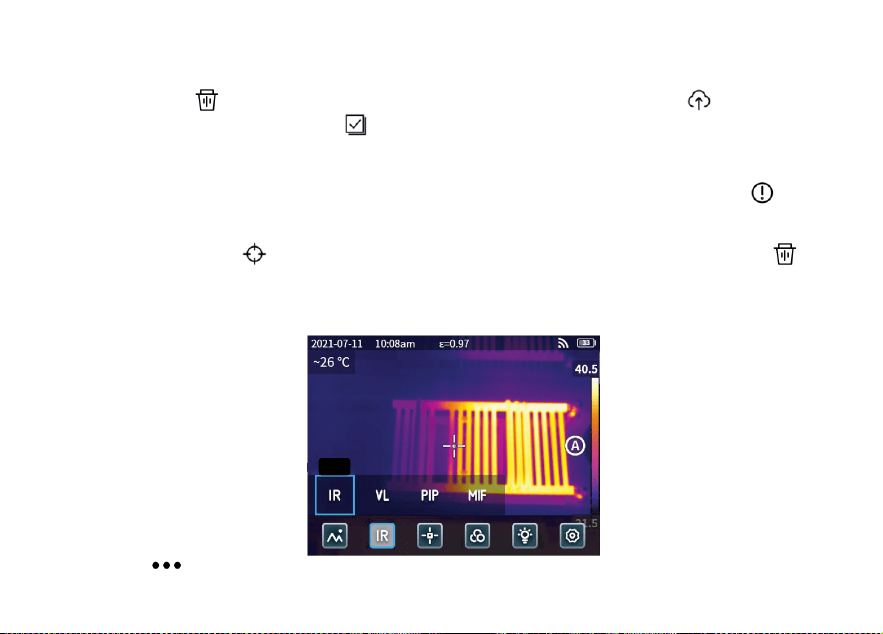
3.2 Mode switch
Infrared
9
Click to open the hidden status bar and then click “ IR " to open the mode options:
select “ IR " , the photo mode switches to infrared;
select “ VL " , the photo mode switches to visible light;
select “ PIP " , the photo mode switches to picture in picture;
select “ MIF " , the photo mode switches to multispectral image fusion.
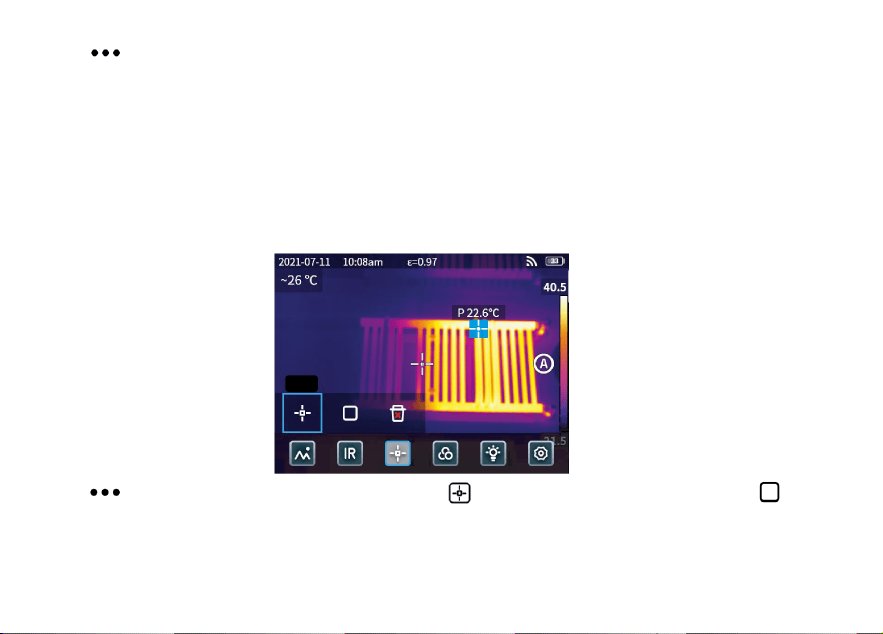
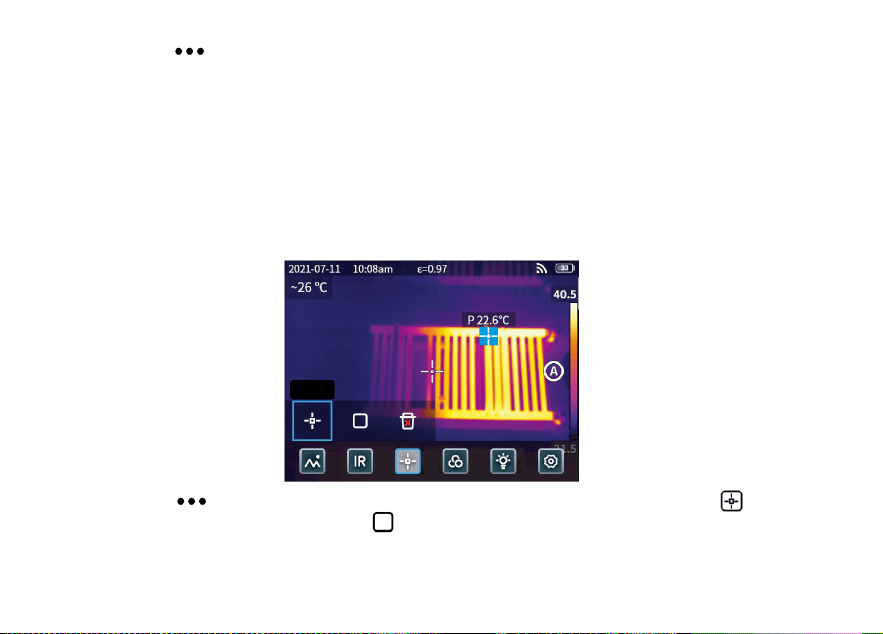
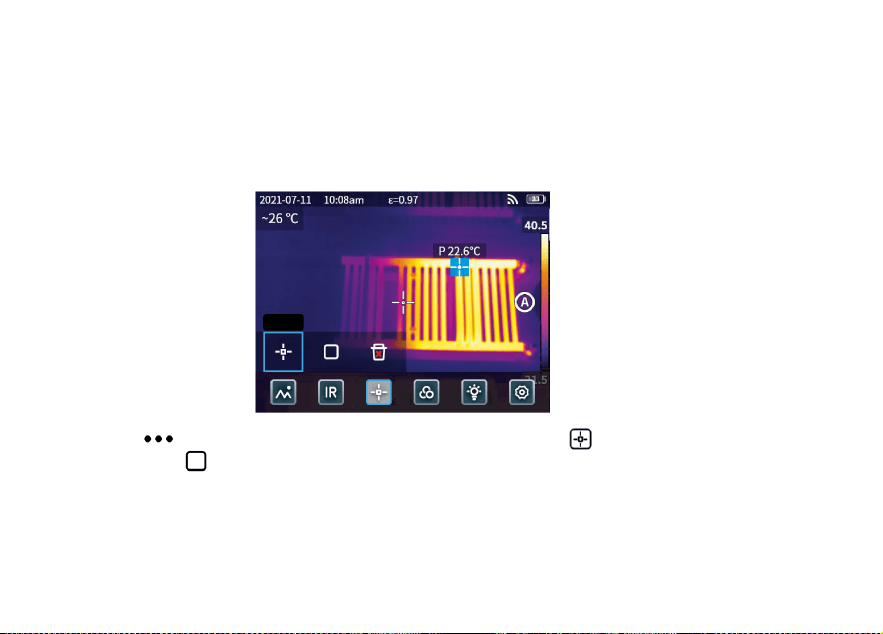
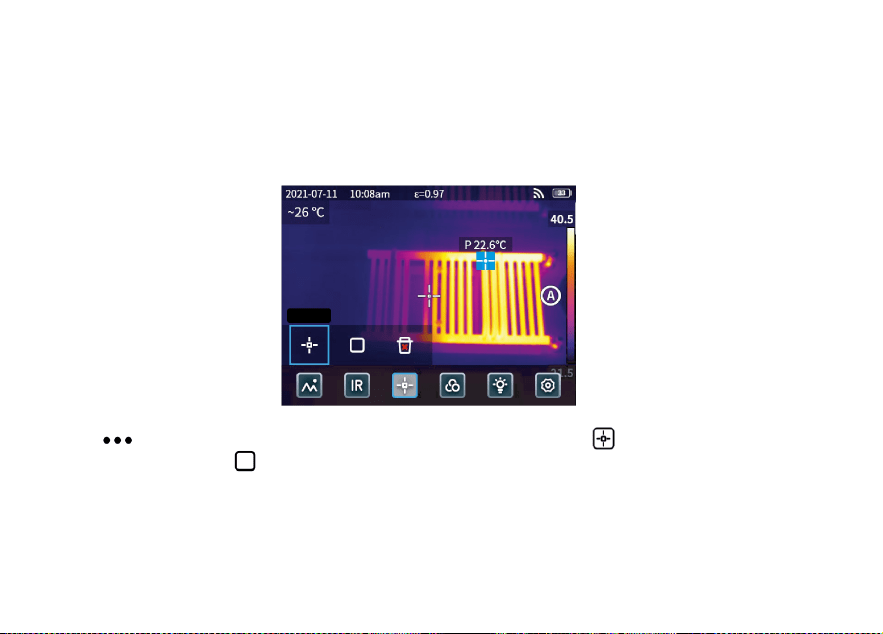
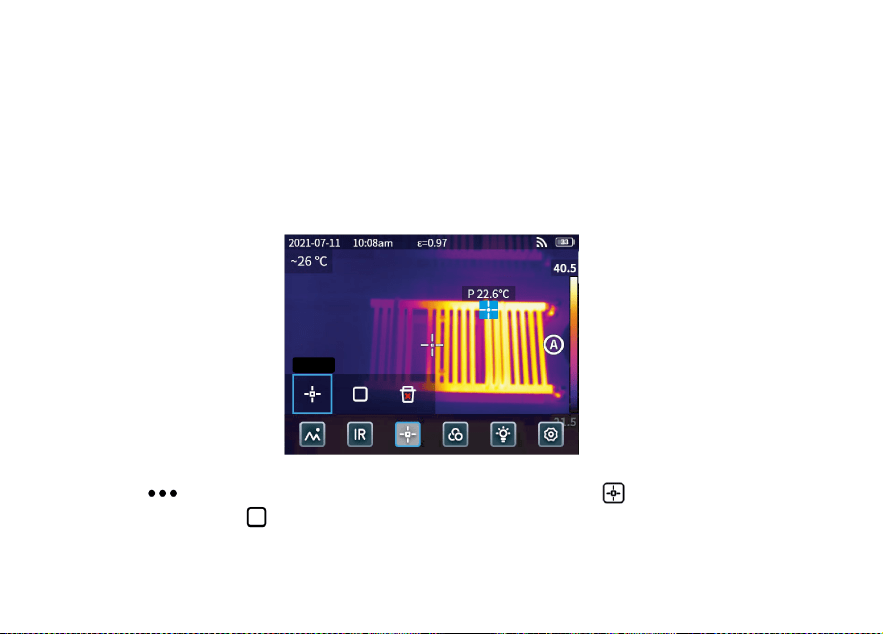
3.3 Object analysis
Click to open the hidden status bar, and then click to add a point analysis object and click to add
a rectangular analysis object. Long press the rectangular analysis object to set the maximum temperature, the
minimum temperature, the average temperature, the area and the center of the object and to delete the
object.
Point
10
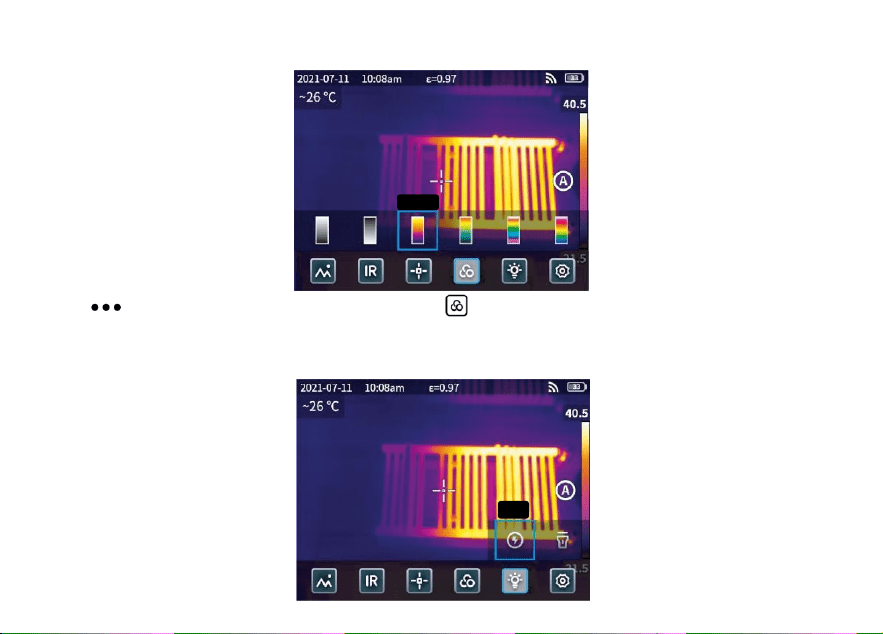
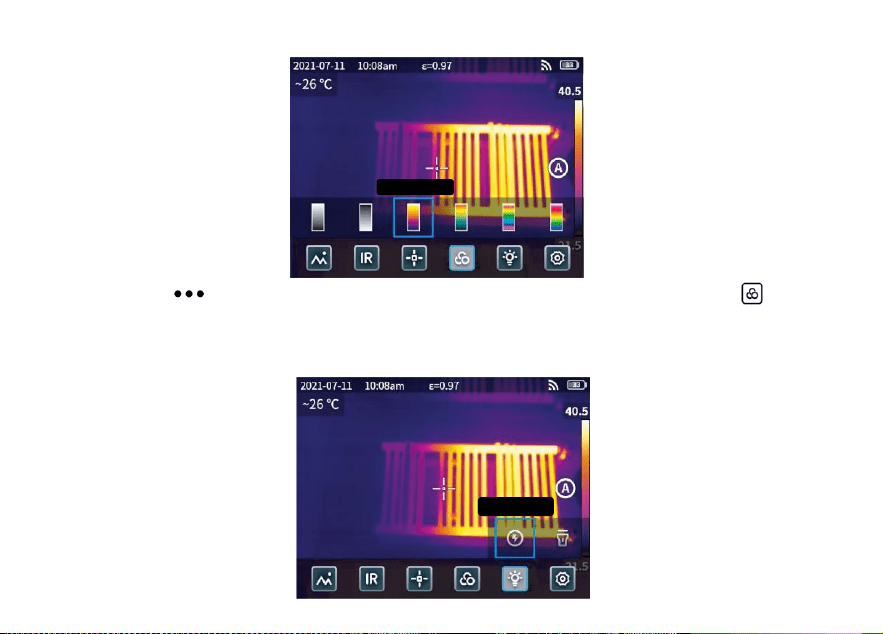
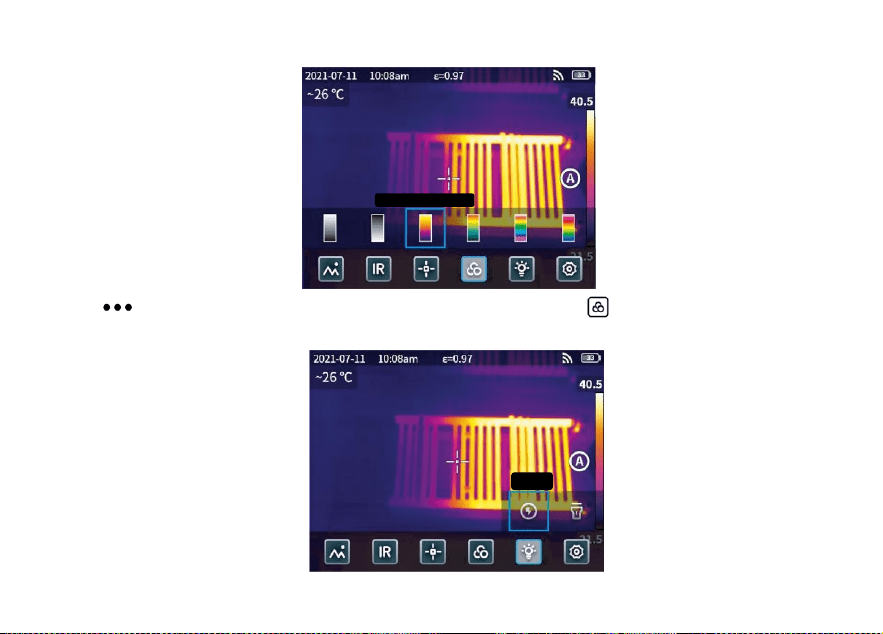
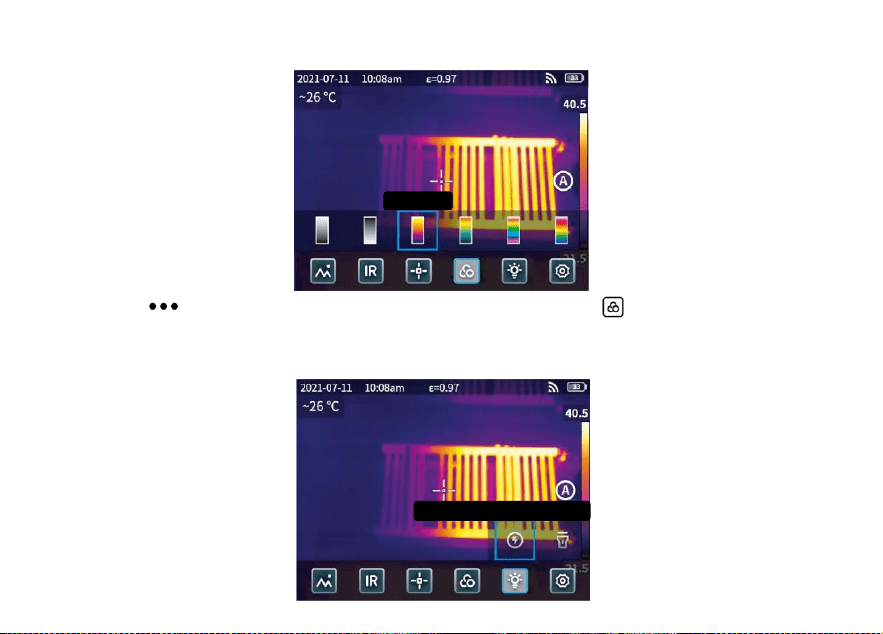
3.4 Palette color
Click to open the hidden status bar and then click to open the palette color menu to switch different
palette colors.
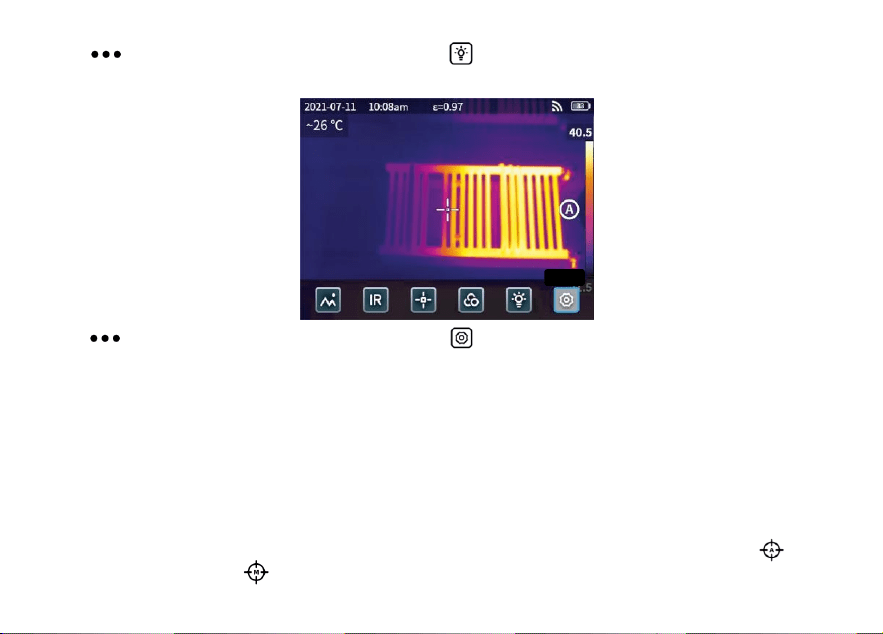
3.5 Flash/Lighting
Iron red
Flash
11
Click to open the hidden status bar and then click to select the flash or lighting separately or
simultaneously.
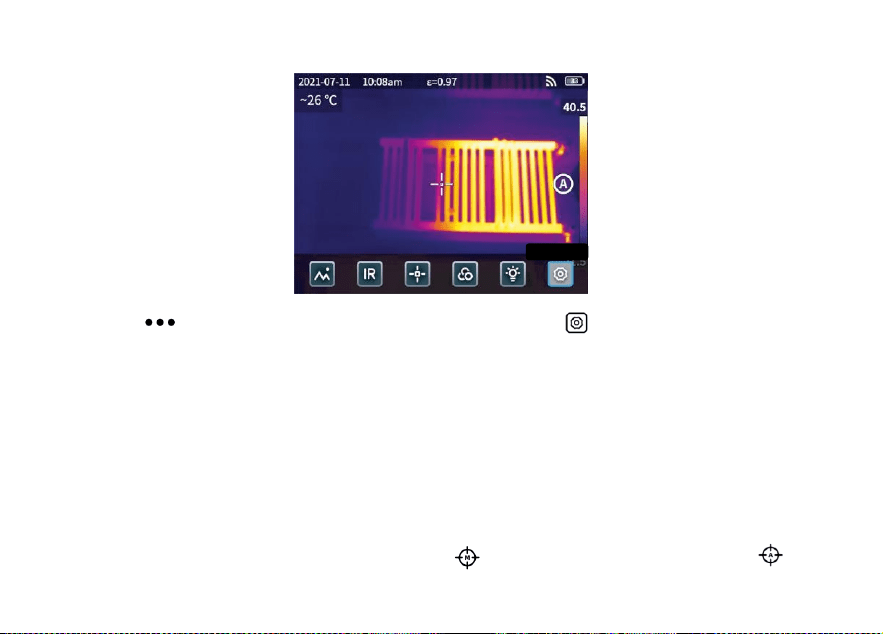
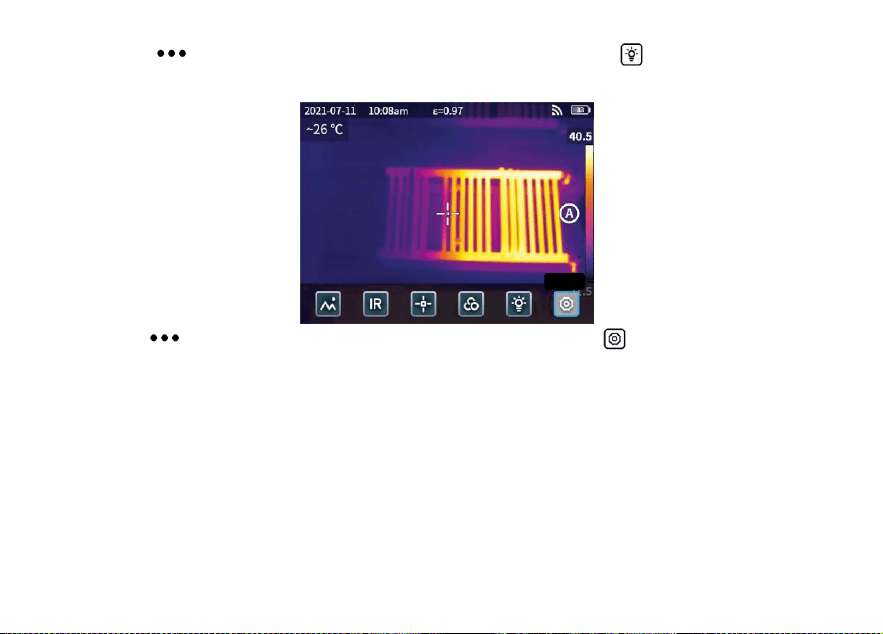
3.6 Setting
Click to open the hidden status bar and then click to enter the settings menu.
3.7 F1/F2 Accessibility buttons
1. Enter the settings menu and select F1/F2 to set the commonly used functions.
2. If F1/F2 is set as laser ranging, turn on the “Laser pointer" in the settings menu and back to the real-time
preview interface and click F1/F2, the device will emit a red laser dot and display the distance measured in
the center of the screen.
3. If F1/F2 is set as smart calibration. In the real-time preview interface, press F1/F2 button and select “turn
on" can save smart calibrate intelligently. Then press the shutter button to freeze the photo, click for
smart calibration and click for manual calibration.
Setting

12
Chapter 4 Others
Emissivity of common objects
Material
Emissivity
Material
Emissivity
Wood
0.85
Black paper
0.86
Water
0.96
Polycarbonate
0.8
Brick
0.75
Concrete
0.97
Stainless steel
0.14
Copper oxide
0.78
Adhesive tape
0.96
Cast iron
0.81
Aluminum plate
0.09
Rust
0.8
Copper plate
0.06
Gypsum
0.75
Dark aluminum
0.95
Paint
0.9
Human skin
0.98
Rubber
0.95
Asphalt
0.96
Soil
0.93
PVC material
0.93

13
Chapter 5 Analysis of Common Problems
Question
Cause
Measure
Boot failure
Low battery
Charging the battery till full
Plug of external power source is not
inserted properly
Pull the plug and reinsert it in the proper place
Battery life expires
Please contact KAIWEETS after-sale service
IR image is not clear
Lens have misted up or been polluted
Clean lens with specialized equipment
Visible light image is
not clear
Surrounding environment is too dark
Open the flashlight
There is vapor in front of visible light or
the visible light is polluted
Clean the front-end of visible light with
specialized equipment
Temperature
measurement is
inaccurate
Parameters settings incorrectly
Change parameter settings or restore the default
parameters.
Temperature measurement starts
immediately after start-up
To ensure accuracy, we recommend start
measurement 5-10 minutes after start-up
Longtime no calibration
To ensure measurement results, we recommend
doing a self-calibration once a year.

14
PC Analysis Software
In addition to being used independently, KTI-K01 thermal Imager can also be used in conjunction with a
Windows system computer. This section explains how to configure the thermal Imager to work with a
Windows system computer for image analysis.
Installation steps
1. Download and install the software
Visit the website: https://kaiweets.com/products/kti-k01, click the link of the website “THERMOTOOLS
APP" and “THERMOTOOLS USER MANUAL" to download the software and user manual of the software.
Then open the file “K01 Thermotools.exe" to install on your computer, and check the software instruction
manual for image or video analysis.
2. Connection method 1: Connect KTI-K01 thermal Imager to the computer with the included USB cable, send
pictures or video files to the PC, and use the “K01 Thermotools" software for analysis.
3. Connection method 2: Upload the files to the cloud on KTI-K01 thermal Imager, log in to the K01
Thermotools account and download the pictures or videos locally, and use the software for analysis.

15
Inhaltsverzeichnis-DE
Vorsichtsmaßnahmen................................................................................................................16
Kapitel 1 Liste der Posten.........................................................................................................19
Kapitel 2 Erscheinungsbild.......................................................................................................20
Kapitel 3 Grundlegende Operationen......................................................................................21
Kapitel 4 Emissionsgrad............................................................................................................26
Kapitel 5 Analyse der gemeinsamen Probleme......................................................................27
PC-Analyse-Software..............................................................................................................28
DE

16
Vorsichtsmaßnahmen
Bitte beachten Sie unbedingt die folgenden Vorsichtsmaßnahmen:
Halten Sie das Gerät so stabil wie möglich, um heftiges Schütteln zu vermeiden.
Verwenden Sie das Gerät nicht bei unzulässigen Betriebstemperaturen und lagern Sie es nicht in einer
Umgebung mit unzulässigen Temperaturen.
Richten Sie das Gerät nicht auf starke Wärmestrahler, wie z. B. Sonne, Laser und Punktschweißgeräte,
aus.
Setzen Sie das Gerät nicht in einer staubigen oder feuchten Umgebung aus. Verhindern Sie, dass Wasser
auf das Gerät spritzt, wenn Sie es in einer Umgebung mit Wasser verwenden.
Legen Sie das Gerät und sein gesamtes Zubehör in eine spezielle Verpackungsbox, wenn Sie es nicht
benutzen.
Blockieren Sie keine Löcher im Gerät.
Um Schäden zu vermeiden, dürfen Sie nicht gegen das Gerät oder sein Zubehör stoßen, es werfen oder
erschüttern.
Bitte zerlegen Sie das Gerät nicht, damit es nicht beschädigt wird und Sie nicht die Garantie verlieren.
Verwenden Sie das Gerät nicht in einer Umgebung, die seine Betriebstemperatur überschreitet, um
mögliche Schäden zu vermeiden.

17
Bringen Sie keine lösliche oder ähnliche Flüssigkeit auf das Gerät und die Kabel auf, um mögliche
Schäden zu vermeiden.
Das Gerät wird mit einem Lithium-Ionen-Akku betrieben, so dass der Benutzer die folgenden
Vorsichtsmaßnahmen strikt beachten muss, um es sicher zu verwenden:
a) Versuchen Sie niemals, die Batterie zu öffnen oder zu zerlegen.
b) Legen Sie den Akku nicht in eine Umgebung mit hohen Temperaturen oder in die Nähe von
Gegenständen mit hohen Temperaturen.
c) Die Batterie darf nicht kurzgeschlossen werden.
d) Legen Sie den Akku nicht in eine feuchte Umgebung oder in Wasser.
e) Wenn die aus der Batterie ausgetretene Flüssigkeit in die Augen gelangt, spülen Sie die Augen sofort mit
klarem Wasser aus und lassen Sie sich entsprechend medizinisch versorgen.
f) Bitte laden Sie den Akku wie im Handbuch beschrieben auf und beachten Sie die Ladeschritte und
Vorsichtsmaßnahmen. Falsches Laden kann den Akku erhitzen, beschädigen oder sogar Verletzungen
verursachen.
Wischen Sie das Gerät wie unten beschrieben ab:
a) Nicht-optische Oberflächen: Verwenden Sie ein sauberes und weiches Tuch, um die nicht-optischen
Oberflächen der Wärmebildkamera abzuwischen, falls erforderlich.
b) Optische Oberflächen: Vermeiden Sie es, die optische Oberfläche der Linse zu verschmutzen, wenn Sie

18
die Wärmebildkamera benutzen. Vermeiden Sie es insbesondere, die Linse mit den Händen zu berühren, da
der Schweiß an den Händen Spuren auf der Linse hinterlassen und die optische Beschichtung auf der
Linsenoberfläche korrodieren kann. Wenn die optische Linsenoberfläche verschmutzt ist, wischen Sie sie
mit speziellem Linsenwischpapier ab.
Vorsichtsmaßnahmen bei der Verwendung von Batterien:
Der Akku kann wiederholt aufgeladen werden. Allerdings ist der Akku ein empfindliches Teil. Wenn die
Standby-Zeit des Geräts stark verkürzt ist, ersetzen Sie den Akku bitte durch einen Originalakku des
Unternehmens.
Wenn das Gerät längere Zeit in Betrieb ist, insbesondere bei hohen Temperaturen, erwärmt sich seine
Oberfläche normalerweise. Wenn es heiß ist, beenden Sie bitte den Ladevorgang und stellen Sie es in den
Schatten. Bitte vermeiden Sie es, heiße Oberflächen über einen längeren Zeitraum zu berühren.
Es wird empfohlen, zum Aufladen des Geräts die Originalakkus und die vom Unternehmen bereitgestellten
Ladekabel zu verwenden.
Die Ladezeit des Akkus hängt von den Temperaturen und der Verwendung ab.
Wenn der Batteriestand niedrig ist, gibt das System eine Meldung über den niedrigen Batteriestand aus.
Wenn der Batteriestand zu niedrig ist, schaltet sich das System automatisch aus.
Reagiert das Gerät nicht auf das Drücken der Einschalttaste, ist der Akku leer und das Gerät kann erst
gestartet werden, nachdem es mit einem Original-Ladegerät mehr als 10 Minuten lang aufgeladen wurde.
19
Kapitel 1 Liste der Posten
Wärmebildkamera
USB-Kabel
Netzadapter
Stecker(Steckertyp abhängig vom Lieferland)
Handgelenkriemen
Flexibles Paket
Kalibrierungskarte
Benutzerhandbuch

20
Kapitel 2 Erscheinungsbild
Bildschirm
F1 Taste für Barrierefreiheit
F2 Taste für Barrierefreiheit
Stativanschluss
Typ-C-Anschluss
Kamera für sichtbares
Infrarot-Objektiv
Laser
Auslöser
Einschalttaste
Blitzlicht/Beleuc
htung
Laser-Entfernungsmessung

21
Kapitel 3 Grundlegende Operationen
3.1 Foto und Album
3.1.1 Foto
Drücken Sie den Auslöser in der Echtzeit-Vorschau, „Bilder wurden gespeichert“ erscheint und eine
2s-Miniaturansicht wird in der oberen rechten Ecke angezeigt.
3.1.2 Fotoansicht
1. Klicken Sie auf das Vorschaubild in der oberen rechten Ecke, um eine Schnellansicht des Fotos zu
erhalten.
2. Klicken Sie auf „ “, um die verborgene Statusleiste zu öffnen, und klicken Sie dann auf „ “, um das
Album zu öffnen und die Fotos in der lokalen Galerie anzuzeigen.
Bilder wurden gespeichert
22
3.1.3 Fotobetrieb
1. Auswählen von Fotos: Rufen Sie die lokale Galerie auf und klicken Sie auf "Auswählen", um das
Auswahlmenü zu öffnen, und klicken Sie dann auf
„ “, um alle Fotos auszuwählen bzw. die Auswahl aufzuheben. Klicken Sie auf „ “, um die ausgewählten
Fotos auf den Cloud-Dienst hochzuladen und klicken Sie auf „ “, um die Fotos zu löschen.
2. Foto-Zoom: Rufen Sie die lokale Galerie auf und zoomen Sie das Foto, indem Sie auf das Foto
doppelklicken oder mit zwei Fingern zoomen.
3. Foto-Details: Geben Sie das Album ein und klicken Sie auf ein Foto, um die Details aufzurufen, und klicken
Sie dann auf „ “ in der oberen rechten Ecke, um die Aufnahmezeit, das Datum und den Emissionsgrad des
Fotos anzuzeigen; klicken Sie auf „VL“, um die sichtbaren Fotos anzuzeigen; klicken Sie auf
„ “ für die intelligente Kalibrierung und die manuelle Kalibrierung; klicken Sie auf „ “, um das Foto zu
löschen.
3.2 Modus-Schalter
Infrarot
23
Klicken Sie auf „ “, um die verborgene Statusleiste zu öffnen, und dann auf „IR“, um die Modusoptionen
zu öffnen:
Wählen Sie „IR“, schaltet der Fotomodus auf Infrarot um;
Wählen Sie „VL“, schaltet der Fotomodus auf sichtbares Licht um;
wählen Sie „PIP“ , der Fotomodus schaltet auf Bild in Bild um;
wählen Sie „MIF“ , der Fotomodus wechselt zur multispektralen Bildfusion.
3.3 Analyseobjekt
Klicken Sie auf „ “, um die versteckte Statusleiste zu öffnen, und klicken Sie dann auf „ “, um ein
Punktanalyseobjekt hinzuzufügen, und auf „ “, um ein rechteckiges Analyseobjekt hinzuzufügen. Drücken
Sie lange auf das rechteckige Analyseobjekt, um die maximale Temperatur, die minimale Temperatur, die
durchschnittliche Temperatur, den Bereich und den Mittelpunkt des Objekts festzulegen und das Objekt zu
löschen.
Punkte
24
3.4 Farbe der Palette
Klicken Sie auf „ “, um die ausgeblendete Statusleiste zu öffnen, und klicken Sie dann auf „ “, um das
Menü für die Palettenfarben zu öffnen, mit dem Sie zwischen verschiedenen Palettenfarben wechseln können.
3.5 Blitzlicht/Beleuchtung
Eisenoxid rot
Taschenlampe
litzlicht

25
Klicken Sie auf „ “, um die verborgene Statusleiste zu öffnen, und klicken Sie dann auf „ “, um den
Blitz oder die Beleuchtung einzeln oder gleichzeitig auszuwählen.
3.6 Einstellung
Klicken Sie auf „ “, um die verborgene Statusleiste zu öffnen, und dann auf „ “, um das
Einstellungsmenü aufzurufen.
3.7 Tasten F1/F2 Zugänglichkeit
1. Rufen Sie das Einstellungsmenü auf und wählen Sie F1/F2, um die am häufigsten verwendeten Funktionen
einzustellen.
2. Wenn F1/F2 als Laser-Entfernungsmessung eingestellt ist, schalten Sie die Option „Laserpointer “ im
Einstellungsmenü ein, gehen Sie zurück zur Echtzeit-Vorschau und klicken Sie auf F1/F2. Das Gerät sendet
einen roten Laserpunkt aus und zeigt die gemessene Entfernung in der Mitte des Bildschirms an.
Einstellun
g

26
3. Wenn F1/F2 als intelligente Kalibrierung eingestellt ist. In der Echtzeit-Vorschau-Schnittstelle, drücken Sie
F1/F2 Taste und wählen Sie "einschalten" können intelligente Kalibrierung intelligent zu speichern. Drücken
Sie dann den Auslöser, um das Foto einzufrieren, klicken Sie auf „ “ für die intelligente Kalibrierung und
klicken Sie auf „ “ für die manuelle Kalibrierung.
Kapitel 4 Emissionsgrad
Emissionsgrad üblicher Objekte
Material
Emissionsgrad
Material
Emissionsgrad
Holz
0,85
Schwarzes Papier
0,86
Wasser
0,96
Polycarbonat
0,8
Ziegelstein
0,75
Beton
0,97
Rostfreier Stahl
0,14
Kupferoxid
0,78
Klebeband
0,96
Gusseisen
0,81
Aluminiumplatte
0,09
Rost
0,8
Kupferplatte
0,06
Gips
0,75
Dunkles Aluminium
0,95
Farbe
0,9
Menschliche Haut
0,98
Gummi
0,95
Asphalt
0,96
Boden
0,93
PVC-Material
0,93

27
Kapitel 5 Analyse der gemeinsamen Probleme
Frage
Bestimmter Grund
Messen
Boot-Ausfall
Schwache Batterie
Aufladen des Akkus bis zur Vollladung
Der Stecker der externen Stromquelle ist nicht
richtig eingesteckt
Ziehen Sie den Stecker und stecken Sie ihn wieder an der
richtigen Stelle ein.
Die Batterielebensdauer ist abgelaufen
Bitte kontaktieren Sie den KAIWEETS-Kundendienst
IR-Bild ist nicht klar
Die Linsen sind beschlagen oder verschmutzt
Objektiv mit Spezialausrüstung reinigen
Bild bei sichtbarem Licht
ist nicht klar
Die Umgebung ist zu dunkel
Öffnen Sie die Taschenlampe
Es befindet sich Dampf vor dem sichtbaren
Licht oder das sichtbare Licht ist verschmutzt
Reinigen Sie die Vorderseite des sichtbaren Lichts mit
speziellen Geräten
Die Temperaturmessung
ist ungenau
Falsche Parametereinstellungen
Ändern Sie die Parametereinstellungen oder stellen Sie die
Standardparameter wieder her.
Temperaturmessung beginnt sofort nach dem
Start
Um die Genauigkeit zu gewährleisten, empfehlen wir, die
Messung 5-10 Minuten nach der Inbetriebnahme zu
starten.
Langfristig keine Kalibrierung
Um sichere Messergebnisse zu erhalten, empfehlen wir,
einmal im Jahr eine Selbstkalibrierung durchzuführen.
28
PC-Analyse-Software
Die Wärmebildkamera KTI-K01 kann nicht nur unabhängig, sondern auch in Verbindung mit einem
Windows-Systemcomputer verwendet werden. In diesem Abschnitt wird erläutert, wie die Wärmebildkamera
für die Arbeit mit einem Windows-Systemcomputer zur Bildanalyse konfiguriert wird.
Installationsschritte
1. Herunterladen und Installieren der Software
Besuchen Sie die Website: https://kaiweets.com/products/kti-k01, klicken Sie auf den Link der Website „
THERMOTOOLS APP“ und „THERMOTOOLS USER MANUAL“, um die Software und das Benutzerhandbuch
der Software herunterzuladen. Öffnen Sie dann die Datei „K01 Thermotools.exe“, um sie auf Ihrem Computer
zu installieren, und lesen Sie die Software-Bedienungsanleitung für die Bild- oder Videoanalyse.
2. Anschlussmethode 1: Schließen Sie die Wärmebildkamera KTI-K01 mit dem mitgelieferten USB-Kabel an
den Computer an, senden Sie Bilder oder Videodateien an den PC, und verwenden Sie die Software „K01
Thermotools“ zur Analyse.
3. Verbindungsmethode 2: Laden Sie die Dateien in die Cloud auf der KTI-K01 Wärmebildkamera hoch,
melden Sie sich beim K01 Thermotools-Konto an und laden Sie die Bilder oder Videos lokal herunter, und
verwenden Sie die Software zur Analyse.

29
Contenu-FR
Précautions ................................................................................................................................30
Chapitre 1 Liste des articles.....................................................................................................33
Chapitre 2 Apparence................................................................................................................34
Chapitre 3 Opérations de base.................................................................................................35
Chapitre 4 Autres.......................................................................................................................40
Chapitre 5 Analyse des problèmes courants..........................................................................41
Logiciel d'analyse PC....... .........................................................................................................42
FR

30
Précautions
Veuillez toujours respecter strictement les précautions suivantes :
Maintenez l'appareil aussi stable que possible pour éviter qu'il ne tremble violemment.
N'utilisez pas l'appareil à des températures de fonctionnement non autorisées et ne le placez pas dans un
environnement où la température de stockage n'est pas autorisée.
N'alignez pas l'appareil avec des émetteurs thermiques puissants, tels que le soleil, les lasers et les
soudeurs par points.
N'exposez pas l'appareil à un environnement poussiéreux ou humide. Empêchez l'eau d'éclabousser
l'appareil lorsque vous l'utilisez dans un environnement où il y a de l'eau.
Placez l'appareil et tous ses accessoires dans une boîte d'emballage spéciale lorsque vous ne l'utilisez
pas.
N'obstruez pas les trous de l'appareil.
Ne pas frapper, jeter ou faire vibrer l'appareil ou ses accessoires afin de ne pas les endommager.
Ne démontez pas l'appareil afin d'éviter qu'il ne soit endommagé et que vous ne perdiez la garantie.
N'utilisez pas l'appareil dans un environnement dépassant sa température de fonctionnement afin d'éviter
d'éventuels dommages.
N'appliquez pas de liquide dissolvant ou similaire sur l'appareil et les câbles afin d'éviter tout dommage

31
éventuel.
L'appareil étant alimenté par une batterie au lithium-ion, les utilisateurs doivent suivre scrupuleusement
les précautions suivantes afin de l'utiliser en toute sécurité :
a) N'essayez jamais d'ouvrir ou de démonter la batterie.
b) Ne placez pas la batterie dans un environnement à haute température ou à proximité d'un objet à haute
température.
c) Ne pas court-circuiter la batterie.
d) Ne pas placer la batterie dans un environnement humide ou dans l'eau.
e) Si le liquide qui s'est échappé de la batterie entre en contact avec les yeux, rincer immédiatement les
yeux à l'eau claire et prendre les soins médicaux nécessaires.
f) Veuillez charger la batterie comme indiqué dans le manuel et suivez les étapes de chargement et les
précautions à prendre. Une charge incorrecte peut chauffer ou endommager la batterie, voire provoquer
des blessures.
Essuyez l'appareil comme décrit ci-dessous :
a) Surfaces non optiques : Utilisez un chiffon propre et doux pour essuyer les surfaces non optiques de
l'imageur thermique si nécessaire.
b) Surfaces optiques : Évitez de tacher la surface optique de l'objectif lorsque vous utilisez l'imageur
thermique, et surtout évitez de toucher l'objectif avec vos mains, car la sueur des mains peut laisser des

32
traces sur l'objectif et corroder le revêtement optique de la surface de l'objectif. Lorsque la surface de la
lentille optique est tachée, essuyez-la avec du papier d'essuyage spécial pour lentilles.
Précautions pour l'utilisation des piles :
La batterie peut être rechargée plusieurs fois. Cependant, la batterie est une pièce vulnérable. Si
l'autonomie en veille de l'appareil est fortement réduite, veuillez remplacer la batterie par une batterie
d'origine fournie par l'entreprise.
Si l'appareil fonctionne pendant une longue période, en particulier à des températures élevées, sa surface
se réchauffe normalement. Lorsqu'il est chaud, arrêtez de le charger et mettez-le à l'ombre. Évitez de toucher
les surfaces chaudes pendant une longue période.
Pour recharger l'appareil, il est conseillé d'utiliser les piles et les câbles de charge d'origine fournis par
l'entreprise.
Le temps de charge de la batterie varie en fonction de la température et de l'utilisation.
Lorsque le niveau de la batterie est faible, le système émet un message d'alerte.
Lorsque le niveau de la batterie est trop faible, le système s'éteint automatiquement.
Si l'appareil ne réagit pas lorsqu'on appuie sur le bouton d'alimentation, la batterie est épuisée et
l'appareil ne peut être lancé qu'après avoir été rechargé avec un chargeur d'origine pendant plus de 10
minutes.
33
Chapitre 1 Liste des articles
Caméra thermique
Câble USB
Adaptateur
d'alimentation
Fiche (le type de fiche dépend du pays de livraison)
Courroie de poignet
Paquet flexible
Carte d'étalonnage
Manuel de l'utilisateur
34
Chapitre 2 Apparence
Écran d'affichage
Bouton d'accessibilité
F1
Bouton d'accessibilité
F2
F2
Connecteur de trépied
Port Type-C
Lentille à lumière
Lentille infrarouge
Laser
Bouton de l'obturateur
Bouton d'alimentation
Flash/éclairage
Télémétrie laser

35
Chapitre 3 Opérations de base
3.1 Photo et album
3.1.1 Photo
Appuyez sur le bouton de l'obturateur dans l'interface de prévisualisation en temps réel, “Image sauvegardée"
apparaît et une vignette de 2 secondes s'affiche dans le coin supérieur droit.
3.1.2 Vue des photos
1. Cliquez sur la vignette dans le coin supérieur droit pour obtenir une vue rapide de la photo.
2. Cliquez sur “ " pour ouvrir la barre d'état masquée, puis cliquez sur “ " pour entrer dans l'album et
afficher les photos de la galerie locale.
Image sauvegardée
36
3.1.3 Fonctionnement des photos
1. Sélectionner des photos : Entrez dans la galerie locale et cliquez sur "Sélectionner" pour ouvrir le menu de
sélection, puis cliquez sur “ " pour sélectionner ou désélectionner toutes les photos. Cliquez sur “ " pour
télécharger les photos sélectionnées vers le service en nuage et cliquez sur “ " pour supprimer les photos.
2. Zoom sur la photo : Accédez à la galerie locale et zoomez sur la photo en double-cliquant dessus ou avec
deux doigts.
3. Détails de la photo : Entrez dans l'album et cliquez sur une photo pour entrer dans les détails, puis cliquez
sur “ " dans le coin supérieur droit pour afficher l'heure de prise de vue, la date et l'émissivité de la photo ;
cliquez sur " VL " pour afficher les photos visibles ; cliquez sur “ " pour l'étalonnage intelligent et
l'étalonnage manuel ; cliquez sur “ " pour supprimer la photo.
3.2 Commutateur de mode
Cliquez sur “ " pour ouvrir la barre d'état cachée, puis cliquez sur “ IR " pour ouvrir les options du mode :
sélectionner “ IR ", le mode photo passe à l'infrarouge ;
Infraroug
e
37
sélectionner “ VL ", le mode photo passe en lumière visible ;
sélectionner “ PIP ", le mode photo passe en image dans l'image ;
sélectionner “ MIF ", le mode photo passe à la fusion d'images multispectrales.
3.3 Analyse des objets
Cliquez sur “ " pour ouvrir la barre d'état cachée, puis cliquez sur “ " pour ajouter un objet d'analyse
ponctuelle et sur “ " pour ajouter un objet d'analyse rectangulaire. Appuyez longuement sur l'objet
d'analyse rectangulaire pour définir la température maximale, la température minimale, la température
moyenne, la zone et le centre de l'objet et pour supprimer l'objet.
Point

38
3.4 Couleur de la palette
Cliquez sur “ " pour ouvrir la barre d'état cachée, puis cliquez sur “ " pour ouvrir le menu des couleurs
de la palette et passer d'une couleur à l'autre.
3.5 Flash/éclairage
Cliquez sur “ " pour ouvrir la barre d'état cachée, puis cliquez sur “ " pour sélectionner le flash ou
l'éclairage séparément ou simultanément.
Rouge
fer
Flash
39
3.6 Réglage
Cliquez sur “ " pour ouvrir la barre d'état cachée, puis cliquez sur “ " pour accéder au menu des
paramètres.
3.7 Boutons d'accessibilité F1/F2
1. Entrez dans le menu des réglages et sélectionnez F1/F2 pour régler les fonctions les plus courantes.
2. Si F1/F2 est réglé sur la télémétrie laser, activez le “pointeur laser" dans le menu des paramètres, revenez
à l'interface de prévisualisation en temps réel et cliquez sur F1/F2, l'appareil émettra un point laser rouge et
affichera la distance mesurée au centre de l'écran.
3. Si F1/F2 est réglé sur l'étalonnage intelligent. Dans l'interface de prévisualisation en temps réel, appuyez
sur le bouton F1/F2 et sélectionnez "activer" pour sauvegarder l'étalonnage intelligent. Appuyez ensuite sur le
bouton de l'obturateur pour figer la photo, cliquez sur “ " pour l'étalonnage intelligent et sur “ " pour
l'étalonnage manuel.
Définition

40
Chapitre 4 Autres
Emissivité d'objets courants
Matériau
Émissivité
Matériau
Émissivité
Bois
0,85
Papier noir
0,86
L'eau
0,96
Polycarbonate
0,8
Brique
0,75
Béton
0,97
Acier inoxydable
0,14
Oxyde de cuivre
0,78
Bande adhésive
0,96
Fonte
0,81
Plaque d'aluminium
0,09
Rouille
0,8
Plaque de cuivre
0,06
Gypse
0,75
Aluminium foncé
0,95
Peinture
0,9
Peau humaine
0,98
Caoutchouc
0,95
Asphalte
0,96
Sol
0,93
Matériau PVC
0,93

41
Chapitre 5 Analyse des problèmes courants
Problèmes
Cause
Mesure
Échec du démarrage
Batterie faible
Chargement de la batterie jusqu'à ce qu'elle soit pleine
La fiche de la source d'alimentation externe
n'est pas insérée correctement
Retirer la fiche et la réinsérer à l'endroit approprié.
Fin de la durée de vie de la batterie
Veuillez contacter le service après-vente de KAIWEETS
L'image IR n'est pas claire
La lentille a été embuée ou polluée
Nettoyer la lentille à l'aide d'un équipement spécialisé
L'image en lumière visible
n'est pas claire
L'environnement est trop sombre
Ouvrir la lampe de poche
Il y a de la vapeur devant la lumière visible ou
la lumière visible est polluée.
Nettoyer l'avant de la lumière visible à l'aide d'un
équipement spécialisé
La mesure de la
température est imprécise
Paramètres incorrectement définis
Modifier les paramètres ou rétablir les paramètres par
défaut.
La mesure de la température commence
immédiatement après le démarrage
Pour garantir la précision de la mesure, il est recommandé
de commencer la mesure 5 à 10 minutes après le
démarrage.
Pas d'étalonnage depuis longtemps
Pour garantir les résultats des mesures, il est
recommandé de procéder à un auto-étalonnage une fois
par an.

42
Logiciel d'analyse PC
Outre son utilisation indépendante, l'imageur thermique KTI-K01 peut également être utilisé avec un
ordinateur fonctionnant sous Windows. Cette section explique comment configurer l'imageur thermique pour
qu'il fonctionne avec un ordinateur Windows pour l'analyse d'images.
Étapes de l'installation
1. Télécharger et installer le logiciel
Visitez le site web : https://kaiweets.com/products/kti-k01, cliquez sur le lien du site web “THERMOTOOLS
APP" et “THERMOTOOLS USER MANUAL" pour télécharger le logiciel et le manuel d'utilisation du logiciel.
Ouvrez ensuite le fichier “K01 Thermotools.exe" pour l'installer sur votre ordinateur et consultez le manuel
d'instructions du logiciel pour l'analyse d'images ou de vidéos.
2. Méthode de connexion 1 : Connectez l'imageur thermique KTI-K01 à l'ordinateur à l'aide du câble USB
fourni, envoyez des images ou des fichiers vidéo au PC et utilisez le logiciel“K01 Thermotools" pour l'analyse.
3. Méthode de connexion 2 : téléchargez les fichiers dans le nuage sur l'imageur thermique KTI-K01,
connectez-vous au compte K01 Thermotools et téléchargez les images ou les vidéos localement, puis utilisez
le logiciel pour l'analyse.

43
Catálogo-ES
Precauciones .............................................................................................................................44
Capítulo 1 Lista de artículos.....................................................................................................47
Capítulo 2 Comparecencia.......................................................................................................48
Capítulo 3 Operaciones básicas..............................................................................................49
Capítulo 4 Emisividad................................................................................................................54
Capítulo 5 Análisis de problemas comunes............................................................................55
Software de análisis de PC....... ..............................................................................................56
ES

44
Precauciones
Siga siempre estrictamente las siguientes precauciones:
Mantenga el aparato lo más estable posible para evitar que se sacuda violentamente.
No utilice el dispositivo a temperaturas de funcionamiento no permitidas ni lo coloque en un entorno a una
temperatura de almacenamiento no permitida.
No alinee el dispositivo con emisores térmicos potentes, como el sol, láseres y soldadores por puntos.
No exponga el aparato a un entorno polvoriento o húmedo. Evite que el agua salpique sobre el dispositivo
cuando lo utilice en un entorno con agua.
Coloque el aparato y todos sus accesorios en una caja de embalaje especial cuando no lo utilice.
No obstruya ningún orificio del aparato.
No golpee, lance ni haga vibrar el aparato ni sus accesorios para evitar daños.
No desmonte el aparato para evitar posibles daños y la pérdida de la garantía.
No utilice el aparato en un entorno que supere su temperatura de funcionamiento para evitar posibles
daños.
No aplique el líquido disolvente o similar sobre el aparato y los cables para evitar posibles daños.
El dispositivo funciona con una batería de iones de litio, por lo que los usuarios deben seguir
estrictamente las siguientes precauciones para utilizarlo con seguridad:

45
a) Nunca intente abrir o desmontar la batería.
b) No coloque la batería en un entorno de alta temperatura o cerca de un objeto de alta temperatura.
c) No cortocircuite la batería.
d) No coloque la batería en un entorno húmedo ni en agua.
e) Si el líquido de la batería entra en contacto con los ojos, lávelos inmediatamente con agua limpia y reciba
la atención médica correspondiente.
f) Cargue la batería como se indica en el manual y siga los pasos y precauciones de carga. Una carga
incorrecta puede calentar o dañar la batería o incluso causar lesiones.
Limpie el dispositivo como se describe a continuación:
a) Superficies no ópticas: Utilice un paño limpio y suave para limpiar las superficies no ópticas de la cámara
termográfica cuando sea necesario.
b) Superficies ópticas: Por favor, evite manchar la superficie óptica de la lente cuando utilice la cámara
termográfica, especialmente evite tocar la lente con las manos ya que el sudor de las manos puede dejar
rastros en la lente y corroer el revestimiento óptico de la superficie de la lente. Cuando se manche la
superficie óptica de la lente, límpiela con papel especial para lentes.

46
Precauciones para el uso de pilas:
La batería puede cargarse varias veces. Sin embargo, la batería es una pieza vulnerable. Si el tiempo en
espera del dispositivo se acorta en gran medida, sustituya su batería por una original proporcionada por la
empresa.
Si el aparato funciona durante mucho tiempo, especialmente a altas temperaturas, su superficie se
calentará normalmente. Cuando esté caliente, por favor, deje de cargarlo y póngalo a la sombra. Por favor,
evite tocar superficies calientes durante mucho tiempo.
Para cargar el dispositivo, se recomienda utilizar baterías y cables de carga originales proporcionados por
la empresa.
El tiempo de carga de la batería varía con las temperaturas y su uso.
Cuando la batería está baja, el sistema mostrará un aviso de batería baja.
El sistema se apagará automáticamente cuando la batería esté demasiado baja.
Si el dispositivo no responde cuando se pulsa el botón de encendido, la batería está agotada y el
dispositivo sólo se puede poner en marcha después de cargarlo durante más de 10 minutos con el cargador
original.

47
Capítulo 1 Lista de artículos
Cámara térmica
Cable USB
Adaptador de
corriente
Enchufe(El tipo de enchufe depende del país de
entrega)
Muñequera
Estuche
Tarjeta de calibración
Manual del usuario
48
Capítulo 2 Aspecto
Pantalla de visualización
Botón de accesibilidad F1
Botón de accesibilidad F2
Conector para trípode
Puerto Tipo-C
Lente de luz visible
Lente infrarroja
Láser
Botón del obturador
Botón de encendido
Flash/iluminació
n
Medición láser

49
Capítulo 3 Operaciones básicas
3.1 Foto y álbum
3.1.1 Fotografía
Pulsa el disparador en la interfaz de previsualización en tiempo real, aparecerá “Imagen guardada" y se
mostrará una miniatura de 2s en la esquina superior derecha.
3.1.2 Vista de fotos
1. Haz clic en la miniatura de la esquina superior derecha para ver rápidamente la foto.
2. Pulse “ " para abrir la barra de estado oculta y, a continuación, pulse “ " para entrar en el álbum y
ver las fotos de la galería local.
3.1.3 Operaciones de fotos
Img. guardada
50
1. Seleccionar fotos: Entre en la galería local y haga clic en "Seleccionar" para abrir el menú de selección y,
a continuación, haga clic en “ " para seleccionar /deseleccionar todas las fotos. Haga clic en “ " para
subir las fotos seleccionadas al servicio en la nube y haga clic en “ " para eliminar las fotos.
2. Zoom de fotos: Entra en la galería local y haz zoom en la foto haciendo doble clic en la foto o con dos
dedos.
3. Detalles de la foto: Entre en el álbum y haga clic en una foto para entrar en los detalles y, a continuación,
haga clic en “ " en la esquina superior derecha para ver la hora de disparo, la fecha y la emisividad de la
foto; haga clic en “ VL " para ver las fotos visibles; haga clic enhaga clic en “ " para calibración inteligente
y calibración manual; pulsa “ " para borrar la foto.
3.2 Conmutador de modo
Pulse “ " para abrir la barra de estado oculta y, a continuación, pulse “ IR " para abrir las opciones de
modo:
seleccione “ IR " , el modo de foto cambia a infrarrojos;
Infrarrojo
51
seleccione “ VL " , el modo de foto cambia a luz visible;
seleccione “ PIP " , el modo de foto cambia a imagen en imagen;
seleccione “ MIF " , el modo foto cambia a fusión de imágenes multiespectrales.
3.3 Análisis de objetos
Pulse “ " para abrir la barra de estado oculta y, a continuación, pulse “ " para añadir un objeto de
análisis puntual y pulse “ " para añadir un objeto de análisis rectangular. Mantenga pulsado el objeto de
análisis rectangular para establecer la temperatura máxima, la temperatura mínima, la temperatura media, el
área y el centro del objeto y para eliminar el objeto.
Punto
52
3.4 Color de la paleta
Pulsa “ " para abrir la barra de estado oculta y, a continuación, pulsa “ " para abrir el menú de colores
de la paleta y cambiar de color.
3.5 Flash/iluminación
óxido de hierro rojo
Flash

53
Haga clic en “ " para abrir la barra de estado oculta y, a continuación, haga clic en “ " para seleccionar
el flash o iluminación por separado o simultáneamente.
3.6 Ajuste
Pulse “ " para abrir la barra de estado oculta y, a continuación, pulse “ " para acceder al menú de
configuración.
3.7 Botones de accesibilidad F1/F2
1. Entre en el menú de ajustes y seleccione F1/F2 para ajustar las funciones más utilizadas.
2. Si F1/F2 está configurado como alcance láser, active el “Puntero láser" en el menú de configuración y
vuelva a la interfaz de previsualización en tiempo real y haga clic en F1/F2, el dispositivo emitirá un punto
láser rojo y mostrará la distancia medida en el centro de la pantalla.
3. Si F1/F2 está configurado como calibración inteligente. En la interfaz de previsualización en tiempo real,
pulse el botón F1/F2 y seleccione “activar" puede guardar la calibración inteligente de forma inteligente. A
Configuraci
ón

54
continuación, pulse el botón del obturador para congelar la foto, haga clic en “ " para la calibración
inteligente y haga clic en “ " para la calibración manual.
Capítulo 4 Emisividad
Emisividad de objetos comunes
Material
Emisividad
Material
Emisividad
Madera
0,85
Papel negro
0,86
Agua
0,96
Policarbonato
0,8
Ladrillo
0,75
Hormigón
0,97
Acero inoxidable
0,14
Óxido de cobre
0,78
Cinta adhesiva
0,96
Hierro fundido
0,81
Chapa de aluminio
0,09
Óxido
0,8
Placa de cobre
0,06
Yeso
0,75
Aluminio oscuro
0,95
Pintar
0,9
Piel humana
0,98
Goma
0,95
Asfalto
0,96
Suelo
0,93
Material de PVC
0,93

55
Capítulo 5 Análisis de problemas comunes
Problema
Causa
Solución
Fallo de arranque
Batería baja
Cargar la batería hasta que esté llena
El enchufe de la fuente de alimentación
externa no está bien insertado
Tire del enchufe y vuelva a insertarlo en el lugar
adecuado
La vida de la batería expira
Póngase en contacto con el servicio postventa
de KAIWEETS
La imagen IR no está
clara
Las lentes se han empañado o
contaminado
Limpiar la lente con equipo especializado
La imagen con luz
visible no está clara
El entorno es demasiado oscuro
Abrir la linterna
Hay vapor delante de la luz visible o la
luz visible está contaminada
Limpiar el frontal de luz visible con equipos
especializados
La medición de la
temperatura es
inexacta
Configuración incorrecta de los
parámetros
Cambia la configuración de los parámetros o
restaura los parámetros por defecto.
La medición de la temperatura se inicia
inmediatamente después del arranque
Para garantizar la precisión, se recomienda
iniciar la medición entre 5 y 10 minutos después
de la puesta en marcha.
Hace tiempo que no se calibra
Para garantizar los resultados de las mediciones,
recomendamos realizar una autocalibración una
vez al año.

56
Software de análisis para PC
Además de utilizarse de forma independiente, la cámara termográfica KTI-K01 también puede utilizarse junto
con un ordenador con sistema Windows. En esta sección se explica cómo configurar la cámara termográfica
para que funcione con un ordenador con sistema Windows para el análisis de imágenes.
Pasos de la instalación
1. Descargue e instale el software
Visite el sitio web: https://kaiweets.com/products/kti-k01, haga clic en el enlace del sitio web
“THERMOTOOLS APP" y “THERMOTOOLS USER MANUAL" para descargar el software y el manual de
usuario del software. A continuación, abra el archivo “K01 Thermotools.exe" para instalarlo en su ordenador
y consulte el manual de instrucciones del software para el análisis de imágenes o vídeos.
2. Método de conexión 1: Conecte la cámara termográfica KTI-K01 al ordenador con el cable USB incluido,
envíe imágenes o archivos de vídeo al PC y utilice el software “K01 Thermotools" para el análisis.
3. Método de conexión 2: Cargue los archivos en la nube en la cámara termográfica KTI-K01, inicie sesión en
la cuenta de K01 Thermotools y descargue las imágenes o vídeos localmente, y utilice el software para el
análisis.

57
Contenuti-IT
Precauzioni ................................................................................................................................58
Capitolo 1 Elenco delle voci......................................................................................................61
Capitolo 2 Aspetto.....................................................................................................................62
Capitolo 3 Operazioni di base..................................................................................................63
Capitolo 4 Emissività.................................................................................................................68
Capitolo 5 Analisi dei problemi comuni...................................................................................69
Software di analisi PC....... .......................................................................................................70
IT

58
Precauzioni
Seguire sempre scrupolosamente le seguenti precauzioni:
Mantenere il dispositivo il più stabile possibile per evitare scosse violente.
Non utilizzare il dispositivo a temperature di esercizio non consentite e non collocarlo in un ambiente con
una temperatura di conservazione non consentita.
Non allineare il dispositivo con forti emettitori termici, come il sole, i laser e le saldatrici a punti.
Non esporre il dispositivo a un ambiente polveroso o umido. Se si utilizza il dispositivo in un ambiente con
presenza d'acqua, evitare che l'acqua vi spruzzi sopra.
Quando non lo si utilizza, riporre il dispositivo e tutti i suoi accessori in un'apposita scatola di imballaggio.
Non ostruire i fori del dispositivo.
Non urtare, lanciare o far vibrare il dispositivo o i suoi accessori per evitare di danneggiarlo.
Non smontare il dispositivo per evitare di danneggiarlo e di perdere la garanzia.
Non utilizzare il dispositivo in un ambiente che superi la sua temperatura di esercizio per evitare possibili
danni.
Non applicare liquidi dissolvibili o simili al dispositivo e ai cavi per evitare possibili danni.
Il dispositivo è alimentato da una batteria agli ioni di litio, pertanto gli utenti devono attenersi
scrupolosamente alle seguenti precauzioni per utilizzarlo in modo sicuro:

59
a) Non tentare mai di aprire o smontare la batteria.
b) Non collocare la batteria in un ambiente ad alta temperatura o nelle vicinanze di un oggetto ad alta
temperatura.
c) Non cortocircuitare la batteria.
d) Non mettere la batteria in un ambiente umido o in acqua.
e) Se il liquido fuoriuscito dalla batteria entra negli occhi, sciacquare immediatamente gli occhi con acqua
pulita e ricorrere alle cure mediche del caso.
f) Caricare la batteria come indicato nel manuale e seguire le fasi di carica e le precauzioni. Una carica
errata può riscaldare o danneggiare la batteria o addirittura causare lesioni.
Pulire il dispositivo come descritto di seguito:
a) Superfici non ottiche: Se necessario, utilizzare un panno pulito e morbido per pulire le superfici non
ottiche della termocamera.
b) Superfici ottiche: Evitare di macchiare la superficie ottica dell'obiettivo quando si utilizza la termocamera,
in particolare evitare di toccare l'obiettivo con le mani poiché il sudore delle mani potrebbe lasciare tracce
sull'obiettivo e corrodere il rivestimento ottico sulla superficie dell'obiettivo. Quando la superficie
dell'obiettivo ottico è macchiata, pulirla con carta speciale per lenti.

60
Precauzioni per l'uso delle batterie:
La batteria può essere caricata ripetutamente. Tuttavia, la batteria è una parte vulnerabile. Se il tempo di
standby del dispositivo si riduce notevolmente, sostituire la batteria con una originale fornita dall'azienda.
Se il dispositivo funziona a lungo, soprattutto a temperature elevate, la sua superficie si riscalda
normalmente. Quando è caldo, interrompere la ricarica e spostarlo all'ombra. Evitare di toccare superfici
calde per lungo tempo.
Per la ricarica del dispositivo, si consiglia di utilizzare batterie e cavi di ricarica originali forniti
dall'azienda.
Il tempo di ricarica della batteria varia in base alle temperature e all'utilizzo.
Quando il livello della batteria è basso, il sistema emette una segnalazione di livello basso.
Quando il livello della batteria è troppo basso, il sistema si spegne automaticamente.
Se il dispositivo non risponde alla pressione del pulsante di accensione, la batteria è esaurita e il
dispositivo può essere avviato solo dopo essere stato caricato con un caricatore originale per più di 10
minuti.

61
Capitolo 1 Elenco degli articoli
Telecamera termica
Cavo USB
Adattatore di
alimentazione
Il tipo di spina dipende dal paese di consegna.
Cinturino da polso
Pacchetto flessibile
Scheda di calibrazione
Manuale d'uso

62
Capitolo 2 Aspetto
Schermo di visualizzazione
Pulsante di accessibilità F1
Pulsante di accessibilità F2
Connettore per treppiede
Porta Tipo-C
Lente a luce visibile
Obiettivo a infrarossi
Laser
Pulsante
dell'otturatore
Pulsante di accensione
Flash/Illuminazione
Rilevamento laser
63
Capitolo 3 Operazioni di base
3.1 Foto e album
3.1.1 Foto
Premere il pulsante di scatto nell'interfaccia di anteprima in tempo reale, appare “Immagine salvata" e
nell'angolo in alto a destra viene visualizzata una miniatura di 2 secondi.
3.1.2 Vista foto
1. Fare clic sulla miniatura nell'angolo in alto a destra per visualizzare rapidamente la foto.
2. Fare clic su “ " per aprire la barra di stato nascosta, quindi fare clic su “ " per accedere all'album
e visualizzare le foto nella galleria locale.
Foto salvata
64
3.1.3 Funzionamento delle foto
1. Selezione delle foto: Entrare nella galleria locale e fare clic su “Seleziona" per aprire il menu di selezione,
quindi fare clic su “ " per selezionare tutte /deselezionare tutte le foto. Fare clic su “ " per caricare le
foto selezionate sul servizio cloud e su “ " per eliminarle.
2. Zoom delle foto: Entrare nella galleria locale e zoomare la foto facendo doppio clic sulla foto o con due
dita.
3. Dettagli foto: Inserire l'album e fare clic su una foto per inserire i dettagli, quindi fare clic su “ "
nell'angolo in alto a destra per visualizzare l'ora di scatto, la data e l'emissività della foto; fare clic su “ VL "
per visualizzare le foto visibili; fare clic su “ VL " per visualizzare le foto visibili; fare clic su " VL " per
visualizzare le foto visibili.“ " per la calibrazione intelligente e la calibrazione manuale; fare clic su “ " per
eliminare la foto.
3.2 Commutatore di modalità
Fare clic su “ " per aprire la barra di stato nascosta, quindi fare clic su “ IR " per aprire le opzioni di
IR
65
modalità:
selezionare “ IR " , la modalità fotografica passa agli infrarossi;
selezionare “ VL " , la modalità fotografica passa alla luce visibile;
selezionare “ PIP " , la modalità foto passa a immagine nell'immagine;
selezionare “ MIF " , la modalità fotografica passa alla fusione di immagini multispettrali.
3.3 Analisi degli oggetti
Fare clic su “ " per aprire la barra di stato nascosta, quindi fare clic su “ " per aggiungere un oggetto
di analisi puntiforme e su “ " per aggiungere un oggetto di analisi rettangolare. Premere a lungo l'oggetto
di analisi rettangolare per impostare la temperatura massima, la temperatura minima, la temperatura media,
l'area e il centro dell'oggetto e per cancellare l'oggetto.
Punto
66
3.4 Colore della tavolozza
Fare clic su “ " per aprire la barra di stato nascosta, quindi fare clic su “ " per aprire il menu dei colori
della tavolozza e cambiare i colori della tavolozza.
3.5 Flash/Illuminazione
Ferro rosso
Lampada stroboscopica
67
Fare clic su “ " per aprire la barra di stato nascosta e quindi fare clic su “ " per selezionare il flash o
l'illuminazione separatamente o contemporaneamente.
3.6 Impostazione
Fare clic su “ " per aprire la barra di stato nascosta, quindi fare clic su “ " per accedere al menu delle
impostazioni.
3.7 Pulsanti di accessibilità F1/F2
1. Accedere al menu delle impostazioni e selezionare F1/F2 per impostare le funzioni più comuni.
2. Se F1/F2 è impostato come laser ranging, attivare il “puntatore laser" nel menu delle impostazioni e
tornare all'interfaccia di anteprima in tempo reale e fare clic su F1/F2; il dispositivo emetterà un punto laser
rosso e visualizzerà la distanza misurata al centro dello schermo.
3. Se F1/F2 è impostato come calibrazione intelligente. Nell'interfaccia di anteprima in tempo reale, premere
il pulsante F1/F2 e selezionare “attiva" per salvare la calibrazione intelligente. Quindi premere il pulsante di
Imposta
zione

68
scatto per congelare la foto, fare clic su “ " per la calibrazione intelligente e su “ " per la calibrazione
manuale.
Capitolo 4 Emissività
Emissività di oggetti comuni
Materiale
Emissività
Materiale
Emissività
Legno
0,85
Carta nera
0,86
Acqua
0,96
Policarbonato
0,8
Mattone
0,75
Calcestruzzo
0,97
Acciaio inox
0,14
Ossido di rame
0,78
Nastro adesivo
0,96
Ghisa
0,81
Piastra di alluminio
0,09
Ruggine
0,8
Lastra di rame
0,06
Gesso
0,75
Alluminio scuro
0,95
Vernice
0,9
Pelle umana
0,98
Gomma
0,95
Asfalto
0,96
Suolo
0,93
Materiale PVC
0,93

69
Capitolo 5 Analisi dei problemi comuni
Sintomo
Causa
Misura
Errore di avvio
Batteria scarica
Caricare la batteria fino a esaurimento
La spina della fonte di alimentazione
esterna non è inserita correttamente
Estrarre la spina e reinserirla nella posizione
corretta.
La durata della batteria scade
Si prega di contattare il servizio post-vendita
KAIWEETS
L'immagine IR non è
chiara
Le lenti si sono appannate o sono state
inquinate
Pulire la lente con un'attrezzatura specializzata
L'immagine in luce
visibile non è chiara
L'ambiente circostante è troppo buio
Aprire la torcia
C'è del vapore davanti alla luce visibile o
la luce visibile è inquinata
Pulire la parte anteriore della luce visibile con
attrezzature specializzate
La misurazione della
temperatura è
imprecisa
Le impostazioni dei parametri non sono
corrette
Modificare le impostazioni dei parametri o
ripristinare i parametri predefiniti.
La misurazione della temperatura inizia
immediatamente dopo l'avvio
Per garantire la precisione, si consiglia di iniziare
la misurazione 5-10 minuti dopo l'avvio.
Nessuna calibrazione da tempo
Per garantire i risultati della misurazione, si
consiglia di eseguire un'autocalibrazione una
volta all'anno.
70
Software di analisi per PC
Oltre a poter essere utilizzato in modo indipendente, il termocolorante KTI-K01 può anche essere utilizzato
insieme a un computer con sistema Windows. Questa sezione spiega come configurare il termocamera per
lavorare con un computer di sistema Windows per l'analisi delle immagini.
Fasi di installazione
1. Scaricare e installare il software
Visitare il sito web: https://kaiweets.com/products/kti-k01, fare clic sul link del sito web “THERMOTOOLS
APP" e “THERMOTOOLS USER MANUAL" per scaricare il software e il manuale utente del software. Aprire
quindi il file “K01 Thermotools.exe" per installarlo sul computer e consultare il manuale di istruzioni del
software per l'analisi di immagini o video.
2. Metodo di connessione 1: collegare il termocamera KTI-K01 al computer con il cavo USB in dotazione,
inviare immagini o file video al PC e utilizzare il software “K01 Thermotools" per l'analisi.
3. Metodo di connessione 2: caricare i file sul cloud del termocamera KTI-K01, accedere all'account K01
Thermotools e scaricare le immagini o i video localmente, quindi utilizzare il software per l'analisi.

71
Оглавление-RU
Меры предосторожности .....................................................................................................72
Глава 1 Список наименований...........................................................................................75
Глава 2 Внешний вид.............................................................................................................76
Глава 3 Основные операции...............................................................................................77
Глава 4 Излучательная способность................................................................................82
Глава 5 Анализ общих проблем.........................................................................................83
Программное обеспечение для анализа ПК......................................................................84
RU

72
Меры предосторожности
Пожалуйста, всегда строго соблюдайте следующие меры предосторожности:
Держите прибор как можно более устойчиво, чтобы избежать сильной тряски.
Не используйте устройство при недопустимых рабочих температурах и не помещайте его в ср
еду с недопустимой температурой хранения.
Не располагайте устройство вблизи мощных тепловых излучателей, таких как солнце, лазеры
и аппараты точечной сварки.
Не подвергайте устройство воздействию пыльной или влажной среды. Не допускайте попадани
я воды на устройство, если оно используется в среде с водой.
Если прибор и все его принадлежности не используются, поместите их в специальную упаков
очную коробку.
Не перекрывайте отверстия в приборе.
Во избежание повреждений не стучите, не бросайте и не вибрируйте устройство или его прин
адлежности.
Пожалуйста, не разбирайте устройство, чтобы избежать его возможного повреждения и потер
и гарантии.
Во избежание возможных повреждений не используйте прибор в условиях, превышающих его
рабочую температуру.
Во избежание возможных повреждений не наносите растворяющую или подобную жидкость на

73
устройство и кабели.
Устройство питается от литий-ионного аккумулятора, поэтому для его безопасной эксплуатац
ии необходимо строго соблюдать следующие меры предосторожности:
a) Никогда не пытайтесь открыть или разобрать батарею.
b) Не помещайте батарею в среду с высокой температурой или рядом с высокотемпературным
и предметами.
c) Не допускайте короткого замыкания батареи.
d) Не помещайте батарею во влажную среду или в воду.
e) При попадании в глаза жидкости, вытекшей из аккумулятора, немедленно промойте глаза чи
стой водой и окажите соответствующую медицинскую помощь.
f) Заряжайте батарею в соответствии с инструкцией, соблюдая все этапы зарядки и меры пред
осторожности. Неправильная зарядка может привести к нагреву, повреждению батареи или даж
е к травмам.
Протрите устройство, как описано ниже:
a) Неоптические поверхности: При необходимости протирайте неоптические поверхности теплов
изора чистой и мягкой тканью.
b) Оптические поверхности: При использовании тепловизора избегайте загрязнения оптической
поверхности объектива, особенно не прикасайтесь к объективу руками, так как пот на руках м
ожет оставить следы на объективе и разъесть оптическое покрытие на его поверхности. При п
оявлении пятен на оптической поверхности объектива протрите ее специальной бумагой для пр

74
отирки объективов.
Меры предосторожности при использовании батарей:
Аккумулятор можно заряжать многократно. Однако аккумулятор является уязвимой деталью.
Если время работы устройства в режиме ожидания значительно сократилось, замените батарею
на оригинальную, поставляемую компанией.
Если устройство работает в течение длительного времени, особенно при высоких температура
х, его поверхность будет нормально нагреваться. Если устройство нагрелось, прекратите зарядку
и перенесите его в тень. Пожалуйста, не прикасайтесь к горячим поверхностям в течение длител
ьного времени.
При зарядке устройства рекомендуется использовать оригинальные аккумуляторы и зарядные
кабели, поставляемые компанией.
Время зарядки аккумулятора зависит от температуры и условий его использования.
При низком уровне заряда батареи система выдает сообщение о низком уровне заряда.
При слишком низком уровне заряда батареи система автоматически отключается.
Если устройство не реагирует на нажатие кнопки питания, значит, разрядился аккумулятор, и
запуск устройства возможен только после зарядки оригинальным зарядным устройством в течен
ие более 10 минут.

75
Глава 1 Перечень предметов
Тепловизионная камера
Кабель USB
Адаптер пита
ния
Тип штекера(штекер зависит от страны пост
авки)
Ремешок на запястье
Гибкий пакет
Калибровочная карта
Руководство пол
ьзователя
76
Глава 2 Внешний вид
Экран дисплея
Кнопка доступа F1
Кнопка доступа F2
Разъем для штатива
Порт Type-C
Объектив для видимого света
Инфракрасный объектив
Лазер
Кнопка затвора
Кнопка питани я
Вспышка/освещение
Лазерная дальнометрия

77
Глава 3 Основные операции
3.1 Фотография и альбом
3.1.1 Фото
Нажмите кнопку спуска затвора в режиме просмотра в реальном времени, появится надпись “Из
ображение сохранено", а в правом верхнем углу будет отображаться миниатюра длительностью 2
с.
3.1.2 Просмотр фотографий
1. Щелкните миниатюру в правом верхнем углу, чтобы быстро просмотреть фотографию.
2. Нажмите кнопку “ ", чтобы открыть скрытую строку состояния, а затем нажмите кнопку
“ ", чтобы войти в альбом для просмотра фотографий в локальной галерее.
Сохраненное изображение

78
3.1.3 Работа с фотографиями
1. Выбор фотографий: Войдите в локальную галерею и нажмите кнопку “Выбрать", чтобы открыт
ь меню выбора, а затем нажмите кнопку
“ " для выбора всех / снятия выделения всех фотографий. Нажмите кнопку “ " для загрузки
выбранных фотографий в облачную службу и кнопку “ " для удаления фотографий.
2. Увеличение фотографий: Войдите в локальную галерею и увеличьте фотографию, дважды щелк
нув по ней или двумя пальцами.
3. Детали фотографии: Войдите в альбом и щелкните фотографию для ввода подробной информа
ции, а затем нажмите кнопку “ " в правом верхнем углу для просмотра времени съемки, даты
и излучательной способности фотографии; нажмите кнопку “VL" для просмотра видимых фотогра
фий; нажмите кнопку
“ " для интеллектуальной калибровки и ручной калибровки; нажмите “ " для удаления фотогр
афии.
3.2 Переключатель режимов
иK

79
Нажмите кнопку “ ", чтобы открыть скрытую строку состояния, а затем нажмите кнопку “IR ",
чтобы открыть параметры режима:
выберите “ IR ", режим фотосъемки переключится на инфракрасный;
выберите “ VL ", режим фотосъемки переключится на видимый свет;
выберите “ PIP ", режим фотосъемки переключится на “картинку в картинке";
выберите “ MIF ", режим фотосъемки переключится на слияние многоспектральных изображений.
3.3 Анализ объектов
Нажмите кнопку “ ", чтобы открыть скрытую строку состояния, затем нажмите кнопку “ ",
чтобы добавить точечный объект анализа, и кнопку “ ", чтобы добавить прямоугольный объект
анализа. Длительным нажатием на прямоугольный объект анализа можно задать максимальную т
емпературу, минимальную температуру, среднюю температуру, площадь и центр объекта, а также
удалить объект.
Toчкa

80
3.4 Цвет палитры
Нажмите кнопку “ ", чтобы открыть скрытую строку состояния, а затем нажмите кнопку “ ",
чтобы открыть меню цветов палитры для переключения различных цветов палитры.
3.5 Вспышка/освещение
Kpaсный режим
вспышкa

81
Нажмите кнопку “ ", чтобы открыть скрытую строку состояния, а затем нажмите кнопку “ ",
чтобы выбрать вспышку или освещение отдельно или одновременно.
3.6 Настройка
Нажмите кнопку “ ", чтобы открыть скрытую строку состояния, а затем нажмите кнопку “ ",
чтобы войти в меню настроек.
3.7 Кнопки доступа F1/F2
1. Войдите в меню настроек и выберите F1/F2 для настройки часто используемых функций.
2. Если F1/F2 установлен как лазерный дальномер, включите “Лазерную указку" в меню настрое
к, вернитесь в интерфейс предварительного просмотра в реальном времени и нажмите F1/F2, пр
ибор излучит красную лазерную точку и отобразит измеренное расстояние в центре экрана.
3. Если для F1/F2 установлена интеллектуальная калибровка. В интерфейсе предварительного пр
осмотра в реальном времени нажмите кнопку F1/F2 и выберите “включить", чтобы сохранить инт
еллектуальную калибровку. Затем нажмите кнопку спуска затвора, чтобы заморозить снимок, наж
мите кнопку “ " для интеллектуальной калибровки и кнопку “ " для ручной калибровки.
Haстройкa

82
Глава 4 Излучательная способность
Излучательная способность обычных объектов
Материал
Излучательная способн
ость
Материал
Излучательная способ
ность
Дерево
0.85
Черная бумага
0.86
Вода
0.96
Поликарбонат
0.8
Кирпич
0.75
Бетон
0.97
Нержавеющая сталь
0.14
Оксид меди
0.78
Клейкая лента
0.96
Чугун
0.81
Алюминиевая пластин
а
0.09
Ржавчина
0.8
Медная пластина
0.06
Гипс
0.75
Темный алюминий
0.95
Краска
0.9
Кожа человека
0.98
Резина
0.95
Асфальт
0.96
Почва
0.93
Материал ПВХ
0.93

83
Глава 5 Анализ общих проблем
Симптом
Причина
Измерение
Сбой загрузки
Разряженная батарея
Зарядка аккумулятора до полного заряда
Вилка внешнего источника п
итания вставлена неправильн
о
Извлеките штекер и вставьте его в соответ
ствующее место
Истечение срока службы бат
ареи
Пожалуйста, обращайтесь в службу послепр
одажного обслуживания KAIWEETS
ИК-изображение нечеткое
Объективы запотевают или з
агрязняются
Очистка объектива с помощью специализир
ованного оборудования
Изображение в видимом
свете нечеткое
Окружающая среда слишком
темная
Открыть фонарь
Перед видимым светом имее
тся пар или видимый свет за
грязнен
Очистка переднего фронта видимого света
с помощью специализированного оборудова
ния
Неточность измерения
температуры
Неправильные настройки пар
аметров
Изменение настроек параметров или восста
новление параметров по умолчанию.
Измерение температуры начи
нается сразу после запуска
Для обеспечения точности рекомендуется н
ачинать измерения через 5-10 минут после
запуска.
Давно не калибровал
Для обеспечения точности результатов изм
ерений рекомендуется проводить самокалиб
ровку один раз в год.
84
Программное обеспечение для анализа ПК
Кроме самостоятельного использования, тепловизор KTI-K01 может применяться совместно с ко
мпьютером под управлением ОС Windows. В данном разделе описывается, как настроить теплови
зор для работы с компьютером под управлением ОС Windows для анализа изображений.
Этапы установки
1. Скачайте и установите программное обеспечение
Посетите сайт: https://kaiweets.com/products/kti-k01, перейдите по ссылке сайта “THERMOTOOLS
APP" и “THERMOTOOLS USER MANUAL", чтобы скачать программное обеспечение и руководство
пользователя программы. Затем откройте файл “K01 Thermotools.exe" для установки на компьюте
р и ознакомьтесь с инструкцией по эксплуатации программы для анализа изображений или виде
о.
2. Способ подключения 1: Подключите тепловизор KTI-K01 к компьютеру с помощью прилагаемо
го USB-кабеля, отправьте на ПК фотографии или видеофайлы и используйте для анализа програ
ммное обеспечение “K01 Thermotools".
3. Способ подключения 2: Загрузите файлы в облако на тепловизоре KTI-K01, войдите в учетную
запись K01 Thermotools и загрузите снимки или видео локально, а затем используйте программн
ое обеспечение для анализа.