GL 48
EN
Instructions for use
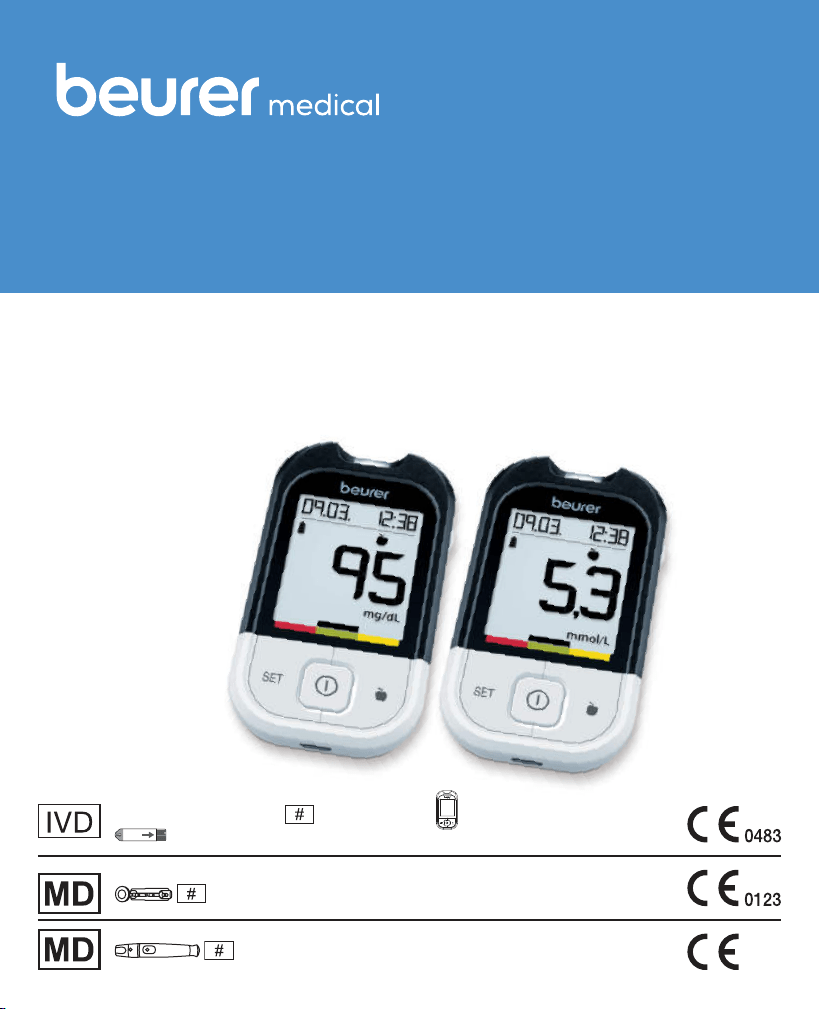
Blood glucose monitor
Step by step
Codefree
Soft
Blood glucose monitor,
GL 48 (inclusive GL 48,
Test strips for GL 48)
LD 04


Beurer GL48 3
Contents
1. Getting to know your device .................................................................................................... 4
1.1 Scope of delivery and accessories ............................................................................................5
1.2 Replacements ..........................................................................................................................6
1.3 Functions of the device ............................................................................................................. 6
1.4 Signs and symbols ................................................................................................................... 7
2. Warnings and safety notes .......................................................................................................8
3. Description of device and accessories ................................................................................ 11
3.1 Blood glucose monitor ............................................................................................................ 11
3.2 Display symbols ......................................................................................................................12
3.3 Test strips ...............................................................................................................................13
4. Initial use and basic settings ................................................................................................. 14
4.1 Removing the battery insulation strips, replacing the batteries .................................................. 14
4.2 Making and changing basic settings ........................................................................................ 14
5. Taking the blood glucose measurement .............................................................................15
5.1 Preparing to take a blood sample ............................................................................................ 16
5.2 Taking a blood sample ............................................................................................................16
5.3 Reading the result and labelling measurements ........................................................................18
5.4 Evaluating measured blood glucose values ..............................................................................19
5.5 Functional check using control solution ................................................................................... 20
6. Measurement memory ............................................................................................................ 23
6.1 Displaying individual values ..................................................................................................... 23
6.2 Displaying average blood glucose values ................................................................................. 24
6.3 Displaying average blood glucose values for labelled values ..................................................... 25
6.4 Transferring measurements to a PC ......................................................................................... 27
7. Storing, maintaining and disinfecting the device ...............................................................28
7.1 Cleaning .................................................................................................................................28
7.2 Disinfection ............................................................................................................................29
8. What if there are problems? ...................................................................................................29
9. Technical specifications .........................................................................................................31
10. Comparison of measured values with laboratory values ...............................................32
11. Usage limits for specialist personnel from the healthcare sector ............................... 34
12. Instructions for use of the LD 04 lancing device and the Softlancets .......................36
12.1 Purpose ................................................................................................................................ 36
12.2 Warnings and safety notes ....................................................................................................37
12.3 Device description ................................................................................................................37
12.4 Initial use ..............................................................................................................................38
12.5 Usage ...................................................................................................................................38
12.6 Blood sample from the fingertip ............................................................................................. 39
12.7 Please also note the following: ..............................................................................................39
12.8 Final steps and disposal ........................................................................................................ 39
12.9 Cleaning and maintenance ....................................................................................................40
12.10 Disposal..............................................................................................................................40
13. Warranty/service .................................................................................................................... 40

4 Beurer GL48
1. GettinG to know your device
Dear customer,
Thank you for choosing a product from our range. Our name stands for high-quality, thoroughly tested
products for applications in the areas of heat, weight, blood pressure, blood glucose, body tempe-
rature, pulse, gentle therapy, massage and air.
Please read these instructions for use carefully and keep them for later use. Be sure to make them
accessible to other users and observe the information they contain.
With kind regards,
Your Beurer team.
Getting to know your device
The GL48 blood glucose measuring system is intended for fast and simple blood glucose measurement
of fresh capillary blood samples, either for self-testing or in a clinical environment by trained personnel.
It enables you to measure your blood glucose quickly and easily, store the measured values and dis-
play the average of all measured values, thereby providing optimum assistance for monitoring your
diabetes. The test is performed exclusively externally (IVD).
The large display shows measured values clearly. The user-friendly design with handy test strips and
the simple controls with just a small number of buttons guarantee simple, yet reliable measurements.
The device can be connected directly to a PC using the USB cable provided. You can evaluate the
measured values on your PC using blood glucose diary software and use the results to monitor your
blood glucose values.
Blood glucose diary software is available to download for free at www.beurer.com.
Beurer GL48 5
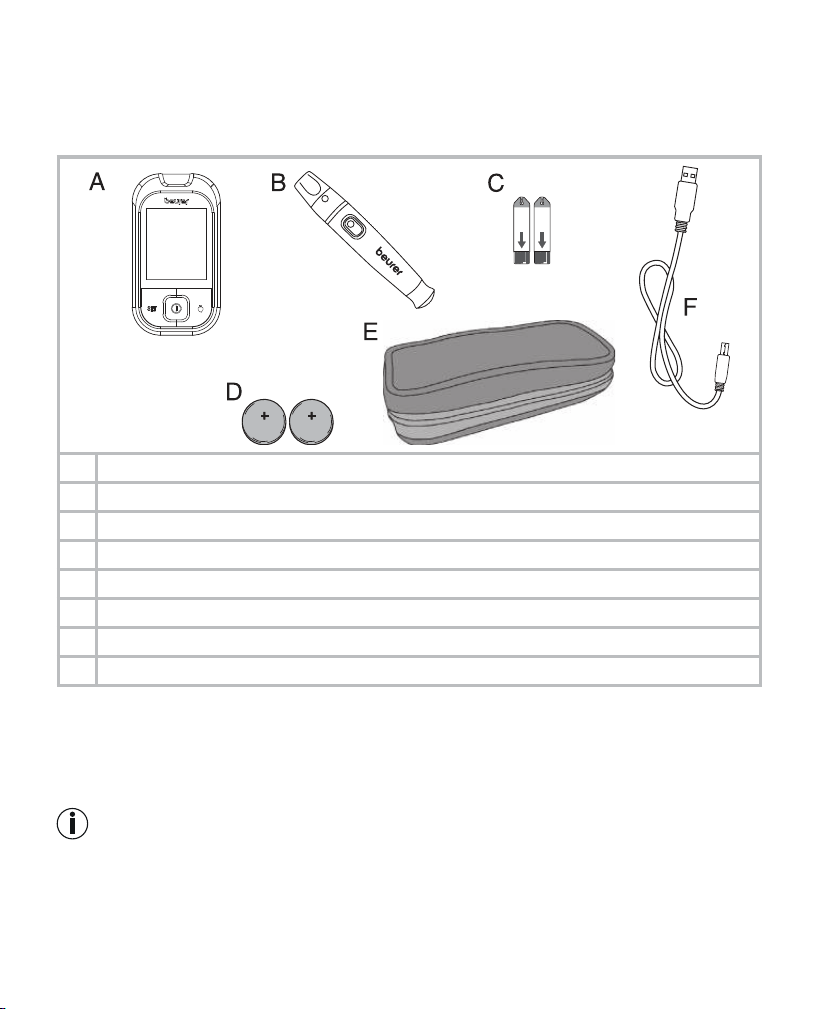
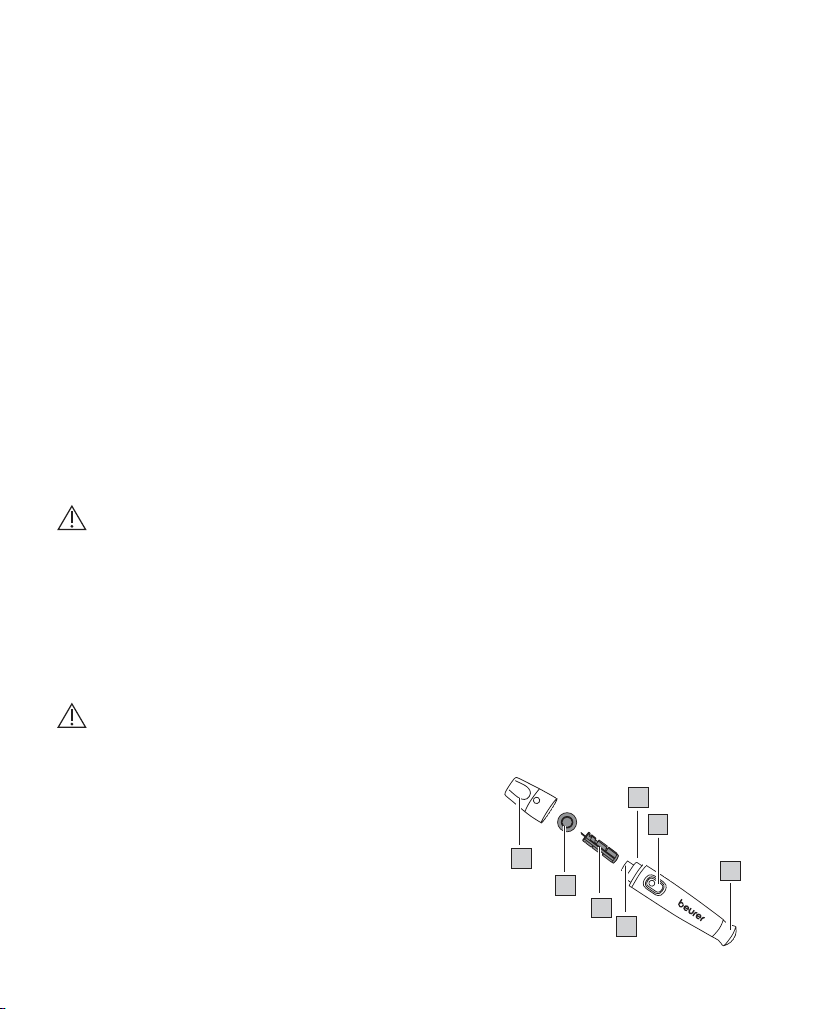
1.1 Scope of delivery and accessories
Check that the set packaging has not been tampered with and make sure that all components are
present. Before use, ensure that there is no visible damage to the device or accessories and that all
packaging material has been removed. If you have any doubts, do not use the device and contact
your retailer or the specified Customer Service address.
5
A 1 blood glucose monitor
B 1 lancing device LD 04
C 10 test strips
D 10 lancets (5x lancet needles (blue, 28G) and 5x soft touch lancets (purple, 33G))
E 2 button cell batteries, 3 V CR2032 (already inserted)
F 1 practical case
G 1 USB cable
These instructions for use, additional information
•
If the packaging has sustained considerable damage or the contents are incomplete, please return
the system to your retailer.
•
The blood glucose monitor, test strips and additionally available control solutions have been specially
designed to complement each other. For this reason, use only test strips and control solutions that
have been approved for this measuring device.
Note
•
Use original manufacturer accessories only.

6 Beurer GL48
1.2 Replacements
You can also obtain test strips, control solution and lancets without a prescription.
Item REF
100 test strips REF 463.72
50 test strips REF 463.70
Control solution LEVEL 7 and 8 REF 463.64
100 soft touch lancets 33G REF 457.24
100 lancet needles 28G REF 457.01
100 safety lancets REF 457.41
200 safety lancets REF 457.42
1.3 Functions of the device
This device is intended for measuring the blood glucose content in human blood. It is also suitable
for self-testing at home.
The measuring device enables you to quickly and simply:
•
Measure your blood glucose level
•
Display, label and save measured values
•
Display the average measured blood glucose value from the last 7, 14, 30 and 90 days
•
Display the average of the labelled measured blood glucose values from the last 7, 14, 30 and 90 days
•
Set the time and date
•
Transfer the stored measured values to a PC for evaluation
The measuring device also includes the following monitoring functions:
•
Warning in the event of unsuitable temperatures
•
Battery replacement display for low batteries
•
Warning that test strip is insuciently filled
Warning
•
Do not use the device to diagnose diabetes; it is intended for regular monitoring only.
•
Consult your GP with regard to insulin doses.
Beurer GL48 7
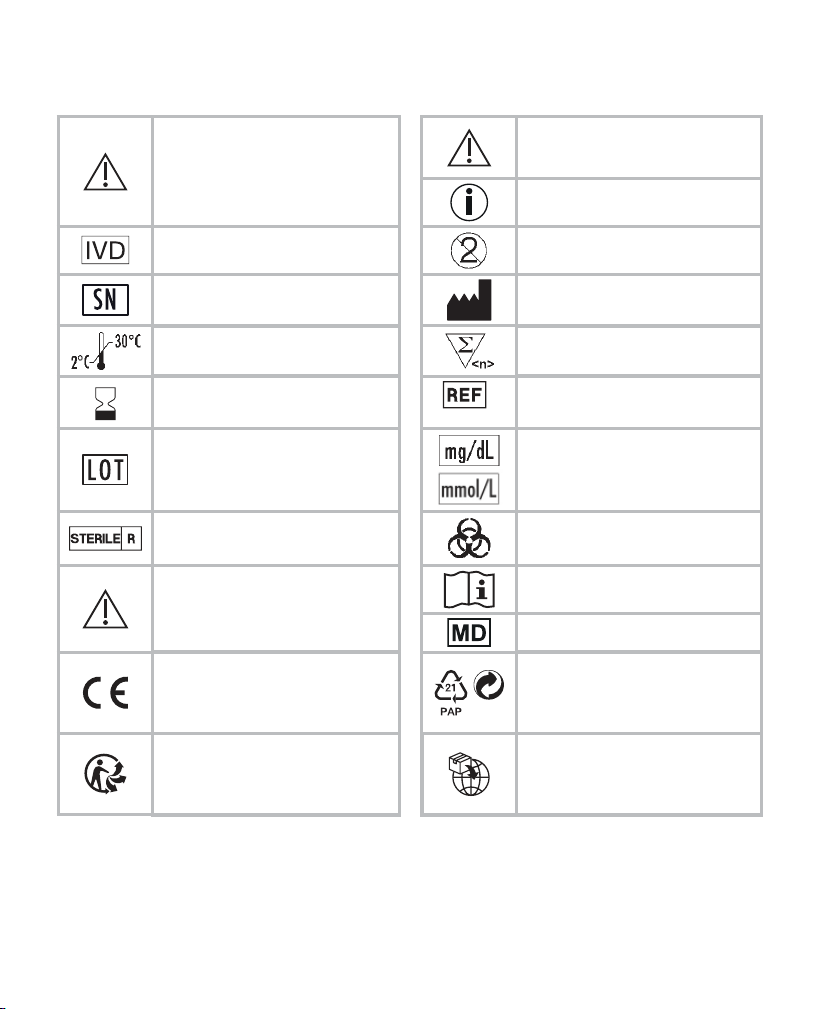
1.4 Signs and symbols
The following symbols are used on the device, in these instructions for use, on the packaging and on
the type plate for the device:
Warning
Warning instruction indicating a
risk of injury or damage to your
health/your patient’s health
Important
Safety note indicating possible
damage to the device/accessory
Note
Note on important information
In vitro diagnostic device
Not for re-use/
for single use only
Serial number Manufacturer
Temperature limit
+2 °C to +30 °C
Contents sucient for <n> tests
Use by
/
Art.-Nr.
Item number
Batch designation
Unit of measurement for blood
glucose value
Sterilised by radiation (lancets) Biohazard, risk of infection
Important: check the instructions
for use for important safety-relat-
ed information such as warnings
and precautions
Consult instructions for use
Medical device (MDR Symbol)
CE labelling
This product satisfies the re-
quirements of the applicable Eu-
ropean and national directives.
Dispose of packaging in an en-
vironmentally friendly manner
Separate the product and pa-
ckaging elements and dispose
of them in accordance with local
regulations.
Importer symbol
8 Beurer GL48
2. warninGs and safety notes
Risk of infection
All components of the measuring device and its accessories may come into contact
with human blood and are therefore a possible source of infection.
Warning
•
Blood glucose values are displayed
in mg/dL or mmol/L.
You risk damaging your health if you meas-
ure your blood glucose value using a unit of
measurement with which you are not familiar,
misinterpret the values and subsequent-
ly take incorrect measures. Ensure that this
measuring device displays a unit of meas-
urement with which you are familiar. The unit
of measurement accompanies each blood
glucose value.
Please contact Customer Services if the device displays the incorrect unit of measurement.
•
When using the measuring device for various persons, observe the generally applicable regulations
regarding disinfection, safety and contamination.
•
Medical carers and others who use this system on several patients must be aware that all products
or objects that come into contact with human blood must be handled, even after cleaning, as though
they could transfer pathogens.
•
The lancing device is suitable for self-testing. Do not share the lancing device or lancet needles with
others or amongst various patients (risk of infection!).
•
Use a new sterile lancet needle for each blood sample (for single use only).
General notes
Warning
Do not use the device in the vicinity of strong electromagnetic fields and keep it away from radio
systems or mobile telephones.
Measuring the blood glucose content
Warning
•
The measurements taken by you are for your information only – they are no substitute for a medical
examination! Consult your GP regularly regarding your measured values. Do not alter the procedu-
res prescribed by your GP.
•
Despite the simple usage of the Beurer GL48 system for self-monitoring of blood glucose levels,
you may possibly need to obtain instructions for using the system from your healthcare professi-
onal (for example, your GP, chemist or diabetes consultant). Only proper use will guarantee exact
measurements.
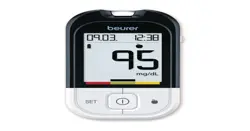
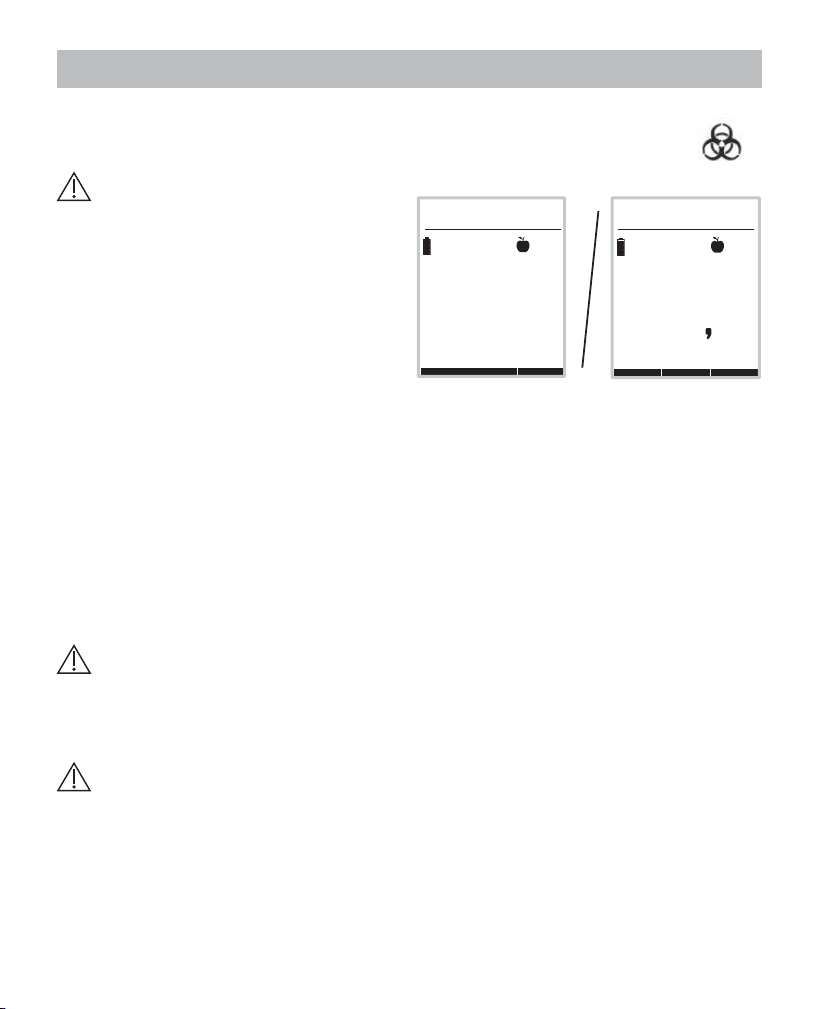
09.03. 12:38
mg/dL
95
09.03. 12:38
3 5
mmol/L
Example
Beurer GL48 9
•
This device may be used by people with reduced mental capabilities provided that they are super-
vised or have been instructed on how to use the device safely and are fully aware of the consequent
risks of use.
•
This device is not suitable for use by people (including children) with restricted physical, sensory
or mental abilities, or lack of experience and/or lack of knowledge, unless they are supervised by
someone who is responsible for their safety, or have received instructions from this person on how
to use the device. Do not allow children to play with the device.
•
A lack of water, high fluid loss, for example perspiration, frequent passing of water, severe hypo-
tension (low blood pressure), shock or hyperosmolar hyperglycaemic non-ketotic coma may lead
to incorrect measured results.
•
A haematocrit value between 20% and 60% has no significant influence on the measurement re-
sults.
•
An excessively high or low haematocrit value (proportion of red blood cells) may lead to incorrect
measurements. In the event of a very high haematocrit value (above 60%), the displayed blood
glucose value may be too low; in the event of a very low haematocrit value (below 20%), it may be
too high. Consult your GP if you do not know your haematocrit value.
•
Do not use the test strips to measure blood glucose values on newborns.
•
Do not use NaF or potassium oxalate anticoagulants to prepare for venous blood samples.
•
Do not test any severely ill patients using this device.
•
Use fresh whole blood only. Do not use serum or plasma.
•
Use capillary blood without squeezing the penetration area. Squeezing the area causes the blood
to be diluted with tissue fluid and this may lead to an incorrect measurement.
•
Do not use the test strips above an altitude of 7010 m.
•
Very high levels of humidity may influence the test results. Relative humidity of more than 90% may
lead to inaccurate results.
Note
•
The Beurer GL48 measuring system is intended for measuring capillary and venous whole blood.
Storage and maintenance
Warning
•
Store the measuring device and its accessories out of the reach of small children and pets. Small
parts, such as lancet needles, parts of the lancing device, batteries or test strips may be life-thre-
atening when swallowed. If swallowed, seek medical attention immediately.
•
The test strip box contains desiccant, which may irritate the skin or eyes when inhaled or swallo-
wed. Keep the box out of the reach of children.
The measuring device is made from precision and electronic components. The accuracy of the mea
-
sured values and service life of the device depend on its careful handling:
•
Protect the device and its accessories from impacts, humidity, dirt, marked temperature fluctuations
and direct sunlight. Do not store the device, test strips and control solution in your vehicle, in the
bathroom or in a cooling appliance!
•
Do not drop the device
10 Beurer GL48
Batteries/Saving measured values
Notes on handling batteries
•
If your skin or eyes come into contact with battery fluid, rinse the aected area with water and seek
medical assistance.
•
Choking hazard! Small children may swallow and choke on batteries. Store batteries out of the
reach of small children.
•
Observe the plus (+) and minus (-) polarity signs.
•
If a battery has leaked, put on protective gloves and clean the battery compartment with a dry cloth.
•
Protect batteries from excessive heat.
•
Risk of explosion! Do not throw batteries into a fire.
•
Do not charge or short-circuit batteries.
•
If the device is not to be used for a relatively long period, take the batteries out of the battery com-
partment.
•
Use identical or equivalent battery types only.
•
Always replace all batteries at the same time.
•
Do not use rechargeable batteries.
•
Do not disassemble, open or crush the batteries.
Note
•
The stored blood glucose values are retained when the batteries are replaced. If applicable, the date
and time must be reset after replacing the batteries.
•
Use lithium-ion batteries only.
Repairs
Note
•
Do not open the device. Failure to comply with this instruction will void the warranty.
•
Do not repair the device yourself. Proper operation can no longer be guaranteed in this case.
•
Please contact Customer Services for repairs.
Disposal
Warning
•
It is essential to comply with the generally applicable safety precautions for handling blood when
disposing of materials of the measuring device. Dispose of all blood samples and materials with
which you or your patients come into contact correctly in order to prevent injury and infection of
other persons.
•
After use, dispose of test strips and lancets in a puncture-proof container.
Beurer GL48 11
Note
Empty, completely flat batteries must be disposed of through specially designated collection boxes,
recycling points or electronics retailers. You are legally required to dispose of the batteries.
The codes below are printed on batteries containing harmful substances:
Pb = Battery contains lead
Cd = Battery contains cadmium
Hg = Battery contains mercury.
For environmental reasons, do not dispose of the device in the household waste at the end
of its service life. Dispose of the device at a suitable local collection or recycling point in your
country. Dispose of the device in accordance with EC Directive – WEEE (Waste Electrical and
Electronic Equipment). If you have any questions, please contact the local authorities responsible
for waste disposal.
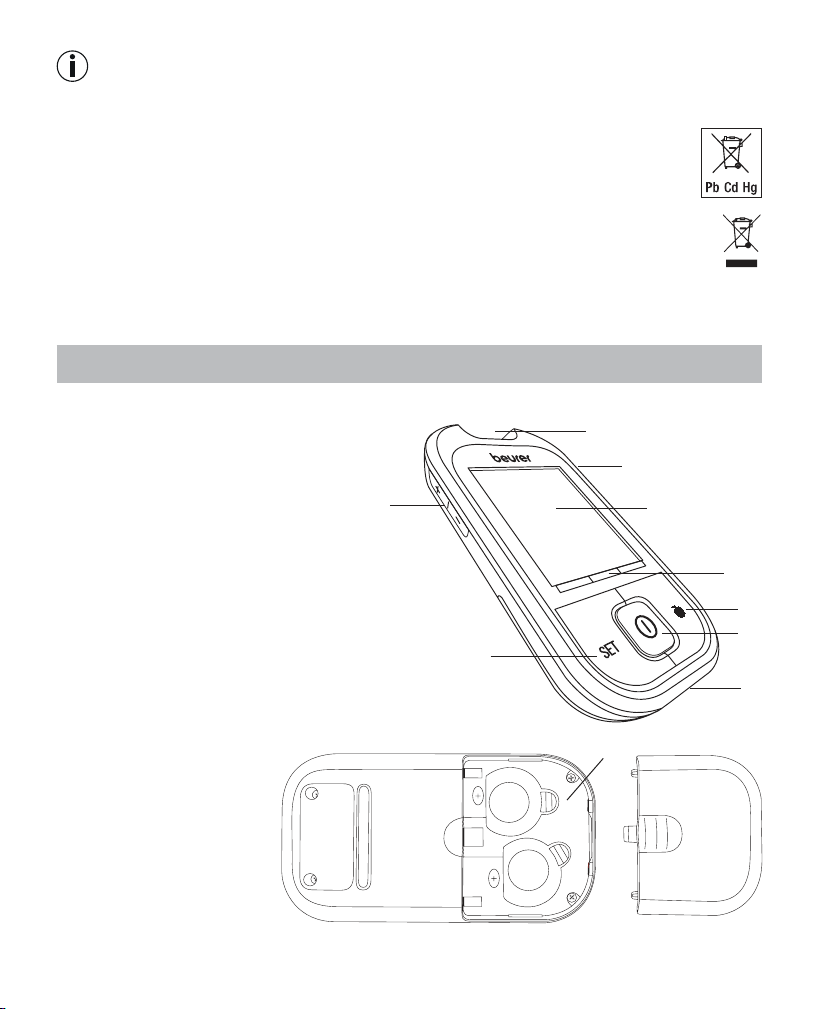
3. description of device and accessories
3.1 Blood glucose monitor
Front
1
Receptacle for test strips, illuminated
2 Test strip ejection slider
3 Display
4 Target scale
5 Highlighting button
6 ON/OFF button
7 PC connection
8 SET button
9 +/- button
Rear
1 Battery compartment (bot
-
tom side)
1
2
3
5
6
7
8
9
4
CR2032
CR2032
1
12 Beurer GL48
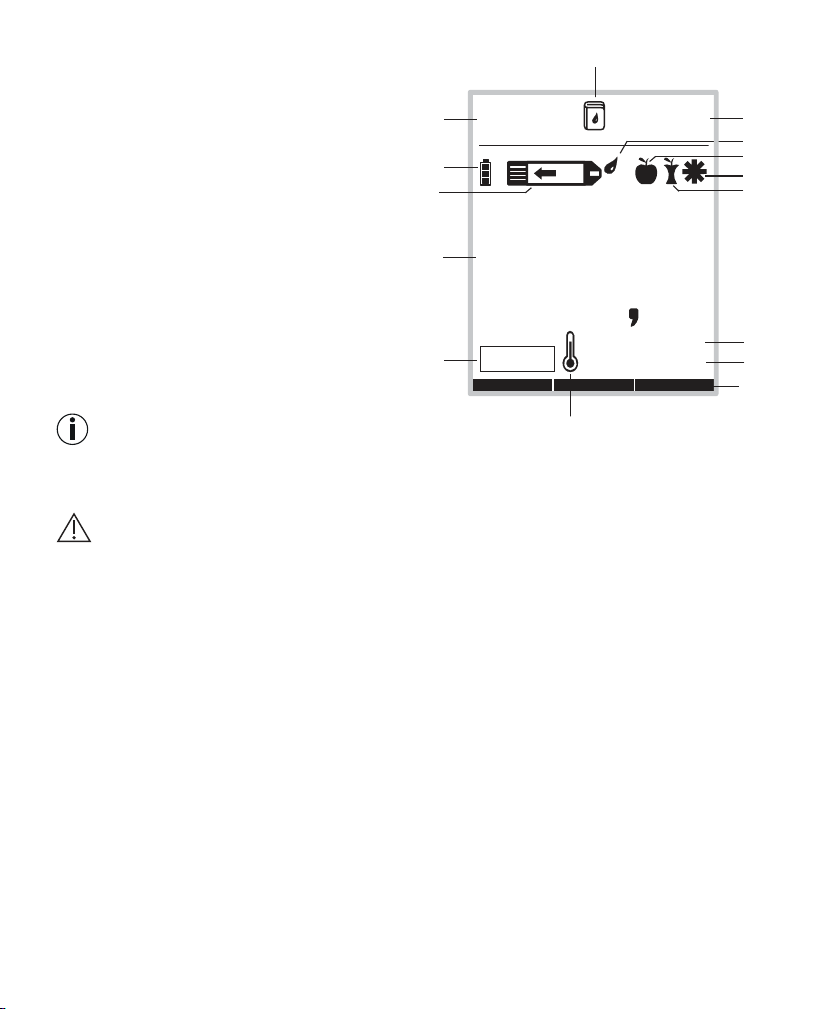
3.2 Display symbols
1 Date, Err
2 Battery status
3 Test strip symbol
4 Measured value display, HI, LO display,
average blood glucose value
5 Control solution measurement
6 Temperature symbol
7 Target scale
8 Blood glucose unit mmol/L
9 Blood glucose unit mg/dL
10 Symbols for labelling measurements
11 Drop symbol
12 Time
13 Memory symbol
Note
The measuring device is supplied with the following basic settings:
•
Acoustic signal o
Warning
Ensure that you are using the device with the correct blood glucose unit (either mg/dL or mmol/L)
setting for you.
If in doubt, consult your GP.
1
2
3
4
5
6
10
10
10
11
88.88. 88:88
mmol/L
mg/dL
CONTROL
1B1B1B
7
8
9
12
13
Beurer GL48 13
3.3 Test strips
Front Rear
3
2
1
1 Gap for blood input
2 Grip area
3 Contacts
You can identify the rear by
the contact tracks.
Insert the test strip into the
device so that the contacts
are pointing inside the slot.
Make sure that the front of the
test strip is facing you.
Note
Read carefully the following information on handling and storing your test strips. The test strips will
only provide accurate measurements if all information is followed.
Warning
Use each test strip only once and for one patient only!
Handling test strips
Note
•
Securely close the test strip box immediately after taking out a test strip.
•
Do not use the test strips if they have expired . The use of expired test strips may lead to incorrect
measurements. The expiry date is located next to the hourglass symbol
on the box.
•
Use the test strip for measurement immediately after removing it from the box.
•
You can touch any part of the test strip with clean, dry hands.
•
Do not bend, cut or otherwise modify the test strips.
•
Do not use test strips that have come into contact with fluids.
14 Beurer GL48
Storing test strips
Note
•
Keep the test strips in a cool, dry place above +2°C and below +30°C. Do not expose the test strips
to direct sunlight or heat. Do not store in your vehicle, in the bathroom or in a cooling appliance.
•
Permitted relative air humidity below 90 %.
•
The test strips must be stored in the original box – never use other containers.
4. initial use and basic settinGs
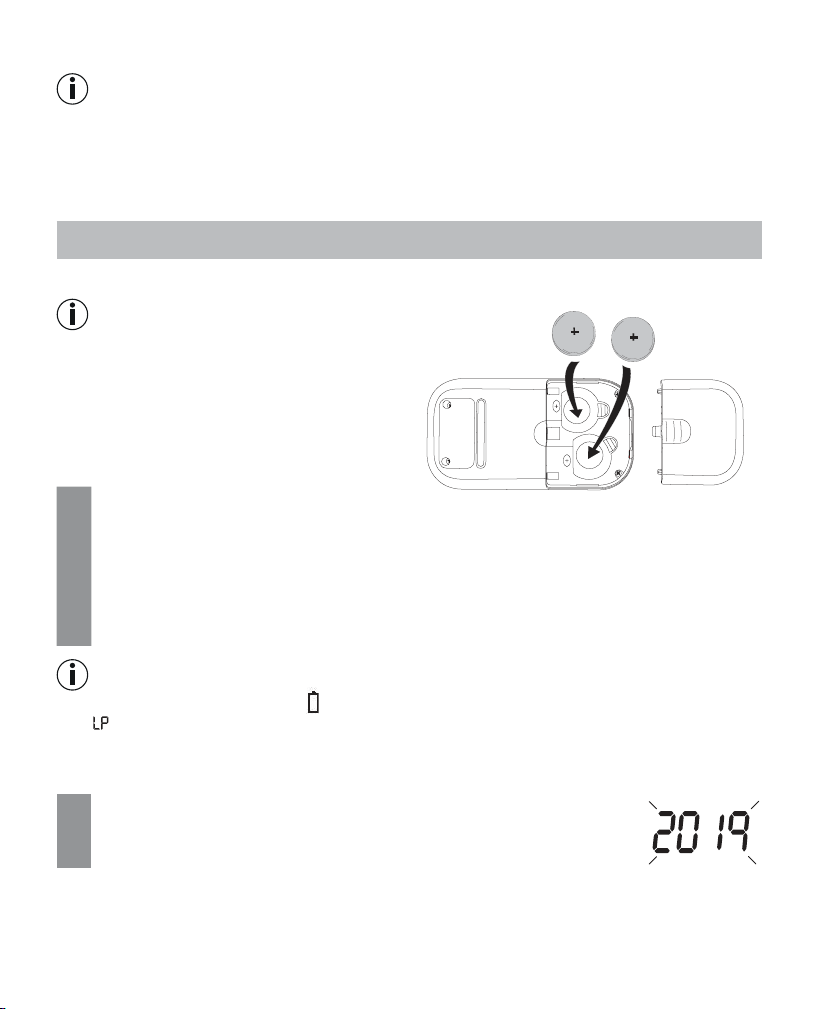
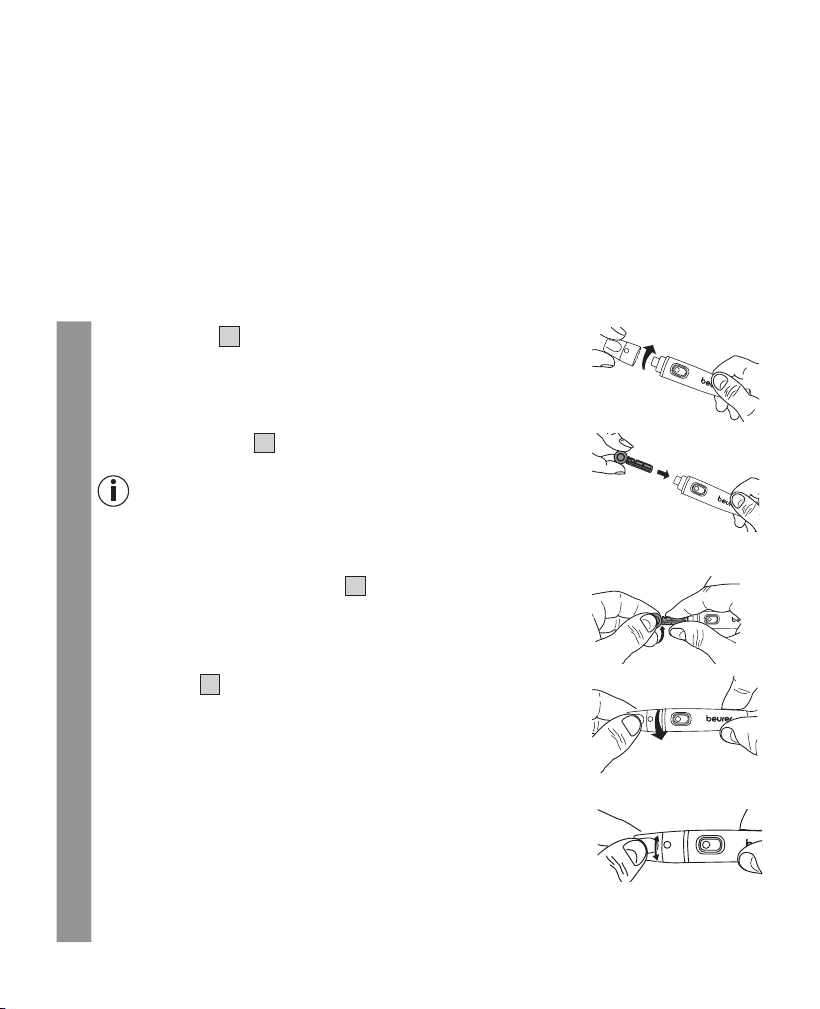
4.1 Removing the battery insulation strips, replacing the batteries
Note
•
Two batteries are included in delivery of the
blood glucose monitor. These have already
been inserted into the battery compartment.
•
Remove the insulation strip before initial
use.
1
Remove the battery compartment lid on the underside of the device.
2
When replacing the batteries, remove all batteries. If necessary, reset the date and time
(see “Making and changing basic settings”, page 14).
3
Insert two new CR 2032 3 V batteries. Make sure that the batteries are inserted the correct
way round in accordance with the markings. See the graphic in the battery compartment.
4
Close the battery compartment lid again carefully.
Note
•
The batteries are almost empty if appears. Replace both batteries as soon as possible.
•
If “ ” appears on the display, the battery power level is so low that no more measurements are
possible.
4.2 Making and changing basic settings
1
Remove the batteries and reinsert them. Alternatively, press the SET
button [8].
The year display flashes.
CR2032
CR2032
Beurer GL48 15
2
Setting the date and time
Note
Y
ou must set the date and time. Otherwise, you will not be able to save your measured values
correctly with a date and time and access them again later.
The time is displayed in the 24-hour format.
Set the year (calendar to 2099) by pressing the “+” or “–” button. Confirm using the SET but-
ton [8].
The day display flashes.
Proceed as described above for the month, day, hour and minute.
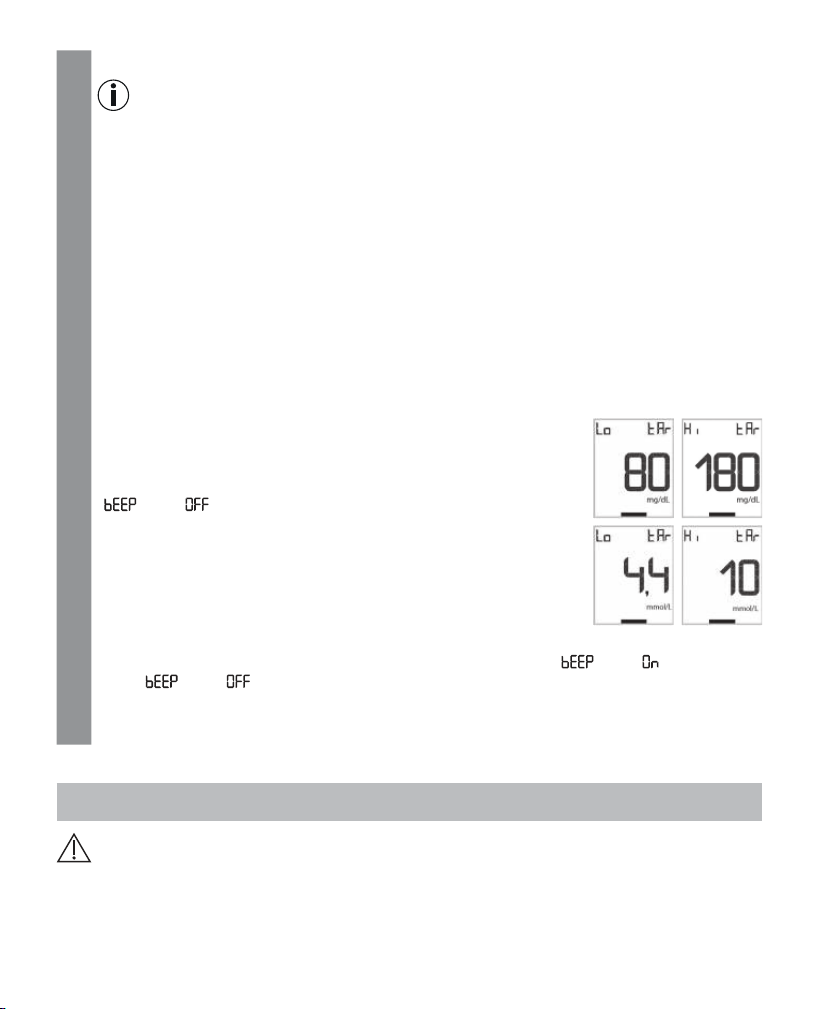
3
Setting the target scale
You can set a normal range for your blood glucose measuring results with the target scale.
After a measurement, a bar in the display will point at the colour-coded target scale beneath
the display.
The bar is in the red area = measurement value is below the set target range
The bar is in the green area = measurement value is within the set target range
The bar is in the yellow area = measurement value is above the set target range
Set the lower limit of your target range (Lo tAr) by pressing the
+/- button. Confirm using the SET button.
Set the upper limit of your target range (Hi tAr) by pressing the
+/- button. Confirm using the SET button.
“
” and “ ” are displayed.
4
Switching the acoustic signal on/o
To switch the acoustic signal on/o, press the “+” or “–” button. “ ” and “ ” for switched
on or “ ” and “ ” for switched o.
Confirm using the SET button [8].
5
The measuring device is now ready for use.
5. takinG the blood Glucose measurement
Warning
•
If the protective disc on a lancet needle has already been removed, do not use the lancet needle.
•
If you drop the lancing device with an inserted lancet needle, carefully pick it up and dispose of the
lancet.
16 Beurer GL48
Important
•
Use the lancing device only with lancet needles from the same manufacturer. Using other lancet
needles may prevent the lancing device from working properly. The instructions for use for the lan-
cing device can be found in section 12.
•
If you are using a third-party lancing device, please read the respective Instructions for Use.
5.1 Preparing to take a blood sample
1
Using the lancing device, you can take a blood sample from the fingertip. To make the pro-
cedure as painless as possible, do not take samples directly from the centre of the fingertip,
but slightly to either side.
Warning
•
In the event of suspected hypoglycaemia: take blood from the fingertip only.
Reason: changes to blood glucose levels can be detected quickly in blood samples taken
from the fingertip.
2
Prepare the following items: measuring device, test strip box, lancing device, sterile lancet
needles.
3
Wash your hands with soap and warm water before taking a blood sample. This not only en-
sures optimal hygiene but also encourages good blood circulation at the puncture area on the
finger. Dry your hands carefully.
Warning
If you have used alcohol for cleaning, ensure that the area has fully dried prior to measuring.
5.2 Taking a blood sample
Warning
•
Change the puncture area for each measurement, e.g. a dierent finger or the other hand. Repea-
tedly using the same area may cause inflammation, numbness or scarring.
•
Without the cap, there is a danger of injury from the exposed lancet.
•
Do not squeeze your finger to obtain a larger drop of blood. If squeezed, the blood is diluted with tis-
sue fluid and this may lead to an incorrect result.
•
Please note that insucient blood circulation at the puncture area, e.g. caused by cold temperatures
or illness, may lead to incorrect results.
Important
Do not apply any blood samples or control solutions to the test strip before inserting it in the measu
-
ring device.
1
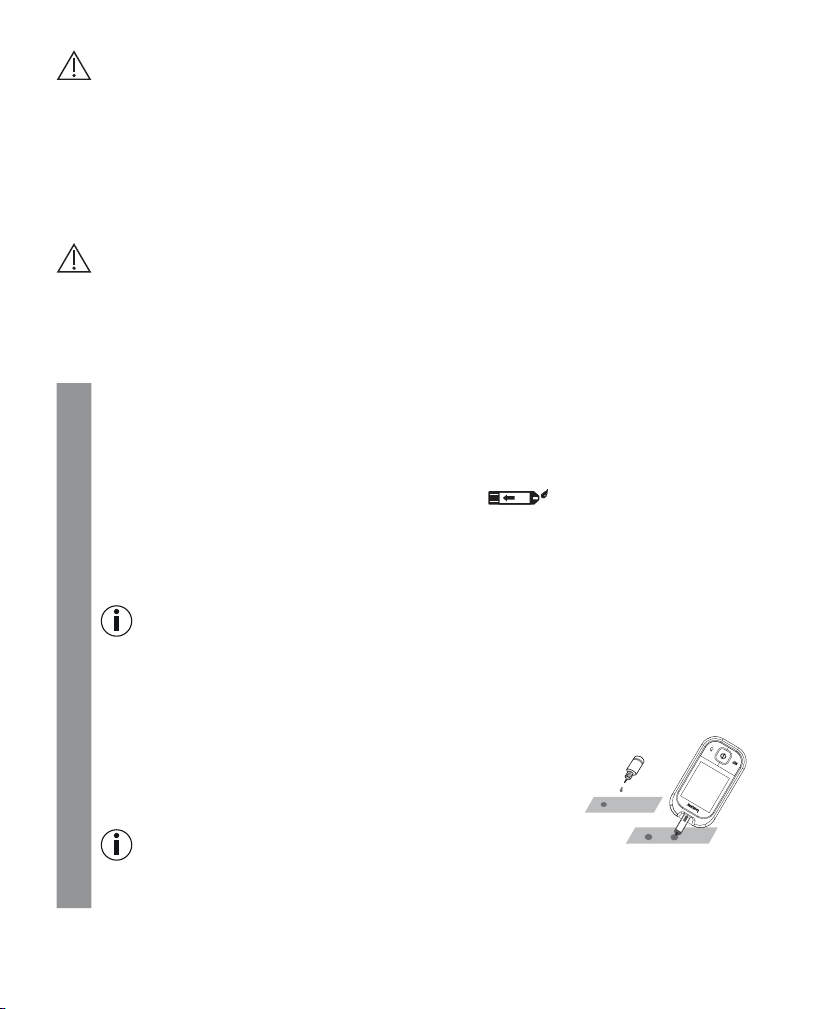
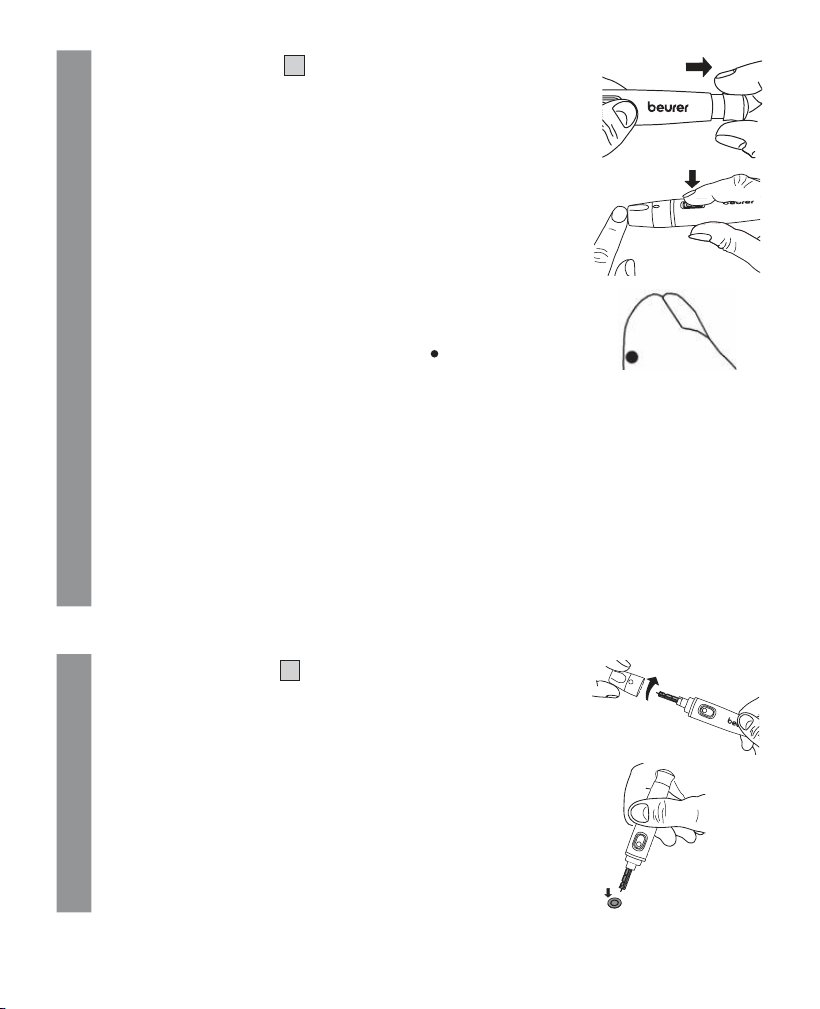
Take a test strip from the box and immediately close it again.
2
Hold the monitor so that the display is facing you.
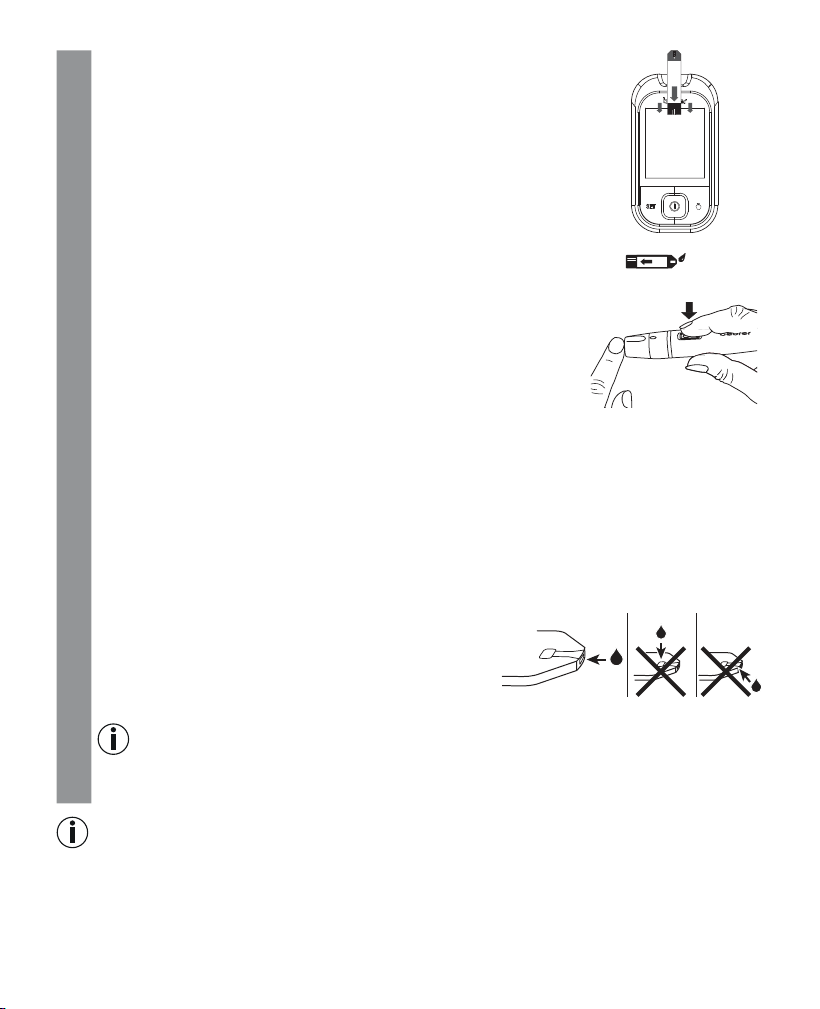
Beurer GL48 17
3
Firmly insert a test strip into the device with the contacts first. Please
make sure that the front is facing you. You can touch any part of the
test strip with clean, dry hands.
Use the test strip within three minutes of removal.
4
The device automatically switches on and shows the start display.
The device is ready for measuring
once the droplet in the test strip symbol starts
flashing
.
5
You may now use the lancing device to take a blood sample. Make
sure that the blood remains as a droplet and is not spread. Immedi-
ately use the blood droplet to take a measurement.
Please read section 12 of these instructions for use in order to find
out how to use the lancing device correctly to take a blood sample.
5
Please also note the following:
•
If the blood glucose test results do not match how you feel, carry out another test using blood
from your fingertip.
•
DO NOT change your treatment purely on the basis of a measurement that was carried out
using blood taken from an alternative area. Carry out another test with blood from your fin-
gertip in order to confirm the test result.
•
If you often fail to notice that you have a low blood glucose level, carry out a test using blood
from your fingertip.
6
If there is an insucient amount of blood, repeat steps 1 to 7 with a greater penetration depth.
7 Hold the blood input gap (at the tip of the test strip) to
the drop of blood until the gap is completely filled and
the monitor in the display starts counting backwards. Do
not press the penetration area to the test strip. The blood
must not be spread. The blood is sucked into the gap.
Note
Error message “002” appears on the display if the gap was not correctly and suciently filled
with blood. Repeat the measurement using a new test strip and a greater penetration depth.
Note
•
Do not apply blood to the sides of the test strips.
•
Do not add blood later if the device does not start the measurement. Remove the test strip and end
this test. Use a new test strip.
OK
18 Beurer GL48
•
The device switches itself o if the test strip has already been inserted into the device but no blood
is added to the test strip within two minutes. Briefly remove the test strip and reinsert it so that the
device automatically switches itself back on.
•
Contact Customer Services if you are unable to fill the test strip with blood correctly.
•
If you are measuring in a dark environment, press the ON/OFF button to switch the device on. The test
strip light switches on and makes it easier to insert the test strip.
5.3 Reading the result and labelling measurements
Reading the result
As soon as the gap is suciently filled with blood, the device performs the blood glucose measure
-
ment. The measuring device counts down for approx. five seconds.
The measurement is then shown on the display.
Reading the target scale
Using the target scale, you can determine if your blood glucose measurement lies in the set normal
range. After a measurement, a bar in the display will point at the colour-coded target scale beneath
the display.
The bar is in the red area = measurement value is below the set target range
The bar is in the green area = measurement value is within the set target range
The bar is in the yellow area = measurement value is above the set target range
Read the measured value. For explanations and actions for the measured values, see chapter “5.5 Eva-
luating measured blood glucose values”. If an error message is displayed, read chapter “8. What if
there are problems?”
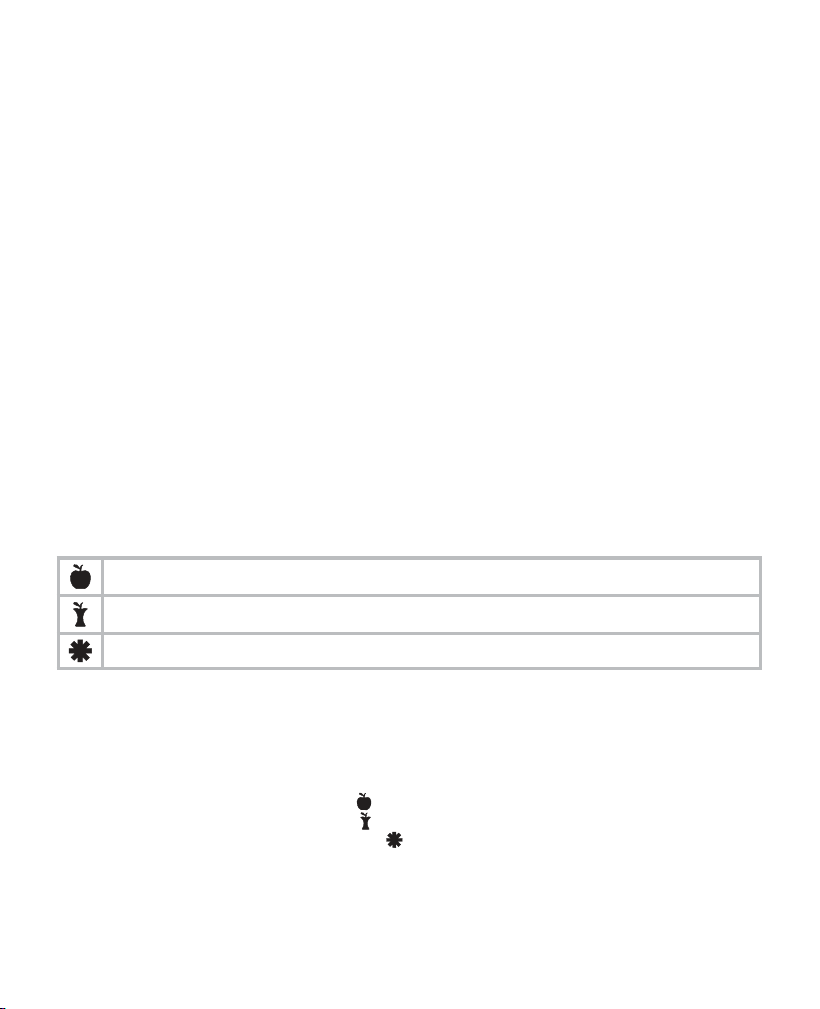
Highlighting measured values
You have the following options to highlight measured values.
Before meals.
After meals.
General highlight (e.g. after exercising).
Highlighting measured values enables you, your GP or diabetes consultant to better monitor your
blood glucose values. For example, you can display the average values of all measurements taken
before meals.
The measured value can be highlighted as soon as it is displayed. You cannot highlight it later.
For this purpose, briefly press the highlight button [3].
a) Pressing once highlights the value with
.
b) Pressing again highlights the value with .
c) Pressing yet again highlights the value with .
d) Pressing a final time removes the highlight.
The selected highlight is stored in the memory of the device when it is switched o.

Beurer GL48 19
5.4 Evaluating measured blood glucose values
Your blood glucose monitor can process measured values between 20 and 630 mg/dL (1.1 and
35.0 mmol/L). The “ ” warning is displayed for measured values below 20 mg/dL (1.1 mmol/L). For
measured values above 250mg/dL (13.9 mmol/L), a ketone warning is also displayed. The “ ” war-
ning is displayed for measured values above 630 mg/dL (35.0 mmol/L).
Warning
•
If you suspect that the blood glucose results are incorrect, first repeat the test and, if applicable,
perform a functional test using control solution. Seek medical advice if dubious results persist.
•
Immediately seek medical attention if your symptoms are not in line with your measured blood glu-
cose values and you have observed all instructions for the Beurer GL48 blood glucose measuring
system.
•
Do not ignore symptoms of too high/low blood glucose levels. Consult your doctor.
Blood glucose values
The following tables list blood glucose values based on the STANDARDS OF MEDICAL CARE IN DI
-
ABETES2016 from the ADA (American Diabetes Association).
Time of the blood glucose
measurement
Normal blood glu-
cose values
Increased risk of dia-
betes (prediabetes)*
Diabetes
On an empty stomach (fas-
ting plasma glucose)
Below 100mg/dL
Below 5.6 mmol/L
100 – 125 mg/dL
5.6 – 6.9 mmol/L
≥ 126 mg/dL
≥ 7.0 mmol/L
Two hours after an oral
glucose tolerance test (con-
sumption of 75g)
Below 140 mg/dL
Below 7.8 mmol/L
140 – 199 mg/dL
7.8 – 11.0 mmol/L
≥ 200 mg/dL
≥ 11.1 mmol/L
* The risk increases continually, beginning with values below the lower limit of the range and increasing disproportionately towards
the upper limit of the range.
Overview of glycaemic recommendations for non-pregnant adults with diabetes
A1C < 7.0%*
< 53 mmol/mol*
Preprandial capillary plasma glucose 80 – 130 mg/dL*
4.4 – 7.2 mmol/L*
Peak value of postprandial capillary plasma glu-
cose**
< 180 mg/dL*
< 10.0 mmol/L*
* For individual patients, more or less strict glycaemic targets may be appropriate. The target values should be adjusted depending
on the length of time the person has had diabetes, age/life expectancy, accompanying diseases, known cardiovascular diseases or
advanced microvascular complications, hypoglycaemia unawareness, as well as individual patient considerations.
** The postprandial glucose value can serve as a target value if the A1C values are not met despite the preprandial glucose targets
having been reached. Postprandial blood glucose measurements should be taken one to two hours after the start of a meal, as this
is when diabetics' values are generally at the highest.
20 Beurer GL48
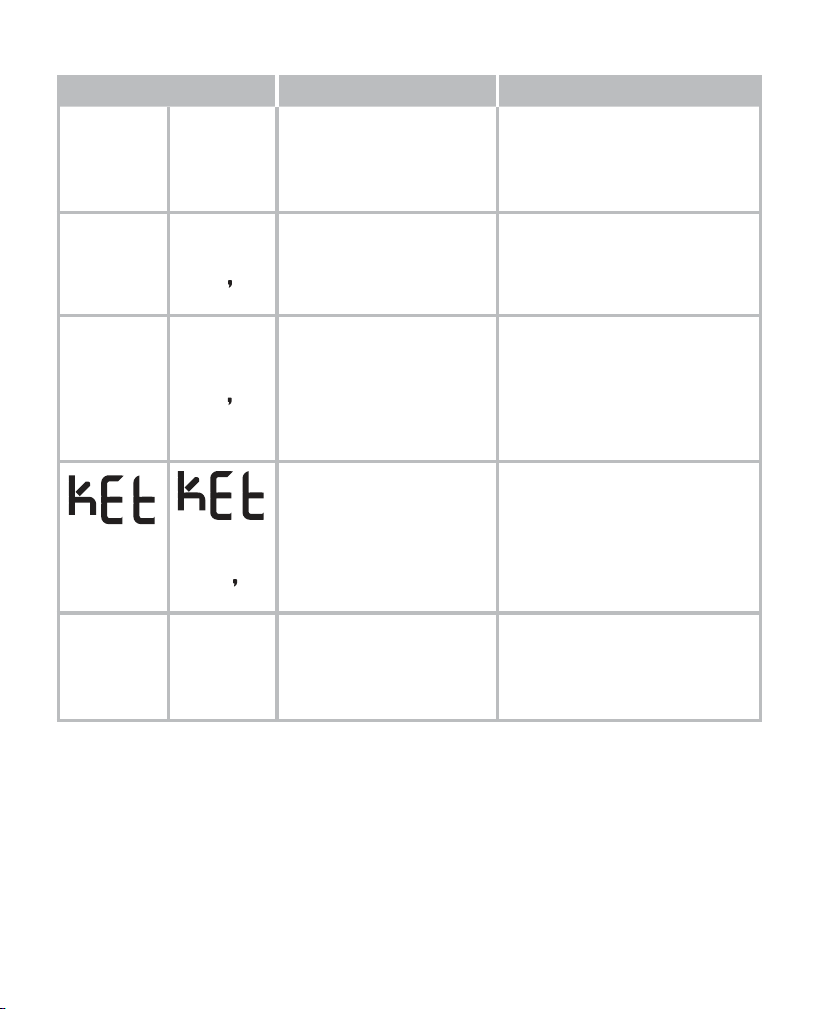
Evaluating critical measured values
Display Blood glucose Action
Lo
Lo
Very low blood glucose
level
below 20 mg/dL
(below 1.1 mmol/L)
Seek medical attention immediately.
65
mg/dL
3 6
mmol/L
Low blood glucose level
below 70 mg/dL
(below 3.9 mmol/L)
Have a suitable snack.
Follow your GP's instructions.
150
mg/dL
8 3
mmol/L
High blood glucose level
on an empty stomach, abo-
ve 100 mg/dL (5.6 mmol/L)
2 hours after a meal
above 140 mg/dL
(7.8 mmol/L)
If this high value persists 2 hours
after your last meal, this may in-
dicate hyperglycaemia (high blood
glucose). Seek medical attention
to coordinate any measures, if ap-
plicable.
300
mg/dL
16
7
mmol/L
High blood glucose level,
possibly ketones
above 250 mg/dL
(13.9 mmol/L)
Perform a ketone test. For this pur-
pose, seek medical attention.
H i
H i
Very high blood glucose
level
above 630 mg/dL
(35.0 mmol/L)
Take another measurement using a
new test strip. If the display is the
same as before: seek medical as-
sistance immediately.
5.5 Functional check using control solution
The control solution is used to test the entire blood glucose measuring system. This helps to deter-
mine whether the measuring device and the test strips are working optimally together and whether
the test is being performed correctly.
Perform the control solution test if you suspect that the measuring device and/or the test strips could
be faulty or if you have repeatedly measured unusual blood glucose values. Also test the measuring
device if it has been dropped or is damaged. The control solution is available separately. For the control
solution test, please observe the additional notes in the instructions for use for the control solution.
Beurer GL48 21
Important
•
Do not use control solutions by a dierent manufacturer. Correct functioning of your measuring de-
vice can only be tested using Beurer control solutions (LEVEL 7 + LEVEL 8).
•
Control solution measurements: When using the device, specialist personnel must follow statutory
guidelines.
•
Do not apply any blood samples or control solutions to the test strip before inserting it in the measu-
ring device.
Performing a functional test using control solution
Warning
To obtain correct results, the measuring device, the test strip and the control solution must be the
same temperature. For the “Functional test using the control solution”, the temperature is to be bet
-
ween 20°C and 26°C.
The check performed at room temperature is used as a general functional check. The operating range
specified in the technical specifications is valid without restriction.
1
Hold the measuring device so that the display is facing you.
2
Insert a test strip into the slot on the measuring device with the contacts first. Ensure the front
of the test strip is facing you (see “Test strip”, page 13).
3
The device automatically switches on and briefly shows the initial display.
The device is ready
for measuring once the droplet in the test strip symbol starts flashing
.
IMPORTANT: Control solutions and blood react to temperature influences in dierent ways.
It is therefore of vital importance that control solution measurement is always performed in
control solution mode. If this mode is not used, results may be obtained that are outside the
target range.
Note
Press the rocker switch “+” or “–”, to change to the control mode. “CONTROL” is shown on
the display. This means that the result value is not stored in the memory, therefore not influ
-
encing your measured value statistics. Press “+” or “–” again. “CONTROL” disappears from
the display and the value is stored normally in the memory.
4
A clean surface is required to perform a correct functional test.
Shake the control solution well before use.
Undo the cap and press two drops next to each other on the clean
surface without touching them. Use the second drop for the mea-
surement.
Note
Do not apply the drop directly to the test strip to avoid contaminating the remaining control
solution in the bottle by touching the test strip with the tip of the bottle.
22 Beurer GL48
5
Hold the input gap (at the tip of the test strip) to the drop of control solution until the gap is
completely filled and the display of the measuring device starts counting backwards.
When the gap is suciently filled with solution, the device performs a measurement. The de-
vice counts down for approx. five seconds. The measurement is then shown on the display.
6
Check whether the result is within the specified range of results for the control solution. This
range of results is printed on the test strip box or the test strip packaging or on the informa-
tion sheet included.
Expected results
At room temperature, the measured values from the test using the control solution should be within
the range printed on the test strip box in approx. 95% of all tests.
Warning
The specified value range (see test strip box) only applies for the control solution. This is not a re
-
commended value for your blood glucose level.
If measured values are outside the specified range, check the following possible causes:
Cause Action
•
The first drop of control solution was not
disposed of.
•
The tip of the bottle was not cleaned
correctly.
•
The bottle was not shaken well enough.
Rectify the cause and repeat the test.
Control solution and/or test strips have
passed their expiry date or are contami-
nated.
Repeat the test using a new bottle of control solution
and/or new test strip from a new box.
The control solution, test strips or measu-
ring device are too warm or too cold.
Bring the control solution, test strips and measuring
device to room temperature (+20°C to +26°C) and re-
peat the test.
The check performed at room temperature is used as a
general functional check. The operating range specified
in the technical specifications is valid without restriction.
The test strips and control solution were
kept at a temperature and humidity out-
side the specified range.
Repeat the test using new/correctly stored test strips
and control solution.
Damaged test strips.
For example:
•
Test strips that were exposed to fresh
air for too long.
•
The test strip box was not closed com-
pletely.
Repeat the test using a new test strip and/or correctly
stored test strips from a new box.
Beurer GL48 23
Cause Action
There is a problem with the measuring
device.
Contact Customer Services.
Functional test was incorrectly perfor-
med.
Repeat the test and follow the instructions.
Warning
Do not use the system to measure your blood glucose level if you are repeatedly provided with
measurements outside the specified range when using control solution. Contact Customer Services.
6. measurement memory
For each measurement, your blood glucose value is automatically saved with the date and time unless
“CONTROL” was activated for a blood glucose measurement using control solution.
The memory can store a maximum of 900 measured values. If the memory is full, the oldest value is
replaced by the most recent value. You can call up every individual measured blood glucose value.
You can also calculate and display the average value for the last 7, 14, 30 and 90 days.
Note
•
If you have already saved measured values and you reset the date, the average values are calculated
as from the new period.
•
“---” indicates an empty memory for measured values. Press the On/O button to switch o the de-
vice.
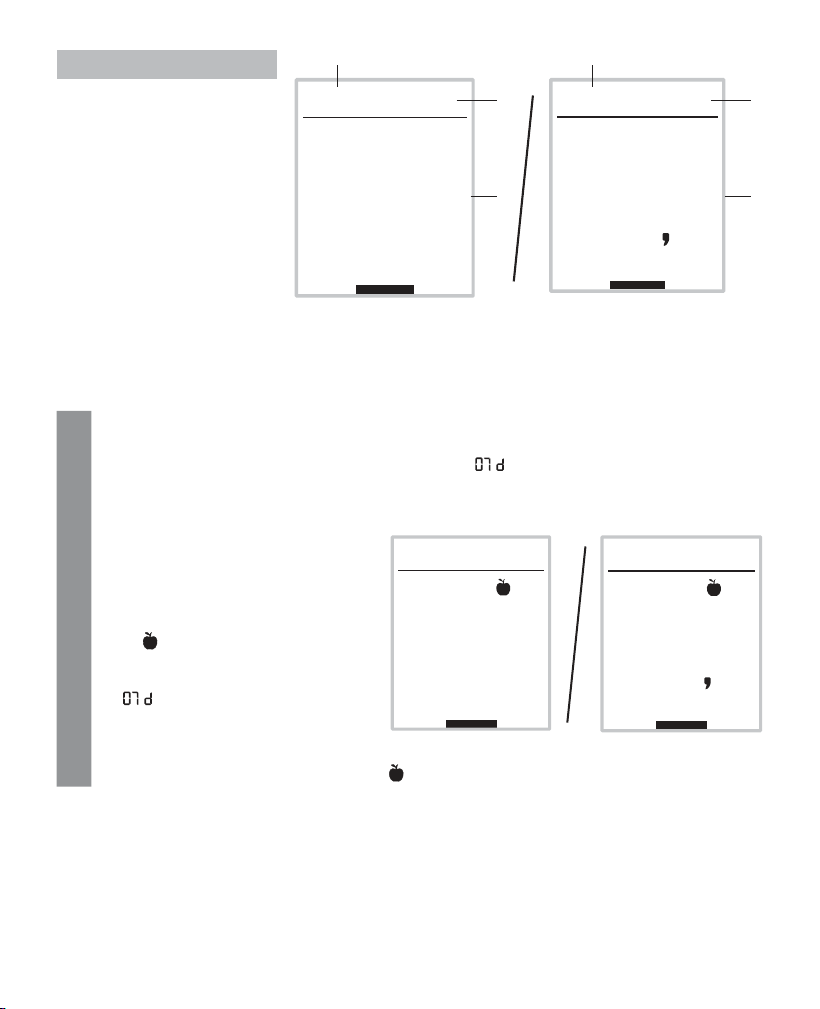
6.1 Displaying individual values
The individual values from the last 900 measurements are displayed. The most recent measured
value is displayed first, and the oldest last. The date and time are also displayed on the measuring
device at the same time.
1
Switch the measuring device on using the ON/OFF button [4]. The initial display is shown
briefly. Press the “+” or “–” rocker switch [6].
2
The recorded measurement value with the measurement unit, time,
88.88. 88:88
and any measurement
label is briefly displayed together with the memory space number (image 1). The memory
space number is then replaced in the display by the date (image 2).

24 Beurer GL48
2
Image 1
0026 12:38
mg/dL
186
10
3
0026 12:38
mmol/L
186
09.03. 12:38
mg/dL
09.03. 12:38
10
3
mmol/L
Image 2
3
Pressing the rocker switch “–” [6] will display the previous measured value each time. You
can display a maximum of 900 previous measurements.
4
You can cancel the process at any time. To do so, press the ON/OFF button or wait until the
device switches itself o automatically after 2 minutes.
6.2 Displaying average blood glucose values
You can display the average measured blood glucose value from the last 7, 14, 30 and 90 days.
1
Switch the measuring device on using the ON/OFF button [4]. The initial display is shown
briefly. Press the “+” rocker switch [6] twice.
The measurement unit of the blood glucose value, “ ” and the average value are displayed.
2
Press “+” [6] repeatedly to display the average value for 7, 14, 30 and 90 days.
3
You can cancel the process at any time. To do so, press the ON/OFF button or wait until the
device switches itself o automatically after 2 minutes.
Beurer GL48 25
No. Explanation
97
0008 07d
mg/dL
1
2
3
0008 07d
5 4
mmol/L
1
2
3
1 Average value
2 Number of days,
e.g. 7
3 Number of saved
values used to calcu
-
late the average
6.3 Displaying average blood glucose values for labelled values
You can display the average measured blood glucose value for labelled values from the last 7, 14,
30 and 90 days.
1
Switch the measuring device on using the ON/OFF button [4]. The initial display is shown
briefly. Press the “+” rocker switch [6] twice.
The measurement unit of the blood glucose value, “ ” and the average of all measured
values are displayed.
2
Press “+” [6] repeatedly to display the average value of all measured values for 14, 30 and
90 days.
After the average of all measured valu
-
es for 90 days is displayed
•
the 7-day average for values measu-
red “before a meal”
•
the symbol
•
the unit of measurement for blood glu-
cose values and
•
“ ”
are shown on the display.
Press “+” [6] repeatedly to display the average blood glucose value from the last 14, 30 and
90 days for values taken “before meals”
.
0014 07d
90
mg/dL
0014 07d
mmol/L
5 0
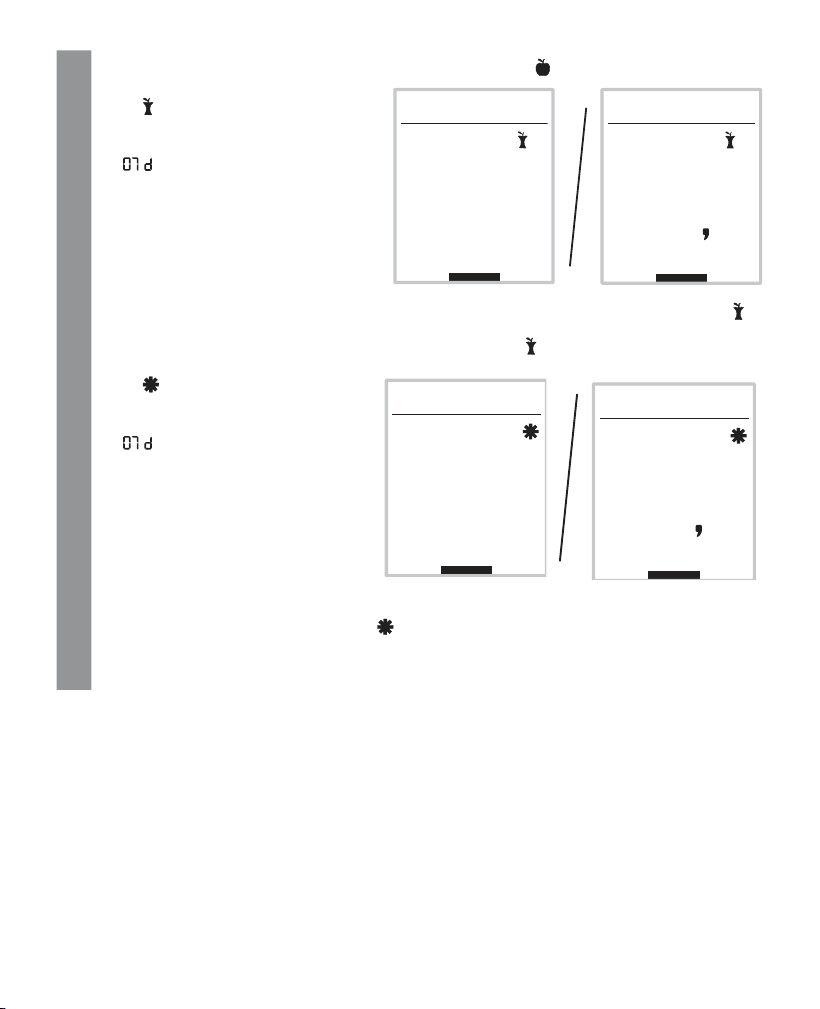
26 Beurer GL48
2
After displaying the average value for 90 days “before
meals”
•
the 7-day average for
values measured “after meals”
•
the symbol
•
the unit of measurement for blood
glucose values and
•
“ ”
are shown on the display.
Press “+” [6] repeatedly to display the average value for 14, 30 and 90 days “after meals”
.
After displaying the average value for 90 days “after meals”
•
the average for the last 7 days of values labelled as “general”
•
the symbol
•
the unit of measurement for blood
glucose values and
•
“ ”
are shown on the display.
Press “+” [6] repeatedly to display the average blood glucose value from the last 14, 30 and
90 day for values labelled as “general” .
3
You can cancel the process at any time. To do so, press the ON/OFF button or wait until the
device switches itself o automatically after 2 minutes.
0025 07d
146
mg/dL
0025 07d
81
mmol/L
97
0009 07d
mg/dL
0009 07d
54
mmol/L

Beurer GL48 27
Note: Speed function
You are in the measurements memory. By pressing the label button [3], you can switch to the dierent
7-day average values. In this way, you can get to the desired average value more quickly. For example:
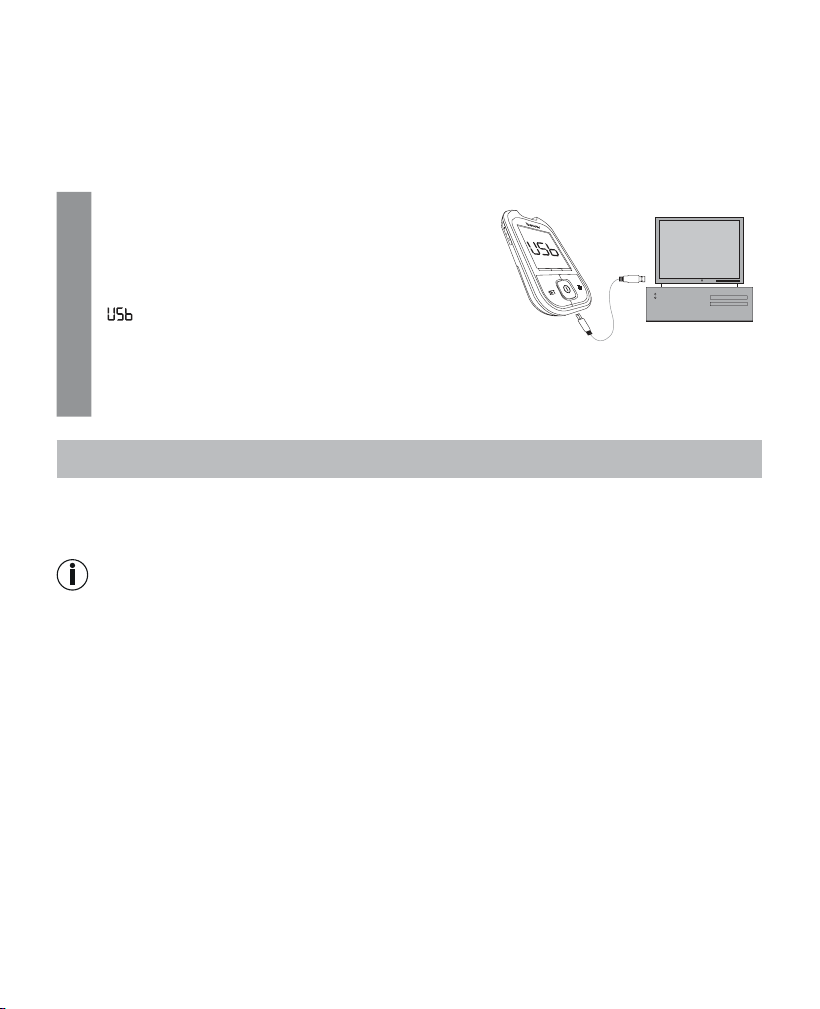
6.4 Transferring measurements to a PC
The GL48 measurement system includes a PC interface [5] that enables you to transfer measured
values saved on the device to a PC. (For the position of the connection port, see page 11).
Beurer blood glucose diary software is available to download for free at
www.beurer.com. This software enables you to evaluate your measured values, add insulin doses
and print results. The software helps you and your GP to better monitor your blood glucose level.
For more information, please read the instructions for use of the blood glucose diary software (also
available to download). This includes all the information required for data transfer and a detailed de-
scription of the software (in English and German language).
The GL48 measuring system is also compatible with Diabass and SiDiary.
Note
•
An eective evaluation is only possible if you have correctly set the date and time (see
page
14
).
•
During data transfer, no measurements can be taken.
•
The measurements remain saved on the measuring device after they have been transferred to the
PC.
Important
Use only the USB cable provided for data transfer. Otherwise you may damage your measuring de
-
vice or PC.
mg/dL
97
0009 07d
0014 07d
90
mg/dL
0025 07d
146
mg/dL
0009 07d
97
mg/dL
0009
07d
54
mmol/L
0014 07d
5
0
mmol/L
0025 07d
81
mmol/L
0009 07 d
54
mmol/L
28 Beurer GL48
Preparation
•
Position the blood glucose monitor near to your PC.
•
Connect the GL48 monitor to your PC using the USB cable provided.
•
Install the blood glucose diary software on your PC as described in the instructions for use of the
software.
Transferring measurements
1
The measuring device must be switched o. Insert
the larger, flat USB connector of the connection
cable into a USB port on your PC. Insert the mini
USB connector into the integrated interface socket
on the GL48 monitor.
2
“ ” is shown on the display of the measuring de-
vice. The measuring device is now ready for the da-
ta transfer.
3
Follow the information on data transfer and evaluation provided in the software and the ins-
tructions for use of the software.
7. storinG, maintaininG and disinfectinG the device
Storing
Keep the Beurer GL48 blood glucose monitor in the case supplied after each measurement and do
not expose it to direct sunlight.
Note
•
Do not store the device, test strips and control solution in your vehicle, in the bathroom or in a coo-
ling appliance!
•
Retain these instructions for use.
•
Remove the batteries if you do not intend to use the device for a prolonged period of time.
7.1 Cleaning
Device
Only clean the device when it is switched o.
Clean the surface of the device using a soft, slightly damp cloth (water or a mild cleaning solution).
Dry the device using a lint-free cloth.
Make sure that moisture does not enter the test strip insertion slot. Do not spray cleaning agent di
-
rectly on the device. Do not submerge the device in water or any other fluids and make sure that no
fluids can get into the device.
Beurer GL48 29
7.2 Disinfection
Device
Please comply with the generally applicable guidelines on disinfection when using the device on dif
-
ferent persons. Do not submerge the device in disinfection solutions or any other fluids and make
sure that no fluids can enter the device.
Note
The measuring device is made of precision components. The accuracy of the measurements and
service life of the device depend on its careful handling:
•
Protect the device from impacts and do not drop it.
•
Protect the device from damaging factors such as moisture, dirt, dust, blood, control solution or
water, marked temperature fluctuations, direct sunlight and extreme cold.
•
If the device is used in a dry environment, in particular near synthetic materials (clothes containing
synthetic fibres and carpets, for example), the damaging static discharges which occur may cause
erroneous results.
•
Do not use the device near sources of strong electro-magnetic radiation, as this may aect normal
operation.
•
It is a good idea to carry out an assessment of the electro-magnetic environment before using the
device commercially.
8. what if there are problems?
Display messages on batteries and blood glucose measurement
No. Cause Solution
LP Batteries empty. Replace all batteries.
ht
Temperature of the measuring envi-
ronment, measuring device or test
strip above the permitted range.
Repeat the test using a new test strip as soon as
the measuring environment, measuring device and
test strips have reached room temperature (+20°C
to +26°C).
The check performed at room temperature is used
as a general functional check. The operating ran-
ge specified in the technical specifications is valid
without restriction.
Lt
Temperature of the measuring envi-
ronment, measuring device or test
strip below the permitted range.
Repeat the test using a new test strip as soon as
the measuring environment, measuring device and
test strips have reached room temperature (+20°C
to +26°C).
The check performed at room temperature is used
as a general functional check. The operating ran-
ge specified in the technical specifications is valid
without restriction.
30 Beurer GL48
No. Cause Solution
Err
Used or contaminated test strip in-
serted.
• Insert an unused test strip that has not expired.
• Repeat the blood glucose measurement.
Err001 System error.
Remove batteries, reinsert batteries. Should the
problem persist any longer, contact Customer Ser-
vices.
Err002 Insucient blood on the test strip. Repeat the measurement using a new test strip.
Err004 Measurement process malfunction. Check the necessary steps before the blood glu-
cose measurement and repeat the measurement
using a new test strip.
Unknown error messages.
Remove batteries, reinsert batteries. Should the
problem persist any longer, contact Customer Ser-
vices.
Problem: device does not switch on
Cause Solution
Batteries empty. Replace batteries.
Incorrectly inserted or missing batteries.
Check whether the batteries have been inserted
correctly (see “Inserting and replacing the batte-
ries” on page 14).
Test strip inserted incorrectly or not completely.
Firmly insert the test strip into the slot on the de-
vice with the contacts first. Make sure that the front
of the test strip is facing you (see “Test strip” on
page 13).
Device faulty. Contact Customer Services.
Problem: the test does not start after inserting the test strip into the device and applying blood
Cause Solution
Insucient blood or test strip not filled cor-
rectly.
Repeat test using a new test strip and a larger drop
of blood. Please note the correct filling of the test
strip (see page 18).
Faulty test strip. Repeat the test using a new test strip.
Blood was applied while the device was swit
-
ched o.
Repeat the test using a new test strip. The de-
vice is only
ready for measuring when the droplet
in the test strip symbol in the display
starts flashing.
Beurer GL48 31
Cause Solution
The basic settings of the device were chan-
ged and the changes were not completed
(see “Making and changing basic settings” on
page 14).
Remove the test strip and press the “ON/OFF” but-
ton until
OFF
is displayed.
Repeat test.
Device faulty. Contact Customer Services.
9. technical specifications
Dimensions (W x H x D) 94.3 x 51.7 x 14.3 mm
Weight 50 g incl. batteries
Power supply 2 x 3 V CR 2032 button cell batteries
Battery life
>1000 measurements
Measured value memory 900 measured values with date/time
Data retained when batteries are changed
Average values for 7, 14, 30, 90 days
Automatic switch-o 2 minutes after last actuation
Storage/
transport temperature
Temperature: +2°C – +30°C
Relative humidity: < 90%
Operating ranges Temperature: +10°C – +40°C
Relative humidity: < 90% non-condensing
Measuring range, glucose Glucose: 20 – 630 mg/dL (1.1 - 35.0 mmol/L)
Blood sample Capillary whole blood
Amount of blood 0.5 microlitres
Blood glucose measurement du
-
ration
Approx. 5 seconds
Calibration Plasma
Testing method Amperometric bio sensor
Use Suitable for self-testing
System function test Each time device is switched on
The serial number is located on the device or in the battery compartment.
EMC
This device complies with the European standard EN 61326 and is subject to specific precautions
with regard to electromagnetic compatibility. Please note that portable and mobile HF communica
-
tion systems may interfere with this device. For more details, please contact our Customer Services
at the address indicated.

32 Beurer GL48
Test strip functionality
Test strips enable a quantitative measurement of the glucose level in fresh whole blood. When the
gap for taking blood comes into contact with a drop of blood, it is automatically filled by simple ca
-
pillary action. The blood is sucked into the absorbing gap on the test strip and the measuring device
measures the blood glucose level in the blood.
The test is based on the measurement of an electric current that is generated by the chemical reaction
of the glucose with the enzyme glucose dehydrogenase (Aspergillus oryzae) on the strip.
During the reaction, a mediator transports electrons through the electrode surface and so genera-
tes a current.
The measuring device analyses this current. The current flow is proportional to the glucose content in
the blood sample. The results are shown on the blood glucose monitor display. Only a small amount
of blood is required (0.5 microlitres) and the duration of measurement is approx. five seconds. The
test strips detect blood glucose values from 20 to 630 mg/dL (1.1 to 35.0 mmol/L).
Chemical components of the test strip sensor
•
FAD glucose dehydrogenase 8%
•
Electron shuttle 55%
•
Enzyme protector 8 %
•
Non-reactive components 29%
Control solution functionality
The control solution contains a fixed amount of glucose that reacts with the test strip. A test with
control solution is similar to a blood test. However, control solution is used instead of blood. The
measured result using control solution must be within the result range. This value range is printed
on every test strip box.
Chemical composition of the control solution
The control solution is a red solution with the following D-glucose level (in percentage shares).
Substances LEVEL 7 control solution LEVEL 8 control solution
D-glucose 0.09% 0.25%
Non-reactive components 99.91% 99.75%
Standards
For the device (including test strips and control solution), the Beurer GL48 measuring system
complies with the European directive IVD (98/79/EC). The lancet needles comply with the Europe
-
an directive MDD (93/42/EC). The lancing device complies with the regulation (EU) MDR (2017/745)
on medical devices.
10.
comparison of measured values with laboratory values
Precision
Three lots of the blood glucose test strips have been tested to assess the precision of the GL 48 and
GL 49 blood glucose measuring systems. This includes a repeat assessment using venous blood
and a laboratory precision assessment using the control material. The blood glucose content of the
Beurer GL48 33
venous blood samples ranges from 40.2 to 311.5 mg/dL (2.2 to 17.3 mmol/L) and control material
from three concentrations is used.
Results of the repeat precision measurements
Sam-
ple
Blood glucose
concentration ranges
Grand mean value Pooled standard
deviation
Pooled coecient
of variation (%)
mg/dL mmol/L mg/dL mmol/L mg/dL mmol/L
1 30-50 1.7-2.8 40.2 2.2 1.6 0.1 ---
2 51-110 2.9-6.1 89.5 5.0 2.3 0.1 2.6
3 111-150 6.2-8.3 133.2 7.4 4.6 0.3 3.4
4 151-250 8.4-13.9 211.4 11.7 7.1 0.4 3.4
5 251-400 14.0-22.2 311.5 17.3 9.1 0.5 2.9
Results of the intermediate precision measurement
Sam-
ple
Glucose
concentration ranges
Control material
Grand mean value Pooled standard
deviation
Pooled coecient
of variation (%)
mg/dL mmol/L mg/dL mmol/L mg/dL
mmol/L
1 30-50 1.7-2.8 41.5 2.3 1.6 0.1 ---
2 96-144 5.3-8.0 131.3 7.3 3.5 0.2 2.7
3 280-420 15.5-23.3 320.9 17.8 7.9 0.4 2.5
System accuracy
The GL 48 and GL 49 blood glucose monitors compared to the YSI 2300.
Three lots of blood glucose test strips have been tested to assess the system accuracy of the GL 48
and GL 49 blood glucose measuring systems and to compare it with the reference method in which
capillary whole blood concentrations of 36.4 mg/dL (2.0 mmol/L) to 595.0 mg/dL (33.0 mmol/L) have
been used.
Results of the system accuracy for glucose concentrations <100 mg/dL (<5.55 mmol/L)
Within ±5 mg/dL
(Within ±0.28 mmol/L)
Within ±10mg/dL
(Within ±0.56 mmol/L)
Within ±15mg/dL
(Within ±0.83 mmol/L)
218/306 (71.2%) 298/306 (99.7%) 305/306 (99.7%)
Results of the system accuracy for glucose concentrations ≥100 mg/dL (≥5.55 mmol/L)
Within ±5% Within ±10% Within ±15%
344/654 (52.6%) 568/654 (86.9%) 644/654 (98.5%)

34 Beurer GL48
Results of the system accuracy for combined glucose concentrations between 36.3 mg/dL
(2.0mmol/L) and 597.0 mg/dL (33.1 mmol/L).
Within ±15 mg/dL or ±15%
(Within ±0.83 mmol/L or ±15%)
949/960 (98.9%)
In comparison to the YSI 2300, the GL 48 and GL 49 met the EN ISO 15197:2015 standard, whereby
95% of the blood glucose values measured have to fall within the following zones: either ±15 mg/dL
(± 0.83mmol/L) of the measured average value when using the reference measuring procedure for
blood glucose concentrations <100 mg/dL (<5.55 mmol/L) or ±15% for blood glucose concentrations
of ≥100 mg/dL (≥5.55 mmol/L). 99 % of the individual measured blood glucose values must fall within
zones A and B of the Consensus Error Grid (CEG) for diabetes type 1.
Performance evaluation by the user
A study to assess the glucose values of blood samples of capillary blood from the fingertips, which
were obtained from 160 individuals that had no special training, produced the following results:
100% within ±15 mg/dL (±0.83 mmol/L) with glucose concentrations <100 mg/dL (<5.55 mmol/L)
and 100% within ±15% of the values obtained in the medical laboratory with glucose concentrations
of at least 100 mg/dL (5.55 mmol/L).
11. usaGe limits for specialist personnel from the
healthcare sector
1.
If the patient exhibits the following symptoms, it may be the case that no correct values can be ob-
tained:
•
Acute dehydration
•
Acute hypotension (low blood pressure)
•
Shock
•
Hyperosmolar hypoglycaemic condition (with or without ketosis)
2. Lipaemic samples: Cholesterol levels up to 400 mg/dL (10.34 mmol/L) and triglycerid levels up to
800 mg/dL (9.37 mmol/L) do not influence the results. Severely lipaemic blood samples were not
tested with the Beurer GL49 blood glucose measuring system; therefore, using the device with
these samples is not recommended.
3. In the case of severely ill patients, blood glucose monitors for home use should not be used.
4. The eect of interfering substances on the measurements depends on the concentration in the
blood. The maximum concentrations of certain substances listed below do not significantly influ-
ence the measurements.
Beurer GL48 35
Concentration of
tested substances
50-100 mg/dL
(2.8-5.6 mmol/L)
250-350 mg/dL
(13.9-19.4 mmol/L)
Acetaminophen
7 mg/dL (0.46 mmol/L) 6.6 mg/dL
(0.37 mmol/L)
4.5%
Ascorbic acid
4 mg/dL (0.23 mmol/L) 3.3 mg/dL
(0.18 mmol/L)
5.1%
Bilirubin
3.3 mg/dL (0.06 mmol/L) 0.1 mg/dL
(0.0 mmol/L)
-1.4%
Cholesterol
400 mg/dL (10.34 mmol/L) -6.8 mg/dL
(-0.38 mmol/L)
-6.2%
Creatinine
30 mg/dL (2.65 mmol/L) 0.0 mg/dL
(0.0 mmol/L)
-0.1%
Dopamine
2.2 mg/dL (0.14 mmol/L) 5.0 mg/dL
(0.28 mmol/L)
1.0%
EDTA
5.0 mg/dL (0.17 mmol/L) -2.0 mg/dL
(-0.11 mmol/L)
-2.4%
Ephedrine
40 mg/dL (2.42 mmol/L) -3.9 mg/dL
(-0.22 mmol/L)
2.4%
Galactose
20 mg/dL (1.11 mmol/L) -3.1 mg/dL
(-0.17 mmol/L)
0.5%
Gentisic acid
7 mg/dL (0.45 mmol/L) 7.2 mg/dL
(0.40 mmol/L)
2.9%
Glutathione
1 mg/dL (1 mmol/L) -2.6 mg/dL
(-0.14 mmol/L)
-3.7%
Haemoglobin
300 mg/dL (0.05 mmol/L) -3.1 mg/dL
(-0.17 mmol/L)
-2.6%
Heparin
2.1 mg/dL
(0.0018 mmol/L)
-3.0 mg/dL
(-0.19 mmol/L)
-1.3%
Ibuprofen
50 mg/dL (2.43 mmol/L) -2.6 mg/dL
(-0.14 mmol/L)
-1.9%
Icodextrin
1094 mg/dL
(0.64~0.78 mmol/L)
-4.17 mg/dL
(-0.23 mmol/L)
-2.9%
Blood glucose
value
Influence
36 Beurer GL48
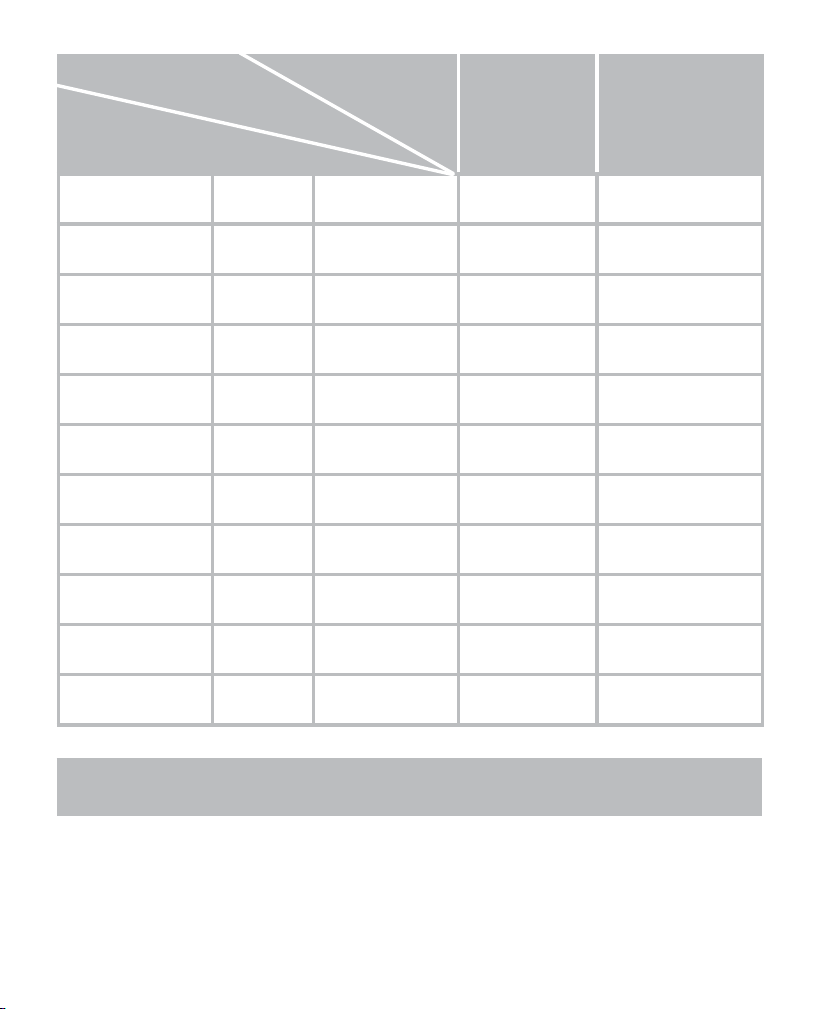
Concentration of
tested substances
50-100 mg/dL
(2.8-5.6 mmol/L)
250-350 mg/dL
(13.9-19.4 mmol/L)
L-Dopa
2 mg/dL (0.10 mmol/L) 9.3 mg/dL
(0.52 mmol/L)
7.9%
Maltose
278 mg/dL (7.72 mmol/L) -1.53 mg/dL
(-0.09 mmol/L)
-2.6%
Methyldopa
4 mg/dL (0.19 mmol/L) 7.3 mg/dL
(0.41 mmol/L)
0.9%
Pralidoxime iodide
5 mg/dL (0.14 mmol/L) 1.7 mg/dL
(0.09 mmol/L)
-0.1%
Sodium salicylate
40 mg/dL (2.50 mmol/L) 3.1 mg/dL
(0.17 mmol/L)
-0.6%
Salicylic acid
60 mg/dL (4.34 mmol/L) -0.1 mg/dL
(-0.01 mmol/L)
7.6%
Tolbutamide
100 mg/dL (3.70 mmol/L) 0.5 mg/dL
(0.02 mmol/L)
-0.8%
Tolazamide
2.5 mg/dL (0.08 mmol/L) -2.3mg/dL
(-0.13 mmol/L)
-1.8%
Triglyceride
800 mg/dL (9.37 mmol/L) -7.5 mg/dL
(-0.42 mmol/L)
-4%
Uric acid
16.5 mg/dL (0.98 mmol/L) 6.6 mg/dL
(0.37 mmol/L)
1.8%
Xylose
9.5 mg/dL (0.63 mmol/L) 5.6 mg/dL
(0.31 mmol/L)
6.6%
12. instructions for use of the ld 04 lancinG device and
the softlancets
12.1 Purpose
The lancing device is intended to be used in conjunction with a separate lancet to take a blood sample
for measuring the sugar content of human capillary blood.
Use the lancing device with lancets only on the skin areas intended for taking the glucose measurement
(fingertips).
Blood glucose
value
Influence
Beurer GL48 37
Target group
The lancing device with lancets is suitable for use by humans at home. The lancing device is not
suitable for use by people (including children) with restricted physical, sensory or mental abilities,
or lack of experience and/or lack of knowledge, unless they are supervised by someone who is
responsible for their safety, or have received instructions from this person on how to use the device.
Do not allow children to play with the device.
The lancets are suitable for use on adults and children from 2 years of age.
Clinical benefits
Taking a blood sample to determine the glucose value in human capillary blood and to inform any
medical treatment that may be prescribed as a result.
Indication
Applicable for diabetes mellitus to determine the glucose value in human capillary blood.
Contraindications
Use the lancing device with lancets only on the body parts listed in these instructions for use. Do
not use on injured, inflamed or scarred skin or in areas where there is already sensory dysfunction.
If you drop the lancing device with a lancet inserted, carefully pick it up and dispose of the lancet.
Change the puncture area each time you take a measurement, e.g. use a dierent finger or the other
hand. Repeatedly using the same area may cause inflammation, numbness or scarring. Make sure
the puncture area is hygienically clean.
12.2 Warnings and safety notes
Risks to the user
•
The lancing device is suitable for self-testing. Never share the lancing device or lancet with others
(risk of infection).
•
Supervise children when using the device to ensure they do not play with it.
•
Use a new sterile lancet for each blood sample (for single use only).
•
If you drop the lancing device with a lancet inserted, carefully pick it up and dispose of the lancet.
•
Change the puncture area each time you take a measurement, e.g. use a dierent finger or the
other hand. Repeatedly using the same area may cause inflammation, numbness or scarring.
•
Make sure the puncture area is hygienically clean.
Risks to the device
•
Use the lancing device only with lancets from the same manufacturer. Using other lancets may
permanently prevent the lancing device from working properly.
12.3 Device description
Lancing device and lancets
28. Cap
29. Protective lancet disc
30. Sterile lancet
31. Lancet holder
5
28
29
30
31
32
33
34
38 Beurer GL48
32. Lancet ejection
33. Trigger button
34. Tensioning device
12.4 Initial use
Unpack the lancing device and check that all the contents are present and intact. Before using the
device for the first time, check that the lancing process works correctly. To do this, tension the lancing
device once without a lancet inserted and press the trigger. When testing that the device functions
correctly, make sure that there is NOT a lancet inserted in the lancing device.
If you have any doubts about whether the lancing device is working correctly, please contact our
Customer Service team specified in these instructions for use.
12.5 Usage
1
Remove the cap
28
from the lancing device.
5
2
Insert a sterile lancet
30
into the lancing device and press it firmly
into place.
Note
Your starter set contains lancets in 2 dierent needle sizes. If you are
unable to take an adequate blood sample using the smaller needles
(purple, 33G), please use the slightly larger needles (blue, 28G).
3
Remove the protective lancet disc
29
by turning it while holding the
shaft of the lancet. Retain the protective disc for the safe disposal of
the used lancet after taking a blood sample.
4
Place the cap
28
onto the lancing device.
5
5
Setting the penetration depth
You can set seven dierent penetration depths on the lancing device.
The penetration depth is displayed as a number.
•
1-3 = for soft or thin skin
•
4-6 = for normal skin
•
7-9 = for thick or callused skin
Turn the movable upper part of the cap until the desired penetration
depth is displayed.
5
Beurer GL48 39
6
Pull the tensioning device
34
back until it audibly engages. Release
the tensioning device. It automatically snaps back into the default
position. The lancing device is now ready for use.
7
You may now use the lancing device to take a blood sample.
Make sure that the blood remains as a droplet and is not spread.
Immediately use the obtained blood droplet to take a measurement.
12.6 Blood sample from the fingertip
The best puncture points are the middle finger and the ring finger.
Firmly position the lancing device slightly to the side of the centre
of the fingertip. Press the trigger button. Remove the lancing device
from the finger. A round drop of blood of at least 0.5 microlitres
(corresponding to approx. 1.2 mm, actual size: ) must have formed.
5
12.7 Please also note the following:
•
If the blood glucose test results do not match how you feel, carry out another test using
blood from your fingertip.
•
DO NOT change your treatment purely on the basis of a measurement that was carried
out using blood taken from an alternative area. Carry out another test with blood from your
fingertip in order to confirm the test result.
•
If you often fail to notice that you have a low blood glucose level, carry out a test using blood
from your fingertip.
8
If there is an insucient amount of blood, repeat steps 1 to 7 with a greater penetration depth.
9
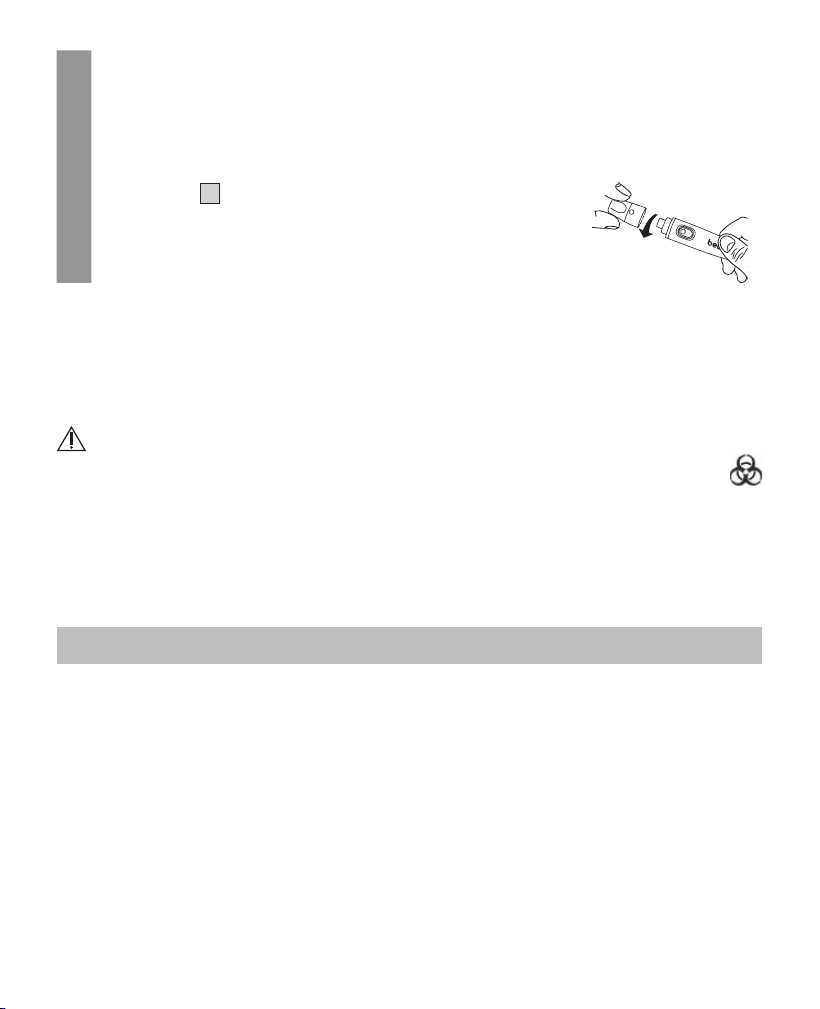
Remove the test strip from the device using the test strip ejection slider. Carefully dispose of the
test strip in accordance with the currently applicable regulations, to avoid infecting other people.
12.8 Final steps and disposal
1
Carefully remove the cap
28
from the lancing device.
5
2
Place the retained protective disc flat on a hard surface. Stick the
needle tip into the protective disc so the needle is no longer exposed.
Take care not to touch the used lancet.
40 Beurer GL48
3
Use the sliding switch on the side.
This causes the lancet to drop out of the holder.
Carefully dispose of all blood samples and materials with which you
or your patient have come into contact. Dispose of the lancet in a
puncture-proof container. This prevents injuries and the infection of
others.
4
Place the cap
28
back onto the lancing device.
5
12.9 Cleaning and maintenance
Clean the lancing device after each use. Remove and dispose of the lancet as described in points
7.9. to 7.12. of these instructions for use.
For cleaning, use a soft cloth or cotton bud that can be moistened with disinfectant or 70% alcohol.
To clean the entire device, please use a soft cloth slightly moistened with a mild soapy solution. Under
no circumstances may liquid enter the device. Do not use the device again until it is completely dry.
Risk of infection
All components of the monitor, its accessories and/or its replacement parts may come into
contact with human blood and are therefore a possible source of infection.
12.10 Disposal
It is essential to comply with the generally applicable safety precautions for handling blood when
disposing of the lancing device and lancets. Carefully dispose of all blood samples and materials with
which you have come into contact in order to prevent injury and infection of others.
13. warranty/service
Beurer GmbH, Söflinger Straße 218, 89077 Ulm, Germany (hereinafter referred to as “Beurer”) provides
a warranty for this product, subject to the requirements below and to the extent described as follows.
The warranty conditions below shall not aect the seller’s statutory warranty obligations which
ensue from the sales agreement with the buyer.
The warranty shall apply without prejudice to any mandatory statutory provisions on liability.
Beurer guarantees the perfect functionality and completeness of this product.
The worldwide warranty period is 5 years, commencing from the purchase of the new, unused pro
-
duct from the seller.
The warranty only applies to products purchased by the buyer as a consumer and used exclusively
for personal purposes in the context of domestic use.
German law shall apply.

Beurer GL48 41
During the warranty period, should this product prove to be incomplete or defective in functionality
in accordance with the following provisions, Beurer shall carry out a repair or a replacement delivery
free of charge, in accordance with these warranty conditions.
If the buyer wishes to make a warranty claim, they should approach their local retailer in the
first instance: see the attached “International Service” list of service addresses.
The buyer will then receive further information about the processing of the warranty claim, e.g. where
they can send the product and what documentation is required.
A warranty claim shall only be considered if the buyer can provide Beurer, or an authorised Beurer
partner, with
– a copy of the invoice/purchase receipt, and
– the original product.
The following are explicitly excluded from this warranty:
– deterioration due to normal use or consumption of the product;
– accessories supplied with this product which are worn out or used up through proper use (e.g.
batteries, rechargeable batteries, cus, seals, electrodes, light sources, attachments and nebu-
liser accessories);
– products that are used, cleaned, stored or maintained improperly and/or contrary to the provisions
of the instructions for use, as well as products that have been opened, repaired or modified by the
buyer or by a service centre not authorised by Beurer;
– damage that arises during transport between manufacturer and customer, or between service
centre and customer;
– products purchased as seconds or as used goods;
– consequential damage arising from a fault in this product (however, in this case, claims may exist
arising from product liability or other compulsory statutory liability provisions).
Repairs or an exchange in full do not extend the warranty period under any circumstances.
The product complies with the EU Medical Device Directive (MDD) 93/42/EC and the Regulation (EU)
2017/745 of the European Parliament and of the Council on medical devices, as well as the respec-
tive national provisions.
For users/patients in the European Union and identical regulation systems (EU Medical Device Regu-
lation (MDR) 2017/745), the following applies: If during or through use of the product a major incident
occurs, notify the manufacturer and/or their representative of this as well as the respective national
authority of the member state in which the user/patient is located.
Where can I obtain this lancing device?
Available without need for a prescription from your pharmacist or outlets selling the Beurer blood
glucose measuring device. Please contact our Customer Service team if you have any further que-
stions concerning the lancing device.
Current status of service addresses
Aktueller Stand der Serviceadressen
Adresses du service actuelles
Stato attuale degli indirizzi di servizio
Estado actual de las direcciones de servicio
www.beurer.com/service

42 Beurer GL48

GL48_2024-06-27_10_IM2_BEU_EN_MDR Subject to errors and changes
Soft
SteriLance Medical (Suzhou) Inc.
No.168 PuTuoShan Road
New District, 215153 Suzhou, Jiangsu
PEOPLE’S REPUBLIC OF CHINA
GL 48 GL 49
Beurer GmbH
•
Söflinger Straße 218
•
89077 Ulm, Germany
www.beurer.com
•
www.beurer-healthguide.com
UK-Importer
Beurer UK Ltd.
•
Suite 16
•
Stonecross Place
•
Stonecross Lane North
WA3 2SH Lowton
•
United Kingdom
LD 04
Beurer GmbH
•
Söflinger Straße 218
•
89077 Ulm, Germany
www.beurer.com
•
www.beurer-healthguide.com
Emergo Europe B.V.
Westervoortsedijk 60,
6827 AT Arnhem,
The Netherlands
