V 1.2
Please follow this guide to complete the
installation and initial setup of the product
Quick Sta Guide
EN
https://wiki.creality.com
Creality ocial Wiki
Bought a product but don't know how to use it?
Don't wor, all your confusions will be resolved!
Comprehensive understanding of the new product,
immersive exploration of its features.
Detailed operation guides to help you get staed
eolessly.
Professional after-sales suppo platform oering
ecient solutions.
Dear Users
Thank you for choosing Creality products. This quick guide introduces the steps for unboxing, installation, and
debugging. Please read it carefully before use.
For more detailed instructions, unboxing videos, and after-sales seice tutorials, please visit the Creality Wiki
platform.
The Creality team is always ready to provide you with quality seice. If you encounter any problems during use,
please contact us through the phone number and email provided at the end of this quick guide.
https://wiki.creality.com/zh/mBox-series/mBox
Creality Cloud – Your 3D Printing Universe Awaits!
Discover the all-in-one 3D printing platform
designed for all enthusiasts.
Access a vast libra of high-quality models.
Hassle-free printing with no slicing or parameter
adjustm you choose
Control remotely and print with just one click, anytime,
anywhere.
Creality Park App
HIGH TEMP!
May cause burns.
Wait 30+ minutes after powering o before handling.
1. Use the printer only as described in this guide. Unauthorized use may cause
inju or propey damage.
2. Keep the printer away from ammable or explosive materials and heat sources.
Operate in a ventilated, cool, low-dust area.
3. Do not place the printer on unstable suaces or suaces subject to excessive
vibration, as vibration may aect print quality.
4. Use Creality-approved laments to prevent extruder clogs and printer damage.
5. Use only the supplied power cord. Plug into a grounded three-prong outlet.
6. Do not touch the nozzle or linear rail during operation, as they may be hot and
cause burns.
7. Do not wear gloves or loose clothing near moving pas — risk of entangle�
ment or inju.
8. After printing, clean residual lament from the nozzle using a tool while still
warm. Do not touch the nozzle directly.
9. With the printer powered o, regularly clean the printer body and linear rails
with a d cloth, removing any dust and lament debris.
10. It is recommended that children under 10 years old use this printer under
adult supeision and guidance.
11. Users must comply with all applicable local laws, regulations, and safety
requirements. Our products must not be used for illegal purposes. Creality
assumes no liability for any violations resulting from improper or illegal use
of the product.
12. Reminder: Do not plug or unplug cables while the device is powered on.
13. The full text of the EU Declaration of Conformity is available at the following
internet address https://wiki.creality.com/en/euro-compliance
14. Hereby, Shenzhen Creality 3D Technology Co.,Ltd declares that the radio
equipment type is in compliance with Directive 2014/53/EU.
Terms of UseTerms of UseTerms of Use
Keep the enclosure door closed
during printing.
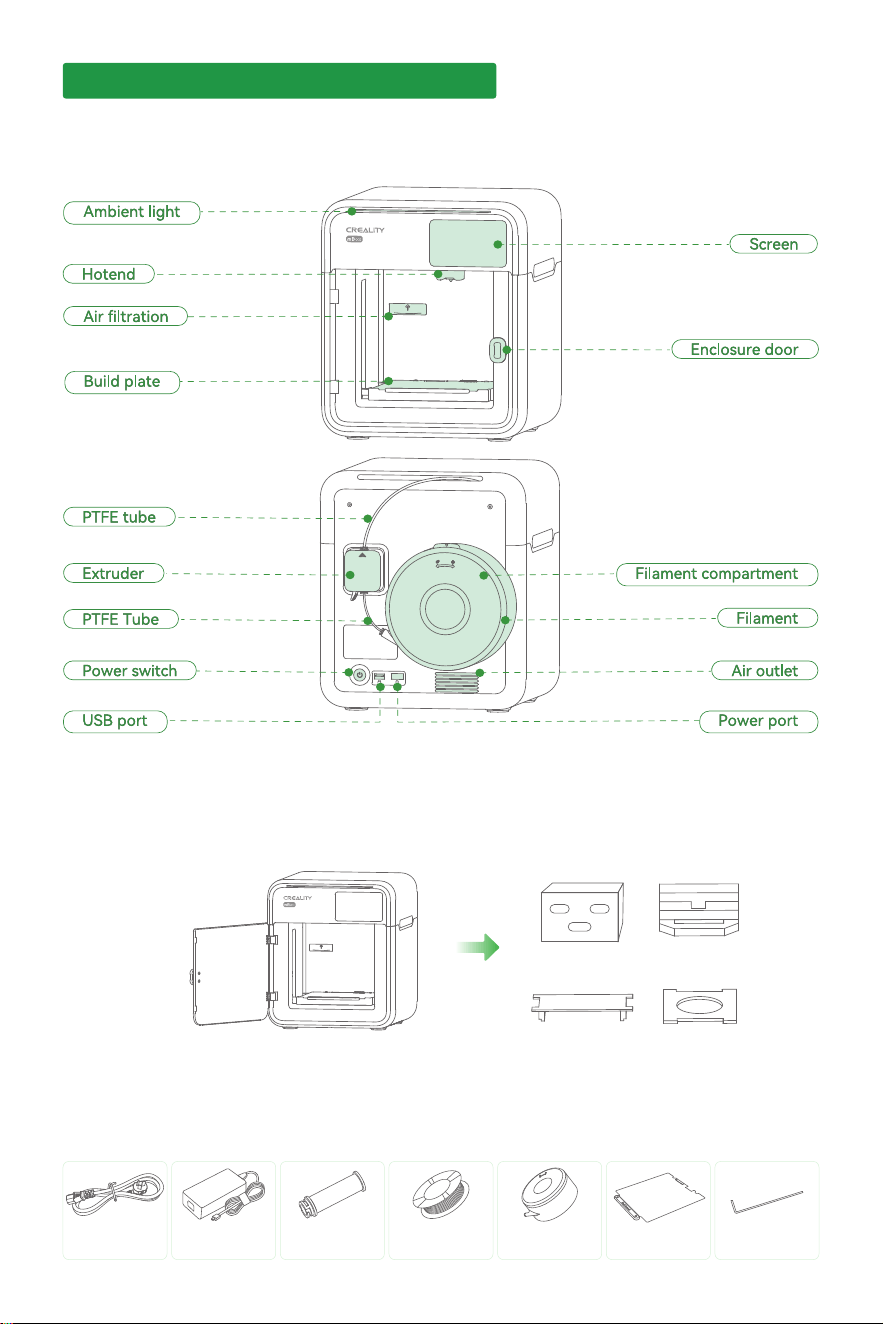
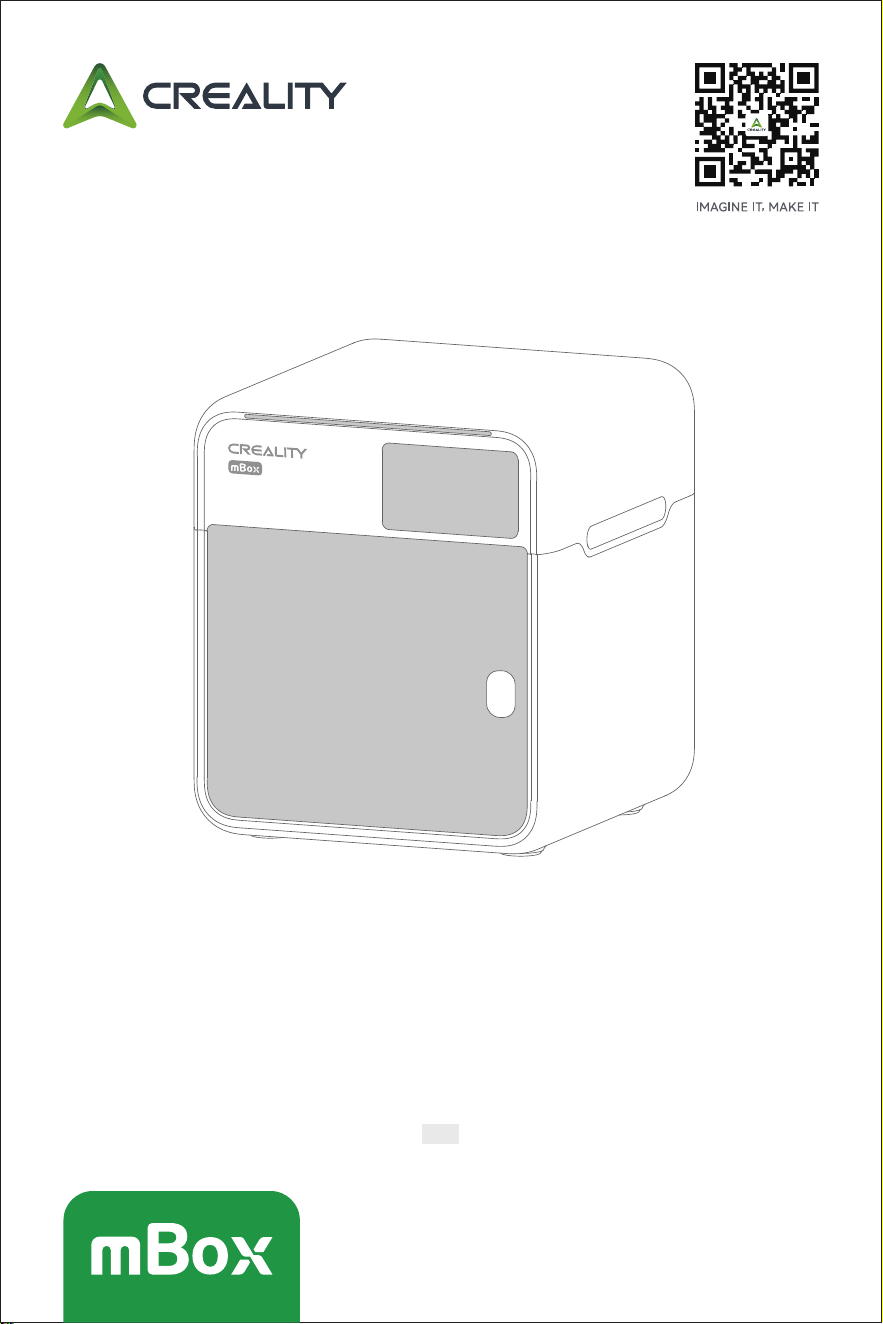
1.1 Getting to Know Your mBox
Unpacking and Checking the ContentsUnpacking and Checking the ContentsUnpacking and Checking the Contents
Power
Cord
Power
Adapter
Spool
Holder
Sample
Filament
Filament
Compament
Build
Plate
H2.0
Hex
Key
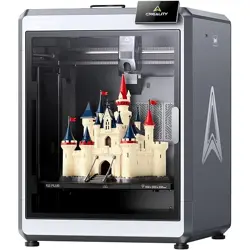
Refer to the diagram on the right to familiarize yourself with the key components.
1.2 Taking out the accesso box
Open the enclosure door. Inside the printer, you will nd an accesso box and protective packing materials (foam/cardboard)
used to secure the printer during transpoation. Remove the accesso box and all protective packing materials before
proceeding to the next step.
1.3 Opening the accesso box and checking the contents
After opening the package, check that all items listed below are included. If any items are missing, please contact customer seice.
Loading FilamentLoading FilamentLoading Filament
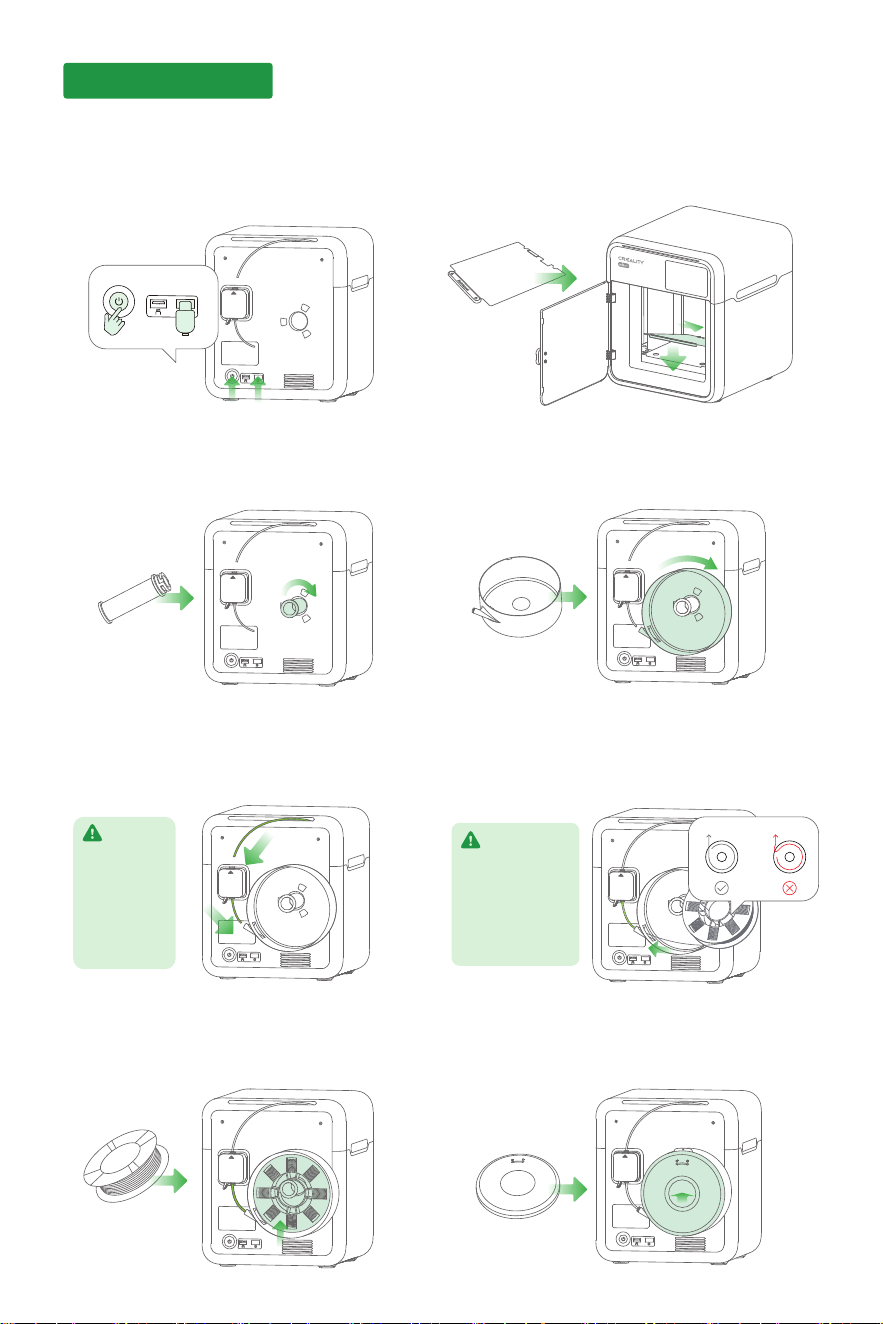
2.1 Connecting the power cord and turning
on the printer
Inse one end of the power cord into the power po on the
back of the printer and the other end into a household
power outlet. Press the power switch to turn on the printer.
2.2 Installing the build plate
With the side marked "Pinch Hazard" facing you, align the
build plate with the positioning posts. Press down on the
two front corners to ensure the plate is properly seated and
does not wobble.
2.7 Installing the lament spool
After pulling lament out from the lament spool outlet, align
the lament spool with the spool holder and gently place it into
the lament compament.
2.8 Closing the lament cover
Close the lament compament cover. After powering on the
printer, tap [Prole] > [Load]. The printer will automatically
load lament.
2.3 Inseing the spool holder
Align the spool holder with the circular mount in the center
of the lament compament. Inse it veically and rotate it
until you hear a "click", indicating that it is installed correctly.
2.6 Feeding lament
As shown in the gure, pull lament from the bottom of the
spool, then inse it into the lament inlet and push it to the
bottom. The blue indicator light on the extruder will turn on
when lament feeding is complete.
2.5 Preparations before loading lament
Connect one end of the PTFE tube to the lament outlet on
the top of the extruder and the other end to the lament
outlet of the spool.
2.4 Installing the lament compament
Align the lament spool with the three mounting slots in the
lament compament on the back of the printer. Rotate the
lament spool until you hear a "click", indicating that it is
installed correctly.
Removing the
PTFE tube:
Press down the
black release
ring on the
lament spool
and pull out
the PTFE tube.
When loading a new
lament for the rst
time, cut o the bent
end. For routine lament
replacement, cut o
the expanded or
deformed lament tip.
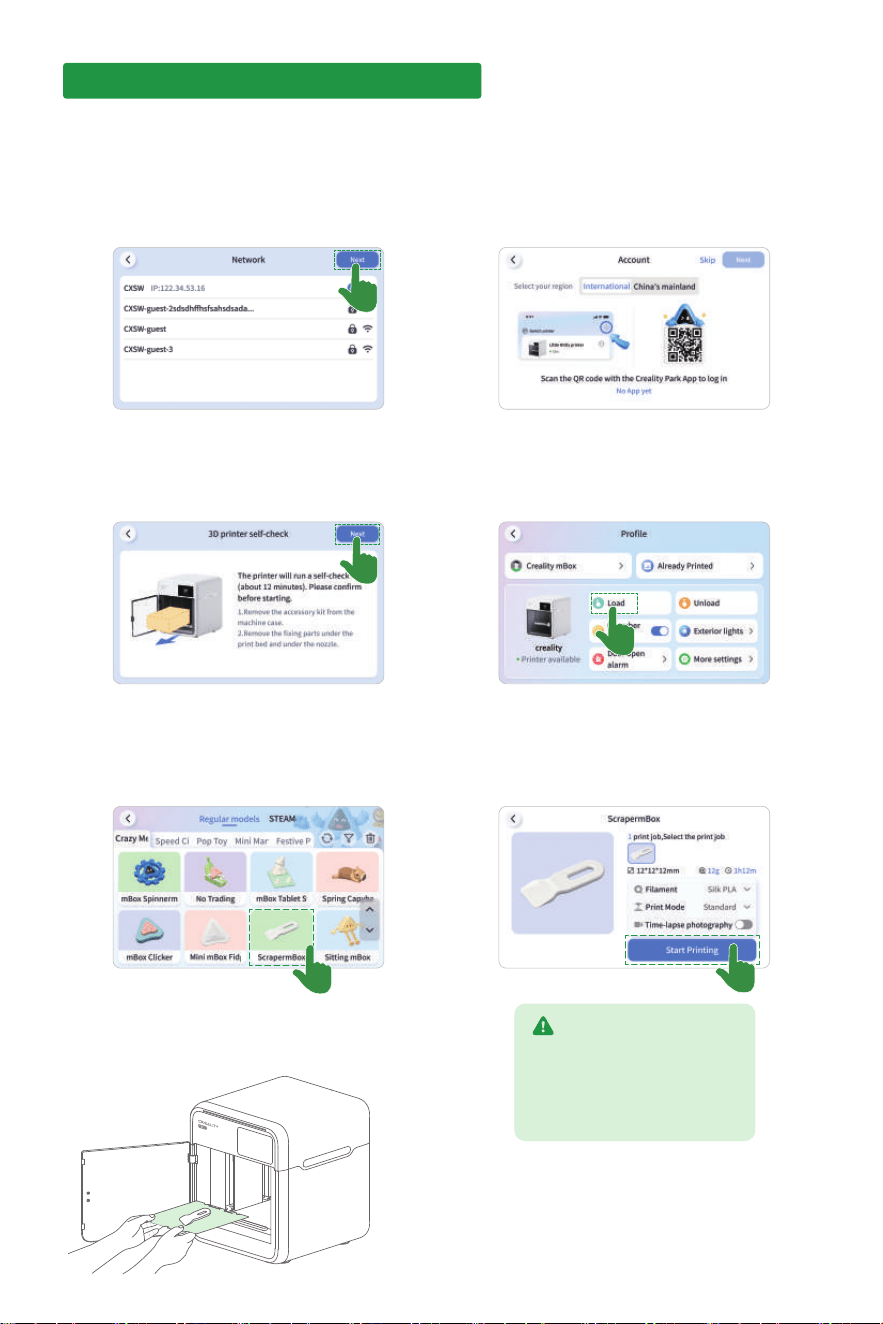
Powering On and Binding the PrinterPowering On and Binding the PrinterPowering On and Binding the Printer
3.1 Connecting to Wi-Fi
After powering on the printer, select the language and region.
The screen will display a list of available networks. Tap your
home Wi-Fi network name, enter the password, and wait for
the connection to be established.
3.2 Downloading the Creality Park
App and Logging In
After connecting to the network, a QR code will appear. If you
already have the app installed, scan the QR code to bind the
printer. If the app is not installed, tap [No App yet] to
download it, then return and scan the QR code to log in.
3.3 Device Self-Check
After logging in to your account, sta the device self-check.
The entire process takes approximately 12 minutes.
Conrm to sta the self-check, then wait for it to complete.
3.4 Loading lament
After the self-check is complete, tap [Load] on the [Prole]
page. The nozzle will heat up and sta feeding lament.
When lament is extruded from the nozzle, lament loading
is complete. Tap [Load completed] to conrm.
3.5 Selecting a model in the Creality Park app
Return to the home page and browse the model libra. For
your rst print, choose a built-in model (e.g., “Spatula”) and
tap it to open the model details page.
3.7 Waiting for cooling and removing the print
After printing is complete, wait 2 minutes for the build plate
to cool. Open the enclosure door and remove the build plate.
Gently bend the plate to detach the print.
3.6 Conrming parameters and staing printing
View the model details page and select the lament type that
matches the lament currently installed in the printer. Review
the model size, print speed, and estimated print time, then
tap [Sta Printing].
During printing: Please keep the
enclosure door closed. Never put
your hands inside the printer! You
can obsee the printing process
through the glass door.
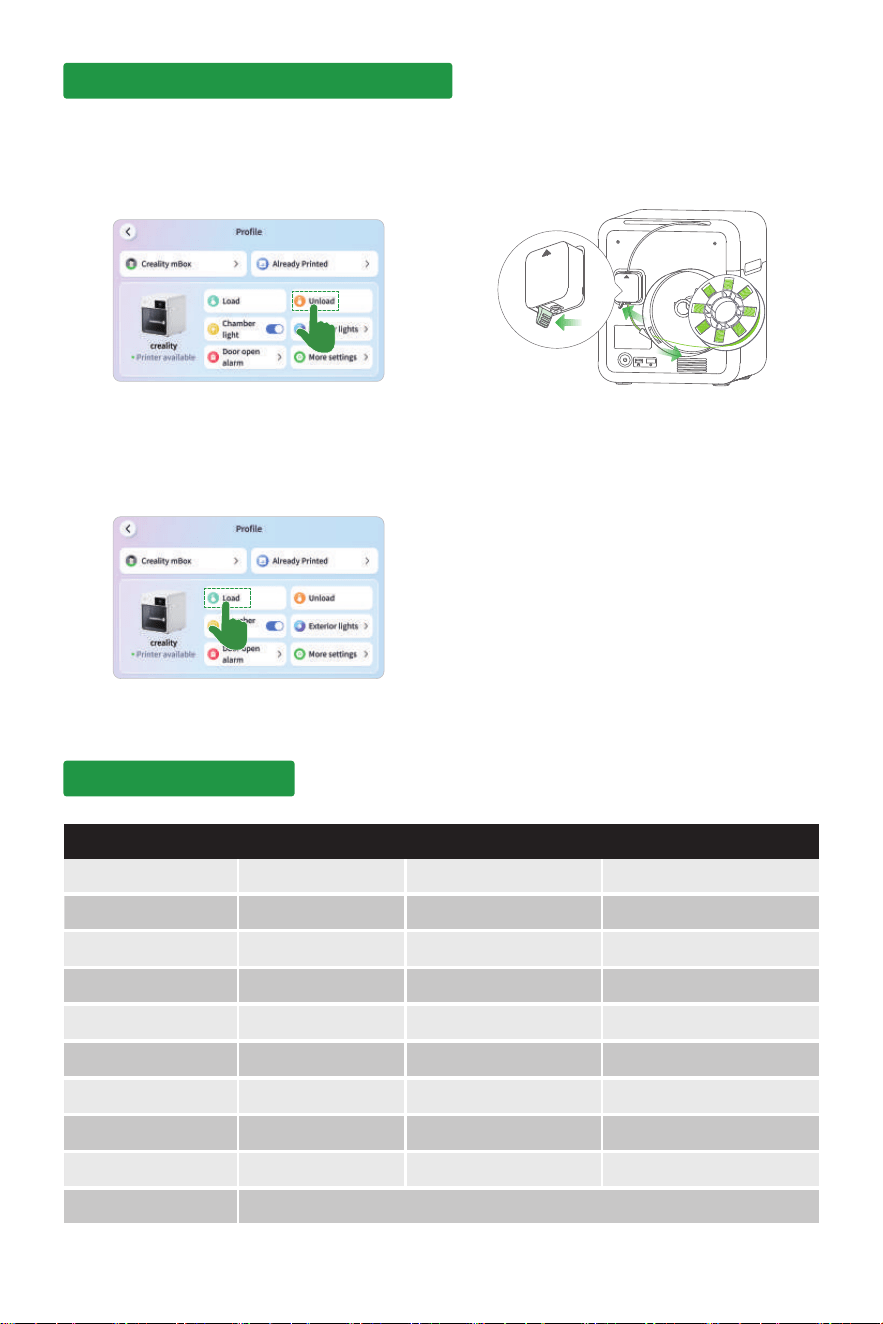
Unloading and Replacing FilamentUnloading and Replacing FilamentUnloading and Replacing Filament
Printer InformationPrinter Information
Printer Information
4.1 Unloading lament
Go to [Prole] and tap [Unload]. The nozzle will heat up, and
the printer will automatically retract the lament back to the
extruder.
4.3 Replacing lament
After removing old lament, if you need to replace it, load the
new lament by following the lament loading procedure.
4.2 Removing old lament
Press and hold the extruder handle, and then pull the
lament straight down from the lament inlet.
Model
Modeling dimensions
Suppoed laments
Nozzle diameter
Nozzle temperature
Rated Power
Screen
mBox
153*153*153mm³
Equipment size 290*340*335mm³
Build Plate
Bed Leveling
Epoxy resin build plate
Automatic leveling
Hyper PLA、PLA Silk
0.44 mm (standard)
Extruder type
Print Speed
Acceleration
Remote extruder
≤300mm/s
≤3000mm/s
≤250℃
65W
100~240V AC,50/60HzRated voltage
3.97 in.
Yes
AI monitoring camera
Yes
Filament Runout Sensor
Yes
Power loss recover
Slicer Software Creality Print 6.0 and above
USB ash drive (oine) / Screen (online) / Mobile app (online)Printing Methods
Equipment Specications
18th Floor, JinXiuHongDu Building, Meilong Road, Xinniu Community,
Minzhi Street, Longhua District, Shenzhen City, China.
Ocial Website: www.creality.com
Tel﹕ +86 755-8523 4565
E-mail: [email protected]
Shenzhen Creality 3D Technology Co.,Ltd.
Users should abide by the laws and regulations of the corresponding count and region where the
equipment is located (place of use), abide by professional ethics, and pay attention to safety
obligations. The use of our products or equipment for any illegal purpose is strictly prohibited. Our
company is not responsible for the relevant legal responsibilities of any violators.
Each model is dierent. All images are for illustrative purposes only, and the actual product may va.
The nal interpretation right belongs to Shenzhen Creality 3D Technology Co., Ltd.