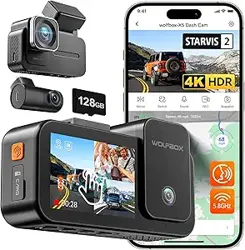

X5
3-CHANNAL DASH CAM
User Manual
wolox.com
The information in this manual is subject to change without notice.
V1.2

After-Sales
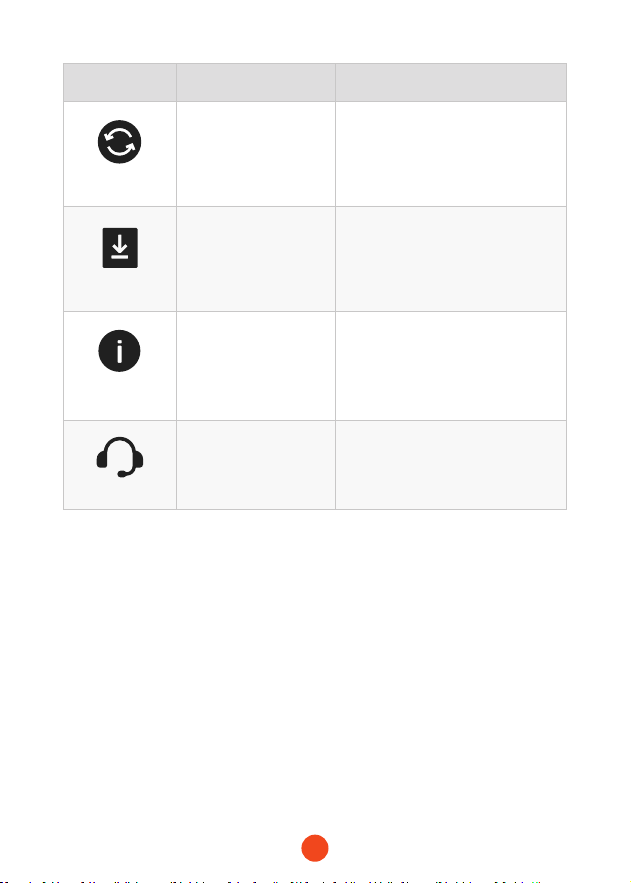
Customer Seice Center . . . . . . . . . . . . . . . . .
101
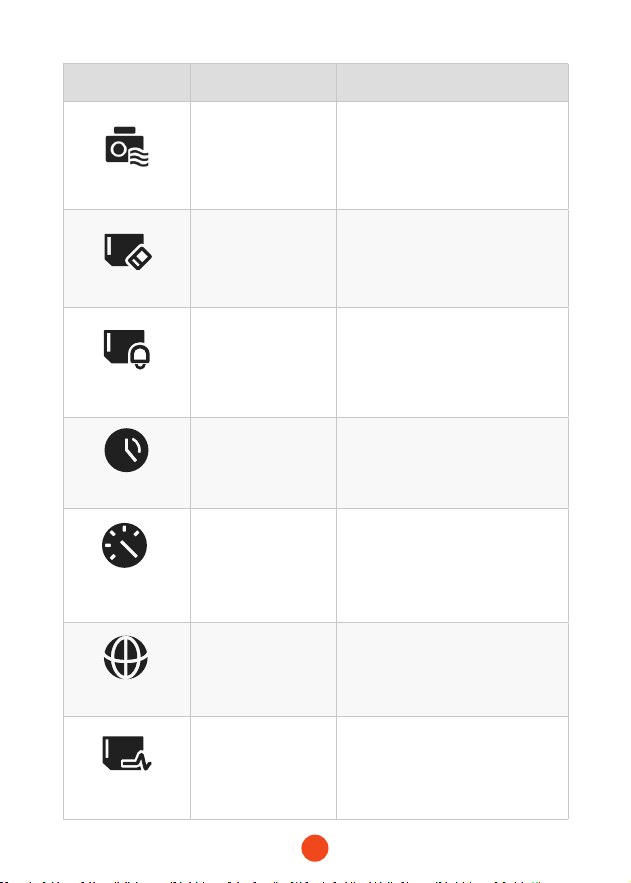
General Oveiew
Notice . . . . . . . . . . . . . . . . . . . . . . . . . . . . . . .
I
Package Contents . . . . . . . . . . . . . . . . . . . . . . . .
II
Appearance . . . . . . . . . . . . . . . . . . . . . . . . . .
III
Touch Screen Function . . . . . . . . . . . . . . . . . . . .
IV

Language
English . . . . . . . . . . . . . . . . . . . . . . . . . .
1 - 20
Deutsch . . . . . . . . . . . . . . . . . . . . . . . .
21 - 40
Français . . . . . . . . . . . . . . . . . . . . . . . .
41 - 60
Italiano . . . . . . . . . . . . . . . . . . . . . . . .
61 - 80
Español . . . . . . . . . . . . . . . . . . . . . . .
81 - 100

I
Notice
• For fuher inquiries, please contact our customer seice via
email at seice@wolox.com.
• Please use original accessories to avoid compatibility issues and
insucient current supply from non-compatible accessories.
• Please do not tamper or splice the rear camera wire for the
purpose of extension, as the rear image/feed to the display may
be lost.
• If this product is damaged or malfunctions, stop using it
immediately and contact WOLFBOX suppo.
• This product is for accident reference only; its eectiveness as
evidence isn't guaranteed, and misuse may infringe on privacy
or other rights, for which we are not responsible.This product is
for DC12V/24V vehicles only.
• When intending to use this device as a USB ash drive, please
ensure that you connect the device's right-side USB-C po
to the computer's USB-C po [USB 3.0 required]. Ensure an
accurate connection to avoid any potential risks of abnormal
rebooting.
• Our warranty period is 18 months. If the machine pas are
damaged or there are any problems during use, we will solve
them in time and provide you with a satisfacto shopping
experience.
Note: The specic warranty period is subject to local laws.
• Free extended warranty seice: After registering information
on WOLFBOX.com, you may extend the warranty for an
additional 6 months free of charge.
URL:https://wolox.com/pages/warranty-form
II
Package Contents
• 2.5K Rear Camera
• Adhesive*2
• Quick Guide• User Manual
• Power Supply Cable
with Car Charger
•4K Dash Cam
• Electrostatic
Sticker *2
• Tool• Lens Cloth
• Cable Clips*5
III
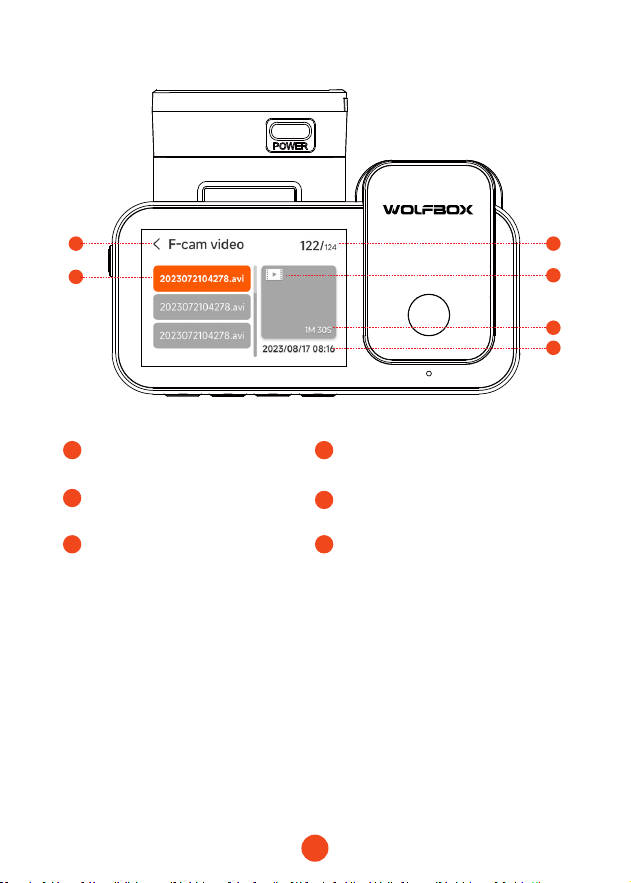
Appearance
2
3
1
4
12
14
13
9
11
8
10
7
5
6
GPS Mount
Touch Screen
USB-C
Power Po
Inside
Camera
Front
Camera
Micro SD
Card Slot
Power Button
Right Button
Menu Button
OK Button
Left Button
Reset Hole
Rear Camera
Input Terminal
(USB-C)
LED Light
*If your camera cannot be powered on, please check whether the
connection between the GPS Mount and the main unit is loose.
Please make sure that the two are fully fastened and aligned.
IV
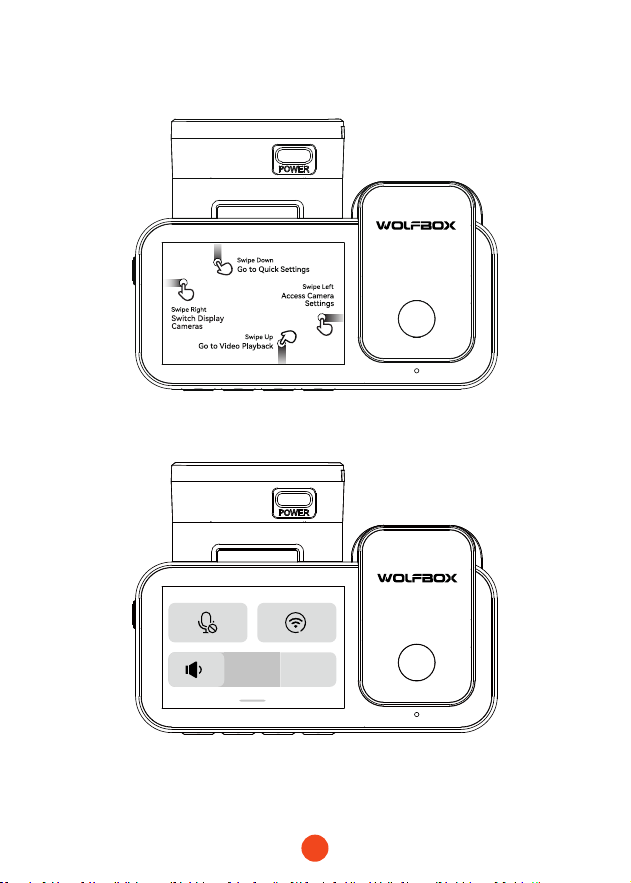
Touch Screen Function
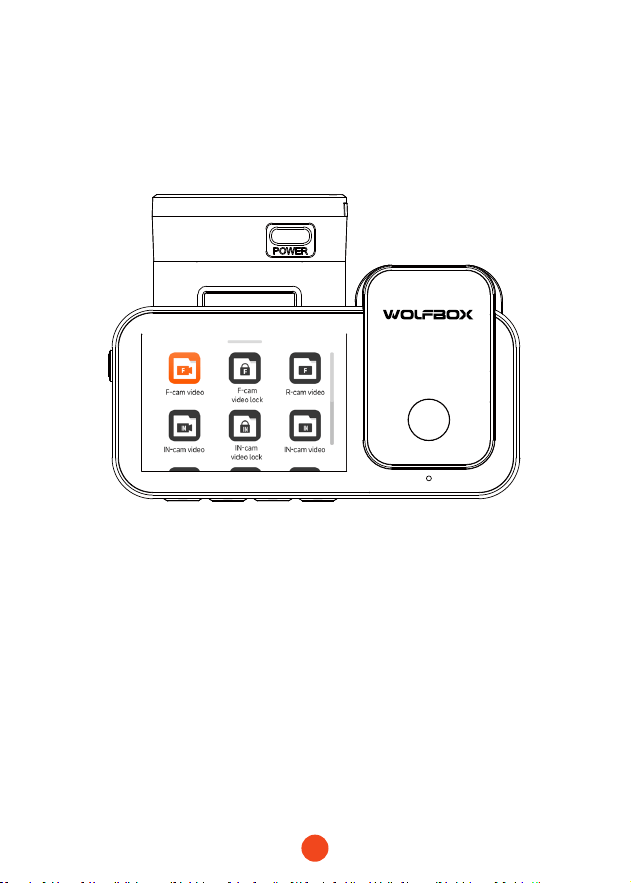
• Quick Setting Mode
Swipe down to enter the quick setting mode you can conveniently
adjust the volume, turn on or o the recording and Wi-Fi.

1
Content
Product Specications . . . . . . . . . . . . . . . . . . . . .
2
User Inteace Oveiew . . . . . . . . . . . . . . . . . . . .
3
Function Oveiew . . . . . . . . . . . . . . . . . . . . . . .
7
Voice Control Function . . . . . . . . . . . . . . . . . . .
12
Play on APP (About Wi-Fi and APP) . . . . . . . . . . . .
13
How to Play Video on Computer . . . . . . . . . . . . . .
14
Installation . . . . . . . . . . . . . . . . . . . . . . . . . .
16
Trouble Shooting . . . . . . . . . . . . . . . . . . . . . . .
19
EN

2
Product Specications
RAM DDR3 8Gb Display Type IPS
Video Format MP4 Image Format JPG
Front Camera 4K Inside Camera 1080P
Rear Camera
2.5K(1440P)
Rear
Lens FPS
30 fps
Display Size 2.35''
Power
Inteace
USB-C
GPS internal
Wi-Fi
Connection
Suppoed
Voice Control Suppoed
Operating
Temperature
-4°F ~158°F
Full Touch
Screen
Suppoed

3
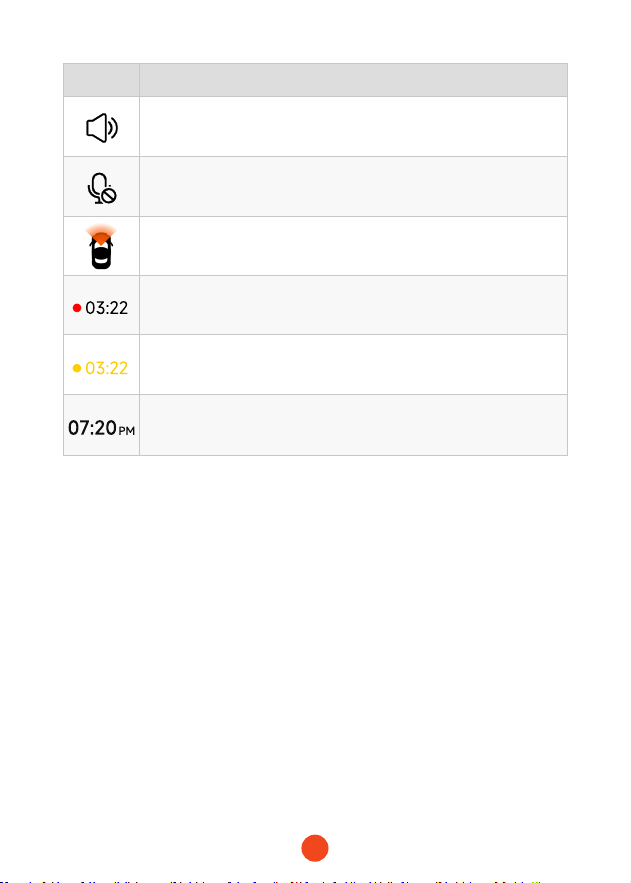
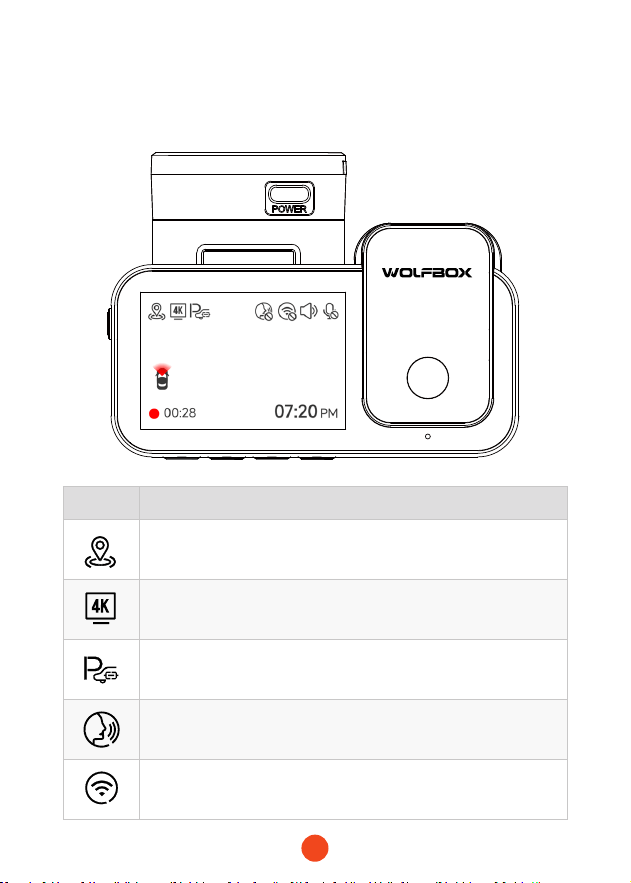
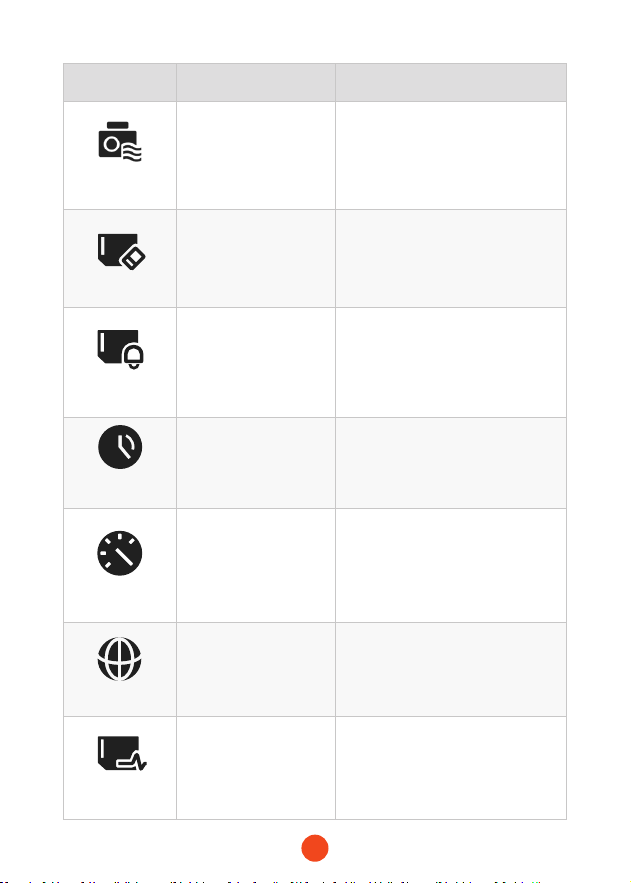
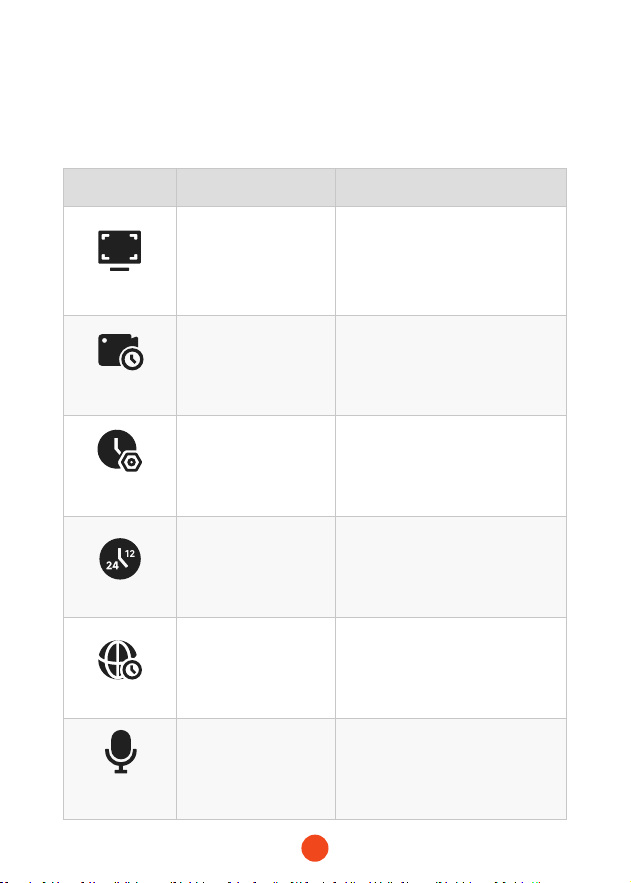
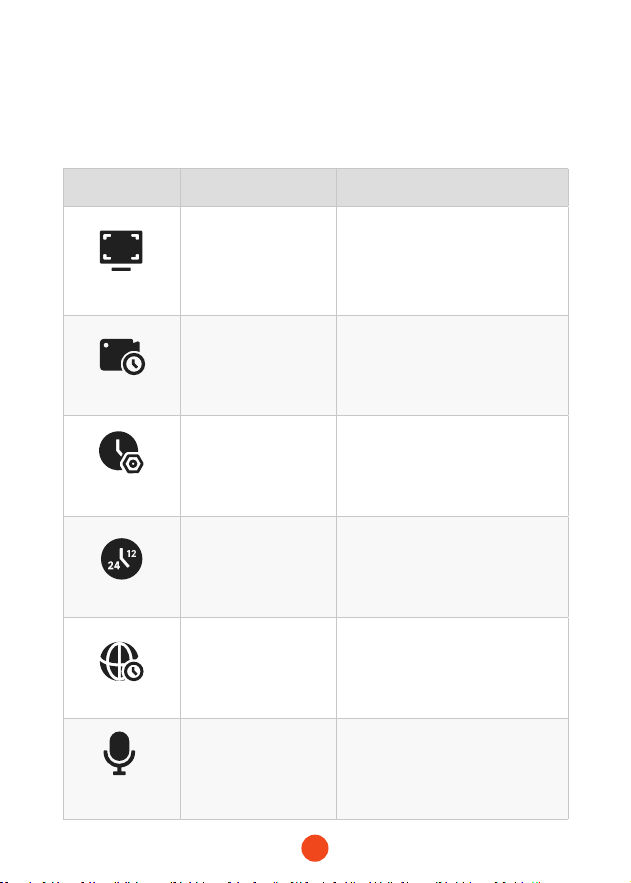
User Inteace Oveiew
• Recording Mode
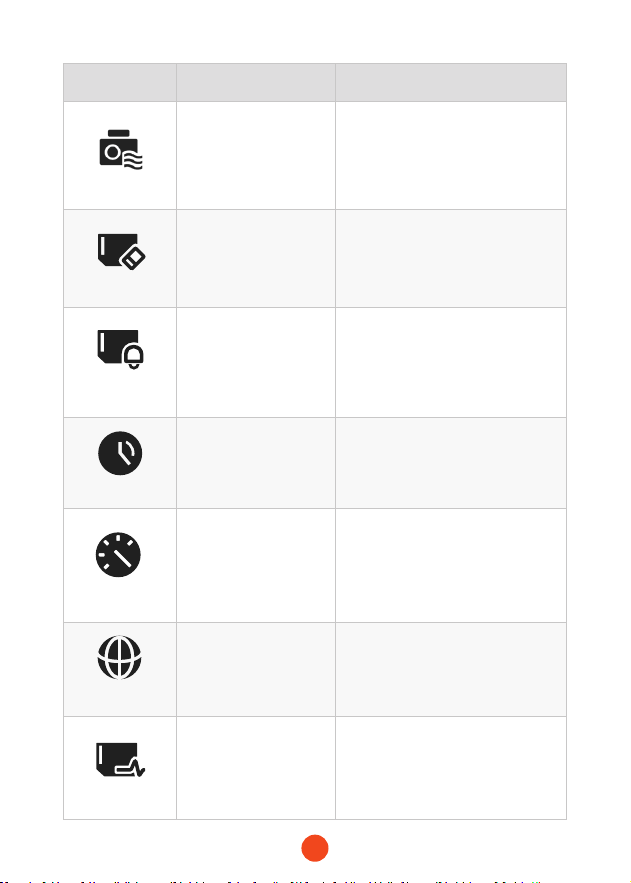
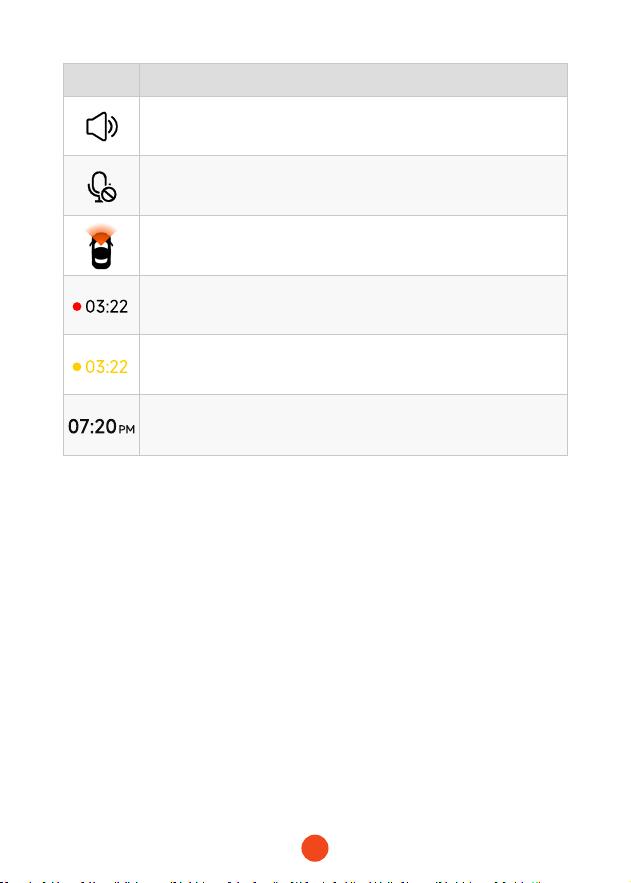
Icon Description
GPS status
Recording resolution
Whether to connect the hardwired kit and set up parking
monitoring
Voice control
Wi-Fi status

4
Icon Description
Camera system sound status
Voice recording statusd
Whether the rear camera is connected
Recording status and recording time
Emergency recording is on
Date and time of the camera
5
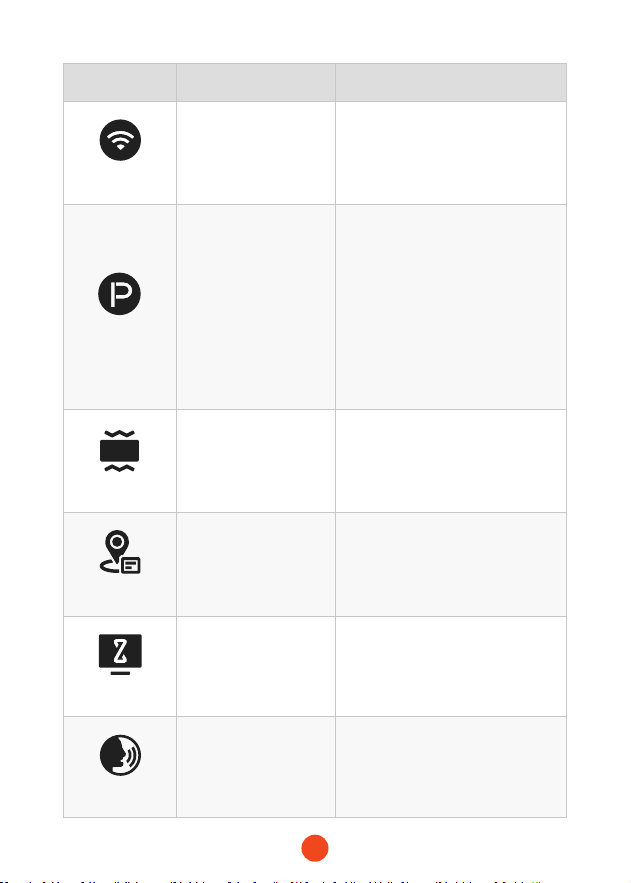
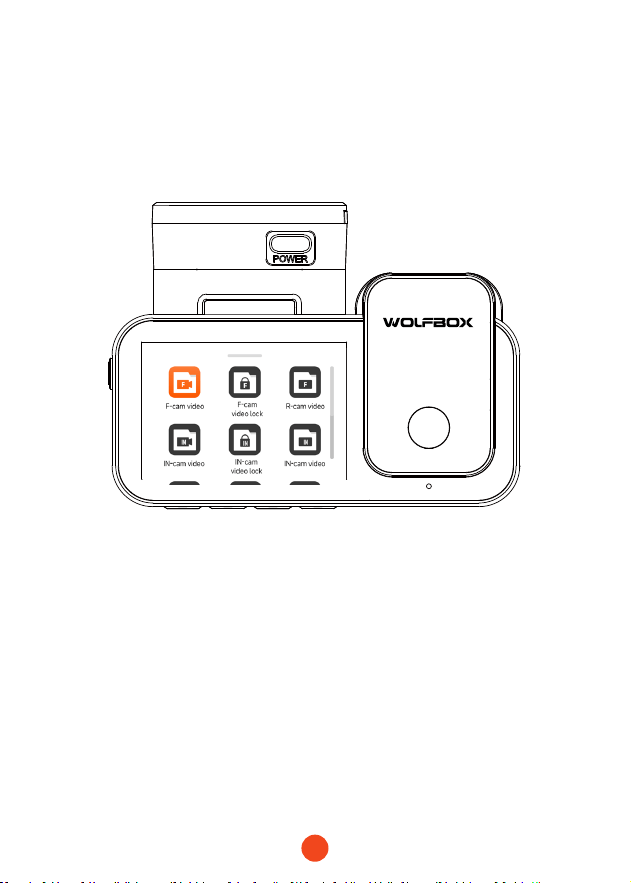
• Playback Mode
When you power on the dash cam, it will sta recording
automatically. Swipe your nger from the bottom of the screen to
the top or select to enter playback mode.
Click/select to access the specic playback folder.

6
1
3
5 5
1
Current folder name
2
3
Index of the current le in
the total les
File name
4
5 6
File type
Video duration Time of video recording
1 2
3
4
5
6

7
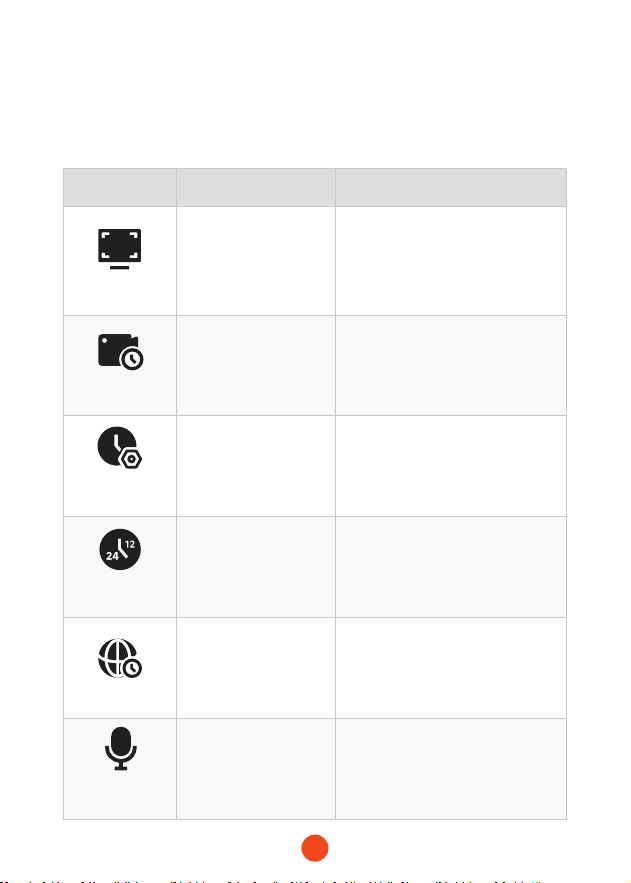
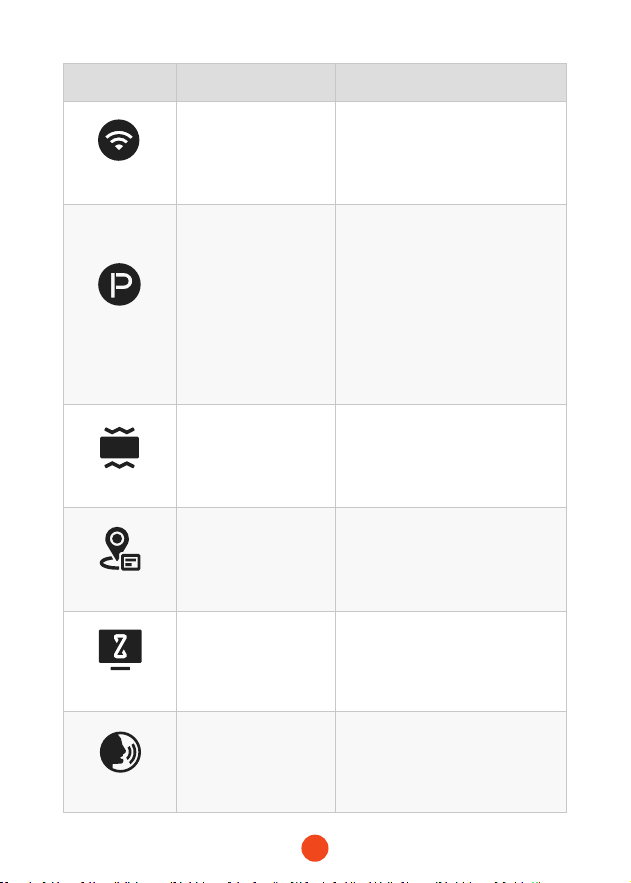
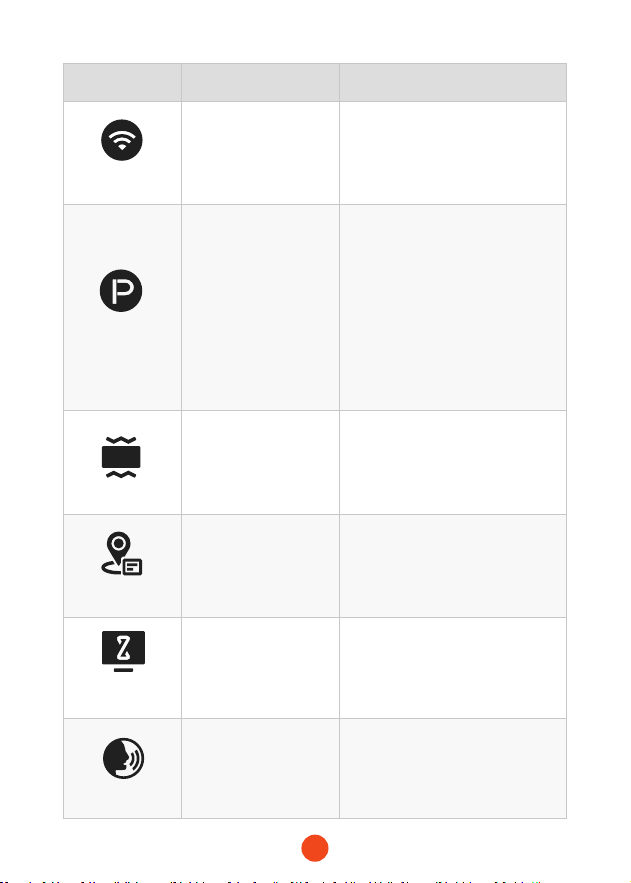
Function Oveiew
Swipe from right to left to access the function menu, where you can
modify various settings and parameters for the machine.
Function Option Description
Resolution
4K+1080P+2.5K
/4K+1080P+1080P
/...
Video resolution selection.
Loop Recording
1 Minute
/3 Minutes
/5 Minutes
Set the duration for loop recording
of video les.
Clock Setting
/
Adjust the current time displayed
on the device.
Time Style
12 Hours/24 Hours Set the time display system.
Time Zone
/
Adjust the time zone based on
geographical location.
Audio Record
ON/OFF Set whether to record sound.
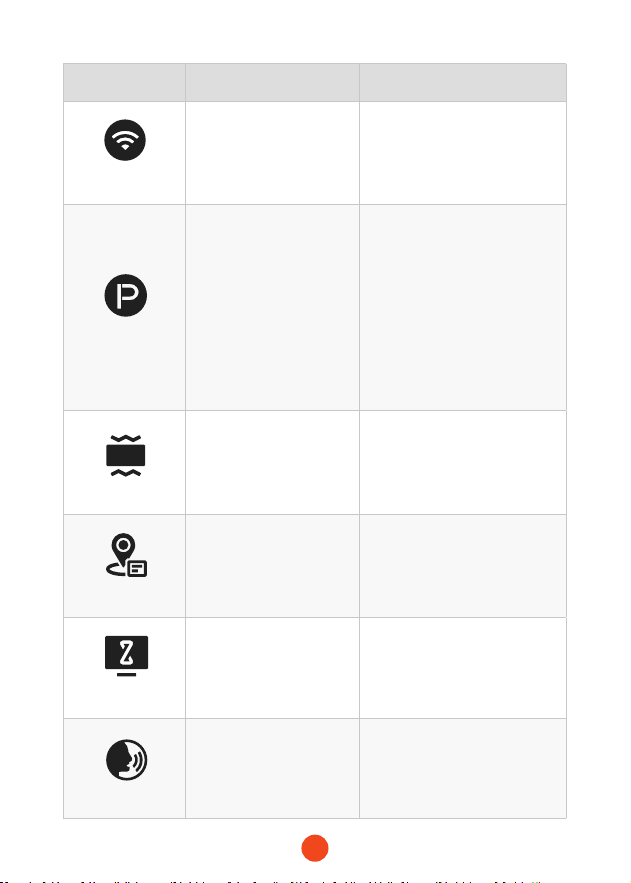
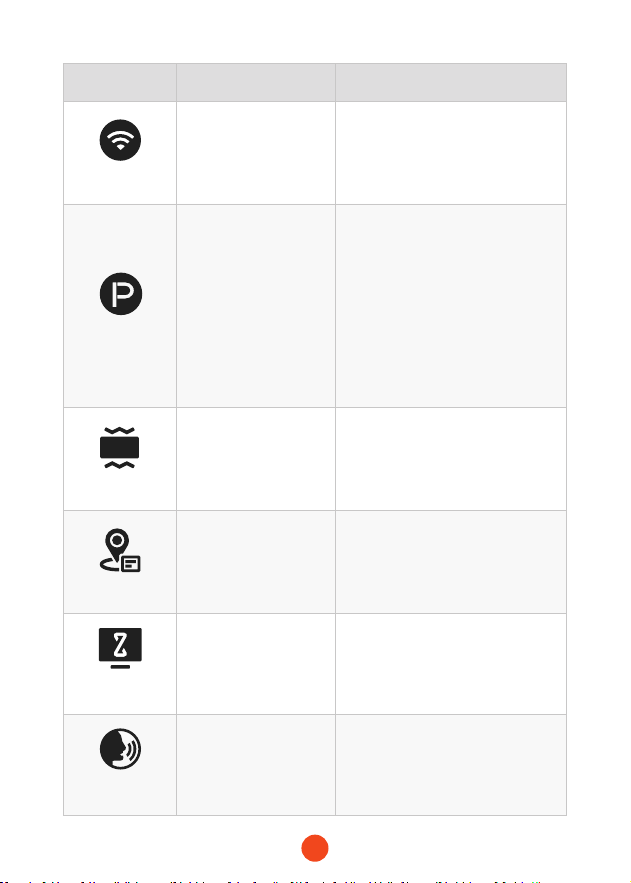
8
Function Option Description
Wi-Fi
ON/OFF
Set the status of the device's
Wi-Fi connection.
Parking Mode
ON
/G-Trigger Recording
/12H Time-lapse
recording
/24H Time-lapse
recording
Monitor the vehicle's status after
the engine is turned o.
G-Sensor
OFF
/Low
/Medium
/High
Set the sensitivity of the G-sensor.
GPS Information
/ Display recorded GPS data.
Screen Saver
OFF
/10 Seconds
/30 Seconds
/2 Minutes
Set the activation time for the
screen saver.
Voice Control
ON
/OFF
/Voice Command
Set the switch for voice control
functionality
.

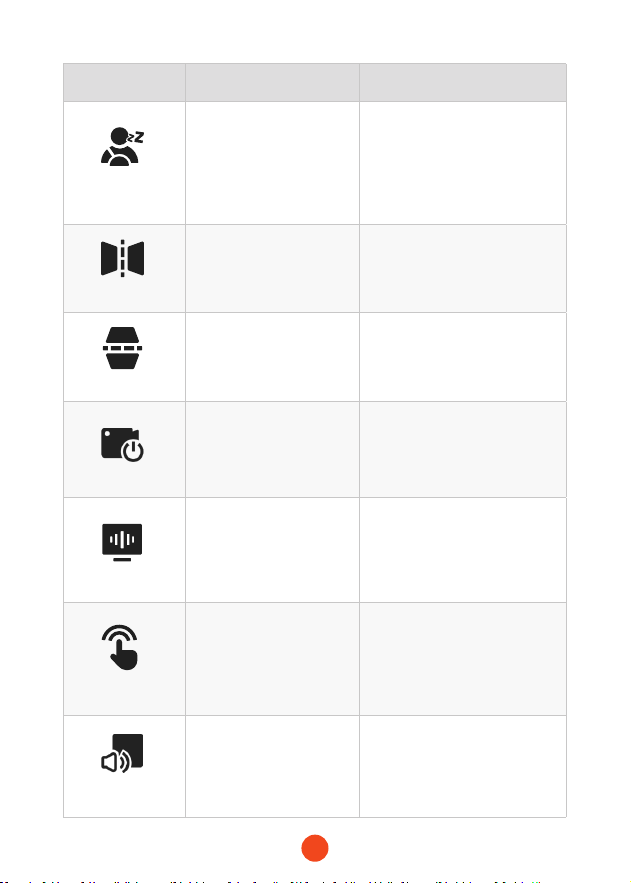
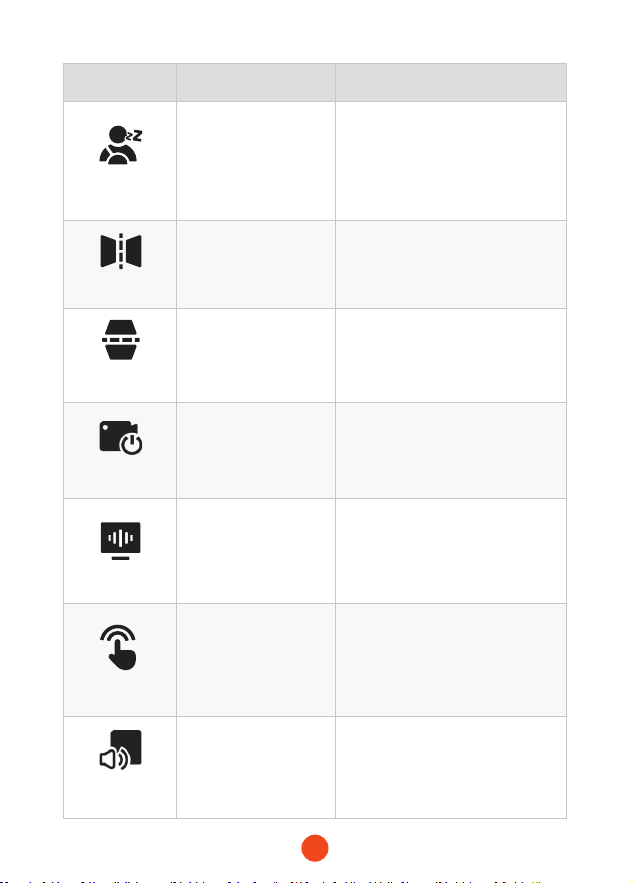
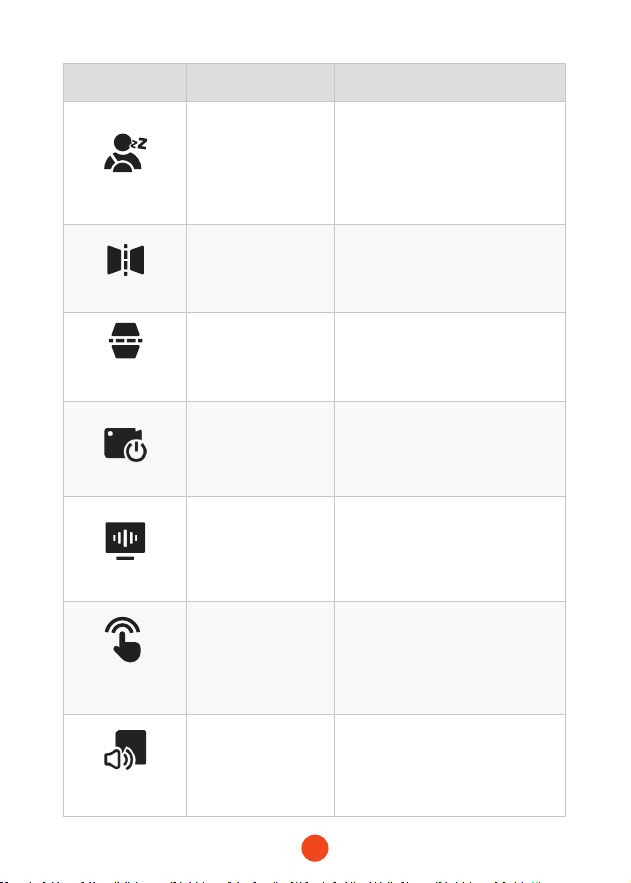
9
Function Option Description
Fatigue
Reminder
OFF
/1 Hour
/2 Hours
/4 Hours
Set the time for fatigue reminder.
Mirror Flip
ON/OFF
Adjust the left-right ip of the
rear camera image.
Rear Cam Flip
ON/OFF
Adjust the up-down ip of the
rear camera image.
Internal
Recording
ON/OFF
Set the switch for the built-in
camera.
Flicker
50 Hz/60 Hz Set the screen refresh rate.
Key Tone
ON/OFF Set the switch for key tones.
Staup Sound
OFF/Low/Medium
/High
Set the sound level of the device.
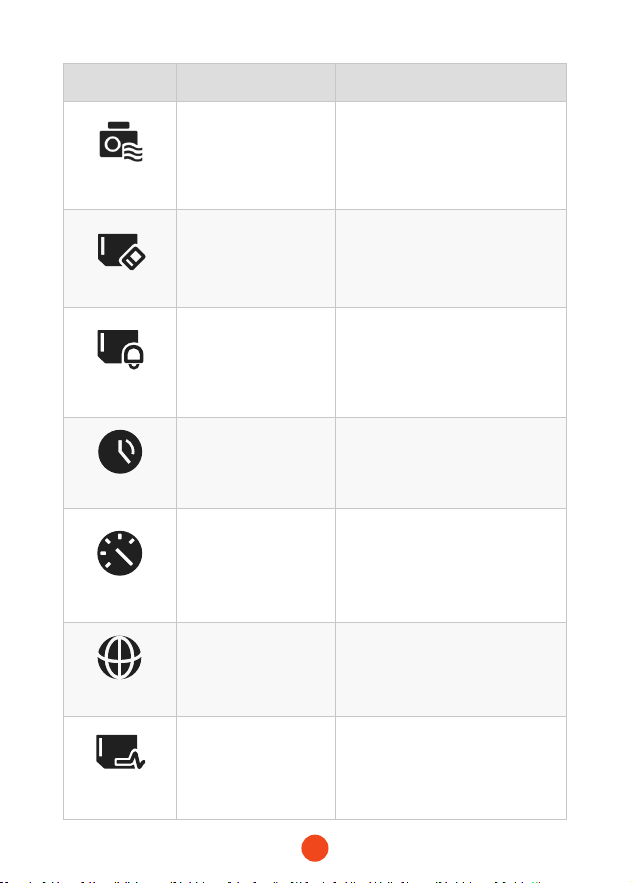
10
Function Option Description
Watermark
ON/OFF
Set the switch for digital
watermark
.
Format SD Card
/
Format the SD card and delete
videos and photos stored on it
.
Format
Reminder
OFF
/Each 15 days
/Each 25 days
Set the reminder for formatting
the SD card.
DST
ON/OFF
Set the reminder for formatting
the SD card.
Speed Unit
KM/H / MPH
Set the switch for daylight saving
time.
Language
English/Français/
Deutsch/Italiano/
Español/...
Set the language for the device.
Card Speed Test
/
Test the SD card's read and write
speeds to ensure they meet the
machine's requirements.
11
Function Option Description
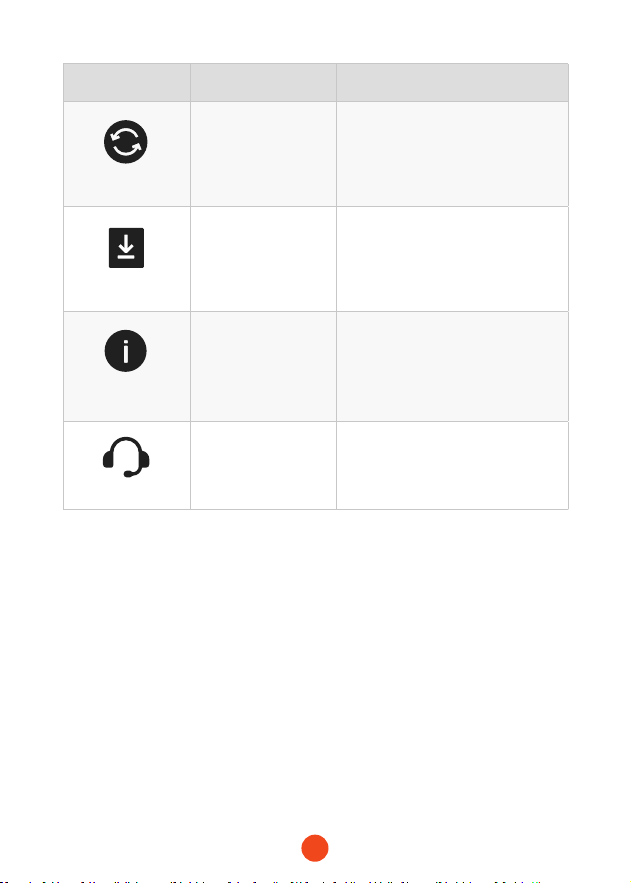
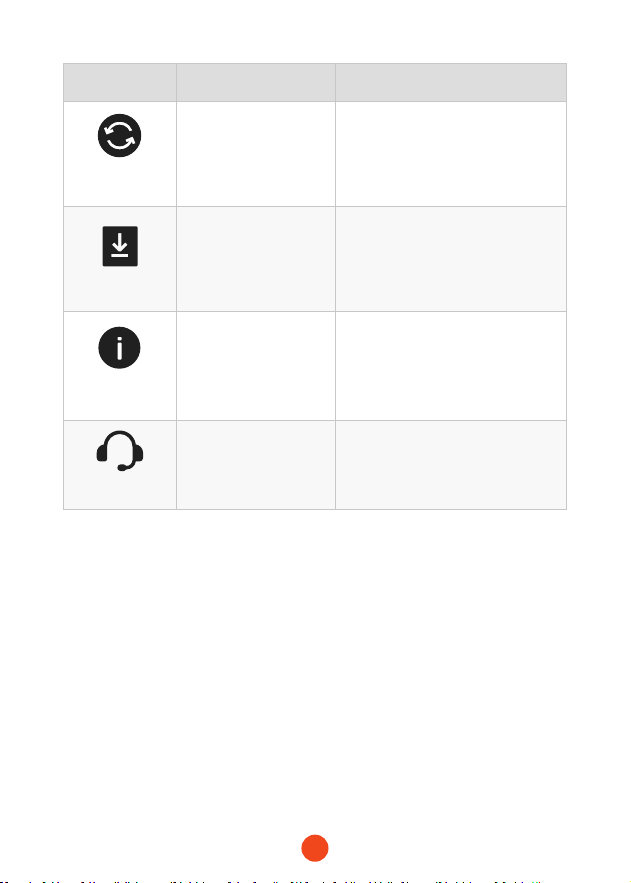
Reset Setup
/
Restore all settings to facto
defaults.
APP
/
Provide QR code for downloading
the app.
Product
Information
/ Display device information.
Help Center
/ After-sales contact information.
Note:
Parking Mode requires a hardware kit (purchased separately) in
order to activate.
With the hardware kit connected and Parking Mode enabled, the
dash cam will enter Lapse Recording mode when the car turns
o. This mode captures video at 1 frame per second until the set
duration ends or the car batte voltage drops below 12V.
12
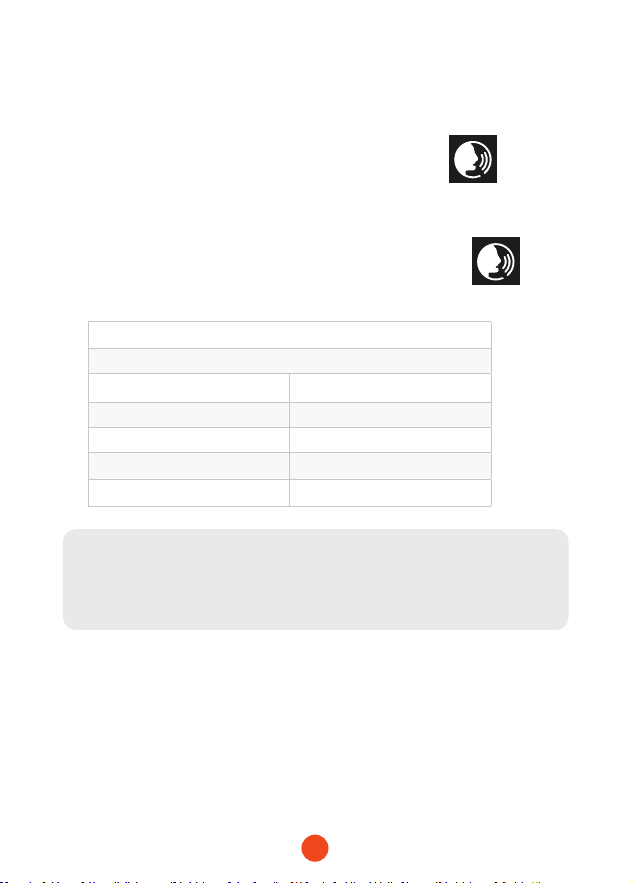
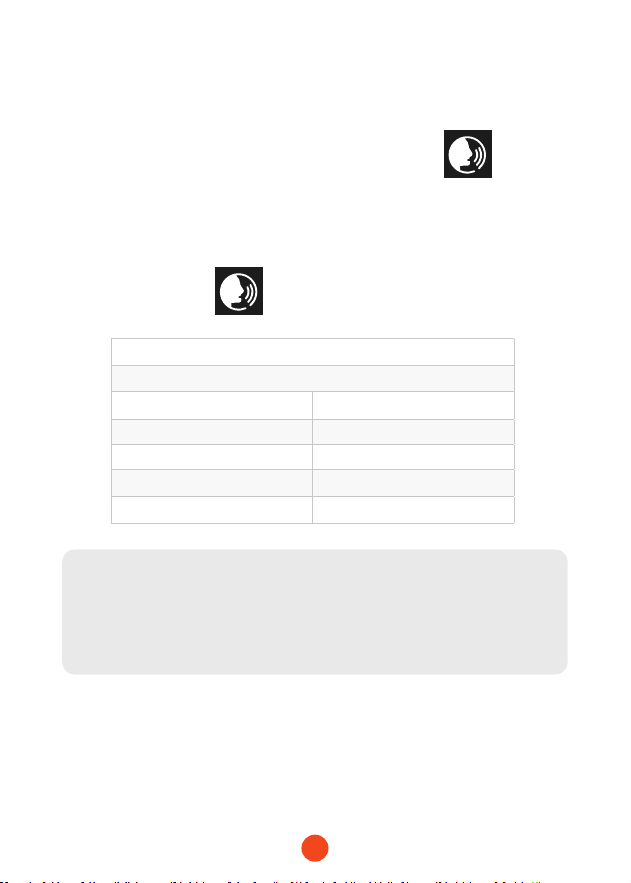
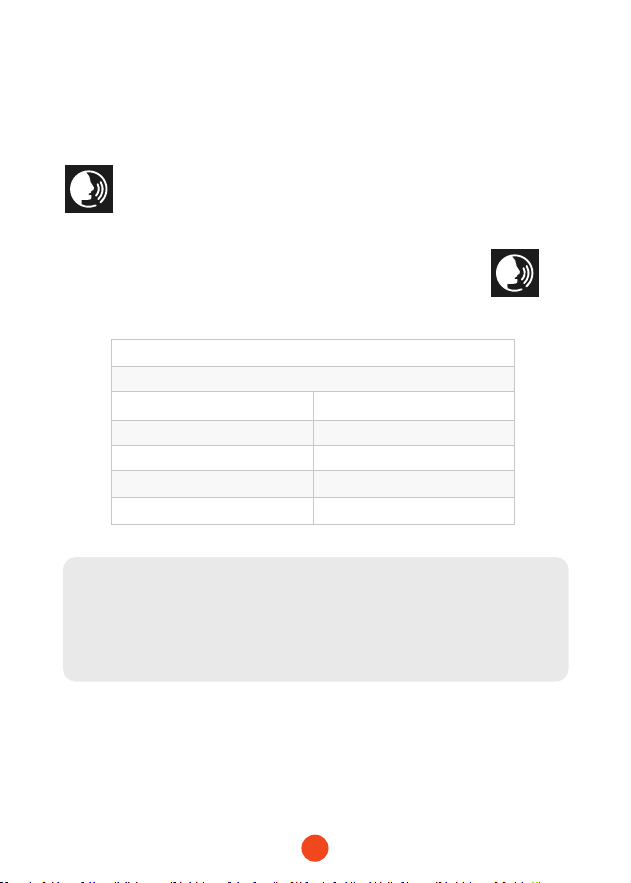
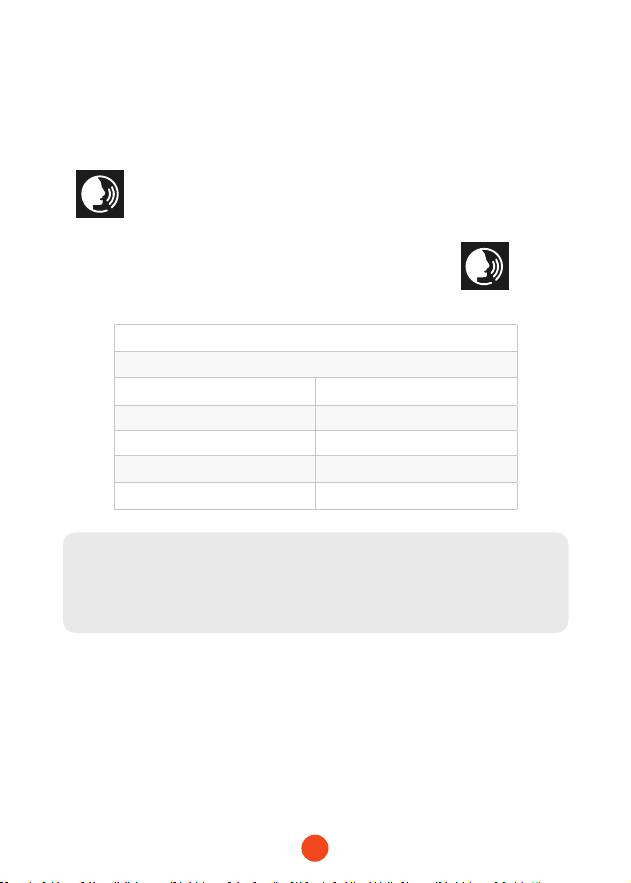
Voice Control Function
Fast control through simple voice commands.
When the recording inteace displays a white icon , it
means that the Voice Control function is activated.
You can enable/disable the voice control function through the
"Voice Control" in the menu or by clicking on the icon on
the screen.
Note:
You can access specic voice commands by tapping on the 'Voice
Command' submenu within the 'Voice Control' section.
lock the video
take picture
turn on audio turn o audio
turn on screen turn o screen
turn on
Wi-Fi
turn o
Wi-Fi
turn on recording turn o recording
show front camera show rear camera

13
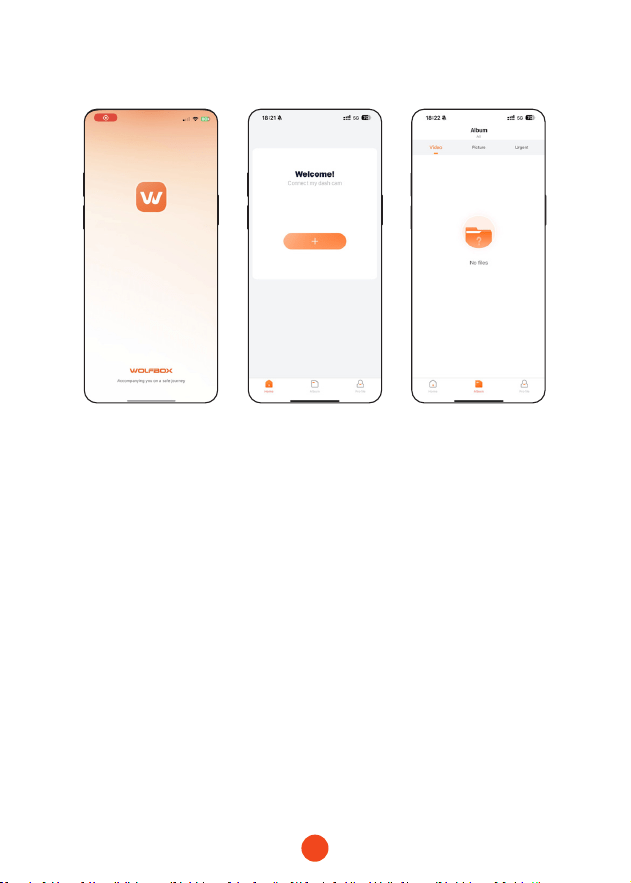
Play on APP (About Wi-Fi and APP)
The Wi-Fi feature has been designed so you can pair your
dash camera wirelessly with your smaphone and access your
recordings instantly from the dash cam. Here you can view,
download and share your videos easily with your friends and
family.
The app “WOLFBOX” is a free app that allows you to operate this
WLAN built-in drive recorder from your smaphone.
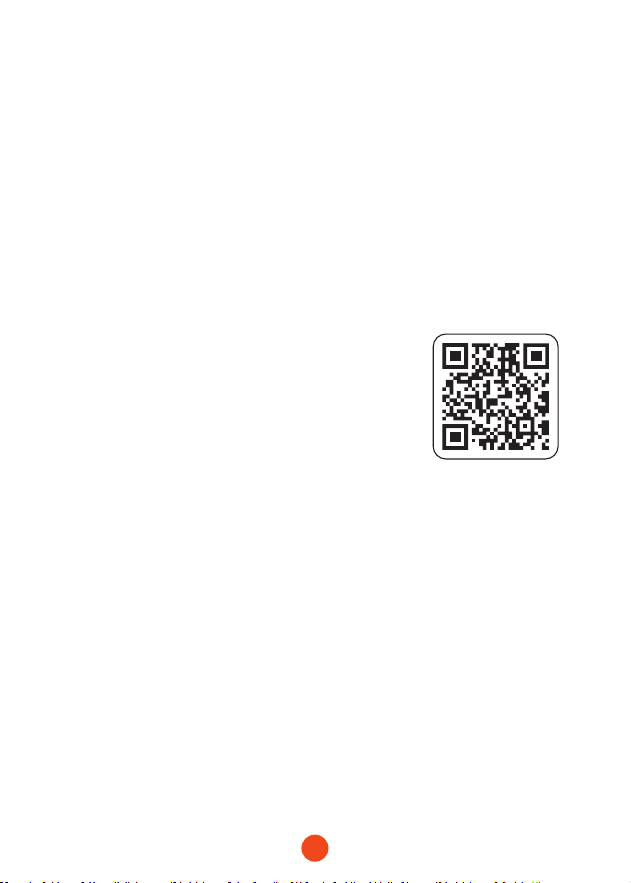
• How to connect Wi-Fi?
1. Download the “WOLFBOX ” app
Go to the following address to download
the “ WOLFBOX” app: https://wolox.
com/app/ You may also use your
smaphone to scan the QR code to go to
the download page.
2. Enable Wi-Fi
Go to Settings to turn on Wi-Fi. Go to Settings to turn on the
Wi-Fi. Then, the device screen will display the Wi-Fi name
and password.
3. Connect Wi-Fi
To connect your iPhone or Android phone to the X5's Wi-
Fi network,go to Settings > Wi-Fi and select X5 Wi-Fi. Then,
enter the default password: 12345678.
4. Open the “WOLFBOX” app
Once your mobile phone is connected to the X5's Wi-Fi
network,open the WOLFBOX app. The camera will sync
automatically, and you should see the live video feed on your
phone.

14
• Edit and share Your Videos in the App
In the app, you can view and edit downloaded local albums and
share them with others.
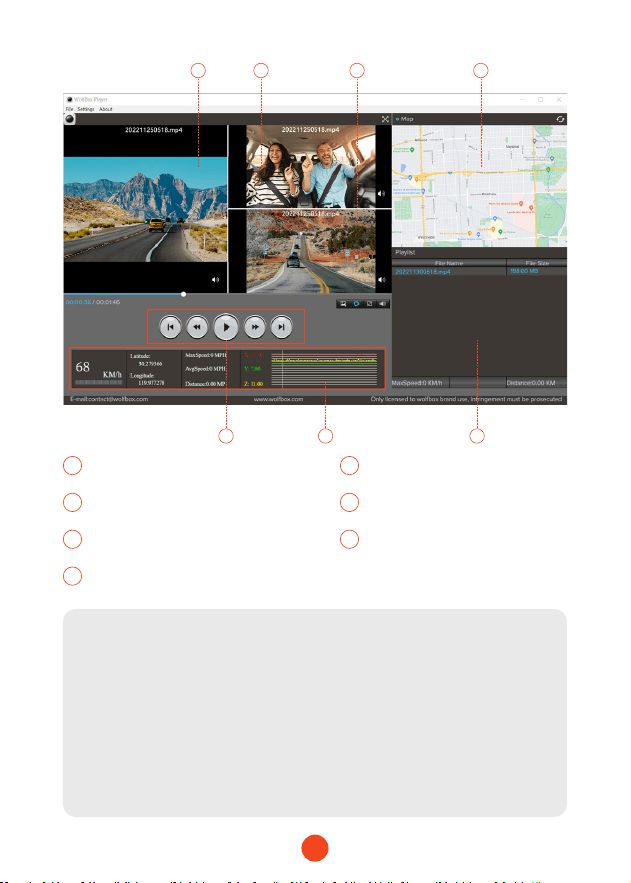
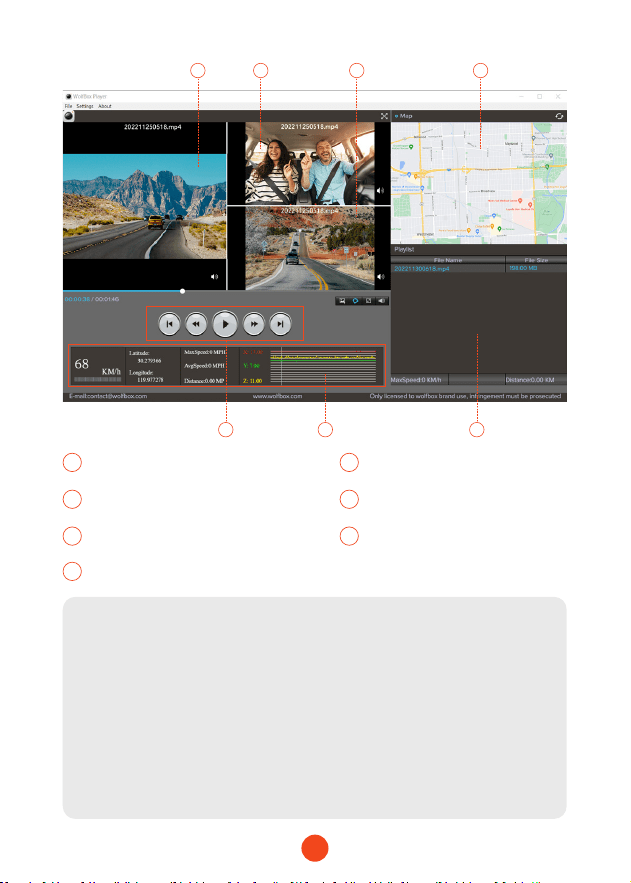
How to Play Video on Computer
We recommend the application “GPS Media Player” to watch and
play dash cam videos, and view Google Maps.
You can download it for free on Mac or Windows from the
following link: https://wolox.com/gps-player/

15
1 2 4
5 76
3
1 2
Video play window (Front) Video play window (Inside)
3 4
Video play window (Rear) Map and track display
5
7
6
Play control panel
Play list
Speed and driving state indication
Note:
If the video les of Front, Middle, and Rear road tracks are
recorded synchronously and loaded into the playing list at the
same time, they can be played separately in split left and right
screens.
When you nd the desired video le, hold down the left mouse
button and drag the desired les to the video play window to
play it.
16
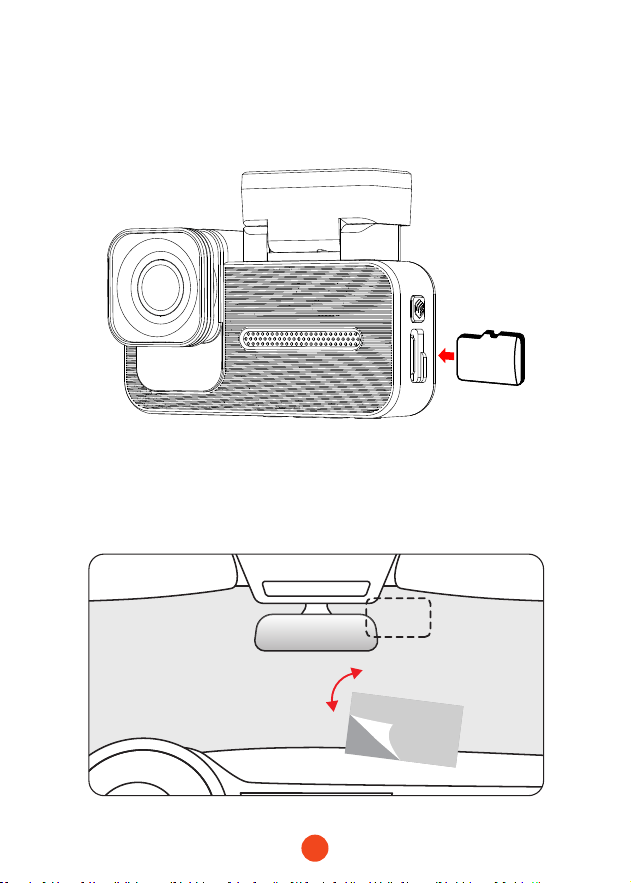
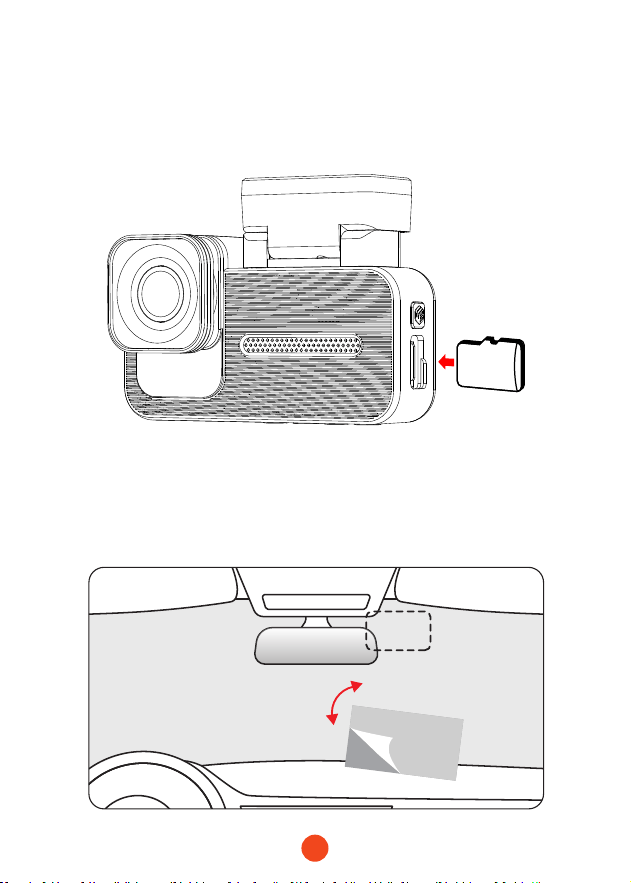
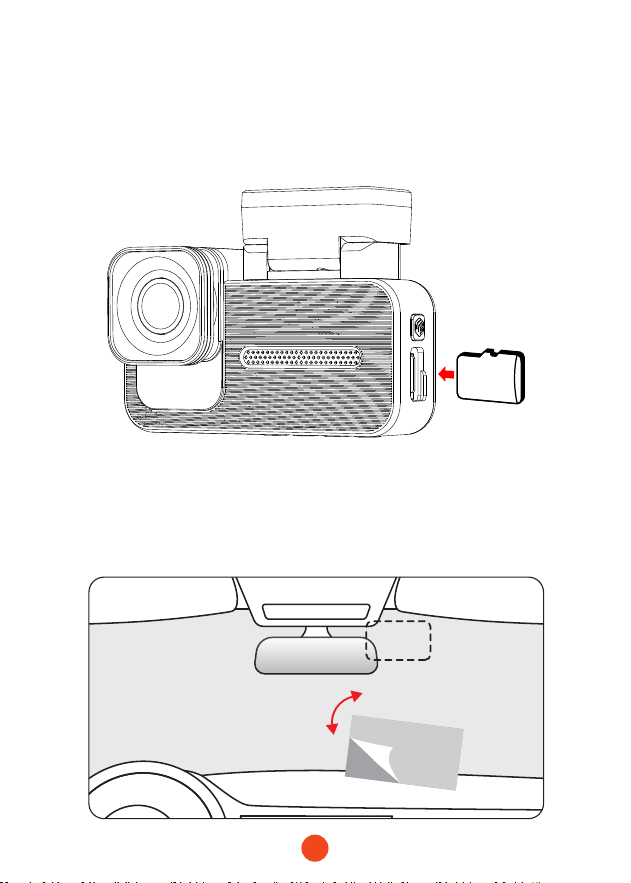
Installation
Before installing your dash cam, please test its functionality with
all accessories and change the default settings to your preference.
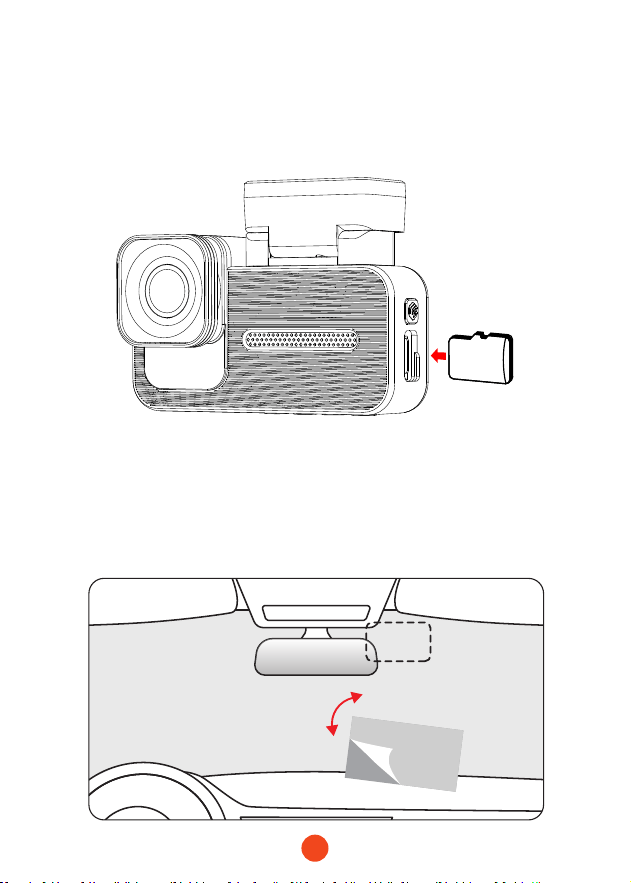
SD
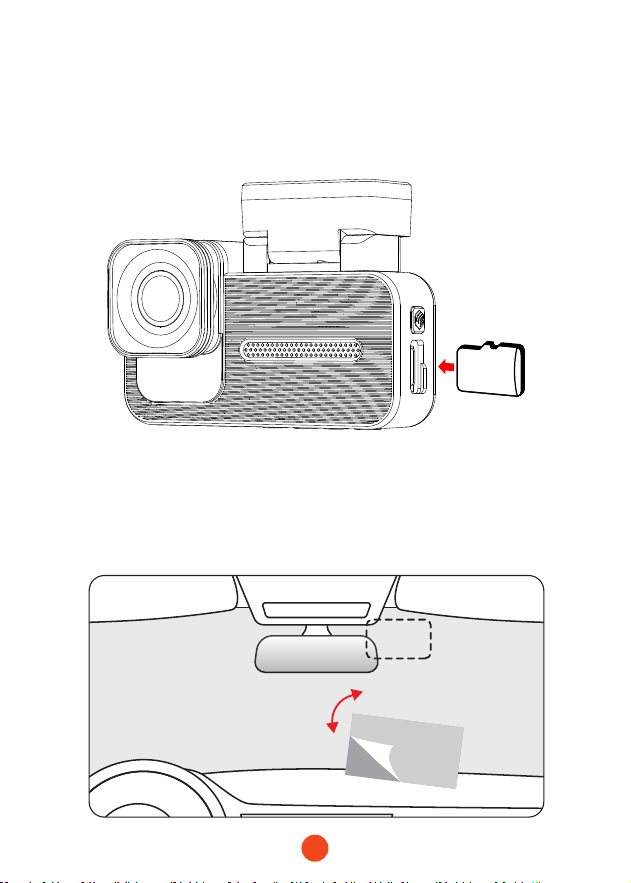
• Front Camera Installation
Peel o the electrostatic sticker on the cellophane and transfer
it to where you want to stick it. Attach the front camera to the
electrostatic sticker and press to make it rmer.
17
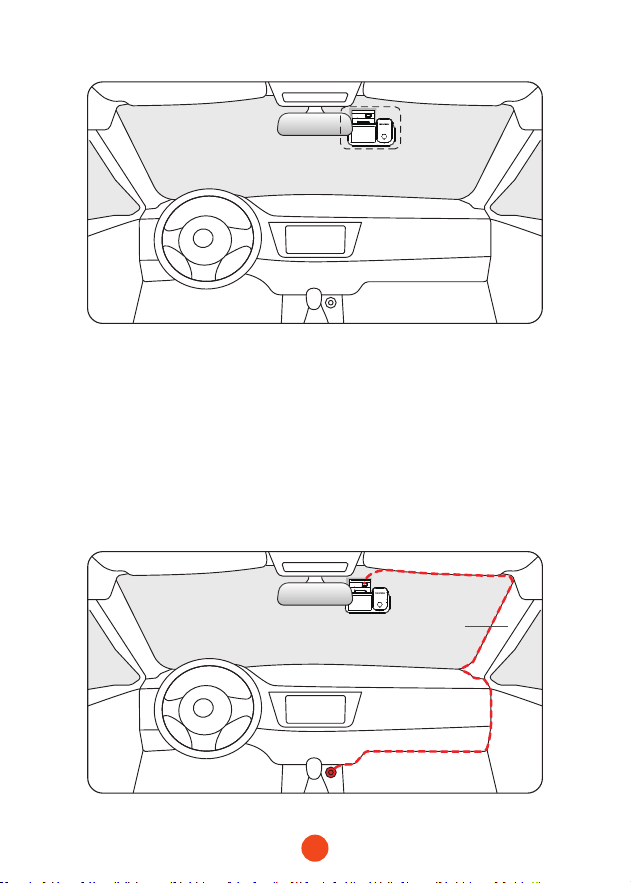
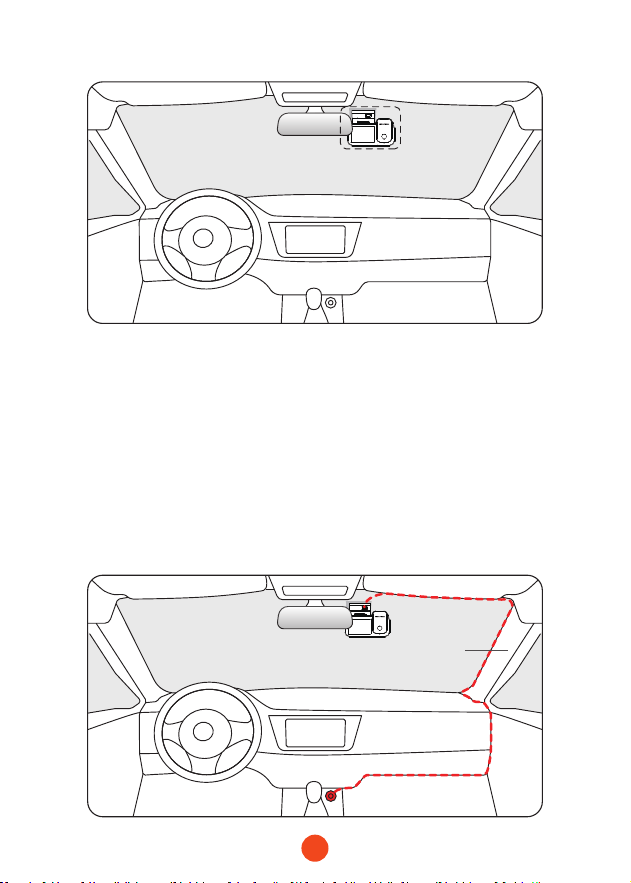
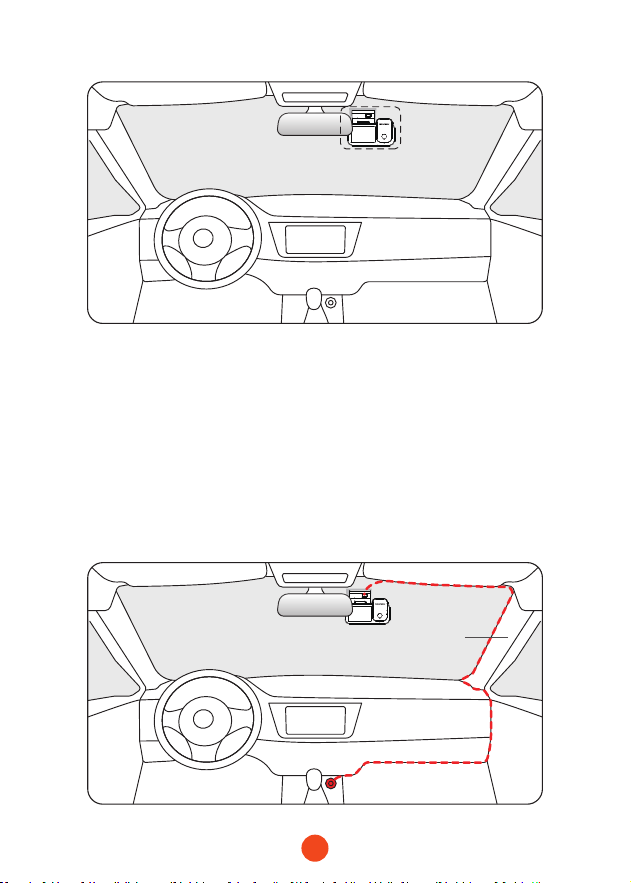
• Wire Layout In The Vehicle
1. The car charger is connected to the cigar socket.
2. Connect the other end of the car charger to the dash cam.
3. Use the crowbar to run the power cable along the front
windshield and the roof, and hide the cable down the A-pillar,
so as not to block the driver's sight and cause danger.
Pillar A

18
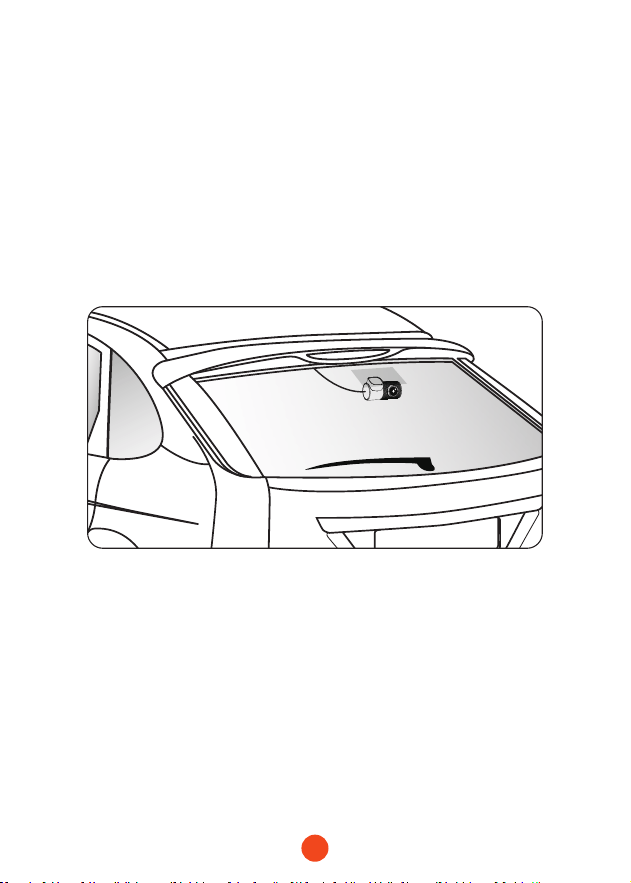
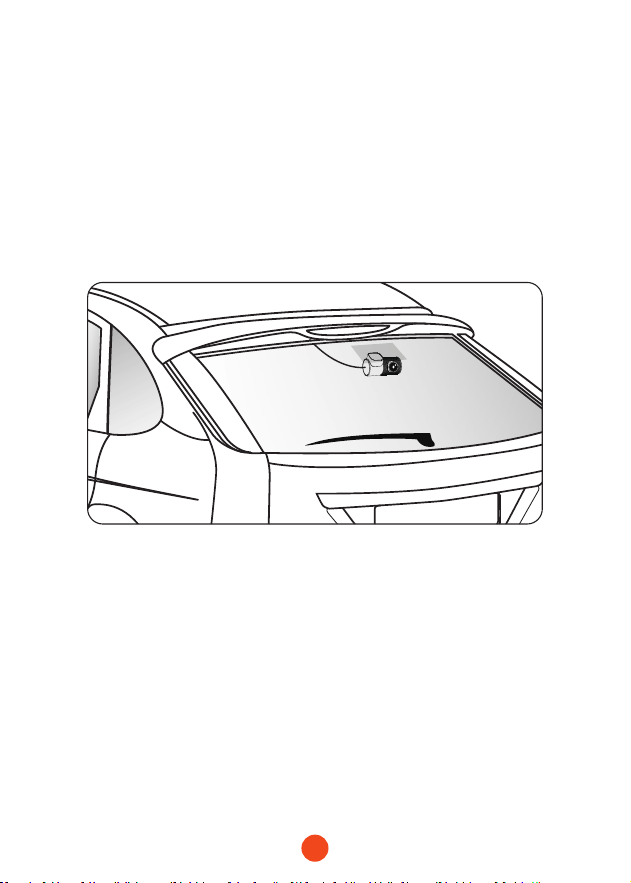
• Mount The Rear Camera
1. Use a clean cloth to wipe the rear windshield where the rear
camera needs to be installed.
2. Peel o the electrostatic sticker, transfer it to the place you
want to stick it.
3. Drain the air bubbles on the electrostatic sticker.
4. Peel o the adhesive on the rear camera and stick it on the
electrostatic sticker.
• Power ON/OFF
• Sho press the power button to turn on, long press the power
button to turn o.
• When using the car charger, if the cigarette lighter po is ACC,
the dash cam will automatically turn on when the car is staed.

19
Trouble Shooting
• Why is there no GPS signal?
1. Clean and reconnect the probe on the main unit and bracket.
Check for any inteerence in your car, like metal lm on the
windshield, radio antenna, or radar detector.
2. Move your car to an open area.
3. If the GPS icon is , it means the GPS signal is good.
If the GPS icon is , it means there is no GPS signal.
• How to turn o the on/o music of dash cam?
Please go to Settings >Key Sound > O.
When the click tone is turned o, the power on and o music
will also be turned o.
• Why does my dash cam prompt card error or please format
Memo Card eve once in a while?
Please follow the steps below to check:
1. Please go to Settings > Format Reminder to check whether
the regular format reminder is enabled.
2. Format the Memo Card.
3. Restore facto settings and resta the dash cam.
4. Update the rmware.
• Dash cam repeated resta/no boot?
1. Make sure you are using the original car charger.
2. Unplug the Memo Card and car charger in turn, and
reinstall them. Check whether the sho circuit is caused by
accessories.

20
3. Reset the machine through the small hole at the bottom of
the driving recorder.
4. If none of the above can solve the problem, please t to
power on the USB cable to conrm whether the host can be
used normally.
5. Please go to the ocial website to update the rmware.
6. If it is not resolved, please contact your dedicated customer
seice for a replacement.
• Why can't I connect to Wi-Fi?
1. Check the working distance of Wi-Fi, about 15ft.
2. Check the SSID and password of the Wi-Fi, or whether there
are other devices connected to the Wi-Fi.
3. Turn o mobile data, security software, and VPN on your
phone.
4. If the issue persists, please contact customer suppo for
assistance.
• Why is the time setting incorrect?
The dash cam features built-in GPS. It automatically adjusts
time based on your location and time zone, eliminating the
need for manual time changes. And you can adjust the time
through Settings > Time Zone/DST.

21
Inhalt
Produkt Spezikationen . . . . . . . . . . . . . . . . . . . .
22
Benutzerobeläche Übersicht . . . . . . . . . . . . . . . .
23
Funktionsübersicht. . . . . . . . . . . . . . . . . . . . . . .
27
Sprachsteuerungsfunktion
. . . . . . . . . . . . . . . . .
32
Auf APP Spielen(Über Wi-Fi und APP) . . . . . . . . . . .
33
Wie man Video auf dem Computer Abspielt . . . . . . . .
34
Installation . . . . . . . . . . . . . . . . . . . . . . . . . .
36
Fehlerbehebung . . . . . . . . . . . . . . . . . . . . . . . .
39
DE

22
Produkt Spezikationen
RAM DDR3 8Gb Displaytyp IPS
Video-format MP4 Bildformat JPG
Frontkamera 4K Rückfahrkamera 1080P
Rückkamera
2.5K(1440P)
Rücklinsen-FPS 30 fps
Bildschirmgröße 2.35''
Stromversorgungs
Schnittstelle
USB-C
GPS intern
WLAN-
Verbindung
Unterstützt
Sprachsteuerung Unterstützt
Betriebstem perat
ur
-4°F ~158°F
Voller
Touchscreen
Unterstützt

23
Symbol Beschreibung
GPS-Status
Aufnahmeauösung
Ob das Festverdrahtungsset angeschlossen und die
Parküberwachung eingerichtet werden soll
Sprachsteuerung
WLAN-Status
Benutzerobeläche Übersicht
• Aufnahmemodus
24
Symbol Beschreibung
Kamerasystem-Tonstatus
Sprachaufnahmestatus
Ob die Rückfahrkamera angeschlossen ist
Aufnahmestatus und Aufnahmezeit
Notfallaufnahme ist aktivie
Datum und Uhrzeit der Kamera

25
• Wiedergabemodus
Beim Einschalten der Dashcam beginnt sie automatisch mit der
Aufnahme. Wischen Sie mit dem Finger von unten nach oben über
den Bildschirm oder wählen Sie, um in den Wiedergabemodus zu
gelangen.
Klicken/Wählen Sie, um auf den spezischen Wiedergabeordner
zuzugreifen.

26
1
3
5 5
1
Aktueller Ordnername
2
3
Index der aktuellen Datei
in den gesamten Dateien
Dateiname
4
5 6
Dateityp
Videodauer Zeitpunkt der Videoaufnahme
1 2
3
4
5
6
27
Funktionsübersicht
Wischen Sie von rechts nach links, um auf das Funktionsmenü
zuzugreifen, in dem Sie verschiedene Einstellungen und Parameter der
Maschine ändern können.
Funktion Option Beschreibung
Auösung
4K+1080P+2.5K
/4K+1080P+1080P
/...
Auswahl der Videoauösung
Schleifenaufnahme
1 Minute
/3 Minuten
/5 Minuten
Legen Sie die Dauer für
die Schleifenaufnahme von
Videodateien fest.
Uhrzeiteinstellung
/
Stellen Sie die aktuelle auf dem
Gerät angezeigte Uhrzeit ein.
Zeitformat
12 Stunden
/24 Stunden
Legen Sie das Zeitanzeigesystem
fest.
Zeitzone
/
Passen Sie die Zeitzone basierend
auf dem geograschen Stando
an.
Tonaufnahme
EIN/AUS
Legen Sie fest, ob Ton
aufgenommen werden soll.
28
Funktion Option Beschreibung
Wi-Fi
EIN/AUS
Stellen Sie den Status der
Wi-Fi-Verbindung des Geräts
ein.
Parkmodus
EIN /G-Trigger-Aufnahme
/12H-Zeitraeraufnahme
/24H-Zeitraeraufnahme
Überwachen Sie den Status
des Fahrzeugs, nachdem der
Motor ausgeschaltet wurde.
G-Sensor
AUS / Niedrig / Mittel
/Hoch
Stellen Sie die Empndlichkeit
des G-Sensors ein.
GPS
/
Aufgezeichnete GPS-Daten
anzeigen.
Bildschirmschoner
AUS / 10 Sekunden / 30
Sekunden / 2 Minuten
Stellen Sie die Aktivierungszeit
für den Bildschirmschoner ein.
Sprachsteuerung
EIN/AUS/Sprachbefehl
Stellen Sie den Schalter für
die Sprachsteuerungsfunktion
ein.
29
Funktion Option Beschreibung
Müdigkeit-
serinnerung
AUS /1 Stunde
/2 Stunden /4 Stunden
Stellen Sie die Zeit für die
Müdigkeitserinnerung ein.
Spiegelbild
EIN/AUS
Passen Sie die Links-Rechts-
Spiegelung des Rückkamera-
Bildes an.
Rückkamera-Flip
EIN/AUS
Passen Sie die Oben-Unten-
Spiegelung des Rückkamera-
Bildes an.
Interne Aufnahme
EIN/AUS
Stellen Sie den Schalter für
die integriee Kamera ein.
Flimmern
50 Hz/60 Hz
Stellen Sie die
Bildschirmaktualisierungsrate
ein.
Klickton
EIN/AUS
Stellen Sie den Schalter für
die Tastenklänge ein.
Lautstär-
keeinstellung
AUS/Niedrig/Mittel/
Hoch
Stellen Sie die Lautstärke des
Geräts ein.
30
Funktion Option Beschreibung
Digital Watermark
EIN/AUS
Stellen Sie den Schalter für das
digitale Wasserzeichen ein.
Formatieren
/
Formatieren Sie die SD-Kae und
löschen Sie darauf gespeichee
Videos und Fotos.
Formatierung-
serinnerung
AUS /Alle 15 Tage
/Alle 25 Tage
Stellen Sie die Erinnerung zum
Formatieren der SD-Kae ein.
Sommerzeit (DST)
EIN/AUS
Stellen Sie den Schalter für die
Sommerzeit ein.
Geschwindigkeits-
Einheit
KM / H / MPH
Stellen Sie die
Geschwindigkeitsanzeigeeinheit
ein.
Sprache
English /Français /
Deutsch /Italiano /
Español /...
Stellen Sie die Sprache für das
Gerät ein.
Kaen-
Geschwindigkeit
/
Testen Sie die Lese- und
Schreibgeschwindigkeit der SD-
Kae, um sicherzustellen, dass sie
den Anforderungen des Geräts
entspricht
.
31
Funktion Option Beschreibung
Setup
zurücksetzen
/
Alle Einstellungen auf die
Werkseinstellungen zurücksetzen.
APP
/
QR-Code für den Download der
App bereitstellen.
Produktinfor-
mationen
/
Geräteinformationen anzeigen.
Hilfezentrum
/
Kontaktinformationen für den
Kundendienst.
Hinweis:
Der Parkmodus eorde ein Hardware-Kit (separat erhältlich),
um aktivie zu werden. Mit verbundenem Hardware-Kit und
aktivieem Parkmodus wechselt die Dashcam in den Zeitraer-
Aufnahmemodus, wenn das Auto ausgeschaltet wird. Dieser
Modus nimmt Videos mit 1 Bild pro Sekunde auf, bis die
eingestellte Dauer endet oder die Autobatteriespannung unter
12V fällt.
32
Sprachsteuerungsfunktion
Schnelle Steuerung durch einfache Sprachbefehle.
Wenn das Aufnahmeinteace ein weißes Symbol anzeigt,
bedeutet dies, dass die Sprachsteuerungsfunktion aktivie ist.
Sie können die Sprachsteuerungsfunktion über die
"Sprachsteuerung" im Menü aktivieren/deaktivieren oder indem
Sie auf das Symbol auf dem Bildschirm klicken.
Hinweis:
Sie können auf spezische Sprachbefehle zugreifen, indem Sie
auf das Untermenü 'Sprachbefehl' im Abschnitt 'Sprachsteuerung'
tippen.
lock the video
take picture
turn on audio turn o audio
turn on screen turn o screen
turn on
Wi-Fi
turn o
Wi-Fi
turn on recording turn o recording
show front camera show rear camera
33
Auf APP Spielen (
Über Wi-Fi und APP)
Die Wi-Fi-Funktion wurde entwickelt, damit Sie Ihre Dashcam
drahtlos mit Ihrem Smaphone koppeln und Ihre Aufnahmen
sofo von der Dashcam aus zugreifen können. Hier können
Sie Ihre Videos einfach ansehen, herunterladen und mit Ihren
Freunden und Ihrer Familie teilen.
Die App "WOLFBOX" ist eine kostenlose App, die es Ihnen
ermöglicht, diesen WLAN-integrieen Drive Recorder von Ihrem
Smaphone aus zu bedienen.
• Wie Verbindet Man Wi-Fi?
1. Laden Sie die "WOLFBOX"-App herunter
Gehen Sie auf die folgende Adresse, um
die "WOLFBOX"-App herunterzuladen:
https://wolox.com/app/ Sie können auch
Ihr Smaphone verwenden, um den QR-
Code zu scannen und zur Download-Seite
zu gelangen.
2. Wi-Fi aktivieren
Gehen Sie zu den Einstellungen, um Wi-Fi einzuschalten.
Dann wird auf dem Bildschirm des Geräts der Wi-Fi-Name
und das Passwo angezeigt.
3. Wi-Fi verbinden
Um Ihr iPhone oder Android-Telefon mit dem Wi-Fi-Netzwerk
des X5 zu verbinden, gehen Sie zu Einstellungen > Wi-Fi und
wählen Sie X5 Wi-Fi. Geben Sie dann das Standardpasswo
ein: 12345678.
4. Önen Sie die "WOLFBOX"-App
Sobald Ihr Mobiltelefon mit dem Wi-Fi-Netzwerk des X5
verbunden ist, önen Sie die WOLFBOX-App. Die Kamera
wird automatisch synchronisie, und Sie sollten den Live-
Video-Feed auf Ihrem Telefon sehen.

34
In der App können Sie heruntergeladene lokale Alben ansehen
und bearbeiten und sie mit anderen teilen.
Wie man Video auf dem Computer Abspielt
Wir empfehlen die Anwendung "GPS Media Player", um Dashcam-
Videos anzusehen und abzuspielen und Google Maps anzuzeigen.
Sie können es kostenlos für Mac oder Windows unter folgendem
Link herunterladen: https://wolox.com/gps-player/
•Bearbeiten und Teilen Ihrer Videos in der App
35
Hinweis:
Wenn die Videodateien der Vorder, Mittel und Rückfahrbahn
synchron aufgezeichnet und gleichzeitig in die Wiedergabeliste
geladen werden, können sie separat in geteilten linken
und rechten Bildschirmen abgespielt werden. Wenn Sie die
gewünschte Videodatei gefunden haben, halten Sie die linke
Maustaste gedrückt und ziehen Sie die gewünschten Dateien in
das Videowiedergabefenster, um sie abzuspielen.
1 2 4
5 76
3
1 2
Video-Wiedergabefenster (Vorne) Video-Wiedergabefenster
(Innen)
3 4
Video-Wiedergabefenster(Hinten) Kaen- und Streckenanzeige
5
7
6
Wiedergabesteuerung
Wiedergabeliste
Geschwindigkeits- und
Fahrzustandsanzeige
36
SD
Installation
Bevor Sie Ihre Dashcam installieren, testen Sie bitte die
Funktionalität mit allen Zubehöeilen und ändern Sie die
Standardeinstellungen nach Ihren Wünschen.
• Installation der Frontkamera
Ziehen Sie den elektrostatischen Auleber vom Zellophan ab
und überagen Sie ihn auf die Stelle, an der Sie ihn anbringen
möchten. Bringen Sie die Frontkamera auf dem elektrostatischen
Auleber an und drücken Sie sie an, um sie fester zu machen.
37
• Kabelverlegung im Fahrzeug
1. Das Autoladegerät wird an die Zigarettenanzünderbuchse
angeschlossen.
2. Verbinden Sie das andere Ende des Autoladegeräts mit der
Dashcam.
3. Verwenden Sie den Hebel, um das Stromkabel entlang der
Windschutzscheibe und des Dachs zu verlegen und das
Kabel entlang der A-Säule zu verstecken, um die Sicht des
Fahrers nicht zu blockieren und keine Gefahr zu verursachen.
Pillar A
38
• Montage der Rückfahrkamera
1. Verwenden Sie ein sauberes Tuch, um die Heckscheibe
abzuwischen, wo die Rückfahrkamera installie werden soll.
2. Ziehen Sie den elektrostatischen Auleber ab und
überagen Sie ihn an die gewünschte Stelle.
3. Drücken Sie die Luftblasen aus dem elektrostatischen
Auleber heraus.
4. Ziehen Sie den Kleber von der Rückfahrkamera ab und kleben
Sie sie auf den elektrostatischen Auleber.
• Ein-/Ausschalten
• Drücken Sie kurz die Einschalttaste, um das Gerät einzuschalten,
und drücken Sie lange, um es auszuschalten.
• Bei Verwendung des Autoladegeräts, wenn der
Zigarettenanzünderanschluss ACC ist, schaltet sich die Dashcam
automatisch ein, wenn das Auto gestaet wird.

39
Fehlerbehebung
・Warum gibt es kein GPS-Signal?
1. Reinigen und verbinden Sie die Sonde an der Haupteinheit
und der Halterung erneut. Überprüfen Sie auf Störungen
in Ihrem Auto, wie Metallfolie auf der Windschutzscheibe,
Radioantenne oder Radarwarner.
2. Bewegen Sie Ihr Auto in ein oenes Gebiet.
3. Wenn das GPS-Symbol ist, bedeutet das, dass das
GPS-Signal gut ist. Wenn das GPS-Symbol ist,
bedeutet das, dass kein GPS-Signal vorhanden ist.
・Wie schalte ich die Ein-/Ausschaltmusik der Dashcam aus?
Bitte gehen Sie zu Einstellungen > Tastenton > Aus.
Wenn der Klickton ausgeschaltet ist, wird auch die Ein- und
Ausschaltmusik ausgeschaltet.
・Warum zeigt meine Dashcam immer wieder Kaenfehler an
oder forde auf, die Speicherkae zu formatieren?
Bitte folgen Sie den untenstehenden Schritten zur Überprüfung:
1. Gehen Sie zu Einstellungen > Format-Erinnerung, um zu
überprüfen, ob die regelmäßige Format-Erinnerung aktivie
ist.
2. Formatieren Sie die Speicherkae.
3. Stellen Sie die Werkseinstellungen wieder her und staen Sie
die Dashcam neu.
4. Aktualisieren Sie die Firmware.
・Dashcam wiederholt Neusta/kein Sta?
1. Stellen Sie sicher, dass Sie das Original-Autoladegerät
verwenden.
2. Ziehen Sie die Speicherkae und das Autoladegerät
nacheinander ab und installieren Sie sie erneut. Überprüfen
Sie, ob ein Kurzschluss durch Zubehör verursacht wird.

40
3. Setzen Sie das Gerät über das kleine Loch an der Unterseite
des Fahenrekorders zurück.
4. Wenn keine der oben genannten Lösungen das Problem
beheben kann, versuchen Sie, das USB-Kabel einzuschalten,
um zu überprüfen, ob das Hauptgerät normal verwendet
werden kann.
5. Bitte besuchen Sie die ozielle Website, um die Firmware zu
aktualisieren.
6. Wenn das Problem nicht gelöst wird, wenden Sie sich bitte an
Ihren Kundendienst für einen Austausch.
・Warum kann ich keine Verbindung zu Wi-Fi herstellen?
1. Überprüfen Sie die Arbeitsentfernung des Wi-Fi, etwa 15ft.
2. Überprüfen Sie die SSID und das Passwo des Wi-Fi oder ob
andere Geräte mit dem Wi-Fi verbunden sind.
3. Schalten Sie mobile Daten, Sicherheitssoftware und VPN auf
Ihrem Telefon aus.
4. Wenn das Problem weiterhin besteht, wenden Sie sich bitte
an den Kundensuppo, um Unterstützung zu erhalten.
・Warum ist die Zeiteinstellung falsch?
Die Dashcam veügt über ein eingebautes GPS. Es passt die Zeit
automatisch basierend auf Ihrem Stando und Ihrer Zeitzone an,
was die Notwendigkeit manueller Zeitänderungen eliminie. Sie
können die Zeit über Einstellungen > Zeitzone/DST anpassen.

41
Contenu
Spécications du Produit . . . . . . . . . . . . . . . . . . .
42
Aperçu de l'inteace Utilisateur . . . . . . . . . . . . . . .
43
Aperçu des Fonctions . . . . . . . . . . . . . . . . . . . . .
47
Fonction de Contrôle Vocal . . . . . . . . . . . . . . . . . .
52
Lecture sur l'APP (À propos du Wi-Fi et de l'APP) . . . . .
53
Comment lire des vidéos sur un ordinateur . . . . . . . . .
54
Installation . . . . . . . . . . . . . . . . . . . . . . . . . . .
56
Dépannage . . . . . . . . . . . . . . . . . . . . . . . . . . .
59
FR

42
Spécications du Produit
RAM DDR3 8Gb Type d'achage IPS
Format vidéo: MP4 Format d'image: JPG
Caméra avant: 4K
Caméra
intérieure
1080P
Caméra arrière:
2.5K(1440P)
FPS caméra
arrière
30 fps
Taille de l'écran 2.35''
Inteace
d'alimentation
USB-C
GPS interne
Connexion
Wi-Fi
Prise en charge
Commande
vocale
Prise en charge
Température de
fonctionnement
-4°F ~158°F
Écran tactile
complet
Prise en charge
43
Aperçu de l'inteace Utilisateur
• Mode d'enregistrement
Icône Description
Statut GPS
Résolution d'enregistrement
Connecter le kit câblé et congurer la sueillance de
stationnement
Commande vocale
État du Wi-Fi

44
Icône Description
Statut sonore du système de caméra
Statut de l'enregistrement vocal
Si la caméra arrière est connectée
Statut d'enregistrement et temps d'enregistrement
Enregistrement d'urgence activé
Date et heure de la caméra
45
• Mode de lecture
Lorsque vous allumez la dashcam, elle commence
automatiquement à enregistrer. Faites glisser votre doigt du
bas de l'écran vers le haut ou sélectionnez pour entrer en mode
lecture.
Cliquez/Sélectionnez pour accéder au dossier de lecture
spécique.

46
1
3
5 5
1
Nom du dossier actuel
2
3
Index du chier actuel
dans les chiers totaux
Nom du chier
4
5 6
Type de chier
Durée de la vidéo Heure de l'enregistrement vidéo
1 2
3
4
5
6
47
Aperçu des Fonctions
Faites glisser de droite à gauche pour accéder au menu des fonctions,
où vous pouvez modier divers paramètres et réglages de la machine.
Fonction Option Description
Résolution
4K+1080P+2.5K
/4K+1080P+1080P
/...
Sélection de la résolution vidéo.
Enregistrement
en boucle
1 Minute
/3 Minutes
/5 Minutes
Réglez la durée de l'enregistrement
en boucle des chiers vidéo.
Réglage de
l'horloge
/
Ajustez l'heure actuelle achée
sur l'appareil.
Format de
l'heure
12 Heures / 24 Heures
Réglez le système d'achage de
l'heure.
Fuseau horaire
/
Ajustez le fuseau horaire en
fonction de la localisation
géographique.
Enregistrement
sonore
ON/OFF
Dénissez si vous souhaitez
enregistrer le son.
48
Fonction Option Description
Wi-Fi
ON/OFF
Réglez l'état de la connexion Wi-Fi
de l'appareil.
Mode Parking
ON
/Enregistrement par
déclenchement G
/Enregistrement en
accéléré 12H
/Enregistrement en
accéléré 24H
Sueillez l'état du véhicule après
que le moteur a été éteint.
G-Sensor
OFF
/Bas
/Moyen
/Haut
Réglez la sensibilité du capteur G.
GPS
/
Achez les données GPS
enregistrées.
Économiseur
d'écran
OFF
/10 Secondes
/ 30 Secondes
/ 2 Minutes
Réglez le temps d'activation de
l'économiseur d'écran.
Commande
vocale
ON
/OFF
/Commande vocale
Réglez l'interrupteur pour la
fonctionnalité de commande
vocale.

49
Fonction Option Description
Rappel de
fatigue
OFF
/1 Heure
/2 Heures
/4 Heures
Réglez le temps pour le rappel de
fatigue.
Miroir inversé
ON/OFF
Ajustez le retournement gauche-
droite de l'image de la caméra
arrière.
Retournement
caméra arrière
ON/OFF
Ajustez le retournement haut-bas
de l'image de la caméra arrière.
Enregistrement
interne
ON/OFF
Réglez l'interrupteur pour la
caméra intégrée.
Scintillement
50 Hz/60 Hz
Réglez la fréquence de
rafraîchissement de l'écran.
Tonalité de clic
ON/OFF
Réglez l'interrupteur pour les
tonalités de touche.
Réglage du
volume
OFF/Bas/Moyen
/Haut
Réglez le niveau sonore de
l'appareil.
50
Fonction Option Description
Filigrane
numérique
ON/OFF
Réglez l'interrupteur pour le
ligrane numérique.
Formater
/
Formatez la cae SD et supprimez
les vidéos et photos qui y sont
stockées.
Rappel de
formatage
OFF
/Tous les 15 jours
/Tous les 25 jours
Réglez le rappel pour le formatage
de la cae SD.
Heure d'été
(DST)
ON/OFF
Réglez l'interrupteur pour l'heure
d'été.
Unité de vitesse
KM/H/MPH
Réglez l'unité d'achage de la
vitesse.
Langue
English/Français
/Deutsch/Italiano
/Español/...
Réglez la langue de l'appareil.
Vitesse de la
cae
/
Testez les vitesses de lecture et
d'écriture de la cae SD pour vous
assurer qu'elles répondent aux
exigences de l'appareil.

51
Fonction Option Description
Réinitialiser les
paramètres
/
Rétablir tous les paramètres par
défaut d'usine.
APP
/
Fournir un code QR pour
télécharger l'application.
Informations sur
le produit
/
Acher les informations sur
l'appareil.
Centre d'aide
/
Informations de contact après-
vente.
Remarque :
Le mode Parking nécessite un kit matériel (vendu séparément)
pour être activé.
Avec le kit matériel connecté et le mode Parking activé, la
dashcam passera en mode d'enregistrement en accéléré lorsque
la voiture s'éteint. Ce mode capture des vidéos à 1 image par
seconde jusqu'à la n de la durée dénie ou jusqu'à ce que la
tension de la batterie de la voiture tombe en dessous de 12V.
52
Fonction de Contrôle Vocal
Contrôle rapide grâce à des commandes vocales simples.
Lorsque l'inteace d'enregistrement ache une icône blanche
,cela signie que la fonction de contrôle vocal est activée.
Vous pouvez activer/désactiver la fonction de contrôle vocal via le
"Contrôle vocal" dans le menu ou en cliquant sur l'icône à
l'écran.
Remarque :
Vous pouvez accéder à des commandes vocales spéciques en
appuyant sur le sous-menu 'Commande vocale' dans la section
'Contrôle vocal'.
lock the video
take picture
turn on audio turn o audio
turn on screen turn o screen
turn on
Wi-Fi
turn o
Wi-Fi
turn on recording turn o recording
show front camera show rear camera

53
Lecture sur l'APP (À Propos du Wi-Fi et de
l'APP)
La fonction Wi-Fi a été conçue pour que vous puissiez coupler
votre caméra de tableau de bord sans l avec votre smaphone
et accéder instantanément à vos enregistrements depuis la
caméra de tableau de bord. Ici, vous pouvez facilement visualiser,
télécharger et paager vos vidéos avec vos amis et votre famille.
L'application "WOLFBOX" est une application gratuite qui vous
permet d'utiliser cet enregistreur de conduite intégré WLAN
depuis votre smaphone.
• Comment se connecter au Wi-Fi ?
1. Télécharger l'application "WOLFBOX"
Rendez-vous à l'adresse suivante pour
télécharger l'application "WOLFBOX" :
https://wolox.com/app/ Vous pouvez
également utiliser votre smaphone
pour scanner le code QR et accéder à la
page de téléchargement.
2. Activer le Wi-Fi
Allez dans les paramètres pour activer le Wi-Fi. Ensuite, l'écran
de l'appareil achera le nom et le mot de passe du Wi-Fi.
3. Connecter le Wi-Fi
Pour connecter votre iPhone ou téléphone Android au réseau
Wi-Fi du X5, allez dans Paramètres > Wi-Fi et sélectionnez X5
Wi-Fi. Entrez ensuite le mot de passe par défaut : 12345678.
4. Ouvrir l'application "WOLFBOX"
Une fois que votre téléphone mobile est connecté au réseau
Wi-Fi du X5, ouvrez l'application WOLFBOX. La caméra se
synchronisera automatiquement et vous devriez voir le ux
vidéo en direct sur votre téléphone.
54
•Modiez et paagez vos vidéos dans l'application
Dans l'application, vous pouvez visualiser et éditer les albums
locaux téléchargés et les paager avec d'autres.
Comment lire des Vidéos sur un Ordinateur
Nous recommandons l'application "GPS Media Player" pour
regarder et lire les vidéos de la dashcam, et visualiser Google
Maps.
Vous pouvez la télécharger gratuitement sur Mac ou Windows à
pair du lien suivant https://wolox.com/gps-player/

55
Remarque :
Si les chiers vidéo des pistes avant, centrale et arrière sont
enregistrés simultanément et chargés dans la liste de lecture
en même temps, ils peuvent être lus séparément sur des écrans
divisés gauche et droit.
Lorsque vous trouvez le chier vidéo souhaité, maintenez le
bouton gauche de la souris enfoncé et faites glisser les chiers
souhaités vers la fenêtre de lecture vidéo pour les lire.
1 2 4
5 76
3
1 2
Fenêtre de lecture vidéo (Avant) Fenêtre de lecture vidéo (Intérieur)
3 4
Fenêtre de lecture vidéo (Arrière) Achage de la cae et du parcours
5
7
6
Panneau de contrôle de lecture
Liste de lecture
Indication de vitesse et d'état
de conduite
56
Installation
Avant d'installer votre caméra de tableau de bord, veuillez tester
son bon fonctionnement avec tous les accessoires et modier les
paramètres par défaut selon vos préférences.
• Instalación de la cámara frontal
Retirez l'autocollant électrostatique du cellophane et transférez-
le à l'endroit où vous souhaitez le coller. Fixez la caméra avant à
l'autocollant électrostatique et appuyez pour la rendre plus ferme.
SD

57
• Disposition des ls dans le véhicule
1. Le chargeur de voiture est connecté à la prise cigare.
2. Branchez l'autre extrémité du chargeur de voiture à la caméra
de tableau de bord.
3. Utilisez le pied-de-biche pour faire passer le câble
d'alimentation le long du pare-brise avant et du toit, et
cachez le câble le long du montant A, an de ne pas bloquer
la vue du conducteur et de ne pas causer de danger.
Pillar A

58
• Installation de la caméra arrière
1. Utilisez un chion propre pour essuyer la lunette arrière où la
caméra arrière doit être installée.
2. Retirez l'autocollant électrostatique et transférez-le à l'endroit
souhaité.
3. Évacuez les bulles d'air sur l'autocollant électrostatique.
4. Retirez l'adhésif de la caméra arrière et collez-la sur
l'autocollant électrostatique.
• Mise sous/hors tension
• Appuyez brièvement sur le bouton d'alimentation pour allumer,
appuyez longuement pour éteindre.
• Lors de l'utilisation du chargeur de voiture, si le po de
l'allume-cigare est ACC, la caméra de tableau de bord s'allumera
automatiquement lorsque la voiture démarre.

59
Dépannage
• Pourquoi n'y a-t-il pas de signal GPS ?
1. Nettoyez et reconnectez la sonde sur l'unité principale et
le suppo. Vériez la présence d'inteérences dans votre
voiture, comme un lm métallique sur le pare-brise, une
antenne radio ou un détecteur de radar.
2. Déplacez votre voiture vers une zone dégagée.
3. Si l'icône GPS est , cela signie que le signal GPS est bon.
Si l'icône GPS est , cela signie qu'il n'y a pas de signal
GPS.
• Comment désactiver la musique de mise en marche/arrêt de
la dashcam ?
Veuillez aller dans Paramètres > Son des touches > Désactivé.
Lorsque le son de clic est désactivé, la musique de mise en
marche et d'arrêt sera également désactivée.
• Pourquoi ma dashcam indique-t-elle une erreur de cae ou
demande-t-elle de formater la cae mémoire de temps en
temps ?
Veuillez suivre les étapes ci-dessous pour vérier :
1. Allez dans Paramètres > Rappel de formatage pour vérier si
le rappel de formatage régulier est activé.
2. Formatez la cae mémoire.
3. Rétablissez les paramètres d'usine et redémarrez la dash cam.
4. Mettez à jour le micrologiciel.
• Redémarrage répété de la dashcam/pas de démarrage ?
1. Assurez-vous d'utiliser le chargeur de voiture d'origine.
2. Débranchez la cae mémoire et le chargeur de voiture à tour
de rôle, et réinstallez-les. Vériez si un cou-circuit est causé
par les accessoires.

60
3. Réinitialisez l'appareil via le petit trou en bas de l'enregistreur
de conduite.
4. Si aucune des solutions ci-dessus ne résout le problème,
essayez d'alimenter le câble USB pour conrmer si l'hôte peut
être utilisé normalement.
5. Veuillez vous rendre sur le site ociel pour mettre à jour le
rmware.
6. Si le problème n'est pas résolu, veuillez contacter votre
seice client dédié pour un remplacement.
• Pourquoi ne puis-je pas me connecter au Wi-Fi ?
1. Vériez la distance de fonctionnement du Wi-Fi, environ 15
pieds.
2. Vériez le SSID et le mot de passe du Wi-Fi, ou si d'autres
appareils sont connectés au Wi-Fi.
3. Désactivez les données mobiles, le logiciel de sécurité et le
VPN sur votre téléphone.
4. Si le problème persiste, veuillez contacter le seice clientèle
pour obtenir de l'aide.
• Pourquoi le réglage de l'heure est-il incorrect ?
La caméra de tableau de bord dispose d'un GPS intégré.
Elle ajuste automatiquement l'heure en fonction de votre
emplacement et de votre fuseau horaire, éliminant ainsi la
nécessité de modier l'heure manuellement. Vous pouvez
ajuster l'heure via Paramètres > Fuseau horaire/DST.

61
Contenuto
Speciche del Prodotto . . . . . . . . . . . . . . . . . . .
62
Panoramica dell'Inteaccia Utente. . . . . . . . . . . . . .
63
Panoramica delle Funzioni . . . . . . . . . . . . . . . . . .
67
Funzione di Controllo Vocale
. . . . . . . . . . . . . . . . .
72
Riproduci sull'APP (Informazioni su Wi-Fi e APP) . . . . . .
73
Come Riprodurre Video sul Computer . . . . . . . . . . . .
74
Installazione . . . . . . . . . . . . . . . . . . . . . . . . . .
76
Risoluzione dei Problemi . . . . . . . . . . . . . . . . . . .
79
IT

62
Speciche del Prodotto
RAM DDR3 8Gb Tipo di Display IPS
Formato video MP4
Formato
Immagine
JPG
Fotocamera
Frontale
4K
Fotocamera
Interna
1080P
Fotocamera
Posteriore
2.5K(1440P)
FPS dell'obiettivo
Posteriore
30 fps
Dimensione del
Display
2.35''
Inteaccia di
Alimentazione
USB-C
GPS internal
Connessione
Wi-Fi
Suppoato
Controllo
Vocale
Suppoato
Temperatura di
Esercizio
-4°F ~158°F
Schermo Tattile
Completo
Suppoato

63
Icona Descrizione
Stato GPS
Risoluzione di registrazione
Se collegare il kit cablato e congurare il monitoraggio del
parcheggio
Controllo vocale
Stato Wi-Fi
Panoramica dell'Inteaccia Utente
• Modalità di registrazione

64
Icona Descrizione
Stato audio del sistema della fotocamera
Stato della registrazione vocale
Se la fotocamera posteriore è connessa
Stato e tempo di registrazione
Registrazione di emergenza attiva
Data e ora della fotocamera

65
• Modalità di riproduzione
Quando accendi la dashcam, inizierà automaticamente a registrare.
Scorri il dito dal basso verso l'alto dello schermo o seleziona per
entrare nella modalità di riproduzione.
Clicca/Seleziona per accedere alla caella di riproduzione
specica.

66
1
3
5 5
1
Nome della caella corrente
2
3
Indice del le corrente nel
totale dei le
Nome del le
4
5 6
Tipo di le
Durata del video Ora della registrazione video
1 2
3
4
5
6
67
Panoramica delle Funzioni
Scorri da destra a sinistra per accedere al menu delle funzioni, dove
puoi modicare varie impostazioni e parametri della macchina.
Funzione Opzione Descrizione
Risoluzione
4K+1080P+2.5K
/4K+1080P+1080P
/...
Selezione della risoluzione video
Registrazione in
loop
1 Minuto
/3 Minuti
/5 Minuti
Imposta la durata per la
registrazione in loop dei le video.
Impostazione
dell'orologio
/
Regola l'ora corrente visualizzata
sul dispositivo.
Stile dell'ora
12 Ore / 24 Ore
Imposta il sistema di
visualizzazione dell'ora.
Fuso orario
/
Regola il fuso orario in base alla
posizione geograca.
Registrazione
audio
ON/OFF Imposta se registrare il suono.
68
Funzione Opzione Descrizione
Wi-Fi
ON/OFF
Imposta lo stato della connessione
Wi-Fi del dispositivo.
Modalità
Parcheggio
ON
/Registrazione con
attivazione G
/Registrazione time-
lapse 12H
/Registrazione time-
lapse 24H
Monitora lo stato del veicolo dopo
che il motore è stato spento.
Sensore G
OFF
/Basso
/Medio
/Alto
Imposta la sensibilità del
sensore G.
GPS
/ Visualizza i dati GPS registrati.
Salvaschermo
OFF
/10 Secondi
/30 Secondi
/2 Minuti
Imposta il tempo di attivazione del
salvaschermo.
Controllo vocale
ON
/OFF
/Comando vocale
Imposta l'interruttore per la
funzionalità di controllo vocale.
69
Funzione Opzione Descrizione
Promemoria di
aaticamento
OFF
/1 Ora
/2 Ore
/4 Ore
Imposta il tempo per il
promemoria di aaticamento.
Specchio
capovolto
ON/OFF
Regola il capovolgimento sinistra-
destra dell'immagine della
telecamera posteriore.
Capovolgimento
cam posteriore
ON/OFF
Regola il capovolgimento alto-
basso dell'immagine della
telecamera posteriore.
Registrazione
interna
ON/OFF
Imposta l'interruttore per la
telecamera integrata.
Sfaallio
50 Hz/60 Hz
Imposta la frequenza di
aggiornamento dello schermo.
Tono di clic
ON/OFF
Imposta l'interruttore per i toni dei
tasti.
Impostazione
del volume
OFF/Basso/Medio
/Alto
Imposta il livello sonoro del
dispositivo.
70
Funzione Opzione Descrizione
Filigrana
digitale
ON/OFF
Imposta l'interruttore per la
ligrana digitale.
Formato
/
Formatta la scheda SD e cancella
i video e le foto memorizzati su di
essa.
Promemoria di
formattazione
OFF
/Ogni 15 giorni
/Ogni 25 giorni
Imposta il promemoria per la
formattazione della scheda SD.
Ora legale (DST)
ON/OFF
Imposta l'interruttore per l'ora
legale.
Unità di velocità
KM/H/MPH
Imposta l'unità di visualizzazione
della velocità.
Lingua
English/Français/
Deutsch/Italiano/
Español/...
Imposta la lingua per il dispositivo.
Velocità della
scheda
/
Testa le velocità di lettura e
scrittura della scheda SD per
assicurai che soddisno i
requisiti del dispositivo.
71
Funzione Opzione Descrizione
Ripristina
impostazioni
/
Ripristina tutte le impostazioni ai
valori di fabbrica.
APP
/
Fornisci il codice QR per scaricare
l'app.
Informazioni sul
prodotto
/
Visualizza le informazioni sul
dispositivo.
Centro
assistenza
/
Informazioni di contatto per il
seizio post-vendita.
Nota:
La modalità Parcheggio richiede un kit hardware (acquistato
separatamente) per essere attivata.
Con il kit hardware collegato e la modalità Parcheggio attivata,
la dash cam entrerà in modalità Registrazione a intealli quando
l'auto si spegne. Questa modalità cattura video a 1 fotogramma
al secondo no alla ne della durata impostata o no a quando la
tensione della batteria dell'auto scende sotto i 12V.
72
Funzione di Controllo Vocale
Controllo rapido tramite semplici comandi vocali.
Quando l'inteaccia di registrazione visualizza un'icona bianca
, signica che la funzione di controllo vocale è attivata.
Puoi abilitare/disabilitare la funzione di controllo vocale tramite il
"Controllo vocale" nel menu o facendo clic sull'icona sullo
schermo.
Nota:
Puoi accedere a comandi vocali specici toccando il sottomenu
'Comando vocale' nella sezione 'Controllo vocale'.
lock the video
take picture
turn on audio turn o audio
turn on screen turn o screen
turn on
Wi-Fi
turn o
Wi-Fi
turn on recording turn o recording
show front camera show rear camera

73
Riproduci sull'APP (Informazioni su Wi-Fi
e APP)
La funzione Wi-Fi è stata progettata in modo da poter accoppiare
la dash cam in modalità wireless con il tuo smaphone e accedere
immediatamente alle tue registrazioni dalla dash cam. Qui puoi
visualizzare, scaricare e condividere facilmente i tuoi video con
amici e familiari.
L'app "WOLFBOX" è un'app gratuita che ti consente di utilizzare
questo registratore di guida integrato WLAN dal tuo smaphone.
• Come connettersi al Wi-Fi?
1. Scarica l'app "WOLFBOX"
Vai al seguente indirizzo per scaricare
l'app "WOLFBOX": https://wolox.
com/app/ Puoi anche utilizzare il tuo
smaphone per scansionare il codice QR
e andare alla pagina di download.
2. Abilita il Wi-Fi
Vai alle Impostazioni per attivare il Wi-Fi. Quindi, lo schermo
del dispositivo mostrerà il nome e la password del Wi-Fi.
3. Connetti il Wi-Fi
Per connettere il tuo iPhone o telefono Android alla rete Wi-
Fi del X5, vai su Impostazioni > Wi-Fi e seleziona X5 Wi-Fi.
Quindi, inserisci la password predenita 12345678.
4. Apri l'app "WOLFBOX"
Una volta che il tuo telefono cellulare è connesso alla
rete Wi-Fi del X5, apri l'app WOLFBOX. La fotocamera si
sincronizzerà automaticamente e dovresti vedere il feed
video in diretta sul tuo telefono.

74
•Modica e condividi i tuoi video nell'App
Nell'app, puoi visualizzare e modicare album locali scaricati e
condividerli con altri.
Come Riprodurre Video sul Computer
Consigliamo l'applicazione "GPS Media Player" per guardare e
riprodurre i video della dash cam e visualizzare Google Maps.
Puoi scaricarla gratuitamente su Mac o Windows dal seguente
link: https://wolox.com/gps-player/

75
1 2 4
5 76
3
1 2
Finestra di riproduzione video
(Anteriore)
Finestra di riproduzione video
(Interno)
3 4
Finestra di riproduzione video
(Posteriore)
Visualizzazione mappe e
percorso
5
7
6
Pannello di controllo della
riproduzione
Elenco di riproduzione
Indicazione di velocità e stato
di guida
Nota:
Se i le video dei percorsi anteriore, centrale e posteriore sono
registrati sincronicamente e caricati nella lista di riproduzione
allo stesso tempo, possono essere riprodotti separatamente su
schermi divisi a sinistra e a destra.
Quando trovi il le video desiderato, tieni premuto il pulsante
sinistro del mouse e trascina i le desiderati nella nestra di
riproduzione video per riprodurli.
76
Installazione
Prima di installare la tua dash cam, ti preghiamo di testarne la
funzionalità con tutti gli accessori e di modicare le impostazioni
predenite secondo le tue preferenze.
• Installazione della fotocamera anteriore
Staccare l'adesivo elettrostatico dal cellophane e trasferirlo nel
punto in cui si desidera incollarlo. Attacca la fotocamera anteriore
all'adesivo elettrostatico e premi per renderla più stabile.
SD

77
• Disposizione dei cavi nel veicolo
1. Il caricabatterie per auto è collegato alla presa accendisigari.
2. Collegare l'altra estremità del caricabatterie per auto alla
dash cam.
3. Utilizzare il piede di porco per far passare il cavo di
alimentazione lungo il parabrezza e il tetto, e nascondere il
cavo lungo il montante A, in modo da non bloccare la vista
del conducente e causare pericolo.
Pillar A

78
• Montaggio della fotocamera posteriore
1. Utilizzare un panno pulito per pulire il lunotto dove deve
essere installata la fotocamera posteriore.
2. Staccare l'adesivo elettrostatico e trasferirlo nel punto
desiderato.
3. Eliminare le bolle d'aria sull'adesivo elettrostatico.
4. Staccare l'adesivo dalla fotocamera posteriore e attaccarla
sull'adesivo elettrostatico.
• Accensione/Spegnimento
• Premere brevemente il pulsante di accensione per accendere,
premere a lungo per spegnere.
• Quando si utilizza il caricabatterie per auto, se la poa
dell'accendisigari è ACC, la dash cam si accenderà
automaticamente quando l'auto viene avviata.

79
Risoluzione dei Problemi
• Perché non c'è segnale GPS ?
1. Pulire e ricollegare la sonda sull'unità principale e sulla
staa. Controllare eventuali inteerenze nella tua auto, come
pellicola metallica sul parabrezza, antenna radio o rilevatore
radar.
2. Sposta la tua auto in un'area apea.
3. Se l'icona GPS è , signica che il segnale GPS è buono.
Se l'icona GPS è , signica che non c'è segnale GPS.
• Come disattivare la musica di accensione/spegnimento della
dash cam?
Vai a Impostazioni > Suono Tasti > Disattivato.
Quando il tono di clic è disattivato, anche la musica di
accensione e spegnimento sarà disattivata.
• Perché la mia dashcam segnala un errore della scheda o
chiede di formattare la scheda di memoria ogni tanto?
Segui i passaggi seguenti per vericare:
1. Vai a Impostazioni > Promemoria Formato per vericare se il
promemoria di formato regolare è abilitato.
2. Formatta la scheda di memoria.
3. Ripristina le impostazioni di fabbrica e riavvia la dashcam.
4. Aggiorna il rmware.
• Riavvio ripetuto della dashcam/nessun avvio?
1. Assicurati di utilizzare il caricabatterie per auto originale.
2. Scollega la scheda di memoria e il caricabatterie per auto a
turno e reinstallali. Verica se il coocircuito è causato dagli
accessori.

80
3. Resettare il dispositivo attraverso il piccolo foro nella pae
inferiore del registratore di guida
4. Se nessuna delle soluzioni sopra risolve il problema, provare
ad alimentare il cavo USB per confermare se l'host può essere
utilizzato normalmente.
5. Si prega di visitare il sito uciale per aggiornare il rmware.
6. Se il problema non è risolto, contattare il seizio clienti
dedicato per una sostituzione.
• Perché non riesco a connettermi al Wi-Fi?
1. Controllare la distanza di lavoro del Wi-Fi, circa 15 piedi.
2. Controllare l'SSID e la password del Wi-Fi o se ci sono altri
dispositivi connessi al Wi-Fi.
3. Disattivare i dati mobili, il software di sicurezza e la VPN sul
telefono.
4. Se il problema persiste, contattare l'assistenza clienti per
assistenza.
• Perché l'impostazione dell'ora è errata?
La dash cam dispone di un GPS integrato. Regola
automaticamente l'ora in base alla tua posizione e al fuso orario,
eliminando la necessità di modiche manuali dell'ora. Puoi
regolare l'ora tramite Impostazioni > Fuso orario/DST.

81
Contenido
Especicaciones del Producto
. . . . . . . . . . . . . . . .
82
Descripción General de la Inteaz de Usuario
. . . . . . . .
83
Descripción General de la Función . . . . . . . . . . . . .
87
Función de Control por Voz . . . . . . . . . . . . . . . . .
92
Reproducir en la APP (Sobre Wi-Fi y APP) . . . . . . . . .
93
Cómo Reproducir Vídeo en el Ordenador . . . . . . . . . .
94
Instalación . . . . . . . . . . . . . . . . . . . . . . . . . . .
96
Solución de Problemas . . . . . . . . . . . . . . . . . . . .
99
ES

82
Especicaciones del Producto
RAM DDR3 8Gb Tipo de Pantalla IPS
Formato de
Video
MP4
Formato de
Imagen
JPG
Cámara Frontal 4K Cámara Interna 1080P
Cámara Trasera
2.5K(1440P)
FPS de la lente
Trasera
30 fps
Tamaño de
Pantalla:
2.35''
Inteaz de
Alimentación:
USB-C
GPS interno Conexión Wi-Fi Sopoada
Control por Voz Sopoada
Temperatura de
Funcionamiento
-4°F ~158°F
Pantalla Táctil
Completa
Sopoada

83
Descripción General de la Inteaz de Usuario
• Modo de grabación
Icono Descripción
Estado del GPS
Resolución de grabación
Si conectar el kit cableado y congurar la monitorización de
estacionamiento
Control por voz
Estado del Wi-Fi
84
Icono Descripción
Estado del sonido del sistema de cámara
Estado de la grabación de voz
Si la cámara trasera está conectada
Estado de grabación y tiempo de grabación
Grabación de emergencia activada
Fecha y hora de la cámara

85
• Modo de reproducción
Cuando enciendes la dashcam, comenzará a grabar
automáticamente. Desliza el dedo de abajo hacia arriba en la
pantalla o selecciona para entrar en el modo de reproducción.
Haz clic/Selecciona para acceder a la carpeta de reproducción
especíca.
86
1
3
5 5
1
Nombre de la carpeta actual
2
3
Índice del archivo actual
en el total de archivos
Nombre del archivo
4
5 6
Tipo de archivo
Duración del video Hora de la grabación del video
1 2
3
4
5
6
87
Descripción General de la Función
Desliza de derecha a izquierda para acceder al menú de funciones,
donde puedes modicar varios ajustes y parámetros de la máquina.
Función Opción Descripción
Resolución
4K+1080P+2.5K
/4K+1080P+1080P
/...
Selección de resolución de video.
Registro circular
1 Minuto
/3 Minutos
/5 Minutos
Establece la duración para la
grabación en bucle de archivos de
video.
Conguración
del reloj
/
Ajusta la hora actual mostrada en
el dispositivo.
Estilo de tiempo
12 Horas / 24 Horas
Establece el sistema de
visualización de la hora.
Zona horaria
/
Ajusta la zona horaria según la
ubicación geográca.
Grabación
ON/OFF Establece si deseas grabar sonido.
88
Función Opción Descripción
Wi-Fi
ON/OFF
Establece el estado de la
conexión Wi-Fi del dispositivo
.
Modo de
estacionamiento
ON
/Grabación por
disparo G
/Grabación a
intealos de 12H
/Grabación a
intealos de 24H
Monitorea el estado del vehículo
después de que el motor se
apague.
G-Sensor
OFF
/Bajo
/Medio
/Alto
Establece la sensibilidad del
sensor G.
Información GPS
/
Muestra los datos GPS
registrados.
Salvapantallas
OFF
/10 Segundos
/30 Segundos
/2 Minutos
Establece el tiempo de activación
para el protector de pantalla.
Control de voz
ON
/OFF
/Comando de voz
Establece el interruptor para la
funcionalidad de control de voz.
89
Función Opción Descripción
Drowsy Driving
OFF
/1 Hora
/2 Horas
/4 Horas
Establece el tiempo para el
recordatorio de fatiga.
Volteo espejo
ON/OFF
Ajusta el volteo izquierda-derecha
de la imagen de la cámara trasera.
La Cámara
trasera gira
ON/OFF
Ajusta el volteo arriba-abajo de la
imagen de la cámara trasera.
Código de víde
ON/OFF
Establece el interruptor para la
cámara integrada.
Gilipollas
50 Hz/60 Hz
Establece la frecuencia de
actualización de la pantalla.
Tono de
la tecla
ON/OFF
Establece el interruptor para los
tonos de las teclas.
Sonido encendido
/apagado
OFF
/Bajo
/Medio
/Alto
Establece el nivel de sonido del
dispositivo.

90
Función Opción Descripción
Marca de agua
ON/OFF
Establece el interruptor para la
marca de agua digital.
Formato de
la tarjeta SD
/
Formatea la tarjeta SD y elimina
los videos y fotos almacenados en
ella.
Recordatorio de
formato
OFF
/Cada 15 días
/Cada 25 días
Establece el recordatorio para
formatear la tarjeta SD.
Horario de
verano (DST)
ON/OFF
Establece el interruptor para el
horario de verano.
Unidad de
velocidad
KM/H/MPH
Establece la unidad de
visualización de velocidad.
Idiomas
English/Français/
Deutsch/Italiano/
Español/...
Establece el idioma para el
dispositivo.
Prueba
de la tarjeta
/
Prueba las velocidades de lectura
y escritura de la tarjeta SD para
asegurae de que cumplan con
los requisitos del dispositivo.

91
Función Opción Descripción
Restablecer
conguración
/
Restaurar todas las
conguraciones a los valores
predeterminados de fábrica.
APP
/
Proporcionar código QR para
descargar la aplicación.
Información del
producto
/
Mostrar información del
dispositivo.
Centro de ayuda
/
Información de contacto para
postventa.
Nota:
El modo de estacionamiento requiere un kit de hardware
(comprado por separado) para activarse.
Con el kit de hardware conectado y el modo de estacionamiento
habilitado, la dash cam entrará en modo de grabación a intealos
cuando el coche se apague. Este modo captura video a 1
fotograma por segundo hasta que nalice la duración establecida
o el voltaje de la batería del coche caiga por debajo de 12V.
92
Función de Control por Voz
Control rápido a través de comandos de voz simples.
Cuando la inteaz de grabación muestra un icono blanco ,
signica que la función de control por voz está activada.
Puedes habilitar/deshabilitar la función de control por voz a través
del "Control por voz" en el menú o haciendo clic en el icono
en la pantalla.
Nota:
Puedes acceder a comandos de voz especícos tocando en el
submenú 'Comando de voz' dentro de la sección 'Control por voz'.
lock the video
take picture
turn on audio turn o audio
turn on screen turn o screen
turn on
Wi-Fi
turn o
Wi-Fi
turn on recording turn o recording
show front camera show rear camera

93
Reproducir en APP (Acerca de Wi-Fi y APP)
La función Wi-Fi ha sido diseñada para que puedas emparejar
tu cámara de tablero de forma inalámbrica con tu smaphone
y acceder instantáneamente a tus grabaciones desde la cámara
de tablero. Aquí puedes ver, descargar y compair tus videos
fácilmente con tus amigos y familiares.
La aplicación "WOLFBOX" es una aplicación gratuita que te
permite operar este grabador de conducción integrado WLAN
desde tu smaphone.
• ¿Cómo conectarse el Wi-Fi?
1. Descarga la aplicación "WOLFBOX"
Ve a la siguiente dirección para
descargar la aplicación "WOLFBOX":
https://wolox.com/app/
También puedes usar tu smaphone
para escanear el código QR y acceder a
la página de descarga.
2. Habilitar Wi-Fi
Ve a Conguración para activar el Wi-Fi. Luego, la pantalla
del dispositivo mostrará el nombre y la contraseña del Wi-Fi.
3. Conectar Wi-Fi
Para conectar tu iPhone o teléfono Android a la red Wi-Fi del
X5, ve a Conguración > Wi-Fi y selecciona X5 Wi-Fi. Luego,
ingresa la contraseña predeterminada: 12345678.
4. Abre la aplicación "WOLFBOX"
Una vez que tu teléfono móvil esté conectado a la red
Wi-Fi del X5, abre la aplicación WOLFBOX. La cámara se
sincronizará automáticamente y deberías ver la transmisión
de video en vivo en tu teléfono.

94
•Edita y compae tus videos en la aplicación
En la aplicación, puedes ver y editar álbumes locales descargados
y compairlos con otros.
Cómo Reproducir Vídeo en la Ordenador
Recomendamos la aplicación "GPS Media Player" para ver y
reproducir videos de la cámara del tablero, y ver Google Maps.
Puedes descargarla gratis en Mac o Windows desde el siguiente
enlace: https://wolox.com/gps-player/
95
1 2 4
5 76
3
1 2
Ventana de reproducción de
video (Frontal)
Ventana de reproducción de
video (Interior)
3 4
Ventana de reproducción de video
(Trasera)
Visualización de mapa y ruta
5
7
6
Panel de control de reproducción
Lista de reproducción
Indicación de velocidad y
estado de conducción
Nota:
Si los archivos de video de las pistas delantera, media y trasera se
graban sincrónicamente y se cargan en la lista de reproducción
al mismo tiempo, pueden reproducirse por separado en pantallas
divididas izquierda y derecha.
Cuando encuentres el archivo de video deseado, mantén
presionado el botón izquierdo del ratón y arrastra los archivos
deseados a la ventana de reproducción de video para
reproducirlos.
96
Instalación
Antes de instalar tu cámara de tablero, prueba su funcionalidad
con todos los accesorios y cambia la conguración
predeterminada a tu preferencia.
• Instalación de la cámara frontal
Despega la etiqueta electrostática del celofán y transérela
al lugar donde deseas pegarla. Coloca la cámara frontal en la
etiqueta electrostática y presiona para que quede más rme.
SD
97
• Disposición del cableado en el vehículo
1. El cargador del coche está conectado al enchufe del
encendedor.
2. Conecta el otro extremo del cargador del coche a la cámara
del tablero.
3. Usa la palanca para pasar el cable de alimentación a lo largo
del parabrisas y el techo, y esconde el cable por el pilar A,
para no bloquear la vista del conductor y causar peligro.
Pillar A
98
• Montaje de la cámara trasera
1. Use un paño limpio para limpiar el parabrisas trasero donde
se debe instalar la cámara trasera.
2. Despegue la etiqueta electrostática y transérala al lugar
deseado.
3. Elimine las burbujas de aire en la etiqueta electrostática.
4. Despegue el adhesivo de la cámara trasera y péguelo en la
etiqueta electrostática.
• Encendido/Apagado
• Presione brevemente el botón de encendido para encender,
presione prolongadamente para apagar.
• Al usar el cargador del coche, si el pueo del encendedor es
ACC, la cámara del tablero se encenderá automáticamente
cuando se inicie el coche.

99
Solución de Problemas
• ¿Por qué no hay señal GPS?
1. Limpia y vuelve a conectar la sonda en la unidad principal y
el sopoe. Verica si hay inteerencias en tu coche, como
película metálica en el parabrisas, antena de radio o detector
de radar.
2. Mueve tu coche a un área abiea.
3. Si el icono GPS es , signica que la señal GPS es buena.
Si el icono de GPS es , signica que no hay señal de
GPS.
• ¿Cómo apagar la música de encendido/apagado de la
dashcam?
Ve a Conguración > Sonido de Teclas > Apagado.
Cuando el tono de clic está desactivado, la música de
encendido y apagado también se desactivará.
• ¿Por qué mi dashcam muestra un error de tarjeta o pide
formatear la tarjeta de memoria de vez en cuando?
Sigue los pasos a continuación para vericar:
1. Ve a Conguración > Recordatorio de Formato para vericar
si el recordatorio de formato regular está habilitado.
2. Formatea la tarjeta de memoria.
3. Restaura los ajustes de fábrica y reinicia la dashcam.
4. Actualiza el rmware.
• ¿Reinicio repetido de la dashcam/no arranca?
1. Asegúrate de estar usando el cargador de coche original.
2. Desconecta la tarjeta de memoria y el cargador del coche
por turno, y vuelve a instalarlos. Verica si el coocircuito es
causado por los accesorios.

100
3. Restablezca el dispositivo a través del pequeño oricio en la
pae inferior del registrador de conducción.
4. Si ninguno de los anteriores puede resolver el problema,
intente encender el cable USB para conrmar si el dispositivo
principal puede usarse normalmente.
5. Visite el sitio web ocial para actualizar el rmware.
6. Si no se resuelve, comuníquese con su seicio al cliente
dedicado para un reemplazo.
• ¿Por qué no puedo conectarme al Wi-Fi?
1. Verique la distancia de trabajo del Wi-Fi, aproximadamente
15 pies.
2. Verique el SSID y la contraseña del Wi-Fi, o si hay otros
dispositivos conectados al Wi-Fi.
3. Apague los datos móviles, el software de seguridad y la VPN
en su teléfono.
4. Si el problema persiste, comuníquese con el sopoe al cliente
para obtener ayuda.
• ¿Por qué la conguración de la hora es incorrecta?
La cámara del tablero cuenta con GPS incorporado. Ajusta
automáticamente la hora según tu ubicación y zona horaria,
eliminando la necesidad de cambios de hora manuales. Y
puedes ajustar la hora a través de Conguración > Zona horaria/
DST.
101
For more information:
seice@wolox.com
https://wolox.com/contact-us
www.wolox.com
Customer Seice Center
If you have any problems with the function or installation, please
contact us with any questions.
Help Center WhatsApp
WOLFBOX


www.wolox.com
Email: seice@wolox.com
Phone: +1 888 296 8399
Check us out here!
Product and seice are the foundation of WOLFBOX.