INSTALLATION MANUAL
For any service-related Issues, please contact
us: Phone Number: 718-576-6342
Email address: [email protected]
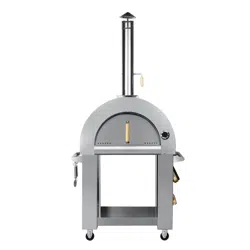
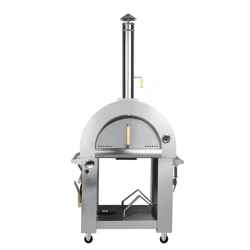
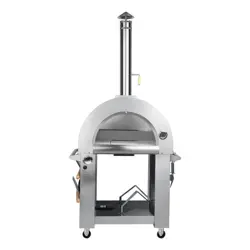
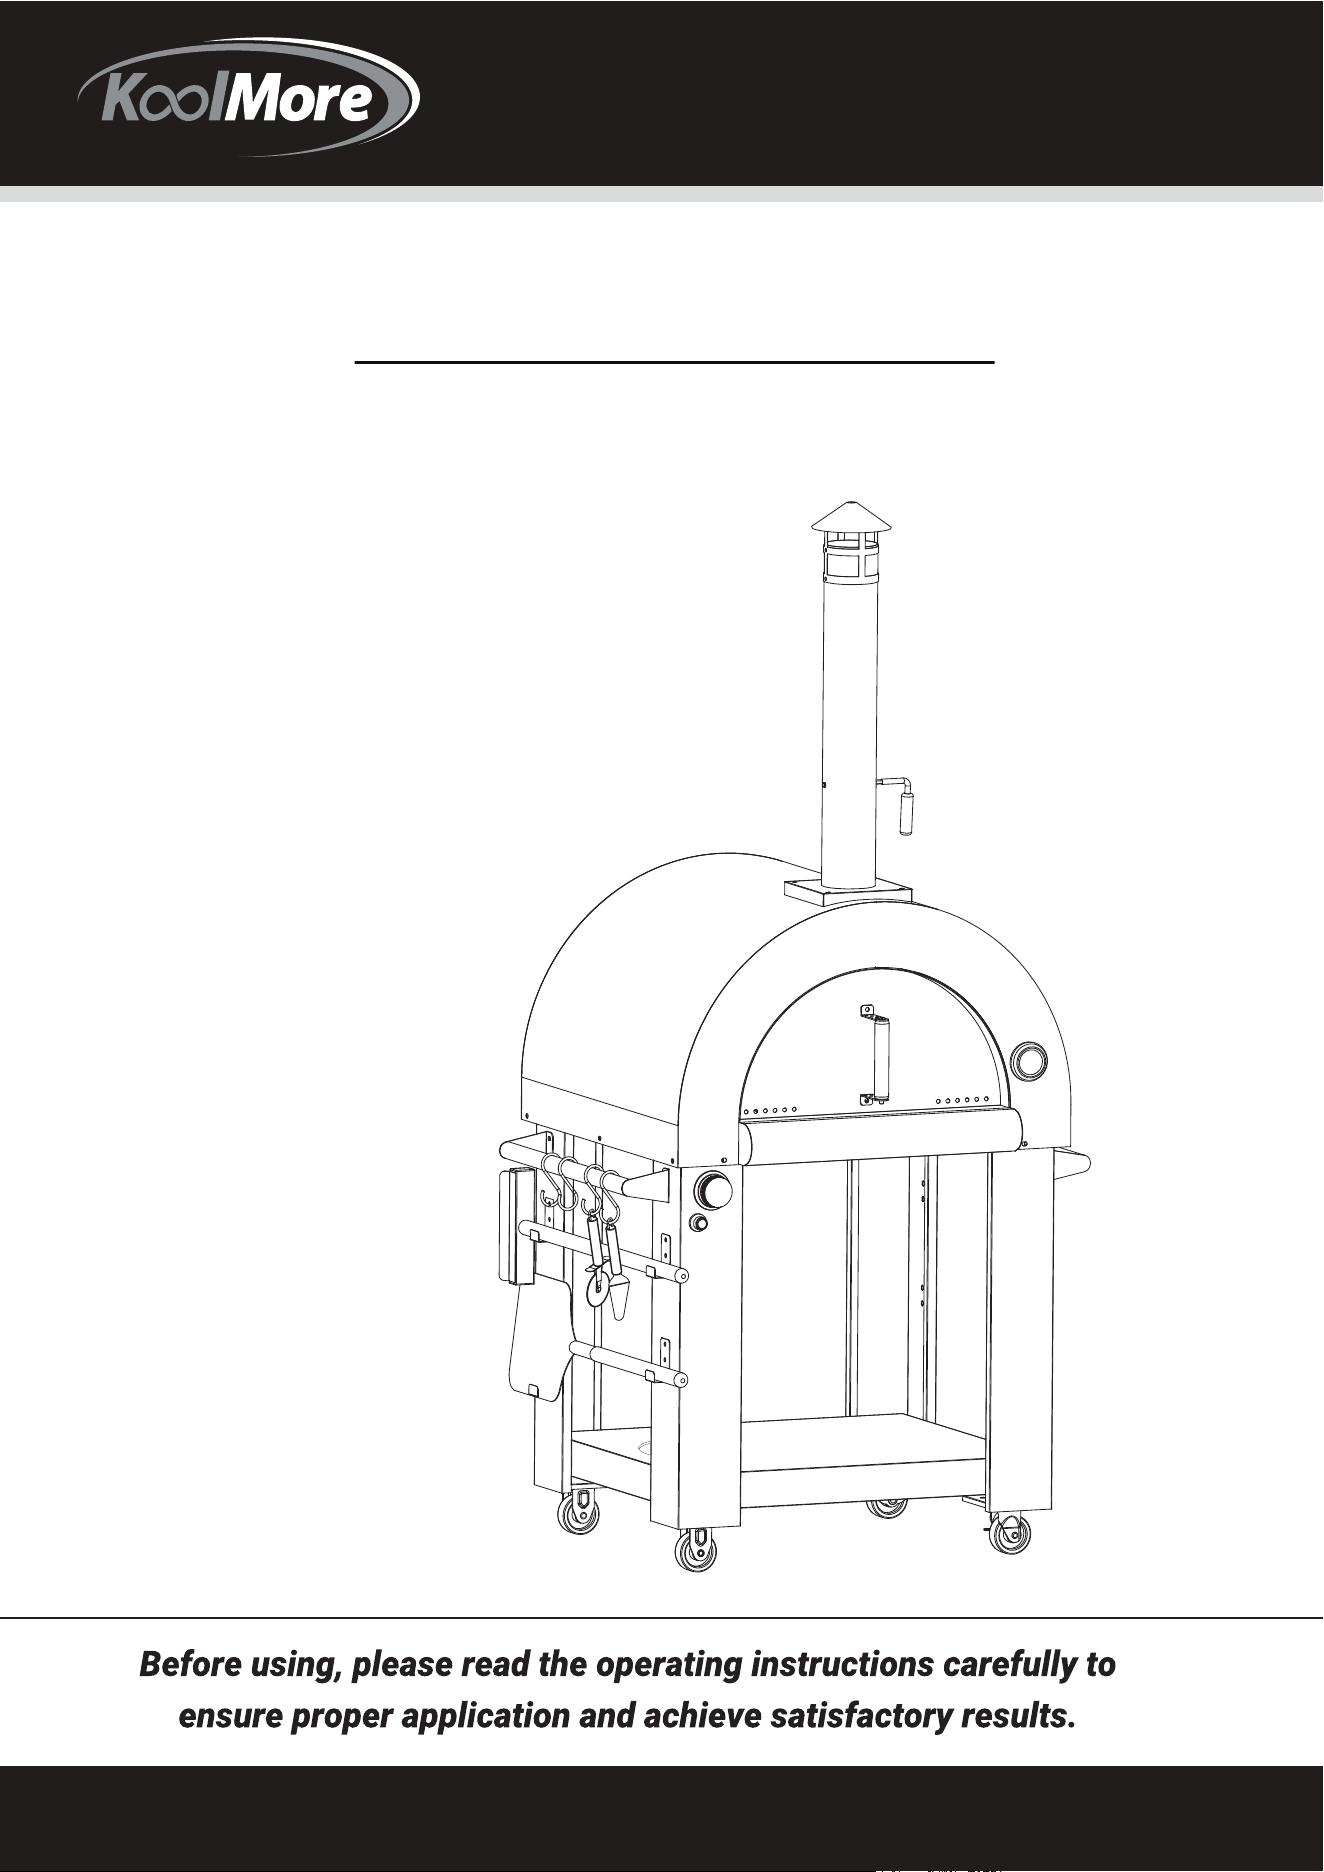
KoolMore Outdoor Kitchen System
Gas/Wood Fired Pizza Oven
PIZZA OVEN
Model:
KM-OKS-DFPO
(Compatible With The KoolMore Outdoor Kitchen System)

SAFETY AND PRECAUTIONS
Your safety and the safety of others are of utmost importance. Please carefully read and follow all the
safety instructions provided in this manual and on your appliance. The following safety messages are
intended to alert you to potential hazards that could cause serious injury, death, or property damage.
The safety alert symbol, along with the words "DANGER" or "WARNING," will be used to indicate the level
of risk associated with each instruction.
DANGER:
If you smell gas:
1. Shut off the gas supply to the appliance.
2. Extinguish any open flames.
3. Open the lid.
4. If the odor of gas persists, keep away from the appliance and immediately contact your gas supplier
or fire department. Failure to follow these instructions could result in a fire or explosion, causing
serious bodily injury, death, or property damage.
WARNING:
• Do not store or use gasoline or other flammable liquids or vapors near this or any other appliance.
• Do not store gas cylinders that are not connected for use near this or any other appliance.
• Never operate this appliance unattended.
• Keep the appliance at least 10 feet (3.0m) away from any structure, combustible material, or other
gas cylinder.
• Maintain a safe distance from any flammable liquid.
• Do not fill the cooking vessel beyond the maximum fill line.
• Never allow oil or grease to exceed 400ºF or 200°C. If the temperature exceeds this limit or if oil
starts to smoke, immediately turn off the burner or gas supply.
• Heated liquids remain scalding hot even after cooking. Do not touch the cooking appliance until the
liquids have cooled to 115ºF (45°C) or below.
• If a fire occurs, keep away from the appliance and immediately call the fire department. Do not
attempt to extinguish an oil or grease fire with water.
• Failure to follow these instructions could result in fire or explosion, causing property damage,
personal injury, or death.
WARNING:
• Use this appliance only outdoors.
• Read the instructions thoroughly before using the appliance.
• Warning: Accessible parts may become very hot. Keep young children away.
• Ensure the appliance is kept away from flammable materials during use.
• Do not move the appliance while it is in use.
• Turn off the gas supply at the gas container after use.
• Do not modify the appliance.
Please ensure that the gas regulator complies with CAN/CSA-B339 and local codes. The flexible hose
should also comply with relevant CAN/CSA-B339 standards and local codes. The maximum length of
the hose should be 1.5m (1.2m for Finland).
1

SAFETY AND PRECAUTIONS
Precautions:
• The installation of this appliance must conform to local codes or, in the absence of local codes, with
the National Fuel Gas Code, ANS| 2223.1/NFPA 54, Storage and Handling of Liquefied Petroleum
Gases, ANSI/NFPA 58, or Natural Gas and Propane Installation Code, CSA B149.1: Propane Storage
and Handling, CSA B149.2, or the Standard for Recreational Vehicle ANSI A119.2/NFPA 1192, and
Recreational Vehicle Code, CSA Z240 RV Series, as applicable.
• This appliance is designed for outdoor use only and should not be used in a building, garage, or any
enclosed area.
• This appliance is not intended for installation on a boat or recreational vehicle unless explicitly stated.
• Maintain a minimum clearance of 24 inches (61cm) from combustible construction on both sides
and from the back of the unit.
• Before each use, inspect the regulator and hose assembly. If there is excessive abrasion, wear, or
cuts, replace the hose assembly with one specified by the manufacturer. The hose used should not
exceed 1.5m.
• This appliance is not intended for commercial use.
• When cooking with oil or grease, have a Type BC or ABC fire extinguisher readily available.
• In the event of an oil or grease fire, do not use water to extinguish it. Call the fire department immedi-
ately. A Type BC or ABC fire extinguisher may be used in some circumstances.
• If it starts raining or snowing while cooking with oil or grease, cover the cooking vessel immediately and
turn off the appliance burners and gas supply. Do not attempt to move the appliance or cooking vessel.
• Place the appliance fryer or boiler on a level, stable, non-combustible surface away from any com-
bustible materials. Asphalt surfaces (blacktop) may not be suitable.
• Never leave the appliance unattended, and keep children and pets away from it at all times.
• This appliance will become hot during and after use. Use insulated oven mitts or gloves to protect
yourself from hot surfaces or splatter from cooking liquids.
• When cooking with oil or grease, always use the provided thermometer. Follow the instructions in the
manual for proper installation and use of the thermometer. If the thermometer is lost or damaged,
replace it with one specified by the appliance manufacturer.
• Do not place an empty cooking vessel on the appliance while it is in operation. Exercise caution
when placing items in the cooking vessel while the appliance is in use.
• Do not move the appliance when it is in use. Allow the cooking vessel to cool to 115°F (45°C) before
moving or storing.
• This appliance should never be used as a heater.
• If the temperature exceeds 400ºF (200°C) or if oil begins to smoke, immediately turn off the burner
or gas supply and wait for the temperature to decrease to less than 350°F (175°C) before relighting
the burner, following the manufacturer's instructions. If there is a lid or cover, do not remove it.
• Follow the maintenance instructions provided in the manual, including the recommended frequency
guidelines, for:
◦ Keeping the appliance area clear of combustible materials, gasoline, and other flammable vapors
and liquids.
◦ Not obstructing the flow of combustion and ventilation air.
◦ Keeping the ventilation openings of the cylinder enclosure free from debris.
◦ Visually checking burner flames using the provided pictorial representations.
◦ Cleaning the appliance, including special surfaces, with recommended cleaning agents if neces-
sary.
◦ Checking and cleaning burner/venturi tubes for insects and nests. A clogged tube can lead to a
fire beneath the appliance.
◦ Information for obtaining replacement parts and where they can be obtained.
2
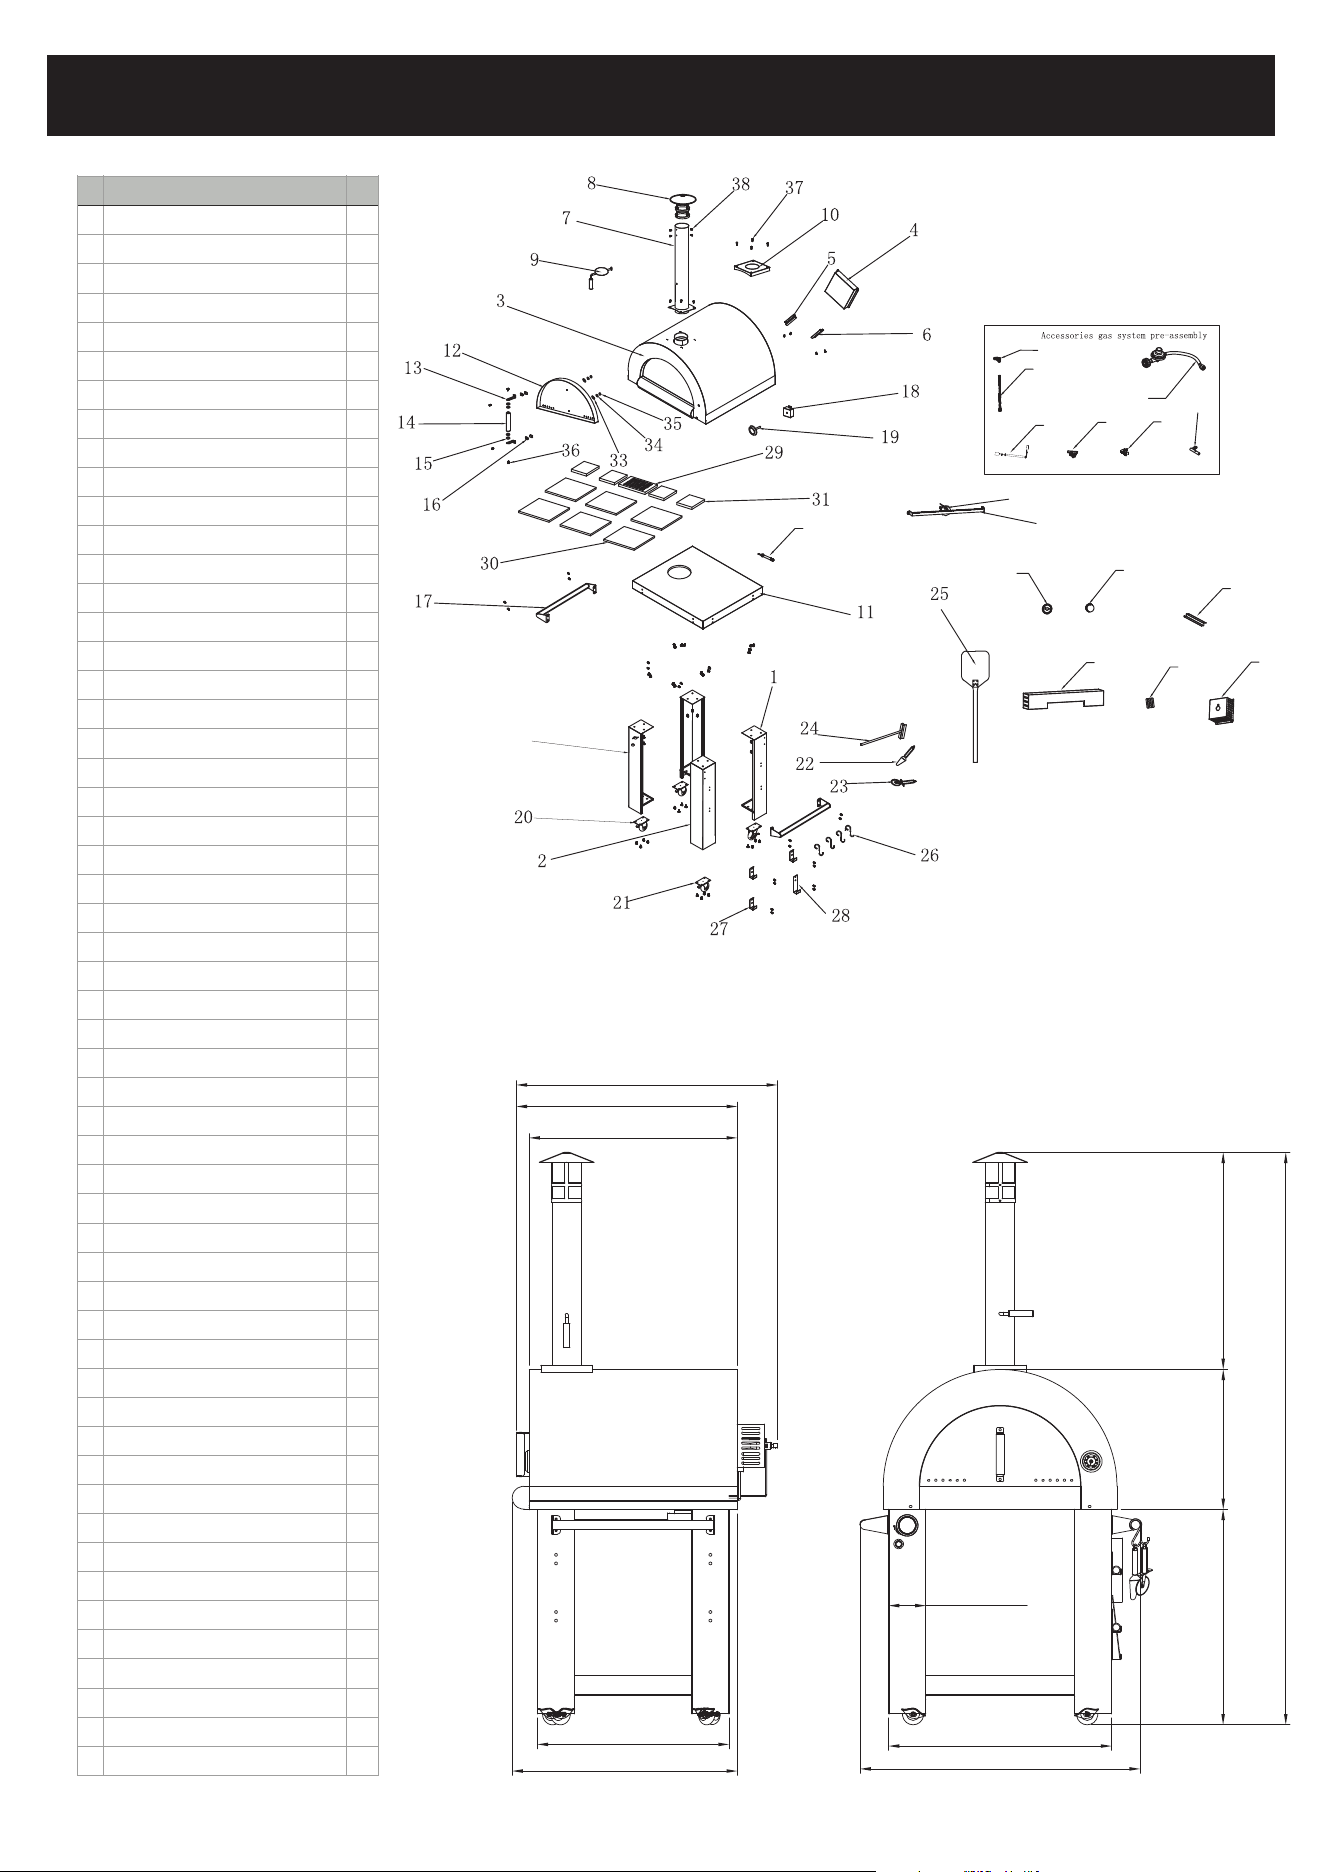
# Parts Name Qty
1 Left legs 1
2 Right legs 2
3 Oven 1
4 Ash pan 1
5
Ash support 1
1
6
Ash support 2
1
7 Chimney 1
8 Chimney top 1
9 Chimney handle 1
10 Chimney Decorative plates 1
11 Strength bottom 1
12 Door 1
13 Handle Installation piece 2
14 Door handle 1
15 Insulation Mat 1 4
16 Insulation Mat 2 4
17 Side handle 1
18
Thermometer support
1
19
Thermometer
1
20 Rigid caster 2
21 Caster with brake 2
22 Pizza-shovel 1
23 Pizza-knife 1
24 Pizza brush 1
25 Split big shovel 1
26 "S" hooks 4
27 "L" hooks 1 3
28 "L" hooks 2 1
29 Ash cover 1
30 Pizza stone 1 6
31
Pizza stone 3
4
33
1/4" flat washer
2
34 1/4" spring washer 2
35 1/4" bolts 2
36 1/4"*15mm screw 62
37 1/4"*35mm screw 4
38 5/32"*10mm screw 7
39 Movable nozzle connector 1
40 Back burner bellows 1
41 Ignition wire 1
42 Main value 1
43 Igniter 1
44 Gas hose 1
45
Combination of regulator and gas hose
1
46
Electrode
1
47 T shape burner 1
48 Knob base 1
49 Knob 1
50 Accessories gas system pre-assembly 1
51 Bellows hook 1
52 Fire exhaust dust cover welding 1
53 Ignition pin fixing cover 1
54 Burner protection cover 1
55 Left front leg 1
4
2
4
0
3
9
4
1
4
4
4
5
4
3
4
6
4
9
5
0
4
8
4
7
5
1
5
2
5
3
5
4
5
5
PART LIST & DIAGRAM
7
5
9
[
3
0
]'
4
9
0
[
1
9
]'
7
5
4
[
3
0
]'
2
0
0
3
[
7
9
]'
7
8
0
[
3
1
']
9
8
0
[
3
9
']
6
7
0
[
2
6
']
7
8
7
[
3
1
']
7
7
3
[
3
0
']
7
2
8
[
2
9
']
1
3
0
[
5
']
9
1
3
.
3
[
3
6
']
LO
I
G
/
N
H
I
I
TE
O
FF
L
IGH
TI
NG
INS
TR
U
CTIO
N
1
2
.
.
I
t
R
e
ada
ll ins
tru
c
t
n
i
t
n
s
o
bef
or
e
light
in
g.
,
ds
,
f
i
,
n
w
TO
LI
a
f
u
n
i
r
g
d
n
n
r
t
it
h
e
io
e
p
n
e
k
a
n
d
t
o
o
t
b
e
h
s
e
(
s
ligh
f
t
c
g
c
u
a
p
r
it
r
i
o
n
5
c
5
e
m
d
i
s
n
u
e
u
r
c
t
e
o
e
.
s
n
O
r
lig
h
t
b
ym
at
ch.
.
.
.
1
P
b
u
ur
s
n
h
e
G
a
r
H
n
s
d
h
T
o
tu
T
u
r
l
H
n
d
l
t
E
i
h
g
e
h
B
t
B
U
i
u
R
r
m
n
N
e
e
r
E
d
i
k
R
a
n
t
o
el
b
y,
s
lowly
to
IGN
I
TE
/HI
,
g
r
m
I
bu
n
he
er
oe
s
no
O
t
l
F
i ht
u
p
djus
t
k
n b
as
de
sie
d
a
fter
bu
,
r
n
eris
lit
.
2
t
I
a
f
urn
r
t
k
o
d
n
n
o
o
o
e
b
bt
o
F
a
n r
e
pe
at
ligh
ting
p
r
oc
edu
re
.
3
t
f
u
d
f
p
o
a
n
r
b
d
n
u
r
r
t
h
n
e
e
e
p
r
e
k
a
d
t
lig
s
h
O
n
t
i
F
o
n
t
F
g
,
l
i
p
g
w
r
h
a
o
t
i
t
c
u
e
du
r
a
r
f
5
t
e
e
r
m
or
i
s
n
t
li
u
e
g
t
p
h
e
t
s
2
,
,
b
y
mat
c
h.
I
E
G
L
N
E
I
C
TI
T
O
R
N
O
N
IC
Ba
t
tery
B
ox
b
U
a
n
t
s
te
cr
ry
ew
bo
t
h
x
e
t
o
c
r
o
e
v
p
e
l
r
a
o
c
f
e
t
t
h
h
e
e
batte
r
y.
3
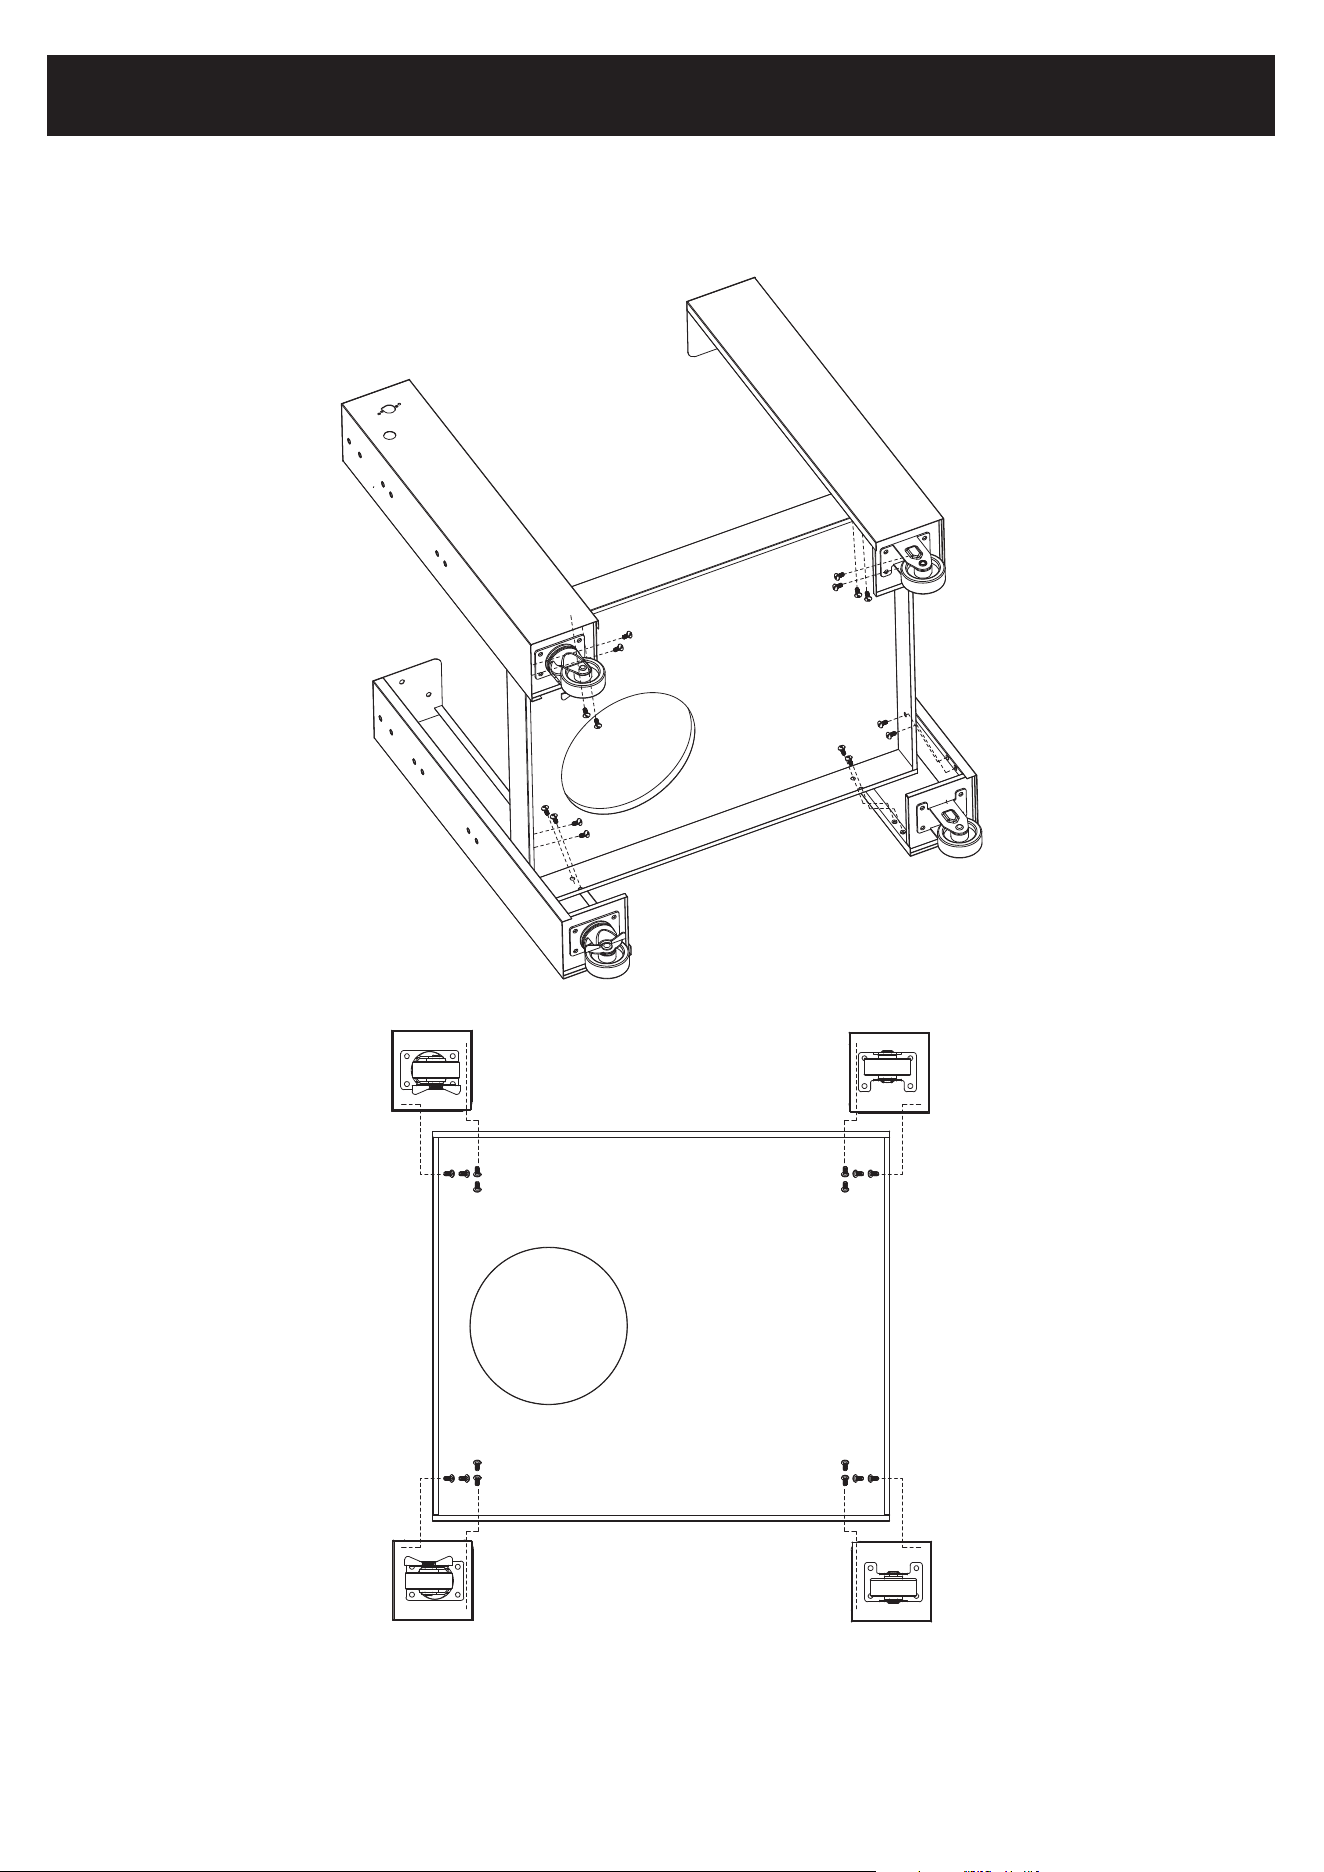
INSTALLATION: SUPPORT LEGS & BOTTOM PLATE
Step 1: Installation of Support Legs and Bottom Plate
1. Using sixteen 1/4"*14 screws (#36), install the Left Legs (#1) and Right Legs (#2) to the Strength Bottom (#11).
4
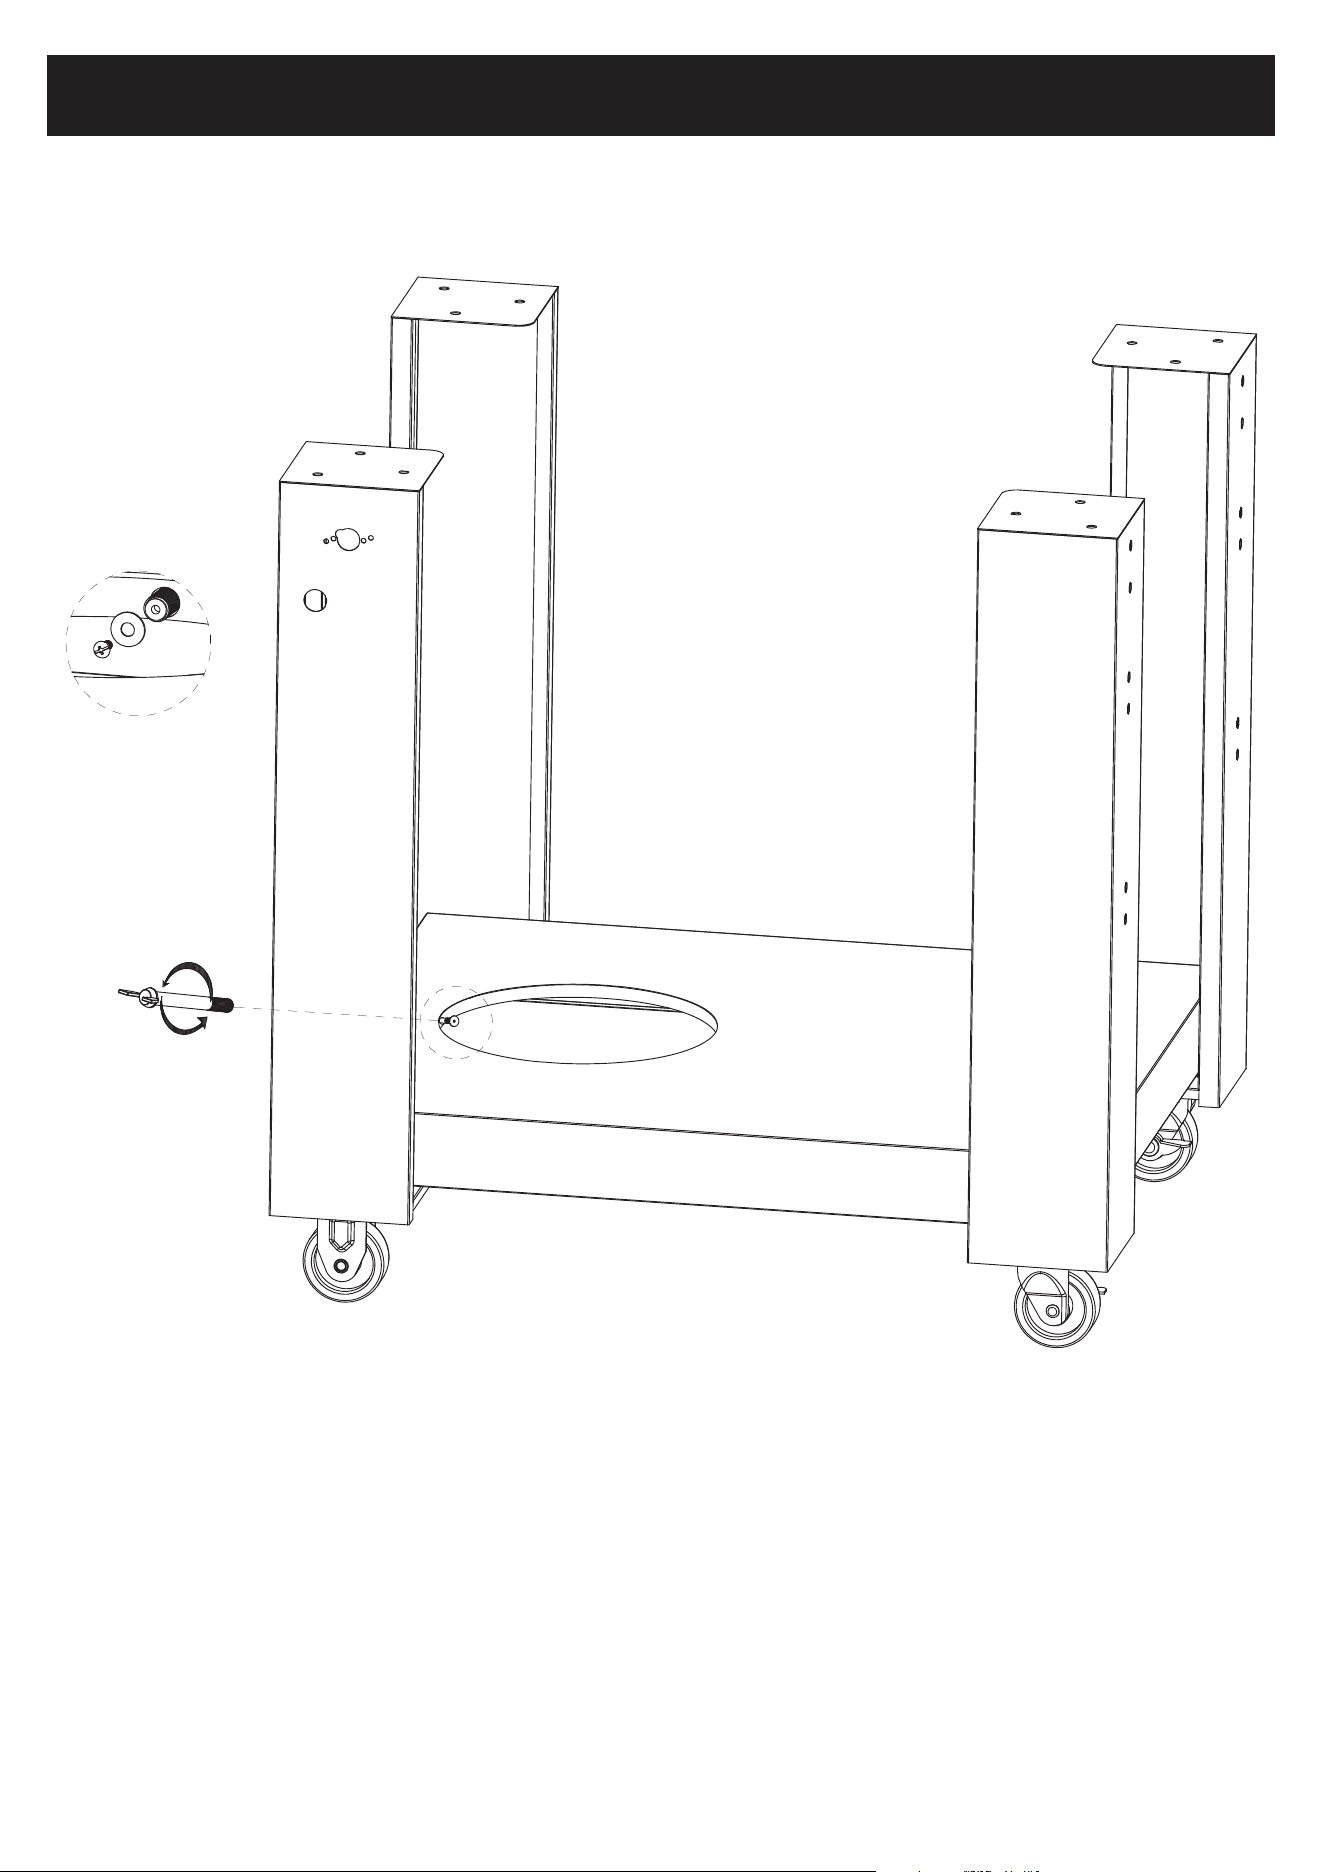
INSTALLATION:
CYLINDER FIXING ROD & REINFORCED BOTTOM PLATE
Step 2: Installation of Cylinder Fixing Rod and Reinforced Bottom Plate
1. Follow the guide to install the cylinder fixing rod and the reinforced bottom plate.
5
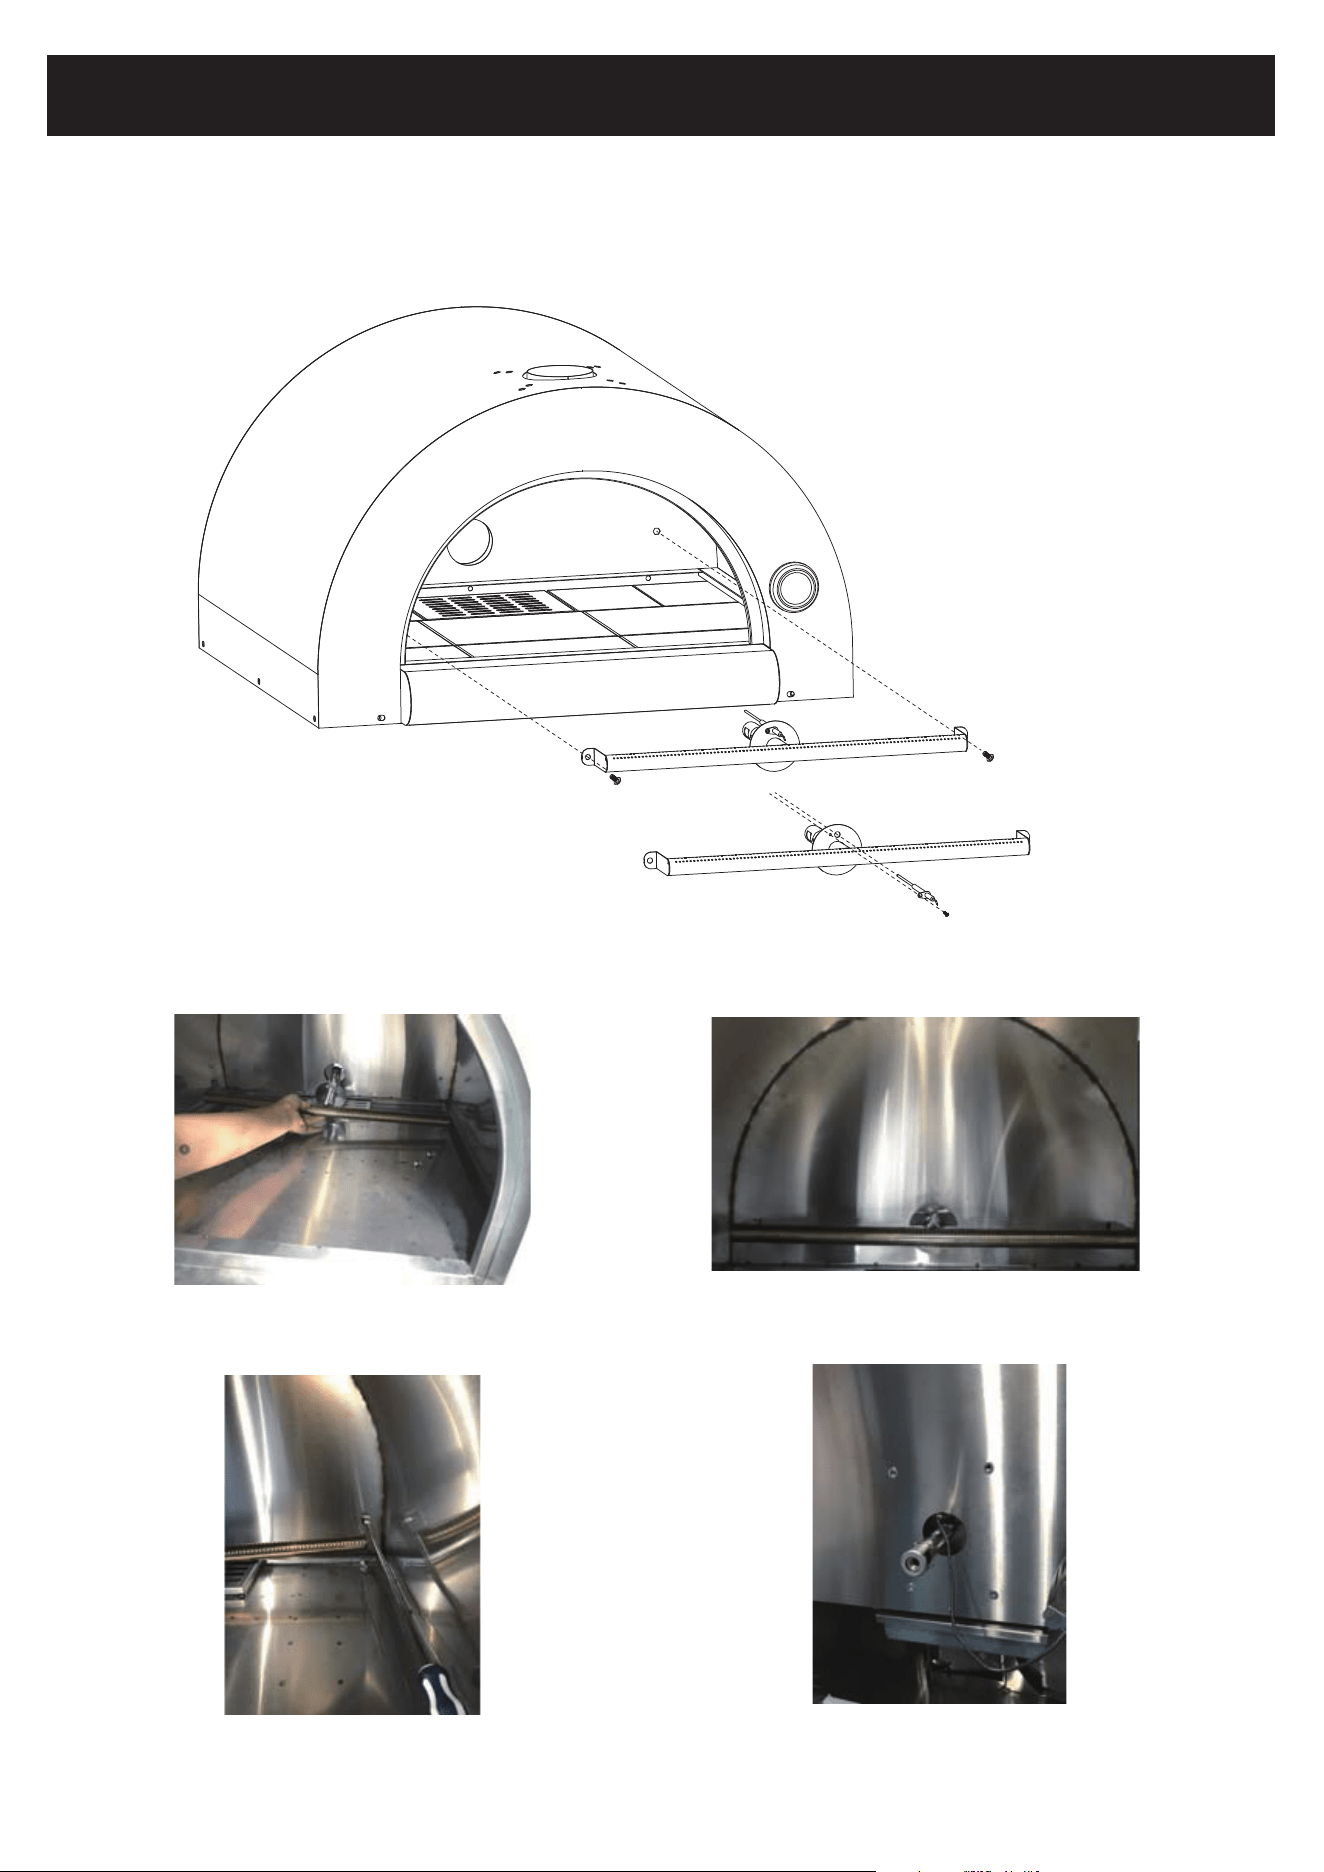
INSTALLATION: ELECTRODE & T-SHAPED BURNER
Step 3: Installation of Electrode and T-Shaped Burner
1. Using one 5/32"*10 screw (#38), install the Electrode (#46) to the T-Shape Burner (#47).
2. Next, using two 1/4"*14 screws (#36), secure the T-Shape Burner (#47) to the Oven (#3).
Picture 1
Picture 2 Picture 4
Picture 3
6
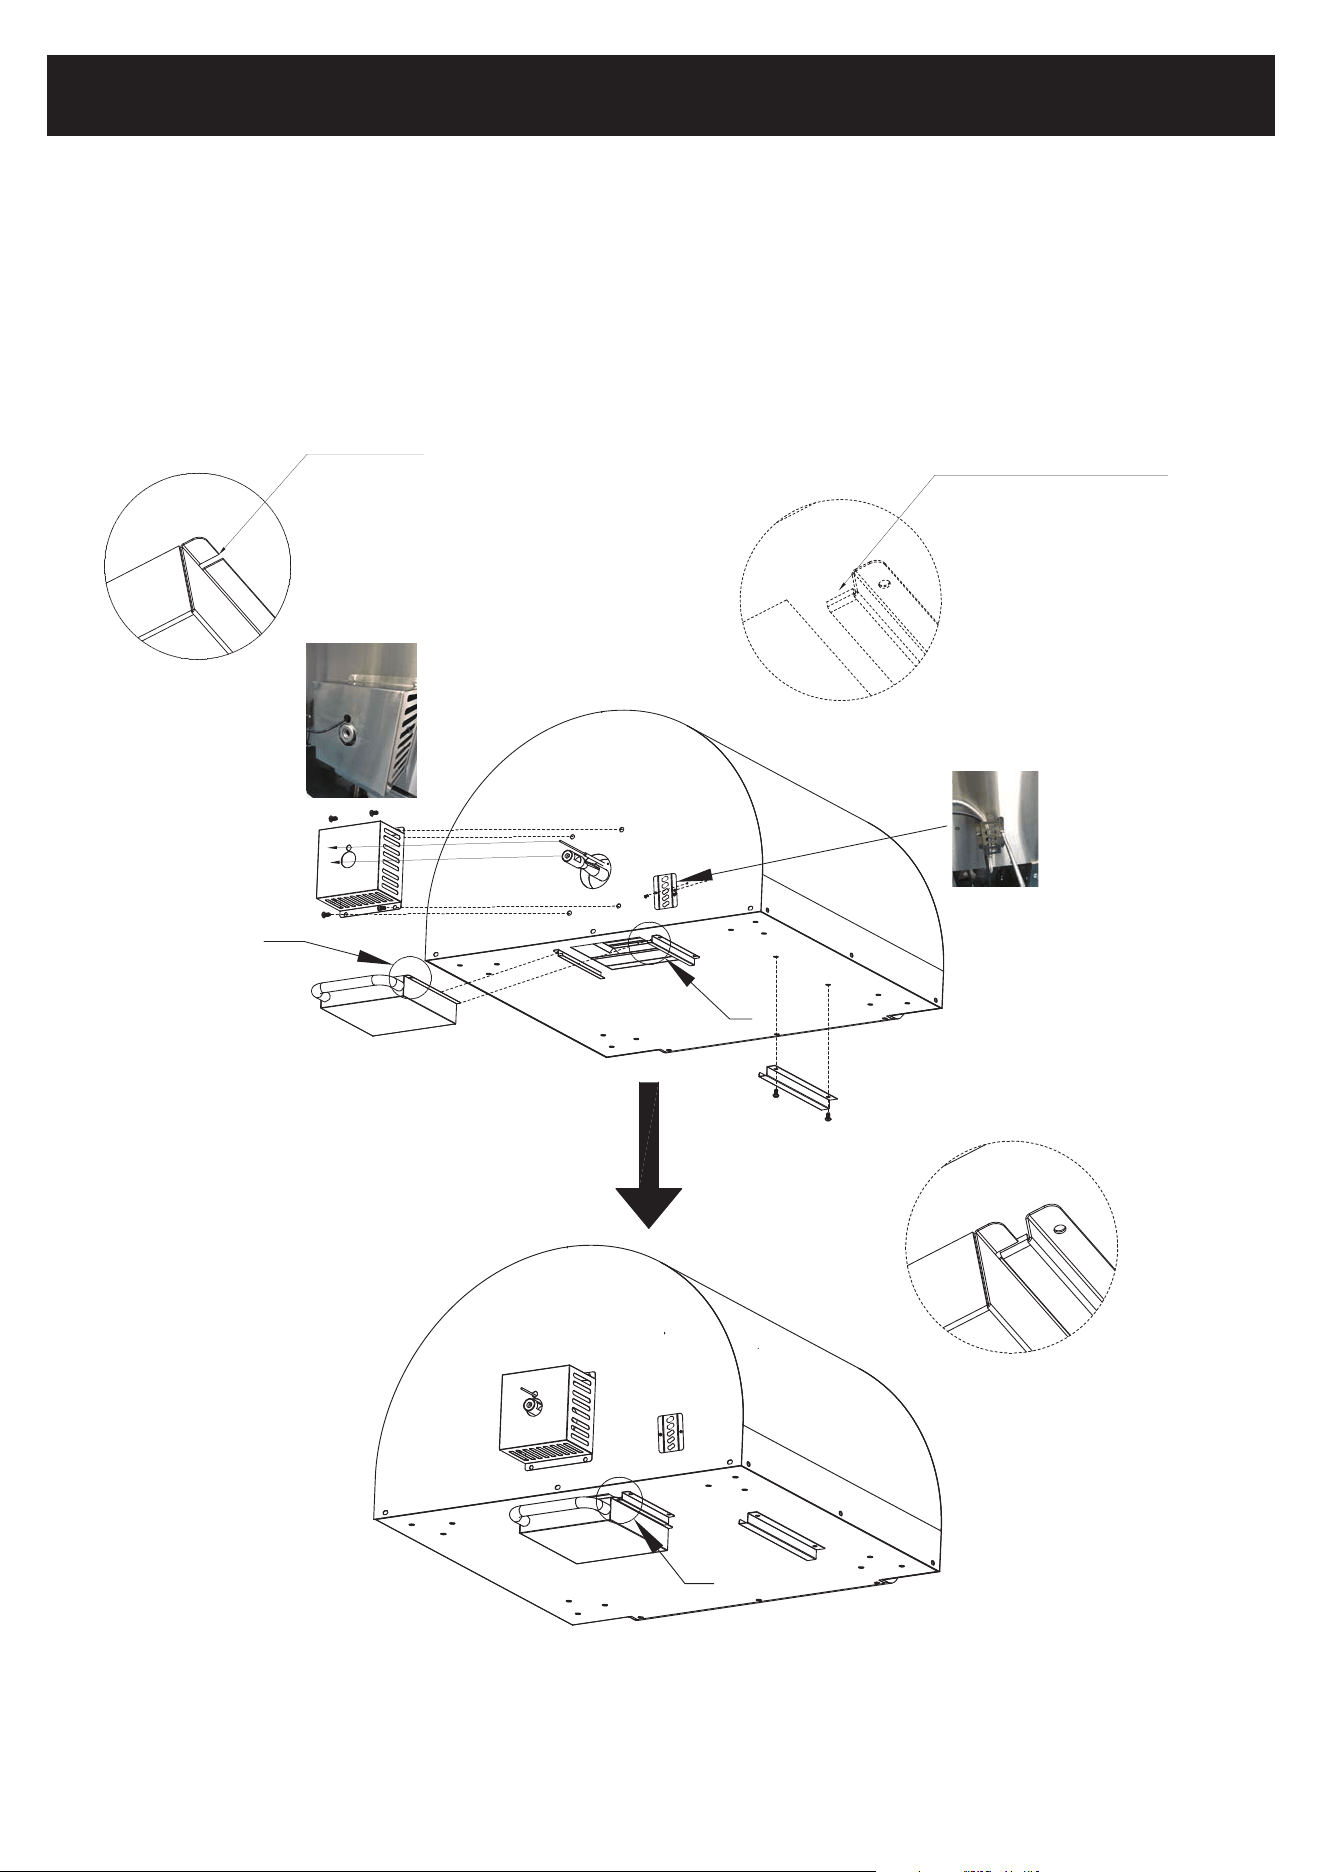
INSTALLATION:
OIL COLLECTING BOX & BURNER PROTECTION
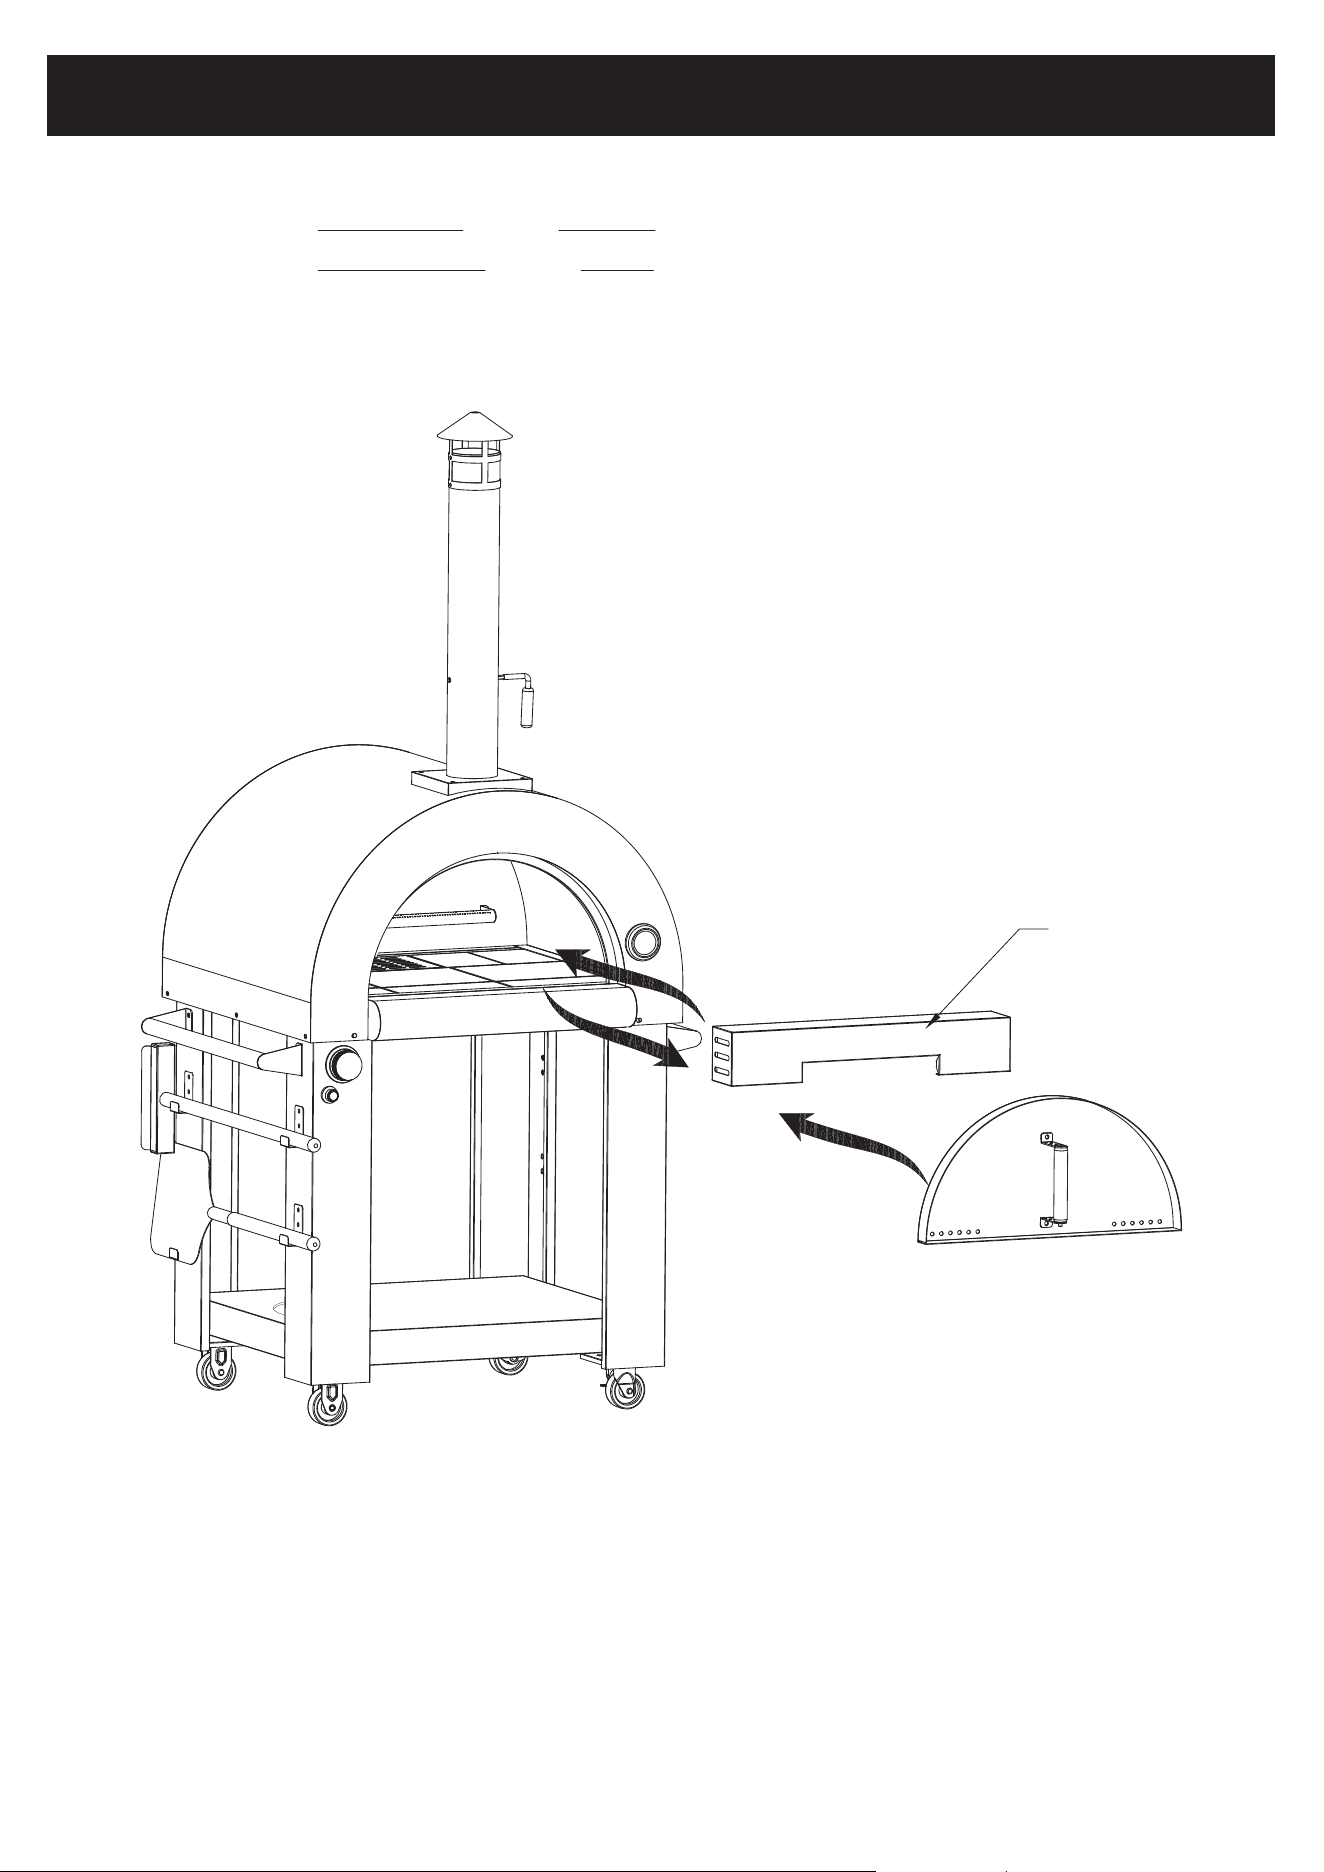
Step 4: Installation of Oil Collecting Box and Burner Protection Cover
1. Using four 1/4"*14 screws (#36) and two 5/32"*10 screws (#38), install the Ash Pan (#4).
A. Ensure the front of the Ash Pan (#4) is facing up, with the end with the card slot inserted into the Ash Pan bracket in parallel.
B. After inserting the Ash Pan (#4), insert the card slot into the Ash Pan bracket buckle to complete the assembly.
2. Install the Burner Protection Cover (#54), Ignition Pin Fixing Cover (#53), and assemble to the Oven
(#3) using the appropriate screws as indicated in the manual.
a
b
View c enlarge
c
Oil collecting box slot
Picture 1
View a enlarge
View b enlarge
Picture 2
Left and right bracket
buckle of oil collecting box
7
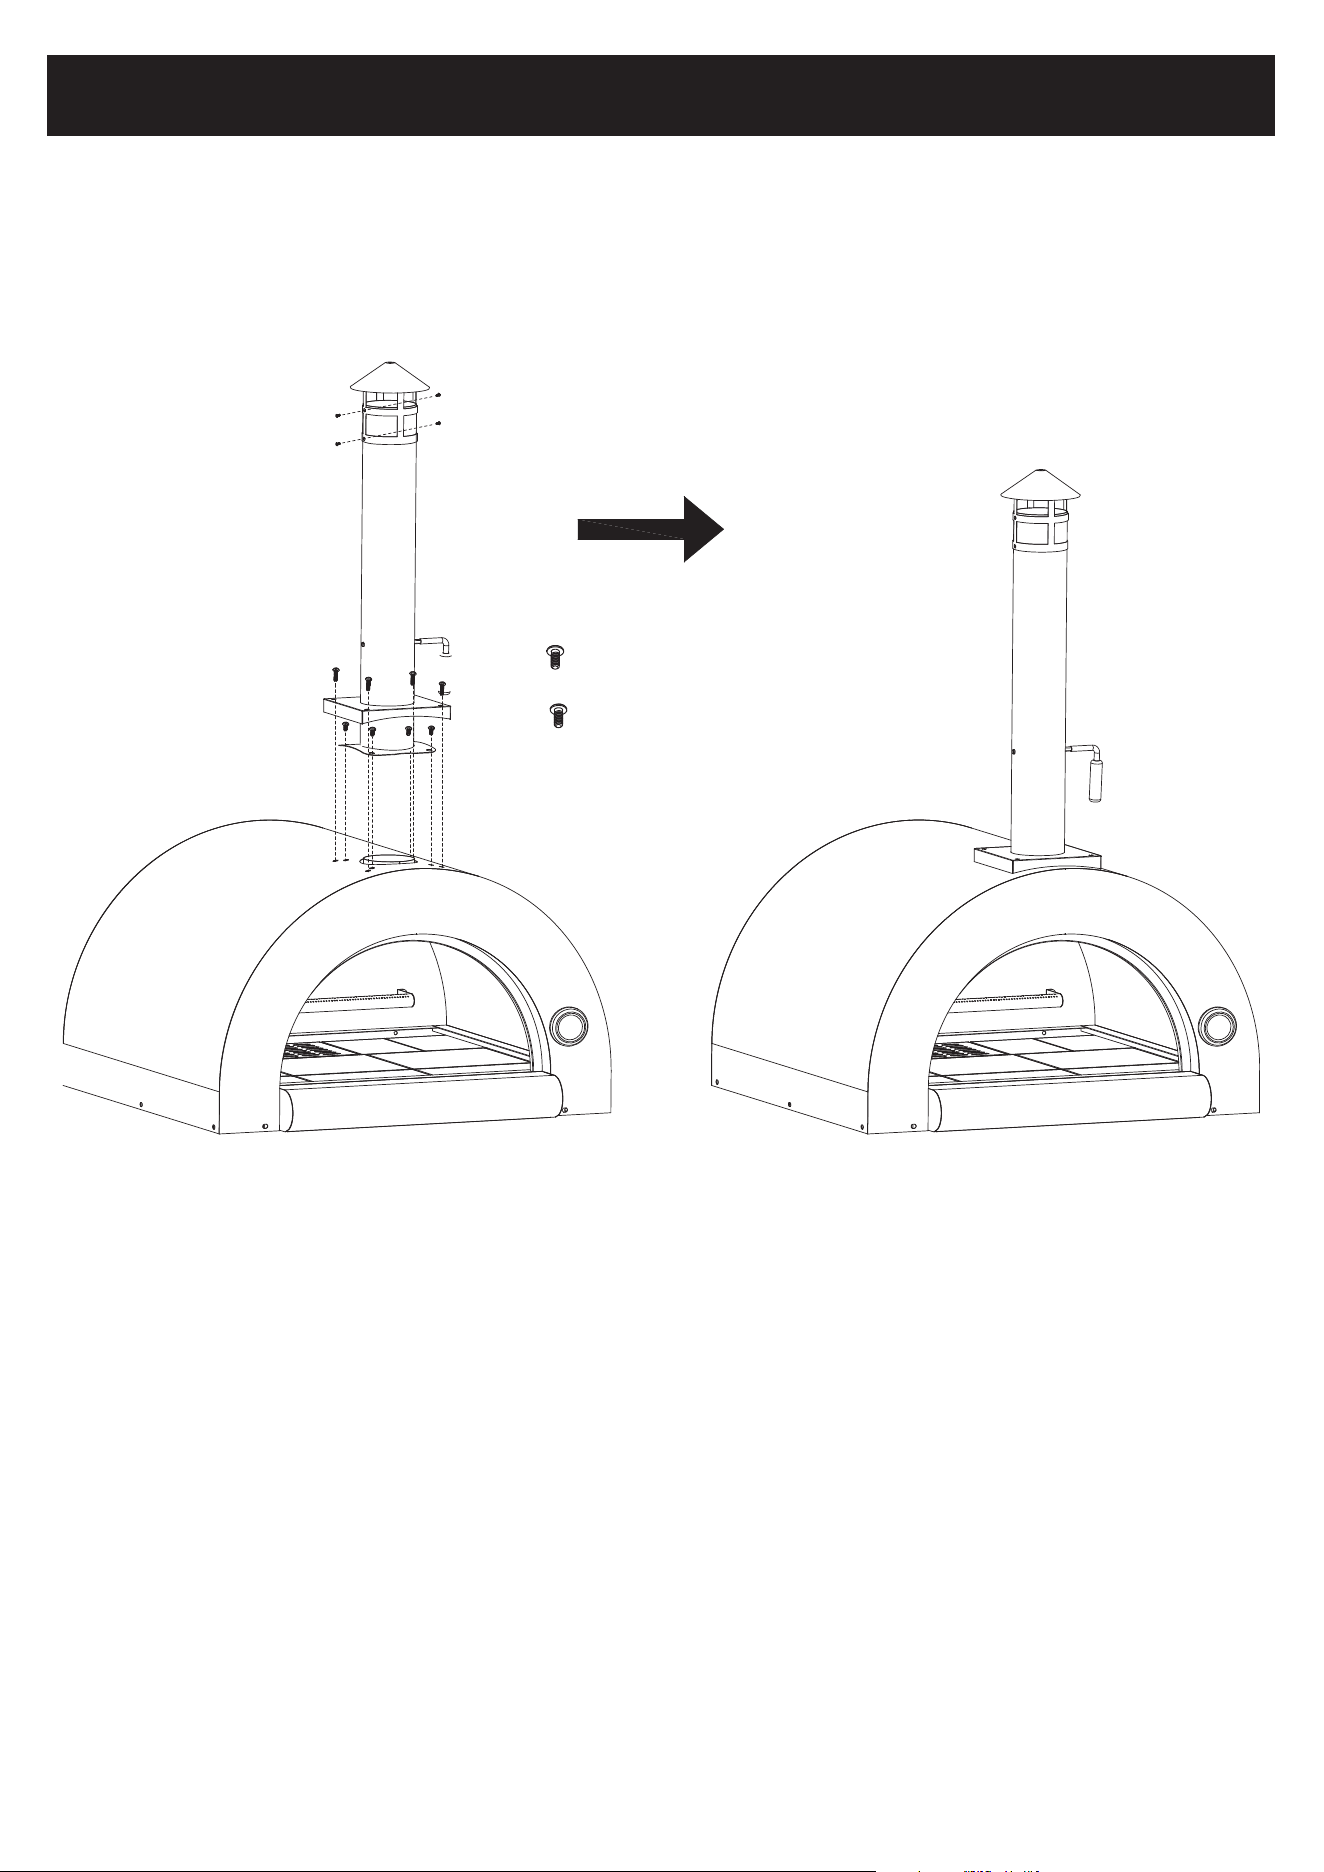
INSTALLATION: CHIMNEY
Step 5: Installation of Chimney
1. First, install the Chimney Top (#8) to the Chimney (#7) using the screws specified in your manual.
2. Next, using four each of 5/32"*10 screws (#38) and 1/4"*14 screws (#36),
secure the Chimney (#7) to the Oven (#3).
5/32"*10 screw 4 pcs/each chimney
1/4"*14 screw 4pcs
8
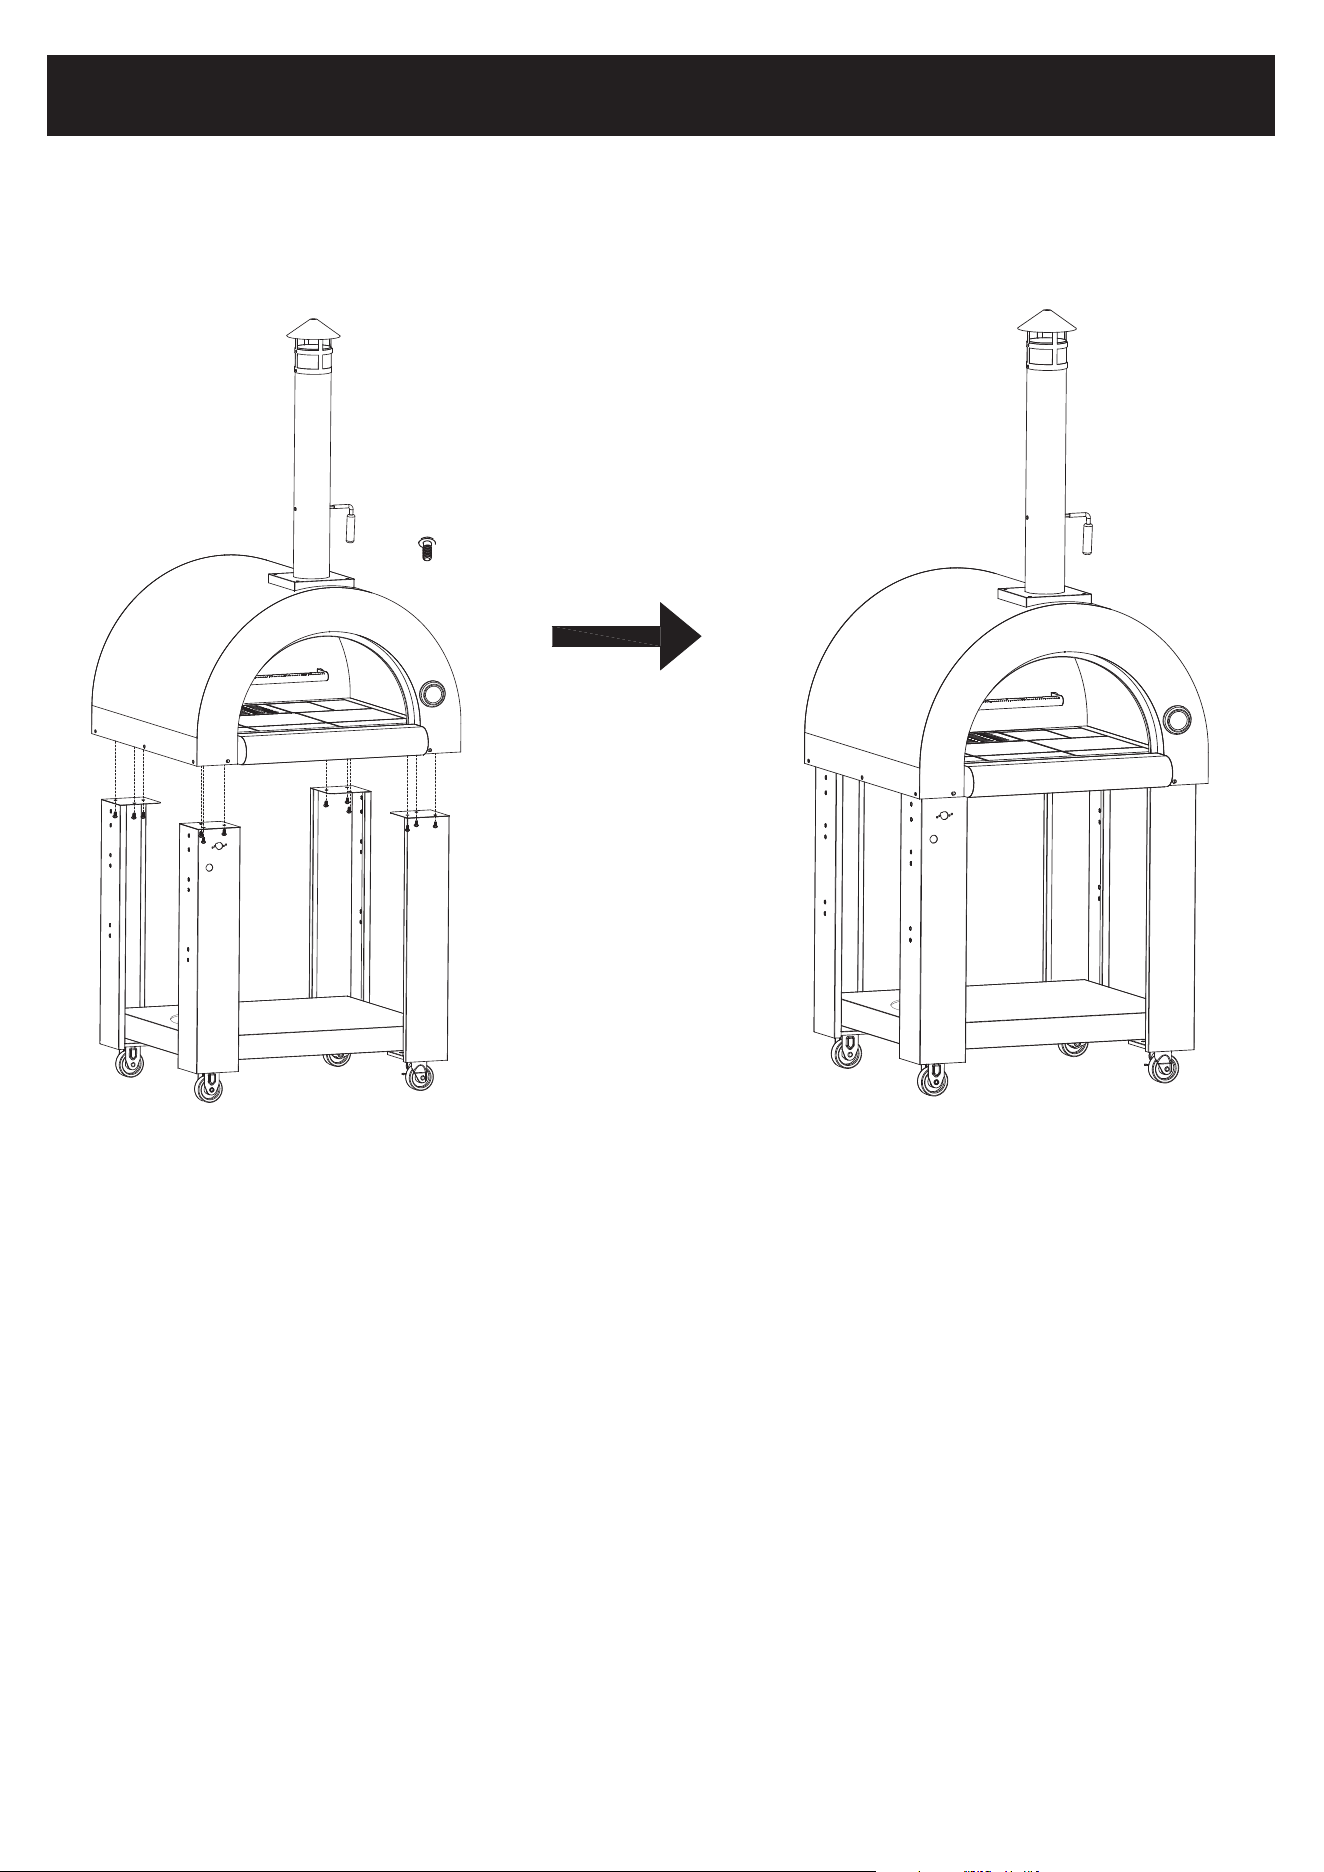
1/4"*14 screw 12pcs/each support 3 pcs
INSTALLATION: SUPPORTING LEG
Step 6: Installation of Support Leg and Oven
1. Secure the Left Legs (#1) and Right Legs (#2) to the Oven (#3) using the appropriate screws as
indicated below.
9
1/4"*14 screw 8pcs
1/4"*14 screw 8pcs
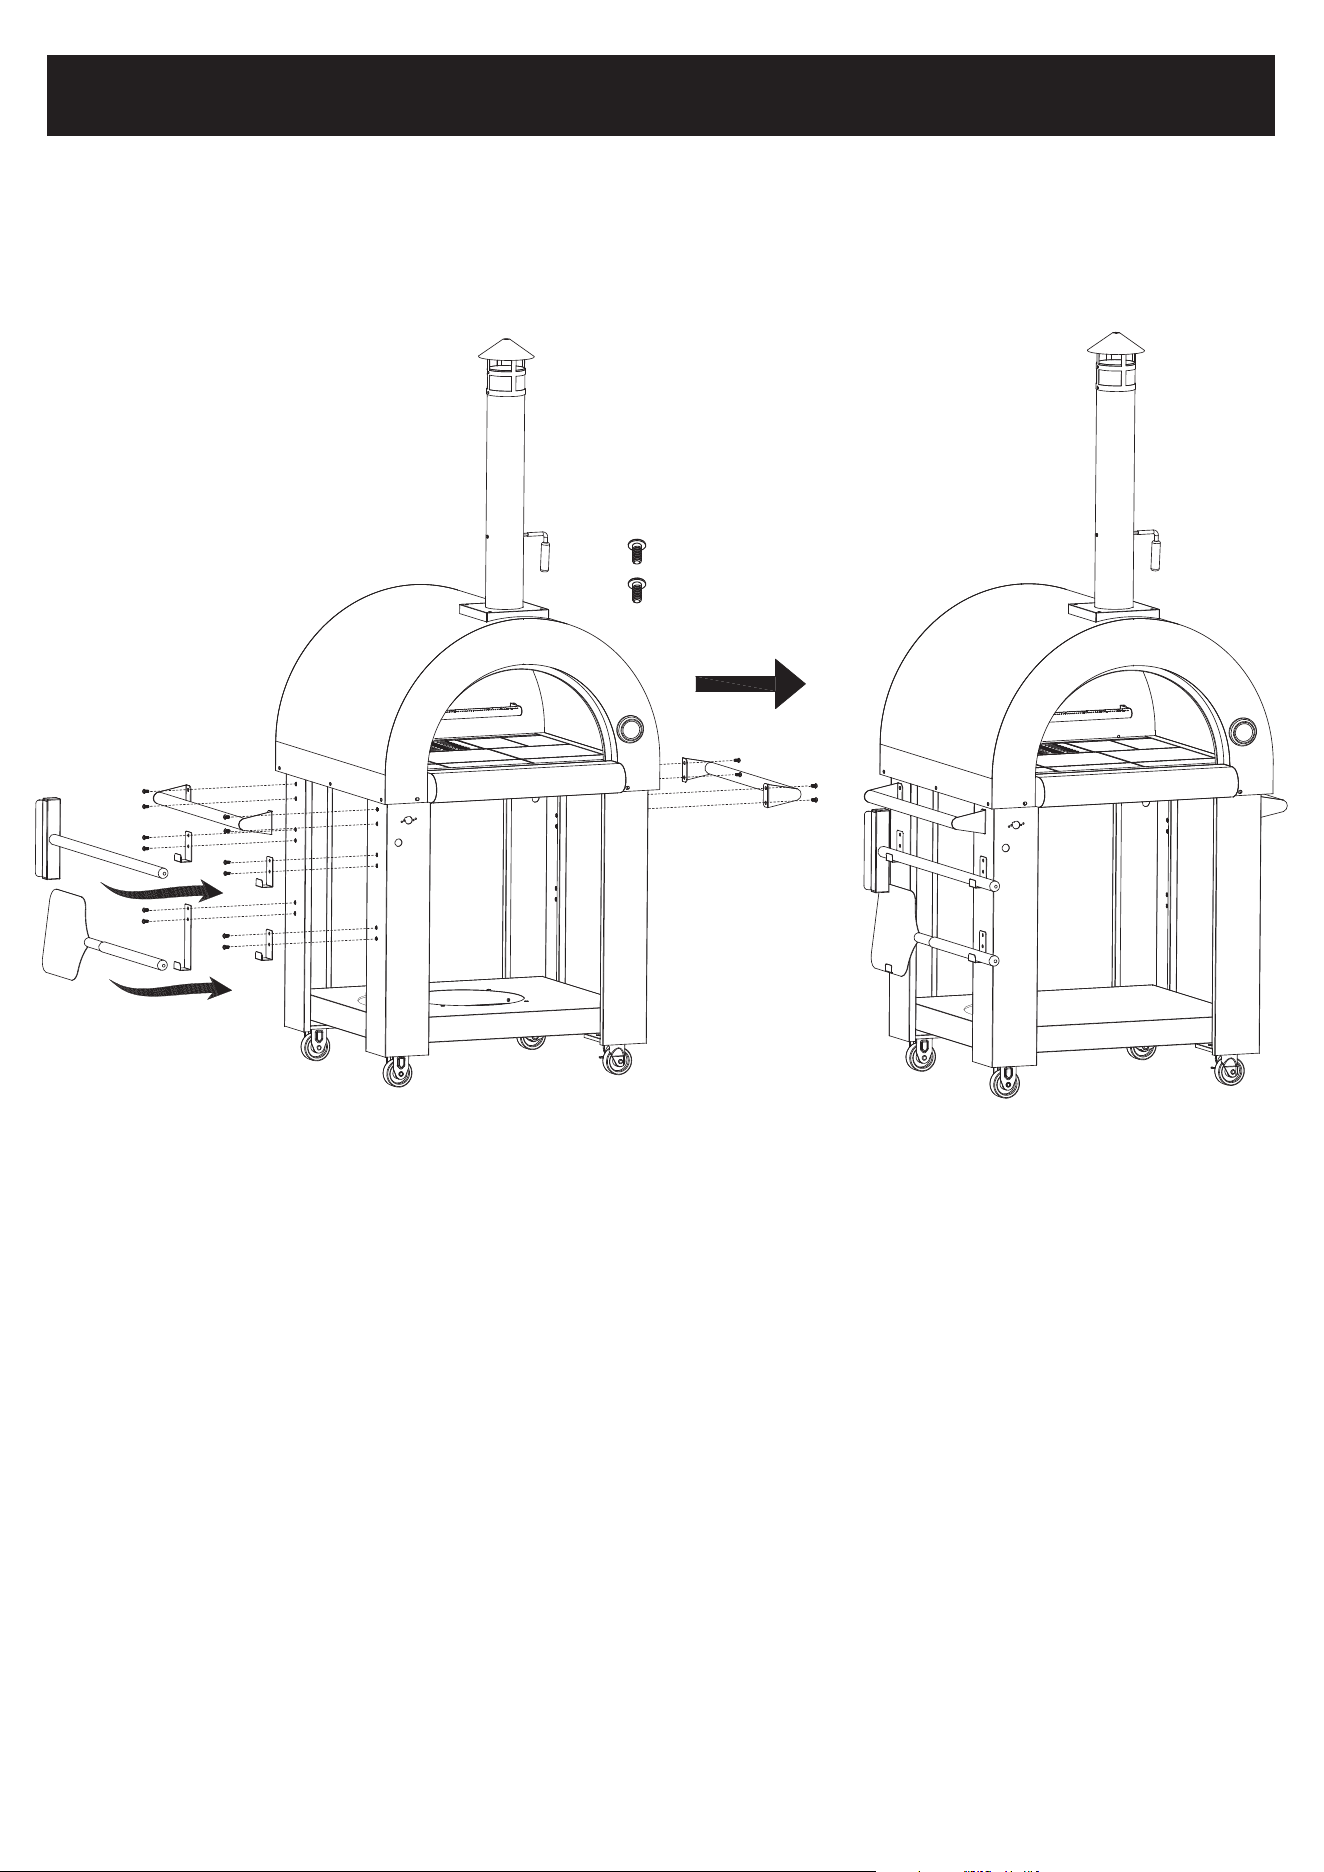
INSTALLATION: HANDLES & HOOKS
Step 7: Installation of Handles and Hooks
1. Attach the Side Handle (#17) and Door Handle (#14) to the Oven (#3) using the screws specified in your manual.
2. Install "L" Hook 1 (#27) and "L" Hook 2 (#28) using the appropriate screws as mentioned ithe diagram.
10
Picture 1 Picture 2 Picture 3
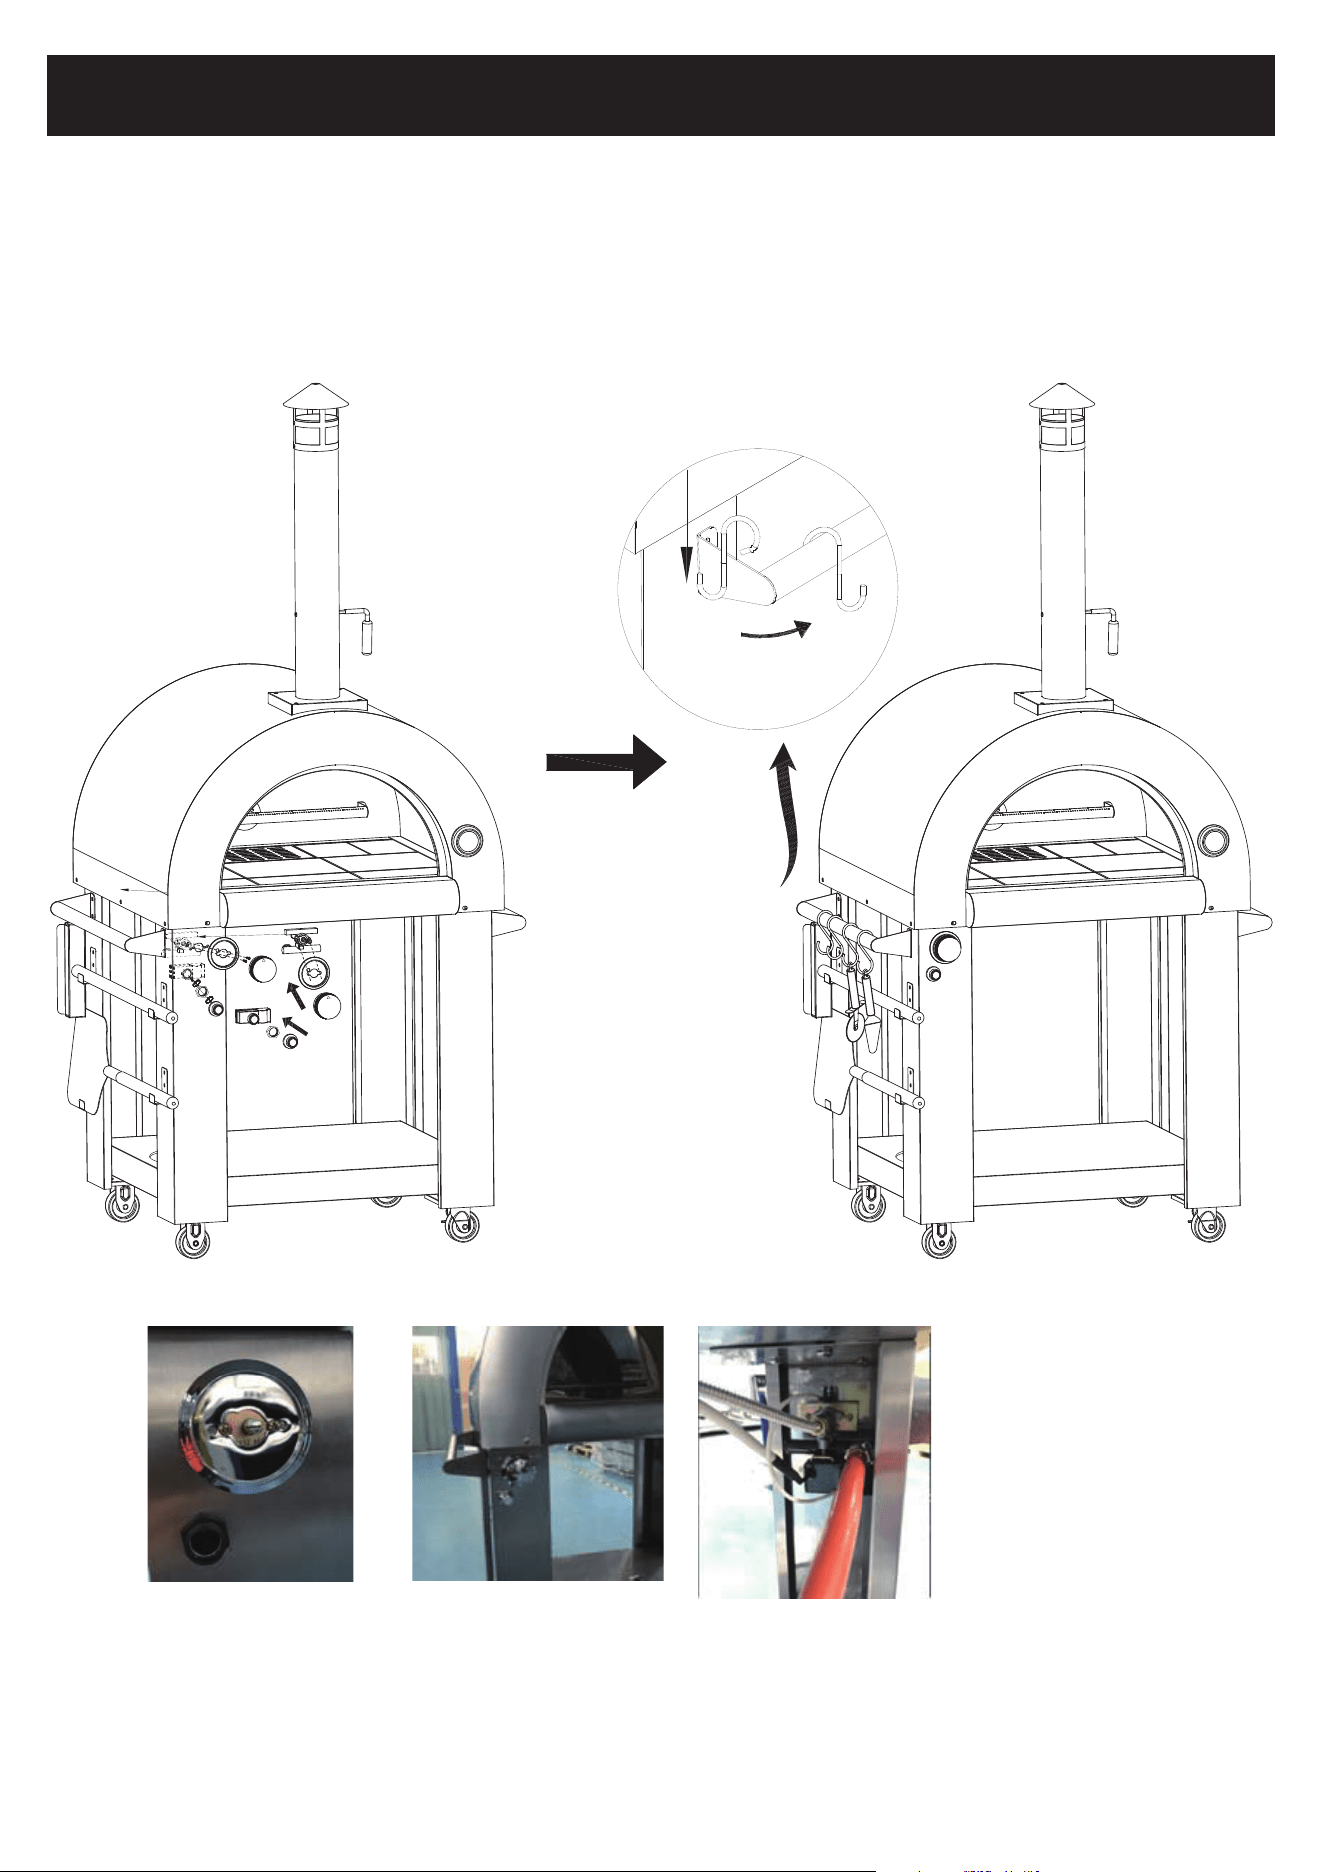
INSTALLATION:
MAIN VALUE, IGNITER AND LEFT FRONT SUPPORT
Step 8: Installation of Main Value, Igniter and Left Front Support
1. Secure the Main Value (#42), Igniter (#43), and Left Front Support to the Oven (#3) using the
specified screws in your manual.
11
Picture 1
Gas system pre-assembled assembly accessories
Picture 2
4
3
4
0
3
9
4
2
4
4
4
5
4
1
4
4
6
4
6
4
0
3
9
5
1
4
7
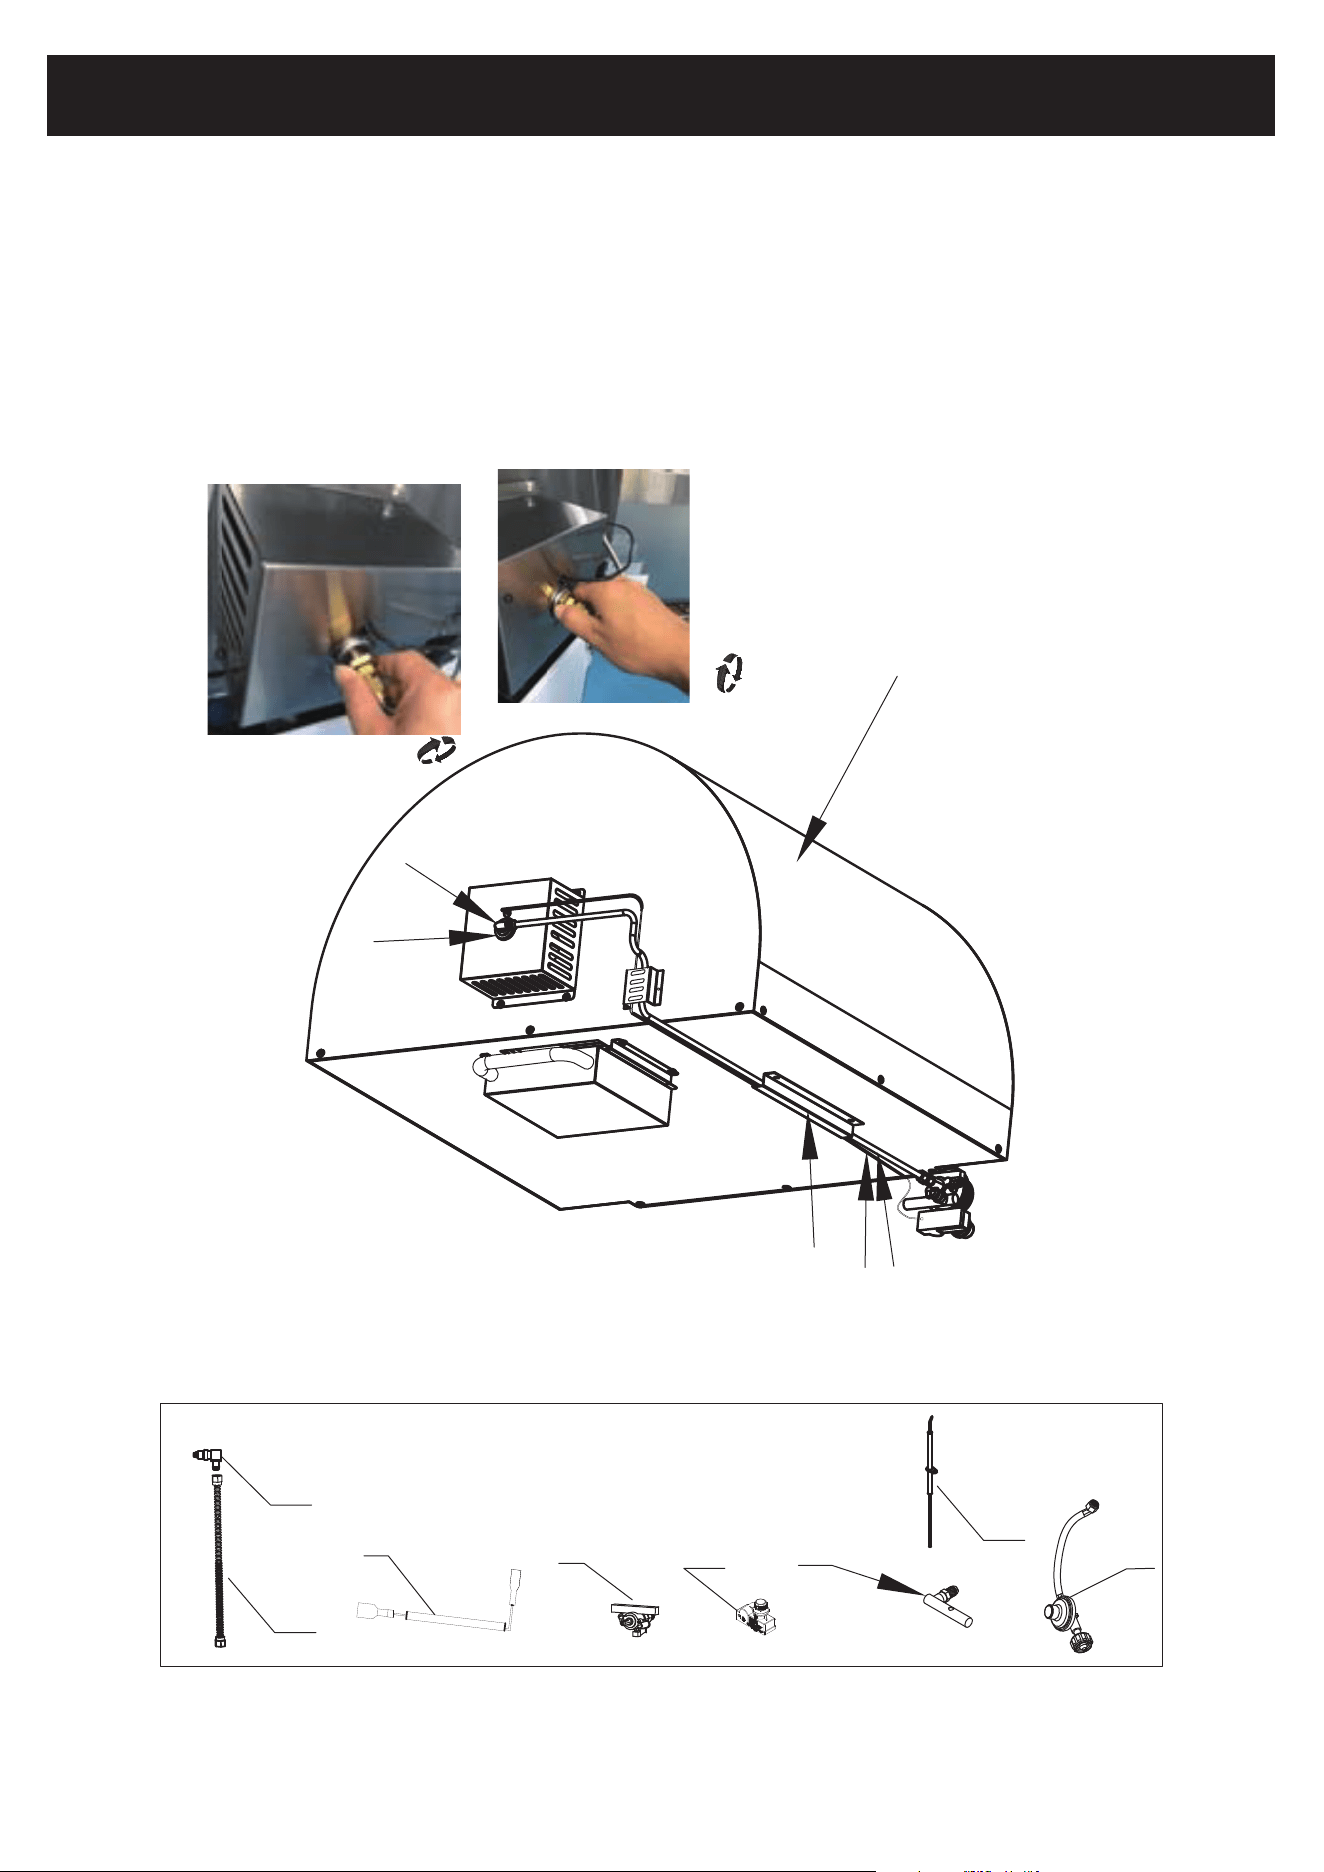
INSTALLATION: PRE-ASSEMBLED GAS SYSTEM
Step 9: Install the Pre-Assembled Gas System
1. Place the Accessories Gas System Pre-Assembly (#50) as per the line drawing,
pass the Back Burner Bellows (#40) through Bellows Hook (#51),
secure it at the 45" mark and bind with cable ties.
2. Manually align the Movable Nozzle Connector (#39) to the T-Shape Burner (#47) and tighten clock-
wise using the appropriate screws as indicated in your manual.
12
1/4"*14screw 2PCS
1/4" flat washer 2pcs
1/4" spring washer 2 pcs
1、4" bolts 2 pcs
Insulation Mat 2 4 pcs
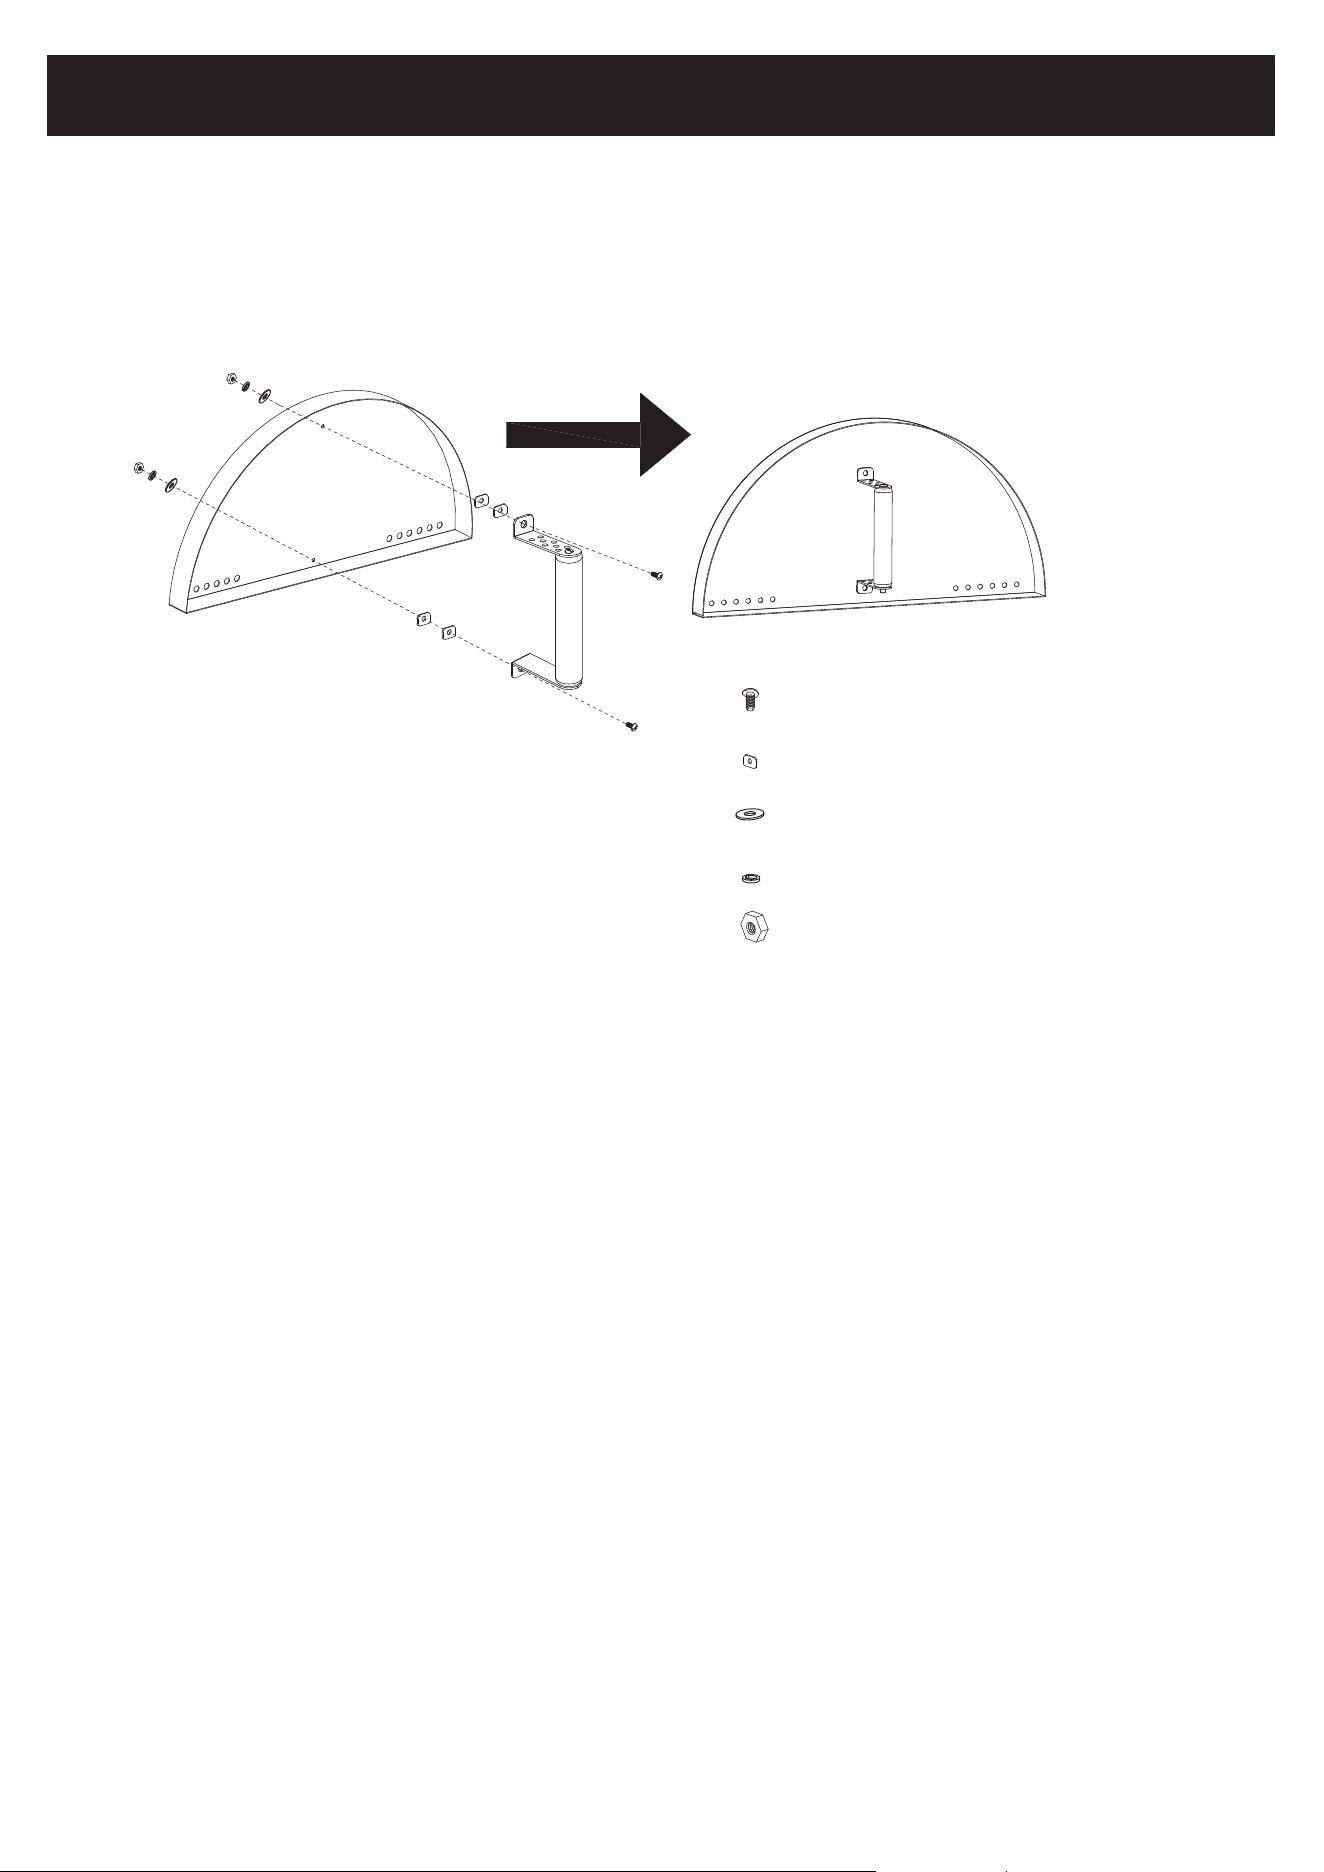
INSTALLATION: DOOR HANDLE
Step 10: Door Handle Mounting
1. Secure the Door Handle (#14) to the Door (#12) using the Handle Installation Piece (#13) and the
screws specified in your manual.
13
5
2
INSTALLATION: GAS / WOOD BURNING
Step 11: Configure for Gas or Wood Burning
1. When working with Gas Burning, please Remove the Fire Exhaust Dust Cover Welding (#52).
2. When working with Wood Burning, please Install the Fire Exhaust Dust Cover Welding (#52) over the
burner, being sure to note the correct direction of placement. Use the screws indicated in your
manual for this step.
14
LEAK TESTING
General Information
Although each grill undergoes a leak test at our factory before being shipped, it's crucial to perform a
thorough gas tightness check upon installation. This requirement stems from the potential mishandling
during shipment or the inadvertent application of excessive pressure to the unit.
Regularly inspect the entire system for leaks using the following procedures. If a gas smell is detected
at any time, immediately perform a comprehensive system leak check.
Preparation Before Testing
Ensure all packing materials, including burner tie-down straps, are removed from the grill.
While conducting the leak test, remember these important safety measures:
1. Refrain from smoking during the leak test.
2. Never use an open flame to perform a leak test.
To prepare for the test, create a soap solution consisting of equal parts liquid detergent and water. Have
a spray bottle, brush, or rag on hand to apply the solution to the fittings. For the first leak test, make sure
the LP cylinder is full.
Testing Procedure
1. Confirm that the control valves are in the "OFF" position before turning on the gas supply.
2. Inspect all connections ranging from the LP gas regulator and supply valve to the connection to the
manifold pipe assembly (the pipe leading to the burners). Soap bubbles will appear where a leak is present.
3. In case of a leak, immediately shut off the gas supply and tighten the leaking fittings.
4. Reactivate the gas supply and perform a recheck.
5. If the leak persists, shut off the gas supply and contact KoolMore customer service at 718-576-6342.
Please use only those parts recommended by the manufacturer for the grill. Using substitute parts will
void the warranty. Refrain from using the grill until all connections have been verified as leak-free.
Gas Flow Check
While each grill burner undergoes a testing and adjustment process at our factory before shipment,
local gas supply variations may necessitate further burner adjustments.
Visually inspect the burner flames, which should be blue and stable, with no yellow tips, excessive noise, or
lifting. If these conditions exist, inspect the air shutter and burner ports for obstructions like dirt, debris, or
spider webs. If you have any questions regarding flame stability, please contact our customer service.
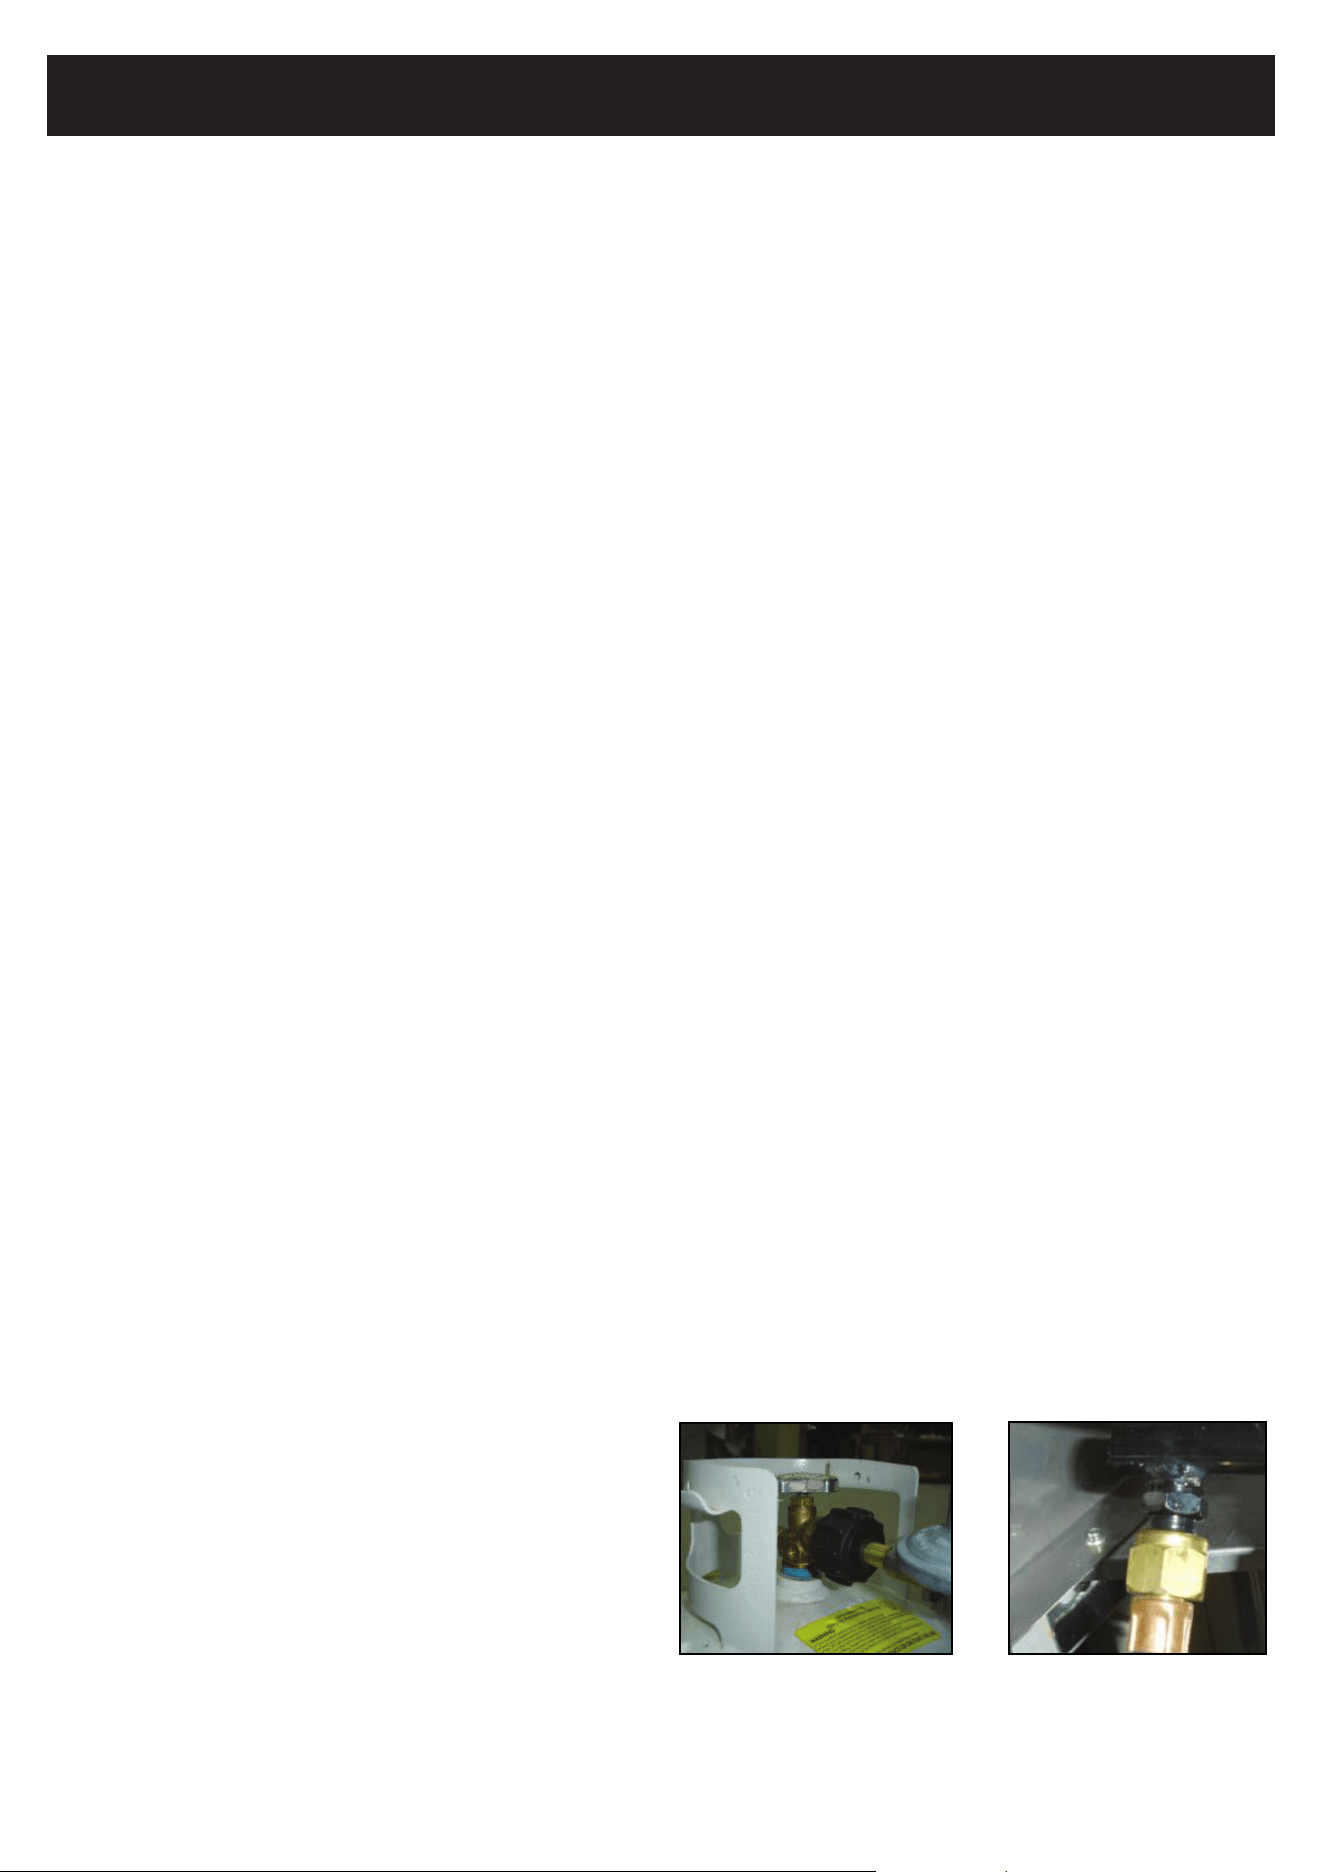
• Always perform a leak check after every LP tank
change and before each use.
• It's useful to keep a spray bottle of soapy water
near the gas supply line's shut-off valve.
• Spraying all fittings and watching for bubble
formation helps detect leaks.
15

GAS USE CAUTION
BEFORE USING YOUR GAS FIRED PIZZA OVEN, PLEASE FOLLOW THE INSTRUCTION BELOW.
If You Smell Gas:
1. Shut off the gas supply.
2. Extinguish any open flames.
3. Open the oven door.
A gas leak could lead to fires or explosions causing serious injury or property damage.
If a gas leak occurs, refrain from lighting the oven and identify the cause of the malfunction to prevent
potential fires and/or explosions.
Safety and Use Guidelines
1. Always use heat-resistant utensils when cooking. Items made of plastic or other materials that
cannot withstand high temperatures should be avoided.
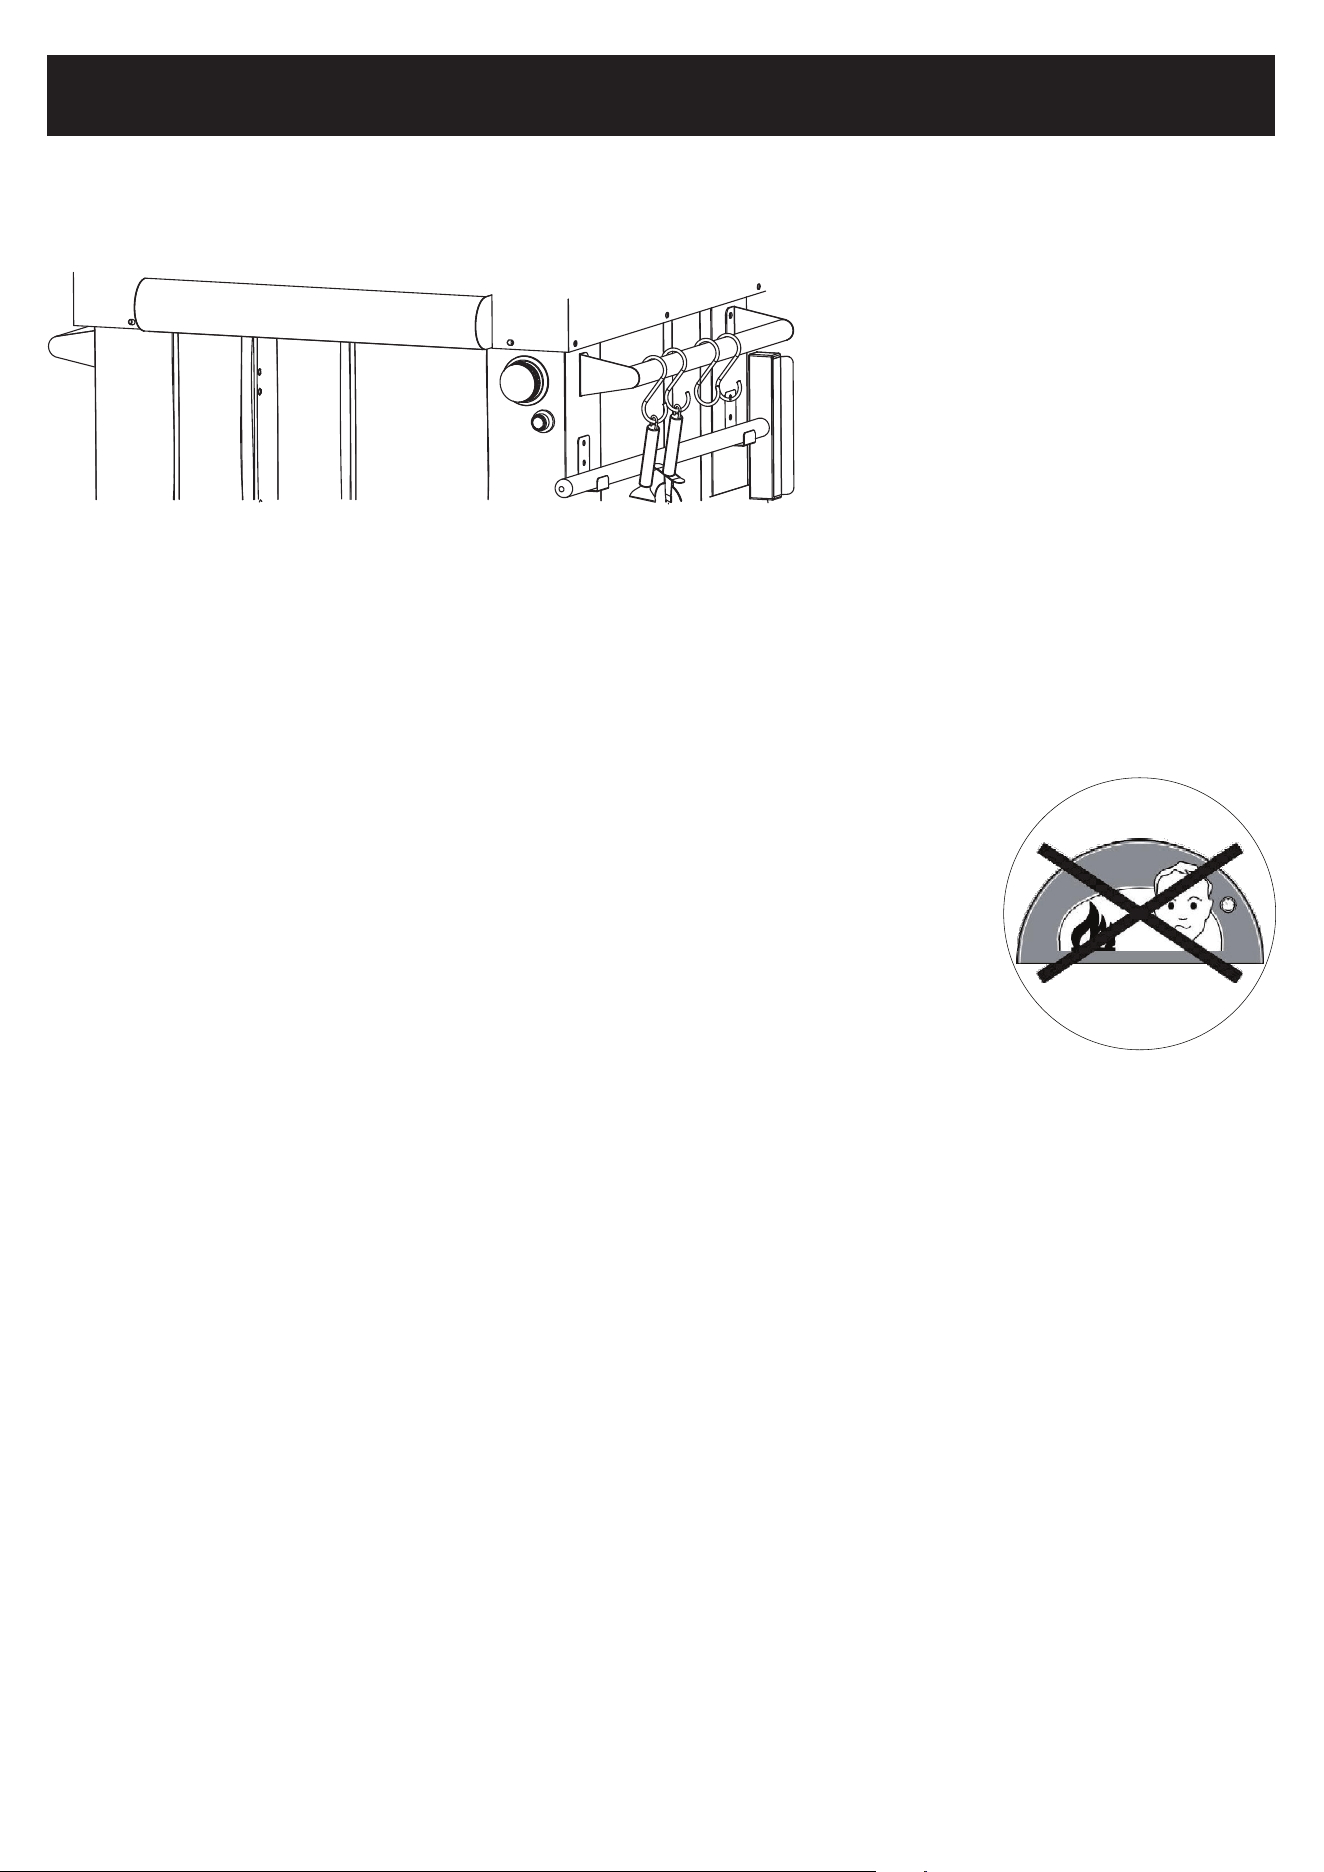
2. Keep children and pets at a safe distance from the oven during operation, as it can reach extremely
high temperatures that can cause severe burns.
3. Keep fuel supply pipes away from hot surfaces.
4. Note that the oven's surface color may change due to high temperatures.
5. Do not operate the oven if it is malfunctioning.
6. This oven is designed solely for outdoor use and should not be used in enclosed or covered areas
such as garages, porches, or verandas.
7. Never use water to extinguish flames in the oven.
8. Avoid using open flames near the oven and do not place empty gas cylinders nearby.
9. Do not apply paint or other substances to the oven.
10.Follow the provided instructions when connecting the regulator.
11.After periods of non-use, check for gas leaks or burner obstructions.
12.Keep all flammable materials at least 100 cm / 39.3 in away from the oven.
13.In case of a grease fire, turn off the gas and close the oven door until the fire is extinguished.
14.The use of natural gas in a unit designed for Liquefied Petroleum Gas (LPG) is dangerous and will
void your warranty.
15.A rusty or dented gas cylinder could be hazardous; ensure it is checked by your gas supplier. Do not
use gas cylinders with a damaged valve.
16. Treat even seemingly empty cylinders as though they contain gas. Store and transport them accordingly.
17.Always wear heat-resistant mittens or cooking gloves during operation.
18.Please note, all parts sealed by the manufacturer should not be tampered.
16
TIPS FOR GAS USE
Your purchased oven may feature some or all of the elements listed below. Please note that the location
and appearance of these features may differ from what is seen on your specific model.
Control Panel
A. Battery (for Ignition) Box
B. Burner Knob
Any alterations to the product can be potentially hazardous. Use only low-pressure flexible pipes and
regulators permitted by the current regulation. When replacing pressure regulators and flexible pipes,
refer only to the manufacturer's instructions.
Inspect the hose before each use for nicks, cracking, abrasions or cuts. If any damage is found, do not
use the oven. Move the oven door using the wooden handles
Lighting Procedure
• Always check all gas connections for leaks before starting your oven.
• When lighting the oven, ensure your face and body are at least 19.6 inches
away from the oven door. The oven door should be open during this process.
• The burner control knob must be in the OFF position before turning on the
LPG cylinder valve.
1. Ensure burner knobs are turned to OFF.
2. For gas ovens using a propane tank, slowly open the tank valve. Note: If the flow-limiting device
activates, your oven may not light. If your oven does not light, or the flames are low and do not heat
properly, turn the tank valve and burner knob off, and wait 30 seconds. After shutting off the tank,
slowly open the tank valve and wait 5 seconds before lighting.
3. Push the pulse ignitor module, push in and turn the burner knob to IGNITE/HI for the burner. The
burner will light immediately. When the burner is lit, turn the knob to the desired setting.
◦ If the flame does not light, leave the knob in the "off" position. Wait 3 minutes and try again.
◦ Do not operate the oven at maximum power for more than 20 minutes.
◦ Do not exceed the limit temperature of 426°C / 800°F.
◦ During operation, never disconnect the gas regulator or other junctions.
◦ Do not touch external surfaces and the chimney flue during oven operation.
B
A
17

TIPS FOR GAS USE
If a burner does not light after several attempts using the control knobs,
the burners may be lit with a match:
To Light The Grill With a Match
1. If you have already attempted to light the main burner with the igniter, allow 5 minutes for any accu-
mulated gas to dissipate.
2. Insert a match into the lighting rod.
3. Strike the match to light it.
4. Gently hold the lit match close to the burner.
5. Push the pulse ignitor module and push in and turn the control knob to IGNITE/ON.
Hold this knob in for 15 seconds after the burner is lit. You will hear the "snapping" sound of the
spark until after the knob is released.
6. Remove the match and replace the manual lighting extension inside the cabinet door.
7. If the burner does not light within seconds, turn the knob to the "OFF" position, wait 5 minutes and try again.
Caution:
When using a match to light the grill, make sure to use the attached lighting rod.
Warnings:
• When lighting, keep your face and hands as far away from the grill as possible.
• Before lighting, please check the connection with the proper procedure.
If there's a leak, turn the gas off.
• This appliance will be hot during and after use. Use insulated oven mitts or gloves for
protection from hot surfaces or splatter from cooking liquids.
• Do not store a spare LP-Gas cylinder under or near the appliance.
Never fill the cylinder beyond 80 percent full.
• If the information in the above warning is not followed exactly, a fire causing death or
serious injury may occur.
18
TIPS FOR GAS USE
LPG Cylinder Usage Advice
1. LPG is heavier than air. Any LPG leak may collect in low areas and prevent dispersion.
2. The LPG cylinder must be installed, transported, and stored in an upright position. LPG cylinders
should not be dropped or handled roughly.
3. Never place a replacement gas cylinder near the gas-fired oven.
4. Never store or transport the LPG cylinder in places where temperatures can reach 50°C/122°F. For
example, do not leave the LPG cylinder in a car during a hot day.
5. Treat "empty" LPG cylinders with the same care as when full. Even when the LPG tank is empty of liquid,
there may still be gas pressure in the cylinder. Always close the cylinder valve before disconnecting.
6. Ensure the regulator is assembled with the vent hole pointed downward so that it will not collect water.
7. Ensure the vent hole is free of dirt, grease, insects, etc.
8. Always check all gas connections for leaks before starting your oven.
9. Make sure the valve of the LPG cylinder or regulator is closed when the LPG cylinder is replaced, and
do it away from any sources of heat or ignition.
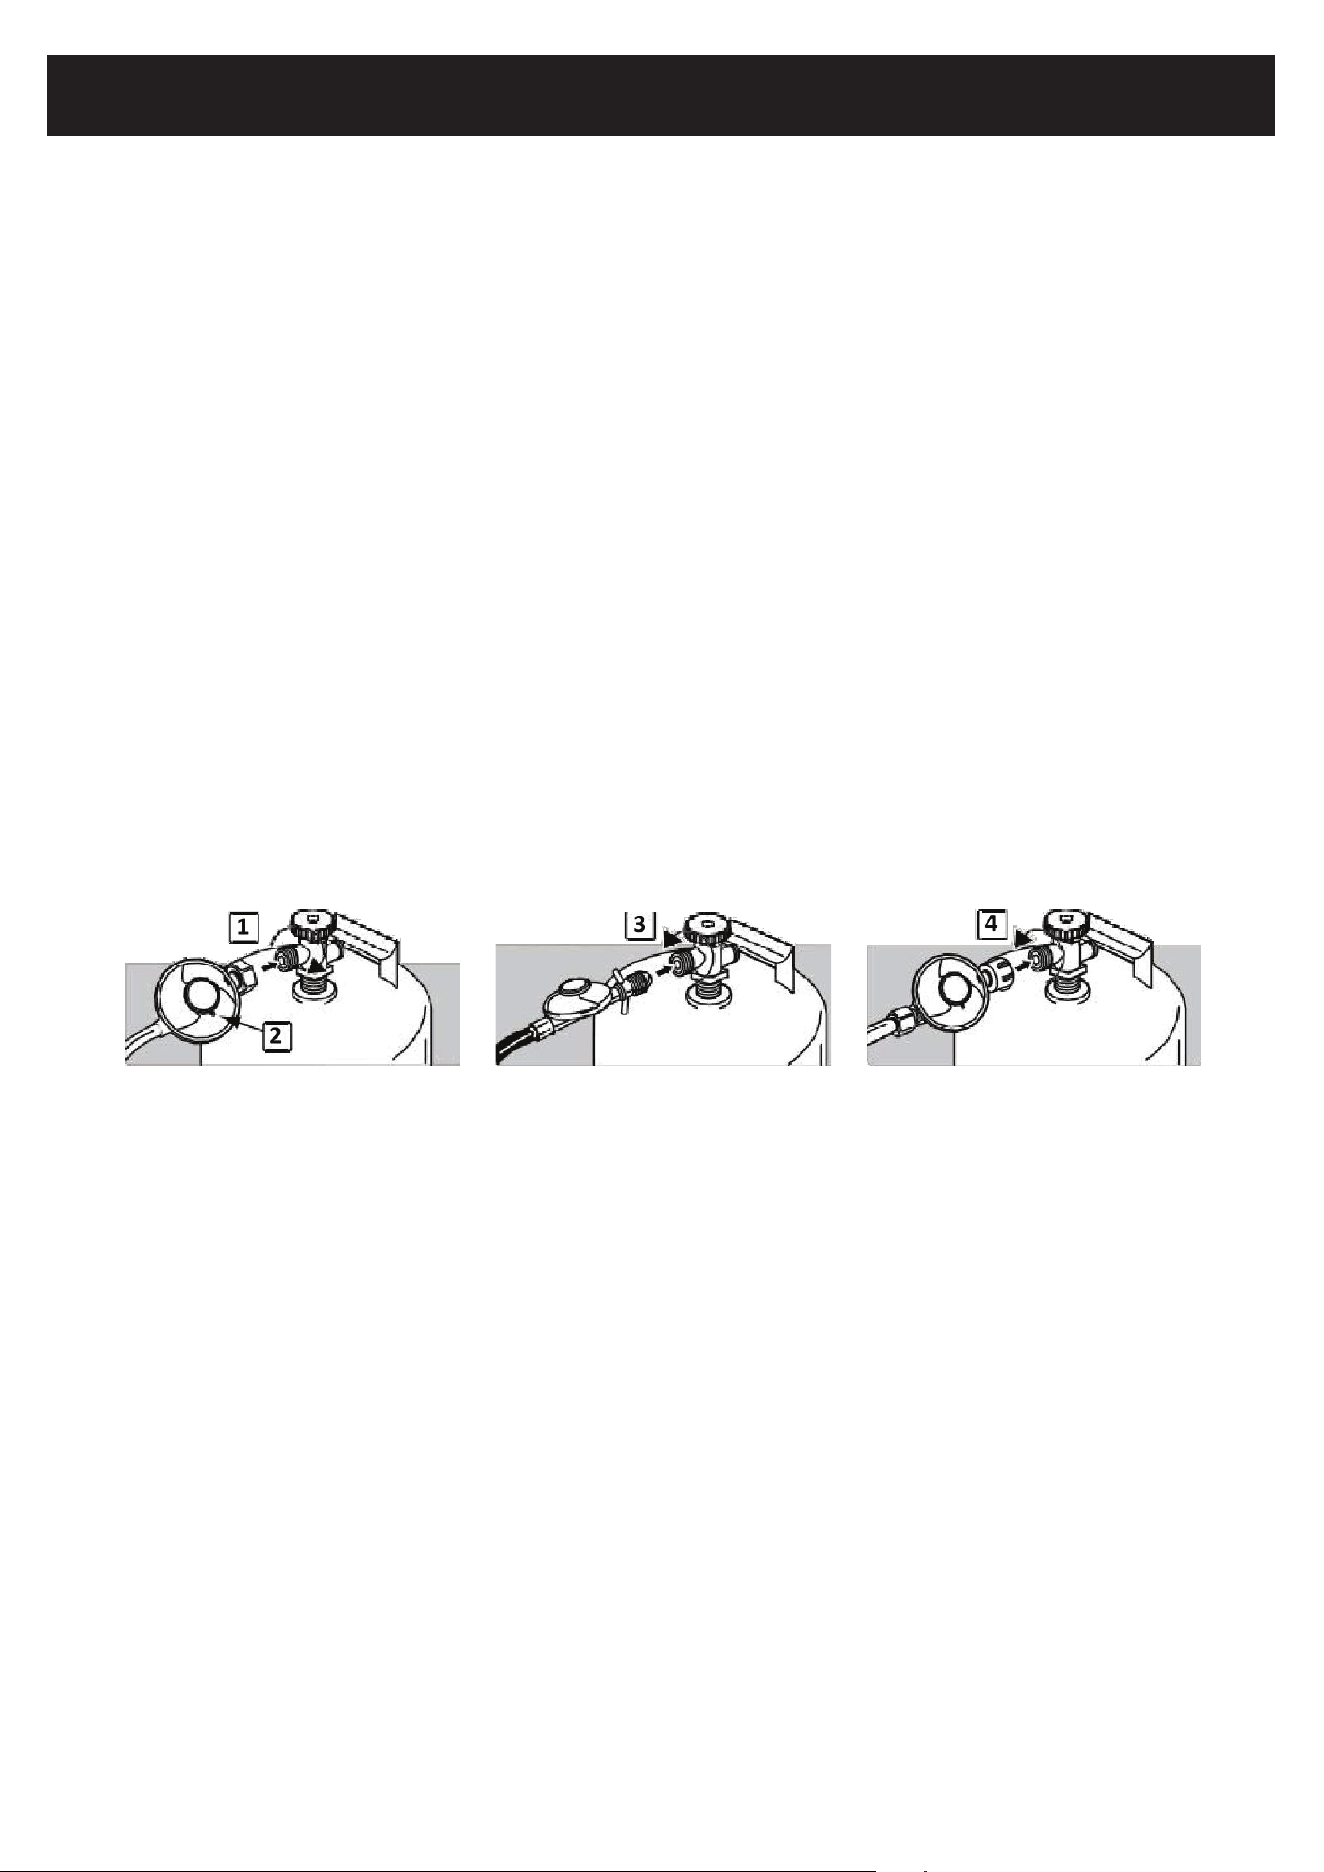
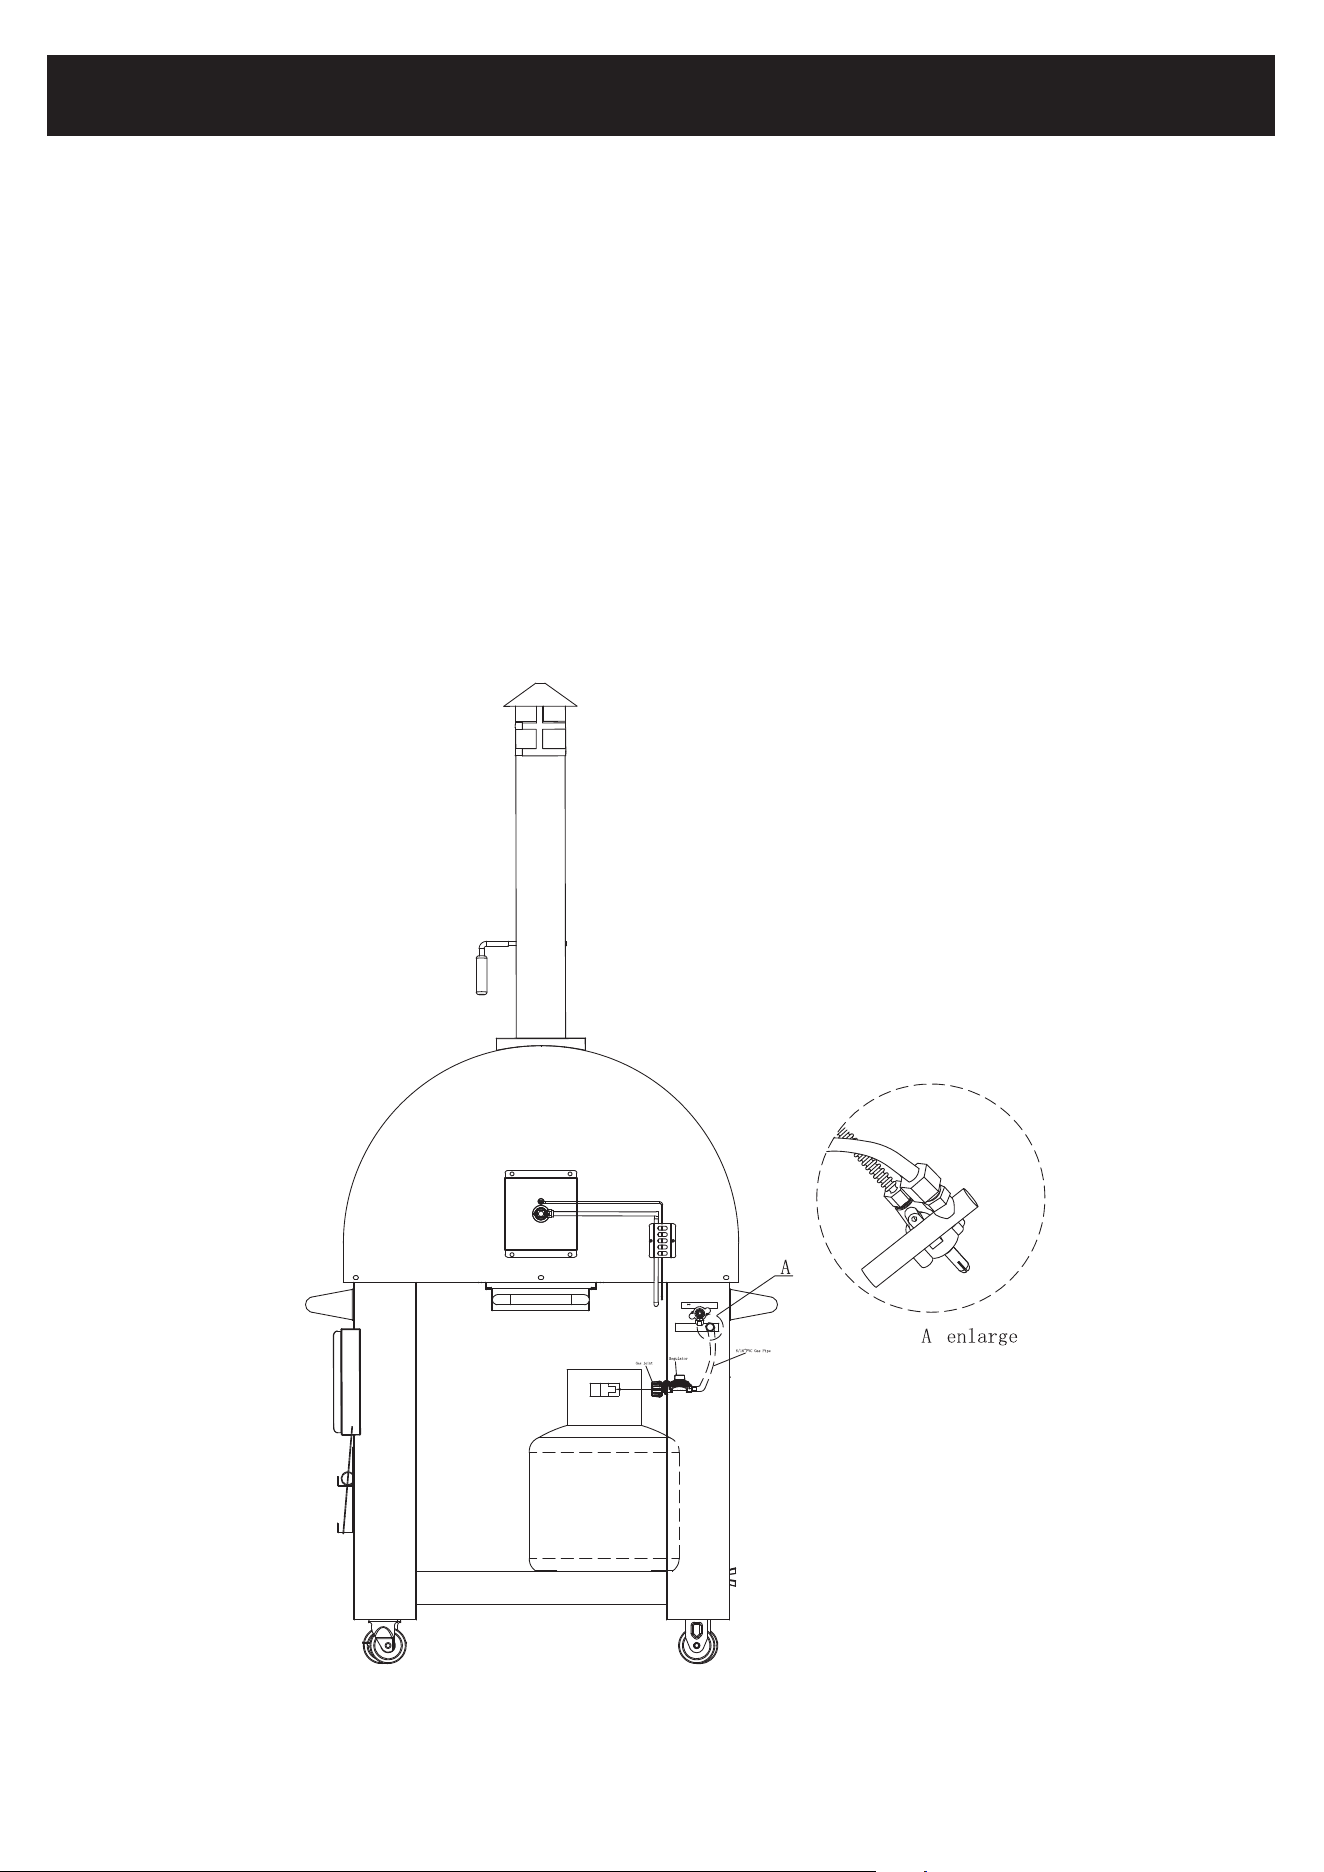
LPG Cylinder Installation
A. Connect the LPG cylinder.
i. Screw the cylinder regulator (NOT included) clockwise (1). Position the regulator so that the vent
hole (2) faces down.
ii. Screw the gas cylinder regulator counterclockwise (3) (4).
B. Place the cylinder on the floor behind the compartment.
C. Place the LPG cylinder so the valve opening faces the rear of the oven.
D. Connect the hosepipe (NOT included) to the junction (a) at the back of the oven. Secure the hosepipe
with the included security straps.
• Use a pressure control adapter (not supplied) with a flow rate of 10kg/h and G30/G31 operation at
28.30/37 mbar, utilize a pipe ND 12mm CE En14800.
• It's recommended to replace the gas hose every 2-3 years.
• Do not twist the flexible gas hose.
• The length of the flexible hose should not exceed 1.5 m / 59 in.
19
TIPS FOR GAS USE
Storage Advice for the Oven
• If the gas-fired oven is not in use, close the gas cylinder feeding valve.
• If the gas-fired oven is stored in an enclosed area, disconnect the gas feeding. The gas cylinder
should be placed outside in a well-ventilated area.
• If the gas cylinder is not disconnected from the oven, place them outside in a well-ventilated area.
• The gas cylinder must be kept away from children's reach and should be placed outside in a well-ven-
tilated place.
• Unused cylinders must NOT be stored in buildings, garages, or other enclosed places.
Important Statements
1. Do not store a spare LP gas cylinder under or near this appliance.
2. Never fill the cylinder beyond 80 percent full.
3. If the instructions are not followed exactly, a fire causing death or serious injury may occur.
Cylinder size:Height:26 in,Width: 12.5 in
20

GAS COOKING
General Cooking Advice
• Always preheat your oven before cooking. Heat for 5-10 minutes or until the thermometer reaches
300-330°C / 572-626°F.
• Consider longer cooking times on cold, windy days or at high altitudes, and shorter times if the
external temperature is particularly hot.
• Cooking time will depend on factors such as weather conditions and the quantities, dimensions, and
shape of the food.
• Depending on cooking conditions, you may need to adjust the burner knob to reach the optimal
cooking temperature.
• Turn off the gas oven and allow it to cool before cleaning.
• Do not clean the oven with traditional oven detergents, abrasive detergents, kitchen detergents, or
detergents containing citrus extracts. Also, avoid using abrasive steel wool.
• Clean the gas burner periodically and remove any food residue. Be careful not to damage the valves
and burners during cleaning.
Advice for Cooking Pizza
1. After lighting the oven, wait about 15 minutes with the burner knob at maximum and the door closed
to reach the ideal temperature for cooking a perfect Neapolitan pizza (which has a higher moisture
content): air temperature of 400°C, and refractory floor temperature of 350°C.
2. Once the optimal temperature is reached, turn the burner to the minimum position and open the
door. The oven will maintain a constant temperature and you can begin inserting the pizzas.
3. Check and remove any residual grease to prevent a grease fire.
4. Do not lean over the open oven while cooking, or place your hands or fingers on the front edge of the oven.
5. If the flames go out during cooking, turn off both the gas knob and the gas cylinder knob. Wait five
minutes before relighting the oven.
6. The oven can reach high temperatures during operation. Do not move it or leave it unattended while it is on.
Troubleshooting
• If the oven cools down too quickly, it might be due to the first startup or starting the oven after a long
period of inactivity. Avoid making a small or fast fire that would not heat the oven to capacity.
Check for water or humidity infiltration and ensure the burner is functioning well, then close the door.
• If the oven does not cook as expected, check that the oven has reached the right temperature. Make
a fire with approximately 10 minutes of high flame and ensure the oven maintains the desired tem-
perature for the duration of the cooking time. Use the door and the flame adjuster to regulate the
heat intensity: open and close the door to raise or lower the temperature as necessary.
21

WOOD USE CAUTION
Getting Started
1. Carefully unpack your Wood-fired Pizza Oven. While it's not too heavy, it's recommended to have two
people lift it out of the box. Ensure to place the Outdoor Oven on the matched cabinet.
2. Remove all the protective film and discard. Assemble the cap/chimney by sliding the ring hardware
around the bottom of the cap, fit the chimney and cap together. Secure it by sliding the ring into
position and tighten with a flat head screwdriver. Slide the chimney pipe onto the top of the Oven.
3. Hint: Season the Outdoor Oven prior to use. Burn two or more times, let the temperature reach
400°C, and allow the fire to die out.
Precautions
• Do Not Overheat Oven: Extreme heat can permanently damage the Outdoor Oven.
Bring the Oven up to temperature slowly. Start with a small fire in the center and once established,
move it to the LEFT side of the oven. Add small amounts of wood until the Oven reaches an even,
high heat. A good temperature for pizza baking is when the Cooking Stone reaches at least 340°C.
• Never Use Chemical Fuel Starters: Only use small kindling and newspaper to help start your fire.
Starting fluids and other fire starters can foul the cooking surface and permanently damage the Oven.
• Never Use Chemical Cleaners: Clean only a cool oven. Use a metal bristle brush or a damp cloth to
clean the Cooking Stone.
The Art and Science of Wood-fired Cooking
Cooking in your Outdoor Oven is much like using the oven in your home. You'll quickly learn how to
regulate the temperature, use different woods for flavor, and be amazed at how good the food tastes.
You can bake delicious pizza and bread, roast meat and vegetables, grill fish and seafood, and create
mouthwatering desserts. The Cooking Stone and Dome of your Outdoor Oven give off radiant heat from
all sides, creating natural convection that bakes everything to perfection, while the fire on the side brings
out a unique crisp and smoky taste.
You can use any variety of oven-safe metal, ceramic, or glass pan to cook in your Oven.
Warning: Keep ovenware away from the flame and don't use in temperatures over 500°F. Always read
and follow ovenware manufacturers' usage instructions.
Choosing Your Wood
Selecting the appropriate wood for your wood-fired oven is crucial for optimal cooking and flavor.
Use only dry hardwoods like oak and hickory. Refrain from using resinous woods like pine or spruce, and
never use treated lumber.
Hint: If the wood produces a lot of black smoke, it is generally an indication you are using the wrong
type of wood.
The type of wood used significantly influences and enhances the taste of your food. Here are some
common hardwoods used in outdoor cooking and the flavors they impart:
1. Apple: Apple wood imparts a milder and sweeter flavor than hickory, making it good for all meats.
2. Cherry: Cherry wood produces slightly sweet, fruity smoke that's great with just about everything. It
pairs well with all meats.
3. Hickory: One of the most common hardwoods, hickory lends a sweet to strong, heavy bacon flavor.
It's suitable for all smoking, particularly pork and ribs.
4. Mesquite: Mesquite is sweeter and more delicate than hickory, making it a perfect complement to
richly flavored meats such as steak, duck, or lamb. However, be careful as it can overpower the taste
if used excessively.
5. Oak: A favorite in Europe, oak imparts a mild smoke flavor with no aftertaste and gives food a beau-
tiful smoked color. It pairs well with red meat, pork, fish, and big game.
6. Pecan: Pecan wood offers a sweet and mild flavor similar to hickory but not as strong. It's good for
cooking chicken, beef, pork, and turkey.
Experiment with different woods to discover which flavors you prefer. But remember, regardless of the
type of wood you choose, ensure that it's thoroughly dried and untreated for the best results.
22

23
WOOD COOKING
Firing Up Your Oven
Your outdoor oven can bring you years of joy and countless mouthwatering dishes once you've
mastered the art of building and maintaining a fire that results in an evenly heated cooking stone.
Hint: Consider investing in a laser thermometer to get accurate temperature readings inside your oven.
1. Starting the Fire: Begin this process around an hour prior to cooking. Split wood into small pieces,
approximately 10" long and 1/2" thick. Using kindling and newspaper, start a fire within the stainless
steel wood caddy in the center of the cooking stone. Continue to add two or three larger pieces until
the fire is well established. Then, move the wood caddy and the fire to the left side of the oven using
the ash sweep.
Hint: You don't need much wood to bring the oven up to 698°F.
2. Stabilizing the Fire: Close the oven door but leave it vented enough to maintain the flame, adding
more wood as needed. The flame should reach the dome's top and curve around to the other
side—this is normal. Just ensure the flames don't exit the oven's opening. The goal is to have the
cooking stone and dome absorb the heat.
3. Ready to Cook: Once the cooking stone reaches between 644°F and 725°F, you're ready to start cooking.
▪ High-Temperature Cooking (644°F - 725°F): This is the perfect range for cooking pizza, which typically
takes less than three minutes on the cooking stone. Remember to rotate the pizza for even cooking.
Hint: A good trick to check if your pizza crust is fully cooked is to lift the pizza (while it's cooking).
If the pizza folds over the sides of the peel, the crust isn't fully cooked.
▪ Medium-Temperature Cooking (446°F - 599°F): This temperature range is suitable for roasting
meats, vegetables, fish, and seafood. Depending on the dish, you might need to cover it initially to
allow it to cook thoroughly before removing the cover for browning.
▪ Grilling: To grill, move the embers to the front-middle of the cooking stone, and place a freestand-
ing grill grate over them. A cast-iron grill grate with legs works best. Now cook your steak, vegeta-
bles, fish, and seafood the way you normally would when using a gas or charcoal grill.
▪ Low-Temperature Cooking (320°F - 419°F): This range is ideal for baking breads, pies, and
desserts. This is generally easier to do after all your other cooking is complete, and by removing
all the embers from the oven. Remember, the oven will need to be preheated sufficiently to retain
enough heat for cooking without a fire. Ensure the cooking stone is at least 500°F for about 15
minutes before removing all the embers.

24
TROUBLESHOOTING
Issue: Burner Will Not Light
• Is the 22 lbs (10 kg) gas fuel tank valve turned off?
◦ Turn the 22 lbs gas fuel tank on.
• Is the Burner properly connected to the gas supply?
◦ Contact a trained repair specialist or see Installation Instructions.
• Is there gas in the 22 lbs gas fuel tank?
◦ Check the gas level.
• Is the igniter working?
◦ Check that the igniter battery is properly installed or check to
see if the battery needs to be replaced. See the "Replacing
the Igniter Battery" section.
◦ Check to see if the Burner will match-light. See "Manually
Lighting the Main Burner" in the "Outdoor Burner Use"
section.
◦ Check for loose wire connections to the igniter or electrodes.
◦ Check to see if debris is blocking the electrodes.
◦ If a spark occurs anywhere but the igniter tip, replace the igniter.
Issue: Burner Flame Will Not Stay Lit
• Is the gas supply fully turned on?
◦ Check that the 22 lbs gas fuel tank valve is fully open.
• Is the gas supply in the 22 lbs fuel gas tank low?
◦ Check the gas level.
• Is the burner properly installed and in good condition?
◦ Check that the burner is installed properly. Check for
defects in the burner.
Issue: Flame Is Noisy, Low, or Erratic
• Is the gas supply fully turned on?
◦ Check that the 22 lbs gas fuel tank valve is fully open.
• Is the gas supply in the 22 lbs fuel gas tank low?
◦ Check the gas level.
• Does only one burner appear low?
◦ Check and clean the burner ports if clogged or dirty.
• Is the gas supply hose bent or kinked?
◦ Straighten the gas supply hose.
• Is the flame noisy or lifting away from the burner?
◦ Burner may be getting too much air. Check the air
shutter adjustment.
• Is the burner flame mostly yellow or orange?
◦ Burner may be in an area that is too windy, or not
receiving enough air. Check the burner air inlets for
obstructions. Check the air shutter adjustment.
Issue: Excessive Flare-Ups
• Is there excessive fat in the food being grilled?
◦ Keep flame on low or turn one burner off.
◦ Keep the hood up when grilling to avoid excessive
flare-ups.
◦ Move food to the warming rack until flames subside.
◦ To avoid damage to the Burner, do not spray water on
gas flames.
Issue: Low Heat (LP Gas)
• For outdoor grills using a 22 lbs gas fuel tank, slowly
open the tank valve. Note: If the flow limiting device
activates, your Burner may not light. If your Burner
does light, the flames will be low and will not heat
properly.
1.Turn the tank valve and all control knobs off and wait 30
seconds.
2.After shutting off the tank, very slowly open the tank
valve and wait 5 seconds before lighting.
3.Light the burners one at a time. See "Lighting the Main
Burner" section.
Maintenance Frequency:
Depending on the frequency of use and habits, before using
this product, you must first check whether there are cracks
in the air pipe, whether the ignition needle and the ignition
needle thread are damaged. The normal maintenance cycle
should be once a week.

25
Once the Outdoor Oven is cold, use the 11.5" Square Peel and the Ash Sweep to brush the Cooking
Stone to remove all ash and debris. Never extinguish the fire with water. Never use chemical cleaners. If
you wish to clean the surface of your Cooking Stone, a damp cloth works best.
Cleaning Individual Parts
1. Thermometer: Clean with warm water, soap, and a soft cloth.
2. Oven: Remove any residual food from the burner with a brush. Do not enlarge burner orifices.
3. Stainless Steel Surfaces: Wash with a soft cloth and soapy water. Pay attention to follow the grain of
the stainless steel. Do not use detergents with acids, turpentine, or xylene. Rinse well after cleaning.
Maintaining the Stainless Steel
Making the steel shine is straightforward. Just wash it with water and soap, rinse with water, and dry properly.
In case of resistant residues, you can use a nonmetal brush.
Cold Season Storage
We suggest storing the oven during the cold season in an enclosed, dry area to protect it from weather-
ing. Before storage, lightly lubricate the metal parts with Vaseline oil to avoid corrosion. After storage,
please check for any malfunction.
Close the oven door to get the oven really hot.
Vent it enough to keep the flame burning.
Add wood as needed.
Once the Cooking Stone reaches 644°F or
higher, you are ready to start cooking entrees,
desserts, and pizzas.
(Do not overheat the oven.)
Start a match-lit fire in the stainless steel
wood caddy. Once the fire is well established,
push fire to the left side with Ash Sweep.
CLEANING THE OVEN

LIMITED WARRANTY
Koolmore Supply, Inc. extends a limited warranty to the original purchaser, guaranteeing that this Koolmore
product is free from manufacturing defects in material or workmanship for one year from the date of
purchase.
Should you discover any such defect within the warranty period, Koolmore Supply, Inc., reserves the right to
repair or replace the product without charge, or to cover the cost of replacement parts and repair labor needed
to correct defects present at the time of purchase or resulting from regular usage, when the appliance has been
installed, operated, and maintained as per the instructions provided.
At its sole discretion, Koolmore Supply Inc. may decide to replace the product. In such an event, your replace-
ment appliance will carry the warranty for the remaining term of the original unit's warranty period.
This warranty is valid exclusively to the original purchaser of the product and only applicable within the United
States. The warranty commences from the date of original consumer purchase. Proof of the original purchase
date will be required to obtain service under this warranty.
Under this limited warranty, your sole and exclusive remedy will be product repair, as outlined above. All
services must be provided by a Koolmore-designated service company.
To claim warranty or request repair service:
Email suppor[email protected]. Please include your name, address, phone number, warranty repair request,
and a copy of your proof of purchase receipt. Alternatively, visit koolmore.com and use the contact us page. A
Koolmore customer service representative will promptly arrange service for your appliance.
We thank you for choosing Koolmore.
WARRANTY EXCLUSIONS
This limited warranty will not cover:
1. Failure of the product to perform during power failures or interruptions,
or due to inadequate electrical service.
2. Damage incurred during transportation or handling.
3. Damage caused by accidents, vermin, lightning, winds, fire, floods, or acts of God.
4. Damage resulting from accidents, alterations, misuse, abuse, improper installation, repair, or mainte-
nance. This includes using any external device that alters or converts the voltage or frequency of
electricity.
5. Unauthorized product modifications, repairs by unauthorized centers, or use of non-approved
replacement parts.
6. Abnormal cleaning and maintenance not aligned with the user's manual.
7. Use of incompatible accessories or components.
8. Any costs associated with repairs or replacements under these excluded circumstances shall be the
responsibility of the consumer.
WARRANTY
26