Customer Service Hotline: +1 844 200 7117 (U.S.)
Working hours: 9:00 a.m.
‒
6:00 p.m. (GMT+1), Monday to Friday
Official Website: https://engwe-bikes.com/
If you have any questions or suggestions regarding this user manual, please contact us at:
Email: service@engwe-bikes.com
Assembly videoAPP Download
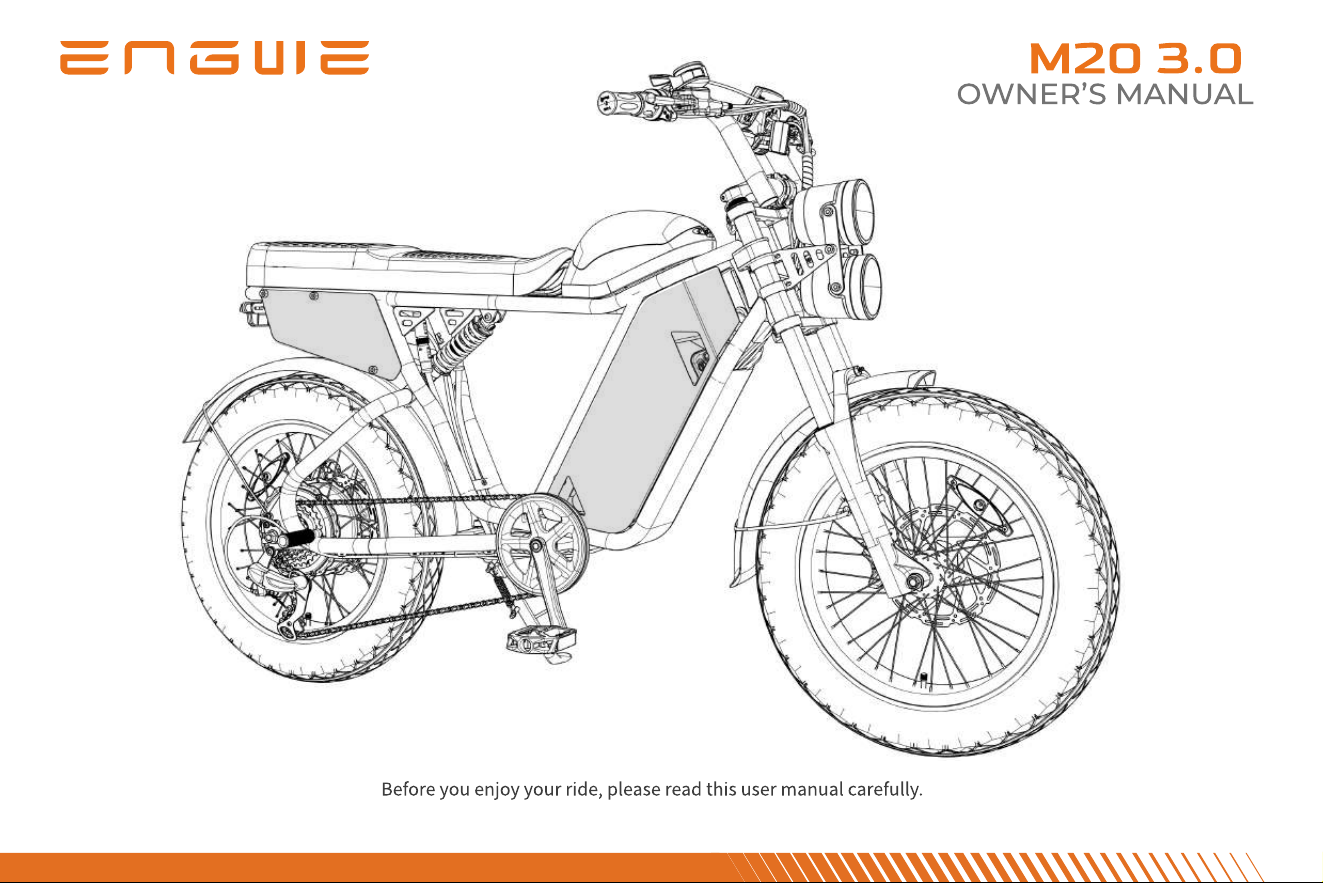
Before you enjoy your ride, please read this user manual carefully.
M20 3.0
1. This d evice c omplies w ith Part 15 o f t he FCC Rules. Operation is s ubject t o t he f ollowing t wo c onditions:
(1) This d evice may n ot c ause h armful interference, a nd
(2) This d evice must a ccept a ny interference r eceived, including interference t hat may c ause u ndesired o peration.
2. Changes o r modifications n ot expressly a pproved b y t he party r esponsible f or c ompliance c ould v oid t he u ser's a uthority to
o perate t he equipment.
NOTE: This equipment h as been tested a nd f ound t o c omply w ith t he l imits f or a Class B d igital d evice, pursuant t o Part 15 o f
t he FCC Rules. These l imits a re d esigned t o provide r easonable protection a gainst h armful interference in a r esidential
installation.
This equipment g enerates u ses a nd c an r adiate r adio f requency energy a nd, if n ot installed a nd u sed in a ccordance w ith t he
instructions, may c ause h armful interference to r adio c ommunications. However, t here is n o g uarantee t hat interference w ill n ot
o ccur in a particular installation. If t his equipment d oes c ause h armful interference to r adio o r t elevision r eception, w hich c an
be d etermined by t urning t he equipment o ff a nd o n, t he u ser is encouraged t o t ry t o c orrect t he interference by o ne o r more
o f t he f ollowing measures:
Reorient o r r elocate t he r eceiving a ntenna.
Increase t he s eparation between t he equipment and r eceiver.
Connect t he equipment into an o utlet o n a c ircuit d ifferent f rom t hat t o w hich t he r eceiver is c onnected.
Consult t he d ealer o r a n experienced r adio/TV t echnician f or h elp.
FCC Radiation Exposure Statement
This equipment c omplies w ith FCC r adiation exposure l imits set f orth f or a n u ncontrolled environment. This equipment s hould
be installed a nd o perated w ith minimum d istance 20cm between t he r adiator & your body
FCC STATEMENT
FCC STATEMENT
FCC STATEMENT
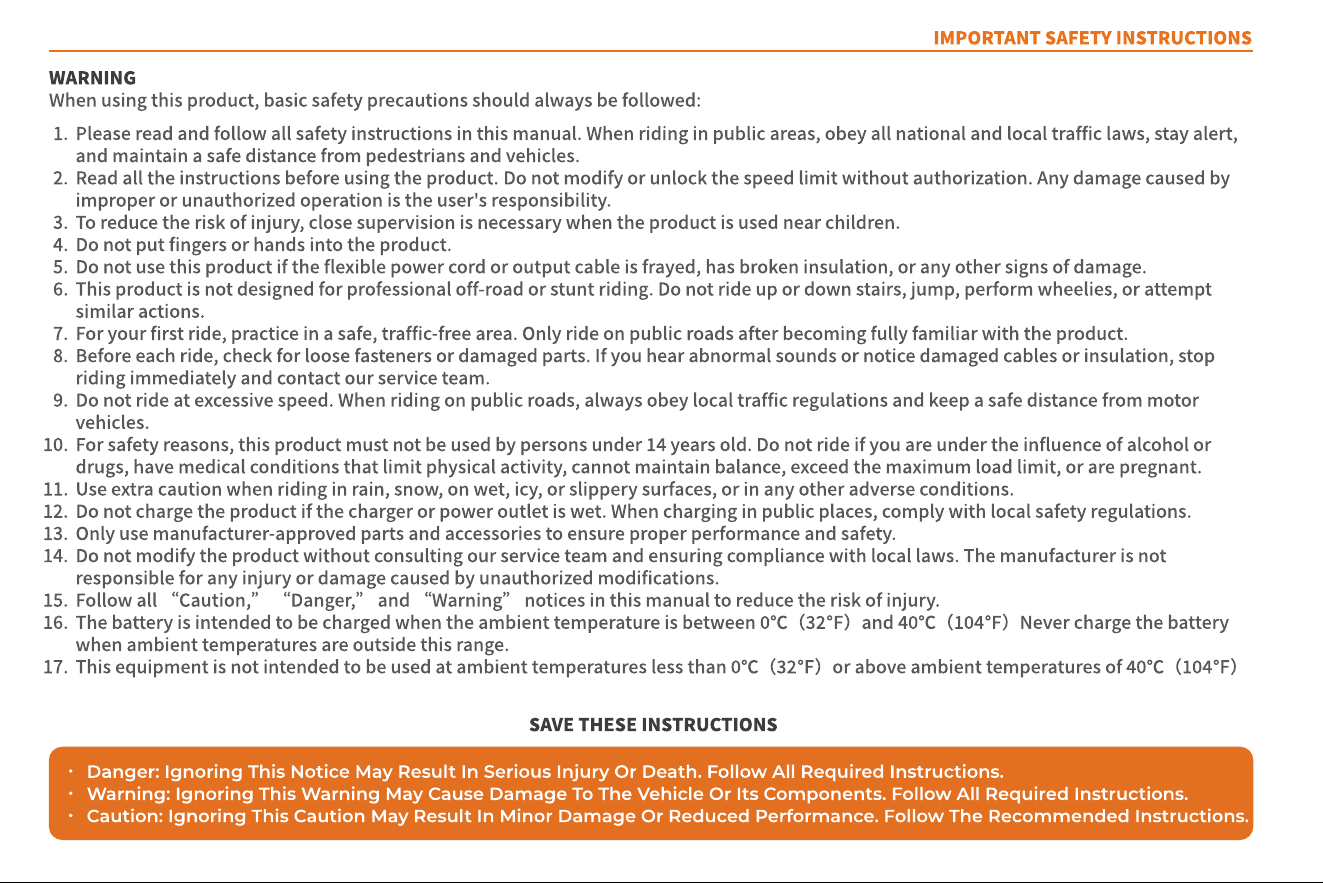
IMPORTANT SAFETY INSTRUCTIONS
DANGER: Ignoring t his n otice may r esult in serious injury o r d eath. Follow a ll r equired instructions.
W ARNING: Ignoring t his w arning may c ause d amage t o t he vehicle o r its c omponents. Follow a ll r equired instructions.
CAUTION: Ignoring t his c aution may r esult in minor d amage o r r educed performance. Follow t he r ecommended instructions.
Please read and follow all safety instructions in this manual. When riding in public areas, obey all national and local traffic laws, stay alert,
and maintain a safe distance from pedestrians and vehicles.
Read all the instructions before using the product.Do not modify or unlock the speed limit without authorization. Any damage caused by
improper or unauthorized operation is the user's responsibility.
To reduce the risk of injury, close supervision is necessary when the product is used near children.
Do not put fingers or hands into the product.
Do not use this product if the flexible power cord or output cable is frayed, has broken insulation, or any other signs of damage.
This product is not designed for professional off-road or stunt riding. Do not ride up or down stairs, jump, perform wheelies, or attempt
similar actions.
For your first ride, practice in a safe, traffic-free area. Only ride on public roads after becoming fully familiar with the product.
Before each ride, check for loose fasteners or damaged parts. If you hear abnormal sounds or notice damaged cables or insulation, stop
riding immediately and contact our service team.
Do not ride at excessive speed. When riding on public roads, always obey local traffic regulations and keep a safe distance from motor
vehicles.
For safety reasons, this product must not be used by persons under 14 years old. Do not ride if you are under the influence of alcohol or
drugs, have medical conditions that limit physical activity, cannot maintain balance, exceed the maximum load limit, or are pregnant.
Use extra caution when riding in rain, snow, on wet, icy, or slippery surfaces, or in any other adverse conditions.
Do not charge the product if the charger or power outlet is wet. When charging in public places, comply with local safety regulations.
Only use manufacturer-approved parts and accessories to ensure proper performance and safety.
Do not modify the product without consulting our service team and ensuring compliance with local laws. The manufacturer is not
responsible for any injury or damage caused by unauthorized modifications.
Follow all
“
Caution,
”
“
Danger,
”
and
“
Warning
”
notices in this manual to reduce the risk of injury.
The battery is intended to be charged when the ambient temperature is between 0
℃
(
32
℉
)
and 40
℃
(
104
℉
)
Never charge the battery
when ambient temperatures are outside this range.
This equipment is not intended to be used at ambient temperatures less than 0
℃
(
32
℉
)
or above ambient temperatures of 40
℃
(
104
℉
)
SAVE THESE INSTRUCTIONS
WARNING
When using this product, basic safety precautions should always be followed:

CONTENTS
4. Service g uide3. USER MAINTENANCE
INSTRUCTIONS
4.1 After-sales service
and warranty coverage
4.2 Warranty card and r epair
r ecord
4.3 Product parameters
3.1 Notes f or o peration
3.2 Maintenance and
self-inspection
3.3 Troubleshooting
2.1 INSTALLATION INSTRUCTIONS
2.2 BATTERY REMOVAL &
INSTALLATION
2.3 How t o c harge
2.4 Quick Operating Instructions
1.1 Packing l ist
1.2 Components
1.3 Functions
1.4 Display Functions
QUICK GUIDE
1.Product Introduction
Assembly videoAPP Download
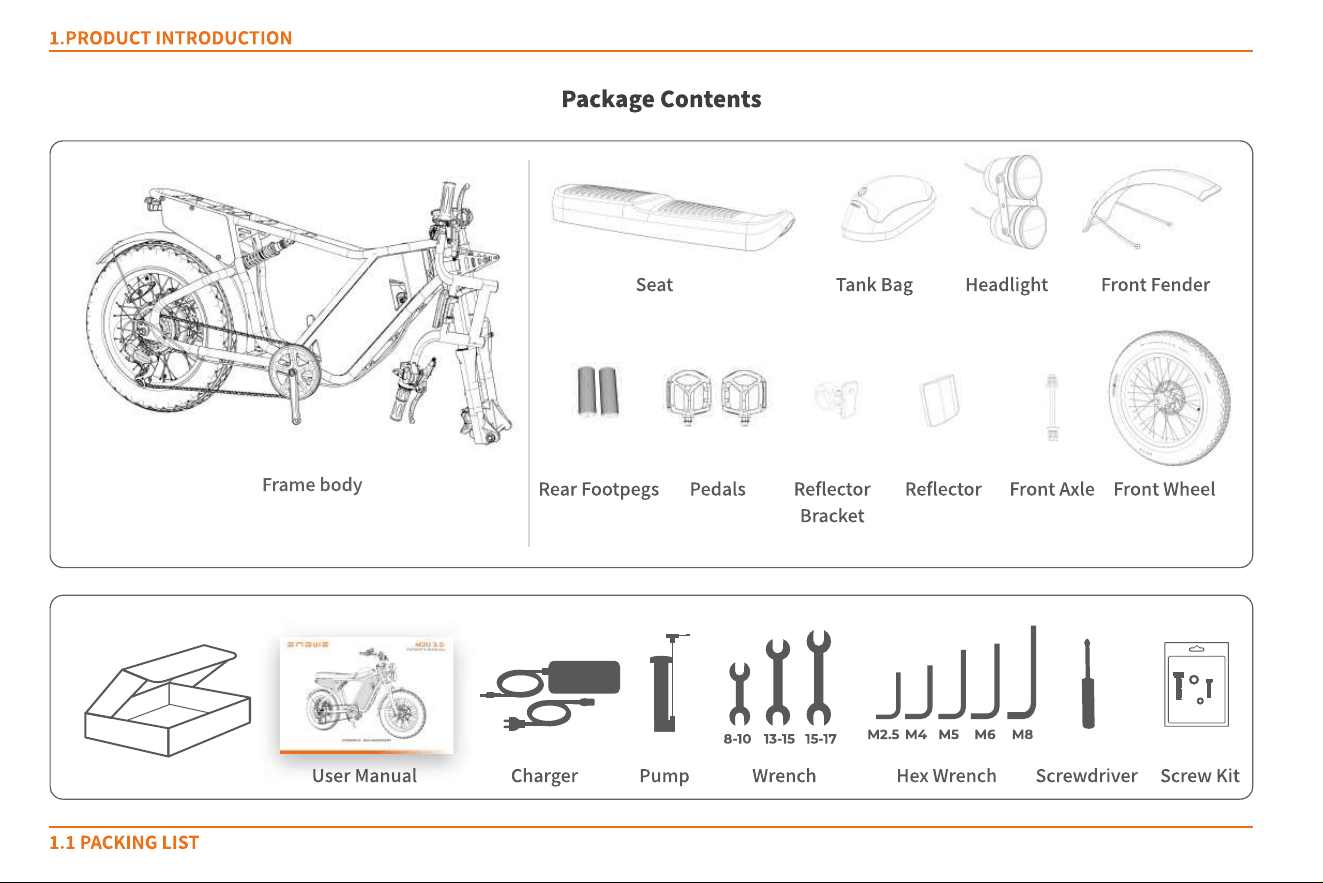
1.1 Pac king l ist
1.Pr o duct Int r o du ct io n
Tank BagSeat Headlight
User Manual Hex Wrench
M4M2.5 M5 M6 M8
Pedals Reflector
Bracket
Reflector Front Axle
Frame body
Front Fender
Front Wheel
Screw KitScrewdriverWrench
8-10 13-15 15-17
Charger Pump
Package Contents
Rear Footpegs
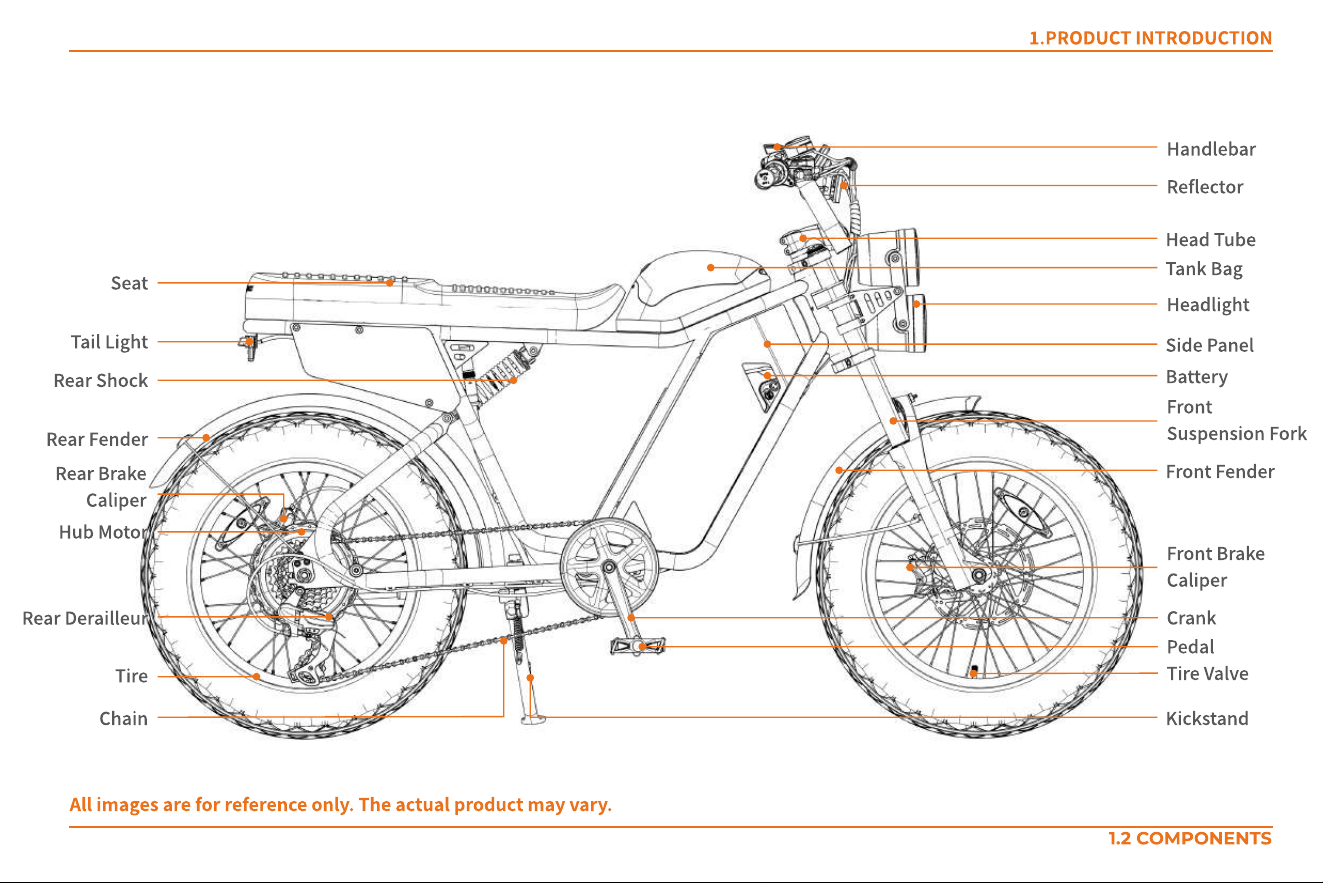
1.Pr o duct Int r o du ct io n
1.2 Co mpo n en t s
Headlight
Front
Suspension Fork
Front Fender
Battery
Side Panel
Tank Bag
Handlebar
Reflector
Head Tube
Tire Valve
Front Brake
Caliper
Kickstand
Pedal
Crank
Seat
Rear Fender
Hub Motor
Tire
Chain
Rear Brake
Caliper
Tail Light
Rear Derailleur
Rear Shock
All images are for reference only. The actual product may vary.
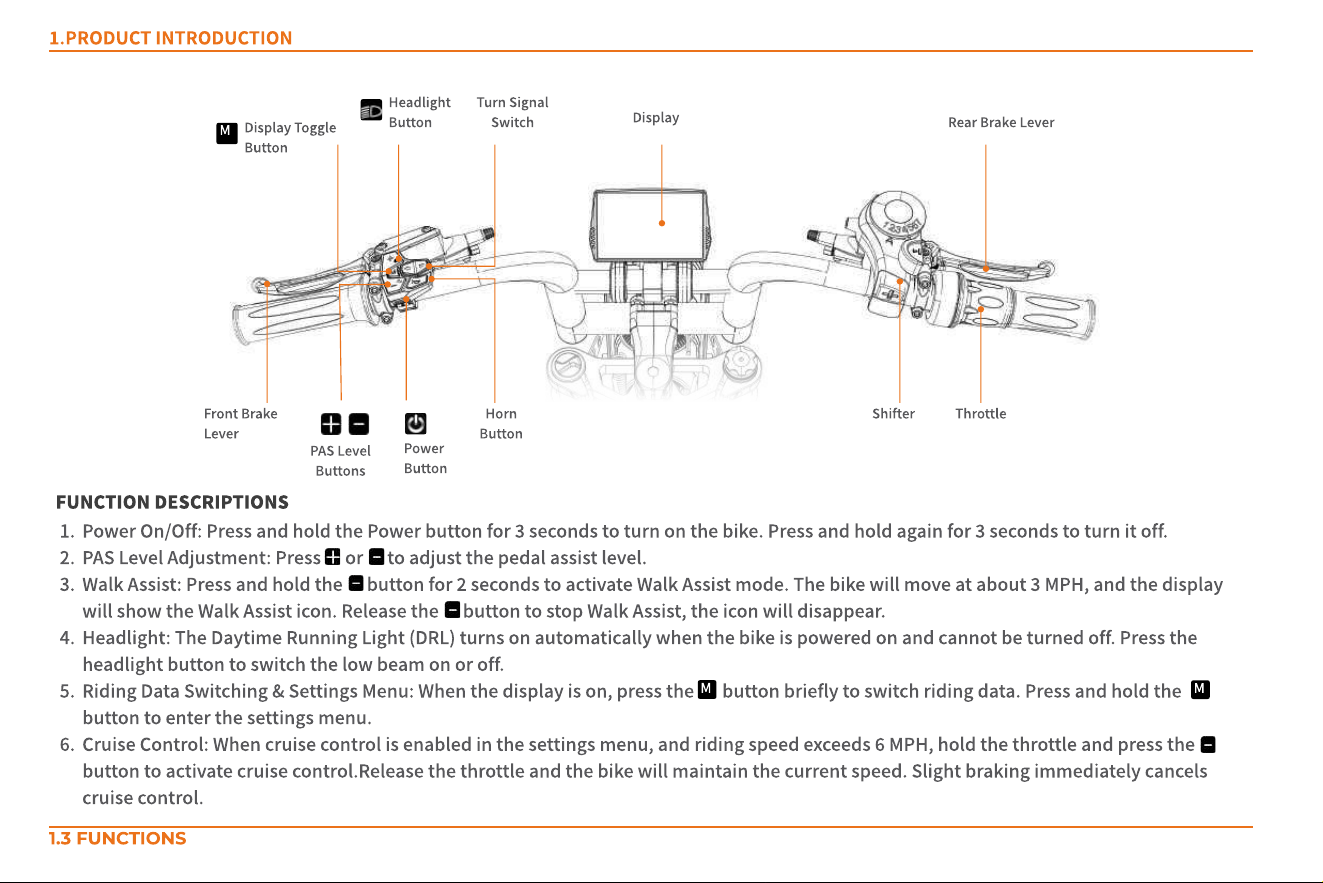
Power On/Off: Press and hold the Power button for 3 seconds to turn on the bike. Press and hold again for 3 seconds to turn it off.
PAS Level Adjustment: Press or to adjust the pedal assist level.
Walk Assist: Press and hold the button for 2 seconds to activate Walk Assist mode. The bike will move at about 3 MPH, and the display
will show the Walk Assist icon. Release the button to stop Walk Assist, the icon will disappear.
Headlight: The Daytime Running Light (DRL) turns on automatically when the bike is powered on and cannot be turned off. Press the
headlight button to switch the low beam on or off.
Riding Data Switching & Settings Menu: When the display is on, press the button briefly to switch riding data. Press and hold the
button to enter the settings menu.
Cruise Control: When cruise control is enabled in the settings menu, and riding speed exceeds 6 MPH, hold the throttle and press the
button to activate cruise control.Release the throttle and the bike will maintain the current speed. Slight braking immediately cancels
cruise control.
1.Pr o duct Int r o du ct io n
1.3 Fu n c t io n s
Front Brake
Lever
Rear Brake Lever
Shifter ThrottleHorn
Button
PAS Level
Buttons
Turn Signal
Switch
Display
Display Toggle
Button
Power
Button
Headlight
Button
M
M
M
Fu n ct io n Des c r ipt io ns
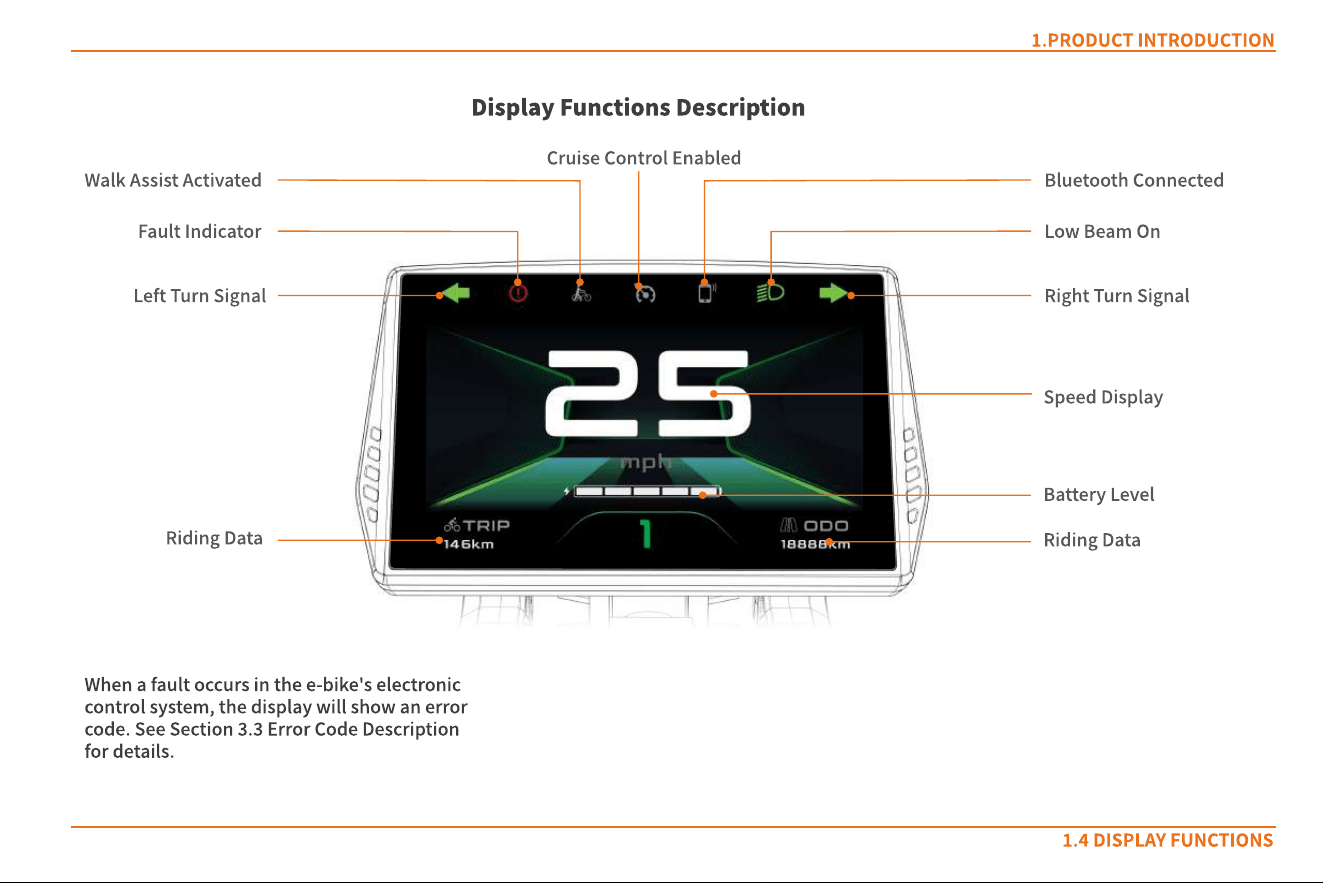
1.Pr o duct Int r o du ct io n
1.4 Dis pl ay Funct ions
Low Beam On
Left t urn signal Right t urn signal
Fault indicator
Speed display
Walk Assist Activated
Cruise Control Enabled
Bluetooth Connected
Riding data
Battery l evel
Riding data
Display Functions Description
When a fault occurs in the e-bike's electronic
control system, the display will show an error
code. See Section 3.3 Error Code Description
for details.
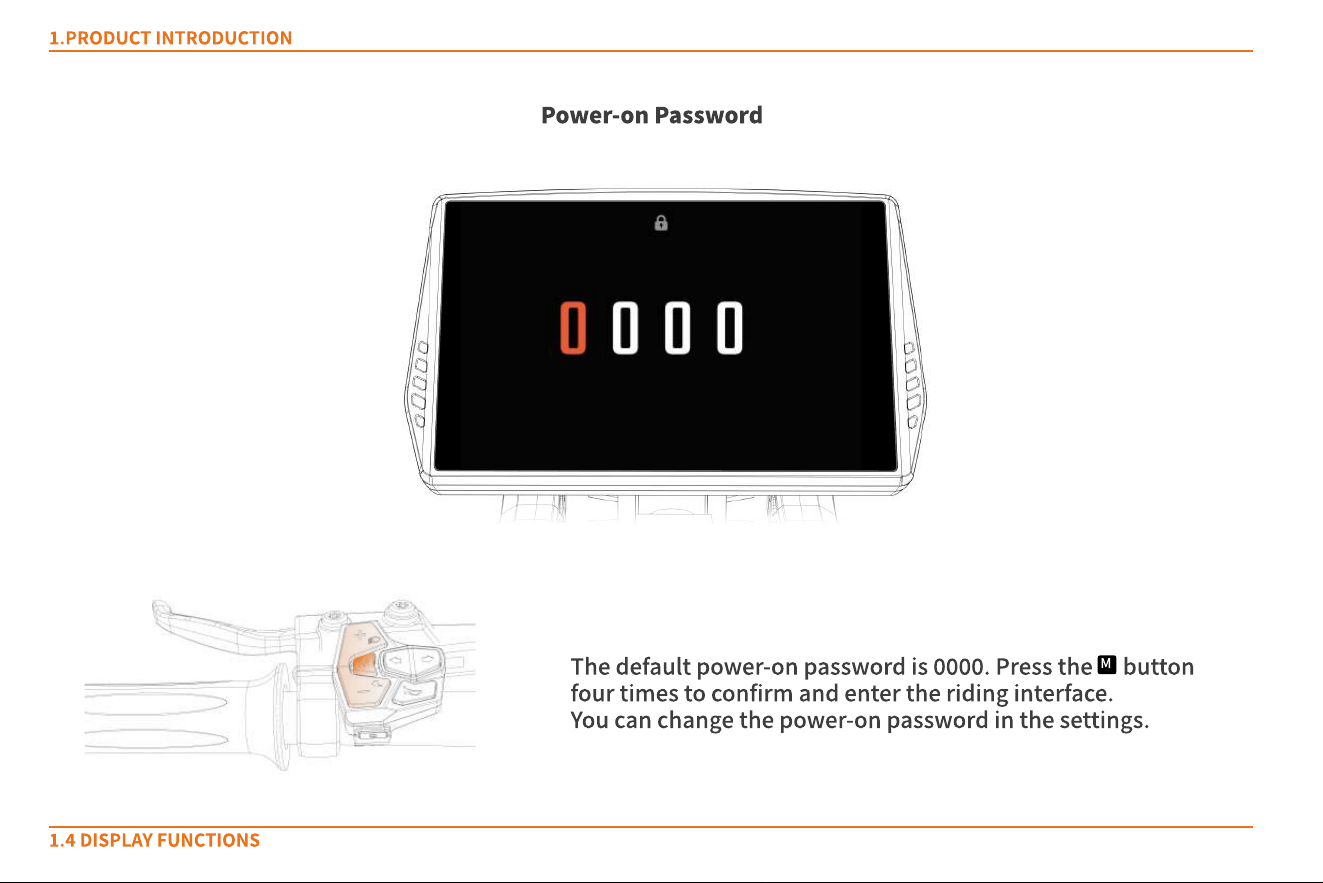
1.Pr o duct Int r o du ct io n
1.4 Dis pl ay Funct ions
power-on password
The default power-on password is 0000. Press the button
four times to confirm and enter the riding interface.
You can change the power-on password in the settings.
M
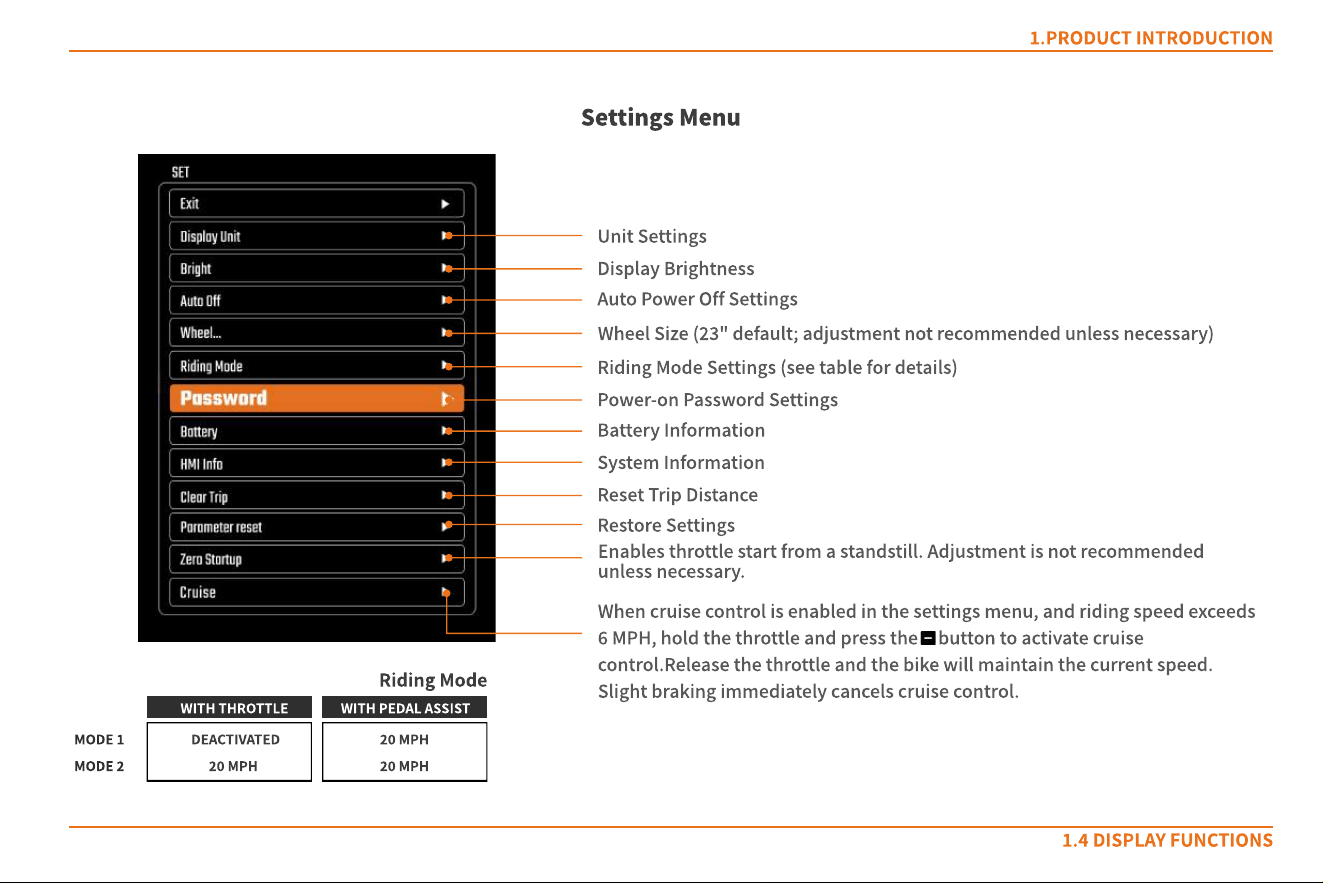
1.Pr o duct Int r o du ct io n
1.4 Dis pl ay Funct ions
Unit Settings
Display Brightness
Auto Power Off Settings
Wheel Size (23" default; adjustment not recommended unless necessary)
Riding Mode Settings (see table for details)
Power-on Password Settings
Reset t rip distance
Restore Settings
Enables throttle start from a standstill. Adjustment is not recommended
unless necessary.
System Information
Battery Information
mo de 1
mo de 2
20 MPHdeact ivat ed
20 MPH20 MPH
Riding Mode
WITH THROTTLE WITH pedal ass iSt
When cruise control is enabled in the settings menu, and riding speed exceeds
6 MPH, hold the throttle and press the button to activate cruise
control.Release the throttle and the bike will maintain the current speed.
Slight braking immediately cancels cruise control.
Settings Menu
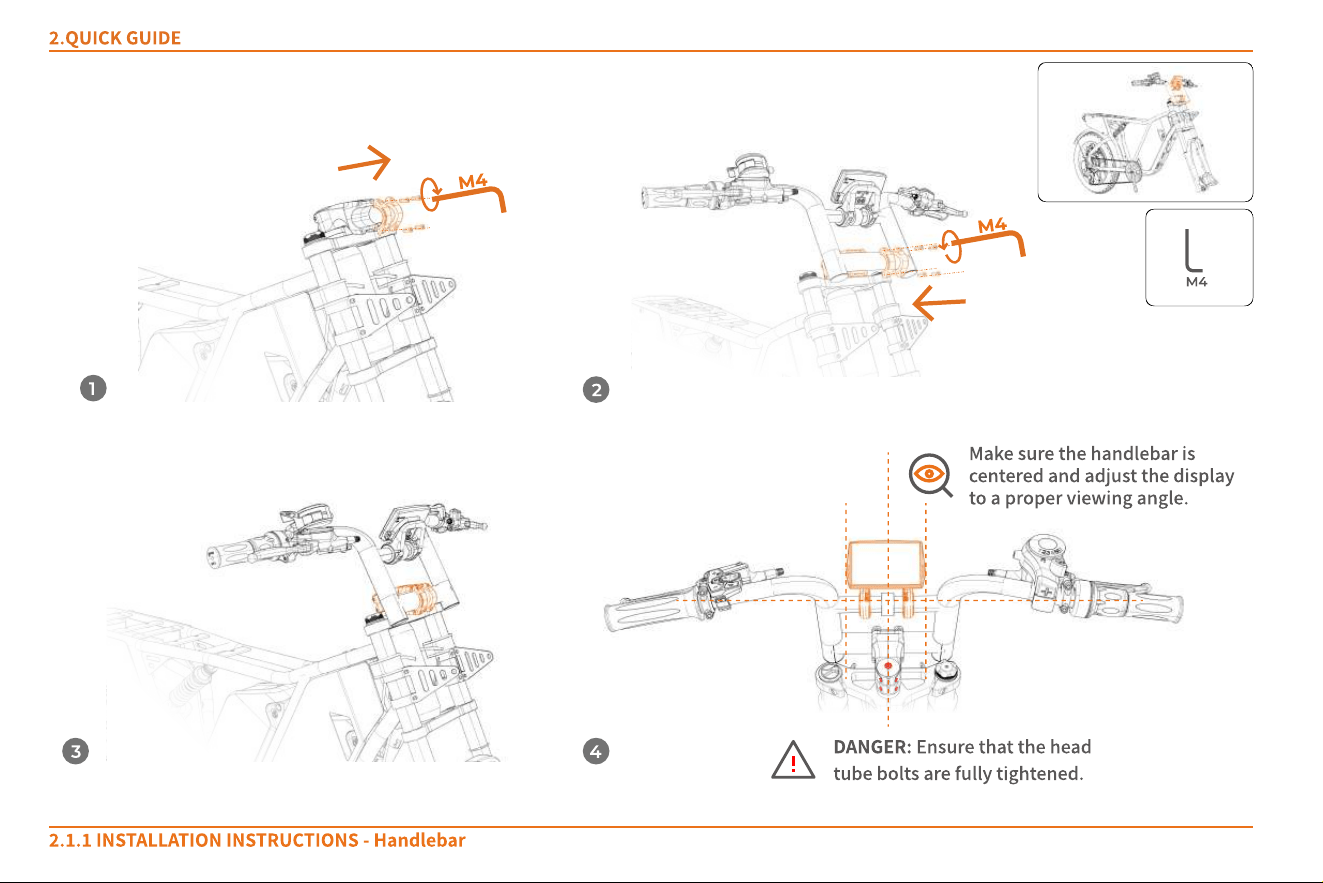
2.1.1 INSTALLATION INSTRUCTIONS - Handlebar
2.QUICK GUIDE
1
2
3 4
M4
Make sure the handlebar is
centered and adjust the display
to a proper viewing angle.
M
4
M
4
DANGER: Ensure that the head
tube bolts are fully tightened.
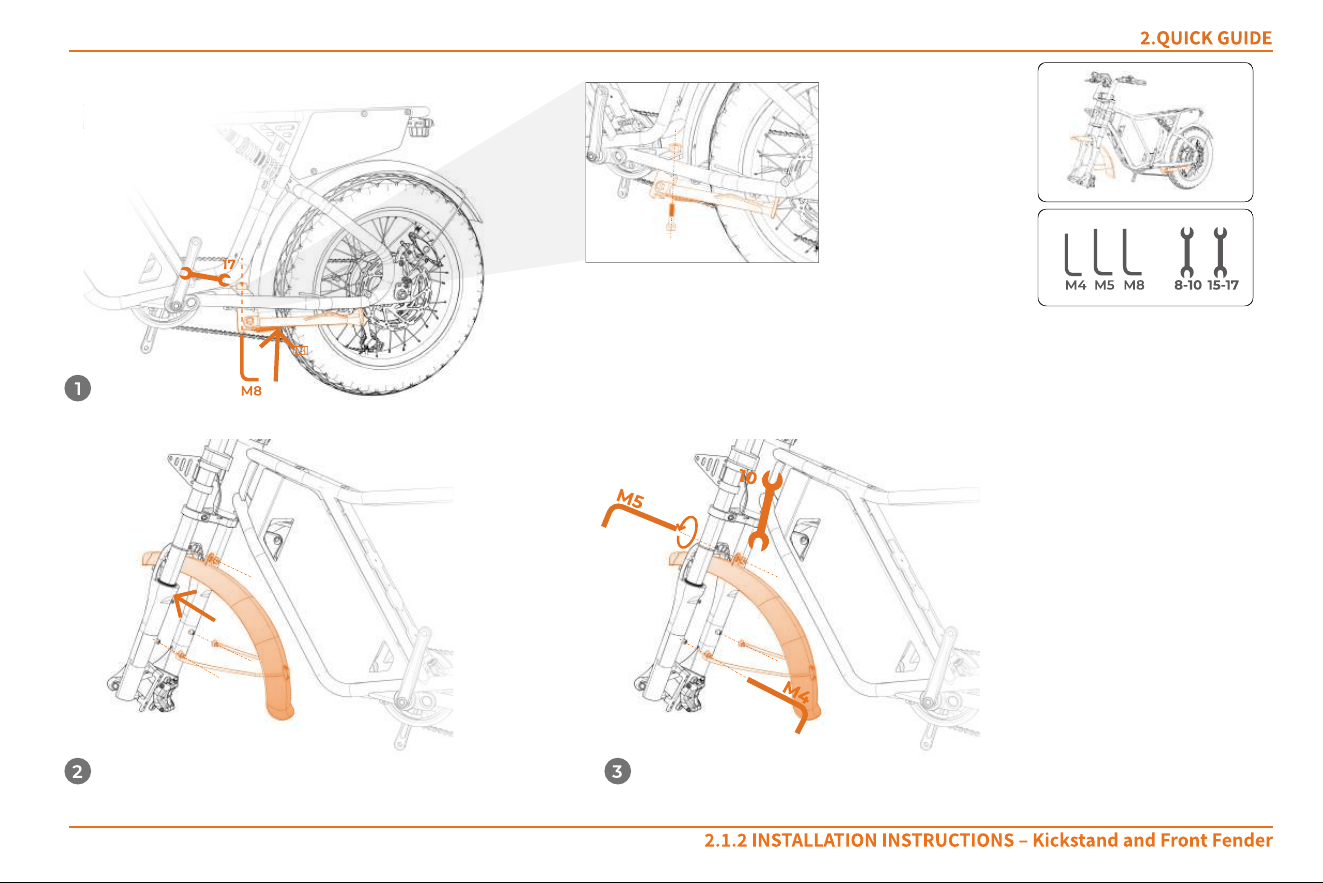
2.1.2 INSTALLATION INSTRUCTIONS
‒
Kickstand and Front Fender
2.QUICK GUIDE
M5 M8
1
2 3
8-10 15-17
M
4
M
5
1
0
M4
1
7
M
8
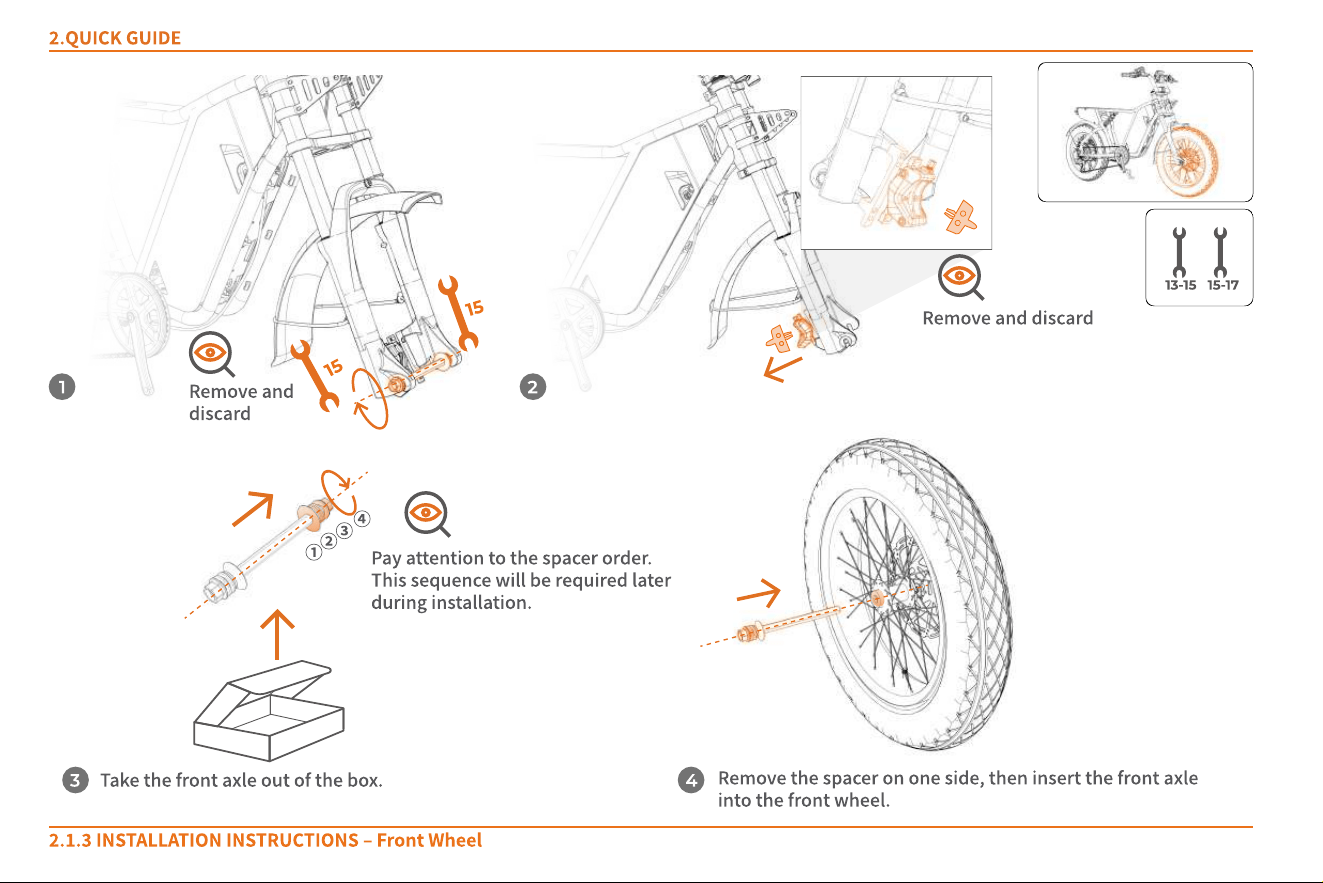
2.1.3 INSTALLATION INSTRUCTIONS
‒
Front Wheel
2.QUICK GUIDE
1 2
3 4
1
5
1
5
Remove and
discard
①
②
③
④
13-15 15-17
Pay attention to the spacer order.
This sequence will be required later
during installation.
Take the front axle out of the box.
Remove the spacer on one side, then insert the front axle
into the front wheel.
Remove and discard
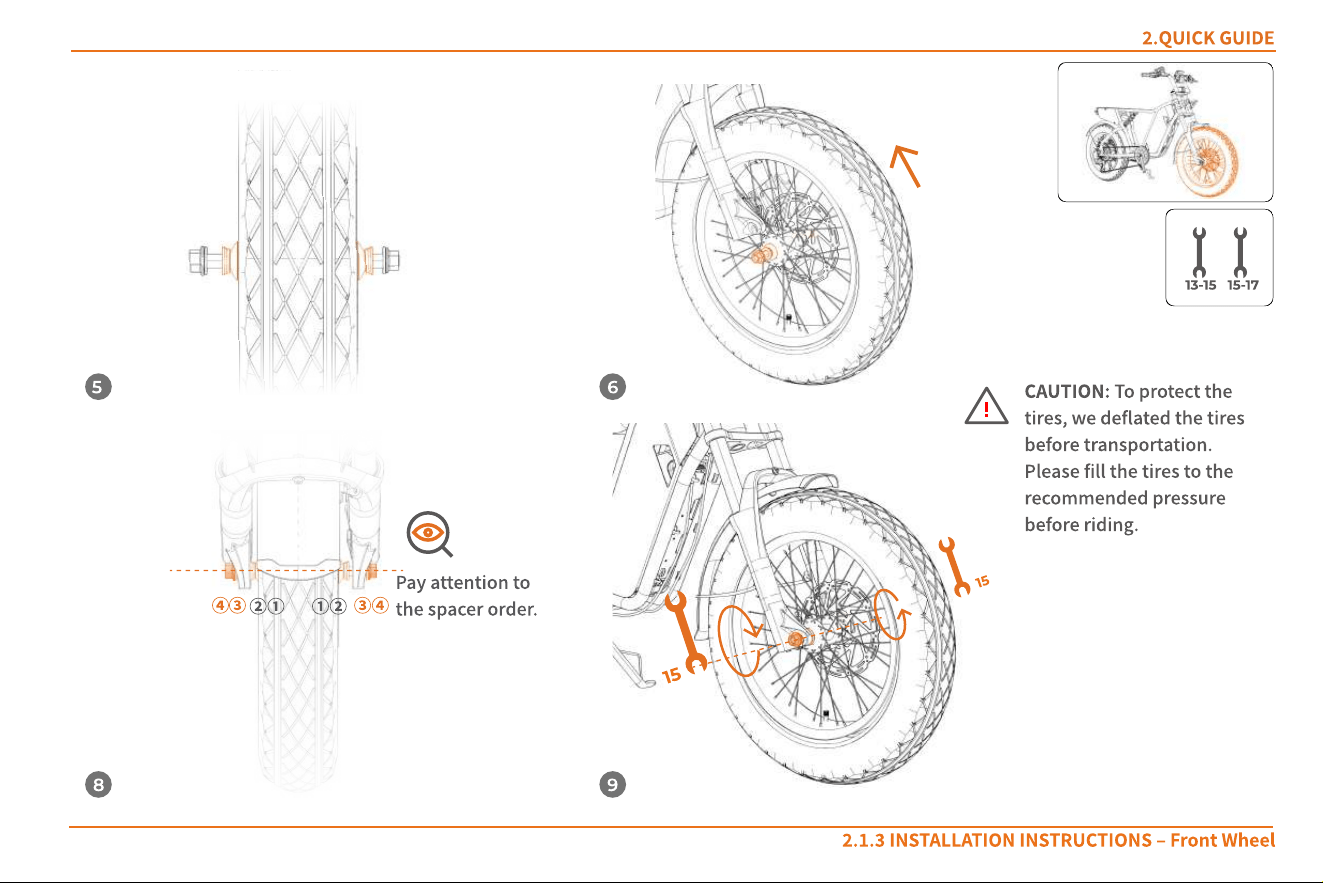
2.1.3 INSTALLATION INSTRUCTIONS
‒
Front Wheel
2.QUICK GUIDE
5 6
8 9
1
5
1
5
① ①
13-15 15-17
①① ②②
③③ ④④
Pay attention to
the spacer order.
CAUTION: To protect the
tires, we deflated the tires
before transportation.
Please fill the tires to the
recommended pressure
before riding.
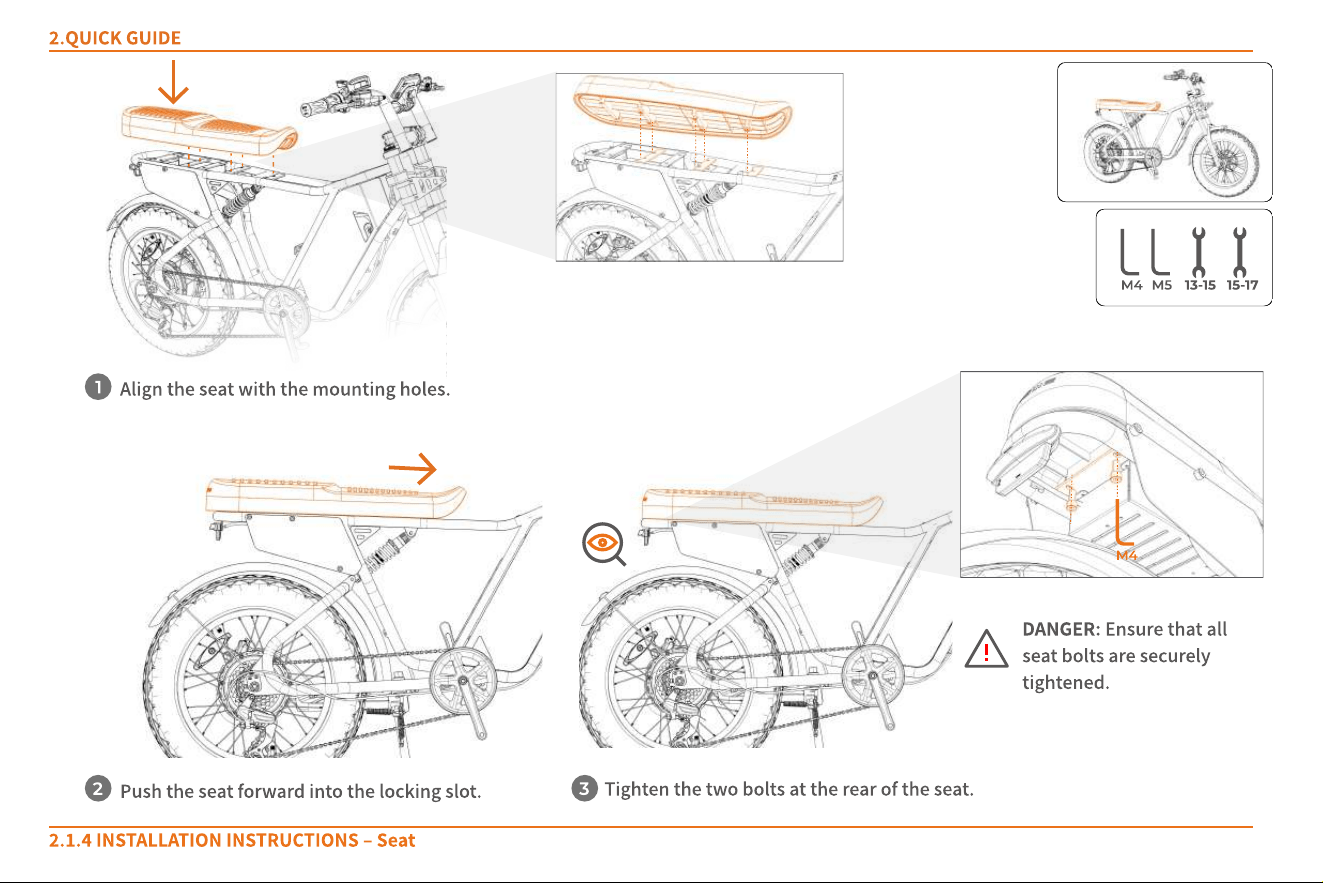
2.1.4 INSTALLATION INSTRUCTIONS
‒
Seat
2.QUICK GUIDE
1
2 3
DANGER: Ensure that all
seat bolts are securely
tightened.
13-15 15-17M5M4
M4
Align the seat with the mounting holes.
Push the seat forward into the locking slot.
Tighten the two bolts at the rear of the seat.
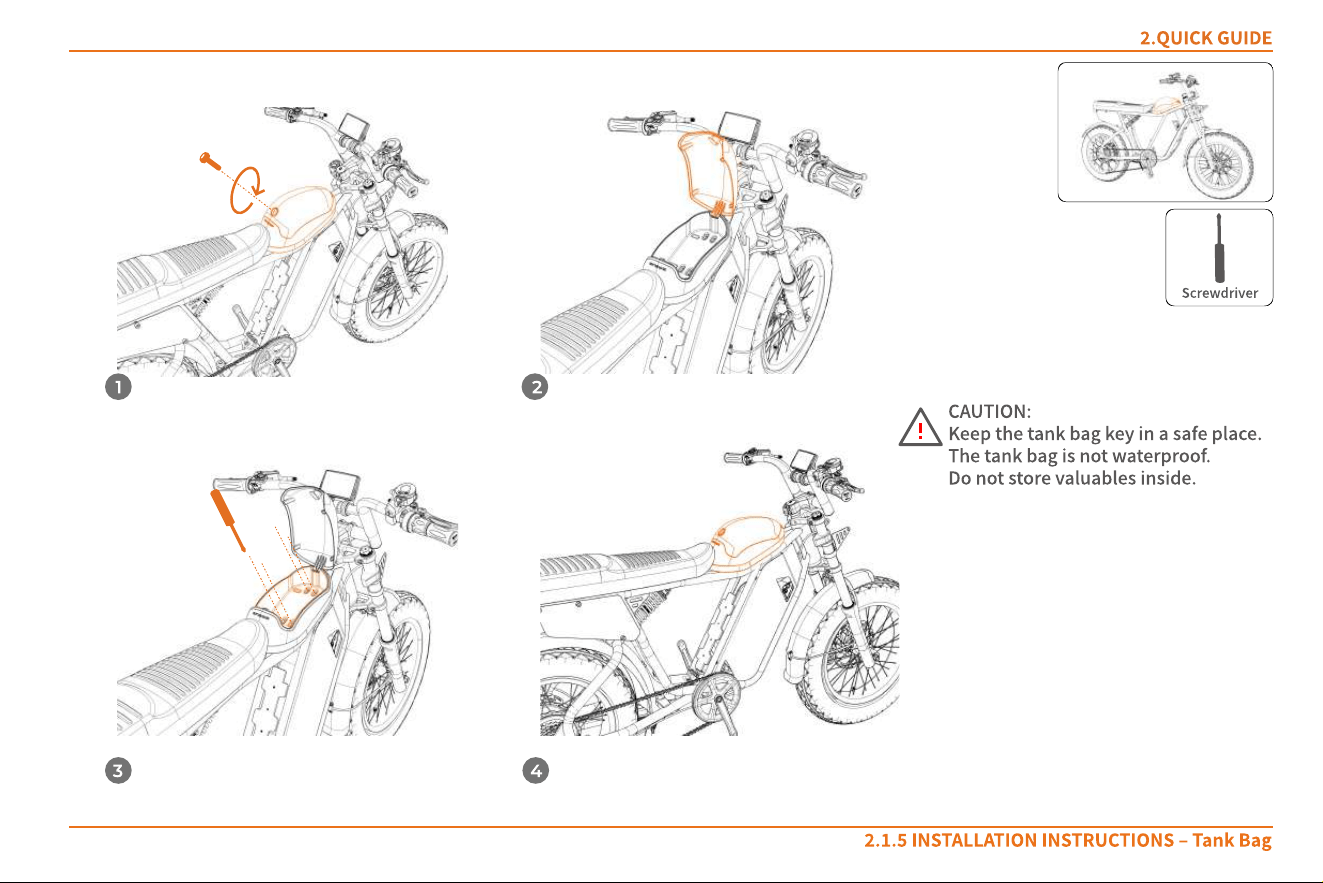
2.1.5 INSTALLATION INSTRUCTIONS
‒
Tank Bag
2.QUICK GUIDE
1 2
3 4
CAUTION:
Keep the tank bag key in a safe place.
The tank bag is not waterproof.
Do not store valuables inside.
Screwdriver
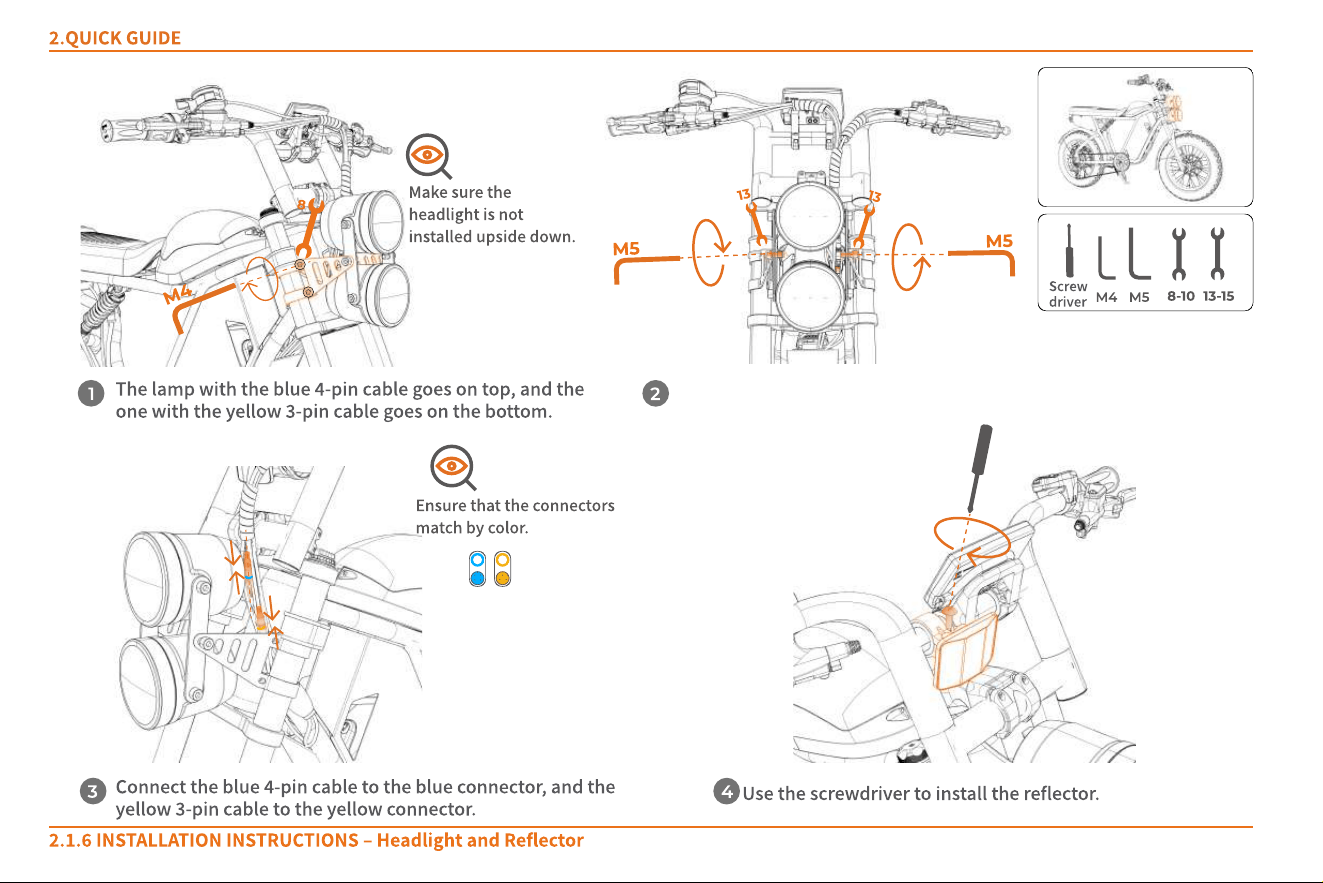
2.QUICK GUIDE
2.1.6 INSTALLATION INSTRUCTIONS
‒
Headlight and Reflector
1
3
2
4
M
5
M
4
M
5
Screw
driver
8-10 13-15
1
3
1
3
8
M4 M5
Ensure that the connectors
match by color.
Make sure the
headlight is not
installed upside down.
The lamp with the blue 4-pin cable goes on top, and the
one with the yellow 3-pin cable goes on the bottom.
Connect the blue 4-pin cable to the blue connector, and the
yellow 3-pin cable to the yellow connector.
Use the screwdriver to install the reflector.
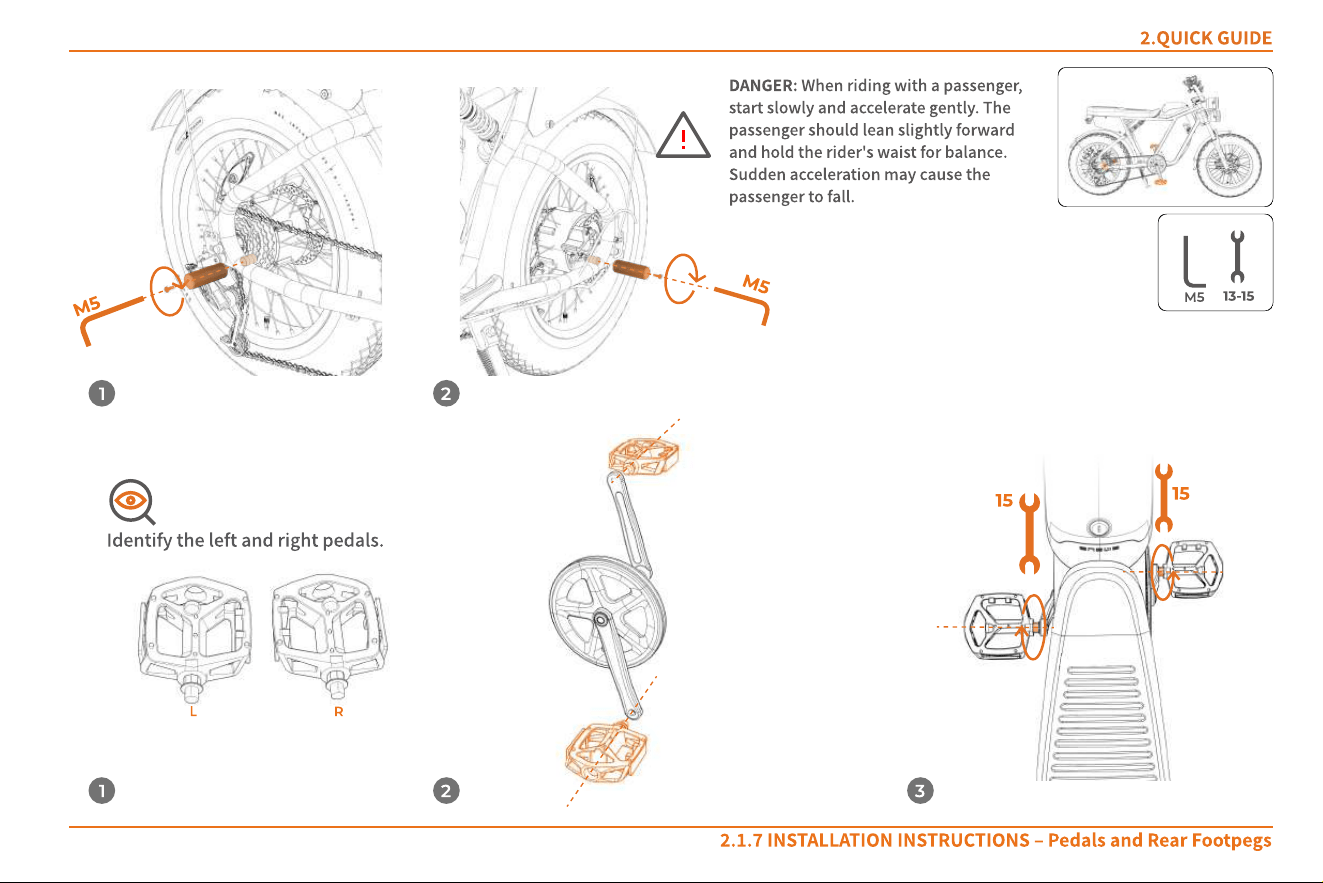
2.1.7 INSTALLATION INSTRUCTIONS
‒
Pedals and Rear Footpegs
2.QUICK GUIDE
M
5
M
5
13-15
M5
1
1
2
2 3
15
15
Identify the left and right pedals.
L R
DANGER: When riding with a passenger,
start slowly and accelerate gently. The
passenger should lean slightly forward
and hold the rider's waist for balance.
Sudden acceleration may cause the
passenger to fall.
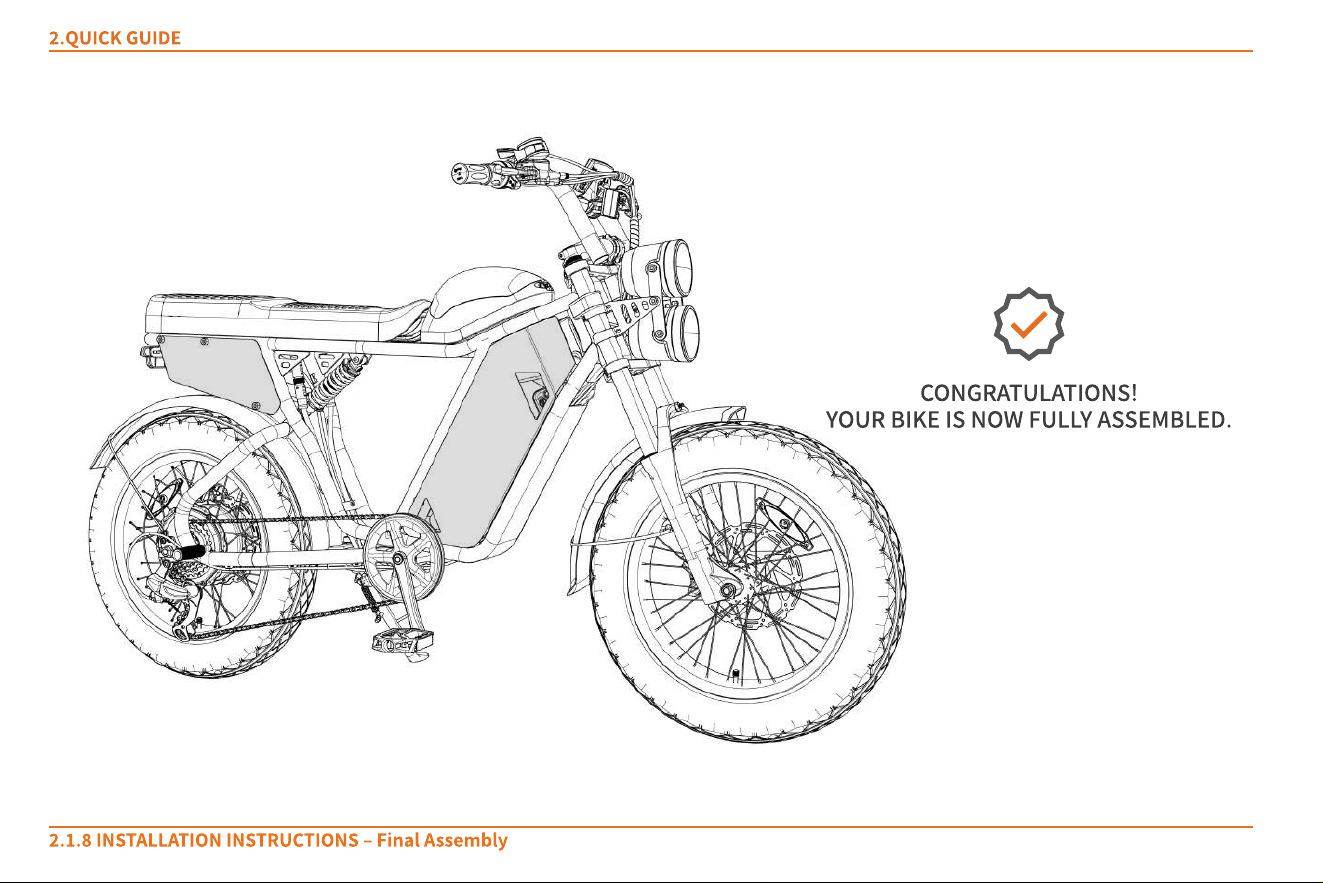
Congr at ul at io ns!
Your bike is now f ul l y assembl ed.
2.1.8 INSTALLATION INSTRUCTIONS
‒
Final Assembly
2.QUICK GUIDE
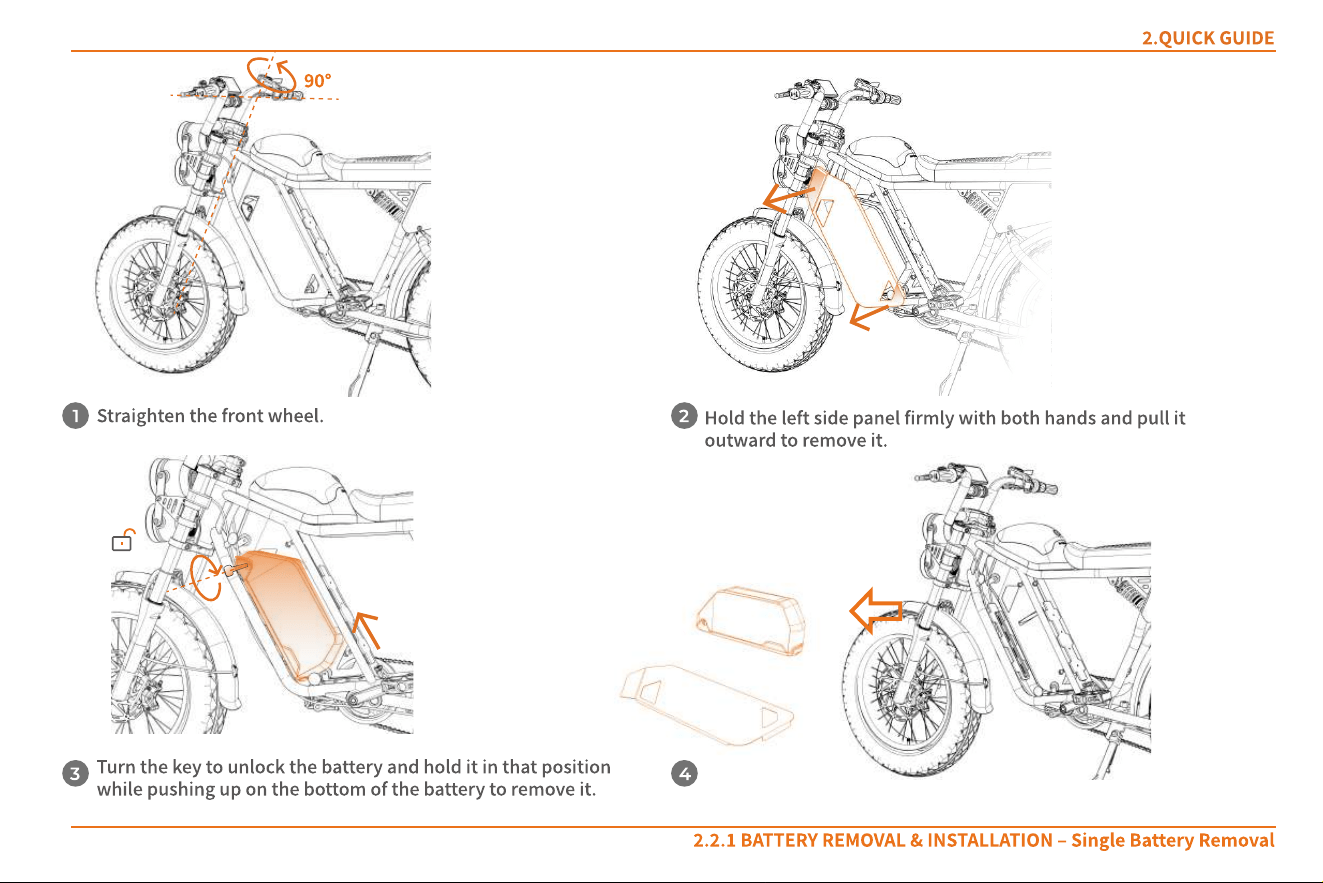
2.2.1 BATTERY REMOVAL & INSTALLATION
‒
Single Battery Removal
2.QUICK GUIDE
1 2
3 4
90°
Turn the key to unlock the battery and hold it in that position
while pushing up on the bottom of the battery to remove it.
Straighten the front wheel.
Hold the left side panel firmly with both hands and pull it
outward to remove it.
①
②
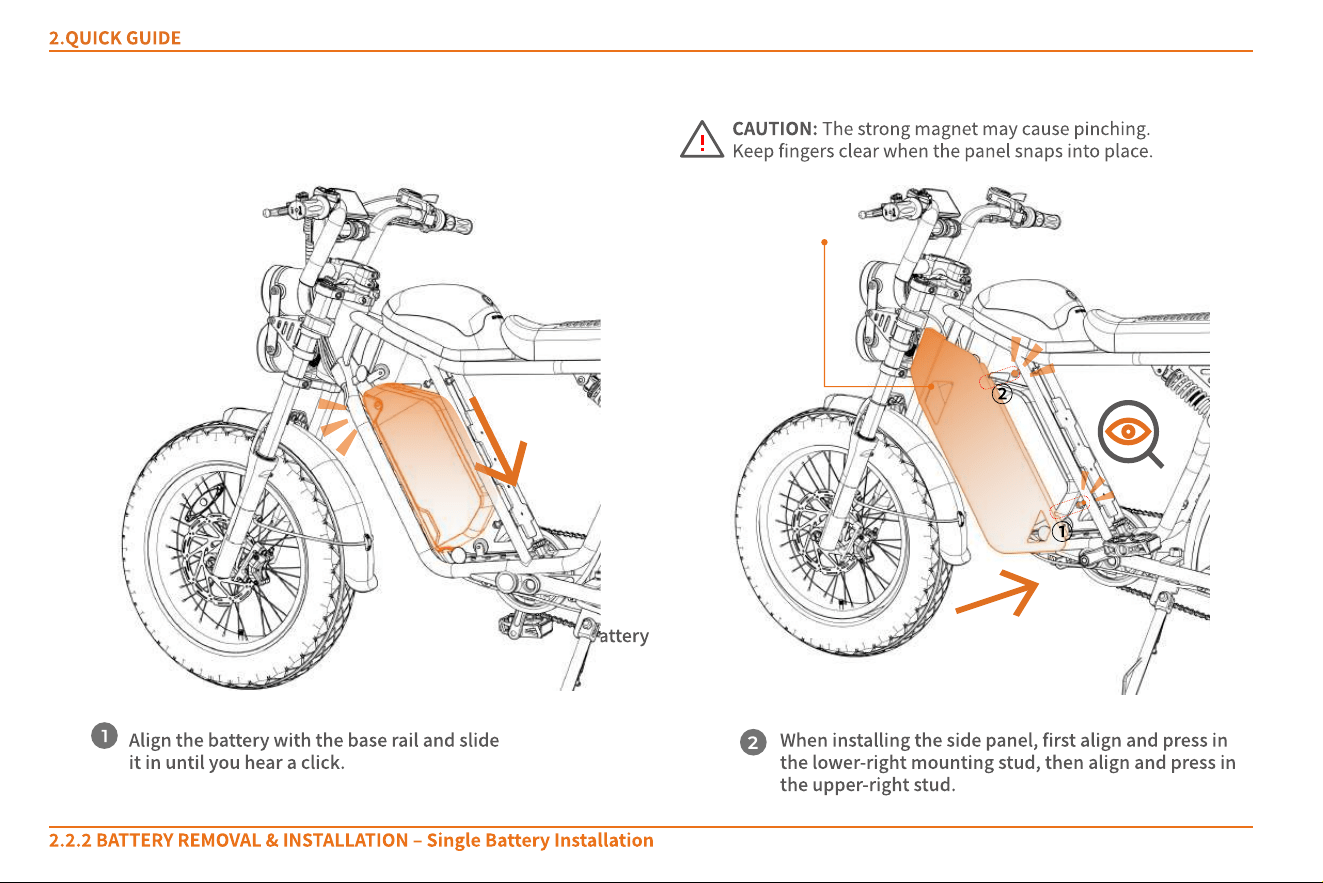
2.2.2 BATTERY REMOVAL & INSTALLATION
‒
Single Battery Installation
2.QUICK GUIDE
1
Align the battery with the base rail and slide
it in until you hear a click.
When installing the side panel, first align and press in
the lower-right mounting stud, then align and press in
the upper-right stud.
2
WARNING: Make sure the battery
is securely locked in place.
Caut ion: The strong magnet may cause pinching.
Keep fingers clear when the panel snaps into place.
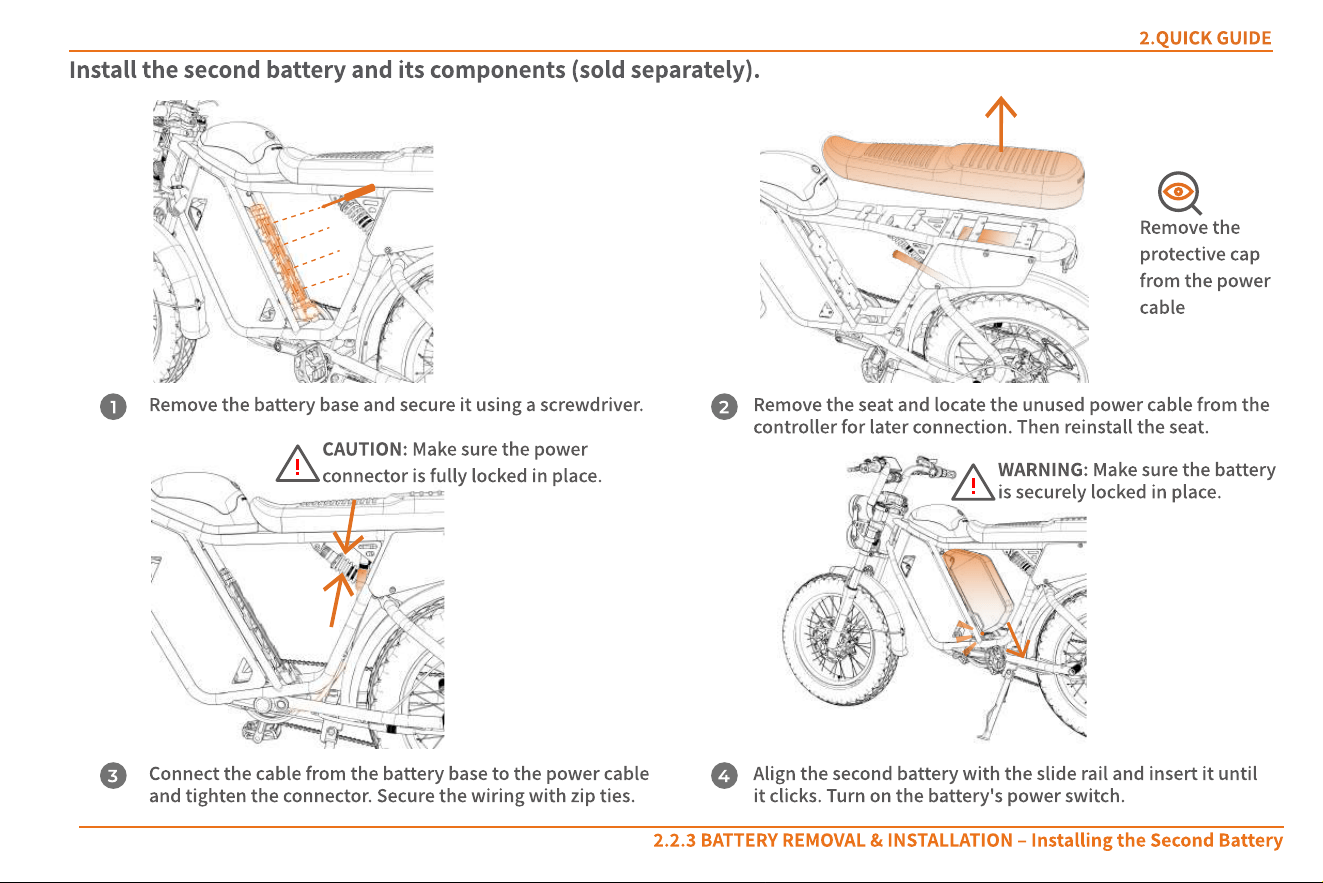
2.2.3 BATTERY REMOVAL & INSTALLATION
‒
Installing the Second Battery
2.QUICK GUIDE
4
Install the second battery and its components (sold separately).
CAUTION: Make sure the power
connector is fully locked in place.
1 2
3
Remove the
protective cap
from the power
cable
Remove the battery base and secure it using a screwdriver. Remove the seat and locate the unused power cable from the
controller for later connection. Then reinstall the seat.
Connect the cable from the battery base to the power cable
and tighten the connector. Secure the wiring with zip ties.
Align the second battery with the slide rail and insert it until
it clicks. Turn on the battery's power switch.
WARNING: Make sure the battery
is securely locked in place.
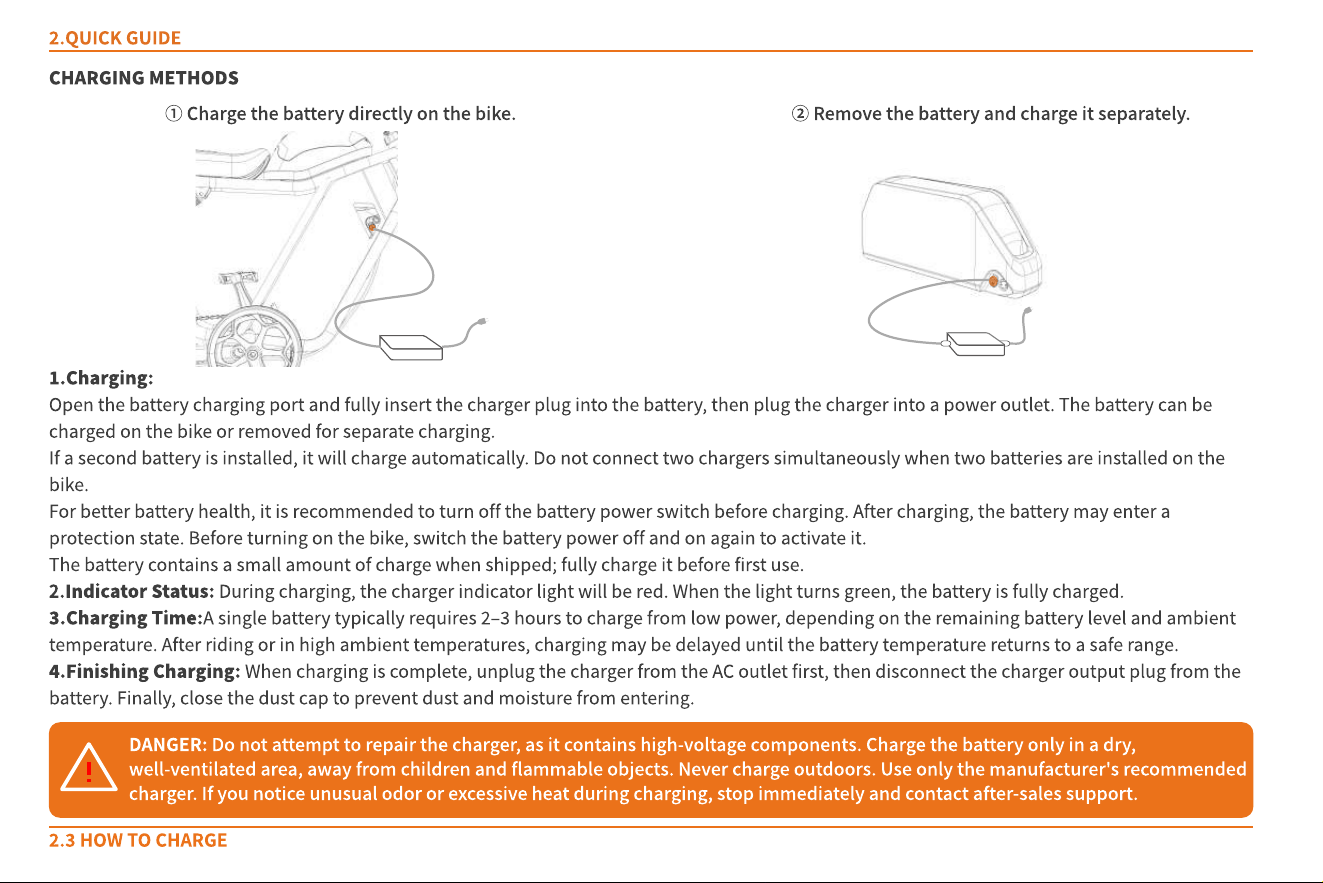
1.Charging:
Open the battery charging port and fully insert the charger plug into the battery, then plug the charger into a power outlet. The battery can be
charged on the bike or removed for separate charging.
If a second battery is installed, it will charge automatically. Do not connect two chargers simultaneously when two batteries are installed on the
bike.
For better battery health, it is recommended to turn off the battery power switch before charging. After charging, the battery may enter a
protection state. Before turning on the bike, switch the battery power off and on again to activate it.
The battery contains a small amount of charge when shipped; fully charge it before first use.
2.Indicator Status: During charging, the charger indicator light will be red. When the light turns green, the battery is fully charged.
3.Charging Time:A single battery typically requires 2
‒
3 hours to charge from low power, depending on the remaining battery level and ambient
temperature. After riding or in high ambient temperatures, charging may be delayed until the battery temperature returns to a safe range.
4.Finishing Charging: When charging is complete, unplug the charger from the AC outlet first, then disconnect the charger output plug from the
battery. Finally, close the dust cap to prevent dust and moisture from entering.
DANGER: Do not attempt to repair the charger, as it contains high-voltage components. Charge the battery only in a dry,
well-ventilated area, away from children and flammable objects. Never charge outdoors. Use only the manufacturer's recommended
charger. If you notice unusual odor or excessive heat during charging, stop immediately and contact after-sales support.
2.QUICK GUIDE
2.3 Ho w t o c har g e
Ch ar g in g Met h o ds
①
Charge the battery directly on the bike.
②
Remove the battery and charge it separately.
2.QUICK GUIDE
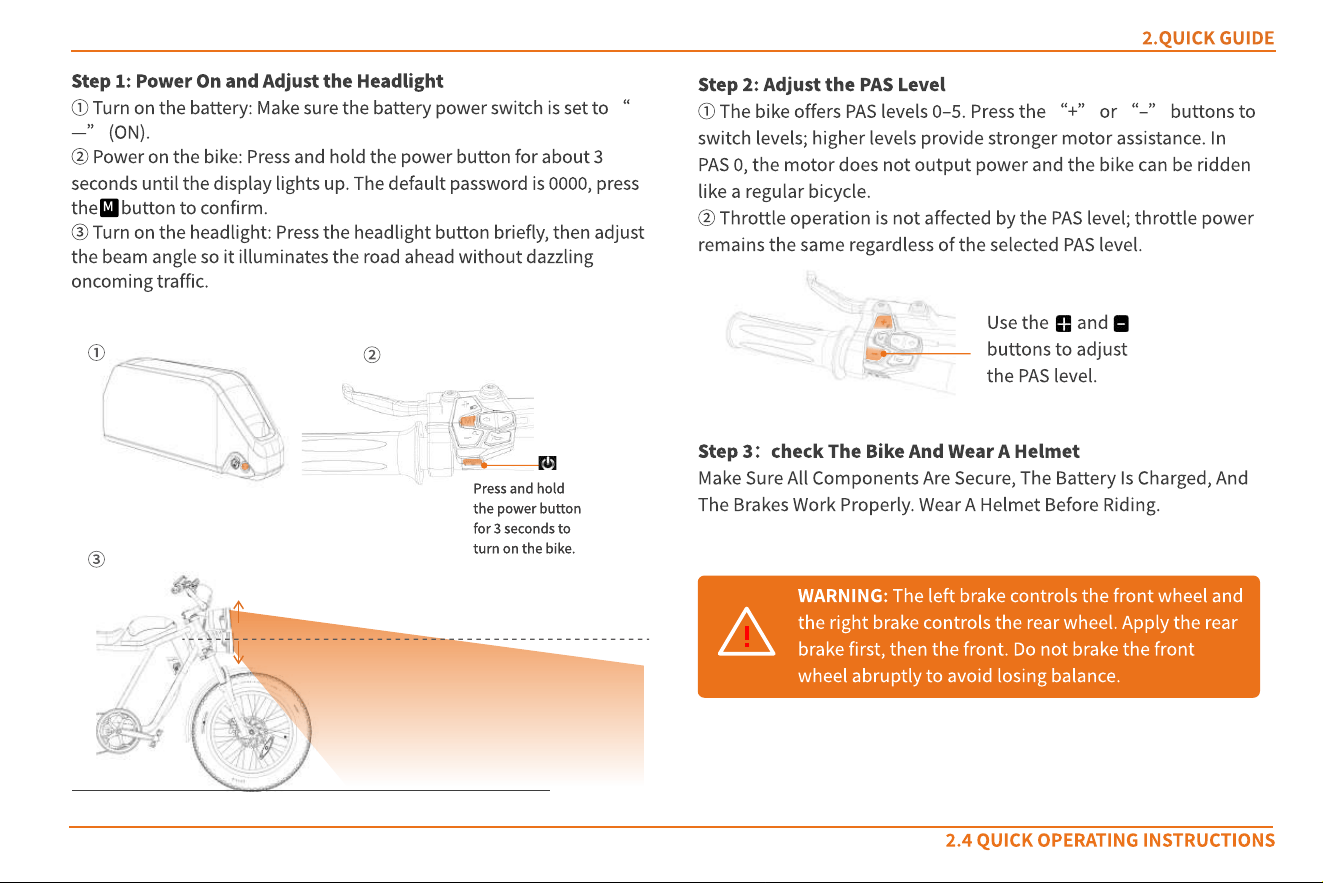
Step 1: Power On and Adjust the Headlight
①
Turn on the battery: Make sure the battery power switch is set to
“
—
”
(ON).
②
Power on the bike: Press and hold the power button for about 3
seconds until the display lights up. The default password is 0000, press
the button to confirm.
③
Turn on the headlight: Press the headlight button briefly, then adjust
the beam angle so it illuminates the road ahead without dazzling
oncoming traffic.
M
War ning : The left brake controls the front wheel and
the right brake controls the rear wheel. Apply the rear
brake first, then the front. Do not brake the front
wheel abruptly to avoid losing balance.
Press and hold
the power button
for 3 seconds to
turn on the bike.
Press and hold
the power button
for 3 seconds to
turn on the bike.
Use the and
buttons to adjust
the PAS level.
Step 2: Adjust the PAS Level
①
The bike offers PAS levels 0
‒
5. Press the
“
+
”
or
“
‒
”
buttons to
switch levels; higher levels provide stronger motor assistance. In
PAS 0, the motor does not output power and the bike can be ridden
like a regular bicycle.
②
Throttle operation is not affected by the PAS level; throttle power
remains the same regardless of the selected PAS level.
Step 3
:
Check t he Bike and Wear a Helmet
Make sure all components are secure, t he battery is charged, and
t he brakes work properly. Wear a helmet before r iding.
2.4 Quick Oper at ing Inst r uct ions
③
②
①
Electrical and Safety Guidelines
Do not park or charge the eBike in building entrances, hallways,
stairwells, or evacuation routes.
Do not charge inside residential buildings. Keep away from
flammable materials and avoid charging for more than 12 hours.
Do not modify the battery, wiring, lighting, or install unauthorized
electrical accessories.
Do not touch electrical components with wet hands or metal
objects.
Do not open electrical parts to avoid liquid or debris entering.
Avoid spraying water directly on electrical connectors; do not use a
pressure washer.
Avoid prolonged exposure to sun or rain to prevent component
aging.
Riding Safety
Riders must be 14 years or older. Do not lend the bike to
inexperienced users.
Ride in designated bike lanes and follow local speed regulations.
Carry passengers or cargo only as allowed by local laws.
Always wear a properly fastened helmet.
Slow down in rain or snow; avoid riding in severe weather.
Follow traffic laws; do not ride under the influence or with
improper control.
Wear bright, comfortable clothing and suitable footwear.
3.USER MAINTENANCE INSTRUCTIONS
3.1 Not es f o r o per at ion
Pre-Ride Checklist
Power on, display works, and battery level is sufficient.
Front/rear lights and turn signals function correctly; headlight angle
is appropriate.
Horn works properly.
Handlebar position and screws are secure.
Brakes are responsive and activate the tail light.
Tire pressure and condition are normal, with no sharp objects.
Wheel nuts are tight; pedal reflectors are intact.
Riding Precautions
Accelerate gradually when starting to avoid sudden loss of control.
Increase braking distance and ride cautiously on wet or snowy roads
to prevent slipping.
Shift to a lower gear before stopping to make the next start easier.
Pushing and Parking
Turn off the power before pushing the bike to avoid accidental
throttle activation.
Use the walk-assist mode when pushing uphill or when carrying
heavy loads.
Park the bike on a flat surface, deploy the kickstand, and turn off the
power.
Clean and maintain the bike regularly to keep it in optimal condition.
Storage Instructions
Store the eBike in a cool, dry, and well-ventilated area, away from
direct sunlight, moisture, and extreme temperatures.
Turn off the battery switch before storage.
For long-term storage, keep the battery between 50%
‒
80% charge
and recharge every 1
‒
2 months.
Keep the bike and battery away from flammable or explosive
materials.
Store the bike and battery out of reach of children.
Do not place heavy objects on the bike or battery.
War ning:Repairs must not be performed by untrained
personnel. If a malfunction occurs, please contact
customer service or visit an authorized service center
for assistance.
3.2 Main t enanc e and s el f -inspect io n
Vehicle Maintenance & Self-Check
The eBike is fully adjusted before leaving the factory. If you have any doubts, contact the manufacturer or dealer.
Check tire pressure regularly and keep it within the recommended range.
Routinely inspect major components
—
handlebar, stem, saddle, axles, bottom bracket, freewheel, chain, and wheels
—
to ensure
smooth operation. Tighten any loose nuts or bolts immediately.
Replace worn parts such as brake pads, chain, or tires at a local repair shop. Always use parts of the same model and specifications.
Motor Maintenance
Keep the motor clean and free from foreign objects or corrosive liquids/gases. Do not strike or heat the motor housing.
The motor is rated IPX5. Do not spray it with a high-pressure water jet or submerge it in water. If water reaches the hub center, electrical
components may short-circuit and become damaged.
Battery Maintenance
Lithium battery lifespan depends heavily on usage habits. Avoid running the battery to very low levels. Charge regularly and do not
leave the battery unused for long periods.
For initial use, a normal full charge is sufficient. Disconnect the charger once charging is complete.
If the bike will not be used for an extended time, charge the battery for about 2 hours every month. Do not store the battery in a fully
discharged state, as deep discharge can cause irreversible damage.
3.USER MAINTENANCE INSTRUCTIONS
Danger : Do not disassemble old batteries yourself. Dispose of them only at government-designated facilities or at our
authorized service centers.
War ning: Keep the battery away from open flames and high-temperature heat sources. Do not throw the battery into fire. Do
not expose it to direct sunlight during hot weather.
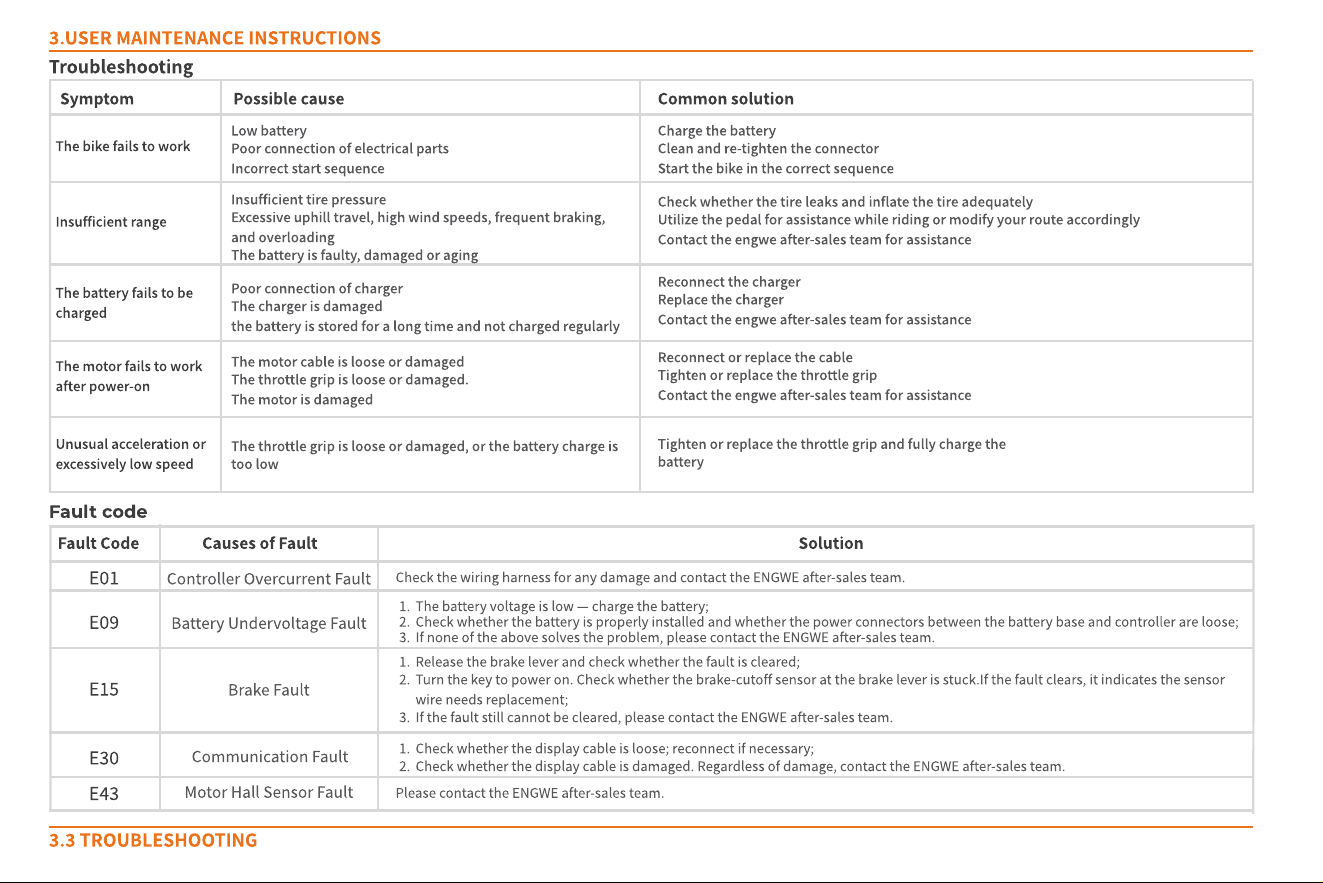
3.3 Tr o u bl esh o ot ing
3.USER MAINTENANCE INSTRUCTIONS
Release the brake lever and check whether the fault is cleared;
Turn the key to power on. Check whether the brake-cutoff sensor at the brake lever is stuck.If the fault clears, it indicates the sensor
wire needs replacement;
If the fault still cannot be cleared, please contact the ENGWE after-sales team.
Controller Overcurrent Fault
Battery Undervoltage Fault
Brake Fault
Communication Fault
Motor Hall Sensor Fault
Causes of Fault Solution
Fault code
Fault Code
E01
E09
E15
E30
E43
Please contact the ENGWE after-sales team.
Check the wiring harness for any damage and contact the ENGWE after-sales team.
The battery voltage is low
—
charge the battery;
Check whether the battery is properly installed and whether the power connectors between the battery base and controller are loose;
If none of the above solves the problem, please contact the ENGWE after-sales team.
Check whether the display cable is loose; reconnect if necessary;
Check whether the display cable is damaged. Regardless of damage, contact the ENGWE after-sales team.
Troubleshooting
The bike fails to work
Insufficient range
The battery fails to be
charged
Unusual acceleration or
excessively low speed
The motor fails to work
after power-on
Charge the battery
Clean and re-tighten the connector
Start the bike in the correct sequence
Check whether the tire leaks and inflate the tire adequately
Utilize the pedal for assistance while riding or modify your route accordingly
Contact the ENGWE after-sales team for assistance
Reconnect the charger
Replace the charger
Contact the ENGWE after-sales team for assistance
Reconnect or replace the cable
Tighten or replace the throttle grip
Contact the ENGWE after-sales team for assistance
Low battery
Poor connection of electrical parts
Incorrect start sequence
Insufficient tire pressure
Excessive uphill travel, high wind speeds, frequent braking,
and overloading
The battery is faulty, damaged or aging
Poor connection of charger
The charger is damaged
The battery is stored for a long time and not charged regularly
The motor cable is loose or damaged
The throttle grip is loose or damaged.
The motor is damaged
The throttle grip is loose or damaged, or the battery charge is
too low
Tighten or replace the throttle grip and fully charge the
battery
Possible causeSymptom Common solution
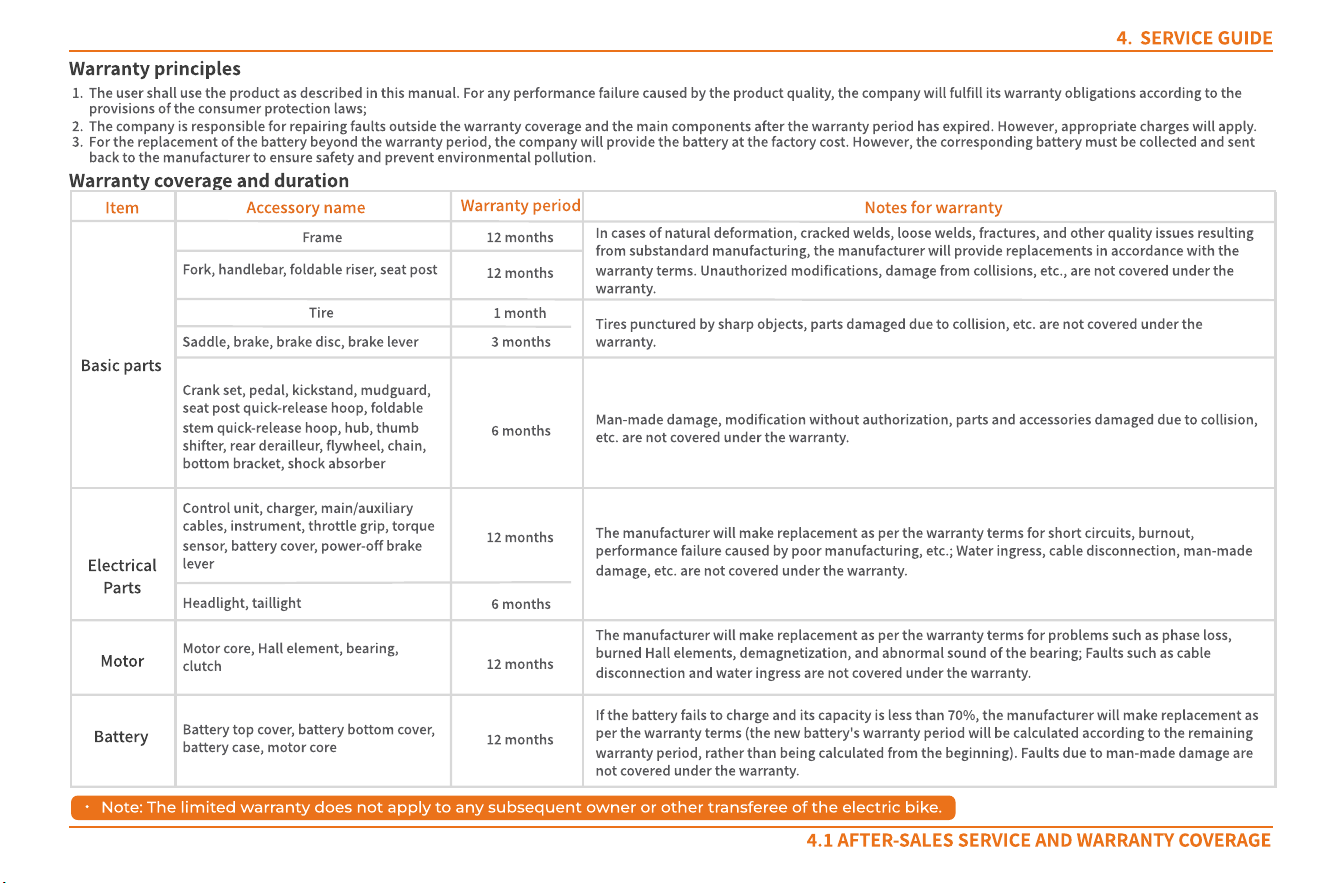
The user shall use the product as described in this manual. For any performance failure caused by the product quality, the Company will fulfill its warranty obligations according to the
provisions of the consumer protection laws;
The Company is responsible for repairing faults outside the warranty coverage and the main components after the warranty period has expired. However, appropriate charges will apply.
For the replacement of the battery beyond the warranty period, the company will provide the battery at the factory cost. However, the corresponding battery must be collected and sent
back to the manufacturer to ensure safety and prevent environmental pollution.
Warranty principles
Warranty coverage and duration
Ser vice gu ide
4.1 Af t er -s al es s er vice and war r ant y cover ag e
Basic parts
Frame
Tire
12 months
Electrical
parts
Motor
Battery
Accessory name
Warranty period
Item
12 months
12 months
Fork, handlebar, foldable riser, seat post
12 months
3 months
1 month
6 months
6 months
12 months
Notes for warranty
In cases of natural deformation, cracked welds, loose welds, fractures, and other quality issues resulting
from substandard manufacturing, the manufacturer will provide replacements in accordance with the
warranty terms. Unauthorized modifications, damage from collisions, etc., are not covered under the
warranty.
Saddle, brake, brake disc, brake lever
Tires punctured by sharp objects, parts damaged due to collision, etc. are not covered under the
warranty.
Crank set, pedal, kickstand, mudguard,
seat post quick-release hoop, foldable
stem quick-release hoop, hub, thumb
shifter, rear derailleur, flywheel, chain,
bottom bracket, shock absorber
Man-made damage, modification without authorization, parts and accessories damaged due to collision,
etc. are not covered under the warranty.
Control unit, charger, main/auxiliary
cables, instrument, throttle grip, torque
sensor, battery cover, power-off brake
lever
Headlight, taillight
Motor core, Hall element, bearing,
clutch
The manufacturer will make replacement as per the warranty terms for short circuits, burnout,
performance failure caused by poor manufacturing, etc.; Water ingress, cable disconnection, man-made
damage, etc. are not covered under the warranty.
Battery top cover, battery bottom cover,
battery case, motor core
The manufacturer will make replacement as per the warranty terms for problems such as phase loss,
burned Hall elements, demagnetization, and abnormal sound of the bearing; Faults such as cable
disconnection and water ingress are not covered under the warranty.
If the battery fails to charge and its capacity is less than 70%, the manufacturer will make replacement as
per the warranty terms (the new battery's warranty period will be calculated according to the remaining
warranty period, rather than being calculated from the beginning). Faults due to man-made damage are
not covered under the warranty.
Note: The limited warranty does not apply to any subsequent owner or other transferee of the electric bike.
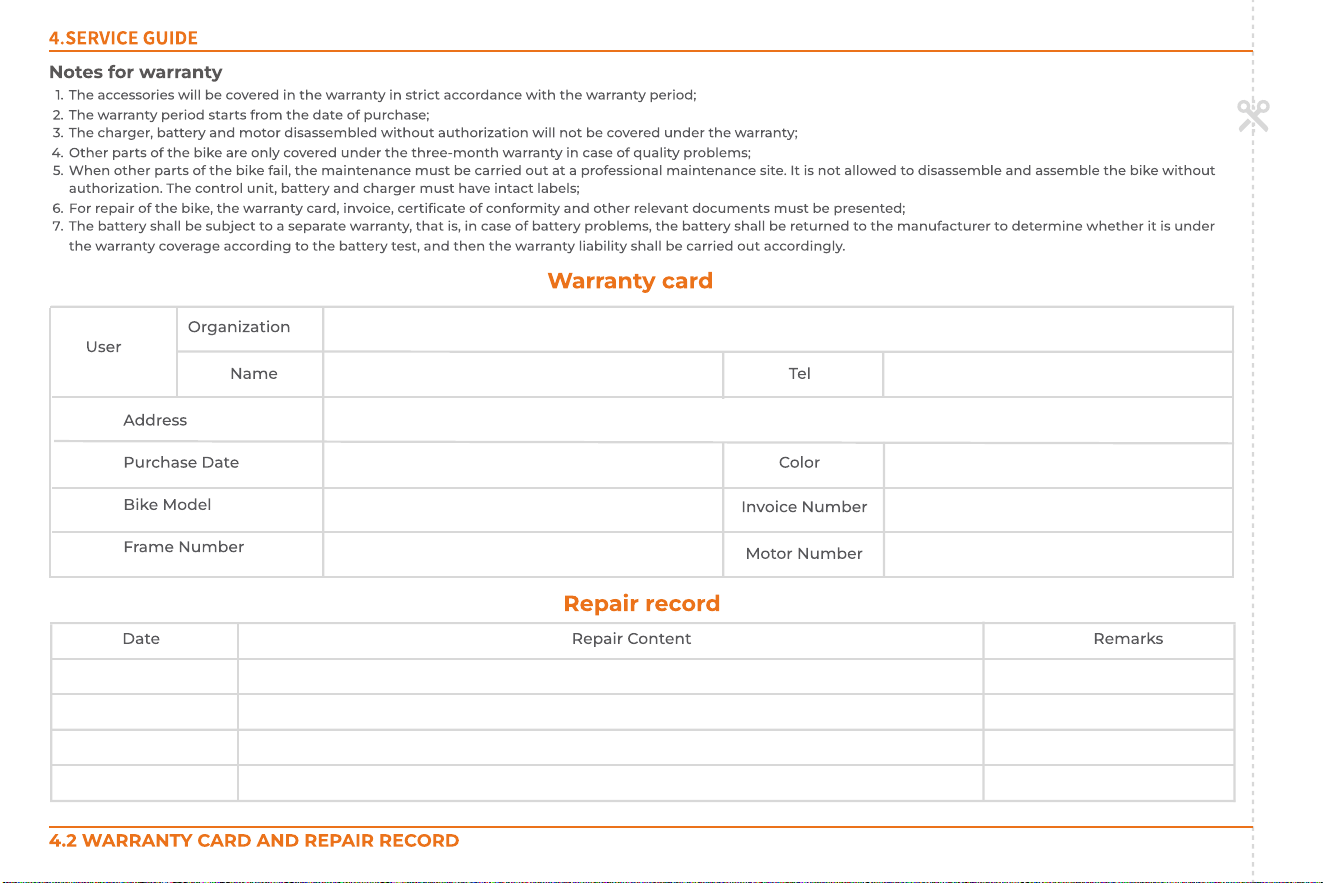
W arranty card
User
Organization
Name Tel
Address
Purchase d ate
Bike model
Frame n umber
Color
Invoice n umber
Motor n umber
Repair record
Date Repair c ontent Remarks
4.Ser vic e guide
4.2 W a r r a n t y c a r d a n d r epa ir r ec o r d
The accessories will be covered in the warranty in strict accordance with the warranty period;
The warranty period starts from the date of purchase;
The charger, battery and m otor disassembled without authorization will not be covered under the warranty;
Other parts of the bike are only covered under the three-month warranty in case of quality problems;
W hen other parts of the bike fail, the m aintenance m ust be carried out at a professional maintenance site. It is not allowed to disassemble and assemble the bike without
authorization. The control unit, battery and charger must have intact labels;
For repair of the bike, the warranty card, invoice, certificate of conform ity and other relevant documents must be presented;
The battery shall be subject to a separate warranty, that is, in case of battery problem s, the battery shall be returned to the m anufacturer to determine whether it is under
the warranty coverage according to the battery test, and then the warranty liability shall be carried out accordingly.
Notes for warranty
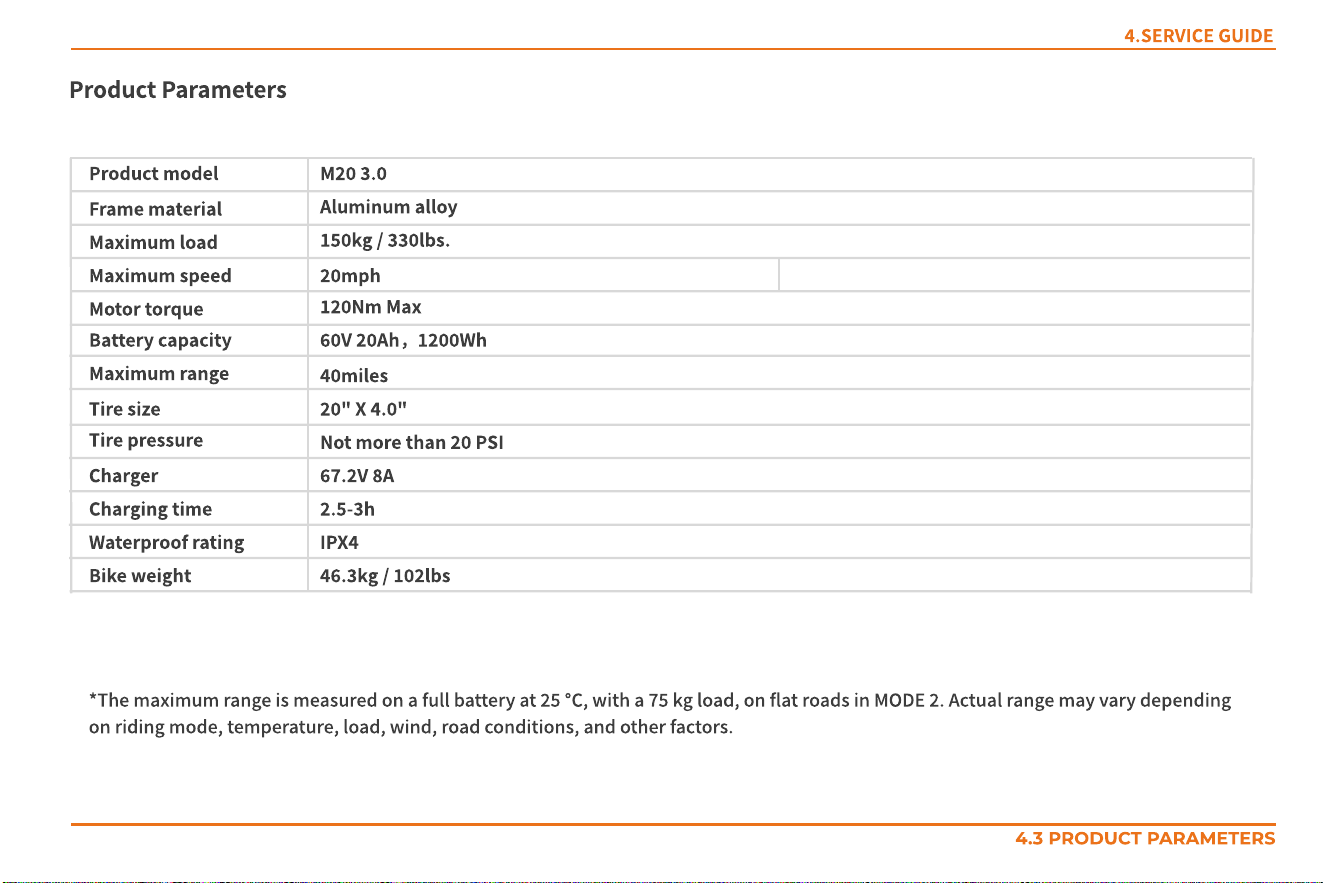
150KG / 330lbs.
4.Ser vic e guide
20mph
67.2V 8A
60V 20Ah
,
1200Wh
40miles
20" x 4.0"
Not more than 20 PSI
M20 3.0
Product parameters
*The maximum range is measured on a full battery at 25 °C, with a 75 kg load, on flat roads in MODE 2. Actual range may vary depending
on riding mode, temperature, load, wind, road conditions, and other factors.
2.5-3h
46.3kg / 102lbs
IPX4
Aluminum alloy
120Nm MAx
4.3 Pr o d u c t pa r a met er s
Maximum load
Maximum speed
Motor torque
Battery capacity
Maximum range
Tire size
Tire pressure
Product model
Charger
Bike weight
Charging time
Waterproof rating
Frame material