Bluetooth Vehicle Diagnostic Dongle I User Manual


Safety Is Always the First Priority!
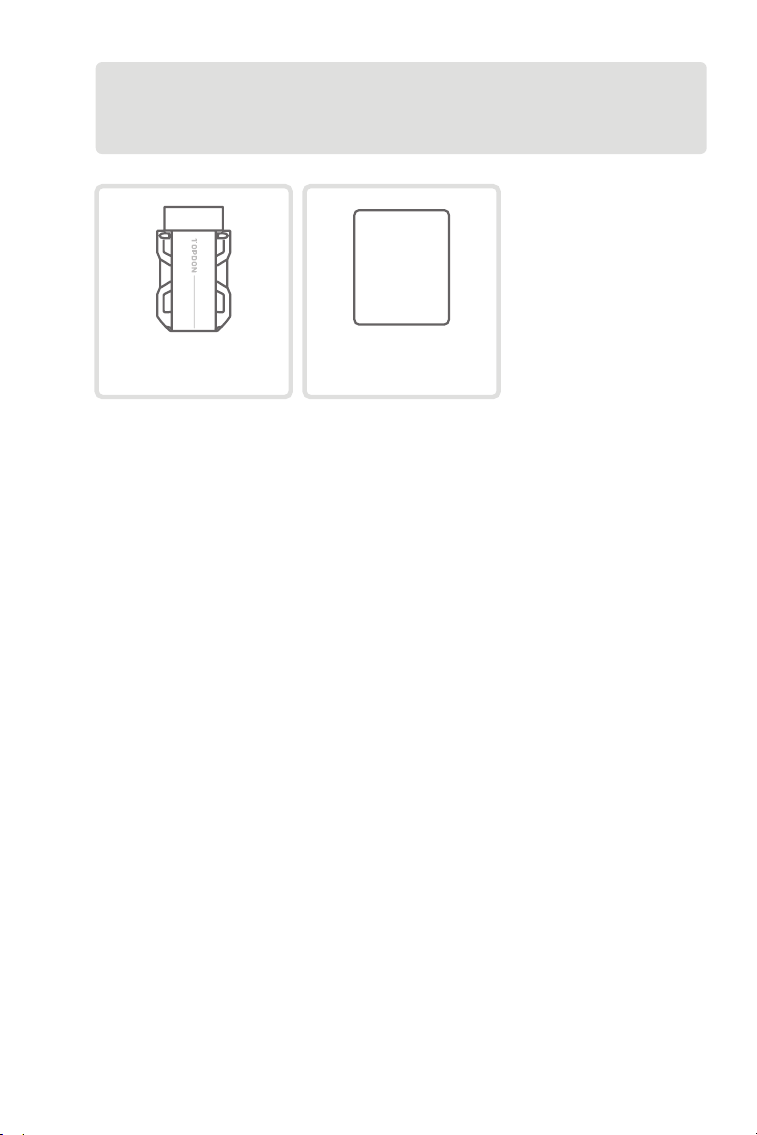
Section 1 What's in the Box?
Section 2 Product Overview
Section 3 Getting Started
Section 4 Using the TopScan via the App
Section 5 Specications
Section 6 FAQ
Section 7 Warranty
Section 8 FCC
.......................................
.......................................
.......................................
.......................................
.......................................
.......................................
.......................................
.......................................
.......................................
4
5
6
8
14
45
46
47
48
Contents

4
For your safety, the safety of others, and to avoid any damage to
the product and your vehicle, CAREFULLY READ AND MAKE SURE
YOU FULLY UNDERSTAND ALL THE SAFETY INSTRUCTIONS AND
MESSAGES ON THIS MANUAL BEFORE OPERATING. You must also
read the vehicle's service manual, and observe the stated precautions
or instructions before and during any test or service procedure.
Keep yourself, your clothing and other objects away from moving or
hot engine parts and avoid contact with electrical connections.
ONLY OPERATE THE VEHICLE IN A WELL-VENTILATED AREA, as the
vehicle produces carbon monoxide, a toxic and poisonous gas, and
particulate matter when the engine is running.
ALWAYS WEAR APPROVED SAFETY GOGGLES to prevent damage
from sharp objects and caustic liquids.
DO NOT SMOKE OR HAVE ANY FLAMES NEAR THE VEHICLE when
testing. The fuel and battery vapors are highly ammable.
DO NOT ATTEMPT TO INTERACT WITH THE PROUDUCT WHILE
DRIVING. Any distraction may cause an accident.
TURN THE IGNITION OFF BEFORE CONNECTING OR
DISCONNECTING THE PRODUCT FROM THE DATA LINK
CONNECTOR (DLC) to prevent causing damage to the product or
vehicle's electronic components.
Safety Is Always the First Priority!
5
TopScan
Quick
User
Guide
Quick User Guide
Section 1
What's in the Box?
6
Section 2
Product Overview
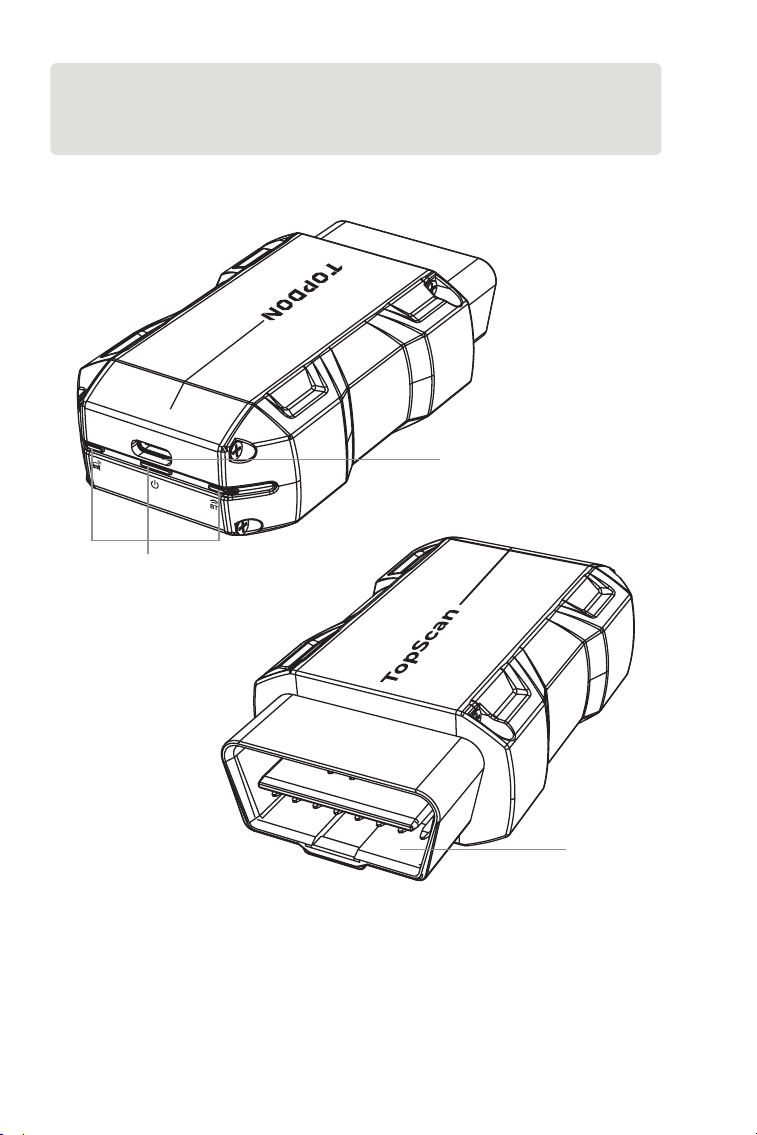
1
3
2

7
1. Indicators
2. OBD-II 16 Pin Connector
Connects the TopScan to vehicle's DLC.
3. USB Type-C Port
Connects the TopScan to a computer for updates.
Solid Blue: Bluetooth
connected
Solid Red: power on
Flashing Green:
communicating with the
vehicle
Bluetooth Connection
Indicator
Power Indicator
Communication
Indicator
8
Section 3
Getting Started
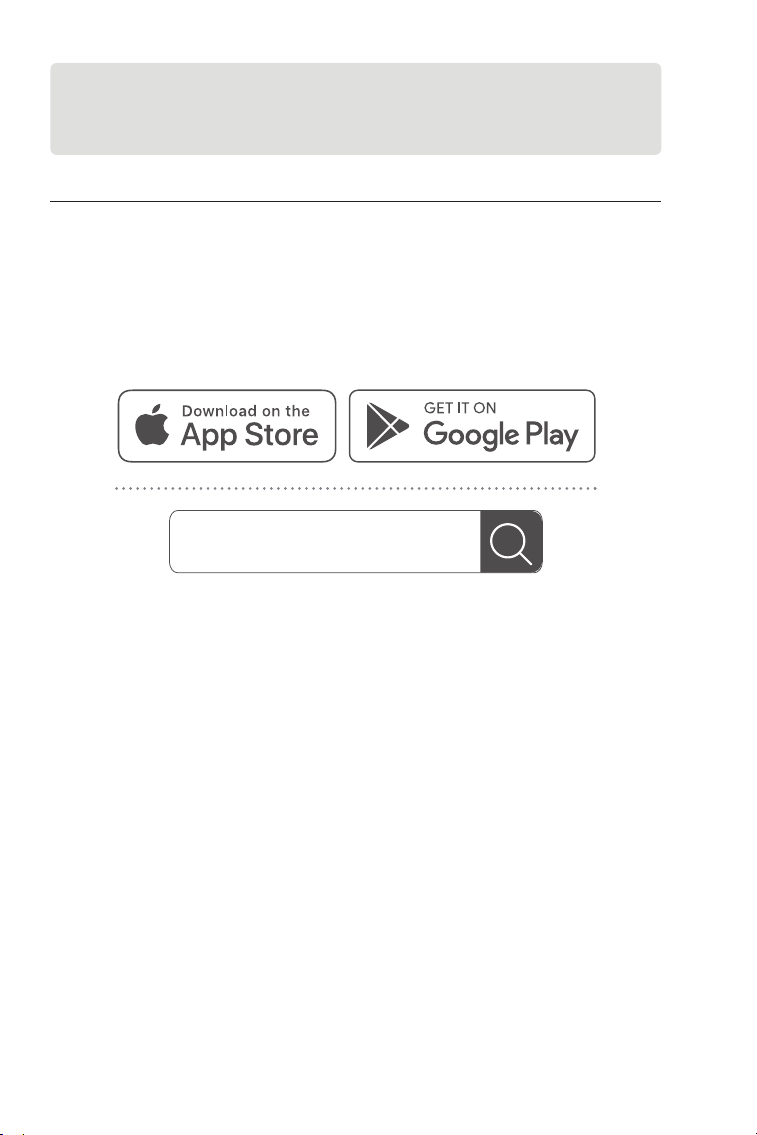
3.1 Download the TopScan App
Search for the TopScan app in App Store or Google Play, download
and install it to your phone.
Figure 3-1
Note:
This app is compatible with iOS 10.0 or later / Android 7.0 or later.
TopScan
9
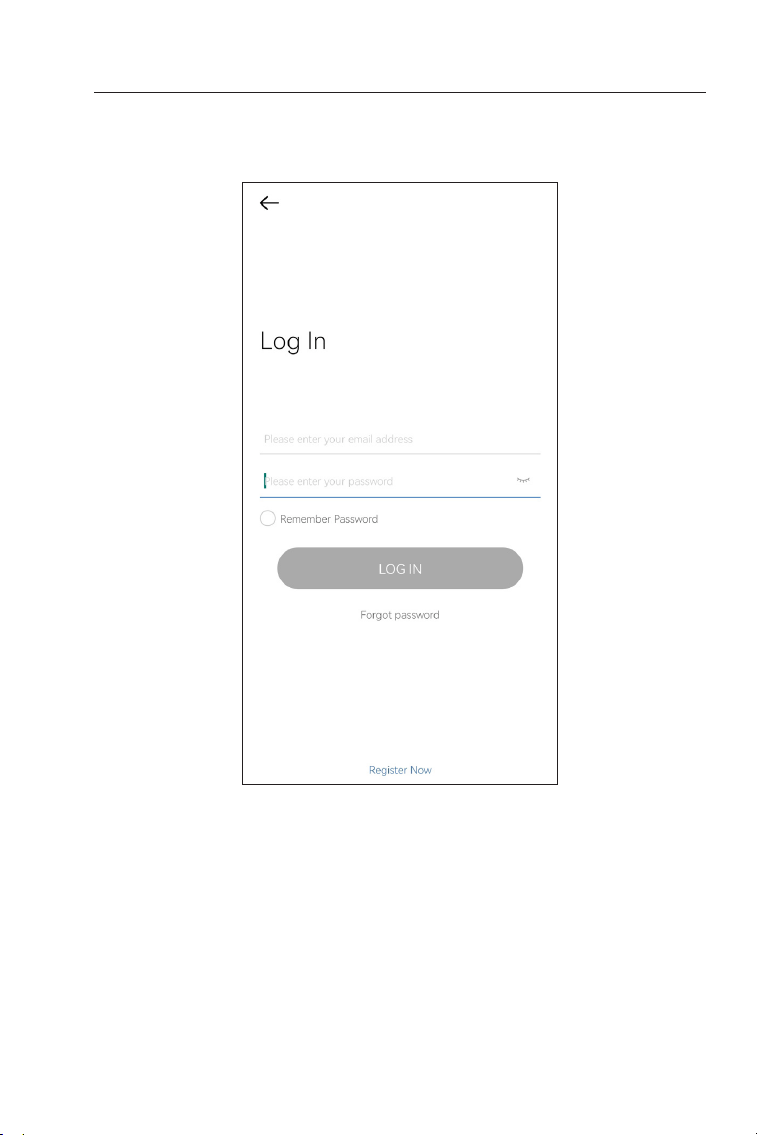
3.2 Register & Log In
Open the app and log in to your TOPDON account. (If you do not
have an account, please register with your email.)
Figure 3-2
10
3.3 Bind the VCI
①
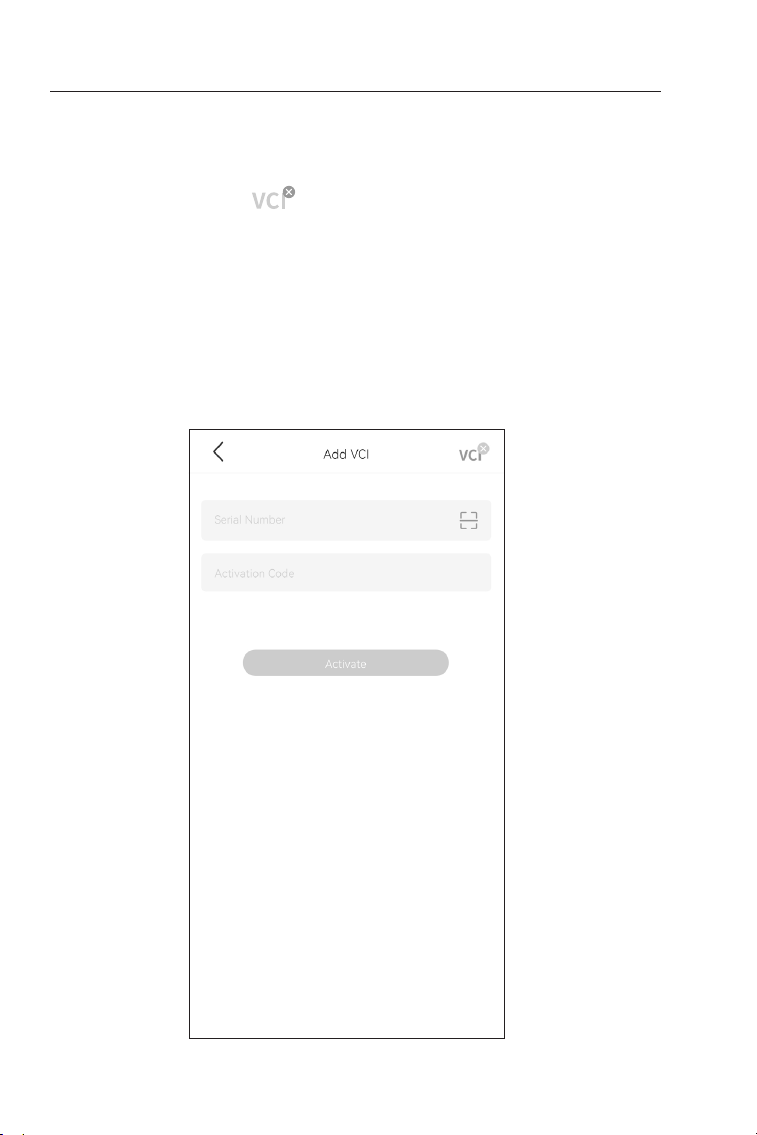
Tap Me > VCI Management > Add VCI.
②
To get the serial number and activation code, please scan the QR
code on the product.
Alternatively, tap the icon at the top right of the activation
screen to establish a Bluetooth connection (see Figure 3-3). Once
the Bluetooth connection between the TopScan and your phone
is established, the serial number and activation code will be
automatically obtained.)
Note:
The TopScan should be properly plugged into the vehicle's DLC
before Bluetooth can be connected.
③
Then, tap Activate.
Figure 3-3
11
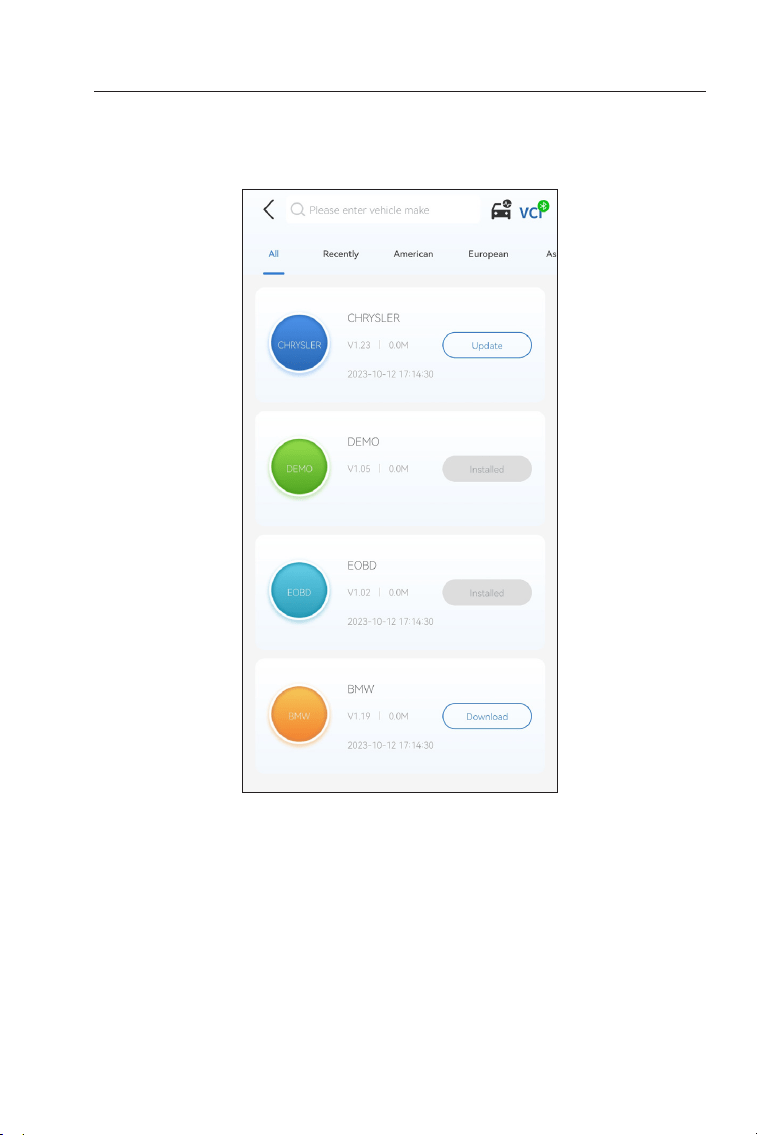
3.4 Download the Diagnostic Software
You will need to download the vehicle-specic software the rst time
you use the diagnostic function. Tap Diagnostics from the home
screen and download the software you need.
Figure 3-4
12
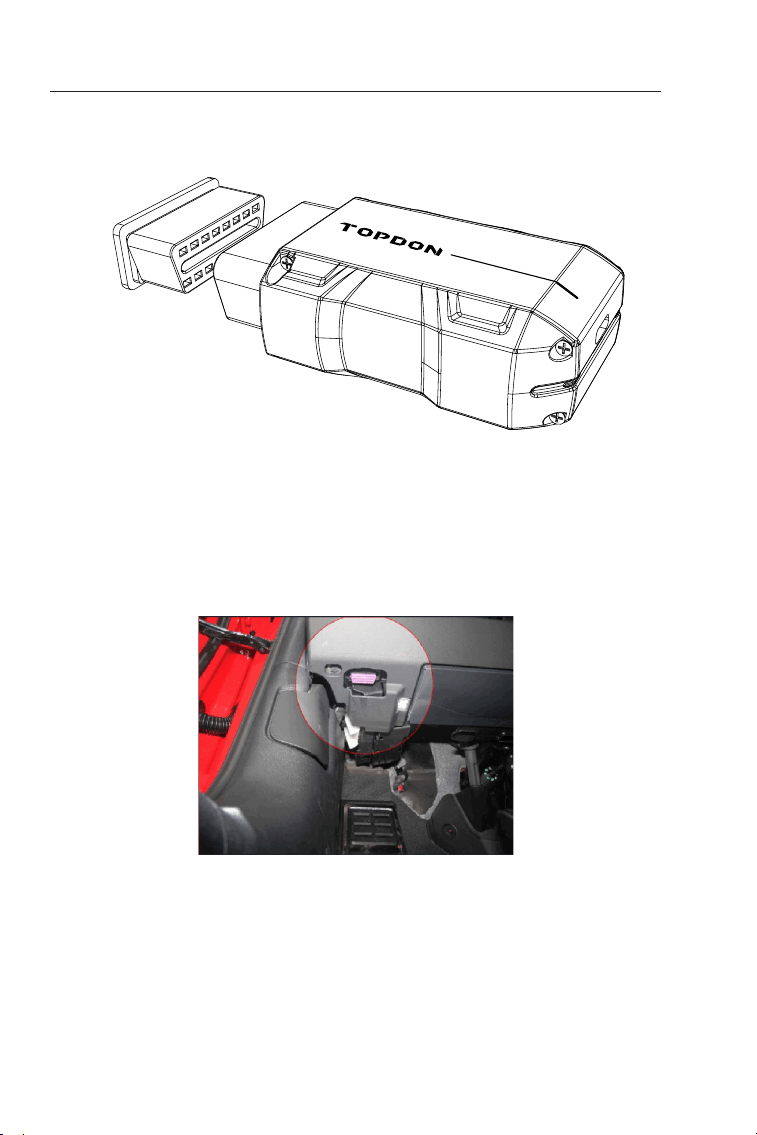
3.5 Plug the TopScan into the Vehicle's DLC
To locate the vehicle's DLC, tap DLC Location from the home screen,
select vehicle make, model and year, and tap Next. A picture of DLC
location for the selected vehicle will display.
Note:
Make sure the ignition is OFF before plugging in the unit.
Figure 3-5
Figure 3-6
13
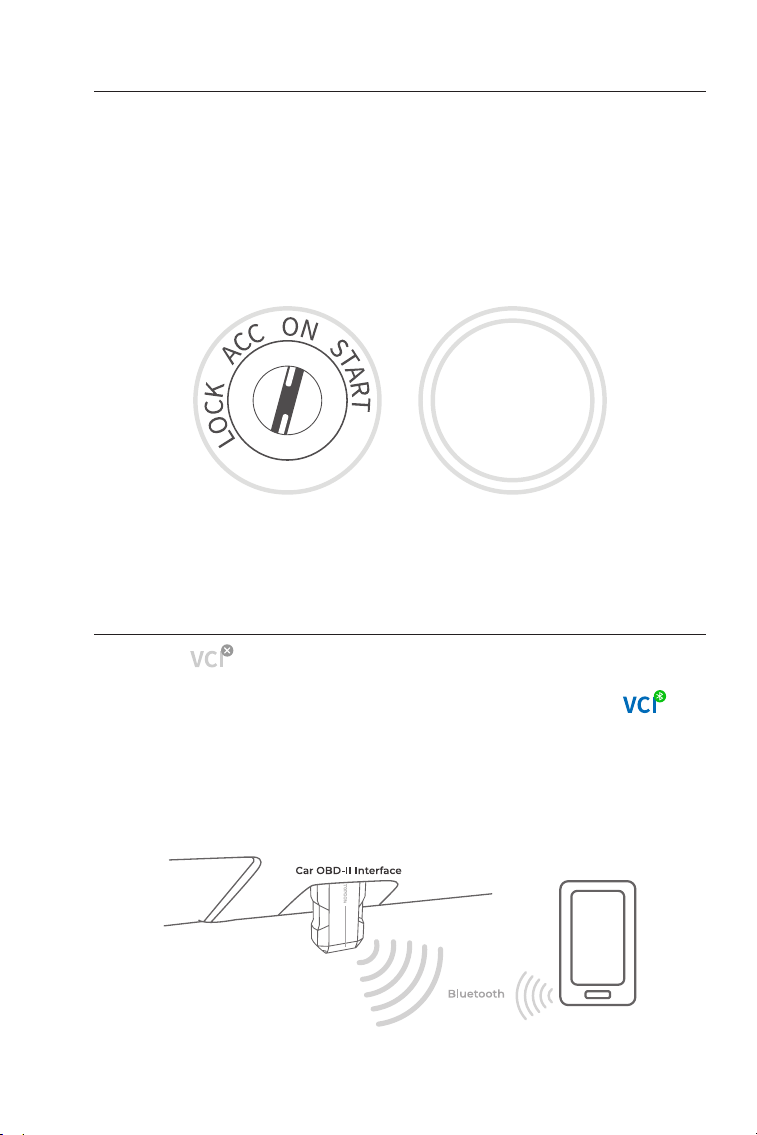
3.6 Turn the Ignition to the "ON" Position (see Figure 3-7)
3.7 Bluetooth Connection
If your vehicle is equipped with a keyless start system and the
ignition switch is an "Engine Start Stop" button (see Figure 3-8), press
the "Engine Start Stop" button until the car is in "ON" mode. Do not
apply the brake while pressing the "Engine Start Stop" button or you
will start the car instead of putting it in the "ON" position.
The method of ignition varies by vehicle model. Refer to the vehicle's
service manual for details.
Tap the icon at the top right of any screen with this icon to
establish Bluetooth connection with the TopScan unit. After the
connection is successfully established, the icon changes to .
Once Bluetooth is successfully paired, the connection will be
automatically established when you open the app. If not connected,
manually tap the icon to reconnect.
ENGINE
START
STOP
Figure 3-7
Figure 3-9
Figure 3-8
14
Figure 4-1
Section 4
Using the TopScan via the App
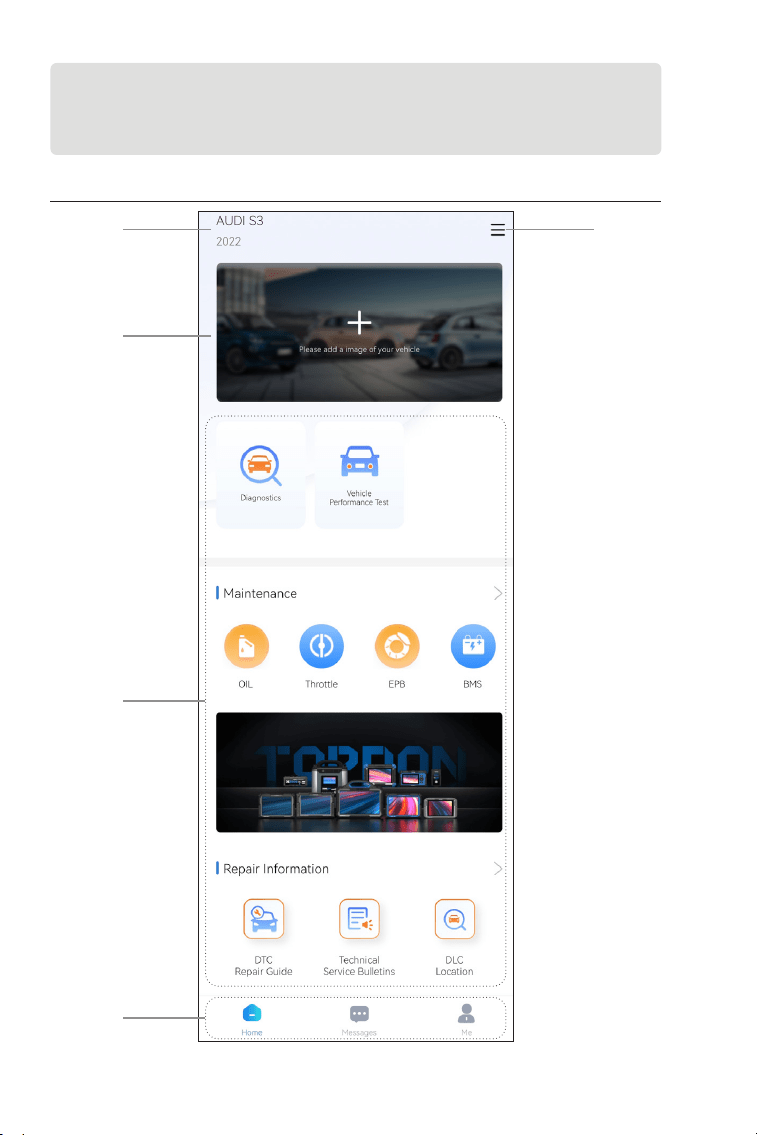
4.1 Home Screen
1 3
2
4
5
15
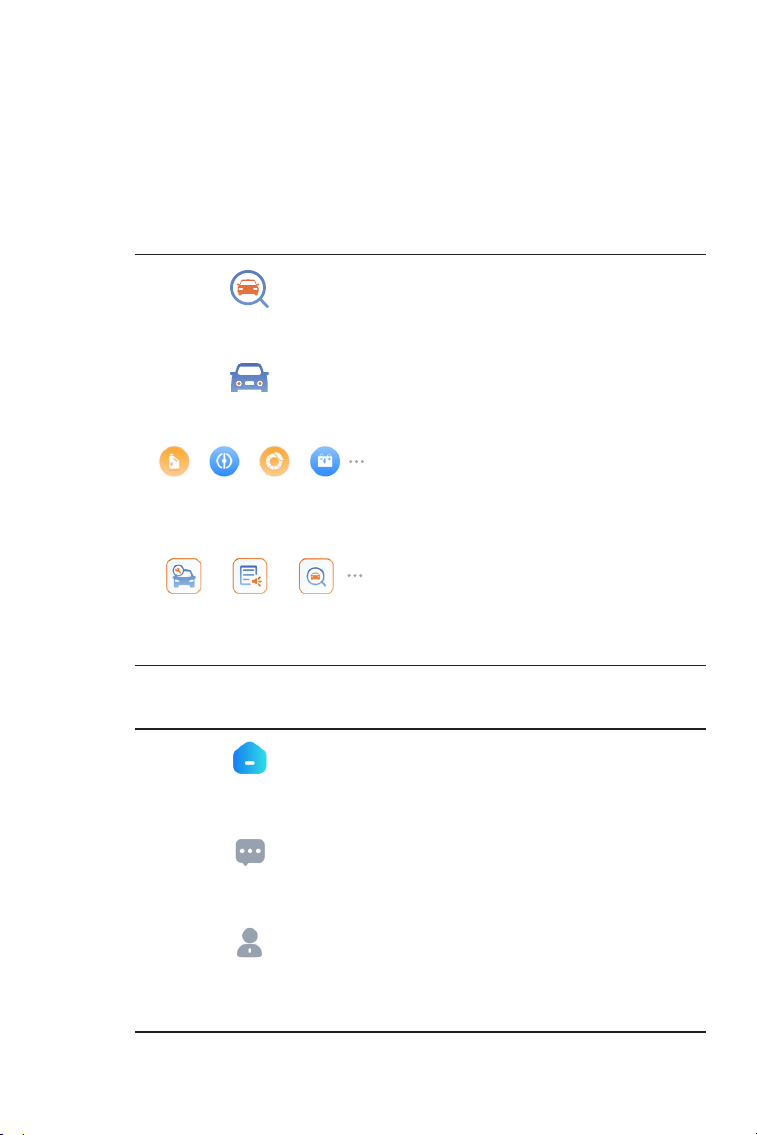
1. Currently Selected Vehicle
2. Image of the Selected Vehicle
3. Vehicle Selection
Selecting the icon opens the vehicle selection screen.
4. Function Icons
5. Toolbar
Congures the TopScan to operate as
a scan tool.
Selecting this icon returns you to the
home screen.
Allows you to perform acceleration
tests on your vehicle.
Selecting this icon opens the
message screen.
Provides 8 maintenance services.
Provides access to recorded data
streams, diagnostic reports, user
manual, VCI management, rmware
update, vehicle management,
account prole, FAQ, and settings.
Includes DTC Repair Guide, Technical
Service Bulletins, DLC Location and
Warning Light Library, which provides
reference information on vehicle
inspection, diagnostics, and repair.
Diagnostics
Home
Vehicle Performance Test
Messages
Maintenance
Me
Repair Information
16
4.2 Diagnostics
4.2.1 Auto Scan and Individual System Diagnostics
Identifying the Vehicle
The Diagnostics module allows you to scan all supported vehicle
systems at one time (Auto Scan) for Diagnostic Trouble Codes (DTCs)
or select an individual system to perform Read Trouble Code, Clear
Trouble Code, Read Data Stream, Read Version Information and
Active Test. You can also access EOBD and Diagnostic Feedback
through this module.
To perform Auto Scan or Individual System Diagnostics, you need
to identify your vehicle rst.
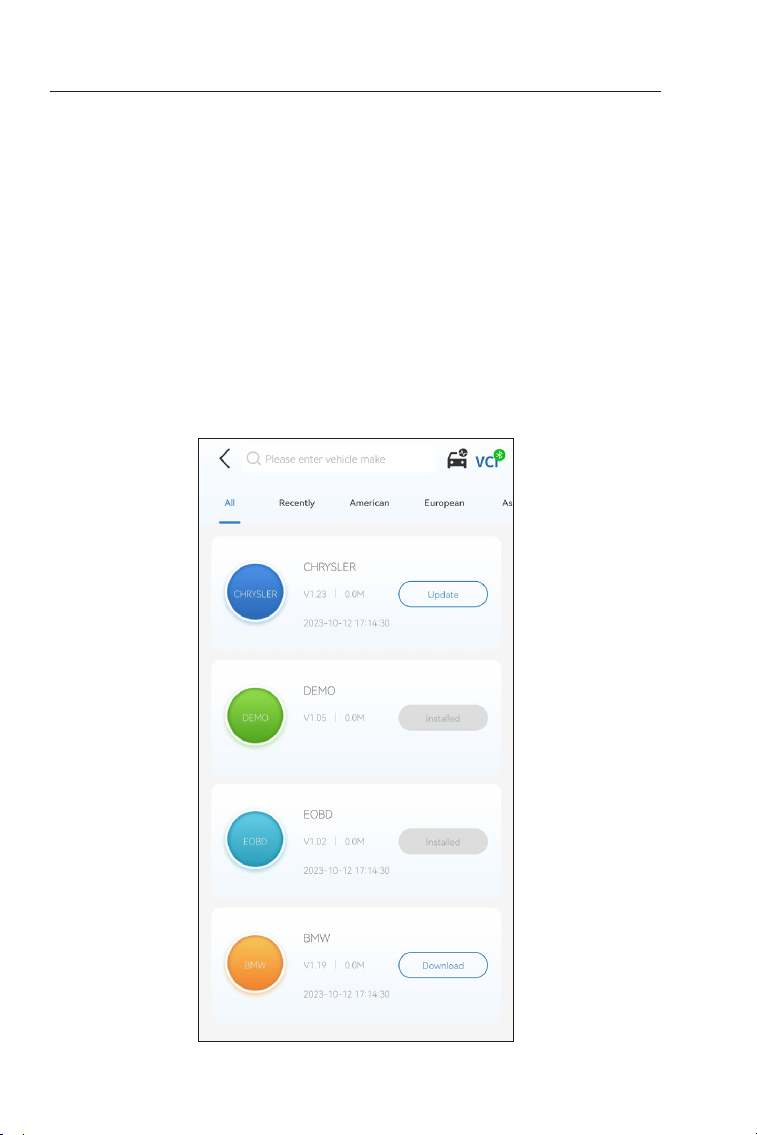
1. Tap Diagnostics from the home screen. A list of vehicle-specic
diagnostic software will display.
Figure 4-2
17
2. Select the software by your vehicle make (If you have not
downloaded the software, please download and install the software
rst).
Note:
A demonstration mode (DEMO option) is provided to help you
become familiar with Diagnostics functions.
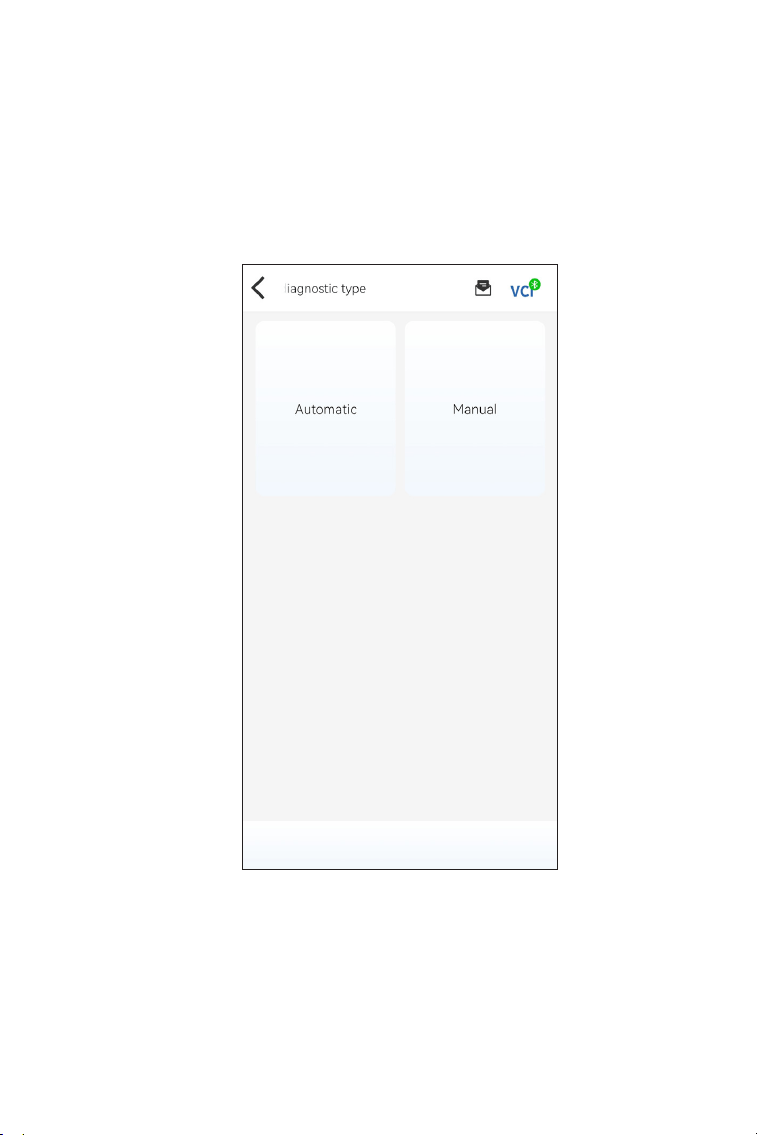
3. Select Automatic / Manual to identify the vehicle.
Figure 4-3
18
Automatic
Manually enter Vehicle Identication Number (VIN) or tap Read to
acquire VIN, then tap Conrm. TopScan will automatically decode
the VIN to identify the vehicle.
Manual
Manually select the vehicle information to identify the vehicle.
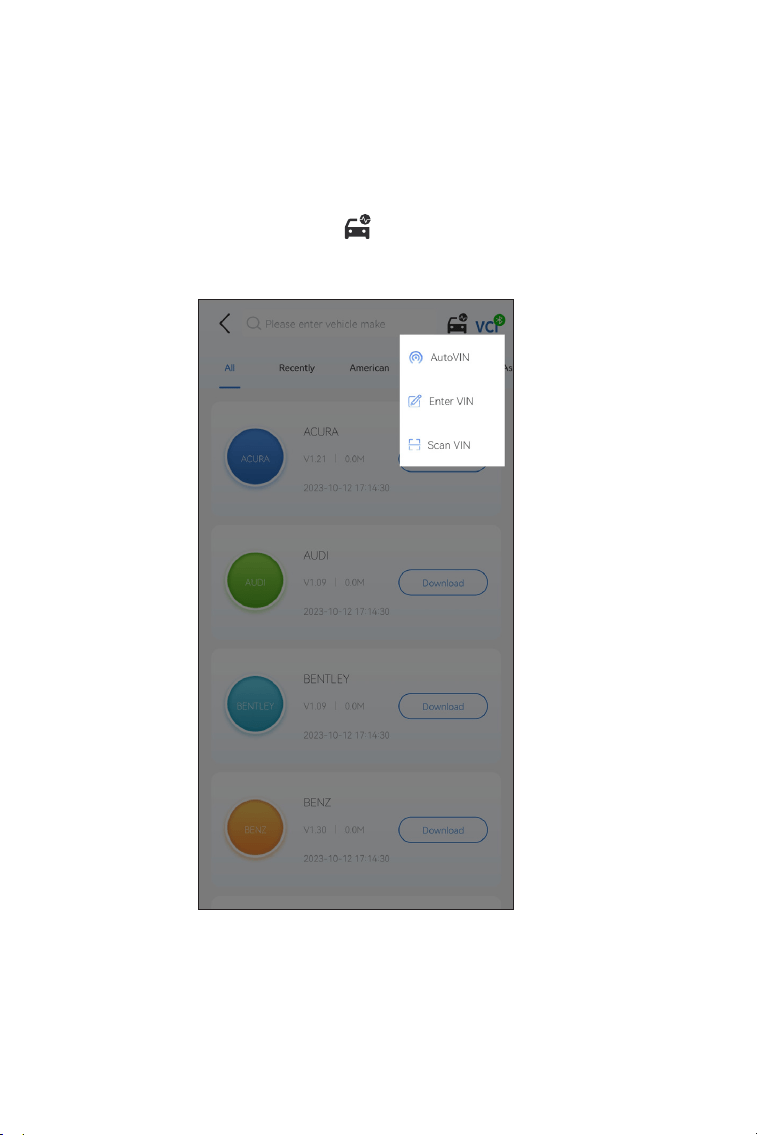
Alternatively, you can tap the icon at the top right of the
screen and select AutoVIN, Enter VIN or Scan VIN to identify the
vehicle.
Figure 4-4
19
AutoVIN - The TopScan automatically reads and decodes the VIN.
Enter VIN - manually enter the VIN or tap to scan the VIN
characters.
Scan VIN - tap to scan the VIN characters.
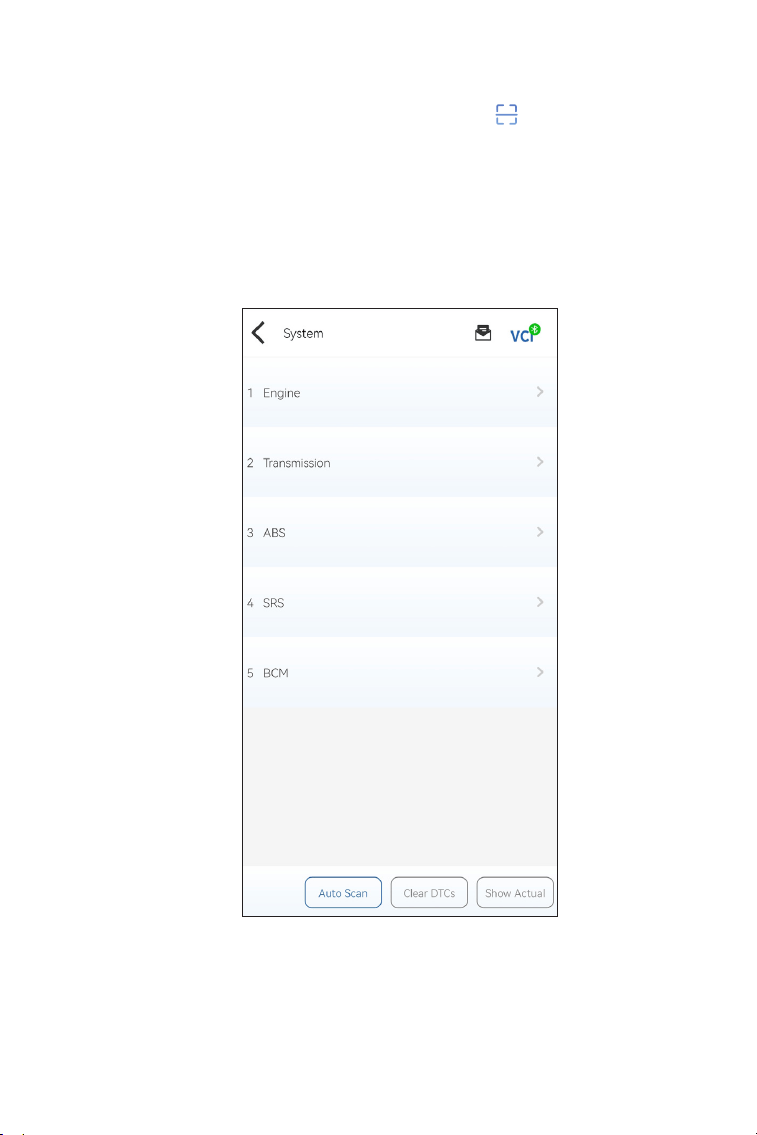
4. A systems menu will display after the vehicle is identied.
Note: Systems may vary by vehicle make, model and year.
Figure 4-5
20
You can either select Auto Scan or tap a vehicle system to open
the function menu for that system.
Figure 4-6
Auto Scan
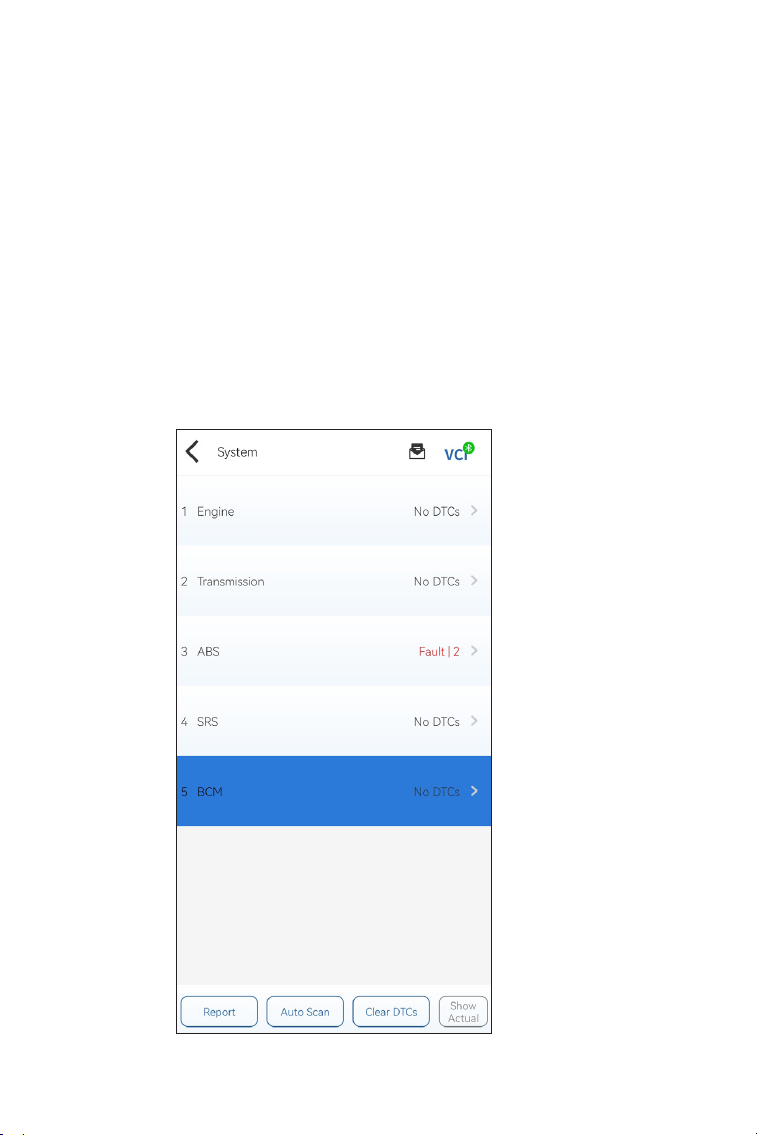
Auto Scan detects the systems supported by the vehicle and
retrieves DTCs for all of these systems, providing a complete health
check of your vehicle. Performing Auto Scan before and after repair
could help in troubleshooting and validating repairs. Pre and post
scan reports can allow you to record the condition of the vehicle
before and after repair for comparison.
To perform an Auto Scan, tap the Auto Scan button. The
TopScan will start scanning all the systems supported by the
vehicle, and DTC retrieval will be automatically proceeded.
Results are displayed progressively as the systems are scanned.
21
Button Description
Report - tap to save the current scan results in report format. (To
view the saved reports, go to Me > Diagnostic Report.)
Clear DTCs - tap to clear all the DTCs retrieved.
Show All / Show Actual - tap to toggle between showing all
vehicle systems and showing only the supported systems.
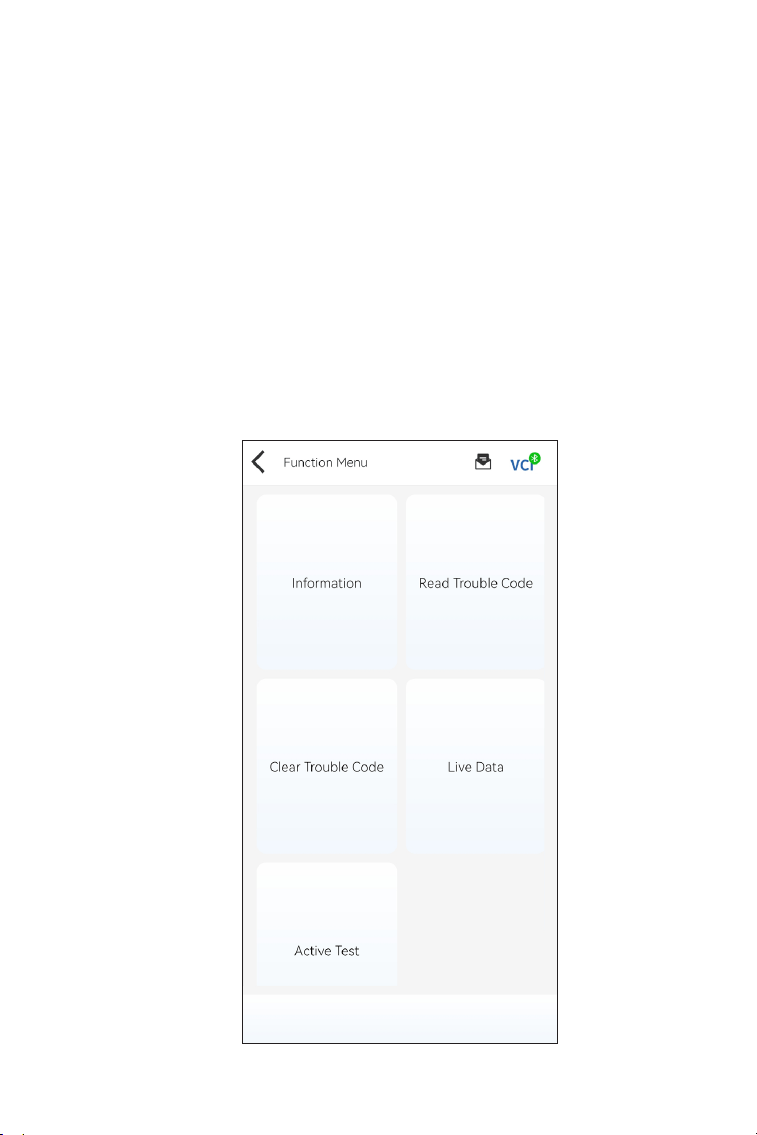
Performing Individual System Diagnostics
To access the function menu of a certain system:
From the systems menu, select the desired vehicle system.
Available function options for the system will be displayed. Select a
function to continue.
Figure 4-7
22
Read Version Information
Tap Information in the function menu. Then you
can view the version information of the Electronic Control Unit
(ECU) for the currently selected system.
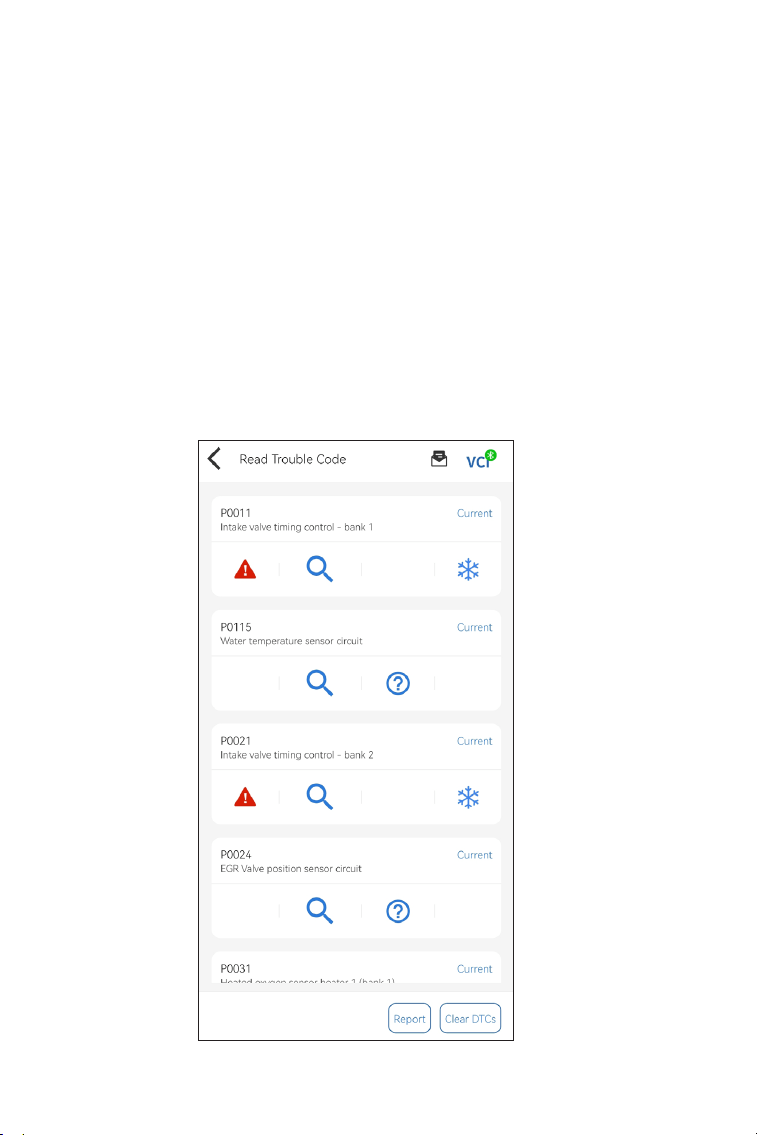
Read Trouble Code
To retrieve DTC for the currently selected system:
Tap Read Trouble Code in the function menu. TopScan will
communicate with the ECU and retrieve and display DTCs for the
currently selected system.
Note: Depending on the vehicle make, some functions may not be
available.
Figure 4-8
23
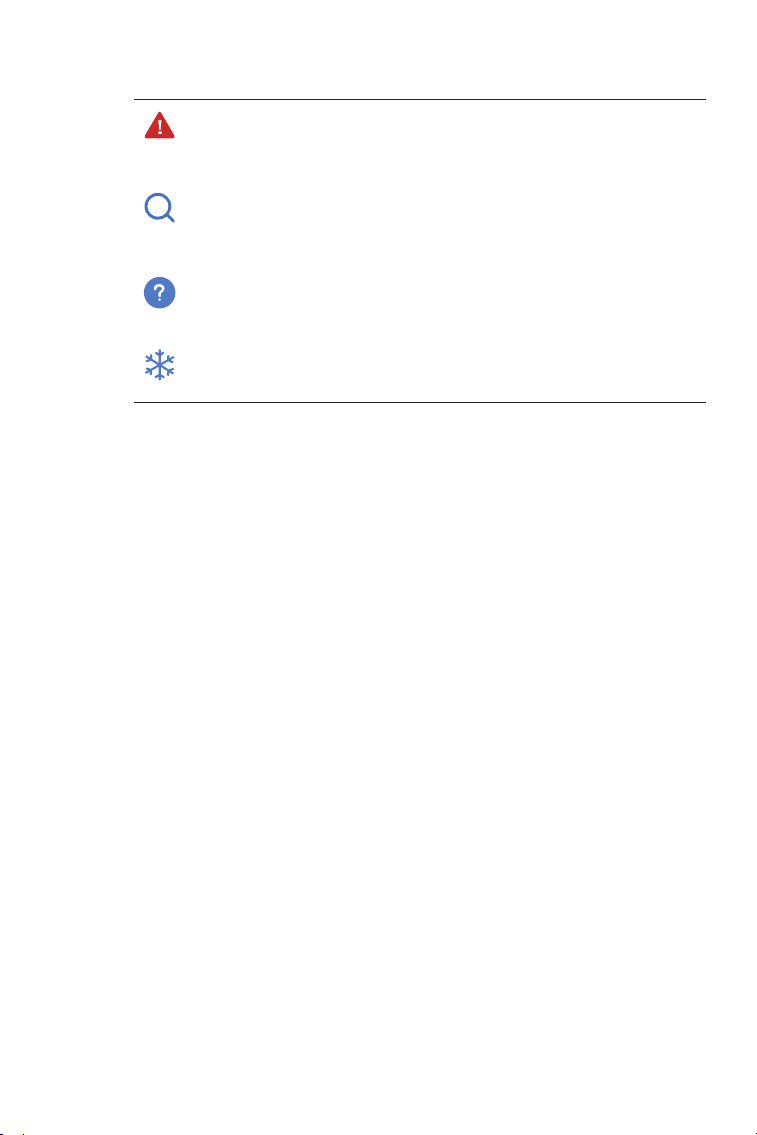
Icon Description
Button Description
Report - tap to save the results in report format. (To view the saved
reports, go to Me > Diagnostic Report.)
Clear DTCs - tap to clear all the DTCs retrieved.
Clear Trouble Code
To clear DTCs for the currently selected system:
1. Tap Clear Trouble Code in the function menu.
2. Tap OK when the DTCs are cleared.
Note:
1. Procedure of clearing DTCs should be performed after the
required repair has been carried out. Once conrmed, DTCs and
freeze data stored in the ECU will be cleared.
2. DO NOT START UP THE ENGINE WHILE CLEARING DTCS.
Indicates that the DTC is causing a warning light to
illuminate.
Tap to open a window that allows you to search on Google
for more information about the DTC.
Tap to view the detailed description of the DTC.
Tap to view the freeze frame captured at the time when
the DTC occurs.
24
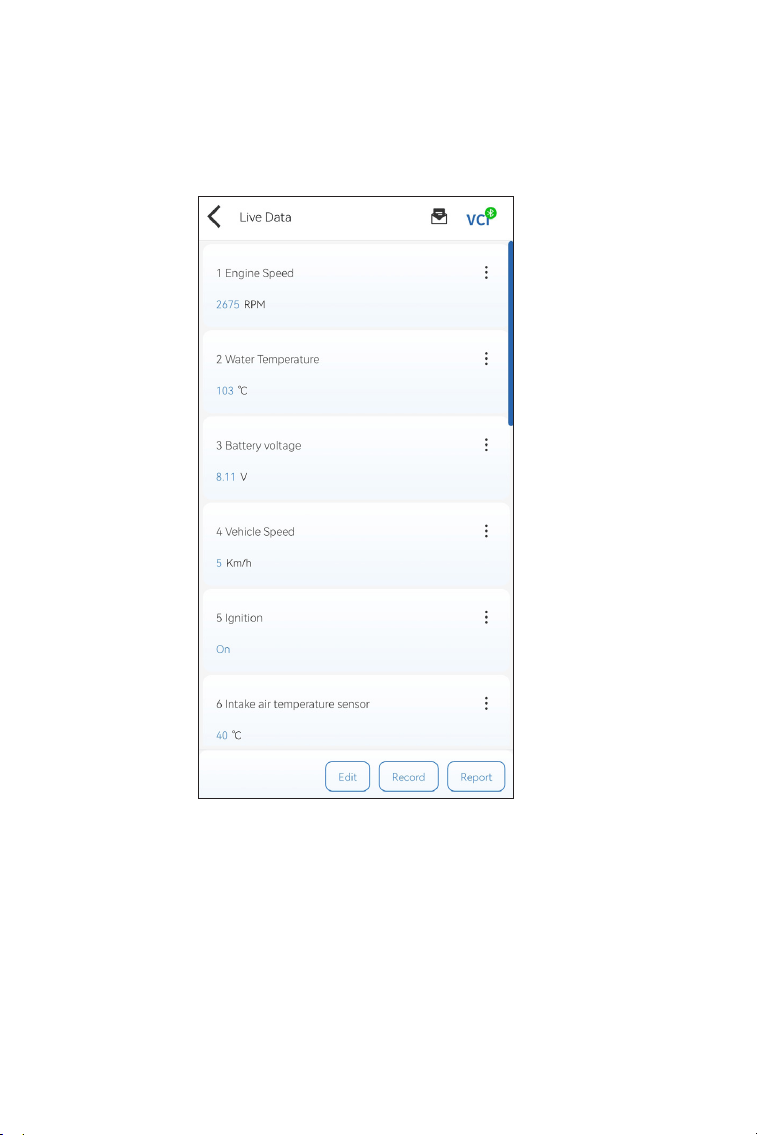
Read Data Stream
To view data stream for the currently selected system:
1. Tap Live Data in the function menu.
A data stream list displays.
Button Description
Edit - allows you to customize your data stream list. Select the
check box of the data stream you are interested in viewing and tap
Conrm.
Record - allows you to record and save data stream information
for comparison and analysis. To view the saved data stream
information, go to Me > Data Stream.
Figure 4-9
25
Report - tap to save the current data stream values in report
format. To view the saved reports, go to Me > Diagnostic Report.
Each entry of the list shows the name and the current value of the
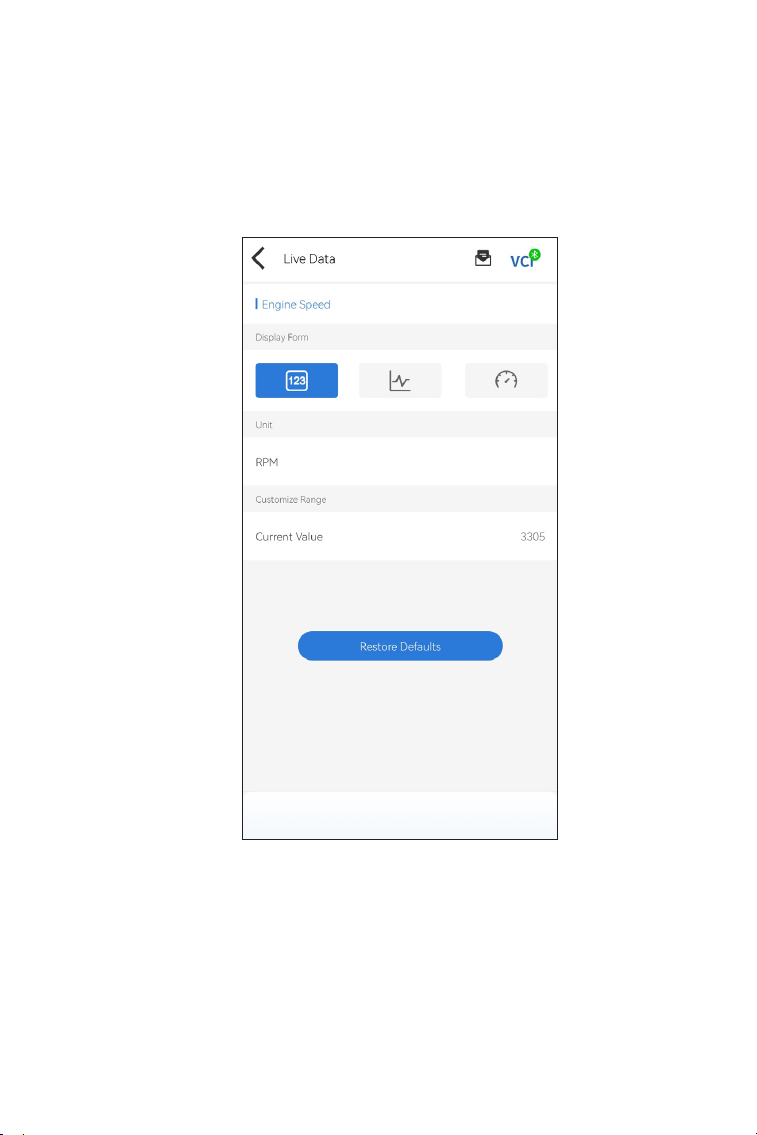
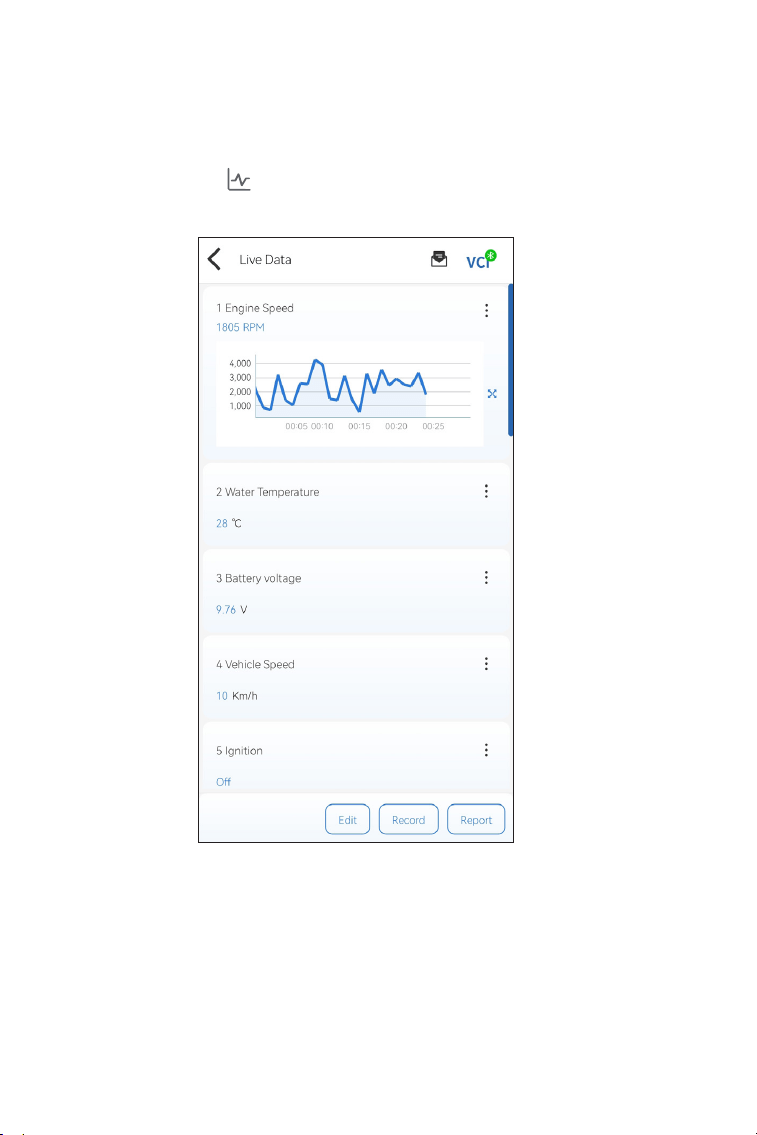
data stream. You can tap the dots at the side of each entry to enter
the setting screen. The data stream can be viewed in value, graph,
or gauge format (see Figure 4-10).
Figure 4-10
26
2. For ease of comparison and observation, the Combine function
is provided which allows up to 4 data streams to be viewed in one
graph.
To access the Combine function:
①
Tap the icon to change the display form, and go back to
the data stream screen.
Figure 4-11
27
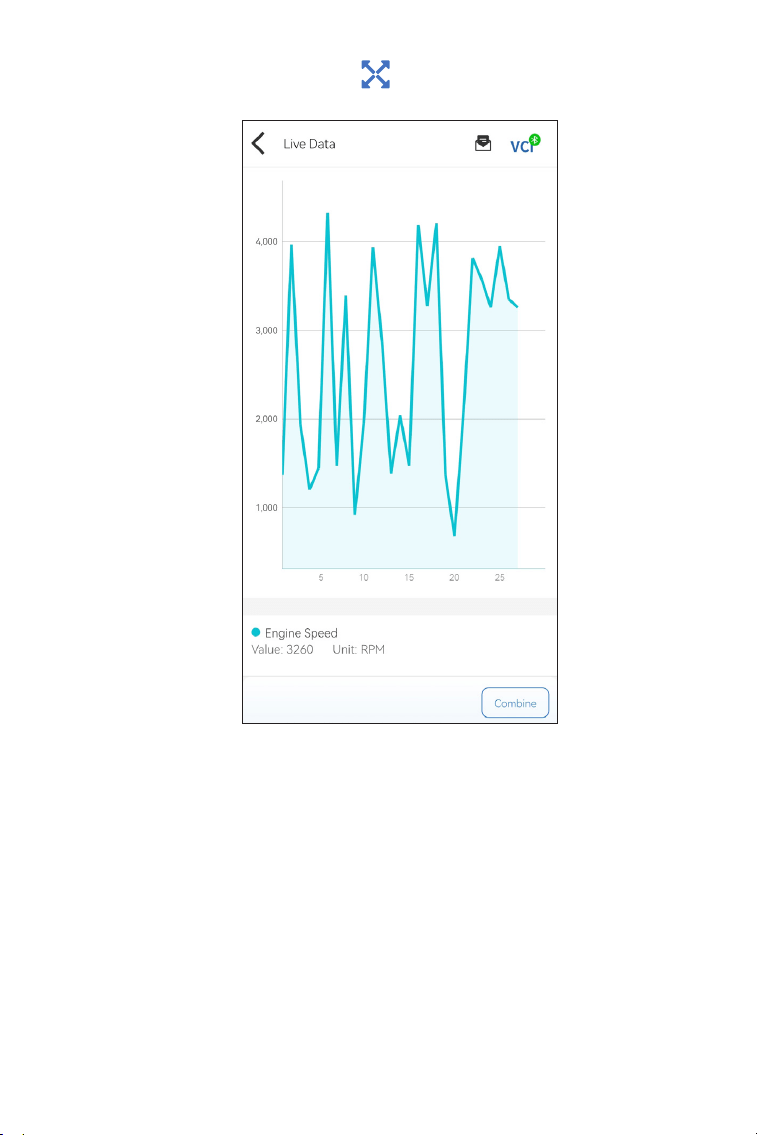
②
Tap the full screen icon at the right side. The following
screen will appear.
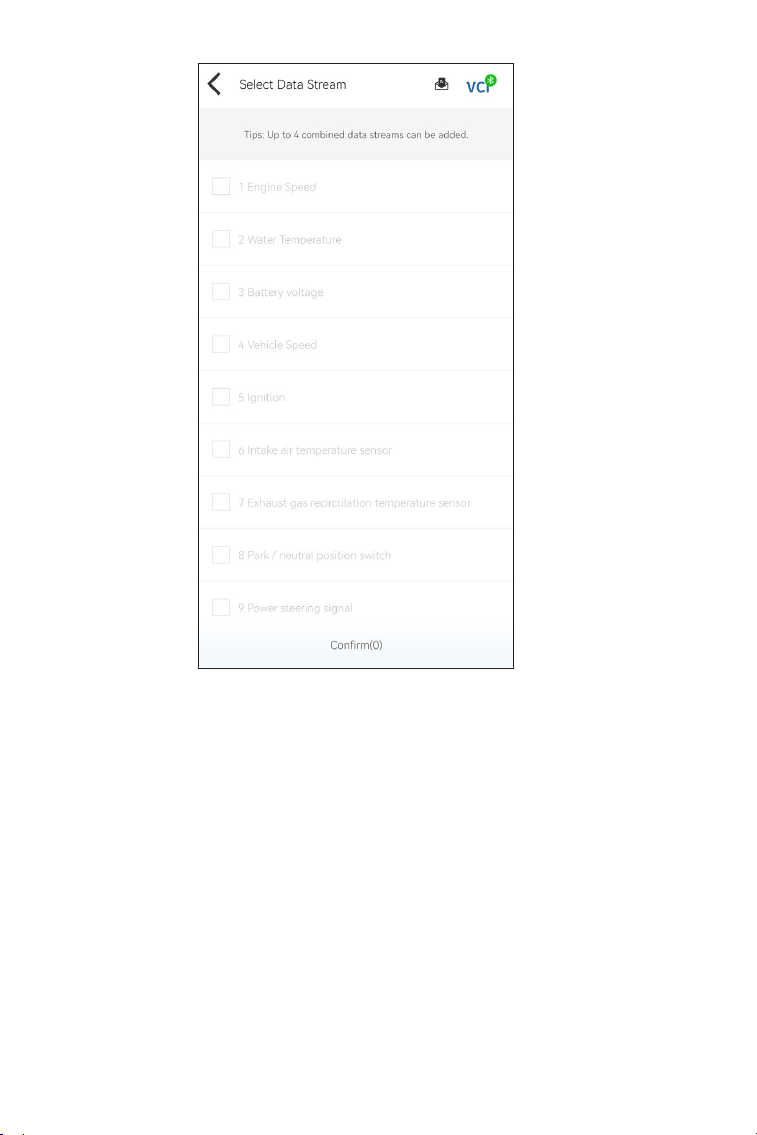
③
Tap Combine, and select up to four data streams.
Figure 4-12
28
④
Tap Conrm. A combined graph will display.
Note:
IF THE VEHICLE MUST BE DRIVEN TO VIEW THE LIVE DATA
STREAM, ALWAYS HAVE A SECOND PERSON HELPING YOU. DO
NOT WATCH THE DATA STREAM WHILE DRIVING.
Figure 4-13
29
Active Test
- allows you to manually control certain component operations
directly from the app to verify the operations of components.
Note:
Available tests vary by vehicle make, year and model.
4.2.2 EOBD
The EOBD function allows you to perform emission-related
diagnostics for your vehicle.
To perform EOBD Diagnostics:
1. Tap Diagnostics from the home screen. Select EOBD in the
displayed vehicle make list.
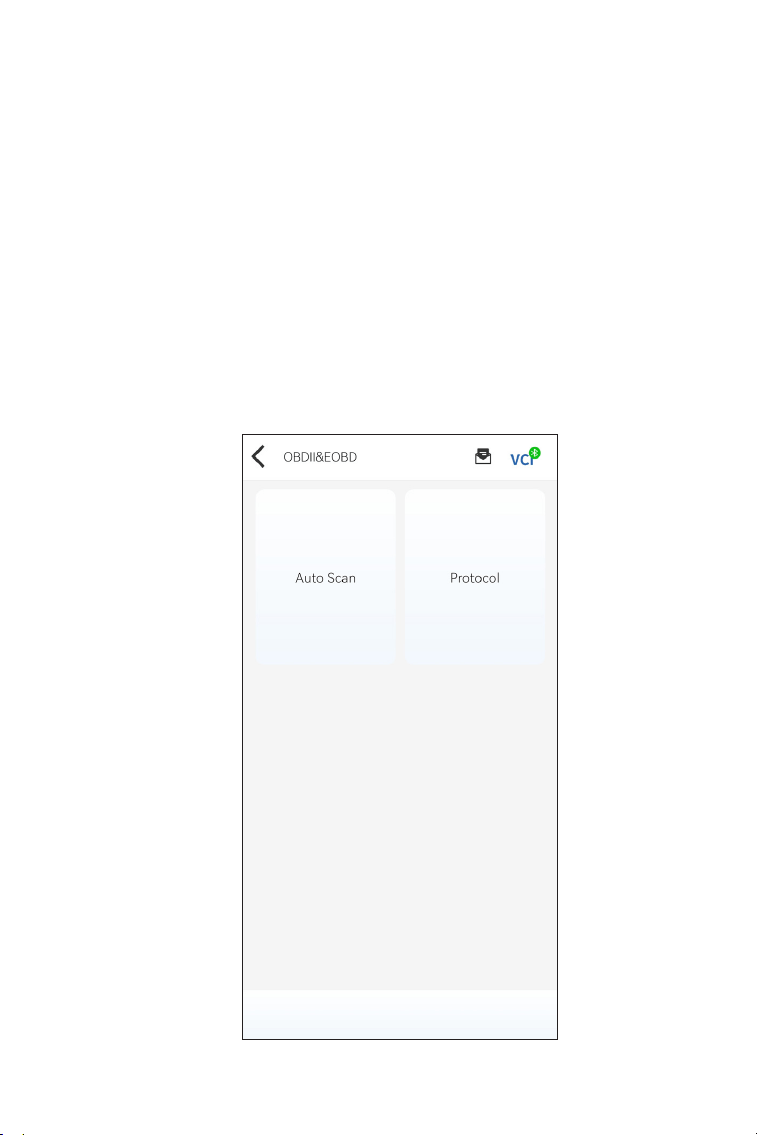
2. Select your communication method: Auto Scan or Protocol.
Figure 4-14
30
Auto Scan - The TopScan will automatically communicate with the
vehicle and identify which protocol the vehicle is using.
Protocol - allows you to manually select the communication
protocol.
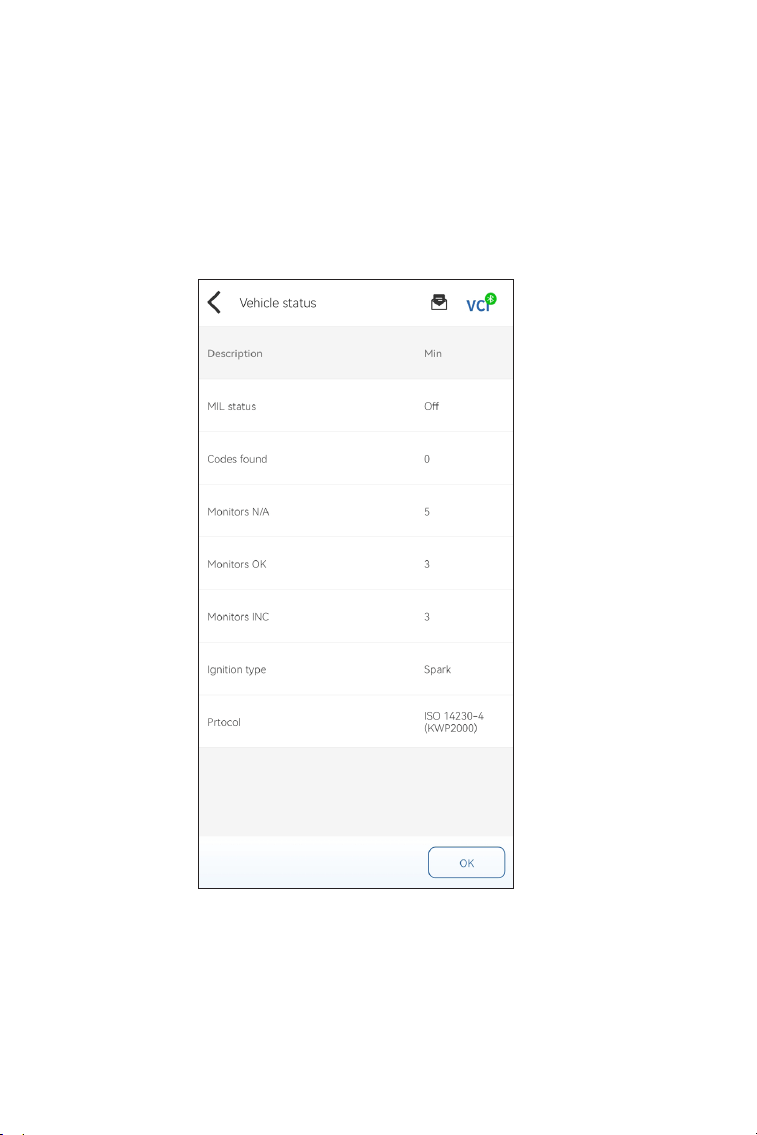
After the communication protocol is conrmed, a vehicle status
screen displays showing the protocol and other status info of your
vehicle.
Figure 4-15
31
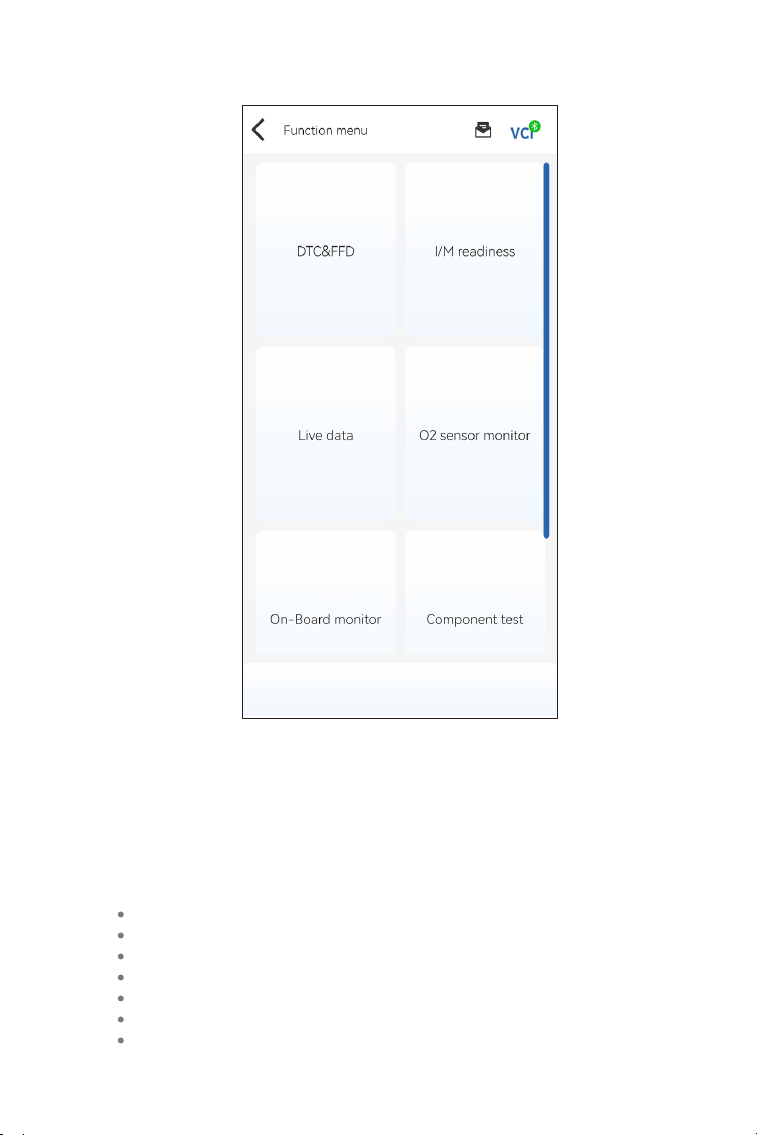
3. Tap OK to enter the function menu.
4. Select a function to continue.
Note: Depending on the vehicle make, some functions may not be
available.
Typical function options may include:
DTC & Freeze Frame Data
I/M Readiness
Live Data
O2 Sensor Monitoring
On-Board Monitoring
Component Testing
Vehicle Information
Figure 4-16

32
DTC & FFD (Freeze Frame Data)
I/M (Inspection and Maintenance) Readiness
This function helps retrieve and clear DTCs stored in the vehicle's
ECU and displays FFD of the emission-related systems.
1. Read DTCs
This function displays the DTCs retrieved from the emission-related
systems.
2. Clear DTCs
This function allows you to clear the DTCs retrieved from the
emission-related systems.
3. FFD
This function takes a snapshot of the data and operating conditions
when an emission-related fault occurs.
Note:
1. The procedure of clearing DTCs should be performed after the
required repair has been carried out. Once conrmed, DTCs and
FFD stored in the ECU will be cleared.
2. DO NOT START UP THE ENGINE WHILE CLEARING DTCS.
This function checks whether or not the various emission-related
systems on the vehicle are operating properly, and are ready for I/M
testing.
It can also be used to check the monitor running status and to
conrm if the repair of a car fault has been performed correctly.
Live Data
This function displays the real-time live data and parameters from
the vehicle’s ECU.
O2 Sensor Monitor
This function displays O2 sensor monitor test results of the most
recently completed tests from the vehicle’s ECU.
On-Board Monitor
This function displays the test results for emission-related
powertrain components and systems that are not continuously
monitored.

33
Component Test
This function helps send control commands to the vehicle's ECU as
a way to test and operate the system parts and components.
Vehicle Information
This function displays a list of information (provided by the vehicle
manufacturer) from the vehicle’s ECU.
The information may include:
• VIN
• Calibration ID (CID)
• Calibration Verication Number (CVN)
4.2.3 Diagnostic Feedback
The TopScan allows you to instantly send diagnostic feedback
(with logs of diagnostic data automatically attached) while you are
encountering a software problem with the diagnostics operations.
To send diagnostic feedback:
1. Tap the icon located at the top right corner of any screen in
the Diagnostics module.
2. Select the type of problem.
3. Write a description of the problem.
Note:
The Diagnostic Feedback function is only available for the
Diagnostics module.
34
4.3.1 Performing a Vehicle Performance Test
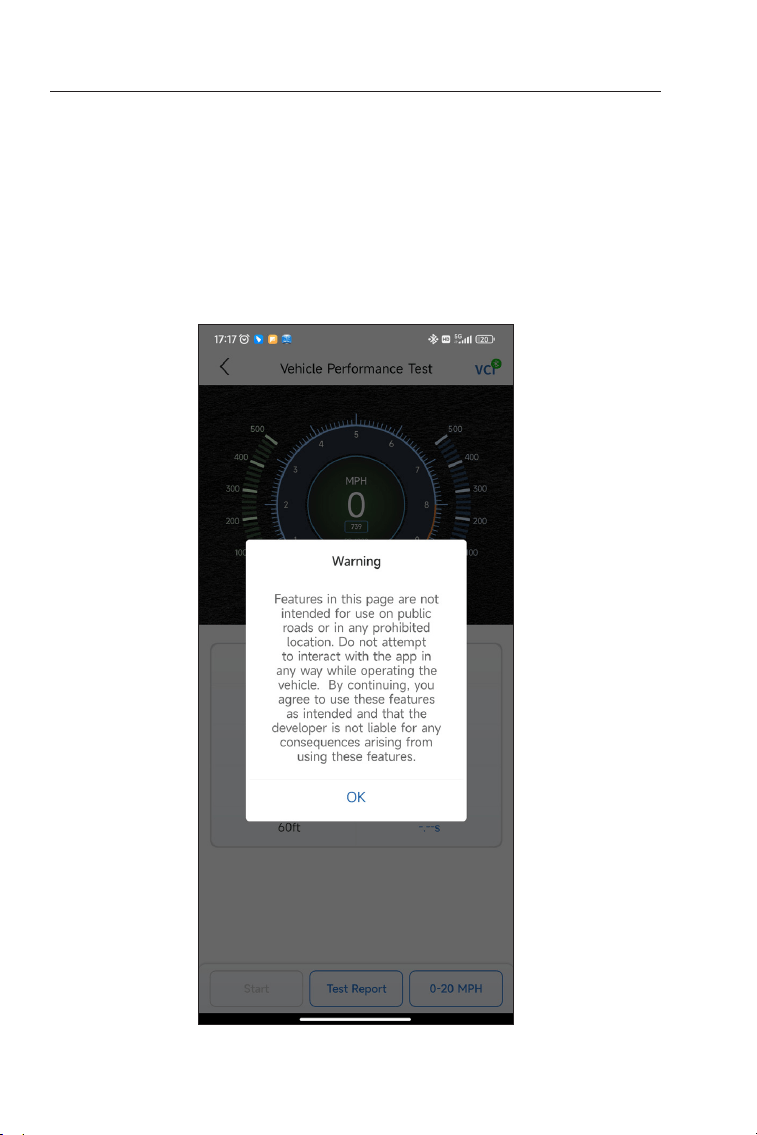
1. Tap Vehicle Performance Test from the home screen.
2. A warning message appears. Carefully read the message and tap
OK to continue.
4.3 Vehicle Performance Test
Vehicle Performance Test allows you to make accurate
measurements of vehicle acceleration, providing results at intervals
dened by set speed and xed distance measurements.
Figure 4-17
35
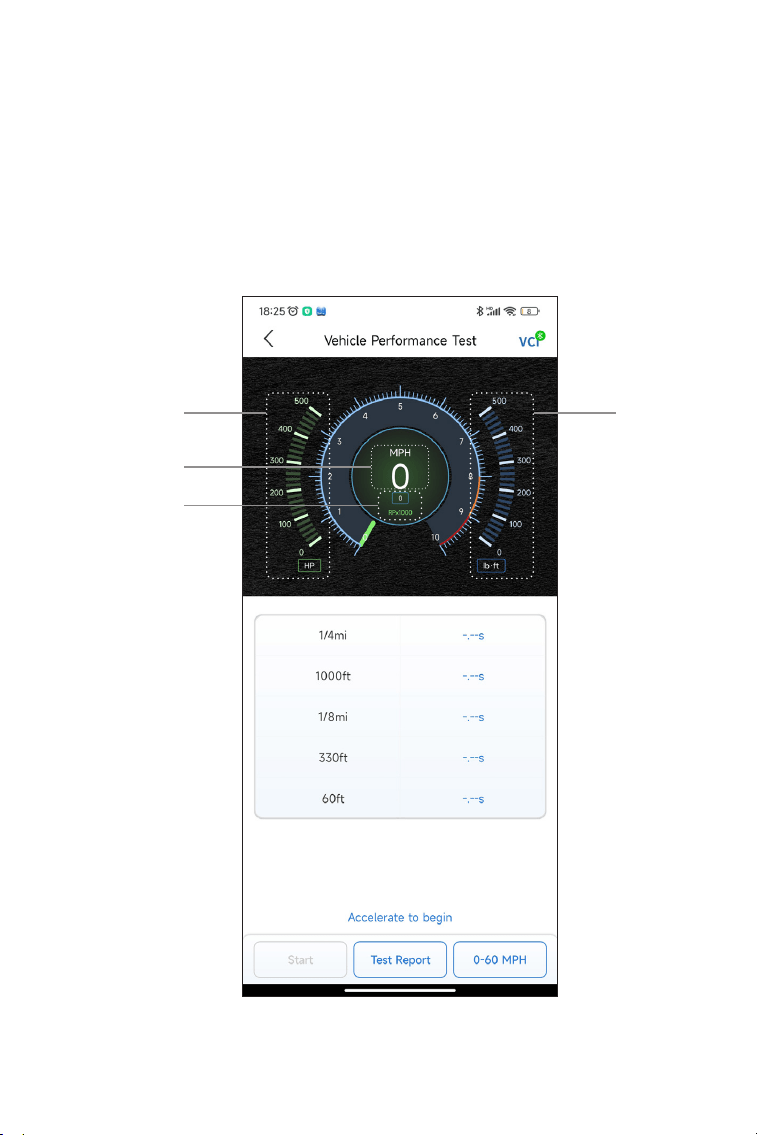
3. The default values for the start and end speeds are 0 MPH and
60 MPH respectively. If you want to change the values, tap the 0-60
MPH button, and tap Edit to set the start and end speeds.
4. Accelerate your vehicle to start the test.
Note:
If you do not reach the end-of-measurement speed, the results will
be automatically reset as soon as the speed of the car is equal to
the start speed.
Figure 4-18
3 4
1
2
36
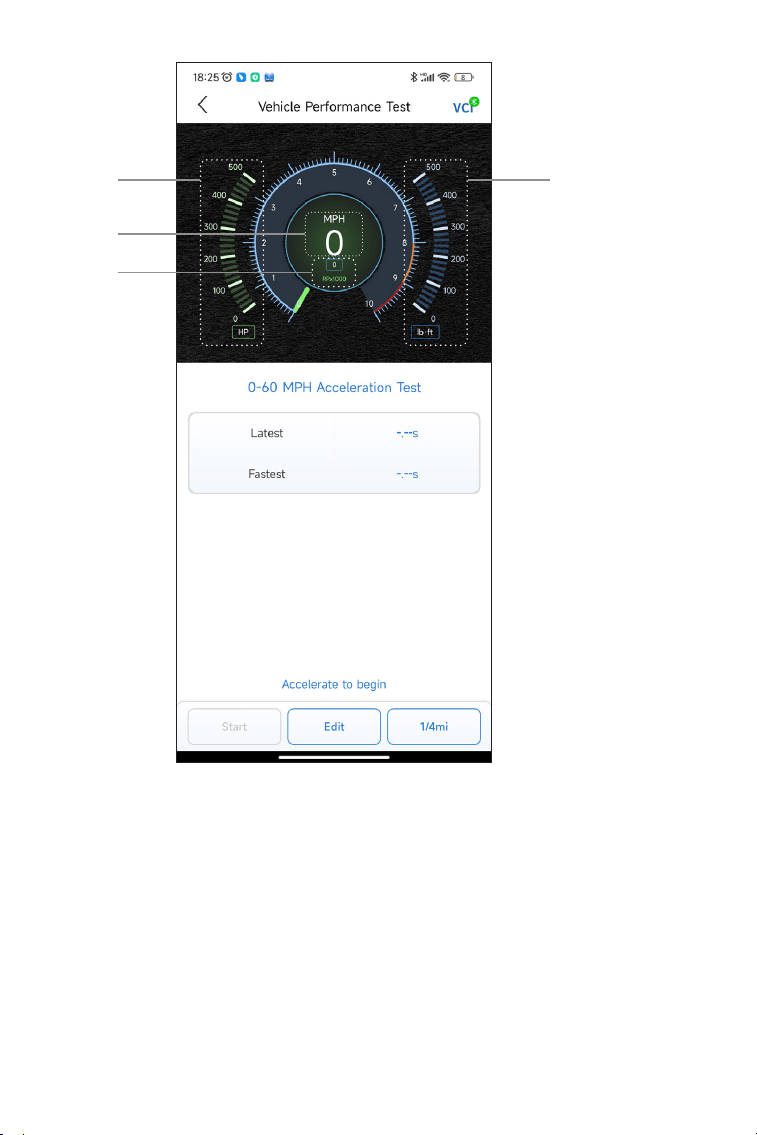
①
Vehicle Speed
②
Engine Speed
③
Horsepower
④
Torque
Button Description
Start - tap to reset for the next run
Test Report - tap to view the test results
0-60 MPH / (1/4 mi) - tap to toggle between 0-60 MPH result screen
Figure 4-19
3 4
1
2
37
and 1/4 mi result screen.
Edit - tap to set the start and end speeds.
4.3.2 Viewing Test Results
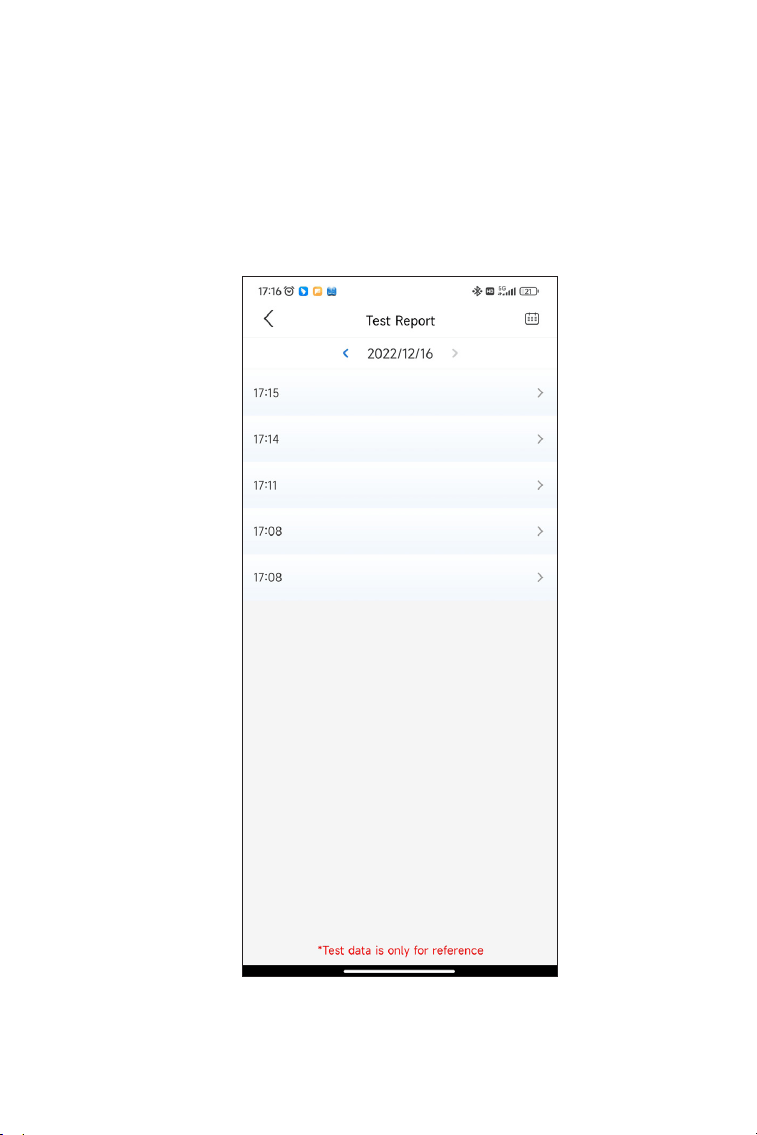
1. From the test screen, tap Test Report. The result screen will appear.
Figure 4-20
38
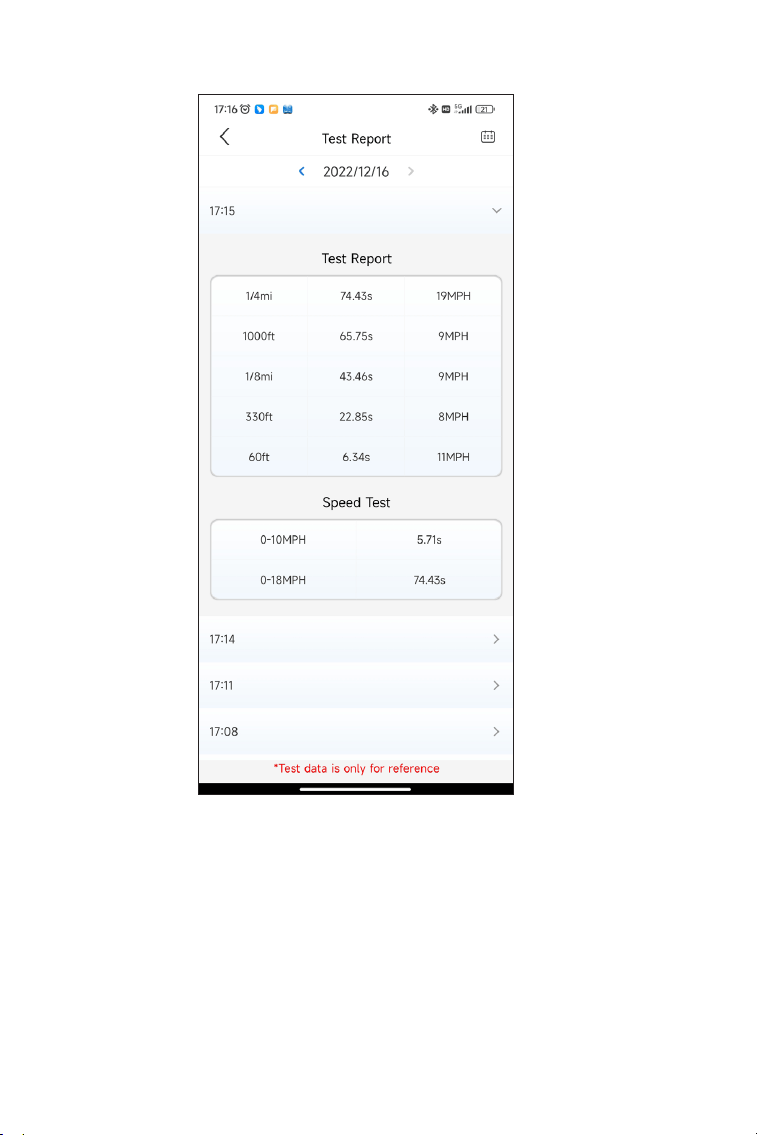
2. Tap the desired record to view its full content.
Figure 4-21

39
1/4 mi Test Results - record the elapsed time for a vehicle to travel
a certain distance (60 ft, 330 ft, 1/8 mi, 1000 ft, 1/4 mi), and the
instantaneous speed at each point (see Figure 4-18 and Figure 4-21).
0-60 MPH Test Results - record the elapsed time for a vehicle to
accelerate from 0 to 60 miles per hour (see Figure 4-19). The values
for the start and end speeds can be changed if desired.
Speed Test Results - record the elapsed time for a vehicle to
accelerate to a specic speed (see Figure 4-21).
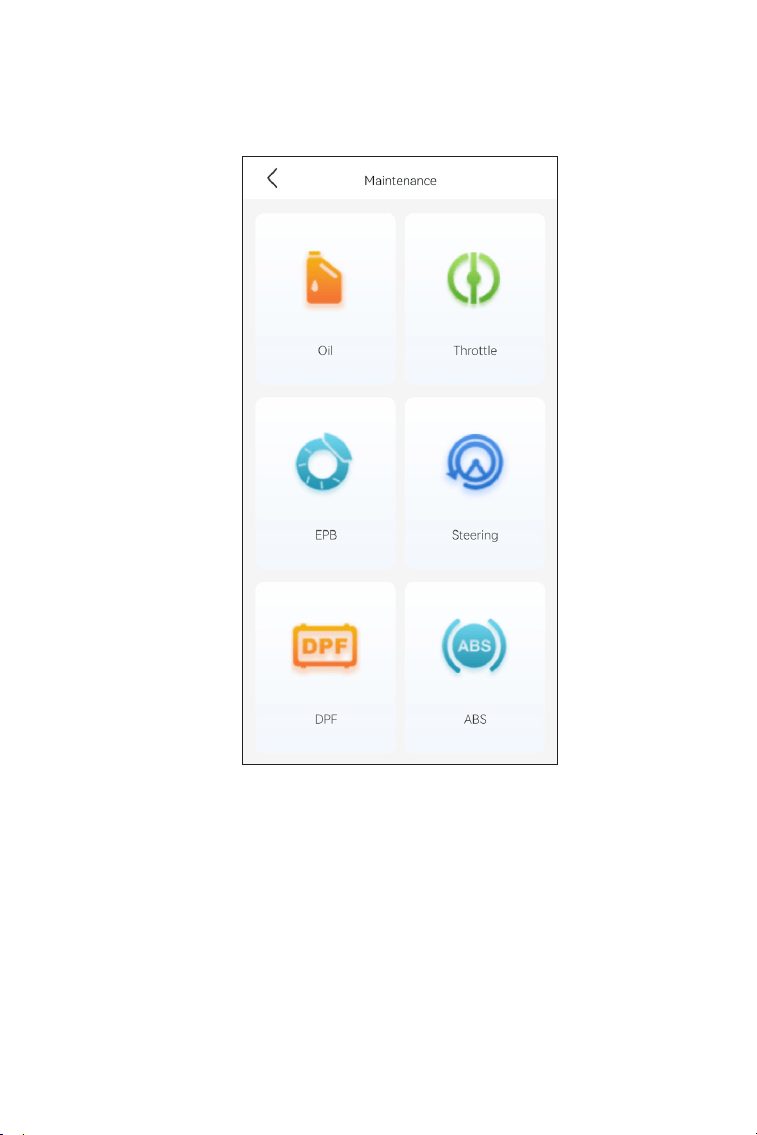
4.4 Maintenance
This function provides you with 8 maintenance services including
Oil Reset, Throttle Adaptation, Electronic Parking Brake (EPB) Reset,
Steering Angle Reset, Diesel Particulate Filter (DPF) Regeneration,
Anti-lock Braking System (ABS) Bleeding, Battery Management
System (BMS) Resets and Airbag Reset.
4.4.1 Services Overview
Oil Reset
This function allows you to reset the oil service lamp for the engine
oil life system, which calculates an optimal oil life change interval
depending on the vehicle driving conditions and weather events. Oil
reset is required every time the engine oil is changed.
EPB Reset
This function helps you replace and reset the brake pads.
It needs to be performed in the following cases:
• After the brake pads and brake pad wear sensor are replaced;
• When the brake pad warning light is on;
• After a short circuit in the brake pad sensor is xed;
• After the servo motor is replaced.
Steering Angle Reset
If the steering angle sensor is replaced, or the steering angle is
inaccurate or not centered, the steering angle reset function needs
to be performed to nd the relative zero position. With this position
as a reference, the ECU can then calculate the exact angle for left
and right steering.

40
BMS Reset
After the car battery is replaced, the car battery control unit needs to
be reset. This will clear fault information (such as low battery level) so
that the control unit can match the relevant information of the newly
replaced battery.
ABS Bleeding
When the brake system is opened to replace components such
as brake pump, master cylinder, brake lines or brake uid, air gets
inside, which can lead to a soft brake pedal. ABS Bleeding is required
to restore the rmness of the brake pedal.
Throttle Adaptation
If the ECU is disconnected accidentally, or if the throttle is replaced
or cleaned, then the throttle actuators need to be initialized via the
Throttle Adaptation function. This resets the ECU's data to its initial
state so that the throttle can accurately regulate the air intake.
DPF Regeneration
This function is mainly used for the regeneration of diesel particulate
lters. To keep the lters performing well it removes particles by
means of combustion and oxidation.
Airbag Reset
This function allows you to reset the airbag data to turn off the airbag
light, so that the airbag control module can run normally.
It needs to be performed in the following cases:
• When the airbag deploys;
• When the diagnostic tool reads "Crash data stored";
• When the airbag light is on;
• When relevant DTCs cannot be cleared.
41
4.4.2 Performing a Service Reset
1. Tap Maintenance from the home screen. A function menu will
display.
2. Select a function that you want to perform.
3. Vehicle identication is required before you can access the
function (for more on identication operations, refer to Identifying
the Vehicle on page 16). When it completes, the function menu
displays.
4. Follow the on-screen instructions to perform the service reset.
Figure 4-22

42
4.5.1 DTC Repair Guide
4.5.2 Technical Service Bulletins
4.5.3 DLC Location
4.5.4 Warning Light Library
The DTC Repair Guide is an experience-based database of generic
OBD-II DTCs, which provides code-specic information, including
popular xes and repair steps for identifying faults.
To use the DTC Repair Guide:
Tap Repair Information > DTC Repair Guide. Enter a DTC in the
search bar to search.
To view technical service bulletins:
Tap Repair Information > Technical Service Bulletins. Select
vehicle make, model, year, system and subsystem, and tap Next. A
list of OEM technical service bulletins issued for the selected vehicle
will display. Tap the desired option to view the full content.
To view DLC location:
Tap Repair Information > DLC Location. Select vehicle make, model
and year, and tap Next. A picture of the DLC location for the selected
vehicle will display.
The Warning Light Library provides information on dashboard
warning lights, including light descriptions, impacts on driving,
typical causes, responsive measures and relevant FAQs.
To use the Warning Light Library:
Tap Repair Information > Warning Light Library. A list of warning
lights will display. Tap the desired option to view the details.
4.5 Repair Information
4.6 Vehicle Management
This function allows you to delete the downloaded vehicle-specic
diagnostic software.
1. Tap Me at the bottom of the home screen, and then tap Vehicle
Management.
2. Select the software that you want to remove, and tap Delete.

43
4.7 Update
4.8 Settings
4.7.1 Diagnostic Software Update
The installed vehicle-specic software can be seen on the software
download page. When a new version is available, an Update button
will display. Tap the button to update the software.
4.7.2 Firmware Update
Tap Me > Firmware Update to update the rmware if a new version
is available.
4.7.3 TopScan App Update
Tap Me > Settings > About > Check for Updates. If there are
updates, tap to update the app to the latest version.
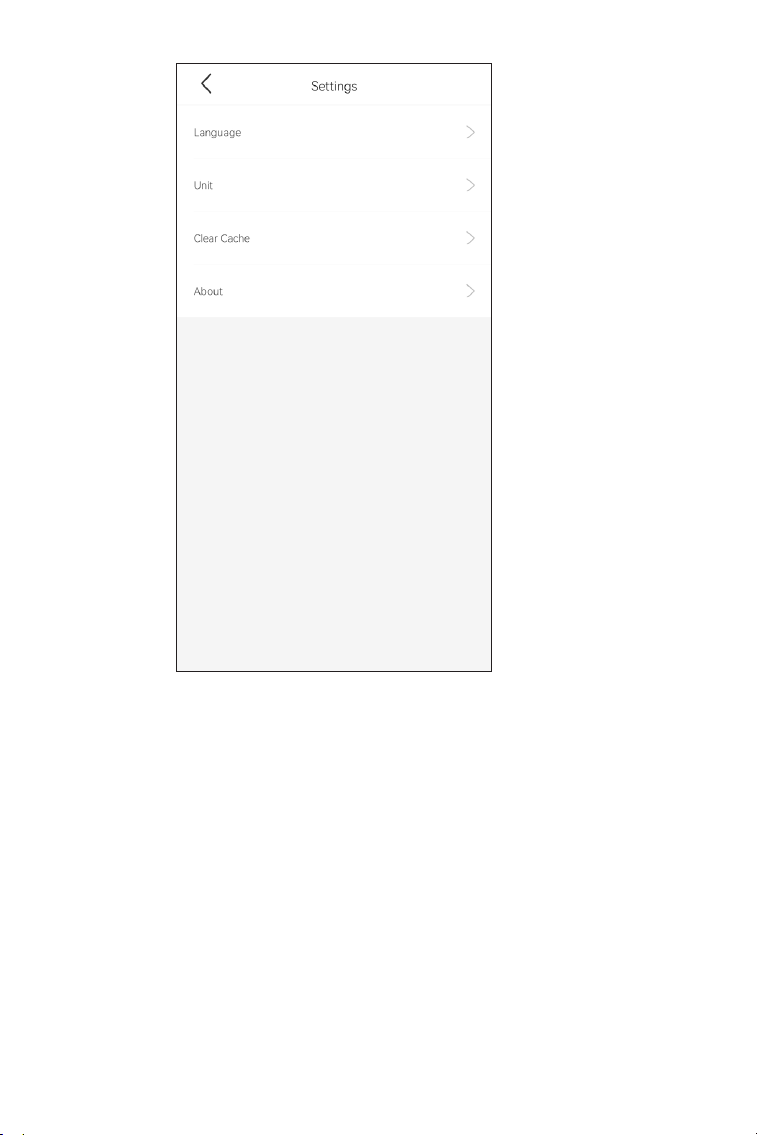
The Settings function provides general setting options including
language setting, password changing, unit setting and cache
clearing, and allows you to view the version information of the app.
To access the setting options:
Tap Me at the bottom of the home screen, and then tap Settings.
The setting screen will display.
44
Figure 4-23

45
Section 5
Specications
Bluetooth
Operating System Supported
Storage Temperature
Working Temperature
Dimensions
Net Weight
Version: Bluetooth 5.0
Range: 33 feet (10 m)
iOS 10.0 or later
Android 7.0 or later
-4
℉
to 158
℉
(-20
℃
to 70
℃
)
14
℉
to 122
℉
(-10
℃
to 50
℃
)
84.1 × 50.4 × 27.2 mm (3.31 × 1.98 ×
1.07'')
78 g (2.75 oz)

46
Section 6
FAQ
What should I do if a communication error occurs?
Follow the steps below to identify the problem:
1) Check if the ignition is ON.
2) Check if the TopScan is securely plugged into the vehicle’s OBD-
II port.
3) Turn the ignition off. Then, turn it on after 10 seconds and
continue the operation.
4) Check if the vehicle’s control module is defective.
Why do I need to download the diagnostic software after
installing the TopScan app?
Since there are various vehicle manufacturers, different diagnostic
software is required for different brands.
What special functions does the TopScan support?
The TopScan supports 8 special functions, including Oil Reset,
Throttle Adaptation, EPB Reset, ABS Bleeding, Steering Angle
Reset, DPF Regeneration, Airbag Reset, and BMS Reset.
Do I need to update the rmware before using it for the rst
time?
Yes. Firmware will automatically update to the latest version once
the TopScan is connected with your phone via Bluetooth. You can
also tap Me > Firmware Update to update the rmware manually.
Can multiple devices be bound to one TopScan app account?
Yes.
Q
Q
Q
Q
Q
A
A
A
A
A

47
Section 7
Warranty
TOPDON's One Year Limited Warranty
TOPDON warrants to its original purchaser that the company's
products will be free from defects in material and workmanship for
12 months from the date of purchase (Warranty Period).
For the defects reported during the Warranty Period, TOPDON will
either repair or replace the defective part or product according to its
technical support analysis and conrmation.
TOPDON shall not be liable for any incidental or consequential
damages arising from the device's use, misuse, or mounting.
If there is any conict between the TOPDON warranty policy and
local laws, the local laws shall prevail.
This limited warranty is void under the following conditions:
• Misused, disassembled, altered or repaired by unauthorized stores
or technicians.
• Careless handling and/or improper operation.
Notice:
All information in this manual is based on the latest information
available at the time of publication and no warranty can be
made for its accuracy or completeness. TOPDON reserves the
right to make changes at any time without notice.

48
Section 8
FCC
This device complies with Part 15 of the FCC Rules. Its operation is
subject to the following two conditions:
(1) this device may not cause harmful interference, and
(2) this device must accept any interference received, including
interference that may cause undesired operation.
Note: This equipment has been tested and found to comply with the
limits for a Class B digital device, pursuant to Part 15 of the FCC Rules.
These limits are designed to provide reasonable protection against
harmful interference in a residential installation.
This equipment generates, uses, and can radiate radio frequency
energy. If not installed and used in accordance with the instructions,
it may cause harmful interference to radio communications.
However, there is no guarantee that the interference will not occur in
a particular installation.
If this equipment does cause harmful interference to radio or
television reception, which can be determined by turning the
equipment on and off, the user is encouraged to try to correct the
interference by one or more of the following measures:
• Reorient or relocate the antenna.
• Increase the distance between the equipment and receiver.
• Connect the equipment into an outlet on a circuit different from
the one connected to the receiver.
• Consult a dealer or an experienced radio/TV technician for help.
49
Scan the QR code for more support!