ArtiDiag900 Lite
Automotive Diagnostic Tool
USER MANUAL


Multilingual
User Manual
Safety Is Always
the First Priority!
Section 1
What's in the Box?
Section 2
Product Overview
Section 3
Getting Started
Section 4
Using Your ArtiDiag900 Lite
Section 5
Specications
Section 6
FAQ
Section 7
Warranty
......................
......................
......................
......................
......................
......................
......................
......................
......................
4
4
5
6
9
16
35
36
37
EN
78
78
79
80
83
90
112
113
114
FR
154
154
155
156
159
166
188
189
190
IT
40
40
41
42
45
52
74
75
76
DE
116
116
117
118
121
128
150
151
152
ES
192
192
193
194
197
204
226
227
228
RU
CONTENTS
4
MULTILINGUAL USER MANUAL
SAFETY IS ALWAYS THE FIRST PRIORITY!
For your safety, the safety of others, and to avoid any
damage to the product and your vehicle, CAREFULLY
READ AND MAKE SURE YOU FULLY UNDERSTAND ALL THE
SAFETY INSTRUCTIONS AND MESSAGES IN THIS MANUAL
BEFORE OPERATING. You must also read the vehicle's
service manual, and observe the stated precautions
or instructions before and during any test or service
procedure.
Keep yourself, your clothing and other objects away
from moving or hot engine parts and avoid contact with
electrical connections.
ONLY OPERATE THE VEHICLE IN A WELL-VENTILATED
AREA, as the vehicle produces carbon monoxide, a toxic
and poisonous gas, and particulate matter when the
engine is running.
READ ALL INSTRUCTIONS BEFORE USE
For multilingual manual in PDF form, scan the QR code below or visit
www.topdon.com/products/artidiag900-lite

5
SECTION 1 WHAT'S IN THE BOX?
• ArtiDiag900 Lite Tablet
• ArtiDiag900 Lite VCI (Vehicle Communication Interface)
• Power Adapter
• OBD-II Extension Cable
• USB Cable (Type-A to Type-C)
• Quick User Guide
• User Manual
• Carrying Case
ALWAYS WEAR approved SAFETY GOGGLES to prevent
damage from sharp objects and caustic liquids.
DO NOT SMOKE OR HAVE ANY FLAMES NEAR THE VEHICLE
when testing. The fuel and battery vapors are highly
ammable.
DO NOT ATTEMPT TO INTERACT WITH THE PROUDUCT
WHILE DRIVING. Any distraction may cause an accident.
TURN THE IGNITION OFF BEFORE CONNECTING OR
DISCONNECTING THE PRODUCT FROM THE VEHICLE's
DATA LINK CONNECTOR (DLC) to prevent causing damage
to the product or vehicle's electronic components.
6
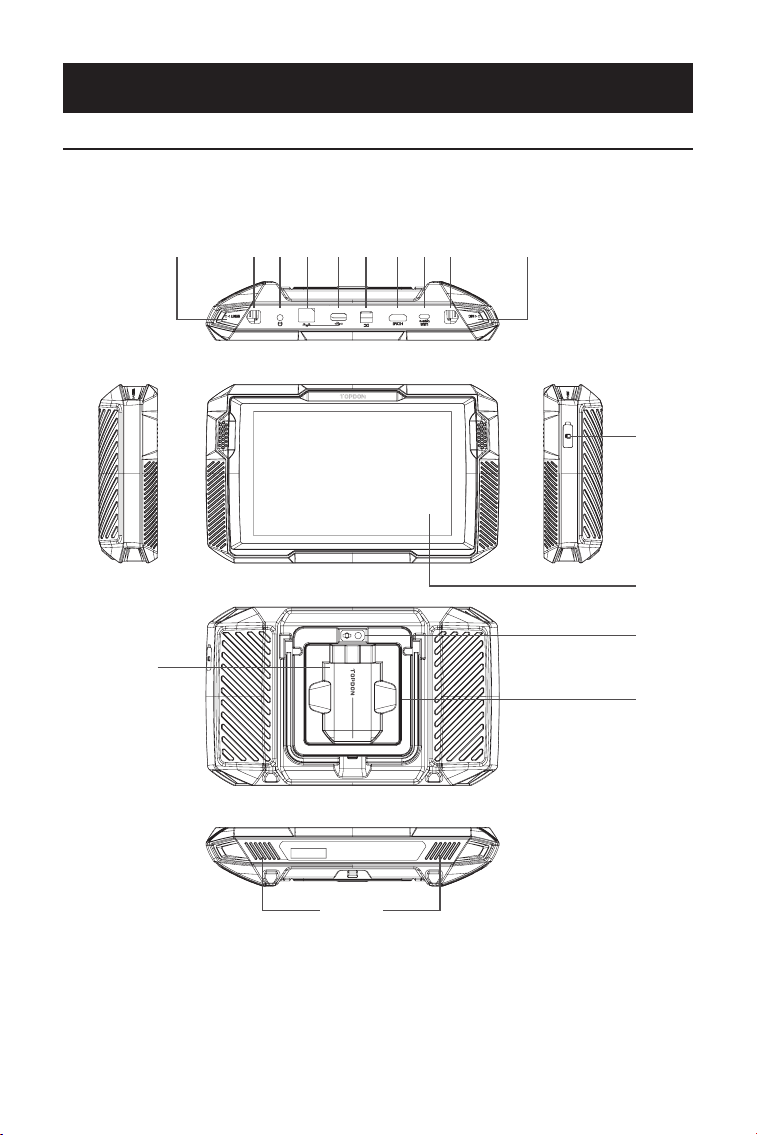
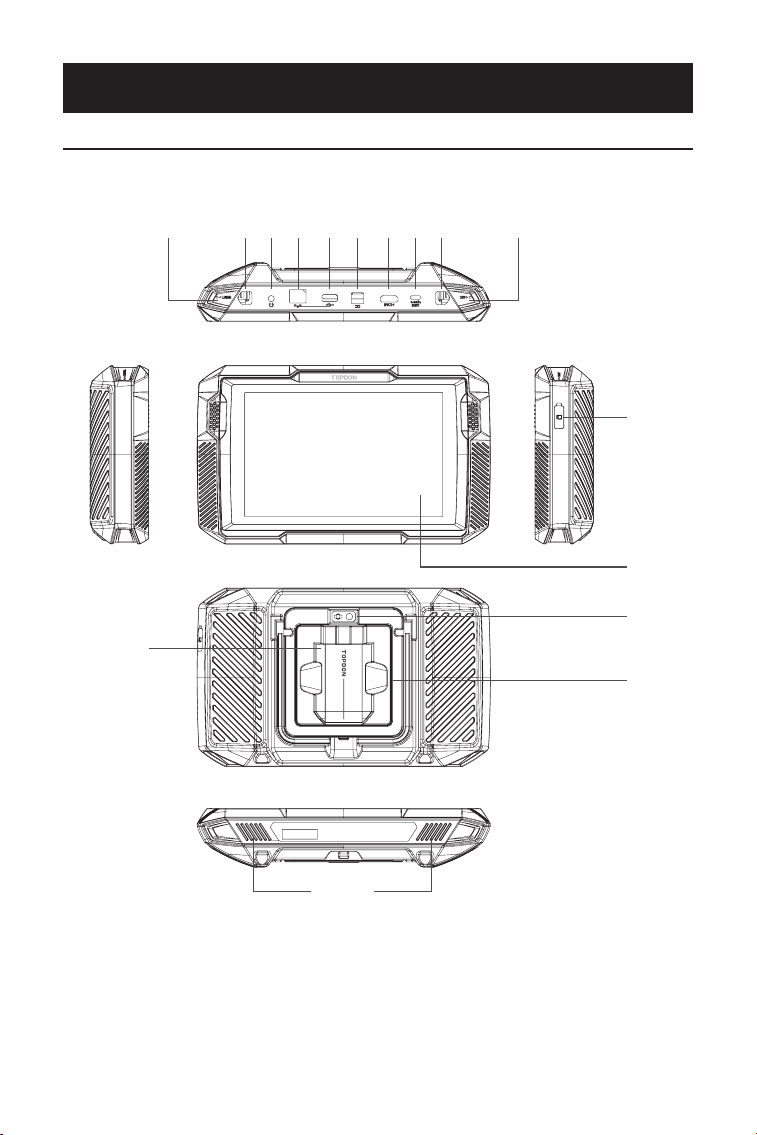
SECTION 2 PRODUCT OVERVIEW
2.1 ArtiDiag900 Lite Tablet
Figure 2-1
1
12
14
13
16
15
32 75 94 86 10 11
ArtiDiag900 Lite

7
Eight-inch Touch Screen
Reset Button
Insert a pin (not included) into the pinhole and press and hold
for 10 seconds to force restart the tablet.
Power Button
Long press the button to turn on the tablet. Long press again
to display the Power off / Restart / Screenshot toolbar, then
tap the desired option.
Short press the button to wake up / lock the screen.
3.5 mm Audio Port
RJ45 Port
USB Type-A Port
Connects the ArtiDiag900 Lite tablet and the ArtiDiag900 Lite
VCI using the supplied USB cable.
DC Power Supply Input Port (12V, 2 A)
Charges the ArtiDiag900 Lite tablet using the supplied power
adapter.
HDMI Port
USB Type-C Port
For data transfer and charging (5V, 2 A)
Screenshot Button
Press and hold for 2 seconds to take a screenshot.
Microphone
TF Card Expansion Slot
Supports hot swap and up to 128 GB storage expansion.
VCI Slot
Camera Lens
Audio Speaker
Collapsible Stand
1.
2.
3.
4.
5.
6.
7.
8.
9.
10.
11.
12.
13.
14.
15.
16.

8
1. Indicators
2. OBD-II 16 Pin Connector
Connects the ArtiDiag900 Lite VCI to vehicle's DLC.
3. USB Type-C Port
Connects the ArtiDiag900 Lite VCI to the ArtiDiag900 Lite tablet
using the supplied USB cable.
Solid Blue: Bluetooth connected
Bluetooth
Connection Indicator
Power
Indicator
Communication
Indicator
Solid Red: power on
Flashing Green: communicating with
the vehicle
1
2
3
2.2 ArtiDiag900 Lite VCI
Figure 2-3

9
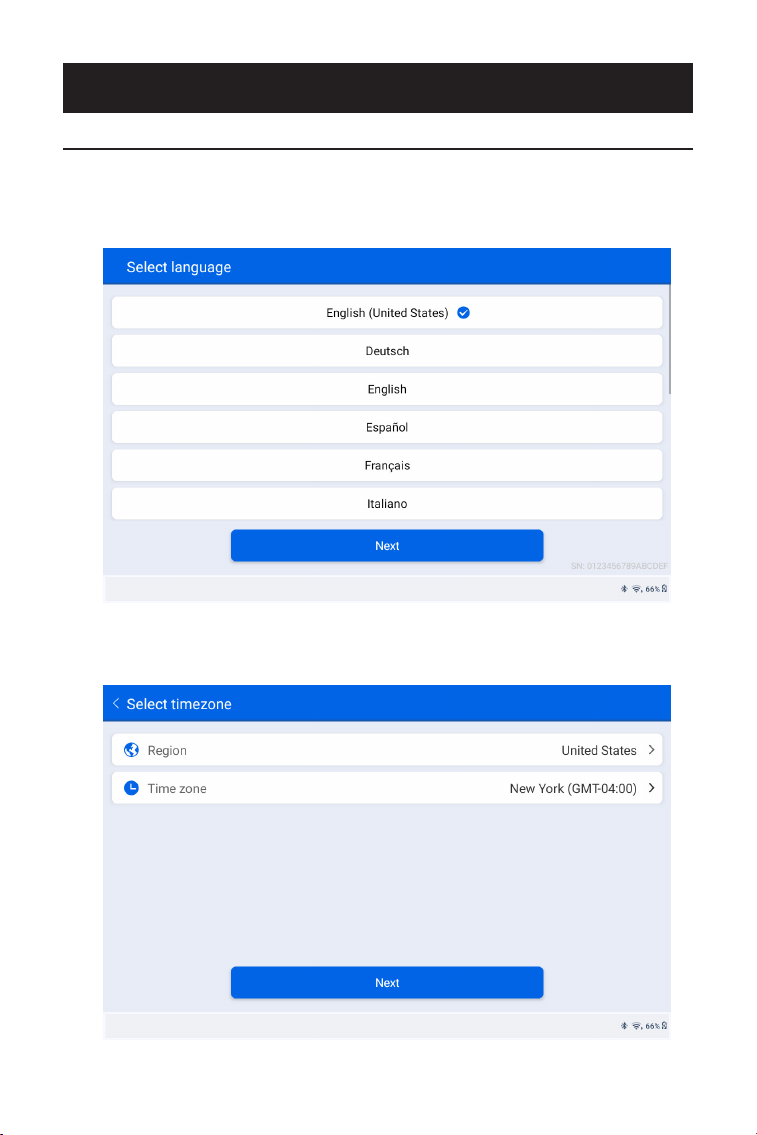
1. Select the desired system language.
2. Choose the appropriate region and time zone.
Figure 3-1
Figure 3-2
SECTION 3 GETTING STARTED
3.1 Basic Setup
Press and hold the power button to turn on the tablet. Follow the steps
below to set up the tablet.

10
3. Congure the Wi-Fi connection. Select a Wi-Fi from the scanned
list and enter the password.
4. Select a method to set the lock screen password. You can also
tap Not Now to skip this step.
Figure 3-3
Figure 3-4

11
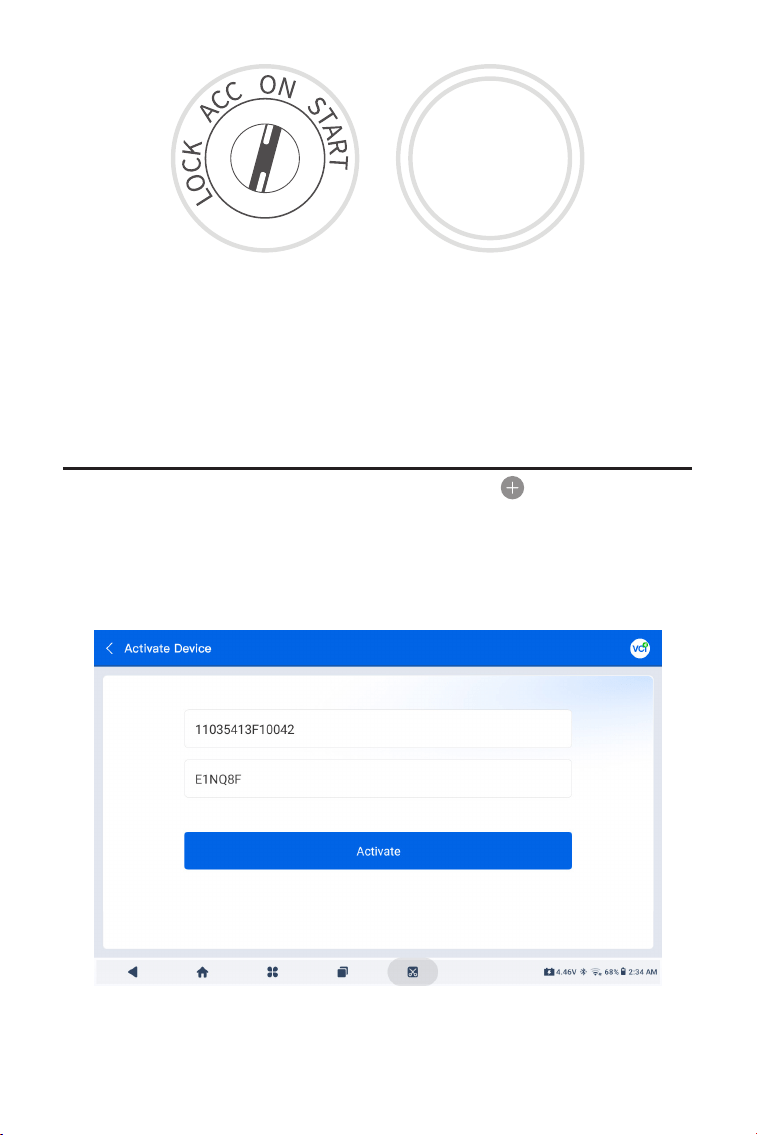
5. Activated successfully. Tap Start and the system will jump to the
ArtiDiag900 Lite app automatically.
6. Log in to your TOPDON account. (If you do not have an account,
register with your Email.)
Figure 3-5
Figure 3-6
12
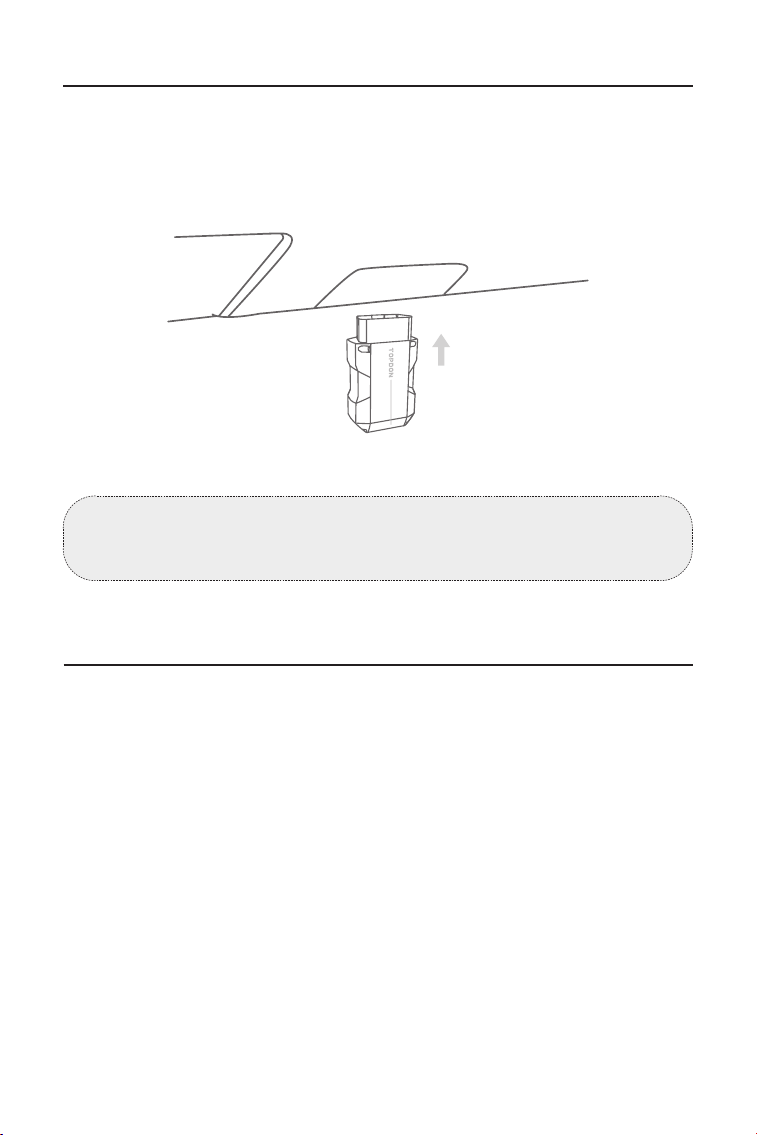
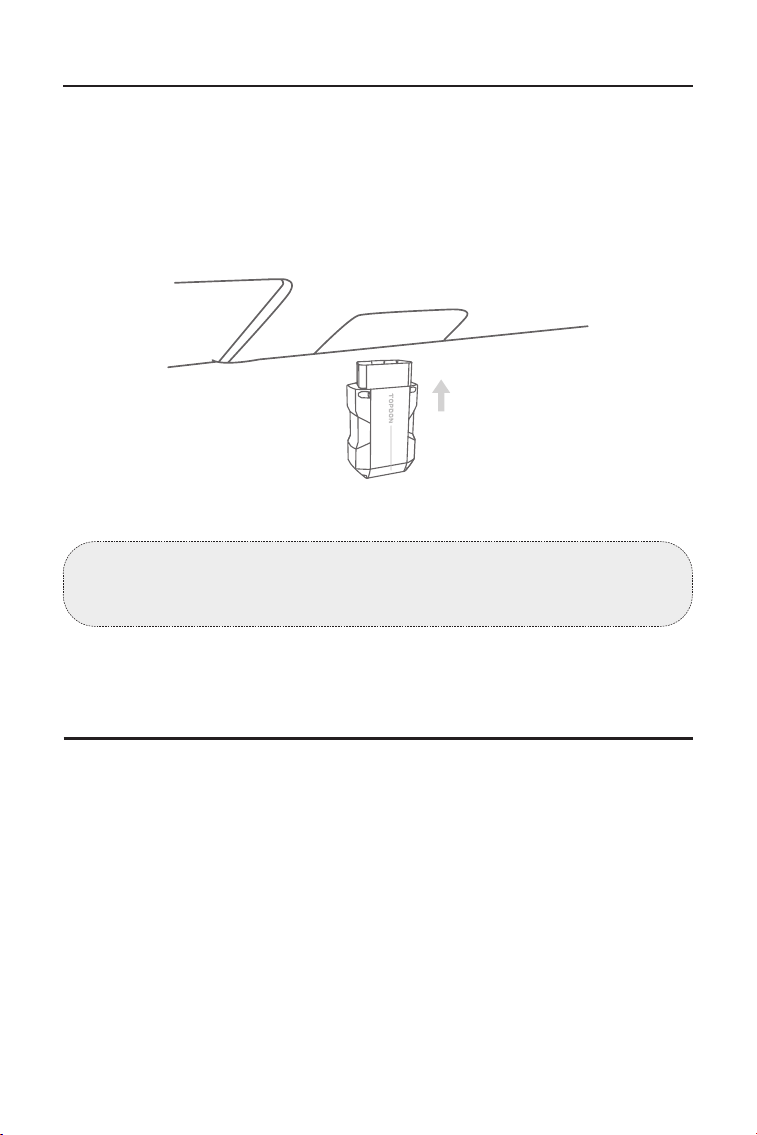
3.2 Plug the ArtiDiag900 Lite VCI into the Vehicle's DLC
3.3 Turn the Ignition to the "ON" Position (see Figure 3-8)
Take the ArtiDiag900 Lite VCI out from the back slot of the
ArtiDiag900 Lite tablet and plug it into the vehicle's DLC. The
vehicle's DLC port is usually located under the dashboard.
If you encounter a problem in locating the DLC, please go to Library
> DLC Location for more details, or refer to the vehicle's service
manual.
If your vehicle is equipped with a keyless start system and the
ignition switch is an "Engine Start Stop" button (see Figure 3-9), press
the "Engine Start Stop" button until the car is in "ON" mode. Do not
apply the brake while pressing the "Engine Start Stop" button, or you
will start the car instead of putting it in the "ON" position.
The method of ignition varies by vehicle model. Refer to the vehicle's
service manual for details.
Note: Make sure the ignition is always OFF before plugging in the
ArtiDiag900 Lite VCI.
Car OBD-II Interface
Figure 3-7
13
3.4 Bind the ArtiDiag900 Lite VCI
①
Go to User Info > VCI Management. Tap the icon at the top
right corner of the screen, and the device will ask you to connect the
Bluetooth rst.
②
Connect the Bluetooth as prompted. Then the serial number and
activation code will be automatically obtained.
The red power LED light on the ArtiDiag900 Lite VCI indicates the
ArtiDiag900 Lite VCI is powered on.
Figure 3-10
Figure 3-8 Figure 3-9
ENGINE
START
STOP
14
③
Then tap Activate to bind the ArtiDiag900 Lite VCI to the
ArtiDiag900 Lite tablet.
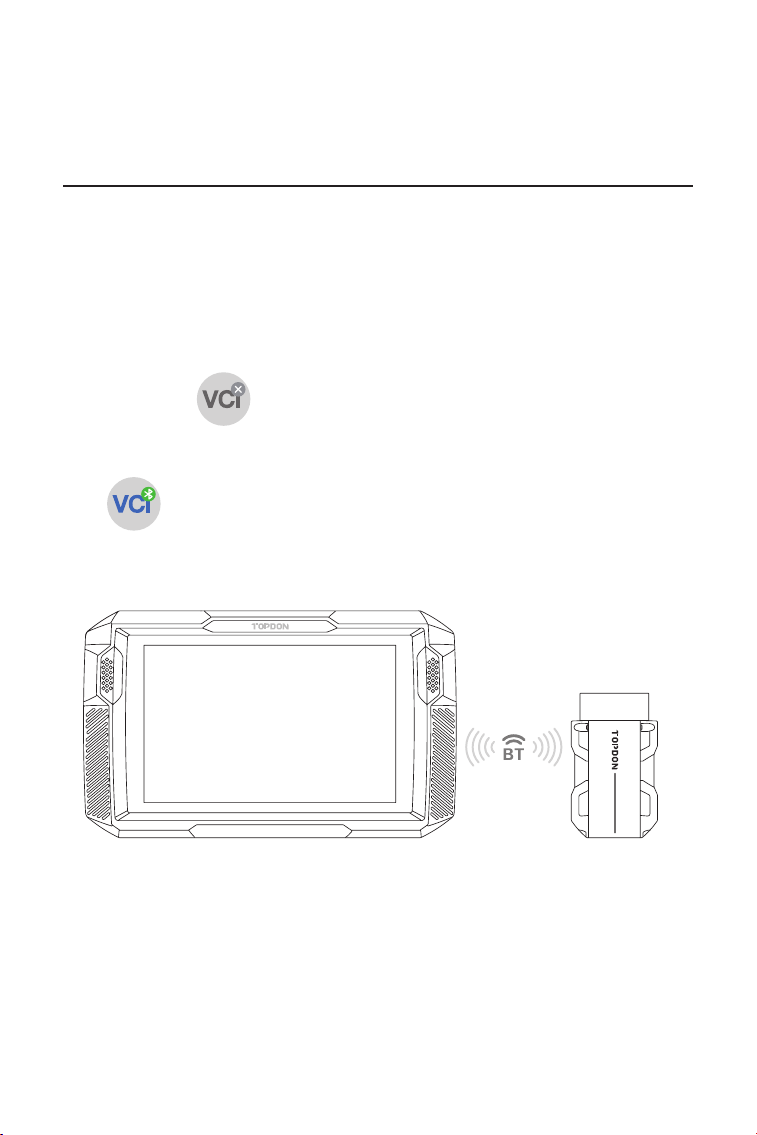
To enable communication between the ArtiDiag900 Lite tablet and
the vehicle, the ArtiDiag900 Lite VCI and the ArtiDiag900 Lite tablet
must always be connected rst. VCI connection can be done via
wireless (Bluetooth) or wired (USB cable) solution.
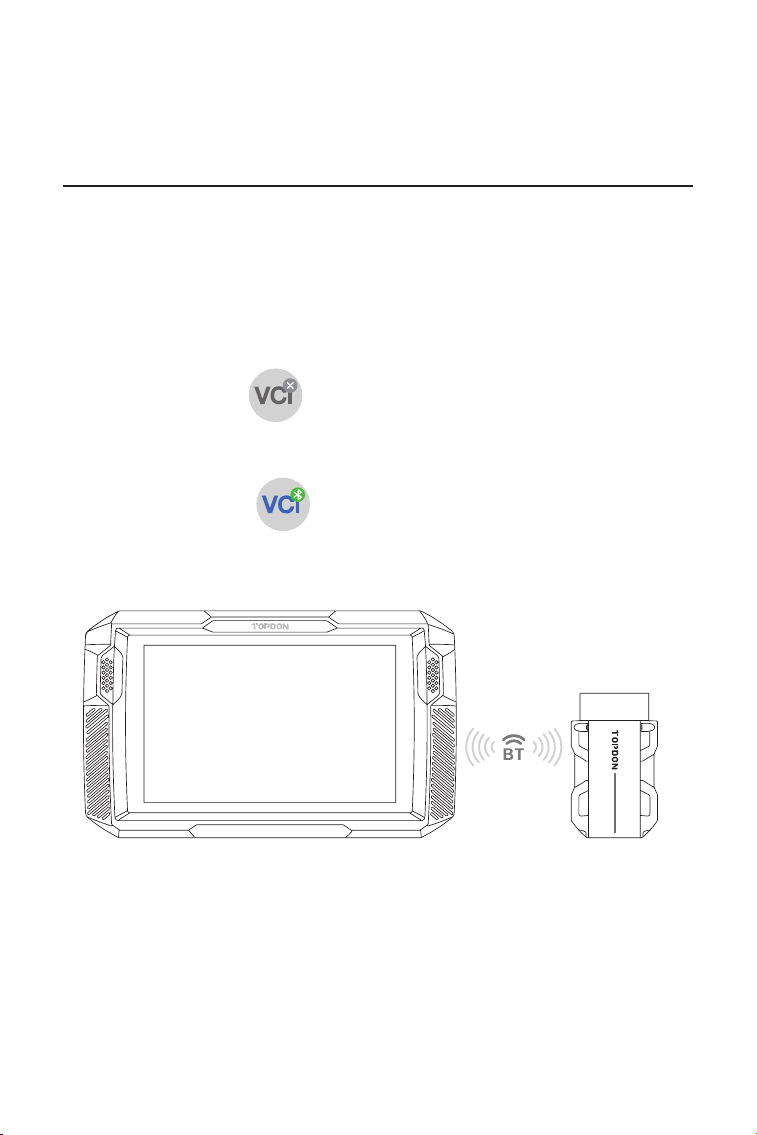
Tap Diagnostics from the home screen of the ArtiDiag900 Lite app,
and tap the icon at the upper right of the screen to establish
Bluetooth connection with the ArtiDiag900 Lite VCI. After the
ArtiDiag900 Lite VCI is successfully connected, the icon changes
to , and the Bluetooth Connection Indicator on the
ArtiDiag900 Lite VCI lights solid blue.
3.5 Connect the ArtiDiag900 Lite VCI to the ArtiDiag900 Lite Tablet
3.5.1 Wireless VCI Connection
Figure 3-11
ArtiDiag900 Lite
15
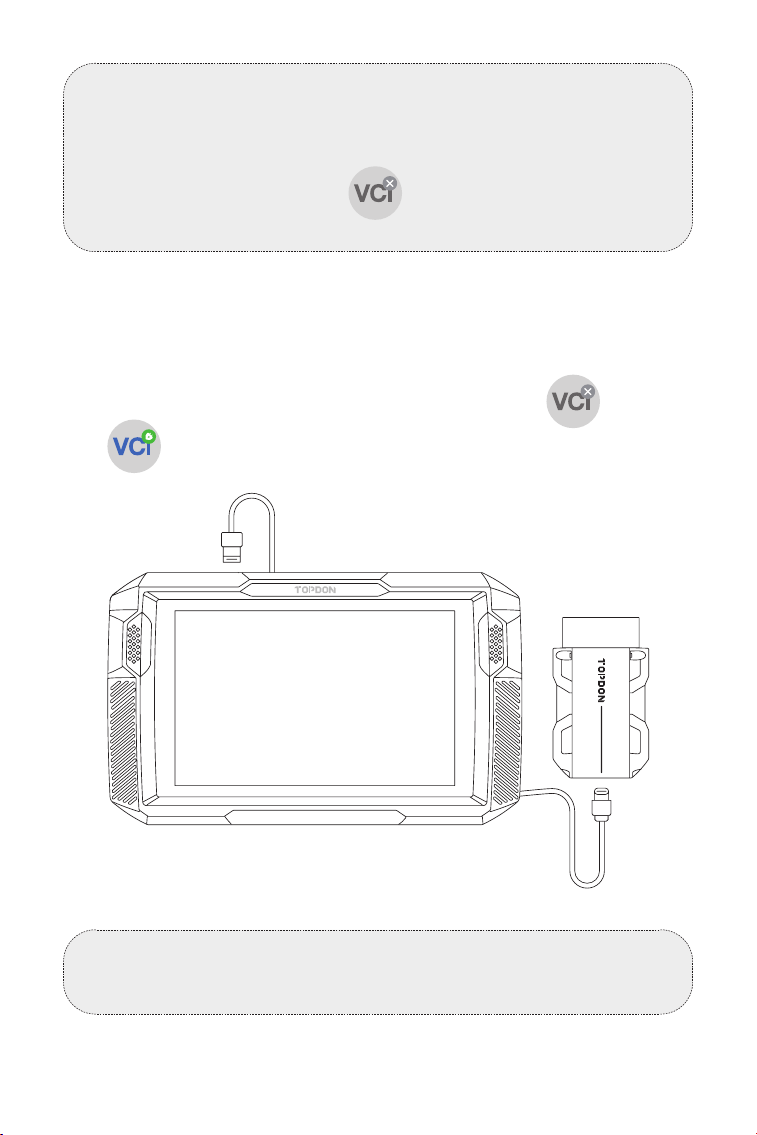
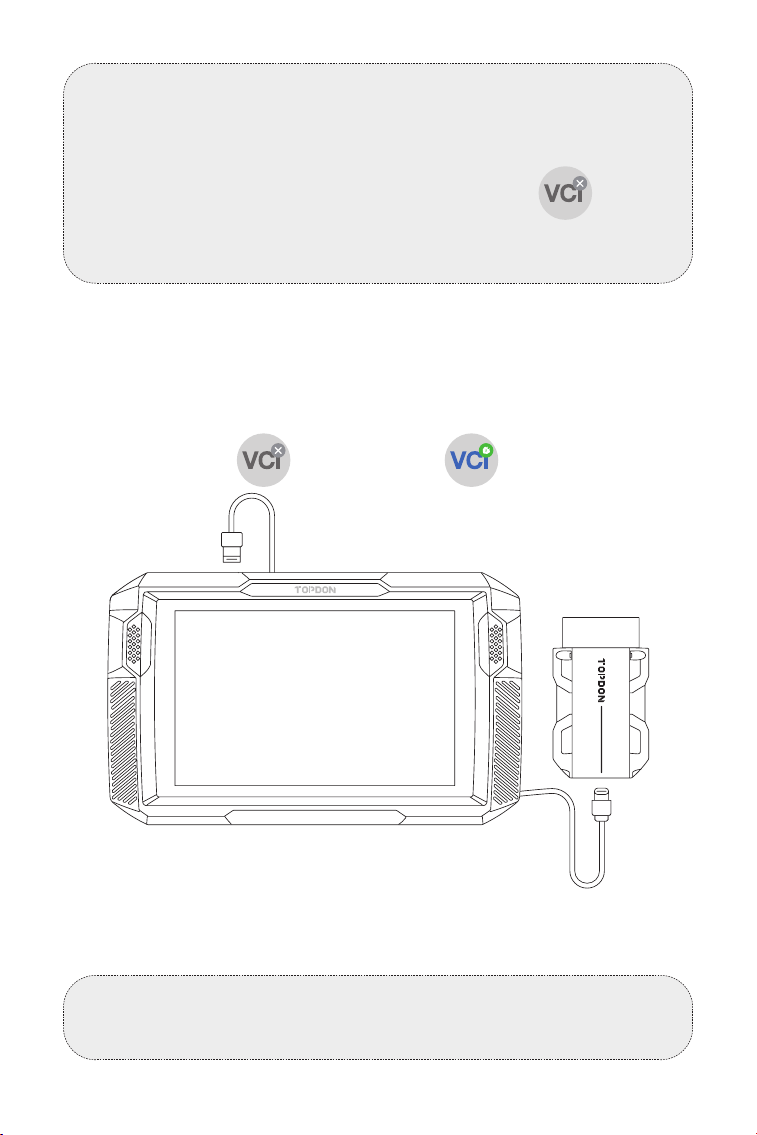
Use the supplied USB cable to connect the ArtiDiag900 Lite VCI to
the ArtiDiag900 Lite tablet (see Figure 3-6). After the ArtiDiag900
Lite VCI is properly connected to the tablet, the icon changes
to .
3.5.2 Wired VCI Connection
Figure 3-12
Note:
Once the ArtiDiag900 Lite VCI has been successfully connected to
your ArtiDiag900 Lite via Bluetooth, the connection will be resumed
automatically next time when you open the ArtiDiag900 Lite app. If
not connected, manually tap of any screen with this icon to
reconnect.
Note:
Once wired connection is applied, Bluetooth will be disconnected
automatically.
USB Type-A
USB Type-C
ArtiDiag900 Lite

16
3.6 Your ArtiDiag900 Lite Is Now Ready for Use
SECTION 4 USING YOUR ARTIDIAG900 LITE
Figure 3-13
4.1 Home Screen
Open the ArtiDiag900 Lite app, and the home screen will display.
Figure 4-1
ArtiDiag900 Lite
17
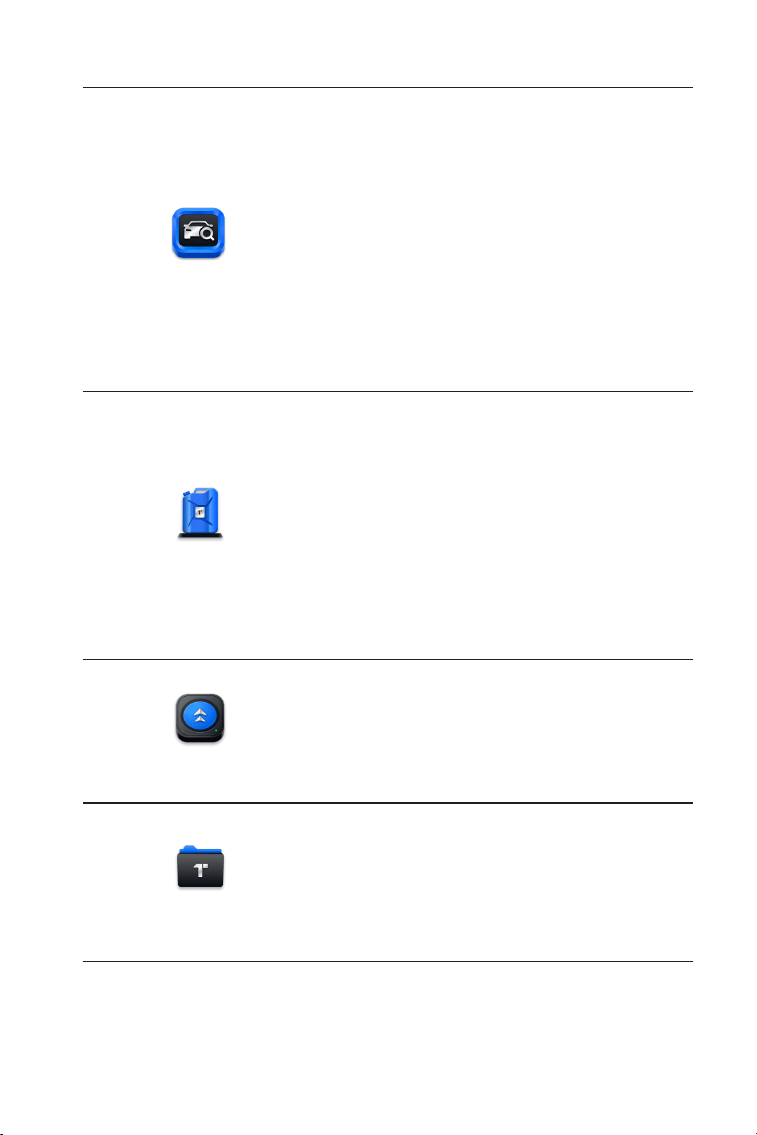
1. Function Icons
Allows you to perform full-system
diagnostics functions including
reading Diagnostic Trouble Codes
(DTCs), clearing DTCs, viewing data
streams, reading Electronic Control
Unit (ECU) version information, and
performing active test. You can also
access EOBD & OBD-II and Diagnostic
Feedback through this module.
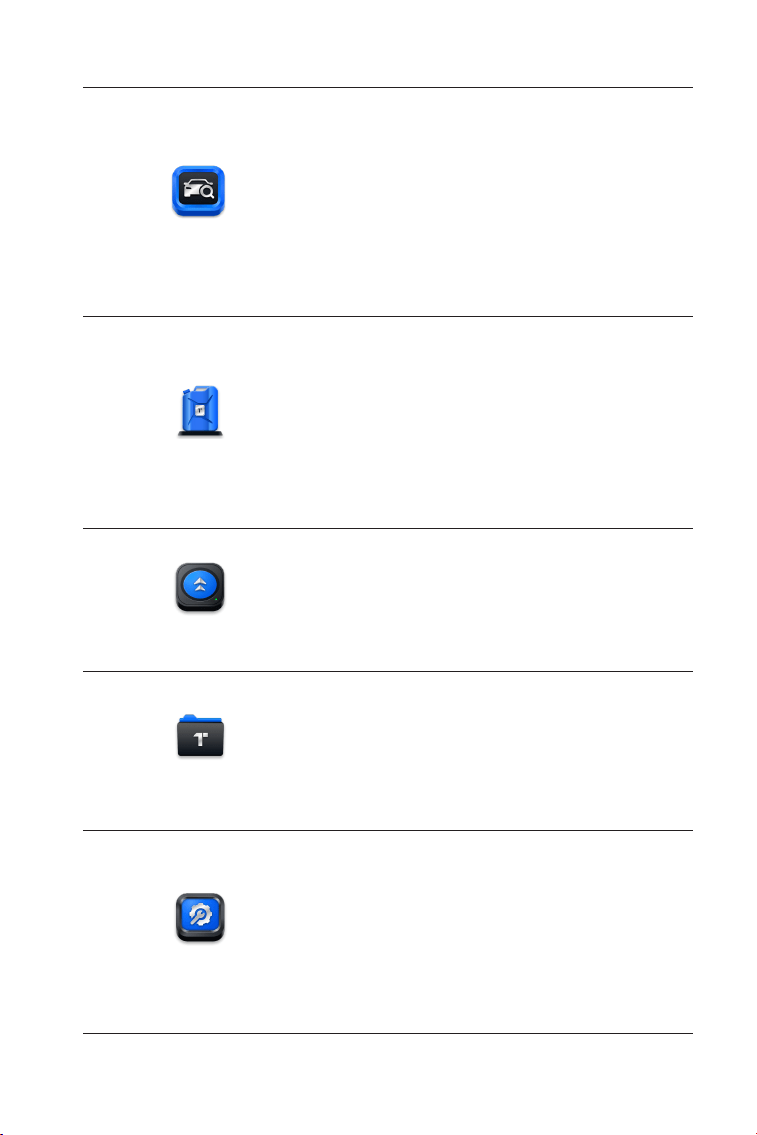
Diagnostics
Provides 8 maintenance services
including Oil Reset, Throttle
Adaptation, EPB Reset, Steering
Angle Reset, DPF Regeneration, ABS
Bleeding, BMS Reset and Airbag
Reset.
Allows you to update the vehicle-
specic Diagnostics software if a new
version is available.
Allows you to access Reports (System
Reports, Fault Code Reports, and Data
Stream Reports) and Replay Data.
Maintenance
Update
Folder
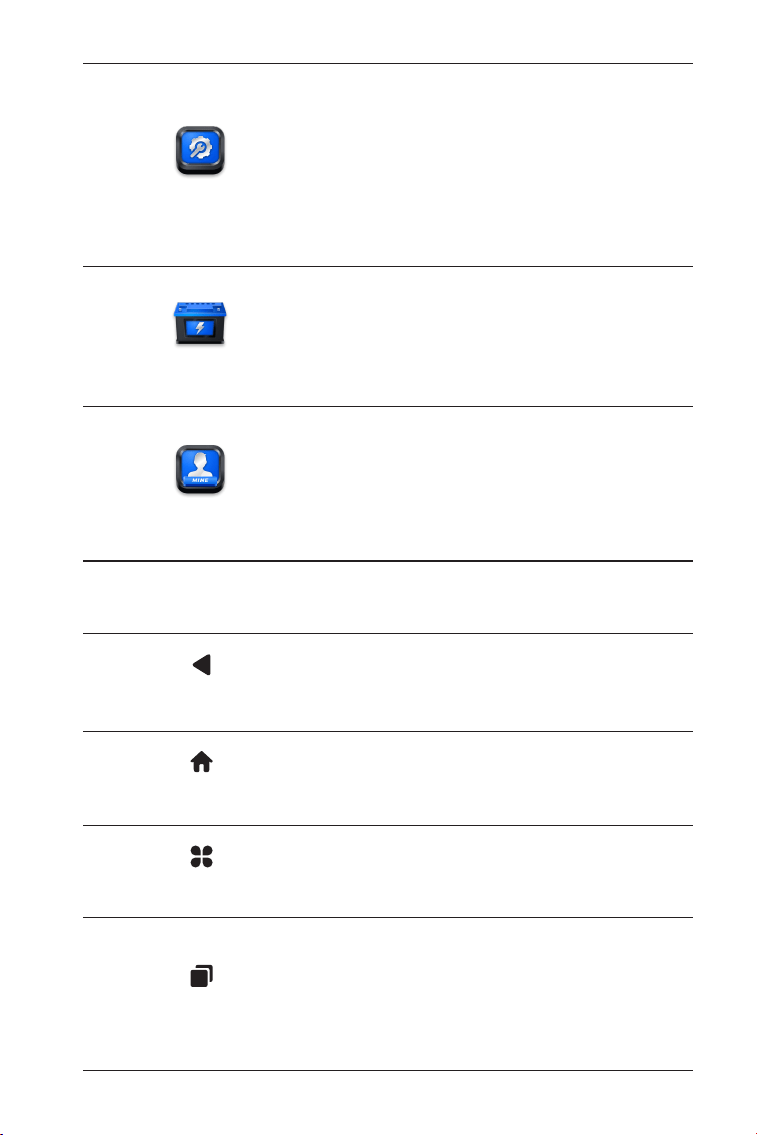
Includes DTC Repair Guide, Technical
Service Bulletins (TSB), DTC Location,
Warning Light Library, and Vehicle
Coverage Lookup, which provides
reference information on vehicle
inspection, diagnostics, and repair.
Library
18
Congures the ArtiDiag900 Lite
tablet to operate as a battery tester
(optional).
Provides access to VCI Management,
Firmware Update, Uninstall Diagnostic
Software, User Info, Customer
Feedback, Shop Info, Settings, and
System Update.
Tester
User Info
2. Navigation Bar
Selecting this icon returns you to the
previous screen.
Selecting this icon returns you to the
home screen of ArtiDiag900 Lite app.
Selecting this icon returns you to the
home screen of Android System.
Selecting this icon displays a list of the
opened apps. You can swipe left or
right to view the full list, tap to open
the app, or swipe up to remove the
app.
Selecting this icon captures a
screenshot of the current page.
Opened Apps
App Home
Back
Android Home
Screenshot
19
4.2 Diagnostics
The Diagnostics module allows you to scan all supported vehicle
systems at one time (Auto Scan) for DTCs or select an individual
system to perform Read DTCs, Clear DTCs, Read Data Stream, Read
ECU Information and Active Test. You can also access EOBD & OBD-II
and Diagnostic Feedback through this module.
Identifying the Vehicle
To perform Auto Scan or Individual System Diagnostics, you need to
identify your vehicle rst. Tap Diagnostics from the home screen of
the ArtiDiag900 Lite app to enter the Diagnostic screen.
4.2.1 Auto Scan and Individual System Diagnostics
Figure 4-2
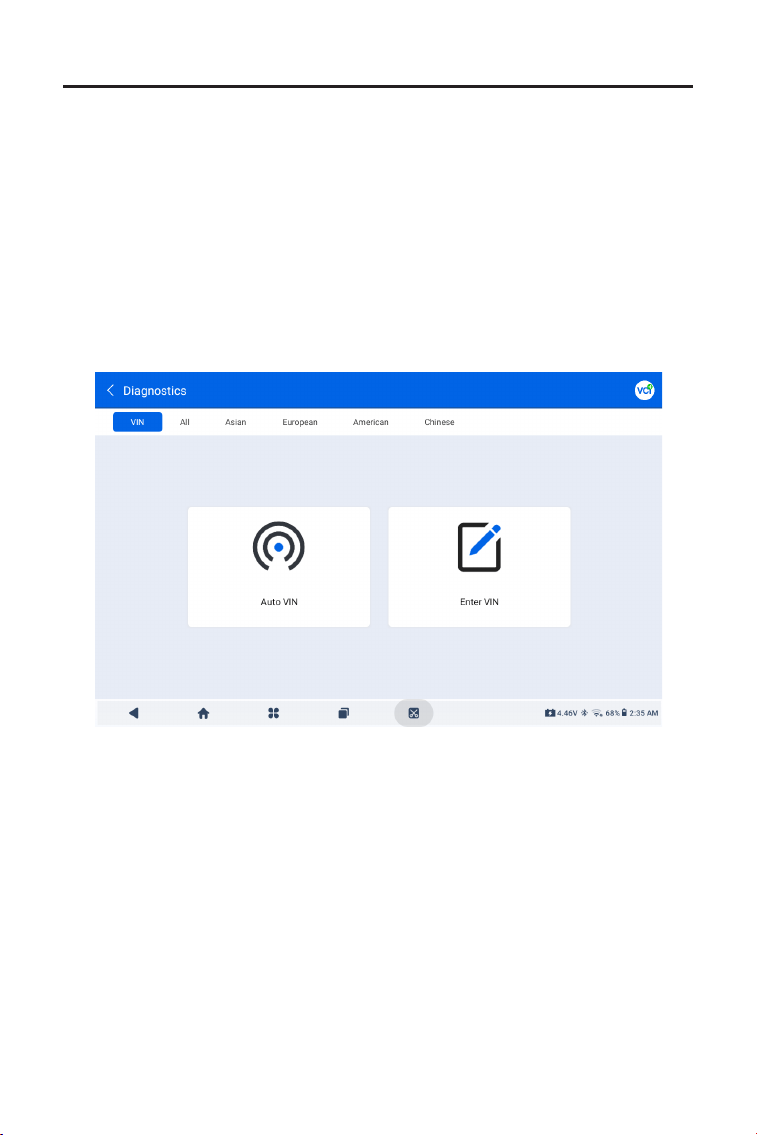
Identifying via VIN
VIN allows you to identify the vehicle via Auto VIN or Enter VIN.
· Auto VIN - The ArtiDiag900 Lite tablet automatically reads and
decodes the Vehicle Identication Number (VIN).
· Enter VIN - manually enter or scan the vehicle VIN to identify the
vehicle.
20
Note:
Systems may vary by vehicle make, model and year.
Figure 4-3
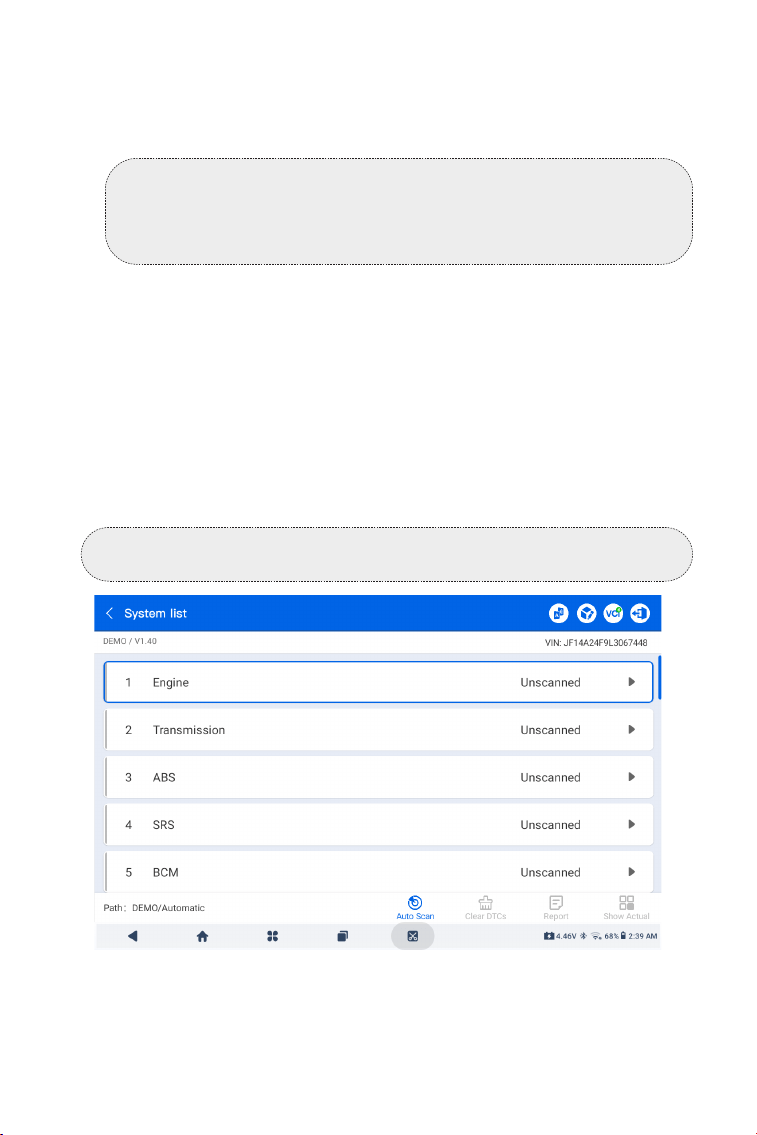
Auto Scan
Auto Scan detects all the systems supported by the vehicle and
retrieves DTCs for all of these systems, providing a complete health
Identifying via Make
1. Tap All, and a list of vehicle makes will display.
2. Select or enter the make of your vehicle.
3. Select Automatic or Manual to identify the vehicle.
Automatic
Manually enter the VIN or tap Read to acquire the VIN. Then tap
Conrm. ArtiDiag900 Lite will automatically decode the VIN to
identify the vehicle.
Manual
Manually select the vehicle information to identify the vehicle.
A system menu will display after the vehicle is identied.
Note:
A demonstration mode (DEMO option) is provided to help you
become familiar with the Diagnostics functions.
21
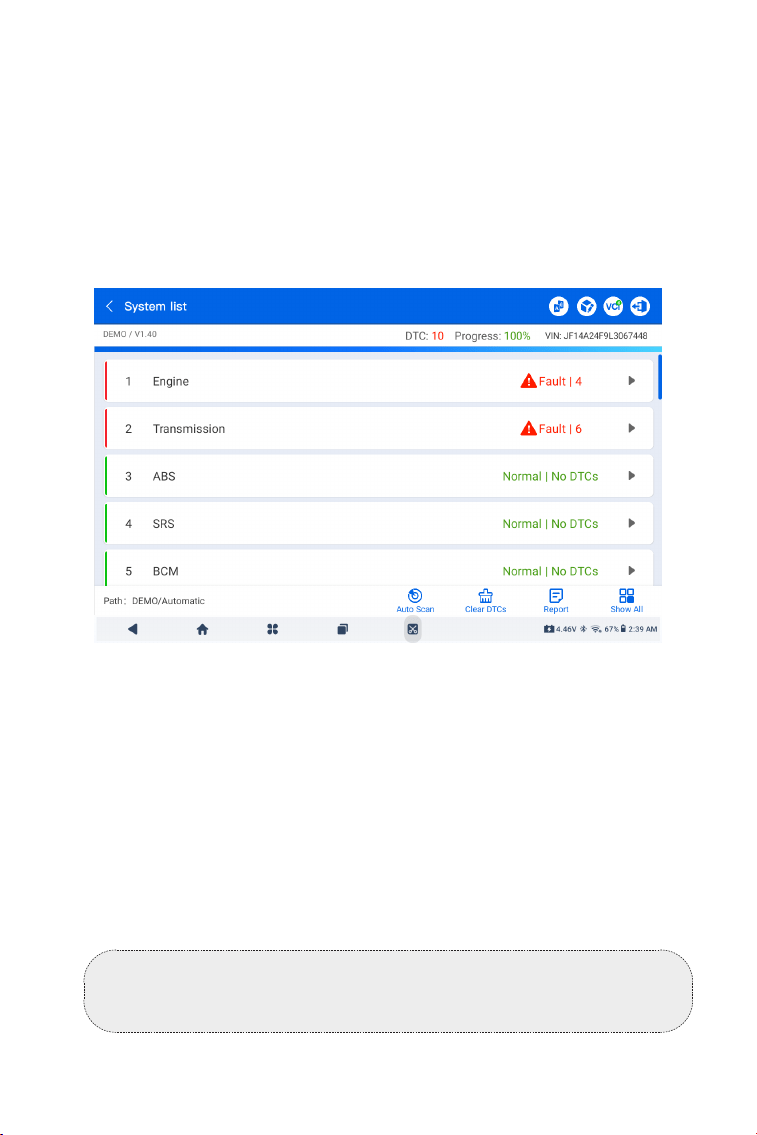
Figure 4-4
Button Description
Clear DTCs - tap to clear all the DTCs retrieved.
Report - tap to save the current scan results in report format. (To
view the saved reports, go to Folder > Reports > System Report)
Show All / Show Actual - tap to toggle between showing all vehicle
systems and showing only the supported systems.
Performing Individual System Diagnostics
Apart from Auto Scan, you can also select an individual system to
perform Read DTCs, Clear DTCs, Read Data Stream, Read ECU
Information and Active Test for that particular system.
check of your vehicle. Performing Auto Scan before and after repair
could help in troubleshooting and validating repairs. Pre and post
scan reports can allow you to record the condition of the vehicle
before and after repair for comparison.
To perform an Auto Scan, tap Auto Scan at the bottom corner. The
ArtiDiag900 Lite tablet will start scanning all the systems supported
by the vehicle, and DTC retrieval will be automatically proceeded.
Results are displayed progressively as the systems are scanned.
Note:
Depending on the vehicle make, some functions may not be
available.
22
Read DTCs
1. After the vehicle is identied, select the system for which you wish
to retrieve DTCs from the system menu.
2. Tap Read DTCs in the function menu.
ArtiDiag900 Lite will communicate with the ECU and retrieve and
display DTCs for the currently selected system.
Figure 4-5
Icon Description
When the icon lights up, tap to open a window
that allows you to search on Google for more
information about the DTC.
When the icon lights up, tap to view the detailed
description of the DTC.
When the icon lights up, tap to view the freeze
frame captured at the time when the DTC occurs.
When the icon lights up, tap to view the instructive
repair measures
.
23
Figure 4-6
Button Description
Report - tap to save the DTCs in report format. (To view the saved
reports, go to Folder > Reports > Fault Code Report)
Clear DTCs - tap to clear all the DTCs retrieved.
Clear DTCs
1. After the vehicle is identied, select the system for which you wish
to clear DTCs from the systems menu.
2. Tap Clear DTCs in the function menu.
3. Tap OK when the DTCs are cleared.
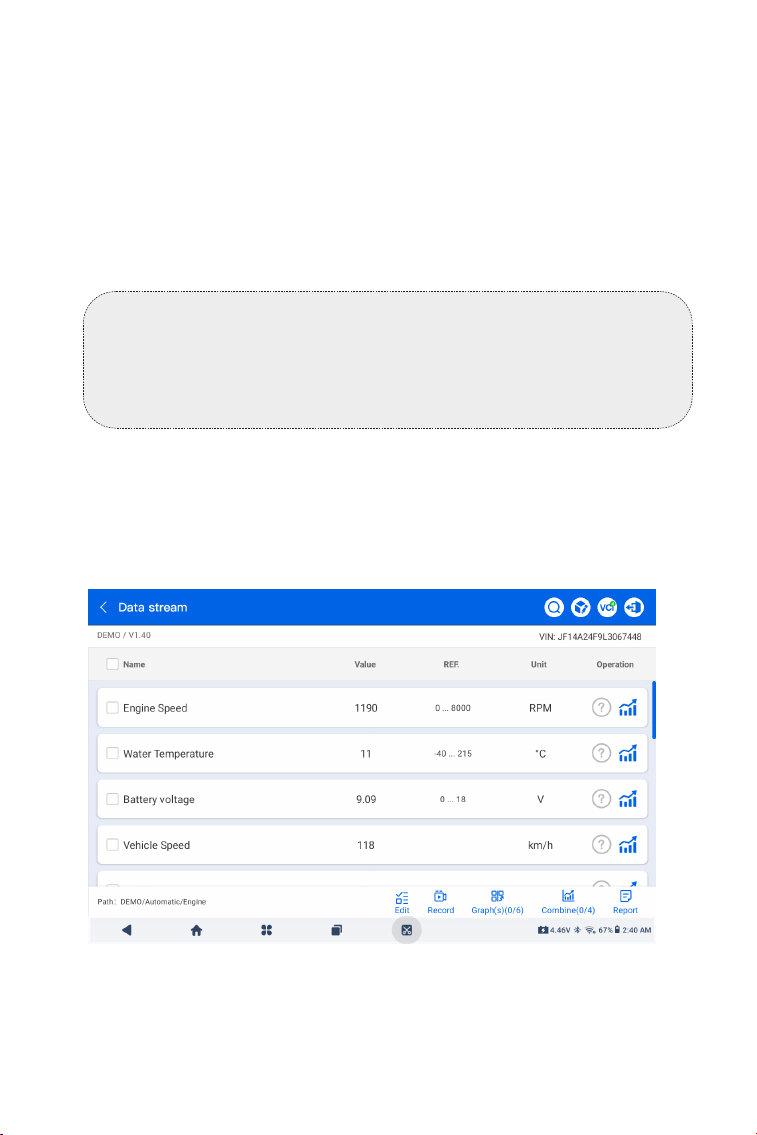
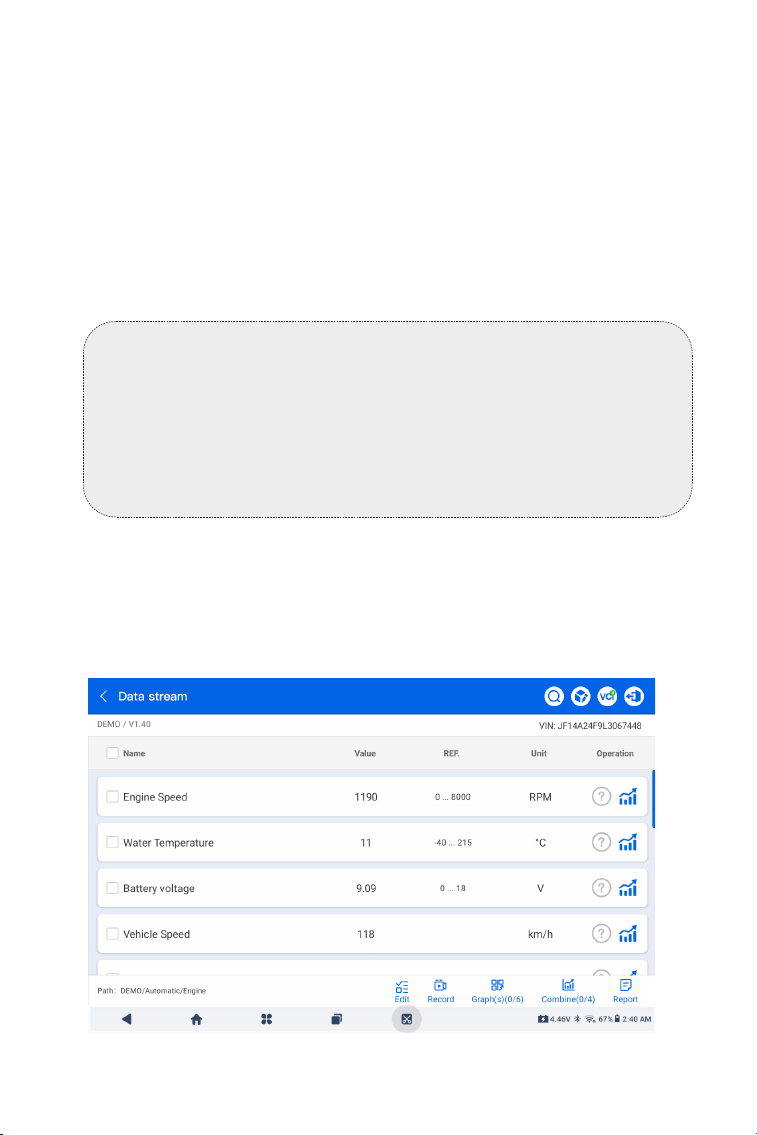
Read Data Stream
1. After the vehicle is identied, select the system for which you wish
to read the data stream from the system menu.
2. Tap Data stream in the function menu. A data stream list
displays.
Note:
1. The procedure of clearing DTCs should be performed after the
required repair has been carried out. Once conrmed, DTCs and
freeze data stored in the ECU will be cleared.
2. DO NOT START UP THE ENGINE WHILE CLEARING DTCS.
24
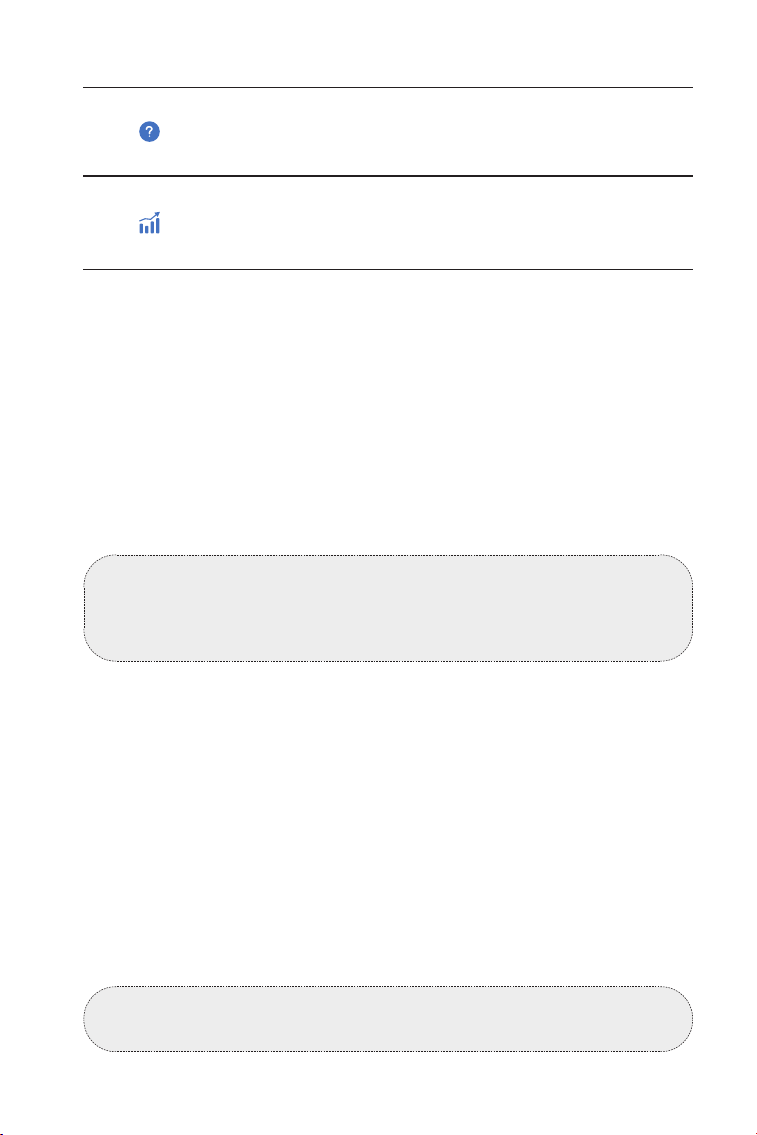
Icon Description
Tap to learn the detailed description of the data
stream
Tap to have the real-time data stream displayed
in a wave-pattern graph.
Button Description
Edit - tap to select the data streams to display.
Record - tap to record and save real-time data stream information
for comparison and analysis. To view the recorded data streams, go
to Folder > Replay Data.
Graph(s) - tap to display up to 6 data streams in graph format.
Combine - tap to combine up to 4 data streams in one graph for
easier comparison and observation.
Report - tap to save the current data stream values in report format.
To view the saved reports, go to Folder > Reports > Data stream
Report.
Read ECU info
1. After the vehicle is identied, select the system for which you wish
to view the ECU version information from the system menu.
2. Tap ECU info in the function menu. Then you can view the ECU
version information of the selected system.
Active test
- allows you to manually control certain component operations
directly from the app to verify the operations of components.
1. After the vehicle is identied, select the system for which you wish
to perform active test from the system menu.
2. Tap Active test in the function menu. Then you can perform
related active tests as needed.
Note:
IF THE VEHICLE MUST BE DRIVEN TO VIEW THE LIVE DATA
STREAM, ALWAYS HAVE A SECOND PERSON HELPING YOU. DO
NOT WATCH THE DATA STREAM WHILE DRIVING.
Note:
Available active tests vary by vehicle make, year and model.
25
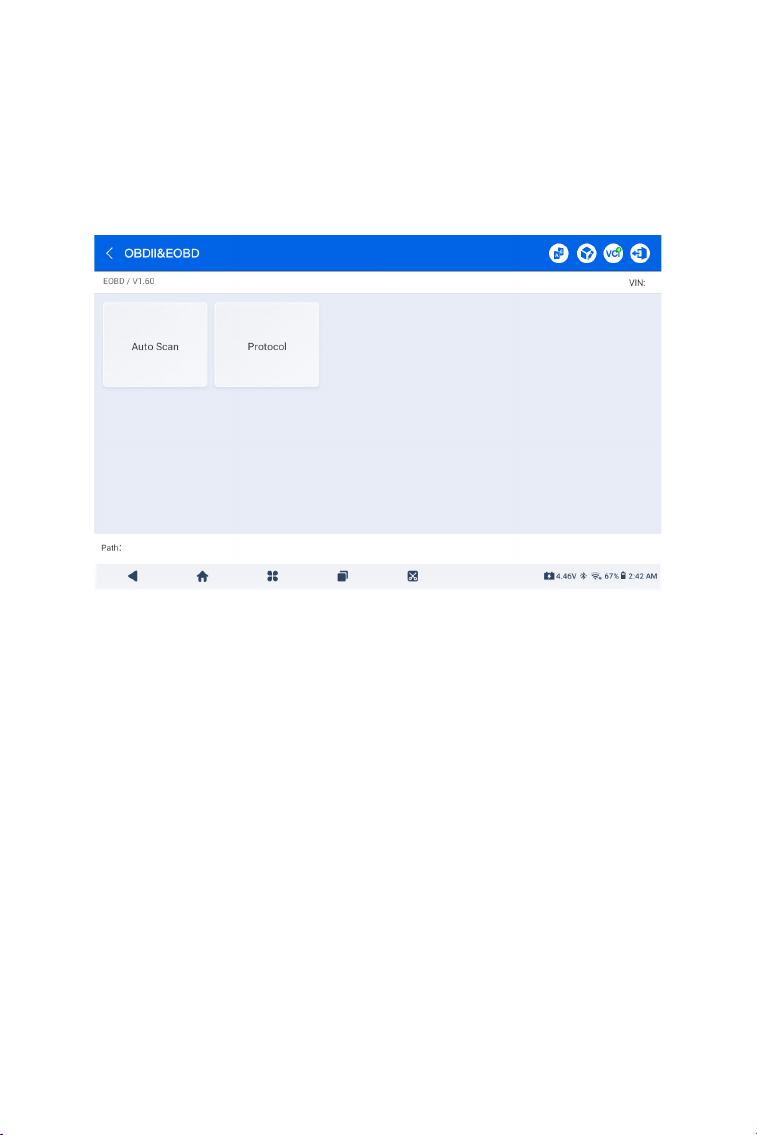
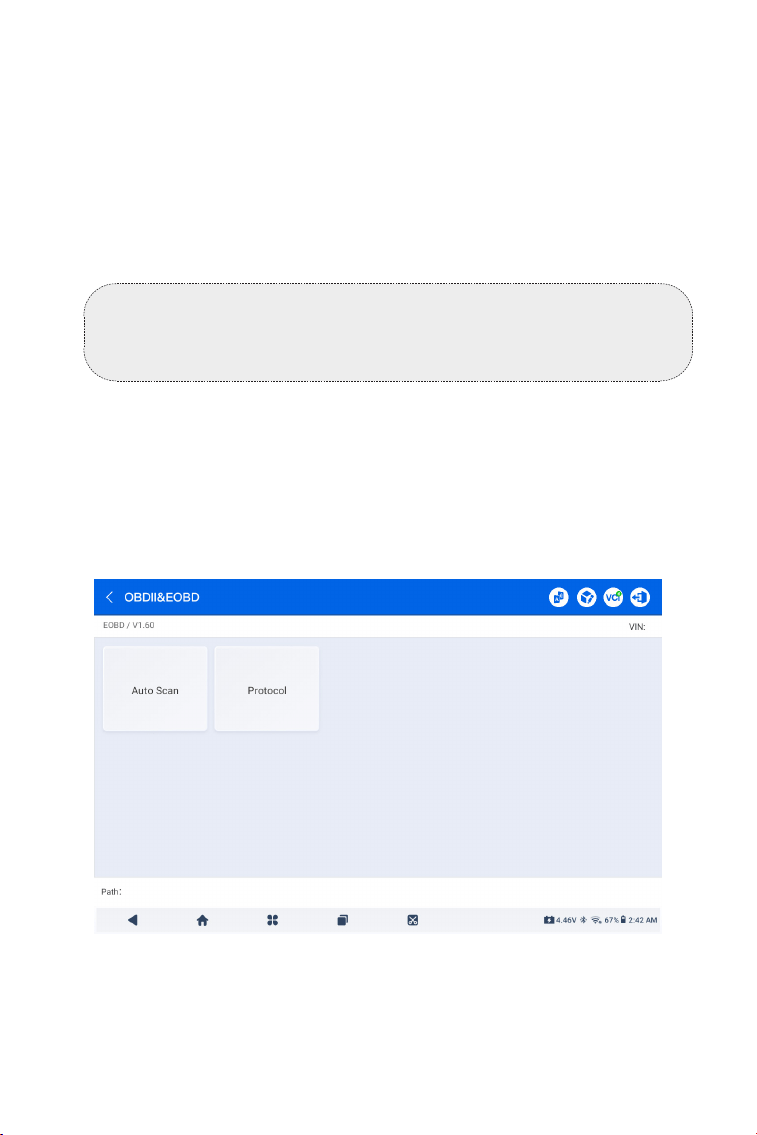
The EOBD & OBD-II function allows you to perform emission-related
diagnostics for your vehicle.
To perform OBD-II Diagnostics:
1. Go to Diagnostics > All > EOBD.
2. Select your communication method: Auto Scan or Protocol.
Auto Scan - the ArtiDiag900 Lite will automatically communicate
with the vehicle and identify which protocol the vehicle is using.
Protocol - allows you to manually select the communication
protocol.
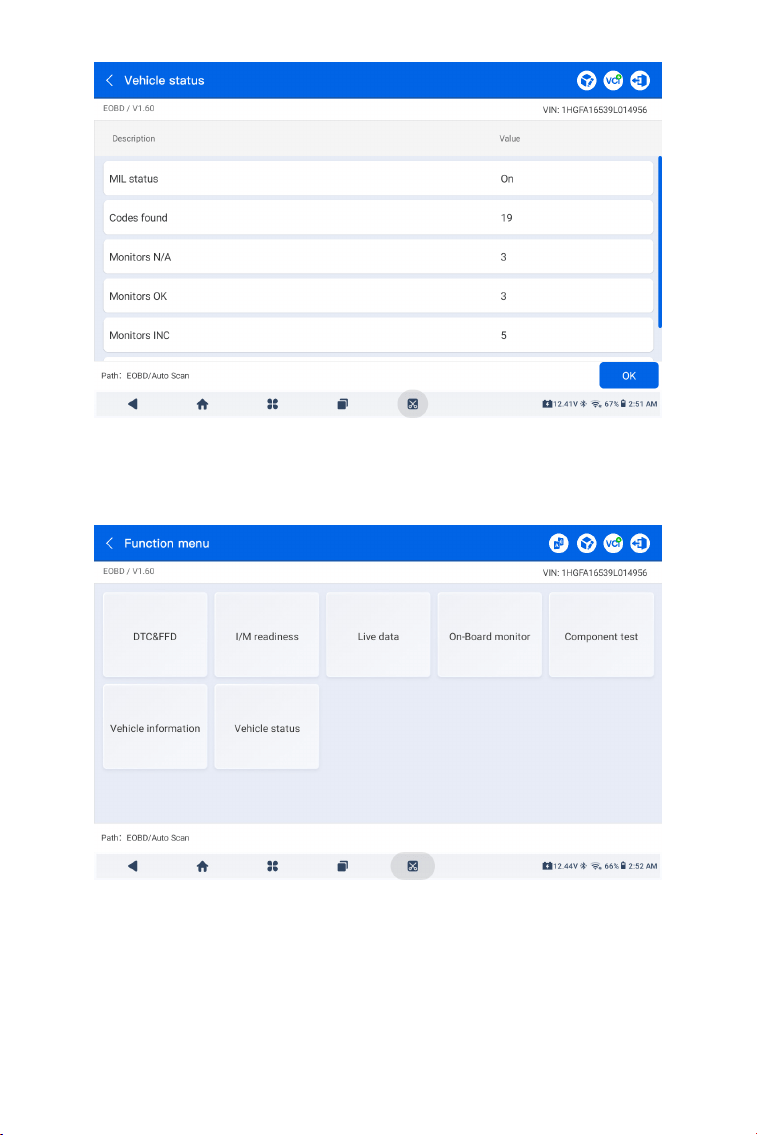
After the communication protocol is conrmed, a vehicle status
screen displays showing the protocol and other status info of your
vehicle.
4.2.2 EOBD & OBD-II
Figure 4-7
26
Figure 4-8
Figure 4-9
3. Tap OK to enter the function menu.

27
4. Select a function to continue.
Typical function options may include: DTC&FFD, I/M readiness, Live
data, On-Board monitor, Component test, Vehicle information and
Vehicle status.
Note:
Depending on the vehicle make, some functions may not be
available.
Note:
1. The procedure of clearing DTCs should be performed after the
required repair has been carried out. Once conrmed, DTCs and
FFD stored in the ECU will be cleared.
2. DO NOT START UP THE ENGINE WHILE CLEARING DTCS.
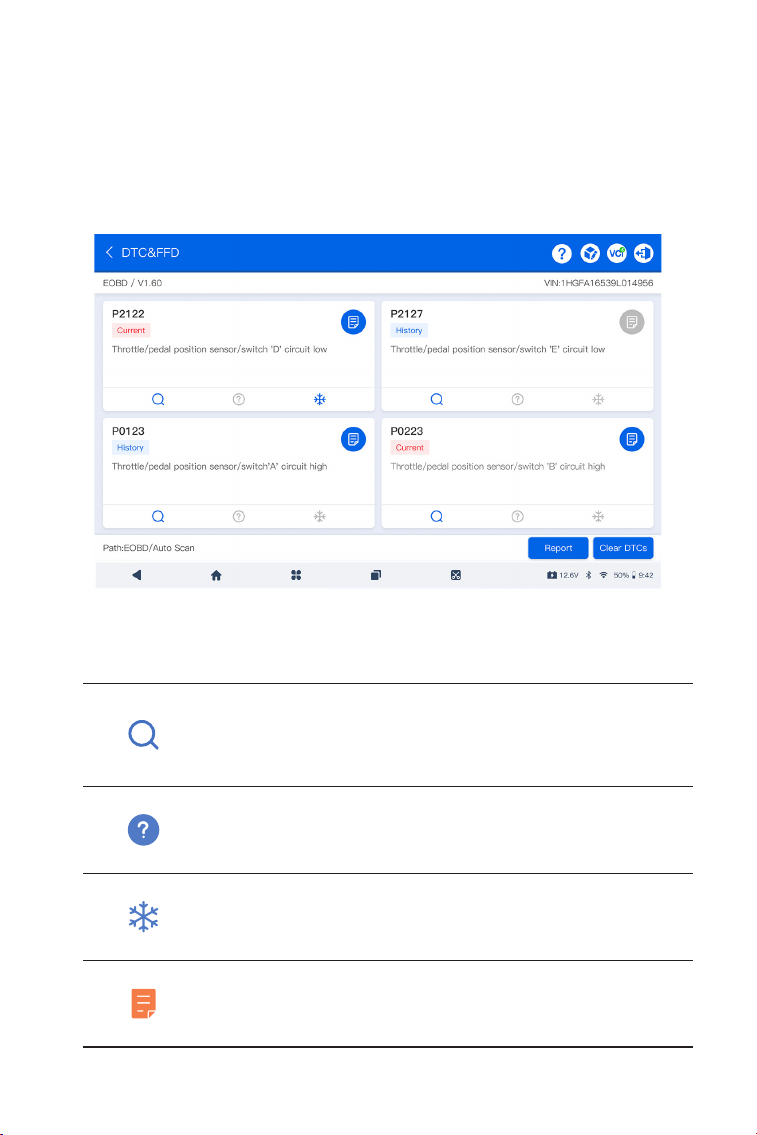
DTC & FFD (Freeze Frame Data)
This function helps read DTCs and clear DTCs stored in the vehicle's
ECU and displays FFD of the emission-related systems.
1. Read DTCs
This function displays the DTCs retrieved from the emission-
related systems.
2. Clear DTCs
This function allows you to clear the DTCs retrieved from the
emission-related systems.
3. FFD
This function takes a snapshot of the data and operating
conditions when an emission-related fault occurs.
I/M (Inspection and Maintenance) Readiness
This function checks whether or not the various emission-related
systems on the vehicle are operating properly, and are ready for I/M
testing.
It can also be used to check the monitor running status and to
conrm if the repair of a car fault has been performed correctly.
Live Data
This function displays the real-time live data and parameters from
the vehicle’s ECU.
O2 Sensor Monitor
This function displays O2 sensor monitor test results of the most
recently completed tests from the vehicle’s ECU.
On-Board Monitor
This function displays the test results for emission-related powertrain

28
components and systems that are not continuously monitored.
Component Test
This function helps send control commands to the vehicle's ECU as a
way to test and operate the system parts and components.
Vehicle Information
This function displays a list of information (provided by the vehicle
manufacturer) from the vehicle’s ECU.
The information may include:
• VIN.
• Calibration ID (CID).
• Calibration Verication Number (CVN).
• In-use performance tracking for spark ignition engines (IUPR)
Vehicle Status
This function displays the status of the vehicle, including Engine,
Transmission, Codes Found, MIL Status, Monitors and Protocol.
The ArtiDiag900 Lite allows you to instantly send diagnostic
feedback (with logs of diagnostic data automatically attached)
while you are encountering a software problem with the diagnostics
operations.
To send diagnostic feedback:
1. Tap the icon located at the top right corner of any screen in
the Diagnostics module.
2. Select the type of problem and tap Conrm.
3. Write a description of the problem.
4. Tap Submit to send the feedback.
4.2.3 Diagnostic Feedback
Note:
The Diagnostic Feedback function is only available with the
Diagnostics module.

29
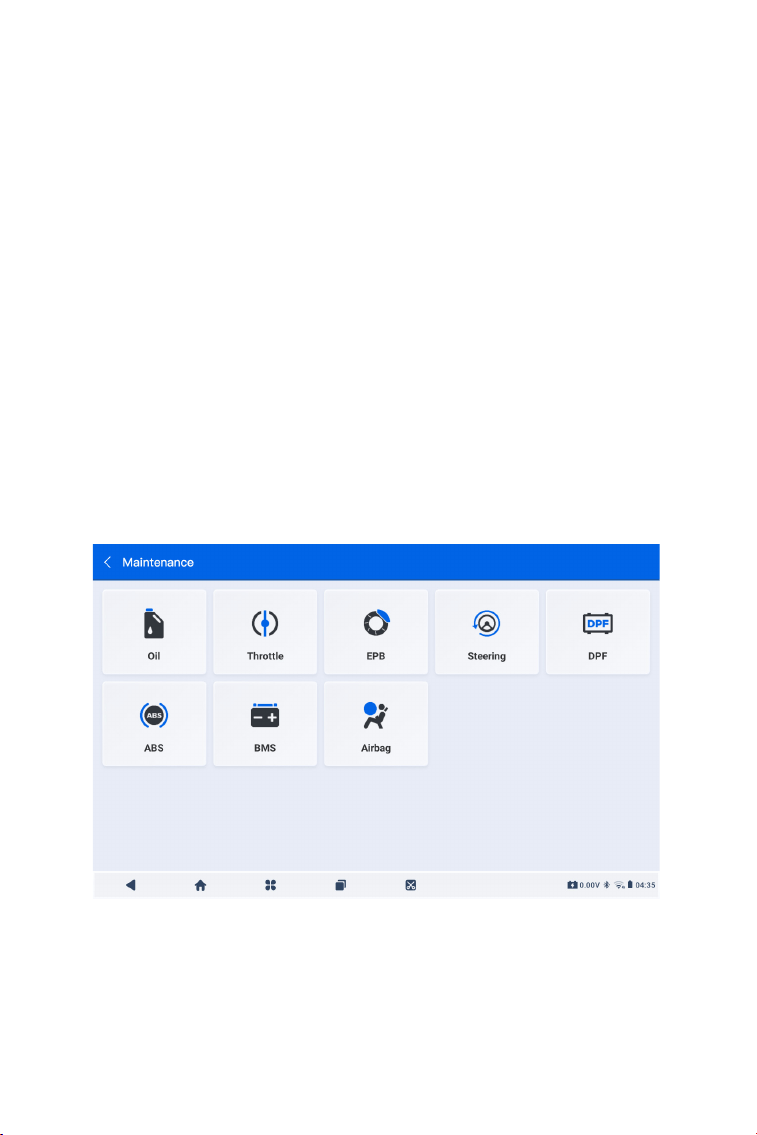
4.3 Maintenance
This function provides you with 8 maintenance services including
Oil Reset, Throttle Adaptation, EPB Reset, Steering Angle Reset, DPF
Regeneration, ABS Bleeding, BMS Reset and Airbag Reset.
Oil (Oil Reset)
This function allows you to reset the oil service lamp for the engine
oil life system. The engine oil light system calculates an optimal oil
change interval depending on the vehicle's driving conditions and
weather events. Oil resets are required every time the engine oil is
changed.
Throttle (Throttle Adaptation)
If the ECU is disconnected accidentally, or if the throttle is replaced
or cleaned, then the throttle actuators need to be initialized via the
Throttle Adaptation function. This resets the ECU's data to its initial
state so that the throttle can accurately regulate the air intake.
EPB (EPB Reset)
This function helps you replace and reset the brake pads.
It needs to be performed in the following cases:
• After the brake pads and brake pad wear sensors are replaced;
• When the brake pad warning light is on;
• After a short circuit in the brake pad sensor is xed;
• After the servo motor is replaced.
Steering (Steering Angle Reset)
If the steering angle sensor is replaced, or the steering angle is
inaccurate or not centered, the steering angle reset function needs
to be performed to nd the relative zero position. With this position
as a reference, the ECU can then calculate the exact angle for left
and right steering.
DPF Regeneration
This function is mainly used for the regeneration of diesel particulate
lters. To keep the lters performing well it removes particles by
means of combustion and oxidation.
ABS (ABS Bleeding)
When the brake system is opened to replace components such
as brake pump, master cylinder, brake lines or brake uid, air gets
inside, which can lead to a soft brake pedal. ABS Bleeding is required
to restore the brake pedal's rmness.
4.3.1 Services Overview
30
BMS (BMS Reset)
After the car battery is replaced, the car battery control unit needs
to be reset. This will clear fault information (such as low battery level)
so that the control unit can match the relevant information of the
newly replaced battery.
Airbag (Airbag Reset)
This function allows you to reset the airbag data to turn off the
airbag light, so that the airbag control module can run normally.
It needs to be performed in the following cases:
• When the airbag deploys;
• When the diagnostic tool reads "Crash data stored";
• When the airbag light is on;
• When relevant DTCs cannot be cleared.
To perform a service reset:
1. Tap Maintenance from the home screen of the ArtiDiag900 Lite
app. A function menu will display.
4.3.2 Steps:
2. Select a desired function that you want to perform.
3. Identify the vehicle via VIN or Make (for more on identication
operations, refer to Identifying the Vehicle in 4.2.1). Then the screen
Figure 4-10
31
for the selected function displays.
4. Follow the on-screen instructions to perform the service reset.
Figure 4-11
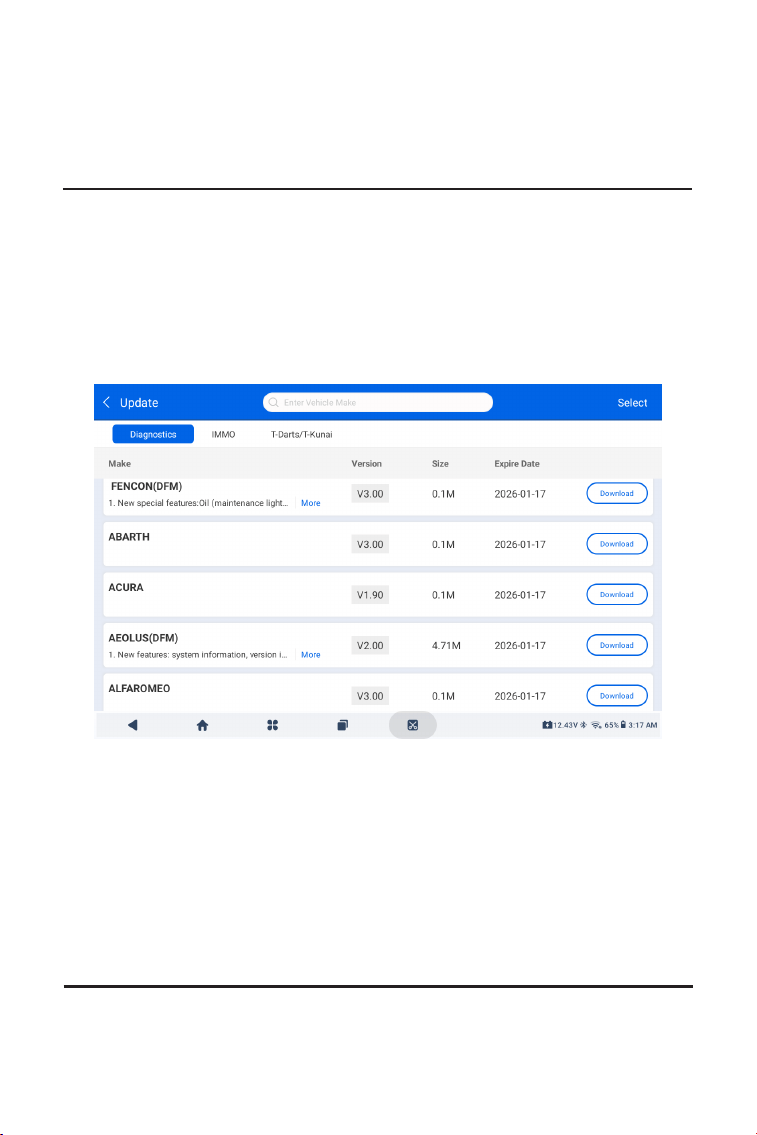
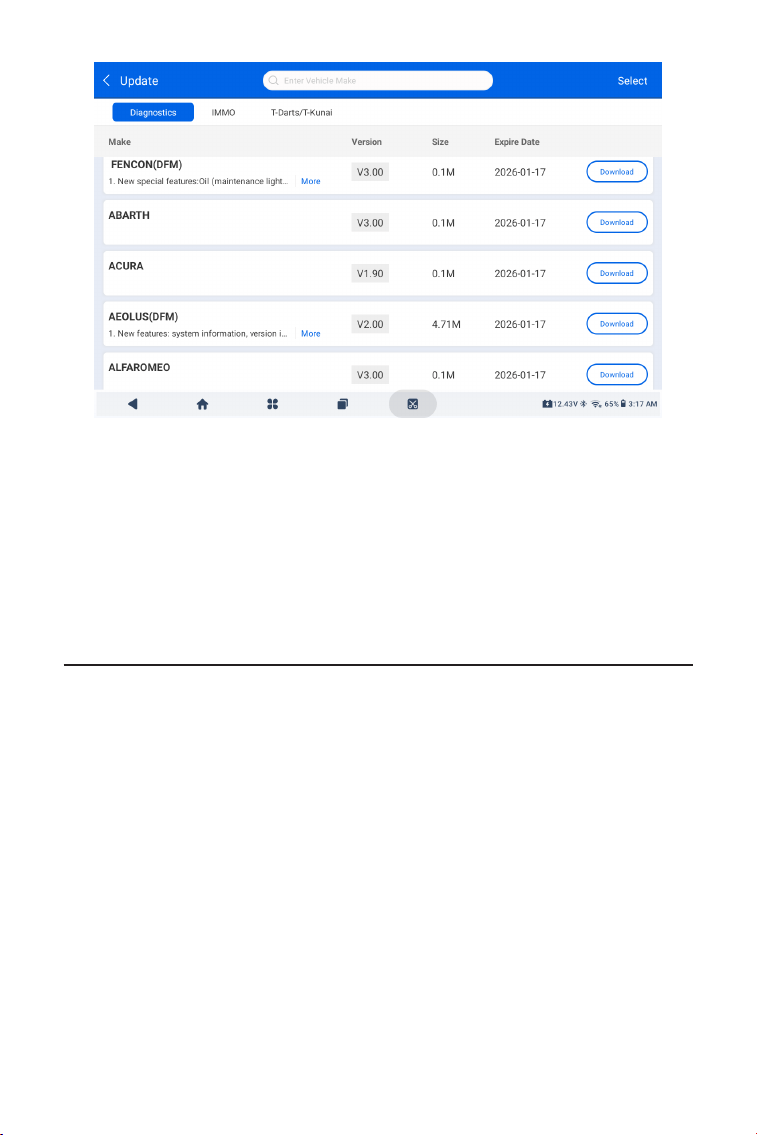
2. Look for a desired vehicle software, or search the software by a
keyword.
3. Tap Download / Update to install the software as you like.
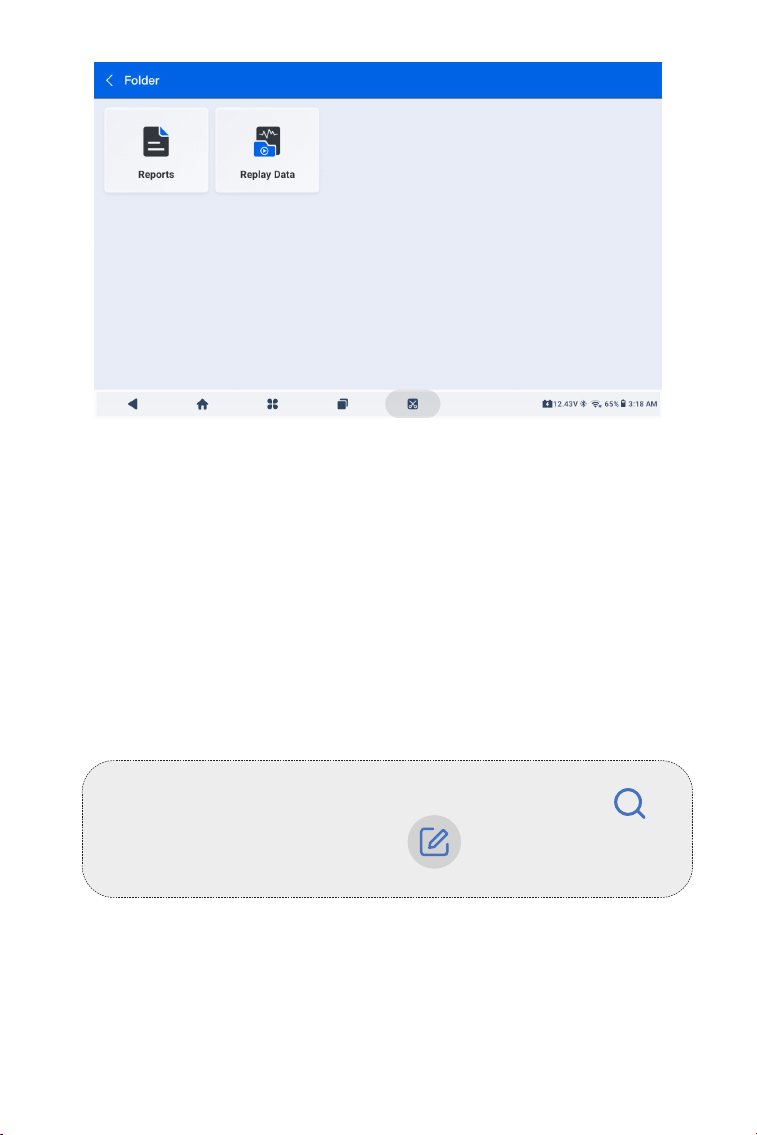
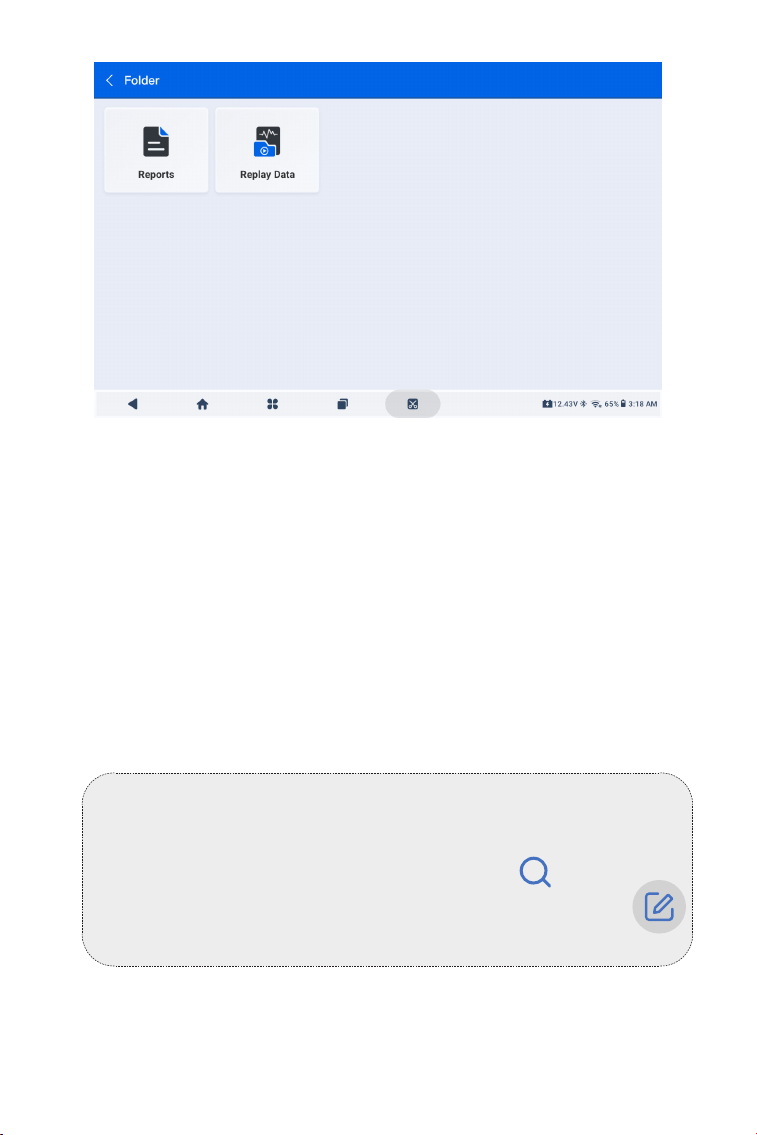
4.5 Folder
This function gives access to Reports (System Report, Fault Code
Report, and Data Stream Report) and Replay Data.
4.4 Update
This function allows you to update the vehicle-specic Diagnostics
software when there is a new version available.
To use the Update function:
1. Tap Update from the home screen of the ArtiDiag900 Lite app,
and the Update screen will display.
32
Figure 4-12
Note:
When on the Reports or Replay Data screen, you can tap to
search for a particular item or tap to batch select and
delete items.
4.5.1 Reports
1. Tap Folder > Reports, and the Reports screen displays.
2. Select a particular report to view details of that report.
4.5.2 Replay Data
1. Tap Folder > Replay Data, and the recorded data stream
list displays.
2. Tap a particular data stream to play the recorded video of that
data stream.

33
4.6 Library
4.7 Tester
4.6.1 DTC Repair Guide
DTC Repair Guide (Generic OBD-II) is an experience-based database
that provides code-specic information, including popular xes and
repair steps for identifying faults.
To use DTC Repair Guide:
Tap Library > DTC Repair Guide. Enter a DTC in the search bar.
4.6.2 TSB (Technical Service Bulletins)
To view Technical Service Bulletins:
Tap Library > TSB. Select vehicle make, model, year, system and
subsystem, and tap Next. A list of OEM technical service bulletins
issued for the selected vehicle will display. Tap the desired bulletin to
view the full content.
4.6.3 DLC Location
To view DLC location:
Tap Library > DLC Location. Select vehicle make, model and year,
and tap Next. A picture of the DLC location for the selected vehicle
will display.
4.6.4 Warning Light Library
The Warning Light Library provides information on dashboard
warning lights, including light descriptions, impacts on driving,
typical causes, responsive measures and relevant FAQs.
To use Warning Light Library:
Tap Library > Warning Light Library. A list of warning lights will
display. Tap the desired warning light to view the details.
4.6.5 Vehicle Coverage Lookup
To view the supported functions and car systems:
Tap Library > Vehicle Coverage Lookup. Select software type, make,
model and year, or enter function/subfunction in the search box,
and then tap Query. Related data issued for the selected vehicle will
display.
This function congures the ArtiDiag900 Lite into an automotive
battery tester. With this function, you can perform battery tests,
cranking tests, and charging tests.

34
Note:
To access the Tester function, additional hardware (sold separately)
is required. If you need to purchase the additional hardware,
please contact local dealers for help.
4.8 User Info
4.8.1 VCI Management
Allows you to bind the VCI to the ArtiDiag900 Lite tablet.
4.8.2 Firmware Update
Allows you to update the rmware if a new version is available.
4.8.3 Uninstall Diagnostic Software
Allows you to uninstall diagnostic software.
4.8.4 User Info
You can tap the prole photo in the User Info screen to change your
prole photo. You can also view your TOPDON ID or Email, change
the nickname or password, delete your TOPDON account, and log
out to your account.
4.8.5 Customer Feedback
This function allows you to write a feedback on the product to the
TOPDON after-sales team.
4.8.6 Shop Info
This section allows you to save the information of repair shops.
4.8.7 Settings
The Settings function allows you to set languages / unit, clear cache,
view the version information of the ArtiDiag900 Lite app, update the
ArtiDiag900 Lite app, view the Terms of Service and Privacy Policy,
and log out to your account.
4.8.8 System Update
Allows you to update the tablet system if a new version is available.
The User Info function provides access to VCI Management, Firmware
Update, Uninstall Diagnostic Software, User Info, My Prole, Customer
Feedback, Shop Info, Settings and System Update.

35
SECTION 5 SPECIFICATIONS
Android11.0
2G
32G
8-inch screen, 1280 x 800
Bluetooth5.0/SPP
USB
Wi-Fi
5 megapixels
Microphone / loudspeaker
Gravity sensor
10,000 mAh
12V DC
USB Type-A
USB Type-C
RJ45
HDIM
DC charging port
Wi-Fi
RJ45
10 x 6.1 x 1.97 in. (255mm x 155mm x 50mm)
32
℉
to 122
℉
(0
℃
to 50
℃
)
-4
℉
to 140
℉
(-20
℃
to 60
℃
)
OperatingSystem
RAM
StorageCapacity
Display Screen
Connectivity
Camera
Audio I/O
Sensor
BatteryCapacity
Input Voltage
Ports
NetworkConnection
Dimension (L x W x H)
WorkingTemperature
StorageTemperature

36
SECTION 6 FAQ
Q: What should I do if a communication error occurs?
A: Follow the steps below to identify the problem:
1) Check if the ignition is ON.
2) Check if the ArtiDiag900 Lite VCI is securely plugged into the
vehicle’s DLC port.
3) Turn the ignition off. Then, turn it on again after 10 seconds and
continue the operation.
4) Check if the vehicle’s control module is defective.
Q: What special functions does the ArtiDiag900 Lite support?
A: ArtiDiag900 Lite supports 8 special functions including Oil
Reset, Throttle Adaptation, EPB Reset, Steering Angle Reset, DPF
Regeneration, ABS Bleeding, BMS Reset and Airbag Reset.
Q: Do I need to update the rmware before using the ArtiDiag900 Lite
for the rst time?
A: Yes. Firmware will automatically update to the latest version once
the ArtiDiag900 Lite VCI is connected with your ArtiDiag900 Lite
tablet via Bluetooth. You can also tap User Info > Firmware Update
to update the rmware manually.
Q: Why is the ArtiDiag900 Lite tablet screen ashing when the engine
is working?
A: That is a normal occurrence caused by electromagnetic
interference.
Q: How do I capture a screenshot?
A: Long press the Screenshot button at the top right edge of the
ArtiDiag900 Lite tablet for 3 seconds to capture a screenshot. To
view the saved pictures, go to Gallery from the home screen of the
Android System.

37
SECTION 7 WARRANTY
TOPDON One Year Limited Warranty
TOPDON warrants to its original purchaser that the company's
products will be free from defects in material and workmanship for 12
months from the date of purchase (Warranty Period).
For the defects reported during the Warranty Period, TOPDON will
either repair or replace the defective part or product according to its
technical support analysis and conrmation.
TOPDON shall not be liable for any incidental or consequential
damages arising from the device's use, misuse, or mounting.
If there is any conict between the TOPDON warranty policy and local
laws, the local laws shall prevail.
This limited warranty is void under the following conditions:
• Misused, disassembled, altered or repaired by unauthorized stores or
technicians.
• Careless handling and/or improper operation.
Notice:
All information in this manual is based on the latest information
available at the time of publication and no warranty can be made
for its accuracy or completeness. TOPDON reserves the right to
make changes at any time without notice.

38
SECTION 8 FCC
Scan the QR code for more support!
Any changes or modications not expressly approved by the party
responsible for compliance could void the user’s authority to operate
the equipment.
This device complies with Part 15 of the FCC Rules. Operation is subject
to the following two conditions:
(1) this device may not cause harmful interference, and
(2) this device must accept any interference received, including
interference that may cause undesired operation.
Note: This equipment has been tested and found to comply with the
limits for a Class B digital device, pursuant to Part 15 of the FCC Rules.
These limits are designed to provide reasonable protection against
harmful interference in a residential installation. This equipment
generates, uses, and can radiate radio frequency energy, and if not
installed and used in accordance with the instructions, may cause
harmful interference to radio communications. However, there is no
guarantee that interference will not occur in a particular installation. If
this equipment does cause harmful interference to radio or television
reception, which can be determined by turning the equipment off and
on, the user is encouraged to try to correct the interference by one or
more of the following measures:
- Reorient or relocate the receiving antenna.
- Increase the separation between the equipment and receiver.
- Connect the equipment into an outlet on a circuit different from that
to which the receiver is connected.
- Consult the dealer or an experienced radio/TV technician for help.

39
DEUTSCH
40
MEHRSPRACHIGES BENUTZERHANDBUCH
SICHERHEIT STEHT IMMER AN ERSTER STELLE!
Um Ihre Sicherheit, die Sicherheit anderer und um Schäden
am Produkt und Ihrem Fahrzeug zu vermeiden, LESEN
SIE DIESE ANLEITUNG SORGFÄLTIG DURCH UND STELLEN
SIE SICHER, DASS SIE ALLE SICHERHEITSANWEISUNGEN
UND HINWEISE VOLLSTÄNDIG VERSTANDEN HABEN,
BEVOR SIE DAS GERÄT IN BETRIEB NEHMEN. Sie müssen
auch das Servicehandbuch des Fahrzeugs lesen und die
angegebenen Vorsichtsmaßnahmen oder Anweisungen
vor und während jeder Prüfung oder Serviceverfahren
beachten.
Halten Sie sich, Ihre Kleidung und andere Gegenstände von
beweglichen oder heißen Motorteilen fern und vermeiden
Sie den Kontakt mit elektrischen Verbindungen.
BETRIEBEN SIE DAS FAHRZEUG NUR IN EINER GUT
BELEUCHTETEN GEGEND, da das Fahrzeug Kohlenmonoxid,
ein giftiges und gefährliches Gas, sowie Feinstaub erzeugt,
wenn der Motor läuft.
LESEN SIE ALLE ANWEISUNGEN VOR DEM GEBRAUCH
Für ein mehrsprachiges Handbuch im PDF-Format scannen Sie den
QR-Code unten oder besuchen Sie www.topdon.com/products/
artidiag900-lite

41
ABSCHNITT 1 WAS IST IN DER BOX?
• ArtiDiag900 Lite Tablet
• ArtiDiag900 Lite VCI (Fahrzeugkommunikationsschnittstelle)
• Netzteil
• OBD-II-Verlängerungskabel
• USB-Kabel (Typ A auf Typ C)
• Schnellstartanleitung
• Benutzerhandbuch
• Tragetasche
TRAGEN SIE IMMER zugelassene SCHUTZBRILLEN,
um Schäden durch scharfe Gegenstände und ätzende
Flüssigkeiten zu vermeiden.
RAUCHEN SIE NICHT UND HALTEN SIE KEINE OFFENEN
FLAMMEN IN DER NÄHE DES FAHRZEUGS, wenn Sie Tests
durchführen. Die Dämpfe von Treibstoff und Batterien sind
hochentzündlich.
VERSUCHEN SIE NICHT, DAS PRODUKT WÄHREND DER
FAHRT ZU BEDIENEN. Jede Ablenkung kann einen Unfall
verursachen.
SCHALTEN SIE DIE ZÜNDUNG AUS, BEVOR SIE DAS
PRODUKT AN DEN DATENLINKANSCHLUSS (DLC) DES
FAHRZEUGS ANSCHLIESSEN ODER ABTRENNEN, um eine
Beschädigung des Produkts oder der elektronischen
Komponenten des Fahrzeugs zu vermeiden.
SICHERHEIT STEHT IMMER AN ERSTER STELLE!
42
ABSCHNITT 2 PRODUKTÜBERSICHT
2.1 ArtiDiag900 Lite-Tablet
Abb 2-1
1
12
14
13
16
15
32 75 94 86 10 11
ArtiDiag900 Lite

43
Acht-Zoll-Touchscreen
Reset-Taste
Führen Sie eine Nadel (nicht im Lieferumfang enthalten)
in das Nadelloch ein und halten Sie sie 10 Sekunden lang
gedrückt, um einen Neustart des Tablets zu erzwingen.
Einschalttaste
Drücken Sie die Taste lange, um das Tablet einzuschalten.
Drücken Sie erneut lange, um die Symbolleiste Ausschalten
/ Neustart / Screenshot anzuzeigen, und tippen Sie dann auf
die gewünschte Option. Drücken Sie die Taste kurz, um den
Bildschirm zu aktivieren / zu sperren.
3,5-mm-Audioanschluss
RJ45-Anschluss
USB-Typ-A-Anschluss
Verbindet das ArtiDiag900 Lite-Tablet und das ArtiDiag900
Lite VCI mithilfe des mitgelieferten USB-Kabels.
DC-Stromversorgungseingang (12 V, 2 A)
Lädt das ArtiDiag900 Lite-Tablet mit dem mitgelieferten
Netzteil auf.
HDMI-Anschluss
USB-Typ-C-Anschluss
Zur Datenübertragung und zum Laden (5V, 2 A)
Screenshot-Schaltäche
Um einen Screenshot zu machen, drücken und 2 Sekunden
lang gedrückt halten.
Mikrofon
TF-Karten-Erweiterungssteckplatz
Unterstützt Hot-Swap und Speichererweiterung auf bis zu 128
GB.
VCI-Steckplatz
Kameraobjektiv
Audio-Lautsprecher
Zusammenklappbarer Ständer
1.
2.
3.
4.
5.
6.
7.
8.
9.
10.
11.
12.
13.
14.
15.
16.

44
1. Indikatoren
2. OBD-II 16-Pin-Anschluss
Verbindet das ArtiDiag900 Lite VCI mit dem DLC des Fahrzeugs.
3. USB-Typ-C-Anschluss
Verbindet das ArtiDiag900 Lite VCI über das mitgelieferte USB-
Kabel mit dem ArtiDiag900 Lite-Tablet.
Durchgängig blau: Bluetooth
verbunden
Bluetooth-
Verbindungsanzeige
Kraftmesser
Kommunikation-
sindikator
Durchgängig rot: eingeschaltet
Grün blinkend: Kommunikation mit
dem Fahrzeug
1
2
3
2.2 ArtiDiag900 Lite VCI
Abb 2-2
45
1. Wählen Sie die gewünschte Systemsprache aus.
2. Wählen Sie die entsprechende Region und Zeitzone aus.
Abb 3-1
Abb 3-2
ABSCHNITT 3 ERSTE SCHRITTE
3.1 Grundlegende Einstellungen
Halten Sie die Einschalttaste gedrückt, um das Tablet einzuschalten.
Befolgen Sie die nachstehenden Schritte, um das Tablet einzurichten.

46
3. Kongurieren Sie die WLAN-Verbindung. Wählen Sie ein WLAN
aus der gescannten Liste aus und geben Sie das Passwort ein.
4. Wählen Sie eine Methode zum Festlegen des Sperrbildschirm-
Passworts. Sie können auch auf Nicht jetzt um diesen Schritt zu
überspringen.
Abb 3-3
Abb 3-4

47
5. Erfolgreich aktiviert. Tippen Sie auf Start und das System springt
automatisch zur ArtiDiag900 Lite-App.
6. Loggen Sie sich in Ihr TOPDON-Konto ein. (Wenn Sie noch kein
Konto haben, registrieren Sie sich bitte mit Ihrer E-Mail-Adresse).
Abb 3-5
Abb 3-6
48
3.2 Stecken Sie das ArtiDiag900 Lite VCI in den DLC des Fahrzeugs
3.3 Drehen Sie die Zündung auf die Position "EIN" (siehe Abbildung
3-8)
Nehmen Sie das ArtiDiag900 Lite VCI aus dem hinteren Steckplatz
des ArtiDiag900 Lite-Tablets und stecken Sie es in den DLC des
Fahrzeugs. Der DLC-Anschluss des Fahrzeugs bendet sich
normalerweise unter dem Armaturenbrett.
Wenn Sie Probleme bei der Lokalisierung des DLC-Anschlusses
haben, gehen Sie bitte zu "Bibliothek" > "DLC-Standort", um weitere
Details zu erhalten, oder konsultieren Sie das Servicehandbuch des
Fahrzeugs.
Wenn Ihr Fahrzeug mit einem schlüssellosen Startsystem
ausgestattet ist und das Zündschloss eine "Motor-Start-Stopp"-Taste
hat (siehe Abbildung 3-9), drücken Sie die "Motor-Start-Stopp"-Taste,
bis sich das Fahrzeug im "EIN"-Modus bendet. Betätigen Sie nicht
die Bremse, während Sie die "Motor-Start-Stopp"-Taste drücken, da
Sie sonst das Fahrzeug starten, anstatt es in die "EIN"-Stellung zu
bringen.
Die Art der Zündung ist je nach Fahrzeugmodell unterschiedlich.
Für weitere Details konsultieren Sie bitte das Servicehandbuch des
Fahrzeugs.
Hinweis: Stellen Sie sicher, dass die Zündung immer ausgeschaltet
ist, bevor Sie das Gerät einstecken.
Car OBD-II Interface
Abb 3-7

49
3.4 Binden Sie das ArtiDiag900 Lite VCI
①
Gehe zu Benutzerinfo > VCI-Verwaltung . Tippen Sie auf die
Symbol in der oberen rechten Ecke des Bildschirms. Das Gerät
fordert Sie zunächst auf, eine Bluetooth-Verbindung herzustellen.
②
Verbinden Sie das Bluetooth-Gerät wie angegeben. Die
Seriennummer und der Aktivierungscode werden dann automatisch
abgerufen.
Die rote Betriebs-LED am ArtiDiag900 Lite VCI zeigt an, dass das
ArtiDiag900 Lite VCI eingeschaltet ist.
Abb 3-10
Abb 3-8 Abb 3-9
ENGINE
START
STOP
50
③
Tippen Sie dann auf aktivieren Sie um das ArtiDiag900 Lite VCI an
das ArtiDiag900 Lite-Tablet zu binden.
Um die Kommunikation zwischen dem ArtiDiag900 Lite-Tablet und dem
Fahrzeug zu ermöglichen, müssen das ArtiDiag900 Lite VCI und das
ArtiDiag900 Lite-Tablet immer zuerst verbunden werden. Die VCI-Verbindung
kann drahtlos (Bluetooth) oder kabelgebunden (USB-Kabel) erfolgen.
KlopfenDiagnose vom Startbildschirm der ArtiDiag900 Lite-App und
tippen Sie auf das Symbol oben rechts auf dem Bildschirm,
um eine Bluetooth-Verbindung mit dem ArtiDiag900 Lite VCI herzustellen.
Nachdem das ArtiDiag900 Lite VCI erfolgreich verbunden wurde, ändert
sich das Symbol zu , und die Bluetooth-Verbindungsanzeige
auf dem ArtiDiag900 Lite VCI leuchtet durchgehend blau.
3.5 Verbinden Sie das ArtiDiag900 Lite VCI mit dem ArtiDiag900
Lite Tablet
3.5.1 Drahtlose VCI-Verbindung
Abb 3-11
ArtiDiag900 Lite
51
Verbinden Sie das ArtiDiag900 Lite VCI mit dem ArtiDiag900 Lite Tablet
über das mitgelieferte USB-Kabel (siehe Abbildung 3-6). Nachdem das
ArtiDiag900 Lite VCI ordnungsgemäß mit dem Tablet verbunden wurde,
wird das Symbol Änderungen an .
3.5.2 Kabelgebundene VCI-Verbindung
Abb 3-12
Hinweis:
Sobald das ArtiDiag900 Lite VCI erfolgreich über Bluetooth mit Ihrem
ArtiDiag900 Lite verbunden wurde, wird die Verbindung beim nächsten
Öffnen der ArtiDiag900 Lite-App automatisch wiederhergestellt. Wenn
keine Verbindung besteht, tippen Sie manuell auf eines
beliebigen Bildschirms mit diesem Symbol, um die Verbindung
wiederherzustellen.
Hinweis:
Sobald eine kabelgebundene Verbindung hergestellt ist, wird
Bluetooth automatisch getrennt.
USB Type-A
USB Type-C
ArtiDiag900 Lite

52
3.6 Ihr ArtiDiag900 Lite ist nun einsatzbereit
ABSCHNITT 4 VERWENDUNG IHRES
ARTIDIAG900 LITE
Abb 3-13
4.1 Startbildschirm
Öffnen Sie die ArtiDiag900 Lite-App und der Startbildschirm wird
angezeigt.
Abb 4-1
ArtiDiag900 Lite
53
1. Funktionssymbole
Ermöglicht Ihnen die Durchführung
von Vollsystemdiagnosefunktionen,
einschließlich dem Lesen von
Diagnose-Fehlercodes (DTCs), dem
Löschen von DTCs, dem Anzeigen
von Datenströmen, dem Lesen
von Versionsinformationen der
elektronischen Steuereinheit (ECU)
und dem Durchführen aktiver Tests.
Sie können über dieses Modul
auch auf EOBD & OBD-II und
Diagnosefeedback zugreifen.
Diagnostik
Bietet 8 Wartungsdienste,
darunter Öl zurücksetzen,
Drosselklappenanpassung, EPB-
zurücksetzen, Lenkwinkel-
zurücksetzen, DPF-Regeneration,
ABS-Blutung, BMS-zurücksetzen und
Airbag zurücksetzen.
Ermöglicht es Ihnen,
die fahrzeugspezische
Diagnosesoftware zu aktualisieren,
wenn eine neue Version verfügbar ist.
Ermöglicht Ihnen den Zugriff
auf Berichte (Systemberichte,
Fehlercodeberichte und
Datenstromberichte) und die
Wiedergabe von Daten.
Wartung
Aktualisieren
Ordner
54
Enthält ein DTC-Reparaturhandbuch,
technische Servicebulletins
(TSB), DTC-Standort, eine
Warnleuchtenbibliothek und
eine Fahrzeugabdeckungssuche,
die Referenzinformationen zur
Fahrzeuginspektion, -diagnose und
-reparatur bietet.
Konguriert das ArtiDiag900
Lite-Tablet für den Betrieb als
Batterietester (optional).
Bietet Zugriff auf VCI-Verwaltung,
Firmware-Update, Deinstallation
von Diagnosesoftware,
Benutzerinformationen,
Kundenfeedback, Shop-Informationen,
Einstellungen und Systemupdate.
Bibliothek
Prüfer
Benutzer-Info
2. Navigationsleiste
Wenn Sie dieses Symbol auswählen,
kehren Sie zum vorherigen Bildschirm
zurück.
Wenn Sie dieses Symbol auswählen,
gelangen Sie zum Startbildschirm der
ArtiDiag900 Lite-App zurück.
Wenn Sie dieses Symbol auswählen,
gelangen Sie zum Startbildschirm des
Android-Systems zurück.
Wenn Sie dieses Symbol auswählen,
wird eine Liste der geöffneten Apps
angezeigt. Sie können nach links oder
rechts wischen, um die vollständige
Liste anzuzeigen, tippen, um die App
zu öffnen, oder nach oben wischen,
um die App zu entfernen.
Geöffnete Apps
App Home
Zurück
Android Home

55
4.2 Diagnose
Mit dem Diagnosemodul können Sie alle unterstützten
Fahrzeugsysteme gleichzeitig (Auto-Scan) nach DTCs durchsuchen
oder ein einzelnes System auswählen, um DTCs zu lesen, DTCs zu
löschen, Datenstrom zu lesen, ECU-Informationen zu lesen und aktive
Tests durchzuführen. Über dieses Modul können Sie auch auf EOBD &
OBD-II und Diagnosefeedback zugreifen.
Identizierung des Fahrzeugs
Um einen automatischen Scan oder eine individuelle
Systemdiagnose durchzuführen, müssen Sie zuerst Ihr Fahrzeug
identizieren. Tippen Sie auf Diagnostik. vom Startbildschirm der
ArtiDiag900 Lite-App, um den Diagnosebildschirm aufzurufen.
4.2.1 Auto-Scan und individuelle Systemdiagnose
Wenn Sie dieses Symbol auswählen,
wird ein Screenshot der aktuellen
Seite erstellt.
Bildschirmfoto
Abb 4-2
Identizierung über VIN
VIN ermöglicht die Identizierung des Fahrzeugs über Auto VIN
oder VIN eingeben.
• Auto VIN - der ArtiDiag900 Lite-Tablet liest und dekodiert
automatisch die Fahrzeugidentikationsnummer (VIN).
• VIN eingeben – Geben Sie die Fahrzeug-VIN manuell ein oder

56
scannen Sie die Fahrzeug-VIN, um das Fahrzeug zu identizieren.
Identizierung über Marke
1. Tippen Sie auf Alle, und eine Liste der Fahrzeugmarken wird
angezeigt.
2. Wählen Sie die Marke aus oder geben Sie sie ein.
Ihres Fahrzeugs.
Hinweis:
Ein Demonstrationsmodus (DEMO Option) soll Ihnen dabei
helfen, sich mit den Diagnosefunktionen vertraut zu machen.
3. Wählen Sie Automatischoder Handbuch zur Identizierung des
Fahrzeugs.
Automatisch
Geben Sie die Fahrgestellnummer manuell ein oder tippen Sie
auf Lesen, um die Fahrgestellnummer zu erfassen, und tippen Sie
dann auf Bestätigen. ArtiDiag900 Lite wird automatisch die VIN
entschlüsseln, um das Fahrzeug zu identizieren.
Manuell
Wählen Sie die Fahrzeuginformationen manuell aus, um das
Fahrzeug zu identizieren.
Nachdem das Fahrzeug identiziert wurde, wird ein Systemmenü
angezeigt.
Hinweis:
Die Systeme können je nach Fahrzeugmarke, -modell und -jahr
variieren.

57
Abb 4-3
Auto-Scan
Die Auto-Scan-Funktion erkennt die von Ihrem Fahrzeug
unterstützten Systeme und ruft die Fehlercodes (DTCs) für
diese Systeme ab, um eine umfassende Fahrzeugdiagnose
durchzuführen. Die Durchführung eines Auto-Scans vor und nach
einer Reparatur kann bei der Fehlersuche und Validierung von
Reparaturen helfen. Die Vor- und Nach-Scan-Berichte ermöglichen
es Ihnen, den Zustand des Fahrzeugs vor und nach der Reparatur zu
dokumentieren, um einen Vergleich durchzuführen.
Um einen Auto Scan durchzuführen, tippen Sie auf die Auto Scan-
Schaltäche in der unteren Ecke. Der ArtiDiag900 Lite-Tablet
beginnt mit dem Scannen der vom Fahrzeug unterstützten
Systeme, und die Fehlercodeabfrage wird automatisch starten.
Die Ergebnisse werden schrittweise angezeigt, während die Systeme
gescannt werden.

58
Abb 4-4
Tastenbeschreibung
DTCs löschen - tippen Sie auf , um alle abgerufenen DTCs zu löschen.
Bericht - tippen Sie auf , um die aktuellen Scanergebnisse im
Berichtsformat zu speichern. (Um die gespeicherten Berichte
anzuzeigen, gehen Sie zu Ordner > Berichte > Systembericht.)
Alle anzeigen / Aktuelle anzeigen - Tippen Sie, um zwischen
der Anzeige aller Fahrzeugsysteme und der Anzeige nur der
unterstützten Systeme umzuschalten.
Individuelle Systemdiagnosen durchführen
Außer, abgesondert, ausgenommenBeim automatischen Scannen
können Sie auch ein einzelnes System auswählen, um für dieses
bestimmte System DTCs zu lesen, DTCs zu löschen, Datenströme zu
lesen, ECU-Informationen zu lesen und aktive Tests durchzuführen.
Hinweis:
Je nach Fahrzeugmarke sind einige Funktionen möglicherweise
nicht verfügbar.
DTCs lesen
1. Nachdem das Fahrzeug identiziert wurde, wählen Sie das
System, für das Sie DTCs abrufen möchten, aus dem Systemmenü
aus.

59
Abb 4-5
Symbolbeschreibung
Wenn dieses Symbol aueuchtet, tippen Sie
darauf, um ein Fenster zu öffnen, in dem Sie nach
weiteren Informationen zum DTC auf Google
suchen können.
Wenn dieses Symbol aueuchtet, bedeutet dies,
dass der DTC dazu führt, dass eine Warnleuchte
aueuchtet.
Wenn dieses Symbol aueuchtet, tippen Sie auf,
um das Standbild anzuzeigen, das zum Zeitpunkt
des Auftretens des DTC aufgenommen wurde.
Wenn dieses Symbol aueuchtet, tippen Sie
auf, um die instruktiven Reparaturmaßnahmen
anzuzeigen.
2. Tippen Sie auf DTCs lesen im Funktionsmenü.
ArtiDiag900 Lite kommuniziert mit der ECU und ruft DTCs für das
aktuell ausgewählte System ab und zeigt sie an.
60
Abb 4-6
Tastenbeschreibung
Bericht - tippen Sie auf , um die DTCs im Berichtsformat zu
speichern. (Um die gespeicherten Berichte anzuzeigen, gehen Sie zu
Ordner > Berichte > Fehlercode-Bericht.)
DTCs löschen - tippen Sie auf , um alle abgerufenen DTCs zu löschen.
Löschen von DTCs
1. Nachdem das Fahrzeug identiziert wurde, wählen Sie das System,
für das Sie die DTCs löschen möchten, aus dem Systemmenü aus.
2. Tippen Sie auf Löschen von DTCs im Funktionsmenü.
3. Tippen Sie auf OK , wenn die DTCs gelöscht sind.
Datenstrom lesen
1. Nachdem das Fahrzeug identiziert wurde, wählen Sie aus dem
Systemmenü das System aus, dessen Datenstrom Sie auslesen
möchten.
2. KlopfenDatenstromim Funktionsmenü .Eine Datenstromliste wird
angezeigt.
Hinweis:
1. Das Verfahren zum Löschen von DTCs sollte durchgeführt
werden, nachdem die erforderliche Reparatur abgeschlossen
wurde. Nach Bestätigung werden die in der ECU gespeicherten
DTCs und Freeze-Daten gelöscht.
2. STARTEN SIE DEN MOTOR NICHT, WÄHREND SIE DIE DTCS
LÖSCHEN.

61
Symbolbeschreibung
Tippen Sie hier, um die detaillierte Beschreibung
des Datenstroms zu erfahren.
Tippen Sie, um den Echtzeit-Datenstrom in
einem Wellenmusterdiagramm anzuzeigen.
Tastenbeschreibung
Bearbeiten - Tippen Sie, um die anzuzeigenden Datenströme
auszuwählen.
Aufzeichnen - Tippen Sie hier, um Datenstrominformationen in
Echtzeit aufzuzeichnen und zu speichern, um sie zu vergleichen und
zu analysieren. Um die aufgezeichneten Datenströme anzuzeigen,
gehen Sie zu Ordner >Wiedergabedaten.
Grak(en) - Tippen Sie, um bis zu 6 Datenströme im
Diagrammformat anzuzeigen.
Kombinieren - Tippen Sie, um bis zu 4 Datenströme in einem
Diagramm zu kombinieren und so den Vergleich und die
Beobachtung zu erleichtern.
Bericht - Tippen Sie hier, um die aktuellen Datenstromwerte im
Berichtsformat zu speichern. Um die gespeicherten Berichte
anzuzeigen, gehen Sie zu Ordner > Berichte > Datenstrombericht.
ECU-Informationen lesen
1. Nachdem das Fahrzeug identiziert wurde, wählen Sie
aus dem Systemmenü das System aus, für das Sie die ECU-
Versionsinformationen anzeigen möchten.
2. KlopfenECU-Informationenim Funktionsmenü. Anschließend
können Sie die ECU-Versionsinformationen des ausgewählten
Systems anzeigen.
Aktiver Test
ermöglicht Ihnen, bestimmte Komponentenvorgänge manuell
Hinweis:
WENN DAS FAHRZEUG FAHREN MUSS, UM DEN LIVE-
DATENSTREAM ANZUSCHAUEN, LASSEN SIE SICH IMMER
VON EINER ZWEITEN PERSON HELFEN. SEHEN SIE SICH DEN
DATENSTREAM NICHT WÄHREND DER FAHRT AN.
62
Hinweis:
Die verfügbaren aktiven Tests variieren je nach Fahrzeugmarke,
Baujahr und Modell.
Mit der EOBD- und OBD-II-Funktion können Sie emissionsbezogene
Diagnosen für Ihr Fahrzeug durchführen.
So führen Sie eine OBD-II-Diagnose durch:
1. Gehe zu Diagnostik > Alle > EOBD.
4.2.2 EOBD und OBD-II
Abb 4-7
direkt aus der App heraus zu steuern, um den Betrieb der
Komponenten zu überprüfen.
1. Nachdem das Fahrzeug identiziert wurde, wählen Sie aus
dem Systemmenü das System aus, für das Sie einen aktiven Test
durchführen möchten.
2. Tippen Sie auf Aktiver Testim Funktionsmenü. Anschließend
können Sie bei Bedarf entsprechende aktive Tests durchführen.
2. Wählen Sie Ihre Kommunikationsmethode: Auto-Scan oder
Protokoll.
Automatischer Scan - ArtiDiag900 Lite kommuniziert automatisch

63
Abb 4-8
Abb 4-9
3. Tippen Sie auf OK , um das Funktionsmenü aufzurufen.
mit dem Fahrzeug und erkennt, welches Protokoll das Fahrzeug
verwendet.
Protokoll - ermöglicht Ihnen, das Kommunikationsprotokoll manuell
auszuwählen.
Nach Bestätigung des Kommunikationsprotokolls wird ein
Fahrzeugstatusbildschirm angezeigtdas Protokoll und weitere
Statusinfos Ihres Fahrzeugs.

64
4. Wählen Sie eine Funktion aus, um fortzufahren.
Typische Funktionsoptionen können sein: DTC&FFD, I/M-Bereitschaft,
Live-Daten, Bordmonitor, Komponententest, Fahrzeuginformationen
und Fahrzeugstatus.
Hinweis:
Je nach Fahrzeugmarke können einige Funktionen nicht
verfügbar sein.
Hinweis:
1. Das Verfahren zum Löschen von DTCs sollte durchgeführt
werden, nachdem die erforderliche Reparatur durchgeführt
wurde. Nach der Bestätigung werden die DTCs und FFDs, die
im Steuergerät (ECU) gespeichert sind, gelöscht.
2. STARTEN SIE DEN MOTOR NICHT, WÄHREND SIE DIE DTCS
LÖSCHEN.
DTC und FFD (Freeze Frame-Daten)
Diese Funktion hilft beim Abrufen und Löschen von DTCs, die
in der ECU des Fahrzeugs gespeichert sind, und zeigt FFD der
emissionsbezogenen Systeme an.
1. DTCs lesen
Diese Funktion zeigt die von den emissionsrelevanten Systemen
abgerufenen DTCs an.
2. DTCs löschen
Mit dieser Funktion können Sie die von den emissionsrelevanten
Systemen abgerufenen DTCs löschen.
3. FFD
Diese Funktion erstellt eine Momentaufnahme der Daten und
Betriebsbedingungen, wenn eine emissionsbezogene Störung
auftritt.
I/M (Inspektion und Wartung) Bereitschaft
Diese Funktion überprüft, ob die verschiedenen
emissionsbezogenen Systeme des Fahrzeugs ordnungsgemäß
funktionieren und für die I/M-Prüfung bereit sind.
Es kann auch den Betriebsstatus des Monitors überprüfen
und bestätigen, ob die Reparatur eines Autofehlers korrekt
durchgeführt wurde.
Echtzeitdaten
Diese Funktion zeigt die Echtzeit-Live-Daten und Parameter von
der ECU des Fahrzeugs.

65
Mit dem ArtiDiag900 Lite können Sie sofort ein Diagnose-
Feedback senden (mit automatisch angehängten Protokollen
der Diagnosedaten), wenn Sie ein Softwareproblem bei den
Diagnosevorgängen feststellen.
So senden Sie ein Diagnose-Feedback:
1. Tippen Sie auf das Symbol in der oberen rechten Ecke jedes
Bildschirmsim Modul Diagnose.
2. Wählen Sie den Typ des Problems und tippen Sie auf Bestätigen.
3. Schreiben Sie eine Beschreibung des Problems.
4. Tippen Sie auf Senden, um das Feedback zu senden.
4.2.3 Diagnose-Feedback
O2-Sensor-Monitor
Diese Funktion zeigt die Testergebnisse des O2-Sensor-Monitors
der zuletzt abgeschlossenen Tests der Fahrzeug-ECU an.
On-Board-Monitor
Diese Funktion zeigt die Prüfergebnisse für emissionsrelevante
Komponenten und Systeme des Antriebsstrangs an, die nicht
kontinuierlich überwacht werden.
Komponententest
Diese Funktion hilft, Steuerbefehle an die ECU des Fahrzeugs zu
senden, um die Systemteile und -komponenten zu testen und zu
betreiben.
Fahrzeug-Informationen
Diese Funktion zeigt eine Liste von Informationen (die vom
Fahrzeughersteller bereitgestellt werden) aus der ECU des
Fahrzeugs an.
Die Informationen können Folgendes umfassen:
• VIN.
• Kalibrierungs-ID (CID).
• Kalibrierungsverizierungsnummer (CVN)
• Leistungsüberwachung im Betrieb für einen Ottomotor (IUPR)
Fahrzeugstatus
Diese Funktion zeigt den Status des Fahrzeugs an, einschließlich
Motor, Getriebe, gefundene Codes, MIL-Status, Monitore und
Protokoll.

66
Hinweis:
Die Funktion Diagnose-Feedback ist nur mit dem Diagnosemodul
verfügbar.
4.3 Wartung
Diese Funktion bietet Ihnen 8 Wartungsdienste, darunter Öl
zurücksetzen, Drosselklappenanpassung, EPB-zurücksetzen,
Lenkwinkel-zurücksetzen, DPF-Regeneration, ABS-Blutung, BMS-
zurücksetzen und Airbag zurücksetzen.
4.3.1 Übersicht der Dienstleistungen
Öl zurücksetzen
Diese Funktion ermöglicht es Ihnen, die Ölserviceleuchte für das
Motorölwartungssystem zurückzusetzen. Das Motoröl-Lichtsystem
berechnet ein optimales Ölwechselintervall in Abhängigkeit von den
Fahrbedingungen und den Witterungsbedingungen des Fahrzeugs.
Öl-Zurücksetzen ist bei jedem Motorölwechsel erforderlich.
Drosselklappenanpassung
Wenn das Steuergerät versehentlich abgeklemmt wird oder
wenn die Drosselklappe ausgetauscht oder gereinigt wird,
müssen die Drosselklappenaktuatoren über die Funktion
Drosselklappenanpassung initialisiert werden. Dies setzt die Daten
des Motorsteuergeräts auf den Ausgangszustand zurück, damit der
Gashebel die Luftzufuhr genau regulieren kann.
EPB zurücksetzen
Diese Funktion hilft Ihnen beim Austausch und Zurücksetzen der
Bremsbeläge.
Es muss in den folgenden Fällen durchgeführt werden:
• Die Bremsbeläge und der Verschleißsensor der Bremsbeläge
werden ausgetauscht.
• Die Bremsbeläge-Kontrollleuchte leuchtet.
• Die Bremsbeläge Sensor Schaltung ist kurz, die zurückgewonnen
wird.
• Der Servomotor wird ersetzt.
Lenkwinkel zurücksetzen
Wenn der Lenkwinkelsensor ausgetauscht wird oder der
Lenkwinkel ungenau oder nicht zentriert ist, muss die Funktion zum
Zurücksetzen des Lenkwinkels ausgeführt werden, um die relative
Nullposition zu nden. Mit dieser Position als Referenz kann das
Motorsteuergerät dann den genauen Winkel für das Lenken nach

67
links und rechts berechnen.
DPF-Regeneration
Diese Funktion wird hauptsächlich für die Regeneration von
Dieselpartikelltern verwendet. Damit die Filter gut funktionieren,
entfernt er Partikel durch Verbrennung und Oxidation.
ABS-Blutung
Mit dieser Funktion können Sie Tests durchführen, um die
Betriebsbedingungen des Antiblockiersystems (ABS) zu überprüfen.
Es muss in den folgenden Fällen durchgeführt werden:
• Wenn die ABS-Leitungen Luft enthalten.
• Wenn der ABS-Computer, ABS-Pumpe, Bremshauptzylinder,
Bremszylinder, Bremsleitung oder Bremsüssigkeit ersetzt wird.
BMS zurücksetzen
Nach dem Austausch der Fahrzeugbatterie muss das Steuergerät
der Fahrzeugbatterie zurückgesetzt werden. Dadurch
werden Fehlerinformationen (wie zum Beispiel eine niedrige
Batteriespannung) gelöscht, damit die Steuereinheit die relevanten
Informationen der neu eingebauten Batterie anpassen kann
Airbag zurücksetzen
Diese Funktion setzt die Airbag-Daten zurück, um die Airbag-
Kollisionsfehleranzeige zu löschen, damit der Airbag-Computer im
Fahrzeug normal laufen kann.
Es muss in den folgenden Fällen durchgeführt werden:
Wenn das Fahrzeug kollidiert und sich der Airbag entfaltet, erscheint
der entsprechende Fehlercode der Kollisionsdaten, die Airbag-
Anzeige leuchtet auf und der Fehlercode kann nicht gelöscht
werden.
So führen Sie einen Service-Reset durch:
1. Tippen Sie auf Wartung auf dem Startbildschirm und ein
Funktionsmenü wird angezeigt.
4.3.2 Schritte

68
2. Wählen Sie die Funktion, die Sie ausführen möchten.
3. Identizieren Sie das Fahrzeug über die Fahrgestellnummer oder
Marke (weitere Informationen zu Identizierungsvorgängen nden
Sie unter Identizierung des Fahrzeugs auf 4.2.1). Anschließend
wird der Bildschirm für die ausgewählte Funktion angezeigt.
4. Befolgen Sie die Anweisungen auf dem Bildschirm, um das
Service-Reset durchzuführen.
Abb 4-10
4.4 Aktualisieren
Mit dieser Funktion können Sie die fahrzeugspezische
Diagnosesoftware aktualisieren, wenn eine neue Software verfügbar
ist.
So führen Sie die Funktion Aktualisieren aus:
1. Tippen Sie auf Aktualisieren auf dem Startbildschirm und der
Bildschirm Aktualisieren wird angezeigt.
69
Abb 4-11
2. Suchen Sie nach einer gewünschten Fahrzeugsoftware zu suchen,
oder die Software anhand eines Stichworts zu durchsuchen.
3. Tippen Sie auf Aktualisierung herunterladenum die Software nach
Wunsch zu installieren.
4.5 Ordner
Diese Funktion ermöglicht den Zugriff auf Berichte (Systembericht,
Fehlercodebericht und Datenstrombericht) und Wiedergabedaten.
70
Abb 4-12
Hinweis:
Wenn Sie sich auf dem Bildschirm „Berichte“ oder
„Wiedergabedaten“ benden, können Sie auf , um nach
einem bestimmten Element zu suchen, oder tippen Sie auf
um Elemente stapelweise auszuwählen und zu löschen.
4.5.1 Berichte
1. Tippen Sie auf Ordner > Berichte.
2. Wählen Sie einen bestimmten Bericht aus, um Details zu diesem
Bericht anzuzeigen.
4.5.2 Wiedergabedaten
1. Tippen Sie auf Ordner > Wiederholung Daten, und die Liste der
aufgezeichneten Datenströme wird angezeigt.
2. Tippen Sie auf einen bestimmten Datenstrom, um das
aufgezeichnete Video dieses Datenstroms abzuspielen.

71
4.6 Bibliothek
4.6.1 DTC-Reparaturanleitung
Die DTC-Reparaturanleitung ist eine erfahrungsbasierte Datenbank,
die code-spezische Informationen, einschließlich gängiger
Fehlerbehebungen und Reparaturschritte zur Identizierung von
Fehlern enthält.
So verwenden Sie die DTC-Reparaturanleitung:
Tippen Sie auf Bibliothek > DTC-Reparaturanleitung. Geben Sie
einen DTC in die Suchleiste ein.
4.6.2 TSB (Technische Service-Bulletins)
So sehen Sie technische Service-Bulletins:
Tippen Sie auf Bibliothek > TSB. Wählen Sie Fahrzeugmarke, Modell,
Baujahr, System und Subsystem und tippen Sie auf Weiter. Eine Liste
der vom Hersteller herausgegebenen technischen Service-Bulletins
für das ausgewählte Fahrzeug wird angezeigt. Tippen Sie auf das
gewünschte Bulletin, um den vollständigen Inhalt anzuzeigen.
4.6.3 DLC-Standort
Um den DLC-Standort anzuzeigen:
Tippen Sie auf Bibliothek > DLC Standort. Wählen Sie
Fahrzeugmarke, -modell und -jahr aus und tippen Sie auf Weiter. Ein
Bild des OBD-II-Anschlusses (DLC) für das ausgewählte Fahrzeug
wird angezeigt.
4.6.4 Warnleuchten-Bibliothek
Die Warnleuchten-Bibliothek bietet Informationen über
Warnleuchten im Armaturenbrett, einschließlich Beschreibungen
der Leuchten, Auswirkungen auf das Fahrverhalten, typische
Ursachen, Abhilfemaßnahmen und relevante FAQs.
So zeigen Sie die Warnleuchten-Bibliothek an:
Tippen Sie auf Bibliothek > Warnleuchten-Bibliothek. Eine Liste
der Warnleuchten wird angezeigt. Tippen Sie auf die gewünschte
Warnleuchte, um weitere Informationen anzuzeigen.
4.6.5 Fahrzeugabdeckungssuche
So zeigen Sie die unterstützten Funktionen und Fahrzeugsysteme
an:
Klopfen Bibliothek > Fahrzeug-Abdeckungssuche. Wählen Sie
Softwaretyp, Marke, Modell und Jahr oder geben Sie Funktion/
Unterfunktion in das Suchfeld ein und tippen Sie dann auf Abfrage.
Es werden die zugehörigen Daten für das ausgewählte Fahrzeug
angezeigt.

72
Hinweis:
Für den Zugriff auf diePrüfer Funktion ist zusätzliche Hardware
(separat erhältlich) erforderlich. Wenn Sie die zusätzliche Hardware
erwerben müssen, wenden Sie sich bitte an Ihren Händler vor Ort.
4.8 Benutzer-Infos
4.8.1 VCI-Verwaltung
Ermöglicht Ihnen, das VCI an das ArtiDiag900 Lite-Tablet zu binden.
4.8.2 Firmware-Update
Ermöglicht die Aktualisierung der Firmware, wenn eine neue Version
verfügbar ist.
4.8.3 Diagnosesoftware deinstallieren
Ermöglicht Ihnen, Diagnose- oder IMMO-Software zu deinstallieren.
4.8.4 Benutzerinformationen
Sie können auf das Prolfoto im Benutzerinfo-Bildschirm tippen,
um Ihr Prolfoto zu ändern. Sie können auch Ihre TOPDON-ID oder
E-Mail anzeigen, den Spitznamen oder das Passwort ändern, Ihr
TOPDON-Konto löschen und sich bei Ihrem Konto abmelden.
4.8.5 Kundenfeedback
Mit dieser Funktion können Sie dem TOPDON Kundenservice ein
Feedback zum Produkt schreiben.
4.8.6 Shop-Info
Ermöglicht das Speichern von Reparaturwerkstattinformationen.
Die Benutzerinfo-Funktion bietet Zugriff auf VCI-Verwaltung,
Firmware-Update, Deinstallation von Diagnosesoftware, Benutzerinfo,
Mein Prol, Kundenfeedback, Shop-Info, Einstellungen und
Systemupdate.
4.7 Tester
Mit dieser Funktion wird das ArtiDiag900 Lite zu einem
Autobatterietester. Mit dieser Funktion können Sie Batterietests,
Anlasstests und Ladetests durchführen.

73
4.8.7 Einstellungen
Mit der Funktion „Einstellungen“ können Sie Sprachen/Einheiten
festlegen, den Cache leeren, die Versionsinformationen der
ArtiDiag900 Lite-App anzeigen, die ArtiDiag900 Lite-App
aktualisieren, die Servicebedingungen und Datenschutzrichtlinie
anzeigen und sich bei Ihrem Konto abmelden.
4.8.8 System-Update
Ermöglicht Ihnen, das Tablet-System zu aktualisieren, wenn eine
neue Version verfügbar ist.

74
ABSCHNITT 5 SPEZIFIKATIONEN
Android 11.0
2G
32G
8-Zoll-Bildschirm, 1280 x 800
Bluetooth 5.0/SPP
USB
W-lan
5 Megapixel
Mikrofon / Lautsprecher
Schwerkraft-Sensor
10.000 mAh
12 V Gleichstrom
USB Typ-A
USB Typ C
RJ45
HDMI
DC-Ladeanschluss
W-lan
RJ45
10 x 6,1 x 1,97 Zoll (255 mm x 155 mm x 50
mm)
32°F bis 122°F(0°C bis 50°C)
-4°F bis 140°F(-20°C bis 60°C)
Betriebssystem
RAM
Speicherkapazität
Bildschirm
Konnektivität
Kamera
Audio-E/A
Sensor
Batterie
Eingangsspannung
Häfen
Netzwerkverbindung
Abmessungen (L x B x H)
Arbeitstemperatur
Lagertemperatur

75
ABSCHNITT 6 FAQ
Q: Wenn ein Kommunikationsfehler auftritt, was soll ich tun?
A: Führen Sie die folgenden Schritte aus, um das Problem zu
identizieren:
1) Überprüfen Sie, ob die Zündung EIN ist.
2) Überprüfen Sie, ob dasArtiDiag900 Lite VCI ist sicher in den DLC-
Anschluss des Fahrzeugs eingesteckt.
3) Schalten Sie die Zündung aus. Schalten Sie ihn dann nach 10
Sekunden wieder ein und setzen Sie den Vorgang fort.
4) Überprüfen Sie, ob das Steuermodul des Fahrzeugs defekt ist.
Q: Welche Sonderfunktionen unterstützt ArtiDiag900 Lite?
A: ArtiDiag900 Lite unterstützt 8 spezielle Funktionen, einschließlich
Öl zurücksetzen, Drosselklappenanpassung, EPB-zurücksetzen,
Lenkwinkel-zurücksetzen, DPF-Regeneration, ABS-Blutung, BMS-
zurücksetzen und Airbag zurücksetzen.
Q: Muss ich die Firmware aktualisieren, bevor ich den ArtiDiag900 Lite
zum ersten Mal verwende?
A: Ja. Die Firmware wird automatisch auf die neueste Version
aktualisiert. Sie können auch auf Benutzer-Info > Firmware-Update
tippen, um die Firmware manuell zu aktualisieren.
Q: Warum blinkt der Bildschirm des ArtiDiag900 Lite-Tablets, wenn
der Motor läuft?
A: Das ist ein normales Phänomen, das durch elektromagnetische
Störungen verursacht wird.
Q: Wie erstelle ich einen Screenshot?
A: Halten Sie die Screenshot-Taste am oberen rechten Rand des
ArtiDiag900 Lite-Tablets 3 Sekunden lang gedrückt, um einen
Screenshot aufzunehmen. Um die gespeicherten Bilder anzuzeigen,
gehen Sie vom Startbildschirm des Android-Systems zur Galerie.

76
ABSCHNITT 7 GARANTIE
TOPDONs Einjährige Eingeschränkte Garantie
TOPDON garantiert seinem ursprünglichen Käufer, dass die Produkte
des Unternehmens für 12 Monate ab Kaufdatum frei von Material- und
Verarbeitungsfehlern sind (Garantiezeitraum).
Für die während der Garantiezeit gemeldeten Mängel wird TOPDON
das defekte Teil oder Gerät gemäß seiner Analyse und Bestätigung
des technischen Supports entweder reparieren oder ersetzen.
TOPDON haftet nicht für Neben- oder Folgeschäden, die durch den
Gebrauch, den Missbrauch oder die Montage des Geräts entstehen.
Bei Widersprüchen zwischen der TOPDON-Gewährleistungsrichtlinie
und den örtlichen Regelungen haben die örtlichen Regelungen
bevorzugte Stellung.
Diese eingeschränkte Garantie erlischt unter den folgenden
Bedingungen:
• Missbrauch, Demontage, Änderung oder Reparatur durch nicht
autorisierte Geschäfte oder Techniker.
• Unachtsame Handhabung und Verletzung des Betriebs.
Notiz:
Alle Informationen in dieser Anleitung basieren auf den neuesten
Informationen, die zum Zeitpunkt der Veröffentlichung verfügbar
waren, und es kann keine Garantie für ihre Genauigkeit oder
Vollständigkeit übernommen werden. TOPDON behält sich
das Recht vor, jederzeit ohne Vorankündigung Änderungen
vorzunehmen.
Scannen Sie den QR-Code für weitere Unterstützung!

77
FRANÇAIS

78
MEHRSPRACHIGES BENUTZERHANDBUCH
LA SÉCURITÉ EST TOUJOURS LA PRIORITÉ
A BSOLUE !
Pour votre sécurité, celle des autres et pour éviter tout
dommage au produit et à votre véhicule, LISEZ ET
ASSUREZ-VOUS DE BIEN COMPRENDRE TOUTES LES
INSTRUCTIONS DE SÉCURITÉ ET LES MESSAGES DE CE
MANUEL AVANT DE PROCÉDER À UNE OPÉRATION. Vous
devez également lire le manuel d'entretien du véhicule
et respecter les précautions ou les instructions indiquées
avant et pendant toute opération de test ou d'entretien.
Éloignez-vous des pièces mobiles ou chaudes du moteur et
évitez tout contact avec les connexions électriques.
UTILISEZ LE VÉHICULE UNIQUEMENT DANS UN ENDROIT
BIEN VENTILÉ, car le véhicule produit du monoxyde de
carbone, un gaz toxique et nocif, ainsi que des particules
lorsque le moteur fonctionne.
LISEZ TOUTES LES INSTRUCTIONS AVANT UTILISATION
Pour un manuel multilingue au format PDF, scannez le code QR ci-
dessous ou visitez www.topdon.com/products/artidiag900-lite

79
SECTION 1 QU'Y A-T-IL DANS LA BOÎTE ?
• ArtiDiag900 Lite Tablette
• ArtiDiag900 Lite VCI (interface de communication véhicule)
• Adaptateur Secteur
• Câble d'Extension OBDII
• Câble USB (Type-A vers Type-C)
• Guide rapide de l'utilisateur
• Manuel de l'utilisateur
• Étui de transport
PORTEZ TOUJOURS DES LUNETTES DE PROTECTION
HOMOLOGUÉES pour éviter les dommages causés par les
objets tranchants et les liquides caustiques.
NE FUMEZ PAS ET N'APPROCHEZ PAS DE FLAMMES À
PROXIMITÉ DU VÉHICULE lors des tests. Les vapeurs de
carburant et de batterie sont hautement inammables.
N'ESSAYEZ PAS DE INTERAGIR AVEC LE PRODUIT EN
CONDUISANT. Toute distraction peut provoquer un
accident.
ÉTEIGNEZ LE CONTACT AVANT DE CONNECTER OU
DÉCONNECTER LE PRODUIT DU CONNECTEUR DE
LIAISON DE DONNÉES (DLC) DU VÉHICULE pour éviter
d'endommager le produit ou les composants électroniques
du véhicule.

80
SECTION 2 PRÉSENTATION DU PRODUIT
2.1 Tablette ArtiDiag900 Lite
Figure 2-1
1
12
14
13
16
15
32 75 94 86 10 11
ArtiDiag900 Lite

81
Écran tactile de huit pouces
Bouton de réinitialisation
Insérez une épingle (non incluse) dans le trou d'épingle et
maintenez enfoncée pendant 10 secondes pour forcer le
redémarrage de la tablette.
Bouton d'alimentation
Appuyez longuement sur le bouton pour allumer la tablette.
Appuyez à nouveau longuement pour afcher la barre d'outils
Éteindre / Redémarrer / Capture d'écran, puis appuyez sur
l'option souhaitée. Appuyez brièvement sur le bouton pour
réveiller/verrouiller l'écran.
Port audio 3,5 mm
Port RJ45
Port USB Type-A
Permet de connecter la tablette ArtiDiag900 Lite et
l'ArtiDiag900 Lite VCI à l'aide du câble USB fourni.
Port d'entrée d'alimentation CC (12 V, 2 A)
Charge la tablette ArtiDiag900 Lite à l'aide de l'adaptateur secteur
fourni.
Port HDMI
Port USB Type-C
Pour le transfert de données et le chargement (5 V, 2 A)
Bouton de capture d'écran
Appuyez et maintenez pendant 2 secondes pour prendre une
capture d'écran.
Micro
Emplacement d'extension de carte TF
Prend en charge le remplacement à chaud et l'extension de
stockage jusqu'à 128 Go.
Emplacement VCI
Objectif de la caméra
Haut-parleur audio
Support pliable
1.
2.
3.
4.
5.
6.
7.
8.
9.
10.
11.
12.
13.
14.
15.
16.

82
1. Indicateurs
2. Connecteur OBD-II 16 broches
Connecte l'ArtiDiag900 Lite VCI au DLC du véhicule.
3. Port USB Type-C
Connecte l'ArtiDiag900 Lite VCI à la tablette ArtiDiag900 Lite à
l'aide du câble USB fourni.
Bleu xe: Bluetooth connecté
Indicateur de
connexion Bluetooth
Indicateur
d'alimentation
Indicateur de
communication
Rouge xe: sous tension
Vert clignotant: communication avec le
véhicule
1
2
3
2.2 ArtiDiag900 Lite VCI
Figure 2-2

83
1. Sélectionnez la langue du système souhaitée.
2. Choisissez la région et le fuseau horaire appropriés.
Figure 3-1
Figure 3-2
SECTION 3 MISE EN ROUTE
3.1 Conguration de base
Appuyez et maintenez enfoncé le bouton d'alimentation pour allumer
la tablette. Suivez les étapes ci-dessous pour congurer la tablette.

84
3. Congurez la connexion Wi-Fi. Sélectionnez un réseau Wi-Fi dans
la liste des réseaux détectés et saisissez le mot de passe.
4. Sélectionnez une méthode pour dénir le mot de passe de
l'écran de verrouillage. Vous pouvez également appuyer sur Pas
maintenant pour sauter cette étape.
Figure 3-3
Figure 3-4

85
5. Activé avec succès. Robinet Commencer et le système passera
automatiquement à l'application ArtiDiag900 Lite.
6. Connectez-vous à votre compte TOPDON. (Si vous n'avez pas de
compte, veuillez vous inscrire avec votre adresse e-mail).
Figure 3-5
Figure 3-6
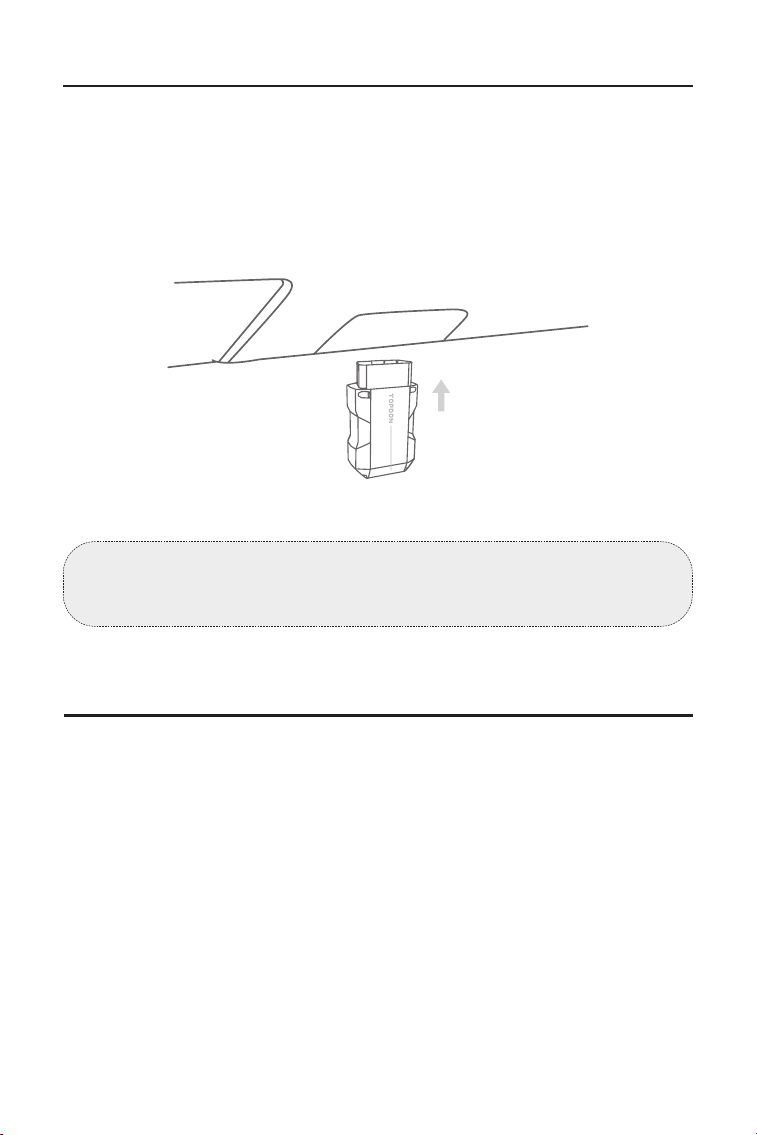
86
3.2 Branchez l'ArtiDiag900 Lite VCI dans le DLC du véhicule
3.3 Mettez le contact sur la position « ON » (voir Figure 3-8)
Retirez l'ArtiDiag900 Lite VCI de la fente arrière de la tablette
ArtiDiag900 Lite et branchez-le sur le DLC du véhicule. Le port DLC
du véhicule est généralement situé sous le tableau de bord.
Si vous rencontrez un problème pour localiser le DLC, veuillez
consulter la rubrique Bibliothèque > Emplacement du DLC pour
plus de détails, ou consultez le manuel d'entretien du véhicule.
Si votre véhicule est équipé d'un système de démarrage sans clé
et que le commutateur d'allumage est un bouton « Démarrage
du moteur » (voir Figure 3-9), appuyez sur le bouton « Démarrage
du moteur » jusqu'à ce que la voiture soit en mode « ON ». Ne pas
appuyer sur la pédale de frein tout en appuyant sur le bouton «
Démarrage du moteur », sinon vous démarrerez la voiture au lieu de
la mettre en position « ON ».
La méthode d'allumage varie en fonction du modèle du véhicule.
Consultez le manuel d'entretien du véhicule pour plus de détails.
Remarque : Assurez-vous que le contact est toujours ÉTEINT avant
de brancher l'appareil.
Car OBD-II Interface
Figure 3-7

87
3.4 Lier le VCI ArtiDiag900 Lite
①
Allez à Informations utilisateur > Gestion VCI . Appuyez sur le
dans le coin supérieur droit de l'écran, et l'appareil vous demandera
d'abord de connecter le Bluetooth.
②
Connectez le Bluetooth comme demandé. Ensuite, le numéro de
série et le code d'activation seront automatiquement obtenus.
Le voyant LED d'alimentation rouge sur l'ArtiDiag900 Lite VCI
indique que l'ArtiDiag900 Lite VCI est sous tension.
Figure 3-10
Figure 3-8 Figure 3-9
ENGINE
START
STOP
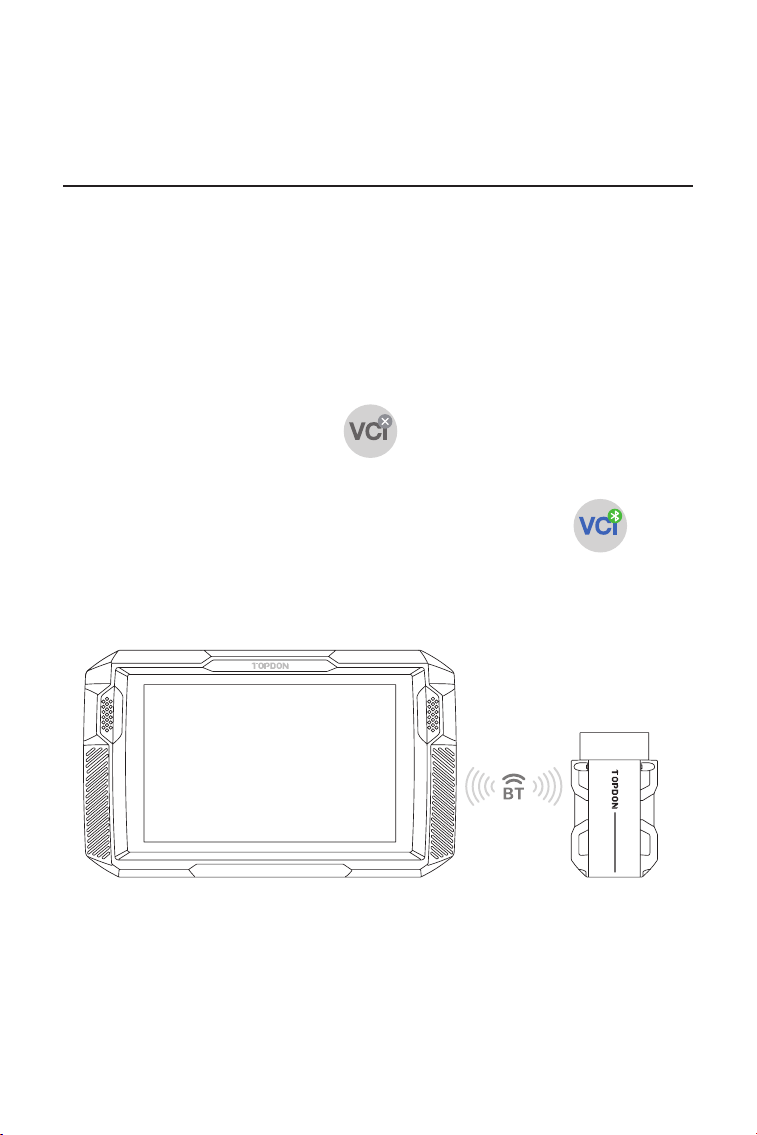
88
③
Puis appuyez sur Activer pour lier l'ArtiDiag900 Lite VCI à la
tablette ArtiDiag900 Lite.
Pour permettre la communication entre la tablette ArtiDiag900 Lite
et le véhicule, l'ArtiDiag900 Lite VCI et la tablette ArtiDiag900 Lite
doivent toujours être connectés en premier. La connexion VCI peut
être effectuée via une solution sans l (Bluetooth) ou laire (câble
USB).
Robinet Diagnostique depuis l'écran d'accueil de l'application ArtiDiag900
Lite, puis appuyez sur le bouton en haut à droite de l'écran pour
établir une connexion Bluetooth avec l'ArtiDiag900 Lite VCI. Une fois
l'ArtiDiag900 Lite VCI connecté avec succès, l'icône devient et
l'indicateur de connexion Bluetooth sur l'ArtiDiag900 Lite VCI s'allume en bleu
xe.
3.5 Connecter l'ArtiDiag900 Lite VCI à la tablette ArtiDiag900 Lite
3.5.1 Connexion VCI sans l
Figure 3-11
ArtiDiag900 Lite

89
Utilisez le câble USB fourni pour connecter l'ArtiDiag900 Lite VCI à
la tablette ArtiDiag900 Lite (voir Figure 3-6). Une fois l'ArtiDiag900
Lite VCI correctement connecté à la tablette, l'icône des
changements à .
3.5.2 Connexion VCI laire
Figure 3-12
Remarque :
Une fois l'ArtiDiag900 Lite VCI connecté avec succès à votre ArtiDiag900
Lite via Bluetooth, la connexion reprendra automatiquement la
prochaine fois que vous ouvrirez l'application ArtiDiag900 Lite. S'il n'est
pas connecté, appuyez manuellement sur de n'importe quel
écran avec cette icône pour se reconnecter.
Remarque :
Une fois la connexion laire appliquée, Bluetooth sera
automatiquement déconnecté.
USB Type-A
USB Type-C
ArtiDiag900 Lite

90
3.6 Votre ArtiDiag900 Lite est maintenant prêt à l'emploi
SECTION 4 UTILISATION DE VOTRE
ARTIDIAG900 LITE
Figure 3-13
4.1 Écran d'accueil
Ouvrez l'application ArtiDiag900 Lite et l'écran d'accueil s'afchera.
Figure 4-1
ArtiDiag900 Lite
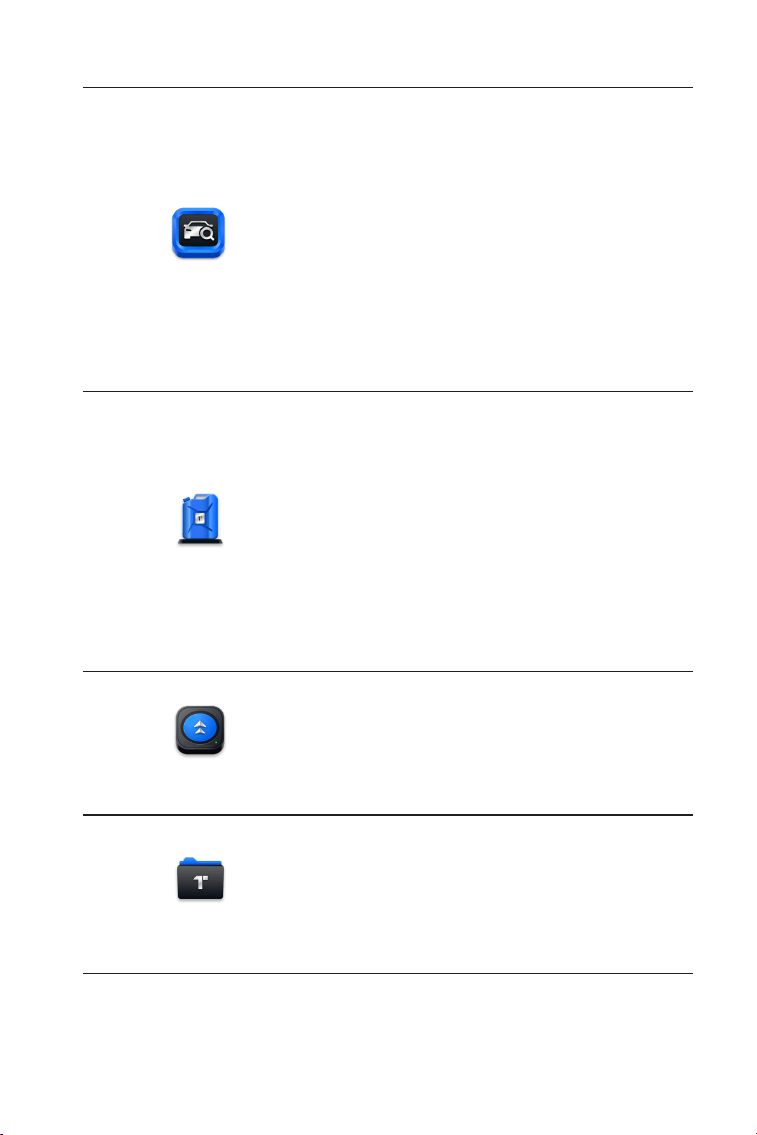
91
1. Icônes de fonction
Vous permet d'effectuer des fonctions
de diagnostic complet du système,
notamment la lecture des codes
d'anomalie de diagnostic (DTC),
l'effacement des DTC, l'afchage
des ux de données, la lecture des
informations sur la version de l'unité
de commande électronique (ECU) et
l'exécution de tests actifs. Vous pouvez
également accéder à EOBD & OBD-
II et aux commentaires de diagnostic
via ce module.
Diagnostics
Fournit 8 services de maintenance,
dont la réinitialisation de l'huile,
l'adaptation de l'accélérateur,
la réinitialisation de l'EPB, la
réinitialisation de l'angle de braquage,
la régénération du DPF, la purge
ABS, la réinitialisation du BMS et la
réinitialisation de l'airbag.
Permet de mettre à jour le logiciel de
diagnostic spécique au véhicule si
une nouvelle version est disponible.
Vous permet d'accéder aux rapports
(rapports système, rapports de
codes d'erreur et rapports de ux de
données) et aux données de relecture.
Maintenance
Mise à jour
Dossier

92
Comprend un guide de réparation
DTC, des bulletins de service
technique (TSB), un emplacement
DTC, une bibliothèque de voyants
d'avertissement et une recherche de
couverture du véhicule, qui fournit
des informations de référence
sur l'inspection, le diagnostic et la
réparation du véhicule.
Congure la tablette ArtiDiag900 Lite
pour fonctionner comme testeur de
batterie (en option).
Fournit un accès à la gestion VCI, à la mise
à jour du micrologiciel, à la désinstallation
du logiciel de diagnostic, aux informations
utilisateur, aux commentaires des clients,
aux informations sur la boutique, aux
paramètres et à la mise à jour du système.
Bibliothèque
Testeur
Informations
utilisateur
2. Barre de navigation
La sélection de cette icône vous
ramène à l'écran précédent.
La sélection de cette icône vous
renvoie à l'écran d'accueil de
l'application ArtiDiag900 Lite.
La sélection de cette icône vous
ramène à l'écran d'accueil du système
Android.
La sélection de cette icône afche une
liste des applications ouvertes. Vous
pouvez faire glisser votre doigt vers
la gauche ou la droite pour afcher
la liste complète, appuyer pour ouvrir
l'application ou faire glisser votre
doigt vers le haut pour supprimer
l'application.
Applications ouvertes
Accueil de l'application
Dos
Accueil Android
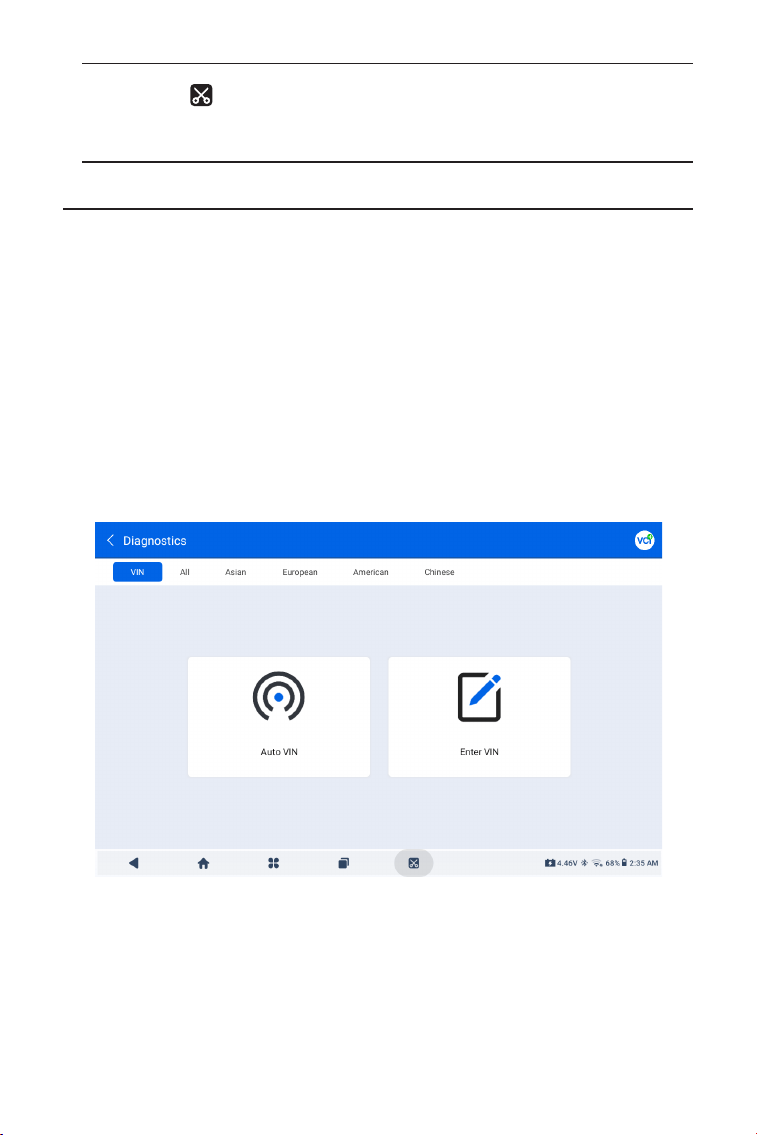
93
4.2 Diagnostics
Le module de diagnostic vous permet d'analyser tous les systèmes du
véhicule pris en charge en même temps (analyse automatique) pour
les DTC ou de sélectionner un système individuel pour effectuer la
lecture des DTC, l'effacement des DTC, la lecture du ux de données,
la lecture des informations sur l'ECU et le test actif. Vous pouvez
également accéder à EOBD & OBD-II et aux commentaires de
diagnostic via ce module.
Identication du véhicule
Pour effectuer une analyse automatique ou des diagnostics
individuels du système, vous devez d'abord identier votre véhicule.
Robinet Diagnostique depuis l’écran d’accueil de l’application
ArtiDiag900 Lite pour accéder à l’écran Diagnostic.
4.2.1 Scan automatique et Diagnostic du système individuel
La sélection de cette icône capture
une capture d'écran de la page
actuelle.
Capture d'écran
Figure 4-2
Identication via VIN
Le VIN vous permet d'identier le véhicule via VIN automatique ou
Entrer le VIN.
• VIN automatique - l'ArtiDiag900 Lite lit et décode
automatiquement le numéro d'identication du véhicule (VIN).
• Entrez le VIN - saisissez manuellement le VIN du véhicule ou

94
scannez le VIN du véhicule pour identier le véhicule.
Identication via la marque
1. Appuyez sur Tous, et une liste des marques de véhicules s'afchera.
2. Sélectionnez ou saisissez la marque sur le
de votre véhicule.
Remarque :
Un mode démonstration (DÉMO option) est fourni pour vous
aider à vous familiariser avec les fonctions de diagnostic.
3. Sélectionnez Automatique ou Manuel pour identier le véhicule.
Automatique
Saisissez manuellement le VIN ou appuyez sur Lire pour obtenir
le VIN, puis appuyez sur Conrmer. ArtiDiag900 Lite décodera
automatiquement le VIN pour identier le véhicule.
Manuel
Sélectionnez manuellement les informations sur le véhicule pour
l'identier.
Un menu système s'afche après l'identication du véhicule.
Remarque :
Les systèmes peuvent varier en fonction de la marque, du modèle
et de l'année du véhicule.

95
Figure 4-3
Scan automatique
Le Scan automatique détecte les systèmes pris en charge par le
véhicule et récupère les DTC pour ces systèmes, offrant ainsi un bilan
de santé complet de votre véhicule. Effectuer un Scan automatique
avant et après une réparation peut aider à résoudre les problèmes
et à valider les réparations. Les rapports de pré et post balayage
vous permettent d'enregistrer l'état du véhicule avant et après la
réparation pour les comparer.
Pour effectuer un Scan automatique, appuyez sur le bouton Scan
automatique dans le coin inférieur, l'ArtiDiag900 Lite commencera
à scanner les systèmes pris en charge par le véhicule, et la
récupération des DTC commencera automatiquement.
Les résultats s'afchent progressivement à mesure que les systèmes
sont scannés.

96
Figure 4-4
Description des boutons
Effacer les DTC - appuyez pour effacer tous les DTC récupérés.
Rapport - appuyez pour enregistrer les résultats du scan en cours
au format de rapport. (Pour voir les rapports enregistrés, allez dans
Dossier > Rapports > Rapport système.)
Afcher tout / Afcher réel - appuyez pour basculer entre l'afchage
de tous les systèmes du véhicule et l'afchage uniquement des
systèmes pris en charge.
Réalisation d'un diagnostic du système individuel
En dehors deAuto Scan, vous pouvez également sélectionner un
système individuel pour effectuer la lecture des DTC, l'effacement
des DTC, la lecture du ux de données, la lecture des informations
sur l'ECU et un test actif pour ce système particulier.
Remarque :
Selon la marque du véhicule, certaines de ces fonctions peuvent
ne pas être disponibles.
Lire les DTC
1. Après l'identication du véhicule, sélectionnez le système duquel
vous souhaitez récupérer les DTC à partir du menu système.
2. Appuyez sur Lire les DTC dans le menu des fonctions.
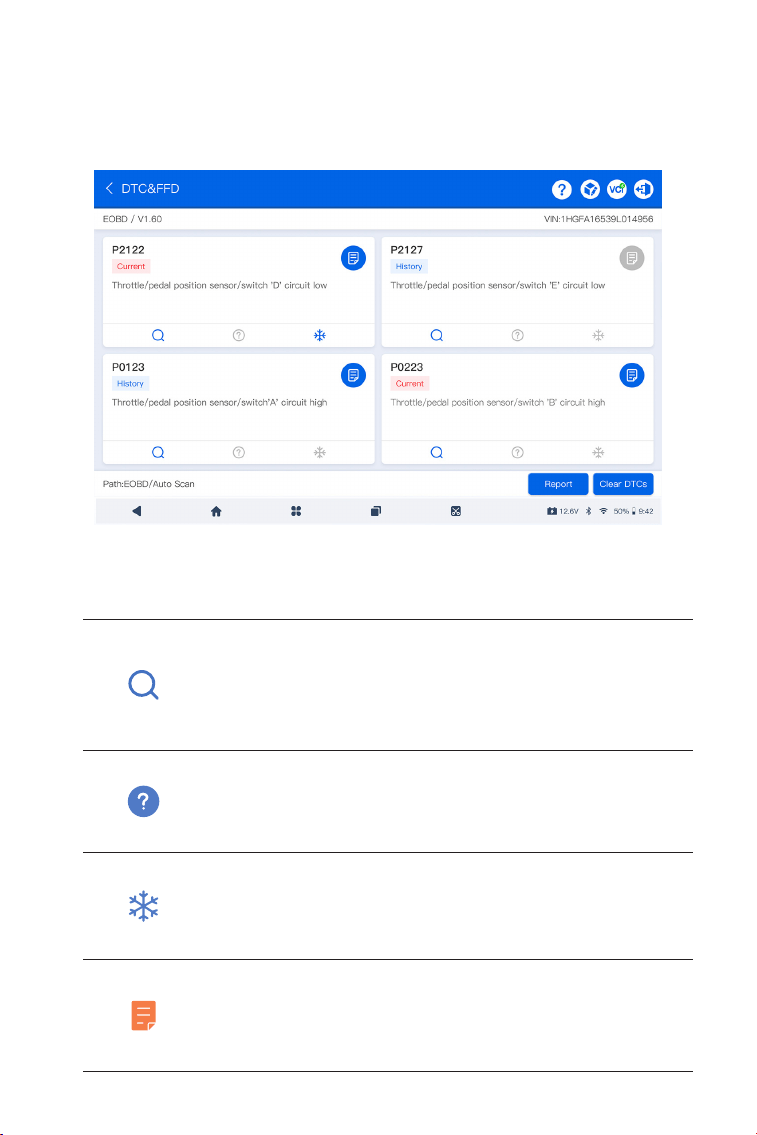
97
Figure 4-5
Description des icônes
Lorsque cette icône s'allume, appuyez dessus pour
ouvrir une fenêtre qui vous permet de rechercher
sur Google plus d'informations sur le DTC.
Lorsque cette icône s'allume, cela indique
que le DTC provoque l'allumage d'un témoin
d'avertissement.
Lorsque cette icône s'allume, appuyez dessus pour
voir l'instantané gé au moment où le DTC se
produit.
Lorsque cette icône s'allume, appuyez dessus pour
voir les mesures de réparation instructives.
ArtiDiag900 Lite communiquera avec l'ECU et récupérera et
afchera les DTC pour le système actuellement sélectionné.

98
Figure 4-6
Description des boutons
Rapport - appuyez pour enregistrer les DTC dans un format de
rapport. (Pour consulter les rapports enregistrés, accédez à Dossier >
Rapports > Rapport de codes de trouble.)
Effacer les DTC - appuyez pour effacer tous les DTC récupérés.
Effacer les DTC
1. Après avoir identié le véhicule, sélectionnez le système pour
lequel vous souhaitez effacer les DTC dans le menu système.
2. Appuyez sur Effacer les DTC dans le menu des fonctions.
3. Appuyez sur OK lorsque les DTCs sont effacés.
Lire le ux de données
1. Après avoir identié le véhicule, sélectionnez le système pour
lequel vous souhaitez lire les données en continu dans le menu
système.
2. Appuyez sur Flux de données dans le menu des fonctions. Une
liste de données en continu s'afche.
Remarque :
1. La procédure d'effacement des DTCs doit être effectuée après la
réparation nécessaire. Une fois conrmé, les DTC et les données
gées stockées dans l'ECU seront effacés.
2. NE PAS DÉMARRER LE MOTEUR PENDANT L'EFFACEMENT DES
DTC.

99
Description des icônes
Appuyez pour connaître la description détaillée
du ux de données.
Appuyez dessus pour afcher le ux de données
en temps réel sous forme d'un graphique en
forme d'onde.
Description des boutons
Modier- appuyez pour sélectionner les ux de données à afcher.
Enregistrer - appuyez pour enregistrer et sauvegarder les
informations du ux de données en temps réel à des ns de
comparaison et d'analyse. Pour afcher les ux de données
enregistrés, accédez à Dossier > Rejouer les données.
Graphique(s) - appuyez pour afcher jusqu'à 6 ux de données en
continu sous forme de graphique.
Combiner - appuyez pour combiner jusqu'à 4 ux de données
en continu dans un graphique pour une comparaison et une
observation plus faciles.
Rapport - appuyez pour enregistrer les valeurs actuelles des ux
de données en continu au format de rapport. Pour consulter les
rapports enregistrés, accédez à Dossier > Rapports > Rapport de
données en continu.
Lire les informations sur l'ECU
1. Après avoir identié le véhicule, sélectionnez le système pour
lequel vous souhaitez afcher les informations de version de l'ECU
dans le menu système.
2. Appuyez sur Info ECU dans le menu des fonctions. Vous pouvez
ensuite voir les informations de version de l'ECU du système
sélectionné.
Test actif
vous permet de contrôler manuellement certaines opérations
Remarque :
SI LE VÉHICULE DOIT ÊTRE CONDUIT POUR VISUALISER LE FLUX
DE DONNÉES EN CONTINU, AYEZ TOUJOURS UNE DEUXIÈME
PERSONNE POUR VOUS AIDER. NE REGARDEZ PAS LE FLUX DE
DONNÉES EN CONDUISANT.

100
La fonction EOBD & OBD-II vous permet d'effectuer des diagnostics
liés aux émissions pour votre véhicule.
Pour effectuer les diagnostics OBD-II:
1. Allez à Diagnostics > Tous > EOBD.
4.2.2 EOBD & OBD-II
Figure 4-7
de composants directement depuis l'application pour vérier les
opérations des composants.
1. Une fois le véhicule identié, sélectionnez le système pour lequel
vous souhaitez effectuer un test actif dans le menu système.
2. Appuyez sur Test actif dans le menu des fonctions. Vous pouvez
ensuite effectuer des tests actifs associés selon vos besoins.
2. Sélectionnez votre méthode de communication : Scan
automatique ou Protocole.
Scan automatique - l'ArtiDiag900 Lite communiquera
Remarque :
Les tests actifs disponibles varient selon la marque, l'année et le
modèle du véhicule.

101
Figure 4-8
Figure 4-9
3. Appuyez sur D'ACCORD pour accéder au menu des fonctions.
automatiquement avec le véhicule et identiera le protocole utilisé
par le véhicule.
Protocole - vous permet de sélectionner manuellement le protocole
de communication.
Une fois le protocole de communication conrmé, un écran d'état
du véhicule s'afchele protocole et d'autres informations sur l'état de
votre véhicule.

102
4. Sélectionnez une fonction pour continuer.
Les options de fonction typiques peuvent inclure : DTC & FFD, Prêt I/
M, Données en continu, Moniteur embarqué, Test des composants,
Informations sur le véhicule et État du véhicule.
Remarque :
Selon la marque du véhicule, certaines de ces fonctions peuvent
ne pas être disponibles.
Remarque :
1. La procédure d'effacement des DTC doit être effectuée après
la réparation nécessaire. Une fois conrmé, les DTC et les FFD
stockés dans l'ECU seront effacés.
2. NE PAS DÉMARRER LE MOTEUR PENDANT L'EFFACEMENT
DES DTC.
DTC et FFD (données d'arrêt sur image)
Cette fonction permet de lire les DTC et d'effacer les DTC stockés
dans l'ECU du véhicule et afche le FFD des systèmes liés aux
émissions.
1. Lire les DTC
Cette fonction afche les DTC récupérés à partir des systèmes liés
aux émissions.
2. Effacer les DTC
Cette fonction vous permet d'effacer les DTC récupérés à partir
des systèmes liés aux émissions.
3. FFD
Cette fonction prend un instantané des données et des conditions
de fonctionnement lorsqu'une défaillance liée aux émissions se
produit.
Prêt I/M
Cette fonction vérie si les différents systèmes liés aux émissions
du véhicule fonctionnent correctement et sont prêts pour les tests
I/M.
Elle peut également vérier l'état d'exécution du moniteur et
conrmer si la réparation d'une défaillance de la voiture a été
effectuée correctement.
Données en continu
Cette fonction afche les données en temps réel provenant de
l'ECU du véhicule.
Moniteur de capteur d'O2

103
L'ArtiDiag900 Lite vous permet d'envoyer instantanément un retour
d'information sur le diagnostic (avec des journaux de données de
diagnostic automatiquement attachés) lorsque vous rencontrez un
problème logiciel avec les opérations de diagnostic.
Pour envoyer un retour d'information sur le diagnostic :
1. Appuyez sur le icône située dans le coin supérieur droit de
n'importe quel écrandans le module Diagnostic.
2. Sélectionnez le type de problème et appuyez sur Conrmer.
3. Rédigez une description du problème.
4. Appuyez sur Envoyer pour envoyer le retour d'information.
4.2.3 Retour d'information sur le diagnostic
Cette fonction afche les résultats des tests du moniteur du
capteur O2 des tests les plus récemment effectués à partir de l'ECU
du véhicule.
Moniteur embarqué
Cette fonction afche les résultats des tests pour les composants
et systèmes liés aux émissions qui ne sont pas surveillés en
continu.
Test des composants
Cette fonction permet d'envoyer des commandes de contrôle à
l'ECU du véhicule an de tester et de faire fonctionner les pièces et
composants du système.
Informations sur le véhicule
Cette fonction afche une liste d'informations (fournies par le
fabricant du véhicule) provenant de l'ECU du véhicule.
Les informations peuvent inclure :
• VIN.
• ID de calibration (CID).
• Numéro de vérication de calibration (CVN).
• Suivi des performances en cours pour les moteurs à allumage
commandé par étincelle (IUPR)
État du véhicule
Cette fonction afche l'état du véhicule, y compris le moteur, la
transmission, les codes trouvés, l'état du MIL, les moniteurs et le
protocole.

104
Remarque :
La fonction de retour d'information sur le diagnostic est
uniquement disponible avec le module de diagnostic.
4.3 Maintenance
Cette fonction vous offre8 services de maintenance, dont la
réinitialisation de l'huile, l'adaptation de l'accélérateur, la réinitialisation
de l'EPB, la réinitialisation de l'angle de braquage, la régénération du
DPF, la purge ABS, la réinitialisation du BMS et la réinitialisation de
l'airbag.
4.3.1 Vue d'ensemble des services
Réinitialisation de l'huile
Cette fonction permet de réinitialiser le témoin de service d'huile
pour le système de durée de vie de l'huile du moteur. Le système de
témoin d'huile du moteur calcule un intervalle optimal de vidange
d'huile en fonction des conditions de conduite du véhicule et des
événements météorologiques. Les réinitialisations d'huile sont
nécessaires à chaque changement d'huile moteur.
Adaptation des papillons des gaz
Si l'ECU est déconnecté accidentellement, ou si le papillon des gaz
est remplacé ou nettoyé, alors les actionneurs de papillon doivent
être initialisés via la fonction d'adaptation des papillons des gaz. Cela
réinitialise les données de l'ECU à son état initial an que le papillon
puisse réguler avec précision l'admission d'air.
Réinitialisation de EPB
Cette fonction vous permet de remplacer et de réinitialiser les
plaquettes de frein.
Il doit être effectué dans les cas suivants :
• Les plaquettes de frein et le capteur d'usure des plaquettes de frein
sont remplacés.
• Le voyant des plaquettes de frein est allumé.
• Le circuit du capteur de plaquettes de frein est court-circuité, il est
récupéré.
• Le servomoteur est remplacé.
Réinitialisation de l'angle de braquage
Si le capteur d'angle de braquage est remplacé, ou si l'angle de
braquage est imprécis ou non centré, la fonction de réinitialisation
de l'angle de braquage doit être effectuée pour trouver la position
zéro relative. Avec cette position comme référence, l'ECU peut
ensuite calculer l'angle exact pour les braquages à gauche et à

105
droite.
Régénération DPF
Cette fonction est principalement utilisée pour la régénération des
ltres à particules diesel. Pour maintenir le bon fonctionnement des
ltres, elle élimine les particules par combustion et oxydation.
PURGE (Purge ABS)
Cette fonction vous permet d'effectuer des tests pour vérier les
conditions de fonctionnement du système de freinage antiblocage
(ABS).
Il doit être effectué dans les cas suivants :
-Lorsque les conduites de l'ABS contiennent de l'air.
-Lorsque l'ordinateur ABS, la pompe ABS, le maître-cylindre de frein,
le cylindre de frein, la conduite de frein ou le liquide de frein sont
remplacés.
Réinitialisation BMS
Après le remplacement de la batterie de voiture, l'unité de contrôle
de la batterie de voiture doit être réinitialisée. Cela effacera les
informations de défaut (telles qu'un niveau de batterie faible)
an que l'unité de contrôle puisse correspondre aux informations
pertinentes de la batterie nouvellement remplacée.
AIR BAG (Réinitialisation de l'Airbag)
Cette fonction peut réinitialiser les données de l'airbag pour effacer
l'indicateur de défaut de collision de l'airbag, an que l'ordinateur de
l'airbag du véhicule puisse fonctionner normalement.
Il doit être effectué dans les cas suivants :
Lorsque le véhicule entre en collision et que l'airbag se déploie, le
code d'erreur correspondant aux données de collision apparaît,
l'indicateur d'airbag s'allume et le code d'erreur ne peut pas être
effacé.
Pour effectuer une réinitialisation de service :
1. Appuyez sur Maintenance depuis l'écran d'accueil et un menu de
fonctions s'afchera.
4.3.2 Étapes

106
2. Sélectionnez la fonction que vous souhaitez effectuer.
3. Identiez le véhicule via VIN ou Make (pour en savoir plus sur
les opérations d'identication, reportez-vous à Identication du
véhiculeà la 4.2.1). Ensuite, l'écran de la fonction sélectionnée
s'afche.
4. Suivez les instructions à l'écran pour effectuer la réinitialisation du
service.
Figure 4-10
4.4 Mise à jour
Cette fonction vous permet de mettre à jour le logiciel de diagnostic
spécique au véhicule lorsqu'une nouvelle version est disponible.
Pour effectuer la fonction de mise à jour :
1. Appuyez sur Mise à jour depuis l'écran d'accueil et l'écran de mise
à jour s'afchera.

107
Figure 4-11
2. Recherchez le logiciel du véhicule souhaité ou recherchez le
logiciel par un mot-clé.
3. Appuyez sur Télécharger la mise à jour pour installer le logiciel
comme vous le souhaitez.
4.5 Dossier
Cette fonction donne accès à Rapports (rapport système, rapport de
code d'erreur et rapport de ux de données) et données de relecture.
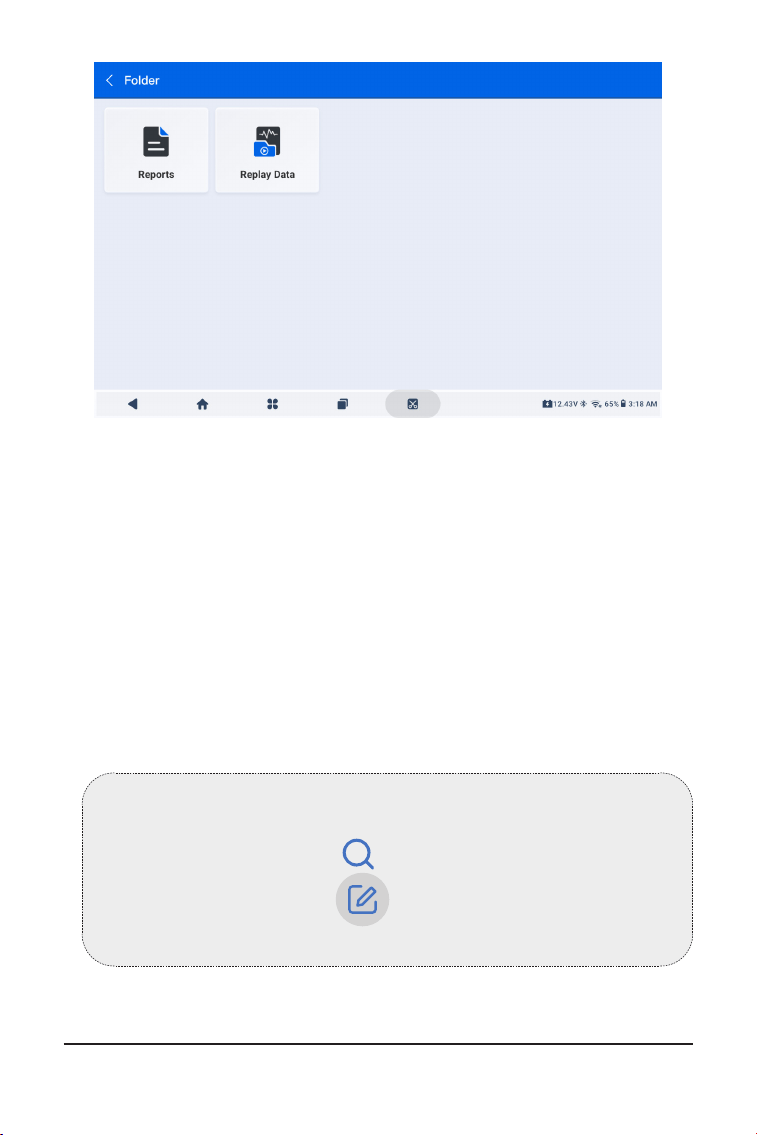
108
Abb 4-12
Note:
Lorsque vous êtes sur l'écran Rapports ou Données de relecture,
vous pouvez appuyer sur pour rechercher un élément
particulier ou appuyez sur pour sélectionner et supprimer
des éléments par lots.
4.5.1 Rapports
1. Appuyez sur Dossier > Rapports.
2. Sélectionnez un rapport spécique pour afcher les détails de ce
rapport.
4.5.2 Données de relecture
1. Appuyez sur Dossier > Rejouer Données, et la liste des ux de
données enregistrés s'afche.
2. Appuyez sur un ux de données particulier pour lire la vidéo
enregistrée de ce ux de données.
4.6 Bibliothèque

109
4.6.1 Guide de réparation DTC
Le Guide de réparation DTC est une base de données basée sur
l'expérience qui fournit des informations spéciques aux codes, y
compris des correctifs populaires et des étapes de réparation pour
identier les défauts.
Pour utiliser le Guide de réparation DTC :
Appuyez sur Bibliothèque > Guide de réparation DTC. Entrez un
DTC dans la barre de recherche.
4.6.2 Bulletins de service technique
Pour consulter les bulletins de service technique :
Appuyez sur Bibliothèque > Bulletins de service technique.
Sélectionnez la marque du véhicule, le modèle, l'année, le système et
le sous-système, puis appuyez sur Suivant. Une liste des bulletins de
service technique OEM émis pour le véhicule sélectionné s'afchera.
Appuyez sur le bulletin désiré pour afcher le contenu complet.
4.6.3 Emplacement du DLC
Pour voir l'emplacement du DLC :
Appuyez sur Bibliothèque > Emplacement du DLC. Sélectionnez la
marque du véhicule, le modèle et l'année, puis appuyez sur Suivant.
Une image de l'emplacement du DLC pour le véhicule sélectionné
s'afchera.
4.6.4 Bibliothèque des voyants d'avertissement
La bibliothèque des voyants d'avertissement fournit des informations
sur les voyants d'avertissement du tableau de bord, y compris les
descriptions des voyants, les impacts sur la conduite, les causes
typiques, les mesures à prendre et les FAQ pertinentes.
Pour consulter la bibliothèque des voyants d'avertissement :
Appuyez sur Bibliothèque > Bibliothèque des voyants
d'avertissement. Une liste des voyants d'avertissement s'afchera.
Appuyez sur le voyant d'avertissement désiré pour afcher les
détails.
4.6.5 Recherche de couverture de véhicule
Pour afcher les fonctions et les systèmes de voiture pris en charge:
Robinet Bibliothèque > Recherche de couverture de véhicule .
Sélectionnez le type de logiciel, la marque, le modèle et l'année,
ou saisissez la fonction/sous-fonction dans la zone de recherche,
puis appuyez sur Requête . Les données associées émises pour le
véhicule sélectionné s'afcheront.

110
Note:
Pour accéder au Testeur fonction, du matériel supplémentaire
(vendu séparément) est requis. Si vous devez acheter du matériel
supplémentaire, veuillez contacter les revendeurs locaux pour
obtenir de l'aide.
4.8 Informations utilisateur
4.8.1 Gestion VCI
Permet de lier le VCI à la tablette ArtiDiag900 Lite.
4.8.2 Mise à jour du rmware
Vous permet de mettre à jour le rmware si une nouvelle version est
disponible.
4.8.3 Désinstaller le logiciel de diagnostic
Vous permet de désinstaller le logiciel de diagnostic ou IMMO.
4.8.4 Informations utilisateur
Vous pouvez appuyer sur la photo de prol dans l'écran Informations
utilisateur pour modier votre photo de prol. Vous pouvez
également afcher votre identiant TOPDON ou votre e-mail,
modier le pseudo ou le mot de passe, supprimer votre compte
TOPDON et vous déconnecter de votre compte.
4.8.5 Commentaires des clients
Cette fonction vous permet d'écrire un commentaire sur le produit à
l'équipe du service après-vente TOPDON.
4.8.6 Informations du magasin
La fonction Informations utilisateur permet d'accéder à la gestion
VCI, à la mise à jour du micrologiciel, à la désinstallation du logiciel
de diagnostic, aux informations utilisateur, à mon prol, aux
commentaires des clients, aux informations sur la boutique, aux
paramètres et à la mise à jour du système.
4.7 Testeur
Cette fonction congure l'ArtiDiag900 Lite en un testeur de batterie
automobile. Avec cette fonction, vous pouvez effectuer des tests de
batterie, des tests de démarrage et des tests de charge.

111
Vous permet de sauvegarder les informations du magasin de
réparation.
4.8.7 Paramètres
La fonction Paramètres vous permet de dénir les langues/unités, de
vider le cache, d'afcher les informations de version de l'application
ArtiDiag900 Lite, de mettre à jour l'application ArtiDiag900 Lite,
d'afcher les conditions d'utilisation et la politique de condentialité
et de vous déconnecter de votre compte.
4.8.8 Mise à jour du système
Permet de mettre à jour le système de la tablette si une nouvelle
version est disponible.

112
SECTION 5 SPÉCIFICATIONS
Android 11.0
2G
32G
Écran de 8 pouces, 1280 x 800
Bluetooth 5.0/SPP
USB
Wi-Fi
5 mégapixels
Microphone / haut-parleur
Capteur de gravité
10000 mAh
12V CC
USB Type-A
USB Type-C
RJ45
HDMI
Port de charge CC
Wi-Fi
RJ45
10 x 6,1 x 1,97 po (255 mm x 155 mm x 50
mm)
32°F à 122°F (0°C à 50°C)
-4°F à 140°F (-20°C à 60°C)
Système opérateur
RAM
Capacité de stockage
Écran d'afchage
Connectivité
Caméra
E/S audio
Capteur
Batterie
Tension d'entrée
Ports
Connexion réseau
Dimensions (L x l x H)
Température de travail
Température de stockage

113
SECTION 6 FAQ
Q : Que dois-je faire en cas d'erreur de communication?
R: Suivez les étapes ci-dessous pour identier le problème :
1) Vériez si l'allumeur est ON.
2) Vériez si le câble de diagnostic ArtiDiag900 Lite VCI est
correctement branché sur la prise DLC du véhicule.
3) Éteignez l'allumeur. Rallumez-le après 10 secondes et poursuivez
l'opération.
4) Vériez si le module de contrôle de véhicule est défectueux.
Q : Quelles fonctions spéciales l'ArtiDiag900 Lite prend-il en charge ?
R: ArtiDiag900 Lite prend en charge 8 fonctions spéciales,
notamment la réinitialisation de l'huile, l'adaptation de l'accélérateur,
la réinitialisation EPB, la réinitialisation de l'angle de braquage,
la régénération DPF, la purge ABS, la réinitialisation BMS et la
réinitialisation de l'airbag.
Q : Dois-je mettre à jour le micrologiciel avant d'utiliser l'ArtiDiag900
Lite pour la première fois ?
R: Oui. Le micrologiciel se mettra automatiquement à jour vers la
dernière version. Vous pouvez également appuyer sur Informations
utilisateur > Mise à jour du micrologiciel pour mettre à jour le
micrologiciel manuellement.
Q : Pourquoi l'écran de la tablette ArtiDiag900 Lite clignote-t-il lorsque
le moteur fonctionne ?
R: Il s’agit d’un phénomène normal provoqué par des interférences
électromagnétiques.
Q : Comment puis-je faire une capture d'écran?
R: Appuyez longuement sur le bouton Capture d'écran situé en haut
à droite de la tablette ArtiDiag900 Lite pendant 3 secondes pour
capturer une capture d'écran. Pour afcher les images enregistrées,
accédez à Galerie depuis l'écran d'accueil du système Android.

114
SECTION 7 GARANTIE
Garantie limitée d'un an de TOPDON
TOPDON garantit à l'acheteur initial que les produits de la société sont
exempts de tout défaut matériel et de fabrication pendant 12 mois à
compter de la date d'achat (période de garantie).
Pour les défauts signalés pendant la période de garantie, TOPDON
réparera ou remplacera la pièce ou le produit défectueux selon l'analyse
et la conrmation de son support technique.
TOPDON ne sera pas responsable des dommages accessoires ou
indirects résultant de l'utilisation, de la mauvaise utilisation ou du
montage de l'appareil.
S'il y a un conit entre la politique de garantie de TOPDON et les lois
locales, les lois locales prévaudront.
Cette garantie limitée est nulle dans les conditions suivantes :
• Mauvaise utilisation, démontage, modication ou réparation par des
magasins ou des techniciens non autorisés.
• Manipulation négligente et violation des règles de fonctionnement.
Avis:
Toutes les informations contenues dans ce manuel sont basées sur
les dernières informations disponibles au moment de la publication
et aucune garantie ne peut être donnée quant à leur exactitude
ou leur exhaustivité. TOPDON se réserve le droit d'apporter des
modications à tout moment sans préavis.
Scannez le code QR pour obtenir plus d'assistance !

115
ESPAÑOL

116
MANUAL DE USUARIO MULTILINGÜE
¡LA SEGURIDAD ES SIEMPRE LA PRIMERA
PRIORIDAD!
Para su seguridad, la seguridad de los demás y para evitar
daños al producto y a su vehículo, LEA DETENIDAMENTE Y
ASEGÚRESE DE COMPRENDER TOTALMENTE TODAS LAS
INSTRUCCIONES Y MENSAJES DE SEGURIDAD DE ESTE
MANUAL ANTES DE OPERAR. También debe leer el manual
de servicio del vehículo y observar las precauciones o
instrucciones indicadas antes y durante cualquier prueba o
procedimiento de servicio.
Manténgase usted, su ropa y otros objetos alejados de las
piezas móviles o calientes del motor y evite el contacto con
las conexiones eléctricas.
OPERE EL VEHÍCULO SÓLO EN UN ÁREA BIEN VENTILADA,
ya que el vehículo produce monóxido de carbono, un gas
tóxico y venenoso, y partículas cuando el motor está en
LEA TODAS LAS INSTRUCCIONES ANTES DE USAR
Para obtener un manual multilingüe en formato PDF, escanee el
código QR a continuación o visite www.topdon.com/products/
artidiag900-lite

117
SECTION 1 ¿QUÉ HAY EN LA CAJA?
• Tableta ArtiDiag900 Lite
• ArtiDiag900 Lite VCI (interfaz de comunicación del vehículo)
• Adaptador de corriente
• Cable de extensión OBD-II
• Cable USB (Tipo A a Tipo C)
• Guía rápida del usuario
• Manual de usuario
• Estuche de transporte
marcha.
USE SIEMPRE GAFAS DE SEGURIDAD aprobadas para evitar
daños causados por objetos punzantes y líquidos cáusticos.
NO FUME NI TENGA LLAMAS CERCA DEL VEHÍCULO
durante la prueba. Los vapores del combustible y de la
batería son altamente inamables.
NO INTENTE INTERACTUAR CON EL PRODUCTO MIENTRAS
CONDUCE. Cualquier distracción puede provocar un
accidente.
APAGUE EL ENCENDIDO ANTES DE CONECTAR O
DESCONECTAR EL PRODUCTO DEL CONECTOR DE ENLACE
DE DATOS (DLC) DEL VEHÍCULO para evitar causar daños al
producto o a los componentes electrónicos del vehículo.
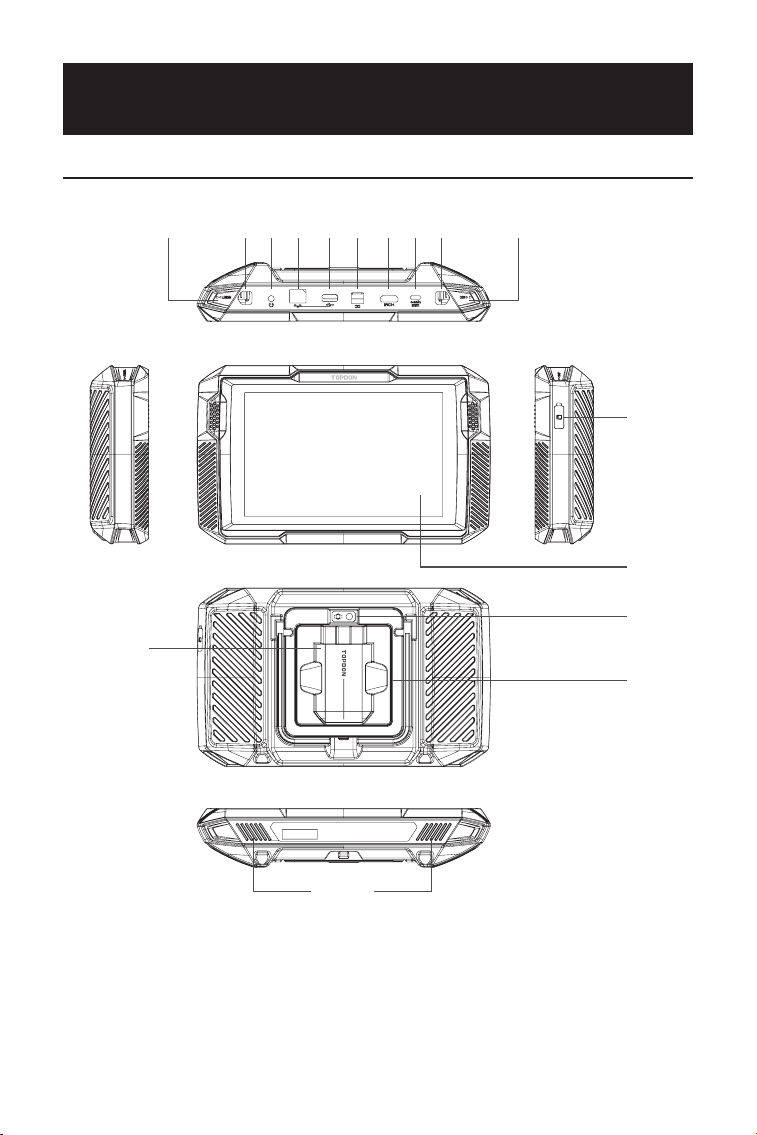
118
SECTION 2 DESCRIPCIÓN GENERAL DEL
PRODUCTO
2.1 Tableta ArtiDiag900 Lite
Figura 2-1
1
12
14
13
16
15
32 75 94 86 10 11
ArtiDiag900 Lite

119
Pantalla táctil de ocho pulgadas
Botón de reinicio
Inserte un aller (no incluido) en el oricio y presione y
mantenga presionado durante 10 segundos para forzar el
reinicio de la tableta.
Botón de encendido
Mantenga presionado el botón para encender la tableta.
Mantenga presionada nuevamente para mostrar la barra de
herramientas Apagar / Reiniciar / Captura de pantalla, luego
toque la opción deseada. Presione brevemente el botón para
activar/bloquear la pantalla.
Puerto de audio de 3,5 mm
Puerto RJ45
Puerto USB tipo A
Conecta la tableta ArtiDiag900 Lite y el ArtiDiag900 Lite VCI
mediante el cable USB suministrado.
Puerto de entrada de fuente de alimentación de CC (12 V, 2 A)
Carga la tableta ArtiDiag900 Lite usando el adaptador de
corriente suministrado.
Puerto HDMI
Puerto USB tipo C
Para transferencia de datos y carga (5 V, 2 A)
Botón de captura de pantalla
Mantenga presionado durante 2 segundos para tomar una
captura de pantalla.
micrófono
Ranura de expansión para tarjeta TF
Admite intercambio en caliente y expansión de
almacenamiento de hasta 128 GB.
Ranura VCI
Lente de la cámara
Altavoz de audio
Soporte plegable
1.
2.
3.
4.
5.
6.
7.
8.
9.
10.
11.
12.
13.
14.
15.
16.

120
1. Indicadores
2. Conector OBD-II de 16 pines
Conecta el ArtiDiag900 Lite VCI al DLC del vehículo.
3. Puerto USB tipo C
Conecta ArtiDiag900 Lite VCI a la tableta ArtiDiag900 Lite
mediante el cable USB suministrado.
Azul jo: Bluetooth conectado
Indicador de
conexión Bluetooth
Indicador de
encendido
Indicador de
comunicación
Rojo jo: encendido
Verde intermitente: comunicando con
el vehículo
1
2
3
2.2 VCI ArtiDiag900 Lite
Figura 2-2

121
1. Seleccione el idioma del sistema deseado.
2. Elija la región y zona horaria adecuadas.
Figura 3-1
Figura 3-2
SECCIÓN 3 INICIO
3.1 Conguración Básica
Mantenga presionado el botón de encendido para encender la tableta.
Siga los pasos a continuación para congurar la tableta.
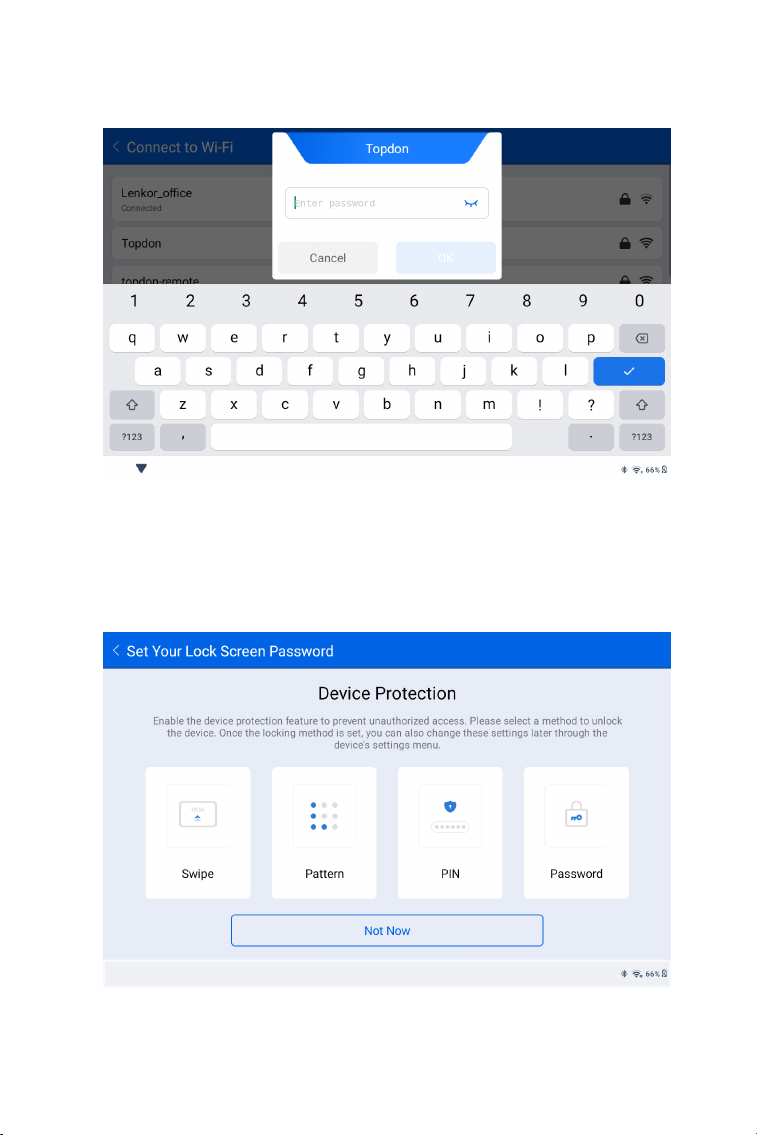
122
3. Congure la conexión Wi-Fi. Seleccione un Wi-Fi de la lista
escaneada e ingrese la contraseña.
4. Seleccione un método para congurar la contraseña de la
pantalla de bloqueo. También puedes tocar Ahora no para omitir
este paso.
Figura 3-3
Figura 3-4
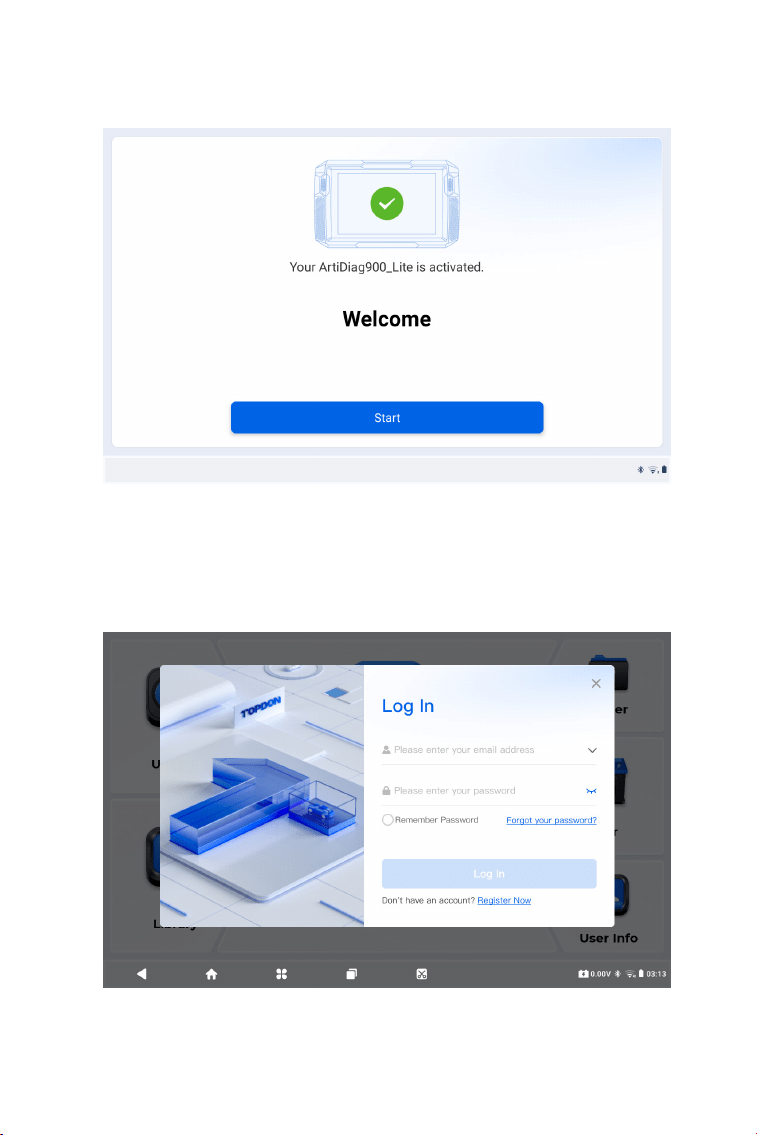
123
5. Activado con éxito. Toque Comenzar y el sistema saltará
automáticamente a la aplicación ArtiDiag900 Lite.
6. Inicie sesión en su cuenta TOPDON. (Si no tiene una cuenta,
regístrese con su correo electrónico).
Figura 3-5
Figura 3-6

124
3.2 Conecte el ArtiDiag900 Lite VCI al DLC del vehículo
3.3 Gire el encendido a la posición "ON" (ver Figura 3-8)
Saque el ArtiDiag900 Lite VCI de la ranura trasera de la tableta
ArtiDiag900 Lite y conéctelo al DLC del vehículo. El puerto DLC del
vehículo generalmente se encuentra debajo del tablero.
Si tiene algún problema para localizar el DLC, vaya a Biblioteca >
Ubicación del DLC para obtener más detalles o consulte el manual
de servicio del vehículo.
Si su vehículo está equipado con un sistema de arranque sin llave y
el interruptor de encendido es un botón de "Arranque y parada del
motor" (consulte la Figura 3-9), presione el botón "Arranque y parada
del motor" hasta que el automóvil esté en modo "ON". No apliques el
freno mientras presionas el botón "Engine Start Stop", o arrancarás
el auto en lugar de ponerlo en la posición "ON".
El método de encendido varía según el modelo de vehículo. Consulte
el manual de servicio del vehículo para obtener más detalles.
Nota: Asegúrese de que el encendido esté siempre apagado antes
de enchufar la unidad.
Car OBD-II Interface
Figura 3-7
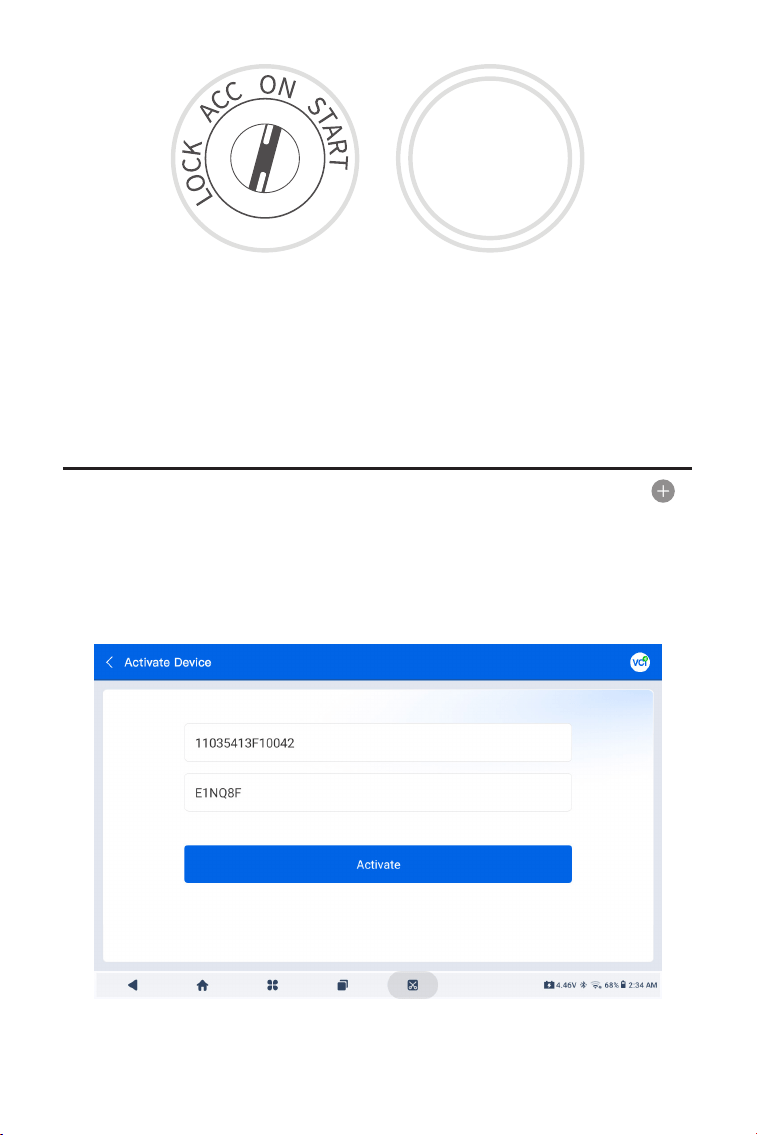
125
3.4 Vincular el VCI ArtiDiag900 Lite
①
Vaya a Información de usuario > Gestión de VCI. Toque en el
icono en la esquina superior derecha de la pantalla y el dispositivo le
pedirá que conecte el Bluetooth primero.
②
Conecte el Bluetooth según se le indique. Luego se obtendrá
automáticamente el número de serie y el código de activación.
La luz LED roja de encendido en ArtiDiag900 Lite VCI indica que
ArtiDiag900 Lite VCI está encendido.
Figura 3-10
Figura 3-8 Figura 3-9
ENGINE
START
STOP
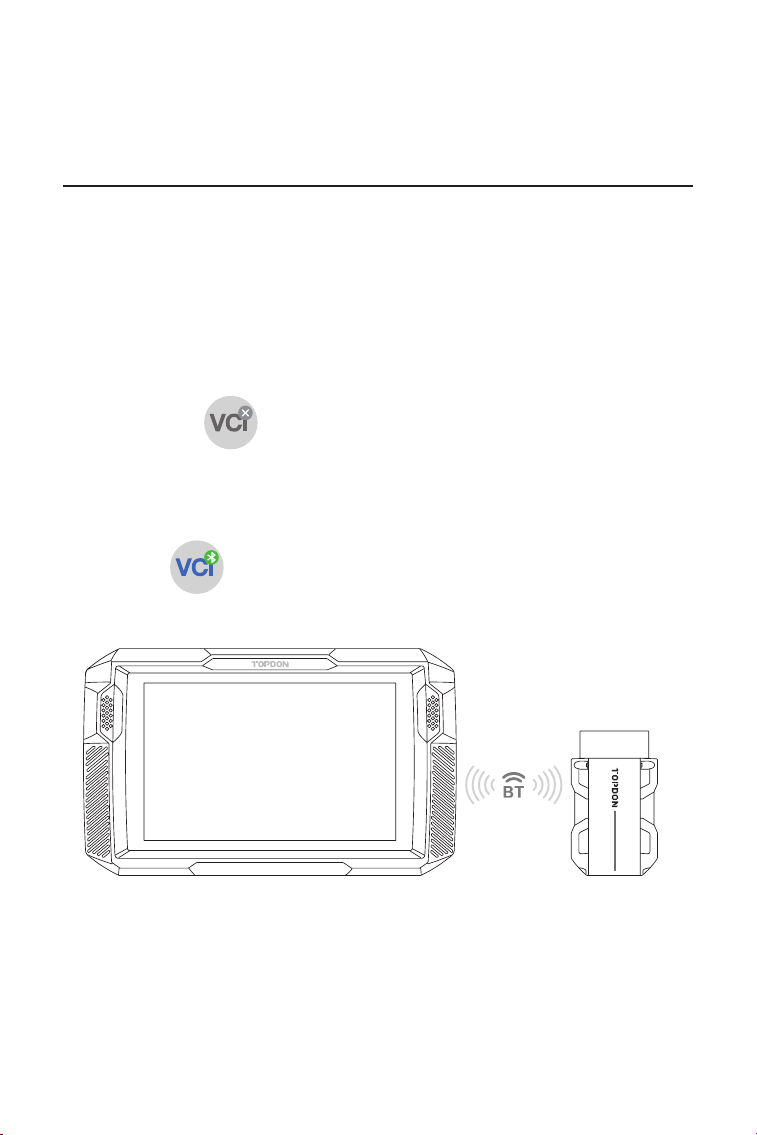
126
③
Luego toque Activar para unir el ArtiDiag900 Lite VCI a la tableta
ArtiDiag900 Lite.
Para permitir la comunicación entre la tableta ArtiDiag900 Lite y el
vehículo, el ArtiDiag900 Lite VCI y la tableta ArtiDiag900 Lite siempre
deben estar conectados primero. La conexión VCI se puede realizar
mediante una solución inalámbrica (Bluetooth) o cableada (cable
USB).
Toque Diagnóstico desde la pantalla de inicio de la aplicación ArtiDiag900
Lite y toque el en la parte superior derecha de la pantalla para
establecer la conexión Bluetooth con ArtiDiag900 Lite VCI. Después
de que ArtiDiag900 Lite VCI se haya conectado correctamente, el icono
cambia a el indicador de conexión Bluetooth en ArtiDiag900 Lite VCI
se ilumina en azul jo.
3.5 Conecte ArtiDiag900 Lite VCI a la tableta ArtiDiag900 Lite
3.5.1 Conexión VCI inalámbrica
Figura 3-11
ArtiDiag900 Lite
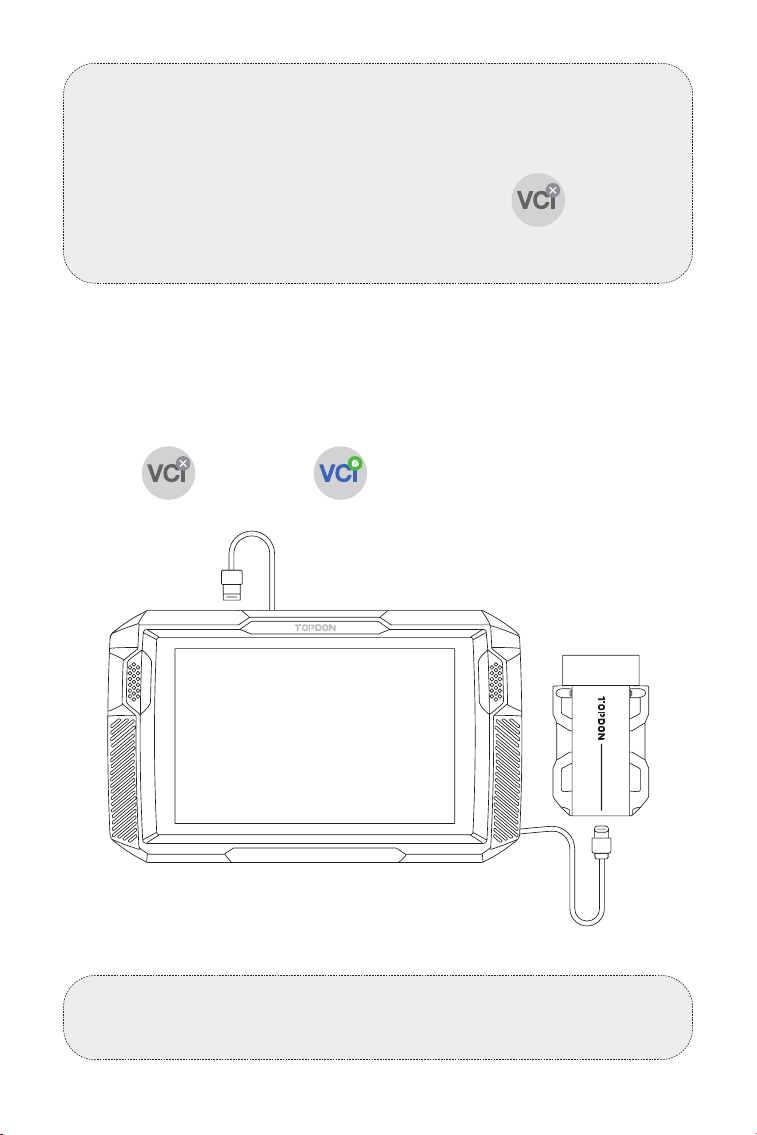
127
Utilice el cable USB suministrado para conectar ArtiDiag900 Lite VCI
a la tableta ArtiDiag900 Lite (consulte la Figura 3-6). Después de que
ArtiDiag900 Lite VCI esté conectado correctamente a la tableta, el
icono cambios a .
3.5.2 Conexión VCI por cable
Figura 3-12
Nota:
Una vez que ArtiDiag900 Lite VCI se haya conectado exitosamente a
su ArtiDiag900 Lite a través de Bluetooth, la conexión se reanudará
automáticamente la próxima vez que abra la aplicación ArtiDiag900
Lite. Si no está conectado, toque manualmente de cualquier
pantalla con este icono para volver a conectarse.
Nota:
Una vez que se aplica la conexión por cable, Bluetooth se
desconectará automáticamente.
USB Type-A
USB Type-C
ArtiDiag900 Lite
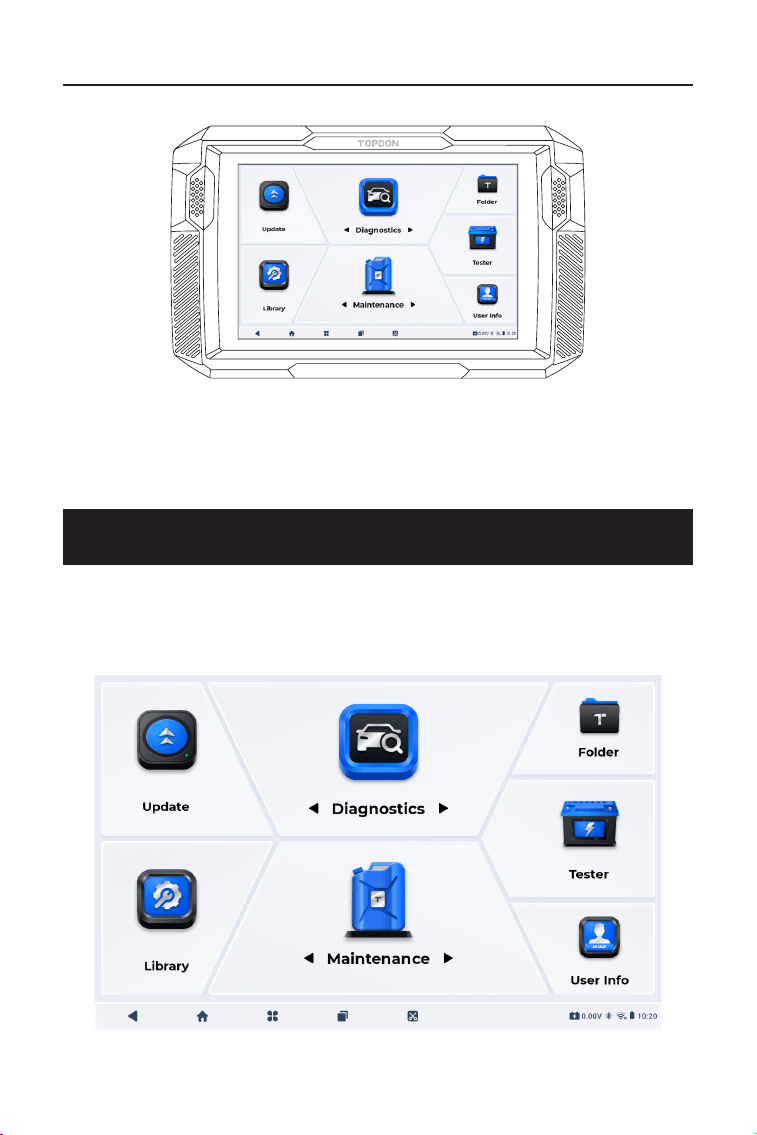
128
3.6 Su ArtiDiag900 Lite ya está listo para usar
SECCIÓN 4 USO DE SU ARTIDIAG900 LITE
Figura 3-13
4.1 Pantalla Principal
Abra la aplicación ArtiDiag900 Lite y aparecerá la pantalla de inicio.
Figura 4-1
ArtiDiag900 Lite

129
1. Iconos de funciones
Le permite realizar funciones de
diagnóstico de todo el sistema,
incluida la lectura de códigos de
diagnóstico de problemas (DTC), la
eliminación de DTC, la visualización
de ujos de datos, la lectura de
información de la versión de la
unidad de control electrónico (ECU)
y la realización de pruebas activas.
También puede acceder a EOBD y
OBD-II y a comentarios de diagnóstico
a través de este módulo.
Diagnóstico
Proporciona 8 servicios de
mantenimiento que incluyen reinicio
de aceite, adaptación del acelerador,
reinicio de EPB, reinicio del ángulo de
dirección, regeneración de DPF, purga
de ABS, reinicio de BMS y reinicio de
airbag.
Le permite actualizar el software de
diagnóstico especíco del vehículo si
hay una nueva versión disponible.
Le permite acceder a informes
(informes del sistema, informes de
códigos de falla e informes de ujo de
datos) y reproducir datos.
Mantenimiento
Actualización
Carpeta

130
Incluye guía de reparación de DTC,
boletines de servicio técnico (TSB),
ubicación de DTC, biblioteca de
luces de advertencia y búsqueda
de cobertura del vehículo, que
proporciona información de referencia
sobre inspección, diagnóstico y
reparación de vehículos.
Congura la tableta ArtiDiag900 Lite
para que funcione como probador de
batería (opcional).
Proporciona acceso a administración
de VCI, actualización de rmware,
desinstalación de software de diagnóstico,
información del usuario, comentarios
de los clientes, información de la tienda,
conguración y actualización del sistema.
Biblioteca
Ensayador
Información del
Usuario
2. Barra de navegación
Al seleccionar este icono volverá a la
pantalla anterior.
Al seleccionar este icono, volverá a
la pantalla de inicio de la aplicación
ArtiDiag900 Lite.
Al seleccionar este icono, regresará
a la pantalla de inicio del sistema
Android.
Al seleccionar este icono se muestra
una lista de las aplicaciones abiertas.
Puede deslizarse hacia la izquierda
o hacia la derecha para ver la
lista completa, tocar para abrir la
aplicación o deslizarse hacia arriba
para eliminarla.
Aplicaciones abiertas
Inicio de la aplicación
Atrás
Inicio de Android

131
4.2 Diagnósticos
El módulo de diagnóstico le permite escanear todos los sistemas del
vehículo compatibles al mismo tiempo (escaneo automático) en busca
de DTC o seleccionar un sistema individual para realizar lectura de
DTC, borrado de DTC, lectura de ujo de datos, lectura de información
de la ECU y prueba activa. También puede acceder a EOBD y OBD-II y
a comentarios de diagnóstico a través de este módulo.
Identicación del Vehículo
Para realizar la exploración automática o el diagnóstico individual
del sistema, primero debe identicar su vehículo. Toque Diagnóstico
desde la pantalla de inicio de la aplicación ArtiDiag900 Lite para
ingresar a la pantalla de Diagnóstico.
4.2.1 Auto Scan y Diagnóstico de Sistema Individual
Al seleccionar este icono se captura
una captura de pantalla de la página
actual.
Captura de pantalla
Figura 4-2
Identicación mediante VIN
VIN le permite identicar el vehículo mediante Auto VIN o Ingresar
VIN.
• Auto VIN – el tableta ArtiDiag900 Lite lee y decodica
automáticamente el Número de Identicación del Vehículo (VIN).
• Ingrese el VIN: ingrese manualmente el VIN del vehículo o escanee

132
el VIN del vehículo para identicarlo.
Identicación mediante Marca
1. Toque Marca, y se mostrará una lista de marcas de vehículos.
2. Seleccione o ingrese la marca en el de
su vehículo.
Nota:
Un modo de demostración (MANIFESTACIÓN opción) se
proporciona para ayudarle a familiarizarse con las funciones de
Diagnóstico.
3. Seleccione Automáticoo Manual para identicar el vehículo.
Automático
Ingresa manualmente el VIN o toca Leer para adquirir el VIN, luego
toca Conrmar. ArtiDiag900 Lite decodicará automáticamente el
VIN para identicar el vehículo.
Manual
Selecciona manualmente la información del vehículo para
identicarlo.
Un menú del sistema se mostrará después de que el vehículo sea
identicado.
Nota:
Los sistemas pueden variar según la marca, modelo y año del
vehículo.

133
Figura 4-3
Auto Scan
Auto Scan detecta los sistemas soportados por el vehículo y
recupera los Códigos de Diagnóstico de Problemas (DTC) para estos
sistemas, proporcionando un chequeo completo de la salud de tu
vehículo. Realizar un Auto Scan antes y después de unareparación
podría ayudar en la resolución de problemas y en la validación de las
reparaciones. Los informes de escaneo previo y posterior te permiten
registrar la condición del vehículo antes y después de la reparación
para comparación.
Para realizar un Auto Scan, toca el botón de Auto Scan en la
esquina inferior, el tableta ArtiDiag900 Lite comenzará a escanear
los sistemas soportados por el vehículo, y la recuperación de DTC
comenzará automáticamente.
Los resultados se muestran progresivamente a medida que se
escanean los sistemas.
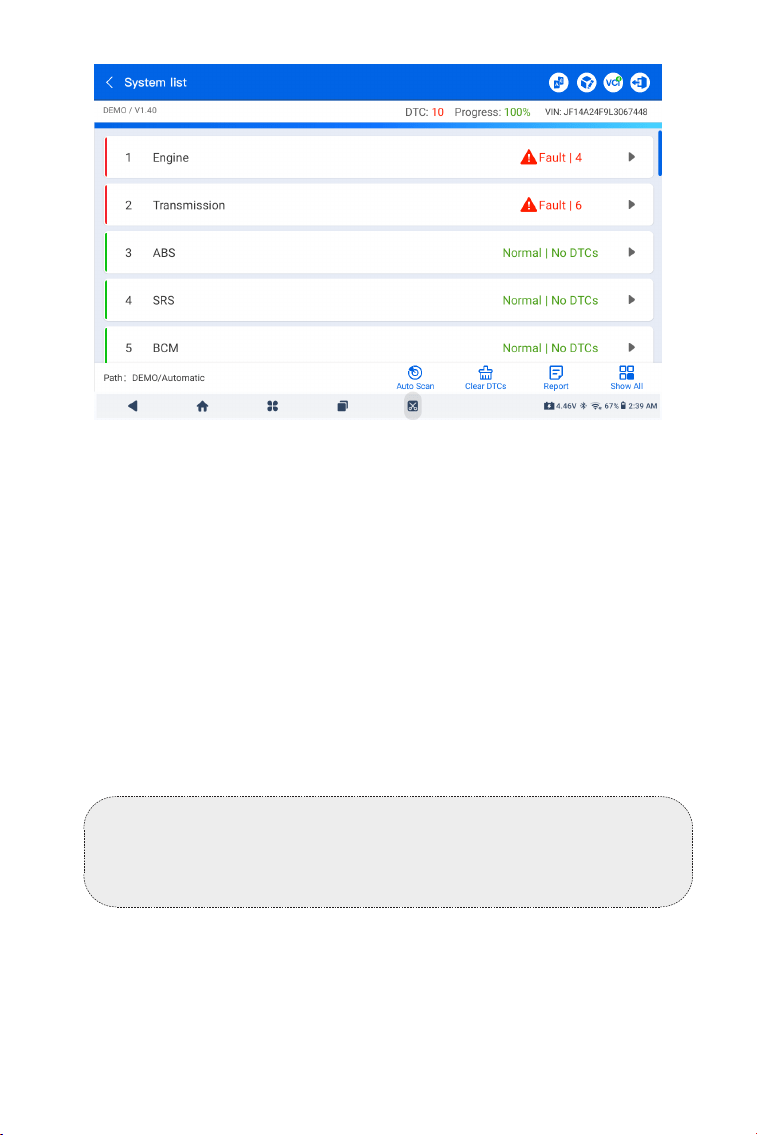
134
Figura 4-4
Descripción del botón
Borrar DTCs - toca para borrar todos los DTCs recuperados.
Informe - toca para guardar los resultados del escaneo actual en
formato de informe. (Para ver los informes guardados, ve a Carpeta >
Informes > Informe del Sistema.)
Mostrar todo/Mostrar real - toque para alternar entre mostrar todos
los sistemas del vehículo y mostrar solo los sistemas compatibles.
Realizando Diagnósticos de Sistemas Individuales
Aparte deAuto Scan, también puede seleccionar un sistema
individual para realizar lectura de DTC, borrado de DTC, lectura de
ujo de datos, lectura de información de la ECU y prueba activa para
ese sistema en particular.
Nota:
Dependiendo de la marca del vehículo, algunas funciones pueden
no estar disponibles.
Leer DTC
1. Después de que el vehículo sea identicado, selecciona el sistema
del cual deseas recuperar los DTCs desde el menú del sistema.
2. Toque Leer DTC en el menú de funciones.

135
Figura 4-5
Descripción del Icono
Cuando este icono se ilumine, toque para abrir
una ventana que le permite buscar en Google más
información sobre el DTC.
Cuando este icono se ilumine, indica que el
DTC está provocando que se ilumine una luz de
advertencia.
Cuando este icono se ilumine, toque para ver el
marco congelado capturado en el momento en
que ocurre el DTC.
Cuando este icono se ilumine, toque para ver las
medidas de reparación instructivas.
ArtiDiag900 Lite se comunicará con la ECU y recuperará y mostrará
los DTC del sistema seleccionado actualmente.

136
Figura 4-6
Descripción del Botón
Informe - toca para guardar los DTCs en formato de informe. (Para
ver los informes guardados, ve a Carpeta > Informes > Informe de
Código de Fallos.)
Borrar DTCs - toca para borrar todos los DTCs recuperados.
Borrar DTC
1. Después de que el vehículo sea identicado, selecciona el sistema
del cual deseas borrar los DTCs desde el menú del sistema.
2. Toque Borrar DTC en el menú de funciones.
3. Toca OK cuando los DTCs sean borrados.
Leer ujo de datos
1. Después de que el vehículo sea identicado, selecciona el sistema
del cual deseas leer el ujo de datos desde el menú del sistema.
2. Toca Flujo de datos en el menú de funciones. Una lista del ujo de
datos se muestra.
Nota:
1. El procedimiento para borrar los DTCs debería realizarse después
de que la reparación requerida haya sido completada. Una vez
conrmado, los DTCs y los datos congelados almacenados en la
ECU serán borrados.
2. NO ARRANQUES EL MOTOR MIENTRAS BORRAS LOS DTCS.

137
Symbolbeschreibung
Toque para conocer la descripción detallada del
ujo de datos.
Tippen Sie auf , um den Echtzeit-Datenstrom in
einem Wellenmusterdiagramm anzuzeigen.
Tastenbeschreibung
Editar - tippen Sie auf , um die Datenströme auszuwählen, die
angezeigt werden sollen.
Registro - toque para registrar y guardar información del ujo de
datos en tiempo real para comparar y analizar. Para ver los ujos de
datos grabados, vaya a Carpeta > Reproducir datos.
Gráco(s) - tippen Sie auf , um bis zu 6 Datenströme im Diagramm
anzuzeigen.
Combinar- tippen Sie, um bis zu 4 Datenströme in einem Diagramm
zu kombinieren, um den Vergleich und die Beobachtung zu
erleichtern.
Informe- tippen Sie auf , um die aktuellen Datenstromwerte im
Berichtsformat zu speichern. Um die gespeicherten Berichte
anzuzeigen, gehen Sie zu Ordner > Berichte > Datenstrombericht.
Leer información de la ECU
1. Nachdem das Fahrzeug identiziert wurde, wählen Sie im
Systemmenü das System aus, für das Sie die Informationen zur ECU-
Version anzeigen möchten.
2. Toca Información de la ECU en el menú de funciones. Luego
podrá ver la información de la versión de la ECU del sistema
seleccionado.
prueba activa
le permite controlar manualmente ciertas operaciones de
componentes directamente desde la aplicación para vericar las
Nota:
WENN DAS FAHRZEUG GEFAHREN WERDEN MUSS, UM DEN
LIVE-DATENSTROM ZU SEHEN, SOLLTE IMMER EINE ZWEITE
PERSON DABEI SEIN. BEOBACHTEN SIE DEN DATENSTROM
NICHT WÄHREND DER FAHRT.

138
Nota:
Las pruebas activas disponibles varían según la marca, el año y el
modelo del vehículo.
Mit der OBDII-/EOBD-Funktion können Sie eine emissionsbezogene
Diagnose für Ihr Fahrzeug durchführen.
Para realizar diagnósticos OBD-II:
1. Ir a Diagnóstico > Todos > EOBD.
4.2.2 EOBD y OBD-II
Figura 4-7
operaciones de los componentes.
1. Después de identicar el vehículo, seleccione el sistema para el
cual desea realizar una prueba activa en el menú del sistema.
2. Toque Prueba activa en el menú de funciones. Luego podrá
realizar pruebas activas relacionadas según sea necesario.
2. Wählen Sie Ihre Kommunikationsmethode: Auto-Scan oder
Protokoll.
Auto Scan - das ArtiDiag900 Lite kommuniziert automatisch
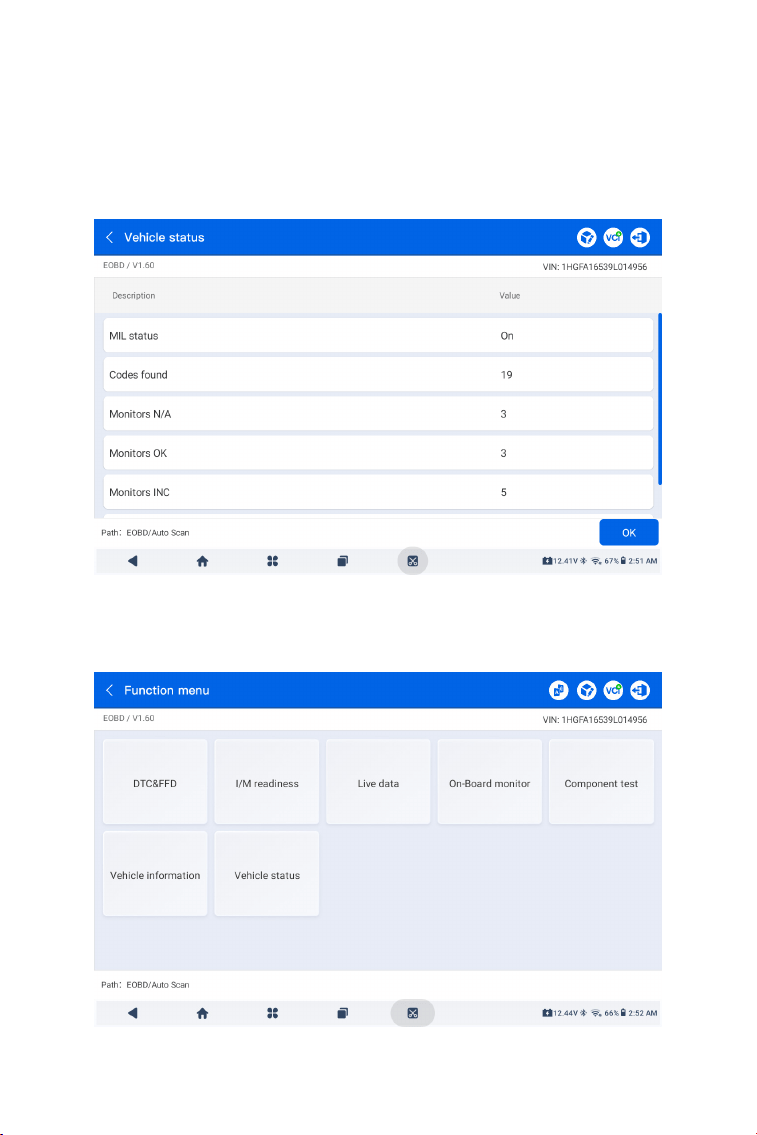
139
Figura 4-8
Figura 4-9
3. Toque DE ACUERDO para ingresar al menú de funciones.
mit dem Fahrzeug und erkennt, welches Protokoll das Fahrzeug
verwendet.
Protokoll - ermöglicht die manuelle Auswahl des
Kommunikationsprotokolls.
Después de conrmar el protocolo de comunicación, se muestra
una pantalla de estado del vehículo.el protocolo y otra información
del estado de su vehículo.

140
4. Wählen Sie eine Funktion aus, um fortzufahren.
Typische Funktionsoptionen können sein: DTC & FFD,
I/M-Bereitschaft, Live-Daten, On-Board-Monitor, Komponententest,
Fahrzeuginformationen und Fahrzeugstatus.
Nota:
Je nach Fahrzeugmarke sind einige Funktionen möglicherweise
nicht verfügbar.
Nota:
1. El procedimiento de borrado de DTCs debe realizarse
después de haber efectuado la reparación requerida. Una vez
conrmado, los DTCs y FFD almacenados en la ECU serán
borrados.
2. NO ARRANQUES EL MOTOR MIENTRAS BORRAS LOS DTCS.
DTC & FFD (Standbild-Daten)
Esta función ayuda a leer y borrar los DTC almacenados en la ECU
del vehículo y muestra el FFD de los sistemas relacionados con las
emisiones.
1. Leer DTCs
Esta función muestra los DTCs recuperados de los sistemas
relacionados con las emisiones.
2. Borrar DTCs
Esta función permite borrar los DTCs recuperados de los sistemas
relacionados con las emisiones.
3. FFD
Esta función toma una instantánea de los datos y condiciones de
operación cuando ocurre una falla relacionada con las emisiones.
Preparación I/M (inspección y mantenimiento)
Esta función verica si los distintos sistemas relacionados con las
emisiones en el vehículo están operando correctamente y están
listos para la prueba I/M.
También puede vericar elestado de funcionamiento del monitor
y conrmar si la reparación de una falla del automóvil se ha
realizado correctamente.
Datos en Vivo
Esta función muestra los datos y parámetros en tiempo real desde
la ECU del vehículo.
Monitor del sensor de O2

141
El ArtiDiag900 Lite le permite enviar instantáneamente
retroalimentación diagnóstica (con registros de datos diagnósticos
automáticamente adjuntos) mientras encuentra un problema de
software con las operaciones de diagnóstico.
Para enviar retroalimentación diagnóstica:
1. Toque el icono ubicado en la esquina superior derecha de
cualquier pantalla con este icono.
2. Seleccione el tipo de problema y toque Conrmar.
3. Escriba una descripción del problema.
4. Toque Enviar para enviar la retroalimentación.
4.2.3 Retroalimentación Diagnóstica
Esta función muestra los resultados de las pruebas del monitor
del sensor de O2 de las pruebas completadas más recientemente
desde la ECU del vehículo.
Monitor a Bordo
Esta función muestra los resultados de las pruebas para los
componentes y sistemas del tren motriz relacionados con las
emisiones que no se monitorean continuamente.
Prueba de Componente
Esta función ayuda a enviar comandos de control a la ECU
del vehículo como una forma de probar y operar las partes y
componentes del sistema.
Información del Vehículo
Esta función muestra una lista de información (proporcionada por
el fabricante del vehículo) desde la ECU del vehículo.
La información puede incluir:
• VIN.
• ID de Calibración (CID).
• Número de Vericación de Calibración (CVN).
• Seguimiento del Rendimiento en Uso para Motores de Encendido
por Chispa (IUPR)
Estado del Vehículo
Esta función muestra el estado del vehículo, incluyendo Motor,
Transmisión, Códigos Encontrados, Estado MIL, Monitores y
Protocolo.

142
Nota:
La función de Retroalimentación Diagnóstica solo está disponible
con el módulo de Diagnósticos.
4.3 Mantenimiento
Esta función le proporciona 8 servicios de mantenimiento que
incluyen reinicio de aceite, adaptación del acelerador, reinicio de EPB,
reinicio del ángulo de dirección, regeneración de DPF, purga de ABS,
reinicio de BMS y reinicio de airbag.
4.3.1 Descripción general de los servicios
Reinicio de Aceite
Esta función le permite restablecer la lámpara de servicio del aceite
para el sistema de vida útil del aceite del motor. El sistema de luz de
aceite del motor calcula un intervalo óptimo de cambio de aceite
dependiendo de las condiciones de conducción del vehículo y los
eventos climáticos. Los reinicios de aceite se requieren cada vez que
se cambia el aceite del motor.
Adaptación del Acelerador
Si la ECU se desconecta accidentalmente, o si el acelerador se
reemplaza o limpia, entonces los actuadores del acelerador
necesitan ser inicializados a través de la función de Adaptación del
Acelerador. Esto restablece los datos de la ECU a su estado inicial
para que el acelerador pueda regular con precisión la admisión de
aire.
Reinicio de EPB
Esta función le ayuda a sustituir y restablecer las pastillas de freno.
Debe realizarse en los siguientes casos:
• Se sustituyen las pastillas de freno y el sensor de desgaste de las
pastillas de freno.
• La luz indicadora de las pastillas de freno está encendida.
• Se produce un cortocircuito en el circuito del sensor de las pastillas
de freno, que se recupera.
• Se sustituye el servomotor.
Reinicio del Ángulo de Dirección
Si se reemplaza el sensor del ángulo de dirección, o si el ángulo de
dirección es inexacto o no está centrado, la función de reinicio del
ángulo de dirección necesita ser realizada para encontrar la posición
cero relativa. Con esta posición como referencia, la ECU puede
entonces calcular el ángulo exacto para la dirección izquierda y
derecha.

143
Regeneración de DPF
Esta función se utiliza principalmente para la regeneración de ltros
de partículas diésel. Para mantener los ltros funcionando bien,
elimina partículas mediante combustión y oxidación.
Purga de ABS
Esta función permite realizar pruebas para comprobar las
condiciones de funcionamiento del Sistema Antibloqueo de Frenos
(ABS).
Debe realizarse en los siguientes casos:
• Cuando los conductos del ABS contienen aire.
• Cuando se sustituye el ordenador ABS, la bomba ABS, el cilindro
maestro de freno, el cilindro de freno, el conducto de freno o el
líquido de frenos.
Reinicio de BMS
Después de que se reemplaza la batería del coche, la unidad de
control de la batería del coche necesita ser restablecida. Esto borrará
la información de fallos (como nivel bajo de batería) para que la
unidad de control pueda emparejar la información relevante de la
batería recién reemplazada.
Reinicio de Airbag
Esta función restablece los datos del airbag para borrar el indicador
de fallo de colisión del airbag, de forma que el ordenador del airbag
del vehículo pueda funcionar con normalidad.
Debe realizarse en los siguientes casos:
Cuando el vehículo colisiona y se despliega el airbag, aparece el
código de fallo correspondiente de los datos de colisión, se enciende
el indicador de airbag y no se puede borrar el código de fallo.
Para realizar un reinicio de servicio:
1. Toque Mantenimiento desde la pantalla principal y se mostrará un
menú de funciones.
4.3.2 Pasos

144
2. Seleccione la función que desea realizar.
3. Identique el vehículo mediante VIN o Marca (para obtener más
información sobre las operaciones de identicación, consulte
Identicando el vehículoen la 4.2.1). Luego aparece la pantalla de
la función seleccionada.
4. Siga las instrucciones en pantalla para realizar el reinicio del
servicio.
Figura 4-10
4.4 Actualización
Esta función le permite actualizar el software de diagnóstico especíco
del vehículo cuando hay nuevo.
Para realizar la función de Actualización:
1. Toque Actualizar desde la pantalla principalyse mostrará la pantalla
de Actualización.

145
Figura 4-11
2. Busque el software del vehículo que desee o busque el software
por palabra clave.
3. Toque Descarga de la actualización para instalar el software como
desee.
4.5 Carpeta
Esta función da acceso a Informes (informe del sistema, informe de
código de error e informe de ujo de datos) y datos de reproducción.
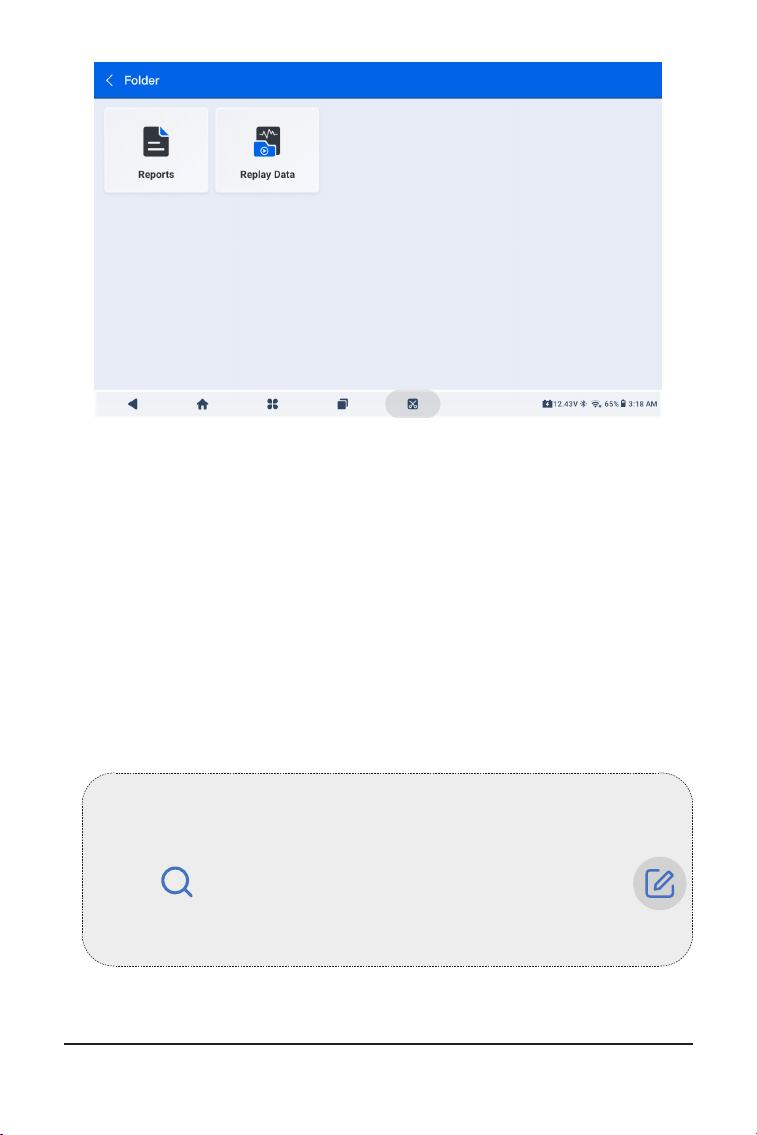
146
Abb 4-12
Nota:
Cuando estés en la pantalla Informes o Reproducir datos, puedes
tocar para buscar un elemento en particular o toque
para seleccionar y eliminar elementos por lotes.
4.5.1 Informes
1. Toque Carpeta > Informes.
2. Seleccione un informe particular para ver detalles de ese informe.
4.5.2 Reproducir datos
1. Toque Carpeta > Repetición DatoS y se muestra la lista de ujos de
datos grabados.
2. Toque un ujo de datos en particular para reproducir el video
grabado de ese ujo de datos.
4.6 Bibliothek

147
4.6.1 Guía de Reparación DTC
La Guía de Reparación DTC es una base de datos basada en
experiencias que proporciona información especíca del código,
incluyendo soluciones populares y pasos de reparación para
identicar fallos.
Para usar la Guía de Reparación DTC:
Toque Biblioteca > Guía de Reparación DTC. Ingrese un DTC en la
barra de búsqueda.
4.6.2 TSB (Boletines de Servicio Técnico)
Para ver boletines de servicio técnico:
Toque Biblioteca > TSB. Seleccione la marca, modelo, año, sistema
y subsistema del vehículo y toque Siguiente. Se mostrará una lista
de boletines de servicio técnico OEM emitidos para el vehículo
seleccionado. Toque el boletín deseado para ver el contenido
completo.
4.6.3 Ubicación del DLC
Para ver la ubicación del DLC:
Toque Biblioteca > Ubicación del DLC. Seleccione la marca, modelo
y año del vehículo y toque Siguiente. Se mostrará una imagen de la
ubicación del DLC para el vehículo seleccionado.
4.6.4 Biblioteca de Luces de Advertencia
La Biblioteca de Luces de Advertencia proporciona información
sobre las luces de advertencia del tablero, incluyendo descripciones
de las luces, impactos en la conducción, causas típicas, medidas de
respuesta y preguntas frecuentes relevantes.
Para ver la Biblioteca de Luces de Advertencia:
Toque Biblioteca > Biblioteca de Luces de Advertencia. Se mostrará
una lista de luces de advertencia. Toque la luz de advertencia
deseada para ver los detalles.
4.6.5 Búsqueda de cobertura de vehículos
Para ver las funciones y sistemas del automóvil compatibles:
Grifo Biblioteca > Búsqueda de cobertura de vehículos . Seleccione
el tipo de software, la marca, el modelo y el año, o ingrese la función/
subfunción en el cuadro de búsqueda y luego toque Consulta.
Se mostrarán los datos relacionados emitidos para el vehículo
seleccionado.

148
Nota:
Para acceder al Ensayador función, se requiere hardware adicional
(se vende por separado). Si necesita comprar hardware adicional,
comuníquese con los distribuidores locales para obtener ayuda.
4.8 Información del Usuario
4.8.1 Gestión de VCI
Le permite vincular el VCI a la tableta ArtiDiag900 Lite.
4.8.2 Actualización de Firmware
Te permite actualizar el rmware si hay una nueva versión
disponible.
4.8.3 Desinstalar el software de diagnóstico
Le permite desinstalar software de diagnóstico o IMMO.
4.8.4 Información del usuario
Puede tocar la foto de perl en la pantalla Información del usuario
para cambiar su foto de perl. También puede ver su ID o correo
electrónico de TOPDON, cambiar el apodo o la contraseña, eliminar
su cuenta de TOPDON y cerrar sesión en su cuenta.
4.8.5 Retroalimentación del Cliente
Esta función te permite escribir una retroalimentación sobre el
producto al equipo de posventa de TOPDON.
4.8.6 Información de la Tienda
La función Información de usuario brinda acceso a Administración
de VCI, Actualización de rmware, Desinstalación de software de
diagnóstico, Información de usuario, Mi perl, Comentarios de clientes,
Información de tienda, Conguración y Actualización del sistema.
4.7 Probador
Esta función congura el ArtiDiag900 Lite como un probador de
baterías para automóviles. Con esta función, puede realizar pruebas
de batería, pruebas de arranque y pruebas de carga.

149
Tepermite guardar información de la tienda de reparaciones.
4.8.7 Conguraciones
La función Conguración le permite congurar idiomas/unidades,
borrar el caché, ver la información de la versión de la aplicación
ArtiDiag900 Lite, actualizar la aplicación ArtiDiag900 Lite, ver los
Términos de servicio y la Política de privacidad y cerrar sesión en su
cuenta.
4.8.8 Actualización del Sistema
Te permite actualizar el software si hay una nueva versión disponible.

150
SECCIÓN 5 ESPECIFICACIONES
Android 11.0
2G
32G
Pantalla de 8 pulgadas, 1280 x 800
Bluetooth 5.0/SPP
USB
Wi
5 megapíxeles
Micrófono / altavoz
Sensor de gravedad
10.000 mAh
12 VCC
USB tipo A
USB tipo C
RJ45
hdmi
Puerto de carga CC
Wi
RJ45
10 x 6,1 x 1,97 pulgadas
(255 mm x 155 mm x 50 mm)
32°F a 122°F(0°C a 50°C)
-4°F a 140°F(-20°C a 60°C)
Sistema operativo
RAM
Capacidad de
almacenamiento
Pantalla
Conectividad
Cámara
E/S de audio
Sensor
Batería
Voltaje de entrada
Puertos
Conexión de red
Dimensiones (L x A x A)
Temperatura de Operación
Temperatura de
Almacenamiento

151
SECCIÓN 6 PREGUNTAS FRECUENTES
P: ¿Qué debo hacer si ocurre un error de comunicación?
R: Siga los pasos a continuación para identicar el problema:
1) Verique si el encendido está en ON.
2) Compruebe si el ArtiDiag900 Lite VCI está rmemente conectado
al puerto DLC del vehículo.
3) Apague el encendido. Enciéndalo de nuevo después de 10
segundos y continúe la operación.
4) Verique si el módulo de control del vehículo está defectuoso.
P: ¿Qué funciones especiales admite ArtiDiag900 Lite?
R: ArtiDiag900 Lite admite 8 funciones especiales que incluyen reinicio
de aceite, adaptación del acelerador, reinicio de EPB, reinicio del
ángulo de dirección, regeneración de DPF, purga de ABS, reinicio de
BMS y reinicio de airbag.
P: ¿Necesito actualizar el rmware antes de usar el ArtiDiag900 Lite
por primera vez?
R: Sí. El rmware se actualizará automáticamente a la última versión.
También puede tocar Información del Usuario > Actualización de
Firmware para actualizar el rmware manualmente.
P: ¿Por qué parpadea la pantalla de la tableta ArtiDiag900 Lite cuando
el motor está funcionando?
R: Eso es algo normal causado por interferencias electromagnéticas.
P: ¿Cómo hago una captura de pantalla?
R: Mantenga presionado el botón Captura de pantalla en el borde
superior derecho de la tableta ArtiDiag900 Lite durante 3 segundos
para realizar una captura de pantalla. Para ver las imágenes
guardadas, vaya a Galería desde la pantalla de inicio del sistema
Android.

152
SECCIÓN 7 GARANTÍA
Garantía limitada de un a ño para TOPDON
TOPDON asegura a sus compradores originales que los productos de
la empresa estarán libres de defectos de materiales y mano de obra
durante un período de 12 meses a partir de la fecha de compra (Período
de Garantía).
Para los defectos reportados durante el período de garantía, TOPDON
analizará y conrmará, reparará o reemplazará las piezas o productos
defectuosos de acuerdo con su soporte técnico.
TOPDON no será responsable de ningún daño accidental o
consecuente causado por el uso, mal uso o instalación del dispositivo.
Si hay conictos entre la política de garantía de TOPDON y las leyes
locales, prevalecerán las leyes locales.
Esta garantía limitada no es válida en los siguientes casos:
• Uso indebido, desmontaje, modicación o reparación de tiendas o
técnicos no autorizados.
• Manejo de errores e irregularidades operativas.
Nota:
Toda la información contenida en este manual se basa en la
información más reciente disponible en el momento de su
publicación y no garantiza su exactitud o exhaustividad. TOPDON
se reserva el derecho de cambiarla en cualquier momento sin
previo aviso.
¡Escanee el código QR para obtener más soporte!

153
ITALIANO

154
MANUALE D'USO MULTILINGUA
LA SICUREZZA È SEMPRE LA PRIMA
PRIORITÀ!
Per la tua sicurezza, la sicurezza degli altri e per evitare
danni al prodotto e al tuo veicolo, LEGGI ATTENTAMENTE E
ACCERTATI DI AVER COMPRESO COMPLETAMENTE TUTTE
LE ISTRUZIONI DI SICUREZZA E I MESSAGGI IN QUESTO
MANUALE PRIMA DI UTILIZZARE. Devi anche leggere il
manuale di servizio del veicolo e osservare le precauzioni
o le istruzioni indicate prima e durante qualsiasi test o
procedura di assistenza.
Mantieni distanza tra te, i tuoi vestiti e altri oggetti dalle
parti mobili o calde del motore e evita il contatto con
connessioni elettriche.
OPERARE IL VEICOLO SOLO IN UN'AREA BEN VENTILATA,
poiché il veicolo emette monossido di carbonio, un gas
tossico e velenoso, e particolato quando il motore è in
LEGGI TUTTE LE ISTRUZIONI PRIMA DELL'USO
Per il manuale multilingue in formato PDF, scansiona il codice QR qui
sotto o visita www.topdon.com/products/artidiag900-lite

155
SEZIONE 1 CONTENUTO DELLA
CONFEZIONE
• Compressa ArtiDiag900 Lite
• ArtiDiag900 Lite VCI (interfaccia di comunicazione del veicolo)
• Adattatore di alimentazione
• Cavo di prolunga OBD-II
• Cavo USB (Tipo-A a Tipo-C)
• Guida rapida per l'utente
• Manuale d'uso
• Custodia
funzione.
INDOSSA SEMPRE OCCHIALI DI SICUREZZA APPROVATI per
prevenire danni da oggetti appuntiti e liquidi corrosivi.
NON FUMARE O AVERE FIAMME VICINO AL VEICOLO
durante i test. I vapori di carburante e batteria sono
altamente inammabili.
NON CERCARE DI INTERAGIRE CON IL PRODOTTO
DURANTE LA GUIDA. Qualsiasi distrazione potrebbe
causare un incidente.
SPEGNERE L'ACCENSIONE PRIMA DI COLLEGARE O
SCOLLEGARE IL PRODOTTO DAL CONNETTORE LINK
DATI DEL VEICOLO (DLC) per evitare di causare danni ai
componenti elettronici del prodotto o del veicolo.

156
SEZIONE 2 PANORAMICA DEL PRODOTTO
2.1 Tavoletta ArtiDiag900 Lite
Figura 2-1
1
12
14
13
16
15
32 75 94 86 10 11
ArtiDiag900 Lite

157
Touchscreen da otto pollici
Pulsante di ripristino
Inserisci uno spillo (non incluso) nel foro stenopeico e tieni
premuto per 10 secondi per forzare il riavvio del tablet.
Pulsante di accensione
Premere a lungo il pulsante per accendere l'tablet. Premere
nuovamente a lungo per visualizzare la barra degli strumenti
di Spegnimento / Riavvio / Schermata, quindi toccare l'opzione
desiderata.
Premere brevemente il pulsante per risvegliare / bloccare lo
schermo.
Porta audio da 3,5 mm
Porta RJ45
Porta USB di tipo A
Collega il tablet ArtiDiag900 Lite e l'ArtiDiag900 Lite VCI
utilizzando il cavo USB in dotazione.
Porta di ingresso dell'alimentatore CC (12 V, 2 A)
Carica il tablet ArtiDiag900 Lite utilizzando l'adattatore di
alimentazione in dotazione.
Porta HDMI
Porta di USB Type-C
Per trasferimento dati e ricarica (5 V, 2 A)
Pulsante schermata
Tieni premuto per 2 secondi per acquisire uno screenshot.
Microfono
Slot di espansione per scheda TF
Supporta hot swap ed espansione di archiviazione no a 128
GB.
Slot VCI
Obiettivo della fotocamera
Altoparlante audio
Supporto pieghevole
1.
2.
3.
4.
5.
6.
7.
8.
9.
10.
11.
12.
13.
14.
15.
16.

158
1. Indicatori
2. Connettore OBD-II a 16 pin
Collega l'ArtiDiag900 Lite VCI al DLC del veicolo.
3. Porta USB di tipo C
Collega l'ArtiDiag900 Lite VCI al tablet ArtiDiag900 Lite utilizzando
il cavo USB in dotazione.
Blu sso: Bluetooth connesso
Indicatore di connessione
Bluetooth
Indicatore di energia
Indicatore di
comunicazione
Rosso sso: accensione
Verde lampeggiante: in
comunicazione con il veicolo
1
2
3
2.2 ArtiDiag900 LiteVCI
Figura 2-2

159
1. Selezionare la lingua di sistema desiderata.
2. Scegliere la regione e il fuso orario appropriati.
Figura 3-1
Figura 3-2
SEZIONE 3 INIZIO
3.1 Congurazione di base
Tieni premuto il pulsante di accensione per accendere il tablet. Seguire
i passaggi seguenti per congurare il tablet.

160
3. Congurare la connessione Wi-Fi. Selezionare una rete Wi-Fi dalla
lista delle reti disponibili e inserire la password.
4. Seleziona un metodo per impostare la password della schermata
di blocco. Puoi anche toccare Non adesso per saltare questo
passaggio.
Figura 3-3
Figura 3-4

161
5. Attivato con successo. Rubinetto Inizio e il sistema passerà
automaticamente all'app ArtiDiag900 Lite.
6. Accedere al proprio account TOPDON. (Se non si dispone di un
account, si prega di registrarsi con il proprio indirizzo email).
Figura 3-5
Figura 3-6
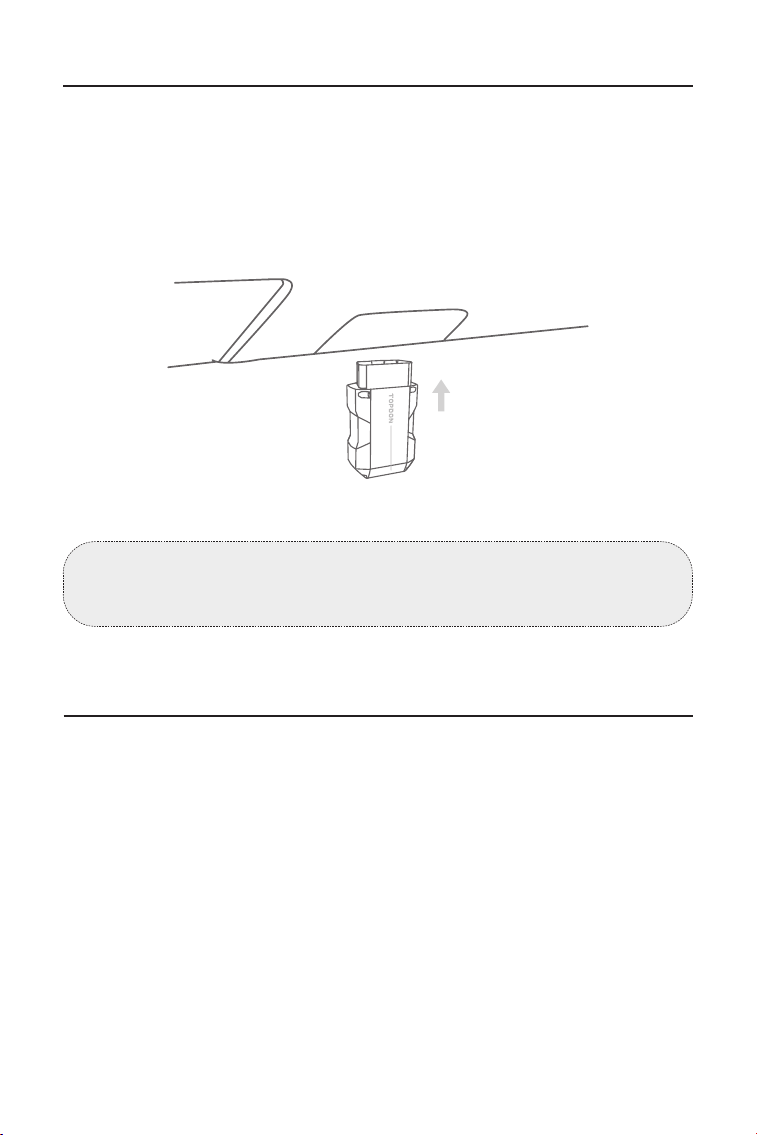
162
3.2 Collegare l'ArtiDiag900 Lite VCI al DLC del veicolo
3.3 Girare l'accensione in posizione "ON" (vedere Figura 3-8)
Estrarre l'ArtiDiag900 Lite VCI dallo slot posteriore del tablet
ArtiDiag900 Lite e collegarlo al DLC del veicolo. La porta DLC del
veicolo si trova di solito sotto il cruscotto.
Se incontri un problema nel localizzare il DLC, vai a Libreria > DLC
Location per ulteriori dettagli o consulta il manuale di servizio del
veicolo.
Se il tuo veicolo è dotato di un sistema di avviamento senza chiave e
l'interruttore di accensione è un pulsante "Engine Start Stop" (vedere
Figura 3-9), premi il pulsante "Engine Start Stop" no a quando l'auto
è in modalità "ON". Non premere il pedale del freno mentre premi
il pulsante "Engine Start Stop", altrimenti avvierai l'auto invece di
metterla in posizione "ON".
Il metodo di accensione varia in base al modello del veicolo. Consulta
il manuale di servizio del veicolo per i dettagli.
Nota: Assicurati che l'accensione sia sempre SPENTA prima di
collegare l'unità.
Car OBD-II Interface
Figura 3-7

163
3.4 Associare l'ArtiDiag900 Lite VCI
①
Vai a Informazioni utente > Gestione VCI . Clicca il
nell'angolo in alto a destra dello schermo e il dispositivo ti chiederà
prima di connettere il Bluetooth.
②
Connetti il Bluetooth come richiesto. Quindi il numero di serie e il
codice di attivazione verranno ottenuti automaticamente.
La luce LED rossa di alimentazione sull'ArtiDiag900 Lite VCI indica
che l'ArtiDiag900 Lite VCI è acceso.
Figura 3-10
Figura 3-8 Figura 3-9
ENGINE
START
STOP
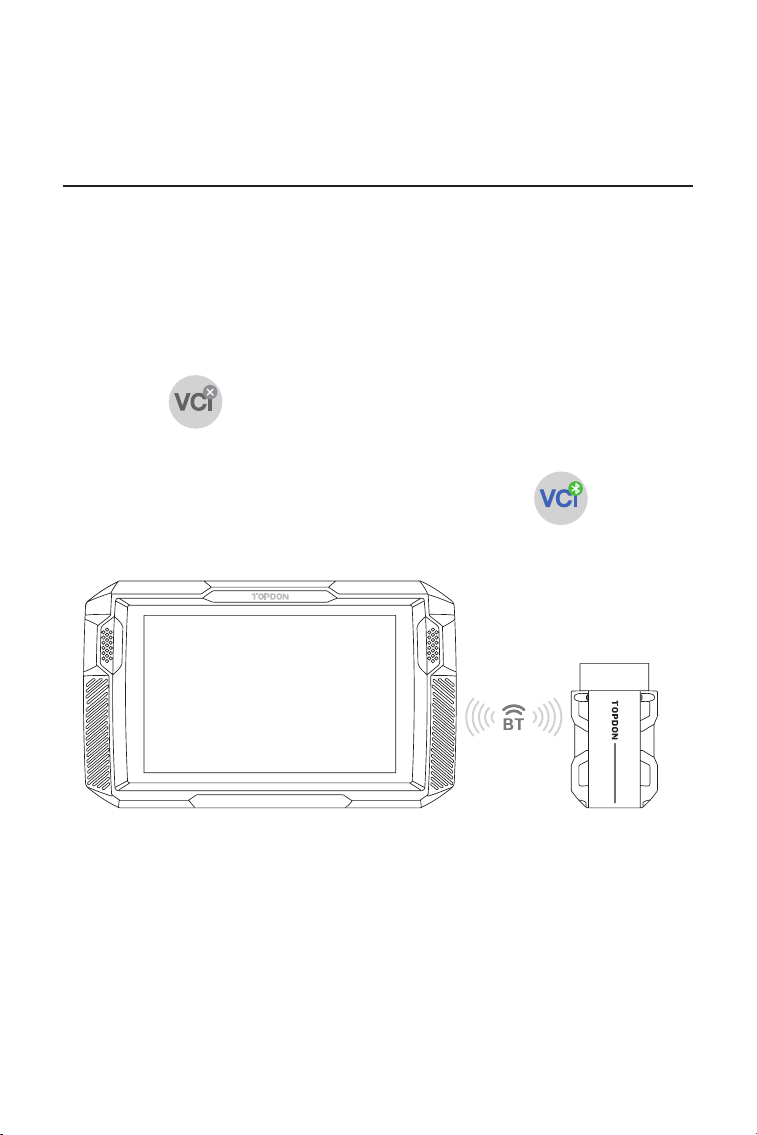
164
③
Quindi toccare Attivare per associare l'ArtiDiag900 Lite VCI al
tablet ArtiDiag900 Lite.
Per consentire la comunicazione tra il tablet ArtiDiag900 Lite e il
veicolo, l'ArtiDiag900 Lite VCI e il tablet ArtiDiag900 Lite devono essere
sempre collegati per primi. La connessione VCI può essere effettuata
tramite una soluzione wireless (Bluetooth) o cablata (cavo USB).
Rubinetto Diagnostica dalla schermata iniziale dell'app ArtiDiag900 Lite
e toccare nell'angolo in alto a destra dello schermo per stabilire
la connessione Bluetooth con l'ArtiDiag900 Lite VCI. Una volta collegato
correttamente l'ArtiDiag900 Lite VCI, l'icona cambia in l'indicatore
di connessione Bluetooth sull'ArtiDiag900 Lite VCI si illumina in blu sso.
3.5 Collegare l'ArtiDiag900 Lite VCI al tablet ArtiDiag900 Lite
3.5.1 Connessione VCI wireless
Figura 3-11
ArtiDiag900 Lite
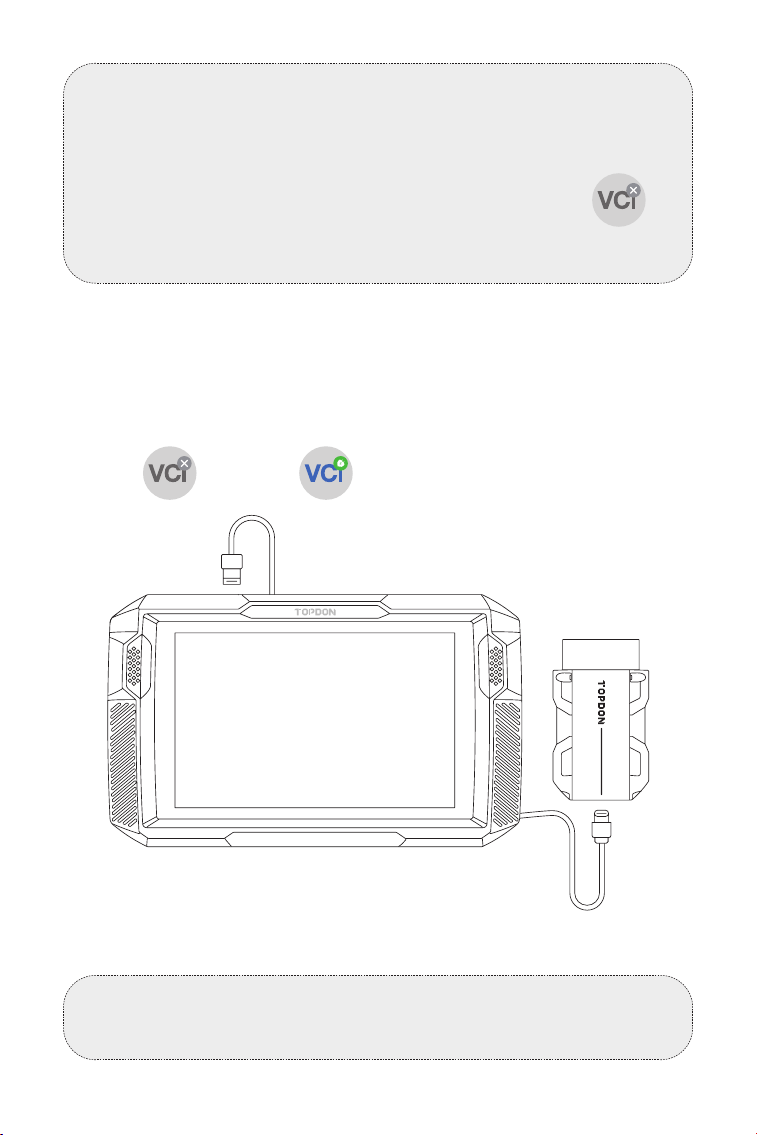
165
Utilizzare il cavo USB in dotazione per collegare l'ArtiDiag900 Lite
VCI al tablet ArtiDiag900 Lite (vedere Figura 3-6). Una volta collegato
correttamente l'ArtiDiag900 Lite VCI al tablet, verrà visualizzata
l'icona cambia in .
3.5.2 Connessione VCI cablata
Figura 3-12
Nota:
Una volta che l'ArtiDiag900 Lite VCI è stato collegato con successo
al tuo ArtiDiag900 Lite tramite Bluetooth, la connessione verrà
ripristinata automaticamente la prossima volta che apri l'app
ArtiDiag900 Lite. Se non connesso, tocca manualmente di
qualsiasi schermata con questa icona per riconnettersi.
Nota:
Una volta applicata la connessione cablata, il Bluetooth verrà
disconnesso automaticamente.
USB Type-A
USB Type-C
ArtiDiag900 Lite
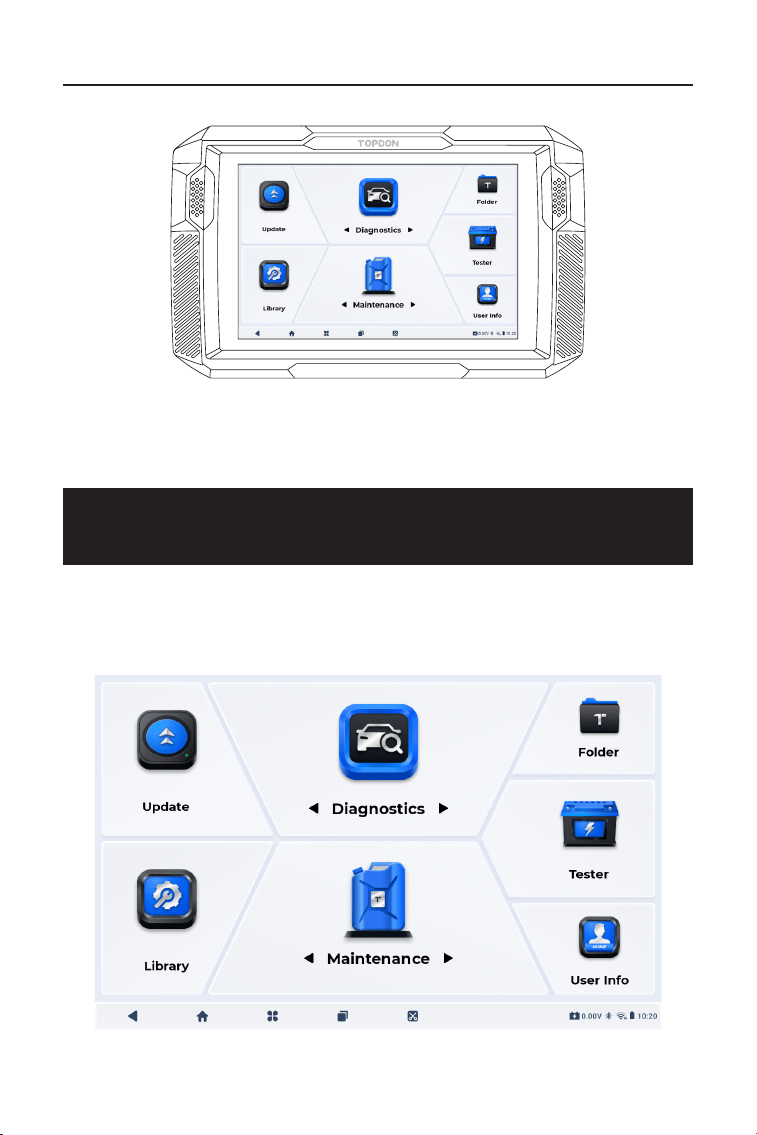
166
3.6 Il vostro ArtiDiag900 Lite è ora pronto per l'uso
SEZIONE 4 UTILIZZO DEL VOSTRO
ARTIDIAG900 LITE
Figura 3-13
4.1 Schermata principale
Apri l'app ArtiDiag900 Lite e verrà visualizzata la schermata
principale.
Figura 4-1
ArtiDiag900 Lite

167
1. Icone di funzione
Consente di eseguire funzioni
diagnostiche dell'intero sistema, tra
cui la lettura dei codici di guasto
diagnostici (DTC), la cancellazione
dei DTC, la visualizzazione dei ussi
di dati, la lettura delle informazioni
sulla versione dell'unità di controllo
elettronico (ECU) e l'esecuzione di test
attivi. Tramite questo modulo è inoltre
possibile accedere a EOBD e OBD-II e
al feedback diagnostico.
Diagnostica
Fornisce 8 servizi di manutenzione,
tra cui Reset Olio, Adattamento
dell'acceleratore, Reset EPB, Reset
Angolo Sterzo, Rigenerazione
DPF, Spurgo ABS, Reset BMS e
Azzeramento airbag.
Consente di aggiornare il software
diagnostico specico del veicolo se è
disponibile una nuova versione.
Consente di accedere ai rapporti
(rapporti di sistema, rapporti sui codici
di errore e rapporti sul usso di dati) e
ai dati di riproduzione.
Manutenzione
Aggiornamento
Cartella
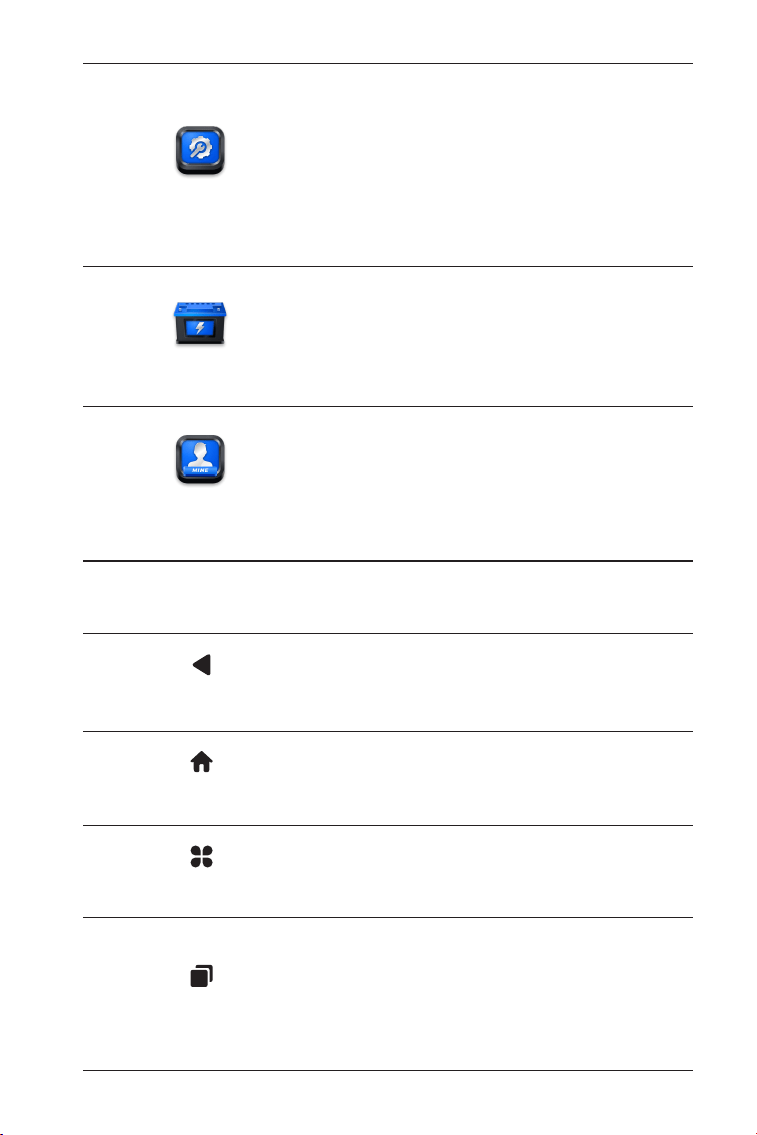
168
Include la guida alla riparazione DTC,
i bollettini di servizio tecnico (TSB),
la posizione del DTC, la libreria delle
spie e la ricerca della copertura del
veicolo, che fornisce informazioni
di riferimento sull'ispezione, la
diagnostica e la riparazione del
veicolo.
Congura il tablet ArtiDiag900 Lite
per funzionare come tester della
batteria (opzionale).
Fornisce l'accesso a Gestione
VCI, Aggiornamento rmware,
Disinstallazione software diagnostico,
Informazioni utente, Feedback cliente,
Informazioni negozio, Impostazioni e
Aggiornamento sistema.
Libreria
Tester
Informazioni utente
2. Barra di navigazione
Selezionando questa icona si ritorna
alla schermata precedente.
Selezionando questa icona si ritorna
alla schermata iniziale dell'app
ArtiDiag900 Lite.
Selezionando questa icona si ritorna
alla schermata principale del sistema
Android.
Selezionando questa icona viene
visualizzato un elenco delle app
aperte. Puoi scorrere verso sinistra
o destra per visualizzare l'elenco
completo, toccare per aprire l'app o
scorrere verso l'alto per rimuovere
l'app.
App aperte
App Casa
Indietro
Casa Android

169
4.2 Diagnostica
Il modulo Diagnostica consente di scansionare tutti i sistemi del
veicolo supportati contemporaneamente (Scansione automatica) per
rilevare DTC o selezionare un singolo sistema per eseguire Lettura
DTC, Cancella DTC, Lettura usso dati, Lettura informazioni ECU e Test
attivo. Tramite questo modulo è inoltre possibile accedere a EOBD e
OBD-II e al feedback diagnostico.
Identicazione del veicolo
Per eseguire la scansione automatica o la diagnostica del sistema
individuale, è necessario prima identicare il veicolo. Rubinetto
Diagnostica dalla schermata iniziale dell'app ArtiDiag900 Lite per
accedere alla schermata Diagnostica.
4.2.1 Auto Scan e diagnostica di sistema individuale
Selezionando questa icona viene
catturato uno screenshot della pagina
corrente.
Immagine dello schermo
Figura 4-2
Identicazione tramite VIN
Il VIN ti consente di identicare il veicolo tramite Auto VIN o Inserisci
VIN.
• Auto VIN - l'Tavoletta ArtiDiag900 Lite legge e decodica
automaticamente il Numero di Identicazione del Veicolo (VIN).
• Inserisci VIN: inserisci manualmente il VIN del veicolo o scansiona il

170
VIN del veicolo per identicare il veicolo.
Identicazione tramite Marca
1. Tocca Tutto e verrà visualizzato un elenco delle marche di veicoli.
2. Selezionare o inserire la marca nel del
tuo veicolo.
Nota:
Una modalità dimostrativa (DIMOSTRAZIONE opzione) viene
fornita per aiutarti a familiarizzare con le funzioni di diagnostica.
3. Seleziona Automatico O Manuale per identicare il veicolo.
Automatico
Inserisci manualmente il VIN o tocca Leggi per acquisire il VIN,
quindi tocca Conferma. ArtiDiag decodicherà automaticamente il
VIN per identicare il veicolo.
Manuale
Seleziona manualmente le informazioni del veicolo per identicarlo.
Dopo l'identicazione del veicolo, verrà visualizzato un menu del
sistema.
Nota:
I sistemi possono variare a seconda della marca, modello e anno
del veicolo.

171
Figura 4-3
Scansione automatica
Auto Scan rileva i sistemi supportati dal veicolo e recupera i codici
diagnostici (DTC) per questi sistemi, fornendo una completa
verica dello stato di salute del tuo veicolo. Eseguire l'Auto Scan
prima e dopo una riparazione potrebbe aiutare nella risoluzione dei
problemi e nella convalida delle riparazioni. I report pre e post scan
ti consentono di registrare le condizioni del veicolo prima e dopo la
riparazione per confrontarle.
Per eseguire un Auto Scan, tocca il pulsante Auto Scan nell'angolo
in basso, l'Tavoletta ArtiDiag900 Lite inizierà a eseguire la scansione
dei sistemi supportati dal veicolo, e il recupero dei DTC inizierà
automaticamente.
I risultati vengono visualizzati progressivamente durante la
scansione dei sistemi.

172
Figura 4-4
Descrizione dei pulsanti
Cancella DTC - tocca per cancellare tutti i DTC recuperati.
Report - tocca per salvare i risultati attuali della scansione in formato
report. (Per visualizzare i report salvati, vai alla Cartella > Rapporti >
Rapporto di sistema.)
Mostra tutto/Mostra effettivo - toccare per alternare tra la
visualizzazione di tutti i sistemi del veicolo e la visualizzazione solo
dei sistemi supportati.
Eseguire la Diagnosi del Sistema Individuale
A parteScansione automatica, è anche possibile selezionare un
singolo sistema per eseguire Leggi DTC, Cancella DTC, Leggi usso
di dati, Leggi informazioni ECU e Test attivo per quel particolare
sistema.
Nota:
A seconda della marca del veicolo, alcune funzioni potrebbero non
essere disponibili.
Leggi i DTC
1. Dopo che il veicolo è stato identicato, seleziona il sistema per il
quale desideri recuperare i DTC dal menu del sistema.
2. Tocca Leggi i DTC nel menu funzioni.

173
Figura 4-5
Descrizione delle icone
Quando questa icona si illumina, tocca per aprire
una nestra che ti consente di cercare su Google
maggiori informazioni sul DTC.
Quando questa icona si illumina, indica che il
DTC sta causando l'illuminazione di una spia di
avvertimento.
Quando questa icona si illumina, tocca per
visualizzare l'istantanea congelata catturata al
momento in cui si verica il DTC.
Quando questa icona si illumina, tocca per
visualizzare le misure riparative istruite.
ArtiDiag900 Lite comunicherà con l'ECU e recupererà e visualizzerà i
DTC per il sistema attualmente selezionato.
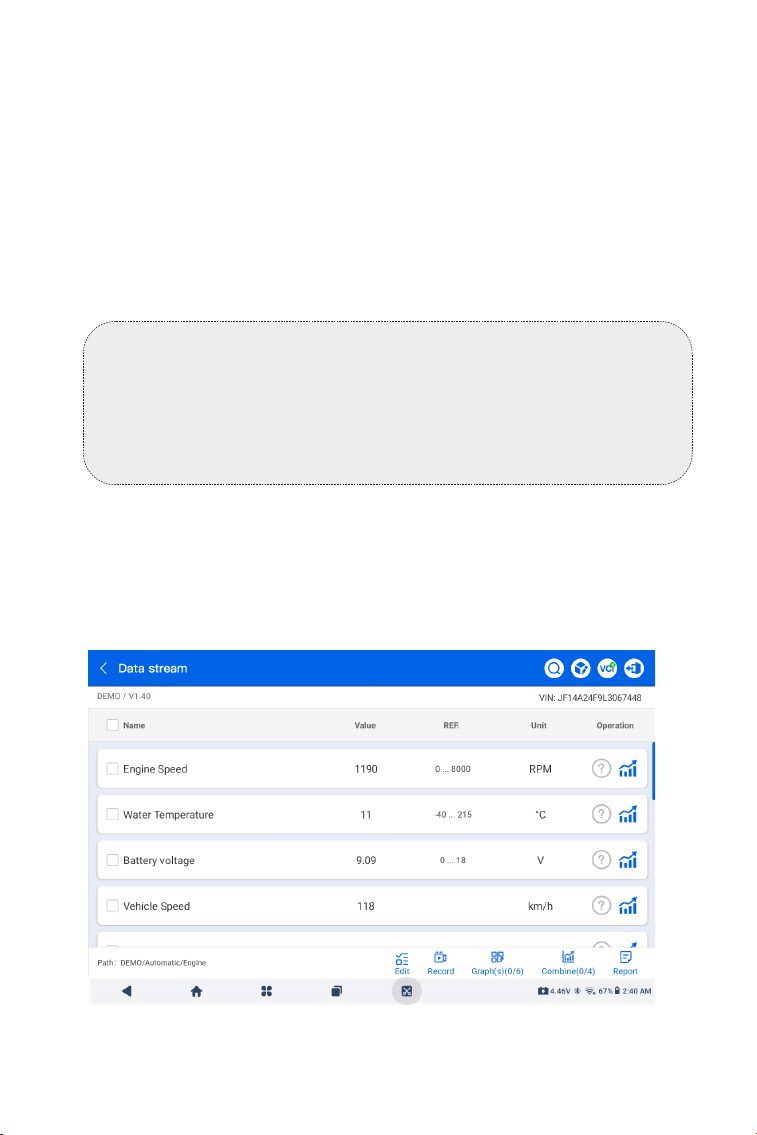
174
Figura 4-6
Descrizione dei pulsanti
Report - tocca per salvare i DTC in formato di rapporto. (Per
visualizzare i rapporti salvati, vai a Cartella > Rapporti > Rapporto
Codice di Errore.)
Cancella DTC - tocca per cancellare tutti i DTC recuperati.
Cancella DTC
1. Dopo aver identicato il veicolo, selezionare il sistema per il quale si
desidera cancellare i codici di errore dalla menu del sistema.
2. Tocca Cancella DTC nel menu funzioni.
3. Toccare OK quando i codici di errore sono cancellati.
Leggi il usso di dati
1. Dopo aver identicato il veicolo, selezionare il sistema per il quale si
desidera leggere il usso di dati dal menu del sistema.
2. Toccare Leggi il Flusso di Dati nel menu delle funzioni. Viene
visualizzata una lista di ussi di dati.
Nota:
1. La procedura di cancellazione dei codici di errore dovrebbe
essere eseguita dopo che la riparazione richiesta è stata
completata. Una volta confermato, i codici di errore e i dati di
congelamento memorizzati nell'ECU verranno cancellati.
2. NON AVVIARE IL MOTORE DURANTE LA CANCELLAZIONE DEI
CODICI DI ERRORE.

175
Descrizione delle icone
Tocca per leggere la descrizione dettagliata del
usso di dati.
Tocca per visualizzare il usso di dati in tempo
reale in un graco a onde.
Descrizione dei pulsanti
Modicare - tocca per selezionare i ussi di dati che desideri
visualizzare.
Documentazione - tocca per registrare e salvare informazioni sul
usso di dati in tempo reale per confronto e analisi. Per visualizzare i
ussi di dati registrati, vai alla Cartella > Riproduci i dati.
Graco(i) - tocca per visualizzare no a 6 ussi di dati in un graco.
Combina - tocca per combinare no a 4 ussi di dati in un unico
graco per una comparazione e osservazione più facile.
Rapporto - tocca per salvare i valori correnti del usso di dati in
formato di report. Per visualizzare i report salvati, vai alla Cartella >
Reports > Data Stream Report.
Leggi le informazioni sull'ECU
1. Dopo aver identicato il veicolo, seleziona il sistema per il quale
desideri visualizzare le informazioni sulla versione dell'ECU dal menu
del sistema.
2. Tocca le informazioni sull'ECU nel menu delle funzioni. Poi puoi
visualizzare le informazioni sulla versione dell'ECU del sistema
selezionato.
Prova attiva
consente di controllare manualmente alcune operazioni dei
Nota:
SE IL VEICOLO DEVE ESSERE GUIDATO PER VISUALIZZARE
IL FLUSSO DI DATI IN TEMPO REALE, AVERE SEMPRE UNA
SECONDA PERSONA CHE TI AIUTA. NON GUARDARE IL FLUSSO
DI DATI MENTRE GUIDI.
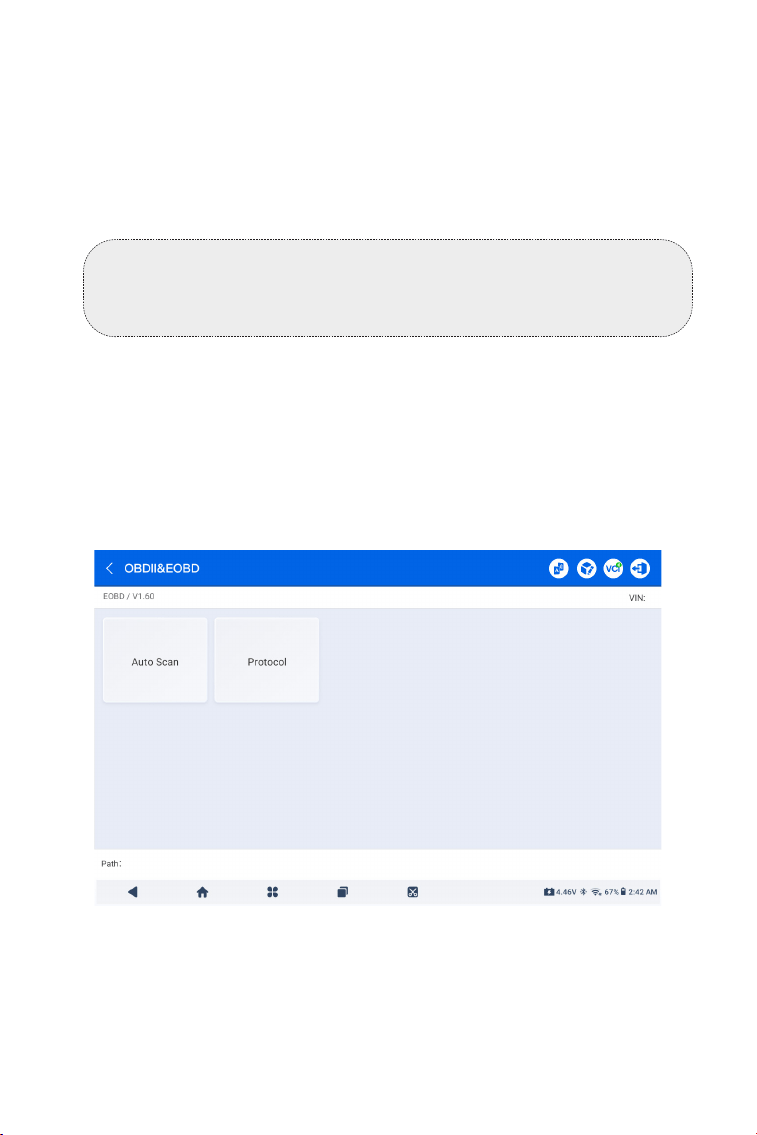
176
Nota:
test attivi disponibili variano in base alla marca, all'anno e al
modello del veicolo.
La funzione OBDII / EOBD ti consente di eseguire diagnostica
correlata alle emissioni per il tuo veicolo.
Per eseguire la diagnostica OBD-II:
1. Vai a Diagnostica > Tutto > EOBD.
4.2.2 EOBD e OBD-II
Figura 4-7
componenti direttamente dall'app per vericare il funzionamento
dei componenti.
1. Dopo aver identicato il veicolo, selezionare il sistema per il quale si
desidera eseguire il test attivo dal menu del sistema.
2. Tocca Prova attiva nel menu funzioni. Quindi è possibile eseguire i
test attivi correlati secondo necessità.
2. Seleziona il tuo metodo di comunicazione: Auto Scan o Protocollo.
Auto Scan - l'ArtiDiag900 Lite comunicherà automaticamente con il
veicolo e identicherà quale protocollo il veicolo sta utilizzando.

177
Figura 4-8
Figura 4-9
3. Tocca OK per accedere al menu delle funzioni.
Protocollo - ti consente di selezionare manualmente il protocollo di
comunicazione.
Dopo aver confermato il protocollo di comunicazione, viene
visualizzata una schermata di stato del veicoloil protocollo e altre
informazioni sullo stato del tuo veicolo.

178
4. Seleziona una funzione per continuare.
Le opzioni tipiche delle funzioni potrebbero includere: DTC & FFD, I/
M Readiness, Dati in Tempo Reale, Monitoraggio a Bordo, Test dei
Componenti, Informazioni sul Veicolo e Stato del Veicolo.
Nota:
A seconda della marca del veicolo, alcune funzioni potrebbero non
essere disponibili.
Nota:
1. La procedura di cancellazione dei DTC dovrebbe essere
eseguita dopo che la riparazione richiesta è stata effettuata. Una
volta confermato, i DTC e i FFD memorizzati nell'ECU verranno
cancellati.
2. NON AVVIARE IL MOTORE DURANTE LA CANCELLAZIONE
DEI CODICI DI ERRORE.
DTC & FFD (Dati di Congelamento Frame)
Questa funzione aiuta a recuperare e cancellare i DTC memorizzati
nell'ECU del veicolo e mostra i FFD dei sistemi correlati alle emissioni.
1 Leggi i DTC
Questa funzione mostra i DTC recuperati dai sistemi correlati alle
emissioni.
2 Cancella i DTC
Questa funzione ti permette di cancellare i DTC recuperati dai
sistemi correlati alle emissioni.
3 FFD
Questa funzione scatta una foto istantanea dei dati e delle
condizioni operative quando si verica un guasto correlato alle
emissioni.
I/M Readiness (Ispezione e Manutenzione).
Questa funzione verica se i vari sistemi correlati alle emissioni del
veicolo stanno funzionando correttamente e sono pronti per il test
I/M.
Può inoltre controllare lo stato di esecuzione del monitor e
confermare se la riparazione di un guasto dell'auto è stata eseguita
correttamente.
Dati in Tempo Reale
Questa funzione visualizza i dati in tempo reale e i parametri dal
modulo di controllo del veicolo ECU.
Monitoraggio del sensore O2

179
L'ArtiDiag900 Lite consente di inviare immediatamente feedback
diagnostico (con registrazioni di dati diagnostici automaticamente
allegati) quando si verica un problema software durante le
operazioni diagnostica.
Per inviare il feedback diagnostico:
1. Tocca il icona situata nell'angolo in alto a destra di qualsiasi
schermatanel modulo Diagnostica.
2. Seleziona il tipo di problema e tocca Confermare.
3. Scrivi una descrizione del problema.
4. Tocca Invia per inviare il feedback.
4.2.3 Feedback Diagnostico
Questa funzione visualizza i risultati dei test di monitoraggio del
sensore O2 dei test completati più recentemente dall'ECU del
veicolo.
On-Board Monitor
Questa funzione mostra i risultati dei test per i componenti
del powertrain correlati alle emissioni e i sistemi che non sono
monitorati continuamente.
Component Test
Questa funzione aiuta a inviare comandi di controllo all'ECU
del veicolo come modo per testare e far funzionare le parti e i
componenti del sistema.
Vehicle Information
Questa funzione visualizza un elenco di informazioni (fornite dal
produttore del veicolo) dall'ECU del veicolo.
Le informazioni possono includere:
• Numero di Identicazione del Veicolo (VIN).
• ID di Calibrazione (CID).
• Numero di Verica della Calibrazione (CVN).
• Monitoraggio delle Prestazioni in Uso per Motori ad Accensione
per Scintilla (IUPR).
Vehicle Status
Questa funzione mostra lo stato del veicolo, inclusi Motore,
Trasmissione, Codici Rilevati, Stato MIL (Malfunction Indicator
Lamp), Monitor e Protocollo.

180
Nota:
La funzione di Feedback Diagnostico è disponibile solo con il
modulo Diagnostica.
4.3 Manutenzione
Questa funzione fornisce 8 servizi di manutenzione, tra cui Reset
Olio, Adattamento dell'acceleratore, Reset EPB, Reset Angolo Sterzo,
Rigenerazione DPF, Spurgo ABS, Reset BMS e Azzeramento airbag.
4.3.1 Panoramica dei Servizi
Reset Olio
Questa funzione ti consente di reimpostare la spia del servizio olio
per il sistema di durata dell'olio motore. Il sistema della spia dell'olio
motore calcola un intervallo di cambio olio ottimale in base alle
condizioni di guida del veicolo e agli eventi meteorologici. Il reset
dell'olio è necessario ogni volta che viene cambiato l'olio motore.
Adattamento dell'Acceleratore
Se l'ECU viene disconnesso accidentalmente o se l'acceleratore
viene sostituito o pulito, è necessario inizializzare gli attuatori
dell'acceleratore tramite la funzione di Adattamento
dell'Acceleratore. Questo reimposta i dati dell'ECU al loro stato
iniziale in modo che l'acceleratore possa regolare con precisione
l'aspirazione dell'aria.
Reset del freno di stazionamento elettronico
Questa funzione consente di sostituire e ripristinare le pastiglie del
freno.
Deve essere eseguita nei seguenti casi:
• La pastiglia del freno e il sensore di usura della pastiglia del freno
sono stati sostituiti.
• la spia delle pastiglie dei freni è accesa.
• Il circuito del sensore della pastiglia del freno è in cortocircuito e
viene ripristinato.
• Il servomotore viene sostituito.
Reset Angolo Sterzo
Se il sensore dell'angolo dello sterzo viene sostituito o se l'angolo
dello sterzo è inaccurato o non centrato, è necessario eseguire la
funzione di Reset Angolo Sterzo per trovare la posizione relativa zero.
Con questa posizione come riferimento, l'ECU può quindi calcolare
l'angolo esatto per lo sterzo a sinistra e a destra.

181
Rigenerazione DPF
Questa funzione è principalmente utilizzata per la rigenerazione
dei ltri antiparticolato diesel. Per mantenere le prestazioni dei ltri,
rimuove le particelle mediante combustione e ossidazione.
Spurgo ABS
Questa funzione consente di eseguire test per vericare le condizioni
di funzionamento del sistema frenante antibloccaggio (ABS).
Deve essere eseguita nei seguenti casi:
· Quando l'ABS contiene aria.
· Quando si sostituiscono il computer dell'ABS, la pompa dell'ABS, la
pompa del freno, il cilindro del freno, il tubo del freno o il liquido dei
freni.
Reset BMS
Dopo la sostituzione della batteria dell'auto, è necessario
reimpostare l'unità di controllo della batteria dell'auto. Ciò cancellerà
le informazioni di errore (come il livello basso della batteria) in modo
che l'unità di controllo possa abbinare le informazioni rilevanti della
batteria appena sostituita.
Azzeramento airbag
Questa funzione azzera i dati dell'airbag per cancellare l'indicatore
di errore di collisione dell'airbag, in modo che il computer dell'airbag
del veicolo possa funzionare normalmente.
Deve essere eseguita nei seguenti casi:Quando il veicolo subisce una
collisione e l'airbag si attiva, appare il codice di errore corrispondente
ai dati di collisione, la spia dell'airbag si accende e il codice di errore
non può essere cancellato.
Per eseguire un reset del servizio:
1. Tocca Manutenzione dalla schermata principale e verrà visualizzato
un menu delle funzioni.
2. Seleziona la funzione che desideri eseguire.
4.3.2 Passaggi
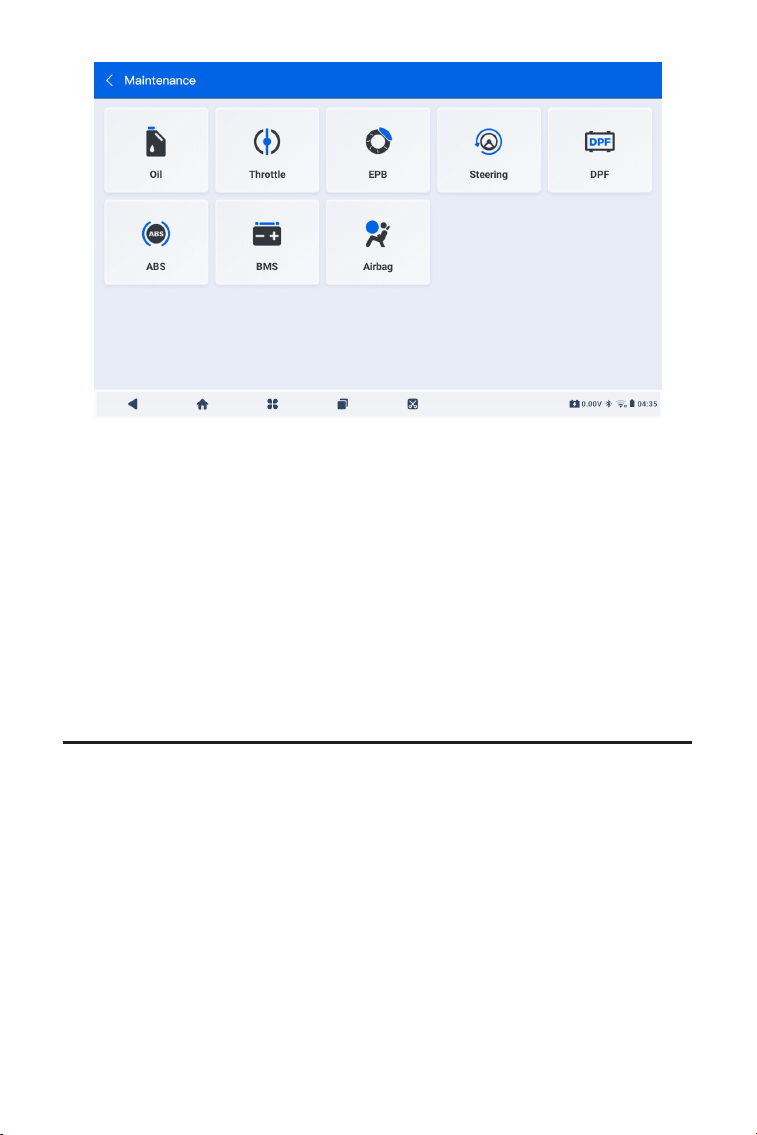
182
3. Identica il veicolo tramite il numero di identicazione del veicolo
(VIN) o la marca (per ulteriori informazioni sulle operazioni di
identicazione, consulta l'Identicazione del Veicolo in Auto Scan
e Diagnostica del Sistema Individuale). Quindi vai alla schermata in
cui viene visualizzata la funzione selezionata.
4. Segui le istruzioni visualizzate sullo schermo per eseguire il reset
del servizio.
Figura 4-10
4.4 Aggiornamento
Questa funzione consente di aggiornare la diagnostica specica del
veicolo quando disponibile un nuovo software.
Per eseguire la funzione di Aggiornamento:
1. Tocca Aggiornamento dalla schermata principale e verrà
visualizzata la schermata di Aggiornamento.

183
Figura 4-11
2. Cerca il software del veicolo desiderato oppure cerca software
tramite una parola chiave.
3. Tocca Scarica/Aggiornaper installare il software come preferisci.
4.5 Cartella
Questa funzione dà accesso a Rapporti (rapporto di sistema, rapporto
codici di errore e rapporto usso di dati) e dati di riproduzione.
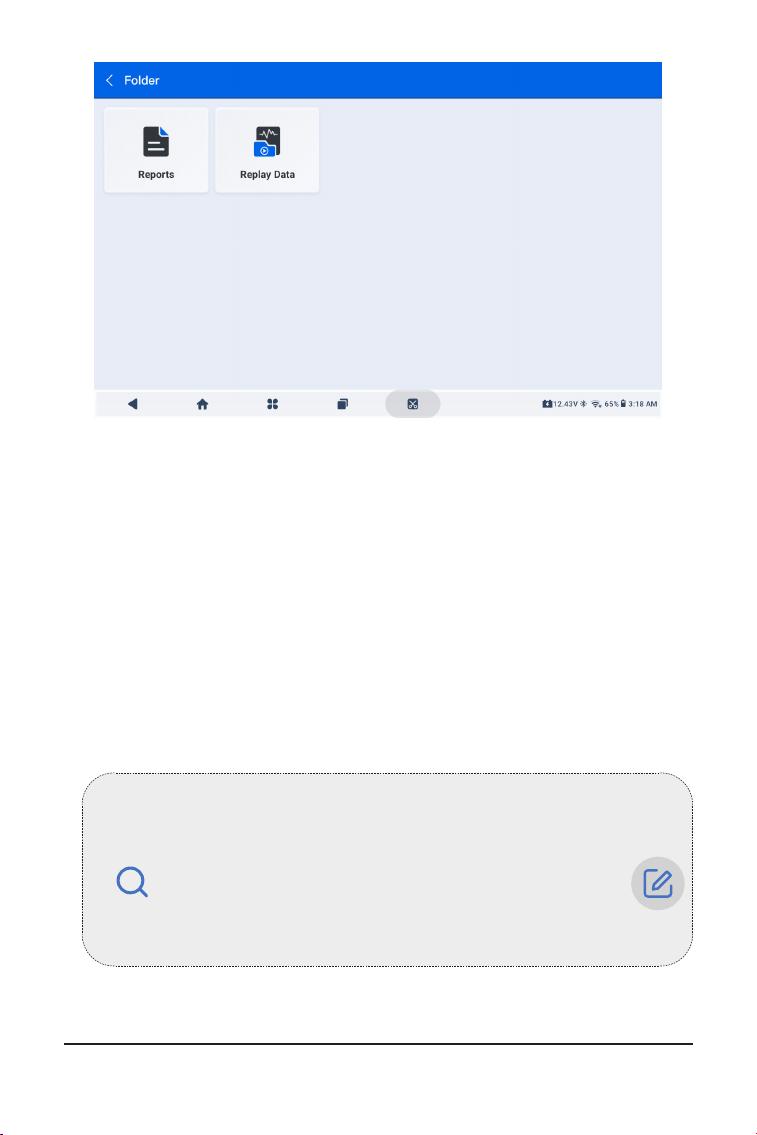
184
Figura 4-12
Nota:
Nella schermata Rapporti o Dati di riproduzione è possibile toccare
per cercare un elemento particolare oppure toccare
per selezionare ed eliminare in batch gli elementi.
4.5.1 Report
1. Tocca Cartella > Report.
2. Seleziona un report specico per visualizzare i dettagli di quel
report.
4.5.2 Riproduzione dei dati
1. Tocca Cartella > Rigiocare Dati, e viene visualizzato l'elenco dei
ussi di dati registrati.
2. Toccare un particolare usso di dati per riprodurre il video
registrato di quel usso di dati.
4.6 Libreria

185
4.6.1 Guida alla Riparazione DTC
Guida alla Riparazione dei DTC è un database basato sull'esperienza
che fornisce informazioni speciche del codice, inclusi rimedi
popolari e passaggi di riparazione per identicare guasti.
Per utilizzare la Guida alla Riparazione dei DTC:
Tocca Libreria > Guida alla Riparazione dei DTC. Inserisci un DTC
nella barra di ricerca.
4.6.2 TSB (Bollettini di Servizio Tecnico)
Per visualizzare i bollettini di servizio tecnico:
Tocca Libreria > Bollettini di Servizio Tecnico. Seleziona marca del
veicolo, modello, anno, sistema e sottosistema e tocca Avanti. Verrà
visualizzata una lista di bollettini di servizio tecnico OEM emessi per
il veicolo selezionato. Tocca il bollettino desiderato per visualizzarne il
contenuto completo.
4.6.3 Posizione DLC
Per visualizzare la posizione del DLC:
Tocca Libreria > Posizione DLC. Seleziona marca del veicolo,
modello e anno, e tocca Avanti. Verrà visualizzata un'immagine della
posizione del DLC per il veicolo selezionato.
4.6.4 Libreria delle Spie di Avvertimento
La Libreria delle Spie di Avvertimento fornisce informazioni sulle spie
di avvertimento del cruscotto, inclusa la descrizione delle luci, gli
impatti sulla guida, le cause tipiche, le misure da adottare e le FAQ
pertinenti.
Per visualizzare la Libreria delle Spie di Avvertimento:
Tocca Libreria > Libreria delle Spie di Avvertimento. Verrà
visualizzata una lista di spie di avvertimento. Tocca la spia di
avvertimento desiderata per visualizzarne i dettagli.
4.6.5 Ricerca copertura veicolo
Per visualizzare le funzioni e i sistemi vettura supportati:
Rubinetto Biblioteca > Ricerca della copertura del veicolo. Seleziona
il tipo di software, la marca, il modello e l'anno oppure inserisci
la funzione/sottofunzione nella casella di ricerca, quindi tocca
Domanda. Verranno visualizzati i dati relativi emessi per il veicolo
selezionato.

186
Nota:
Per accedere al Tester funzione, è necessario hardware aggiuntivo
(venduto separatamente). Se è necessario acquistare hardware
aggiuntivo, contattare i rivenditori locali per assistenza.
4.8 Informazioni Utente
4.8.1 Gestione VCI
Consente di associare il VCI al tablet ArtiDiag900 Lite.
4.8.2 Aggiornamento Firmware
Ti permette di aggiornare il rmware se è disponibile una nuova
versione.
4.8.3 Disinstallare il software diagnostico
Consente di disinstallare il software diagnostico o IMMO.
4.8.4 Informazioni utente
Puoi toccare la foto del prolo nella schermata Informazioni utente
per modicare la foto del prolo. Puoi anche visualizzare il tuo ID
TOPDON o e-mail, modicare il nickname o la password, eliminare il
tuo account TOPDON e disconnetterti dal tuo account.
4.8.5 Feedback dei Clienti
Questa funzione ti consente di inviare un feedback sul prodotto al
team di assistenza post-vendita TOPDON.
4.8.6 Informazioni sul negozio
La funzione Informazioni utente fornisce l'accesso a Gestione VCI,
Aggiornamento rmware, Disinstallazione software diagnostico,
Informazioni utente, Prolo personale, Feedback cliente, Informazioni
negozio, Impostazioni e Aggiornamento sistema.
4.7 Tester
Questa funzione congura l'ArtiDiag900 Lite in un tester per batterie
per autoveicoli. Con questa funzione è possibile eseguire test della
batteria, test di avviamento e test di ricarica.

187
Questa sezione permette di salvare le informazioni delle ofcine di
riparazione.
4.8.7 Impostazioni
La funzione Impostazioni ti consente di impostare lingue/unità,
svuotare la cache, visualizzare le informazioni sulla versione dell'app
ArtiDiag900 Lite, aggiornare l'app ArtiDiag900 Lite, visualizzare i
Termini di servizio e l'Informativa sulla privacy e disconnettersi dal
tuo account.
4.8.8 Aggiornamento del Sistema
Ti consente di aggiornare il software se è disponibile una nuova
versione.

188
SEZIONE 5 SPECIFICHE
Android 11.0
2G
32G
Schermo da 8 pollici, 1280 x 800
Bluetooth 5.0/SPP
USB
Wi
5 megapixel
Microfono/altoparlante
Sensore di gravità
10.000 mAh
12 V CC
USB tipo A
USB di tipo C
RJ45
HDMI
Porta di ricarica CC
Wi
RJ45
10 x 6,1 x 1,97 pollici (255 mm x 155 mm x
50 mm)
32°F a 122°F(0°C a 50°C)
-4°F a 140°F(-20°C a 60°C)
Sistema operativo
RAM
Capacità di memoria
Schermo Display
Connettività
Telecamera
I/O audio
Sensore
Batteria
Tensione di ingresso
Porti
Connessione di rete
Dimensioni (L x P x A)
Temperatura di Lavoro
Temperatura di
Conservazione

189
SEZIONE 6 DOMANDE FREQUENTI
Q: Cosa devo fare se si verica un errore di comunicazione?
A: Seguire i passaggi seguenti per identicare il problema:
1) Vericare se l'accensione è ACCESA.
2) Controllare se il cavo diagnostico OBD-II di ArtiDiag è collegato
saldamente alla porta DLC del veicolo.
3) Spegnere l'accensione. Riaccenderla dopo 10 secondi e continuare
l'operazione.
4) Vericare se il modulo di controllo del veicolo è difettoso.
Q: Quali funzioni speciali supporta ArtiDiag900 Lite?
A: ArtiDiag900 Lite supporta 8 funzioni speciali, tra cui Reset Olio,
Adattamento dell'acceleratore, Reset EPB, Reset Angolo Sterzo,
Rigenerazione DPF, Spurgo ABS, Reset BMS, Codica Iniettore,
Reset TPMS, Azzeramento airbag, Inizializzazione del tetto apribile,
Calibrazione dei sedili e Calibrazione dei nestrini.
Q: È necessario aggiornare il rmware prima di utilizzare per la prima
volta ArtiDiag900 Lite?
A: Sì. Il rmware si aggiornerà automaticamente all'ultima versione
disponibile. È anche possibile toccare Informazioni Utente >
Aggiornamento Firmware per aggiornare manualmente il rmware.
Q: Perché lo schermo del tablet ArtiDiag900 Lite lampeggia quando il
motore è in funzione?
A: Si tratta di un evento normale causato da interferenze
elettromagnetiche.
Q: Come faccio a catturare uno screenshot?
A: Premi a lungo il pulsante Screenshot sul bordo superiore destro del
tablet ArtiDiag900 Lite per 3 secondi per acquisire uno screenshot.
Per visualizzare le immagini salvate, vai su Galleria dalla schermata
principale del sistema Android.

190
SEZIONE 7 GARANTIA
Garanzia limitata di un anno di TOPDON
TOPDON garantisce al suo acquirente originale che i prodotti
dell'azienda saranno esenti da difetti di materiale e lavorazione per 12
mesi dalla data di acquisto (Periodo di garanzia).
Per i difetti segnalati durante il periodo di garanzia, TOPDON riparerà
o sostituirà la parte o il prodotto difettoso in base all'analisi e alla
conferma del supporto tecnico.
TOPDON non sarà responsabile per eventuali danni incidentali o
consequenziali derivanti dall'uso, uso improprio o montaggio del
dispositivo.
In caso di conitto tra la politica di garanzia TOPDON e le leggi locali,
prevarranno le leggi locali.
Questa garanzia limitata è nulla nelle seguenti condizioni:
• Usato in modo improprio, smontato, alterato o riparato da negozi o
tecnici non autorizzati.
• Manipolazione negligente e violazione dell'operazione.
Avviso:
tutte le informazioni contenute in questo manuale si basano sulle
ultime informazioni disponibili al momento della pubblicazione
e non può essere fornita alcuna garanzia per la sua accuratezza o
completezza. TOPDON si riserva il diritto di apportare modiche in
qualsiasi momento senza preavviso.
Scansiona il codice QR per ulteriore supporto!

191
РУССКИЙ

192
МНОГОЯЗЫЧНОЕ РУКОВОДСТВО
ПОЛЬЗОВАТЕЛЯ
БЕЗОПАСНОСТЬ ВСЕГДА НА ПЕРВОМ
МЕСТЕ!
В целях вашей безопасности, безопасности
других людей, а также во избежание какого-
либо повреждения продукта и вашего автомобиля
ВНИМАТЕЛЬНО ПРОЧТИТЕ И УБЕДИТЕСЬ, ЧТО ВЫ
ПОЛНОСТЬЮ ПОНИМАЕТЕ ВСЕ ИНСТРУКЦИИ ПО
ТЕХНИКЕ БЕЗОПАСНОСТИ, СОДЕРЖАЩИЕСЯ В ДАННОМ
РУКОВОДСТВЕ, ПРЕЖДЕ ЧЕМ НАЧАТЬ ЭКСПЛУАТАЦИЮ.
Вы также должны ознакомиться с руководством по
техническому обслуживанию автомобиля и соблюдать
указанные меры предосторожности или инструкции до
и во время любых тестов или процедур технического
обслуживания.
Держите себя, свою одежду и другие предметы
подальше от движущихся или горячих деталей
двигателя и избегайте контакта с электрическими
соединениями.
ПРОЧТИТЕ ВСЕ ИНСТРУКЦИИ ПЕРЕД ИСПОЛЬЗОВАНИЕМ
Чтобы получить многоязычное руководство в формате PDF,
отсканируйте QR-код ниже или посетите www.topdon.com/
products/artidiag900-lite

193
РАЗДЕЛ 1 ЧТО В КОРОБКЕ?
• Планшет УльтраДиаг
• ArtiDiag900 Lite VCI (Интерфейс связи автомобиля)
• Адаптер питания
• Удлинительный кабель OBD-II
• USB-кабель (с Type-A на Type-C)
• Краткое руководство пользователя
• Руководство пользователя
• Чехол для переноски
ЭКСПЛУАТИРУЙТЕ АВТОМОБИЛЬ ТОЛЬКО В
ХОРОШО ПРОВЕТРИВАЕМОМ ПОМЕЩЕНИИ, так как
при работающем двигателе автомобиль выделяет
монооксид углерода, токсичный газ, а также твердые
частицы.
ВСЕГДА НАДЕВАЙТЕ одобренные ЗАЩИТНЫЕ
ОЧКИ, чтобы предотвратить повреждение острыми
предметами и едкими жидкостями.
Во время теста НЕ КУРИТЕ И НЕ РАЗВОДИТЕ ОГОНЬ
ВБЛИЗИ АВТОМОБИЛЯ. Пары топлива и аккумулятора
легко воспламеняются.
НЕ ПЫТАЙТЕСЬ ВЗАИМОДЕЙСТВОВАТЬ С ПРОДУКТОМ
ВО ВРЕМЯ ДВИЖЕНИЯ. Любая невнимательность может
привести к несчастному случаю.
ВЫКЛЮЧИТЕ ЗАЖИГАНИЕ ПЕРЕД ПОДКЛЮЧЕНИЕМ ИЛИ
ОТСОЕДИНЕНИЕМ УСТРОЙСТВА ОТ РАЗЪЕМА ПЕРЕДАЧИ
ДАННЫХ АВТОМОБИЛЯ (DLC), чтобы предотвратить
повреждение устройства или электронных компонентов
автомобиля.

194
РАЗДЕЛ 2 ОБЗОР ПРОДУКТА
2.1 Планшет УльтраДиаг
Рисунок 2-1
1
12
14
13
16
15
32 75 94 86 10 11
ArtiDiag900 Lite

195
Восьмидюймовый сенсорный экран
Кнопка сброса
Вставьте булавку (не входит в комплект) в отверстие,
нажмите и удерживайте в течение 10 секунд, чтобы
принудительно перезагрузить планшет.
Кнопка питания
Зажатие кнопки позволяет включить ArtiDiag900
Lite. Повторно зажмите для отображения панели
инструментов выключения / перезапуска / Снимок, затем
нажмите нужную опцию.
Короткое нажатие кнопки приводит к пробуждению /
блокировке экрана.
Аудиопорт 3,5 мм
Порт RJ45
Порт USB типа A
Соединяет планшет ArtiDiag900 Lite и ArtiDiag900 Lite VCI
с помощью прилагаемого USB-кабеля.
Входной порт источника питания постоянного тока (12 В, 2
А).
Заряжает планшет ArtiDiag900 Lite с помощью
прилагаемого адаптера питания.
Порт HDMI
Порт USB типа C.
Для передачи данных и зарядки (5В, 2 А)
Кнопка снимка экрана
Нажмите и удерживайте в течение 2 секунд, чтобы сделать
снимок экрана.
Микрофон
Слот расширения TF-карты
Поддерживает горячую замену и расширение хранилища
до 128 ГБ.
Слот VCI
Объектив камеры
Аудиодинамик
Складная подставка.
1.
2.
3.
4.
5.
6.
7.
8.
9.
10.
11.
12.
13.
14.
15.
16.
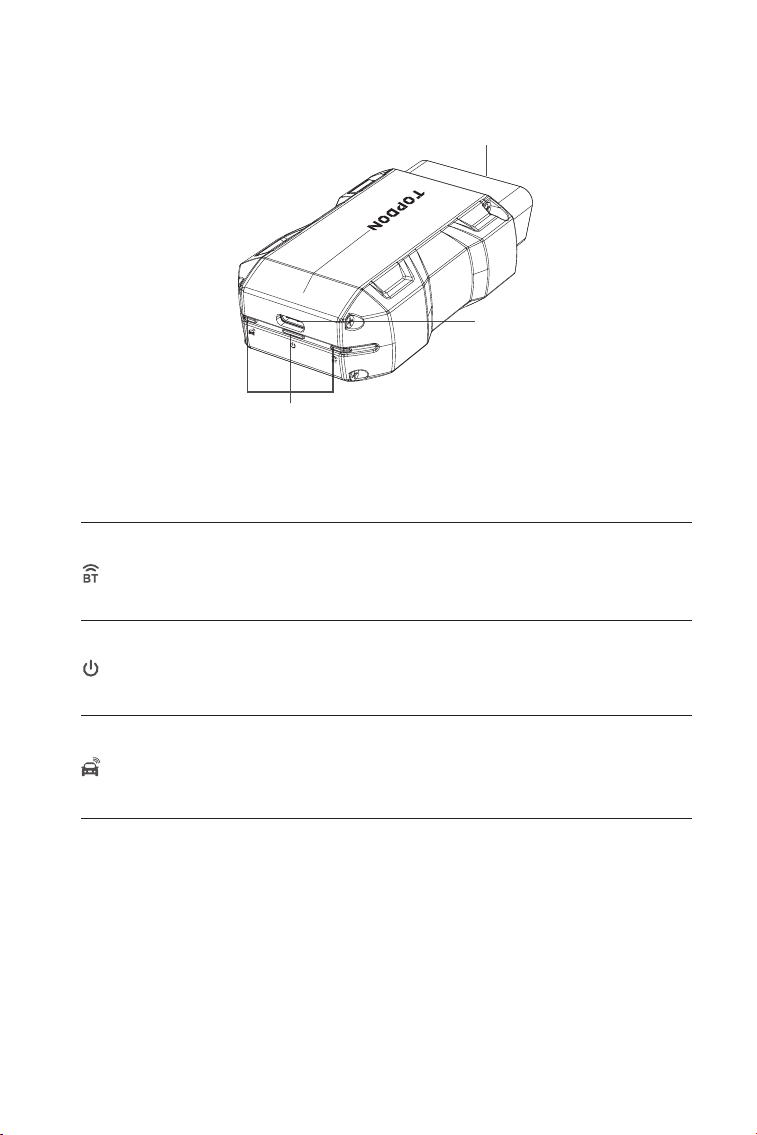
196
1. Индикаторы
2. 16-контактный разъем OBD-II.
Подключает ArtiDiag900 Lite VCI к DLC автомобиля.
3. Порт USB типа C.
Подключает ArtiDiag900 Lite VCI к планшету ArtiDiag900 Lite с
помощью прилагаемого USB-кабеля.
Горит синим: Bluetooth
подключен.
Индикатор подключения
Bluetooth
Индикатор мощности
Индикатор связи
Непрерывный красный: питание
включено
Мигающий зеленый: связь с
автомобилем.
1
2
3
2.2 УльтраДиаг ВКИ
Рисунок 2-2

197
1. Выберите предпочитаемый язык системы.
2. Выберите подходящий регион и часовой пояс.
Рисунок 3-1
Рисунок 3-2
РАЗДЕЛ 3 НАЧАЛО ЭКСПЛУАТАЦИИ
3.1 Базовые настройки
Нажмите и удерживайте кнопку питания, чтобы включить планшет.
Выполните следующие действия, чтобы настроить планшет.

198
3. Настройте подключение Wi-Fi. Выберите Wi-Fi из
отсканированного списка и введите пароль.
4. Выберите метод установки пароля экрана блокировки. Вы
также можете нажать Не сейчас чтобы пропустить этот шаг.
Рисунок 3-3
Рисунок 3-4
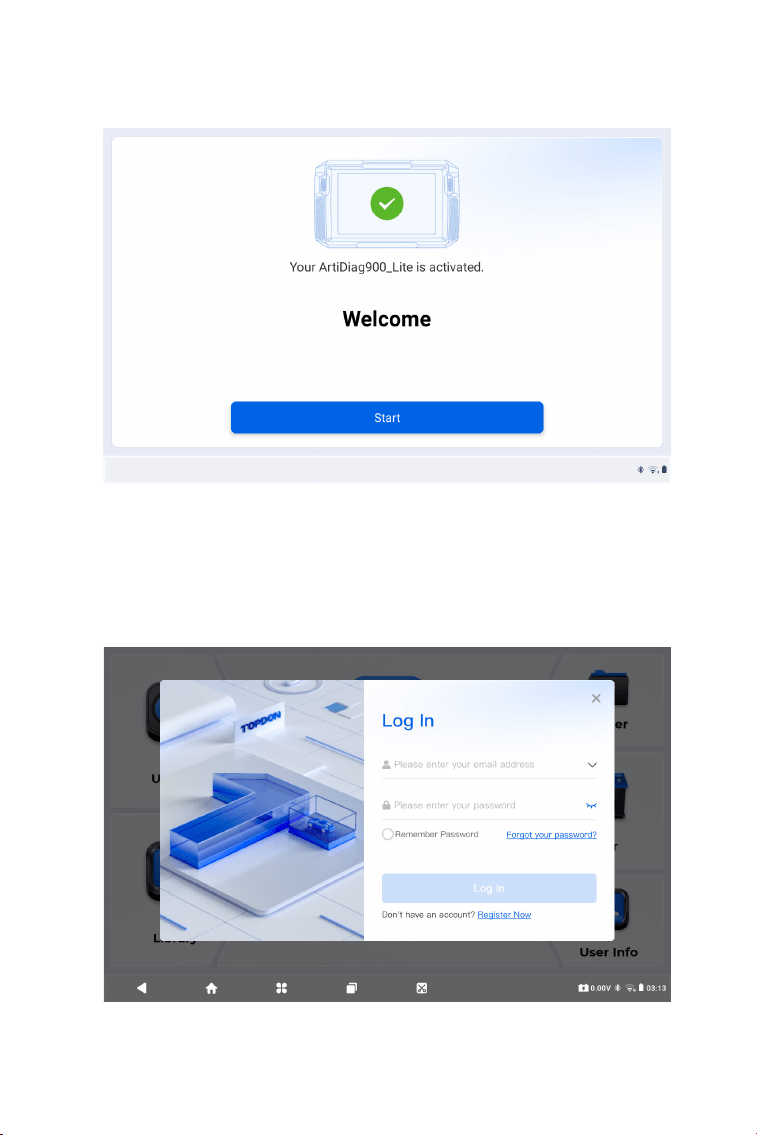
199
5. Активировано успешно. Кран Начинать и система
автоматически перейдет к приложению ArtiDiag900 Lite.
6. Войдите в вашу учетную запись TOPDON. (Если у вас нет
учетной записи, пожалуйста, зарегистрируйтесь, указав свой
адрес электронной почты).
Рисунок 3-5
Рисунок 3-6

200
3.2 Подключите ArtiDiag900 Lite VCI к DLC автомобиля.
3.3 Переведите зажигание в положение «ВКЛЮЧЕНО» (см. рис.
3-8)
Извлеките ArtiDiag900 Lite VCI из заднего слота планшета
ArtiDiag900 Lite и подключите его к DLC автомобиля. Разъем DLC
автомобиля обычно расположен под приборной панелью.
Если у вас возникли проблемы с поиском DLC, пожалуйста,
перейдите в раздел Библиотека > Расположение DLC для
получения более подробной информации или обратитесь к
руководству по техническому обслуживанию автомобиля.
Если ваш автомобиль оснащен системой запуска без ключа,
а ключ зажигания представляет собой кнопку «Старт-стоп»
(см. рис. 3-9), нажимайте кнопку «Старт-стоп» до тех пор, пока
автомобиль не перейдет в режим «ВКЛЮЧЕНО». Не нажимайте
на тормоз во время нажатия кнопки «Старт-стоп», иначе вы
заведете автомобиль вместо того, чтобы перевести его в
положение «ВКЛЮЧЕНО».
Способ зажигания зависит от модели автомобиля. Более
подробную информацию смотрите в руководстве по
техническому обслуживанию автомобиля.
Примечание: Перед подключением устройства к розетке
убедитесь, что зажигание выключено.
Car OBD-II Interface
Рисунок 3-7
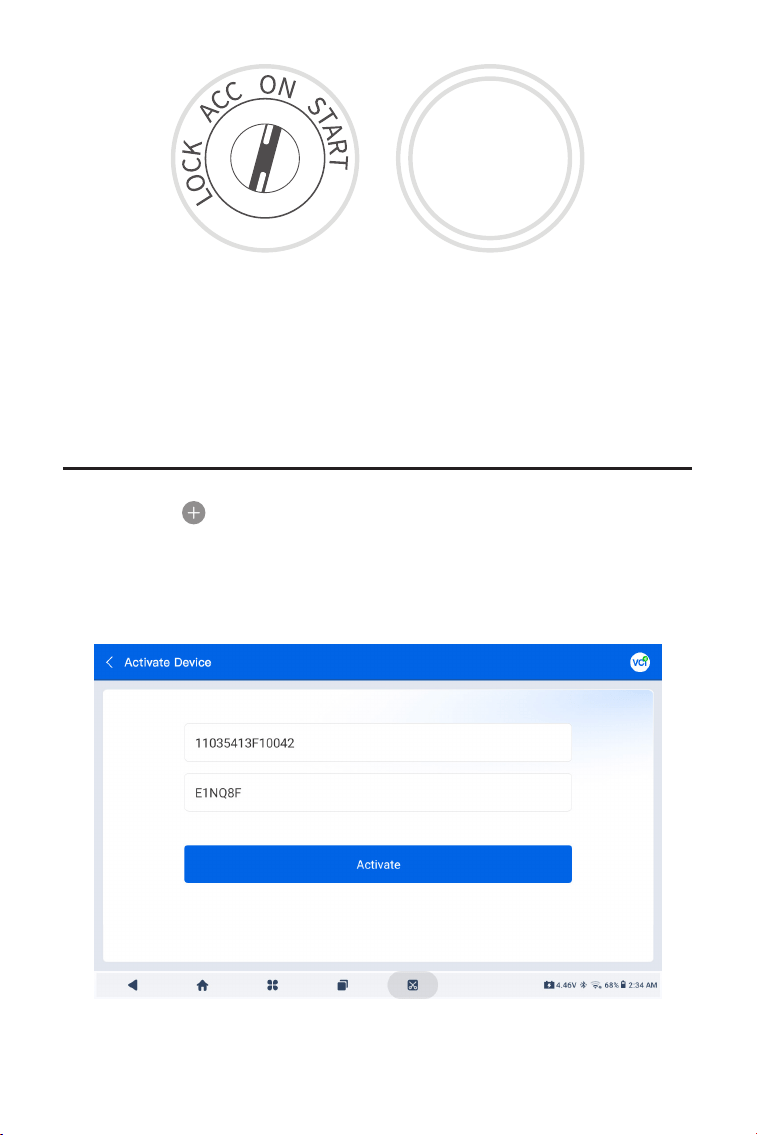
201
3.4 Привязка ArtiDiag900 Lite VCI
①
Перейти к Информация о пользователе > Управление VCI.
Нажмите в правом верхнем углу экрана, и устройство
попросит вас сначала подключить Bluetooth.
②
Подключите Bluetooth, как будет предложено. После
этого серийный номер и код активации будут получены
автоматически.
Красный светодиодный индикатор питания на ArtiDiag900 Lite
VCI указывает на то, что ArtiDiag900 Lite VCI включен.
Рисунок 3-10
Рисунок 3-8 Рисунок 3-9
ENGINE
START
STOP
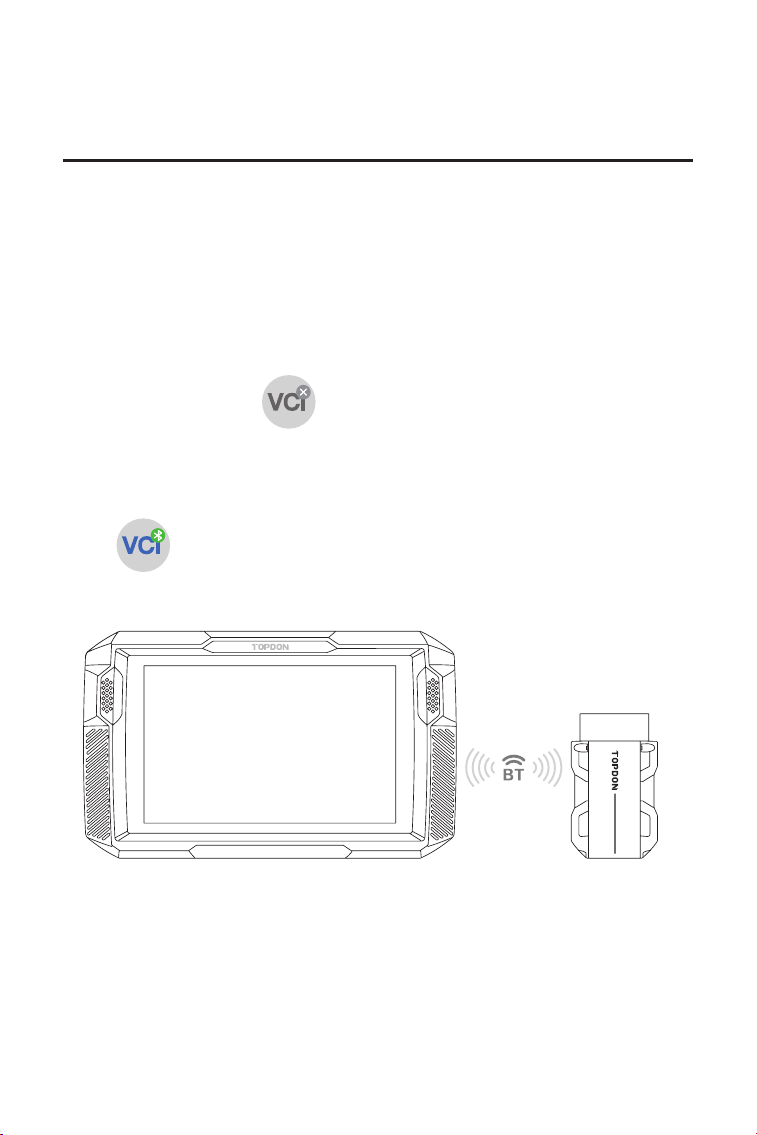
202
③
Затем нажмите Активировать для привязки ArtiDiag900 Lite
VCI к планшету ArtiDiag900 Lite.
Чтобы обеспечить связь между планшетом ArtiDiag900 Lite и
автомобилем, необходимо сначала всегда подключить ArtiDiag900
Lite VCI и планшет ArtiDiag900 Lite. Соединение VCI может
осуществляться через беспроводное (Bluetooth) или проводное
(USB-кабель) решение.
Кран Диагностика с главного экрана приложения ArtiDiag900 Lite
и коснитесь значка в правом верхнем углу экрана, чтобы
установить соединение Bluetooth с ArtiDiag900 Lite VCI. После
успешного подключения ArtiDiag900 Lite VCI значок изменится
на а индикатор подключения Bluetooth на ArtiDiag900 Lite
VCI загорится ровным синим светом.
3.5 Подключите ArtiDiag900 Lite VCI к планшету ArtiDiag900 Lite.
3.5.1 Беспроводное соединение VCI
Рисунок 3-11
ArtiDiag900 Lite
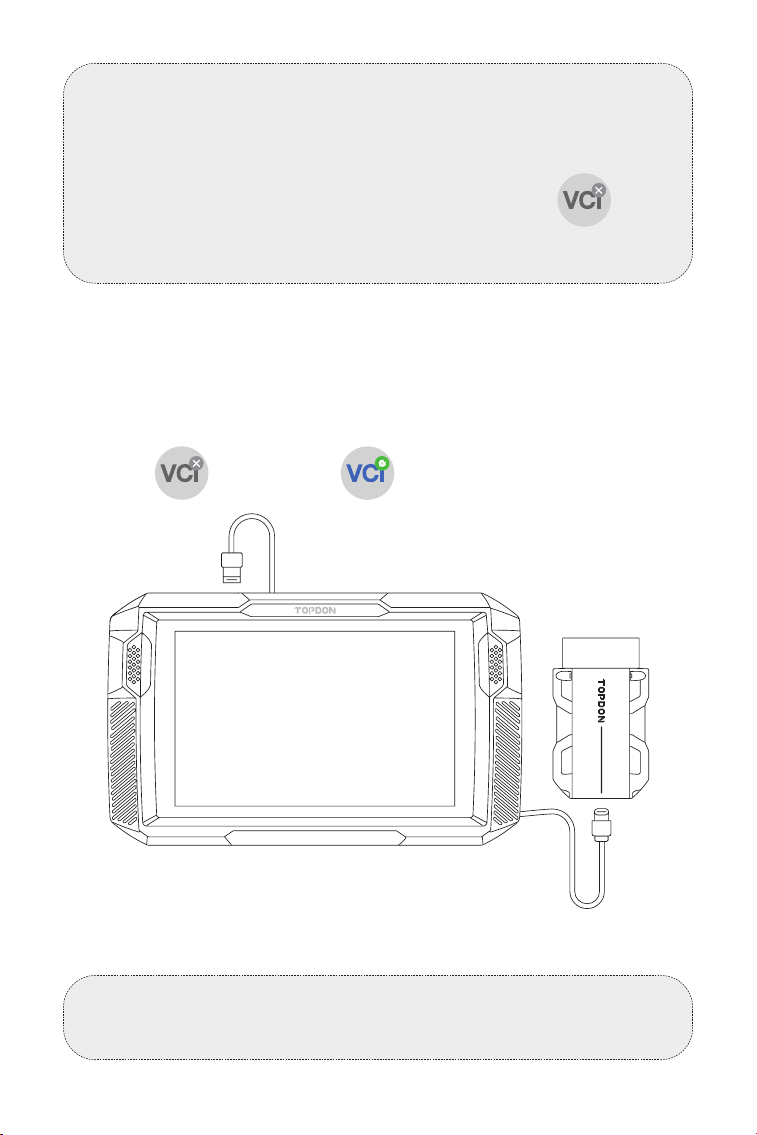
203
Используйте прилагаемый USB-кабель для подключения
ArtiDiag900 Lite VCI к планшету ArtiDiag900 Lite (см. Рисунок 3-6).
После правильного подключения ArtiDiag900 Lite VCI к планшету
значок изменения в .
3.5.2 Проводное подключение VCI
Рисунок 3-12
Примечание:
После успешного подключения ArtiDiag900 Lite VCI к ArtiDiag900
Lite через Bluetooth соединение возобновится автоматически
при следующем открытии приложения ArtiDiag900 Lite. Если
подключение не установлено, коснитесь вручную любого
экрана с этим значком для повторного подключения.
Примечание:
После применения проводного соединения Bluetooth
автоматически отключится.
USB Type-A
USB Type-C
ArtiDiag900 Lite
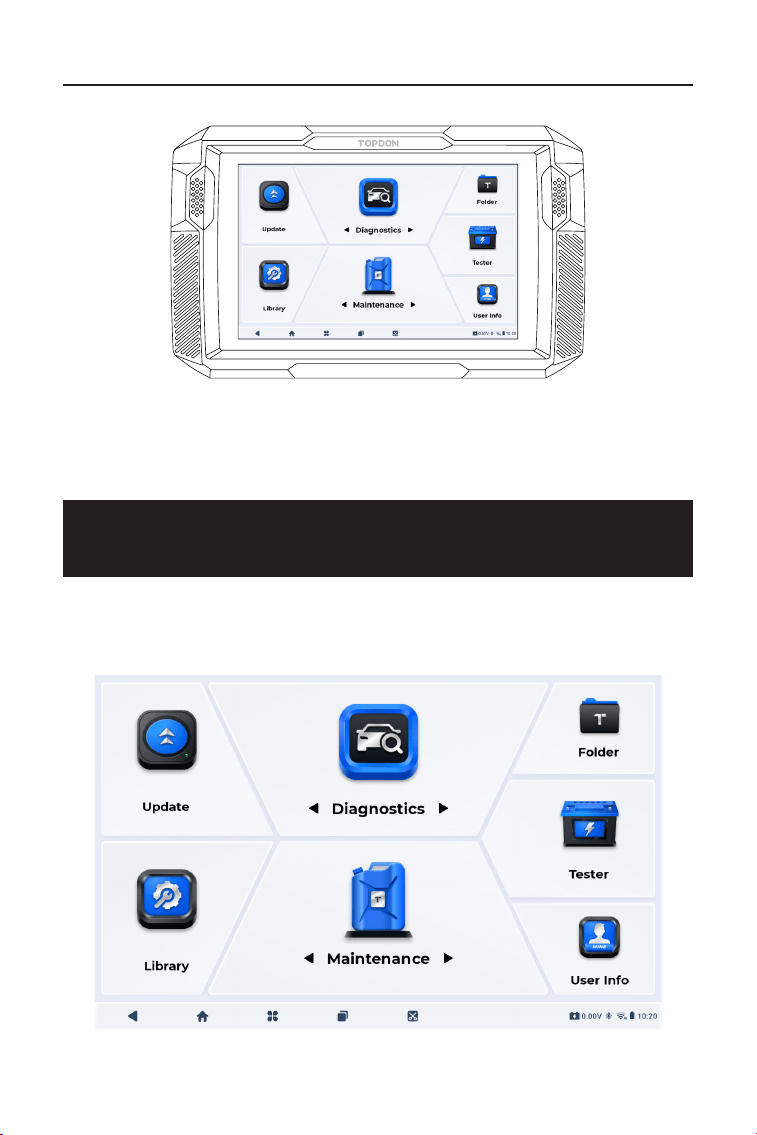
204
3.6 Теперь ваш ArtiDiag900 Lite готов к использованию
РАЗДЕЛ 4 ИСПОЛЬЗОВАНИЕ ВАШЕГО
ARTIDIAG900 LITE
Рисунок 3-13
4.1 Главный экран
Откройте приложение ArtiDiag900 Lite, и откроется главный
экран.
Рисунок 4-1
ArtiDiag900 Lite
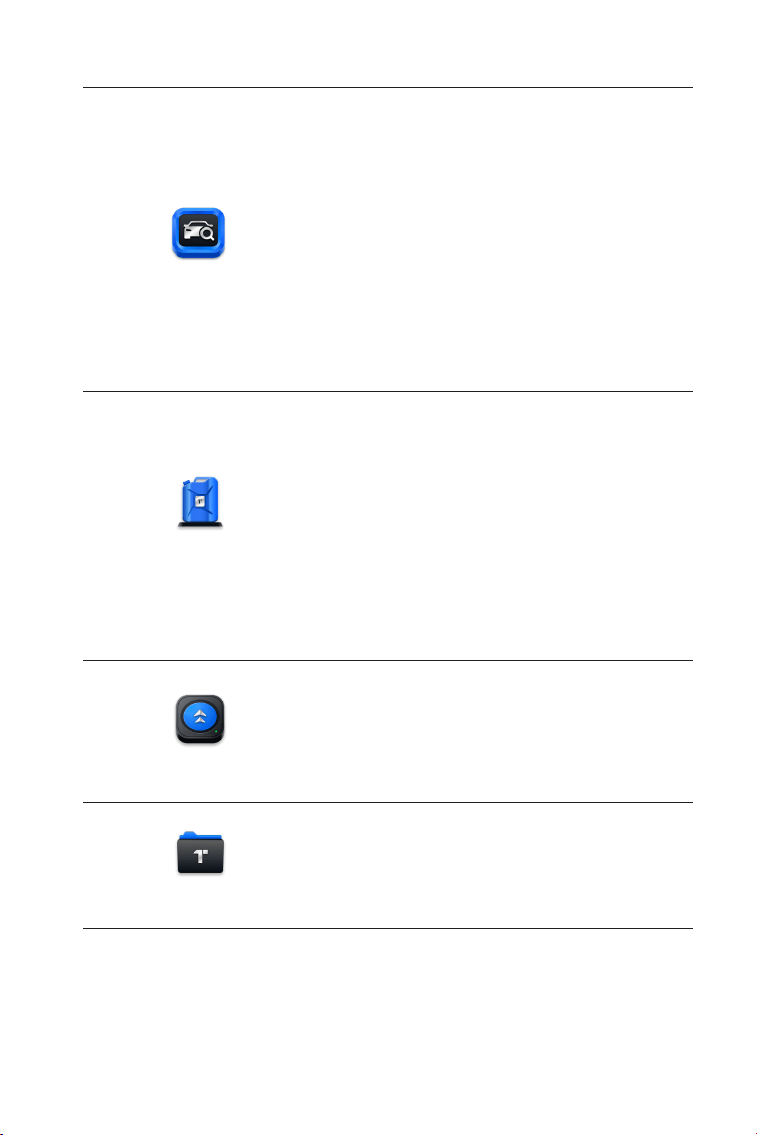
205
1. Значки функций
Позволяет выполнять
функции полной диагностики
системы, включая считывание
диагностических кодов
неисправностей (DTC), очистку
кодов DTC, просмотр потоков
данных, чтение информации
о версии электронного блока
управления (ECU) и выполнение
активного тестирования. Через
этот модуль вы также можете
получить доступ к EOBD и OBD-II и
диагностической обратной связи.
Диагностика
Предоставляет 8 услуг по
техническому обслуживанию,
включая сброс уровня масла,
адаптацию дроссельной заслонки,
сброс EPB, сброс угла поворота
рулевого колеса, регенерацию DPF,
Прокачка ABS, сброс BMS и Сброс
подушки безопасности.
Позволяет обновлять
диагностическое программное
обеспечение конкретного
автомобиля, если доступна новая
версия.
Позволяет получить доступ к
отчетам (системным отчетам,
отчетам о кодах неисправностей и
отчетам о потоках данных) и данным
воспроизведения.
Техническое
обслуживание
Обновлять
Папка
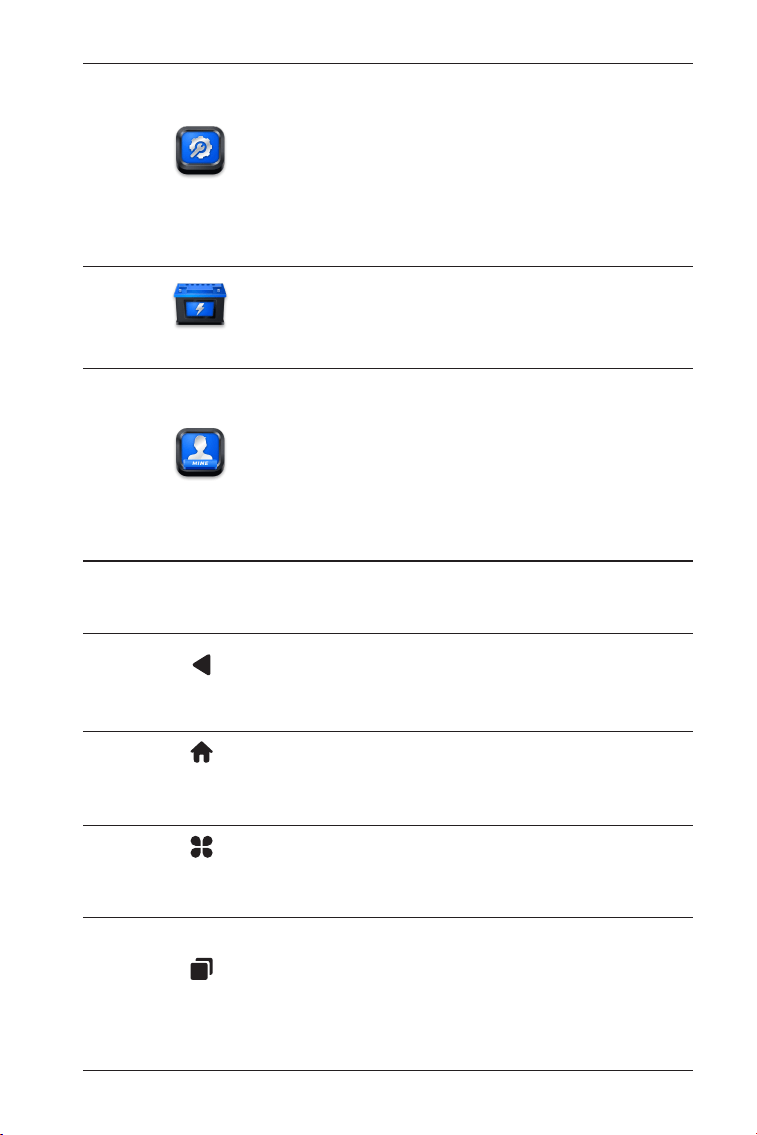
206
Включает руководство по ремонту
DTC, бюллетени технического
обслуживания (TSB), расположение
кодов DTC, библиотеку сигнальных
ламп и поиск зоны покрытия
автомобиля, в которой содержится
справочная информация по
осмотру, диагностике и ремонту
автомобиля.
Настраивает планшет ArtiDiag900
Lite для работы в качестве тестера
аккумулятора (дополнительно).
Обеспечивает доступ к управлению
VCI, обновлению встроенного
ПО, удалению диагностического
программного обеспечения,
информации о пользователе,
отзывам клиентов, информации
о магазине, настройкам и
обновлению системы.
Библиотека
Тестер
О пользователе
2. Панель навигации
Выбор этого значка возвращает вас
к предыдущему экрану.
Выбор этого значка возвращает
вас на главный экран приложения
ArtiDiag900 Lite.
Выбор этого значка возвращает вас
на главный экран системы Android.
При выборе этого значка
отображается список открытых
приложений. Вы можете провести
влево или вправо, чтобы
просмотреть полный список,
нажать, чтобы открыть приложение,
или провести вверх, чтобы удалить
приложение.
Назад
Главная страница
приложения
Главная страница
Android
Открытые
приложения
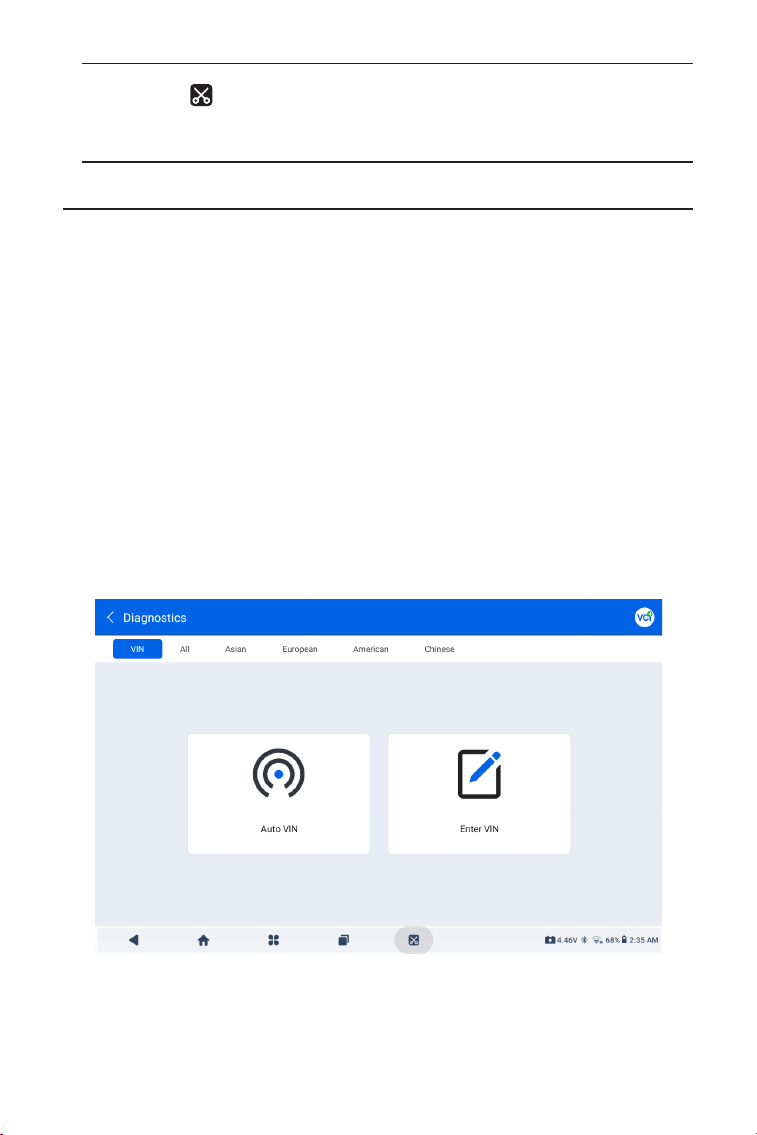
207
4.2 Диагностика
Модуль диагностики позволяет одновременно сканировать
все поддерживаемые системы автомобиля (автоматическое
сканирование) на предмет кодов DTC или выбирать отдельную
систему для выполнения чтения кодов DTC, удаления кодов DTC,
чтения потока данных, чтения информации ECU и активного
тестирования. Через этот модуль вы также можете получить доступ
к EOBD и OBD-II и диагностической обратной связи.
Идентификация автомобиля
Чтобы выполнить автоматическое сканирование или
индивидуальную диагностику системы, вам необходимо сначала
идентифицировать свой автомобиль. Кран Диагностика с
главного экрана приложения ArtiDiag900 Lite, чтобы перейти на
экран диагностики.
4.2.1 Автоматическое сканирование и диагностика отдельной
системы
При выборе этого значка делается
снимок экрана текущей страницы.
Скриншот
Рисунок 4-2

208
Идентификация по VIN
VIN позволяет идентифицировать автомобиль с помощью авто-
VIN или введения VIN.
• Авто-VIN - UltraiDiag автоматически считывает и декодирует
идентификационный номер транспортного средства (VIN).
• Введите VIN - введите VIN автомобиля вручную или
отсканируйте его, чтобы идентифицировать автомобиль.
Идентификация по марке
1. Нажмите Все, и отобразится список марок автомобилей.
2. Выберите или введите марку на
вашего автомобиля.
Примечание:
Демонстрационный режим (ДЕМО опция) предоставляется,
чтобы помочь вам ознакомиться с функциями диагностики.
3. Выберите Автоматическийили Руководство для
идентификации транспортного средства.
Автоматически
Введите VIN вручную или нажмите «Считать», чтобы
получить VIN, затем нажмите «Подтвердить». ArtiDiag900 Lite
автоматически расшифрует VIN для идентификации автомобиля.
Вручную
Вручную выберите информацию об автомобиле, чтобы
идентифицировать автомобиль.
После идентификации автомобиля отобразится системное меню.
Примечание:
Системы могут различаться в зависимости от марки, модели и
года выпуска автомобиля.
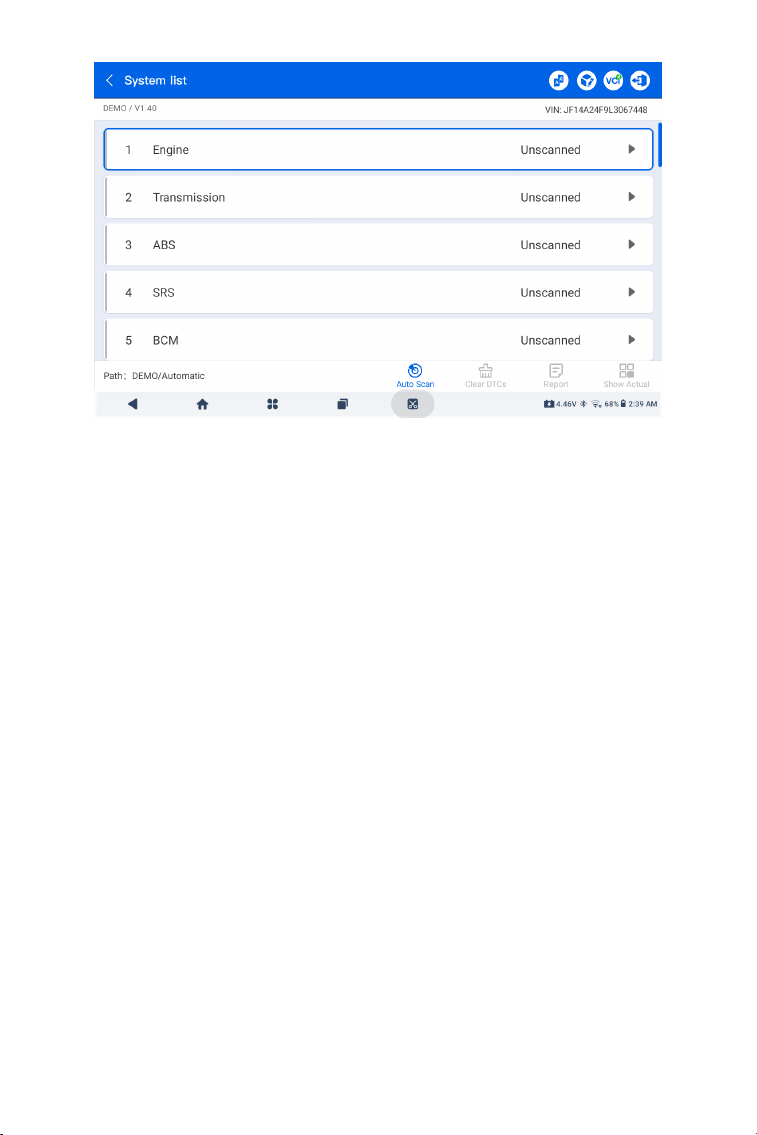
209
Рисунок 4-3
Автоматическое сканирование
Автоматическое сканирование обнаруживает системы,
поддерживаемые автомобилем, и извлекает коды
неисправностей для этих систем, обеспечивая полную
проверку работоспособности вашего автомобиля. Выполнение
автоматического сканирования до и после ремонта может
помочь в устранении неполадок и проверке правильности
ремонта. Отчеты о предварительном и последующем
сканировании позволяют записывать состояние автомобиля до
и после ремонта для сравнения.
Чтобы выполнить автоматическое сканирование, нажмите
кнопку автоматического сканирования в нижнем углу,
ArtiDiag900 Lite начнет сканирование систем, поддерживаемых
автомобилем, и поиск DTC начнется автоматически.
Результаты отображаются постепенно по мере сканирования
систем.
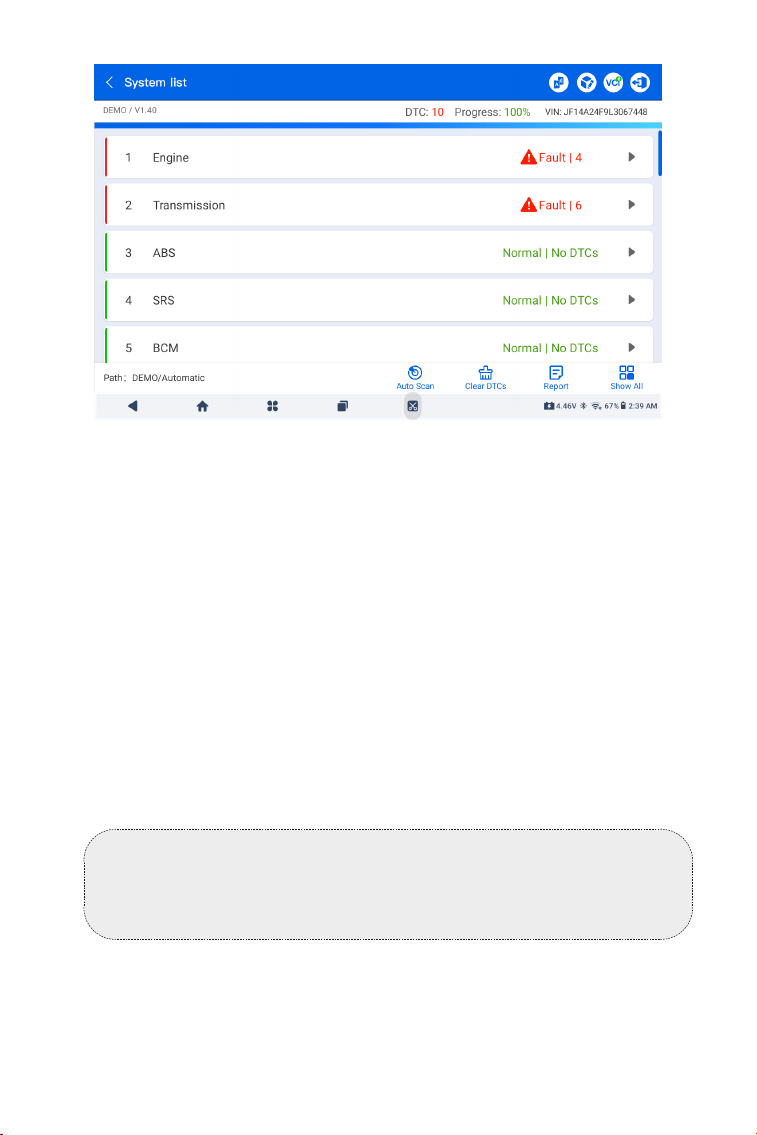
210
Рисунок 4-4
Описание кнопки
Очистить DTC - нажмите, чтобы очистить все извлеченные коды
неисправностей.
Отчет - нажмите, чтобы сохранить текущие результаты
сканирования в формате отчета. (Чтобы просмотреть
сохраненные отчеты, перейдите в Папка > Отчеты > Системные
отчеты.)
Показать все / Показать актуальное - коснитесь, чтобы
переключиться между отображением всех систем автомобиля и
отображением только поддерживаемых систем.
Выполнение диагностики отдельной системы
КромеПри автоматическом сканировании вы также можете
выбрать отдельную систему для выполнения чтения кодов DTC,
удаления кодов DTC, чтения потока данных, чтения информации
ECU и активного тестирования для этой конкретной системы.
Примечание:
В зависимости от марки автомобиля некоторые функции могут
быть недоступны.
Чтение кодов неисправности
1. После идентификации автомобиля выберите систему, для
которой вы хотите получить коды неисправностей, в системном
меню.

211
Рисунок 4-5
Описание значка
Когда загорится этот значок, нажмите, чтобы
открыть окно, которое позволит вам выполнить
поиск в Google для получения дополнительной
информации о DTC.
Когда загорается этот значок, это указывает
на то, что DTC вызывает загорание светового
индикатора.
Когда загорится этот значок, нажмите, чтобы
просмотреть стоп-кадр, снятый в момент
возникновения DTC.
Когда загорится этот значок, нажмите, чтобы
просмотреть инструкции по ремонту.
2. Нажмите Чтение кодов неисправностив меню функций.
ArtiDiag900 Lite будет связываться с ЭБУ, получать и отображать
коды DTC для выбранной в данный момент системы.
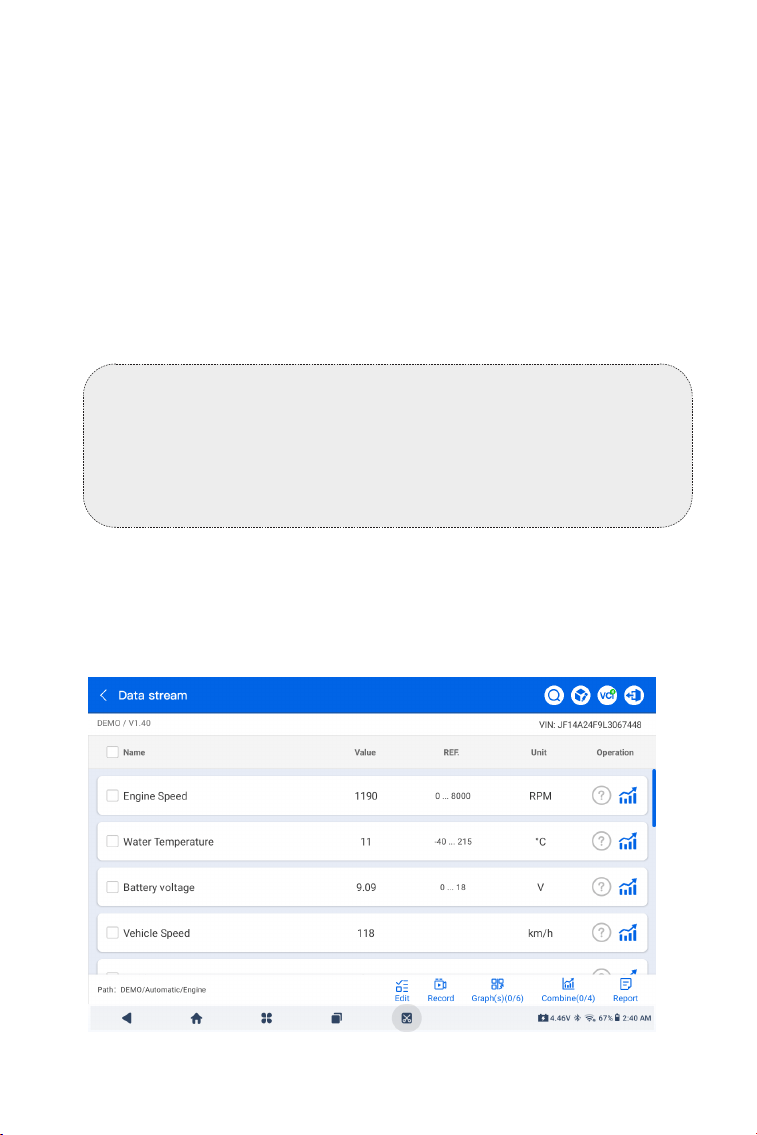
212
Рисунок 4-6
Описание кнопки
Отчет - нажмите, чтобы сохранить коды неисправностей в
формате отчета. (Чтобы просмотреть сохраненные отчеты,
перейдите в Папка > Отчеты > Отчеты о коде неисправности.)
Очистить DTC - нажмите, чтобы очистить все извлеченные коды
неисправностей.
Очистить коды DTC
1. После идентификации автомобиля выберите систему, для
которой вы хотите удалить коды неисправностей, в системном
меню.
2. Нажмите Очистить коды DTC в меню функций.
3. Нажмите ОК, когда коды неисправностей будут удалены.
Чтение потока данных
1. После идентификации автомобиля выберите систему, для
которой вы хотите считывать поток данных, в системном меню.
2. Нажмите Чтение потока данных в функциональном меню.
Отобразится список потоков данных.
Примечание:
1. Процедуру очистки кодов неисправностей следует
выполнять после завершения необходимого ремонта.
После подтверждения коды неисправностей и данные о
замораживании, хранящиеся в ECU, будут удалены.
2. НЕ ЗАПУСКАЙТЕ ДВИГАТЕЛЬ ВО ВРЕМЯ ОЧИСТКИ КОДОВ
НЕИСПРАВНОСТЕЙ.

213
Описание значка
Нажмите, чтобы узнать подробное описание
потока данных.
Нажмите, чтобы отобразить поток данных в
реальном времени в виде волнового графика.
Описание кнопки
Редактировать - коснитесь, чтобы выбрать потоки данных для
отображения.
Записывать - коснитесь, чтобы записать и сохранить
информацию о потоке данных в реальном времени для
сравнения и анализа. Для просмотра записанных потоков
данных перейдите в Папка > Воспроизведение данных.
График(ы) - нажмите, чтобы отобразить до 6 потоков данных в
виде графика.
Объединить - нажмите, чтобы объединить до 4 потоков данных в
одном графике для упрощения сравнения и наблюдения.
Отчет - нажмите, чтобы сохранить текущие значения потока
данных в формате отчета. Чтобы просмотреть сохраненные
отчеты, перейдите в Папка > Отчеты > Отчеты потока данных.
Чтение информации об ЭБУ
1. После идентификации автомобиля выберите систему, для
которой вы хотите просмотреть информацию о версии ECU, в
системном меню.
2. Нажмите информации об ЭБУ в функциональном меню. Затем
вы можете просмотреть информацию о версии ECU выбранной
системы.
Активный тест
позволяет вручную управлять некоторыми операциями
компонентов непосредственно из приложения для проверки
работы компонентов.
Примечание:
ЕСЛИ ДЛЯ ПРОСМОТРА ПОТОКА ДАННЫХ В РЕЖИМЕ
РЕАЛЬНОГО ВРЕМЕНИ НЕОБХОДИМО УПРАВЛЯТЬ
АВТОМОБИЛЕМ, УБЕДИТЕСЬ, ЧТО ВАМ БУДЕТ ПОМОГАТЬ
ВТОРОЙ ЧЕЛОВЕК. НЕ ПРОСМАТРИВАЙТЕ ПОТОК ДАННЫХ
ВО ВРЕМЯ ДВИЖЕНИЯ.
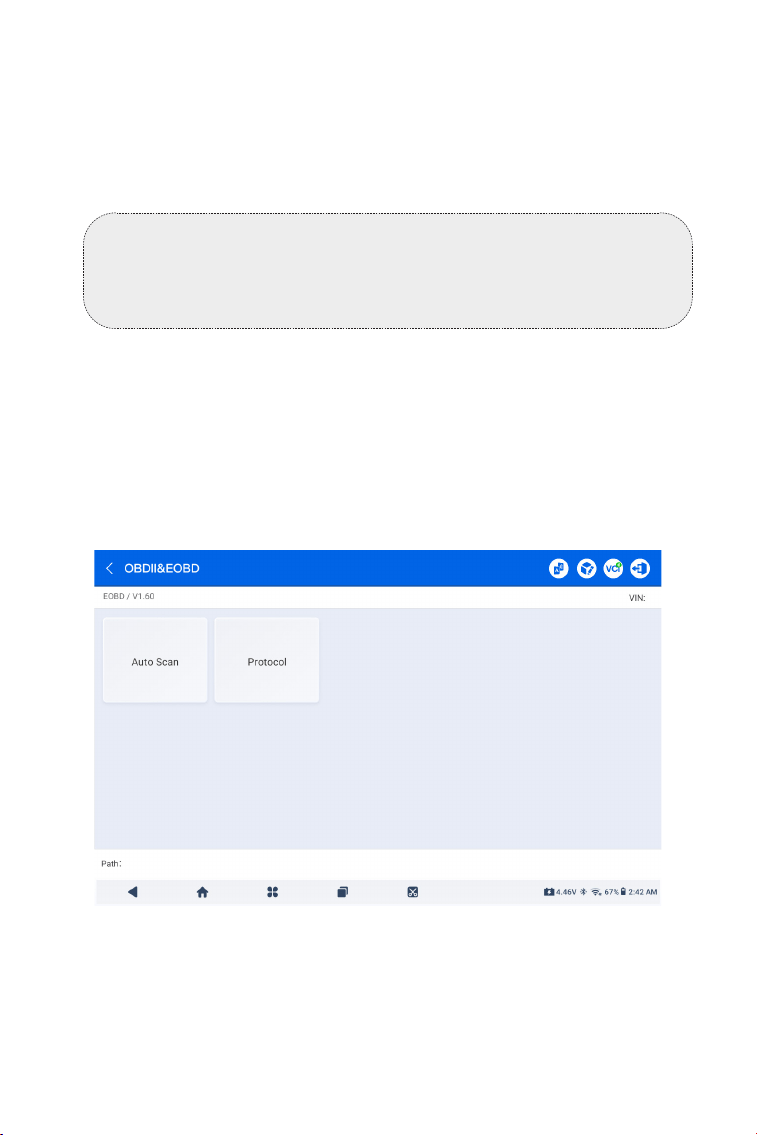
214
Примечание:
Доступные активные тесты различаются в зависимости от
марки, года выпуска и модели автомобиля.
Функция OBDII / EOBD позволяет вам выполнять диагностику
вашего автомобиля, связанную с выбросами.
Для выполнения диагностики OBD-II:
1. Перейти к Диагностика > Все > EOBD.
4.2.2 EOBD и OBD-II
Рисунок 4-7
1. После идентификации автомобиля выберите в системном
меню систему, для которой вы хотите выполнить активную
проверку.
2. Нажмите Активный теств меню функций. Затем вы можете при
необходимости выполнить соответствующие активные тесты.
2. Выберите свой способ связи: Автоматическое сканирование
или Протокол.
Автоматическое сканирование - ArtiDiag900 Lite автоматически
свяжется с автомобилем и определит, какой протокол использует
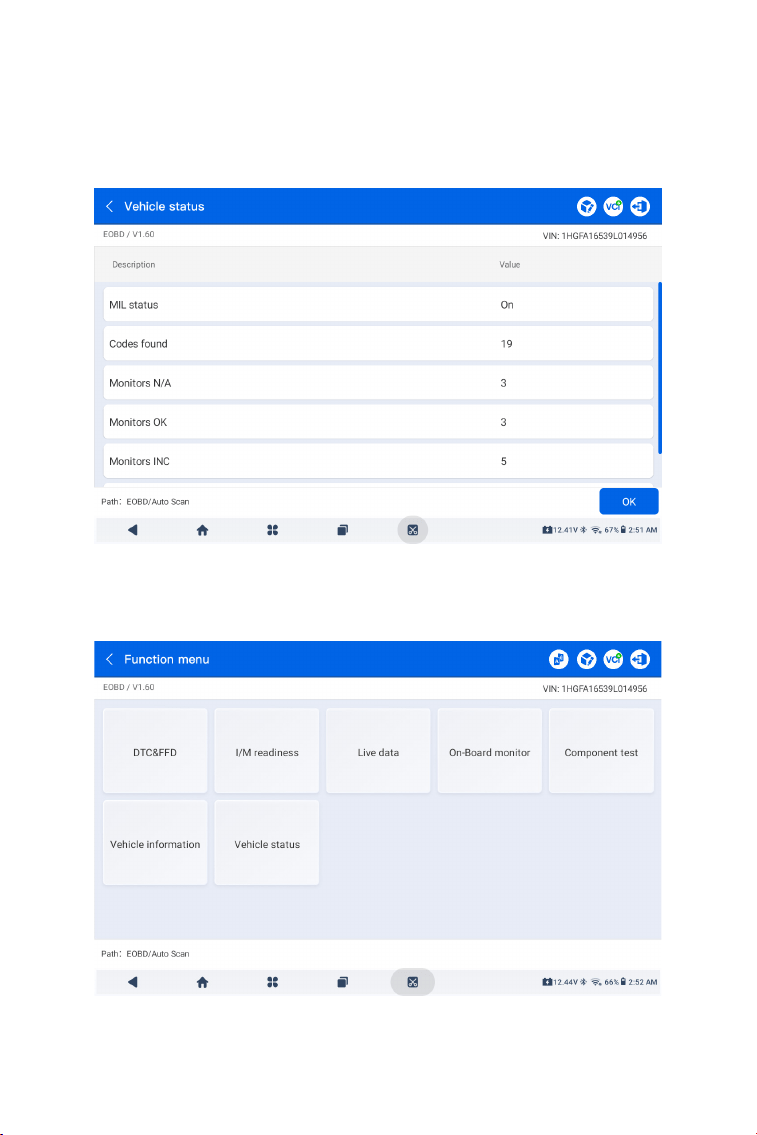
215
Рисунок 4-8
Рисунок 4-9
3. Нажмите ОК для входа в меню функций.
автомобиль.
Протокол - позволяет вам вручную выбрать протокол связи.
После подтверждения протокола связи отображается экран
состояния автомобиля.протокол и другая информация о
состоянии вашего автомобиля.
4. Выберите функцию, чтобы продолжить.

216
Типичные функциональные опции могут включать: DTC и FFD,
готовность к техосмотру, реальные данные, бортовой монитор,
тестирование компонентов, информация об автомобиле и его
состоянии.
Примечание:
В зависимости от марки автомобиля некоторые функции могут
быть недоступны.
Примечание:
1. Процедуру очистки кодов неисправностей следует
выполнять после проведения необходимого ремонта. После
подтверждения коды неисправностей и FFD, хранящиеся в
ECU, будут очищены.
2. НЕ ЗАПУСКАЙТЕ ДВИГАТЕЛЬ ВО ВРЕМЯ ОЧИСТКИ КОДОВ
НЕИСПРАВНОСТЕЙ.
DTC и FFD (данные стоп-кадра)
Эта функция помогает извлекать и очищать коды
неисправностей, хранящиеся в ECU автомобиля, и отображает
FFD систем, связанных с выбросами.
1. Считать DTC
Эта функция отображает коды неисправностей, полученные из
систем, связанных с выбросами.
2. Очистить DTC
Эта функция позволяет вам очистить коды неисправностей,
полученные из систем, связанных с выбросами.
3. FFD
Эта функция делает снимок данных и условий эксплуатации
при возникновении неисправности, связанной с выбросами.
Готовность I/M (осмотр и техническое обслуживание)
Эта функция проверяет, правильно ли работают различные
системы автомобиля, связанные с выбросами, и готовы ли они
к тестированию ТО/РТО.
Она также может проверить состояние работы монитора
и подтвердить, правильно ли был выполнен ремонт
неисправности автомобиля.
Реальные данные
Эта функция отображает оперативные данные и параметры из
ECU в режиме реального времени.
Монитор датчика O2
Эта функция отображает результаты проверки монитора

217
ArtiDiag900 Lite позволяет вам мгновенно отправлять отзывы
по диагностике (с автоматически прикрепляемыми журналами
диагностических данных), когда вы сталкиваетесь с программной
проблемой при выполнении диагностических операций.
Для отправки отзыва по диагностике:
1. Нажмите значок значок, расположенный в правом
верхнем углу любого экранав модуле Диагностика.
2. Выберите тип проблемы и нажмите Подтверждать.
3. Опишите проблему.
4. Нажмите Отправить, чтобы отправить отзыв.
4.2.3 Диагностическая обратная связь
датчика O2 последних завершенных тестов ЭБУ автомобиля.
Бортовой монитор
Эта функция отображает результаты испытаний компонентов
и систем силовой установки, связанных с выбросами, которые
не подвергаются постоянному мониторингу.
Тестирование компонентов
Эта функция помогает отправлять управляющие команды в
ECU автомобиля для тестирования и эксплуатации частей и
компонентов системы.
Информация об автомобиле
Эта функция отображает список информации
(предоставленной производителем автомобиля) из ECU
автомобиля.
Информация может включать:
• VIN.
• ID калибровки (CID).
• Номер проверки калибровки (CVN).
• Отслеживание производительности двигателя с искровым
зажиганием в процессе эксплуатации (IUPR)
Состояние автомобиля
Эта функция отображает состояние автомобиля, включая
двигатель, трансмиссию, найденные коды, статус MIL,
мониторы и протокол.

218
Примечание:
Функция диагностической обратной связи доступна только с
модулем диагностики.
4.3 Обслуживание
Эта функция предоставляет вам 8 услуг по техническому
обслуживанию, включая сброс уровня масла, адаптацию
дроссельной заслонки, сброс EPB, сброс угла поворота рулевого
колеса, регенерацию DPF, Прокачка ABS, сброс BMS и Сброс
подушки безопасности.
4.3.1 Обзор услуг
Сброс уровня масла
Эта функция позволяет сбросить индикатор смены масла в
системе службы моторного масла. Система контроля уровня
моторного масла рассчитывает оптимальный интервал замены
масла в зависимости от условий движения автомобиля и
погодных условий. Сброс уровня масла требуется при каждой
замене моторного масла.
Адаптация дроссельной заслонки
Если ECU случайно отсоединен, или если дроссельная заслонка
заменена или очищена, то необходимо инициализировать
приводы дроссельной заслонки с помощью функции адаптации
дроссельной заслонки. Это возвращает данные ECU в
исходное состояние, так что дроссельная заслонка может точно
регулировать подачу воздуха.
Сброс EPB
Эта функция поможет вам заменить и переустановить тормозные
колодки.
Это необходимо выполнить в следующих случаях:
• Заменены тормозные колодки и датчик износа тормозных
колодок.
• Горит контрольная лампа тормозных колодок.
• Цепь датчика тормозных колодок короткая, которая
восстанавливается.
• Серводвигатель заменен.
Сброс угла поворота рулевого колеса
Если датчик угла поворота рулевого колеса заменен, или угол
поворота рулевого колеса неточен или не отцентрирован,
необходимо выполнить функцию сброса угла поворота рулевого
колеса, чтобы найти относительное нулевое положение.

219
Используя это положение в качестве ориентира, ECU затем
может рассчитать точный угол для левого и правого рулевого
управления.
Регенерация DPF
Эта функция в основном используется для регенерации
дизельных сажевых фильтров. Чтобы обеспечить хорошую работу
фильтров, она удаляет частицы путем сжигания и окисления.
Прокачка ABS
Эта функция позволяет выполнять тесты для проверки условий
работы антиблокировочной тормозной системы (ABS).
Это необходимо выполнить в следующих случаях:
• Когда в трубопроводах ABS содержится воздух.
• Когда компьютер ABS, насос ABS, главный тормозной цилиндр,
тормозной цилиндр, тормозная магистраль.или заменена
тормозная жидкость.
Сброс BMS
После замены автомобильного аккумулятора необходимо
сбросить блок управления автомобильным аккумулятором.
Это очистит информацию о неисправности (например, о
низком уровне заряда аккумулятора), чтобы блок управления
мог сопоставить соответствующую информацию о недавно
замененном аккумуляторе.
Сброс подушки безопасности
Эта функция сбрасывает данные подушки безопасности,
чтобы очистить индикатор неисправности при столкновении
с подушкой безопасности, чтобы компьютер подушки
безопасности в автомобиле мог работать нормально.
Это необходимо выполнить в следующих случаях:
При столкновении транспортного средства и срабатывании
подушки безопасности появляется соответствующий код
неисправности в данных о столкновении, загорается индикатор
подушки безопасности, и код неисправности не может быть
удален.
Для выполнения сервисного сброса:
1. Нажмите Обслуживание на главном экране и отобразится
функциональное меню.
4.3.2 Действия

220
2. Выберите функцию, которую вы хотите выполнить.
3. Определите автомобиль по VIN или марке (подробнее об
операциях идентификации см. Идентификация автомобиля на
4.2.1). Затем отобразится экран выбранной функции.
4. Следуйте инструкциям на экране, чтобы выполнить сервисный
сброс.
Рисунок 4-10
4.4 Обновление
Эта функция позволяет обновлять диагностику конкретного
автомобиля, программное обеспечение IMMO и программное
обеспечение T-Darts/T-Kunai.когда доступно новое программное
обеспечение.
Для выполнения функции обновления:
1. Нажмите Обновить на главном экране и отобразится экран
обновления.
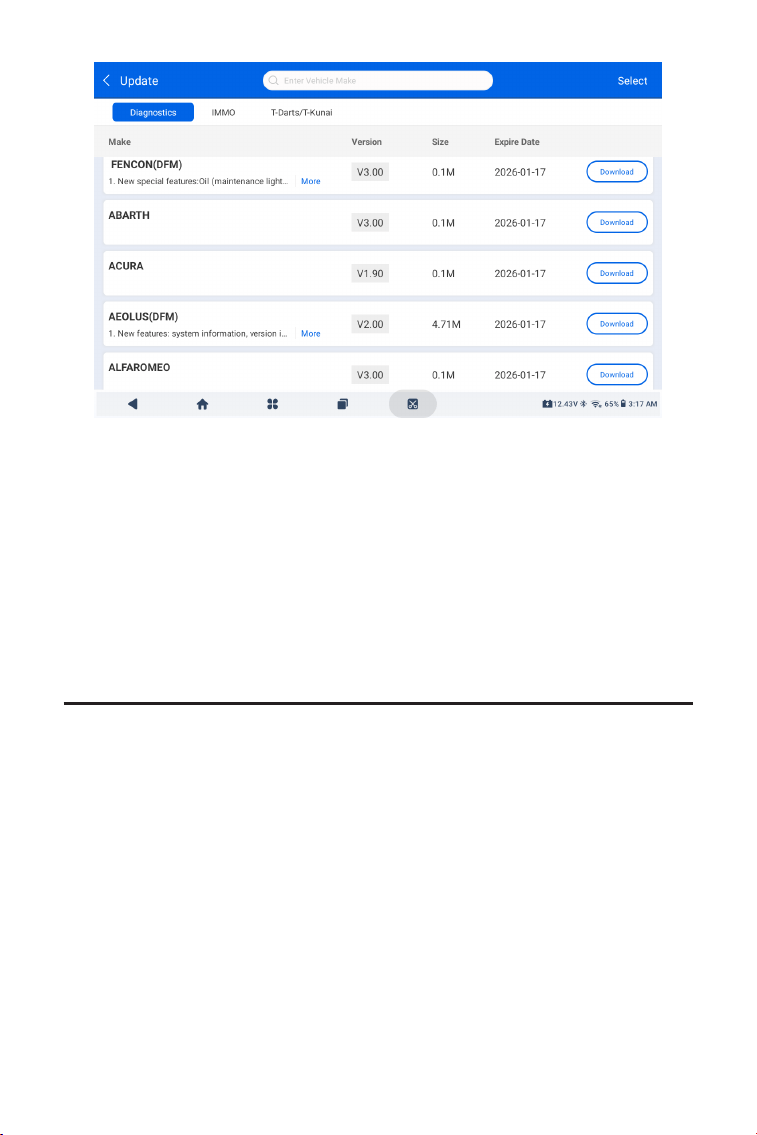
221
Рисунок 4-11
2. Найдите необходимое вам программное обеспечение
для транспортного средства или найдите программное
обеспечение по ключевому слову.
3. Нажмите Скачать/Обновитьустановить программное
обеспечение по своему усмотрению.
4.5 Папка
Эта функция дает доступ к Отчеты (системный отчет, отчет о
кодах неисправностей и отчет о потоке данных) и данные
воспроизведения.
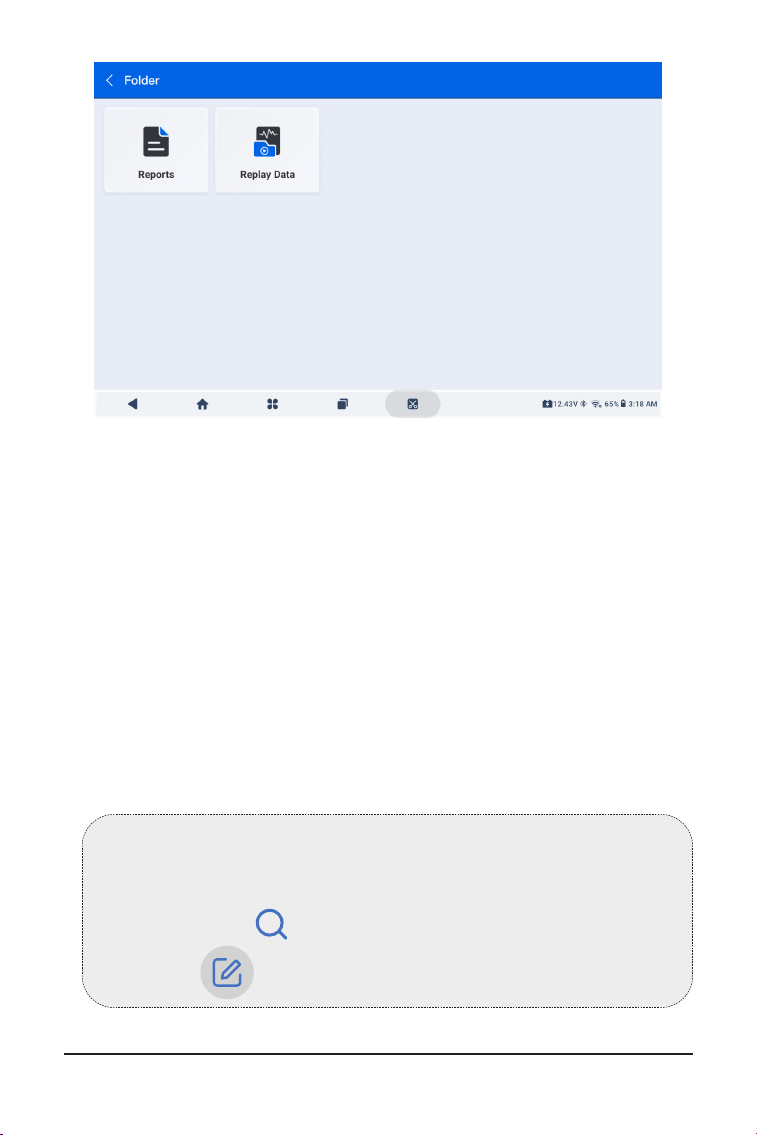
222
Рисунок 4-12
Примечание:
На экране «Отчеты» или «Данные воспроизведения» вы
можете нажать для поиска определенного элемента или
коснитесь для пакетного выбора и удаления элементов.
4.5.1 Отчеты
1. Нажмите Папка > Отчеты.
2. Выберите конкретный отчет, чтобы просмотреть подробные
сведения об этом отчете.
4.5.2 Данные воспроизведения
1. Нажмите Папка > Повтор Данные, и отобразится список
записанных потоков данных.
2. Коснитесь определенного потока данных, чтобы воспроизвести
записанное видео этого потока данных.
4.6 Библиотека

223
4.6.1 Руководство по ремонту DTC
Руководство по ремонту DTC — это база данных, основанная на
опыте, которая предоставляет информацию о конкретном коде,
включая популярные исправления и этапы устранения для
выявления неисправностей.
Как использовать руководство по ремонту DTC:
Нажмите Библиотека > Руководство по ремонту DTC. Введите
DTC в строке поиска.
4.6.2 TSB (Бюллетени технического обслуживания)
Чтобы просмотреть бюллетени технического обслуживания:
Для просмотра бюллетеней технического обслуживания:
Нажмите Библиотека > TSB. Выберите марку автомобиля,
модель, год выпуска, систему и подсистему и нажмите Далее.
Отобразится список бюллетеней технического обслуживания
OEM, выпущенных для выбранного автомобиля. Нажмите на
нужный бюллетень, чтобы просмотреть его полное содержание.
4.6.3 Расположение DLC
Для просмотра местоположения DLC:
Нажмите Библиотека > Расположение DLC. Выберите марку,
модель и год выпуска автомобиля и нажмите Далее. Отобразится
изображение местоположения DLC для выбранного автомобиля.
4.6.4 Библиотека световых индикаторов
Библиотека световых индикаторов содержит информацию о
световых индикаторах приборной панели, включая описание
лампочек, воздействие на управление автомобилем, типичные
причины, меры реагирования и соответствующие часто
задаваемые вопросы.
Для просмотра библиотеки световых индикаторов:
Нажмите Библиотека > Библиотека световых индикаторов.
Отобразится список световых индикаторов. Нажмите на нужный
световой индикатор, чтобы просмотреть подробности.
4.6.5 Поиск покрытия транспортных средств
Чтобы просмотреть поддерживаемые функции и системы
автомобиля:
Кран Библиотека > Поиск покрытия транспортных средств.
Выберите тип программного обеспечения, марку, модель и
год или введите функцию/подфункцию в поле поиска, а затем
нажмите Запрос . Отобразятся соответствующие данные,
выданные для выбранного автомобиля.

224
Примечание:
Чтобы получить доступ к Тестер функции требуется
дополнительное оборудование (продается отдельно). Если
вам необходимо приобрести дополнительное оборудование,
обратитесь за помощью к местным дилерам.
4.8 О пользователе
4.8.1 Управление VCI
Позволяет привязать VCI к планшету ArtiDiag900 Lite.
4.8.2 Обновление встроенного ПО
Позволяет обновить встроенное ПО, если доступна новая
версия.
4.8.3 Удаление диагностического программного обеспечения
Позволяет удалить диагностическое программное обеспечение
или программное обеспечение IMMO.
4.8.4 Информация о пользователе
Вы можете нажать на фотографию профиля на экране
«Информация о пользователе», чтобы изменить фотографию
профиля. Вы также можете просмотреть свой идентификатор
TOPDON или адрес электронной почты, изменить псевдоним
или пароль, удалить свою учетную запись TOPDON и выйти из
своей учетной записи.
4.8.5 Отзывы клиентов
Эта функция позволяет вам написать отзыв о продукте в отдел
послепродажного обслуживания TOPDON.
Функция информации о пользователе обеспечивает доступ
к управлению VCI, обновлению прошивки, удалению
диагностического программного обеспечения, информации о
пользователе, моему профилю, отзывам клиентов, информации о
магазине, настройкам и обновлению системы.
4.7 Тестер
Эта функция превращает ArtiDiag900 Lite в тестер автомобильных
аккумуляторов. С помощью этой функции вы можете выполнять
тесты батареи, тесты запуска и зарядки.

225
4.8.6 Информация о мастерской
Позволяет вам сохранить информацию о ремонтной мастерской.
4.8.7 Настройки
Функция «Настройки» позволяет вам устанавливать языки/
единицы измерения, очищать кэш, просматривать информацию
о версии приложения ArtiDiag900 Lite, обновлять приложение
ArtiDiag900 Lite, просматривать Условия обслуживания и
Политику конфиденциальности, а также выходить из своей
учетной записи.
4.8.8 Обновление системы
Позволяет обновить систему планшета, если доступна новая
версия.

226
РАЗДЕЛ 5 ТЕХНИЧЕСКИЕ
ХАРАКТЕРИСТИКИ
Андроид 11.0
2G
32G
Экран 8 дюймов, 1280х800
Bluetooth 5.0/СПП
USB
Wi-Fi
5 мегапикселей
Микрофон/громкоговоритель
Датчик силы тяжести
10 000 мАч
12 В постоянного тока
USB-тип-A
USB-тип-C
RJ45
HDMI
Порт зарядки постоянного тока
Wi-Fi
RJ45
10 x 6,1 x 1,97 дюйма (255 x 155 x 50 мм)
32°F до 122°F (0°C до 50°C)
-4°F до 140°F(-20°C до 60°C)
Операционная система
RAM
Вместимость склада
Экран дисплея
Возможности подключения
Камера
Аудио ввод/вывод
Датчик
Батарея
Входное напряжение
Порты
Подключение к сети
Размеры (Д х Ш х В)
Рабочая температура
Температура хранения

227
РАЗДЕЛ 6 ЧАСТЫЕ ВОПРОСЫ
В: Что мне следует делать, если возникает ошибка связи?
О: Выполните эти действия, чтобы выявить проблему:
1) Проверьте, включено ли зажигание.
2) Проверьте, надежно ли подключен ArtiDiag900 Lite VCI к
разъему DLC автомобиля.
3) Выключите зажигание. Затем включите его снова через 10
секунд и продолжайте выполнять действия.
4) Проверьте исправность модуля управления автомобилем.
В: Какие специальные функции поддерживает ArtiDiag900 Lite?
О: ArtiDiag900 Lite поддерживает 8 услуг по техническому
обслуживанию, включая сброс уровня масла, адаптацию
дроссельной заслонки, сброс EPB, сброс угла поворота
рулевого колеса, регенерацию DPF, Прокачка ABS, сброс BMS и
Сброс подушки безопасности.
В: Нужно ли мне обновлять прошивку перед первым
использованием ArtiDiag900 Lite?
О: Да. Прошивка автоматически обновится до последней версии.
Вы также можете нажать «О пользователе» > «Обновление
прошивки», чтобы обновить прошивку вручную.
В: Почему мигает экран планшета ArtiDiag900 Lite при
работающем двигателе?
О: Это нормальное явление, вызванное электромагнитными
помехами.
В: Как сделать снимок экрана?
О: Нажмите и удерживайте кнопку «Снимок экрана» в правом
верхнем углу планшета ArtiDiag900 Lite и удерживайте ее
в течение 3 секунд, чтобы сделать снимок экрана. Чтобы
просмотреть сохраненные изображения, перейдите в Галерею
с главного экрана системы Android.

228
РАЗДЕЛ 7 ГАРАНТИЯ
Гарантия TOPDON на один год
TOPDON гарантирует покупателю, что не будет никаких дефектов
материалов и изготовления продукции TOPDON в течение 12
месяцев (гарантийный срок) с даты покупки. При обнаружении
дефектов в течение гарантийного периода TOPDON проведёт
ремонт или замену дефектных деталей или продуктов после
анализа и подтверждения проблемы своей технической
поддержкой.
TOPDON не несет ответственности за любые случайные или
косвенные убытки, вызванные использованием, неправильным
использованием или установкой прибора.
В случае возникновения противоречий между гарантийной
политикой TOPDON и местным законодательством
преимущественную силу имеют местные законы.
Данная гарантия недействительна в следующих случаях:
Неправильное использование, разборка, модификация или
ремонт специалистами по техническому обслуживанию, не
уполномоченными Topdon.
Небрежное обращение и неправильная эксплуатация.
Примечание:
Вся информация в этом руководстве, показанная на момент
публикации, имеет преимущественную силу, компания не
отвечает за ее точность и полноту.
Topdon оставляет за собой право вносить изменения в
данное руководство в любое время без предварительного
уведомления.
Отсканируйте QR-код для получения дополнительной поддержки!