Product Instructions
Product No. 2000314
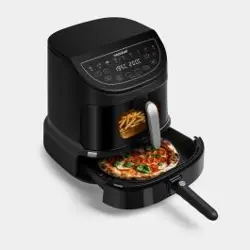
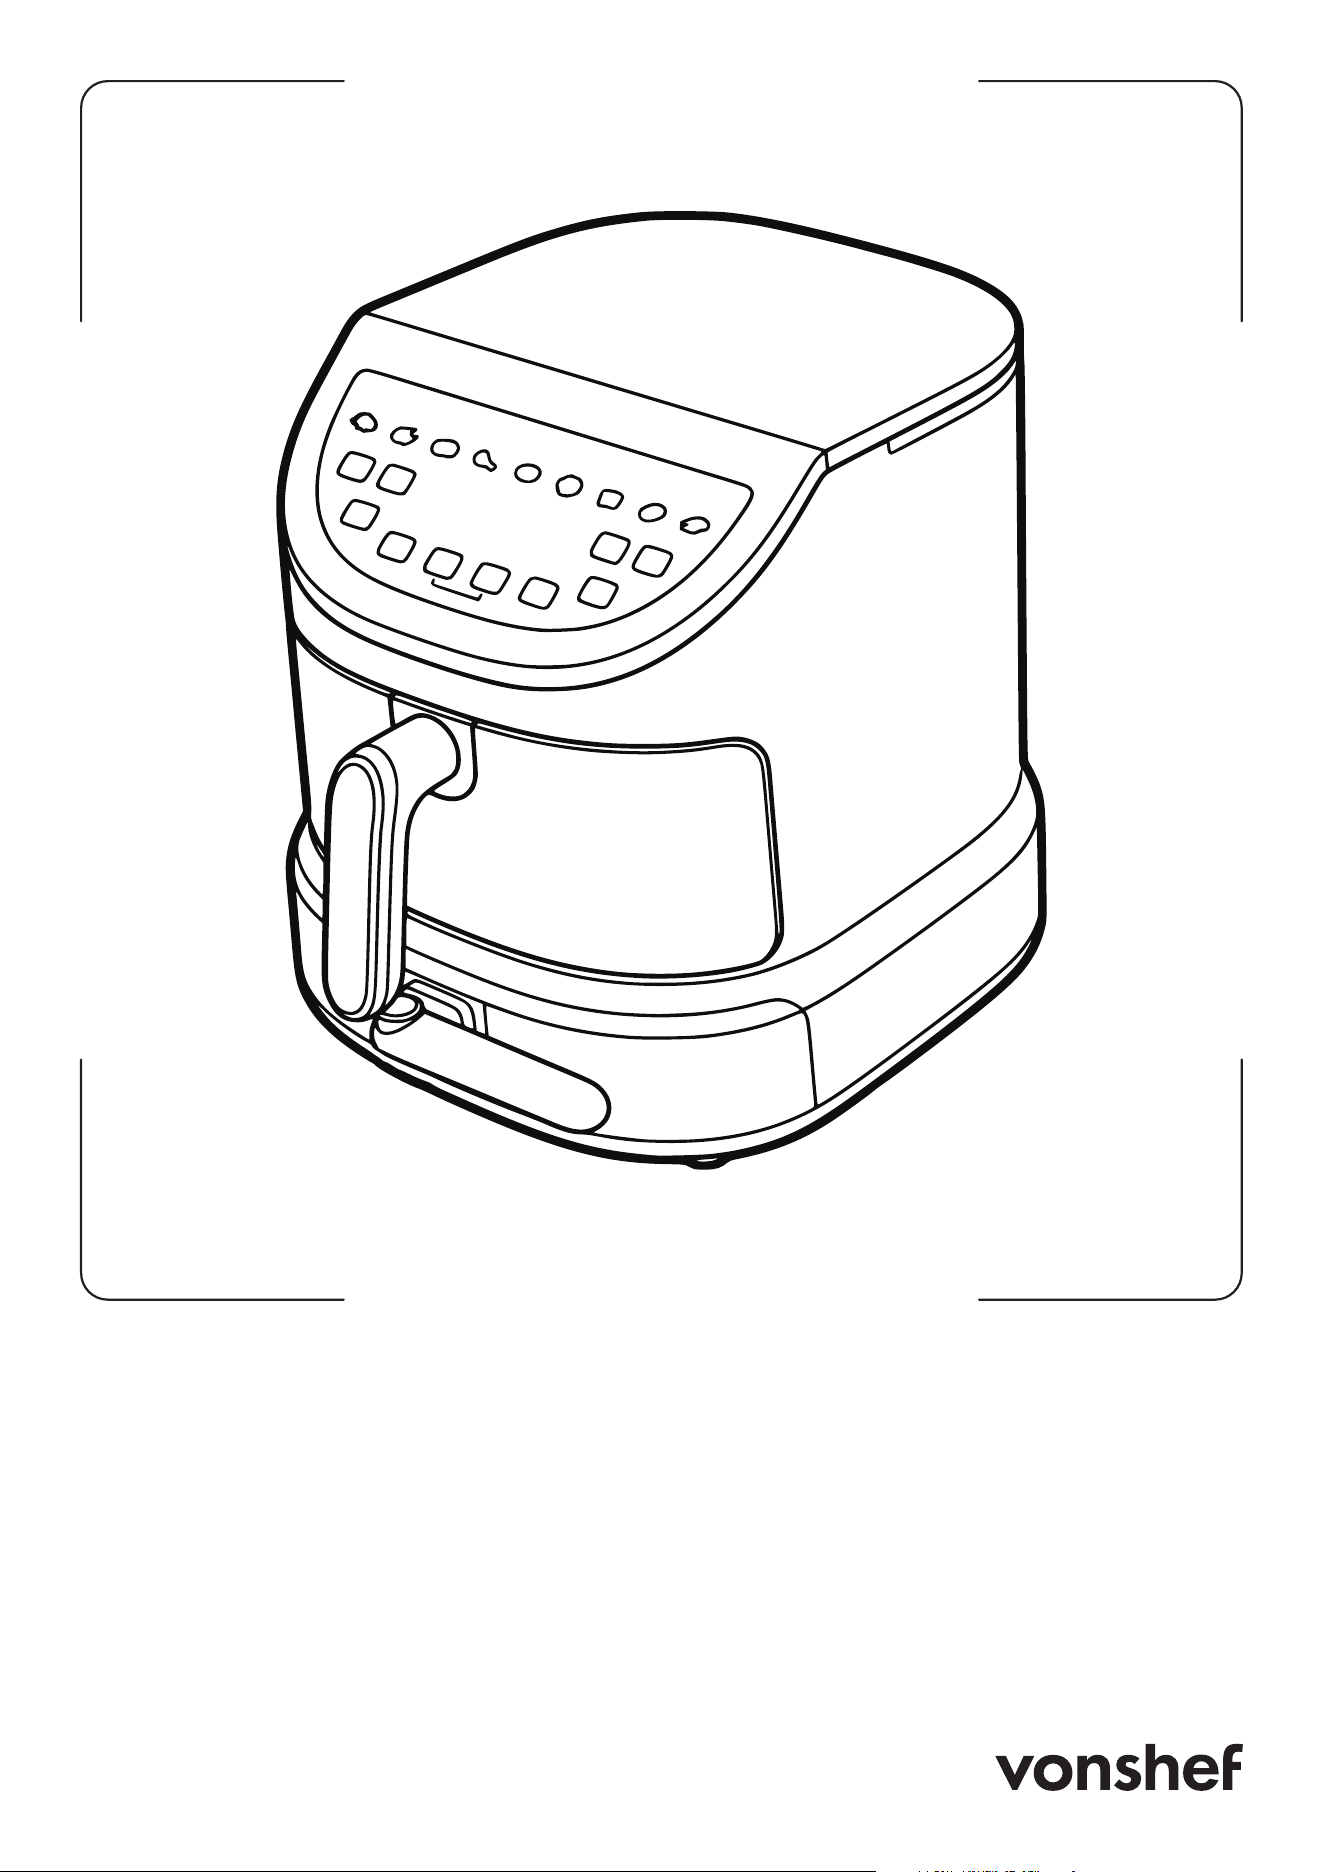
8.5L AIR FRYER
WITH PIZZA TRAY
2 3
Need further help?
suppor[email protected]
See our full range at
www.vonhaus.com
Let’s get started!
Visit our product hub for
useful tips and tricks on
getting the most out of
your new product.
SCAN ME
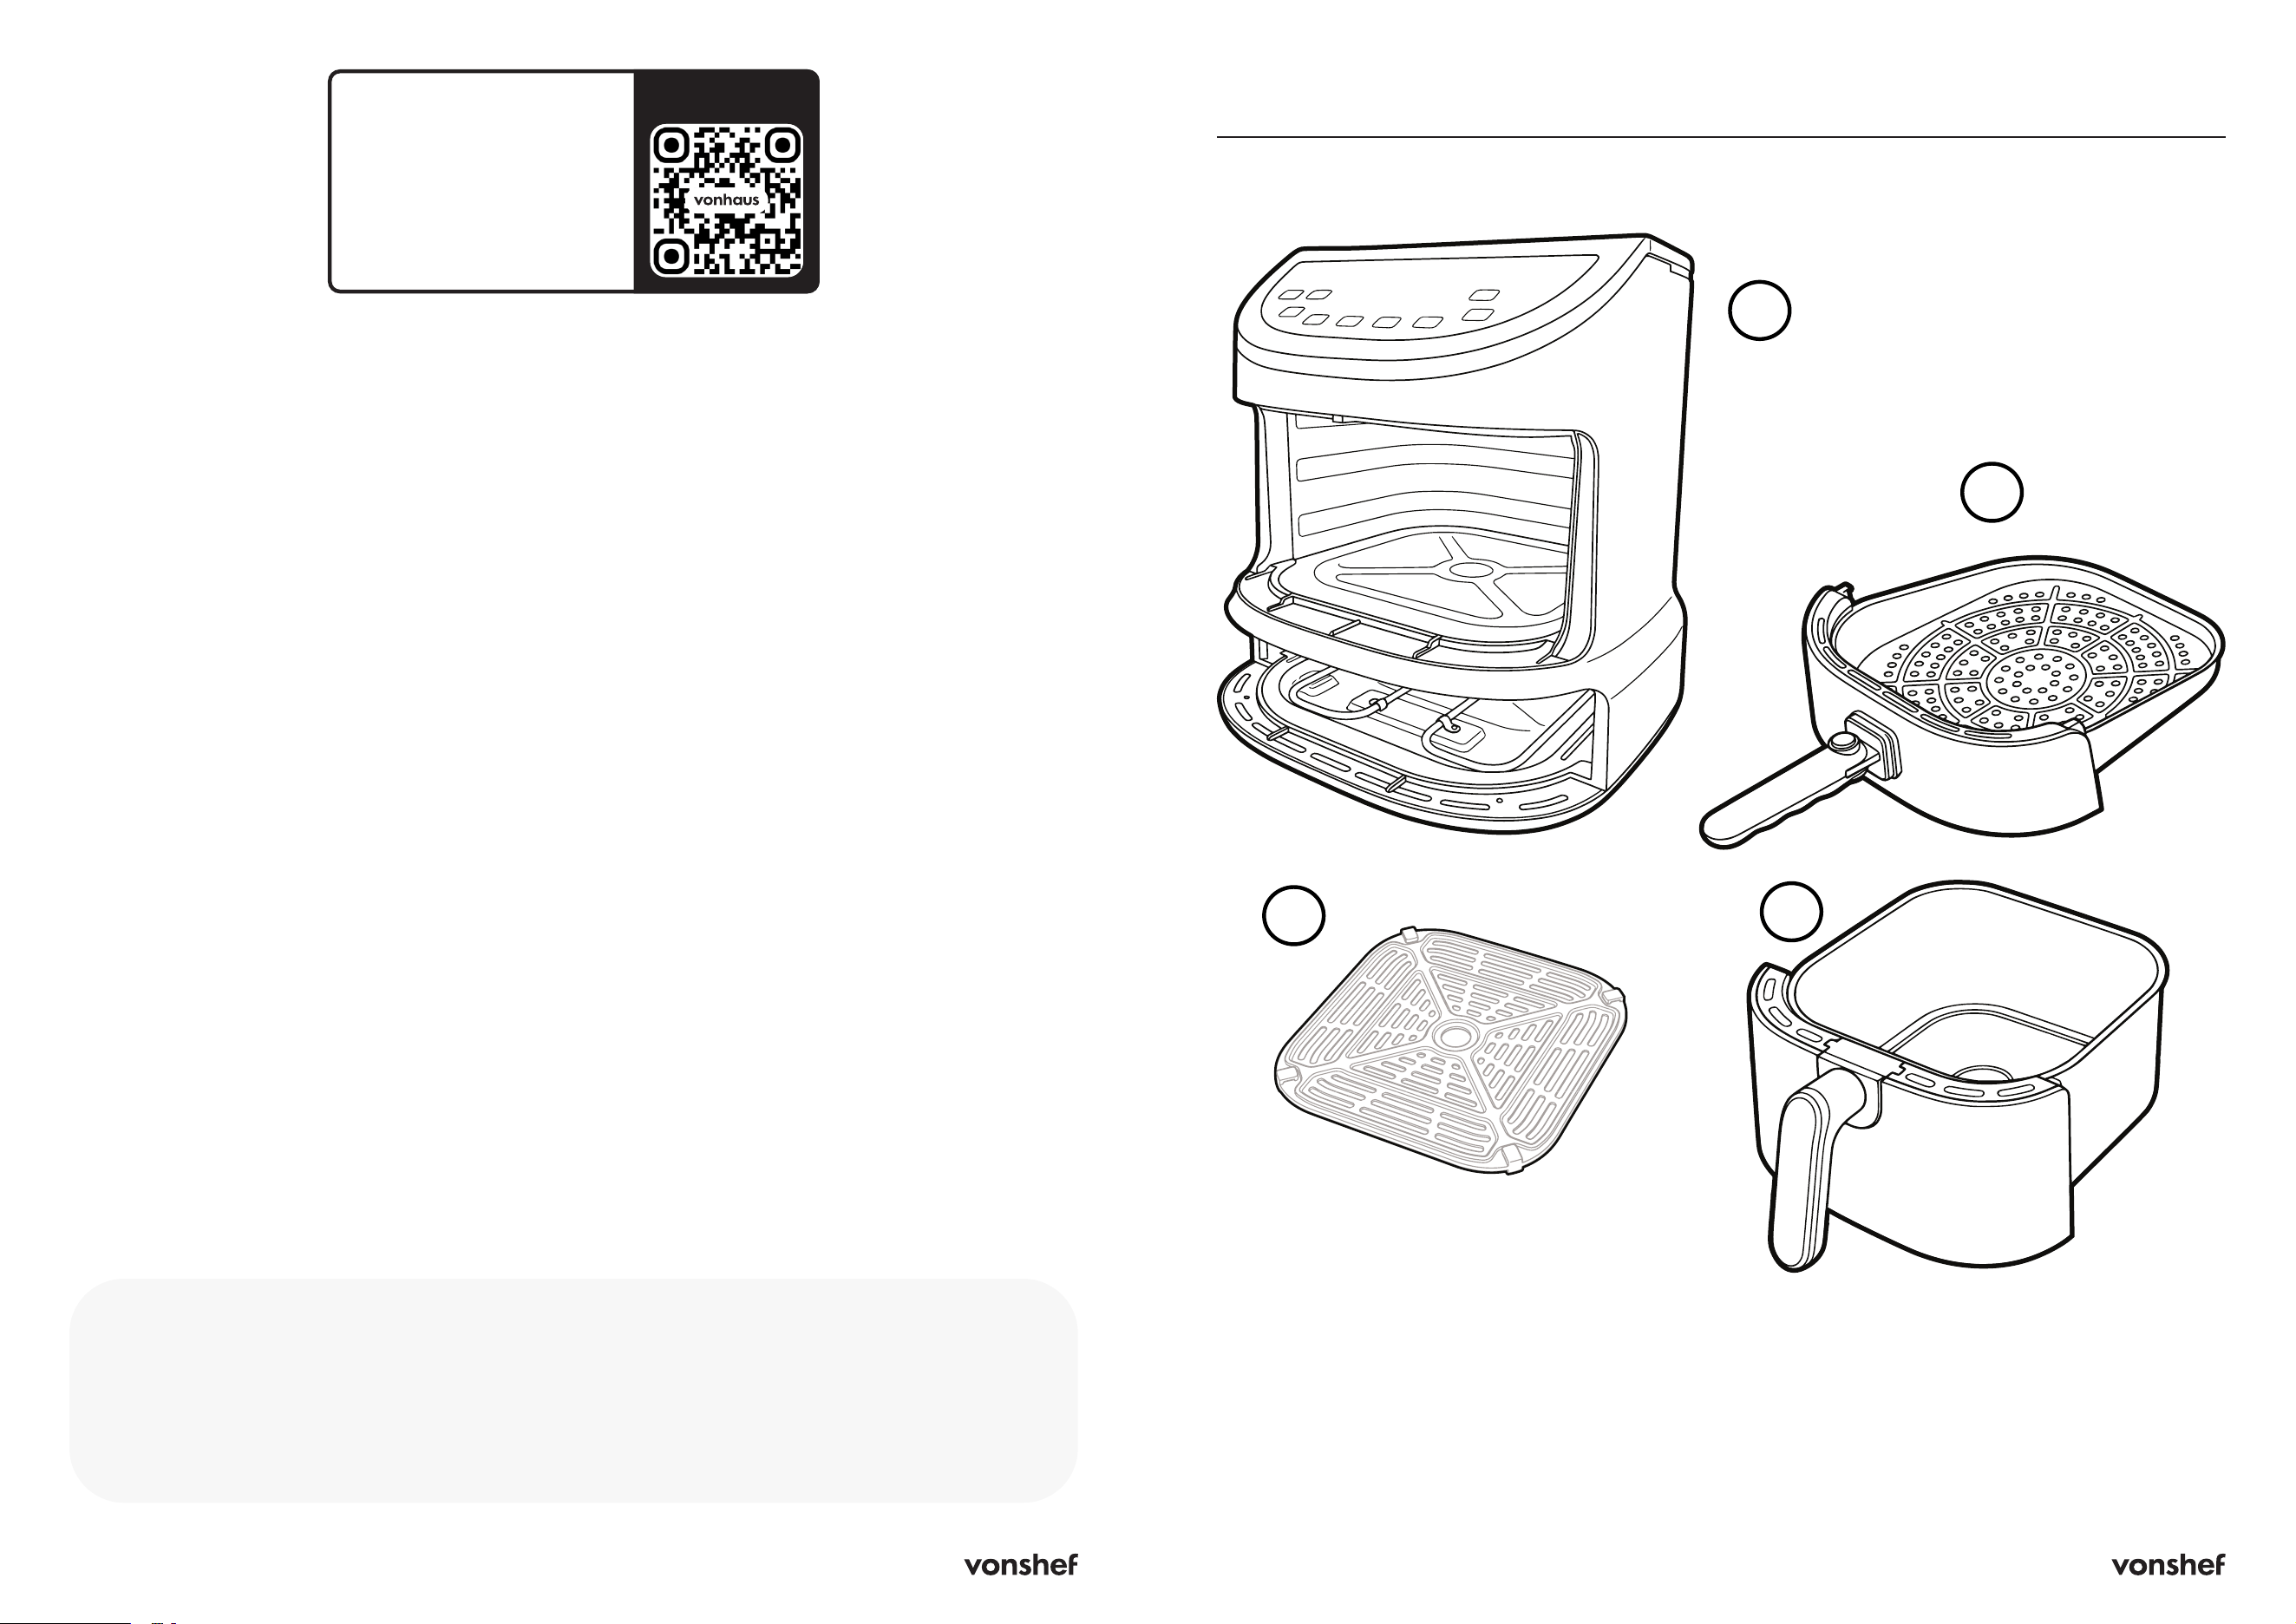
Components
A. Main Unit
B. Pizza Tray
C. Crisping Plate
D. Frying Basket
A
B
C
D
4 5
Getting Started
Before First Use
Remove all packaging, then rinse the frying
basket, pizza tray and crisping plate with
warm soapy water. Dry all parts thoroughly
before placing them back into the main unit.
The frying basket, pizza tray and crisping
plate are dishwasher safe. The main unit must
never be immersed in water — wipe it clean
with a slightly damp cloth and ensure it is
completely dry before use.
Preparation
Place the appliance on a flat, stable, heat-
resistant surface with at least 30cm of clear
space around it for ventilation.
Insert the frying basket and pizza tray into the
main unit and run a dry heat cycle at 200°C
for 10 minutes to pre-heat. A small amount
of smoke or a slight odour during the first few
minutes is normal. Ensure the room is well
ventilated.
Control Panel
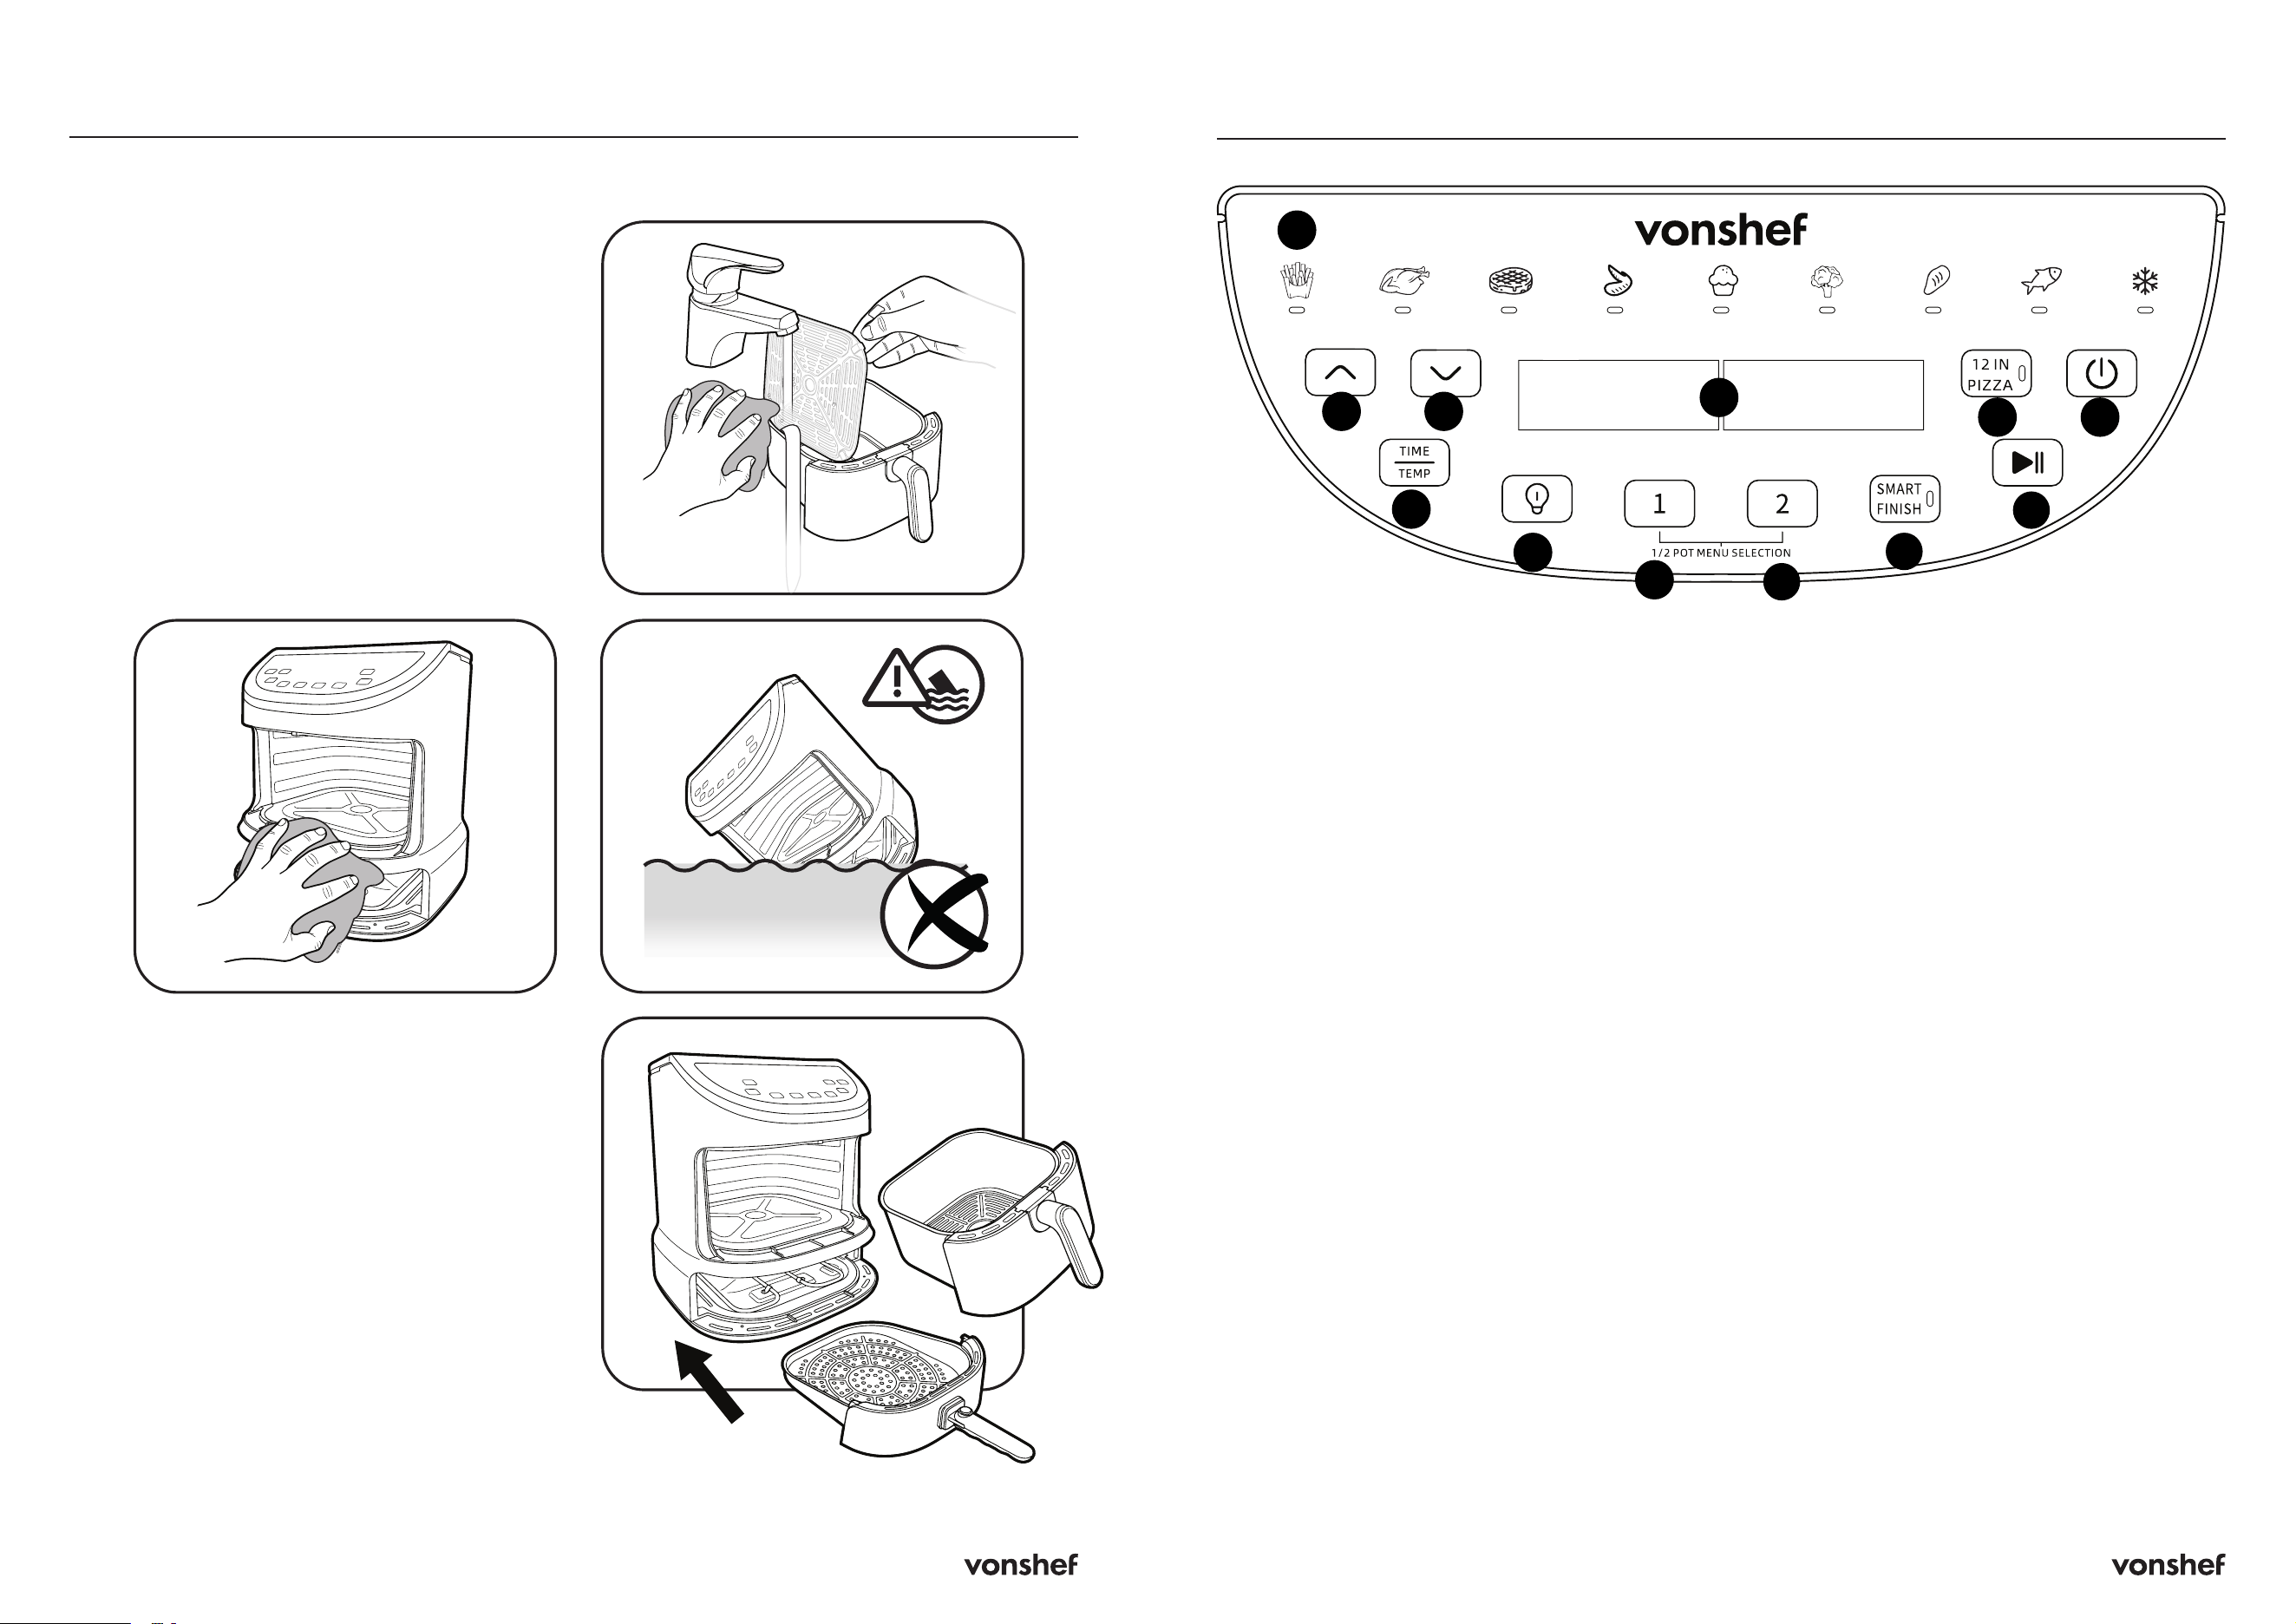
2
1. Preset Functions - The light beneath the
food icon will illuminate when you select
the desired preset function
2. Up - Press once to increase time by 1
minute or temperature by 5°C. Long hold
for continuous increase
3. Down - Press once to decrease time by 1
minute or temperature by 5°C. Long hold
for continuous decrease
4. Digital Display Screens - Shows time,
temperature and status messages e.g Pre
Heat, Add Food, Pause, Open & End
• Left Screen - Display screen for
main compartment
• Right Screen - Display screen for
pizza tray compartment
5. 12IN Pizza - Press to select the pizza
mode (only applicable for the pizza tray)
6. Power - Press to turn the appliance on or
off
7. Time/Temp - Press to adjust either the
time or temperature. Once you have
clicked this, use the Up or Down buttons
to adjust to your desired setting
8. Light - Press to turn the light on/off in the
upper basket
9. 1- Press to operate the upper basket.
Press to select and cycle through the 12
preset functions
10. 2 - Press to operate the lower pizza tray.
Press to select and cycle through the
preset functions. Please note, only steak,
chicken and fish are applicable for the
pizza tray
11 . Smart Finish - When using the upper
and lower basket simultaneously, press to
sync so they both finish at the same time
12. Start/Pause - Press once to start or
pause cooking. Press and hold to cancel
the current function
3
7
8
4
10
5 6
1
9
11
12
6 7
Upper Basket
1. Place the crisping plate in the bottom of
the frying basket, then use the handle to
insert the basket into the main unit.
2. Position the appliance on a flat, stable,
heat-resistant surface with at least 30cm
of clear space around it for ventilation.
3. Remove the basket and add food, then
insert the basket back into the main unit.
4. When you press the Power button,
button 1 will remain lit, while all other
indicator lights will go off . The display
will show “---”.
5. Press 1 to enter the menu mode. At this
time, the first menu item will light up, with
only the upper zone active. Press 1 again
to cycle through the menu options. Once
the target menu is selected, press ▶▶II to
begin.
Alternatively, press TIME/TEMP
and use the ▲/▼ buttons to set your
desired time and temperature. Then
press ▶II to start cooking.
6. When cooking is complete, the appliance
will beep five times and the display will
show End.
7. Using the handle, remove the basket from
the main unit and place it on a stable,
heat-resistant surface.
8. Use tongs to remove the food and take
care to avoid burns.
Pizza Tray
1. Position the appliance on a flat, stable,
heat-resistant surface with at least 30cm of
clear space around it for ventilation.
2. Add your food to the pizza tray, then use
the handle to insert the tray into the main
unit.
3. When you press the Power button, the
button 1 will remain lit, while all other
indicator lights will go off. The display will
show ”---”.
4. When you press button 2, it will remain lit
while all other indicator lights turn off. The
display will show ”---”. At this time, there
is only lower zone work. You can press 2
again to switch to the target menu, or press
12IN Pizza to select pizza mode, then
press ▶II to begin.
Alternatively, press TIME/TEMP
and use the ▲/▼ buttons to set your
desired time and temperature. Then
press ▶II to start cooking.
5. When cooking is complete, the appliance
will beep five times and the display will
show End.
6. Using the handle, remove the pizza tray
from the main unit and place it on a stable,
heat-resistant surface.
7. Use tongs to remove the food and take
care to avoid burns.
Upper Basket and Pizza Tray
Work Together
1. Press the Power button and button 1
will light up. The display will show “---”.
2. Press button 1 to select the desired
menu.
3. Then press button 2 and button 2 will
light up. The display will show “---”.
4. Press button 2 again to choose the
desired menu.
5. Finally, press▶ ▶II to start or pause
cooking.
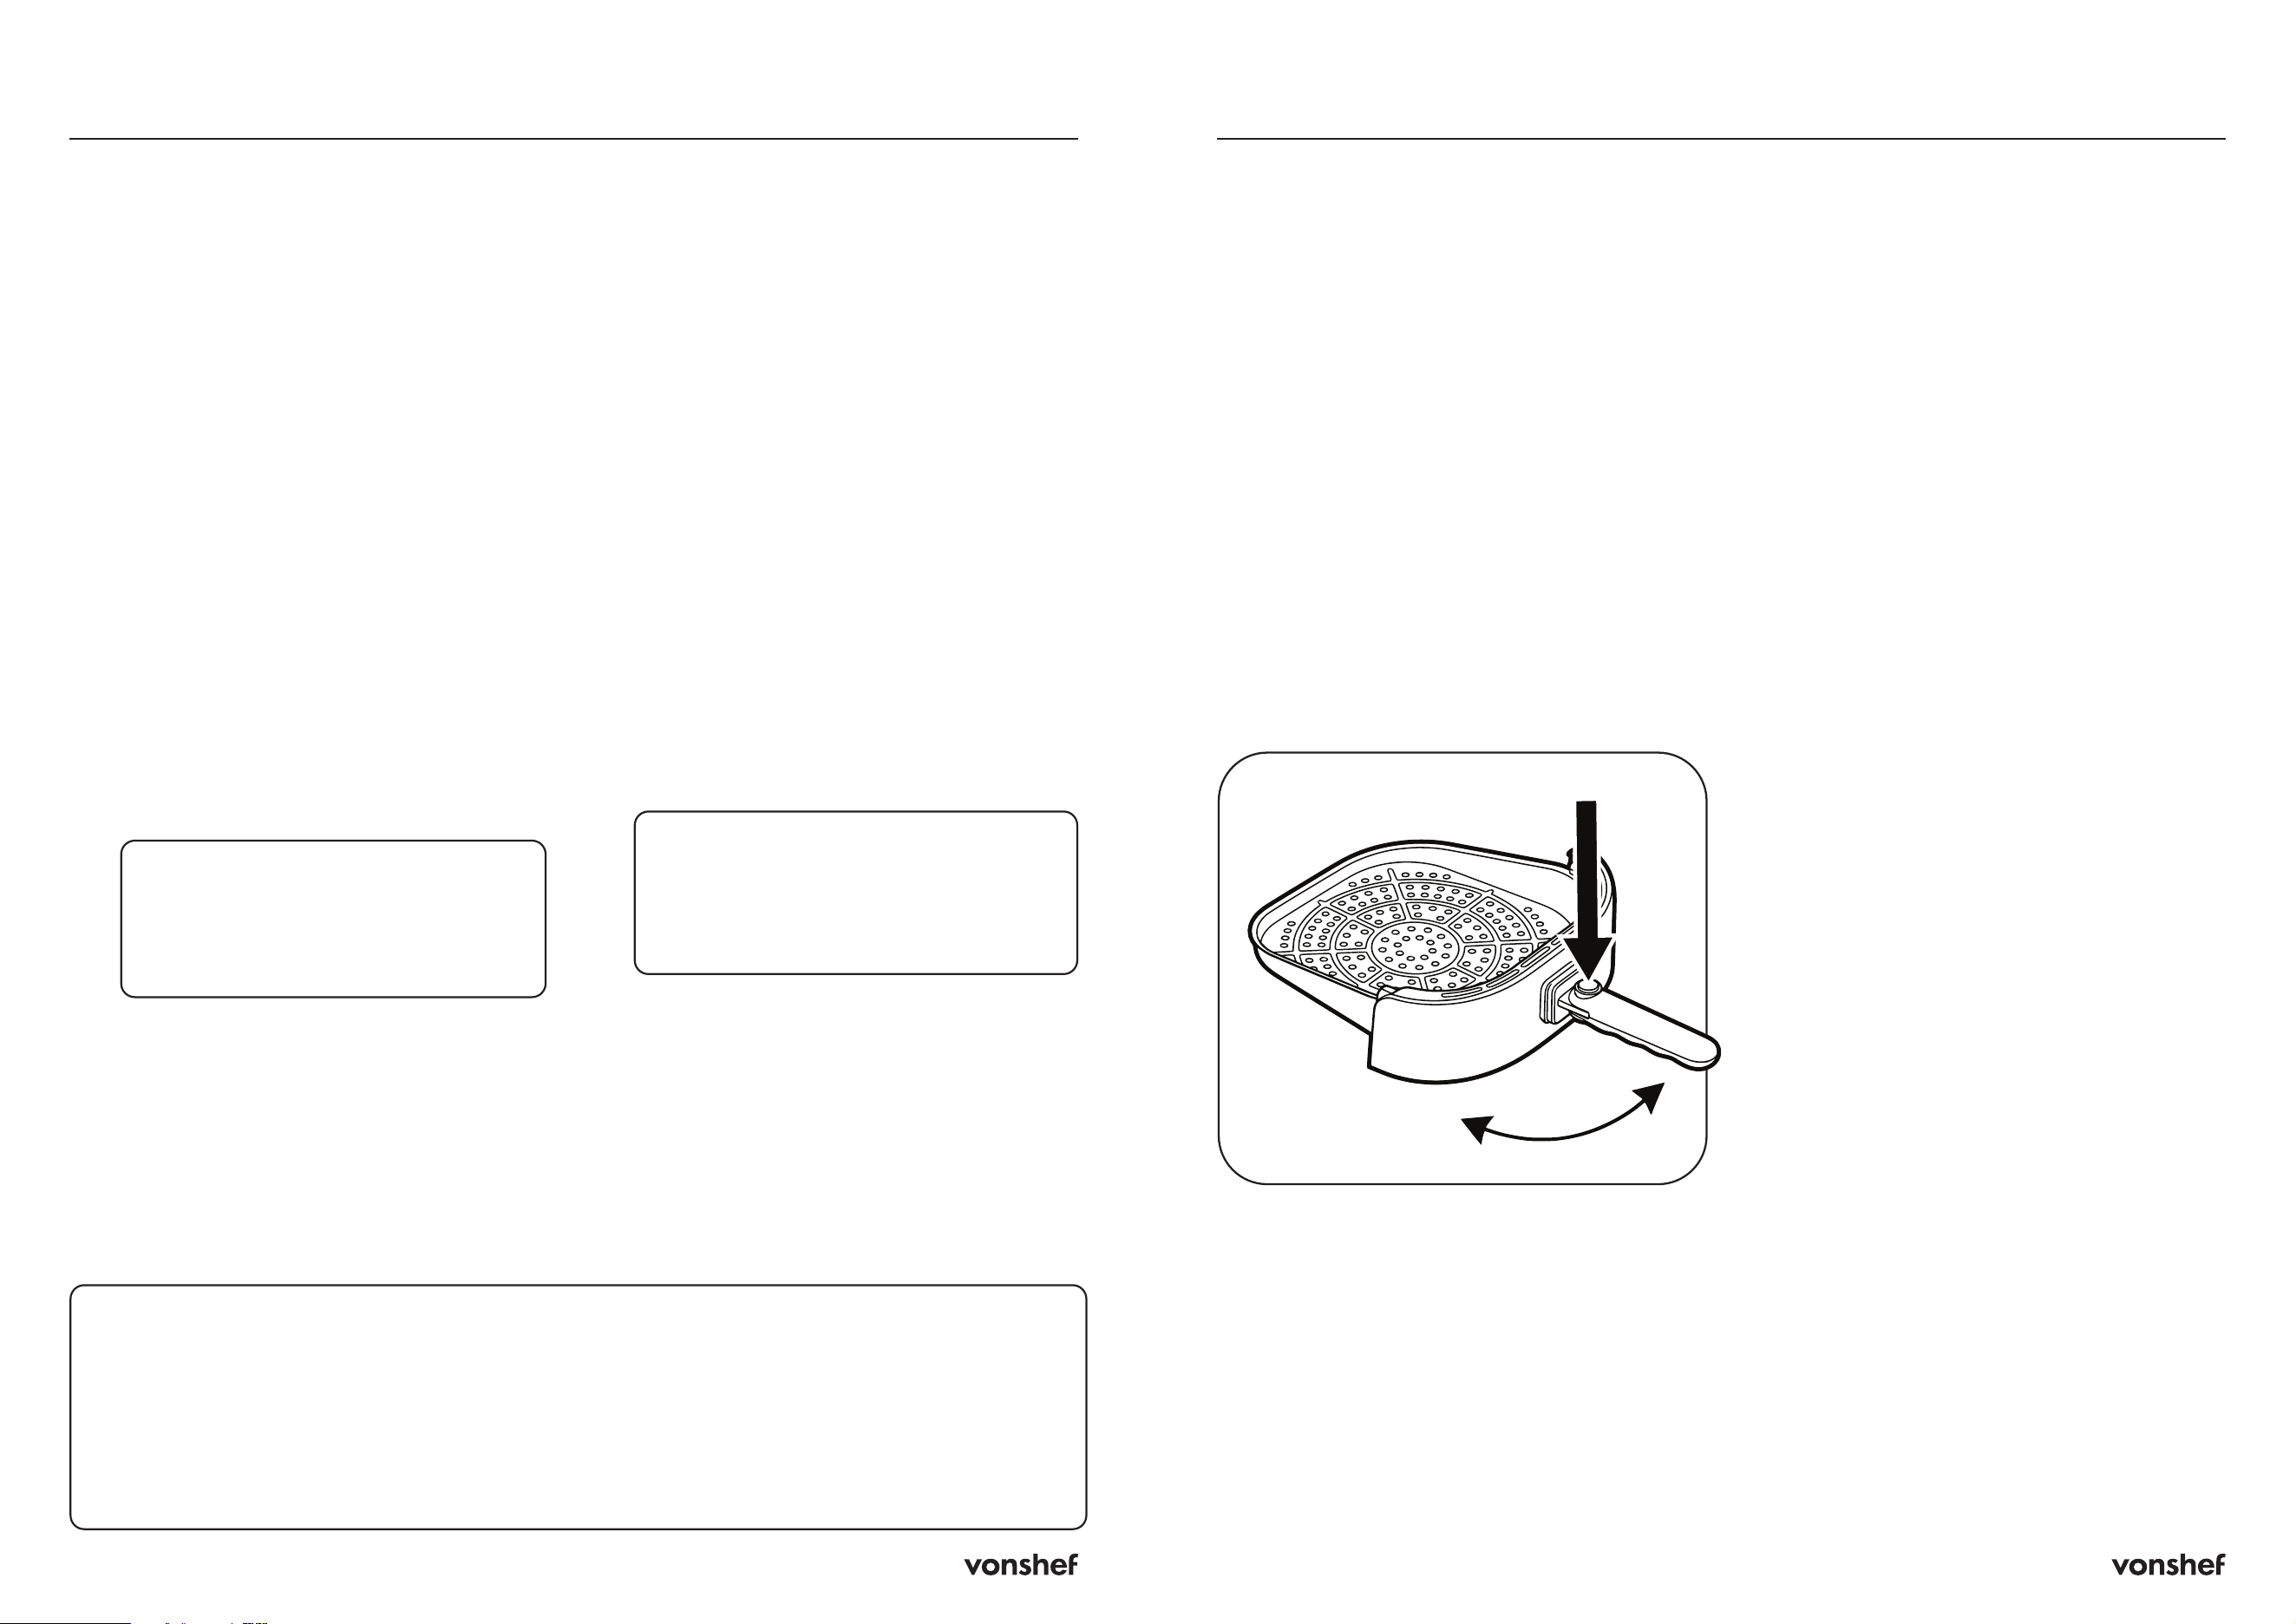
When finished, press the button on top of the
handle to fold it flat for compact storage.
Usage Usage
Cancel Function
When a function is running and you need to exit the current operation, first press the button 1
(Upper Basket) or button 2 (Pizza Tray) button, then press and hold the ▶II button to stop
the current operation. The corresponding basket indicator and digital display will turn off. You
can then select and start another function.
8 9
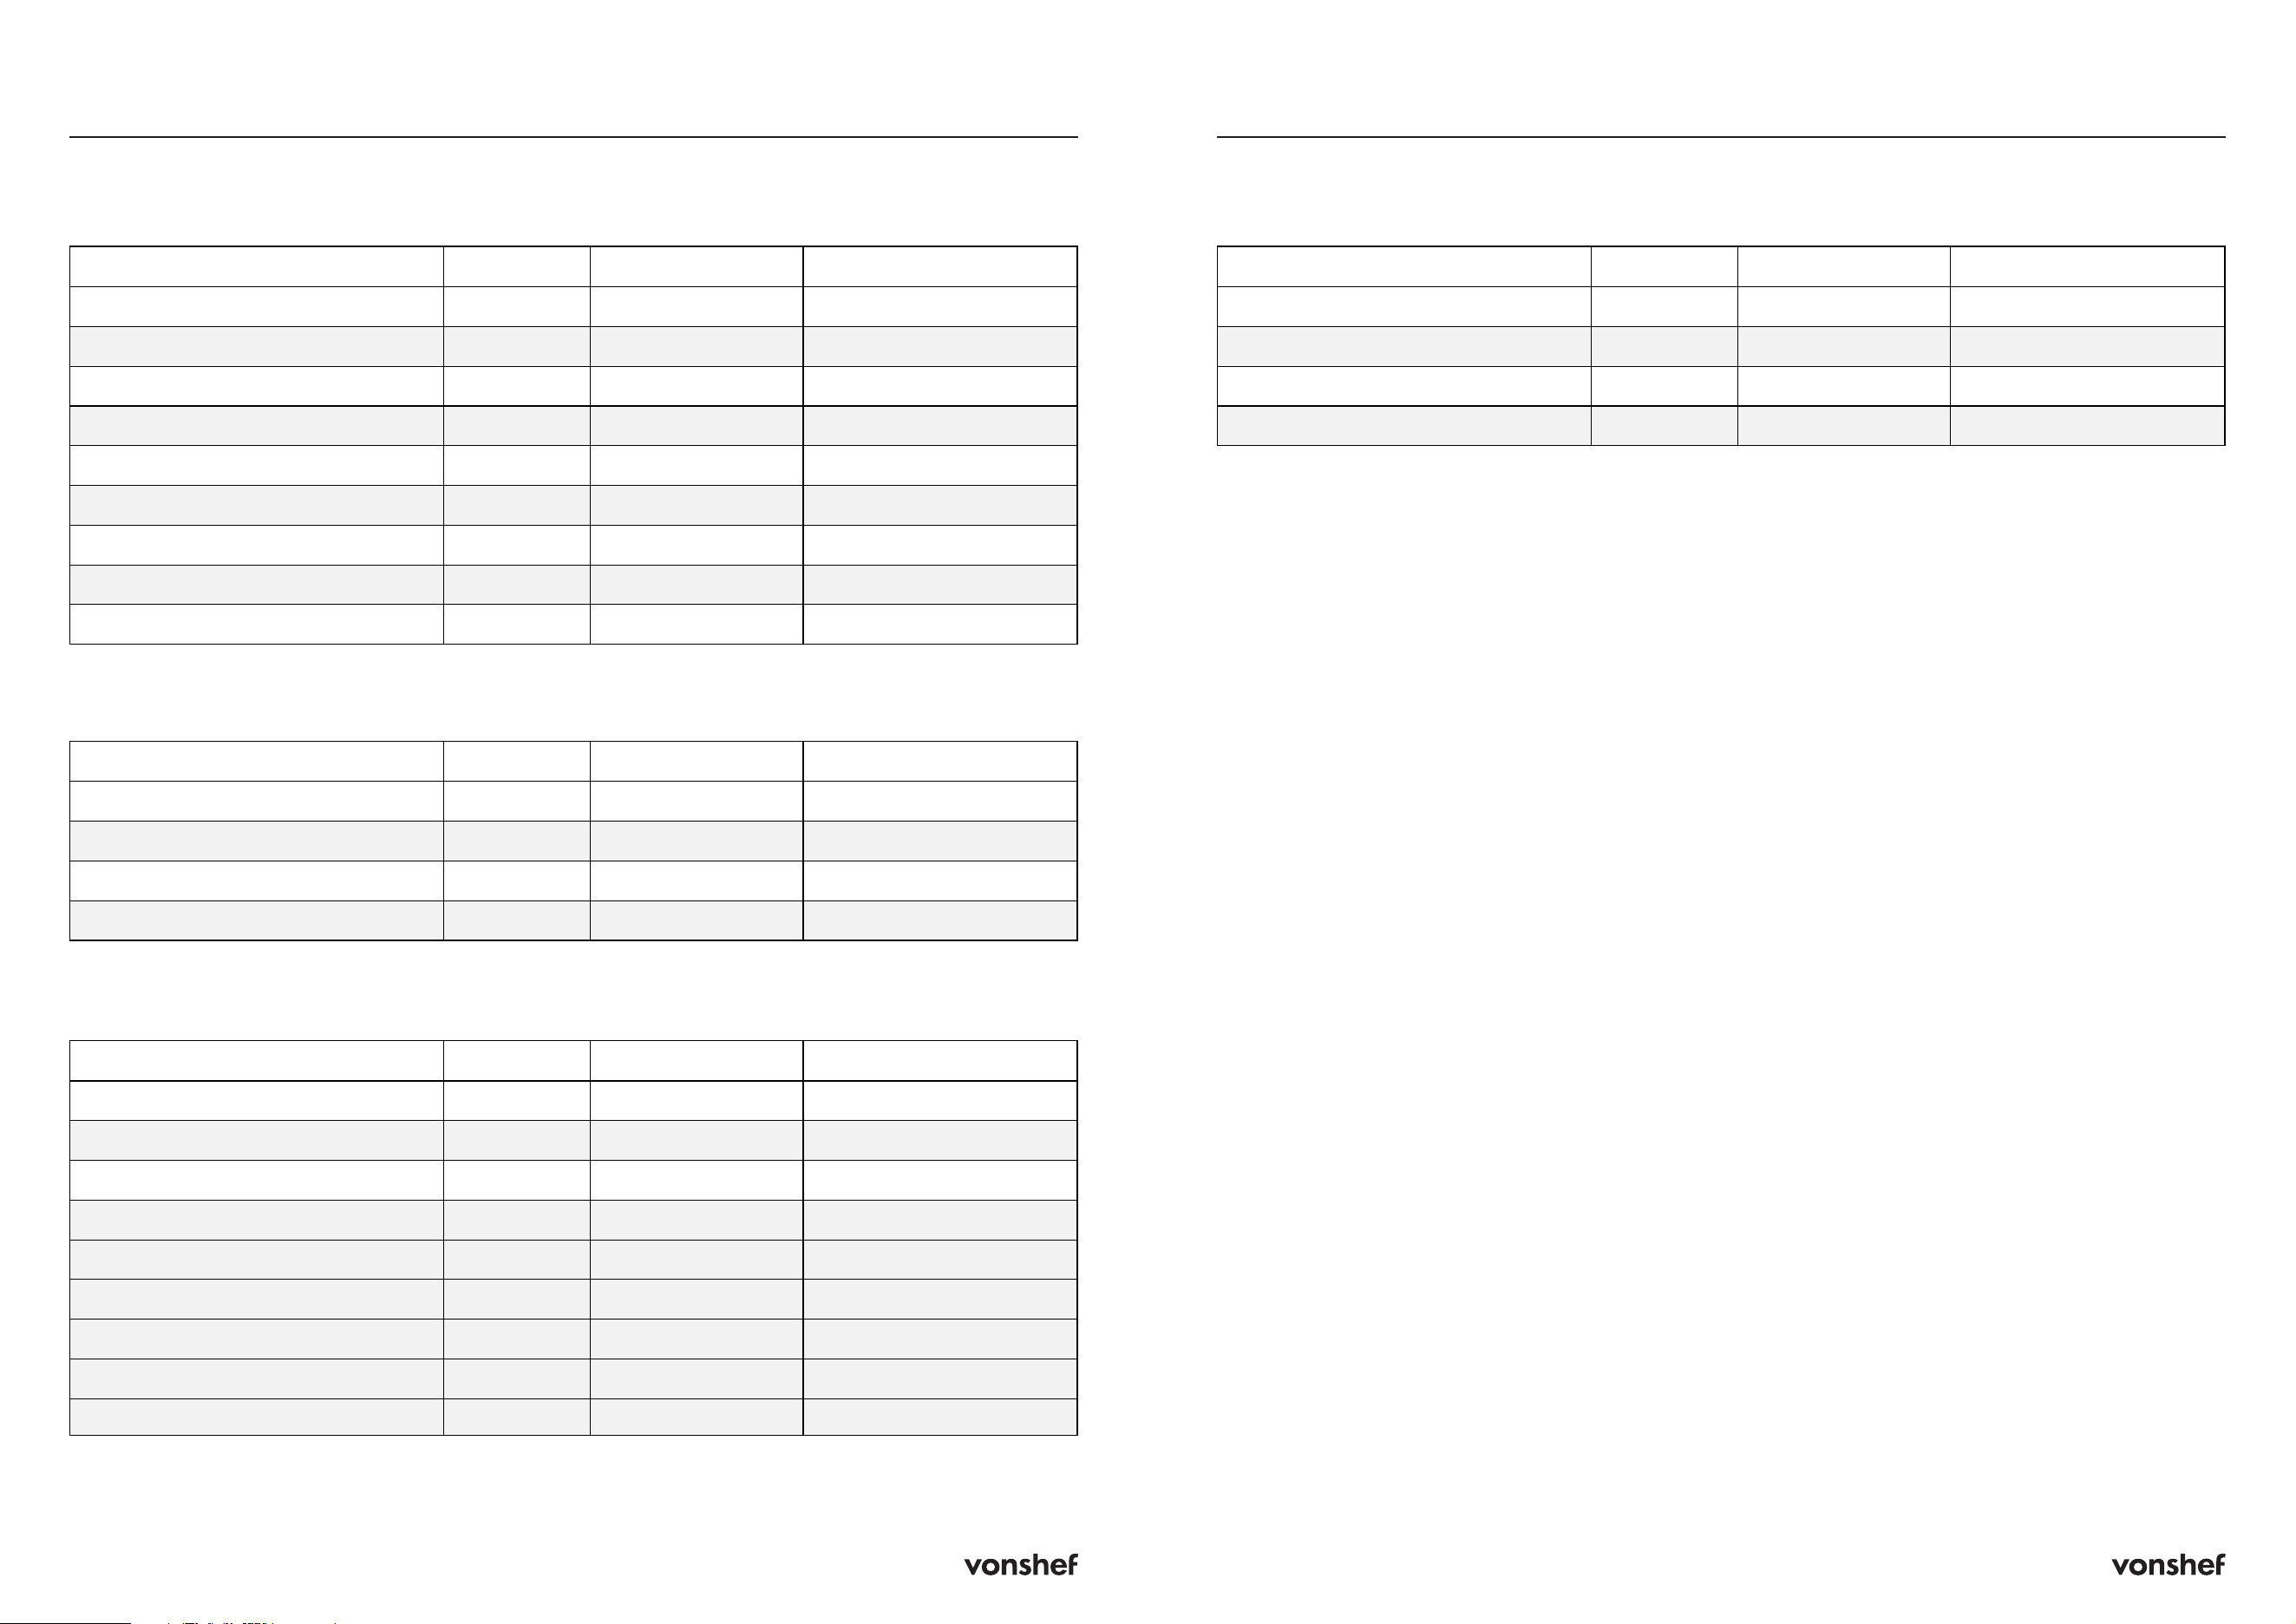
Presets
Function Default Time Default Temp Adjustable Range
French Fries 18 min 200°C 40°C-200°C / 1-60 min
Roast Chicken 35 min 200°C 40°C-200°C / 1-60 min
Steak 15 min 200°C 40°C-200°C / 1-60 min
Wings 15 min 200°C 40°C-200°C / 1-60 min
Cake 20 min 155°C 40°C-200°C / 1-60 min
Vegetables 6 min 180°C 40°C-200°C / 1-60 min
Chicken 18 min 190°C 40°C-200°C / 1-60 min
Fish 15 min 200°C 40°C-200°C / 1-60 min
Defrost 30 min 60°C 40°C-200°C / 1-60 min
Single Zone Mode – Upper Zone Only
Function Default Time Default Temp Adjustable Range
Chicken 25 min 190°C 40°C-200°C / 1-60 min
Steak 15 min 200°C 40°C-200°C / 1-60 min
Fish 15 min 200°C 40°C-200°C / 1-60 min
Pizza 15 min 200°C 40°C-200°C / 1-60 min
Single Zone Mode – Lower Zone Only
Function Default Time Default Temp Adjustable Range
French Fries 25 min 200°C 40°C-200°C / 1-60 min
Roast Chicken 35 min 200°C 40°C-200°C / 1-60 min
Steak 18 min 200°C 40°C-200°C / 1-60 min
Wings 20 min 200°C 40°C-200°C / 1-60 min
Cake 25 min 155°C 40°C-200°C / 1-60 min
Vegetables 6 min 180°C 40°C-200°C / 1-60 min
Chicken 25 min 190°C 40°C-200°C / 1-60 min
Defrost 30 min 60°C 40°C-200°C / 1-60 min
Fish 18 min 200°C 40°C-200°C / 1-60 min
Dual Zone Mode – Upper Zone
Presets
Function Default Time Default Temp Adjustable Range
Chicken 25 min 200°C 40°C-200°C / 1-60 min
Steak 20 min 200°C 40°C-200°C / 1-60 min
Fish 20 min 200°C 40°C-200°C / 1-60 min
Pizza 20 min 200°C 40°C-200°C / 1-60 min
Dual Zone Mode – Lower Zone

10 11
Important Safety Notice
This product is not suitable for use by children
or by individuals with physical, sensory, or
mental impairments that may limit their ability
to operate the equipment safely, unless they
have been given supervision or instruction
concerning the safe use of the product by a
person responsible for their safety.
Improper use may result in serious injury.
Always ensure the operator is capable
of understanding and following all safety
instructions provided in this manual.
Surfaces become very hot during use.
General Safety
Do not allow to be used as a toy. Children
should be supervised to ensure they do not
play with the appliance. If the appliance is
not functioning properly, has been dropped,
damaged, left outdoors, or immersed in liquid,
do not use, contact Customer Services. Do not
use the appliance if any parts appear to be
faulty, missing or damaged. Ensure all parts
are securely attached as instructed by this
instruction manual before use.
Cables and Plugs
Check to ensure your electricity supply matches
that shown on the rating plate. This product
should only be used as rated. Preferably,
the socket outlet should be protected by
a Residual Current Device RCD (UK/EU)
Ground Fault Indicator (US). Do not use with a
damaged cable or plug. If the supply cable is
damaged, it must be replaced by a qualified
engineer or authorised service agent in order
to avoid a hazard. The use of an extension
cable is not recommended. Do not handle
the plug or appliance with wet hands. Keep
the cable away from heated surfaces. Do not
let the cable hang over the edge of the table
or countertop where it could be pulled on
inadvertently by children or pets. Do not pull
the cable around sharp edges or corners. Do
not leave unattended when plugged in. Unplug
from outlet when not in use. Turn off all controls
before unplugging. Do not unplug by pulling
on the cable. To unplug, grasp the plug, not the
cable. Always unplug before performing user
maintenance, connecting or disconnecting
attachments, or changing accessories. Ensure
the cable is stored safely to prevent hazards.
Risk of Personal Injury
Always locate your appliance away from
the edge of the worktop, on a firm, flat, heat-
resistant surface with sufficient space around
all sides (at least 10cm). Do not insert any
objects into openings or cover the appliance.
Do not place any cardboard, plastics or paper
inside or on the appliance unless stated in the
instructions. Do not use the appliance near
any combustible surfaces or items. Only use
suitable cookware where applicable. Do not
use outdoors or near heat sources. Take care
not to touch any surfaces that may remain
hot for a period of time after use. Never
operate the appliance when empty. Do not
overload/overfill the appliance. Do not fill the
frying Basket with oil as this is a fire hazard.
When using for the first time your appliance
may give off a ‘new’ smell or vapour. This
will dissipate after a few uses. Do not lift or
move the appliance whilst in use. Do not
operate continuously for periods longer than
those marked on the product or indicated in
the instructions. Do not leave the appliance
unattended. Check regularly to avoid burning
foods. Avoid touching any of the inner surfaces
after use as they remain hot for some time.
Information
CAUTION! When removing the Frying
Basket from the appliance, hot steam may be
released. Keep your hands and face at a safe
distance to avoid injury. Ensure the appliance is
switched off and unplugged before changing
accessories or cleaning.
Cleaning & Maintenance
Allow the appliance to cool for 30-60 minutes
for cleaning. Never soak or immerse electrical
or heating components and or a component
that has a plug attached. Hand washing
recommended; soak in warm soapy water and
wipe down using a soft sponge. To remove
stubborn stains, use a non abrasive cleaning
brush. Do not use abrasive, harsh cleaning
solutions or metal scouring pads. Never wash
any electrical or heating components and or
a component that has a plug attached in a
dishwasher.
Technical Specifications
Rated Voltage: 220-240V
Rated Power: 2100W
Rated Frequency: 50Hz
Information
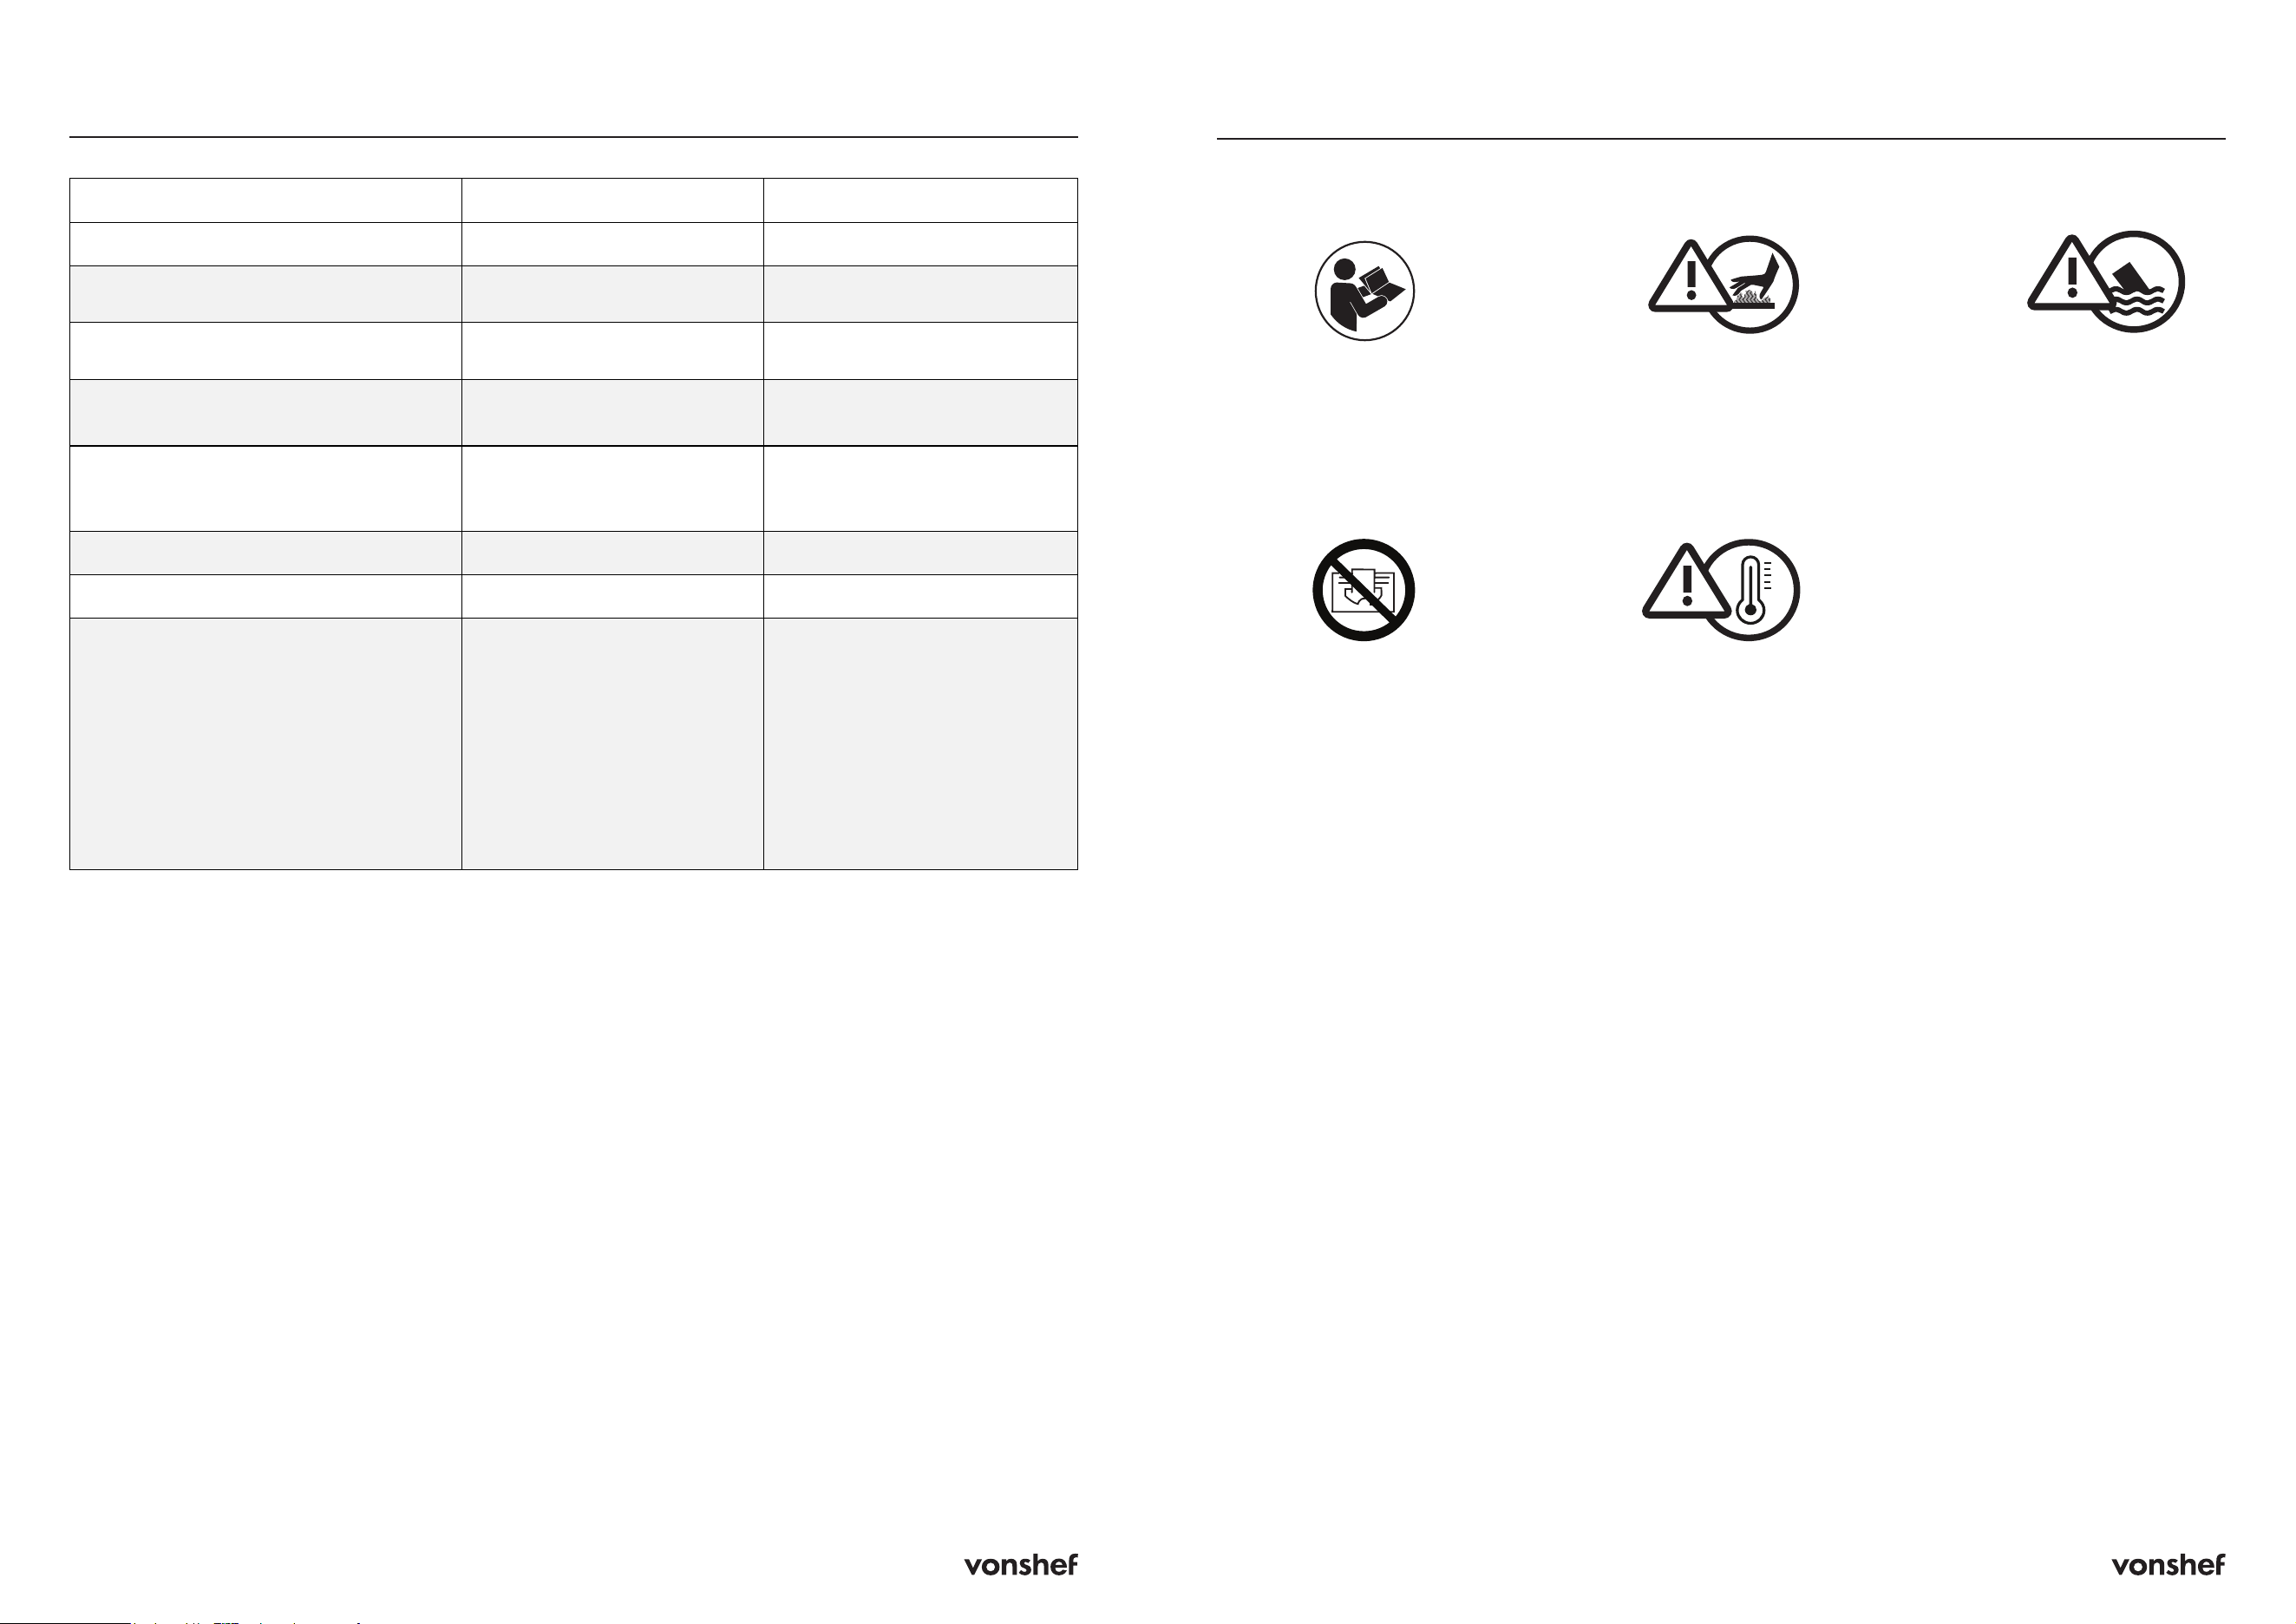
12 13
Troubleshooting
Issue Possible Cause Solution
Product not working Power not plugged in Plug into a grounded socket
Left display shows E1/E2
Top sensor open/short
circuit
Contact us
Right display shows E1/E2
Bottom sensor open/short
circuit
Contact us
Display shows OPEN Basket not seated properly
Pull out basket and firmly
reinsert until properly placed
Fan not rotating Not plugged in, or motor/
component fault
Check power connection. If
fault persists, contact us
Fan making abnormal noise Fan blade deformed Contact us
Cannot insert pot smoothly Pot edge deformed Contact us
White smoke during cooking Cooking greasy food
When cooking greasy
foods, keep the temperature
below 180°C to avoid
burning.
Ensure the frying basket and
rack are cleaned thoroughly
after every use to prevent a
build-up of food residue.
Usage & Safety
Do not immerse in water.Please read all instructions
carefully before use and
retain for future reference.
A5P | 01
2500253
Please read all instructions carefully before use and
retain for future reference.
Veuillez lire attentivement ces instructions avant
utilisation et conservez-les pour pouvoir les consulter
à l’avenir.
Bitte lesen Sie die Anleitung sorgfältig und bewahren Sie
sie als Referenz auf.
Leed todas las instrucciones detenidamente antes de
usar y retened para futuras consultas.
Si prega di leggere attentamente tutte le istruzioni prima
dell’uso e conservarle per una futura consultazione.
Lea todas las instrucciones detenidamente antes de
usar y consérvelas para futuras consultas.
CAUTION Do not immerse in water.
ATTENTION Ne pas immerger dans l’eau.
VORSICHT Nicht in Wasser tauchen.
PRECAUCIÓN No sumergid en agua.
AVVERTENZA Non immergere nell’acqua.
PRECAUCIÓN No sumergir en agua.
Do not cover.
Ne pas couvrir.
Nicht abdecken.
No cubrir.
Non coprire.
No cubrir.
CAUTION hot surfaces
ATTENTION Surfaces chaudes
VORSICHT heiße Oberächen
PRECAUCIÓN supercies calientes
AVVERTENZA Superci calde
PRECAUCIÓN supercies calientes
Do not place any combustible items underneath the
furniture. Items like barbeques and repits are
forbidden.
Ne placez pas d’éléments combustibles sous le
meubles. Les articles comme les barbecues et les
foyers sont interdits.
Stellen Sie keine brennbaren Gegenstände unter die
Möbel. Gegenstände wie Grillen und Feuerstellen
sind verboten.
No coloque ningún elemento combustible debajo
del
mueble. Los artículos como barbacoas y fogatas
están prohibidos.
Non posizionare oggetti combustibili sotto il
mobilia. Sono vietati articoli come barbecue e pozzi
del fuoco.
CAUTION: Hot surfaces.
Do not cover. ATTENTION This appliance
has a thermal cut out switch
The thermal cut out will
activate and shut down
the appliance should the
appliance overheat.
Unplug from the mains and
or battery and allow to cool
for 30-40 minutes before
re-use.

14 15
Customer Service
If you are having difficulty using this product
and require support, please contact
suppor[email protected]
Warranty
To register your product and find out if you
qualify for a free extended warranty please
go to www.vonhaus.com/warranty
Please retain a proof of purchase receipt or
statement as proof of the purchase date.
The warranty only applies if the product is used
solely in the manner indicated in the warnings
page of this manual, and all other instructions
have been followed accurately.
Any abuse of the product or the manner in
which it is used will invalidate the warranty.
Returns
Returned goods will not be accepted unless
re-packaged in its original packaging and
accompanied by a relevant and completed
returns form. This does not affect your statutory
rights.
No rights are given under this warranty to a
person acquiring the appliance second-hand
or for commercial or communal use.
Copyright
All material in this instruction manual are
copyrighted by DOMU Brands.
Any unauthorised use may violate worldwide
copyright, trademark, and other laws.
Thank You
Thank you for purchasing your product/
appliance.
Should you require assistance with your
purchase, please contact us at
suppor[email protected]
Vonhaus is a registered trademark of DOMU
Brands Ltd.
Made in China for DOMU Brands Ltd.
Unit 30, Stakehill Industrial Estate
Middleton, Manchester, M24 2RW
EU Authorised Representative
Authorised Representative Service
77 Camden Street Lower
Dublin, D02 XE80
Ireland
Information
Product No. 2000314
Let’s get started!
Visit our product hub for
useful tips and tricks on
getting the most out of
your new product.
SCAN ME