A5P | 01
2501015
Please read all instructions carefully before use and
retain for future reference.
Veuillez lire attentivement ces instructions avant
utilisation et conservez-les pour pouvoir les consulter
à l’avenir.
Bitte lesen Sie die Anleitung sorgfältig und bewahren Sie
sie als Referenz auf.
Leed todas las instrucciones detenidamente antes de
usar y retened para futuras consultas.
Si prega di leggere attentamente tutte le istruzioni prima
dell’uso e conservarle per una futura consultazione.
ATTENTION This appliance has a thermal cut out
switch. The thermal cut out will activate and shut down
the appliance should the appliance overheat.
Unplug from the mains and or battery and allow to cool
for 30 minutes before re-use.
ATTENTION Cet appareil dispose d’un interrupteur
d’arrêt thermique. L’arrêt thermique s’activera
et éteindra l’appareil si l’appareil commençait à
surchauer.
Débranchez la prise, ou la batterie, et laissez refroidir
pendant 30 minutes avant de réutiliser.
VORSICHT Dieses Gerät hat einen thermischen
Ausschalter. Der thermische Ausschalter wird aktiviert
und schaltet das Gerät aus, wenn das Gerät überhitzt.
Ziehen Sie den Stecker aus der Steckdose und/oder
entfernen Sie den Akku und lassen Sie das Gerät 30
Minuten abkühlen, bevor Sie es erneut benutzen.
ATENCIÓN Este aparato tiene un interruptor de corte
térmico. El corte térmico se activará y apagará el
dispositivo si el aparato se sobrecalienta.
Desenchufe de la red y / o la batería y déjelo enfriar
durante 30 minutos antes de volver a usarlo.
ATTENZIONE Questo apparecchio è dotato di un
interruttore di protezione termica che accende e spegne
l’apparecchio in caso di surriscaldamento.
Scollegare dalla rete elettrica e o la batteria e lasciar
rareddare per 30 minuti prima di un nuovo utilizzo.
CAUTION Do not immerse in water.
ATTENTION Ne pas immerger dans l’eau.
VORSICHT Nicht in Wasser tauchen.
PRECAUCIÓN No sumergid en agua.
AVVERTENZA Non immergere nell’acqua.
Do not cover.
Ne pas couvrir.
Nicht abdecken.
No cubrir.
Non coprire.
CAUTION hot surfaces
ATTENTION Surfaces chaudes
VORSICHT heiße Oberächen
PRECAUCIÓN supercies calientes
AVVERTENZA Superci calde
Materials approved for food use.
Matériaux approuvés pour un usage alimentaire.
Materialien sind für Lebensmittel zugelassen.
Materiales aprobados para uso alimentario.
Materiali approvati per uso alimentare.
Scan me
For a quick guide to Air Fryer Recipes

A5P | 01
EN
Please read all instructions carefully before use and
retain for future reference.
INTENDED USE Only operate the appliance for its
intended purpose and within the parameters specied
in this manual.
This appliance is for domestic use only. Do not use
outdoors or on wet surfaces.
This appliance is not intended for use by persons with
reduced physical, sensory or mental capabilities, or
lack of experience and knowledge, unless supervised or
given appropriate instruction concerning the product’s
use by a person responsible for their safety.
The appliance is not intended to be operated by means
of an external timer or separate remote-control system.
GENERAL SAFETY Do not allow to be used as a toy.
Children should be supervised to ensure they do not
play with the appliance.
If the appliance is not functioning properly, has been
dropped, damaged, left outdoors, or immersed in liquid,
do not use, contact DOMU Brands Customer Services.
Do not use the appliance if any parts appear to be faulty,
missing or damaged.
Ensure all parts are securely attached as instructed by
this instruction manual before use.
CABLES AND PLUGS Check to ensure your electricity
supply matches that shown on the rating plate. This
product should only be used as rated. Preferably, the
socket outlet should be protected by a Residual Current
Device RCD (UK/EU) Ground Fault Indicator (US).
Do not use with a damaged cable or plug. If the supply
cable is damaged, it must be replaced by a qualied
engineer or authorised service agent in order to avoid a
hazard. The use of an extension cable is not recom-
mended.
Do not handle the plug or appliance with wet hands.
Keep the cable away from heated surfaces.
Do not let the cable hang over the edge of the table or
countertop where it could be pulled on inadvertently by
children or pets.
Do not pull the cable around sharp edges or corners.
Do not leave unattended when plugged in. Unplug from
outlet when not in use.
Turn o all controls before unplugging.
Do not unplug by pulling on the cable. To unplug, grasp
the plug, not the cable.
Always unplug before performing user maintenance,
connecting or disconnecting attachments, or changing
accessories.
Ensure the cable is stored safely to prevent hazards.
RISK OF PERSONAL INJURY Always locate your
appliance away from the edge of the worktop, on a rm,
at, heat-resistant surface with sucient space around
all sides.
Do not insert any objects into openings or cover the
appliance.
Do not place any cardboard, plastics or paper inside or
on the appliance unless stated in the instructions.
Do not use the appliance near any combustible
surfaces.
Only use suitable cookware where applicable.
Do not use outdoors or near heat sources.
Take care not to touch any surfaces that may get hot
when in use.
Take care not to touch any surfaces that may remain hot
for a period of time after use.
Never operate the appliance when empty.
Do not overload/overll the appliance.
When using for the rst time your appliance may give
o a ‘new’ smell or vapour. This will dissipate after a
few uses.
Do not lift or move the appliance whilst in use.
Do not operate continuously for periods longer than
those marked on the product or indicated in the
instructions.
Ensure the appliance is switched o and unplugged
before changing accessories or cleaning.
Use only as described in this manual and with DOMU
Brands recommended attachments only.
CLEANING & MAINTENANCE Never soak or immerse
electrical or heating components and or a component
that has a plug attached.
Hand washing recommended; soak in warm soapy
water and wipe down using a soft sponge. To remove
stubborn stains, use a non abrasive cleaning brush.
Do not use abrasive, harsh cleaning solutions or metal
scouring pads.
Never wash any electrical or heating components and or
a component that has a plug attached in a dishwasher.
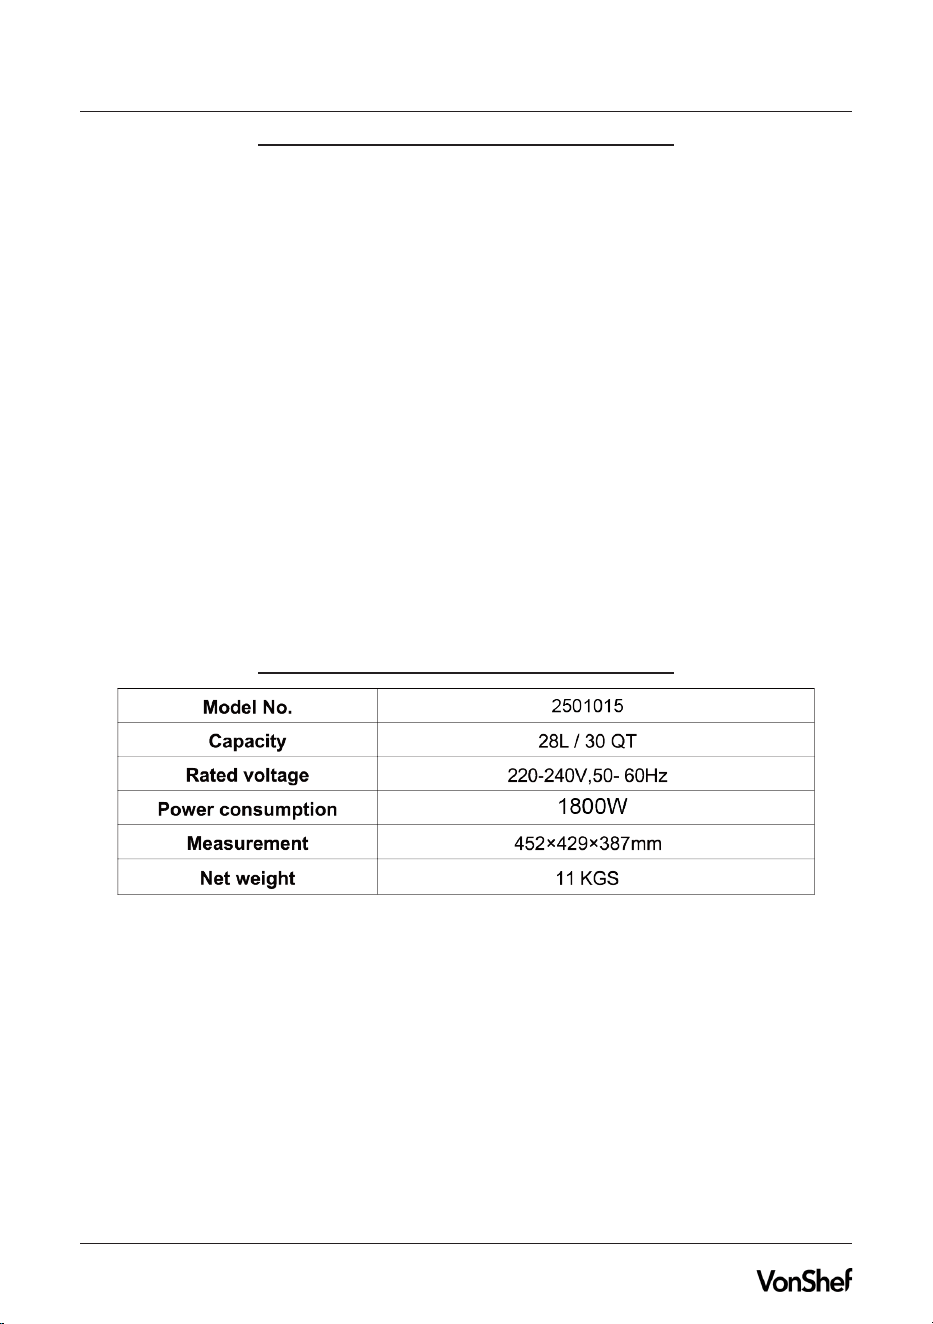
TECHNICAL SPECIFICATION
Rated Voltage 220-240V
Rated Power 1800W
Rated Frequency 50-60Hz
FR
Veuillez lire attentivement ces instructions avant
utilisation et conservez-les pour pouvoir les consulter
à l’avenir.
UTILISATION PRÉVUE
Utilisez l’appareil uniquement pour son usage prévu
et conformément aux paramètres précisés dans ce
manuel.
Cet appareil est réservé à un usage domestique. Ne
l’utilisez pas en extérieur ni sur des surfaces humides.
Cet appareil n’a pas été conçu pour être utilisé par des
personnes sourant de capacités physiques, sensori-
elles ou mentales réduites, non plus que par celles qui
manquent de connaissances et d’expérience, à moins
qu’une personne responsable de leur sécurité ne les su-
pervise ou ne leur ait donné les instructions appropriées
à propos de l’utilisation du produit.
L’appareil n’est pas fait pour être utilisé à l’aide d’une
minuterie externe ou d’un système de commande à
distance distinct.
CONSIGNES GÉNÉRALES DE SÉCURITÉ N’autorisez
jamais qu’il soit utilisé comme un jouet. Les enfants
devraient toujours être supervisés an de s’assurer
qu’ils ne jouent pas avec l’appareil.
Si l’appareil ne fonctionne pas correctement, qu’il est
tombé, qu’il a été endommagé, laissé en extérieur ou
immergé dans du liquide, ne l’utilisez pas et contactez
les Services à la clientèle de DOMU Brands.
N’utilisez pas l’appareil si des pièces ont l’air défec-
tueuses, manquantes ou endommagées.
Avant utilisation, vériez que toutes les pièces sont bien
attachées, comme indiqué dans le mode d’emploi.
FILS ET PRISES Assurez-vous que votre alimentation
électrique correspond aux valeurs achées sur la
plaque signalétique. Ce produit doit seulement être
utilisé conformément à cette puissance nominale. La
prise de courant devrait, de préférence, être protégée
par un dispositif diérentiel à courant résiduel (DDR) ou
un Indicateur de défaut de prise à la terre.

A5P | 01
En cas de dégât sur un câble ou une che, ne l’utilisez
pas. Si le câble d’alimentation est endommagé, il doit,
pour éviter tout danger, être remplacé par un ingénieur
qualié ou un prestataire de service autorisé. L’utilisation
d’une rallonge n’est pas recommandée.
Ne maniez ni la che ni l’appareil avec des mains
mouillées.
Conservez les câbles loin des surfaces chauées.
Ne laissez pas le câble pendre au bord de la table ou
du plan de travail. Les enfants ou les animaux de com-
pagnie pourraient tirer dessus par inadvertance,
Ne tirez pas le câble sur des bords ou des coins
coupants.
Ne laissez jamais sans surveillance lorsqu’il est branché.
Débranchez de la prise lorsque vous ne l’utilisez pas.
Désactivez toutes les commandes avant de débrancher.
Ne débranchez jamais en tirant sur le câble. Pour
débrancher, attrapez la che et non le l.
Débranchez toujours avant de réaliser l’entretien, de
connecter ou déconnecter des accessoires ou de
changer d’accessoire.
An d’éviter tout risque, vériez que le câble est entre-
posé en toute sécurité.
RISQUES DE BLESSURES Placez toujours votre ap-
pareil loin des bords du plan de travail, sur une surface
ferme, plate et résistante à la chaleur, avec susam-
ment d’espace sur les côtés.
N’insérez pas d’objets dans les ouvertures et ne couvrez
pas l’appareil.
Ne placez pas de carton, de plastique ou de papier à
l’intérieur de l’appareil, sauf si indiqué diéremment
dans les instructions.
N’utilisez pas l’appareil près des surfaces combustibles.
Utilisez uniquement, lorsque applicable, les ustensiles
de cuisine adaptés.
Ne l’utilisez pas en extérieur ni près de sources de
chaleur.
Attention à ne toucher aucune surface qui pourrait
chauer en cours d’utilisation.
Attention à ne toucher aucune surface qui pourrait rester
chaude pendant un moment après utilisation.
Ne faites jamais fonctionner l’appareil à vide.
Ne surchargez pas et ne remplissez pas trop l’appareil.
Lorsque vous l’utilisez pour la première fois, votre ap-
pareil pourrait émettre une odeur de neuf ou un peu de
vapeur. Ceci disparaîtra après quelques utilisations.
Ne soulevez pas et ne déplacez pas l’appareil lorsqu’il
fonctionne.
Ne faites pas fonctionner en permanence, pendant des
périodes de temps plus longues que celles achées sur
le produit ou indiquées dans les instructions.
Vériez que l’appareil est éteint et débranché avant de
changer les accessoires ou de le nettoyer.
N’utilisez que comme décrit dans ce manuel et
uniquement avec les pièces recommandées par DOMU
Brands.
NETTOYAGE ET ENTRETIEN Ne plongez et n’im-
mergez jamais des composants électriques ou chauf-
fant, non plus qu’un composant attaché à une prise.
Le lavage à la main est recommandé ; trempez dans
de l’eau chaude et savonneuse, puis essuyez avec une
éponge douce. Pour retirer les tâches tenaces, utilisez
une brosse non abrasive. N’utilisez pas de solutions
de nettoyage abrasives ou acides, non plus que des
tampons à récurer métalliques.
Ne lavez jamais au lave-vaisselle des composants
électriques ou chauants, non plus qu’un composant
attaché à une prise.
CARACTÉRISTIQUES TECHNIQUES
Tension nominale 220-240V
Puissance nominale 1800W
Fréquence nominale 50-60Hz
DE
Bitte lesen Sie die Anleitung sorgfältig und bewahren Sie
sie als Referenz auf.
NUTZUNGSZWECK
Verwenden Sie das Gerät nur für den vorgesehenen
Zweck und innerhalb der in diesem Handbuch angege-
benen Parameter.
Dieses Gerät ist nur für den Hausgebrauch gedacht.
Verwenden Sie es nicht im Freien oder auf nassen
Oberächen.
Dieses Produkt darf nicht von Personen (auch Kindern)
mit eingeschränkten physischen, sensorischen oder
mentalen Fähigkeiten oder einem Mangel an Erfahrung
und Wissen bedient werden, es sei denn sie wird von
einer für Ihre Sicherheit verantwortlichen Person, beauf-
sichtigt oder zur richtigen Nutzung angeleitet.
Das Gerät darf nicht mit einem externen Timer oder
einer separaten Fernbedienung verwendet werden.
ALLGEMEINE VORSICHTSMASSNAHMEN
Dieses Produkt darf nicht als Spielzeug genutzt werden.
Kinder sollten beaufsichtigt werden. Stellen Sie sicher,
dass Kinder nicht mit dem Gerät spielen.
Wenn das Gerät nicht richtig funktioniert, herunterge-
fallen oder beschädigt ist, im Freien liegen geblieben ist
oder in Flüssigkeit getaucht wurde nutzen Sie es nicht.
Kontaktieren Sie in diesem Fall den DOMU Brands
Kundendienst.
Nutzen Sie das Gerät nicht, wenn Teile fehlerhaft schein-
en, wenn Teile fehlen oder beschädigt sind.
Stellen Sie vor dem Gebrauch sicher, dass alle Teile wie
in dieser Bedienungsanleitung beschrieben ordnungs-
gemäß befestigt sind.
KABEL UND STECKER
Prüfen Sie, ob Ihr Stromnetz zu den auf dem Typen-
schild genannten Spannungen passt. Dieses Produkt
sollte nur mit den dort genannten Netzspannungen
verwendet werden. Vorzugsweise sollte die Steckdose
durch eine Fehlerstrom-Schutzeinrichtung RCD (UK /
EU), Erdschlussanzeige (US) geschützt werden.
Verwenden Sie das Gerät nicht mit beschädigtem
Kabel oder Stecker. Wenn das Stromkabel beschädigt
ist, muss es von einem qualizierten Techniker oder
Kundendienstmitarbeiter ausgetauscht werden, um
Gefahren zu vermeiden. Die Verwendung eines Ver-
längerungskabels wird nicht empfohlen.
Bedienen Sie das Gerät oder den Stecker nicht mit
nassen Händen.
Halten Sie das Kabel fern von erhitzten Oberächen.
Lassen Sie das Kabel nicht über den Tischrand oder die
Arbeitsäche hängen, damit das Gerät nicht von Kindern
oder Haustieren heruntergezogen werden kann.
Führen Sie das Kabel nicht um scharfe Ecken oder
Kanten herum.
Lassen Sie das eingesteckte Gerät nicht unbeauf-
sichtigt. Ziehen Sie den Stecker, wenn Sie das Gerät
nicht verwenden.
Schalten Sie das Gerät vor dem Ausstecken aus.
Stecken Sie das Gerät nicht aus, indem Sie am Kabel
ziehen. Um das Gerät auszustecken ziehen Sie bitte am
Stecker, nicht am Kabel.
Ziehen Sie immer den Stecker, bevor Sie das Gerät
warten, Aufsätze anbringen oder entfernen oder bevor
Sie das Zubehör wechseln.
Achten Sie darauf, dass das Kabel sicher verstaut wird,
um Gefahren zu vermeiden.
VERLETZUNGSGEFAHR
Stellen Sie Ihr Gerät niemals zu nahe an den Rand der
Arbeitsäche. Stellen Sie es auf eine stabile, ache,
hitzeresistente Oberäche mit ausreichend Platz auf

A5P | 01
allen Seiten. Stecken Sie nichts in Önungen, decken
Sie das Gerät nicht ab.
Legen Sie keine Pappe, kein Plastik oder Papier in oder
auf das Gerät, es sei denn, dies wird in der Anleitung
erlaubt.Verwenden Sie das Gerät nicht in der Nähe von
brennbaren Oberächen.
Verwenden Sie nur geeignetes Kochgeschirr, falls zutr-
eend. Verwenden Sie das Gerät nicht im Freien oder in
der Nähe von Wärmequellen.
Achten Sie darauf, keine Oberächen zu berühren, die
bei der Benutzung heiß werden könnten.
Achten Sie darauf, keine Oberächen zu berühren, die
nach Gebrauch längere Zeit heiß bleiben könnten.
Lassen Sie das Gerät niemals laufen, wenn es leer ist.
Überladen / Überfüllen Sie das Gerät nicht.
Wenn Sie das Gerät zum ersten Mal verwenden, kann es
riechen oder dampfen. Dies verschwindet nach wenigen
Anwendungen.
Heben Sie das Gerät nicht an, wenn es verwendet ist.
Bewegen Sie es während des Betriebs nicht.
Verwenden Sie das Gerät nicht länger durchgehend,
wie in dieser Anleitung oder auf dem Gerät selbst
angegeben.
Stellen Sie sicher, dass das Gerät ausgeschaltet und
ausgesteckt ist, bevor Sie Zubehör wechseln oder
reinigen.
Verwenden Sie es nur so, wie in dieser Anleitung bes-
chrieben und nur zusammen mit den von DOMU Brands
empfohlenen Zubehörteilen.
REINIGUNG & PFLEGE
Tauchen Sie elektrische Komponenten und oder eine
Komponente, die einen Stecker hat, niemals in Flüssig-
keiten ein.
Spülen Sie das Produkt von Hand mit warmem Wasser
und einem milden Spülmittel. Verwenden Sie einen
weichen Schwamm. Verwenden Sie zum Entfernen von
hartnäckigen Flecken eine nicht scheuernde Reinigungs-
bürste. Verwenden Sie keine scheuernden, scharfen
Reinigungslösungen oder Metallscheuerschwämme.
Geben Sie elektrische Komponenten und oder eine
Komponente, die einen Stecker hat, niemals in eine
Geschirrspülmaschine.
TECHNISCHE SPEZIFIKATION
Nennspannung 220-240V
Nennleistung 1800W
Nennfrequenz 50-60HZ
ES
Por favor, leed cuidadosamente las instrucciones antes
del uso y conservadlas para futuras consultas.
USO PREVISTO
Utilizad el artefacto sólo para su propósito previsto y
dentro de los parámetros especicados en este manual.
Este artefacto es sólo para uso doméstico. No lo
utilicéis fuera de casa o sobre supercies mojadas.
Este artefacto no está destinado a ser usado por per-
sonas con reducidas capacidades físicas, sensoriales
o mentales, o falta de experiencia y conocimiento, a
menos que sea bajo supervisión o bajo la apropiada
instrucción sobre el uso del producto por una persona
responsable de su seguridad.
El artefacto no está diseñado para ser operado por me-
dio de un temporizador externo o un sistema de control
remoto separado.
SEGURIDAD GENERAL
No permitáis que sea usado como un juguete. Los niños
deben ser supervisados para asegurarse de que no
jueguen con el artefacto.
Si el artefacto no funciona correctamente, se ha caído, daña-
do, dejado afuera o ha sido inmerso en líquido, no lo uséis,
comunicaos con el Servicio al Cliente de DOMU Brands.
No uséis el artefacto si alguna de las piezas parece
estar defectuosa, falta o está dañada.
Aseguraos de que todas las piezas están rmemente
unidas como es indicado en este manual antes de su
uso.
CABLES Y ENCHUFES
Vericad para aseguraros de que vuestro suministro de
electricidad coincide con el que se muestra en la placa
de características. Este producto sólo debe usarse
según la clasicación. Preferiblemente, la toma de
corriente debe estar protegida por un Indicador de falla
a tierra (US) del Dispositivo de Corriente Residual RCD
(UK/EU).
No lo utilicéis con un cable o enchufe dañado. Si el
cable de suministro está dañado, debe ser reemplaza-
do por un ingeniero calicado o un agente de servicio
autorizado para evitar riesgos. El uso de un cable de
extensión no es recomendable.
No manipuléis el enchufe o el artefacto con las manos
mojadas.
Mantened el cable alejado de supercies calientes.
No permitáis que el cable cuelgue de los bordes de la
mesa o encimera donde podría ser halado inadvertida-
mente por niños o mascotas.
No tiréis del cable alrededor de bordes alados o
esquinas.
No lo dejéis desatendido cuando esté enchufado. Des-
enchufadlo cuando no esté en uso.
Apagad todos los controles antes de desconectar.
No desenchuféis halando del cable. Para desenchufar,
agarrad el enchufe, no el cable.
Siempre desenchufad antes de realizar mantenimiento,
conectar, desconectar o cambiar accesorios.
Aseguraos de que el cable está almacenado de forma
segura para evitar riesgos.
RIESGO DE LESIONES PERSONALES.
Colocad siempre vuestro artefacto lejos de los bordes
de la encimera, sobre una supercie rme, plana y
resistente al calor con suciente espacio a los lados.
Manipulad siempre las cuchillas /objetos alados con
cuidado.
El artefacto no está no está destinado a ser utilizado
por medio de un temporizador externo o un sistema
separado de control remoto.
No pongáis cartulinas, plástico o papel dentro o sobre el
artefacto a menos que se indique en las instrucciones.
No utilicéis el artefacto cerca de supercies combus-
tibles.
Sólo utilizad utensilios de cocina adecuados cuando
corresponda.
No lo utilicéis fuera de casa o cerca de fuentes de calor.
Tened cuidado de no tocar ninguna supercie que
pueda calentarse cuando esté en uso.
Tened cuidado de no tocar ninguna supercie que
pueda permanecer caliente por un periodo de tiempo
luego del uso.
Nunca operéis el artefacto cuando este vacío.
No sobrecarguéis/sobrellenéis el artefacto.
Cuando estéis usando el artefacto por primera vez,
puede emitir un “nuevo” olor o vapor. Esto se disipará
luego de un poco de uso.
No levantéis o mováis el artefacto mientras esté en
funcionamiento.
No lo uséis continuamente por periodos más largos
que los marcados en el producto o indicados en las
instrucciones.
Aseguraos de que el artefacto esté apagado y desench-
ufado antes de cambiar los accesorios o limpiarlo.
Usadlo sólo como es descrito en este manual y con los

A5P | 01
accesorios recomendados por DOMU Brands.
LIMPIEZA Y MANTENIMIENTO
Nunca sumerjáis componentes eléctricos o calientes y /
o componentes que tengan un enchufe.
Lavado a mano recomendado; remojad en agua tibia y
jabonosa y limpiad utilizando una esponja suave. Para
remover manchas difíciles, usad un cepillo de limpieza
no abrasivo. No utilicéis productos de limpieza abra-
sivos o duros o esponjas de alambre.
Nunca lavéis ningún componente eléctrico o caliente y /
o un componente que tenga enchufe en el lavaplatos.
Poten-
ESPECIFICACIÓN TÉCNICA
Tensión nominal 220-240V
cia nominal 1800W
Frecuencia nominal 50-60Hz
IT
Si prega di leggere attentamente tutte le istruzioni prima
dell’uso e conservarle per una futura consultazione.
USO PREVISTO
Utilizzare l’apparecchio solo per il suo scopo previsto e
secondo i parametri indicati nel presente manuale.
Questo apparecchio è solo per uso domestico. Non
utilizzare all’esterno o su superci bagnate.
Questo apparecchio non è destinato all’utilizzo da parte
di soggetti con ridotte capacità siche, sensoriali o
mentali, oppure senza esperienza, tranne nel caso in cui
abbiano avuto la supervisione o istruzioni, relative all’uti-
lizzo del prodotto, da parte di un soggetto responsabile
della loro sicurezza.
L’apparecchio non può essere azionato attraverso
un timer esterno o tramite un sistema di controllo da
remoto separato.
SICUREZZA GENERALE
Non consentirne l’utilizzo come giocattolo. I bambini
devono essere supervisionati per garantire che non
utilizzino l’apparecchio per giocare.
Qualora l ’apparecchio non dovesse funzionare in mani-
era adeguata, sia caduto, danneggiato, lasciato all’es-
terno oppure immerso in sostanze liquide, non utilizzare,
contattare il Servizio clienti di DOMU Brands.
Non utilizzare l’apparecchio nel caso in cui una qualsiasi
parte dovesse sembrare difettosa, mancante o danneg-
giata.Prima dell’uso, accertarsi che tutte le parti siano
ssate bene come indicato nel presente manuale delle
istruzioni.
CAVI E PRESE
Assicurarsi che il voltaggio indicato sulla targhetta
dell’apparecchio corrisponda a quella della propria rete
elettrica. Questo apparecchio può essere utilizzato solo
come indicato. La presa di corrente dovrebbe essere
preferibilmente protetta da un Dispositivo per corrente
residua (RCD), Ground Fault Indicator (USA).
Non utilizzare con cavo o presa danneggiati. Qualora
il cavo di alimentazione dovesse essere danneggiato,
deve essere sostituito da un ingegnere qualicato, al
ne di evitare pericoli. Non si consiglia l’utilizzo di una
prolunga.
Non manovrare la presa o l’apparecchio con le mani
bagnate.
Tenere il cavo lontano da superci riscaldate.
Non lasciare il cavo appeso al bordo del tavolo o del pi-
ano della cucina dove può essere tirato inavvertitamente
da bambini o animali domestici.
Non arrotolare il cavo intorno a bordi o angoli taglienti.
Non lasciare la presa inserita incustodita. Quando non si
utilizza, staccare la spina.
Prima di staccare la spina, spegnere tutto.
Non staccare la spina tirando il cavo. Per staccare la
spina, aerrare la spina e non il cavo.
Staccare sempre la spina prima di qualsiasi tipo di ma-
nutenzione, prima di collegare o scollegare gli accessori
o prima di cambiare accessorio.
Conservare il cavo in modo sicuro per evitare pericoli.
RISCHIO DI LESIONI PERSONALI
Posizionare sempre l’apparecchio lontano dal bordo del
piano di lavoro, su una supercie piatta, ferma e resist-
ente al calore con spazio suciente intorno ai lati.
Non inserire nessun oggetto nelle aperture o nella
copertura dell’apparecchio.
Non posizionare alcun cartone, plastica o carta all’inter-
no o sull’apparecchio se non indicato nelle istruzioni.
Non usare l’apparecchio vicino ad alcuna supercie
combustibile.
Utilizzare solo pentole adatte, se possibile.
Non utilizzare all’esterno o vicino a fonti di calore.
Fare attenzione a non toccare alcuna supercie che può
riscaldarsi durante l’uso.
Fare attenzione a non toccare alcuna supercie che può
rimanere calda per un certo periodo dopo l’uso.
Non utilizzare mai l’apparecchio quando è vuoto.
Non sovraccaricare l’apparecchio.
Quando si utilizza per la prima volta, l’apparecchio può
emettere un odore di “nuovo” o del vapore. Scomparirà
dopo qualche utilizzo.
Non sollevare o spostare l’apparecchio quando è in uso.
Non utilizzare continuativamente per periodi più lunghi
di quelli indicati sul prodotto o nelle istruzioni.
Prima di cambiare gli accessori o pulire, accertarsi che
l’apparecchio sia spento e scollegato.
Utilizzare solo come descritto nel presente manuale e
solo con gli accessori consigliati da DOMU Brands.
PULIZIA E MANUTENZIONE
Non mettere in ammollo né immergere alcuna parte
elettrica o componente collegata a una presa.
Si consiglia il lavaggio a mano; immergere in acqua
saponata tiepida e stronare con una spugna morbida.
Per rimuovere le macchie ostinate utilizzare una
spugnetta non abrasiva. Non usare detergenti abrasivi o
spugne abrasive per la pulizia.
Non lavare alcun componente elettrico o di riscal-
damento e o componente collegato a una presa in
lavastoviglie.
SPECIFICHE TECNICHE
Tensione nominale 220-240V
Potenza nominale 1800W
Frequenza nominale 50-60Hz
A5P | 01

A5P | 01
BEFORE FIRST USE/ AVANT LA PREMIÈRE UTILISATION / VOR ERSTER NUTZUNG/
ANTES DEL PRIMER USO/ PRIMA DEL PRIMO UTILIZZO
1. Before using your oven for the first time, carefully remove all the accessories, packaging materials and recycle
appropriately.
2. Remove the parts from the box then wash all removable parts with warm, soapy water and anon-abrasive sponge.
Wipe inside of the oven with damp cloth or sponge. Blot dry with paper towels to be sure the appliance is completely fry
before using.
3. Place the appliance on a flat, horizontal and stable surface (make sure surface is heat-resistant). DO NOT
OPERATE THIS APPLIANCE ON THE SAME CIRCUIT WITH ANOTHER APPLIANCE.
4. Before using the appliance, always place the crumbs tray underneath the bottom heating elements.
5. For the first time use only, set the TEMPERATURE KNOB’’to MAX, set the function setting to Toast/Bread”’and set
the TlMER’”to 15 minutes (with the oven empty). NOW PRESS THE START/STOP button and let the unit run for the full
15 minutes. This will burn off any of the protecting oil remaining in the oven.
6. Please tear off the film on the knob digital control panel before using,this film is for protecting the control panel not
been scratched.
NOTE: The oven may smoke during this process. This is normal for a new appliance as the protecting oil evap-
orates. The smoke will not last longer than the 15 minutes for the appliance that runs for the rst time.
A5P | 01
COMPONENTS

A5P | 01
COMPONENTS
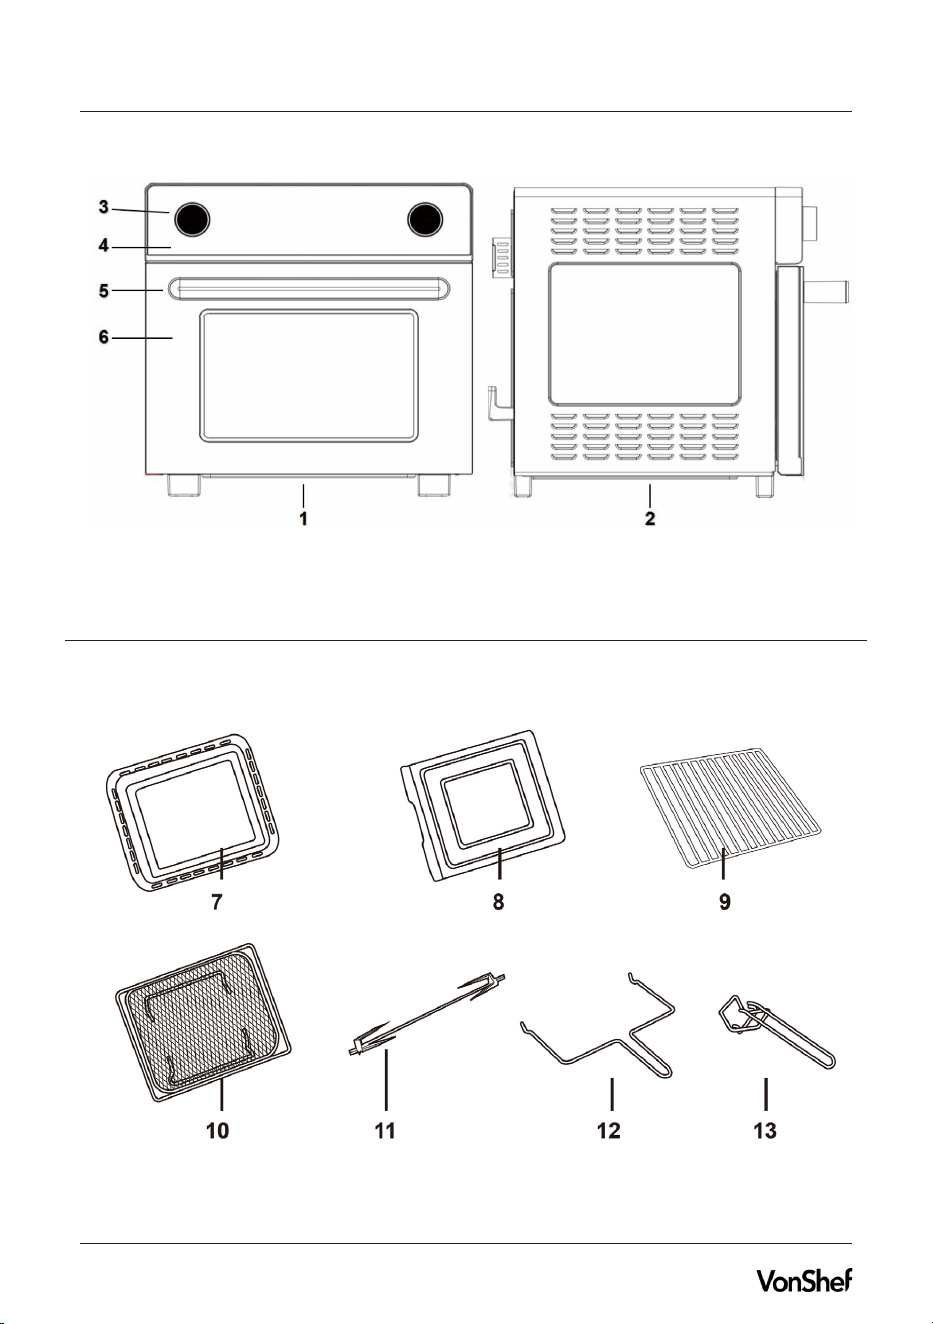
EN
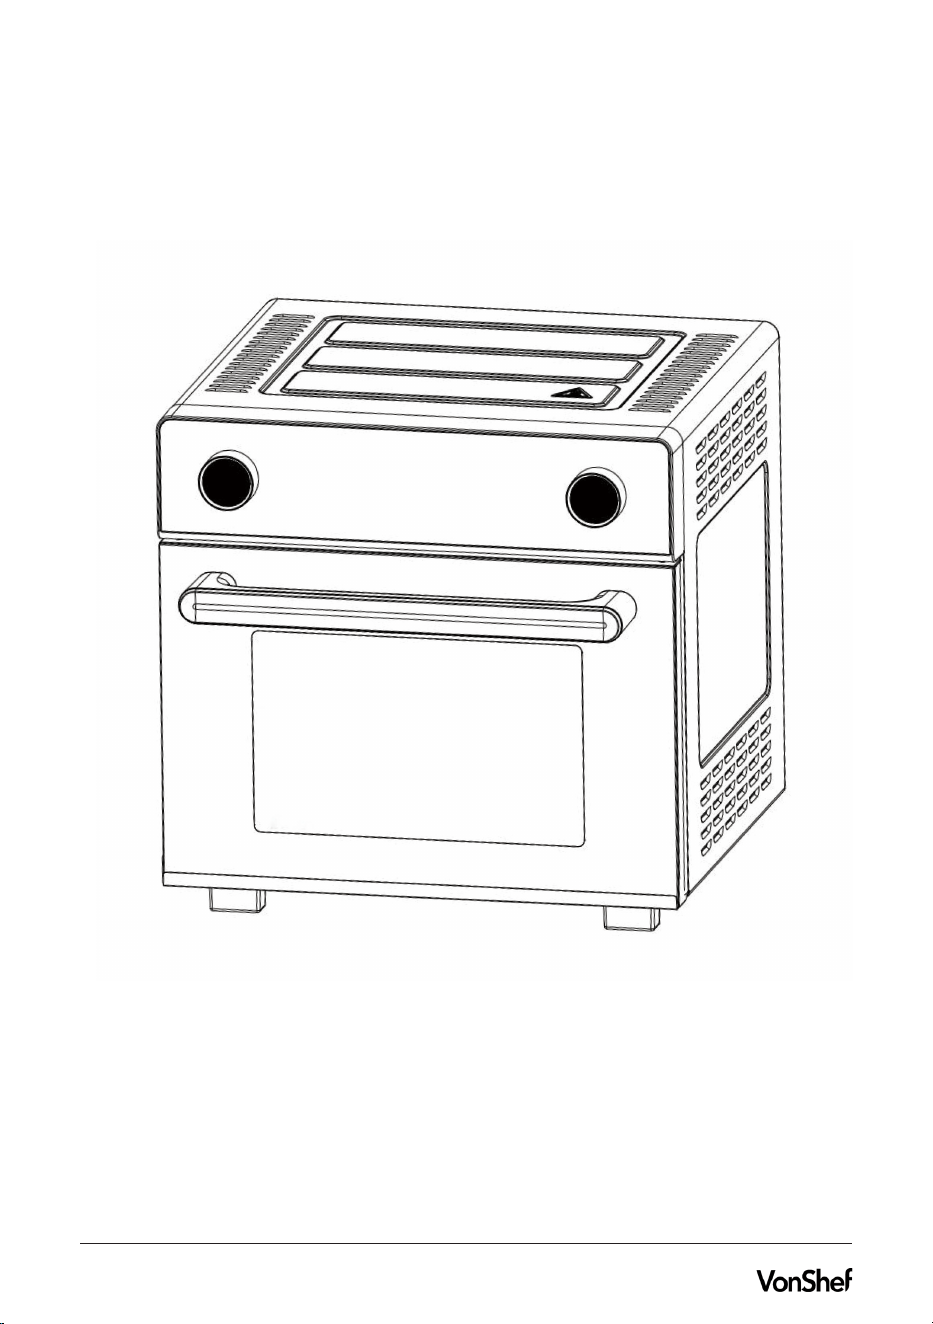
1.Air Fry Oven Front view
2. Air Fry Oven side view
3. Knobs
4.Touch LED electronic screen
5.Door handle
6.Double-layer glass door
7.Baking tray**
8.Crumb tray/drip pan
9.Rack
10.Air frying basket
11.Rotisserie spit and forks
12.Rotisserie handle
13.Tong
FR
1. Vue de face du four de friture d’air
2. Vue latérale du four de friture à air
3. Bouton
4. Écran électronique tactile LED
5. Poignée de porte
6. Porte à double vitrage
7. Plaque de cuisson * *
8. Disque de détritus / disque de goutte
9. Rack
10. Panier de friture d’air
11. Barbecue et fourchette
12. Poignée de magasin de rôti
13. Enfants
DE
1.Air Frittierofen Frontansicht
2. Air Fry Ofen Seitenansicht
3. Knöpfe
4.Touch LED elektronischer Bildschirm
5.Türgri
6.Doppellagige Glastür
7.Backblech**
8.Crumb Tablett/Tropfpfanne
9.Rack
10.Air Bratkorb
11.Rotisserie Spucke und Gabeln
12.Rotisseriegri
13.Tong
ES
1. vista frontal de la freidora de aire
2. vista lateral de la freidora de aire
3. Perilla
4. pantalla electrónica LED táctil
5. manija de puerta
6. puerta de vidrio de doble capa
7. bandeja de horno * *
8. disco de escombros / disco de goteo
9. bastidores
10. cesta de fritura de aire
11. barbacoas y tenedores
12. mango de la barbacoa
13. niños
IT
1.Air Fry Forno Vista frontale
2. Air Fry Forno vista laterale
3. Manopole
4. Touch LED schermo elettronico
5. Maniglia della porta
6. Porta di vetro a doppio strato
7.Vassoio da forno
8.Vassoio per crumb/vaschetta per gocciolamento
9.Rack
10.Cestino per friggere aria
11.Rotisserie sputi e forchette
12.Maniglia per rotisserie
13.Tong
** Baking tray doubles as a drip tray when placed in bottom slot to catch excess oil and foodbits.
A5P | 01
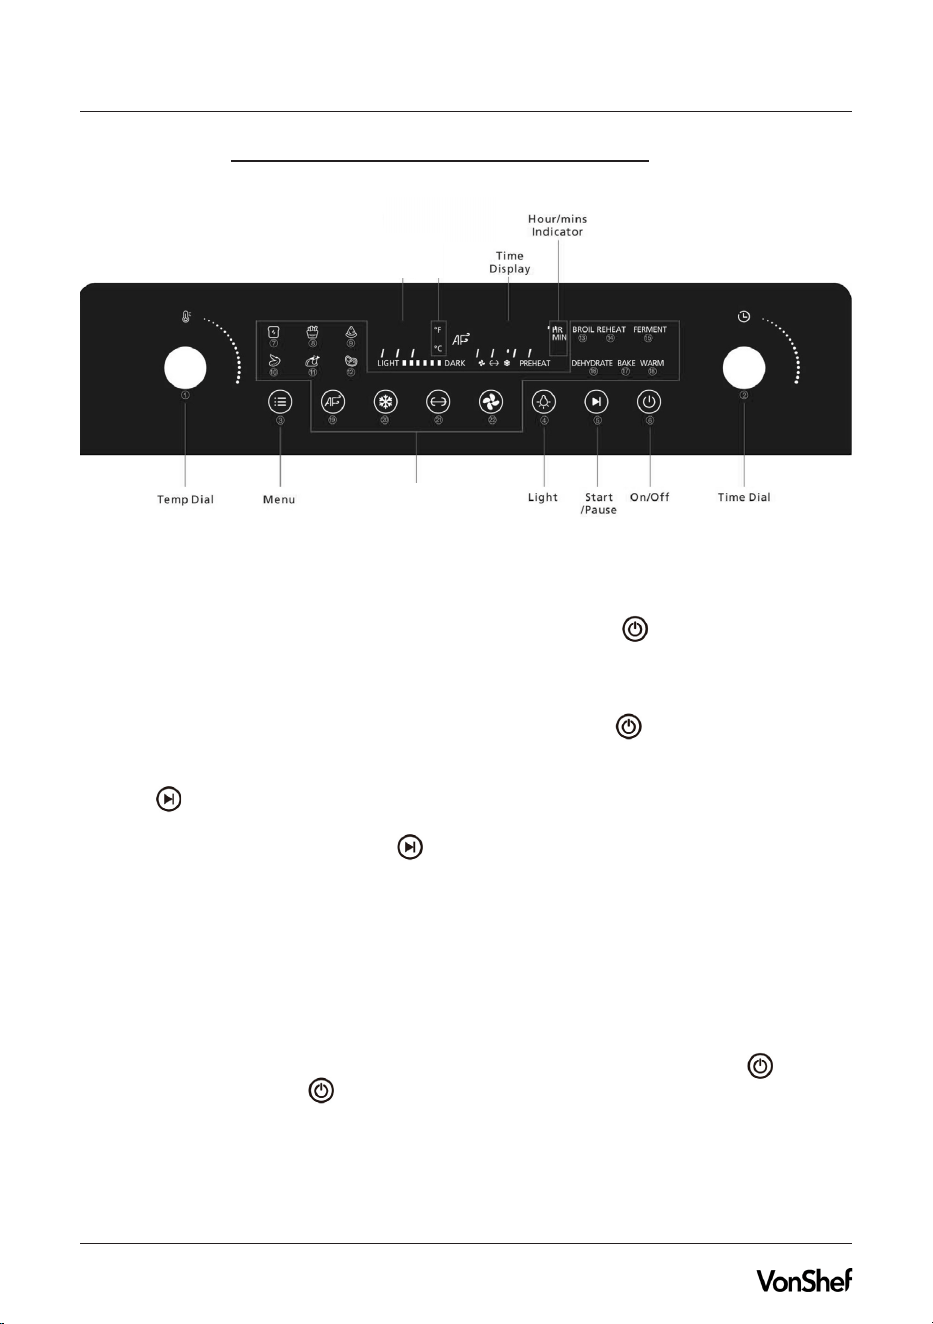
QUICK GUIDE TO KNOW YOUR CONTROL PANEL
OPERATION/ OPÉRATION/BETRIEB/OPERACIÓN/FUNZIONAMENTO
1. TEMP DIAL
Turn the Temp dial to the desired temp when you need for cooking and then press to begin cooking cycle.
2.TIME DIAL
Turn the Time dial to the desired time when you need for cooking and then press to begin cooking cycle.
3.MENU
Press the button to select cooking function. Keep tapping this button until your desired function is selected. The
selected function will icker.
After turning on the air fryer oven, press and hold the button can switch between Fahrenheit and Celsius.
4.LIGHT
Press the button to turn on/off the light inside oven.
5.START
I PAUSE
Press the button to start or pause the cooking process.
6.ON/OFF
Connecting the air fryer oven to the power source , the appliance will enter sleeping mode. The light
will turn on. Press and hold the button will turn on /off the oven and enter standby mode. The
machine can only work properly when the front door is closed.
During operation, press this button to stop the cooking process and return to standby mode.
Fahrenheit/Celsius Indicator
Temperature Display
Cooking Function
A5P | 01
OPERATION/ OPÉRATION/BETRIEB/OPERACIÓN/FUNZIONAMENTO
Instructions
HOW TO USE THE COOKING FUNCTION
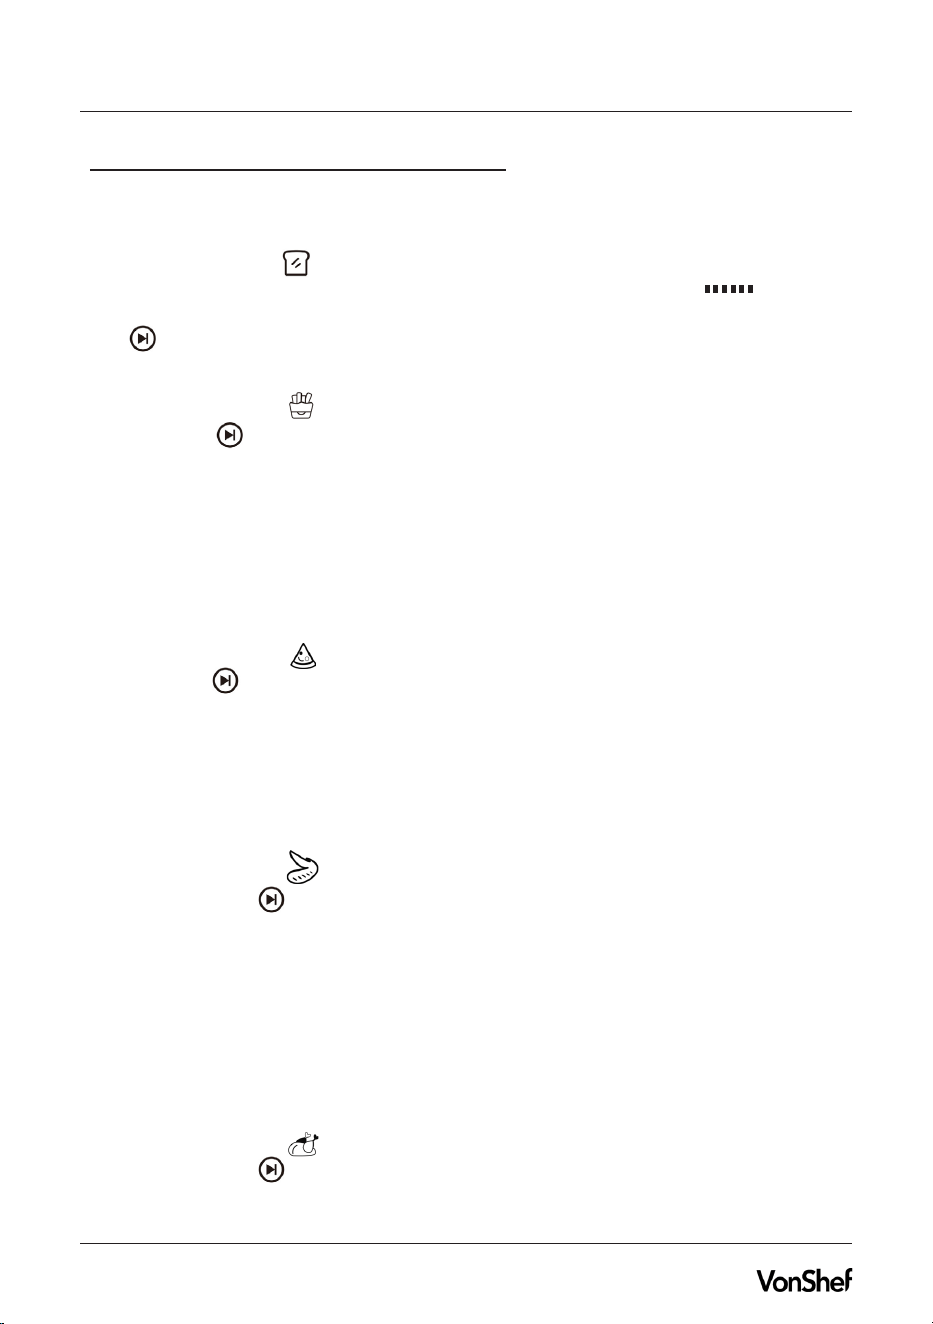
7. TOAST
This function browns the outside of your bread while keeping the inside soft. it is also ideal for
English muffins
and frozen waffles.
Tap the Menu button to select Toast cooking function. The preset temperature is 450F/230℃ and preset time is 3
minutes.The darkness setting will be indicated by the row of small squares on the display LIGHT
DARK . Turn
the Time dial (1-12 minutes) to select darkness. The icon will light up according to the selected setting.Then
press to start toasting, the cooking time will begin to count down.
8.CHIPS
Tap the Menu button to select Chips cooking function. The preset temperature is 320F/160℃ and preset time is
16 minutes. Press start preheating. When the oven reaches setting temperature, preheat finishes. The display
will show “Add Food’
for 10 seconds and beep for 3 seconds. Put the food inside the oven and close the door, the
cooking will automatically start. You can also put the food inside the oven before preheat, the oven will automatically
preheat and start to cook. But preheat without food will lead to a better cooking result.
With this cooking function you can customize the temperature(320F-390*F/160℃-200℃) and time(0-30 minutes)
anytime before or during cooking.
9.PIZZA
This function melts and browns cheese and toppings while crisping crust.
Tap the Menu button to select Pizza cooking function. The preset temperature is 320F/160℃ and preset time is
18 minutes. Press to start preheating. When the oven reaches setting temperature, preheat finishes. The display
will show ‘Add Food’ for 10 seconds and beep for 3 seconds. Put the food inside the oven and close the door, the cook-
ing will automatically start. You can also put the food inside the oven before preheat, the oven will automatically
preheat and start to cook. But preheat without food will lead to a better cooking result.
With this cooking function you can customize the temperature(320F-390F/160℃-200℃) and time(0-30 minutes) any-
time before or during cooking.
10.CHICKEN WING
Tap the Menu button to select Chicken Wing cooking function. The preset temperature is 390’F/200℃ and preset
time is 16 minutes. Press to start preheating. When the oven reaches setting temperature, preheat nishes. The
display will show ‘Add Food’ for 10 seconds and beep for 3 seconds. Put the food inside the oven and close the
door, the cooking will automatically start.
You can also put the food inside the oven before preheat, the oven will automatically preheat and start to cook. But
preheat without food will lead to a better cooking result.
With this cooking function you can customize the temperature(320’F-450F/160℃-230℃
) and time(0-30 minutes)
anytime before or during cooking.
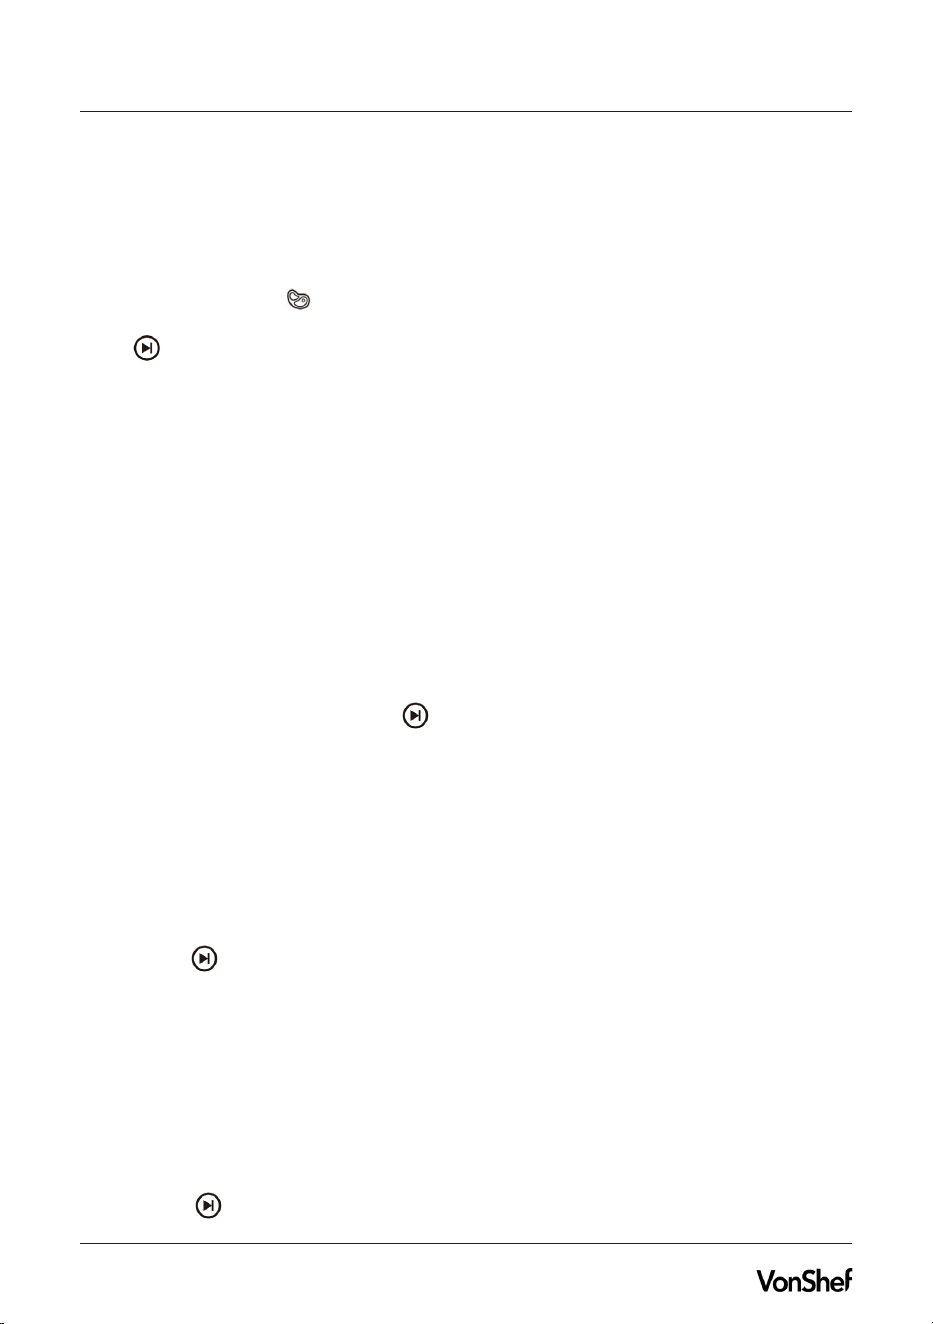
11.CHICKEN
This function roasts whole chicken or other kinds of meat.
Tap the Menu button to select Chicken cooking function. The preset temperature is 450℉/230℃ and preset
time is 35 minutes. Press to start preheating. When the oven reaches setting temperature, preheat nishes. The
display will show ‘Add Food’ for 10 seconds and beep for 3 seconds. Put the food inside the oven and close the
door, the cooking will automatically start.
A5P | 01
OPERATION/ OPÉRATION/BETRIEB/OPERACIÓN/FUNZIONAMENTO
You can also put the food inside the oven before preheat, the oven will automatically preheat and start to cook, But
preheat without food will lead to a better cooking result.
With this cooking function you can customize the temperature(320F-450F/160℃-230℃) and time(0-60 minutes) any-
time before or during cooking.
**You can use ROTISSERlE to roast chicken more evenly.
12.STEAK
Tap the Menu button to select Steak cooking function. The preset temperature is 450F/230℃ and preset time is 7
minutes. The preset program will lead to a MEDIUM-WELL cooking result.
Press to start preheating. When the oven reaches setting temperature, preheat nishes.The display will show
‘Add Food’ for 10 seconds and beep for 3 seconds. Put the food inside the oven and close the door, the cooking will
automatically start.
After 4 minutes the display will show ‘Flip’ for 10 seconds and beep for 3 seconds. Flip the steak and close the door,
the cooking will continue.
You can also put the food inside the oven before preheat, the oven will automatically preheat and start to cook. But
preheat without food will lead to a better cooking result.
With this cooking function you can customize the temperature(320℉-450℉/160℃-230℃) and time(0-30 minutes)
anytime before or during cooking, based on the thickness or weight of the steak.
13.BROIL
Broiling function can be used for beef, chicken, pork, sh, and more. lt also can be used to top-brown casseroles and
gratins.
Tap the Menu button to select BROlL cooking function. The preset temperature is 250℉/120℃ and preset time is 7
minutes
Turn the Time dial to adjust cooking time. Press to start preheating. When the oven reaches setting temperature,
preheat nishes. The display will show ‘Add Food’ for 10 seconds and beep for 3 seconds. Put the food inside the oven
and close the door, the cooking will automatically start.
You can also put the food inside the oven before preheat, the oven will automatically preheat and start to cook. But
preheat without food will lead to a better cooking result. With this cooking function you can customize the tempera-
ture(195℉-450℉/90℃-230℃)and time(0-2 hours) anytime before or during cooking.
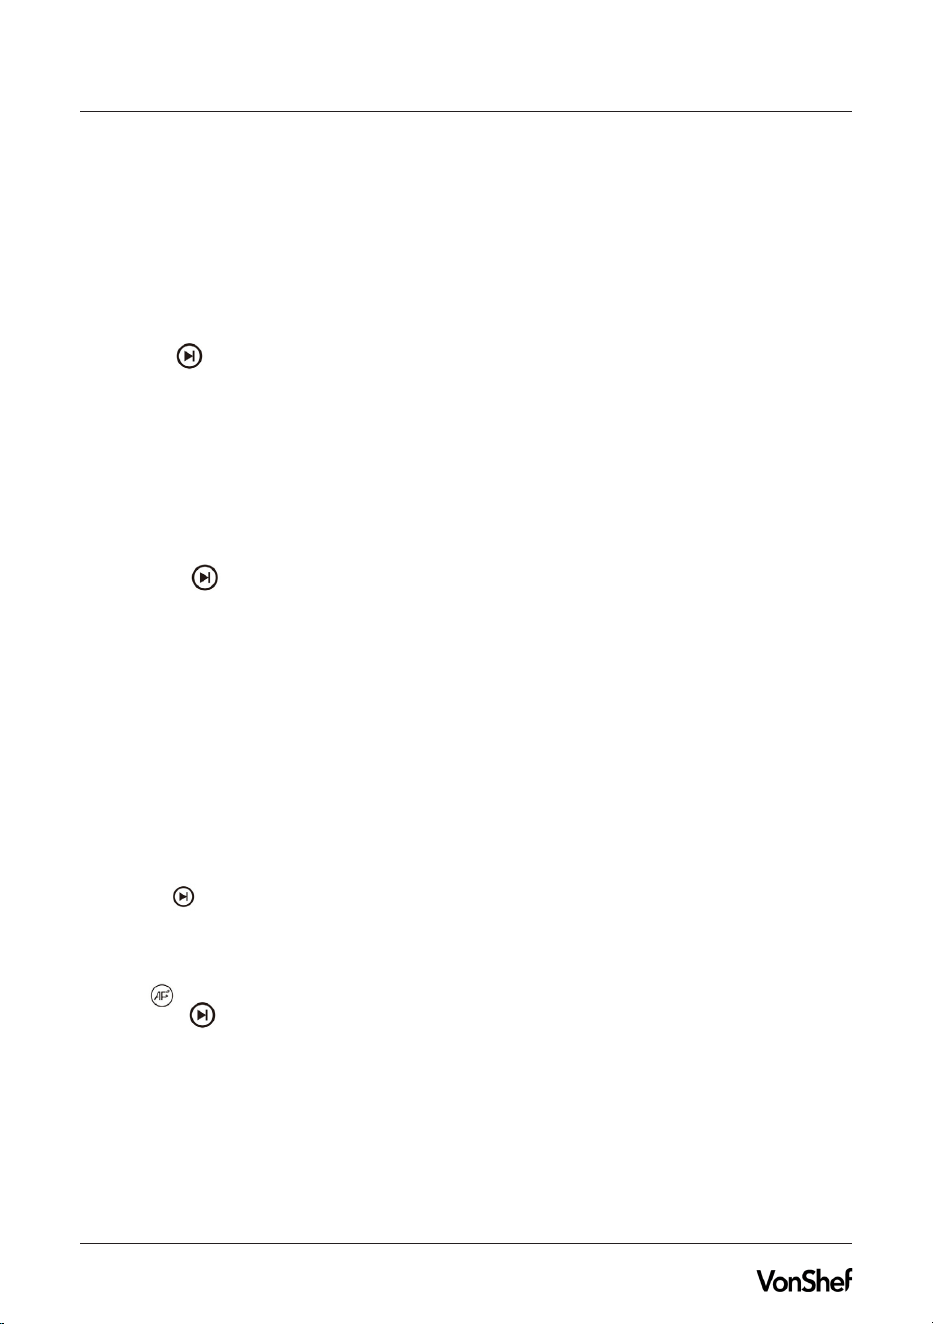
14.REHEAT
Use this function to reheat leftovers.
Tap the Menu button to select REHEAT cooking function. The preset temperature is 205℉/95℃ and preset time is 5
minutes. Press to start reheating. the cooking time will begin to count down.
With this cooking function you can customize the temperature(195℉-450℉/90℃-230℃) and time(0-2 hours) anytime
before or during cooking.
15.FERMENT
This function is designed to precisely hold low temperatures, providing an ideal environment for proong bread, rolls,
pizza, and dough. lt can also be used for making yogurt with an appropriate recipe (using 105°F/40℃ temperature and
12 hours time).
Place dough in a heat-safe container. Cover and place on the food tray or wire rack. lnsert at low position and close the
oven door. Tap the Menu button to select FERMENT cooking function.Select desired temperature and time by turning
the dials. Press to start. the cooking time will begin to count down.
A5P | 01
OPERATION/ OPÉRATION/BETRIEB/OPERACIÓN/FUNZIONAMENTO
With this cooking function you can customize the temperature(70°F-115°F/20℃
-45℃) and time(0-12 hours) anytime
before or during cooking.
16.DEHYDRATE
The Dehydrate function combines low and stable heat to dry out food without cooking. Good for drying fruit or vegeta-
bles chips.
Place the food to be cooked on the wire rack/food tray. lnsert the rack/tray into the middle position inside of the oven
and close the door.
Tap the Menu button to select DEHYDRATE cooking function. The preset temperature is140F/60Cand preset time is 5
hours. Press to start. The cooking time will begin
to count down.
With this cooking function you can customize the temperature(85°F-175°F/30℃-80℃) and time(0-24 hours) anytime
before or during cooking.
17.BAKE
The Bake function cooks food evenly throughout. This function is ideal for baking cakes, muffins,brownies and pastries.
Insert the rack/tray into the middle position inside of the oven and close the door.
Tap the Menu button to select BAKE cooking function. The preset temperature is 355°F/180℃ and preset time is 20
minutes. Press to start preheating. When the oven reaches setting temperature, preheat nishes. The display will
show ‘Add Food’ for 10 seconds and beep for 3 seconds. Put the food inside the oven and close the door, the cooking
will automatically start.
You can also put the food inside the oven before preheat, the oven will automatically preheat and start to cook. But
preheat without food will lead to a better cooking result.
With this cooking function you can customize the temperature(150°F-450°F/65℃-230℃) and time(0-4 hours) anytime
before or during cooking.
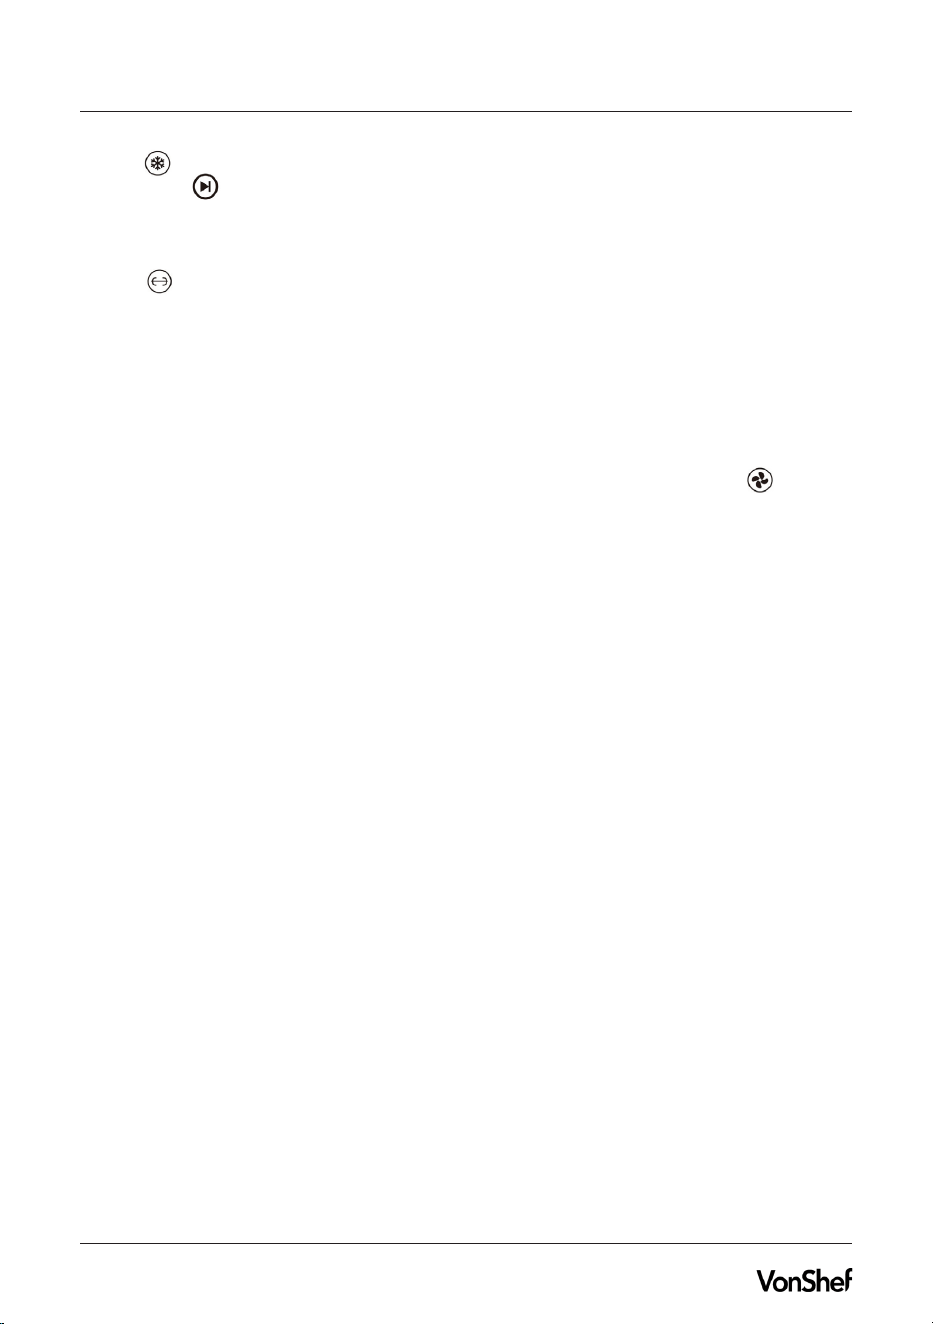
18.WARM
This function is designed to keep food warm at the recommended temperature to prevent bacterial growth (160°F/70°C
or above).
Place hot food in a heat-safe container. Cover and place on the food tray.
Tap the Menu button to select WARM cooking function. The preset temperature is 150°F/65℃ and preset time is 1
hour. Press to start. The cooking time will begin to count down. With this cooking function you can customize the
temperature(85°F-175°F/30℃-80℃ ) and time(0-24 hours) anytime before or during cooking.
19. AIR FRY (WITH HIGH SPEED FAN)
Tap the button to select Air Fry cooking function. The preset temperature is 355°F/180℃ and preset time is 20
minutes. Press to start preheating. When the oven reaches setting temperature, preheat finishes. The display will
show ‘Add Food’ for 10 seconds and beep for 3 seconds. Put the food inside the oven and close the door, the cooking
will automatically start. You can also put the food inside the oven before preheat, the oven will automatically preheat
and start to cook. But preheat without food will lead to a better cooking result.
With this cooking function you can customize the temperature(105°F-450°F/40℃-230℃) and time(0-60 minutes)
anytime before or during cooking.
20.DEFROST
Place the frozen food to be cooked on the wire rack/food tray. insert the rack/tray into the middle position inside of the
A5P | 01
OPERATION/ OPÉRATION/BETRIEB/OPERACIÓN/FUNZIONAMENTO
oven and close the door.
Tap the button to select Defrost cooking function. The preset temperature is 120°F/50℃ and preset time is 40
minutes. Press to start. The cooking time will begin to count down.With this cooking function you can customize
the temperature(70°F-120°F/20℃-50℃) and time(0-150 minutes) anytime before or during cooking.
21. ROTISSERIE
Tap the button to enable Rotisserie function optionally when using other cooking functions.The Rotisserie function
is a rotating spit with 2 forks to x the food, good for whole chicken roasting.Place whole chicken on the rotisserie spit
and x it by the forks on both sides, then insert the spit into the rotisserie hole position and close the door.
Rotating basket(not included in this product) can also be used. Place food inside the rotating basket, then insert the
spit into the rotisserie hole position and close the door. Be careful not to overll the basket as food may expand during
cooking.
22. CONVECTION (WITH LOW SPEED FAN)
When you are cooking with BROIL, REHEAT, FERMENT, BAKE and WARM functions, you can tap the button to
enable/disable the convection fan.
NOTE:
1. The fan inside the appliance will still keep working for 1 minute after nishing cook-
ing For better heat dissipation.
2. lf the door of the appliance is open during cooking, the appllance will pause working.
It will continue working with the set program when the door is closed again.
A5P | 01
OPERATION/ OPÉRATION/BETRIEB/OPERACIÓN/FUNZIONAMENTO
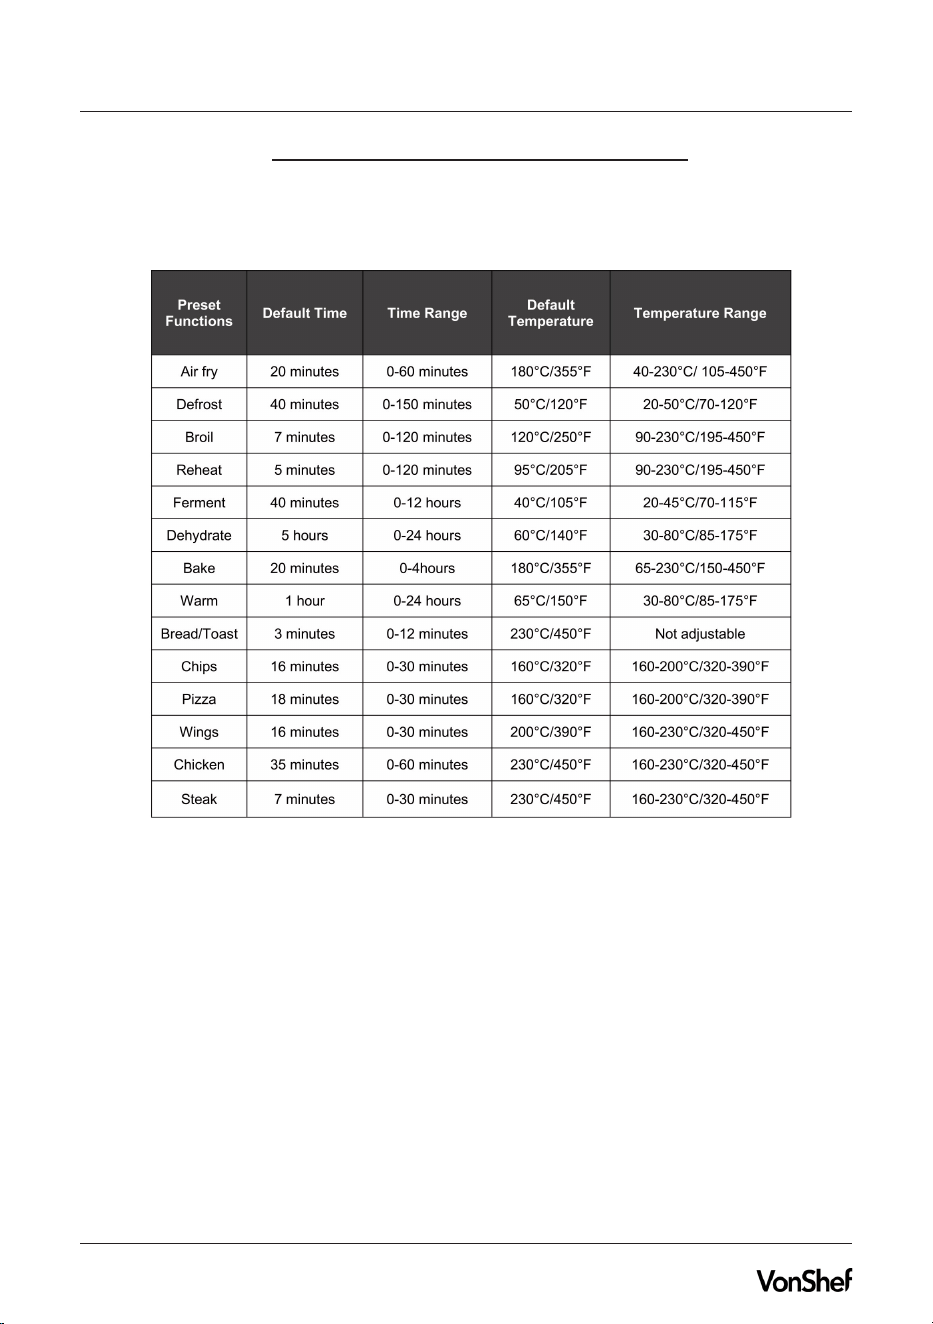
COOKING FUNCTIONS & SETTINGS
There are 14 preset cooking functions: air fry, defrost, broil, reheat, ferment, dehydrate, bake,warm, toast, chips, pizza,
wings, chicken, steak:
For time and temperature settings, see the table above for reference.
Please note:Time and temperature are indicative, cooking results can vary on food or quantity.

A5P | 01
OPERATION/ OPÉRATION/BETRIEB/OPERACIÓN/FUNZIONAMENTO
COOKING GUIDE
Air fry: Air frying is a basic function of this unit. With this function, users can deep-fry food for crispy results, requiring
little or no oil. Not all food should be tossed in oil, frozen food and food with high fat such as chicken wings or bacon
do not require oil.To achieve crispy and browned results on food such as hand-cut fries or vegetables, it is suggested
to coat food with one tablespoon of oil evenly. Under this mode, 6 heating elements and high speed fan are turned on
altogether. This mode is perfect for French fries, chicken wings, chicken nuggets etc. You can also air fry other food by
adjusting the time and temperature as desired.
Defrost: With this function, users can defrost frozen food quickly. For time and temperature settings, please check the
table above, both can be adjusted according to the size or thickness of the food.
Broil: This function is mainly for cooking meat, such as sh, beef, chicken, pork chop etc.For desired time and tem-
perature, please check the table above for reference. Under this mode.The upper 4 heating elements are turned on.
For better cooking results, preheat is highly recommended. As this function takes short cooking time and requires high
temperature. it is suggested to watch over the food while cooking to avoid overcooking.
Reheat: With this function, users can reheat leftovers without overcooking or drying them out.Under this mode, 6 heat-
ing elements are tured on. For time and temperature settings, please refer to the table above.
Ferment: This function is designed to precisely hold low temperatures, providing an ideal environment for proong
bread, rolls, pizza and dough etc. it can also be used for making yogurt with an appropriate recipe (using 105°F /40°C
temperature and 12 hours time). Under this mode, the upper 2 heating elements and lower 2 heating elements are
turned on.
Dehydrate: This function can be used for dehydrating fruits, herbs and owers and removes moisture from food so that
you can keep them for a longer period of time.Under this mode,The upper 4 elements and low speed fan are turned on
altogether.For time and temperature settings, please refer to the table above.
Bake: This function is the same as that of the conventional oven. it is suitable for food such as biscuits, cakes, muns,
cookies etc. Under this mode, 6 heating elements and high speed fan are turned on altogether. For time and tempera-
ture, please refer to the table above.
Warm: With this function, users can keep the food warm after grilling, baking, or toasting prior to serving.Under this
mode,the upper 2 heating elements and lower 2 heating elements are turned on.
Toast/Bread: With this function, users can toast bread to perfection, crunchy outside and soft inside. Under this mode,
6 heating elements and high speed fan are working altogether.To achieve better results, put the food at the center of
the wire rack evenly, then place the wire rack in the middle position inside the oven. Toasting times will vary depending
on the type of bread toasted. Sweet and fruit breads generally take less time than white or wholemeal bread.
Chips: With this function , users can make delicious French fries/chips. You can adjust the time and temperature
according to the amount or size of chips. Under this mode, 6 heating elements and high speed fan are turned on
together.For better results, coat the chips with proper oil, put the chips onto the air fry basket evenly, then place the air
fry basket in the middle rack position inside the oven.

A5P | 01
OPERATION/ OPÉRATION/BETRIEB/OPERACIÓN/FUNZIONAMENTO
Pizza: With this function, users can cook crispy and delicious pizza. Under this mode, 6 heating elements and low
speed fan are turned on altogether. You can adjust the time and temperature according to the size of the pizza. When
cooking with this function, put the pizza at the center ofthe bake pan, place the bake pan in the middle position inside
the oven. lt is suggested to rotate the pizza 180° halfway through cooking.
Chicken wings: With this function, users can make crispy and delicious chicken wings. Under this mode, 6 heating
elements and high speed fan are turned on together. When cooking with this function, place the seasoned wings on the
baking pan or rack, then place the pan/rack in the middle rack position inside the oven. T
ime and temperature can be
adjusted according to the amount or size of the wings.
Chicken: This function is for roasting tender and juicy whole chicken. Under this mode, 6 heating elements and high
speed fan are turned on altogether.When cooking with this function, place the seasoned whole chicken on the rotisserie
spit and x it by the forks on both sides, then use the rotisserie handle to insert the long end of the rotisserie spit into
the rotisserie hole position.Once the long end of spit is in the hole, place the short end of the spit onto the rotisserie
notchon the other side. Ensure your chicken is well-balanced so that the spit spins without snagging or grazing any
heating elements when it rotates.Place the drip tray under the lower heating elements to catch any fatty residue from
the chicken. Close the oven door and then press the rotisserie button, lf your version of the unit is without rotisserie
function, just put the chicken on the bake pan, then place the bake pan at level 2 or 3 position.
Steak: This function is for perfect steak. Under this mode, the default setting will lead to adoneness of ‘MEDIUM
WELL’. 6 heating elements and high speed fan are turned on altogether.Preheat is highly recommended when you
cook with this function. Put the seasoned steak with salt, pepper and a bit of oil on the bake pan, place the bake pan at
level 2 position and start to cook. After cooking for 7 minutes, the unit will remind you to ip the steak. You can adjust
the time and temperature according to the desired degree of doneness. Ensure to place the drip tray on the bottom of
the oven to catch any fatty residue from the steak.
Chicken wings: With this function, users can make crispy and delicious chicken wings. Under this mode, 6 heating
elements and high speed fan are turned on together. When cooking with this function, place the seasoned wings on the
baking pan or rack, then place the pan/rack in the middle rack position inside the oven. T
ime and temperature can be
adjusted according to the amount or size of the wings.
Chicken: This function is for roasting tender and juicy whole chicken. Under this mode, 6 heating elements and high
speed fan are turned on altogether.When cooking with this function, place the seasoned whole chicken on the rotisserie
spit and x it by the forks on both sides, then use the rotisserie handle to insert the long end of the rotisserie spit into
the rotisserie hole position.Once the long end of spit is in the hole, place the short end of the spit onto the rotisserie
notch on the other side. Ensure your chicken is well-balanced so that the spit spins without snagging or grazing any
heating elements when it rotates.Place the drip tray under the lower heating elements to catch any fatty residue from
the chicken. Close the oven door and then press the rotisserie button. lf your version of the unit is without rotisserie
function, just put the chicken on the bake pan, then place the bake pan at level 2 or 3 position.
Steak: This function is for perfect steak. Under this mode, the default setting will lead to a doneness of ‘MEDIUM
WELL’. 6 heating elements and high speed fan are turned on altogether.Preheat is highly recommended when you
cook with this function. Put the seasoned steak with salt, pepper and a bit of oil on the bake pan, place the bake pan at
level 2 position and start to cook. After cooking for 7 minutes, the unit will remind you to ip the steak. You can adjust
the time and temperature according to the desired degree of doneness. Ensure to place the drip tray on the bottom of
the oven to catch any fatty residue from the steak.
A5P | 01
* Make sure to clean the appliance after each use. Cleaning regularly prevents the accumulation of grease and helps
avoid unpleasant smells.
* Before cleaning, always ensure the appliance is disconnected from the power supply and has completely cooled
down.
* Wipe the interior and exterior of the appliance with a damp cloth and then dry thoroughly. Do not immerse the unit in
water or wash under running water.
* Wash the mesh basket, baking tray and wire rack in warm soapy water, then rinse and dry thoroughly.
* Never use abrasive products in the cavity. Make sure no water or damp penetrates the appliance except the cavity.
* Ensure all parts are clean and dry before placing them back inside the appliance.
NOTE: Do not use harsh or abrasive cleaners to clean the air fryer oven, as this may dam-
age the appliance’s nishing.
MAINTENANCE /ENTRETIEN /INSTANDHALTUNG / MANTENIMIENTO / MANUTENZIONE / MANTENIMIENTO
CLEAN & MAINTENANCE
TECHNICAL SPECIFICATIONS
A5P | 01
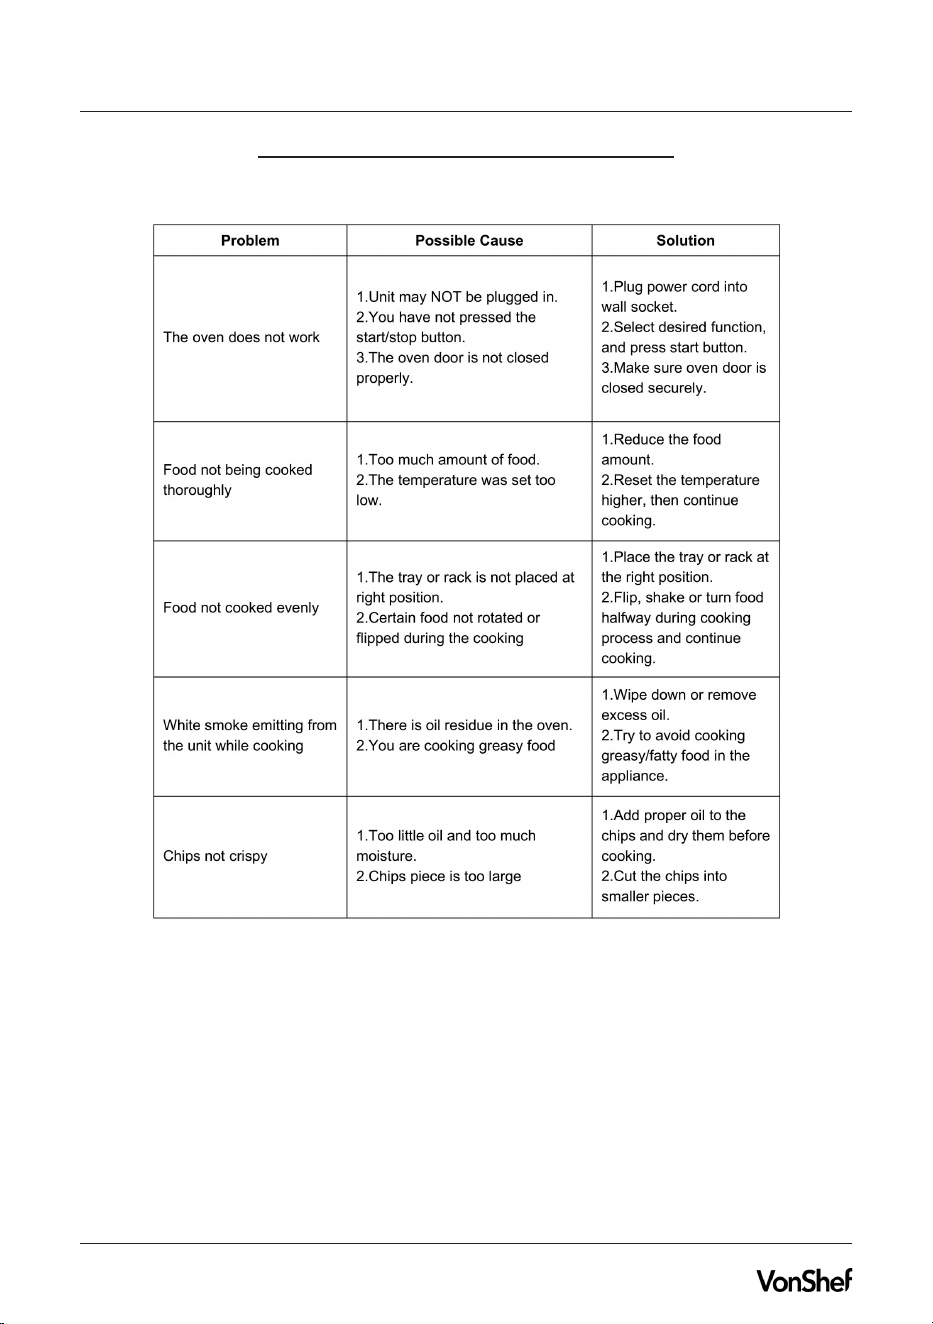
TROUBLESHOOTING
Please perform these troubleshooting before sending the appliance to the service center.

A5P | 01
DE
ENTSORGUNG Bitte entsorgen Sie das Produkt an
geeigneten Entsorgungsstellen. Fragen Sie bei Ihrer
Gemeinde nach.
KUNDENSERVICE Wenn Sie Schwierigkeiten mit
diesem Produkt haben und Unterstützung benötigen,
wenden Sie sich bitte an
GARANTIE Um Ihr Produkt zu registrieren und zu er-
fahren, ob eine kostenlose verlängerte Garantie möglich
ist, gehen Sie bitte auf www.vonshef.com/warranty.
Bitte behalten Sie eine Rechnung oder den Kassenzet-
tel als Nachweis des Einkaufdatums auf. Die Garantie
gilt nur, wenn das Produkt nur wie in dieser Anleitung
beschrieben verwendet wurde und wenn alle Anweisun-
gen befolgt wurden. Jeglicher Missbrauch des Produkts
oder der Art und Weise, in der es verwendet wird, macht
die Garantie ungültig. Zurückgegebene Artikel werden
nur akzeptiert, wenn sie sich in der Originalverpackung
benden und wenn ein relevantes und vollständig aus-
gefülltes Rücksendeformular enthalten ist. Dies betrit
nicht Ihre gesetzlichen Ansprüche. Für Artikel, die ge-
braucht erworben wurden, oder die kommerzielle oder
gemeinschaftlich genutzt werden, entstehen keinerlei
Ansprüche auf Garantie.
COPYRIGHT Alle Materialien in dieser Anleitung stehen
unter Copyright von DOMU Brands Ltd.Jede unautor-
isierte Verwendung kann das weltweite Copyright, die
Handelsmarke und andere Gesetze verletzen.
ES
INFORMACION DE DESECHO Por favor, reciclad
en las instalaciones correspondientes. Consultad
con vuestra autoridad local para obtener consejos de
reciclaje.
SERVICIO AL CLIENTE Si tiene dicultades para utilizar
este producto y necesita asistencia, contacte con
GARANTÍA Para registrar vuestro producto y averiguar
si calica para una garantía extendida gratuita, vaya a
www.vonshef.com/warranty. Conservad un compro-
bante de recibo de compra o extracto como prueba
de la fecha de compra. La garantía solo se aplica si el
producto se utiliza únicamente de la manera indicada
en la página de advertencias de este manual, y todas
las demás instrucciones se han seguido con precisión.
Cualquier abuso del producto o la manera en que se
use invalidará la garantía. Los productos devueltos no
se aceptarán a menos que se vuelvan a empaquetar en
su embalaje original y acompañados por un formulario
de devolución completo y pertinente. Esto no afecta
sus derechos legales. No se otorgan derechos bajo
esta garantía a una persona que adquiere el aparato de
segunda mano o para uso comercial o comunitario
DERECHOS DE AUTOR Todo el material en este man-
ual de instrucciones está protegido por DOMU Brands.
Cualquier uso no autorizado puede violar los derechos
de autor, marcas comerciales y otras leyes en todo el
mundo.
EN
DISPOSAL INFORMATION Please recycle where
facilities exist. Check with your local authority for
recycling advice.
CUSTOMER SERVICE If you are having diculty using
this product and require support, please contact
WARRANTY To register your product and nd out if you
qualify for a free extended warranty please go to
www.vonshef.com/warranty.
Please retain a proof of purchase receipt or statement
as proof of the purchase date. The warranty only applies
if the product is used solely in the manner indicated
in the warnings page of this manual, and all other
instructions have been followed accurately. Any abuse
of the product or the manner in which it is used will
invalidate the warranty. Returned goods will not be ac-
cepted unless re-packaged in its original packaging and
accompanied by a relevant and completed returns form.
This does not aect your statutory rights. No rights
are given under this warranty to a person acquiring the
appliance second-hand or for commercial or communal
use.
COPYRIGHT All material in this instruction manual are
copyrighted by DOMU Brands.Any unauthorised use
may violate worldwide copyright, trademark, and other
laws.
FR
INFORMATIONS RELATIVES AU RECYCLAGE
Veuillez recycler là où il existe des installations
adéquates. Vériez auprès de vos autorités locales pour
obtenir des conseils sur le recyclage.
SERVICE CLIENT Si vous rencontrez des dicultés
pour utiliser ce produit et avez besoin d’assistance,
veuillez contacter
GARANTIE Pour enregistrer votre produit et découvrir
si vous vous qualiez pour une extension gratuite de
garantie, rendez-vous sur
www.vonshef.com/warranty. Conservez une preuve
d’achat, reçu ou attestation, pour prouver la date de
l’achat. La garantie ne s’applique que si le produit a
été utilisé de la manière indiquée dans la section de la
page des avertissements de ce manuel et que toutes
les instructions ont été suivies de manière précise.
Tous les abus réalisés sur le produit, dans la manière
dont il a été utilisé, rendront la garantie caduque. Les
marchandises renvoyées ne seront acceptées que si
elles sont remballées dans leur emballage d’origine et
accompagnées d’un
formulaire de retour adéquat et rempli. Ceci n’aecte
pas vos droits statutaires. Cette garantie n’accorde
aucun droit à une personne obtenant le produit de
seconde main ou à des ns d’utilisation commerciale ou
communale.
DROITS D’AUTEUR Toutes les informations de ce
manuel d’utilisation sont protégées par droit d’auteur
par DOMU Brands. Toute utilisation non autorisée
pourrait enfreindre les lois mondiales de droit d’auteur,
de marque déposée ainsi que d’autres lois.
C

A5P | 01
IT
INFORMAZIONI SULLO SMALTIMENTO Si prega di
riciclare nelle apposite strutture. Chiedere una consulen-
za alle autorità competenti per il riciclo.
SERVIZIO CLIENTI Se si riscontrano dicoltà nell’utiliz-
zo di questo prodotto e si richiede
supporto, contattare
GARANZIA Per registrare il prodotto e capire se hai
diritto all’estensione di garanzia, vai su
www.vonshef.com/warranty. Si prega di conservare la
ricevuta del pagamento quale prova della data d’ac-
quisto. La garanzia si applica solo se il prodotto viene
utilizzato esclusivamente come indicato nella pagina
delle Avvertenze del presente manuale e se tutte le altre
informazioni vengano accuratamente seguite. Qualsia-
si abuso nell’utilizzo di questo prodotto invaliderà la
garanzia. I resi non saranno accettati se non riposti nella
confezione originale ed accompagnati da un modulo di
reso completo. Ciò non pregiudica i propri diritti obblig-
atori. La presente garanzia non attribuisce alcun diritto
a coloro che acquistano prodotti di seconda mano o per
ni commerciali o condivisi.
COPYRIGHT Tutto il materiale contenuto nel presente
manuale delle istruzioni è protetto da copyright di
DOMU Brands. Qualsiasi uso non autorizzato potrebbe
violare il copyright a livello mondiale, marchio ed altre
leggi.
THANK YOU
Thank you for purchasing your product/appliance.
Should you require further assistance with your
purchase, you can contact us at
VonShef is a registered trademark of DOMU Brands Ltd. Made
in China for DOMU Brands. DOMU Brands Ltd.
Unit 30, Stakehill Industrial Estate, Middleton, Manchester
M24 2RW.
Authorised Representative:
Authorised Representative Service,77 Camden Street Lower,
Dublin, D02 XE80, Ireland.
MERCI
Merci d’avoir acheté notre produit/appareil.
Si vous aviez besoin d’aide suite à votre achat, vous pou-
vez nous contacter a
VonShef est une marque déposée de DOMU Brands Ltd. Fab-
riqué en Chine pour DOMU Brands. DOMU Brands Ltd.
Unit 30, Stakehill Industrial Estate, Middleton, Manchester
M24 2RW.
Authorised Representative:
Authorised Representative Service,77 Camden Street Lower,
Dublin, D02 XE80, Ireland.
VIELEN DANK
Vielen Dank, dass Sie das Produkt/Gerät gekauft
haben. Sollten Sie weitere Unterstützung benötigen,
können Sie uns gerne unter (email) kontaktieren.
VonShef ist eine registrierte Handelsmarke von DOMU Brands
Ltd. Hergestellt in China für DOMU Brands. DOMU Brands Ltd.
Unit 30, Stakehill Industrial Estate, Middleton, Manchester
M24 2RW.
Authorised Representative:
Authorised Representative Service,77 Camden Street Lower,
Dublin, D02 XE80, Ireland.
GRACIAS
Gracias por comprar vuestro producto/aparato
Si requiere asistencia con vuestra compra, podeis con-
tactarnos a
VonShef es una marca registrada de DOMU Brands Ltd. Hecha
en China para DOMU Brands.DOMU Brands Ltd.
Unit 30, Stakehill Industrial Estate, Middleton, Manchester
M24 2RW.
Authorised Representative:
Authorised Representative Service,77 Camden Street Lower,
Dublin, D02 XE80, Ireland.
GRAZIE
Grazie per aver acquistato il prodotto.
Per ulteriore assistenza sul tuo acquisto, puoi
contattarci all’indirizzo email
VonShef è un marchio registrato di DOMU Brands Ltd. Made
in Cina per DOMU Brands. DOMU Brands Ltd.
Unit 30, Stakehill Industrial Estate, Middleton, Manchester
M24 2RW.
Authorised Representative:
Authorised Representative Service,77 Camden Street Lower,
Dublin, D02 XE80, Ireland.

A5P | 01