1
LB 400
Installation and Operating Manual

2
3
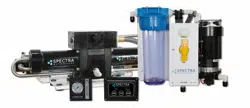
Introduction to the LB 400
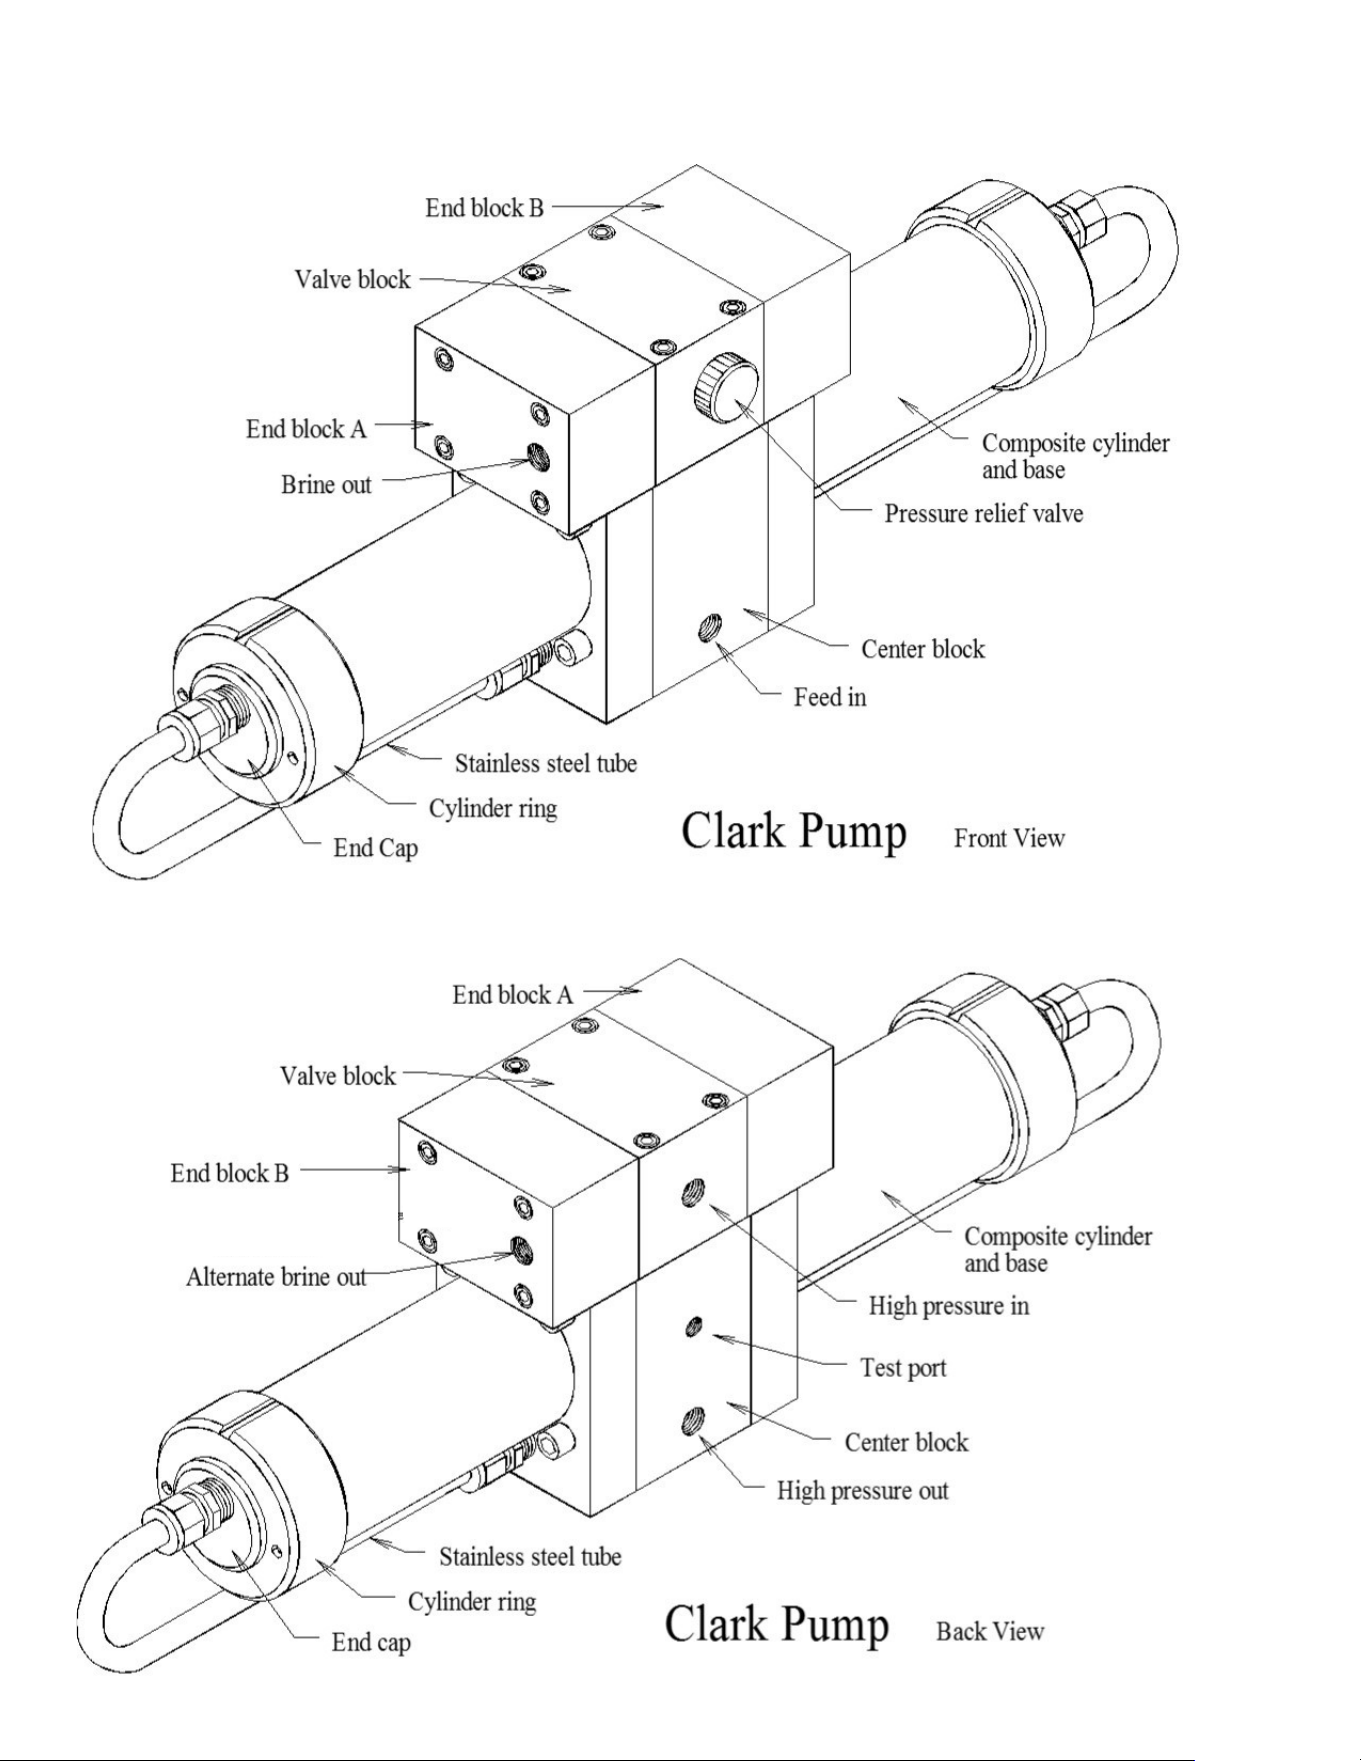
The Spectra Clark Pump is a hydraulic intensifier and energy recovery device that was intro-
duced in 1997 and has been utilized in over 12,000 watermakers to date. It is built with epoxy
composites, engineered plastics and is designed to survive in a seawater environment.
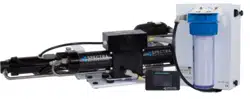
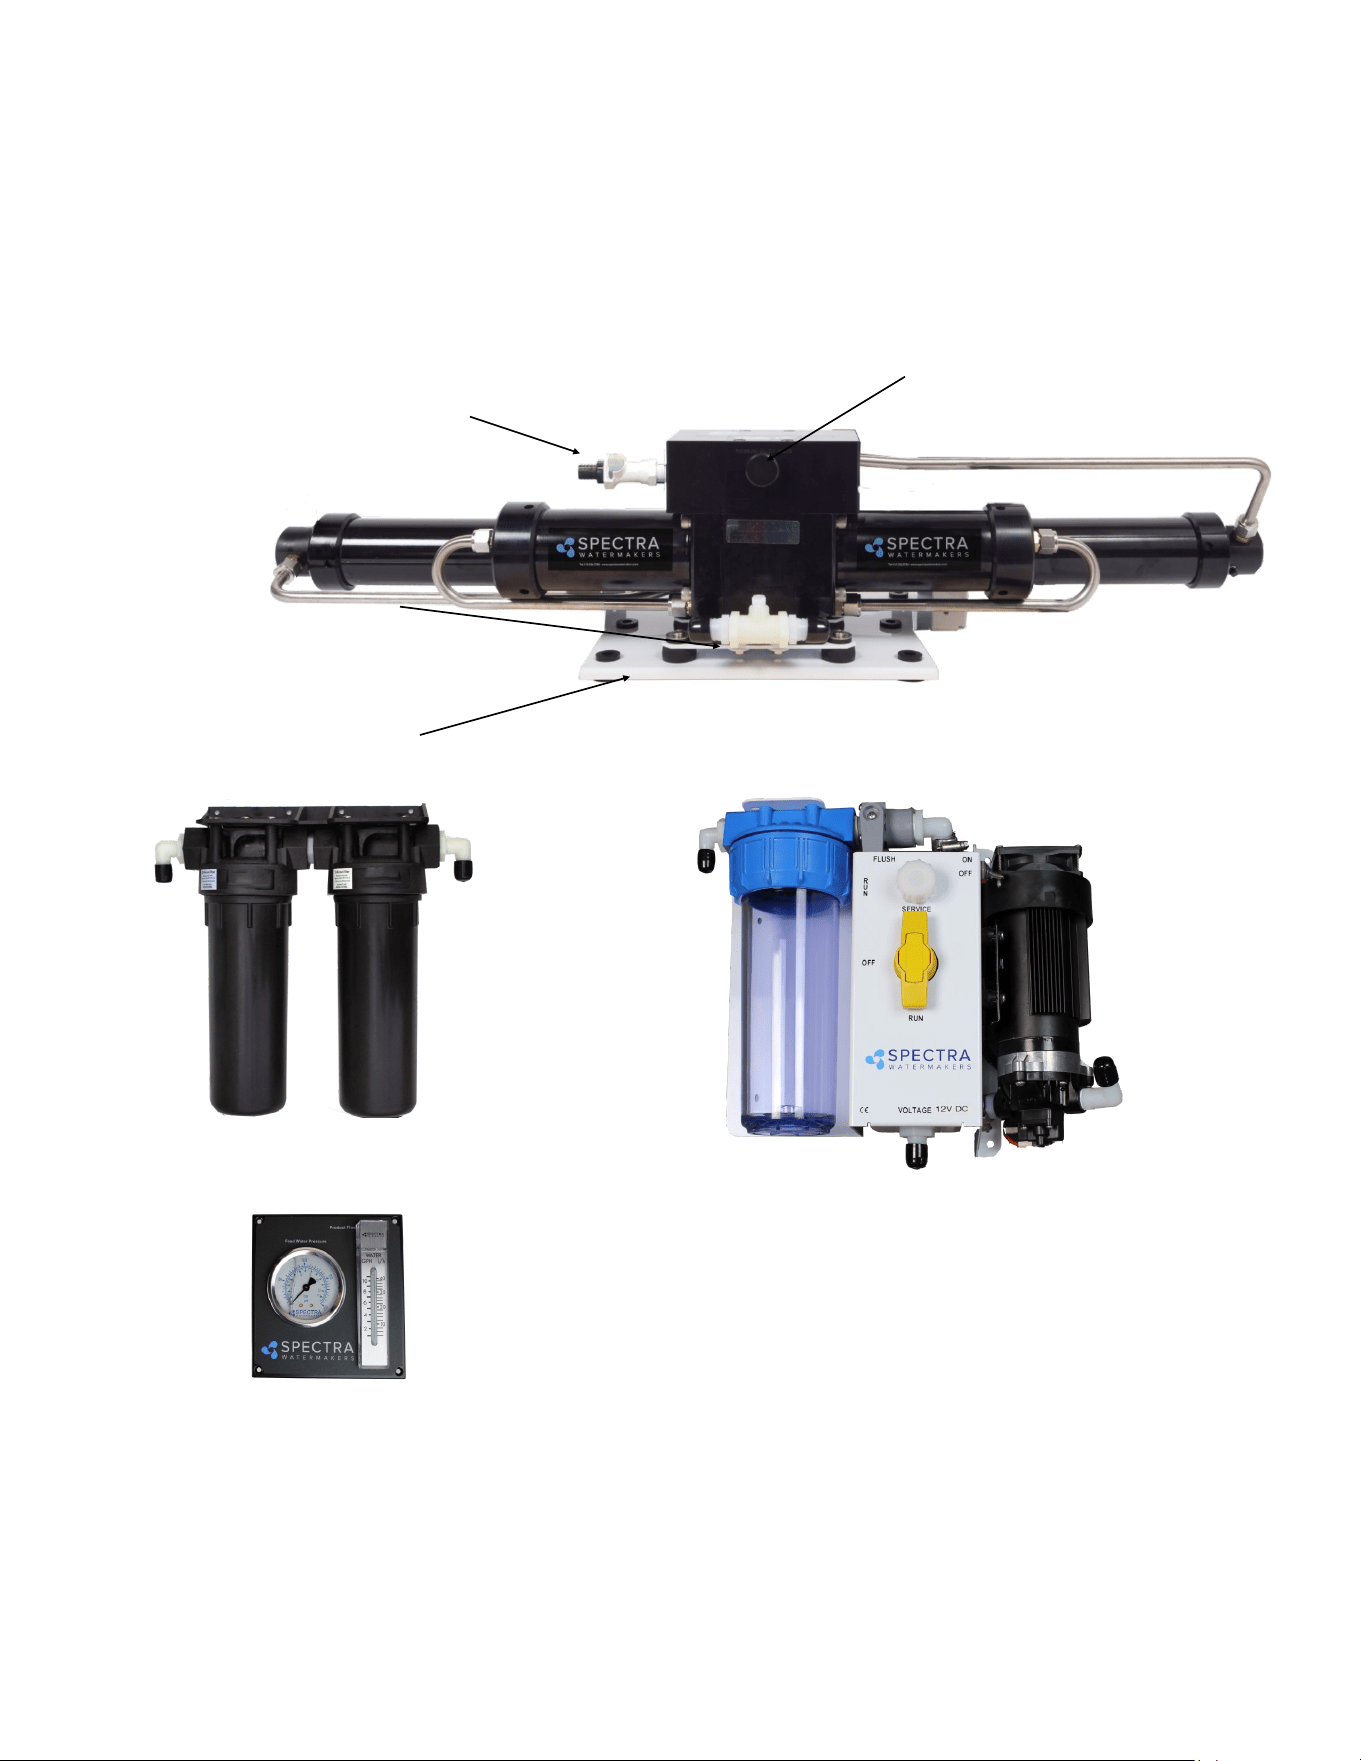
Front View
Pressure relief valve
Quick disconnect fitting to
facilitate maintenance.
Double rubber mounts
for to absorb vibration
Optional Flush & Service module
Filter Module
Pressure Gauge and Product
Flow Meter

4
Unpack the system and inspect it to make sure that it has not been damaged in shipment.
Refer to the shipping list for your system to make sure you have received all of the compo-
nents listed. Do not discard any packaging until you have found and identified all of the
parts. The small installation parts are listed on the kit list.
Warning! We will not be held responsible for shortages and or freight damage that are not
reported within thirty days of the ship date.
Study the system layout diagram, component photos and descriptions before beginning your
installation. This will assist you in understanding the function of each component.
Layout the system. Before starting the installation identify the location where each module
and component will be placed. Insure that there is proper clearance around the components
for removal of filters and system service. Also check to make sure you have adequate tubing
and hose before starting so additional parts may be ordered.
Getting Started
Shipping List
• High Pressure Clark Pump and a 40” Reverse Osmosis Membrane Module.
• Accumulator Tank
• Monitor Gauge panel
• Installation Fittings Kit
• Hand held Salinity monitor
• 5/8”(14.75mm) Hose 25 Feet
• 1/4 product tubing (50’)
• Feed Water flow meter
• 20 and 5 micron pre-filter assembly
• Product sampling 3-way valve
• Brine Service Hose
• Optional Flush/Service Module
5
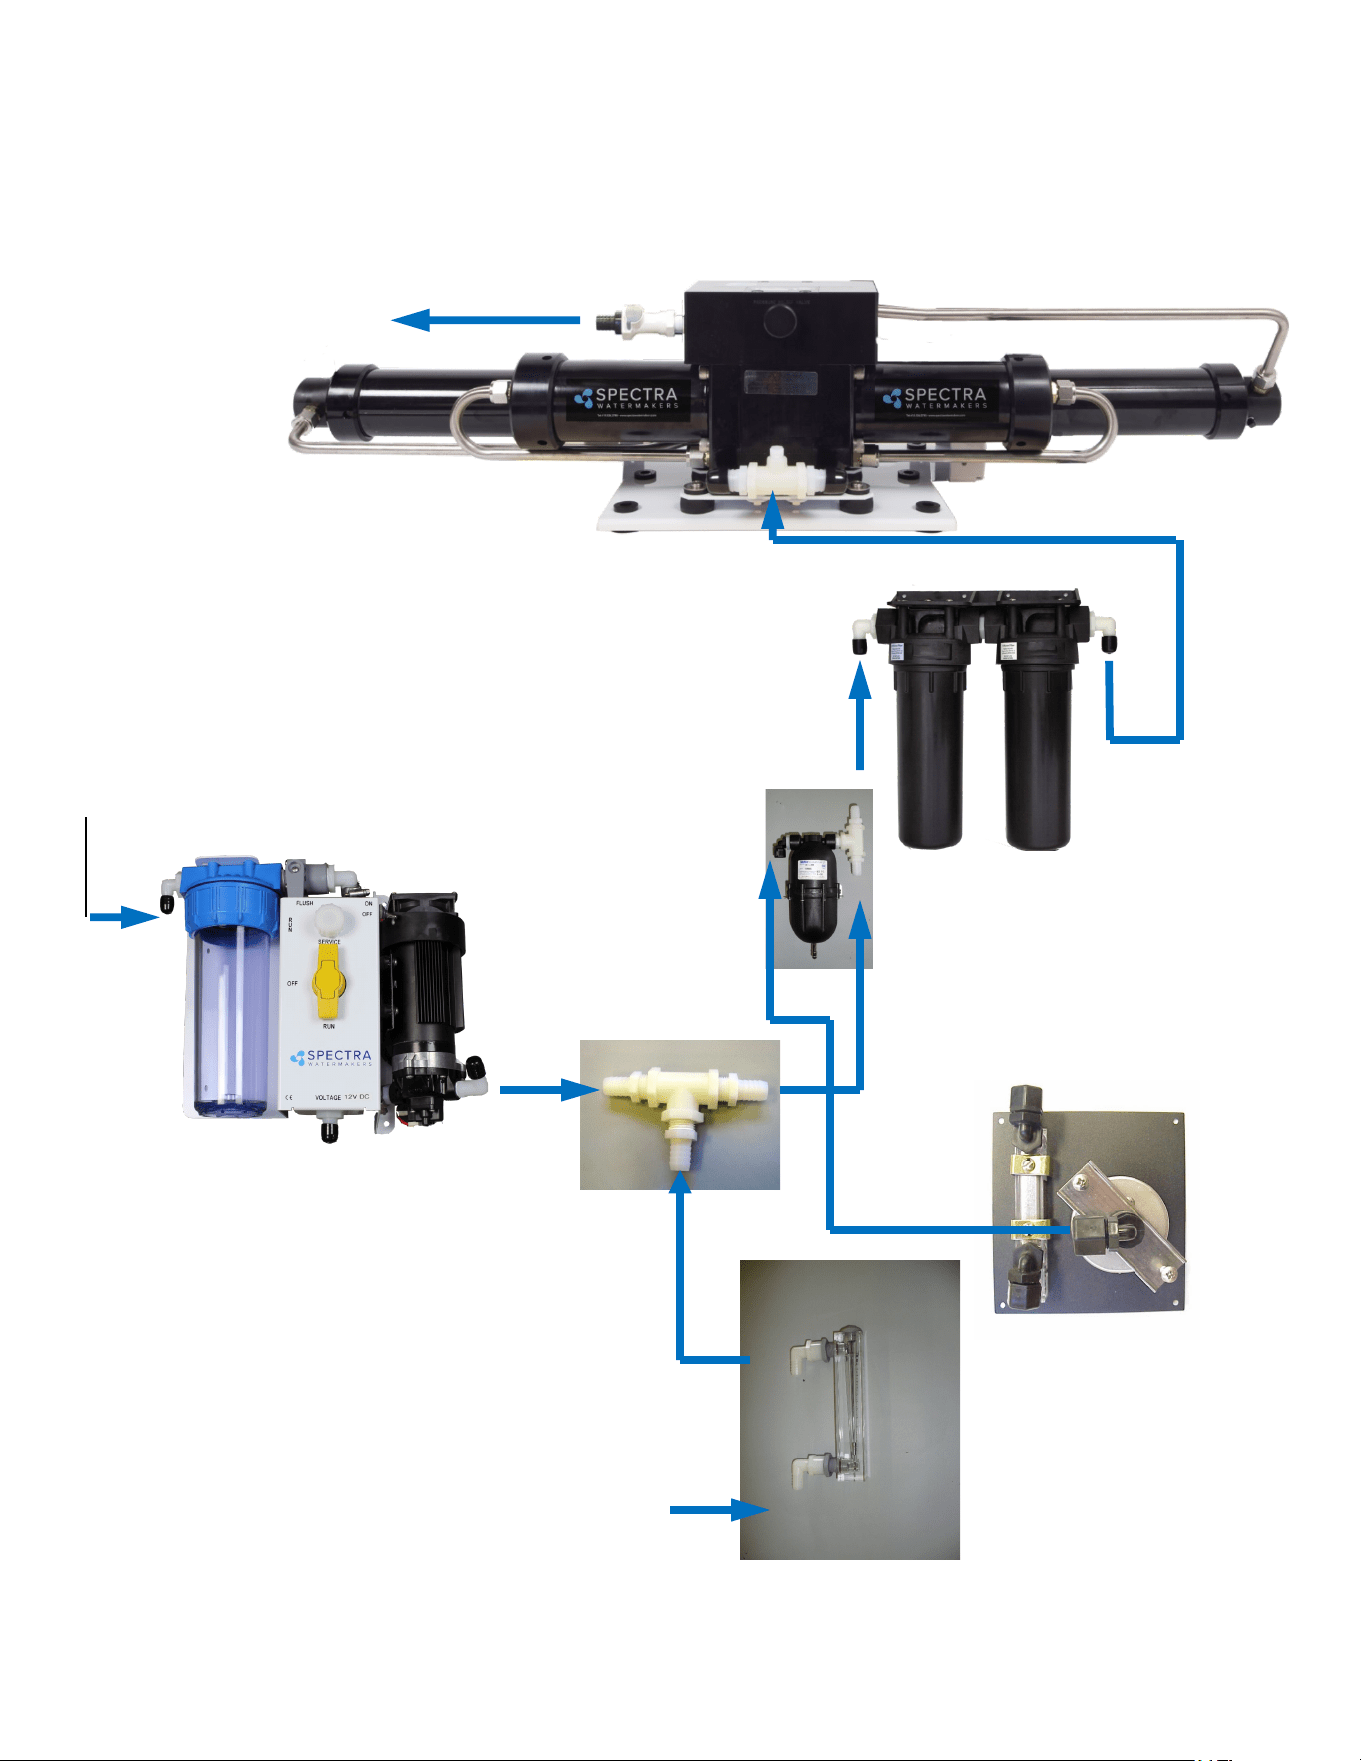
Feed Flow Meter
20 & 5 micron filters.
Do not mount over
electrical equipment.
Leave clearance below
for filter change.
Fresh water from tank to
charcoal filter.
Accumulator, Factory pre-
charged. Install in any position
and plumb as shown.
Brine Discharge to
appropriate drain
Plumbing Layout
Feed Water Inlet from
Customer supplied
pump. 3GPM, 100PSI
Optional Service/flush Module
Pressure Gauge
6
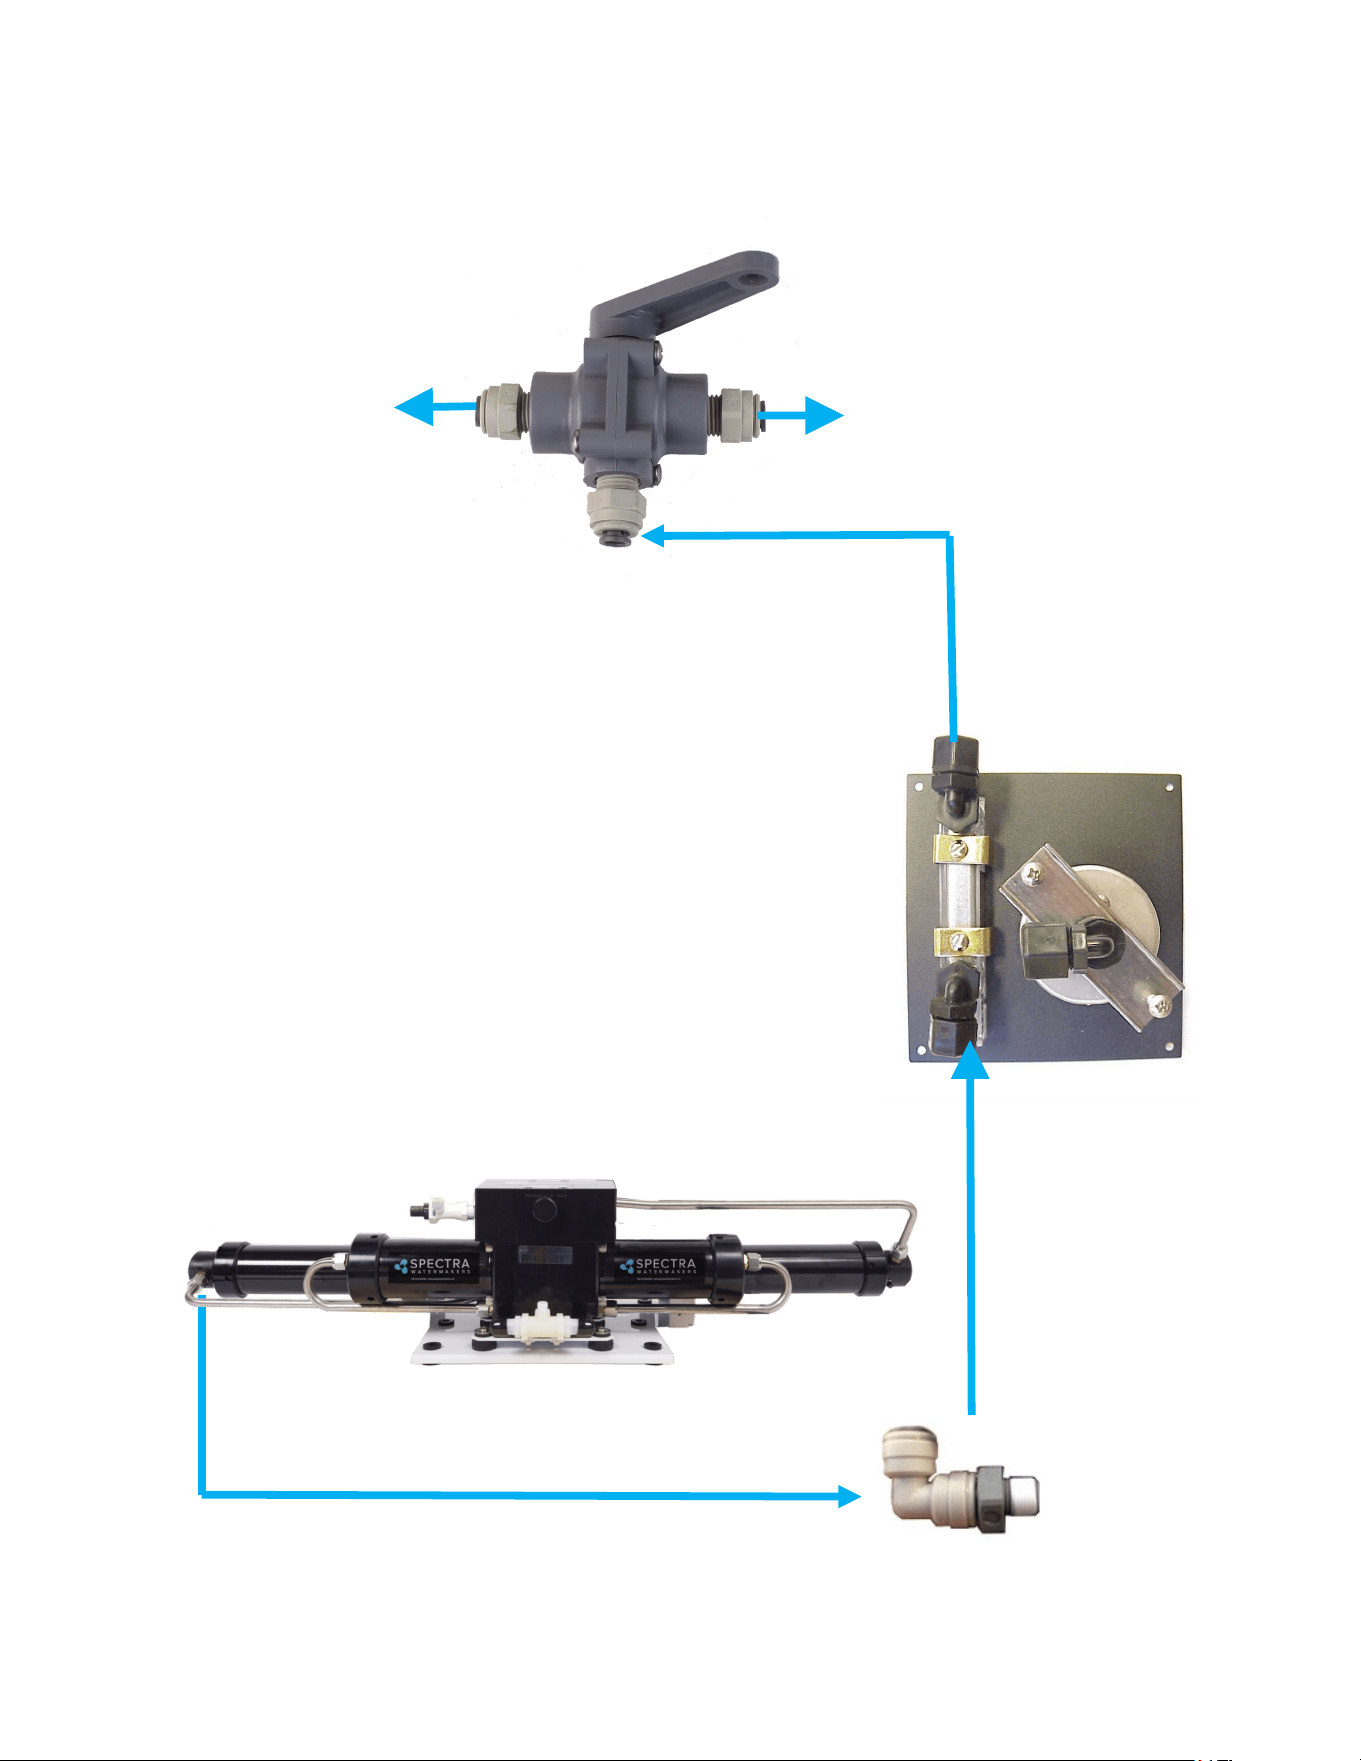
Each of the four 1/8” ports in the membrane endcaps are
common to the product manifold so product can come from
any of these ports
Back view of instrument panel.
Product Flow meter
Pressure Gauge
Product Water and Pressure Gauge Tube Installation
Note; Product water should fall into the storage tank through an air gap or have a low
cracking pressure (<3psi) check valve installed to prevent back flow.
Product sampling valve. Mount using
the supplied plastic straps as shown.
Note: the handle points in the direction
of the flow.
Product to tank, route the product
water from the valve into the top of
the tank.
To Sampling Tap for
testing the product water
or for service proce-
dures.
Put enough tube on this
port to reach your ser-
vice (pickling) contain-
er.
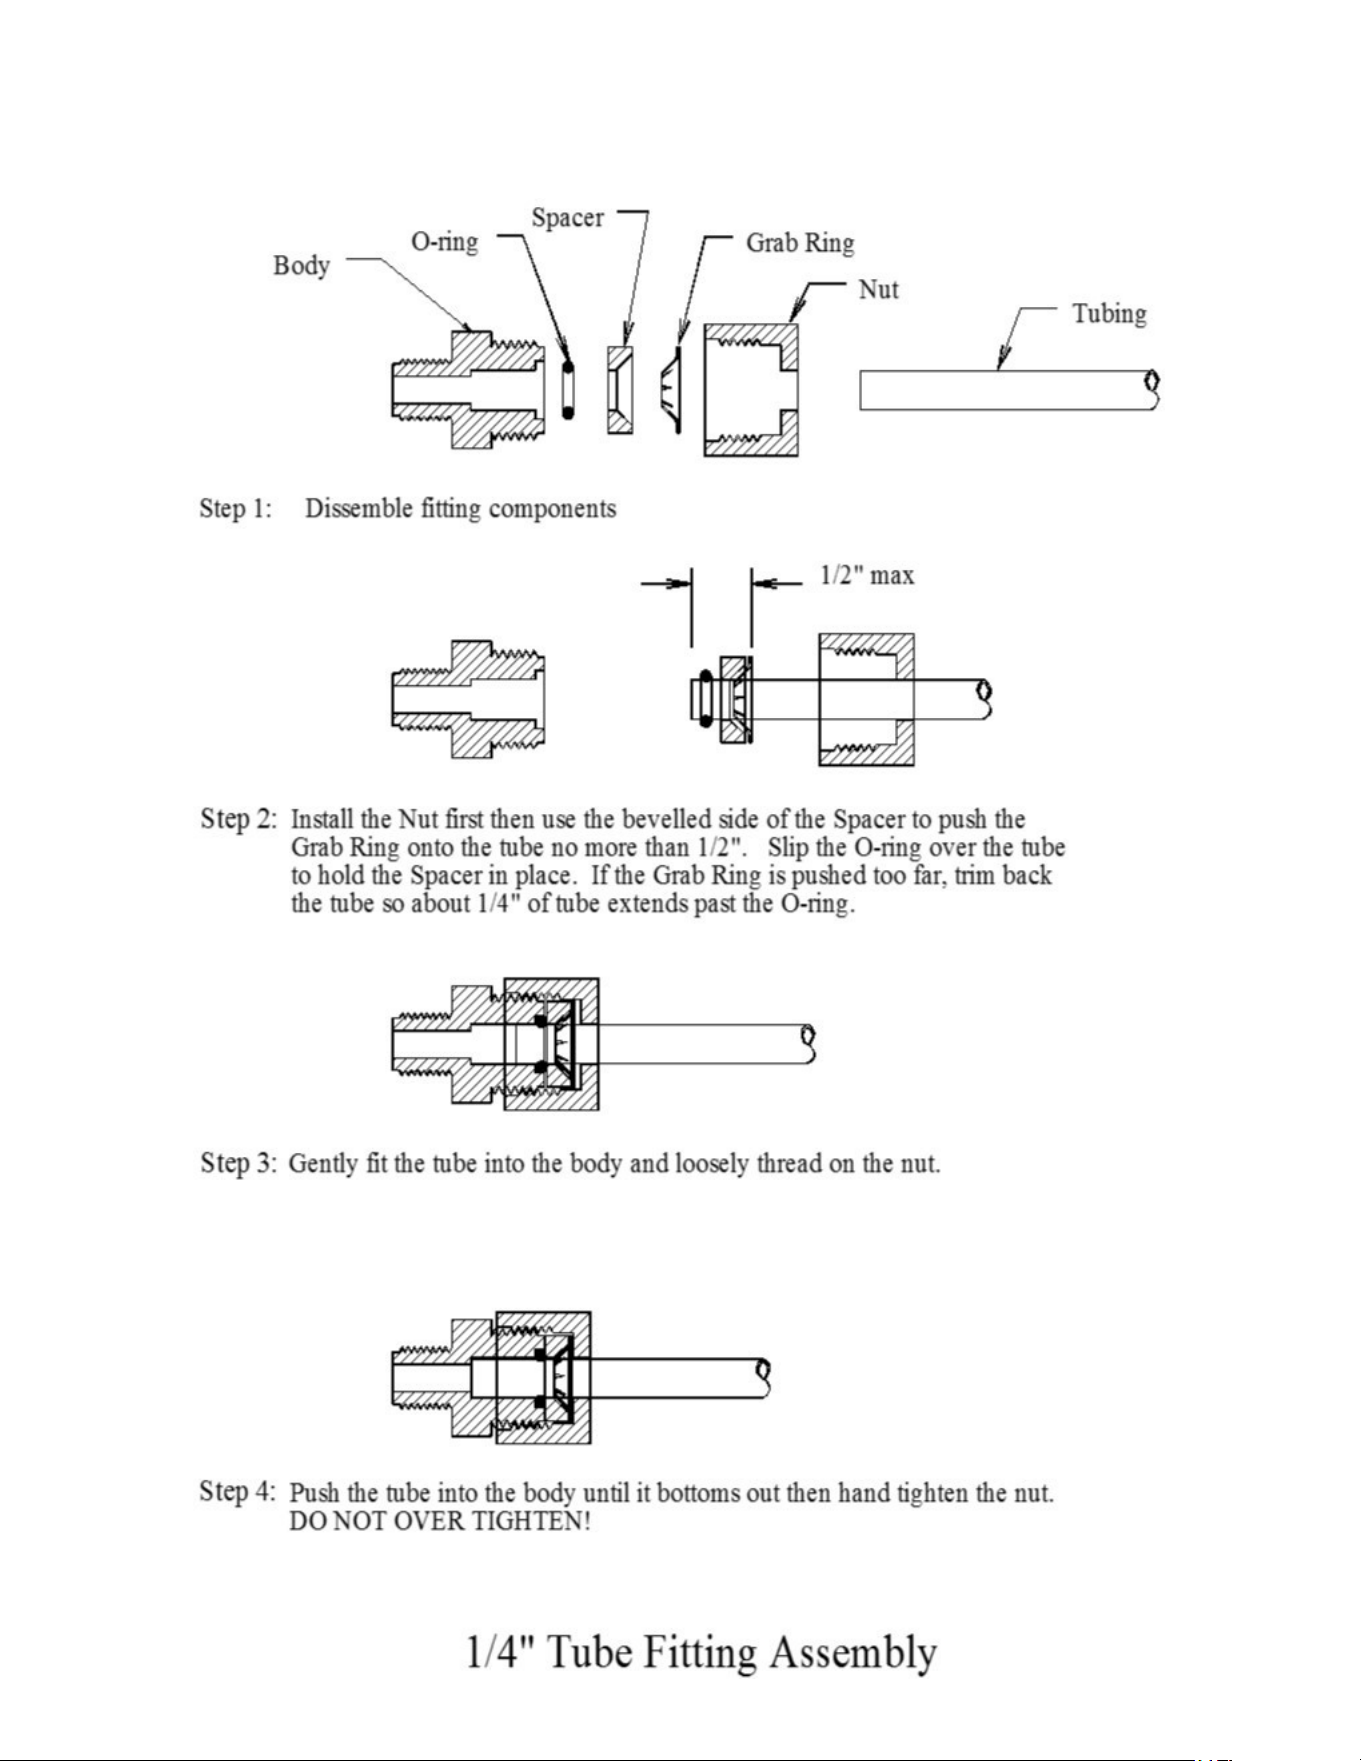
Plastic fittings should have 3-4 wraps of Tef-
lon tape and will thread almost all the way in.
Leave the first pipe thread uncoated to avoid
cross threading. Avoid getting dirt or debris
in the system during assembly. Secure piping
away from moving objects and protect from
chafe.
7
8
Warning! Damage may occur if the purge sequence is bypassed and the membrane is
pressurized with storage chemical in it.
• The feed water pump is ready and primed
• All of your hose connections are tight.
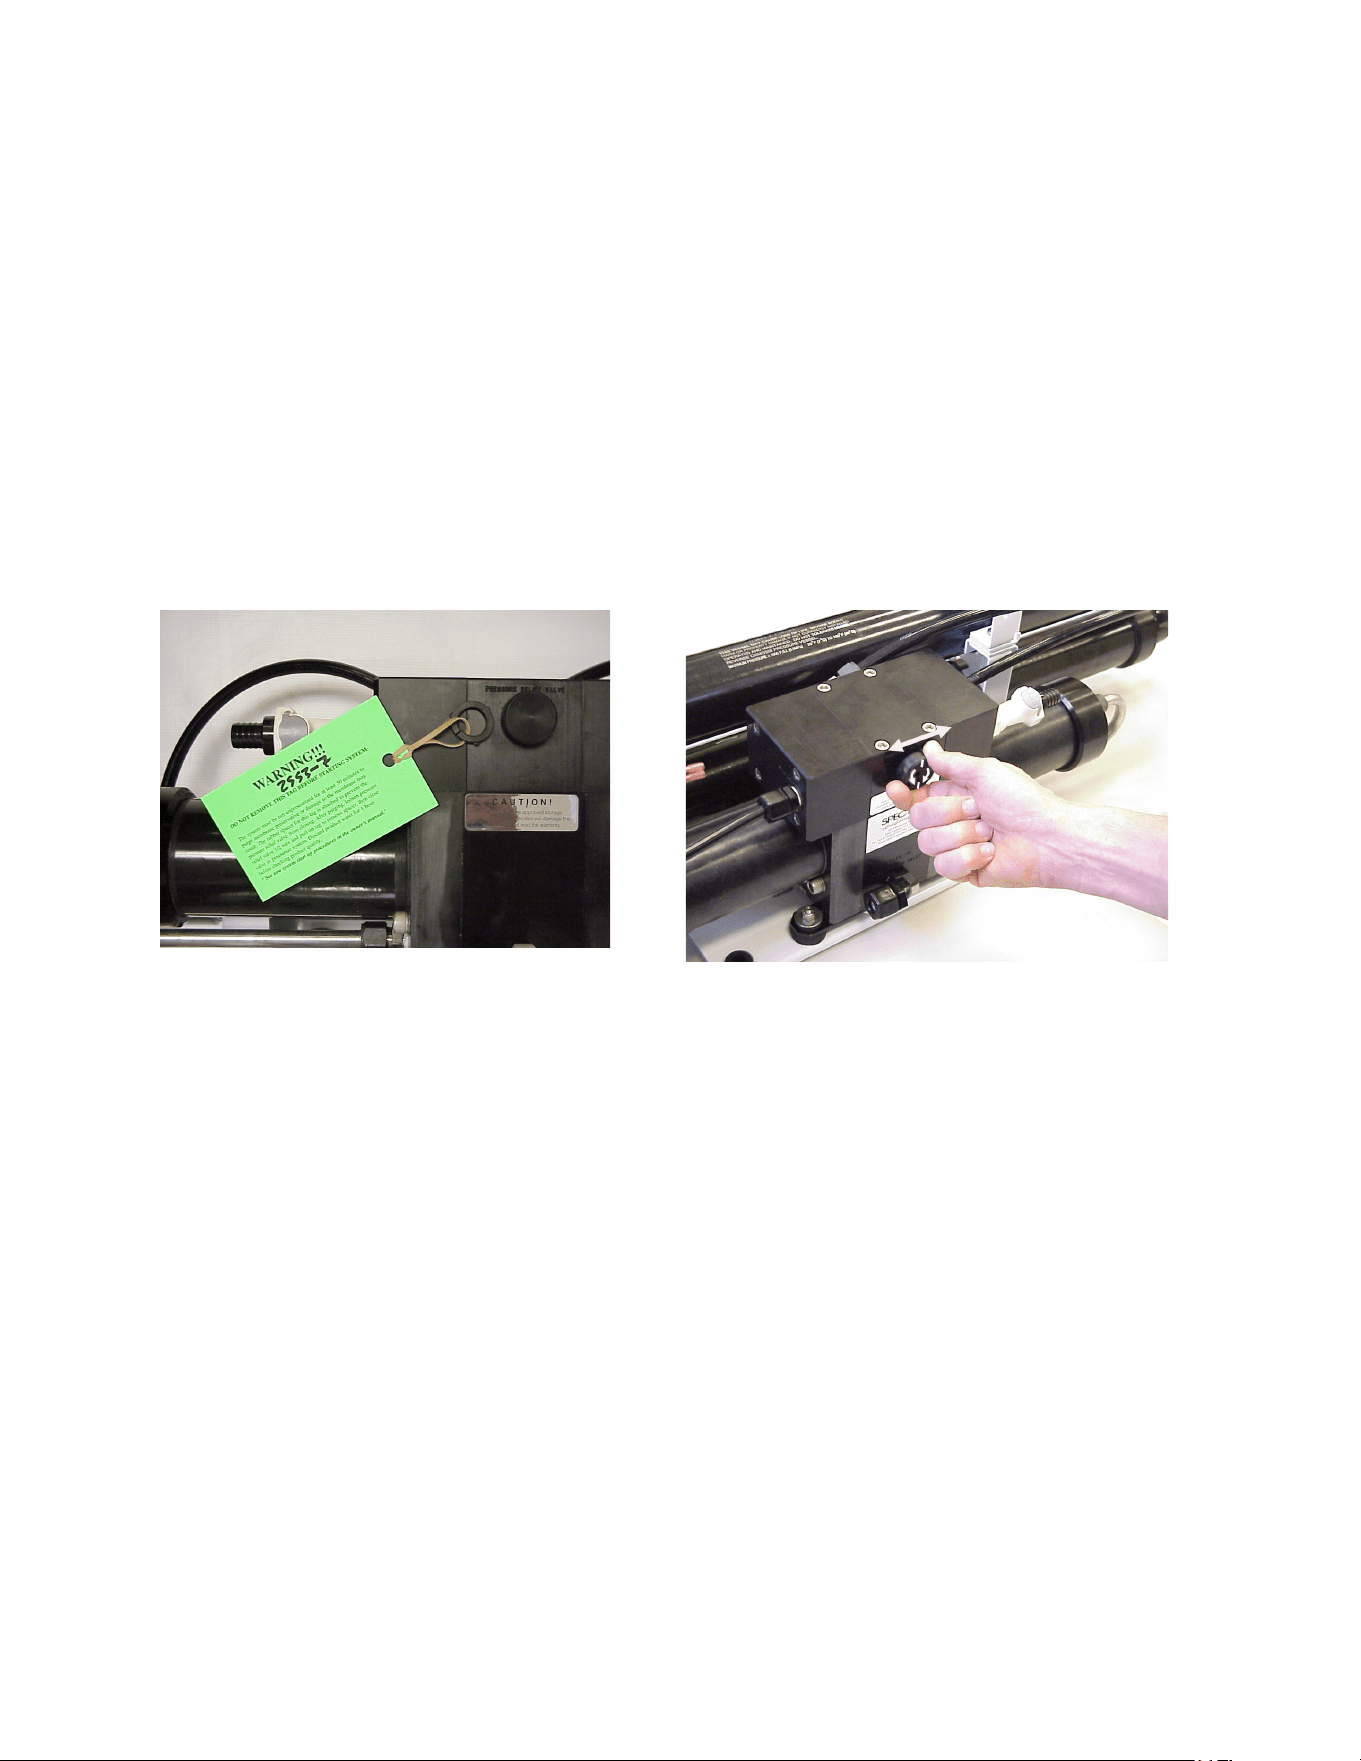
• The pressure relief valve is open1/2 turn.
• The sampling valve is set to the sample position.
1. First Check That:
2. Disconnect the feed water hose at the prefilters or Clark Pump Inlet. Start the feed pump
and regulate the feed flow to 3GPM (11LPH). Reconnect the hoses.
3. Start the feed pump and run the system without pressure for 20 minutes to purge the
storage chemicals. The system should have an open flow pressure on the gauge of about 30
PSI (2 Bar)
4. Close the pressure relief valve. The pressure should rise to 100 PSI (7 Bar) and after
several minutes start making water. If the feed water is brackish or fresh the pressure will
be lower. Regulate the feed flow to 2.8 GPM.
5. Allow the system to run for 5-10 minutes and then test the product with your hand held
salinity tester. If the product is below 750 PPM it is considered potable and may be diverted
to the tank.
New System Start-Up and Testing
Open 1/2 Turn to Purge Chemicals! Remove Tag and Washer!
6. If the system is equipped with a customer supplied fresh water flush Charcoal filter and
valve, the flush water flow rate must be regulated to 1.5GPM or less. Ensure that this is the
case by timing the flow rate of brine out of the system. Close the service valve, open the flush
valve, and collect the brine in a graduated container to time the flow.

9
System Operation
Normal operation
If the system has been pickled or stored use the New system startup procedure.
1. Check to see that the feed water regulator valve is open to its correct position.
2. Turn the product valve to the “Sample” position.
3. Start the feed pump and check for flow. After five minutes check the product water with
your hand held salinity tester. If it is good you may divert it into your tank.
4. Run the system until you have filled your tank or have made enough to meet your re-
quirements for several days.
5. Stop the feed pump.
6. Open the fresh water flush valve and start the flush pump.
7. Flush for 2 1/2 minutes or until fresh water begins to appear at the brine discharge.
8. Return flush valve to its run position.
You may now leave the system unattended for up to five days without further attention
We recommend operating the system for longer periods and effecting a FW flush than run-
ning the machine every day and not flushing the system.
NOTE: Flush water must be chlorine free! Use only product water or water filtered
through an activated charcoal filter at the manufacturer’s specified flow rate.
10
Long Term Storage Procedures
Watermakers are best run continuously. When not in use, biological growth in the mem-
brane is the leading cause of membrane fouling. A warm environment will cause more
growth than a cold environment. The fresh water flush system will greatly reduce biologi-
cal growth but may not stop it completely in certain conditions. If an optional “Zeta Guard”
or Z-Brane water treatment system is installed in the system, then three to five day flushing
intervals will maintain the system as long as fresh water is provided and the charcoal filter
maintained.
System Storage or “Pickling”
If the system is to be left unused for more than five days, perform the following storage pro-
cedure. The procedure introduces a chemical compound into the system that prevents biolog-
ical growth. This procedure requires de-chlorinated water which can be made with the Spec-
tra’s charcoal filter. Charcoal filters last a maximum of 6 months once wetted.
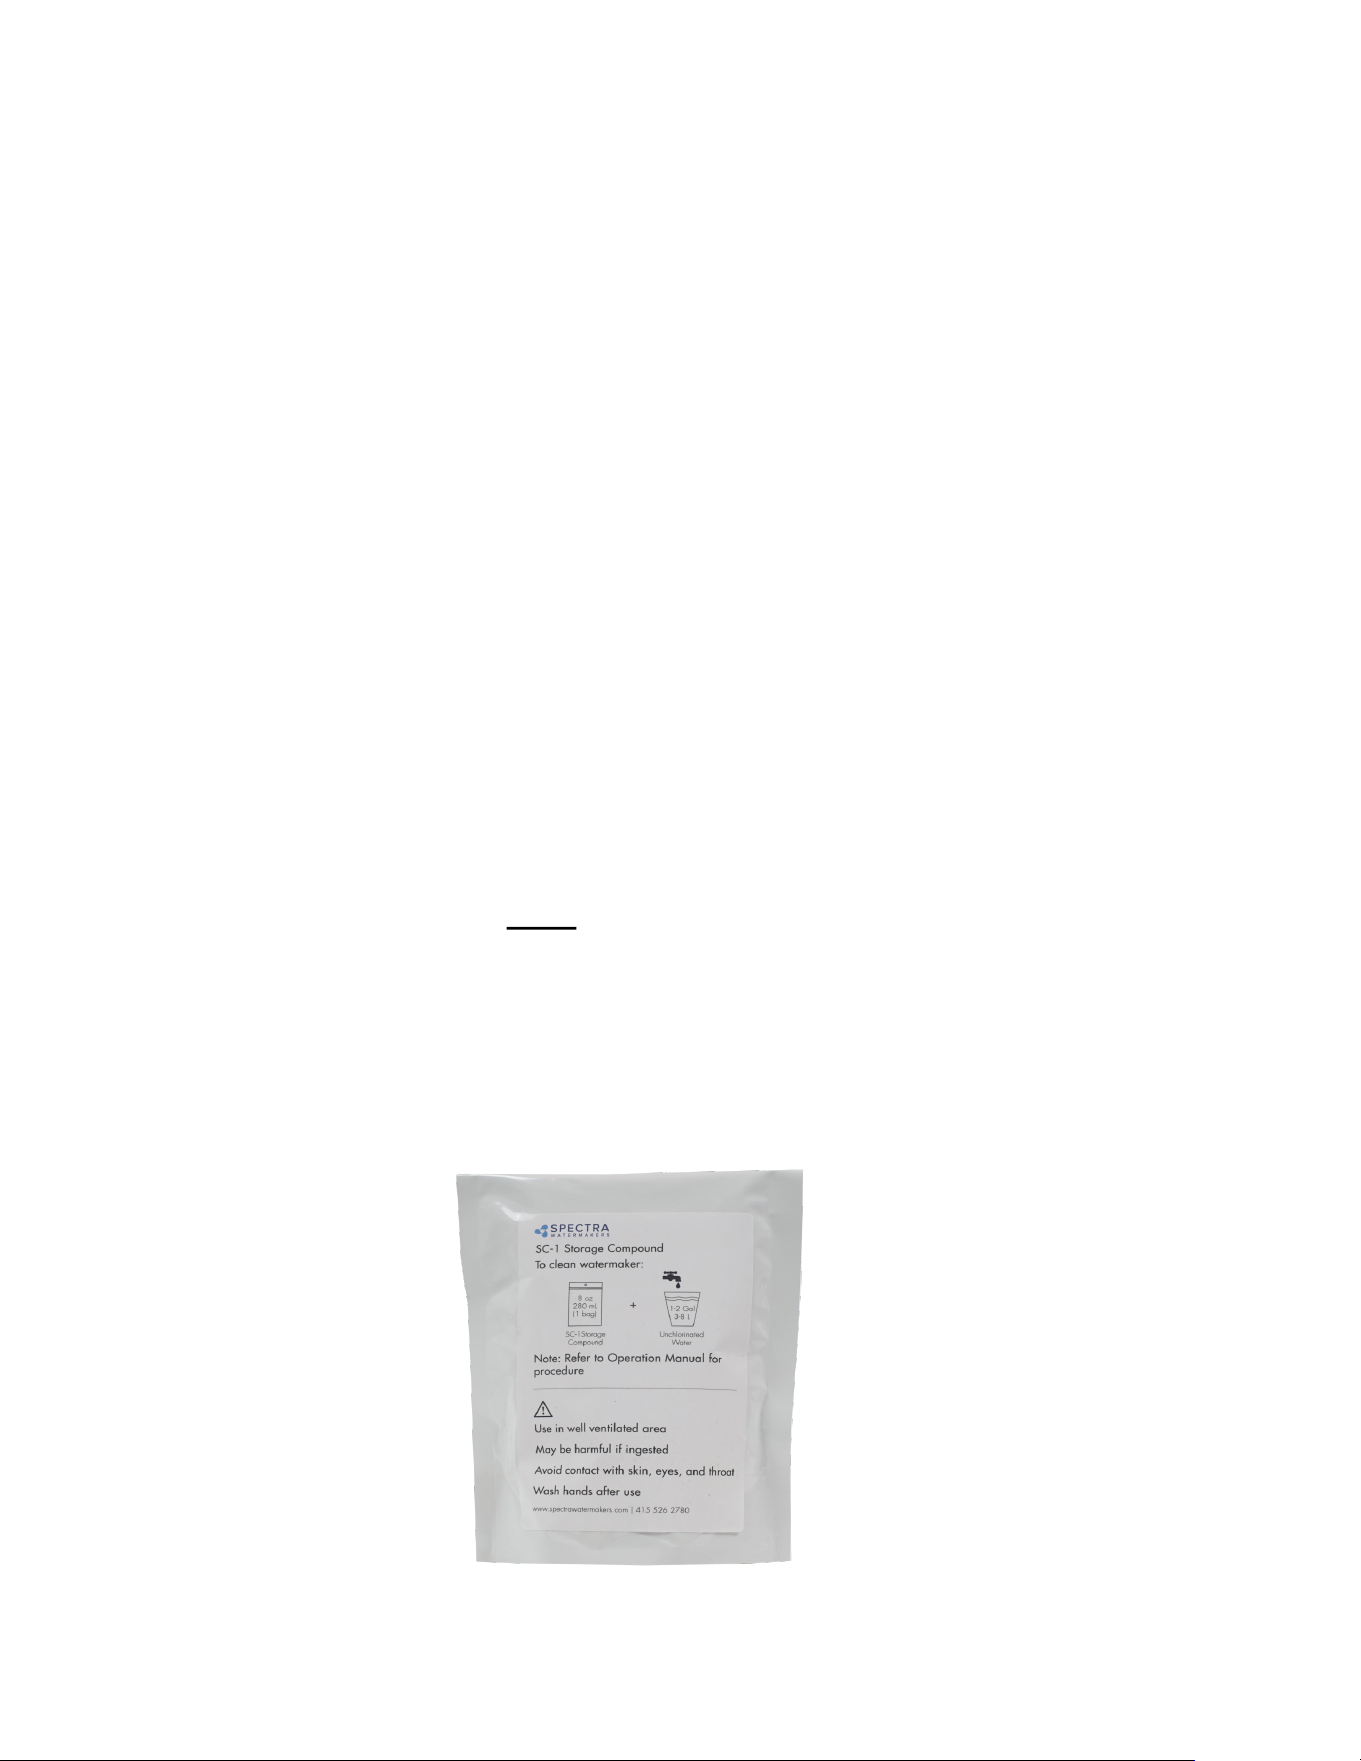
Spectra SC-1 a special storage compound used by the US Navy. It is formulated to be
compatible with the modern engineering plastics and composites in the Spectra pumps.
Do not use any substitute except propylene Glycol. If you wish to use glycol for stor-
agefollow the winterizing instructions. SC-1 Storage Compound has to be mixed at a
ratio of 1 Spectra container to 3 gallons (12L) of fresh water to have the proper solution
for short term storage (under two months use 1/2 of a container)
Caution! Avoid contact with skin, eyes, or lungs with the storage chemical.
11
Storage Procedure
1. Perform a fresh water flush as described in the normal operation section.
2. Connect the Intake Service Hose to the Service connection on the Service/Flush Module
and set the valve to “Service”. Place the Hose in a clean bucket containing 1 gallon of chlo-
rine free water.
3. Disconnect the brine discharge hose and connect the brine service hose to the Clark Pump
Brine discharge fitting. Run the hose to the bucket.
4. Mix 1 container of SC-1 storage compound with the water in the bucket.
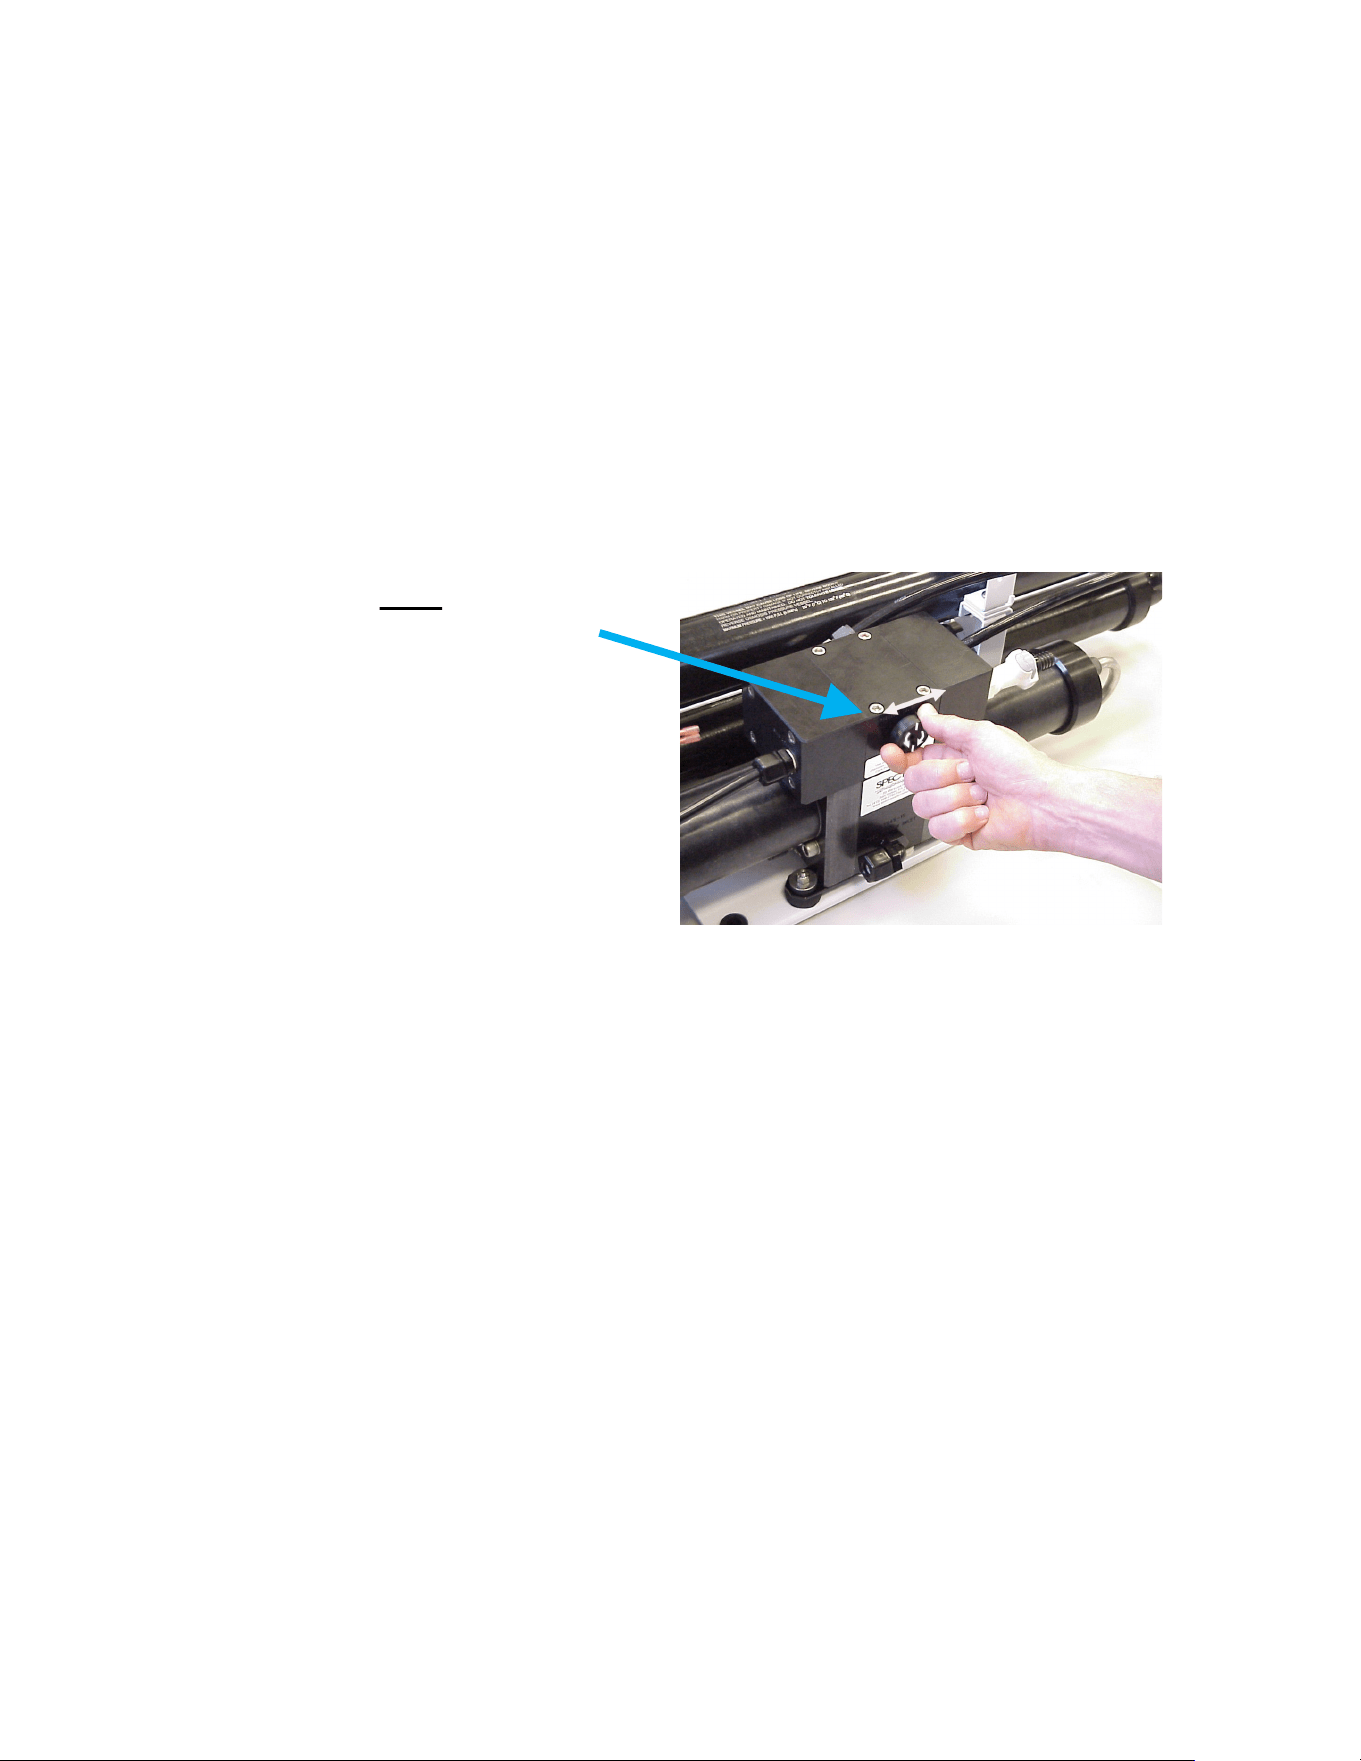
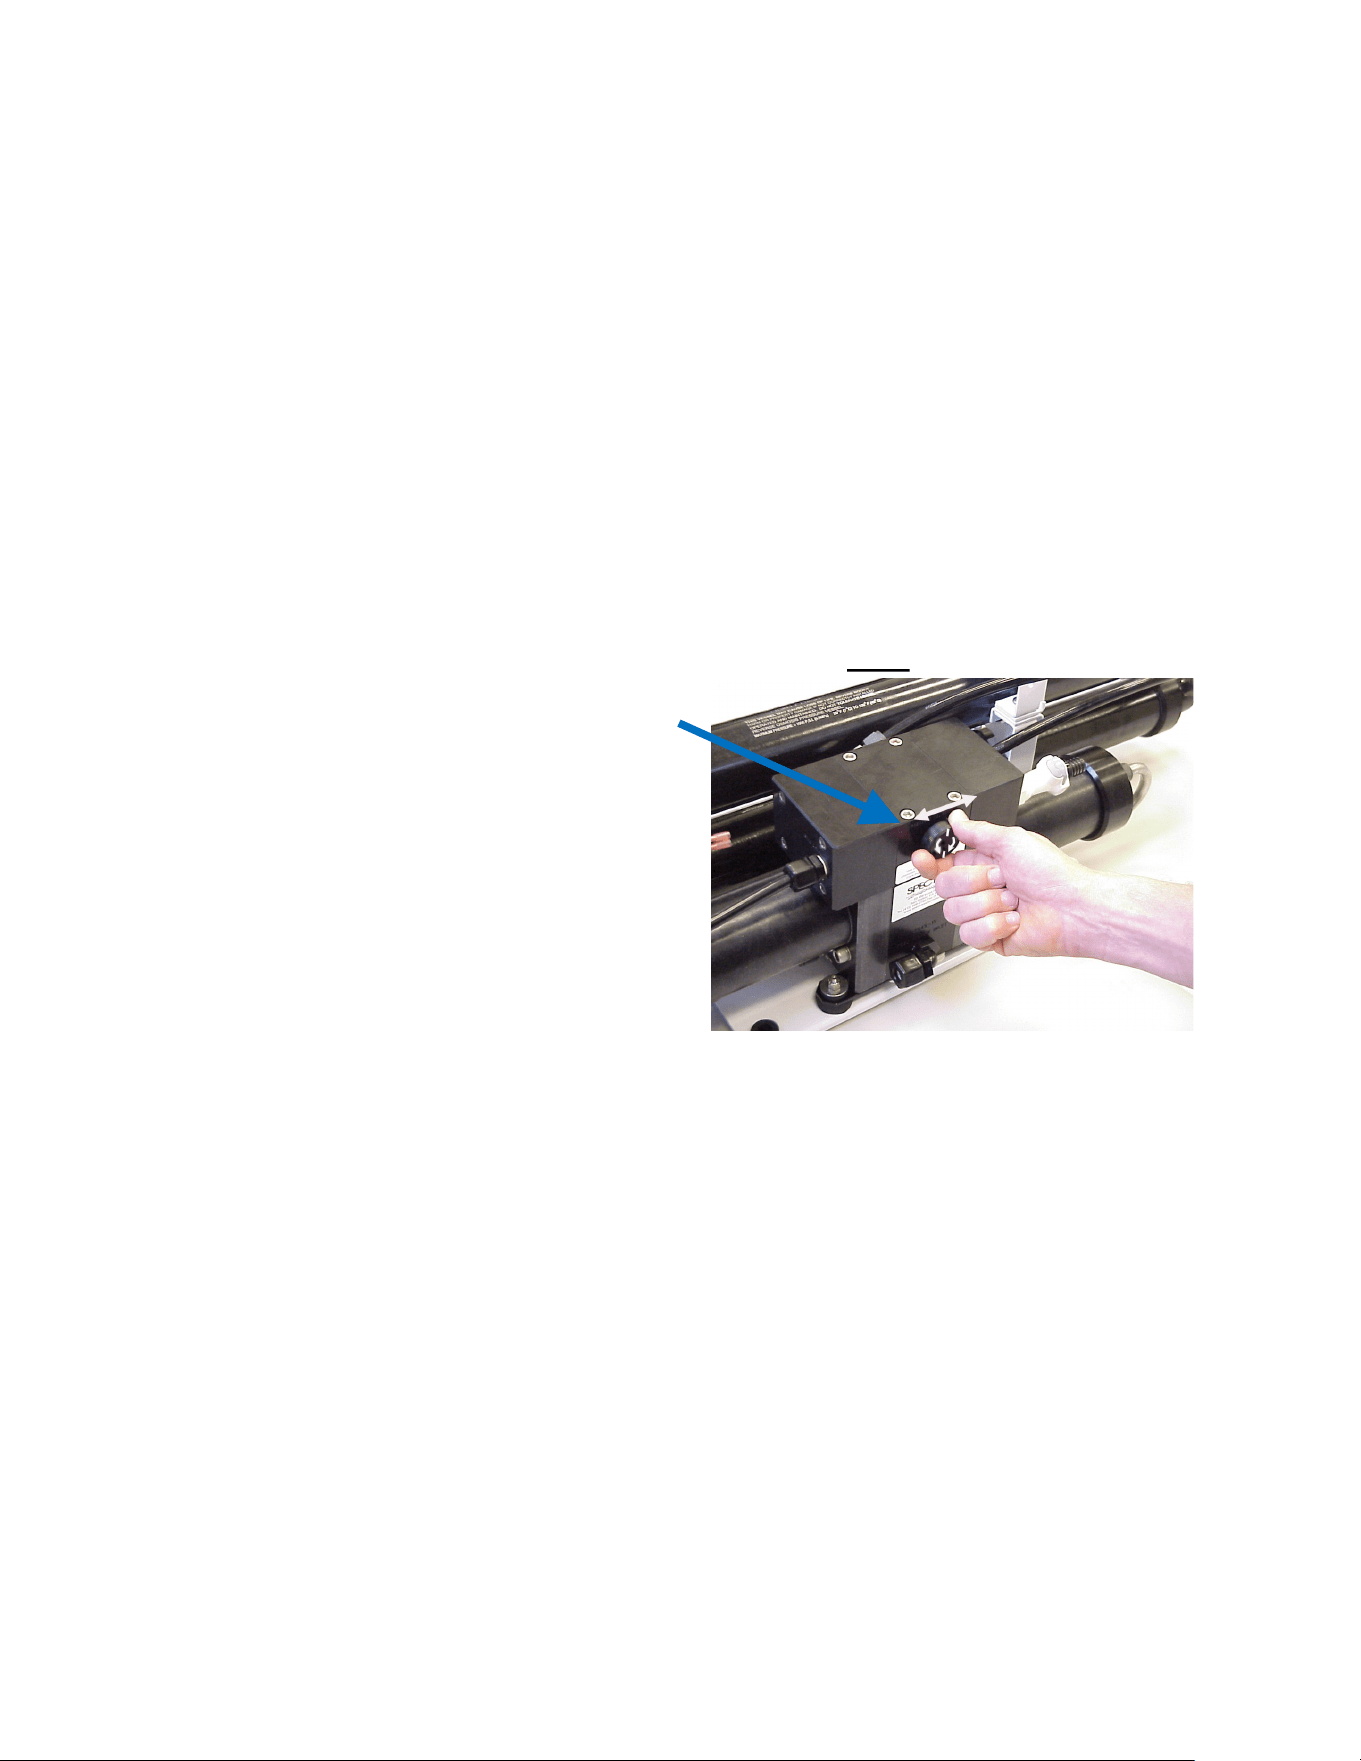
5. Make sure the pressure relief valve on
the Clark pump is Open 1/2 turn coun-
terclockwise to un-pressurize the
system.
Note; If the system is pressurized
while chemicals are present, per-
manent membrane damage may occur.
6. Turn on the service/flush pump. Circulate
the storage chemical in the system for approximately 10 minutes.
Clean Up:
Remove the quick disconnect from the Clark pump brine discharge, and replace the original
hose. Remove the prefilters, drain the filter housings, and replace the prefilters with clean dry
ones.
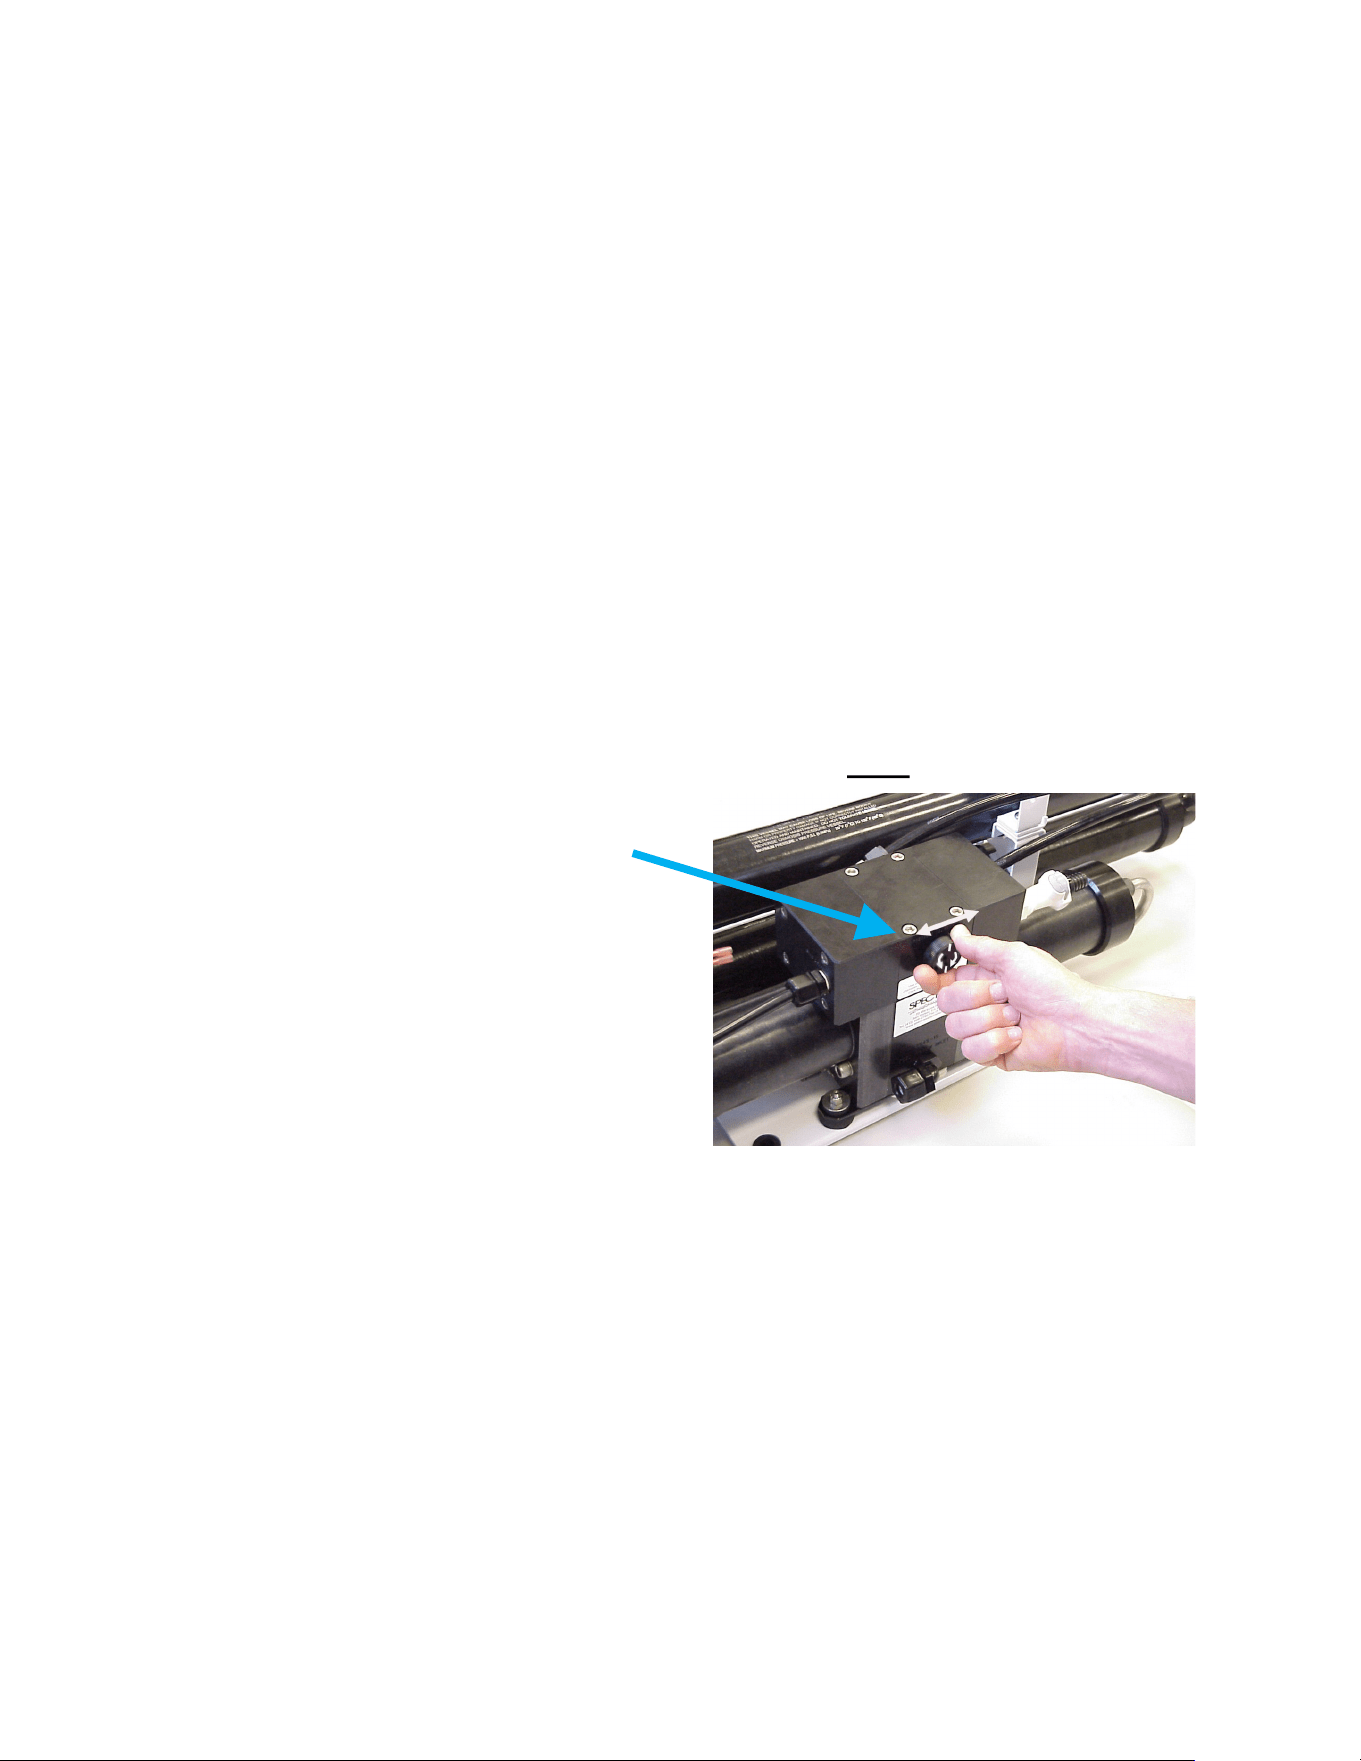
Turn the service valve 180° back to its original position, restore the system to its operating
configuration.
Note: If the system is not equipped with a Service/Flush Module use a portable pump rated at
3GPM or less and at least 40 psi. Use Chlorine free water. Disconnect the feed hose at the
flow meter and connect the portable pump discharge hose to the meter.
12
Winterizing
Storage Procedure
1. Perform a fresh water flush as described in the normal operation section.
Connect the Intake Service Hose to the Service connection on the Service/Flush Module and set
the valve to “Service”. Place the Hose in a clean bucket containing 1 gallon of chlorine free
water.
3. Disconnect the brine discharge hose and connect the brine service hose to the Clark Pump
Brine discharge fitting. Run the hose to the bucket.
4. Pour 2 gallons of Propylene Glycol Potable water antifreeze into the bucket.
5. Make sure the pressure relief valve on the Clark pump is Open 1/2 turn counterclock-
wise to un-pressurize the system.
Note; If the system is pressurized while
chemicals are present, permanent mem-
brane damage may occur.
6. Turn on the service/flush pump. Circulate
the antifreeze in the system for approximately
10 minutes.
Clean Up:
Remove the quick disconnect from the Clark pump brine discharge, and replace the original
hose. Remove the prefilters, drain the filter housings, and replace the prefilters with clean dry
ones.
Turn the service valve 180° back to its original position, restore the system to its operating con-
figuration.
The product water system will not be protected and should be drained or blown out with com-
pressed air.
Note: If the system is not equipped with a Service/Flush Module use a portable pump rated at
3GPM or less and at least 40 psi. Use Chlorine free water. Disconnect the feed hose at the
flow meter and connect the portable pump discharge hose to the meter.

13
Maintenance
The Prefilter
• Service the prefilter on a regular basis. The pressure will rise on the remote gauge when
the filter becomes dirty. Extremely dirty filters will harm system performance and may
cause the feed pump to cycle on the high pressure switch.
• To service the filters shut off the service valve open the housing, discard the old filter,
Clean out the housing bowl, reassemble the housing with new 5 micron filter element.
Leave dry until next startup.
• Use only Spectra approved filters or you may void your warranty. The filters may be
cleaned several times with a soft brush and water in a bucket. Occasionally, lightly lube
the filter housing O-ring with silicone grease.
• Replace the charcoal filter element at least every 6 months! This filter protects the mem-
brane by removing chorine from the fresh flush water. Use only a Spectra replacement!
General
Periodically inspect the entire system for leakage and chafe on the tubing and hoses. Repair
any leaks you find as soon as practical. Some crystal formation around the Clark pump
blocks is normal. Wipe down any salt encrusted areas with a damp cloth. Do not tolerate
leaks or corrosion, as they will damage the watermaker.
The Charcoal Fresh Water Flush Filter
The Clark Pump
Clark pump requires no routine maintenance except inspection for leaks. Tighten any hose
clamps or fittings the show signs or leakage. The High Pressure fittings threaded into the
Clark pump are o-ring seals with a straight thread. These should never leak and should never
be over tightened. If one of the tube nuts starts to leak it can be un-threaded, sealed with a
bit of silicone grease or silicone seal and with two wrenches, tightened very tight!

14
Membrane Cleaning
For normal cleaning, the SC-3 Acid Cleaning Compound is used first, then the SC-2 Alkaline
Cleaning Compound. If known bio-fouling is present, the SC-2 may be used first. Using hot wa-
ter if possible, up to 120° (45C) is recommended as it greatly enhances the ability of the cleaners
to do their jobs.
If the history of the system is unknown or has been left “unpickled” for an extended length of
time and biological growth is present, it is recommended that the system is cleaned with SC-2,
using an alternate source of unchlorinated fresh water before the system is run under pressure. A
simple test can be performed to see if biological growth has occurred. Before running the sys-
tem, remove the prefilters and examine their condition If the housings are full of smelly discol-
ored water, the system was not properly stored. Install clean prefilters if they were bad. Next
check the membrane. Detach the brine discharge hose and lead to a bucket. Open the pressure
relief valve one turn, and manually run the system for 30 seconds. Examine the brine water: if
it’s discolored and smells bad, perform an SC-2 cleaning with an alternate source of unchlorinat-
ed water before running the system pressurized. If the brine is fairly clean, the system can be
purged, run normally, and checked for performance. Clean the membranes only if performance is
reduced.
Heating the water is preferable. One way to do this is to find a camp stove and use a large stain-
less steel pot to heat the solution in. The cleaning solution throughout the system will heat as it
circulates in and out of the pot. An alternative is to heat the one or two gallons of initial water to
120° on the main stove before mixing in the cleaner and circulating it into the system. Periodical-
ly stop and reheat the solution.
Perform the cleaning procedures while the ship is in acceptable sea water for purging and testing.
The membranes need to be cleaned only when they have lost up to 15% of their capacity due to
fouling or the product quality degrades. The leading cause of fouling is from biological growth
that occurs when the system is left unused without flushing or pickling. Fouling from mineral
scaling can happen during operation under certain sea water conditions, and from rust. Monitor
the product salinity and feed pressure for higher than normal readings for the conditions. Other
conditions can cause high pressure such as cold feed water or clogged filters. Low product flow
is usually due to low voltage, damaged feed pump or Clark pump. Look for all other causes be-
fore cleaning the membrane. Membrane life can be shortened by excessive cleaning.
There are two types of cleaners: acid and alkaline. The acid cleaner (SC-3) will remove mineral
scaling. The alkaline cleaner (SC-2) is used to remove biological by-products, oil, and dirt parti-
cles that get past the prefilters. If membrane performance is reduced and they have not been
pickled recently, cleaning with both chemicals is recommended. The acid cleaner should be
used first. If the membrane fails to respond to both cleanings, this is an indication of another
problem with the system, or that it is time to replace the membrane. Contact Spectra Watermak-
ers before removing a membrane.
The Membranes
15
A Spectra Cleaning Compound (SC-2 or SC-3) must be mixed with fresh water at a ratio of 1 con-
tainer of compound to 3 gallons (12L) of unchlorinated water to have the proper solution. An av-
erage of two gallons (8L) of water is already present inside a 150 system . This water has to be fig-
ured into the mixture. A 150 system will use 1 container of compound,
Note: Procedures are the same for the SC-2 and SC-3 cleaners
Note: If the system is not equipped with a Service/Flush Module use a portable pump rated at
3GPM or less and at least 40 psi. Use Chlorine free water. Disconnect the feed hose at the
flow meter and connect the portable pump discharge hose to the meter.
1. Perform a fresh water flush as described in the normal operation section.
2. Connect the Intake Service Hose to the Service connection on the Service/Flush Module and
set the valve to “Service”. Place the Hose in a clean bucket containing 1 gallon of chlorine free
water.
3. Disconnect the brine discharge hose and connect the brine service hose to the Clark Pump
Brine discharge fitting. Run the hose to the bucket.
4. Mix 1 container of SC-2 or SC-3 cleaning compound with the water in the bucket.
5. Make sure the pressure relief valve on the Clark pump is Open 1/2 turn counterclock-
wise to un-pressurize the system.
Note; If the system is pressurized
while chemicals are present, perma-
nent membrane damage may occur.
6. Turn on the flush module pump. Circulate
the cleaning chemical in the system for approx-
imately 20 minutes. Allow the chemical to
stand in the system for about 2 hours, circulat-
ing
it occasionally. The solutions act more rapidly
if kept warm.
Clean Up:
Remove the quick disconnect from the Clark pump brine discharge, and replace the original
hose. Remove the prefilters, drain the filter housings, and replace the prefilters with clean dry
ones.
Turn the service valve 180° back to its original position, restore the system to its operating con-
figuration.
Follow the New System Startup Procedures to purge the chemicals from the system.

16
Suggested Spares
Spectra Watermakers parts list:
SC-1 STORAGE CHEMICAL……………………….. KIT-
CHEM-SC1
SC-2 CLEANER…………………………………………….KIT-CHEM-SC2
SC-3 CLEANER…………………………………………….KIT-CHEM-SC3
BASIC CRUISE A ………………………………………….KIT-BCK-B
5 MIC FILTER……………………………………………...FT-FTC-5
CHARCOAL FILTER………………………………………FT-FTC-CC
20 MICRON FILTER……………………….………………FT-FTC-20
FILTER HOUSING O-RING……………………………….SO-FHS-10H
OFF SHORE KIT…………………………………………...KIT-OFFSH
Part Number
17
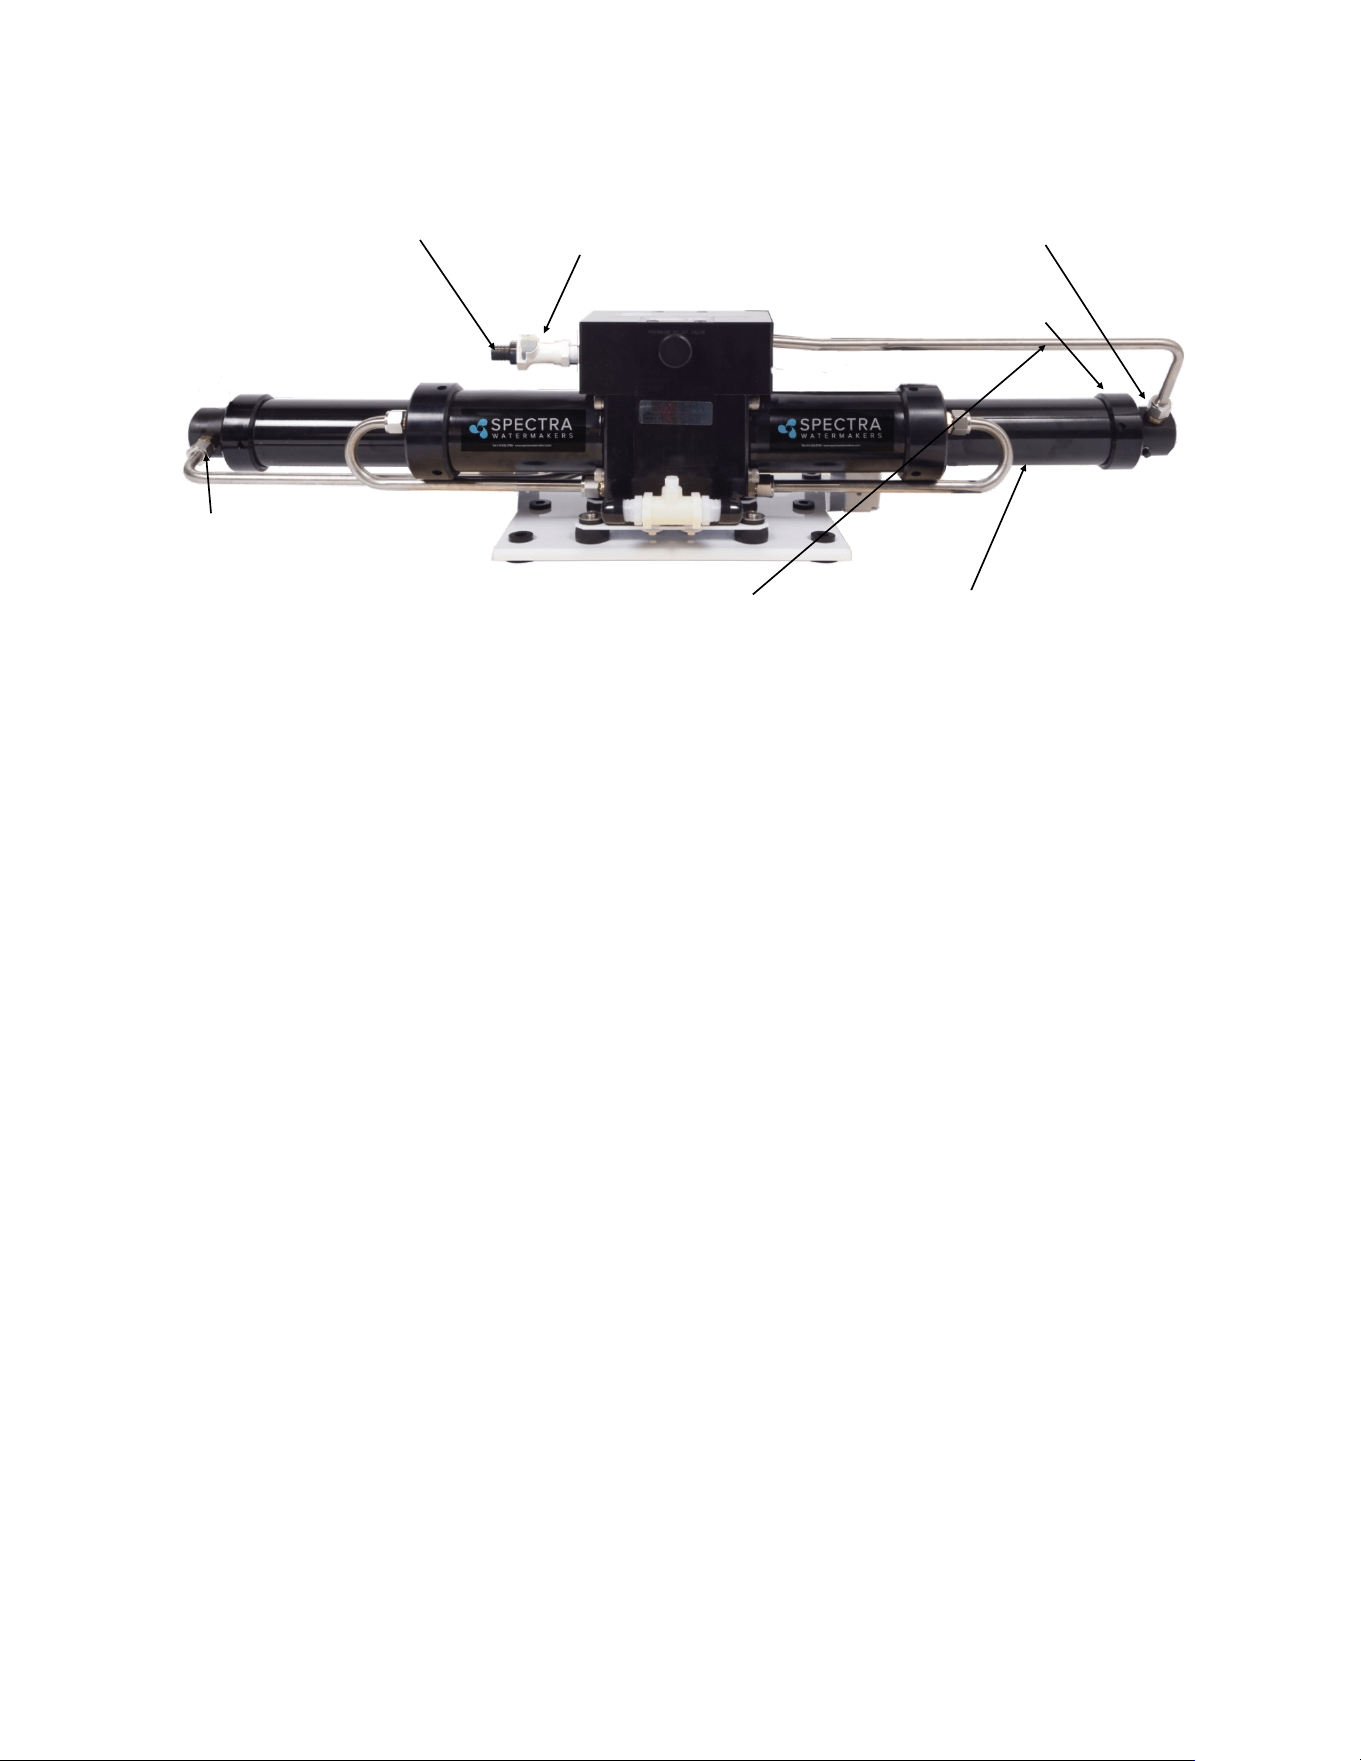
1/2” High Pressure Tube
PL-NLT-1/2HP
40” High Pressure Vessel
FT-PV-40
3/8"NPTX1/2"Tube fitting bronze
PL-MTS-3/8X1/2B
Connector O-ring
SO-HPP-CT
Pressure Vessel Ring
FT-PV-ER
Pressure Vessel End Cap
FT-PV-EP1
5/8 Quick Disc. Hose Barb
PL-QDC-HB5/8
3/8 NPT Quick Disc. Body
PL-QDC-BD3/8
Part Numbers
18
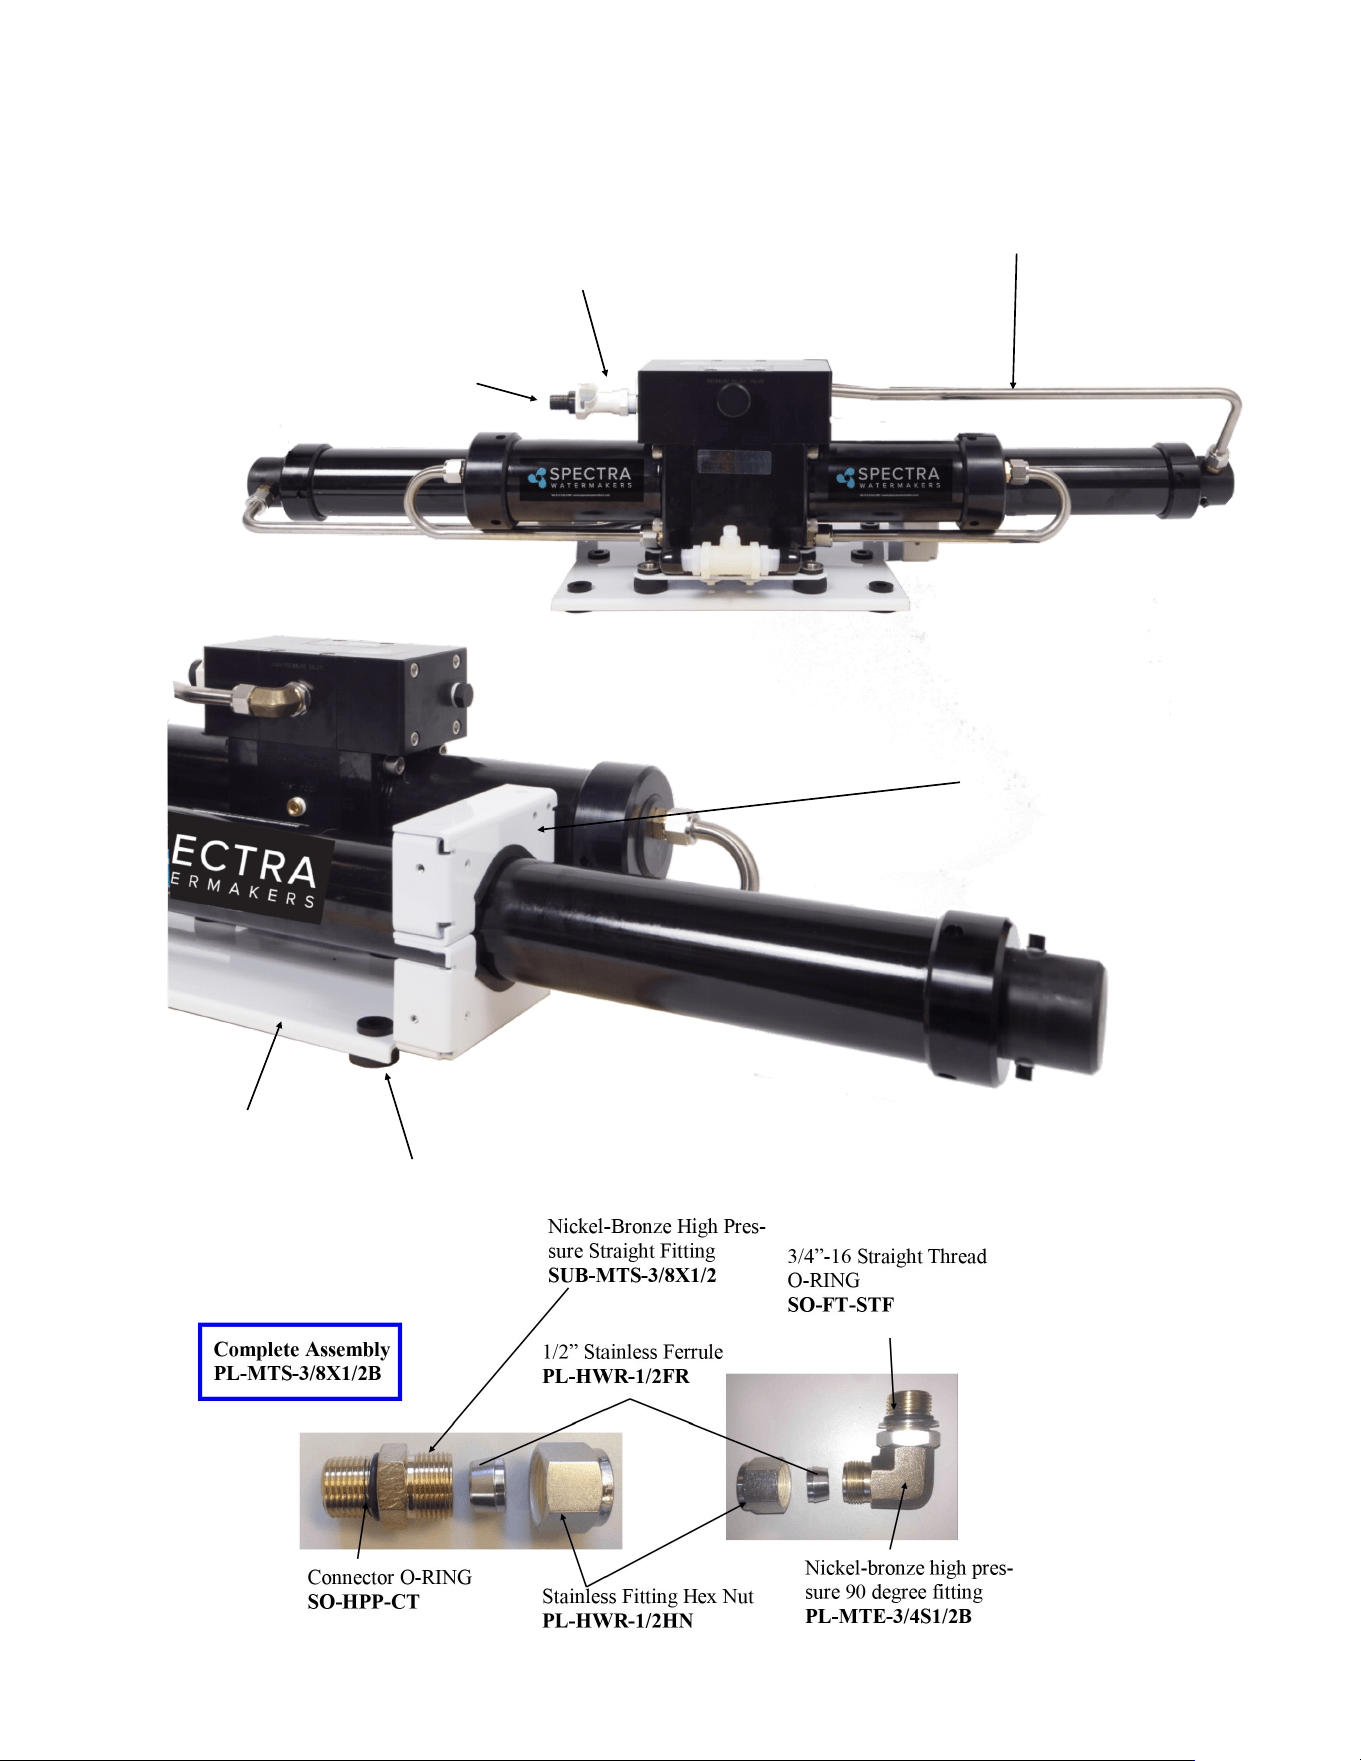
Front View
3/8 NPT Quick Disc. Body
PL-QDC-BD3/8
5/8 Quick Disc. Hose Barb
PL-QDC-HB5/8
Plate Bracket
FM-PVB-PB
Rubber Mount
HD-RBP-RM
Nylon Spacer
HD-SPN-MKINS
Plate Bracket End Cap
FM-PVB-PBE
1/2” High Pressure Tube
PL-NLT-1/2HP
Part Numbers
19
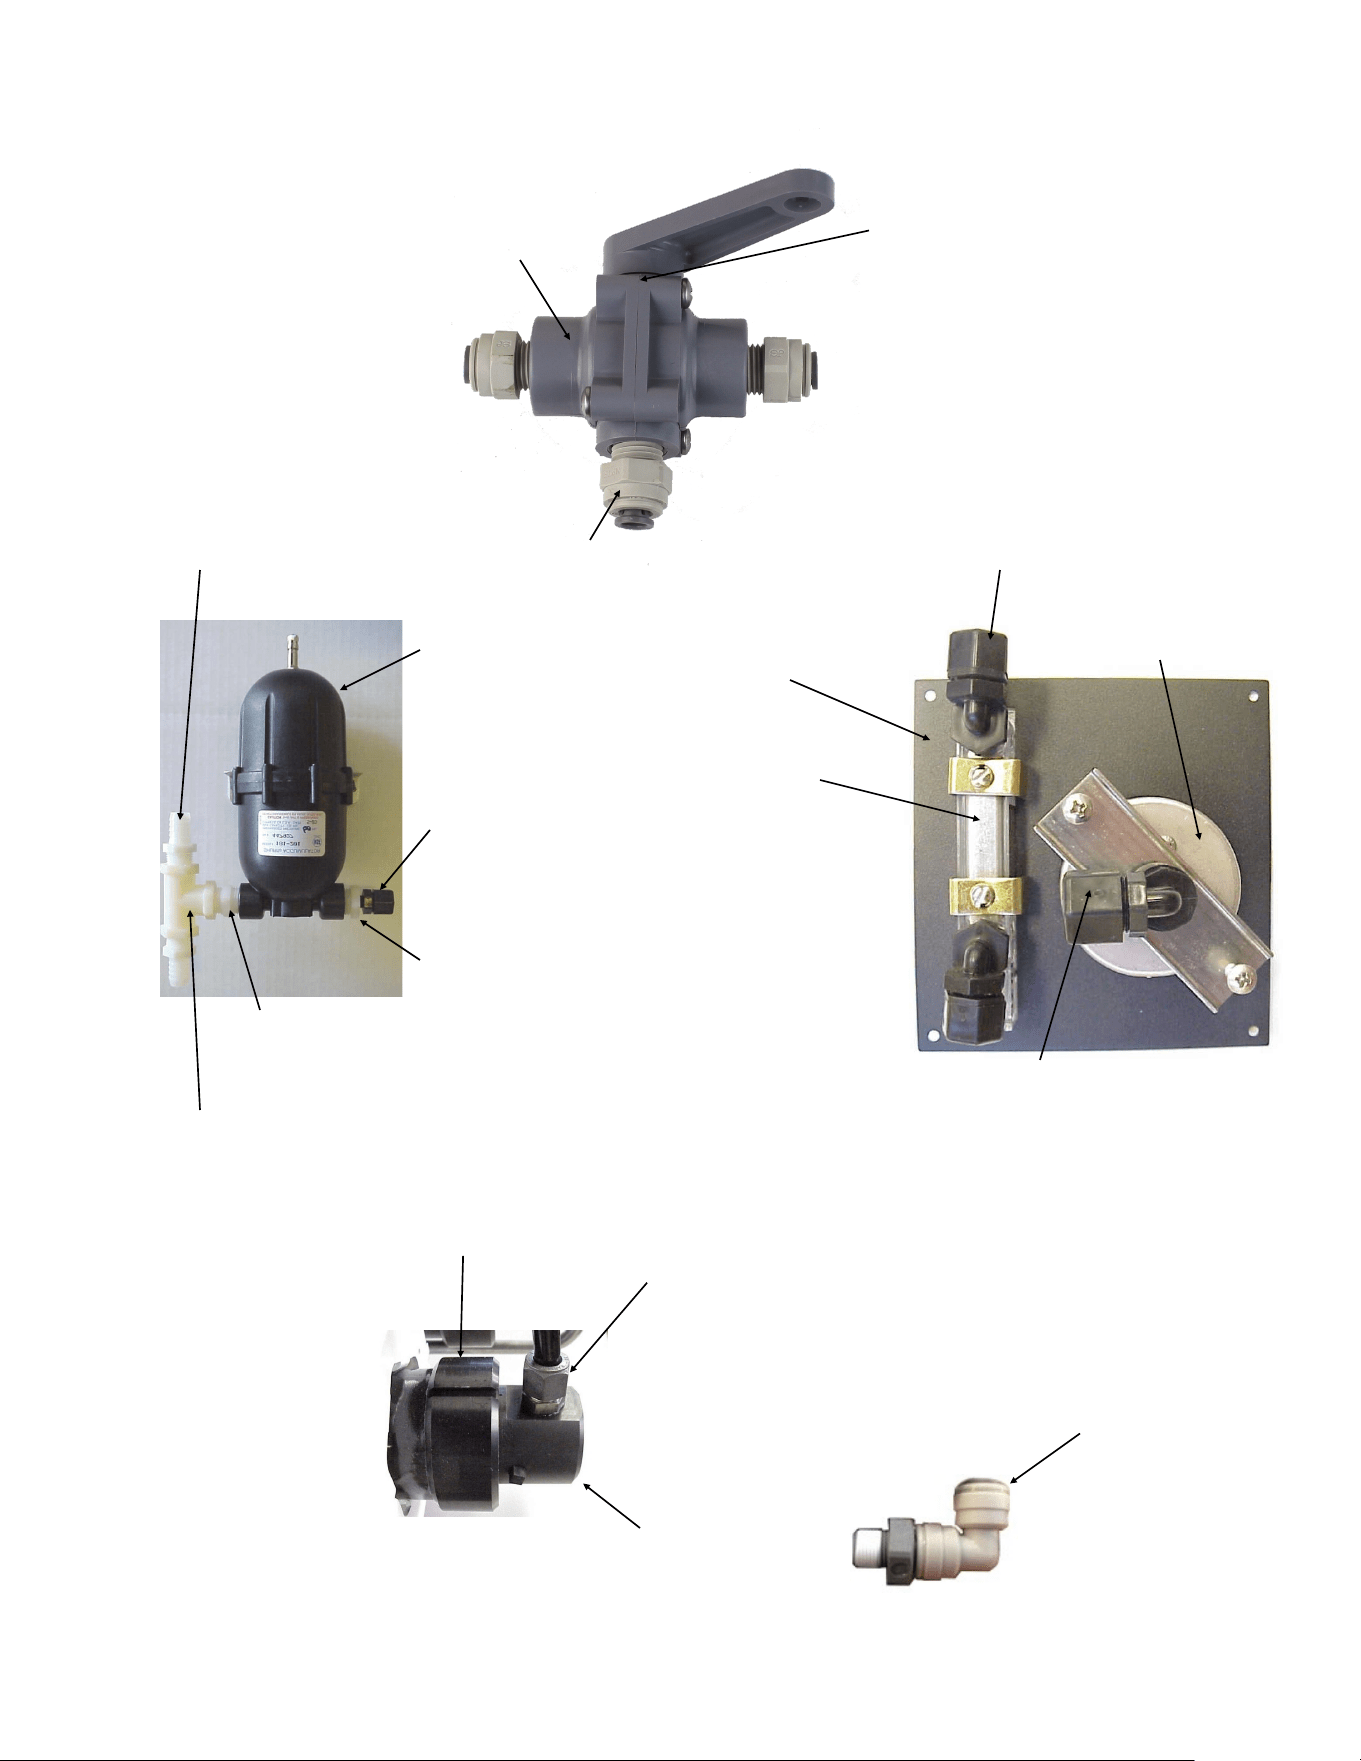
!/4” 3-Way Valve
PL-VLV-3W1/4
3/4” Clamp
PL-CLP-3/4CAR
**not pictured
1/4”NPTX1/4” Tube Fitting El.
PL-MTE-1/4X1/4P
1/8”NPTX1/4”Tube Fitting El
PL-MTE-1/8X1/4P
Accumulator Tank
PL-ACC-TK
Product Flow Meter
PL-FMT-20
Spectra Panel
FM-KIT-MP
Pressure Guage
PL-PSG-LP2.5
1/4”FPTX1/4” Tube Fitting El
PL-FTE-1/4X1/4P
1/8”FPTX1/4”Tube
Fitting
PL-SWF-1/8X1/4J
1/4”NPTX1/4”Tube Fitting
PL-MTS-1/4X1/4J
1/2NPT X 1/4FPT Bushing Reducer
PL-BSH-1/2X1/4N
1/2” NPT Nipple
PL-NP-1/2N
1/2” Female Tee
PL-TEE-1/2FN
1/2NPTX5/8 Hose Barb
PL-HBS-1/2X5/8
3/8”NPTX1/2”Tube Fitting SS.
PL-MTS-3/8X1/2B
Pressure Vessel End Cap
KIT-PV-25EP1
Pressure Vessel Ring
FT-PV-ER
Part Numbers
20
HP-TB-VEB-B
HP-TB-VB
HP-TB-VEB-A
HP-TB-BV
HP-CB-CB10
HP-CYL-SST
HP-CYL-R
HP-CYL-EC
HP-CYL-CCA
Not used
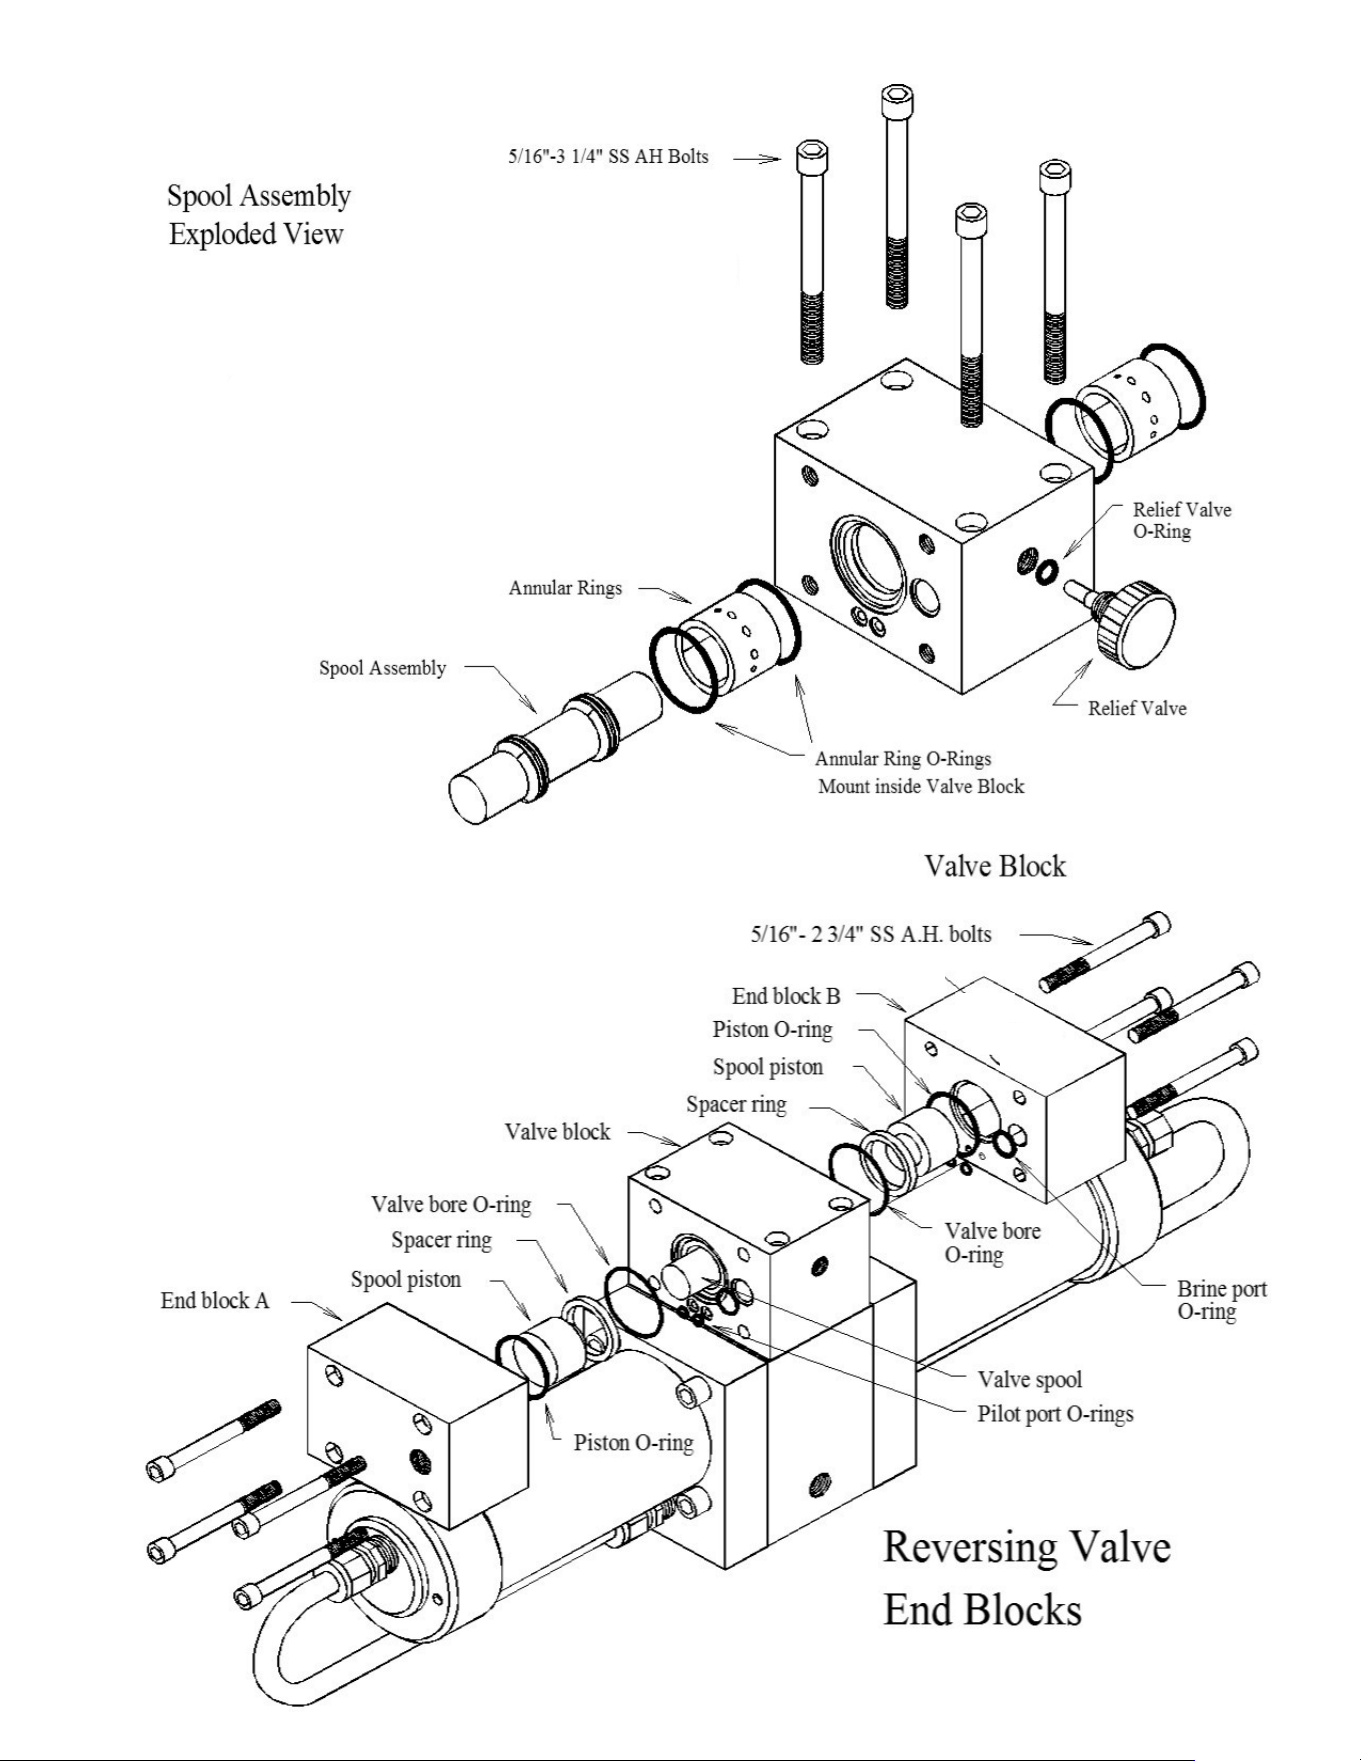
21
HD-CPS-5/16X3
KIT-HP-10VSA
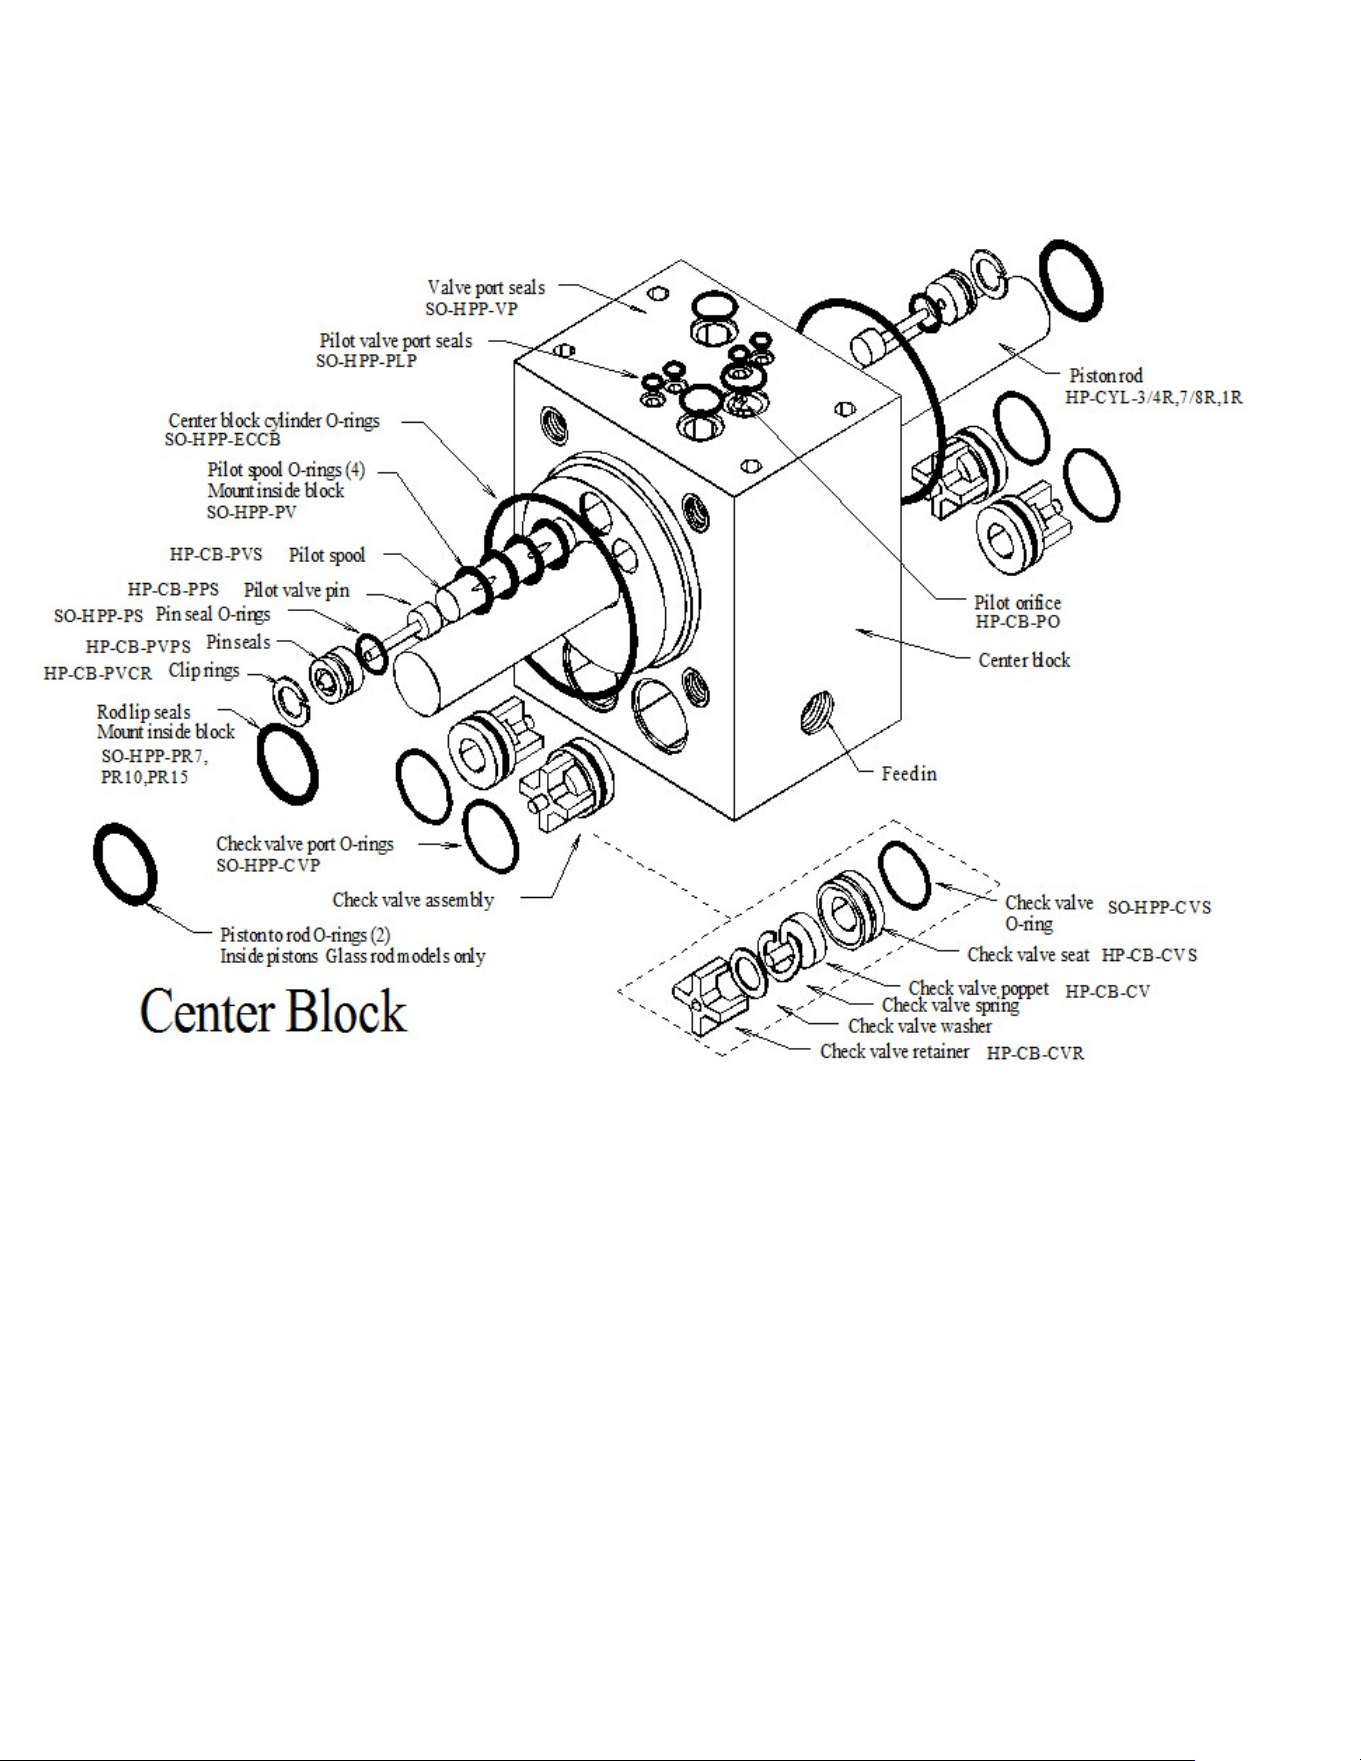
HP-TB-ARP
SO-HPP-AR1
SO-HPP-RV
HP-TB-BV
HD-CPS-5/162.75
SO-HPP-SP
HP-TB-VSP
HP-TB-SR
SO-HPP-VB
SO-HPP-PLP
SO-HPP-VP
22
23
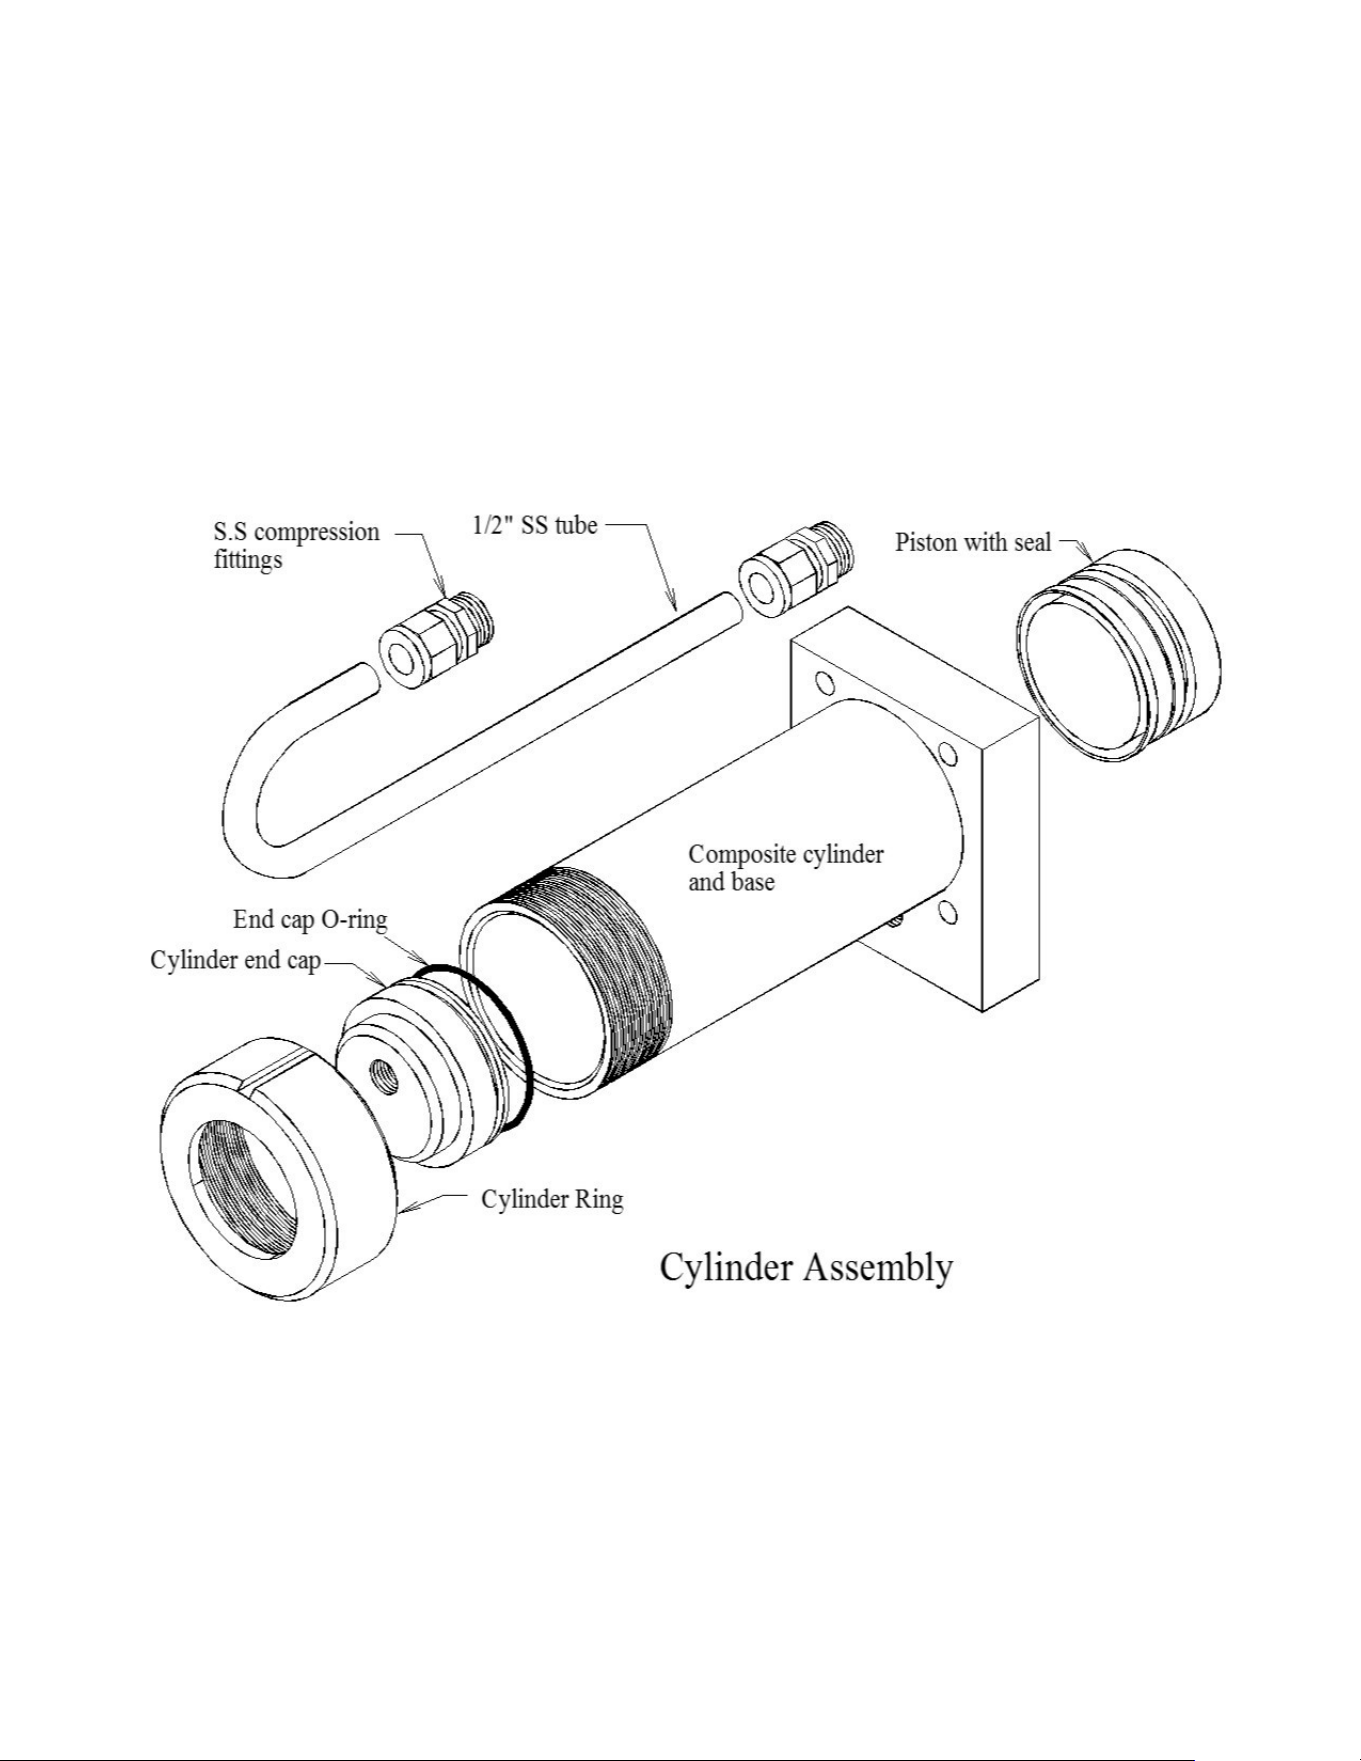
Cylinder Assembly
1/2" SS tube
S.S compression
fittings
Composite cylinder
and base
Early Models
Piston with seal
End plug O-ring
End plug
PL-MTS-3/8X1/2B
HP-CYL-SST
HP-CYL-CCA
SO-HPP-ECCB
HP-CYL-EC
HP-CYL-R
HP-CYL-PT
Parts