Rev.26.05
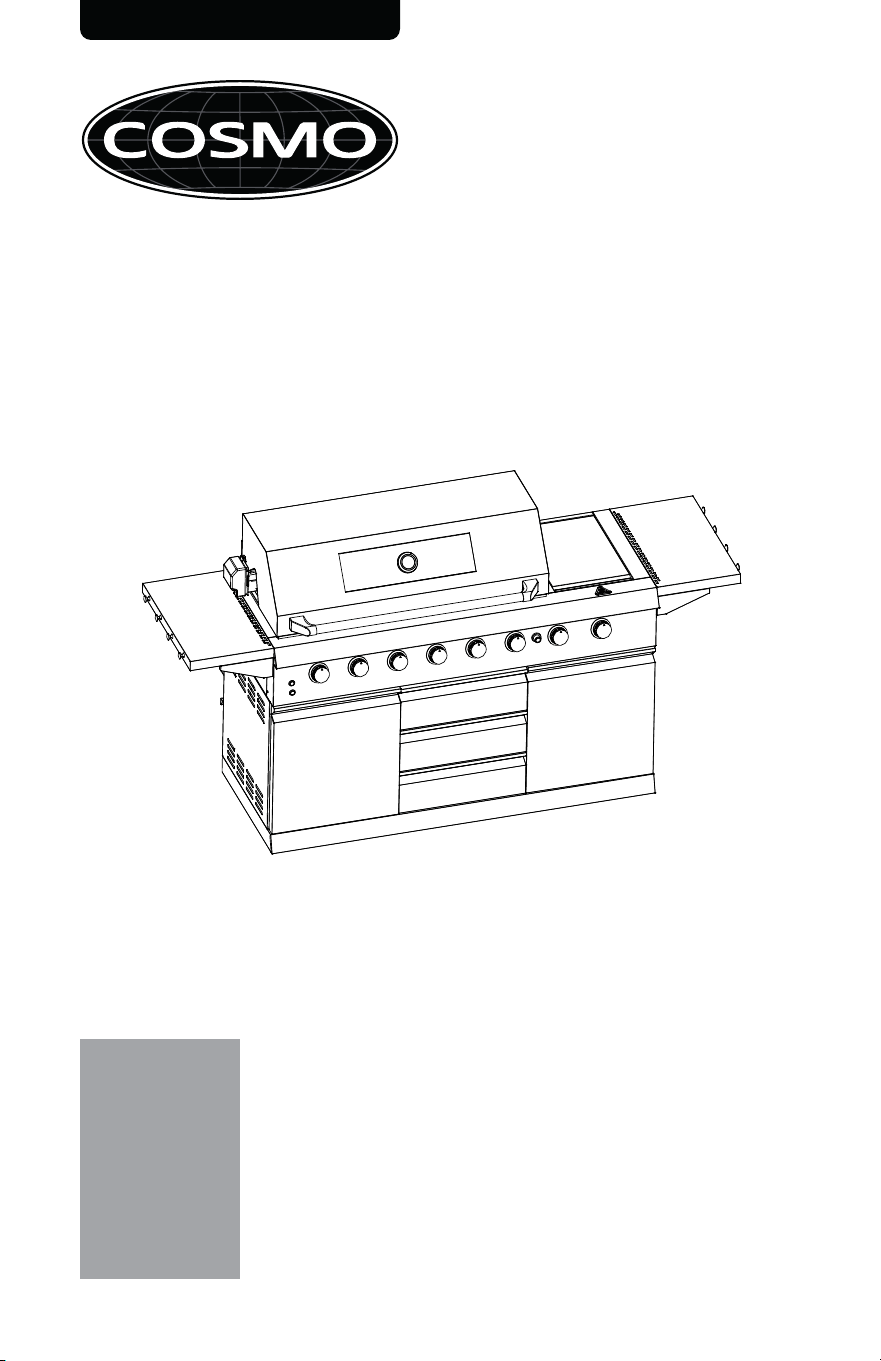
GAS GRILL
COS-GGFN587GSS COS-GGFN587GBK
FREESTANDING GAS GRILL
USER MANUAL
IMPORTANT: READ AND SAVE THESE INSTRUCTIONS.
FOR RESIDENTIAL USE ONLY.
INSTALLER:
HOMEOWNER:
PLEASE LEAVE THIS GUIDE WITH THE HOMEOWNER.
PLEASE KEEP THIS GUIDE FOR FUTURE REFERENCE.
THANK YOU FOR YOUR PURCHASE
Thank you for your purchase. We know that you have many brands and
products to choose from and we are honored to know that you have decided
to take one of our products into your home and hope that you enjoy it.
COSMO Appliances are designed according to the strictest safety and
performance standard for the North American market. We follow the most
advanced manufacturing philosophy. Each appliance leaves the factory after
thorough quality inspection and testing. Our distributors and our service
partners are ready to answer any questions you may have regarding how to
install, use and care for your products. We hope that this manual will help you
learn to use the product in the safest and most effective manner.
Before using this product, please read through this manual carefully. Keep
this user manual in a safe place for future reference. Please ensure that other
persons using this product are familiar with these instructions as well.
If you have any questions or concerns, please contact the dealer from whom you
purchased the product, or contact our Customer Support at:
1-888-784-3108
Reach us online at:
www.cosmoappliances.com
2
TABLE OF CONTENTS
3
Gas Grill Safety ................................................................................................. 4
Cart Stability & Movement .................................................................................. 7
Important Safety Instructions ........................................................................... 8
Overview .......................................................................................................... 12
Grill Layout ............................................................................................................ 12
Optional Accessories ........................................................................................... 14
Operation ......................................................................................................... 15
Control Panel ........................................................................................................ 15
Main Burners and Side Griddle ......................................................................... 16
Rotisserie .............................................................................................................. 20
Before Using the Rotisserie ....................................................................... 20
Assembling the Rotisserie Kit ................................................................... 22
Removing the Rotisserie (After Cooking) ............................................... 26
Side Griddle .......................................................................................................... 27
Before Using the Side Griddle .................................................................. 27
After Using the Side Griddle ..................................................................... 28
Griddle Accessory Cooking (Optional) ................................................... 29
Match Lighting .................................................................................................... 30
Powering Down & Safety After Use ................................................................. 34
Tips and Techniques ........................................................................................ 35
Rotisserie Cooking ............................................................................................... 36
Side Griddle Cooking ......................................................................................... 39
Maintenance & Care ....................................................................................... 40
Cleaning the Main Drip Tray & Side Griddle Oilcup .................................... 43
Cleaning Cooking Grates .................................................................................. 44
Cleaning the Burners .......................................................................................... 45
Cleaning the Exterior Stainless Steel Surfaces .............................................. 46
Cleaning the Viewing Window ......................................................................... 46
Storage Drawer ................................................................................................... 47
Replacing the Battery ........................................................................................ 48
Replacing Light Bulb ........................................................................................... 49
Grill Cover Care ................................................................................................... 52
Storing the Grill .................................................................................................... 53
Troubleshooting .............................................................................................. 54
Grill Problems ....................................................................................................... 54
Drawer Problems ................................................................................................. 56
Limited Warranty ............................................................................................ 57
GAS GRILL SAFETY
Read All Instructions Before Using the Appliance
Your safety and the safety of others are very important.
We have provided many important safety messages in this manual and on
your appliance. Always read and obey all safety messages.
This is the safety alert symbol.
This symbol alerts you to potential hazards that
can kill or hurt you and others.
All safety messages will follow the safety alert
symbol and either the word "WARNING" or
"CAUTION." These words mean:
You can be killed or seriously injured if you don't
follow instructions.
WARNING
A potentially hazardous situation which, if not
avoided, could result in minor or moderate injury.
CAUTION
All safety messages will tell you what the potential hazard is, tell you how
to reduce the chance of injury, and tell you what can happen if the
instructions are not followed.
In the State of Massachusetts, the following installation instructions apply:
• Installations and repairs must be performed by a qualified or licensed
contractor, plumber, or gasfitter qualified or licensed by the State of
Massachusetts.
• If using a ball valve, it shall be a T-handle type.
• A flexible gas connector, when used, must not exceed 3 feet (91.5 cm).
California Proposition 65 Warning
WARNING: Cancer and Reproductive Harm - www.P65Warnings.ca.gov.
4
WARNING
Fire and Explosion Hazard
If the information in this manual is not followed exactly, a fire or explosion
may result causing property damage, personal injury or death.
• Installation and service must be performed by a qualified installer,
service agency or the gas supplier.
• WHAT TO DO IF YOU SMELL GAS
- Do not try to light any appliance.
- Do not touch any electrical switch.
- Do not use any phone in your building.
- Clear the room, building, or area of all occupants.
- Immediately call your gas supplier from a neighbor's phone. Follow
the gas supplier's instructions.
• If you cannot reach your gas supplier, call the fire department.
WARNING
Never Operate the Top Surface Cooking Section of this Appliance
Unattended.
• Failure to follow this warning statement could result in fire, explosion, or
burn hazard that could cause property damage, personal injury, or
death.
• If a fire should occur, keep away from the appliance and immediately
call your fire department.
DO NOT ATTEMPT TO EXTINGUISH AN OIL/GREASE FIRE WITH WATER.
5
WARNING
• Gas leaks cannot always be detected by smell. Gas suppliers
recommend that you use a gas detector approved by UL or CSA. For
more information, contact your gas supplier.
• Do not install or operate this grill beneath any ventilation system that
blows air downward toward the appliance. Downward air can disrupt
ignition/combustion and lead to injury or unintended operation.
• This appliance is intended for outdoor residential use only.
• If your model includes powered features (e.g., lights or
transformer/rotisserie motor), connect only to a 3-prong, 120 V~ 60 Hz,
GFCI-protected receptacle. Appliance must be properly grounded per
local code (or NEC/CSA).
• Proper gas installation (LP cylinder connection or natural-gas line,
conversions, and adjustments) is the responsibility of the installer and
must be performed only by qualified personnel. Service should be
performed only by qualified grill technicians. The manufacturer is not
responsible for injury or damage resulting from incorrect or
unauthorized installation or service.
• Product failure or damage resulting from improper installation,
conversion, or modification is not covered under warranty.
6
CART STABILITY & MOVEMENT
WARNING
Hazard
• Place the grill on a level, stable surface before lighting.
• Lock both braked casters before use; do not operate with wheels
unlocked.
• Do not move the grill while operating or hot. Allow to cool completely
before repositioning.
• Move the grill by the cart frame/handle, not by the side shelves or hood.
• Keep children and pets away from the grill at all times.
• Secure the LP cylinder upright in the tank tray and lock it with the tray
locking screw and the cylinder locking screw, so it cannot move. Never
operate the grill with the cylinder loose or out of position.
Before Each Use — Quick Check:
• Grill is level and casters are locked.
• LP cylinder is properly seated and locked with the tray locking screw and
the cylinder locking screw.
• Gas hose and any electrical cord are not under the wheels and clear of
hot surfaces.
If You Need to Move the Grill:
• Turn all burner knobs OFF and close the LP cylinder valve.
• Let the grill cool completely.
• Unlock casters and roll the cart carefully.
• Reposition on a level surface and re-lock the braked casters before
lighting.
7
IMPORTANT SAFETY INSTRUCTIONS
WARNING: To reduce the risk of fire, electrical shock, injury, or property
damage when using this gas grill, follow basic precautions, including:
• Outdoor use only. Do not use in a building, garage, enclosed patio, or
under unprotected overhead combustibles; operate only in a well-
ventilated outdoor area.
• Open the hood before lighting and do not lean over the open grill while
lighting.
• Never leave the grill unattended during preheat or use. Do not move
the grill while it is operating or hot. Keep children and pets away;
accessible parts get very hot.
• Do not use water on a grease fire. If a grease fire develops, turn burner
knobs OFF and close the LP cylinder valve; grills are ventilated and
cannot be smothered by closing the hood/lid. Clean drip trays, oil cups
and cookbox regularly.
• LP cylinder safety: Never store a spare or disconnected cylinder under
or near the grill. Never fill a cylinder beyond ~80% full. Keep cylinders
upright and away from heat (>125 °F / 51 °C).
• Leak checks: After storage, at first use, and whenever you reconnect
fittings, perform a soap-solution leak test. Do not use an open flame to
check for leaks; keep away from sparks during testing.
• Keep cords & hoses clear of heat. Route any electrical supply cords and
the fuel hose away from hot surfaces and sharp edges.
• Do not modify the grill or enlarge burner/orifice openings. Use only
manufacturer-approved parts and accessories.
• User servicing: Do not repair or replace parts unless specifically
recommended in this manual. All other service should be referred to
qualified grill technicians.
• Storage in/on the grill: Do not store combustibles in the cart or under
the cookbox while the grill is hot or in operation.
• Cleaning hot surfaces – Use caution when wiping hot grates/plates—
wet cloths can flash steam and cause burns. Many cleaners produce
fumes on hot surfaces; allow the grill to cool before most cleaning.
READ AND SAVE THESE INSTRUCTIONS
8
IMPORTANT SAFETY INSTRUCTIONS
• Use only dry, heat-resistant grill mitts – Moist or damp mitts can cause
steam burns. Do not use towels or bulky cloths, and keep mitts away
from hot surfaces and flames.
• Never leave burners unattended on HIGH. Boilovers and grease can
smoke and ignite. Stay at the grill during preheat, searing, and any
high-heat cooking.
• Cookware prohibition – This appliance is not approved for heating
external cookware. Do not place pots, pans, woks, kettles, Dutch ovens,
griddle plates, or similar items on the main cooking grates, side burner,
or side griddle. Cook food directly on the grill’s integrated
grates/griddle only.
• No handles over edges – Since external cookware is not permitted, do
not position tools or accessories so that handles extend over walkways
or adjacent burner areas.
• Proper Installation – If your grill has AC-powered features (e.g.,
lights/transformer), connect only to a 3-prong, 120 V~, 60 Hz, GFCI-
protected, weather-resistant receptacle. The receptacle must be
properly grounded per local codes or, if none, the National Electrical
Code (NEC, NFPA 70) or the Canadian Electrical Code (CSA C22.1). Have
a qualified electrician verify correct grounding and polarity. Do not
remove the ground pin or use adapters/unsupported extensions.
• Injuries may result from misuse of appliance cabinets or drawers such as
stepping, leaning, or sitting on the cabinets or drawers.
• Maintenance – Keep Grill area clear and free from combustible
materials, gasoline, and other flammable vapors and liquids.
• Grease control – Do not allow grease/food debris to accumulate in the
cookbox, on the grates, or in drip tray and oil cup; clean regularly to
reduce flare-ups and fire risk.
• Flame management – Adjust burner settings to avoid excessive flames
and flare-ups; do not create flames that roll out of the cookbox.
(External cookware use is not permitted.)
• Opening the lid – Open the lid slowly and stand to the side to let hot
air/steam escape before placing or removing food.
READ AND SAVE THESE INSTRUCTIONS
9
IMPORTANT SAFETY INSTRUCTIONS
• Do Not Heat Unopened Food Containers – Pressure can build up and
the container may burst, causing injury.
• Keep Grill Air Vents Unobstructed – Do not block lid exhaust vents or the
cookbox air inlets; proper airflow is required for safe combustion.
• Lid Use – Operate with the lid position recommended for the cooking
method. Never defeat safety clearances or shield the control panel from
heat with foil/covers.
• Placement of Cooking Grates & Warming Rack – Position cooking grates
and the warming rack while the grill is cool. If adjustment is necessary
while hot, use dry, heat-resistant mitts and avoid contact with hot
surfaces.
• Aluminum Foil & Probes – Do not line the cookbox, flame tamers or
grates with foil; it blocks airflow and can cause grease fires. Keep meat-
probe wires and connectors away from open flames and burner ports.
• DO NOT TOUCH BURNERS OR HOT SURFACES OF THE GRILL – Burners,
flame tamers, grates, the cookbox, hood, viewing window, and nearby
metal surfaces can be hot enough to cause burns. During and after use,
avoid contact with hot parts and keep clothing and combustibles away
until the grill has cooled.
• Flame Management – Adjust burner settings to prevent excessive
flames or flare-ups. If a burner goes out or a flare-up occurs, turn knobs
OFF, open the hood, and wait 5 minutes before relighting.
• Gas Shutoff – Have the installer show you the location and operation of
the LP cylinder valve and, for plumbed installations, the natural-gas
shutoff valve.
• Proper Disposal of the Appliance – Dispose of or recycle the grill in
accordance with federal and local regulations. Contact local authorities
for environmentally safe disposal/recycling.
• Do Not Clean Hood/Window Gasket – If your model includes a gasket,
it is essential for a proper seal. Avoid rubbing, damaging, or moving the
gasket.
• Do Not Use Oven/Harsh Cleaners – Do not use commercial oven
cleaners, caustic agents, or liner/protective coatings in or around any
part of the grill; they can damage finishes and components.
• Clean Only Parts Listed in This Manual – Follow the cleaning and
maintenance instructions provided; perform no other servicing unless
specifically directed.
READ AND SAVE THESE INSTRUCTIONS
10
IMPORTANT SAFETY INSTRUCTIONS
For installations with an outdoor ventilating hood
• Use only an outdoor-rated, non-combustible hood installed per local
code and the hood/grill clearances. Do not use recirculating or
downward-blowing systems that disrupt ignition/combustion.
• Keep hood inlets/exhaust unobstructed; never cover filters or vents with
foil or liners.
For cleaning grill
• Before burn-off: Remove food and loose accessories; scrape heavy
residue; empty and reinstall the main drip tray and side griddle’s oil cup.
• Start and monitor. Light burners per instructions and run on HIGH only
for the recommended short period; do not leave unattended. If
excessive smoke or flare-up occurs, turn all knobs OFF and allow to cool.
• After burn-off: Allow the grill to cool before wiping ash/soot from grates
and cookbox.
• If ignition/flame occurs in the cookbox during burn-off: Turn all burner
knobs OFF and close the LP cylinder valve (or NG shutoff). Do not open
the lid rapidly—introducing fresh air can intensify flames. Allow the fire
to extinguish on its own.
• If anything malfunctions: Turn the grill OFF, close the fuel supply,
disconnect power to any accessories, and contact a qualified service
provider.
• Pet/bird sensitivity: Smoke/fumes from high-heat cleaning can affect
sensitive animals. Keep birds and pets well away in a separate, well-
ventilated area.
READ AND SAVE THESE INSTRUCTIONS
11
OVERVIEW
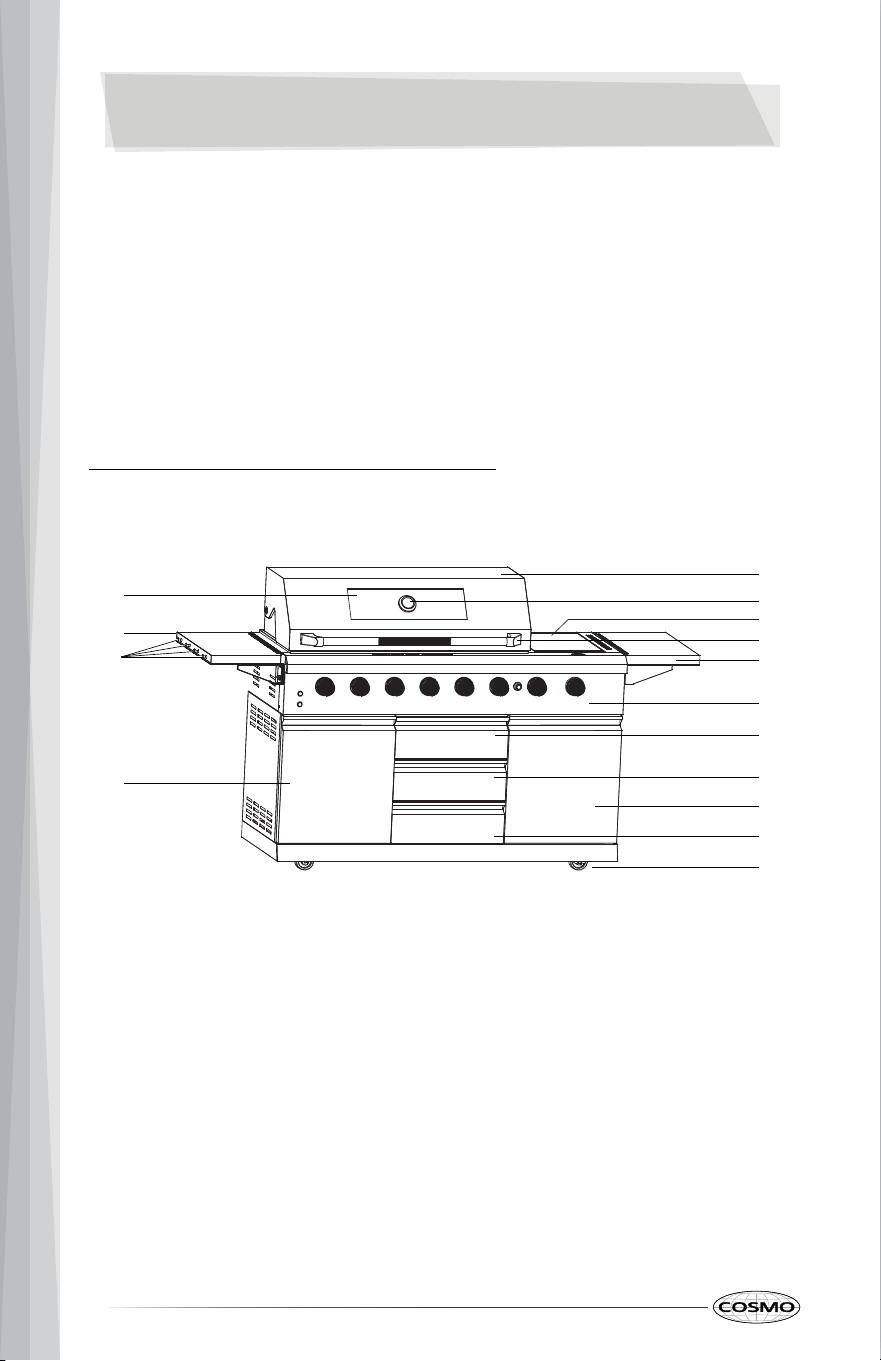
GRILL LAYOUT
The grill you have purchased may have some or all of the items listed. The
locations and appearances of the features shown here may not match those
of your model.
EXTERIOR GRILL
COS-GGFN587GSS and COS-GGFN587GBK
A. Grill hood (lid)
B. Thermometer
C. Side griddle
D. Hood handle
E. Foldable side shelves
F. Control panel
G. Storage drawer
H. Cabinets
I. Wheels
J. Viewing window
K. Hooks
D
B
A
E
F
G
H
B
E
G
G
H
C
I
K
J
12
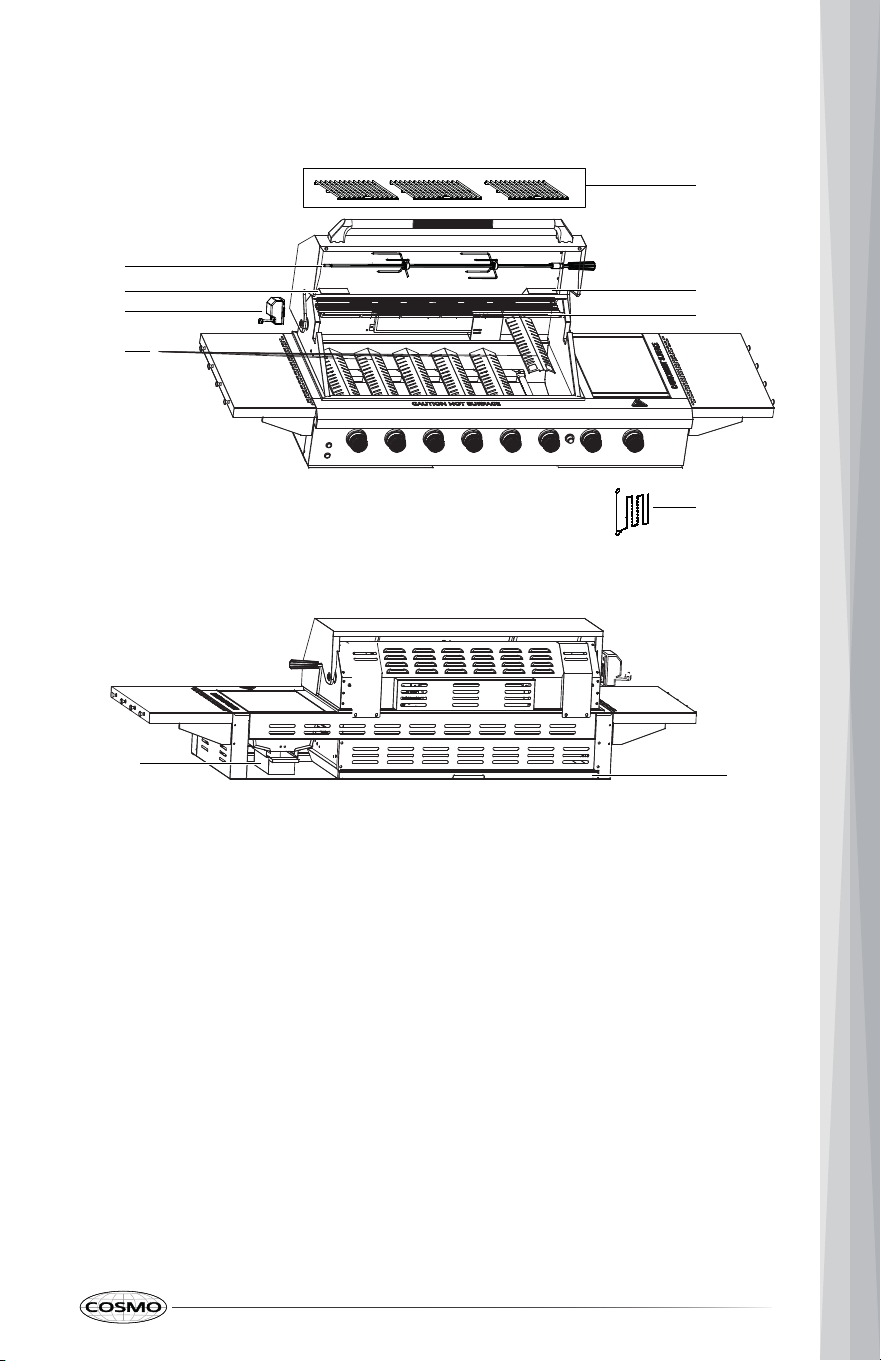
GRILL TOP
A. Cooking grates
B. Hood lights
C. Warming rack
D. Grill matchstick holder
E. Rotisserie
F. Rotisserie motor
G. Flame tamer (Heat plates)
H. Main drip tray (pan)
I. Side griddle oil cup
A
E
C
G
B
B
F
D
H
I
13
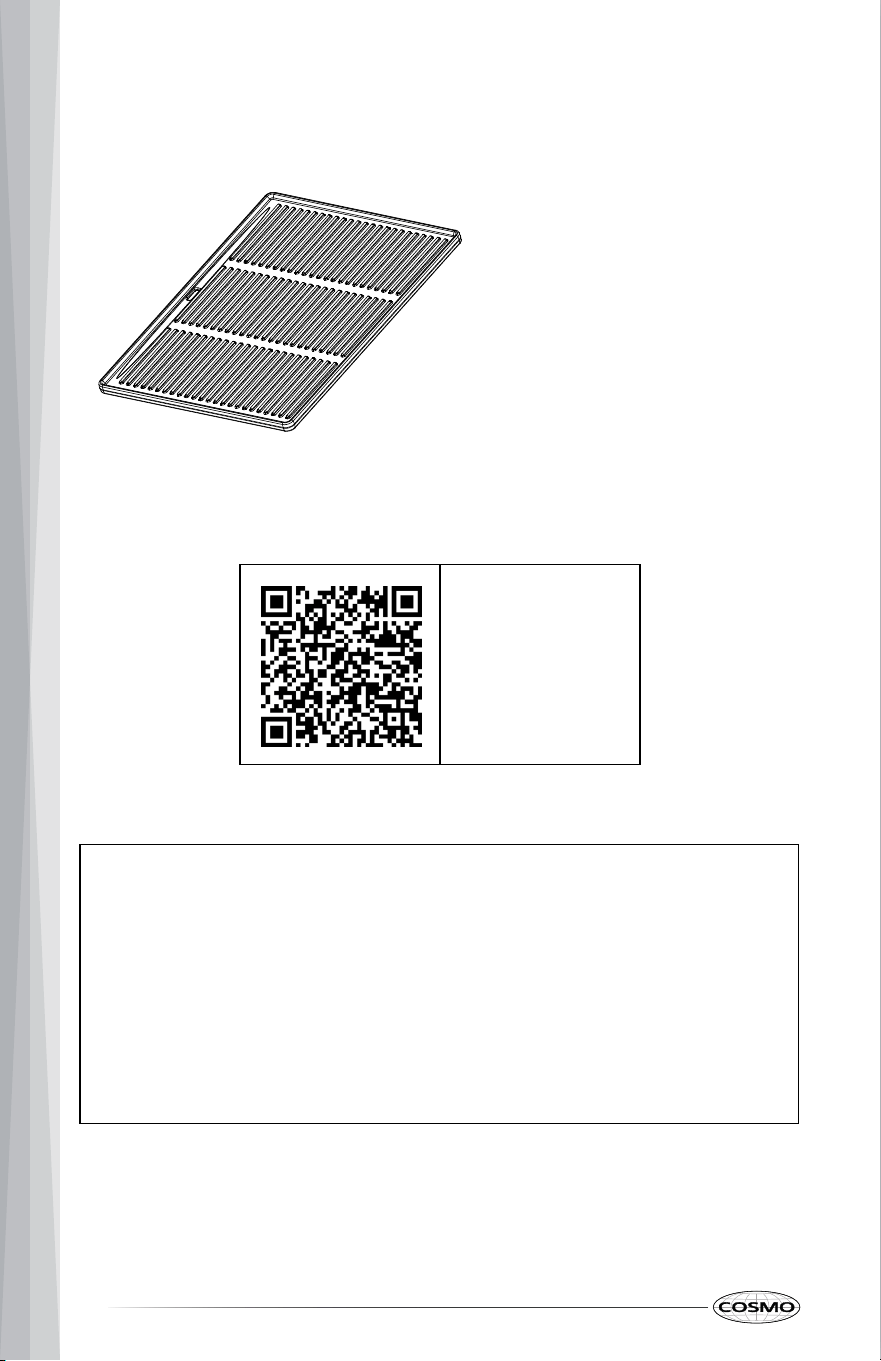
OPTIONAL ACCESSORIES
Griddle
Scan to find
available Griddle
and replacement
Lights/Bulbs
Note:
• Reference the contact information at the end of this manual and
contact customer service if any accessories are missing.
• To purchase replacement parts or any other accessories, please visit
www.cosmoappliances.com or reference the contact information at the
end of this manual.
• The images in this guide may be different from the actual components
and accessories, which are subject to change by the manufacturer
without prior notice for product improvement purposes.
14
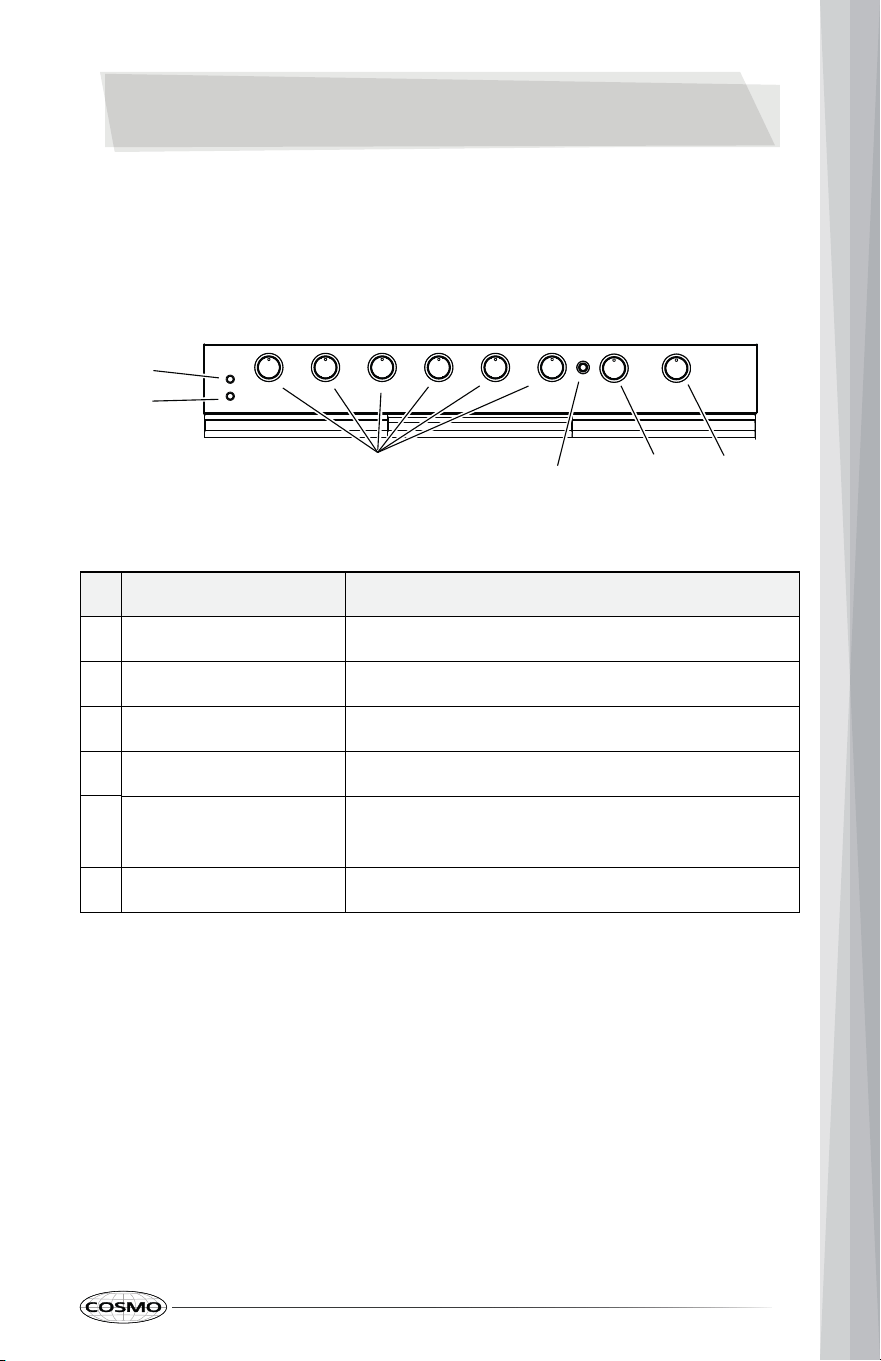
OPERATION
CONTROL PANEL
The appearance of the knobs may vary from what is shown below.
# Name Description
A Main burner knobs To control the main burners.
B Rotisserie burner knob To control the rotisserie burner.
C Side griddle knob To control the side griddle.
D
Knobs backlit LED
switch
To turn knob LED ON/OFF.
E
Hood light switch To turn the hood light ON/OFF.
F AA Battery box This is to store 1 AA battery for the ignition.
A B CF
D
E
15
MAIN BURNERS AND SIDE GRIDDLE
BEFORE USING THE MAIN BURNERS AND SIDE GRIDDLE
Read all instructions before using.
WARNING
• Assembly check before use. Make sure all burners, flame tamers,
igniters, cooking grates, and the drip tray and oil cup are correctly
installed and fully seated before operating any burner.
• Never leave the grill unattended on HIGH. Grease and juices can smoke
and ignite. Stay at the grill during preheat, searing, and any high-heat
cooking.
• Do not line or cover the grill with foil. Do not line the grates, flame
tamers, or cookbox with aluminum foil or liners. This blocks airflow, can
cause overheating/CO buildup, and increases grease-fire risk. Use only
the factory drip tray and oil cup where specified.
• No external cookware. This appliance is not approved for heating pots,
pans, woks, kettles, Dutch ovens, griddle plates, or similar items on the
cooking grates and side griddle. Cook food directly on the integrated
grates/griddle only.
• Prevent spillovers & flare-ups. Trim excess fat, avoid over-oiling, pat
marinades dry before cooking, and don’t overload the grates. Manage
heat to keep flames under control and clean drip tray, oil cup and
cookbox regularly to prevent hazardous buildup.
Note:
• The center cooking grate is wider than the left/right grates. Install
grates in their correct positions—do not interchange them.
16
CAUTION
• Flame management. Keep flames controlled under the food; do not
allow flames to roll out of the cookbox or contact the control panel or
side shelves. Reduce heat to control flare-ups. (External cookware use is
not permitted.)
• Preheating only—don’t run empty for long. Preheat only as needed.
Avoid operating burners on HIGH for extended periods with an empty
grill; prolonged empty high heat can discolor or damage grates, flame
tamers, and finishes.
• No disassembly while lit or hot. Do not remove grates, flame tamers, or
disassemble any burner while another burner is on or the grill is hot.
Damage and injury may result.
• Let parts cool before contact/cleaning. Ensure burners, grates, flame
tamers, and the cookbox are cool before placing hands, mitts, or
cleaning tools on them. Use dry, heat-resistant gloves when handling
warm components.
IMPORTANT:
• Outdoor use only. A gas grill produces heat, moisture, smoke, and
combustion byproducts (including carbon monoxide). Never operate
indoors, in a garage, or in any enclosed/partially enclosed space. Use
only in a well-ventilated outdoor area with required clearances.
• Ensure adequate ventilation. Keep hood exhaust and cookbox air inlets
unobstructed; do not cover grates, flame tamers, or vents with foil/liners.
• If installed under an outdoor ventilating hood (if equipped): use an
outdoor-rated, ducted hood. Turn the hood fan on before lighting and
increase the fan speed during high-heat or “flaming” foods to remove
smoke/steam effectively.
• Prolonged high-heat cooking: Expect increased heat, moisture, and
smoke. If accumulation occurs, reduce burner settings, open the hood to
vent, and/or increase hood ventilation (where present) until conditions
clear.
• Do not line or cover the grates, flame tamers, cookbox, or hood with
aluminum foil or oven liners. This traps heat, blocks airflow, and can
cause smoke, fire, or product damage. Damage from improper liners is
not covered by warranty.
• Only use manufacturer-approved drip tray and oil cup. Do not use any
other liners elsewhere.
17
• No external cookware. Do not place pots, pans, foil trays, dishes, or
water/ice pans on the grates, side burner, or side griddle. Cook food
directly on the built-in grates/griddle only.
• Do not use plastic wrap, wax paper, or similar materials anywhere on or
in the grill.
• Keep hood exhaust vents and cookbox air inlets unobstructed; do not
block with foil, pans, or covers.
• Do not use an overhead “air curtain” or downward-blowing hood above
this grill; downward airflow can disrupt ignition/combustion.
• Avoid excessive flames. If a burner goes out or a flare-up occurs: turn
knobs OFF, open the hood, wait 5 minutes, then relight per the
instructions.
• While the grill is still warm (not hot), you may brush grates to loosen
residue. Empty/replace drip tray and oil cup only after fully cool.
• If the battery is depleted or AC power (if equipped) is unavailable,
main/side burners may be match-lit using the match holder per the
manual.
• Do not match-light the rotisserie burner. Use its electric ignitor; if it fails to
light within ~5 seconds, turn OFF and wait 5 minutes before retrying.
• Moisture/condensation may appear on the viewing window or hood
during heat-up; this is normal and will dissipate as the grill stabilizes.
18
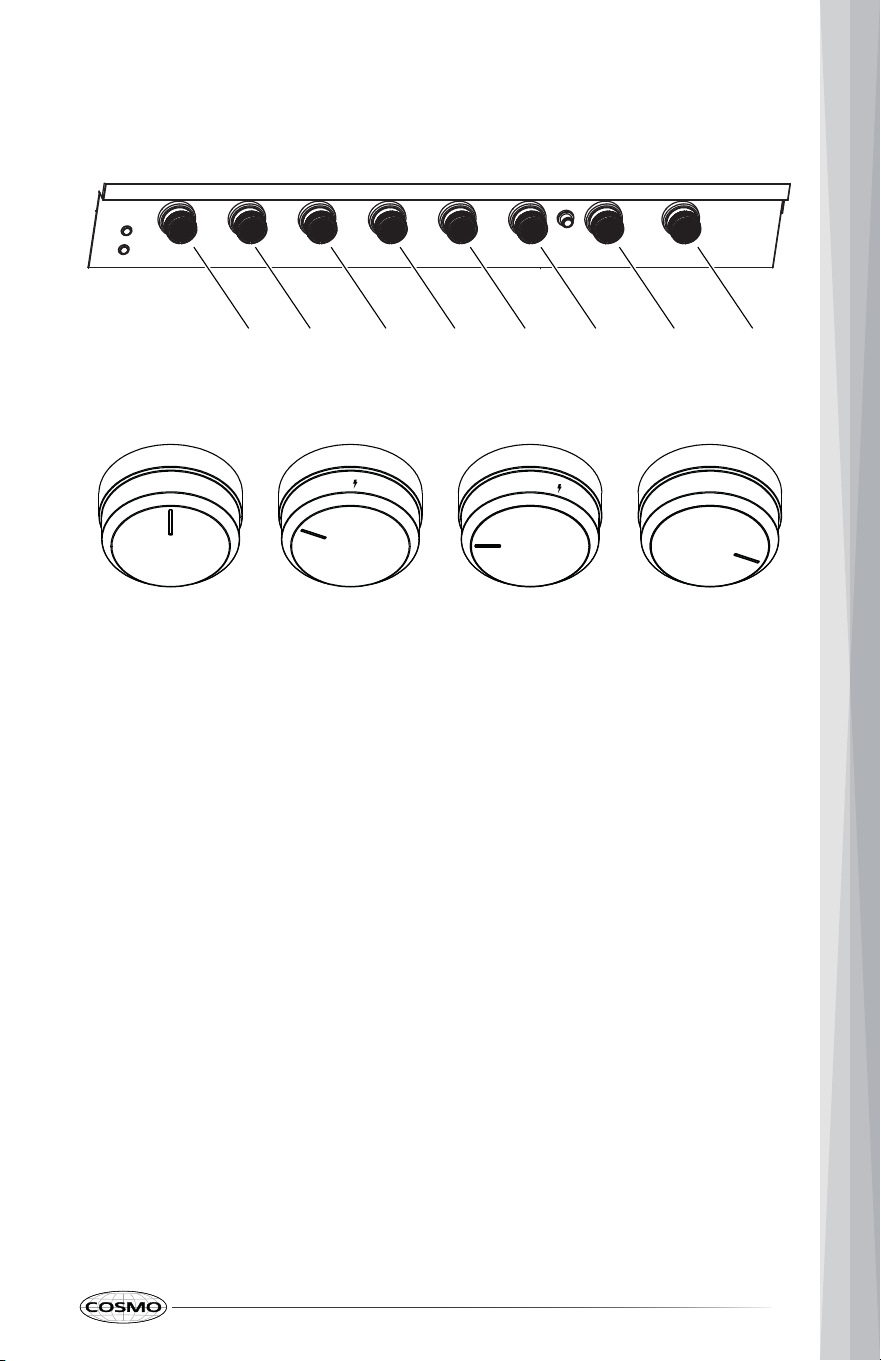
USING THE SURFACE BURNERS
Lighting the Main Burners and Side Griddle
1. Open the hood.
2. Select a burner and find its control knob.
3. Push the knob in and turn it to the Ignite position. The electric spark
ignition system will make a clicking noise.
4. Once gas is ignited, turn the knob to adjust the flame size.
5. If the burner does not light within 5 seconds: turn the knob OFF, wait 5
minutes to clear gas, then repeat the lighting steps
6. To turn off a burner, turn the knob to the OFF position.
OFF position Ignite position HI position LO position
O
F
F
L
O
H
I
H
I
1 2 3 4 5 6 7 8
19
Note:
• When one burner is turned to Ignite, other burners will spark. Sparking
will continue as long as the knob remains at Ignite.
• Do not touch any main burner components (e.g. Cooking grates, igniter)
while the igniters are sparking, and do not lean over the grill while
lighting.
ROTISSERIE
Note:
• Do not operate the side griddle simultaneously with the rotisserie
burner and remove the Warming Rack.
• The rotisserie IR burner places the heat behind the food for even, radiant
roasting with minimal flare-ups.
• A main drip tray under the spit rod collects grease from the rotisserie
cooking.
BEFORE USING THE ROTISSERIE
MOUNTING THE ROTISSERIE MOTOR
Note:
• Remove the Warming Rack, if installed before this installation.
20
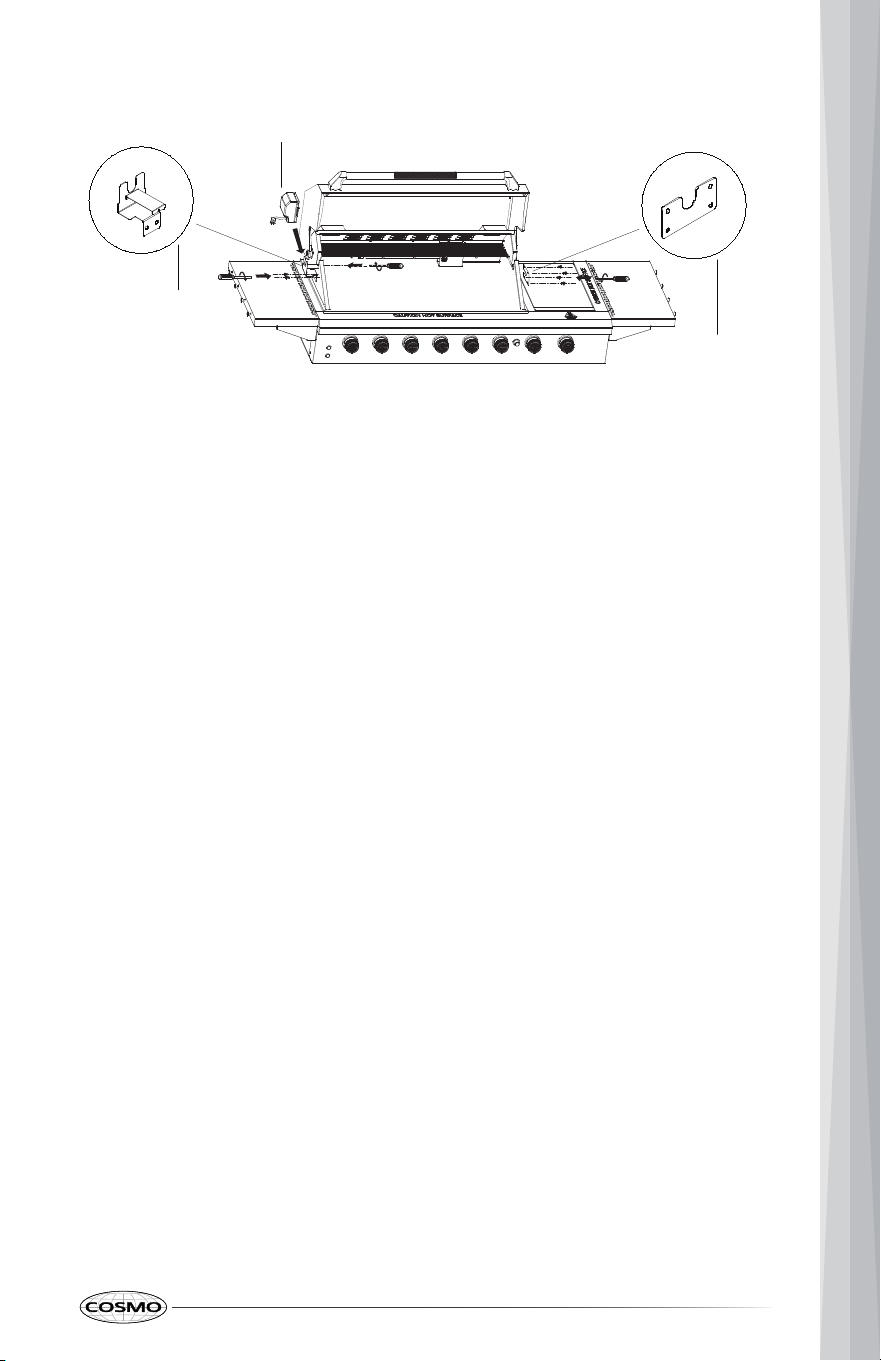
1. Find the pre-drilled holes on the left side panel. Hold the motor bracket so
its shelf faces the cookbox and fasten it with 1× 5/32" screw from inside
the cookbox and 2× 1/4" screws from outside. Tighten until solid (no
wobble).
2. Mount the spit-rod support/handle bracket on the right-side panel (the
cradle the handle end rests in) with 4x1/4” screws from outside; tighten
fully so it can support the rod.
3. Slide the motor onto the motor bracket with the drive socket facing the
cookbox; sight across the cookbox and make sure the socket lines up level
with the opposite side.
QUICK CHECKS
• Remove the warming rack before rotisserie use.
• Center the meat on the spit rod, tighten the forks into the thickest
sections, and truss/tie poultry wings and legs so they clear the grates and
hood during rotation.
• Do not exceed the rotisserie 25 Lbs (11 kg) weight and confirm there’s
clearance through a full turn before lighting.
Rotisserie
Motor Bracket
Rotisserie Spit
Rod Handle
Support Bracket
Rotisserie Motor
21
• Open the hood, to ignite, push in and turn the rotisserie knob slowly to
ON position; hold for ~15 seconds after ignition so the safety device stays
open. If it does not light within 5 seconds, turn to OFF position and wait 5
minutes before retrying.
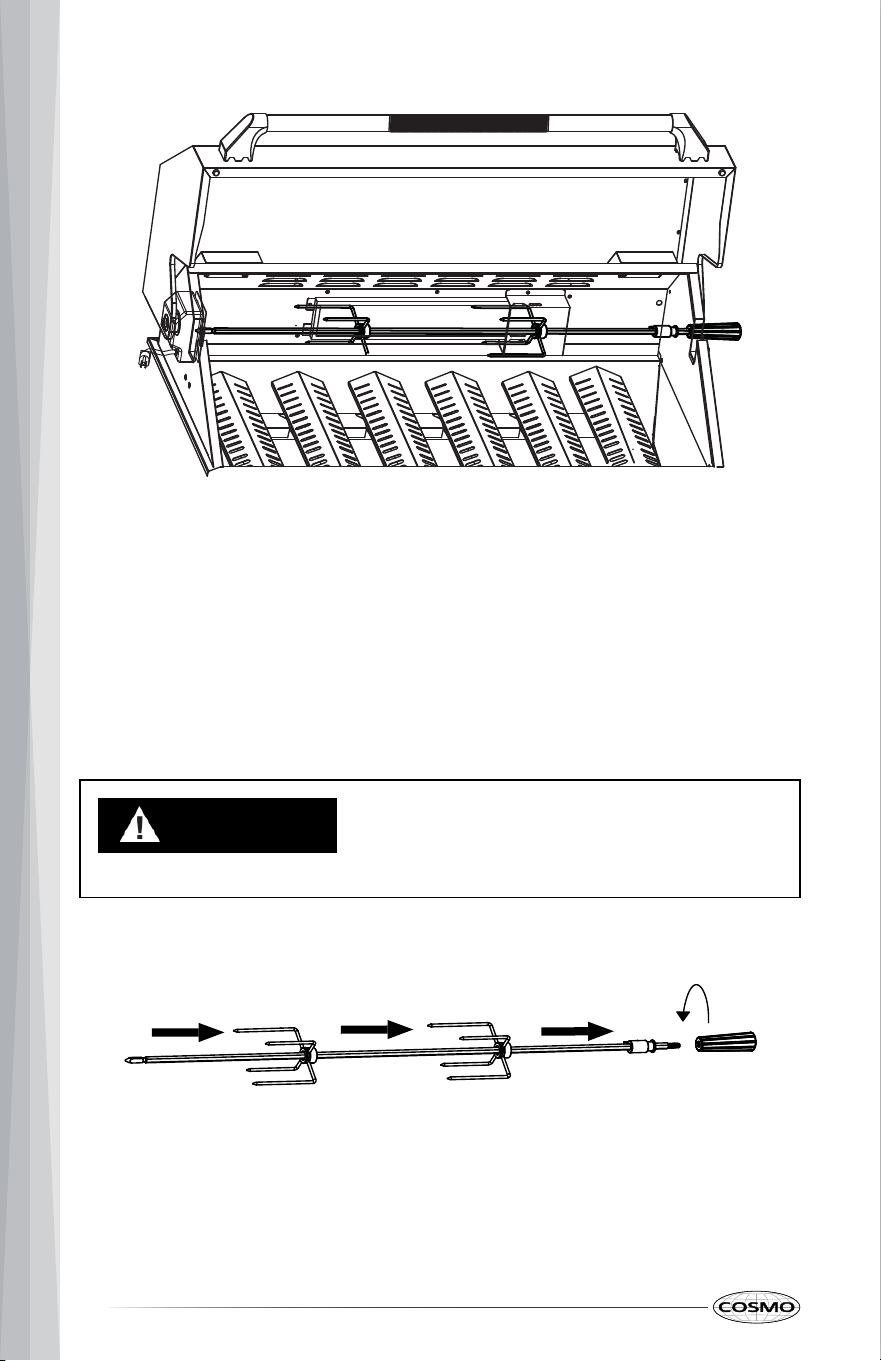
ASSEMBLING THE ROTISSERIE KIT
CAUTION
• Wear a heat-resistant mitt when checking balance on a hot grill.
22
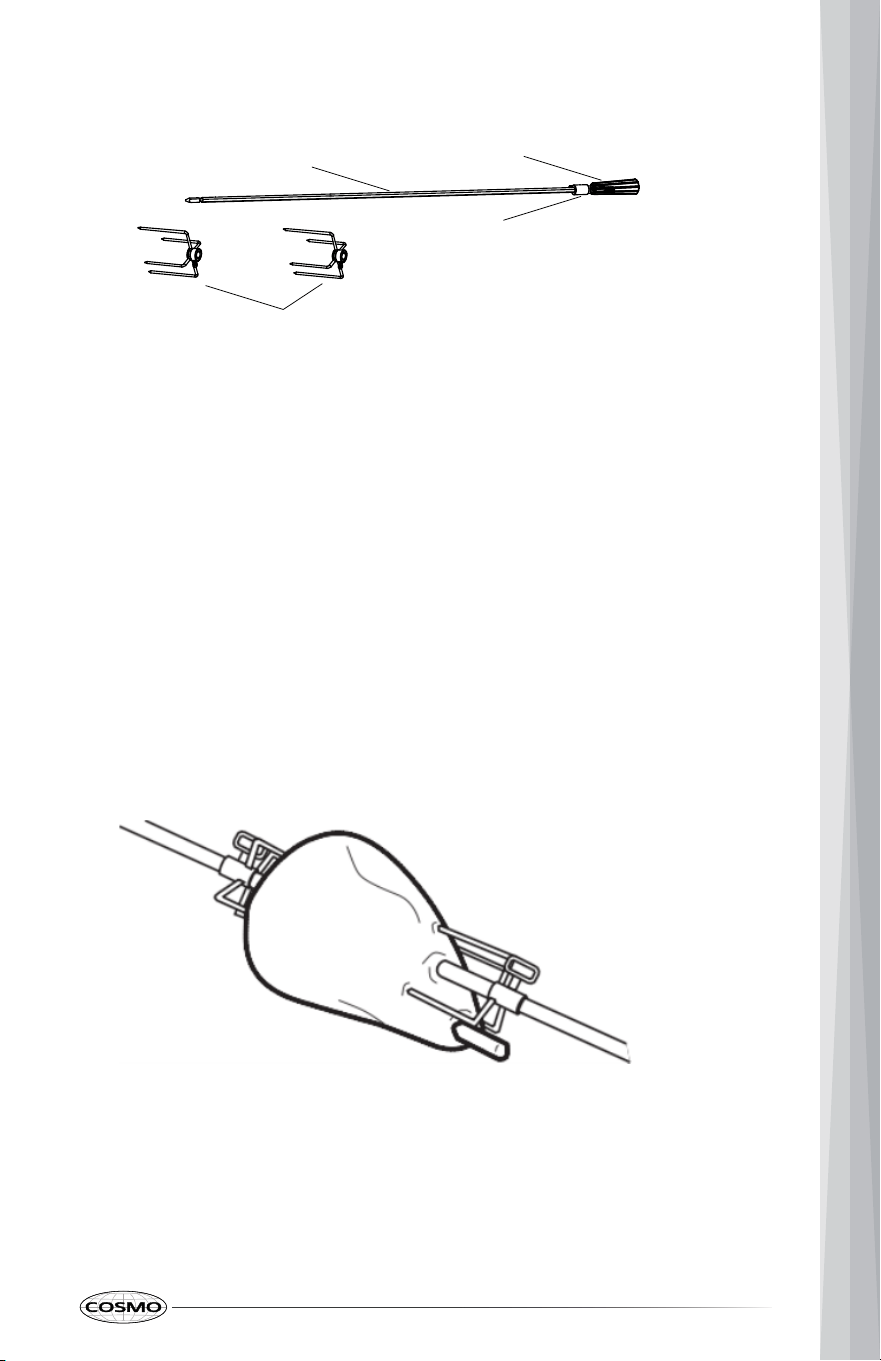
The instructions below are according to the illustrated diagram above.
1. Place the rotisserie spit rod on a clean surface with the threaded end to
your right end and hand-tighten the handle snug (don’t overtighten).
2. Push the shaft collar ring from the square/pointed end (left) and slide to
the right edge near the handle and tighten it’s set screw.
3. Slide a rotisserie fork on from the left side of the rod inward toward the
center and lightly snug its thumbscrew.
4. Now slide the food onto the rod and push firmly into the fork.
5. Push another fork outward gently pushing firmly against the food and
make sure the food is secured between both forks and tighten both fork’s
thumbscrews.
Rotisserie Forks
Rotisserie Spit Rod
Rotisserie Handle
Rotisserie Shaft Collar Ring
23
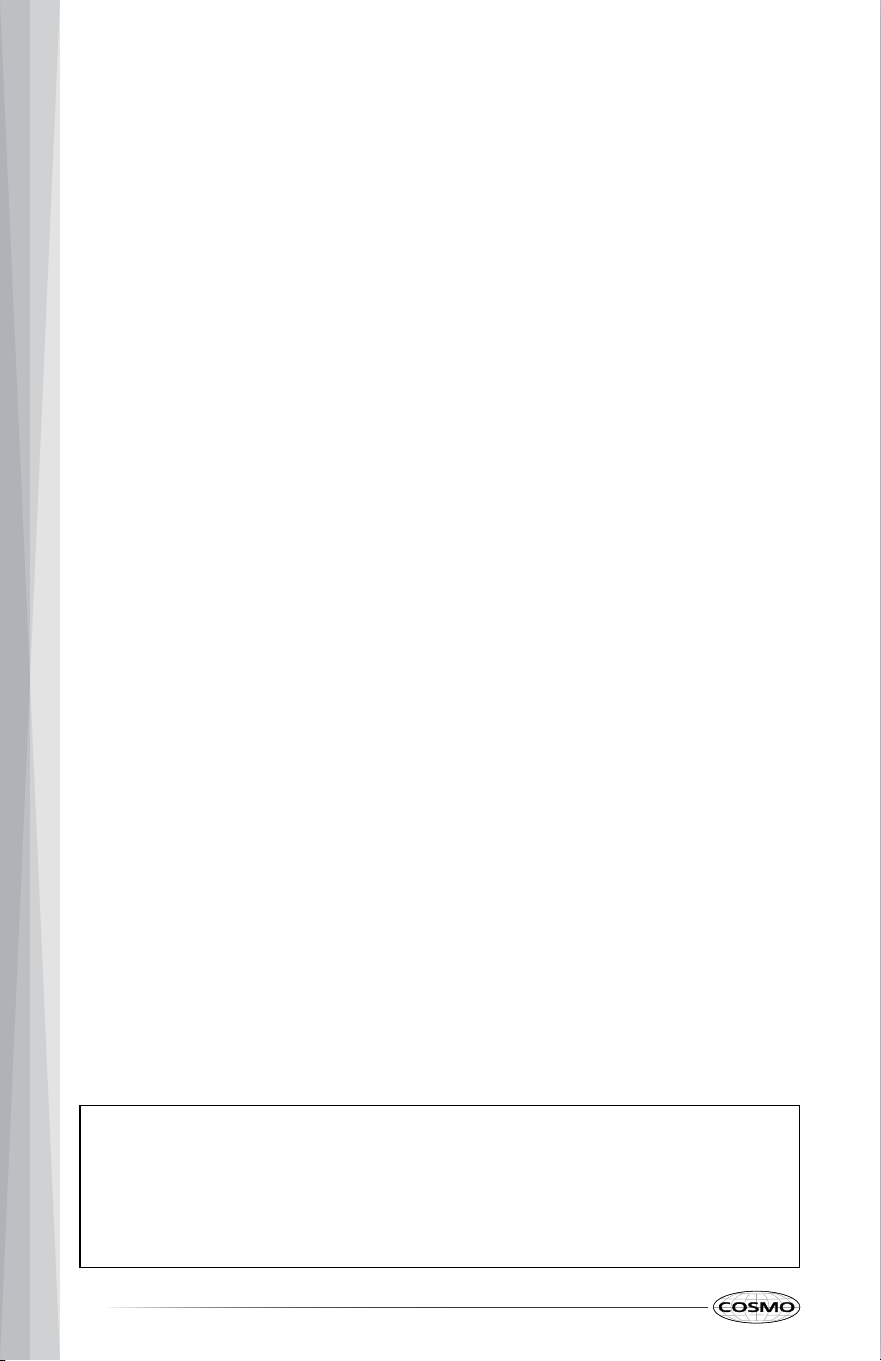
6. Snug the shaft-collar ring against the handle-side stop point and tighten
its set screw.
7. Do a quick balance check; if one side dips, re-center the forks and
retighten.
USING THE ROTISSERIE
MOUNTING THE ROTISSERIE TO THE GRILL
1. Push the spit rod into the square/pointed end (left) fully into the motor
socket.
2. Lower the handle end into the spit rod handle support bracket on the
opposite side so the rod sits level.
3. Slide both forks to the center and tighten the thumb screws so the forks
cannot move.
4. Turn the spit rod one full turn by hand manually and make sure it’s
rotating well.
5. Route the rotisserie motor’s cord to a GFCI outlet, keeping it and the gas
hose away from hot areas and plug in and turn on the switch on the
rotisserie motor and run it for 5–10 seconds. If it wobbles or creeps out,
unplug, re-center the forks, and re-seat the spit rod.
Lighting the Rotisserie Burner
Note:
• Rotisserie burner uses a thermocouple, which is a safety shut-off valve.
When lighting, push in, turn to HI, and hold for 5–10 seconds so the
sensor warms and keeps gas flowing. If you release too soon, the safety
will close and the flame will go out—relight and hold longer.
24
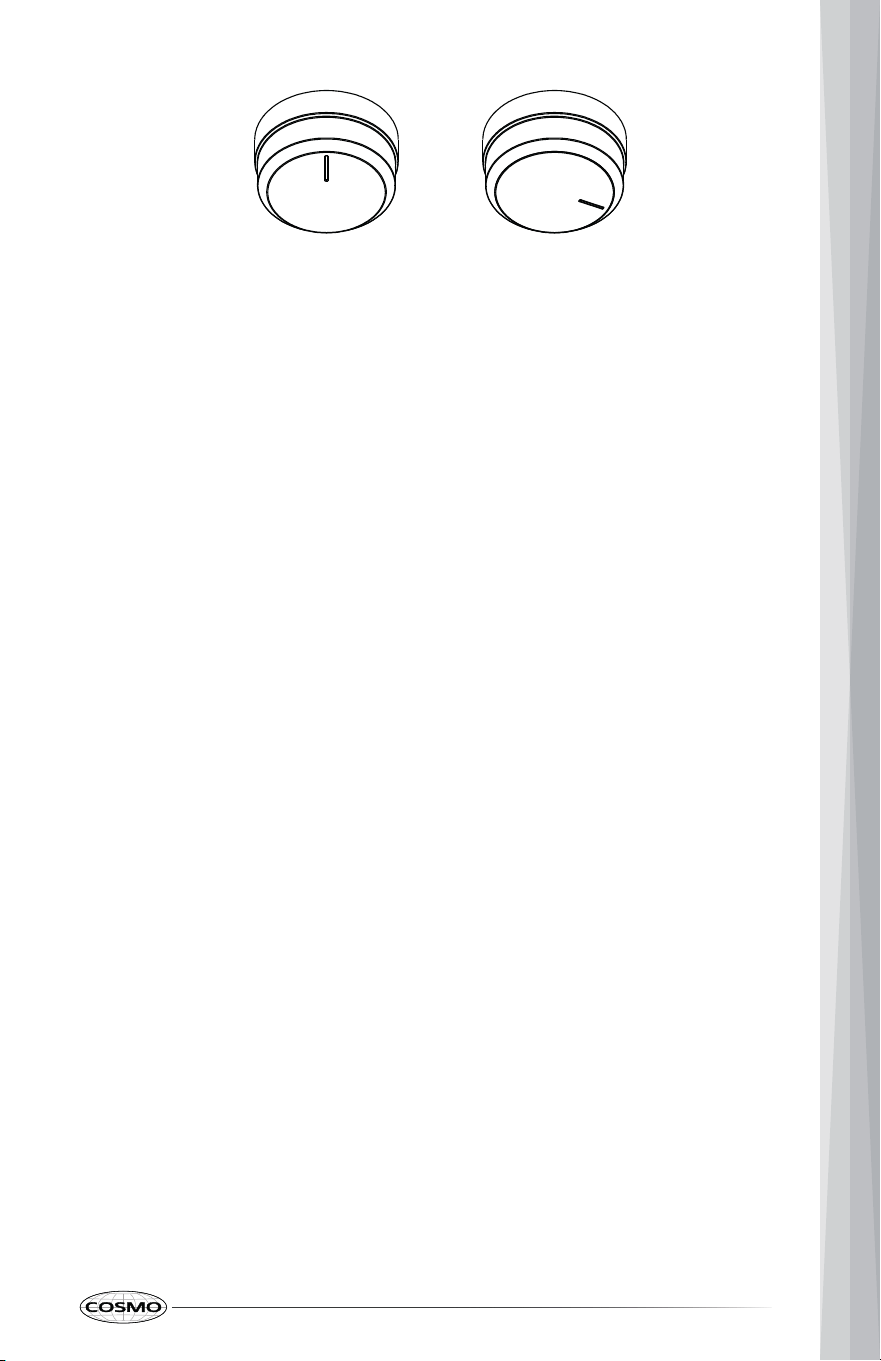
1. Open the hood, push the rotisserie knob in and turn to ON. The electric
spark ignition system will make a clicking noise.
2. If the burner does not light within 5 seconds: turn the knob to OFF
position, wait 5 minutes to clear gas, then repeat the lighting steps.
3. To turn off the burner, turn the knob to the OFF position.
AFTER USING THE ROTISSERIE
• Turn rotisserie knob to OFF position; close the LP cylinder valve (or NG
shutoff).
• Let the grill cool completely.
• Remove and clean the main drip tray, grates below, and any splatter on
the cookbox.
• Wipe and lightly oil the spit rod and forks before storage.
OFF position ON position
O
F
F
O
N
25
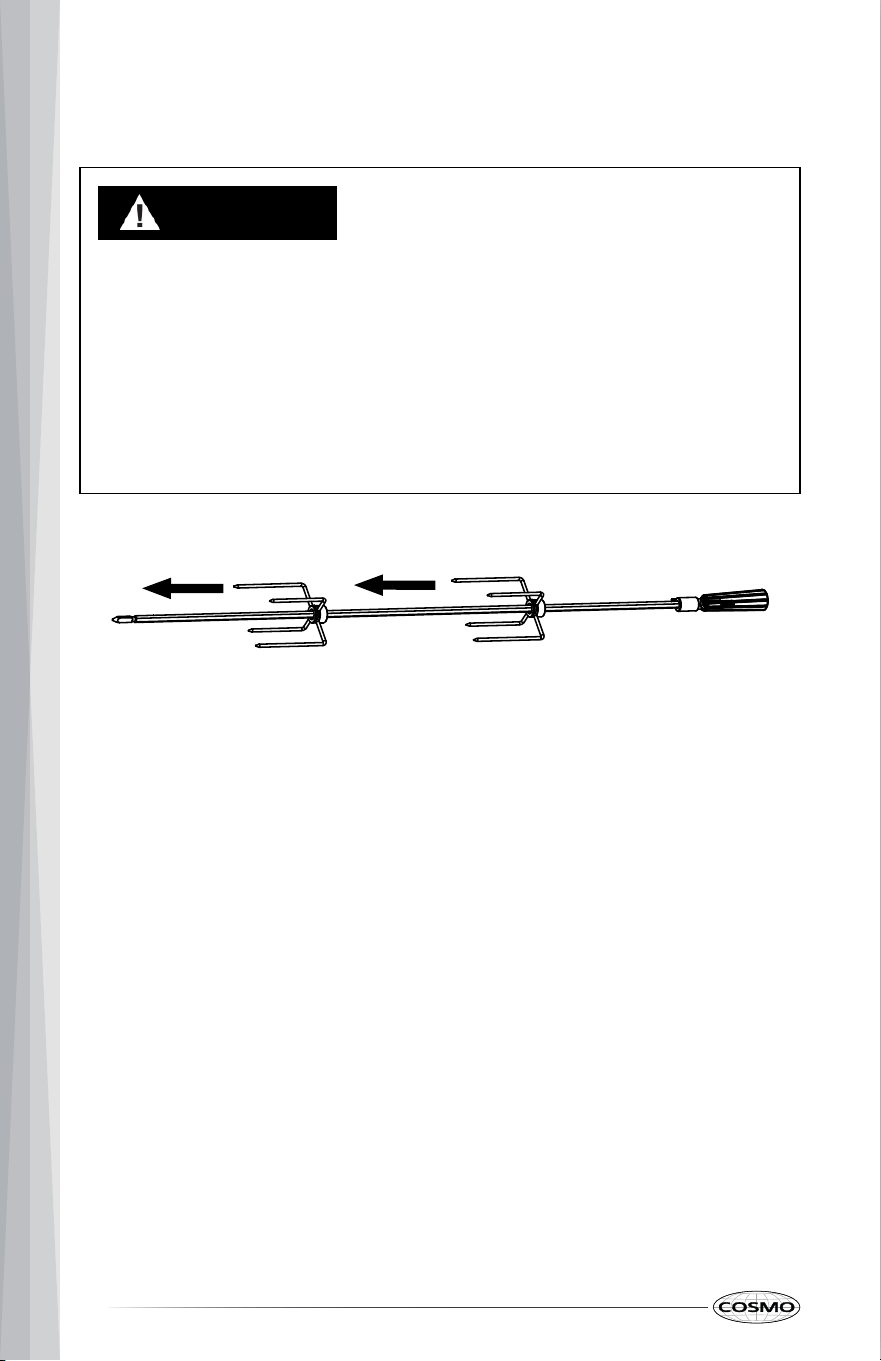
Removing the Rotisserie (After Cooking)
CAUTION
• Parts and forks are very hot and sharp—keep face/hands clear; keep
kids/pets 3 ft (1 m) away.
• Turn all burners OFF, close gas, unplug the motor, and wear heat-
resistant gloves before touching the spit rod or motor.
• Keep a drip tray under the roast; set hot parts on a metal tray, not
plastic/wood/grass.
• Keep the motor cord off hot/moving parts; lift the spit rod, level with the
hood open to avoid hitting the hood or tipping the grill.
1. Turn off the rotisserie burner, unplug the motor, and put on heat-resistant
gloves.
2. Lift the handle end out of the spit rod handle support bracket, then pull
the spit rod straight out of the motor. Set the spit rod on a safe surface.
3. Loosen fork thumbscrews and slide the meat off onto a board. Let parts
cool; wipe the spit rod, forks, shaft collar ring clean.
4. When cool, slide the motor off the bracket and coil its cord.
5. (Optional) If you want the side clear, remove the motor and handle
support bracket: take out its screws and store the bracket with the motor.
6. Reinstall the warming rack and close the hood. Store all rotisserie parts
together securely for next use.
26
SIDE GRIDDLE
Note:
• Do not operate the side griddle simultaneously with the rotisserie
burner and remove the rotisserie spit rod before using the side griddle.
BEFORE USING SIDE GRIDDLE
CAUTION
• Hot oils can ignite. Use only a thin sheen of oil.
• Do not cover the side griddle with foil or oversized cookware
(overheating/oxygen starvation).
• Wear a heat-resistant mitt when scraping or moving the griddle.
• Confirm the grease oil cup is installed and empty.
• Keep the side griddle lid open when using it.
• Use minimal oil; do not deep-fry on the griddle.
• Keep a scraper and heat-safe mitt nearby.
Lighting & Preheating
1. Open the lid, push in and turn the griddle knob slowly to HI position; hold
5–15 seconds after ignition so the flame safety stays open.
2. If not lit in 5 seconds: turn off, wait 5 minutes, retry.
3. Preheat 5–7 minutes (drops of water should “dance” on the surface).
Reduce to MED–LOW for most cooking.
27
CAUTION
• Hot oils can ignite. Use only a thin sheen of oil.
• Do not cover the side griddle with foil or oversized cookware
(overheating/oxygen starvation).
• Wear a heat-resistant mitt when scraping or moving the griddle.
AFTER USING SIDE GRIDDLE
1. Turn griddle knob to OFF position; close LP cylinder (or NG shutoff).
2. While warm, scrape to the drain; wipe with paper towels.
3. For stuck bits, pour a little warm water to steam-lift; wipe dry.
4. When fully cool, check/empty the grease oil cup.
Managing Grease
1. Push residue toward the drain channel; let it flow into the grease oil cup.
2. If smoking builds, lower heat; use less oil next batch.
3. Empty the grease oil cup only when cool.
28
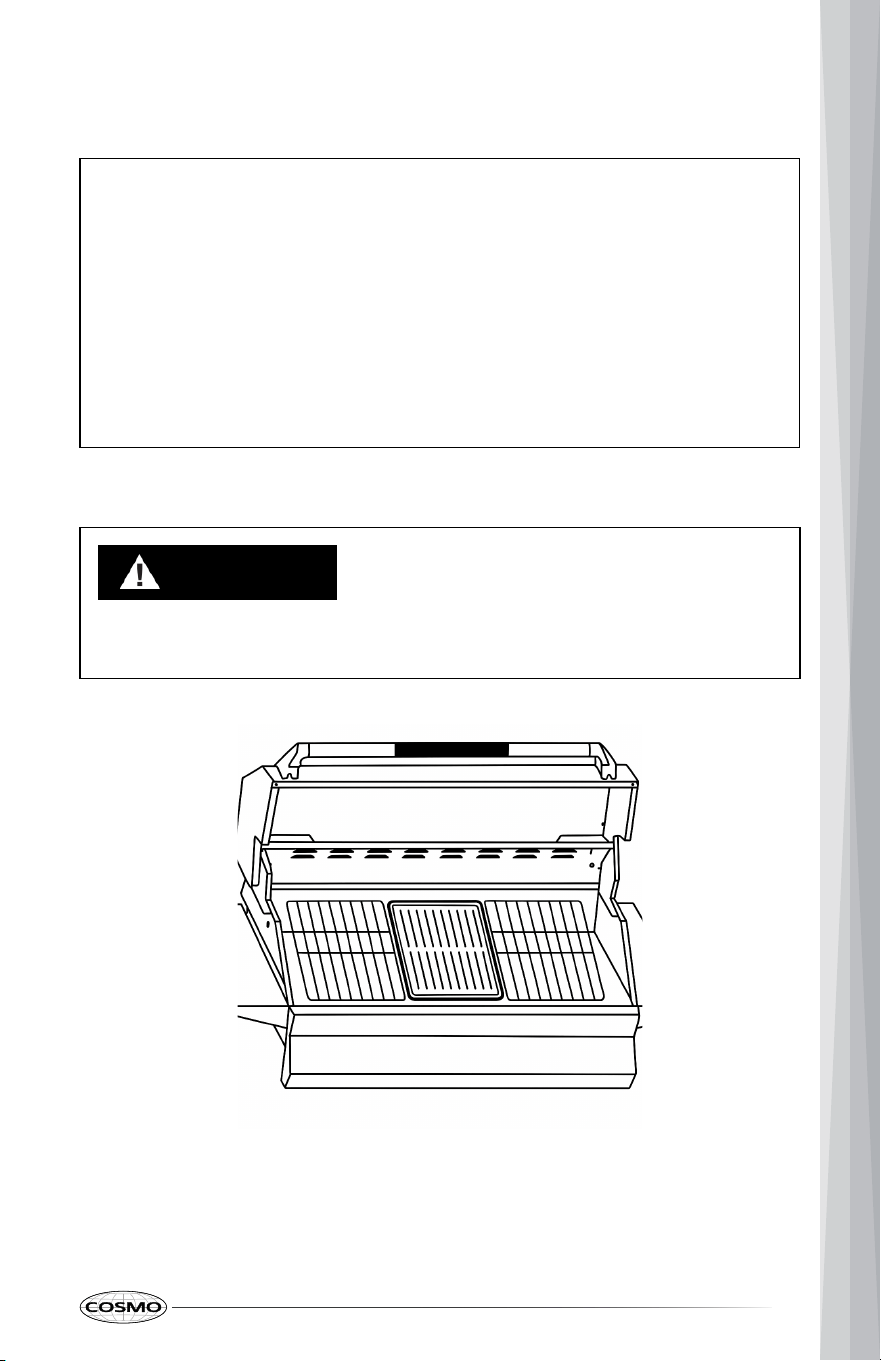
GRIDDLE ACCESSORY COOKING (OPTIONAL)
Note:
• This Griddle is sold separately please visit www.cosmoappliances.com
or reference the contact information at the end of this manual. Please
refer to the OPTIONAL ACCESSORIES/PARTS Section.
• Placing the larger center grate at a side position can concentrate heat
and may cause permanent discoloration (yellowing/whitening) of
adjacent countertop surfaces.
• Use minimal oil; do not deep-fry on the griddle.
• Keep a scraper and heat-safe mitt nearby.
CAUTION
• Make sure the grill is cool down before you replace the Griddle.
• DO NOT Touch when it is hot!
1. Remove the rotisserie spit rod and the warming rack before installing the
Griddle
29
2. Make sure the cooking grates are cool and replace the middle cooking
grate which is wider than the other 2 grates with the griddle.
3. After the use, if you want to remove the griddle, wait until it is cooled
down and replace it with the middle cooking grate.
MATCH LIGHTING
CAUTION
• Replace the grates and flame tamers with caution after lighting up the
burners with the matchstick holder.
If the igniter is not operating, you may light the burners manually with a
match or grill lighter. Replace the battery as soon as possible REPLACING THE
BATTERY Section.
Match Lighting the Main Burners
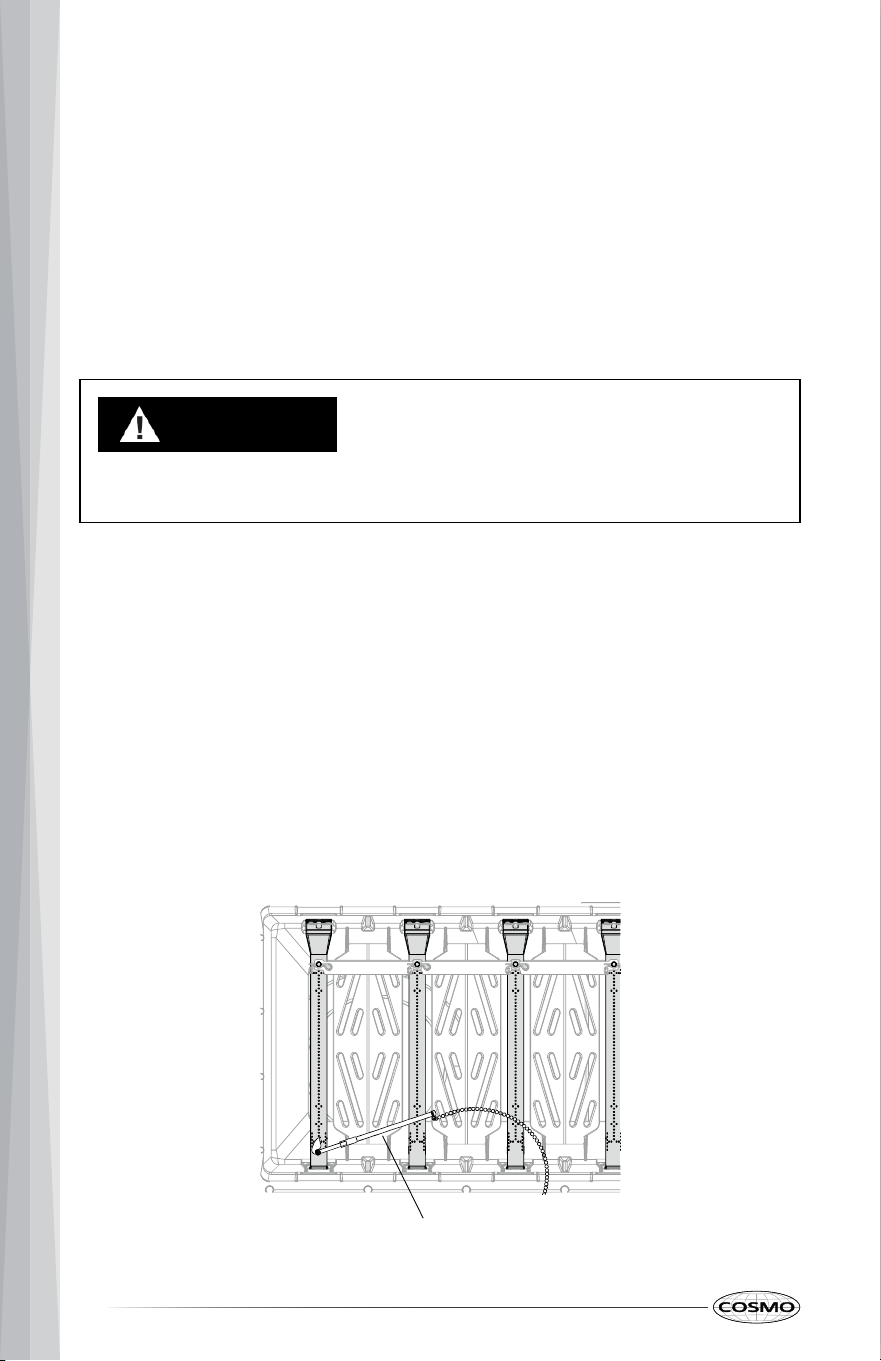
1. Open the hood and remove the grates and flame tamers
2. Keep your face away—and using extreme caution, place a lit match in the
matchstick holder (or use a long match) and position it at the tip of the
spark igniter.
Matchstick Holder
30
3. Push in the burner knob and turn to HI position. The burner should light
within 5 seconds.
4. If the burner does not light within 5 seconds, turn the knob OFF and wait
5 minutes to let gas dissipate, try to reignite again.
5. Once lit, adjust the flame to the lowest and replace the flame tamer and
the grates. Turn the knob to OFF position, after use.
Match Lighting the Side Griddle Burner
1. Open the lid and lift off the grate.
2. Keep your face away—and using extreme caution, place a lit match in the
matchstick holder (or use a long match) and position it at the tip of the
spark igniter.
3. Push in the knob and turn to HI position. The burner should light within 5
seconds.
4. If the burner does not light within 5 seconds, turn the knob to OFF position
and wait 5 minutes to let gas dissipate, try to reignite again.
5. Once lit, adjust the flame to the lowest and replace the grate. Turn the
knob to the OFF position, after use.
Match Lighting the Rotisserie Burner
Note:
• Rotisserie burner uses a thermocouple, which is a safety shut-off valve.
When lighting, push in, turn to HI, and hold for 5–10 seconds so the
sensor warms and keeps gas flowing. If you release too soon, the safety
will close and the flame will go out—relight and hold longer.
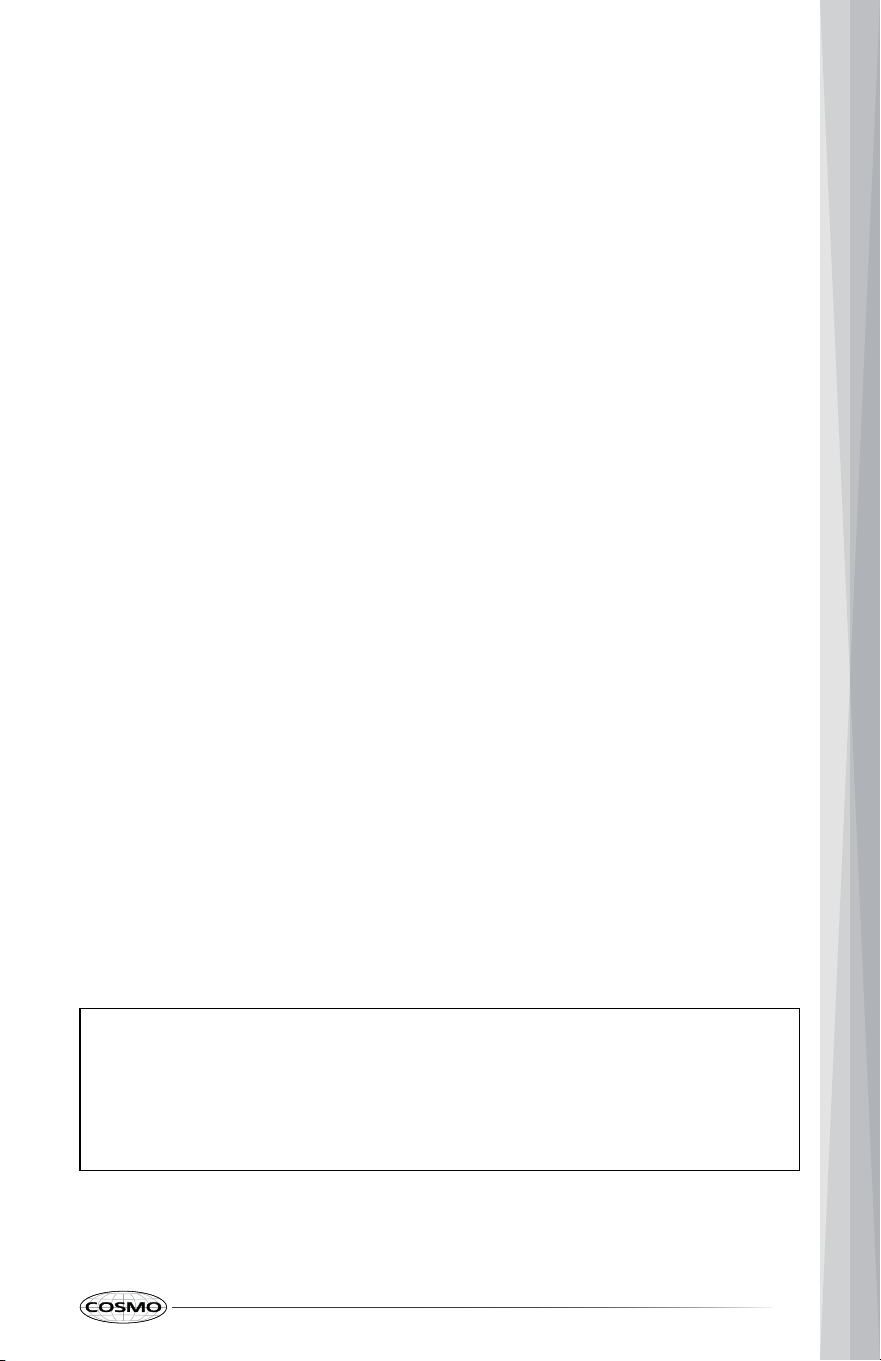
1. Open the lid and remove 5 screws from the front to remove the rear
rotisserie burner cover.
31
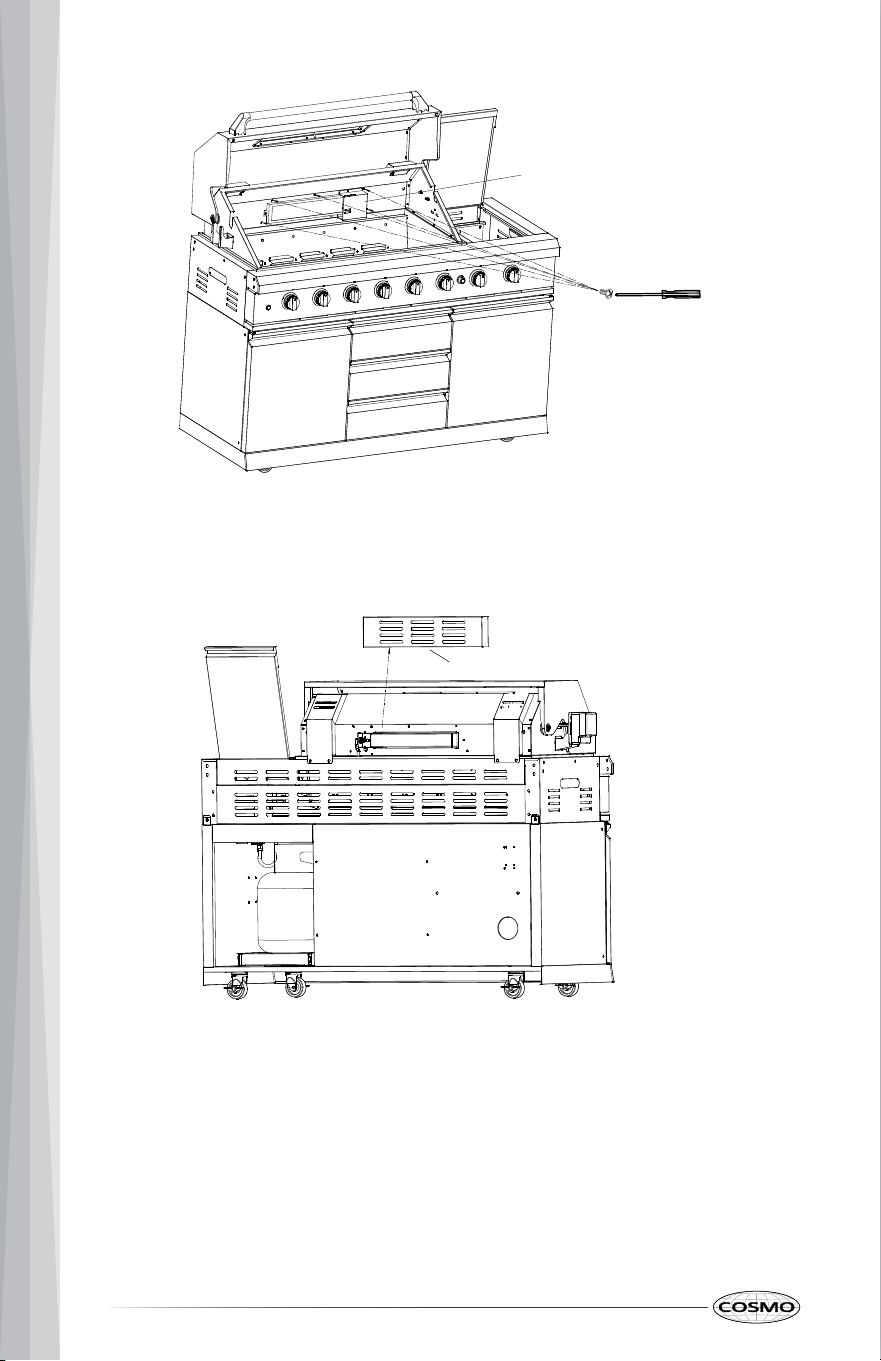
2. Remove 2 screws from behind to take off front rotisserie burner cover to
access the thermocouple,
Rear Rotisserie Burner Cover
Front Rotisserie Burner Cover
32
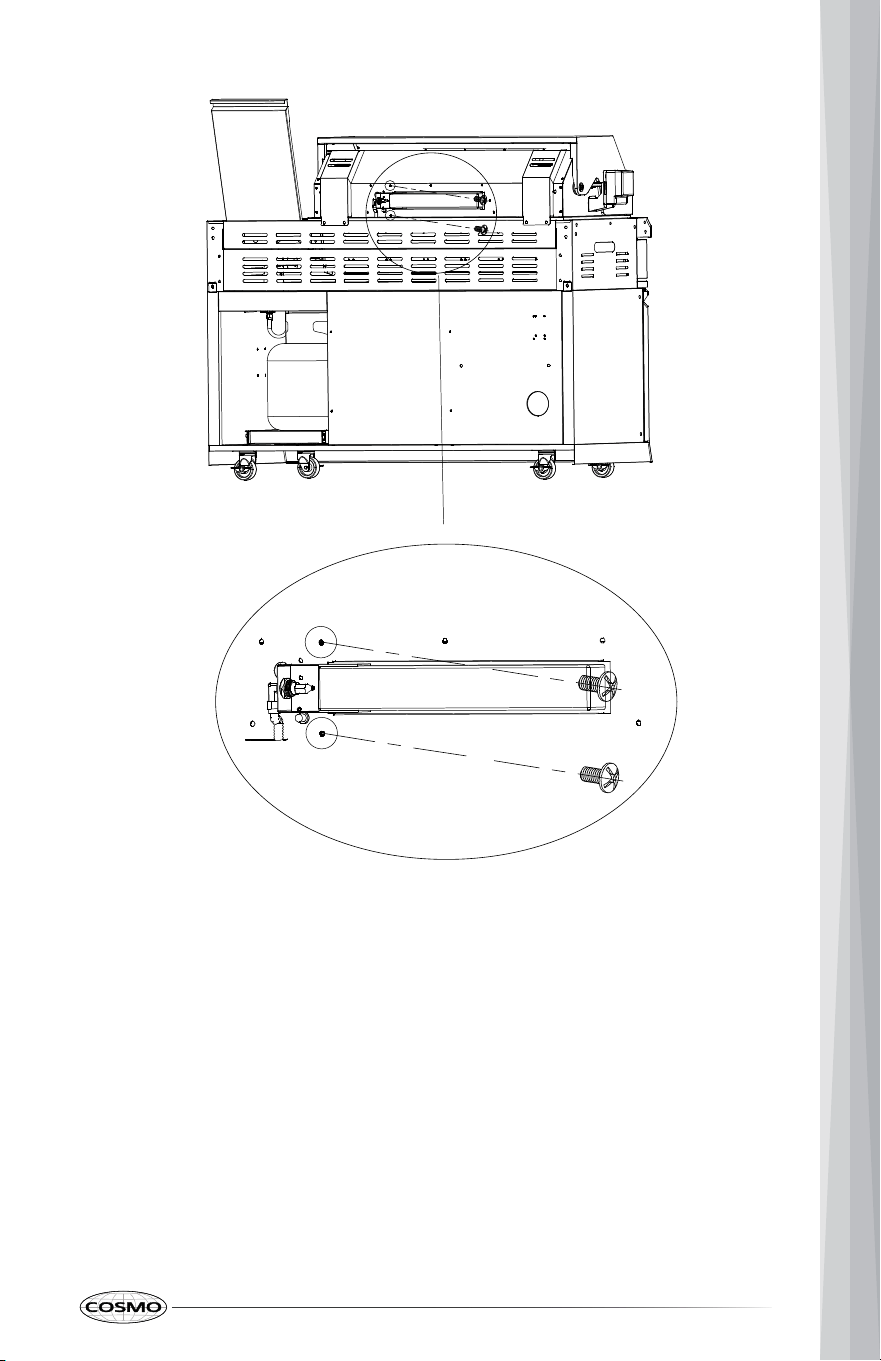
3. Keep your face away—and using extreme caution, place a lit match in the
matchstick holder (or use a long match) and position it at the tip of the
thermocouple.
4. Push in the knob and turn to HI position. The burner should light within 5-
10 seconds.
5. If the burner does not light within 10 seconds, turn the knob to OFF
position and wait 5 minutes to let gas dissipate, try to reignite again.
6. Once lit, adjust the flame to the lowest and replace the rear and front
rotisserie burner covers using the gloves.
33
7. Turn the knob to the OFF position, after use.
POWERING DOWN & SAFETY AFTER USE
Turn the control knobs to “OFF” and close the LP cylinder valve (turn clockwise
to fully close). For natural-gas installations, close the manual gas shutoff
valve. Allow the grill to cool completely before covering, cleaning, or moving.
34
TIPS AND TECHNIQUES
CAUTION
Food Poisoning Hazard
• Do not let perishable food sit in or around the grill for more than 1 hour
before or after cooking. Discard food that has been left out too long—
especially in hot weather.
• Keep easily spoiled foods (milk, eggs, fish, meat, poultry) refrigerated
until grilling. Even when chilled, do not stage them in the grill for more
than 1 hour before cooking begins, and remove/refrigerate promptly
after cooking.
• Avoid cross-contamination: use clean plates and utensils for cooked
food; do not reuse items that touched raw food. Consuming spoiled or
contaminated food can cause illness.
CAUTION
• To ensure food is safe to eat, cook to at least the USDA minimum
internal temperatures (use a food thermometer).
• When cooking without a main drip tray and the side griddle oil cup (not
recommended), pay close attention to avoid the risk of a grease fire.
35
ROTISSERIE COOKING
To ensure that it is safe to eat, food must be cooked to the minimum internal
temperatures listed in the table.
USDA Safe Minimum Internal Temperatures
Cooking Mode Minimum Temperature
Beef, Veal, Lamb (steaks, chops, roasts)
145°F (63°C)
Pork (chops, roasts, fresh ham)
145°F (63°C)
Ground Meats (beef, pork, veal, lamb)
160°F (71°C)
Whole Poultry (chicken, turkey, duck)
165°F (74°C)
Poultry Parts or Ground Poultry 165°F (74°C)
Fish (finfish)
145°F (63°C)
Egg Dishes / Casseroles 160°F (71°C)
How to Use a Probe Thermometer (Optional)
CAUTION
• Always turn the rotisserie burner OFF and unplug/turn off the motor
before inserting or removing a probe—wear heat-resistant gloves and
keep hands clear of hot parts and moving hardware.
• Do not operate the rotisserie burner and motor, when the thermometer
is inserted.
1. Turn off the rotisserie burner and turn off the rotisserie motor. Wait until it
stops completely. Wear heat-resistant gloves.
2. Insert the probe into the center of the thickest part of the meat (not
touching bone, fat, or the spit rod).
36
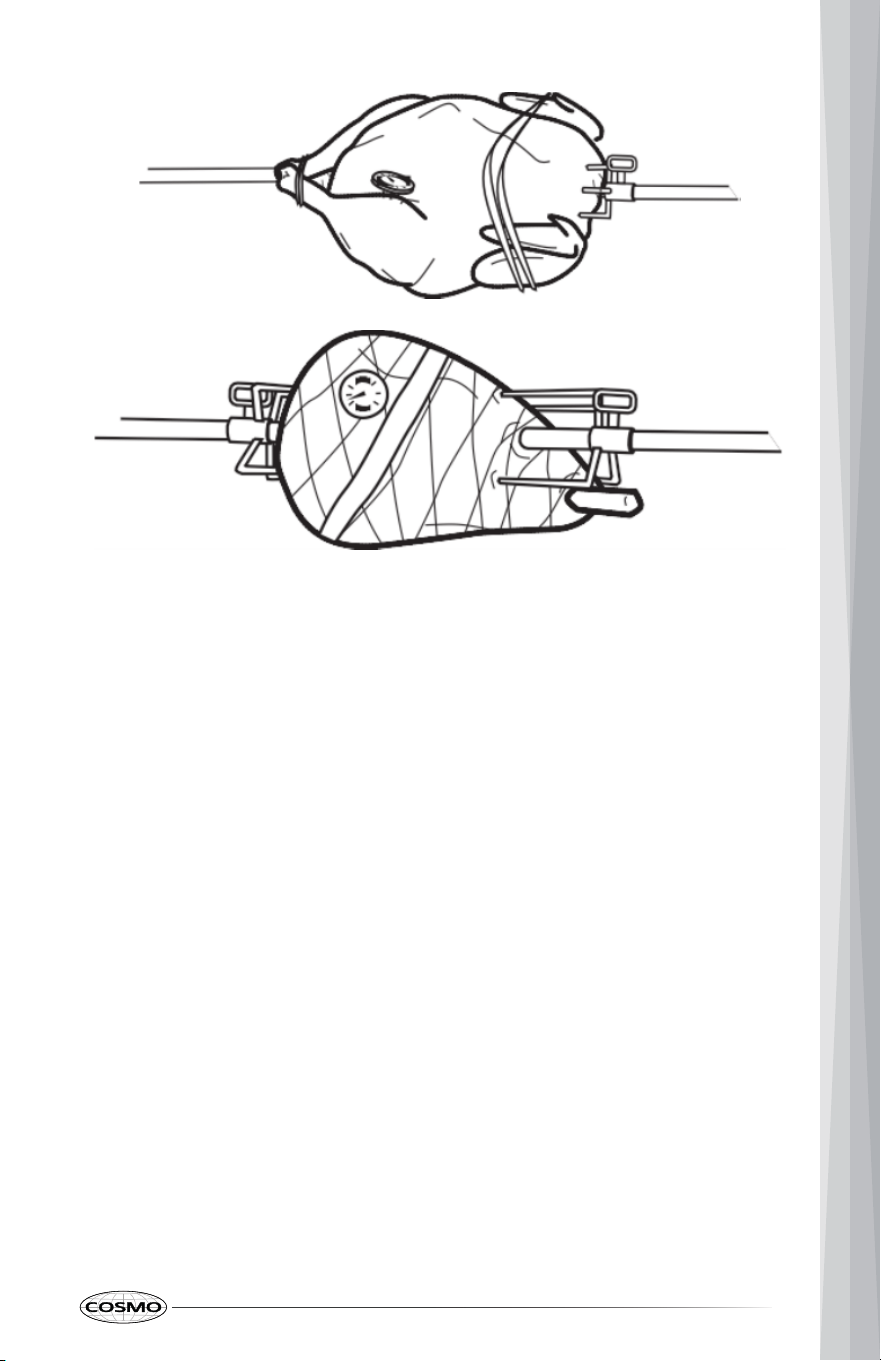
3. For roasts: aim the tip to the center mass; for poultry: insert into the
deepest breast or inner thigh.
4. Keep the wire away from flames and hot metal edges.
5. When the target temperature is reached, remove the probe from the
meat; apply any glazes during the last few minutes of cooking before
turning on the rotisserie.
Using Rotisserie — Poultry (whole bird)
1. With breast down, fold wing tips behind the back (or tie).
2. Tie legs together; secure loose skin.
3. Insert spit rod through the cavity, parallel to the backbone and just above
tail.
4. Position forks on each side and tighten screws into the meaty areas.
37
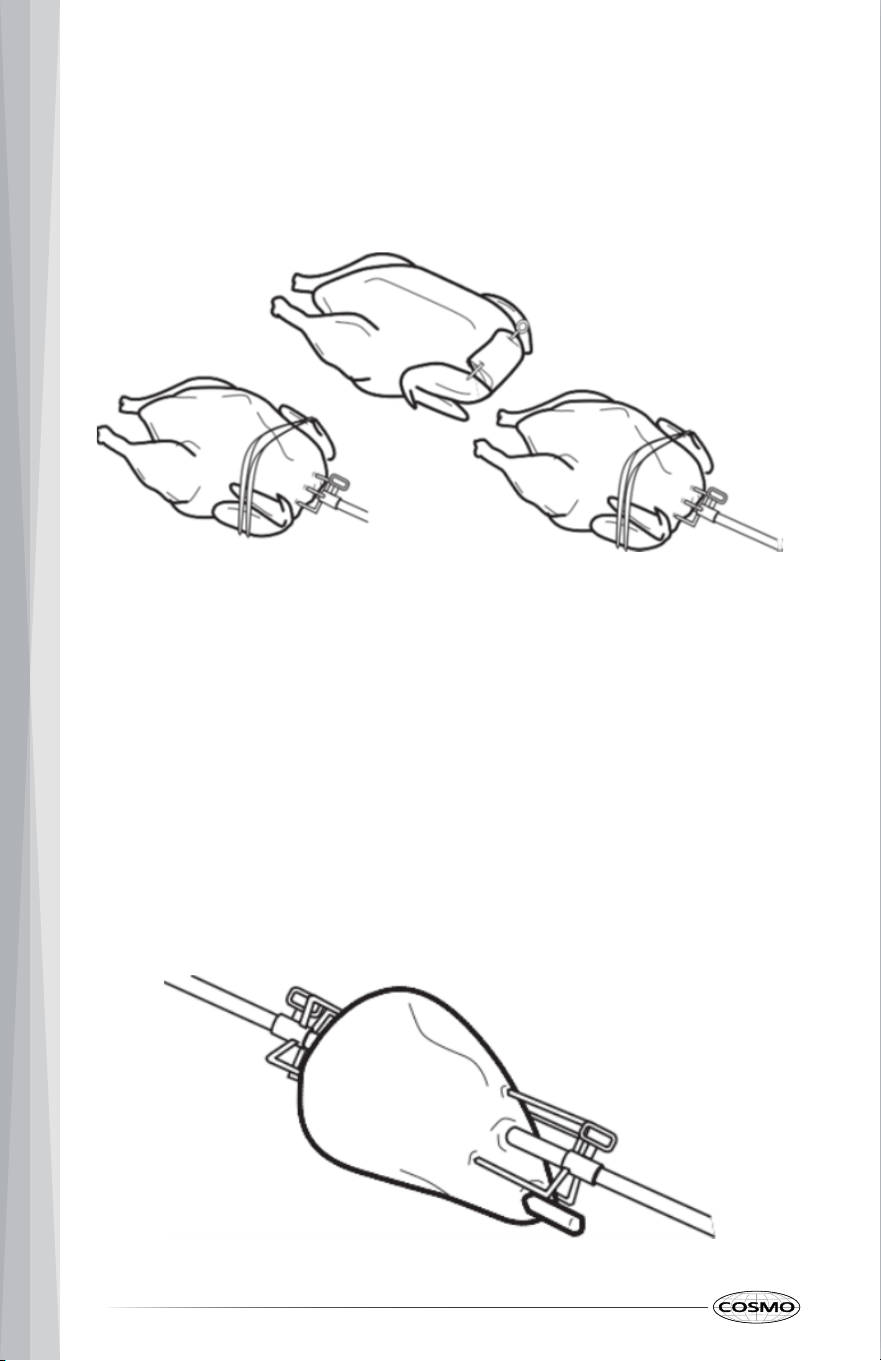
5. Check balance; tighten all screws.
6. Mount rod in the grill, set motor to ON.
Using Rotisserie — Leg of Lamb (boned and rolled)
1. Tie roast into a compact, even cylinder.
2. Insert spit rod through the center of the roast.
3. Position forks on both ends; tighten.
4. Mount rod and start the motor.
38
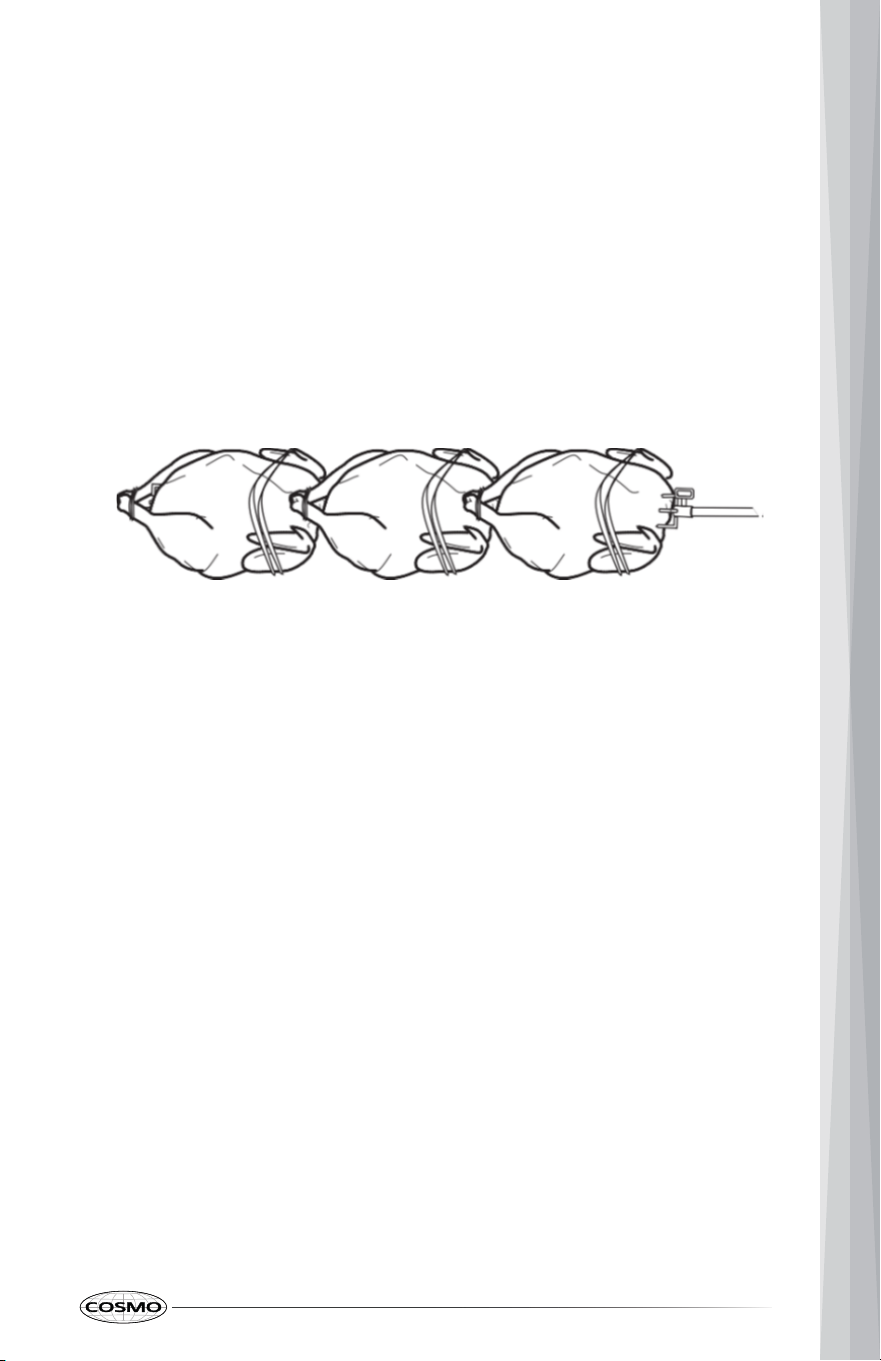
Three Chickens on One Rotisserie Spit Rod
1. Tie or skewer wings and legs to the bodies.
2. Insert spit rod; arrange birds evenly spaced and facing the same
direction.
3. Loop twine around legs and tail to secure; tighten forks into the thighs.
4. Balance and tighten all hardware; start the motor.
SIDE GRIDDLE COOKING
Heat Control
1. For sear: start HI 1–2 min, then cook at MED.
2. For delicate foods (eggs, fish): LOW–MED, add oil/butter just before food.
Cooking Basics
1. Smash burgers/steaks: sear on HI 60–90 sec, flip, finish MED.
2. Veg, fajitas, fried rice: MED, keep food moving; deglaze with a splash of
water if needed.
3. Eggs/pancakes: LOW–MED, light oil; avoid pooling grease.
39
MAINTENANCE & CARE
IMPORTANT: If you experience any of the following, TURN OFF all burners
and gas supply and perform the cleaning steps on this page (with the grill
cool). A thorough cleaning is recommended at least twice a year, or more
often with frequent use.
• Grill not reaching temperature
• 2 yellow or lifting flames
• Popping noises;
• Delayed burner ignition
• Uneven heat
• Flare-ups
• Grease fires
• Flashback.
WARNING
• Make sure the LP gas cylinder valve is closed and burner knobs are OFF.
• Do NOT store a spare LP gas cylinder (filled or empty) under or near the
grill.
• Never store flammable liquids or spray canisters under or near the grill.
• If the outdoor gas appliance is not in use, turn off gas at the LP cylinder
(or NG shutoff).
• LP gas cylinders must not be stored in a building or enclosure (including
garages/sheds) and must be kept out of reach of children.
• Wear gloves and safety glasses.
• Heed all warnings in this manual. Always perform a leak test any time
you refill or change your LP gas cylinder or reconnect gas lines.
• Never leave your LP cylinder valve open when not in use. Never leave
the control knobs open when not in use.
• Always open the grill hood before attempting to light your grill.
40
CAUTION
Flashback Fire Hazard
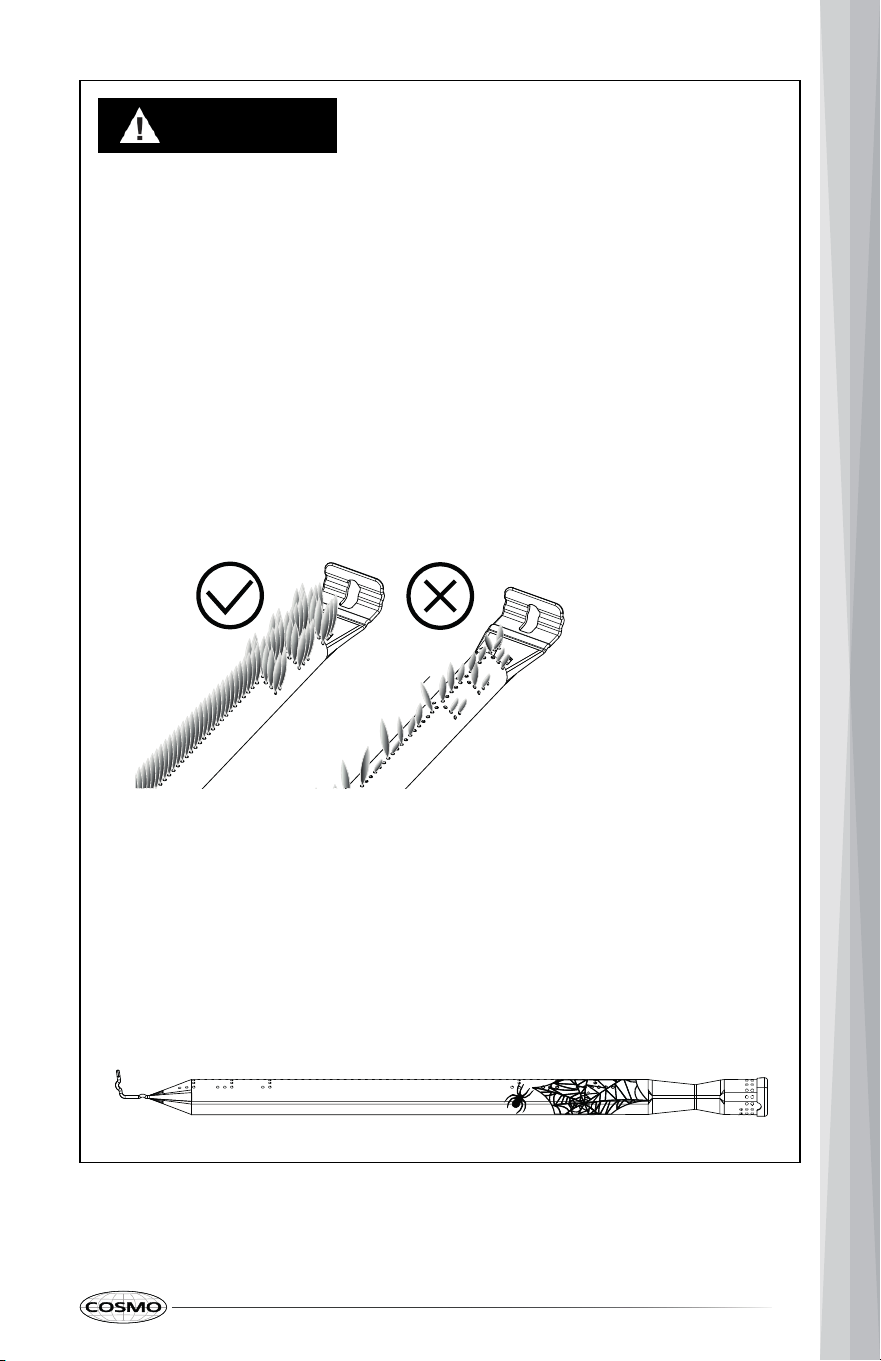
• Spiders and small insects can nest in burner venturi tubes and air inlets,
blocking gas flow and causing flashback (ignition behind the control
panel).
• Watch for: hard-to-light burners, weak/yellow or flickering flames,
“popping/roaring” sounds, or flame under the control panel.
If Observed:
• Turn all burner knobs OFF and close the LP/NG shutoff.
• Wait 5 minutes.
• Clean the venturi and burners before relighting.
Quick clean (grill cool, gas off): remove grates and flame tamers → lift
burners → sweep venturi with a flexible brush and clear ports with a paper
clip → brush spider screens → re-seat burners over the orifices.
Do not try to “burn out” webs or spray insecticide into tubes. Regular
inspection after storage or long idle periods prevents flashback.
41
CAUTION
Burn Hazard
• Do not leave small children unattended near the appliance during the
cleaning cycle. The outside of the Gas Grill can become hot to the
touch.
CLEANING THE COOKBOX
Note:
• Do not line the cookbox or grates with foil or liners—this blocks airflow
and can cause overheating and fire.
• A full tray of grease can ignite excessive build-up inside the cookbox
can lead to grease fires and overheating.
1. Make sure the grill is cool, remove grates and flame tamers.
2. Use a plastic scraper to pull debris/grease toward the drain and into the
drip tray or oil cup.
3. If a more thorough cleaning is required: apply a grill-safe, non-caustic
degreaser, let dwell per product directions, then scrape/wipe again.
4. Wipe remaining residue with warm, soapy water; rinse and dry
completely.
5. Reinstall flame tamers and grates.
42
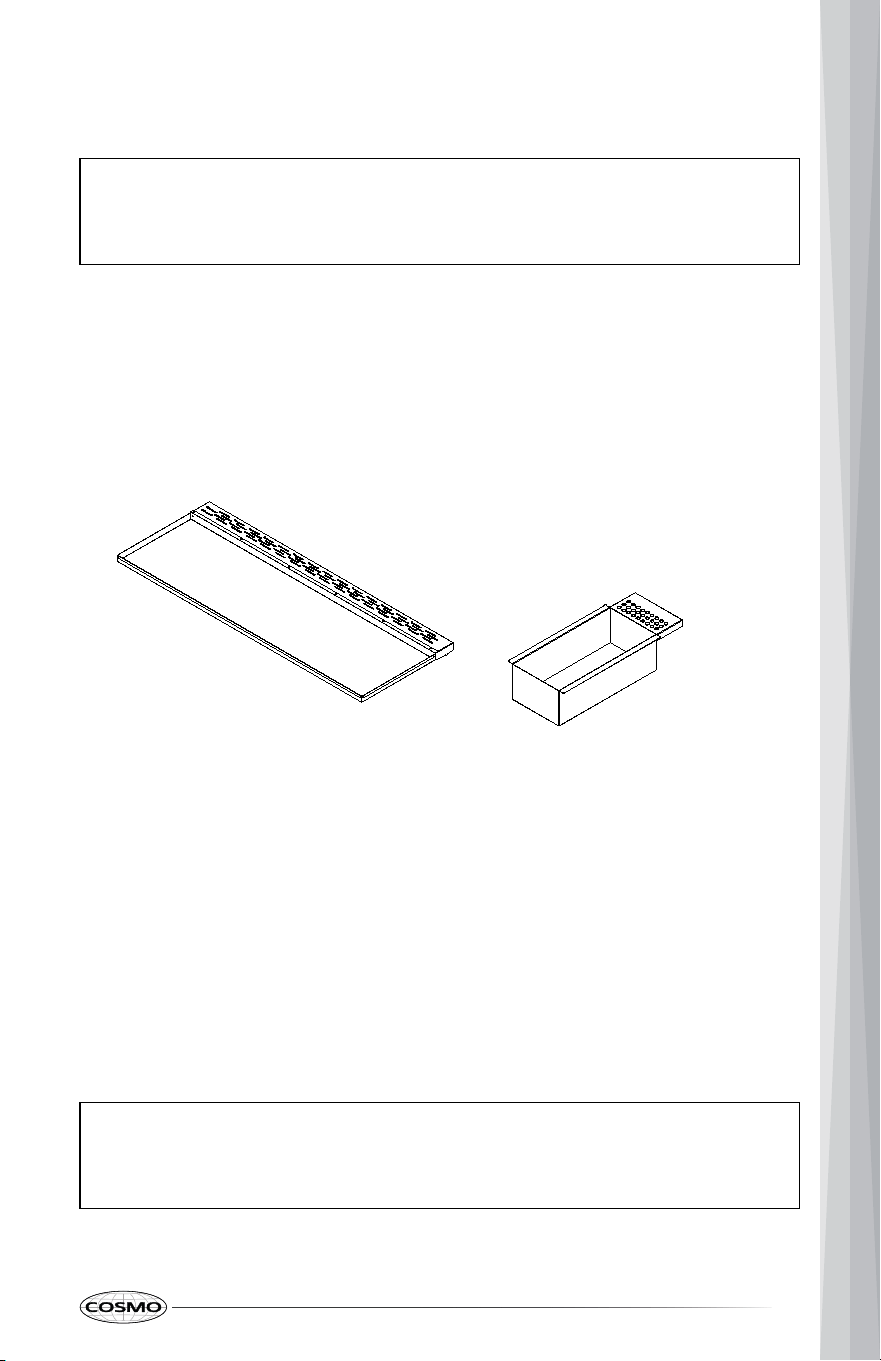
CLEANING THE MAIN DRIP TRAY & SIDE GRIDDLE OILCUP
Note:
• Do not use steel wool, abrasive cleansers or oven cleaner. Do not soak
knobs.
The grease management system includes a pull-out main drip tray for the
cookbox and a removable oil cup for the side griddle.
1. When cool, pull out the main drip tray and the side griddle’s oil cup from
behind the grill and discard the oil and grease.
2. Scrape excess grease with a plastic scraper into a suitable container.
3. Wash the tray and cup with warm water and mild soap; rinse and dry
fully.
4. Put the main drip tray and griddle oil cup back in place, by sliding them
back in.
Note:
• Empty/inspect the tray and cup every few cooks. A full tray and cup of
grease can ignite.
43
CAUTION
• Handle with care to avoid chipping. Use only nylon, brass, or soft
stainless brushes; avoid harsh abrasives or metal scrapers.
Note:
• Do not use soap-filled scouring pads, abrasive cleaners, cooktop
polishing cream, steel-wool pads, gritty washcloths or some paper
towels. Damage may occur, even with one-time or limited use.
CLEANING COOKING GRATES
(Stainless steel or Cast iron, as equipped)
Quick clean:
• While preheating, brush grates with a grill brush to remove loose debris.
• Burn off residue on high flame for a few minutes, then brush grates with a
grill brush
If a more thorough cleaning is required:
1. Remove cool grates; wash with warm water and mild soap and a non-
scratch nylon pad.
2. Rinse and dry thoroughly. Lightly wipe with a high-smoke-point oil before
next use to reduce sticking.
CLEANING THE FLAME TAMERS
1. Remove flame tamers when cool.
2. Over a trash container, use a plastic scraper or grill brush to remove loose
debris and carbon.
44

3. For deeper cleaning, wash with warm, soapy water; rinse and dry
completely.
4. Ensure any drain holes are clear—do not block with foil.
5. Re-install in their original positions.
CLEANING THE BURNERS
Keeping burner tubes free of blockages (spiders/insects/debris/grease) is
essential for safe operation.
1. When the grill is cool and in OFF position, remove cooking grates and
flame tamers.
2. Brush the outside of each burner tube with a clean grill brush.
3. If your grill has cotter pins or hitch pins holding the burner in place, pull
them out. Then gently lift the burner just enough to see underneath it. Be
careful not to bend the igniter.
4. Use a pipe cleaner or flexible venturi brush to clean inside the burner tube
toward the burner opening; tap/shake out debris.
5. Use a paper clip or soft wire to clear individual burner holes. Do not
enlarge holes or use anything that can damage them.
6. Clean the spider/insect screens at the air inlets with a soft brush.
7. Reinstall burners, ensuring each burner seats over the gas orifice. Refit
any retaining pins.
8. Reinstall flame tamers and grates.
45
CLEANING THE INSIDE OF THE HOOD
Grease and smoke can form carbon that eventually flakes.
• While the hood is warm (not hot), brush carbon from the inner hood with
a grill brush.
• Wipe with warm, soapy water; rinse and dry.
• Avoid harsh abrasives that can damage finishes.
CLEANING THE EXTERIOR STAINLESS STEEL SURFACES
Grease and smoke can form carbon that eventually flakes.
• Use a non-abrasive, outdoor stainless cleaner.
• Wipe with the grain using a microfiber cloth; rinse any residue and dry.
• Do not use paper towels (can scratch).
• Wipe spills and acidic/salty sauces promptly to prevent staining.
• Clean after each cook once surfaces are cool.
For painted/black finishes, use mild soap and water; avoid abrasives and
solvent cleaners.
CLEANING THE VIEWING WINDOW (if equipped)
The window can darken with smoke/grease.
Note:
• DO NOT use abrasive cleansers, razor blades, or metal scouring pads
on the glass—they will scratch the surface.
1. Remove loose grease. Mix ½ cup baking soda with enough water to form
a paste.
2. Wipe the glass dry; spread the paste and let sit 15–20 min.
3. Wipe with a damp microfiber cloth and rinse.
46
4. Dry with a clean microfiber cloth. Repeat as needed.
CONTROL PANEL
Cleaning Method:
• Glass cleaner and soft cloth or sponge: Apply glass cleaner to soft cloth or
sponge, not directly on panel.
Note:
• Do not use abrasive cleaners, steel-wool pads, gritty washcloths or
some paper towels. Damage may occur.
MAIN DRIP TRAY AND SIDE GRIDDLE GREASE OIL CUP
Cleaning Method:
• Mildly abrasive cleanser: Scrub with wet scouring pad.
• Solution of ½ cup (125 mL) ammonia to 1 gal. (3.75 L) water: Soak for 20
minutes, and then scrub with scouring or steel-wool pad.
STORAGE DRAWER
Fully open the drawer and empty the drawer before cleaning.
Cleaning Method:
• Clean with warm water, and use a damp cloth or sponge.
Note:
• Do not use scrub pads or abrasive cleaning pads.
• Most cleaning can be done with the drawer in place; however, the
drawer may be removed if further cleaning is needed.
47
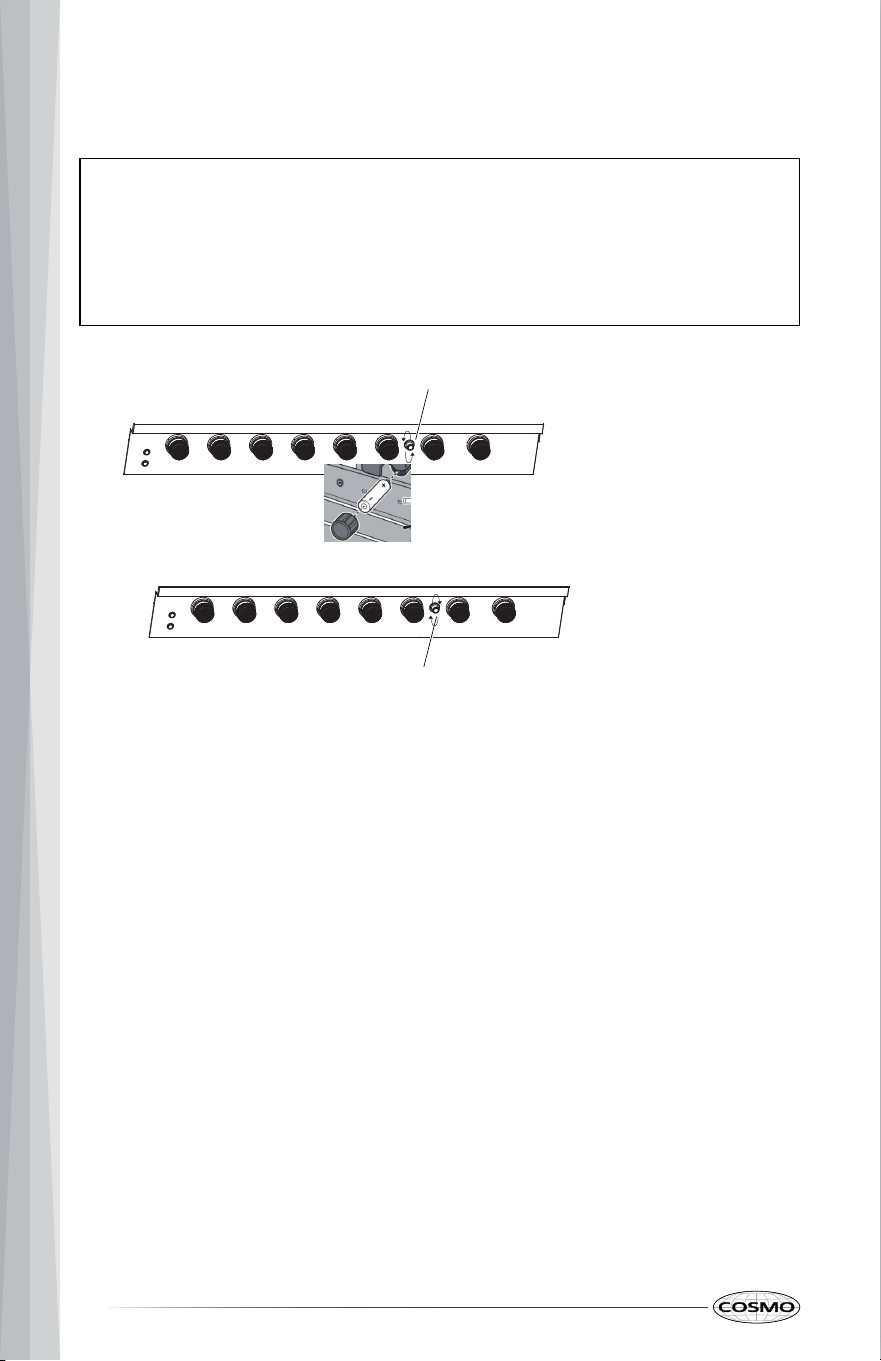
REPLACING THE BATTERY
Note:
• Install a new, correct-type battery in the battery box for the igniter.
• Recycle or dispose of batteries per local regulations.
• Do not leave batteries where a child or pet could play with or swallow
them.
1. Remove the battery box cap by turning it counterclockwise, and pull it
out. Take out the old battery, if there’s one.
2. Insert a new 1x AA battery.
3. Put the battery box cap back in and turn it clockwise until snug (do not
overtighten).
4. Turn the knob to the ignite position to test— you should hear clicking
sound and see the flame on the burner.
Remove Battery Box Cap
Replace Battery Box Cap
48
REPLACING LIGHT BULB
Note:
• Please refer to the OPTIONAL ACCESSORIES Section, to buy the hood
lights.
• Do not touch the glass with bare hands—use clean gloves/tissue when
removing the light.
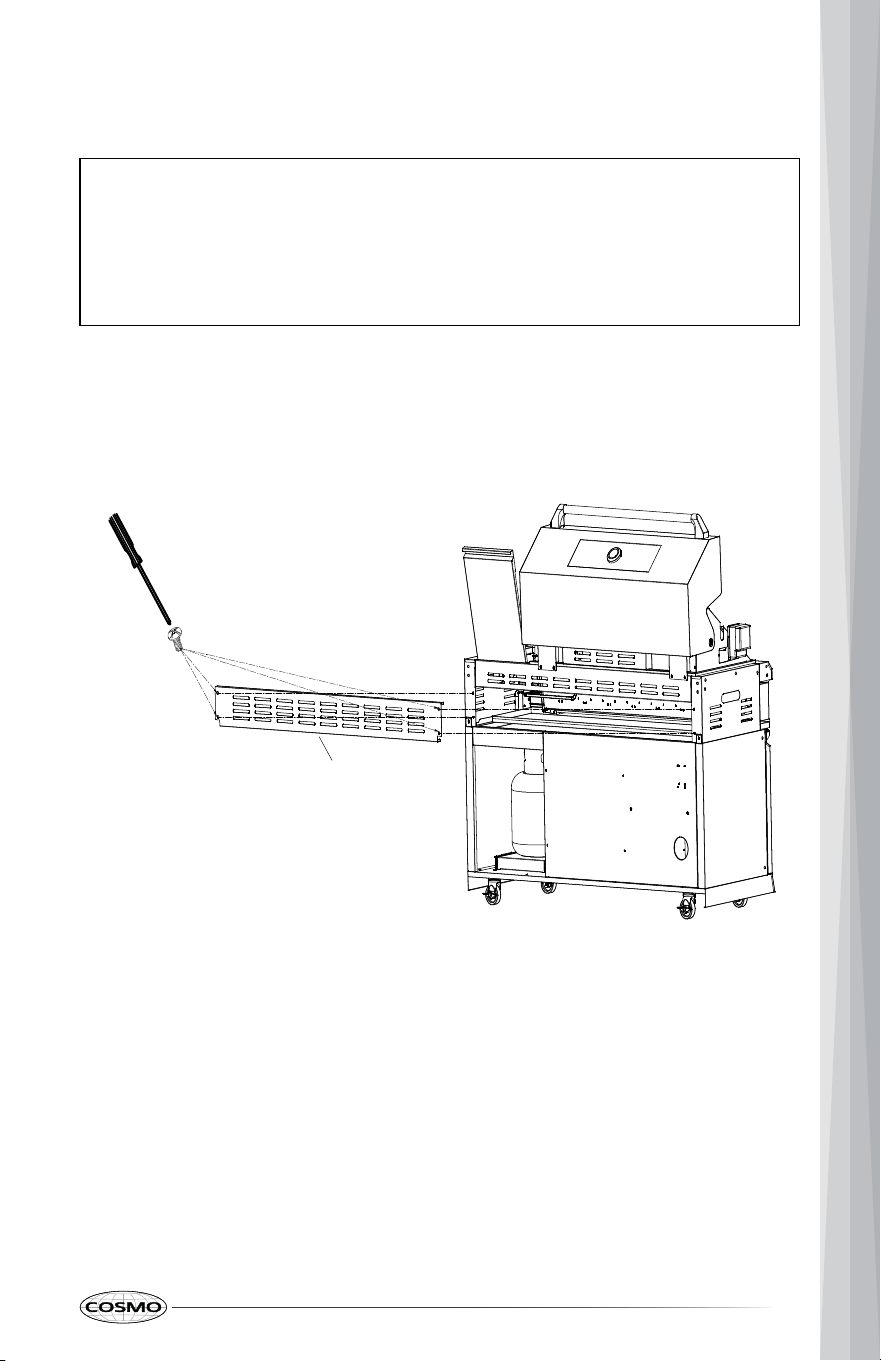
1. Turn off the grill. At the back, remove the 4 bottom screws and take out
bottom venting panel and put it aside.
2. Disconnect the hood light’s 2-pin connector on the left side.
Bottom Venting Panel
49
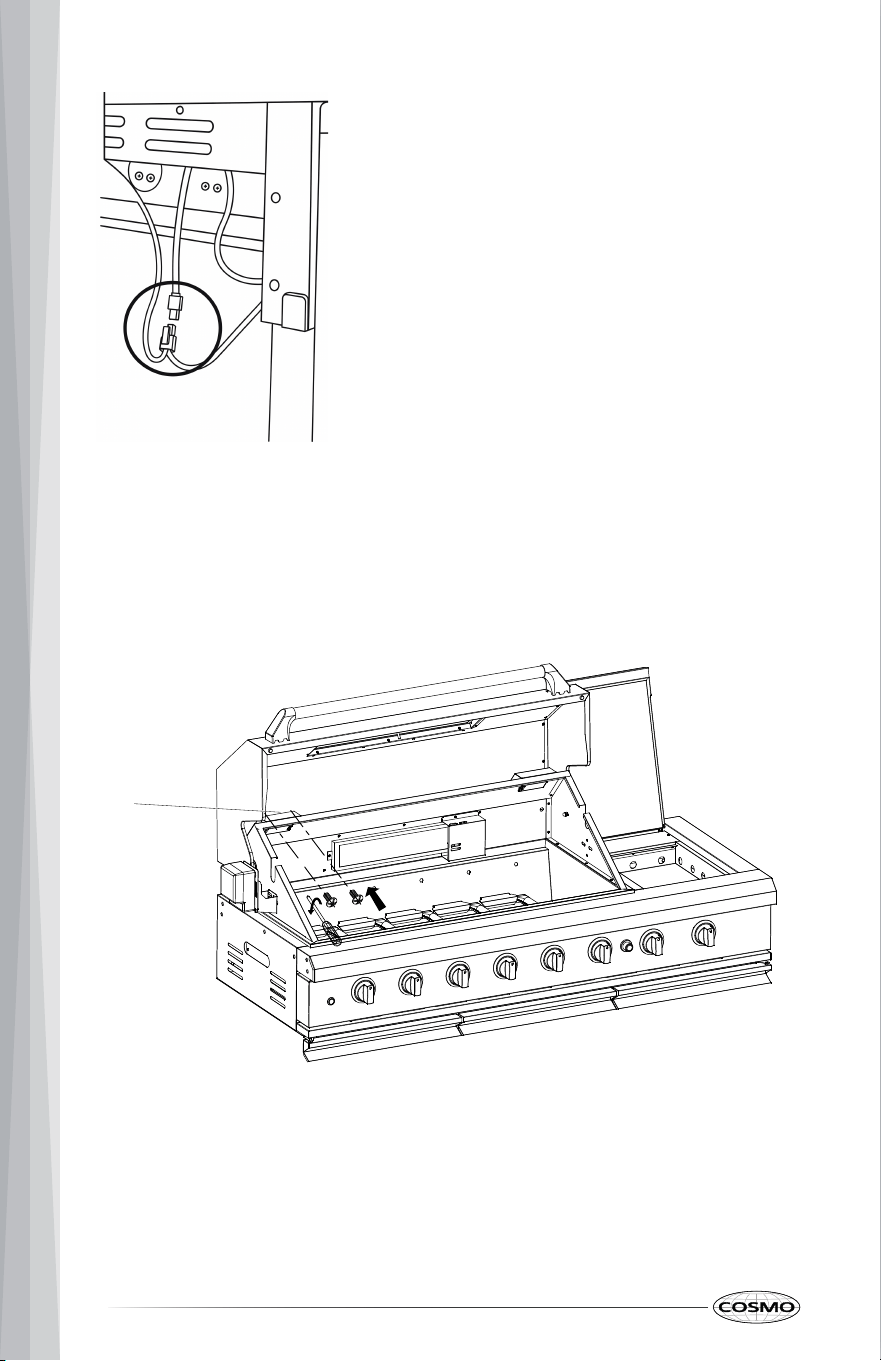
3. Open the grill hood and on the left side, remove 2 screws on the rear light
cover from the front of the grill.
4. Now from the behind, remove 2 screws at bottom of the rear light cover
and take it off the hood.
Rear Light
Cover
50
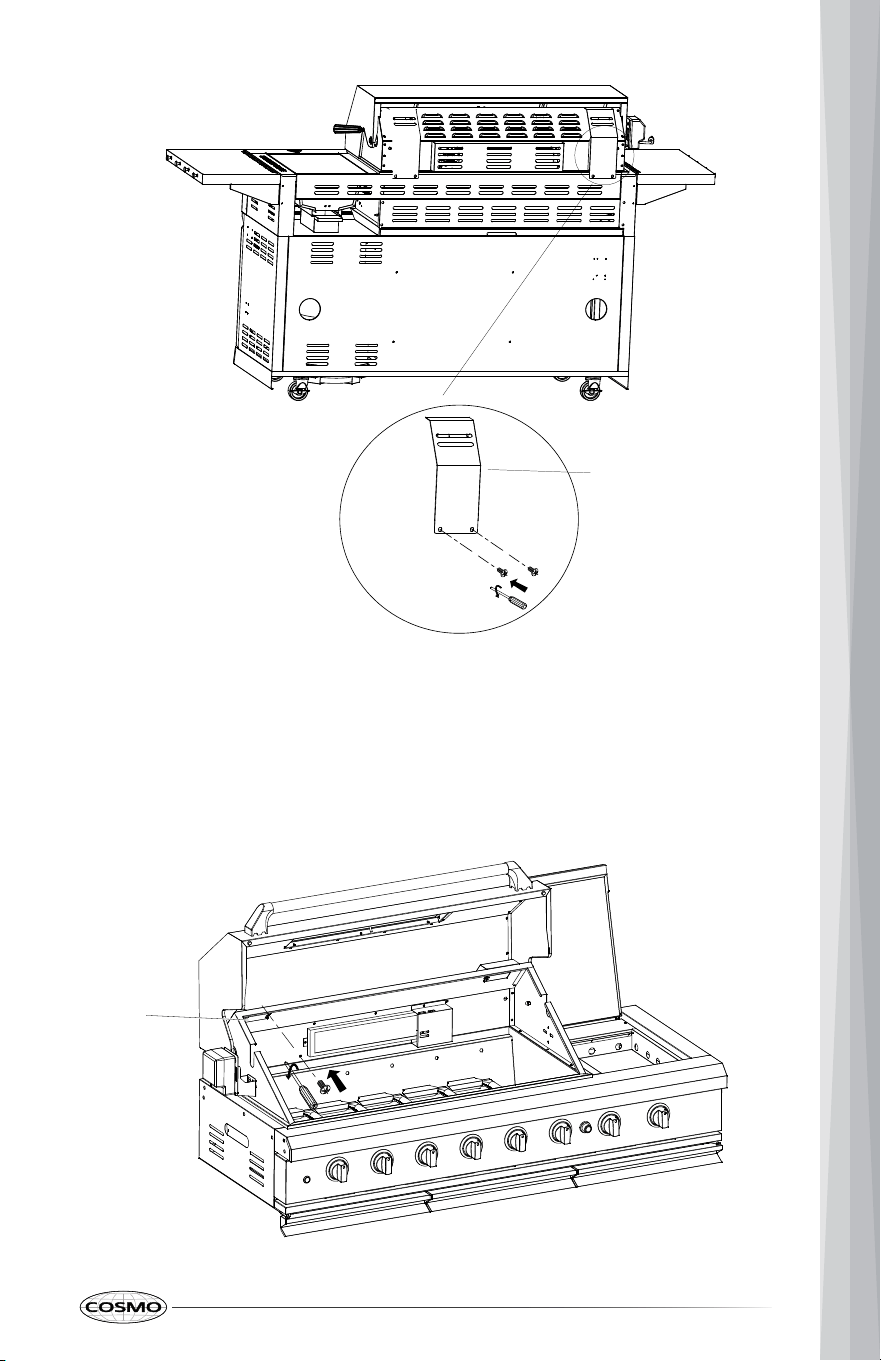
5. Remove the 1 screw securing the light; pull the hood light with attached
wire out.
Rear Light Cover
Hood Light
51
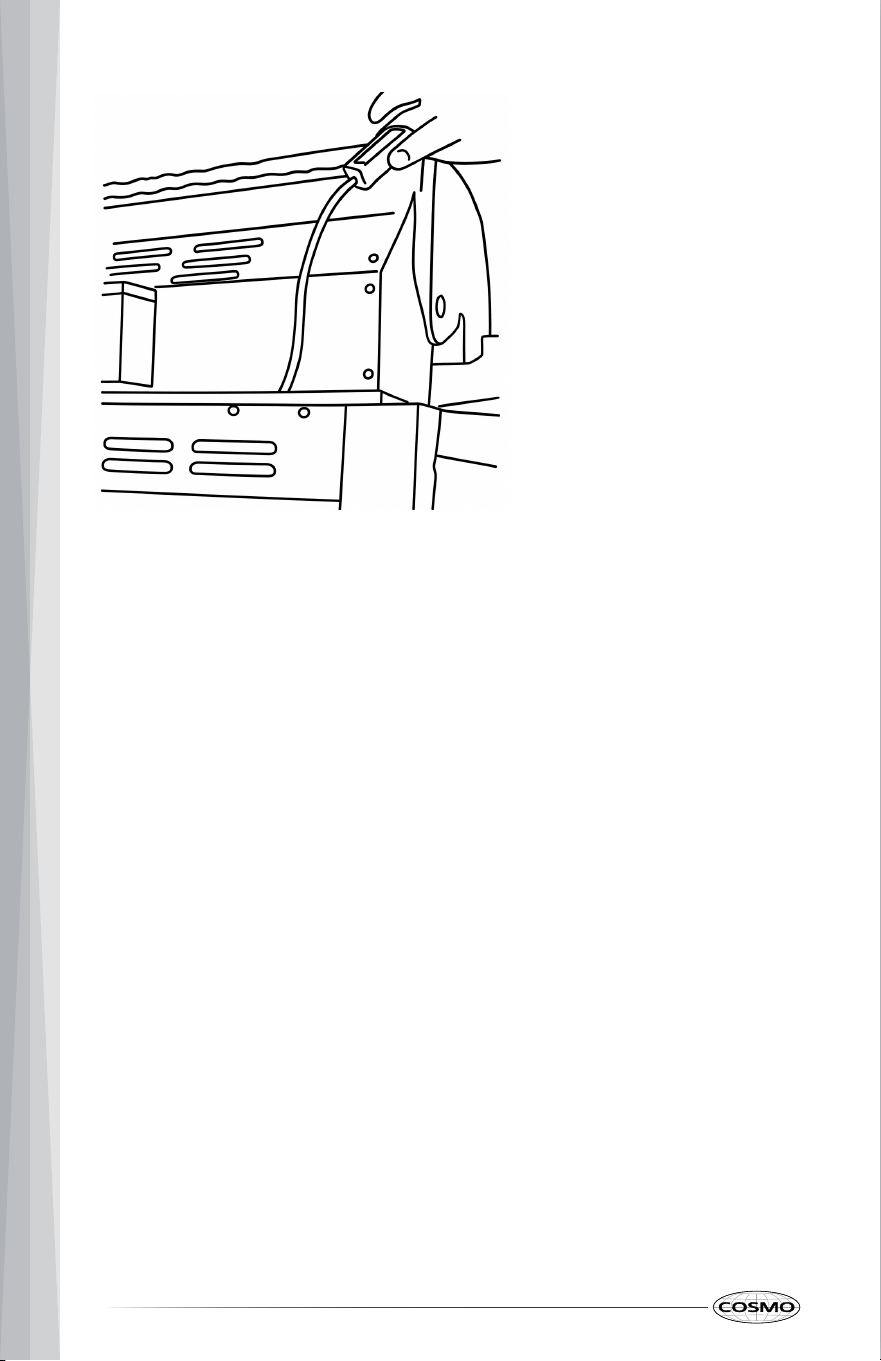
6. Replace the old hood light with the new one and reattach 2-pin
connector.
7. Now repeat the same on the right side.
8. Reinstall the rear light covers on both sides, and secure the bottom
venting panel screws on the back of the grill. Now, restore the power and
test the lights.
52
GRILL COVER CARE
• This grill includes a fitted cover stored in the upper storage drawer.
• Only cover the grill when it is completely cool, dry, and all burner knobs
are OFF.
• Pull the cover down over the hood, control panel, and cart so it sits flat
and doesn’t flap excessively in the wind.
• To clean, brush off dust and debris with a soft brush/cloth, then spot-
clean with mild soap and water; do not use bleach, harsh chemicals, or
abrasive pads.

STORING THE GRILL
• Clean all surfaces. Lightly coat bare metal parts with cooking oil to
prevent rust.
• If storing the grill indoors, disconnect the LP cylinder and leave the LP
cylinder outdoors in a well-ventilated area.
• Place the dust cap on the cylinder valve outlet whenever the cylinder is
not in use.
• Check and clean burner tubes before storage and at the start of each
season—spiders/insects can build nests that block gas flow.
• If storing the grill outdoors, cover it with a breathable, outdoor grill cover
after the grill is cool and dry.
• Remove and clean loose components. Season cast-iron grates with a light
coat of shortening/oil and wrap in a clean towel before storage.
• For long-term storage, remove the ignitor battery to avoid corrosion.
53
• Rinse if needed and let the cover air-dry fully before putting it back on
the grill.
• When ready to cook, remove the cover completely and store it in a safe
place, away from hot or sharp surfaces.
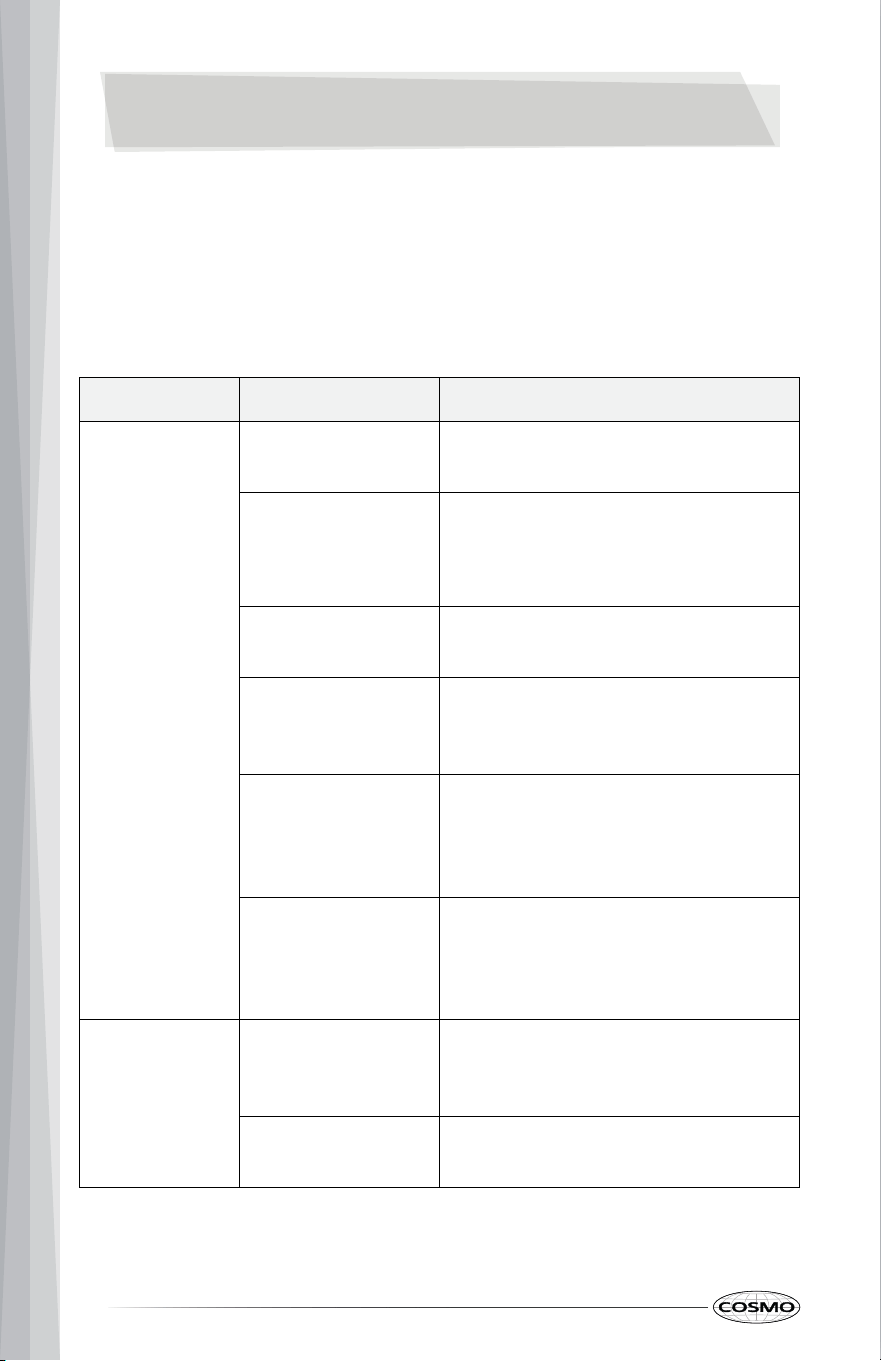
TROUBLESHOOTING
BEFORE CALLING FOR SERVICE
First try the solutions suggested here to possibly avoid the cost of a service
call.
GRILL PROBLEMS
Problem Possible Cause Solution
Burner will not
ignite
LP cylinder empty
or valve closed
Refill/replace cylinder and open
valve slowly.
Battery
dead/reversed;
ignitor cap loose
Replace battery (correct polarity),
tighten cap, clean contacts.
Ignitor wire
off/disconnected
Reseat wire at module and
electrode.
Electrode
dirty/misaligned/cr
acked
Clean and set gap ~3–5 mm; replace
if damaged. Align toward a burner
port.
Venturi or burner
ports blocked
(insects/grease)
Remove burner; brush outside; clean
venturi with flexible brush; clear
ports with paper clip; clean spider
screens; reinstall.
Orifice clogged /
hose kinked /
burner not seated
over orifice
Clean orifice; straighten hose; reseat
burner.
Rrotisserie
burner won’t
stay lit
Knob released too
soon; thermocouple
not hot yet
Relight and hold knob in ~15 s after
ignition.
Low gas or strong
wind blowing flame
Check supply; shield from wind; allow
longer warmup.
54
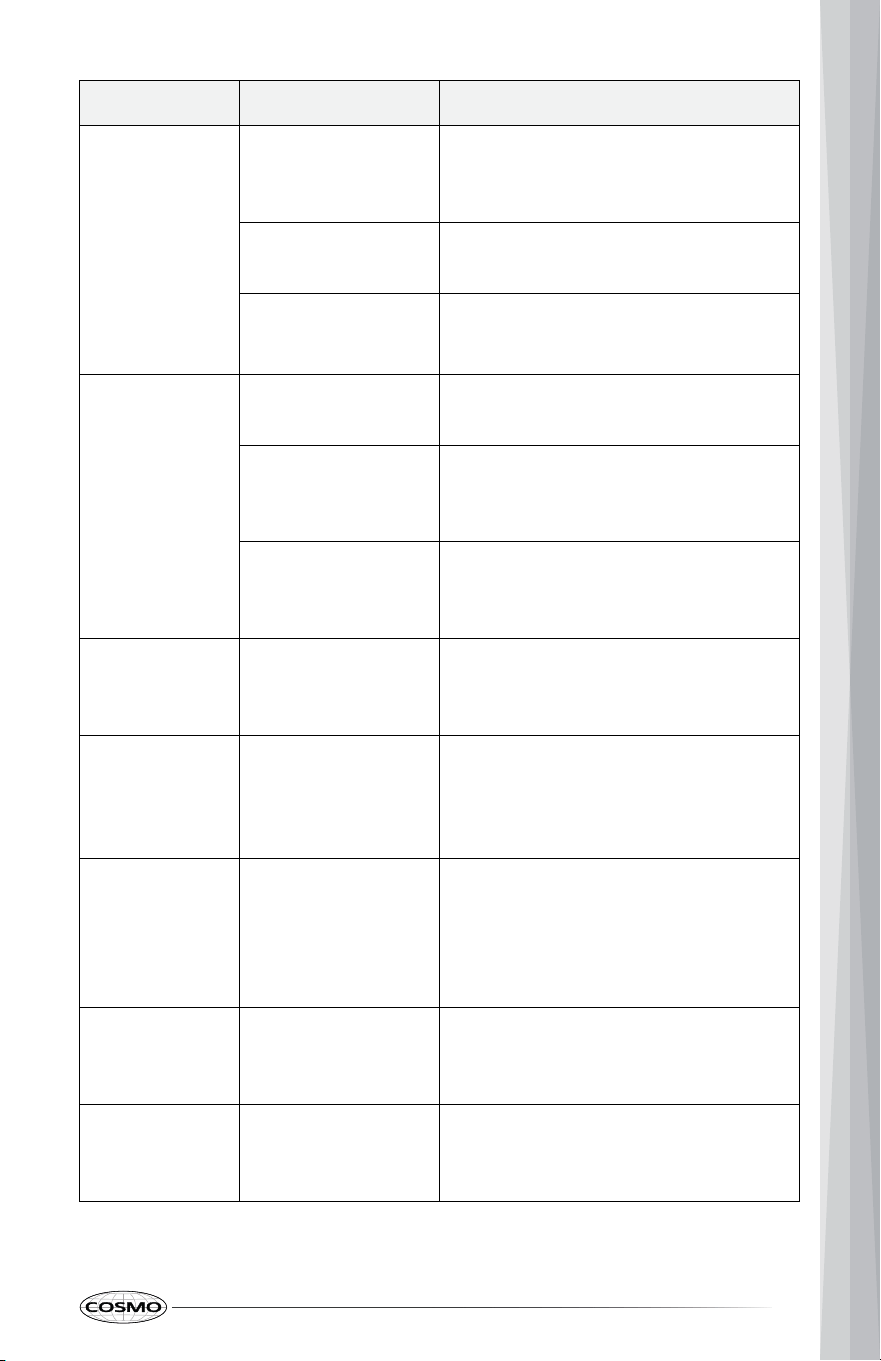
Problem Possible Cause Solution
Flickering
flame or low
temperature
on HIGH
Excess-flow device
tripped (opened
cylinder too fast)
Turn all knobs OFF; close cylinder;
wait 5 min; reopen cylinder slowly
and relight.
Partial blockage in
venturi/ports
Clean burners/venturi/ports; check
spider screens.
Low cylinder level /
very cold weather
Replace/refill cylinder; allow extra
preheat with hood closed.
Ignitor clicks
but no spark
Battery
dead/corroded
Replace battery; clean/dry contacts.
Broken/shorted
wire; electrode
cracked
Inspect/replace wire/electrode.
Electrode gap
wrong / not over a
port
Adjust gap to 3–5 mm and align to
gas port.
Popping sound
/ decreasing
heat
LP cylinder nearly
empty; venturi
blocked
Replace/refill cylinder; clean venturi.
Hot spots on
cooking
surface
Uneven blockage;
debris on flame
tamers or in
cookbox
Clean burners and flame tamers;
scrape cookbox; empty the main drip
tray and side griddle’s oil cup.
Flare-ups or
grease fire
Grease buildup;
excess fat/oil;
sugary marinades
Move food to cooler zone; turn
affected burner(s) down/off. For
grease fire: turn all burners OFF,
keep hood closed, stand back—never
use water. Clean thoroughly after.
Yellow flames Insufficient air;
blocked
venturi/ports
Some yellow tipping is normal;
otherwise remove burner and clean
venturi/ports.
Regulator
humming
noise
Gas flowing or
valve opened too
fast
Usually normal; if excessive, close
cylinder and reopen slowly.
55
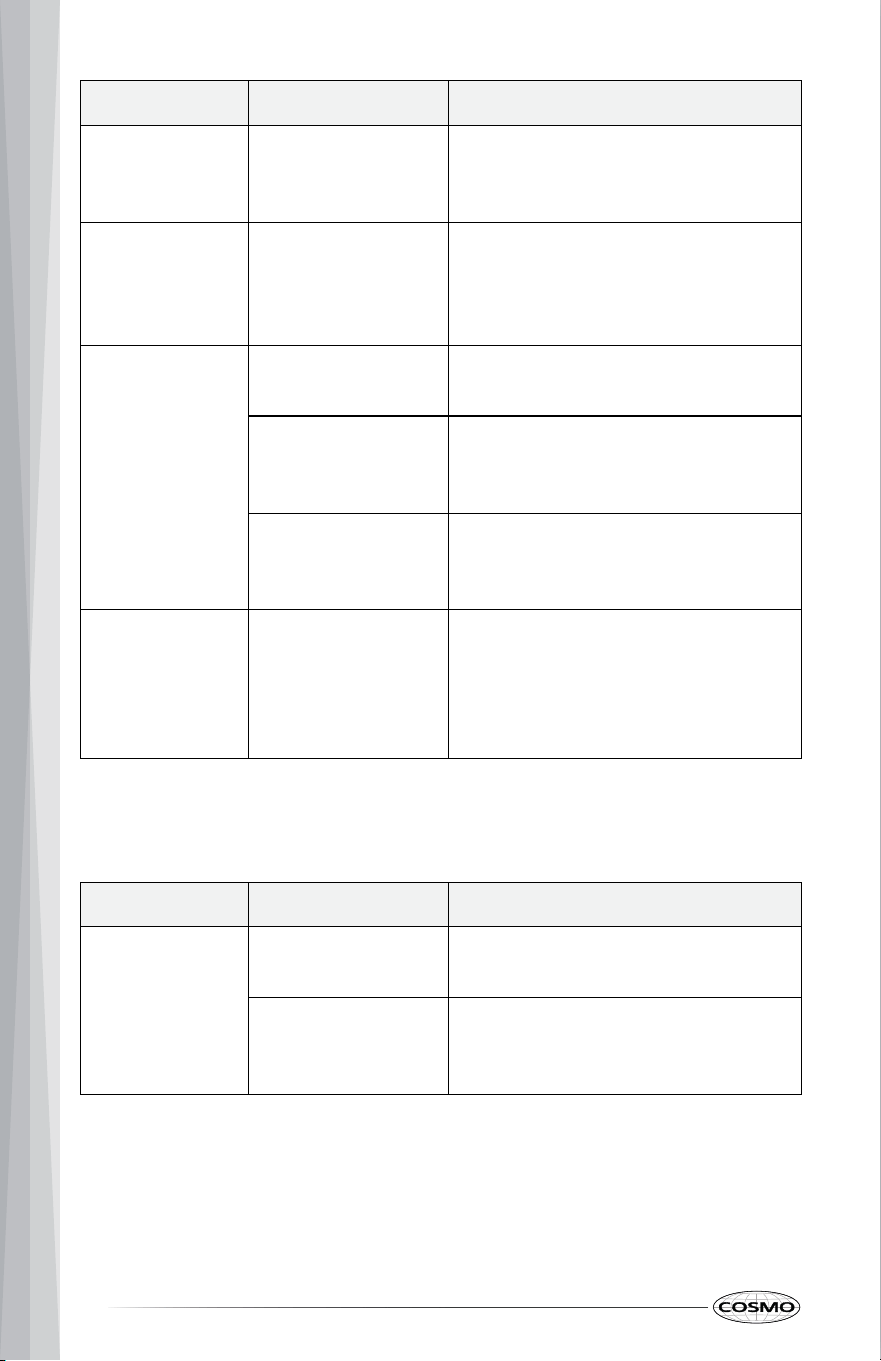
Problem Possible Cause Solution
Inside of hood
appears to be
“peeling”
Carbonized grease
(soot flakes), not
paint
While warm (not hot), brush off;
wipe clean.
Cooking grids
rusting
Porcelain enamel
chipped / not
dried/oiled after
cleaning
Clean gently; dry thoroughly; wipe a
thin coat of high-smoke-point oil
after cleaning.
Control panel
or lights not
working (if
equipped)
Not plugged into
GFCI / GFCI tripped
Plug in; reset GFCI.
Transformer not
outputting 12 VDC;
loose connections
Check transformer output; reseat
connectors; replace if faulty.
Burned-out bulb Replace with correct type/wattage
bulb (see “Replacing the Grill Light
Bulb”).
Smell of gas Loose fitting or leak
in
hose/regulator/val
ve
Close LP cylinder (or NG shutoff)
immediately. Perform a soap-
solution leak test and tighten/repair
before use. Do not operate until
leak is sealed.
DRAWER PROBLEMS
Problem Possible Cause Solution
Drawer does
not slide
smoothly or
drags
The drawer is out of
alignment
Fully extend the drawer and push it
all the way back in.
The drawer is
overloaded or the
load is unbalanced
Reduce load weight.
Redistribute drawer loads.
56
LIMITED WARRANTY
WARRANTY AND SERVICE
To receive warranty service, your product must be registered. To register and
review full warranty details, visit:
www.cosmoappliances.com/warranty
Scan to Register
CUSTOMER SUPPORT
To contact customer service for assistance, visit:
www.cosmoappliances.com/chat
Scan to Contact
57
Correct disposal of this product:
This marking indicates that this appliance should not be
disposed with other household wastes. To prevent
possible harm to the environment or human health from
uncontrolled waste disposal, recycle it responsibly to
promote the sustainable reuse of material resources.
IMPORTANT
Do Not Return This Product to The Store
If you have a problem with this product, please contact Customer Support at
+1 (626) 800-4288
Dated proof of purchase, model #, and serial # required for warranty service.
IMPORTANT
Ne pas Réexpédier ce Produit au Magasin
Pour tout problème concernant ce produit, veuillez contacter le service des
consommateurs Customer Support au
+1 (626) 800-4288
Une preuve d’achat datee est requise pour beneficier de la garantie.
IMPORTANTE
No regrese este producto a la tienda
Si tiene algún problema con este producto, por favor contacte el ayuda al
cliente al
+1 (626) 800-4288
(Válido solo en E.U.A.)
Necesita una prueba de de compra fechada, número de modelo y de serie
para el servicio de la garantía.
58
MEMO
59