CZ100
照明系统 - 供电端
2026.05.08
V0.9
用户手册
User Manual
Lighting Sytem-Ground
Station
1
一、应急处置
紧急关机类问题
通过“急停按键”紧急关机
通过“ 供电端电源按键”紧急关机
APP类问题
如何重启APP
注意:如遇到app无法控制设备的情况,可尝试终止app进程,再重新启动app,有一定概率可
以恢复控制。
操作流程:
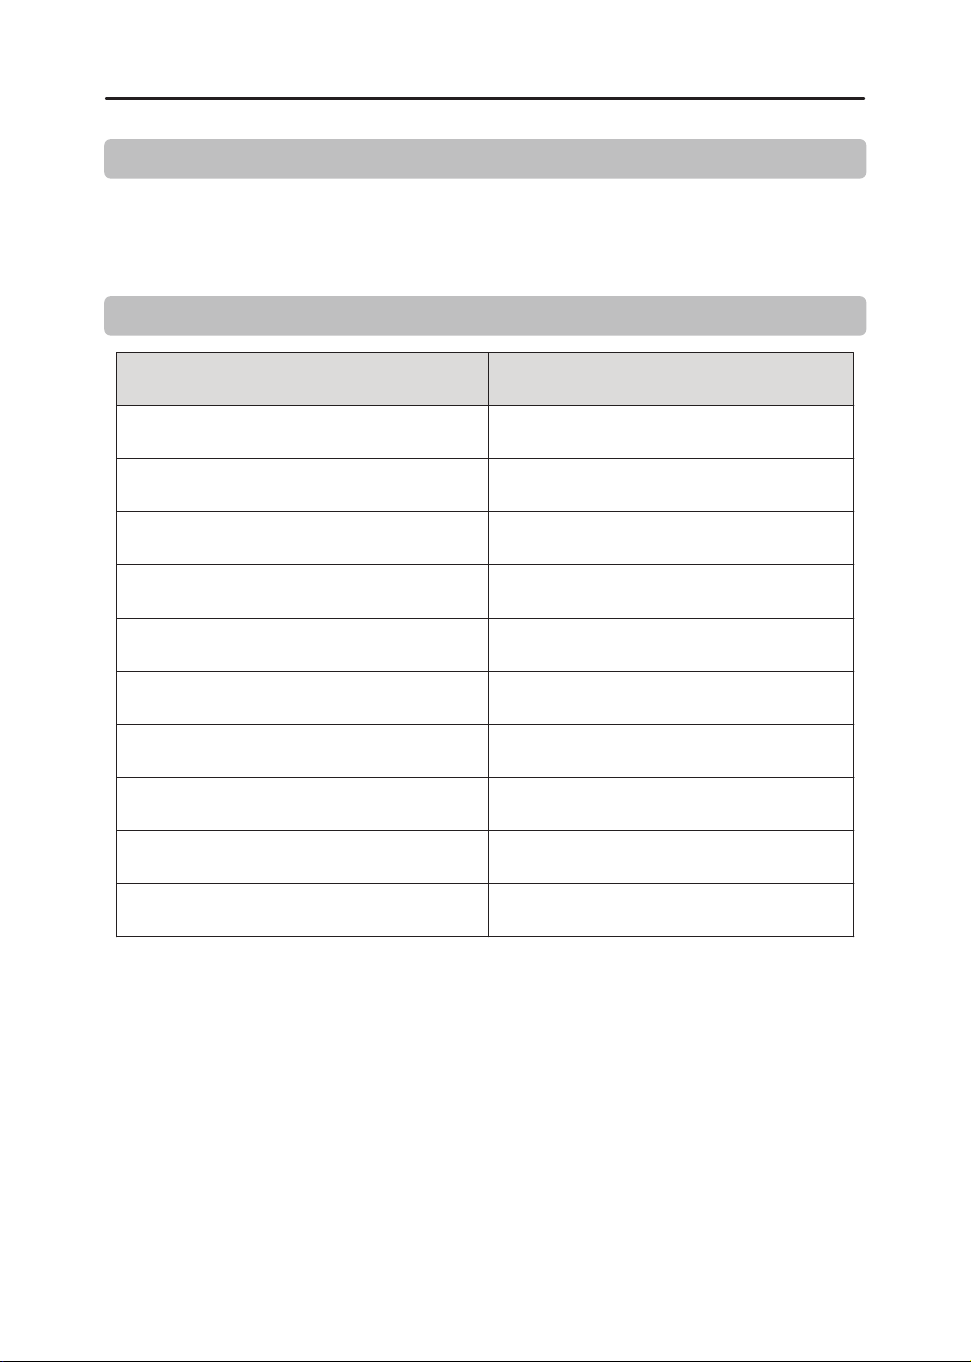
在屏幕下方边缘上滑一下,出现系统导航栏,选择右下方【任务管理】按钮,进入任务管理页面。
1、
应急处理仅仅适用于设备的电力紧急切断的状况。正常使用请避免紧急操作。
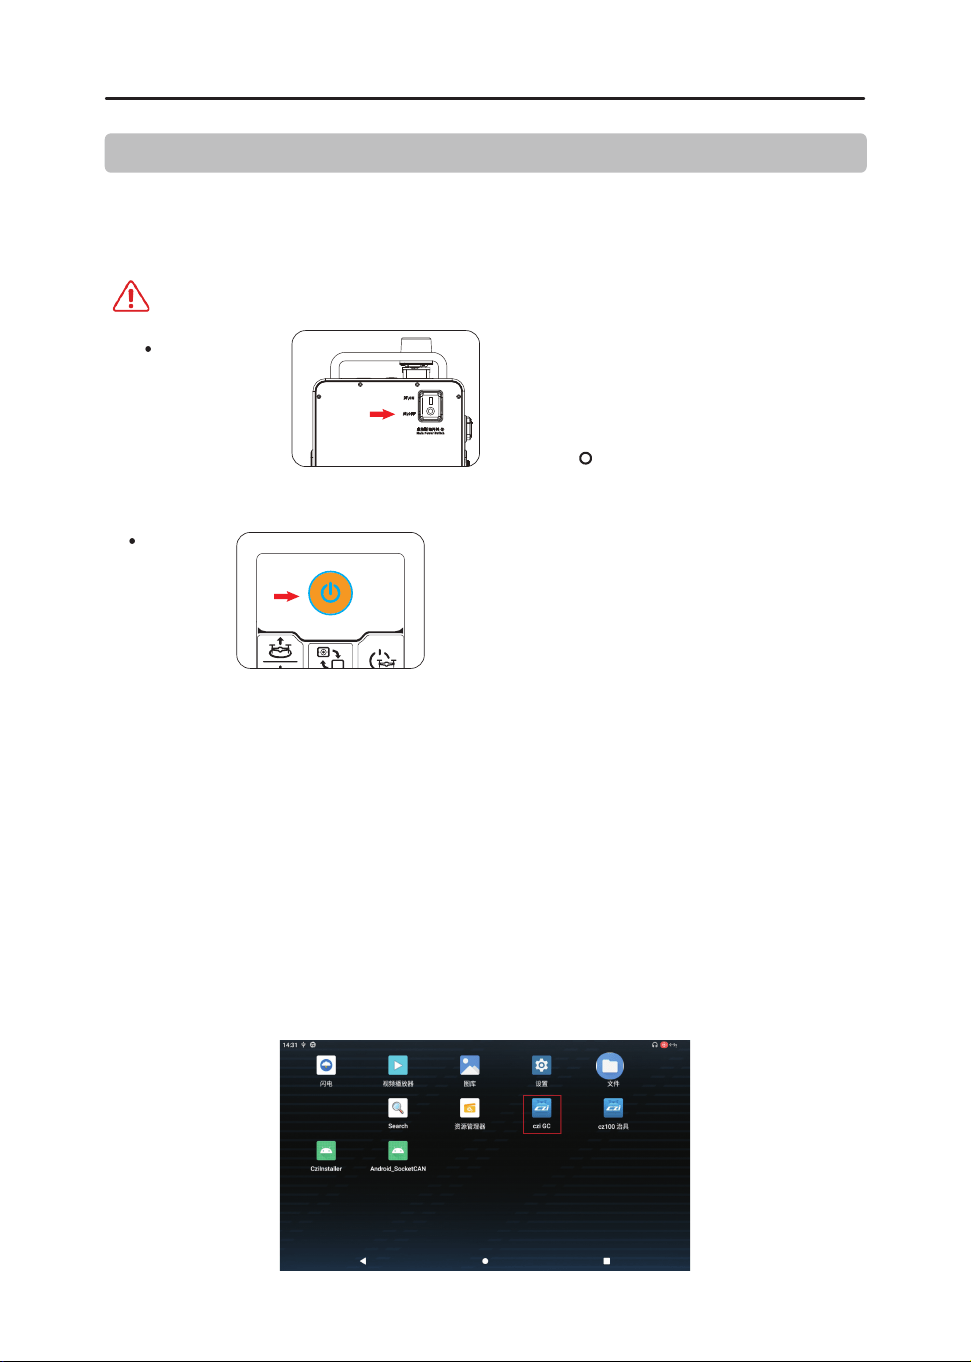
紧急断电开关:
开关打到“ ”进行紧急停机断电操作。
按键断电:
长按此电源键3秒,进行紧急停机断电操作。
找到运行中的czi GC程序任务,拖动上滑,关掉程序。
2、
在系统桌面找到czi GC程序,重新点开即可。(如果桌面中未找到,可以上滑进入系统桌面抽屉
页面找)
3、

网络链接类问题
如何处置安卓手机 & 安卓平板电脑无法通过 WIFI 连接供电端问题
如出现手机连接设备长时间搜索不到设备的情况,请点击重新搜索设备,由于手机权限限制,
无法快速获取到 WiFi 列表,有时候需要一定的时间才能搜索到 WiFi 设备。
如何处置 供电端无法通过 WIFI 连接安卓手机 & 安卓平板热点问题
请确保手机开启 WIFI 热点时,设置为 2.4G 模式, 供电端只能搜索到 2.4GWIFI 并连接。
使用本产品之前,请仔细阅读本文档。本声明对安全使用本产品以及您的合法权益有着
重要影响。一旦使用本产品,即视为您已经充分阅读、了解、理解、认可和接受本文档全部
条款和内容。
二、免责声明
本产品并非玩具,使用此产品具有一定的安全风险,本产品不适合未满18岁的人士或法
律规定的限制民事行为能力人/无民事行为能力人或行动能力障碍人士使用,亦不适合未
取得成至智能机器科技有限公司(以下简称成至)认可(或现行法律法规、政策规定认可)
的CZ100设备操作培训的人士使用。请勿让儿童接触本产品,在有儿童出现的场景 操作
时请务必特别小心注意。
操作者承诺仅出于正当目的并在法律允许范围内使用本产品,并且同意本条款及成至可
能制定的任何相关政策或者准则。使用者了解并接受本产品在使用过程中将自动上传并
保存相关使用记录和数据至 供电端。若因为使用者的原因导致使用记录和数据无法 上
传保存,导致无法对使用记录和数据进行分析时,成至将不承担责任。
在法律允许的最大范围内,在任何情况下成至不对本产品提供任何明示或暗示的保证,
包括但不限于可销性,特定用途的适合性或不侵权的暗示保证。
在法律允许的最大程度下,成至不承担因用户未按照本文《使用说明》使用产品所引发的
一切损失。并不对任何间接性、后果性、惩罚性、偶然性、特殊性或刑罚性的损害,包括因
您购买、使用或不能使用本产品而遭受的损失承担责任(即使该等损失的可能性已被告
知亦然)。
在法律允许的最大程度下,在任何情况下,成至因所有损害、损失及引致诉讼而对您所负
的法律责任或金额均不会超过您因购买产品而向成至支付的金额。
在任何情况下,购买者或使用者均应遵守产品使用地国家及区域的相关法律法规,成至
不承担因购买者或使用者违反相关法律法规而产生的任何责任。
某些国家的法律可能会禁止免除责任类条款,因此您在不同国家的相关权利可能会有所
不同,但这并不意味着本声明中的内容必然无效。
在法律允许范围内,成至享有对以上条款的最终解释权和修改权。成至有权在不再事先
通知的情况下,通过成至官方网站、《使用说明》、线上App等途径对本条款进行更新、改版
或终止。
2
3
三、产品概述
四、规格参数
≤13kg
2300mAh
5.5 ″
1920*1080
1000 尼特
供电端重量
供电端尺寸
供电端输入电压
供电端电池容量
屏幕尺寸
屏幕分辨率
屏幕亮度
供电端输出接口
385*337*224mm
176-264VAC
HDMI、网口
防护等级
工作温度
储存温度
IP44
-20℃~+50℃
-40℃~70℃
≤13kg
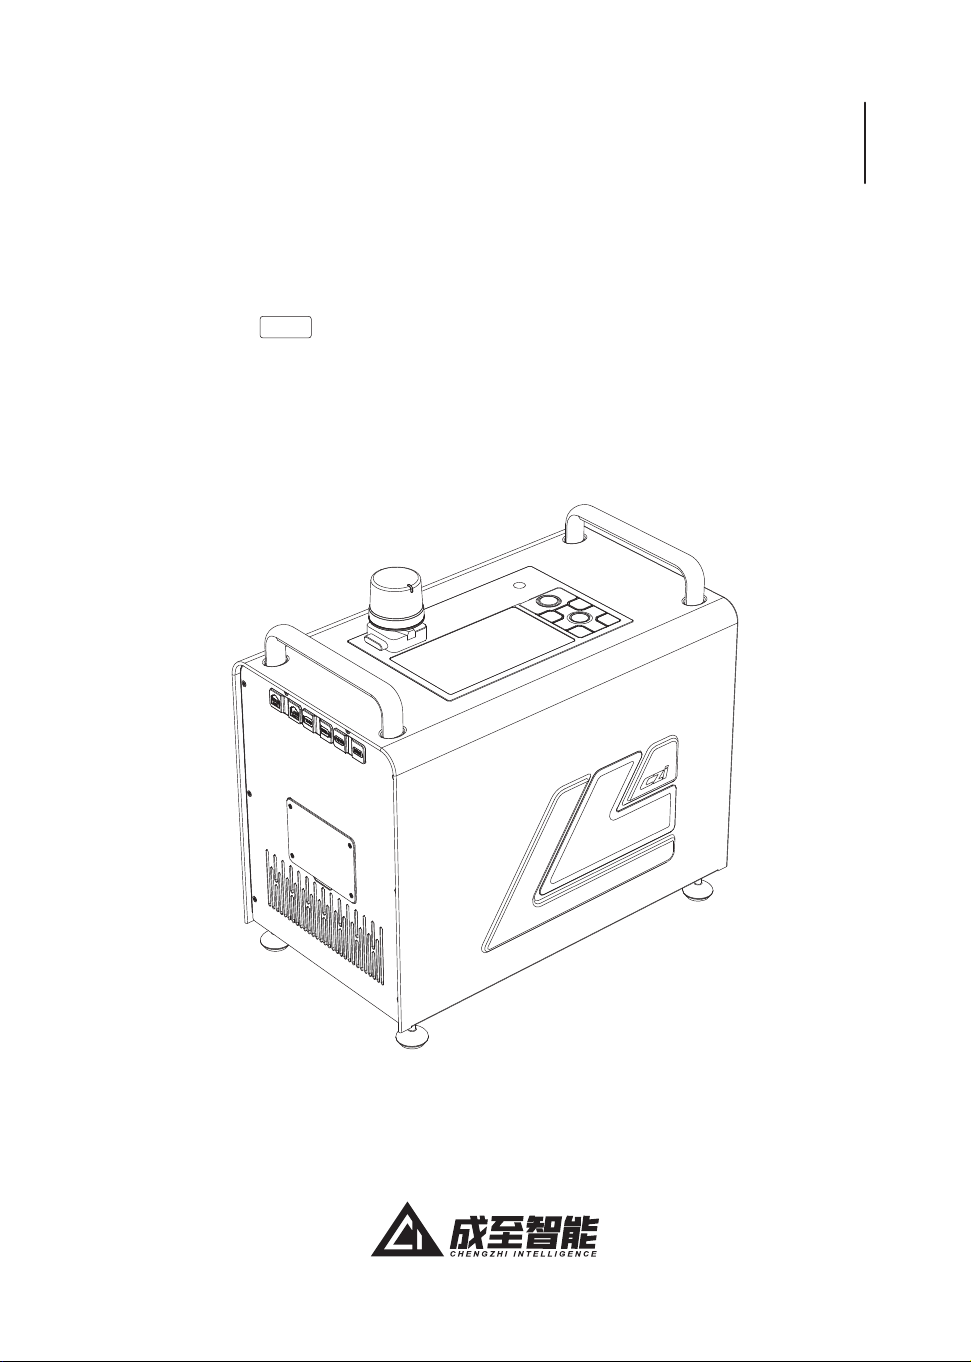
成至CZ100是一种高效、可靠的轻型应急照明解决方案,采用外部供电方式,为夜间的应
急救援任务提供了强有力的支持。
4
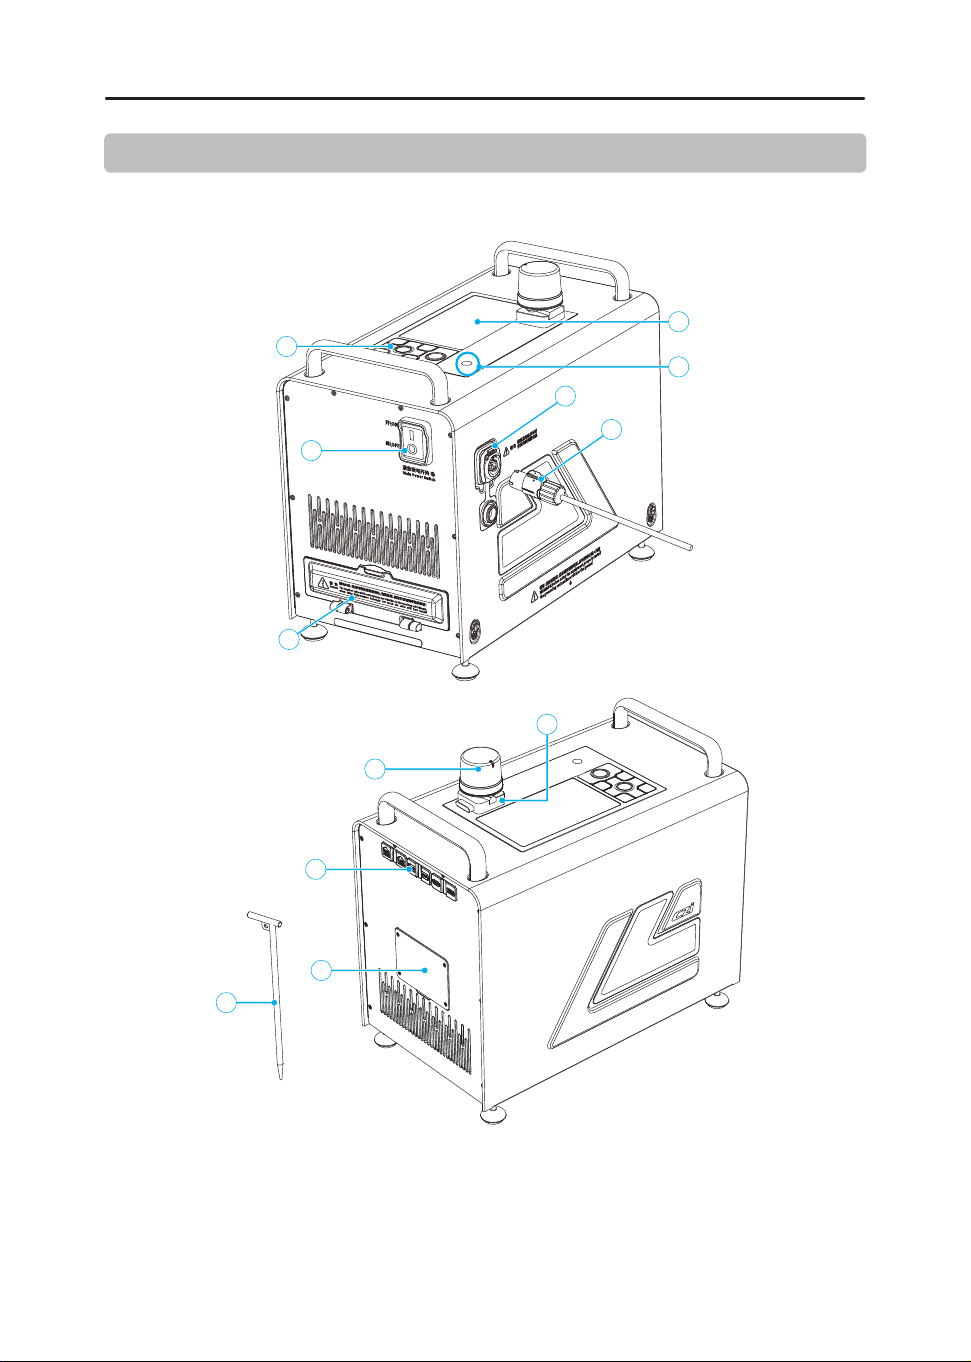
五、主要部件与结构介绍
5.1 供电端
2
4
5
1
3
6
7
8
9
11
10
12
⑦ 导线盖 ⑧ 外部设备连接口 ⑨ 电池盖 ⑩ 接地钉
① 显示屏 ② 摄像头 ③ 按键面板
④ 电源输入口 ⑤ 电源线
⑥ 紧急断电开关
⑪ RTK ⑫ RTK座

5
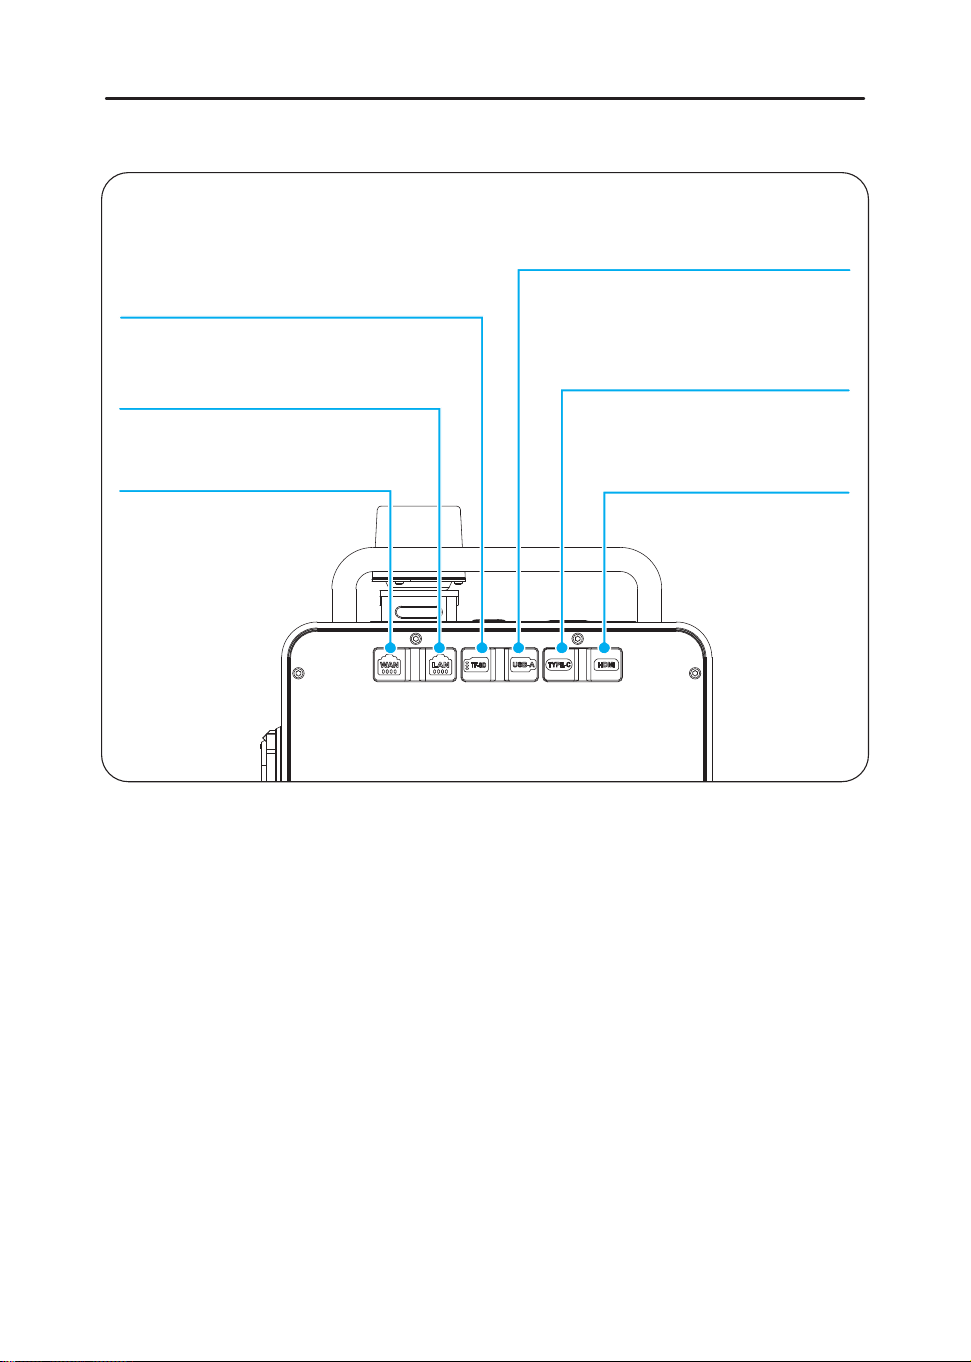
外部设备各连接口的作用:
HDMI 口:支持 1080P 高清视频实时回传
TYPE-C 口:可为任务设备 ( 如执法记录仪 )
进行快速供电,可输出 65W 快充供电,支持 PD3.0
USB-A 口:提供 USB 主机功能,支持 USB 通讯 /RTK 线连接口
TF-SD 口:数据传输与备份:可以将设备中的数据转移到 TF 卡上
进行备份
LAN 口:连接外部电脑设备,通过局域网上传视频源至本地设备
WAN 口:连接外部网络,通过网络可更新系统
或上传视频源
6
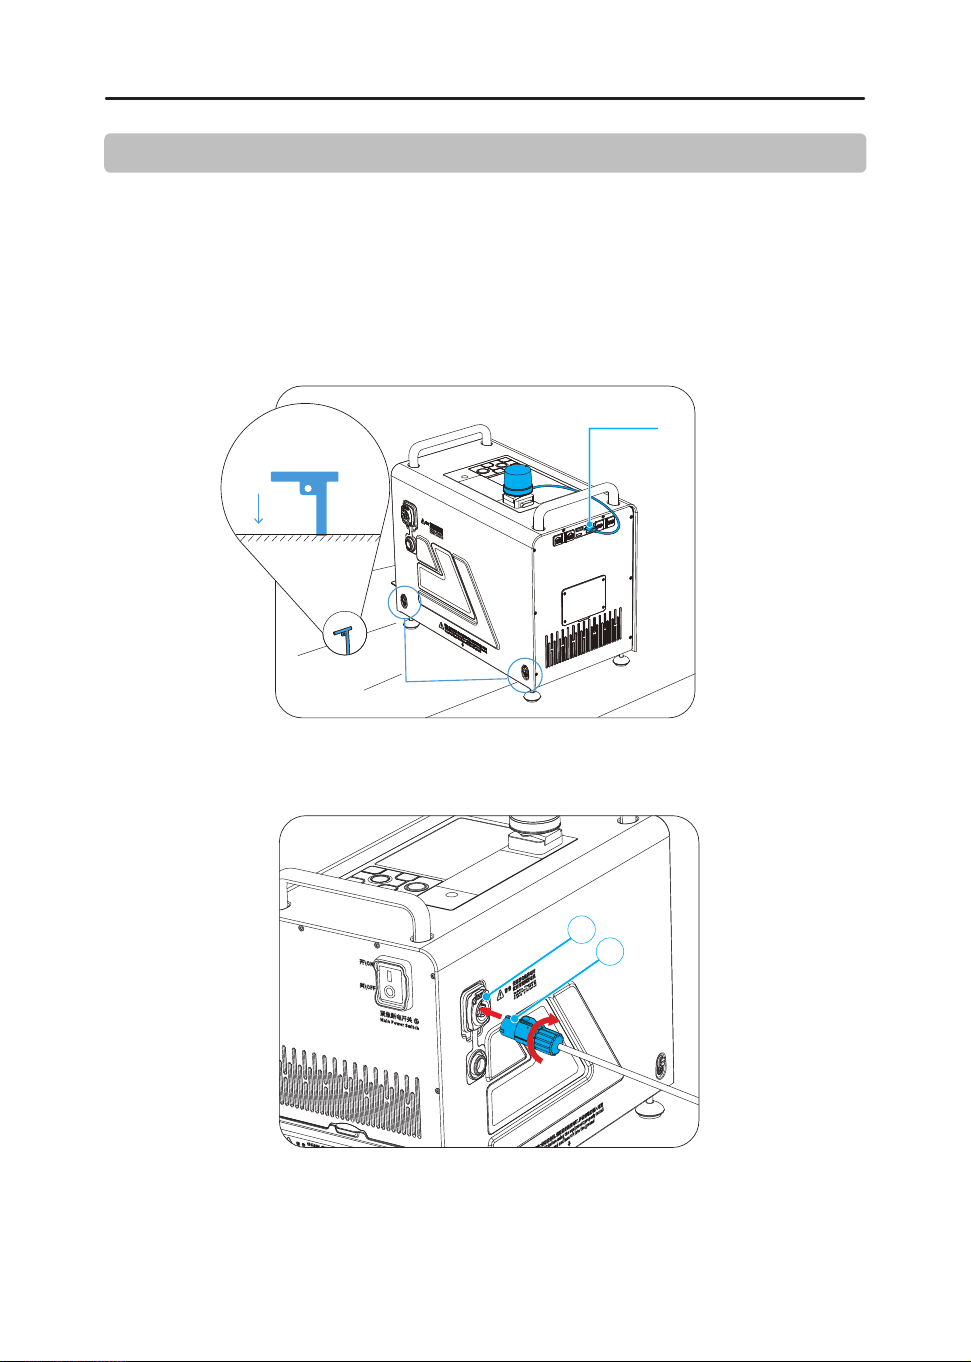
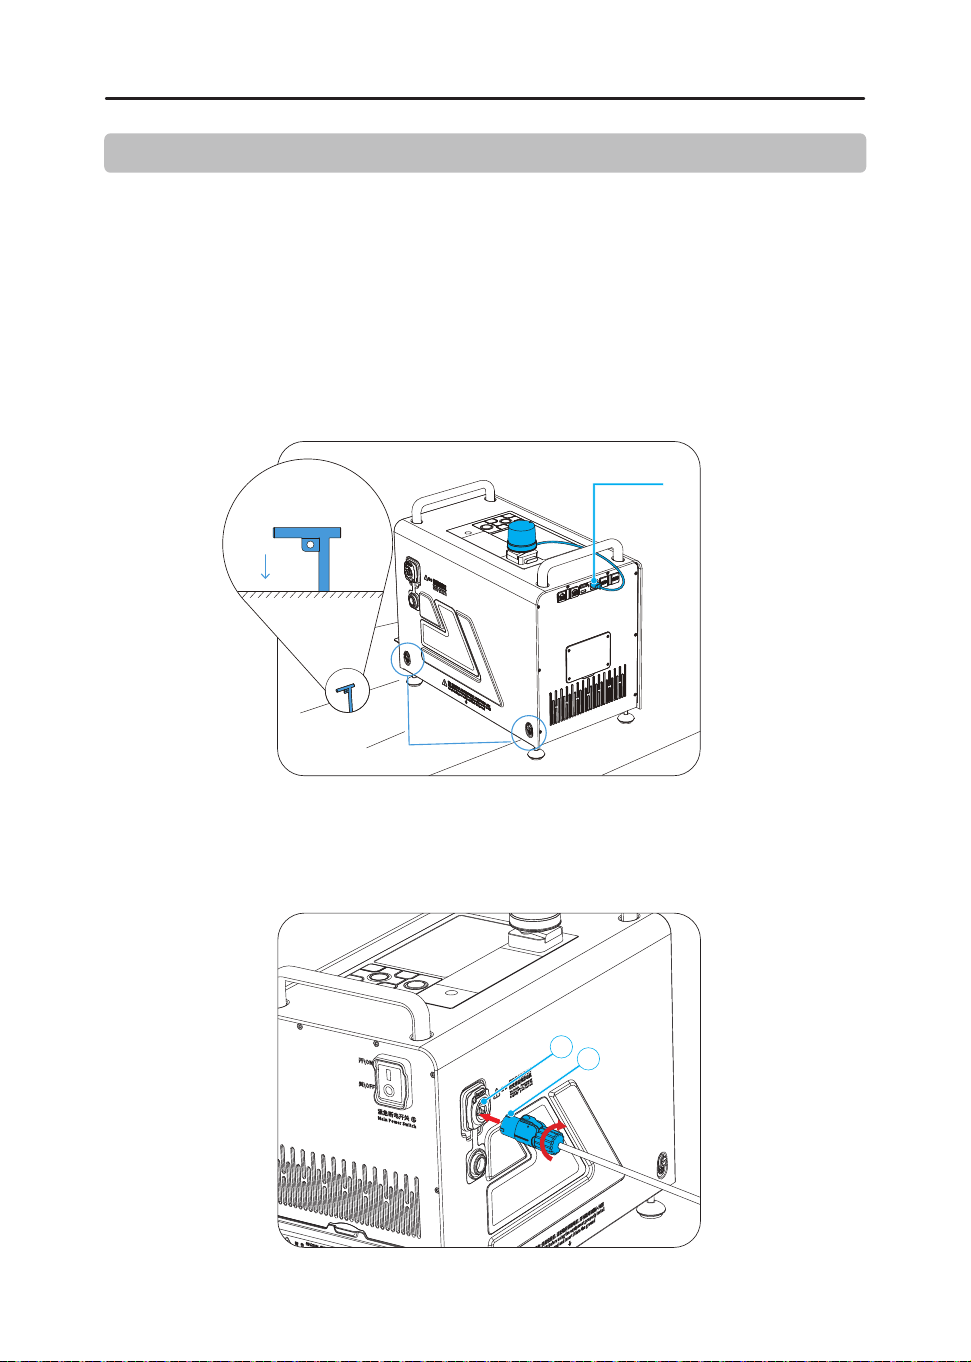
6.3
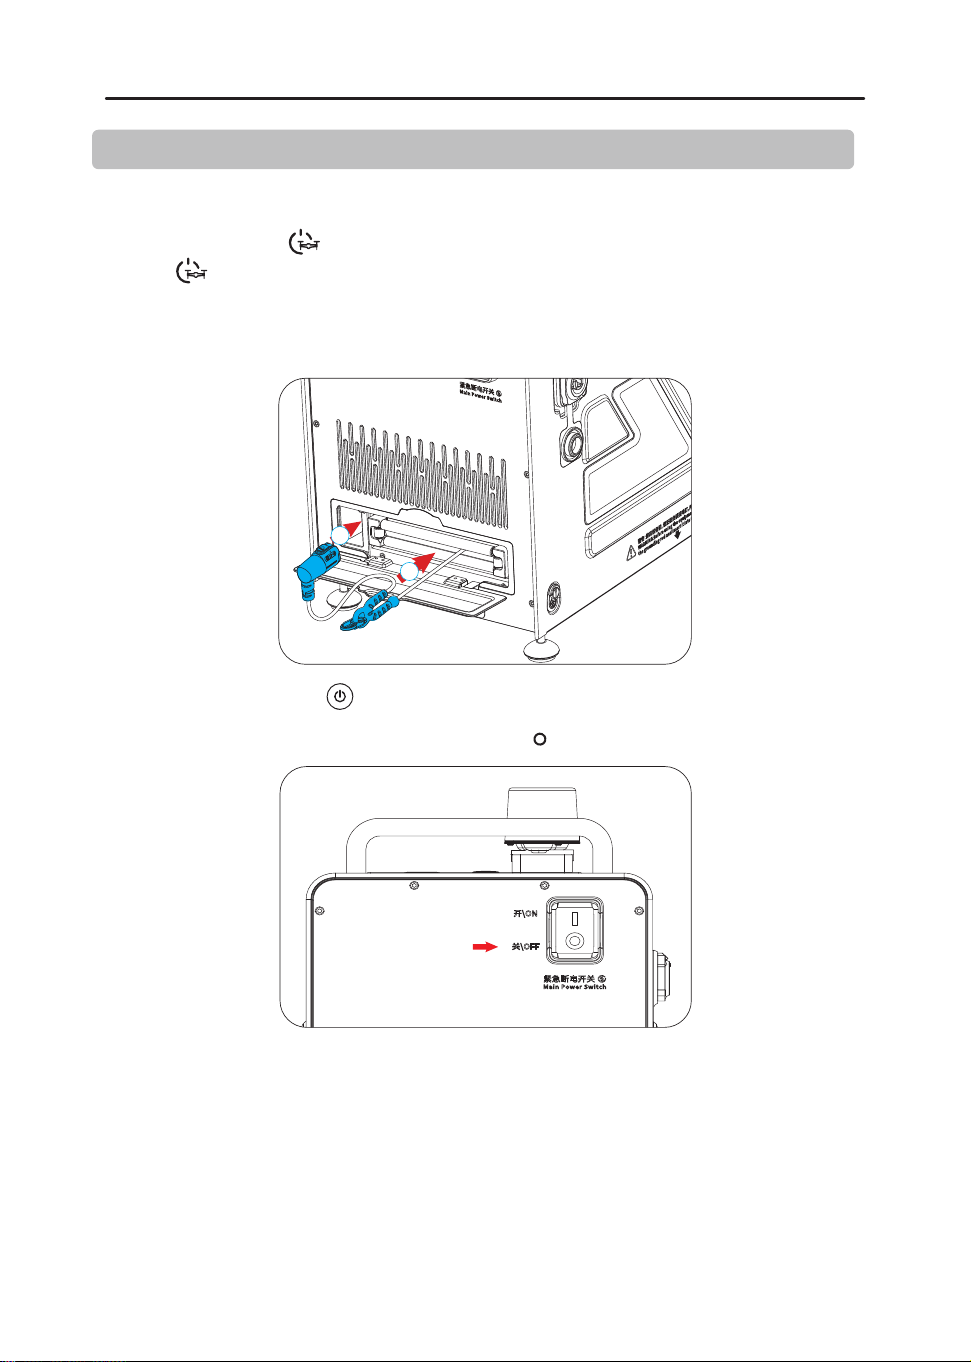
供电端电源连接:打开电源座面盖,图示1处的凸块与图示2的槽对准后,将电源线插入,
顺时针旋转,直到听到“咔”声,表示已完成。
1
2
六、CZ100照明系統-供电端的安装及操作流程
展开背包、取出供电端
CZ100- 供电端的安装:
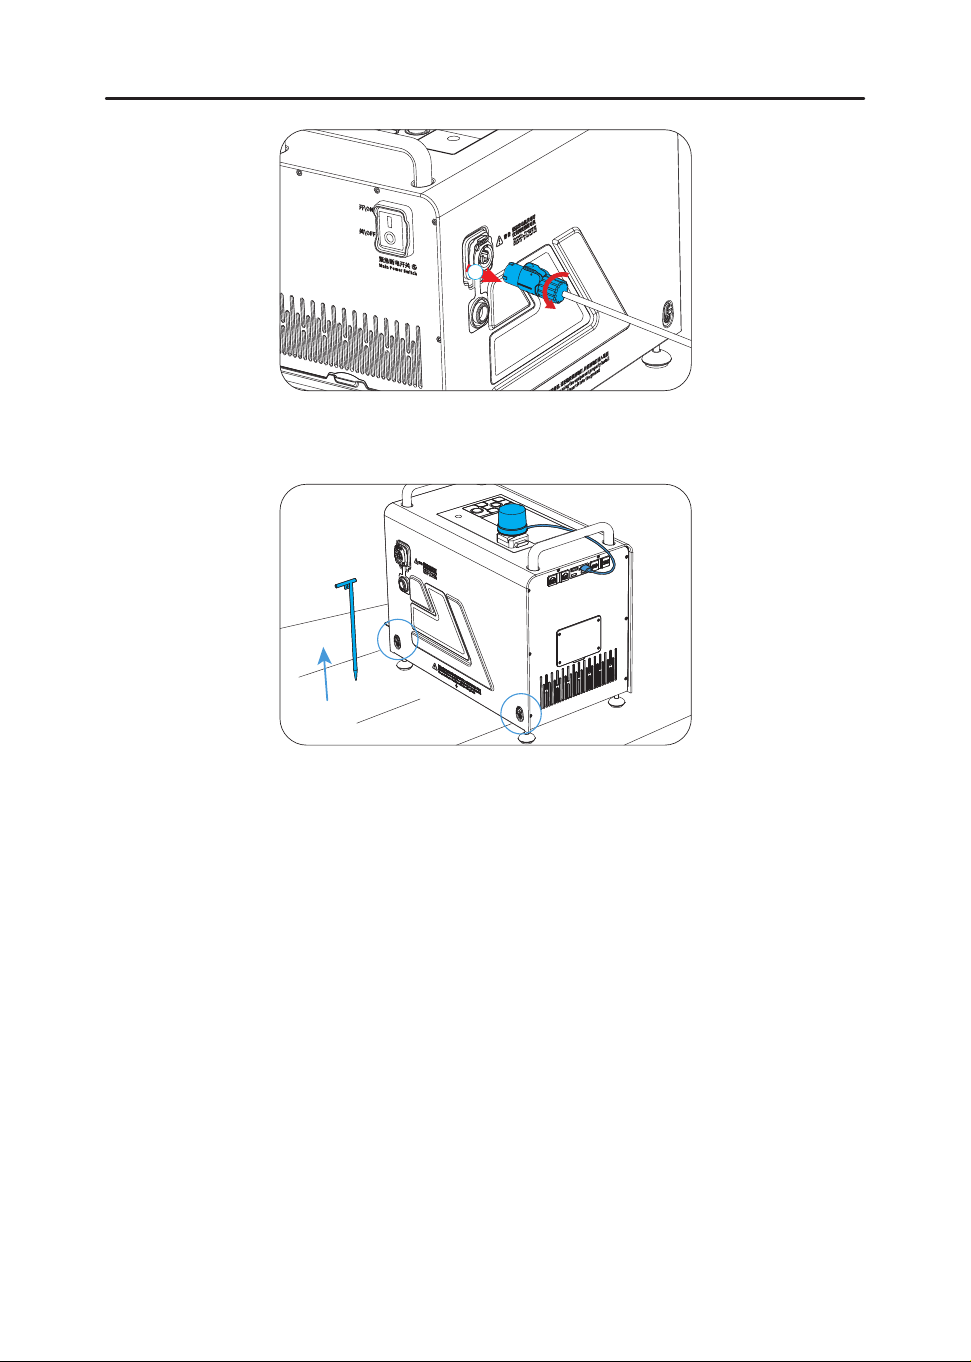
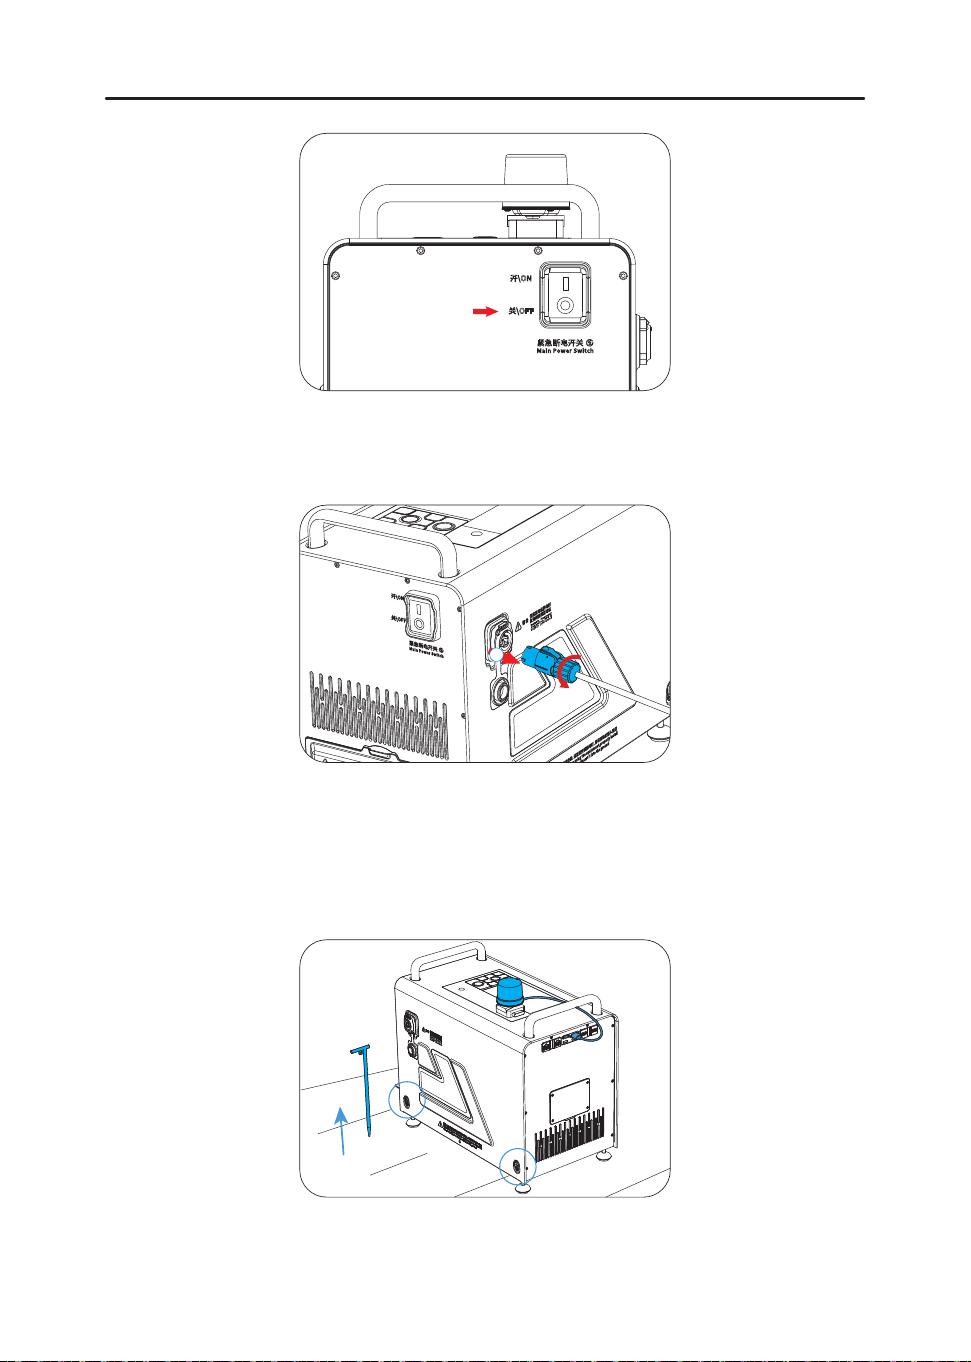
6.1 接地针安装:从附件包取出接地钉,将接地钉手拧螺丝松开,拧紧接地线,将插入地下20CM
左右。
6.2
RTK安装:取出RTK模块,将RTK装入RTK座,USB插入前盖USB口。
接地线安装孔
RTK线插口:USB-A
接地钉插入指示图
地底
6.4 220V电源连接:将电源插头与市电或者变频发电机插座连接。
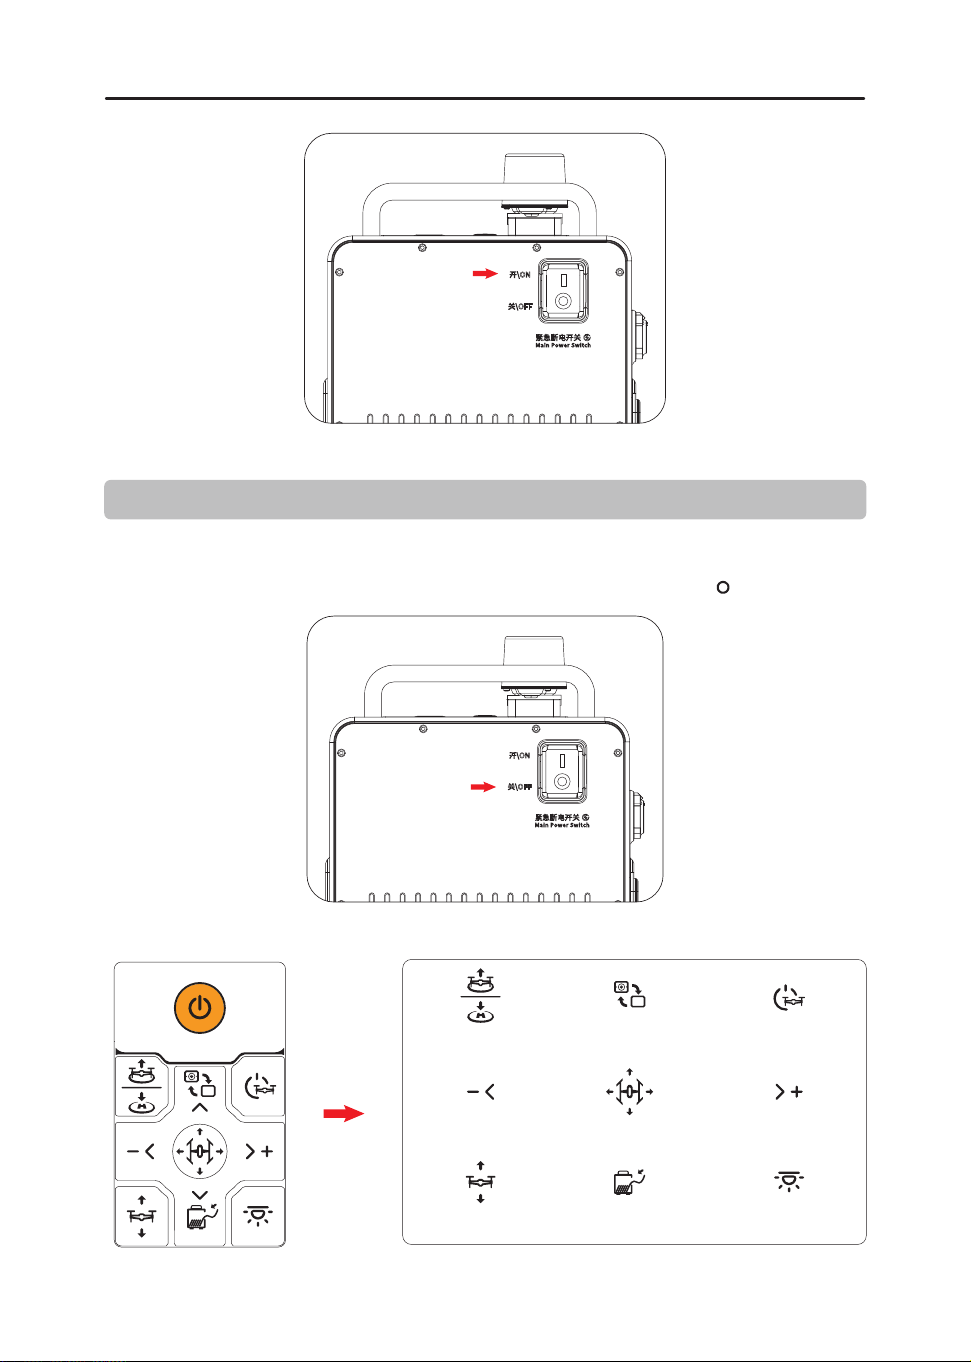
6.5 打开 供电端开关:开启供电端,开关打到“I”。
7
注意:每次使用完必须关闭 供电端紧急断电开关:关闭 供电端,开关打到“ ”。
七、产品使用介绍
首次使用设备之前,请将设备所有固件更新到最新版本
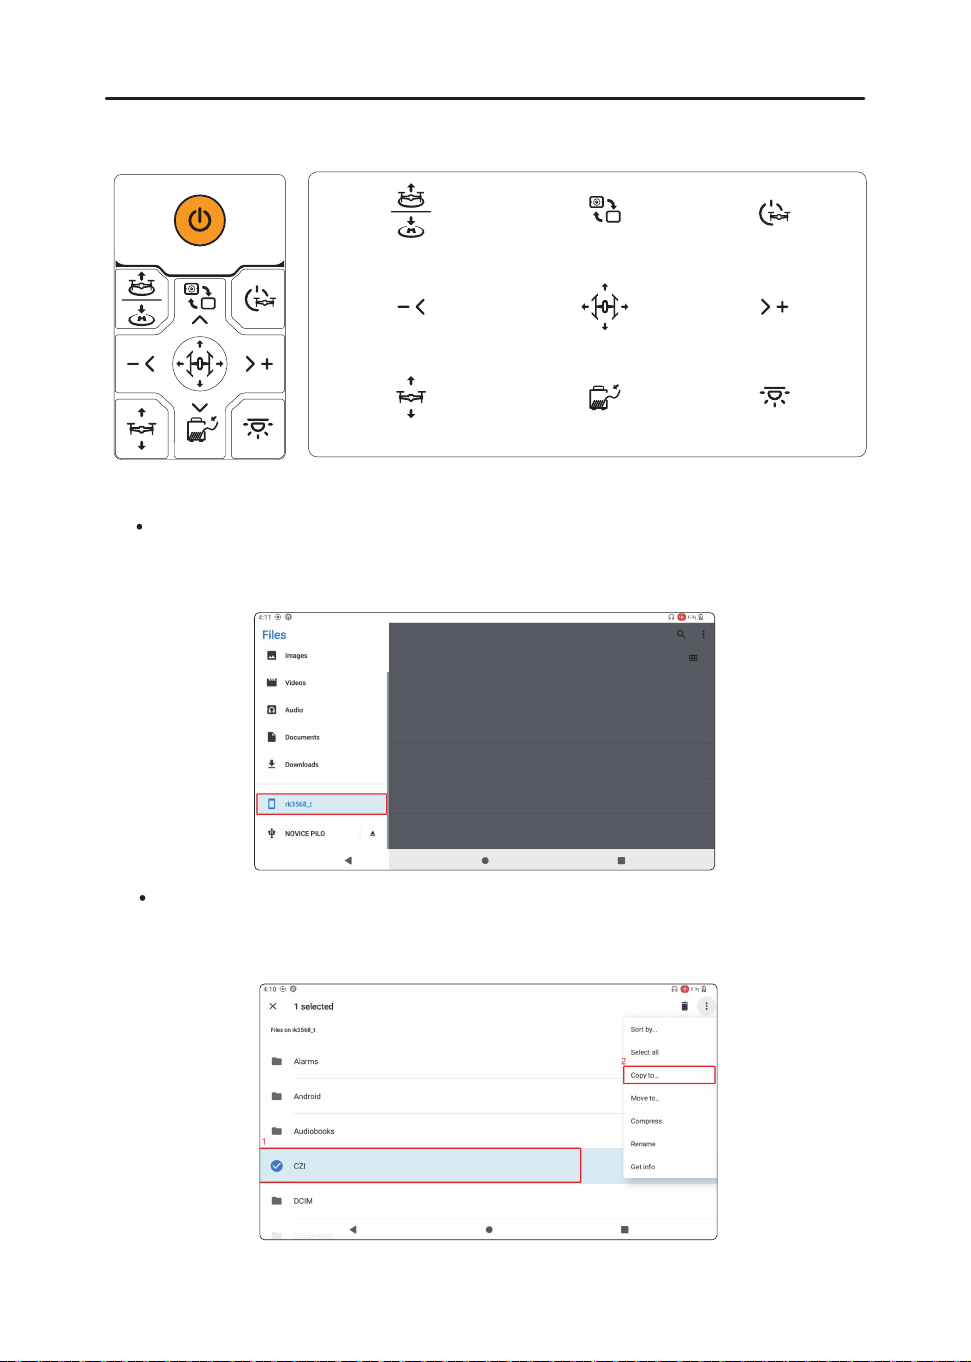
按键说明
选取灯具
降低灯光功率
切换视频画面
调整收线力度
关闭高压
选取灯光
选择按键
增加灯光功率
调整灯具高度
8
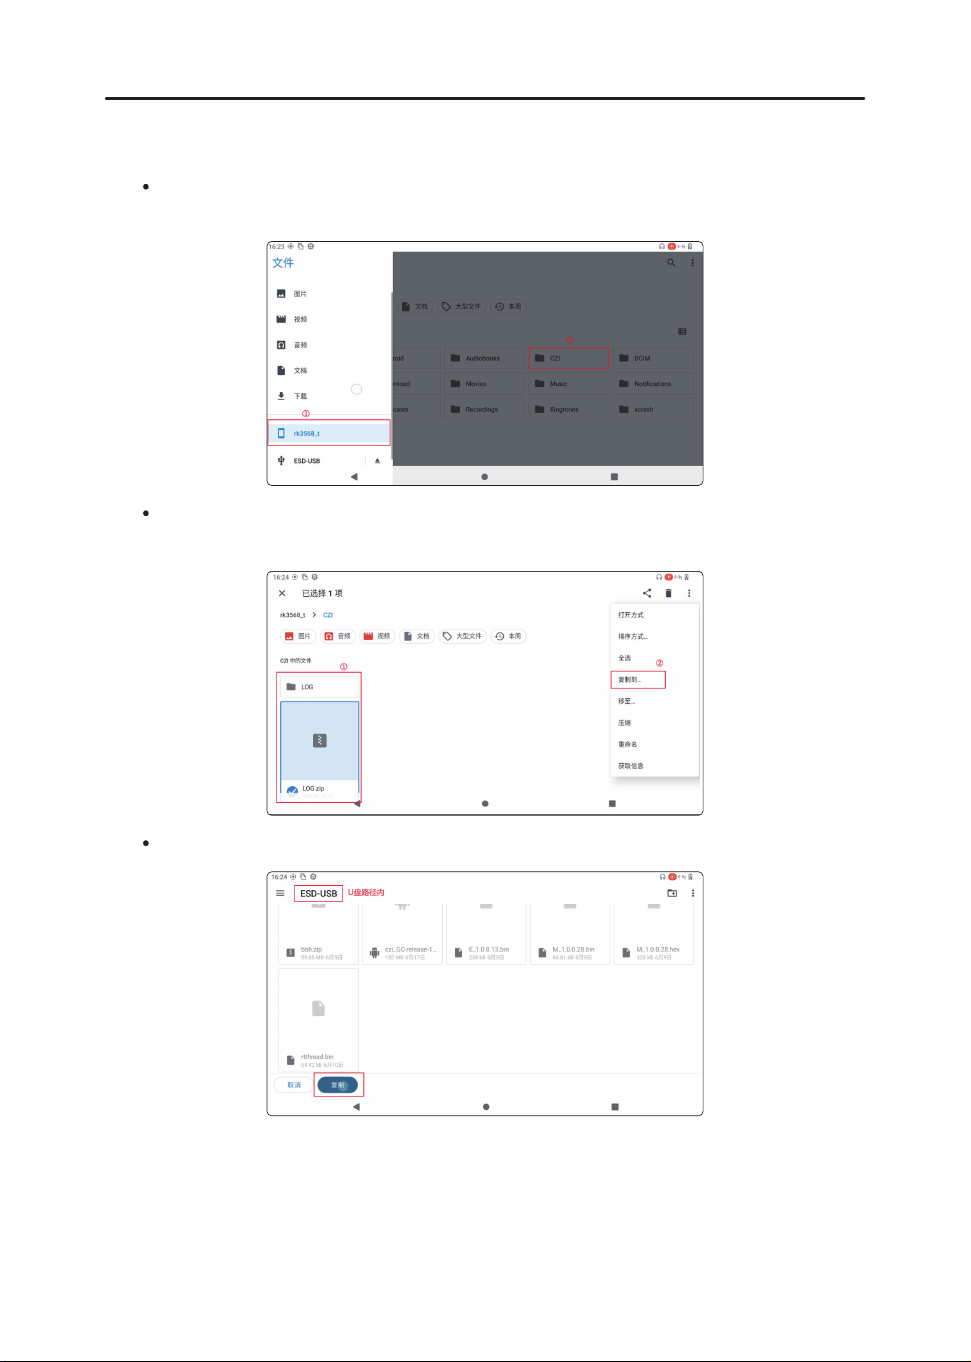
选中U盘目录,点击复制。
运行日志的导出方式为:插入U盘,打开文件管理器,点击设备名称,这是内部存储路径,
ESD-USB是U盘存储路径,不同的U盘可能存在不同的命名。
把内部存储目录下CZI/LOG目录下的文件全部复制到U盘即可,长按选中需要拷贝的文件
(文件夹或压缩包都可以),然后点击右上角“复制到...”。
7.1 日志导出方法
9
八、使用后拆卸及回收
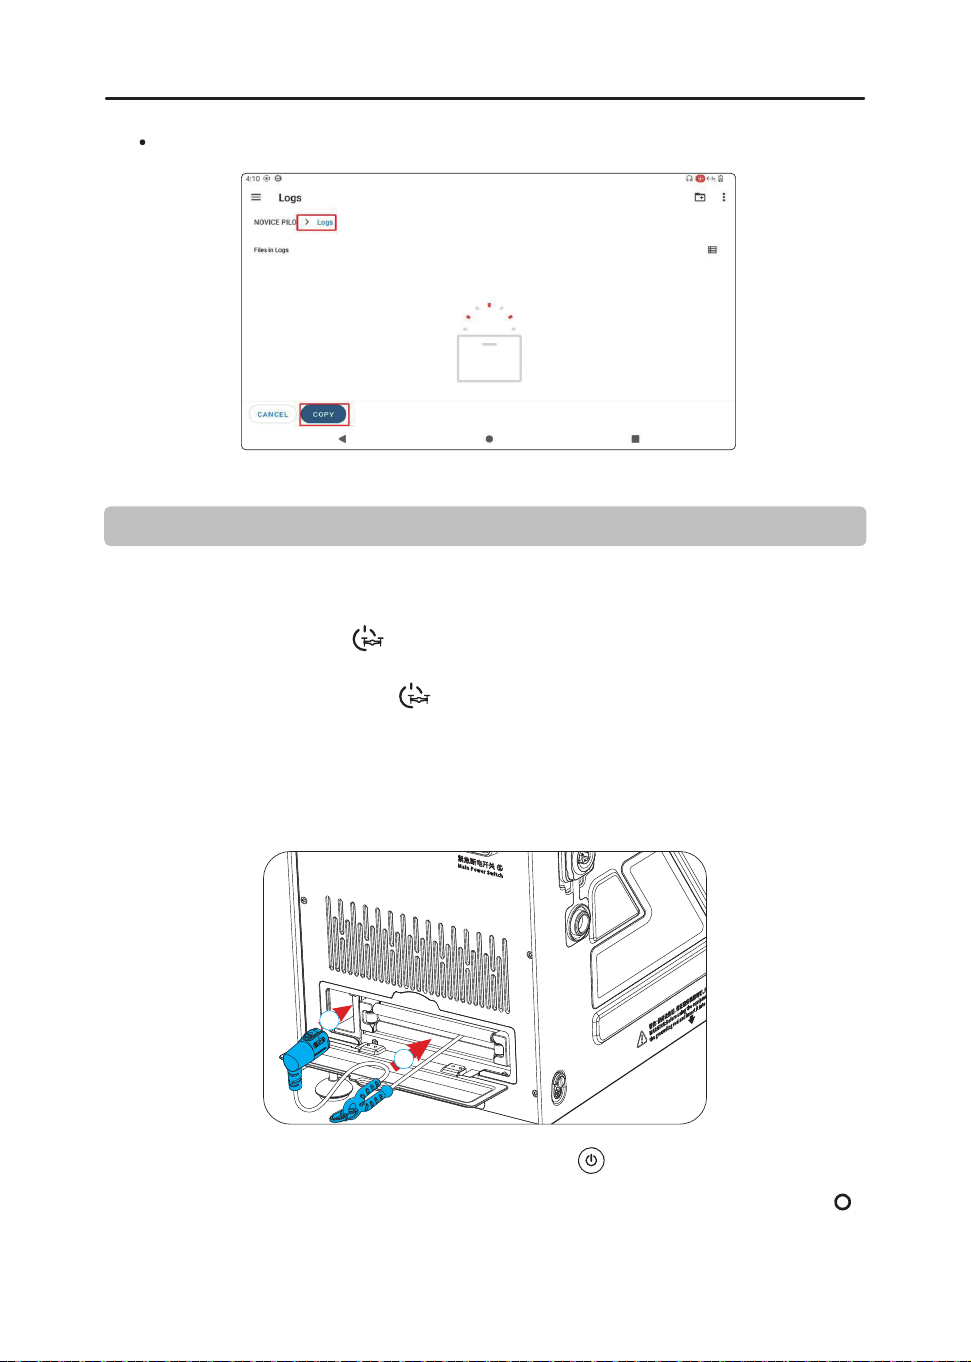
CZ100- 供电端的拆卸:( 供电端拆卸之前确保关闭高压)
8.1
长按供电端的“ ”按键,听到“关闭高压”的声音,即关闭高压输出。发出“哒哒哒”声响,
“ ”按键亮蓝灯熄灯。
8.2
取下 插头:解开挂钩,将“ 插头”从设备接口取下,通过 供电端收回 线缆,插头收回至箭
头1所示方向,挂钩收回至箭头2所示方向,关闭导线盖。
2
1
8.3
供电端关机::长按【 】按键,设备关机。
8.5
供电端电源断开:电源线按钮往箭头 1 所示方向滑动,同时逆时针方向旋转,将电源线
接头从插座上拔下,把线收回并盖上电源盖。
8.4
供电端紧急断电开关:关闭 供电端,开关打到“ ”。
10
1
8.8
收纳:供电端放进背包里。
8.6
220V电源断开:将电源插头从市电(或者发电机)插座拔出。
8.7
接地针回收:将接地针拔出,拧开接地线手拧螺丝,将接地线、RTK模块收回接地附件包。
11
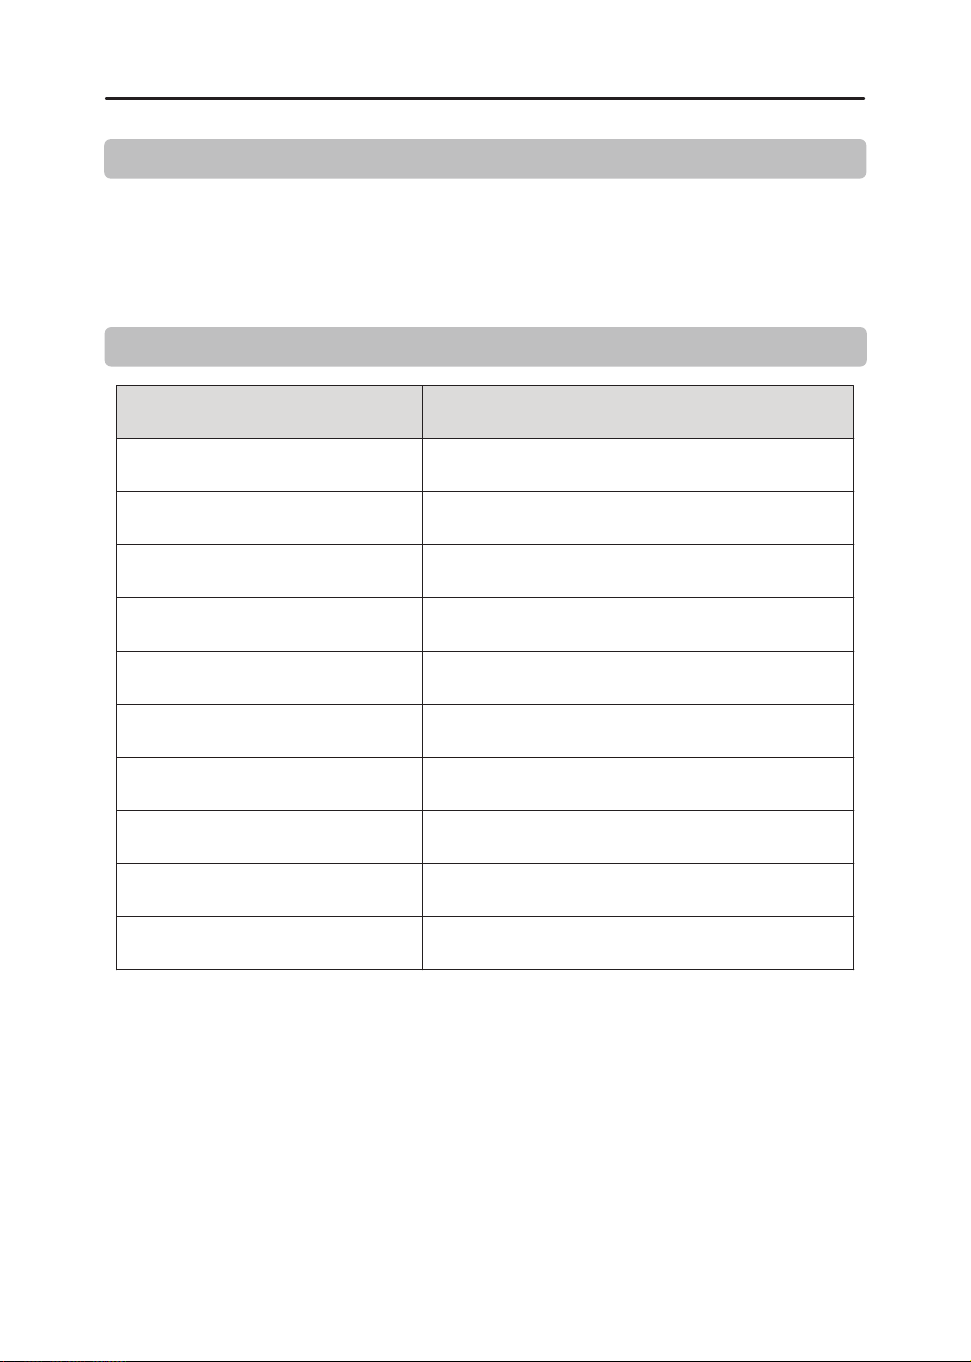
2.
Locate the running czi GC app and swipe it upward to close the process.
3.
Return to the system desktop, find the czi GC app icon and tap to restart. (If the icon
is not on the desktop, swipe up to access the app drawer to locate it.)
Note : If the app fails to control the device, try closing the app process and restarting
the app. This may restore control in certain cases.
Operating Steps:
Application Issues
How to restart the app
1.
Swipe up from the bottom edge of the screen to display the system navigation bar,
then select the rightmost Task Manager button to enter the task management page.
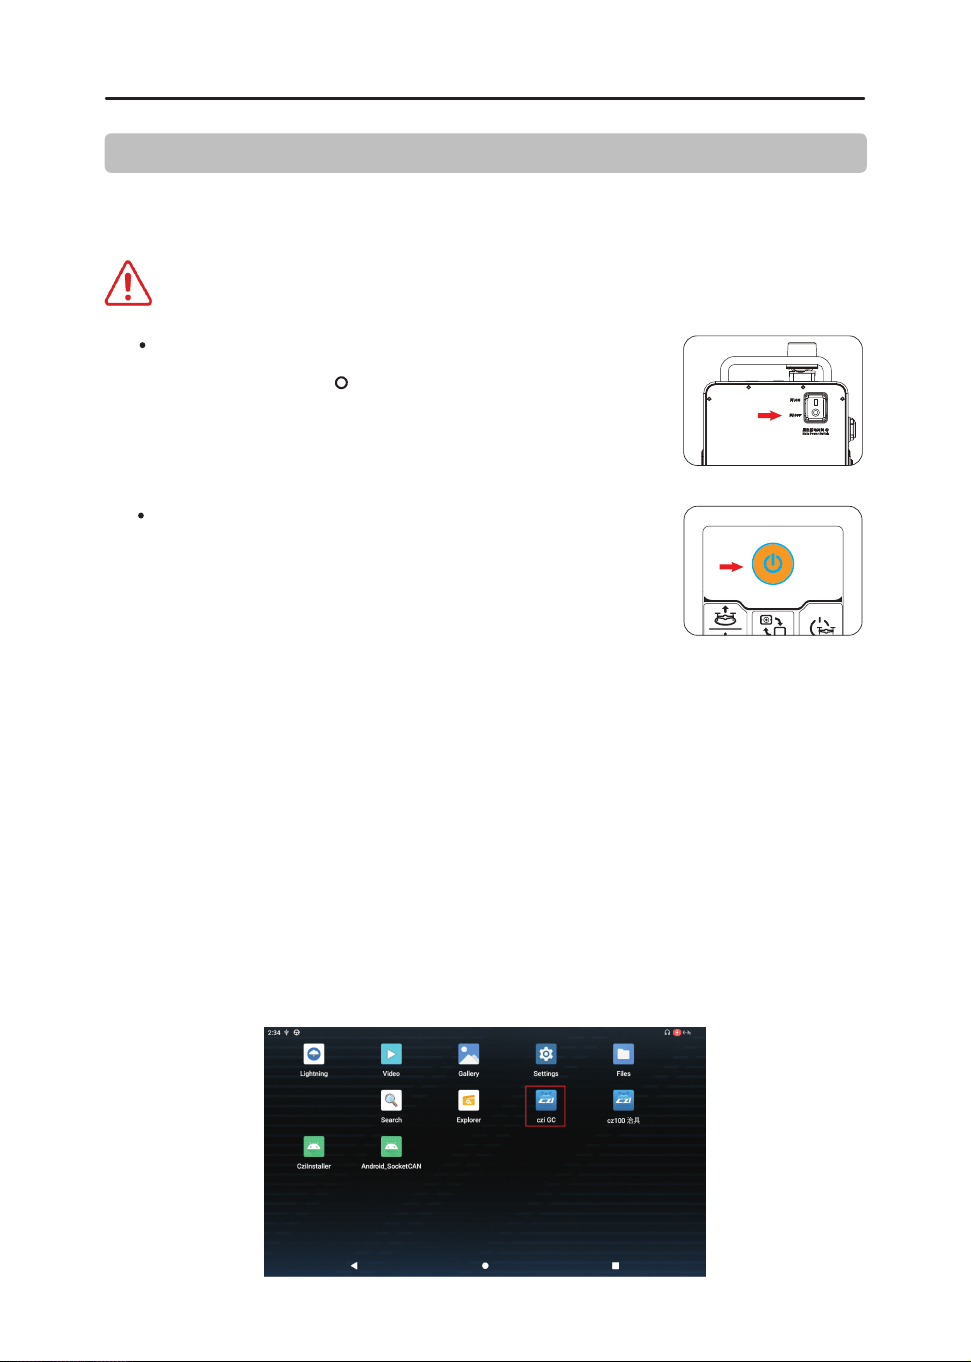
1. Emergency Procedures
Emergency procedures are only applicable for emergency power cut-off situations
of the equipment. Avoid performing emergency operations during normal use.
Emergency Shutdown Issues
By Main Power Switch
By Ground Station Power Button
Main Power Switch:
Turn the switch to " " to perform an emergency
shutdown and power cut-off.
Power Button Shutdown:
Long press the power button for 3 seconds to perform
an emergency shutdown and power cut-off.

Network Connection Issues
How to Resolve Android Phones & Tablets Unable to Connect to Ground Station
via Wi-Fi
IIf your phone is unable to detect the device for an extended period, tap "Rescan
Device." Due to Android system permission restrictions, the Wi-Fi list may not be
retrieved instantly, and it may take some time to discover available Wi-Fi devices.
How to Resolve Connection Failures Between the Ground Station and an
Android Phone/Tablet Hotspot
Ensure your phone is set to 2.4GHz mode when enabling the Wi-Fi hotspot. The
ground station can only detect and connect to 2.4GHz Wi-Fi networks.
12

13
2. Disclaimer
Please read this document carefully before using the product. This disclaimer has
a significant impact on the safe use of the product and your legal rights. By using
this product, you are deemed to have read, understood, and accepted all the
terms and conditions herein.
This product is not a toy and carries certain operational risks. It is not suitable for
individuals under 18 years old, those with limited or no legal capacity, or those
with mobility impairments. It must not be used by untrained individuals without
czi’s official certification. Keep out of reach of children and exercise caution when
operating near minors.
Operators agree to use this product solely for lawful purposes and within the
scope permitted by applicable laws, and they accept these terms along with any
related policies or guidelines established by czi. Users acknowledge and consent
that the product will automatically upload and store relevant usage records and
data to the ground station during operation. czi shall not be held liable for any
failure to upload, store, or analyze usage data caused by user-related issues.
To the maximum extent permitted by law, czi shall not be liable for any losses arising
from the user’s failure to follow this User Manual. czi shall not be responsible for any
indirect, consequential, punitive, incidental, special, or exemplary damages, includ-
ing losses resulting from the purchase, use, or inability to use this product, even if such
damages were foreseeable or advised.
To the maximum extent permitted by law, czi provides no express or implied
warranties, including but not limited to merchantability, fitness for a particular
purpose, or non-infringement.
To the maximum extent permitted by law, under no circumstances shall czi’s total
liability for any damages, losses, or causes of action exceed the amount paid by
you to czi for the purchase of this product.
Under all circumstances, the purchaser or user must comply with the applicable
laws and regulations of the country or region where the product is used. czi shall
not be held liable for any consequences arising from the purchaser’s or user’s
violation of such laws or regulations.
Some countries may not allow the exclusion or limitation of certain liabilities, so
your rights may vary depending on local laws. However, this does not render the
provisions of this disclaimer invalid.
To the extent permitted by law, czi reserves the right of final interpretation and
amendment of the above terms. czi may update, revise, or terminate these terms
at its discretion via the official website, User Manual, or online app, without prior
notice.
14
3. Product Overview
CZ100 is a highly efficient and reliable lightweight emergency lighting solution. It
adopts a power supply method, providing strong support for nighttime emergency
rescue operations.
4. Specifications
Screen Brightness
Ground Station Weight
Ground Station Dimensions
Ground Station Input Voltage
Ground Station Battery Capacity
Screen Size
Screen Resolution
≤13kg
385*337*224mm
176-264VAC
2300mAh
5.5 ″
1920*1080
1000 nits
Ground Station Output Interfaces
IP Rating
Operating Temperature
Storage Temperature
HDMI, Ethernet port
IP44
-20℃~+50℃
-40℃~70℃

15
5. Main Components and Structure
5.1 Ground Station
① Display Screen ② Camera ③ Button Pane
④ Power Input Port
⑤ Power Cable
⑦ Cable Cover ⑧ External Device Port ⑥
Main Power Switch
⑨ Battery Cover
8
9
11
10
12
2
4
5
1
3
6
7
⑩ Grounding Rod ⑪ RTK Module ⑫ RTK Mount
16
Function of the External Device Port:
HDMI Port: Supports real-time transmission of
1080P high-definition video.
Type-C Port: Provides fast power supply for mission devices
(e.g. body-worn cameras), supporting 65W fast charging
and PD 3.0 power delivery.
USB-A Port: Provides USB host functionality, supporting
USB communication and RTK cable connections.
TF-SD Port: Used for data transfer and backup. Enables transferring
and backing up data from the device to a TF card
LAN Port: Connects to external computer devices for uploading
video sources to local equipment over a local area network.
WAN Port: Connects to an external network for system
updates or video source uploads via the internet.
17
6. Installation and Operation Guide
Unpack the backpack and take out the ground station.
6.3
Ground Station Power Connection: Open the power socket cover, align the
protrusion shown at position 1 with the slot shown at position 2, insert the power
cable, and rotate it clockwise until you hear a "click" sound, indicating the
connection is complete.
CZ100-Ground Station Installation:
Grounding Rod Installation: From the accessory kit, take out the ground rod.
Loosen the screw on the ground rod by hand, tighten the grounding wire, and
insert the rod into the ground to a depth of approximately 20 cm.
6.1
6.2
TK Installation: Remove the RTK module, insert it into the RTK mount, and
connect the USB cable to the front-cover USB port.
RTK Cable Port:USB-A
Grounding Cable
Installation Hole
Grounding Rod
Insertion Diagram
Underground
1
2

18
6.4
220V Power Connection: Connect the power plug to a mains outlet or a variable
frequency generator socket.
6.5
Turn on the Ground Station Power Switch: Flip the switch to the“ I ”position to
power on the ground station.
7. Product Usage Instructions
Before using the device for the first time, please update all firmware to the
latest version.
Note: After each use, ensure the ground station Main Power Switch is turned OFF:
Switch off the ground station power supply and set the switch to the “ ” position.
19
To export operation logs: insert a USB drive, open the file manager, and select the
device name to access the internal storage path. The USB drive path will appear as
ESD-USB (note that different USB drives may have different names).
7.1 Log Export Method
Simply copy all files from the internal storage directory CZI/LOG to the USB drive.
Long press to select the files you want to copy (folders or compressed files are both
supported), then tap "Copy to..." in the top right corner.
Button Description
Video Switching
Cable Tension Adjustment
Select Button
Light Selection
Decrease Light Power
Light Height Adjustment
High Voltage Off
Light Selection
Increase Light Power
20
Select the USB drive folder and tap "Copy" to complete the transfer.
8. Post-Use Operation Procedure and Storage
Disconnection of the CZ100 Ground Station (ensure high voltage is turned
off before proceeding).
8.2
Remove the Plug: Unfasten the hook, disconnect the plug from the device, and
retract the cable using the ground station. Retract the plug in the direction
indicated by Arrow ① and the hook in the direction of Arrow ②. Then, close the
wire cover.
2
1
8.1
Press and hold the " " button on the ground station until the voice prompt
"High Voltage Off" is heard to disable the high-voltage output. The CZ100 will emit
a series of beeps, and the " " button's blue indicator will turn off.
8.3
Power Off the Ground Station: Long press the " " button to turn off the device.
8.4
Main Power Switch: Turn off the ground station by flipping the switch to the " "
position.
21
8.5
Disconnecting Ground Station Power: Slide the power cord button in the direction
indicated by Arrow ①, then rotate it counterclockwise to unplug the power
connector from the socket. Retract the power cord and close the power cover.
1
8.6
Disconnecting 220V Power: Unplug the power plug from the mains (or generator)
socket.
8.7
Retracting the Grounding Rod: Pull out the grounding rod, loosen the hand-tight-
ened screw on the grounding wire, and store the grounding wire and RTK module
back into the grounding accessory kit.
8.8
Storage: Place the ground station into the backpack for storage.

Made in ChinaMade in China
This device complies with part 15 of the FCC Rules. Operation is subject to the following two conditions:
(1)This device may not cause harmful interferenc
(2)this device must accept any interference received, including interference that may cause unde operation.
Any Changes or modifications not expressly approved by the party responsible for compliance could void the
user's authority to operate the equipment.
Note: This equipment has been tested and found to comply with the limits for a Class B digital device, pursuant to
part 15 of the FCC Rules. These limits are designed to provide reasonable protection against harmful interference
in a residential installation. This equipment generates uses and can radiate radio frequency energy and, if not
installed and used in accordance with the instructions, may cause harmful interference to radio communications.
However, there is no guarantee that interference will not occur in a particular installation. If this equipment does
cause harmful interference to radio or television reception, which can be determined by turning the equipment off
and on, the user is encouraged to try to correct the interference by one or more of the following measures:
-Reorient or relocate the receiving antenna.
-Increase the separation between the equipment and receiver.
-Connect the equipment into an outlet on a circuit different from that to which the receiver is connected.
-Consult the dealer or an experienced radio/TV technician for help.
FCC Radiation Exposure Statement
This device meets the FCC requirements for RF exposure.The device is designed for normal indoor use and
complieswith applicable FCC exposure limits.
This equipment should be installed and operated with minimum distance 20cm between the radiator & your body.