
V2.0
2018.11
User Manual
DJI GS PRO

©
2018 DJI All Rights Reserved.
3
Contents
Video Tutorials 2
Disclaimer 4
Warning 4
Introduction 5
Download DJI GS Pro 5
Connect the Aircraft 5
Mission Type 6
PhotoMap 6
Virtual Fence 6
3D Map 6
Waypoint Flight 6
DJI GS Pro Main Screen 7
Personal Space 8
Team Space 9
Create or Join a Team 9
Members Roles 9
Team Space Page 11
Mission Page 13
Create a Mission 16
Through Files 16
Through the Screen or Aircraft 18
Perform Mission 20
Safety Instructions 20
Pre-ight Checklist 20
Start to Fly 20
Pause Mission 21
Special Cases 21
Mission Complete 21
Parameter Setting Introduction 22
Screen Elements 22
Camera View 24
Virtual Fence Settings 25
PhotoMap / 3D Map Settings 26
Waypoint Flight Settings 29
PhotoMap 32
Importing Photos 32
Compositing a Map 32
Managing Maps 33
Calibrating Maps 33

4
©
2018 DJI All Rights Reserved.
Disclaimer
Read this disclaimer and the Terms of Use in DJI GS Pro (hereinafter referred to as “product”) carefully
before using this product. By using this product, you hereby agree to this disclaimer and the Terms of
Use and signify that you have read it fully. Please install and use this product in strict accordance with
the User Manual. SZ DJI TECHNOLOGY CO., LTD. and its afliated companies assume no liability for
damage(s) or injuries incurred directly or indirectly from using this product improperly.
DJI
TM
is a trademark of SZ DJI TECHNOLOGY CO., LTD. (abbreviated as “DJI”) and its afliated
companies. Names of products, brands, etc., appearing in this manual are trademarks or registered
trademarks of their respective owner companies. This product and manual are copyrighted by DJI
with all rights reserved. No part of this product or manual shall be reproduced in any form without
the prior written consent of or authorization from DJI.
This disclaimer is produced in various languages. In the event of variance among different versions,
the Chinese version shall prevail when the product in question is purchased in China, and the
English version shall prevail when the product in question is purchased in any other region.
Warning
1. Ensure your ight area is safe before each ight.
2. Be sure to maintain a visual line of sight (VLOS) to your aircraft at all times.
3. The aircraft will continue its mission or exit it according to the settings but only if remote
controller signal is lost or disconnected during a mission.
Go to > Advanced Settings to enable or disable “Exit Mission When Signal Lost” (disabled
by default). If disabled, the aircraft will continue the mission, meaning Failsafe will not be
triggered. If enabled, the aircraft will pause the mission and record a breakpoint. Then it will
perform as the setting in “Remote Controller Signal Lost” in the DJI GO
TM
/ DJI GO 4 app. Users
can resume the mission after the signal recovers.
4. When the GNSS signal is strong, if the RTH button is pressed and held during a mission, the
aircraft will stop the mission immediately and begin RTH. The mission cannot be continued and
will need to be restarted.
5. When the battery level or voltage is low during mission, the DJI GS Pro will prompt a Low Battery
Level Warning, and the aircraft will pause the mission and begin RTH or landing. The mission can
be continued after replacing battery. The low battery threshold is the value pre-set in DJI GO / DJI
GO 4 app.
6. Enabling iPad sound is strongly recommended to avoid missing important hints and warnings
that help ensure a safe ight.
7. Aircraft with obstacle avoidance will have this capability enabled by default in DJI GS Pro to
ensure ight safety. Check that the Sensing System is operational in the current surroundings. If
it is not, disable it in the “Prepare for Flight” checklist, or the mission will not be able to start.
8. All of the altitude values in DJI GS Pro are relative to the altitude of the take-off point. In the same
mission, the altitude above sea level for the same point during the mission will vary if taking off at
different altitudes.
©
2018 DJI All Rights Reserved.
5
Introduction
DJI GS Pro (also known as Ground Station Pro) is an iPad app designed for industrial applications
including but not limited to, aerial imaging, architecture, precision agriculture, electrical inspections,
search and rescue, safety control, and more. It provides easy mission planning through different
methods such as tapping on the map, setting points using the aircraft, or importing files, and
automated aircraft control during the planned mission. DJI GS Pro is compatible with the iPad
product line and many DJI aircraft, ight controllers, cameras and accessories*.
DJI GS Pro of v2.0 or above supports individual and team aircraft operations. Additionally, the
subscription feature allows for ight, team, and project data to be backed up on the Cloud server.
Download DJI GS Pro
Search for “DJI GS Pro” on the App Store, and install the app on your iPad.
DJI GS Pro is supported on iOS 9.2 (or later).
First-time use requires an internet connection for activation.
Your DJI devices can be activated in DJI GS Pro instead of DJI GO / DJI GO 4 app.
Connect the Aircraft
Connect the aircraft to DJI GS Pro as if using the DJI GO / DJI GO 4 app.
* Support for DJI devices will be added as testing and development continues. Visit the DJI GS Pro product page
on dji.com for a complete list. http://www.dji.com/ground-station-pro
6
©
2018 DJI All Rights Reserved.
DJI GS Pro automatically generates efficient flight paths after the user has set
their required ight area and camera parameters. The aircraft will then follow this
route to complete its aerial photography tasks. The user can then import photos
directly into DJI GS Pro, and a photomap can be composited* automatically in
the app, providing a reference for information for other missions. Users can also
manually calibrate the composite result to reconstruct the actual environment
more accurately.
Waypoint Flight
Set a waypoint ight path, dene waypoint actions then start ying with a tap.
3D Map Area: DJI GS Pro automatically generates efcient ight paths after the
user has set their required ight area and camera parameters. The aircraft will
then follow this route throughout its mission. The image data captured during
these ights can be input into 3D reconstruction software to generate 3D maps.
3D Map
3D Map POI**: 3D Map POI excels at gathering critical data from physical
structures. Its parameter settings are similar to 3D Map Area, such as flight
area and action, parameters, and overlap ratio. With new customizable features
like Circle and Vertical, 3D Map POI provides complete accuracy for effective
structural management.
* PhotoMap composite is a premium feature. By creating this type of mission, aerial photography and importing
photos to DJI GS Pro will be enabled. Each account comes with ve free trials to composite a photomap using
aerial images. Please make a purchase via the prompt page for follow-up use and refer to the description in the
app for details.
**3D Map POI is a premium feature. Creating and editing this type of mission is permitted but performance is
disabled when left unpaid. Please make a purchase via the prompt page when starting a new mission. Please
refer to the description in the app for details.
A virtual fence denes a specic area of ight and is useful in scenarios where
some areas of a site are no-y zones or if ight should only happen within one
area, such as during manual pesticide spraying or ight training. As the aircraft
approaches the boundaries of the virtual fence it will slow to a hover, ensuring it
stays within the ight area.
Virtual Fence
PhotoMap
Mission Type
©
2018 DJI All Rights Reserved.
7
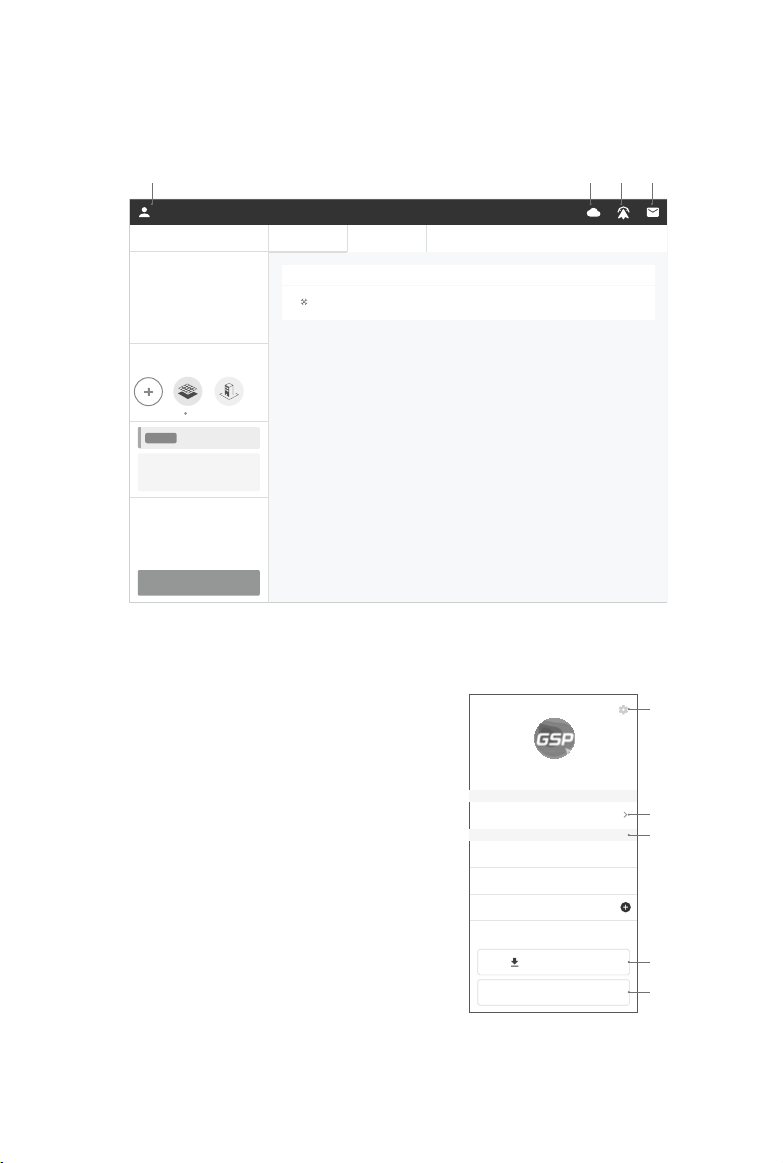
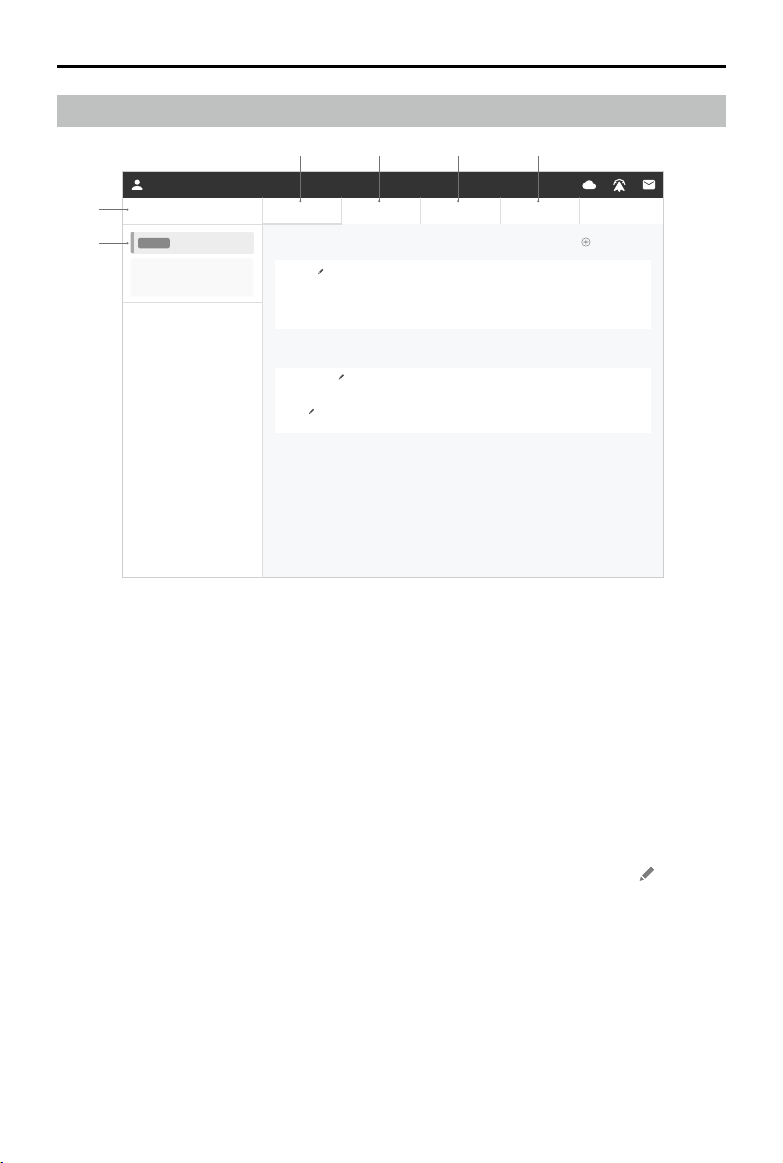
DJI GS Pro Main Screen
View and manage personal information and team information, use the subscription feature, sync
data, and view system notications on the main screen.
DJI-
Personal Space
My Purchased Functions
Drones FlightLog
Flight Duration
MODEL
Active
NAME DURATION DISTANCE
Phantom 4 DJI 12
MIN 3 S 827 M
Flight Distance
12
Free
3
M
827
5
My Missions
MIN SEC
1 2 3 4
DJI
Personal
Team
Member
Member
Personal Space
Team 1
Team 2
Create My Team
Logout
Download All Data
a
b
c
d
e
1. Account Information
Shows the user name of the account logged
in. Tap to enter the menu.
a. Settings: Includes privacy settings,
measurement unit, purchase and
subscription management.
b. Personal Space: Tap to switch to
personal space.
c. Team: Tap the team to enter the
corresponding Team Space, or tap to
create a new team.
d. Download All Data: Tap to download
data from the Cloud to use ofine.
e. Log out of the account.
User Manual
DJI GS PRO
8
©
2018 DJI All Rights Reserved.
2. Cloud Connection Status
Shows the current connection status to the Cloud server. There will be an X mark on the icon if
there is no connection.
3. Flight Records
Tap to view the flight records produced with an account that’s been logged in on this iPad.
Users can export the ight records to be analyzed by other tools.
4. Information Center
Tap to enter the menu that displays App Status and Notifications such as announcements,
changes to team information, etc.
Personal Space
The Personal Space displays information of the account that’s currently logged in. Users can enter
Mission Page to create, edit and perform personal missions.
DJI-
Personal Space
My Purchased Functions
Drones FlightLog
Flight Duration
MODEL
Active
NAME DURATION DISTANCE
Phantom 4 DJI 12
MIN 3 S 827 M
Flight Distance
12
Free
3
M
827
5
My Missions
MIN SEC
5
1
2
3
4
6
1. Flight Statistics
Shows the total ight duration and distance when using GS Pro with the account logged in.
2. My Purchased Functions
Shows the purchased functions. Tap + to purchase more.
User Manual
DJI GS PRO
©
2018 DJI All Rights Reserved.
9
3. Subscription Features
Shows the current subscription status. Tap to go to the purchase page. GS Pro offers a free
subscription that allow users to upload a limited amount of mission data to the Cloud. The paid
subscription allows users to upload unlimited amounts of mission data. Personal subscriptions
and Team subscriptions are separate features.
4. My Missions
Tap to create, edit and start missions. Refer to Mission Page (p. 13) for details.
5. Drones
After the aircraft is connected to the iPad, it can be registered in the popup window. This tab
shows the information of all the registered aircraft, such as model, name, flight duration and
mileage. Note: Flight statistics will only be tracked when the aircraft has been registered. It is
recommended to y the connected aircraft after registration.
6. FlightLog
Shows the ightlogs of the missions, including ight duration and mileage, start coordinates,
number of photos captured, etc.
If auto-sync for ightlogs is disabled, the right side of the screen will have an upload button after
new logs are created. Tap to upload all the logs.
Team Space
The Team Space displays all the information of the current team. Users can create or join a team,
and then tap one of the projects to enter Mission Page and create, edit and perform team missions.
Create or Join a Team
Users can create a team or join a team through an invitation. A team can contain multiple projects.
Project members create and start missions in their own projects.
Create a team: a subscription is required to create teams. Tap on the upper left corner, and then
tap “Create My Team” to purchase a license and create teams.
Join a Team: Click the link in the invitation email. Then login your DJI account and set your name in
the team to join the team.
Members Roles
There are three roles for team members: Member, Admin, and Agent. Refer to the table below for
detailed descriptions.
Roles Descriptions Permission
Member
View the team and
project information
related to the member
himself/herself only.
This role has the least
permission.
To view the information related to himself/herself:
The projects that the member is a part of and that are not
archived.
The ight logs produced when the member completes a
ight mission.
To leave the team.
User Manual
DJI GS PRO
10
©
2018 DJI All Rights Reserved.
Admin
View all of the team
information and
manage Members
All of the Member permissions plus the following:
To create a project;
To view information of each project and has the permission
of a projector manager;
To view information of each member, invite and delete
members;
To view the ight logs of each member.
Agent
The creator of the
team. This role has
the most permission.
All of the Admin permissions (except to leave the team*) plus
the following:
To change the role of others in this team, including to
change the role of a Member or Admin and to transfer the
role of Agent to others.
To purchase and update the team license.
* To leave the team, the Agent has to transfer this role to others to make himself/herself a role of
Member or Admin.
When a team member joins a project, he/she becomes a project member. There are two roles for
project members, Operator and Manager. Refer to the table below for detailed descriptions.
Roles Descriptions Permission
Operator
Work on missions
only, cannot modify
projects.
To create, perform, delete**, and upload missions;
To view and duplicate mission settings of other members.
Manager
Manage projects and
members.
All of an Operator’s permission** plus the following:
To edit the project name;
To archive and unarchive a project;
To add and delete project members;
To view ight logs in the project;
To set the parameters of a mission as Master settings.
** A project Manager has the permission to delete missions. But project Operators can only delete
missions when their role in the team is Admin or Agent.
User Manual
DJI GS PRO
©
2018 DJI All Rights Reserved.
11
Team Space Page
DJI-
DJI Admin Projects Members Drones FlightLog
Active
Professional
Running Projects Create Project
Archived Projects
Test 1
Test 2
Test Project
Test
Manager
Operator
Manager
Manager
3 4 5 6
1
2
1. Team Information
Shows the team name and the role within the team.
2. Subscription Features
Shows the subscription status of the current team. The team Agent can tap to go to a purchase
page to renew or upgrade the subscription (e.g. increase the max number of members, add
functions, etc.). Personal subscriptions and Team subscriptions are separate features.
3. Project
Shows all the projects related to the current user.
Running Projects:
Shows all the projects with actionable missions and the user’s role in the projects.
If the current user is a project Manager, team Admin or team Agent, he/she can tap
to rename
the project, and swipe the project to the left to manage project members, archive or delete the
project. Archived projects will be shown in “Archived Projects”.
Tap a project to enter its Mission Page to create, edit, and execute missions.
Archived Projects:
Shows the archived projects. Only the project Manager, team Admin or team Agent has
permission to view the archived projects. For these projects, users can view missions, edit
members, and delete the project but not edit missions.
Swipe the project to the left to manage project members, unarchive or delete the project.
Unarchived projects will be put back into the “Running Projects”.
User Manual
DJI GS PRO
12
©
2018 DJI All Rights Reserved.
Create Project:
Only a team Admin or team Agent can create projects. Tap the button, enter the project name in
the popup menu, and then add project members to create the project.
4. Members
Shows the information of team members. The display varies by role. Refer to Members Roles (p. 9)
for details.
A team Agent or Admin can invite new members to the team by sending emails via the Invite
button in this page. If users receive the invitation, they can tap the link in the email, log in with a
DJI account and enter a nickname in the team to join the team.
5. Drones
After the aircraft is connected to the iPad, it can be registered in the popup window. This tab
shows the information of all the registered aircraft, such as model, name, flight duration and
mileage. Note: Flight statistics will only be tracked when the aircraft has been registered. It is
recommended to y the connected aircraft after registration.
6. FlightLog
Shows the ightlogs of the missions and manual ights. Display varies by role. Refer to Members
Roles (p. 9) for details.
If auto-sync for ightlogs is disabled, the right side of the screen will have an upload button after
new logs are created. Tap to upload all the logs.
Internet connection is required to view the Members, Drones, and FlightLog information
mentioned above. Some data will be stored in the GS Pro cache.
©
2018 DJI All Rights Reserved.
13
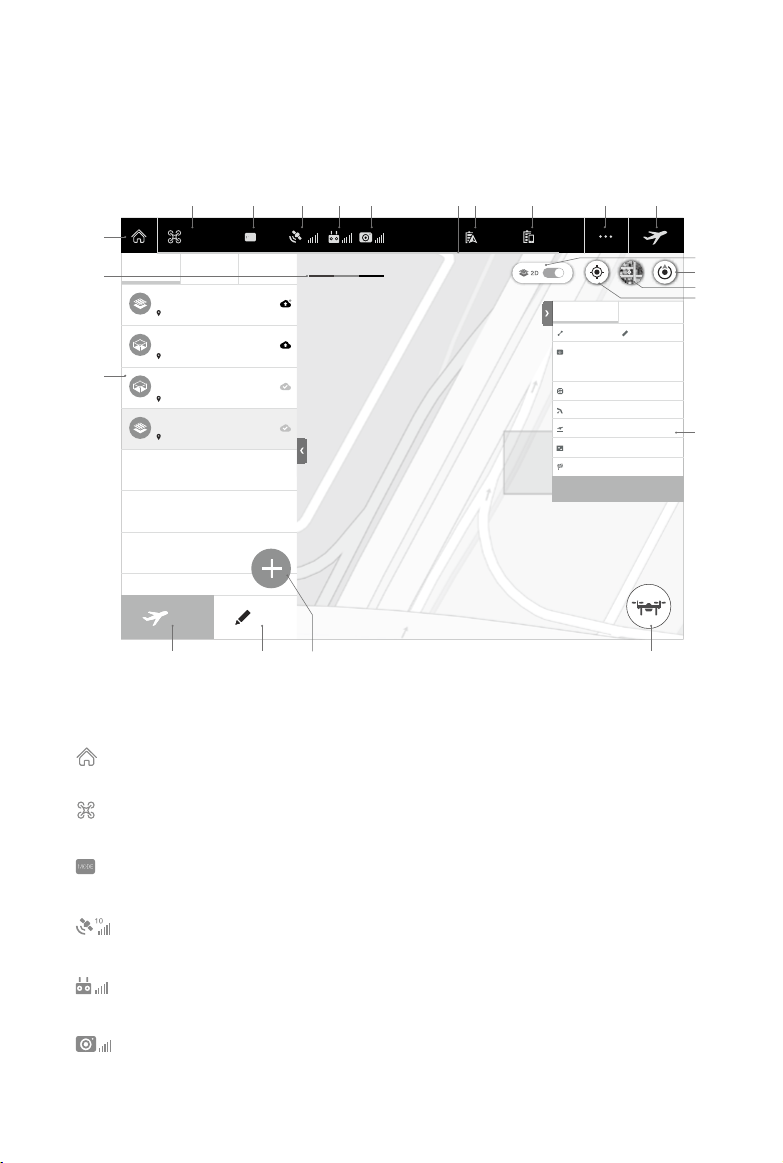
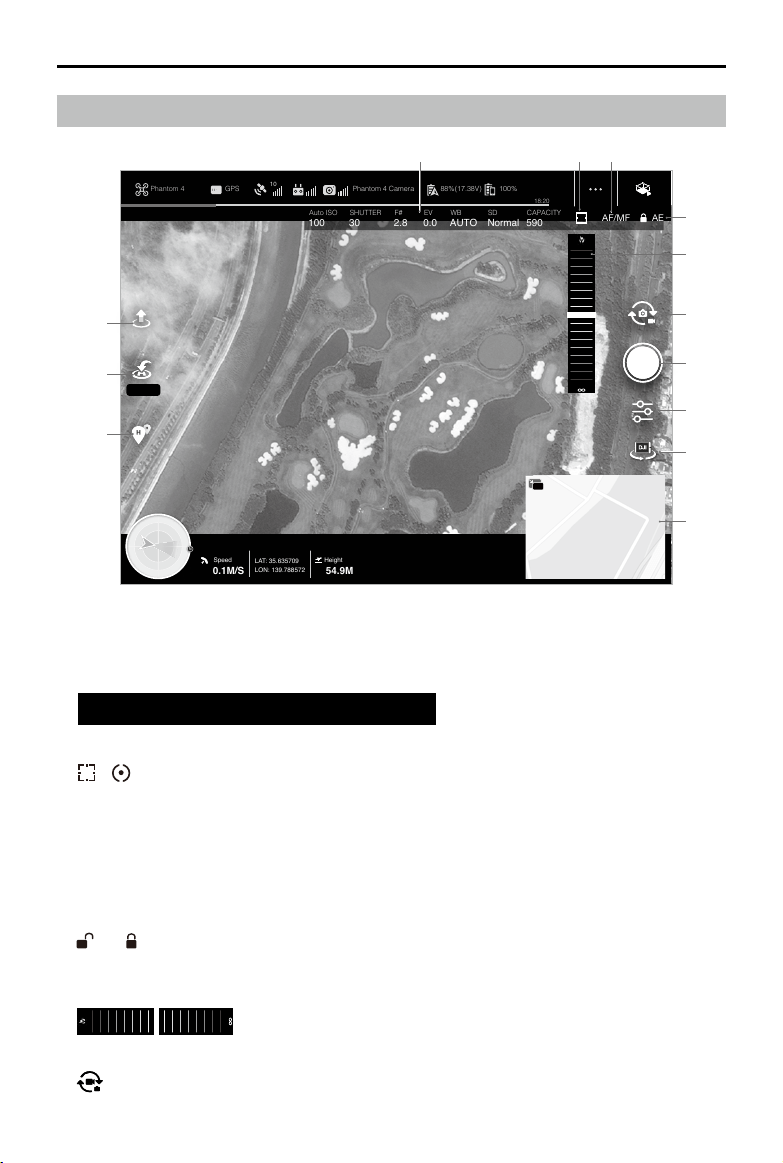
Mission Page
Access the Mission Page from Personal Space or Team Space to create, edit and perform mission.
The displays and actions for personal missions and team missions are different. Unless otherwise
specied, the descriptions apply to both personal and team missions.
Phantom 4 Camera 100%GPS
10
Edit
Mission Matrial Map
18:20
Phantom 4 88%(17.38V)
Fly
Mine
Show Team's Parameters
Master
234 PTS
Phantom 4 Camera
13148.6 FT
0.0
。
0.0
FT
11.2 MPH
164.0 FT 2.2 CM/PX
F: 75 % S: 60 %
Hover&Capture at Point
Parallel to Main Path
Inside Mode
Hover
Mission 3
Mission 5
Mission 4
Mission 1
2016
Guangdong Shenzhen Nanshan
Guangdong Shenzhen Nanshan
Guangdong Shenzhen Nanshan
2016
2016
Guangdong Shenzhen Nanshan
2016
0 150 M
2 3 4 5 6 8
2220 2119
7 9 10 11
16
18
17
12
1
15
13
14
1. Back
: Tap to return to the main screen.
2. Aircraft / Flight Controller Connection
: Shows the current connection status between DJI GS Pro and the aircraft or ight controller.
3. Flight Mode
: Shows the current ight mode of the aircraft.
4. GNSS Signal Strength
: Shows the current GNSS signal strength and number of connected satellites.
5. Remote Controller Signal Strength
: Shows the strength of the remote controller signal.
6. Camera Model
: Shows the camera model used and the strength of the video downlink.
User Manual
DJI GS PRO
14
©
2018 DJI All Rights Reserved.
7. Battery Level Indicator
: Provides a dynamic display of the remaining ight time. The red zone represents critically
low battery level.
8. Aircraft Battery Level
88%(17.38V)
: Shows the current battery level and battery voltage if using DJI Intelligent Flight
Batteries, or it shows the current battery voltage if using other batteries.
9. iPad Battery Level
100%
: Shows the current battery level of the iPad.
10. General Settings
: Tap for compass calibration, stick mode, fly zone manager, and in-app purchase
functions. Tap Advanced to display WGS84 coordinates (enable Map Optimization first),
measurement unit settings, and aircraft action when the signal is lost. Tap Help for app or
aircraft components versions (tap to switch), terms of use and user manual, etc.
11. Prepare for Flight / Pause Mission / Resume Mission / End Mission / Composite Map /
Calibrate Map / Reset Calibration
/ Prepare for Flight: Tap to enter the checklist after setting parameters.
Pause Mission: Tap to pause the mission during PhotoMap, 3D Map or Waypoint Flight
missions. A menu for further actions will appear.
Resume Mission: After pausing a mission, enter Edit mission, and tap this button. A menu will
appear allowing you to resume a mission or carry out a different operation.
End Mission: Tap to end a Virtual Fence mission, disabling the fence.
Composite Map: After choosing photos corresponding to a PhotoMap mission and conguring
parameters, tap to composite a photomap. Please refer to PhotoMap (p. 32) for details.
Calibrate Map: After a photomap composite, add the calibration point pairs and tap the icon
to calibrate the composite result. Please refer to PhotoMap (p. 32) for details.
Reset Calibration: Tap to reset the calibration map to the original one before the calibration
is saved. Refer to PhotoMap (p. 32) for details.
12. Scale
: Shows the current scale of the map.
13. 2D Switch
: The switch will show up in any other interface except the Map tag on the Navigation Pane.
After generating maps through the imported les or compositing photomap in GS Pro, if the maps
are pinned, and the 2D switch is enabled, then the corresponding geometries or photomap will
be displayed on the screen all the time. If the 2D switch is disabled, they will disappear.
14. Location
: Tap to center the map around the iPad location.
15. Map Mode
: Tap to switch between Standard Map, Satellite Map or Hybrid Map.
User Manual
DJI GS PRO
©
2018 DJI All Rights Reserved.
15
16. Rotation Lock
: Rotation is locked by default, i.e. the map view will not follow iPad rotation, and North is
at the top. Tap the Rotation Lock button during mission editing to unlock rotation and have the
map view follow the iPad rotation.
17. Navigation Pane
The Navigation Pane includes Mission, Material, and Map tag. Tap the arrow on the right of the
list to collapse or expand it.
Mission:
View all missions.
Tap a mission to select it. Then, users will see the Fly and Edit buttons, as well as Preview and
Set Parameters. There will not be a preview if the selected mission is synced locally for the
rst time. Users can view and copy other member’s parameters (refer to the later content “18.
Preview and Set Parameters” for details), or tap the Edit button to set parameters, so that the
mission can have local parameters for preview.
Swipe the mission to the left, options such as copy, delete and logs will show up. The display
varies for personal missions and team missions as shown below.
Copy: This option shows up only when there are local parameters for the mission. Tap to create
a copy.
Delete: For team missions, this option shows up only when the user’s role is project Manager,
team Admin or team Agent. Tap to delete the mission.
Logs: This option shows up only for team missions and when the user’s role is project Manager,
team Admin or team Agent. Tap to view the parameters change logs. If a set of parameters
has been used to y, an inverted triangle will show up in this log. Tap the triangle to view the
mission status. Tap each log to preview its corresponding parameters and set them as Master
parameters in the window on the right side. Other members can use the Master parameters
quickly when they view the parameters. Refer to the later content “18. Preview and Set
Parameters” for details.
The icon on the right side of the mission name indicates the mission status compared with the
one in the Cloud.
: Data can be uploaded. The mission is a new local mission, or it has local updates. Tap to
upload it to the Cloud.
: Data conict. The data in the Cloud is different from the local one. Tap the icon, a popup
window will ask users whether they want to overwrite the local data.
: Data has been synced. Local data is consistent with Cloud data.
Materials:
Includes Files and Photos.
Files will list all imported KML/SHP/KMZ/ZIP files or folders. Tap “Files” > “Start Import” to
import KML/SHP les into GS Pro. Refer to Create a Mission for details.
Photos will list all image data corresponding to PhotoMap missions. Tap
or swipe to the left
to select the image source and import them. Refer to PhotoMap (p. 32) for details.
Map:
You can view two kinds of map including vector maps generated through the imported
KML/SHP les (refer to Create a Mission) and maps composited through a PhotoMap mission
(refer to PhotoMap on p. 32).
User Manual
DJI GS PRO
16
©
2018 DJI All Rights Reserved.
18. Preview and Set Parameters
Select a mission in the list, then the menu will show up in the right screen. For personal
missions, there will only be a Mine tab. For team missions, both Mine and Master tabs will
show up.
Mine:
View the current parameters. For team mission, tap Show Team’s Parameters to view
parameters of other members if they are stored in the Cloud. When viewing others’ parameters,
tap the corresponding button to overwrite the current parameters.
Master:
Tap to preview the Master parameters if Master parameters have been set. Tap the
corresponding button to overwrite the current parameters.
19. Fly
: Select a mission in the list, then tap the button to see a pre-ight checklist. Once all the
items are checked, the mission can be performed.
20. Edit
: Select a mission in the list, then tap the button for parameter settings. Refer to Parameter
Setting Introduction (p. 22) on how to do this.
21. New Mission
: Tap to create a new mission, select mission type and point-setting method, and set
parameters. Refer to Create a Mission for more details.
22. Flight Telemetry and Camera Preview
: Tap this icon and the screen will display the ight telemetry and the camera preview. For
more details, please refer to Parameter Setting Introduction (p. 22).
Create a Mission
Create a mission via the following two methods:
Import KML/SHP les to generate maps for creating mission (3D Map Area POI excluded).
Tap on the screen or set points using the aircraft to create a mission.
Through Files
GS Pro supports KML, SHP, KMZ, and ZIP formats. When opening les on the iPad, GS
Pro will automatically decompress KMZ and ZIP les. When uploading les to the server,
only KML and SHP formats are supported.
GS Pro can generate polygons, line strings, and points. Points cannot be used to create a
ight mission, yet can be used as a reference for GCP (Ground Control Point) setup.
Currently, WGS-84 is the only coordinate system supported by GS Pro.
Importing Files
You can import les in GS Pro, or choose GS Pro when opening les on the iPad.
User Manual
DJI GS PRO
©
2018 DJI All Rights Reserved.
17
Importing Files Using the Material tag in GS Pro
1. Go to the Navigation Pane in GS Pro, tap Material > Files > Start Import. A pop-up box will appear.
2. Enter the le server IP address in the box into the browser on your PC or Mac, then upload the
KML/SHP les on the webpage.
3. After the upload is completed, tap “Done” in GS Pro. You can nd the les in GS Pro under “Files”.
To delete the le, swipe it to the left and choose an option.
Ensure that the iPad and the PC/Mac are connected to the same LAN when importing
les. Otherwise, the le server cannot be accessed.
The le server cannot be accessed by tapping “Done” in GS Pro. To enable the server
again, tap “Start Import” in GS Pro.
Opening Files on the iPad
Download KML/SHP/KMZ/ZIP les on the iPad via Safari, email or another app. Then open the le
and choose “DJI GS Pro” to import files into GS Pro. It will automatically decompress KMZ and
ZIP les to their corresponding folders. You can nd the les or folders in GS Pro under “Files”. To
delete the le, swipe it to the left and choose an option.
Generating and Managing Maps
1. Go to Files, swipe the desired KML/SHP file to the left, and then tap “Import”. GS Pro will
automatically process the le and generate geometries in the Map tag.
2. There will be a red dot on the Map tag after import. Tap the tag to nd a group of maps for each
KML/SHP le. Tap to expand or collapse them.
3. There are three kinds of geometries in the maps, polygons, line strings and points.
Tap the geometry le, and the screen will show up the corresponding geometry.
Swipe to the left to Create Mission, Pin or Delete an operation. Please note that there is no Create
Mission option for points.
Tap and hold the map on the list to enter the multi-select mode to Pin or Delete more than one map.
4. If geometry les are pinned, the screen will show them up all the time when viewing maps under
the Map tag. In any other interface, use the 2D switch on the right side of the screen to enable/
disable the display.
Creating a Mission
1. Under the Map tag, swipe the desired geometry le (points excluded), and then tap “Create
Mission”.
2. Choose an appropriate mission type.
Mission types will vary according to different geometries. Select PhotoMap, Virtual Fence or 3D
Map Area for polygons or Waypoint Flight for line strings.
3. Flight areas or routes generated by a geometry will appear on the screen. Tap any point to
select it, and it will turn from white to blue. Drag the point to change the area shape or ight

User Manual
DJI GS PRO
18
©
2018 DJI All Rights Reserved.
2. Choose Mission Type
Choose an appropriate mission type.
3. Choose Point Set Method
There are several methods for setting Virtual Fence boundaries, PhotoMap or 3D Map Area,
building radius, and flight radius for 3D Map POI or flight waypoints. Once the points are
conrmed, up to 99 waypoints can be included with the generated ight path. If the number of
waypoints exceeds this, the mission will fail.
Tap: Tap on the map to create a boundary point of an area, flight waypoint, or center of a
building to be circled.
Tapping the desired flight location on the map once will create a corresponding area or
waypoint according to different types of mission.
Tapping in PhotoMap, Virtual Fence or 3D Map Area will create a rectangular ight zone around
that point, while tapping in Waypoint Flight mission will create a single waypoint. Tap any point
to select it and it will turn from white to blue. Drag the point to change the area shape or ight
path. Drag
onto the map to add a point. To delete a selected point, tap in the bottom left
corner of the parameter settings page.
Tapping in 3D Map POI will create two concentric circles centered by that point. The black
OR
path. Add a point by dragging onto the map. To delete a selected point, tap in the bottom
left corner of the parameter settings page.
4. Set each item in the parameter settings list and tap the “Save” button in the top left corner of the
screen when complete. Refer to the Parameter Setting Introduction (p. 22) for more details.
Through the Screen or Aircraft
Tap on the screen or set points using the aircraft to generate ight areas or routes.
1. New Mission
Tap the New Mission button on the left of the screen.

User Manual
DJI GS PRO
©
2018 DJI All Rights Reserved.
19
one indicates the circle of the building radius, and the blue one indicates the circle of the ight
radius. Drag
towards the middle to adjust the center circle. Drag the white dot on each circle
to adjust its corresponding radius.
Aircraft: You can y the aircraft to the desired position and set the location as a boundary point
in Virtual Fence or 3D Map Area as a waypoint in Waypoint Flight mission, or set the building
and ight radius calculated through several places.
: In 3D Map POI, y the aircraft to several positions around the building and tap the icon
to select. At least two or more points are required to determine the radius of the center of the
building. Tap
to nish setting the building radius. Next, y the aircraft to the desired position
and tap
to set the ight radius. In other missions, tap to set the aircraft position as a boundary
point or a waypoint.
: Tap to delete the last point.
: Tap to nish after setting all the required points.
Aircraft (Record Altitude): This method can only be used for Waypoint Flight missions. The
instructions are the same as “Aircraft” above. In addition, both position and altitude will be
recorded. When performing the mission, the aircraft will y the preset position and altitude.
The ight area will be generated according to the order the points were set.
The area generated according to the order that the points were set cannot intersect
otherwise a ight area cannot be generated. DJI GS Pro will decide if points can be
used to generate a ight area. If not, the “Finish” button will be grayed out and cannot
be tapped.
4. Parameter Settings
Set each item in the parameter setting list and tap the “Save” button in the top left corner of the
screen when complete. Refer to the Parameter Setting Introduction (p. 22) for more details.

20
©
2018 DJI All Rights Reserved.
Perform Mission
Safety Instructions
Please pay careful attention when ying and shooting in 3D Map POI. Vertical and Circle (below)
are the two modes in Flight Course Mode settings.
1. In Circle and Vertical mode, the aircraft will y in a straight path between waypoints, although the
actual distance between the aircraft and the structure may sometimes be shorter than the preset
ight radius. During Capture at Equal Distance/Time Interval mode, the aircraft will y along a
parabola and the distance to the shooting target may be longer than the preset radius, so please
make sure the surrounding area is open and large enough to avoid collision risks. To ensure
ight safety, operators on the ground should move along with the aircraft to maintain line of sight
as the aircraft ies around the structure.
2. In Vertical mode, the aircraft will y up and down many times at a relatively low speed (1~4 m/
s, although speed varies from different aircraft modes), which will lead to a longer shooting time
and faster consumption of the battery level.
3. When resuming operations in Circle or Vertical mode, the aircraft will rst ascend directly to a
height equal to the previous waypoint, than y towards it. To avoid collision risks, be sure there
are no ceilings or buildings above the aircraft.
Pre-flight Checklist
Choose a mission in the mission list, tap “Edit” then tap “Prepare for Flight” in the top right corner of
the screen. Check and adjust the aircraft according to the checklist that appears until all items are
green, indicating that takeoff is permitted. Items in yellow require adjustment but the aircraft can
take off without doing so. Only ying when all items are green is highly recommended.
Start to Fly
Tap “Start to y” at the bottom of the checklist when ready. An aircraft’s actions will vary depending
on its mission. The Aircraft Status Bar will show the current aircraft status, mission progress, etc.
Please enter the fence
Speed
Height
LAT: 35.635709
LON: 139.788572
0.1M/S
54.9M
N
Virtual Fence
After starting, if the aircraft’s latitude, longitude or altitude is outside of the fence boundaries, there
will be visual and audio prompts on the iPad. The Virtual Fence will be disabled at this time and the
aircraft can be own freely. The Virtual Fence will be automatically enabled when the aircraft enters
fence boundaries. Once inside, if the aircraft approaches the boundaries of the fence, it will slow to
a hover and audio prompts will sound from the iPad.
PhotoMap / 3D Map / Waypoint Flight
After starting, the aircraft will y to the start point automatically. In 3D Map POI, the altitude of the
start point will be the preset maximum altitude.

User Manual
DJI GS PRO
©
2018 DJI All Rights Reserved.
21
Pause Mission
During PhotoMap, 3D Map or Waypoint Flight missions, tap the “Pause Mission” button on the top
right corner of the screen to pause the mission. The aircraft will hover in place and record the last
performed waypoint. The aircraft can then be own freely and a menu will pop up with additional
control options.
Resume from Last Stopped Point: The aircraft will continue the mission from the point where
recording stopped.
Start Over: The aircraft will y to the start point and restart the mission.
Cancel Current Mission: The aircraft will stop and exit from the current mission. The mission cannot
be continued.
Back to Mission List: Back to the mission list. To check this menu again, select the required mission
and tap edit then tap “Resume Mission”.
Special Cases
1. During a Virtual Fence mission, if the aircraft ies out of the fence due to external forces i.e.
strong wind, a prompt will appear in the Aircraft Status Bar, an audio prompt will sound from the
iPad, and the fence will be disabled. Users must stop the mission and restart it.
2. During a Virtual Fence mission if the ight mode switch on the remote controller is toggled, the
fence will be disabled immediately. The aircraft will stop and exit from the current mission, a
prompt will appear in the Aircraft Status Bar, and an audio prompt will sound from the iPad.
3. During any mission, the aircraft will exit from its mission and enter a normal flight mode if
positioning is not available due to a weak GNSS signal. Users can choose to continue the
mission if the signal is strong. When continuing, the aircraft will continue from its last recorded
point.
4. Low Battery Level Warning: When the battery level or voltage is lower than the value pre-set, an
audio prompt will sound from the remote controller. After a few seconds, the aircraft will pause
the mission and begin RTH. Users can cancel the RTH by pressing the Smart RTH button on the
remote controller. The mission can be continued and the aircraft will continue the mission from
the point where recording stopped after replacing battery.
5. Critically Low Battery Level Warning: When the battery level or voltage is lower than the value
pre-set, an audio prompt will sound from the remote controller. The aircraft will pause the mission
and land automatically. The mission can be continued and the aircraft will continue the mission
from the point where recording stopped after replacing battery.
Mission Complete
After nishing a Virtual Fence mission, tap “End Mission” in the top right corner of the screen. After
completing a PhotoMap, 3D Map or Waypoint Flight mission, the aircraft will perform the pre-set
“End-Mission Action.” The aircraft can be controlled freely after that. For PhotoMap missions, GS
Pro will prompt a page with options where users can choose to download photos from the aircraft
either immediately or later.

22
©
2018 DJI All Rights Reserved.
Parameter Setting Introduction
This section introduces the common screen elements for all mission types, then introduces separate
parameters for each mission type.
Screen Elements
1. Parameter List
Collapse /
Expand:
Tap to collapse or expand the list.
Mission Name:
Tap the button on the right to edit the mission name.
Mission Information:
Information varies according to different mission types. These
include: mission type, ight length, waypoint quantity, cover area, estimated ight time, estimated
photos, batteries needed, capture interval (F: interval of two consecutive pictures captured along
the same main path and S: interval of two pictures on two parallel main paths), camera settings
(exposure mode, shutter speed, focus mode), motion blur (the ground sample distance due to
motion blur with the current shutter speed and ight speed), etc. Swipe to view all.
Sliders:
Slide left or right to adjust values.
5.0 M/S
Text Box:
Tap and hold to show ne tuning buttons. Tap to adjust.
Boundary Point / Building Center / Waypoint Edit
LAT
22.540062
113.951940
LON
0 150 M
88%(17.38V) 100%
Speed
Height
LAT: 35.635709
LON: 139.788572
0.1M/S
54.9M
N
LAT
22.540062
113.951940
LON
Mission 6
Mission Type
Maximum Speed
5.0 M/S
50.0 M
Maximum Altitude
VirtualFence
GPS
Phantom 4
Phantom 4 Camera
10
18:20
1
2
3
5
4
User Manual
DJI GS PRO
©
2018 DJI All Rights Reserved.
23
a. Latitude & Longitude: Tap the box to input values. Tap the arrow keys on the right for ne
tuning. Up and down adjust latitude while left and right adjust longitude.
b. Delete: Select a point then tap this button to delete it.
c. Reverse Path: This option will appear in Waypoint Flight missions. Tap it to swap the start
and end points to reverse the ight path. “S” refers to the start point.
2. Camera Preview
/ : The real-time camera view will be shown here once the image feed is received. Tap
to minimize the preview. Tap the window to enter Camera View for camera settings. For more
details, please refer to Camera View.
: If using a DJI A3 or Matrice 600 series device equipped with a DJI gimbal, camera, or other
HDMI/AV camera, tap this icon to congure available preview sources and the bandwidth ratio
between sources.
3. Flight Telemetry
Speed
Height
LAT: 35.635709
LON: 139.788572
0.1M/S 54.9M
N
Flight Attitude and Radar Functions
The aircraft’s ight attitude is indicated by the circular icon.
a. The blue arrow indicates the aircraft and shows the direction it is facing.
b. The ratio of the grey and blue areas indicate aircraft pitch.
c. The horizontal level of the grey area indicates the aircraft’s roll angle.
Flight Parameters
Speed:
Movement speed of the aircraft.
Latitude & Longitude:
Two values that dene aircraft location.
Altitude:
Vertical distance from the takeoff point.
North:
N
indicates North according to the iPad location. This North is unrelated to North on the map.
4. Saving Default Settings
: Tap to save the current settings as the default settings. These settings will now be used for
missions created hereafter.
5. Save
: Tap to save current settings.
User Manual
DJI GS PRO
24
©
2018 DJI All Rights Reserved.
1. Camera Parameters
Displays camera settings parameters and capacity of the Micro SD card.
Auto ISO
100
SHUTTER
30
F#
2.8
EV
0.0
WB
AUTO
SD
Normal
CAPACITY
590
2. Focus / Metering Button
/ : Tap to switch between focus and metering mode. Tap to select object for focusing or
metering. Auto Focus-Continuous will be triggered automatically according to the status of the
aircraft and camera after enabling Auto Focus.
3. Auto Focus / Manual Focus
AF/MF : Tap to switch between Auto Focus and Manual Focus. If using Auto Focus, tap an
object on screen to focus. If using Manual Focus, slide the Focal Length Slider to focus.
4. Auto Exposure Lock / Unlock
AE / AE : Tap this to lock an exposure value, and tap again to unlock it.
5. Focal Length Slider
If using Manual Focus, slide this slider to focus.
6. Photo / Video Toggle
: Tap to switch between photo and video recording modes.
10
18:20
GPS
Auto ISO
100%Phantom 4 Phantom 4 Camera 88%(17.38V)
Speed
Height
LAT: 35.635709
LON: 139.788572
0.1M/S
100
SHUTTER
30
F#
2.8
EV
0.0
WB
AUTO Normal
SD
CAPACITY
590
54.9M
N
AF/MF AE
30.0 M
1 2
5
4
6
7
8
9
10
11
12
13
3
Camera View
User Manual
DJI GS PRO
©
2018 DJI All Rights Reserved.
25
7. Shoot / Record Button
/ : Tap this to shoot photos or record video. When recording video, there will be a time
code under the button to show how long the camera has been recording. Alternatively, you can
press the Shutter Button or Video Recording Button on the remote controller.
8. Camera Settings
: Tap to set the ISO, Shutter Speed, F-number and Exposure Value of the camera, Capture
Mode, Image Size, Image Format and White Balance, AF Assistant, MF Assistant and Grid.
9. Available Preview Sources
: If using a DJI A3 or Matrice 600 series device equipped with a DJI gimbal, camera, or
other HDMI/AV camera, tap this icon to congure available preview sources and the bandwidth
ratio between sources.
10. Map
Tap the map to return to the Map View. Tap the icon in the left top corner to minimize the map.
11. Home Point Setting Button
: Tap this to set the aircraft location or device location as Home Point.
12. Smart RTH
: Tap this to initiate the Return to Home (RTH) function. The aircraft will return to the last
recorded home point, land and stop the motors. Tap the text under the icon to set an RTH
altitude.
13. Auto Takeoff / Landing
/ : Tap to initiate auto takeoff or landing.
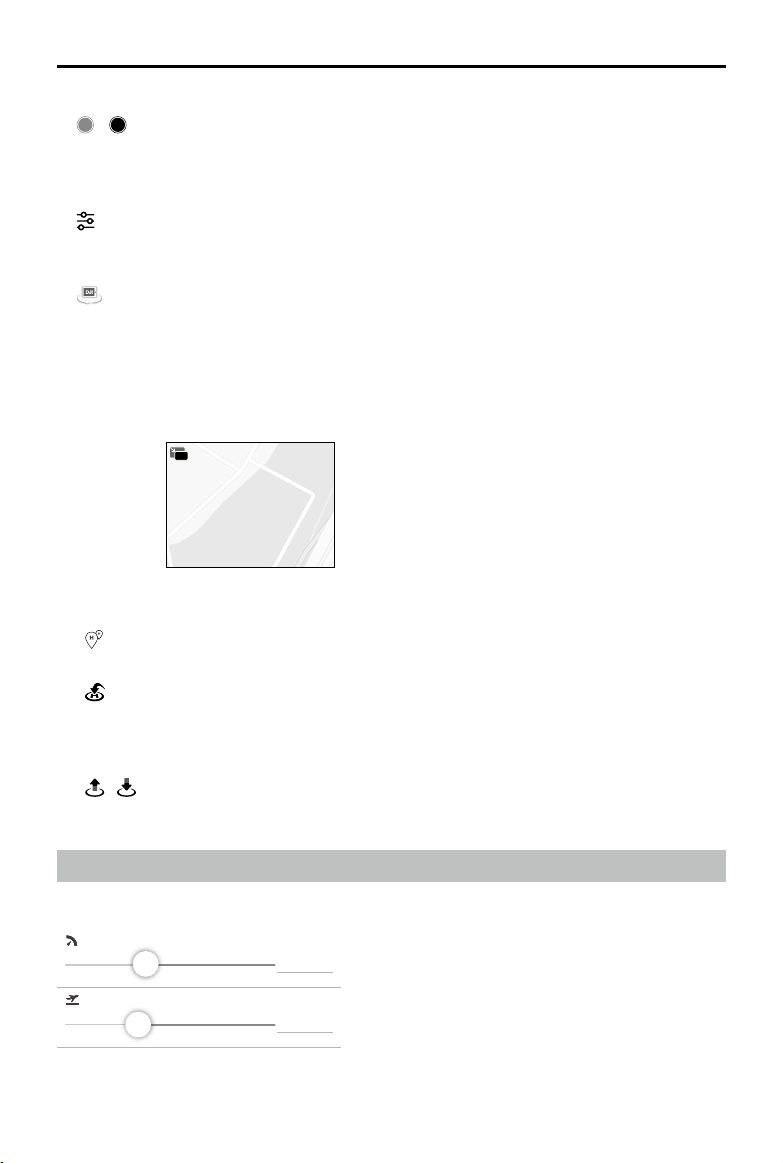
Maximum Speed
5.0 M/S
Maximum Altitude
50.0 M
1. Maximum Speed
Aircraft speed limit. This is 5m/s by default. The
range is 1 to 12m/s.
2. Maximum Altitude
Aircraft altitude limit. This is 50m by default. The
range is 2 to 150m.
Virtual Fence Settings
User Manual
DJI GS PRO
26
©
2018 DJI All Rights Reserved.
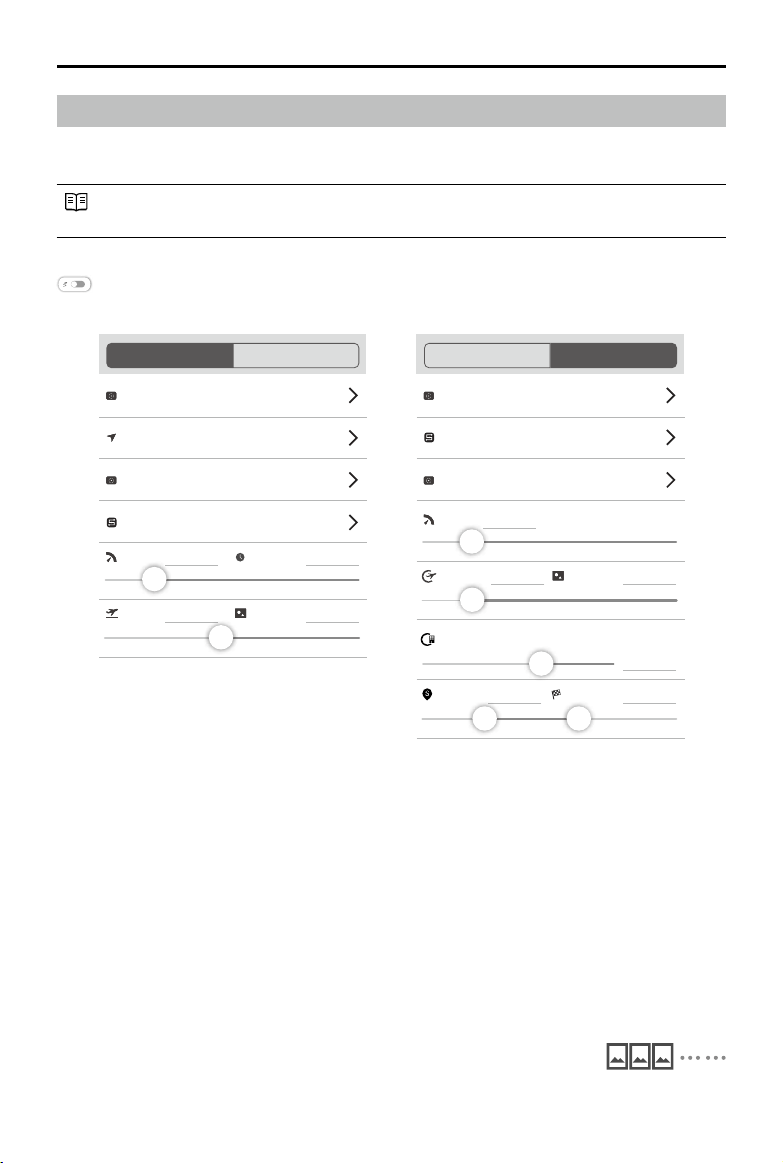
PhotoMap / 3D Map Settings
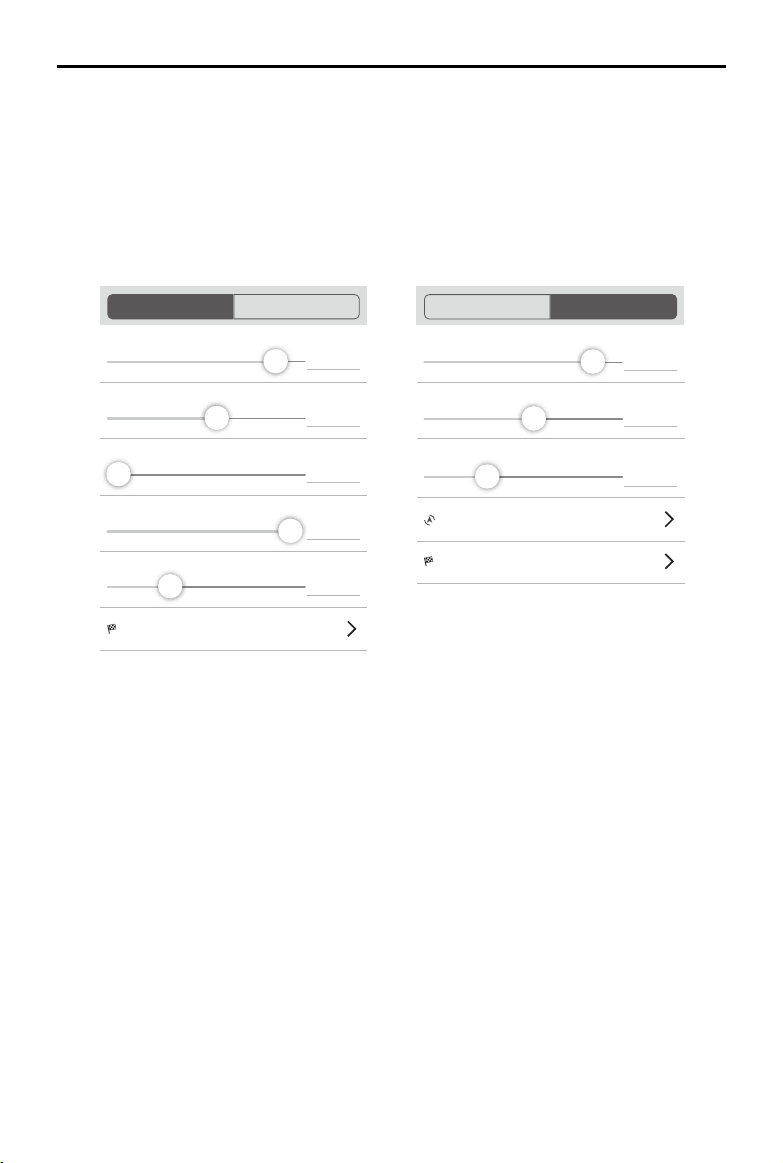
The settings of PhotoMap, 3D Map Area and 3D Map POI are similar. Unless otherwise specied,
the descriptions below are compatible with all the three types of missions.
Main Path: The ight path on which shooting is required is called the Main Path in a 3D Map
mission.
Flight Path Display
Displays the generated ight path if enabled. The path will be hidden if disabled.
Basic
1. Camera Model
Always set parameters according to the camera and lens used in order to calculate the optimal
ight path.
Fixed Lens: Includes DJI Phantom 3 series, Phantom 4 series and Mavic Pro, Zenmuse X3,
and Zenmuse X4S cameras. The app will choose the corresponding camera when an aircraft is
connected.
Variable Lens (Zenmuse X5 / Zenmuse X5R / Zenmuse X5S / Zenmuse Z3): Tap to enter, set the
parameters according to the lens or zoom level used then tap “Add Camera”.
Custom Camera: Tap “New Custom Camera”, set the parameters according to the camera and
lens used (input “1”, if you’re not sure about distortion) then tap “Add Camera”.
2. Shooting Angle (for PhotoMap and 3D Map Area only)
Choose the direction of the camera when ying along the path.
Parallel to Main Path: The camera is parallel to the main path, i.e. the
angle of the camera pan axis is the same as the angle of the main path.
The pictures captured on the main path will be put in order as shown.
Camera Model
Shooting Angle
Resolution
Shutter Intv.
Capture Mode
Flight Course Mode
Speed
Phantom 4 Camera
Basic
Advanced
Parallel to Main Path
Capture at Equal Dist. Interval
Scan Mode
Altitude
93.3 M 4.0 CM/PX
2.5 M/S
2.0 SEC
PhotoMap / 3D Map Area
Flight Course Mode
Vertical Mode
Camera Model
Resolution
Capture Mode
Speed
Phantom 4 Camera
Capture at Equal Dist. Interval
Flight Rad.
146.1 M
2.9 CM/PX
Basic
Advanced
118..2 M
Min Alt. Max Alt.
50.0 M
Building Radius
78.3 M
2.5 M/S
3D Map POI
User Manual
DJI GS PRO
©
2018 DJI All Rights Reserved.
27
Vertical to Main Path: The camera pan axis is vertical to the main path.
The pictures captured on the main path will be put in order as shown.
3. Capture Mode
Hover & Capture at a Point: The app will calculate the flight path and waypoint quantity
according to the parameters. When performing a mission, the aircraft will hover and capture at
each waypoint. In this mode, shooting is stable, but the time required will be long. The number of
waypoints required may be large, which will also make mission times longer.
Capture at Equal Dist. Interval / Time Interval: In Capture at Equal Dist. Interval / Time Interval Modes,
the aircraft will not hover during capturing as it ies along the main path. Users can set the shutter
interval. The ight speed is calculated automatically according to the camera features and the altitude
(resolution) setting. In this mode, operation is fast. However, short exposure times are required.
If the interval is too small, Equal Dist. Interval / Time Interval are not be available due to
the short shooting interval or the minimum speed of the aircraft. If this occurs, a warning
will pop up and the aircraft will switch to Hover & Capture at a Point automatically.
Flight controller version 3.2.10 or later is required for Distance Interval / Time Interval.
If using an older version, a prompt will appear warning that this is not available. This
capture mode can be used after a rmware update. Go to General Settings > Help >
App Version, to check the current ight controller version.
4. Flight Course Mode
In PhotoMap or 3D Map Area, choose between Scan and Inside Mode.
Scan Mode: Generate a ight course by scanning line by line. For a concave polygon, the course
may be beyond the area boundaries.
Inside Mode: Every part of the flight course generated will be inside the area. For a convex
polygon, the course will be the same as the one generated in scan mode. For a concave
polygon, the course will be optimized for accuracy so the ight course may intersect.
In 3D Map POI, choose between Vertical and Circle Mode.
Vertical Mode: The ight course generated will be a square zigzag route with the vertical path as
the main path. When shooting along the main path is completed, the aircraft will shift to the next
one and then continue shooting.
Circle Mode: The flight course generated will be a circular path at different altitudes. Each
circular path is the main path. The aircraft will fly and shoot from top to the bottom. When
shooting along one of the main paths is completed, it will descend to the next one at the start
point and then continue shooting.
5. Speed
Flight speed can only be set in Hover & Capture at a Point. Speed is dened as 5m/s by default
and can be set between 1 to 15m/s. In Distance Interval / Time Interval, the speed is calculated
automatically, so it cannot be adjusted here.
6. Shutter Interval
Tap this and hold to set a shutter interval when the capture mode is set as “Capture at Equal
Dist. Interval” or “Time Interval”. If an error prompt appears, follow the on-screen instructions to
adjust the corresponding settings.
7. Altitude (for PhotoMap and 3D Map Area only)
Adjust the ight altitude or the corresponding resolution. It is dened as 50m by default and can
be set between 5 to 500m.
User Manual
DJI GS PRO
28
©
2018 DJI All Rights Reserved.
8. Flight Radius and Building Radius (for 3D Map POI only)
Adjust the ight radius and building radius or the corresponding resolution. The maximum ight
radius can be 500m, while the minimum building radius can be 1m.
9. Min Alt. and Max Alt. (for 3D Map POI only)
Set the minimum and maximum ying altitude. The ight course generated will be in this range. It
can be set between 1 to 500 m.
Advanced
1. Front Overlap Ratio
The overlap ratio of two consecutive pictures captured along the same main path. This is dened
as 90% by default and can be set from 10% to 99%.
2. Side Overlap Ratio
The overlap ratio of two pictures on two parallel main paths. This is dened as 60% by default
and can be set from 10% to 99%.
3. Course Angle (for 3D Map Area only)
The angle of the main path. East is 0°, with a positive value when it is counterclockwise. The
range can be set from 0° to 360°.
4. Margin (for 3D Map Area only)
Expand (positive value) or narrow (negative value) the area margin for control over the area of
ight. The margin range is dened as -30 to +30m in scan mode and -30 to 0m in inside mode.
5. Gimbal Pitch Angle (for 3D Map Area and 3D Map POI only)
The gimbal pitch angle at the selected waypoint. Pitch angle can range from -90° to 0°, with
downward represented by -90° and forward represented by 0°.
For a 3D Map Area mission, the ight course will be moved for a distance in the rear direction of
the aircraft according to the gimbal pitch angle.
Front Overlap Ratio
Side Overlap Ratio
Course Angle
Margin
Gimbal Pitch Angle
End-Mission Action
90 %
Hover
60 %
0 °
0.0 M
-63.2
。
Basic
Advanced
PhotoMap / 3D Map Area 3D Map POI
Gimbal Pitch Angle
Flight Direction
Counter Clockwise
-63.2
。
End-Mission Action
Hover
Front Overlap Ratio
Side Overlap Ratio
90 %
Basic
Advanced
60 %
User Manual
DJI GS PRO
©
2018 DJI All Rights Reserved.
29
The distance will be automatically calculated based on the gimbal pitch angle to ensure that the
camera is always facing the ight area. When the pitch angle exceeds -45°, the distance will
remain at the value when the pitch angle is set at -45°.
6. End-Mission Action
Aircraft action after completing a mission.
Return to Home: Tap to enter and set the RTH altitude. If the aircraft altitude is higher than this pre-
set value, it will return to home at its mission completion altitude. If the aircraft altitude is lower than
the pre-set value it will ascend to the RTH altitude after mission completion before returning to
home.
Hover: The aircraft will hover at the nal waypoint after mission completion. Then users can then
control the aircraft directly.
Land: The aircraft will land at the final waypoint and stop motors automatically after mission
completion.
7. Flight Direction (for 3D Map POI only)
The ight course around the building when performing a mission. Choose between Clockwise
and Counter Clockwise.
Since up to 99 waypoints can be set for a mission, users can adjust the capture mode,
ight radius, ight altitude, or overlap ratio to reduce waypoint quantity, if too many.
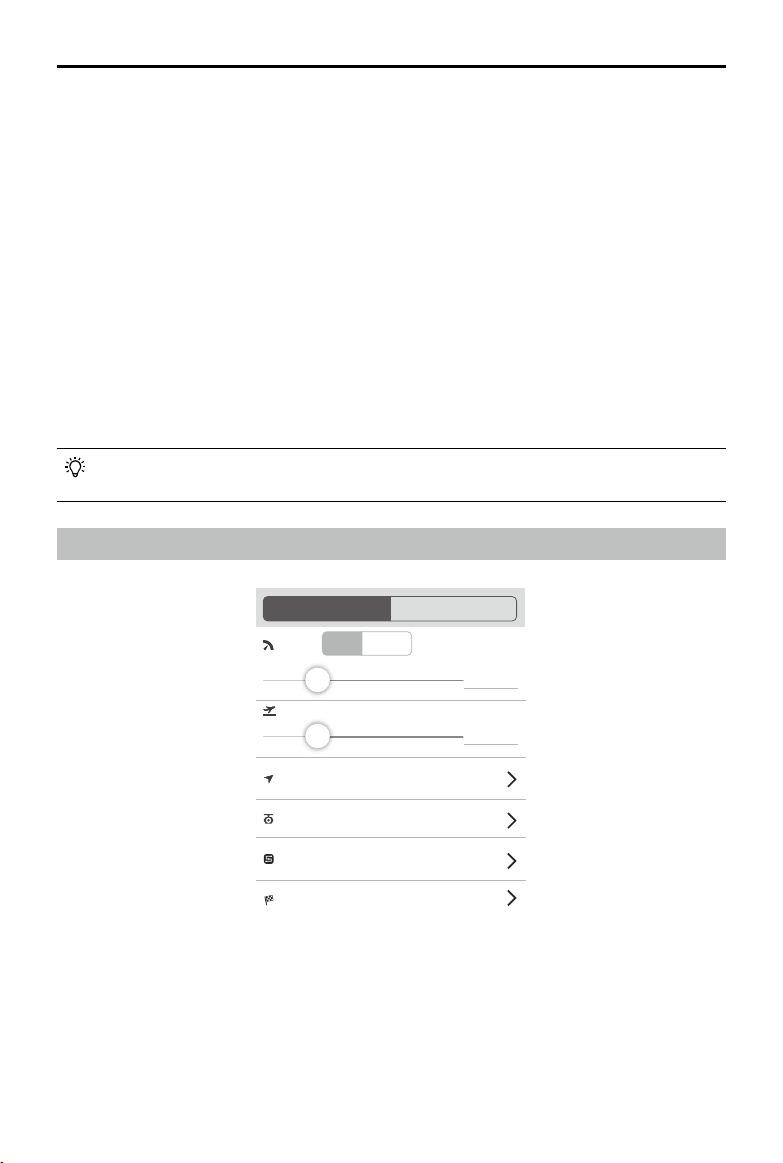
Waypoint Flight Settings
All Points
Manual
Auto
Gimbal Pitch Angle
Altitude
50.0 M
Each Point
All Points
End-Mission Action
Hover
Aircraft Heading
Course Aligned
Manual
Cornering
Curved
Speed
5.0 M/S
1. Speed
Auto: The aircraft will y at a constant speed during a Waypoint Flight mission. Slide the slider to
set a ight speed from 1 to 15m/s.
Manual: Flight speed during a Waypoint Flight mission can be controlled manually. Slide the
slider to set a maximum ight speed from 1 to 15m/s.
2. Altitude
The relative altitude between the aircraft and the takeoff point during ight. This can be set from
1 to 500m. You can also set the altitude of each point in “Each Point” settings.
User Manual
DJI GS PRO
30
©
2018 DJI All Rights Reserved.
3. Aircraft Heading
Course Aligned: The aircraft’s nose is always aligned to the direction of the next two waypoints.
Dened Per Point: Set aircraft heading at each waypoint in “Each Point” settings.
Manual: Users manually control the aircraft heading using the control sticks.
4. Gimbal Pitch Angle
Manual: Users manually control gimbal pitch through the gimbal dial.
Dened Per Point: Set gimbal pitch angle at each waypoint in “Each Point” settings.
5. Cornering
Straight: The aircraft will y to a waypoint and perform Waypoint Actions. If no Waypoint Actions
are set on a waypoint, the aircraft will stop at the waypoint, adjust its heading and y to the next
waypoint.
Curved: The aircraft will y on a smooth curve when passing by a waypoint. Set a “Cornering
Radius” for each waypoint in “Each Point” settings. However, be aware that Waypoint Actions will
be disabled if “Cornering” is set to “Curved”.
6. End-Mission Action
Aircraft action after mission complete.
Return to Home: Tap to enter and set the RTH altitude. If the aircraft altitude is higher than this pre-set
value, it will return to home at its mission completion altitude. If the aircraft altitude is lower than the
pre-set value it will ascend to the RTH altitude after mission completion before returning to home.
Hover: The aircraft will hover at the nal waypoint after mission completion. Then users can then
control the aircraft directly.
Land: The aircraft will land at the final waypoint and stop motors automatically after mission
completion.
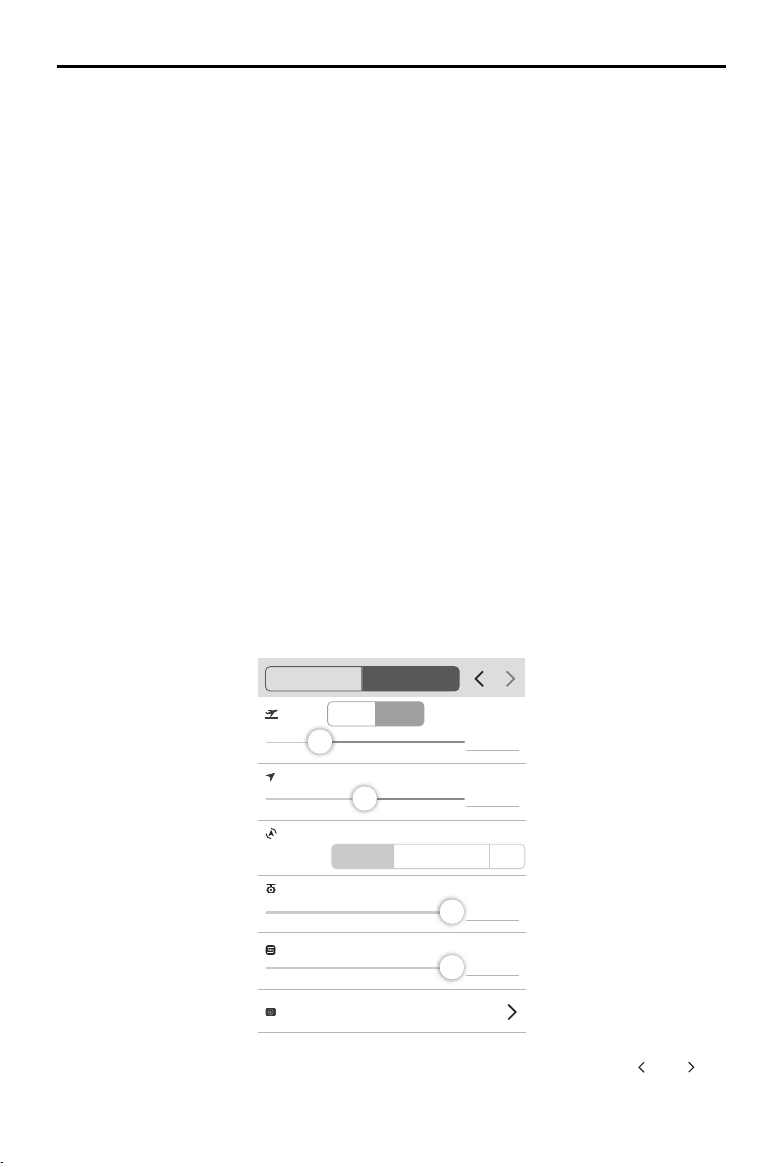
Each Point
Altitude
Aircraft Heading
Aircraft Rotation Direction
Gimbal Pitch Angle
Cornering Radius
Enable Disable
Clockwise
Counter Clockwise Auto
50.0 M
0
。
0
。
N/A
Waypoint Action
Each Point
All Points
3.0 M
Select a waypoint (it will turn blue when selected) then set waypoint parameters. Tap “ ” or “ ” on
the right of “Each Point” to switch to the previous or next waypoint.

User Manual
DJI GS PRO
©
2018 DJI All Rights Reserved.
31
1. Altitude
If disabled, the altitude will be set according to “All Points” settings. If enabled, the altitude of
each waypoint can be set separately. Then range can be set from 1 to 500m. The aircraft will
ascend and descend automatically during ight according to the value of each waypoint.
2. Aircraft Heading
This option will be available only if “Dened Per Point” is set for “Aircraft Heading” in “All Points”
settings. North is 0°, with a positive value indicating clockwise. The available range is from -180°
to 180°.
3. Aircraft Rotation Direction
The aircraft rotation direction when ying to the next waypoint. This option will be available only if
“Dened Per Point” is set for “Aircraft Heading” in “All Points” settings. Choose from Clockwise,
Counter Clockwise and Auto.
4. Gimbal Pitch Angle
The gimbal pitch angle at the selected waypoint. This option will be available only if “Dened Per
Point” is set for “Gimbal Pitch Angle” in “All Points” settings. Pitch angle can range from -90° to 0°,
with downward represented by -90° and forward represented by 0°. The gimbal will tilt gradually to
the angle pre-set at the next waypoint if the values at the two consecutive waypoints are different.
5. Cornering Radius
This is the aircraft’s cornering radius when ying past a waypoint. This option will be available
only if “Cornering” is set to “Curved” in “All Points” settings. Note that the “Cornering Radius”
setting is unavailable for start and stop points.
6. Waypoint Action
Tap to enter. Up to 15 actions can be added. Delete actions, re-order them or copy them to other
waypoints.
Add Waypoint Actions: Tap to add. Actions will be performed in the order they are added unless
re-ordered.
a. Hover: The aircraft will hover at the waypoint. Tap to set hovering time.
b. Photo Capture: Capture on arrival at a waypoint. Note that Photo Capture cannot be added if
the camera is recording.
c. Start Recording: Start recording on arrival at a waypoint. Note that Start Recording cannot be
added if the camera is already recording.
d. Stop Recording: Stop recording on arrival at a waypoint. Note that Stop Recording cannot be
added if the camera is not recording.
e. Aircraft Rotation: Adjust the aircraft heading on arrival at a waypoint. Tap to set the rotation
angle. North is 0° with a negative value representing clockwise and the range is -180° to
180°.
f. Gimbal Pitch Rotation: Adjust the gimbal pitch angle on arrival at this waypoint. Pitch angle
can range from -90° to 0°, with downward represented by -90° and forward represented by
0°. If “Gimbal Pitch Angle” is set as a value in “Each Point” settings, the aircraft will y to the
waypoint with the dened Gimbal Pitch Angle then adjust it according to the Gimbal Pitch
Rotation settings dened when adding a Waypoint Action for the current waypoint.
Delete Action: Slide the desired action in the action list left then tap Delete.
Re-Order: Tap to enter. Tap and hold the desired action, drag it to the desired position and
release. After all the actions are in the desired position, tap Re-Order Finished.
Propagate Actions: Tap to copy all actions to all other waypoints.
32
©
2018 DJI All Rights Reserved.
PhotoMap
When a PhotoMap mission is completed, users can import images into GS Pro to composite a 2D
map. Calibration can also be applied to the composite result.
Importing Photos
After a mission, GS Pro will show a prompt window to remind users to download photos from the
aircraft. A new material item will also be generated under the Material tag for the photo set of the
current ight. Follow the instructions below to import photos if you missed the prompt window.
1. Tap the “Material” tag in the Navigation Pane. It will show photo materials which have the same
name as their corresponding PhotoMap missions.
2. Tap the icon
on the right of the desired mission, and then choose a photo source between
“From Photo Library” on the iPad and “From Aircraft.”
a. If you want to choose “From Photo Library” on the iPad, a Lightning to SD Card Camera
Reader is required to import the photos to the Micro SD card of the aircraft to “Photos” on
the iPad. Next, tap “From Photo Library” in GS Pro; it will display photos matching the current
mission. Users can choose part or all of the photos and then tap “Import.”
b. If “From Aircraft” is selected, ensure that the aircraft is connected to the remote controller.
GS Pro will download the corresponding aerial photos automatically. Make sure that the
Micro SD card of the aircraft includes all of the pictures taken during this ight. Otherwise,
the import will fail.
Since downloading photos from the aircraft takes long time, it is recommended to import
a large number of photos to the iPad through a Lightning to SD Card Camera Reader.
3. After photos have been imported, if there is an update, swipe the mission to the left and then tap
“Import” to select the photo source again. This operation is the same as Step 2.
Compositing a Map
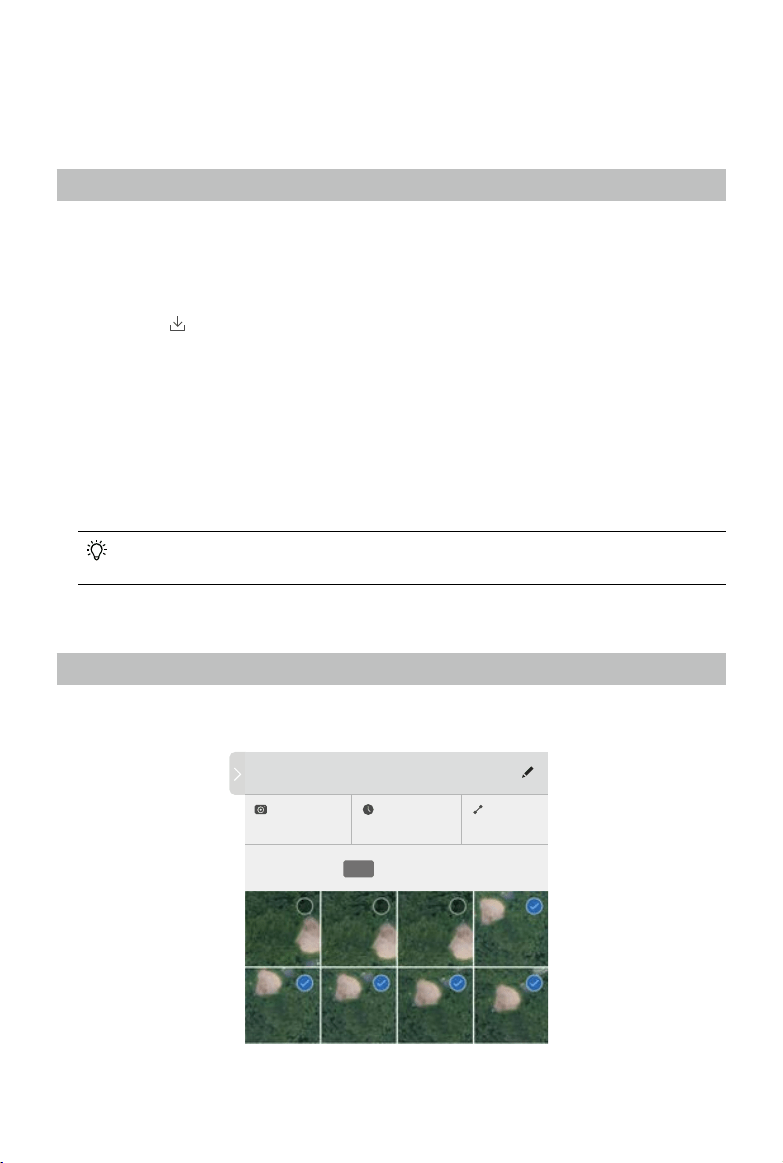
1. Tap the desired mission in the “Material” tag to enter the editing page.
Mission 6
Camera
Phantom 4 Camera
All High LowMid
Capture Interval
F: -1.2 M / S: -0.7 M
Photos
19/24
User Manual
DJI GS PRO
©
2018 DJI All Rights Reserved.
33
Collapse / Expand: Tap to collapse or expand the editing page.
Mission 6
Material Name: Tap the button on the right to edit its name.
Camera: Displays the camera model used.
Capture Interval: F indicates the interval of two consecutive pictures captured along the
same main path, and S indicates the interval of two pictures on two parallel main paths. The
intervals will vary according to the number of selected photos.
Photo Number: Displays the number of selected photos and all photos.
All / High / Mid / Low: Select the number of photos used to composite a map (the four options
are listed as the number of photos from more to less). The more the photos you select, the more
precise the composite map may be, and also the more system resources will be used. The GS
Pro will select the corresponding photos automatically according to different options. Users can
also manually select photos required in the Photo Preview section.
Photo Preview and Select: Click the photo to view it in full screen, and click the circle in the
upper right corner to select the photo or deselect.
2. Coordinates of each photo, when captured, will be displayed in the map view. A yellow dot
indicates that the corresponding photo has been selected, and the white dot indicates that it has
not been selected.
3. After photos have been selected, tap the composite button on the upper right corner and wait for
the composite to complete. If the composite gets canceled halfway, it will start over after tapping
the button again.
4. There will be a red dot on the Map tag after the composite. Tap the tag to nd folders with the
same name as each PhotoMap mission. Tap to expand or collapse them.
Managing Maps
1. In the photomap list under the Map tag, tap a map, and the screen will show up the
corresponding composite result.
2. Swipe to the left to Calibrate, Pin or Delete the map. Please note that there is no Calibrate option
for calibrated maps. Select Calibrate for composite map calibration. Refer to Calibrating Maps
for details.
3. Tap and hold the map on the list to enter the multi-select mode to Pin or Delete more than one
map.
4. If maps are pinned, the screen will show them up all the time when viewing maps under the Map
tag. In any other interface, use the 2D switch on the right side of the screen to enable/disable the
display.
Calibrating Maps
There will be an offset between the photomap composited by aerial photos and its actual position
due to aircraft positioning deviation when capturing and also photo quality. Select three or more
references as reference points and obtain their exact coordinates for map calibration in GS Pro.
1. Under the photomap list, swipe the desired map to the left, then tap Calibrate to enter the map
calibration page.
User Manual
DJI GS PRO
34
©
2018 DJI All Rights Reserved.
LAT
22.540062
113.951940
LON
Composition 1
Control Point 2
Control Point 3
Control Point 1
Offset West 1.5m North 1.0m
Reference Correction
Collapse / Expand: Tap to collapse or expand the editing page.
Composition 1
Map Name: Tap the button on the right to edit its name.
Control Point 1
Control Point Pair List: Displays the added control point pairs including reference
points and correction points. Tap to select from them.
Offset: Shows the offset between the selected correction point and reference point. For
example, “West 1.5m, North 1.0m” indicates that the correction position is away from the
reference point 1.5m in the west and 1.0m in the north.
Reference Correction
Reference Point / Correction Point: Tap to select the reference point or correction
point in the point pair, and then change the values or delete the point in the editing section under it.
LAT
22.540062
113.951940
LON
Composition 1
Control Point 2
Control Point 3
Control Point 1
Offset West 1.5m North 1.0m
Reference Correction
Longitude / Latitude: Displays the longitude and latitude of the selected point. Tap the text box
or arrow keys to adjust the values.
纬度
22.540062
113.951940
经度
Composition 1
Control Point 2
Control Point 3
Control Point 1
偏移 偏西 1.5m 偏北 1.0m
参考点 校正点
Delete: Tap to delete the selected reference point or correction point.
纬度
22.540062
113.951940
经度
Composition 1
Control Point 2
Control Point 3
Control Point 1
偏移 偏西 1.5m 偏北 1.0m
参考点 校正点
Aircraft: Tap to set the current position of the aircraft as the correction point position
corresponding to the selected reference point. Ensure that the aircraft is connected to GS Pro
when using this function.
2. Tap the map and a point pair for calibration will be generated automatically. All the point pairs
are listed in order. The yellow points on the map are reference points, which correspond to the
on-map position of each reference, while the blue points are correction points, which are the
actual positions corresponding to the reference points.
3. Drag the point on the map to change its position. Tap a point on the map to select it, and it will
be lit up. Next, edit it in the editing section.

User Manual
DJI GS PRO
©
2018 DJI All Rights Reserved.
35
4. After adding three or more calibration point pairs, tap the calibration button on the upper right
corner to start calibration.
5. The screen will show up the calibrated map when calibration is completed.
6. If re-calibration is needed, tap the reset button in the upper right corner. The map will go back to
the original one.
Tap the return button on the upper left corner and then tap Save to save the current calibration.
7. There will be a calibrated map in the map list if saved. Swipe to the left or tap and hold to Pin or
Delete it.

Copyright © 2018 DJI All Rights Reserved.
This content is subject to change.
Download the latest version from
http://www.dji.com/ground-station-pro
If you have any questions about this document, please contact DJI
by sending an email to [email protected].
DJI Support
http://www.dji.com/support