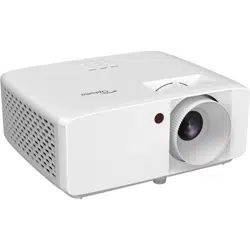
FOCUS
User manual
DLP
®
Projector

English
2
TABLE OF CONTENTS
COPYRIGHT ....................................................................................... 4
Declaration Notice for Free and Open Source Software ........................................................... 4
Free and Open Source Software Notice.................................................................................... 4
Licenses .................................................................................................................................... 5
SAFETY ............................................................................................... 9
Important Safety Instruction....................................................................................................... 9
Safety Information .................................................................................................................... 10
Cleaning the Lens..................................................................................................................... 10
Copyright .................................................................................................................................. 11
Disclaimer ................................................................................................................................. 11
Trademark Recognition ............................................................................................................ 11
FCC .......................................................................................................................................... 11
Declaration of Conformity for EU countries .............................................................................. 12
WEEE ....................................................................................................................................... 12
INTRODUCTION ............................................................................... 13
Package overview .................................................................................................................... 13
Standard accessories ............................................................................................................... 13
Optional accessories ................................................................................................................ 13
Product overview ...................................................................................................................... 14
Connections.............................................................................................................................. 16
Keypad ..................................................................................................................................... 18
Remote control ......................................................................................................................... 19
SETUP AND INSTALLATION ........................................................... 20
Installing the projector .............................................................................................................. 20
Connecting sources to the projector ......................................................................................... 22
Adjusting the projector image ................................................................................................... 23
Adjusting the projector focus .................................................................................................... 24
Remote setup ........................................................................................................................... 25
USING THE PROJECTOR ............................................................... 27
Powering on / o the projector .................................................................................................. 27
Selecting an input source ......................................................................................................... 30
Home screen overview ............................................................................................................. 31
System date and time ............................................................................................................... 31
Projector settings menu (OSD)................................................................................................. 32
OSD Menu tree......................................................................................................................... 33
Selecting an input source ......................................................................................................... 44
Selecting an app ....................................................................................................................... 45

English
3
ADDITIONAL INFORMATION .......................................................... 48
Compatible resolutions ............................................................................................................. 48
Multimedia support format ........................................................................................................ 49
Image size and projection distance .......................................................................................... 51
Tripod mount the projector ........................................................................................................ 53
IR remote control codes ........................................................................................................... 54
Troubleshooting ........................................................................................................................ 56
Warning indicators .................................................................................................................... 58
Specications ........................................................................................................................... 60
Optoma global oces ............................................................................................................... 61

English
4
COPYRIGHT
Copyright (C) 2024 by Optoma Corporation
ALL RIGHTS RESERVED.
The copyright declaration applies to any part of the product, however if the declaration and Free and Open Source
license requirements are in explicit conict, the FOSS license prevails.
Declaration Notice for Free and Open Source Software
The software included in this product contains copyrighted software that is originally licensed under the Free and
Open Source Software licenses, such as Apache License 2.0, and SIL Open Font License (OFL). The related
notices and disclaimers are described below.
Free and Open Source Software Notice
Roboto Light
• License Full Name: Apache License 2.0
• SPDX Short Identier: Apache-2.0
• Modied Status: No
• Copyright Notice: Copyright 2011 Google Inc. Licensed under the Apache License, Version 2.0
(the “License”); you may not use this le except in compliance with the License. You may obtain a
copy of the License at
http://www.apache.org/licenses/LICENSE-2.0
Unless required by applicable law or agreed to in writing, software distributed under the License is
distributed on an “AS IS” BASIS, WITHOUT WARRANTIES OR CONDITIONS OF ANY KIND, either
express or implied. See the License for the specic language governing permissions and limitations
under the License.
Noto Serif KR
• License Full Name: SIL Open Font License 1.1
• SPDX Short Identier: OFL-1.1
• Modied Status: No
• Copyright Notice: Copyright 2017 Adobe Systems Incorporated (http://www.adobe.com/)
This Font Software is licensed under the SIL Open Font License, Version 1.1.
This license is copied below, and is also available with a FAQ at: https://scripts.sil.org/OFL

English
5
Licenses
Apache License, Version 2.0, January 2004
http://www.apache.org/licenses/
TERMS AND CONDITIONS FOR USE, REPRODUCTION, AND DISTRIBUTION
1. Denitions.
“License” shall mean the terms and conditions for use, reproduction, and distribution as dened by Sections 1
through 9 of this document.
“Licensor” shall mean the copyright owner or entity authorized by the copyright owner that is granting the License.
“Legal Entity” shall mean the union of the acting entity and all other entities that control, are controlled by, or are
under common control with that entity. For the purposes of this denition, “control” means (i) the power, direct or
indirect, to cause the direction or management of such entity, whether by contract or otherwise, or (ii) ownership of
fty percent (50%) or more of the outstanding shares, or (iii) benecial ownership of such entity.
“You” (or “Your”) shall mean an individual or Legal Entity exercising permissions granted by this License.
“Source” form shall mean the preferred form for making modications, including but not limited to software source
code, documentation source, and conguration les.
“Object” form shall mean any form resulting from mechanical transformation or translation of a Source form,
including but not limited to compiled object code, generated documentation, and conversions to other media types.
“Work” shall mean the work of authorship, whether in Source or Object form, made available under the License, as
indicated by a copyright notice that is included in or attached to the work (an example is provided in the Appendix
below).
“Derivative Works” shall mean any work, whether in Source or Object form, that is based on (or derived from)
the Work and for which the editorial revisions, annotations, elaborations, or other modications represent, as a
whole, an original work of authorship. For the purposes of this License, Derivative Works shall not include works
that remain separable from, or merely link (or bind by name) to the interfaces of, the Work and Derivative Works
thereof.
“Contribution” shall mean any work of authorship, including the original version of the Work and any modications
or additions to that Work or Derivative Works thereof, that is intentionally submitted to Licensor for inclusion
in the Work by the copyright owner or by an individual or Legal Entity authorized to submit on behalf of the
copyright owner. For the purposes of this denition, “submitted” means any form of electronic, verbal, or written
communication sent to the Licensor or its representatives, including but not limited to communication on electronic
mailing lists, source code control systems, and issue tracking systems that are managed by, or on behalf of, the
Licensor for the purpose of discussing and improving the Work, but excluding communication that is conspicuously
marked or otherwise designated in writing by the copyright owner as “Not a Contribution.”
“Contributor” shall mean Licensor and any individual or Legal Entity on behalf of whom a Contribution has been
received by Licensor and subsequently incorporated within the Work.
2. Grant of Copyright License. Subject to the terms and conditions of this License, each Contributor hereby
grants to You a perpetual, worldwide, non-exclusive, no-charge, royalty-free, irrevocable copyright license to
reproduce, prepare Derivative Works of, publicly display, publicly perform, sublicense, and distribute the Work and
such Derivative Works in Source or Object form.
3. Grant of Patent License. Subject to the terms and conditions of this License, each Contributor hereby grants
to You a perpetual, worldwide, non-exclusive, no-charge, royalty-free, irrevocable (except as stated in this section)
patent license to make, have made, use, oer to sell, sell, import, and otherwise transfer the Work, where such
license applies only to those patent claims licensable by such Contributor that are necessarily infringed by their
Contribution(s) alone or by combination of their Contribution(s) with the Work to which such Contribution(s) was
submitted. If You institute patent litigation against any entity (including a cross-claim or counterclaim in a lawsuit)
alleging that the Work or a Contribution incorporated within the Work constitutes direct or contributory patent
infringement, then any patent licenses granted to You under this License for that Work shall terminate as of the
date such litigation is led.

English
6
4. Redistribution. You may reproduce and distribute copies of the Work or Derivative Works thereof in any
medium, with or without modications, and in Source or Object form, provided that You meet the following
conditions:
1. You must give any other recipients of the Work or Derivative Works a copy of this License; and
2. You must cause any modied les to carry prominent notices stating that You changed the les; and
3. You must retain, in the Source form of any Derivative Works that You distribute, all copyright, patent,
trademark, and attribution notices from the Source form of the Work, excluding those notices that do
not pertain to any part of the Derivative Works; and
4. If the Work includes a “NOTICE” text le as part of its distribution, then any Derivative Works that
You distribute must include a readable copy of the attribution notices contained within such NOTICE
le, excluding those notices that do not pertain to any part of the Derivative Works, in at least one
of the following places: within a NOTICE text le distributed as part of the Derivative Works; within
the Source form or documentation, if provided along with the Derivative Works; or, within a display
generated by the Derivative Works, if and wherever such third-party notices normally appear. The
contents of the NOTICE le are for informational purposes only and do not modify the License. You
may add Your own attribution notices within Derivative Works that You distribute, alongside or as an
addendum to the NOTICE text from the Work, provided that such additional attribution notices cannot
be construed as modifying the License.
You may add Your own copyright statement to Your modications and may provide additional or
dierent license terms and conditions for use, reproduction, or distribution of Your modications, or for
any such Derivative Works as a whole, provided Your use, reproduction, and distribution of the Work
otherwise complies with the conditions stated in this License.
5. Submission of Contributions. Unless You explicitly state otherwise, any Contribution intentionally submitted
for inclusion in the Work by You to the Licensor shall be under the terms and conditions of this License, without any
additional terms or conditions. Notwithstanding the above, nothing herein shall supersede or modify the terms of
any separate license agreement you may have executed with Licensor regarding such Contributions.
6. Trademarks. This License does not grant permission to use the trade names, trademarks, service marks, or
product names of the Licensor, except as required for reasonable and customary use in describing the origin of the
Work and reproducing the content of the NOTICE le.
7. Disclaimer of Warranty. Unless required by applicable law or agreed to in writing, Licensor provides the
Work (and each Contributor provides its Contributions) on an “AS IS” BASIS, WITHOUT WARRANTIES OR
CONDITIONS OF ANY KIND, either express or implied, including, without limitation, any warranties or conditions
of TITLE, NON-INFRINGEMENT, MERCHANTABILITY, or FITNESS FOR A PARTICULAR PURPOSE. You are
solely responsible for determining the appropriateness of using or redistributing the Work and assume any risks
associated with Your exercise of permissions under this License.
8. Limitation of Liability. In no event and under no legal theory, whether in tort (including negligence), contract,
or otherwise, unless required by applicable law (such as deliberate and grossly negligent acts) or agreed to in
writing, shall any Contributor be liable to You for damages, including any direct, indirect, special, incidental, or
consequential damages of any character arising as a result of this License or out of the use or inability to use the
Work (including but not limited to damages for loss of goodwill, work stoppage, computer failure or malfunction, or
any and all other commercial damages or losses), even if such Contributor has been advised of the possibility of
such damages.
9. Accepting Warranty or Additional Liability. While redistributing the Work or Derivative Works thereof, You may
choose to oer, and charge a fee for, acceptance of support, warranty, indemnity, or other liability obligations and/
or rights consistent with this License. However, in accepting such obligations, You may act only on Your own behalf
and on Your sole responsibility, not on behalf of any other Contributor, and only if You agree to indemnify, defend,
and hold each Contributor harmless for any liability incurred by, or claims asserted against, such Contributor by
reason of your accepting any such warranty or additional liability.
END OF TERMS AND CONDITIONS

English
7
HOW TO APPLY THE APACHE LICENSE TO YOUR WORK
Include a copy of the Apache License, typically in a le called LICENSE, in your work, and consider also including a
NOTICE le that references the License.
To apply the Apache License to specic les in your work, attach the following boilerplate declaration, replacing the
elds enclosed by brackets “[]” with your own identifying information. (Don’t include the brackets!) Enclose the text
in the appropriate comment syntax for the le format. We also recommend that you include a le or class name and
description of purpose on the same “printed page” as the copyright notice for easier identication within third-party
archives.
Copyright [yyyy] [name of copyright owner]
Licensed under the Apache License, Version 2.0 (the “License”); you may not use this le except in compliance
with the License. You may obtain a copy of the License at
http://www.apache.org/licenses/LICENSE-2.0
Unless required by applicable law or agreed to in writing, software distributed under the License is distributed on
an “AS IS” BASIS, WITHOUT WARRANTIES OR CONDITIONS OF ANY KIND, either express or implied.
See the License for the specic language governing permissions and limitations under the License.
SIL OPEN FONT LICENSE, Version 1.1 - 26 February 2007
PREAMBLE
The goals of the Open Font License (OFL) are to stimulate worldwide development of collaborative font projects, to
support the font creation eorts of academic and linguistic communities, and to provide a free and open framework
in which fonts may be shared and improved in partnership with others.
The OFL allows the licensed fonts to be used, studied, modied and redistributed freely as long as they are not
sold by themselves. The fonts, including any derivative works, can be bundled, embedded, redistributed and/or sold
with any software provided that any reserved names are not used by derivative works. The fonts and derivatives,
however, cannot be released under any other type of license. The requirement for fonts to remain under this license
does not apply to any document created using the fonts or their derivatives.
DEFINITIONS
“Font Software” refers to the set of les released by the Copyright Holder(s) under this license and clearly marked
as such. This may include source les, build scripts and documentation.
“Reserved Font Name” refers to any names specied as such after the copyright statement(s).
“Original Version” refers to the collection of Font Software components as distributed by the Copyright Holder(s).
“Modied Version” refers to any derivative made by adding to, deleting, or substituting — in part or in whole —
any of the components of the Original Version, by changing formats or by porting the Font Software to a new
environment.
“Author” refers to any designer, engineer, programmer, technical writer or other person who contributed to the Font
Software.

English
8
PERMISSION & CONDITIONS
Permission is hereby granted, free of charge, to any person obtaining a copy of the Font Software, to use, study,
copy, merge, embed, modify, redistribute, and sell modied and unmodied copies of the Font Software, subject to
the following conditions:
1. Neither the Font Software nor any of its individual components, in Original or Modied Versions, may
be sold by itself.
2. Original or Modied Versions of the Font Software may be bundled, redistributed and/or sold with any
software, provided that each copy contains the above copyright notice and this license. These can
be included either as stand-alone text les, human-readable headers or in the appropriate machine-
readable metadata elds within text or binary les as long as those elds can be easily viewed by the
user.
3. No Modied Version of the Font Software may use the Reserved Font Name(s) unless explicit written
permission is granted by the corresponding Copyright Holder. This restriction only applies to the
primary font name as presented to the users.
4. The name(s) of the Copyright Holder(s) or the Author(s) of the Font Software shall not be used to
promote, endorse or advertise any Modied Version, except to acknowledge the contribution(s) of the
Copyright Holder(s) and the Author(s) or with their explicit written permission.
5. The Font Software, modied or unmodied, in part or in whole, must be distributed entirely under
this license, and must not be distributed under any other license. The requirement for fonts to remain
under this license does not apply to any document created using the Font Software.
TERMINATION
This license becomes null and void if any of the above conditions are not met.
DISCLAIMER
THE FONT SOFTWARE IS PROVIDED “AS IS”, WITHOUT WARRANTY OF ANY KIND, EXPRESS OR IMPLIED,
INCLUDING BUT NOT LIMITED TO ANY WARRANTIES OF MERCHANTABILITY, FITNESS FOR A PARTICULAR
PURPOSE AND NONINFRINGEMENT OF COPYRIGHT, PATENT, TRADEMARK, OR OTHER RIGHT. IN NO
EVENT SHALL THE COPYRIGHT HOLDER BE LIABLE FOR ANY CLAIM, DAMAGES OR OTHER LIABILITY,
INCLUDING ANY GENERAL, SPECIAL, INDIRECT, INCIDENTAL, OR CONSEQUENTIAL DAMAGES, WHETHER
IN AN ACTION OF CONTRACT, TORT OR OTHERWISE, ARISING FROM, OUT OF THE USE OR INABILITY TO
USE THE FONT SOFTWARE OR FROM OTHER DEALINGS IN THE FONT SOFTWARE.
English
9
SAFETY
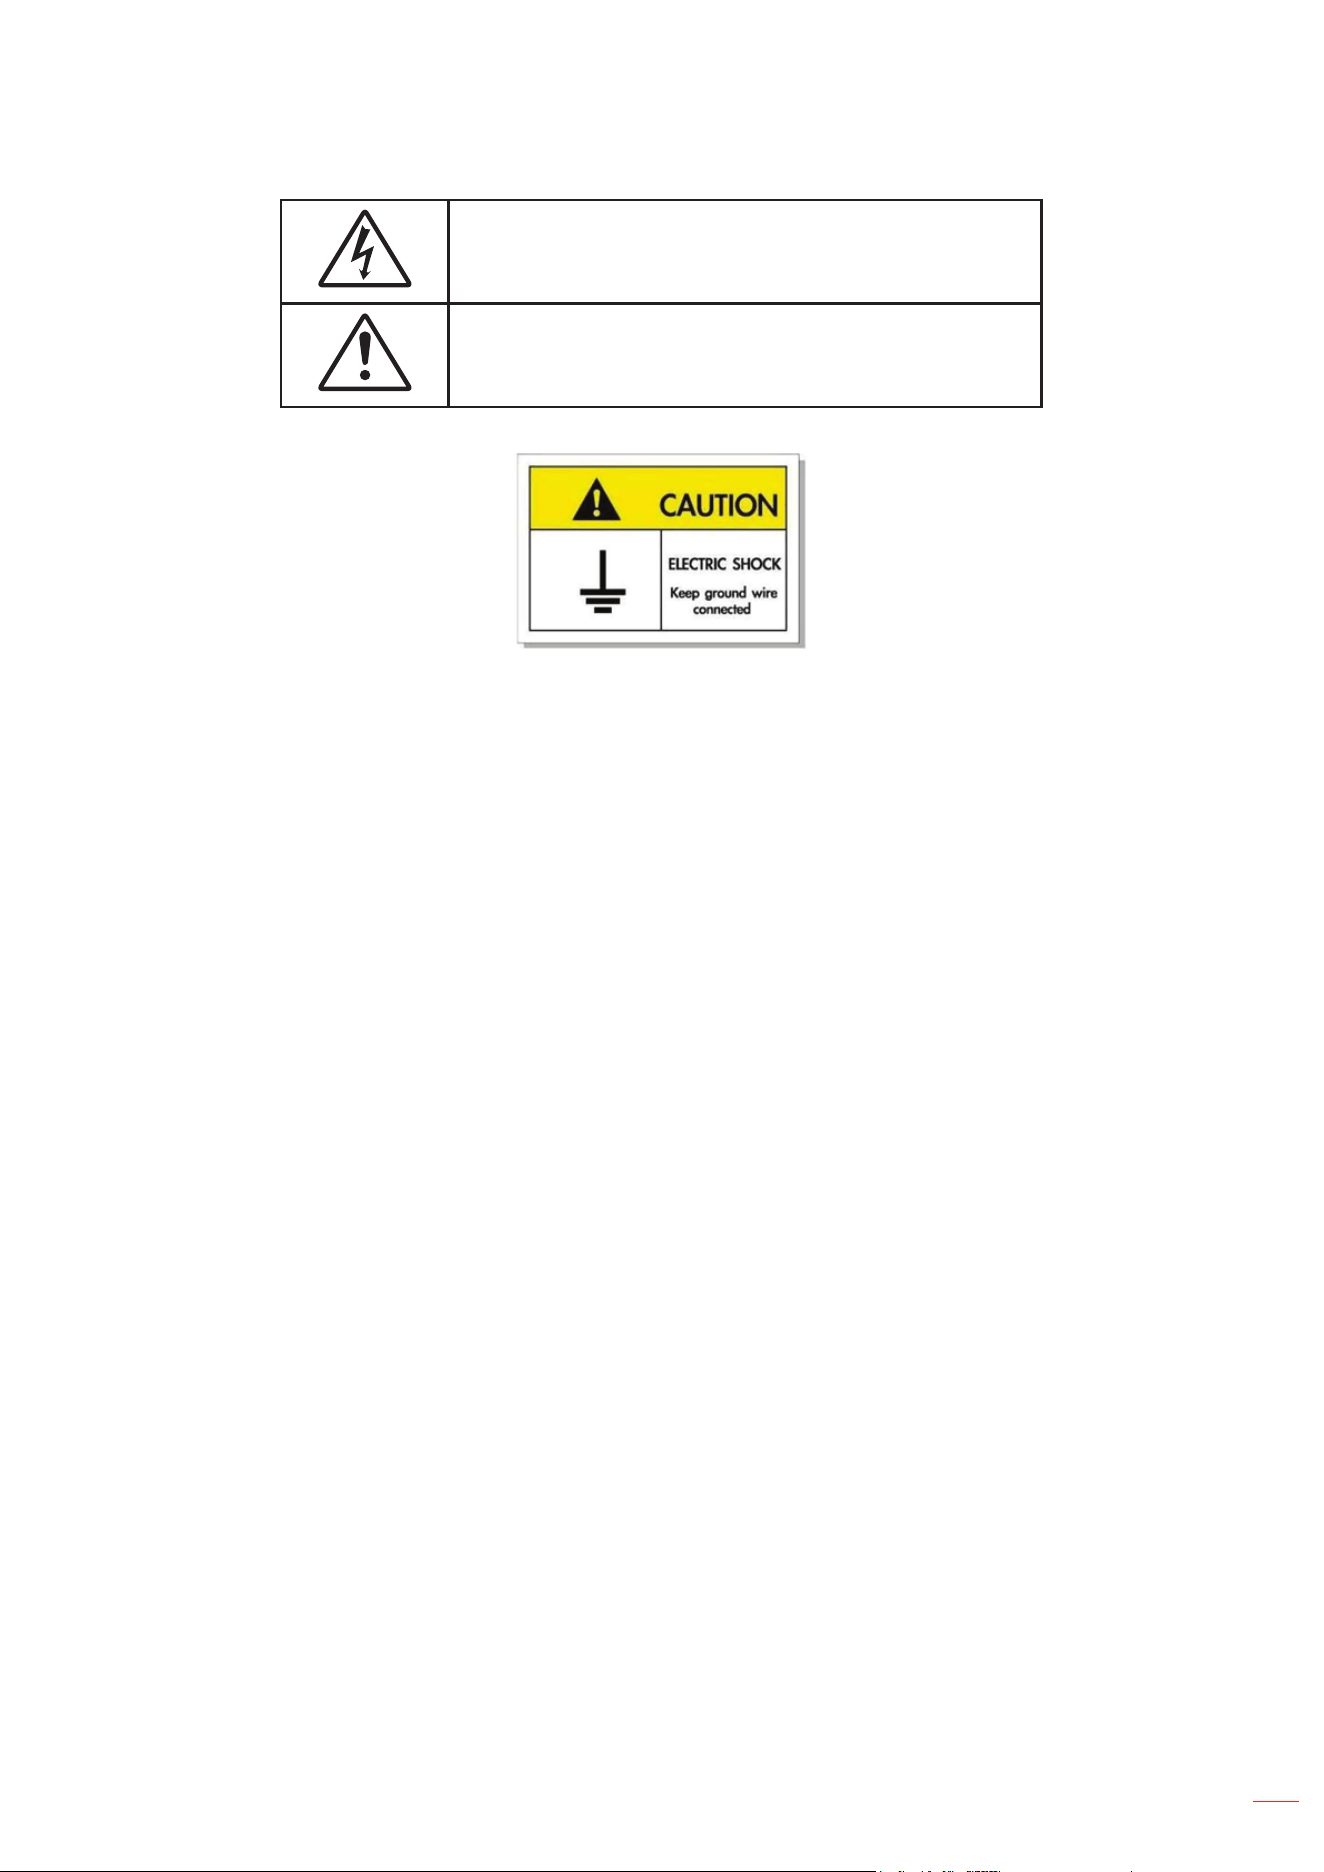
The lightning ash with arrow head within an equilateral triangle is
intended to alert the user to the presence of uninsulated "dangerous
voltage" within the product's enclosure that may be of sucient
magnitude to constitute a risk of electric shock to persons.
The exclamation point within an equilateral triangle is intended to alert
the user to the presence of important operating and maintenance
(servicing) instructions in the literature accompanying the appliance.
Please follow all warnings, precautions and maintenance as recommended in this user’s guide.
To avoid electric shock, the unit and its peripherals must be properly grounded (earthed).
Important Safety Instruction
• Do not block any ventilation openings. To ensure reliable operation of the projector and to protect from
over heating, it is recommended to install the projector in a location that does not block ventilation. As an
example, do not place the projector on a crowded coee table, sofa, bed, etc. Do not put the projector in
an enclosure such as a book case or a cabinet that restricts air ow.
• To reduce the risk of re and/or electric shock, do not expose the projector to rain or moisture. Do not
install near heat sources such as radiators, heaters, stoves or any other apparatus such as ampliers
that emits heat.
• Do not let objects or liquids enter the projector. They may touch dangerous voltage points and short out
parts that could result in re or electric shock.
• Do not use under the following conditions:
± In extremely hot, cold or humid environments.
(i) Ensure that the ambient room temperature is within 0°C ~ 40°C
(ii) Relative humidity is 10% ~ 80%
± In areas susceptible to excessive dust and dirt.
± Near any appliance generating a strong magnetic eld.
± In direct sunlight.
• Do not use the unit if it has been physically damaged or abused. Physical damage/abuse would be (but
not limited to):
± Unit has been dropped.
± Power supply cord or plug has been damaged.
± Liquid has been spilled on to the projector.
± Projector has been exposed to rain or moisture.
± Something has fallen in the projector or something is loose inside.
• Do not place the projector on an unstable surface. The projector may fall over resulting in injury or the
projector may become damaged.
• Do not block the light coming out of the projector lens when in operation. The light will heat the object
and could melt, cause burns or start a re.
English
10
• Please do not open or disassemble the projector as this may cause electric shock.
• Do not attempt to service the unit yourself. Opening or removing covers may expose you to dangerous
voltages or other hazards. Please call Optoma before you send the unit for repair.
• See projector enclosure for safety related markings.
• The unit should only be repaired by appropriate service personnel.
• Only use attachments/accessories specied by the manufacturer.
• Do not look into straight into the projector lens during operation. The bright light may harm your eyes.
• Turn o and unplug the power plug from the AC outlet before cleaning the product.
• Use a soft dry cloth with mild detergent to clean the display housing. Do not use abrasive cleaners,
waxes or solvents to clean the unit.
• Disconnect the power plug from AC outlet if the product is not being used for a long period of time.
• Do not setup the projector in places where it might be subjected to vibration or shock.
• Do not touch the lens with bare hands.
• ! WARNING CHEMICAL BURN HAZARD
This product contains a small button battery. If swallowed, this battery can cause severe
internal burns [within 2 hours] and can lead to death.
Keep new and used batteries away from children. If battery compartment will not close
securely, stop using product and keep it away from children.
If you think batteries might have been swallowed or placed inside any part of the body,
seek immediate medical attention.
• Remove battery/batteries from remote control before storage. If the battery/batteries are left in the
remote for long periods, they may leak.
• Do not use or store the projector in places where smoke from oil or cigarettes may be present, as it can
adversely aect the quality of the projector performance.
• Use a power strip and or surge protector. As power outages and brown-outs can KILL devices.
Safety Information
• As with any bright source, do not stare into the direct beam, RG2 IEC 62471-5:2015.
• Product label(Rating label) on the bottom of the product.
Cleaning the Lens
• Before cleaning the lens, be sure to turn o the projector and unplug the power cord to allow it to
completely cool down.
• Use a compressed air tank to remove the dust.
• Use a special cloth for cleaning lens and gently wipe the lens. Do not touch the lens with your ngers.
• Do not use alkaline/acid detergents or volatile solvents such as alcohol for cleaning lens. If the lens is
damaged due to the cleaning process, it is not covered by the warranty.
Warning: Do not use a spray containing ammable gases to remove dust or dirt from the lens. This
may cause a re due to excessive heat inside the projector.
Warning: Do not clean the lens if the projector is warming up as this may cause the lens’ surface lm
to peel o.
Warning: Do not wipe or tap the lens with a hard object.

English
11
Copyright
This publication, including all photographs, illustrations and software, is protected under international copyright
laws, with all rights reserved. Neither this manual, nor any of the material contained herein, may be reproduced
without written consent of the author.
© Copyright 2024
Disclaimer
The information in this document is subject to change without notice. The manufacturer makes no representations
or warranties with respect to the contents hereof and specically disclaims any implied warranties of
merchantability or tness for any particular purpose. The manufacturer reserves the right to revise this publication
and to make changes from time to time in the content hereof without obligation of the manufacturer to notify any
person of such revision or changes.
Trademark Recognition
Kensington is a U.S. registered trademark of ACCO Brand Corporation with issued registrations and pending
applications in other countries throughout the world.
HDMI, the HDMI Logo, and High-Denition Multimedia Interface are trademarks or registered trademarks of HDMI
Licensing LLC in the United States and other countries.
DLP
®
, DLP Link and the DLP logo are registered trademarks of Texas Instruments and BrilliantColor
TM
is a
trademark of Texas Instruments.
All other product names used in this manual are the properties of their respective owners and are
Acknowledged.
FCC
This device has been tested and found to comply with the limits for a Class B digital device pursuant to Part 15
of the FCC rules. These limits are designed to provide reasonable protection against harmful interference in a
residential installation. This device generates, uses and can radiate radio frequency energy and, if not installed and
used in accordance with the instructions, may cause harmful interference to radio communications.
However, there is no guarantee that interference will not occur in a particular installation. If this device does cause
harmful interference to radio or television reception, which can be determined by turning the device o and on is
encouraged to try to correct the interference by one or more of the following measures:
• Reorient or relocate the receiving antenna.
• Increase the separation between the device and receiver.
• Connect the device into an outlet on a circuit dierent from that to which the receiver is connected.
• Consult the dealer or an experienced radio/television technician for help.
Notice: Shielded cables
All connections to other computing devices must be made using shielded cables to maintain compliance with FCC
regulations.
Caution
Changes or modications not expressly approved by the manufacturer could void the user’s authority, which is
granted by the Federal Communications Commission, to operate this projector.
Operation Conditions
This device complies with Part 15 of the FCC Rules. Operation is subject to the following two conditions:
1. This device may not cause harmful interference and
2. This device must accept any interference received, including interference that may cause undesired operation.

English
12
Notice: Canadian users
This Class B digital apparatus complies with Canadian ICES-003.
Remarque à l’intention des utilisateurs canadiens
Cet appareil numerique de la classe B est conforme a la norme NMB-003 du Canada.
Declaration of Conformity for EU countries
• EMC Directive 2014/30/EC (including amendments)
• Low Voltage Directive 2014/35/EC
• RED 2014/53/EU (if product has RF function)
WEEE
Disposal instructions
Do not throw this electronic device into the trash when discarding. To minimize pollution and ensure
utmost protection of the global environment, please recycle it.
English
13
INTRODUCTION
Thank you for purchasing an Optoma laser projector. For full list of features please visit the product page on our
website, where you will also nd additional information and documentation such as FAQs.
Package overview
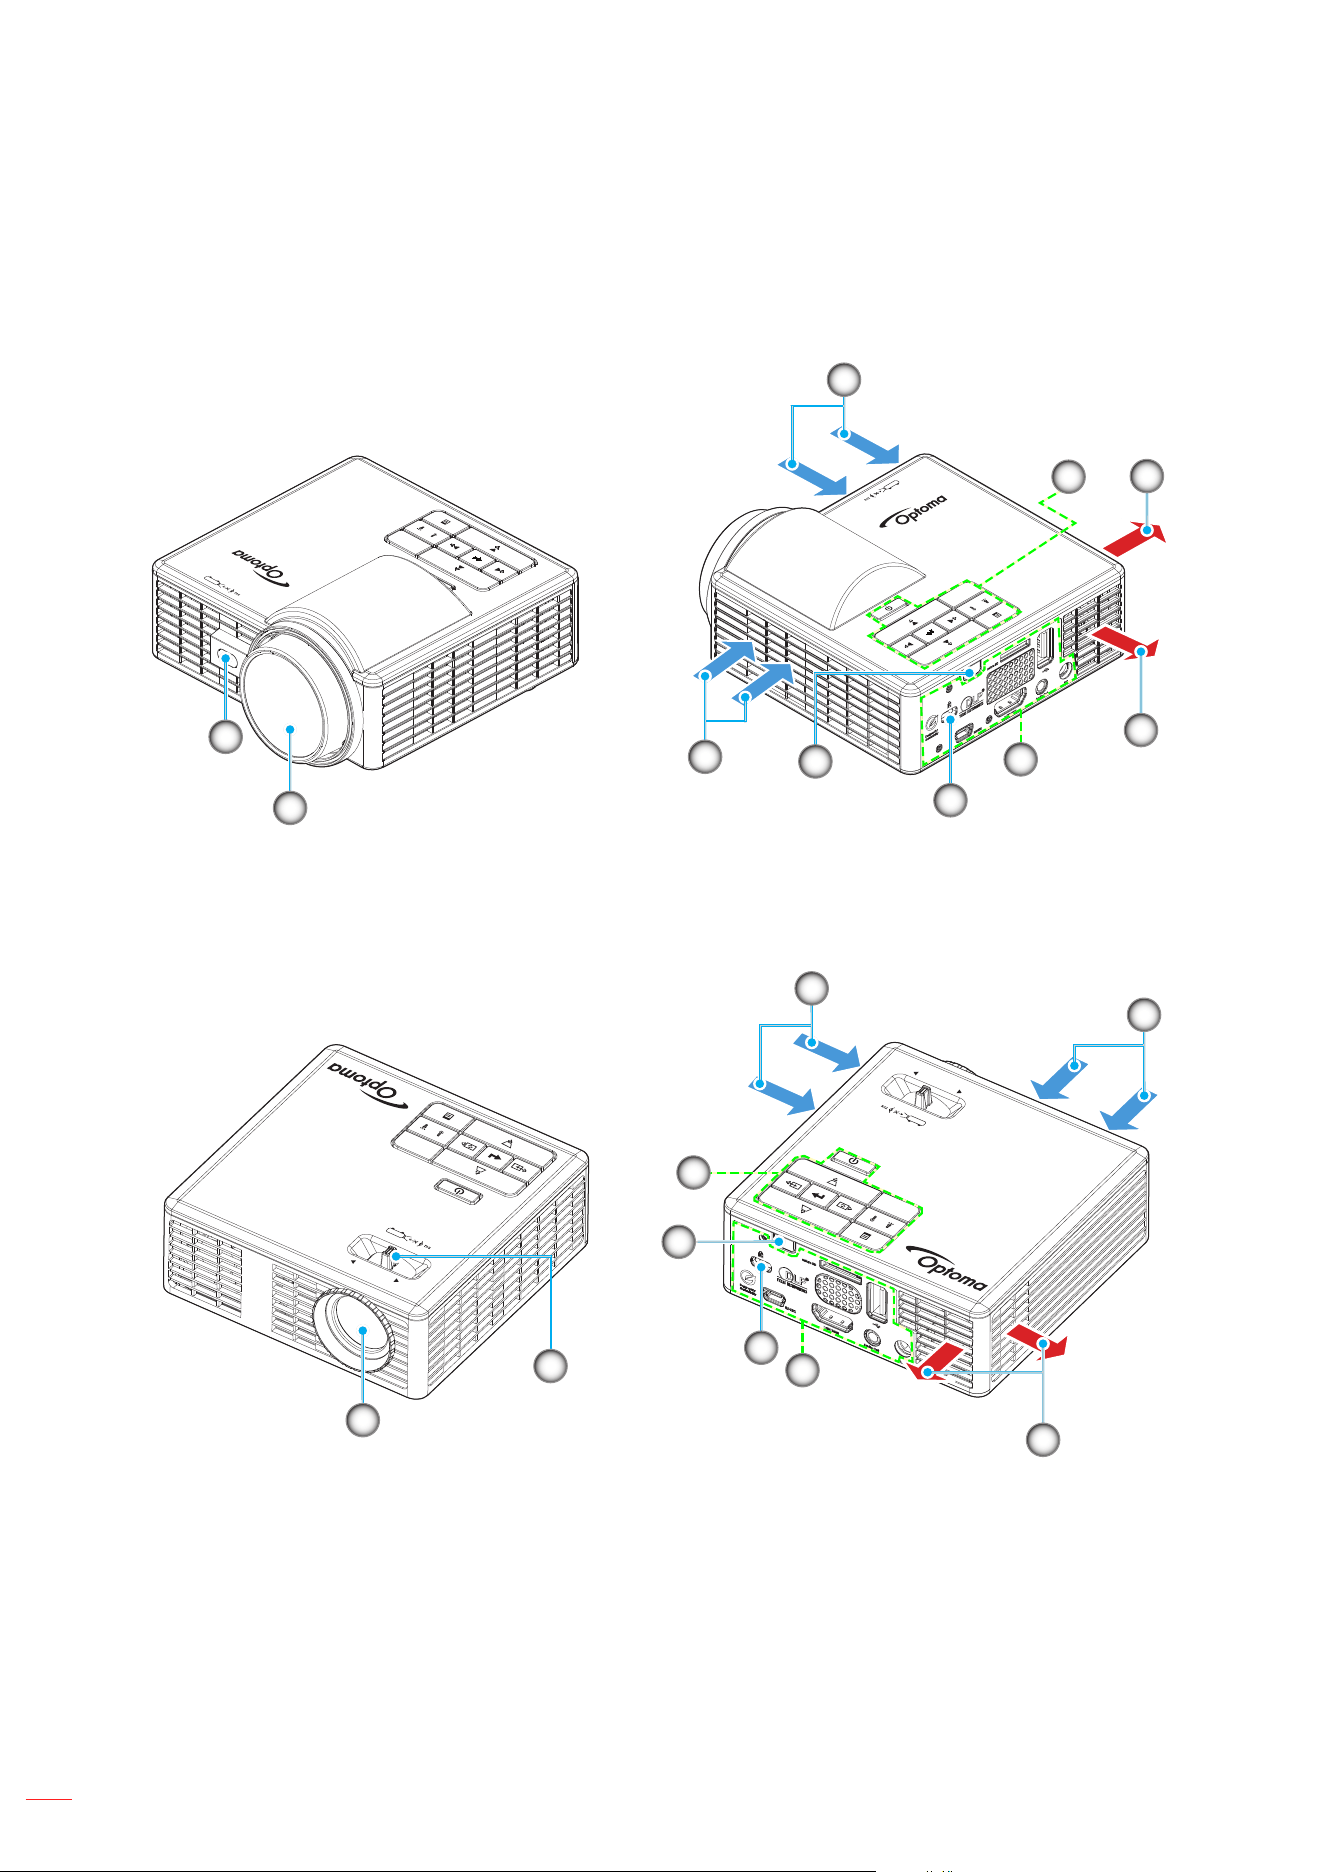
Carefully unpack and verify that you have the items listed below under standard accessories. Some of the items
under optional accessories may not be available depending on the model, specication and your region of
purchase. Please check with your place of purchase. Some accessories may vary from region to region.
The warranty card is only supplied in some specic regions. Please consult your dealer for detailed information.
Standard accessories
Projector
Documentation
Quick start user manual
Note:
•
For access to the setup information, user manual, warranty information, and product updates
– please scan the QR Code or visit the following URL:
https://www.optoma.com/support/download
• Power cable and optional accessories may vary by country.
Optional accessories
Wi-Fi dongle
(EZC-5201BS)
Lens cap
Note: The optional accessories may vary depending on the region and the purchased projector model.
Mini USB-B to RS232
cable (10cm)
Power cable Power adapter CArrying case
Remote control
English
14
INTRODUCTION
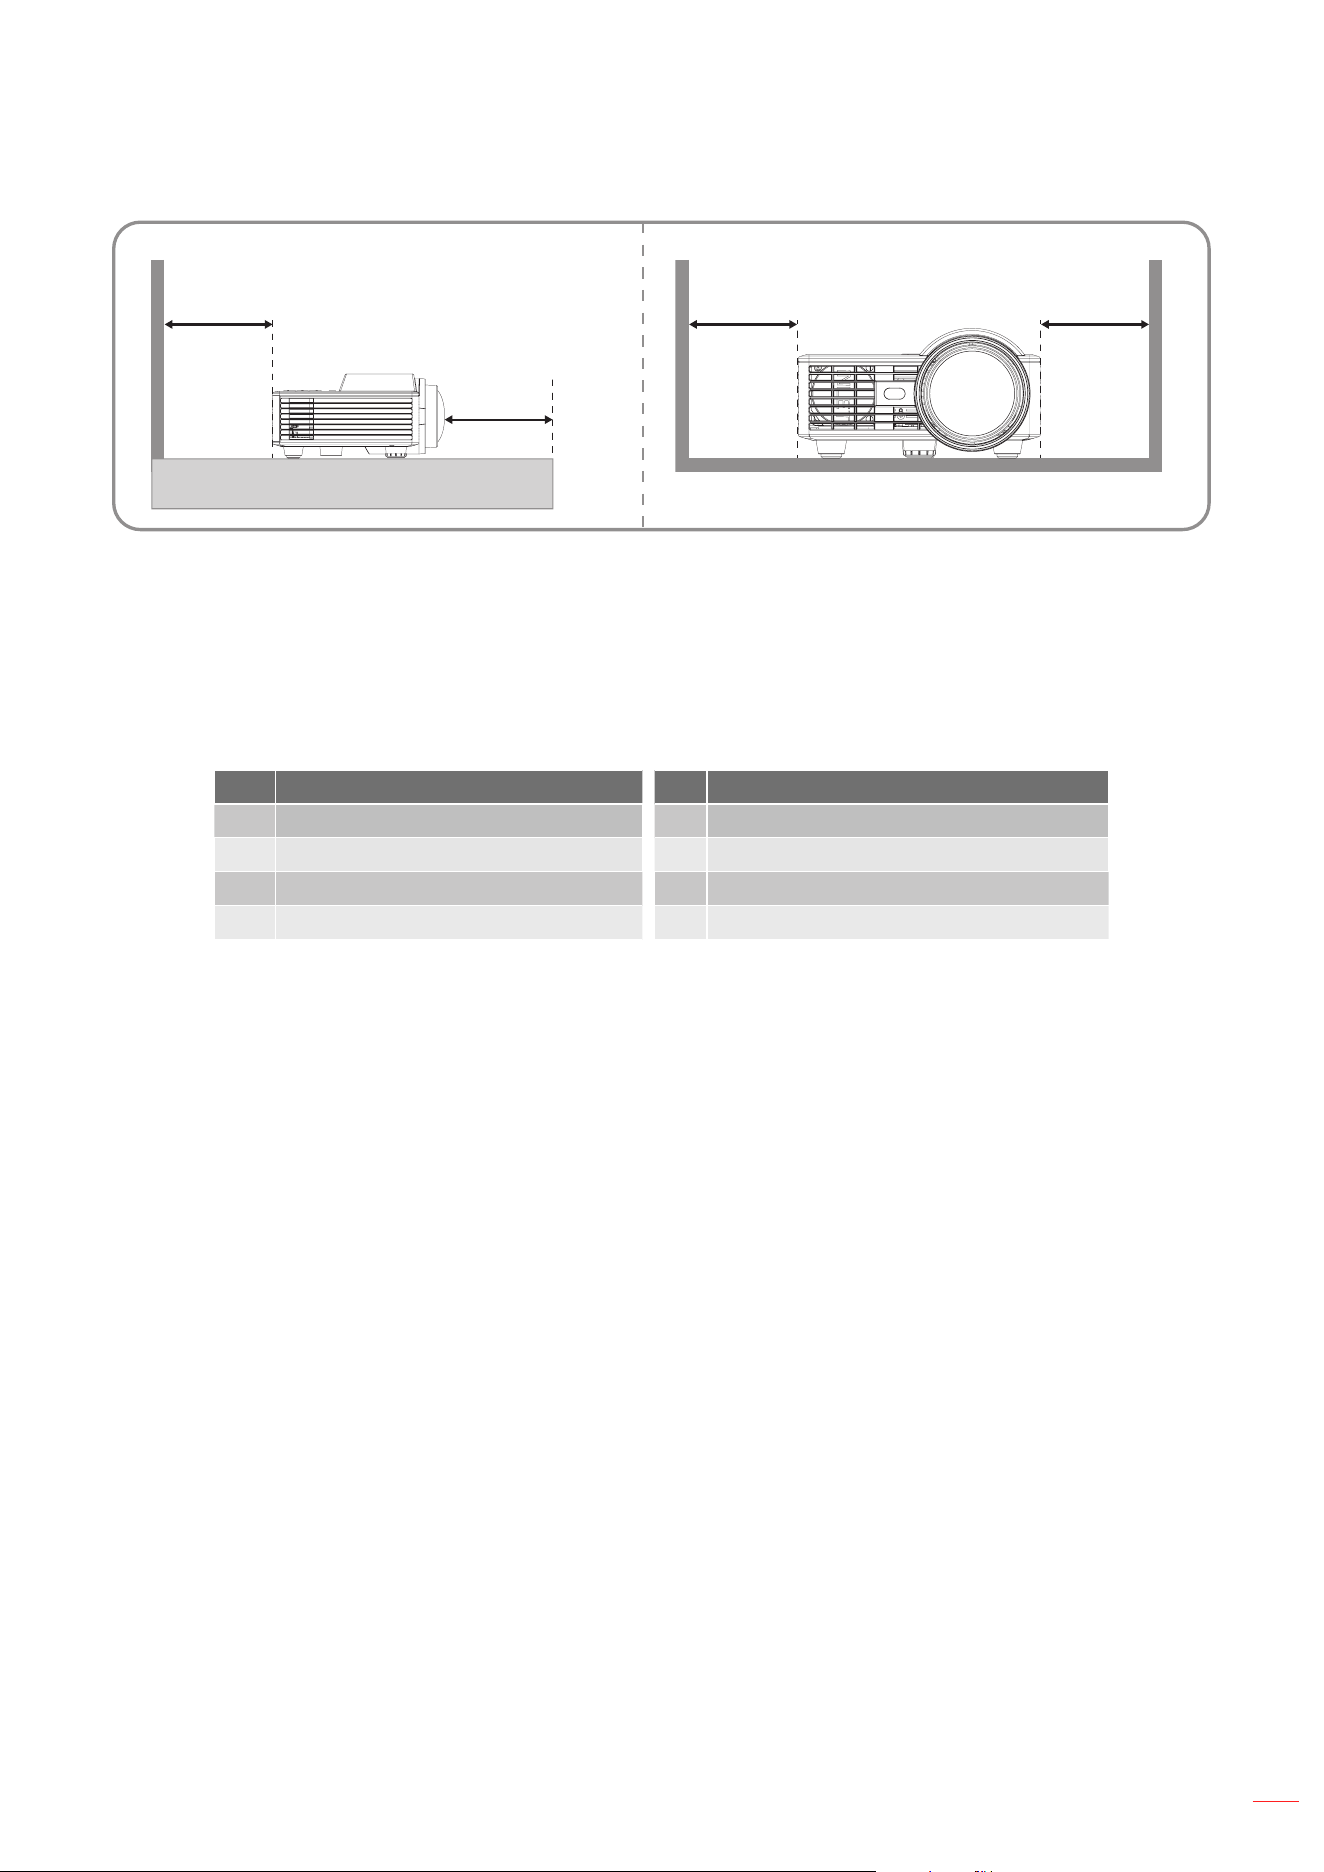
Product overview
ML1050STi model
1
2
4
2
4
3
7
5
6
8
ML750i model
FOCUS
FOCUS
3
1
2
2
4
7
5
8
6
English
15
INTRODUCTION
Minimum
150mm
Minimum
150mm
Minimum
150mm
≤ 120mm
Desk
Note:
• Do not block projector intake and exhaust vents.
• When operating the projector in an enclosed space, allow at least 15 cm clearance around the intake
and exhaust vents.
• Ensure the distance between projector and the edge of table is less then 120mm to avoid light sensor
detection interference. (For ML1050STi only.)
No Item No Item
1. Lens 5. Input / Output
2. Ventilation (inlet) 6. Kensington™ Lock Port
3. Keypad 7. IR Receiver
4. Ventilation (outlet) 8. Focus Sensor / Lever
English
16
INTRODUCTION
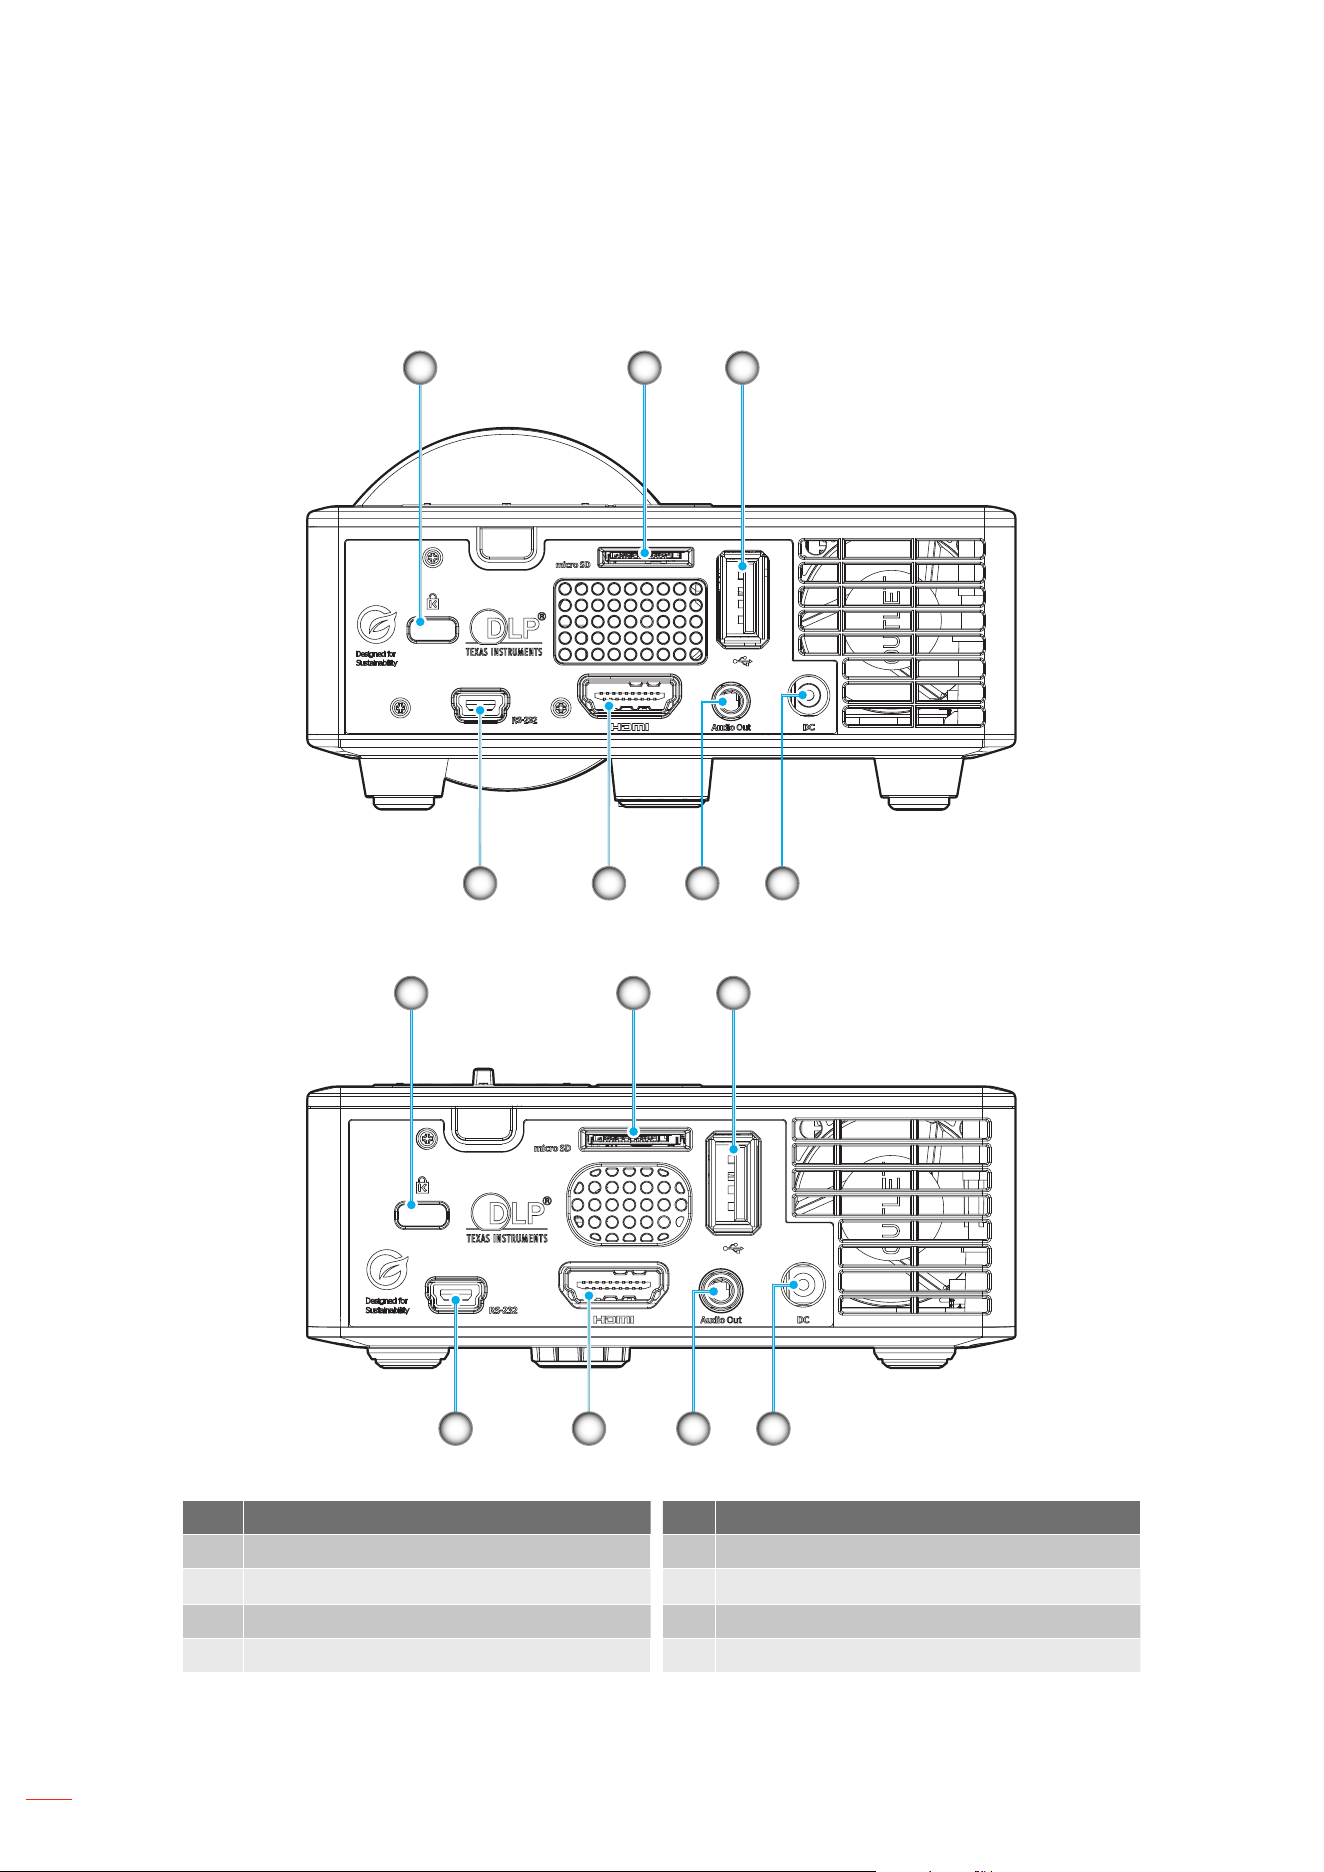
Connections
ML1050STi model
1 2 3
7 6 5 4
ML750i model
1 2 3
7 6 5 4
No Item No Item
1. Kensington
TM
Lock Port 5. Audio Out Connector
2.
Micro SD Card Slot (Up to 32G)
6.
HDMI Connector
3. USB Power Out (5V/0.5A) Connector 7. Mini USB (RS232 control) Connector
4. DC Jack
Note:
• Signal mode support varies from dierent model in each sales region.

English
17
INTRODUCTION
• Mini USB Connector (#7) is for RS232 function only.
a. To enable RS232 control, activate the hot key (Sequence accessible via RS232 quick guide*)
* To obtain the RS232 quick start guide, please contact your local Optoma Sales/Service team.
b. Use specied cable (Mini USB – to – D SUB 9) to connect to PC or laptop.
c. Do not use other cables or devices with this connector, any incompatible power output may cause
damage to the device or connector.
d. For additional information regarding the RS232 connector, please contact your local reseller or
service center.
English
18
INTRODUCTION
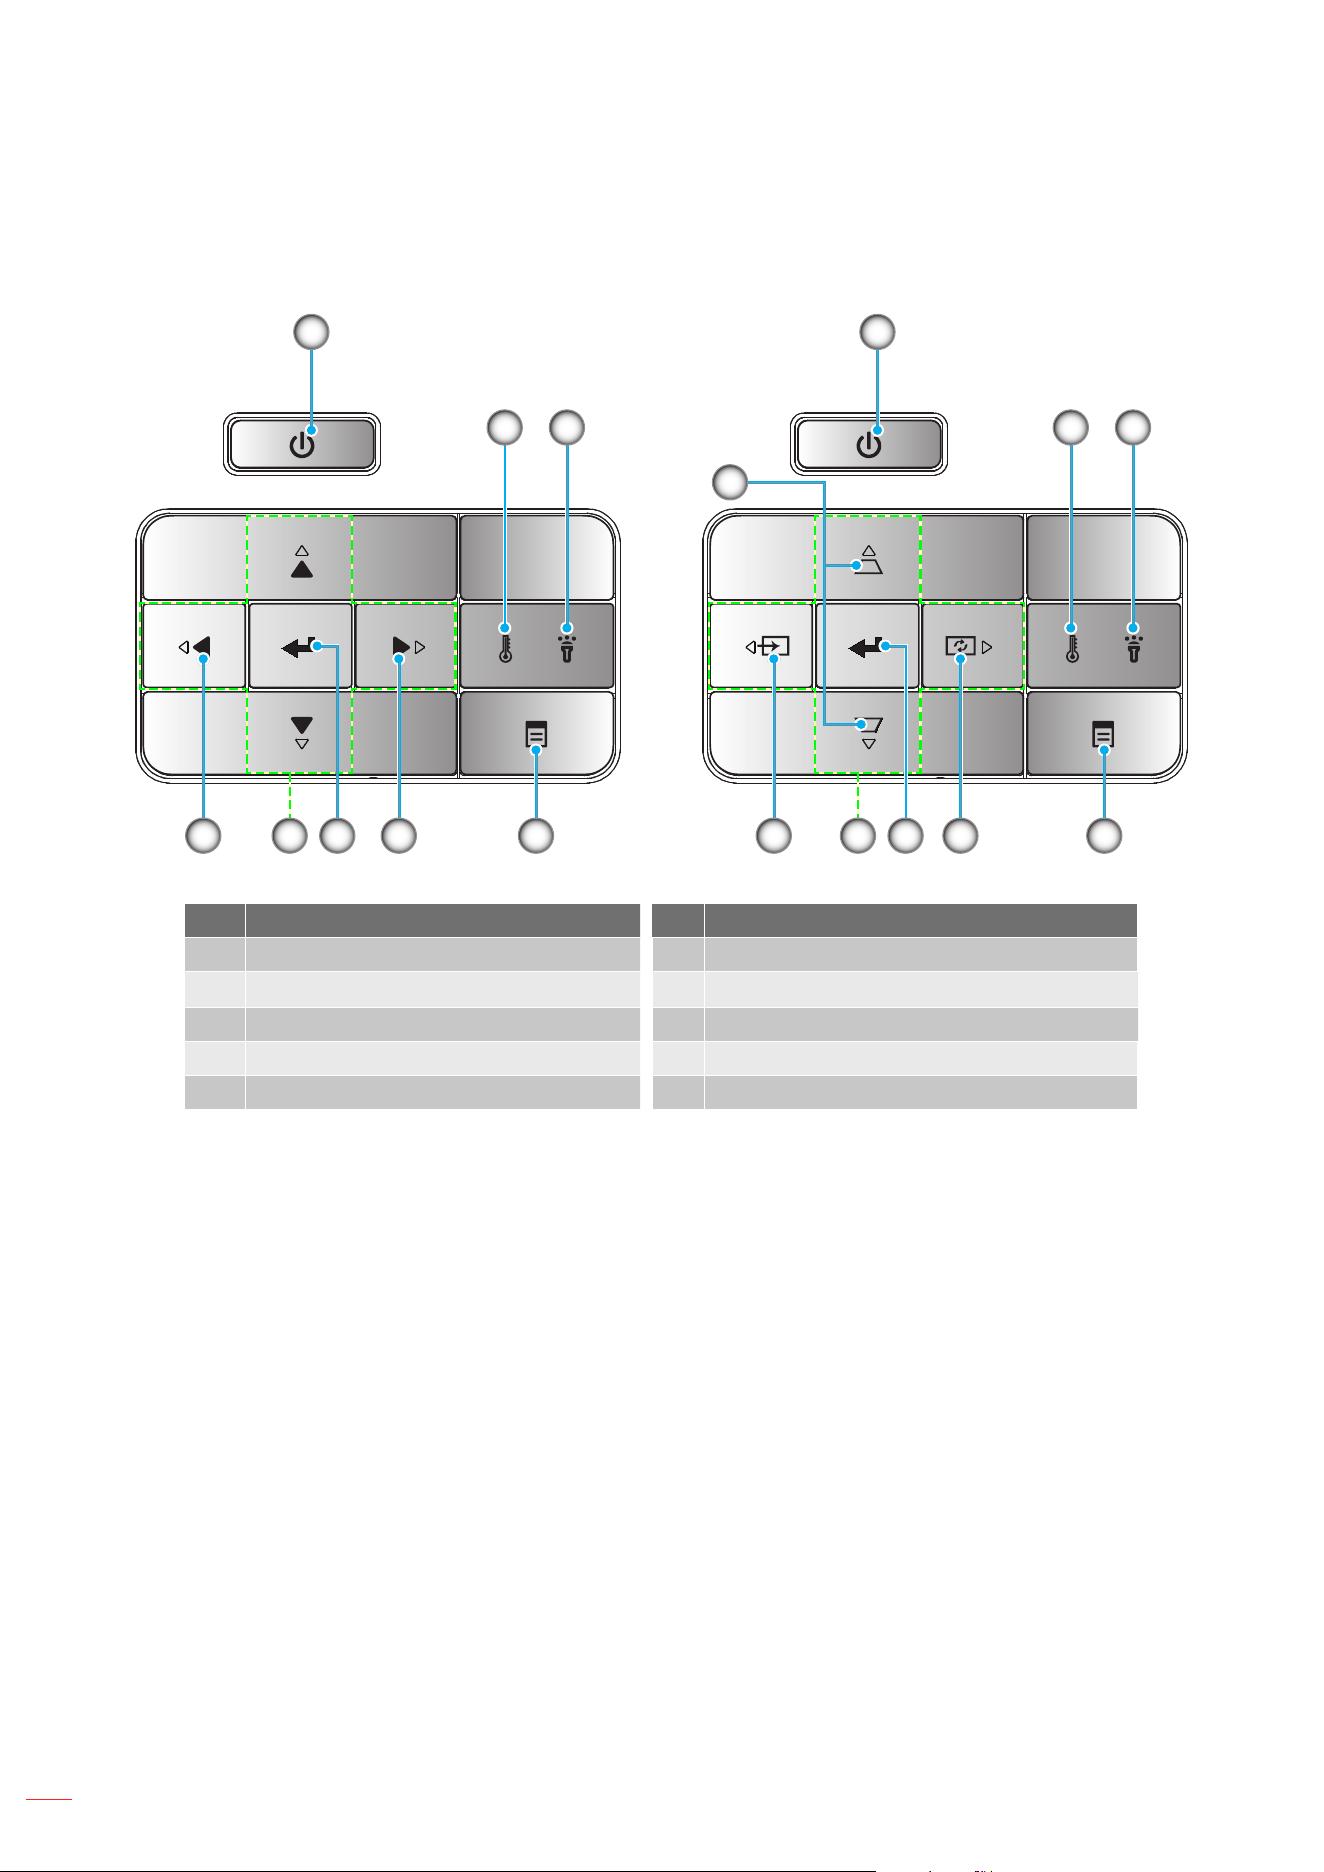
Keypad
ML1050STi model ML750i model
1
2 3
7 458 6 7 4
1
2 3
9
58 6
No Item No Item
1. Power with its LED 6. Enter
2.
Temp LED
7.
Four Directional Select Keys
3. Lamp LED 8. Source (ML750i model only)
4. Menu 9. Keystone Correction (ML750i model only)
5. Re-Sync (ML750i model only)
Note:
• Menu (#4): Multiple function depends on the input source.
*HDMI: Press to display or exit the on-screen display menus.
*Home (USB-A, SD card):
a. Press and hold (over 1 second): To activate the OSD.
b. Press: Back to the previous page.
English
19
INTRODUCTION
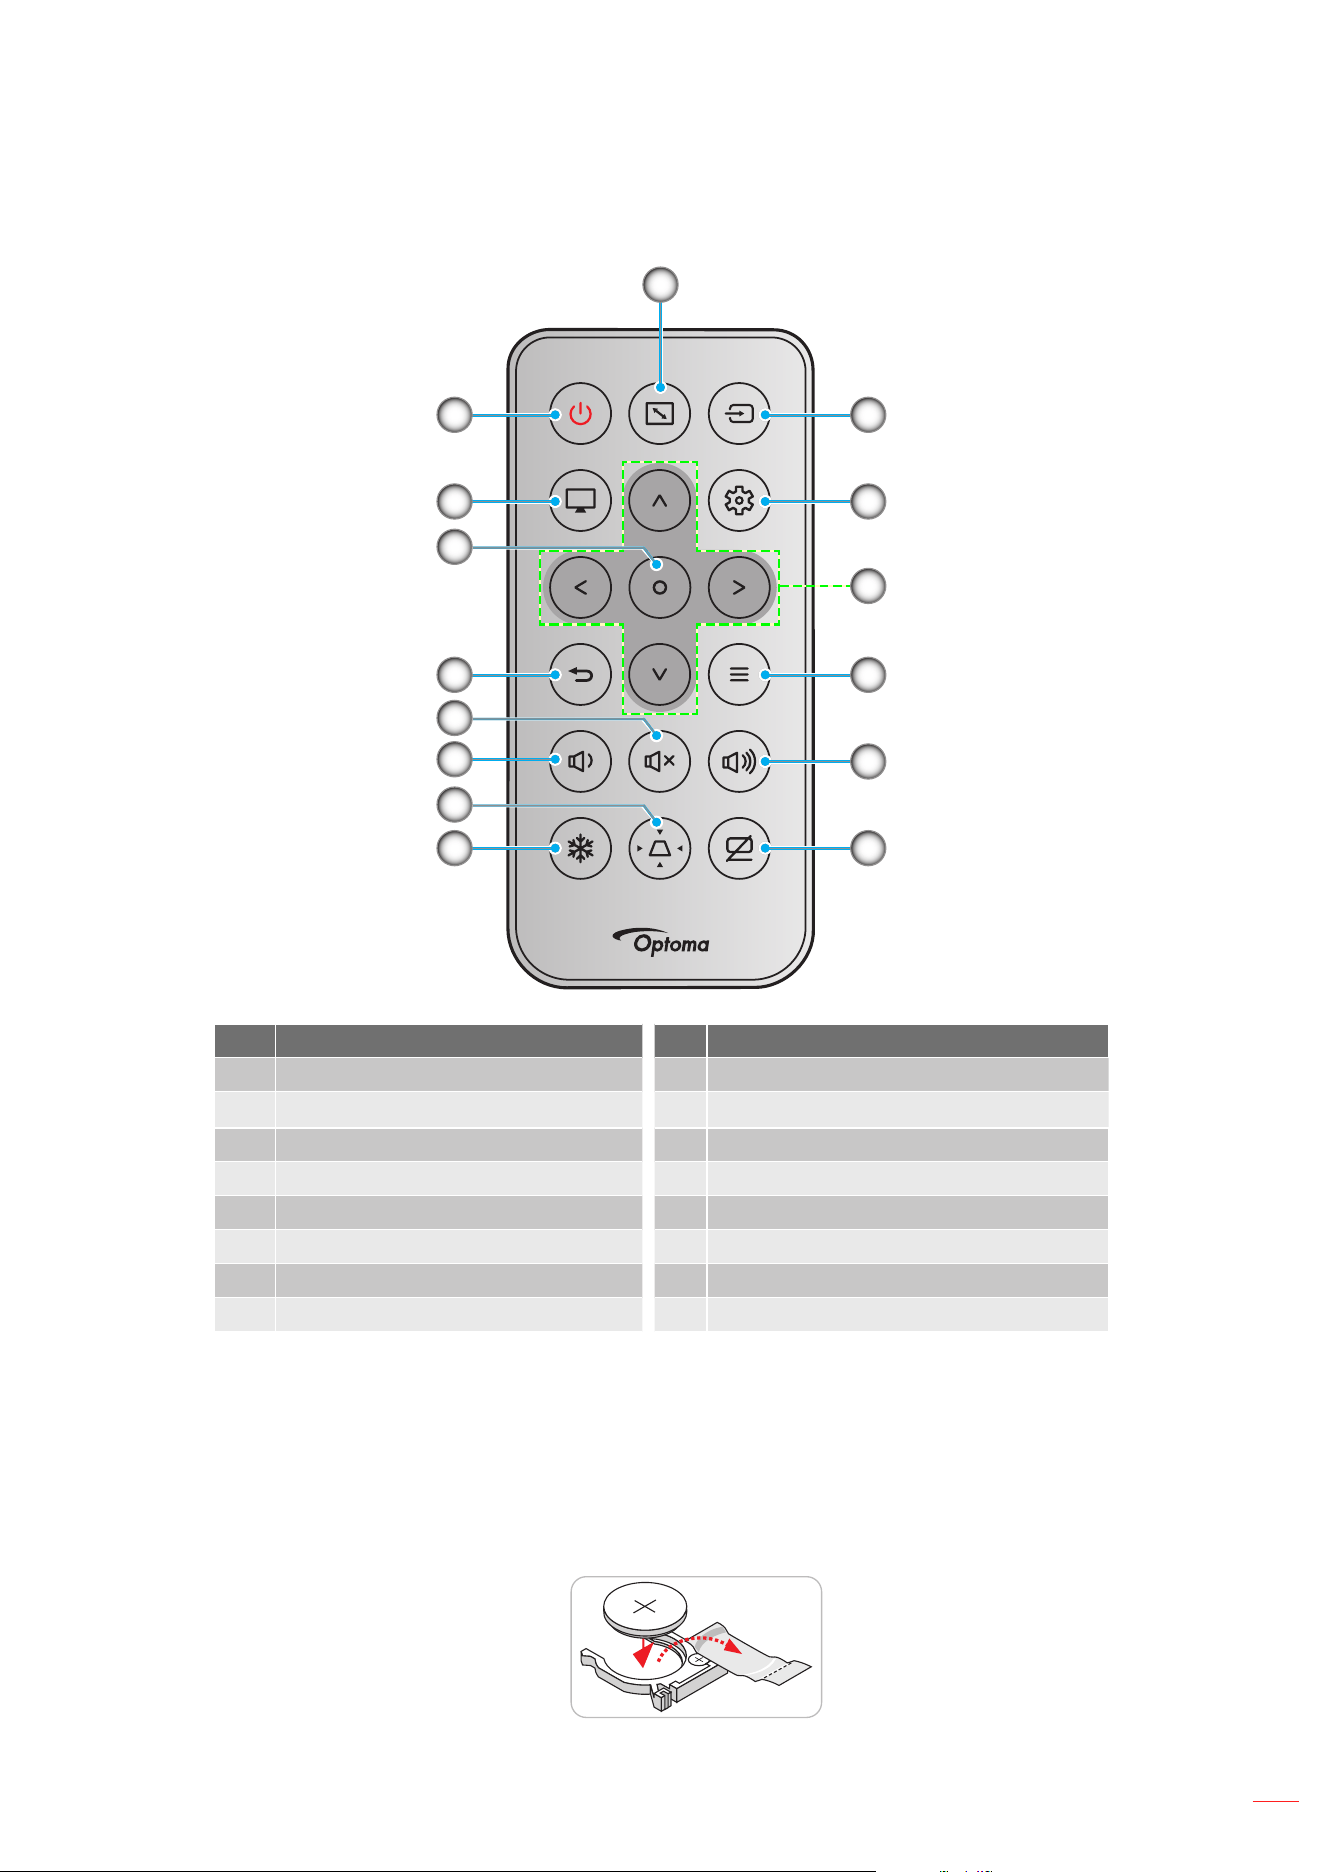
Remote control
1
2
10
3
5
7
9
6
8
11
12
14
15
13
4
No Item No Item
1. Aspect Ratio 9. Freeze
2.
Power On / O 10. AV Mute
3. Mode / Home 11. Volume +
4. Enter 12. Menu / Back
5. Return 13. Four Directional Select Keys
6. Mute 14. Settings / Setup Menu / Menu
7. Volume - 15. Source
8. Keystone Correction
Note:
• Some keys may have no function for models that do not support these features. (Please refer to page
54).
• Before using the remote control for the rst time, remove the transparent insulation tape. See page
25 for battery installation.
• The inclusion of the battery for the remote control may vary depending on the region.
3
V
O
L
T
S
CR2025
English
20
SETUP AND INSTALLATION
Installing the projector
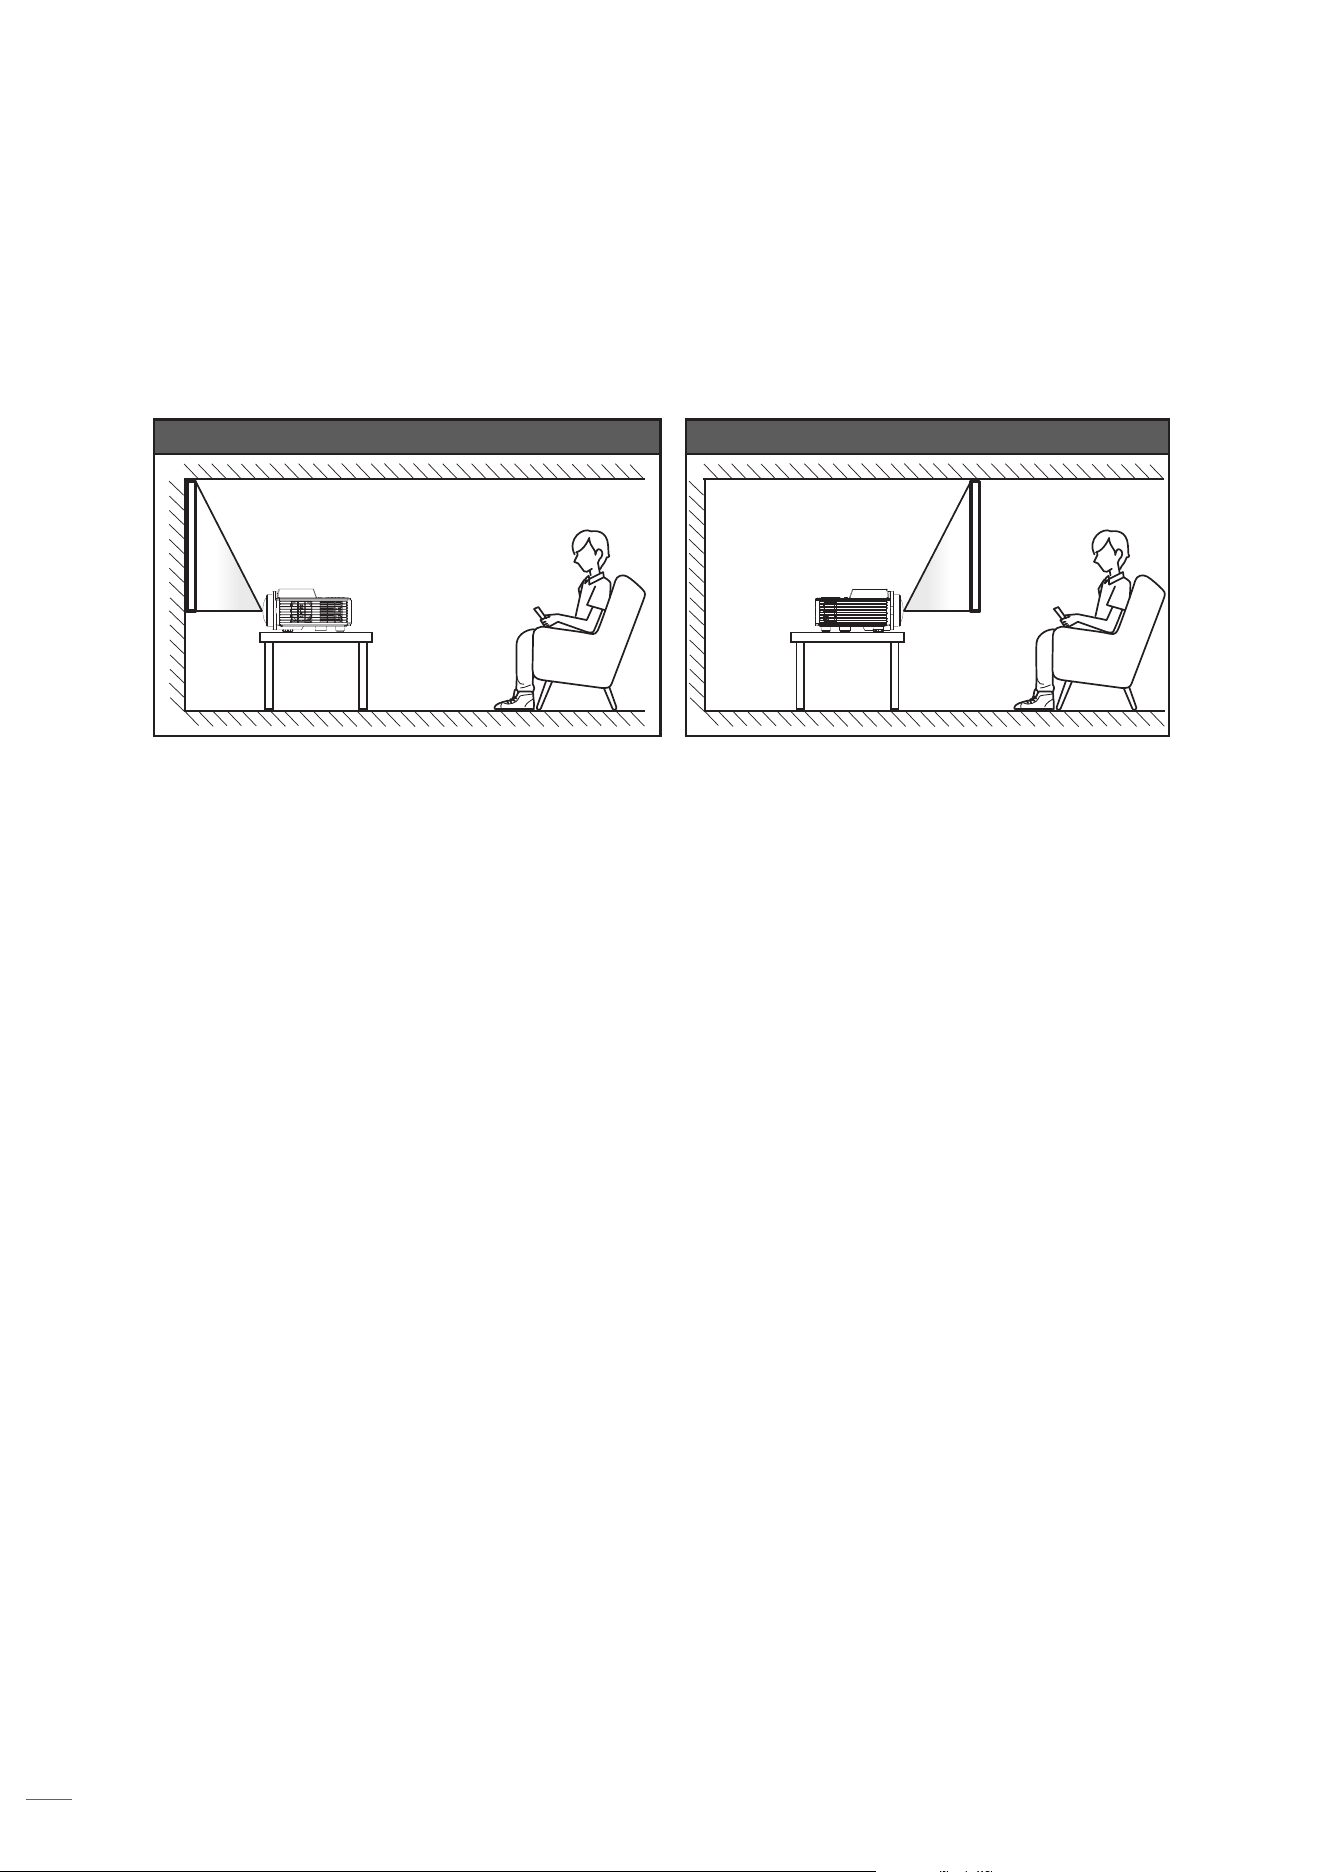
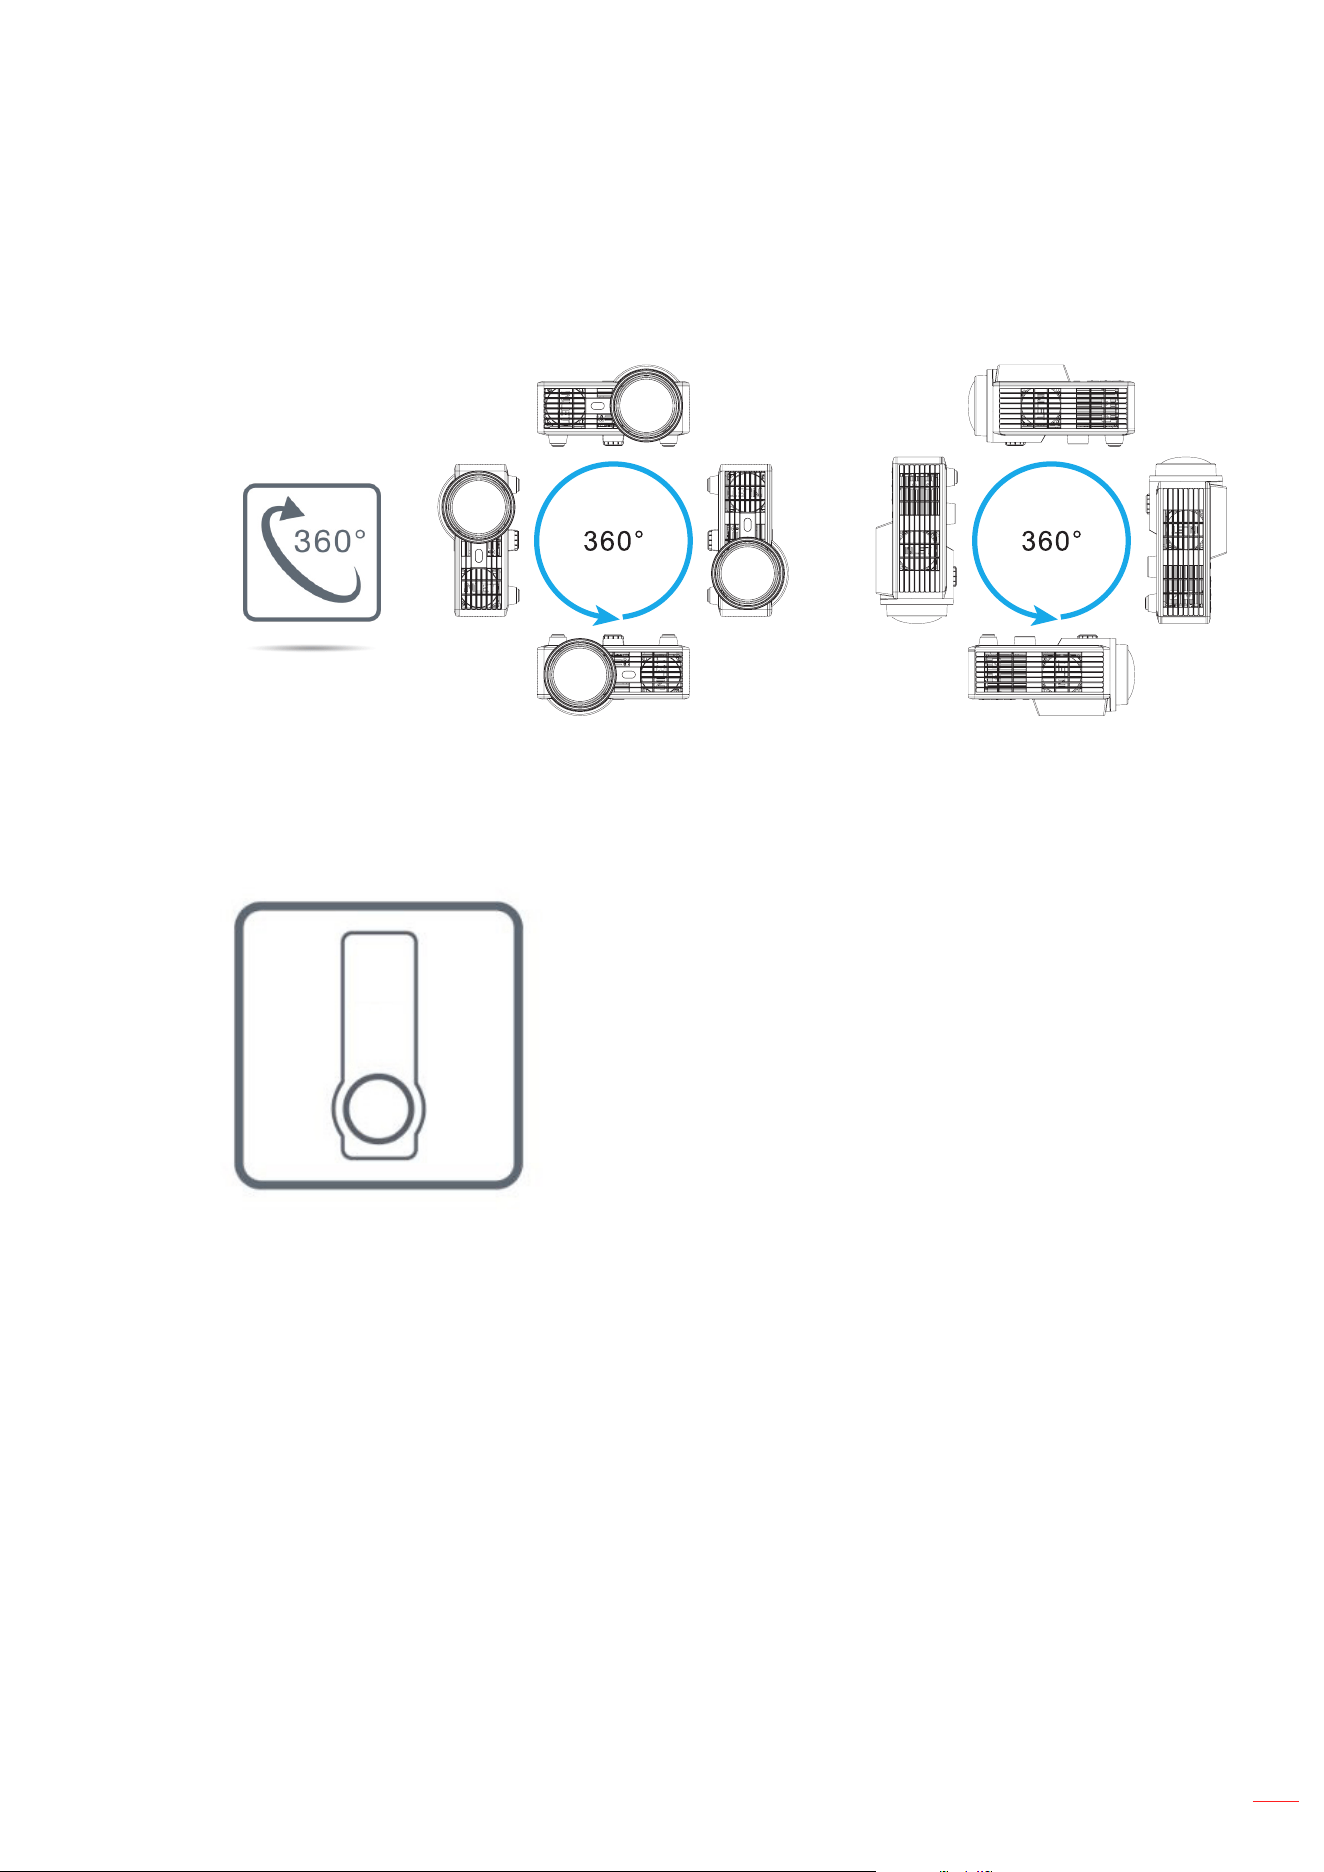
Your projector is designed to be installed in several positions.
Your room layout or personal preference will dictate which installation location you select. Take into consideration
the size and position of your screen, the location of a suitable power outlet, as well as the location and distance
between the projector and the rest of your equipment.
Table mount front Table mount rear
Projector should be placed at on a surface and 90 degrees / perpendicular to the screen.
• How to determine projector location for a given screen size, please refer to distance table on pages
51~52.
• How to determine screen size for a given distance, please refer to distance table on pages
51~52.
Note: The further away the projector is placed from the screen the projected image size increases and vertical
oset also increases proportionally.
English
21
SETUP AND INSTALLATION
Projector installation notice
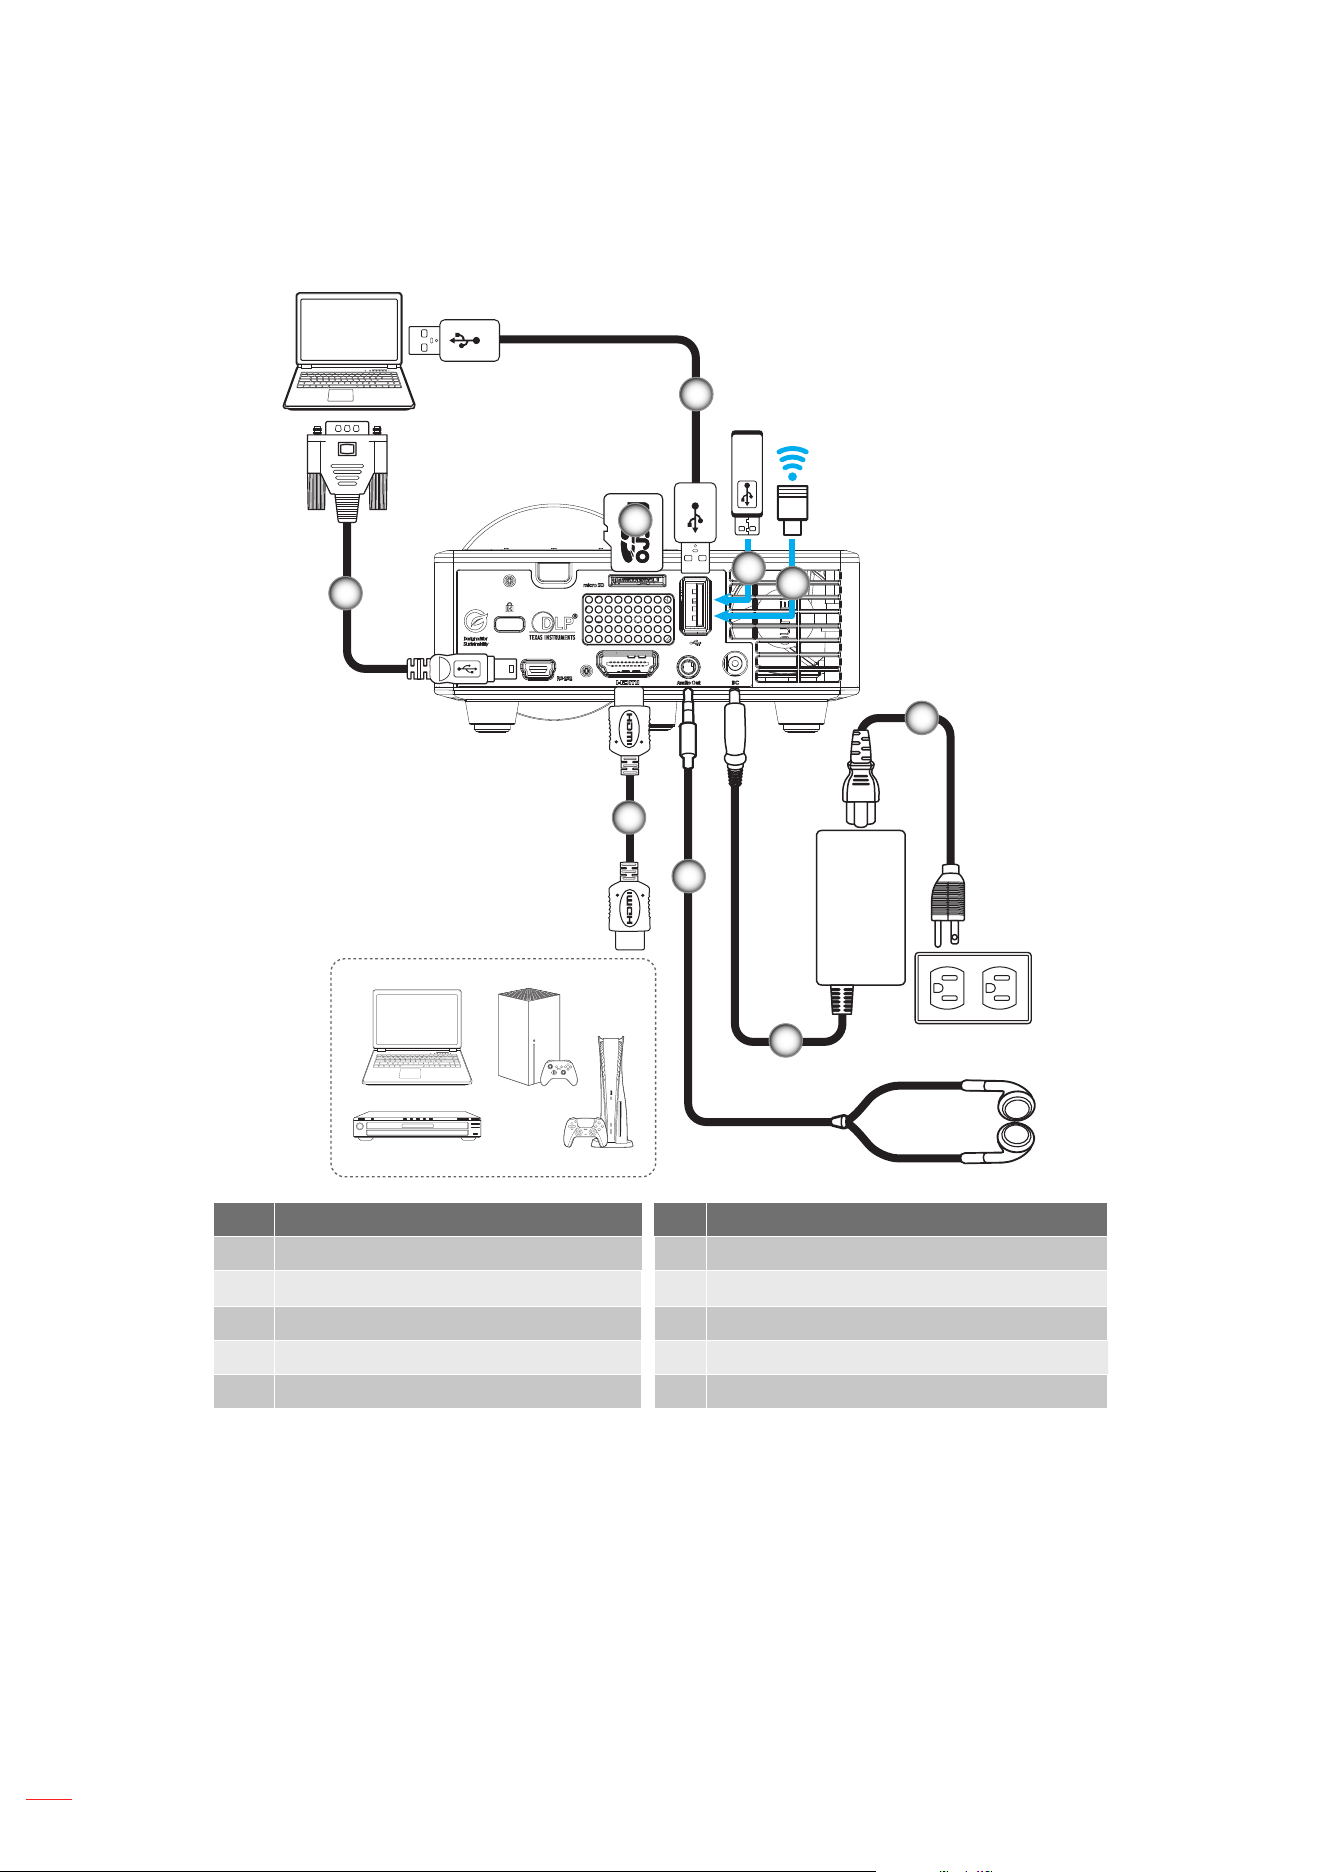
• 360 projection*
With 360° projection*, images can be displayed in any orientation, giving you the freedom and
versatility to install this projector in the desired location.
Portrait projection
• Ideal for digital signage applications; you can rotate your projector 90 degrees to project a portrait
image.
English
22
SETUP AND INSTALLATION
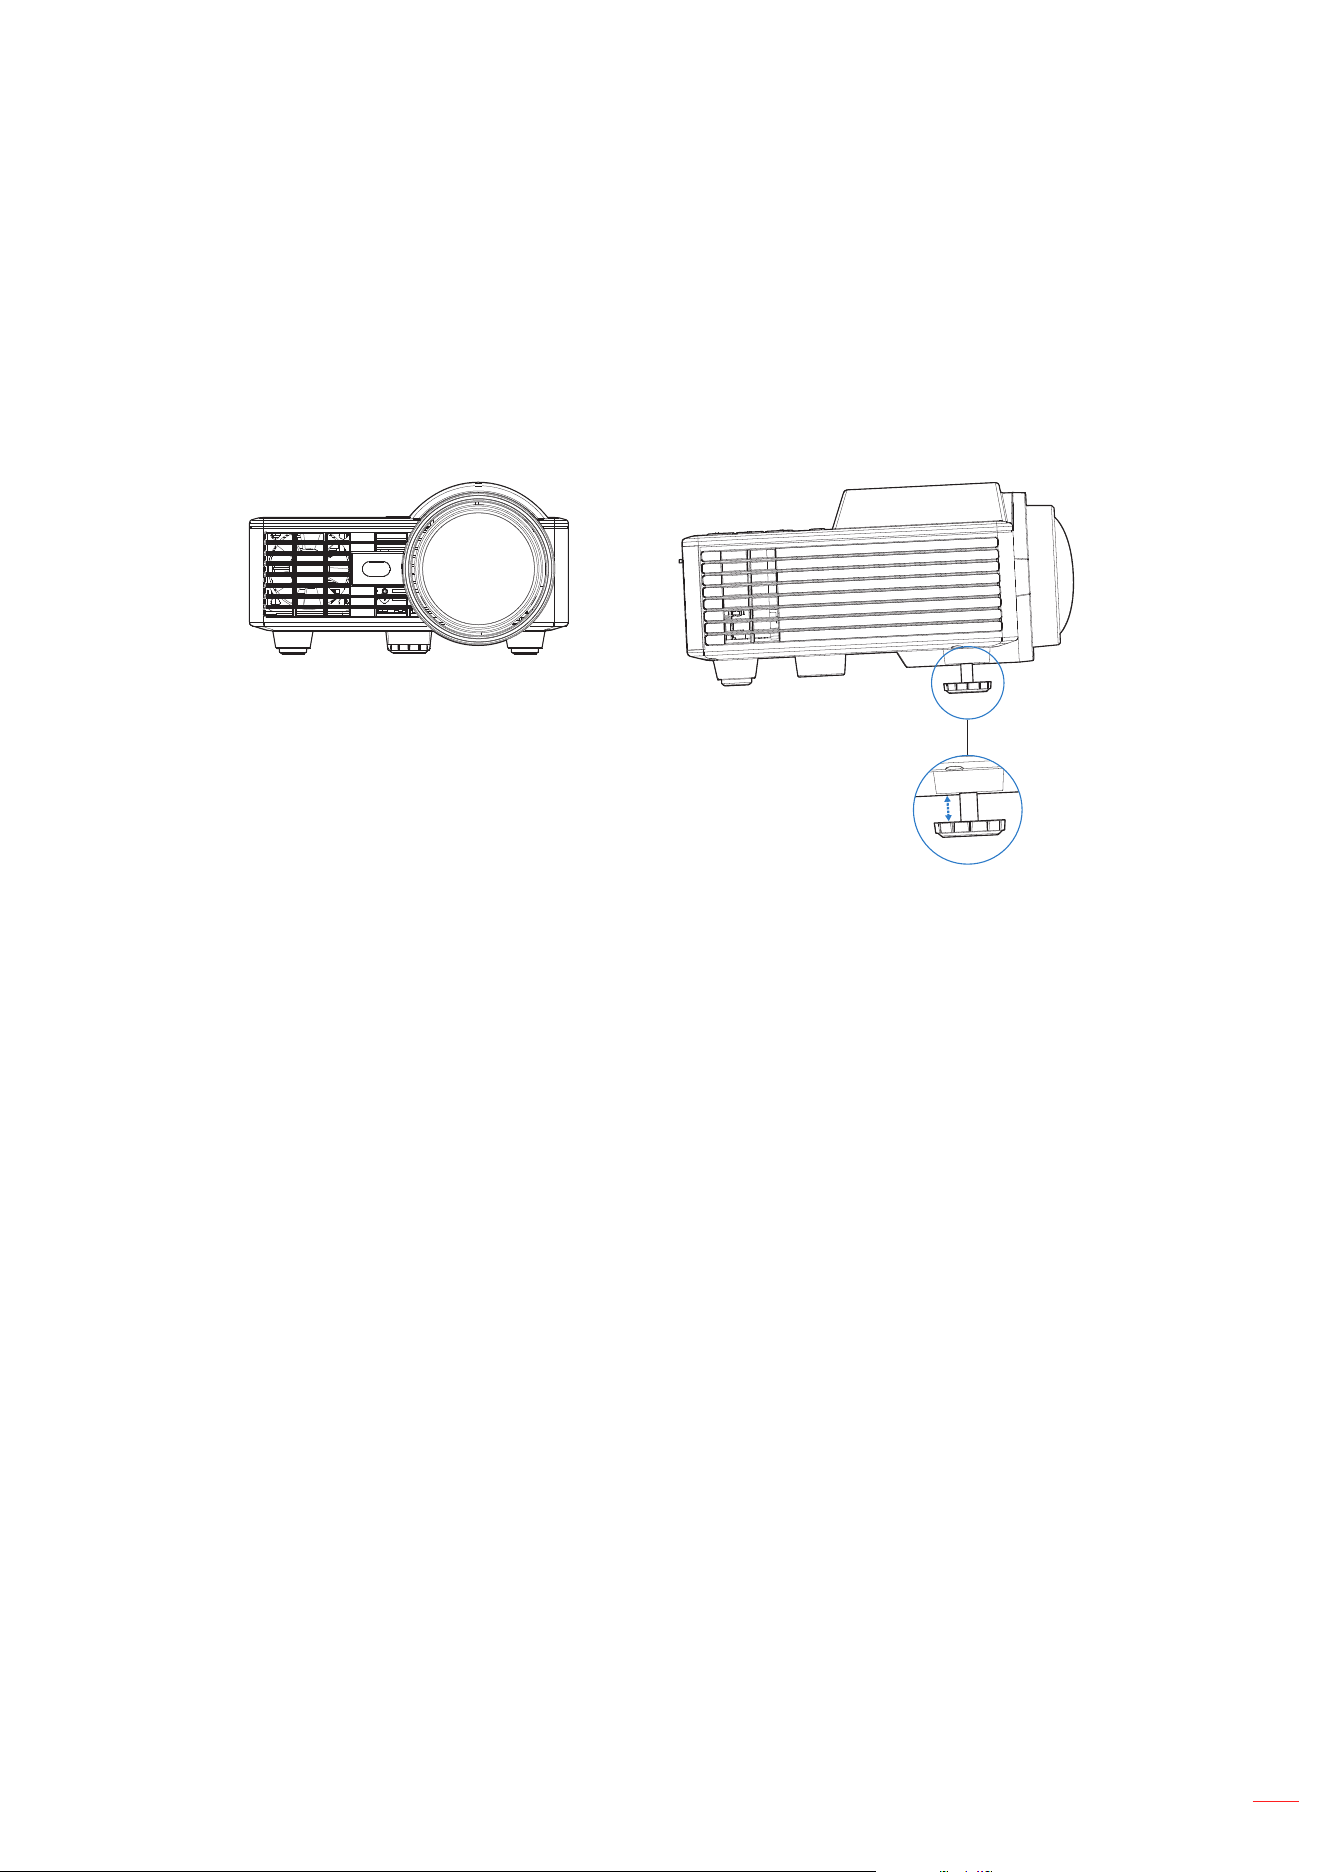
Connecting sources to the projector
1
3
2
4
9
5
6
7
8
No Item No Item
1. Mini USB-B to RS232 Cable 6. Power Cable
2.
Micro SD Card (Up to 32GB)
7.
Power Adapter
3. USB Cable 8. Audio Out Cable
4. USB Disk Drive 9. HDMI Cable
5. Wi-Fi Dongle
English
23
SETUP AND INSTALLATION
Adjusting the projector image
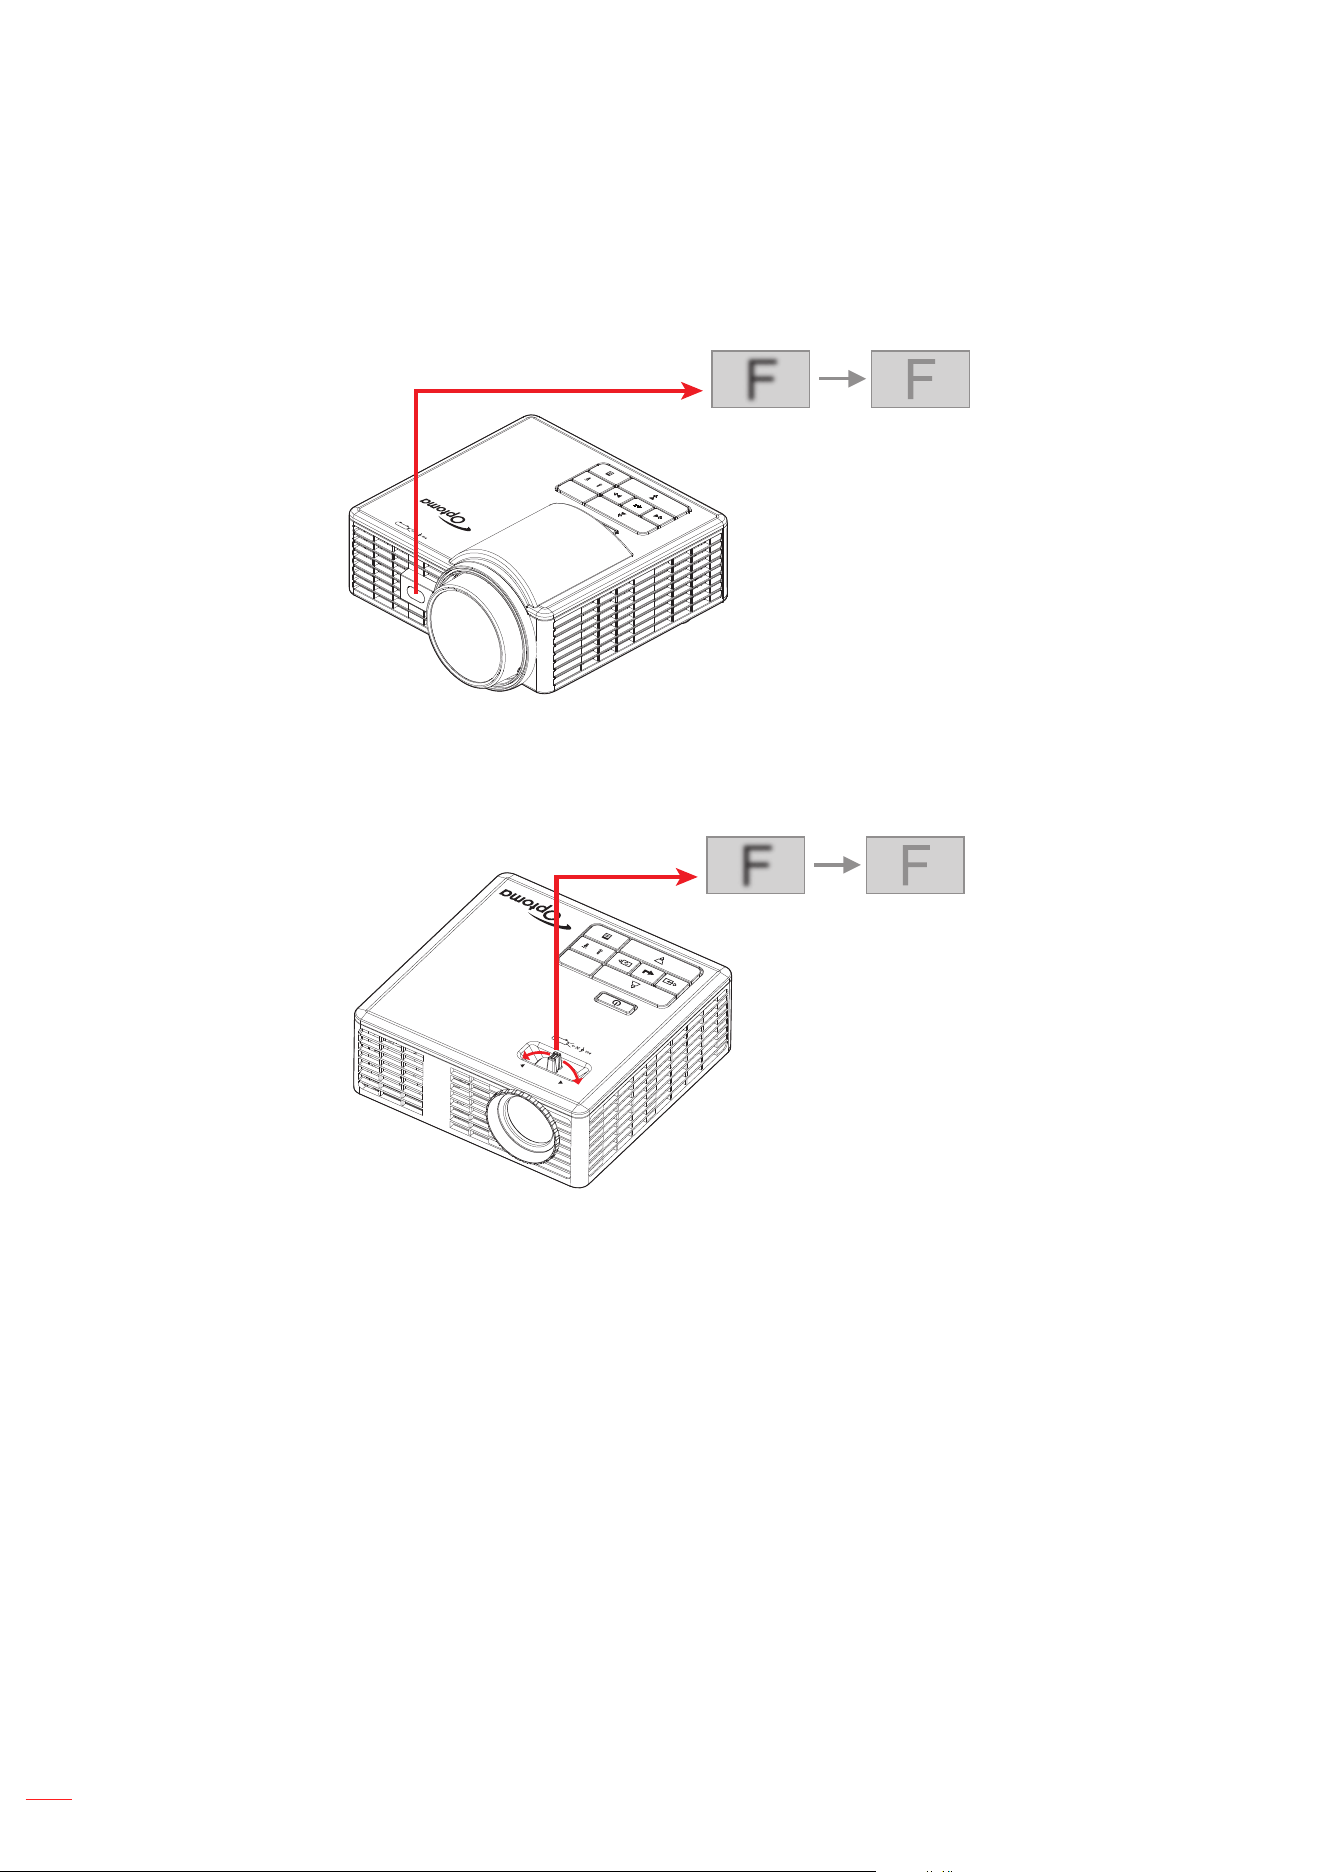
Raising the Projector Height
Raise the projector to the desired display angle, and use the front tilt adjustment wheel to ne-tune the display
angle.
Lowering the Projector Height
Lower the projector, and use the front tilt adjustment wheel to ne-tune the display angle.
Front tilt adjustment wheel
(Angle of tilt: 0 to 3 degrees)
Important Note: To avoid damaging the projector, ensure that the adjustment wheels are fully retracted before
moving the projector or placing the projector in its carrying case.
English
25
SETUP AND INSTALLATION
Remote setup
Installing / replacing the batteries
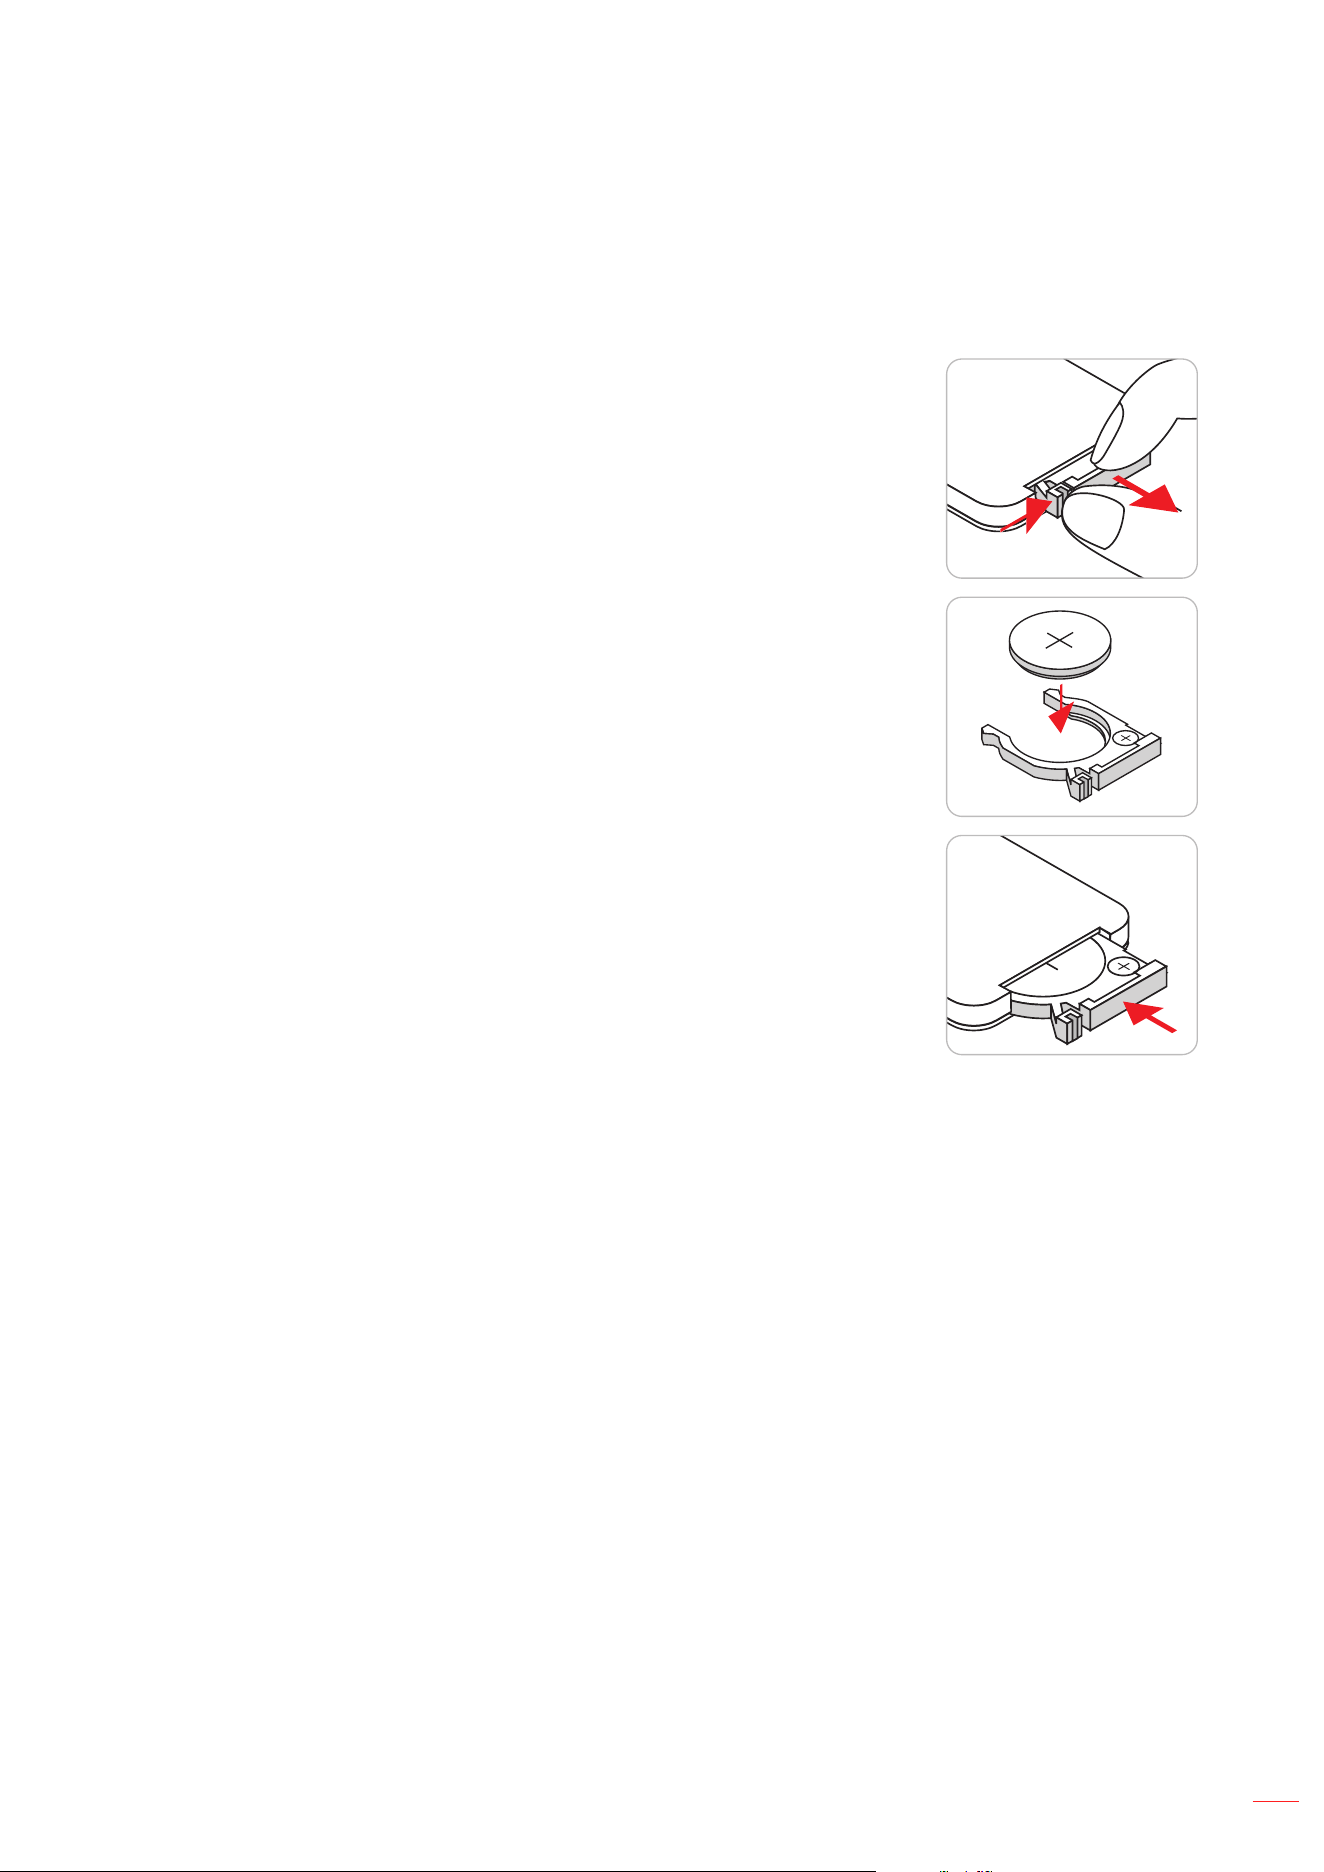
1. Press rmly and slide the battery cover o.
M
n
O
2
-
L
i
C
E
L
L
3
V
O
L
T
S
J
A
P
A
N
H
CR2025
2. Install new battery into the compartment. Remove the old battery and
install new one (CR2025). Ensure that the side with a “+” is facing
up.
3
V
O
L
T
S
CR2025
3. Put the cover back.
M
3
V
O
L
T
S
CR2025
CAUTION: To ensure safe operation, please observe the following precautions:
• Use CR2025 type battery.
• Avoid contact with water or liquid.
• Do not expose the remote control to moisture or heat.
• Do not drop the remote control.
• If the battery has leaked in the remote control, carefully wipe the case clean and install new battery.
• Risk of an explosion if battery is replaced by an incorrect type.
• Dispose of used battery according to the instructions.
Note: The inclusion of the battery for the remote control may vary depending on the region.
English
26
SETUP AND INSTALLATION
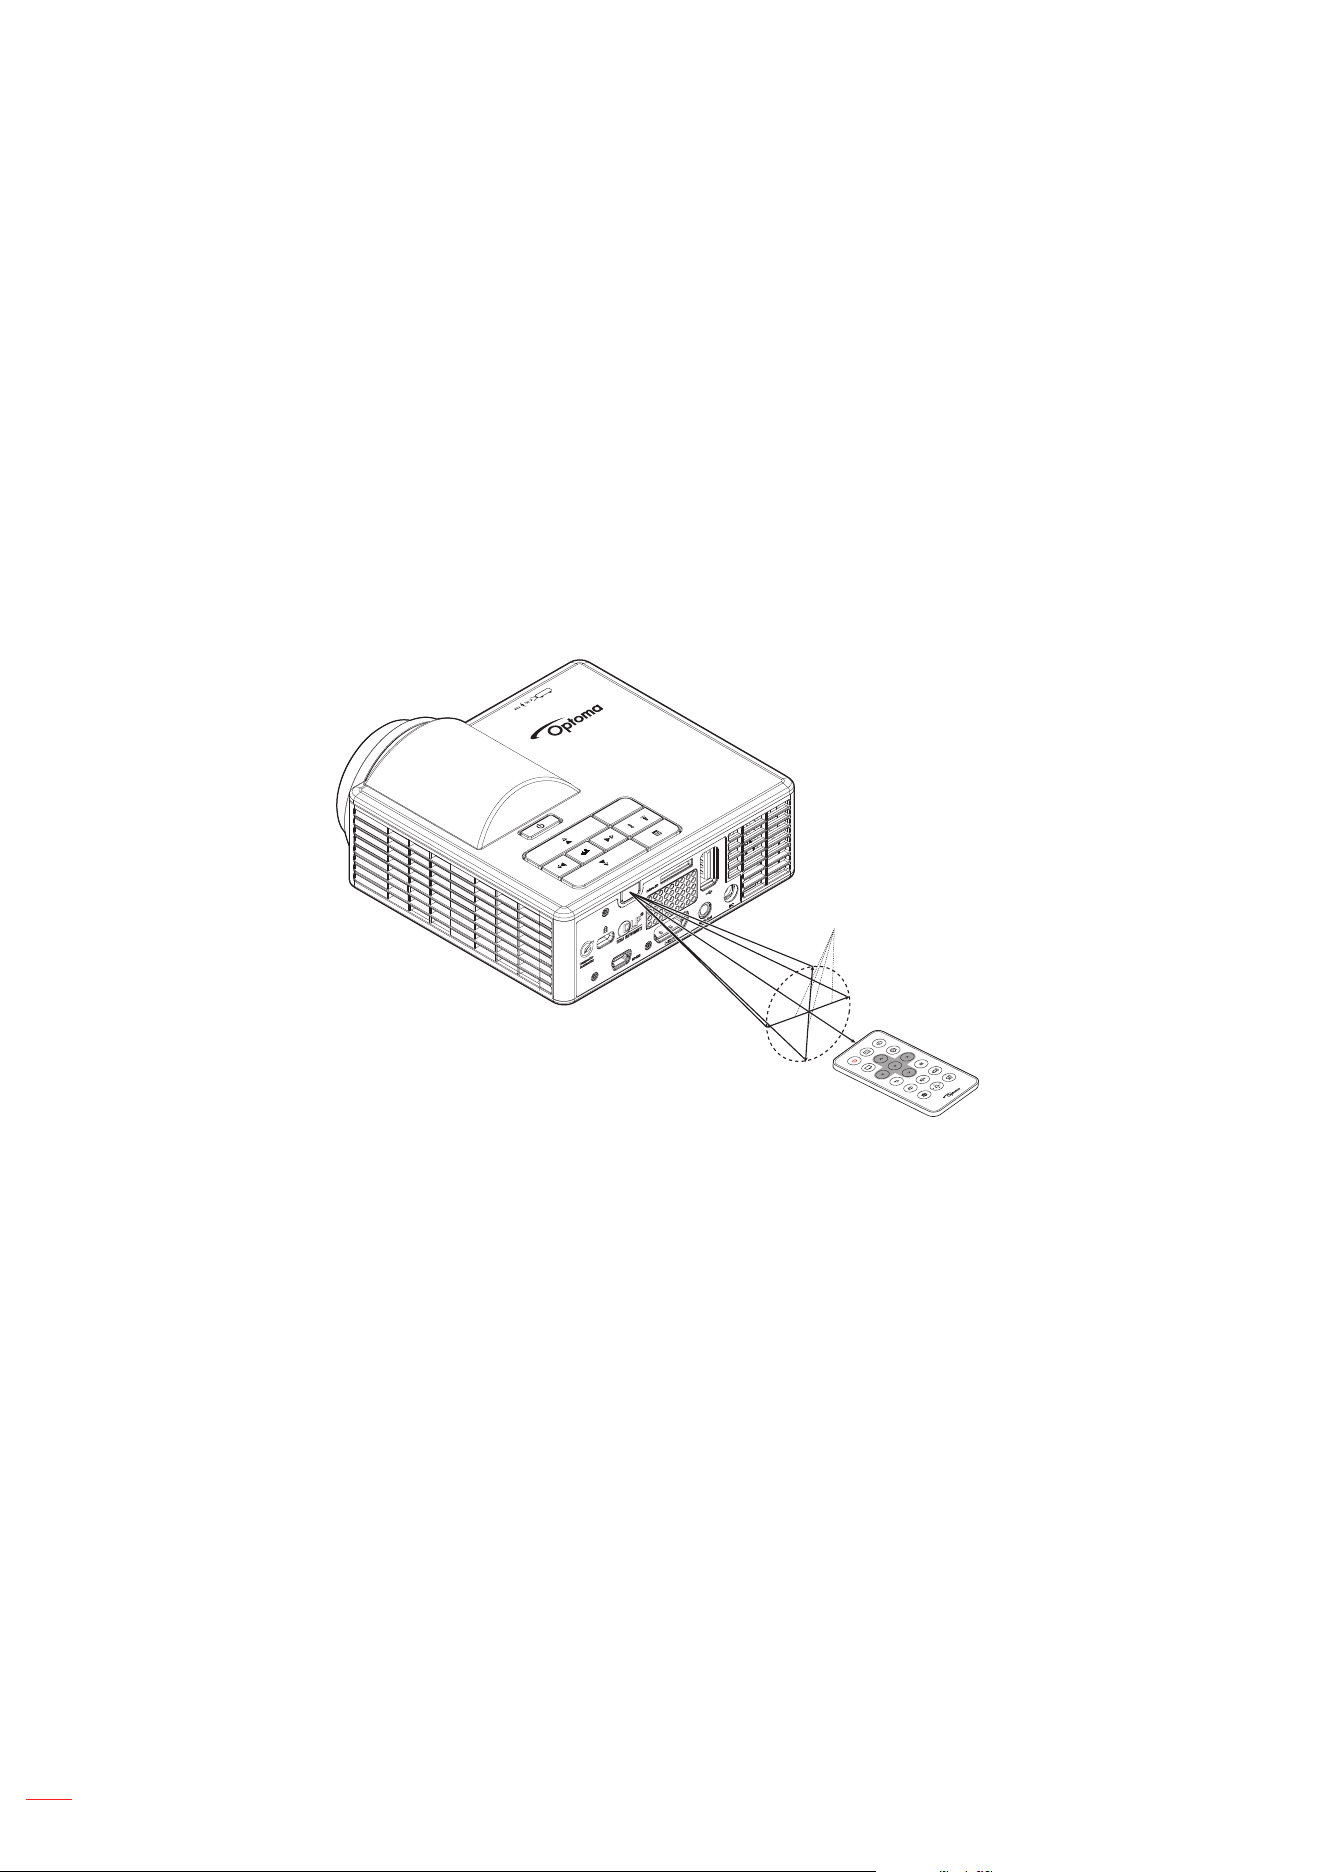
Eective range
Infra-Red (IR) remote control sensor is located on the rear side of the projector. Ensure that the remote control is held
at an angle ±30 degrees perpendicular to the projector’s IR remote control sensor to ensure correct functionality. The
distance between the remote control and the sensor should not be longer than 6 meters (19.7 feet).
• Make sure that there are no obstacles between the remote control and the IR sensor on the projector
that might obstruct the infra-red beam.
• Make sure the IR transmitter of the remote control is not being shined on directly by sunlight or
uorescent lamps.
• Please keep the remote controller at least 2m away from uorescent lamps or it may malfunction.
• If the remote control is close to Inverter-Type uorescent lamps, it might become ineective from time
to time.
• If the remote control and the projector are within a very short distance of one another, the remote
control might become ineective.
Approx. ± 15°
Approx. ±30°
English
27
USING THE PROJECTOR
Powering on / o the projector
or
Powering on
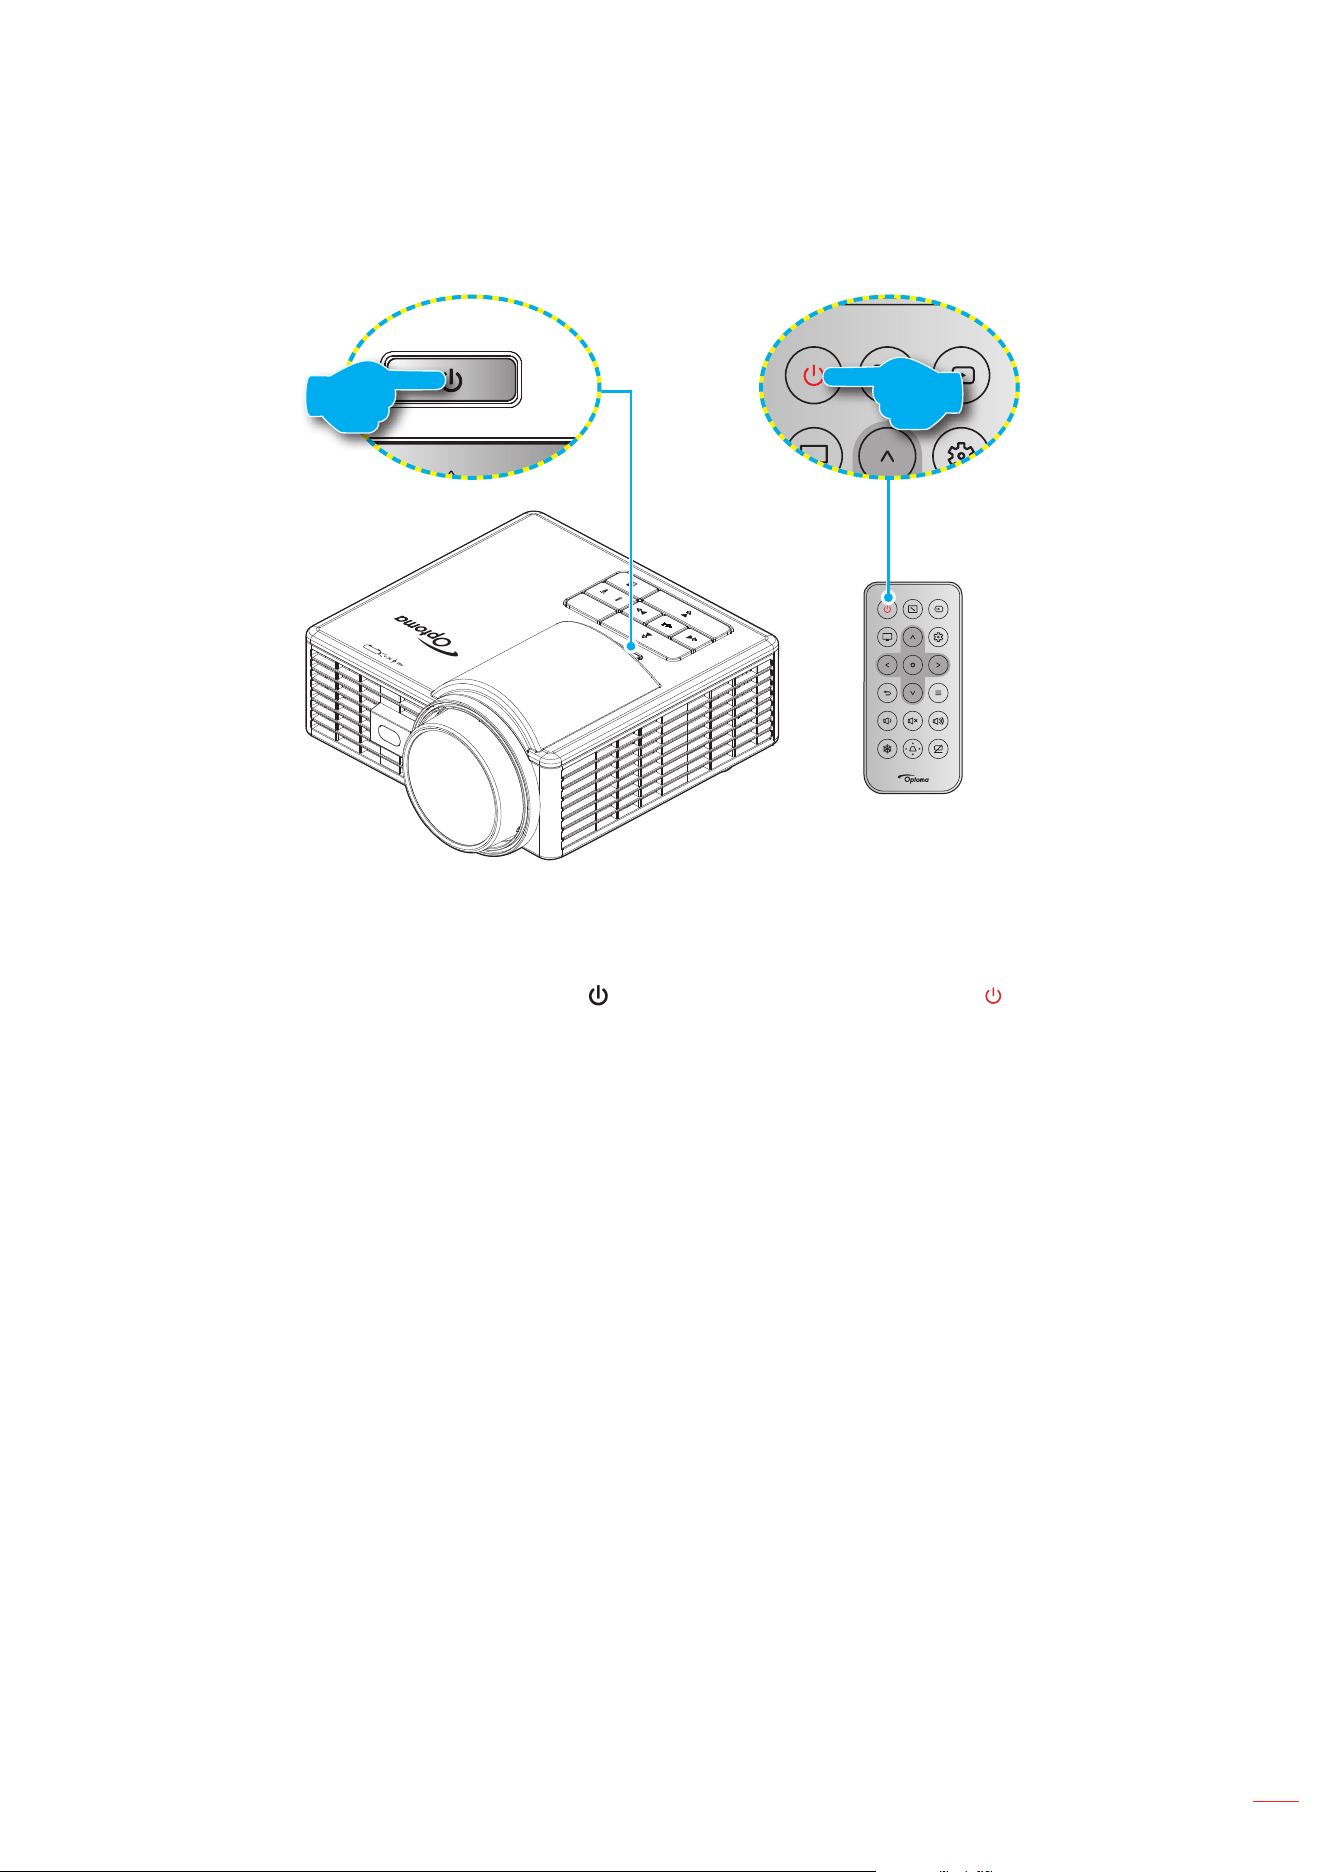
1. Securely connect the power cord and signal/source cable. When connected, the Power LED will turn
amber.
2. Turn on the projector by pressing the
button on the projector keypad or the button on the remote
control.
3. A start up screen will display in approximately 5 seconds and the Power LED will turn blue.
Note: The rst time the projector is turned on, you will be prompted to select the preferred language, projection
orientation, and other settings.
English
28
USING THE PROJECTOR
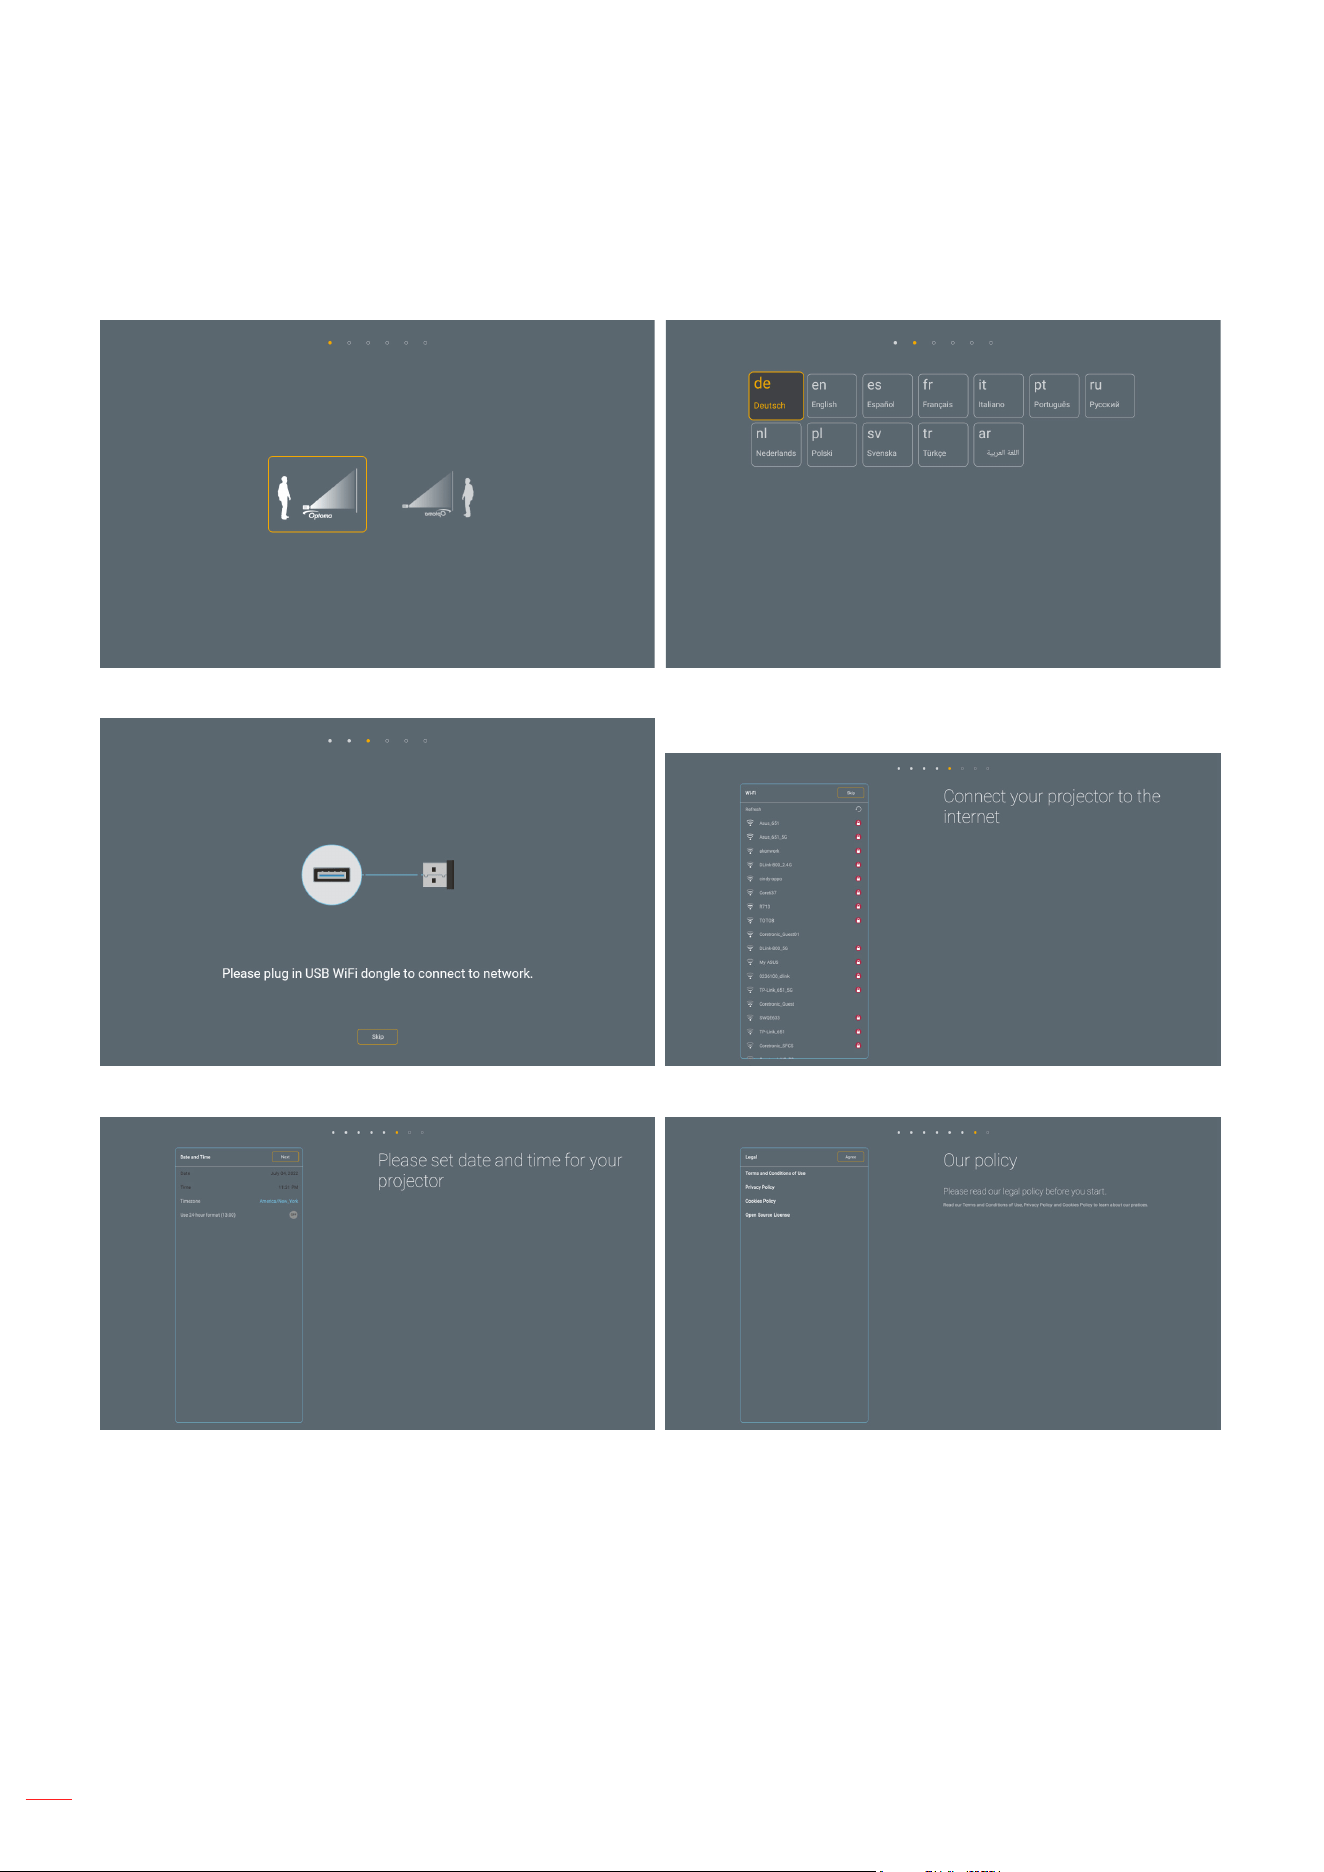
The rst time the projector is turned on, you will be prompted to do the initial setup including selecting the projection
orientation, preferred language, conguring network settings, and more. Once the Setup Complete! screen
appears, it indicates the projector is ready to use.
[Projection screen] [Language screen]
[Wi-Fi dongle installation screen] [Network screen]
[Date and time screen] [Regulation screen]

English
29
USING THE PROJECTOR
Powering o
1. Turn o the projector by pressing the
button on the projector keypad or the button on the remote
control.
2. The following message will be displayed:
Power O
Power O?
Press power key again.
3. Press the / button again to conrm, otherwise the message will disappear after 15 seconds.
When you press the / button for the second time, the projector will shut down.
4. When the Power LED turns solid amber, this indicates the projector has entered standby mode. When
the projector is in standby mode, simply press the
/ button again to turn on the projector.
5. Disconnect the power cab;e from the electrical outlet and the projector.
Note: It is not recommended that the projector is turned on immediately, right after a power o procedure.
English
30
USING THE PROJECTOR
Selecting an input source
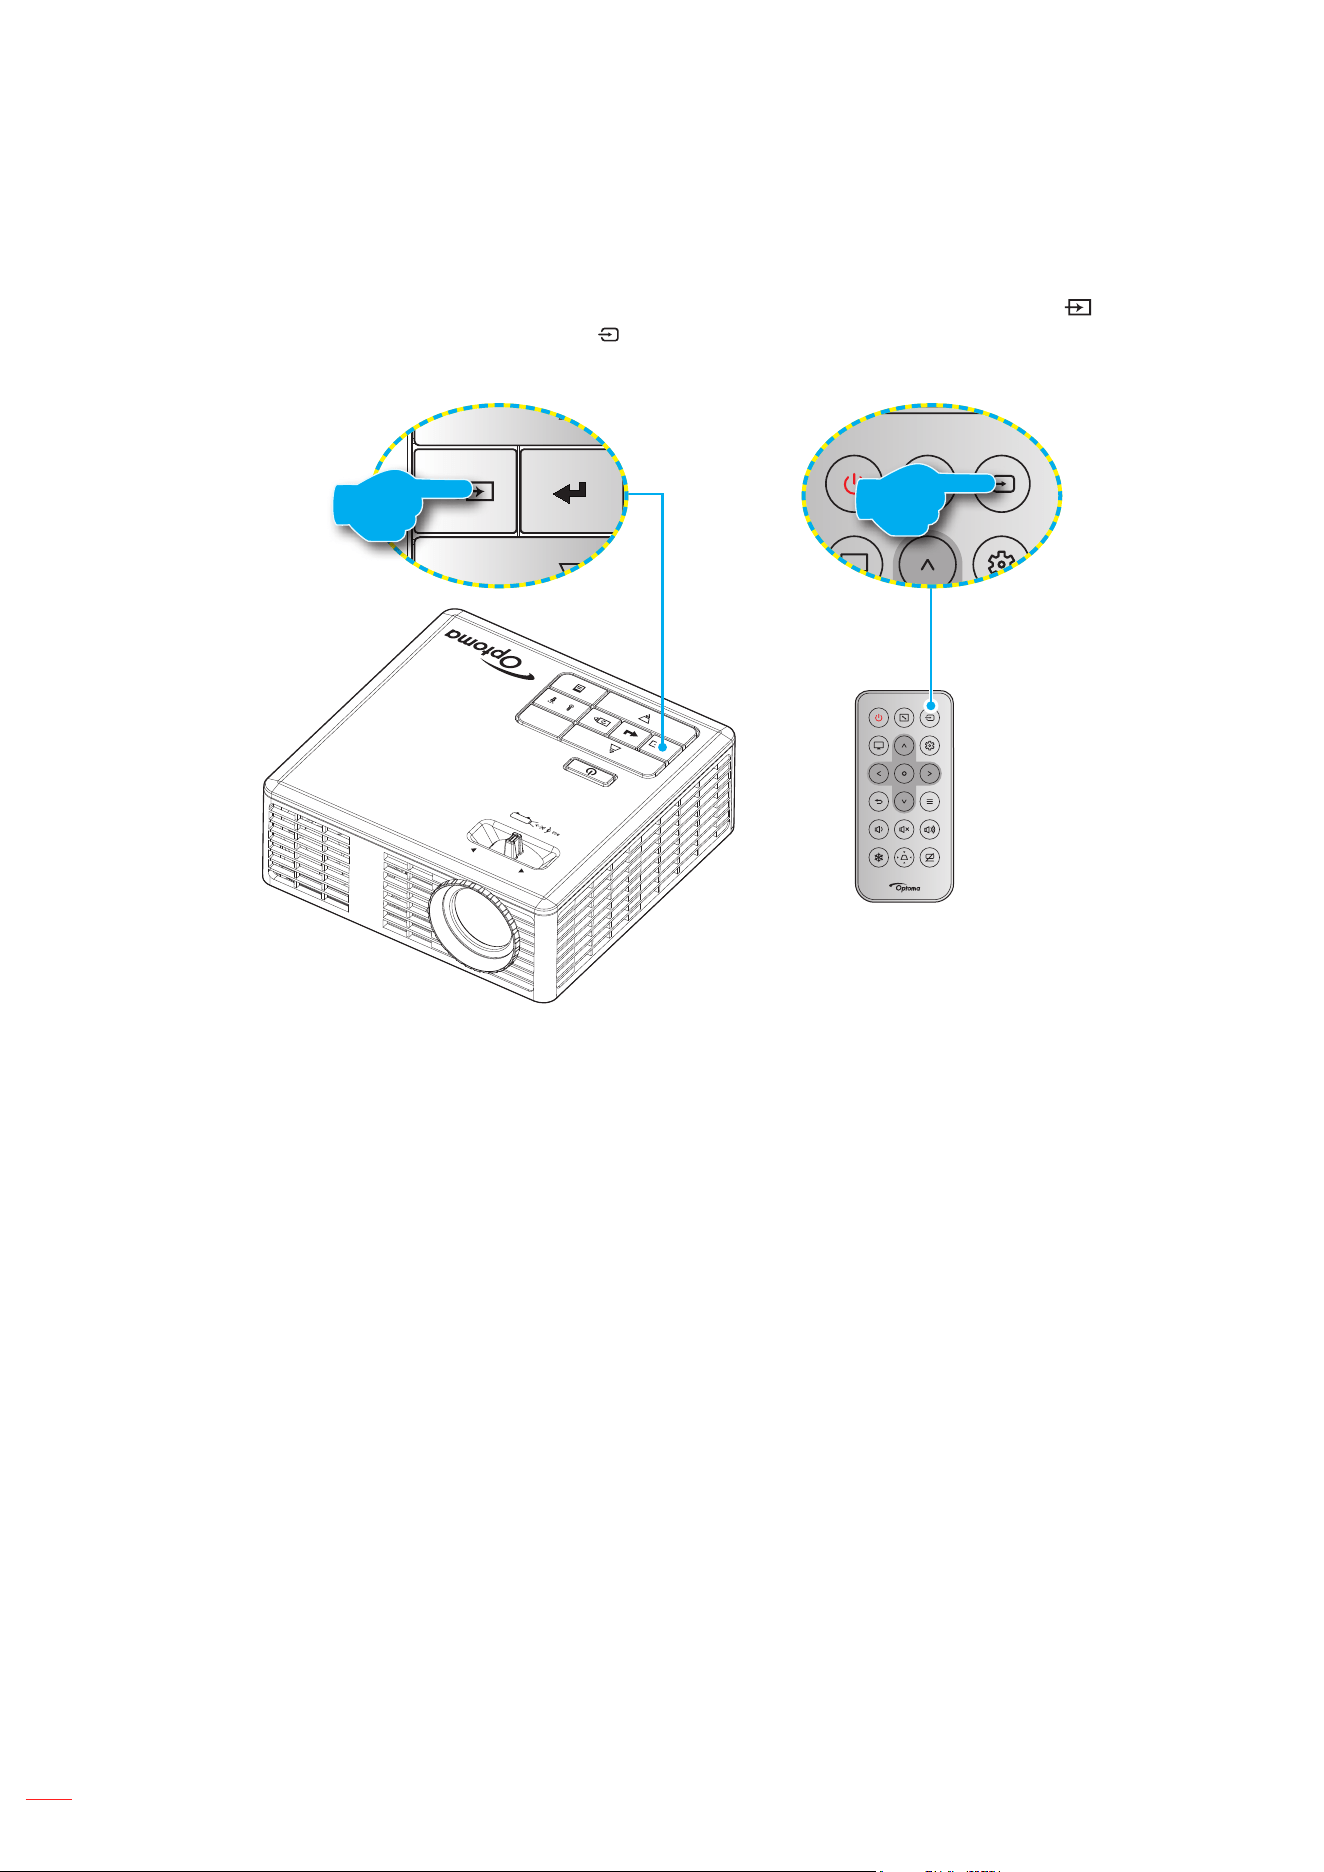
Turn on the connected source that you want to display on the screen, such as computer, notebook, video player,
etc. The projector will automatically detect the source. If multiple sources are connected, press the button on the
projector keypad (ML750i model only) or press the button on the remote control to select the desired input.
FOCUS
or
English
31
USING THE PROJECTOR
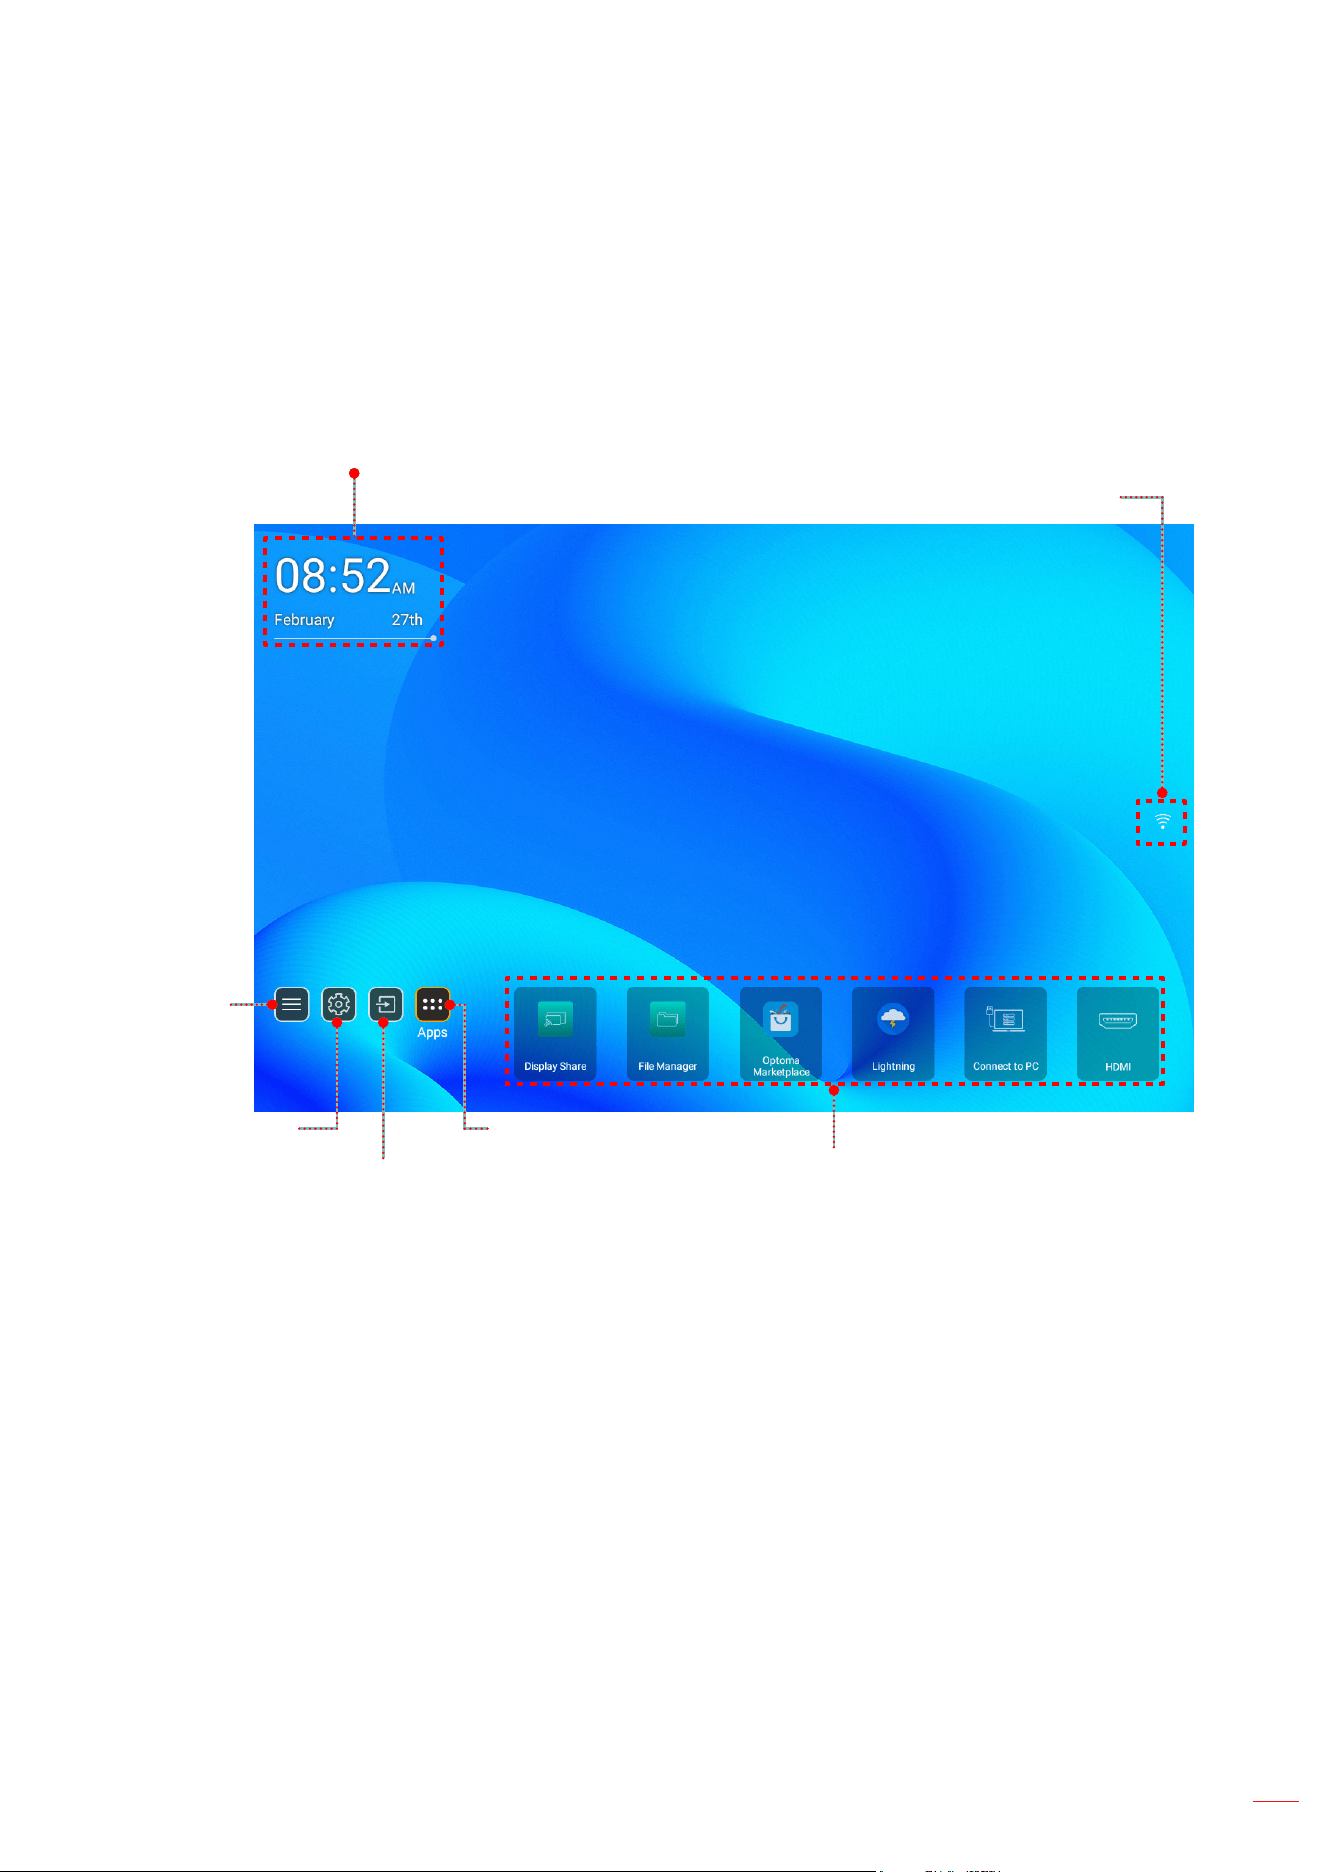
Home screen overview
The Home screen is displayed every time you start the projector. It contains system date and time, system status,
icons to access OSD menu, projector settings menu, apps, input sources, and more.
To navigate the Home screen, simply use the buttons on the remote control.
You can return to the Home screen at any time by pressing the Mode key on the remote control when UI is at
launcher or the input source is USB-A or SD card.
System Date and Time
Shortcuts
Status Bar
OSD Menu
System Settings
Input Sources
Apps
Note: The selected menu or item is highlighted in orange color, for example “Apps” on the image above.
System date and time
Date and time is displayed on the Home screen if the projector is connected to the network.The default setting is
10:00am, 2019/01/01. AM/PM will appear only if the 24-hour format is o.
To modify date and time parameters, select the respective eld on the screen. The Date and Time settings page
opens automatically. Then perform the modications.
English
32
USING THE PROJECTOR
Projector settings menu (OSD)
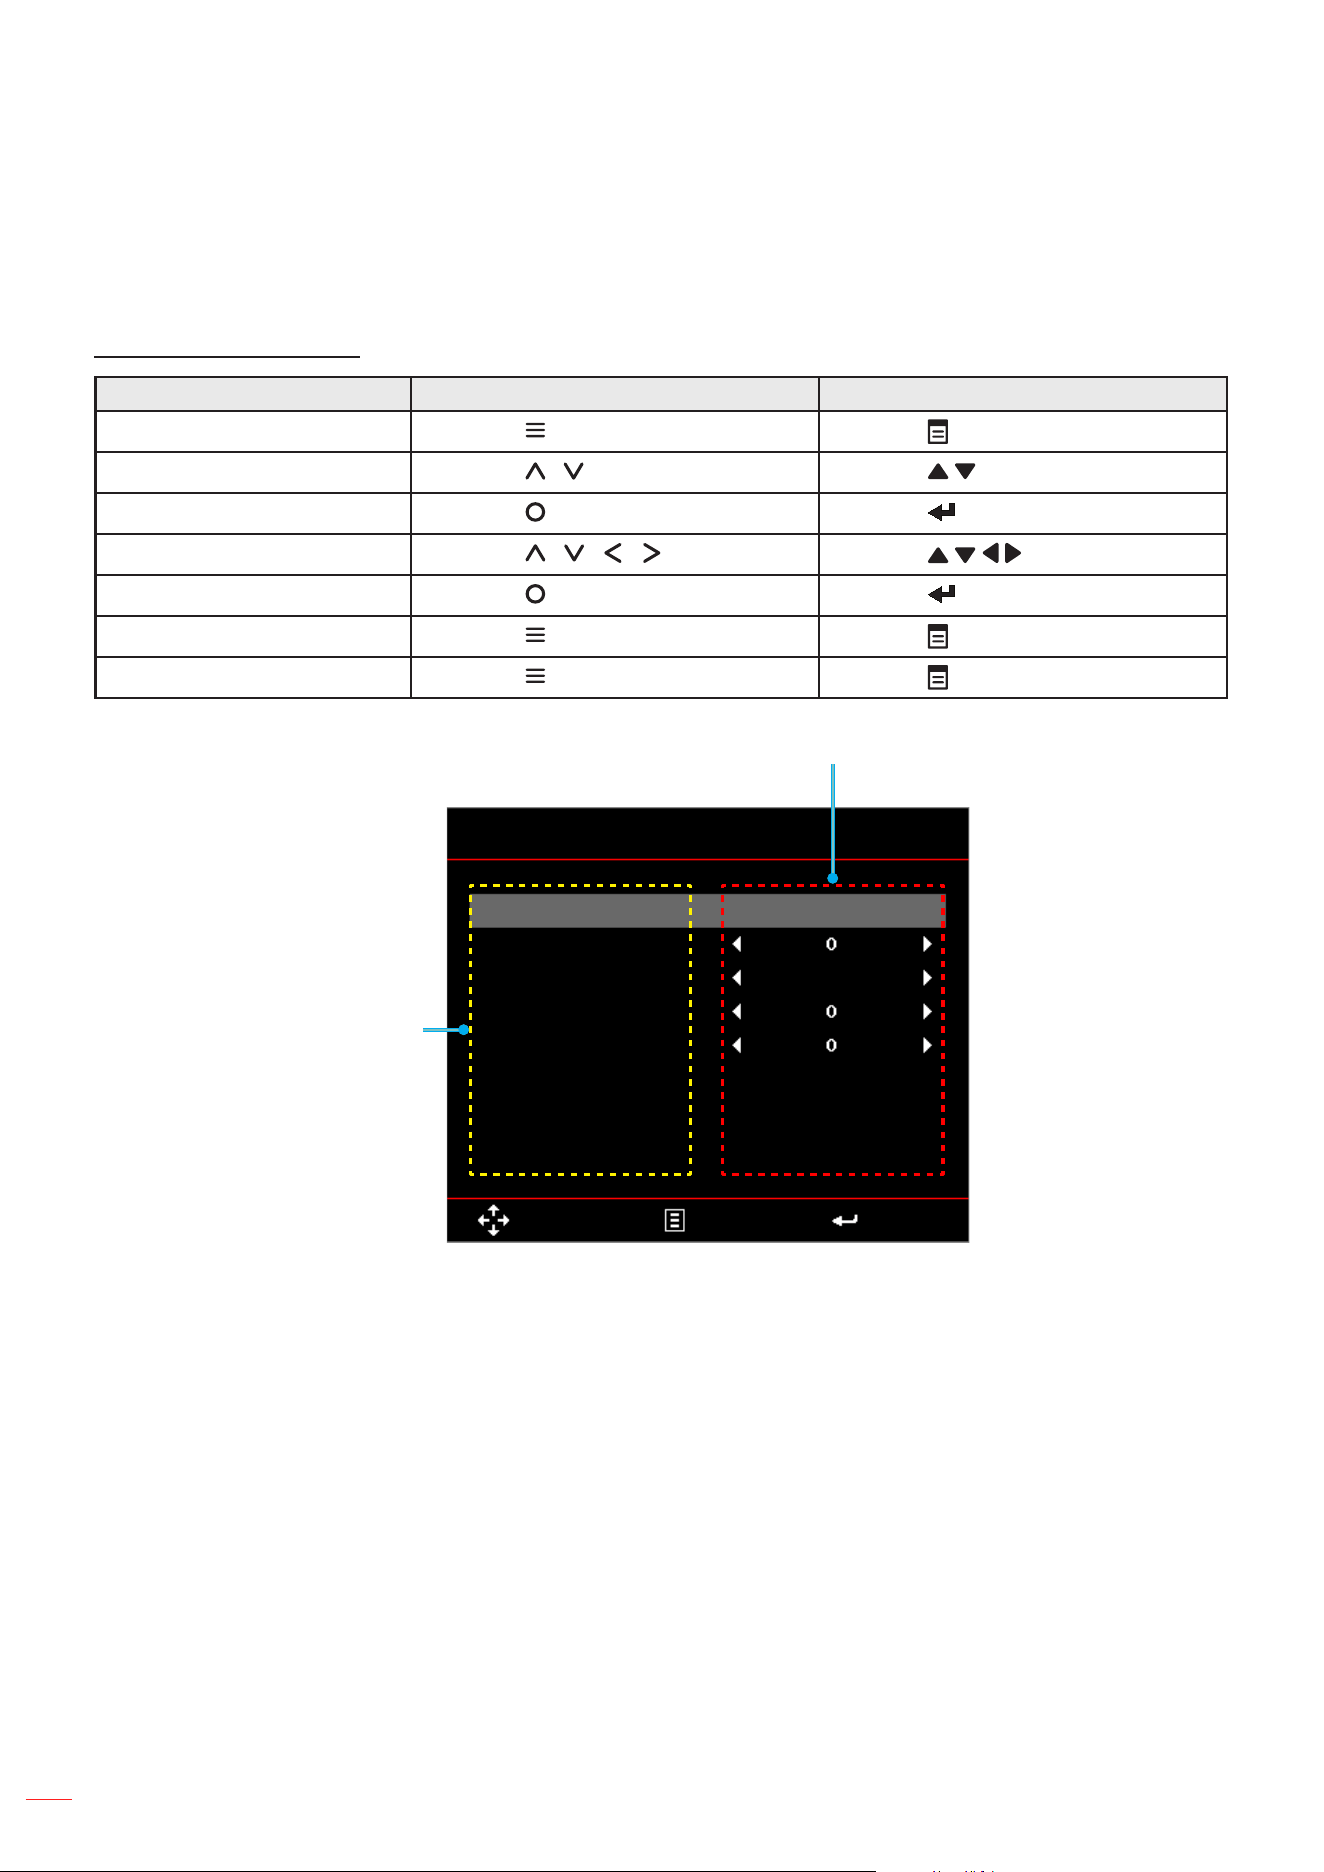
The projector has multilingual on-screen display menus that allow you to make image adjustments and change a
variety of settings. The projector will automatically detect the source.
General menu navigation
Operation Using the Remote Control Using the Projector Keypad
Open the OSD menu
Press the
button
Press the
button
Select an item
Press the
/ button
Press the
/ button
Enter the submenu
Press the
button
Press the
button
Adjust the setting
Press the
/ / / button
Press the
/ / / button
Conrm the selection
Press the
button
Press the
button
Move to the previous item
Press the
button
Press the
button
Close the OSD menu
Press the
button
Press the
button
Settings
Menu
Select Exit Enter
Menu
Input Source
Volume
Display Mode
Brightness
Contrast
Image
Display
Setup
Bright
English
33
USING THE PROJECTOR
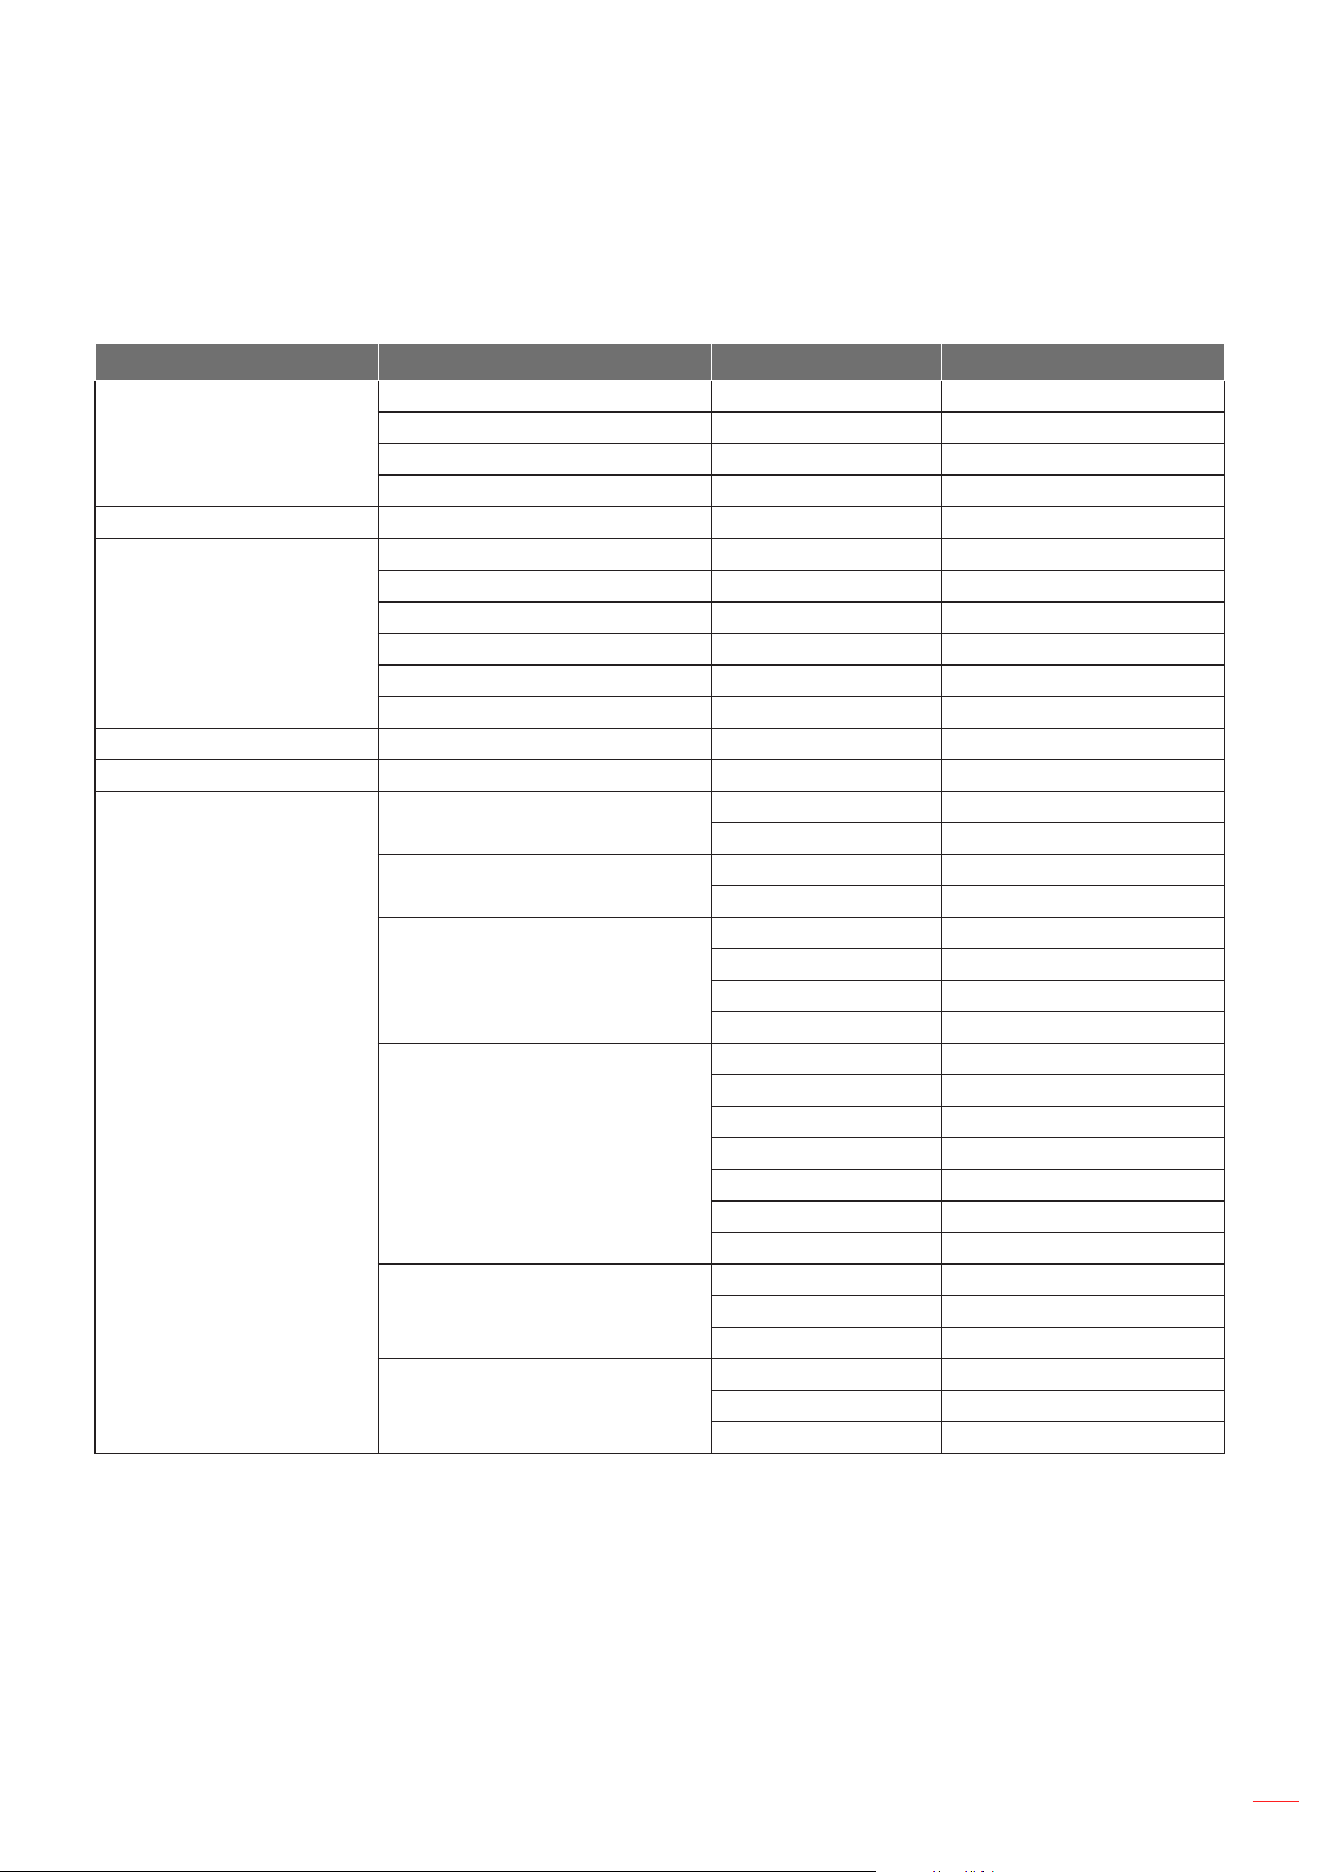
OSD Menu tree
Note: The OSD menu tree items and features are subject to models and region. Optoma reserve the right to add
or remove items to improve product performance without notice.
Main Menu Sub Menu Sub Menu 2 Option
Input Source
HDMI
Home
USB-A
SD Card
Volume 0~10
Display Mode
Bright
PC
Cinema
Photo
sRGB
Eco.
Brightness 0~10
Contrast 0~10
Image
3D
On
O
3D Sync. Invert
On
O
Aspect Ratio
Auto
4:3
16:9
16:10
Zoom
50%
75%
100%
125%
150%
175%
200%
Color Temperature
Warm
Standard
Cold
Color Space
Auto
RGB
YUV
English
34
USING THE PROJECTOR
Main Menu Sub Menu Sub Menu 2 Option
Display
Auto Keystone
On
O
Keystone -40~+40
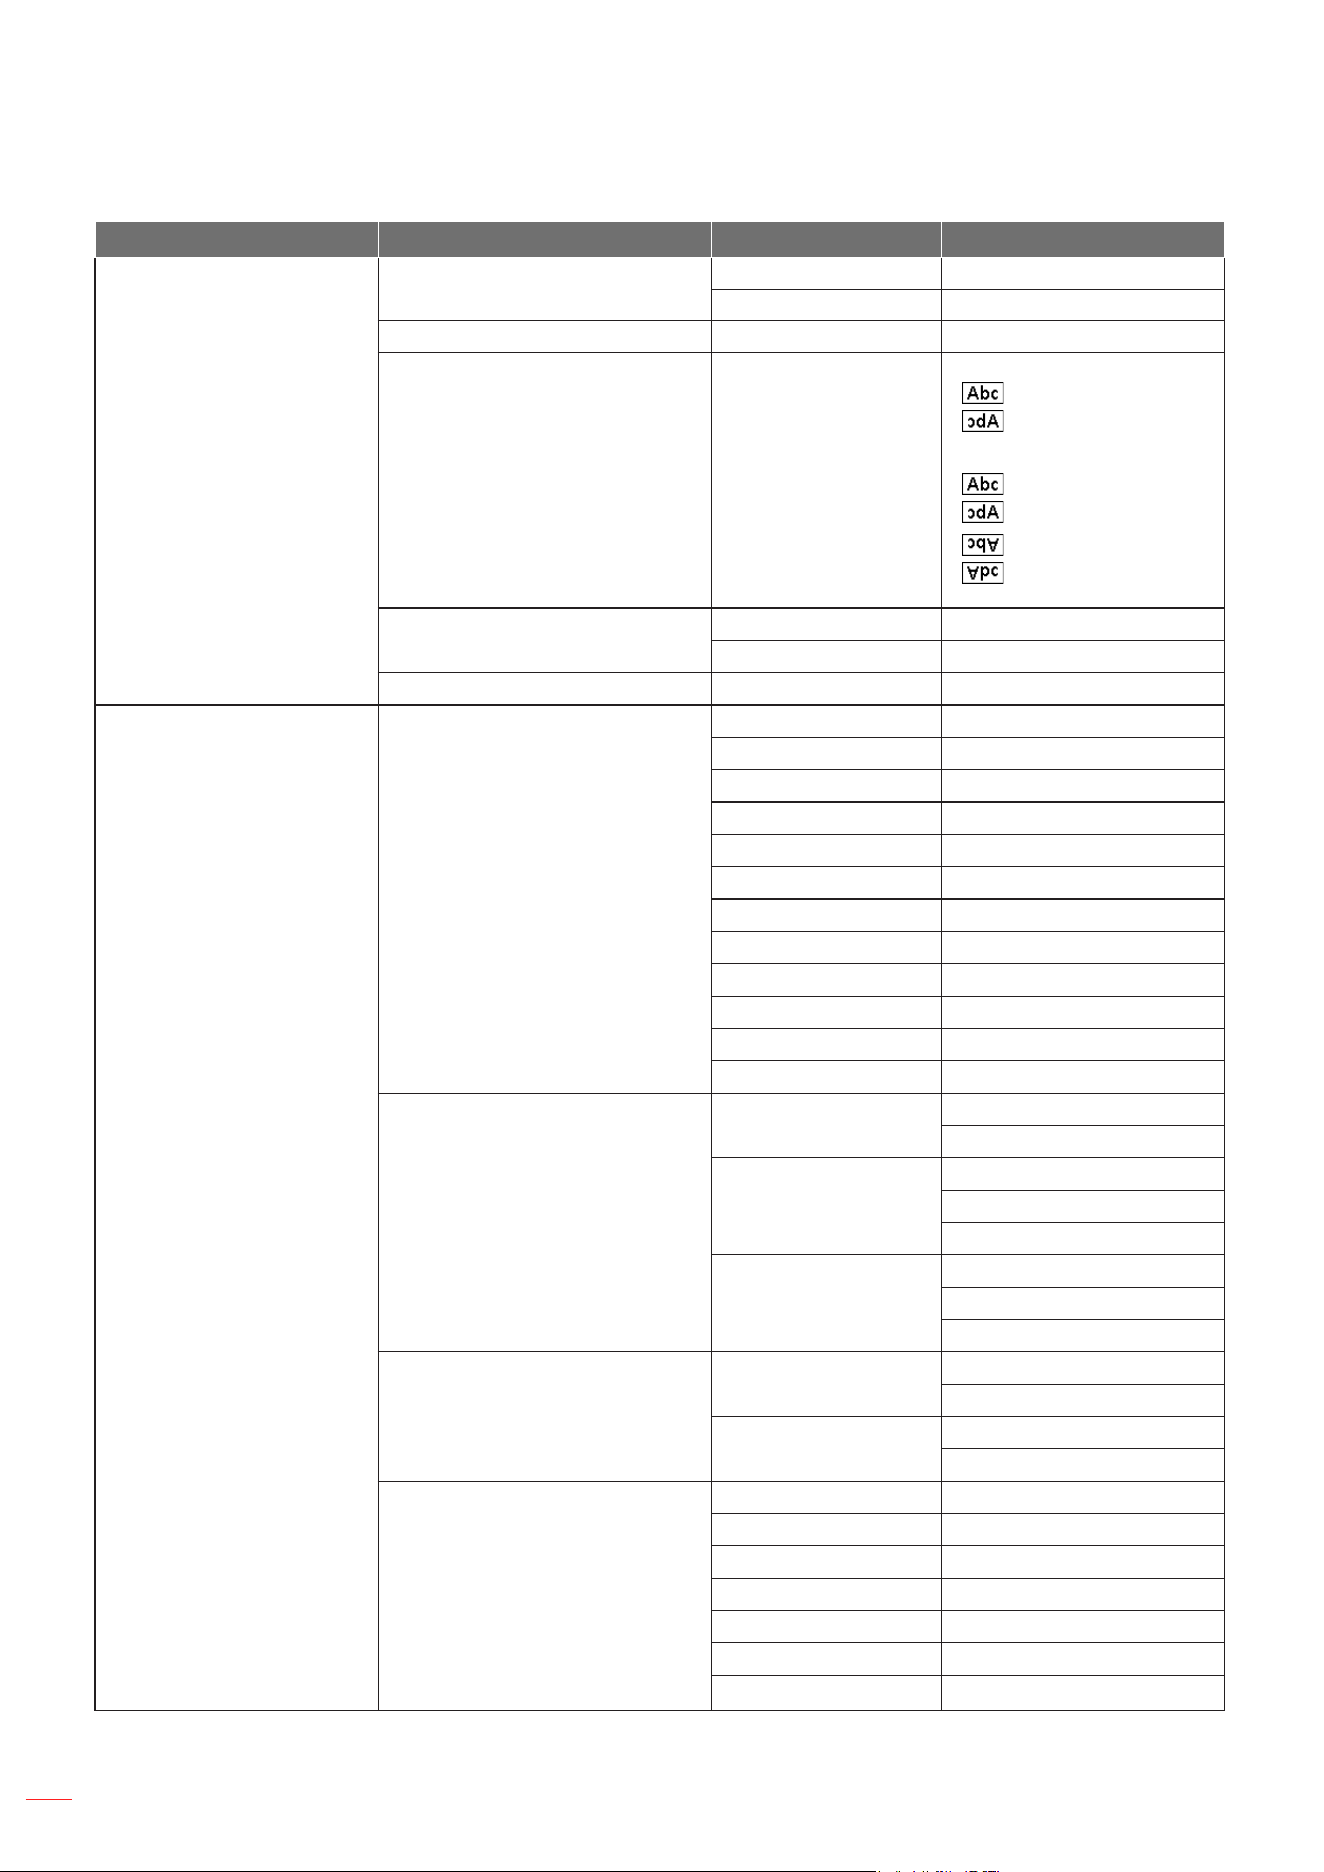
Projection
Auto Keystone: On
-
:
No reverse
-
:
Left/ Right reverse
Auto Keystone: Off
-
:
No reverse
-
:
Left/ Right reverse
-
:
Up/ Down reverse
-
:
Up/ Down and Left/
Right reverse
Auto Focus (For ML1050STi only)
On
O
Manual Focus (For ML1050STi only)
Setup
Language
English
German
French
Italian
Spanish
Portuguese
Polish
Dutch
Russian
Swedish
Turkish
Arabic
Source
Auto Source
On
O
Auto Source Switch
HDMI
USB-A
SD Card
Boot-up Source
Auto
HDMI
Home
Power On
Direct Power On
On
O
Signal Power on
On
O
Sleep Timer (hh:mm)
Auto (20 min)
O
0:30
1:00
3:00
8:00
12:00

English
35
USING THE PROJECTOR
Main Menu Sub Menu Sub Menu 2 Option
Setup
Advanced
Saturation 0~20
Hue -10~10
Reset
Yes
No
Info.
Regulatory
Serial Number
Light Source Hours
Device MAC address
Ver.

English
36
USING THE PROJECTOR
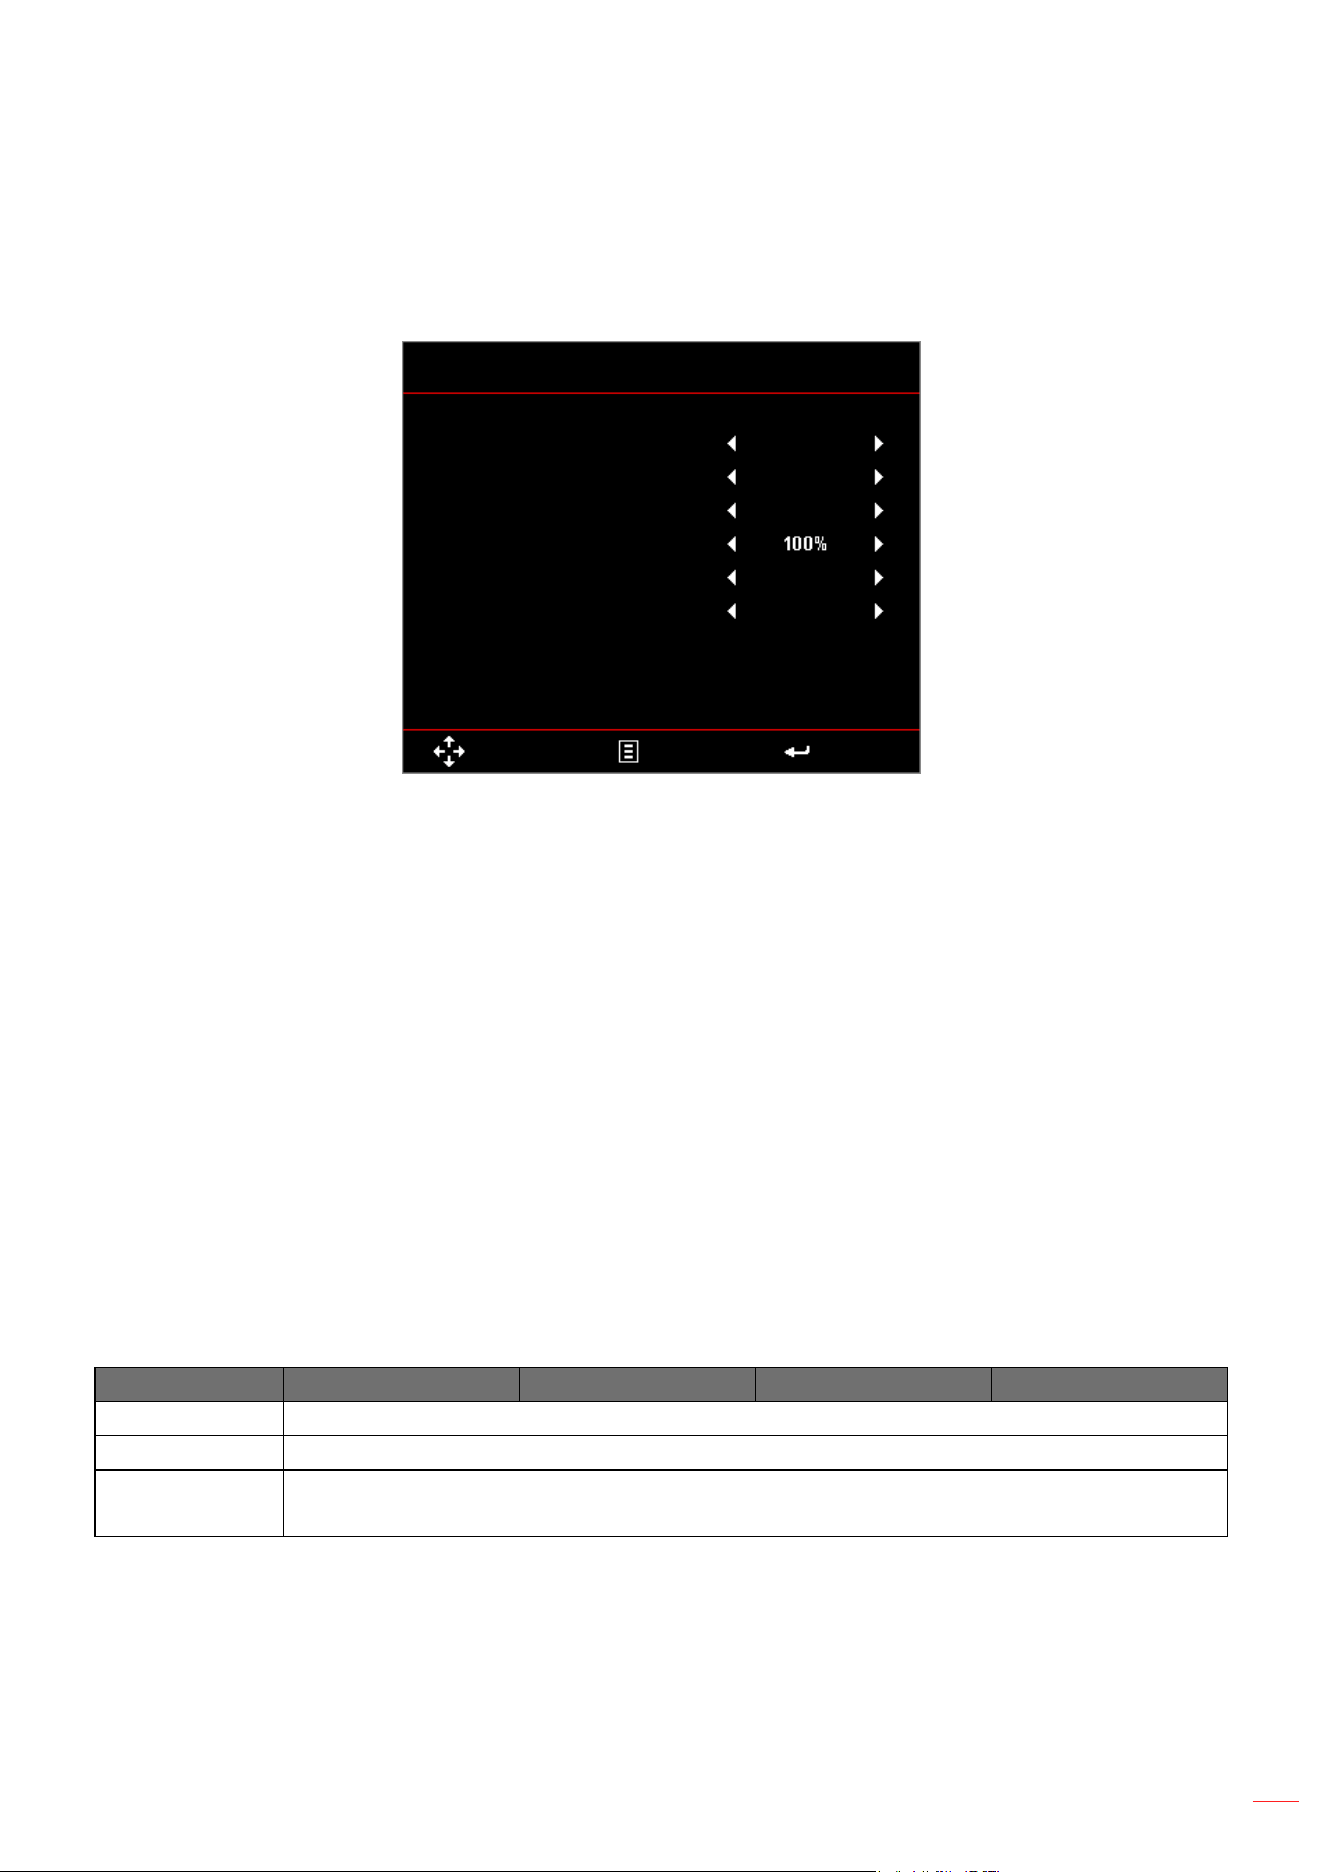
Input Source menu
Select your projector’s input source. The options are: HDMI, Home, USB-A, and SD Card.
Volume menu
Adjust the volume.
Display Mode menu
Optimize the display image. The options are: Bright, PC, Cinema, Photo; sRGB, and Eco..
Brightness menu
Adjust the brightness of the image.
Contrast menu
Adjust the display contrast.
English
37
USING THE PROJECTOR
Image menu
The Image menu allows you to modify various image settings, such as 3D related, aspect ratio, zoom, color
temperature, and color space.
Image
On
3D Sync. Invert
Aspect Ratio
Zoom
Color Temperature
Color Space
Select Exit Enter
O
Auto
Warm
Auto
3D
3D
Turn the 3D function on or o.
3D Sync. Invert
Turn the 3D sync. inverter option on or o.
Note:
• 3D/3D Sync. Invert cannot be changed when you select image settings.
• In 3D mode, the maximum supported input timing is 1024x768 @ 120Hz.
Aspect Ratio
Select the format to adjust how the image appears. Options are:
• Auto: Maintain the aspect ratio of the image projector according to the input source.
• 4:3: The input source scales to t the screen and projects a 4:3 image.
• 16:9: The input source scales to t the screen and projects a 16:9 image.
• 16:10: The input source scales to t the screen and projects a 16:10 image.
Scaling table:
Wide screen 480i/p 576i/p 1080i/p (16:9) 720p (16:9)
4x3 Scale to 1067x800.
16x10 Scale to 1280x800.
Auto - If source is 4:3, the screen will be automatically resized to 1067x800.
- If source is 16:9 and 16:10, the screen will be automatically resized to 1280x800.
Zoom
Zoom in or zoom out the image. Options are: 50%, 75%, 100%, 125%, 150%, 175%, and 200%.

English
38
USING THE PROJECTOR
Color Temperature
Select the color temperature. Options are: Warm, Standard, and Cold.
Note: The Color Temperature function is not supported in Bright, Eco., and 3D modes.
Color Space
Select an appropriate color matrix type. Options are: Auto, RGB, and YUV.
Note: The Color Space function is supported only in HDMI mode.

English
39
USING THE PROJECTOR
Display menu
The Display menu allows you to modify the display settings, such as keystone, projection, auto focus, and manual
focus.
Note: The Auto Focus and Manual Focus function is for ML1050STi only.
Auto Keystone
Select On to automatically adjust image distortion caused by tilting the projector.
Note: The Auto Keystone function can be only used to adjust the image distortion vertically.
Keystone
Adjust image distortion caused by tilting the projector (+/-40 degrees).
Note: If you adjust the keystone degree manually then the Auto Keystone function will be automatically switched
o.
Projection
Select the projection mode, depending upon how the projector is mounted.
• If the Auto Keystone is set to On, you can choose one of the following options:
No reverse
Left/ Right reverse
• If the Auto Keystone is set to O, you can choose one of the following options:
No reverse
Left/ Right reverse
Up/ Down reverse
Up/ Down and Left/ Right reverse
English
40
USING THE PROJECTOR
Auto Focus (For ML1050STi only)
Select On to automatically adjust the image focus.
Note:
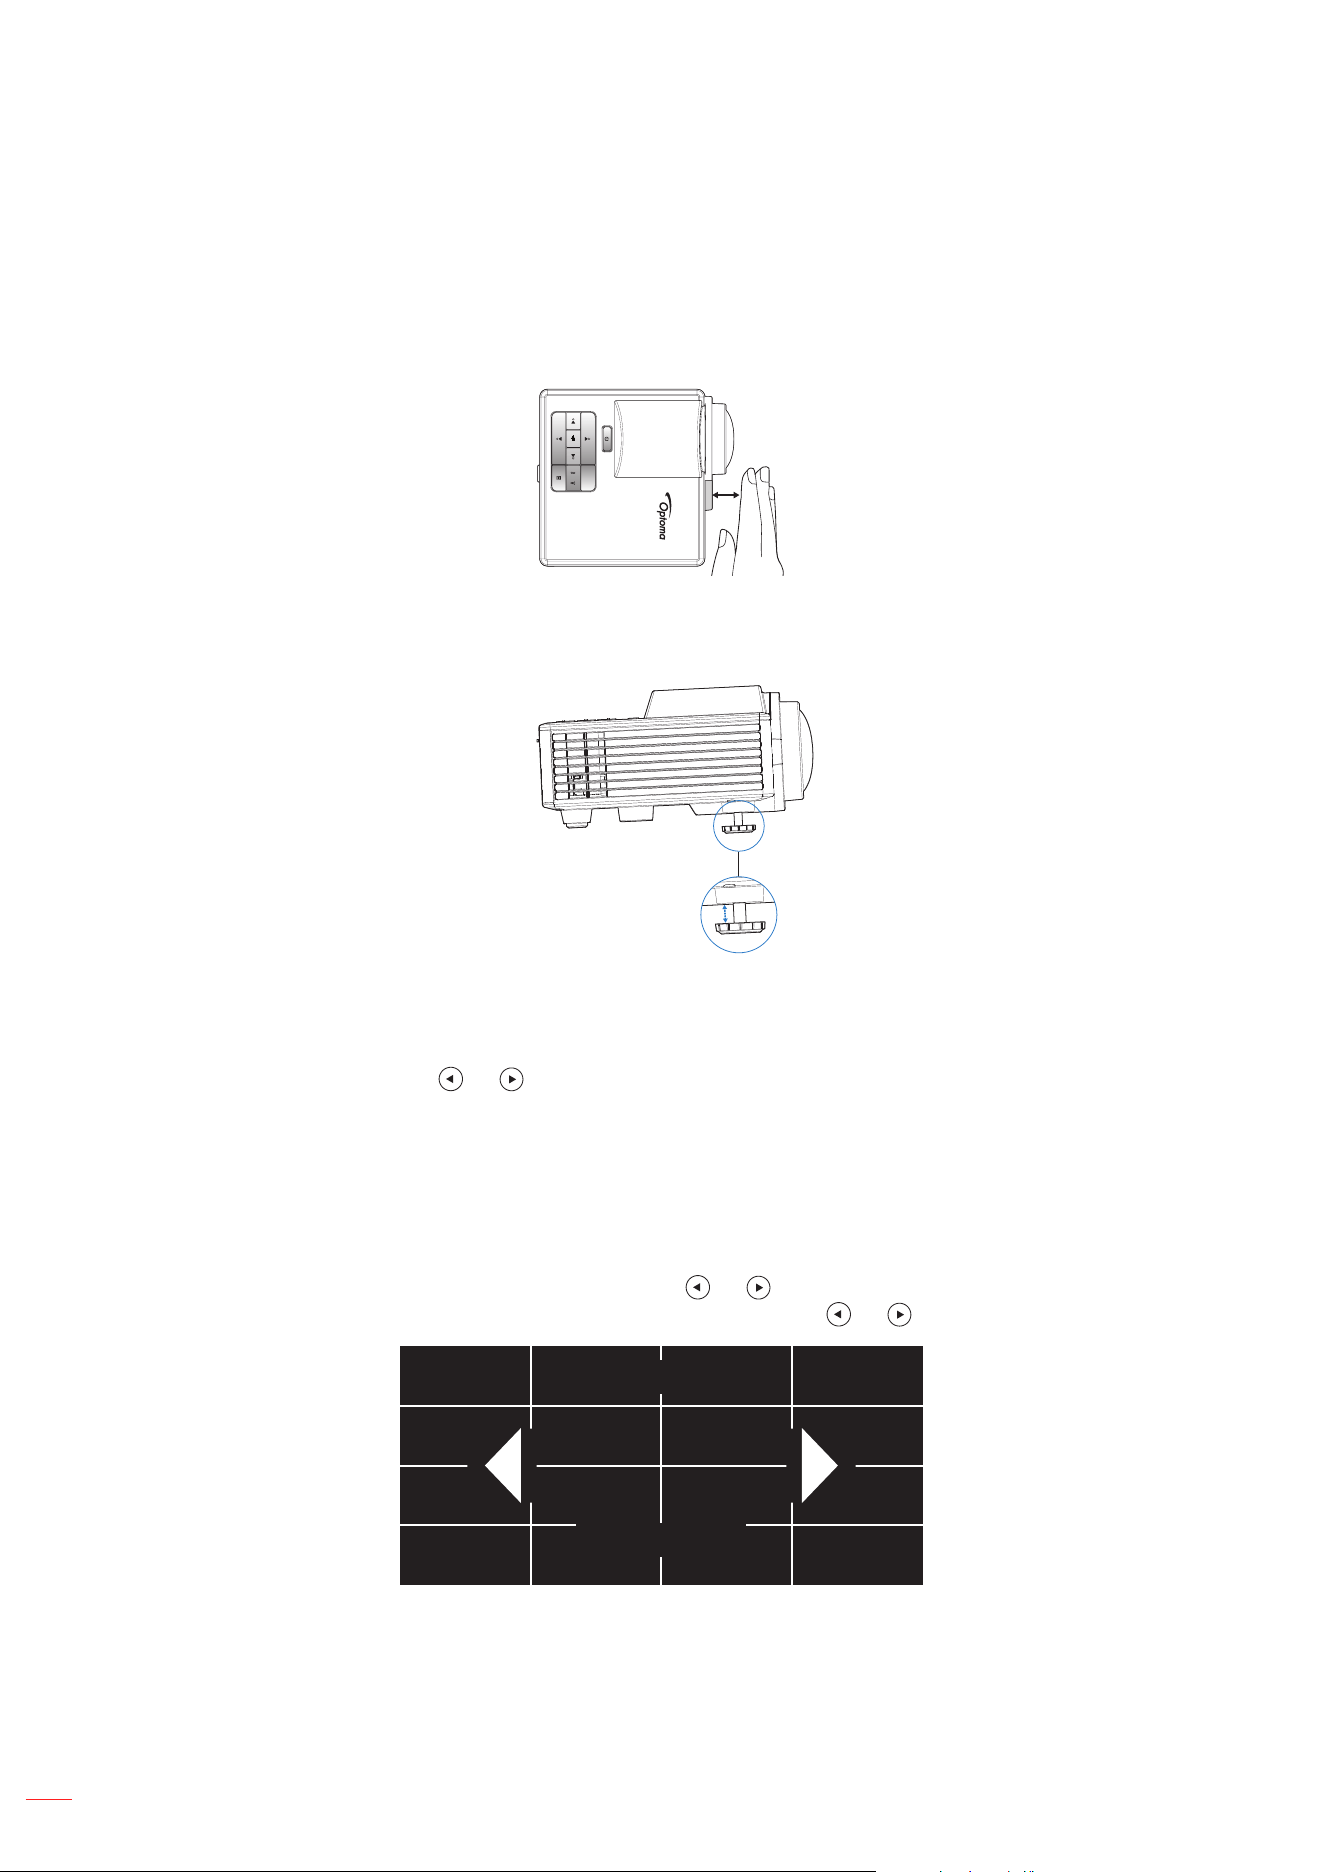
• If the projected image is unclear, please cover the sensor in front of the projector (less than 3cm) for
one second and then release it. The projector adjustment will be reset to zero.
< 3cm
< 3cm
• If the projected image is still unclear after performing the zero adjustment, please rotate the front
tilt adjustment wheel to raise the projector to the desired display angle, and then reset the projector
adjustment to zero.
• If the projected image is still unclear after performing above two steps, you have to adjust the image
focus manually. To access the calibration screen for manual adjustment, do one of the following:
a. Select Manual Focus from the OSD menu (Display > Manual Focus).
b. Press and hold the
or button on the control panel/remote control.
• Ensure the distance between projector and the edge of table is less then 120mm to avoid light sensor
detection interference.
Manual Focus (For ML1050STi only)
Adjust the image focus manually when Auto Focus option is O.
Note: When the calibration screen appears, long press the
or button on the control panel/remote control to
perform the coarse focus adjustment rst, and then short press the
or button to ne-tune your focus.
Focus
0

English
41
USING THE PROJECTOR
Setup menu
The Setup menu allows you to choose the default OSD language, congure the input source related settings, set
sleep timer, and other options.
Language
Set the language for the OSD. Options are: English, German, French, Italian, Spanish, Portuguese, Polish, Dutch,
Russian, Swedish, Turkish, and Arabic.
Source
Congure the input source related settings.
Auto Source
Choose this option to let the projector automatically nd an available input source.
Auto Source Switch
When HDMI input signal is detected, the projector will automatically switch the input source. Auto Source Switch
allows control over which input source is scanned. Example: If HDMI and USB-A are set to “On” and SD Card is set
to “O” - Auto Source will only scan HDMI and USB-A.
Note: Source Switch allows control over which input source is scanned.
Boot-up Source
Select the projector’s boot-up source. Options are: Auto, HDMI, and Home.
Note: If the Boot-Up Source is set to “Auto”, each boot-up of the projector will use the previous source input.
Power On
Congure the power on related settings.
Direct Power On
Choose On to activate Direct Power mode. The projector will automatically power on when AC power is supplied,
without pressing the Power button on the projector control panel or on the remote control.
Signal Power on (For HDMI source only)
Choose On to activate Signal Power mode. The projector will automatically power on when a signal is detected,
without pressing the Power button on the projector control panel or on the remote control.
Sleep Timer (hh:mm)
Set the countdown timer interval. The countdown timer will start, with or without a signal being sent to the projector.
The projector will automatically power o when the countdown has nished. Options are: Auto, O, 0:30, 1:00,
3:00, 8:00, 12:00.
Note: If the Sleep Timer is set to “Auto”, then the projector will automatically power o after 20 minutes if no signal
has been detected.
Advanced
The Advanced menu allows you to change settings for Saturation and Hue.
Saturation
Adjust the saturation of the image.
Note: Saturation can be only adjusted in HDMI mode with supported video timings 1080p/i, 720p, and 480p/i.
Hue
Adjust the hue of the image.
Note: Hue can be only adjusted in HDMI mode with supported video timings 1080p/i, 720p, and 480p/i.

English
42
USING THE PROJECTOR
Reset
Reset all settings to its factory default, including HDMI and Home source (USB-A, SD card) settings. After choosing
this option, a conrmation message appears on the screen. Select “Yes” to conrm or “No” to cancel reset.
Info.
View the projector information about its status and settings. The projector information is read only.
English
43
USING THE PROJECTOR
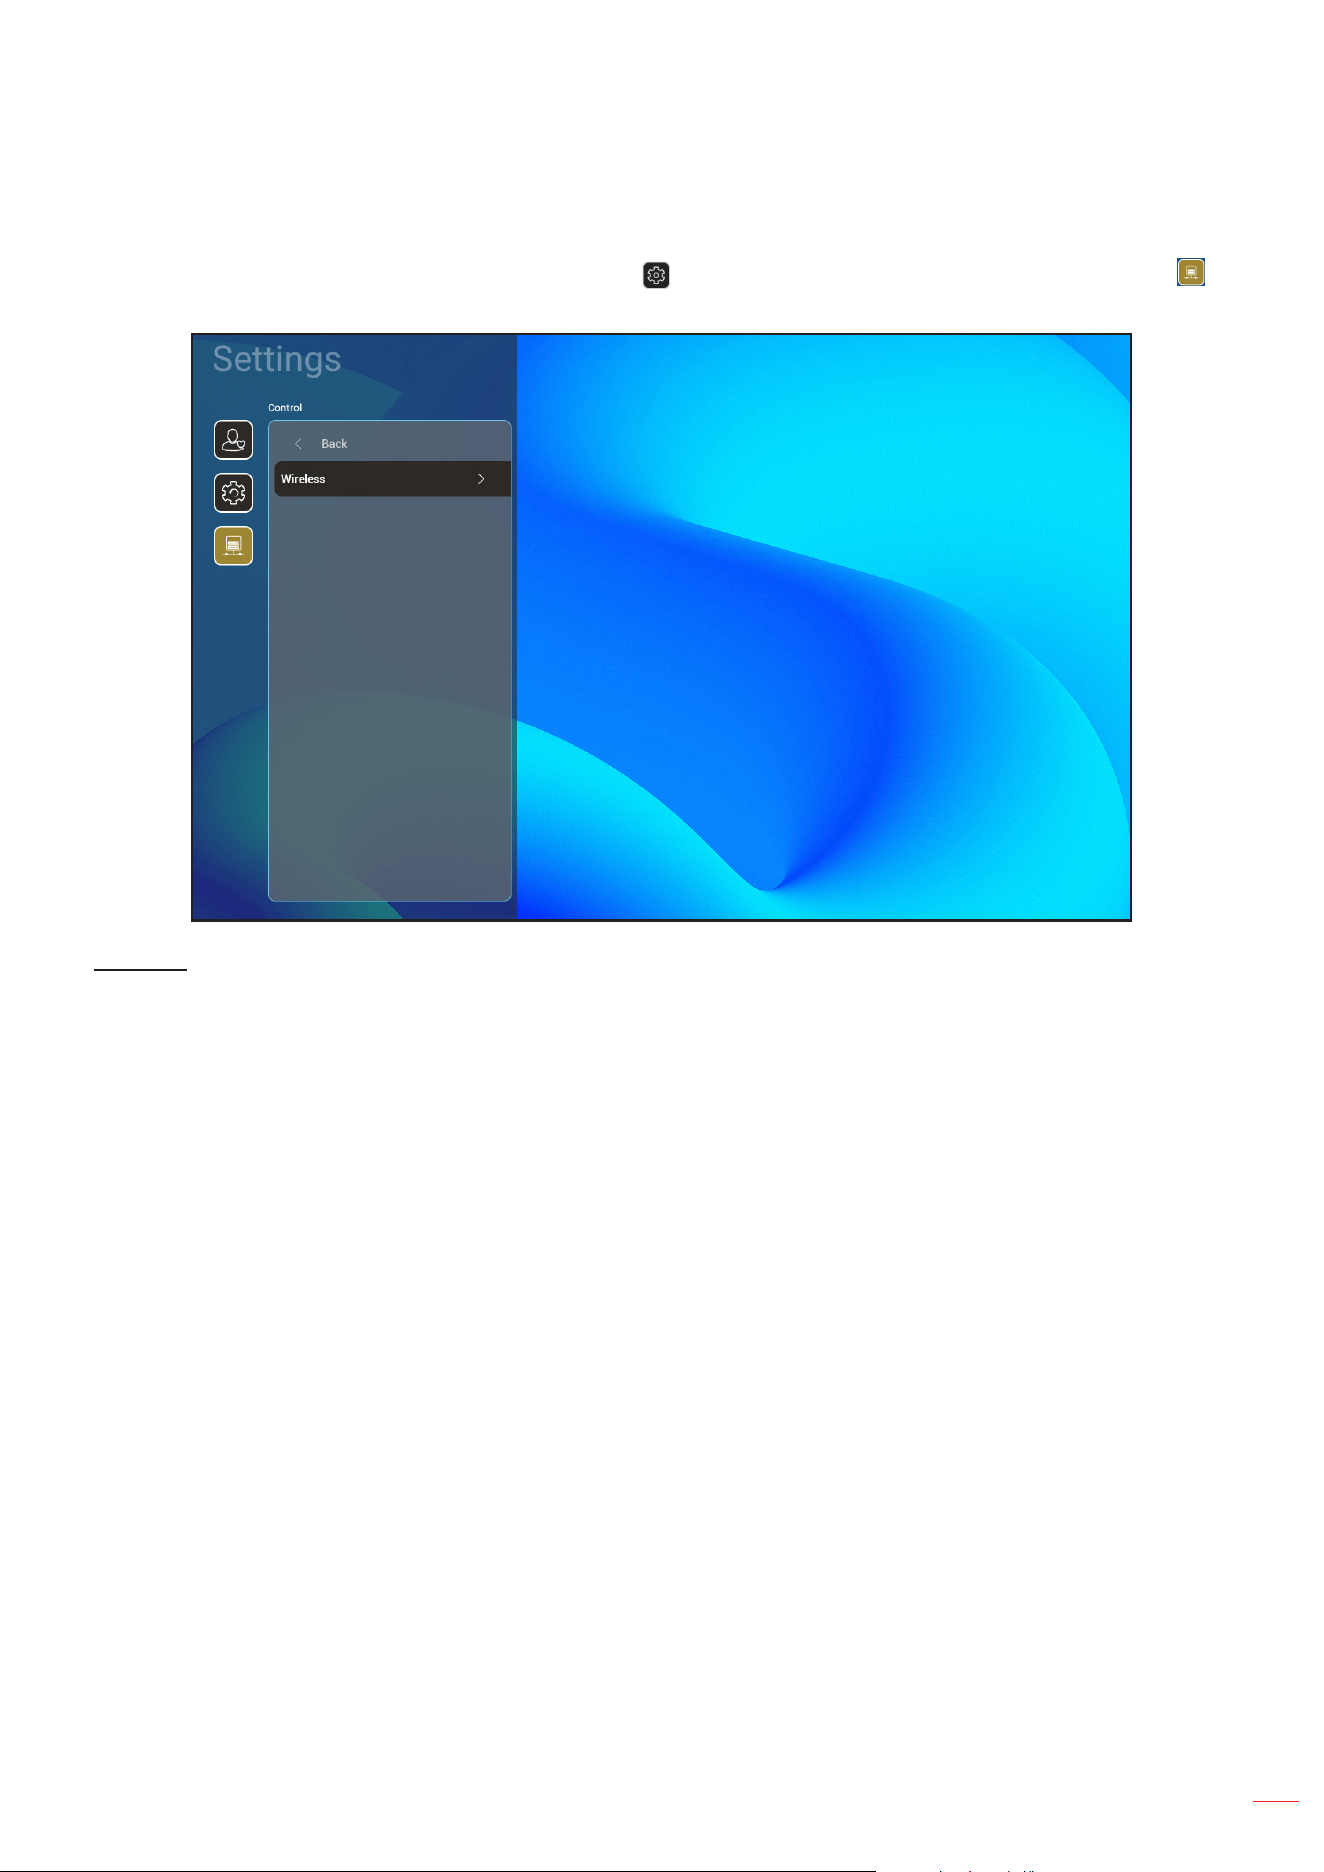
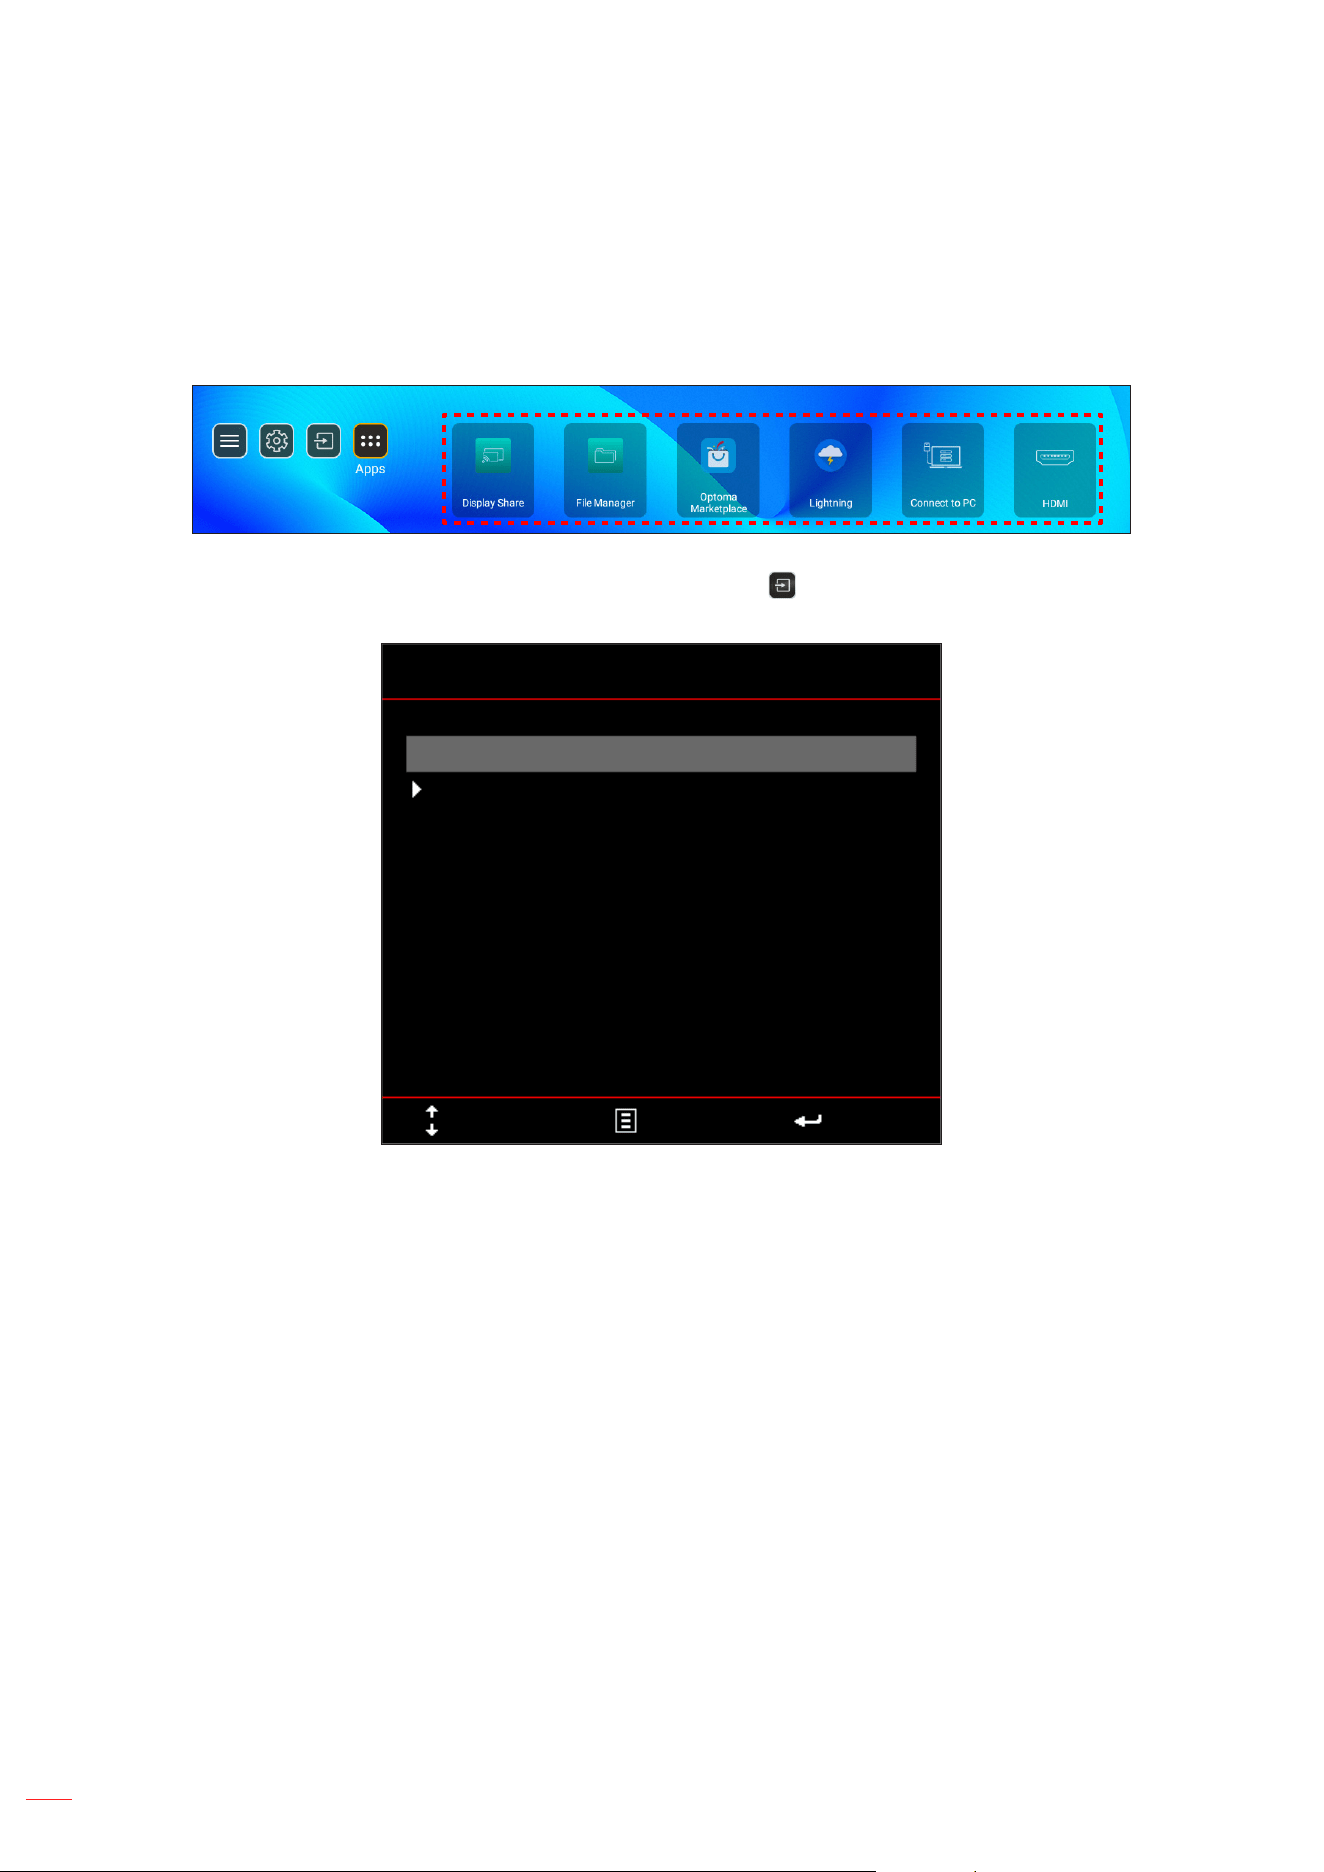
Control menu
On the Home screen, select the system settings menu “ ” to congure various system settings. Then select “ ”
to enter the Control menu.
Wireless
Congure wireless network settings.
• Wi-Fi: Set the Wi-Fi option to “ON” to enable wireless network feature.
• Available Network SSID: Select your desired wireless access point and enter or congure the
necessary connection parameters (if required), for example password, proxy settings, and IP address.
For information, you can review the signal strength.
Choose “Cancel” to return to the Network menu without saving settings. Choose “Forget” to delete the
wireless network prole.
Note: Whenever you need to input symbols, the system will automatically pop-up an onscreen
keyboard.
• Add New Network: Manually enter the network name.
• Portable Hotspot: Congure the projector to behave as a wireless access point for other devices.
English
44
USING THE PROJECTOR
Selecting an input source
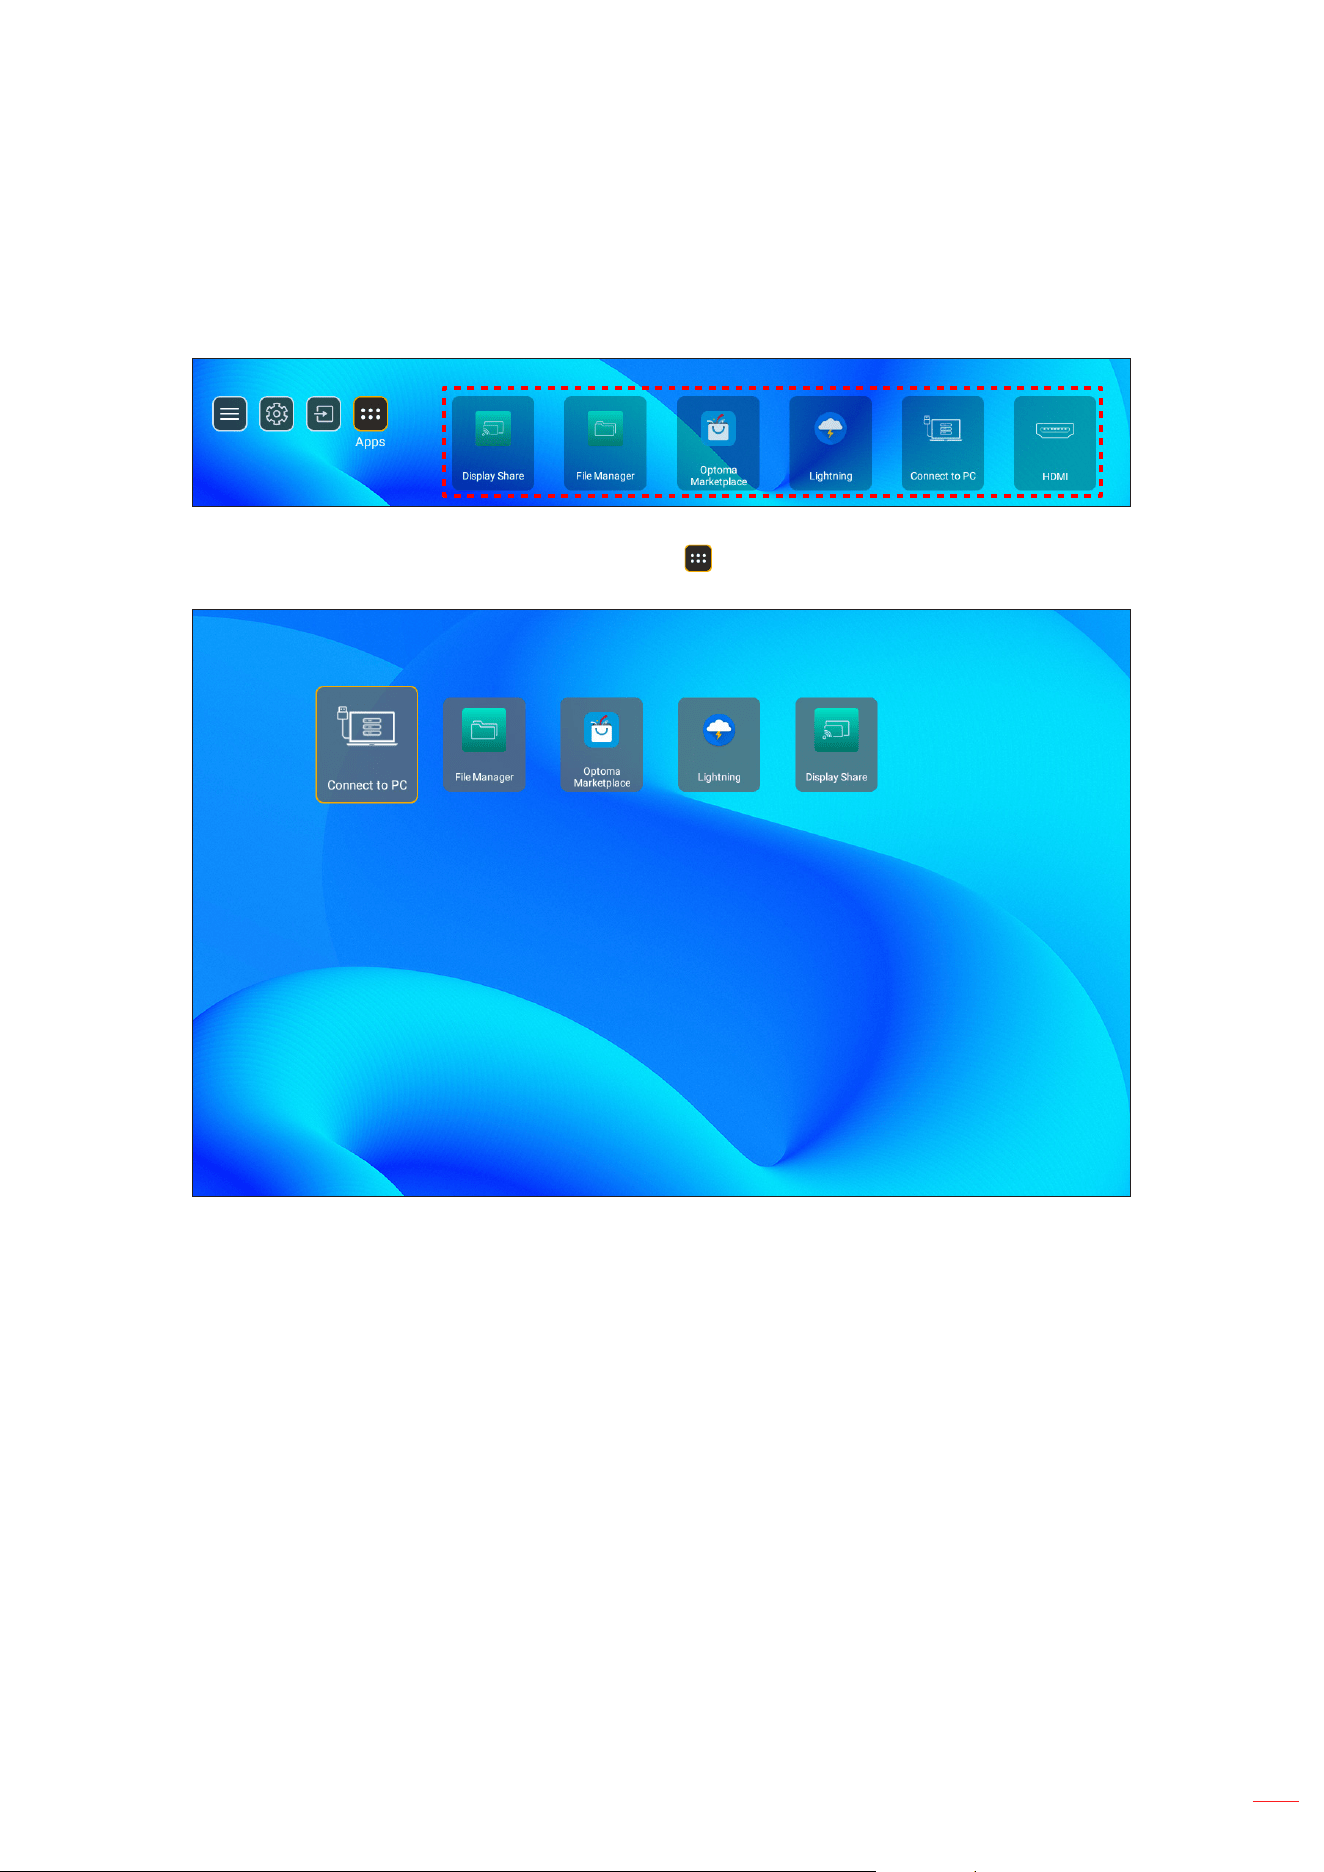
You can select any input source directly on the Home screen using an input shortcut.
Note:
You can personalize shortcut settings in “System Settings menu Personalize Home Shortcuts”. You
can also modify the shortcut order on the Home screen.
If the desired input source is not visible on the Home screen, select “ ” to view all input options. Then select your
input source or select “Home” to return to the Home screen.
Input Source
HDMI
Home
USB-A
SD Card
Select Exit Enter
English
45
USING THE PROJECTOR
Selecting an app
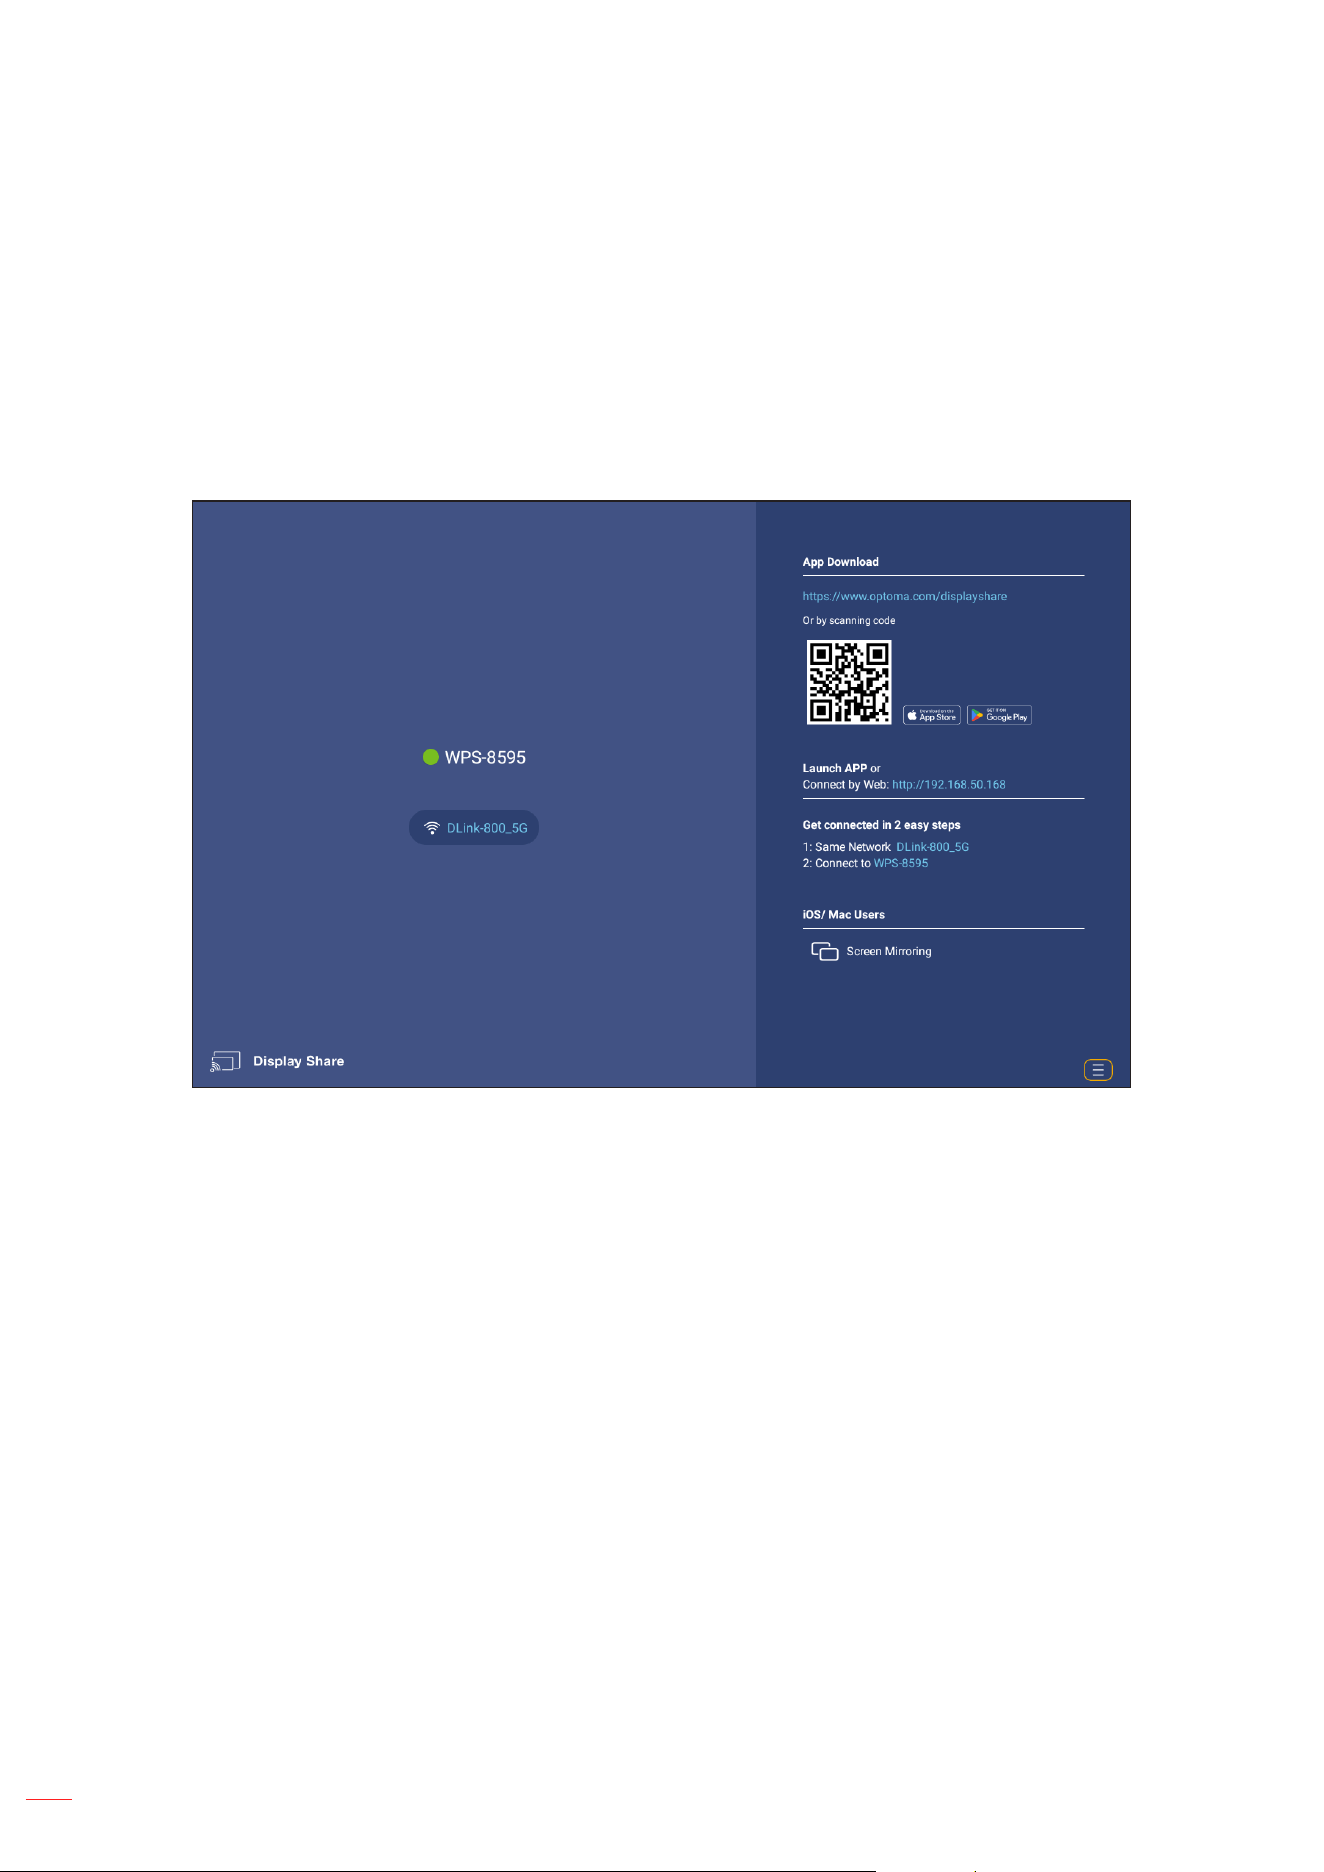
You can select any app directly on the Home screen using an app shortcut.
Note:
You can personalize shortcut settings in “System Settings menu Personalize Home Shortcuts”.
If the desired app is not visible on the Home screen, select “ ” to view all installed apps. Then select your desired
app.
English
46
USING THE PROJECTOR
Display Share
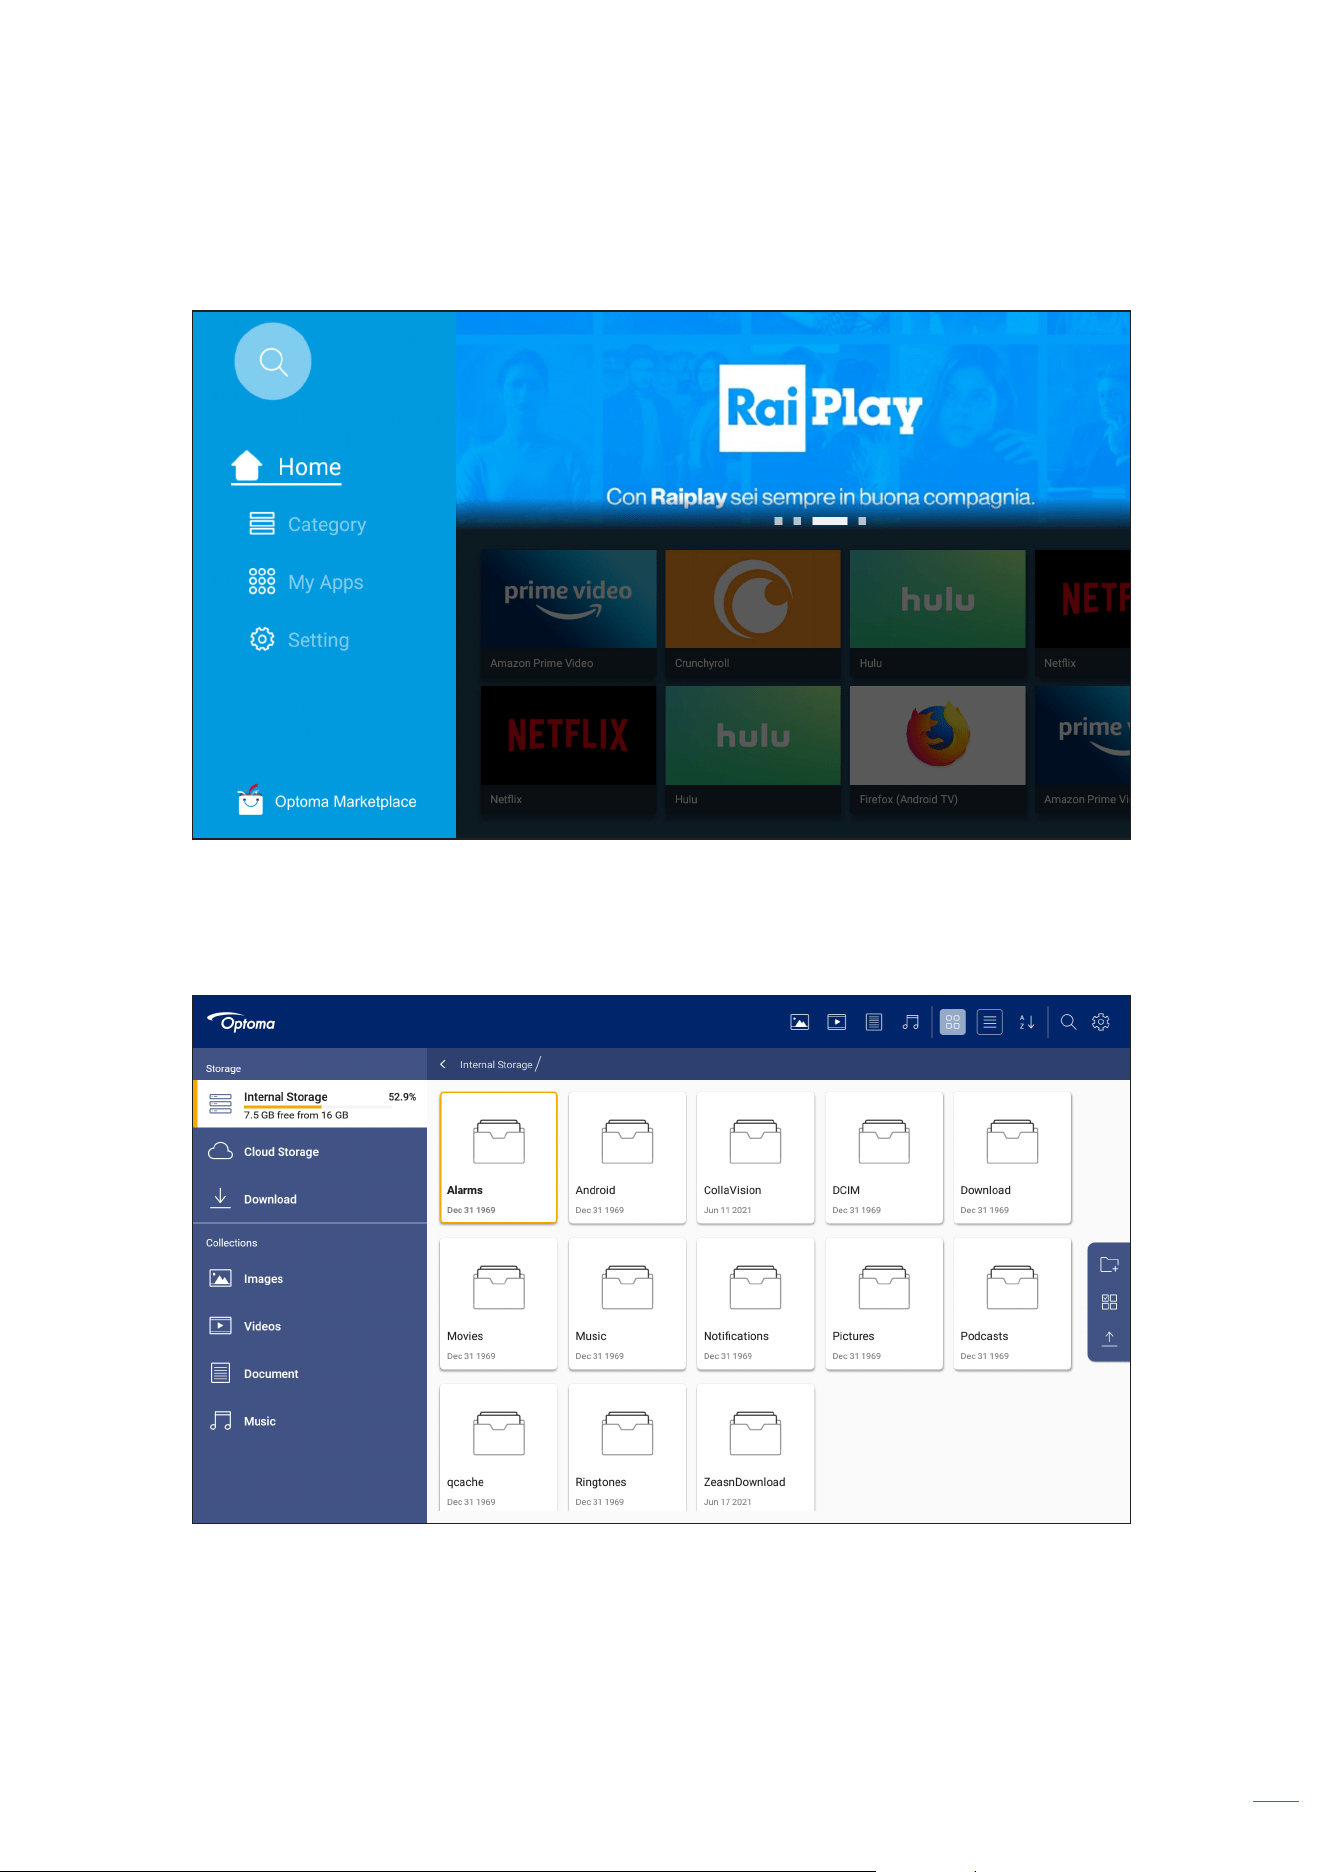
To get the App, you can do either of the following:
• if you are using the mobile device, scan the QR code on the screen.
• if you are using the computer, simply go to the link.
Then install the Display Share app in your computer or mobile device.
Before you get started, make sure to connect your computer or mobile device to the same Wi-Fi as the projector.
Then follow the on-screen instructions to operate the App.
Note: For initial activation of the iOS screen mirroring function, please ensure the projector is connected to the
internet, then launch the Display Share app. You are only required to perform this initial step once and after
the initial connection is established, the Display Share app does not need to be open for future use of the
iOS screen mirroring function.
English
47
USING THE PROJECTOR
Optoma Marketplace
With the Optoma Marketplace app, you can search and install any App.
File Manager
With the File Manager app, you can manage the les stored in the internal storage, external storage, and cloud
storage.
English
48
ADDITIONAL INFORMATION
Compatible resolutions
EDID Timing
B0/Established Timing B0/Standard Timing B0/Detail Timing
Resolution V [Hz] H [Hz] Resolution V [Hz] Ratio Resolution V [Hz]
720x400 70 31.5 800x600 120 4:3 1280x800 60
640x480 60 31.5 1024x768 120 4:3
640x480 66.6(67) 34.9 1280x720 60 16:9
640x480 72 37.9 1280x720 120 16:9
640x480 75 37.5 1280x1024 60 5:4
800x600 56 35.1 1440x900 60 16:10
800x600 60 37.9 1680x1050 60 16:10
800x600 72 48.1
800x600 75 46.9
832x624 75 48.9
1024x768 60 48.4
1024x768 70 56.5
1024x768 75 60
1280x1024 75 80
1152x870 75 67.5 Be limited within 8 resolutions
B1/Video Mode B1/Detail Timing
Resolution H [Hz] Resolution V [Hz]
640x480p 4:3 60 1366x768 60
720(1440)x576i 4:3 50 1920x1080 60
720(1440)x576i 16:9 50
720(1440)x480i 4:3 60
720(1440)x480i 16:9 60
720x576p 4:3 50
720x576p 16:9 50
720x480p 4:3 60
720x480p 16:9 60
1280x720p 16:9 50
1280x720p 16:9 60
1920x1080i 16:9 60
1920x1080i 16:9 50
1920x1080p 16:9 24
1920x1080p 16:9 30
1920x1080p 16:9 50
1920x1080p 16:9 60

English
49
ADDITIONAL INFORMATION
Multimedia support format
Audio Format
Decoder Audio Codec Channel Bit rate Sampling rate File Format Remarks
MPEG
MPEG1/2/2.5 Audio
Layer1/2/3
2
8kbps~320Kbps,
CBR and VBR
8KHZ~48KHz MP1, MP2, MP3 n.a
OGG Q1~ Q10 2 n.a 8KHZ~48KHz OGG, OGA n.a
FLAC Compress Level 0~8 2 n.a 8KHZ~48KHz FLACC n.a
AAC
ADIF, ATDS Header AAC-
LC and AAC-HE,
AAC-ELD
5.1 n.a 8KHZ~48KHz AAC, M4A n.a
Video Format
Decoder
Video
Codec
Supported
Image Size
Maximum
Frame Rate
Maximum Bit
Rate
File
Format
Remarks
MPEG-1/2 MPEG-1/2
48x48 pixels to
1920x1088 pixels
30fps 80Mbps
DAT,
MPG,
VOB, TS
Support Field Coding
H.264/AVC H.264
48x48 pixels to
4096x2304 pixels
2304p@30fps 100Mbps
AVI, MKV,
MP4,
MOV,
3GP, TS,
FLV
(1) Support Field Coding
(2) Support MBAFF
(3) Support High and High10
Prole
MOTION
JPEG
MJPEG
48x48 pixels to
1920x1088 pixels
30fps 38.4Mbps AVI n.a
Photo Format
Decoder Image Codec Support Image Size Container Remarks
JPEG JFIF le format 1.02
48x48 pixels to
8176x8176pixels
JPG,JPEG
(1) Not Support Non-interleaved Scan
Remarks
(2) Software support SRGB JPEG
(3) Software support Adobe RGB JPEG
BMP BMP No Restriction BMP n.a
GIF GIF No Restriction GIF n.a
PNG PNG No Restriction PNG n.a
WEBP WEBP No Restriction WEBP n.a

English
50
ADDITIONAL INFORMATION
Oce Viewer
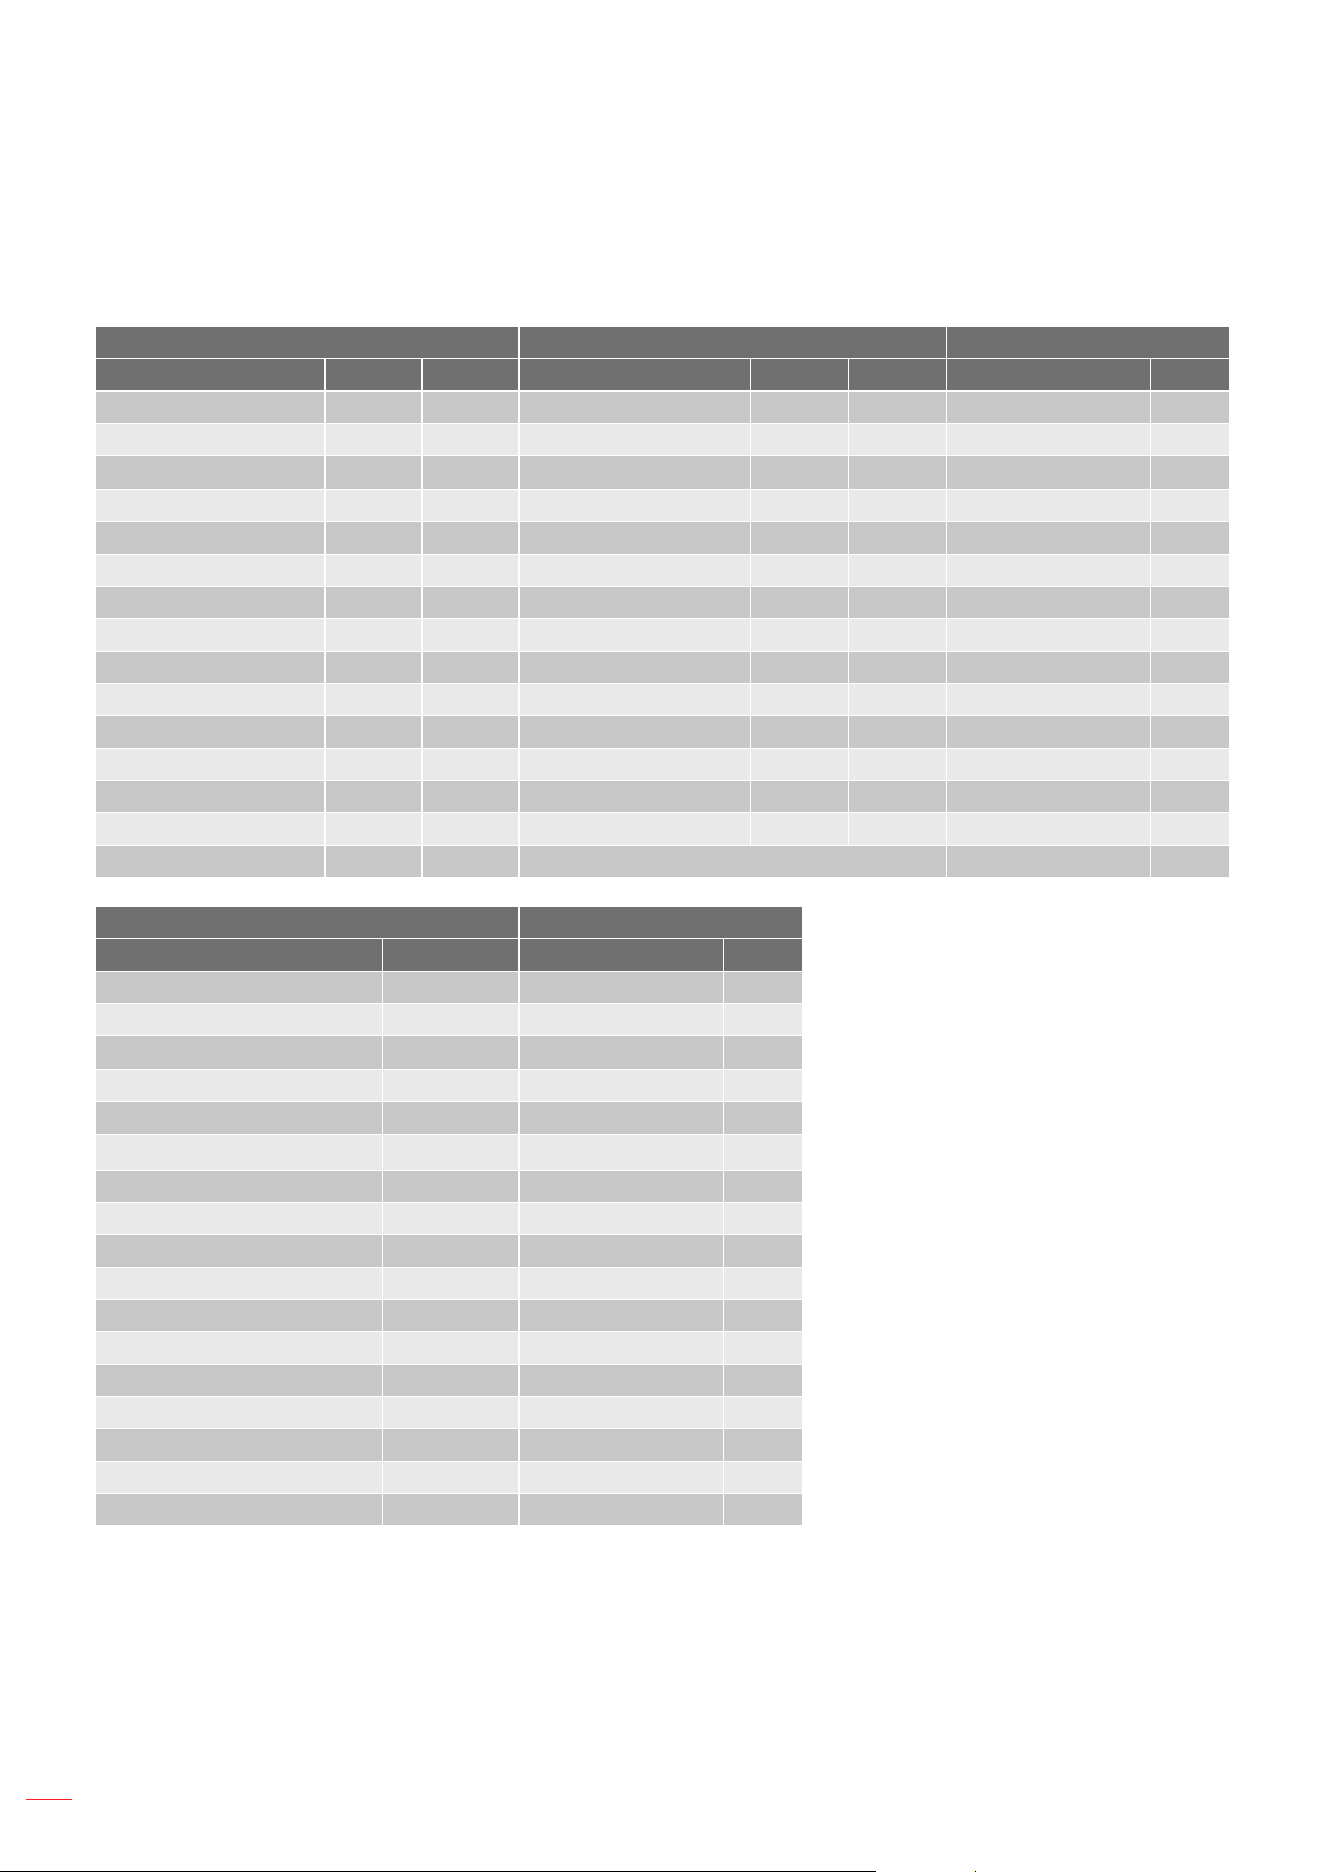
Document Format Support Version and Format
PDF PDF 1.7 and above(*.pdf)
Writter (Word)
Microsoft Word 97/2000/XP/2003 Document(*.doc)
Microsoft Word 97/2000/XP/2003 Template(*.dot)
Microsoft Word 2007/2010 Document(*.docx)
Microsoft Word 2007/2010 Template(*.dotx)
Text Files(*.txt, *.log)
Spreadsheet (Excel)
Microsoft Excel 97/2000/XP/2003 Workbook(*.xls)
Microsoft Excel 2007/2010 Workbook(*.xlsx)
Text Files(*.csv)
Microsoft Excel 97/2000/XP/2003 Template(*.xlt)
Microsoft Excel 2007/2010 Template(*.xltx)
Presentation (PowerPoint)
Microsoft PowerPoint 97/2000/XP/2003 Presentation(*.ppt, *.pps)
Microsoft PowerPoint 2007/2010 Presentation(*.pptx, *.ppsx)
Microsoft PowerPoint 97/2000/XP/2003 Presentation Templates(*.pot)
Microsoft PowerPoint 2007/2010 Presentation Templates(*.potx)
USB Support Format
FAT32
NTFS
exFAT
English
51
ADDITIONAL INFORMATION
Image size and projection distance
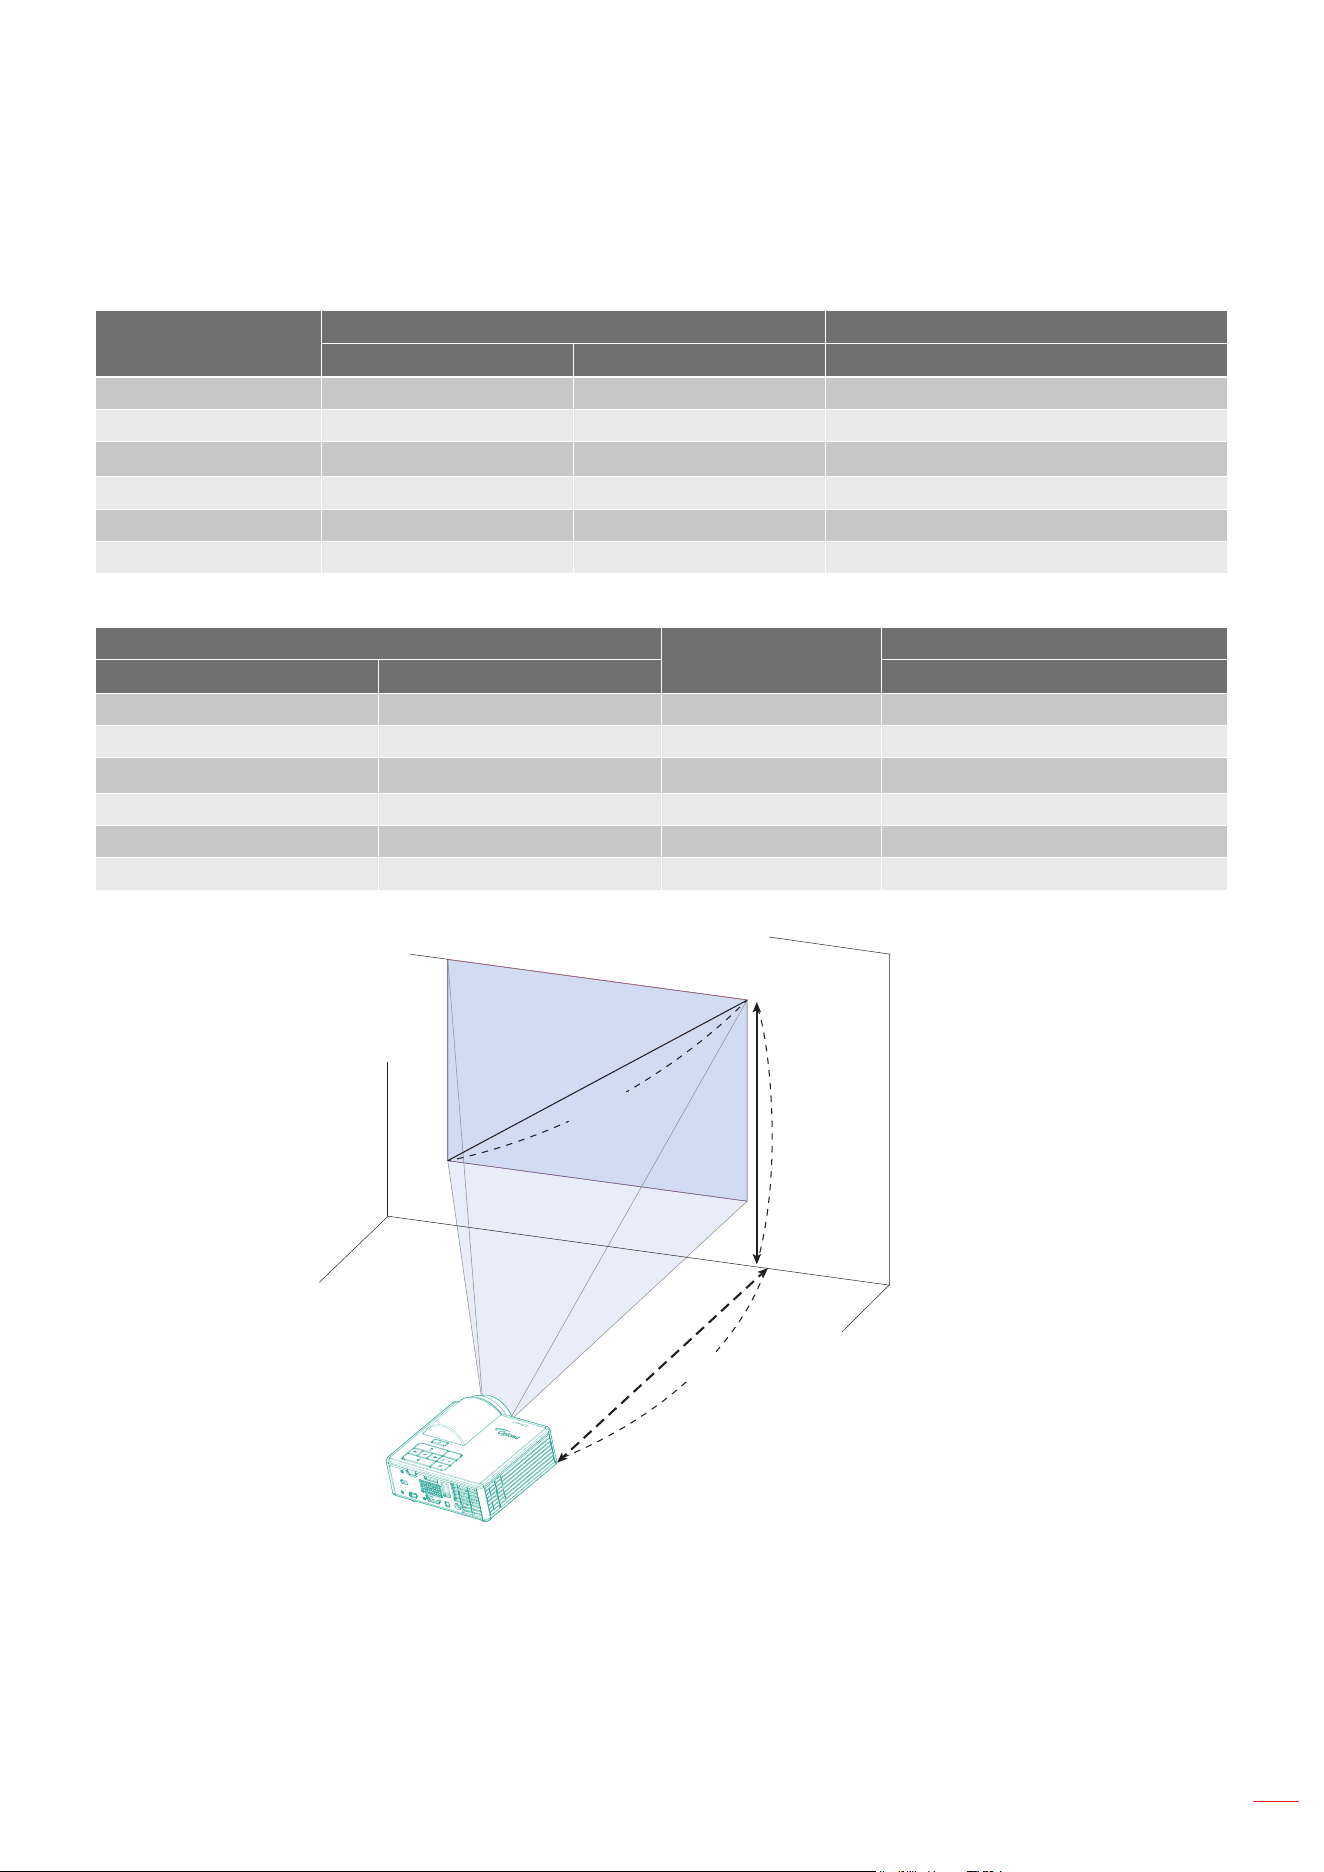
ML1050STi model
Desired Distance (m)
<B>
Screen Size Top
Diagonal (inch) <A> W (cm) x H (cm) From base to top of image (cm) <C>
0.86 50 107 x 67 67
1.04 60 129 x 81 81
1.21 70 151 x 94 94
1.39 80 172 x 108 108
1.56 90 194 x 121 121
1.73 100 215 x 135 135
Desired image size
Distance (m)
<B>
Top (cm)
Diagonal (inch) <A> W (cm) x H (cm) From base to top of image <D>
50 108 x 67 0.86 67
60 129 x 81 1.041 81
70 151 x 94 1.21 94
80 172 x 108 1.39 108
90 194 x 121 1.56 121
100 215 x 135 1.73 135
A
60"
Desired
image size
D
B
Height: 81 cm
from base to top of
image
Desired Distance
1.04 m
English
52
ADDITIONAL INFORMATION
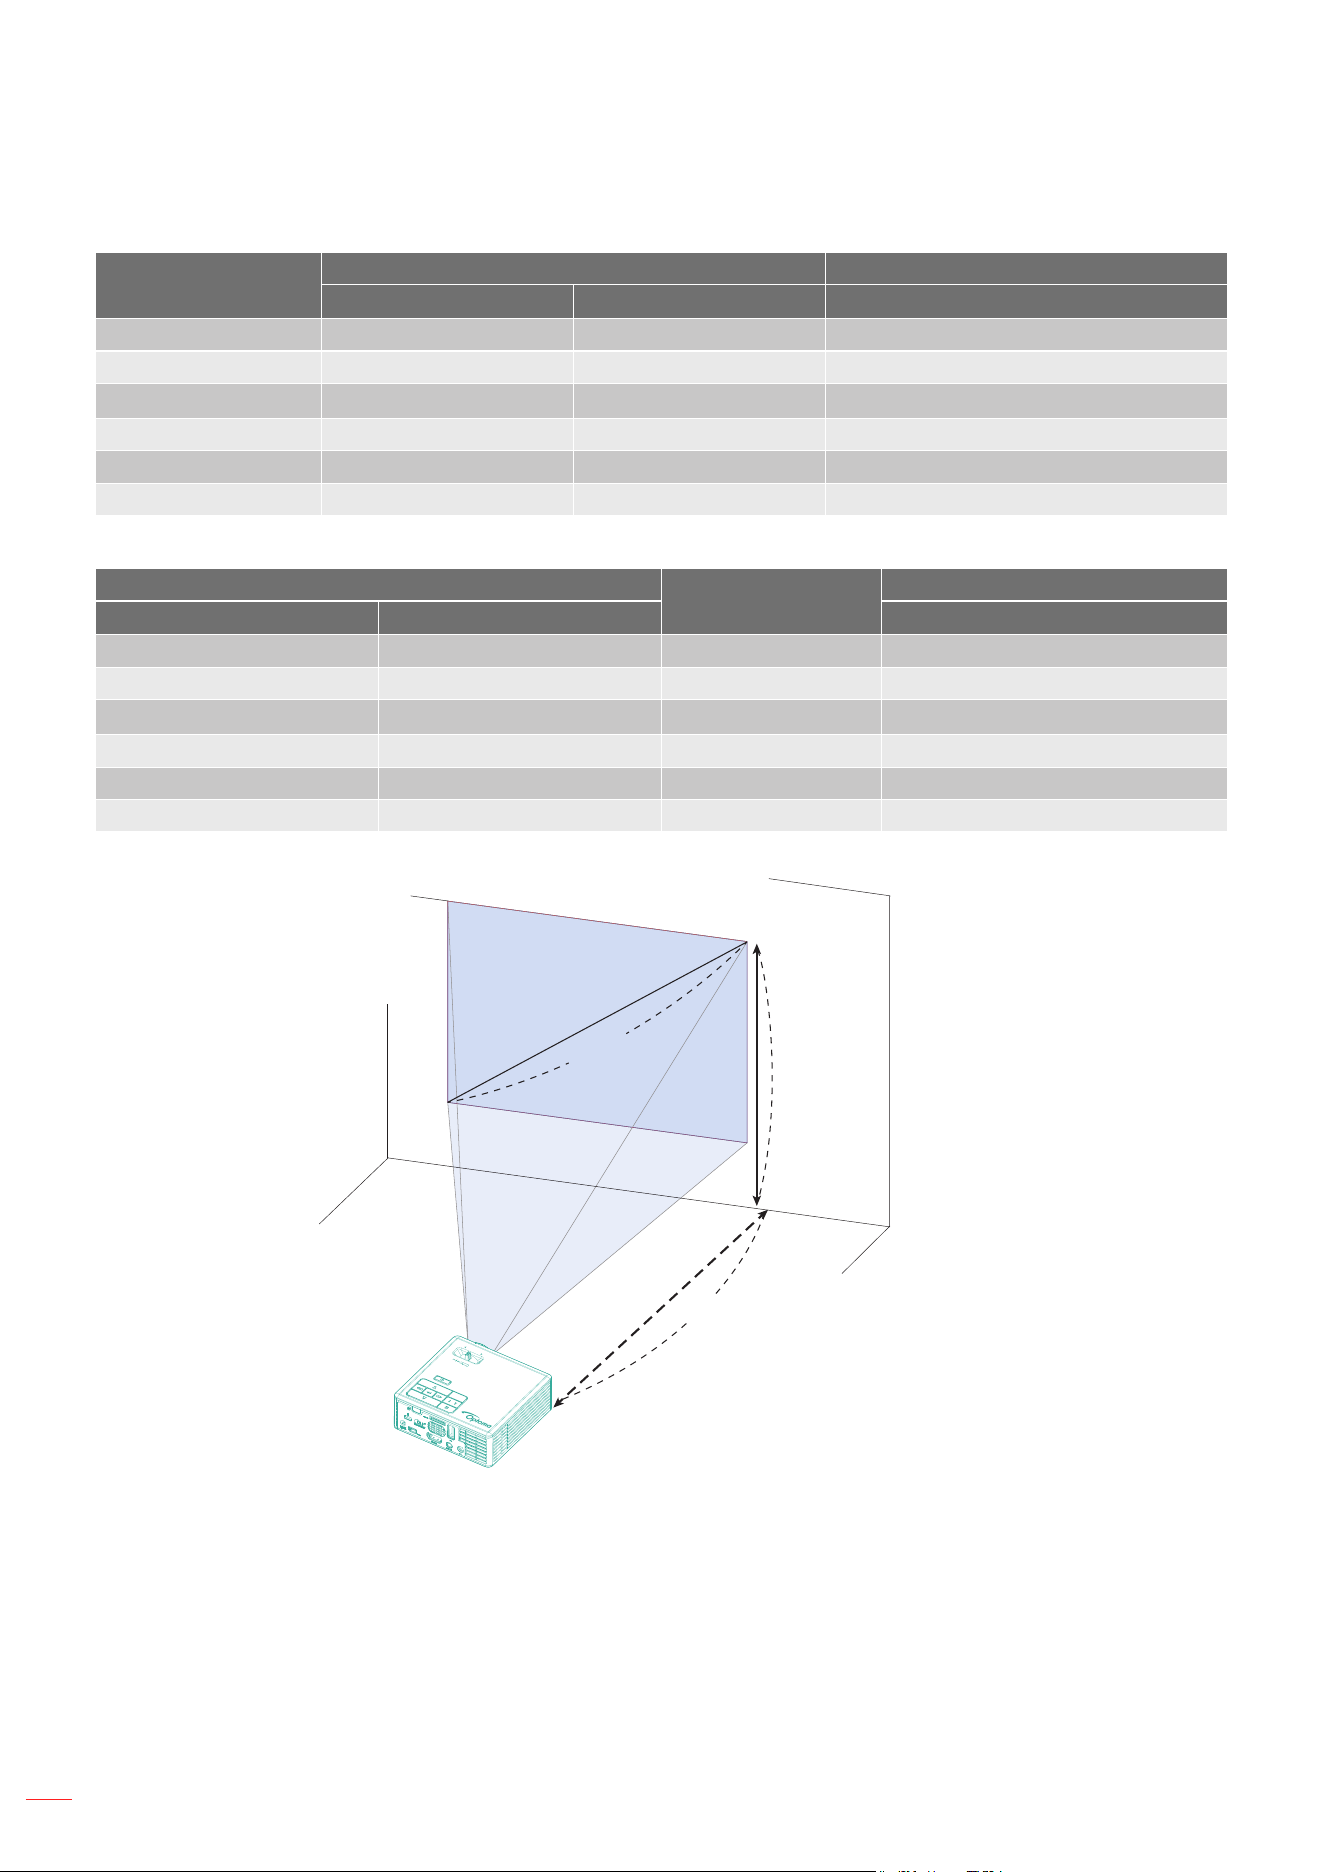
ML750i model
Desired Distance (m)
<B>
Screen Size Top
Diagonal (inch) <A> W (cm) x H (cm) From base to top of image (cm) <C>
0.97 30 65 x 40 40
1.29 40 86 x 54 54
1.62 50 108 x 68 68
1.94 60 129 x 81 81
2.26 70 151 x 94 94
2.58 80 172 x 108 108
Desired image size
Distance (m)
<B>
Top (cm)
Diagonal (inch) <A> W (cm) x H (cm) From base to top of image <D>
30 65 x 40 0.969 40
40 86 x 54 1.292 54
50 108 x 67 1.62 67
60 129 x 81 1.94 81
70 151 x 94 2.26 94
80 172 x 108 2.58 108
FOCUS
A
40"
Desired
image size
D
B
Height: 54 cm
from base to top of
image
Desired Distance
1.292 m
Distance
English
53
ADDITIONAL INFORMATION
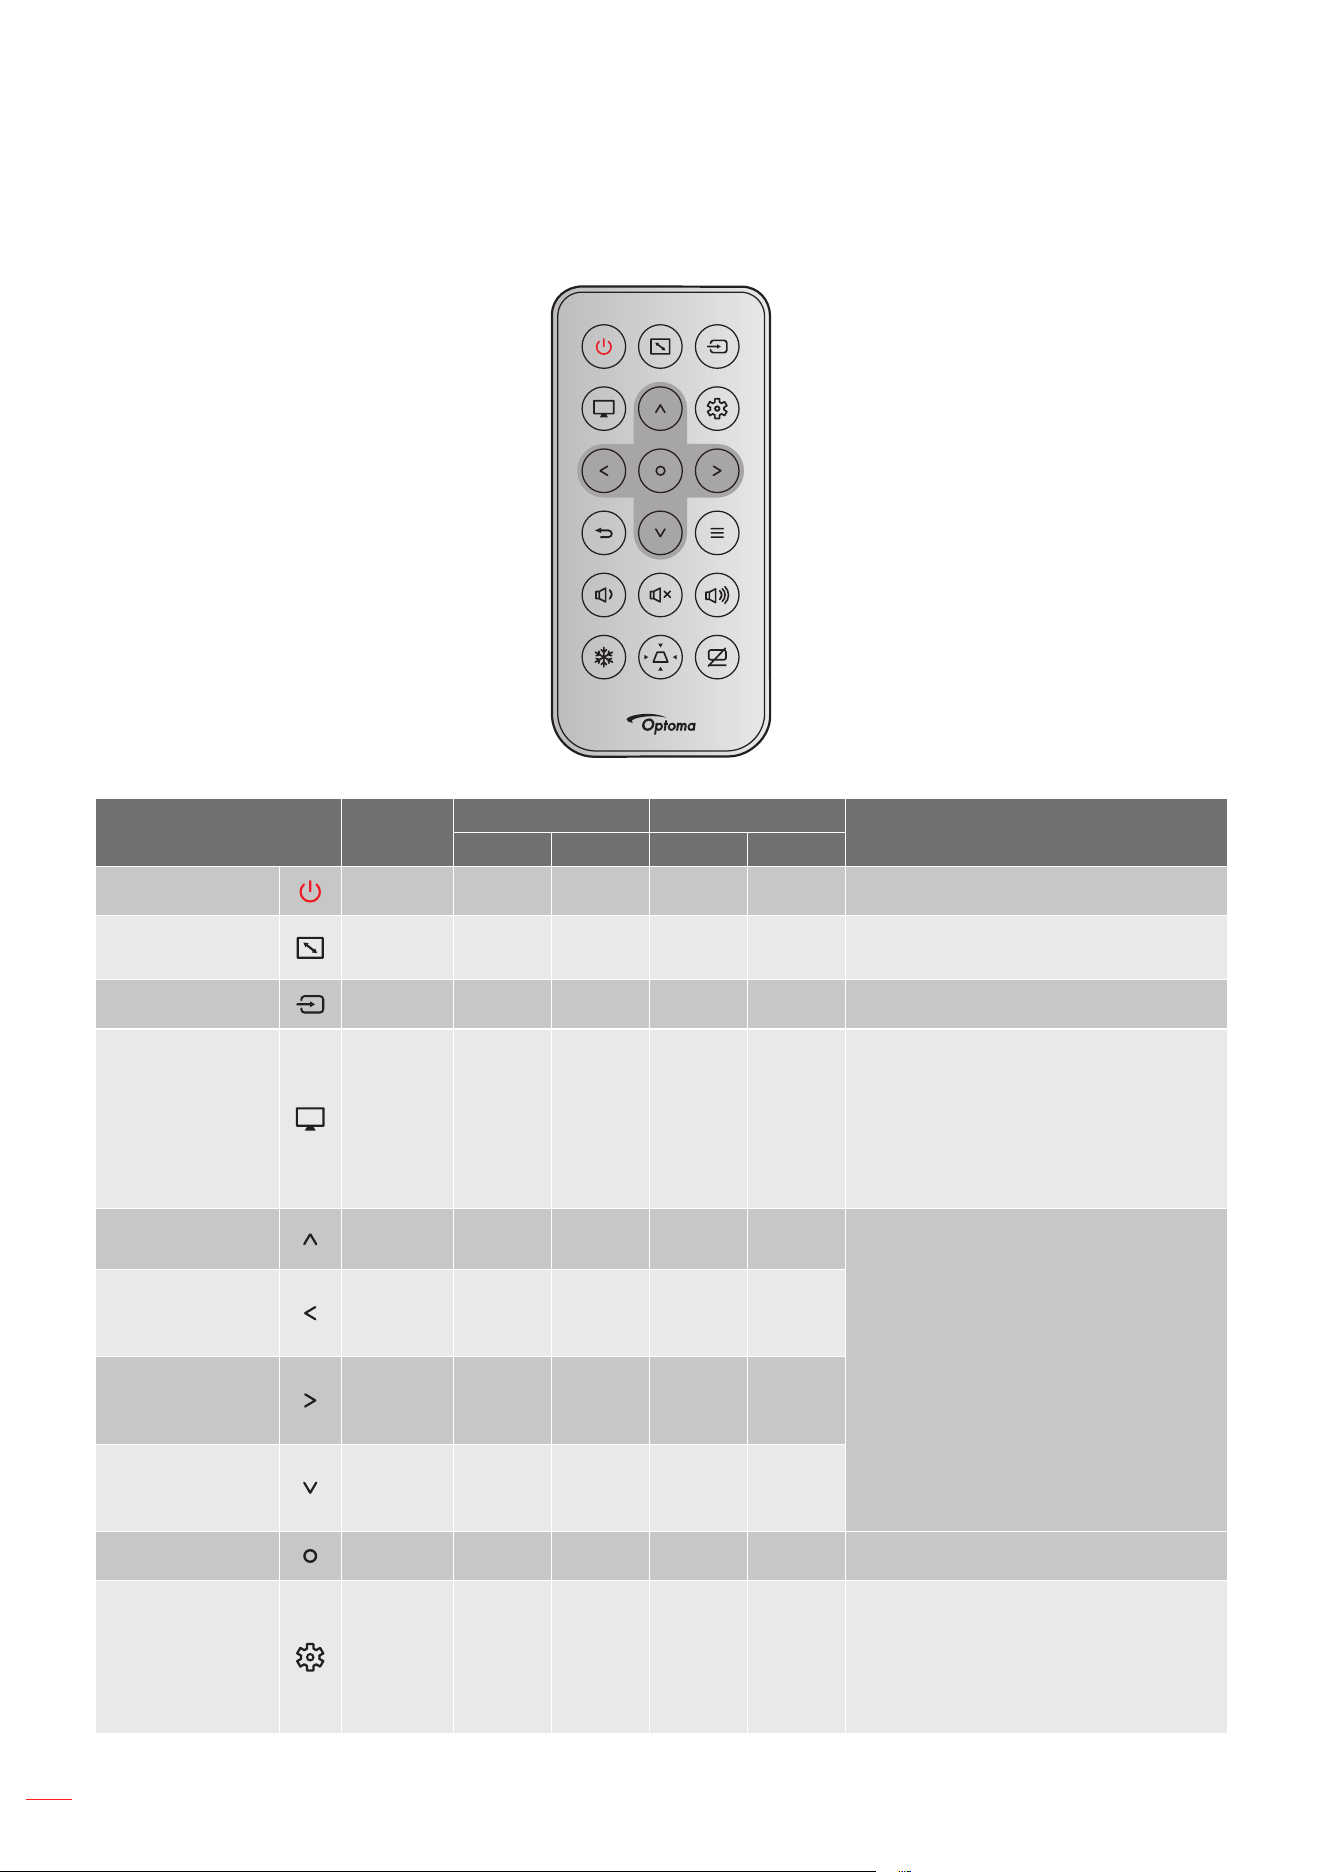
Tripod mount the projector
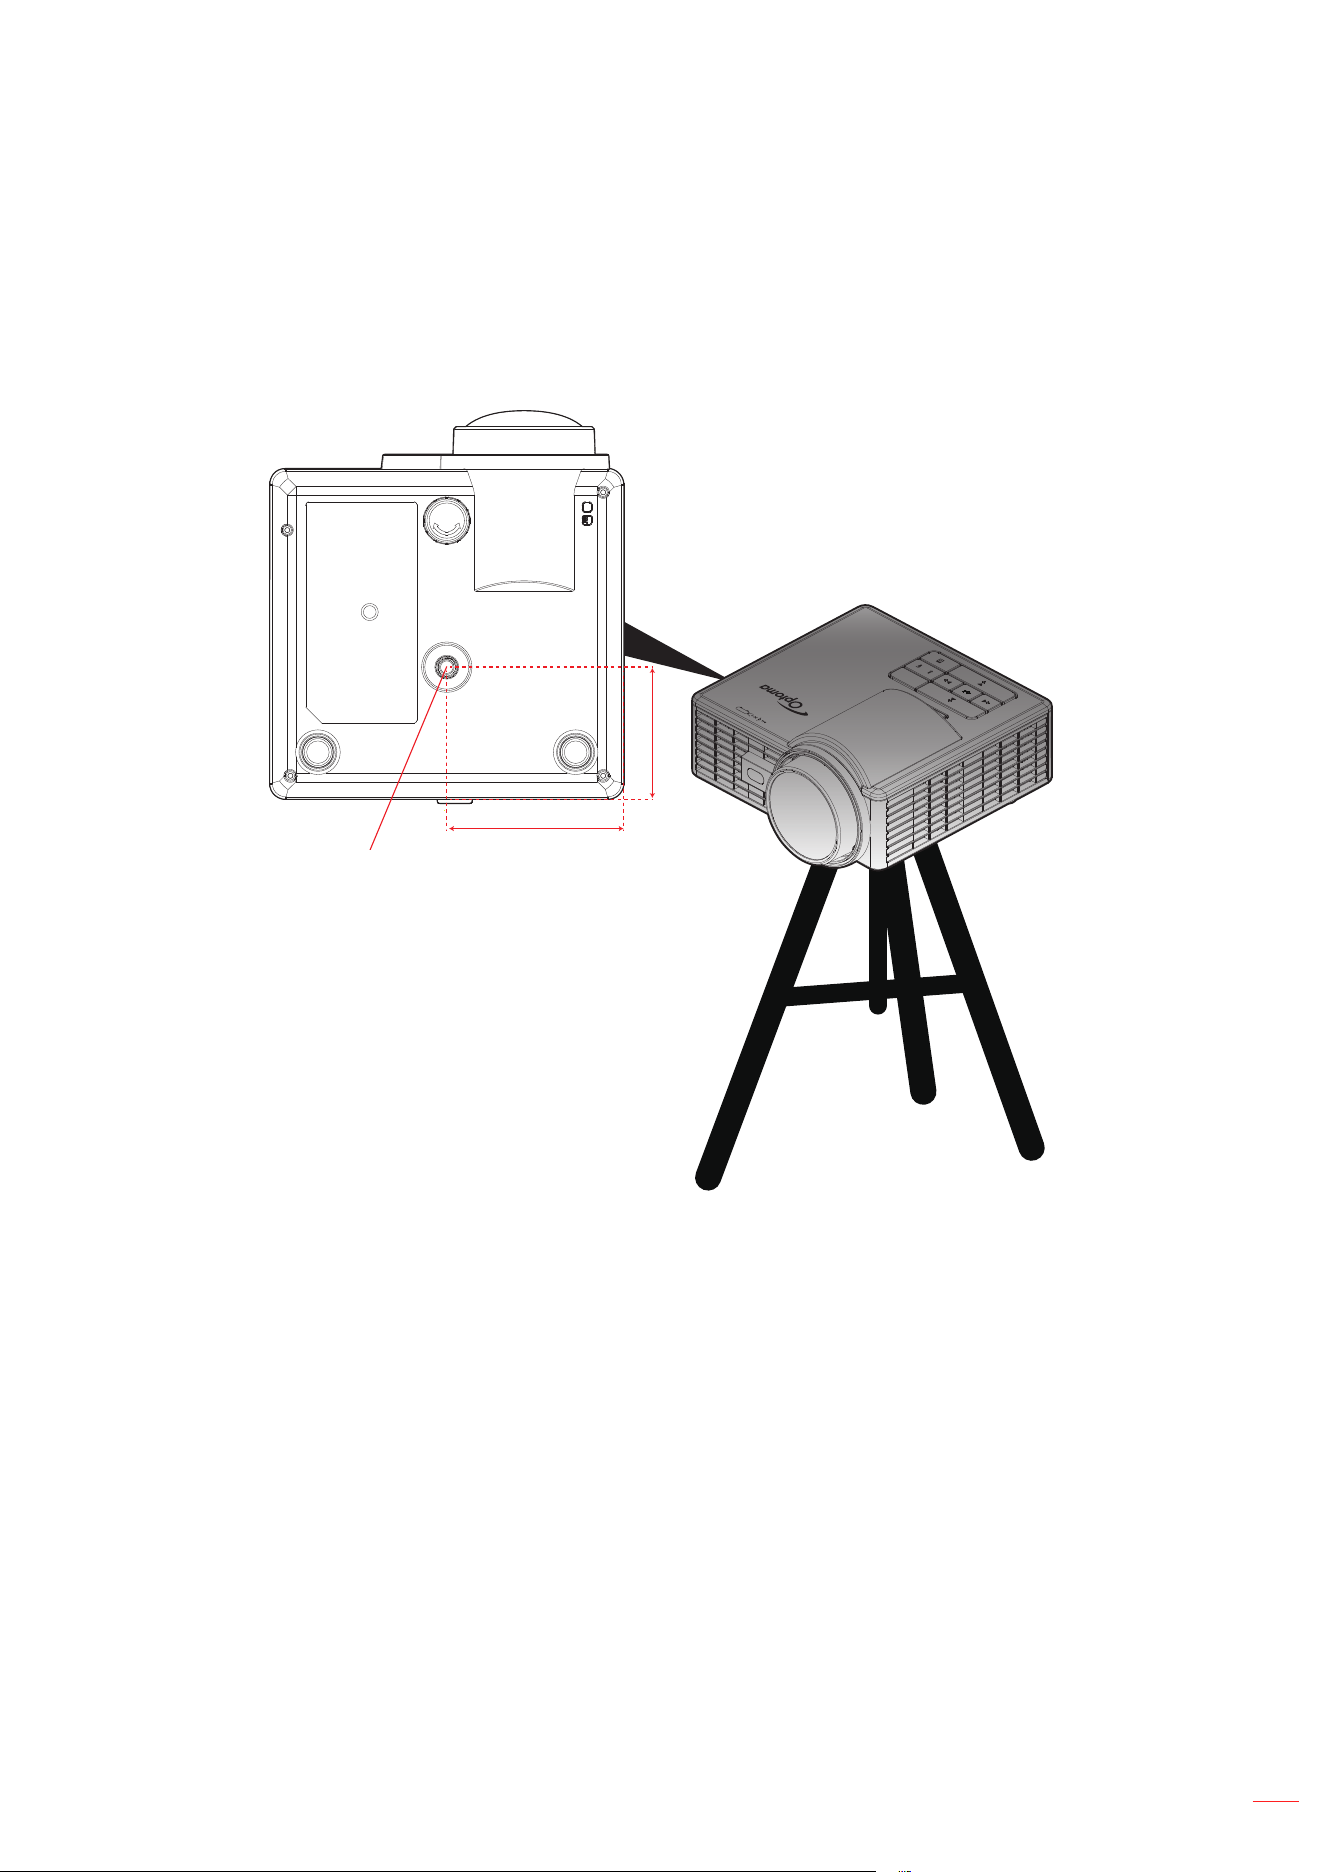
Screw a standard tripod into the screw hole on the projector.
Note: Please note that damage resulting from incorrect installation will void the warranty.
Unit: mm
Insert Nut 1/4” - 20 UNC
(Screw hole for tripod)
42.0
56.25
English
54
ADDITIONAL INFORMATION
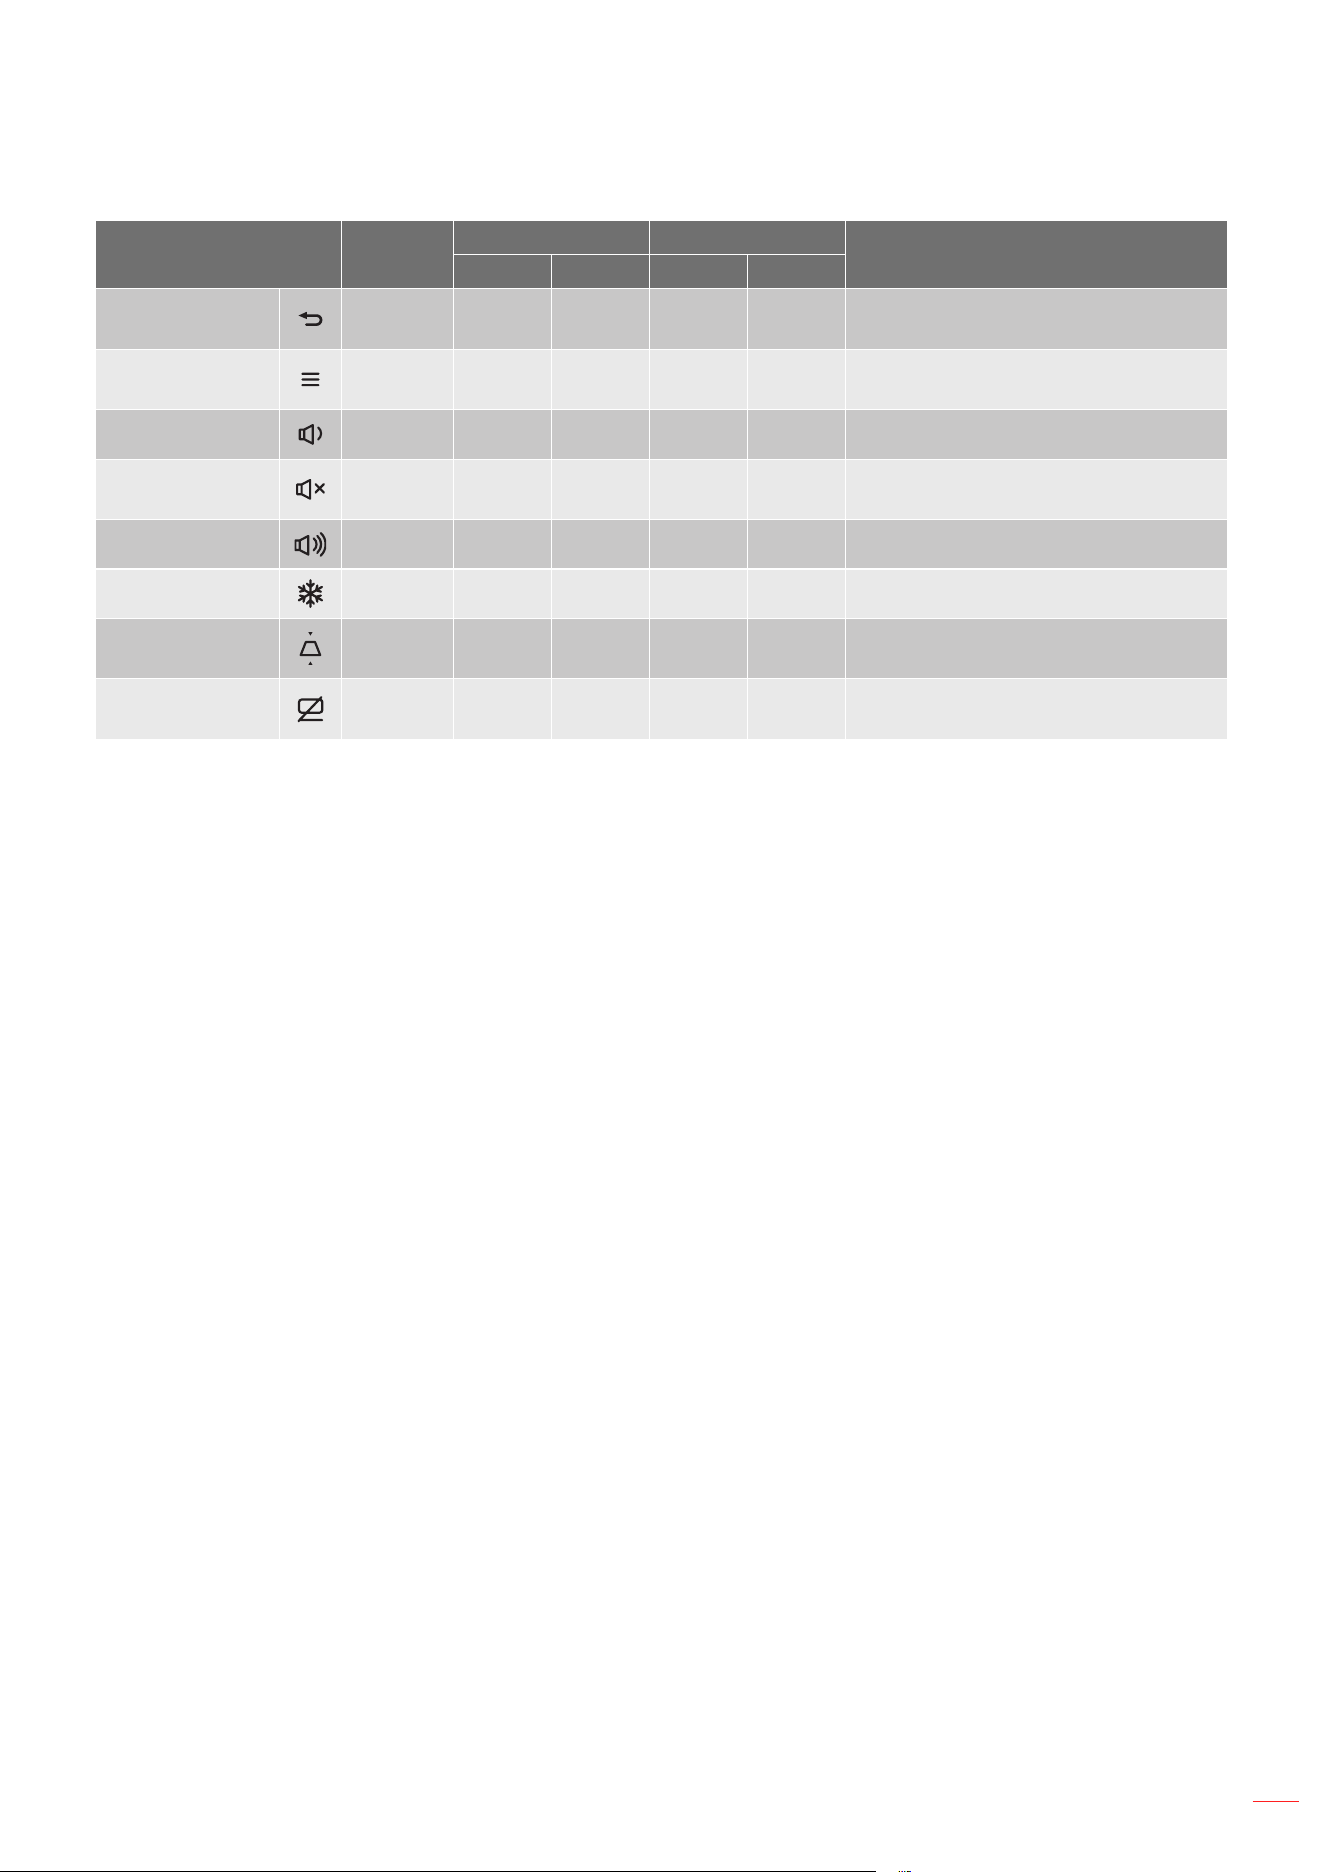
IR remote control codes
Key
NEC
format
Customer Code Key Code
Description
Byte 1 Byte 2 Byte 3 Byte 4
Power
Format 1 32 CD 02 FD Press to turn on / o the projector.
Aspect ratio
Format 1 32 CD 64 9B
Press to change the aspect ratio of a
displayed image.
Source
Format 1 32 CD C3 3C Press to select an input signal.
Mode
Format 1 32 CD 5 FA
Multiple function depends on the
input source.
• HDMI: Change the Picture mode
of a displayed image.
• Home (USB-A or SD Card): Back
to Android Home / Launcher.
Four directional
select keys (Up)
Format 2 32 CD 11 EE
Press to select items or make
adjustments to your selection.
Four directional
select keys
(Left)
Format 2 32 CD 10 EF
Four directional
select keys
(Right)
Format 2 32 CD 12 ED
Four directional
select keys
(Down)
Format 2 32 CD 14 EB
Enter
Format 1 32 CD 0F F0 Conrm your item selection.
Settings/Setup
Menu
Format 1 32 CD A8 57
Multiple function depends on the
input source.
• HDMI: Enter to Setup menu.
• Home (USB-A or SD Card):
Launch Android Menu.
English
55
ADDITIONAL INFORMATION
Key
NEC
format
Customer Code Key Code
Description
Byte 1 Byte 2 Byte 3 Byte 4
Return
Format 1 32 CD 0D F2
Press to return to the previous
menu.
Menu
Format 1 32 CD 0E F1
Press to display or exit the on-
screen display menus.
Volume -
Format 2 32 CD 8F 70 Press to decrease the volume.
Mute
Format 1 32 CD 52 AD
Press to momentarily turn o / on the
audio.
Volume +
Format 2 32 CD 8C 73 Press to increase the volume.
Freeze
Format 1 32 CD 06 F9 Press to freeze the projector image.
Keystone
Format 1 32 CD 7 F8
Press to adjust image distortion
caused by tilting the projector.
AV Mute
Format 1 32 CD 03 FC
Press to hide / unhide the screen
picture and turn o / on audio.

English
56
ADDITIONAL INFORMATION
Troubleshooting
If you experience a problem with your projector, please refer to the following information. If a problem persists,
please contact your local reseller or service center.
Image problems
No image appears on-screen
• Ensure all the cables and power connections are correctly and securely connected as described in the
"Installation" section.
• Ensure the pins of connectors are not crooked or broken.
• Ensure that the "Mute" feature is not turned on.
Image is out of focus
• Ensure the distance between projector and the edge of table is less then 120mm to avoid light sensor
detection interference. (For ML1050STi only.)
• Turn the focus lever clockwise or counterclockwise until the image is sharp and legible.
(For ML750i only.) (Please see page 24).
• Make sure the projection screen is between the required distance from the projector.
(Please refer to pages 51~52).
The image is stretched when displaying 16:9 DVD title
• When you play anamorphic DVD or 16:9 DVD, the projector will show the best image in 16: 9 format
on projector side.
• If you play 4:3 format DVD title, please change the format as 4:3 in projector OSD.
• Please setup the display format as 16:9 (wide) aspect ratio type on your DVD player.
Image is too small or too large
• Use the Zoom function or congure the Aspect Ratio setting in the Image menu.
(Please see page 37).
• Move the projector closer to or further from the screen.
Image has slanted sides:
• If possible, reposition the projector so that it is centered on the screen and below the bottom of the
screen.
Image is reversed
• Select "Display Projection" from the OSD and adjust the projection direction.
(Please see page 39).

English
57
ADDITIONAL INFORMATION
Other problems
The projector stops responding to all controls
• If possible, turn o the projector, then unplug the power cord and wait at least 20 seconds before
reconnecting power.
Remote control problems
If the remote control does not work
• Check the operating angle of the remote control is pointed within ±15° to the IR receiver on the
projector.
• Make sure there are not any obstructions between the remote control and the projector. Move to within
6 m (19.7 ft) of the projector.
• Make sure batteries are inserted correctly.
• Replace batteries if they are exhausted.

English
58
ADDITIONAL INFORMATION
Warning indicators
When the warning indicators (see below) light up or ash, the projector will automatically shutdown:
• “Lamp” LED indicator is lit amber and if “Power” indicator ashes amber.
• “Temp” LED indicator is lit amber and if “Power” indicator ashes amber. This indicates the projector
has overheated. Under normal conditions, the project can be switched back on.
• “Temp” LED indicator ashes amber and if “Power” indicator ashes amber.
Unplug the power cord from the projector, wait for 30 seconds and try again. If the warning indicator lights up or
ashes, please contact your nearest service center for assistance.
LED lightning messages
Message
Power LED Temp LED Lamp LED
(Amber) (Blue) (Amber) (Amber)
Standby state
(Input power cord)
Steady light
Power on Steady light
Power o (Cooling)
Flashing
(0.5 sec o /
0.5 sec on). Back to
Amber steady light
when cooling fan
turns o.
Error (Lamp failure)
Flashing
(0.5 sec o /
0.5 sec on)
Steady light
Error (Fan failure)
Flashing
(0.5 sec o /
0.5 sec on)
Flashing
(0.5 sec o /
0.5 sec on)
Error (Over temp.)
Flashing
(0.5 sec o /
0.5 sec on)
Steady light
FOTA DDP
Flashing
(0.5 sec o /
0.5 sec on)
Flashing
(0.5 sec o /
0.5 sec on)
Flashing
(0.5 sec o /
0.5 sec on)
Auto MCU Steady light
Flashing
(0.05 sec o /
0.05 sec on)
Flashing
(0.05 sec on /
0.05 sec o)

English
59
ADDITIONAL INFORMATION
• Power o:
Power O
Power O?
Press power key again.
• Temperature warning:
Warning
Over temperature
The projector will switch o automatically
Please contact a service center for repair.

English
60
ADDITIONAL INFORMATION
Specications
Item ML1050STi ML750i
Native Resolution 1280x800 1280x800
Maximum
Resolution
• Graphic up to 1680x1050@60Hz
• Maximum Resolution:
HDMI (1.4b): 1920x1080@60Hz
• Maximum Bandwidth:
HDMI 1.4b: 149MHz
• Graphic up to 1680x1050@60Hz
• Maximum Resolution:
HDMI (1.4b): 1920x1080@60Hz
• Maximum Bandwidth:
HDMI 1.4b: 149MHz
Lens
• Throw ratio: 0.8
• F-stop: 1.9
• Focal length: 8.02 mm
• Throw ratio: 1.5
• F-stop: 1.9
• Focal length: 14.95 mm
Oset 100%±5% 100%±5%
Image size 50"~100" (optimized@60’’) 30"~80" (optimized@40’’)
Projection
distance
0.86 m@50” ~ 1.73 m@100" 0.969 m@30” ~ 2.58 m@80"
I/Os
• HDMI 1.4b x 1
• USB Type-A x 1 for Power USB 5V/0.5A
and Wi-Fi dongle
• SD card slot
• Mini USB (RS232 control)
• HDMI 1.4b x 1
• USB Type-A x 1 for Power USB 5V/0.5A
and Wi-Fi dongle
• SD card slot
• Mini USB (RS232 control)
Colour 16.7 Million color 16.7 Million color
Scan rate
• Horizontal scan rate: 30~80 KHz
• Vertical scan rate: 24~75Hz, (120Hz for
3D feature)
• Horizontal scan rate: 30~80 KHz
• Vertical scan rate: 24~75Hz, (120Hz for
3D featured)
Speaker 2.0W x1, Maximum 1.5W drive power 2.0W x1, Maximum 1.5W drive power
Power
Consumption
• Maximum: (Bright mode)
• 60W (typical), 69W (max.) @110VAC
• 57W (typical), 66W (max.) @220VAC
• Minimum: (ECO mode)
• 25W (typical), 29W (max.) @110VAC
• 23W (typical), 27W (max.) @220VAC
• Maximum: (Bright mode)
• 60W (typical), 69W (max.) @110VAC
• 57W (typical), 66W (max.) @220VAC
• Minimum: (ECO mode)
• 25W (typical), 29W (max.) @110VAC
• 23W (typical), 27W (max.) @220VAC
Input current AC in 1.5A (DC in 3,42A) max AC in 1.5A (DC in 3,42A) max
Installation
orientations
Front, Rear, Ceiling, Rear-top Front, Rear, Ceiling, Rear-top
Dimensions
(WxDxH)
• w/o lens ring and rubber foot:
112.5x105x39.9mm (4.4x4.1x1.6 inches)
• With feet:
112.5x105x48.1mm (4.4x4.1x1.9 inches)
• w/o lens ring and rubber foot:
106.3x105x39.1mm (4.2x4.1x1.6 inches)
• With feet:
106.3x105x42.1mm (4.2x4.1x1.7 inches)
Weight 470g±5g 384g±5g
Environmental
Operating in 0~40°C, 10% to 80% humidity
(non-condensing)
Operating in 0~40°C, 10% to 80% humidity
(non-condensing)
Note: All specications are subject to change without notice.
English
61
ADDITIONAL INFORMATION
Optoma global oces
For service or support, please contact your local oce.
USA
Optoma Technology, Inc. 888-289-6786
47697 Westinghouse Drive.
510-897-8601
Fremont, Ca 94539
Canada
Optoma Technology, Inc. 888-289-6786
47697 Westinghouse Drive. 510-897-8601
Fremont, Ca 94539 [email protected]
Latin America
Optoma Technology, Inc. 888-289-6786
47697 Westinghouse Drive.
510-897-8601
Fremont, Ca 94539 [email protected]
Europe
Unit 1, Network 41, Bourne End Mills
Hemel Hempstead, Herts,
HP1 2UJ, United Kingdom +44 (0) 1923 691 800
www.optoma.eu +44 (0) 1923 691 888
Benelux BV
Randstad 22-123 +31 (0) 36 820 0252
1316 BW Almere +31 (0) 36 548 9052
The Netherlands
www.optoma.nl
France
Bâtiment E +33 1 41 46 12 20
81-83 avenue Edouard Vaillant +33 1 41 46 94 35
92100 Boulogne Billancourt, France [email protected]
Spain
C/ José Hierro,36 Of. 1C +34 91 499 06 06
28522 Rivas VaciaMadrid, +34 91 670 08 32
Spain
Deutschland
Am Nordpark 3 +49 (0) 2161 68643 0
41069 Mönchengladbach +49 (0) 2161 68643 99
Germany [email protected]
Scandinavia
Lerpeveien 25 +47 32 98 89 90
3040 Drammen
+47 32 98 89 99
Norway [email protected]
PO.BOX 9515
3038 Drammen
Norway
Korea
https://www.optoma.com/kr/
Japan
https://www.optoma.com/jp/
Taiwan
https://www.optoma.com/tw/
China
Room 2001, 20F, Building 4, +86-21-62947376
No.1398 Kaixuan Road, +86-21-62947375
Changning District www.optoma.com.cn
Shanghai, 200052, China
Australia
https://www.optoma.com/au/

www.optoma.com