©2024 TP-Link 7106511428 REV1.2.1
Before You Start
Operation Mode
Access Point Mode
(Default Mode)
Range Extender Mode
Scenario
You want to transform your wired (Ethernet) network to a
wireless one.
Which mode do you need? Refer to the table to choose a proper mode.
Multi-SSID Mode
You want to connect your devices to dierent wireless
networks and become isolated by VLANs.
Client Mode
You have a wired device with an Ethernet port and no wireless
capability, for example, a Smart TV, Media Player, or game
console. You want to connect it to the internet wirelessly.
You are in a Wi-Fi dead zone or a place with weak wireless
signal. You want to have a larger eective range of wireless
signal throughout your home or oce.
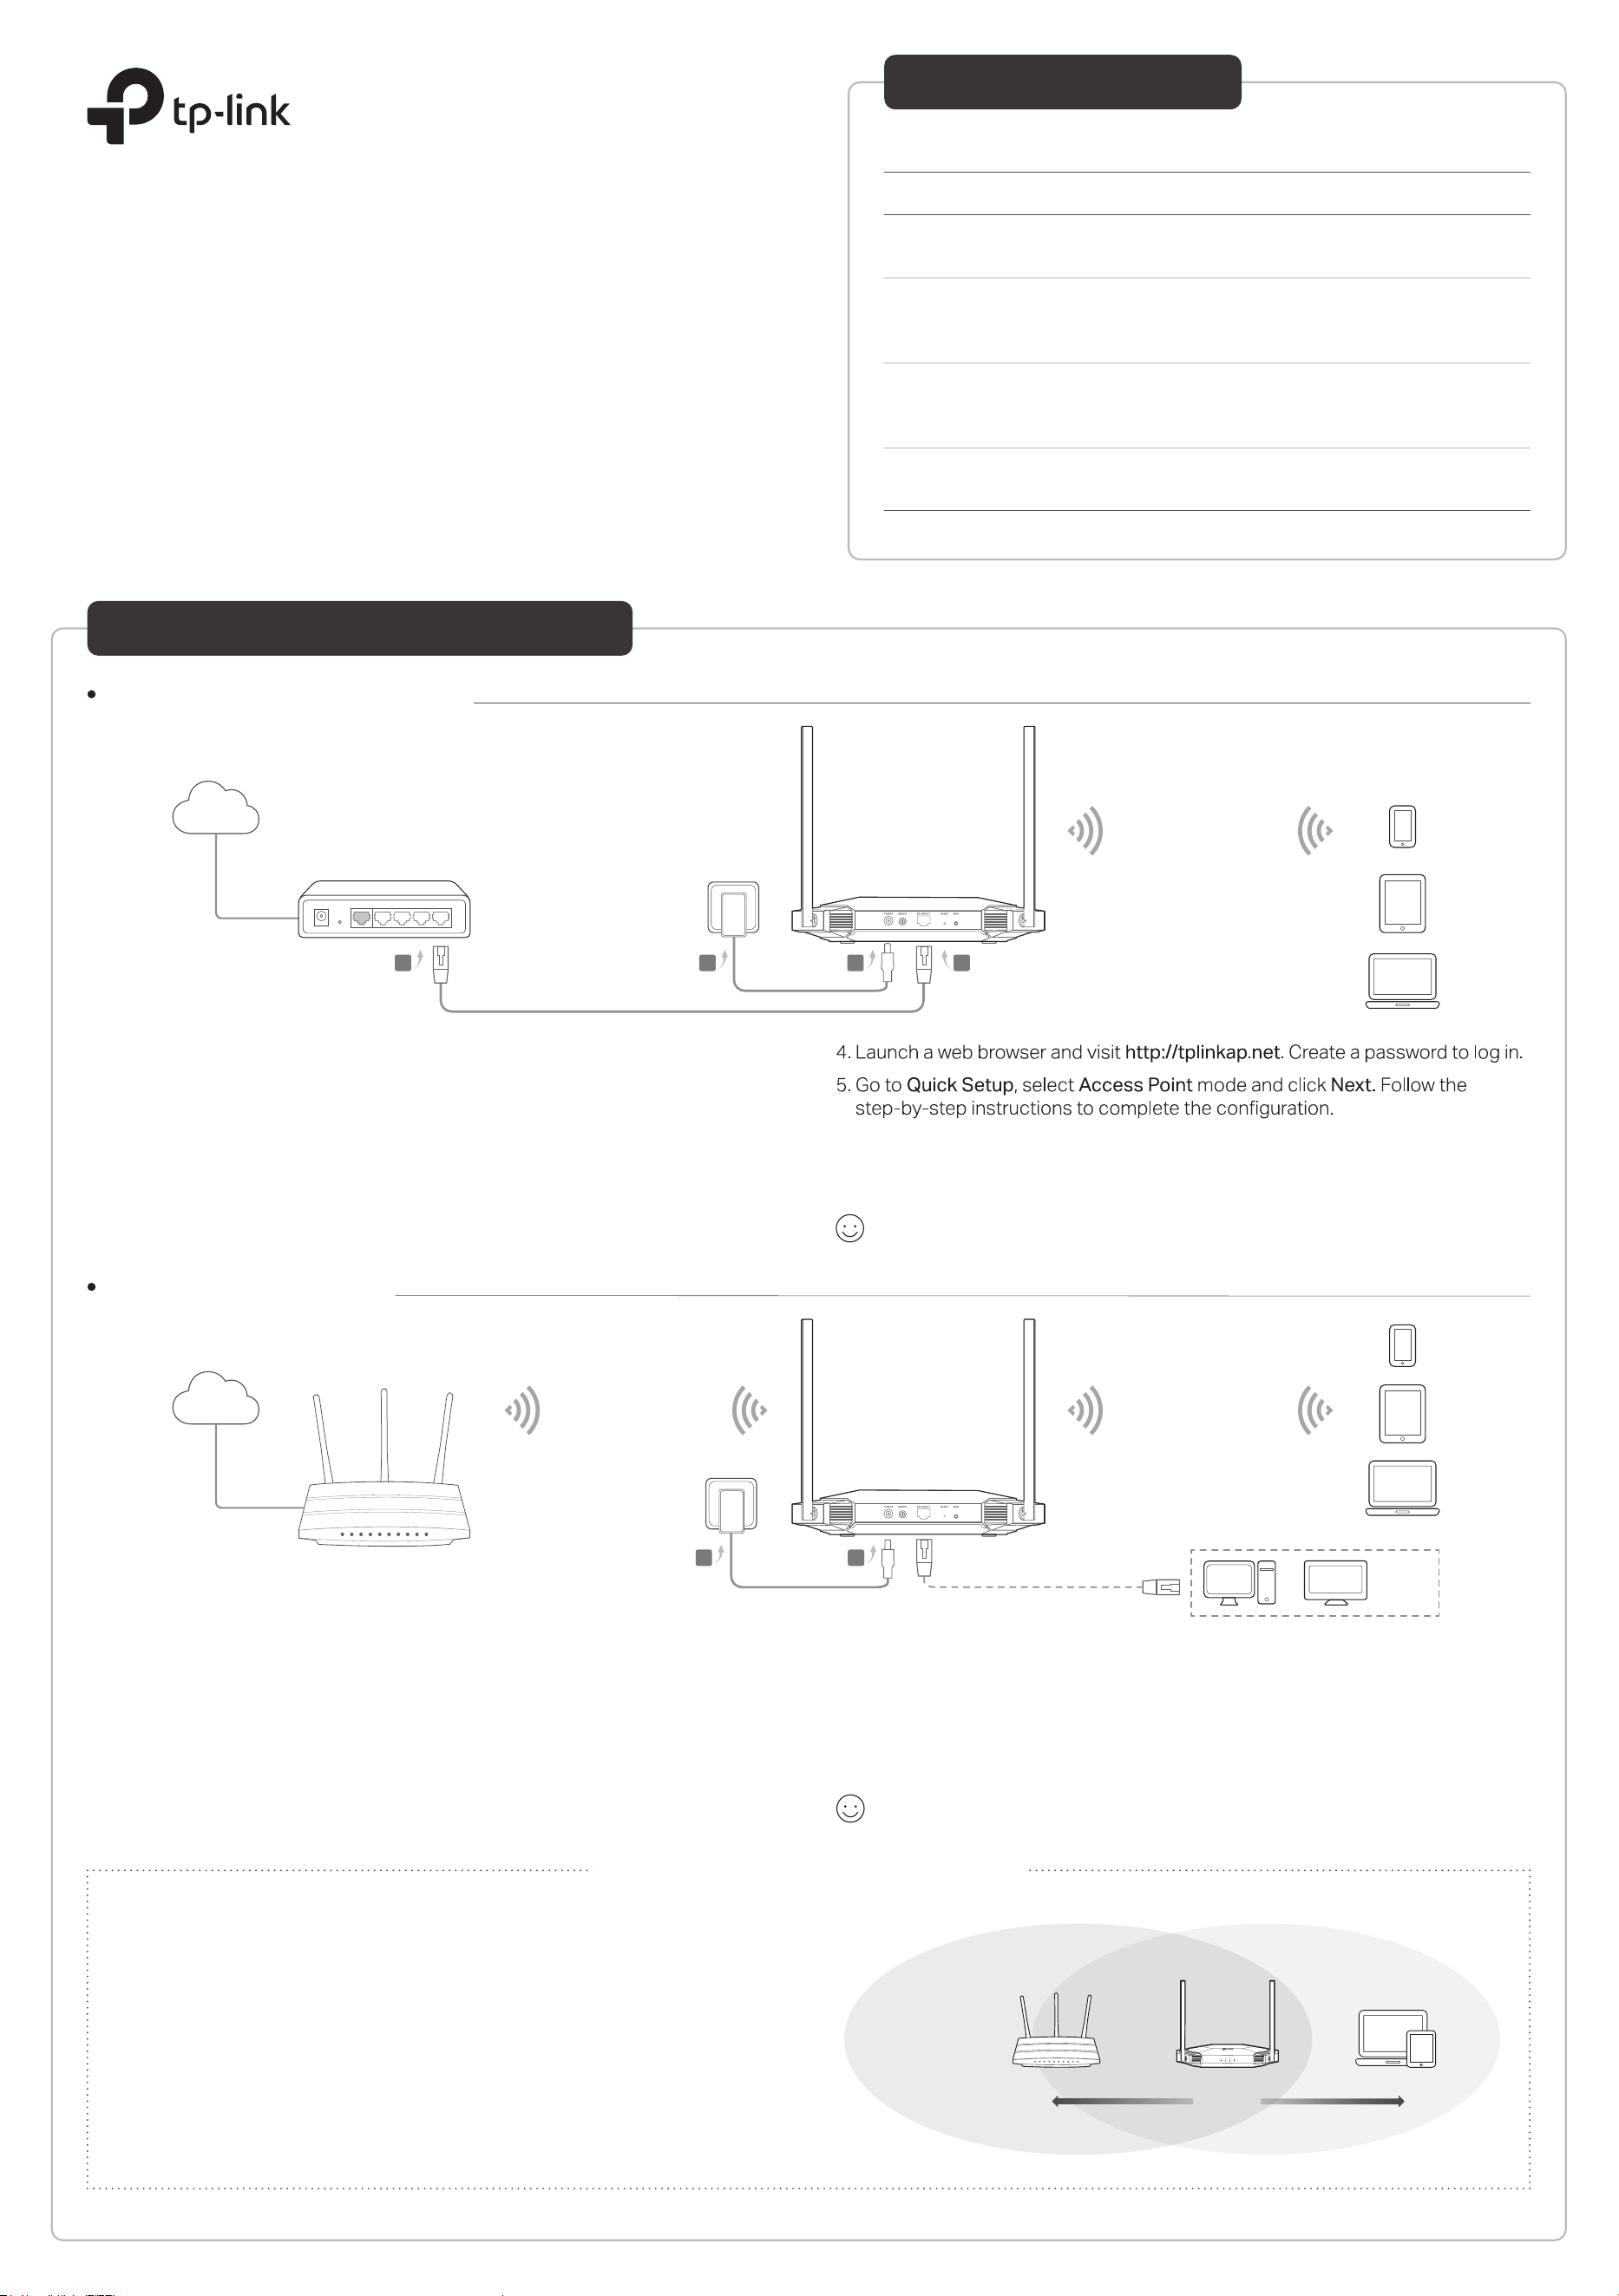
Access Point Mode (Default)
Transforms your existing wired network to a wireless one.
Existing Router
Existing Router
Internet
B AC
Quick Installation Guide
Gigabit Wi-Fi 6 Access Point
Congure the Access Point
Tips for Optimal Wireless Performance
Router Devices
Halfway
• Halfway is the best way.
Generally, the ideal location for the access point is about halfway between your router and your
wireless clients and make sure that the location you choose is within the range of your router. If that
is not possible, place it closer to your router to ensure stable performance.
• Less obstacles ensure better performance.
Choose a location with less obstacles around that may block the signal between the access point
and your router. An open corridor or a spacious location is ideal.
• Less interference provides more stability.
Choose a location away from Bluetooth devices and other household electronics, such as cordless
phones, microwaves, and baby monitors to minimize signal interference.
1. Connect the access point according to Step A and B in the diagram.
2. Turn on the power, and wait for about 2 minutes until the Power and Wi-Fi LEDs
are lit and stable.
3. Use the default wireless network names (SSIDs) and password printed on the
label of the access point to join its Wi-Fi network. You can also connect your
computer to the access point via an Ethernet cable.
Note: You can surf the internet now. To enhance network security, it is recommended to change the default SSID
(netowrk name) and password of your Wi-Fi network. To do so, perform the following steps.
6. Connect the access point according to Step C and D in the diagram.
7. Now, connect your wireless devices to the new Wi-Fi network.
Enjoy!
Range Extender Mode
Extends the range of an existing Wi-Fi network.
Internet
Extended Network
1. Connect the access point according to Step A and B in the diagram.
2. Turn on the power, and wait for about 2 minutes until the Power and Wi-Fi LEDs
are lit and stable.
3. Use the default wireless network names (SSIDs) and password printed on the
label of the access point to join its Wi-Fi network. You can also connect your
computer to the access point via an Ethernet cable.
4. Launch a web browser and visit http://tplinkap.net. Create a password to log in.
Enjoy!
5. Go to Quick Setup, select Range Extender mode and click Next. Follow the
step-by-step instructions to complete the conguration.
6. Relocate the access point to a suitable place. For details, refer to the tips below.
7. Now, connect your devices to the access point wirelessly or via an Ethernet
cable.
Wireless Network
OR OR
TV
Other
Wired
Device
*Images may dier from your actual product.
B A
Access Point
Access Point
Main Network
D
SSID 1 for VLAN 1
SSID 2 for VLAN 2
SSID 3 for VLAN 3
SSID 4 for VLAN 4
Creates multiple wireless networks to provide dierent security and VLAN groups.
Multi-SSID Mode
VLAN 1
VLAN 2
VLAN 3
VLAN 4
Internet
Frequently Asked Questions (FAQ)
Q1. How do I reset the access point to its factory default settings?
• With the access point powered on, use a pin to press and hold the RESET button until the Power LED starts
blinking, then release the button.
Note: Resetting the access point will clear all previous congurations, and the access point will reset to the default Access Point
mode.
Q2. What should I do if I cannot access the web management page?
• If the computer is set to a static IP address, change its settings to obtain an IP address automatically.
• Verify that http://tplinkap.net or http://192.168.0.254 is correctly entered in the web browser.
• Use another web browser and try again.
• Reboot your access point and try again.
• Power o your main router and enter http://tplinkap.net in the web browser to try again.
Q3. How do I recover the access point’s web management password or retrieve my Wi-Fi password?
• If you forget the password for the web management page, refer to Q1 to reset the access point to its factory
default settings. Then create a new login password.
• If you forget your Wi-Fi password, connect a computer to the access point via an Ethernet cable, log into the web
management page, and go to Wireless > Wireless Settings to retrieve or reset your Wi-Fi password.
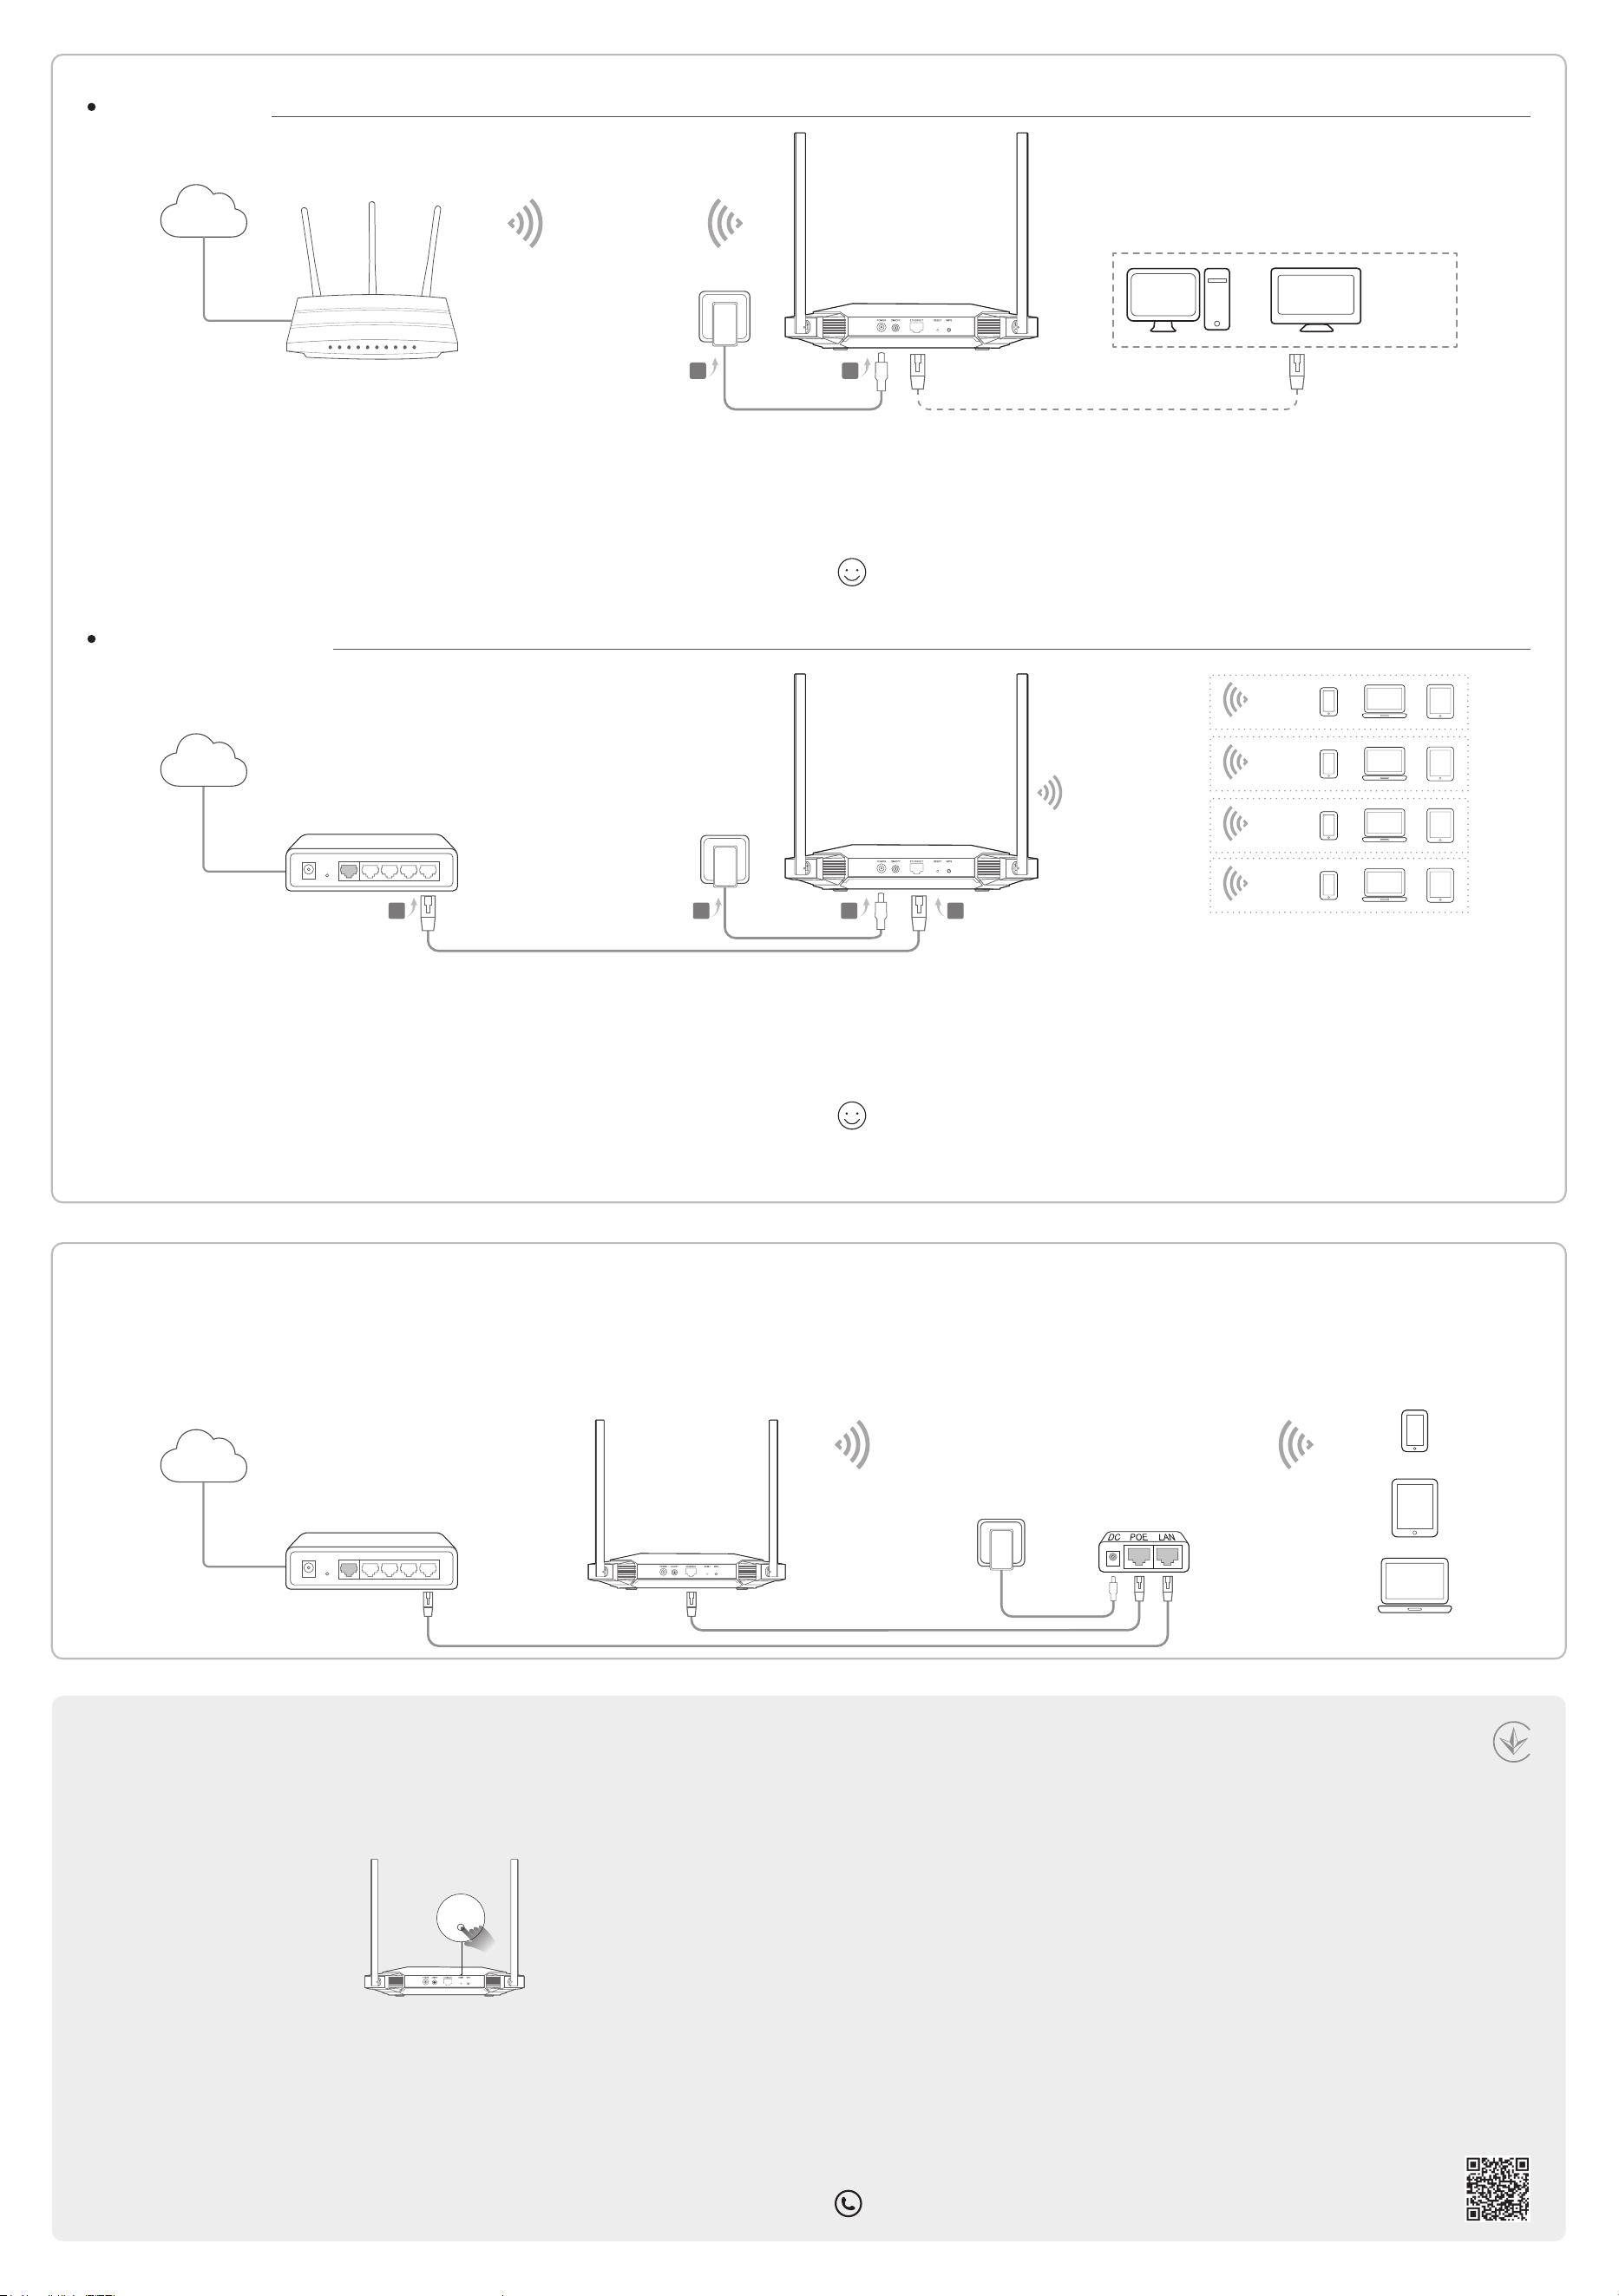
Client Mode
Connects your wired device to a wireless network.
Internet
Main Network
Access Point
Access Point
Access Point
Safety Information
• Keep the device away from water, re, humidity or hot environments.
• Do not attempt to disassemble, repair, or modify the device. If you need service, please contact us.
• Do not use any other chargers than those recommended.
• Do not use damaged charger or USB cable to charge the device.
• Do not use the device where wireless devices are not allowed.
• Adapter shall be installed near the equipment and shall be easily accessible.
Please read and follow the above safety information when operating the device. We cannot guarantee that no accidents or
damage will occur due to improper use of the device. Please use this product with care and operate at your own risk.
TP-Link hereby declares that the device is in compliance with the essential requirements and other relevant provisions of
directives 2014/53/EU, 2009/125/EC, 2011 /65/EU and (EU) 2015/863.
The original EU declaration of conformity may be found at https://www.tp-link.com/en/support/ce/
TP-Link hereby declares that the device is in compliance with the essential requirements and other relevant provisions of the
Radio Equipment Regulations 2017.
The original UK declaration of conformity may be found at https://www.tp-link.com/support/ukca/
1. Connect the access point according to Step A and B in the diagram.
2. Turn on the power, and wait for about 2 minutes until the Power and Wi-Fi LEDs
are lit and stable.
3. Use the default wireless network names (SSIDs) and password printed on the
label of the access point to join its Wi-Fi network. You can also connect your
computer to the access point via an Ethernet cable.
Enjoy!
4. Launch a web browser and visit http://tplinkap.net. Create a password to log in.
5. Go to Quick Setup, select Client mode and click Next. Follow the step-by-step
instructions to complete the conguration.
6. Now, connect your wired device to the access point via an Ethernet cable.
1. Connect the access point according to Step A and B in the diagram.
2. Turn on the power, and wait for about 2 minutes until the Power and Wi-Fi LEDs
are lit and stable.
3. Use the default wireless network names (SSIDs) and password printed on the
label of the access point to join its Wi-Fi network. You can also connect your
computer to the access point via an Ethernet cable.
4. Launch a web browser and visit http://tplinkap.net. Create a password to log in.
Enjoy!
5. Go to Quick Setup, select Multi-SSID mode and click Next. Follow the
step-by-step instructions to complete the conguration.
6. Connect the access point according to Step C and D in the diagram.
7. Now, connect your wireless devices to the Wi-Fi networks.
Tip: If you want to isolate dierent networks, go to Wireless > Wireless Settings, click the edit icon of each SSID
entry and set dierent VLAN IDs.
Q4. What should I do if my wireless network is not stable?
This could be caused by interference. You can try the following methods:
• Log in to the web management page. Go to Wireless > Wireless Settings and change your wireless channel to a
dierent one.
• Move the access point to a new location away from Bluetooth devices and other household electronics, such as
cordless phones, microwaves, and baby monitors to minimize signal interference.
RESET
Power the device with the provided passive PoE injector when the access point is located far from a power outlet. Use the Ethernet cable (included in the box) to connect
your Access Point and the passive PoE injector.
Note: The passive PoE injector supports a cable length up to 30 meters, but the value may vary due to the environment.
Power on via the PoE Injector
OR OR
TV
Other
Wired
Device
For technical support, replacement services, user guides, and other information, please visit
https://www.tp-link.com/support, or simply scan the QR code.
AB
Existing Router
Existing Router
Passive PoE InjectorExisting Router
Internet
Provided Ethernet Cable
B AC D
