HOTO EdgeFlow
Cordless Electric Scissors
50 mm

Visit our website for more Cool Tools
( www.hototools.com )
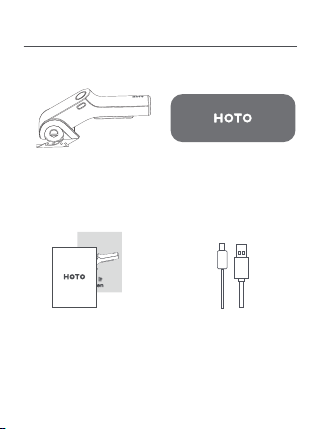
01 Package Content
USB-C
Charging Cable x 1
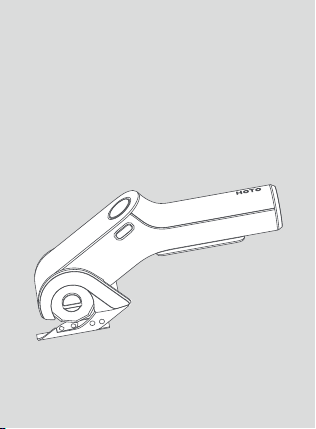
HOTO EdgeFlow Cordless
Electric Scissors x 1
Storage Bag x 1
Safety Warning x 1
User Manual x 1
1
HOTO
EdgeFlow Cordless
Electric Scissors
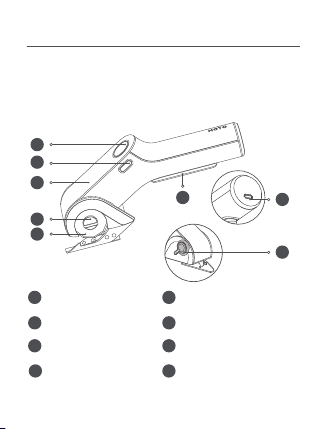
02 Package Overview
1
2
3
4
7
8
5
6
ON/OFF Switch
Lock Off Button
BOOST Button
Display Screen
Blade-change Switch
Blade
USB-C Charging Port
Sharpen Switch
Read this manual carefully before use, and retain it for
future reference.Thank you for choosing HOTO EdgeFlow
Cordless Electric Scissors.
1
2
8
3
4
5
6
7
2

03 User Manual
Product Usage
This tool is designed for cutting flexible and soft materials
with a thickness of no more than 6.5 mm, such as carpets,
PVC, cardboard, leather, fabrics, and similar materials.
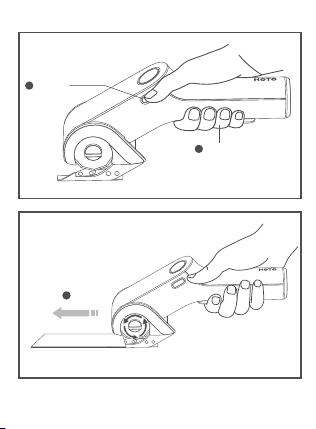
Start the Device
• This tool is locked off to prevent accidental starting.
• To start the tool, please depress the ON/OFF Switch then
the Lock Off Button and release the Lock Off Button.
• If the Lock Off Button is not clicked, the device will power
on but will not boot; if the Lock Off Button is not
released, the screen will display an E1 error.
3
4
1
HOLD
2
CLICK
ONCE
3
GO!
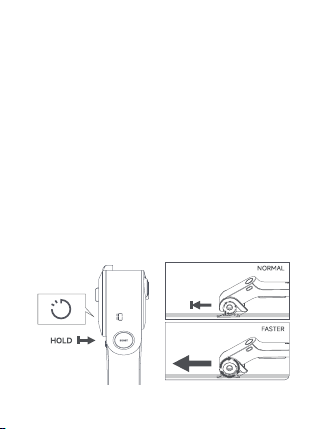
BOOST Mode
1. The BOOST Button is used to activate the high-power
cutting mode.
Notes:
1. Keep the Blade sharp for cleaner, faster cuts and
reduced motor load during operation.
2. When cutting materials with adhesive backing, clean the
Blade regularly. Adhesive residue can accumulate,
reducing cutting quality and overloading the motor.
3. When cutting curves, avoid tilting the tool; keep the
Blade perpendicular to the workpiece.
4. Do not apply excessive forward pressure when pushing
the tool. With practice, you will learn how to achieve
smoother and easier cuts.
5. In low-battery protection mode (battery level ≤ 5%),
the device cannot operate in normal mode.
5
10s

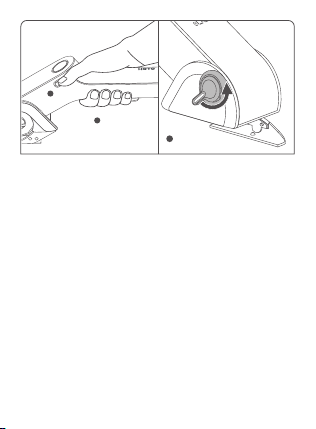
Sharpening Mode
1. Sharpening Mode is used to sharpen the Blade to
maintain its cutting efficiency. Activate this mode by
turning the Sharpen Switch in the direction of the arrow.
2. In normal mode, turn and hold the Sharpen Switch to
enter Sharpening Mode. The Display Screen will show the
sharpening mode with a 10-second countdown.
3. Operate the device to allow the sharpening stone to
grind the Blade until the countdown ends. Release the
Sharpen Switch to complete the sharpening process.
2. When encountering materials that are too hard or thick,
or if the blade gets stuck during cutting, press the BOOST
Button to increase cutting power for the next 10 seconds.
The Display Screen will show a 10-second countdown.
3. After 10 seconds, the device will return to normal
cutting mode, and the display will revert to showing the
battery percentage and icon.
4. During normal operation, press and hold the BOOST
Button to activate BOOST Mode.
5. If the device enters a stall state in normal mode while
the ON/OFF Switch is still pressed, simultaneously press
and hold the BOOST Button to activate BOOST Mode.
Note:
BOOST Mode cannot be activated in low-battery
protection state (battery level ≤ 5%).
6
Notes:
1. Sharpening Mode lasts for 10 seconds by default. If the
user does not release the knob after the countdown, the
display will show "00" with the "SHARPEN" indicator
flashing.
2. BOOST Mode and Sharpening Mode are mutually
exclusive. If the Sharpen Switch is turned during BOOST
Mode, the device will exit BOOST Mode and switch to
normal speed for sharpening.
3. Turning the Sharpen Switch while the device is powered
off will not activate Sharpening Mode.
7
1
2
HOLD
PRESS
3
ROTAT E
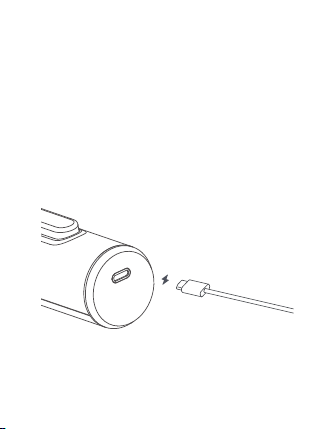
Charging the Tool
1. This device is equipped with a universal USB-C Charging
Port and includes a USB-C charging cable. A charger is not
included. Please use a charger with DC output, 5V voltage,
and 500mA-2000mA current to charge the battery.
2. Charging time is approximately 2.5 hours, depending on
the charger. For safety, do not operate the device while
charging.
3. Charge the battery promptly when the power level is too
low.
4. Avoid overcharging or deep discharging the battery, as
this may damage its capacity.
8
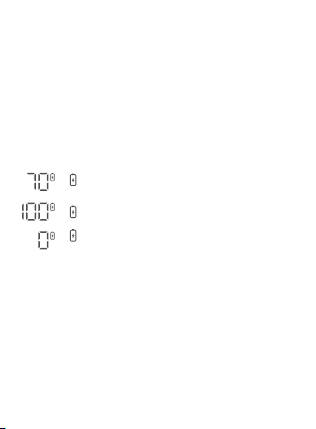
Battery Level Display
1. While Charging
When connected to a power source, the battery percent-
age remains lit, and the battery icon flashes .
2. Fully Charged
Displays 100%, and the battery icon remains lit .
3. Low Battery
In low-battery protection state (battery level ≤5% and
>0%), the display shows 0%, and the battery icon blinks
rapidly three times before the screen turns off .
Notes:
1. When the battery is fully depleted, the device will shut
down via the protection circuit: the blade will stop
moving.
2. The battery may overheat and become temporarily
unchargeable in warm environments or after frequent use.
Allow the battery to cool before charging.
3. The electric scissors will not operate while charging.
Flashes:5%<Battery level<100%
Blinks three times and turns off :
0% < Battery level ≤ 5%
Remains lit:Battery level=100%
9
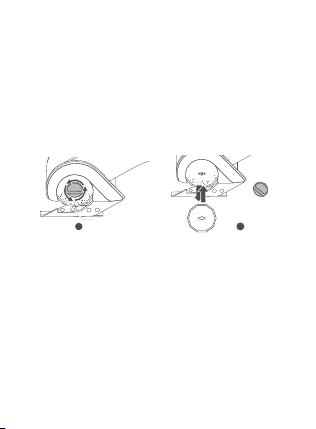
Blade Replacement Instructions
1. Rotate the Blade-change Switch in the direction shown
by the arrow (Fig. 1) until it is completely unscrewed and
removed.
2. Replace the Blade by following the arrow direction
indicated in (Fig. 2).
3. Reverse the rotation of the Blade-change Switch
(opposite direction as Fig. 1) until it is fully tightened and
secured.
Note:
1. Do not power on or use the device until the blade is
completely and properly installed.
2. Failure to comply may result in damage to the machine
or loss of components or risk of serious personal injury.
2
REPLACE
1
UNSCREW
10

Screen Display
Normal Display
1. When pressing the Lock Off Button and ON/OFF Switch,
the Display Screen will show the battery percentage and
icon. The screen will turn off after prolonged inactivity.
Error Display
When a malfunction occurs, the Smart Digital Display will
show an error message.
Error
Code
E1
E3
Low
Battery
Protec-
tion
Screen displays "E1"
Error caused by
long-pressing
the Lock Off
Operating
environment
temperature
exceeds 70°C
Operating
environment
temperature is
below -10°C
Battery level
≤ 5 %
Release the
Lock Off
Move the
electric
scissors to an
environment
between -10° C
and 70°C
Move the
electric scissors
to an
environment
between -10 ° C
and 70°C
Charge the
electric scissors
immediately
Cannot enter Normal Mode or
BOOST Mode. Screen shows 0% ,
and the battery icon blinks
rapidly three times before
turning off.
Device stops working, screen
displays "E3" (Low-Temperature
Protection). If the display
persists while holding the
ON/OFF Switch, it will turn off
after releasing the switch.
Device stops working, screen
displays "E2" (Overheat
Protection). If the display
persists while holding the
ON/OFF Switch, it will turn off
after releasing the switch.
Symptom Cause Solution
E2
11

04 Maintenance & Storage
Daily Cleaning & Care
Keep all components, vents, and motor housing free from
dirt and dust.
Wipe the machine with a clean cloth or use compressed
air to remove debris.
Clean the machine immediately after each use. Regularly
wipe with a damp cloth and mild soap.
Do not use detergents or corrosive solvents, as they may
damage plastic parts.
Prevent water from entering the machine interior to avoid
electric shock hazards.
Product Storage
Store the machine and accessories in a cool, dry place at
-20 ° C to 60 ° C (ideal range: 5 ° C-30 ° C). Use the original
packaging for storage.
Before storage, charge the battery to 50%-75% . Recharge
every 3-6 months to maintain battery health.
12

05 Safety Precautions
Ensure the power is disconnected before servicing
electrical components.
This product is not a toy. Do not allow children to operate.
For users aged 16+ only.
Use only compatible blades designed for this electric
scissors. Avoid excessive force to prevent material or blade
damage.
Thin materials (e.g., fabric) may get pulled into the tool
during cutting. For optimal results:
Do not apply excessive pressure.
Hold the fabric taut and cut slowly.
WARNING!
Never let the support stand get stuck during cutting.
The foot must remain parallel to the cutting line.
13

06 Specification
Product Name:
HOTO EdgeFlow Cordless Electric Scissors
Product Model:QWJDA001
Item Dimensions:
Approx.215.4*106.8*60.9 mm / 8.50*4.21*2.40 inch
Net Weight: Approx.430 g / 0.95 lb
Nominal Voltage: 3.6 V
Input Parameter: 5 V 1 A
Nominal Capacity: 2000 mAh
Charging Time: Approx.150 min
Continuous Usage Time: Approx.40 min
No-Load Speed: 285 RPM
Maximum Torque: 2 N·m / 17.7 lb·in
14

Information:
The declared vibration total value(s) and the declared noise
emission value(s) have been measured in accordance with a
standard test method and may be used for comparing one
tool with another; The declared vibration total value(s) and
the declared noise emission value(s) may also be used in a
preliminary assessment of exposure.
The vibration and noise emissions during actual use of the
power tool can differ from the declared values depending on
the ways in which the tool is used especially what kind of
workpiece is processed; and It is necessary to identify safety
measures to protect the operator that are based on an
estimation of exposure in the actual conditions of use
(taking account of all parts of the operating cycle such as the
times when the tool is switched off and when it is running
idle in addition to the trigger time).
Declaration of the noise emission values according to
EN 62841(considered uncertainty 5 dB(A))
Sound pressure level: 67 dB (A)
Sound power level: 73 dB (A)
Declaration of the vibration emission according to EN 62841
(considered uncertainty 1.5 m/s²): 16.5 m/s²
15

All products bearing this symbol are waste electrical and
electronic equipment(WEEE as in directive 2012/19/EU)
which should not be mixed with unsorted household
waste. Instead, you should protect human health and the
environment by handing over your waste equipment to a
designated collection point for the recycling of waste
electrical and electronic equipment, appointed by the
government or local authorities. Correct disposal and
recycling will help prevent potential negative consequences
to the environment and human health. Please contact the
installer or local authorities for more information about the
location as well as terms and conditions of such collection
points.
Troubleshooting
Fault Cause
Solution
Device stops
rotating
during use
Let the device
cool down
Device is operating
under heavy load
continuously,
triggering overheat
protection or low
voltage protection
Unable to
turn on
Out of battery
Please charge the
equipment in time.
16
We Shanghai HOTO Technology Co., Ltd., hereby,
declares that this equipment is
in compliance with
the applicable Directives and European Norms, and
amendments.
Manufacturer: Shanghai HOTO Technology Co., Ltd.
Address: Building 45, No. 50, Moganshan Road, Shanghai, China
The packaging materials are recyclable. Please
dispose of packaging in an environmentally
friendly manner.
Notes for packaging
Charging cable is
not properly
connected
Reconnect the
charging cable
Unable to
install
accessories
Accessory size
does not match
the tool head
Use the
accessories
provided in the
box, or accessories
of the correct size
Unable to
charge
EC REP
HOTO EUROPE AB
Pumpgatan 1, 417 55 GÖTEBORG,
Sweden
17

This supplier’s declaration of conformity is hereby for
We declare that the above mentioned device has been
tested and found in compliance with CFR 47 Part 15
Regulation.
This device complies with part 15 of the FCC Rules.
Operation is subject to the following two conditions: (1)
This device may not cause harmful interference, and (2)
this device must accept any interference received,
including interference that may cause undesired operation.
Note: This equipment has been tested and found to comply
with the limits for a Class B digital device, pursuant to part 15
of the FCC Rules. These limits are designed to provide
reasonable protection against harmful interference in a
residential installation. This equipment generates, uses and
can radiate radio frequency energy and, if not installed and
used in accordance with the instructions, may cause harmful
interference to radio communications. However, there is no
guarantee that interference will not occur in a particular
installation. If this equipment does cause harmful
interference to radio or television reception, which can be
determined by turning the equipment off and on, the user is
encouraged to try to correct the interference by one or
more of the following measures:
Product: HOTO EdgeFlow Cordless Electric Scissors
Product model: QWJDA001
Brand/Trade: HOTO
18

Representative of Responsible Party for SDoC
Reorient or relocate the receiving antenna.
Increase the separation between the equipment and
receiver.
Connect the equipment into an outlet on a circuit different
from that to which the receiver is connected.
Consult the dealer or an experienced radio/TV technician
for help.
Company: HOTO (US) TECHNOLOGY CO LTD
Address: 919 North Market Street, Suite 950,
Wilmington DE 19801
Country: U.S.A.
Customer Service(US): +1 855-577-2659
Mon-Fri 9:00am-5:00pm(CST)
19

DECLARATION OF CONFORMITY
EU Declaration of Conformity
We
Shanghai HOTO Technology Co., Ltd.
Declare that the product:
HOTO EdgeFlow Cordless Electric Scissors
QWJDA001
Complies with the essential health and safety requirements of
the following directives:
2014/30/EU Electromagnetic Compatibility directive References
to the following harmonized standard were made:
EN IEC 55014-1:2021
EN IEC 55014-2:2021
EN IEC 61000-3-2:2019+A1:2021+A2:2024
EN 61000-3-3:2013/A2:2021/AC:2022-01
2011/65/EU+ (EU) 2015/863 Restrictions of the Use of Certain
Hazardous Substances in Electrical and Electronic Equipment
Authorised signatory and technical file holder:
Shanghai HOTO Technology Co., Ltd.
Building 45, No.50 Moganshan Road, Shanghai, China
20