HOTO
12V Brushless Drill

1
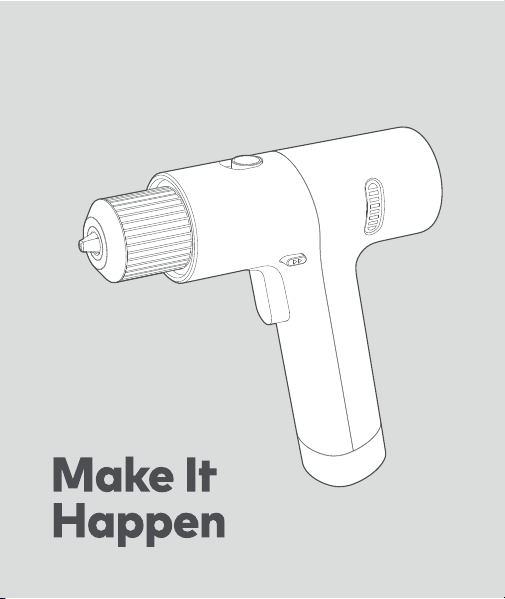
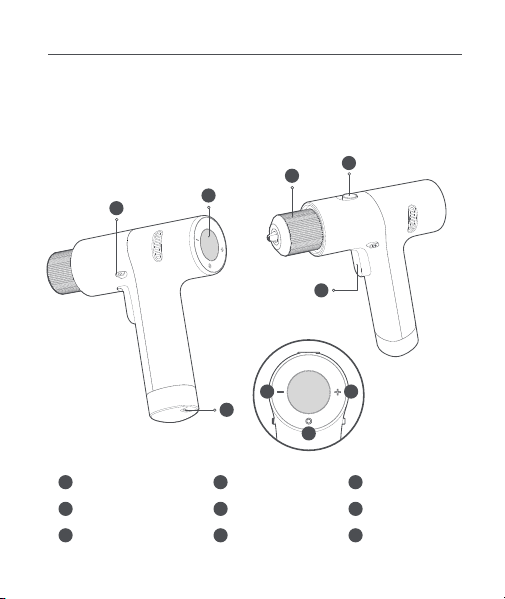
01 Product Overview
Read this manual carefully before use, and retain it for future reference.
Thank you for choosing HOTO 12V Brushless Drill.
3
1
4
1
2
3
4
5
6
Chuck
Function Switch
Trigger
7
8
9
Mode Button
Display
Forward/Lock/
Reverse Button
Torque/Speed
Increase Button
Torque/Speed
Decrease Button
Type-C Charging
Port
The product is for tightening and loosening screws, as well as drilling holes in wood,
metal, plastic and bricks. However, it is not suitable for drilling holes in extremely hard
materials like concrete or stone. Please select the right drill bit/driver bit suitable for
the material.
5
9
2
6 7
8
2
02 How to Use
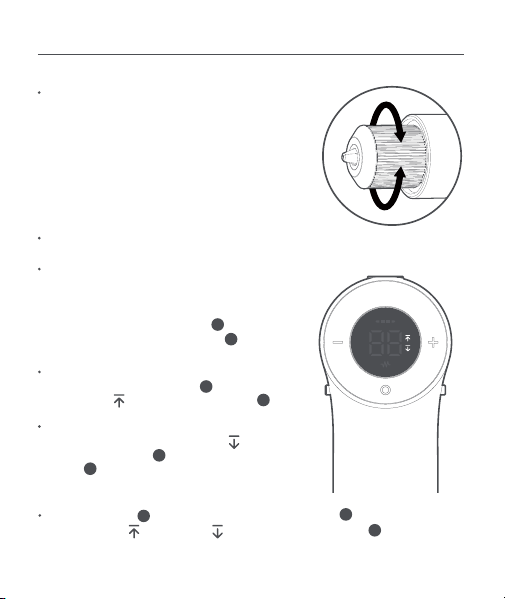
Use the forward/lock/reverse button to change
the rotation direction or lock the trigger .
Turn the chuck in the direction shown in arrow (1)
until the chuck is loose enough for a driver bit/drill
bit to be inserted. Insert the driver bit/drill bit and
then turn the chuck in the direction shown in
arrow (2) until the driver bit/drill bit is secured in
place. Do not use the drill's inertia to lock the
chuck. Please make sure the driver bit/drill bit is
secured in place before triggering the drill.
Forward/Lock/Reverse Button
Driver Bit/Drill Bit Installing
Trigger
The trigger is pressure sensitive, allowing
multiple speeds.
The more you press it, the faster it goes.
(2)
(1)
4
3
Forward: When drilling or tightening screws, push
the forward/lock/reverse button to the far left
and the icon " " will light up on the display .
4
5
Reverse: When loosening or unscrewing screws,
push the forward/lock/reverse button to the
far right and the icon " " will light up on the
display .
4
5
Locking the trigger : push the forward/lock/reverse button to the middle and
neither the icon " " nor the icon " ". will be shown on the display .
3
4
5
3
Function Switch
Drilling: Push the function switch to the drill position " " and press the trigger and
the drill will operate at a high speed, suitable for drilling holes.
Screwing: Push the function switch to the screw position " " and press the trigger
and the drill will operate at a low speed, suitable for tightening or loosening screws.
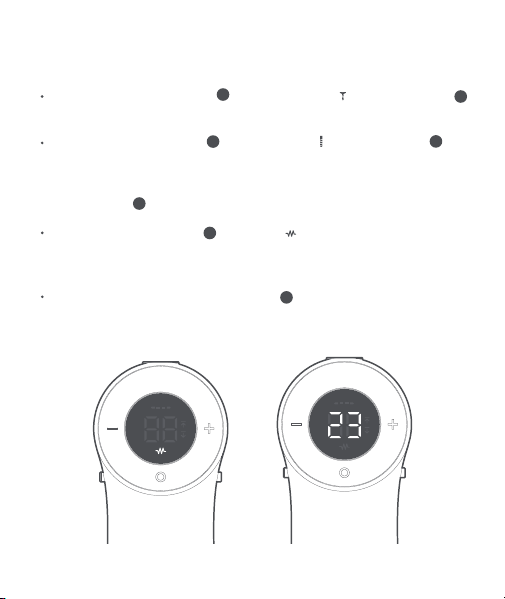
Mode Button
Pulse mode: Press mode button until the icon " " is shown on the display. Under the
pulse mode, the drill operates intermittently at a lower speed, suitable for beginners to
get used to the drill, as it avoids slipping of the drill bit on the surface you're drilling or
screws stripped by the driver bit.
Manual torque/speed mode: Press mode button until a number is shown on the
display, and the drill is under the manual torque/speed mode.
Press mode button to choose between manual torque/speed mode and pulse mode.
Pulse mode Self-select mode
2
3
2
3
8
8
8

4
Different Levels under the Manual Torque/Speed Mode
Screwing:
The manual torque/speed mode has 30 levels. Press one time the torque/speed increase
button or the torque/speed decrease button , the torque/speed will
increase/decrease by one level; press the relevant button continuously, the torque/speed
will increase/decrease quickly.
For materials that are soft or easy to deform and crack:
It is recommended to start from lower levels and not to exceed level 5. This will prevent
excessive torque that damages the device parts.
At level 1, the drill outputs the lowest torque. If level 1 is not up to the task, press the
button "+" to increase the torque level. Output of torque increases correspondingly with
the level up from 1 to 30.
Level 30 has the largest torque.
Note: When used at level 16-30, the output torque is high, so please use the tool with
both hands to prevent excessive reaction force from twisting your wrists, so as to ensure
safety.
Drilling:
For materials that are soft or light:
It is recommended to start from lower levels. At level 1, the drill outputs the lowest
torque and rotation speed.
If level 1 is not up to the task, press the button "+" to increase the torque level, and the
output of torque will increase correspondingly.
Level 30 has the largest torque and rotation speed. When drilling holes in hard materials,
e.g. steel and ceramic tile, you can directly set the drill at level 30 to maximize efficiency.
7 6

5
Note: The driller will not work when charging. This product comes
with a USB charging cable and a universal Type-C charging port.
When the drill is turned on and the forward/lock/reverse button is set to the middle
position, if no operation is made in 10s, the display will turn off and the drill will shut
down automatically.
When the drill is turned on and the forward/lock/reverse button is pushed to the
left or right, if no operation is make in 60s, the display will turn off and the drill will
shut down automatically.
Display
The Battery Indicator has 4 lights, wich each representing 25% of the total energy.
If 4 lights are on, the battery is fully charged.
Low battery: the remaining one light of the battery charging indicator " " blinks
rapidly.
Charging: At the beginning, four lights of the battery charging indicator " " blink
successively and repeatedly. After charging 25% of battery, the first light is lit up
constantly, and the rest three blink successively and repeatedly, and so the same
process goes on.
Fully charged: All the four lights of the battery charging indicator " " are lit up
constantly.
Battery Indicator
5
4
4
5

6
03 General Power Tool Safety Warnings
WARNING! Read all safety warnings, instructions, illustrations and specifications
provided with this power tool. Failure to follow all instructions listed below may
result in electric shock, fire and/or serious injury.
Save all warnings and instructions for future reference.
The term “power tool” in the warnings refers to your mains-operated (corded) power
tool or baery-operated (cordless) power tool.
Keep work area clean and well lit. Cluered or dark areas invite accidents.
Do not operate power tools in explosive atmospheres, such as in the presence of
flammable liquids, gases or dust. Power tools create sparks which may ignite the
dust or fumes.
Keep children and bystanders away while operating a powertool. Distractions
can cause you to lose control.
Work Area Safety
Power tool plugs must match the outlet. Never modify the plug in any way. Do
not use any adapter plugs with earthed (grounded) power tools. Unmodified
plugs and matching outlets will reduce risk of electric shock.
Avoid body contact with earthed or grounded surfaces, such as pipes, radiators,
ranges and refrigerators. There is an increased risk of electric shock if your body
is earthed or grounded.
Do not expose power tools to rain or wet conditions. Water entering a power tool
will increase the risk of electric shock.
Do not abuse the cord. Never use the cord for carrying, pulling or unplugging the
power tool. Keep cord away from heat, oil, sharp edges or moving parts.
Damaged or entangled cords increase the risk of electric shock.
When operating a power tool outdoors, use an extension cord suitable for
outdoor use. Use of a cord suitable for outdoor use reduces the risk of electric
shock.
If operating a power tool in a damp location is unavoidable, use a residual
current device (RCD) protected supply. Use of an RCD reduces the risk of
electric shock.
Electrical safety

7
Stay alert, watch what you are doing and use common sense when operating a
power tool. Do not use a power tool while you are tired or under the influence of
drugs, alcohol or medication. A moment of inaention while operating power tools
may result in serious personal injury.
Use personal protective equipment. Always wear eye protection. Protective
equipment such as a dust mask, non-skid safety shoes, hard hat or hearing
protection used for appropriate conditions will reduce personal injuries.
Prevent unintentional starting. Ensure the switch is in the off-position before
connecting to power source and/or baery pack, picking up or carrying the tool.
Carrying power tools with your finger on the switch or energising power tools that
have the switch on invites accidents.
Remove any adjusting key or wrench before turning the power tool on. A wrench
or a key le aached to a rotating part of the power tool may result in personal
injury.
Do not overreach. Keep proper footing and balance at all times. This enables
beer control of the power tool in unexpected situations.
Dress properly. Do not wear loose clothing or jewellery. Keep your hair and
clothing away from moving parts. Loose clothes, jewellery or long hair can be
caught in moving parts.
If devices are provided for the connection of dust extraction and collection
facilities, ensure these are connected and properly used. Use of dust collection
can reduce dust-related hazards.
Do not let familiarity gained from frequent use of tools allow you to become
complacent and ignore tool safety principles. A careless action can cause severe
injury within a fraction of a second.
Personal Safety

8
Do not force the power tool. Use the correct power tool for your application. The
correct power tool will do the job beer and safer at the rate for which it was
designed.
Do not use the power tool if the switch does not turn it on and off. Any power
tool that cannot be controlled with the switch is dangerous and must be
repaired.
Disconnect the plug from the power source and/or remove the baery pack, if
detachable, from the power tool before making any adjustments, changing
accessories, or storing power tools. Such preventive safety measures reduce
the risk of starting the power tool accidentally.
Store idle power tools out of the reach of children and do not allow persons
unfamiliar with the power tool or these instructions to operate the power tool.
Power tools are dangerous in the hands of untrained users.
Maintain power tools and accessories. Check for misalignment or binding of
moving parts, breakage of parts and any other condition that may affect the
power tool's operation. If damaged, have the power tool repaired before use.
Many accidents are caused by poorly maintained power tools.
Use the power tool, accessories and tool bits etc. in accordance with these
instructions, taking into account the working conditions and the work to be
performed. Use of the power tool for operations different from those intended
could result in a hazardous situation.
Keep handles and grasping surfaces dry, clean and free from oil and grease.
Slippery handles and grasping surfaces do not allow for safe handling and control
of the tool in unexpected situations.
Power Tool Use And Care

9
Recharge only with the charger specified by the manufacturer. A charger that
is suitable for one type of baery pack may create a risk of fire when used with
another baery pack.
Use power tools only with specifically designated baery packs. Use of any
other baery packs may create a risk of injury and fire.
When baery pack is not in use, keep it away from other metal objects, like
paper clips, coins, keys, nails, screws or other small metal objects, that can
make a connection from one terminal to another. Shorting the baery terminals
together may cause burns or a fire.
Under abusive conditions, liquid may be ejected from the baery; avoid
contact. If contact accidentally occurs, flush with water. If liquid contacts eyes,
additionally seek medical help. Liquid ejected from the baery may cause
irritation or burns.
Do not use a baery pack or tool that is damaged or modified. Damaged or
modified baeries may exhibit unpredictable behavior resulting in fire, explosion
or risk of injury.
Do not expose a baery pack or tool to fire or excessive temperature.
Exposure to fire or temperature above 130°C may cause explosion.
Follow all charging instructions and do not charge the baery pack or tool
outside the temperature range specified in the instructions.
Charging
improperly or at temperatures outside the specified range may damage the
baery and increase the risk of fire.
Baery tool use and care
Have your power tool serviced by a qualified repair person using only identical
replacement parts. This will ensure that the safety of the power tool is
maintained.
Never service damaged baery packs. Service of baery packs should only be
performed by the manufacturer or authorized service providers.
Service

10
Never operate at higher speed than the maximum speed rating of the drill bit. At
higher speeds, the bit is likely to bend if allowed to rotate freely without contacting
the workpiece, resulting in personal injury.
Always start drilling at low speed and with the bit tip in contact with the
workpiece. At higher speeds, the bit is likely to bend if allowed to rotate freely
without contacting the workpiece, resulting in personal injury.
Apply pressure only in direct line with the bit and do not apply excessive
pressure. Bits can bend causing breakage or loss of control, resulting in personal
injury.
Safety instructions when using long drill bits
Secure the workpiece.
A workpiece clamped with clamping devices or in a vice is
held more secure than by hand.
Always wait until the power tool has come to a complete stop before placing it
down. The application tool can jam and cause you to lose control of the power tool.
Switch the power tool off immediately if the application tool becomes blocked. Be
prepared for high torque reactions which cause kickback. The application tool
becomes blocked when it becomes jammed in the workpiece or when the power
tool becomes overloaded.
Use suitable detectors to determine if there are hidden supply lines or contact
the local utility company for assistance. Contact with electric cables can cause
fire and electrical shock. Damaging gas lines can lead to explosion. Breaking water
pipes causes property damage.
Additional safety information
Hold the power tool by insulatedgripping surfaces,when performing an operation
where the cuing accessory or fasteners may contact hidden wiring. Cuing
accessory contacting a "live" wire may make exposed metal parts of the power tool
"live" and could give the operator an electric shock.
Safety Instructions for Drill/Driver
11
Hold the power tool securely. When tightening and loosening screws be prepared
for temporarily high torque reactions.
In case of damage and improper use of the baery, vapours may be emied.
The baery can set alight or explode. Ensure the area is well ventilated and seek
medical aention should you experience any adverse effects. The vapours may
irritate the respiratory system.
Do not open the baery. There is a risk of short-circuiting.
The baery can be damaged by pointed objects such as nails or screwdrivers
or by force applied externally. An internal short circuit may occur, causing the
baery to burn, smoke, explode or overheat.
Only use the baery with products from the manufacturer. This is the only way
in which you can protect the baery against dangerous overload.
Protect the baery against heat, e.g. against continuous intense sunlight, fire,
dirt, water and moisture. There is a risk of explosion and short-circuiting.
All products bearing this symbol are waste electrical and electronic equipment
(WEEE as in directive 2012/19/EU) which should not be mixed with unsorted
household waste. Instead, you should protect human health and the
environment by handing over your waste equipment to a designated collection point
for the recycling of waste electrical and electronic equipment, appointed by the
government or local authorities. Correct disposal and recycling will help prevent
potential negative consequences to the environment and human health. Please
contact the installer or local authorities for more information about the location
as well as terms and conditions of such collection points.
We Shanghai HOTO Technology Co., Ltd., hereby, declares that this
equipment is in compliance with the applicable Directives and European
Norms, and amendments.

12
This supplier’s declaration of conformity is hereby for
We declare that the above mentioned device has been tested
and found in compliance with CFR 47 Part 15 Regulation.
This device complies with part 15 of the FCC Rules. Operation is subject to the
following two conditions: (1) This device may not cause harmful interference, and
(2) this device must accept any interference received, including interference that
may cause undesired operation.
Product: HOTO 12V Brushless Electric Driller
Model Number(s): QWLDZ001
Brand/Trade: HOTO
Federal Communications Commission Supplier’s
Declaration of Conformity
Representative of Responsible Party for SDoC
Reorient or relocate the receiving antenna.
Increase the separation between the equipment and receiver.
Connect the equipment into an outlet on a circuit different from that to which
the receiver is connected.
Consult the dealer or an experienced radio/TV technician for help.
Note: This equipment has been tested and found to comply with the limits for a Class
B digital device, pursuant to part 15 of the FCC Rules. These limits are designed to
provide reasonable protection against harmful interference in a residential
installation. This equipment generates, uses and can radiate radio frequency energy
and, if not installed and used in accordance with the instructions, may cause harmful
interference to radio communications. However, there is no guarantee that interference
will not occur in a particular installation. If this equipment does cause harmful
interference to radio or television reception, which can be determined by turning the
equipment off and on, the user is encouraged to try to correct the interference by
one or more of the following measures:
Company: HOTO (US) TECHNOLOGY CO LTD
Address: 919 North Market Street, Suite 950, Wilmington DE 19801
Country: U.S.A.
Customer Service(US): +1 855-577-2659
Mon-Fri 9:00am-5:00pm(CST)

Error
Drill stops rotating
during use with
displayed
Drill stops rotating during
use with displayed.
Unable to insert drill bit
Continuous use of the
machine under heavy load
which results in drive
board overheating
The drill bit is in wrong size
for the chuck.
Lithium battery depleted
The trigger is locked as
the forward/lock/reverse
button stays in the middle
position.
Drill doesn't start after
pressing the trigger
Unable to charge the
battery
Cool down
Continuous use of the
machine under heavy load
which results in battery
overheating or single
battery undervoltage
Cool down and charge
Charge the battery
Use a drill bit that comes with
the drill or use one that is ≤
10mm in diameter.
Causes Solutions
Push the forward/lock/reverse
button to the left or right (when
looking at the drill from the back
towards the chuck).
The USB cable isn't
plugged in or the included
charging cable isn't being
used.
Check whether the battery
indicator is on and whether
use the charging cable that
comes with the drill.
Troubleshooting
13
Drill stops rotating
during use with
displayed

Model: QWLDZ001
Item Dimensions: 185×180×54 mm
Maximum Torque: 30 N·m
Driller Net Weight: Approx. 882 g
Bit Size: C6.3×50 mm
Phillips-head: PH1/PH2
Pozidriv: PZ2
Torx: T25
Hex: H3/H4/H5
Standard: SL5
Triangular: 2.3
TW Type: TW1
Drill Specification:
Metal Drill Bits 3/4/5/6 mm
Wood Drill Bits 4/5/6/7 mm
Note: The metal drill is black (only for metal) and the wood drill is silver (only for
plastic and wood). Bits and drills are consumables.
Rated Voltage: 12 V
Rated Capacity: 2000 mAh
Baery Type: Lithium-ion Baery Series
Unloaded Rotational Speed:
0-1400 /min (drilling mode)
0-370 /min (screwing mode)
Charging Voltage /Current: 5 V 3 A; 9 V 1.5 A
Sound pressure level: 80.4 dB(A)
Sound power level: 69.4 dB(A)
Declaration of the vibration emission according to EN 62841
(considered uncertainty 1.5 m/s²): 1.832 m/s²
Declaration of the noise emission values according to EN 62841
(considered uncertainty 5 dB(A))
14
Baery Charger Input: 100–240 V~, 50/60 Hz, 0.6 A
Baery Charger Output: 5.0 V 3.0 A 15.0 W, 9.0 V 2.23 A 20.0 W
The charger is not provided with the product and should be bought seperately.
The charger must comply with local laws and regulations.
The charger meets the requirements of 60335-2-29 and 60335-1. independently
certified.

15
Information:
The declared vibration total value(s) and the declared noise emission value(s)
have been measured in accordance with a standard test method and may be used
for comparing one tool with another;
The declared vibration total value(s) and the declared noise emission value(s) may
also be used in a preliminary assessment of exposure.
Warning:
The vibration and noise emissions during actual use of the power tool can differ
from the declared values depending on the ways in which the tool is used
especially what kind of workpiece is processed; and
It is necessary to identify safety measures to protect the operator that are based
on an estimation of exposure in the actual conditions of use (taking account of all
parts of the operating cycle such as the times when the tool is switched off and
when it is running idle in addition to the trigger time).
The baery is not replaceable.
Manufacturer: Shanghai HOTO Technology Co., Ltd.
Address: Building 45, No.50 Moganshan Road, Shanghai, China
DECLARATION OF CONFORMITY
EU Declaration of Conformity
We
Shanghai HOTO Technology Co., Ltd.
Declare that the product:
HOTO 12V Brushless Drill / QWLDZ001
Complies with the essential health and safety requirements of the following directives:
2006/42/EC The Machinery Directive
References to the following harmonized standard were made:
EN 62841-1:2015
- EN 62841-2-1:2018+A11:2019
EN55014-1: 2017
EN55014-2: 2015
EN 61000-3-2:2014
EN 61000-3-3:2013
2014/30/EU Electromagnetic Compatibility directive References to the following
harmonized standard were made:
2011/65/EU+ (EU) 2015/863 Restrictions of the Use of Certain Hazardous
Substances in Electrical and Electronic Equipment
Authorised signatory and technical file holder:
Shanghai HOTO Technology Co., Ltd.
Building 45, No.50 Moganshan Road, Shanghai, China
16
17
DECLARATION OF CONFORMITY
UK Declaration of Conformity
We
Shanghai HOTO Technology Co., Ltd.
Declare that the product:
HOTO 12V Brushless Drill/QWLDZ001
Complies with the essential health and safety requirements of the
following directives:
BS EN 62841-1: 2015
BS EN 62841-2-1:2018/A11:2019
BS EN IEC 55014-1: 2021
BS EN IEC 55014-2: 2021
Supply of Machinery (Safety) Regulations 2008 and Electromagnetic
Compatibility Regulations 2016 Electromagnetic Compatibility directive
References to the following harmonized standard were made:
Electronic Equipment Regulations 2012 (S.I. 2012/3032) (as amended)
Restrictions of the Use of Certain Hazardous Substances in
Electrical and Electronic Equipment
Authorised signatory and technical file holder:
Shanghai HOTO Technology Co., Ltd.
Building 45, No.50 Moganshan Road, Shanghai, China