23
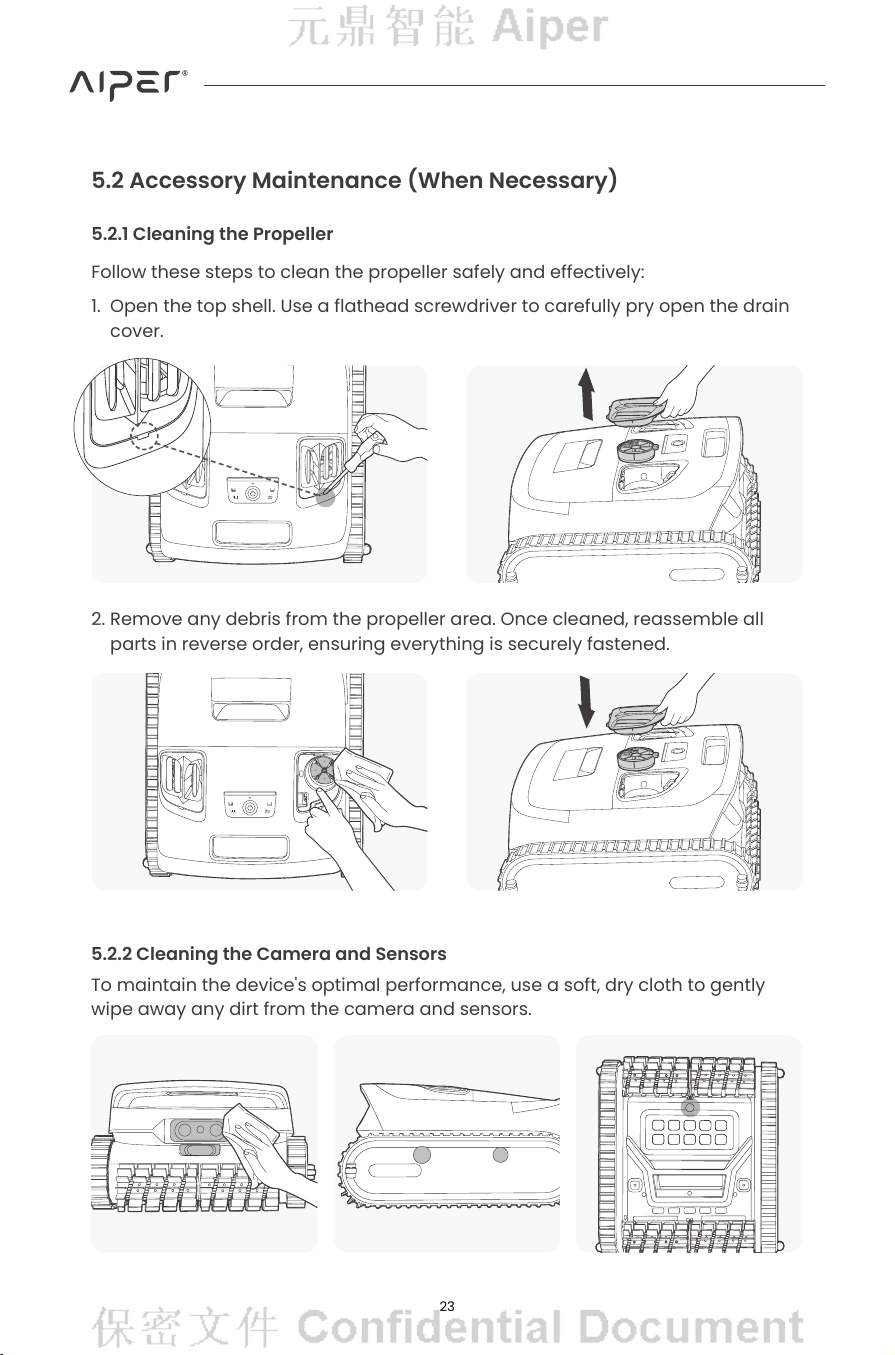
5.2.1 Cleaning the Propeller
Follow these steps to clean the propeller safely and effectively:
1. Open the top shell. Use a athead screwdriver to carefully pry open the drain
cover.
5.2 Accessory Maintenance (When Necessary)
2. Remove any debris from the propeller area. Once cleaned, reassemble all
parts in reverse order, ensuring everything is securely fastened.
5.2.2 Cleaning the Camera and Sensors
To maintain the device's optimal performance, use a soft, dry cloth to gently
wipe away any dirt from the camera and sensors.
24
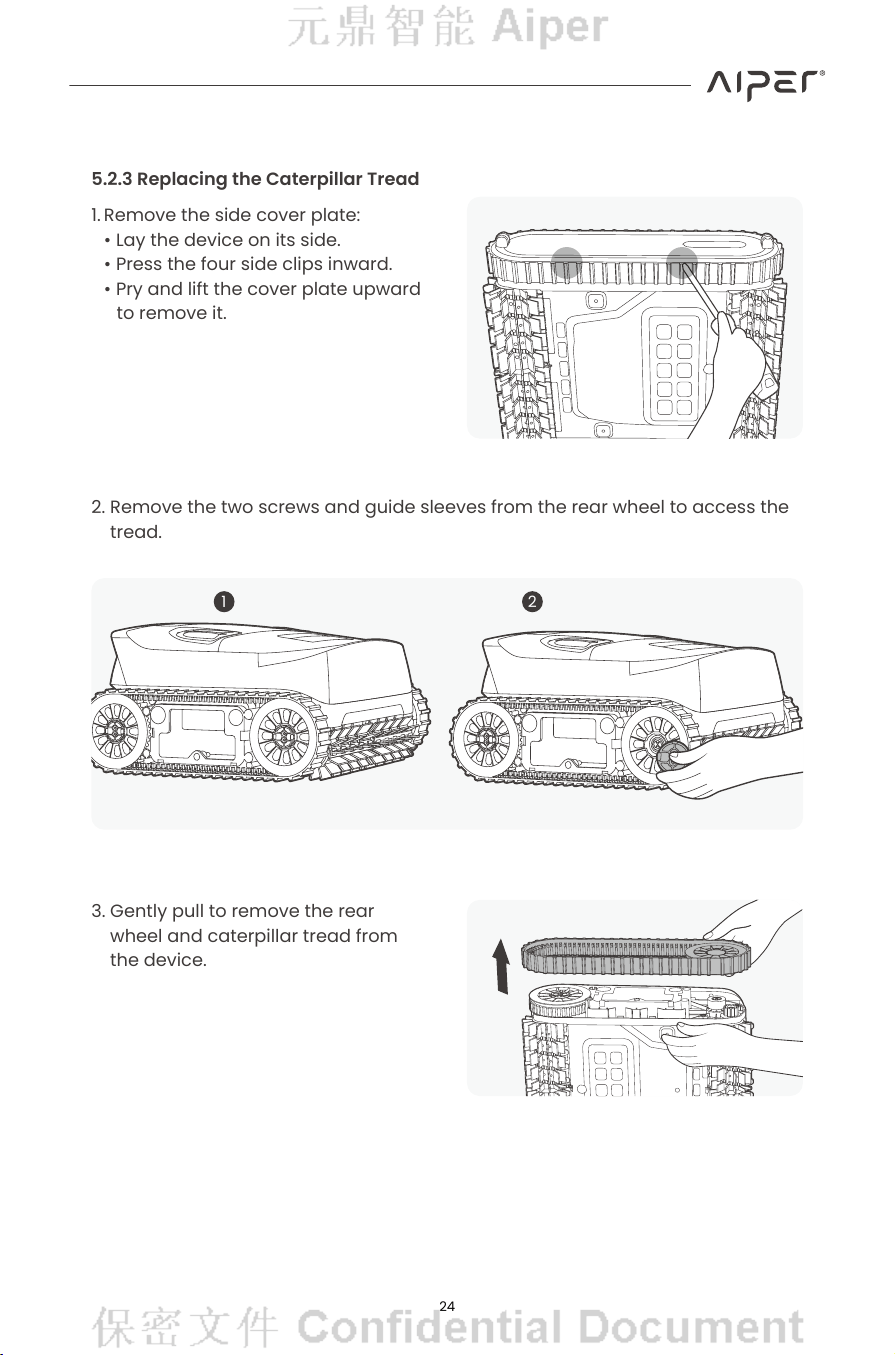
5.2.3 Replacing the Caterpillar Tread
2. Remove the two screws and guide sleeves from the rear wheel to access the
tread.
1. Remove the side cover plate:
• Lay the device on its side.
• Press the four side clips inward.
• Pry and lift the cover plate upward
to remove it.
3. Gently pull to remove the rear
wheel and caterpillar tread from
the device.
1
2
25
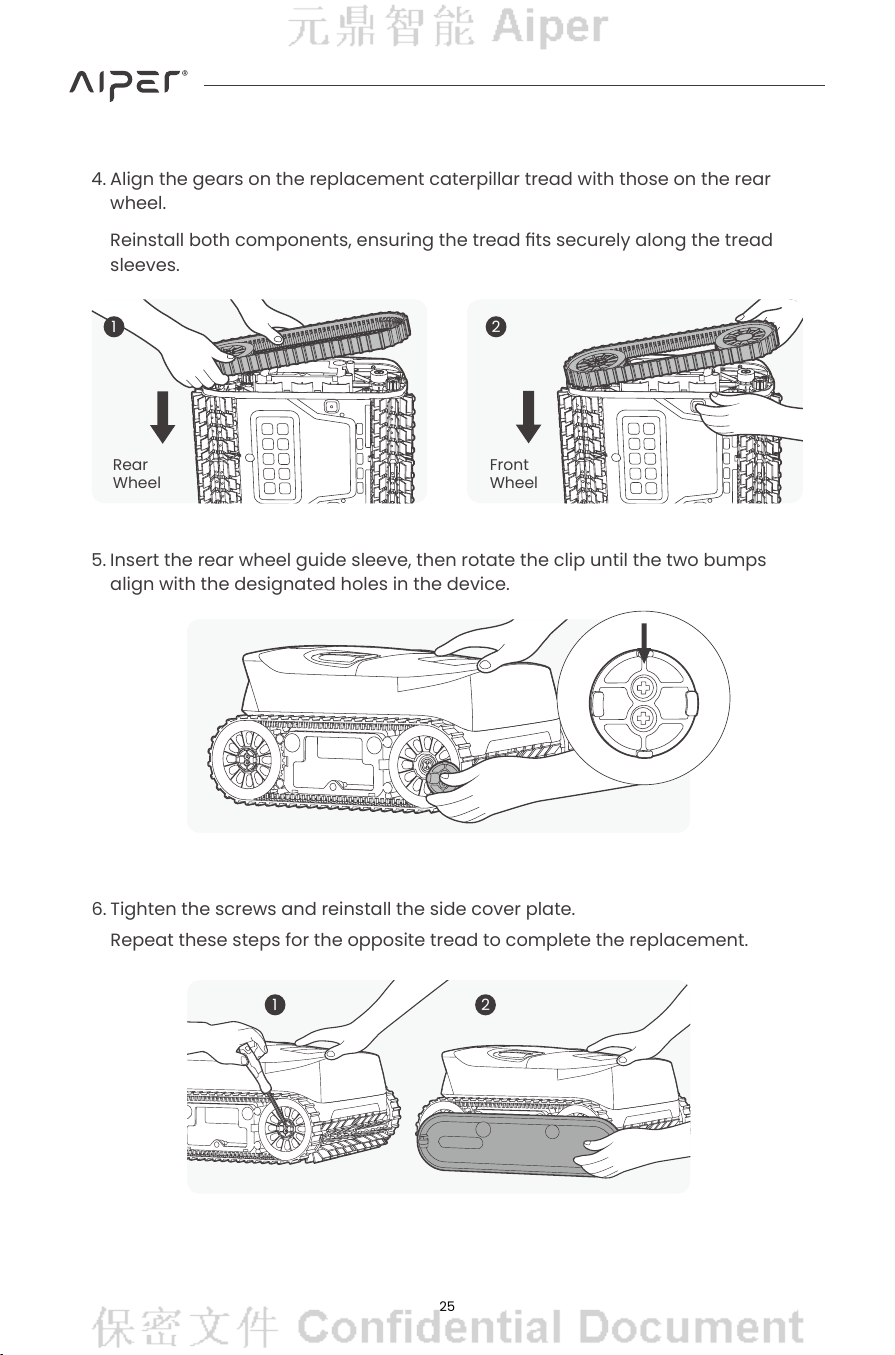
4. Align the gears on the replacement caterpillar tread with those on the rear
wheel.
Reinstall both components, ensuring the tread ts securely along the tread
sleeves.
6. Tighten the screws and reinstall the side cover plate.
Repeat these steps for the opposite tread to complete the replacement.
5. Insert the rear wheel guide sleeve, then rotate the clip until the two bumps
align with the designated holes in the device.
Rear
Wheel
Front
Wheel
1
2
1
2
26
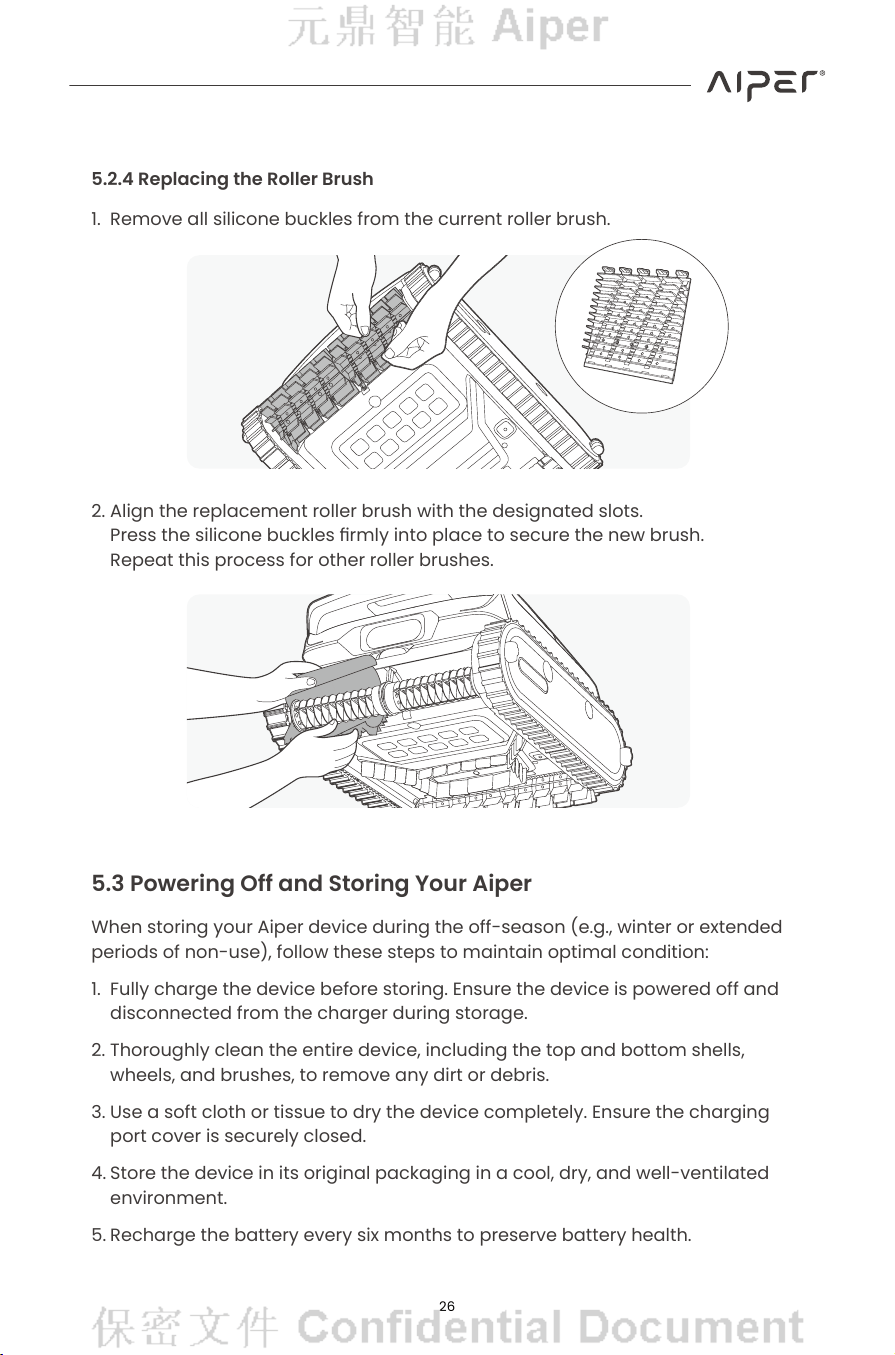
2. Align the replacement roller brush with the designated slots.
Press the silicone buckles rmly into place to secure the new brush.
Repeat this process for other roller brushes.
5.2.4 Replacing the Roller Brush
1. Remove all silicone buckles from the current roller brush.
5.3 Powering Off and Storing Your Aiper
When storing your Aiper device during the off-season (e.g., winter or extended
periods of non-use), follow these steps to maintain optimal condition:
1. Fully charge the device before storing. Ensure the device is powered off and
disconnected from the charger during storage.
2. Thoroughly clean the entire device, including the top and bottom shells,
wheels, and brushes, to remove any dirt or debris.
3. Use a soft cloth or tissue to dry the device completely. Ensure the charging
port cover is securely closed.
4. Store the device in its original packaging in a cool, dry, and well-ventilated
environment.
5. Recharge the battery every six months to preserve battery health.
27
6
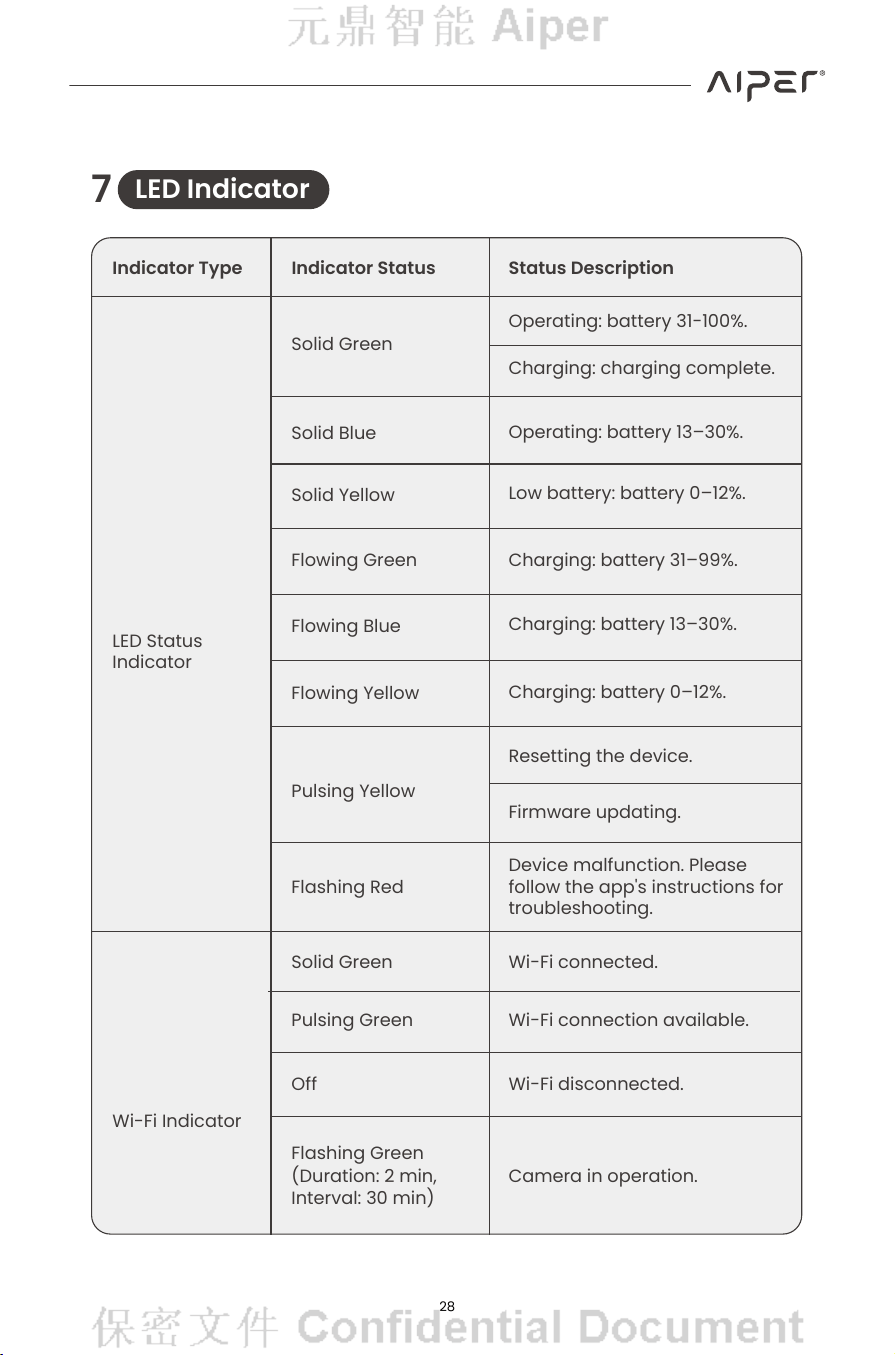
Specications
Model: PRX30SE
Rated Input: 25.2V
⎓
3.0A
Charger Model: GM95-252300-1FGN, GM95-252300-4FGN
Charger Input: 100–240V~, 50/60Hz, 2.5A
Charger Output: 25.2V
⎓
3.0A
Charging Dock Model: CH02
Charging Dock Input: 25.2V
⎓
3.0A
Battery Pack Voltage: 21.6V
⎓
Charging Dock Output: 25.2V
⎓
3.0A
Water Protection Rating: IPX8
Charging Time: 4.5 Hours
Min Water Depth: 0.82 ft (0.25m)
Suction Power: 8000 GPH (30283 LPH)
Max Water Depth: 10 ft (3m)
Battery Pack Life: Up to 240 min - Floor
Battery Pack Mode: C1264D2-04
Battery Pack Capacity: 10300mAh (222.48Wh)
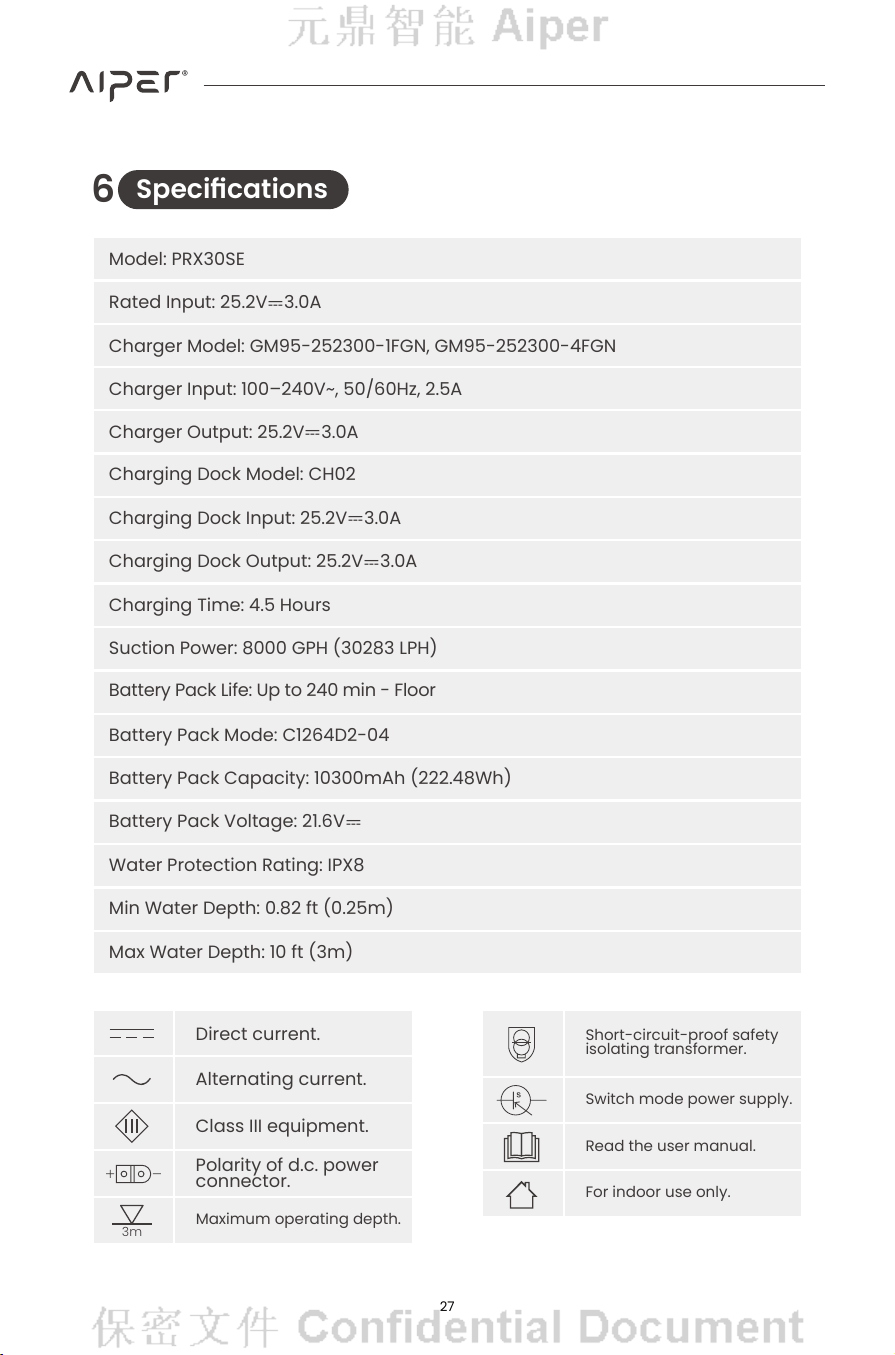
Direct current.
Short-circuit-proof safety
isolating transformer.
Alternating current.
Switch mode power supply.
Class III equipment.
Read the user manual.
Polarity of d.c. power
connector.
For indoor use only.
Maximum operating depth.
3m
28
7
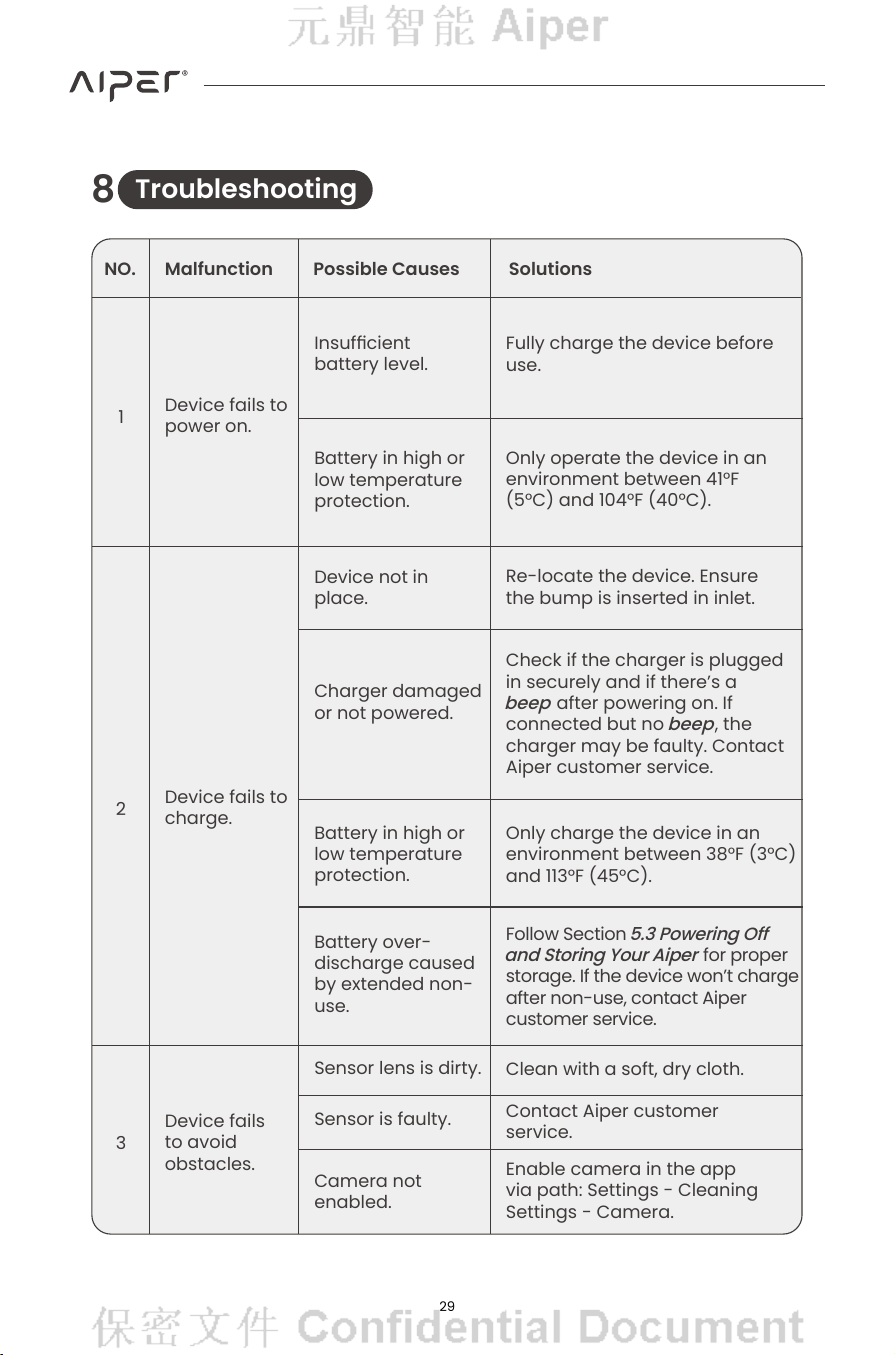
LED Indicator
LED Status
Indicator
Wi-Fi Indicator
Indicator Type Indicator Status Status Description
Solid Green
Solid Blue
Solid Yellow
Flowing Green
Flowing Blue
Flowing Yellow
Solid Green
Pulsing Green
Off
Flashing Green
(Duration: 2 min,
Interval: 30 min)
Pulsing Yellow
Flashing Red
Operating: battery 31-100%.
Charging: charging complete.
Operating: battery 13–30%.
Low battery: battery 0–12%.
Charging: battery 31–99%.
Charging: battery 13–30%.
Charging: battery 0–12%.
Device malfunction. Please
follow the app's instructions for
troubleshooting.
Resetting the device.
Firmware updating.
Wi-Fi connected.
Wi-Fi connection available.
Wi-Fi disconnected.
Camera in operation.
29
8
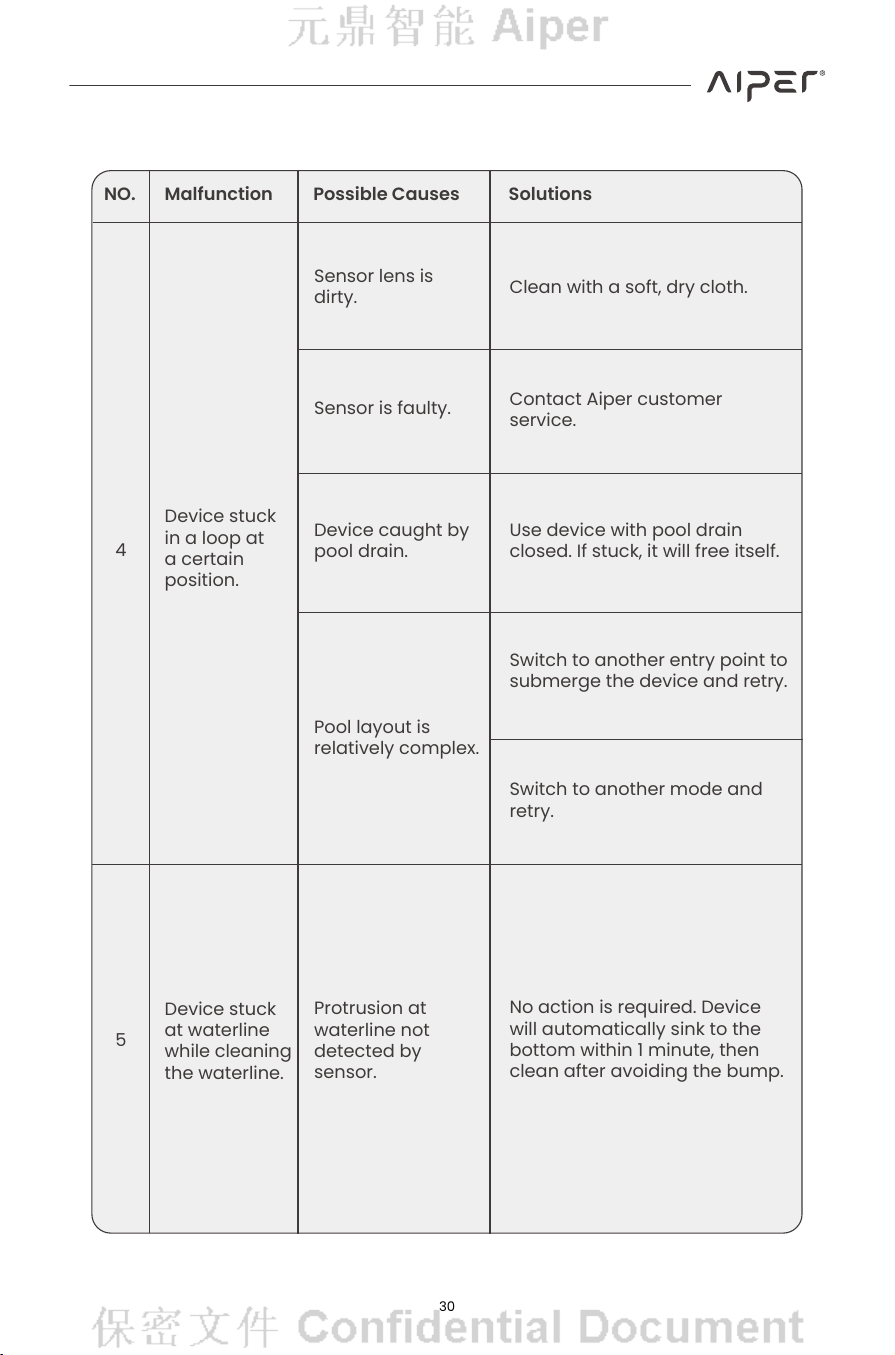
Troubleshooting
1
2
3
Device fails to
power on.
Device fails to
charge.
Device fails
to avoid
obstacles.
MalfunctionNO. Possible Causes Solutions
Insufcient
battery level.
Device not in
place.
Charger damaged
or not powered.
Sensor lens is dirty.
Sensor is faulty.
Camera not
enabled.
Battery in high or
low temperature
protection.
Battery over-
discharge caused
by extended non-
use.
Battery in high or
low temperature
protection.
Fully charge the device before
use.
Only operate the device in an
environment between 41°F
(5°C) and 104°F (40°C).
Re-locate the device. Ensure
the bump is inserted in inlet.
Check if the charger is plugged
in securely and if there’s a
beep
after powering on. If
connected but no
beep
, the
charger may be faulty. Contact
Aiper customer service.
Clean with a soft, dry cloth.
Contact Aiper customer
service.
Enable camera in the app
via path: Settings - Cleaning
Settings - Camera.
Only charge the device in an
environment between 38°F (3°C)
and 113°F (45°C).
Follow Section
5.3 Powering Off
and Storing Your Aiper
for proper
storage. If the device won’t charge
after non-use, contact Aiper
customer service.
30
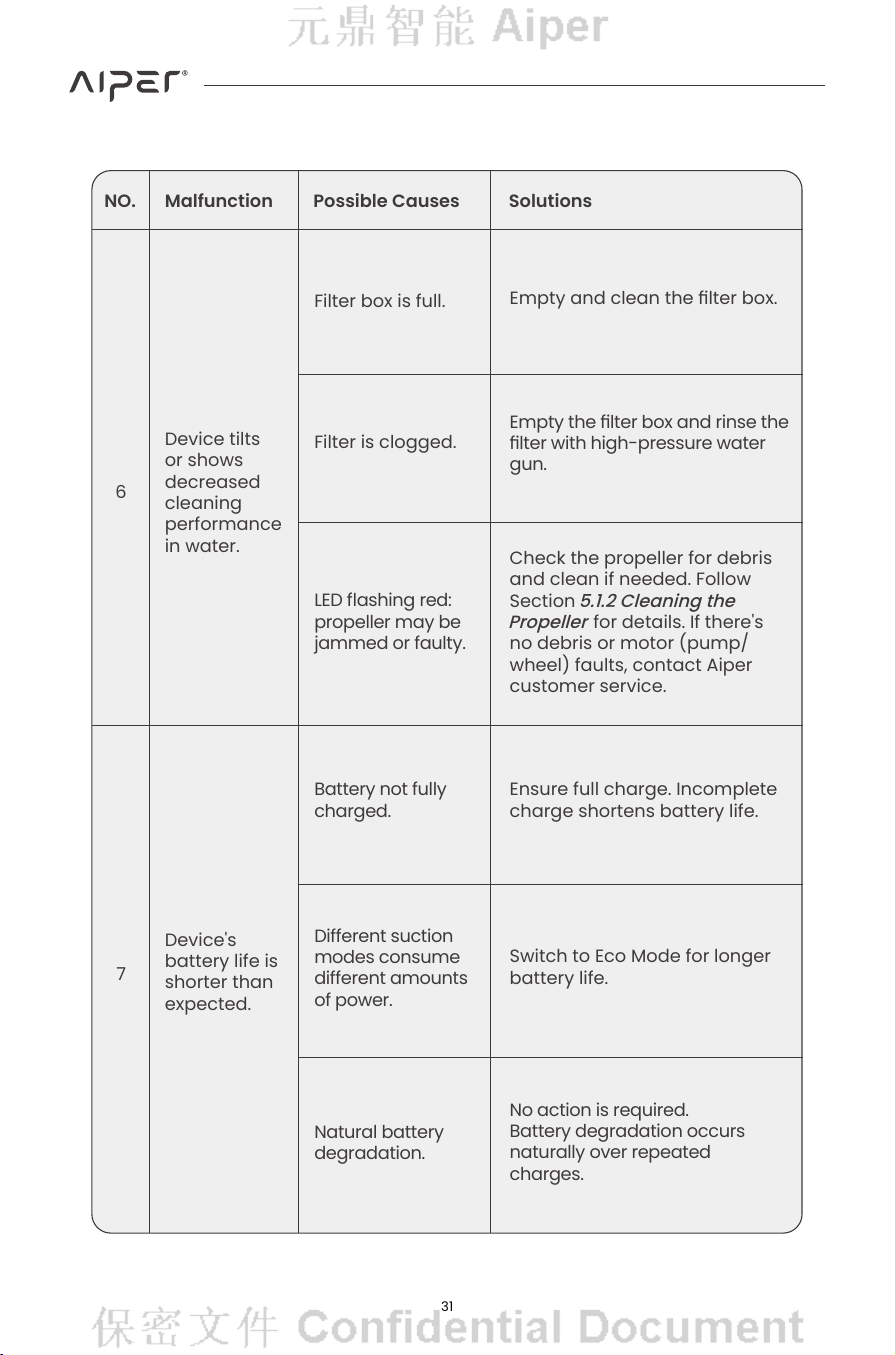
4
5
Device stuck
in a loop at
a certain
position.
Device stuck
at waterline
while cleaning
the waterline.
MalfunctionNO. Possible Causes Solutions
Sensor lens is
dirty.
Sensor is faulty.
Device caught by
pool drain.
Protrusion at
waterline not
detected by
sensor.
Pool layout is
relatively complex.
Clean with a soft, dry cloth.
Contact Aiper customer
service.
No action is required. Device
will automatically sink to the
bottom within 1 minute, then
clean after avoiding the bump.
Use device with pool drain
closed. If stuck, it will free itself.
Switch to another entry point to
submerge the device and retry.
Switch to another mode and
retry.
31
6
7
Device tilts
or shows
decreased
cleaning
performance
in water.
Device's
battery life is
shorter than
expected.
MalfunctionNO. Possible Causes Solutions
Filter box is full.
LED ashing red:
propeller may be
jammed or faulty.
Battery not fully
charged.
Different suction
modes consume
different amounts
of power.
Natural battery
degradation.
No action is required.
Battery degradation occurs
naturally over repeated
charges.
Filter is clogged.
Empty and clean the lter box.
Check the propeller for debris
and clean if needed. Follow
Section
5.1.2 Cleaning the
Propeller
for details. If there's
no debris or motor (pump/
wheel) faults, contact Aiper
customer service.
Ensure full charge. Incomplete
charge shortens battery life.
Switch to Eco Mode for longer
battery life.
Empty the lter box and rinse the
lter with high-pressure water
gun.
32
8
9
Device has
stopped
working.
Device fails
to perform
targeted debris
cleaning.
MalfunctionNO. Possible Causes Solutions
LED solid red: low
battery level.
LED ashing red:
propeller may be
jammed or faulty.
Patrol Mode or
VisionPath 2.0 is
not enabled.
Aiper Vision
Camera is dirty.
Aiper Vision
Camera is faulty.
Fully charge the device before
use.
Check the propeller for debris
and clean if needed. Follow
Section
5.1.2 Cleaning the
Propeller
for details. If there's
no debris or motor (pump/
wheel) faults, contact Aiper
customer service.
Enable Patrol Mode or
VisionPath 2.0 in Aiper App.
Disabling the setting will block
activation.
Clean with a soft, dry cloth.
Contact Aiper customer
service.
33
This product has passed quality control and safety test conducted by our
technicians.
1. This product comes with a 36-month warranty that covers your item’s battery
and motor from the date of purchase.
2. This warranty is voided if the product has been altered, misused, or has been
repaired by unauthorized persons.
3. This warranty extends only to manufacturing defects and does not cover
damage resulting from the mishandling of the product by the owner.
4. The order number or record of purchase must be presented at the request of
any repair claim during the warranty period.
9
Warranty
This symbol indicates that this product shall not be treated as
household waste. Instead it shall be handed over to the
applicable collection point for the recycling of electrical and
electronic equipment.