User Manual for ZD-S Excellence
Controller
Model:
1. Overview
•
Button Layout
•
Basic Operations
•
Mode Selection & Device Connection
•
Mode Switching
•
Turbo Mode
•
Calibration
•
Back Button Setup
•
Onboard Profile Switching
•
Dual-Stage Trigger Switch
•
Shortcuts in Switch Mode
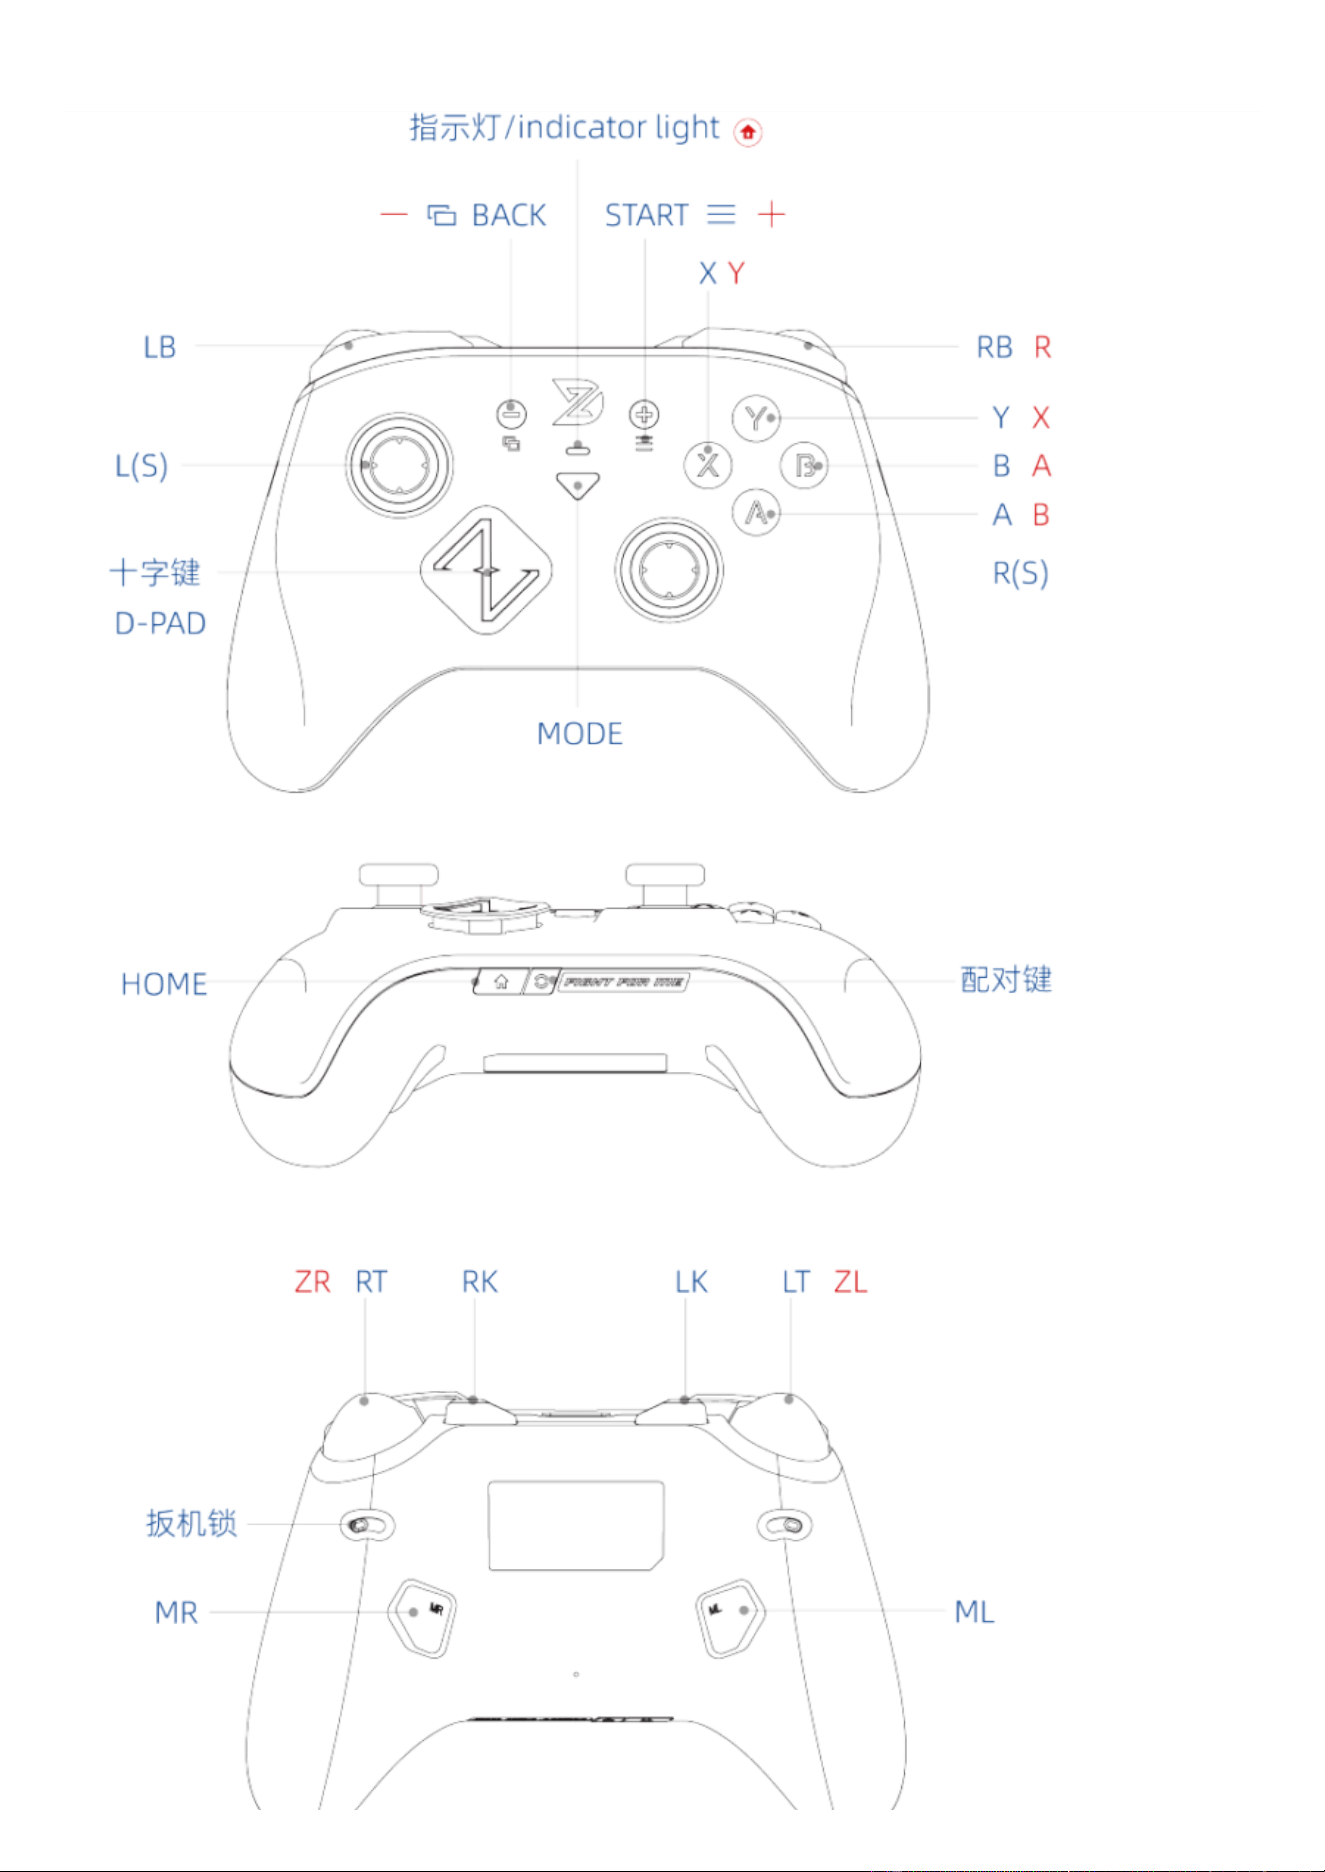
Blue marks indicate Xbox layout buttons, red marks are for NS layout buttons
ZD-S32
2. Basic Operations
1. Power On
Hold the
Home
button for 1 second to power on.
2. Power Off
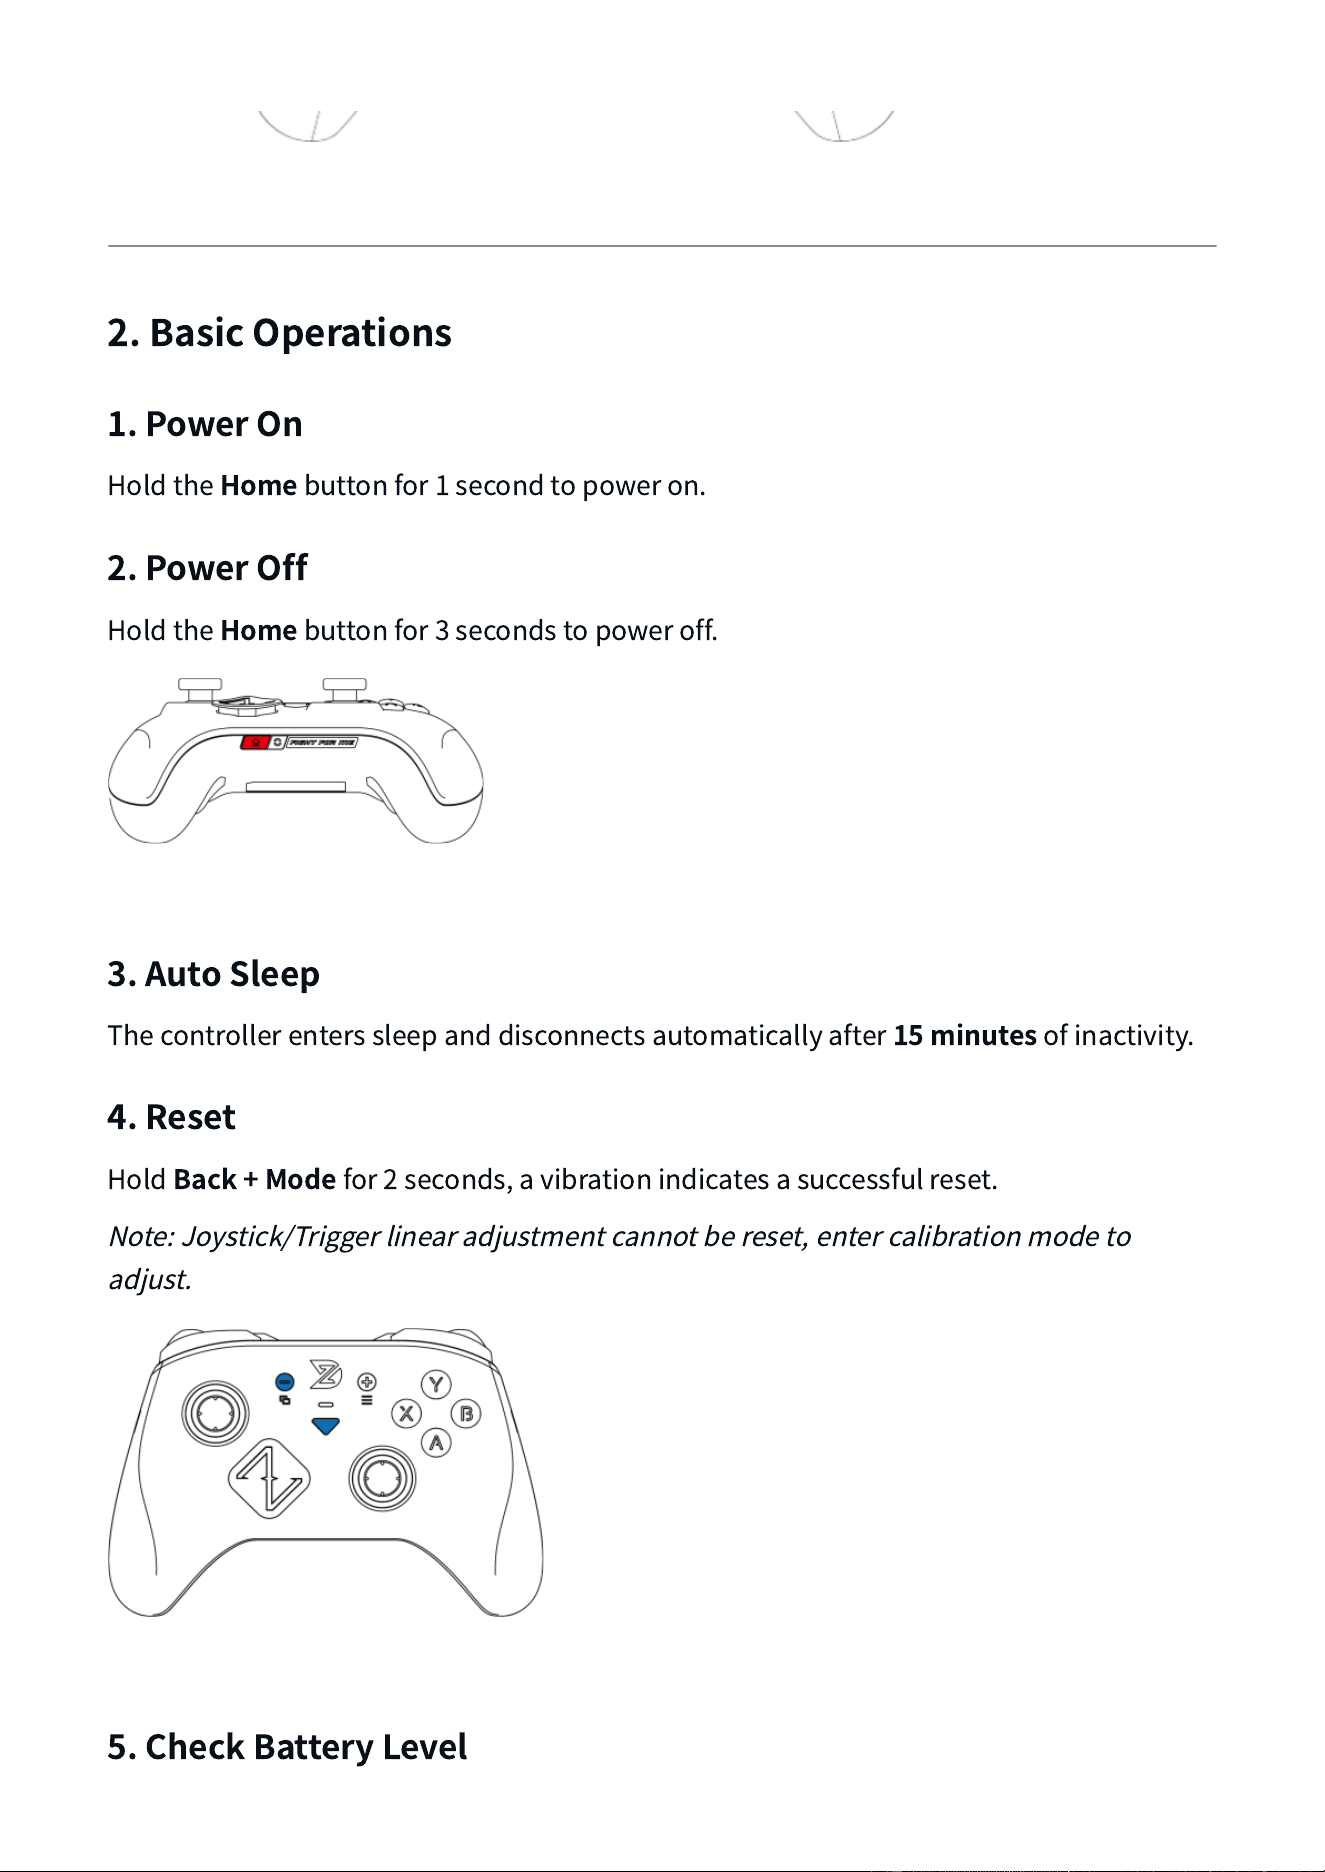
Hold the
Home
button for 3 seconds to power off.
3. Auto Sleep
The controller enters sleep and disconnects automatically after
15 minutes
of inactivity.
4. Reset
Hold
Back + Mode
for 2 seconds, a vibration indicates a successful reset.
Note: Joystick/Trigger linear adjustment cannot be reset, enter calibration mode to
adjust.
5. Check Battery Level
Check via the official app.
6. Charging
•
Use a computer USB port for charging.
•
Use a 5V/2A or lower charger.
•
DO NOT USE
fast chargers, low-quality non-standard adapters, or
over-voltage/over-current power supplies.
3. Mode Selection & Device Connection
1. Wired Connection (PC)
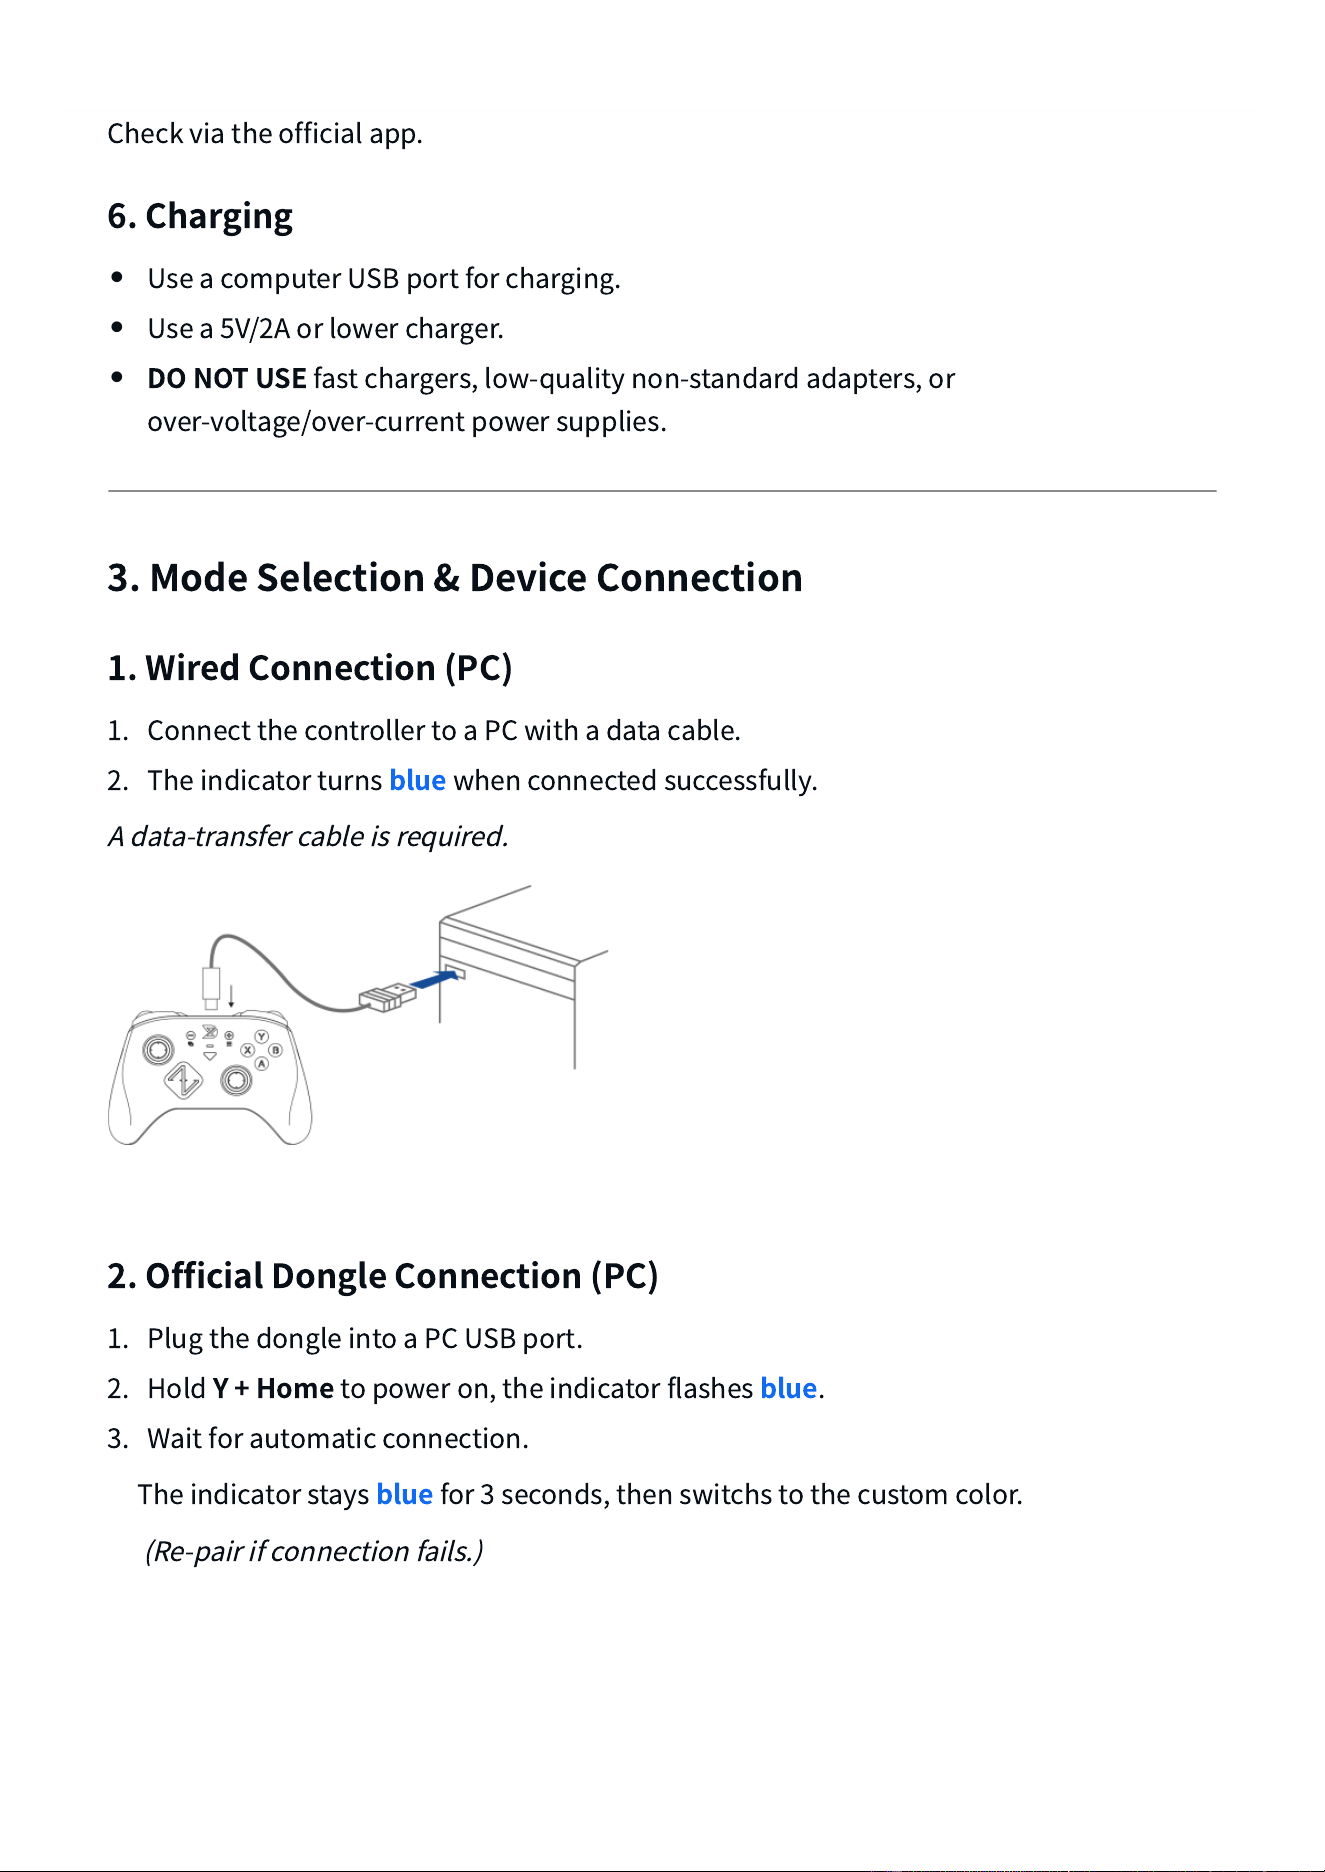
Connect the controller to a PC with a data cable.
The indicator turns
blue
when connected successfully.
A data-transfer cable is required.
2. Official Dongle Connection (PC)
Plug the dongle into a PC USB port.
Hold
Y + Home
to power on, the indicator flashes
blue
.
Wait for automatic connection.
The indicator stays
blue
for 3 seconds, then switchs to the custom color.
(Re-pair if connection fails.)
1.
2.
1.
2.
3.
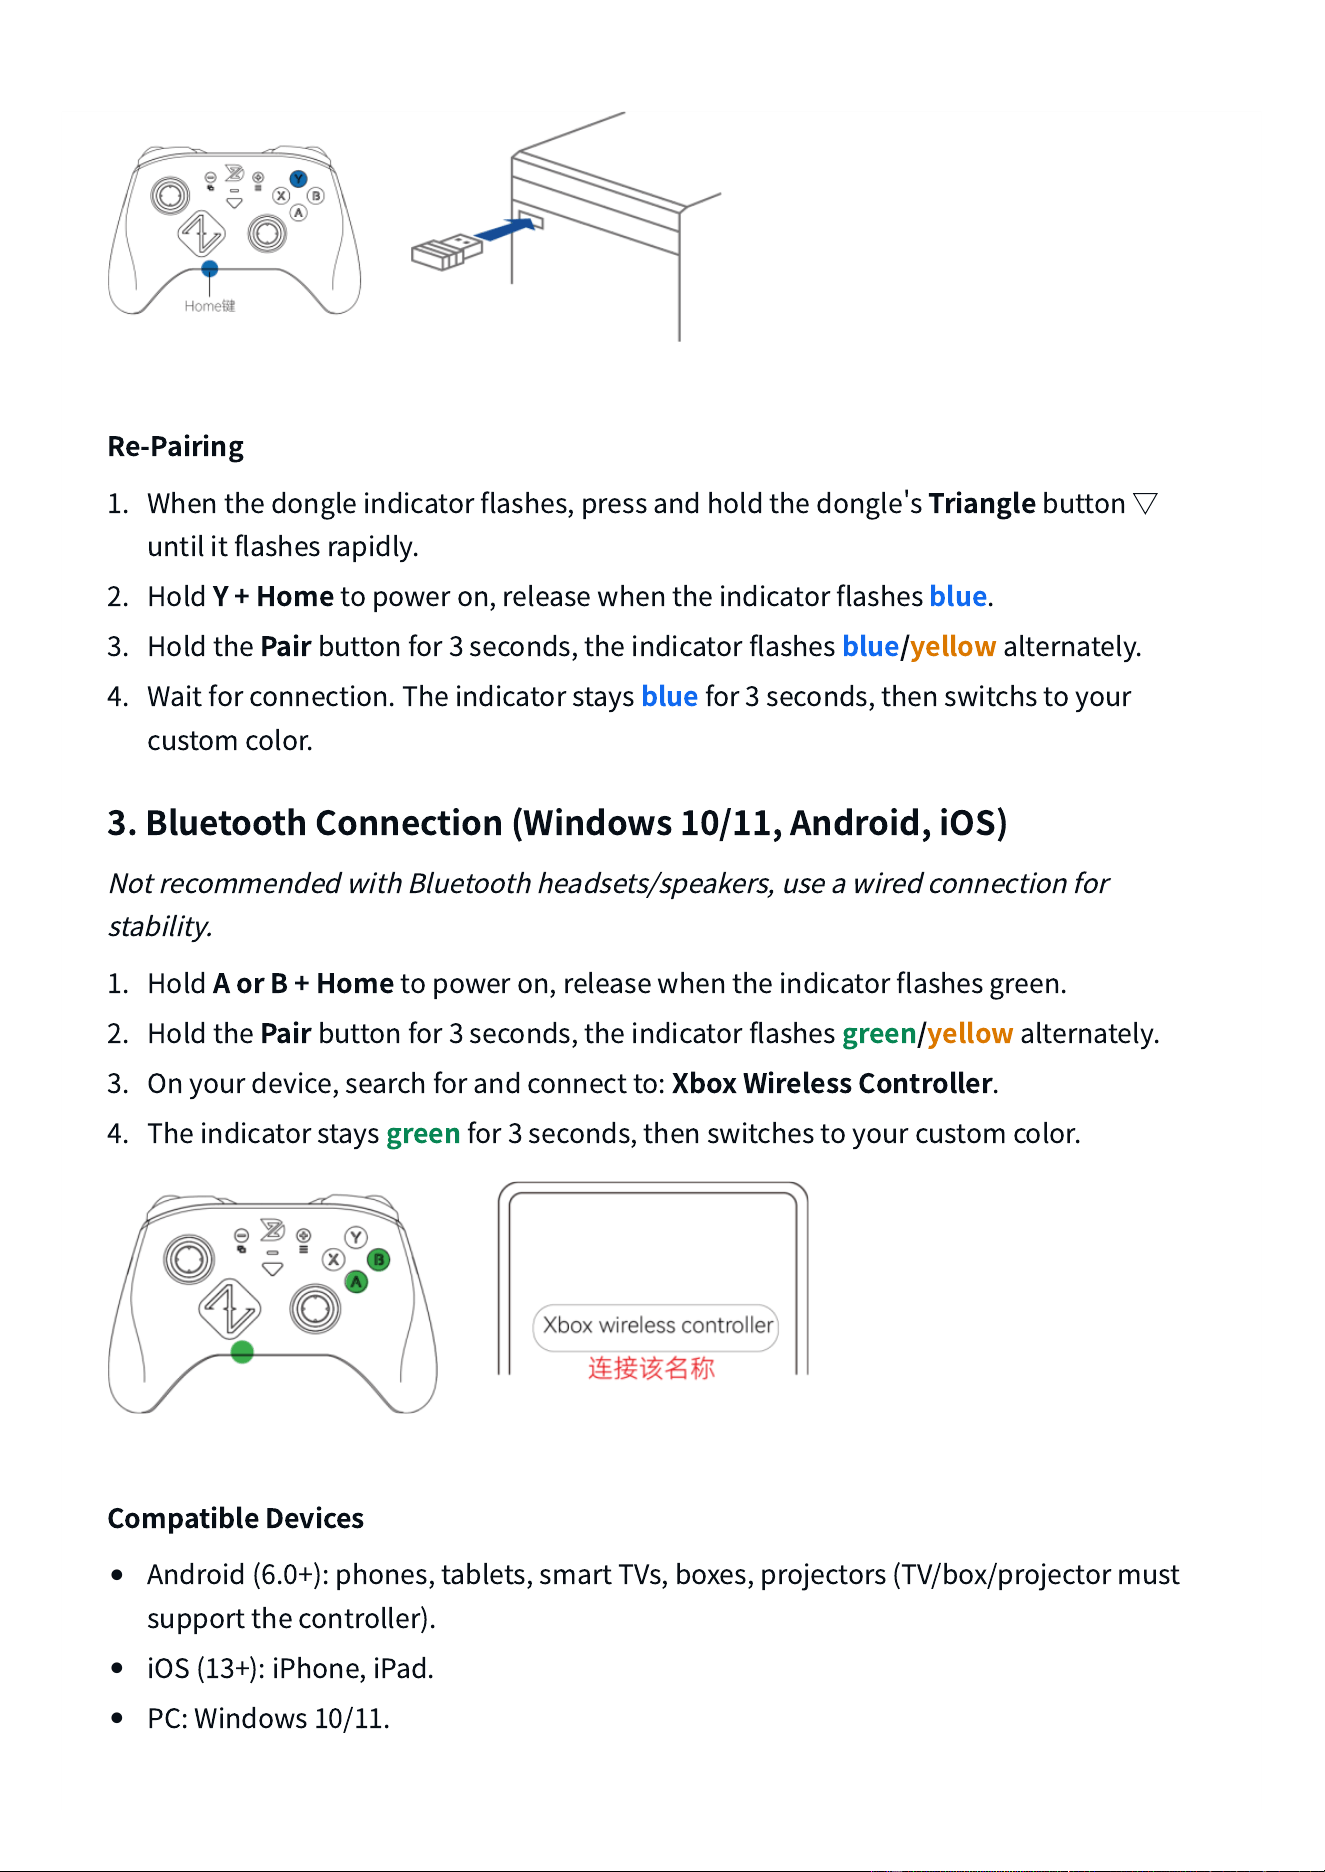
Re-Pairing
When the dongle indicator flashes, press and hold the dongle
s
Triangle
button
▽
until it flashes rapidly.
Hold
Y + Home
to power on, release when the indicator flashes
blue
.
Hold the
Pair
button for 3 seconds, the indicator flashes
blue/yellow
alternately.
Wait for connection. The indicator stays
blue
for 3 seconds, then switchs to your
custom color.
3. Bluetooth Connection (Windows 10/11, Android, iOS)
Not recommended with Bluetooth headsets/speakers, use a wired connection for
stability.
Hold
A or B + Home
to power on, release when the indicator flashes green.
Hold the
Pair
button for 3 seconds, the indicator flashes
green/yellow
alternately.
On your device, search for and connect to:
Xbox Wireless Controller
.
The indicator stays
green
for 3 seconds, then switches to your custom color.
Compatible Devices
•
Android (6.0+): phones, tablets, smart TVs, boxes, projectors (TV/box/projector must
support the controller).
•
iOS (13+): iPhone, iPad.
•
PC: Windows 10/11.
1.
2.
3.
4.
1.
2.
3.
4.
4. Connection to Nintendo Switch
Wireless Connection
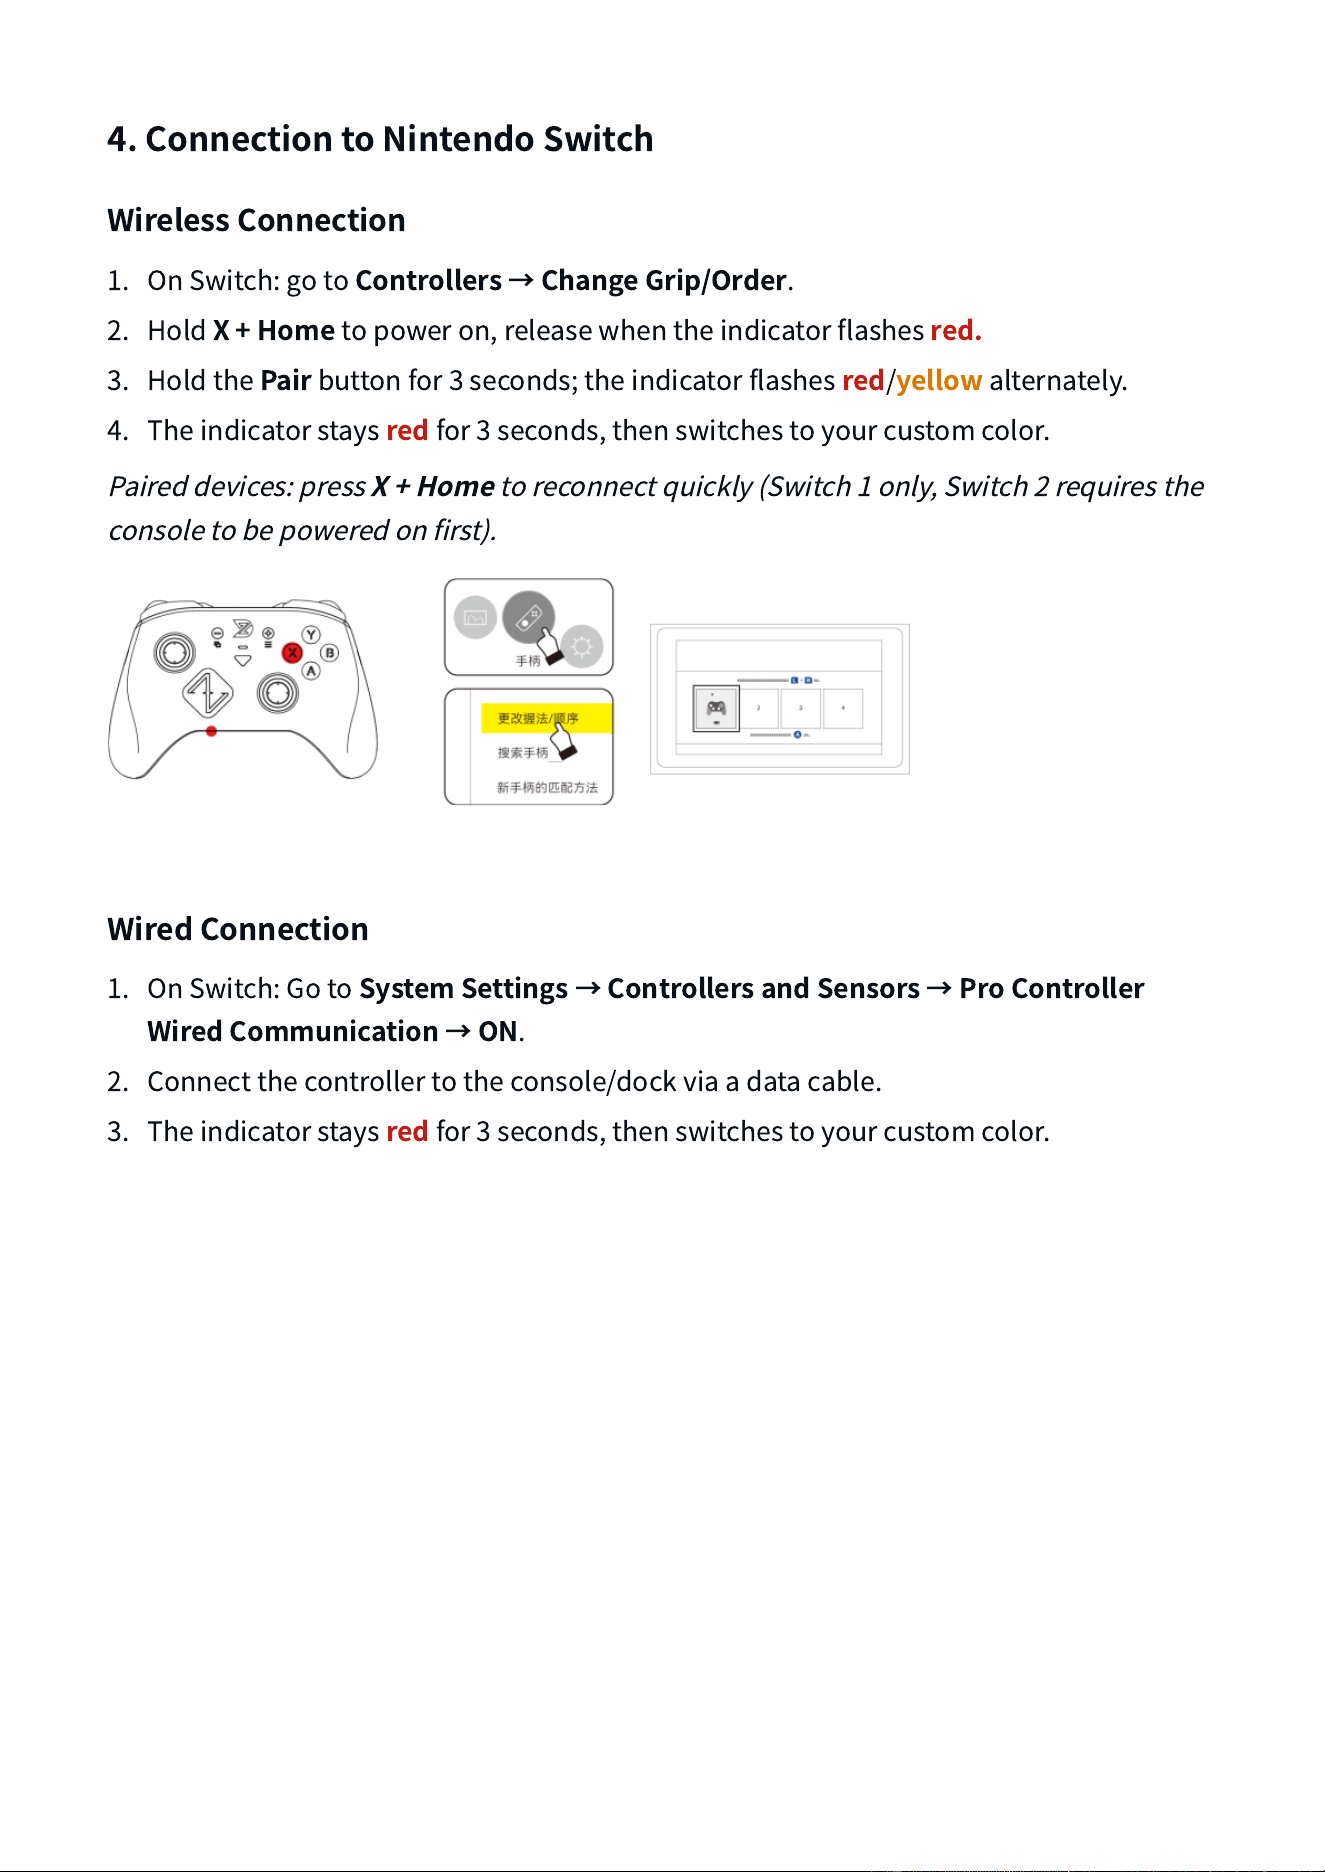
On Switch: go to
Controllers
→
Change Grip/Order
.
Hold
X + Home
to power on, release when the indicator flashes
red.
Hold the
Pair
button for 3 seconds; the indicator flashes
red
/
yellow
alternately.
The indicator stays
red
for 3 seconds, then switches to your custom color.
Paired devices: press
X + Home
to reconnect quickly (Switch 1 only, Switch 2 requires the
console to be powered on first).
Wired Connection
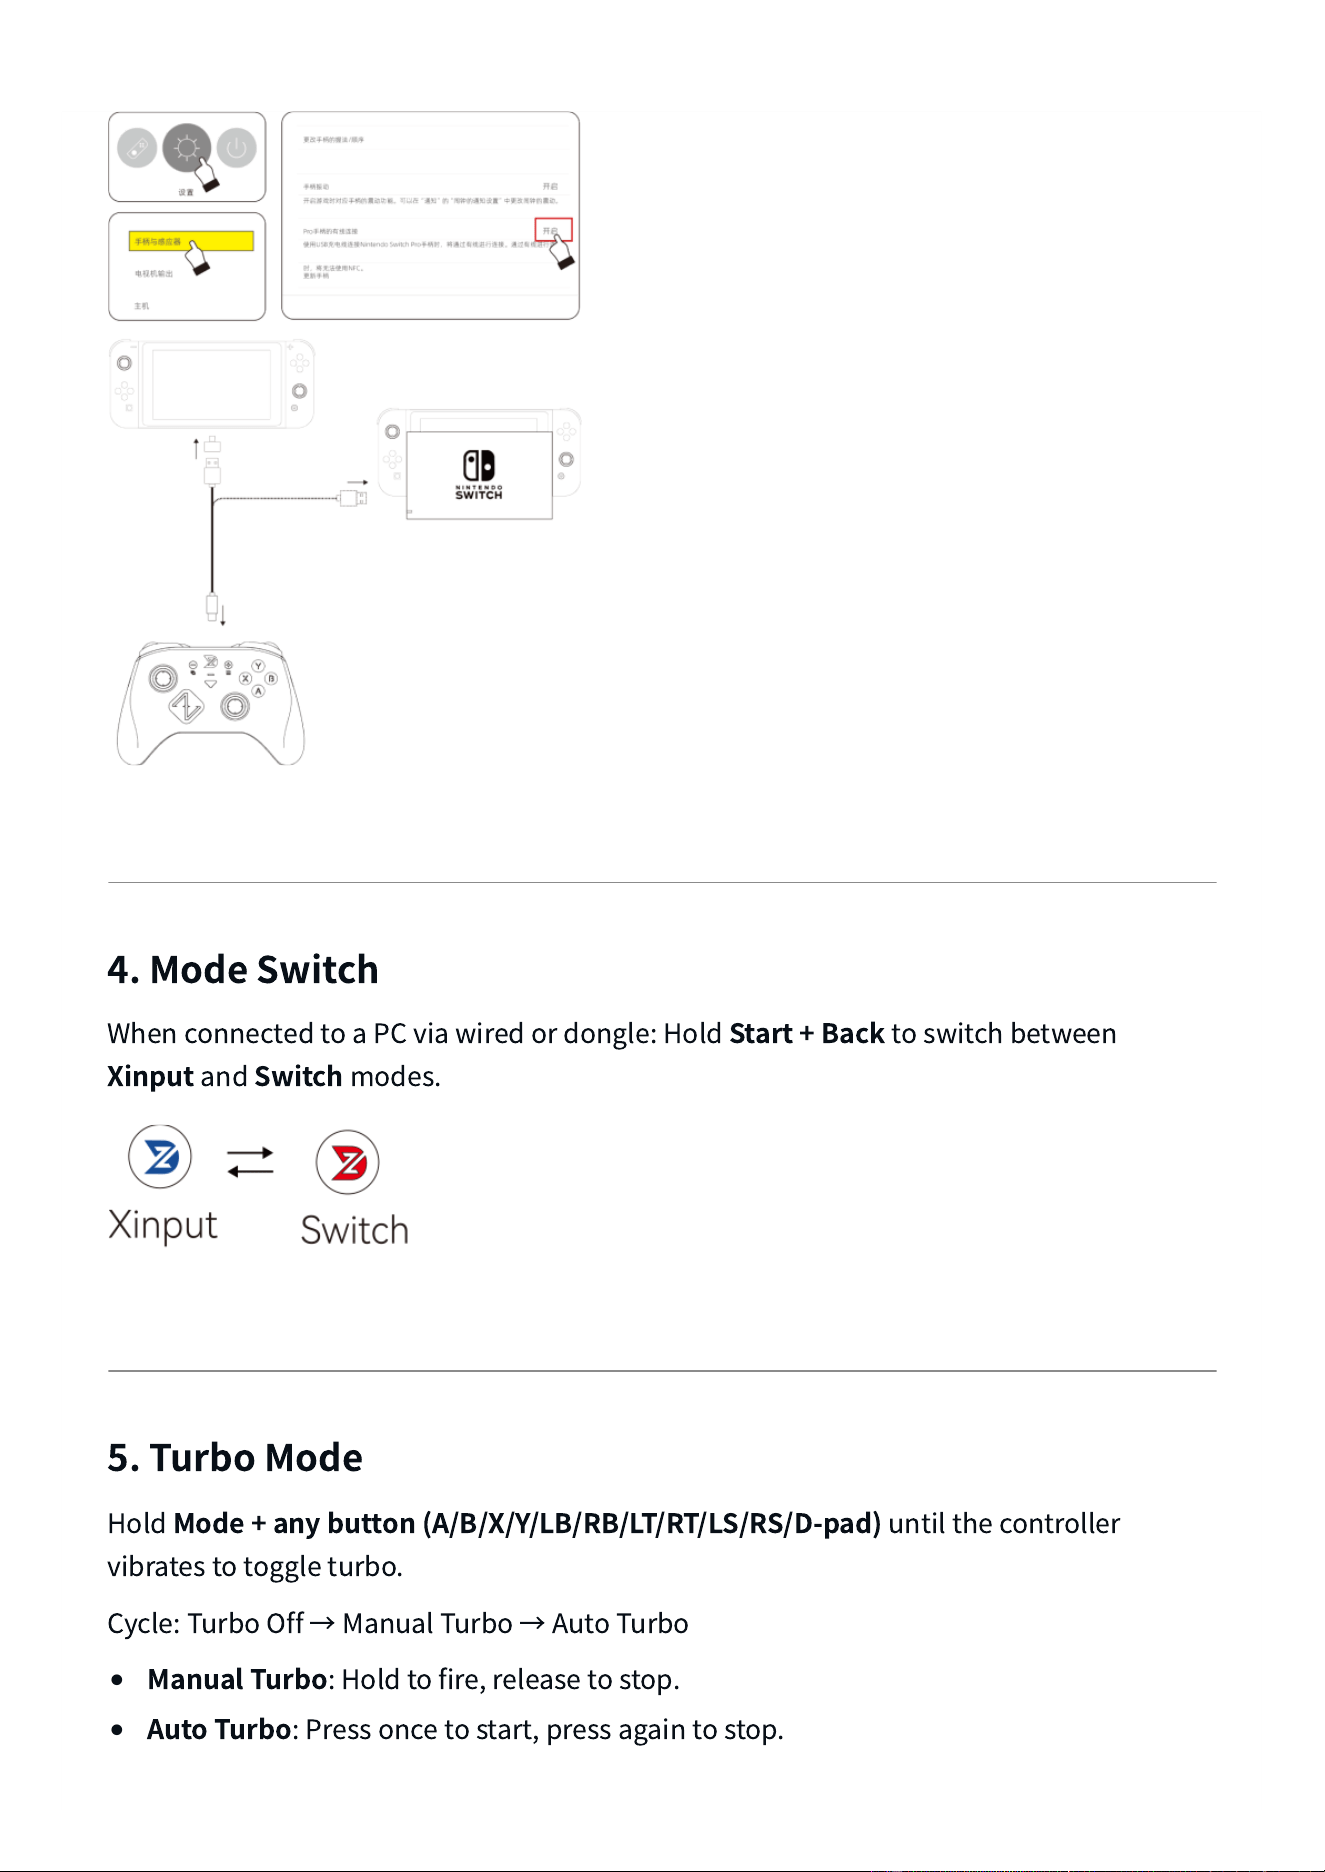
On Switch: Go to
System Settings
→
Controllers and Sensors
→
Pro Controller
Wired Communication
→
ON
.
Connect the controller to the console/dock via a data cable.
The indicator stays
red
for 3 seconds, then switches to your custom color.
1.
2.
3.
4.
1.
2.
3.
4. Mode Switch
When connected to a PC via wired or dongle: Hold
Start + Back
to switch between
Xinput
and
Switch
modes.
5. Turbo Mode
Hold
Mode + any button (A/B/X/Y/LB/RB/LT/RT/LS/RS/D-pad)
until the controller
vibrates to toggle turbo.
Cycle: Turbo Off
→
Manual Turbo
→
Auto Turbo
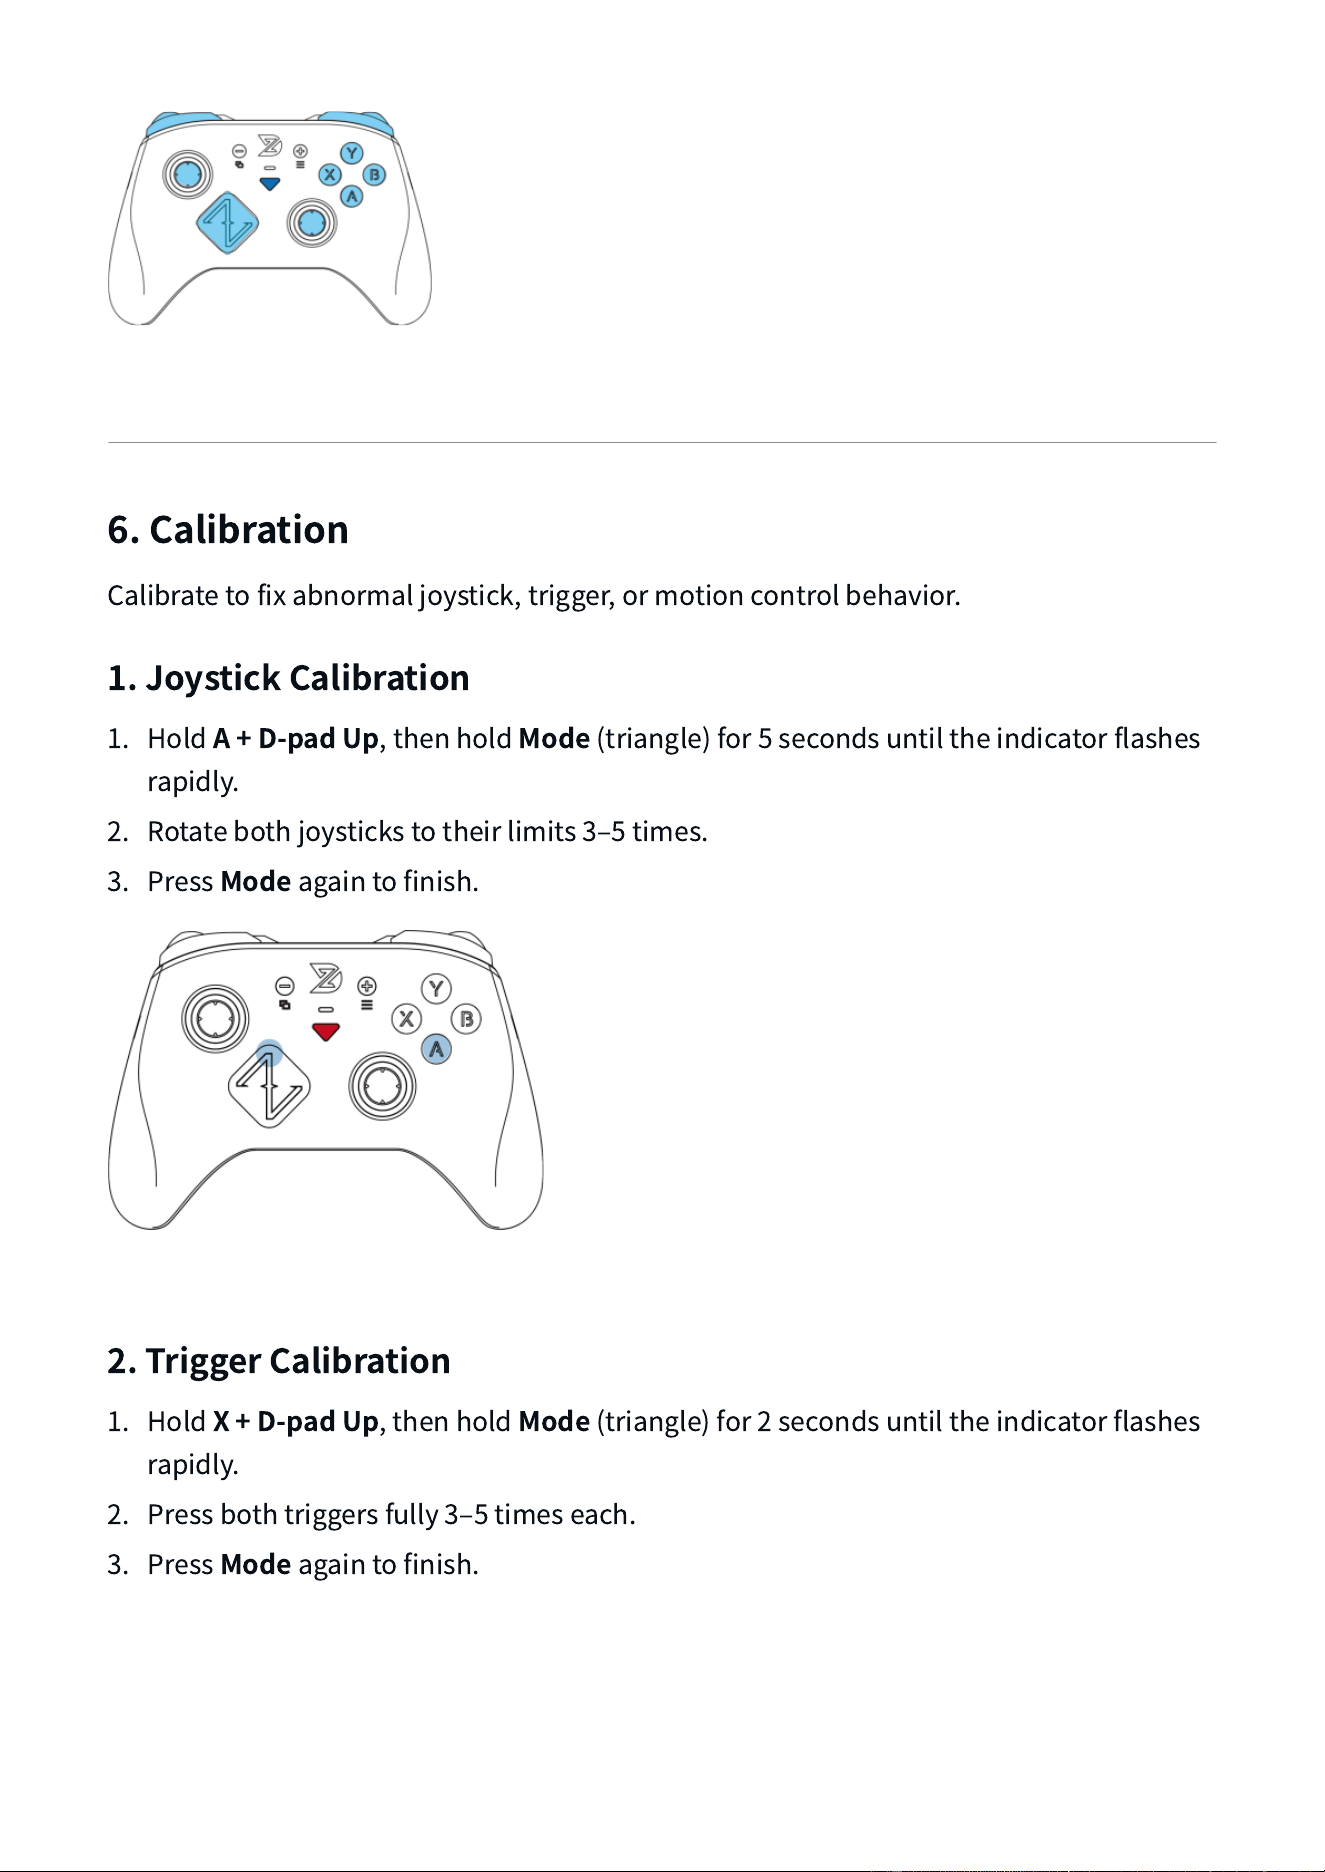
•
Manual Turbo
: Hold to fire, release to stop.
•
Auto Turbo
: Press once to start, press again to stop.
6. Calibration
Calibrate to fix abnormal joystick, trigger, or motion control behavior.
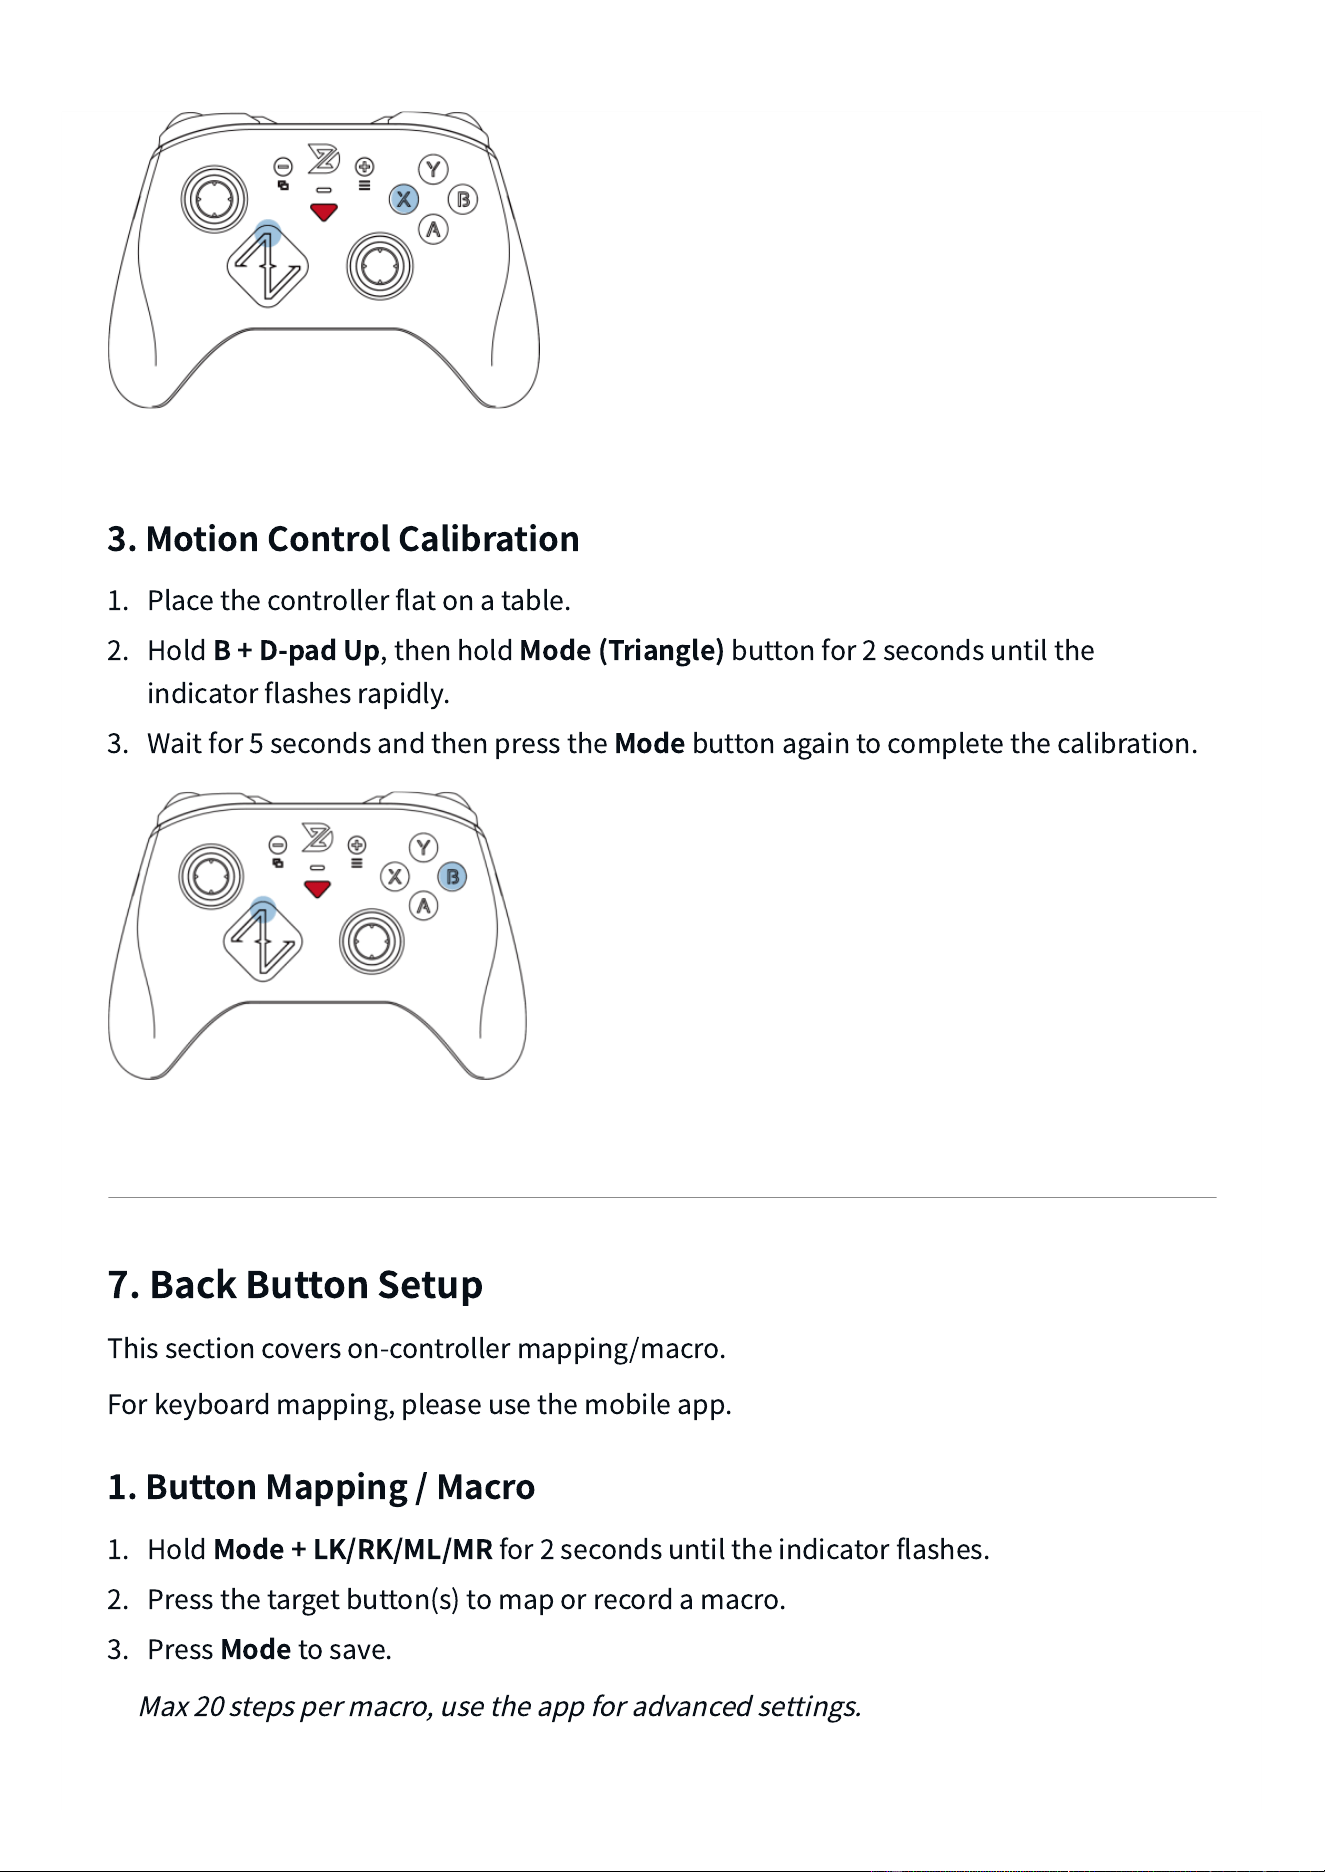
1. Joystick Calibration
Hold
A + D-pad Up
, then hold
Mode
(triangle) for 5 seconds until the indicator flashes
rapidly.
Rotate both joysticks to their limits 3
‒
5 times.
Press
Mode
again to finish.
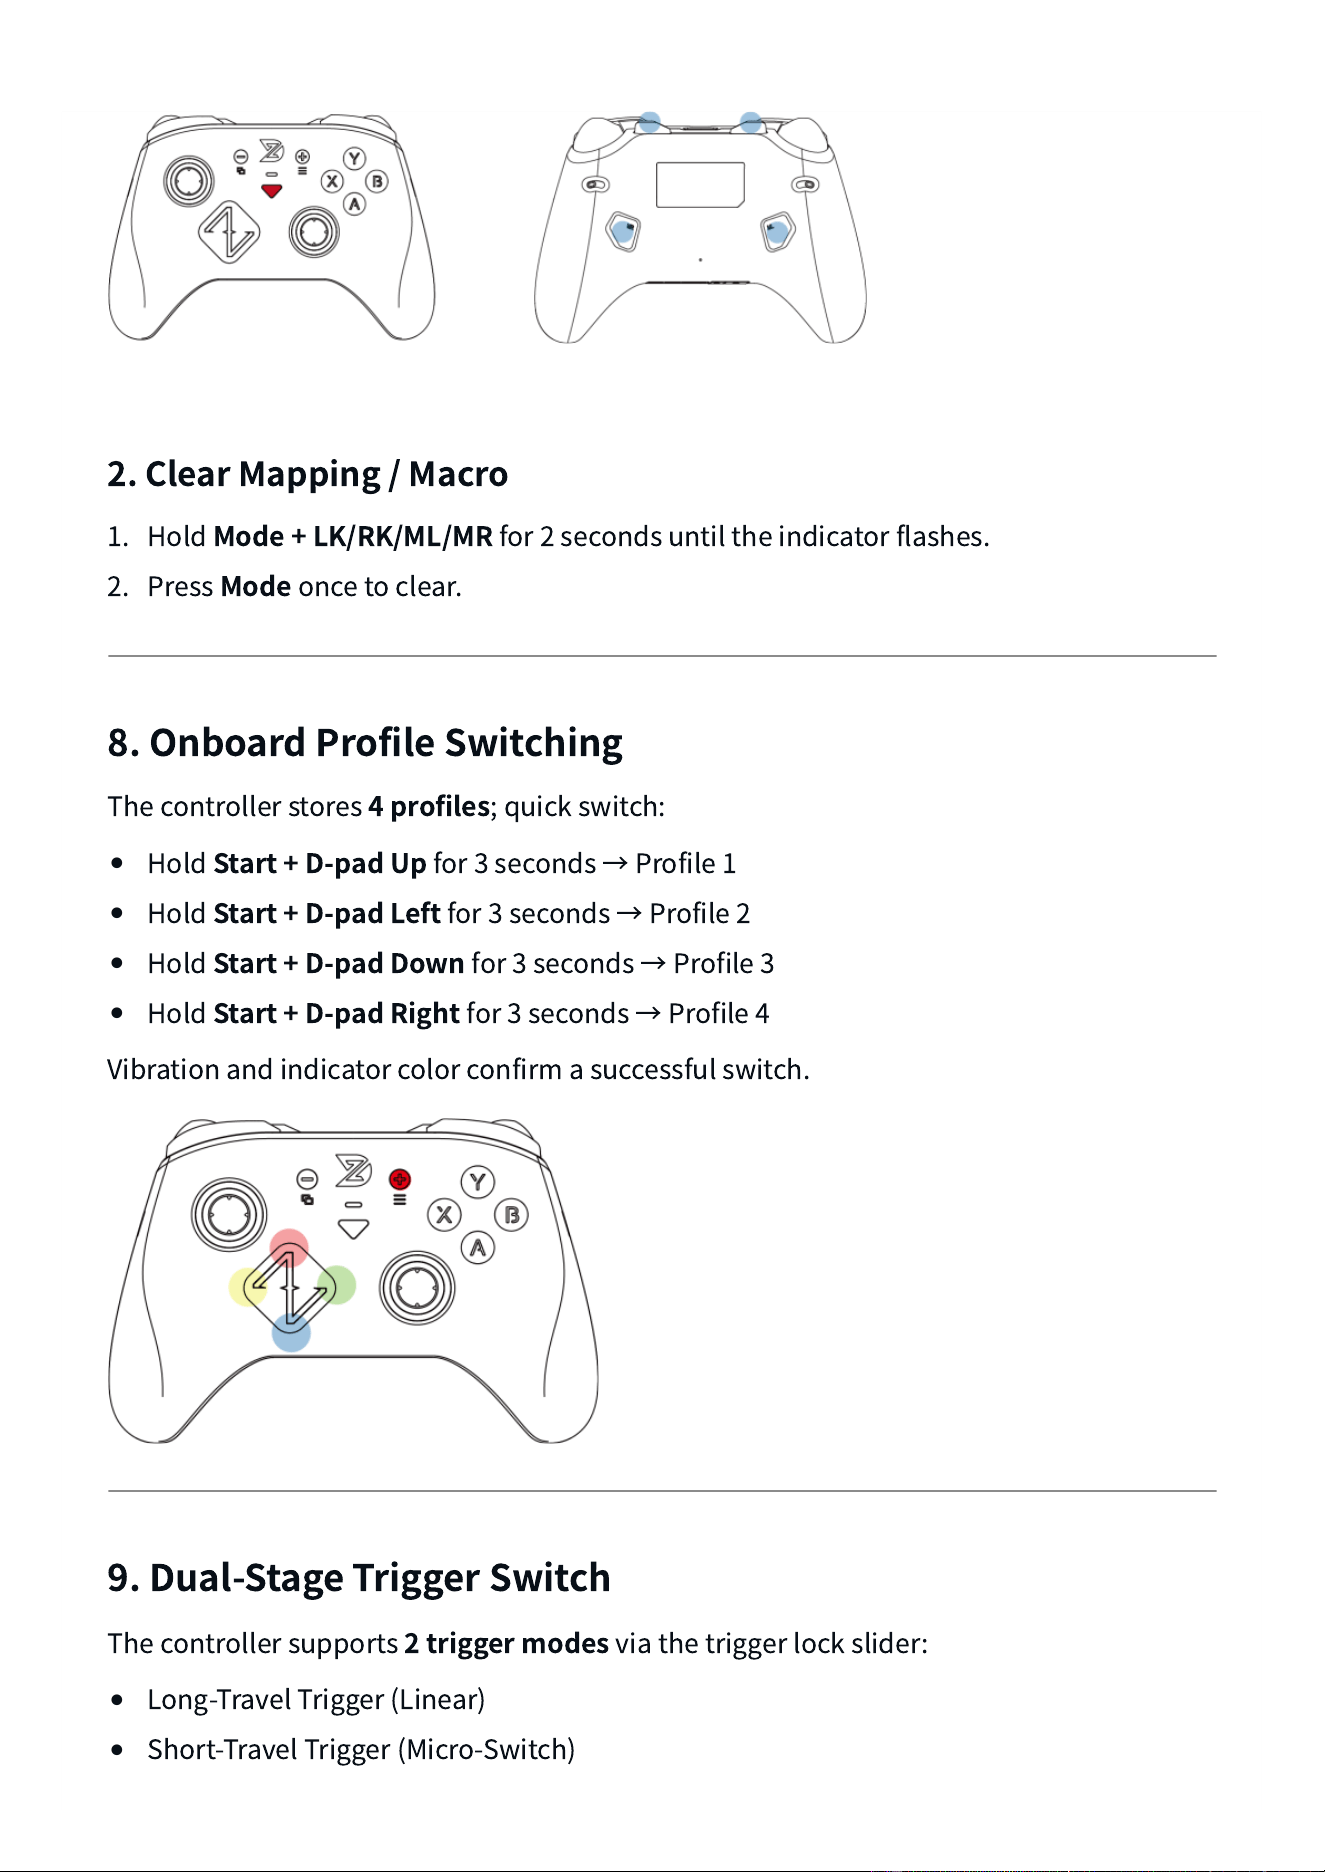
2. Trigger Calibration
Hold
X + D-pad Up
, then hold
Mode
(triangle) for 2 seconds until the indicator flashes
rapidly.
Press both triggers fully 3
‒
5 times each.
Press
Mode
again to finish.
1.
2.
3.
1.
2.
3.
3. Motion Control Calibration
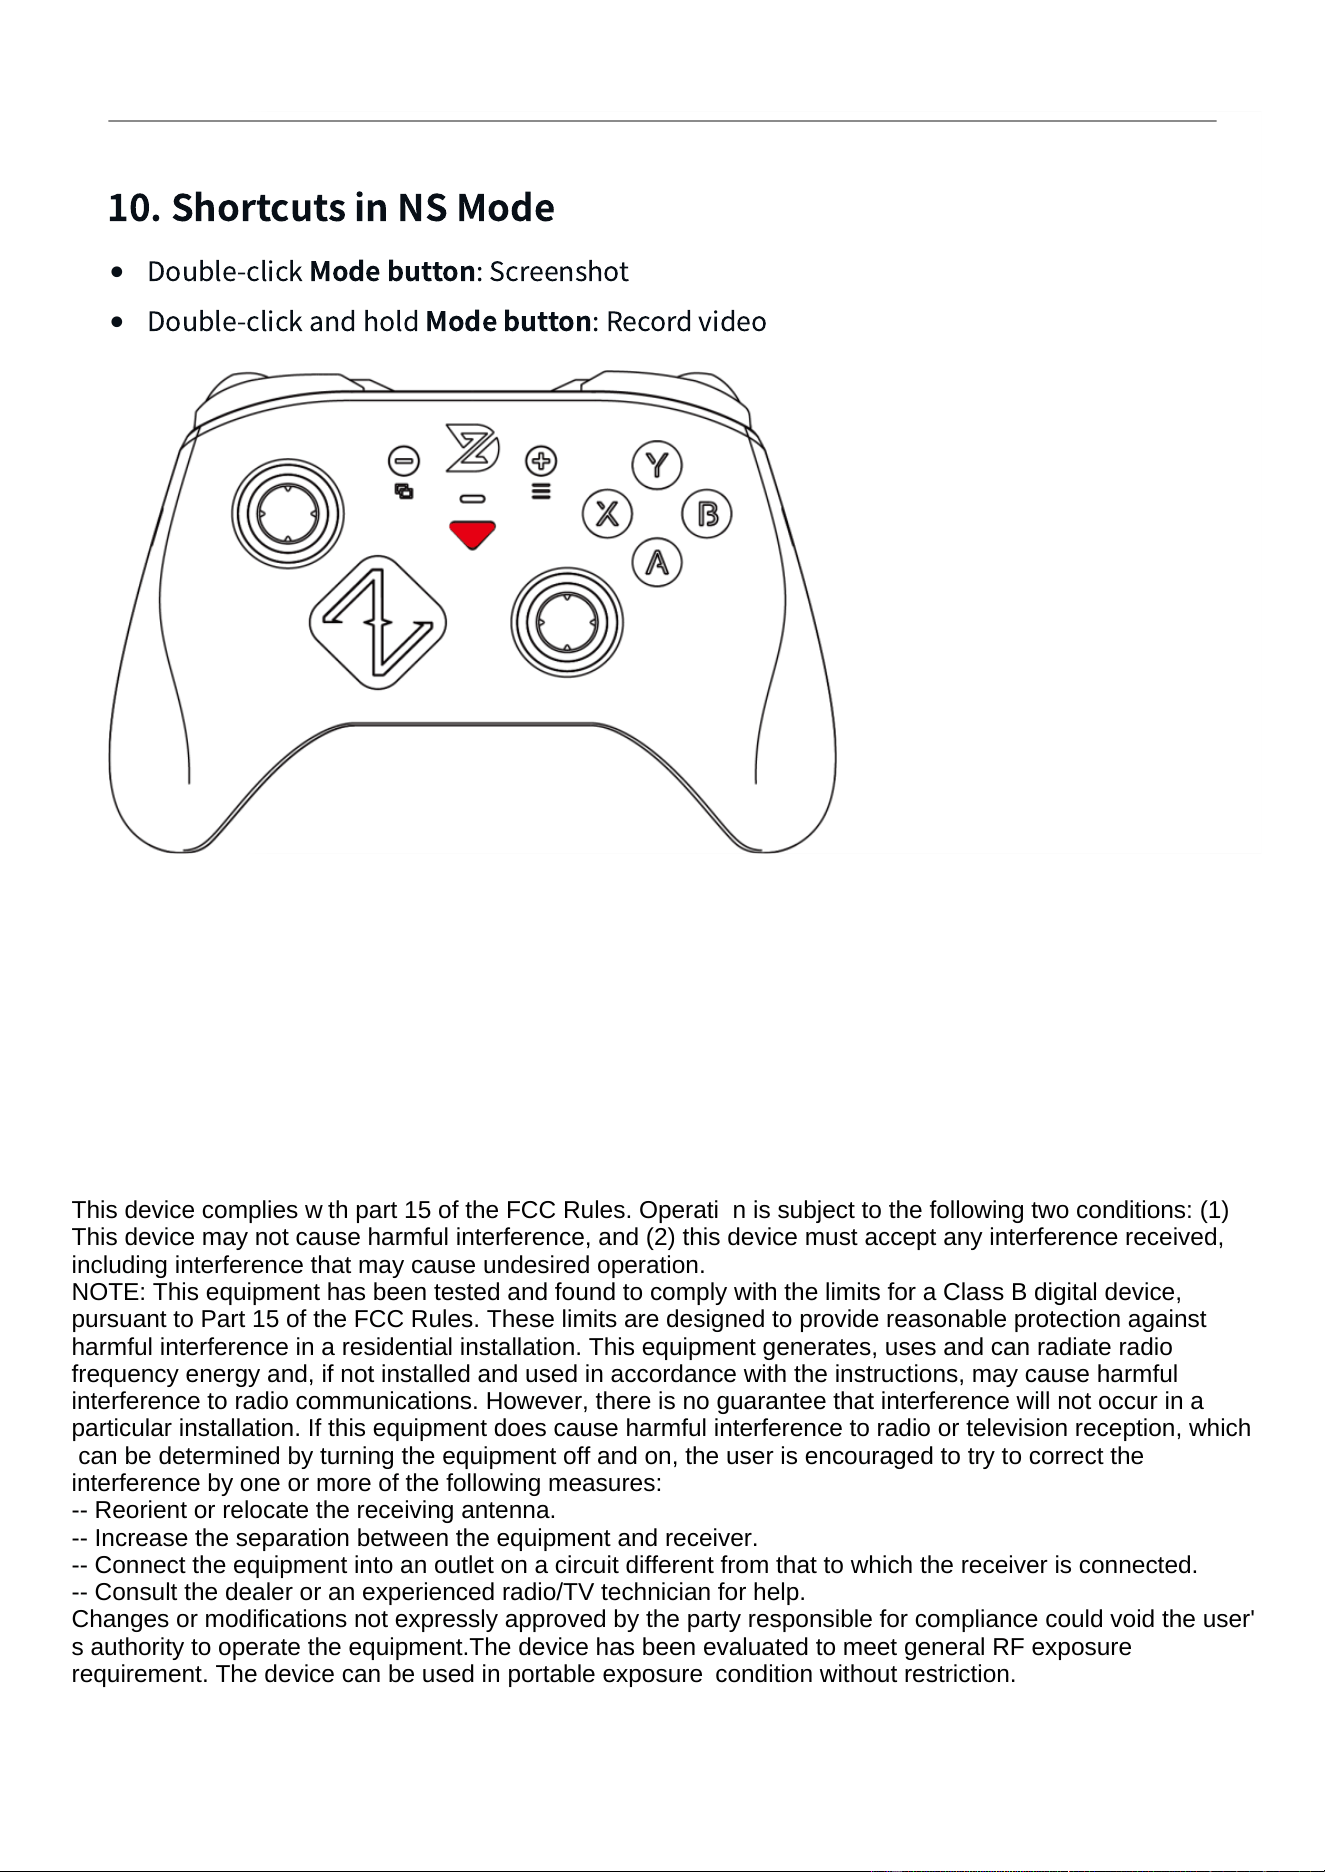
Place the controller flat on a table.
Hold
B + D-pad Up
, then hold
Mode (Triangle)
button for 2 seconds until the
indicator flashes rapidly.
Wait for 5 seconds and then press the
Mode
button again to complete the calibration.
7. Back Button Setup
This section covers on-controller mapping/macro.
For keyboard mapping, please use the mobile app.
1. Button Mapping / Macro
Hold
Mode + LK/RK/ML/MR
for 2 seconds until the indicator flashes.
Press the target button(s) to map or record a macro.
Press
Mode
to save.
Max 20 steps per macro, use the app for advanced settings.
1.
2.
3.
1.
2.
3.
2. Clear Mapping / Macro
Hold
Mode + LK/RK/ML/MR
for 2 seconds until the indicator flashes.
Press
Mode
once to clear.
8. Onboard Profile Switching
The controller stores
4 profiles
; quick switch:
•
Hold
Start + D-pad Up
for 3 seconds
→
Profile 1
•
Hold
Start + D-pad Left
for 3 seconds
→
Profile 2
•
Hold
Start + D-pad Down
for 3 seconds
→
Profile 3
•
Hold
Start + D-pad Right
for 3 seconds
→
Profile 4
Vibration and indicator color confirm a successful switch.
9. Dual-Stage Trigger Switch
The controller supports
2 trigger modes
via the trigger lock slider:
•
Long-Travel Trigger (Linear)
•
Short-Travel Trigger (Micro-Switch)
1.
2.
10. Shortcuts in NS Mode
•
Double-click
Mode button
: Screenshot
•
Double-click and hold
Mode button
: Record video
This device complies with part 15 of the FCC Rules. Operation is subject to the following two conditions: (1)
This device may not cause harmful interference, and (2) this device must accept any interference received,
including interference that may cause undesired operation.
NOTE: This equipment has been tested and found to comply with the limits for a Class B digital device,
pursuant to Part 15 of the FCC Rules. These limits are designed to provide reasonable protection against
harmful interference in a residential installation. This equipment generates, uses and can radiate radio
frequency energy and, if not installed and used in accordance with the instructions, may cause harmful
interference to radio communications. However, there is no guarantee that interference will not occur in a
particular installation. If this equipment does cause harmful interference to radio or television reception, which
can be determined by turning the equipment off and on, the user is encouraged to try to correct the
interference by one or more of the following measures:
-- Reorient or relocate the receiving antenna.
-- Increase the separation between the equipment and receiver.
-- Connect the equipment into an outlet on a circuit different from that to which the receiver is connected.
-- Consult the dealer or an experienced radio/TV technician for help.
Changes or modifications not expressly approved by the party responsible for compliance could void the user'
s authority to operate the equipment.The device has been evaluated to meet general RF exposure
requirement. The device can be used in portable exposure condition without restriction.