Smartbrush™
User Instruction Manual

01 Warnings
02 Safety Warnings
06 Safety Instructions
07 Complete System
08 Technical Data
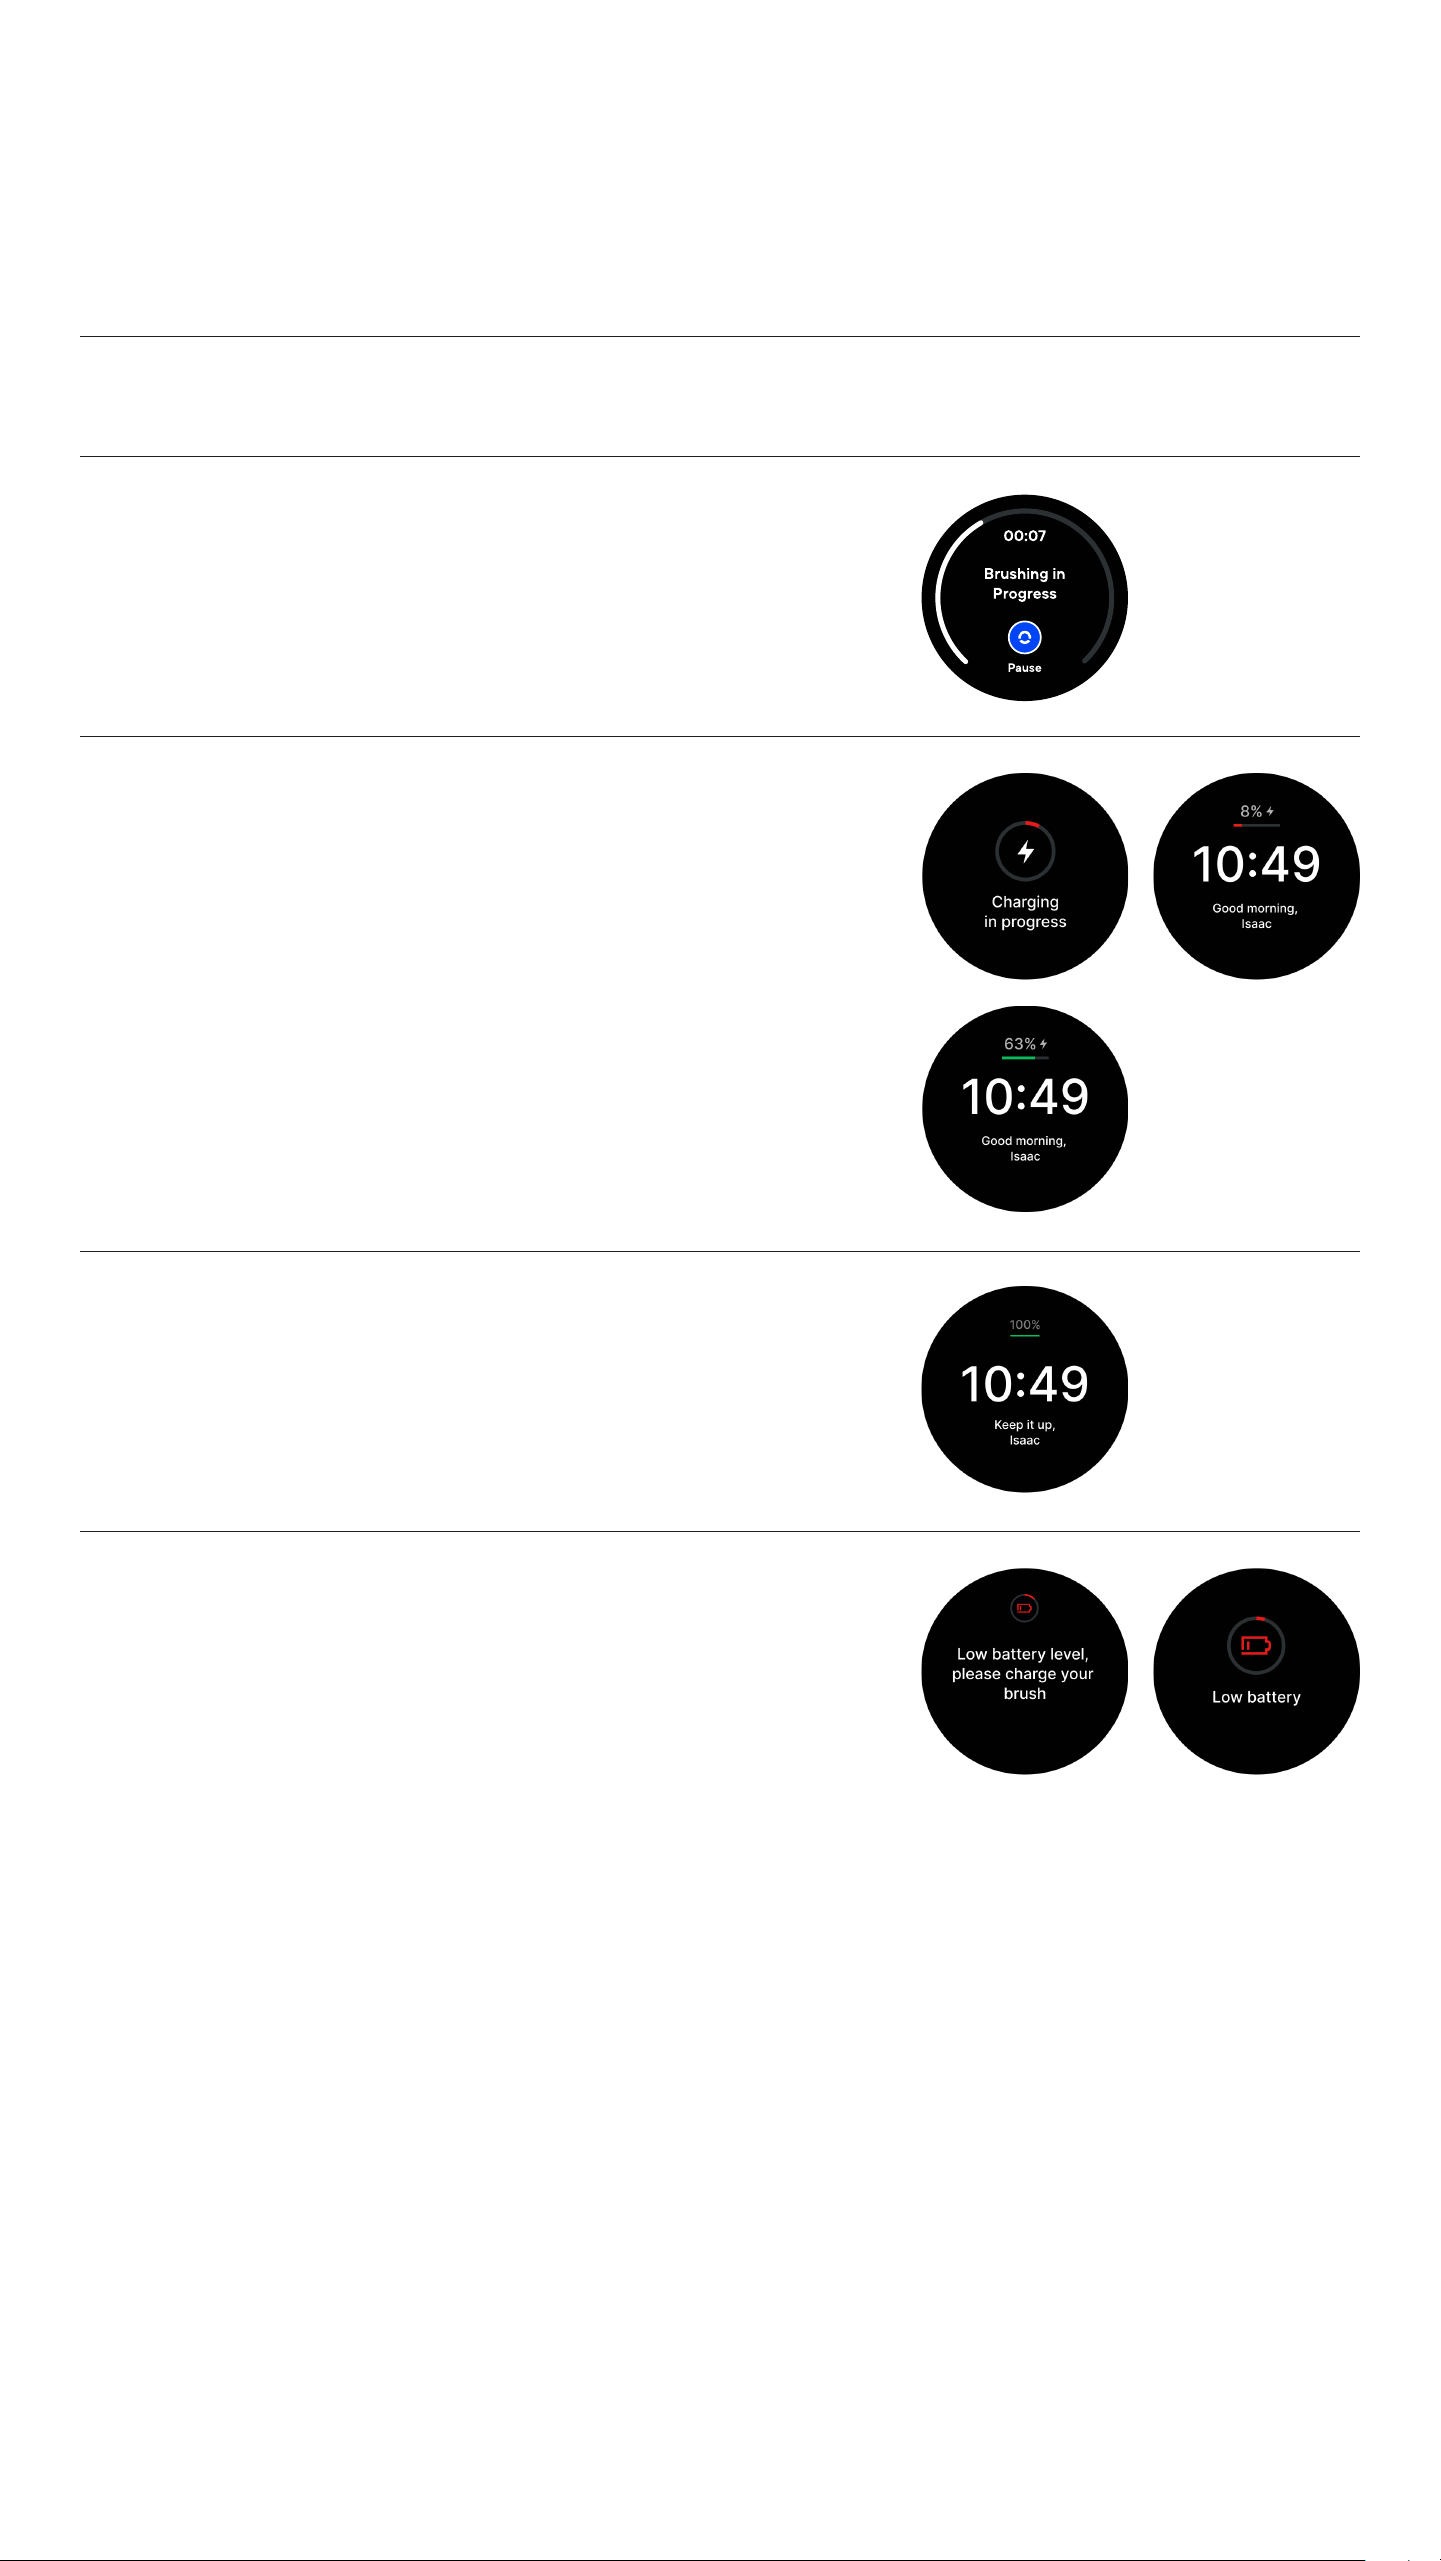
10 Visual Signals
11
Unpack and Check Feno® Smartbrush™
11 Assembling
12 Setting Up Feno® Smartbrush™
16 Charging
18 Regular vs. Foam Toothpaste
19 Brushing
21 Tongue Cleaner
22 Cleaning
24 Scanning
25 Low Battery
25 Recharging
26 TrueFit™ Mouthpiece
27 Maintenance and Storage Safety
27 Service and Repair Safety Information
28 Rebooting and Resetting Your
Feno Smartbrush
29 Software Updates
30 Disposal
31 Warranty - USA
Preface
General Safety Instructions
Feno
®
Smartbrush™
Feno
®
Smartbrush™ in Use
Maintenance
Disposal
Warranty
01
02
07
11
26
30
31
Table of Contents
User Instruction Manual

1User Instruction Manual
IP 64
This user manual (this “User Manual”) is intended
for the user of the Feno® Smartbrush™.
THIS USER MANUAL IS PROVIDED BY:
Feno Labs, Inc.
10395 JEFFERSON BLVD,
CULVER CITY, CA 90232
United States
Feno Labs, Inc. may be referred to herein as “The
Manufacturer”, “we", "us”, or "ours.”)
Preface
Warnings
Warning indicates a hazard with a
considerable level of risk which, if not
avoided, could result in malfunctions,
damage of property and in worst case
personal injury or death.

2User Instruction Manual
General Safety Instructions
READ ALL INSTRUCTIONS IN THIS USER
MANUAL BEFORE USE.
Read this User Manual carefully before you
use Feno® Smartbrush™ and save it for
future reference.
Please follow safety precautions when you use
Feno® Smartbrush™, especially when
children are present.
Important Note for Users With Dental Work
IMPORTANT NOTICE FOR USERS WITH
DENTAL CROWNS
USING THE FENO SMARTBRUSH™ AND
FENO FOAM™ WITH SENSITIVE TEETH
USE WITH BRACES
The Feno Smartbrush may be used with
permanent dental crowns that have been
in place for a minimum of 4 weeks, but only
when using the lowest intensity setting.
Do not use the Smartbrush with temporary
crowns under any circumstances or with
newly placed permanent crowns (less than
4 weeks old). For other dental restorations
The Feno Smartbrush and Feno Foam are
designed to be gentle for users with
sensitive teeth. The Smartbrush features
dierent speed levels letting you control
the cleaning speed, while foam is formulated
without harsh abrasives to provide an
eective yet gentle clean.
The Feno Smartbrush is not currently
recommended for individuals with braces,
as the Mouthpiece is not designed to t
over orthodontic appliances. Once your
such as veneers, please consult your dentist
before use. Feno recommends consulting
with your dentist if you have any concerns
about using the Smartbrush with your spe-
cic dental work. Users assume responsi-
bility when using the Smartbrush with any
dental restorations.
If you experience sensitivity, we recom-
mend starting at the slowest speed and
gradually adjust the speed to your comfort
level. If you have any discomfort, please
consult Feno for personalized advice.
braces are removed, you may begin using
the Smartbrush and start your Feno oral
care journey.

3User Instruction Manual
Safety Warnings
RISK OF ELECTRIC SHOCK
TO REDUCE THE RISK OF BURNS,
ELECTROCUTION, FIRE, OR INJURY TO PERSONS:
Do not place or store the Hub™, Smarthan-
dle™, or Feno® Smartbrush™ where it can
fall or be pulled into water
or other liquid.
Do not reach for the Hub™ if it has fall-
en into water or other liquid. If the
Hub™ or Smarthandle™ falls into water
or other liquid, unplug it immediately.
Do not use the Feno® Smartbrush™ while
• Use with improper voltage will damage
the products and VOID any warranty.
• If products are opened/disassembled for
ANY reason, any warranty is VOID.
• Do not use this product if it has a dam-
aged cord or plug, if it is not working
properly, if it has been dropped or dam-
aged, or dropped into water. Contact
Feno® customer service at
support@feno.co
• Do attempt to use any Feno® products
under the tongue, in the ear, nose or
other delicate areas. The Feno® products
are capable of causing serious damage in
these areas.
• Use this product only as indicated in
these instructions or as recommended by
your dental professional.
• Only use tips and accessories recom-
mended by Feno® Labs, Inc.
• Do not drop or insert any foreign object
into any opening.
• Do not use Feno® products outdoors or
operate where aerosol (spray) products
are being used or where oxygen is being
administered.
• Remove any oral jewelry prior to use of
the Feno® Smartbrush™.
• Do not use any Feno® products if you
have an open wound on your tongue or
in your mouth.
• If your physician or cardiologist has ad-
vised you to receive antibiotic premed-
ication before dental procedures, you
should consult your dentist and/or med-
bathing. Unplug the Hub™ before cleaning
and assure that it is dry before plugging it
into an electrical outlet.
Never use a damaged Hub™ that has a dam-
aged Power Cable. Please visit feno.co for
replacement.
ical professional before using the Feno®
products or any other oral hygiene aid.
• If you have a pacemaker or other im-
planted device containing magnets or
electronics, contact your physician or the
device manufacturer prior to using the
Feno® Smartbrush™.
• Do not use the Feno® Smartbrush™ for
more than 1 minute total for each day.
• This product does not contain any
user-serviceable parts in the Feno®
Smartbrush™ or Hub™. Do not attempt to
open either component.
• Using toothpastes containing peroxide
may damage the plastic housing of the
Feno® Smartbrush or Hub™.
• Using abrasive or chemical cleaners may
damage the plastic housing of
the Feno®
Smartbrush™ or Hub™.
• Close supervision is necessary when this
product is used by, on, or near children
or individuals with disabilities.
• Children should be supervised to ensure
that they do not play with the products.
• If you are undergoing treatment for any
oral care condition, consult your dental
professional prior to use.
• This Smartbrush™ is a personal care
product and is not intended for use on
multiple patients in a dental practice or
institution. For hygienic reasons, we rec-
ommend the use of an individual Smar-
thandle™ and TrueFit™ Mouthpiece for
each family member.

4User Instruction Manual
POWER CABLE
INSTALLATION SAFETY INFORMATION
For safety reasons, only use the supplied
Power Cable and Power Adapter provided
with the Feno® Smartbrush™.
Using another Power Cable may
damage Feno® Smartbrush™, Hub™, or
Smarthandle™ and may short circuit or other
damage to property or personal injury. Do
not plug the Power Cable into a power plug
or power outlet which is not designed for
use with the Feno® Smartbrush™.
Check the Feno® Smartbrush™ for any dam-
age before use. If there is any visible damage,
strong odor, or overheating of components,
unplug all connections immediately and stop
using the Feno® Smartbrush™.
Do not use the Power Cable provided with
the Feno® Smartbrush™ with other prod-
ucts.
Keep the unused Power Cable in a dry, el-
evated, or locked location away from chil-
dren. Finally, never touch the Power Cable
with wet hands.
Check the Power Cable for damage before
the rst use and during the life of the Hub™.
CAUTION! Only use the Power Cable in a
suitable, properly installed (by an authorized
electrician) and easily accessible power
outlet compatible with the Power Cable pro-
vided by Feno®. Make sure that the Power
Cable can always be disconnected from the
power outlet.
TO AVOID TRUEFIT™ MOUTHPIECE HEAD BREAKAGE, WHICH
MAY GENERATE SMALL PARTS CHOKING HAZARD OR DEATH:
• Prior to each use, ensure the True-
Fit™ Mouthpiece ts well. Discontinue
use of the Smartbrush if Mouthpiece
no longer ts properly. Never use the
Feno® Smartbrush without the TrueFit™
Mouthpiece.
• If the Smarthandle™ is dropped, the
TrueFit™ Mouthpiece should be re-
placed before the next use even if no
damage is visible.
• Replace the TrueFit™ Mouthpiece ev-
ery 3 months or sooner if the TrueFit™
Mouthpiece becomes worn.
• Clean the TrueFit™ Mouthpiece proper-
ly after each use (see Cleaning section
on page 21). Proper cleaning ensures the
safe use and functional life of the Feno®
Smartbrush™.
INSTALLATION SAFETY INFORMATION
Do not plug the Power Cable into an elec-
trical outlet with a higher voltage than the
specication in this User Manual (see the
“Technical Data” below) and please note
that voltage converters DO NOT guarantee
voltage compatibility.
Do not force the Power Cable into an
electrical outlet, which is not designed for
use with the Feno® Smartbrush™.
Keep the Power Cable away from heated
surfaces.
Protect the Power Cable from being strained,
pinched, or buckled and placed in a way
to prevent people from stumbling over
the Power Cable. Particularly, ensure that
damage is avoided at the two ends of the
Power Cable and the point where the Power
Cable exits from the Hub™.

5User Instruction Manual
TEMPERATURE
Do not expose the Feno® Smartbrush™ to
temperatures above 40°C / 104°F and be-
low 10°C / 50°F.
Children below the age of 18 should not use
the Feno® Smartbrush™.
Do not leave children unattended with the
Feno® Smartbrush™ packaging material,
as the packaging material may cause
suocation or other harm if swallowed.
For all users:
Please use the Feno® Smartbrush™ with
care and consideration. Do not use the
Feno® Smartbrush™ or other electrical
equipment provided with the Feno®
Smartbrush™ if you lack concentration or
awareness or if you are impaired by alcohol
or drugs (including recreational drugs and
drugs prescribed by physicians).
For institutions (dentists and other dental
oces, clinics, etc.):
The Feno® Smartbrush™ is a personal care
product and is not intended for use on multi-
ple patients.
For individuals with disabilities:
Please consult your dental professional
before use of the Feno®.

6User Instruction Manual
Safety Instructions
Carefully read all safety instructions and
information in this User Manual before using
the Feno® Smartbrush™.
To avoid re, explosions, electric shocks or
other hazards that may result in damage
to property and/or severe or fatal personal
injuries:
• Do not use the Feno® Smartbrush™
while bathing and/or showering.
• Do not place or store the Feno® Smart-
brush™ where it can fall or be pulled
into a tub, sink, or shower.
• Do not place or drop the Feno® Smart-
brush™ into water or other liquids.
• Prevent unintentional starting.
• Disconnect the power supply from
the Feno® Smartbrush™ before
making any adjustments, changing
accessories, or storing the Feno®
Smartbrush™. Such preventive safety
measures reduce the risk of starting
the Feno® Smartbrush™ accidentally.
•
It is very important that you read and un-
derstand this User Manual before using the
Feno® Smartbrush™.
Please keep this User Manual for future
reference and provide it to any subsequent
user of the the Feno® Smartbrush™.
LEGAL NOTICE AND WAIVER
CHANGES TO THE USER MANUAL
The Manufacturer is not liable for cases
of damage to property or personal injury
caused by incorrect use of the Feno®
Smartbrush™ or other non-compliance with
this User Manual and other instructions
provided by the manufacturer, including the
Quick Start Guide.
Please read the User Manual before using
the Feno® Smartbrush™. The latest version
of the User Manual and other product
documentation are available at feno.co/
smartbrush-getting-started
This applies both to use and charging of
the Feno® Smartbrush™ and any disposal
of electrical equipment provided by the
Manufacturer.
Incorrect use of the Feno® Smartbrush™ and
non-compliance with the User Manual and/
or the Quick Start
Guide will also void any
warranties provided
by the Manufacturer.
Any changes to this User Manual will be
included in the updated version of this User
Manual available at
feno.co/smartbrush-getting-started.
Note: You can also submit comments and
feedback on the same website. We would
greatly appreciate it.

7User Instruction Manual
Smarthandle™
Truet™️ Mouthpiece
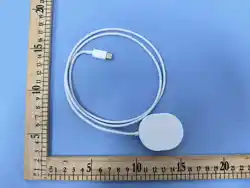
Snap Charger
Power Cable
Tongue Cleaner
Feno Foam™ Toothpaste
To use the Feno® Smartbrush™,
you need these components and
accessories:
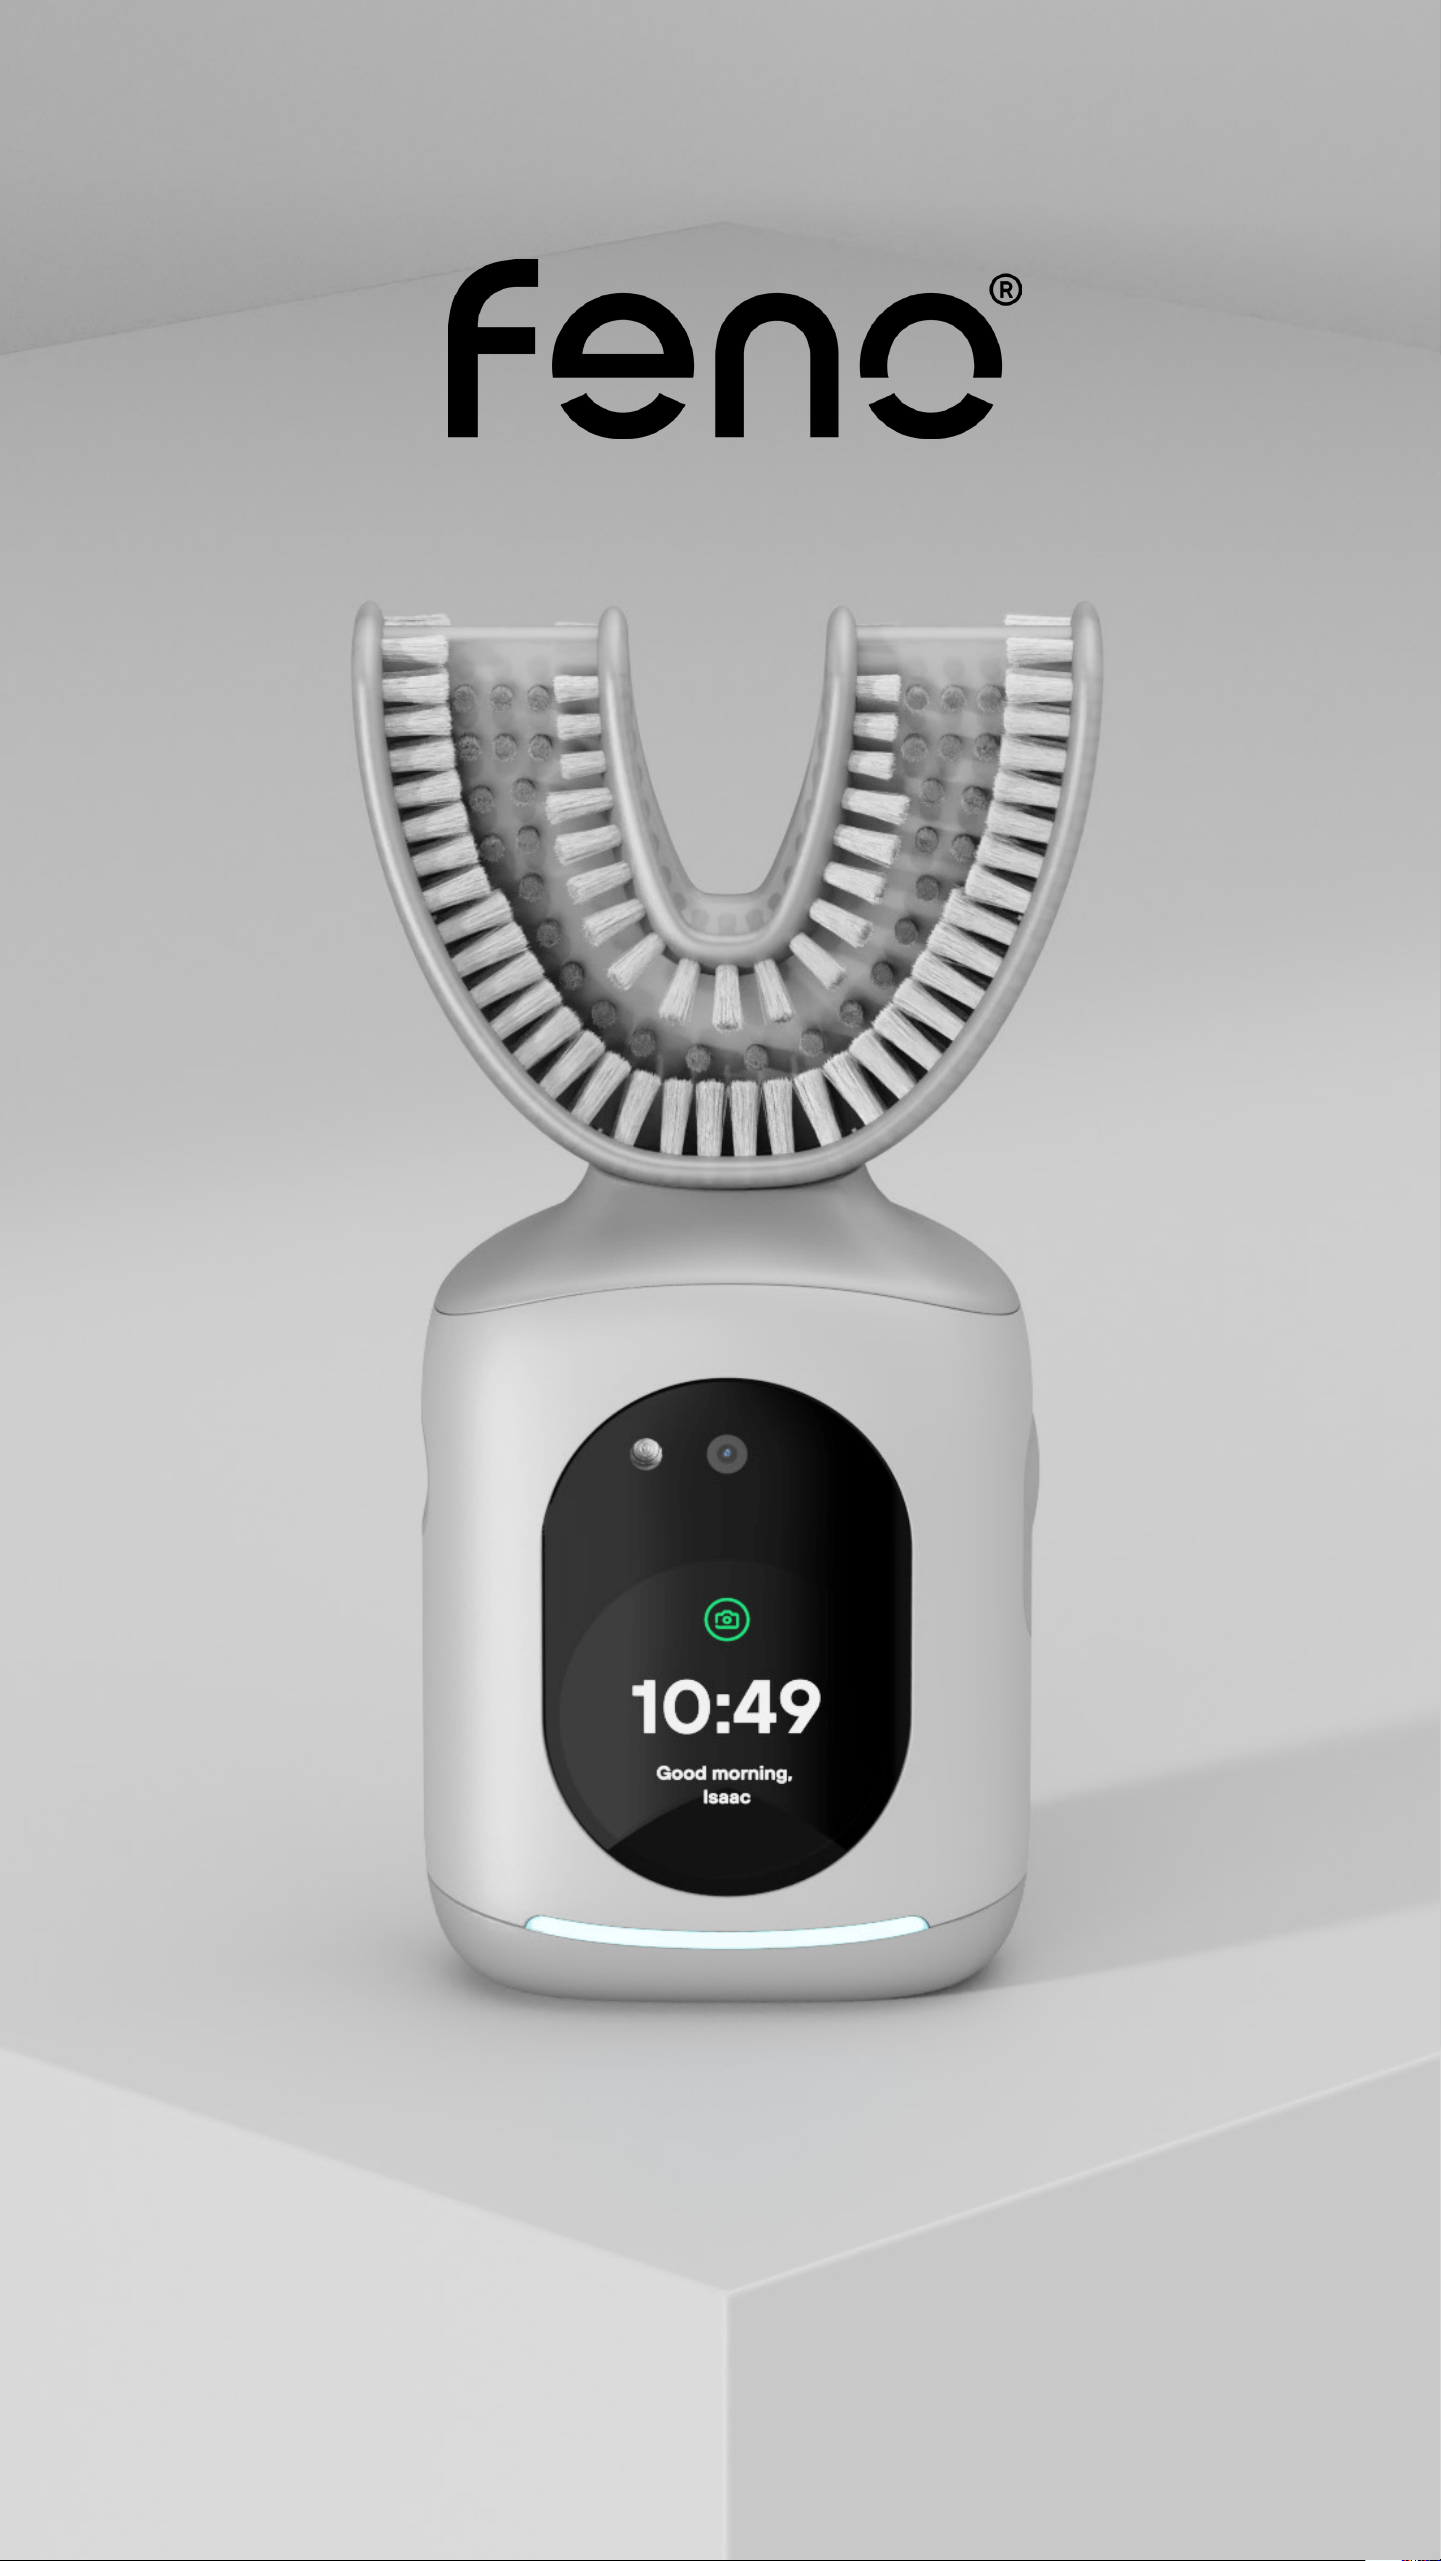
The Smarthandle™ houses a suite of revolutionary at-home
oral care
tech: An embedded high denition scanner
captures
dental imaging for analysis on the Feno® app; the
proprietary
ArcFlow Tech™ propels the TrueFit™ Mouth-
piece’s gentle yet powerful motion to massage the
gum-
line and clean teeth; and the Smarthandle’s
display shares
time, weather, and brushing details.
Feno’s TrueFit™ Mouthpiece features 18,000 ultra-soft
nylon bristles fused to a semi-pliable plate that adapts
to your unique dental arch. For the best clean, replace your
TrueFit™ Mouthpiece every three months.
TheSnap Chargeris a compact, travel-ready charger de-
signed specically for the Feno Smartbrush, clipping se-
curely onto the back of the Smarthandle for easy, ecient
charging. Built to t seamlessly into your routine, it’s light-
weight and portable—perfect for travel or simply reducing
clutter at home. The Snap Charger ensures your Smart-
brush is always powered up, so you never miss a step in
your oral care routine, no matter where life takes you. Just
snap it on to charge and enjoy uninterrupted support for
your personalized oral health journey.
The Power Cable charges the Hub™ for the Feno®
Smartbrush™. To charge the Hub™, connect the Pow-
er Cable to the Hub™ and the included Feno® Power
Adapter.
This minimalist stainless steel Feno® Tongue Cleaner
is expertly designed to gently and eciently remove
the buildup of bacteria and debris that can lead to bad
breath. A simple yet eective solution for tongue clean-
ing at home and on the go.
Our foaming Feno Foam™ Toothpaste easily reaches
tight spaces between teeth, supports enamel with xyli-
tol, and refreshes naturally.
ACCESSORY DESCRIPTION
Feno
®
Smartbrush™
Complete System

8User Instruction Manual
Technical Data
General Information
Smarthandle™
TrueFit™ Mouthpiece
Operating voltage: 5V
Operating wattage: MAX 5W
PARAMETER
PARAMETER
PARAMETER
VALUE
VALUE
VALUE
Technical Life Span*
Operating Temperature Range
Relative Humidity**
Maximum radio-frequency power
transmitted in the frequency band(s) in
which the radio equipment operates
IP Rating Headpiece
Weight
Charging Mechanism
Battery
Typical Charging Duration*
Standby Time
Standby Time (deep sleep)
Usage Time
Frequency Band
Dimensions
Weight
7 YEARS
-5-45°C (23-113°F)
10-90%
3W
IP 64
140g
Induction charging
103040 [1200mAh]
4 hours
8 hours
600 hours
20 second duration [90 times], total 1800
seconds or 30 minutes
110KHz-200KHz
78 x 75 x 36MM (±10MM depending on
Mouthpiece size)
30g-40g

9User Instruction Manual
The Hub™
Power Cable
PARAMETER
PARAMETER
VALUE
VALUE
Input Power
Wireless Charging
Power
Dimensions
Weight
Input Power
Output Power
Dimensions
Weight
5V/1.0A
110KHz-200KHz
5W
90x 67x 165MM
207g
AC 100-240V-50/60HZ 0.35A
5V/2A
57.5x 31x 22MM
31g
* The Technical Data above is based on use
at ordinary room temperature (approx. 20
degrees Celsius/70 degrees Fahrenheit)
and on use of the components and acces-
sories provided by the Manufacturer with
the Feno® Smartbrush™ only.
** Sustained higher humidity can harm the
durability of the Feno® Smartbrush™.
*Note: This item is currently on backorder.
Please check your conrmation email to
verify if it’s included in your package.
Furthermore, please note that this Power
Cable is designed to operate within 5 volts.
Voltage converters DO NOT guarantee
voltage compatibility.
Any use or charging of the Feno®
Smartbrush™ not approved by this User
Manual could result in personal injury or
property damage and will void the warranty.
10User Instruction Manual
Brushing
Charging
Fully Charged
Critical Battery Alert
The Feno® Smartbrush™
is running. Brushing
mode activated. Lasts for
20 seconds.
The Feno® Smartbrush™
is charging.
The
Feno® Smartbrush™
is fully charged.
The Feno® Smartbrush™
needs power.
Visual Signals
NAME +
LED INDICATION
MEANING PRODUCT SCREENS
11User Instruction Manual
Unpack and Check The Feno
®
Smartbrush™
Assembling
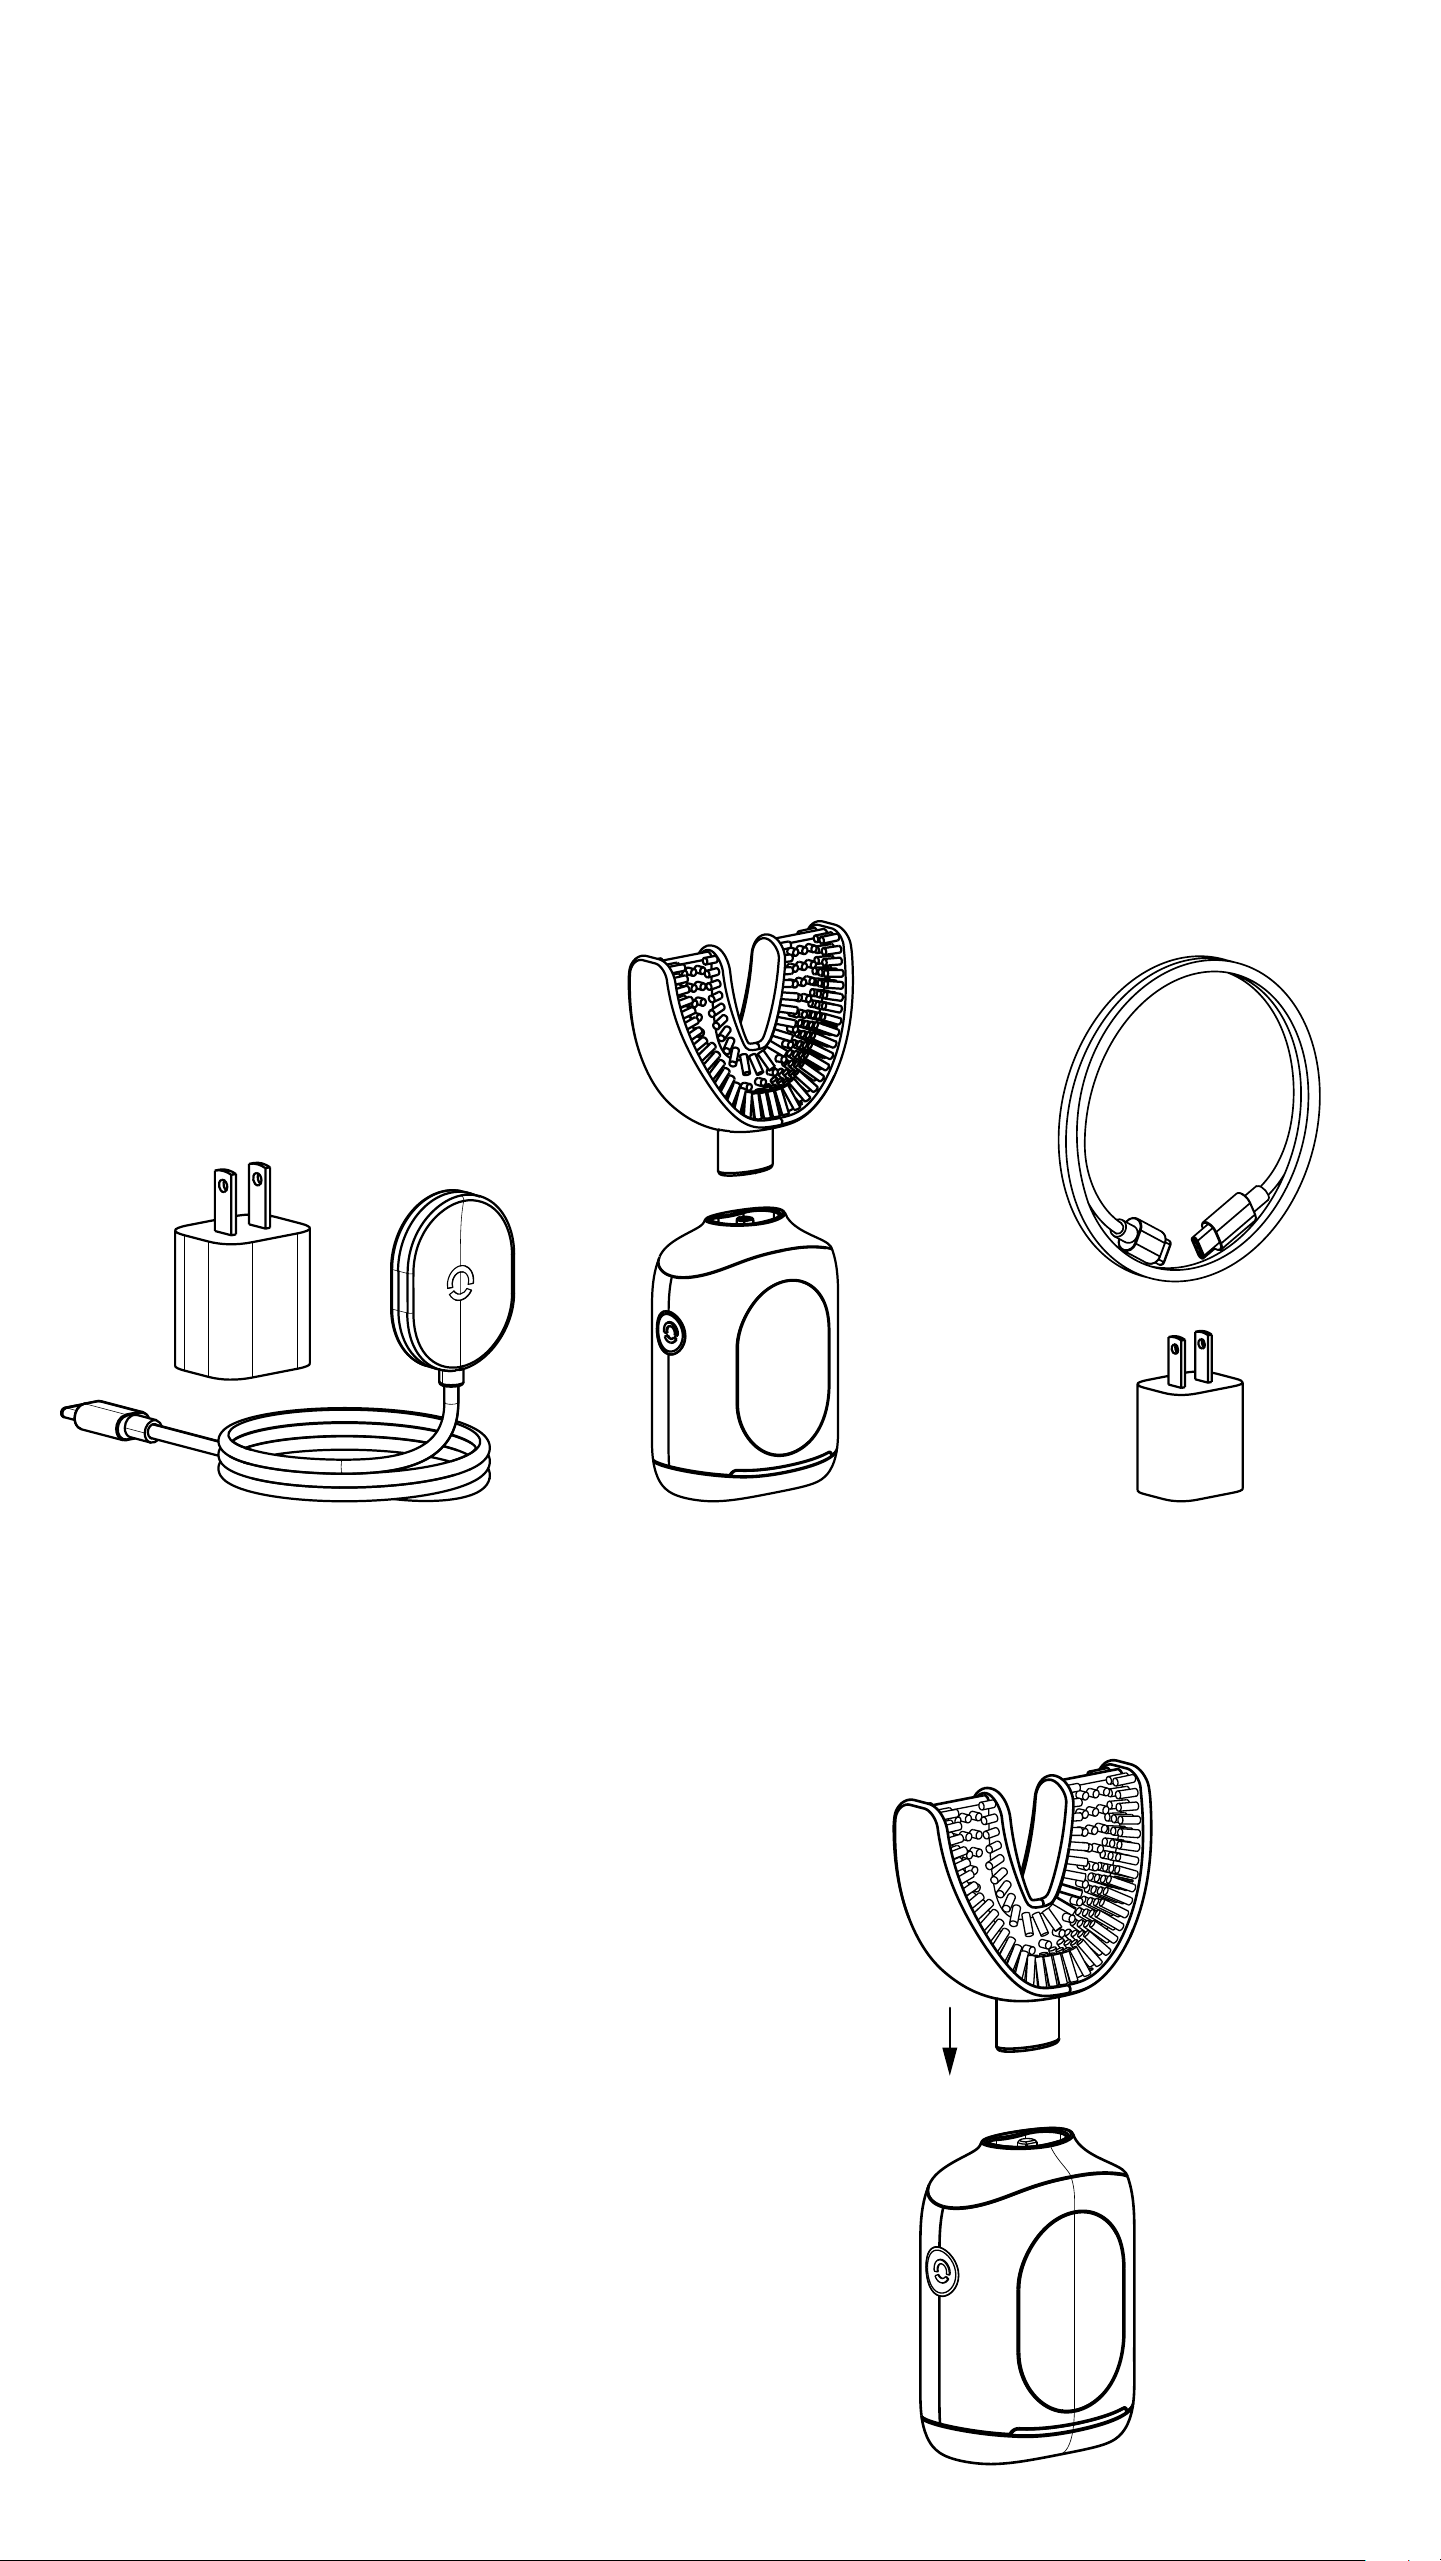
Unpack the Feno® Smartbrush™ and dispose
of the packaging material in a proper way. See
section DISPOSAL for more information.
Please make sure that the packaging
contains the following*:
Assemble the Feno® Smartbrush™ by attaching
the TrueFit™ Mouthpiece to the connector pin
on the Smarthandle™. Push until you hear a soft
"click" indicating the TrueFit™ Mouthpiece
is securely attached.
SMARTHANDLE™ +
TRUEFIT™ MOUTHPIECE
THE SNAP CHARGER POWER CABLE AND
POWER ADAPTER
Feno
®
Smartbrush™ in Use
12User Instruction Manual
Setting Up the Feno
®
Smartbrush™
This guide will walk you through what you
can expect to see on the Feno® Smart-
brush™ screen as soon as you turn on your
device for the rst time.
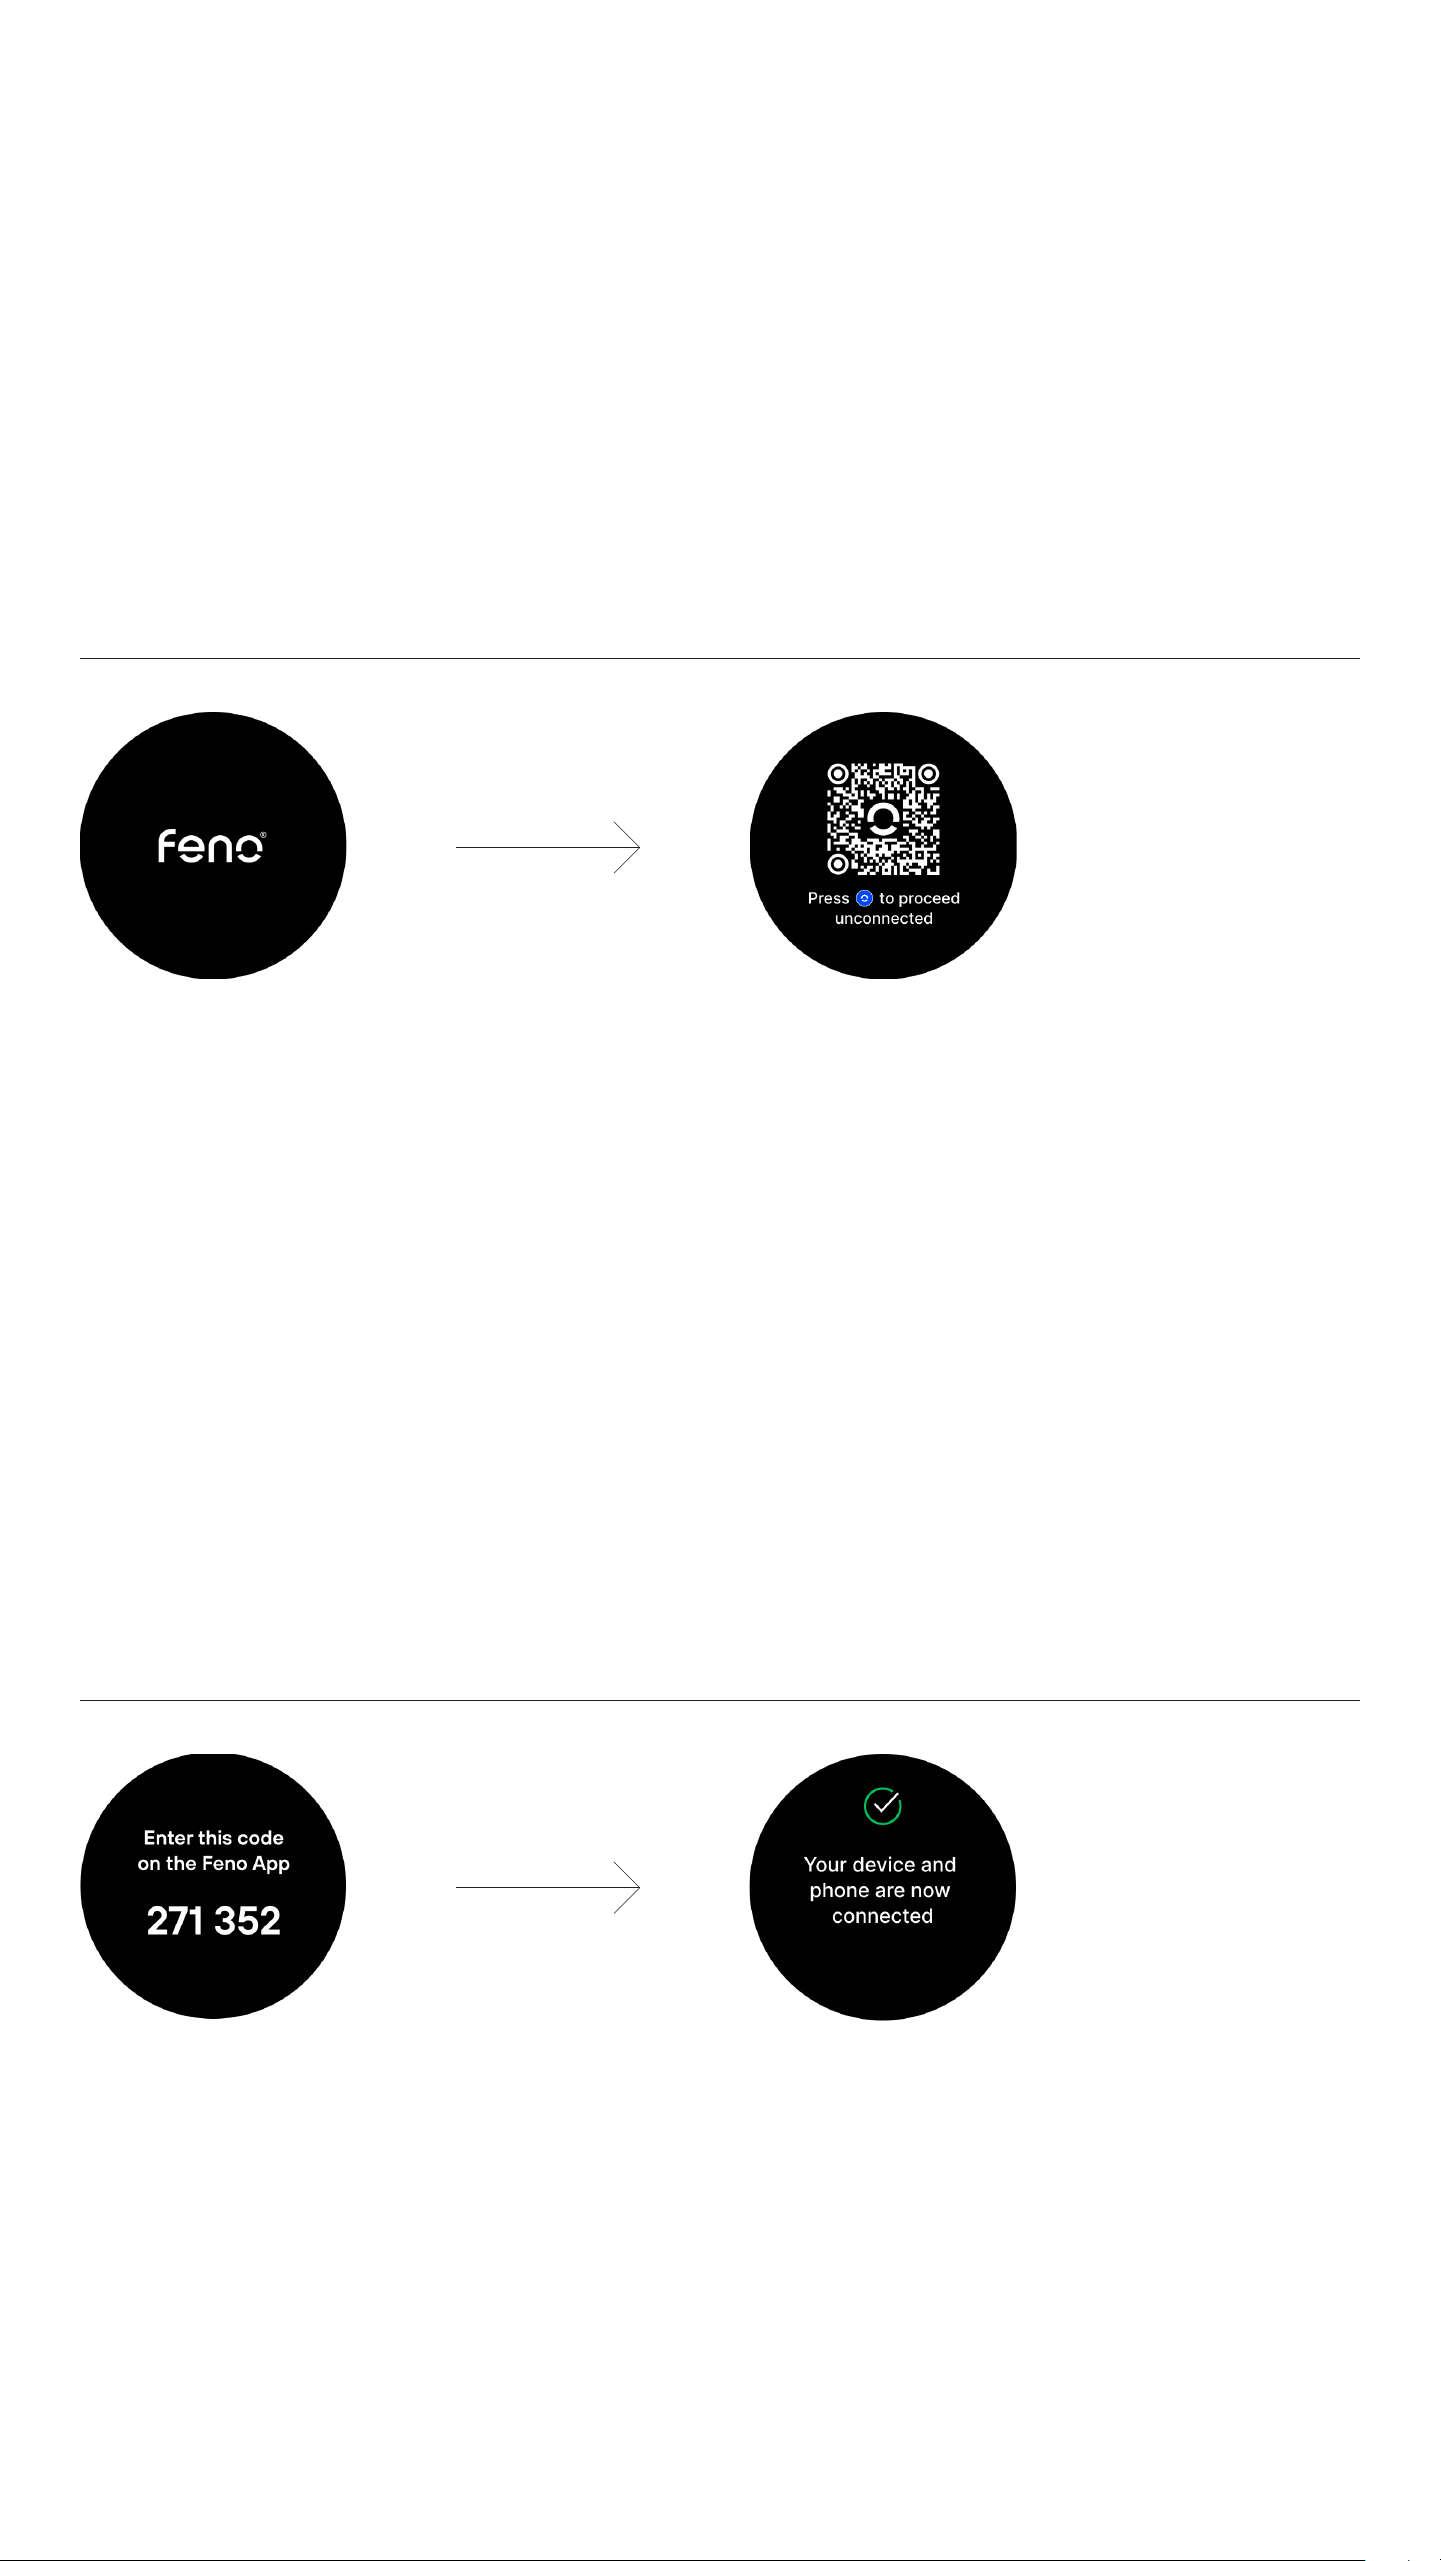
When you rst power on your Feno
Smartbrush or after a restart, the device
will greet you with the Feno logo. After
approximately three seconds, the screen
will prompt you to download the Feno app.
Upon turning on your device, you will be
greeted by a welcome screen. This screen
will display the Feno® logo.
You will then be presented with a QR code
to download the app. You can choose
to scan the QR code to connect your
Smartbrush to the Feno app, or you may opt
to use the device without app connectivity.
To proceed, press the upper button on the
side of the device.
WELCOME SCREENS
Once you've downloaded the app, follow
the setup steps in-app until a unique
code appears on your Smartbrush; enter
CONNECTING TO THE APP
this code into the app to connect your
Smartbrush. Upon successful entry, your
Smartbrush will be connected to the app.
13User Instruction Manual
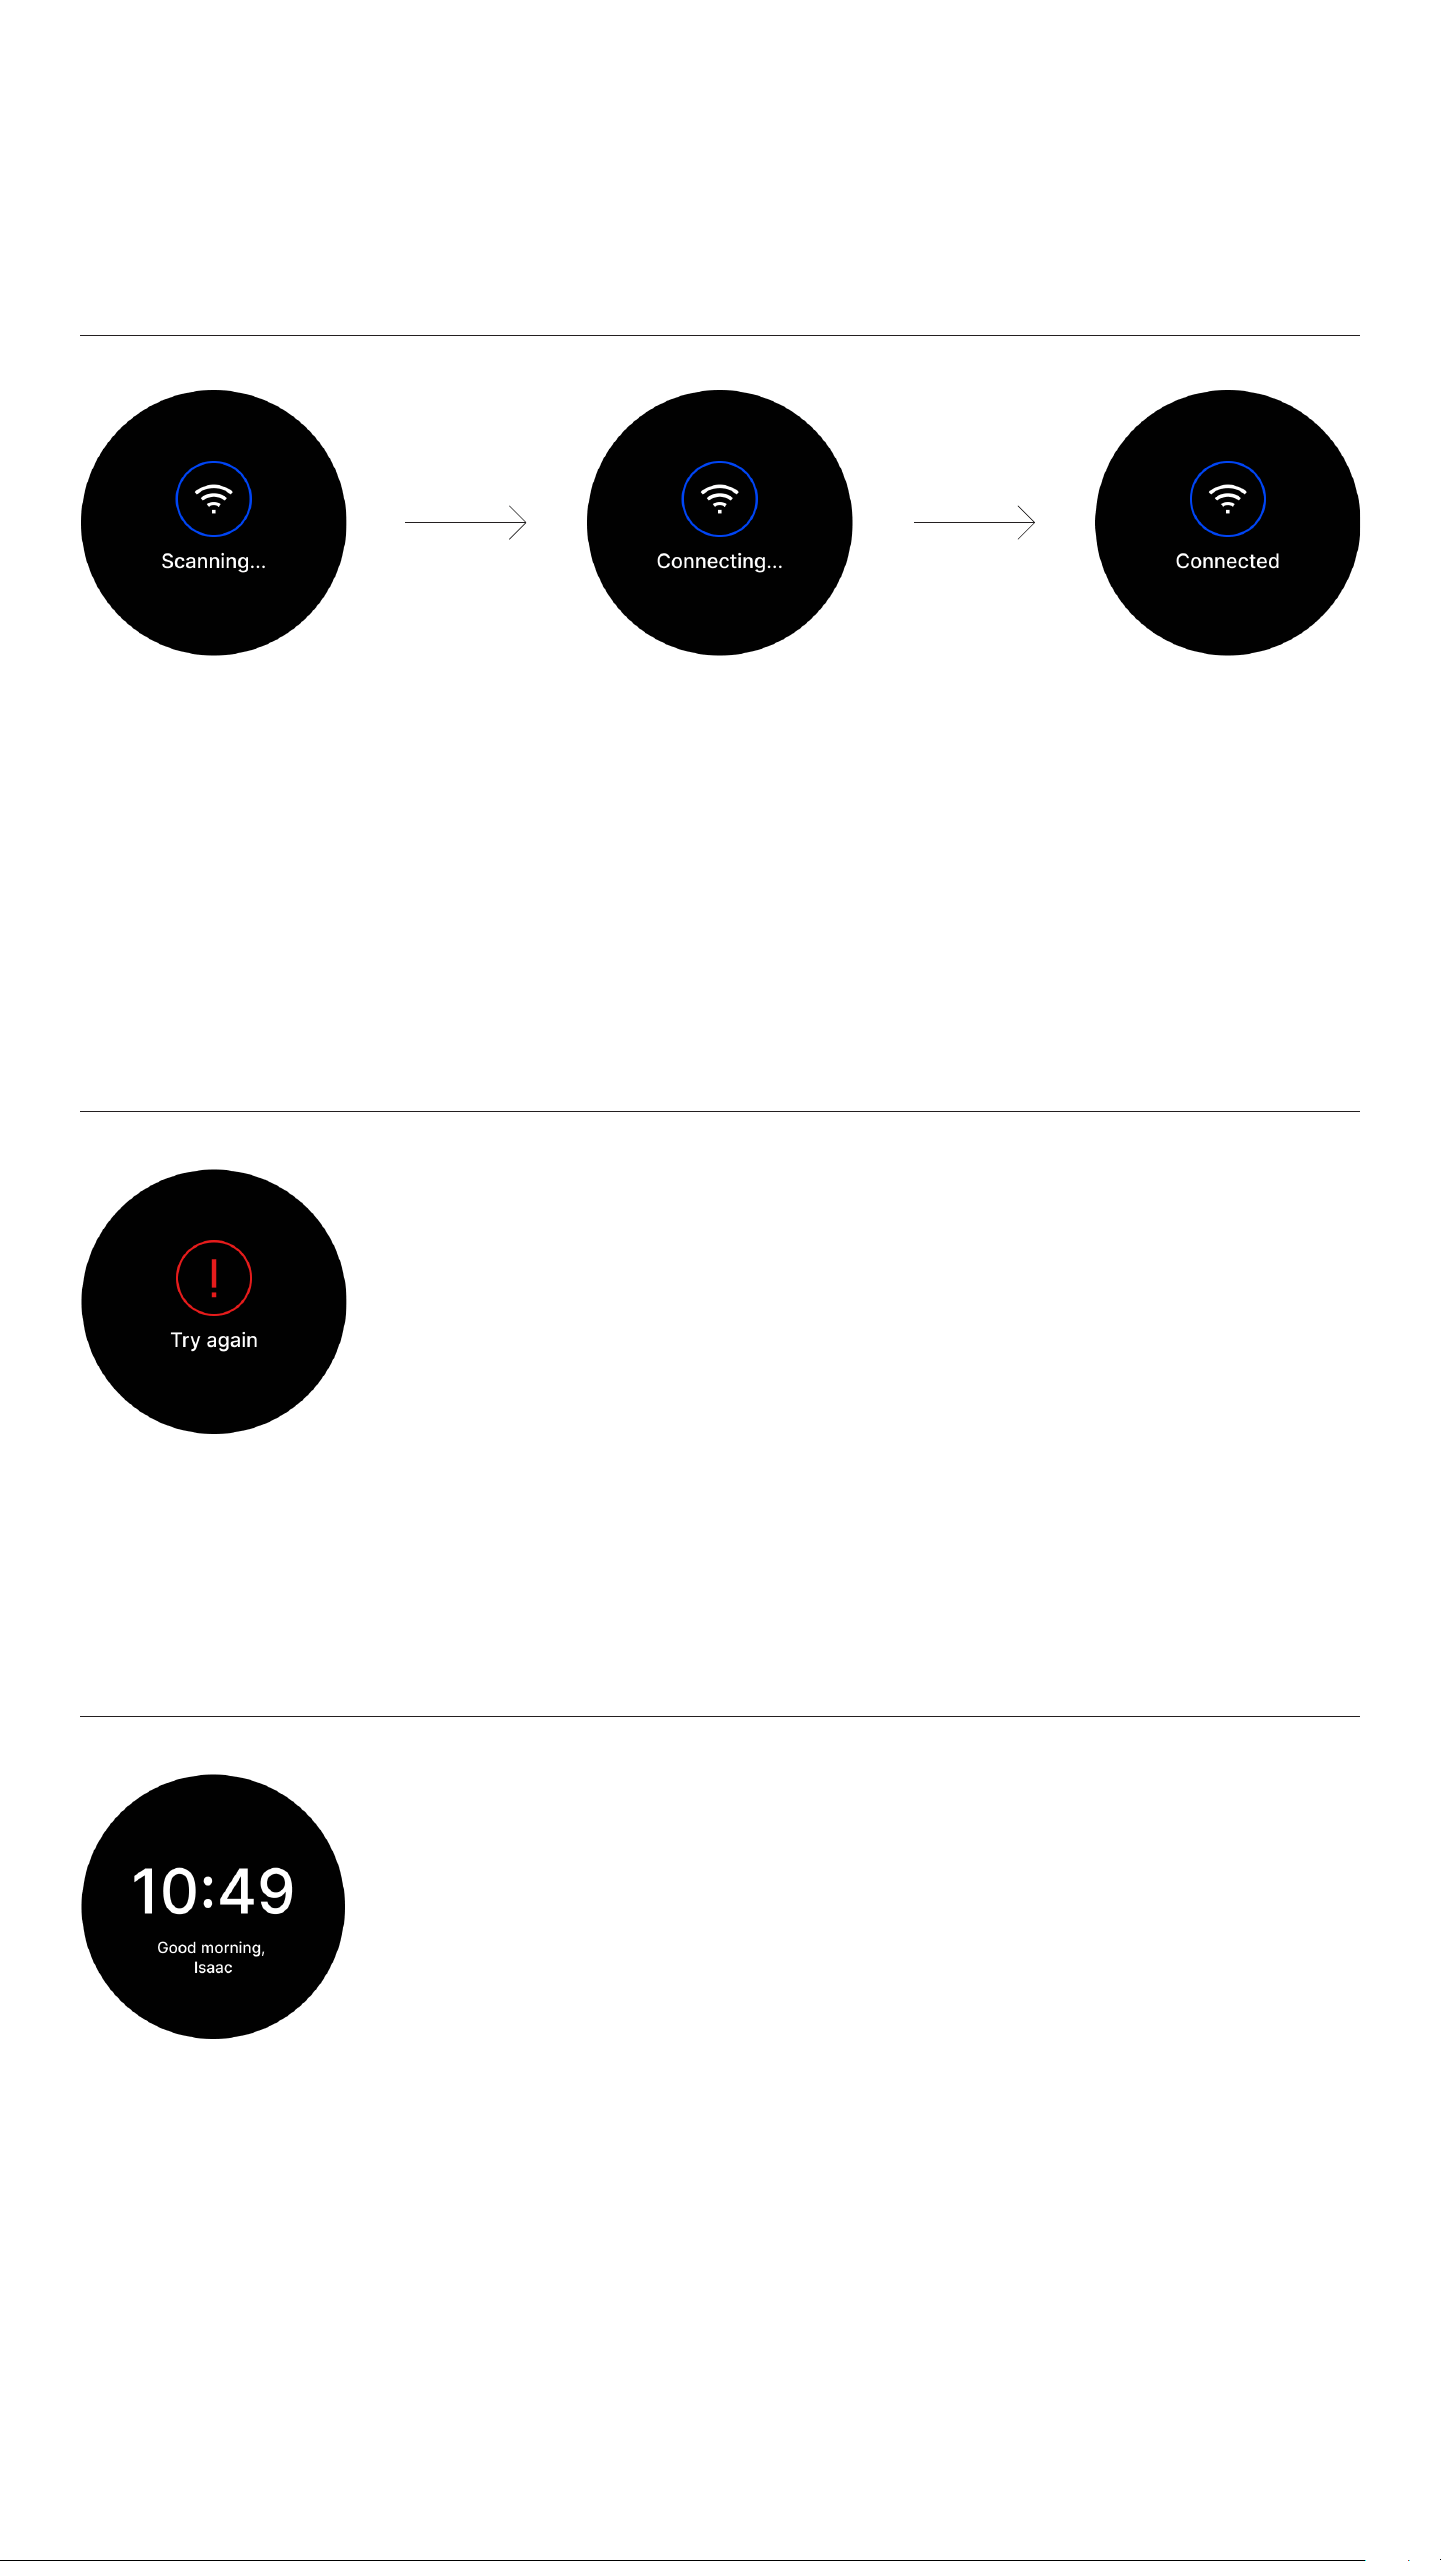
To connect your Smartbrush to Wi-Fi,
navigate to the Wi-Fi list within the Feno
App, select your desired network, and
CONNECTING TO THE WIFI
enter the password; once the connection
is successful, your Smartbrush will be
connected to the Wi-Fi.
During the Wi-Fi connection process, you may be
prompted to try again. If this happens, ensure that
you have entered the correct Wi-Fi network and
password, and verify that your mobile device is also
connected to a Wi-Fi network. Moving closer to the
router can improve connectivity. If the issue persists,
please contact support.
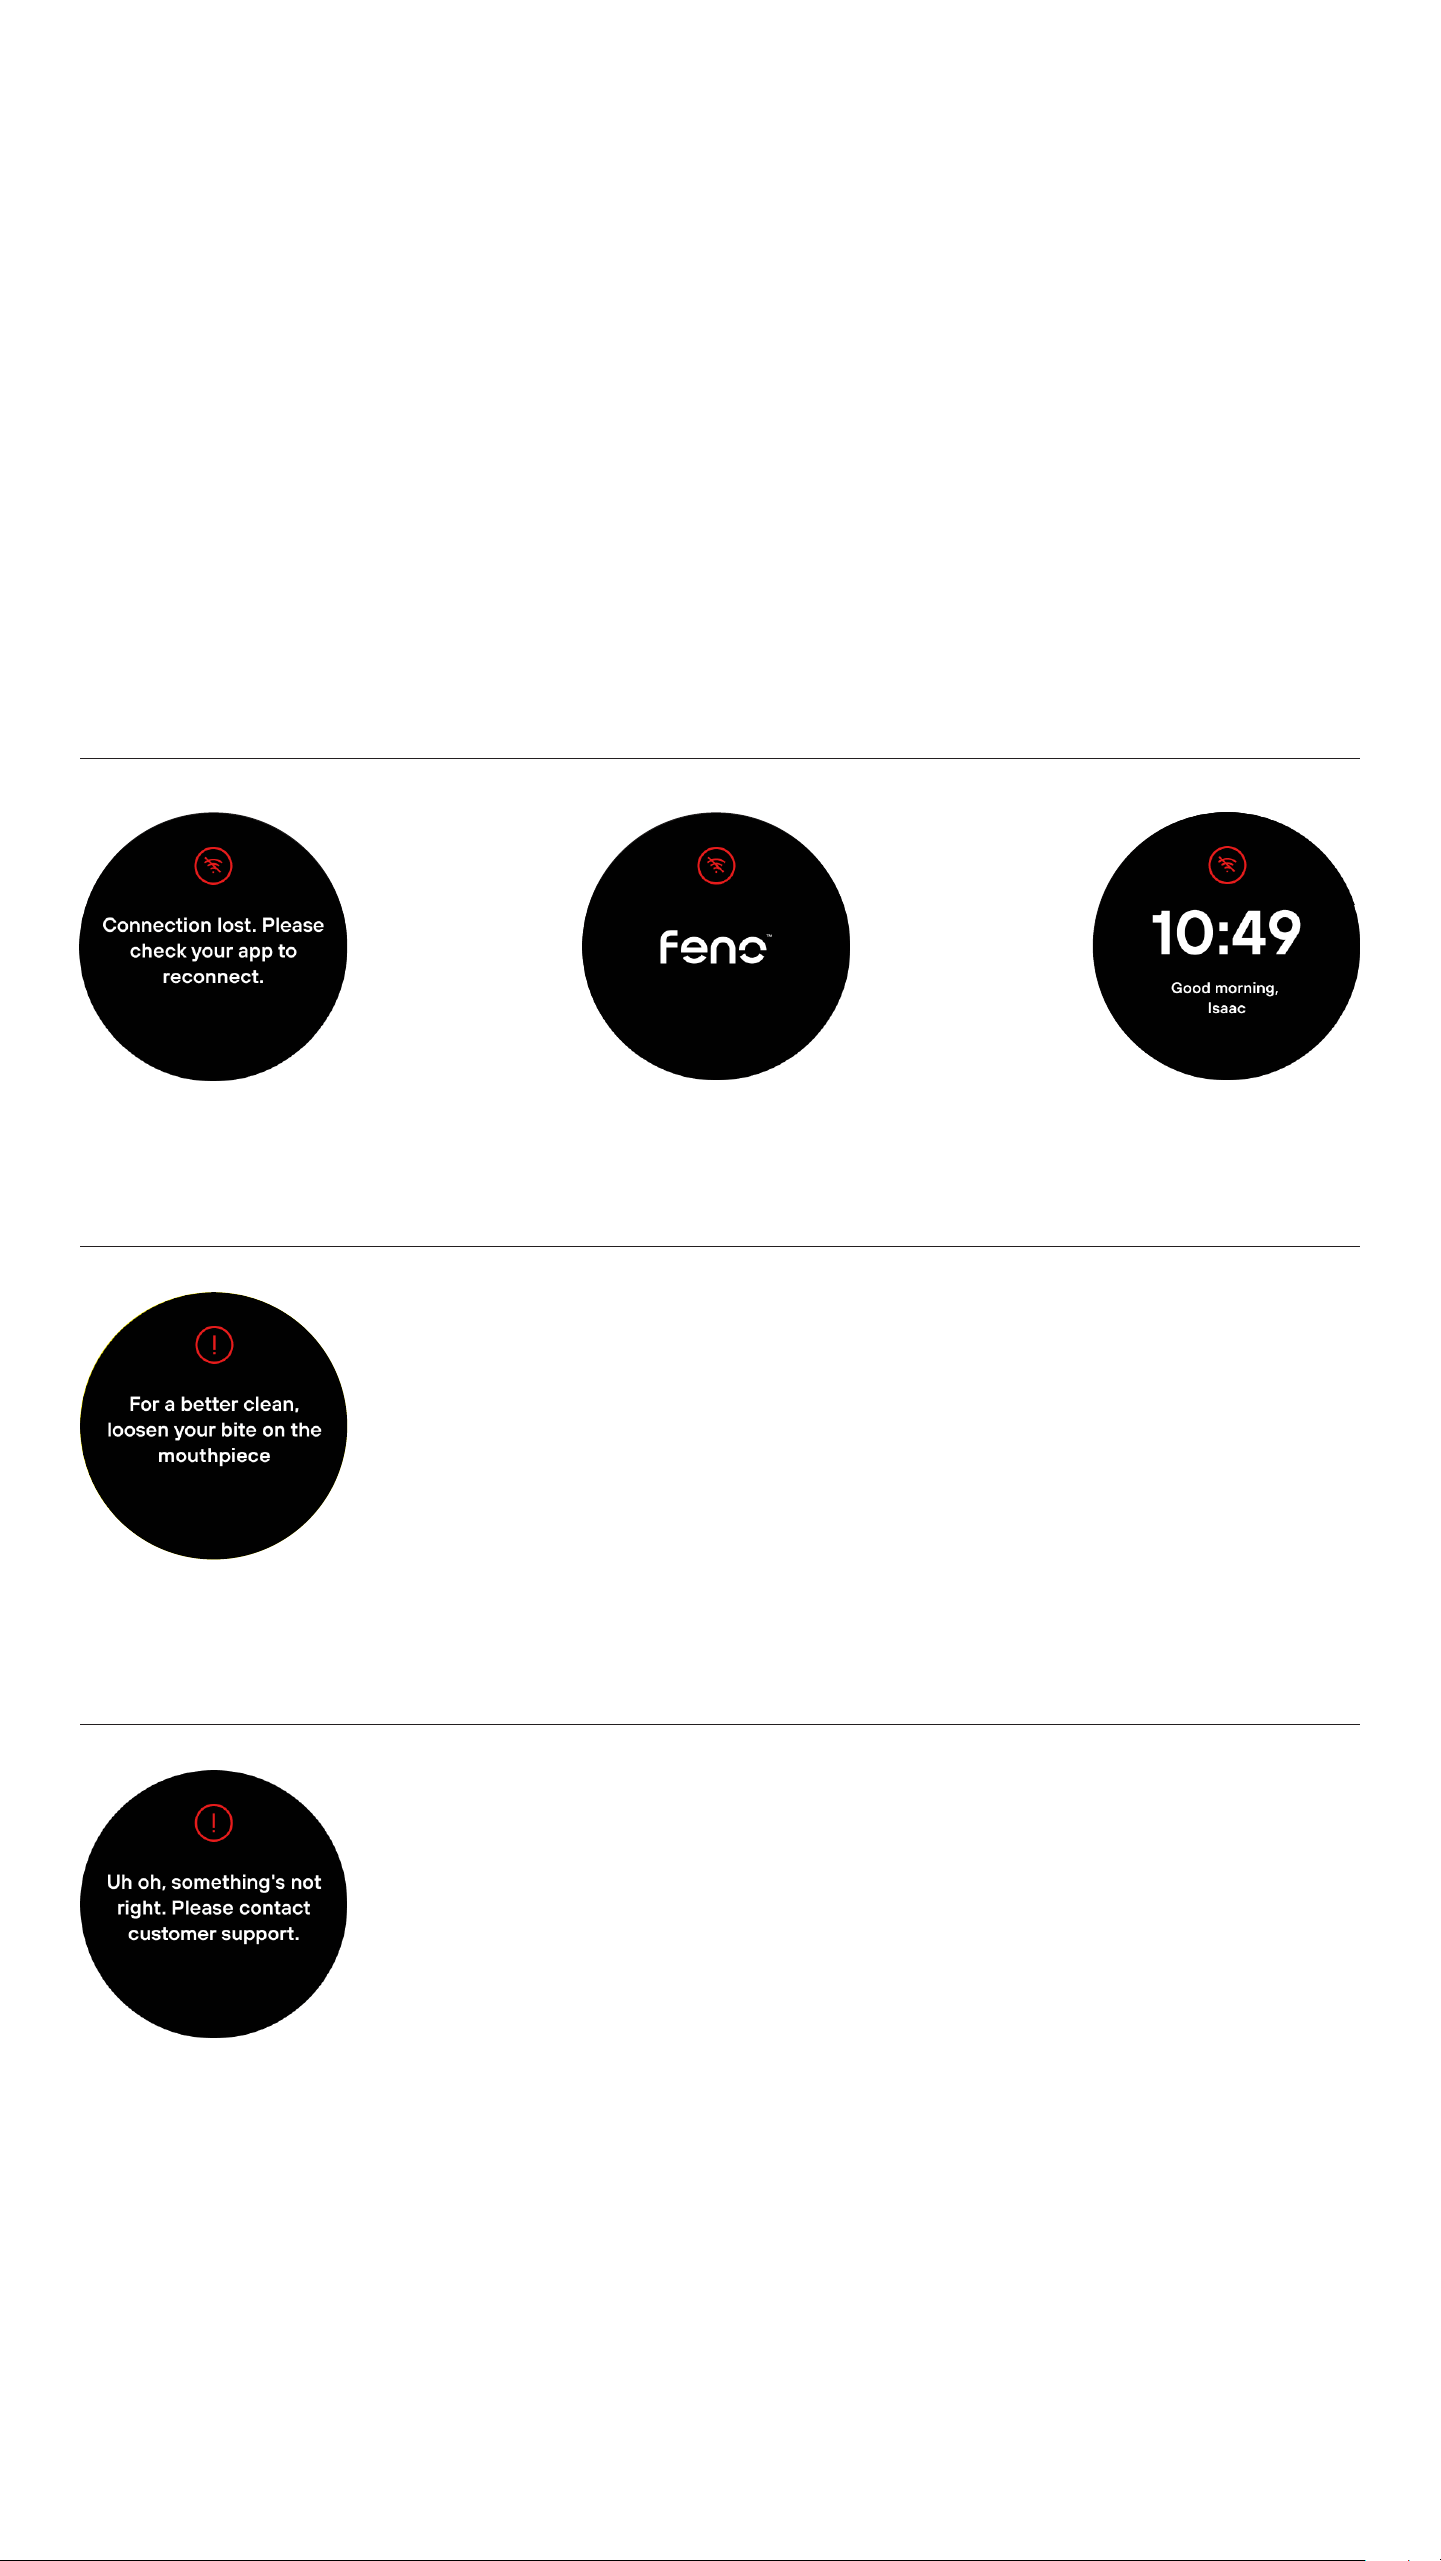
Once you’re set up and connected to your mobile
device. This is how the screen will look like on idle.
This is your homescreen.
It should show the time in your timezone as well as a
greeting with your name.
WIFI CONNECTION FAILED
HOMESCREEN
14User Instruction Manual
Error Messaging
The error message shown on screens below
states that the Feno® Smartbrush™ is not
connected to Wi-Fi or the Feno® App. If you
wish to connect, kindly follow the steps on
how to connect to a Wi-Fi.
ERROR INDICATION SCREENS
Your Smartbrush™ can detect how hard you're putting
pressure on the TrueFit™ Mouthpiece. When brushing,
you might notice that the Feno® Smartbrush™ has
stopped on its own and it showed this prompt. Kindly
follow the instructions as shown on screen and
continue brushing as normal.
Please contact customer support when the screen has
popped up with this error message. You can reach out via
email with your concern at [email protected].
EXCESSIVE BITE PRESSURE
CUSTOMER SUPPORT
15User Instruction Manual
Charging the Feno
®
Smartbrush™
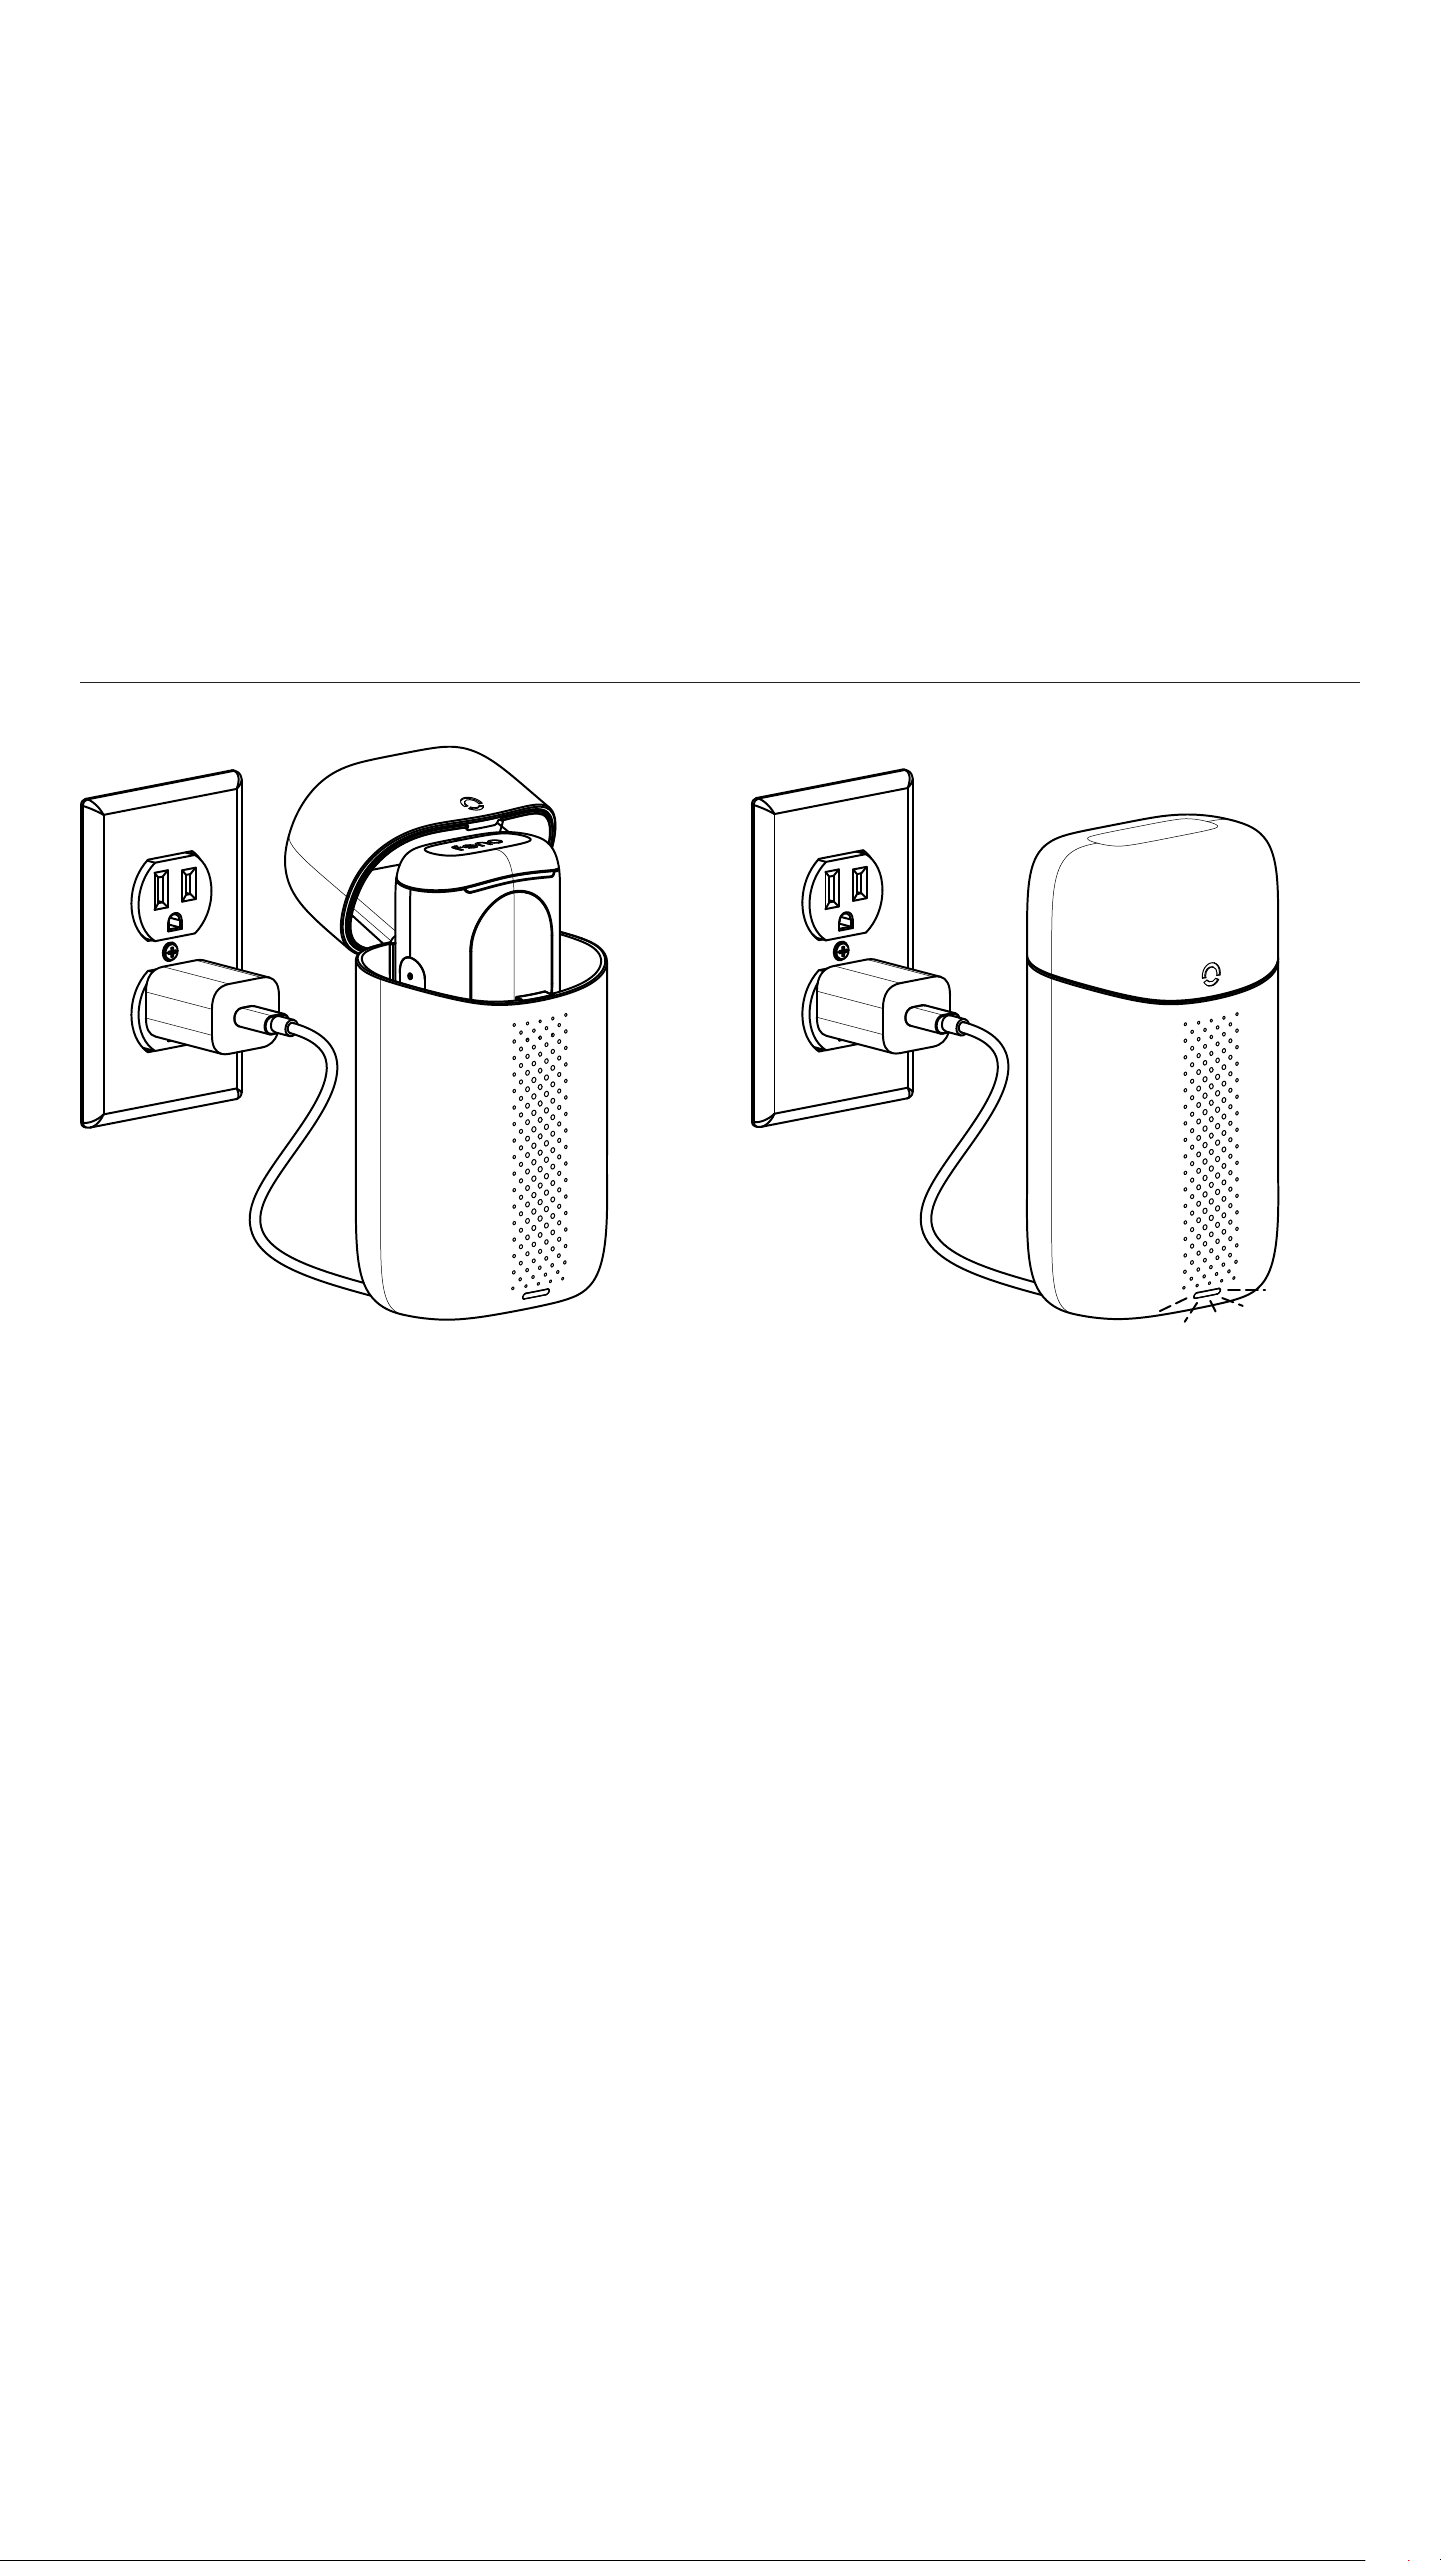
Together with the Hub™, you should re-
ceive a Power Cable to connect to the Pow-
er Adapter. Make sure the Power Cable is
undamaged, ts securely into the charging
port, and is connected to the correct power
voltage. Once the Hub™ is connected to the
power source, you should see an indication
that it's charging.
The screen will show a battery icon with a
battery sign in the center and green outline
(encircling slowly the icon as it charges the
Feno® Smartbrush™) together with the text
“Charging in progress”. If left after 3 seconds,
the screen will go back to the homescreen
with the same icon at the top of the screen.
Plug one end of the Power Cable into the
Hub™ and connect the other end to the
included Feno® Power Adapter. The
THE HUB™
Power Adapter or power plug used for
charging must be in accordance with the
Technical Data section.
16User Instruction Manual
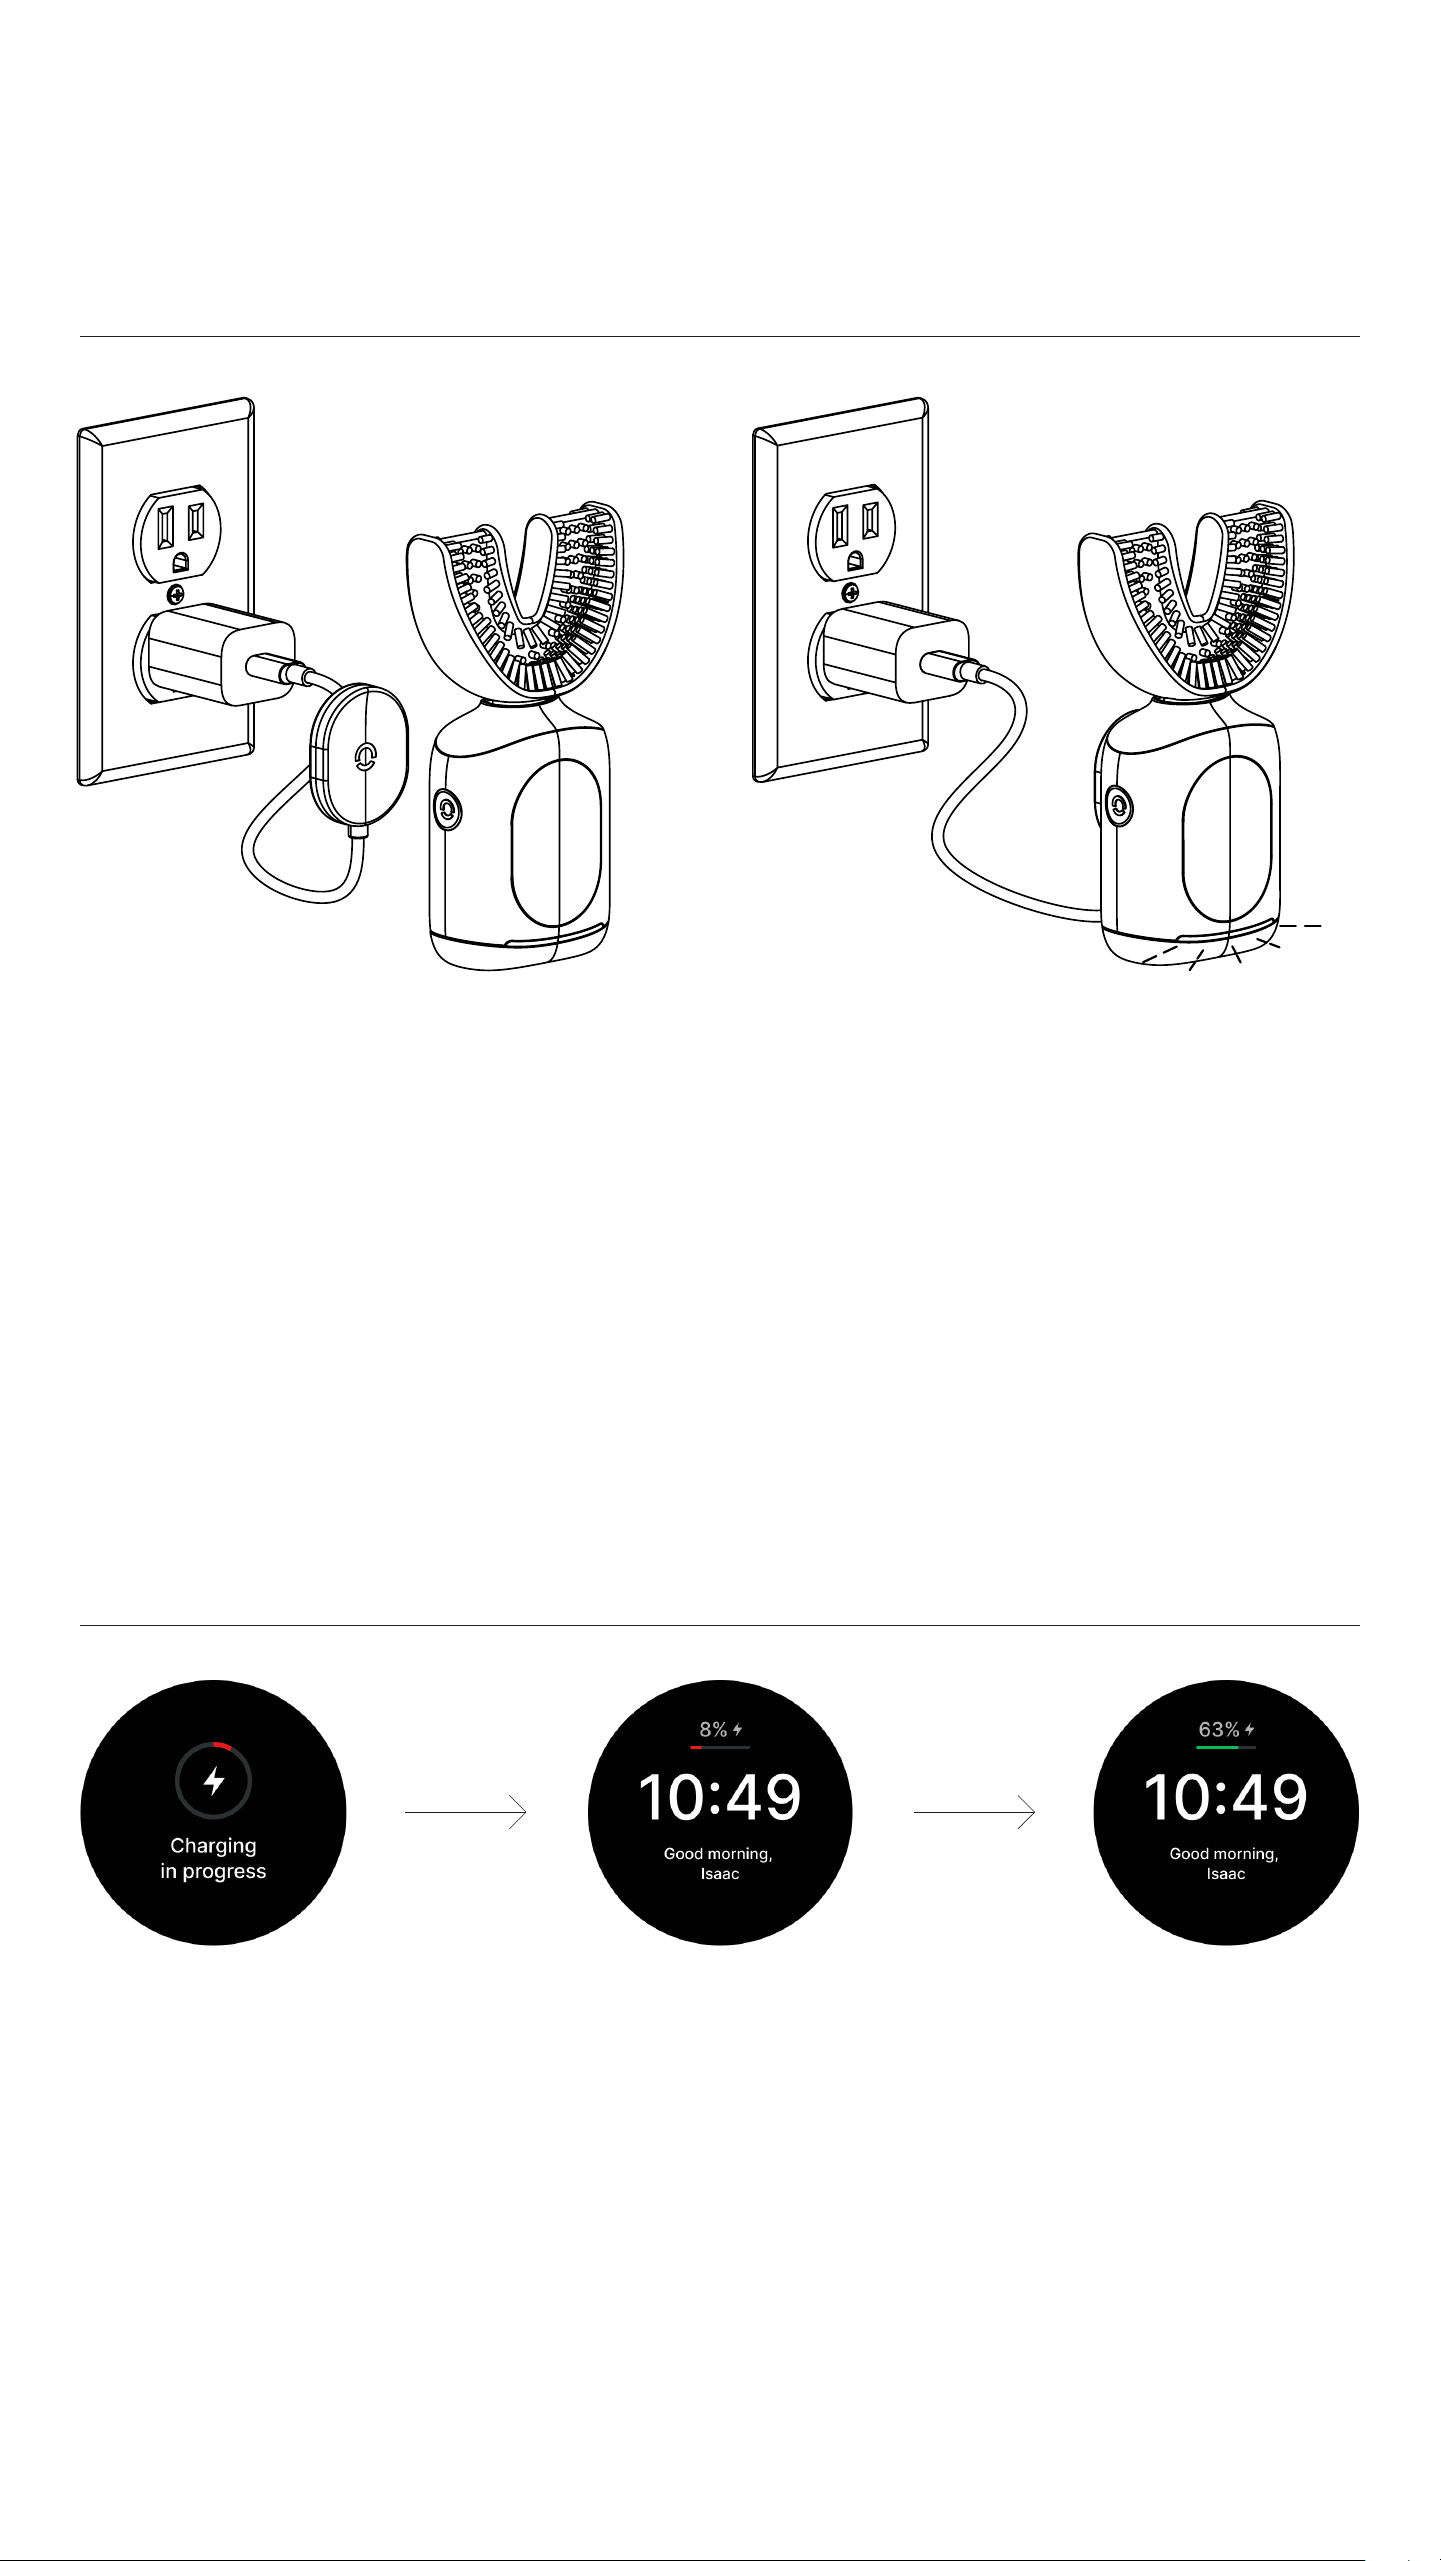
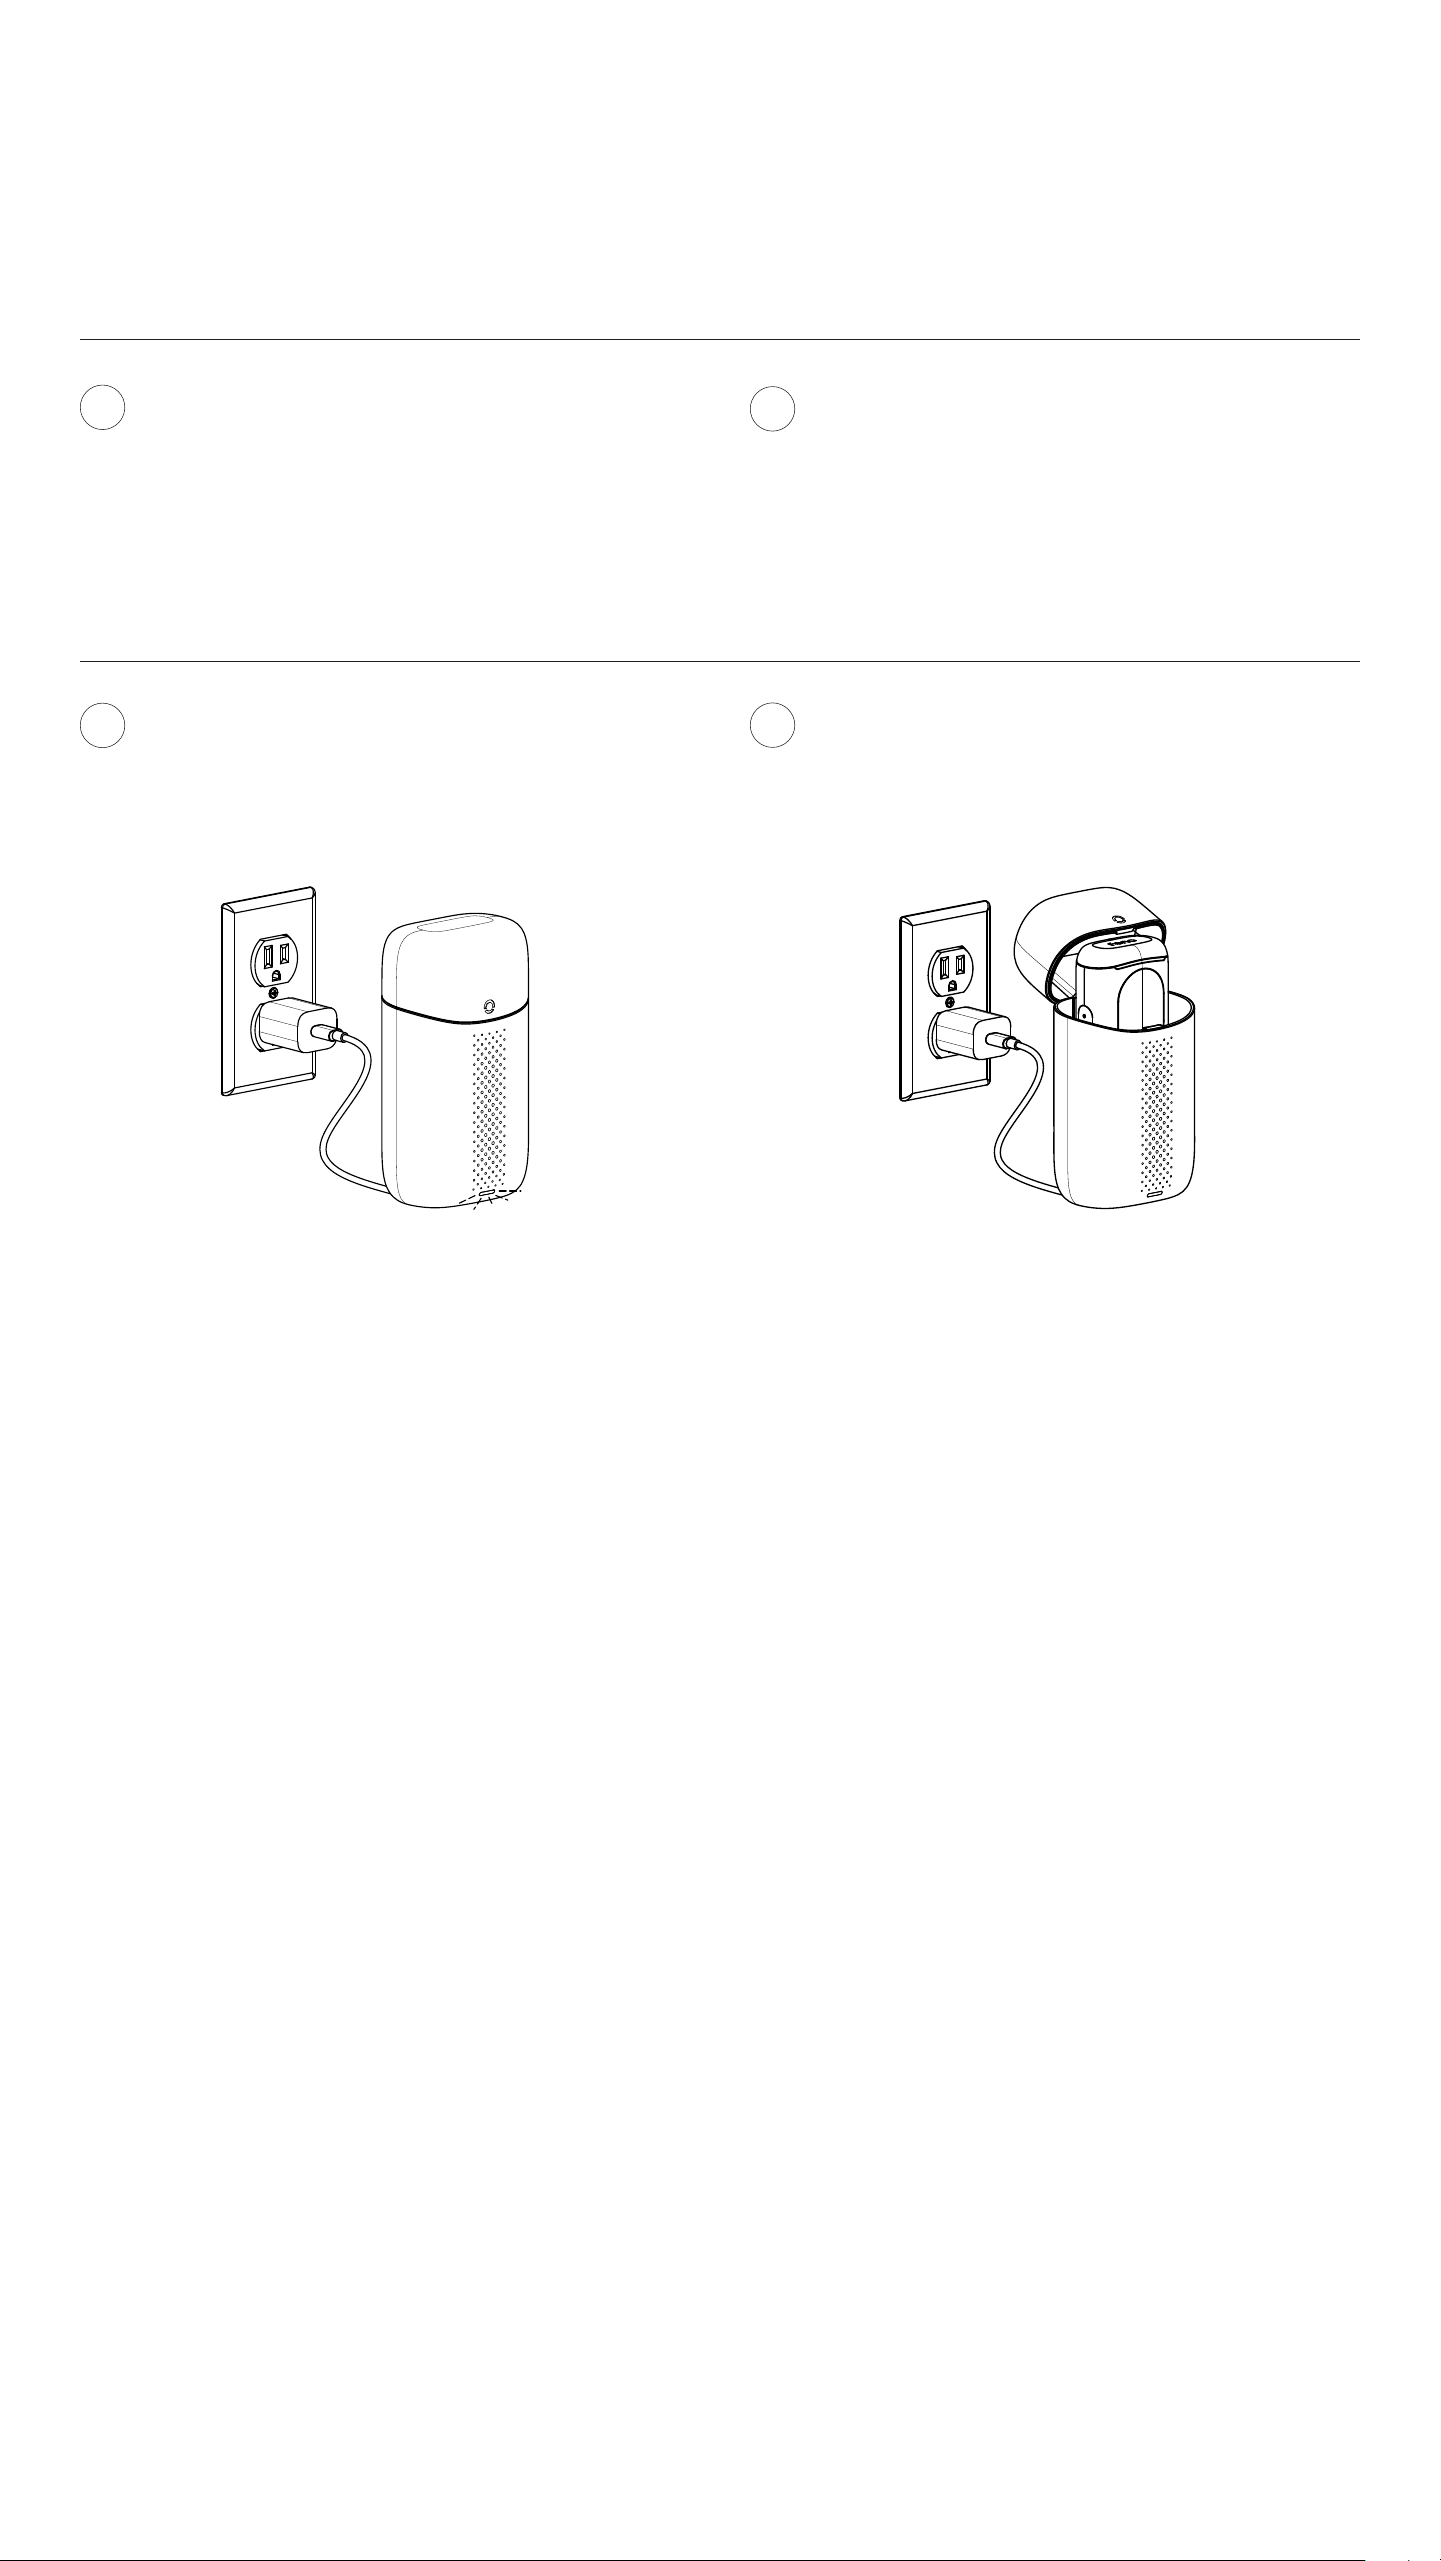
THE SNAP CHARGER
Attach the Snap Charger to the Feno® Power
Adapter and plug it into an outlet. Place the
Snap Charger (with the Feno logo facing
inwards) on the back of the Smarthandle™.
Magnets will snap it into place.
Connect the smarthandle to the Snap
Charger to charge in between brushes.
We recommend laying the snap
charger down on a at surface with
the Smarthandle™ on top.
THE FENO
®
CHARGING SCREENS
When you connect your device to the
charger, the screen will briefly display a
charging notification saying “Charging is
in progress”. After 3 seconds, it will return
to the home screen. There, you'll see an
electric charge icon next to the battery
percentage, indicating ongoing charging.
Once the battery reaches 10%, the battery
indicator will turn green.
17User Instruction Manual
REGULAR AND FENO FOAM™
TOOTHPASTE APPLICATION
REGULAR TOOTHPASTE
PASTE-THEN-BRUSH METHOD
Briey put the TrueFit™ Mouthpiece
under running water.
Spread the toothpaste (regular or Feno
Foam™) in a thin layer on both sides of
the TrueFit™ Mouthpiece.
Use the Feno® Smartbrush™ as
described in Brushing section
(next page).
1
2
4
Regular
Foam
Top
Top
Bottom
Bottom
Make sure the toothpaste is evenly
spread on all bristles.
3
Briey put the TrueFit™ Mouthpiece
under running water.
1
Squeeze a pea-sized portion of tooth-
paste (regular or gel) into your mouth.
2
Put a small amount of water in your
mouth and swirl the toothpaste around
your mouth until you feel your mouth
is well covered.
Use the Feno® Smartbrush™ as de-
scribed previously in Brushing section.
3 4
Regular vs. Foam Toothpaste
The Feno® Smartbrush™ can be used with
any toothpaste you like. Please read below for
information on how you might most eective-
ly use regular toothpaste, gel toothpaste, and
our Feno Foam™ Toothpaste.
Feno® recommends Feno Foam™ Tooth-
paste due to its eciency and ease of use.
In addition, the residue of Feno Foam™
Toothpaste in the Feno® Smartbrush™ can
be easily removed by cleaning it.
18User Instruction Manual
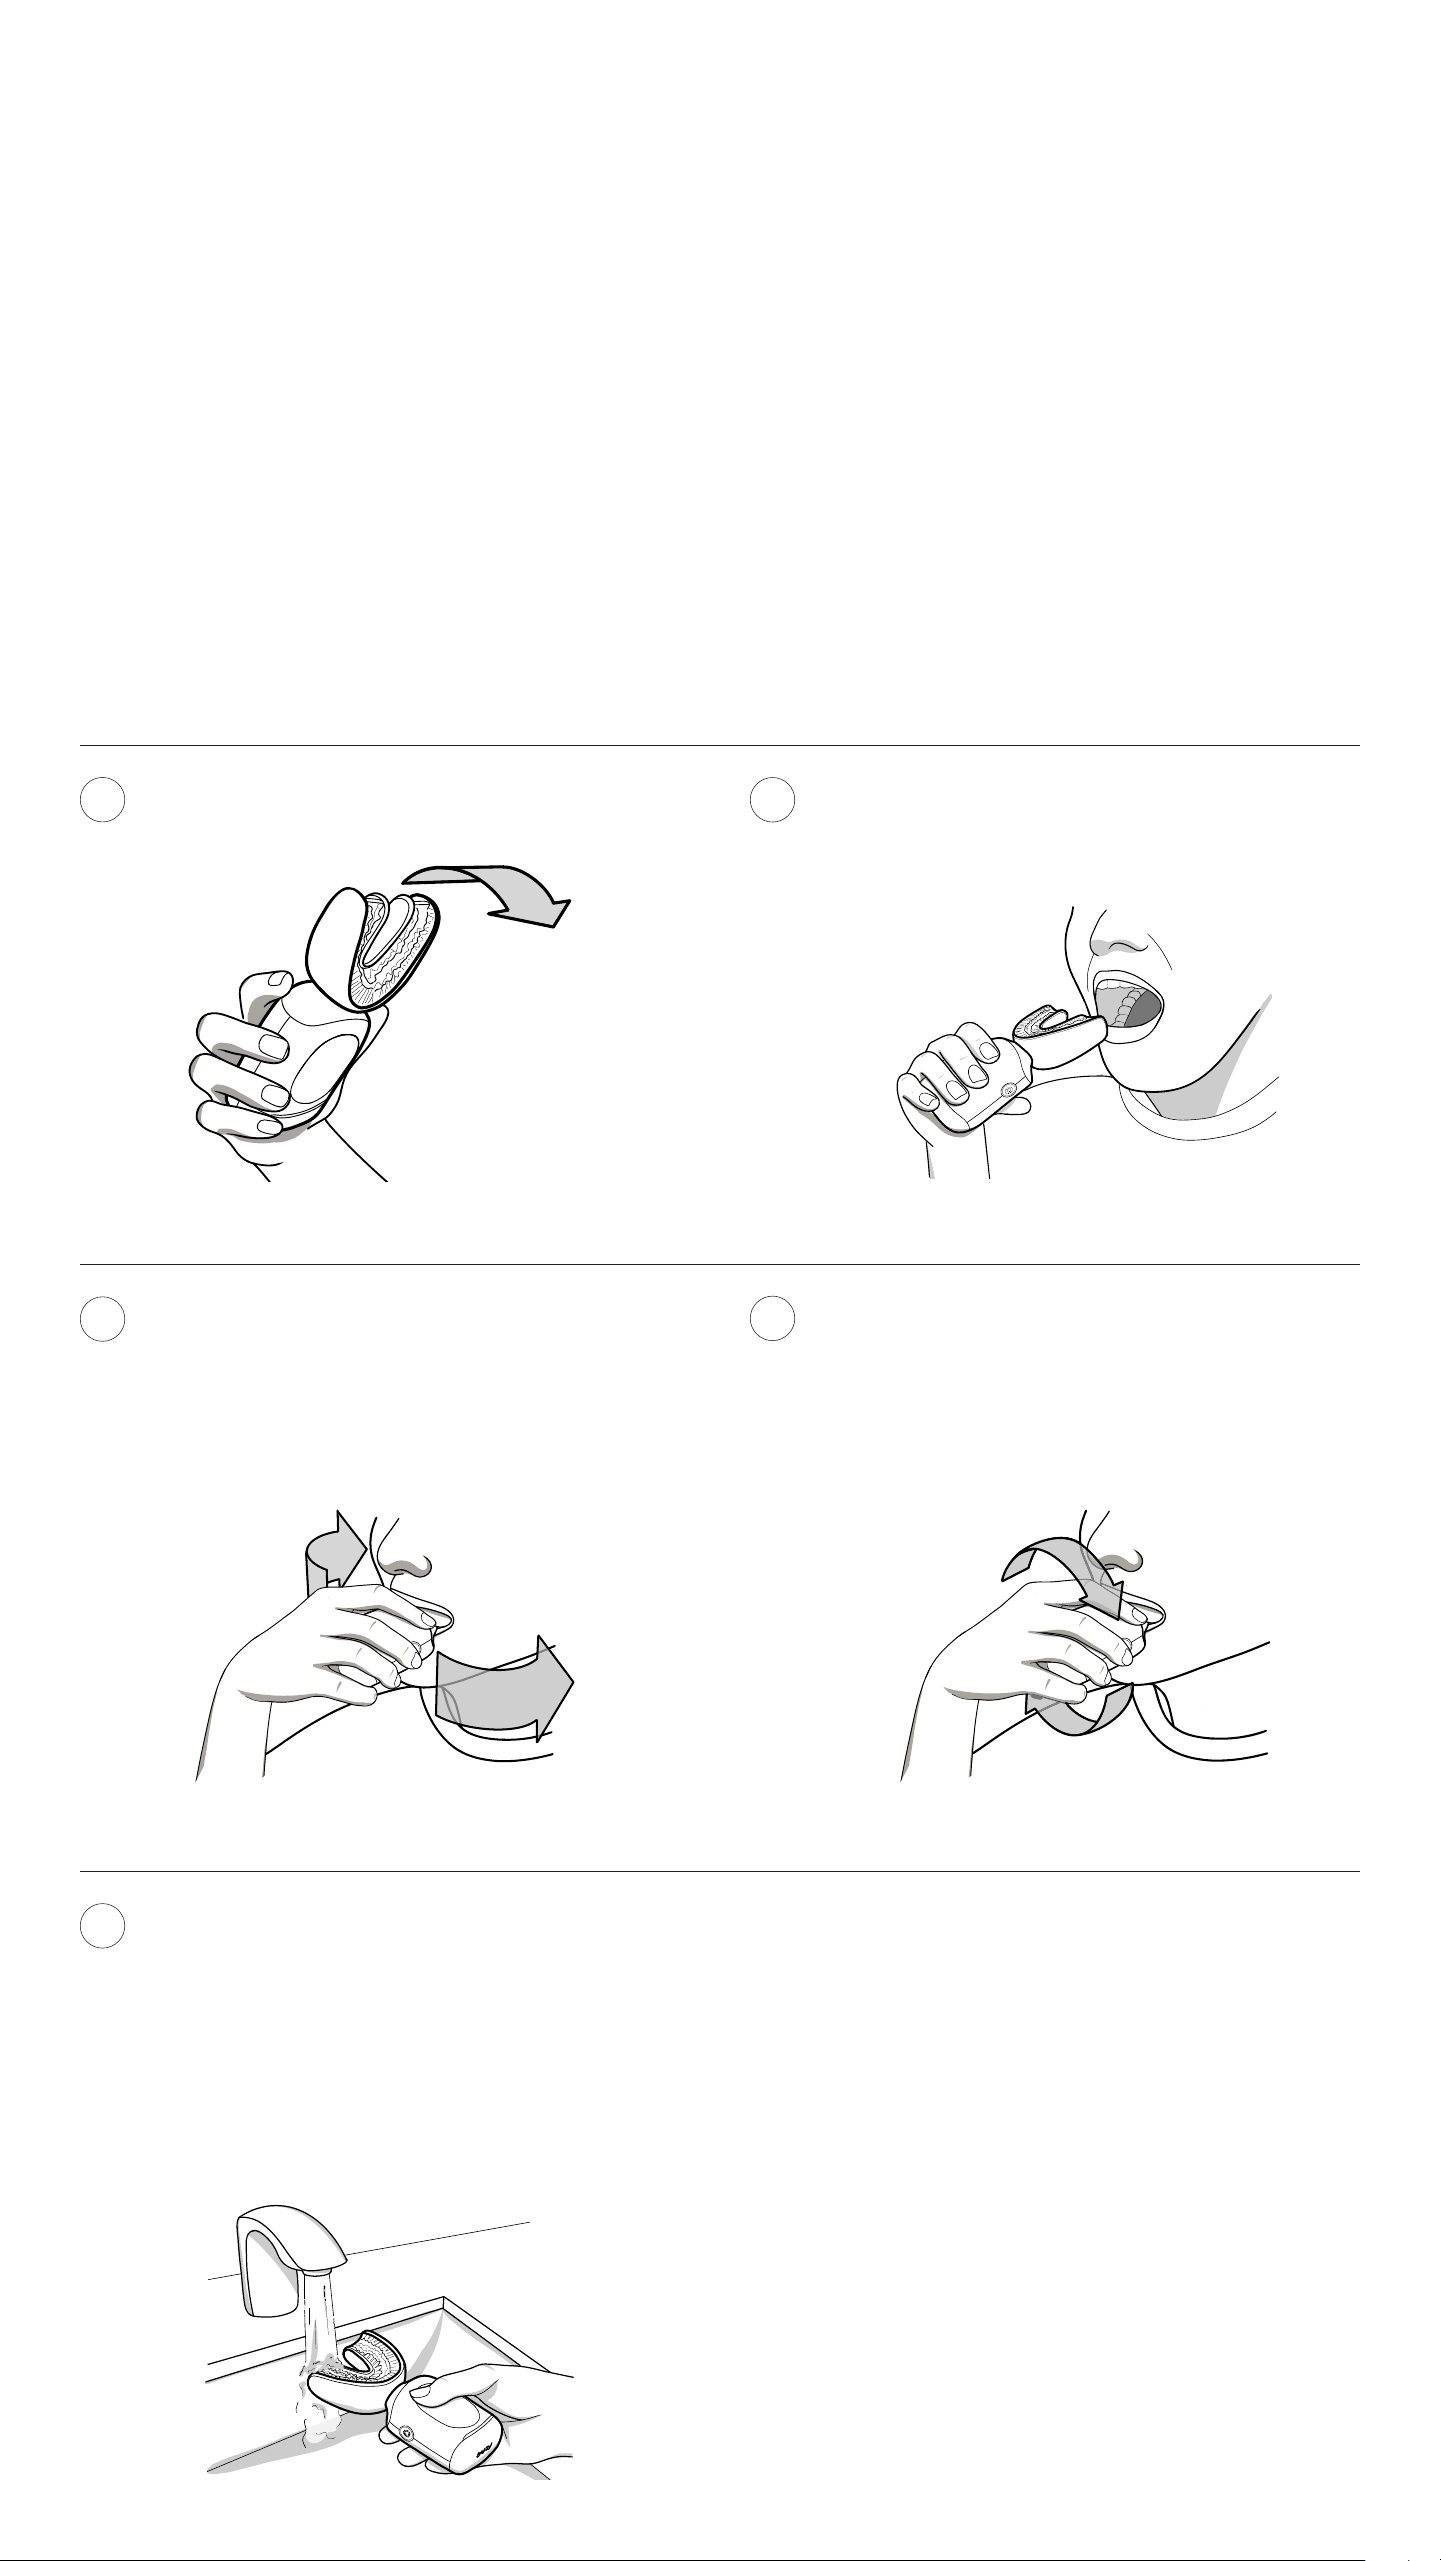
Brushing
TO USE THE FENO
®
SMARTBRUSH™:
Hold the Smarthandle™ while turned o.
Adjust the position of the TrueFit™
Mouthpiece by moving your jaw, so
the bristles cover all of your teeth and
your gum line.
Gently insert the TrueFit™ Mouthpiece
into your mouth
and softly bite on to it.
1
3
2
While on, make sure to move the True-
Fit™ Mouthpiece in a slow circular
motion for optimal bristle contact and
brushing results.
4
5
Wait until the movement stops after
20 seconds. Take the TrueFit™ Mouth-
piece out of your mouth. Clean the
TrueFit™ Mouthpiece. See section
Cleaning and maintenance and corre-
sponding Smarthandle™ screen below.
CAUTION! Some individuals may
experience a mild tingling sensation, gag
reex, irritation or minor bleeding when
using Feno® Smartbrush™ for the rst time.
These experiences typically stop after a few
days of use.
If not, please reach out to us at
support@feno.co and consult your dental
professional before continuing your use of
the Feno® Smartbrush™.

19User Instruction Manual
IN PROGRESS
SCREENS WHILE BRUSHING
COMPLETE PAUSED
Press the upper button to
start brushing. While using
the Feno® Smartbrush™, it
should show on the screen
“Brushing in Progress” as
well as the time remaining
until the brush is completed.
Once the timer has nished,
the screen will conrm that
the brush cycle has been
completed. After a few sec-
onds, the Feno® Smart-
brush™ will go back to the
home screen.
You can pause the Feno®
Smartbrush™ by pressing
the feno pause button. You
can continue brushing by
clicking on the same but-
ton. If you choose not to re-
sume brushing, the screen
will lead to the homepage.
Insert the TrueFit™ Mouthpiece into your
mouth carefully. Stop using the TrueFit™
Mouthpiece if you can feel pain while in-
serting the TrueFit™ Mouthpiece or running
the Feno® Smartbrush™.
The Feno® Smartbrush™ brushes all teeth
simultaneously - it requires no tooth-by-
tooth brushing technique. The TrueFit™
Mouthpiece may cause it to slip o the teeth
during use, particularly when rst getting
used to this technique and especially if the
mouth is open too wide.
Consult your dental professional before
using the Feno® Smartbrush™ if you have
braces or dental restorations.
If you wear braces it is not always possible to
t the TrueFit™ Mouthpiece into your mouth
correctly.
If this is the case, be sure to clean the wires
and brackets adequately as plaque builds on
those areas as well as on teeth and gums. If
braces prevent a proper t, do not attempt
to use the Feno® Smartbrush™ and seek
advice from your dental professional.
If you have dental restorations, use the
Feno® Smartbrush™ as you would regularly,
but make sure to adjust the TrueFit™
Mouthpiece around all surfaces of your
dental restorations.
If you suer from any dental disease,
have one or more tooth crowns or wear
dental prostheses, consult your dental
professional or physician before using the
Feno® Smartbrush™. Do not use a TrueFit™
Mouthpiece with crushed, bent, loose,
or dislodged bristles. Damaged bristles
may break o while brushing. Replace
the TrueFit™ Mouthpiece with a new one
every 3 months or sooner if the TrueFit™
Mouthpiece shows signs of wear. Not
following the instructions set forth in this
User Manual may cause damage to the
bristles.
BRUSHING DISCLAIMERS
20User Instruction Manual
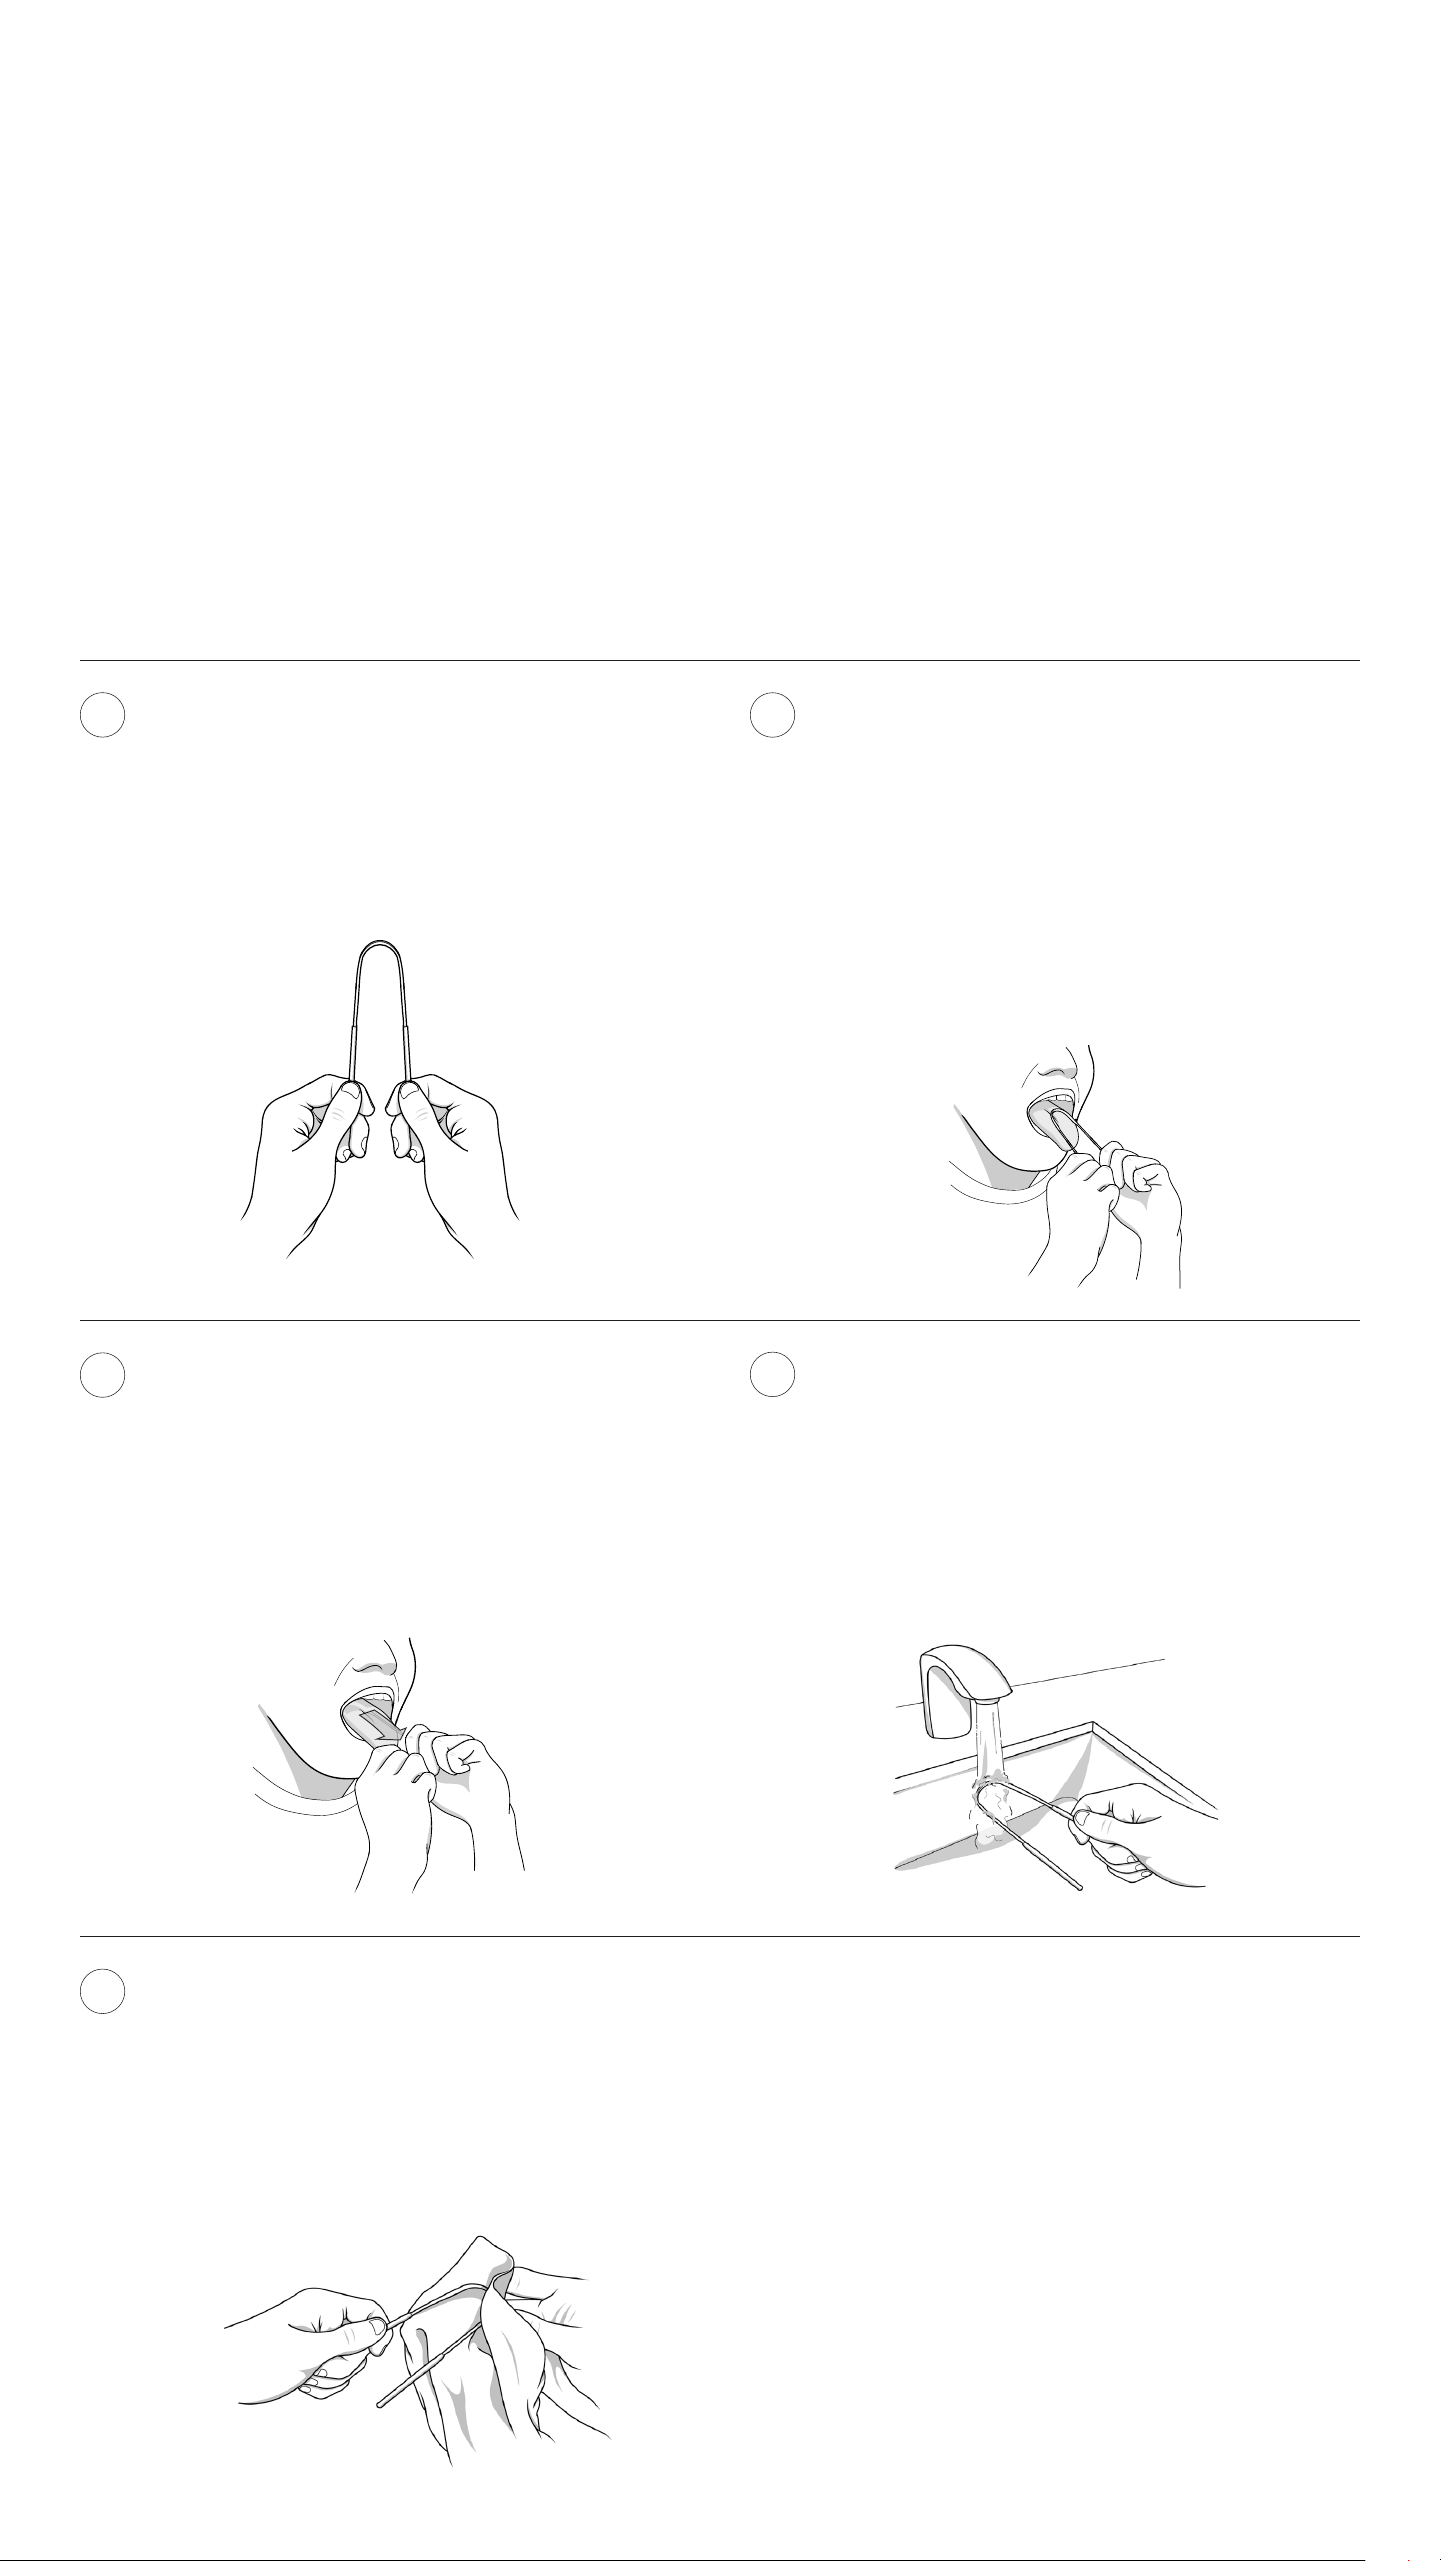
Tongue Cleaner
This minimalist stainless steel Feno®
Tongue Cleaner is expertly designed to
gently and eciently remove the buildup
of bacteria and debris that can lead to bad
breath. A simple yet eective solution for
tongue cleaning at home and on the go.
TO USE THE TONGUE CLEANER:
Securing Your Grip
For precise control, rmly grasp the
Feno® Tongue Cleaner using one or
both hands, ensuring you have a stable
hold on its handles.
Mastering the Technique
With a gentle yet determined motion,
navigate the Feno® Tongue Cleaner
from the back to the front of your tongue.
As you progress, you'll witness the eec-
tive removal of unwanted residue.
Initiate With Thoughtfulness
Position the Feno® Tongue Cleaner
gently at the back of your tongue. Extend
it only as far as you're comfortable, prior-
itizing your well-being. Should you en-
counter any discomfort or feel the onset
of a gag reex, halt the process. If pain is
experienced, cease usage immediately.
1
3
2
Cleanse and Continue
After each eective pass, it's crucial to
rinse the Feno® Tongue Cleaner to rid
it of the collected debris. For optimal
results, replicate the cleaning action 5-8
times, ensuring a thorough cleanse.
4
5
Maintenance Matters
Once your session concludes, wash
the Feno® Tongue Cleaner under
warm water. To maintain its prime con-
dition, pat it dry using a clean cloth.
21User Instruction Manual
Clean the Feno® Smartbrush™ after each
use. If the Feno® Smartbrush™ is not used
for an extended period of time, unplug the
Hub™, clean the product as described below
and store it in a cool, dry place away from
direct sunlight.
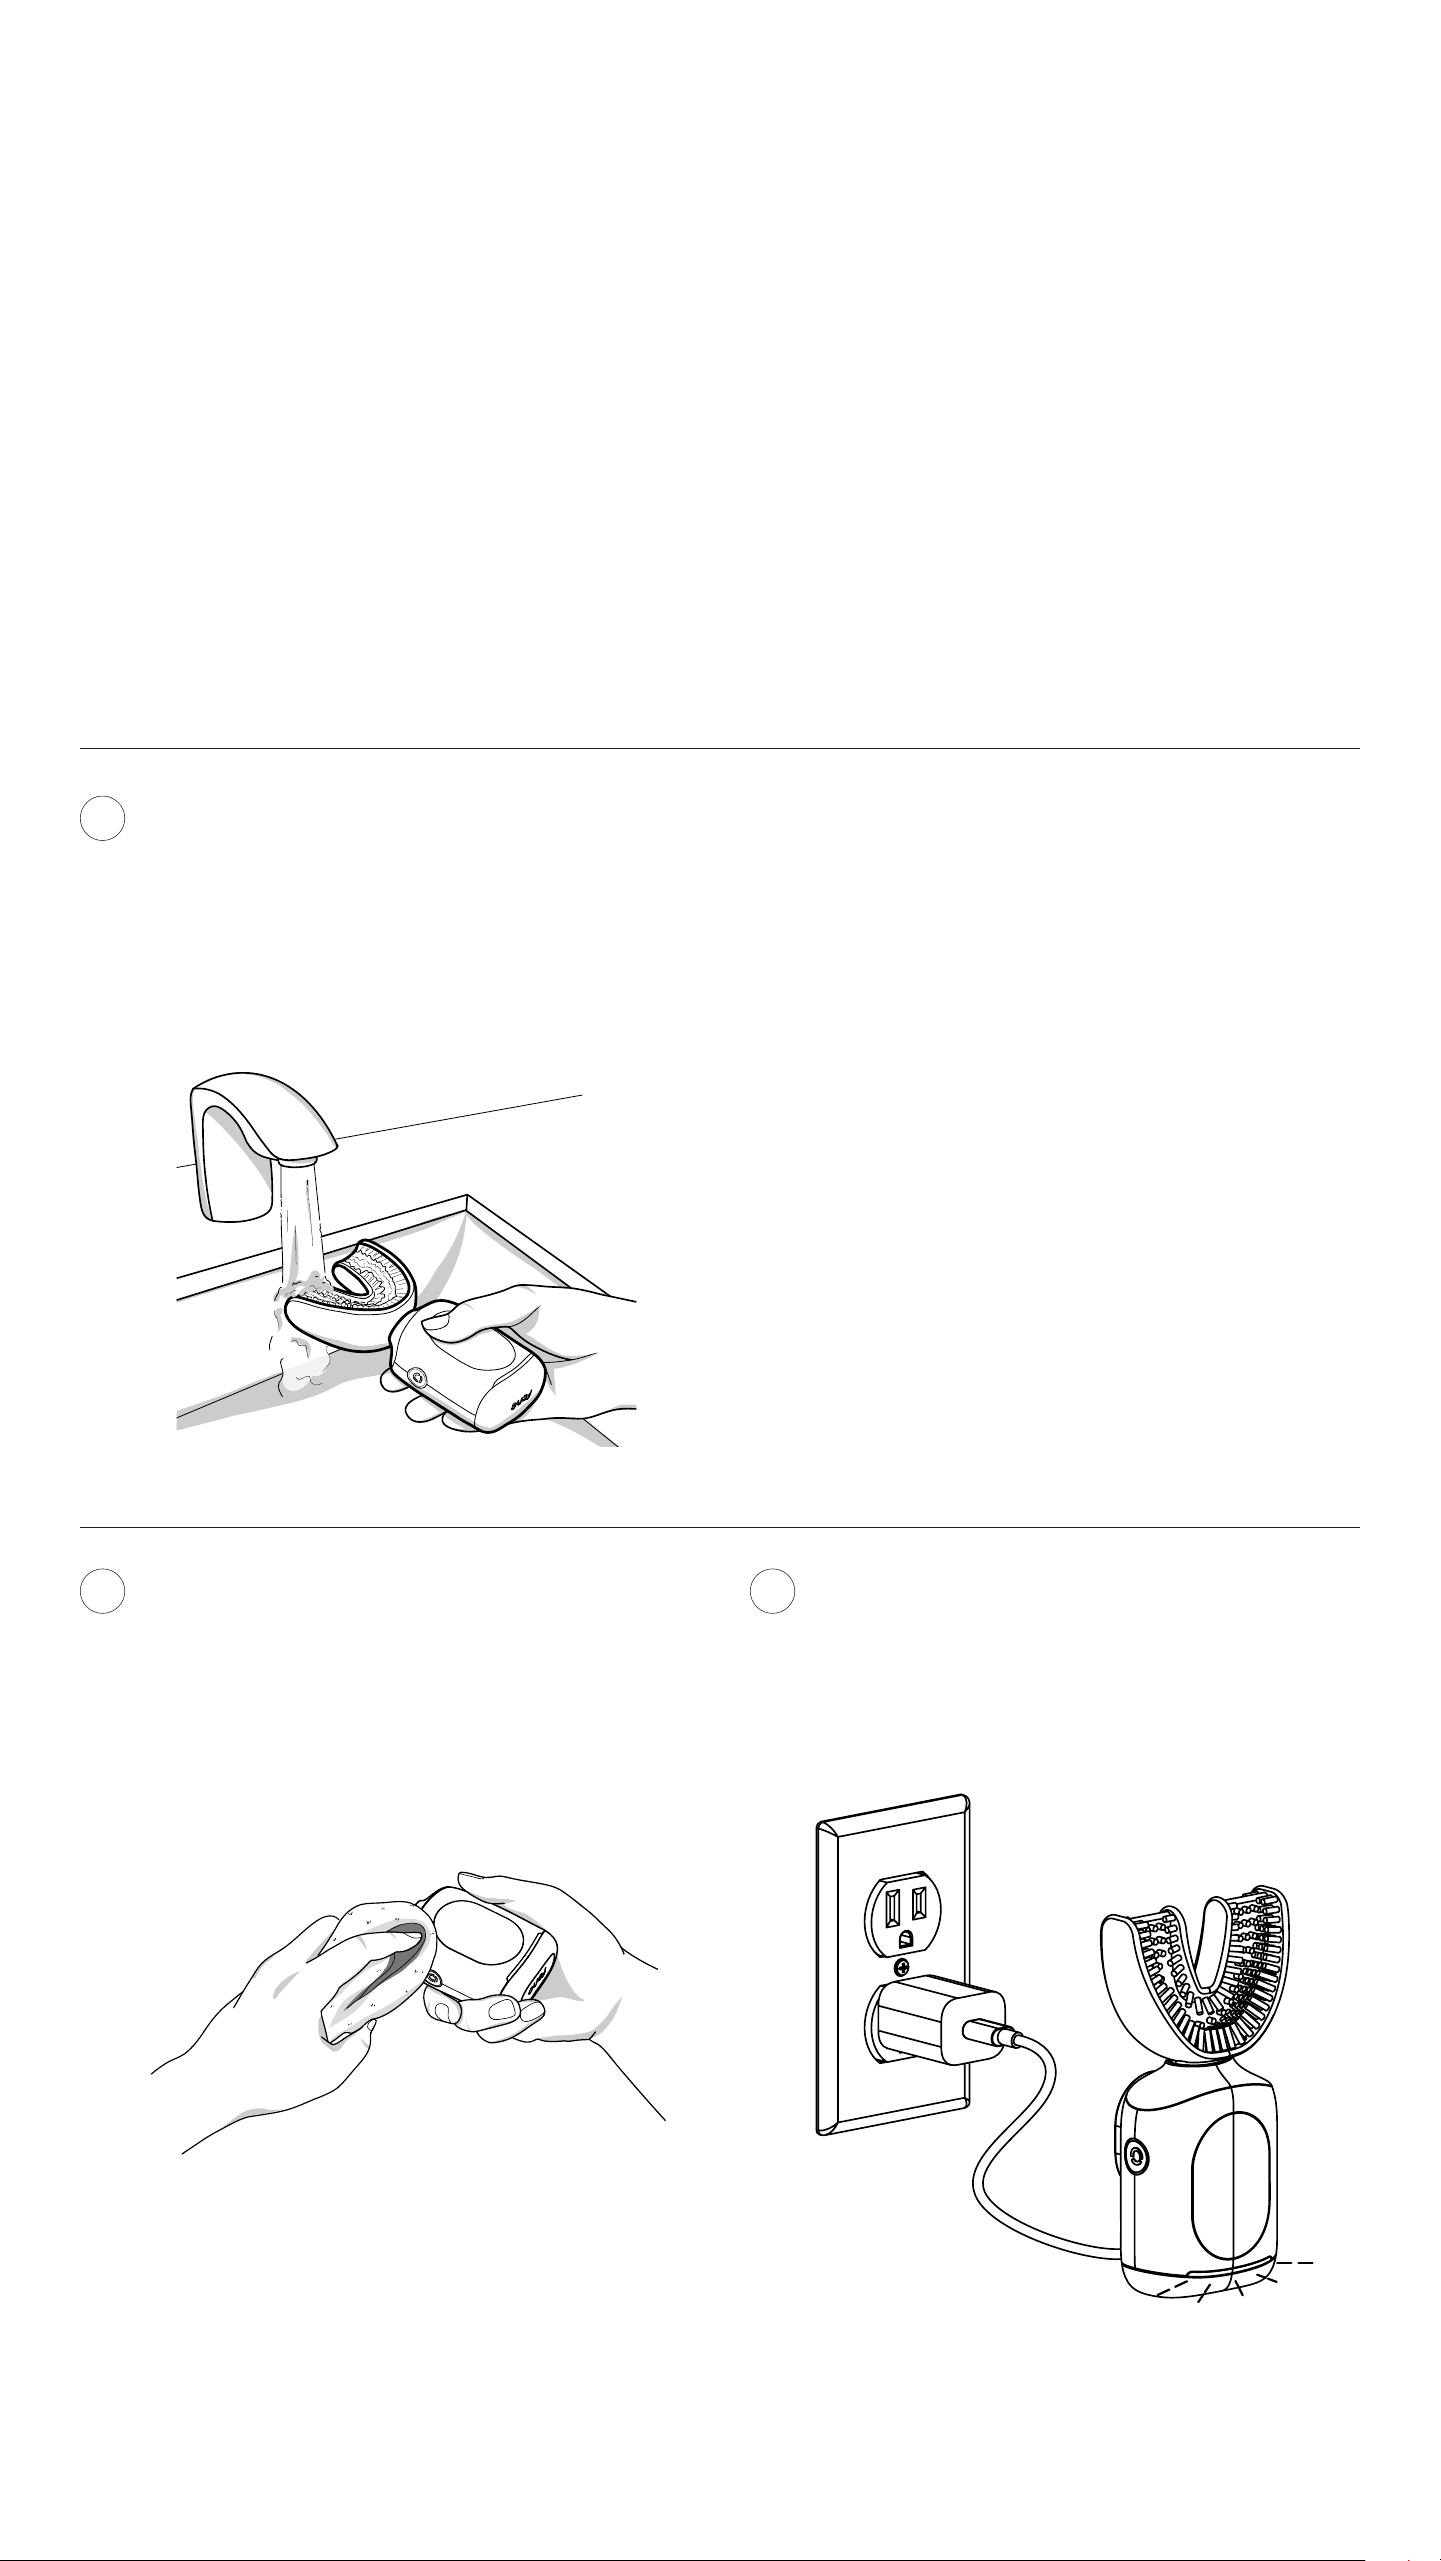
Cleaning
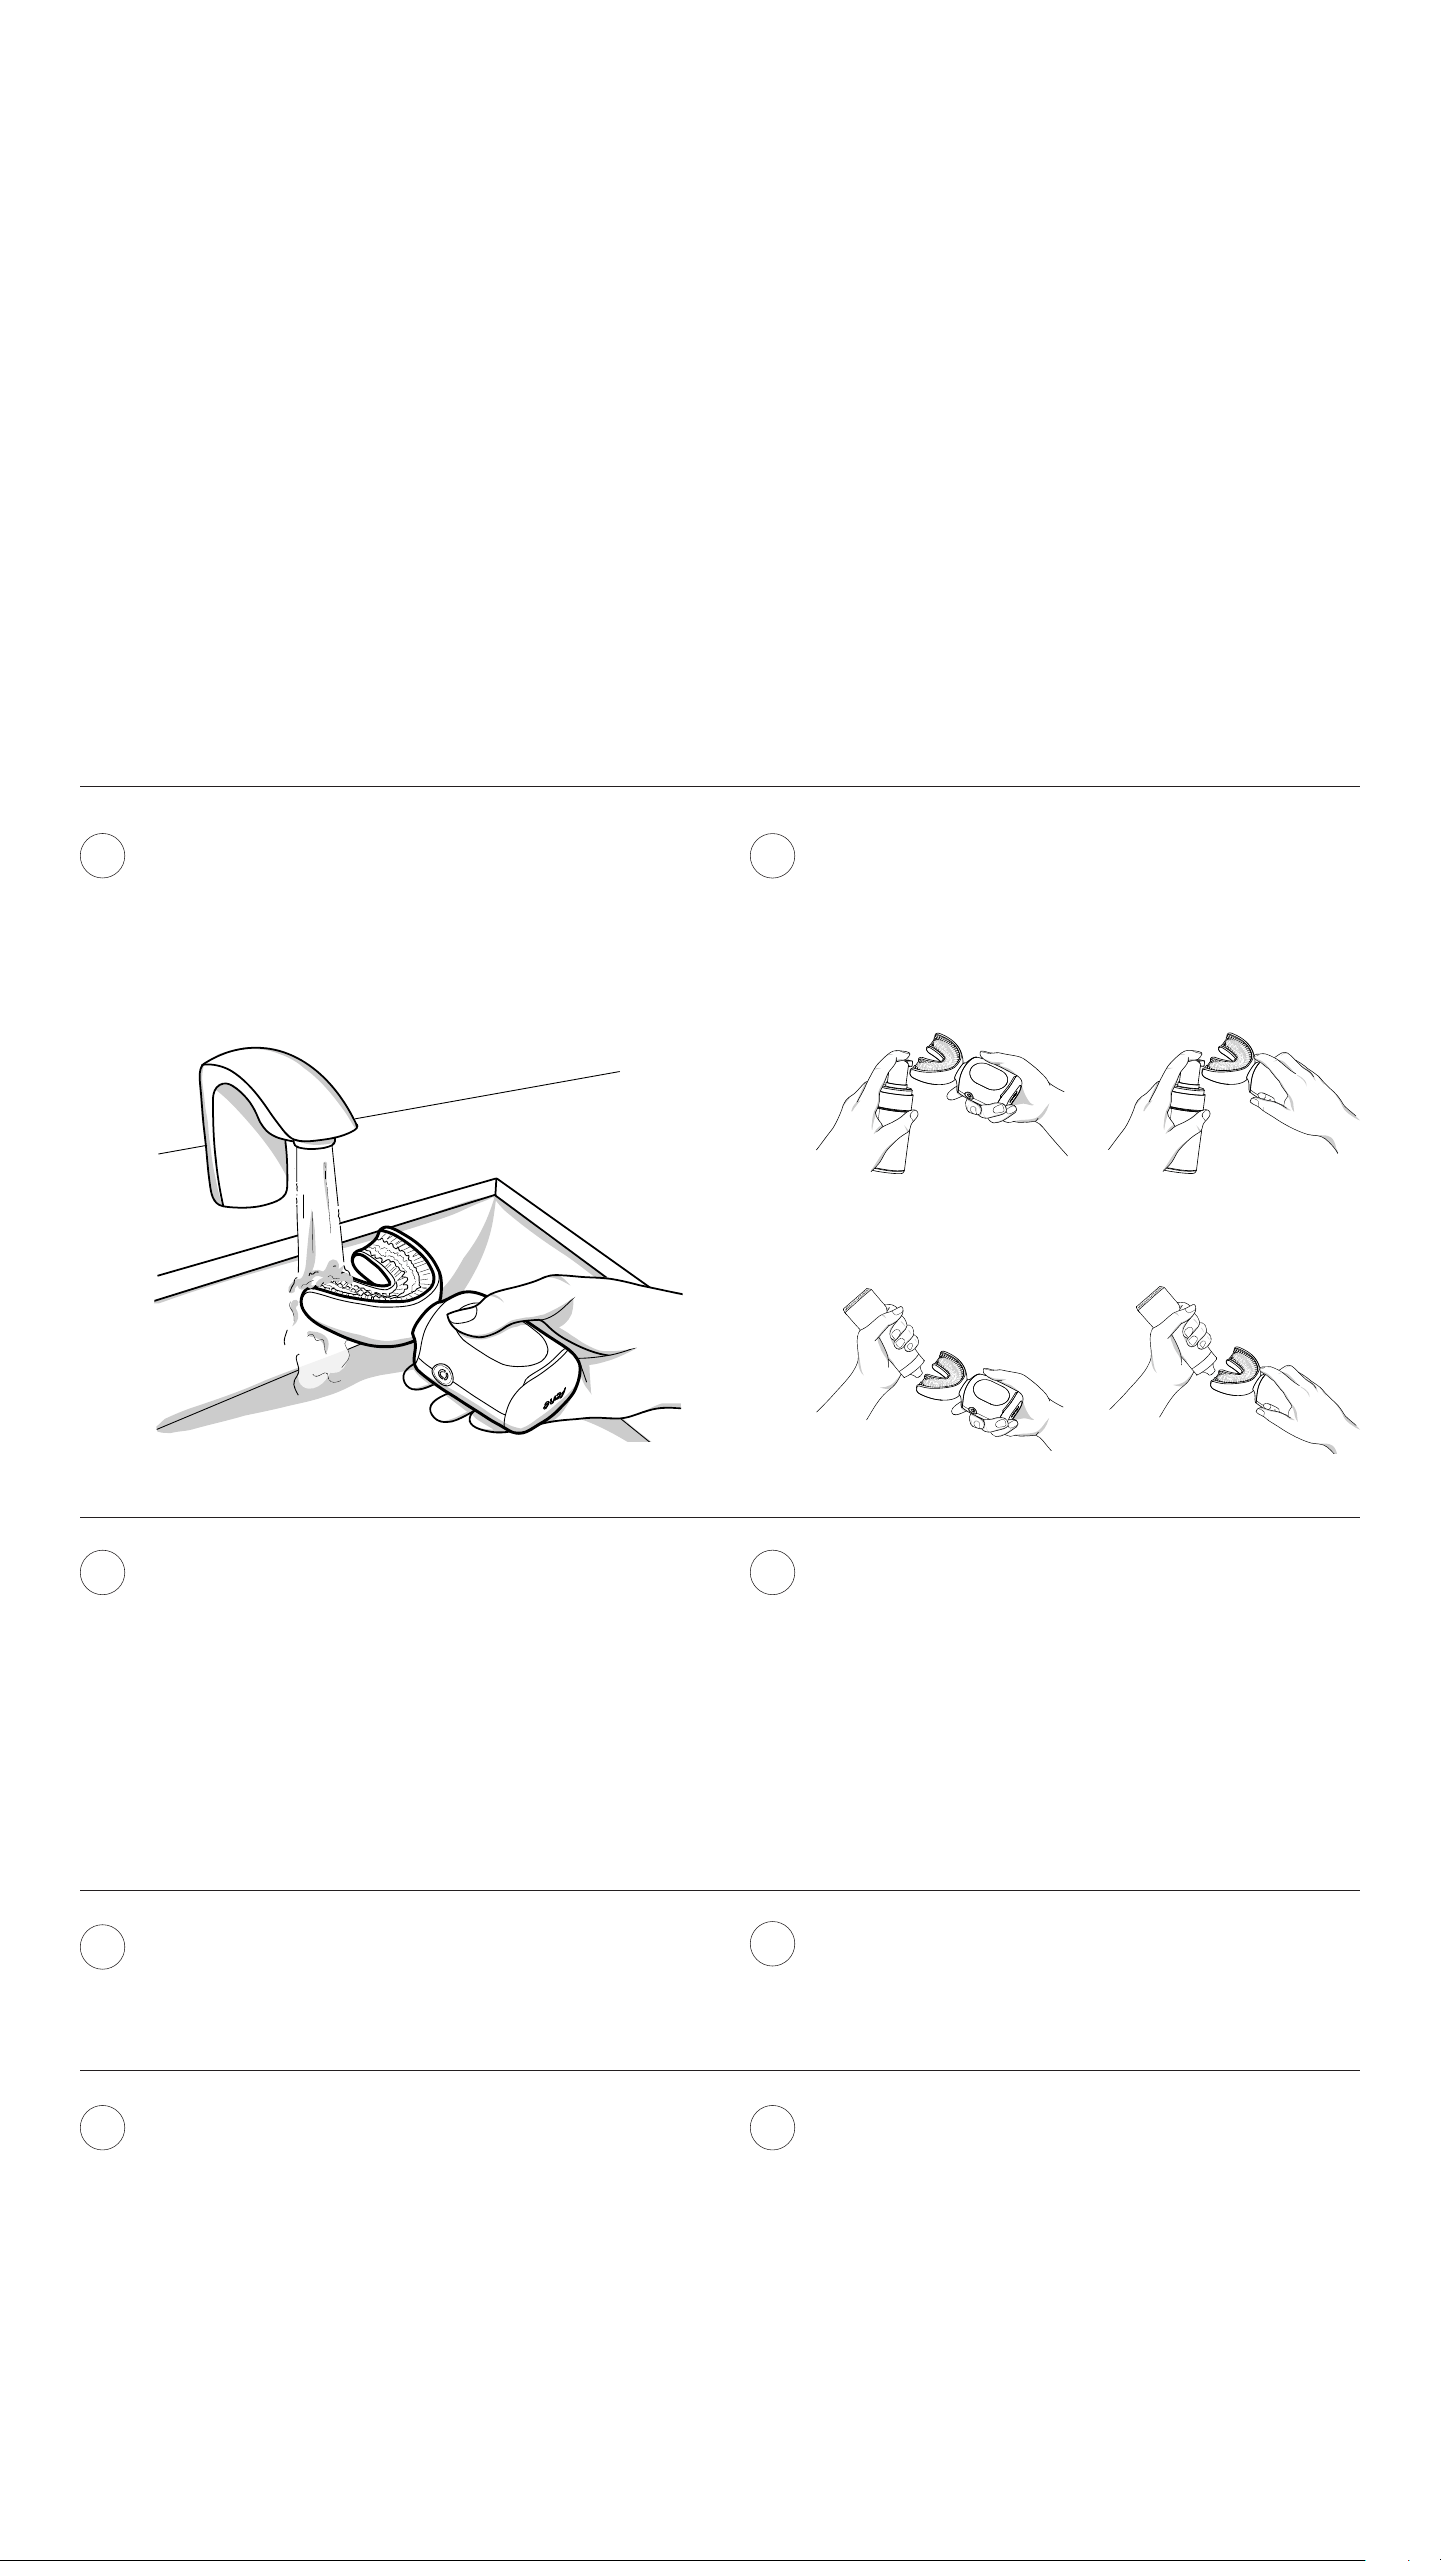
CLEANING
Rinse the TrueFit™ Mouthpiece under
lukewarm water. CAUTION! Do not
rinse the TrueFit™ Mouthpiece in water
more than 40°C/104°F or in any way
expose it to boiling water.
Detach the TrueFit™ Mouthpiece.
Use a damp cloth to wipe the entire
surface of the Smarthandle™. Make
sure the Smarthandle™ is completely
dry. CAUTION! Do not hold the
Smarthandle™ under water.
Reattach the TrueFit™ Mouthpiece
and put the Snap Charger at the back
of the Smarthandle™ to keep the
device charged.
1
43
Furthermore, please note that if your
toothpaste includes peroxide, baking soda
or other bicarbonates (common in whitening
toothpastes), thoroughly clean your TrueFit™
Mouthpiece after each use. Otherwise,
the toothpaste residues may damage the
TrueFit™ Mouthpiece.
22User Instruction Manual
Unplug the Power Cable from the
Hub™. Use a dry cloth to wipe the
surface of the Hub™. CAUTION! Do
not clean the Hub™ by immersing it
under water.
Place the Hub™ on a safe
and dry surface.
Place the Smarthandle™ back into the
Hub™.
When the Hub™ is completely dry, plug
the Hub™ into an electrical outlet.
1
2
4
3
CLEANING THE HUB™

23User Instruction Manual
Scanning
Once it is placed correctly, the device will scan
your mouth. For a more accurate oral health re-
port, repeat the scanning process 3 times.
Once the scan is completed, the device will pro-
cess the data and notify you if it was successful. If
you receive a "successful" message, rest assured
that our team has received your scans, and they
are currently under review by our dentists.
Please check your Wi-Fi connection and try again.
Ensure your device is connected to a stable Wi-
Fi network and verify your internet connection is
working. If the problem persists, try restarting the
device and attempting to scan again.
Should you continue to experience issues, Move
closer to your router and retry to scan. if it persists,
contact our support team.
From the home screen, press the upper button
once to activate the scanner, which will then be
ready to start scanning. You'll see a prompt on
the screen to open your mouth wide.
TAKING YOUR SCAN
SCANNING
PROCESSING SCAN
SCANNING ERROR
The Feno Smartbrush allows you to scan your
teeth to get an Oral Health Report (available
for Feno+ members).
24User Instruction Manual
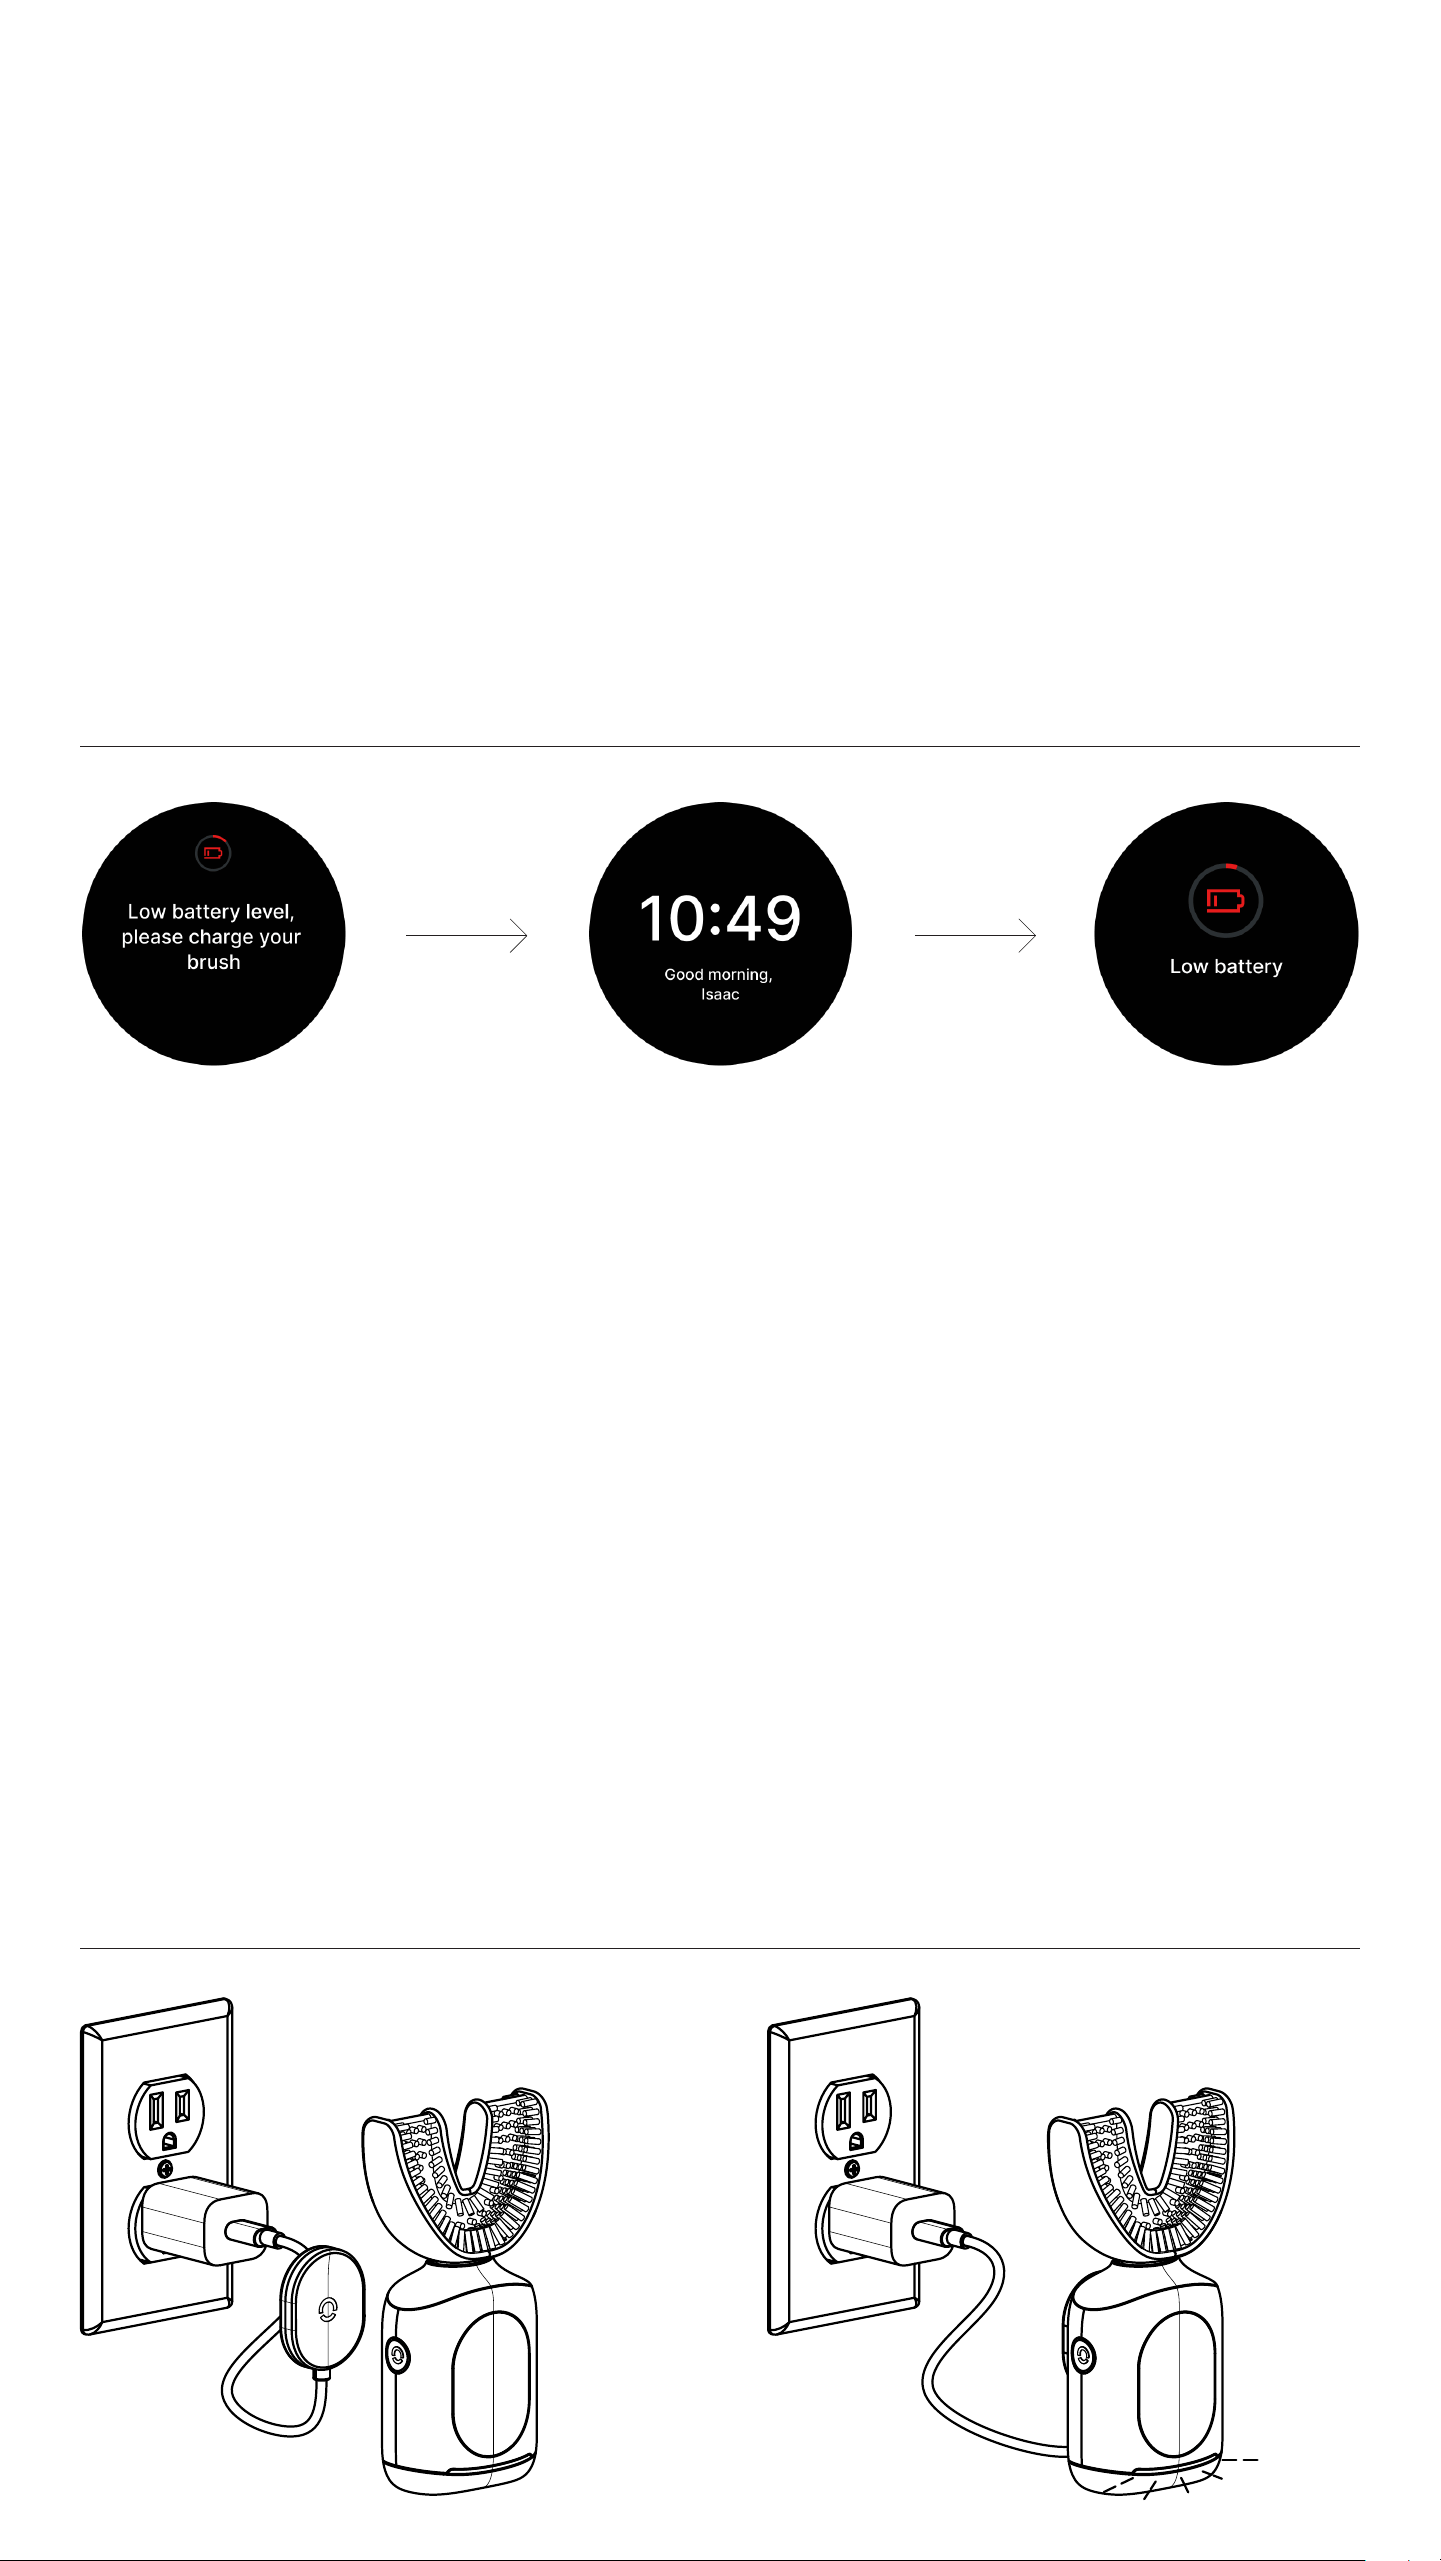
Low Battery
When your Smarthandle™ battery is running
low, you will see a notication on your
screen indicating the low battery status.
The notication will have a battery icon
with a red outline at the top of the screen
and a pop-up message that asks you to
charge your brush. If you choose to ignore
the notication, your homescreen will
continue to have the red battery icon until
the battery is drained.
Recharging the Feno
®
Smartbrush™
The Smarthandle™ is sealed, and the battery
is not accessible. Do not attempt to replace
the batteries. Tampering with the batteries
risks re, electrocution, and chemical burns.
Place the Snap Charger at the back of the
Feno® Smartbrush™. You will know that it
is connected properly if the screen says,
"Charging in Progress".
THE SNAP CHARGER
Use the Feno® Smartbrush™ only with the
Power Cable and the Snap Charger provided
with the Feno® Smartbrush™. Never use the
Power Cable if it is damaged. Keep the Pow-
er Cable away from heated surfaces. After
each use, the Feno® Smartbrush™ should be
connected to the Snap Charger to be ready
LOW BATTERY SCREEN PROGRESSION
Timer 5 seconds When the battery life is low

25User Instruction Manual
RECHARGING DISCLAIMERS
Please note that the battery performance
may degrade over time. Battery degradation
in electrical equipment over time is normal
and does not constitute a malfunction or
defect with the Feno® Smartbrush™.
Do not attempt to change the battery if
you experience any battery problems, but
contact Feno® Smartbrush™ Customer
Support at support@feno.co. If liquid is
discharged from the battery, avoid contact
with such liquid. If contact occurs, ush
thoroughly with water immediately. Liquid
discharged from the battery may cause
irritation or burns. If irritation or burns occur,
please consult a medical professional.
26User Instruction Manual
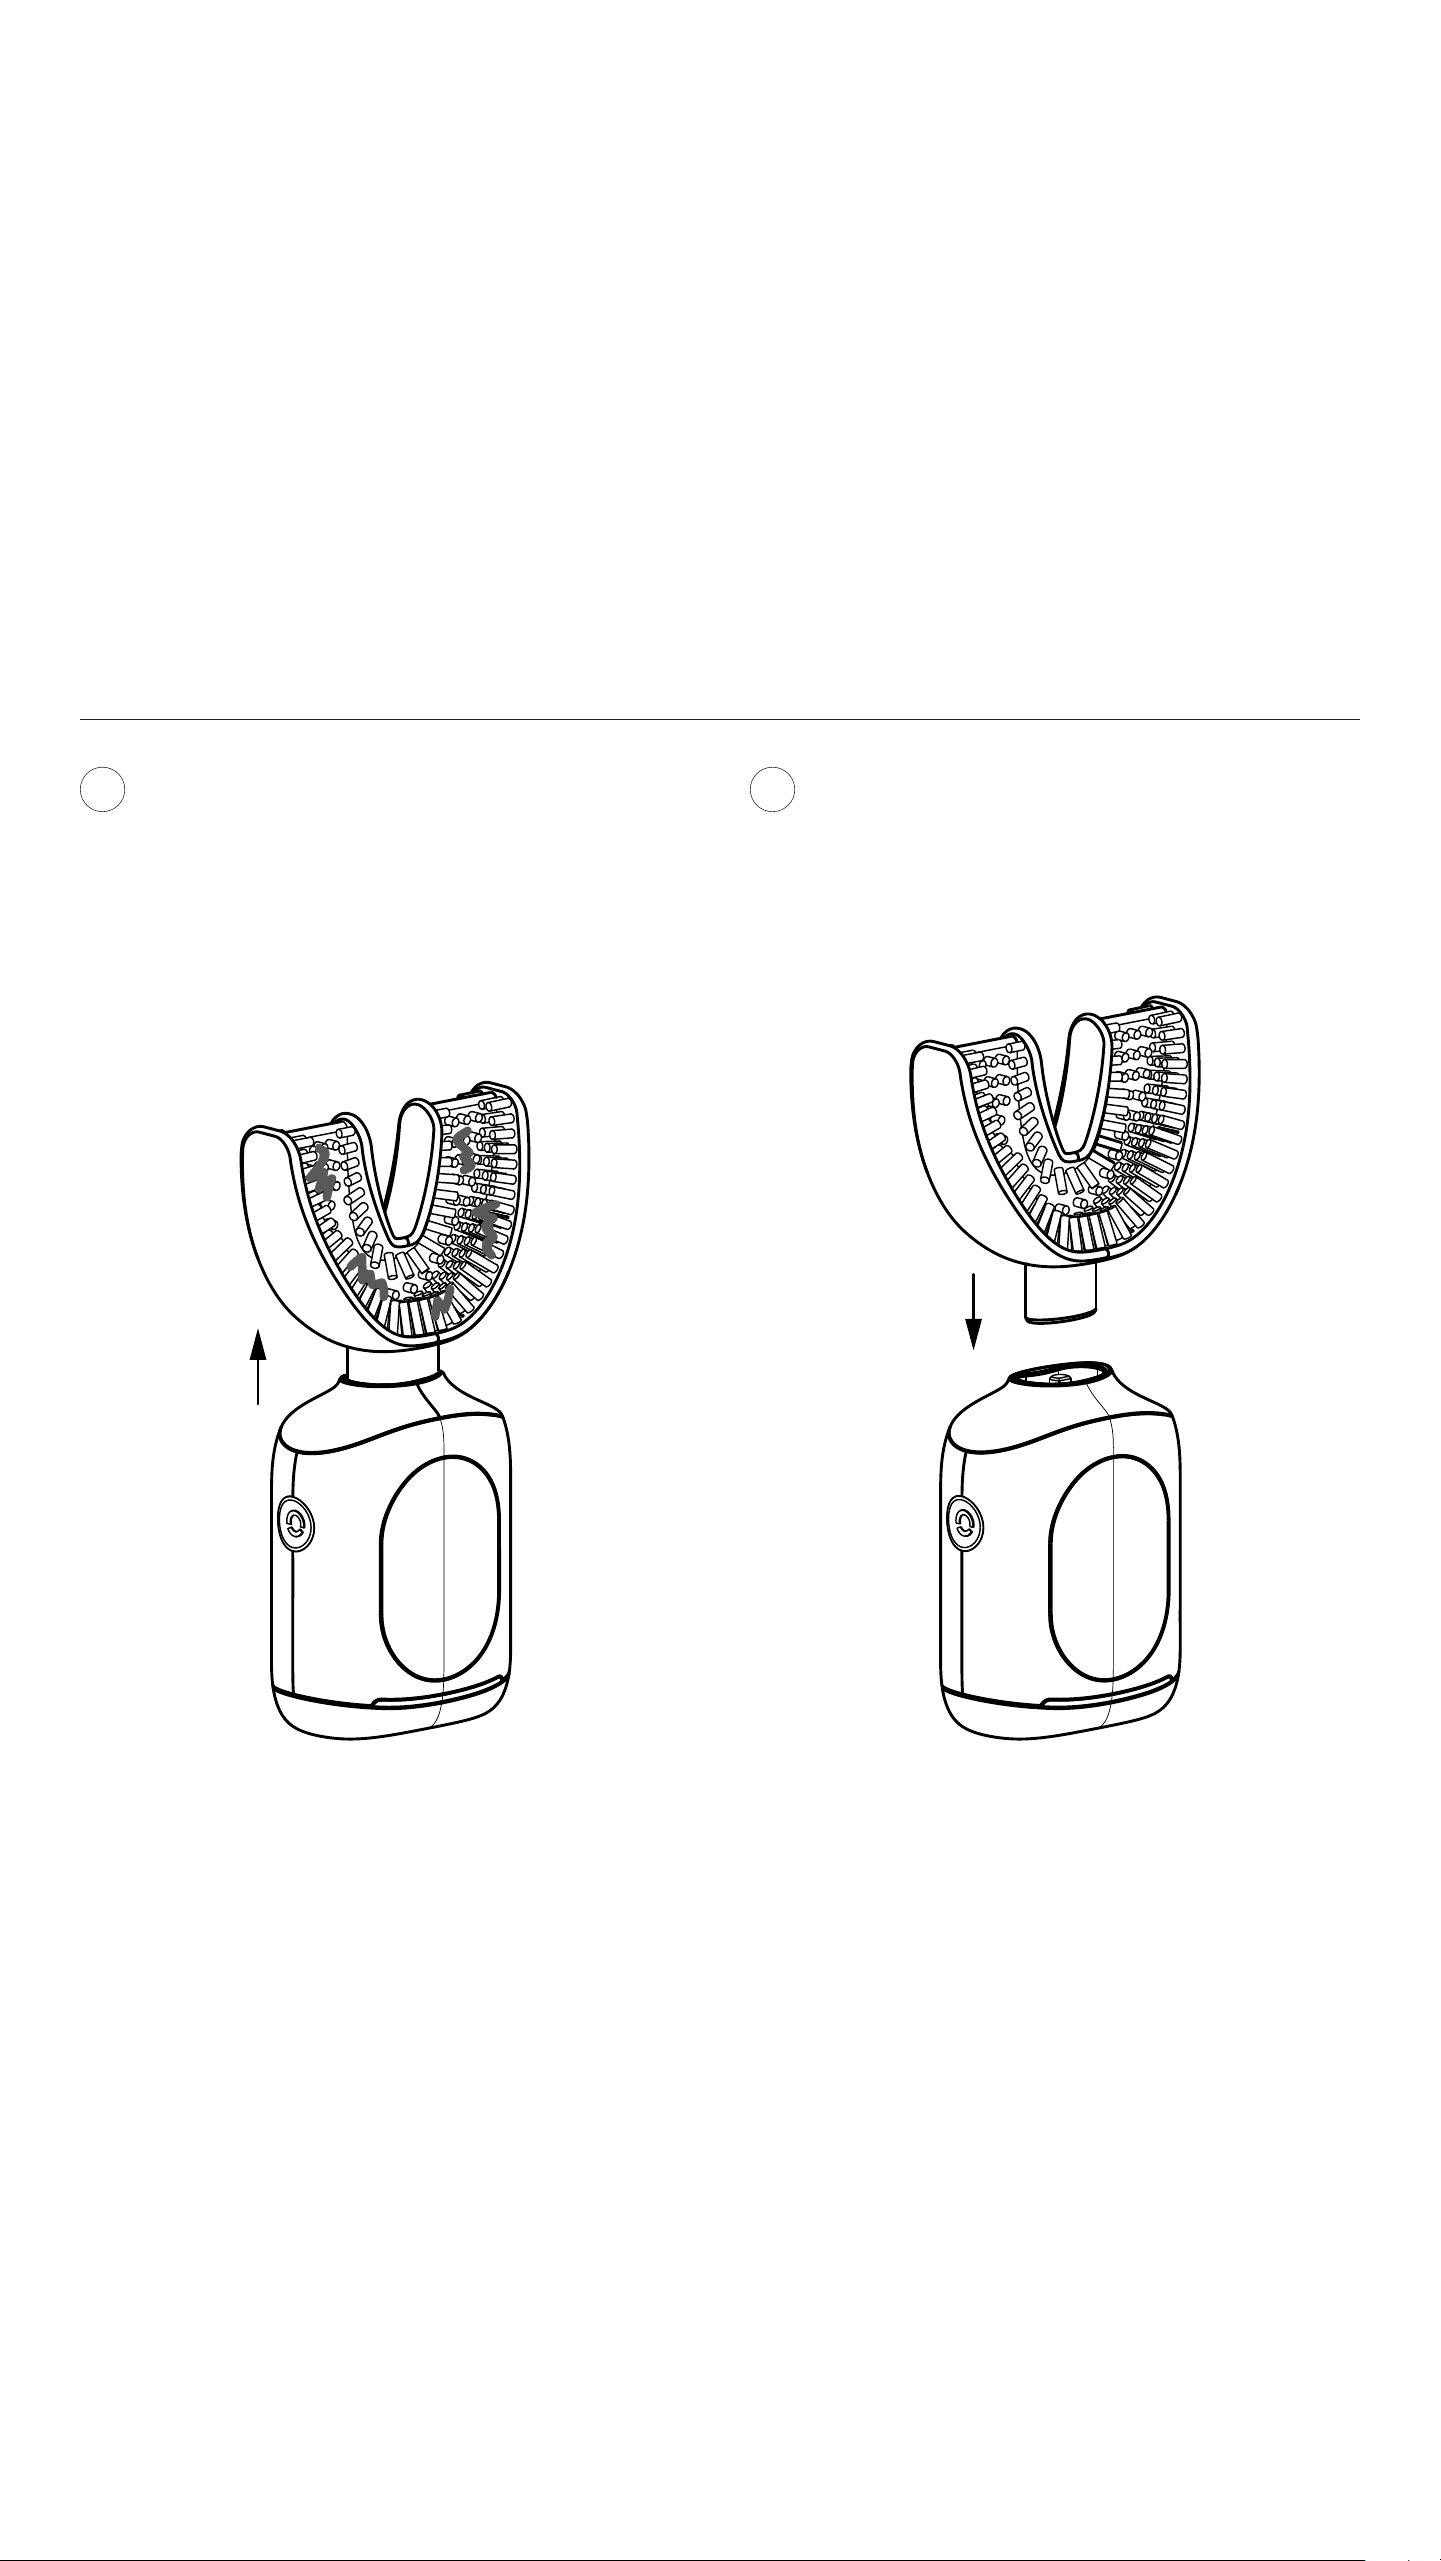
Remove the TrueFit™ Mouthpiece from
the Smarthandle™ by gently pulling
them apart. Do not use exsessive force.
Insert the Smarthandle™ connector into
the new TrueFit™ Mouthpiece until you
hear a soft click indicating the TrueFit™
Mouthpiece is securely attached.
2
Replace your TrueFit™ Mouthpiece at least
every three months to achieve optimal
brushing results.
CAUTION! Be careful when connecting
these
parts as body parts might get pinched
between them.
Replacing the TrueFit™ Mouthpiece
1
Maintenance

27User Instruction Manual
Service and Repair
Safety Information
The Feno® Smartbrush™, or Hub™, does
not contain any user-serviceable parts.
Do not attempt to open, modify or repair the
Feno® Smartbrush™, or Hub™. Do not drop,
puncture, break, or expose it to high pressure.
Alterations to the Feno® Smartbrush™ or
Hub™ and technical modications are not
permitted. If the Power Cable is damaged,
visit feno.co
for a replacement.
CAUTION! If you try to open, modify or
repair the Feno® Smartbrush™ yourself, the
Manufacturer will not cover subsequent repair
expenses or replace the Feno® Smartbrush™
if repair is not possible. Additionally, any
applicable warranty will be voided.
All conguration, servicing, and repairs
must be made by the Manufacturer or an
authorized reseller.
If you experience any technical issues with
the Feno® Smartbrush™, please contact
Feno® Smartbrush™ Customer Support at
support@feno.co for further assistance.
Maintenance and Storage
Safety Information
See the cleaning and maintenance
instructions before cleaning the Feno®
Smartbrush™.
Do not let water touch the electronic
connection of the Hub™ and the Power
Cable. Electrocution or re may result.
Rinse the TrueFit™ Mouthpiece and
Smarthandle™ with lukewarm water.
Disconnect these parts before cleaning.
Do not immerse the Smarthandle™ in
water. Use a damp cloth to clean the Hub™.
Do not use wipes or any other cleaning
products that contain chemicals as these
may damage the Hub™.
If the Feno® Smartbrush™ will not be used
for an extended period of time, unplug the
Hub™. Store the Feno® Smartbrush™ in a
cool, dry place away from direct sunlight.
Do not put any parts of the Feno®
Smartbrush™ into the dishwasher or
any other electrical appliances not
manufactured by Feno®.

28User Instruction Manual
Rebooting and Resetting
Your Feno Smartbrush
If you're experiencing any issues with your
Feno Smartbrush, performing a quick reboot
might help. Follow these simple steps to re-
fresh or, if needed, factory reset your device.
If refreshing doesn’t resolve the issue, you
can perform a factory reset. This process
will restore your Smartbrush to its original
settings, so you’ll need to set it up and
reconnect it to the Feno app afterward.
If you continue to experience issues after a
factory reset, our Customer Support team is
available to help. You can reach us at
support@feno.coor by calling323-800-8564.
Go to the Home Screen:
Start by ensuring your Smartbrush is
on the home screen. You’ll know you’re
there if you can see the time and your
name displayed.
Prepare for Reset:
Make sure you’re ready to reset the de-
vice to factory settings, as this will erase
any personalized settings and data.
Check Functionality:
After the screen refreshes and returns
to the home screen, try brushing again
to see if the issue has been resolved.
Wait for Countdown:
The reset screen will display a countdown.
Continue holding all three buttons until
the countdown completes, indicating that
the factory reset has started.
Reconnect to Feno App:
Once the reset is complete, open the
Feno app and follow the setup instruc-
tions to reconnect and personalize your
Smartbrush settings.
Hold the Logo Button:
Press and hold the logo button on your
Smartbrush for about 5 seconds. This
will initiate a reboot of the device.
Hold All Three Buttons:
Simultaneously press and hold the logo
button, the up button, and the down
button on your Smartbrush. Keep holding
until the factory reset screen appears.
2
2
1
1
3
3 4
REBOOTING YOUR SMARTBRUSH
FACTORY RESETTING YOUR SMARTBRUSH
29User Instruction Manual
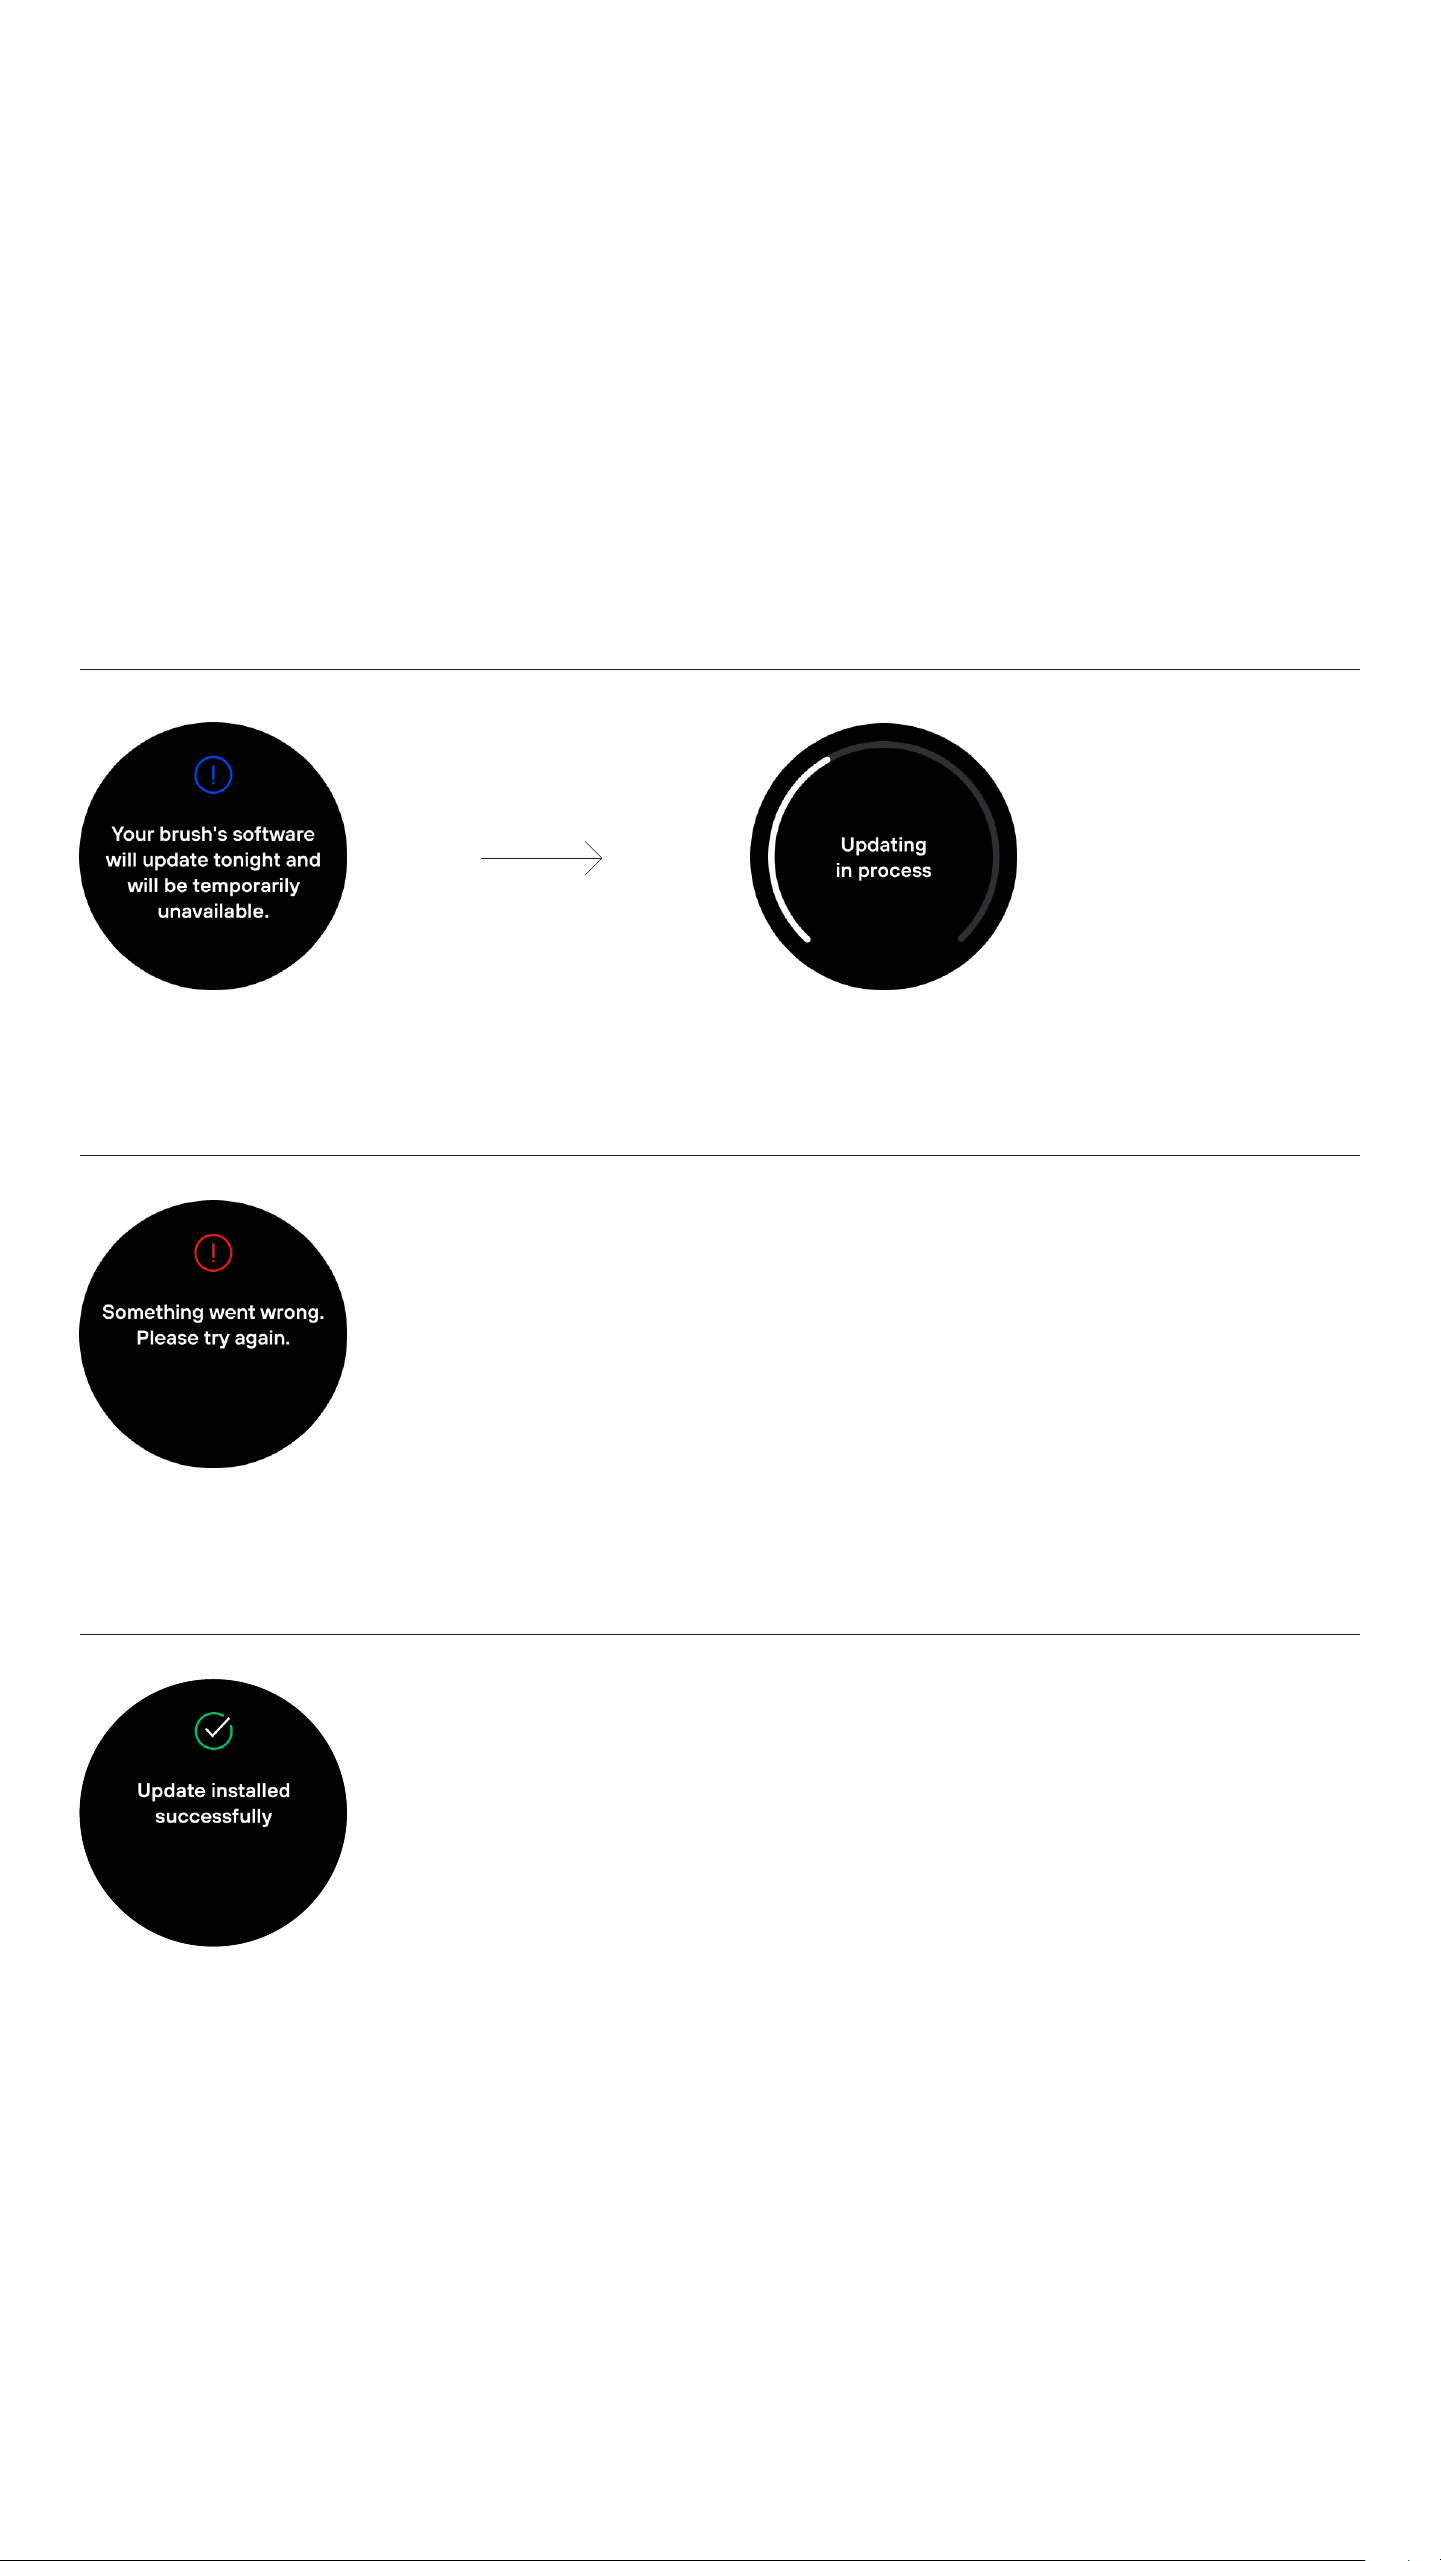
When a software update is available for
your Feno® Smartbrush™, you will see a
notication on your screen indicating that
an update is ready to be installed.
Software Updates
Wait for the next screen to track update
progress. Software updates are only avail-
able if the Feno® Smartbrush™ is connect-
ed to Wi-Fi.
SOFTWARE PROGRESS SCREENS
If you see the screen prompting that there is an error,
please try again until successful. If the problem per-
sists, reach out to support@feno.co.
Once the update is complete and successful, the next
screen will show a check mark with the text that says
the update has been successfully installed.
FAILED UPDATE
SUCCESSFUL UPDATE

30User Instruction Manual
Disposal
Follow the instructions in the DISPOSAL
section in this User Manual for the safe disposal
of the Feno® Smartbrush™.
Contact Feno® Customer Support at
support@feno.co for further assistance.
ACCESSORY DESCRIPTION
The Feno® Smarthandle™ must be disposed
of in accordance with local regulations for
battery disposal.
DISPOSAL OF ELECTRIC EQUIPMENT
DISPOSAL OF PACKAGING WASTE
DISPOSAL OF BATTERIES
Please dispose according to applicable
local regulations. By disposing of the Feno®
Smartbrush™ and its accessories in the
proper manner, you help to avoid possible
hazards for the environment and public
The packaging is made of dierent materials,
which may be disposed of through your
local facilities. By disposing of the packaging
in the proper manner, you help to avoid
The Feno® Smartbrush™ contains a battery.
Batteries may not be disposed of with the
usual domestic waste. They may contain toxic
heavy metals and are subject to hazardous
waste regulations. For this reason, dispose of
health that could otherwise be caused by
improper treatment of waste equipment.
The recycling of materials contributes to the
conservation of natural resources. Therefore,
do not dispose of your old electrical equip-
ment with unsorted waste.
possible hazards for the environment and
public health. The packaging is primarily
made of corrugated berboard, paper pulp
material and plastics.
the Rechargeable Smarthandle™ (the part
that contains the battery) at a local collection
point for waste electrical equipment. Do not
attempt to open the Smarthandle™ and to
remove the battery yourself.

31User Instruction Manual
Warranty
Feno® Smartbrush™ warrants these prod-
ucts to be free of defects in material and
workmanship as follows:
TrueFit™ Mouthpiece - for a period of (1)
month from the date of original purchase.
Smarthandle™ - for a period of (12) months
from the date of original purchase.
The Hub™ - for a period of (12) months from
the date of original purchase.
If the proucts exhibit such defects, Feno®
will, at its option, repair or replace it without
cost for parts and labor. The products must
be carried in or shipped, prepaid and insured
(recommended), to an authorized Feno®
Smartbrush™ Service Center. Proof of date
of original purchase or other acquisition is
required.
The cost to ship the products to an autho-
rized Service Center is the responsibility of
the consumer, the cost to return the prod-
ucts to the consumer is the responsibility of
Feno®.
This warranty does not cover nishes or normal
wear, nor does it cover damage resulting
from accident, misuse, dirt, water, tampering,
unreasonable use, service performed or
attempted by unauthorized service agencies,
failure to provide reasonable and necessary
maintenance, including recharging, or units
that have been modied or used for commercia
l
purposes. In addition, and without limiting
the foregoing, this warranty does not apply
in the following instances:
TrueFit™ Mouthpiece: bending/stretching
it forcefully handling; general weakening of
bristles over time.
Smarthandle™: contact with water more
than splashing.
The Hub™: cleaning/submerging/
lling with water of the Hub™; charging of
other products than the Smarthandle™;
using inappropriate adapter/ cable/power
outlet for running the Hub™.
OPENING OF THE CASING AND/OR ANY
CHANGES TO THE COMPONENTS OR
PRODUCTS AS A WHOLE AUTOMATICAL-
LY VOIDS THE WARRANTY.
ALL IMPLIED WARRANTIES, INCLUD-
ING ANY IMPLIED WARRANTY OF MER-
CHANTABILITY OR FITNESS FOR ANY
PARTICULAR PURPOSE, ARE LIMITED
IN DURATION TO: ONE (1) MONTH FOR
THE TRUEFIT™ MOUTHPIECE, TWELVE
(12) MONTHS FOR THE SMARTHANDLE™,
AND TWELVE (12) MONTHS FOR THE
HUB™ FROM DATE OF ORIGINAL PUR-
CHASE OR OTHER ACQUISITION. SOME
STATES DO NOT ALLOW LIMITATIONS
ON HOW LONG AN IMPLIED WARRANTY
LASTS, SO THE ABOVE LIMITATION MAY
NOT APPLY TO YOU.
IN NO EVENT WILL FENO LABS, INC. OR
ANY OF ITS AFFILIATES OR SUBSIDIAR-
IES BE LIABLE FOR ANY SPECIAL, INCI-
DENTAL OR CONSEQUENTIAL DAMAGES
BASED UPON BREACH OF WARRANTY,
BREACH OF CONTRACT, NEGLIGENCE,
TORT, OR ANY OTHER LEGAL THEORY.
Some states do not allow the exclusion or
limitation of incidental or consequential
damages, so the above limitation may not
apply to you.
This warranty gives you specic legal rights,
and you may have other legal rights which
vary from state to state.
How to obtain service and additional infor-
mation:
Should this products require service,
please contact us at support@feno.co to be
referred to the preferred authorized Feno®
Smartbrush™ Service Center. To obtain
service, ship the products to the referred
authorized Feno® Smartbrush™ Service
Center. Pack the products well. Ship the
products prepaid and insured (recommend-
ed). Include a copy of your proof of purchase
or other acquisition to verify warranty cover-
age, if applicable.
To order original Feno® Smartbrush™ re-
placement parts and accessories or to ob-
tain a hard copy of this warranty, please
contact us at support@feno.co
Warranty - USA

Feno Labs, Inc.
10395 JEFFERSON BLVD,
CULVER CITY, CA 90232
UNITED STATES
User Instruction Manual

FCC Statement
This device complies with part 15 of the FCC Rules. Operation is subject to the following two
conditions: (1) This device may not cause harmful interference, and (2) this device must accept any interference
received, including interference that may cause undesired operation. This equipment has been tested and found to
comply with the limits for a Class B digital device, pursuant to part 15 of the FCC Rules. These limits are designed to
provide reasonable protection against harmful interference in a residential installation. This equipment generates,
uses and can radiate radio frequency energy and, if not installed and used in accordance with the instructions, may
cause harmful interference to radio communications. However, there is no guarantee that interference will not occur
in a particular installation. If this equipment does cause harmful interference to radio or television reception, which
can be determined by turning the equipment off and on, the user is encouraged to try to correct the interference by
one or more of the following measures:
•Reorient or relocate the receiving antenna.
•Increase the separation between the equipment and receiver.
•Connect the equipment into an outlet on a circuit different from that to which the receiver is
connected.
•Consult the dealer or an experienced radio/TV technician for help.
Caution: Any changes or modifications to this device not explicitly approved by manufacturer could void your authority
to operate this equipment.
RF Exposure Information
For Wireless charger
The device has been evaluated to meet general RF exposure requirement. This equipment should be installed and
operated with minimum distance 20cm between the radiator and your body.