# MatterDetails
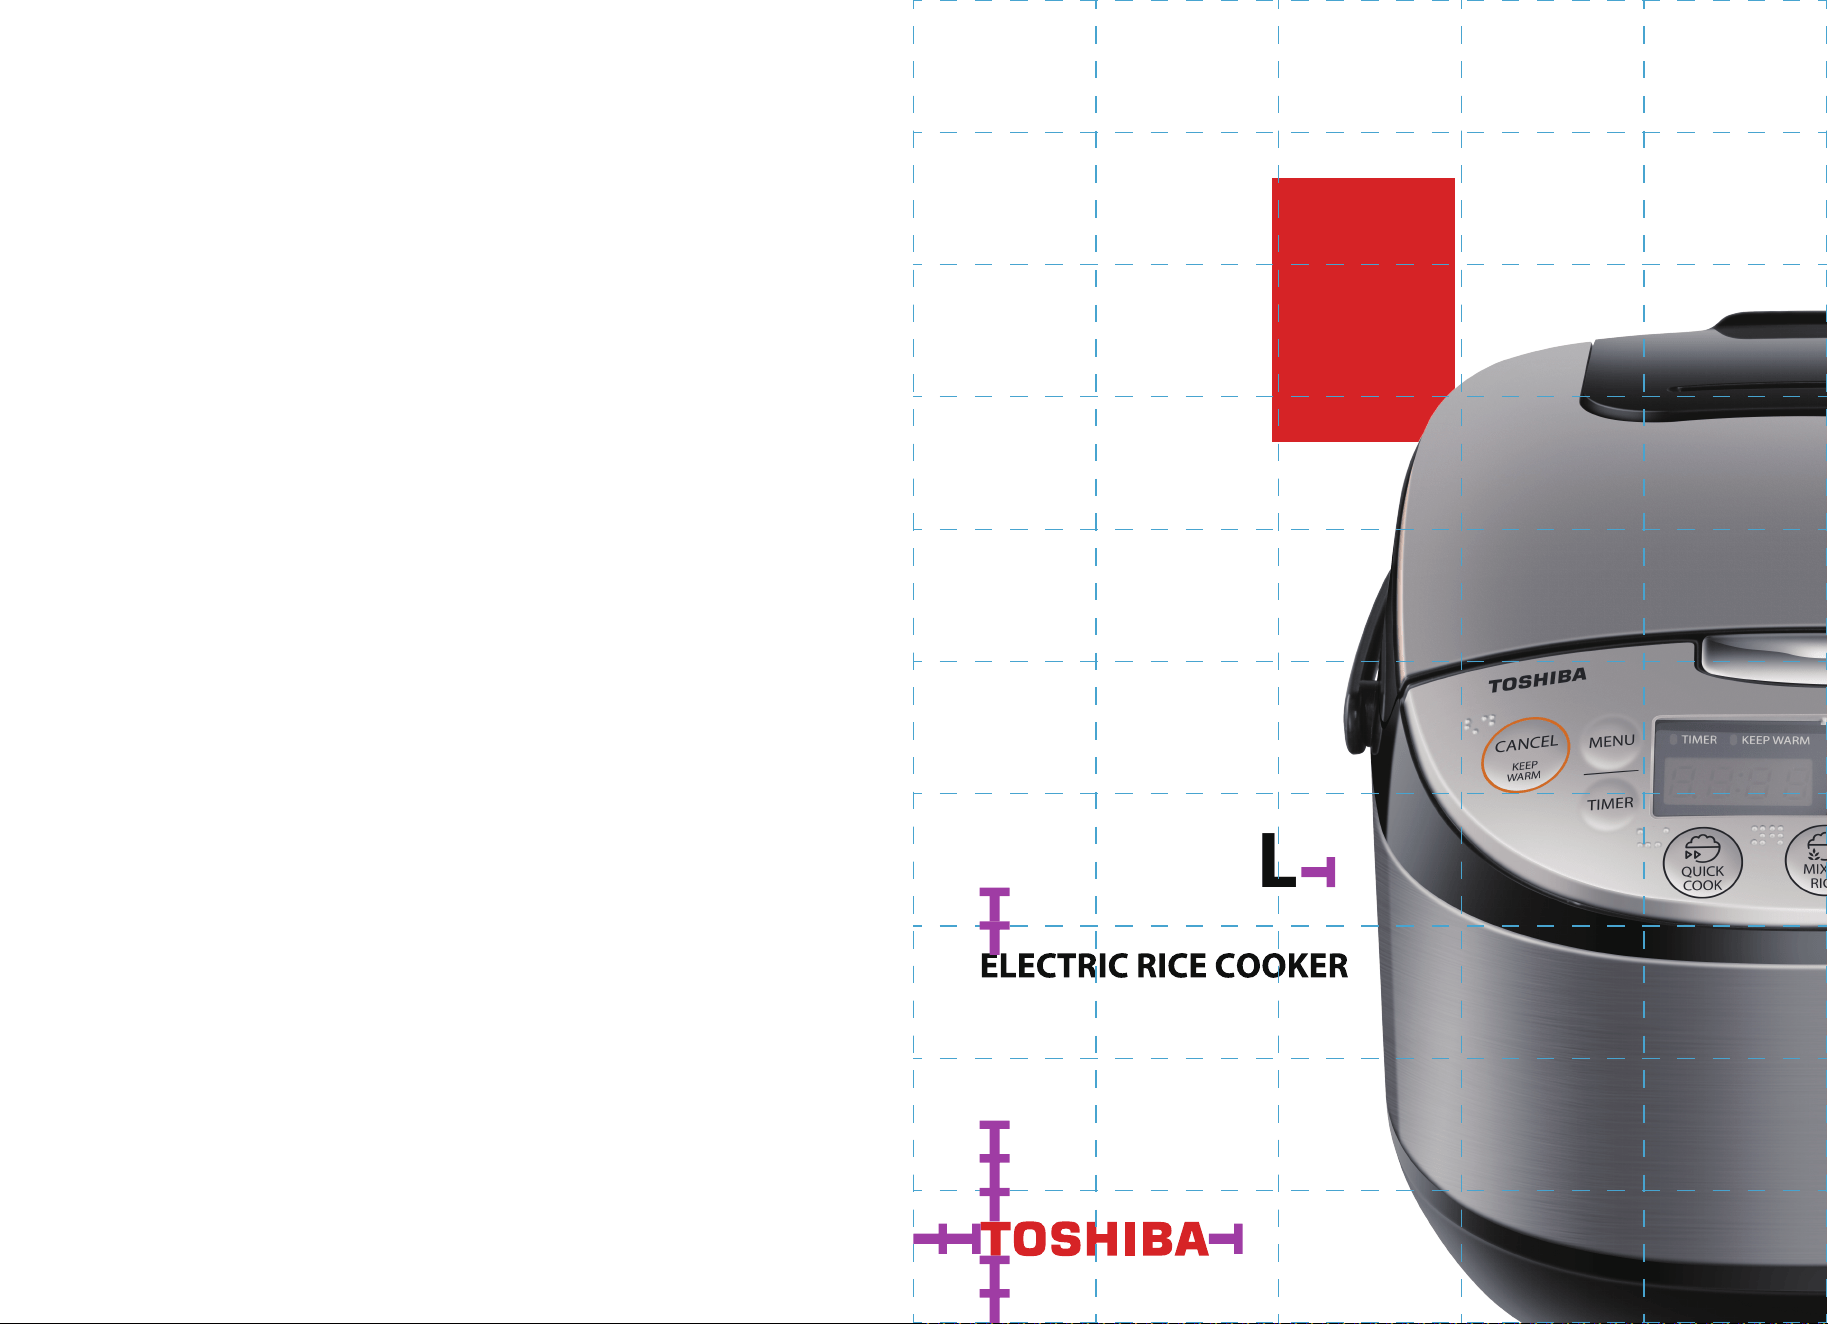
USER
MANUAL
RC-10DR1TMY(N)
RC-10DR1TMY(S)
RC-18DR1TMY(S
)
)
●
Please read the instruction manual and use it correctly for
your own safety.
Before using, please read “Safety Cautions” and “Please
follow the instructions”. (page 2 – 7)
●
After reading, please keep the instruction manual at a place
where any person who is going to use this cooker can nd
and see it.
Thank you for purchasing Toshiba rice cooker.
Contents
Safety Cautions
……………………. .
2
Please observe and follow
…………….… 7
Parts Identication ………………………
8
Basic steps to cook rice ………………… 9
How to cook delicious rice……………… 11
Rice cooking procedures …………… 12
Standard of cooking amounts and cooking times
12
Display of cooking times
……………………
12
Setting the timer
……………………… 13
Clock Adjustment
………………………… 13
“Keep Warm”
……… 14
Food preparation methods
…………… 15
How to use “Steam” with steam stand …
16
Cake & Crispy Rice
………………...…
17
Sushi
……..............…………………
18
Soup & Congee
.......……………...…
19
Clean & Care………………………… 20
How to take out and put in the inner lid,
steam vent
…………………………
20
Cleaning by boiling ……………………
20
In case of problems …………………
21
Power failure
…………………………
23
Error indication ……………………… 24
……………………… 24
Clean & Care / Special notices
Making proper use
Rice Cooking
Before Use
…
.
...
....
....
.
...
.
...
…
…
WARNING CAUTION
SAFETY CAUTIONS
■ This is to explain the extent of injuries and damages that may occur if the
instructions are not followed.
Probable causes of
“severe injuries”or
“death”
Probable causes of
“bodily harm”or
“property damages”
Please follow for your own safety
■ The explanation are divided into sections according to instruction details.
To prevent res, burns, electric shocks, electricity
leakage, short circuits
WARNING
Misuse may cause potential injury
WARNING
“PROHIBITION”
cases
“CAUTION" cases
“OBSERVATION"
cases
Warning: Avoid spilling to the
connector.
●
If the supply cord is damaged,
it must be replaced by a
special cord or assembly
available from the manufacturer
or its service agent.
●
Please turn o and unplug the
appliance before cleaning,
maintenance or relocation and
whenever it is not in use.
●
Don't place the appliance
to the place close to
heat-sensitive curtains.
This appliance is intended to
be used in house-hold and
similar locations such as:
Sta kitchen areas in shops,
oce and other working
environments; farm houses;
by clients in hotels,motels and
other residential type
environments; bed and
breakfast type environments.
●
●
●
Children should be supervised
to ensure that they do not play
with the appliance.
●
The heating element surface
is subject to residual heat
after use, do not touch.
This appliance is not intended
for use by persons (including
children) with reduced
physical,sensory or mental
capabilities, or lack of
experience and knowledge,
unless they have been given
supervision or instruction
concerning use of the
appliance by a person
responsible for their safety.
This appliance is for
household use only. Do not
use outdoors.
●
2
※ Illustration in the instruction manual might be dierent from the product you
purchased.
● Use a separate socket of
220-240V.Using the cooker
with other appliances will
result in overheating leading to
re hazards.Do not connect
the product to the power
source which is not specied
in the operation manual.
Do not allow children to ap
the plug.
If an extension cord is
necessary, use it separately.
●
Fully insert the plug into the
socket.
●
Periodically remove dust from
the power plug. Accumulation
of dust, due to humidity, will
cause insulation failure leading
to re hazards. Use dry cloth
to wipe dust away.
●
Make sure there is no metallic
articles or trash ( e.g., pin, etc.)
left at the pointed end of
cooker-plug.
●
Use the power plug / cord correctly.
●
●
Always unplug when not in
use. If not, due to insulation
deterioration, it may cause
an electric shock, electricity
leakage, re hazards, etc.
●
Stop using immediately if
abnormalities/malfunctions are
found.
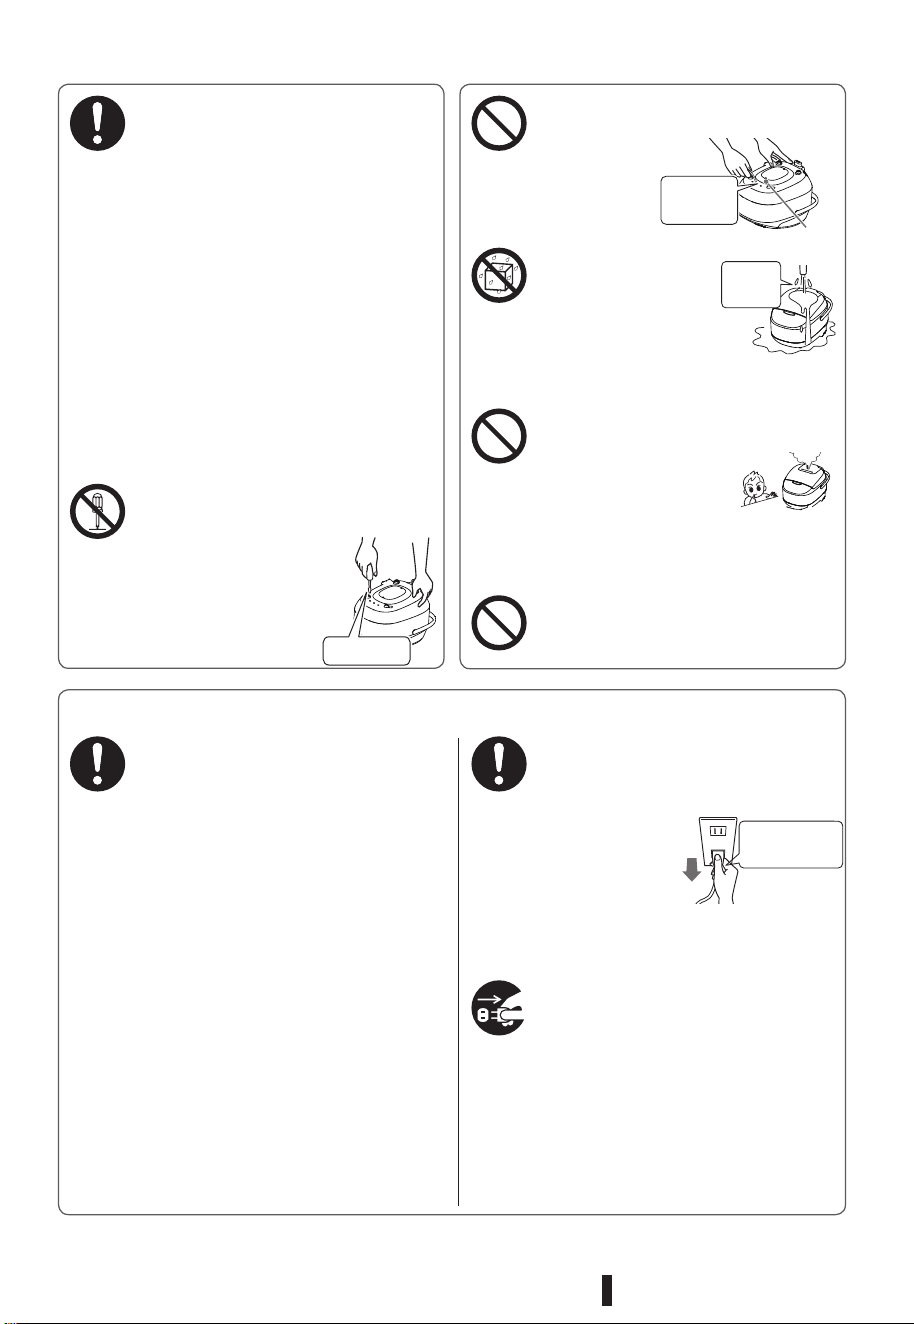
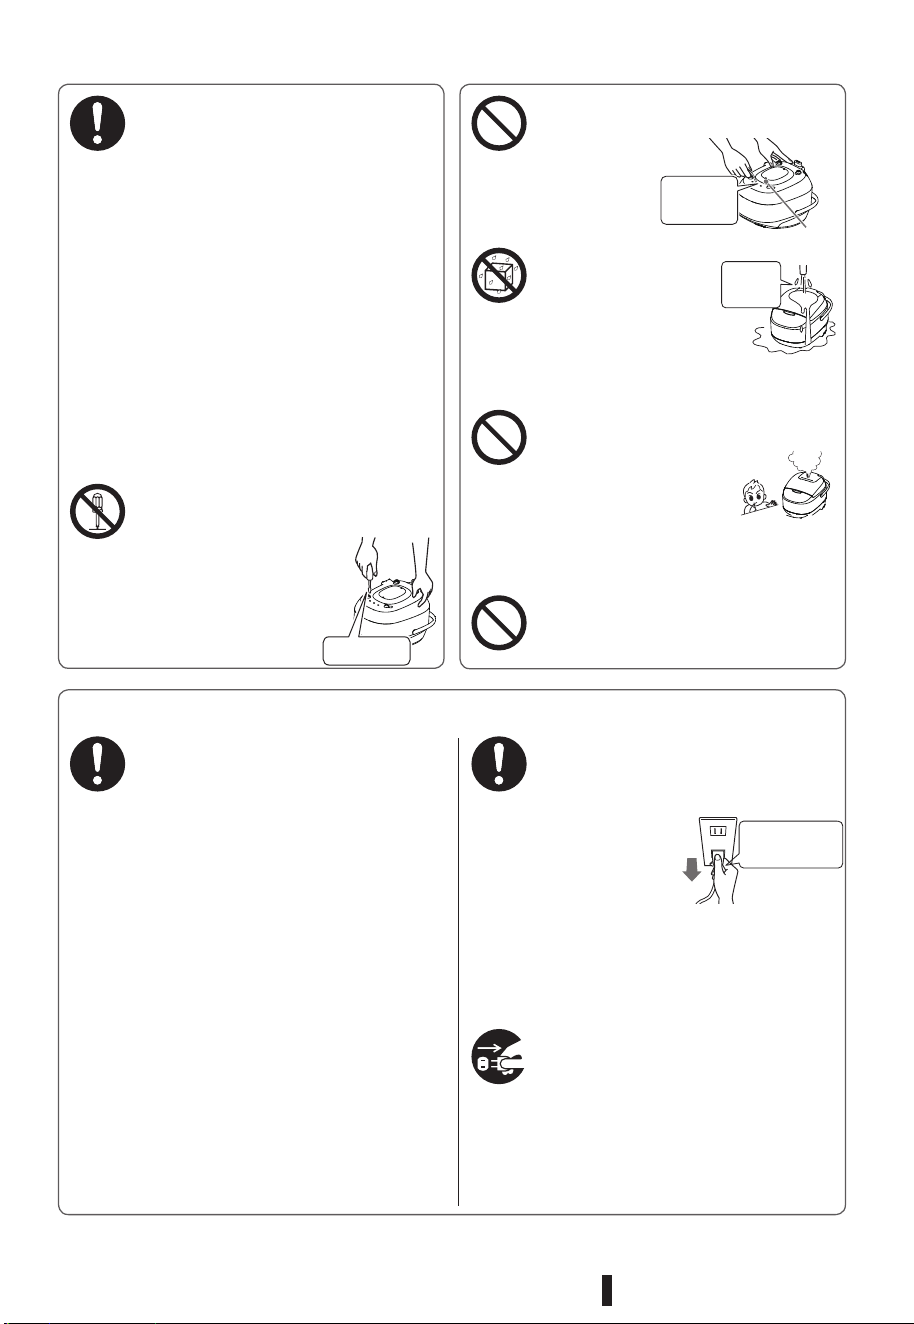
Do not insert any foreign object
into the air vent or blank gaps
at bottom of the
cooker.
While cooking, do not open the
inner lid or move/carry the rice
cooker to other places.
Especially
metal articles
e.g. pins, wire, etc.
Unplug immediately and
contact the Store from which
the product was bought or
Toshiba service center for
examination and repair.
● The power plug / cord is
abnormally hot.
● The cooker has a burnt smell.
● The cooker is partly cracked,
loosen, wobbling.
●
The inner pot, outer lid, or
inner lid is broken or deformed.
● The cooking heater becomes
bent.
Do not immerse
the cooker body
and the power plug
and cord in water or
pour water over them.
Do not place them in a place
exposed to water.
Do not insert
any foreign
object.
air vent
Do not disassemble, repair, or
modify the cooker by yourself.
For any repair, please
consult the Store
from which the
product was bought
or Toshiba service
center.
Do not allow anyone unfamiliar
with this cooker handling
to use it by
themselves. Do not
use the cooker where
children can reach, particularly
keep your eyes on children
during cooking or right after
cooked.
DISASSEMBLY
PROHIBITED
Do not
make it
wet
Hold the power plug head
when pulling it out from the
outlet. If not,
it may catch
re, due to
an electric
shock, a short circuit, etc.
Insert the power plug into
the power outlet as far as
the base of the power plug.
Hold the plug
head and pull it
out of the socket.
(Do not hold the
power cord while
unplugging)
3
Safety Cautions
●
●
●
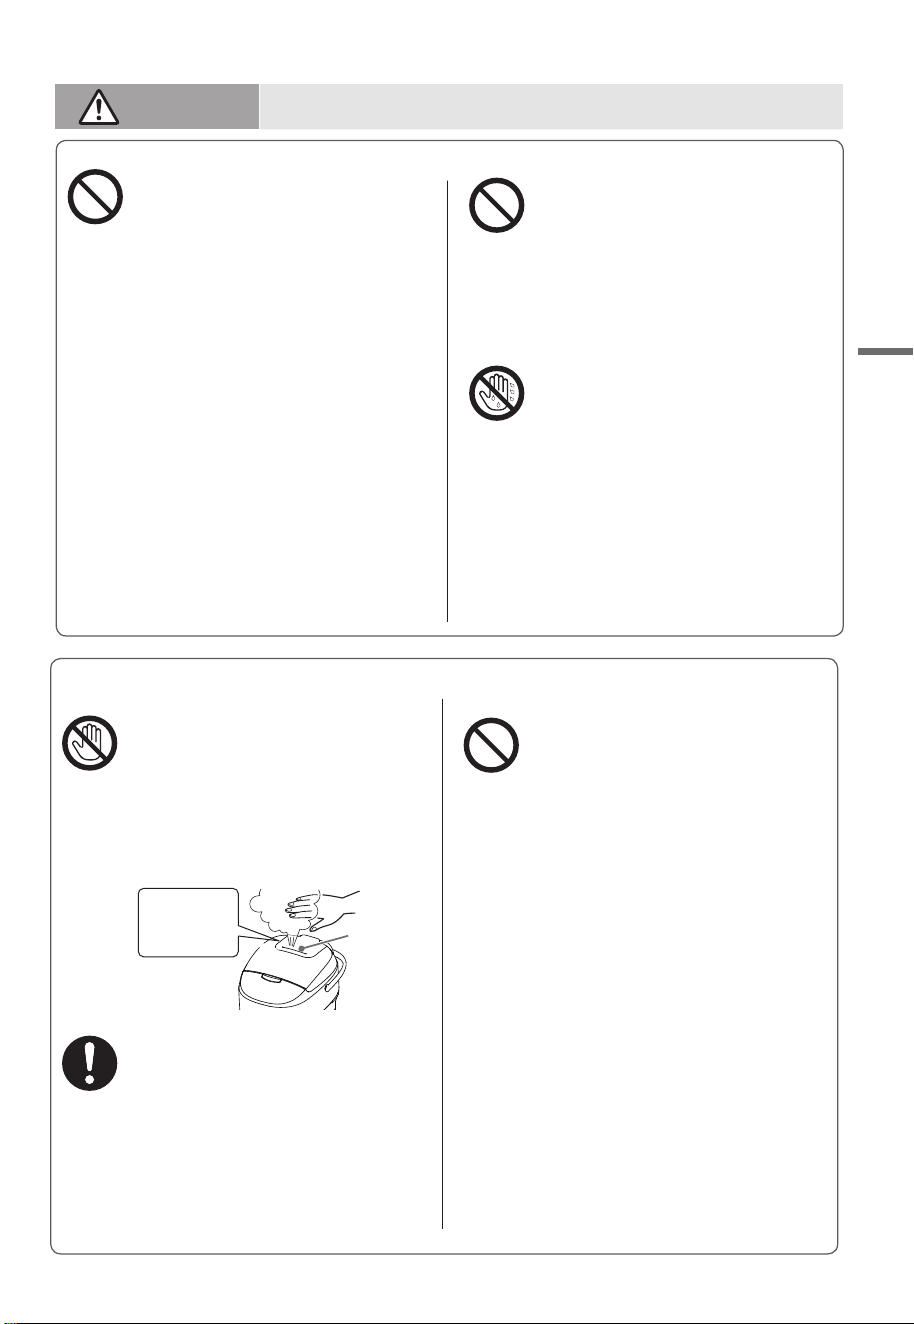
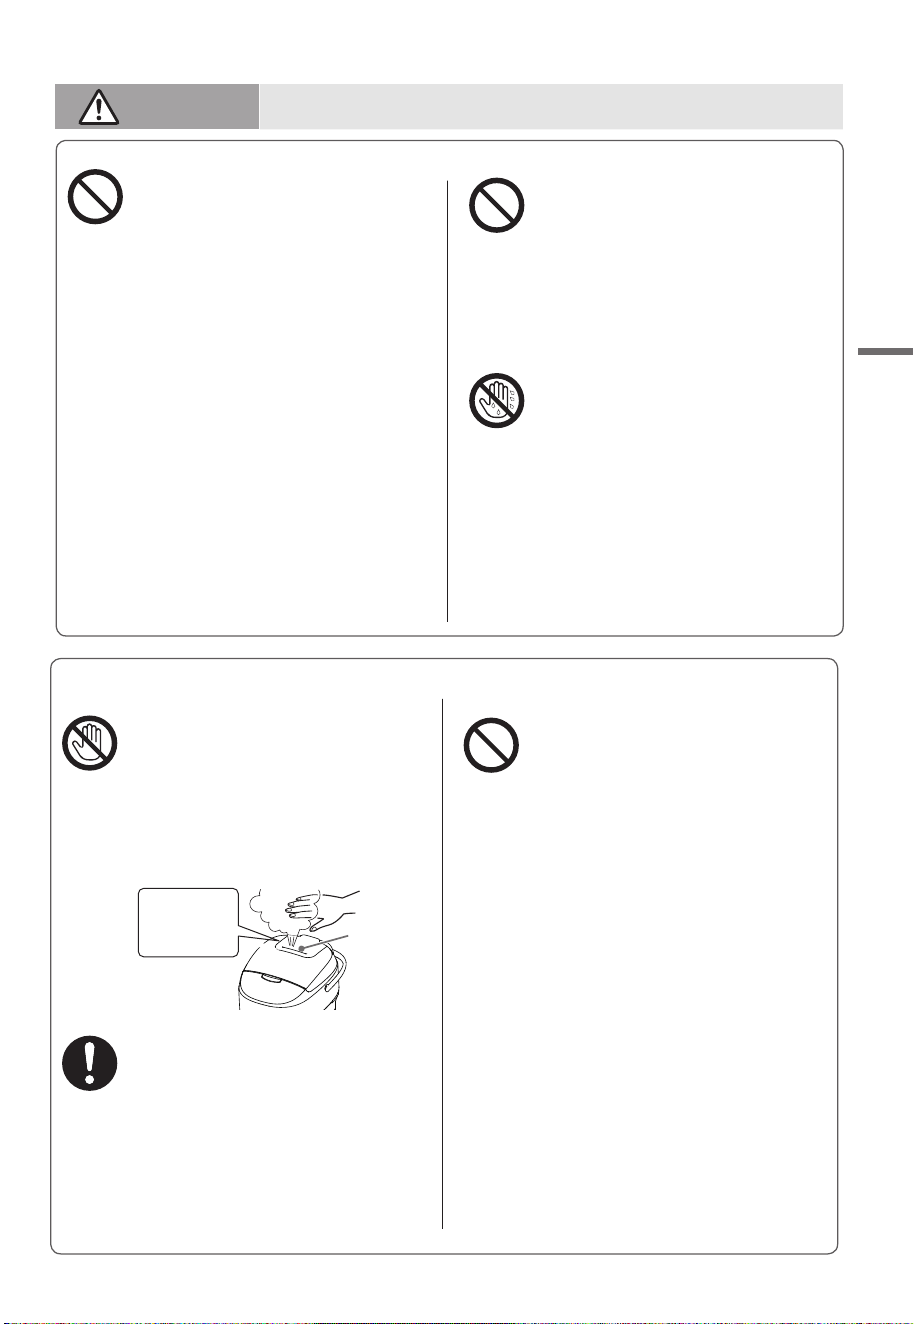
Steam
vent
Hot & strong
steam often
comes out
The steam vent is hot. Keep
your face or hands away from
it.
Be careful, especially with
babies and infants.
Make sure to install the steam
vent.
Do not use the cooker for any
purposes other than those
indicated in the instruction
manual.
Because it may cause food or
steam contained inside spill or
burst out, resulting in burn
wounds/injuries.
Putting materials that may block the
steam vent, for example, cooking
sheets, aluminum foil, lye-removing
sheets, food wraps, or thin-layer
ingredients such as greens,
tomatoes,beans, etc.
Cooking the food that’s easy to spill
out e.g., jams, beans, etc.
Putting ingredients in plastic bags
and heating in the cooker.
《Examples of inappropriate cooking
ways 》
Use the power plug/cord correctly. (continued)
Do not use damaged
cords/power plugs, etc., or
those with loose insertion.
Handle the power cords with
care. Do not pull, tuck, twist,
bend them with force in
unnatural ways or turn on
electricity while they are still
coiled. Do not place heavy
objects on their tops. Do not
modify or deform them in any
way.
Do not insert or pull out the
power plug or the cooker-plug
with wet hands. Make sure
your hands are dry before
touching the power plug.
Do not touch the product, cord, or
power plug with wet hands. Do not
operate the product if the cord or
power plug is damaged, or the power
plug is inserted improperly.
Do not let steam reach the
power plug or other electrical
appliances. Especially be
careful when using any
kitchen storage shelf.
Do not place the power plug
or cord in the place with high
temperature, ooded water,
and high humidity or touch it
with sharp-edge object.
If power cord damaged.
purchase specied replacement
from the producer.
Do not use any power cords
other than the cooker
attachments and do not use
the cooker attached cords for
other appliances.
Use the power plug/cord correctly. (continued)
●
●
●
●
●
●
●
To prevent res, burns, electric shocks, electric leakage,
short circuit, etc.
WARNING
4
(continued)
●
●
While using or after using, do
not touch hot parts including
the inner lid, the cooking
heater, the inner pot, the
steam vent, the heat sink, etc.
When not in use, do not press
the “Cook” key or
“CANCEL/KEEP WARM” key.
●
To maintain or repair, do it
after unplugging and the
cooker has cooled down.
There may be hot water still
gathering in the steam vent.
●
After cooking, beware of
steam or hot water dripping
from the inner lid, while
opening it.
●
Before take out the inner pot,
press the “CANCEL/KEEP
WARM” key. Although the
inner pot is taken out during
cooking or warming, the
power will not be
automatically cut o.
●
Please use a dry dishcloth,
mittens, etc. to take out the
hot inner pot.
●
While moving the cooker, do
not touch the hook button.
●
Do not shake the cooker while
holding the handle.
●
While cooking, do not set up
the handles.
●
Do not turn on the cooker,
when the pot is empty.
Because it may cause
overheating, breakdowns,
and malfunctions.
Because the cooking heater, the
inner pot, the outer pot, the
inner lid will be at high
temperature.
To prevent burn wounds / injuries.
To prevent electricity leakage, electric shocks, bodily
harm, burn wounds, re hazards, and property damages.
To prevent boiling over or spilling out
CAUTION
●
●
Rice porridge is to be made
with lots of water, so we don’t
use “White Rice” or “Quick
Rice” menu.
Please make rice porridge by
“Congee” menu.
Do not increase water too
much more than the indicated
water level scale.
The standard is within 2 mm
against the indicated water
level scale.
5
●
A place where near the naked
ame, wet area,or hot and high
humidity area.
Also beware for the accessories
and attachments.
●
Do not use any other things instead of the inner pot which is specically
designed for the cooker.
●
Do not bring any ammable object, hazardous object, chemicals, or
ammable gas near or in the product.
●
Read the instruction manual carefully and thoroughly before using the
product.
●
Always inspect that the product is in a good operating condition before
using by following the recommendation in the instruction manual.
●
Remove all packing materials.
When putting the cooker on a
kitchen storage shelf, be careful not
to let steam be conned.
●
●
Sliding table with insucient load
strength.
The load strength standard is
1.0L type : 10 kg and up;
1.8L type : 12 kg and up;
●
An uneven/unstable place or on
heat-sensitive carpets, mats, etc.
They may cause burn wounds, re
hazards.
●
On materials that may block the air
vent, for example paper, cloth ,
carpet, etc.
●
A place where the lid cannot be
fully opened. It may cause burn
injuries and damages.
SAFETY CAUTIONS
Please follow for your own safety
To prevent electricity leakage, electric shocks, bodily harm,
burn wounds,re hazards, and property damages.
Do not use the cooker in the following places
●
The high electromagnetic area.
●
A place close to walls, furniture,
etc.
For safe use
CAUTION
6
Please observe
and follow
To prevent breakdowns, malfunctions, etc.
Do not use the cooker in the following
places.
They may cause malfunctions,
deformation, discoloration, etc.
Keep the cooker and surroundings
clean and ready to use. Dust, bugs, etc.
entering inside of function-maintain-
ing parts (such as the air vent, etc.,) may
cause malfunctions of the cooker.
● Do not put dishes in the inner pot
and use it as a washing-up bowl.
● Do not use a scrubbing brush or
dish washer to wash the inner pot.
● Do not use any cleanser, bleaching
agent to wash the inner pot. (use
neutral detergent for kitchen use.)
● Rice seasoned and cooked with
various ingredients cannot be kept
warm. (Please wash right after
using seasonings.)
● Do not use vinegar.
● Do not scrub with a scoop or strike
with a sieve.
● Do not use a metal ladle or a
whisk.
Do not use the cooker in the following ways to prevent coating inside the inner pot
from getting scratched and getting unstuck
●
A place which is exposed to
direct sunlight
● A place where oil, etc., splashes
Do not put any dishcloth on the lid,
especially on the steam vent.
Steam may be confined, resulting in
malfunctions, deformation,
discoloration, etc. of the lid, the steam
vent, and operation parts.
Wipe away water droplets or any
foreign substances.
If using while foreign substances are
left, stuck to the cooking heater, the
temperature sensor, the outer part of
inner pot, the packing of inner lid, etc.,
rice will not be well cooked, resulting
in malfunctions.
Do not use the inner pot with a gas
range, IH cooking appliances,
microwave ovens, etc. They may
cause deformation, discoloration,
malfunctions, etc.
Stop using if the cooker become loose,
cracked, fell down.
Please contact the store from which
the product was bought or Toshiba
service center for examination and
repair.
7
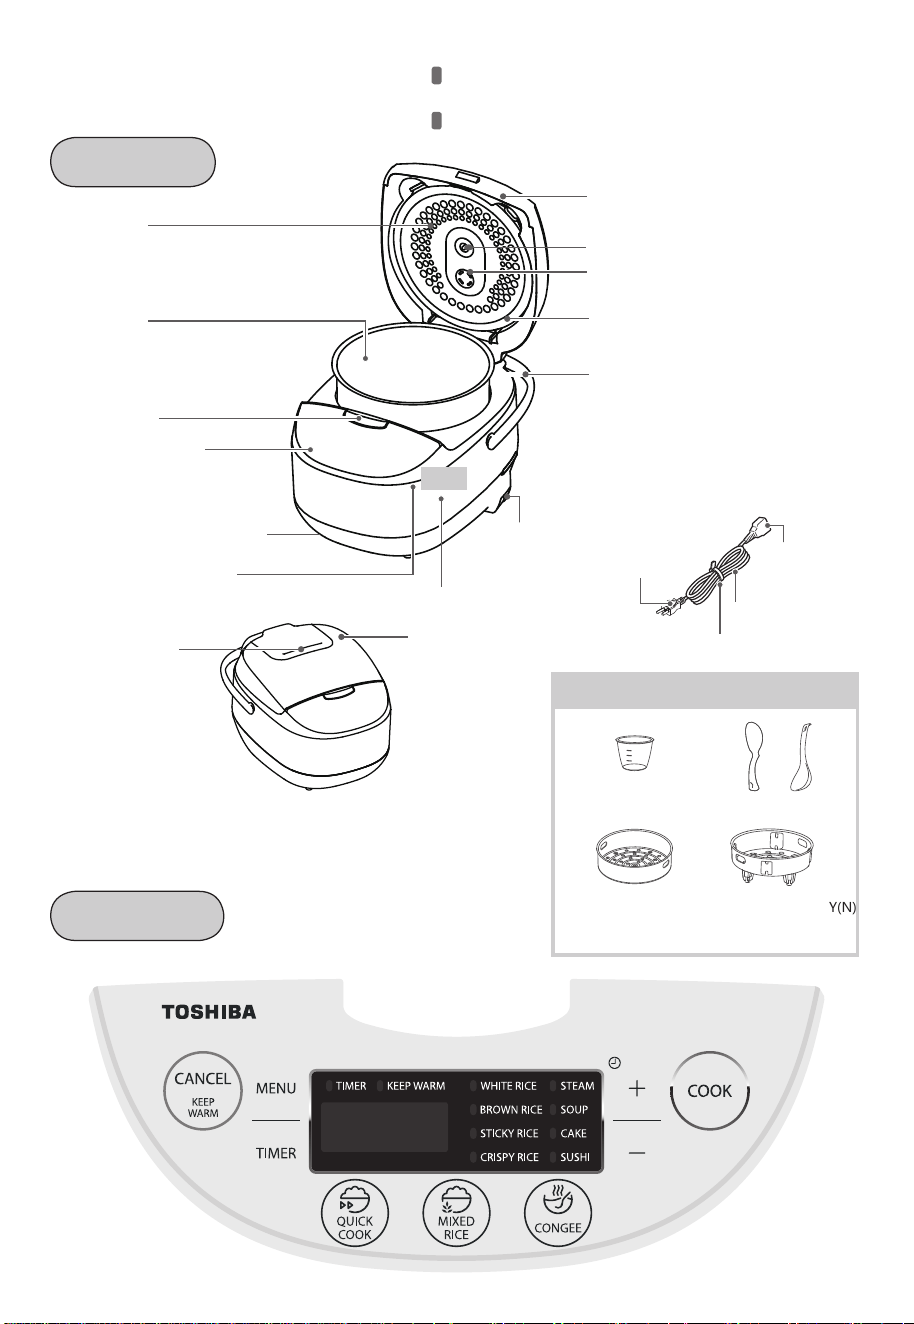
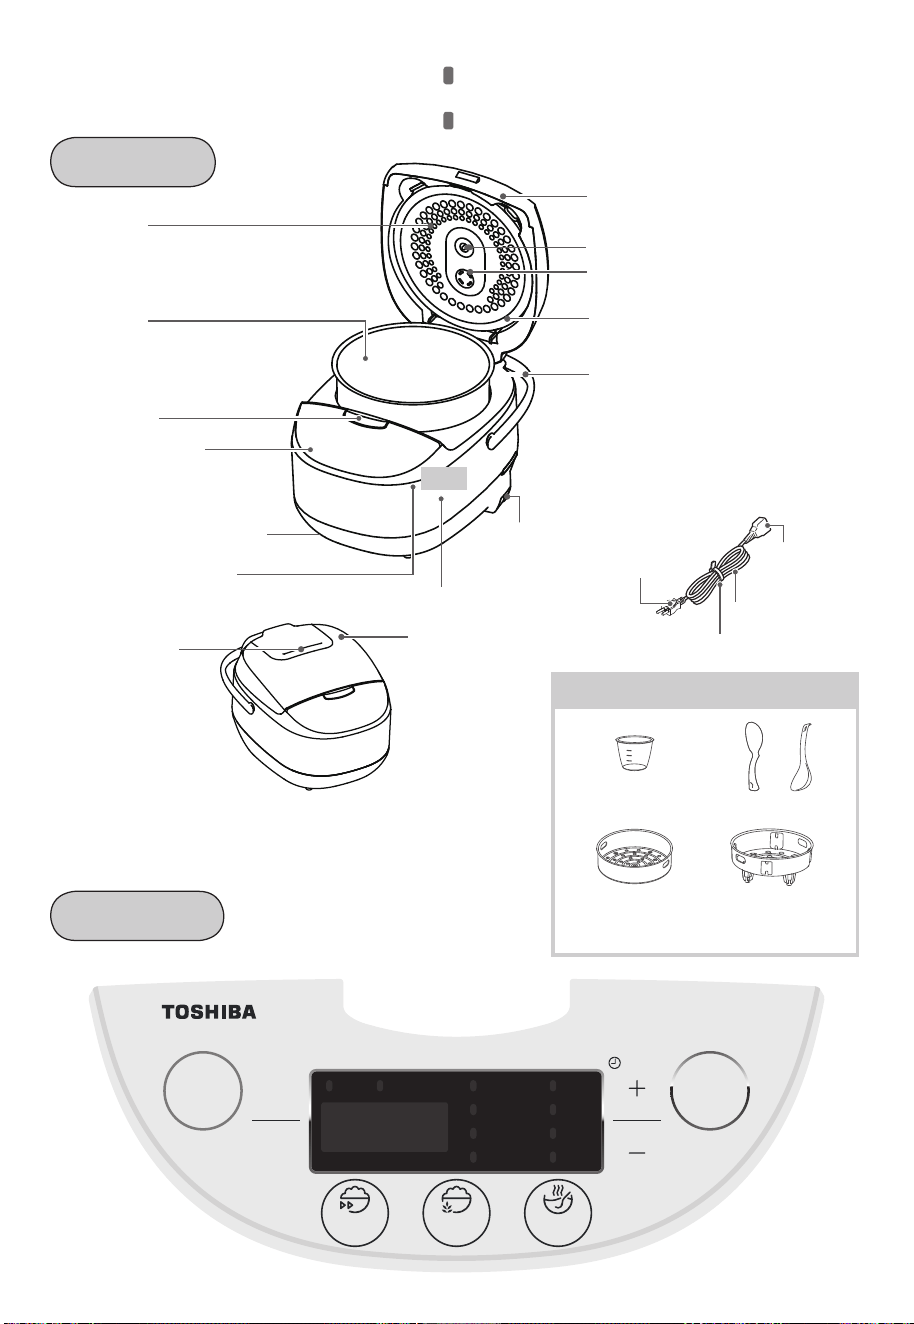
Parts Identication
Body
Operation Panel
Inner pot
Inner Lid Packing
Outer Lid
Handle
Hook Button
Operation Panel
Cover Sensor
Temperature Sensor
(remove foreign matters)
Steam Vent
(remove and wash
every time)
Inner Lid
Air Vent (at the bottom)
inside
Steam Exit
Accessories
Scoop
Measuring cup
(approximately 180 ml.)
Cooking Heater
Safety
Warning Label
Cooker-Plug Hole
Power cord (Cord set)
Power Plug
Cooker-Plug
cord
Please remove strap from cord
when using rice cooker
Spoon
For Model:
RC-10DH1NMY
RC-18DH1NMY
For Model:
RC-10DR1TMY(N)
RC-10DR1TMY(S)
RC-18DR1TMY(S)
When using for the rst time, please wash the inner pot, inner lid,
steam vent, other accessories and attachments
At rst use, there might be an odor from plastic, etc. This odor will
disappear after using
8
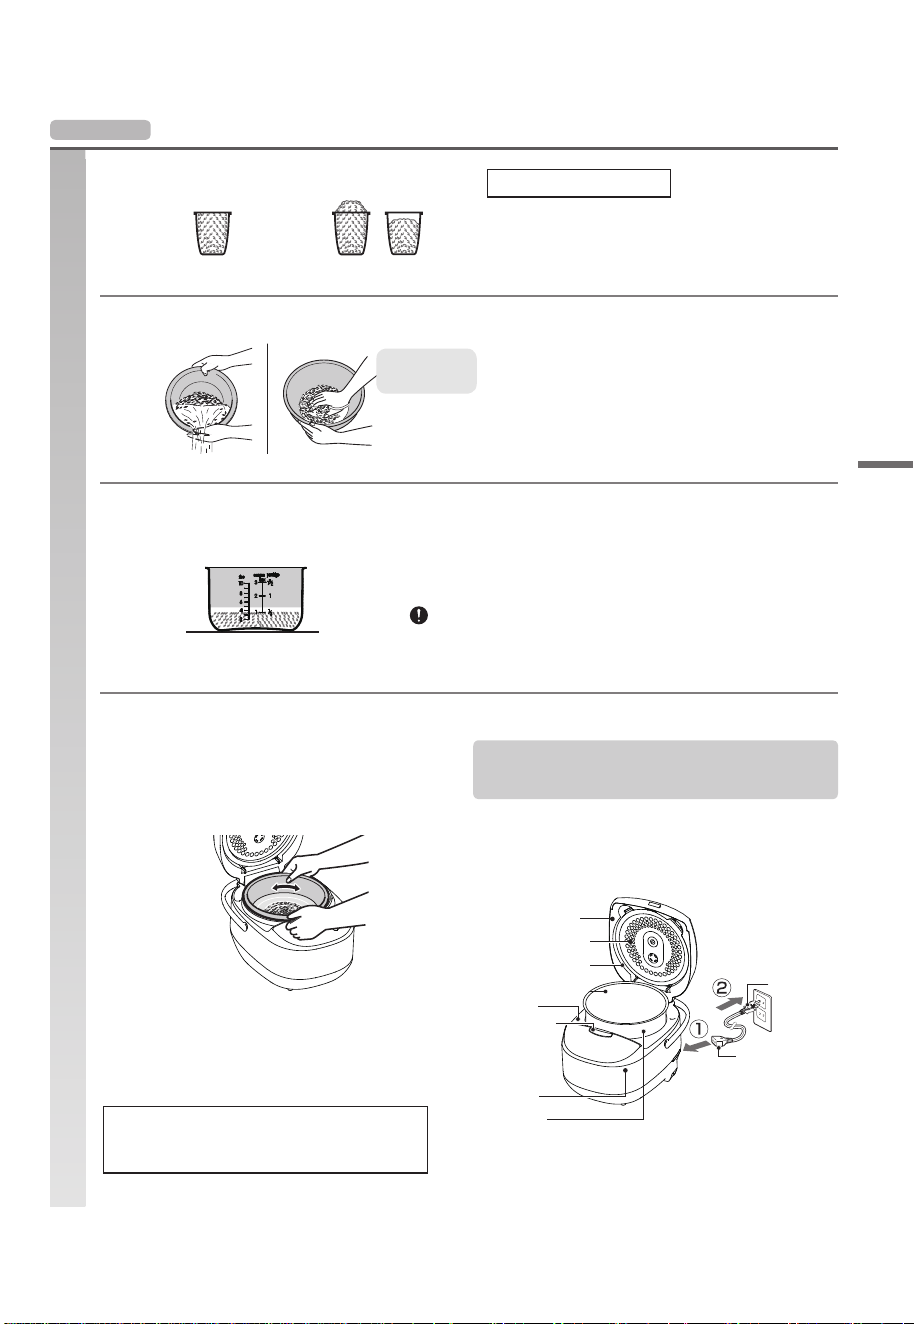
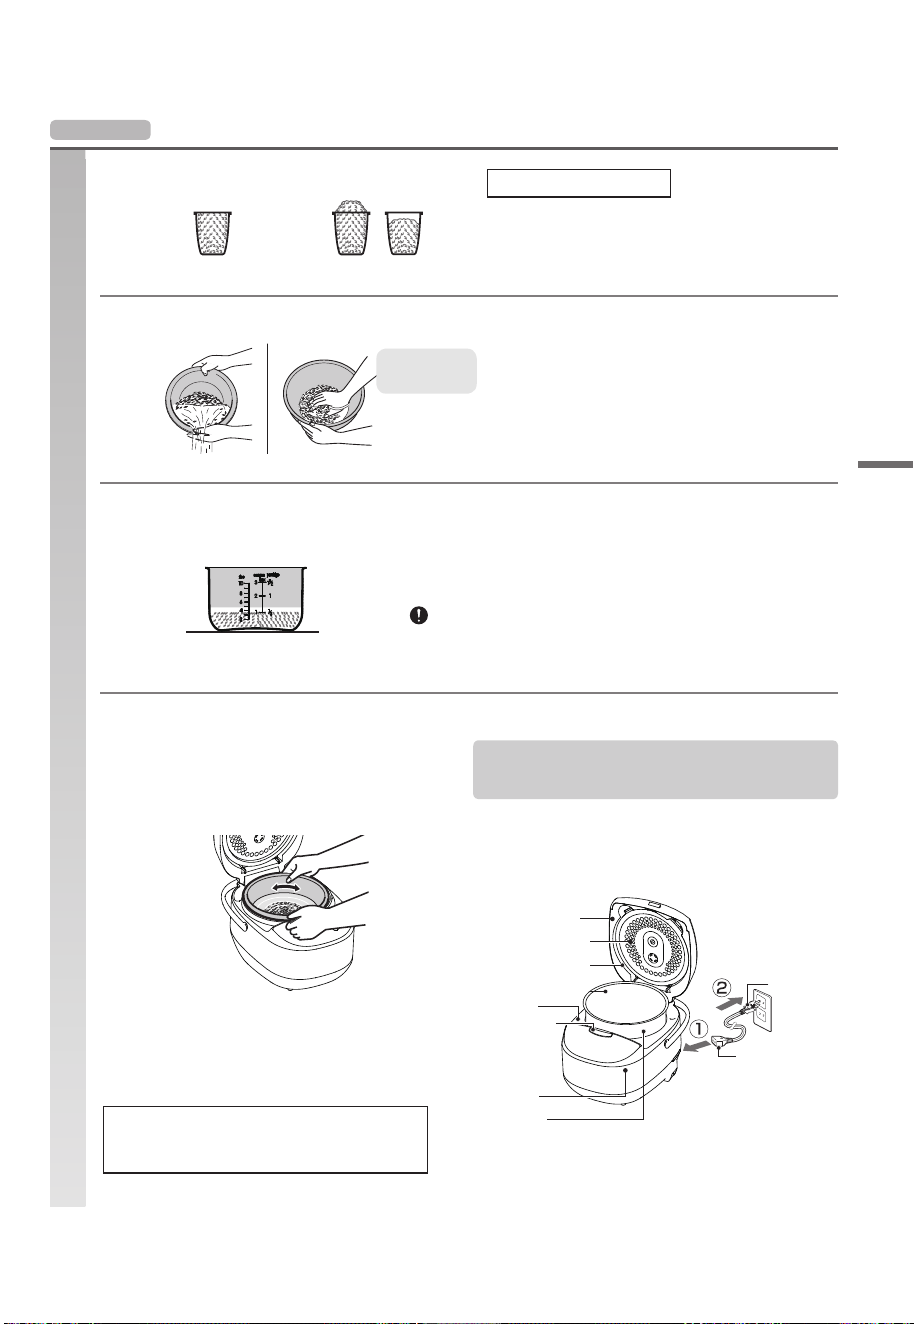
Basic Steps to Cook Rice
1
Measure rice
●
It might dier from other food measuring cups
(200ml) or other rice measuring vessels.
Quickly rinse the rice until
the water runs clear.
Select the water level scale based on the size and number of
the measuring cup.
1. Fill plenty of water, swirl the rice around
quickly and gently (with one hand), then pour
out the water immediately.
2. Polish the grains of rice and rinse several
times, until the water runs clear.
Preparation
A level cup = 180ml
[Good example] [Bad example]
Basic Steps to Cook Rice
Basic Steps
3
Adjust the water level.
Wipe o water droplets, foreign
subsatances, and set the inner pot,
then close the lid.
.
please adjust the water level according
to your taste.
Level o the rice, on a at place.
●
(
Standard: adjust within 2mm against the indicated scale)
4
●
If there are water droplets or foreign substances left
or stuck to the following parts, please wipe o.
Levelly place the inner pot on the bottommost
part inside the cooker (without inclination to
either side).
Turn the inner pot 2-3 times in the direction as
shown by the arrows, to have it closely touch
the cooking heater.
Water droplets or foreign substances left may
cause steam leakage, cause the lid to fail to
close completely, and cause the rice not to
cook well,
Gap of hook button
Temperature
sensor
Inner surface of outer lid
Inner lid packing
Brim of inner pot
Frame
Outer surface /
Bottom surface of inner pot
Inner lid
Power plug
Cooker plug
1. Insert the cooker plug.
2. Insert the power plug.
Connect the power cord:
with the measuring cup provided
2
Wash rice.
●
In case of washing rice in the inner pot,
please do not use any whisk.
The inner pot
can be used to
rinse rice
9
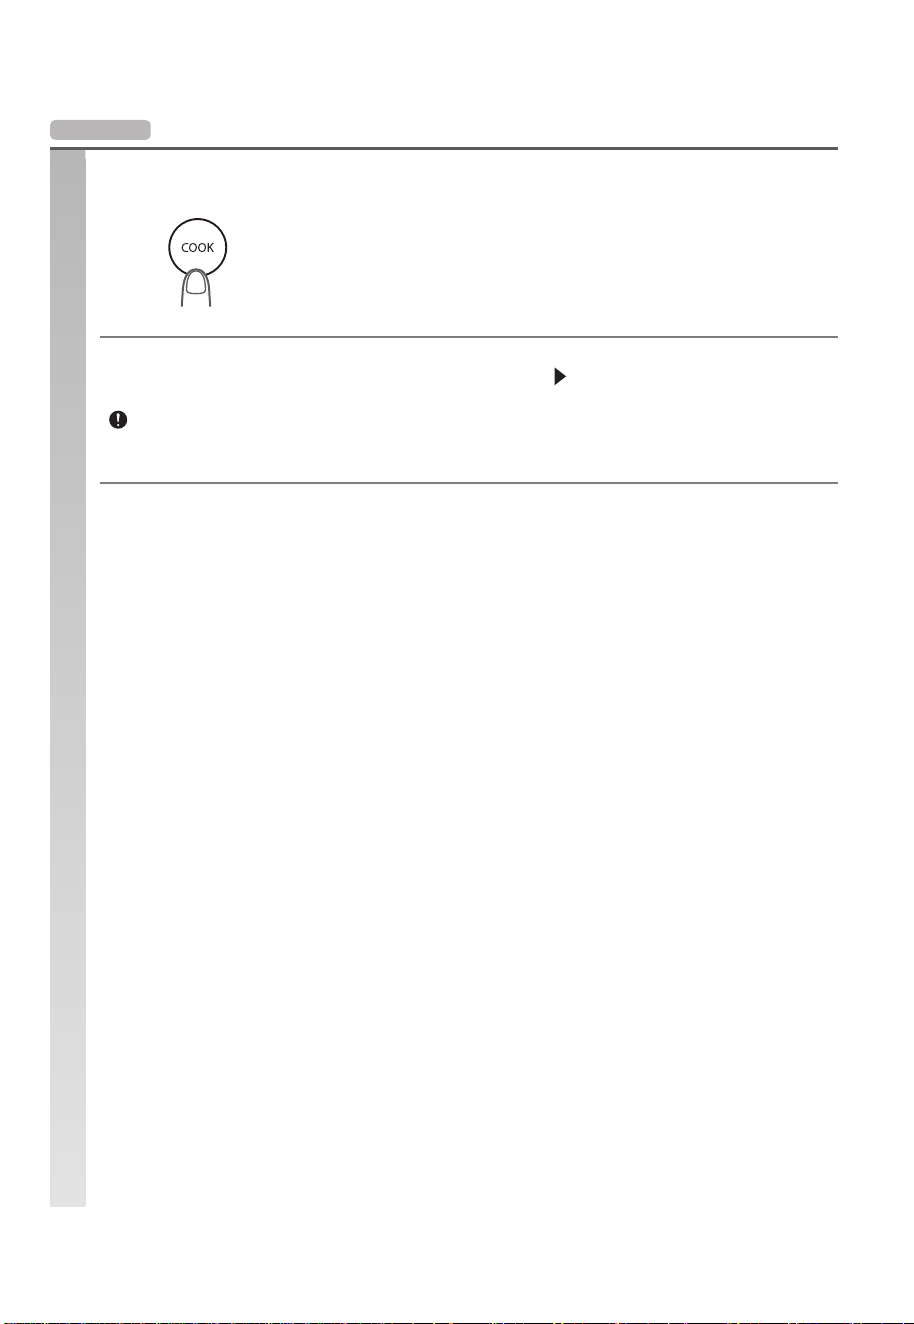
Basic Steps to Cook Rice
Preparation
Basic Steps
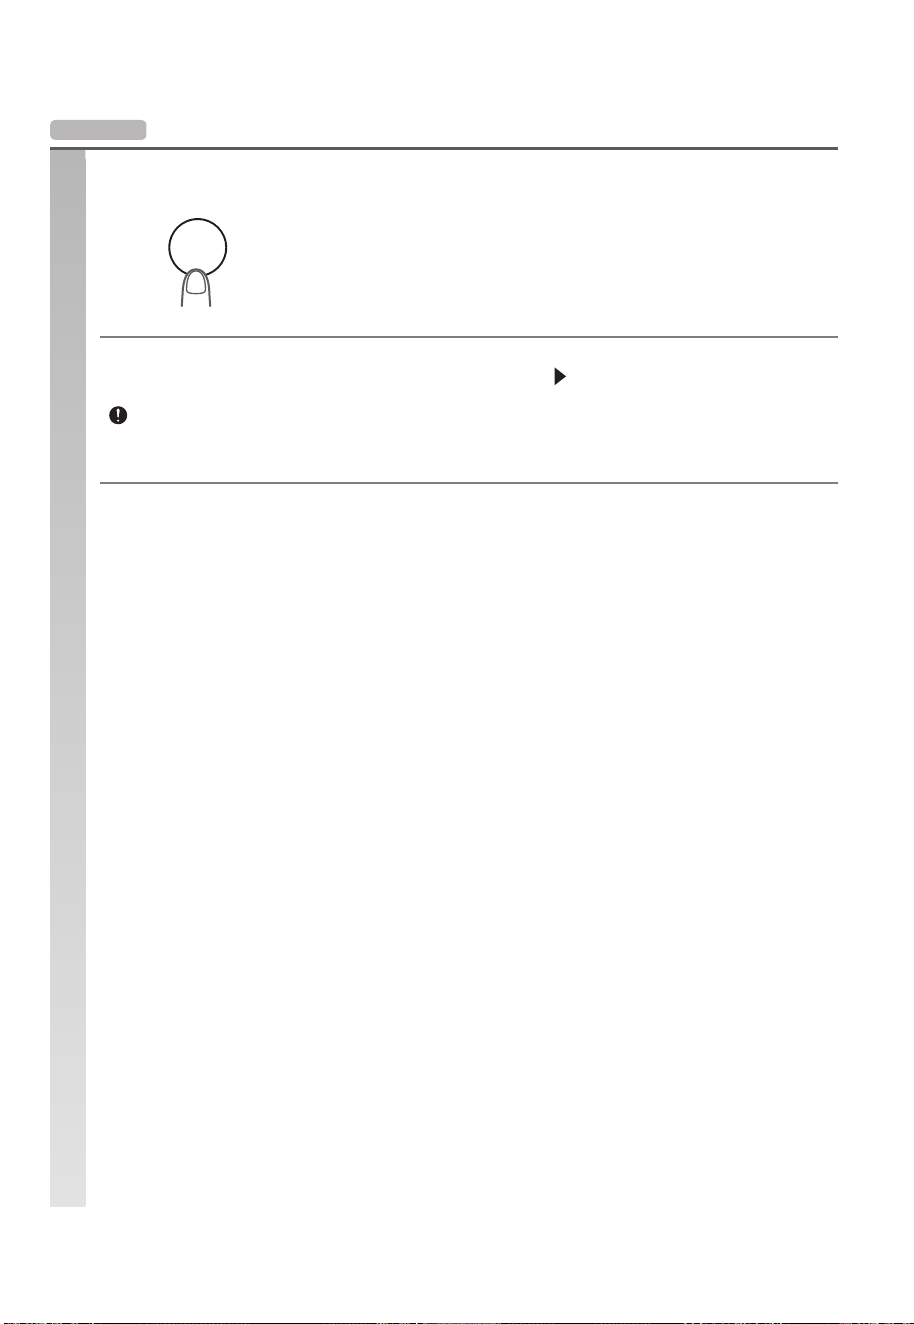
"KEEP WARM" lamp turns on.
After using, press the "CANCEL" key and
unplug from power outlet.
Please press the "CANCEL" key to cut o power before removing the inner pot.
※
During keeping the rice warm, although removing the inner pot, the cooker will not turn o automatically.
5
●
There’s no need to soak the rice.
●
lease do not forget to close the lid and attach the steam vent.
Press the
“Cook” key.
Select the cooking menu, conrm, and start cooking.
If the buzzer sounds, it indicates that the rice has
cooked.
In the case of" cooking immediately after keeping warm" or" continuously cooking" please wait until the
temperature of the inner lid, the temperature inside the cooker, etc., have cooled down to the normal human
body temperature.
●
10
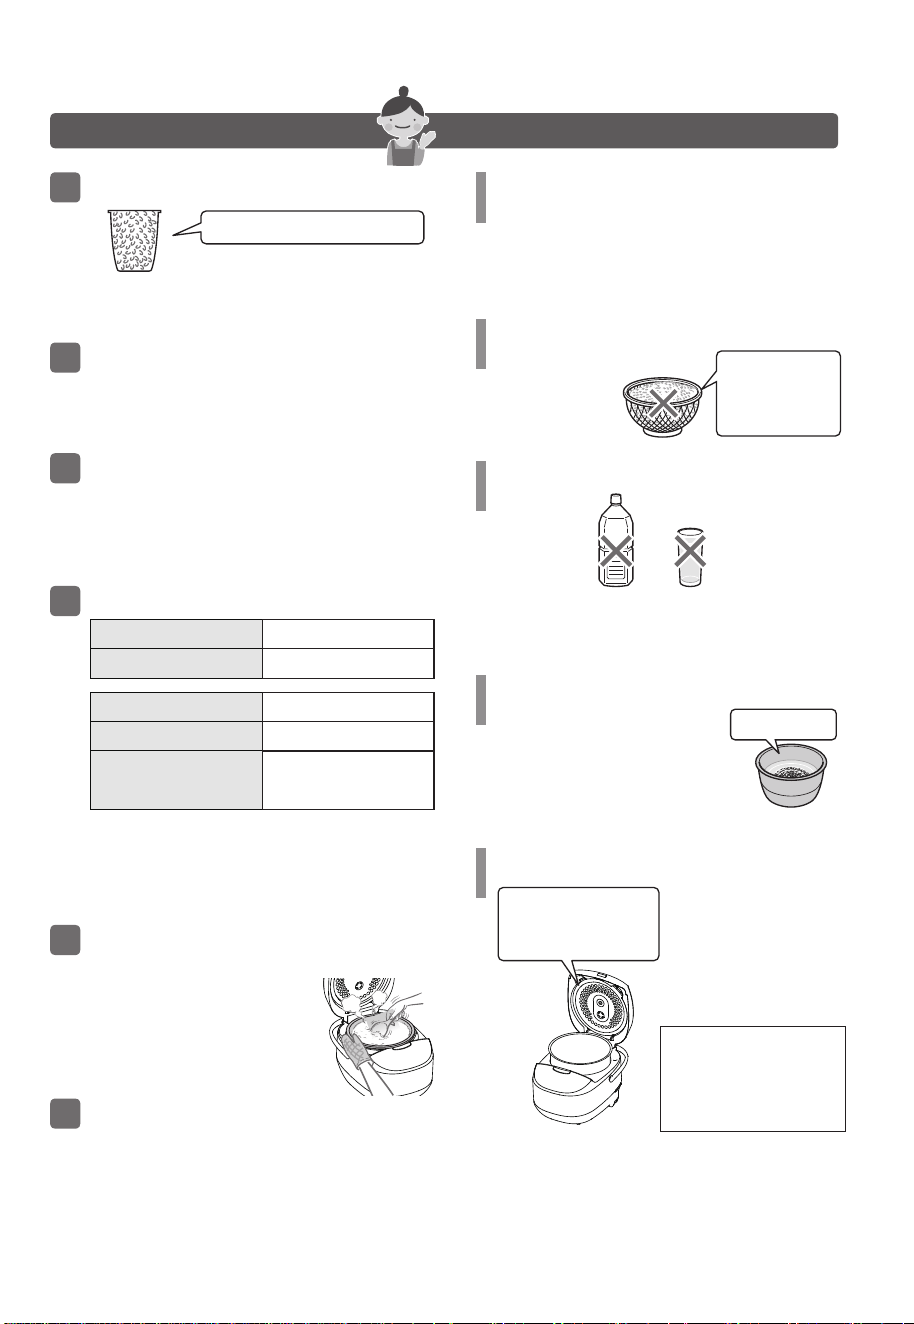
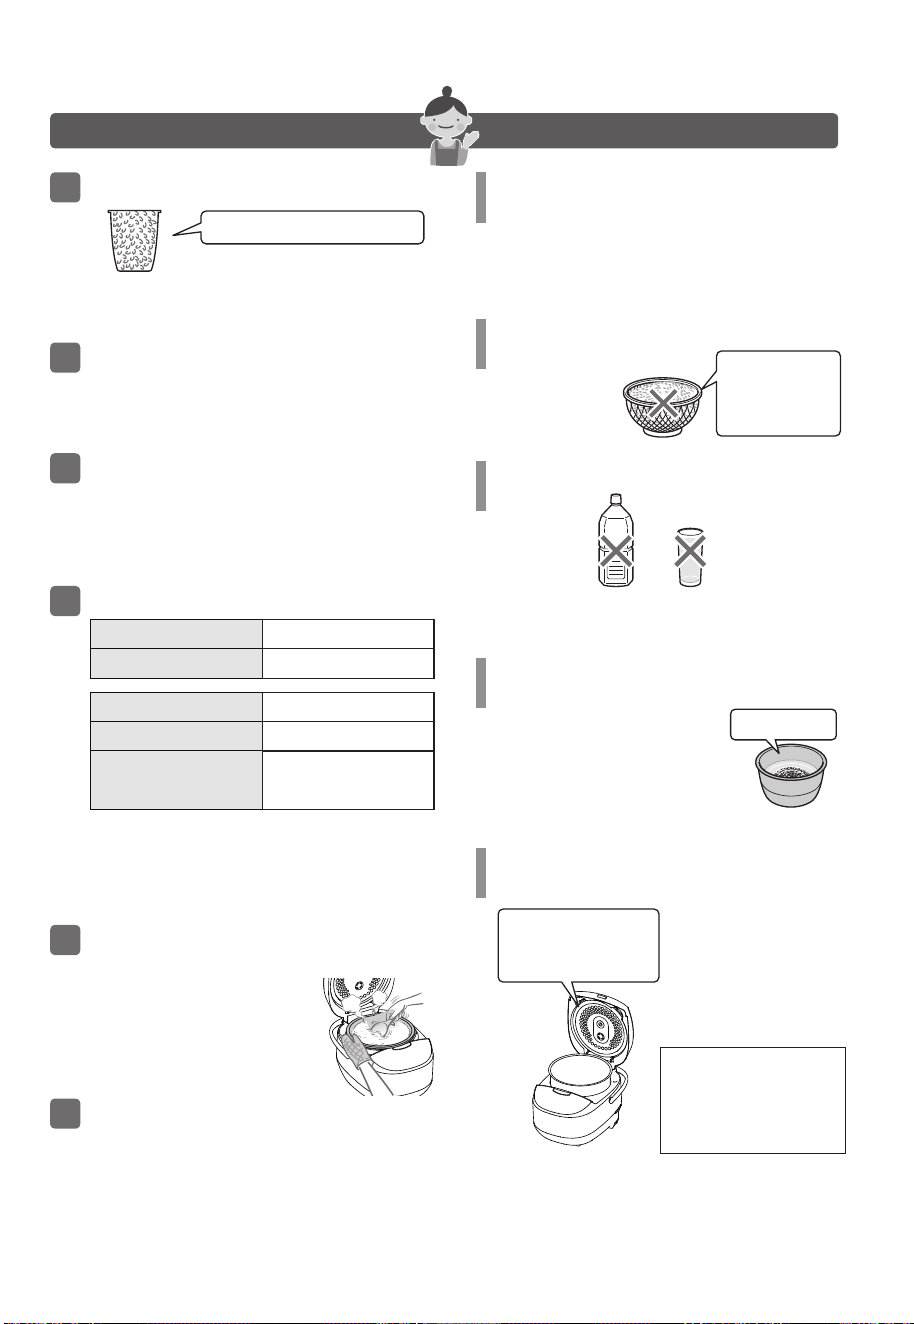
How to cook delicious rice
About Rice
●
●
After washing, do not leave the rice in
a colander.
Avoid leaving the
rice in a colander.
Unsuitable kinds of water for rice cooking
Hard mineral
water
Ionized
water over
pH9
A cause of hard
and dry rice
A cause of mushy
and sticky rice
(
(
It is recommend to use cold water
for pre-programmed cooking in
summer.
After washing, wipe o
water droplets with a
clean cloth.
Too-high water temperature will
result in undelicious cooked rice
and unpleasant odor.)
After using, immediately clean and care.
Leaving the cooker dirty
will cause bad smells.
After stop “Keep Warm”
operation, do not leave
rice in the pot (or it will
cause unpleasant odors).
In summer, use
cold water
Wash and keep the inner
lid, inner pot, steam vent
clean all the time.
Measure rice accurately (level o the top).
Do not shake the measuring cup
If shaking, the amount of rice will
increase more than enough.
Washing with hot water or washing slowly may
cause a bad odor of rice bran.
Measuring cup
provided with
the cooker
Do not wash rice with hot water.
Do not wash rice for a long time.
Gently wash, to avoid smashing
the rice grains.
Lightly rub the rice grains one another.
(Cracked or broken rice tends to get mushy
and sticky when cooked.)
If preferring harder rice
lower the water level below the
indicated scale
The condition and quality of each kind of rice is
dierent, depending on brands, places of origin ,
storage conditions.
Therefore, please adjust according to your
preference.
Buy a proper amount of new rice of which the
ricepolishing date indicates that it can be
completely consumed within 2 weeks - 1 month.
Prevent oxidation by keeping rice in a tightly closed
container and store it in a dark, cool place.
The rice grains may
get cracked resulting
in becoming mushy
and sticky when
cooked.
Adjust water level according to preference.
When cooking is nished, loosen the
cooked rice entirely with a scoop.
“Keep warm” operation should end in a
short period of time.
If preferring softer rice
raise the water level above the
indicated scale
Freshly-harvested rice
slightly below the indicated scale
Whole rice
according to the indicated scale
Old Rice
Wheat
slightly over the indicated scale
Rice during rainy season to summer
Please loosen the cooked rice by
holding the inner pot with a dry
cloth or mittens to prevent it from
clumping or sticking together.
In the case of “rice seasoned and cooked with
various ingredients”, small amount of rice, or
keeping warm for extended periods, it is advised
to wrap in plastic wraps and keep in the freezer.
)
)
( )
( )
Rice cooking water should be 30℃ or lower.
11
n
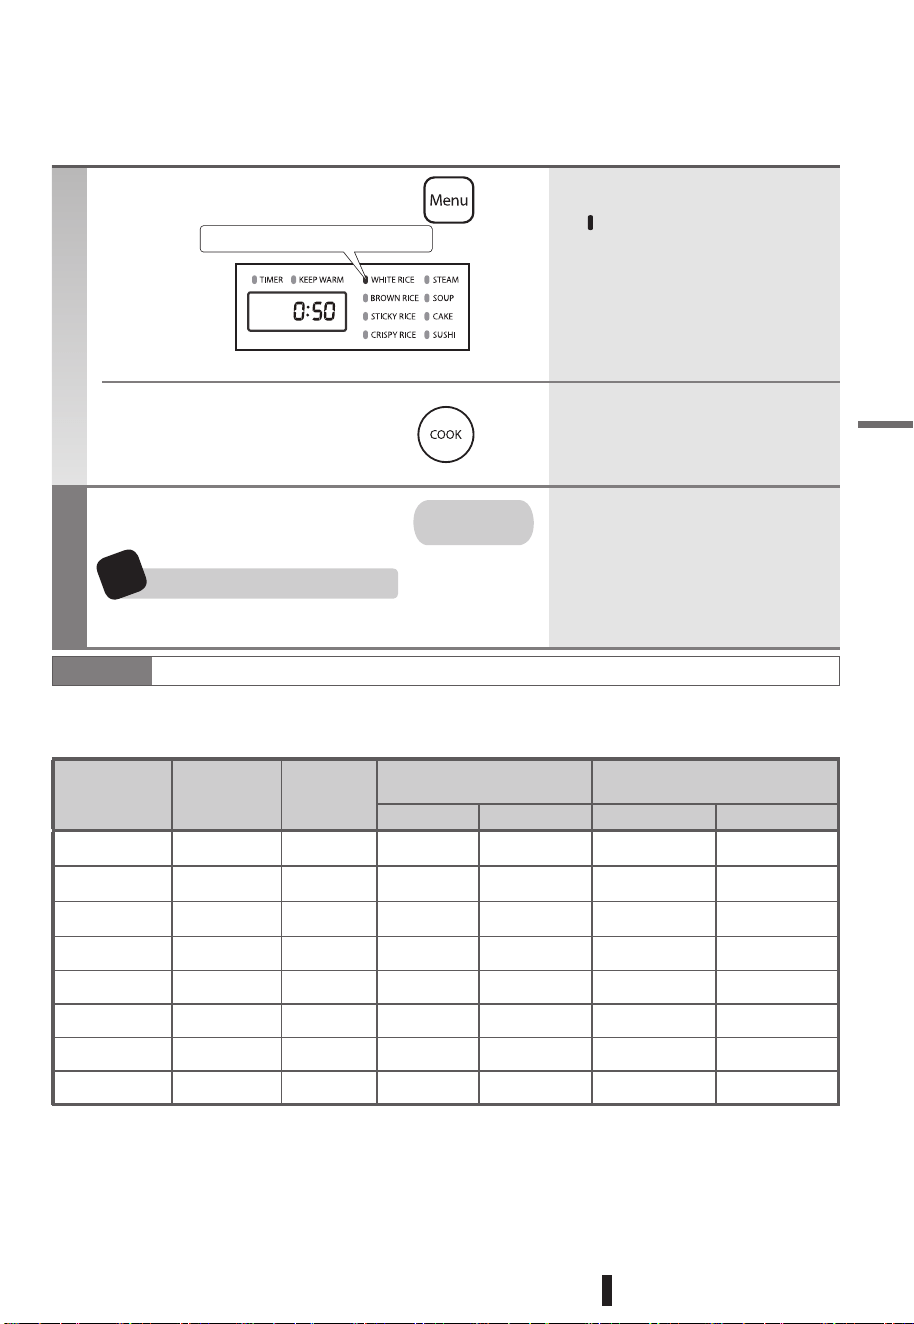
Rice Cooking Procedures
Operation
Rice Cooked
●
●
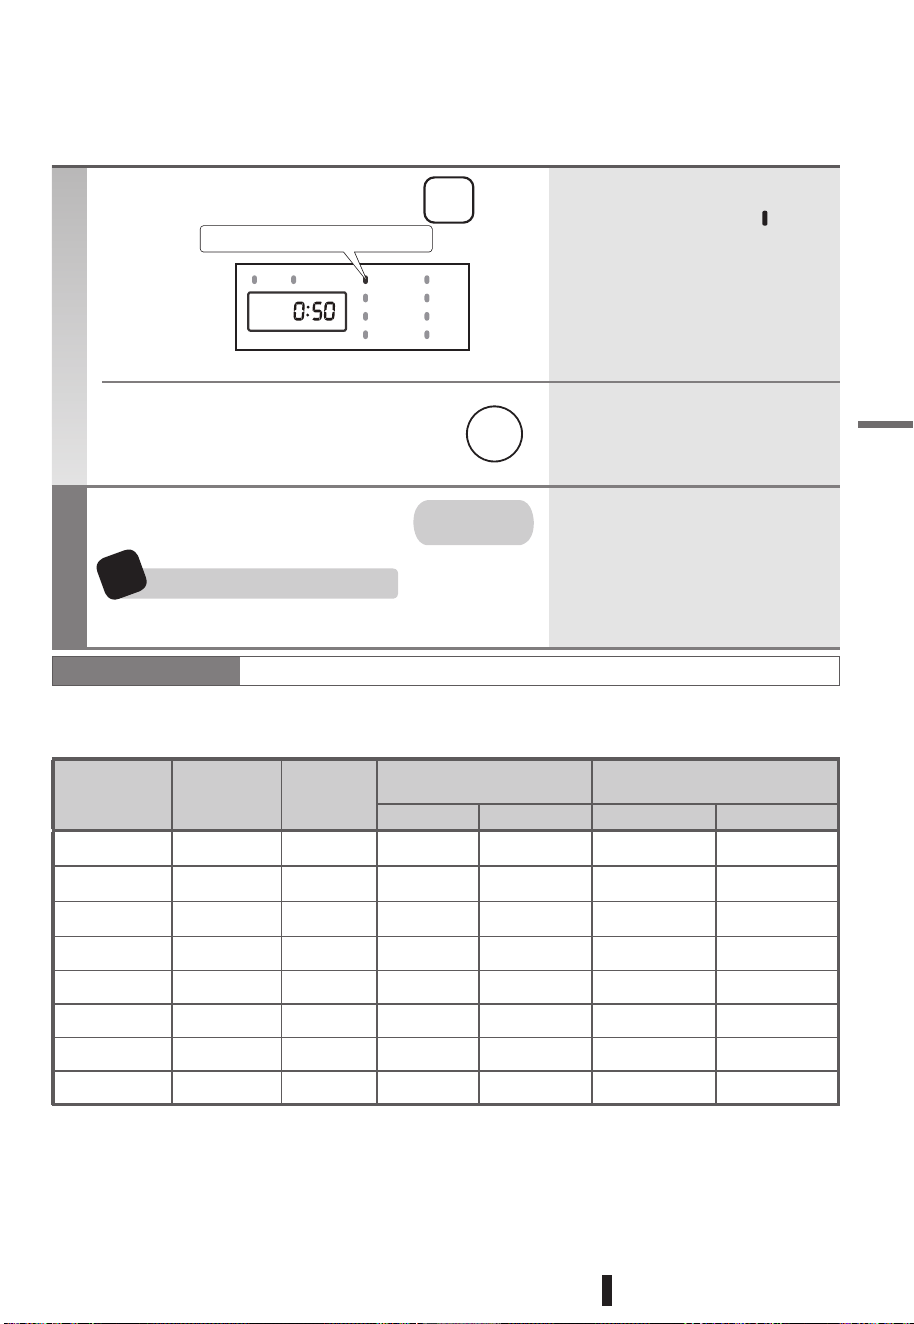
Press the “COOK” key,the lamp of the
[“KEEP WARM” lamp] turns on.
Showing the elapsed time for
keeping rice warm in units of one
minute.
corresponding menu will be from
ashing to being on all the time.
Select the cooking menu with
1
2
After using Press “CANCEL” key and pull the power plug from the outlet.
Immediately loosen cooked rice
TIPS
● Every time we press the “Menu” key,
“ ” mark will move and the selection
will consequently change.
●
Actual cooking time may vary by about 10 minutes, depending on amounts of rice, amounts of water, water
●
temperatures, etc.
●
Please keep the rice warm for not longer than 12 hours for
DR series, 6 hours for DH series.
Operation Method
Select the “Water level scale” and the “Rice Cooking menu” that match the type of rice to be
cooked.
When rice is cooked, the buzzer
sounds to show cooking is nished.
Keeping warm
automatically
Rice Cooking Procedures
Type of rice
to be cooked
Cooking
menu
Water level
scale
cooking amounts of rice
unit : cup
Standard times for cooking
unit : minute
MIXED RICE
-1 5.5 -2 10
-2 10
-2 6
-2 6
-2 6
-2 6
-1 4
-0.25 0.5 -0.5 1.5
30 45 min
60 80 min
40 50 min
60 80 min
35 55 min
60 70 min
2 Hour
30 45 min
60 80 min
40 55 min
60 80 min
45 65 min
60 70 min
2 Hour
WHITE RICE
-1 5.5
CONGEE
QUICK COOK
STICKY RICE
CRISPY RICE
1.0 L type 1.0 L type1.8 L type 1.8 L type
1
-
4
1
-
4
Adjust to the cooking menu
BROWN RICE
White rice
White rice
White rice White rice
-2 10
40 50 min 40 55 min
-1 5.5
SUSHI
Sushi Rice White rice
Mixed rice
Brown rice
White rice
Congee
ecir etih W
Mixed rice
ecir etih W
ecir etih W
rown rice
B
Sticky rice
For all cooking menu, don't add water exceed to the “MAX” level scale.
1
-
4
Cooking starts, after pressing
~
~
~
~
~
~
~
~
~
~
~
~
~
~
12
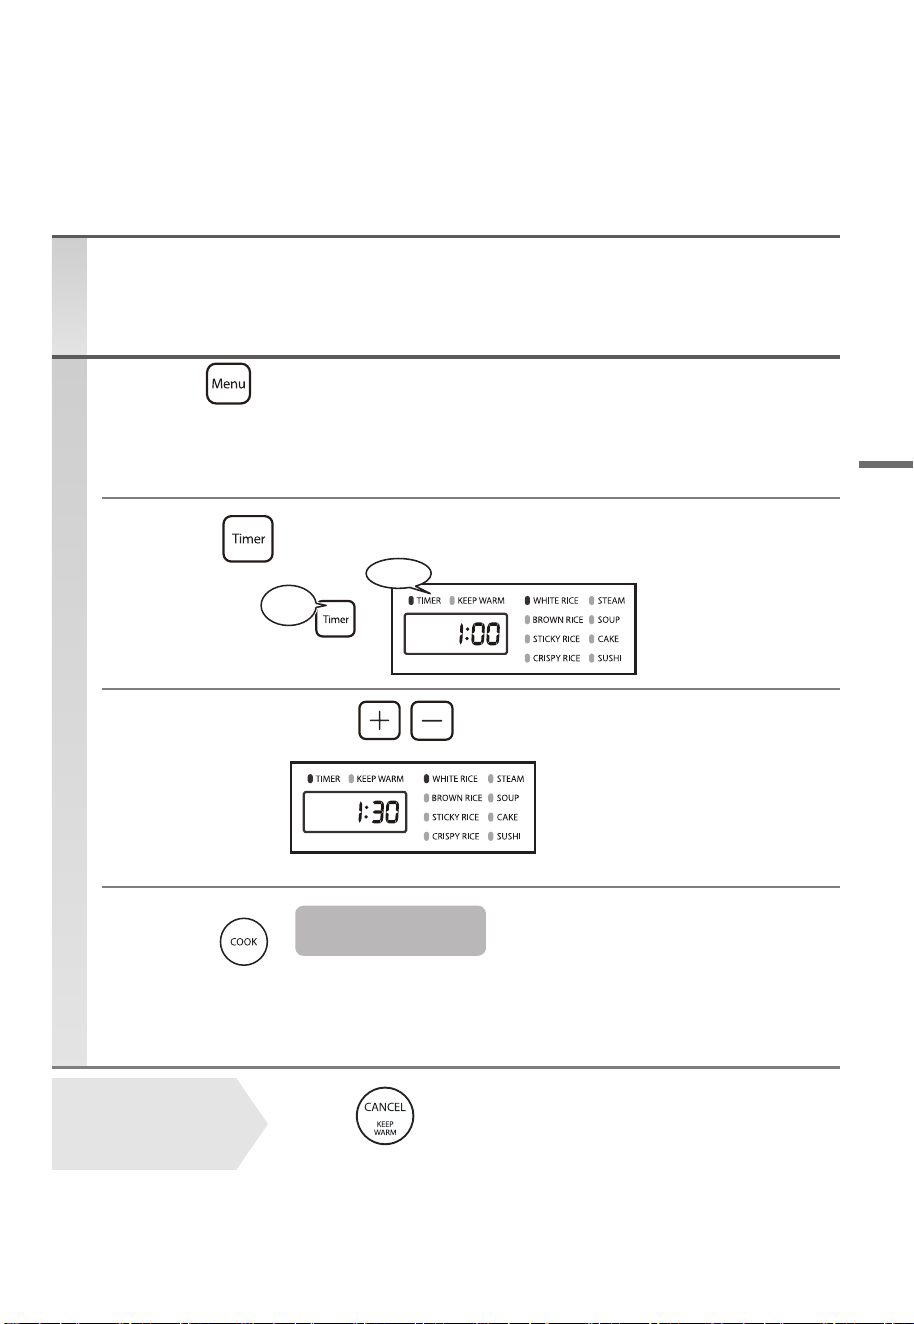
Setting the timer
Press
●
The completion time can be set in units of
10 minutes.
If we keep pushing “ + ” key or -“ ” key for
a while, the time display will change quickly.
●
Set the completion
time with
3
Press
4
Cooking at the preset time.
Please do not use pre-programmed settings for germed brown rice, rice mixed with cereals, and rice
seasoned and cooked with various ingredients.
【example : The rice will nish cooking at half past one. 】
●
Pre-programmed time will be displayed
until rice-cooking starts.
When rice-cooking starts, the “TIMER” lamp
will turn o.
●
If the “COOK” key is not pressed, it will exit
from preset mode to standby mode after
2 minutes.
●
Pre-programmed coo king
is completed
1
With
2
set the cooking menu,
adjusting to make it proper for the kind
of rice to be cooked
Preparation
Put the inner pot in the cooker and close the lid.
Operation
Setting the timer
Press
When desiring to cancel
the pre-programed settings
or
if the operation is incorrect
The light
turns on
Indication
13
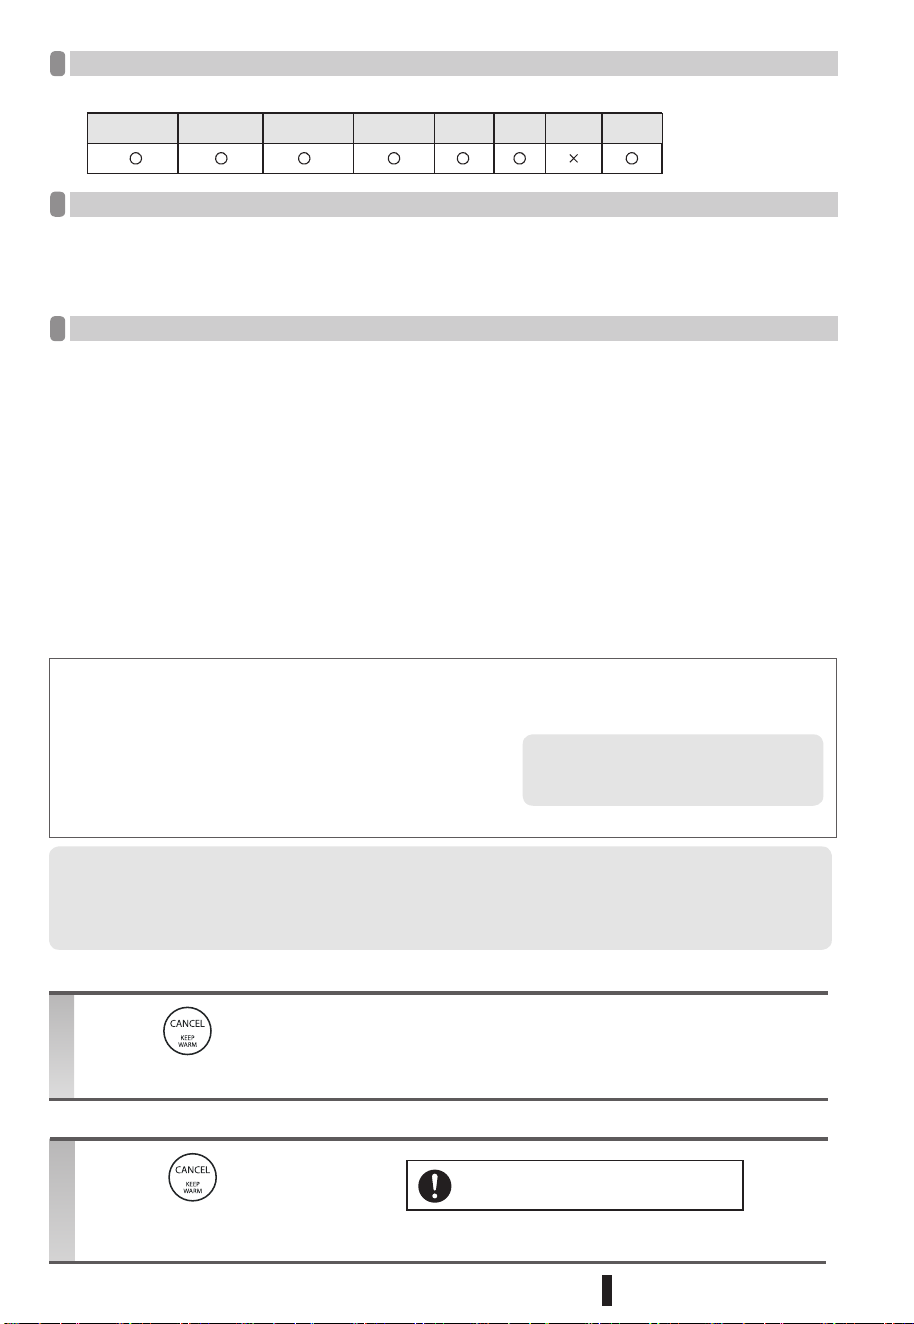
Possible pre-programmed menus
Pre-programmed Time
Notice
● If the cooked rice is quite soft, please reduce the water according to your preference.
In case of pre-programmed cooking, starchy substances will sink to the bottom and may become light brown.
In case of low room temperatures, low water temperatures and large amounts of water, rice may cook later by
about 10 minutes.
●
●
●
Please do not use pre-programed function to each of the following items marked with “X”.
white rice brown rice sticky rice
● Please do not set preprogrammed times so long over 14 hours ( maximum 8 hours in summer).
Too long preprogrammed time will cause decay and unpleasant odurs.
If the preprogrammed time is not more than the cooking time of the selected menu, the cooker will start cooking at
once.
●
crispy rice steam soup cake sushi
If pressing it will start to keep the ri
ce warm.
After cooking, the rice will automatically be kept warm.
Operation
When desiring to keep rice warm after finishing coo king.
“KEEP WARM” feature
●
Gathering rice to central part will help it not to get too hard, too mushy and sticky.
During keeping rice warm, If worrying that it may get too mushy and sticky, please do not let the rice left at the
side of inner pot.
●
Tips for keeping rice warm
●
“Keep Warm” lamp will turn on.
●
“KEEP WARM” temperature can be controlled automatically depending on using conditions, in order to
keep our rice warm and delicious.
Press the “Cancel” key, when desiring to stop “KEEP WARM” operation.
During keeping rice warm, although the inner pot is removed, power will not be cut o automatically.
●
●
■
with various ingredients, etc.)
・
using for longer than 12 hours for DR series, 6 hours for DH series.
・using while there is a scoop, etc. in the pot.
・using for cold rice.
■
Do not stop "Keep Warm" operation, while the rice is still in the inner pot. (It may cause a bad smell)
If the display blinks during “Keep Warm”
operation, please press the “Cancel” key,
and take the rice out.
When desiring to stop keeping rice warm
If pressing
● “KEEP WARM” lamp turns o.
※During keeping rice warm, when the inner pot is removed, power will not be cut o automatically.
Before taking out the inner pot, please press
the “Cancel” key and unplug to cut o power.
Operation
Do not use the “Keep Warm” feature in the following cases:(They are causes of bad odors and decoloration)
・using for any rice other than white rice. (e.g. germed brown rice, congee, rice seasoned and cooked
14
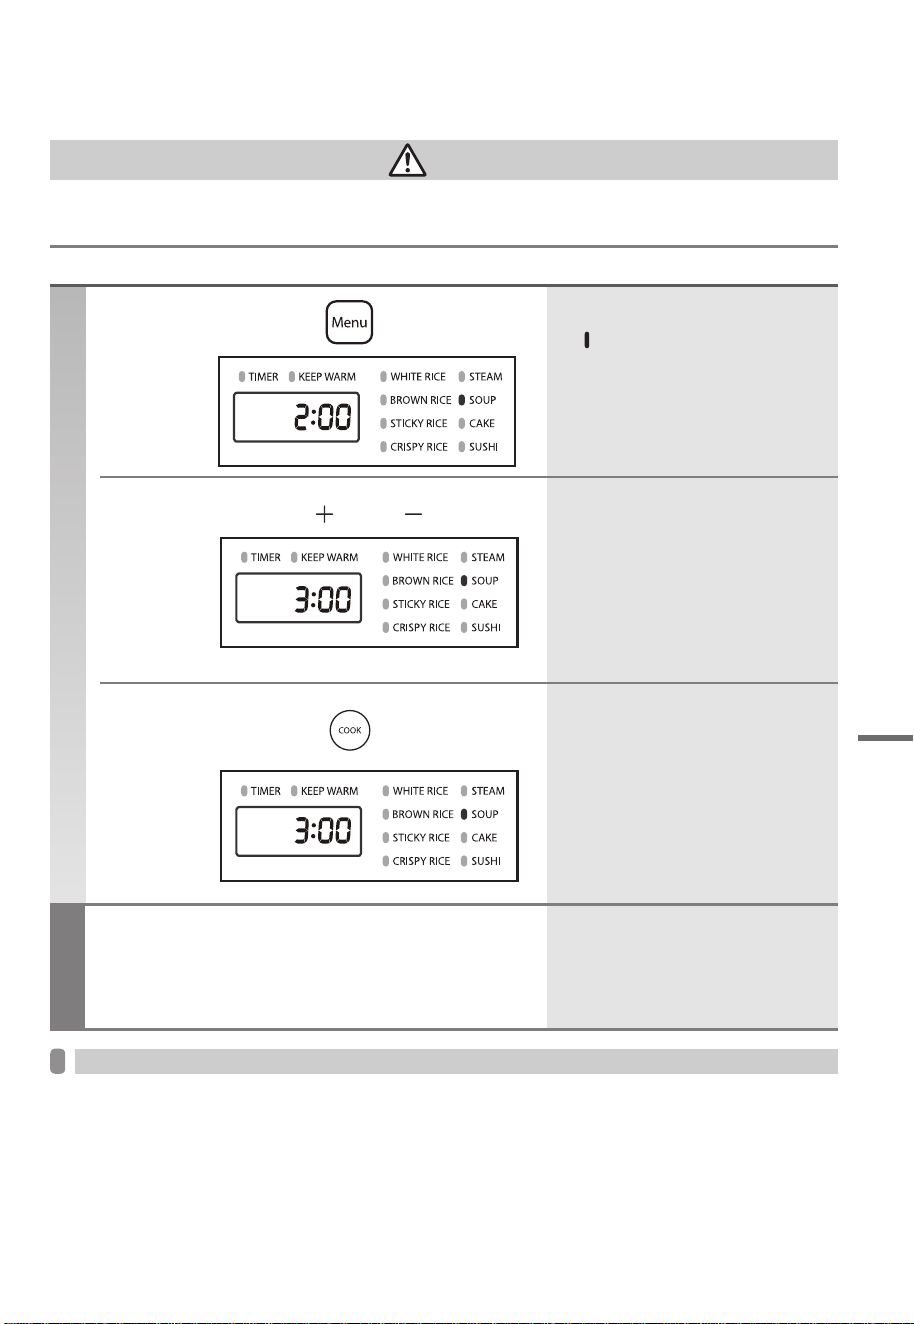
Food Preparation Methods
Operation
Completion
Select menu by
1
Basic procedures
When cooking is nished, the buzzer sounds.
● P lease us e pot holders to take the inner pot out,
becaus e it is very hot.
Do not leave any food in the inner pot for a long time.
●
2
Start cooking by
3
Adjust time by “ ” and “ ”
●
When you choose the “Steam”
key ,it can be set to the maximum
of 60 minutes with 1 minute / unit.
●
When you choose the “Soup” key, it
can be set to the maximum of 4 hours
●
Only the “ STEAM ” and “ SOUP ” can
adjust time.
with 10minutes/unit.
If keep pressing the key, times displayed
will change more quickly.
●
●
Press the “ COOK ” key, the lamp
of the corresponding menu will be
from ashing to being on all the time.
Notes
●
Don’t add water over “MAX” water level.
“Food preparation” times mentioned in the instruction manual are for reference only. The actual time
Please use plastic or wooden cooking utensils, to prevent the inner pot from getting scratched.
Make sure the inner pot has been put properly in the cooker. If it does not closely touch the cooking heater,
the food may not be well made.
●
results may vary depending on ingredients, room temperature, etc.
●
●
● It is easy to smell bad, so please always
clean with good care.Please clean by
boiling whenever worrying about any
bad odor.
【 Ex. Cooking time 3 hours 】
WARNING
Please do not cook or use any ingredients which are not mentioned
. Because they may cause steam or ingredients to
spill over or scatter, resulting in burn wounds, injuries, damages, etc.
Besides, they may be causes of inner-pot corrosion, bad odors, etc.
● Every time the “MENU” key is pressed,
will move, and the selection will
consequently change.
Food Preparation Methods
15
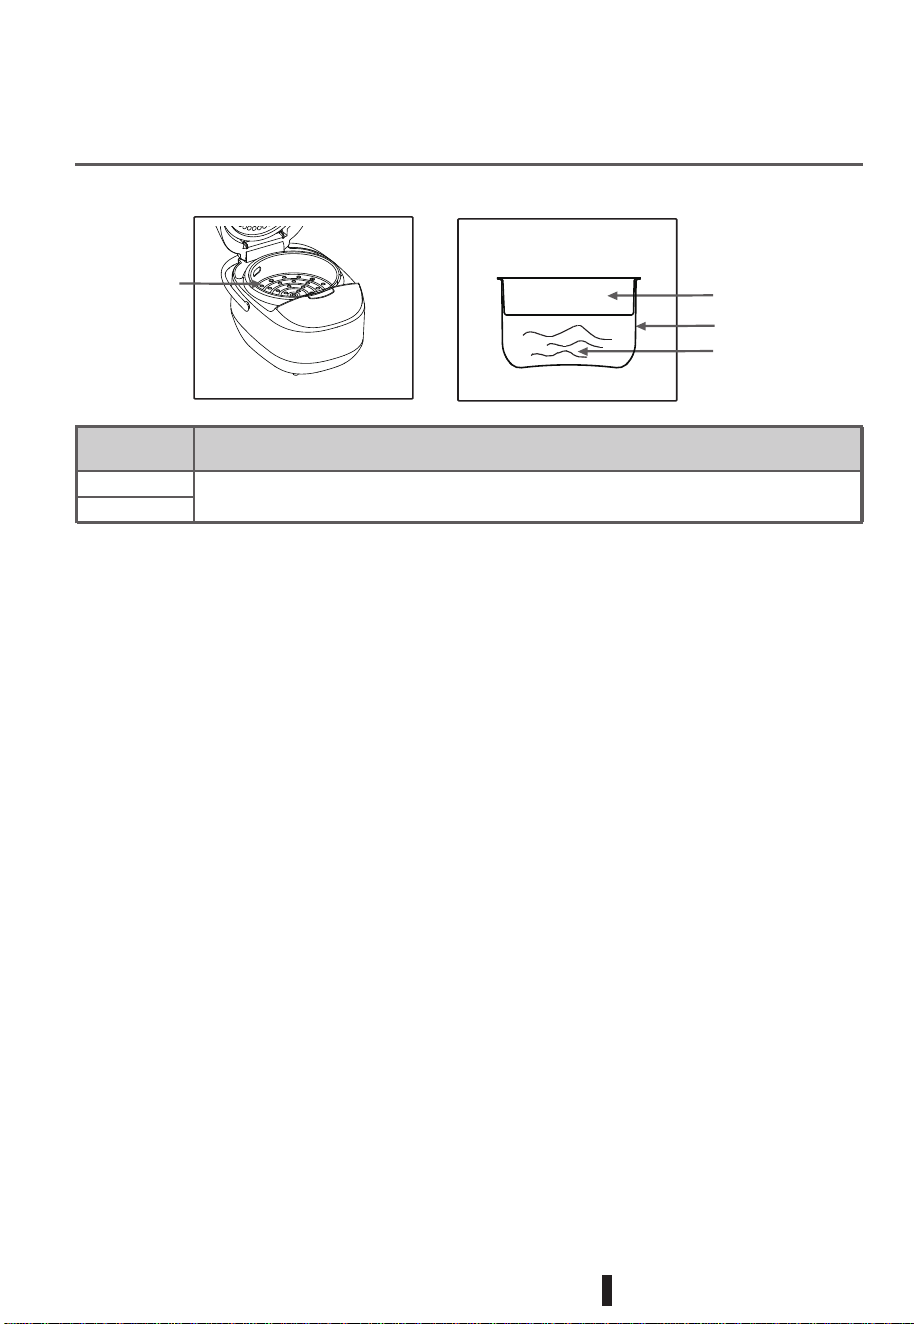
How to use “STEAM” with steam stand
Water level
Follow "White Rice " wate level 2
How to pour water
Rice cooker
1.8L type
1.0L type
steam stand
inner pot
steam stand
water
Take the model of RC-10DH1NMY & RC-18DH1NMY as an example:
16
Put rice that is washed clean into the inner pot, and add water to the corresponding water
line based on rice amount (3 cups of long grain rice) as well as the appropriate amount of
peanut oil.
1
2
1
2
3
Close the lid,press “MENU” button to select “CRISPY RICE” function, and press “COOK”
button, and wait patiently for the function to end.
Ingredients preparation:
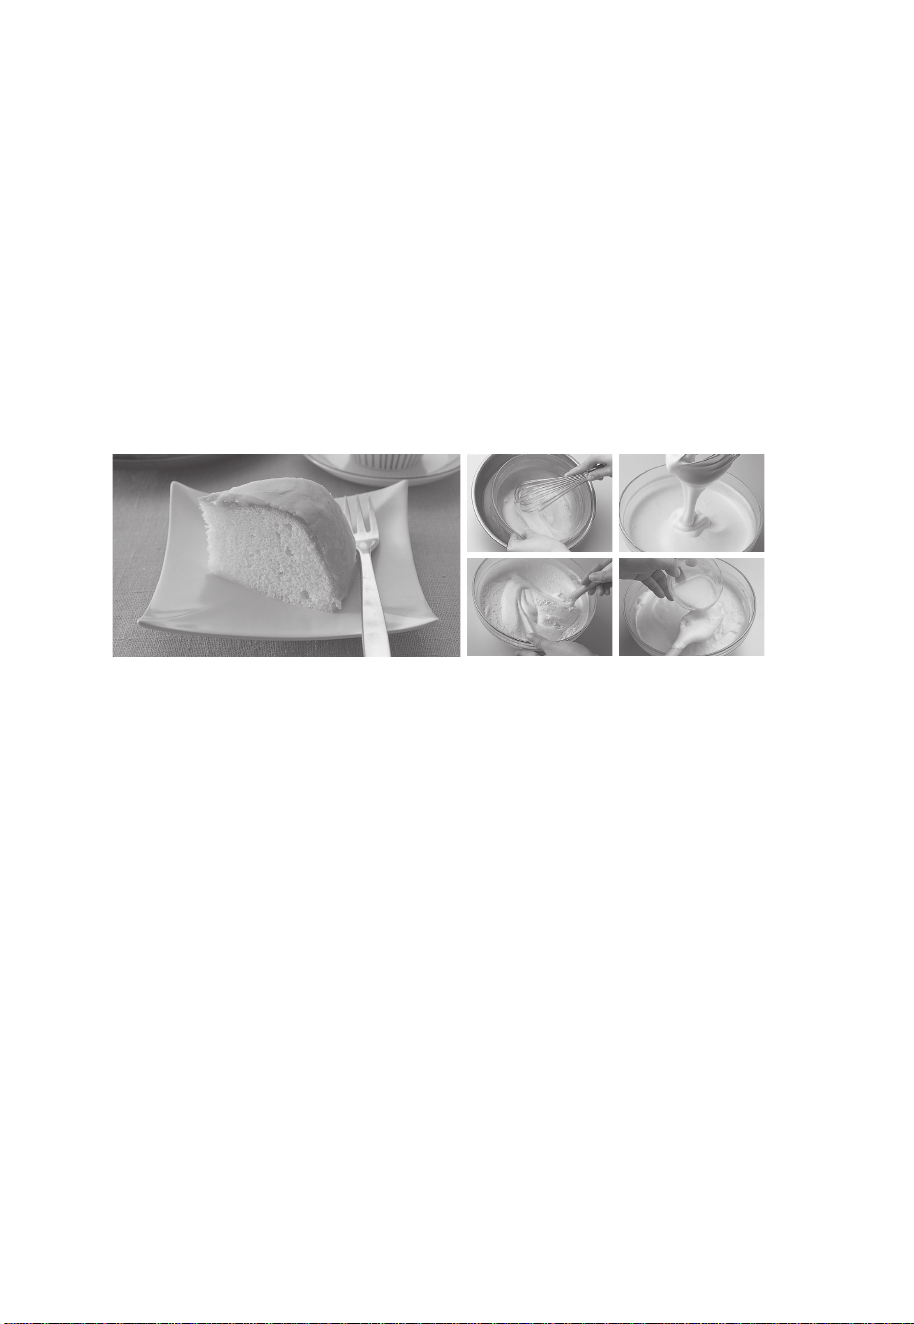
Small amount: 3 eggs, 100g caster sugar, 120g cake our (baking powder), 30g butter
(not melted).
Large amount: 5 eggs, 180g caster sugar, 200g cake our (baking powder), 50g butter
(not melted).
(Cake tests for Large mount are not carried out for below models: RC-10DR1TMY(S).
Put in sugar and eggs, stir with a whisk until it is frothy. Then add cake our and stir with
a wooden spoon. Add melted butter, stir quickly and quickly pour into the electric cooker
inner pot for operation before the bubbles disappear.
Press the “MENU” button and choose “CAKE” function, then press “COOK” button.
The cooking time is around 45 minutes.
CAKE
CRISPY RICE
17
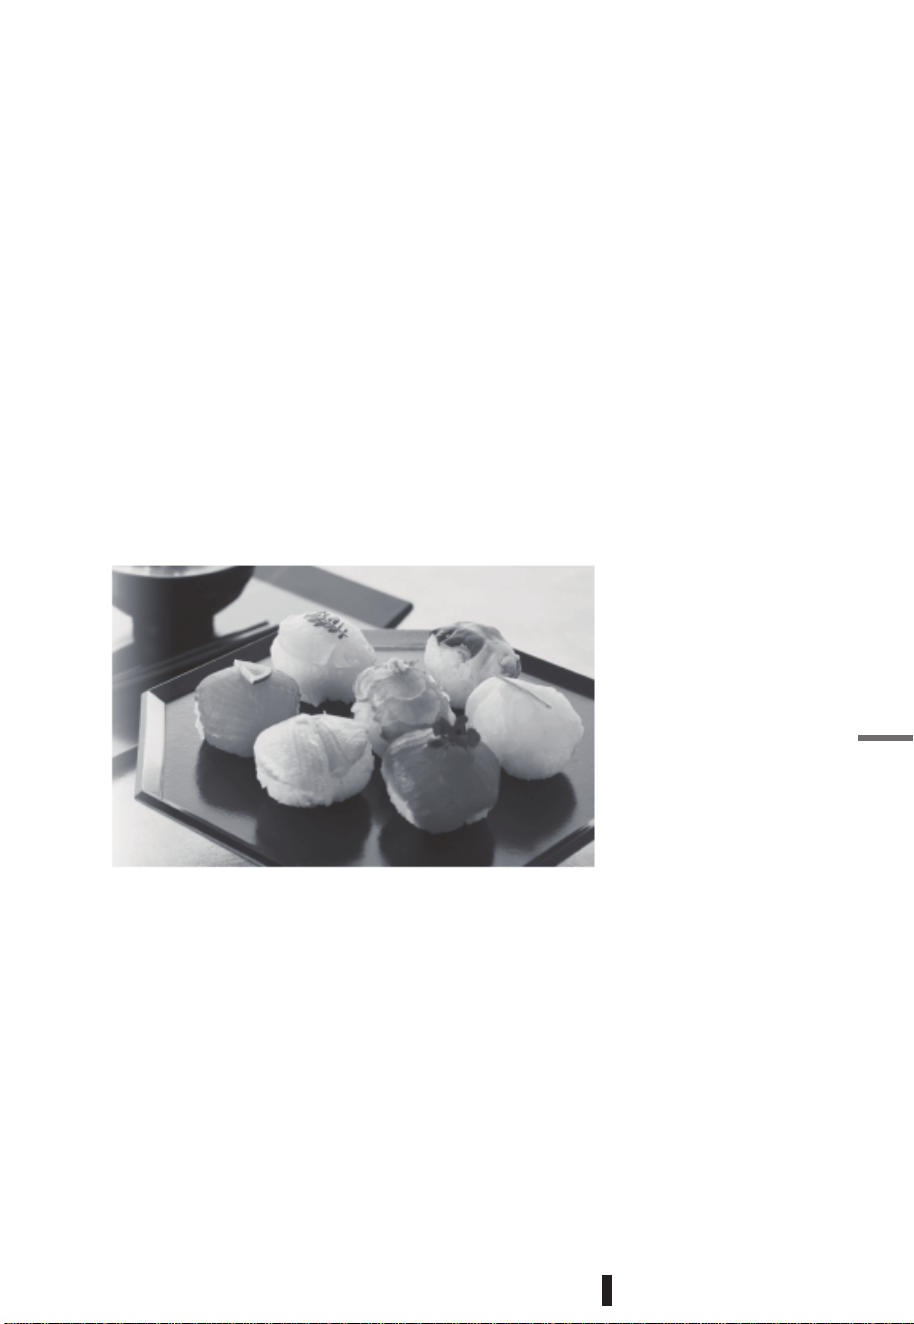
Spread seasoned vinegar on the rice, then mix it with the rice. Fan the rice with a round fan until it
renders luster.
*Do not mix seasoned vinegar with the rice in the inner pot.
1
2
3
4
5
Cooking tips (as follows)
● Mix seasoned vinegar with the rice when it is still hot, so that seasoned vinegar can be fully
blended into the rice.
● Replacing water with chilled kelp water for rice cooking can make rice more delicious.
● The reason why we use a sushi barrel is that excess water can be absorbed by it, so that rice will
not get sticky.
Ingredients (for 4 people):
China's northeast rice or special rice for sushi:300 g
Seasoned vinegar (mixed in advance): Vinegar (6 big spoons), sugar (1 big spoon) and salt (1
small spoon)
Wash rice quickly until the water is clear, add water to the water level scale 2 for "WHITE RICE",
and close the lid.
SUSHI
Select the "Sushi" function, and press the "COOK" button, the cooking time is around 50 minutes.
Wipe the sushi barrel with a cloth soaked in vinegar water, and pour cooked rice into the barrel.
18
1
2
2
3
SOUP
1
CONGEE
• The pre-set time is suggested not for more than 12 hours, otherwise the off-flavor may occur;
• To ensure the best cooking effect, the pre-set operation is not suggested for the “Crispy Rice”.
Prepare rice and water. Place the rinsed rice into the inner pot and choose the appropriate water
level according to rice amount.
Note: You may adjust the amount of water according to personal preference.
Close the lid, and press the “Menu” button to select “Congee”.
Start cooking Press the “COOK” button to enter the cooking state, and the cooking will be
completed in designated time.
NOTE :
Prepare soup ingredients (such as chicken, corn, carrots etc.), wash all ingredients and cut into
small pieces, then put them into the inner pot, and add water not more than Max water line.
Close the lid, press the “MENU” button to select the “SOUP”, then press the “COOK” button, and
wait for cooking to be completed.
19
●
Do not put anything
(for example. detergents, etc.)
other than wa ter.
Do not cons ecutively clean by
steam.
S ome s mell may not be
completely a bsent.
●
●
1
2
3
Cleaning by boiling (approximately onc e a week )Please also do whenever it smells unpleasant.
Put water in the inner pot (until it reaches the water level scale 2 for
White Rice), and close the lid.
Select (White Rice )with “Menu” key, and press “COOK” key.
When it becomes “Keep-Warm operation”, press “Cancel” key. When
the cooker has cooled down, remove the inner lid, inner pot and steam
vent, wash and dry them.
Clean & Care
CAUTION
Unplug the cooker before
cleaning and caring.
(
It is a cause of burn wounds )
The inner pot, the inner lid, the steam vent, and scoop should be washed after each use.
The meas uring cup should be washed with neutral dishwashing detergent.
Adding seasonings in the pot without washing the inner lid afte r that, will result in rusting
Do not wet the cooker body,
cooking heater, temperature sensor.
Wipe o dirt and foreign substances
with a well-wrung cloth.
●
Do not wash without taking it apart.
Do not wet the operation parts and
outer lid (cover lid). Do not pour water
into the inner side of the cooker body.
Do not pull the hea t s ink packing
forcefully. (It does not come off)
●
Please do not use the following materials
(They are causes of deformation, decoloration, corrosion, cra cks scratches)
●
Detergents other than neutral detergent for kitchen use
Scrubbing brushes, melamine sponges which easily cause scratches
●
●
●
If there are any grains of cooked rice left at the cooking heater/
temperature s ens or, pleas e rub gently with soft-s andpaper
(approximately no. 600), and wipe off with a well-wrung cloth.
Outer Lid (Cover Lid)
Frame
The inner lid is made from
aluminum. It may decolorized
by detergents used for dish
washers.
Using an unclean cooker will result in bad odors, etc.
Therefore, please keep it clean all the time.
Always make sure to wipe o the water droplets from the steam
vent,
inner pot /packing.
Heat Sink
Heat sink packing
Inner side of the body
Cooking Heater
Temperature
Sensor
Use cotton buds to remove dirt,
foreign substances from the air
vent (at bottom of cooker body)
and hook button gap.
Hook
Button
Air Vent
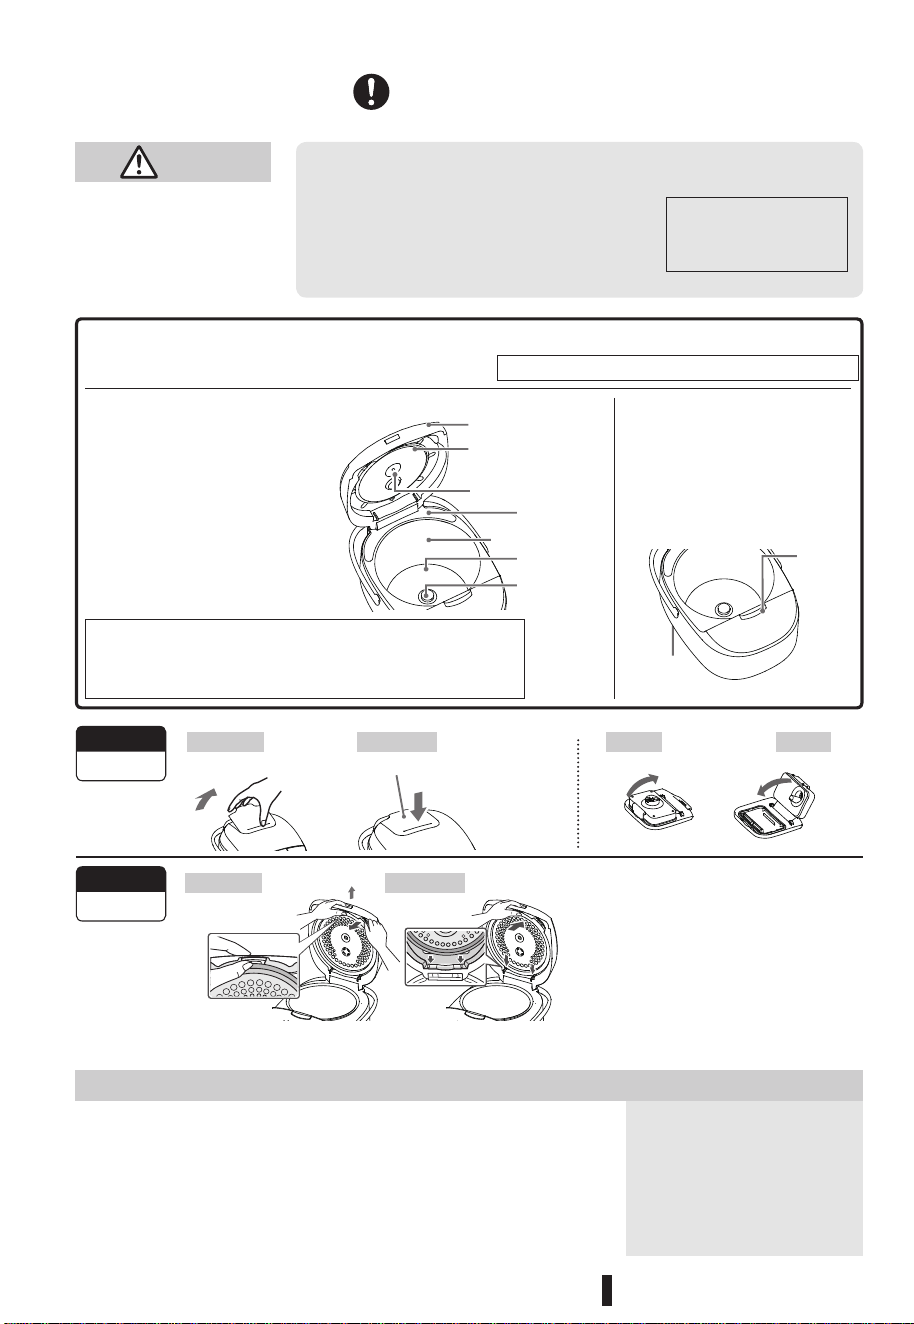
Remove by
Attach
to the hollow part and pus h down
completely
pulling up to the top
direction
Remove by
①
②
Steam Vent
Each time
of use
●
Inner Lid
Each time
of use
pulling forward
Insert at the direction of the lower
two shears.
Press to make it fully attached.
Without attaching the inner lid, the outer li d (cover-lid) cannot be closed completely
(to prevent forgetting to attach the inner lid
)
Set the brim
CloseOpen
Dish washers / dish dryers
Benzene, thinner, al cohol, cleanser, bleaching agent
20
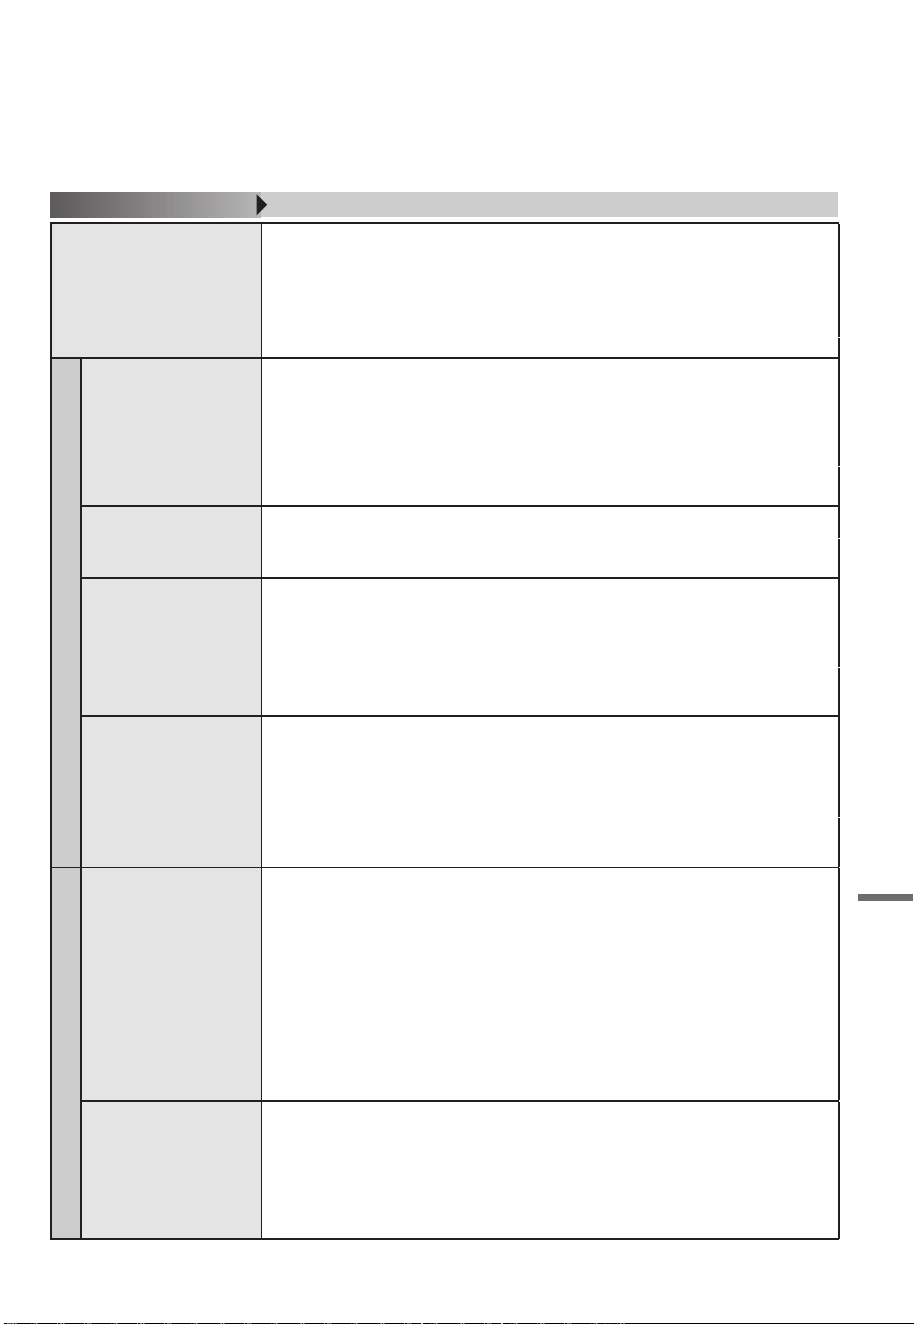
In Case of Problems
Before making repair requests, please investigate once more. If cannot investigate or take further action by
The cooker doesn't power on.
The rice does not cook.
The cooked rice is tepid although
being handled with “Keep-Warm”
function.
The rice is juicy.
K ey operation cannot be performed.
● Is the cooker unplugged or d oes the plug fall out of the outlet ?
If the current time is displayed during the cooking or the “Keep Warm” operation, the
cooker is in a power failure state and the plug is disconnected or the circuit breaker
shuts down power.
Rice
Soft
Mushy, Sticky
Clumping together
Undelicious
● Please cook the rice with less water.
●
●
●
●
●
When the rice has cooked, loosen it immediately and entirely.
Please cook new rice with less water.
Soaking beforehand will soften the texture of rice cooked with pre-programmed settings.
Washing the rice grains forcefully or leaving it in a colander may cause it to get cracked
and become mushy, sticky when cooked.
Is it cooked with hot water or alkaline ionized water with pH 9 or higher ?
Hard
Dry
Undelicious
●
Please cook the rice with more water.
●
●
Please soak the rice grains before cooking.
Was it cooked with mineral water which has high degree of hardness ?
Getting scorched
※ Getting a little burnt and
turning to light brown is
not a result of breakdown
or failure
Rice gets scorched easily in the following cases:
When rice has not been was hed enough.
When soaking time is too long.
For wash-free rice (Musenmai), rinsing 1 - 2 times can reduce scorch problems.
When there are dirt or foreign substances stuck to the temperature sensor.
When adding seasonings to rice cooked with several ingredients. When cooking germed
brown rice, etc.
●
●
●
●
●
Undelicious,
Not cooked well
●
●
●
●
●
Do you cook rice while the cooker inner-side, inner-lid, etc. are still hot or warm? Please
wait until their temperatures have cooled down to the same level of human body.
In case of “Quick Cook” operation, the rice may be rather hard, or rather soft.
Are there any foreign substances stuck to the temperature sensor, inner-lid packing,
steam vent, etc.?
Is the inner pot deformed? Did you forget to attach the inner lid, steam vent, etc.?
Was there any power failure? Was the cooker unplugged ?
Rice kept warm
Unpleasant odors
In case of having
unpleasant odors, please
clean by boiling and get it
dried before the next use.
※
●
●
●
●
●
Turning a dierent color
Dry.
●
Is there any foreign substances stuck to the inner lid packing, the brim of inner pot, or
the frame of cooker body?
Is there any foreign substances stuck to the temperature sensor or the outside of inner pot?
Is the steam vent attached properly?
Is “Keep Warm” time too long? Has the rice been repeatedly reheated?
“Keep Warm” operation with a small amount of rice may cause the rice at the bottom to
get hard and dry, so please gather and pile the rice at the central part.
●
●
●
●
Causes / points of investigation
Trouble Cases
(continued)
In Case of Problems
yourself, please make an inquiry to Toshiba service center.
Please check if “KEEP WARM” function has been used in the following ways:
Using for a too long time. Using other programs than white rice. Using for cold rice. Using
when a scoop is still put in the pot. Using for 12 hours for DR series, 6 hours for DH series
or longer.
Is the cooker body / inner lid / steam vent dirty ?
Please particularly remove t he inner lid / the steam vent to wash and use a clean cloth to
wipe off water droplets every time after cooking.
Has the rice been washed enough? Is the pre-programmed cooking time is too long? Is the
rice left in the pot, with the “Keep Warm” mode off?
(Pressing the key by mistake, or disconnecting because of a power failure)
Did you leave the rice in the inner pot after turning off the “Keep Warm” operation?
Please check the above details and change the “Keep Warm” settings.
21
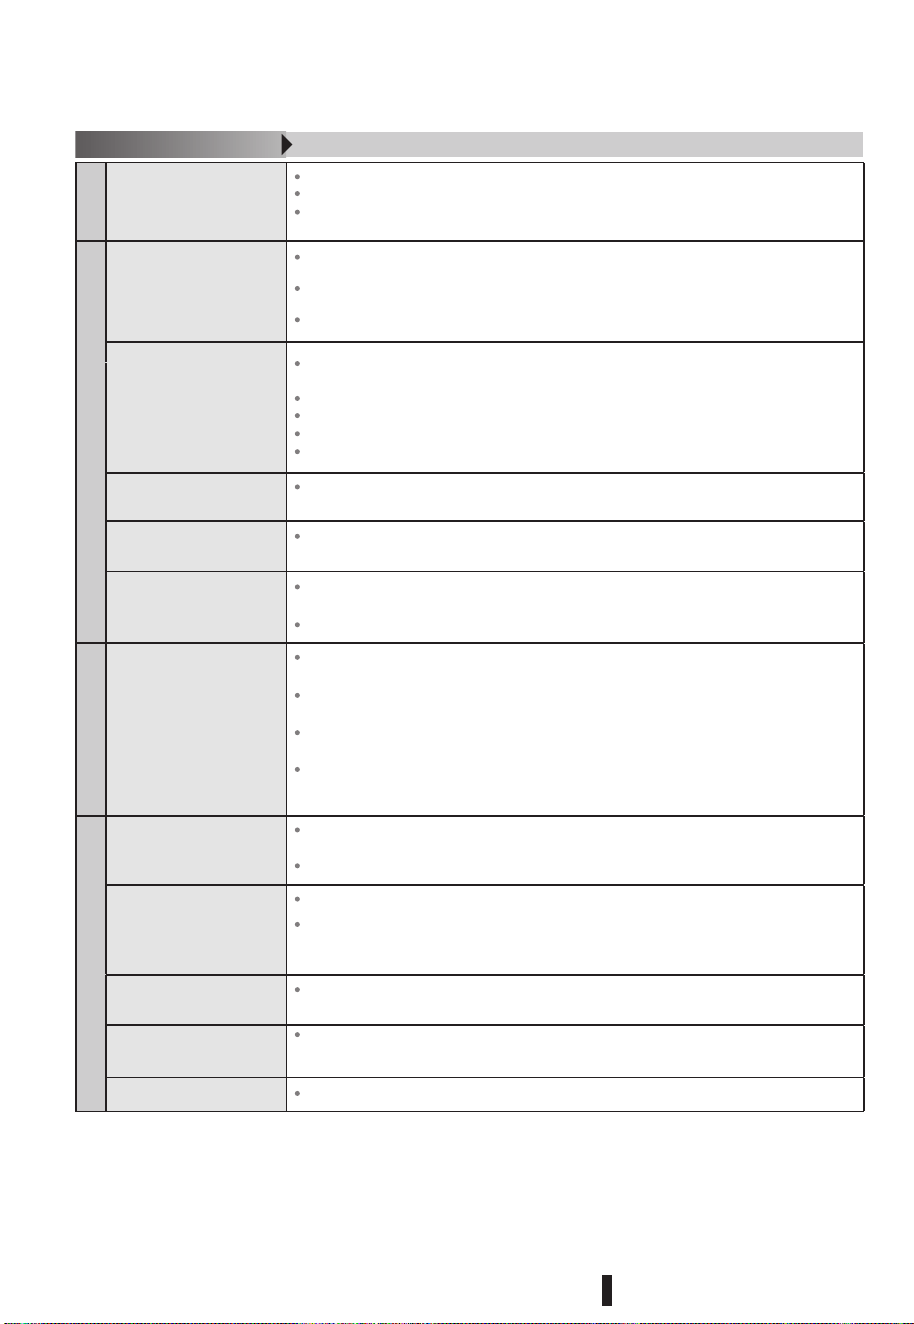
Causes / Points of investigation
Trouble Cases
Mushy, Sticky
Please cook rice with less water, then keep it warm.
After the rice has cooked, loosen it immediately and entirely.
Gather rice at the central part of the pot and sometimes mix together entirely, to
prevent it from being left at the inner surface of inner pot.
・
Rice Cooking Keeping warm
Steam leakage
※Check after the rice
has cooked
Are there any foreign substances stuck to the inner-lid packing, inner-pot brim, or on the
cooker frame?
Are there any scratches at the inner-lid packing? Are there any deformation of the inner
lid / inner pot?
Is the inner lid attached properly?
Boiling over
Spattering
Are there any problems of small amounts of rice, large amounts of water, insucient rice
washing?
Did you make any mistake of porridge cooking menu
?
Are there any foreign substances stuck to the temperature sensor?
Is it dirty inside the steam vent ?
Are the inner lid, the steam vent attached properly?
Thin lms appear at the
inner pot.
Oblate-shaped lms are sweet constituents (starch) of rice which have melt and dried.
There is no abnormality in this case.
Water droplets appear at
the inner lid, inner pot, etc.
Water droplets may appear at the inner lid, inner pot, etc., in order to prevent drying.
There is no abnormality in this case.
When opening the lid,
water drips from the
packing, etc.
When opening the lid, there may be some liquid dripping from the frame, etc., depending
on lid opening times, room temperature, etc.
Are there any foreign substances stuck to the temperature sensor/the outer side of inner
pot ?
Cooking starts immediately
Rice does not cook at the
pre-programmed time
Pre-programmed operation
cannot be done.
If pre-programmed times are within the time of the cooking menu, it will start cooking at
once.
Rice may cook later by about 10 minutes. if the room temperature / water temperature
is low, and the amount of water is large.
Has the inner pot been put properly in the cooker, when setting the pre-programmed
operation?
Did you forget to set the cooker for pre-programmed operation, or forget to press
“COOK” key or something like that ?
It is hard to close the lid
The lid cannot be closed
Is the inner lid attached properly? In order to prevent forgetting to attach the inner
lid, the outer lid cannot be closed completely without the inner lid attached.
Are there any foreign substances stuck in the gap of hook button, etc.?
Key operation cannot be
done
Is the plug inserted ? Is the inner lid attached?
While selecting “Food Preparation” course, such as
<Cake >,
the “TIMER” key is not accepted despite pressing it.
The “COOK” lamp goes out
The operation stops half way
If the “Cancel” key is pressed by mistake, or if a power failure lasts for a long period,
the power will be cut o.
The remaining cook time
indicated is not the same
as that of real cooking.
It is possible that the remaining cook time indicated may not be the same as that of real
cooking. It is not because the cooker is out of order. The actual time results may vary
depending on ingredien ts, room temperature, etc.
The indicator of time spent in
“Keep Warm” mode blinks
It indicates that the rice has been kept warm for a long period of time, so please stop it.
Pre-programmed settings
・
Operation Indications
22
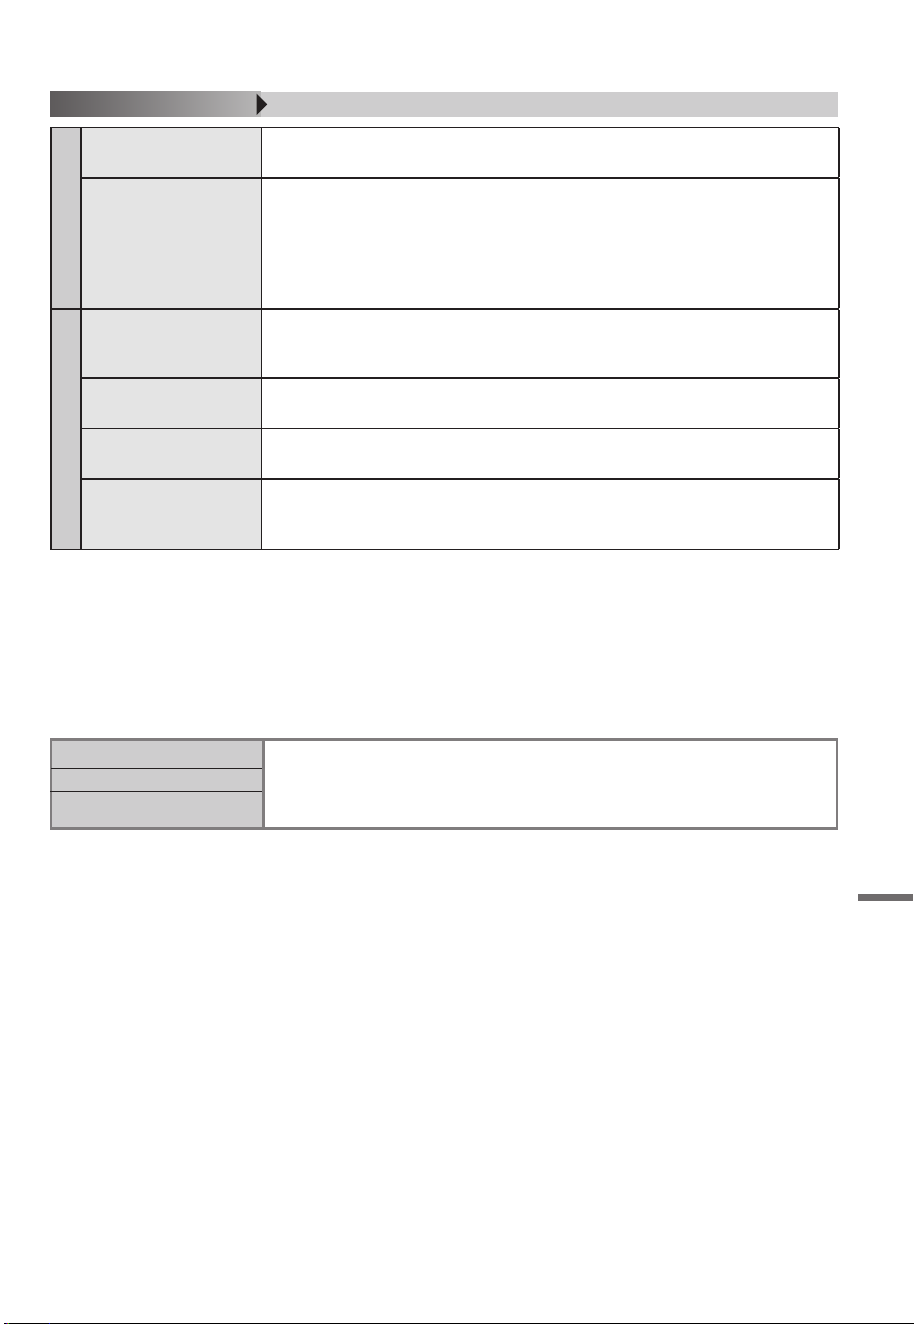
Food Preparing
It takes a long time to prepare
food.T he setup time does not
decrease.
●
The setup time starts from the “ready-to-cook” temperature. However, it needs s ome time
for heating until the temperature gets ready for cooking. T herefore, real cooking times will
be longer than s etup times.
The food is not well made.
●
Finished condition of cooked food may vary depending on ingredients and measuring
methods, etc. Please check and conrm the cooking procedures and cooking times.
The following factors may lead to cooking failure, steam leakage, or cause the lid not
to close properly.
Foreign substances stick to the temperature sensor. The inner pot is deformed. Cooked
food is left in the pot. There was a power failure. The cooker connection plug was not
inserted in the socket.
●
It sounds when cooking.
●
[Tik] heat adjustment sound ,[Chu] steaming sound. (It is not because of malfunctioning).
[JuJu] sound of water droplets spattering and burning at the outer surface of inner pot
Please wipe o water droplets at the outer surface of inner pot before putting it into the
cooker.
●
There is plastic smell.
●
At the beginning of use, there may be some unpleasant smell, but it will disappear little
by little while using if feeling worry, please clean it by boiling .
→
There are s cratches, dirt on
the outer surface of inner pot.
●
After using, coated inner surface may get scratched or get dirty, but there will be no
eect on cooking or warming quality.
The circuit breaker is off ,
when cooking food.
●
If using the cooker with other electric appliances in the same time, power consumption
may be overrated, causing the circuit breaker to cut o power. Please use an isolated
outlet.
Others
Causes / Points of investigation
Trouble Cases
※If the power failure lasts for a long time, the rice may be not well cooked.
During keeping warm /
During steam boiling
During rice cooking
During pre-programmed cooking
●
After restoring from a power failure,the cooker
will restore to the origin al state.
In case of a power failure
Please do in the same way as when the cooker is halfway unplugged, When the cooker connection plug falls out, or when
the breaker cuts o power.
In case of troubles
23
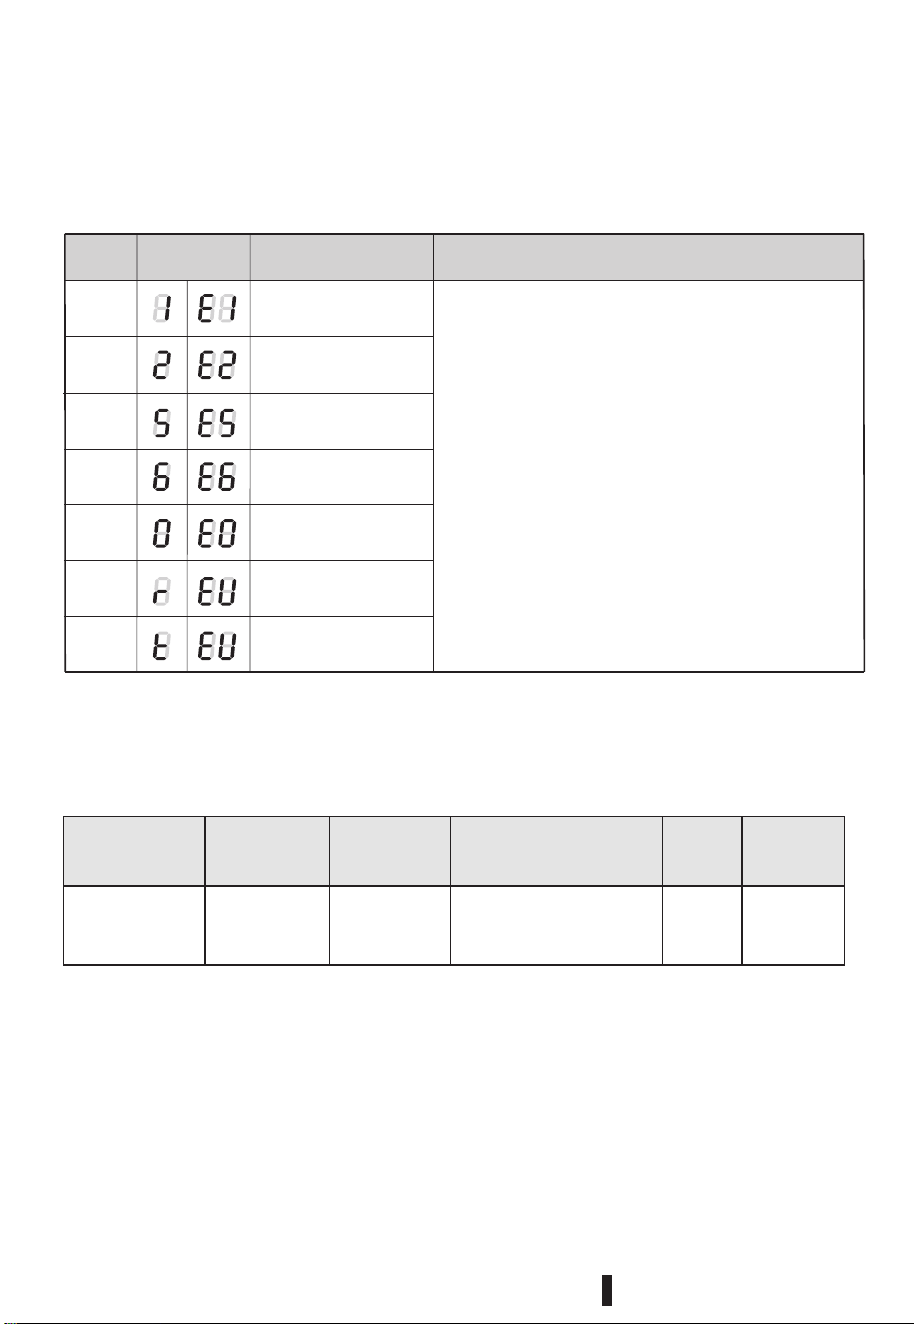
ERROR INDICATION
Anomaly self-checking
Display the cause of the abnormality Please contact your local dealer or service
network for repair or installation.
Indicat
or state
Light on
Abnormal
display
Possible
Reason
Solutions
Main thermistor (bottom
sensor) short circuit
Pull out and re-connect the power cord, the display still
shows same message, please send the cooker to your
local after-sales service centre for maintenance.
Main thermistor (bottom
sensor) open circuit
Light on
Abnormal temperature
system error
Top lid sensor (handle
thermistor) open circuit
Top lid sensor (handle
thermistor) short circuit
Light on
Light on
Light on
Communication error
Communication error
Light on
Flash
Specications
(COOK)
Power
Consumption
Body
Dimension
Model Name
RC-10DR1TMY(S)
220-240V~ 50/60Hz
L400*W308*H250(mm)625-744W
Body
Frequency
Weight
Power Supply
3.2kg
24
# MatterDetails
RC-10DR1TMY(N)
RC-10DR1TMY(S)
RC-18DR1TMY(S
)
)
PANDUAN
PENGGUNA
PERIUK NASI ELEKTRIK
●
●
Kandungan
Pembersihan & Penjagaan / Notis khas
Memasak Nasi
Langkah-langkah keselamatan ............................... 2
Sila ikuti arahan............................................................. 7
Pengenalan bahagian................................................. 8
Langkah asas memasak nasi .................................... 9
Cara memasak nasi yang sedap............................ 11
Tatacara memasak nasi............................................ 12
Standard jumlah untuk dimasak dan masa memasak ..12
Paparan masa memasak ......................................12
Pelarasan Jam ...................................................13
Kegagalan kuasa .................................................23
Menetapkan pemasa ................................................ 13
Kaedah penyediaan makanan............................... 15
Pembersihan & Penjagaan...................................... 20
Petunjuk ralat .............................................................. 24
Spesikasi...................................................................... 24
Sekiranya berlaku sebarang masalah ................. 21
“Panaskan” ................................................................... 14
Cara menggunakan "KUKUS" dengan kaki pengukus
16
Kek & Nasi Rangup.......................................................17
Sushi..................................................................................18
Sup & Bubur....................................................................19
Cara mengeluarkan dan memasukkan
penutup dalam, lubang wap...................................
20
Pembersihan dengan kaedah pendidihan..........20
Terima kasih kerana membeli periuk nasi Toshiba.
Sila baca manual arahan dan gunakan periuk nasi dengan
betul untuk keselamatan anda.
Selepas anda selesai membaca manual ini, sila simpan manual
arahan di tempat yang mudah dicapai atau dilihat oleh
mana-mana individu yang akan menggunakan periuk ini.
Sebelum menggunakan, sila baca "Langkah-langkah
Keselamatan" dan "Sila ikuti arahan". (muka surat 2 - 7)
Sebelum
Penggunaan
Membuat penggunaan
yang betul
AMARAN AWAS
■
■
AMARAN
Penyalahgunaan perkakas ini boleh menyebabkan kecederaan
AMARAN
2
Sila ikuti untuk keselamatan diri anda
Perkara ini adalah untuk menjelaskan tahap kecederaan dan kerosakan yang mungkin
berlaku jika arahan tidak diikuti.
Penerangan dibahagikan kepada bahagian mengikut butiran arahan.
Perkara yang mungkin
menyebabkan
"kecederaan teruk" atau
"kematian"
Kes "LARANGAN". Kes "PEMERHATIAN".
Untuk mengelakkan kebakaran, melecur, kejutan elektrik,
kebocoran elektrik, litar pintas
Kes "AWAS".
Perkara yang mungkin
menjadi punca kepada
"kemudaratan tubuh badan"
atau "kerosakan harta benda"
• Amaran: Elakkan sebarang
tumpahan pada penyambung.
• Kanak-kanak harus diawasi untuk
memastikan mereka tidak bermain
dengan perkakas ini.
• Permukaan elemen pemanas
mengandungi sisa haba selepas
digunakan, jangan sentuh.
• Jangan letakkan perkakas pada
tempat yang berdekatan
dengan langsir sensitif haba.
• Perkakas ini bertujuan untuk
digunakan di rumah dan lokasi
yang serupa seperti: Ruang
dapur kakitangan di kedai,
pejabat dan persekitaran kerja
lain; rumah ladang; oleh
pelanggan di hotel, motel dan
persekitaran jenis kediaman
lain; persekitaran penginapan
jenis inap dan sarapan.
• Jika kord bekalan kuasa rosak, ia
mesti diganti dengan kord khas
atau pemasangan
yang tersedia daripada pengilang
atau ejen servisnya.
• Sila matikan dan cabut plag
perkakas sebelum pembersihan,
penyelenggaraan atau
penempatan semula dan apabila ia
tidak digunakan.
• Perkakas ini tidak dimaksudkan
untuk digunakan oleh orang
(termasuk kanak-kanak)
yang kurang keupayaan zikal,
deria atau mental, atau kurang
pengalaman dan
pengetahuan, melainkan mereka
telah diberi pengawasan atau
arahan mengenai
penggunaan perkakas oleh
orang yang bertanggungjawab
untuk keselamatan mereka.
Perkakas ini adalah untuk
kegunaan isi rumah sahaja.
Jangan gunakan di luar rumah.
LANGKAH-LANGKAH
KESELAMATAN
※
Gunakan palam kuasa / kord dengan betul.
3
Hentikan penggunaan dengan
serta-merta jika
keabnormalan/kerosakan ditemui.
Cabut plag serta-merta dan hubungi
Kedai tempat produk itu dibeli atau
pusat servis Toshiba untuk
pemeriksaan dan pembaikan.
• Palam / kord kuasa sangat panas.
• Periuk mempunyai bau hangus.
• Periuk sebahagiannya retak,
longgar, bergoyang.
• Periuk dalam, penutup luar atau
penutup dalam pecah atau
berubah bentuk.
• Pemanas memasak menjadi
bengkok.
Jangan memasukkan sebarang
objek asing ke dalam lubang udara
Jangan merendam
badan periuk dan
palam kuasa serta
kord dalam air atau
Jangan membenarkan sesiapa yang
Semasa memasak, jangan buka
penutup dalam atau alihkan/bawa
periuk nasi ke tempat lain.
Jangan buka, baiki atau ubah suai
periuk ini sendiri.
Untuk sebarang
pembaikan, sila rujuk
Kedai tempat produk itu
dibeli atau pusat servis
Toshiba.
Jangan
memasukkan
sebarang objek
asing
lubang
udara
Pastikan
tidak
basah
Pegang kepala
palam dan tarik
keluar dari soket.
(Jangan pegang kord
kuasa semasa
mencabut plag)
• Gunakan soket berasingan 220-240V.
Menggunakan periuk bersama
perkakas lain akan mengakibatkan
soket terlalu panas yang membawa
kepada bahaya kebakaran. Jangan
menyambungkan produk ke sumber
kuasa yang tidak dinyatakan dalam
manual operasi.
• Jika kord sambungan diperlukan,
gunakannya secara berasingan.
• Masukkan palam sepenuhnya ke
dalam soket.
• Keluarkan habuk dari palam kuasa
secara berkala. Pengumpulan habuk,
disebabkan oleh kelembapan, akan
menyebabkan kegagalan penebat
yang membawa kepada bahaya
kemarahan. Gunakan kain kering
untuk mengelap habuk.
• Pastikan tiada barang logam atau
sampah (cth, pin, dsb.) yang tertinggal
di hujung runcing palam periuk.
• Jangan membenarkan
kanak-kanak bermain dengan
palam kuasa.
• Sentiasa cabut palam apabila
tidak digunakan. Jika tidak,
disebabkan kemerosotan
penebat, ia boleh menyebabkan
kejutan elektrik, kebocoran
elektrik, bahaya kebakaran, dsb.
Ilustrasi dalam manual arahan mungkin berbeza daripada produk yang anda beli.
DILARANG
MENYAHPASANG
menuangkan air ke atasnya.
Jangan meletakkan periuk di
tempat yang terdedah kepada air.
atau celah kosong
di bahagian
bawah dapur.
Terutamanya
barang logam cth pin, wayar, dsb.
tidak biasa dengan pengendalian
periuk ini untuk
menggunakannya sendiri.
Jangan menggunakan
periuk yang boleh dicapai oleh
kanak-kanak, terutamanya perhatikan
kanak-kanak semasa memasak atau
sejurus selepas dimasak.
• Pegang kepala palam kuasa
apabila
menariknya
keluar dari alur
keluar. Jika tidak,
ia mungkin terbakar, disebabkan
oleh renjatan elektrik, litar pintas,
dsb. Masukkan palam kuasa ke
dalam salur keluar kuasa sehingga
ke pangkal palam kuasa.
Gunakan palam/kord kuasa dengan betul. (Bersambung)
Gunakan palam/kord kuasa dengan betul. (Bersambung)
AMARAN
4
• Jangan gunakan kord/palam kuasa
yang rosak, dsb., atau yang
mempunyai sisipan longgar.
• Jangan biarkan wap sampai ke
palam kuasa atau peralatan elektrik
lain. Terutamanya berhati-hati
apabila menggunakan mana-mana
rak penyimpanan dapur.
• Jangan gunakan sebarang kord
kuasa selain daripada disertakan
bersama periuk dan jangan
gunakan kord yang dipasang pada
periuk untuk peralatan lain.
• Jangan letakkan palam kuasa atau
kord di tempat yang mempunyai
suhu tinggi, air banjir dan
kelembapan yang tinggi atau
sentuh dengan objek tepi tajam.
• Jika kord kuasa rosak, beli kord
kuasa pengganti yang ditentukan
daripada pengeluar.
• Kendalikan kord kuasa dengan
berhati-hati. Jangan tarik, selit, putar,
bengkokkannya dengan cara yang
tidak wajar atau hidupkan elektrik
semasa ia masih bergelung. Jangan
letakkan objek berat di atasnya.
Jangan ubah suai atau ubah
bentuknya dalam apa cara sekalipun.
• Jangan masukkan atau cabut
palam kuasa atau palam periuk
dengan tangan yang basah.
Pastikan tangan anda kering
sebelum menyentuh palam kuasa.
Jangan sentuh produk, kord atau palam
kuasa dengan tangan yang basah. Jangan
mengendalikan produk jika kord atau
palam kuasa rosak, atau palam kuasa
dimasukkan dengan tidak betul.
Untuk mengelakkan kebakaran, terbakar, kejutan elektrik,
kebocoran elektrik, litar pintas, dsb.
Lubang wap panas. Jauhkan
muka atau tangan anda
daripadanya.
Berhati-hati, terutamanya
dengan bayi dan anak kecil.
Jangan menggunakan periuk
untuk sebarang tujuan selain
daripada yang ditunjukkan dalam
manual arahan. Kerana ia boleh
menyebabkan makanan atau wap
yang terkandung di dalam
tertumpah atau terkeluar,
mengakibatkan luka/kecederaan
melecur.
Pastikan anda memasang bolong
stim.
《Contoh cara memasak yang tidak sesuai》
• Meletakkan bahan-bahan yang boleh
menghalang lubang wap, contohnya,
kertas memasak, kerajang aluminium,
kertas penanggal alkali, pembalut makanan
atau bahan lapisan nipis seperti sayur-sayu-
ran, tomato, kekacang, dsb.
• Memasak makanan yang mudah tertumpah
cth, jem, kekacang, dsb.
• Masukkan bahan ke dalam beg plastik dan
panaskan dalam periuk.
Tempat wap
panas & kuat
kerap keluar
Lubang
wap
LANGKAH-LANGKAH KESELAMATAN
(bersambung)
Untuk mengelakkan luka melecur / kecederaan.
Untuk mengelakkan mendidih atau tertumpah
AWAS
5
• ubur nasi perlu dimasak dengan air
yang banyak, jadi kami tidak
menggunakan menu “White Rice”
(Nasi Putih) atau “Quick Rice”
(Pantas Masak). Sila buat bubur nasi
mengikut menu “Congee” (Bubur).
• Semasa menggunakan atau
selepas menggunakan periuk ini,
jangan sentuh bahagian panas
termasuk penutup dalam,
pemanas memasak, periuk dalam,
lubang wap, sinki haba, dsb.
• Untuk menyelenggara atau
membaiki, lakukan selepas
mencabut palam dan periuk
telah menjadi sejuk.
Kemungkinan masih terdapat air
panas yang terkumpul di dalam
lubang wap.
• Selepas memasak, berhati-hati
terhadap wap atau air panas
yang menitis dari penutup
dalam, semasa membukanya.
• Sebelum mengeluarkan periuk
dalam, tekan kekunci
“CANCEL/KEEP WARM”
(BATAL/PANASKAN). Walaupun
periuk dalam dikeluarkan
semasa memasak atau
memanaskan, kuasa tidak akan
terputus secara automatik.
• Sila gunakan kain lap yang
kering, sarung tangan, dsb.
untuk mengeluarkan periuk
dalam yang panas.
• Apabila tidak digunakan, jangan
tekan kekunci “Cook” (Masak) atau
kekunci “CANCEL/KEEP WARM”
(BATAL/PANASKAN).
Kerana pemanas memasak, periuk
dalam, periuk luar, penutup dalam
akan berada pada suhu yang
tinggi.
• Semasa menggerakkan periuk,
jangan sentuh butang cangkuk.
• Jangan goncangkan periuk
semasa memegang pemegang.
• Semasa memasak, jangan angkat
pemegangnya.
• Jangan hidupkan periuk, apabila
periuk kosong.
Kerana ia boleh menyebabkan
periuk menjadi terlalu panas,
rosak dan malfungsi.
• Jangan tambah air yang terlalu
banyak melebihi skala paras air
yang ditunjukkan.
Sukatan piawai adalah dalam
lingkungan 2mm berbanding skala
paras air yang ditunjukkan.
Untuk mengelakkan kebocoran elektrik, renjatan elektrik, kecederaan
badan, luka melecur, bahaya kebakaran dan kerosakan harta benda.
Jangan gunakan periuk di tempat berikut
Untuk kegunaan yang selamat
AWAS
6
Sila ikuti untuk keselamatan diri anda
• Tempat yang berdekatan dengan
nyalaan api, kawasan basah atau
kawasan panas dan kelembapan tinggi.
Sila ambil perhatian terhadap aksesori
dan lampiran.
• Tempat yang tidak rata/tidak stabil atau
di atas permaidani sensitif haba, tikar, dll.
Ia boleh menyebabkan luka melecur,
bahaya kebakaran.
• Pada bahan yang boleh menghalang
lubang udara, contohnya kertas, kain,
permaidani, dsb.
• Tempat penutup periuk tidak boleh
dibuka sepenuhnya. Ia boleh
menyebabkan kecederaan dan
kerosakan terbakar.
• Jangan gunakan apa-apa benda lain sebagai ganti periuk dalam yang direka
khusus untuk periuk ini.
• Jangan bawa sebarang objek mudah terbakar, objek berbahaya, bahan kimia
atau gas mudah terbakar berhampiran atau di dalam produk.
• Baca manual arahan dengan teliti sebelum menggunakan produk.
• Sentiasa periksa sama ada produk berada dalam keadaan operasi yang baik
sebelum digunakan dengan mengikut cadangan dalam manual arahan.
• Keluarkan semua bahan pembungkus.
• Kawasan yang mengandungi
elektromagnet tinggi.
• Tempat berdekatan dengan dinding,
perabot, dsb.
Apabila meletakkan periuk di atas rak
penyimpanan dapur, berhati-hati agar
tidak membiarkan wap terkurung.
• Meja gelongsor dengan kekuatan
beban yang tidak mencukupi.
Kekuatan beban yang standard ialah
Jenis 1.0L: 10 kg dan ke atas;
• Jenis 1.8L: 12kg dan ke atas;
Untuk mengelakkan kebocoran elektrik, renjatan elektrik, kecederaan
badan, luka melecur, bahaya kebakaran dan kerosakan harta benda.
LANGKAH-LANGKAH
KESELAMATAN
7
Untuk mengelakkan kerosakan, malfungsi, dsb.
Jangan gunakan periuk di tempat berikut.
Mereka boleh menyebabkan kerosakan,
ubah bentuk, perubahan warna, dsb.
• Tempat yang terdedah kepada cahaya
matahari langsung
• Tempat yang berminyak, dsb., mudah
terkena percikan
Jangan letakkan apa-apa kain lap pada
penutup, terutamanya pada lubang wap.
Wap mungkin terkurung, mengakibatkan
kerosakan, ubah bentuk, perubahan warna,
dsb. penutup, lubang wap dan bahagian
operasi.
Pastikan periuk dan persekitaran di
sekelilingnya bersih dan sedia untuk
digunakan. Debu, pepijat, dsb. yang masuk
ke dalam bahagian yang mengekalkan
fungsi (seperti lubang udara, dsb.,) boleh
menyebabkan kerosakan pada periuk.
Jangan masukkan pinggan mangkuk ke
dalam periuk dalam dan gunakannya sebagai
mangkuk basuh.
• Jangan gunakan berus penyental atau mesin
basuh pinggan mangkuk untuk mencuci
periuk dalam.
• Jangan gunakan sebarang pembersih, agen
peluntur untuk mencuci periuk dalam.
(gunakan detergen neutral untuk kegunaan
dapur.)
• Nasi yang dimasak dengan pelbagai
bahan perencah tidak boleh dipanaskan.
(Sila basuh selepas menggunakan bahan
perasa.)
• Jangan gunakan cuka.
• Jangan gosok dengan sudu atau sapu
dengan ayak.
• Jangan gunakan senduk logam atau
pemukul.
Lapkan titisan air atau sebarang bahan
asing.
Jika menggunakan periuk semasa bahan
asing ditinggalkan, melekat pada
pemanas memasak, pengesan suhu,
bahagian luar periuk dalam, pembungkus
penutup dalam, dsb., nasi tidak akan
dimasak dengan baik, ini mengakibatkan
kerosakan.
Jangan gunakan periuk dalam dengan
gas, peralatan memasak haba induksi,
ketuhar gelombang mikro, dsb. Ia boleh
menyebabkan berubah bentuk,
perubahan warna, malfungsi, dsb.
Hentikan penggunaan jika periuk menjadi
longgar, retak, jatuh.
Sila hubungi kedai tempat produk itu
dibeli atau pusat servis Toshiba untuk
pemeriksaan dan pembaikan.
Sila ikuti arahan
Jangan gunakan periuk dengan cara berikut untuk mengelakkan salutan di dalam periuk
dalam daripada tercalar dan tercabut.
Badan
Panel operasi
dalam
Aksesori
Pemanas Memasak
Palam Kuasa
Untuk Model:
RC-10DH1NMY
RC-18DH1NMY
Untuk Model:
RC-10DR1TMY(N)
RC-10DR1TMY(S)
RC-18DR1TMY(S)
8
BATALKAN
MASAK
MENU
PEMASA
CEPAT
MASAK
NASI
CAMPUR
BUBUR
PEMASA PANASKAN MASAK
NASI PERANG
PULUT
NASI RANGUP
KUKUS
SUP
KEK
SUSHI
PANASKAN
Apabila menggunakan periuk ini buat kali pertama, sila basuh periuk
dalam, penutup dalam, lubang wap, aksesori dan lampiran lain
Pada penggunaan pertama, mungkin terdapat bau dari plastik, dll.
Bau ini akan hilang selepas digunakan
Penutup
Dalam
Periuk
dalam
Butang
Cangkuk
Panel Operasi
Lubang Udara
(di bahagian bawah)
Label Amaran
Keselamatan
Lubang Palam Periuk
Kord kuasa (set kord)
Palam Periuk
kord
Sila tanggalkan tali dari kord apabila
menggunakan periuk nasi
Pengesan Suhu
(buang benda asing)
Lubang Wap
Penutup Luar
Pengesan Penutup
Tempat Stim Keluar
Pembungkus
Penutup Dalam
Pemegang
(tanggal dan basuh
setiap kali penggunaan)
Cawan penyukat
(kira-kira 180 ml.)
Senduk Sudu
Pengenalan bahagian
Langkah asas memasak nasi
1
Sukat beras
●
Persediaan
Aras cawan = 180ml
[Contoh sukatan betul] [Contoh sukatan yang salah]
Langkah asas memasak nasi
Langkah asas
3
Laraskan paras air. Pilih skala paras air berdasarkan saiz dan bilangan cawan penyukat.
●
4
●
Penutup dalam
2
Basuh beras.
●
9
Ia mungkin berbeza daripada cawan penyukat
makanan lain (200ml) atau bekas penyukat
beras lain.
Untuk mencuci beras dalam periuk dalam, sila
jangan gunakan sebarang pemukul telur.
sila laraskan paras air mengikut citarasa anda.
Titisan air atau bahan asing yang tertinggal boleh
menyebabkan kebocoran wap, menyebabkan
penutup gagal ditutup sepenuhnya, dan
menyebabkan nasi tidak masak dengan baik.
Letakkan periuk dalam secara rata pada
bahagian paling bawah di dalam periuk
(tanpa condong ke mana-mana belah sisi).
Pusingkan periuk dalam 2-3 kali mengikut arah seperti
yang ditunjukkan oleh anak panah, supaya ia
menyentuh dengan rapat pemanas memasak.
Ratakan beras, di tempat yang rata.
Lapkan titisan air, bahan asing,
dan masukkan periuk dalam,
kemudian tutup penutup.
( Standard: laraskan dalam 2mm terhadap skala yang
ditunjukkan)
Bilas beras dengan cepat
sehingga airnya jernih.
Periuk dalam boleh
digunakan untuk
membilas beras
1. Isikan air yang banyak, kacaukan beras dengan
cepat dan perlahan-lahan (dengan sebelah
tangan), kemudian tuangkan air dengan segera.
2. Gilapkan butir beras dan bilas beberapa kali,
sehingga airnya jernih.
Jika terdapat titisan air atau bahan asing yang
tertinggal atau melekat pada bahagian berikut, sila
lapkan.
dengan cawan penyukat
yang disediakan
Permukaan dalaman
penutup luar
Pembungkus penutup dalam
Sisi periuk dalam
Bingkai
Celah butang cangkuk
Pengesan suhu
Palam kuasa
Palam periuk
Sambungkan kord kuasa:
1. Masukkan palam
pemasak.
2. Masukkan palam kuasa.
Permukaan luar /
Permukaan bawah
periuk dalam
Langkah asas memasak nasi
Persediaan
Langkah asas
5
●
Tidak perlu rendam beras.
●
Jangan lupa untuk menutup penutup dan pasangkan lubang stim.
●
10
Pilih menu memasak, sahkan, dan mula memasak.
Tekan kekunci
"Masak".
Masak
Selepas menggunakan, tekan kekunci
"BATALKAN" dan cabut plag dari salur
keluar kuasa.
Dalam kes "memasak serta-merta selepas memanaskan" atau "memasak secara berterusan" sila tunggu
sehingga suhu penutup dalam, suhu di dalam periuk, dsb., telah menjadi sejuk kepada suhu badan.
Sila tekan kekunci "BATALKAN" untuk memutuskan kuasa sebelum
mengeluarkan periuk dalam.
※ Semasa memastikan nasi hangat, walaupun mengeluarkan periuk dalam, periuk tidak akan mati
secara automatik.
Jika buzzer berbunyi menandakan nasi telah masak.
Lampu "PANASKAN" dihidupkan.
Cara memasak nasi yang sedap
●
●
(
(
)
)
( )
( )
11
Sukat beras dengan tepat (paras dari atas).
Jangan basuh beras dengan air panas.
Jangan basuh beras lama-lama.
Jangan goncangkan cawan penyukat
Jika digoncang, jumlah nasi akan
bertambah lebih dari cukup.
Mencuci dengan air panas atau membasuh
perlahan-lahan boleh menyebabkan bau dedak padi
yang busuk.
Tentang Nasi
Selepas mencuci, jangan biarkan beras
dalam mangkuk penapis.
Jenis air yang tidak sesuai untuk memasak
nasi
Air untuk memasak nasi hendaklah dalam
suhu 30℃ atau lebih rendah.
Selepas menggunakan periuk, sila bersihkan
dengan segera.
Beli beras baru dalam kuantiti yang sesuai yang tarikh
mengilat beras menunjukkan bahawa ia boleh
dimakan sepenuhnya dalam masa 2 minggu - 1 bulan.
Cegah pengoksidaan dengan menyimpan beras
dalam bekas bertutup rapat dan simpan di tempat
yang gelap dan sejuk.
Elakkan
meninggalkan
beras dalam
mangkuk penapis.
Adalah disyorkan untuk
menggunakan air sejuk untuk
memasak yang telah diprogramkan
pada musim panas.
Air
mineral
keras
Punca nasi keras
dan kering
Punca nasi lembek
dan melekit
Suhu air yang terlalu tinggi akan
mengakibatkan nasi masak yang tidak enak
dan bau yang tidak menyenangkan.)
Pada musim panas,
gunakan air sejuk
Selepas mencuci, lap
titisan air dengan
kain bersih.
Membiarkan periuk kotor
akan menyebabkan bau
busuk.
Selepas menghentikan operasi
"Keep Warm" (Panaskan),
jangan biarkan nasi di dalam
periuk (atau ia akan
menyebabkan bau yang tidak
menyenangkan).
Basuh dan pastikan
penutup dalam, periuk
dalam, lubang wap bersih
sepanjang masa.
Air terion
melebihi pH9
Biji beras mungkin
retak mengakibatkan
menjadi lembek dan
melekit apabila
dimasak.
Basuh perlahan-lahan, untuk
mengelakkan butiran beras hancur.
Laraskan paras air mengikut keutamaan.
Apabila memasak selesai, kacaukan nasi yang
telah dimasak sepenuhnya dengan sudu.
Operasi “Panaskan” sepatutnya tamat dalam
tempoh yang singkat.
Jika lebih suka nasi yang
lebih keras
turunkan paras air di bawah skala
yang ditunjukkan
naikkan paras air melebihi skala
yang ditunjukkan
sedikit di bawah skala yang
ditunjukkan
mengikut skala yang ditunjukkan
sedikit melebihi skala yang
ditunjukkan
Jika lebih suka nasi yang
lebih lembut
Beras yang baru dituai
Nasi penuh
Beras Lama
Beras semasa musim hujan hingga musim
panas
Gandum
Gosokkan butiran beras satu sama lain. (Nasi
yang retak atau pecah cenderung menjadi
lembek dan melekit apabila dimasak.)
Keadaan dan kualiti setiap jenis beras adalah
berbeza, bergantung kepada jenama, tempat asal,
keadaan penyimpanan.
Oleh itu, sila laraskan mengikut keutamaan anda.
Sila kacaukan nasi yang telah
dimasak dengan memegang periuk
dalam dengan kain kering atau
sarung tangan untuk mengelak-
kannya daripada bergumpal atau
melekat bersama.
Dalam kes "nasi yang dimasak dengan pelbagai
bahan", sedikit nasi, atau dipanaskan untuk tempoh
yang lama, anda dinasihatkan untuk membungkus
nasi dalam plastik dan simpan di dalam peti sejuk.
Cawan penyukat
disediakan bersama
periuk masak
Tatacara memasak nasi
Operasi
Nasi masak
●
●
1
2
Selepas menggunakan
PETUA
●
●
●
●
Kaedah Operasi
Tatacara memasak nasi
5.5 1- 01 2 -
01 2 -
6 2 -
6 2 -
6 2 -
6 2 -
4 1 -
5.1 5.0 -5.0 52.0 -
-1 5.5
Jenis 1.0 L Jenis 1.8 L
1
-
4
1
-
4
01 2 -
-1 5.5
1
-
4
12
PEMASA PANASKAN
MASAK
NASI PERANG
PULUT
NASI RANGUP
KUKUS
SUP
KEK
SUSHI
Pilih menu memasak dengan
Apabila nasi sudah masak, buzzer
berbunyi menandakan masakan sudah
selesai.
Kekal dipanaskan
secara automatik
Memasak bermula, selepas menekan
Sesuaikan dengan menu masakan
Segera kacaukan nasi yang telah dimasak
Sila pastikan nasi hangat tidak lebih daripada 12 jam
untuk siri DR, 6 jam untuk siri DH.
Setiap kali kita menekan
kekunci "Menu", tanda " "
akan bergerak dan pilihan akan
berubah.
Tekan kekunci "Masak", lampu menu
yang sepadan akan bertukar
daripada berkelip kepada menyala
sepanjang masa.
[Lampu “PANASKAN” ] dihidupkan.
Menunjukkan masa berlalu untuk
memastikan nasi hangat dalam unit
satu minit.
Tekan kekunci "BATALKAN" dan tarik palam kuasa dari alur keluar.
Pilih "Skala paras air" dan "menu Memasak Nasi" yang sepadan dengan jenis nasi yang hendak
dimasak.
Masa memasak sebenar mungkin berbeza-beza kira-kira 10 minit, bergantung pada jumlah nasi, jumlah air, suhu
air, dsb.
Untuk semua menu masakan, jangan tambah air melebihi skala tahap “MAX”.
MENU
MASAK
Menu Memasak
Jenis beras
yang
dimasak
Skala paras
air
Jumlah beras dimasak
unit : cawan
Jenis 1.0 L Jenis 1.8 L
Masa piawai memasak
unit : minit
30 ~ 45 min
60 ~ 80 min
2 Jam
40 ~ 55 min
6 0 ~ 80 min
4 5 ~ 65 min
6 0 ~ 70 min
4 0 ~ 55 min
30 ~ 45 min
60 ~ 80 min
2 Jam
40 ~ 50 min
6 0 ~ 80 min
3 5 ~ 55 min
6 0 ~ 70 min
4 0 ~ 50 min
CEPAT MASAK
NASI CAMPUR
BUBUR
NASI PUTIH
NASI PERANG
PULUT
NASI RANGUP
SUSHI
Beras putih
Beras campur
Beras putih
Beras putih
Beras perang
Beras pulut
Beras putih
Beras sushi
Nasi putih
Nasi campur
Bubur
Nasi putih
Nasi perang
Nasi putih
Nasi putih
Nasi putih
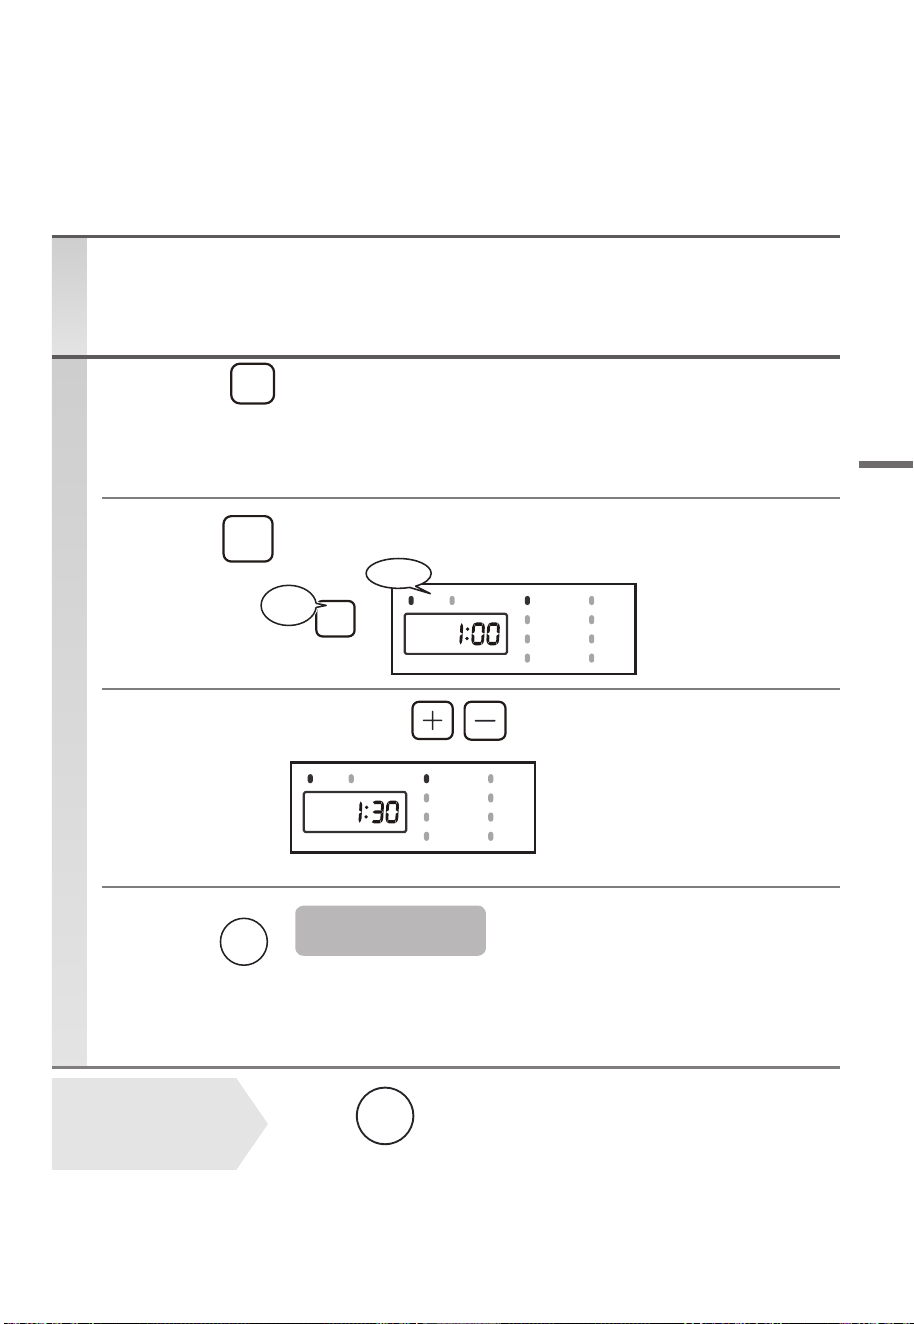
Menetapkan pemasa
Tekan
Tekan
Tekan
●
●
3
4
●
●
●
1
2
Persediaan
Operasi
Menetapkan pemasa
13
Masa siap boleh ditetapkan dalam unit 10 minit.
Jika kita terus menekan kekunci “+ ” atau
kekunci “-” untuk seketika, paparan masa akan
berubah dengan cepat.
Masa yang telah diprogramkan akan
dipaparkan sehingga memasak nasi bermula.
Apabila memasak nasi bermula, lampu
“PEMASA” akan dimatikan.
Jika kekunci "MASAK" tidak ditekan, ia akan
keluar dari mod pratetap ke mod siap sedia
selepas 2 minit.
Memasak pada masa yang telah ditetapkan.
Tolong jangan gunakan tetapan yang telah diprogramkan untuk beras perang germa, beras yang
dicampurkan dengan bijirin, dan beras yang dimasak dengan pelbagai bahan.
Masukkan periuk dalam ke dalam periuk
dan tutup penutup.
Dengan , tetapkan menu masakan, laraskan
supaya sesuai dengan jenis nasi yang hendak dimasak
Tetapkan masa siap dengan
MENU
PEMASA
MASAK
MASAK
Lampu
menyala
【 contoh : Nasi akan selesai dimasak pada pukul satu setengah. 】
Apabila ingin membatalkan
tetapan yang telah
diprogramkan atau jika
operasi tidak betul
Masakan yang telah
diprogramkan telah selesai
Petunjuk
PEMASA PANASKAN
MASAK
NASI PERANG
PULUT
NASI RANGUP
KUKUS
SUP
KEK
SUSHI
PEMASA PANASKAN
MASAK
NASI PERANG
PULUT
NASI RANGUP
KUKUS
SUP
KEK
SUSHI
BATALKAN
PANASKAN
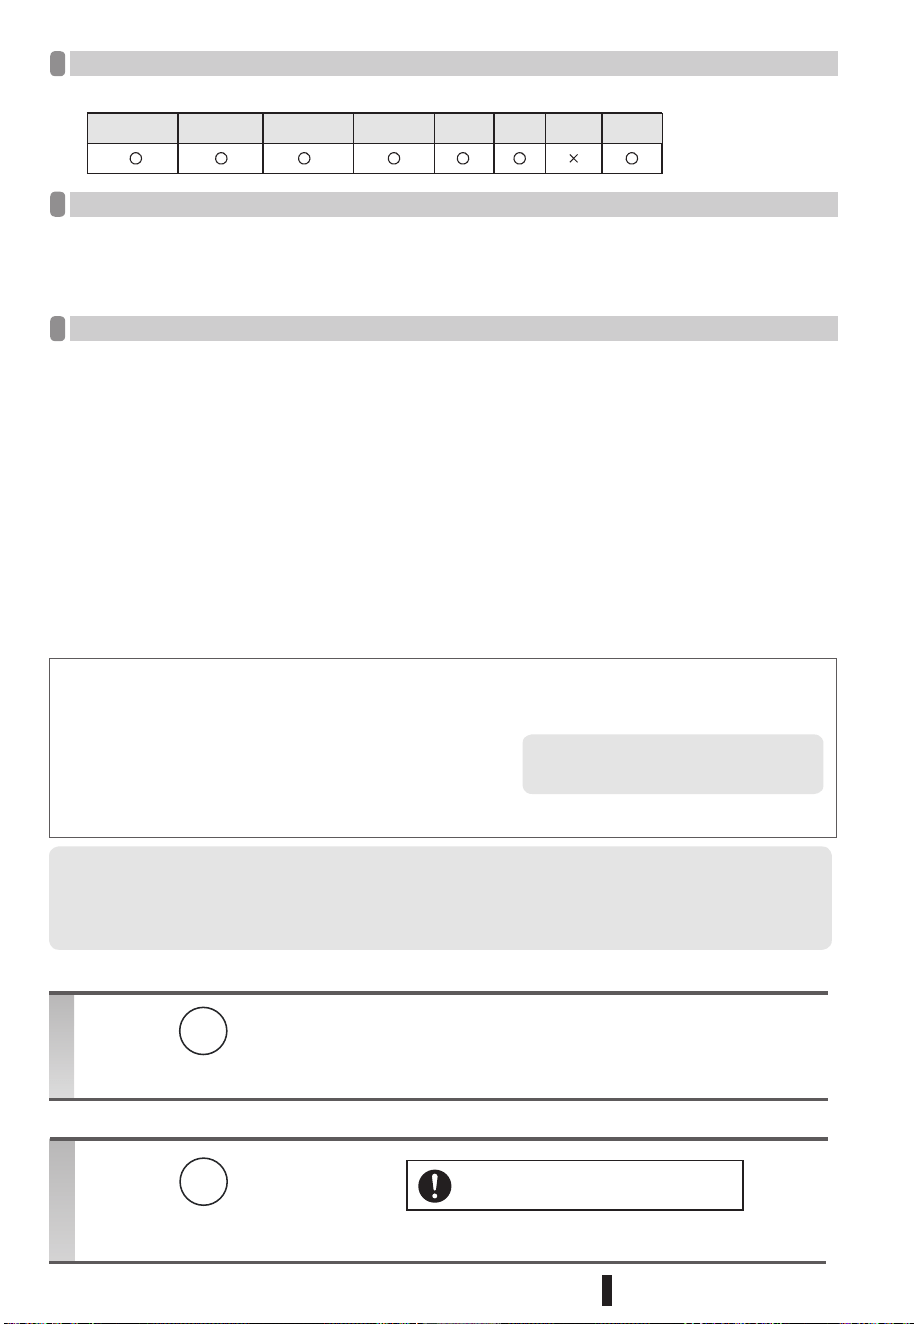
Notis
●
●
●
●
●
●
Operasi
Apabila ingin memanaskan nasi selepas selesai memasak.
"PANASKAN"
●
●
Petua untuk memastikan nasi hangat
●
Lampu “Panaskan” akan dihidupkan.
Lampu “PANASKAN” dimatikan.
Semasa memastikan nasi hangat, apabila periuk dalam dikeluarkan, kuasa tidak akan terputus secara automatik.
●
●
●
■
·
·
·
■
Apabila ingin berhenti memanaskan nasi
●
※
Operasi
·
14
Menu praprogram yang mungkin
Masa Praprogram
Sila jangan gunakan fungsi praprogram untuk setiap item berikut yang ditandakan dengan “X”.
Sila jangan tetapkan masa praprogram begitu lama melebihi 14 jam (maksimum 8 jam pada musim panas).
Masa praprogram yang terlalu lama akan menyebabkan pereputan dan bau yang tidak menyenangkan.
Jika masa praprogram tidak melebihi masa memasak menu yang dipilih, periuk akan mula memasak sekali gus.
Selepas masak, nasi akan sentiasa hangat.
Jika nasi yang dimasak agak lembut, sila kurangkan air mengikut kesukaan anda.
Dalam kes memasak yang telah diprogramkan, bahan berkanji akan tenggelam ke bahagian bawah dan mungkin menjadi
coklat muda.
Sekiranya suhu bilik rendah, suhu air rendah dan jumlah air yang banyak, nasi boleh masak kemudian dalam masa kira-kira 10
minit.
Suhu "KEEP WARM" (PANASKAN) boleh dikawal secara automatik bergantung pada keadaan penggunaan, untuk
memastikan nasi kami hangat dan lazat.
Tekan kekunci “Cancel” (Batalkan), apabila ingin menghentikan operasi “PANASKAN”.
Semasa memastikan nasi hangat, walaupun periuk dalam dikeluarkan, kuasa tidak akan terputus secara automatik.
Mengumpul nasi ke bahagian tengah akan membantu ia tidak menjadi terlalu keras, terlalu lembek dan melekit.
Semasa memastikan nasi hangat, Jika bimbang ia mungkin terlalu lembek dan melekit, sila jangan biarkan nasi
tertinggal di sisi periuk dalam.
Jangan gunakan ciri “Panaskan” dalam kes berikut: (Ia adalah punca bau busuk dan pewarnaan)
Jangan hentikan operasi "
Panaskan", semasa nasi masih berada di dalam periuk dalam. ( Ia boleh menyebab-
kan bau busuk )
Jika paparan berkelip semasa operasi
"Panaskan" , sila tekan kekunci "Panaskan", dan
keluarkan nasi.
menggunakan lebih daripada 12 jam untuk siri DR, 6 jam untuk siri DH.
digunakan untuk sebarang nasi selain nasi putih. (cth beras perang germa, bubur, nasi yang dimasak dengan
pelbagai bahan, dsb.)
menggunakan semasa ada sudu, dsb. di dalam periuk.
digunakan untuk nasi sejuk.
putih nasi nasi perang pulut Nasi rangup kukus Sup kek sushi
Jika menekan , ia akan mula memastikan nasi hangat.
Jika menekan
Sebelum mengeluarkan periuk dalam, sila tekan kekunci
"Batalkan" dan cabut plag untuk memutuskan kuasa.
BATALKAN
PANASKAN
BATALKAN
PANASKAN
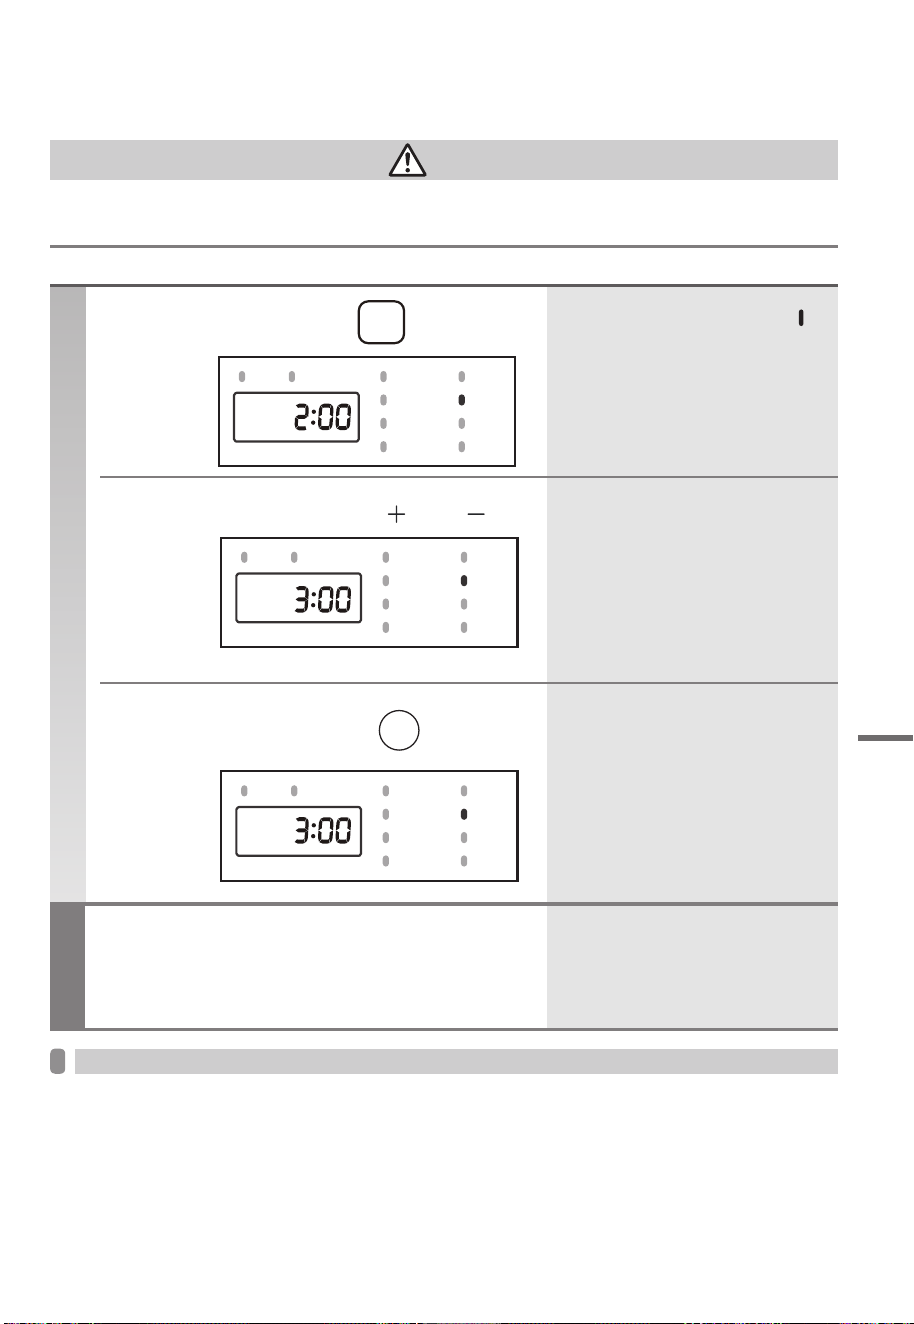
Kaedah penyediaan makanan
Operasi
Selesai
1
Prosedur asas
●
●
2
3
●
●
●
●
●
Nota
●
●
●
●
●
【 Cth. Masa memasak 3 jam 】
AMARAN
●
Kaedah penyediaan makanan
15
Tolong jangan masak atau gunakan apa-apa bahan yang tidak dinyatakan. Kerana ia boleh menyebabkan wap atau bahan
tumpah atau bertaburan, mengakibatkan luka melecur, kecederaan, kerosakan, dsb.
Selain itu, ia mungkin menjadi punca kakisan dalam periuk, bau busuk, dsb.
Pilih menu mengikut
Laraskan masa dengan “ ” dan “ ”
Mula memasak dengan
Apabila memasak selesai, buzzer berbunyi.
Sila gunakan pemegang periuk untuk mengeluarkan periuk
dalam, kerana ia sangat panas.
Jangan tinggalkan sebarang makanan di dalam periuk dalam
untuk masa yang lama.
MENU
MASAK
Setiap kali kekunci "MENU" ditekan,
akan bergerak, dan pilihan akan
berubah.
Hanya menu "KUKUS" dan " SUP " yang boleh
melaraskan masa.
Apabila anda memilih kekunci "Sup" , ia boleh
ditetapkan kepada maksimum 4 jam dengan
10 minit/unit.
Apabila anda memilih kekunci "Kukus", ia boleh
ditetapkan kepada maksimum 60 minit dengan
1 minit / unit.
Jika terus menekan kekunci, masa yang
dipaparkan akan berubah dengan lebih
cepat.
Tekan kekunci "MASAK", lampu menu
yang sepadan akan bertukar daripada
berkelip kepada menyala sepanjang
masa.
Mudah berbau busuk, jadi sila sentiasa
bersihkan dengan penjagaan yang baik.
Sila bersihkan dengan kaedah
pendidihan apabila bimbang tentang
sebarang bau busuk.
Jangan tambah air melebihi paras air “MAKSIMUM”.
Masa "penyediaan makanan" yang dinyatakan dalam manual arahan adalah untuk rujukan sahaja. Keputusan
masa sebenar mungkin berbeza bergantung pada ramuan, suhu bilik, dsb.
Sila gunakan peralatan memasak plastik atau kayu, untuk mengelakkan periuk dalam daripada tercalar.
Pastikan periuk dalam telah dimasukkan dengan betul ke dalam periuk. Jika ia tidak menyentuh pemanas
memasak, makanan mungkin tidak dibuat dengan baik.
PEMASA PANASKAN
MASAK
NASI PERANG
PULUT
NASI RANGUP
KUKUS
SUP
KEK
SUSHI
PEMASA PANASKAN
MASAK
NASI PERANG
PULUT
NASI RANGUP
KUKUS
SUP
KEK
SUSHI
PEMASA PANASKAN
MASAK
NASI PERANG
PULUT
NASI RANGUP
KUKUS
SUP
KEK
SUSHI
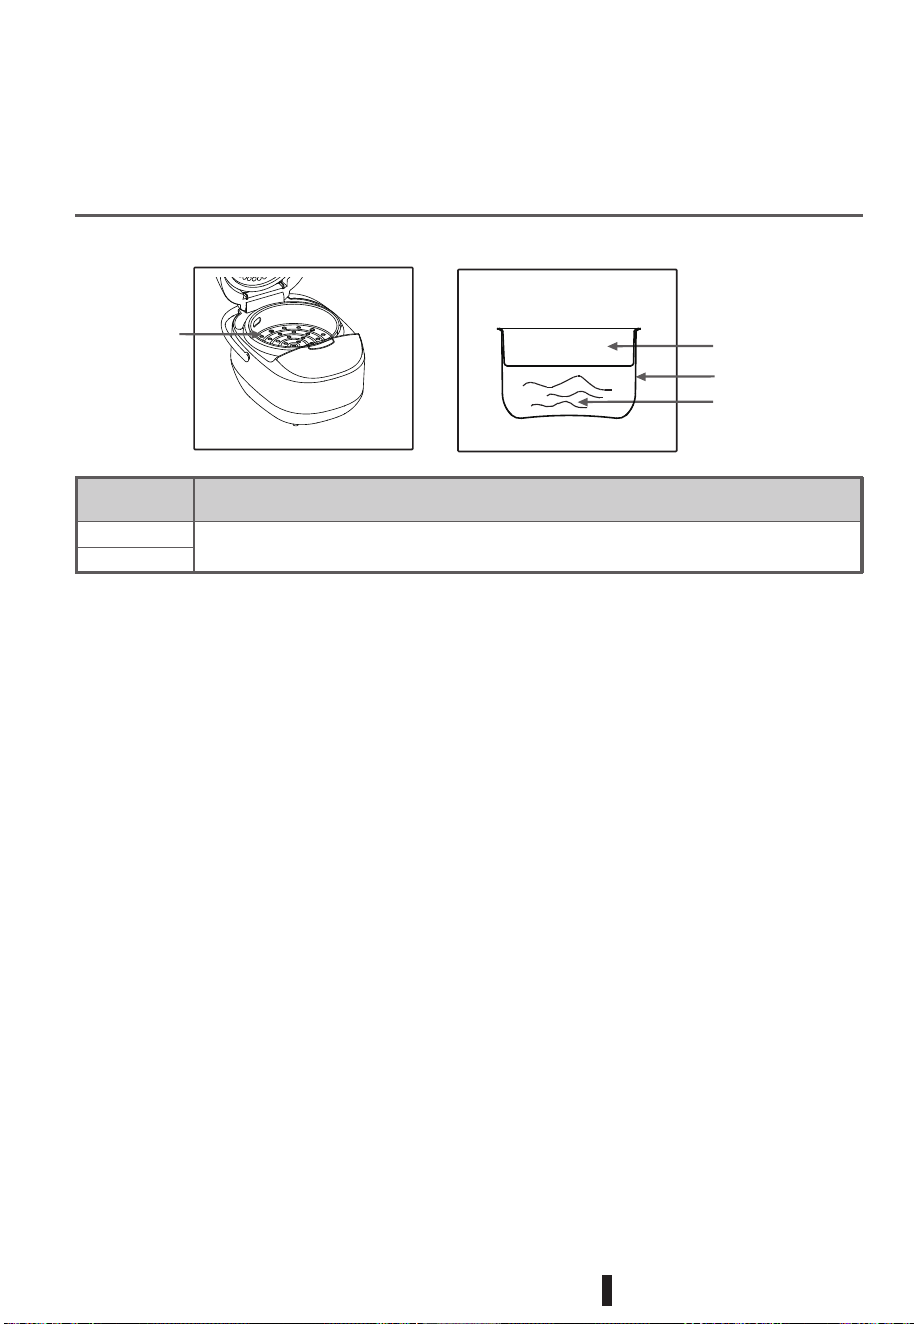
Paras air
Ikut paras air 2 “White Rice” (Nasi Putih)
Cara menuang air
Periuk nasi
Jenis 1.8 L
Jenis 1.0 L
Kaki pengukus
periuk dalam
Kaki pengukus
air
Ambil model RC-10DH1NMY & RC-18DH1NMY sebagai contoh:
16
Cara menggunakan “KUKUS” dengan
kaki pengukus
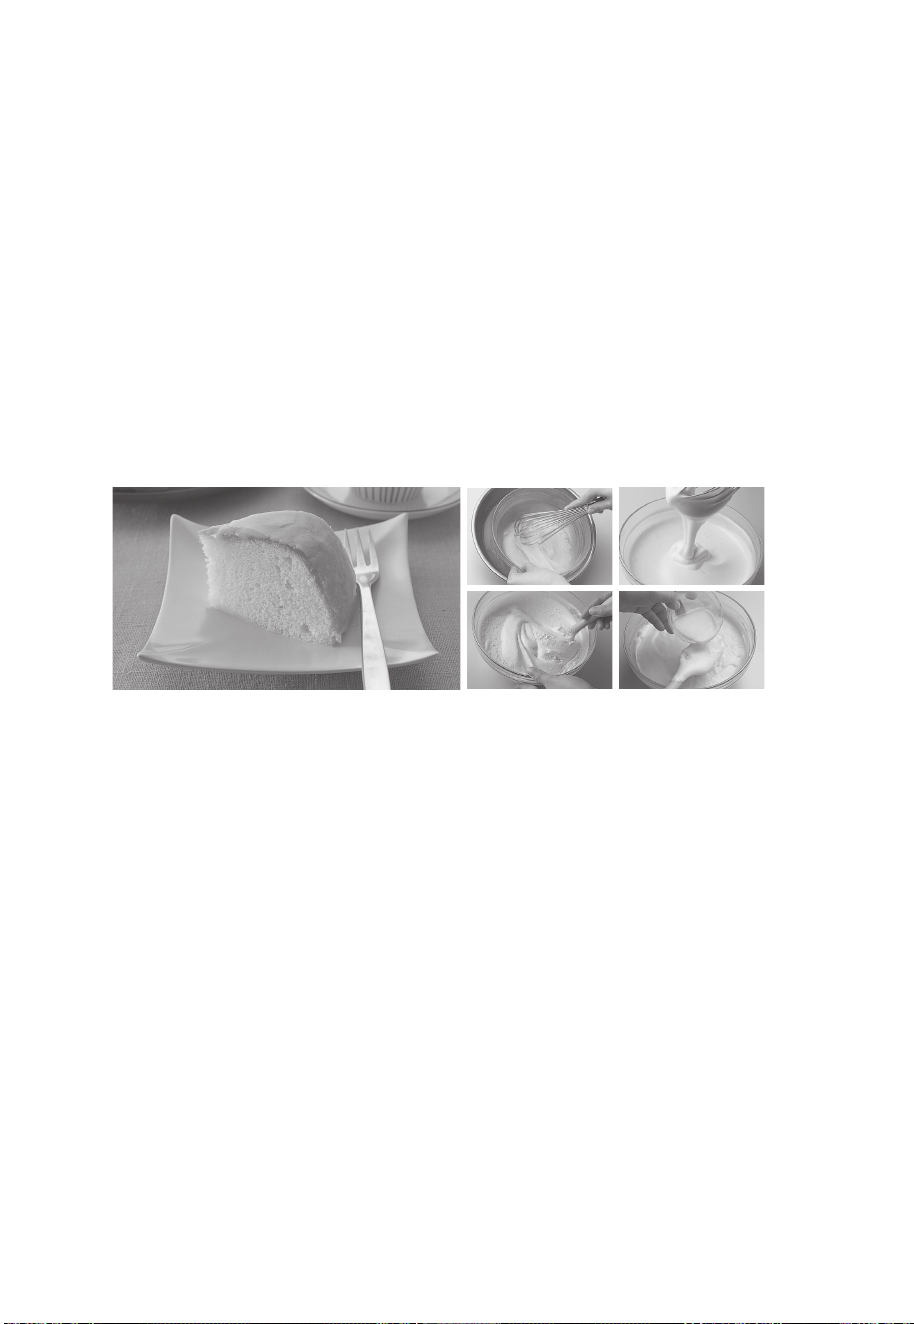
1
2
1
2
3
KEK
NASI RANGUP
17
Penyediaan bahan:
Jumlah kecil: 3 biji telur, 100g gula kastor, 120g tepung kek (serbuk penaik), 30g mentega
(tidak cair).
Jumlah besar: 5 biji telur, 180g gula kastor, 200g tepung kek (serbuk penaik), 50g mentega
(tidak cair).
(Ujian kek untuk acuan besar tidak dijalankan untuk model di bawah: RC-10DR1TMY(S).
Masukkan gula dan telur, kacau dengan pemukul telur hingga berbuih. Kemudian masukkan
tepung kek dan kacau dengan senduk kayu. Masukkan mentega cair, kacau cepat dan cepat
tuangkan ke dalam periuk dalam periuk elektrik untuk operasi sebelum buih hilang.
Tekan butang “MENU” dan pilih fungsi “KEK”, kemudian tekan butang “MASAK”.
Masa memasak adalah sekitar 45 minit.
Masukkan beras yang telah dibasuh bersih ke dalam periuk dalam, dan tambahkan air ke
garisan air yang sepadan berdasarkan jumlah beras (3 cawan beras gandum panjang)
serta jumlah minyak kacang tanah yang sesuai.
Tutup penutup, tekan butang "MENU" untuk memilih fungsi "NASI RANGUP", dan tekan
butang "MASAK", dan tunggu sehingga fungsi tersebut tamat.
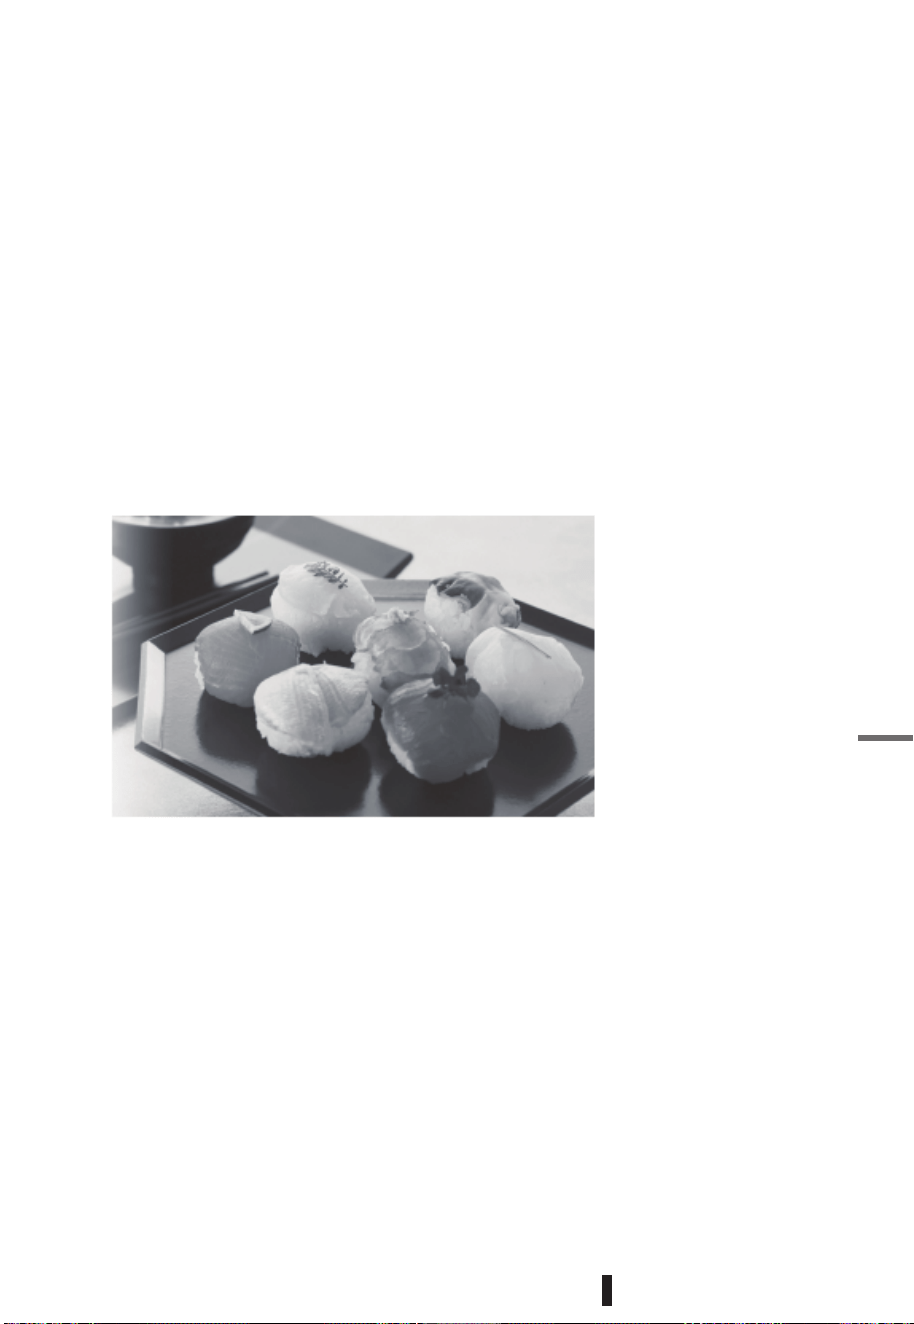
*Jangan campurkan cuka berperisa dengan nasi dalam periuk dalam.
1
2
3
4
5
Petua memasak (seperti berikut)
●
●
●
SUSHI
18
Bahan (untuk 4 orang):
Beras timur laut China atau beras khas untuk sushi : 300g
Cuka perasa (dicampurkan terlebih dahulu): Cuka (6 sudu besar), gula (1 sudu besar) dan garam
(1 sudu kecil)
Basuh beras dengan cepat sehingga air jernih, masukkan air pada skala paras air 2 untuk "NASI
PUTIH", dan tutup penutup.
Pilih fungsi "Sushi", dan tekan butang "MASAK", masa memasak adalah sekitar 50 minit.
Lapkan tong sushi dengan kain yang direndam dalam air cuka, dan tuangkan nasi yang
telah dimasak ke dalam tong.
Sapukan cuka berperisa pada beras, kemudian gaulkan dengan beras. Kipas nasi dengan
kipas bulat sehingga nampak kilauan.
Gaulkan cuka berperisa dengan nasi semasa masih panas, supaya cuka berperisa dapat
sebati sepenuhnya ke dalam nasi.
Sebab kita mengguna tong sushi ialah lebihan air boleh diserap olehnya, supaya nasi
tak melekit.
Menggantikan air dengan air kelp sejuk untuk memasak nasi boleh menjadikan nasi
lebih lazat.
1
2
2
3
SUP
1
BUBUR
NOTA :
19
Sediakan bahan sup (seperti ayam, jagung, lobak merah dan lain-lain), basuh semua
bahan dan potong kecil, kemudian masukkan ke dalam periuk dalam, dan tambah air
tidak lebih daripada garisan air Max.
Tutup penutup, tekan butang "MENU" untuk memilih "SUP", kemudian tekan butang
"COOK" (MASAK), dan tunggu sehingga memasak selesai.
Sediakan beras dan air. Masukkan beras yang telah dibilas ke dalam periuk dalam dan
pilih paras air yang sesuai mengikut jumlah beras.
Tutup penutup, dan tekan butang "Menu" untuk memilih "Bubur".
Mula memasak Tekan butang "MASAK" untuk memasuki keadaan memasak, dan
memasak akan selesai dalam masa yang ditetapkan.
• Masa pratetap dicadangkan tidak melebihi 12 jam, jika tidak, rasa tidak sedap mungkin
berlaku;
• Untuk memastikan kesan memasak yang terbaik, operasi pratetap tidak dicadangkan
untuk "Nasi Rangup".
Nota: Anda boleh melaraskan jumlah air mengikut keutamaan peribadi.
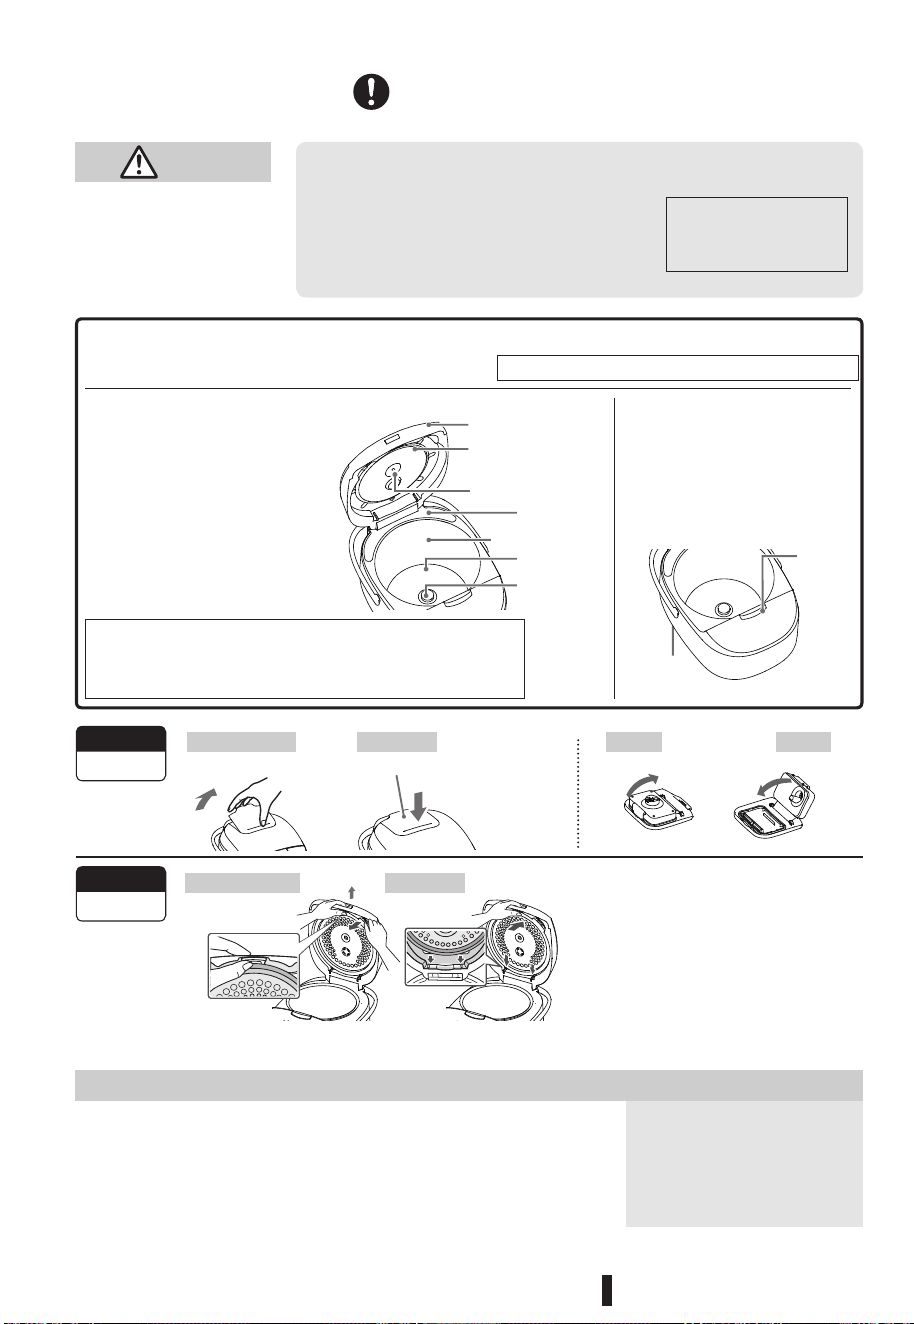
●
●
●
1
2
3
AWAS
●
●
Jangan gunakan bahan berikut
●
●
●
●
①
②
Lubang Wap
●
Tudung Dalam
TutupBuka
20
Cabut plag periuk sebelum
membersihkan dan
melakukan
penyelenggaraan. ( Ia
adalah punca luka melecur )
Menggunakan periuk yang tidak bersih akan menyebabkan bau busuk,
dsb. Oleh itu, sila pastikan ia bersih sepanjang masa. Sentiasa pastikan
untuk mengelap titisan air dari lubang wap, periuk/pembungkus dalam.
(Ia adalah punca ubah bentuk, penyahwarnaan, kakisan, calar retak)
Tudung dalam diperbuat daripada
aluminium. Ia mungkin dinyahwarna
oleh detergen yang digunakan untuk
pencuci pinggan mangkuk.
Menambah perasa dalam periuk tanpa mencuci penutup dalam selepas itu, akan
mengakibatkan berkarat
Pencuci pinggan mangkuk / pengering pinggan mangkuk
Detergen selain daripada detergen neutral untuk
kegunaan dapur
Benzena, penipisan, alkohol, pembersih, agen peluntur
Berus gosok, span melamin yang mudah menyebabkan
calar
Jangan basuh tanpa mengasingkannya.
Jangan basahkan bahagian operasi dan
penutup luar (penutup penutup). Jangan
tuangkan air ke bahagian dalam badan
periuk.
Jangan tarik pembungkus sinki haba
dengan kuat. (Ia tidak tertanggal)
Jangan basahkan badan periuk,
pemanas memasak, pengesan
suhu. Lap kotoran dan bendasing
dengan kain yang diperah.
Gunakan putik kapas untuk
mengeluarkan kotoran, bahan
asing dari lubang udara (di
bahagian bawah badan dapur)
dan celah butang cangkuk.
Jika terdapat sebarang butiran nasi masak yang tertinggal di
pemanas/pengesan suhu memasak, sila gosok perlahan-lahan
dengan kertas pasir lembut (anggaran no. 600), dan lap dengan
kain yang telah diperah.
Penutup Luar
(Tudung Penutup)
Sinki Haba
Pembungkus sinki haba
Bingkai
Bahagian dalam badan
Pemanas
Memasak
Pengesan suhu
Butang
Cangkuk
Lubang
Udara
Setiap kali
penggunaan
Keluarkan dengan
PasangkanKeluarkan dengan
Tetapkan tepi
menarik ke arah atas
ke bahagian berongga dan tekan ke bawah
sepenuhnya
Tanpa memasang tudung dalam, penutup luar (tudung penutup) tidak boleh ditutup
sepenuhnya (untuk mengelakkan terlupa memasang tudung dalam)
Pembersihan dengan kaedah pendidihan
Masukkan air ke dalam periuk dalam (sehingga mencapai paras air
skala 2 untuk Nasi Putih), dan tutup penutup.
Pilih (Nasi Putih) dengan kekunci "Menu", dan tekan kekunci "MASAK".
Apabila ia menjadi "Operasi Panaskan", tekan kekunci "Batalkan".
Apabila periuk telah sejuk, keluarkan penutup dalam, periuk dalam dan
lubang wap, basuh dan keringkannya.
( kira-kira sekali seminggu )
Sila lakukan juga apabila periuk berbau tidak menyenangkan.
Masukkan mengikut arah dua gunting
bawah.
Tekan untuk menjadikannya terpasang
sepenuhnya.
Jangan letak apa-apa (contohnya
detergen yang mencukupi, dsb.)
selain air.
Jangan bersihkan secara
berturut-turut dengan wap.
Sesetengah bau mungkin tidak
hilang sepenuhnya.
menarik ke hadapan
Setiap kali
penggunaan
Pembersihan
& Penjagaan
Periuk dalam, penutup dalam, lubang wap, dan sudu hendaklah dicuci selepas setiap penggunaan.
Cawan penyukat hendaklah dibasuh dengan detergen pencuci pinggan
mangkuk neutral.
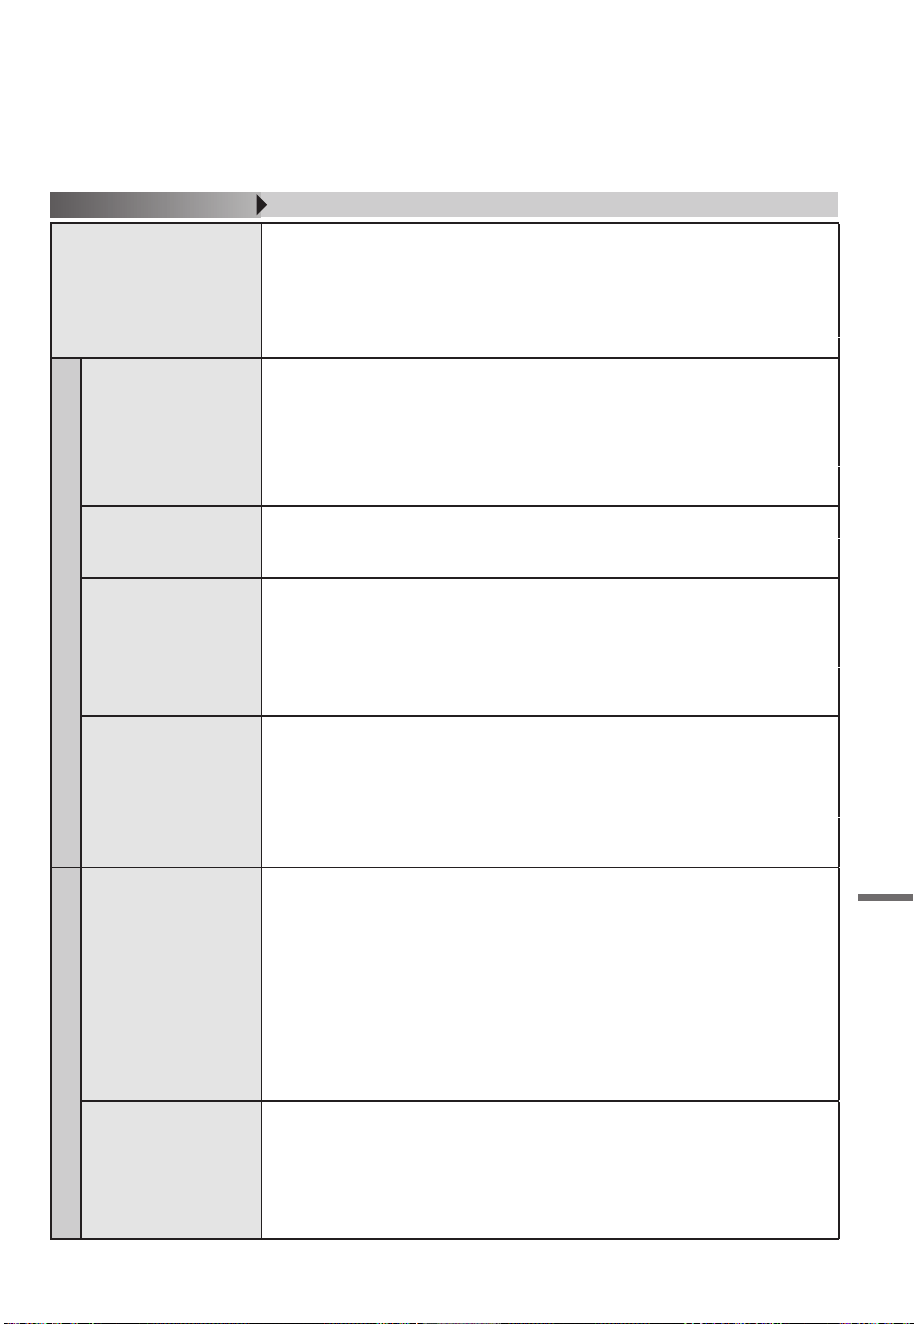
Sekiranya berlaku sebarang masalah
●
Nasi
●
●
●
●
●
●
●
●
●
Hangus
※
Beras mudah hangus dalam keadaan berikut:
●
●
●
●
●
●
●
●
●
●
Nasi tetap hangat
※
●
●
●
●
●
●
●
●
●
●
Punca / perkara-perkara untuk disiasat
Masalah
Sekiranya berlaku sebarang masalah
21
Sebelum membuat permintaan pembaikan, sila siasat sekali lagi. Jika tidak dapat menyiasat atau mengambil
tindakan lanjut sendiri, sila buat pertanyaan kepada pusat servis Toshiba.
Periuk tidak dihidupkan.
Nasi tidak masak.
Nasi yang dimasak adalah lembut
walaupun dikendalikan dengan
fungsi "Keep-Warm" (Panaskan).
Nasinya berair.
Operasi kunci tidak dapat dilakukan.
Lembut
Lembek, Melekit
Bergumpal
Tidak sedap
Adakah palam periuk dicabut atau adakah palamnya terkeluar dari alur keluar?
Jika masa semasa dipaparkan semasa memasak atau operasi "Keep Warm" (Panaskan),
periuk berada dalam keadaan kegagalan kuasa dan palam terputus kuasa atau
pemutus litar mematikan kuasa.
Sila masak nasi dengan kurang air.
Apabila nasi telah masak, kacaukan dengan segera dan sepenuhnya.
Sila masak nasi baharu dengan kurang air.
Rendamkan beras terlebih dahulu untuk melembutkan tekstur nasi yang dimasak dengan
tetapan yang telah diprogramkan.
Mencuci butir beras secara paksa atau membiarkannya dalam mangkuk penapis boleh
menyebabkan ia merekah dan menjadi lembek, melekit apabila dimasak.
Adakah ia dimasak dengan air panas atau air terion beralkali dengan pH 9 atau lebih tinggi?
Sila masak nasi dengan lebih banyak air.
Sila rendam biji beras sebelum dimasak.
Adakah ia dimasak dengan air mineral yang mempunyai tahap kekerasan yang tinggi?
Apabila beras belum cukup dibasuh.
Apabila masa rendaman terlalu lama.
Untuk beras tanpa basuh (Musenmai), bilasan 1 - 2 kali boleh mengurangkan masalah hangus.
Apabila terdapat kotoran atau bahan asing yang melekat pada pengesan suhu.
Apabila menambah perasa ke nasi yang dimasak dengan beberapa bahan. Apabila memasak
beras perang germa, dll.
Adakah anda memasak nasi semasa periuk bahagian dalam, penutup dalam, dsb. masih
panas atau suam? Sila tunggu sehingga suhu perkakas telah menyejuk ke paras suhu badan.
Dalam kes operasi "Quick Cook" (Cepat Masak), nasi mungkin agak keras, atau agak lembut.
Adakah terdapat bahan asing yang melekat pada pengesan suhu, pembungkus penutup
dalam, lubang wap, dsb.?
Adakah periuk dalam keadaan tidak betul? Adakah anda terlupa untuk memasang penutup
dalam, lubang wap, dll.?
Adakah terdapat sebarang kegagalan kuasa? Adakah periuk dicabut palamnya?
Sila semak sama ada fungsi "KEEP WARM" (PANASKAN) telah digunakan dengan cara berikut:
Penggunaan terlalu lama. Menggunakan program lain selain nasi putih. Digunakan untuk
nasi sejuk. Menggunakan apabila sudu masih dimasukkan ke dalam periuk. Menggunakan
selama 12 jam untuk siri DR, 6 jam untuk siri DH atau lebih lama.
Adakah badan periuk / penutup dalam / lubang wap kotor?
Sila keluarkan penutup dalam / lubang wap untuk mencuci dan gunakan kain bersih untuk
mengelap titisan air setiap kali selepas memasak.
Adakah beras yang dicuci cukup? Adakah masa memasak yang telah diprogramkan terlalu lama?
Adakah nasi tertinggal di dalam periuk, dengan mod "Keep Warm" (Panaskan) dimatikan?
(Tertekan kekunci secara tidak sengaja, atau memutuskan sambungan kerana kegagalan kuasa)
Adakah anda meninggalkan nasi di dalam periuk dalam selepas mematikan operasi "Keep
Warm" (Panaskan)?
Sila semak butiran di atas dan tukar tetapan "Keep Warm" (Panaskan).
Adakah terdapat bahan asing yang melekat pada pembungkus penutup dalam, sisi periuk
dalam, atau bingkai badan periuk?
Adakah terdapat bahan asing yang melekat pada pengesan suhu atau bahagian luar periuk
dalam?
Adakah lubang wap dipasang dengan betul?
Adakah masa "Keep Warm" (Panaskan) terlalu lama? Adakah nasi telah dipanaskan semula?
Operasi “Keep Warm” (Panaskan) dengan sedikit nasi boleh menyebabkan nasi di bahagian bawah
menjadi keras dan kering, jadi sila kumpulkan dan longgokan beras di bahagian tengah.
Keras
Kering
Tidak sedap
Tidak sedap,
Tidak dimasak
dengan baik
Sedikit hangit dan
bertukar kepada coklat
muda adalah
bukan disebabkan
kerosakan
atau kegagalan periuk
Sekiranya mempunyai
bau yang tidak
menyenangkan, sila
bersihkan periuk
dengan kaedah
pendidihan dan
keringkan sebelum
penggunaan
seterusnya.
Berubah warna
Kering.
Bau yang tidak
menyenangkan
(bersambung)
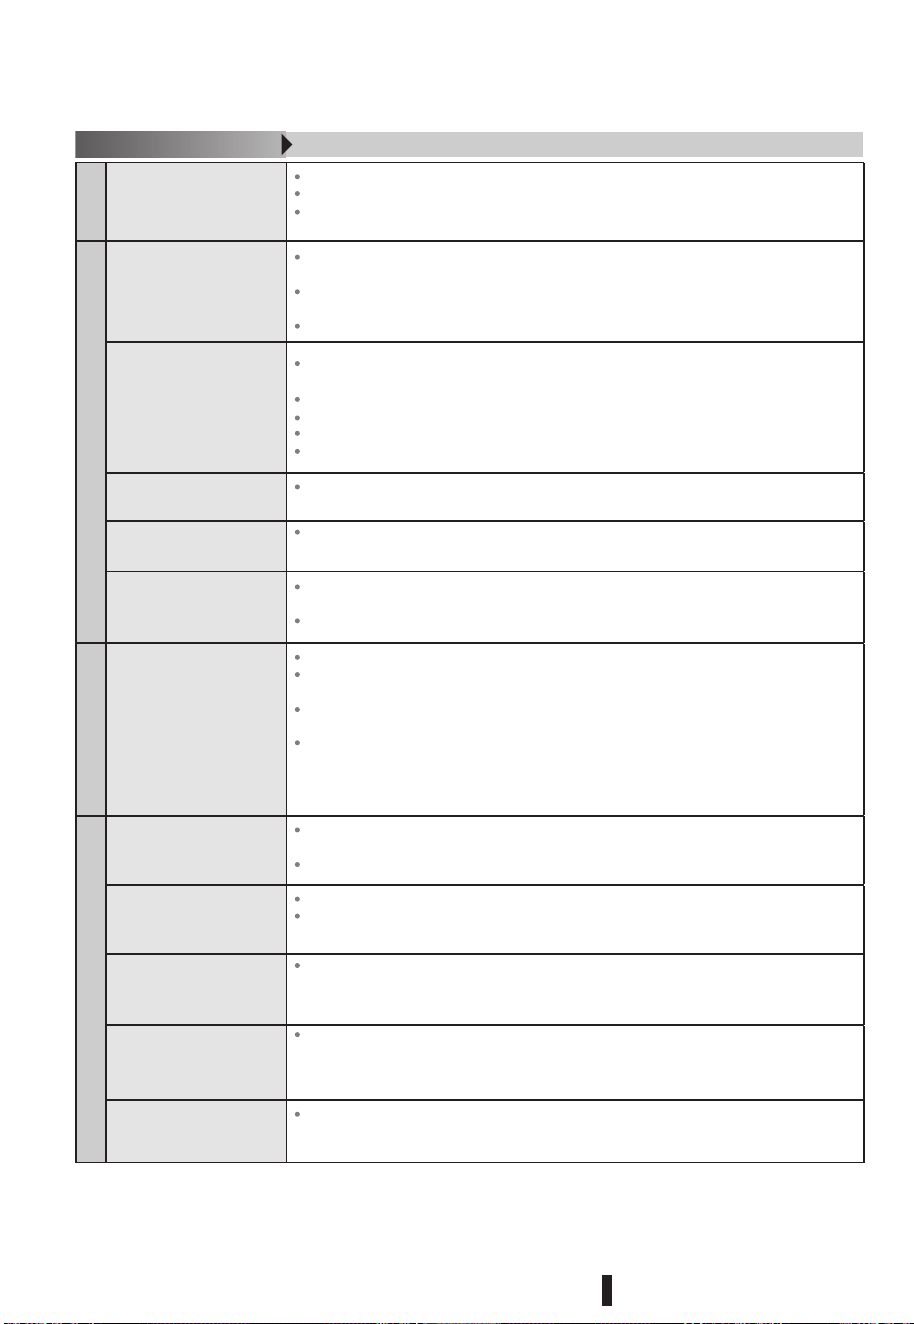
Kebocoran wap
※
Tetapan praprogram
Operasi Petunjuk
22
Punca / perkara-perkara untuk disiasat
Masalah
Lembek, Melekit
Mendidih
Memercik
Lapisan nipis muncul di
dalam periuk.
Titisan air muncul di
penutup dalam, periuk
dalam, dll.
Apabila membuka
penutup, air menitis dari
pembungkus, dsb.
Proses memasak
dimulakan serta-merta
Nasi tidak masak pada
masa yang telah
diprogramkan
Operasi yang telah
diprogramkan tidak boleh
dilakukan.
Sukar untuk menutup
tudung
Tudung tidak boleh
ditutup
Operasi kekunci tidak
boleh dilakukan
Lampu "COOK" (MASAK)
terpadam
Operasi berhenti separuh
jalan
Baki masa memasak yang
ditunjukkan tidak sama
dengan masa memasak
sebenar.
Penunjuk masa yang
dihabiskan dalam mod “Keep
Warm” (Panaskan) berkelip
Periksa selepas nasi
sudah masak
Sila masak nasi dengan kurang air, kemudian suamkan.
Selepas nasi masak, kacaukan dengan segera dan sepenuhnya.
Kumpulkan nasi di bahagian tengah periuk dan kadangkala gaul sebati, untuk
mengelakkan ia tertinggal di permukaan dalam periuk dalam.
Adakah terdapat bahan asing yang melekat pada pembungkus penutup dalam, sisi periuk
dalam atau pada bingkai periuk?
Adakah terdapat sebarang calar pada pembungkus penutup dalam? Adakah terdapat
sebarang ubah bentuk penutup dalam / periuk dalam?
Adakah penutup dalam dipasang dengan betul?
Adakah terdapat masalah beras yang sedikit, air yang banyak, basuhan beras yang
tidak mencukupi?
Adakah anda tersilap menu masakan bubur?
Adakah terdapat bahan asing yang melekat pada pengesan suhu?
Adakah ia kotor di dalam lubang wap?
Adakah penutup dalam, lubang wap dipasang dengan betul?
Lapisan nipis muncul di dalam periuk.
Titisan air mungkin muncul pada penutup dalam, periuk dalam, dsb., untuk mengelakkan
pengeringan.
Tiada ketidaknormalan yang berlaku dalam keadaan ini.
Semasa membuka penutup, mungkin terdapat sedikit cecair yang menitis dari bingkai, dsb.,
bergantung pada masa pembukaan penutup, suhu bilik, dsb.
Adakah terdapat bahan asing yang melekat pada pengesan suhu/bahagian luar periuk dalam?
Jika masa praprogram berada dalam masa menu memasak, ia akan mula memasak sekaligus.
Nasi boleh masak kemudian lebih kurang 10 minit. jika suhu bilik / suhu air rendah, dan
jumlah air adalah banyak.
Adakah periuk dalam telah diletakkan dengan betul di dalam periuk, semasa menetapkan
operasi yang telah diprogramkan?
Adakah anda terlupa untuk menetapkan periuk untuk operasi praprogram, atau lupa untuk
menekan kekunci "COOK" (MASAK) atau sesuatu sepertinya?
Adakah penutup dalam dipasang dengan betul? Untuk mengelakkan terlupa memasang penutup
dalam, penutup luar tidak boleh ditutup sepenuhnya tanpa terpasang penutup dalam.
Adakah terdapat bahan asing yang tersangkut di celah butang cangkuk, dsb.?
Adakah palam dimasukkan? Adakah penutup dalam dipasang?
Semasa memilih "Penyediaan Makanan", seperti <Cake > (Kek), kekunci "TIMER" (PEMASA)
tidak diterima walaupun menekannya.
Jika kekunci "Cancel" (Batalkan) tersilap tekan, atau jika kegagalan kuasa berlarutan untuk
tempoh yang lama, kuasa akan terputus o_
Ada kemungkinan bahawa baki masa memasak yang ditunjukkan mungkin tidak sama
dengan masa memasak sebenar. Ia bukan kerana periuk rosak. Keputusan masa sebenar
mungkin berbeza bergantung pada ramuan, suhu bilik, dsb.
Ini menunjukkan bahawa nasi telah disimpan hangat untuk jangka masa yang lama, jadi sila
hentikannya.
Memasak Nasi/Mengekalkan kehangatan
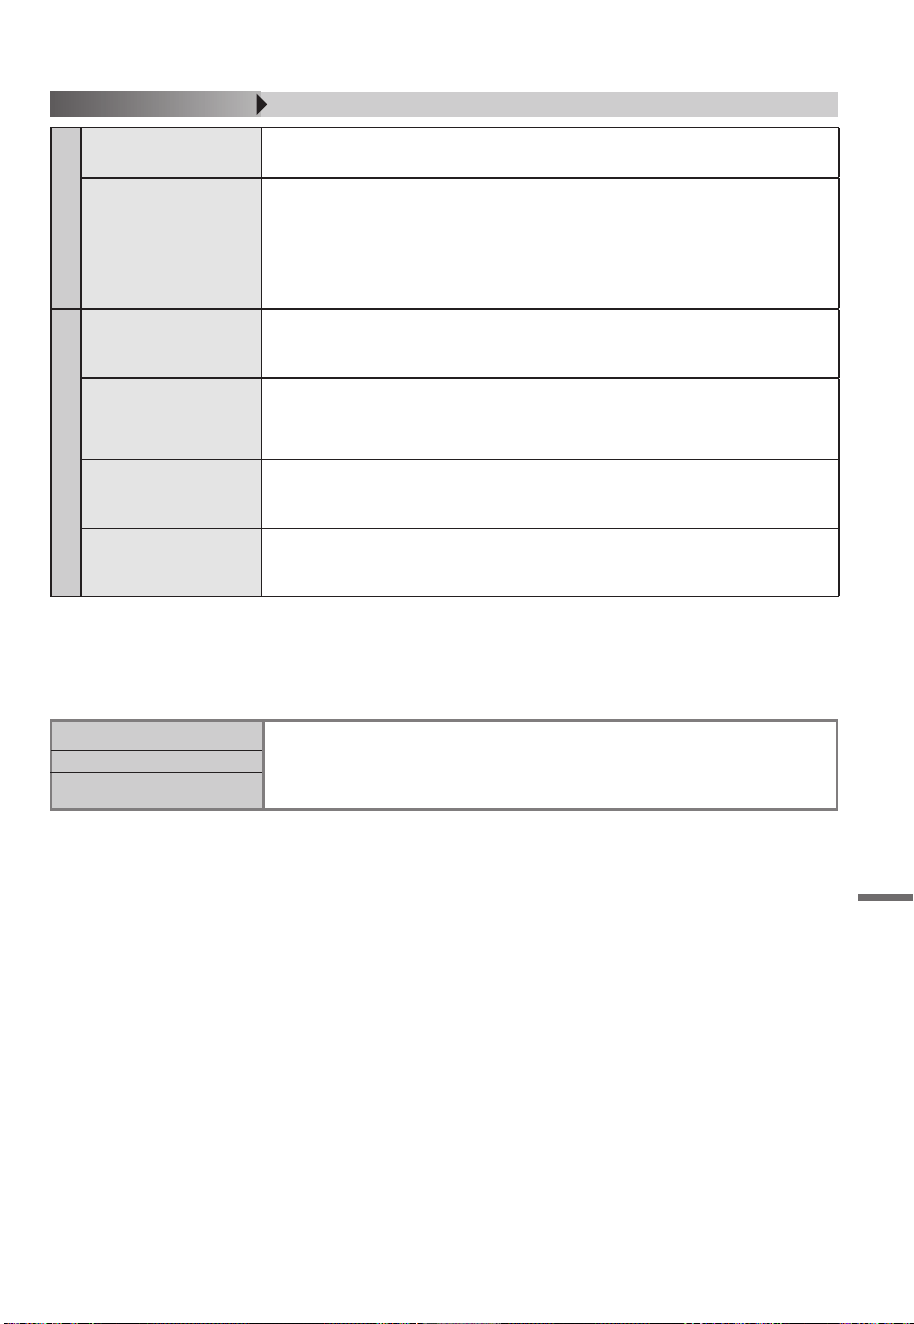
Penyediaan Makanan
●
●
●
●
●
●
Lain-lain
※
●
Sekiranya berlaku kegagalan kuasa
23
Punca / perkara-perkara untuk disiasat
Masalah
Sekiranya berlaku sebarang masalah
Ia mengambil masa yang lama untuk
menyediakan makanan. Masa
persediaan tidak berkurangan.
Makanan tidak dimasak
dengan elok.
Berbunyi semasa
memasak.
Ada bau plastik.
Pemutus litar dimatikan,
semasa memasak
makanan.
Sila lakukan dengan cara yang sama seperti apabila periuk dicabut separuh jalan, apabila palam sambungan periuk
terputus, atau apabila pemutus terputus kuasa.
Semasa memasak dalam
praprogram
Selepas dipulihkan daripada kegagalan kuasa, periuk akan dipulihkan
kepada keadaan asal.
Jika kegagalan kuasa adalah lama, nasi mungkin tidak dimasak dengan baik.
Semasa memasak nasi
Semasa memanaskan /
Semasa mendidihkan wap
Masa persediaan bermula daripada suhu " ready-to-cook” (sedia untuk dimasak). Walau
bagaimanapun, ia memerlukan sedikit masa untuk dipanaskan sehingga suhu bersedia untuk
memasak. Oleh itu, masa memasak sebenar akan lebih lama daripada masa persediaan .
Keadaan siap makanan yang dimasak mungkin berbeza-beza bergantung pada ramuan dan
kaedah penyukatan, dsb. Sila semak dan sahkan prosedur memasak dan masa memasak.
Faktor berikut boleh menyebabkan kegagalan memasak, kebocoran wap, atau menyebab-
kan penutup tidak ditutup dengan betul.
Bahan asing melekat pada pengesan suhu. Periuk dalam keadaan tidak betul. Makanan yang
telah dimasak dibiarkan di dalam periuk. Terdapat kegagalan kuasa. Palam sambungan
pemasak tidak dimasukkan ke dalam soket.
[Tik] ialah bunyi pelarasan haba, [Chu] ialah bunyi mengukus. (Ia bukan kerana tidak berfungsi).
[JuJu] bunyi titisan air yang terpercik dan terbakar di permukaan luar periuk dalam
Sila lapkan titisan air di permukaan luar periuk dalam sebelum memasukkannya ke dalam
periuk.
Pada permulaan penggunaan, mungkin terdapat beberapa bau yang tidak menyenangkan,
tetapi ia akan hilang sedikit
sedikit semasa menggunakan jika → berasa bimbang, sila bersihkannya dengan kaedah
pendidhan.
●
Terdapat calar, kotoran
pada permukaan luar
periuk dalam.
Selepas digunakan, permukaan dalam yang bersalut mungkin tercalar atau menjadi kotor,
tetapi tiada kesan pada kualiti memasak atau pemanasan.
●
Jika menggunakan periuk dengan peralatan elektrik lain pada masa yang sama,
penggunaan kuasa mungkin berlebihan, ini menyebabkan pemutus litar terputus kuasa. Sila
gunakan saluran keluar yang berasingan.
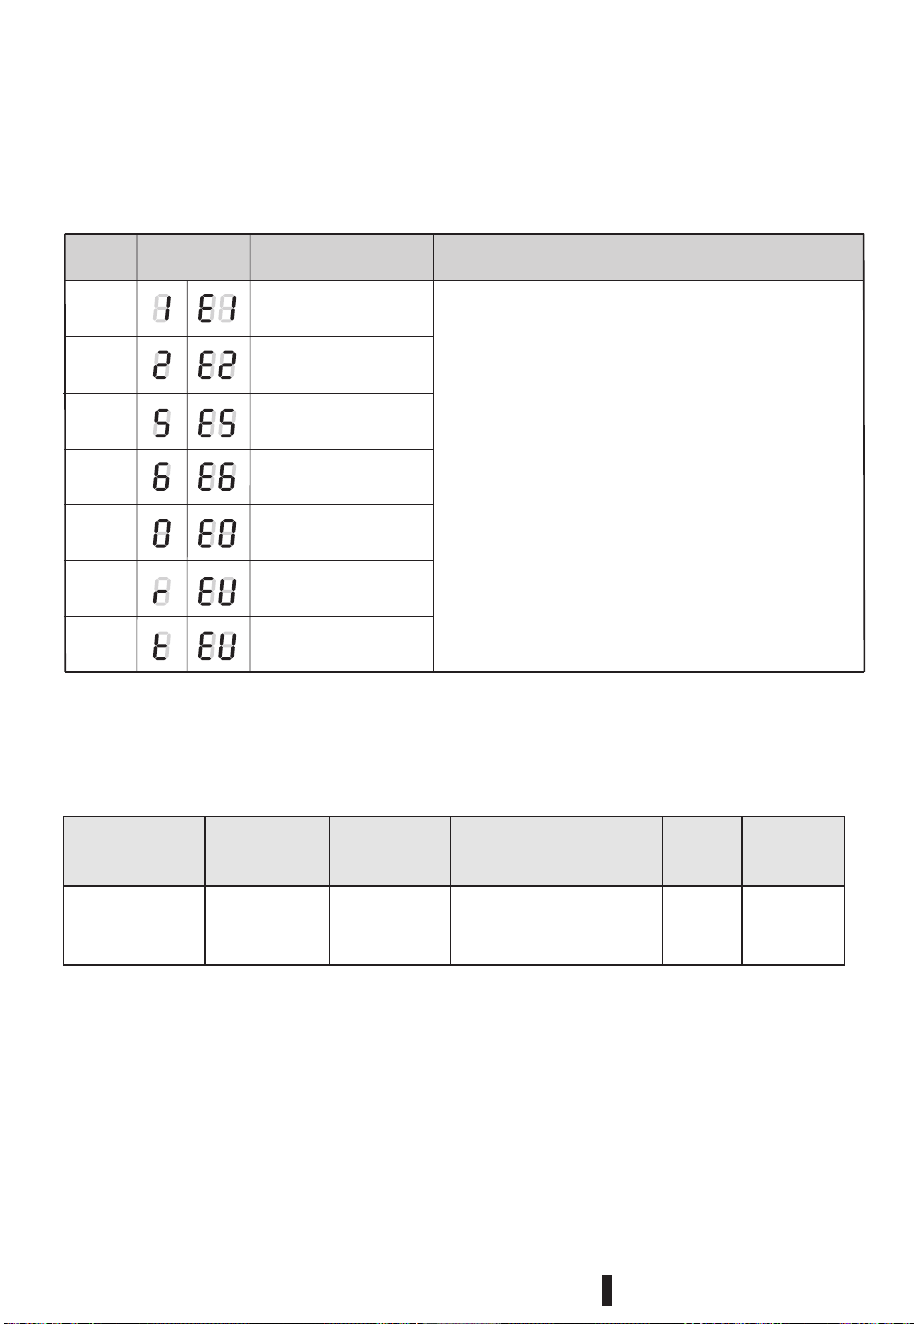
PETUNJUK RALAT
Spesikasi
RC-10DR1TMY(S)
220-240V~ 50/60Hz
L400*W308*H250(mm)625-744W 3.2kg
24
Pemeriksaan kendiri anomali
Paparkan punca
keabnormalan
Sila hubungi pengedar tempatan anda atau rangkaian
perkhidmatan untuk pembaikan atau pemasangan.
Menunjuk-
kan atau
menyatakan
Lampu
menyala
Termistor utama (bawah
pengesan) litar terbuka
Termistor utama (bawah
pengesan) litar pintas
Pengedan penutup atas
(pemegang
termistor) litar terbuka
Pengedan penutup atas
(pemegang
termistor) litar pintas
Ralat sistem suhu tidak normal
Cabut dan sambungkan semula kord kuasa, paparan masih
menunjukkan mesej yang sama, sila hantarkan periuk ke pusat
servis selepas jualan tempatan anda untuk penyelenggaraan.
Masalah komunikasi
Masalah komunikasi
Lampu
menyala
Lampu
menyala
Lampu
menyala
Lampu
menyala
Lampu
menyala
Berkelip
Nama model Bekalan Kuasa
Penggunaan
Kuasa (MASAK)
Berat
Badan
Dimensi Badan Kekerapan
Paparan tidak
normal
Sebab yang Mungkin Penyelesaian
# MatterDetails
RC-10DR1TMY(N)
RC-10DR1TMY(S)
RC-18DR1TMY(S
)
)
用户手册
电饭煲
●
●
目录表
清洗与保养/规格
使用规范
煮饭
使用前
安全注意事项....................................................... 2
请按照说明要求操作 .......................................... 7
各部位名称........................................................... 8
煮饭的基本步骤 .................................................. 9
如何煮出美味的米饭 .........................................11
煮饭过程..............................................................12
烹饪量和烹饪时间标准 ......................................12
烹饪时间显示 .................................................12
时钟调整 .......................................................13
电源故障 ........................................................23
定时设置..............................................................13
食材制备方法 .....................................................15
清洗与保养..........................................................20
错误提示..............................................................24
规格 ......................................................................24
故障情况..............................................................21
“保温”..............................................................14
如何使用蒸笼应用“蒸煮”功能......................16
蛋糕与锅巴饭.......................................................17
寿司饭...................................................................18
煲汤与香浓粥.......................................................19
内盖与蒸汽阀的取放方法..................................20
煮沸清洗...............................................................20
衷心感谢您购买东芝电饭煲。
为保证您自身的安全,请仔细阅读本说明书。
阅读完毕后,请务必将本使用说明书妥善存放在可随时查
阅之处。
使用前,请阅读“安全注意事项”和“请注意”。(第
2–7页)
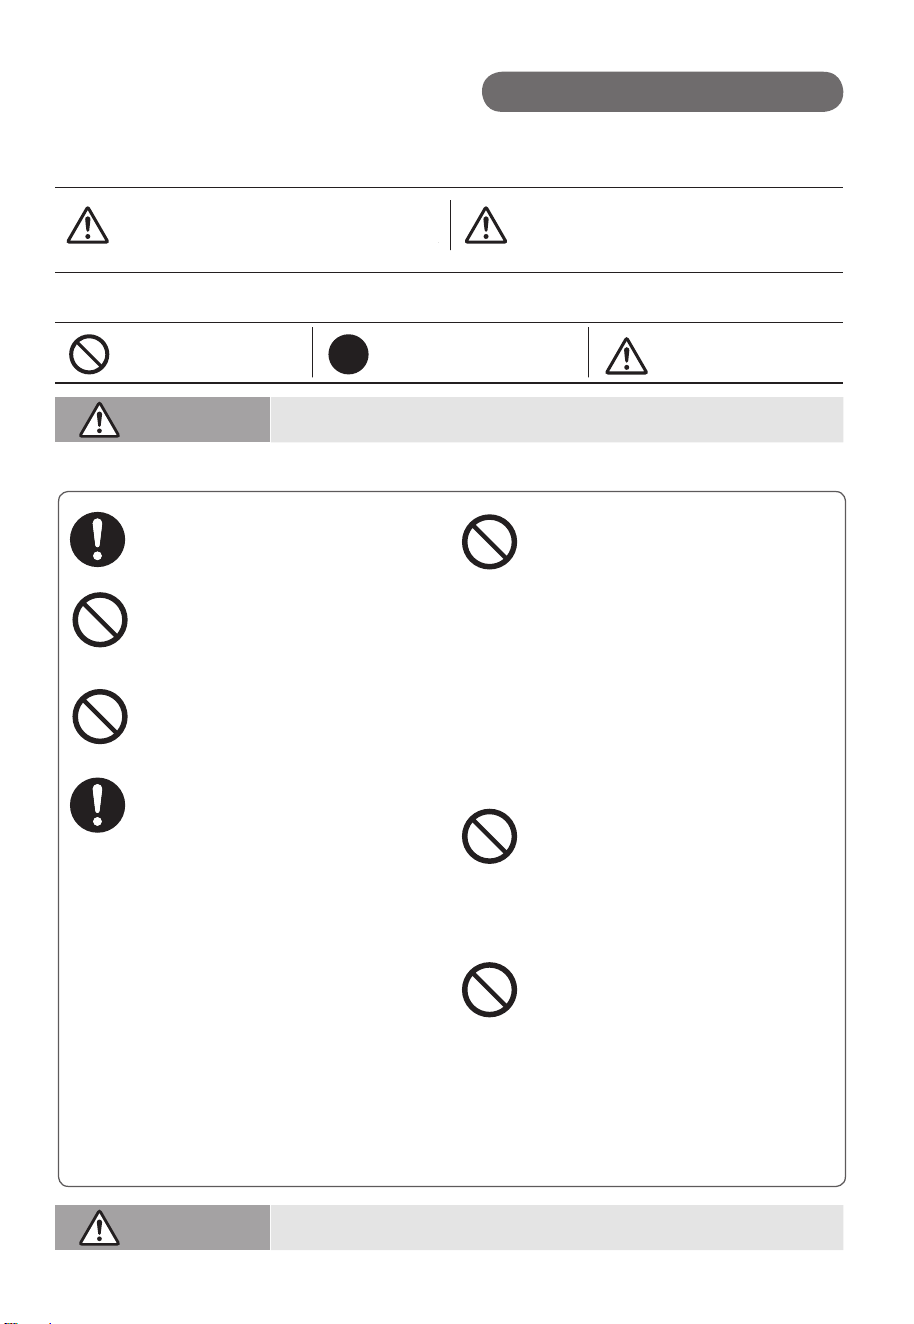
警告 注意
安全注意事项
■
■
警告
使用不当可能导致潜在伤害
警告
2
为了安全请务必遵守
针对不遵守本说明书要求可能造成的危害和损害程度分类进行说明。
针对需要遵守的内容分类进行说明。
有造成“重伤”或“死亡”
可能性的内容
“禁止”的内容
“遵守指示”的内容
以防止火灾、烫伤、触电、漏电、短路等为目的
“督促注意”的内容
有发生“轻伤”和“房屋
及财产等损失”的可能性
的内容
• 警告:避免溢出到连接器
上。
• 儿童应受到监督,确保他
们不会耍玩本电器。
• 电热盘表面在使用完毕后
仍有余热,请勿触摸。
• 请勿将本电器置于靠近窗
帘或其他热敏材料的地方。
• 本产品适用于家用以及类
似的应用如:商店、办公室
和其他工作环境中的员工厨
房区域;农舍;酒店客户、
汽车旅馆客户和其他住宅类
型环境中的客户;住宿加早
餐类型的环境。
• 如果电源线损坏,必须使
用制造商或其服务代理商提
供的专用电线或组件予以替
换。
• 在清洁、维护或重新安放
之前以及不使用之时,请关
闭并拔掉电器的插头。
• 除非由安全监护人就本
电器进行监督或指导,
否则身体、感官或智力
障碍者,或者缺乏相关
经验和知识的人士(包
括儿童)请勿使用本电
器。本电器仅供家用,
不得在户外使用。
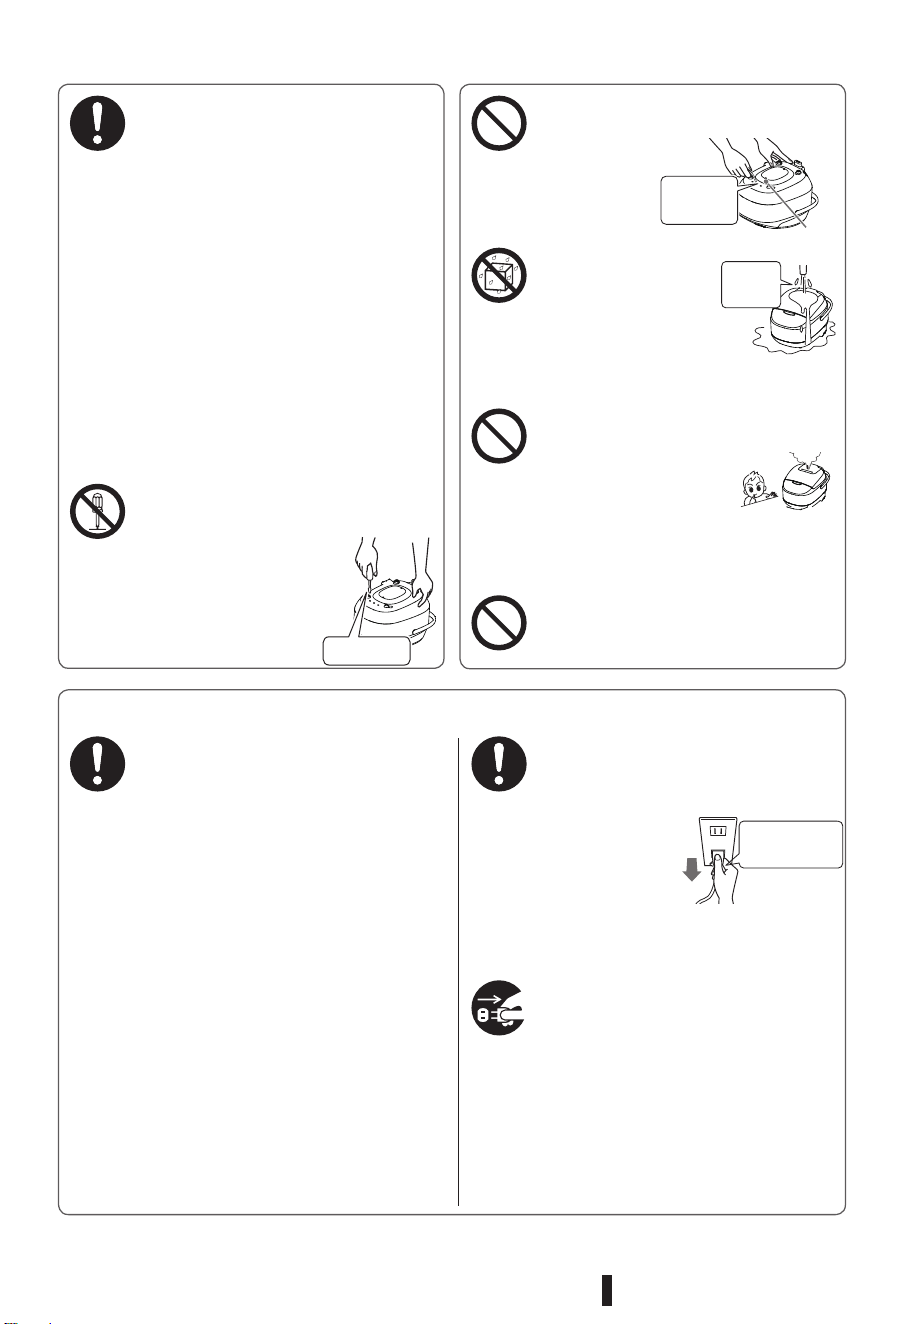
※
正确使用电源插头/电源线。
通气孔
禁止自行拆卸
3
一旦发现异常/故障,请立即
停止使用。
立即拔掉插头,并联系购买
产品的商店或东芝服务中心
进行检查和维修。
• 电源插头/电线异常发热。
• 电饭煲散发出烧焦的气味。
• 电饭煲本体有部分破裂、松
动、晃动。
• 内锅、外盖或内盖破损或变
形。
• 电热盘弯曲。
请勿将任何异物插入通气孔
或电饭煲底部的
缝隙中。
尤其是金属
制品,例如:
大头针、电线等
请勿将电饭煲主体、
电源插头和电源线
浸入水中或将水倒
在上面。
不要将其放置在与水接触的
位置。
请勿让不熟悉电饭煲的人员
独自使用。请勿在儿
童可触及的位置使用
电饭煲,尤其在烹
煮过程中以及在烹煮完成之
后应留意儿童,防止其接近
电饭煲而造成伤害。
在烹煮过程中,请勿打开上
盖或移动/搬动电饭煲。
请勿自行拆卸、修理
或改装电饭煲。
如需维修,请咨询购
买产品的商店或东芝
维修中心。
请勿插入任
何异物。
电器不
得浸入
水中。
抓住插头并将其
从插座中拔出。
(在拔电源线时请
勿握住电源线)
• 使用独立的220-240V插座。
本电饭煲与其他电器一起使
用会导致过热,引发火灾危
险。
请勿将本产品连接至本说明
书规定之外的电源。
• 如果需要延长线,请单独使
用。
• 将插头完全插入插座。
• 定期清理电源插头上的灰
尘。受潮积灰将导致绝缘失
效,引发火灾危险。用干布
擦去灰尘。
• 确保电饭煲插头尖端上无金
属物品或垃圾(例如:大头
针等)。
• 请勿让儿童拍打插头。
• 在拔出插座中的电源插头
时,请握住电源插头。否
则触电、短路
等可能引起
火灾。
将电源插头
插入电源插座,直至电源插
头完全插入底座。
• 不使用时务必拔下电源插
头。否则,绝缘劣化可能会
导致触电、漏电、火灾等。
如产品图片与实物不一致,以产品实物为准。
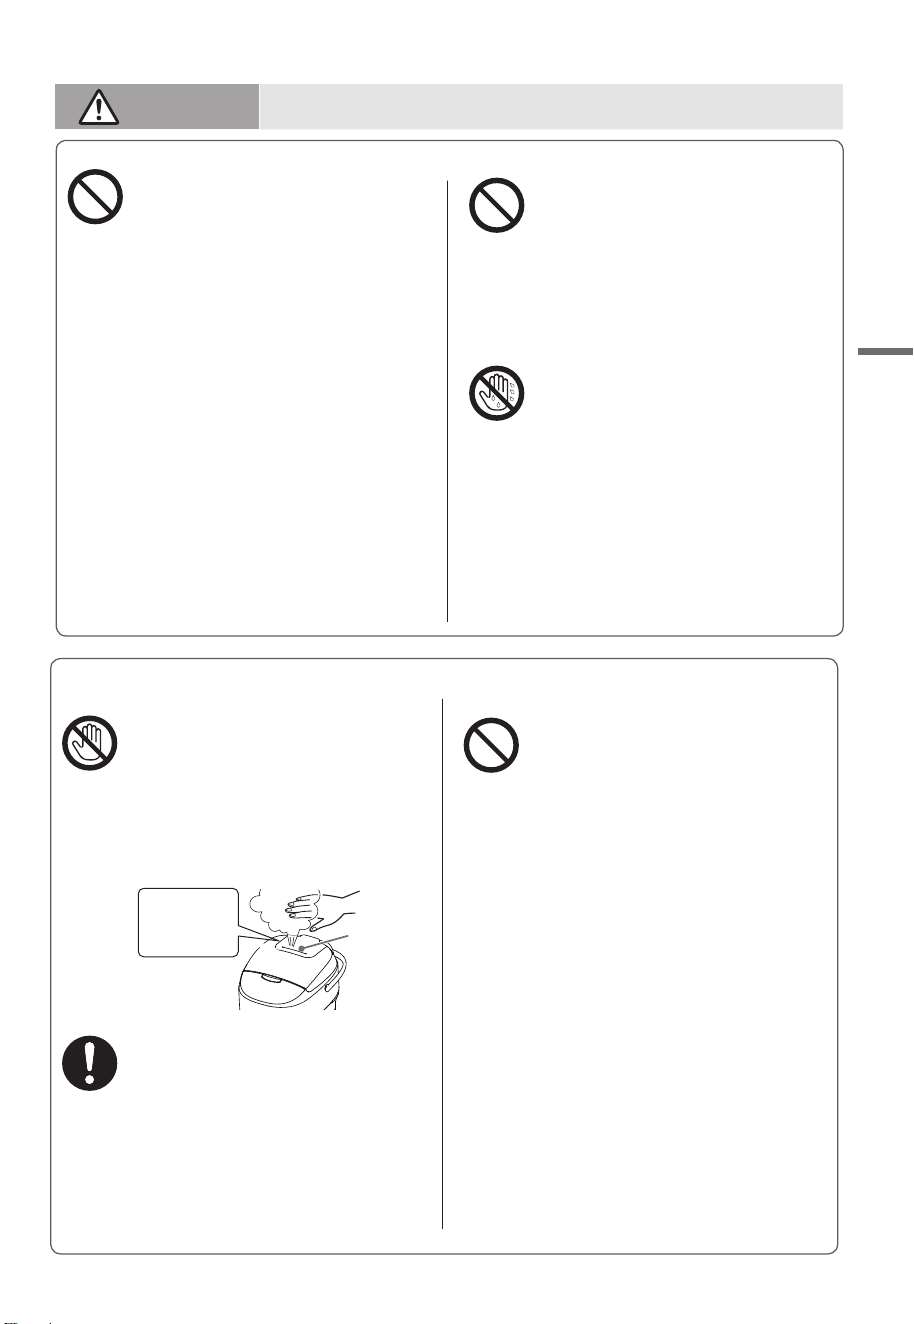
安全注意事项
正确使用电源插头/电源线。(续)
正确使用电源插头/电源线。(续)
警告
4
• 请勿使用损坏的电源线/电源
插头或者松动的插头等。
• 请勿让蒸汽接触到电源插头或
其他电器。在使用任何厨房储
物架时都要特别小心。
• 请勿使用除电饭煲标配之外的
任何电源线,也不要将电饭煲
的电源线用于其他电器。
• 请勿将电源插头或电源线放在
高温、浸水和潮湿的地方,也
不要接触到利器。
• 如果电源软线损坏,必须用专
用软线或从其制造商或维修部
买到的专用组件来更换。
• 小心处理电源线。不要以不
自然的方式拉扯、卷起、扭
曲、弯曲电源线,也不要在
盘绕时接通电源。不要在上
面放置重物。不要以任何方
式改装电源线或使电源线变
形。
• 请勿用湿手插拔电源插头或
电饭煲插头。在接触电源插
头之前,确保双手干燥。
请勿用湿手触摸该产品、电源线
或电源插头。如果电源线、电源
插头损坏,或电源插头的插入方
式不正确,请勿操作本产品。
防止电饭煲引发火灾、烧伤、触电、漏电、短路等
蒸汽口温度高。脸部或双手
远离蒸汽口。
尤其注意婴儿和儿童,避免
他们碰触蒸汽口。
请勿将电饭煲用作说明书规
定之外的用途。
因为这样做可能导致锅内的
食物或蒸汽溢出或爆炸,导
致烧伤/受伤。
确保安装蒸汽阀。
<错误烹煮方式示例>
• 放置可能阻塞蒸汽口的材料,例如:
菜单、铝箔纸、除碱片、食品包装或
青菜、西红柿、豆类等薄片类配料。
• 烹煮容易溢出的食物,例如:果酱、
豆类等时。
• 将配料放入塑料袋在电饭煲中加热。
经常喷出高
温蒸汽
蒸汽口
(续)
防止烧伤/受伤。
防止沸腾或溢出
注意
5
• 煮粥需要多加水,所以无需
使用“白米饭”或“快煮饭
”以外的菜单制作米粥。
请使用“香浓粥”菜单制作
米粥。
• 在使用过程中或刚使用后,
请勿触摸高温部件,包括内
盖、内锅、蒸汽口、散热部
件等。
• 进行维护或修理时,请拔下
电源,等待电饭煲冷却。蒸
汽口可能会有热水积聚。
• 烹煮后,在打开上盖时应小
心蒸汽以及留下的热水滴。
• 首先按“取消/保温”键,
然后再取出内锅。在烹煮或
保温过程中取出内锅,无法
自动断电。
• 请使用干抹布、佩戴烘焙手
套等取出高温内锅。
• 不使用时,请勿按“烹饪”
键或“取消/保温”键。
因为此时烹饪电热盘、内锅、
外锅、内盖都非常烫。
• 在移动产品时,请勿触摸开
盖按钮。
• 请勿握住提手摇晃电饭煲。
• 烹煮时,不要使提手竖立起
来。
• 请勿干烧电饭煲。因为这样
做可能导致过热、故障和失
灵。
• 注水量不得超过标注水位
线。
该标准的允许值与标注水
位线的误差不超过2毫米。
避免漏电、触电、人身伤害、烧伤、火灾危险和财产损失。
安全注意事项
请勿在以下地方使用电饭煲
为保证安全使用
注意
6
为了安全请务必遵守
• 靠近明火的区域、潮湿区域或
高温高湿区域。
• 另外,还应注意配件和附件。
• 不平坦的地方或在热敏垫上。
它们可能会导致烧伤,引发火
灾危险。
• 在可能堵塞通气孔的材料上,
例如:纸、布、毯子等
• 无法完全打开盖子的地方。它
可能会导致烧伤、损坏。
• 请勿使用除电饭煲专用内锅之外的其他配件。
• 请勿在产品附近或产品中存放任何易燃物品、危险物品、化学品或易
燃气体。
• 使用本产品前,请仔细阅读使用说明书。
• 使用前请务必按照说明书中的建议检查产品是否处于良好工作状态。
• 清除所有包装材料。
• 高电磁区域。
• 靠近墙壁、家具等的地方
将电饭煲放在厨房储物架上时,
注意不要阻碍蒸汽的释放。
• 荷载强度不足的滑台。荷载强度
标准如下:
1.0L型:10 kg及以上;
• 1.8L型:12 kg及以上;
避免漏电、触电、人身伤害、烧伤、火灾危险和财产损失。
请按照说明要求
操作
请勿以下列方式使用电饭煲,以防止内锅涂层刮花并脱落
7
若要防止故障、失灵等
请勿在以下地方使用电饭煲。
它们可能会导致故障、变形、变色
等。
• 暴露在阳光直射下的地方
• 溅油的地方
请勿在盖子上盖上任何抹布,特别
是在蒸汽口上。
因为蒸汽的释放可能因此受到限
制,从而导致盖子、蒸汽口和操作
部件发生故障、变形、变色等。
保持电饭煲和周围环境清洁,随时
可用。灰尘、虫子等进入功能部件
内部(例如:通风口)会导致电饭
煲发生故障。
● 请勿将餐具放入内锅中,或用来洗
碗。
● 请勿使用擦洗刷或洗碗机清洗内
锅。
● 请勿使用任何清洁剂、漂白剂清洗
内锅。(请使用厨房专用中性洗涤
剂。)
● 调味米和添加多种配料的大米不能
保温。(请在使用调味料后立即清
洗。)
● 请勿使用醋。
● 请勿用勺子刮擦或用筛子敲打。
● 请勿使用金属勺或搅拌器。
擦去水滴或任何异物。
如果在未清除异物的情况下使用,
例如,有异物粘在电热盘、温度传
感器、内锅外部、内盖等处,米饭
会无法煮熟,导致故障发生。
不要在煤气灶、间接加热烹煮电
器、微波炉中使用内锅。因为它们
可能会导致内锅变形、变色、故障
等。
如果电饭煲松动、破裂、跌落,请
停止使用。
请联系购买产品的商店或东芝服务
中心进行检查和维修。
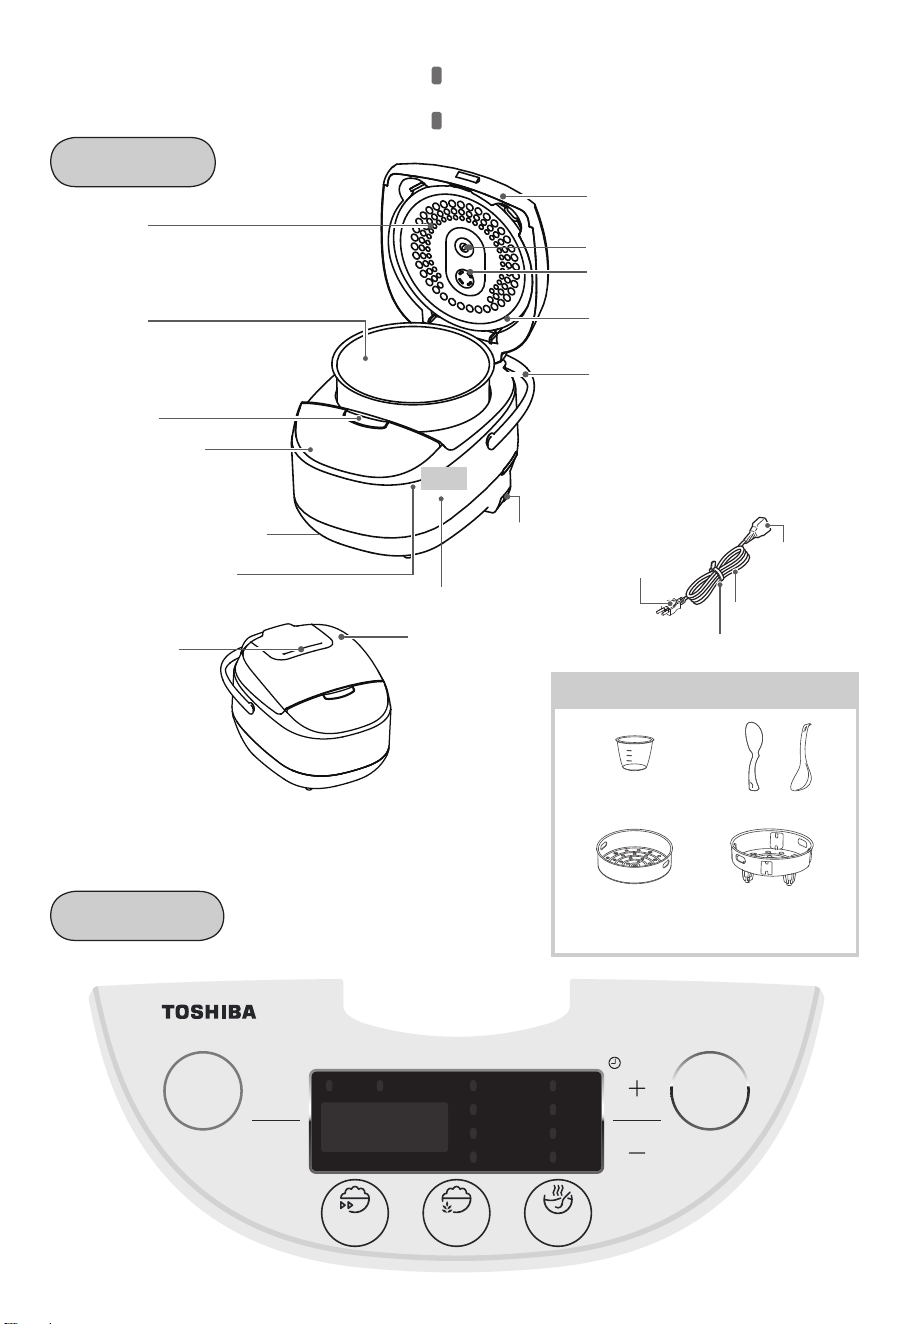
机体
操作面板
内侧
配件
电热盘
电源插头
型号:
RC-10DH1NMY
RC-18DH1NMY
型号:
RC-10DR1TMY(N)
RC-10DR1TMY(S)
RC-18DR1TMY(S)
8
各部位名称
取消
烹饪
菜单
预约
快煮饭 杂粮饭 香浓粥
预约 保温 白米饭
糙米饭
糯米饭
锅巴饭
蒸煮
煲汤
蛋糕
寿司饭
保温
首次使用时,请清洗内锅、内盖、蒸汽阀。
首次使用时,可能会产生塑料等气味。使用后气味消失。
内盖
内锅
开盖按钮
操作面板
通风口(底侧)
安全警告
标示处
电饭煲-插头孔
电源线(电源线套装)
电饭煲插头
电源线
使用电饭煲时取下电源线扎带
温度传感器
(去除异物)
蒸汽阀
外盖
上盖温度传感器
蒸汽出口
内盖密封
提手
(每次拆下并清洗)
量杯
(大约180ml)
饭勺 汤勺
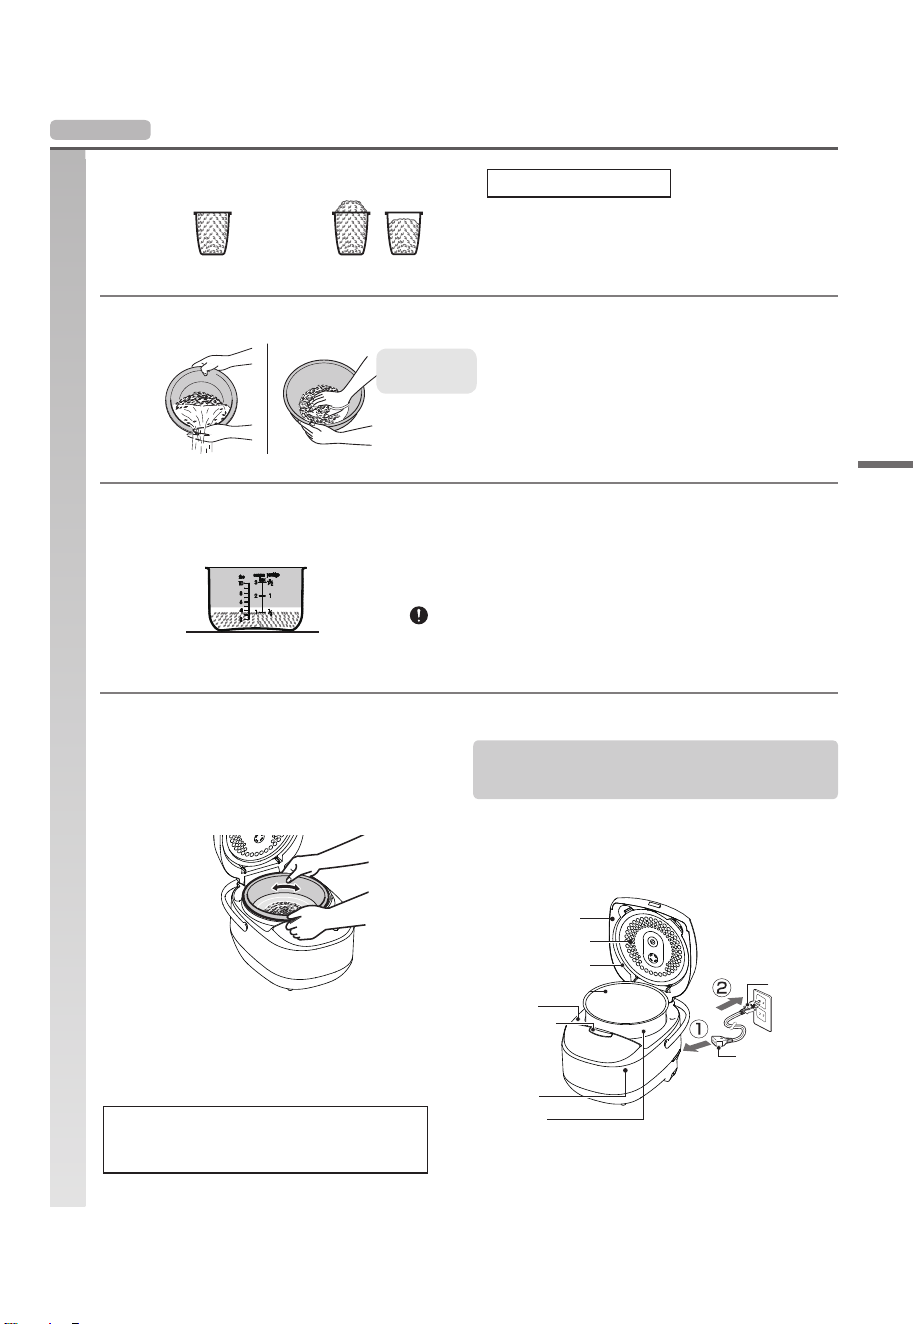
煮饭的基本步骤
1
量米
●
准备
一平杯= 180ml
[正确用法] [错误用法]
煮饭的基本步骤
基本步骤
3
选择水位刻度。根据量杯的尺寸和数量选择水位刻度。
●
4
●
开盖按钮空隙
温度感应器
外盖内表面
内盖垫圈
内锅边缘
外壳
内锅外表面 /
底部表面
内盖
电源插头
电饭煲插头
1. 插入电饭煲插头。
2. 插入电源插头。
连接电源线:
使用随附的量杯
2
淘米
●
9
该量杯的容量可能与其他食品量杯(200ml)
或其他大米测量容器不同。
如果在内锅中淘米,请勿使用任何搅拌器。
请根据您的口味调整水位。
残留的水滴或异物可能导致蒸汽泄漏,使
盖子无法完全闭合,影响米饭烹煮效果。
将内锅平放在电饭煲内部的最底部
(不向任何一侧倾斜)。
按箭头所示方向转动内锅2-3次,使其与
烹煮电热盘紧密接触。
在平坦的地方把米均匀地放在内锅里。
擦去附着的水滴、异物,装好
内锅,关闭锅盖。
( 标准:按照指示的水位刻度调整,误差不超过2mm)
快速淘洗大米,直至水变清澈。
可使用内锅
淘米
1. 加入足量的水,(用一只手)充分搅伴后立
即将水倒掉。
2. 多次淘洗大米,直到水流清澈。
以下各部附着有残留水滴或异物,请将其擦拭干净。
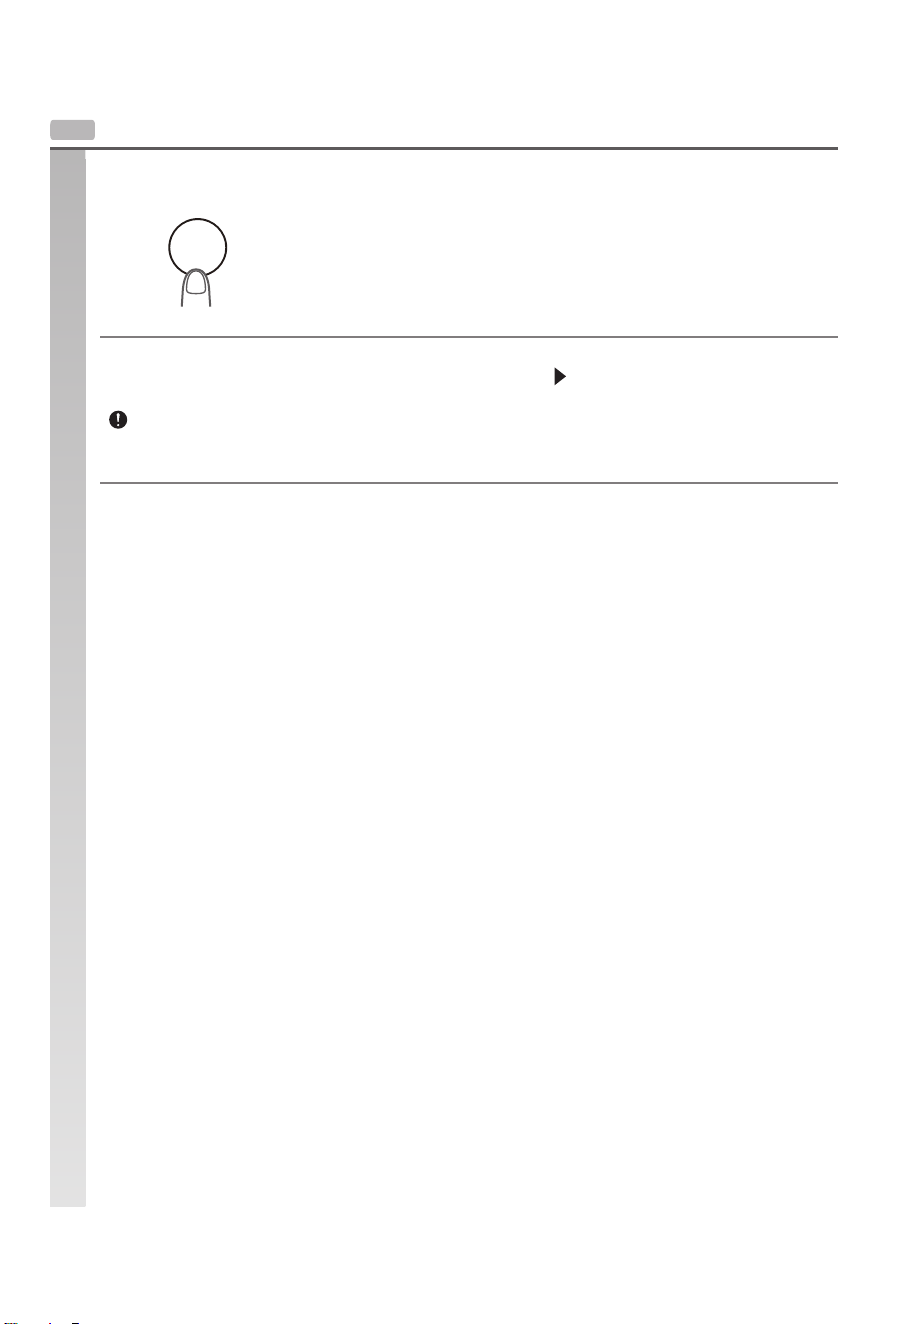
煮饭的基本步骤
准备
基本步骤
“保温”指示灯亮起。
5
●
无需浸泡大米。
●
请勿忘记盖上盖子并安装蒸汽阀。
如果蜂鸣器响起,则表示米饭已煮熟。
●
10
设定、确认煮饭模式,开始煮饭。
按下“烹
饪”键。
烹饪
使用后,按“取消”键并拔下电源
插座上的插头。
在“保温后立即烹煮”或“连续烹煮”情况下,请等到内盖温度以及电饭煲内部的温度已经冷却到人体
常温。
在取出内锅之前,请按“取消”键切断电源。
※ 在米饭保温时,即使取出内锅,电饭煲也不会自动停止运作。
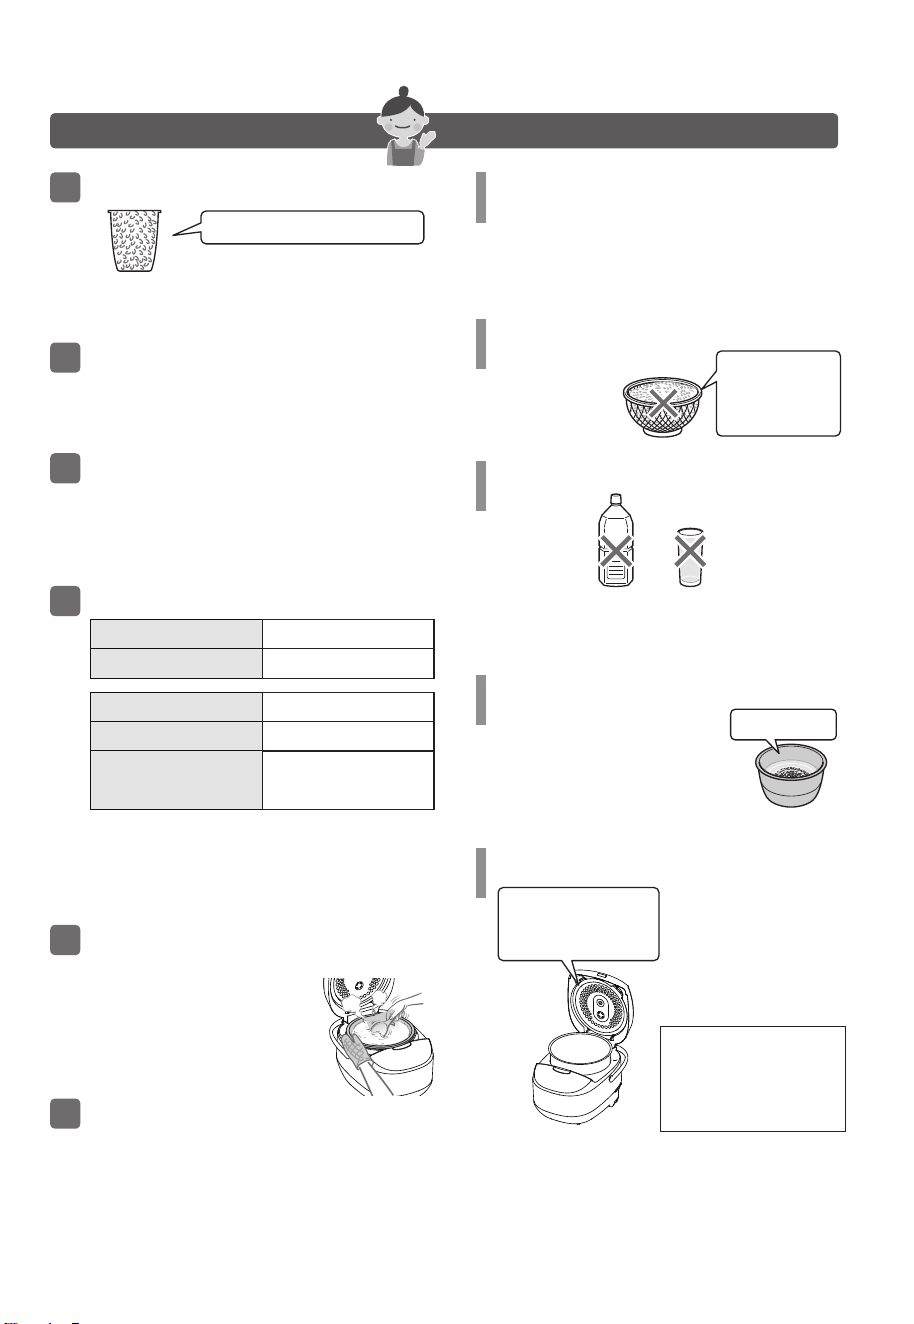
如何煮出美味的米饭
●
●
(
(
夏季使用冷水
)
)
( )
( )
11
准确测量米量(不超过上限)。
勿使用热水淘米。
淘米时间不宜过长。
请勿摇晃量杯
如果摇晃量杯,米量会增
加很多。
热水淘米或淘米过慢会导致米糠产生异味。
米饭
淘米完成后,不要将大米留在漏
勺中。
不适合煮饭的水
煮饭用水不应超过30°C。
使用后,立即清洁并保养。
根据生产日期购买适量新产大米,在2周-1个月
内食用完。
将大米放入密闭的容器中,存放在阴凉处,避
免氧化。
请勿将米饭放在
漏勺中。
建议夏季使用冷水进行预设
烹煮。
硬矿泉水
导致米饭变硬变
干的原因
糊状和粘稠原因
水温过高会导致米饭口味不佳,
产生异味。
洗完后,用干净的
布擦去滴。
不清洁电饭煲会导
致产生异味。
停止“保温”后,不要
将米饭留在锅中(否则
会产生难闻的气味)。
清洗并保持内盖、内
锅、蒸汽阀的清洁。
pH9以
上的离
子水
米粒可能会破裂,
导致烹煮时变成黏
糊状。
淘米要轻柔,以免碾碎米粒。
根据喜好调整水位刻度。
烹煮完成后,用勺子充分打散煮
好的米饭。
“保温”时间不应过长。
如果喜欢劲道的米饭
将水位降低至指定的水位以下
将水位升高至指定的水位以上
比刻度稍少
根据标注刻度
比刻度稍高
如果喜欢软糯的米饭
新米
全米
陈米
梅雨季节~夏季
小麦
轻轻搓洗米粒。
(碾碎的米粒在煮熟后会变成糊状,发粘。)
各种大米的状况和质量都不同,具体取决于品牌、
产地、储存条件。
因此请根据您的喜好进行调整。
请用干布或手套握住内锅,将
米饭打散,防止米饭结块或粘
连。
对于“调味米和带配料的米饭”,若
剩余少量米饭或需要长时间保温的情
况下,建议用塑料包装进行包装后放
在冰箱中。
电饭煲标
配量杯
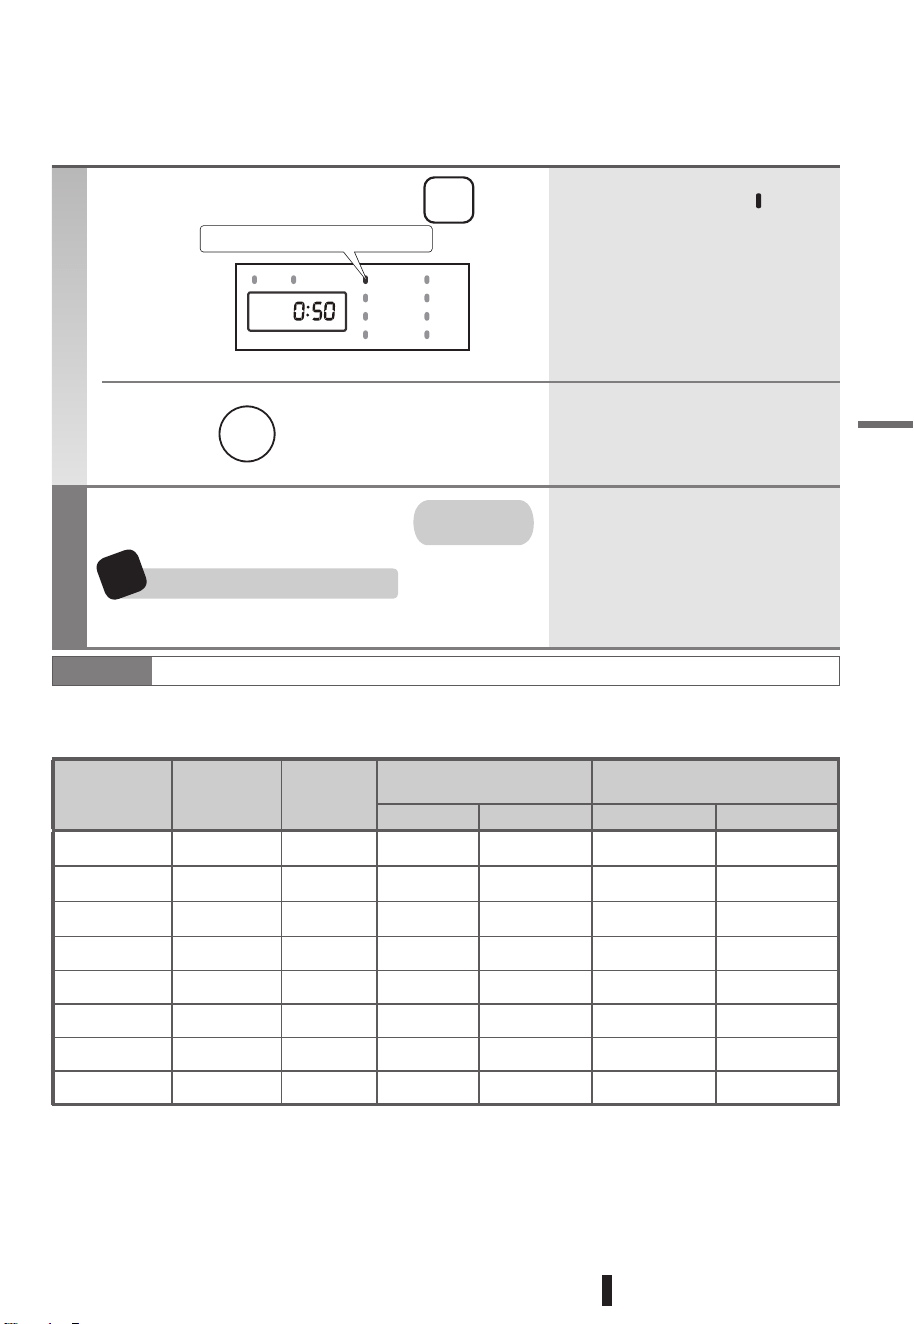
煮饭过程
操作
煮熟的米饭
●
●
1
2
使用后
小贴士
●
●
●
●
操作方法
自动保温
煮饭过程
5.5 1- 01 2 -
01 2 -
6 2 -
6 2 -
6 2 -
6 2 -
4 1 -
5.1 5.0 -5.0 52.0 -
-1 5.5
1.0 L型 1.8 L型
1
-
4
1
-
4
01 2 -
-1 5.5
1
-
4
12
预约 保温 白米饭
糙米饭
糯米饭
锅巴饭
蒸煮
煲汤
蛋糕
寿司饭
选择烹饪菜单
当米饭煮熟时,蜂鸣器响起,表示
烹煮完成
按下“ ”按钮后,开始煮饭。
调整烹饪菜单
立即将米饭打散
DR系列请勿将米饭保温6小时以上,DH系列请勿将
米饭保温12小时以上。
每次按“功能”键时,“ ”标记
总是移位,导致选项发生变化。
按下“烹饪”按钮,相应菜单指示
灯刚开始闪烁,然后常亮。
【“保温”指示灯】亮起。以小时
为单位显示米饭的已保温时间。
按“取消”键并拔出插座中的电源插头。
选择与相应大米对应的“水位刻度”和“煮饭模式”。
实际煮饭时间可能会有10分钟左右的误差,具体取决于米量、水量,水温等。
所有煮饭模式添加的水量不得超过最高刻度。
菜单
烹饪
煮饭模式 米饭类型 水位刻度
煮饭用米量
(单位:杯)
1.0 L型 1.8 L型
煮饭时间
(单位:分钟)
30 ~ 45分钟
60 ~ 80分钟
2小时
40 ~ 55分钟
60 ~ 80分钟
45 ~ 65分钟
60 ~ 70分钟
40 ~ 55分钟
30 ~ 45分钟
60 ~ 80分钟
2小时
40 ~ 50分钟
60 ~ 80分钟
35 ~ 55分钟
60 ~ 70分钟
40 ~ 50分钟
快煮饭
杂粮饭
香浓粥
白米饭
糙米饭
糯米饭
锅巴饭
寿司饭
白米
杂粮
白米
白米
糙米
糯米
白米
寿司米
快煮饭
杂粮饭
香浓粥
白米饭
糙米饭
白米饭
白米饭
白米饭
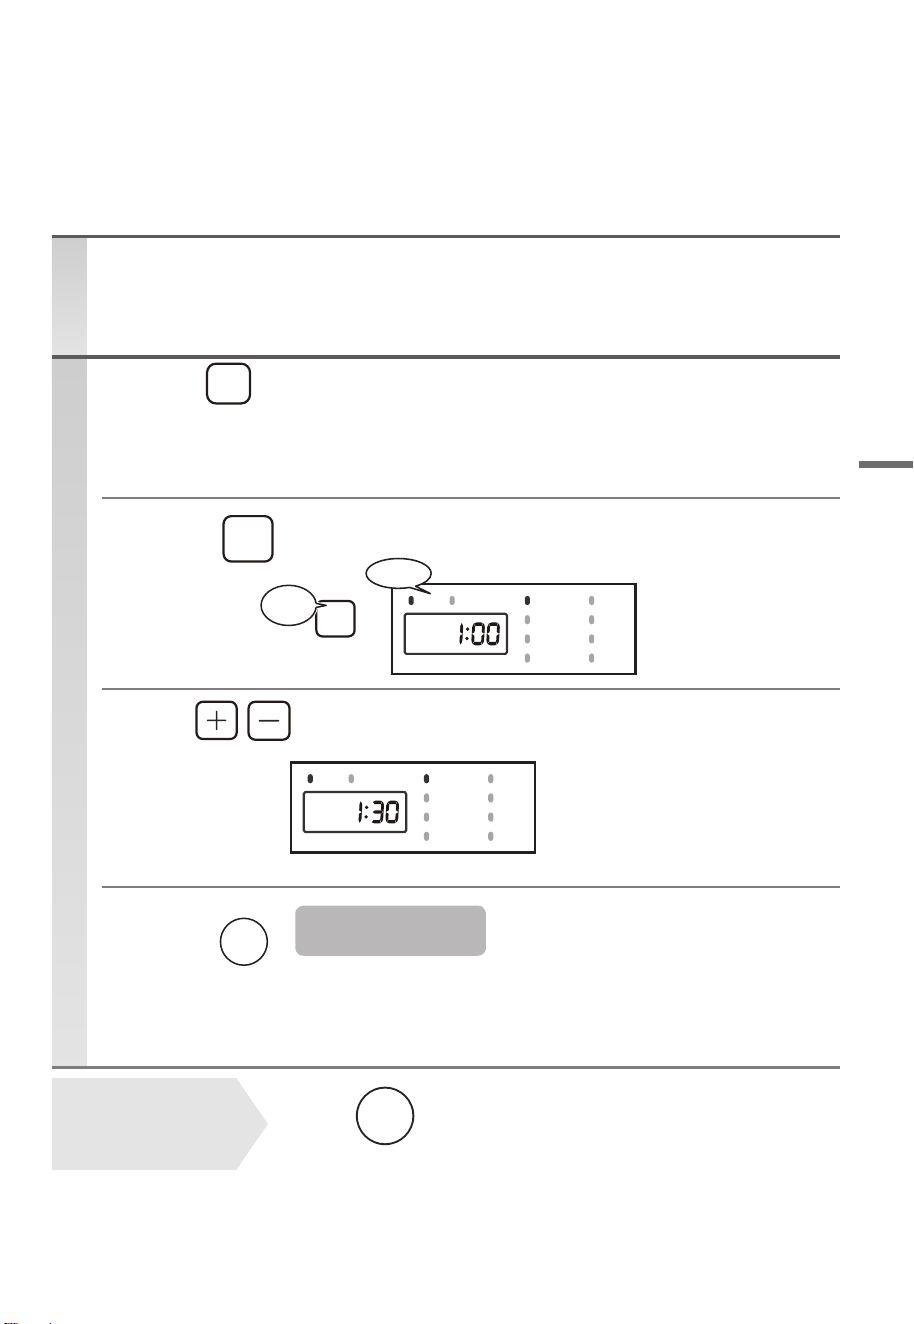
定时设置
按下
按下
按下
●
●
3
4
●
●
●
1
2
制备
操作
定时设置
13
预约 保温 白米饭
糙米饭
糯米饭
锅巴饭
蒸煮
煲汤
蛋糕
寿司饭
预约 保温 白米饭
糙米饭
糯米饭
锅巴饭
蒸煮
煲汤
蛋糕
寿司饭
完成时间可以以10分钟为单位进行设置。
如果长按“+”键或“-”键,将快速显示
时间变化。
显示预设时间,直到开始烹煮。
当开始煮饭时,“预约”指示灯亮起。
如果未按下“烹饪”键,电饭煲将在2分钟
后从预设模式切换至待机模式。
按照预设时间烹煮。
请不要使用预设设置来烹煮麦芽糙米、混有谷物的大米,以及经过调味和含有不同配料的大米。
将内锅放入电饭煲中并盖上盖子。
使用 键设置烹饪菜单,
将其调整至适合相应大米类型的模式
用
菜单
预约
预约
取消
保温
预约
指示灯
亮起
【例如:米饭将在1:30煮熟。】
希望取消预设设置或
出现操作错误时
预设烹煮完成
提示
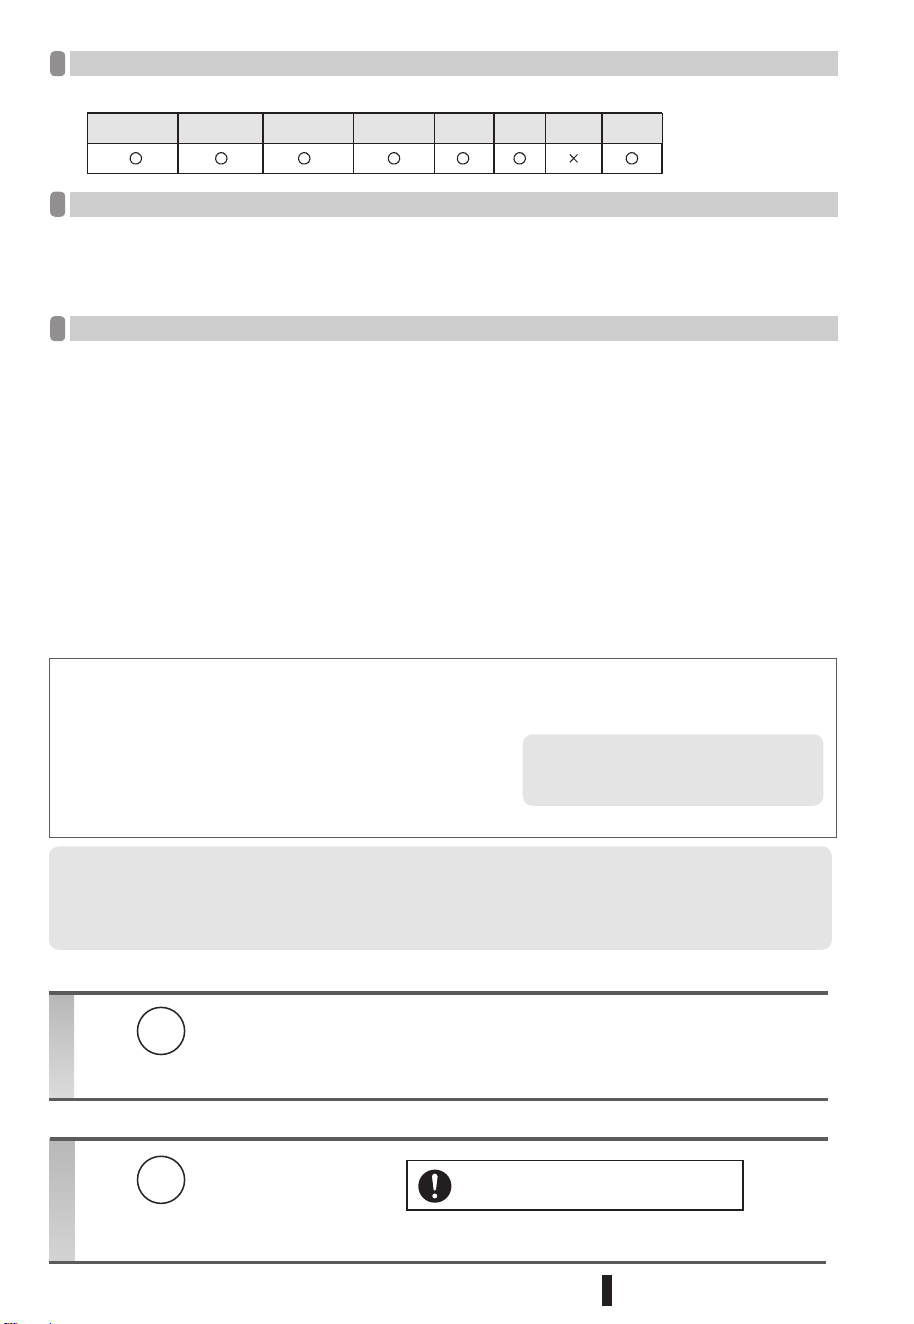
注意
●
●
●
●
●
●
操作
断电后希望保持米饭的温度时。
“保温”
●
●
米饭保温小贴士
●
“保温”指示灯亮起。
“保温”指示灯熄灭。
在米饭保温过程中,当取出内锅时,不会自动断电。
●
●
●
■
·
·
·
■
当想要停止米饭保温时
●
※
操作
·
14
可预设的菜单
预设时间
对于标有“X”以下各项,请勿使用预设功能。
请勿将预设程时间设置超过14小时。(夏季最长8小时)。预设时间过长会导致腐烂,产生异味。
如果预设时间为不超过选定菜单的烹饪时间,电饭煲将立即启动烹煮。
煮饭完成后自动保温。
如果米饭过软,请根据您的喜好减少煮米用水。
在预设烹煮情况下,淀粉类物质沉到底部,可能呈现浅棕色。
在室温低、水温低和水量大的情况下,米饭大约需要延后10分钟才可以煮熟
“保温”功能可根据使用条件自动控制,从而保持米饭的温度和味道。
当希望停止“保温”操作时,按“取消”键。
在米饭保温过程中,当取出内锅时,不会自动断电。
把米饭集中到中间区域可避免米饭过硬、过软或过于黏稠。
在米饭保温过程中,如果担心米饭变得过于粘稠,请勿把米饭留在内锅的一侧。
在以下情况下请勿使用“保温”功能:(这些将导致产生异味、掉色现象)
如果米饭仍在内锅中,请勿停止“保温”操作。
如果在“保温”操作期间显示屏闪烁,
请按“取消”键取出米饭。
DR系列请勿将米饭保温6小时以上,DH系列请勿将米饭保温
在烹煮除快速饭之外的大米时使用。(例如:糙米、粥、添加各种调味料和配料的米饭等)
在锅里使用时有勺子等。
热冷饭时使用。
白米饭 糙米饭 糯米饭 锅巴饭 蒸煮 煲汤 蛋糕 寿司饭
如果按 电饭煲将开始保温。
如果按
取消
保温
取消
保温
在取出内锅之前,请按“取消”键,拔
下插头切断电源。
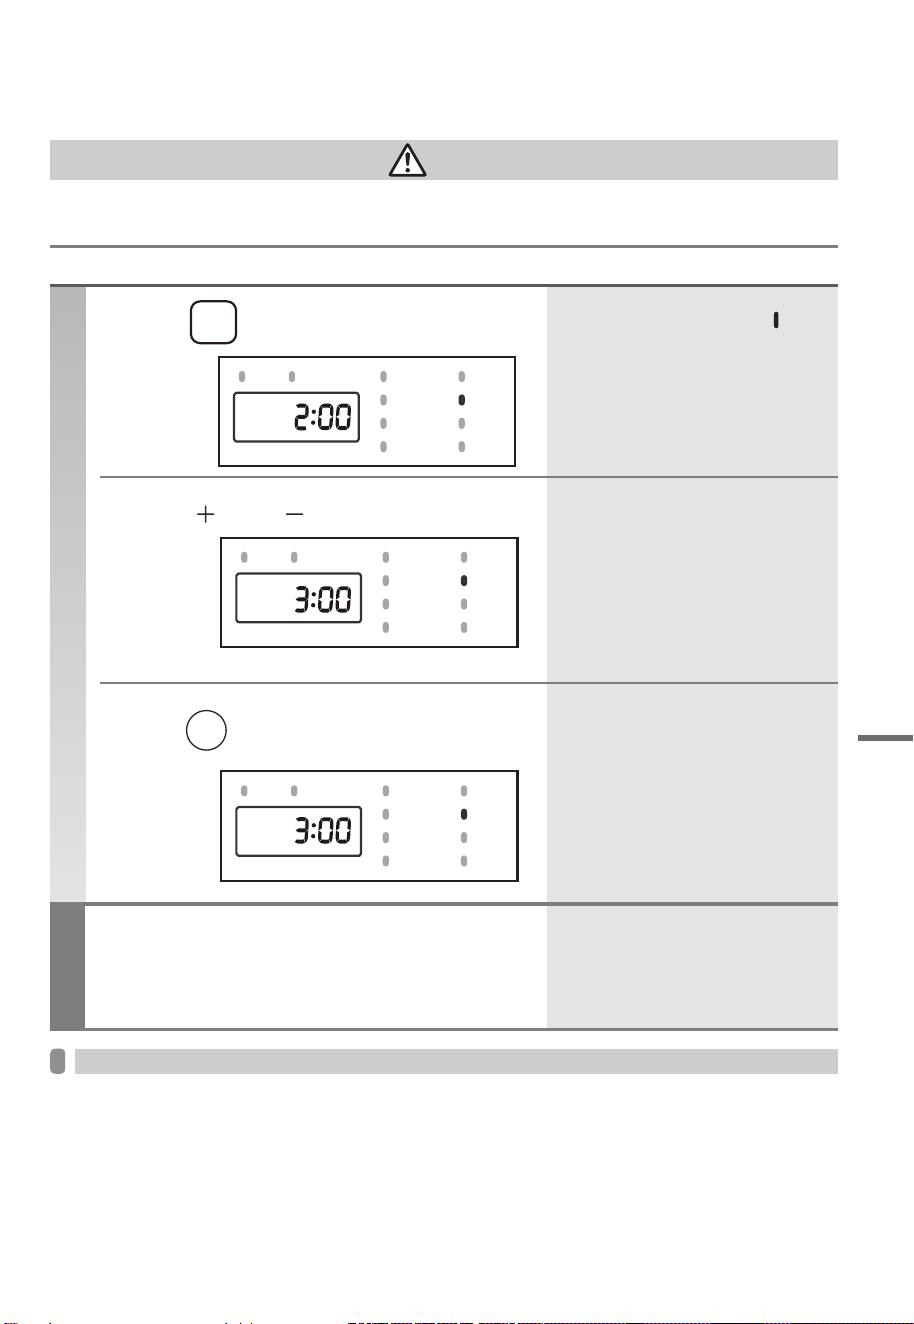
食材制备方法
操作
完成
1
基本过程
●
●
2
3
●
●
●
●
●
注意:
●
●
●
●
●
【 例如:烹饪时间3小时 】
警告
●
食材制备方法
15
预约 保温 白米饭
糙米饭
糯米饭
锅巴饭
蒸煮
煲汤
蛋糕
寿司饭
预约 保温 白米饭
糙米饭
糯米饭
锅巴饭
蒸煮
煲汤
蛋糕
寿司饭
预约 保温 白米饭
糙米饭
糯米饭
锅巴饭
蒸煮
煲汤
蛋糕
寿司饭
请勿烹煮或使用本说明书中未提及的任何原料,因为此类食材可能产生蒸汽,或食材溢出或散落,造成烧伤、受伤、
损伤等。
此外,这些食材还可能导致内锅腐蚀,产生臭味等。
按 按钮选择菜单
按 和 按钮调整时间
按 按钮开始煮饭
烹煮完成后,蜂鸣器响起。
请使用防热手套取出高温内锅。
请勿将任何食物长时间留在内锅中。
菜单
预约
每次按一次“功能”键时,“ ”移
动,选择相应改变。
只有选择“蒸煮”和“煲汤”模式
可以调整烹饪时间。
当选择 “煲汤”键时,最长可选4小
时,以10分钟为单位进行调节。
当选择 “蒸煮”键时,最长可选60
分钟,以1分钟为单位进行调节。
如果长按该按键,时间显示的变化
速度会更快。
按下“烹饪”键,相应菜单的指示
灯将从闪烁变为常亮。
由于易产生异味,所以请务必注意
清洁。如果担心产生异味,请煮沸
清洁。
加水量不得超出“最大”刻度线。
本说明书中提到的“食材制备”时间仅供参考。实际时间可能因配料、水量、室温等而异。
请使用塑料或木制炊具,防止刮伤内锅。
确保内锅已正确放入电饭煲。如果内锅没有紧密接触加热器,可能无法将食材煮熟。
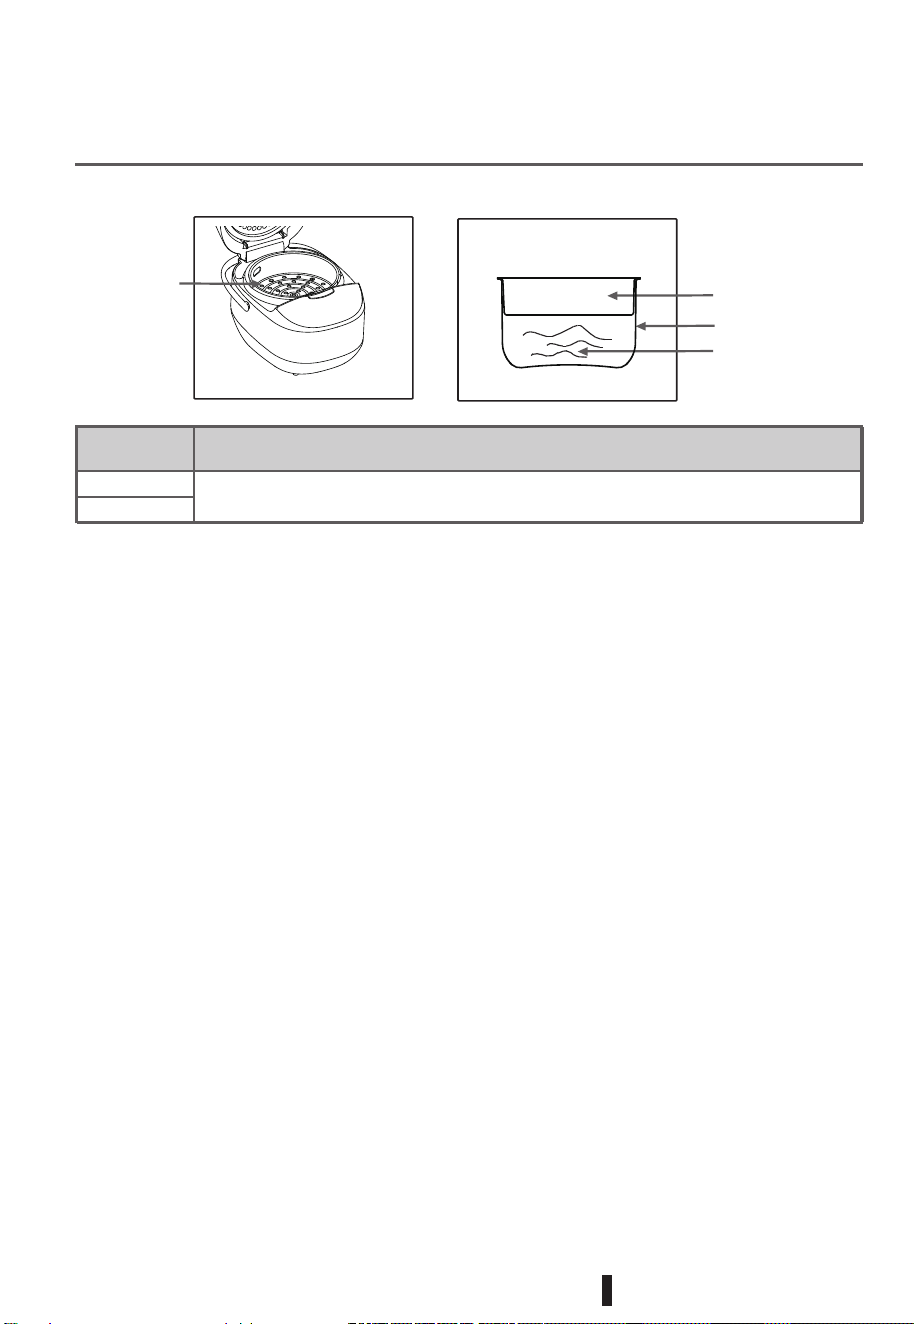
如何使用蒸笼应用“蒸煮”功能
水位
按“白米饭”第2刻度
如何倒水
电饭煲
1.8L
1.0L
蒸笼
内锅
蒸笼
水
以RC-10DH1NMY和RC-18DH1NMY型号为例:
16
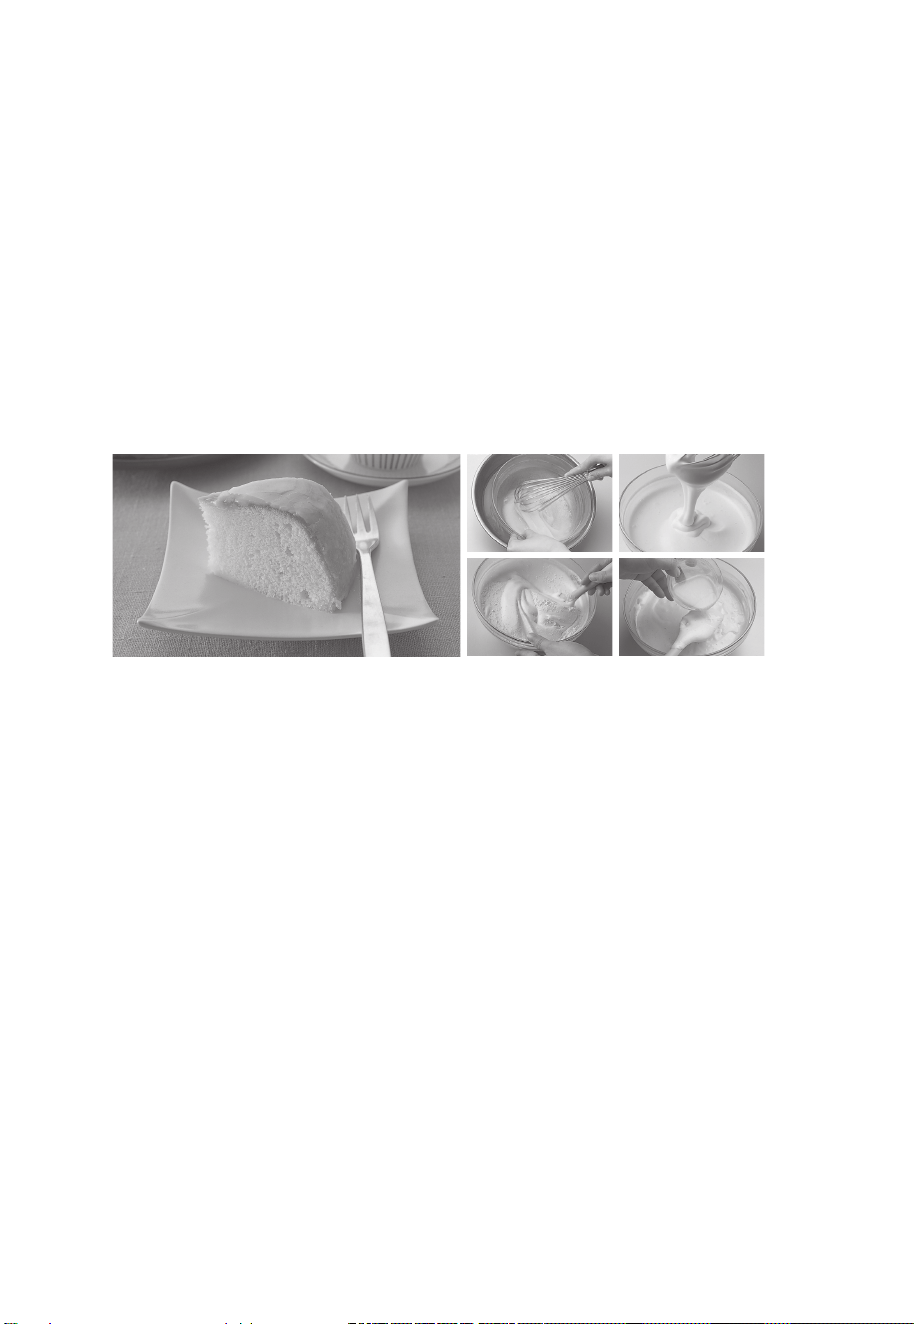
1
2
1
2
3
蛋糕
锅巴饭
17
材料准备:
小量:鸡蛋3个,细白沙糖100g,蛋糕粉(生发粉)120g,未融化的牛油30g。
大量:鸡蛋5个,细白沙糖180g,蛋糕粉(生发粉)200g,未融化的牛油50g。
(RC-10DR1TMY(S)型号不进行大量蛋糕制备测试。)
放糖,加入鸡蛋,用搅打蛋器搅拌至起泡,加入蛋糕粉,快速搅拌混合,在起泡没
有消失前快速倒入电饭煲里制作。
按“菜单”键选择“蛋糕”功能,然后再按“烹饪”键进入工作状态。烹饪时间大
概45分钟。
将洗净的大米放入内锅,根据米量(3杯长粒米),加水到相应的水位线,并倒入适
量的花生油。
合上盖子,按 “菜单”键选择 “锅巴饭”功能,并按“烹饪”键,耐心等待运行结
束。
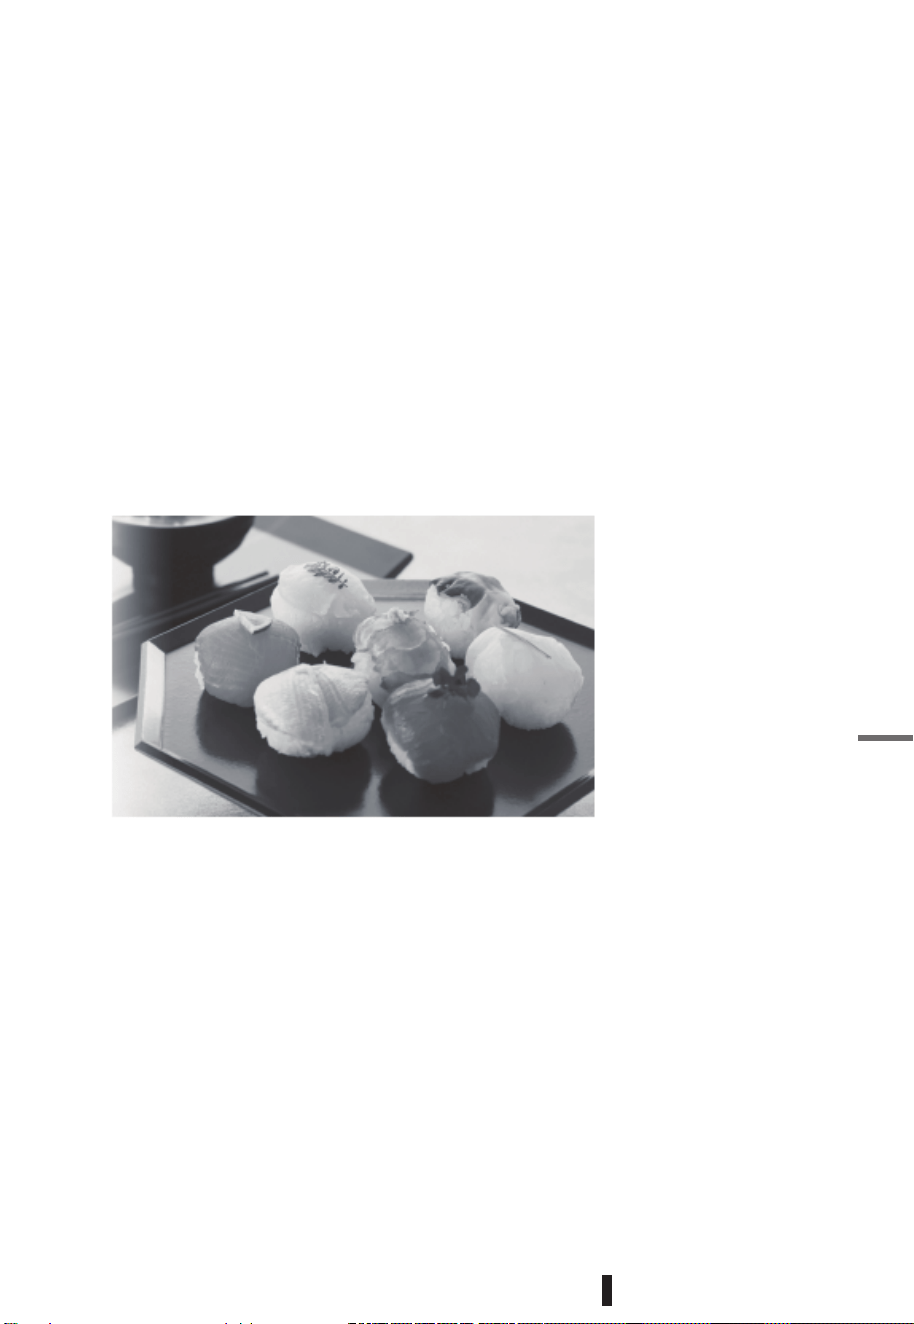
*请勿在内锅里将调味醋与米饭混合。
1
2
3
4
5
烹饪小贴士(如下所述)
●
●
●
寿司饭
18
食材(4人份):
中国东北大米或寿司专用米:300克
调味醋(事先混合好):醋(6大勺)、糖(1大勺)和盐(1小勺)
动作迅速地洗好米,直至水变清,加水至“白米饭”的水位刻度 2,合上盖子。
选择“寿司饭”功能,然后按下“烹饪”按钮,烹饪时间约为50分钟。
用浸有醋水的抹布擦拭寿司桶,将煮好的米饭转移至寿司桶。
将调味醋在米饭上淋遍,使之与米饭混合。用团扇扇至米饭呈现光泽。
趁米饭还是热的时候与调味醋混合,可以使调味醋充分融入米饭内。
使用寿司桶,多余的水分会被桶吸收,这样米饭就不太会变成糊状。
用冷却的海带泡水代替水来煮饭,可以增添美味。
1
2
2
3
煲汤
1
香浓粥
注:
19
准备好汤料(如鸡肉、玉米、胡萝卜等),将所有材料洗净并切成小块,然后放入
内锅,加水不超过最大刻度线。
合上盖子,按下“菜单”按钮选择“煲汤”,然后按下“烹饪”按钮,等待烹饪完
成。
准备好米和水。将淘净的米放入内锅,根据米量加水至适当的水位。
合上盖子,然后按“菜单”按钮选择“香浓粥”按钮。
开始烹饪。按下“烹饪”按钮进入烹饪状态,烹饪将在指定时间内完成。
• 建议预设时间不超过12小时,否则可能会产生异味;
• 为保证最佳烹饪效果,不建议对“锅巴饭”进行预设烹饪。
注:您可以根据个人喜好调整水量。
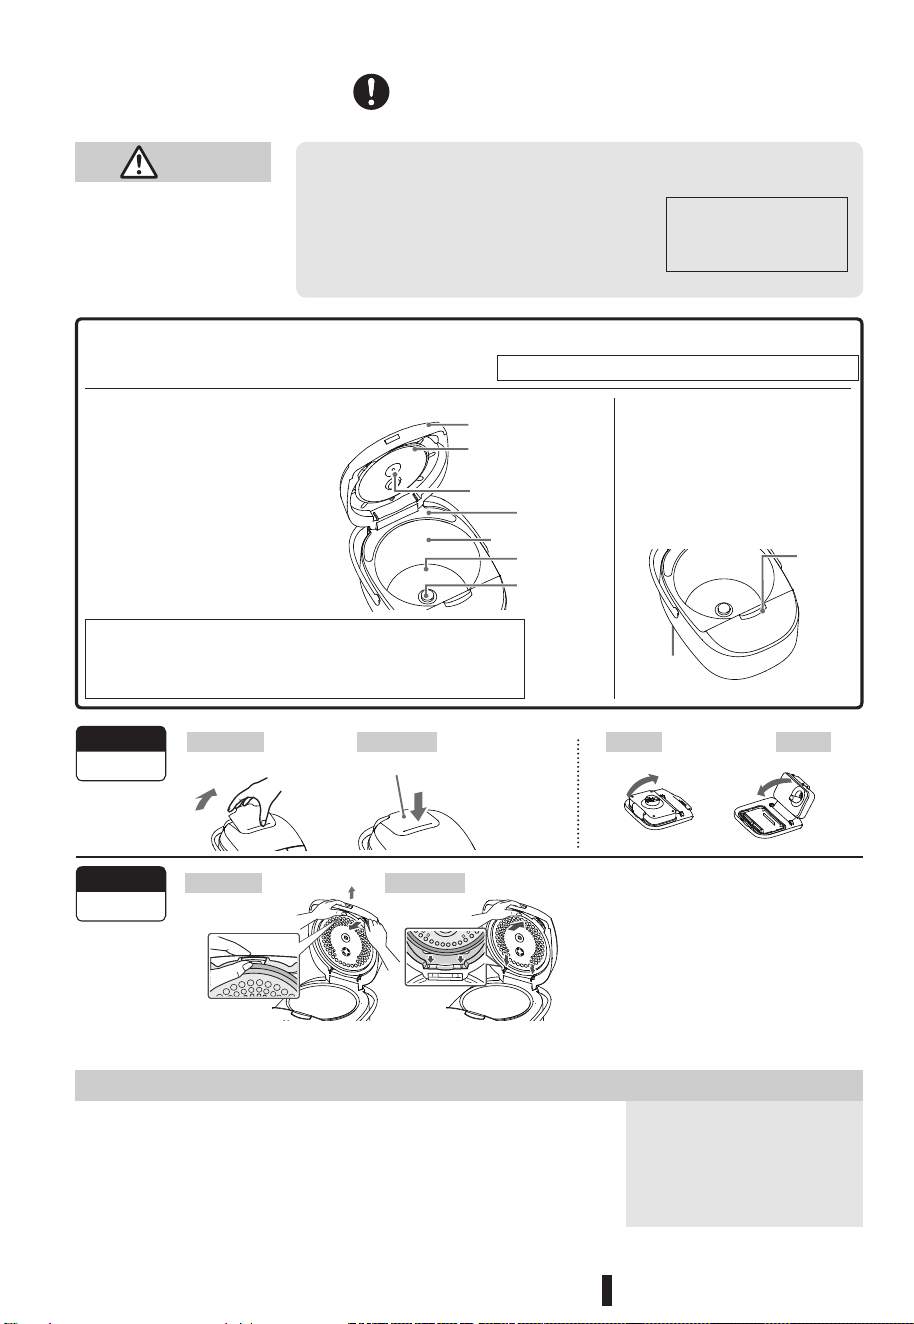
●
●
●
1
2
3
清洗与保养
注意
每次使用后,应清洗内锅、内盖、蒸汽阀和勺子。
应使用中性餐具洗涤剂清洗量杯。
在内锅内加入调味料后若不洗涤活动盖板会导致生锈。
●
●
请勿使用以下材料
●
●
●
●
①
②
蒸汽阀
●
内盖
关闭打开
20
在清洁和维护之前,请拔
下电饭煲的电源插头。
(这是导致烧伤的原因)
使用不干净的电饭煲会产生异味。因此,请始终保持清洁。
务必擦去蒸汽阀、内锅/密封环上的水滴。
(它们是导致变形、褪色、腐蚀、裂缝划痕的原因)
内盖采用铝制材料制成。
洗碗机专用清洁剂会导致
其褪色。
洗碗机/烘碗机
除厨房用中性洗涤剂以外的洗涤剂
苯、稀释剂、酒精、清洁剂、漂白剂
擦洗刷、易造成划痕的三聚氰胺海绵
请勿清洗整机。请勿弄湿操作部
件和上盖(盖子)。请勿将水倒
入电饭煲主体的内侧。
请勿用力拉扯散热片包装。(不
会脱落)
不要弄湿产品主体、电热
盘、温度传感器。
用拧干的湿布擦去污垢和异
物。
使用棉签清除通风口(电饭煲
底部)和按钮缝隙中的污垢、
异物。
如果在电热盘/温度传感器上留下任何米粒,请用柔软的砂纸
(大约600号)轻轻擦拭,并用拧干的湿布擦拭干净。
外盖(上盖)
散热片
散热片垫圈
框架
主体内侧
电热盘
温度传感器
通气孔
开盖
按钮
每次使用时
拆卸蒸汽阀
安装内盖 拆卸内盖
安装蒸汽阀
向上拉可将其
取下
放入空心部分至完全安装到位
在没有安装内盖的情况下,上盖无法完全闭合(以防止忘记安装内盖)
煮沸清洗(大约每周一次)
向内锅加水(直到达到米饭水位2),然后盖上盖子。
按下“菜单”键选择(白米饭)功能,然后按“烹饪”键。
当变为“保温”时,按“取消”键。当电饭煲冷却后,取下内
盖、内锅和蒸汽阀,然后清洗晾干。
即使没有异味也需如此。
沿着下方两个箭头的方向插入。
按下使其安装到位。
不要添加除水之外的任何物质
(例如:洗涤剂等)。
不要用蒸汽连续清洗。
有些气味可能无法完全去除。
向前拉可将其
取下
每次使用时
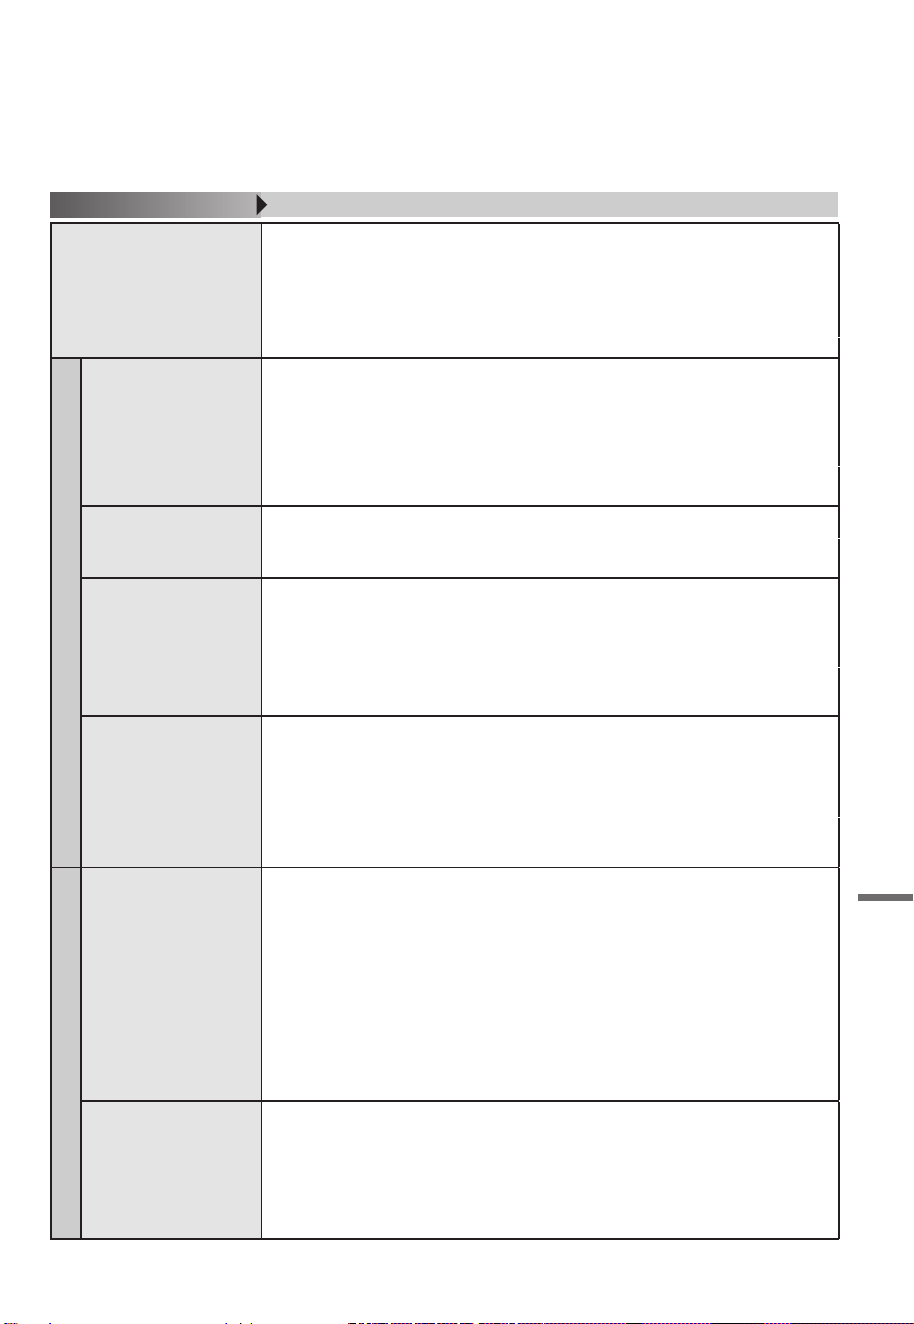
故障情况
●
米饭
●
●
●
●
●
●
●
●
●
糊锅
※
在下列情况下,大米容易糊锅:
●
●
●
●
●
●
●
●
●
●
米饭保温
异味
※
●
●
●
●
●
●
●
●
●
●
成因/调查点
故障案例
(续)
故障情况
21
在提交维修请求之前,请再次进行检查。如果无法自行检查或采取进一步行动,请向东芝维修中心
询问。
电饭煲未通电。
米饭不熟。
虽然经过了“保温”处理,但是,
煮熟的米饭仅温热。
米饭水分过多。
按键操作无法执行。
软糯
米糊
相互粘连
味道不好
电饭煲的插头是否已拔出,插头是否从插座中掉出来?
如果在烹煮或“保温”操作期间显示当前时间,说明电饭煲处于电源故障状态,
并且插头已断开或断路器已切断电源。
请减少煮米用水量。
米饭煮熟后,立即把米饭完全打散。
请减少煮米用水量。
预先浸泡大米,再使用预设设置烹煮,可使米饭更软糯。
淘米力度过大或使用漏勺淘米可能导致米粒破裂,煮熟后成呈现黏糊状。
是否适用pH 9以上的碱性热水煮米?
请增加煮米用水量。
请在烹煮前浸泡米粒。
是否使用高硬度的矿泉水?
当淘米不充分时。
当浸泡时间过长时。
对于免洗米,淘洗1-2次可以减少糊锅。
当温度传感器上粘有异物。
当在大米中添加调味料和其他配料时。烹煮糙米等时。
是否在电饭煲内测、内盖等仍处于高温时煮饭? 请等待这些部件的温度降至人体常
温后再煮饭。
在“快煮”功能下,米饭可能过硬或过软。
是否有任何异物黏附在温度传感器、活动盖板、蒸汽阀上?
内锅是否变形?是否忘记连接活动盖板、蒸汽阀等?
是否存在电源故障?是否插上电饭煲的插头?
是否按照下列方式使用“保温”功能?
使用时间过长。在烹煮除快速饭之外的食材时使用。热冷饭时使用。在使用时勺子还留
在内锅中。使用时间超过12小时。
电饭煲主体/活动盖板/蒸汽阀是否未清洁?
在每次烹煮后请取下活动盖板/蒸汽阀进行清洗,然后用干净的布擦去水渍。
淘米是否足够充分?预设烹煮时间是否过长?
在关闭“保温”功能后内锅中是否还有米饭?
(按错按键,或因电源故障断电)
在关闭“保温”功能后内胆中是否还有米饭?请检查上述情况,并更改“保温”设置。
是否有任何异物粘在活动盖板包装、内锅边缘或电饭煲主体框架上?
温度传感器或内锅外侧是否粘附异物?
蒸汽阀是否正确连接?
“保温”时间是否太长?是否重复加热?
当米饭较少时,“保温”操作可能会导致底部的米饭变硬变干,所以请把米饭集中到
中间区域。
变硬
变干
味道不好
味道不好,烹煮效
果不佳
轻微焦化并呈现浅
棕色不是故障或失
败的结果
请在下次使用前煮
沸并晾干,以防散
发异味。
米饭颜色变黄、变干。
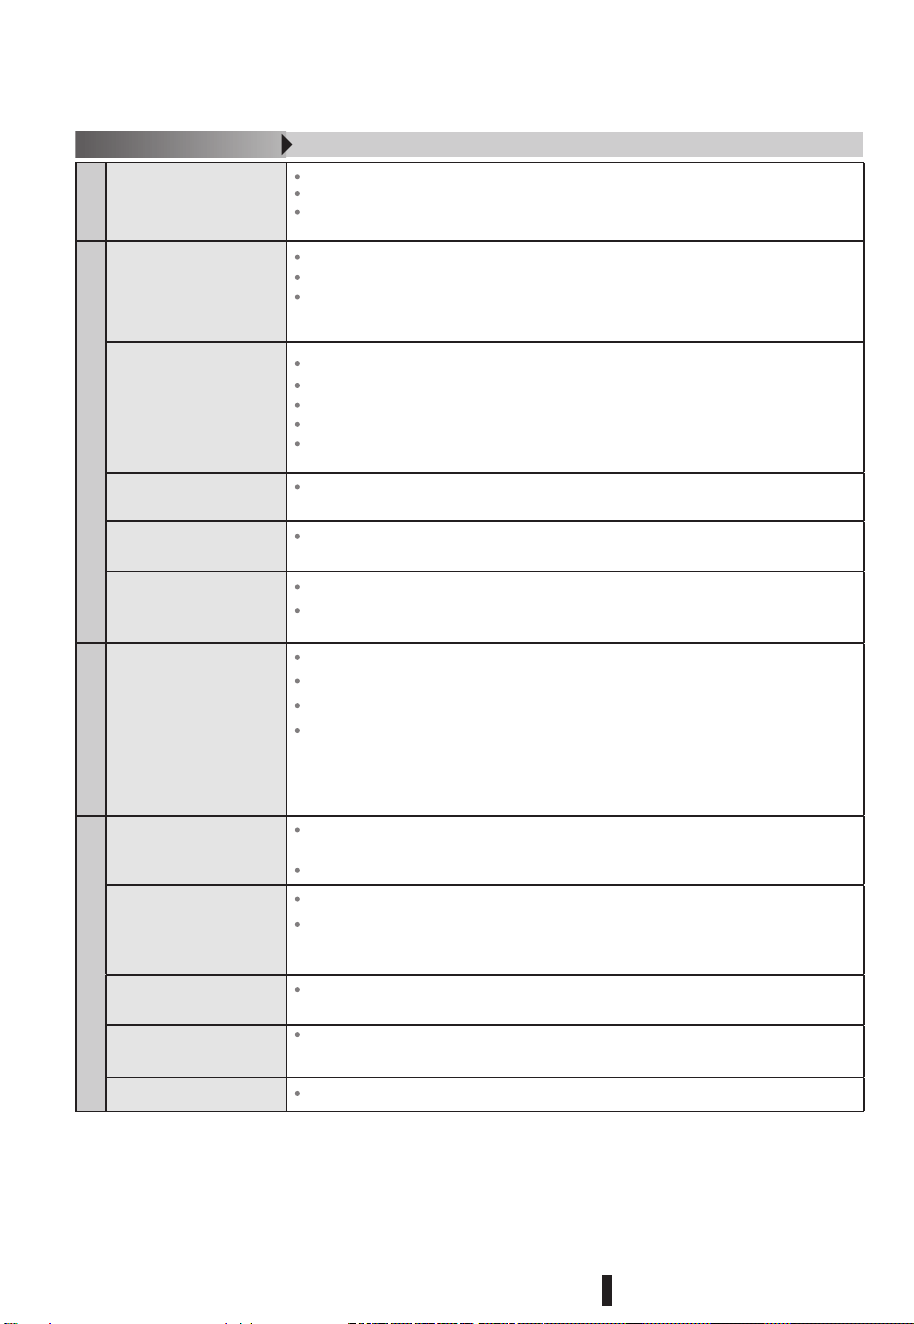
煮饭、保温
漏汽
※
预设设置
操作提示
22
成因/调查点
故障案例
呈米糊状,粘稠
沸腾溢出
内锅上形成薄膜。
内盖、内锅等处出现水
滴。
打开盖子时,水沿着产
品外壁处滴下。
立即开始烹煮
未在预设时间煮饭
无法完成预设操作
难以盖上盖子
无法盖上盖子
按键操作无法执行
“烹饪”指示灯熄灭运
行中途停止。
剩余时间显示与实际煮
饭时间不同
在“保温”模式下,时间指
示灯闪烁
米饭煮熟后进行检
查
减少煮饭水量,然后保温。
米饭煮熟后,立即把米饭完全打散。
把米饭集中到内锅的中间区域,有时可以把米饭完全混在一起,避免粘在内锅的
内表面。
是否有任何异物粘在内盖、内锅边缘或电饭煲主体框架上?
内盖上是否有划痕?内盖/内锅是否变形?
内盖是否正确连接?
是否存在米量小、水量大、淘米不充分等问题?
您的煮粥菜单是否有问题?
温度传感器上是否粘有异物?
蒸汽阀内部是否清洁?
活动盖板、蒸汽阀是否正确连接?
扁圆形薄膜是大米中甜味成分(淀粉)熔化干燥后形成的。这种情况不是故障。
内盖、内锅等处出现水滴,为了防止变干,这种情况不是故障。
打开盖子时,可能会有一些水沿着产品外壁处滴下,具体取决于开盖时间、室温等。
温度传感器/内锅外侧是否粘附异物?
如果预设的时间在烹饪菜单的时间内,将立即开始烹饪。
将在10分钟之后开始煮饭。是否室温/水温低、水量大。
在设置预设操作时,是否已将内锅正确放入电饭煲?
您是否忘记将电饭煲设置为预设操作,或忘记按“烹饪”键等?
活动盖板是否正确连接?为了避免忘记安装活动盖板,在没有安装活动盖板的情况下,
外盖无法完全合上。
开盖按钮的空隙键是否有异物等?
是否插入插头?是否装好内盖?
在选择“食材制备”功能时,例如<蛋糕>,不可使用“预约”功能,按键不会起作用。
如果不小心按下“取消”键,或者电源故障长时间持续,会切断电源。
显示的剩余烹饪时间可能与实际烹饪的时间不一样。这并不是因为电饭煲出故障。实际
的时间可能会因食材、室温等因素而不同。
这说明米饭保温时间行,请立即停止保温。
食材制备
●
●
●
●
●
●
●
●
其他
※
●
电源故障
23
成因/调查点
故障案例
故障情况
如果该食材需要较长的时间制
备,则不会消耗设置的时间。
食物烹煮结果不佳
烹煮时会发出声音。
有塑料气味。
内锅外表面有划痕、
污垢。
在烹煮食物过程中,
关闭断路器。
当中途拔出电饭煲的电源、电饭煲连接插头脱落或断路器切断电源时,采用以下的处理办法。
在预设烹煮过程中
从电源故障中恢复后,电饭煲会恢复至初始状态。
如果电源长时间持续故障,米饭的烹煮效果可能不佳。
在煮饭过程中
在保温过程中或在蒸煮过程中
设置时间从“准备烹煮”温度开始计算。但是,将温度加热至烹煮所要求的温度
需要一定的时间。因此,实际制作时间比设置时间要长。
食材的最终烹煮效果可能因配料和测量方法等而异。请检查并确认烹煮程序和烹煮
时间。
下列因素可能导致烹煮失败、蒸汽泄漏或盖子无法正常关闭。
有异物黏附在温度传感器上。内锅变形。锅内留有熟食。电源出现故障。电饭煲插
头未插入插座中。
【滴滴声】调整温度的声音,【呼呼声】蒸汽发出的声音。(这种情况不是故障)。
【嘟嘟声】水滴在内胆的外表面喷溅和沸腾的声音
在将内锅放入电饭煲之前,请擦去内胆外表面的水滴。
在第一次使用时,可能会产生一些难闻的气味,但是,在使用过程中,这种气味会逐渐
消失,如果感到担心,请煮沸并清洗。
使用后,内表面涂层可能会刮伤或变脏,但对烹煮或加热质量没有影响。
如果同时使用电饭煲和其他电器,可能会导致功耗超标,断路器会切断电源。请使用独
立插座。
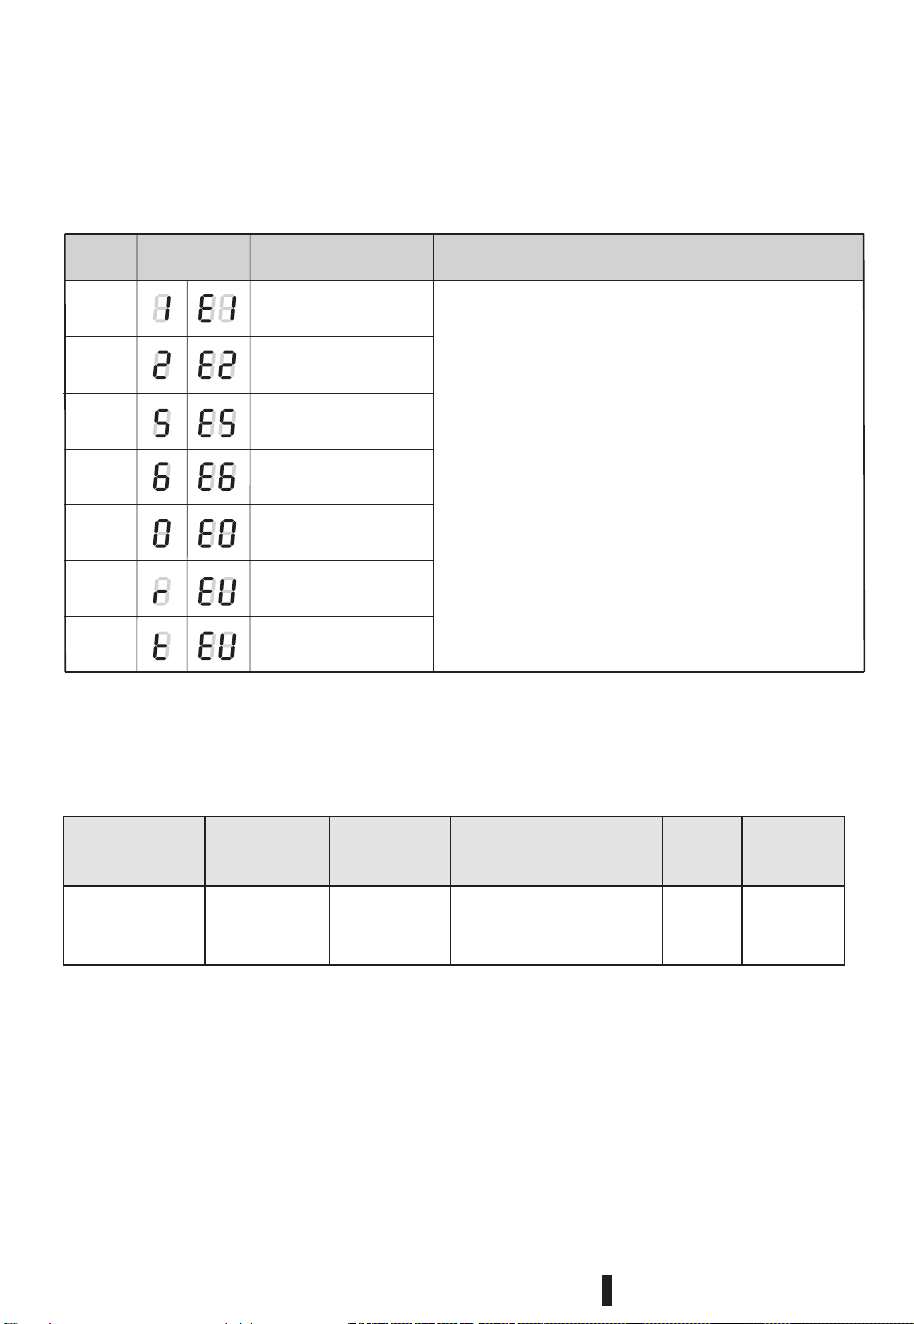
错误提示
规格
RC-10DR1TMY(S)
220-240V~ 50/60Hz
L400*W308*H250(mm)625-744W 3.2kg
24
异常现象自检
显示异常原因判断
请联系当地经销商或服务网点进行维修或安装。
指示
状态
常亮
主热敏电阻(底部传
感)开路
主热敏电阻(底部传感
器)短路
上盖传感器(手柄热敏
电阻)开路
上盖传感器(手柄热敏
电阻)短路
异常温度系统错误
拔出并重新连接电源线,显示屏仍显示相同的信息,
请将电饭煲送到当地的售后服务中心进行维修。
通信故障
通信故障
常亮
常亮
常亮
常亮
常亮
闪烁
型号 电源
消耗电力
(煮饭)
本体
重量
本体尺寸 频率
异常显示 可能原因 解决方法