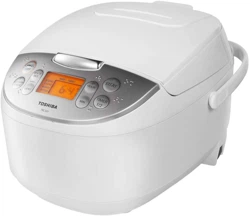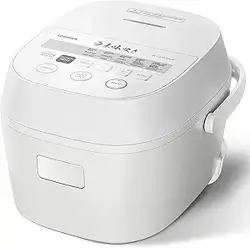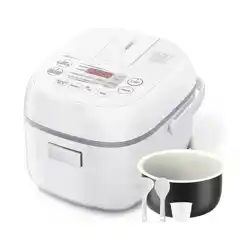

User Manual of Product 1:
Toshiba Small Rice Cooker 3 Cup Uncooked – LCD Display
with 8 Cooking Functions, Fuzzy Logic Technology, 24-Hr
Delay Timer and Auto Keep Warm, Non-Stick Inner Pot, White
User Manual of Product 2:
TOSHIBA EM925A5A-SS Countertop Microwave Oven, 0.9 Cu
Ft With 10.6 Inch Removable Turntable, 900W, 6 Auto Menus,
Mute Function & ECO Mode, Child Lock, LED Lighting,
Stainless Steel
Page 1
User Manual
USER MANUAL
Electric Rice Cooker
Warning notices: Before using this product,
please read this manual carefully and keep
it for future reference.
to change without prior notice for product
The design and specifications are subject
improvement. Consult with your dealer or
the manufacturer for details.
https://www.toshiba-lifestyle.com/us/
Safety Precautions
Product Features
Installation Instructions
Operating Instructions
Care and Cleaning
Troubleshooting Tips
TRCS02
Version A - 12 - 2020


Page 2
0
Safety Precautions ........................................................................................................ 4
1
Product Features ........................................................................................................... 5
2
Installation Instructions .............................................................................................. 6
Unpacking ................................................................................................................... 6
Electrical Requirements ......................................................................................... 6
Location Requirements .......................................................................................... 7
3
Operating Instructions................................................................................................ 8
Controls ...................................................................................................................... 8
Using the Rice Cooker ............................................................................................ 9
4
Care And Cleaning .....................................................................................................18
5
Troubleshooting Tips ................................................................................................23
6
Warranty .........................................................................................................................25
Read This Manual
Inside you’ll find many helpful hints on how to use and maintain your rice cooker properly.
Just a little preventive care on your part can save you a great deal of time and money
over the life of your rice cooker. You’ll find many answers to common problems in the
troubleshooting tips - you should be able to fix most of them quickly before calling service.
These instructions may not cover every possible condition of use, so common sense and
attention to safety is required when operating and maintaining this product.
Safety
Precautions
Page 3
SAFETY PRECAUTIONS
To prevent injury to the user or other people and property damage, the following
instructions must be followed. Incorrect operation due to ignoring of instructions
may cause harm or damage. The level of risk is shown by the following indications.
WARNING: This symbol indicates the possibility of death or serious injury.
CAUTION: This symbol indicates the possibility of injury or damage to property.
IMPORTANT SAFETY INSTRUCTIONS
When using electrical appliances, basic safety precautions should always be followed
including the following:
WARNING
• Read all instructions before use.
• Do not touch hot surfaces. Use potholders or oven mitts when handling the
cooking bowl or lid.
• To avoid electrical shock do not immerse cord, plugs, or the rice cooker housing
in water or other liquid.
• This appliance is not intended for use by persons (including children) with
reduced physical, sensory or mental capabilities, or lack of experience and
knowledge, unless they have been given supervision or instruction concerning
the use of the appliance by a person responsible for their safety.
• Close supervision is necessary when any appliance is used by or near children.
• Keep appliance and cord away from children.
• Unplug from electrical outlet when not in use and before cleaning.
•
• Do not operate any appliance with a damaged cord or plug or after the
appliance malfunctions or has been damaged in any manner. Return appliance
to the nearest Authorized Service Center for examination, repair, or adjustment.
• Do not disassemble, repair or modify the rice cooker. For any repair, consult a
Toshiba authorized Service Center.
• Do not operate the rice cooker if any part of the unit is damaged.
• Do not use outdoors. Intended for indoor household use only.
• Do not let cord hang over edge of countertop, or touch hot surfaces, including
the top of the rice cooker. Never use outlet below countertop, and never use
with an e
xtension cord.
• Do not place on or near a hot gas or electric burner, or in a heated oven.
• Do not place near heat-sensitive curtains.
Allow appliance to cool before putting on or taking off parts.
Safety
Precautions
Page 4
WARNING
• The total amount of food and water should NOT exceed the MAX level marked
on the cooking pot. Some foods such as rice, expand during cooking and
• Spilled food can cause serious burns. Extreme caution must be used when
moving an appliance containing hot liquids or hot oil.
• Do not use appliance for other than intended use.
•
• A short power cord is used to reduce the risk resulting from the cord being
grabbed by children, or becoming entangled in or tripping over a longer cord.
•
• The use of accessory attachments not recommended by Toshiba may cause
injuries.
• Handles are not used to carry heavy objects. Items in the cooker can not be
moved by the handle.
CAUTION
To reduce the risk of Electric Shock, cook only in removable container.
SAVE THESE INSTRUCTIONS
THIS PRODUCT IS DESIGNED FOR HOUSEHOLD USE ONLY.
KEEP APPLIANCE AWAY FROM CHILDREN.
should not fill the cooking pot over half way.
Always attach cord to appliance first, and then plug cord into a wall outlet.
To disconnect, set all controls to “Off,” then remove plug from wall outlet.

Page 5
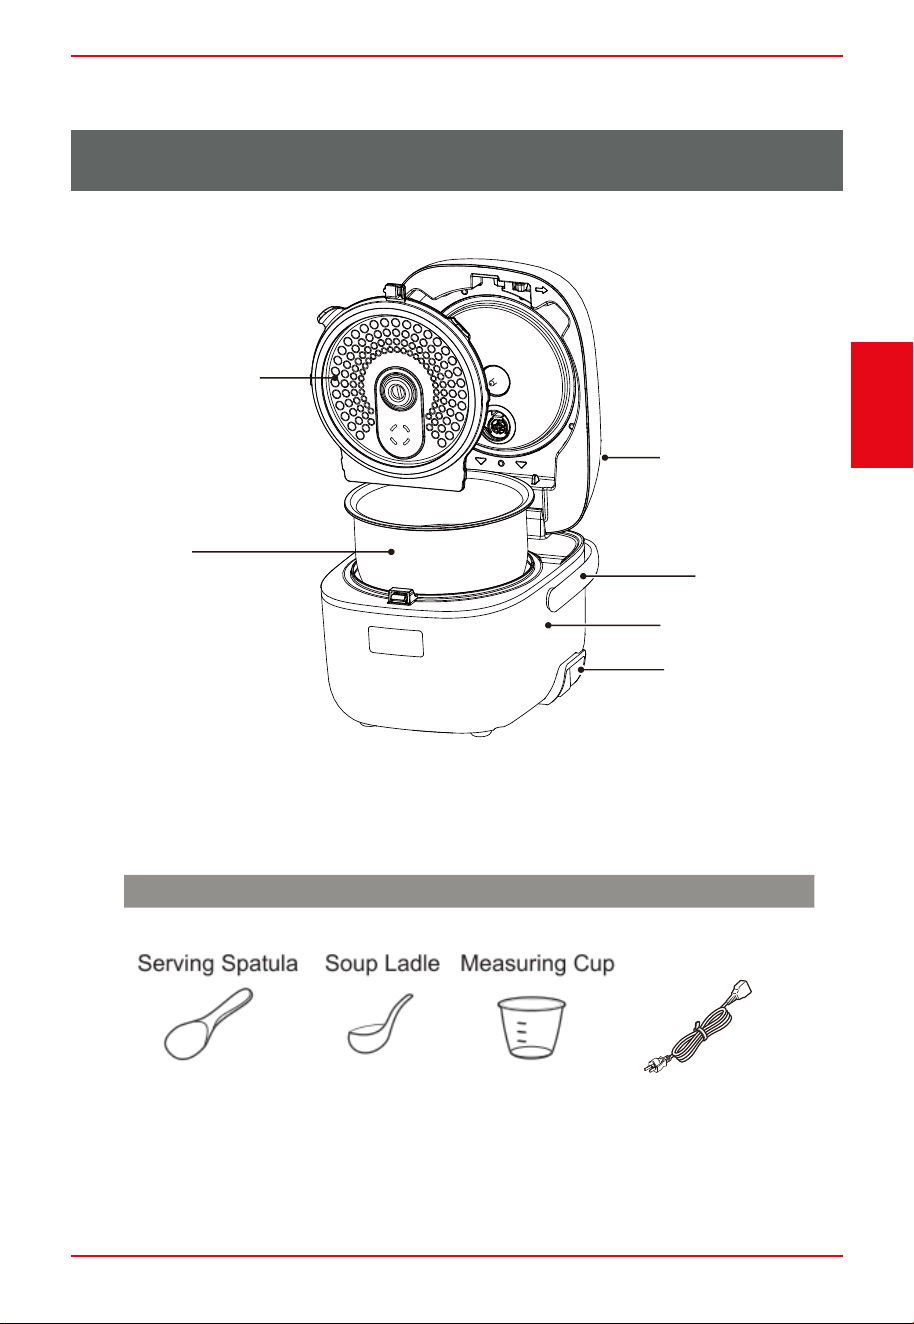
Product
Features
PRODUCT FEATURES
Accessories
Upper
Housing
Outer body
Inner Pot
Removable
movable cover
Handle
Power
Power cord
Page 6
Installation
Instructions
INSTALLATION INSTRUCTIONS
Unpacking
Remove all packing materials.
Wash the cooking pot, inner lid, steam port and other accessories, and then dry thoroughly
before using.
Electrical Requirements
WARNING
Electrical Shock Hazard
• Plug into a grounded 3 prong outlet.
• Do not remove the ground prong.
• Do not use an adapter.
• Do not use an extension cord.
A 120 V, grounded electrical supply is required. It is recommended that a separate circuit
serving only the rice cooker is used. Sharing the power supply with other appliances will
result in overheating.
Power Supply Cord
NOTE
A short power supply cord is used to reduce the risks of becoming entangled in, or tripping
over a longer cord, or of the cord being grabbed by children.
outlet near the appliance. Do NOT use an extension cord.
If the power supply cord is too short, have a qualified electrician or technician install an
This Rice Cooker has a 3-prong grounded plug. To reduce the risk of electrical shock, the
plug will fit into an outlet only one way. If the plug does not fit in the outlet, contact a
qualified electrician. Do not modify the plug.
Failure to do so can result in death, fire or electrical shock.
Page 7
Installation
Instructions
Location Requirements
This rice cooker is designed for household use only; the cooker should not be used for
commercial use.
Use indoors on a stable, level, non-heat sensitive surface such as a countertop in a location
where the lid can be fully opened; do NOT use outdoors.
Do not place the rice cooker on an area of the countertop that is exposed to direct sunlight,
or where it might be splashed with cooking oil.
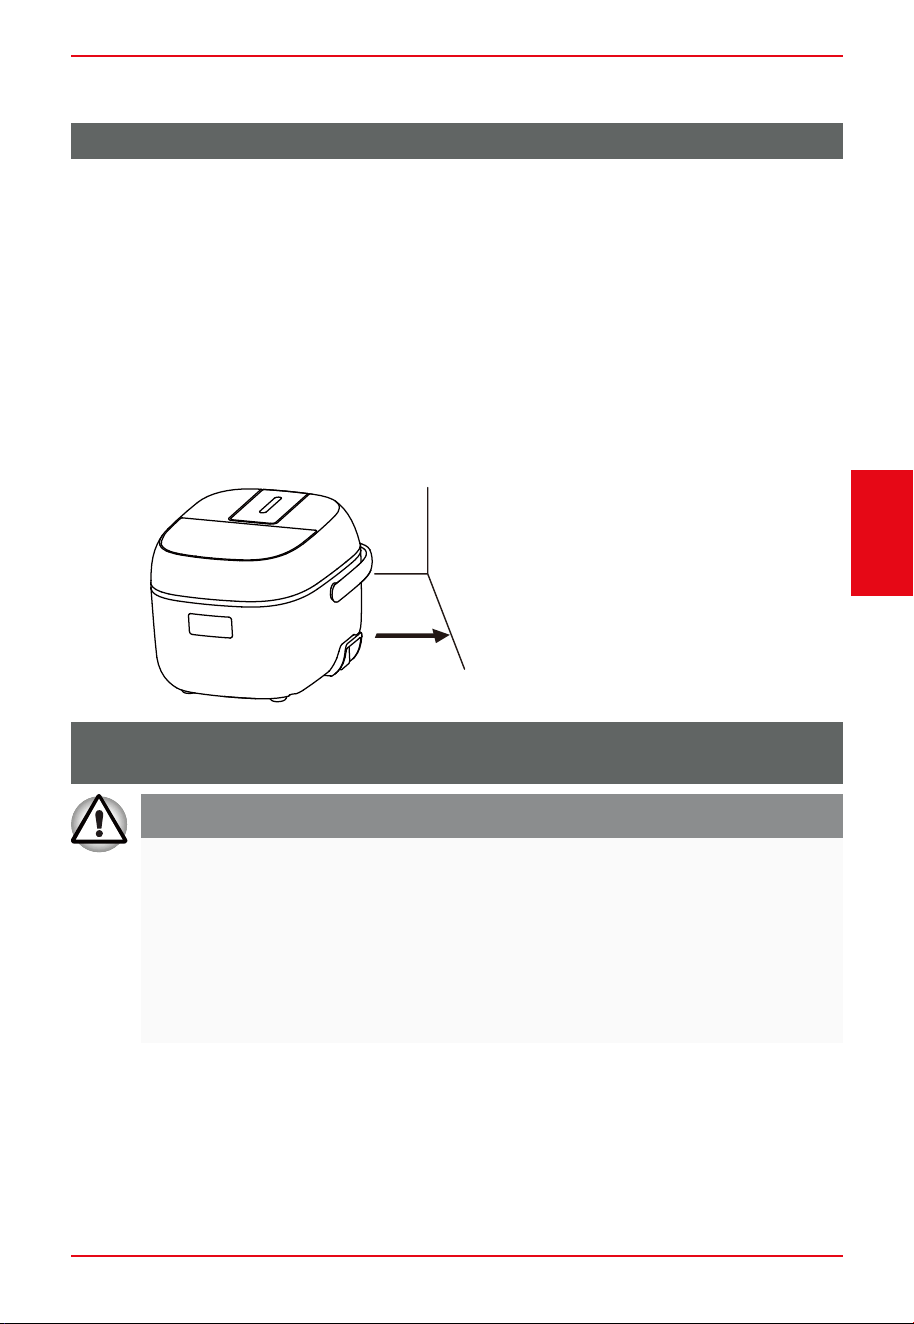
RECOMMENDED CLEARANCE
Steam and heat emitted from the rice cooker may damage or discolor nearby walls or
cabinets. It is recommended that the rice cooker be placed a minimum distance of 12”
a
a
At least 12" (30.5 cm)
OPERATING INSTRUCTIONS
WARNING
Fire/Burn Hazard
Unplug immediately and do not use rice cooker if:
• The power supply cord becomes abnormally hot during use.
• Smoke is emitted from the rice cooker or a burning odor is detected.
• The rice cooker is cracked or there are loose or rattling parts.
• The cooking pot, outer lid or inner lid is broken or deformed.
Failure to do so may result in fire, electric shock or injury.
(30.5 cm) from walls or cabinets.
Page 8
Operating
Instructions
Controls
IMPORTANT
c e
d
a
f
g
h
b
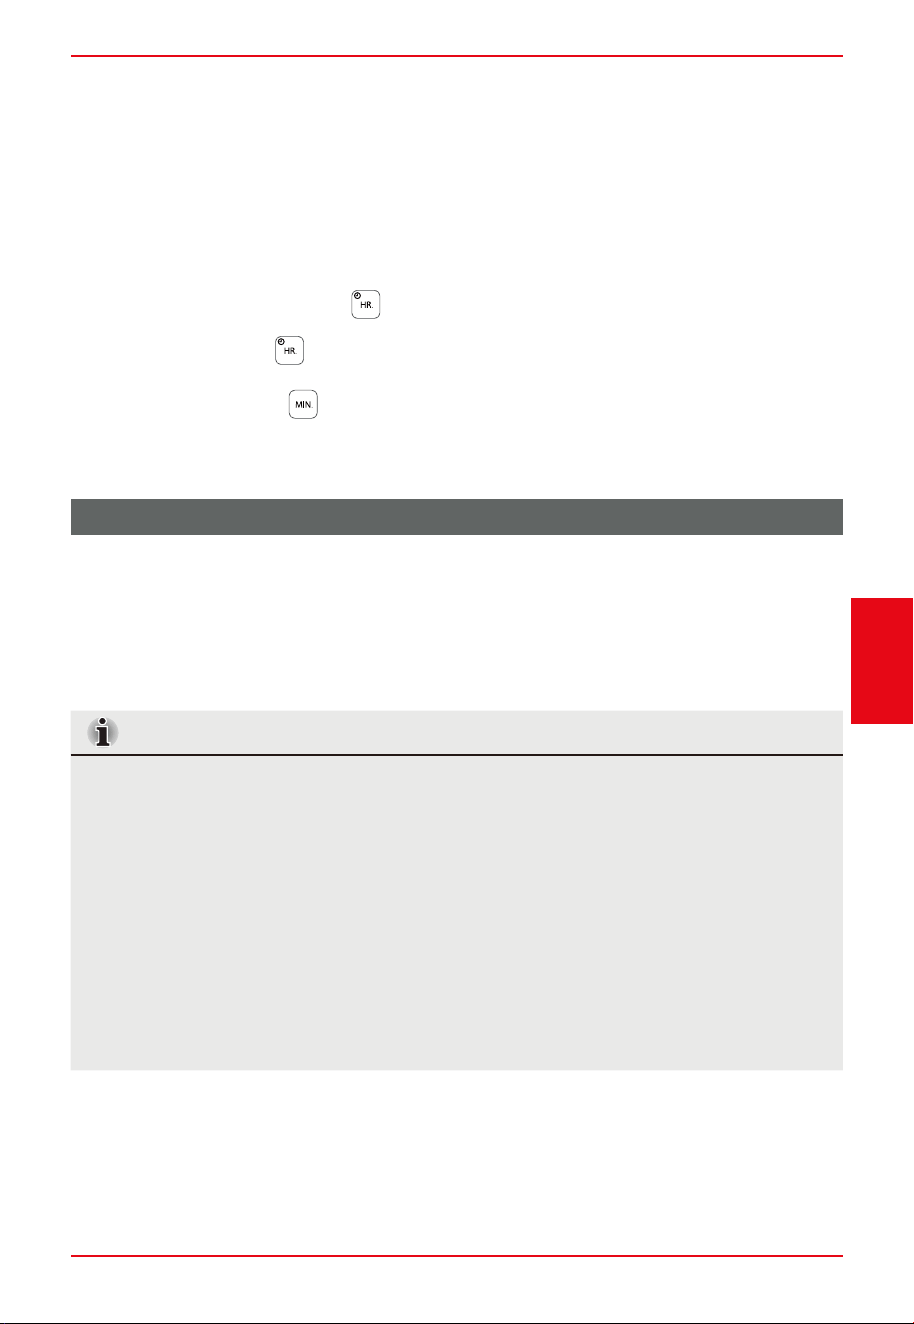
a OFF/ CANCEL
Press the OFF/CANCLE button to stop cooking and return to ON (standby mode).
b White Rice
Press the WHITE RICE button to set the program to cook white rice.
c Cooking Programs and Time Display
d Hour and Minute Buttons
Press the HR. or MIN. button to set the current time/delay time/the cooking time of slow
cook and porridge.
e Start
Press START to begin cooking. The control panel will illuminate with the set program.
f Keep Warm/Reheat
Press the KEEP WARM/REHEAT button to keep warm or reheat the cooked rice.
g Menu
Press the MENU button to select from the preset cooking programs listed on the display.
h TIMER
To select a cooking program, the rice cooker must first be plugged into a grounded
3 prong electrical outlet (ON).
Page 9
Operating
Instructions
SET CURRENT TIME
The rice cooker uses a 24-hour clock (0:00 [midnight] to 23:59 [11:59pm]). The clock cannot
be set while the rice cooker is being used for: cooking, keeping warm or reheating, or after the
delay timer has been set.
1. Plug the power supply cord into a grounded 3-prong electrical outlet to turn on the rice
cooker.
2. Press and hold the HR button
display.
3. Press the HR button
continuously to change the hour or press and hold the
for 2+ seconds until the time flickers on the
button to fast forward.
4. Press the MIN. button continuously to change the minutes or press and hold the
button to fast forward.
5. When the correct time-of-day appears on the display, quickly press START to set the time.
Using the Rice Cooker
INTRODUCTION
IMPORTANT
• Do NOT place anything on or over the rice cooker lid, during use.
• Do NOT touch the steam vent during cooking.
• Do NOT place the interior cooking pot on a cooktop burner; the high temperature
will warp the pot. The cooking pot is designed to be used only in the rice cooker.
• Do not use a pot or container other than the cooking pot (provided) in the rice
cooker.
• Do not insert any foreign objects into the air vent or gaps at the bottom of the rice
cooker.
• Do not season rice while it is being kept warm in the cooking pot. Seasonings left in
contact with the interior of the cooking pot may damage the non-stick coating.
• Do not use metal cooking utensils. Metal utensils may scratch or damage the non-
stick coating.
The Toshiba® Rice and Grain Cooker benefits from the use of Fuzzy Logic, a technology that
senses moisture levels to accurately cook food. Cooking time and temperature are defined
by the appliance. Our highly intelligent Rice and Grain Multicooker automatically adjusts the
heat and timing for perfect results every time.

Page 10
Operating
Instructions
MEASURING RICE
IMPORTANT
The total amount of rice and water should NOT exceed the 3 cup MAX level marked
inside the cooking pot.
NOTE
• To achieve the correct ratio of rice to water, use ONLY the Rice Measure (cup provided).
• Level the rice in the Rice Measure cup so that it is even with the top.
•
• If the rice requires rinsing before cooking, measure the rice before you rinse it, Follow the
RINSING RICE
Some types of rice are rinse-free and other types require rinsing before use to remove excess
starch which may make the rice sticky. Also, cooking rice with starchy water may result in the
rice burning or being improperly cooked.
If the water should turn white or cloudy, when added to rinse-free rice, drain and replace the
water before cooking. Many recipes recommend rinsing quickly so the rice does not absorb
water prior to cooking.
To Rinse Rice Quickly:
1. Place a colander inside a larger bowl.
2. Place the rice in the colander and rinse under cool running water.
Rinsing rice in hot water may prevent the rice from cooking properly.
3. Using your hand stir the rice around 3 to 4 times to separate the grains.
4. C
ontinue to rinse until the water in the bowl is clear.
ADDING OTHER INGREDIENTS
If you wish to add other ingredients or seasonings to the rice, do so after adding the water.
For softer or firmer rice adjust the ratio of water to rice accordingly.
rinsing directions for that specific type of rice.
The Rice Measure is significantly smaller than the standard U.S. cup measure.
The rice will not cook properly and be too firm if ingredients are added before the water.
Page 11
Operating
Instructions
COOKING RICE
WARNING
Electrical Shock Hazard
• Plug into a grounded 3 prong outlet.
• Do not remove the ground prong.
• Do not use an adapter.
• Do not use an extension cord.
NOTE
Cooking time will vary depending on the type of rice or grain being cooked.
1.
accessories and attachments, and then dry each thoroughly.
2. Measure rice, and then rinse rice, if needed.
3. Add measured rice to the cooking pot.
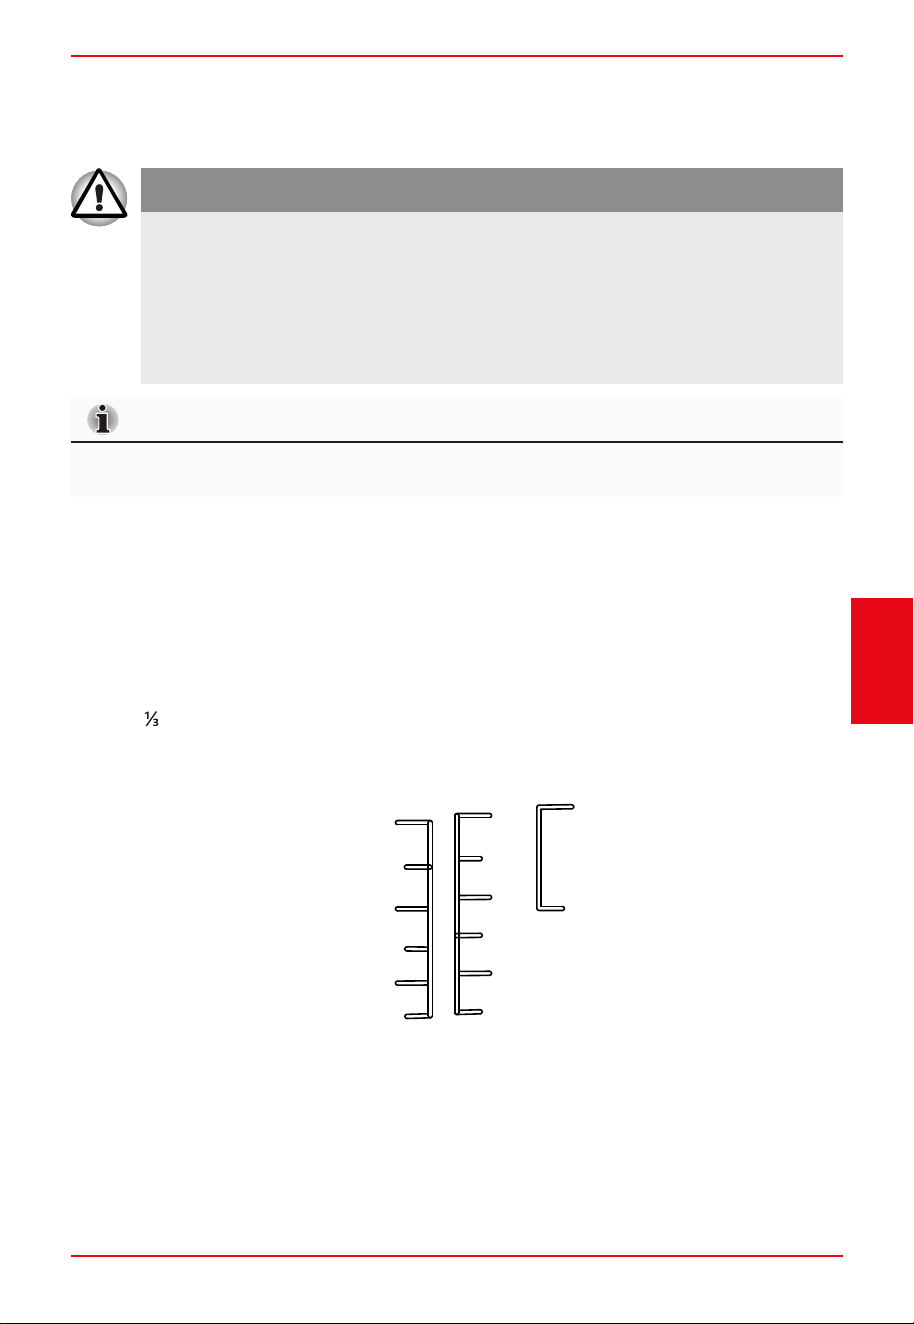
4. Add water until it reaches the corresponding numbered Water Line marked on the
interior of the cooking pot. For example, when cooking 3 measures of white rice, add
water to third line from the bottom of the pot.
To suit your personal preference, the amount of liquid can be adjusted slightly (no more
than
of the distance between the lines).
5. Stir the rice into the water, so that each grain is immersed in the water.
6. Place the cooking pot into the rice cooker.
3
2
1
0.5
3
White
Rice
Mixed
Grain
Porridge
2
1
0.5
0.5
0.25
Failure to do so can result in death, fire or electrical shock.
Before using for the first time, wash the cooking pot, inner lid, steam port, other
Page 12
Operating
Instructions
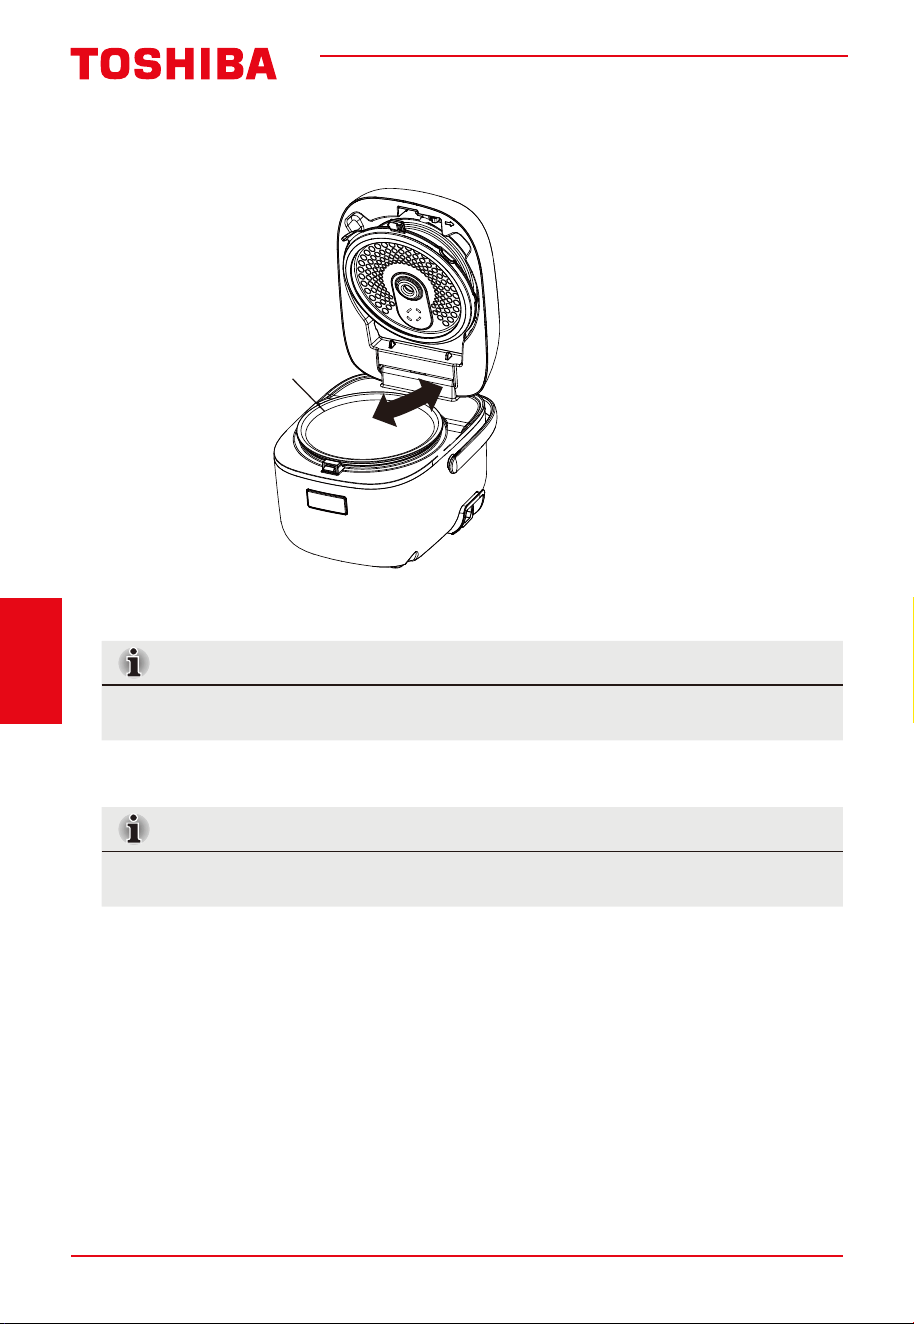
7. Rotate the pot two to three times to ensure a solid contact between the bottom of the
cooking pot and the heating plate.
a
a Cooking Pot
8. Close the lid, and then press downward until it clicks into place.
9. Plug the power supply cord into a grounded 3 prong electrical outlet.
NOTE
The rice cooker is powered ON, but in standby mode (no heat).
10. Select desired cooking program. See “Controls” for explanation of options.
11. Press START.
NOTE
13.
Warm/Reheat light will illuminate.
During first use, there may be a plastic odor which will dissipate after using.
When cooking is completed, 5 beeps will sound. The Start light will turn off and the Keep

Page 13
Operating
Instructions
Application of function buttons
START button
Plug in power supply, LED displays current time, multi-cooker is on Standby mode. Under the
standby state, select the desired function and press "START" to start the program. If there is not
any operation for more than two minutes, it will return to the standby state automatically.
OFF/CANCEL button
1. Press “OFF/CANCLE” button to return to the standby state.
2. Under the working state, press "OFF/CANCEL" button to exit the working state and return to
the standby state.
MENU
Under the “standby” state , press the "MENU" button to select various functions.
Every time we press the “MENU” key,“ ” mark will move and the selection will consequently
change. The functions cycle as follow:
QUICK COOK/WHITE RICE/BROWN RICE/MIXED GRAIN/SLOW COOK/PORRIDGE/CAKE/EGG
WHITE RICE
Under the “standby” state, press "WHITE RICE" button, The “ ” mark in the display area
corresponding to "WHITE RICE" will be displayed.
KEEP WARM/REHEAT
When desiring to keep rice warm after cutting power, press "KEEP WARM/REHEAT"button,
"Keep Warm/Reheat" light on.It will start to keep the rice warm.When desiring to reheat
rice during the"KEEP WARM/REHEAT" function,loosen it ,close the lid and press the"KEEP
WARM/REHEAT" button,Reheating will start.

Page 14
Operating
Instructions
TIMER
After selecting the function need to pre-set the cooking time, press "TIMER" button, “TIMER1” light
on,and the corresponding function light flashs on, press the “TIMER” button again, "TIMER1" light
off and “TIMER2” light on.set the time and press "START" button.
The preset time is the cooking completion time.
“HR.” and “Min.” button.
Press the HR. or MIN. button to adjust the cooking time of slow cook and porridge.
Select the reserving set state, press the “HR.” or “MIN.” button to set the time of stopping
reserving. Press “HR.” once to increase 1h, press “MIN.” once to increase 10min.
MIXED GRAIN
1.Under the standby mode, press the "MENU"button, select "MIXED GRAIN" function,
"MIXED GRAIN" light flashs.
2. Press the "Start" button to start the "MIXED GRAIN" program, "Start" and "MIXED GRAIN" lights
stay on, and digital screen display countdown timer.
3.The MIXED GRAIN function automatically enters the stew stage after cooking automatically
enters the temperature preservation function when program completes.
The MIXED GRAIN function Recommended cooking range 0.5-3 cups of rice.
NOTE:Mixed grains need to be soaked in hot water for 2~3 hours before cooking.
Quick Rice
1.Under the standby mode, press the "MENU" button, select "Quick Rice" function,"Quick Rice"
light flashs.
2.Press the "Start" button to start the "Quick Rice" program, "Start" and "Quick Rice"lights stay on,
and digital screen display countdown timer.
3. The Quick Rice function automatically enters the stew stage after cooking automatically enters
the temperature preservation function when program completes.

Page 15
Operating
Instructions
Brown Rice
1.Under the standby mode, press the "MENU" button, select "Brown Rice" function,"Brown Rice"
light flashs.
2.Press the "Start" button to start the "Brown Rice" program, "Start" and "Brown Rice"lights stay on,
and digital screen display countdown timer.
3.The Brown Rice function automatically enters the stew stage after cooking automatically enters
the temperature preservation function when program completes.
The Brown Rice function Recommended cooking range 0.5-3 cups of rice.
White Rice
1. Under the standby mode, press the "Menu" button , select "WhiteRice"
function,"Whiet Rice" light flashs.
2.Press the "Start" button to start the "White Rice" program, "Start" and "White Rice" lights stay on,
and digital screen display countdown timer.
3. The White Rice function automatically enters the stew stage after cooking automatically
enters the temperature preservation function when program completes.
CAKE
1. Under the standby mode, press the "MENU" button, select "CAKE" function, "CAKE" light flashs.
2. Press the "Start" button to start the "CAKE" function, "START" and "CAKE" lights stay on, and
digital screen display countdown timer.
3. The "CAKE" function automatically enters the temperature preservation.
Recipes:
3 eggs, white sugar 100g, cake mix 120g, unmelted butter 30g.
1. Put the sugar and eggs into a bowl, then stir with a whisk until foaming.
2. Add the cake flour, stir with a wooden spoon evenly; add the melted butter and mix quickly.
3. Pour it into the rice cooker before the bubbles disappear quickly.

Page 16
Operating
Instructions
PORRIDGE
1. Under the standby mode, press the "MENU" button, select "PORRIDGE" function, "PORRIDGE"
light flashs.
2. Press "HR." and "MIN." button to adjust Porridge cooking time, the default timing is 90 minutes.
Time can be adjusted between 60 minutes to 120 minutes.
3. Press the "START" button to start the "PORRIDGE" function, "PORRIDGE" lights stay on, and
digital screen display countdown timer.
4. "PORRIDGE" function automatically enters the temperature preservation function when
program completes.
EGG
1. Under the standby mode, press the "MENU" button, select "EGG" function, "EGG" light flashs.
2. Press the "Start" button to start the "EGG" function, "START" and "EGG" lights stay on, and
digital screen display countdown timer.
3. The "EGG" function automatically enters the standby state when program completes.
Recipes:
Appropriate amount of eggs and water
1. Put the eggs into the inner pot.
2. Add water until eggs are soaked in,and do not exceed maximum water level.
3. Closing the cover, select the “EGG" function to start cooking.
SLOW COOK
1.Under the standby mode, press the "MENU" button, select "SLOWCOOK" function, "SLOW
COOK" light flashs.
2.Press "HR." and "MIN." button to adjust SLOW COOK cookingtime, the default timing is 3 hours.
Time can be adjusted between 3 hours to 8 hours.
3.Press the "START" button to start the "SLOW COOK" function,"SLOW COOK" lights stay on, and
digital screen display countdowntimer.
4."SLOW COOK" function automatically enters the temperaturepreservation function when
program completes.

Page 17
Operating
Instructions
Timer per-set method (QUICK COOK/WHITE RICE/BROWN
RICE/MIXED RICE/SLOW COOK/PORRIDGE)
1. Select the function requires pre-set timer, press the "TIMER" button, "TIMER1" light on and
enter the setting state. Press the “TIMER” button again, "TIMER1" light off and “TIMER2” light on.
Press "HR." or "MIN." to pre-set the completion time. Press "HR." once to increase 1 hour, press
"MIN." once to increase 10 minutes. Long press to increase automatically.
2. Press "START" button to start the pre-set timer function. The screen displays the completion
time and starts the countdown.
3. Timer can be pre-set up to 24 hours.
4. Temperature preservation: The cooker enters to temperature preservation mode once cooking
completed. The temperature preservation time is up to 24 hours, cooker returns to standby
state after 24 hours. The shorter the preservation time, the better the taste.
Note: Recommended timer pre-setting is no more than 12 hours to avoid food deterioration.
Page 18
Care and
Cleaning
CARE AND CLEANING
WARNING
Burn Hazard
• Wait until the rice cooker has cooled before cleaning.
Failure to do so may result in burns
Unplug the rice cooker from the electrical outlet, allow it to cool, and then clean and dry the
cooker and all its parts after each use to avoid odors and poor performance.
GENERAL CARE
IMPORTANT
The rice cooker is not dishwasher safe. Use only soft cloths with a mild dish soap
solution to clean the rice cooker. Do not wash either the rice cooker or its interior
cooking pot in the dishwasher.
CLEANING THE COOKER EXTERIOR
IMPORTANT
Do NOT immerse the rice cooker in water.
Using a soft, damp cloth, clean the outer surfaces of the rice cooker.
Using a soft, dry cloth thoroughly dry the outer surfaces.
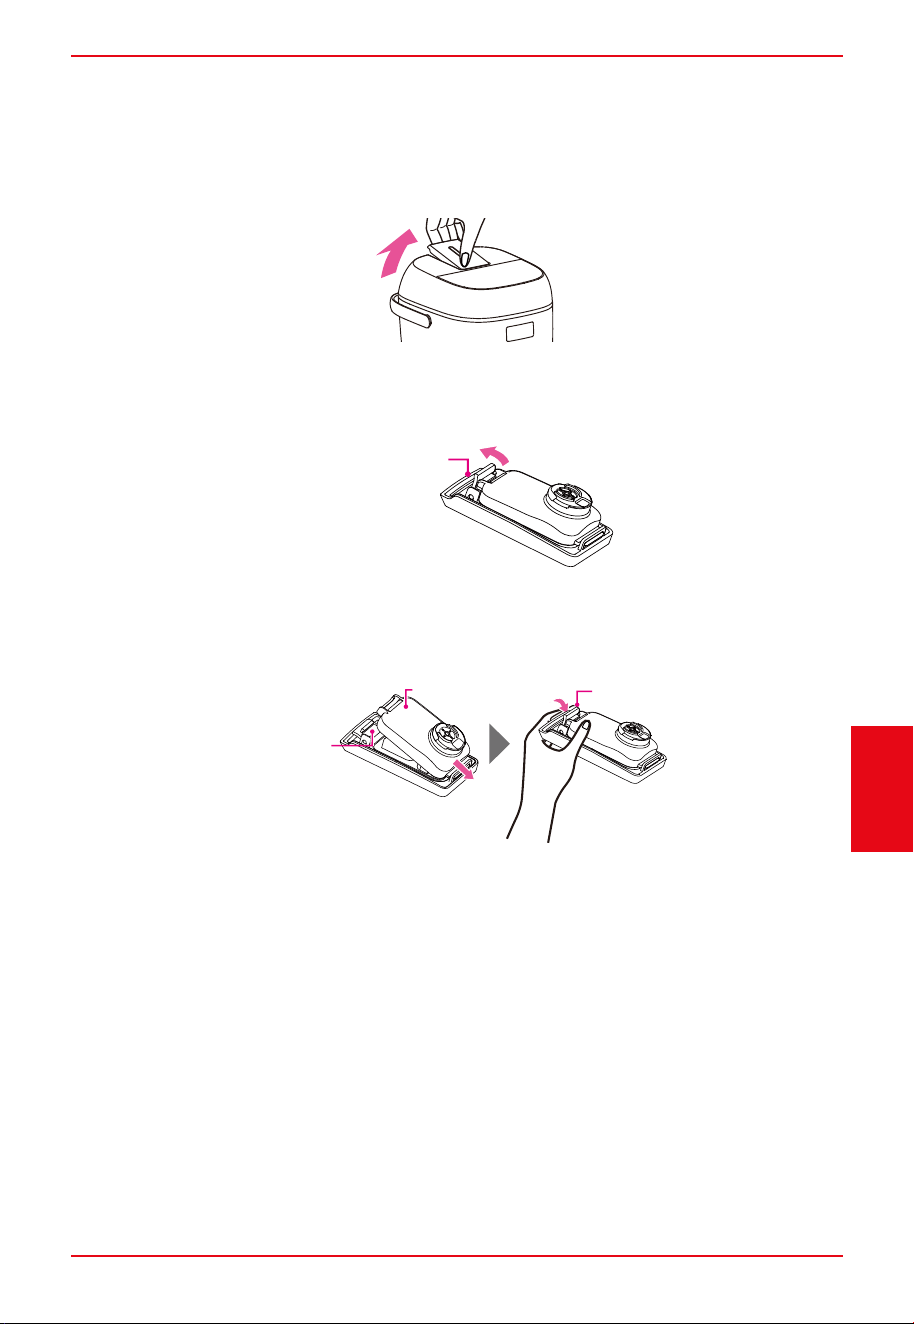
Steam Valve
IMPORTANT
• Clean the steam valve frequently to ensure proper venting.
• The rice cooker should be cool to the touch before cleaning the steam valve.
Page 19
Care and
Cleaning
1. Remove the steam valve from the body.
Pull up
Please press to install.
•
•
2. Open
Hold the steam valve and open the small buckle.
Small buckle
3. Cut-out
Insert the buckle on the steam valve base into the pinhole of the steam valve cover, and
fasten the small buckle.
Steam valve cover
Steam valve base Small buckle
When the sealing bar of the steam valve inside the cover is removed, please press it in to
prevent it from appearing from the slot.
Page 20
Care and
Cleaning
Heating Plate
1. Using a steel wool pad, remove any residue burned onto the metal heating plate.
2. Using a soft, damp cloth, wipe the heating plate, and then dry thoroughly.
Cooking Pot
IMPORTANT
• The inside of the cooking pot has a non-stick coating that can lose its non-stick
properties if it becomes scratched or damaged.
• Do not use abrasive cleansers, vinegar, bleaching agents, steel wool or other harsh
scrubbing brushes to clean the cooking pot.
• Do not use metal cooking utensils.
• Wash the cooking pot immediately after removing rice that has been seasoned.
Seasonings may damage the non-stick coating of the cooking pot if left in contact
for any length of time.
1. Wash the cooking pot, using a soft cloth and a nonabrasive cleanser or a mild solution of
dish soap and warm water.
2. Using a soft cloth, dry both the interior and exterior of the cooking pot.
3. Any other servicing should be performed by an authorized service representative.
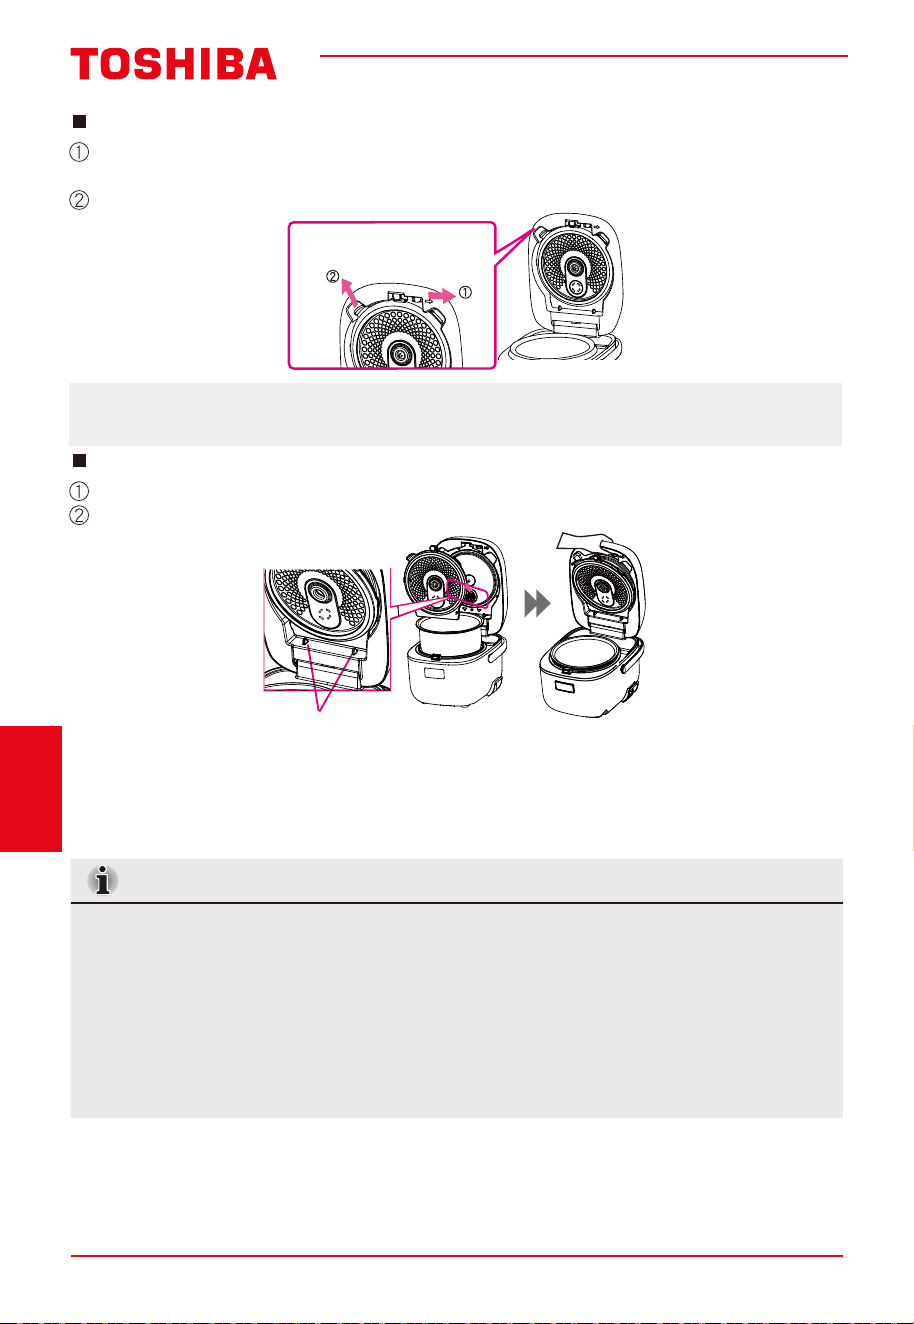
Remove the removable cover plate.
Push the inner cover slider to the right according to the arrow (the removable c
leans forward).
Grab the handle and pull up the removable cover plate.
Inner cover slider
Handle
When the removable cover plate is removed, the upper housing cannot be c
prevent you from cooking without the removable cover plate.
Installation methods for the removable cover plate
Lean and insert the inner cover into the slot from above.
Push and press the handle until a "clicking" sound is generated from the cover sid
Inside the slot
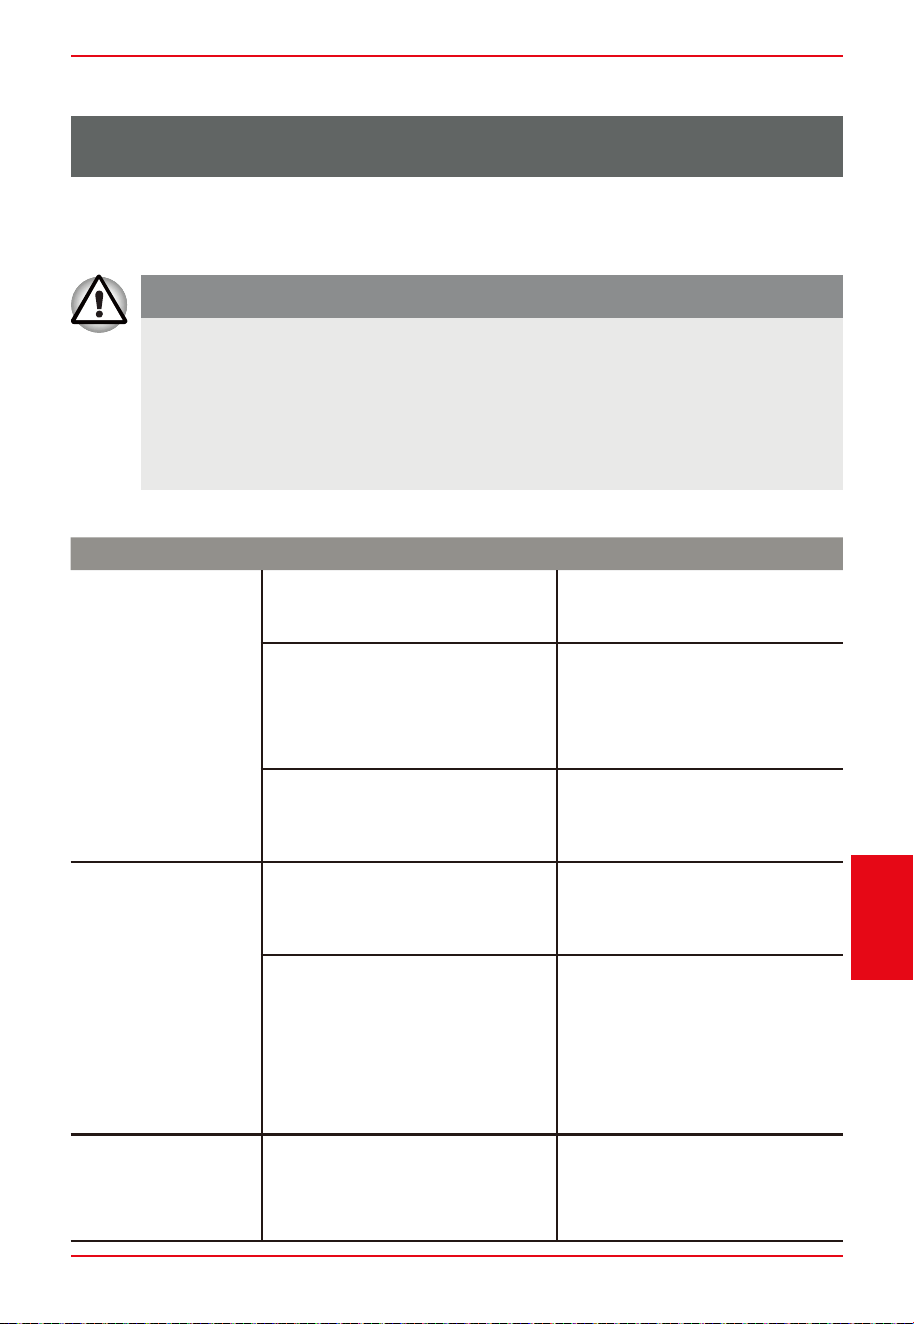
TROUBLESHOOTING TIPS
Before calling for service, review the following tips. It may save you time and money.
This list includes common occurrences that are not the result of poor workmanship or
defective materials.
WARNING
Electrical Shock Hazard
• Plug into a grounded 3 prong outlet.
• Do not remove the ground prong.
• Do not use an adapter.
• Do not use an extension cord.
PROBLEM POSSIBLE CAUSE SOLUTION
Rice cooker does
not operate
The power supply cord is not
completely plugged into a
working 3 prong electrical outlet.
Plug the power supply cord into
the electrical outlet.
There has been a power failure.
During a power failure, the time-
of-day, not the countdown time,
will appear in the display during
a cooking program.
Reset the circuit breaker or
replace the fuse once power is
restored.
Another appliance was plugged
into the same electrical outlet,
which tripped the circuit breaker
or blown a household fuse.
Reset the circuit breaker or
replace the fuse. Plug power
supply cord into a separate,
dedicated circuit.
Rice is mushy,
sticky or clumping
Rice was cooked with too much
water
Use less water when cooking
immediately using a fork to
rice. Once cooked, fluff rice
separate the grains.
Rice was rinsed or soaked before
cooking
Pre-rinsing can cause the rice to
crack and become mushy and
sticky during cooking.
Soaking before cooking softens
the texture of rice.
If rinsing is required, rinse the
rice quickly and drain as much
water as possible. Do not allow
rice to soak in liquid prior to
cooking.
Rice is hard or dry Rice was not cooked with
enough water or it was cooked
with mineral water.
Use more water when cooking
rice.
Soak the rice for a short time
before cooking.
Failure to do so can result in death, fire or electrical shock.
Page 21
Troubleshooting
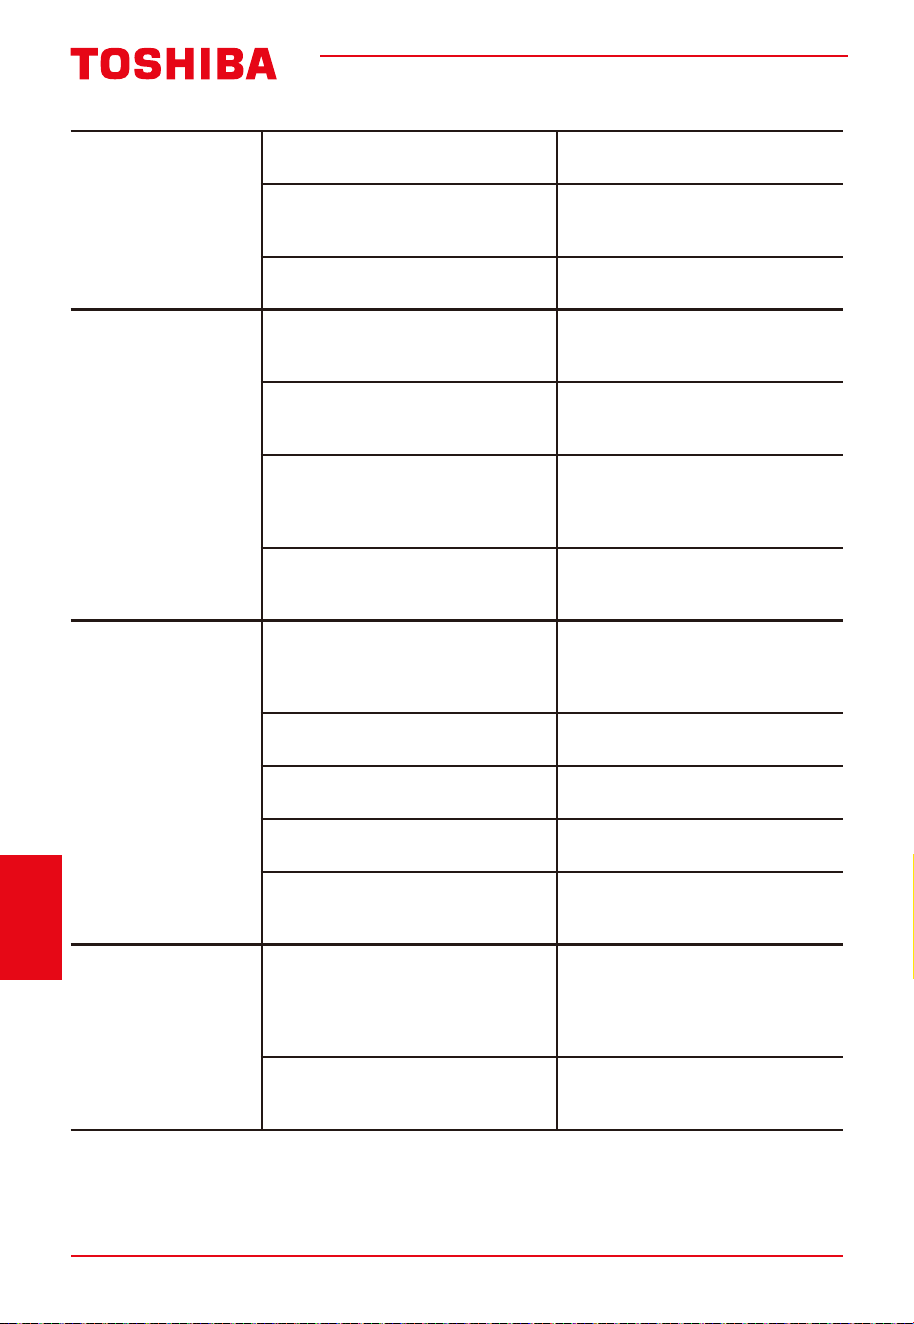
Page 22
Troubleshooting
Rice is scorched
NOTE: Rice turning
a light brown color
is not a result of rice
cooker failure.
Dirt or a foreign substance is
stuck to the temperature sensor.
Remove foreign substance and
clean well.
Other ingredients and/or
seasonings were added to the
rice before cooking.
Cook only rice with the proper
ratio of water.
Rice was soaked for too long. Soak rice for a shorter period
of time.
Rice does not taste
good
The cooking pot and inner cover
are warm or hot when cooking
begins.
Allow rice cooker to cool
completely before cooking a
new batch.
Dirt or a foreign substance is
stuck to the temperature sensor,
inner lid, or steam vent.
Remove foreign substance and
clean well.
The inner lid or steam vent was
not attached to the rice cooker.
After cleaning replace both the
inner lid and steam vent into
the rice cooker. See “Care and
Cleaning.”
Used wrong ratio of ingredients
to water or wrong cooking
program for
Accurately measure the correct
ratio of ingredients to water.
Unpleasant odor
NOTE: A plastic
odor is normal the
cooker is used.
first few times the
Keep
Warm mode was used too
long.
Do not allow rice to remain in
Serve rice soon after the
Keep Warm mode indefinitely.
10-minute resting period.
Rice left in the cooking pot after
Keep Warm mode has turned off.
Remove cooked rice from
cooker.
The rice was not rinsed
thoroughly.
Rinse rice until the water runs
clear.
The cooking pot, inner lid and/or
steam vent is dirty.
Clean and dry parts thoroughly.
See “Cleaning.”
The plastic scoop was left in the
cooking pot.
Remove plastic scoop and all
accessories from the rice cooker
before using.
Rice is dry and has
turned color
Rice has been reheated
repeatedly.
Rice should be reheated only
once to maintain the quality.
Sprinkle rice with water to help
keep it from drying out during
reheating.
Steam vent is not attached
correctly.
After washing, attach the steam
vent correctly to the rice cooker.
See “Cleaning.”
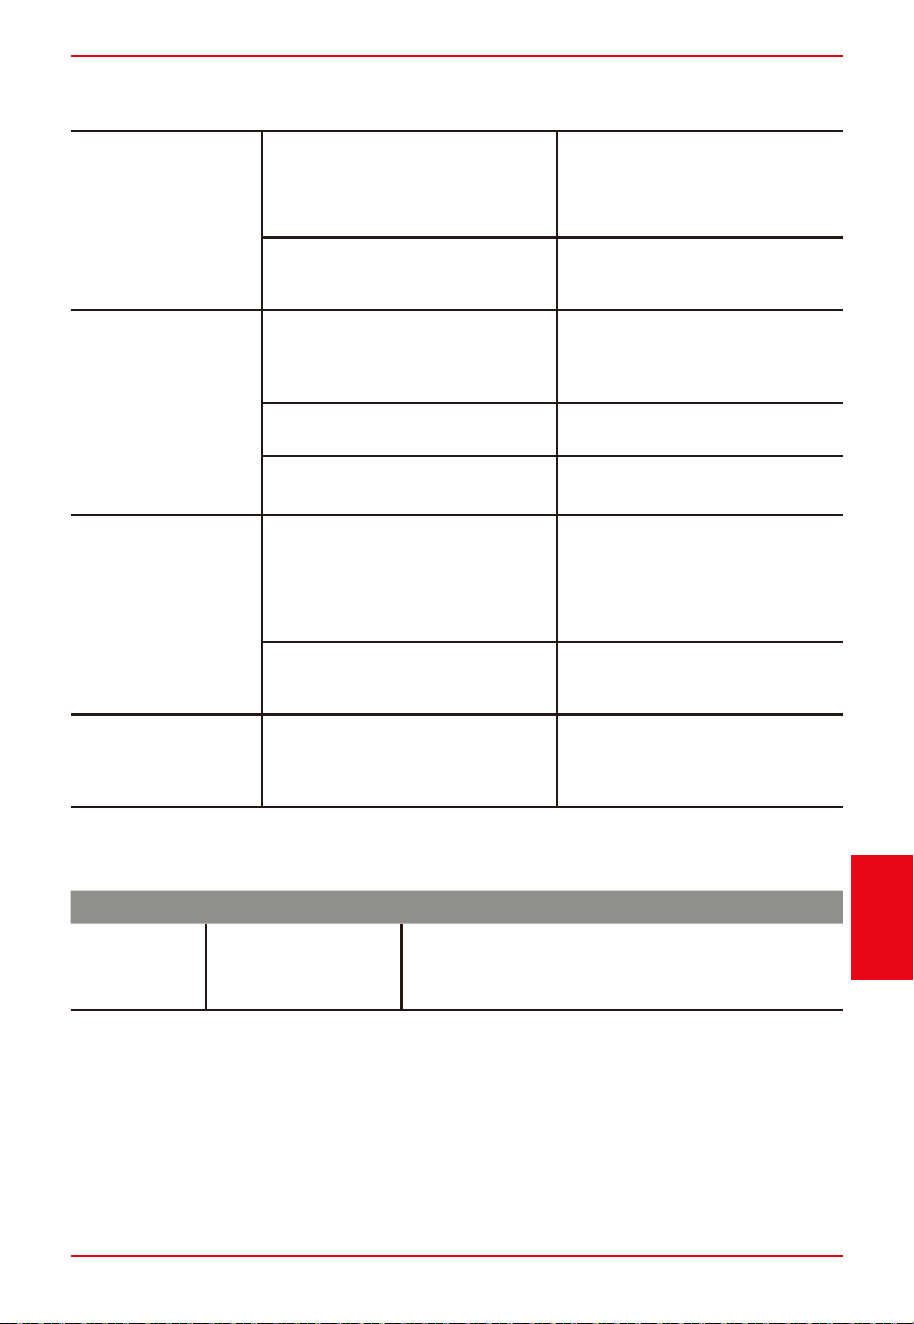
Page 23
Troubleshooting
Steam escaping
from the rice
cooker
The inner lid is not attached
properly.
The inner lid and/or cooking pot
is deformed.
Check the condition of the inner
inner lid is correctly seated in
lid and gasket. Confirm that the
the cooker cover.
Foreign substances are stuck to
the inner lid, cooking pot rim or
the frame of the rice cooker.
Clean both the cooking pot and
rice cooker after each use.
Rice cooker
boiling over and
spattering
NOTE: It is normal
for moisture to
appear on the inner
lid or cooking pot
and drip when the
lid is opened.
The inner lid and/or steam vent
are not attached properly.
After cleaning replace both the
inner lid and steam vent into
the rice cooker. See “Care and
Cleaning.”
The steam vent and/or
temperature sensor is dirty.
Clean the steam vent and
temperature sensor.
Porridge program was
unintentionally used to cook rice.
Select the cooking program for
the ingredients you are cooking.
Difficult to close
the cooker lid
The inner lid is not attached
properly.
NOTE: The outer lid will not
close unless the inner lid is
attached correctly.
Replace the inner lid into the
top cover of the rice cooker. See
“Care and Cleaning.”
Foreign substances in the lid
latch well are preventing the
outer lid from latching.
Remove debris from the lid
latch well.
Film on interior of
cooking pot
The starch in the rice will melt
during cooking and dry onto the
interior of the cooking pot.
During washing, use a non-
abrasive plastic scouring pad
or utensil to gently remove the
ERROR DISPLAY
PROBLEM POSSIBLE CAUSE SOLUTION
E1, E2, E5,
E6, EU
Circuit Board and
Sensor Fault
Immediately unplug rice cooker.
After error is resolved, plug in rice cooker, and then
press CANCEL to remove error code from display.
film.

Page 24
Warranty
LIMITED ONE-YEAR WARRANTY
(U.S. AND CANADA ONLY)
Warranty Period:
This warranty is available to consumers only. You are a consumer if you own a Toshiba® Rice
and Grain Multicooker that was purchased at retail for personal, family or household use.
Except as otherwise required under applicable law, this warranty is not available to retailers
or other commercial purchasers or owners.
We warrant that your Toshiba® Rice and Grain Multicooker will be free of defects in materials
or workmanship under normal home use for 1 year from the date of original purchase.
However, product registration does not eliminate the need for the consumer to maintain the
original proof of purchase in order to
not have proof of purchase date, the
obtain the warranty benefits. In the event that you do
d
purchase date for purposes of this warranty will be the
ate of manufacture.
If your Toshiba® Rice and Grain Multicooker should prove to be defective within the warranty
period, we will repair it, or if we think necessary, replace it. To obtain warranty service, simply
call our toll-free number 1-855-204-5313 for additional information from our Consumer
Service Representatives or send the defective product to Consumer Service at T
oshiba,
5 Sylvan Way, Parsippany, NJ 07054.
NOTE:
For added protection and secure handling of any Toshiba product that is being returned, we
recommend you use a traceable, insured delivery service. Toshiba cannot be held responsible
for in-transit damage or for packages that are not delivered to us. Lost and/or damaged
products are not covered under warranty. Please be sure to include your return address,
daytime phone number, description of the product defect, product model number (located
on bottom of product), original date of purchase, and any other information pertinent to the
product’s return.
CALIFORNIA RESIDENTS ONLY
California law provides that for In-Warranty Service California residents have the option of
returning a nonconforming product (A) to the store where it was purchased or (B) to another
retail store that sells Toshiba products of the same type. The retail store shall then, at its
discretion, either repair the product, refer the consumer to an independent repair facility,
replace the product, or refund the purchase price less the amount directly attributable
to the consumer’s prior usage of the product. If the above two options do not result in
the appropriate relief to the c
onsumer, the consumer may then take the product to an
independent repair facility if service or repair can be economically accomplished. Toshiba
and not the consumer will be responsible for the reasonable cost of such service, repair,
replacement, or refund for nonconforming products under warranty.
California residents may also, according to their preference, return nonconforming products
directly to Toshiba for repair, or if necessary, replacement, by calling our Consumer Service
Center toll-free at 1-855-204-5313. Toshiba will be responsible for the cost of the repair,
replacement, and shipping and handling for such products under warranty.

Page 25
Warranty
BEFORE RETURNING YOUR TOSHIBA PRODUCT
If you are experiencing problems with your Toshiba product, we suggest that you call our
Toshiba Service Center at
servicing is needed, a Representative can confirm whether the product is under warranty and
manufactured to the strictest specifications and has been designed for use only in 120-volt
1-855-204-5313 before returning the product for service. If
direct you to the nearest service location. Your Toshiba® Rice and Grain Multicooker has been
outlets and only with authorized accessories and replacement parts. This warranty expressly
excludes any defects or damages caused by attempted use of this unit with a converter,
as well as by use with accessories, replacement parts or repair service other than those
authorized by Toshiba. This warranty does not damage caused by accident, misuse, shipment
or other than ordinary household use. This warranty excludes all incidental or consequential
damages. Some states do not allow the exclusion or limitation of these damages, so these
exclusions may not apply to you. This warranty gives you specific legal rights, and you may
also have other rights, which vary from state to state.
Important:
If the nonconforming product is to be serviced by someone other than Toshiba’s Authorized
Service Center, please remind the servicer to call our Consumer Service Center at
1-855-204-5313 to ensure that the problem is p
roperly diagnosed, the product is serviced
with the correct parts, and the product is still under warranty.

MICROWAVE SOLO OVEN
INSTRUCTION MANUAL
EM925A5A-SS
Please review this instruction manual before operating.

PRODUCT SAFETY
Precautions to avoid possible exposure to excessive microwave energy .................................... EN-01
Important safety instructions ....................................................................................................................... EN-03
Grounding instructions ................................................................................................................................... EN-07
Radio interference ............................................................................................................................................ EN-09
Utensils .................................................................................................................................................................. EN-10
Materials you can use in microwave oven ............................................................................................... EN-11
Materials can not be used in microwave oven ...................................................................................... EN-13
PRODUCT SETTING
Setting up your oven ....................................................................................................................................... EN-14
INSTRUCTION FOR USE
Before using for the rst time ....................................................................................................................... EN-18
Operation ............................................................................................................................................................. EN-19
1. Power levels ................................................................................................................................................... EN-20
2. Clock setting .................................................................................................................................................. EN-21
3. Kitchen timer ................................................................................................................................................. EN-21
4. Microwave cook ........................................................................................................................................... EN-22
5. One touch start ............................................................................................................................................ EN-23
6. Time defrost ................................................................................................................................................... EN-24
7. Weight defrost function ............................................................................................................................ EN-24
8. Popcorn ........................................................................................................................................................... EN-25
9. Potato .............................................................................................................................................................. EN-25
10. Frozen vegetable ....................................................................................................................................... EN-25
CONTENTS

11. Beverage ...................................................................................................................................................... EN-26
12. Dinner plate ................................................................................................................................................ EN-26
13. Pizza ............................................................................................................................................................... EN-27
14. Memory function ...................................................................................................................................... EN-27
15. Turn on/o the buzzer sound ............................................................................................................... EN-28
16. Multi-stage cooking ................................................................................................................................. EN-28
17. Energy saver mode ................................................................................................................................... EN-30
18. Lock function .............................................................................................................................................. EN-30
19. Inquiring function ..................................................................................................................................... EN-30
20. Cooking end reminder function .......................................................................................................... EN-31
21. Other specications ................................................................................................................................. EN-31
Cleaning ................................................................................................................................................................ EN-32
MAINTENANCE
Trouble shooting ............................................................................................................................................... EN-34
One year limited warranty ............................................................................................................................. EN-36
NOTE
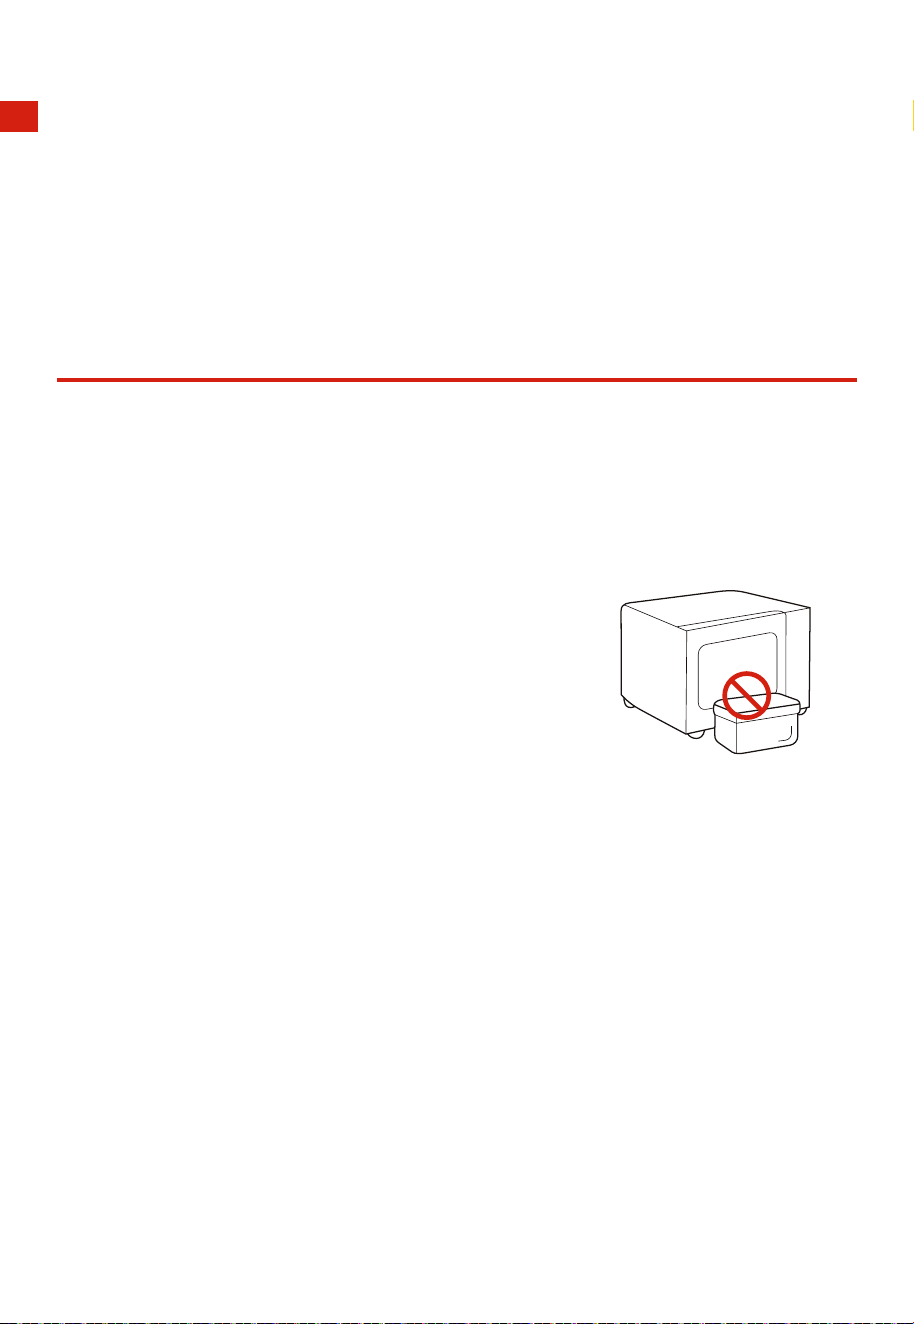
BEFORE OPERATING THIS PRODUCT, READ,
UNDERSTAND, AND FOLLOW THESE INSTRUCTIONS.
BE SURE TO SAVE THIS BOOKLIST FOR FUTURE
REFERENCE.
EN-01
PRODUCT SAFETY
PRECAUTIONS TO AVOID POSSIBLE
EXPOSURE TO EXCESSIVE
MICROWAVE ENERGY
(a). Do not attempt to operate this oven with the door open
since open door operation can result in harmful exposure to
microwave energy.
It is important not to defeat or tamper with the safety
interlocks.
(b). Do not place any object between the
oven front face and the door or allow
soil or cleaner residue to accumulate on
sealing surfaces.
(c). Do not operate the oven if it is damaged. It is particularly
important that the oven door closes properly and that there is
no damage to the:
(1). DOOR (bent)
(2). HINGES AND LATCHES (broken or loosened)
(3). DOOR SEALS AND SEALING SURFACES
(d). The oven should not be adjusted or repaired by anyone
except properly qualied service personnel.
EN-02
SPECIFICATIONS
MODEL
EM925A5A- SS
RATED VOLTAGE
120V~ 60Hz
RATED INPUT POWER(MICROWAVE)
1350W
RATED OUTPUT POWER(MICROWAVE)
900W
OVEN CAPACITY
0.9 cu.ft.
TURNTABLE DIAMETER
10.6 inch
EXTERNAL DIMENSIONS
19.15 15.91 11.48 inchx x
NET WEIGHT
Approx. 27.3 Lbs
All pictures in this manual are for illustrative purposes only; these may be
slightly different from the purchased equipment, please refer to the
actual product.
NOTE
EN-03
IMPORTANT SAFETY INSTRUCTIONS
WARNING
To reduce the risk of burns, electric shock, fire, injury
to persons or exposure to excessive microwave oven
energy when using your appliance, follow basic
safety precautions, including the following:
Read all instructions before
using the appliance.
Read and follow the
specific:
"PRECAUTIONS TO AVOID
POSSIBLE EXPOSURE TO
EXCESSIVE MICROWAVE
ENERGY" found on page 1.
As with most cooking
appliances, close
supervision is necessary to
reduce the risk of a fire in
the oven cavity.
This appliance must be
grounded. Connect only to
properly grounded outlet.
See "GROUNDING
INSTRUCTIONS" found on
page 7.
To reduce the risk of fire in
the oven cavity:
1. Do not overcook
food. Carefully attend
appliance when
paper, plastic, or other
combustible materials
are placed inside
the oven to facilitate
cooking.
2. Remove wire twist-ties
from paper or plastic
bag before placing bag
in oven.
3. If material inside of the
oven ignite, keep oven
door closed, turn oven
o, and disconnect the
power cord, or shut o
power at the fuse or
circuit breaker panel.
4. Do not use the cavity
for storage purposes.
EN-04
Do not leave paper
products, cooking
utensils, or food in the
cavity when not in use.
Install or locate this oven
only in accordance with
the installation instructions
provided.
As with any appliance,
close supervision is
necessary when used by
children.
This microwave should be
serviced only by qualied
service personnel.
Contact nearest authorized
service facility for
examination, repair, or
adjustment.
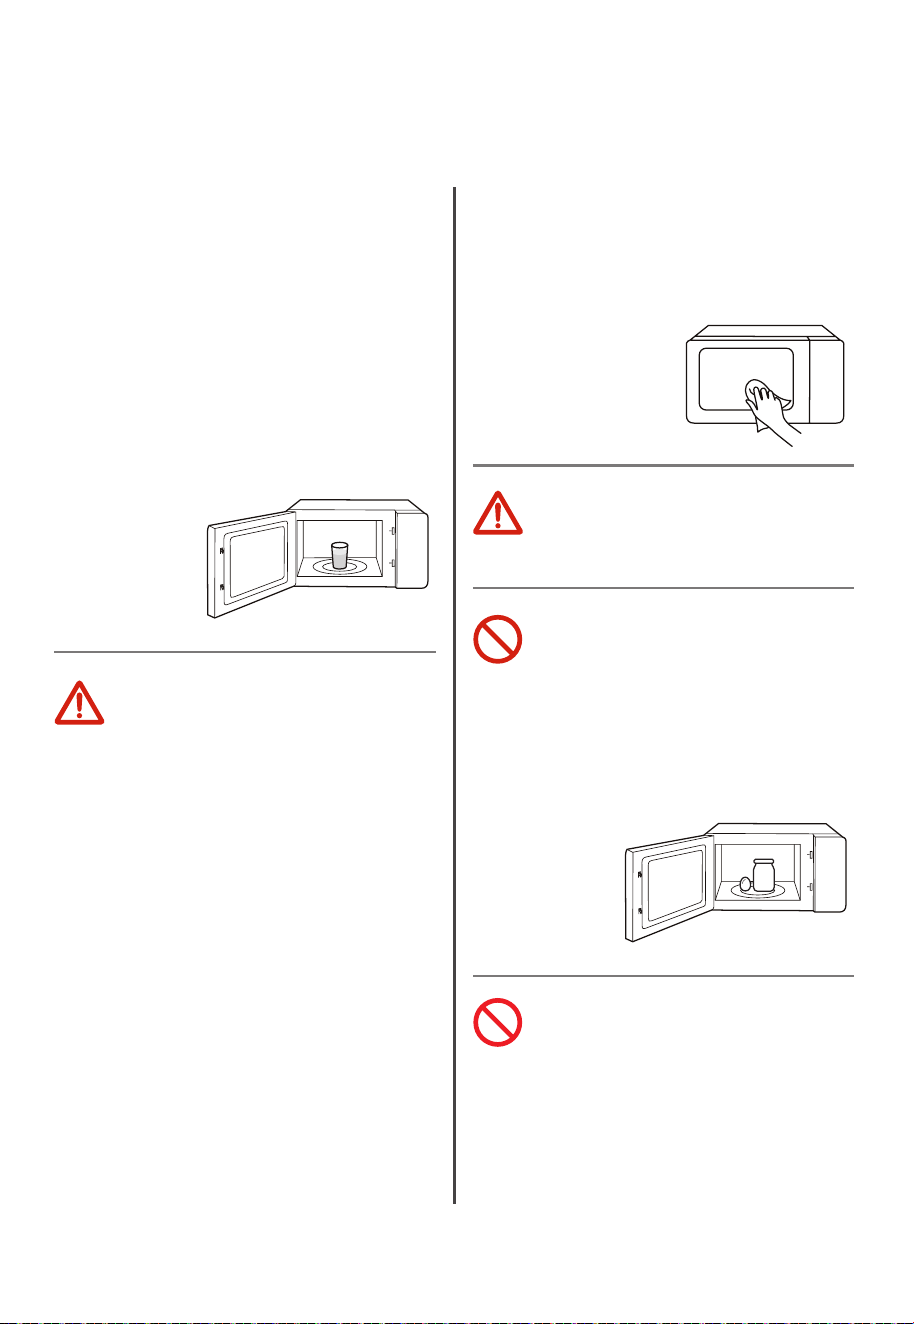
Liquids, such as water,
coee, or tea are able
to overheat beyond the
boiling point without
appearing to be boiling.
Visible bubbling or boiling
when the container
is removed from the
microwave oven is not
always present.
THIS COULD RESULT
IN VERY HOT LIQUIDS
SUDDENLY BOILING OVER
WHEN THE CONTAINER IS
DISTURBED OR A SPOON
OR OTHER UTENSIL IS
INSERTED INTO THE
LIQUID.
1. Do not overheat the
liquid.
2. Stir the liquid both
before and halfway
through heating it.
3. Do not use straight-
sided containers with
narrow necks.
IMPORTANT SAFETY INSTRUCTIONS
Keep cord away from
heated surfaces.
EN-05
IMPORTANT SAFETY INSTRUCTIONS
4. After heating, allow
the container to stand
in the microwave oven
for a short time before
removing the container.
5. Use extreme care when
inserting a spoon or
other utensil into the
container.
When cleaning surfaces
of door and oven that
comes together on closing
the door, use only mild,
nonabrasive soaps, or
detergent applied with a
sponge or soft cloth.
This appliance is for private
household use only.
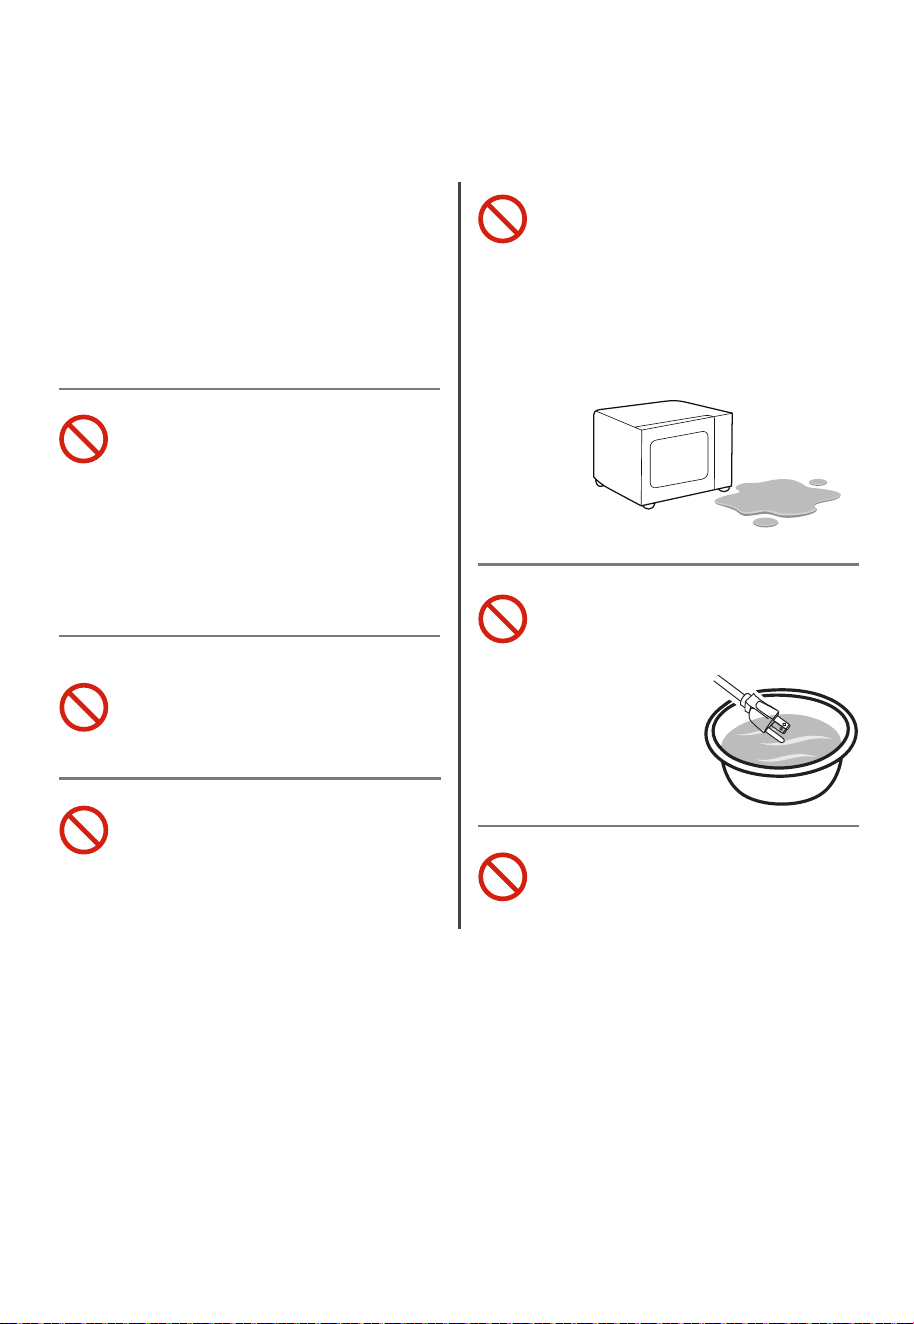
Some products such as
whole eggs and sealed
containers, for example,
closed glass jars are able to
explode and should not be
heated in this oven.
Use this appliance only
for its intended use as
described in the manual.
Do not use corrosive
chemicals or vapors in
this appliance. This type
Please keep the wave
guide area clean. Use soft
damp cloth to clean it up
when there is food splash
residue on the wave guide
area or the cavity.Failure to
clean food residue may
cause innocuous sparking
or some smoke in the
microwave cavity,
discoloration of the cavity
may also occur.
EN-06
IMPORTANT SAFETY INSTRUCTIONS
Do not cover or block any
openings on the oven.
Do not store or use this
appliance outdoors.
Do not use this oven
near water, for example,
near a kitchen sink, in
a wet basement, near a
swimming pool, or similar
location.
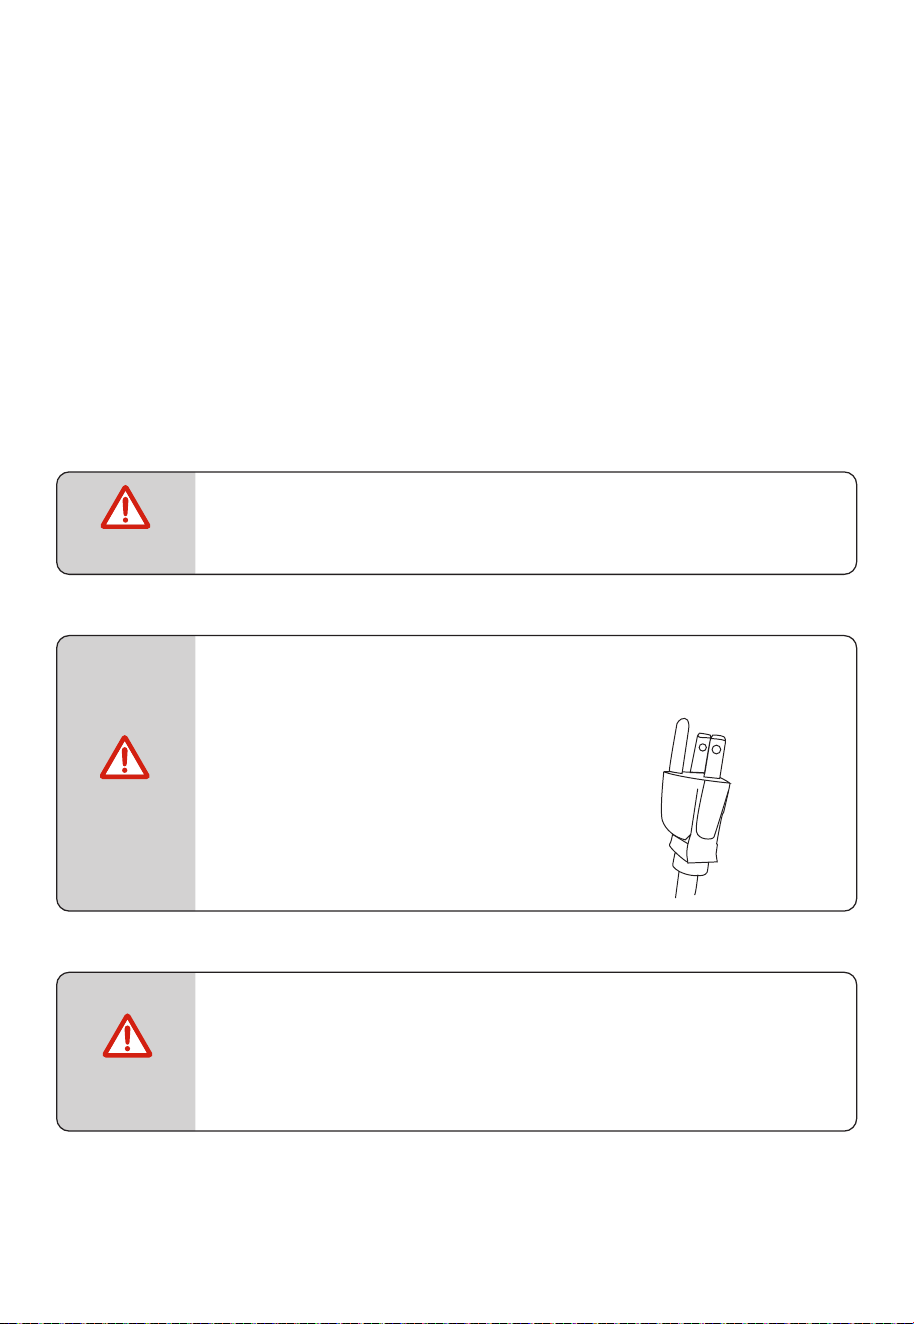
Do not immerse cord or
plug in water or any other
liquid.
Do not let cord hang over
edge of table or counter.
SAVE THESE INSTRUCTIONS
HOUSEHOLD INDOOR USE ONLY
of oven is specifically
designed to heat, cook or
dry food.
It is not designed for
industrial or laboratory use.
Do not operate this oven
if it has a damaged cord
or plug, if it is not working
properly, or if it has been
damaged or dropped.
EN-07
GROUNDING INSTRUCTIONS
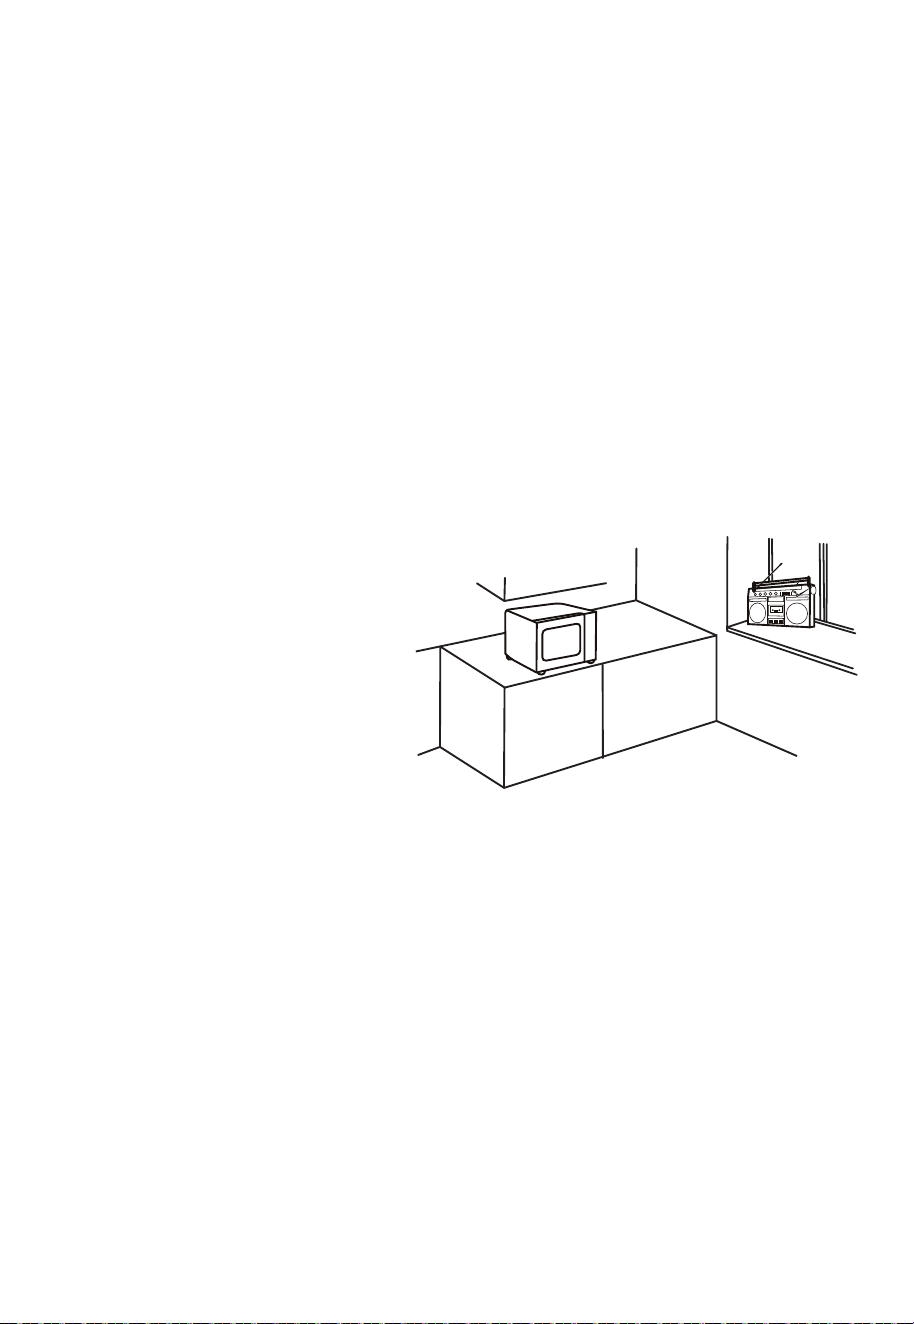
This appliance must be grounded. In the event of an electrical
short circuit, grounding reduces the risk of electric shock by
providing an escape wire for the electric current. To protect against
electrical shock, this appliance is equipped with a cord having a 3
prong grounding-type plug for insertion into a proper grounding-
type receptacle. DO NOT alter the plug for use in a 2-prong
receptacle. If the plug will not t into a receptacle, have the proper
receptacle installed by a qualied electrician.
CAUTION
Do not insert your ngers into any gaps or holes; it
may cause injuries.
WARNING
Improper use of the
grounding can result in a
risk of electric shock.
Three-pronged
(grounding) plug
DANGER
Electric Shock Hazard:
Touching some of the internal components can
cause serious personal injury or death. Do not
disassemble this appliance.

EN-08
Consult a qualied electrician or serviceman if the grounding
instructions are not completely understood or if doubt exists as to
whether the appliance is properly grounded. If it is necessary to
use an extension cord, use only a 3-wire extension cord that has a
3-pronged grounding plug , and a 3-slot receptacle that will accept
the plug on the appliance. The marked rating of the extension
cord shall be equal to or greater than the electrical rating of the
appliance.
WARNING
Electric Shock Hazard:
1. A short power-supply cord is provided to reduce
the risks resulting from becoming entangled in or
tripping over a longer cord.
2. Longer cord sets or extension cords are available
and may be used if care is exercised in their use.
3. If a long cord sets or extension cord is used:
(1). The marked electrical rating of the cord set or
extension cord should be at least as great as
the electrical rating of the appliance.
(2). The extension cord must be a grounding -type
3-wire cord.
(3). The longer cord should be arranged so that it
will not drape over the countertop or tabletop
where it can be pulled on by children or
tripped over unintentionally.
GROUNDING INSTRUCTIONS
EN-09
RADIO INTERFERENCE
1. Operation of the microwave oven may cause interference to
your radio, TV or similar equipment.
2. When there is interference, it may be reduced or eliminated by
taking the following measures:
(1). Clean door and sealing surface of the oven.
(2). Reorient the receiving antenna of radio or television.
(3). Relocate the microwave oven with respect to the receiver.
(4). Move the microwave oven away from the receiver.
(5). Plug the microwave oven into a dierent outlet so that
microwave oven and receiver are on dierent branch circuits.
This device complies with
part 18 of the FCC Rules.
EN-10
UTENSILS
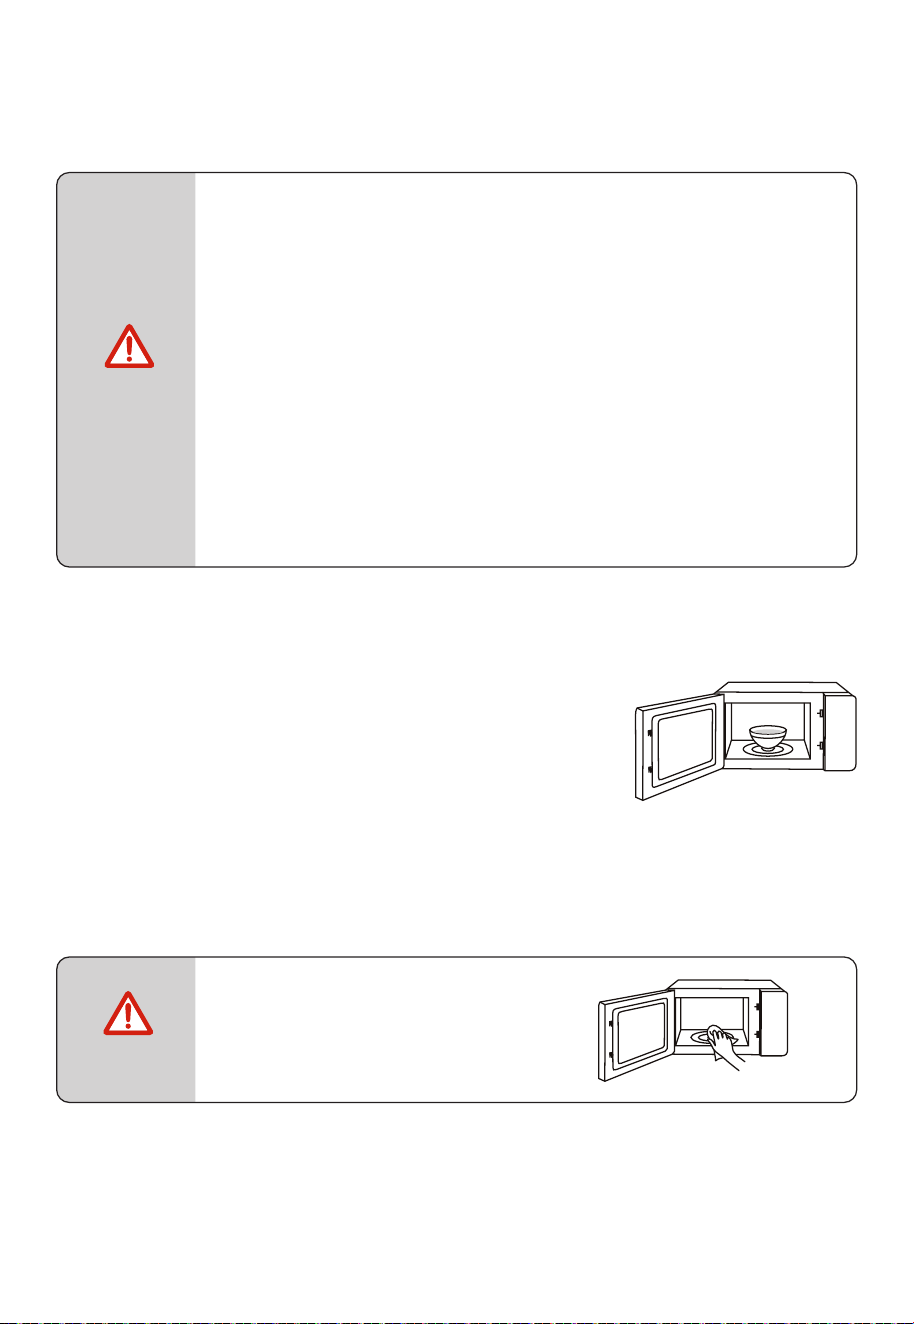
Personal Injury Hazard:
Tightly-closed utensils could explode. Closed
containers should be opened and plastic pouches
should be pierced before cooking.
See the instructions on "Materials you can use in
microwave oven " or "Materials can not be used in
microwave oven."
There may be certain non-metallic utensils that are
not safe to use for microwaving. If in doubt, you can
test the utensil in question following the procedure
below.
Utensil Test:
1. Fill a microwave-safe container with 1 cup
of cold water (250ml) along with the utensil
in question.
2. Cook on maximum power for 1 min.
3. Carefully feel the utensil. If the empty
utensil is warm, do not use it for microwave
cooking.
4. Do not exceed 1 min cooking time.
KEEP THE CAVITY CLEAN
CAUTION
NOTE
EN-11
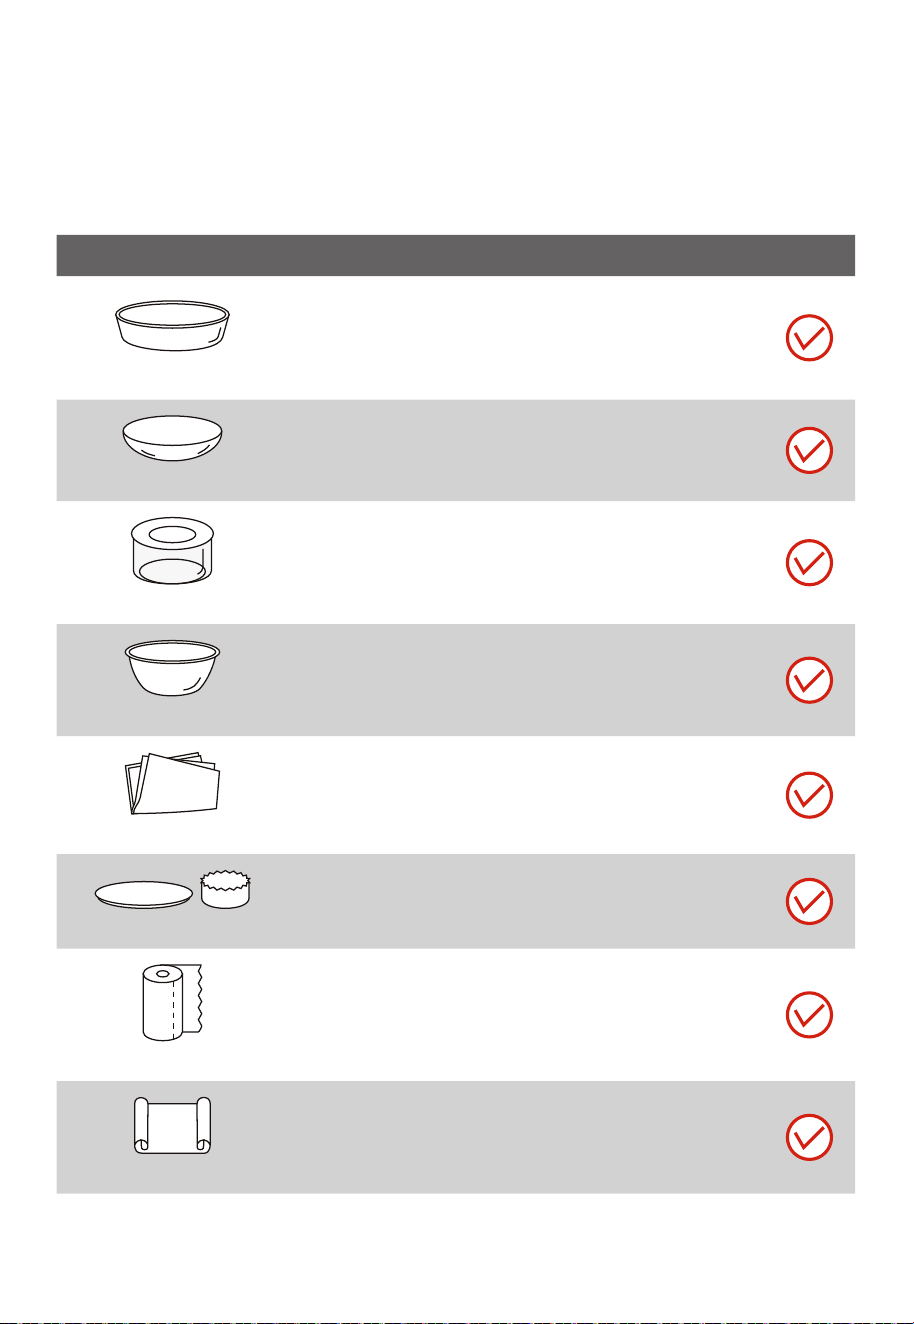
MATERIALS YOU CAN USE IN
MICROWAVE OVEN
UTENSILS REMARKS
Browning dish
Follow manufacturer’s instructions.
The bottom of browning dish must be at least 3/16 inch
(5mm) above the turntable. Incorrect usage may cause
the turntable to break.
Dinnerware
Microwave-safe only. Follow manufacturer’s
instructions. Do not use cracked or chipped dishes.
Glass jars
Always remove lid. Use only to heat food until just
warm. Most glass jars are not heat resistant and may
break.
Glassware
Heat-resistant oven glassware only. Make sure there is
no metallic trim. Do not use cracked or chipped dishes.
Oven cooking bags
Follow manufacturer’s instructions. Do not close with
metal tie.
Make slits to allow steam to escape.
Paper plates and cups
Use for short–term cooking/warming only. Do not leave
oven unattended while cooking.
Paper towels
Use to cover food for reheating and absorbing fat. Use
with supervision for a short-term cooking only.
Parchment paper
Use as a cover to prevent splattering or a wrap for
steaming.
EN-12
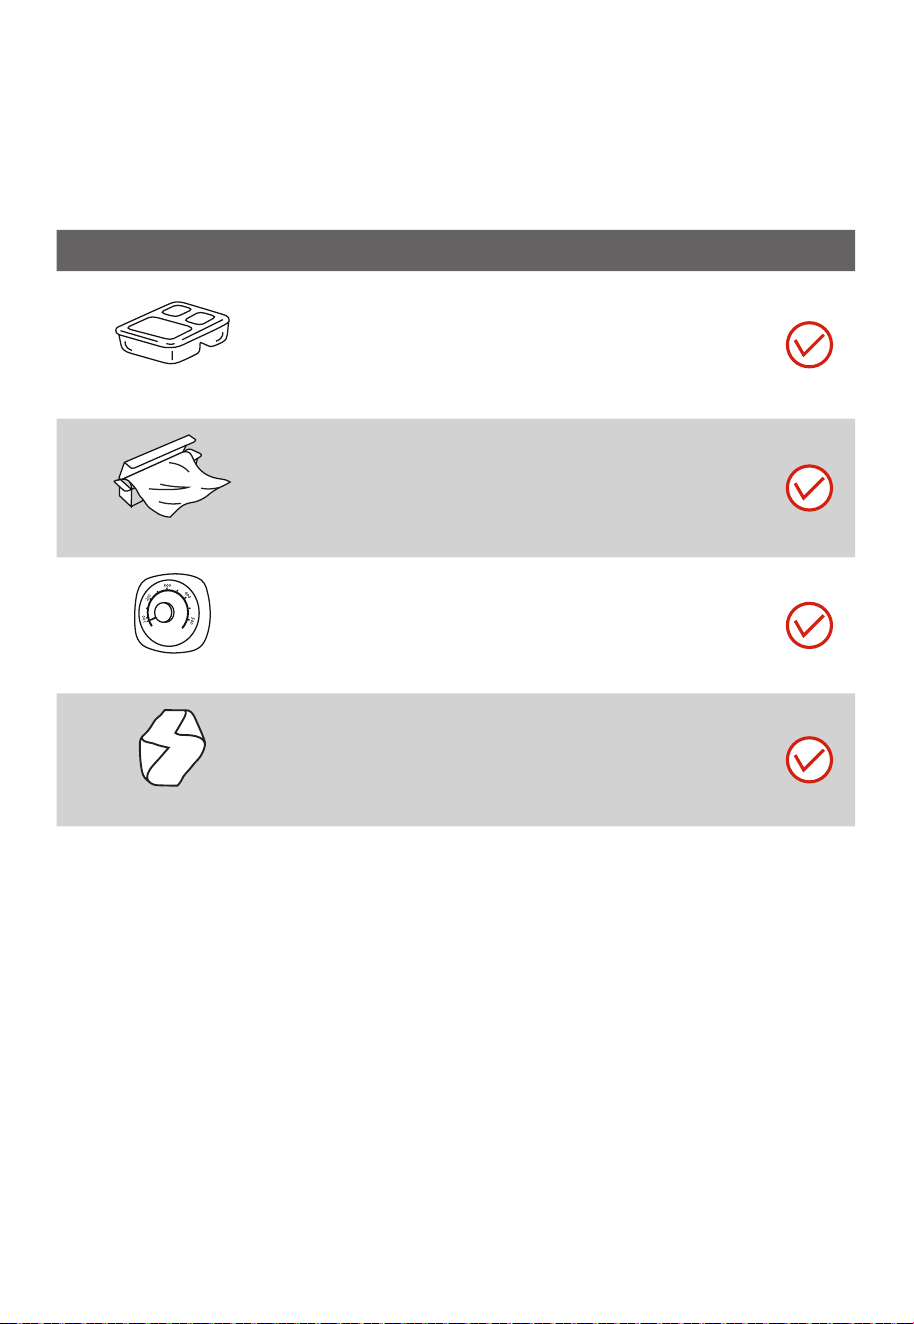
UTENSILS REMARKS
Plastic
Microwave-safe only. Follow the manufacturer’s
instructions. Should be labeled “Microwave Safe”. Some
plastic containers soften, as the food inside gets hot.
“Boiling bags” and tightly closed plastic bags should be
slit, pierced or vented as directed by package.
Plastic wrap
Microwave-safe only. Use to cover food during cooking
to retain moisture. Do not allow plastic wrap to touch
food.
Thermometers
Microwave-safe only (meat and candy thermometers).
Wax paper
Use as a cover to prevent splattering and retain
moisture.
MATERIALS YOU CAN USE IN
MICROWAVE OVEN
EN-13
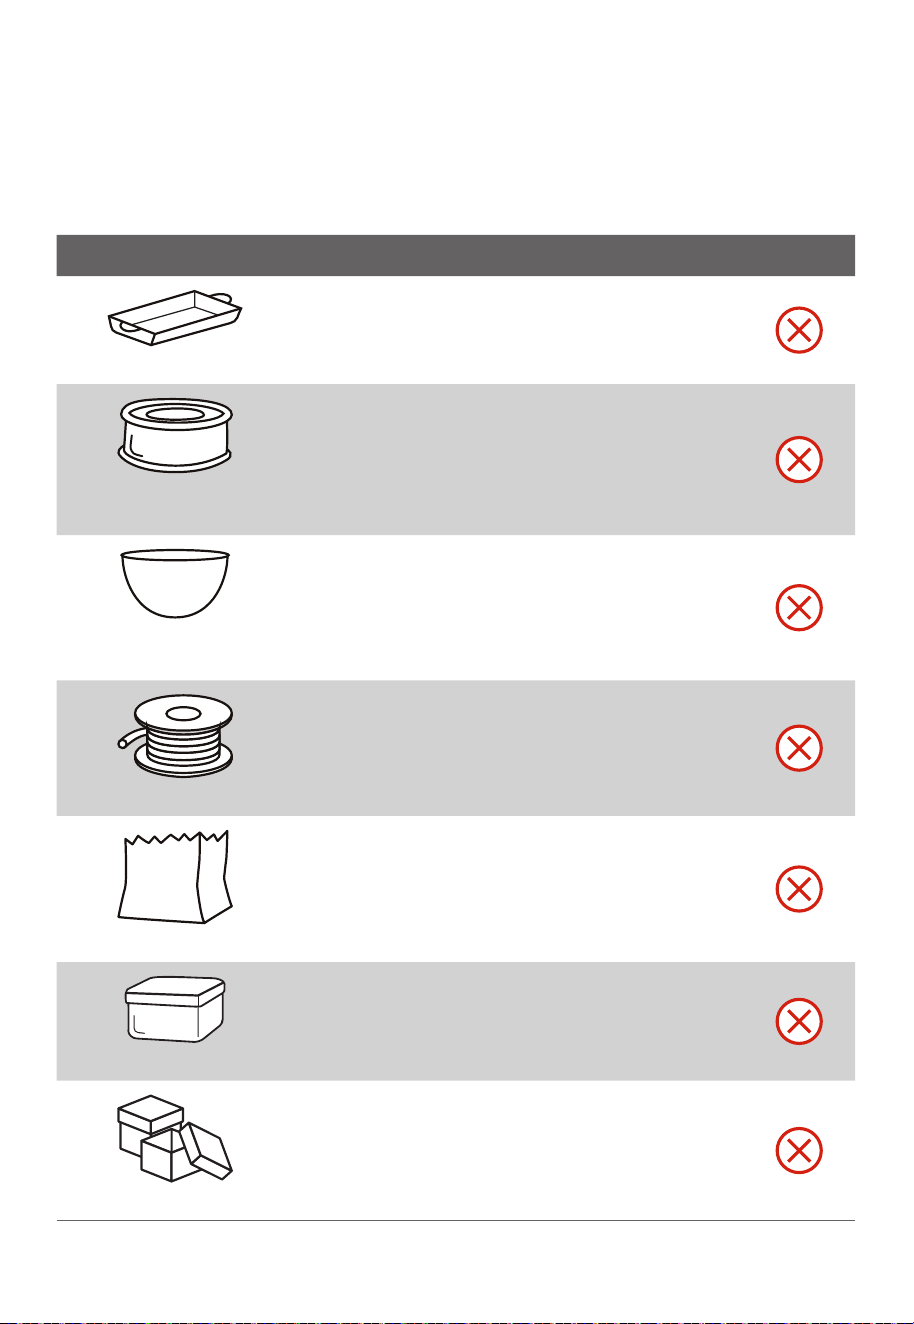
MATERIALS CAN NOT BE USED IN
MICROWAVE OVEN
UTENSILS REMARKS
Aluminum tray
May cause arcing. Transfer food into microwave-safe
dish.
Food carton with metal
handle
May cause arcing. Transfer food into microwave-safe
dish.
Metal or metal trimmed
utensils
Metal shields the food from microwave energy.
Metal trim may cause arcing.
Metal twist ties
May cause arcing and could cause a fire in the oven.
Paper bags
May cause a fire in the oven.
Plastic foam
Plastic foam may melt or contaminate the liquid
inside when exposed to high temperature.
Wood
Wood will dry out when used in the microwave oven
and may split or crack.
EN-14
PRODUCT SETTING
SETTING UP YOUR OVEN
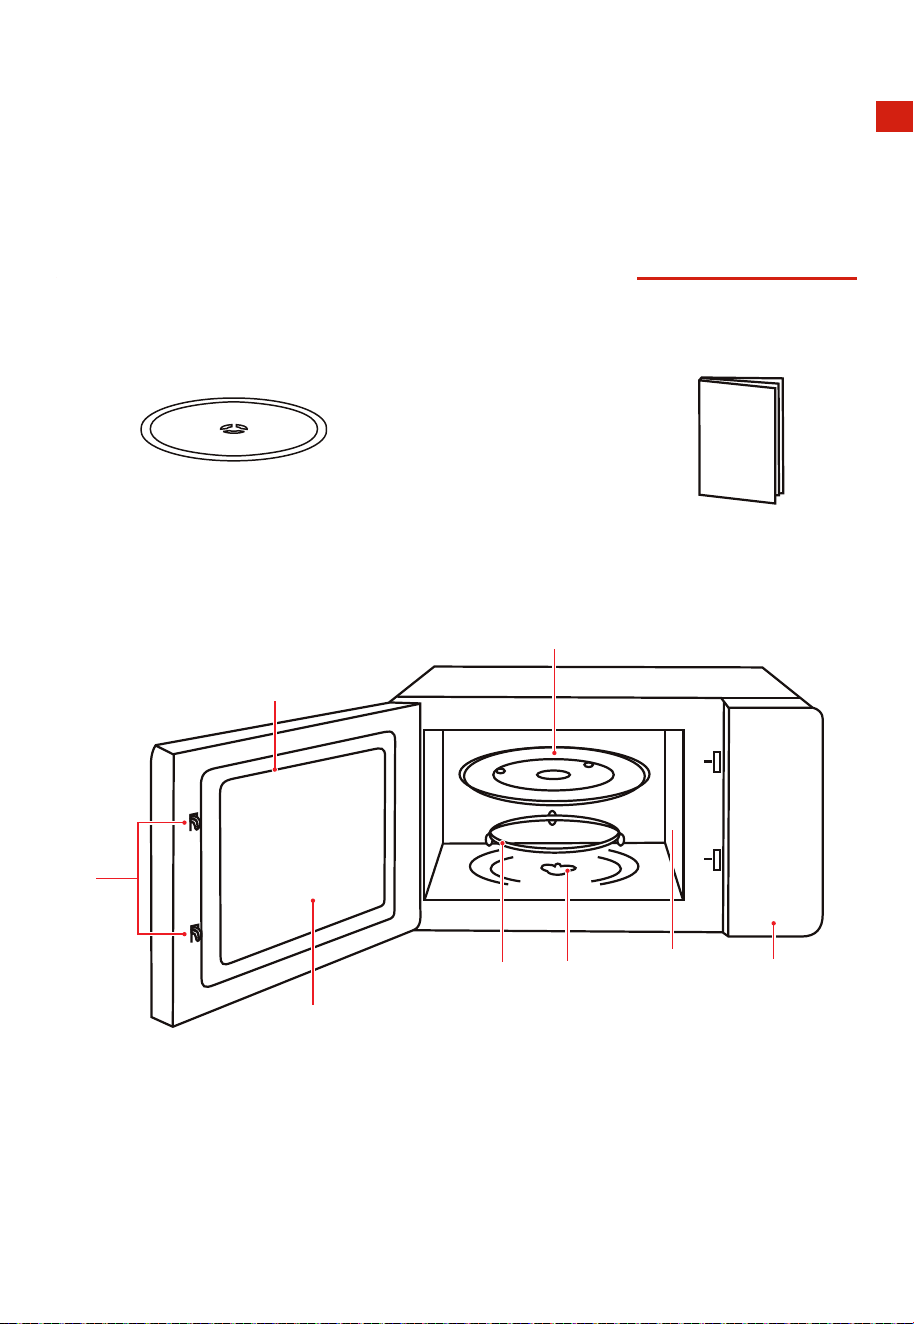
NAMES OF OVEN PARTS AND ACCESSORIES
Remove the oven and all materials from the carton and oven cavity. Your oven comes with the
following accessories:
Instruction Manual
Glass Tray
(Can be used under all functions)
A. Control panel
B. Glass tray
C. Turntable shaft
D. Turntable ring assembly
E. Door assembly
F. Observation window
G. Safety interlock system
E
G
F
B
AD C
H
H
.
Waveguide cover
EN-15
SETTING UP YOUR OVEN
TURNTABLE INSTALLATION
Cleaning the cooking compartment and putting the turntable in place.
For new installations, make sure all packaging and shipping tape has been removed from the
turntable shaft.
Before using the appliance to prepare food for the first time, you will need to put the turntable
in place correctly. You must clean the cooking compartment and accessories.
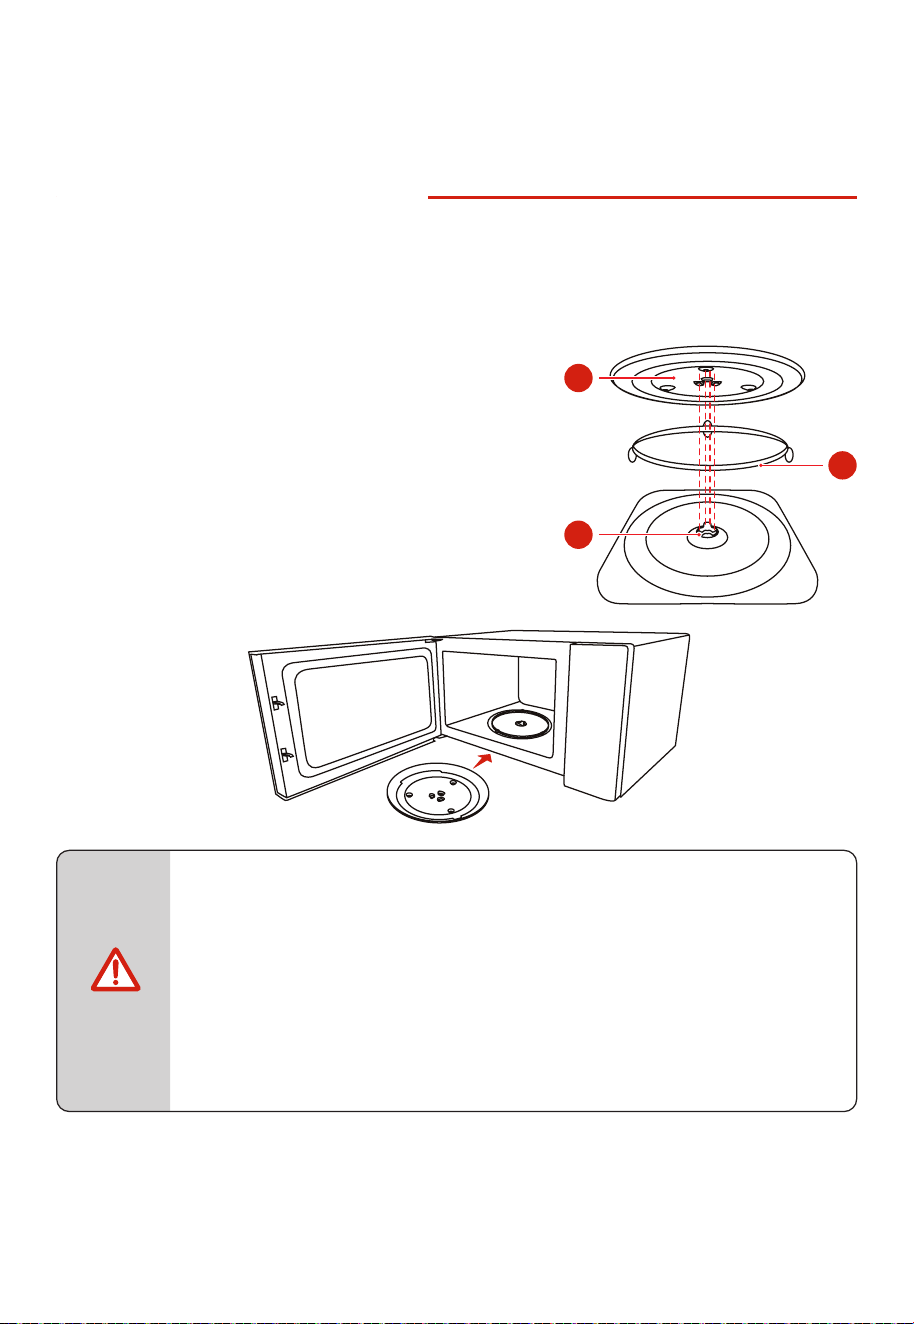
How to put the turntable in place:
1. Place the turntable ring assembly
③
into the recess in
the cooking compartment.
2. Place the glass tray
①
on the turntable ring
assemblies
③
.
Fit the raised, curved lines in the center of the glass
tray bottom between the three spokes of the shaft.
Make sure that the glass tray
①
engages in the
turntable shaft
②
in the center of the cooking
compartment floor. The rollers on the shaft should fit
inside the turntable bottom ridge.
• Never use the appliance without the turntable. Make sure that it is properly
engaged. The turntable can turn clockwise or anti-clockwise.
• Never place the glass tray upside down. The glass tray should never be
restricted.
• Both glass tray and turntable ring assembly must always be used during
cooking.
• All food and containers of food are always placed on the glass tray for cooking.
• Never restrict the movement of the turntable.
• If glass tray or turntable ring assembly cracks or breaks, contact your nearest
authorized service center.
1
2
3
NOTE
EN-16
SETTING UP YOUR OVEN
COUNTERTOP INSTALLATION
INSTALLATION
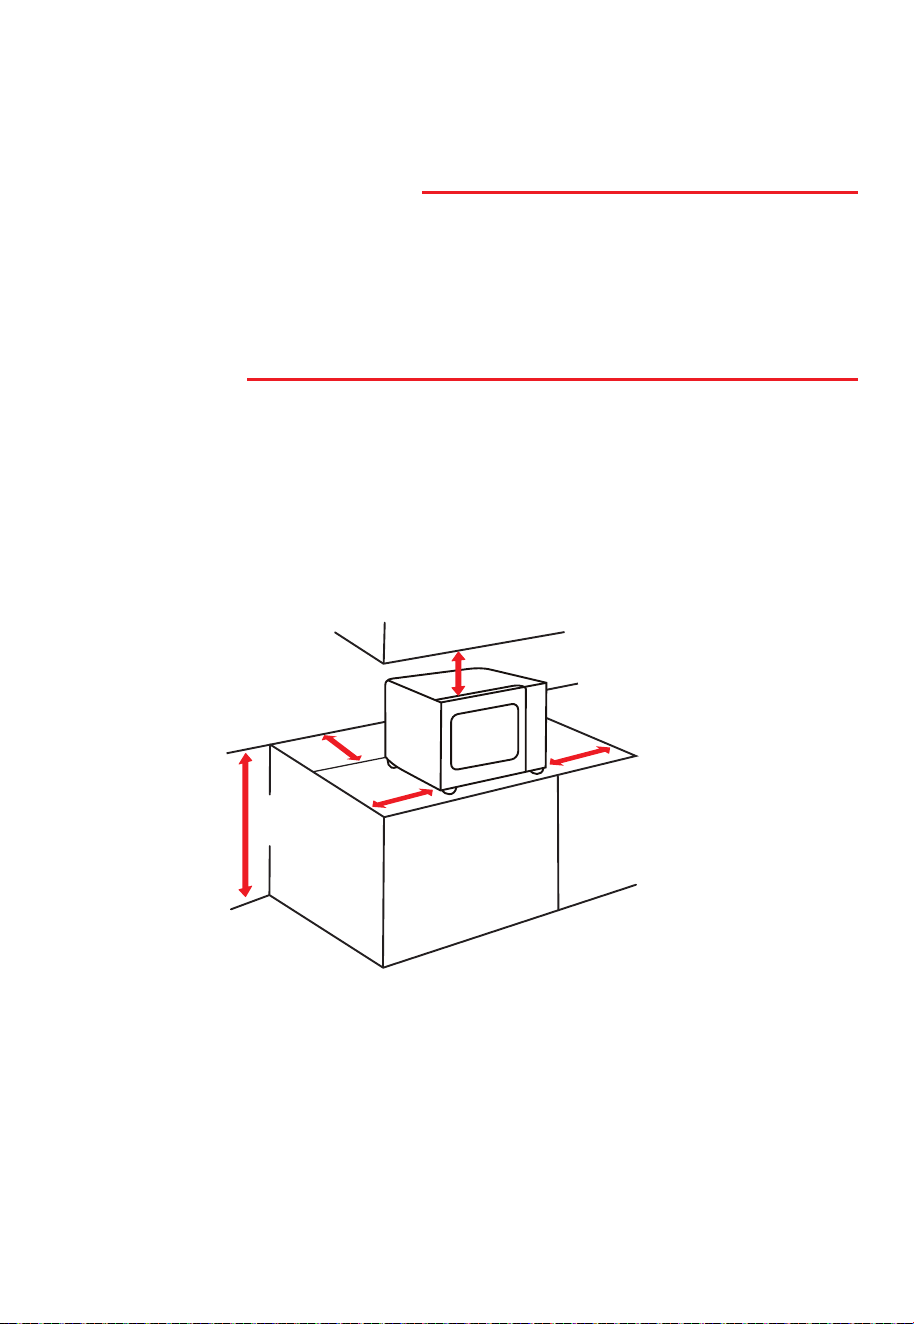
1. Select a level surface that provide enough open space for the intake and/or outlet vents.
b. Leave a minimum clearance of 3.0 inches on each side, 3.0 inches on top and 1.0 inch in the rear.
c.Do not remove the legs from the bottom of the oven.
d
.Block ing the intake and/or outlet openings can damage the oven.
e.
Please place the oven as far away from radios and TV as possible.
Operation of microwave oven may cause interference to your radio or TV reception.
3.0 inches(7.5cm)
3.0 inches
(7.5cm)
3.0 inches
(7.5cm)
>3.0 ft
(91.6cm)
1.0 inch
(2.5cm)
a. The minimum installation height is 3.0 ft.
Remove all packing material and accessories. Examine the oven for any damage such as dents or
broken door. Do not install if oven is damaged.
Cabinet: Remove any protective film found on the microwave oven cabinet surface. Do not
remove the light brown waveguide cover that is attached to the oven cavity to protect the
magnetron.
EN-17
2. Plug microwave oven into a standard household outlet. Be sure the voltage and the
frequency is the same as the voltage and the frequency on the rating label.
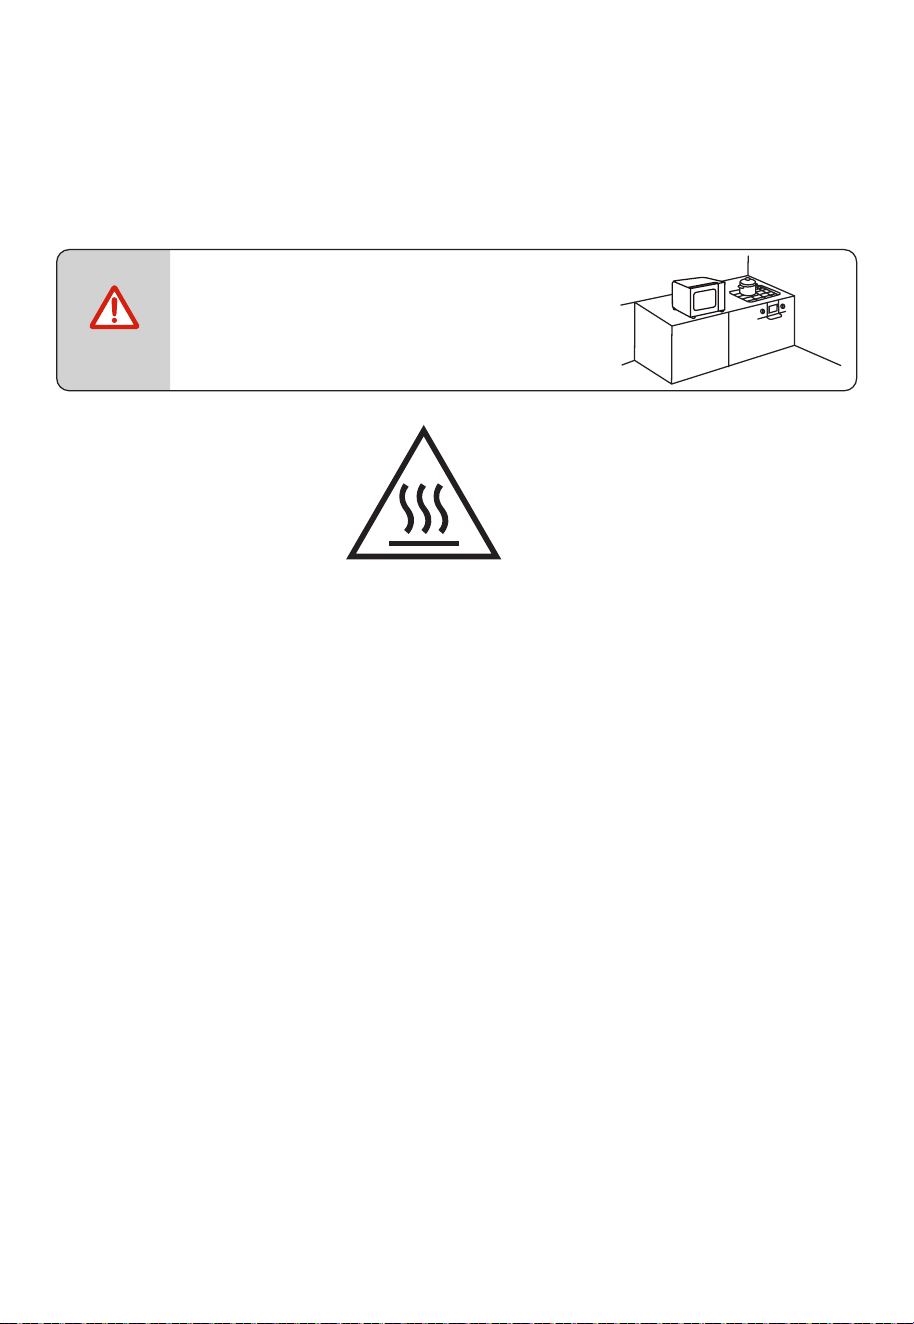
• Do not install oven over a range cooktop or
other heat-producing appliance.
If installed near or over a heat source, the oven
could be damaged and the warranty would be
avoid.
NOTE
SETTING UP YOUR OVEN
The accessible surface may be
hot during operation
EN-18
INSTRUCTION FOR USE
BEFORE USING FOR THE FIRST TIME
The appliance may produce unpleasant odors when it is used for the first time.
This section tells you what you need to do before using your microwave to prepare food for the
first time. Read the section entitled " " beforehand on page
3.
IMPORTANT SAFETY INSTRUCTIONS
Before you can use your new appliance, you will need to put the turntable in place correctly. You
must also clean the cooking compartment and accessories.
• Never use the appliance without the turntable.
• Make sure that it is properly engaged. The turntable can turn clockwise or
anti-clockwise.
NOTE
EN-19
OPERATION
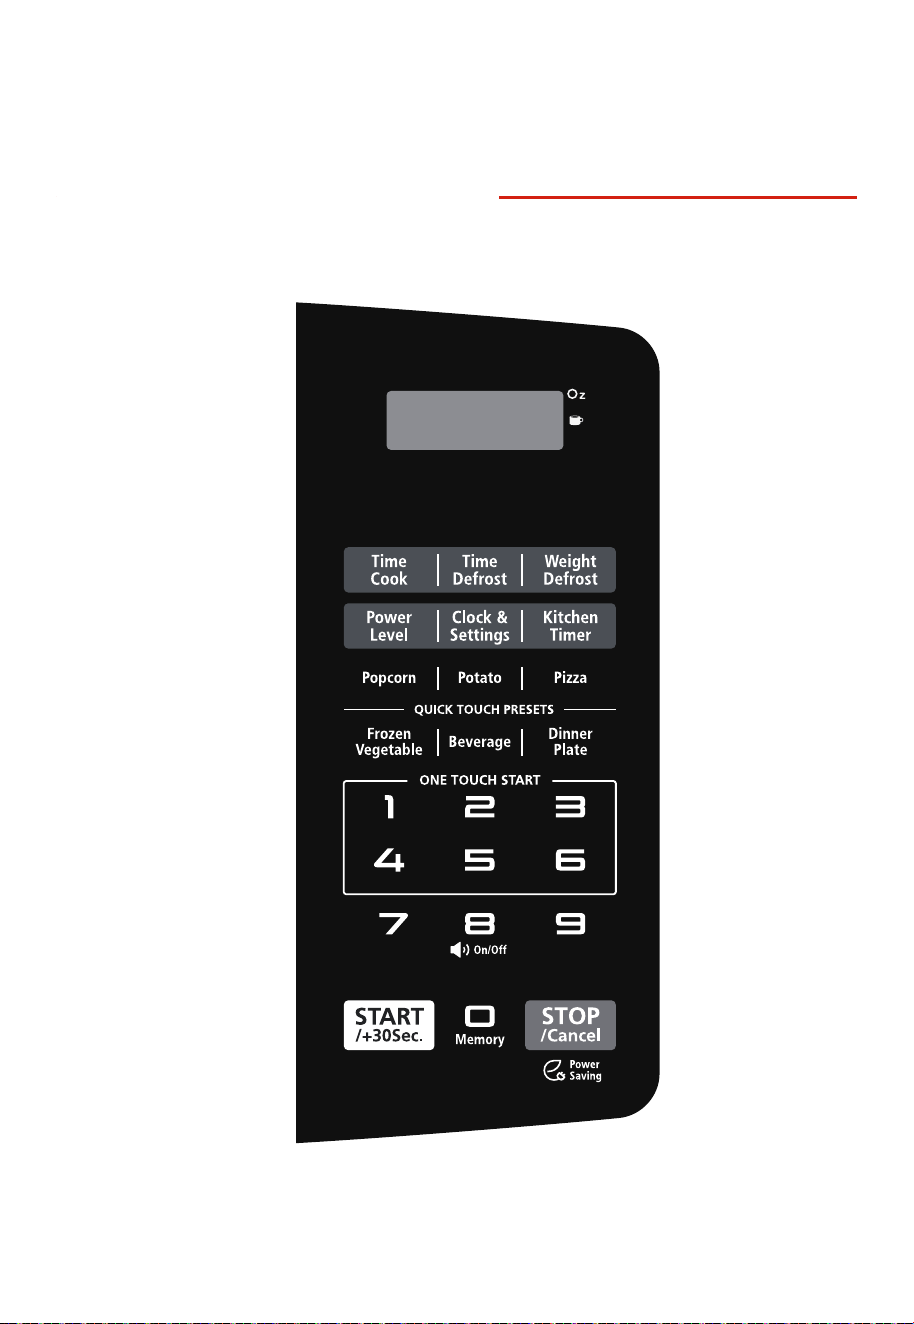
CONTROL PANEL AND FEATURES
EN-20
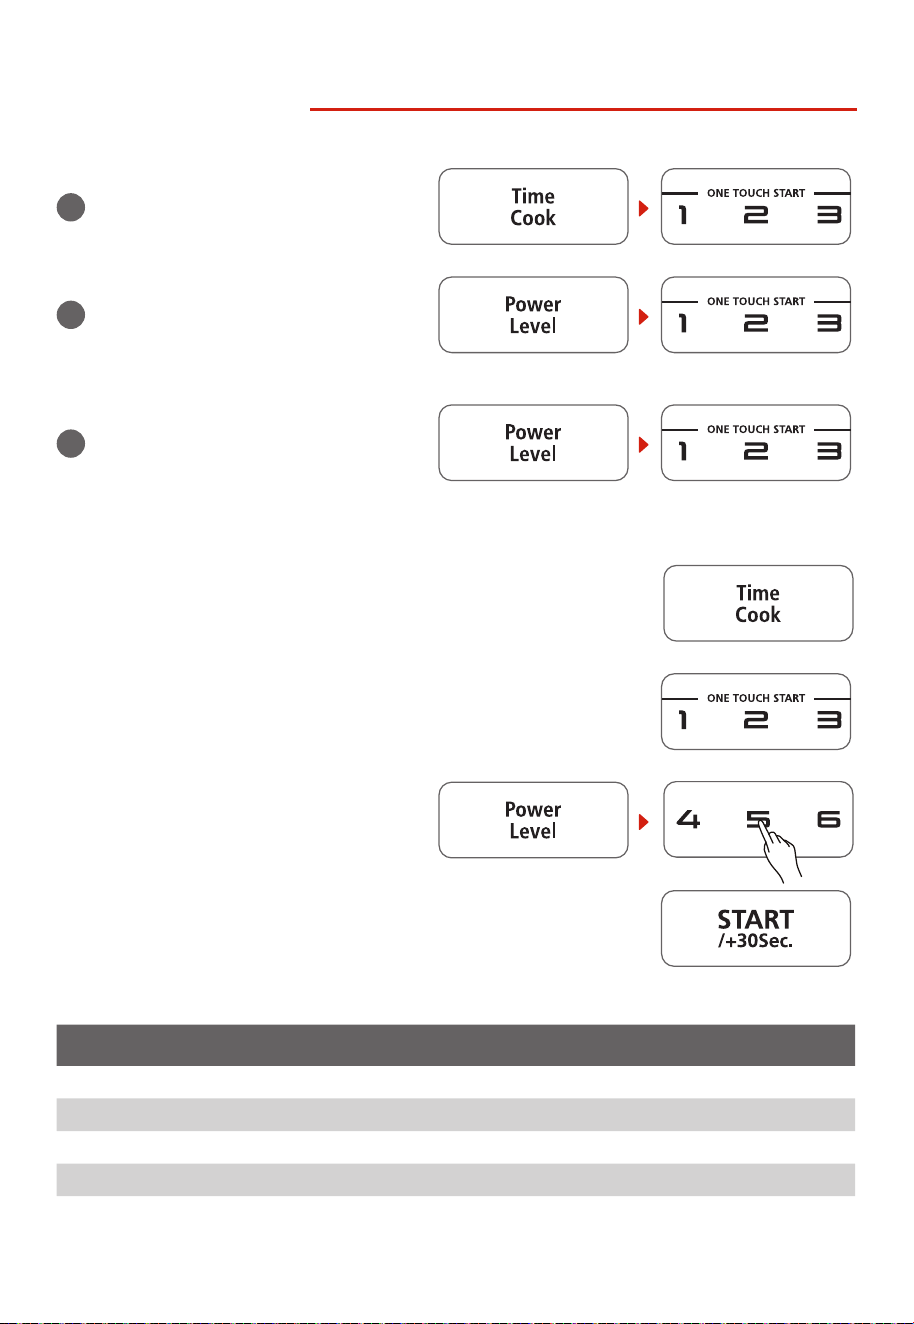
1. POWER LEVELS
Ten power levels are available.
a
Press "Time Cook" , "00:00" will display,
then press number pads.
b
Press "Power Level" and "PL10" will
display. Then press number pads to
select a dierent power level.
c
In cooking state of microwave, press
"Power Level", the current power will
be displayed for 3 seconds. Then press
number pads to change a dierent
power level.
Example : To cook the food with 50% microwave power for 15 minutes.
• Press "Time Cook" , "00:00" will display.
• Press "1, 5, 0, 0" in order for 15:00 to appear in the display.
• Press "Power Level" , then press "5" to
select 50% microwave power.
• Press " START/+30Sec. " to start cooking. Buzzer sounds once. The
remaining cooking time will display.
LEVEL POWER DISPLAY
10 100% PL10
9 90% PL9
8 80% PL8
7 70% PL7
EN-21
LEVEL POWER DISPLAY
6 60% PL6
5 50% PL5
4 40% PL4
3 30% PL3
2 20% PL2
1 10% PL1
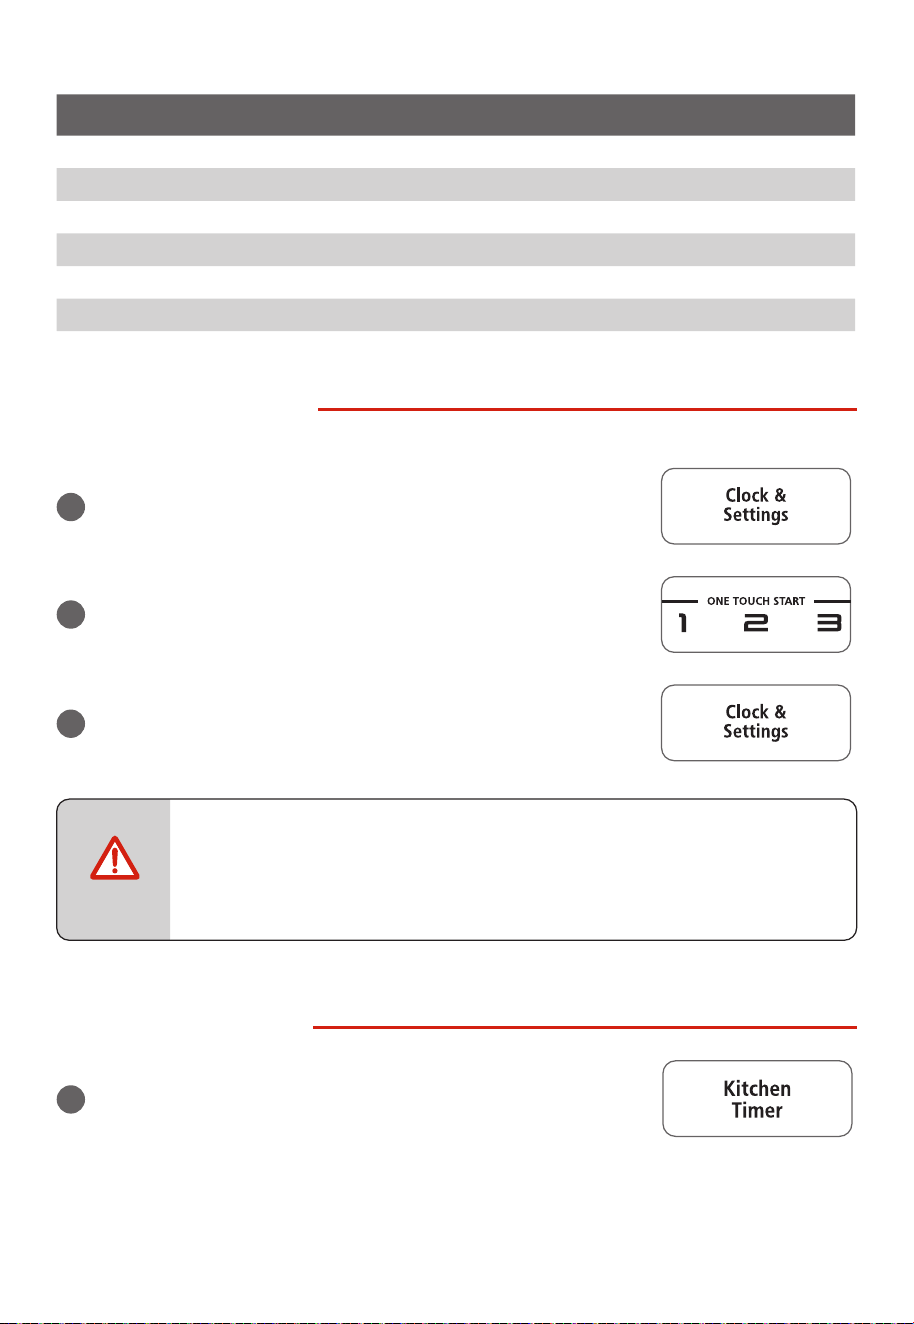
2. CLOCK SETTING
When the microwave oven is plugged into an outlet, "0:00" will display.
a
Press "Clock & Settings" once, "00:00" will appear in the display.
b
Press the number pads to enter the current clock time. For
example, if the time is now 10:12, press " 1, 0, 1, 2 " in order.
c
Press "Clock & Settings" to nish clock setting, " : " will ash and
the numbers will appear as a clock time in the display.
• If the numbers entered are not within the range between 1:00 to 12:59, the
setting will not be accepted until valid numbers are entered.
• In the process of setting clock, if the " STOP/Cancel " pad is pressed or if there
is no operation within 1 minute, the display will automatically return to the
previous clock setting.
3. KITCHEN TIMER
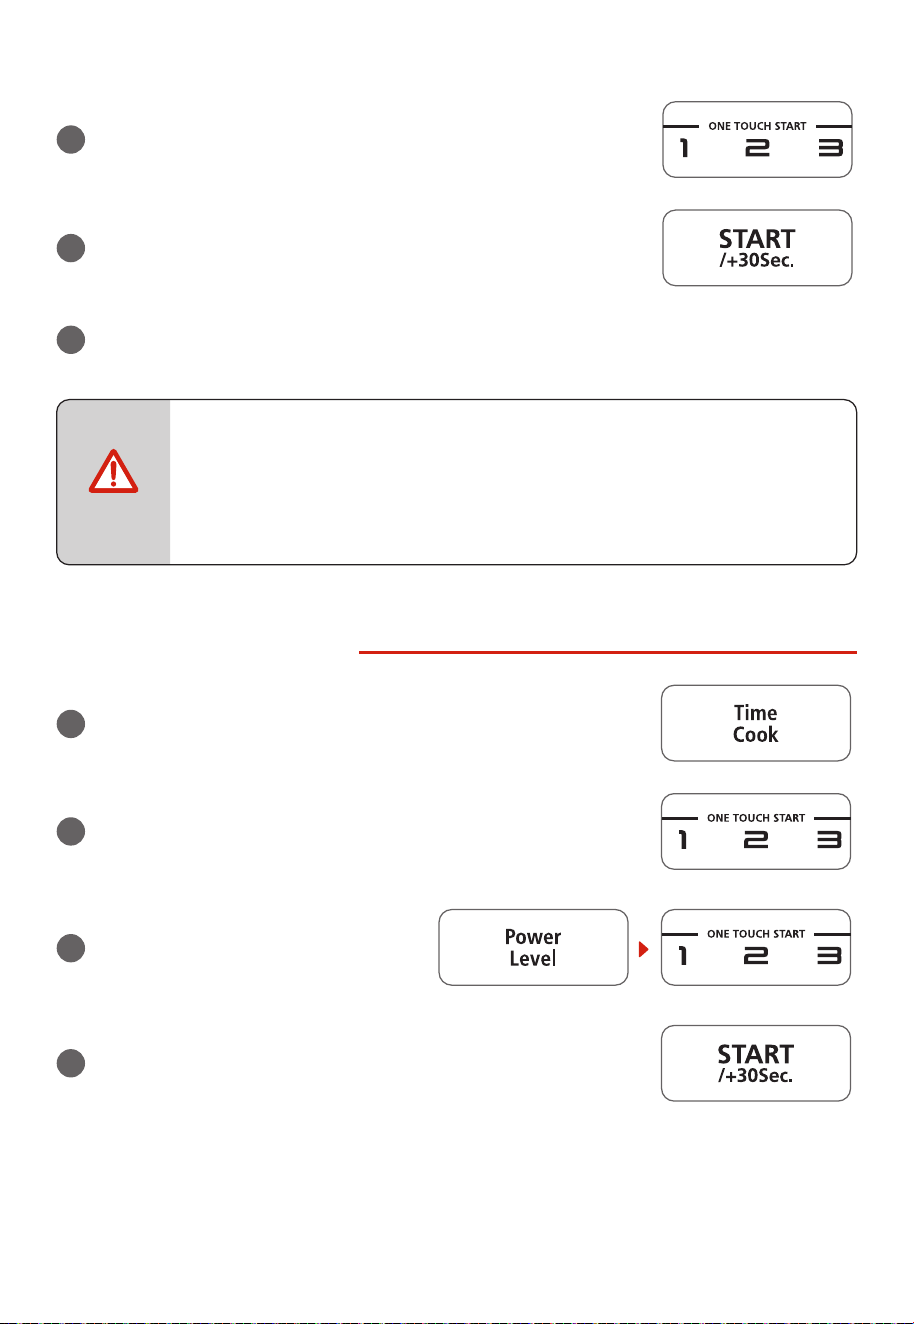
a
Press "Kitchen Timer" once, "00:00" will appear in the display.
NOTE
EN-22
b
Press the number pads to enter the time amount. The
maximum amount of time that can be entered is 99 minutes,
99 seconds.
c
Press " START/+30Sec. " to conrm setting, and the timer will
start to count down.
d
When the time amount elapses, the oven will beep 5 times.
• The Kitchen Timer setting is dierent from the Clock setting; it is simply a
timer.
• During the Kitchen Timer function, no cooking function can be set into
operation.
• Kitchen Timer amount cannot be increased by pressing " START/+30Sec. "
.
• Pressing " STOP/Cancel " will cancel the Timer countdown.
4. MICROWAVE COOK
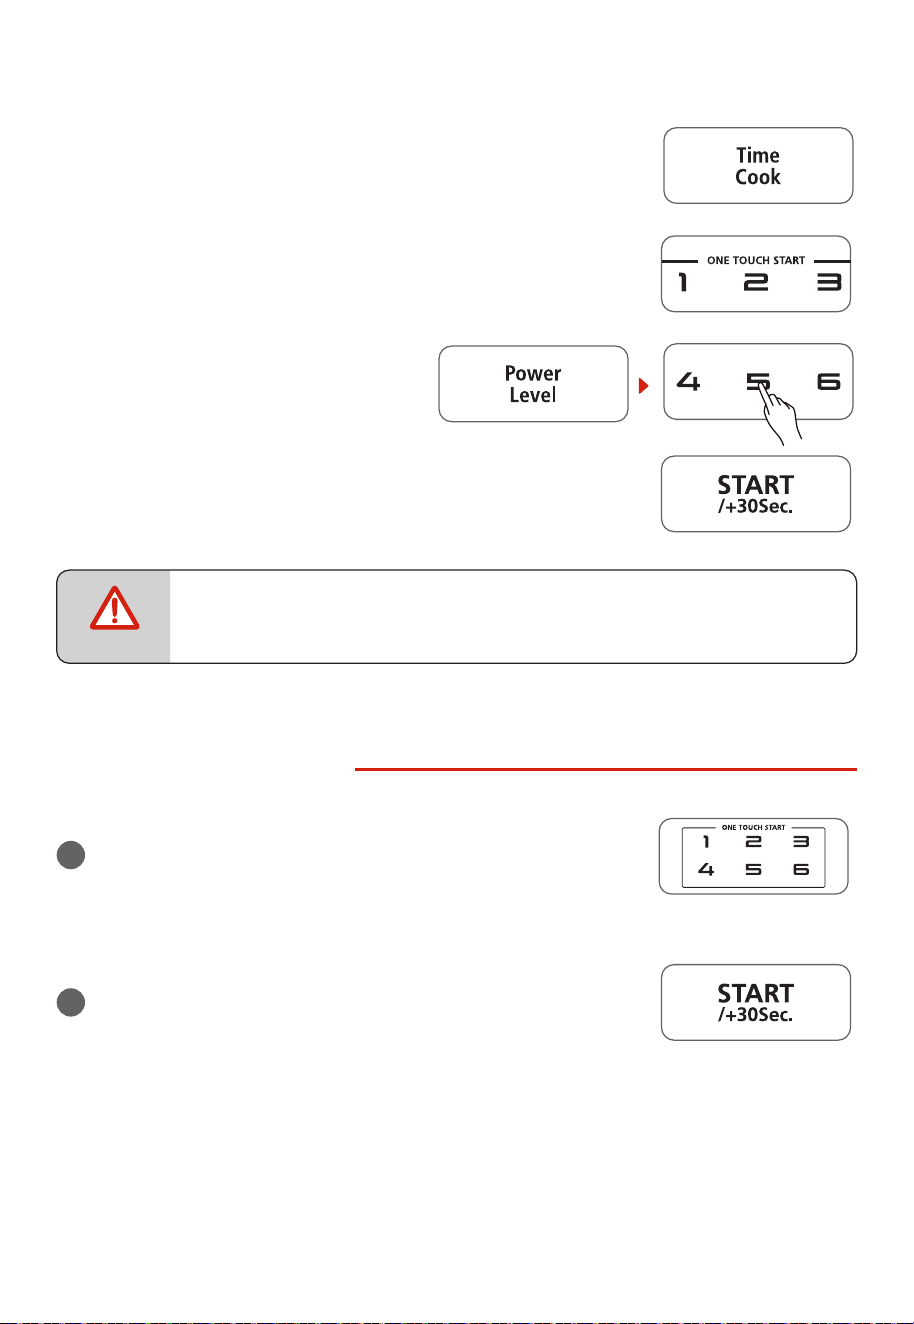
a
Press "Time Cook" , "00:00" will appear in the display.
b
Press number pads to enter the cooking time. The maximum
cooking time is 99 minutes, 99 seconds.
c
Press "Power Level", PL10 will ash. Press
number pads 0 through 9 to select a
dierent power level if desired. See the
POWER LEVEL table above.
d
Press " START/+30Sec. " to start cooking. The remaining cooking
time will display.
NOTE
EN-23
Example : To cook the food with 50% microwave power for 15 minutes.
• Press "Time Cook" , "00:00" will display.
• Press "1, 5, 0, 0" in order for 15:00 to appear in the display.
• Press "Power Level" , then press "5" to
select 50% microwave power.
• Press " START/+30Sec. " to start cooking. The remaining cooking
time will display.
• In the process of setting, if the " STOP/Cancel " pad is pressed or if there is no
operation within 1 minute, the oven will automatically return to display the
clock.
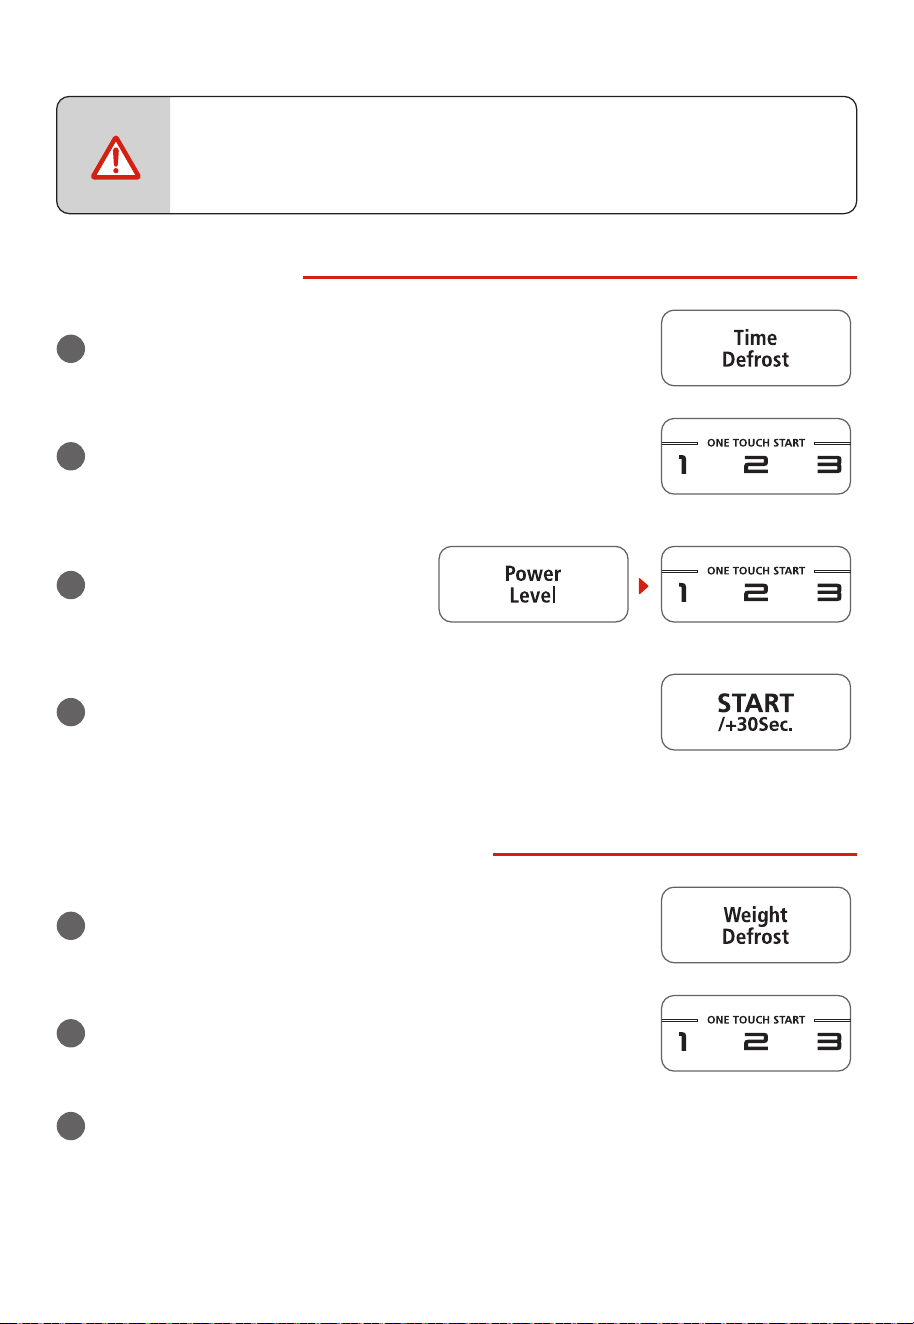
5. ONE TOUCH START
a
Instant cooking at 100% power level and 1 to 6 minutes
cooking time can be started by pressing number pads 1
to 6. Press " START/+30Sec. " to increase the cooking time
by 30 seconds with each press. The maximum cooking time
is 99 minutes, 99 seconds.
b
Instant cooking at 100% power level and 30 seconds cooking
time can be started by pressing " START/+30Sec. ". Each
repeated press will increase cooking time by 30 seconds. The
maximum cooking time is 99 minutes, 99 seconds.
NOTE
EN-24
• Time can also be added in 30 second increments by pressing " START/+30Sec.
" during Microwave Cooking, Time Defrost and Multi-stage Cooking.
• Time cannot be added by pressing " START/+30Sec. " during Weight Defrost
and Kitchen Timer functions.
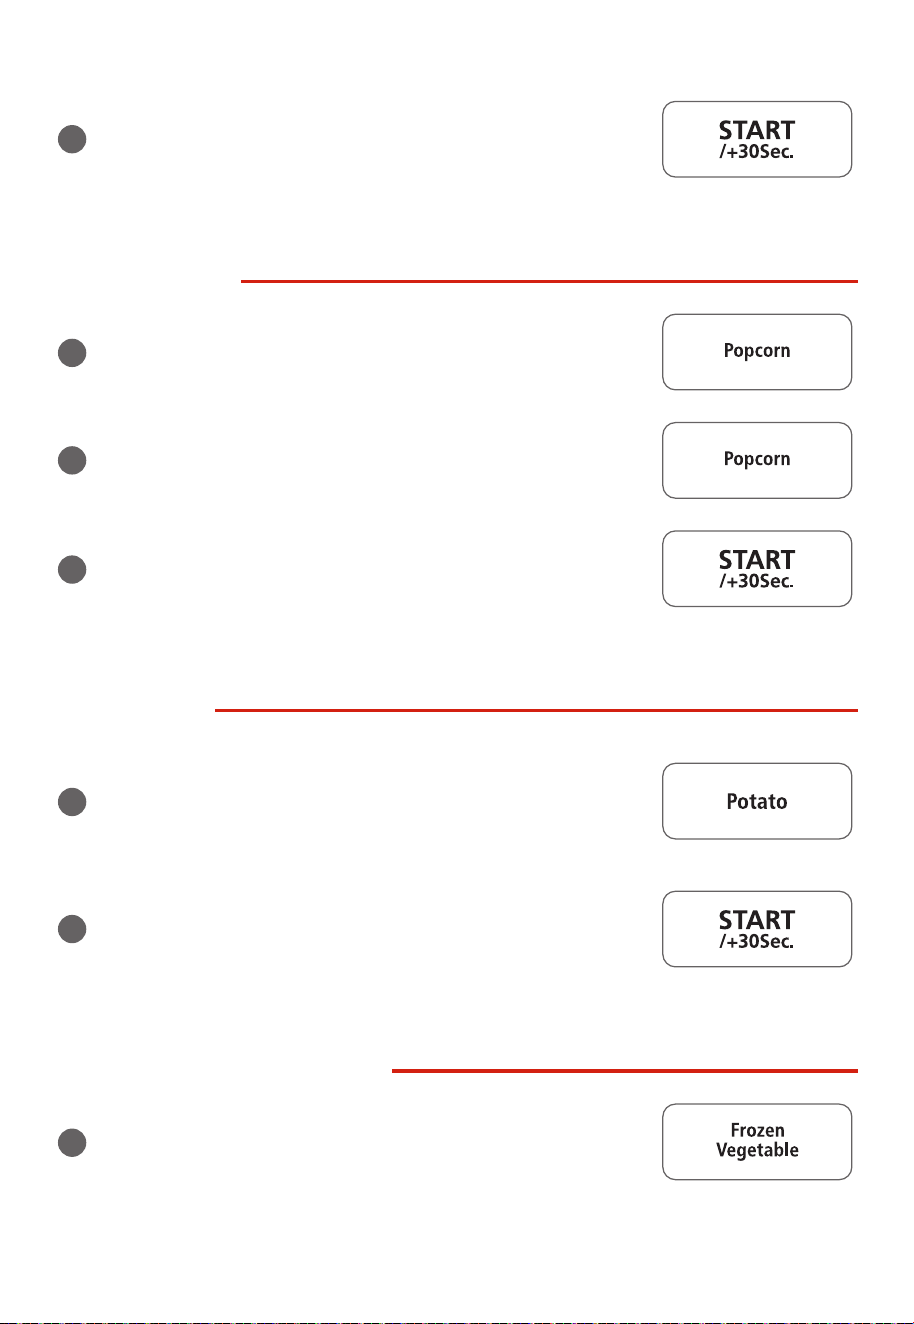
6. TIME DEFROST
a
Press "Time Defrost" , "dEF2" will appear in the display.
b
Press the number pads to input the defrost time.
c
The default microwave power is power
level 3. If you want to change the power
level, level, press "Power Level" once,
and PL3 will display; then press the
number pad for the desired power level.
d
Press " START/+30Sec. " to start defrost cooking. And the remaining
defrost time will display.
7. WEIGHT DEFROST FUNCTION
a
Press Weight Defrost once,"dEF1" will display." "
b
Press number pads to input weight to be defrosted.
Input the weight range between 4 to 100 Oz.
c
If the weight input is not between 4 to 100 Oz, the input will be invalid. A beep will sound
and the unit will not work until valid numbers are entered.
NOTE
EN-25
d
Press " START/+30Sec. " to start defrosting and the cooking time
remaining will be displayed.
8. POPCORN
a
Press "Popcorn" , "1.75" will appear in the display.
b
Press "Popcorn" two more times to choose the weight, "3.0" and
"3.5" will display in order.
c
Press " START/+30Sec. " to cook. The remaining time will display.
Oven beeps 5 times when cooking nish.
9. POTATO
a
Press "Potato" repeatedly until the number you wish appears in the
display "1", "2", "3" will display in order.
Press once : 1 potato (approx. 8.0 oz)
Press Twice: 2 potatoes ( approx. 16.0 oz)
Press 3 Times: 3 potatoes ( approx. 24.0 oz)
b
Press " START/+30Sec. " to cook. The remaining time will display.
Oven beeps 5 times when cooking nish.
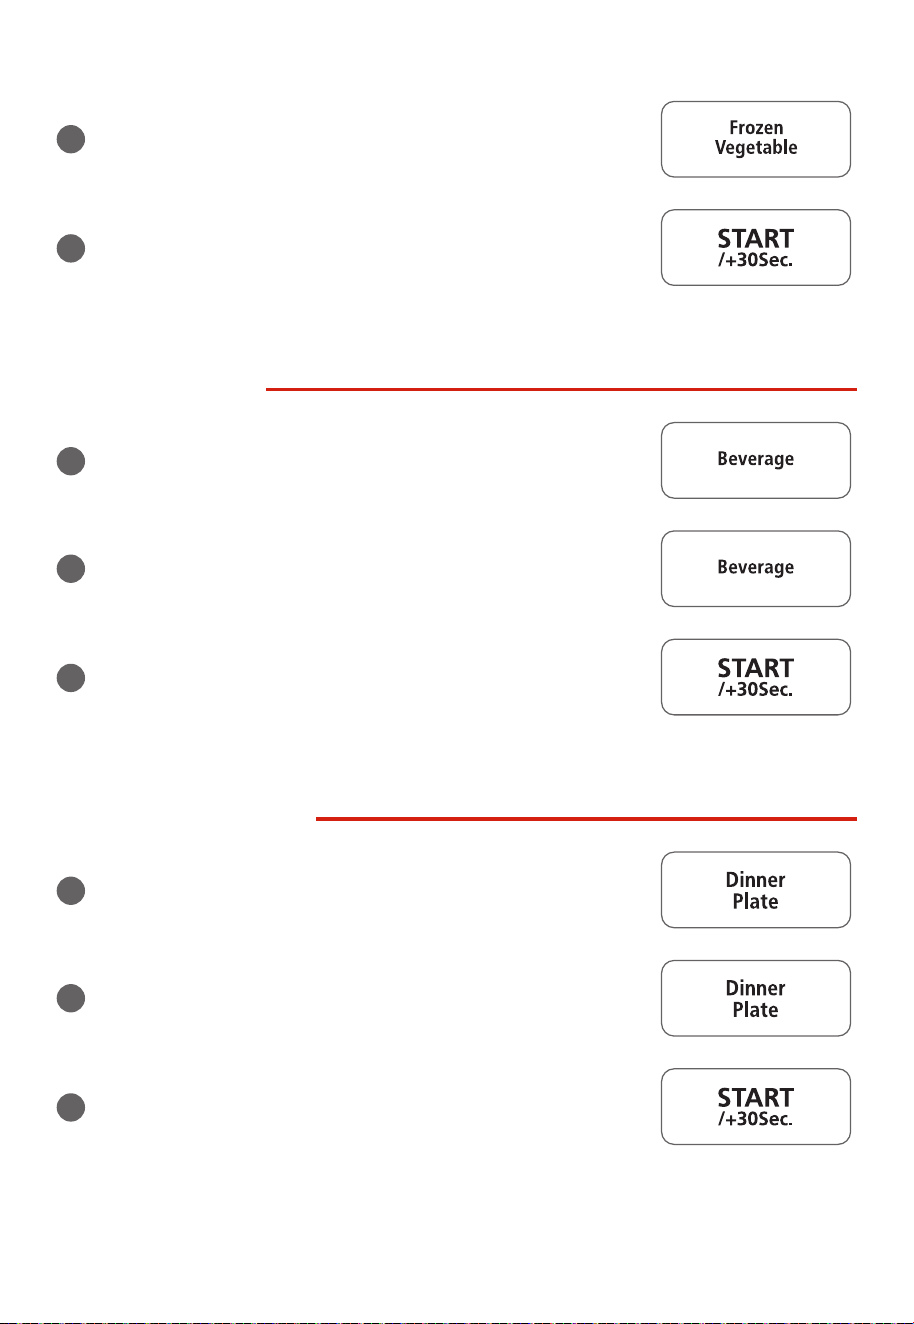
10. FROZEN VEGETABLE
a
Press "Frozen Vegetable" , "4.0" will appear in the display.
EN-26
b
Press "Frozen Vegetable" two more times to choose the weight,
"8.0" and "16.0" will display in order.
c
Press " START/+30Sec. " to cook. The remaining time will display.
Oven beeps 5 times when cooking nish.
11. BEVERAGE
a
Press "Beverage" , "1" will appear in the display.
b
Press "Beverage" two more times to choose the weight, "2" and "3"
will display in order. One cup is about 4.0 Oz.
c
Press " START/+30Sec. " to cook. The remaining time will display.
Oven beeps 5 times when cooking nish.
12. DINNER PLATE
a
Press "Dinner Plate" , "9.0" will appear in the display.
b
Press "Dinner Plate" two more times to choose the weight, "12.0"
and "18.0" will display in order.
c
Press " START/+30Sec. " to cook. The remaining time will display.
Oven beeps 5 times when cooking nish.
EN-27
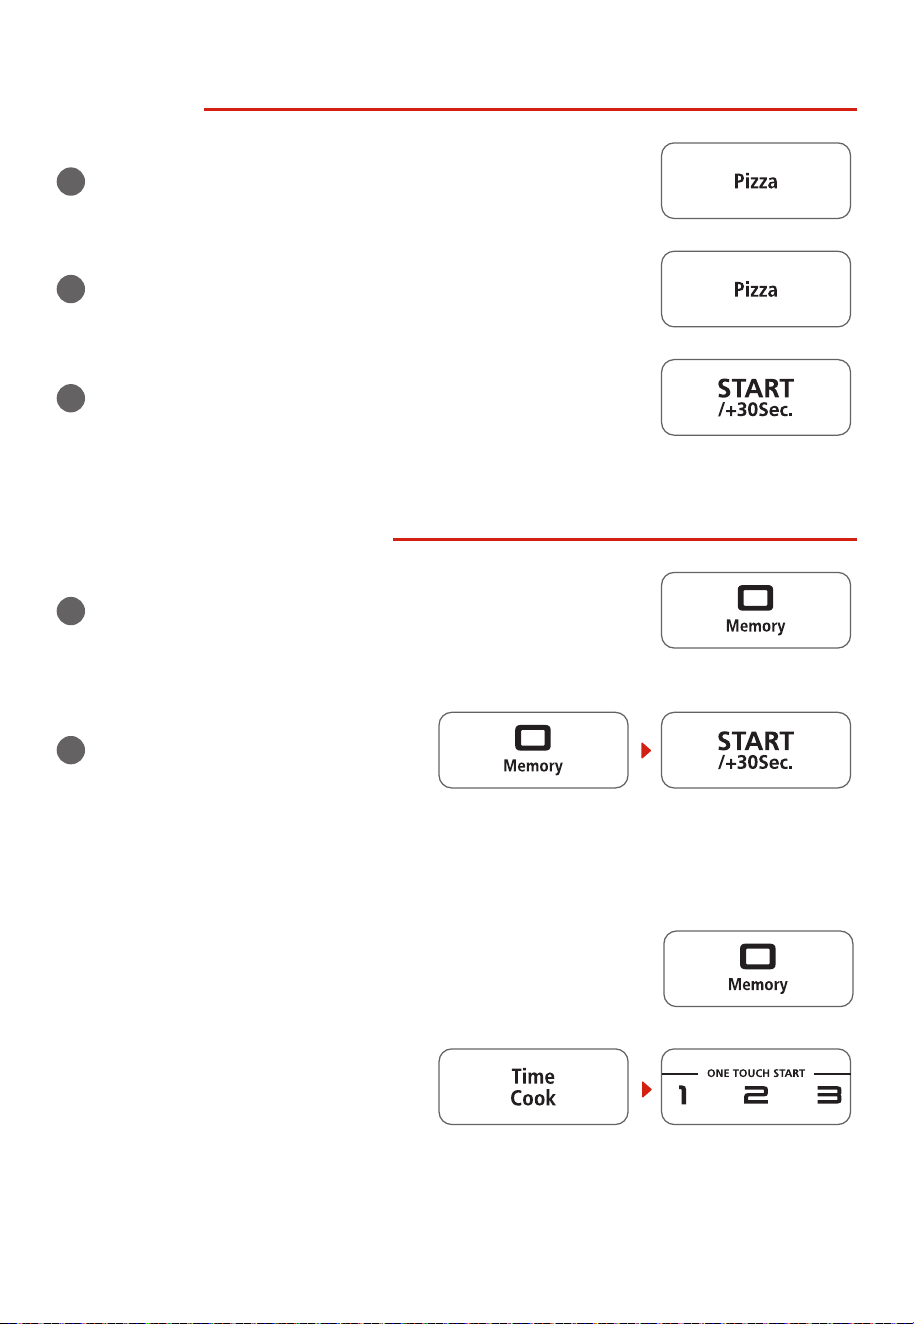
13. PIZZA
a
Press "Pizza" , "4.0" will appear in the display.
b
Press "Pizza" two more times to choose the weight, "8.0" and "14.0"
will display in order.
c
Press " START/+30Sec. " to cook. The remaining time will display.
Oven beeps 5 times when cooking nish.
14. MEMORY FUNCTION
a
Press "Memory" to program and choose up to three cooking
procedures. Each procedure will be indicated by 1, 2 or 3 in the
display.
b
Press "Memory" until your desired
procedure number appears in the
display.
Press " START/+30Sec. " to begin it. A
maximum of two cooking stages can be
set for each procedure.
To program a procedure, follow the steps listed below.
Example: Cook food at 80% Power Level for 3 minutes and 20 seconds; save as memory 2.
• Press "Memory" twice; screen displays 2.
• Press "Time Cook", then press "3","2" and
"0" in order.
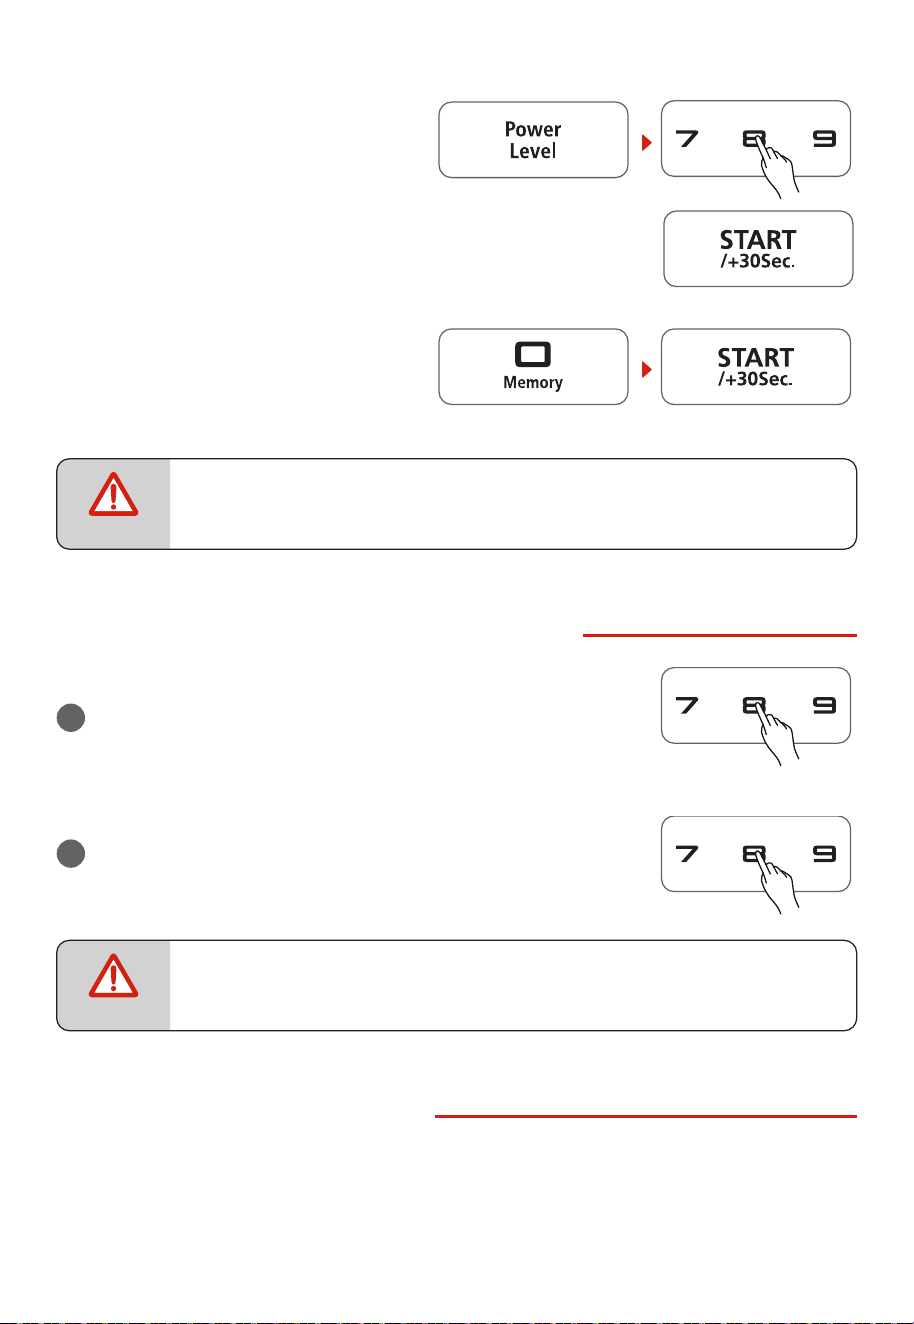
EN-28
• Press "Power Level" once, then press "8"
for "PL8" to display.
• Press " START/+30Sec. " to save the procedure. Oven beeps once.
Or press " START/+30Sec. " twice directly save and start cooking.
• To choose the procedure from the
memory list, press "Memory" twice.
Screen will display "2". Press
"START/+30Sec." to run procedure.
NOTE
• Auto Menu cannot be set in Memory function.
15. TURN ON/OFF THE BUZZER SOUND
a
It is default that the buzzer sounds is open. In waiting state,
long pressing on number 8 for 3 seconds, it sounds a long
beep, turns o the sound. All the buttons has no beep when
b
When the sounds turn o, long pressing on 8 f or 3 seconds, it
sounds a long beep and the sound turn on.
they are pressed, including the ending cooking sounds is turn
o too.
NOTE
• All models has mute function and energy-saved function. This function can
work under lock function too.
16. MULTI-STAGE COOKING
At most 2 stages can be set for cooking. If one stage is Defrost, it will automatically set to be the
rst stage.
EN-29
NOTE
• Auto Menu cannot be set in Multi-stage Cooking.
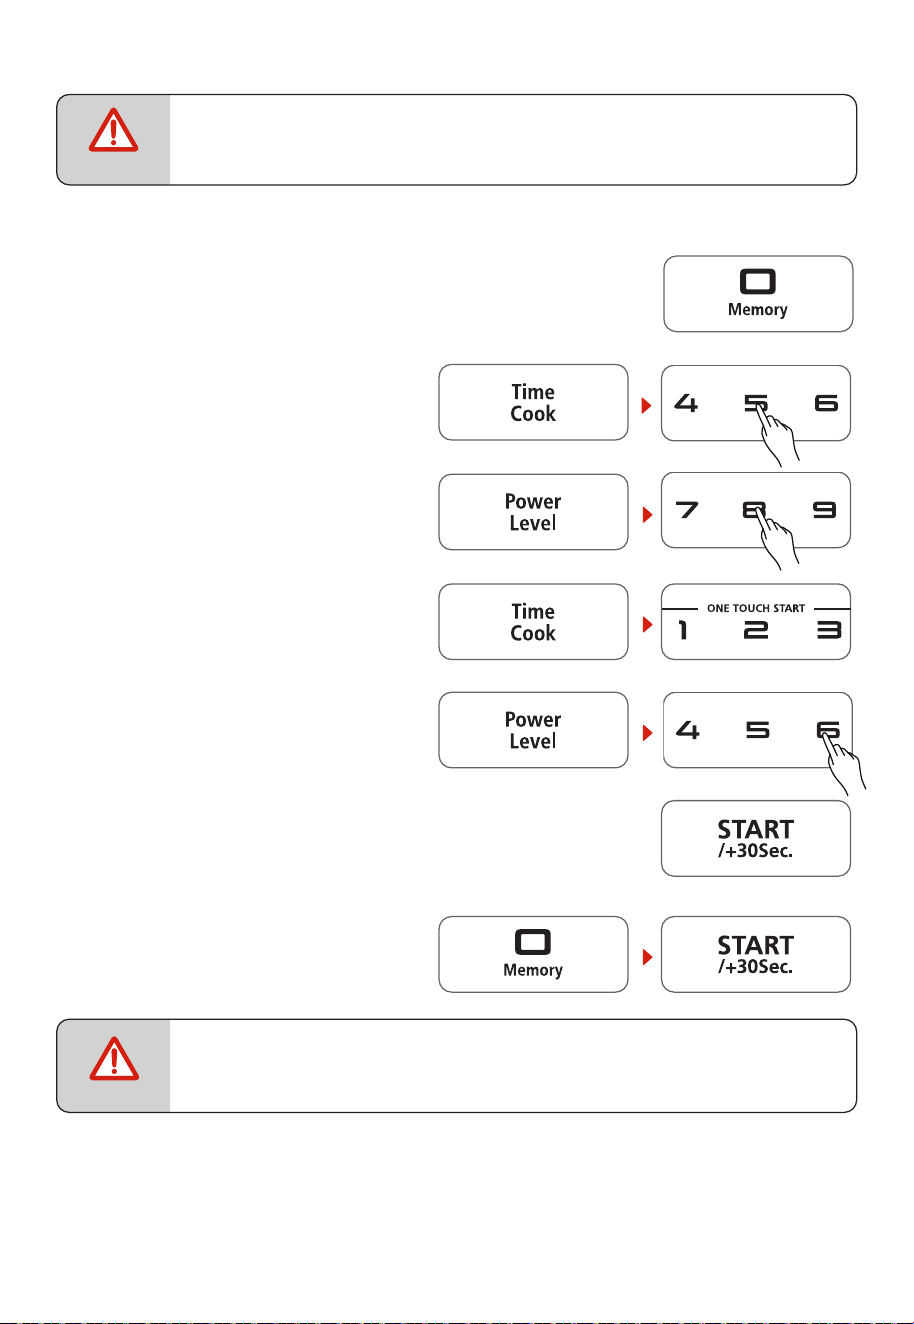
Example: 80% Power Level for 5 minutes followed by 60% Power Level for 10 minutes;
saved as memory 3.
• Press "Memory" 3 times; screen displays 3.
• Press "Time Cook", then press "5", "0" and
"0" to set rst stage cook time.
• Press "Power Level" once, then press "8" to
choose 80% rst stage cooking power.
• Press "Time Cook" again, then press "1", "0",
"0" and "0" to set second stage cook time.
• Press "Power Level" again, then press "6" to
choose 60% second stage cooking power.
• Press " START/+30Sec. " twice to immediately start multi-stage
• To choose the procedure from the memory
list, press "Memory" three times. Screen
will display "3"; press " START/+30Sec. " to
run procedure.
• If you do not want to save a particular multi-stage program as a procedure, do
not press "Memory" as the rst step.
• Press " START/+30Sec. " after programming both stages.
NOTE
cooking.
EN-30
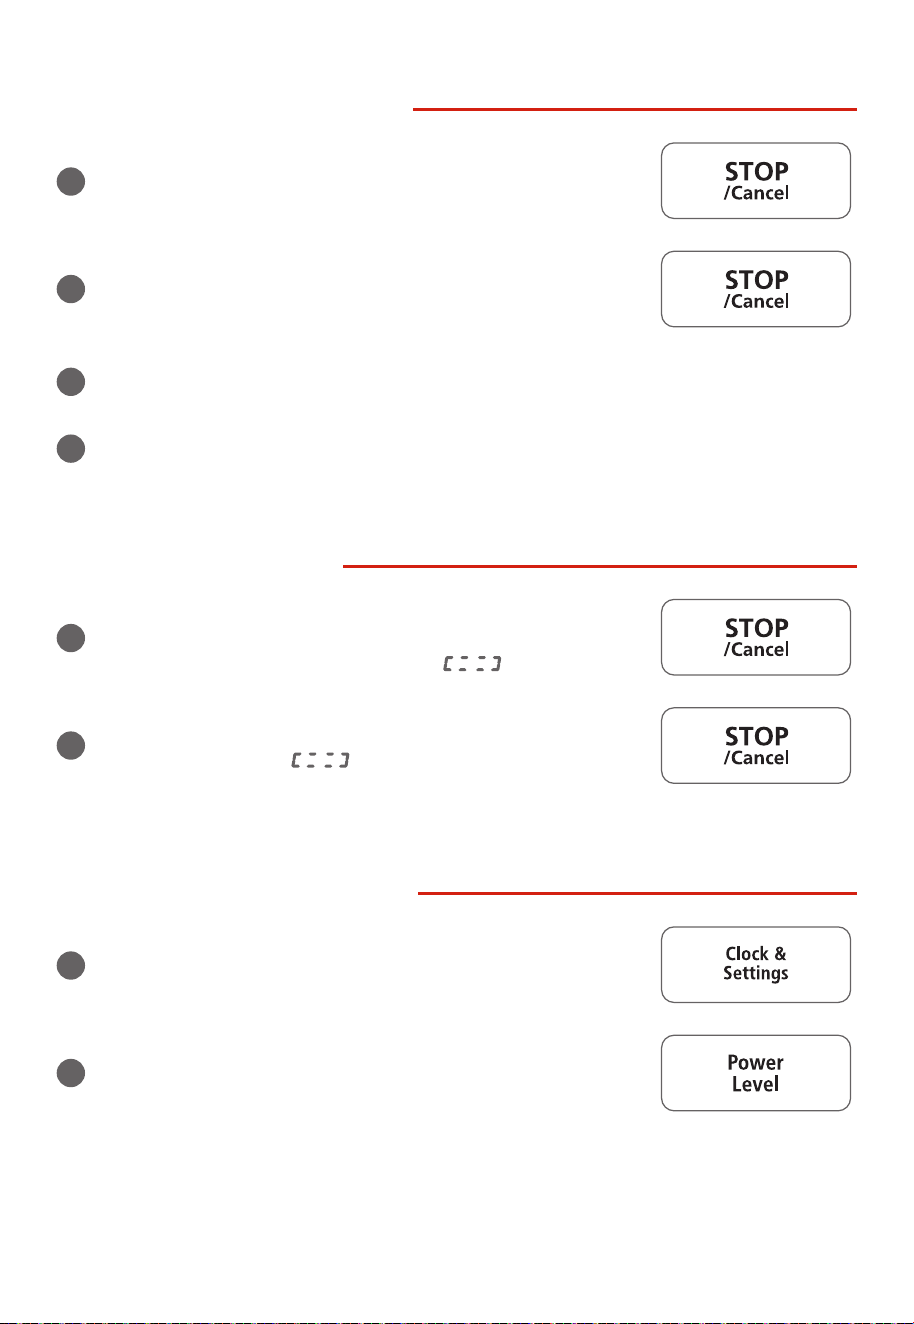
17. ENERGY SAVER MODE
a
In standby mode, press the " STOP/Cancel " once (less than 3
seconds to avoid starting the child lock function ) to enter the
Energy Saver mode.
b
In child-locked mode, press the " STOP/Cancel " once (less than
3 seconds) and release to enter the Energy Saver Mode.
c
Above operation is the only way to start the Energy Saver
mode.
d
The Energy Saver mode works only if the door is closed.
18. LOCK FUNCTION
a
To lock the microwave so that it cannot be operated by
children or other unintended users, press " STOP/Cancel " pad
for 3 seconds. You will hear a long beep. “ ” will display.
b
To Unlock, press " STOP/Cancel " for three seconds, you will
hear a long beep and " " will disappear.
19. INQUIRING FUNCTION
a
When oven is cooking, press "Clock & Settings" for the time of
day to appear for three seconds in the display.
b
When oven is cooking, press "Power Level" pad for cooking
power to appear for three seconds in the display.

EN-31
20. COOKING END REMINDER FUNCTION
The oven will beep ve times to alert the user that cooking time has ended.
21. OTHER SPECIFICATIONS
a
"START/+30Sec." must be pressed to continue cooking if the
door is opened during cooking.
b
A single beep sounds to indicate that a pad is correctly pressed; if pad is not correctly
pressed, no beep sounds.
EN-32
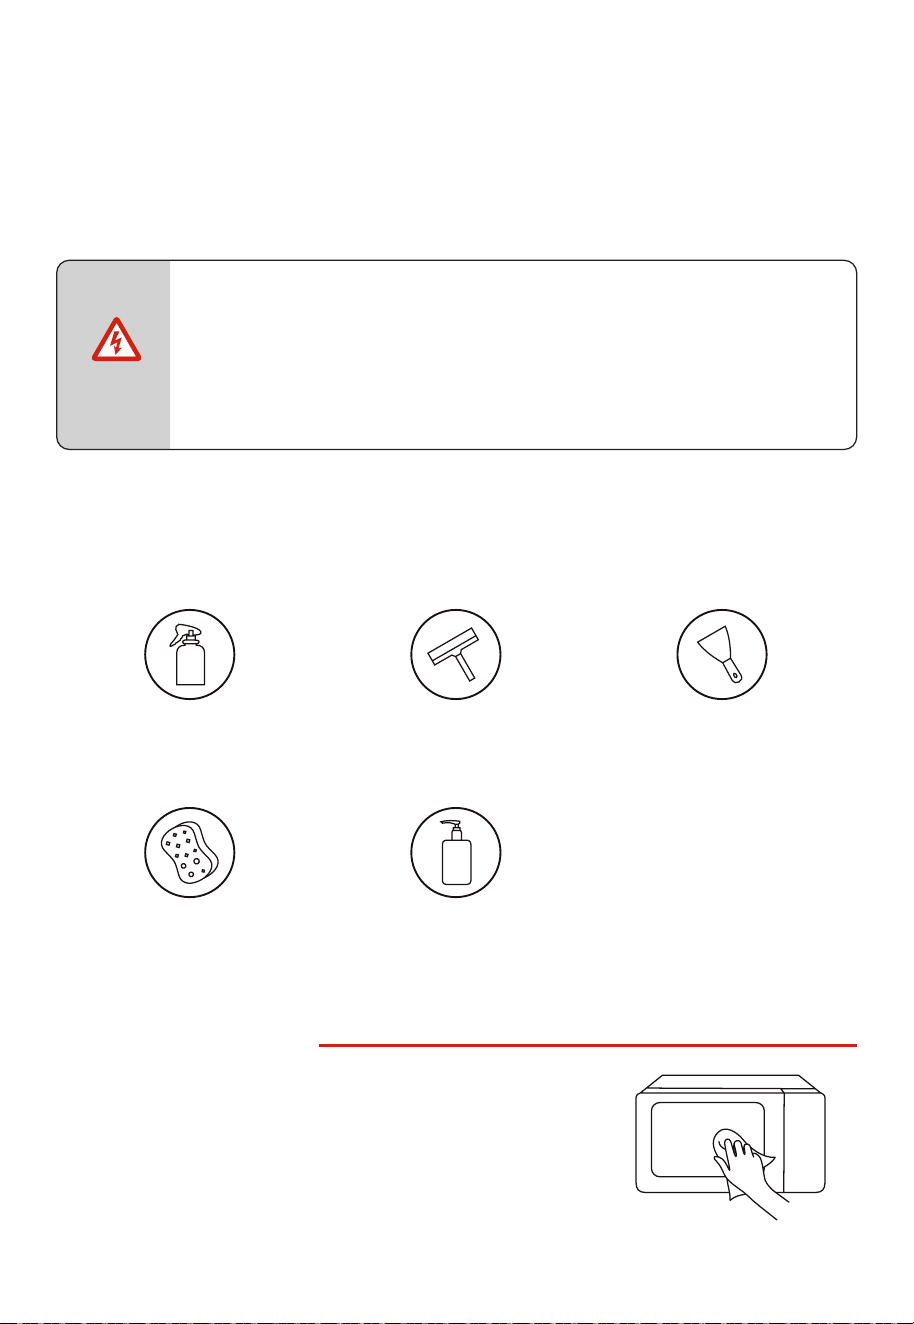
CLEANING
With good care and cleaning, your appliance will retain its appearance and remain fully
functioning for a long time to come. We will explain here how you should correctly care for and
clean your appliance.
• Scratched glass in the appliance door may develop into a crack. Do not use a
glass scraper, sharp or abrasive cleaning aids or detergents.
• The surface of the appliance may become damaged if it is not cleaned
properly. Microwave energy may escape.
Clean the appliance on a regular basis, and remove any food remnants
immediately.
• Do not immerse the appliance in water or clean under a jet of water.
Cleaning agent
To ensure that the dierent surfaces are not damaged by using the wrong cleaning agent,
observe the information . Wash new sponge cloths thoroughly before use.below
Do not use:
Harsh or abrasive cleaning
agents
Metal or glass scrapers to
clean the door panels
Metal or glass scrapers to
clean the door seal
Hard scouring pads or
sponges
Cleaning agents with a
high alcohol content
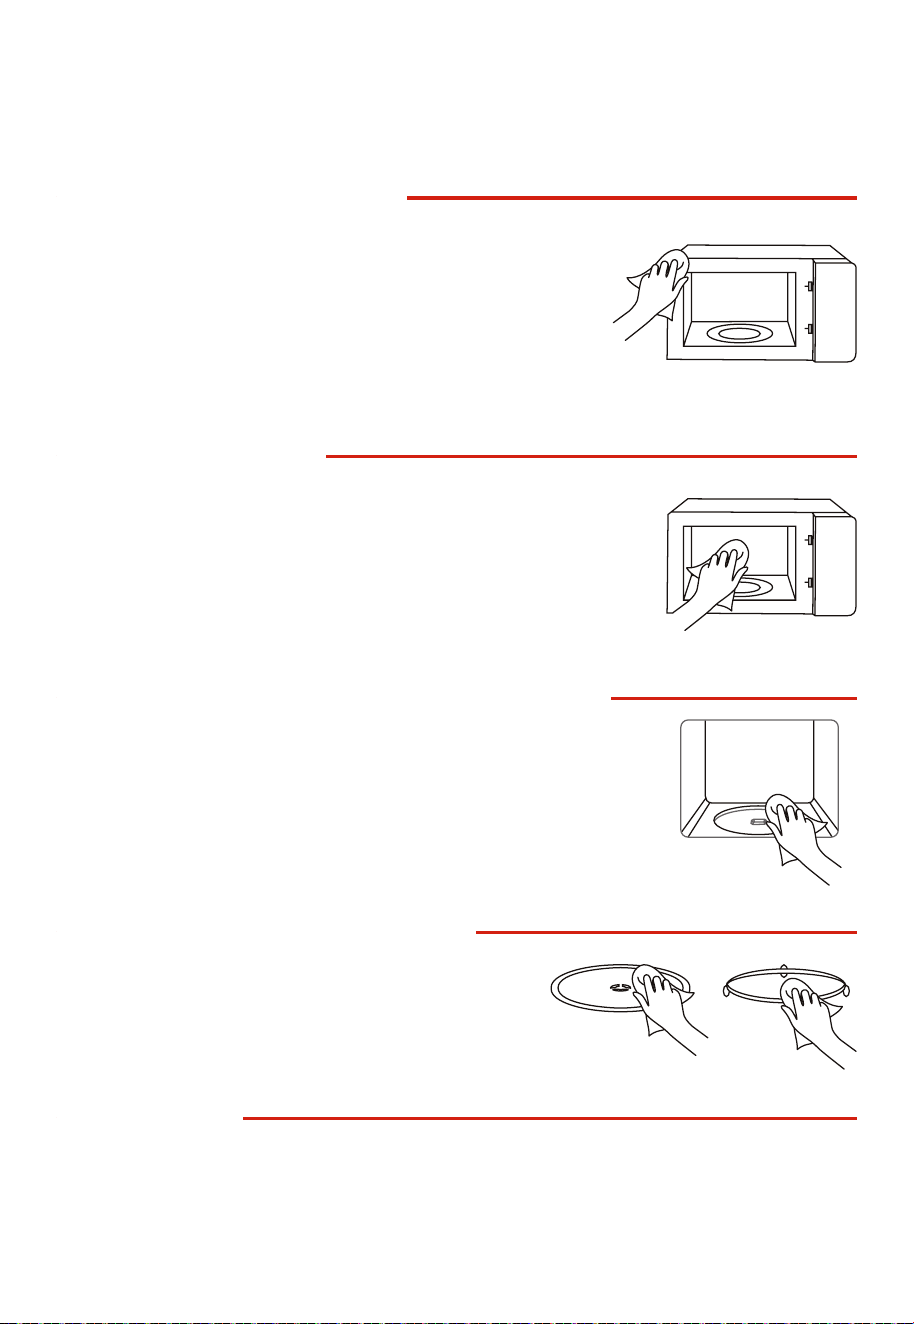
APPLIANCE FRONT
Hot soapy water:
Clean using a dish cloth and then dry with a soft cloth.
Do not use metal or glass scrapers for cleaning.
WARNING
EN-33
APPLIANCE FRONT PLATE
Hot soapy water:
Clean using a dish cloth and then dry with a soft cloth.
Remove splashes and patches of limescale, grease, starch and
albumin immediately. Corrosion can form under these patches
or splashes. Do not use glass cleaners or metal or glass scrapers
for cleaning.
APPLIANCE CAVITY
Hot soapy water or vinegar solution:
Clean using a dish cloth and then dry with a soft cloth. Do
not use oven spray or any other aggressive oven cleaners or
abrasive materials. Scouring pads, rough sponges and pan
cleaners are also unsuitable. These items scratch the surface.
Allow the interior surfaces to dry completely.
RECESS IN THE COOKING COMPARTMENT
Damp cloth:
Water must not be allowed to run into the appliance through the
turntable drive. Dry the turntable drive with a cloth.
TURNTABLE AND ROLLER RING
Hot soapy water:
When placing the turntable back into its recess, it
must engage properly.
DOOR PANEL
Glass cleaner:
Clean with a dish cloth. Do not use glass scrapers.
CLEANING

EN-34
MAINTENANCE
TROUBLE SHOOTING
Check your problem by using the chart below and try the solutions for each problem.
TROUBLE POSSIBLE CAUSE POSSIBLE REMEDY
Oven will not start
a. Electrical cord for oven is not
plugged in.
b. Door is open.
c. Wrong operation is set.
a. Plug into the outlet.
b. Close the door and try again.
c. Check instructions
Arcing or sparking
a. Materials to be avoided in
microwave oven were used.
b. The oven is operated when
empty.
c. Spilled food remains in the
cavity.
a. Use microwave-safe cookware
only.
b. Do not operate with oven
empty.
c. Clean cavity with wet towel.
Unevenly cooked foods
a. Materials to be avoided in
microwave oven were used.
b. Food is not defrosted
completely.
c. Cooking time, power level is
not suitable.
d. Food is not turned or stirred.
a. Use microwave-safe cookware
only.
b. Completely defrost food.
c. Use correct cooking time,
power level.
d. Turn or stir food.
Overcooked foods
Cooking time, power level is not
suitable.
Use correct cooking time, power
level.
Undercooked foods
a. Materials to be avoided in
microwave oven were used.
b. Food is not defrosted
completely.
c. Oven ventilation ports are
restricted.
d. Cooking time, power level is
not suitable.
a. Use microwave-safe cookware
only.
b. Completely defrost food.
c. Check to see that oven venti-
lation ports are not restricted.
d. Use correct cooking time,
power level
Improper defrosting
a. Materials to be avoided in
microwave oven were used.
b. Cooking time, power level is
not suitable.
c. Food is not turned or stirred.
a. Use microwave-safe cookware
only.
b. Use correct cooking time,
power level.
c. Turn or stir food.

EN-35
TROUBLE POSSIBLE CAUSE POSSIBLE REMEDY
Sensor cooked foods
not properly cooked
a. Cover or lid on food not
vented.
b. Door opened before sensor-
detected cooking time appears
in display.
a. Cover or lid over food must
contain vent hole for escaping
steam.
b. Do not open door to stir or
turn food before sensor-
detected cooking time
appears in display.
TROUBLE SHOOTING

EN-36
ONE YEAR LIMITED WARRANTY
This product carries a warranty stating that it will be free from defects in material and
workmanship for a period of one year from the date of purchase. This warranty is valid for the
original retail purchaser from the date of initial retail purchase and is not transferable. Keep your
original sales receipt.
IMPORTANT:
1. This warranty does not cover damages resulting from accident, misuse or abuse, lack of
reasonable care, the affixing of any attachments not provided with the product, loss of parts,
or subjecting the appliance to any but the specified voltage. ( Read directions carefully. )
2. This warranty is void if this product is ever used for other than private household purposes.
3. This warranty is void if this product is ever used outside of United State.
If service is required during the warranty period, properly pack your unit. We recommend using
the original carton and packing materials.
If additional assistance is needed, please contact customer assistance at:
Midea America Corp. expressly disclaims all responsibility for consequential damages or
incidental losses caused by use of the appliance. Some states do not allow this exclusion or
limitation of incidental or consequential losses so the foregoing disclaimer may not apply to you.
This warranty gives you specific legal rights, and you may also have other rights which may vary
from state to state.
The serial number can be found on the back cabinet. We suggest that you record the serial
number of your unit in the space below for future reference
Model Number : ____________________
Serial Number : _____________________
SAVE THIS FOR YOUR RECORDS
Made in China
customercare@us.toshiba-lifestyle.com
855-204-5313
Product registration is not mandatory. Failure to complete and return the card or form does not
diminish the consumer' s warranty rights.
PN:16170000A89753