INSTRUCTION MANUAL
EN
COMBINATION MICROWAVE OVEN
راخبلاب ةلواط نرف
AR
COMBI
Important information for the user
Recommendations /
Description /
Use /
Cleaning and care /
Safety instructions /
Information /
Advice /
Dear Customer, Thank you for purchasing one of our appliances. Our products are unique because they combine iconic
style with innovative technical solutions. They match perfectly with other products in our range and work equally well as a
standalone design objects in your kitchen. We hope you enjoy using your new appliance! Best regards.
SMEG S.p.A.
Model: MOC02
1
6
5
3
4
2
A
B
D
987
Model: MOC02
C
E
1
19
10
13
4
14 15
2
5
16
3
1120
12
21
6
17 18
10
11
D
E
12
21
3
4
13
14
15
1
EN
Instructions
IMPORTANT SAFETY INSTRUCTIONS
READ CAREFULLY AND KEEP FOR
FUTURE REFERENCE
1 Instructions
This user manual is an integral part of the
appliance and must therefore be kept in its
entirety and within the user’s reach for the
whole working life of the appliance.
1.1 Intended use
Failure to comply with the safety instructions
and failure to read the instructions for the
microwave oven may lead to the appliance
being used incorrectly and cause personal
injury.
• Do not use the appliance for purposes
other than those for which it was designed.
Improper use could cause injury.
• The appliance is not designed to operate
with external timers or with remote-control
systems.
• Use the appliance indoors, protected
from weather conditions.
• This appliance is intended for cooking
food in domestic and similar environments,
such as:
- staff kitchen areas in shops, offices and
other working environments
- by guests in hotels, motels and other
residential accommodation
- bed and breakfast facilities / farm
accommodation
- any other use, for example in
restaurants, bars and coffee shops is
considered improper.
1.2 General safety instructions
Follow all safety instructions in order to use
the appliance safely:
• WARNING: When in use, the
appliance and its accessible parts
become very hot. Small children should
be kept away from the appliance. Never
touch the heating elements during use.
• Protect your hands by wearing oven
gloves when moving food inside the
oven.
• Never try to put out a fire or flames with
water: Turn off the appliance and smother
the flames with a fire blanket or other
appropriate cover.
• This appliance may be used by children
aged at least 8 and by people of reduced
physical, sensory or mental capacity,
or lacking in experience in the use of
electrical appliances, provided that they
are supervised or instructed by adults
who are responsible for their safety.
• Children must not play with the appliance.
• Keep children under the age of 8 away
from the appliance and power cable
unless they are constantly supervised.
• Keep children under the age of 8 away
from the appliance when it is in use.
• Cleaning and maintenance must not be
carried out by unsupervised children.
2
Instructions
• The cooking process must always be
monitored. A short cooking process must
be continuously monitored.
• Never leave the appliance unattended
during cooking operations where fats or
oils could be released, as these could
then heat up and catch fire.
• Be very careful.
• Do not pour water directly on very hot
waveguide covers.
• Keep the oven door closed during
cooking.
• Switch off the appliance immediately
after use.
• Allow the appliance to cool down after
use. Do not touch the waveguide covers
inside the oven or the heating elements,
as they can be very hot. Danger of burns
or scalds!
• Do not insert pointed metal objects
(cutlery or utensils) into the slots in the
appliance.
• Do not use or store flammable materials
near the appliance.
• Do not use aerosols in the vicinity of this
appliance whilst it is in use.
• Do not modify this appliance.
• Installation and servicing should be
carried out by qualified personnel in
accordance with current standards.
• Do not try to repair the appliance yourself
or without the assistance of a qualified
technician.
• Do not pull the cable to unplug the
appliance.
• Do not use extension cables.
• Minimum height of free space necessary
above the top surface of the oven is
30 cm.
• Appliance must not be placed in a
cabinet.
• Only use utensils that are suitable for use
in microwave ovens.
• The oven should be cleaned regularly
and any food deposits removed.
• This appliance is not intended to be
installed in a cabinet. This appliance is
intended to be used on a benchtop not
exceeding 900mm from the floor.
WARNING: If the door
or door seals are damaged,
the oven must not be operated
until it has been repaired by a
competent person.
WARNING: It is hazardous
for anyone other than a
competent person to carry out
any service or repair operation
that involves the removal of a
cover which gives protection
against exposure to microwave
energy.
Liquids and other foods must not
be heated in sealed containers
since they are liable to explode.
Only allow children to use the
oven without supervision when
adequate instructions have been
given so that the child is able to
use the oven in a safe way and
understands the hazards of
improper use.
3
EN
Instructions
1.3 Caution when using this
appliance
• Do not sit on the appliance.
• Do not use abrasive or corrosive
detergents (e.g. powder products, stain
removers and metallic sponges), rough
materials or sharp metal scrapers on glass
parts as they may scratch the surface and
cause the glass to shatter. Use wooden
or plastic utensils.
• Do not use cleaning products containing
chlorine, ammonia, bleach or alcohol on
steel parts or parts with a metallic surface
finish (e.g. anodised, nickel-plated or
chrome-plated).
• Do not use steam jets to clean the
appliance.
• Do not spray any spray products near the
appliance.
• Do not obstruct ventilation openings and
heat dispersal slots.
• Fire hazard: Do not leave objects inside
the appliance.
• Do not use the appliance to heat rooms
for any reason.
• Do not use plastic cookware or containers
unsuitable for microwave cooking.
• Do not use plastic containers unsuitable
for microwave cooking when cooking
food.
• Do not put sealed tins or containers in the
oven.
• WARNING: Do not use hermetically
sealed containers to heat food in the
microwave, as the increased pressure
may cause damage or explosions when
the container is opened.
• Do not cook food wrapped in plastic,
aluminium or tin foil.
• Do not cover the bottom of the oven
cavity with aluminium or tin foil sheets.
• Do not place pans or trays directly on the
bottom of the oven cavity.
• If you wish to use greaseproof paper,
place it so that it will not interfere with the
hot air circulation inside the oven.
• Never use the oven door to lever the
appliance into place when fitting.
• Avoid exerting too much pressure on the
oven door when open.
• Do not rest any weight or sit on the open
door of the appliance.
• Take care that no objects are stuck in the
doors.
• Do not install / use the appliance
outdoors.
• Install / use the appliance on a flat,
stable surface.
• Do not remove the waveguide covers on
the sides of the microwave cavity, which
prevent grease and food residue from
entering the slots.

4
Instructions
• When heating food in plastic or paper
containers, keep an eye on the oven due
to the possibility of ignition.
• The microwave oven is intended for
heating food and beverages. Drying of
food or clothing and heating of warming
pads, slippers, sponges, damp cloth and
similar may lead to risk of injury, ignition
or fire.
• If smoke is observed, switch off or unplug
the appliance and keep the door closed
in order to stifle any flames.
• Microwave heating of beverages
can result in delayed eruptive boiling,
therefore care must be taken when
handling the container.
• The contents of feeding bottles and
baby food jars shall be stirred or shaken
and the temperature checked before
consumption, in order to avoid burns.
• Eggs in their shell and whole hard-boiled
eggs should not be heated in microwave
ovens since they may explode, even after
microwave heating has ended.
• Failure to maintain the oven in a clean
condition could lead to deterioration of
the surface that could adversely affect the
life of the appliance and possibly result in
a hazardous situation.
• In the case of vertical combustible walls,
install / use the appliance at a minimum
distance of 8 cm.
• This appliance must not be installed in
boats or caravans.
• The appliance must not be installed on a
pedestal.
• Do not immerse the appliance, the power
cord or the plug in water or any other
liquid.
• Avoid spilling liquids onto the power plug
and base.
• If the power cable becomes damaged,
contact technical support immediately to
arrange for it to be replaced in order to
avoid possible hazards.
• Always use any necessary/required
personal protective equipment (PPE)
before performing any work on the
appliance (installation, maintenance,
positioning or movement).
• Before performing any work on the
appliance, switch off the power supply.
• Metallic containers for food and
beverages are not allowed during
microwave cooking.
5
EN
Instructions
1.5 Manufacturer liability
The manufacturer declines any liability for
damage to persons or property caused by:
• Use of the appliance other than the one
envisaged.
• Not having read the user manual.
• Tampering with any part of the appliance.
• Use of non-original spare parts.
• Failure to comply with the safety
instructions.
Please store these instructions
carefully. If the appliance is
transferred to others, they
should also be given this
instructions booklet.
These instructions can be downloaded from
the Smeg website “www.smeg.com”.
1.6 Disposal
Electrical appliances must not be disposed
of together with household waste.
Devices marked with this
symbol are subject to European
Directive 2012/19/EU
requirements.
• All waste electrical and electronic
appliances must be disposed of
separately from household waste and
taken to authorised waste disposal
facilities. Disposing of the used appliance
correctly will help to safeguard the
environment and human health. For
further information regarding the disposal
of used appliances, please contact your
local authority waste disposal department
or the shop where the appliance was
purchased.
1.4 Connecting the appliance
Make sure that the voltage and frequency
of the power supply correspond to those
indicated on the data plate on the bottom
of the appliance.
If the plug of the appliance is not compatible
with the socket, contact our Technical
Assistance service for a replacement.
• Children must not play with this appliance.
• Keep the appliance and its power cable
out of the reach of children.
• Always unplug the appliance from the
power socket if it is to be left unattended
and before assembly, disassembly or
cleaning.
• Disconnect the appliance from the power
supply before changing the accessories
or approaching moving parts when in
use.
The accessible surface may be
hot during operation.
6
Instructions / Description
1.7 Installation
1) Select a level surface that provides
enough open space for the intake
and/or outlet vents.
• The minimum installation height is 85 cm.
• The rear surface of appliance shall be
placed against a wall. Leave a minimum
clearance of 30 cm above the oven. A
minimum clearance of 20 cm is required
between the oven and any adjacent
walls.
• Do not remove the legs from the bottom
of the oven.
• Blocking the intake and/or outlet
openings can damage the oven.
• Place the oven as far away from radios
and TV as possible. Operation of
microwave oven may cause interference
to your radio or TV reception.
2) Plug your oven into a standard
household outlet. Be sure the voltage
and the frequency is the same as the
voltage and the frequency on the rating
label.
Do not install oven over a
range cooktop or other heat-
producing appliance. If installed
near or over a heat source, the
oven could be damaged and
the warranty would be void.
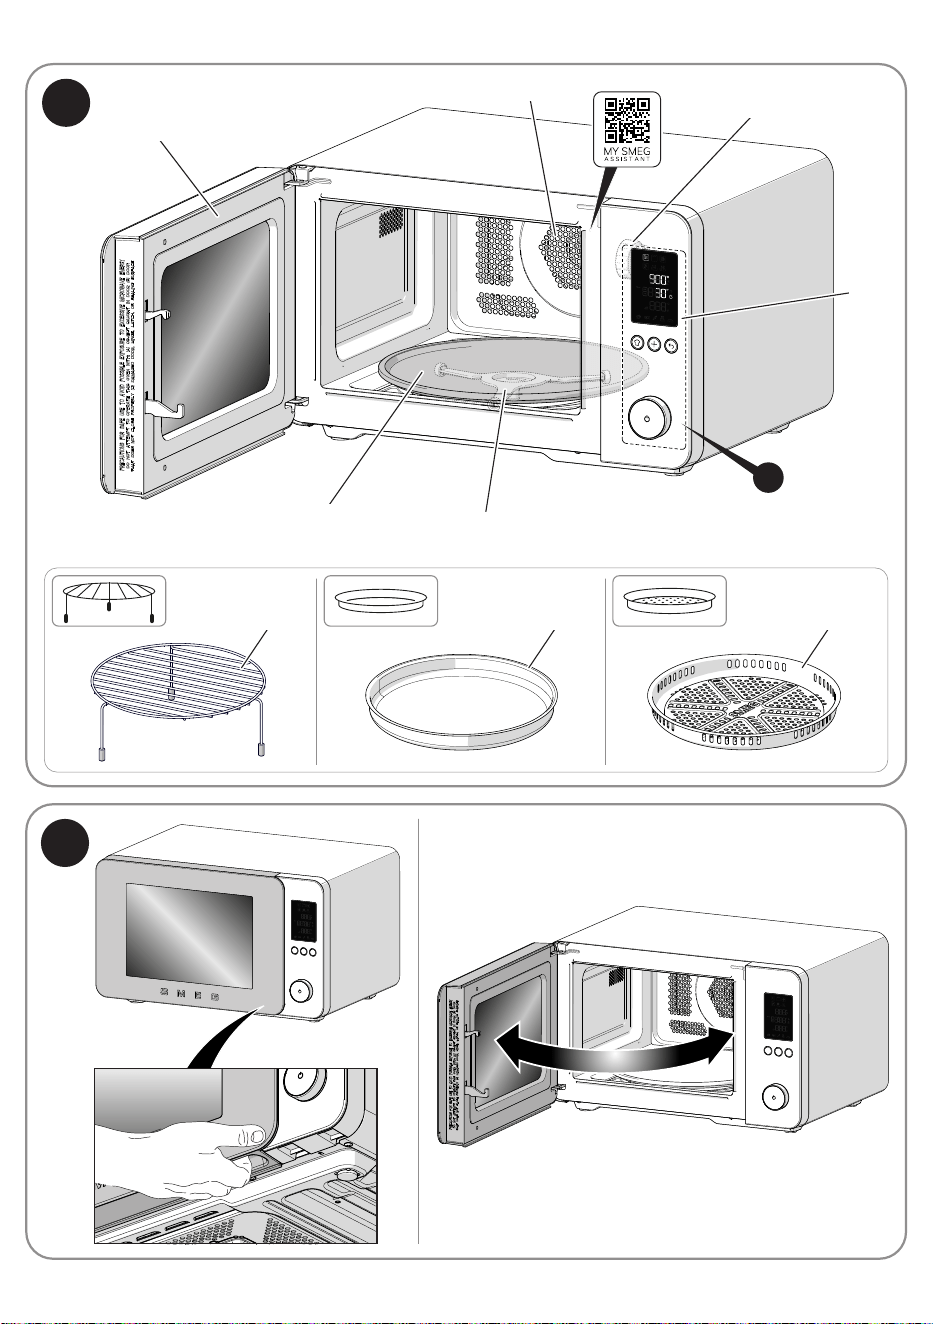
2 Appliance description
(Fig. A)
1) Control panel and display
2) Oven light
3) Door
4) Fan
5) Roller ring
6) Turntable
7) Grill rack
8) Crisp plate
9) Air fryer basket
Technical specifications
Rated Voltage/
Frequency
230-240 V~ 50 Hz
Microwave Input 1450 W
Microwave Output 900 W
Grill 950-1000 W
Convection 2000-2100 W
2.1 Before first use
Danger of burns
High appliance temperature
• Failure to follow these
instructions may result in fire,
burns or scalds.
• Remove any protective film from the
outside or inside of the appliance,
including accessories.
7
EN
Description
• Remove any labels (apart from the
technical data plate) from the accessories
and shelves.
• Remove and wash all the accessories (see
section “4 Cleaning and maintenance“).
Before use, make sure that all
the components are intact.
2.2 Description of the parts (Fig. A)
Light (2)
The appliance’s interior lighting comes on:
• When the door is opened.
• during cooking.
Fan (4)
The internal fan cools the appliance and
operates during cooking.
The fan causes a steady outflow of air from
above the door which may continue for
a short time even after the appliance has
been switched off.
Roller ring (5)
The appliance is equipped with a roller ring
in the centre of the cooking cavity on which
the turntable rests.
2.3 Description of accessories
(Fig. A)
Turntable (6)
Glass turntable in the centre of the
microwave base, used as a support surface
and to collect food residues during cooking.
It rotates during use to ensure even heat
distribution.
Grill rack (7)
Grid that allows food to be placed in
a raised position in the oven. Optimises
cooking with a grill or fan function. Ideal for
even browning, gratinating and roasting.
Crisp plate (8)
Tray that allows you to cook food evenly
and to a golden brown. Ideal for pizzas,
savoury cakes and gratins, it ensures crisp
results in a short time.
Air fryer basket (9)
Perforated tray that allows optimal
circulation of hot air, ideal for air frying
breaded, pre-cooked and/or frozen foods.
The accessories intended to
come into contact with food are
made of materials that comply
with the provisions of current
legislation.
8
Description
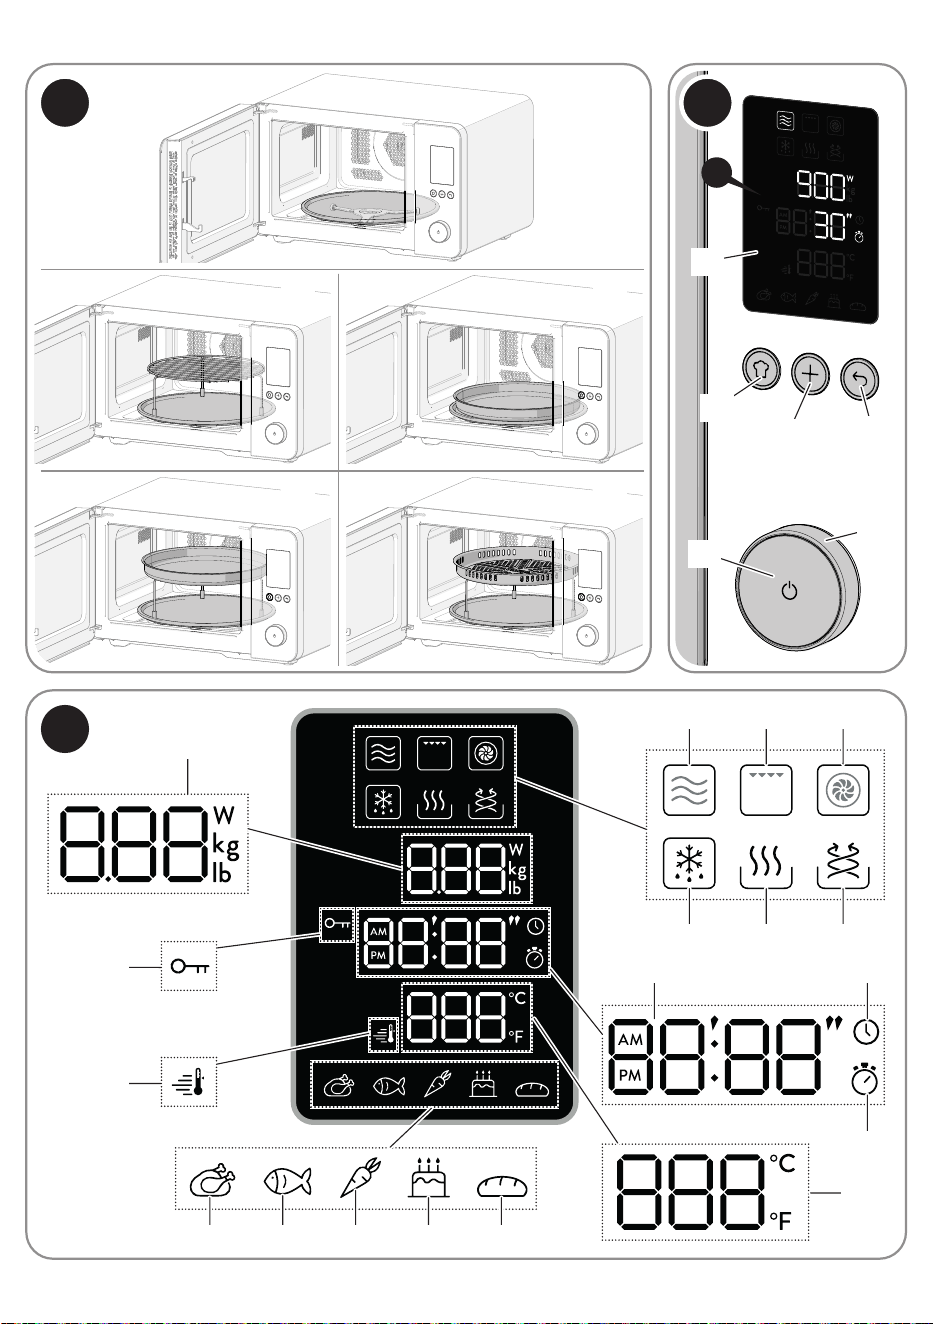
2.4 Description of the controls
(Fig. D)
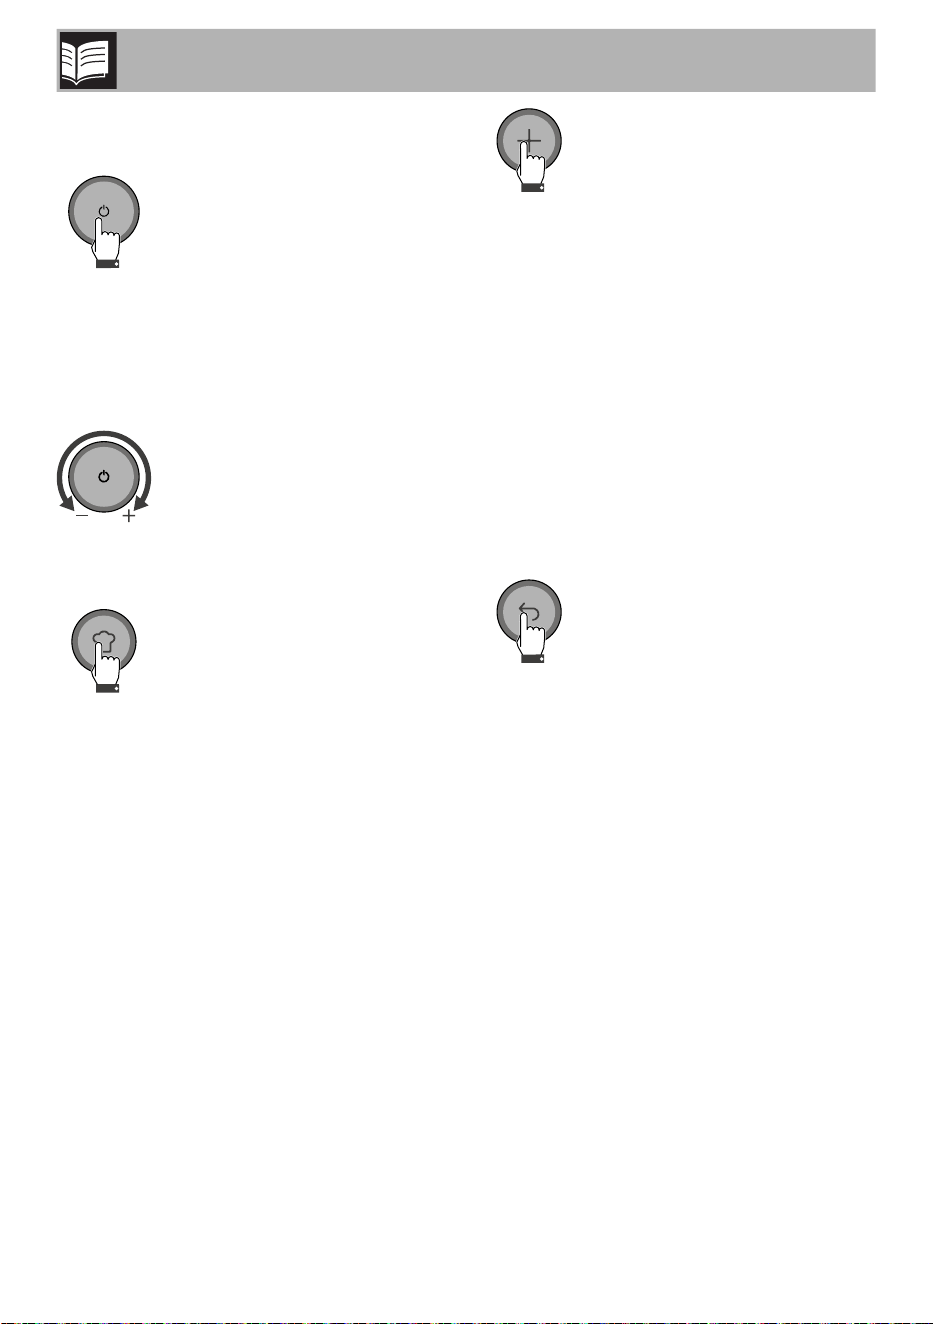
START/STOP button (10)
A short press allows you to confirm the
required function or to start or pause
cooking. Press and hold to stop cooking
or access the user settings section (only
available in clock mode).
Navigation knob (11)
Allows you to navigate through the available
functions and cooking settings.
Chef Menu button (12)
Gives access to the Chef Menu for
automatic programmes.
Plus button (13)
Allows you to activate one of the following
functions depending on when it is selected:
• Once a cooking function has been set, it
allows you to add a second function to
start sequentially from the first (multi-step
function).
• When cooking, it adds cooking time
in 30 second increments (+30 second
function).
• In clock mode, it immediately starts
microwave cooking at maximum power
(Quick Start function).
Back button (14)
Returns to the previous selection.
Display (15)
The display shows the functions, parameters
and the values of the cooking settings.
9
EN
Description
2.5 Description of the display
(Fig. E)
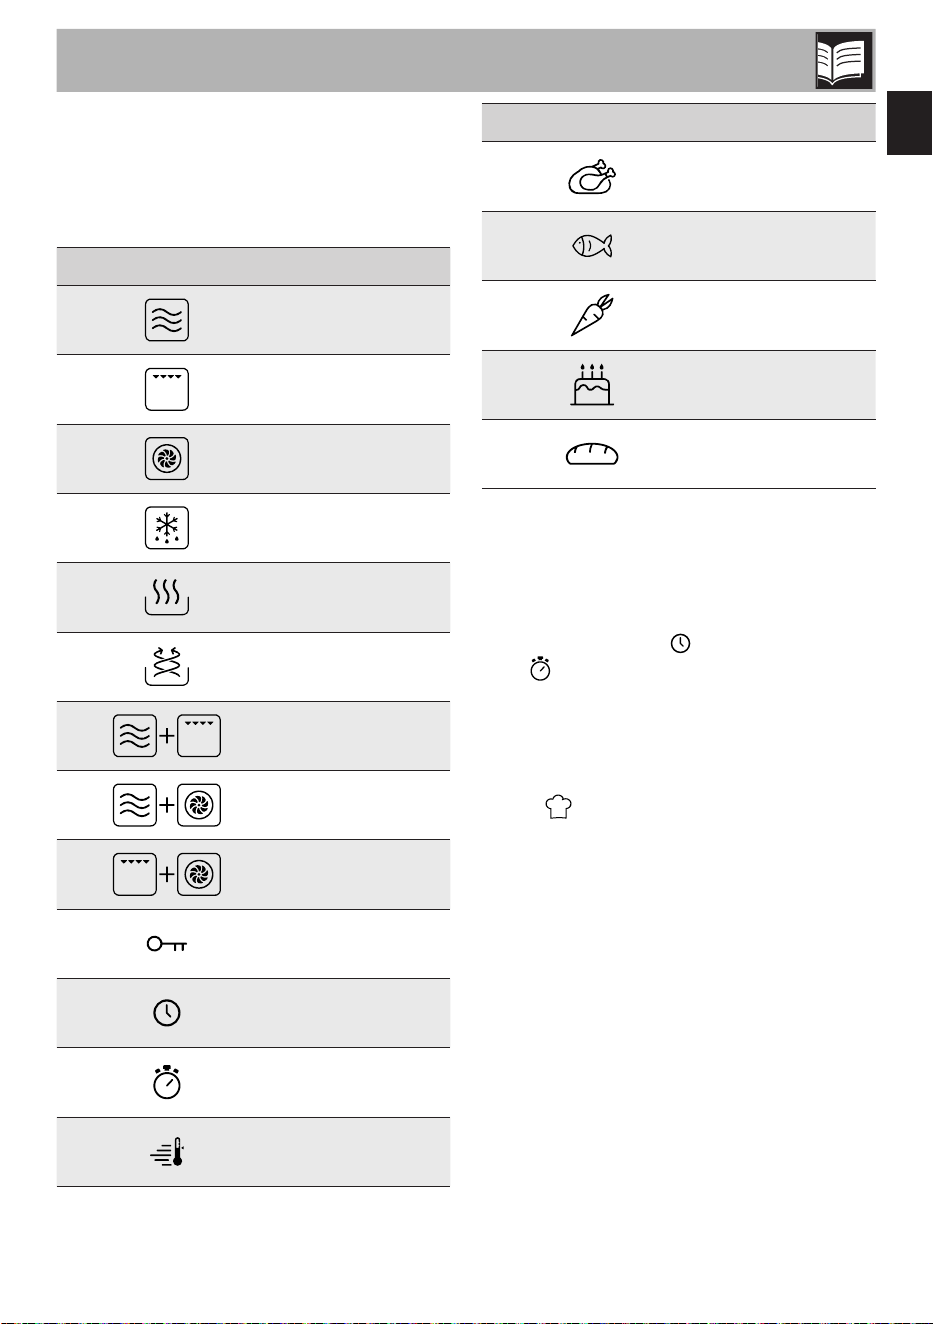
Display icons
Icon
Meaning
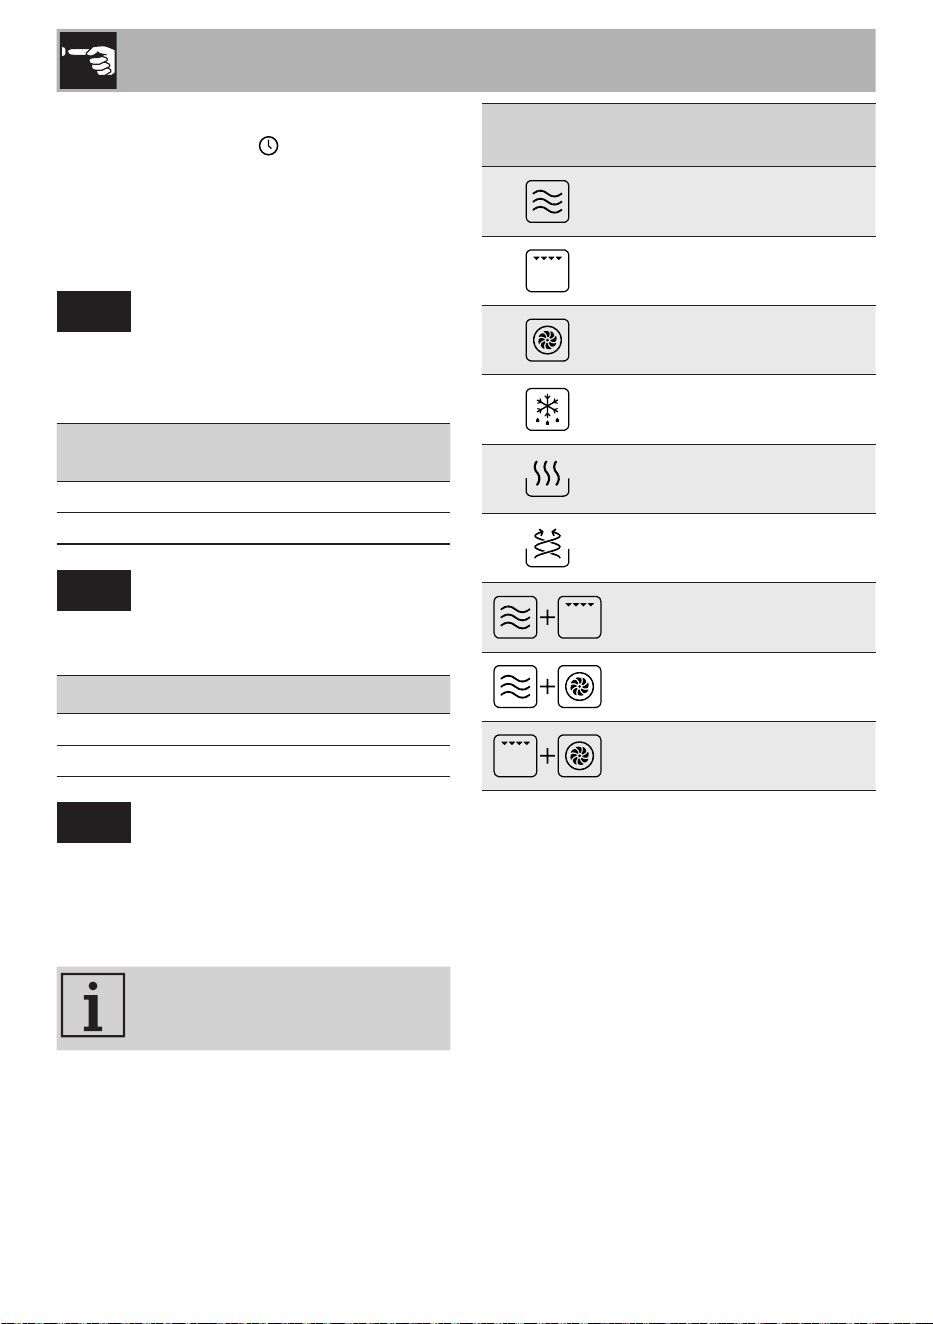
1 Microwave
2 Grill
3 Fan-assisted
4 Defrost
5 Warm
6 Air-Fry
7 Microwave + Grill
8
Microwave +
Fan-assisted
9 Grill + Fan-assisted
10 Child lock
11 Clock
12 Cooking timer
13 Pre-heating
Icon Meaning
14 Meat and poultry
15 Fish and shellfish
16 Vegetables
17 Cakes and sweets
18
Bread, pizza
and cereals
Power/weight indicator (19)
Displays cooking power or food weight.
Clock and timer (20)
Displays the time and the cooking
time set on the timer.
Temperature and recipe number (21)
Displays the cooking temperature and the
automatic programme number in the Chef
Menu .
10
Use
3 Use
3.1 First use
• Heat the empty oven to the maximum
temperature to burn off any residues from
the manufacturing process.
• Ventilate the room and leave the room
while the appliance is heating up.
• When the appliance is used for the
first time, when heating, it may give off
unpleasant smells due to manufacturing
residues remaining on some components.
These smells usually disappear after the
appliance has been heated for the first
time.
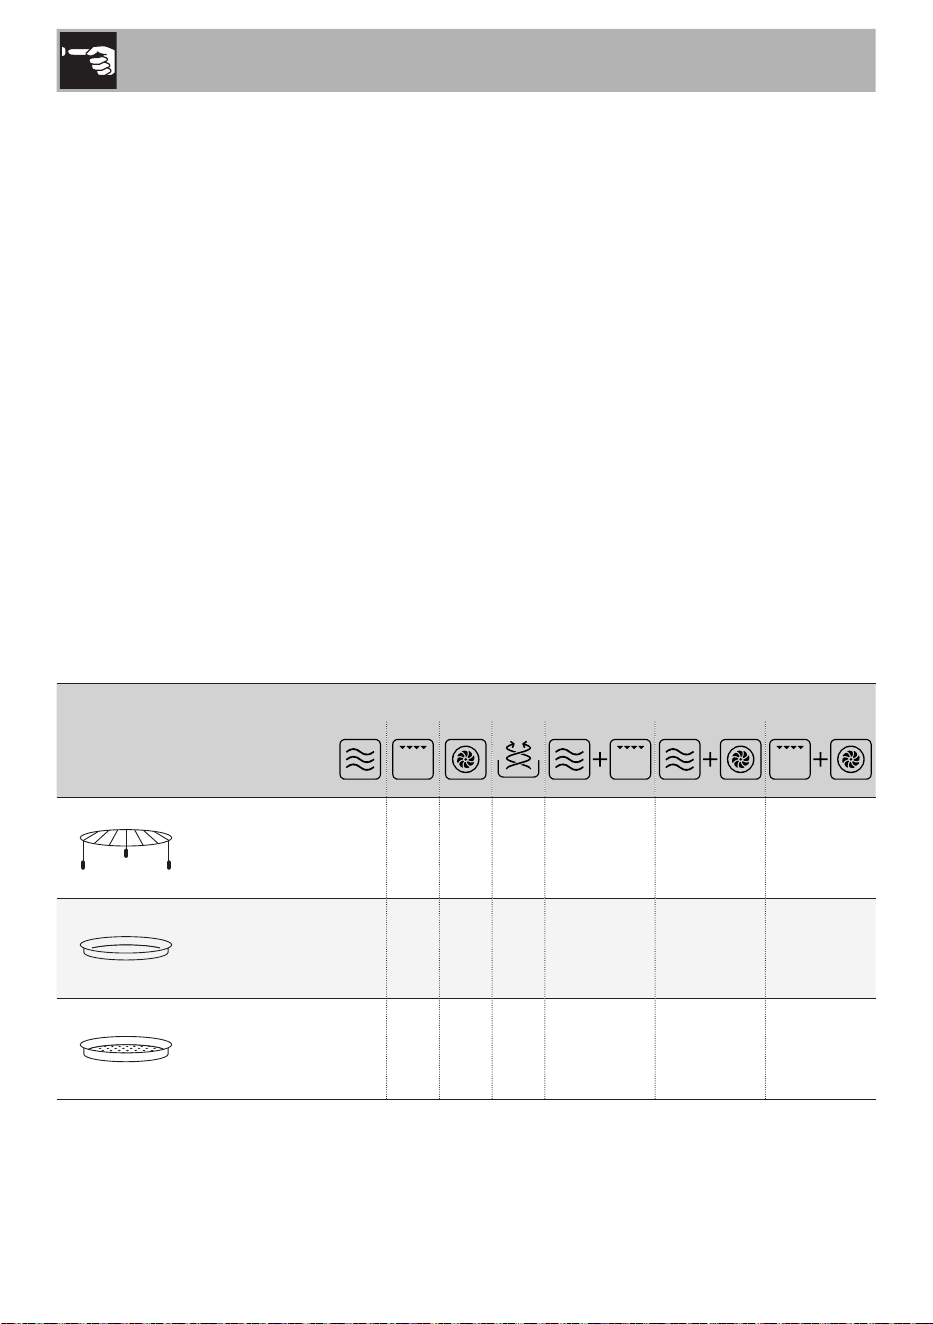
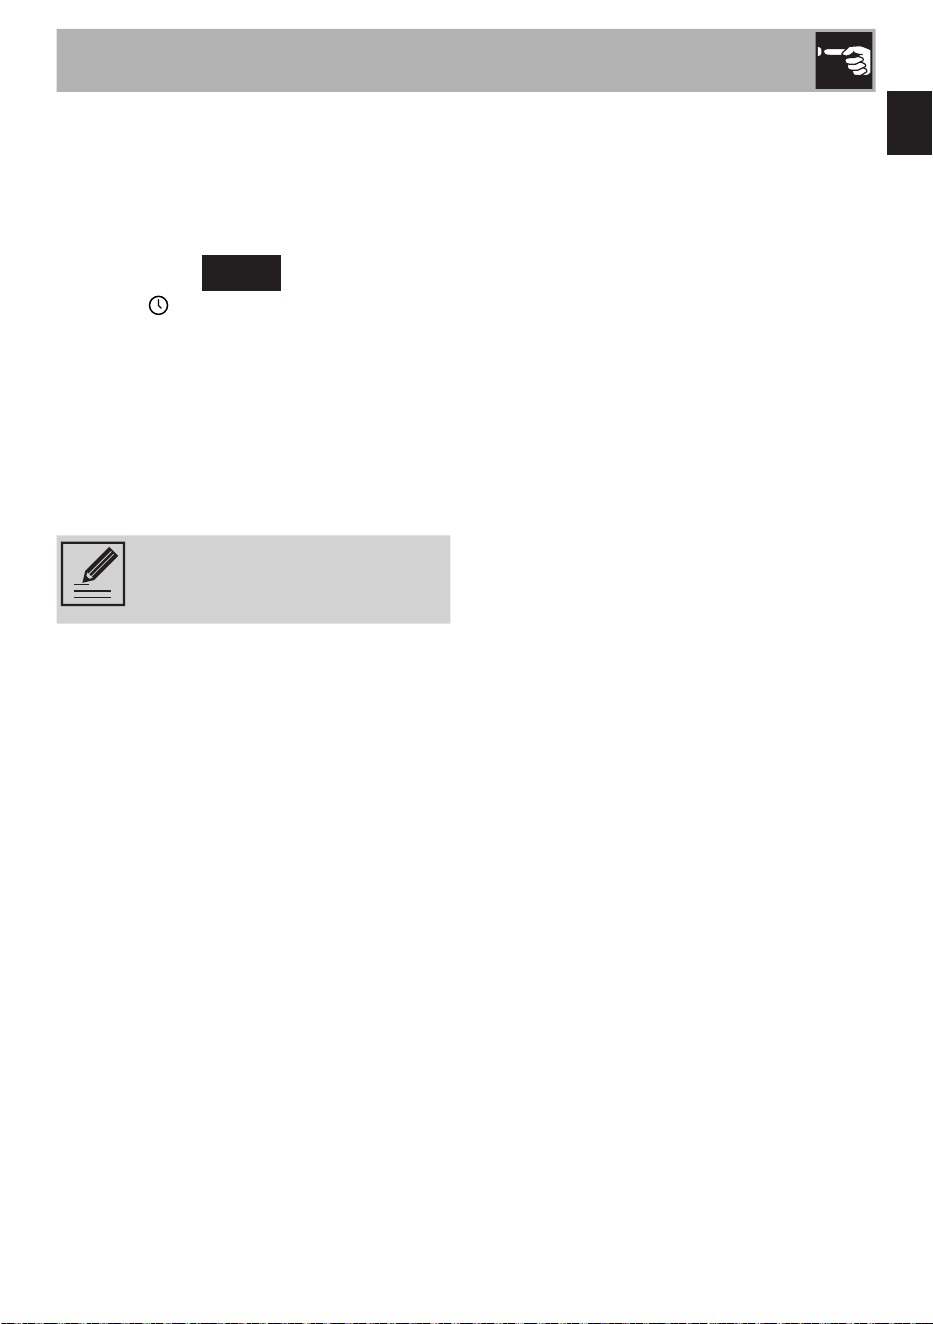
Using the accessories (Fig. C)
The turntable must be correctly positioned
on the roller ring and the accessories can
be placed on it if required.
Accessory
Instructions
for use
(Fig. C)
Compatible functions
(1)
x
x x
(2)
(3)
x
x x x
(4)
x
x x
11
EN
Use
3.2 How to use the microwave oven
Setting the time
When connecting the appliance for the
first time or after a power failure, the
flashing time
12:00
and the clock
symbol appear on the display.
The current time has to be set in order to
start a cooking function:
1) Turn the knob to set the hour to the
required value.
2) Confirm using the START/STOP button.
3) Repeat the procedure to set the minutes
and confirm the selected time.
To set the current time and/or
the display format (12h/24h)
see “3.3 Settings Menu“.
Selecting the cooking functions
To start using the microwave and select the
cooking function:
1) Turn the knob to select the required
function.
2) Confirm by pressing the START/STOP
button to access the cooking settings
available for the selected function (see
specific table).
3) Turn the knob to adjust the parameters
and press the START/STOP button to
confirm.
4) When you have finished adjusting
the selectable settings, press the
START/STOP button to start.
12
Use
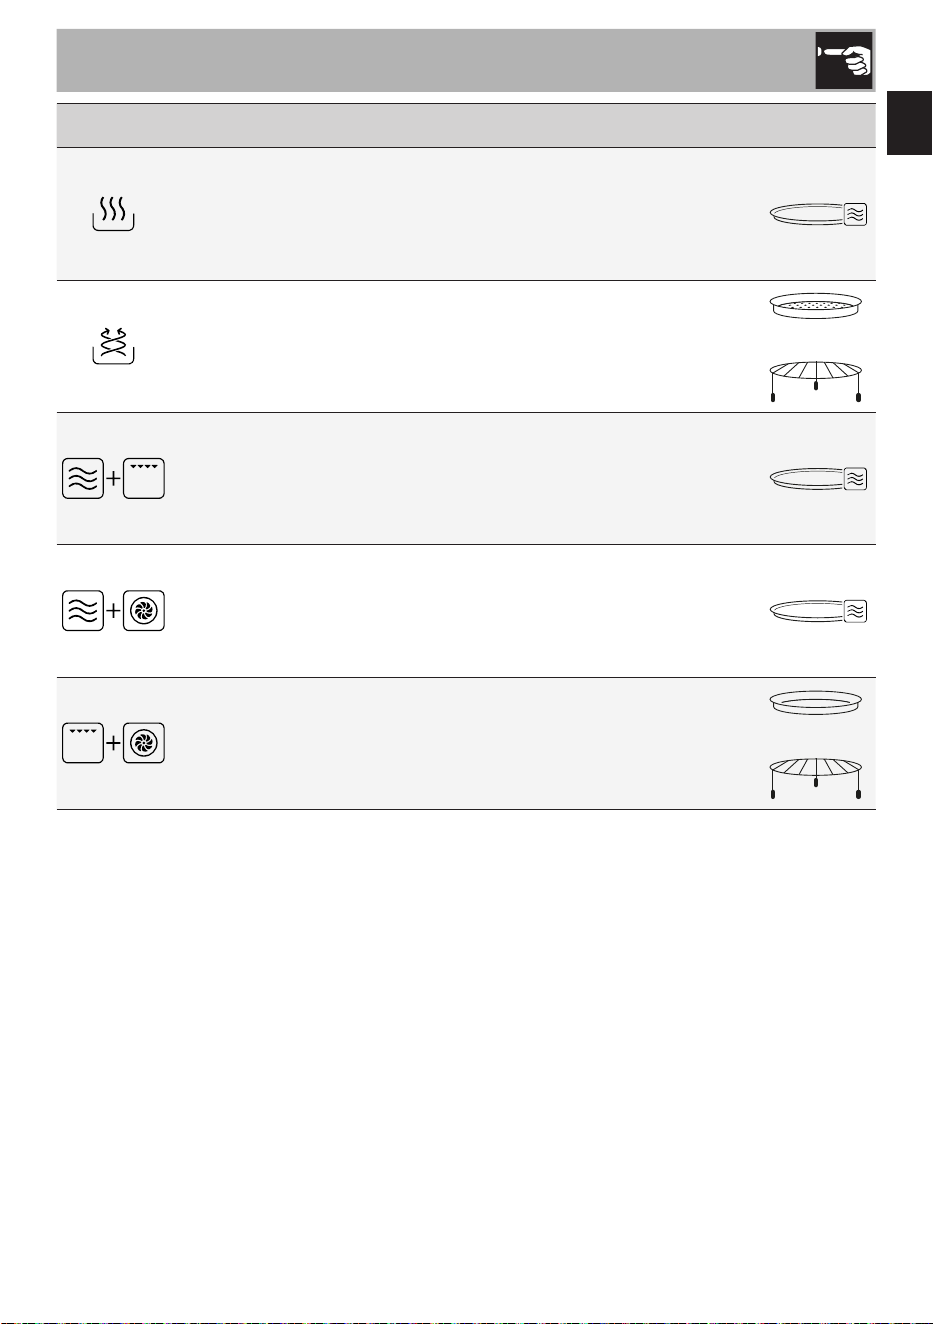
This symbol indicates a plate suitable for use in a microwave oven (not
supplied).
Function Description Settings Accessory
Microwave
Quickly cook, defrost or heat food and
drinks.
• Power
• Cooking time
Grill
Produces excellent grilling and
gratinating results.
• Cooking time
Fan-assisted
Gives you the same cooking results as a
traditional oven.
• Temperature
• Cooking time
Defrost
Allows you to defrost frozen food in two
ways:
• Auto Defrost: allows you to choose
between automatic programmes (see
specific table) and set the weight
of the food. The time is calculated
automatically.
• Manual Defrost: allows you to set the
required defrosting time manually.
• Food weight
(Auto Defrost)
• Cooking time
(Manual Defrost)
13
EN
Use
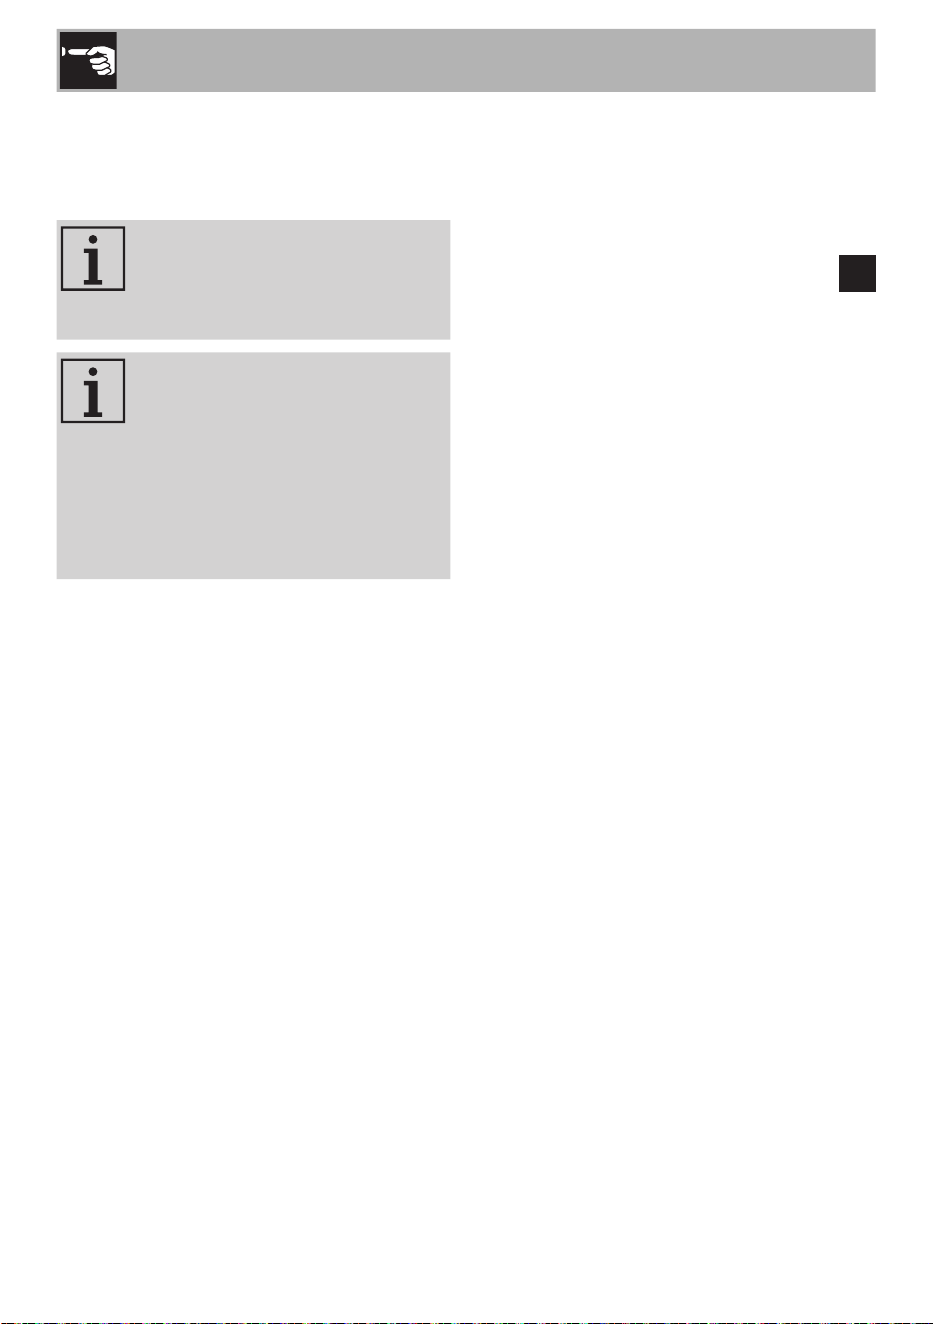
Function Description Settings Accessory
Warm
Useful for reheating or keeping food
warm.
• Cooking time
Air-Fry
Useful for frying without oil or with a
small amount of oil.
• Temperature
• Cooking time
+
Microwave + Grill
Combines microwave and grill cooking
for faster grilling and browning.
• Power
• Cooking time
Microwave + Fan-assisted
Combines microwave and fan-assisted
cooking for faster oven cooking.
• Power
• Temperature
• Cooking time
Grill + Fan-assisted
Combines the grill and fan-assisted
cooking for crispy and succulent results.
• Temperature
• Cooking time
14
Use
Selecting Chef Menu functions
Various automatic programmes can be
selected for each food category in the Chef
Menu.
Once the type and weight of the
food has been set, the appliance
automatically selects the most
appropriate cooking mode.
Slight variations in time
are possible depending on
the ingredients or cooking
accessories used and the degree
of cooking required.
We recommend that you always
check the food at the end of the
preset cooking time.
1) Press the Chef Menu button.
2) Turn the knob to select the food
category.
3) Confirm using the START/STOP button.
4) Turn the knob to set the required
programme. The recipe indicator
P
flashes.
5) Confirm using the START/STOP button.
Once the recipe has been selected, you
can change the set weight (see “Changing
the cooking settings“).
6) Turn the knob to set the food weight.
7) Press the START/STOP button to start.
15
EN
Use
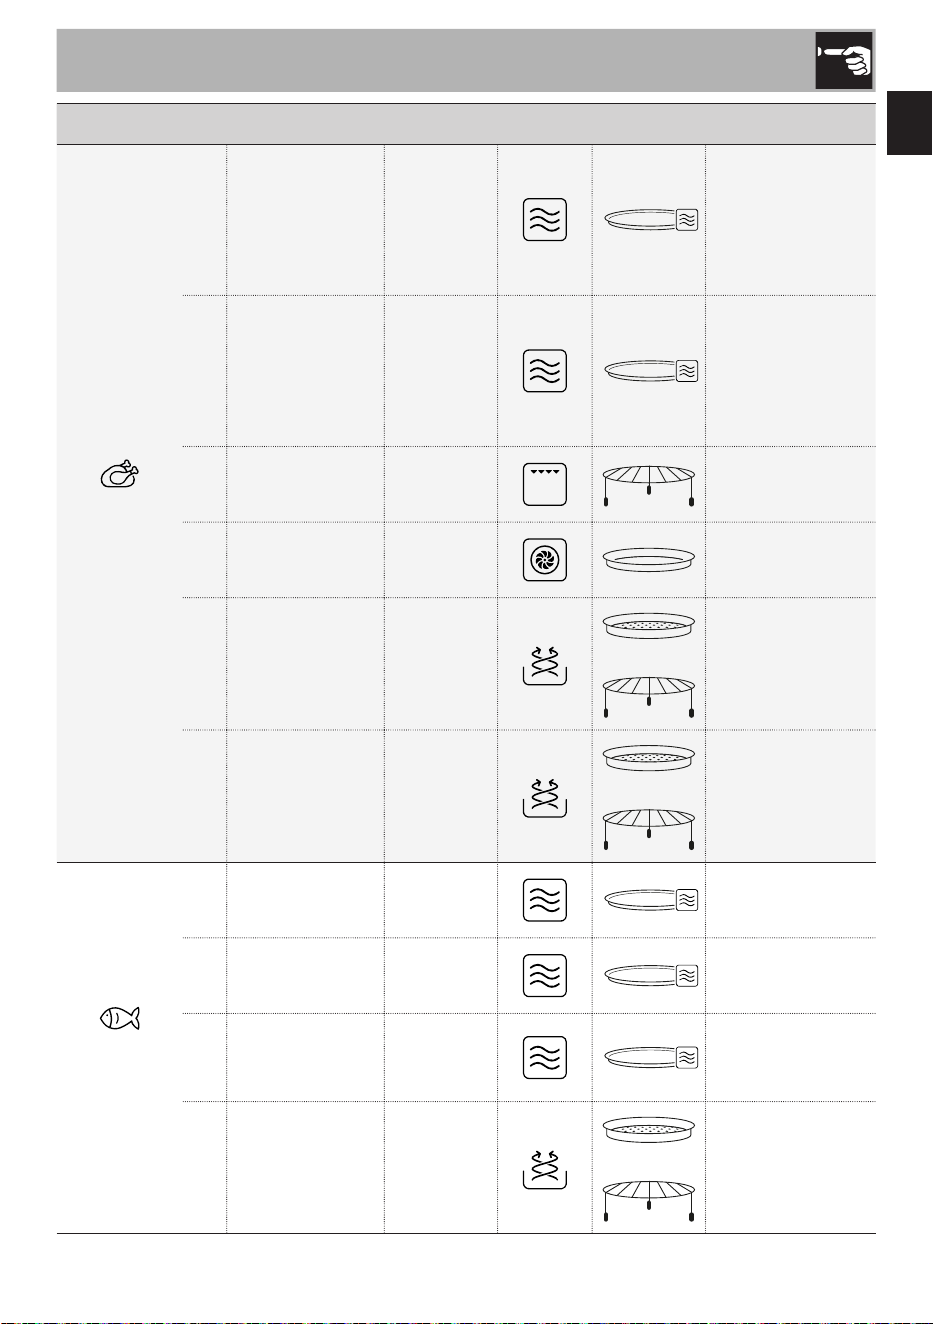
Category Programme Weight Function Accessory Cooking tips
Meat and
poultry
P01
Meat
150-600 g
Cover during
cooking. Use
slices no thicker
than 3 cm. Cover
and allow to rest
before serving.
P02
Chicken 150-600 g
Cover during
cooking. Use
slices no thicker
than 3 cm. Cover
and allow to rest
before serving.
P03
Bacon 4-8 pcs -
P04
Roast chicken 1-1.2 kg -
P05
Chicken wings 150-300 g
+
-
P06
Chicken nuggets 300 g
+
-
Fish and
shellfish
P07
Fish fillets
(thick slice)
150-650 g -
P08
Fish fillets
(thin slice)
150-650 g -
P09
Shrimps 250 g
Cover and allow
to rest before
serving.
P10
Fish fingers
(frozen)
300 g
+
-
16
Use
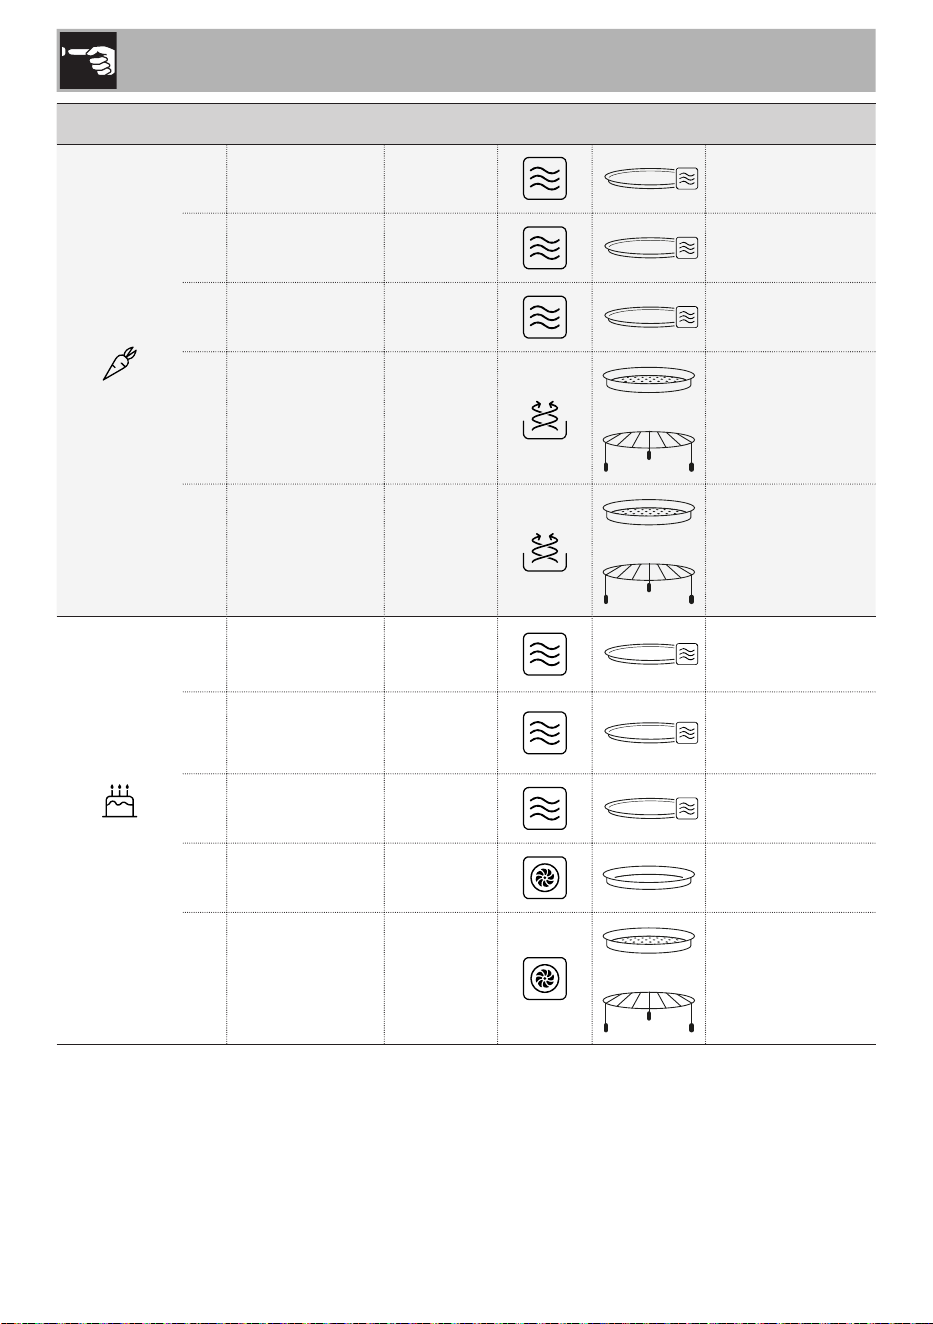
Category Programme Weight Function Accessory Cooking tips
Vegetables
P11
Potatoes 1-3 pcs
Pierce before
cooking.
P12
Hard vegetables 200-400 g
Cover during
cooking.
P13
Soft vegetables 200-400 g
Cover during
cooking.
P14
Frozen
vegetables
250 g
+
-
P15
Chips (frozen) 300 g
+
-
Cakes and
sweets
P16
Popcorn 100 g -
P17
Melting 113 g
Recommended
for butter and soft
cheeses.
P18
Mug cake 115 g -
P19
Cake 475 g -
P20
Muffins 740 g
+
-
17
EN
Use
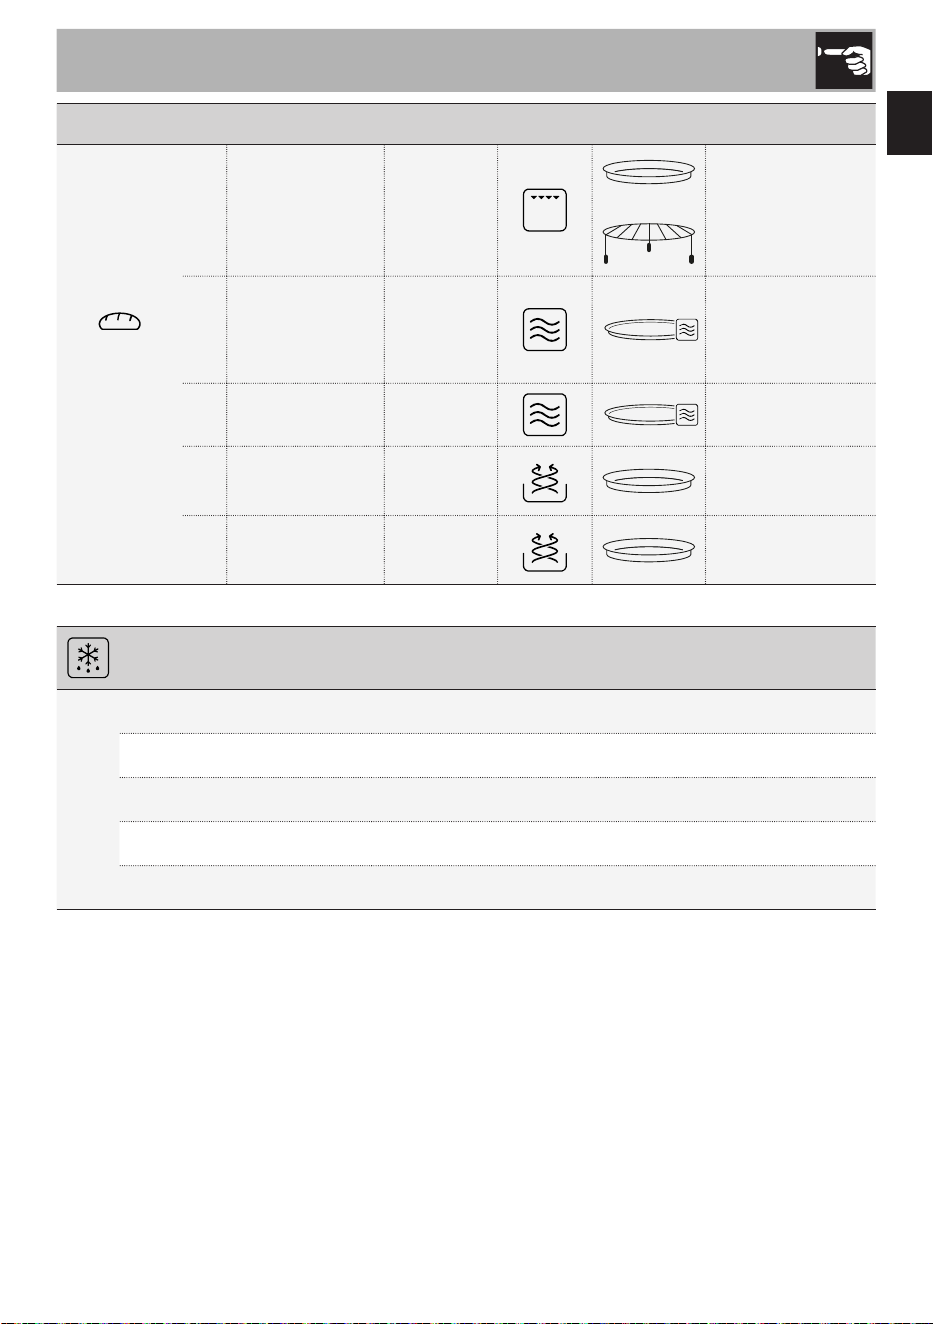
Category Programme Weight Function Accessory Cooking tips
Bread,
pizza and
cereals
P21
Toast 100 g
+
Turn half way
through cooking.
P22
Rice 200-600 g
Ratio to water
= 1:1.8
Cover during
cooking.
P23
Pizza (reheating) 100-400 g -
P24
Pizza (frozen) 300 g -
P25
Lasagne/
Pasta bake
300-500 g -
Programme Weight Cooking tips
AUTO DEFROST
d01
Minced meat 125 - 500 g Turn half way through cooking.
d02
Meat 400 - 800 g -
d03
Fish 500 g - 1 kg -
d04
Vegetables 300 - 500 g -
d05
Bread 280 - 600 g -
18
Use
Changing the cooking settings
Each cooking setting can be changed by
following the steps below:
Before you start cooking:
1) Turn the knob to select the required
parameter.
2) Press the START/STOP button to
confirm.
3) Turn the knob to set the required value.
4) Press the START/STOP button to move
to the next parameter or to start cooking.
During cooking:
1) Press the START/STOP button to pause
cooking.
2) Press the BACK button; the last
parameter set will flash.
3) Turn the knob to change the value of the
selected parameter.
4) Press the BACK button again to return
to the previous parameters and change
them using the knob.
Preheating
The fan assisted cooking, air frying and
combined fan assisted cooking functions
are always preceded by a preheating
phase, which allows the appliance
to reach the cooking temperature more
quickly.
During this phase, the indicatorlights
up .
To start cooking, press the START/STOP
button at the end of the preheating phase.
If the dish has already been
placed in the oven, the START/
STOP button (13) has to be
pressed in order for cooking to
start, also after the preheating
stage has finished.
End of cooking
If a cooking duration has been set, it ends
automatically. The text
End
, appears
on the display, the timer symbol flashes
and a buzzer sounds, which can be
switched off using the START/STOP button.
To end cooking manually and go back
to the clock display, press and hold the
START/STOP button for at least 3 seconds.
19
EN
Use
Quick Start Function
In clock mode, press and hold the PLUS
button to activate the Quick Start function to
start cooking immediately. The microwave
function is activated for 30 seconds at
maximum power.
+30 seconds function
During cooking, press the PLUS button
to quickly increase the time in 30 second
increments.
This function is not available
for the automatic programmes
in the Chef Menu and for the
Auto Defrost and Auto Warm
functions.
Multi-step Function
During the function selection phase, it
is possible to set a sequence of up to
2 cooking functions that are automatically
activated at the end of the previous function.
To add a sequence of functions:
1) After setting a cooking function (before
starting to cook), press the PLUS button.
The icons of the available cooking
functions flash on the display.
2) Set the parameters for the second
function.
3) Start cooking.
It is not possible to activate the
multi-step function once cooking
has started.
3.3 Settings Menu
The settings menu can only be
accessed when the microwave
is in clock mode.
1) Press and hold the START/STOP button.
2) Turn the knob to scroll through the menu
items.
3) Press the START/STOP button to
confirm the setting to be configured.
4) Press and hold the START/STOP button
to save the setting and exit the menu.
Loc
Child lock
This function allows the appliance to lock
(On) the controls.
When the function is active, the
indicator lights up on the display.
To disable the function, go back
to the Settings menu and select
OFF.
Snd
Sound
Enables (On) or disables (OFF) the sounds
emitted by the microwave.
CLoC
Clock format
Sets the time display to a 12 (12H) or
24 hour (24H) format.
20
Use
Modifying the time
1) The clock icon appears on the
display and the hours start to flash.
2) Turn the knob to the required value.
3) Confirm using the SET button.
4) Repeat the procedure to set the minutes.
unit
Setting the units of measurement
Set the units of measurement for temperature
and weight according to the following
table:
Hardness
level
Temperature Weight
EU °C kg
US °F lb
brl
Display brightness
This allows you to select the brightness of
the display according to the following table:
Hardness level Display brightness
1 25%
2 100%
turn
Turntable setting
When enabled (On), the turntable is rotated
to optimise cooking results.
Can only be deactivated (OFF) for cooking
functions that do not use microwave mode.
It does not affect the automatic
programme settings of the Chef
Menu.
Function
Turntable
(Default)
Modifiable
On
x
On
On
On
x
On
x
On
On
x
On
x
On
21
EN
Cleaning and maintenance
4 Cleaning and maintenance
The instructions manual contains cleaning
and maintenance instructions and
recommendations from the manufacturer to
the customer. Any other intervention should
be carried out by an authorised service
centre.
Before cleaning, ALWAYS remove the plug
from the mains power supply and allow the
appliance to cool down.
Caution
• Do not use steam jets to clean
the appliance.
• Do not use cleaning products
containing chlorine, ammonia,
bleach or alcohol on steel parts
or parts with a metallic surface
finish.
• Do not use abrasive or corrosive
detergents.
• Do not use rough or abrasive
materials or sharp metal
scrapers.
• Clean the components and
accessories regularly after
each use.
Cleaning the surfaces
To keep the surfaces in good condition,
they should be cleaned regularly after use.
Let them cool first.
Ordinary daily cleaning
Always and only use specific products that
do not contain abrasives or chlorine-based
acids.
Pour the product onto a damp cloth and
wipe the surface, rinse thoroughly and dry
with a soft cloth or a microfibre cloth.
Food stains or residues
Do not use steel sponges and sharp
scrapers as they will damage the surface.
Use normal, non-abrasive products and a
wooden or plastic tool, if necessary. Rinse
thoroughly and dry with a soft cloth or a
microfibre cloth.
Do not allow residues of sugary foods (such
as jam) to set inside the oven. If left to set
for too long, they might damage the enamel
lining of the appliance.
22
Cleaning and maintenance
Cleaning the accessories
Wash all accessories in warm soapy water
with a soft sponge or a soft cloth. Rinse
and dry thoroughly. Do not use abrasive
detergents, metallic sponges or metal
tools to clean the accessories as they may
damage the surfaces.
Cleaning the door glazing
The glass in the door should always be kept
perfectly clean. Use absorbent kitchen roll.
In case of stubborn dirt, wash with a damp
sponge and an ordinary detergent.
Cleaning the oven cavity
In order to keep your oven in the best
possible condition, clean it regularly after
letting it cool down.
Avoid letting food residue dry inside the
oven cavity, as this could damage the
enamel.
23
EN
What to do if...
Problem Possible cause Solution
The microwave oven does
not switch on.
The plug has not been
properly inserted into the
power socket.
Make sure the plug has
been inserted properly into
the power socket.
Possible cable or electronic
board failure.
Contact your local service
centre.
No power.
Make sure that the power
supply is working properly.
If the problem persists,
contact a qualified
electrician.
The oven light does not
switch on.
The plug has not been
properly inserted into the
power socket.
Make sure the plug has
been inserted properly into
the power socket.
The light bulb or microwave
oven door sensor may be
faulty.
Contact your local service
centre.
Cooking does not start.
No confirmation.
Make sure that you confirm
the cooking phase when
you have set the required
values (see “3.2 How to use
the microwave oven“).
The microwave door is not
closed.
Make sure that the
microwave door is closed.
The microwave oven door
sensor may be faulty.
Contact your local service
centre.
The turntable does not
rotate or makes a noise
during operation.
The plate is not positioned
correctly on the support.
Make sure that the plate is
correctly positioned.
The support is not inserted
correctly.
Make sure that the support
is inserted correctly.
24
What to do if...
Problem Possible cause Solution
There are sparks and
crackles inside the
microwave during
cooking.
Cookware with metallic
finishes were used.
Make sure that you only use
containers that are suitable
for microwave cooking.
Forks or other metal utensils
have been left inside the
microwave.
Aluminium foil has been
used inside the microwave
oven.
Hot air or steam escapes
around the door or from
the vents during use.
It is normal for hot air to
escape from above the door
to cool the oven during use.
Wait for the appliance to
cool down normally.
If hot air or steam continues
to escape, or if it escapes
from other parts of the oven,
contact your local service
centre.
One of the following error
codes appears on the
display:
E-01 / E-02 / E-03 / E-04
/ E-05 / E-06 / E-07 /
E-08 / E-09 / E-10.
-
Contact your local service
centre.
If the problem has not been resolved or in the case of other types of fault,
contact your local technical support centre.
Notes
Scan the QR code for quick access to the My Smeg Assistant portal
My Smeg Assistant ةباوب ىلإ ا
ً
يرس لوصولا لجأ نم ةيرسلا ةباجتسا زمر حسما
The manufacturer reserves the right to make any changes deemed necessary for the improvement of its products without
prior notice. The illustrations and descriptions contained in this manual are therefore not binding and are merely indicative.