Read all safety warnings and instructions. Failure to follow the warnings
and instructions may result in electric shock, fire and/or serious injury.
Save all warnings and instructions for future reference.
ASSEMBLY AND USER’S GUIDE
ITEM: 75037
AUTOMATIC POOL SUCTION
CLEANER VACUUM
FOR IN-GROUND & ABOVE-GROUND
SWIMMING POOL
DANGER
75037


TABLE OF CONTENTS
1
TABLE OF CONTENTS
IMPORTANT SAFETY INSTRUCTIONS
GENERAL SAFETY
OVERVIEW (PRODUCT INFORMATION)
INTRODUCTION
DIMENSIONS
SPECIFICATIONS
ASSEMBLY
STEP 1
STEP 2
STEP 3
STEP 4
STEP 5
STEP 6
OPERATION
ADJUSTMENT
TROUBLESHOOTING
MAINTENANCE
REPLACEMENT PARTS
21
22
Customer Service and Technical Support
Legends and Symbols
Parts Diagram 22
DISCLAIMER 23
1
23
2
2
3
5
6
6
7
8
8
9
10
11
12
13
17
17
18
PACKAGING CONTENTS 5
STEP 7
STEP 8
STEP 9
14
15
16

IMPORTANT SAFETY INSTRUCTIONS
2
For safety reasons, children should not be allowed to use this product.
Failure to comply with all instructions and warnings may lead to severe bodily injury or
even death. It is strongly recommended that only a qualified pool service professional install and service
this product. Prior to using this product, installers, operators, and owners must carefully review these
warnings and all instructions provided in the owner's manual. It is essential to leave these warnings and
the owner's manual with the pool owner for their reference and safety.
ATTENTION INSTALLER: This manual contains vital information regarding the installation, operation,
and safe use of this product. It is essential to provide this manual to the end user of the product. Failure
to read and follow all instructions could lead to severe injuries.
USE OF NON-XTREMEPOWERUS REPLACEMENT PARTS VOIDS WARRANTY
DANGER: Ignoring these hazards can result in death, severe personal injury, or
significant property damage.
WARNING: Indicates potential hazards that can result in severe personal injury,
death, or significant property damage. Ignoring these warnings presents a real
danger.
CAUTION: Indicates potential hazards that can result in minor or moderate personal
injury, property damage, or actions that are unpredictable and unsafe. Ignoring these
cautions presents a potential hazard.
NOTICE: This label indicates important special instructions that are not directly
related to hazards.
This guide provides instructions for installing / assembling and using the product. If you have any
questions about the product, please contact XtremepowerUS.
This guide contains important information about safely installing and operating this product. After
installation, make sure to share this information with the owner/operator or leave it with them for their
reference.
Legends and Symbols
When you come across the safety-alert symbol on the product or in this manual, pay attention to the
following signal words and remain vigilant about the potential for personal injury.
IMPORTANT SAFETY INSTRUCTIONS
DANGER
WARNING
WARNING
CAUTION
NOTE
DANGER
IMPORTANT SAFETY INSTRUCTIONS
3
Do Not Modify the Product:
• Unauthorized modification may impair the function and/or safety of the product, potentially resulting
in serious injury or damage.
Avoid Entrapment:
• The suction from the hose or cleaner can trap a swimmer underwater. Never allow anyone to enter
the pool when the cleaner is in use.
DANGER
Do Not Play with the Cleaner or Hose:
• Never play with the cleaner, hose, or suction ports. These can entrap swimmers or cause injury. Do
not apply the cleaner or hose to your body, clothing, or hair.
Stop the Pump Before Cleaning or Maintenance:
• Always turn off the pool pump and suction before cleaning or maintaining the cleaner. Moving parts
and suction can cause injury.
Stop the Pump Before Swimming:
• Before swimming, turn off the pump, detach the hose, and move the cleaner and hose to a safe
corner of the pool. Remove the hose from the pool if it may interfere with swimmers.
Ensure All Operators Are Informed:
• Do not allow anyone to operate or assemble the product until they have read this manual and
understand its operation.
WARNING
GENERAL SAFETY
CAUTION
Use Common Sense and Caution:
• This manual may not cover every possible situation. Operators must use common sense and
caution while using the product.
Avoid Unauthorized Modifications:
• Do not modify the product. Unauthorized changes can impair its function, safety, and longevity.
Cover Suction Ports When Not in Use:
• If your pool has a dedicated suction port/vac port/automatic pool cleaner port, cover it when not
in use.
IMPORTANT SAFETY INSTRUCTIONS
4
Clean the Pool Before First Use:
• Clean the pool of algae and debris before using the cleaner for the first time. The cleaner is not
designed for initial cleaning after construction or at the start of the season.
Manufacturer's Liability:
• The manufacturer is not liable for repairs or replacements related to damage from improper use.
Ensure you follow these instructions to avoid potential damage to your pool.
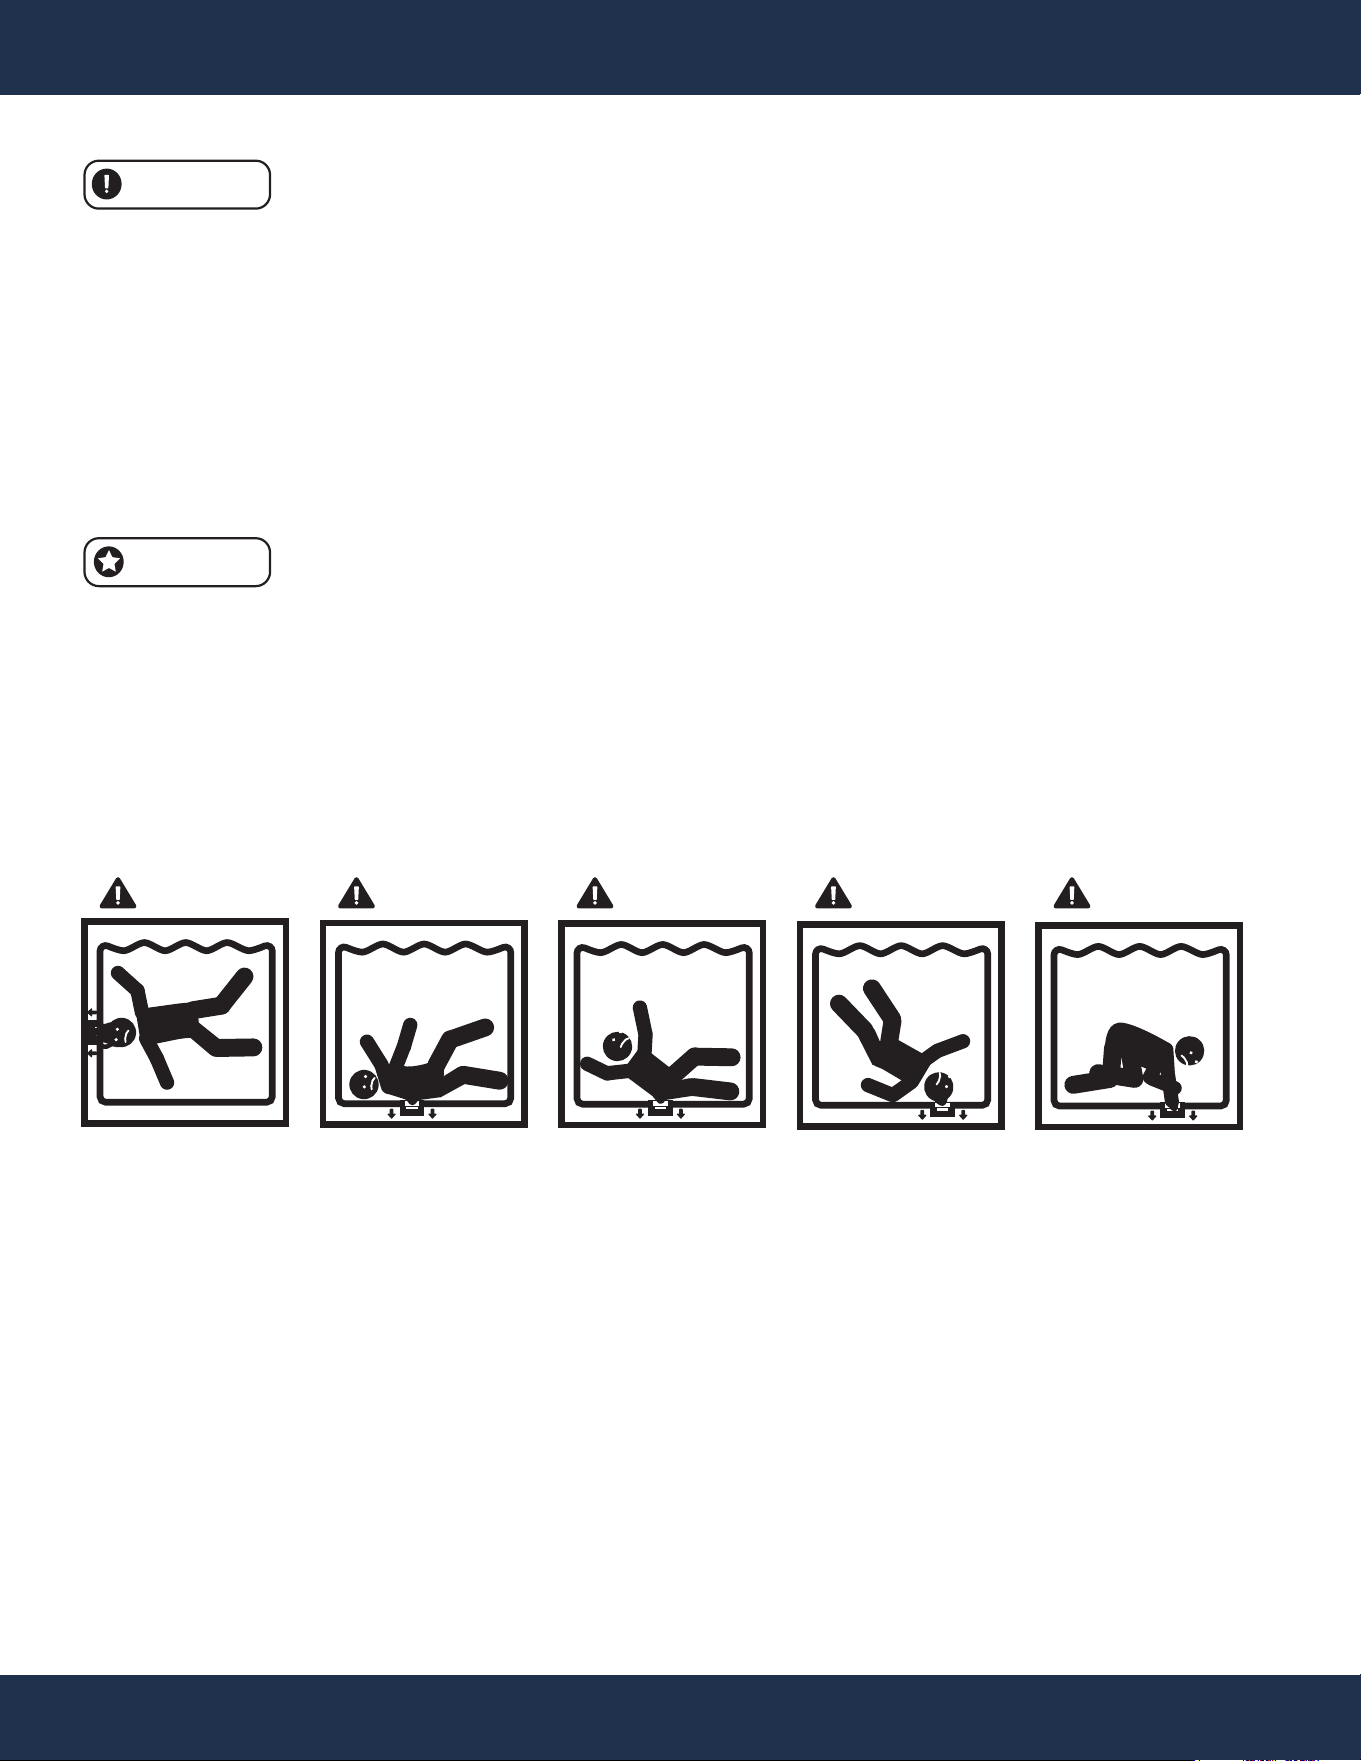
SUCTION ENTRAPMENT HAZARD
DANGER DANGER
DANGER DANGER DANGER
Supervise Use Around the Pool:
• Ensure that no one, especially children, uses or plays with the cleaner, hose, or suction ports.
Educate pool users about the dangers associated with these components.
Inspect the Pool Before Use:
• Ensure your pool is free of debris, wear and tear, or obstructions like roots, branches, or rocks
before using the cleaner. Check vinyl pools for damage and ensure gunite, plaster, and tile pools
are free of deterioration and loose tiles.
NOTE
CAUTION
OVERVIEW (PRODUCT INFORMATION)
5
OVERVIEW (PRODUCT INFORMATION)
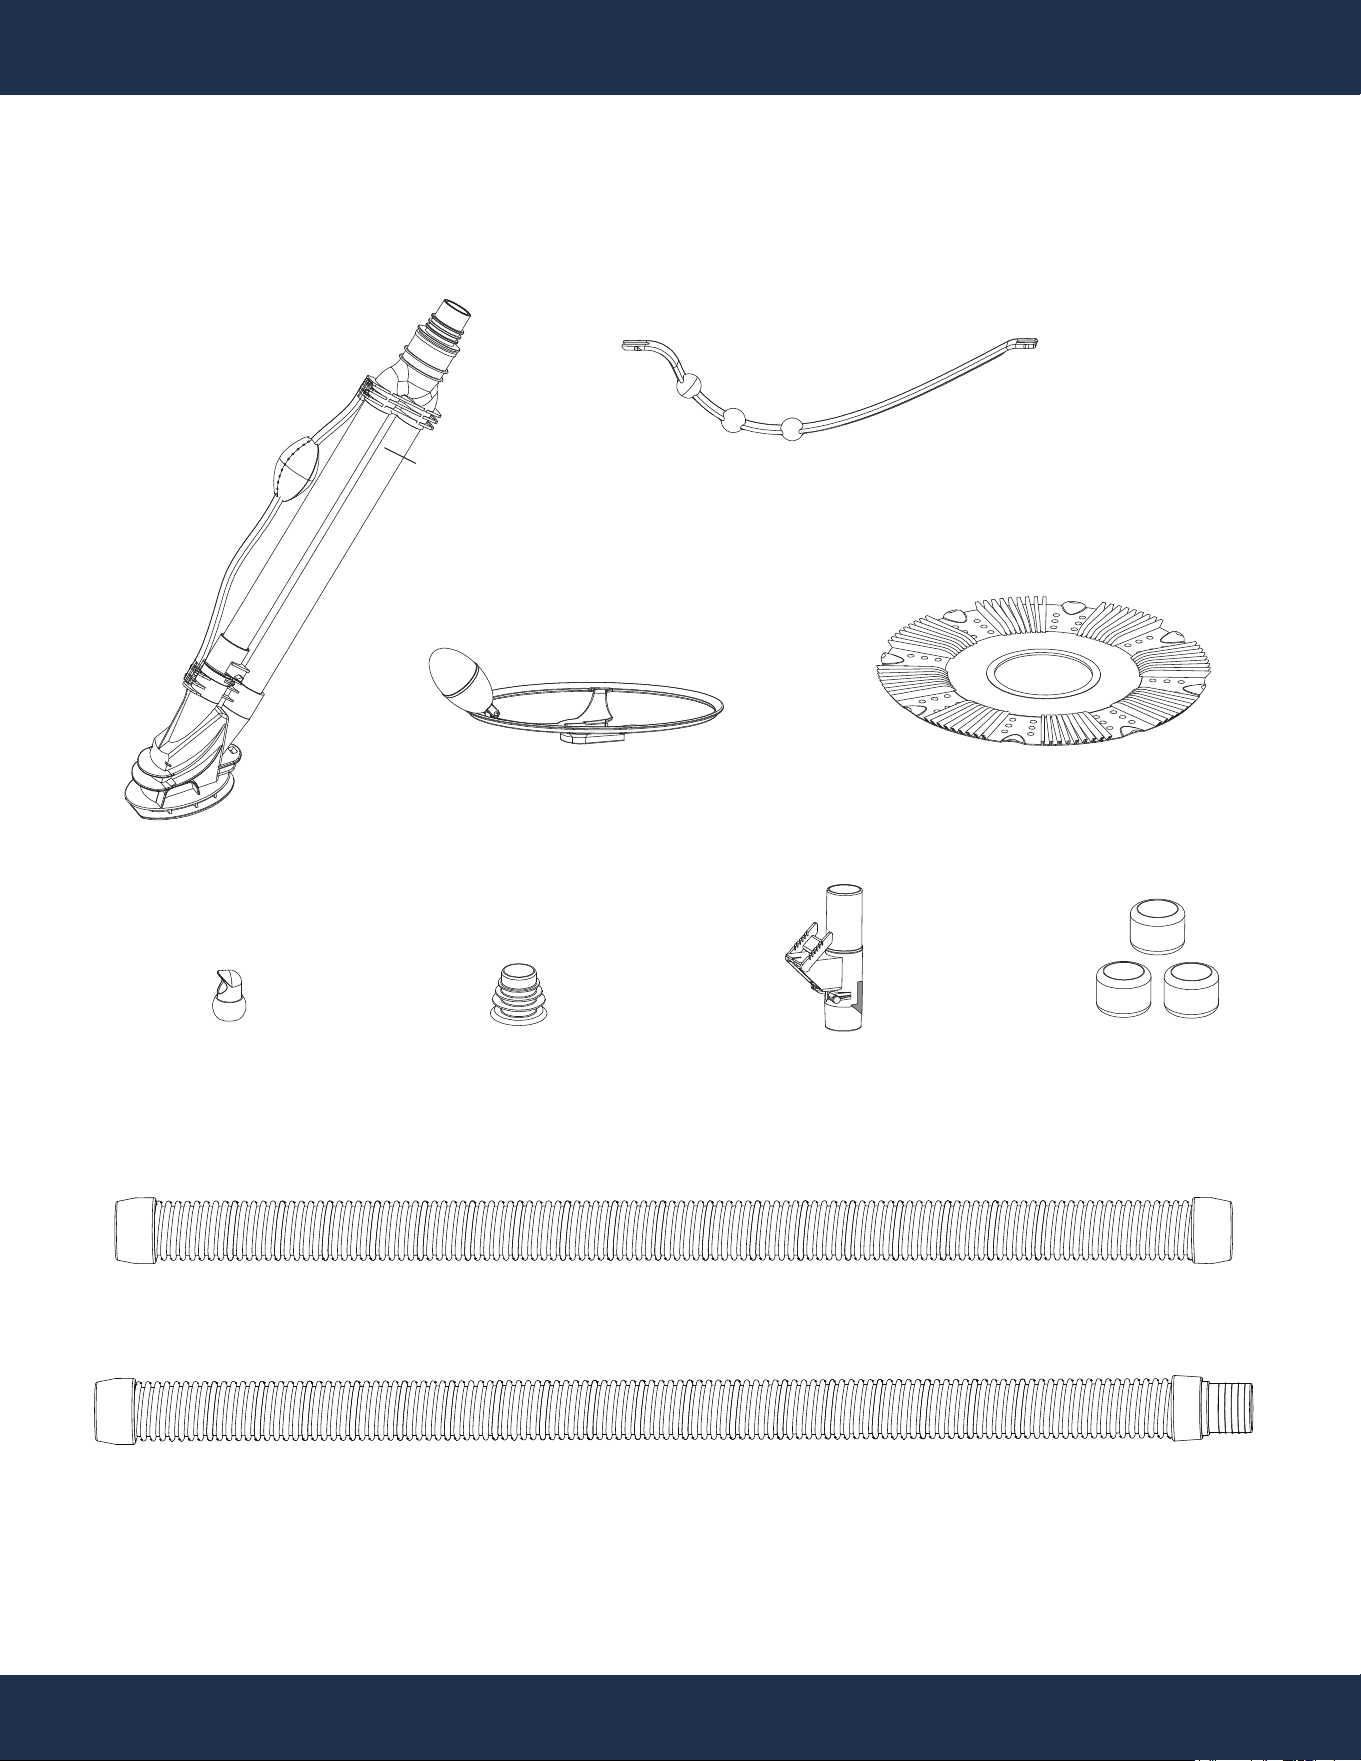
PACKAGING CONTENTS
PARTS # 1
CLEANER ASSEMBLY
1 PC(S)
PARTS #
7
PLEATED SEAL
1 PC(S)
PARTS #
2
DIVE FLOAT RESTRICTOR
1 PC(S)
PARTS # 16
FEMALE TO FEMALE HOSE
1 PC(S)
PARTS # 9
ROLLER BUMPER STRAP
1 PC(S)
PARTS # 12
EYEBALL DIVERTER
(OPTIONAL*) 1 PC(S)
PARTS # 17
FEMALE TO MALE HOSE
9 PC(S)
PARTS #
14
HOSE WEIGHTS
3 PC(S)
PARTS #
13
HOSE CONE
1 PC(S)
PARTS #
15
REGULATOR VALVE
1 PC(S)
*If the machine isn't covering the entire pool or is missing areas, adjust the eyeball diverter on the pool's return line.Rotate the diverter to face
different directions to improve water flow and cleaner circulation. This may not be necessary for newer pools.
6
OVERVIEW (PRODUCT INFORMATION)
XtremepowerUS In-ground Pool Suction Cleaner Vacuum, the ultimate solution for effortless pool
maintenance. Designed to clean inground pools from top to bottom automatically, this cleaner offers
powerful suction to pick up everything from dirt and bugs to pebbles and twigs, allowing for more time
spent enjoying the pool and less time cleaning it.
Key Features:
• Efficient Cleaning: Operates with only one moving part, eliminating the need for wheels, gears, or
diaphragms, reducing the risk of jams and breakdowns.
• Easy Maintenance: Smart design allows for quick access, enabling easy maintenance without
hassle.
• No Additional Tools or Electricity Required: Attaches to existing filtration systems. No tools or
electricity are needed for operation.
• Complete Set: Includes 30 feet of vacuum hose, ideal for pools up to 16’ x 32’.
• Power Requirements: Requires a swimming pool pump of at least 1 hp or 1600 GPH to function
effectively.
• Versatile: Suitable for in-ground and above-ground pools of any size, shape, or construction.
INTRODUCTION
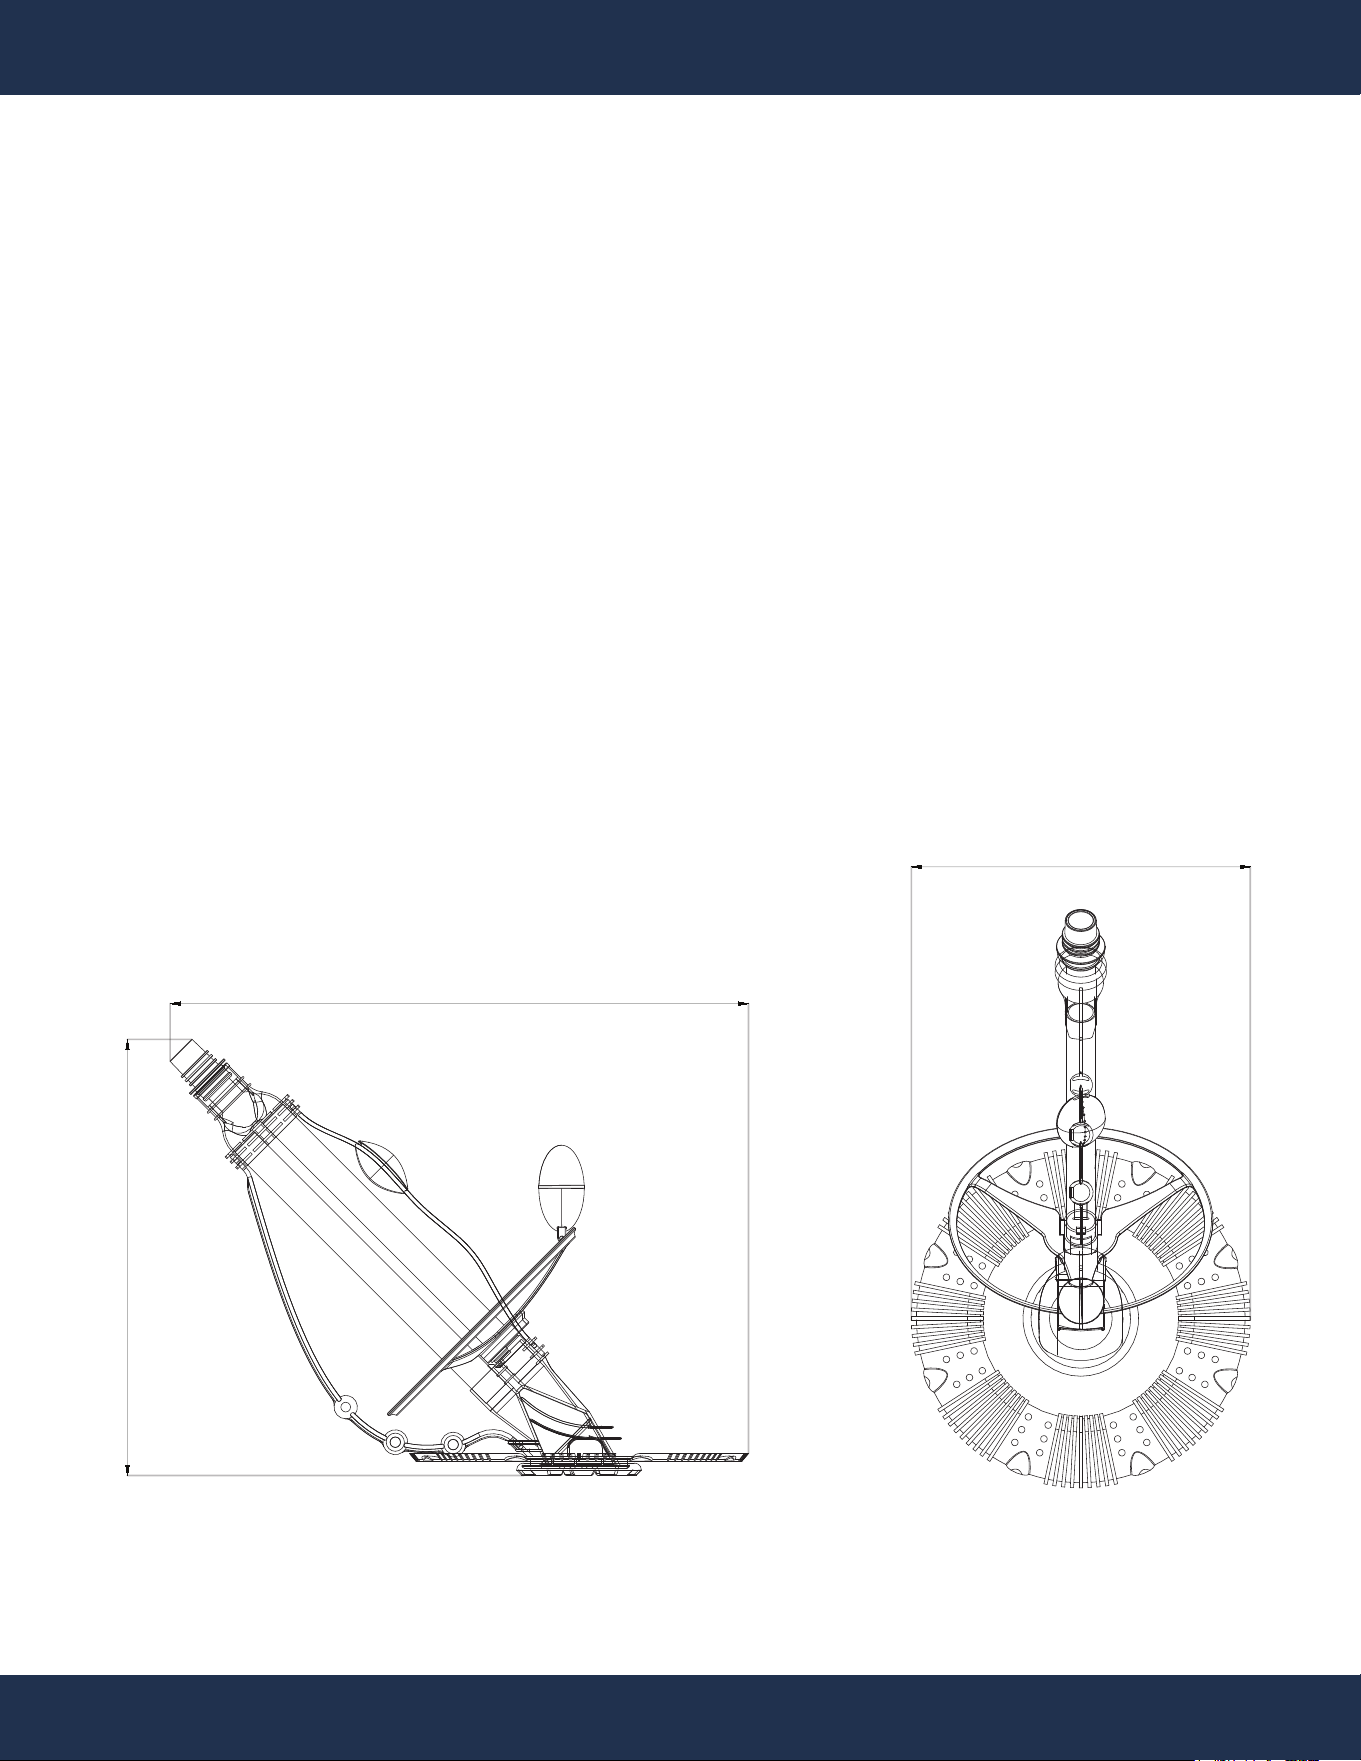
DIMENSIONS
16.1”
27.5”
20.8”

7
OVERVIEW (PRODUCT INFORMATION)
SPECIFICATIONS
POWER-FREE OPERATION
POOL COMPATIBILITY
PUMP REQUIREMENTS
INCLUDED ACCESSORIES
SUITABLE POOL TYPE
HOSE DIAMETER
NO ELECTRICITY NEEDED, NO TOOLS REQUIRED
UP TO 16 FT X 34 FT
AT LEAST 3/4 HP POOL PUMP OR 1,600 GPH
30 FT VACUUM HOSE
IN-GROUND, ABOVE-GROUND
1.5”
8
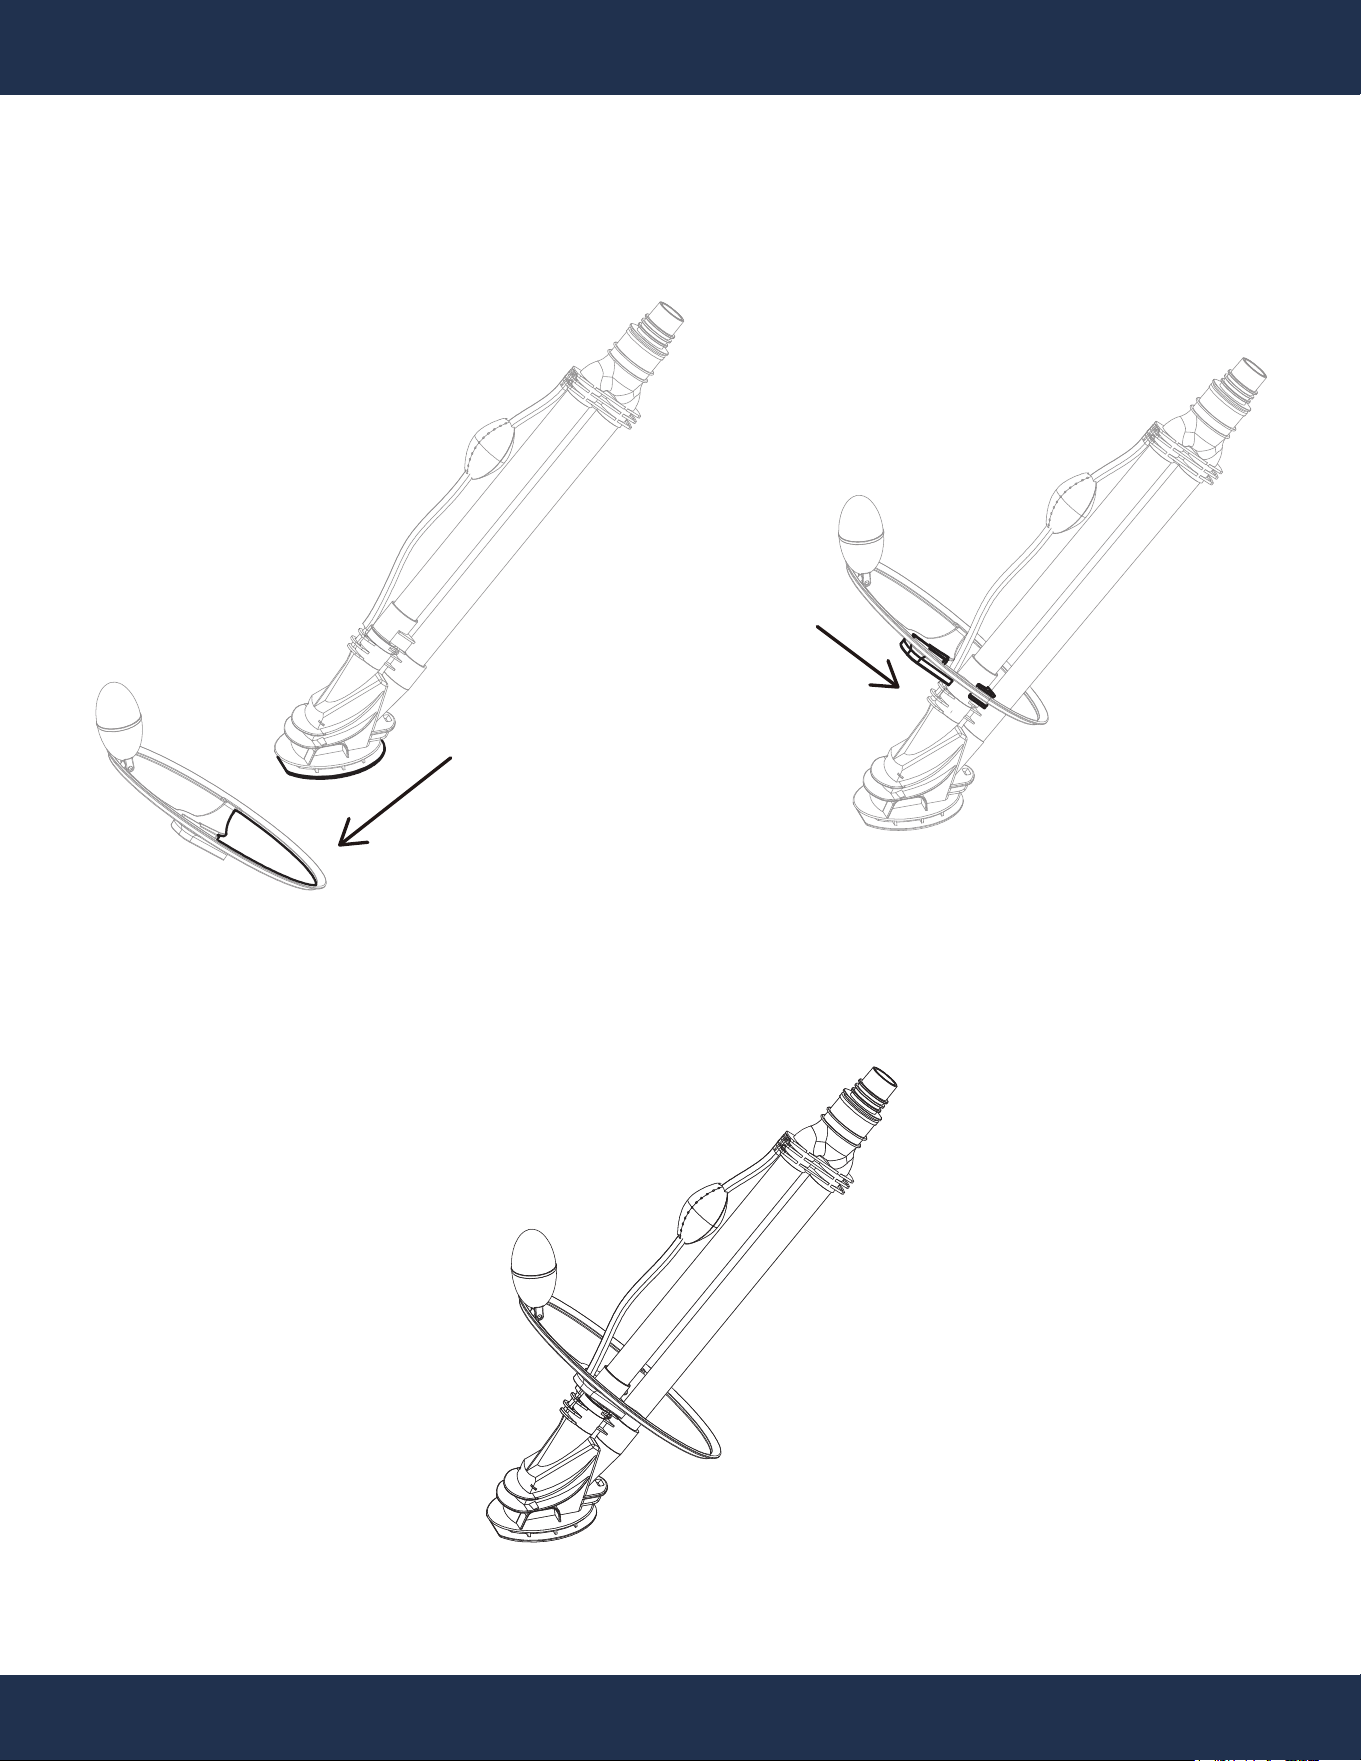
ASSEMBLY
STEP 1
ASSEMBLY
PARTS # 1
PARTS # 2
PARTS # 1
PARTS # 2
9
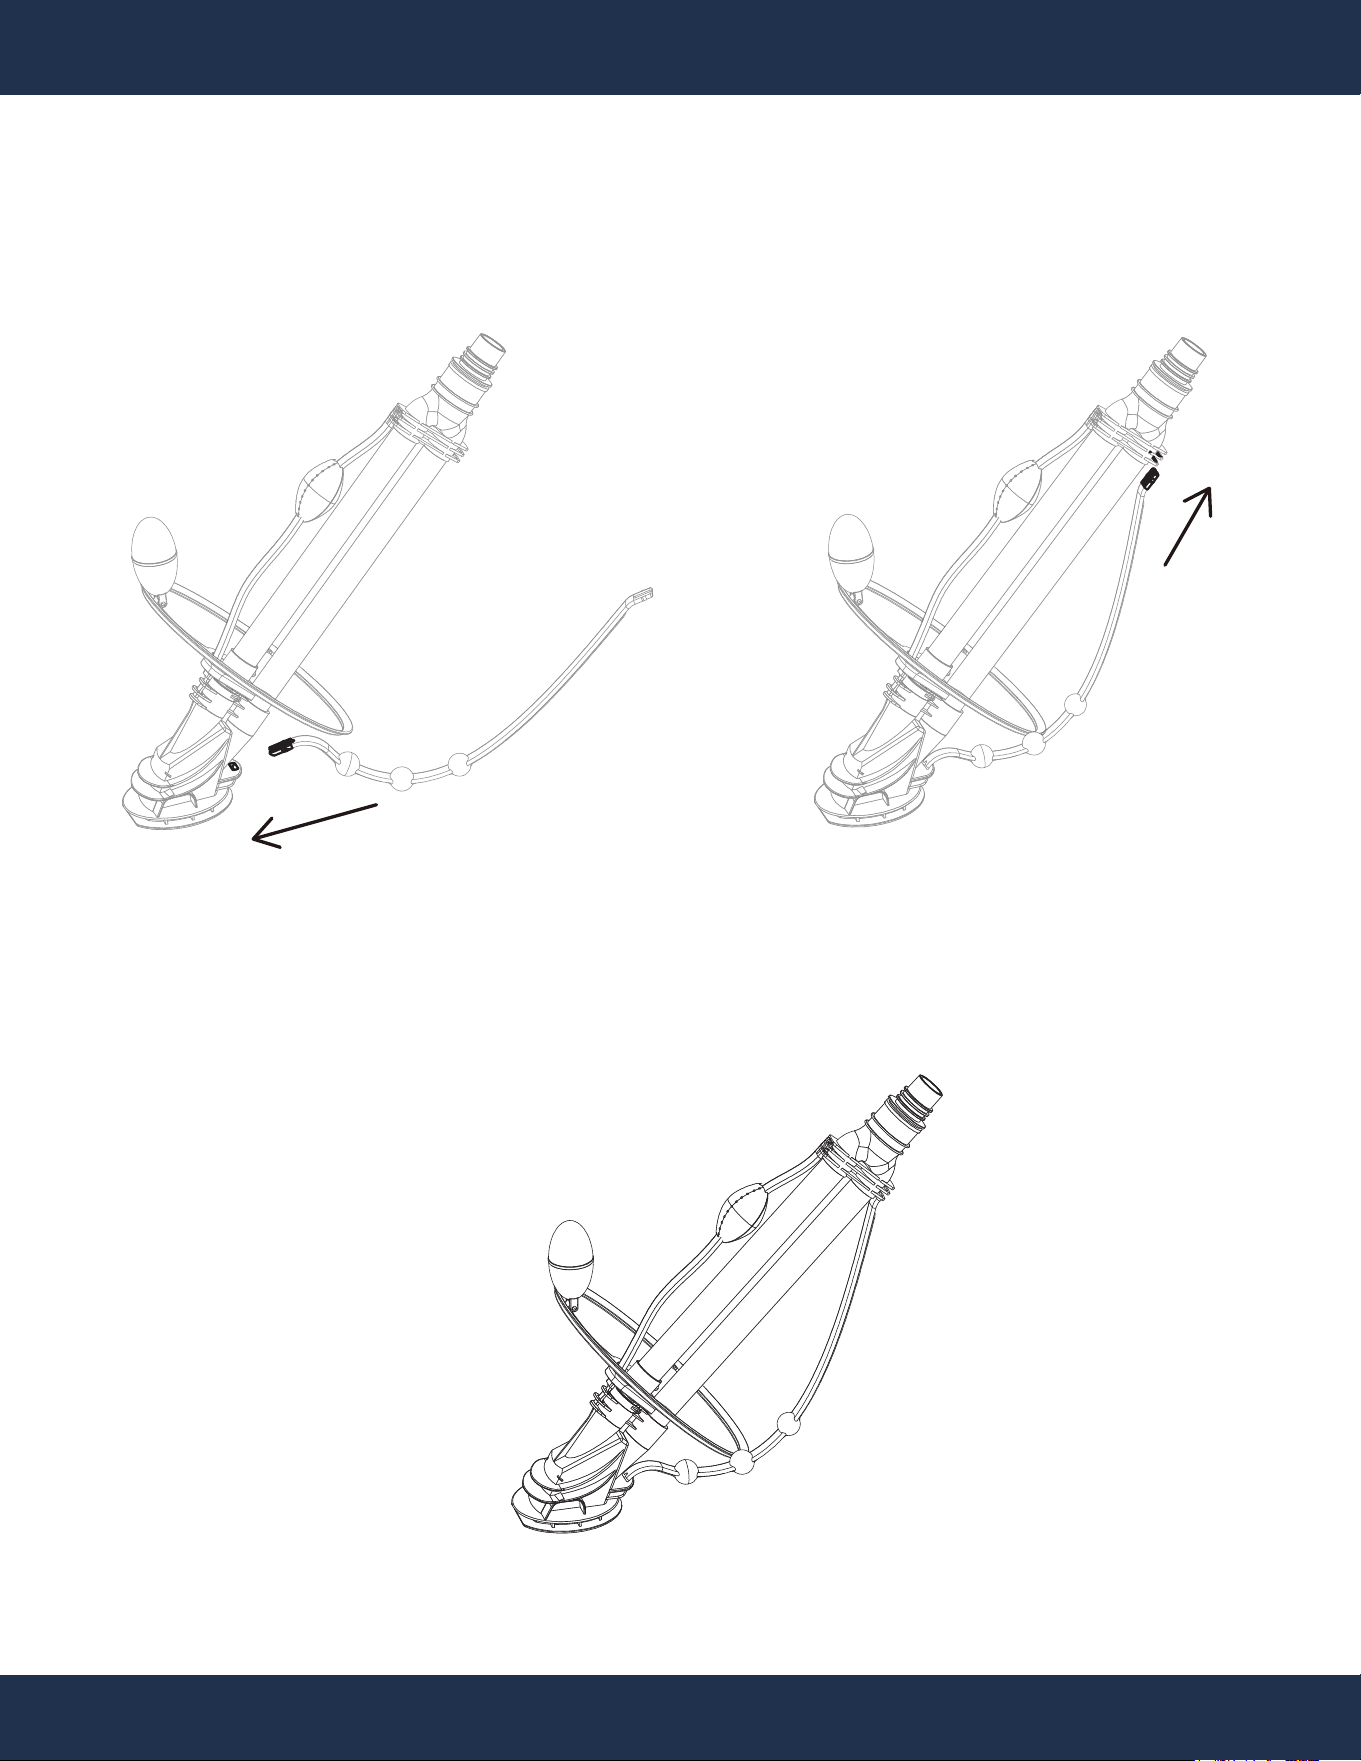
ASSEMBLY
STEP 2
PARTS # 9 PARTS # 9

10
INSTALLATION
14
INSTALLATION
10
STEP 3
ASSEMBLY
UP
PARTS # 7
UP
11
ASSEMBLY
STEP 4
UP
PARTS # 14
2
ND
WEIGHT:
6 FT FROM SWIVEL HEAD
PARTS # 14
1
ST
WEIGHT:
3 FT FROM SWIVEL HEAD
PARTS # 14
3
RD
WEIGHT:
9 FT FROM SWIVEL HEAD
POOL DEPTH
4 FT OR LESS
4 ~ 7 FT
7 ~ 12 FT
12 FT OR MORE
PART # 14 WEIGHT PLACEMENT
1
ST
WEIGHT: 3 FT FROM SWIVEL HEAD
2
ND
WEIGHT: 6 FT FROM SWIVEL HEAD
3
RD
WEIGHT: 9 FT FROM SWIVEL HEAD
ADDITIONAL WEIGHT (NOT INCLUDED):
12 FT FROM SWIVEL HEAD
12
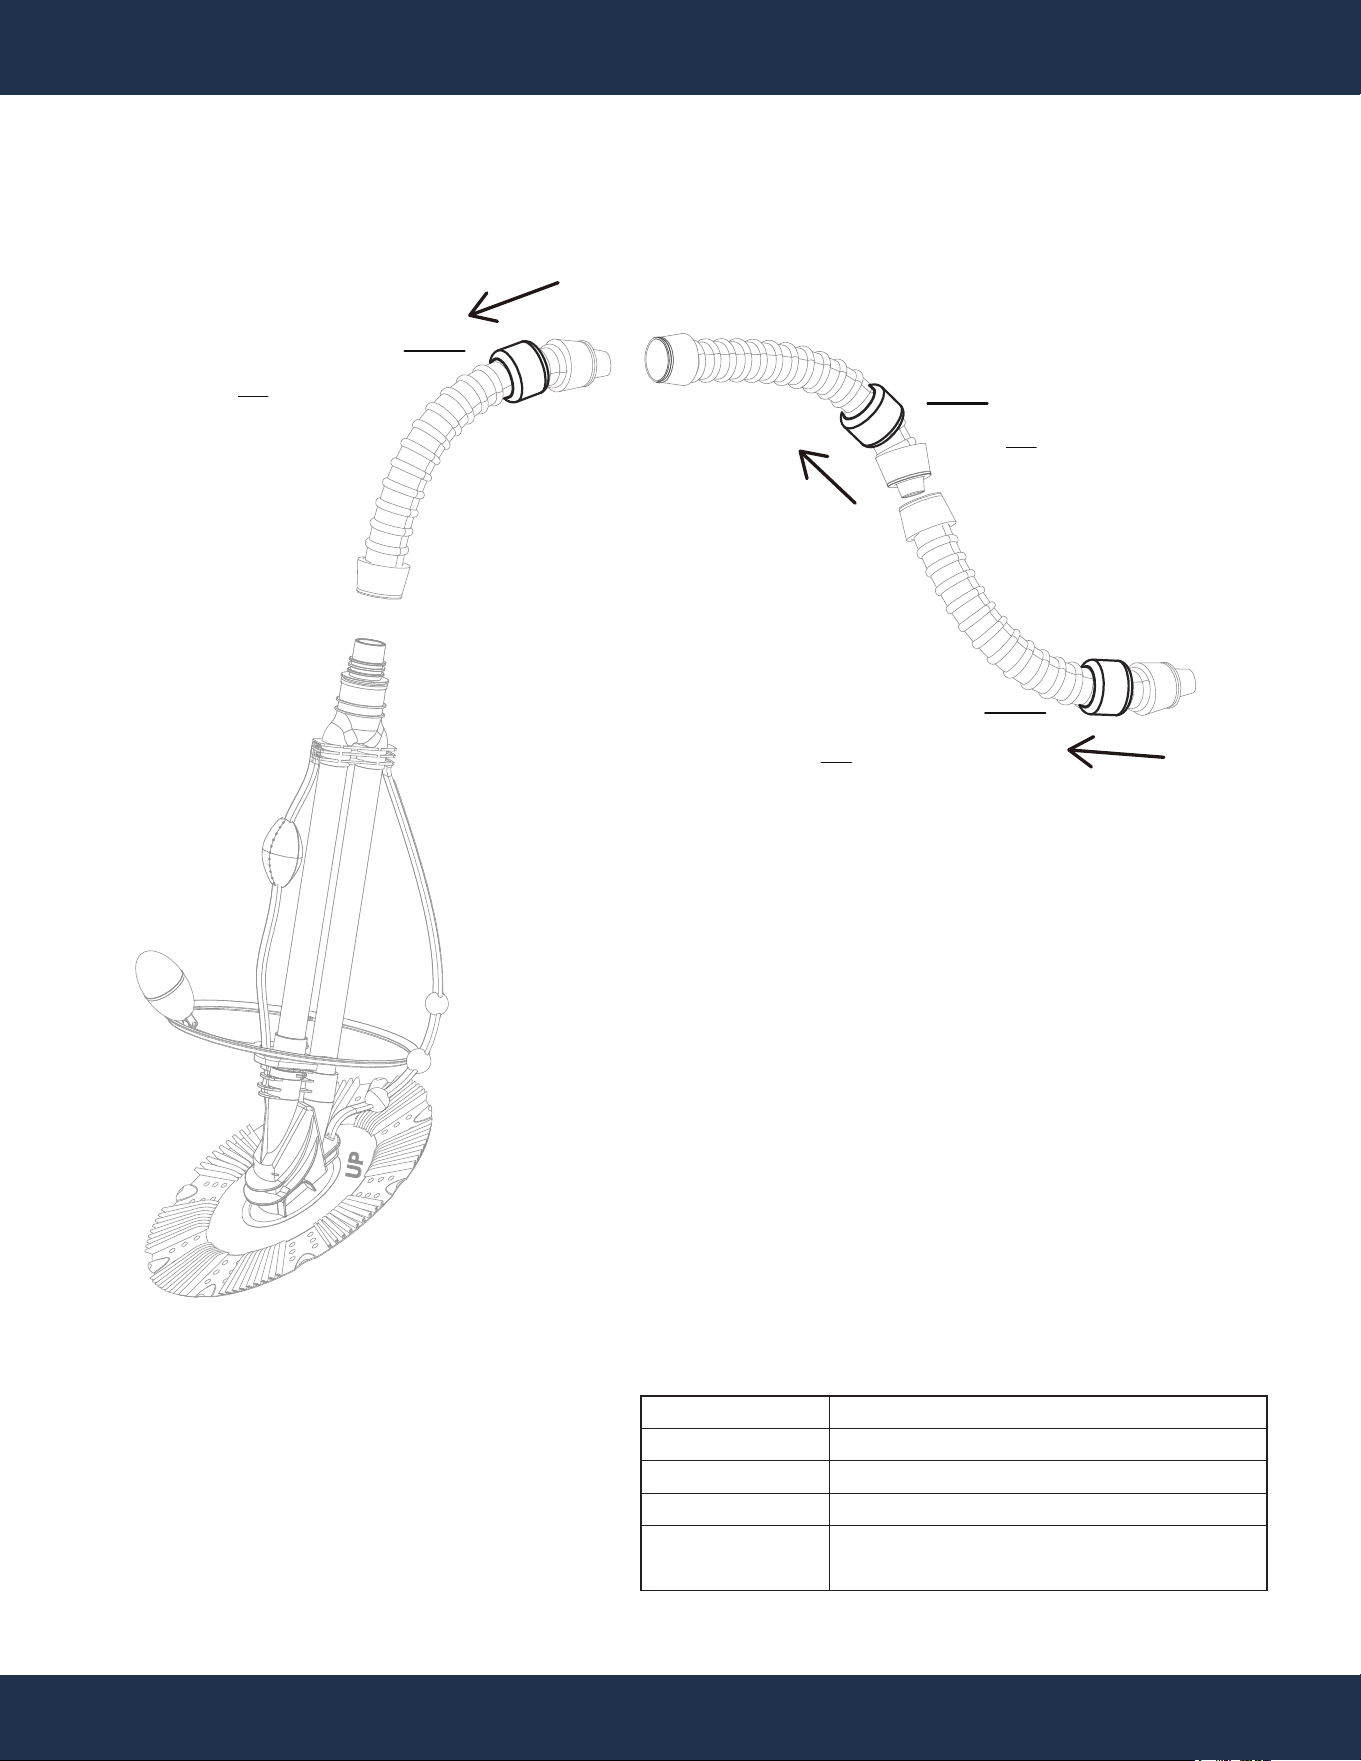
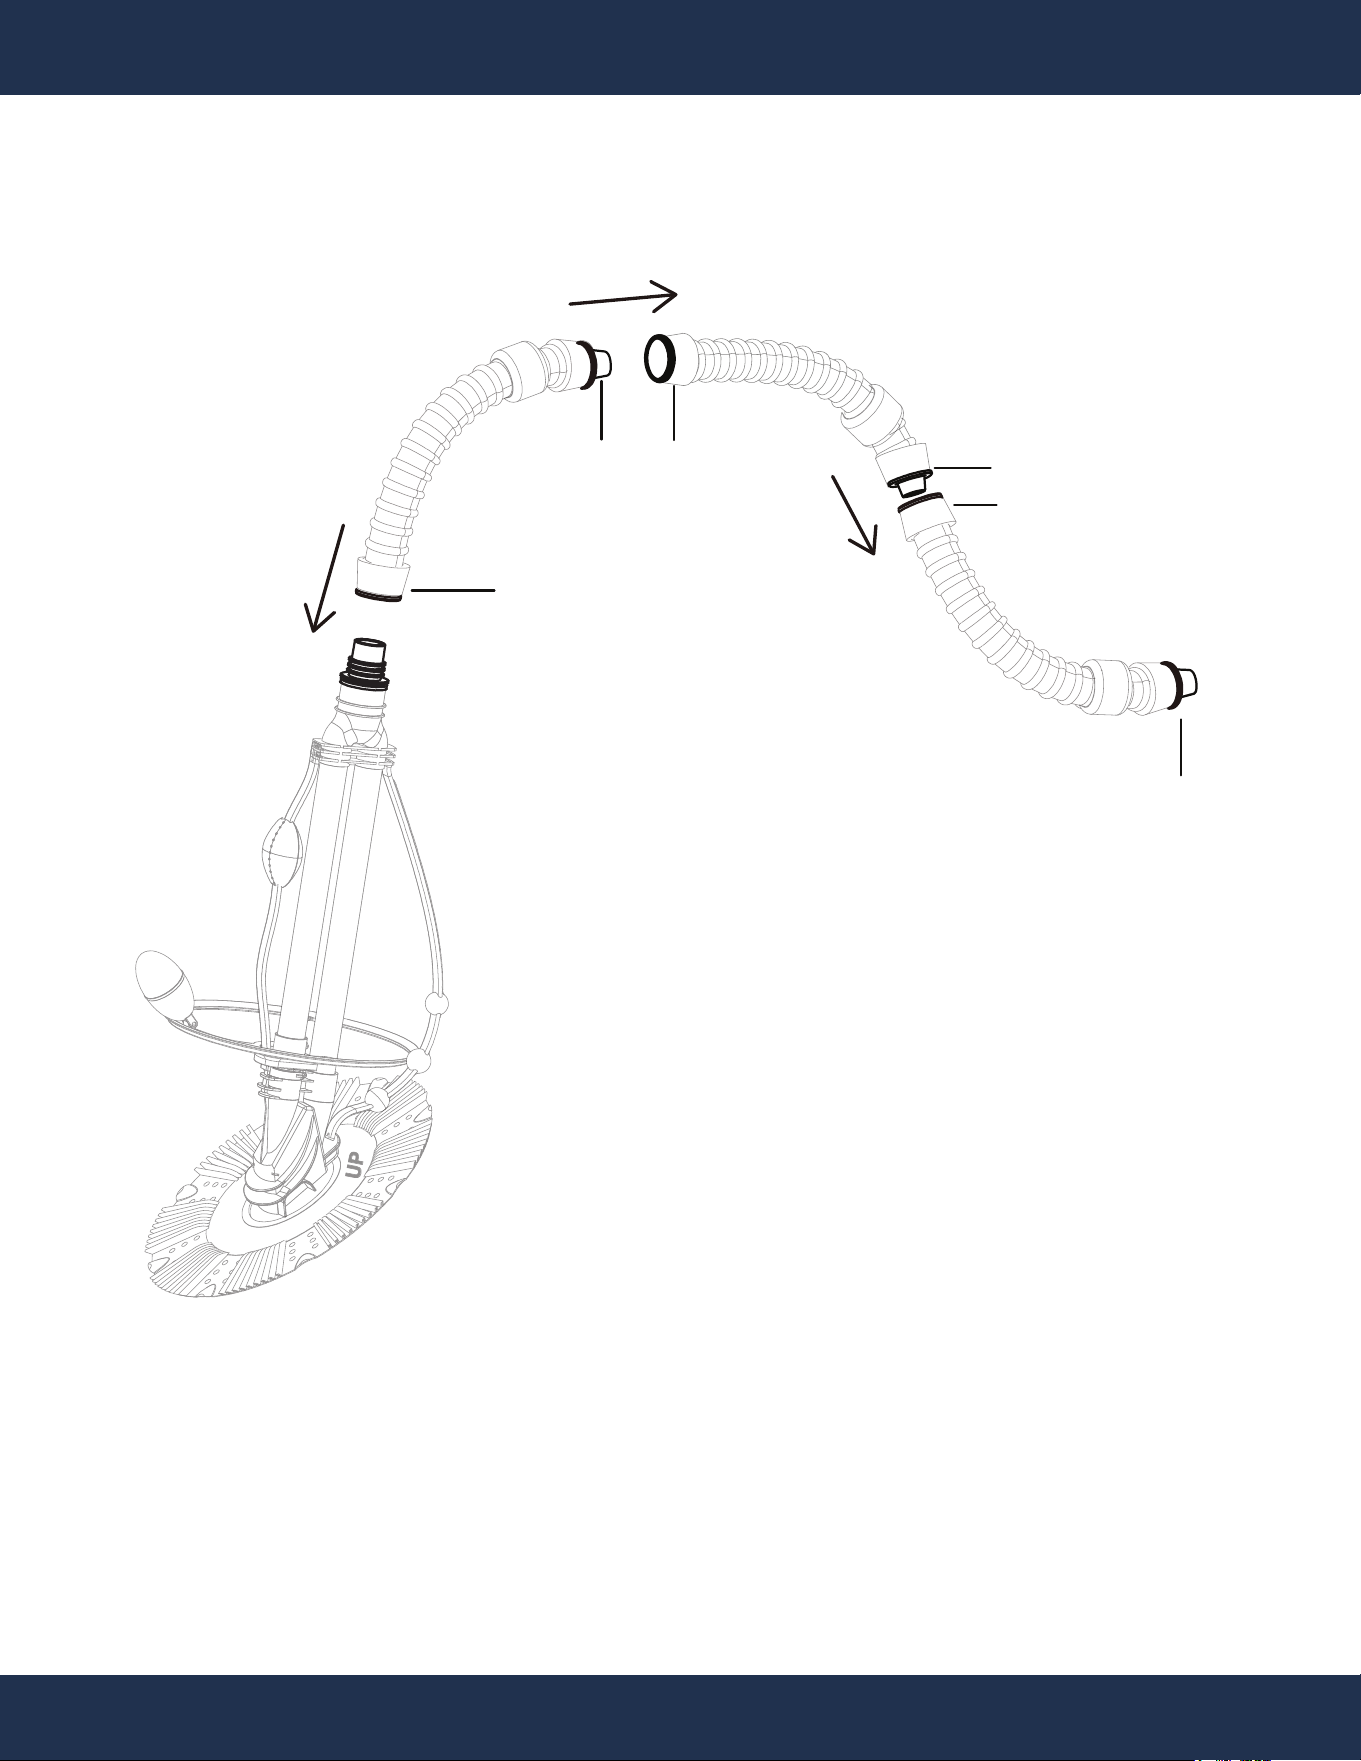
ASSEMBLY
STEP 5
UP
FEMALE CUFF
MALE CUFF
MALE CUFF
FEMALE CUFF
PARTS # 17
PARTS # 17
PARTS # 17
MALE CUFF
FEMALE CUFF
13
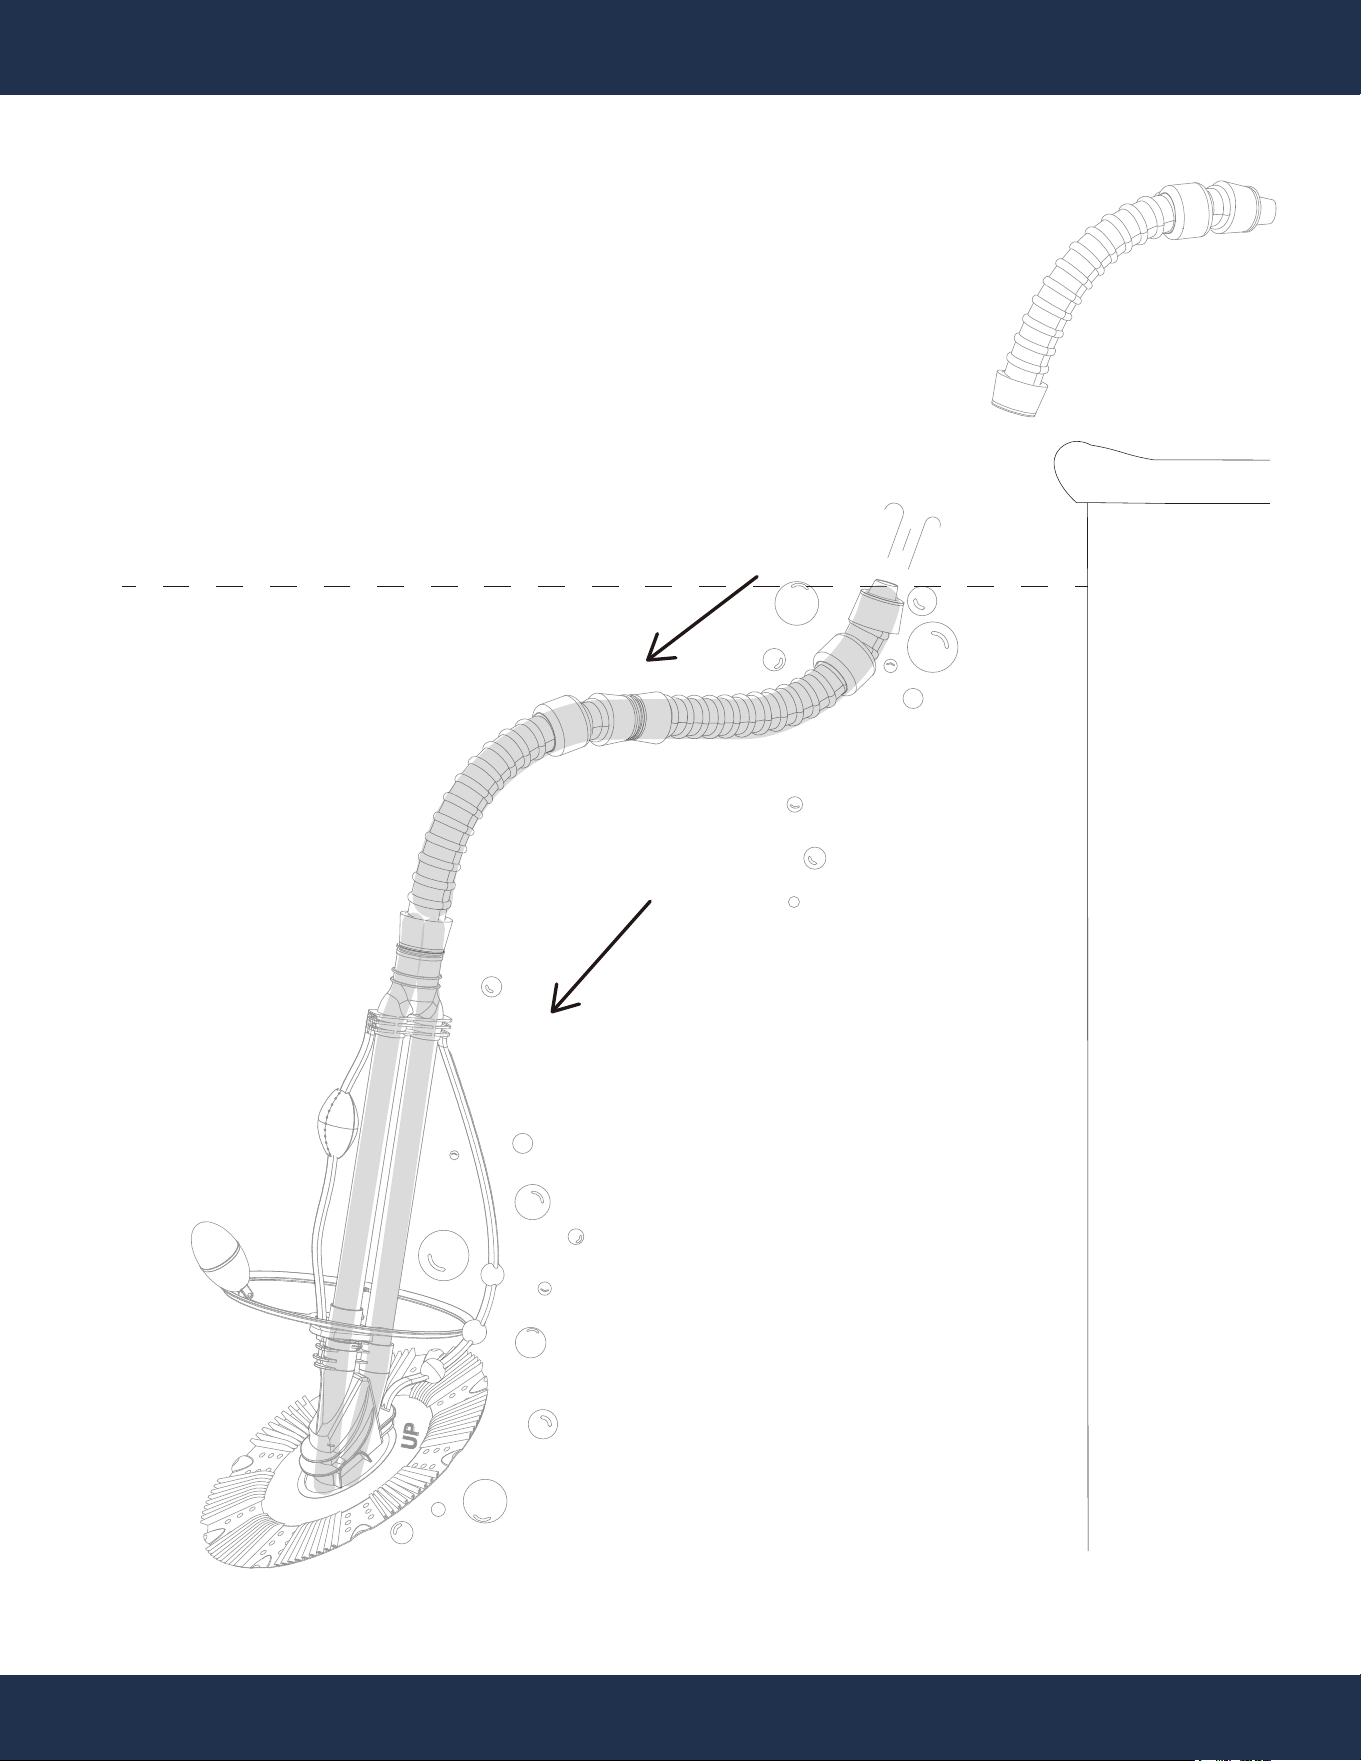
ASSEMBLY
STEP 6
COPING
WATERLINE
FILL HOSE WITH POOL
WATER TO REMOVE AIR
SUBMERGE CLEANER &
HOSE INTO POOL
UP
SUBMERGE HOSE INTO POOL
PARTS # 17
BUBBLE
AIR
BUBBLE
14
ASSEMBLY
THE FEMALE CUFF
OF PARTS# 16
THE LAST MALE CUFF
OF PARTS# 17
THE LAST FEMALE CUFF
END OF PARTS# 16
THE MALE CUFF END
OF PARTS# 15
THE FEMALE CUFF END
OF PARTS# 15
PARTS # 17
THE LAST MALE TO
FEMALE HOSE
PARTS # 16
PARTS # 16
PARTS # 15
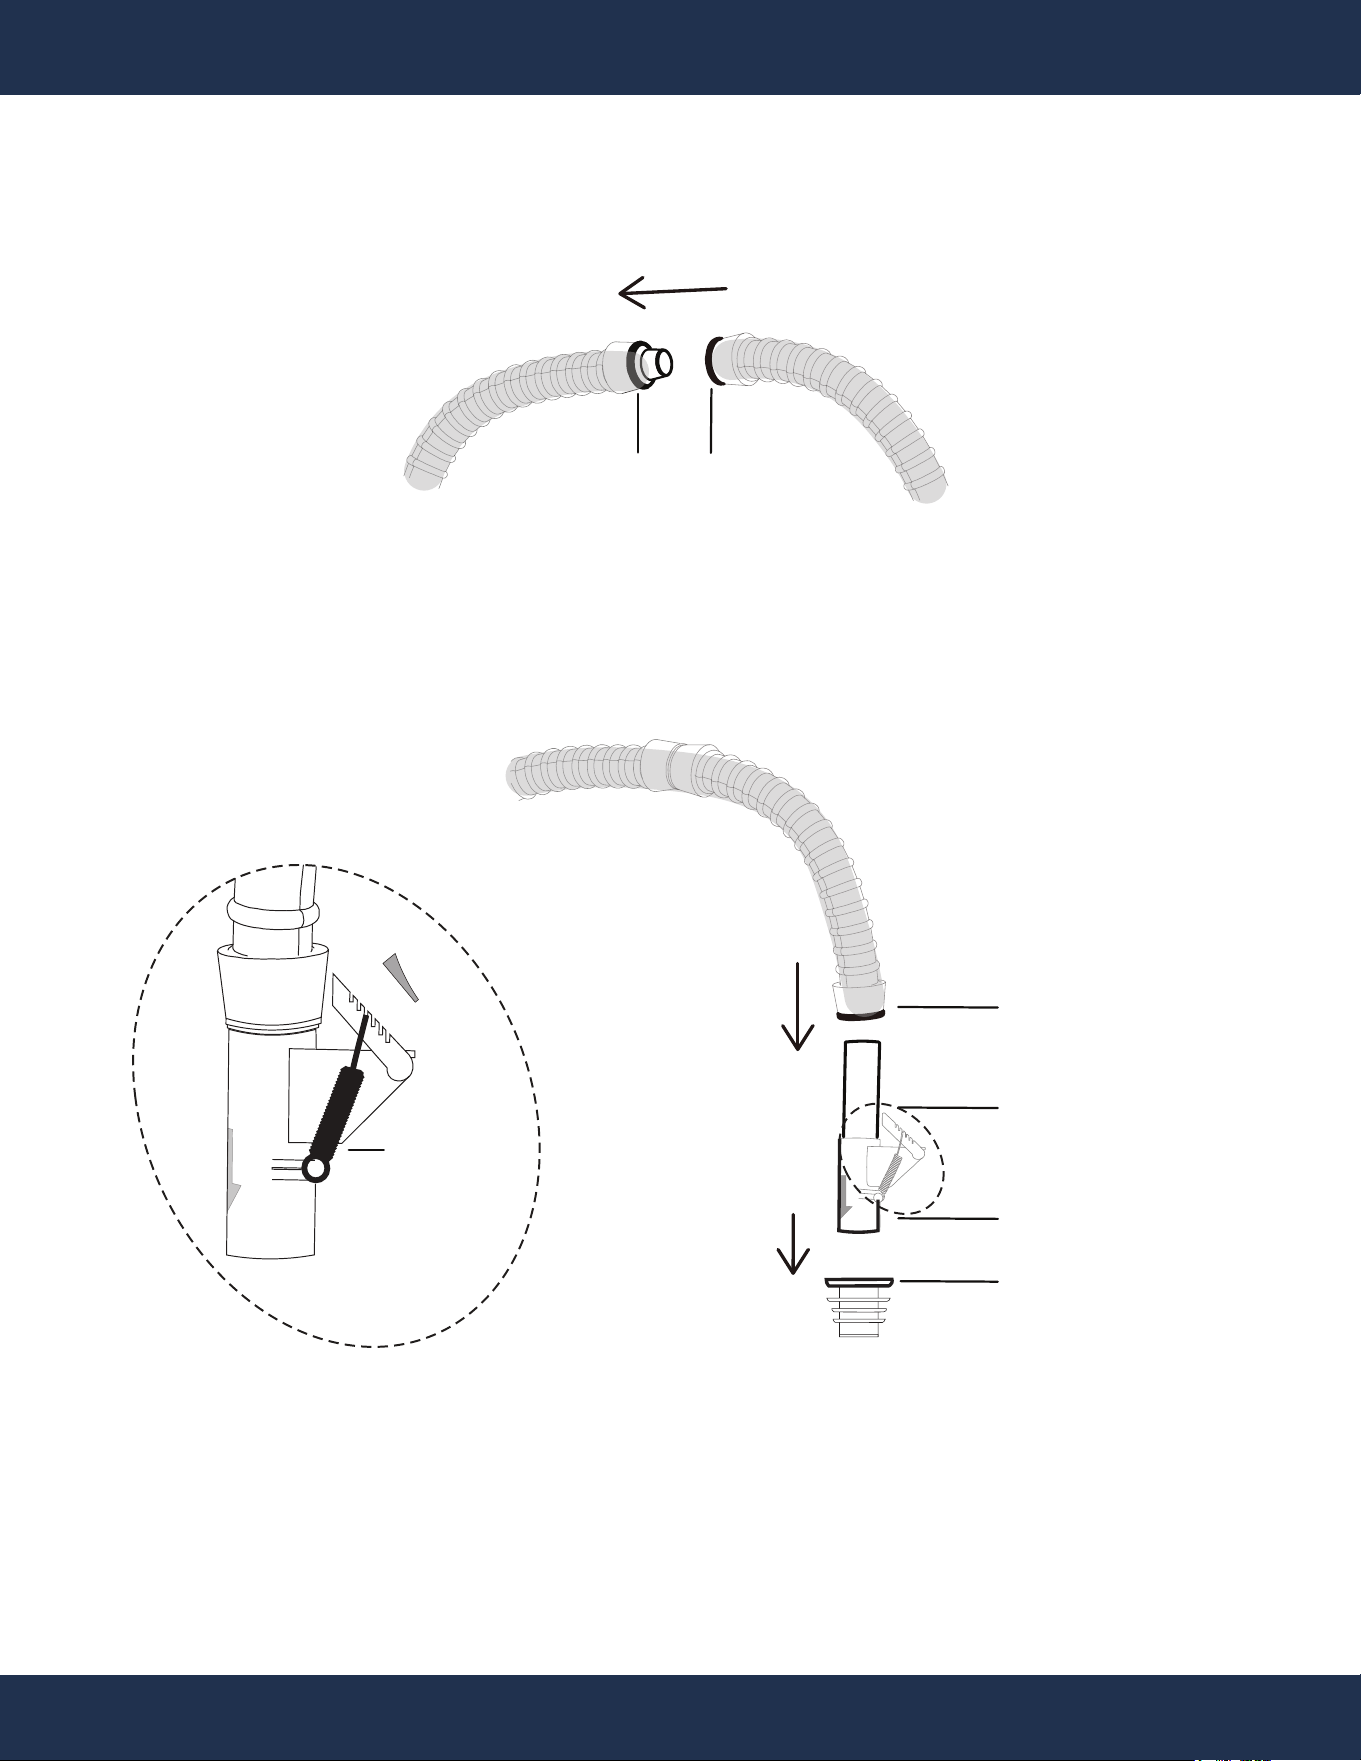
STEP 7
THE FEMALE CUFF END
OF PARTS# 13
PARTS # 13
6
5
4
3
2
1
VALVE
REGULATOR
OF PARTS# 15
PARTS # 15
HIGH
SUCTION
LOW
SUCTION
15
INSTALLATION
15
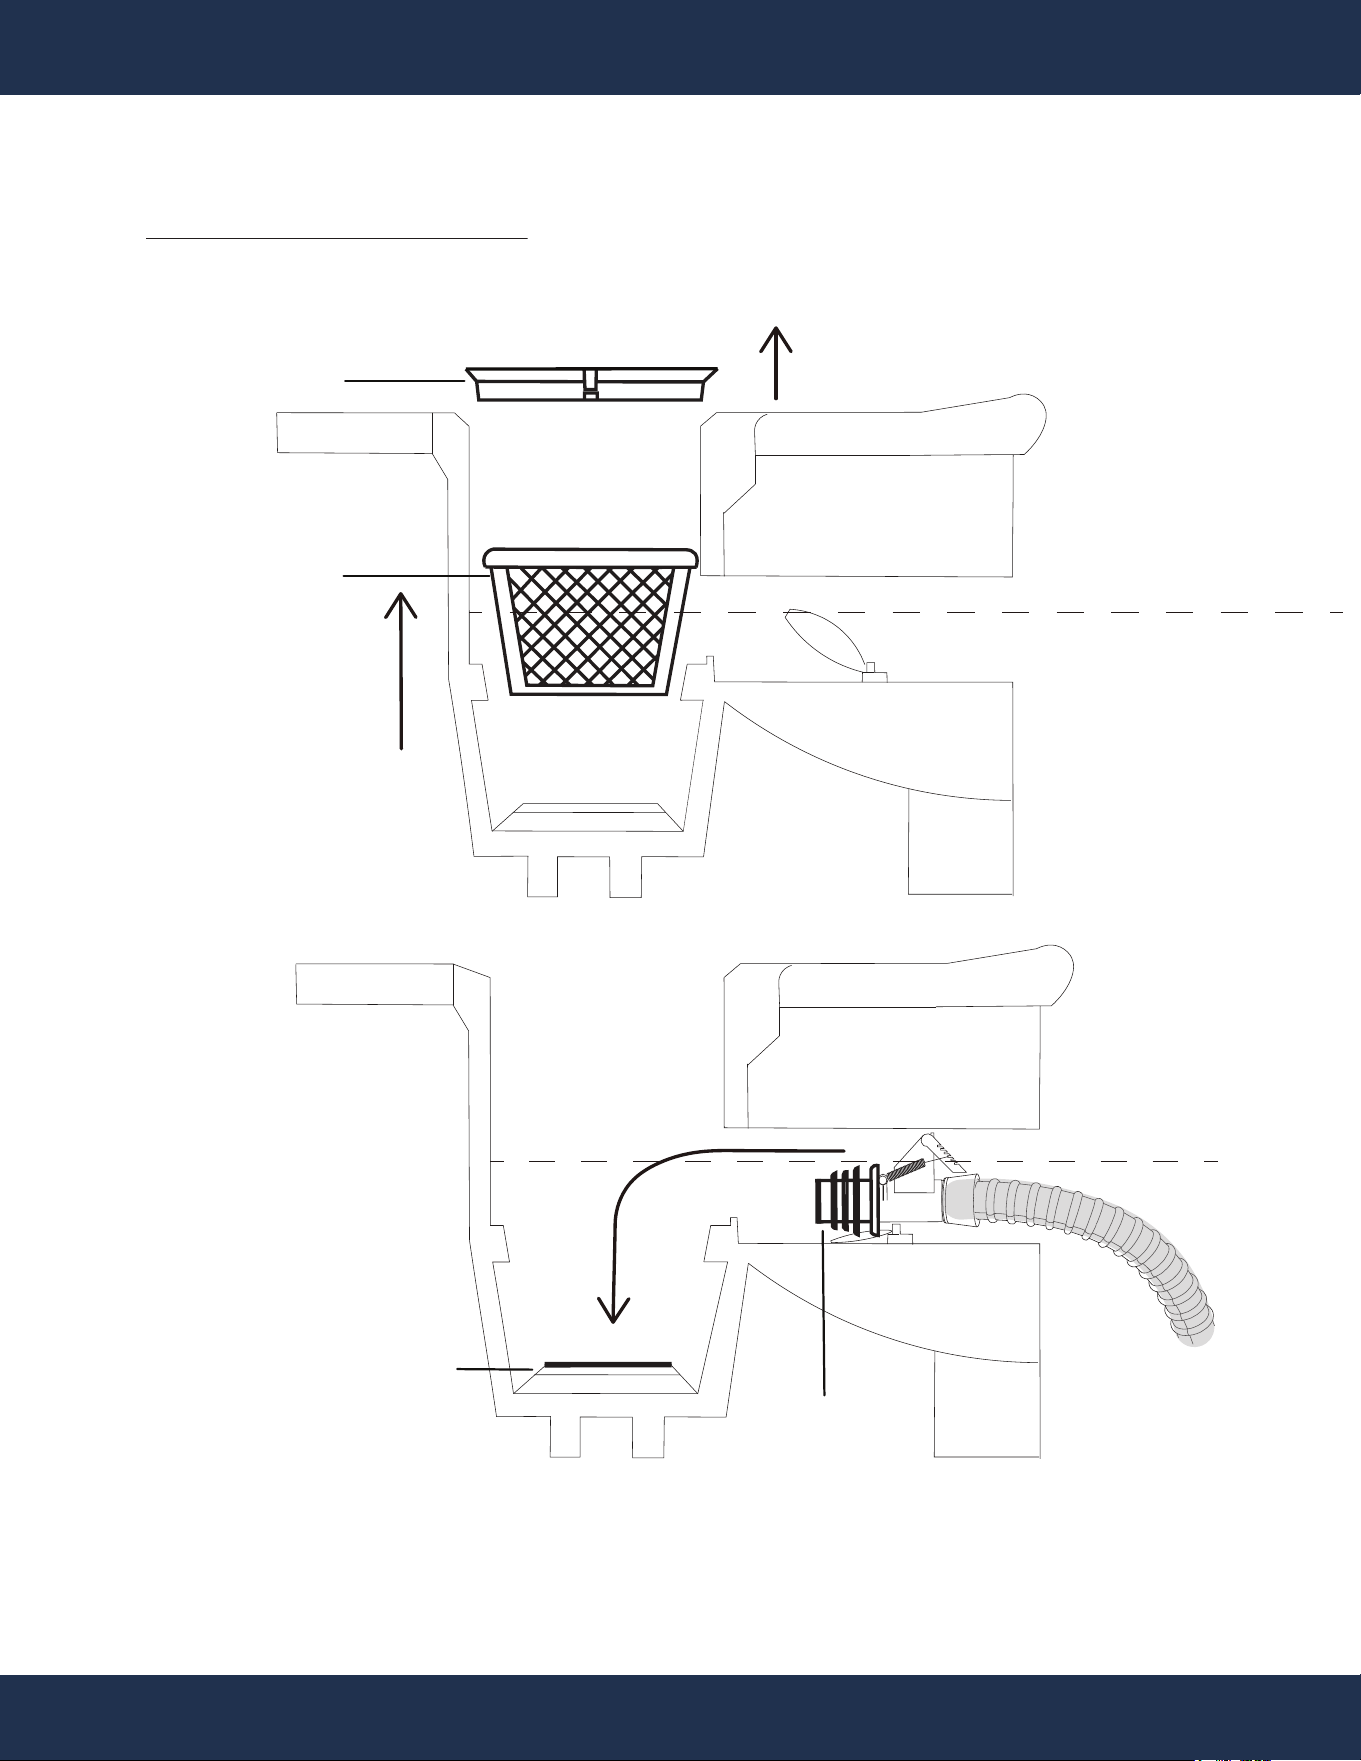
ASSEMBLY
STEP 8
SKIMMER
BASKET
LID
WATERLINE
COPING
WEIR
PARTS # 6
SUCTION PORT
THE MALE CUFF
END OF PARTS# 6
SWIMMING POOL
WATERLINE
FOR POOL SKIMMER CONNECTION
16
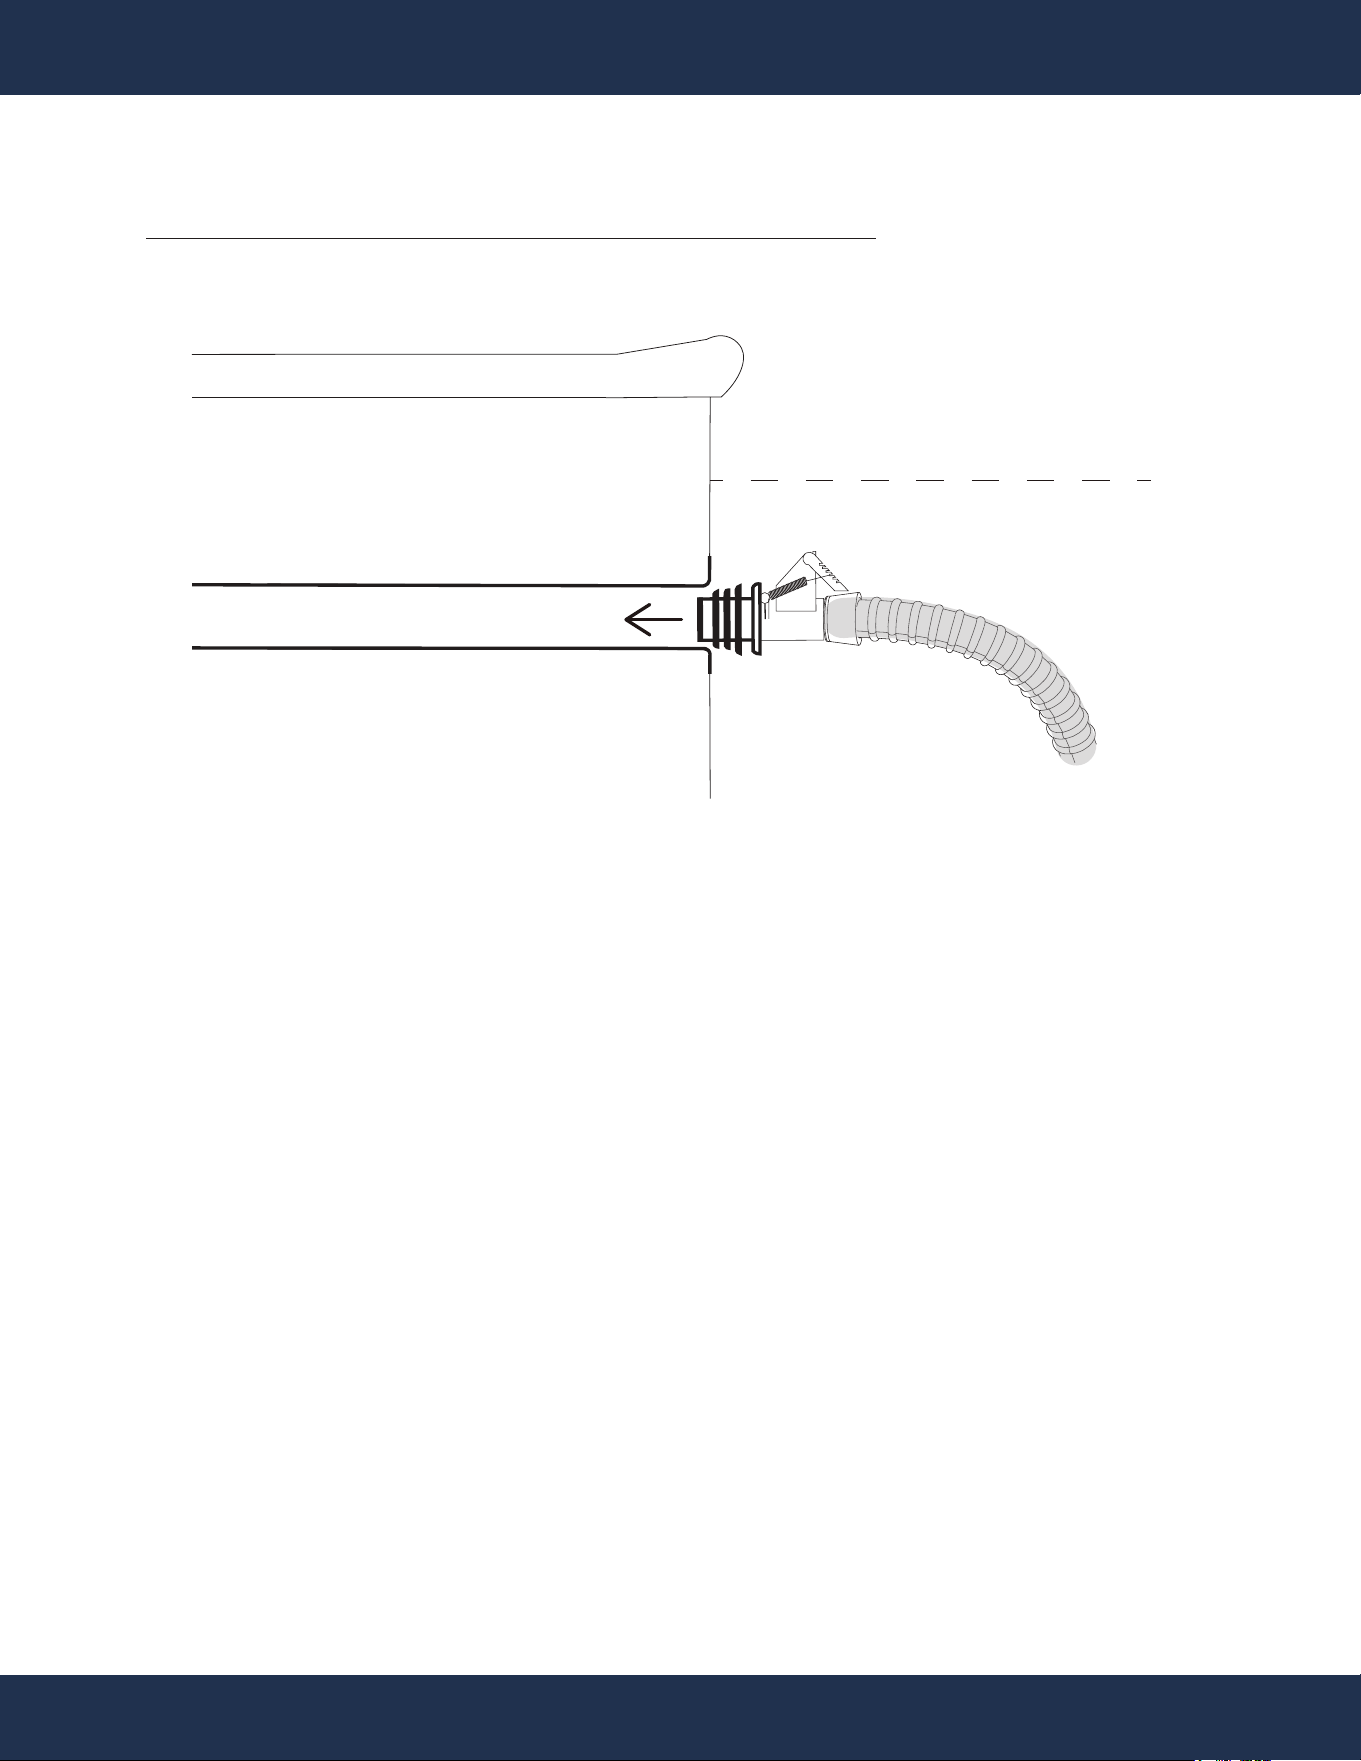
ASSEMBLY
STEP 9
FOR DEDICATED POOL VACUUM / SUCTION LINE CONNECTION
WATERLINE
COPING
POOL VACUUM / SUCTION / RETURN LINE
17
OPERATION
ADJUSTMENT
OPERATION
After installation, turn on the pool pump and let it run for a few minutes to remove all air from the system.
The cleaner should move at 8 to 12 FT per minute. Check the following adjustments:
CAUTION
Check the hose length with the pump on, as it contracts during operation.
Hose Length
• With the cleaner running, move it to the furthest point in the pool using a pole.
• The hose should reach the furthest end of the pool plus one extra hose section. Remove extra
sections from the center to avoid disturbing hose weights. Save removed sections for future use.
Turn off the pump when adding or removing hose sections.
NOTE
Hose Balance
Turn off the pump and observe the cleaner. The hose balance is correct when the cleaner’s seal is
flat on the pool floor, and the diver tubes are at a 45° angle.
• Hose too light: If the hose rises above 45°, move the weights closer to the cleaner or each other.
• Hose too heavy: If the hose sags below 45°, move the weights away from the cleaner or each
other.
CAUTION
The return line water flow can affect the cleaner’s performance. Use the included eyeball diverter to
adjust the flow.
Return Line Water Flow (Optional)
• To Install the Eyeball Diverter (Parts # 12):
▪ Turn off the pump. Remove the original eyeball from the return line by unscrewing the lock
ring.
▪ Install the cleaner’s eyeball diverter and tighten the lock ring, ensuring the opening points in
the desired direction.
• Eyeball Diverter Positions:
Position the diverter to redirect water flow away from the cleaner
▪ Along the pool's side (tile line)
▪ Downward
▪ Against the hose to steer the cleaner away from obstacles

18
TROUBLESHOOTING
GENERAL CHECKS
TROUBLESHOOTING
Because of the individual characteristics of the pool, some additional adjustments may be required to
get the best performance from the cleaner.
• Bottom main drain: Close the drain.
• Filter: Ensure it is clean.
• Pump strainer basket: Clean if necessary.
• Debris blocking cleaner: Remove any debris.
• Leaky hose: Replace any leaky sections.
• Automatic regulator valve: Ensure it is free of debris.
CLEANER NOT MOVING OR PULSATING
• Ensure the main drain and all suction lines are closed except for the cleaner's suction line.
• Check for debris in the filter and pump basket.
• Inspect the cleaner’s flapper for debris that may prevent movement.
• Ensure the pool pump and filter system provide at least 20 gallons per minute of water flow. Or
consult a professional for help.
CLEANER STAYS IN ONE END OF THE POOL
• Adjust the return line water flow with an eyeball diverter.
• Ensure the hose is long enough to reach the furthest end of the pool.
• Check that the hose balance is correct.
CLEANER STAYS ON THE MAIN DRAIN
• Ensure the main drain is closed. Consult a professional if needed.
• Ensure the main drain grate is installed and flush with the pool floor.
CLEANER SLOWS DOWN AND AIR BUBBLES ENTER THE POOL
• Identify and correct any air leaks causing the pump to lose its prime.
• Check the hose for leaks.
• Ensure the vacuum connection is submerged.
• Inspect the pump basket lid for tightness, cracks, or worn/missing O-rings. Consult a professional if
needed.

19
TROUBLESHOOTING
CLEANER PULLS AIR OR REMAINS AT THE WATER'S SURFACE
• Ensure the dive float mechanism operates freely and the dive float restrictor is installed.
• Verify the automatic regulator valve is correctly installed and not clogged.
• Maintain the water level at least 2 inches below the pool deck.
• Ensure the cleaner operates at the proper speed (8-12 feet per minute).
CLEANER STAYS AT THE SHALLOW END OF THE STEPS
• Adjust the return line water flow with an eyeball diverter.
• Verify the automatic regulator valve installation and cleanliness.
• Ensure the hose is long enough to reach the furthest end, including the steps.
• Check the hose balance in the shallow end.
• Ensure the dive float mechanism operates freely.
• Shorten the roller bumper strap by ½ inch if necessary.
CLEANER TRACKS IN A REPETITIVE PATTERN
• Ensure the swivel on top of the cleaner turns freely.
• Adjust the return line water flow with an eyeball diverter.
• Check for bent or kinked hose sections. Lay the hose flat on a surface to inspect.
CLEANER HOSE GETS TANGLED
• Cause: Hose wound too tightly, swivel points not swiveling, too much hose, weights improperly
balanced
• Resolution: Lay the hose out in the sun, swap hose sections, remove excess hose, adjust weights
CLEANER MOVING SLOWLY
• Cause: Insufficient pressure or suction
• Resolution: Clean pump basket and filter, ensure proper suction, check for blockages or cracks,
adjust regulator valve
CLEANER NOT REACHING ALL AREAS OF THE POOL
• Cause: Stuck in deep end, return line water flow, not climbing stairs, hose too long/short, not
reaching shallow end
• Resolution: Address pressure or suction issues, use eyeball diverter, adjust hose length, check
depth and angle

20
TROUBLESHOOTING
REMOVING DEBRIS FROM THE FLAPPER
• Turn the cleaner upside down and jiggle the flapper or flush with a hose to remove debris.
• If debris persists:
▪ Remove the four lids in the foot pad, unscrew, and remove the foot pad.
▪ Remove the screw from the baffle plate, pull out the plate, and then remove the flapper.
▪ Clear the debris and reassemble the cleaner.

21
MAINTENANCE
MAINTENANCE
MAINTENANCE TIPS
• Inspect the flapper to ensure it moves freely and is not obstructed by debris.
• Replace the foot pad if it is excessively worn.
• Store the hose flat and out of direct sunlight; do not coil the hose.
• Swap hose sections every 3 months to prevent sticking and ensure proper movement.
22
REPLACEMENT PARTS
REPLACEMENT PARTS
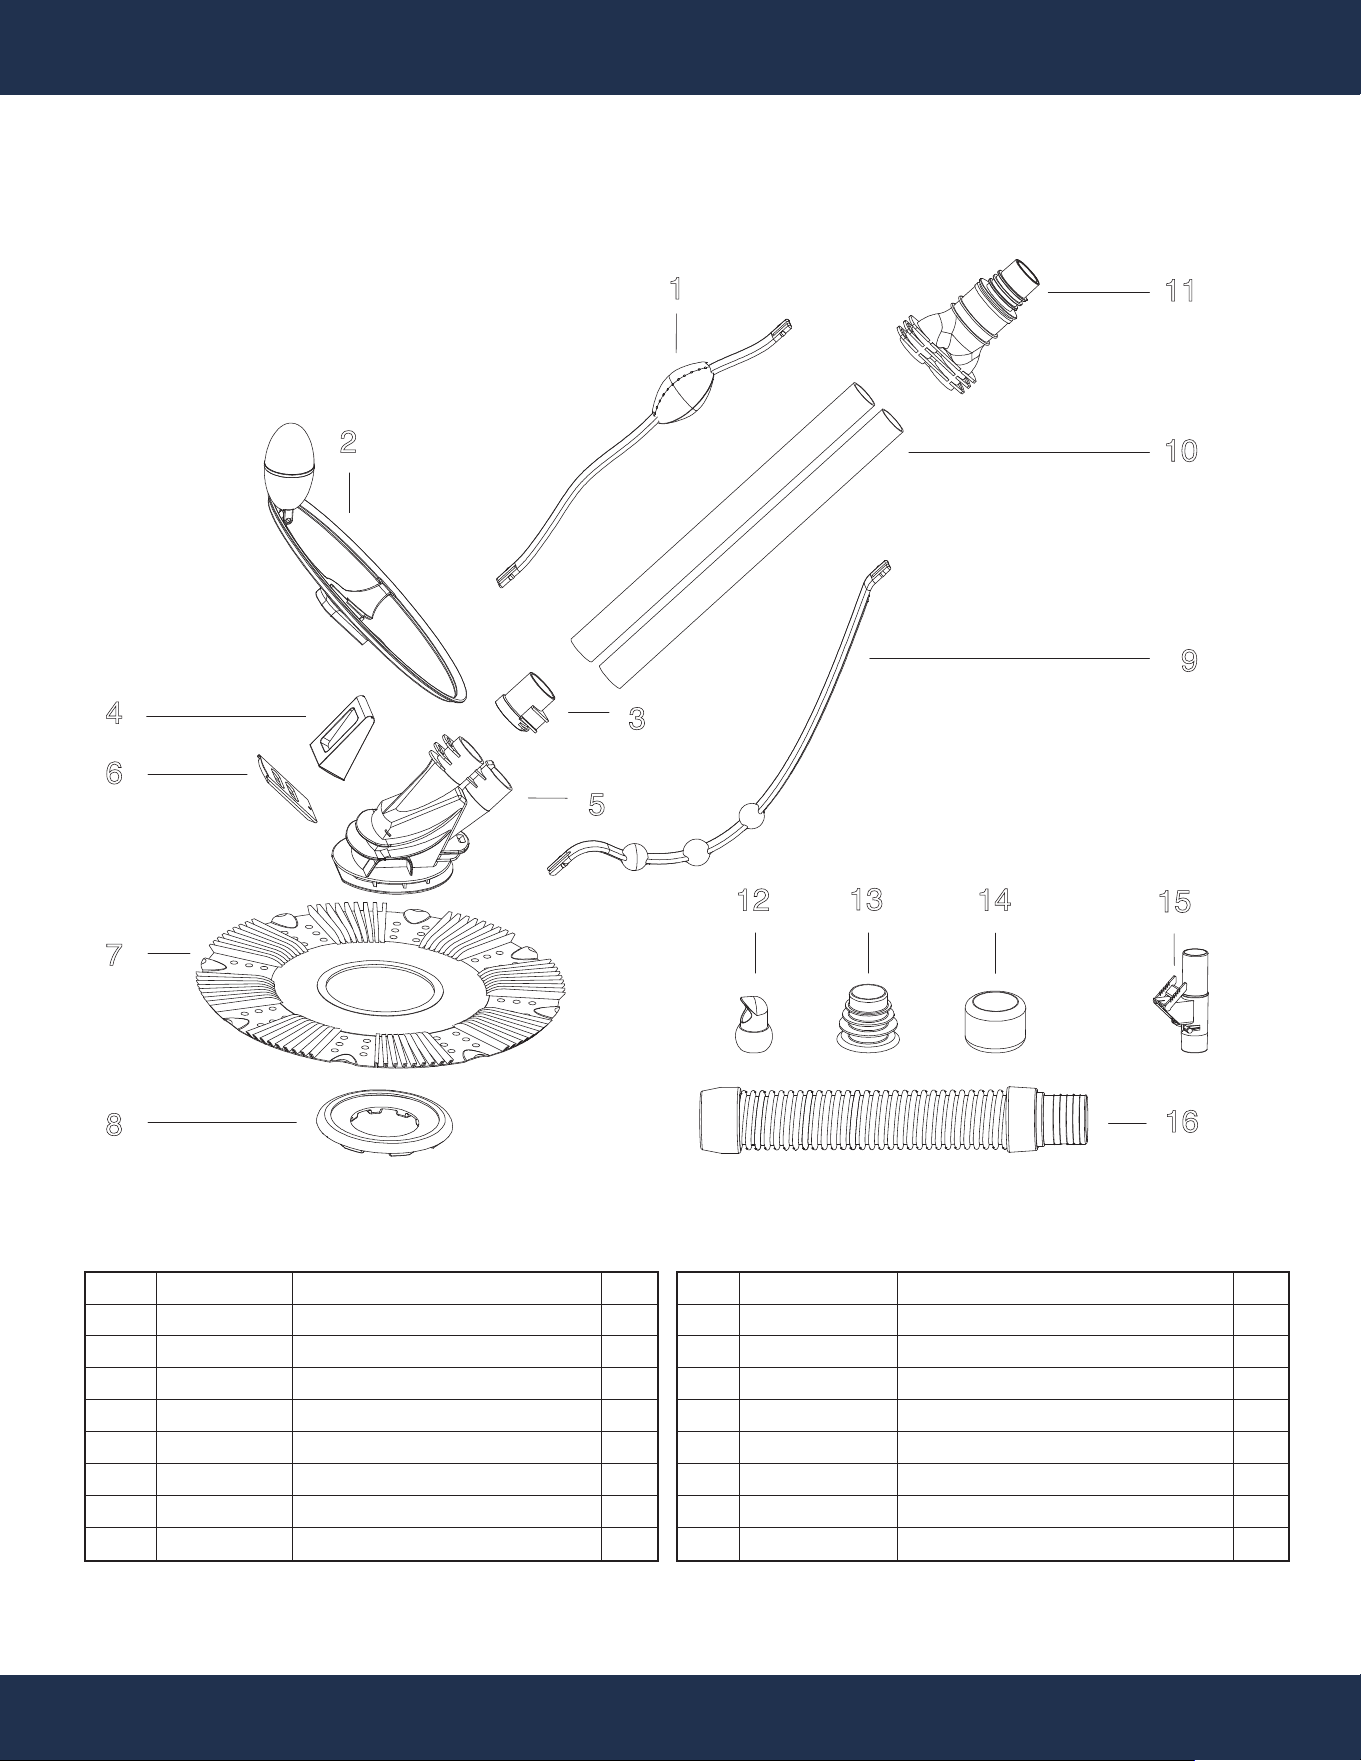
PARTS DIAGRAM
ITEM
1
2
3
4
5
6
7
8
REF. #
647325072
647325073
647325024
647325012
647325071
647325013
647325019
647325020
DESCRIPTION
ABOVE BALANCE ASSEMBLY
DIVE FLOAT RESTRICTOR
STRAP FIXED SUPPORT
FLAPPER
FLAPPER PLATE
BOTTOM COVER
PLEATED SEAL
BOTTOM PLATE
QTY
1
1
1
1
1
1
1
1
ITEM
9
10
11
12
13
14
15
16
REF. #
647325014
65748020052
647325074
647325021
647325001
647325025
647325075
647325077
DESCRIPTION
ROLLER BUMPER STRAP
CLEANER PIPE
TEE ASSEMBLY
EYEBALL DIVERTER
HOSE CONE
HOSE WEIGHTS
AUTOMATIC REGULATOR VALVE
HOSES FOR CLEANER 3 FT
QTY
1
1
1
1
1
3
1
10
1
2
4
6
5
3
8
7
9
11
12
13
14
15
16
10

DISCLAIMER
PLEASE READ THE FOLLOWING CAREFULLY
The manufacturer and/or distributor have provided the parts list and assembly diagram in this
manual for reference purposes only. They do not make any representation or warranty to the buyer
that they are qualified to make repairs to the product or replace any parts of the product. In fact, the
manufacturer and/or distributor expressly state that all repairs and parts replacements should be
undertaken by certified and licensed technicians, and not by the buyer.
The buyer assumes all risk and liability arising from their repairs to the original product or
replacement parts or arising from their installation of replacement parts. It is strongly advised that
qualified professionals handle any repairs or replacements to ensure safety and proper functioning
of the product. Improper installation and operation may result in injury, property damage, or voiding
of warranty. The manufacturer and/or distributor shall not be held responsible for any accidents,
damages, or malfunctions resulting from the buyer's installation and operation of the product. It is
essential to follow all safety guidelines and recommendations provided in this manual and to seek
professional assistance if unsure about the installation or operation procedures.
CUSTOMER SERVICE
If you have any questions about ordering our pool pumps and replacement parts or pool products,
please feel free to contact us using the following contact information:
Customer Service and Technical Support
Phone: (909) 628-0880
Email: [email protected]
Hours of Operation: Monday – Friday, 9AM – 4PM (CST)
23
DISCLAIMER
