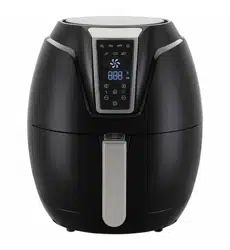
3.4
L A
ir
F
ryer
INSTRUCTION MAN
UAL
HIC-AF-8062
Brief Introduction
Thanks for purchasing this top
-q
uality oil
-
free fryer.
Y
ou are now able to cook a wide assortment of healthy food
-
with no oil.
This fryer uses hot air in combination with high
-
speed air circulation to prepare
dishes fast and easy.. With our Oil Free Fryer, now you have a more convenient
way to make delicious food like cakes and milk egg biscuits etc.
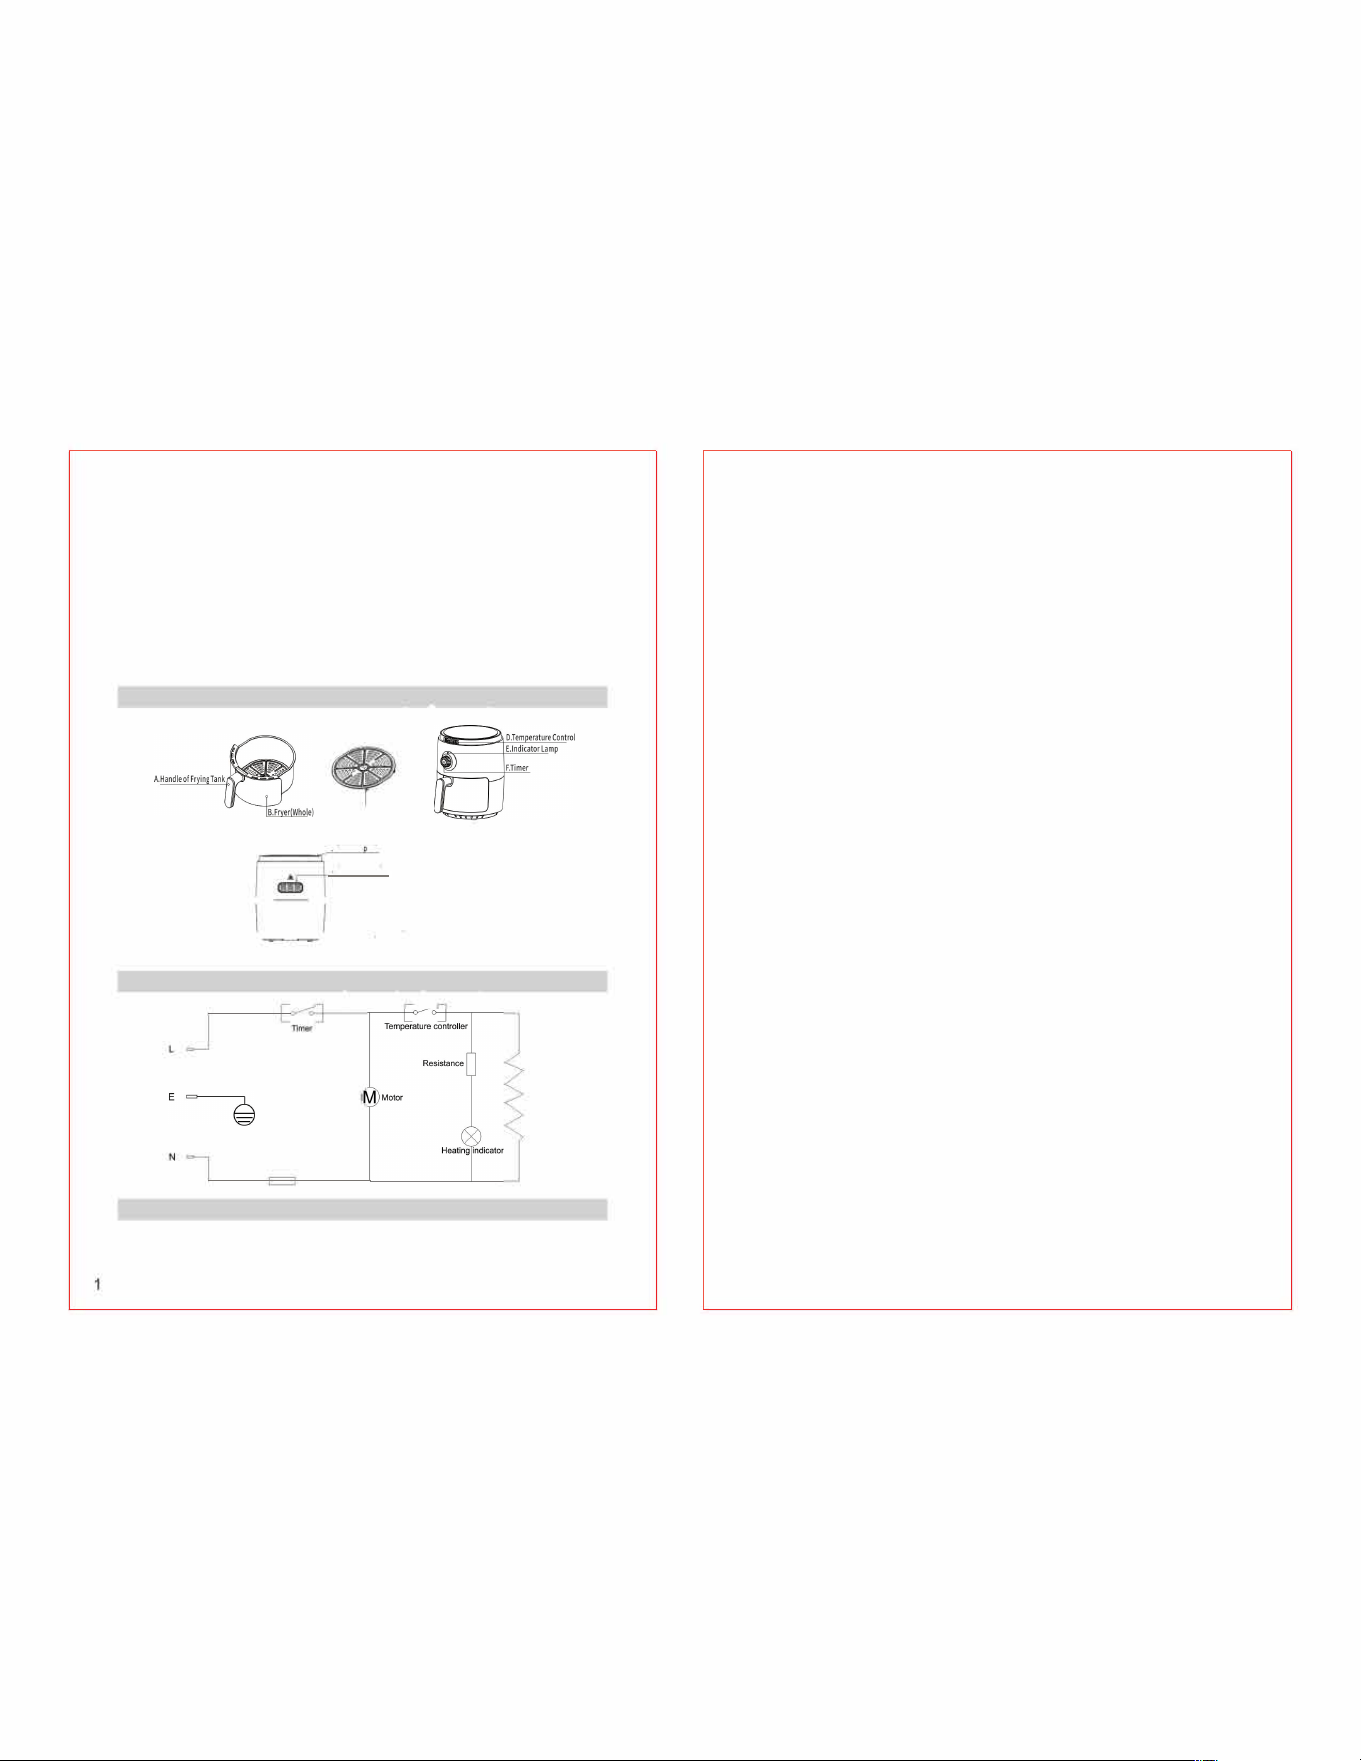
General Instruction (Figure 1)
C.FryingTray
HAir0utlet0pening
f--
GAirlnletOenmg �
�
I PowerW1re
Circuit Diagram (Figure 2)
Temperature fuse
Attention
Heating coil
Please r
ead this product manual before you use the appliance and keep it safely
for future reference.
I. Danger
1. Never immerse in water nor rinse under the tap , this appliance which contains electrical
components and the heating elements.
2. Do not let any water or other liquid enter the appliance , to prevent electric shock.
3. Always put the food ingredients in the frying tank for frying , to prevent it from coming into
contact with the heating elements.
4. While the appliance is operating, do not cover the air inlet and air outlet opening.
5. Never pour oil into the fryer, for this may cause fire.
6. Do not touch the inside of the appliance while it is operating.
II. War
ning
1. Before connecting the product with the electric power, please check if the power provided in
accordance with the rated power of the appliance.
2. Do not use the appliance if the plug or the power cord is damaged.
3. If the power cord is damaged, you must have it replaced at an authorized service center or
similarly qualified person to avoid hazard.
4. This appliance is not intended for use by persons with reduced physical, sensory or mental
capabilities including children or who lack experience and knowledge, unless they have be
given supervision or instruction concerning use of the appliance by a person responsible for
their safety.
5. Do not let them children play the appliance like a toy.
6.
K
eep the appliance and its mains cord out of the reach of children especially when the
appliance is switched on or is cooling down
7.
K
eep power wire away from hot surfaces.
8. Do not plug in the appliance or operate the control panel with wet hands.
9.
O
nly connect the appliance to an earthed wall socket. Always make sure that the plug is
inserted into the wall socket properly
10. Never connect the appliance with external timer, in case danger might occur.
11. Never place the appliance on or near combustible material like the table cloth, or the
curtain etc.
12. Never place the appliance against the wall or against other appliances. There
should be at least 10cm of free space for the back side, left/ right sides, and the upper side of
the product . Do not put things on top of the appliance.
13. Never use the appliance for purposes not illustrated in this manual.
14. Do not let the appliance operated unattended.
15. During the period of fat-free frying, steam with high temperature will be emitted from
the air outlet opening. The hands and face should be away from the steam and the air outlet
opening. Also be careful of hot steam and hot air when you remove the frying tray from the
appliance.
16. The surface below the appliance may become hot during use.
17. Immediately unplug the appliance if you see dark smoke coming out. Wait for the
smoke emission to stop before removing the frying tray from the appliance.
Ill. Notice
1. Place the appliance on a horizontal, level and stable surface.
2. This appliance is intended for normal household use only. It is not intended for use in
environments such as staff kitchens, offices, farms or other work environments. Nor is it intended to
be used by clients in hotels or other similar environments.
3. If the customer has failed to use the product correctly, or has used the product for professional
or half professional purposes, or failed to follow the instructions in the manual while using , then
such misuse will invalidate the guarantee, we are not responsible for damages caused by these.
4. The appliance must be sent to the authorized repair centers for repair . Do not repair the
product by yourself, for it will invalidate the guarantee.
5. Always unplug the power after use.
6.
L
et the appliance cool down for approx. 30 minutes before you handle or clean it.
7. Ensure that the food ingredients fried in the product turn into the golden color, and not the black
or brown color. Removed burnt remnants.
IV. Automatic Closing
The appliance is equipped with a timer. When the timer countdown sets to 0, the product will
ring and close automatically.
To close the appliance manually, please turn the knob of the timer counterclockwise to 0.
2
3
Before First Use
1. Remove all the packing materials.
2. Remove the glue and labels on the appliance except for the rating label.
3. Clean the frying tank and the frying tray thoroughly with hot water, detergent using
non-abrasive sponge.
4. Clean the inside and outside of the appliance with warm moist cloth.
5. The fat-free fryer uses the technology of hot air heating. Never pour oil or fat into the fryer.
Preparing for Use
1. Place the appliance on a level surface that is even, stable, and heat-resistant.
2. Put the frying tray into the fryer tank properly.
3. Never pour oil or other liquid into the fryer tank . Never put things cover the air inlet opening of
the appliance, for this will prevent the air flow and reduce the effect of hot air heating.
O
perating This
A
pp
l
iance
The fat-free fryer can be used to cook many types of food ingredients. The additional food making
manual will assist you to understand this product.
I.
O
il-Free Frying
1. Insert the plug into the grounded socket.
2. Pull out the frying tank carefully from the oil-free fryer.
3. Put the food ingredients into the frying tank.
Notice: Put the frying tray first in the frying tank before placing the food ingredients into the
frying tank. The amount of food ingredients should never be too much nor too little , as it may
affect the final quality of frying.
4. Slip the frying tank back to the oil-free fryer. (Notice: Do not touch the fryer immediately
after the operation, to avoid scald. One can only move the fryer by holding the handle.)
5. Adjust to the right temperature by turning the temperature control knob . ( Please refer to the
"Settings" part of this chapter.)
6. Determine the time for cooking the food ingredients. (Please refer to the "Settings" part of this
chapter.)
7. To turn on the product, please adjust the knob of the timer to decide the time for cooking . ( If
the product starts with cold boot, the cooking time should be 3 minutes longer.)
• The timer will begin to countdown the time according to the Setting time.
• During the operation of the oil-free fryer , the heating indicator lamp will turn on and off
continuously. This shows that the heating components are turning on and off continuously ,
thus to maintain of the Setting temperature.
• The excess oil from the food ingredients will be collected at the bottom of the frying tank.
8.Some food ingredients require overturning during the middle term of cooking ( refer to the
"Settings" part of this chapter). To overturn the food ingredients, hold the handle and pull out the
frying tank from the appliance, and then make the turning. After that, slip the frying tank back to
the fat-free fryer.
9.The ringing of the timer means that the Setting time has expired. Then pull the frying tank out
of the appliance, and put it on heat-resistant surface.
Notice: You can also close the product manually when it's working. To do this, turn the timer knob
to 0.
10. Check to see if the food ingredients are cooked well . If the food require more cooking,
then slip the frying tank into the appliance, and set the timer with extra minutes.
11. Do not overturn the frying tank, for this will cause the excessive oil collected at the bottom of
the frying tank to leak onto the food ingredients. After cooking with the fat-free fryer , the frying
tank and the food are still very hot , to avoid scald , do not touch the food with your hands
immediately. In most cases, after frying, there are steam coming out from the fryer.
12. Use clamps to take the food from the frying tank and place them into bowls or plates.
13. After completing the cooking process of the first batch , the fat-free fryer can start to cook
another batch again, for another time frame.
II. Settings
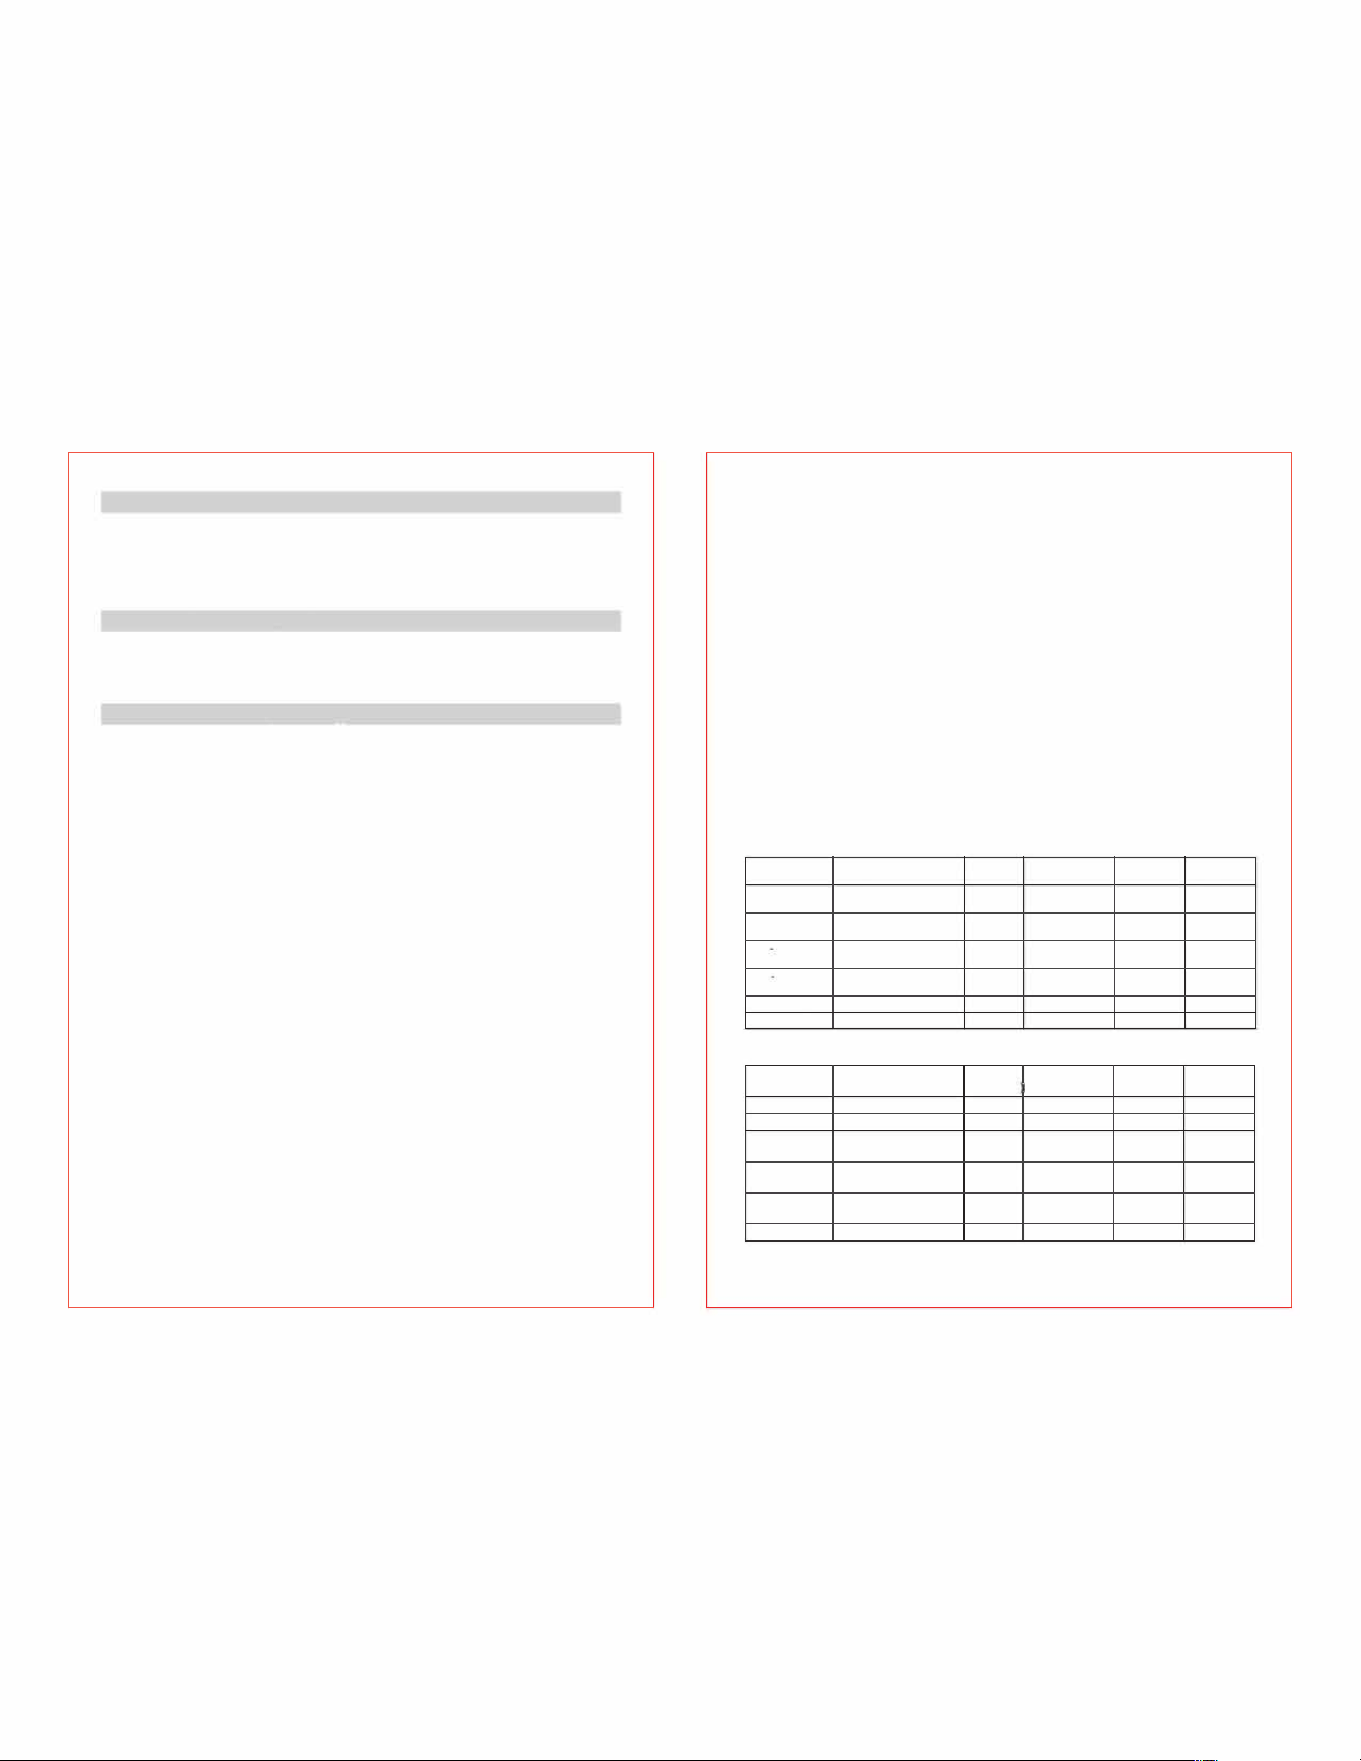
The following table will assist you to choose the basic Settings for the food you want to cook.
Note: Please remember that these Settings is for reference only . Since food differ in source,
size, shape and brand, we can not guarantee to provide the best Settings for your food .
Because the Rapid Air Technology instantly reheats the air inside the appliance, pulling the
frying tray briefly out of the appliance during hot air frying barely disturbs the process.
Ill. Note
1. Smaller ingredients usually require a slightly shorter preparation time than larger
ingredients.
2. A larger amount of ingredients only requires a slightly longer preparation time, a smaller
amount of ingredients only requires a slightly shorter preparation time.
3. Shaking smaller ingredients halfway through the preparation time optimized the end result and
can help prevent unevenly fried ingredients.
4. By adding small amount of oil to the fresh potatoes , the food can be made crisper. After adding
the oil, the food ingredients should be shelved for several minutes before frying
them in the oil-free fryer.
5. Do not prepare extremely greasy ingredients such as sausages in the air fryer.
6. Snacks that can be prepared in an oven can also be prepared in the air fryer.
7.The optimal amount for preparing crispy fries is 500 grams.
8. Use pre-made dough to prepare filled snacks quickly and easily. Pre-made dough also
requires a shorter preparation time than home-made dough.
9. You can also use the air fryer to reheat ingredients by setting the temperature to 150
°
C and
the timer to about 10 minutes.
IV. Potatoes and Chips
Type
Minimum-Maximum
Time
Temperature(
°
C)
Overturning
Additional
food ingredients amount
(minutes)
information
Frozen Thin
300-700
12-16
200
Overturning
Chips
Frozen Thick
300-700 12-20 200
Overturning
Chips
Self-made Chips
300-800 18-25 180
Overturning
Adding 1/2
(8*8 mm) spoon of oil
Self-made Potato
300-800 18-22 180
Overturning
Adding 1/2
Chips spoon of oil
Potato Cakes
250
15-18 180
Butter Potatoes
500
18-22
180
V.Meat
Type
Minimum-Maximum
Time
Temperature(
°
C)
Overturning
Additional
food ingredients amount
(minutes
information
Beefsteak 100-500
8-12
180
Overturning
Pork Chop
100-500 10-14 180
Overturning
Hamburger
100-500
7-14
180
Overturning
Adding 1/2
spoon of oil
Sausage Rolls
100-500
13-15
200
Overturning
Adding 1/2
spoon of oil
Chicken
100-500 18-22 180
Overturning
Adding 1/2
Drumstick
spoon of oil
Chicken Breast
100-500 10-15 180
4
5
VI.
S
na
c
ks
:
Type
Minimum-Maximum
Time
emperature(
°
C)
Overturning
Additional
food ingredients amount
(minutes}
information
Spring Roll
100-400
8-10
200
Overturning
Adding½
spoon of oil
Frozen Chicken
100-500 6-10 200
Overturning
Adding 1/2
Nuggets
spoon of oil
Frozen Frying
100-400 6-10 200
Adding 1/2
Fish Slices
spoon of oil
Frozen Branded
100-400 8-10 200
Adding 1/2
Cheese Snack
spoon of oil
Brewed
100-400 10
180
Vegetable
Notice: If the fat-free fryer starts with cold boot, the cooking time should be 3 minutes longer.
VII. Make Frying Chips by yourself
For best results , we advise to use the pre baked chips ( e.g. frozen chips). To make home-made
fries, please follow the steps below:
1. Peel the potatoes and cut them into small chips.
2. Soak the potato chips in a bowl for at least 20 minutes, take them out and drain them on the
paper for cooking room use.
3. Pour olive oil into the bowl with a spoon, put the potato chips into the bowl and mix them round,
until all the potato chips are oiled evenly.
4. Remove the potatoes chips out of the bowl with your hands or kitchen wares, leave the excess
oil in the bowl. Then pour the potato chips into the frying tank.
Notice: 1. Put the frying tray in the frying tank before putting potato chips into the frying tank.
2. Do not pour all the potato chips into the frying tank one time , to prevent too much oil
being collected at the bottom of the frying tank after.
5. Fry the potato chips following the instructions in this chapter.
Cleaning
Clean the appliance after every use.
The frying tray, basket and the inside of the appliance have a non-stick coating. Do not use metal kitchen
utensils or abrasive cleaning materials to clean them, as this may damage the non-stick coating.
1.Pull out the plug from the power socket, let the appliance cool down.
2.Use moist cloth to scrub the outside part of the appliance.
3. Clean the frying tank or frying tray with hot water, detergent with non-abrasive sponge , please
add hot water into the frying tank together with some detergent . Put the frying tray into the frying
tank, and then soak the frying tank and the frying tray for 10 minutes.
4. Clean the inside parts of the appliance with hot water and non-abrasive sponge.
5. Use cleaning brush to clean the heating components, swept away remaining food residual.
6. Use a clean brush to clean the air inlet opening and the air outlet opening.
Storage
1. Unplug the appliance and let it cool down.
2. Make sure all parts are clean and dry.
3. Pack up the power wire.
Guarantee and Services
If you require services or repairing , or have any doubt , you can communicate with the local
Customer Center
If there is no Customer Center near your location, you can communicate with your local dealer.
Problem
The fryer does
not wok
Malfunction and Treating Method
Possible Causes Solving Method
1. Insert the plug into the grounded power
socket.
2. Turn the timer knob to set the right time
needed for cooking, and then turn on the
1. The plug of appliance is
not inserted into the power
socket.
2. User have failed to set the
timer.
power.
The in
gredients fried
with the air fryer are
not done.
1. Put smaller batches of ingredients in the
basket. Smaller batches are fried more
evenly.
2. Turn the temperature control knob to set the
temperature require. (refer to the "Settings"
part in the chapter of "Operating this Product")
3. Turn the timer knob to the required
preparation time (see section
'
Settings
')
.
1. The amount of the
ingredients in the basket is too
much
2. The set temperature is too
low.
3. The preparation time is too
short.
T
he ingredients are
f
r
ied unevenly in
the air fryer.
Fried snacks are not
crispy when they come
out of the air fryer
W
hite smoke comes
out from the
appliance
Certain types of the ingredients
need to be shaken halfway
through the preparation time
T
Y
ou used a type of snacks meant
to be prepared in a traditional
deep fryer.
Ingredients that lie on top of or across each
other (e.g. fries) need to be shaken halfway
through the preparation time (see section
'
Settings
'
).
U
se oven snacks or lightly brush some oil onto
the snacks for a crispier result.
1. Y
ou are preparing greasy
ingredients.
2.
The pan still contains greasy
residues from previous use.
1. When you are cooking food ingredients with
comparatively high oil content in the fat-free fryer,
large amount
�
foil fume will _infiltrate into the frying
t
a
�
k.
T
h
e
.
O
I
i
�
1
1
1
p
r
o
d
u
c
e
w
h
i
t
e
O
_
I
i
f
u
m
e
B
,
a
n
�
t
h
_e
f
r
y
i
n
g
t
a
n
k
m
i
g
h
t
b
e
h
o
t
t
e
r
than
u
s
u
a
l
.
u
t
t
h
i
s
w
i
l
l
n
o
t
a
f
f
e
c
t
t
h
e
f
i
n
a
l
c
o
o
k
i
n
g
e
f
f
e
c
t
.
2. The white smoke produced by heating the oil and
fat inside the fryer. Make sure to clean the frying
tank each time after each use.
Fresh crisps are not
You have failed to soak the potato Use fresh potatoes, and following the instructions
fried evenly inside
chips correctly before the frying in "Make Frying Chips by yourself" chapter.
the fryer
The fried chips
are not crispy when
they come up
from the fryer
1. Make sure to drain the potato chips correctly
before adding oil to them.
The
crispiness is based by the
2
. B
y cutting the potato
chips into smaller size, they
oil
content and moisture
content
can be made more light
and crisp.
of the potato chips.
3
.
The potato chips can be made more light and crisp
by adding small amount of oil to them.
6