单页尺寸:7CM*10CM
03
09
图
3
图
4
W30 BT1
(1)左键点击YL( )图标,在弹出的软件界面中点击“云指令设
置”,点击添加指令(如图 )。输入指令词,选择与指令词对应的
控制功能(打开文件夹/文件/网站/固定文本)(如图 )。
6.云指令设置
12
13
01
07
语音键
AI 键
麦克风
Type-C
充电接口
鼠标滚轮
鼠标左键
鼠标右键
电子显示屏
2.4G高性能无线模式(接收器模式)
注:鼠标出厂默认连接模式为2.4G无线模式
2.4G无线
接收器
鼠标开关
图
1
图
2
模式切换
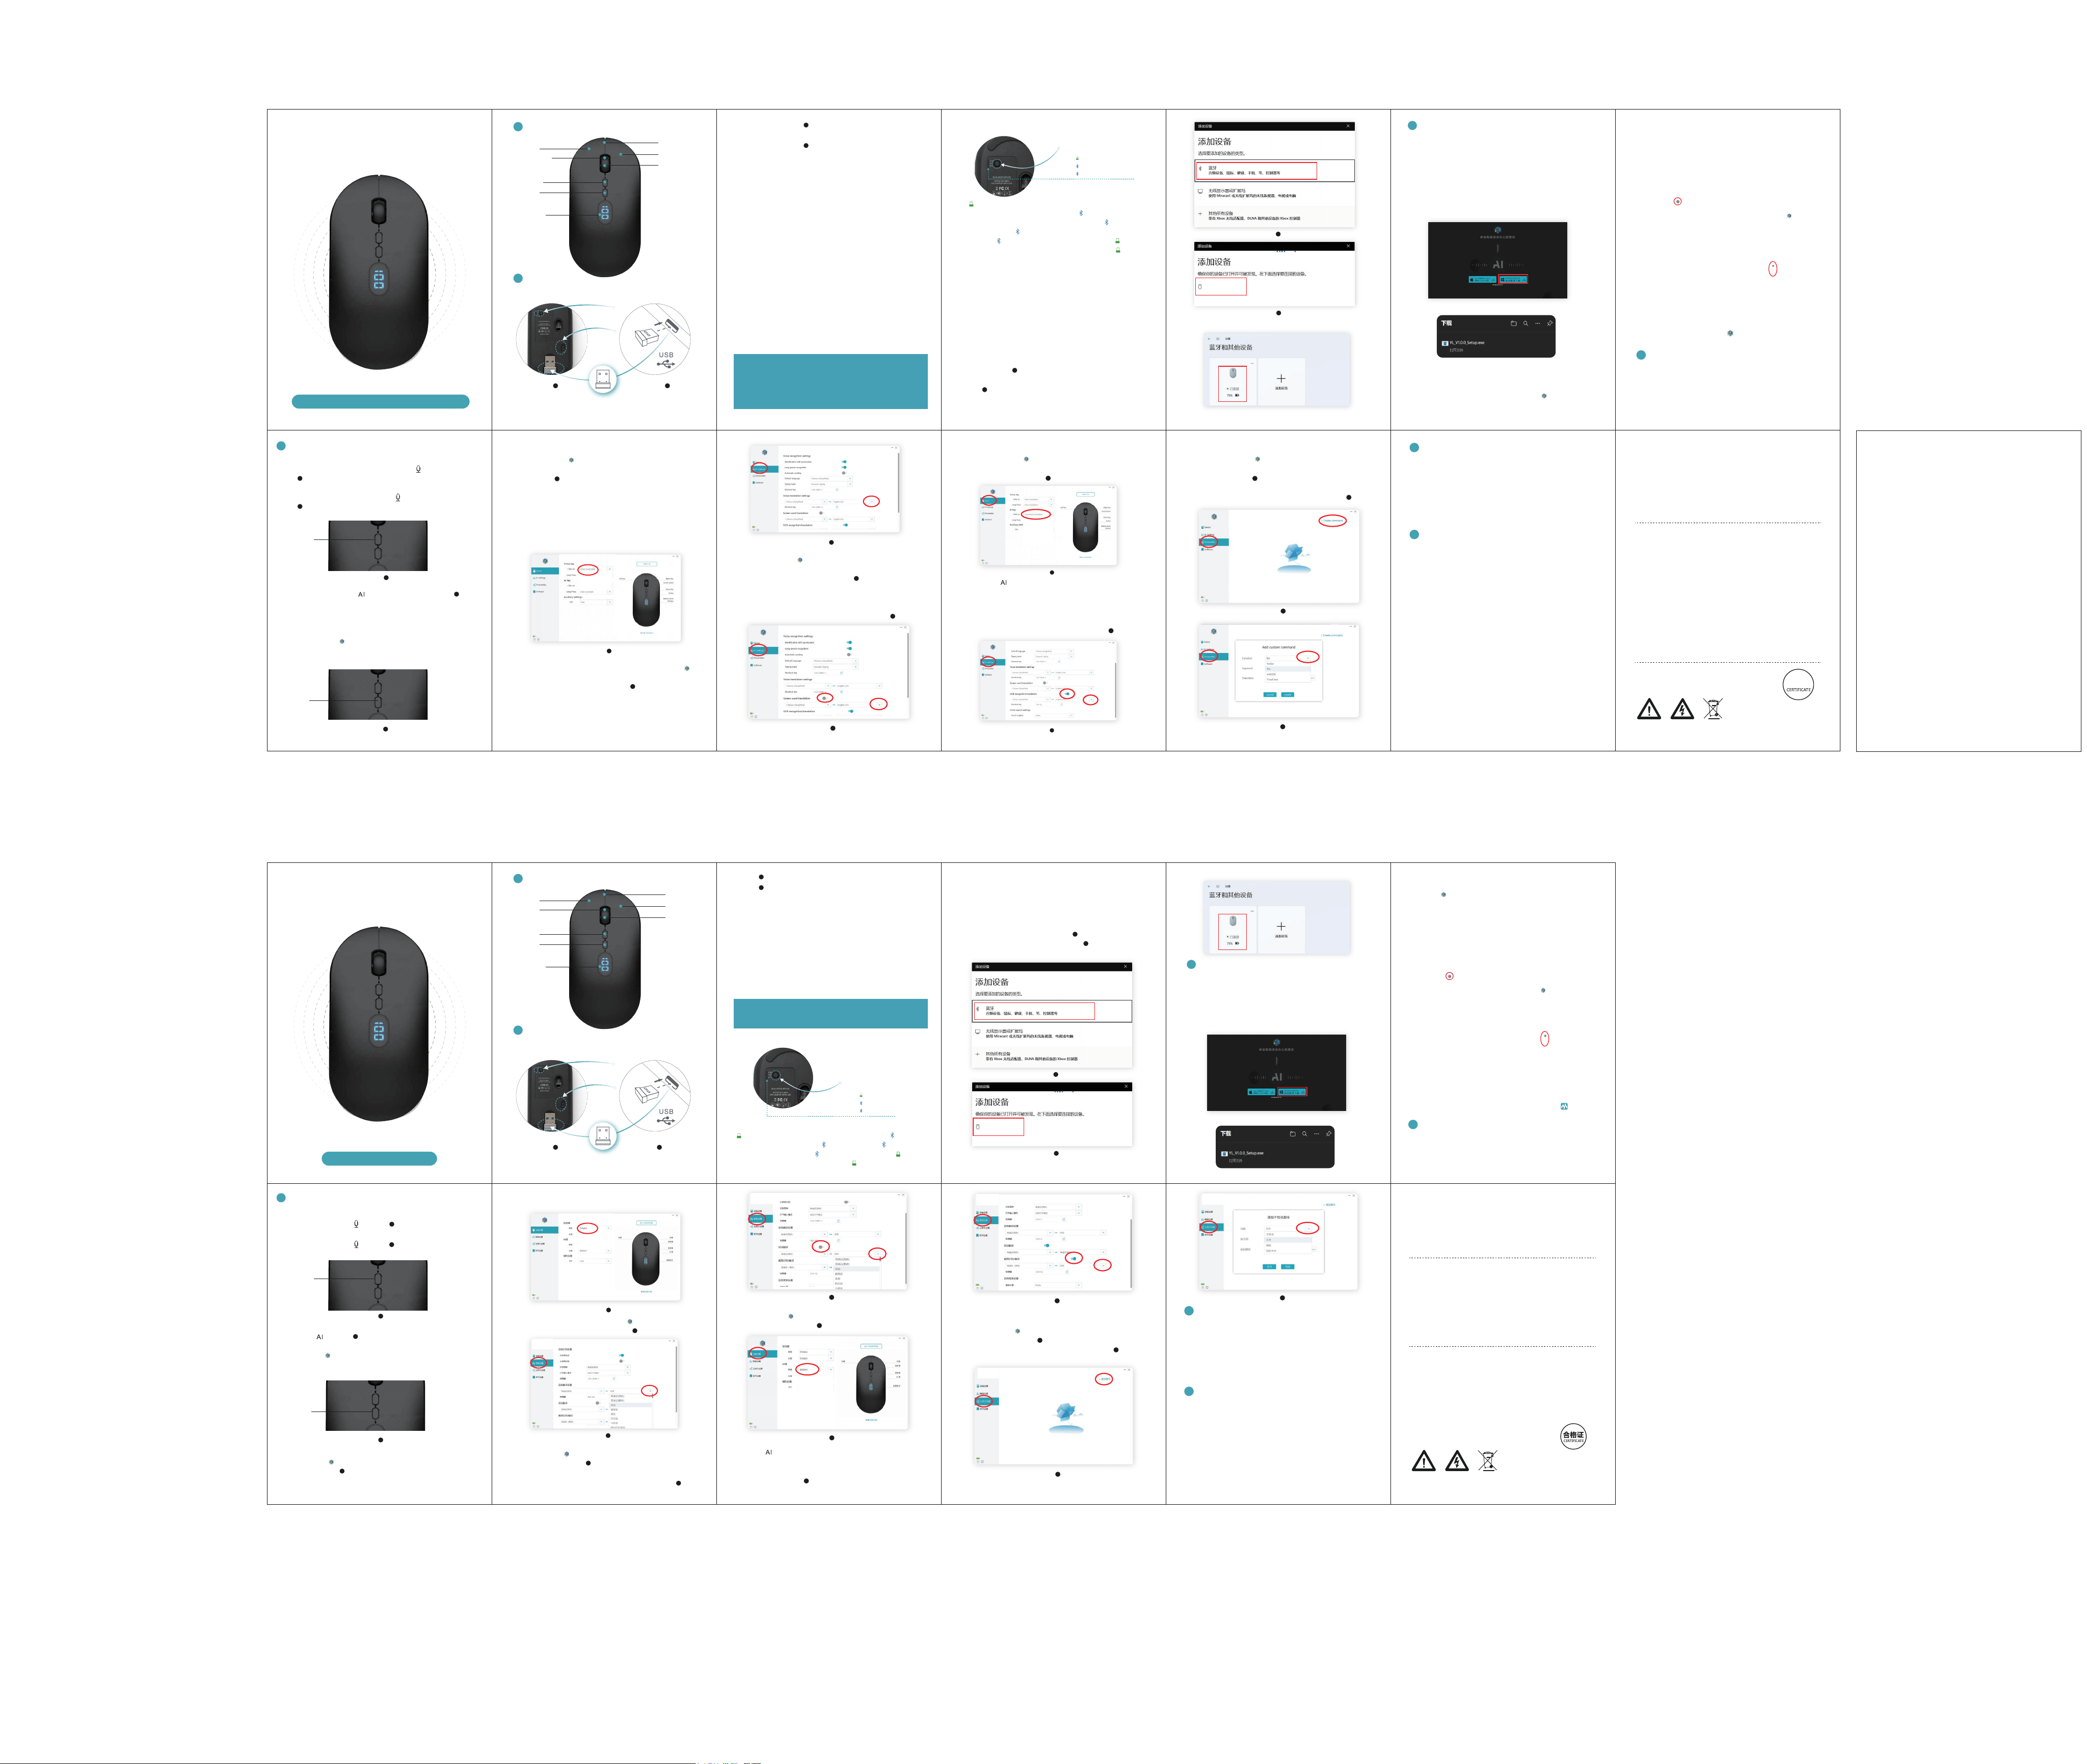
产品结构及按键说明1
使用鼠标2
使用说明及售后服务保障
06
1.语音打字
(1)短语音模式:按住鼠标“ ”键(如图 )开始说话,说完松开即可实
现语音打字。
2.语音搜索
(1)按住鼠标“ ”键(如图 )开始说话,说完松开即可实现智能搜索。
(2)语音搜索的语种以语音打字语种为准。
(3)左键点击YL( )图标,在弹出的软件界面中点击“智能设置”,在“语
音搜索设置”可以设置搜索引擎和搜索快捷键。
3.语音翻译
5
(2)长语音模式:单击鼠标“ ”键(如图 )开始说话,说完再次单击按
键即可实现语音打字。
5
6
图
语音键
5
图
AI键
6
(1)左键点击YL( )图标,在弹出的软件界面中点击“设备设置”,选择“
语音翻译”功能(如图 )。
(2)短语音模式:按住鼠标翻译键开始说话,说完松开即可实现语音翻译。
7
W30
智能语音鼠标
Smart Voice Mouse
功能介绍
5
04
1.由于超低的待机功耗,在固定的场所使用时,不必刻意让鼠标
关机,携带外出时建议让鼠标处于关机状态。
1.配有可充电电池的智能语音鼠标要避免暴露在日照下或者存
放在炎热的汽车内,切记不要随意拆卸鼠标的外壳或拆解零部件。
2.充电电池的外部表面在一定的挤压或局部受力下可能会导致
意外爆炸或引起火灾,如需外出携带请最好将鼠标产品处于关
闭状态。
3.鼠标接触环境温度不要超过60摄氏度,否则充电电池会加速老化。
4.智能语音鼠标充电温度环境为:0~45摄氏度范围为佳。
3.电池为3.7V-500mAh可充电电池,除非需要更换,不必取出。不
能使用1.5VAAA碱性电池。
2.2.4G无线接收器插入计算机USB后,不必刻意取出收纳。
10
显示已连接:
1.软件安装包获取方法
下载界面:
Windows用户在鼠标正常使用情况下,长按鼠标滚轮键6秒可自
动弹出驱动程序下载页面(或浏览器输入
"http://www.miclink.net/YULI"打开驱动下载页面),点击Windows
驱动程序下载按钮,即可下载软件。
Windows操作系统
W30 BT1
软件安装方法
3
使用注意事项
6
特别提醒7
02
08
图
10
(1)左键点击YL( )图标,在弹出的软件界面中点击“设备设置”,
选择“截图翻译”功能(如图 )。
(2)单击“ ”键,鼠标滑动选择识别或翻译内容点击软件识别或
翻译按钮即可。
(3)在软件中可以设置截图翻译的识别和翻译语种,也可以修改截
图翻译的快捷键(如图 )。
5.截图识别/翻译
10
11
我们竭力保障严谨的产品设计与完善的产品品质,致力于
高性能与个性化的用户体验,并提供完备的售后服务。
智能语音鼠标自售出之日起,在正常使用情况下如发生硬件
故障,可享受12个月的免费保障服务。
以下因素不在免费保修服务内,我们将提供有偿售后服务,
可进行故障修复,部件或整机更换。
1.被未经授权的人员拆解,检修和拼装;
2.因使用中造成的物理损坏、损毁;
3.正常损耗及与产品质量无关的其他原因所造成的异常。
产地:中国深圳
Made in China
1.软件安装包获取方法
MacOS用户在APP Store中搜索MicLink Pro直接下载安装。
安装完成后打开,电脑顶部状态栏会显示软件图标( )。
建议使用电脑USB接口或5V供电对鼠标进行充电,充电时滚
轮处常亮红灯,充满后红灯熄灭,充满大约2小时。(禁止使用快
充适配器和快充线为鼠标充电)
05
(1)双击已下载的安装包,点击“下一步”进行安装。
(2)安装完成后,软件会自动运行,电脑右下角的任务栏会显示
软件图标( )。
注意事项:
因安装默认开机自动打开驱动,如果杀毒软件弹出警告阻止开
机启动,选择允许本次操作即可。
Mac OS操作系统
(软件正常运行,任务栏会出现软件 图标)
(也可能在隐藏的任务栏中)
服务保障凭证
保障条款
11
充电说明4
图
12
图
13
(1)左键点击YL( )图标,在弹出的软件界面中点击“智能设置”,找
到划词翻译的按钮(如图 ),点击按钮,鼠标滑动选中需要翻译的
文字,点击翻译按钮即可。
(2)在软件中可以设置划词翻译的识别和翻译语种(如图 )。
(4)如需选择翻译的语种,左键点击
YL( )图标,在弹出的软件界
面中点击“智能设置”进入翻译设置(如图 )。
4.划词翻译
图
7
8
9
9
(3)长语音模式:单击鼠标翻译键开始说话,说完再次单击按键即
可实现语音翻译。
图
8
划词翻译按钮
图
9
图
11
截图翻译按钮
蓝牙BLE模式
(1)如图 所示,取出鼠标2.4G无线接收器。
(2)如图 所示,将2.4G无线接收器插入到电脑的任一USB接口中。
(3)稍作等待,电脑识别到鼠标设备后,开启鼠标电源开关,鼠标功能即
可正常使用。如果以上操作鼠标无反应,请尝试将2.4G无线接收器在电
脑上更换其他USB接口进行连接。(若仍不能正常使用,请按照以下方
式进行配对)
(4)无线2.4G配对模式:
按模式切换键变更至2.4模式,2.4G模式灯慢闪,按住鼠标底部模
式键3-5秒,等待绿色模式灯快闪,鼠标进入2.4G配对模式,配对操作
需在60秒内完成,配对成功后2.4G模式灯常亮。
,鼠标可以正常使用(
如失败重复以上操作)。
(5)鼠标的语音功能需安装专用智能语音鼠标软件。软件下载安装方法
请见第4页《三、软件安装方法》。
1
2
使用2.4G高性能无线模式,需配合鼠标底部的无线接收器使用;使用蓝牙
模式,需要电脑拥有蓝牙硬件且支持蓝牙BLE功能。
(操作系统支持Windows7、8、10、11以上或MacOS 10.10以上版本。)
模式切换按键
2.4G无线
蓝牙4.2及以上
蓝牙4.2及以上
1
2
( )2.4G模式下,按一下鼠标底部模式切换按钮,切换为( )蓝牙1,
鼠标电子显示屏出现蓝色图标( ),再按一下切换为( )蓝牙2,鼠
标电子显示屏出现紫色图标( ),再按一下又重新切换为( )2.4G
无线模式,鼠标电子显示屏出现绿色图标( ),依次循环。
1
2
1
2
(2)进入蓝牙配对模式
(3)与电脑进行配对连接
在电脑设置界面打开设备选项,如图 点击“添加蓝牙或其它设
备”,弹出的对话框中如图选择“蓝牙”,如图 找到"W30 BT1"并点
击进行配对连接,与电脑配对成功后,指示灯蓝灯会长亮5秒后熄灭。
按模式切换键变更至蓝牙模式,蓝色模式灯慢闪,按住鼠标底部
模式键3-5秒,等待蓝色模式灯快闪,鼠标进入蓝牙配对模式,配对操
作需在60秒内完成,配对成功后蓝牙模式灯常亮。
3
4
03
11
Figure
3
Figure
4
W30 BT1
(1) Left-click the YL ( ) icon, then in the pop-up software
interface, click "Cloud Command Settings," and click "Add
Command" (Figure ). Enter the command word, and
select the control function corresponding to the command
word (Open folder/file/website/fixed text) (Figure ).
6. Cloud Command Settings
12
13
01
09
Voice key
AI key
Microphone
Type-C
Mouse wheel
Left key
right key
Electronic
display
screen
2.4G High-Performance Wireless Mode (Receiver Mode)
Note: The default factory connection mode for
the mouse is 2.4G wireless mode.
2.4G Wireless
Receiver
Mouse switch
Figure
1
Figure
2
Mode switch
Product structure and button description1
Use the mouse2
Instructions for Use and After-Sales Service Guarantee
07
08
Voice typing
2. Voice Search
3. Voice translation
(1) Short voice mode: Hold down the mouse " " key (as shown in
Figure ) to start speaking. Release after speaking to achieve
voice typing.
(2) Long voice mode: Click the mouse " " key (as shown in
Figure ) to start speaking. Click the key again after speaking to
achieve voice typing.
5
5
Figure
Voice key
5
Figure
AI key
6
(1) Left-click the YL ( ) icon, then in the pop-up software
interface, click "Device Settings," and select the "Voice Translation"
function (Figure ).
(2) Short voice mode: Hold down the translation button with the
mouse to start speaking. Release it after speaking to achieve voice
translation.
(3) Long voice mode: Click the mouse translation button to start
speaking. Click the button again after finishing to achieve voice
translation.
7
W30 Smart Voice Mouse
Function Introduction
5
04
1. Due to the ultra-low standby power consumption, when used in a
fixed location, there is no need to deliberately turn off the mouse;
however, when carrying it out, it is recommended to turn off the
mouse.
2. After inserting the 2.4G wireless receiver into the computer's USB
port, there is no need to deliberately remove it for storage.
3. The battery is a 3.7V-500mAh rechargeable battery. It does not need
to be removed unless it needs to be replaced. Do not use 1.5V AAA
alkaline batteries.
1. The smart voice mouse equipped with a rechargeable battery should
be kept away from exposure to sunlight or stored in a hot car. Do not
disassemble the mouse casing or dismantle its parts at will.
2. The external surface of the rechargeable battery may cause accidental
explosion or fire under certain squeezing or localized force. If you need
to carry it outdoors, it is best to keep the mouse product turned off.
3. The contact environment temperature of the mouse should not
exceed 60 degrees Celsius; otherwise, the rechargeable battery will age
more quickly.
4. The ideal charging temperature range for the smart voice mouse is
0~45 degrees Celsius.
5.This device complies with Part 15 of the FCC Rules.Operation is subject
to the following two conditions:
(1)This device may not cause harmful interference,and
(2)This device must accept any interference received,including
interference that may ca use undesired operation.
12
Connected:
1. Method to obtain the software installation package
Download interface:
Windows users can automatically open the driver download
page (or input in the browser) by long-pressing the mouse
wheel button for 6 seconds while the mouse is functioning
normally
"http://www.miclink.net/YULI" opens the driver download
page, click the Windows driver download button to download
the software.
Windows operating system
W30 BT1
Software Installation Method
3
Precautions for Use
6
Special Reminder
7
02
10
Figure
10
We are committed to ensuring rigorous product design
and excellent product quality, dedicated to delivering
high-performance and personalized user experiences,
and providing comprehensive after-sales service.
From the date of purchase, if a hardware failure occurs
under normal use, the intelligent voice mouse is eligible
for a 12-month free warranty service.
The following factors are not covered by the free
warranty service. We will provide paid after-sales services,
including fault repair, component replacement, or whole
machine replacement.
1. Disassembly, maintenance, and reassembly by
unauthorized personnel;
2. Physical damage or destruction caused during use;
3. Abnormalities caused by normal wear and tear or other
reasons unrelated to product quality.
Made in China
Certificate of
Qualification
1. Method to obtain the software installation package
MacOS users can search for MicLink Pro in the App Store to
download and install it directly. After installation, open the
app, and the software icon ( ) will appear in the top
status bar of the computer.
It is recommended to charge the mouse using a
computer's USB port or 5V power supply. During charging,
the red light on the scroll wheel will stay on; when fully
charged, the red light will turn off. Charging takes
approximately 2 hours. (Fast charging adapters and fast
charging cables are prohibited for charging the mouse.)
05 06
(1) Double-click the downloaded installation package and
click "Next" to proceed with the installation.
(2) After the installation is complete, the software will
automatically run, and the software icon ( ) will appear
in the taskbar at the bottom right corner of the computer.
Precautions:
Because the driver automatically opens on startup by
default, if your antivirus software prompts a warning and
blocks the startup, simply choose to allow this operation.
Mac OS operating system
(The software runs normally, and the software icon will
appear on the taskbar.)
(may also be in the hidden taskbar)
Service Guarantee Certificate
Guarantee Clause
13
Charging Instructions
4
Figure
12
Figure
13
(4) To select the language for translation, left-click the YL ( )
icon, then click "Smart Settings" in the pop-up software interface
to access the translation settings (Figure ).
4. Word translation
Figure
7
Figure
8
8
Figure
9
Figure
11
Screenshot translation button
Bluetooth BLE mode
(1) As shown in Figure( ), remove the mouse 2.4G wireless
receiver.
(2) As shown in Figure( ), insert the 2.4G wireless receiver into
any USB port of the computer.
(3) Wait briefly; after the computer recognizes the mouse device,
turn on the mouse power switch, and the mouse functions will
operate normally. If there is no response from the mouse after
the above steps, try connecting the 2.4G wireless receiver to a
different USB port on the computer. (If it still cannot be used
normally, please pair it according to the following method.)
(4) Wireless 2.4G pairing mode:
Press the mode switch button to change to 2.4G mode. The 2.4G
mode indicator light will flash slowly. Hold the mode button at
the bottom of the mouse for 3-5 seconds, wait for the green
mode light to flash rapidly. The mouse enters 2.4G pairing
mode. The pairing operation must be completed within 60
seconds. After successful pairing, the 2.4G mode light will stay
on. The mouse can be used normally (if it fails, repeat the above
operation).
(5) The mouse's voice function requires the installation of
dedicated intelligent voice mouse software. For installation
instructions, please refer to page 4, "3. Software Installation
Method."
1
2
Use the 2.4G high-performance wireless mode, which requires the
wireless receiver at the bottom of the mouse; when using Bluetooth
mode, the computer must have Bluetooth hardware and support
Bluetooth BLE functionality.
(Operating system support includes Windows 7, 8, 10, 11 or above,
or MacOS 10.10 or above.)
Mode switch button
2.4G Wireless
Bluetooth 4.2 and above
Bluetooth 4.2 and above
1
2
(2) Enter Bluetooth pairing mode
Press the mode switch button to change to Bluetooth mode.
The blue mode indicator light will flash slowly. Hold the
bottom mode button on the mouse for 3-5 seconds and wait
for the blue mode indicator light to flash quickly. The mouse
will enter Bluetooth pairing mode. The pairing process must be
completed within 60 seconds. Once paired successfully, the
Bluetooth mode indicator light will stay on.
(3) Pairing with the computer
Open the device options in the computer settings interface, as
shown in Figure( ). Click on "Add Bluetooth or other device,"
and in the pop-up dialog box, select "Bluetooth" as shown in
Figure( ). Find "W30 BT1" and click to pair and connect. After
successfully pairing with the computer, the blue indicator light
will stay on for 5 seconds and then turn off.
3
4
(2) Click the " " button, then use the mouse to slide and
select the recognition or translation content, and click the
software recognition or translation button to proceed.
(3) In the software, you can set the recognition and translation
languages for screenshot translation, and also modify the
shortcut keys for screenshot translation (Figure ).
11
(1) Hold down the mouse " " key (as shown in the figure ) to
start speaking. Release it after speaking to achieve intelligent
search.
(2) The language of voice search is based on the voice typing
language.
(3) Left-click the YL ( ) icon, then click "Smart Settings" on the
pop-up software interface. In "Voice Search Settings," you can set
the search engine and search shortcut keys.
6
(1) Left-click the YL ( ) icon, then click "Device Settings" in
the pop-up software interface, and select the "Screenshot
Translation" feature (Figure ).
5. Screenshot Recognition/Translation
10
In ( ) 2.4G mode, press the mode switch button at the
bottom of the mouse once to switch to ( ) Bluetooth 1, and
the mouse electronic display shows a blue icon ( ). Press
again to switch to ( ) Bluetooth 2, and the display shows a
purple icon ( ). Press once more to switch back to ( ) 2.4G
wireless mode, and the display shows a green icon ( ). This
cycle repeats sequentially.
1
2
1
2
(1) Left-click the YL ( ) icon, then in the pop-up software
interface, click "Smart Settings," locate the button for
"Translate by Highlighted Text" (Figure ), click the button,
then use the mouse to slide and select the text to be translated,
and click the translate button.
(2) The software allows you to set the recognition and
translation languages for word highlighting (Figure ).
9
9
Highlight-to-translate button
FCC STATEMENT
NOTE: This equipment has been tested and found to comply with
the limits for a Class B digital device, pursuant to Part 15 of the FCC
Rules. These limits are designed to provide reasonable protection
against harmful interference in a residential installation.
This equipment generates uses and can radiate radio frequency
energy and, if not installed and used in accordance with the
instructions, may cause harmful interference to radio
communications. However, there is no guarantee that interference
will not occur in a particular installation. If this equipment does
cause harmful interference to radio or television reception, which
can be determined by turning the equipment off and on, the user is
encouraged to try to correct the interference by one or more of the
following measures:
Reorient or relocate the receiving antenna.
Increase the separation between the equipment and receiver.
Connect the equipment into an outlet on a circuit different from
that to which the receiver is connected.
Consult the dealer or an experienced radio/TV technician for help.
RF warning statement:
The device has been evaluated to meet general RF exposure
requirement. The device can be used in portable exposure
condition without restriction.
Changes or modifications not expressly approved by the party
responsible for compliance could void the user's authority to
operate the equipment.