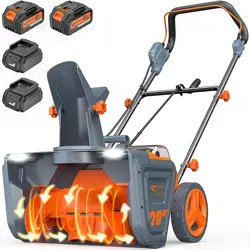
Model: ASYSN01
INSTRUCTION MANUAL
SNOW BLOWER
WARNING:
Carefully review and understand all INSTRUCTIONS prior to operating this device. Failure to follow the safety
rules and other basic safety precautions may result in serious personal injury. Keep these instructions in a safe
place and accessible so that they can be reviewed as required. Keep these instructions to assist in future
servicing needs.

TABLE OF CONTENTS
MAJOR TECHNICAL DATA ·········································································
GENERAL SAFETY WARNINGS································································
Protection··································································································
Electrical Safety··························································································
Work Area Safety······················································································
Personal Safety························································································
Power Tool Use And Care·············································································
Specific Safety Rules················································································
Maintenance And Storage·············································································
BATTERY AND CHARGER SAFETY INSTRUCTIONS··································
Information About The Battery···································································
Information About The Charger And The Charging Process····························
Protection From Environmental Influences··················································
Proper Care For Battery And Charger····························································
Storage···································································································
Battery And Charger Off-Season Storage························································
Battery Caution & Disposal······································································
Battery Pack Recycling···············································································
SYMBOL·································································································
KNOW YOUR CORDLESS SNOW BLOWER·················································
UNPACKING····························································································
BATTERY PACK OPERATION····································································
CHARGER OPERATION········································································
Charging the Batteries············································································
ASSEMBLY·························································································
Assembling Lower Handle Bar······································································
Assemble The Upper Handle Bar··································································
Chute Crank Assembly················································································
Assemble The Thrower Tube········································································
OPERATION························································································
Adjusting Throw Direction And Throw Height···············································
Starting & Stopping···············································································
Operate Dual LED Headlight········································································
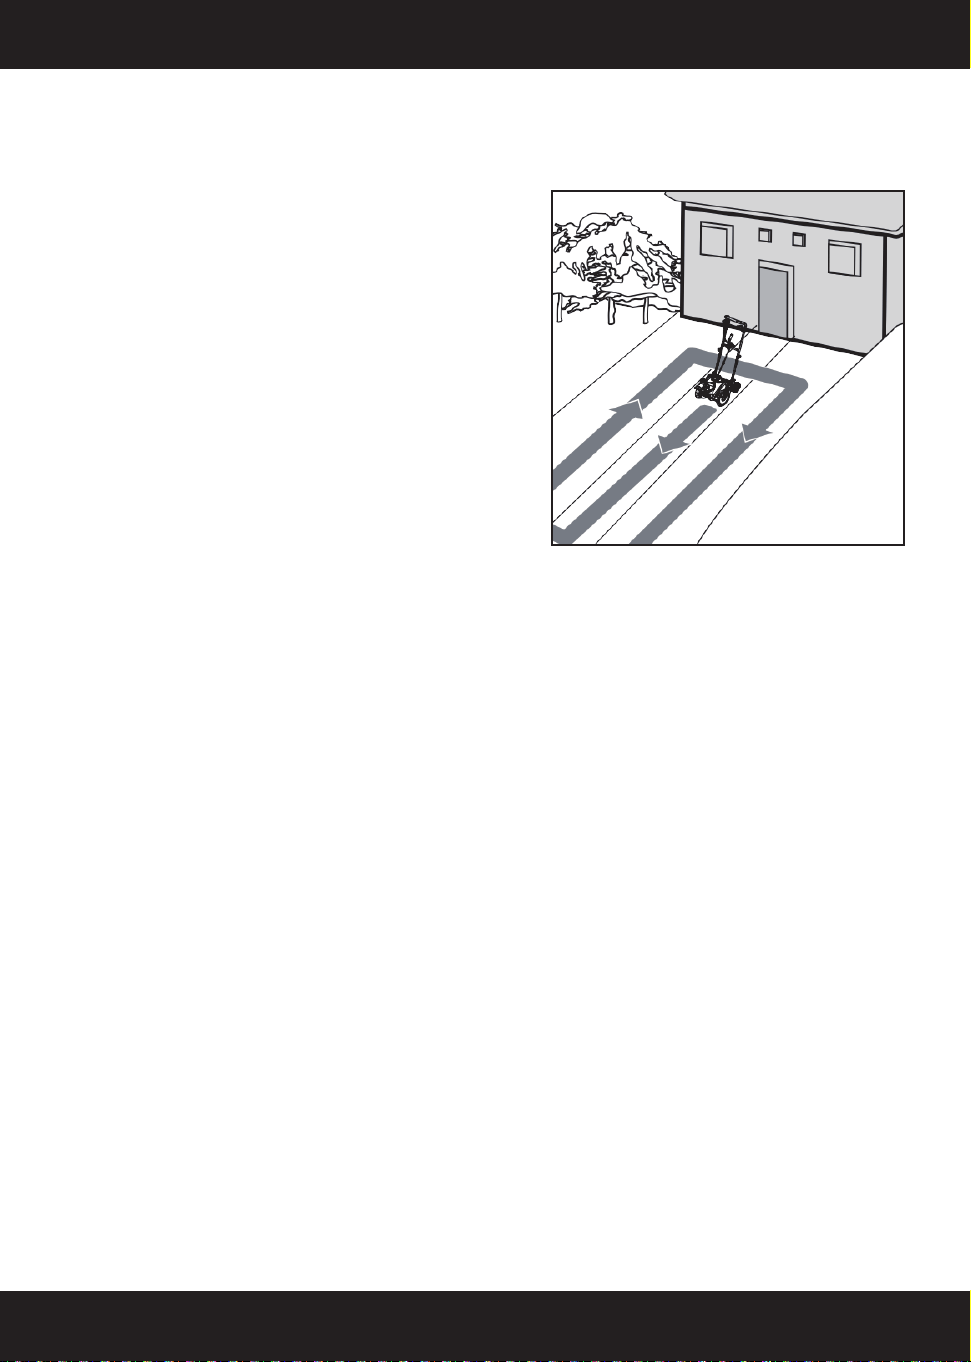
How To Clear A Driveway/Experts Offer Practical Tips·······································
Operating Tips··························································································
MAINTENANCE AND STORAGE·································································
Cleaning··································································································
Storage···································································································
Transportation···························································································
TROUBLESHOOTING···············································································
1
1-6
2
2
2-3
3-4
4
4-6
6
7-14
9-10
10-11
11-12
12
12
13
13-14
14
14
15
16
16
17-18
17-18
18-20
18
19
19
20
20-23
20-21
21-22
22
23
23
24
24
24
24
25

If any problems, please contact our aftersales email:[email protected]
- Keenstone Power Tools -
1 | English
MAJOR TECHNICAL DATA
GENERAL SAFETY WARNINGS
ALL OPERATORS MUST READ THESE INSTRUCTIONS BEFORE USE
Voltage
Clearing width
Throw Distance Max
Depth of Snow Cut
Battery Capacity
No Load Speed
Machine weight
40V D.C. (2 x 20V)
20"/50cm
7m(front),4.5m(side)
10in. (25.4cm)
4.0 Ah
1900 rpm
10.4kg
WARNING: Before using this tool or any of its accessories, read this manual
and follow all Safety Rules and Operating Instructions. The important precau-
tions, safeguards and instructions appearing in this manual are not meant to
cover all possible situations. It must be understood that common sense and
caution are factors which cannot be built into the product.
Notice the personal safety alert symbol A used in this manual to draw
your attention to a WARNING given along with the particular operating
instruction. This means that the operation requires special ATTENTION,
CAUTION and AWARENESS.
WEAR CSA APPROVED EYE PROTECTION
WEAR A FACE MASK

If any problems, please contact our aftersales email:[email protected]
- Keenstone Power Tools -
2 | English
Protection
ALWAYS WEAR EYE PROTECTION THAT CONFORMS WITH CSA
REQUIREMENTS or ANSI SAFETY STANDARD Z87.1 FLYING DEBRIS can
cause permanent eye damage. Prescription eyeglasses ARE NOT a replace-
ment for proper eye protection.
1. Keep work area clean and well lit. Cluttered or dark areas invite accidents.
2. Do not operate snow blower in explosive atmospheres, such as in the
presence of flammable liquids, gases, or dust. Power tools create sparks
which may ignite the dust or fumes.
3. Keep children and bystanders away while operating a power tool. Distrac-
tions can cause you to lose control.
4. Snow blower plugs must match the outlet. Never modify the plug in any
way. Do not use any adapter plugs with earthed (grounded) snow blower.
Unmodified plugs and matching outlets will reduce risk of electric shock.
WARNING: Noncompliant eyewear can cause serious injury if broken during
the operation of a power tool.
ALWAYS WEAR EAR PROTECTION
WARNING: Use hearing protection, particularly during extended periods of
operation of the tool, or if the operation is noisy.
Electrical Safety
Work Area Safety
WARNING: Use proper circuit protection.
WARNING: Ventilation openings in batteries and chargers must always be
open to allow cooling air to circulate freely. Air vents that are blocked, restrict-
ed or covered may result in the battery or charger overheating. Overheating
may lead to damage to the tool or cause a fire, resulting in possible serious
injury.
READ ALL INSTRUCTIONS BEFORE USING THIS SNOW BLOWER

If any problems, please contact our aftersales email:[email protected]
- Keenstone Power Tools -
3 | English
5. Avoid body contact with earthed or grounded surfaces such as pipes,
radiators, ranges and refrigerators. There is an increased risk of electric shock
if your body is earthed or grounded.
6. Do not expose the snow blower to rain or wet locations. Water entering a
snow blower will increase the risk of electric shock.
7. Do not abuse the cord. Never use the cord for carrying, pulling or unplug-
ging the snow blower. Keep cord away from heat, oil, sharp edges or moving
parts. Damaged or entangled cords increase the risk of electric shock.
8. When operating a charger outdoors, use an extension cord suitable for
outdoor use. Use of a cord suitable for outdoor use reduces the risk of electric
shock.
9. If operating a power tool in a damp location is unavoidable, use a residual
current device (RCD) protected supply. Use of a ground fault circuit interrupter
(GFCl) reduces the risk of electric shock.
Personal Safety
1. Stay alert, watch what you are doing and use common sense when operat-
ing a snow blower. Do not use a snow blower while you are tired or under the
influence of drugs, alcohol or medication. A moment of inattention while oper-
ating the snow blower may result in serious personal injury.
2. Use personal protective equipment. Always wear eye protection. Protective
equipment such as: dust mask, nonskid safety shoes, hard hat, or hearing
protection used for appropriate conditions will reduce personal injuries.
3. Prevent unintentional starting. Ensure the switch is in the off-position before
connecting to power source and/or battery pack, picking up or carrying the
tool. Carrying power tools with your finger on the switch or energizing power
tools that have the switch on invites accidents.
4. Remove any adjusting key or wrench before turning the power tool on. A
wrench or a key left attached to a rotating part of the snow blower may result
in personal injury.
5. Do not overreach. Keep proper footing and balance at all times. This
enables better control of the snow blower in unexpected situations.
6. Dress properly. Do not wear loose clothing or jewellery. Keep your hair,
clothing and gloves away from moving parts. Loose clothes, jewellery or long
hair can be caught in moving parts.

If any problems, please contact our aftersales email:[email protected]
- Keenstone Power Tools -
4 | English
Power Tool Use And Care
Specific Safety Rules
1. Do not force the power tool. Use the correct power tool for your application.
The correct power tool will do the job better and safer at the rate for which it
was designed.
2. Do not use the power tool if the switch does not turn it on and off. Any power
tool that cannot be controlled with the switch is dangerous and must be
repaired.
3. Disconnect the plug from the power source and/or the battery pack from the
power tool before making any adjustments, changing accessories, or storing
power tools. Such preventive safety measures reduce the risk of starting the
power tool accidentally.
4. Store idle power tools out of the reach of children and do not allow persons
unfamiliar with the power tool or these instructions to operate the power tool.
Power tools are dangerous in the hands of untrained users.
5. Maintain power tools. Check for misalignment or binding of moving parts,
breakage of parts and any other condition that may affect the power tool's
operation. If damaged, have the power tool repaired before use. Many acci-
dents are caused by poorly maintained power tools.
6. Keep cutting tools sharp and clean. Properly maintained cutting tools with
sharp cutting edges are less likely to bind and are easier to control.
7. Use the power tool, accessories and tool bits etc. in accordance with these
instructions, taking into account the working conditions and the work to be
performed. Use of the power tool for operations different from those intended
could result in a hazardous situation.
8. Use auxiliary handles supplied with the tool. Loss of control can cause
personal injury.
7. If devices are provided for the connection of dust extraction and collection
facilities, ensure these are connected and properly used.

If any problems, please contact our aftersales email:[email protected]
- Keenstone Power Tools -
5 | English
WARNING: Read, understand and follow all instructions on the machine and
in the manual before operating this unit. Thoroughly familiarize yourself with
the controls and the proper use of the equipment. Know how to stop the unit
and disengage the controls quickly.
1. Children should never be allowed access to the equipment. Adults should
never operate the equipment without carefully reading and understanding
these instructions.
2. Keep the area of operation clear of all persons, particularly small children
and pets.
3. Exercise caution to avoid slipping or falling.
4. Thoroughly inspect the area where the equipment is to be used and remove
all doormats, sleds, boards, wires and other foreign objects.
5. Do not operate the equipment without wearing adequate winter garments.
Avoid loose fitting articles of clothing that can become caught in moving parts.
Wear footwear that will improve footing on slippery surfaces.
6. Do not attempt to clear snow from a gravel or crushed rock surface. This
product is intended for use only on paved surfaces.
7. Never attempt to make any adjustments while the motor is running (except
when specifically recommended by the manufacturer).
8. Always wear safety glasses or eye shields during operation or while
performing an adjustment or repair to protect your eyes from foreign objects
that may be thrown from the machine.
9. Do not put hands or feet near or under rotating parts. Keep clear of the
discharge opening at all times.
10. Exercise extreme caution when operating on or crossing gravel drives,
walks or roads. Stay alert for hidden hazards or traffic.
11. After striking a foreign object, stop the motor. Thoroughly inspect the
cordless snow blower for any damage, and repair the damage before restart-
ing and operating the cordless snow blower.
12. If the unit should start to vibrate abnormally, stop the motor and check the
unit immediately to ascertain the cause. Vibration is generally a sign of trouble.
13. Stop the motor and remove the battery whenever you leave the operating
position, when transporting the unit, before unclogging the rotor blade housing
and when making any repairs, adjustments or inspections to the unit.
14. When cleaning, repairing or inspecting the cordless snow blower, make
sure that all moving parts have come to a complete stop before beginning
work.

If any problems, please contact our aftersales email:[email protected]
- Keenstone Power Tools -
6 | English
Maintenance And Storage
1. Check all fasteners at frequent intervals for proper tightness to ensure that
the equipment is in safe working condition.
2. Always refer to the operator's manual for important details, such as how to
properly store your cordless snow blower for an extended period of time.
3. Maintain or replace safety and instruction labels as needed.
4. Run the machine a few minutes a er throwing snow to prevent the rotor
blades from freezing.
15. Exercise extreme caution when operating on slopes.
Never operate the cordless snow blower without proper guards and other
safety devices in place and in proper working order.
16. Never direct the discharge toward people or areas where property damage
can occur. Keep children, pets and other bystanders away from the work area.
17. Do not overload the machine capacity by attempting to clear snow at too
fast a rate.
18. Look behind and use care when backing up with the cordless snow
blower.
19. Never operate the cordless snow blower without good visibility or light.
Always be sure of your footing, and keep a firm hold on the handles. Walk,
never run, with the unit.
WARNING: CLEARING A CLOGGED ROTOR HOUSING
Hand contact with the rotating rotor blades inside the rotor housing is the most
common cause of injury associated with cordless snow blowers. Never use
your hands to clear a clogged rotor housing.
To clear the rotor housing:
•Shut the motor off and remove the battery.
•Wait 10 seconds to be sure the rotor blades have come to a complete stop.
•Always use a clean-out tool, not your hands, to free the rotating blades.

If any problems, please contact our aftersales email:[email protected]
- Keenstone Power Tools -
7 | English
BATTERY AND CHARGER SAFETY
INSTRUCTIONS
IMPORTANT! Analyses confirm that incorrect use and poor care of high-per-
formance batteries are the main factors responsible for personal and/or prod-
uct damage.
WARNING! Use only approved replacement batteries; other batteries may
damage the cordless snow blower and cause it to malfunction, which can lead
to serious personal injury.
WARNING! Do not use a battery pack or appliance that is damaged or modi-
fied. Damaged or modified batteries may exhibit unpredictable behavior
resulting in fire, explosion or risk of injury.
Do not modify or attempt to repair the appliance or the battery pack except as
indicated in the instructions for use and care.
Have your battery pack serviced by a qualified repair person using only identi-
cal replacement parts. This will ensure that the safety of the battery pack is
maintained.
CAUTION! To reduce the risk of injury, charge the 20V lithium-ion battery pack
only in its designated lithium-ion charger. Other types of chargers present risk
of fire, personal injury and damage. Do not wire a battery pack to a power
supply plug or car cigarette lighter. Such misuse will permanently disable or
damage the battery pack.
1. Avoid dangerous environments - Do not charge the battery pack in rain,
snow or in damp or wet locations. Do not use the battery pack or charger in
the presence of explosive atmospheres (gaseous fumes, dust or flammable
materials) because sparks may be generated when inserting or removing the
battery pack, which could lead to a fire.
2. Charge in a well-ventilated area - Do not block the charger vents. Keep
them clear to allow for proper ventilation. Do not allow smoking or open flames
near a charging battery pack. Vented gases may explode.
NOTE: The safe temperature range for the battery is 41°F - 105°F / 5°C -
40.5°C. Do not charge the battery outside in freezing weather; charge it at
room temperature.
3. Maintain charger cord - When unplugging the charger, pull the plug, not
the cord, from the receptacle to reduce the risk of damage to the electrical
plug and cord. Never carry the charger by its cord or yank it by the cord to

If any problems, please contact our aftersales email:[email protected]
- Keenstone Power Tools -
8 | English
disconnect it from the receptacle. Keep the cord away from heat, oil and sharp
edges. Make sure the cord will not be stepped on, tripped over or subjected to
damage or stress when the charger is in use. Do not use the charger with a
damaged cord or plug. Replace a damaged charger immediately.
4. Do not use an extension cord unless it is absolutely necessary - Using
the wrong, damaged or improperly wired extension cord poses a risk of fire
and electric shock. If an extension cord must be used, plug the charger into a
properly wired 16 gauge or larger extension cord with the female plug match-
ing the male plug on the charger. Make sure that the extension cord is in good
electrical condition.
5. Charger is rated for 120 volt AC only - The charger must be plugged into
an appropriate receptacle.
6. Use only recommended attachments - Use of an attachment not recom-
mended or sold by the battery charger or battery pack manufacturer may
result in risk of fire, electric shock or personal injury.
Unplug charger when not in use - Make sure to remove battery packs from
unplugged chargers.
WARNING! To reduce the risk of electric shock, always unplug the charger
before performing any cleaning or maintenance. Do not allow water to flow into
the charger. Use a Ground Fault Circuit Interrupter (GFCl) to reduce shock
hazards.
7. Do not burn or incinerate battery packs - Battery packs may explode,
causing personal injury or damage. Toxic fumes and materials are created
when battery packs are burned.
8. Do not crush, drop or damage battery packs - Do not use the battery
pack or charger if they have sustained a sharp blow, been dropped, run over
or have been damaged in anyway (i.e. pierced with a nail, hit with a hammer,
stepped on, etc.).
9. Do not disassemble - Incorrect reassembly may pose a serious risk of
electric shock, fire or exposure to toxic battery chemicals.
10. Battery chemicals cause serious burns - Never let a damaged battery
pack contact the skin, eyes or mouth. If a damaged battery pack leaks battery
chemicals, use rubber or neoprene gloves to safely dispose of it. If skin is
exposed to battery fluids, wash the affected area with soap and water and
rinse with vinegar. If eyes are exposed to battery chemicals, immediately flush
with water for 20 minutes and seek medical attention. Remove and dispose of
contaminated clothing.

If any problems, please contact our aftersales email:[email protected]
- Keenstone Power Tools -
9 | English
Information About The Battery
1. The battery pack supplied with your cordless snow blower is only partially
charged. The battery pack has to be charged completely before you use the
tool for the first time.
2. For optimum battery performance, avoid low discharge cycles by charging
the battery pack frequently.
3. Store the battery pack in a cool place, ideally at 77°F / 25°C and charged to
at least 40%.
4. Lithium-ion batteries are subject to a natural aging process. The battery
pack must be replaced at the latest when its capacity falls to just 80% of its
capacity when new. Weakened cells in an aged battery pack are no longer
capable of meeting the high power requirements needed for the proper opera-
tion of your snow blower, and therefore pose a safety risk.
5. Do not throw battery packs into an open fire as this poses a risk of explo-
sion.
6. Do not ignite the battery pack or expose it to fire.
SAVE THESE INSTRUCTIONS FOR REFERENCE
7. Do not exhaustively discharge batteries. Exhaustive discharge will damage
the battery cells. The most common cause of exhaustive discharge is lengthy
storage or nonuse of partially discharged batteries. Stop working as soon as
the performance of the battery falls noticeably or the electronic protection
system triggers. Place the battery pack in storage only after it has been fully
charged.
11. Do not short circuit - A battery pack will short circuit if a metal object
makes a connection between the positive and negative contacts on the battery
pack. Do not place a battery pack near anything that may cause a short circuit,
such as paper clips, coins, keys, screws, nails and other metallic objects. A
short-circuited battery pack poses a risk of fire and severe personal injury.
12. Store your battery pack and charger in a cool, dry place - Do not store
the battery pack or charger where temperatures may exceed 105°F / 40.5°C,
such as in direct sunlight or inside a vehicle or metal building during the
summer.

If any problems, please contact our aftersales email:[email protected]
- Keenstone Power Tools -
10 | English
Information About The Charger And The Charging
Process
1. Please check the data marked on the rating plate of the battery charger. Be
sure to connect the battery charger to a power supply with the voltage marked
on the rating plate. Never connect it to a different charger voltage.
2. Protect the battery charger and its cord from damage. Keep the charger and
its cord away from heat, oil and sharp edges.
3. Electrical plugs must match the outlet. Never modify the plug in any way. Do
not use any adapter plugs with grounded appliances. Unmodified plugs and
matching outlets will reduce the risk of electric shock.
4. Keep the battery charger, battery pack(s) and the cordless tool out of the
reach of children.
5. Do not use the supplied battery charger to charge other cordless tools
unless indicated as compatible by the manufacturer.
6. During periods of heavy use, the battery pack will become warm. Allow the
battery pack to cool to room temperature before inserting it into the charger to
recharge.
8. Protect batteries and the tool from overloads. Overloads will quickly result in
overheating and cell damage inside the battery housing even if this overheat-
ing is not apparent externally.
9. Avoid damage and shocks. Immediately replace batteries that have been
dropped from a height of more than one meter or those that have been
exposed to violent shocks, even if the housing of the battery pack appears to
be undamaged. The battery cells inside the battery may have suffered serious
damage. In such instances, please read the waste disposal information for
proper battery disposal.
10. If the battery pack suffers overloading and overheating, the integrated
protective cutoff will switch off the equipment for safety reasons. IMPORTANT!
Do not press the ON/OFF switch anymore if the protective cut off has been
activated. This may damage the battery pack.
11. Use only original battery packs. The use of other batteries poses a fire risk
and may result in injuries or an explosion.

If any problems, please contact our aftersales email:[email protected]
- Keenstone Power Tools -
11 | English
READ ALL INSTRUCTIONS BEFORE USING THIS SNOW BLOWER
Protection From Environmental Influences
7. Do not overcharge batteries. Do not exceed the maximum charging times.
These charging times only apply to discharged batteries. Frequent insertion of
a charged or partially charged battery pack will result in overcharging and cell
damage. Do not leave batteries in the charger for days on end.
8. Never use or charge batteries if you suspect that it has been more than 12
months since the last time they were charged. There is a high probability that
the battery pack has already suffered dangerous damage (exhaustive
discharge).
9. Charging batteries at a temperature below 41°F /5°C will cause chemical
damage to the cells and may cause a fire.
10. Do not use batteries that have been exposed to heat during the charging
process, as the battery cells may have suffered dangerous damage.
11. Do not use batteries that have suffered curvature or deformation during the
charging process or those that exhibit other atypical symptoms (gassing,
hissing, cracking, etc.).
12. Never fully discharge the battery pack (maximum recommended depth of
discharge is 80%). A complete discharge of the battery pack will lead to
premature aging of the battery cells.
1. Wear suitable work clothes. Wear safety goggles.
2. Protect your cordless tool and the battery charger from moisture and rain.
Moisture and rain can cause dangerous cell damage.
3. Do not use the cordless tool or the battery charger near vapors and flamma-
ble liquids.
4. Do not keep the battery charger in places where the temperature is liable to
reach over 105°F / 40.5°C. In particular, do not leave the battery charger in a
car that is parked in the sunshine.
5. Protect batteries from overheating. Overloads, overcharging and exposure
to direct sunlight will result in overheating and cell damage. Never charge or
work with batteries that have been overheated - replace them immediately, if
possible.

If any problems, please contact our aftersales email:[email protected]
- Keenstone Power Tools -
12 | English
Proper Care For Battery And Charger
Storage
WARNING! To reduce the risk of injury, always unplug the charger and
remove the battery pack from the charger before performing any maintenance
task.
1. To reduce the risk of injury and damage, never immerse your battery pack
or charger in liquid or allow any liquid to flow inside these components.
2. Clean out dust and debris from charger vents and electrical contacts by
blowing with compressed air.
3. Use only mild soap on a damp cloth to clean the battery pack and charger,
keeping away from all electrical contacts. Certain cleaning agents and
solvents are harmful to plastics and other insulated parts. Some of these
include gasoline, turpentine, lacquer thinner, paint thinner, chlorinated cleaning
solvents, ammonia and household detergents containing ammonia. Never use
flammable or combustible solvents around battery packs, battery chargers or
tools.
4.The lithium-ion battery charger has no serviceable parts.
6. Store the charger and your cordless tool only in dry locations with an ambi-
ent temperature of 41°F - 105°F / 5°C - 40.5°C. Store your lithium-ion battery
pack in a cool, dry place at a temperature of 77°F / 25°C. Protect the battery
pack, charger and cordless tool from humidity and direct sunlight. Only place
fully charged batteries in storage (charged to at least 40%).
7. Prevent the lithium-ion battery pack from freezing. Battery packs that were
stored below 32°F / 0°C for more than 60 minutes must be discarded.
1.Examine the cordless snow blower thoroughly for worn, loose or damaged
parts.
2.Remove the battery from the cordless snow blower before storing.
3.Store the cordless snow blower indoors in a locked, dry place out of the
reach of children to prevent unauthorized use or damage.

If any problems, please contact our aftersales email:[email protected]
- Keenstone Power Tools -
13 | English
Battery Caution & Disposal
Battery And Charger Off-Season Storage
1. Do not expose your battery pack or charger to water, rain or allow them to
get wet. This could permanently damage the charger and the battery pack. Do
not use oil or solvents to clean or lubricate your battery pack as the plastic
casing can become brittle and crack, causing a serious risk of injury.
2. Store the battery pack and charger at room temperature away from mois-
ture. Do not store in damp locations where corrosion of terminals may occur.
As with other battery pack types, permanent capacity loss can result if the
pack is stored for long periods of time at high temperatures over 105° F / 40.5°
C.
3. Lithium-ion battery packs maintain their charge during storage longer than
other battery pack types. As a general practice, it is best to unplug the battery
charger and remove the battery pack when they are not in use. Recharge the
battery pack every 6 months to 50% capacity during off-season storage to
maintain optimal battery performance.
Always dispose of your battery pack according to federal, provincial, and local
regulations. Contact a recycling agency in your area for recycling locations.
CAUTION! Even discharged battery packs contain some energy. Before
disposing, use electrical tape to cover the terminals to prevent the battery pack
from shorting, which could cause a fire or explosion.
WARNING! To reduce the risk of injury or explosion, never burn or incinerate a
battery pack even if it is damaged, dead or completely discharged. When
burned, toxic fumes and materials are emitted into the surrounding atmo-
sphere.
1. Batteries vary according to device. Consult your manual for specific informa-
tion.
2. Install only new batteries of the same type in your product (where applica-
ble).
3. Failure to insert batteries in the correct polarity, as indicated in the battery
compartment or manual, may shorten the life of the batteries or cause batter-
ies to leak.

If any problems, please contact our aftersales email:[email protected]
- Keenstone Power Tools -
14 | English
4. Do not mix old and new batteries.
5. Do not dispose of batteries in fire.
6. Batteries should be recycled or disposed of as per provincial and local
guidelines.
Battery Pack Recycling
To preserve our natural resources, please recycle or dispose of batteries
properly. The batteries charged by this charger may contain chemicals and
metals that are harmful to the environment. Never dispose of rechargeable
batteries in your normal household garbage or in landfill sites as they will add
to the pollution of the environment.
SYMBOL
Warning!
Read the operator 's manual.
Wear ear protection .
Double insulation.
Before any work on the machine itself,
pull the power plug from the outlet.
Wear face shield.
Avoid injury from rotating auger. Keep
hands, feet, and clothing away.
Wear head protection.
Wear protective gloves.
Wear safety footwear.
Remove plug from the mains immedi-
ately if the cable is damaged or cut.
Shut off motor before unclogging
discharge chute .
If any problems, please contact our aftersales email:[email protected]
- Keenstone Power Tools -
15 | English
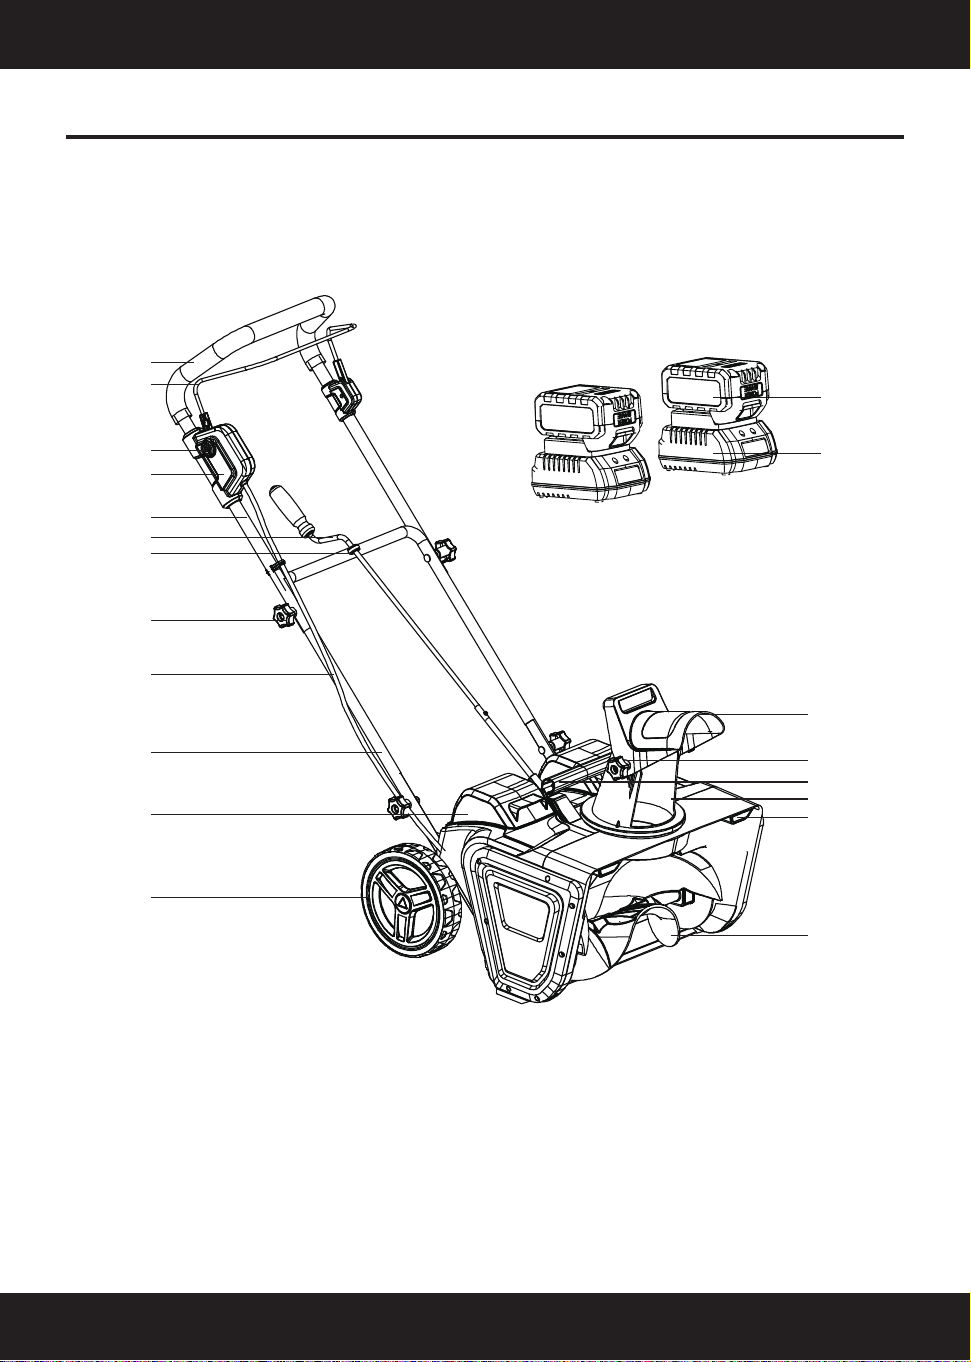
KNOW YOUR CORDLESS SNOW BLOWER
Read the owner’s manual and safety rules carefully before operating your
cordless snow blower. Compare the illustration below to the actual unit in order
to familiarize yourself with the location of the various controls and adjustments.
Save this manual for future reference.
1. Handle bar
2. ON/OFF trigger
3. Safety lock button
4. Switch box
5. Upper frame
6. Upper crank rod
7. Rubber ring
8. Handle knobs and bolts (4)
9. Cord
10. Middle frame
11. Battery compartment (2)
12. Wheel (2)
13. Auger
14. LED light
15. Discharge chute
16. Auxiliary handle
17. Deflector knob
18. Chute deflector
19. Charger (2)
20. Battery pack (2)
1
2
3
4
5
6
7
8
9
10
11
12
13
14
15
16
17
18
19
20

If any problems, please contact our aftersales email:[email protected]
- Keenstone Power Tools -
16 | English
UNPACKING
BATTERY PACK OPERATION
Carton Contents:
• Cordless snow blower
• Joint-fixing knob and bolt (4)
• Upper crank rod (assembled)
• Chute deflector & Discharge chute
• Lithium-ion battery (2)
• Lithium-ion charger (2)
• Manual
1. Carefully remove the cordless snow blower and check to see that all of the
above items are supplied.
2. Inspect the product carefully to make sure no breakage or damage occurred
during shipping.
NOTE: Do not discard the shipping carton and packaging material until you
are ready to use the electric snow thrower. The packaging is made of recycla-
ble materials. Properly dispose of these materials in accordance with local
regulations or save the packaging for long-term product storage.
IMPORTANT! The equipment and packaging material are not toys. Do not let
children play with plastic bags, foils or small parts. These items can be swal-
lowed and pose a suffocation risk!
The equipment is powered by 2 lithium-ion batteries. The battery packs are
completely sealed and maintenance free.
WARNING! The cordless snow blower can only be powered by both of the
batteries together. One battery cannot provide sufficient power to the tool.
Make sure to use two batteries of the same voltage and the same capacity.
Using the tool with batteries of different capacity will cause damage to the
batteries.
If any problems, please contact our aftersales email:[email protected]
- Keenstone Power Tools -
17 | English
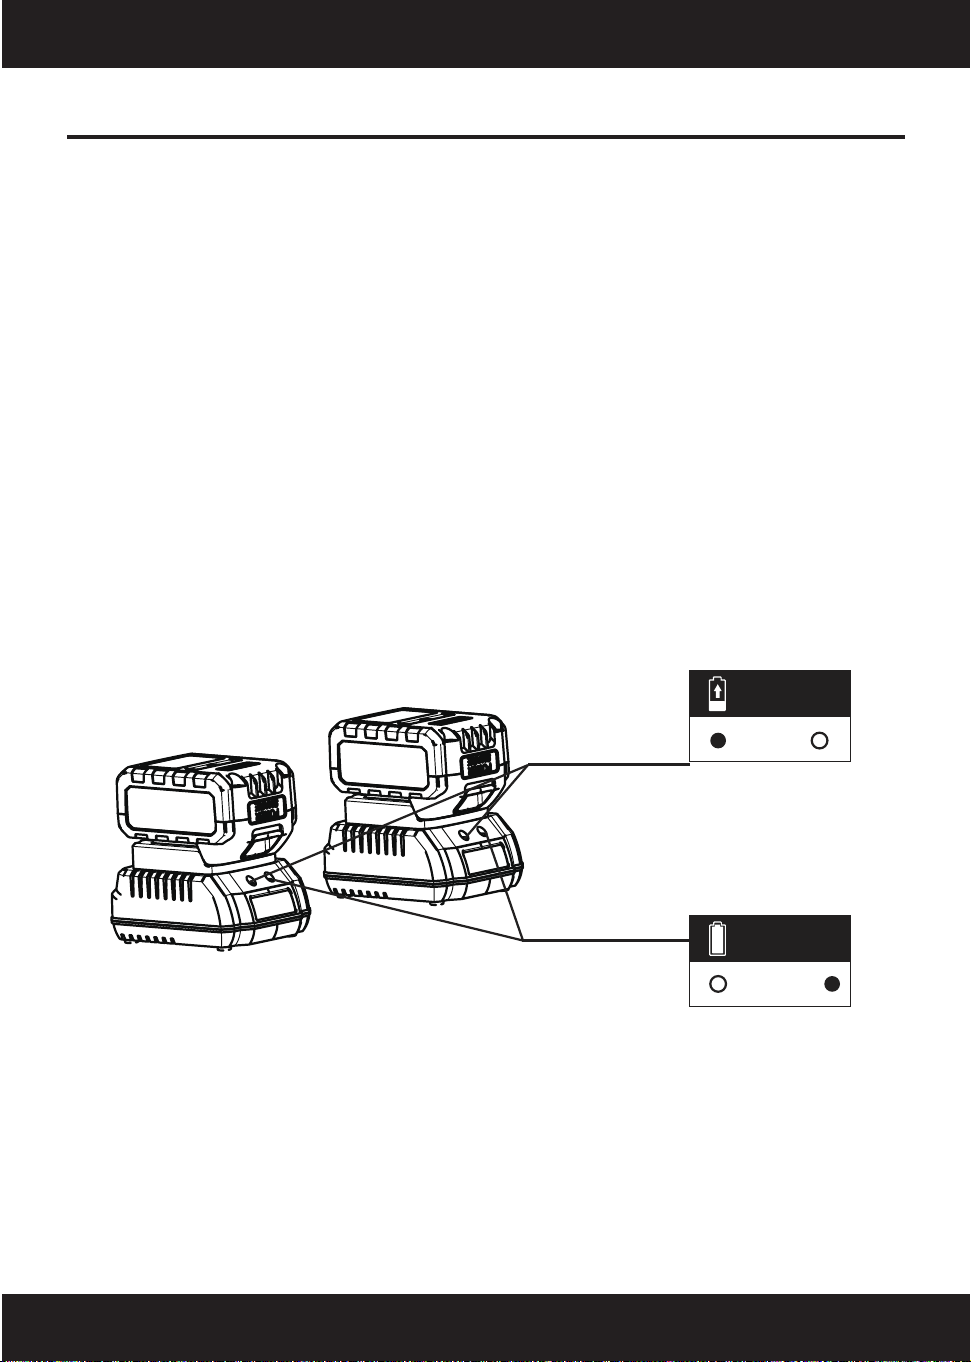
CHARGER OPERATION
WARNING! Charge only lithium-ion battery packs with its compatible
lithium-ion charger. Other types of batteries may cause personal injury and
damage.
To reduce the risk of electric shock, do not allow water to flow into the char-
ger's AC/DC plug.
Charging the Batteries
1. Check that the mains voltage is the same as that marked on the rating plate
of the battery charger. Then, insert the charger's plug into the electrical wall
outlet. When you plug in the charger, green lights will illuminate and stay
green.
2. Place the battery packs into the charger by sliding the packs to lock them
into position. When you insert the batteries into the charger, the green lights
will go off, and the red lights will illuminate to indicate that the
batteries are charging.
3. When the charger lights turn green, the batteries are fully charged.
NOTE: A fully discharged pack with an internal temperature in the normal
range will fully charge in 1 hrs (between 32ºF/0ºC and 113ºF/45ºC).
Charging
Red
Green
Fully
Charged
If any problems, please contact our aftersales email:[email protected]
- Keenstone Power Tools -
18 | English
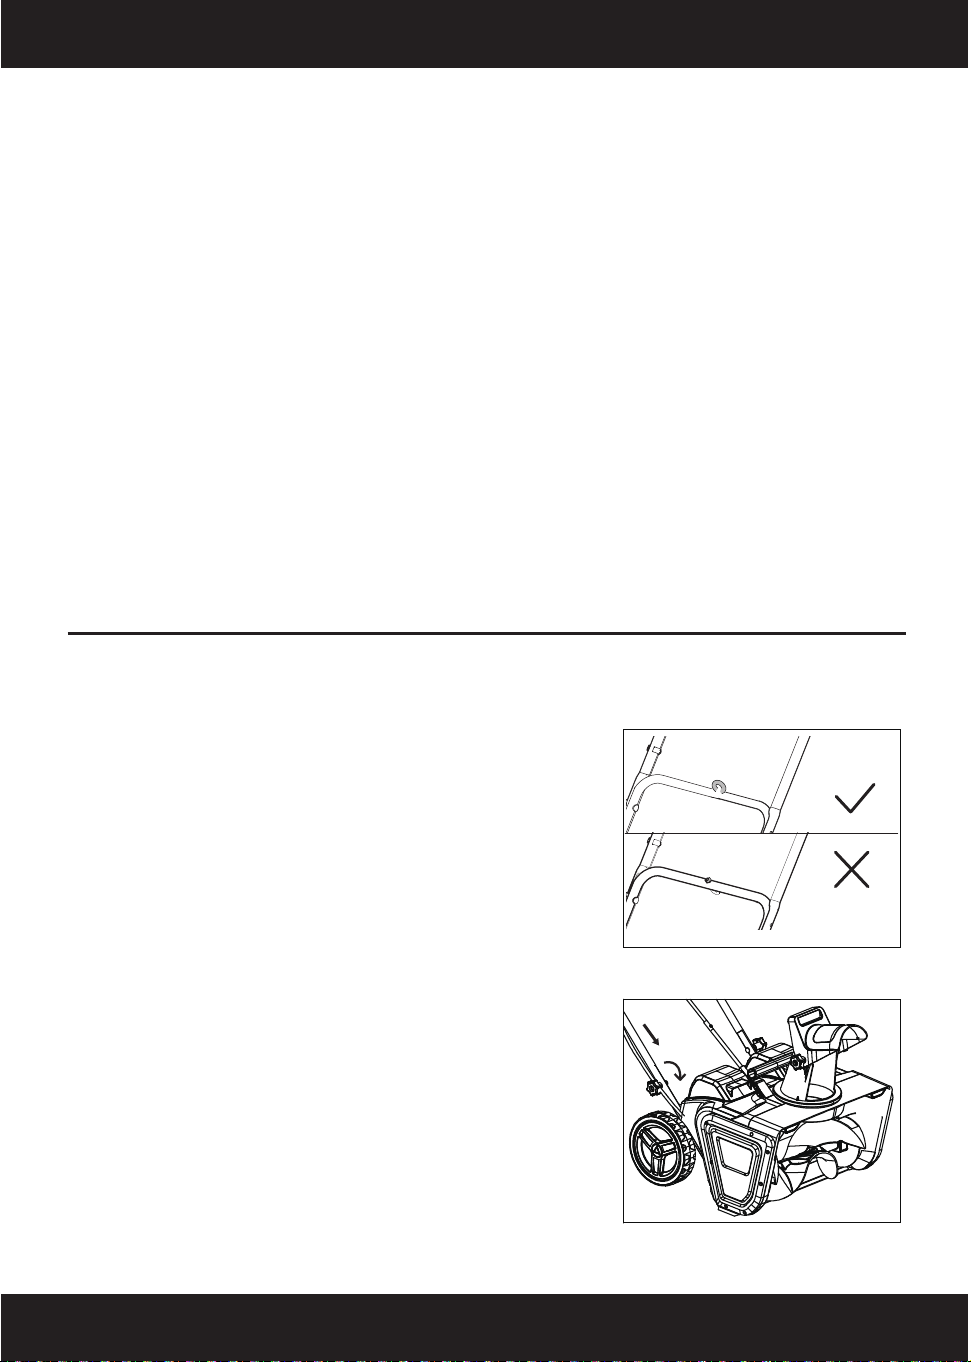
Assembling Lower Handle Bar
ASSEMBLY
IMPORTANT: When attaching the lower handle to
the snow blower, make sure the chute crank bar
mounting hole on the lower handlebar is facing
upwards (Fig.1)
Lock lower handle with handle locking knob in
side of bar where assembly hole is indented
(Fig.2)
4. If the light indicators do not come on at all, check that the battery packs are
fully seated into the bay. Remove the battery packs and reinsert.
5. When charging is complete, remove the batteries from the charger by
pressing the push lock buttons and sliding the batteries backward to unlock
them from the charger.
6. Timely recharging of the batteries will help prolong the batteries' life. You
must recharge the battery packs when you notice a drop in the equipment's
power.
IMPORTANT! Never allow the battery packs to become
fully discharged as this will cause irreversible damage to the batteries.
IMPORTANT! Fully charge before long-term storage. Low charge storage may
permanently damage the battery.
Fig.1
Fig.2
1
2

If any problems, please contact our aftersales email:[email protected]
- Keenstone Power Tools -
19 | English
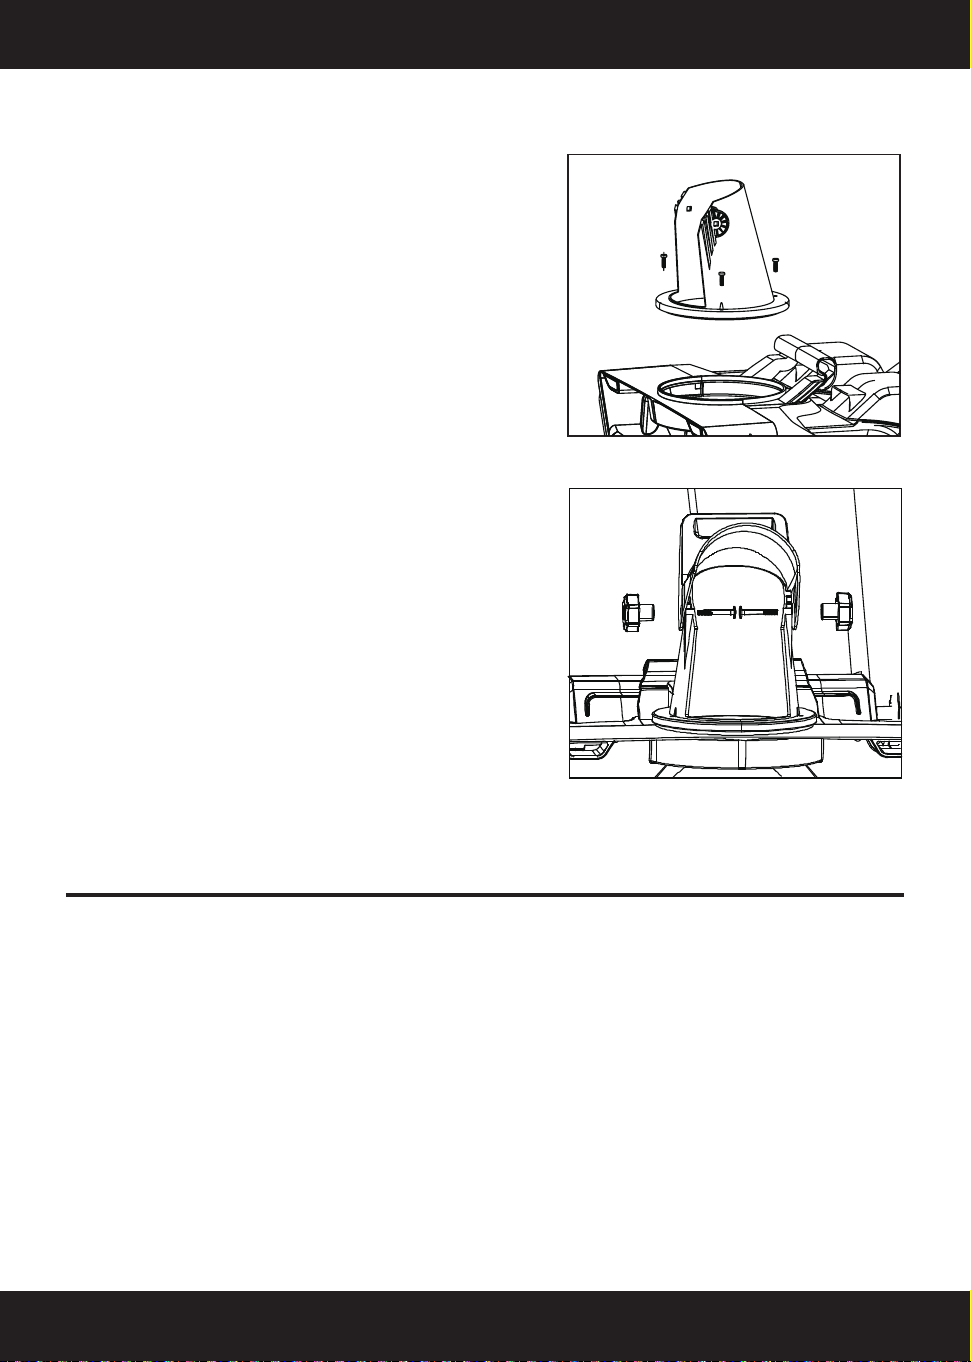
Assemble The Upper Handle Bar
Chute Crank Assembly
a)Choose one of the three holes in the
lower handle for the desired handle's
height when attaching the upper handle
bar (Fig.3). And then lock with handle
locking knob.
b)Locked power cord with cable clip
(Fig.4)
a)Insert chute crank bar through the hole
in lower handle bar (Fig.5)
b)Tighten screw to connect chute crank
bar (Fig.6)
Fig.3
Fig.4
Fig.5
Fig.6
20 | English
If any problems, please contact our aftersales email:[email protected]
- Keenstone Power Tools -
OPERATION
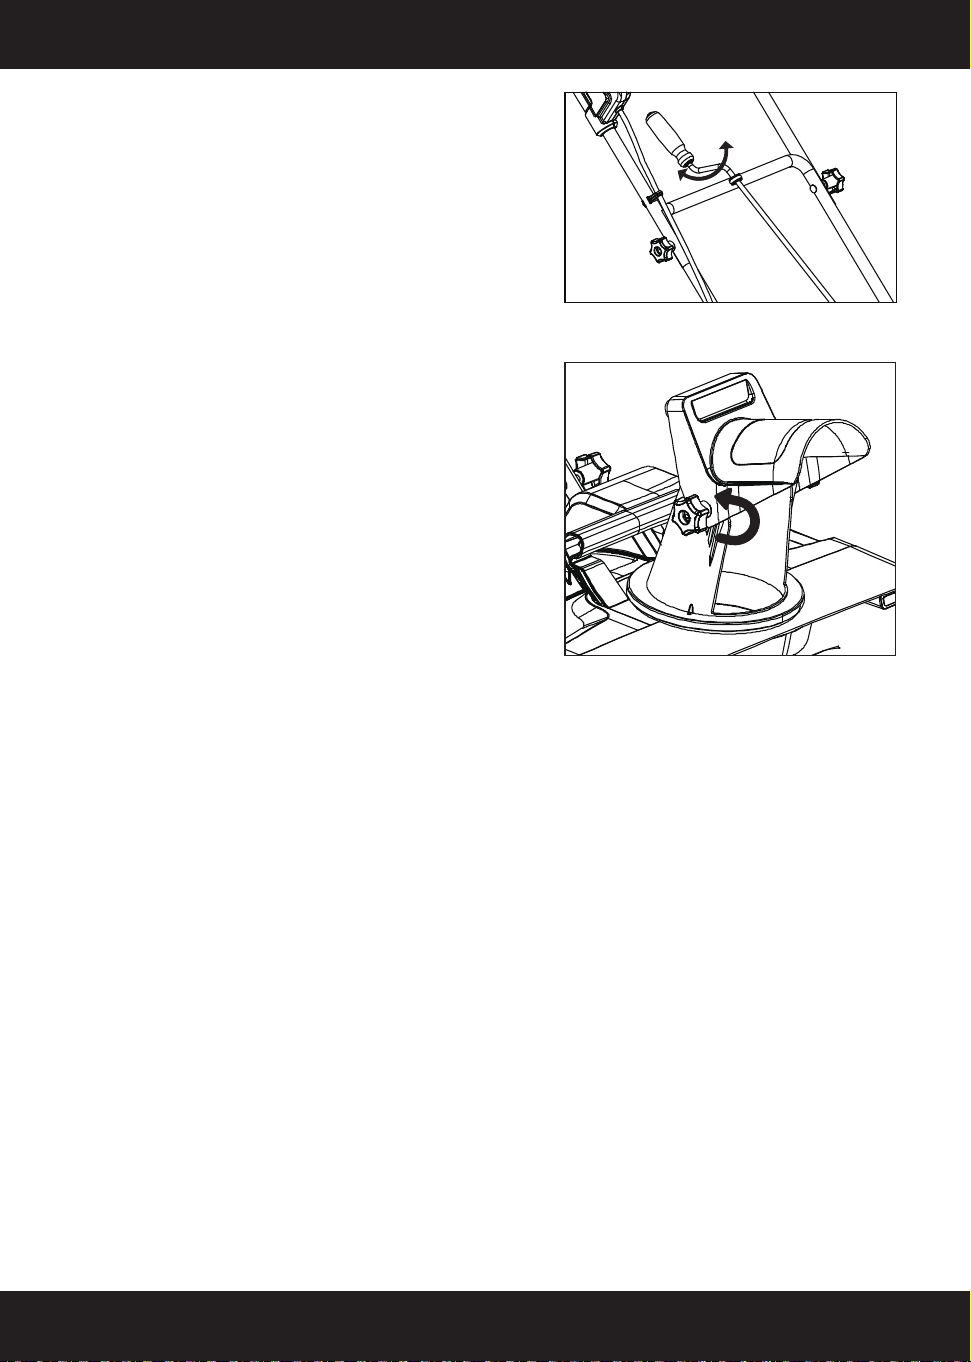
Assemble The Thrower Tube
Adjusting Throw Direction And Throw Height
WARNING:Never direct the snow discharge chute at the operator, at
bystanders, at vehicles, or at nearby windows. The discharged snow and
foreign objects accidentally picked up by the snow thrower can cause serious
damage and personal injury.
Always orient the discharge chute in the opposite direction from where you,
bystanders, surrounding vehicles, or windows are located.
a)Place the discharge chute in place and
lock it in place with three screws(Fig.7a).
b)Use the deflector knob to securely fasten
the chute deflector to the discharge chute.(-
Fig.7b).
Fig.7 b
Fig.7 a
21 | English
If any problems, please contact our aftersales email:[email protected]
- Keenstone Power Tools -
Starting & Stopping
b)The chute deflector on the top of the
discharge chute controls the height of the
snow stream. Loosen the knobs to raise or
lower the deflector to the desired height of
snow you wish to throw. Tighten the knobs
to secure the deflector (Fig. 9).
WARNING: Make sure that the chute deflector snaps and locks completelyon-
to the discharge chute. An opening between the discharge chute and the
chute deflector may allow foreign objects to be picked up by the snow thrower
and thrown in the direction of the operator causing serious bodily injury.
•Do not advance the chute deflector too far forward causing an opening to
appear between the deflector and discharge chute.
•Do not overtighten the knobs on the chute deflector.
a)The discharge chute can be adjusted 180
degrees by rotating the chute crank. Rotate
the chute control crank clockwise to move
the discharge chute to the left and counter-
clockwise to move the chute to the right
(Fig. 8).
Fig.8
Fig.9
22 | English
If any problems, please contact our aftersales email:[email protected]
- Keenstone Power Tools -
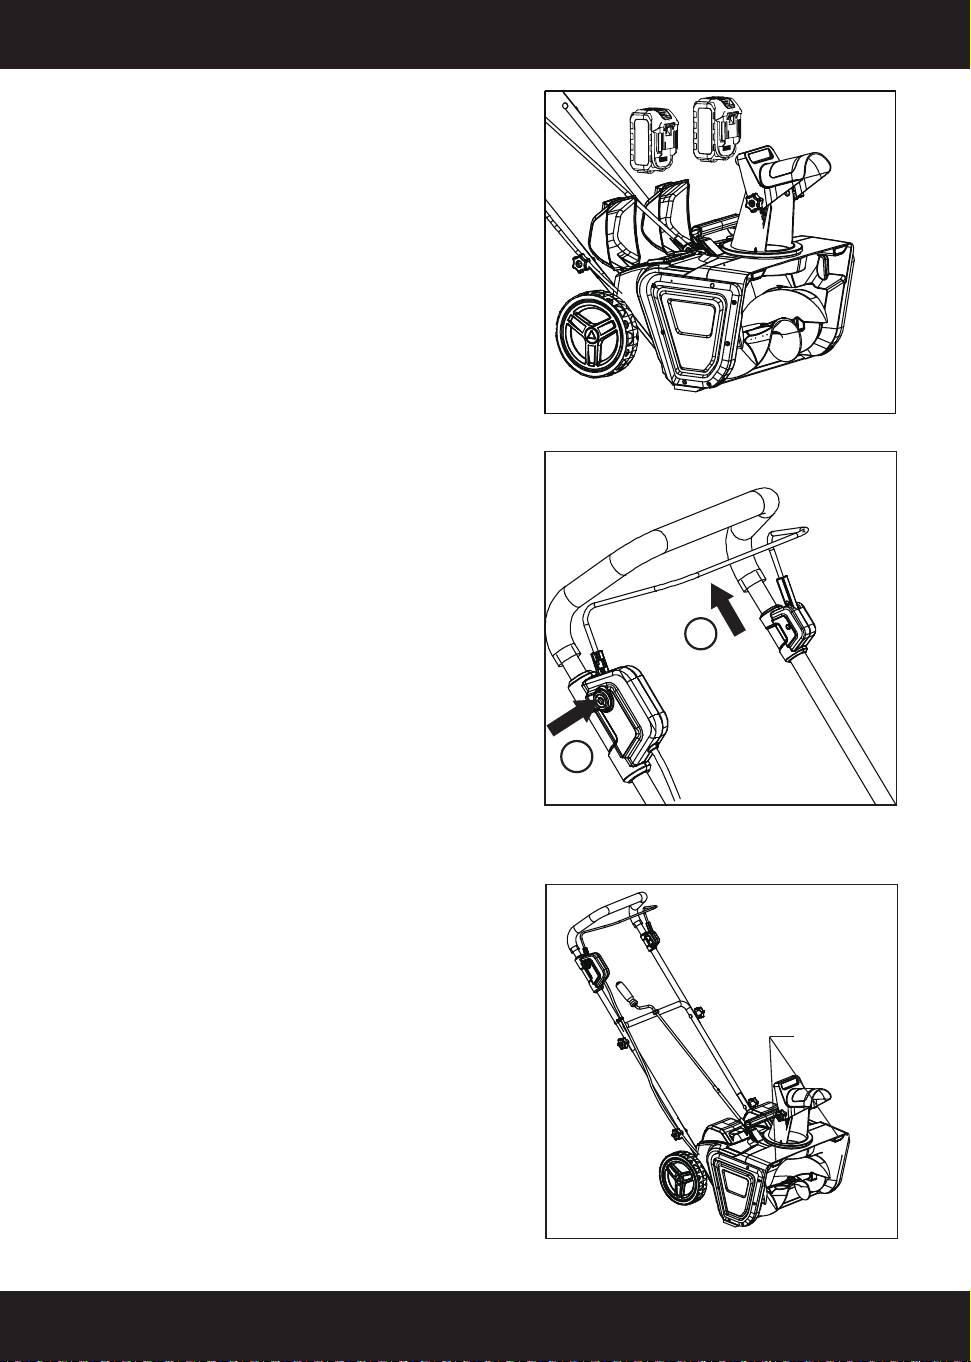
Operate Dual LED Headlight
a) Before switch on machine, insert the
battery pack into the battery compartment
(Fig.10)
b)To start machine, press side switch 1, and
then pull switch lever 2 (Fig.11)
To stop machine, just release main switch
lever 2.
a)Switch on machine as Fig.12 and head-
light will turn ON. Release main switch lever
as Fig.12, and headlight will turn off.
Fig.12
Fig.11
2
1
Fig.10
Dual LED
headlight
23 | English
If any problems, please contact our aftersales email:[email protected]
- Keenstone Power Tools -
How To Clear A Driveway/Experts Offer Practical
Tips
Operating Tips
SNOW BLOWER (NON·WINDY CONDI-
TIONS).
a) Cut a path straight down the middle of the
driveway with the Discharge Chute facing
left.
b) Without adjusting the Discharge Chute,
turn machine around 180 degrees.
c) Return to driveway's start. Turn machine
the same direction as before.
d) Continue making circles outward in this
direction until the driveway is clear.
Fig.13
• Start the cordless snow blower. Push the shovel forward at a comfortable
rate, yet slow enough to clear the path completely. The clearing width of the
snow blower and the depth of snowfall should dictate your forward speed.
• Direct the snow discharge to the right or to the left by holding the cordless
snow blower at a slight angle.
• To remove snow most efficiently, throw the snow downwind and slightly
overlap each swath.
• This cordless snow blower cuts a path 20" /50cm wide and up to
12"/ 30cm deep.
• When clearing deeper drifts, hold the cordless snow blower by the upper and
lower handles and use a swinging or sweeping motion. Remove up to
6/16 cm.
• Remove the battery after using the cordless snow blower. Hang the shovel
so it will not be misplaced or damaged.

24 | English
If any problems, please contact our aftersales email:[email protected]
- Keenstone Power Tools -
MAINTENANCE AND STORAGE
WARNING
All maintenance should be carried out by a qualified person, do not try to
repair any defect. When servicing, use only identical replacement parts. Use of
any other part could create a hazard or causeproduct damage.
1.Remove the battery pack.
2.Brush or blow dust and debris out of the air vents using compressed air or a
vacuum, Keep the airvents free of obstructions, sawdust, and wood chips. Do
not spray, wash, or immerse the air vents inwater.
3.Wipe off the housing and the plastic components using a moist, soft cloth.
Do not use strong solventsor detergents on the plastic housing or plastic
components.
4.Certain household cleaners may cause damage and may cause a shock
hazard.
1.Remove the battery pack.
2.Clean the product and re-pack to original package.
3.Store the product and its accessories in a dark, dry, frost-free, well-ventilated
place.
4.Always store the product in a place that is inaccessible to children.
5.We recommend using the original package for storage or covering the
product with a suitable cloth or enclosure to protect it against dust.
1.Remove the battery pack.
2.Re-pack to original package.
3.Protect the product from any heavy impact or strong vibrations which may
occur during transportation in vehicles.
4.Secure the product to prevent it from slipping or falling over.
Transportation
Storage
Cleaning

25 | English
If any problems, please contact our aftersales email:[email protected]
- Keenstone Power Tools -
When Something isn't Working
DANGER! Risk of injury!
lmproperly performed repairs can lead to the
device not functioning safely. This can endanger yourself and the environment.
TROUBLESHOOTING
Problem
Snow blower
does not start
Poor performance
Abnormal
vibrations
Motor is on but the
auger does not turn.
Snow blower leaves
a thin layer of snow
Battery not installed well
Battery depleted
Lock-off button not
depressed
Battery too cold
Drive belt worn or
damaged
Contact the service center
for replacing.
Contact the service center
for replacing.
Switch off the snow blower, remove
the battery pack, and clean the
discharge.
Auger worn or damaged
Discharge blocked
Drive belt worn or
damaged
Auger worn or damaged
Scraper blade worn
Contact the service center
for replacing.
Contact the service center
for replacing.
Replace the scraper blade.
Scraper blade worn Replace the scraper blade.
Drive belt damaged Contact the service center
for replacing.
Make sure the battery is
fully inserted
Charge the battery.
Depress the lock-off button fully
and then squeeze the On/Off switch.
Remove battery from snow blower.
Place battery on charger and allow
to charge for 10 minutes. Remove
from charger and install in snow
blower for use.
Possible Cause Possible Solution

MAJOR TECHNICAL DATA ·········································································
GENERAL SAFETY WARNINGS································································
Protection··································································································
Electrical Safety··························································································
Work Area Safety······················································································
Personal Safety························································································
Power Tool Use And Care·············································································
Specific Safety Rules················································································
Maintenance And Storage·············································································
BATTERY AND CHARGER SAFETY INSTRUCTIONS··································
Information About The Battery···································································
Information About The Charger And The Charging Process····························
Protection From Environmental Influences··················································
Proper Care For Battery And Charger····························································
Storage···································································································
Battery And Charger Off-Season Storage························································
Battery Caution & Disposal······································································
Battery Pack Recycling···············································································
SYMBOL·································································································
KNOW YOUR CORDLESS SNOW BLOWER·················································
UNPACKING····························································································
BATTERY PACK OPERATION····································································
CHARGER OPERATION········································································
Charging the Batteries············································································
ASSEMBLY·························································································
Assembling Lower Handle Bar······································································
Assemble The Upper Handle Bar··································································
Chute Crank Assembly················································································
Assemble The Thrower Tube········································································
OPERATION························································································
Adjusting Throw Direction And Throw Height···············································
Starting & Stopping···············································································
Operate Dual LED Headlight········································································
How To Clear A Driveway/Experts Offer Practical Tips·······································
Operating Tips··························································································
MAINTENANCE AND STORAGE·································································
Cleaning··································································································
Storage···································································································
Transportation···························································································
TROUBLESHOOTING···············································································
ÍNDICE DE CONTENIDOS
DATOS TÉCNICOS PRINCIPALES ·······························································
ADVERTENCIAS GENERALES DE SEGURIDAD··········································
Protección··································································································
Eguridad Eléctrica·······················································································
Seguridad En El Área De Trabajo································································
Seguridad Personal··················································································
Uso Y Mantenimiento De La Herramienta Eléctrica············································
Reglas De Seguridad Específicas································································
Mantenimiento Y Almacenamiento··································································
INSTRUCCIONES DE SEGURIDAD PARA LA BATERÍA Y EL·······················
Información Sobre La Batería········································································
Información Sobre El Cargador Y El Proceso De··············································
Protección Contra Las Influencias Ambientales················································
Cuidado Adecuado De La Batería Y El···························································
Almacenamiento························································································
Almacenamiento De Batería Y Cargador Fuera De Temporada···························
Precaución Y Eliminación De La ······························································
Reciclaje De Baterías·················································································
SÍMBOLO································································································
CONOZCA SU QUITANIEVES INALÁMBRICO···············································
DESEMBALAJE·······················································································
FUNCIONAMIENTO DEL PAQUETE DE BATERÍAS········································
FUNCIONAMIENTO DEL CARGADOR·····················································
Cargando Las Baterías···········································································
ASAMBLEA························································································
Montaje Del Manillar Inferior········································································
Ensamblaje Del Manillar Superior··································································
Conjunto De Manivela Del Conducto·····························································
Ensamblar El Tubo Lanzador········································································
OPERACIÓN························································································
Ajuste De La Dirección Y La Altura De Lanzamiento·····································
Arranque Y Parada················································································
Funcionamiento Del Faro LED Doble·····························································
Cómo Limpiar Un Camino De Entrada/Expertos Ofrecen···································
Consejos De Funcionamiento······································································
MANTENIMIENTO Y ALMACENAMIENTO····················································
Limpieza··································································································
Almacenamiento·······················································································
Transporte·······························································································
SOLUCIÓN DE PROBLEMAS·····································································
1
1-6
2
2
2-3
3-4
4
4-6
6
7-13
9
10
11
11
12
12
12-13
13
13
14
15
15
16-17
16-17
17-19
17
18
18
19
19-22
19-20
20-21
21
22
22
23
23
23
23
24

Correo electrónico postventa: [email protected]
- Keenstone Herramienta Eléctrica -
1 | Español
DATOS TÉCNICOS PRINCIPALES
ADVERTENCIAS GENERALES DE SEGURIDAD
TODOS LOS OPERADORES DEBEN LEER ESTAS INSTRUCCIONES
Voltaje
Ancho de limpieza
Distancia máxima de lanzamiento
Profundidad de corte de nieve
Capacidad de batería
Velocidad sin carga
Peso del equipo
40V D.C. (2 x 20V)
20"/50cm
7m(front),4.5m(side)
10in. (25.4cm)
4.0 Ah
1900 rpm
10.4kg
ANTES DE USAR EL EQUIPO: Antes de utilizar esta herramienta o cualquiera
de sus accesorios, lea este manual y siga todas las normas de seguridad e
instrucciones de funcionamiento. Las precauciones, salvaguardias e instruc-
ciones importantes que aparecen en este manual no cubren todas las situa-
ciones posibles. Es importante tener en cuenta que el sentido común y la
precaución son factores que no pueden integrarse en el producto.
Tenga en cuenta el símbolo de alerta de seguridad personal A que se
utiliza en este manual para llamar su atención sobre una ADVERTENCIA
que se incluye junto con las instrucciones de funcionamiento específicas.
Esto significa que la operación requiere especial ATENCIÓN, PRECAU-
CIÓN y CONCIENCIA.
USE PROTECCIÓN PARA LOS OJOS APROBADA POR CSA
USAR UNA MASCARILLA FACIAL
WEAR A FACE MASK

Correo electrónico postventa: [email protected]
- Keenstone Herramienta Eléctrica -
2 | Español
Protección
USE SIEMPRE PROTECCIÓN OCULAR QUE CUMPLE CON LOS REQUISIT-
OS DE LA CSA o LA NORMA DE SEGURIDAD ANSI Z87.1. Los escombros
que salen volando pueden causar daño ocular permanente. Las gafas gradua-
das NO reemplazan la protección ocular adecuada.
ADVERTENCIA: Los anteojos no conformes pueden causar lesiones graves si
se rompen durante el uso de una herramienta eléctrica.
UTILICE SIEMPRE PROTECCIÓN PARA LOS OÍDOS
ADVERTENCIA: Utilice protección auditiva, especialmente durante períodos
prolongados de funcionamiento de la herramienta o si el funcionamiento es
ruidoso.
1. Mantenga el área de trabajo limpia y bien iluminada. Las áreas desordenadas
u oscuras pueden causar accidentes.
2. No opere el quitanieve en atmósferas explosivas, como en presencia de
líquidos, gases o polvo inflamables. Las herramientas eléctricas generan
chispas que pueden encender el polvo o los vapores.
3. Mantenga a los niños y a otras personas alejadas mientras esté operando la
herramienta. Las distracciones pueden hacerle perder el control.
4. El enchufe del quitanieve debe coincidir con la toma de corriente. Nunca
modifique el enchufe de ninguna manera. No use adaptadores con herramientas
eléctricas conectadas a tierra. Los enchufes sin modificar y las tomas de corrien-
te adecuadas reducen el riesgo de descarga eléctrica.
Eguridad Eléctrica
Seguridad En El Área De Trabajo
ADVERTENCIA: Use una protección de circuito adecuada.
ADVERTENCIA: Las aberturas de ventilación en las baterías y cargadores
deben estar siempre abiertas para permitir la circulación libre del aire. Las rejillas
de ventilación bloqueadas, restringidas o cubiertas pueden provocar el
sobrecalentamiento de la batería o del cargador. El sobrecalentamiento puede
dañar la herramienta o provocar un incendio, causando posibles lesiones
graves.
LEA TODAS LAS INSTRUCCIONES ANTES DE USAR ESTA QUITANIEVE

Correo electrónico postventa: [email protected]
- Keenstone Herramienta Eléctrica -
3 | Español
5. Evite el contacto corporal con superficies conectadas a tierra como tuberías,
radiadores, estufas y refrigeradores. Existe un mayor riesgo de descarga eléctri-
ca si su cuerpo está conectado a tierra.
6. No exponga el quitanieve a la lluvia ni lo utilice en lugares húmedos. El
ingreso de agua en el interior de la herramienta aumentará el riesgo de descar-
ga eléctrica.
7. No maltrate el cable. Nunca utilice el cable para transportar, tirar o desenchu-
far el quitanieve. Mantenga el cable alejado del calor, aceite, bordes afilados o
partes móviles. Los cables dañados o enredados aumentan el riesgo de descar-
ga eléctrica.
8. Si opera un cargador en exteriores, utilice un cable de extensión adecuado
para uso exterior.
9.Si es inevitable usar una herramienta eléctrica en un lugar húmedo, utilice una
fuente de alimentación protegida por un dispositivo de corriente residual (RC-
D/GFCI). Esto reduce el riesgo de descarga eléctrica.
Seguridad Personal
1. Permanezca alerta, preste atención a lo que está haciendo y use el sentido
común al operar el quitanieve. No lo use si está cansado o bajo los efectos de
drogas, alcohol o medicamentos. Un momento de distracción puede causar
lesiones graves.
2. Utilice equipo de protección personal. Siempre use protección ocular. El
equipo protector como mascarillas, calzado antideslizante, casco o protección
auditiva, utilizado según las condiciones, reduce el riesgo de lesiones.
3. Prevenga arranques accidentales. Asegúrese de que el interruptor esté en la
posición de apagado antes de conectar a la fuente de energía o batería, recoger
o transportar la herramienta. Transportar herramientas con el dedo en el inter-
ruptor o encender herramientas con el interruptor en posición encendida puede
causar accidentes.
4. Retire cualquier llave o herramienta de ajuste antes de encender la herra-
mienta. Una llave dejada en una parte giratoria puede causar lesiones.
5. No se sobreextienda. Mantenga el equilibrio y la postura adecuada en todo
momento. Esto permite un mejor control de la herramienta en situaciones
inesperadas.
6. Vístase adecuadamente. No use ropa suelta ni joyas. Mantenga el cabello,
ropa y guantes alejados de las partes móviles. La ropa suelta o el cabello largo

Correo electrónico postventa: [email protected]
- Keenstone Herramienta Eléctrica -
4 | Español
Uso Y Mantenimiento De La Herramienta Eléctrica
Reglas De Seguridad Específicas
1. No fuerce la herramienta eléctrica. Use la herramienta adecuada para la
aplicación prevista. La herramienta correcta realizará el trabajo mejor y de
manera más segura.
2. No utilice la herramienta si el interruptor no la enciende o apaga. Toda herra-
mienta que no se pueda controlar con el interruptor es peligrosa y debe ser
reparada.
3. Desconecte el enchufe de la fuente de energía y/o retire el paquete de batería
antes de realizar ajustes, cambiar accesorios o almacenar la herramienta. Estas
medidas preventivas reducen el riesgo de arranque accidental.
4.Guarde las herramientas eléctricas fuera del alcance de los niños y no permita
que personas no familiarizadas con la herramienta o con estas instrucciones la
utilicen. Las herramientas en manos de personas sin entrenamiento son peligro-
sas.
5.Mantenga las herramientas eléctricas. Verifique si hay desalineación, atascos,
partes rotas u otras condiciones que puedan afectar su funcionamiento. Si está
dañada, repare la herramienta antes de usarla. Muchos accidentes son
causados por herramientas mal mantenidas.
6. Mantenga las herramientas de corte afiladas y limpias. Las herramientas
adecuadamente mantenidas son menos propensas a atascarse y son más
fáciles de controlar.
7. Use la herramienta, los accesorios y las brocas de acuerdo con estas instruc-
ciones, teniendo en cuenta las condiciones del entorno y el trabajo a realizar.
Usar la herramienta para tareas distintas a las previstas puede ocasionar situa-
ciones peligrosas.
8. Utilice las empuñaduras auxiliares proporcionadas con la herramienta. La
pérdida de control puede causar lesiones personales.
pueden engancharse.
7. Si se proporcionan dispositivos para extracción de polvo o recolección,
asegúrese de que estén correctamente conectados y se utilicen correctamente.

Correo electrónico postventa: [email protected]
- Keenstone Herramienta Eléctrica -
5 | Español
ADVERTENCIA: Lea, comprenda y siga todas las instrucciones del equipo y del
manual antes de operar esta unidad. Familiarícese completamente con los
controles y el uso adecuado del equipo. Sepa cómo detener la unidad y desacti-
var los controles rápidamente.
1. Los niños no deben tener acceso al equipo. Los adultos no deben operar el
equipo sin haber leído y entendido estas instrucciones.
2. Mantenga el área de operación libre de personas, especialmente niños
pequeños y mascotas.
3. Tenga cuidado para evitar resbalones o caídas.
4. Inspeccione minuciosamente el área donde se va a usar el equipo y retire
felpudos, trineos, tablas, cables u otros objetos extraños.
5. No opere el equipo sin llevar ropa adecuada para el invierno. Evite prendas
sueltas que puedan quedar atrapadas en partes móviles. Use calzado que
proporcione buena tracción en superficies resbaladizas
6. No intente quitar nieve de superficies de grava o piedra triturada. Este produc-
to está diseñado solo para superficies pavimentadas.
7. Nunca intente realizar ajustes mientras el motor esté en funcionamiento
(excepto cuando se recomiende específicamente).
8. Siempre utilice gafas de seguridad o protectores oculares durante la
operación o al realizar ajustes o reparaciones, para protegerse de objetos que
puedan salir despedidos.
9. No coloque las manos ni los pies cerca o debajo de las partes giratorias.
Manténgase alejado de la abertura de descarga en todo momento.
10. Extreme la precaución al operar o cruzar caminos con grava. Esté atento a
peligros ocultos o tráfico.
11. Después de golpear un objeto extraño, detenga el motor. Inspeccione
minuciosamente el quitanieve inalámbrico por daños y repárelo antes de reini-
ciarlo.
12. Si la unidad comienza a vibrar de manera anormal, detenga el motor y revise
de inmediato. La vibración suele ser signo de problemas.
13. Detenga el motor y retire la batería cuando deje la posición de operación, al
transportar la unidad, al desatascar la carcasa de la hélice o al realizar ajustes o
inspecciones.
14.Al limpiar, reparar o inspeccionar el quitanieve, asegúrese de que todas las
partes móviles se hayan detenido completamente.
15. Tenga extrema precaución al operar en pendientes.
Nunca opere el quitanieves inalámbrico sin las protecciones y otros dispositivos

Correo electrónico postventa: [email protected]
- Keenstone Herramienta Eléctrica -
6 | Español
Mantenimiento Y Almacenamiento
1. Revise todos los sujetadores con frecuencia para asegurarse de que estén
bien apretados y que el equipo se mantenga en condiciones seguras de funcio-
namiento.
2. Consulte siempre el manual del operador para obtener detalles importantes,
como cómo almacenar correctamente su quitanieve inalámbrico por un período
prolongado.
3. Mantenga o reemplace las etiquetas de seguridad e instrucciones según sea
necesario.
4. Haga funcionar la máquina durante unos minutos después de quitar la nieve
para evitar que las cuchillas del rotor se congelen.
de seguridad adecuados instalados y en buen estado de funcionamiento.
16. Nunca dirija la descarga hacia personas o propiedades que puedan resultar
dañadas. Mantenga a niños, mascotas y otras personas alejadas del área de
trabajo.
17. No sobrecargue la capacidad de la máquina intentando quitar nieve demasi-
ado rápido.
18. Mire hacia atrás y tenga cuidado al retroceder con el quitanieve.
19. Nunca opere el quitanieve sin buena visibilidad o iluminación. Asegúrese
siempre de tener un buen punto de apoyo y sostener firmemente las empuñadu-
ras. Camine, nunca corra.
ADVERTENCIA: DESATASCAR LA CARCASA DE LA HÉLICE
El contacto con las cuchillas giratorias dentro de la carcasa es una de las
causas más comunes de lesiones con quitanieves inalámbricos.
Nunca use las manos para desatascar la carcasa.:
•Apague el motor y retire la batería..
•Espere 10 segundos para asegurar que las cuchillas se detengan completa-
mente.
•Use siempre una herramienta especial de limpieza, nunca las manos.

Correo electrónico postventa: [email protected]
- Keenstone Herramienta Eléctrica -
7 | Español
INSTRUCCIONES DE SEGURIDAD PARA LA
BATERÍA Y EL
IMPORTANTE: Los análisis confirman que el uso incorrecto y el mal cuidado de
las baterías de alto rendimiento son los principales factores responsables de
daños personales y/o al producto.
ADVERTENCIA! Utilice únicamente baterías de repuesto aprobadas; otras
baterías pueden dañar el quitanieves inalámbrico y provocar un mal funciona-
miento, lo que puede provocar lesiones personales graves.
ADVERTENCIA! No utilice baterías o aparatos que estén dañados o modifica-
dos. Las baterías dañadas o modificadas pueden presentar un comportamiento
impredecible que puede resultar en fuego, explosión o lesiones.
No modifique ni intente reparar el aparato o el paquete de baterías, salvo lo
indicado en las instrucciones de uso y cuidado.
Haga que un técnico calificado revise su batería, utilizando solo piezas de
repuesto idénticas para asegurar su seguridad.
PRECAUCIÓN: Para reducir el riesgo de lesiones, cargue el paquete de
baterías de ion de litio de 20V únicamente en su cargador designado. Otros
tipos de cargadores pueden presentar riesgo de incendio, lesiones personales y
daños.
Nunca conecte una batería directamente a una fuente de alimentación o al
encendedor de cigarrillos de un automóvil. Este uso inapropiado dañará perma-
nentemente la batería.
1. Evite entornos peligrosos - No cargue la batería bajo lluvia, nieve o en
lugares húmedos. No utilice la batería ni el cargador en presencia de atmósferas
explosivas (gases, polvo o materiales inflamables), ya que al insertar o quitar la
batería pueden generarse chispas.
2. Cargue en un área bien ventilada - No bloquee las rejillas del cargador. No
permita fumar ni llamas abiertas cerca de la batería en carga.
Nota: La temperatura segura para la batería es de 5°C – 40.5°C (41°F – 105°F).
3. Cuidado con el cable del cargador – Al desenchufar el cargador, jale del
enchufe y no del cable. No use un cargador con cable o enchufe dañado.
4. Evite el uso de extensiones eléctricas innecesarias – Si debe usar una,
asegúrese de que esté en buenas condiciones y tenga un calibre adecuado
(mínimo calibre 16 AWG).
5. El cargador solo acepta corriente alterna de 120V – Conéctelo únicamente

Correo electrónico postventa: [email protected]
- Keenstone Herramienta Eléctrica -
8 | Español
a tomacorrientes apropiados.
6.Utilice únicamente los accesorios recomendados. El uso de un accesorio
no recomendado o vendido por el fabricante del cargador o la batería puede
provocar incendio, descarga eléctrica o lesiones personales.
Desenchufe el cargador cuando no lo utilice. Asegúrese de retirar las baterías de
los cargadores desenchufados.
ADVERTENCIA! Para reducir el riesgo de descarga eléctrica, desenchufe
siempre el cargador antes de realizar cualquier limpieza o mantenimiento. No
permita que entre agua en el cargador. Utilice un interruptor de circuito por falla a
tierra (GFCI) para reducir el riesgo de descarga eléctrica.
7. Desconecte el cargador cuando no esté en uso – También retire las
baterías de los cargadores cuando no estén en uso.
8.No aplaste, deje caer ni dañe los paquetes de baterías: no utilice el
paquete de baterías ni el cargador si han sufrido un golpe fuerte, se han caído,
han sido atropellados o han sufrido algún daño (es decir, si han sido perforados
con un clavo, golpeados con un martillo, pisados, etc.).
9. No desarmar: un montaje incorrecto puede suponer un grave riesgo de
descarga eléctrica, incendio o exposición a sustancias químicas tóxicas de la
batería.
10. Los productos químicos de las baterías causan quemaduras graves.
Nunca permita que una batería dañada entre en contacto con la piel, los ojos o
la boca. Si una batería dañada tiene fugas de productos químicos, utilice
guantes de goma o neopreno para desecharla de forma segura. Si la piel entra
en contacto con los líquidos de la batería, lave la zona afectada con agua y
jabón y enjuague con vinagre. Si los ojos entran en contacto con los productos
químicos de la batería, enjuáguelos inmediatamente con agua durante 20
minutos y busque atención médica. Quítese y deseche la ropa contaminada.
11. No cortocircuite: Una batería se cortocircuitará si un objeto metálico conec-
ta los contactos positivo y negativo. No coloque la batería cerca de objetos que
puedan causar un cortocircuito, como clips, monedas, llaves, tornillos, clavos u
otros objetos metálicos. Una batería en cortocircuito supone un riesgo de incen-
dio y lesiones personales graves.
12.Guarde la batería y el cargador en un lugar fresco y seco. No guarde la
batería ni el cargador donde las temperaturas puedan superar los 105 °F / 40,5
°C, como bajo la luz solar directa o dentro de un vehículo o un edificio metálico
durante el verano.

Correo electrónico postventa: [email protected]
- Keenstone Herramienta Eléctrica -
9 | Español
Información Sobre La Batería
1. El paquete de baterías incluido con su quitanieve inalámbrico está solo
parcialmente cargado. Debe cargarse completamente antes del primer uso.
2. Para un rendimiento óptimo de la batería, evite ciclos de descarga profunda
cargándola con frecuencia.
3. Almacene la batería en un lugar fresco, idealmente a 25 °C (77 °F) y con al
menos un 40 % de carga.
4. Las baterías de iones de litio están sujetas a un proceso natural de envejec-
imiento. Debe reemplazar el paquete de baterías cuando su capacidad caiga al
80 % de su capacidad original. Las celdas debilitadas no podrán suministrar la
energía requerida y pueden representar un riesgo para la seguridad.
5. No arroje las baterías al fuego, ya que podrían explotar.
6. No exponga la batería al fuego ni intente encenderla.
GUARDE ESTAS INSTRUCCIONES PARA CONSULTA FUTURA
7.No descargue completamente las baterías. Una descarga completa dañará las
celdas. La causa más común de una descarga completa es el almacenamiento
prolongado o la falta de uso de baterías parcialmente descargadas. Deje de
trabajar en cuanto el rendimiento de la batería disminuya notablemente o se
active el sistema de protección electrónico. Guarde la batería solo después de
que esté completamente cargada.
8. Proteja las baterías y la herramienta de sobrecargas. Las sobrecargas
pueden provocar rápidamente sobrecalentamiento y daños en las celdas dentro
de la carcasa de la batería, incluso si este sobrecalentamiento no es evidente
externamente.
9. Evite daños y descargas eléctricas. Reemplace inmediatamente las baterías
que hayan caído desde una altura superior a un metro o hayan estado expues-
tas a descargas eléctricas fuertes, incluso si la carcasa de la batería parece
estar intacta. Las celdas de la batería podrían haber sufrido daños graves. En
tales casos, consulte la información sobre eliminación de residuos para obtener
información sobre la eliminación correcta de las baterías.
10.Si la batería se sobrecarga o se sobrecalienta, el interruptor de seguridad
integrado apagará el equipo por seguridad. ¡IMPORTANTE! No presione el
interruptor de encendido/apagado si el interruptor de seguridad está activado.
Esto podría dañar la batería.
11.Utilice únicamente baterías originales. El uso de otras baterías supone un
riesgo de incendio y puede provocar lesiones o una explosión.

Correo electrónico postventa: [email protected]
- Keenstone Herramienta Eléctrica -
10 | Español
Información Sobre El Cargador Y El Proceso De
1. Verifique los datos marcados en la placa de características del cargador de
batería. Asegúrese de conectar el cargador a una fuente de alimentación con el
voltaje indicado en la placa. Nunca lo conecte a un cargador con un voltaje
diferente..
2. Proteja el cargador de batería y su cable de daños. Manténgalos alejados del
calor, el aceite y los bordes afilados.
3. Los enchufes eléctricos deben coincidir con la toma de corriente. Nunca
modifique el enchufe de ninguna manera. No utilice adaptadores de enchufe con
aparatos con conexión a tierra. Los enchufes sin modificar y las tomas de
corriente compatibles reducen el riesgo de descarga eléctrica.
4. Mantenga el cargador de batería, los paquetes de baterías y la herramienta
inalámbrica fuera del alcance de los niños.
5. No utilice el cargador de batería suministrado para cargar otras herramientas
inalámbricas a menos que el fabricante indique lo contrario como compatible.
6. Durante períodos de uso intensivo, la batería se calentará. Deje que se enfríe
a temperatura ambiente antes de insertarla en el cargador para recargarla.
LEA TODAS LAS INSTRUCCIONES ANTES DE USAR ESTA QUITANIEVE
7. No sobrecargue las baterías. No exceda los tiempos máximos de carga.
Estos tiempos de carga solo aplican a baterías descargadas. Insertar frecuente-
mente una batería cargada o parcialmente cargada provocará una sobrecarga y
dañará las celdas. No deje las baterías en el cargador durante días seguidos.
8. Nunca utilice ni cargue las baterías si sospecha que han pasado más de 12
meses desde la última vez que se cargaron. Es muy probable que la batería ya
haya sufrido daños peligrosos (descarga completa).
9. Cargar las baterías a una temperatura inferior a 5 °C / 41 °F provocará daños
químicos en las celdas y puede provocar un incendio.
10. No utilice baterías que hayan estado expuestas al calor durante el proceso
de carga, ya que las celdas de la batería podrían haber sufrido daños peligrosos.
11. No utilice baterías que hayan sufrido curvatura o deformación durante el
proceso de carga o que presenten otros síntomas atípicos (chisporroteo,
silbidos, crujidos, etc.).
12. Nunca descargue completamente la batería (la profundidad de descarga
recomendada es del 80%). Una descarga completa provocará un envejecimien-
to prematuro de las celdas.

Correo electrónico postventa: [email protected]
- Keenstone Herramienta Eléctrica -
11 | Español
Protección Contra Las Influencias Ambientales
1. Use ropa de trabajo adecuada y gafas de seguridad.
2. Proteja la herramienta y el cargador de la humedad y la lluvia.
3. No utilice la herramienta ni el cargador cerca de vapores o líquidos inflam-
ables.
4. No almacene el cargador en lugares donde la temperatura supere los
40.5 °C (105 °F), por ejemplo, dentro de un automóvil bajo el sol.
5. Proteja las baterías del sobrecalentamiento. Las sobrecargas, la carga
excesiva y la exposición directa al sol pueden dañarlas.
Nunca utilice ni cargue baterías sobrecalentadas. Reemplácelas inmediata-
mente.
6. Almacene el cargador y la herramienta solo en lugares secos y con
temperatura ambiente entre 5 °C y 40.5 °C (41 °F – 105 °F).
Guarde el paquete de batería completamente cargado (al menos 40 %) a
25 °C (77 °F), en un lugar seco y protegido del sol directo.
7. Evite que el paquete de baterías se congele. Si ha estado almacenado a
menos de 0 °C (32 °F) durante más de una hora, debe desecharse.
Cuidado Adecuado De La Batería Y El
ADVERTENCIA: Para reducir el riesgo de lesiones, siempre desenchufe el
cargador y retire la batería antes de realizar cualquier tarea de mantenimiento.
1. Para reducir el riesgo de lesiones o daños, nunca sumerja el cargador ni la
batería en líquido, ni permita que ningún líquido entre en sus componentes.
2. Limpie el polvo y los residuos de las rejillas de ventilación y de los contactos
eléctricos con aire comprimido.
3. Use solamente jabón suave y un paño húmedo para limpiar la batería y el
cargador, evitando el contacto con las conexiones eléctricas.
� Algunos productos de limpieza son perjudiciales para los plásticos o partes
aisladas. Evite gasolina, aguarrás, disolventes de laca, cloro, amoníaco y
limpiadores domésticos con amoníaco.
Nunca use solventes inflamables o combustibles cerca de las baterías,
cargadores o herramientas.
4.El cargador de batería de iones de litio no contiene partes que el usuario
pueda reparar.

Correo electrónico postventa: [email protected]
- Keenstone Herramienta Eléctrica -
12 | Español
Almacenamiento
1.Examine el quitanieve minuciosamente en busca de piezas desgastadas,
flojas o dañadas.
2.Retire la batería antes de almacenar.
3.Almacene el quitanieve en interiores, en un lugar cerrado, seco y fuera del
alcance de los niños para evitar su uso no autorizado o daños.
Almacenamiento De Batería Y Cargador Fuera De
Temporada
1. No exponga la batería ni el cargador al agua ni a la lluvia, ni permita que se
mojen. Esto podría dañarlos permanentemente. No utilice aceite ni disol-
ventes para limpiar o lubricar la batería, ya que la carcasa de plástico puede
quebrarse y agrietarse, lo que podría causar lesiones graves..
2. Guarde la batería y el cargador a temperatura ambiente, alejados de la
humedad. No los guarde en lugares húmedos donde pueda producirse
corrosión en los terminales. Al igual que con otros tipos de baterías, puede
producirse una pérdida permanente de capacidad si se almacenan durante
largos periodos a temperaturas superiores a 40,5 °C (105 °F).
3. Las baterías de iones de litio mantienen su carga durante el almacenamien-
to durante más tiempo que otros tipos de baterías. Como práctica general, se
recomienda desconectar el cargador y retirar la batería cuando no se utilice.
Recargue la batería cada 6 meses al 50 % de su capacidad durante el alma-
cenamiento fuera de temporada para mantener un rendimiento óptimo.
Precaución Y Eliminación De La
Deseche siempre la batería de acuerdo con las normativas federales, provin-
ciales y locales. Contacte con una agencia de reciclaje de su zona para
obtener información sobre los puntos de reciclaje.
¡PRECAUCIÓN! Incluso las baterías descargadas contienen energía. Antes
de desecharlas, cubra los terminales con cinta aislante para evitar cortocircu-
itos, lo que podría provocar un incendio o una explosión.
¡ADVERTENCIA! Para reducir el riesgo de lesiones o explosiones, nunca
queme ni incinere una batería, incluso si está dañada, agotada o completa-
mente descargada. Al quemarla, se emiten humos y materiales tóxicos a la
atmósfera.
Correo electrónico postventa: [email protected]
- Keenstone Herramienta Eléctrica -
13| Español
Lea el manual del operador.
Utilice protección para los oídos.
Use un protector facial.
Doble aislamiento.
Antes de realizar cualquier trabajo en
la máquina, desenchufe la clavija de
la toma de corriente.
Evite lesiones causadas por el sinfín
giratorio. Mantenga las manos, los pies
y la ropa alejados.
¡Advertencia!
Use protección para la cabeza.
Use guantes protectores.
Use calzado de seguridad.
Desconecte el enchufe de la red
eléctrica inmediatamente si el cable
está dañado.
Apague el motor antes de destapar el
conducto de descarga.
SÍMBOLO
Reciclaje De Baterías
1. Las baterías varían según el dispositivo. Consulte el manual para obtener
información específica.
2. Instale únicamente baterías nuevas del mismo tipo en su producto (cuando
corresponda).
3. Si no se insertan las baterías con la polaridad correcta, como se indica en
el compartimiento de las baterías o en el manual, puede acortar la vida útil de
las baterías o provocar fugas.
4. No mezcle pilas viejas y nuevas.
5. No arroje las baterías al fuego.
6. Las baterías deben reciclarse o desecharse según las pautas provinciales y
locales.
Para preservar nuestros recursos naturales, recicle o deseche las baterías
correctamente. Las baterías cargadas con este cargador pueden contener
sustancias químicas y metales perjudiciales para el medio ambiente. Nunca
tire baterías recargables en la basura doméstica ni en vertederos, ya que
contribuirán a la contaminación ambiental.

Correo electrónico postventa: [email protected]
- Keenstone Herramienta Eléctrica -
14| Español
Lea atentamente el manual del usuario y las normas de seguridad antes de
utilizar su quitanieves inalámbrico. Compare la ilustración a continuación con
la unidad real para familiarizarse con la ubicación de los distintos controles y
ajustes. Conserve este manual para futuras consultas.
CONOZCA SU QUITANIEVES INALÁMBRICO
1. manillar
2. Gatillo de encendido/apagado
3. Botón de bloqueo de seguridad
4. Caja de interruptores
5. Marco superior
6. Biela superior
7. Anillo de goma
8. Perillas y pernos de manija (4)
9. Cable
10. Marco intermedio
11. Compartimento de la batería (2)
12. Rueda (2)
13. Barrena
14. Luz LED
15. Conducto de descarga
16. Mango auxiliar
17. Perilla deflectora
18. Deflector de canal
19. Cargador (2)
20. Paquete de baterías (2)
1
2
3
4
5
6
7
8
9
10
11
12
13
14
15
16
17
18
19
20

Correo electrónico postventa: [email protected]
- Keenstone Herramienta Eléctrica -
15 | Español
DESEMBALAJE
FUNCIONAMIENTO DEL PAQUETE DE BATERÍAS
Contenido de la caja:
• Quitanieves inalámbrico
• Perilla y perno de fijación de la junta (4)
• Biela superior (ensamblada)
• Deflector de canal y canal de descarga
• Batería de iones de litio (2)
•Cargador de iones de litio (2)
• Manual
1. Retire con cuidado el quitanieves inalámbrico y verifique que todos los elemen-
tos anteriores estén incluidos.
2. Inspeccione el producto cuidadosamente para asegurarse de que no haya
ocurrido ninguna rotura o daño durante el envío.
NOTA: No deseche la caja de envío ni el material de embalaje hasta que esté
listo para usar el quitanieves eléctrico. El embalaje está hecho de materiales
reciclables. Deseche estos materiales correctamente según las normativas
locales o guarde el embalaje para almacenar el producto a largo plazo.
¡IMPORTANTE! El equipo y el material de embalaje no son juguetes. No permita
que los niños jueguen con bolsas de plástico, láminas ni piezas pequeñas. Estos
artículos pueden ser ingeridos y suponen un riesgo de asfixia.
El equipo funciona con dos baterías de iones de litio. Los paquetes de baterías
están completamente sellados y no requieren mantenimiento.
¡ADVERTENCIA! La quitanieves inalámbrica solo funciona con ambas baterías
a la vez. Una sola batería no puede proporcionar suficiente potencia a la herra-
mienta. Asegúrese de usar dos baterías del mismo voltaje y capacidad. Usar la
herramienta con baterías de diferente capacidad dañará las baterías.
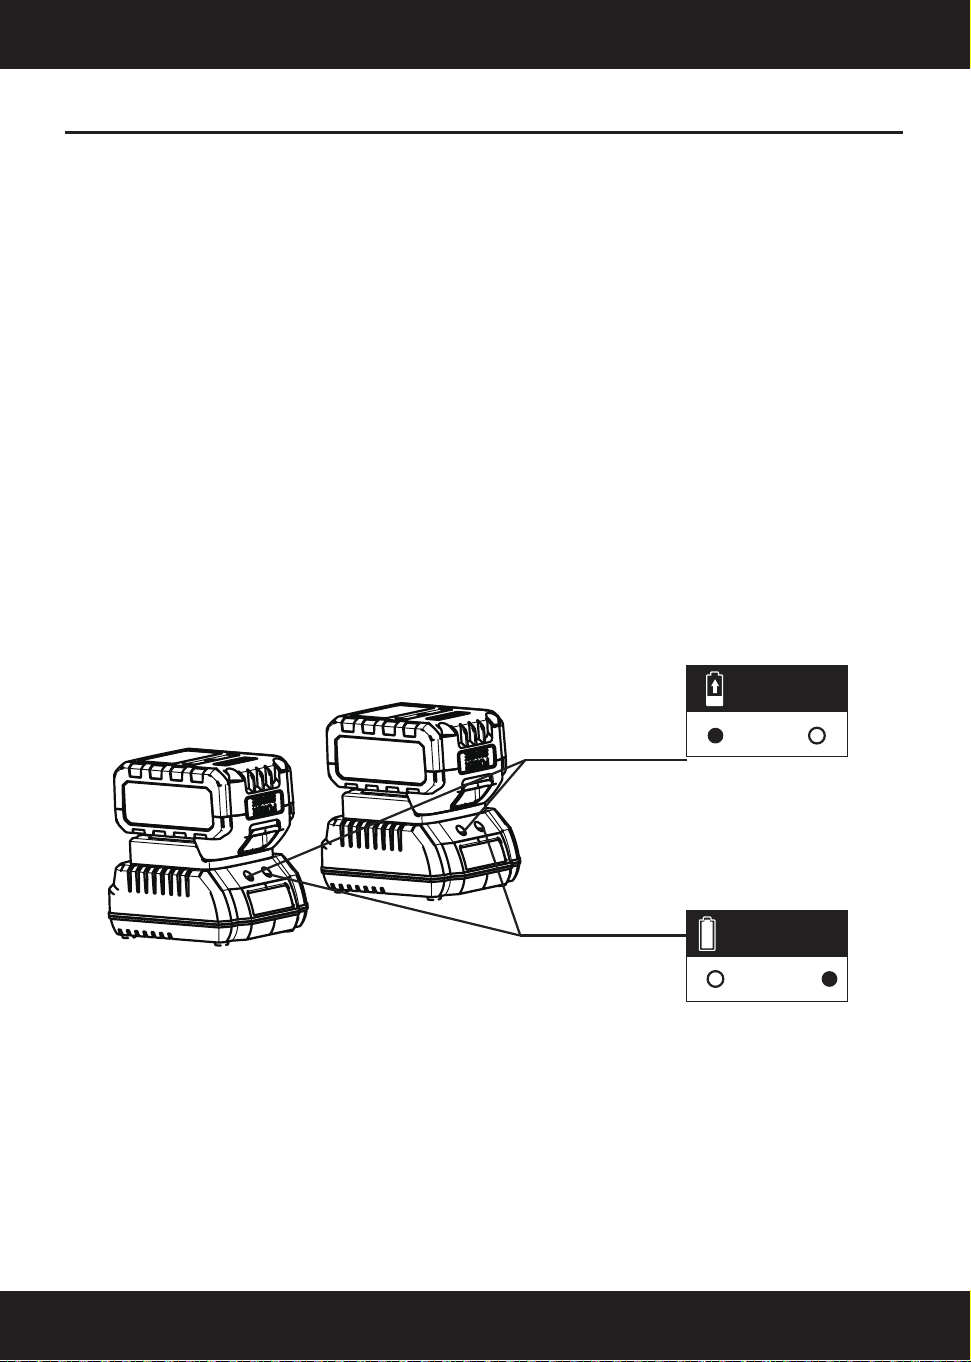
Correo electrónico postventa: [email protected]
- Keenstone Herramienta Eléctrica -
16 | Español
FUNCIONAMIENTO DEL CARGADOR
¡ADVERTENCIA! Cargue únicamente las baterías de iones de litio con su
cargador compatible. Otros tipos de baterías pueden causar lesiones y daños
personales.
Para reducir el riesgo de descarga eléctrica, no permita que entre agua en el
enchufe de CA/CC del cargador.
Cargando Las Baterías
1. Compruebe que la tensión de red coincida con la indicada en la placa de
características del cargador de batería. A continuación, conecte el cargador a
la toma de corriente. Al conectar el cargador, las luces verdes se encenderán
y permanecerán en verde.
2. Coloque las baterías en el cargador deslizándolas hasta que encajen. Al
insertarlas, las luces verdes se apagarán y las rojas se encenderán para
indicar que se están cargando.
3. Cuando las luces del cargador se vuelven verdes, las baterías están
completamente cargadas.
NOTA: Una batería completamente descargada con una temperatura interna
dentro del rango normal se cargará completamente en 1 hora (entre 0 °C y
45 °C).
Cargando
Rojo
Verde
Completamente
cargado

Correo electrónico postventa: [email protected]
- Keenstone Herramienta Eléctrica -
17| Español
Montaje Del Manillar Inferior
ASAMBLEA
IMPORTANTE: Al montar el manillar inferior en la
quitanieves, asegúrese de que el orificio de
montaje de la manivela del conducto en el manil-
lar inferior esté orientado hacia arriba (Fig. 1).
a)Bloquee el mango inferior con la perilla de
bloqueo del mango en el costado de la barra
donde está marcado el orificio de ensamblaje
(Fig. 2)
4.Si los indicadores luminosos no se encienden, compruebe que las baterías
estén bien colocadas en el compartimento. Retire las baterías y vuelva a
insertarlas.
5. Cuando se complete la carga, retire las baterías del cargador presionando
los botones de bloqueo y deslizando las baterías hacia atrás para desblo-
quearlas del cargador.
6. Recargar las baterías a tiempo ayudará a prolongar su vida útil. Debe
recargarlas cuando note una disminución en la carga del equipo.
¡IMPORTANTE! Nunca permita que las baterías se descarguen por
completo, ya que esto les causará daños irreversibles.
¡IMPORTANTE! Cárguela completamente antes de almacenarla durante
mucho tiempo. El almacenamiento a baja carga puede dañar permanen-
temente la batería.
Fig.1
Fig.2
1
2
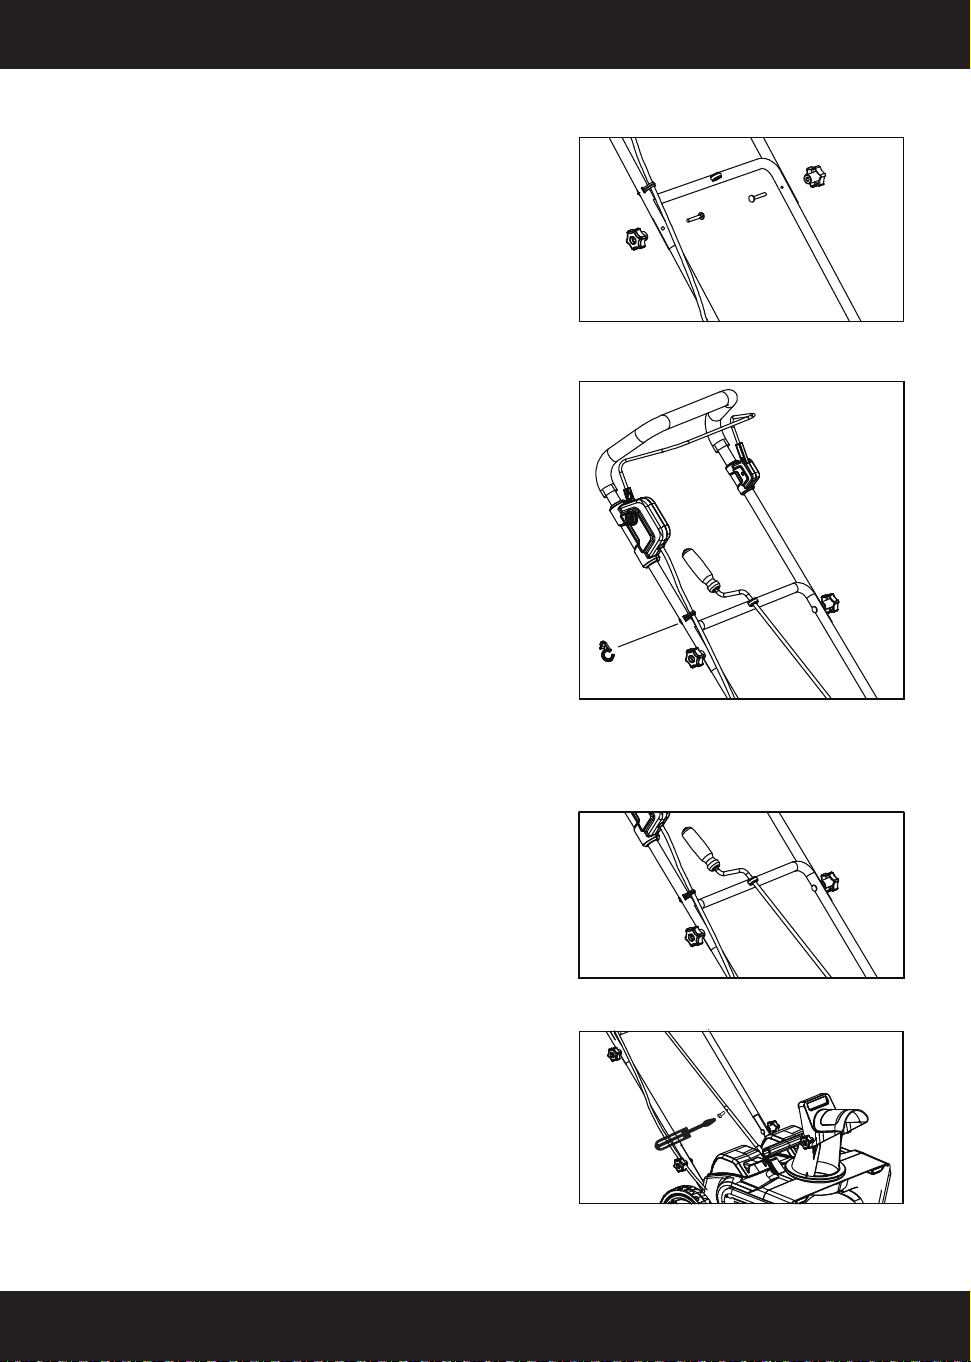
Correo electrónico postventa: [email protected]
- Keenstone Herramienta Eléctrica -
18 | Español
Ensamblaje Del Manillar Superior
Conjunto De Manivela Del Conducto
a) Seleccione uno de los tres orificios del
manillar inferior para la altura deseada al
colocar el manillar superior (Fig. 3). A
continuación, bloquéelo con la perilla de
bloqueo.
b)Cable de alimentación bloqueado con
clip para cable (Fig. 4)
a) Inserte la manivela del conducto a
través del orificio en la barra inferior del
mango (Fig. 5)
b)Apriete el tornillo para conectar la barra
de manivela del conducto (Fig. 6)
Fig.3
Fig.4
Fig.5
Fig.6
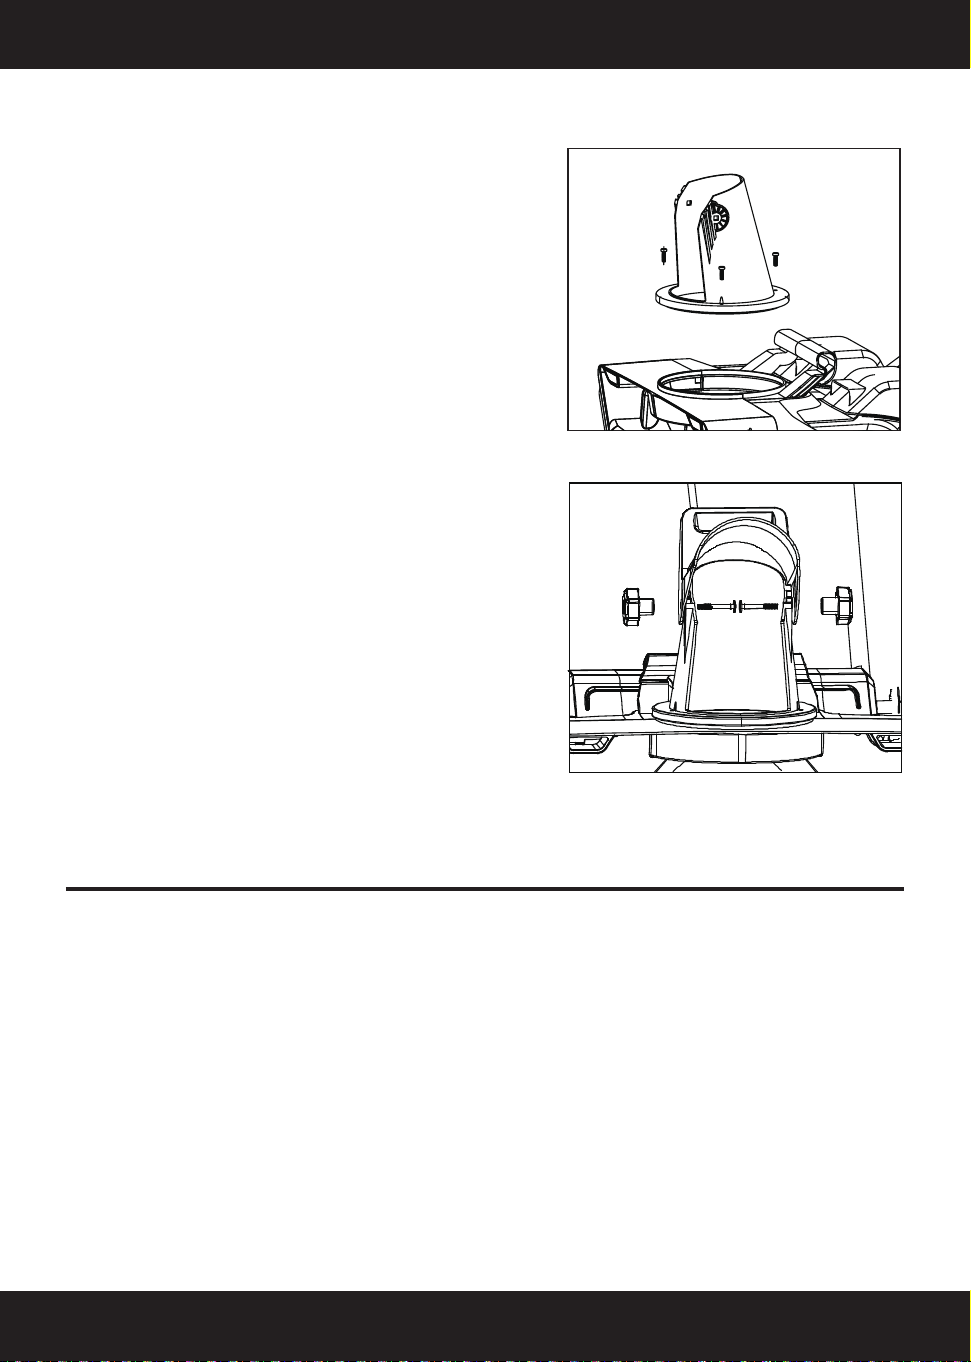
Correo electrónico postventa: [email protected]
- Keenstone Herramienta Eléctrica -
19 | Español
OPERACIÓN
Ensamblar El Tubo Lanzador
Ajuste De La Dirección Y La Altura De Lanzamiento
ADVERTENCIA: Nunca dirija el tubo de descarga de nieve hacia el operador,
transeúntes, vehículos ni ventanas cercanas. La nieve descargada y los
objetos extraños que la máquina quitanieves recoja accidentalmente pueden
causar daños graves y lesiones personales.
Oriente siempre el conducto de descarga en la dirección opuesta a donde se
encuentre usted, los transeúntes, los vehículos circundantes o las ventanas.
a)Coloque el conducto de descarga en su
lugar y fíjelo con tres tornillos (Fig. 7a).
b)Utilice la perilla del deflector para fijar
firmemente el deflector del conducto al
conducto de descarga (Fig. 7b).
Fig.7 b
Fig.7 a
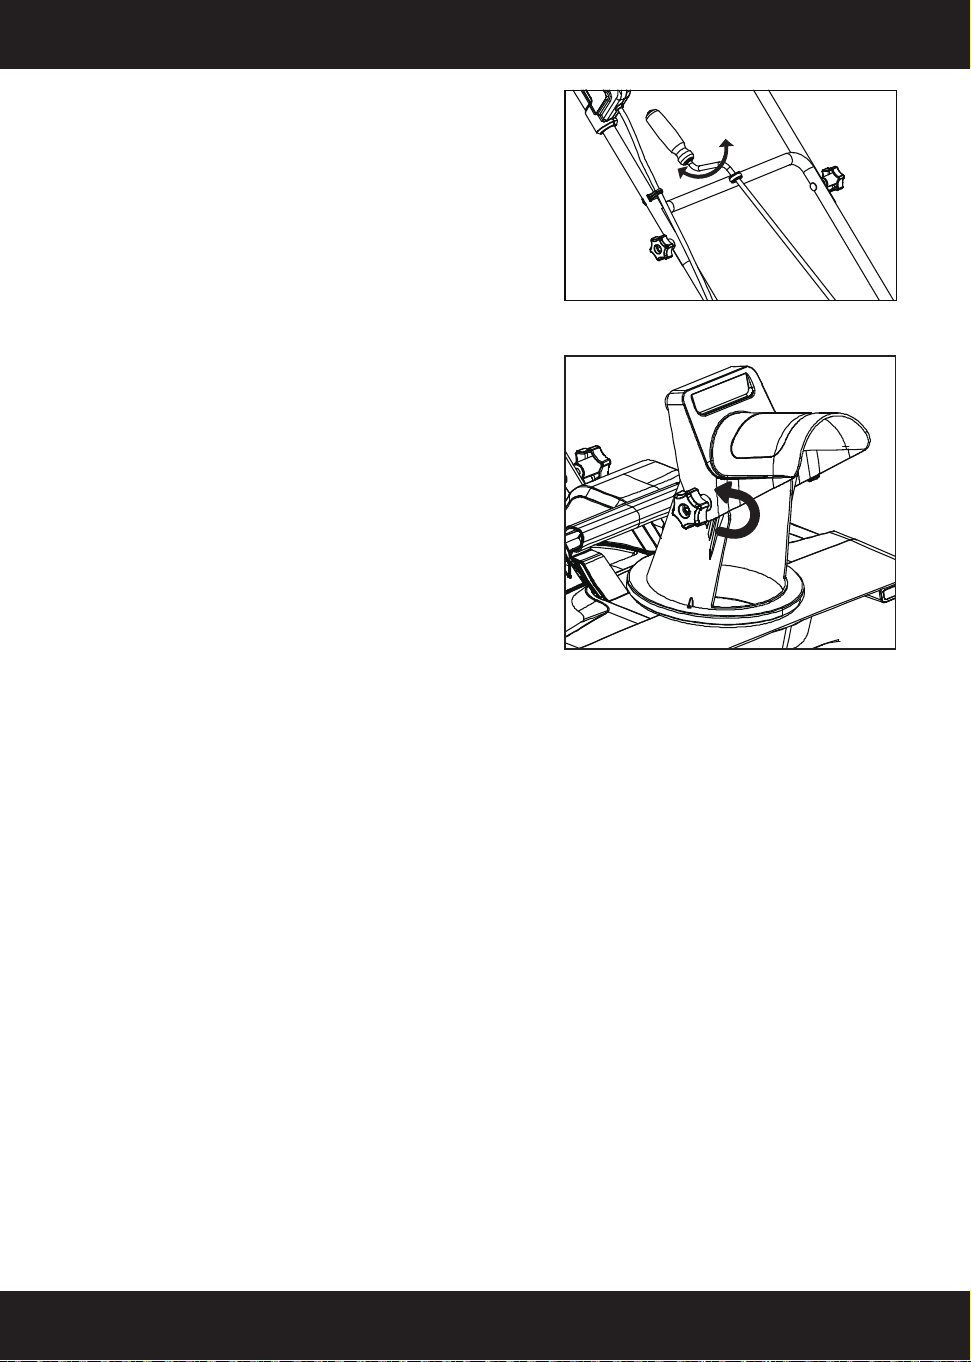
Correo electrónico postventa: [email protected]
- Keenstone Herramienta Eléctrica -
20 | Español
Arranque Y Parada
b)El conducto de descarga controla la altura
del chorro de nieve. Afloje las perillas para
subir o bajar el deflector a la altura deseada
de nieve. Apriete las perillas para asegurar
el deflector (Fig. 9).
ADVERTENCIA: Asegúrese de que el deflector del conducto encaje comple-
tamente en el conducto de descarga. Una abertura entre el conducto de
descarga y el deflector podría permitir que la máquina quitanieves recoja
objetos extraños y los arroje hacia el operador, causando lesiones graves.
•No avance demasiado el deflector del conducto porque podría aparecer una
abertura entre el deflector y el conducto de descarga.
•No apriete demasiado las perillas del deflector del conducto.
a)El conducto de descarga se puede ajustar
180 grados girando la manivela. Gire la
manivela de control del conducto en sentido
horario para moverlo hacia la izquierda y en
sentido antihorario para moverlo hacia la
derecha (Fig. 8).
Fig.8
Fig.9
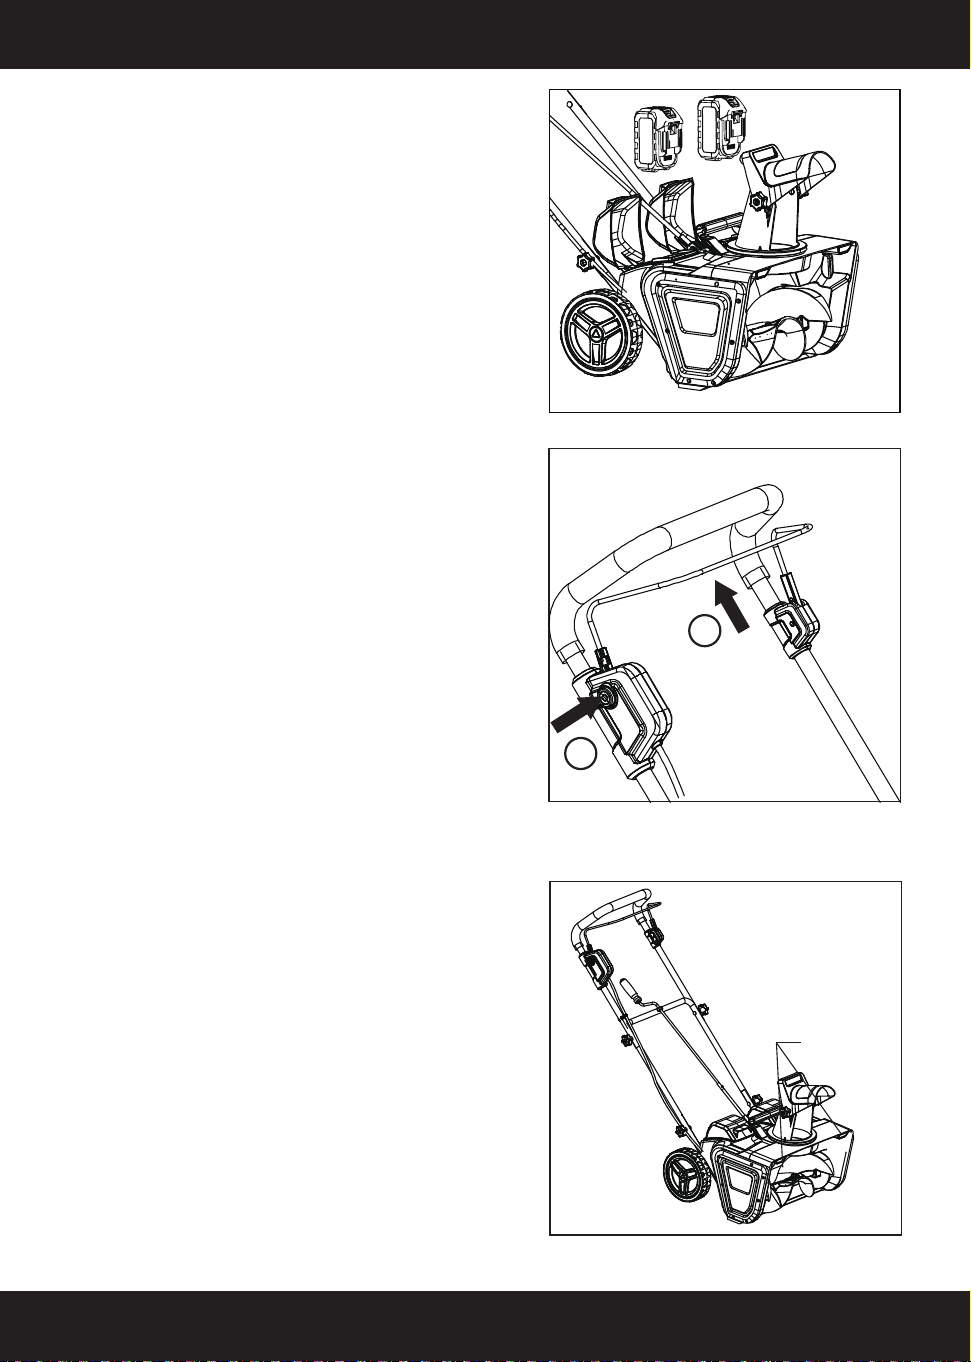
Correo electrónico postventa: [email protected]
- Keenstone Herramienta Eléctrica -
21 | Español
Funcionamiento Del Faro LED Doble
a) Antes de encender, inserte las dos
baterías en sus compartimentos (Fig. 10).
b)Para arrancar la máquina, presione el
interruptor lateral 1 y luego tire de la palanca
del interruptor 2 (Fig. 11).
Para parar la máquina, simplemente suelte
la palanca del interruptor principal 2.
a) Encienda la máquina como se muestra
en la Fig. 12 y el faro se encenderá. Suelte
la palanca del interruptor principal como se
muestra en la Fig. 12 y el faro se apagará.
Fig.12
Fig.11
2
1
Fig.10
Dual LED
headlight
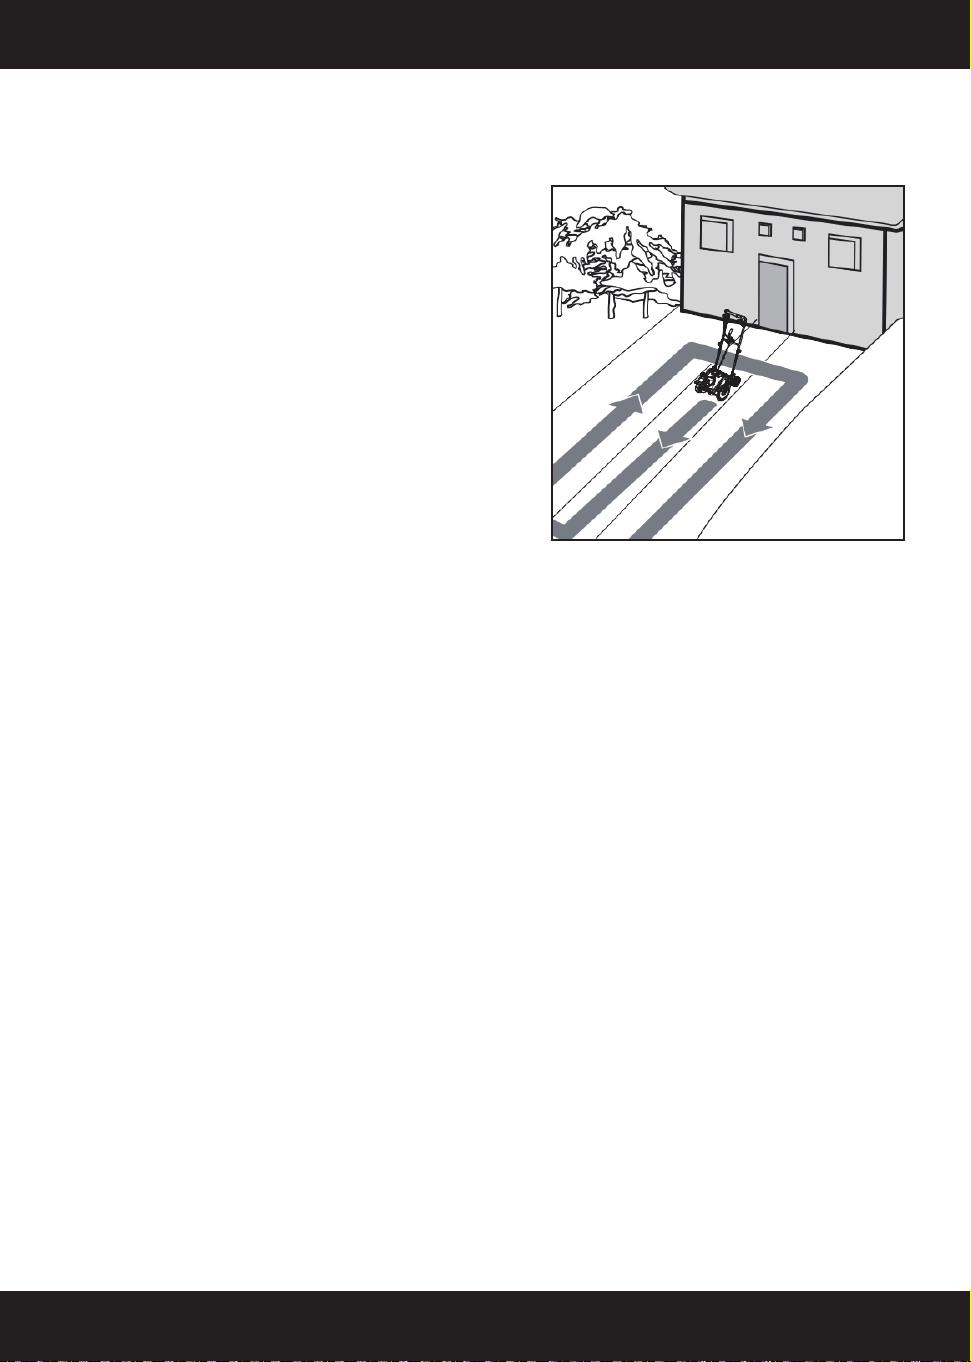
Correo electrónico postventa: [email protected]
- Keenstone Herramienta Eléctrica -
22 | Español
Cómo Limpiar Un Camino De Entrada/Expertos Ofre-
cen
CONSEJOS PRÁCTICOS (Fig. 13)
QUITANIEBLAS (CONDICIONES SIN
VIENTO).
a) Haga un camino recto por el centro del
camino de entrada, con el canal apuntando
hacia la izquierda.
b) Gire la máquina 180° sin cambiar la
dirección del canal.
c) Regrese al punto de inicio y repita en la
misma dirección, creando círculos concén-
tricos hacia fuera.
d) Continúe haciendo círculos hacia afuera
en esta dirección hasta que el camino de
entrada esté despejado.
Fig.13
Consejos De Funcionamiento
• Arranque la quitanieves inalámbrica. Empuje la pala hacia adelante a una
velocidad cómoda, pero lo suficientemente lenta como para despejar el
camino por completo. El ancho de limpieza de la quitanieves y la profundidad
de la nieve caída determinarán su velocidad de avance.
• Dirija la descarga de nieve hacia la derecha o hacia la izquierda sosteniendo
el quitanieves inalámbrico en un ligero ángulo..
• Para quitar la nieve de manera más eficiente, arroje la nieve a favor del
viento y superponga ligeramente cada franja.
• Este quitanieves inalámbrico corta un camino de 50 cm/20 pulgadas de
ancho y hasta 30 cm/12 pulgadas de profundidad..
• Al limpiar montículos de nieve más profundos, sujete la quitanieves inalám-
brica por las manijas superior e inferior y realice un movimiento de balanceo o
barrido. Retire hasta 6/16 cm..
• Retire la batería después de usar la quitanieves inalámbrica. Cuelgue la pala
para que no se pierda ni se dañe..

Correo electrónico postventa: [email protected]
- Keenstone Herramienta Eléctrica -
23 | Español
1.Retire el paquete de baterías.
2.Use un cepillo o aire comprimido para eliminar polvo y residuos de las
rejillas de ventilación.
No rocíe, lave ni sumerja las rejillas en agua.
3.Limpie el cuerpo y las partes plásticas con un paño suave y húmedo.
No use disolventes agresivos o productos de limpieza fuertes
4.Algunos productos de limpieza domésticos pueden dañar el plástico y crear
riesgos de descarga eléctrica.
1.Retire el paquete de baterías.
2.Limpie el producto y guárdelo en su empaque original si es posible.
3.Almacene el producto y sus accesorios en un lugar oscuro, seco, ventilado y
libre de heladas.
4.Mantenga el producto fuera del alcance de los niños.
5.Si no usa el embalaje original, cúbralo con un paño adecuado para prote-
gerlo del polvo.
1.Retire el paquete de baterías.
2.Reempaque en su caja original si es posible.
3.Proteja el equipo contra impactos fuertes o vibraciones durante el transporte
en vehículos.
4.Asegure el producto para evitar que se deslice o caiga.
Transporte
Almacenamiento
Limpieza
MANTENIMIENTO Y ALMACENAMIENTO
ADVERTENCIA
Todo el mantenimiento debe ser realizado por personal calificado.
No intente reparar defectos por su cuenta. Use solo piezas de repuesto
idénticas.El uso de otras piezas puede representar un peligro o dañar el
producto.

Correo electrónico postventa: [email protected]
- Keenstone Herramienta Eléctrica -
24 | Español
CUANDO ALGO NO FUNCIONA
PELIGRO! ¡Riesgo de lesiones! Reparaciones mal realizadas pueden hacer que
el dispositivo no sea seguro.Esto puede poner en peligro su seguridad y la del
entorno.
SOLUCIÓN DE PROBLEMAS
Problema
El quitanieve
no arranca
Bajo rendimiento
Vibraciones
anormales
El motor está encendido
pero el sinfín no gira
La pala quitanieves
deja una fina capa
de nieve
Batería mal insertada
Batería descargada
Botón de seguridad
no presionado
Batería demasiado fría
Correa de transmisión
desgastada o dañada
Póngase en contacto con el centro
de servicio para su sustitución.
Póngase en contacto con el centro
de servicio para su sustitución.
Apague la pala de nieve, retire la
batería y limpie la descarga.
Sinfín desgastado
o dañado
Descarga bloqueada
Correa de transmisión
desgastada o dañada
Sinfín desgastado o
dañado
Rascador desgastado
Póngase en contacto con el centro
de servicio para su sustitución.
Póngase en contacto con el centro
de servicio para su sustitución.
Sustituya el rascador.
Rascador desgastado Sustituya el rascador.
Correa de transmisión
dañada
Póngase en contacto con el centro
de servicio para su sustitución.
Verifique que esté
completamente insertada
Cargue la batería.
Presione el botón de seguridad y
luego accione el interruptor
Retire la batería de la pala quitanieves.
Coloque la batería en el cargador y
déjela cargar durante 10 minutos.
Retírela del cargador e instálela en
la pala quitanieves para su uso.
Causa posible Solución sugerida

Please use your mobile phone to
scan the QR code to watch the
product installation video.
MADE IN CHINA
