
FDS
AMPLIFIERS
Manuel d’utilisation / User Manual / 使用手册
Français : page 3
English : page 21
中文:第39页


Nous vous remercions d’avoir choisi Focal et de partager avec nous notre passion du son, de la
musique, révélés avec précision et pureté : “Listen Beyond”. Ces haut-parleurs de haute technicité
intègrent les perfectionnements Focal en matière de conception de haut-parleurs pour l’obtention
d’un son puissant et de très haute qualité. Afin de tirer le meilleur de votre système et d’exploiter
toutes ses performances, nous vous conseillons de lire ce livret, puis de le conserver avec précaution
pour pouvoir vous y référer ultérieurement. Tout problème dû au non-respect des règles d’utilisation
peut entraîner l’invalidation de la garantie. Pour un résultat optimal, nous vous recommandons de
faire eectuer l’installation par un professionnel.
ATTENTION
Ce symbole désigne des instructions importantes. Le non-respect de ces instructions peut
entraîner des blessures ou des dommages matériels.
Contenu
- 1 amplificateur FDS 4.350 ou FDS 2.350 ou FDS 1.350
- 1 manuel d’utilisation
- 1 set d’accessoires
AMPLIFICATEURS FDS
Manuel d'utilisation
Pour validation de la garantie Focal-JMlab,
il est maintenant possible d’enregistrer son produit en ligne : www.focal.com/garantie
Français

4
AMPLIFICATEURS FDS
Manuel d'utilisation
AVERTISSEMENT
• N’activer aucune fonction susceptible de détourner votre attention lors de la conduite du véhicule.
Les fonctions ou réglages requérant une attention prolongée, ne doivent être exploitées qu’à l’arrêt
complet du véhicule. Veiller à toujours stopper le véhicule dans un endroit sûr avant d’activer ces
fonctions. Il y a risque de provoquer un accident.
• Garder le volume à faible niveau de façon à pouvoir entendre les bruits extérieurs durant la période
de conduite du véhicule. Il y a risque de provoquer un accident.
• Ne pas ouvrir votre amplificateur FDS, ni opérer de modifications sur le produit. Il y a risque
d’accident, d’incendie ou de choc électrique.
• Utiliser votre amplificateur FDS sur des applications mobiles de 12 volts uniquement. Toute
utilisation autre que l’application désignée comporte un risque d’incendie, de choc électrique ou de
blessure.
• Utiliser des fusibles d’ampérage approprié. Il y a risque d’incendie ou de décharge électrique.
• Ne pas obstruer le radiateur de votre amplificateur FDS. Une surchauffe interne peut se produire et
provoquer un incendie.
• Effectuer correctement les connexions. Vérifier la section du câble et le type de câble. Il y a risque
d’incendie, de blessures et/ou d’endommagement de l’appareil.
• Ne pas utiliser d’écrous ni de boulons du circuit de direction ou de freinage, de réservoir, de
ceintures ou autres éléments de sécurité pour la connexion de la masse. L’utilisation de ces organes
comme masse peut désactiver le système de contrôle du véhicule et causer un incendie ou autre
avarie.
• Garder les petits objets susceptibles d’être ingérés, comme les boulons, accessoires ou les vis,
hors de portée des enfants. L’ingestion de tels objets peut entrainer de graves blessures. En cas
d’ingestion, consulter un médecin.
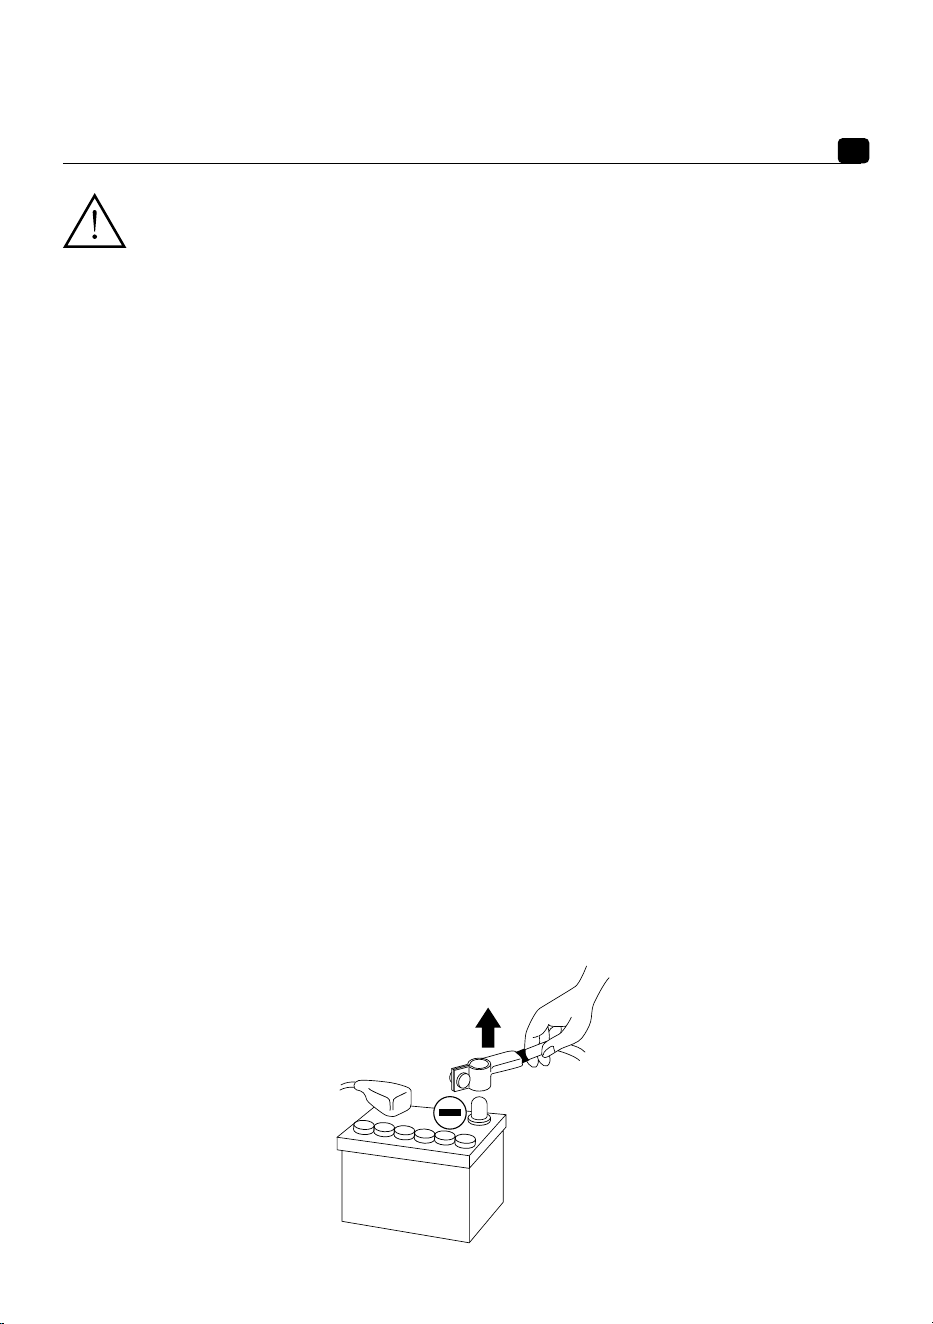
• Avant d’entamer l’installation, déconnecter la borne négative de la batterie pour éviter tout risque
de blessure, d’incendie ou d’endommagement du matériel. (fig. 1)
fig. 1

5
AMPLIFICATEURS FDS
Manuel d'utilisation
ATTENTION
L’écoute prolongée à fort niveau, au-delà de 110 dB, peut détériorer durablement l’audition. Des
écoutes, même brèves, au-delà de 130 dB, peuvent provoquer des lésions auditives irrémédiables.
Interrompre toute utilisation en cas de problème. Le non-respect de cette précaution peut entrainer
des blessures ou endommager l’appareil. Si un dysfonctionnement persiste, retourner l’appareil auprès
de votre revendeur Focal en vue de sa réparation.
Utiliser les accessoires spécifiés et les installer correctement. Utiliser uniquement les accessoires
spécifiés dans le manuel d’utilisation, ainsi que ceux qui sont fournis dans l’emballage. L’utilisation
d’autres composants peut causer des dommages internes au produit, ou son installation risque de ne
pas être effectuée correctement. Les pièces utilisées risquent de se desserrer et de provoquer des
dommages ou une défaillance technique du produit. Il y a risque d’accident, d’incendie ou de choc
électrique.
Ne pas installer dans des zones fortement humides ou poussiéreuses. Eviter d’installer l’appareil dans
des zones du véhicule soumises à une forte humidité ou à une présence excessive de poussière. La
pénétration d’humidité ou de poussière à l’intérieur du produit risque de provoquer une défaillance.

6
AMPLIFICATEURS FDS
Manuel d'utilisation
Installation de votre amplificateur FDS
L’installation de ce produit requiert des compétences techniques et de l’expérience. En cas
d’incertitude sur l’aptitude à installer l’amplificateur, confier cette tâche à un revendeur Focal afin
de profiter pleinement de l’ensemble des possibilités de votre amplificateur FDS.
Câblage de votre amplificateur FDS
Utiliser uniquement les câbles préconisés dans le manuel d’utilisation et les accessoires fournis. Le
câble haut-parleur doit être utilisé UNIQUEMENT pour relier l’amplificateur aux haut-parleurs. La
section des câbles d’alimentation doit correspondre à celle mentionnée dans le tableau (paragraphe
3.1) et est fonction de la puissance de l’amplificateur et de la longueur de câble nécessaire. Utiliser des
câbles RCA à double ou triple blindage pour éviter tout parasitage du signal bas niveau.
Durée de fonctionnement de votre amplificateur FDS
Eviter de faire fonctionner l’amplificateur durant une longue période sans démarrer le véhicule. Ceci
peut entrainer la décharge prématurée de la batterie.
Ventilation
Il est impératif de ne pas couvrir la zone supérieure de votre amplificateur FDS afin de ne pas créer
de surchauffe.
Matériel requis pour effectuer l’installation (en dehors des accessoires fournis) :
• 2 gaines de section adéquates (1 gaine pour le câble d’alimentation, 1 gaine pour le lot de câbles haut-
parleurs, REMOTE, modulation RCA)
• Multimètre (voltage/ampérage)
• Fer à souder + étain
• Pince à sertir
• Pince à dénuder
• Coupe-fils
• Clé de borne de batterie
• Perceuse à main et mèches assorties
• Gaines thermo-rétractables de diamètres appropriés aux différents câbles
• Câble d’alimentation de longueur et de section adéquates
• Câble d’allumage à distance (entrée REM de l’amplificateur) de longueur et de section adéquates
• Câble de masse de longueur et de section adéquates
• Porte fusible et fusible adéquat
• Cosse de liaison à la borne positive (+) de la batterie
• Cosse de liaison au châssis du véhicule (-)
• Vis avec tête de vis de 6 mm au minimum et son écrou pour mise à la masse sur le châssis du véhicule
Installation :
La section ci-dessous traite de points relatifs au véhicule dont il faut tenir compte pour l’installation
de votre amplificateur. Vous gagnerez du temps en planifiant à l’avance la disposition du système et
du câblage.
Assurez-vous, durant cette étape préparatoire, que l’ensemble des réglages resteront accessibles une
fois l’installation terminée.

7
AMPLIFICATEURS FDS
Manuel d'utilisation
Avant de commencer l’installation, merci de suivre scrupuleusement les règles suivantes :
1 - Après lecture intégrale du manuel d’utilisation, s’assurer d’avoir compris l’ensemble des instructions
avant d’installer votre amplificateur.
2 - Débrancher le fil négatif de la batterie avant de commencer l’installation (fig.1)
3 - Pour faciliter le montage, nous suggérons de dérouler tous les fils avant d’installer votre amplificateur.
4 - Acheminer l’ensemble des câbles RCA, haut-parleur et REM à l’ écart des câbles d’alimentation afin
d’éviter tout parasitage du signal.
5 - Utiliser des connecteurs de qualité et les fourches sur le bornier de l’amplificateur afin d’assurer une
fiabilité d’installation et minimiser les pertes de signal ou de puissance.
6 – Vérifier avant de réaliser quelque opération de ne pas couper ou percer le réservoir d’essence, les
conduites de carburant, de frein, hydrauliques ou de dépression, ainsi que le câblage électrique ou
tout élément sécuritaire.
7 - Ne jamais faire passer de fil sous le véhicule. Il faut impérativement les installer à l’intérieur de celui-
ci. Lors du passage des câbles, vérifier que ceux-ci ne gêneront pas la conduite du véhicule. Les
câbles qui obstruent ou dépassent à des endroits tels que le volant, les pédales (frein, accélérateur
et embrayage, etc…), peuvent s’avérer extrêmement dangereux.
8 - Eviter de faire passer des fils par-dessus ou à travers des bords tranchants. Tout fil acheminé à
travers du métal doit être protégé par des passe-fils. Faire cheminer les câbles à l’ écart des pièces
mobiles (rails d’un siège, …) et des arêtes acérées ou pointues. Cela évitera ainsi de coincer ou
d’endommager les câbles et d’engendrer un court-circuit électrique.
9 - Toujours protéger la batterie et le circuit électrique de dommages potentiels à l’aide de fusibles.
Installer un porte-fusible et un fusible appropriés sur le câble d’alimentation 12 V positif (+) à moins
de 40 cm de la borne de la batterie. Idéalement, cette distance doit être la plus courte possible
(fig.5).
10 - Préparer la masse du châssis en grattant toute trace de peinture sur la surface métallique, afin
d’assurer une bonne mise à la masse. Les connexions de masse doivent être aussi courtes que
possible et TOUJOURS connectées à du métal soudé à la carrosserie ou au châssis du véhicule (fig.
2). Le point de masse généralement retenu est celui assurant la liaison entre la borne négative de
la batterie et le châssis du véhicule.
11 - NE JAMAIS monter ce produit dans le compartiment moteur du véhicule. Ceci entrainerait
l’annulation de la garantie.
1 - Mise en place de votre amplificateur FDS
Où installer votre amplificateur FDS ?
En raison de la puissance de l’amplificateur, une dissipation thermique est nécessaire au fonctionnement.
Pour cette raison, l’amplificateur doit être monté dans un endroit permettant une ventilation, tout
spécialement sur le dessus. Eviter tout encastrement ou recouvrement de l’amplificateur dans sa zone
d’installation.
2 - Fixation de votre amplificateur FDS
Positionner votre amplificateur à l’emplacement souhaité et le repérer.
Repérer les points de fixation dans votre support en retirant les capots à chaque extrémité.
Utiliser les vis de fixation fournies (adaptées à un vissage dans un support bois).
3 – Câblage de votre amplificateur FDS
AVERTISSEMENT
En cas de doute sur l’aptitude à installer l’amplificateur et câbler le système de façon
adéquate, confier cette tâche à un revendeur/installateur Focal.
8
AMPLIFICATEURS FDS
Manuel d'utilisation
ATTENTION
Eviter de faire passer les câbles d’alimentation près des câbles d’entrée bas niveau (LOW
LEVEL INPUTS), de l’antenne, des équipements et faisceaux sensibles. Les fils d’alimentation
transportent un courant élevé pouvant produire un parasitage du signal audio.
ATTENTION
Réduire le plus possible la longueur des câbles afin d’optimiser la qualité de l’installation et
ainsi limiter les pertes de signal.
ATTENTION
Avant de débuter la phase de connexion, s’assurer de retirer la borne négative (-) de la
batterie du véhicule (fig. 1).
3.1 - Quelle section de câble d’alimentation choisir ?
Votre amplificateur FDS nécessite une alimentation d’ampérage approprié.
Les sections des câbles d’alimentation à utiliser dépendent de la distance de câblage à la batterie, ils
sont préconisés dans le tableau suivant :
Longueur du câble en mètres jusqu’à la batterie
Longueur < 3 m < 4 m < 5 m < 6 m < 7 m
Section mm
2
>4 mm
2
> 5 mm
2
> 5 mm
2
> 5 mm
2
> 5 mm
2
Section AWG < 11 AWG < 10 AWG < 10 AWG < 10 AWG < 10 AWG
Le respect de ces règles de câblage est indispensable à l’aspect sécuritaire de votre installation
électrique, il est également important pour maintenir les performances maximales de votre amplificateur
FDS.
3.2 – Câblage des signaux d’entrée et sortie sur votre amplificateur FDS
Faire cheminer ensemble les câbles de modulation (RCA), les câbles haut-parleurs, le câble REM en les
isolant des autres accessoires automobiles de forte puissance, particulièrement les moteurs électriques
(essuie-glace, ...). Conserver toute la longueur des câbles, elle sera ajustée plus tard.
3.3 – Câblage de l’alimentation de votre amplificateur FDS
3.3.1 – Faire cheminer le câble d’alimentation positif (+) en prenant soin de le faire passer à l’opposé
des câbles précédemment tirés pour éviter tout parasitage. NE PAS CONNECTER LE CABLE
POUR L’INSTANT.
9
AMPLIFICATEURS FDS
Manuel d'utilisation
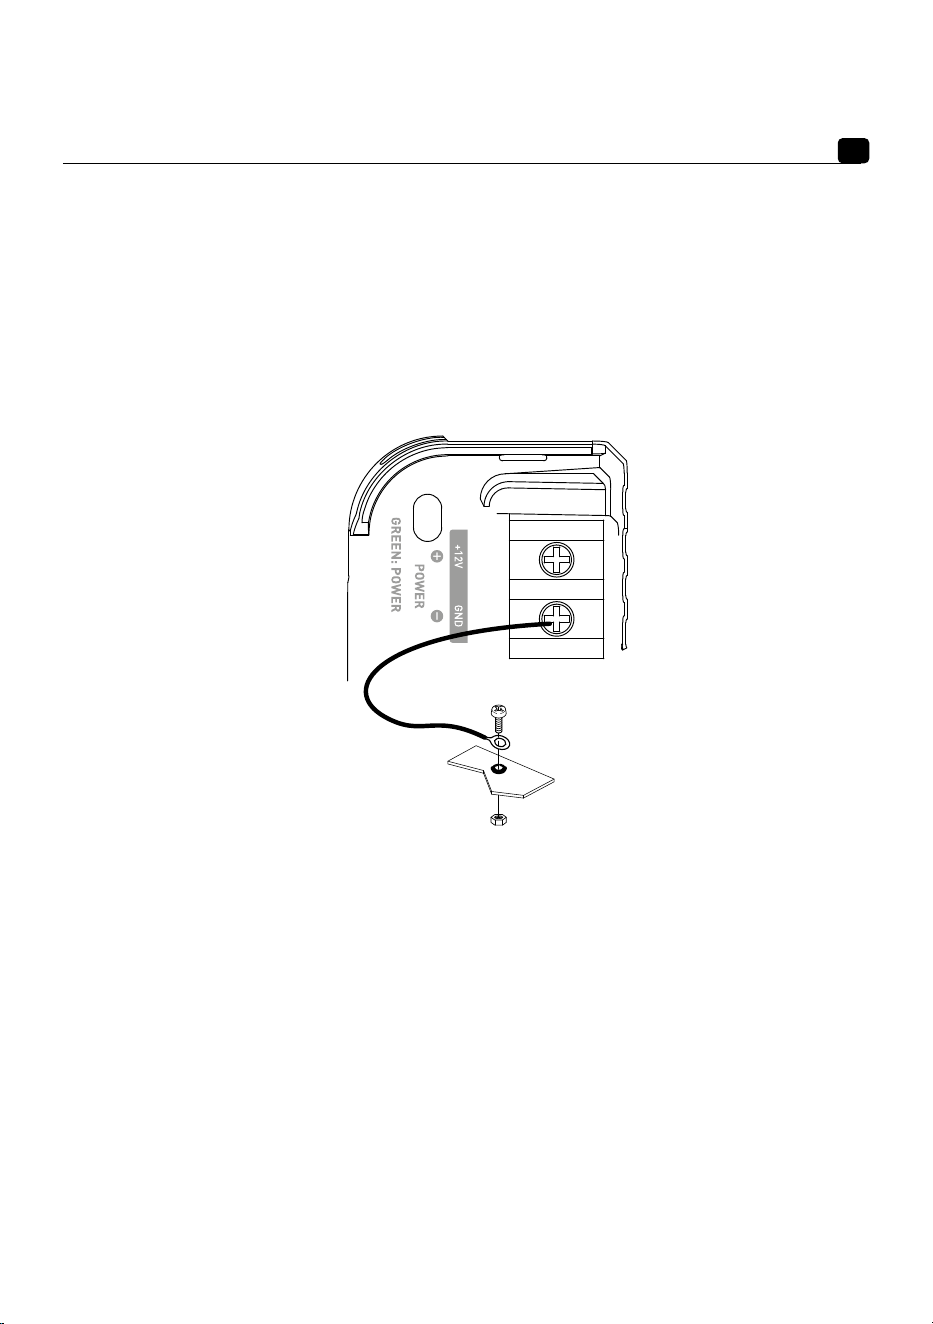
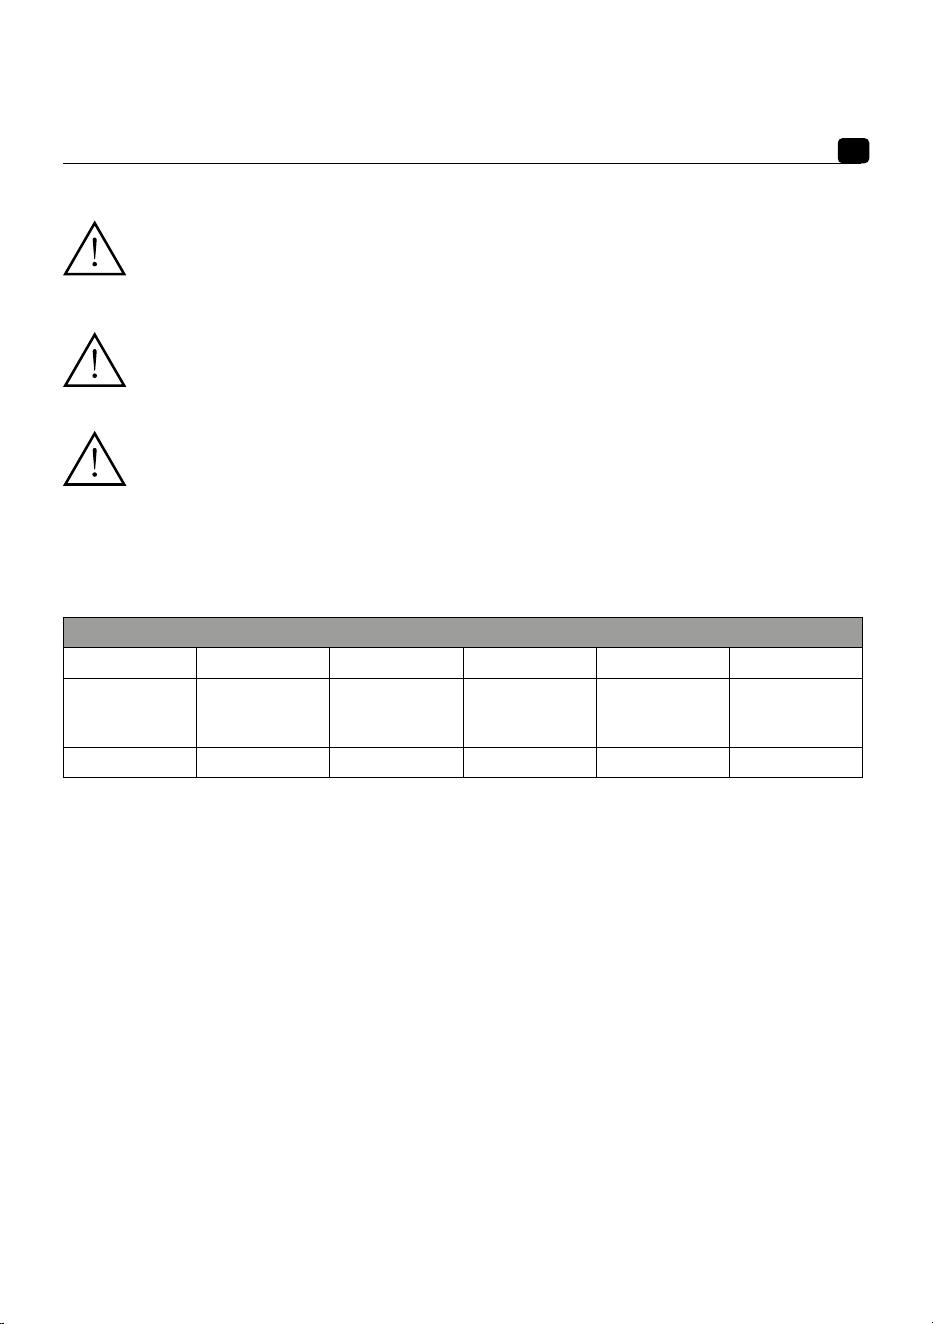
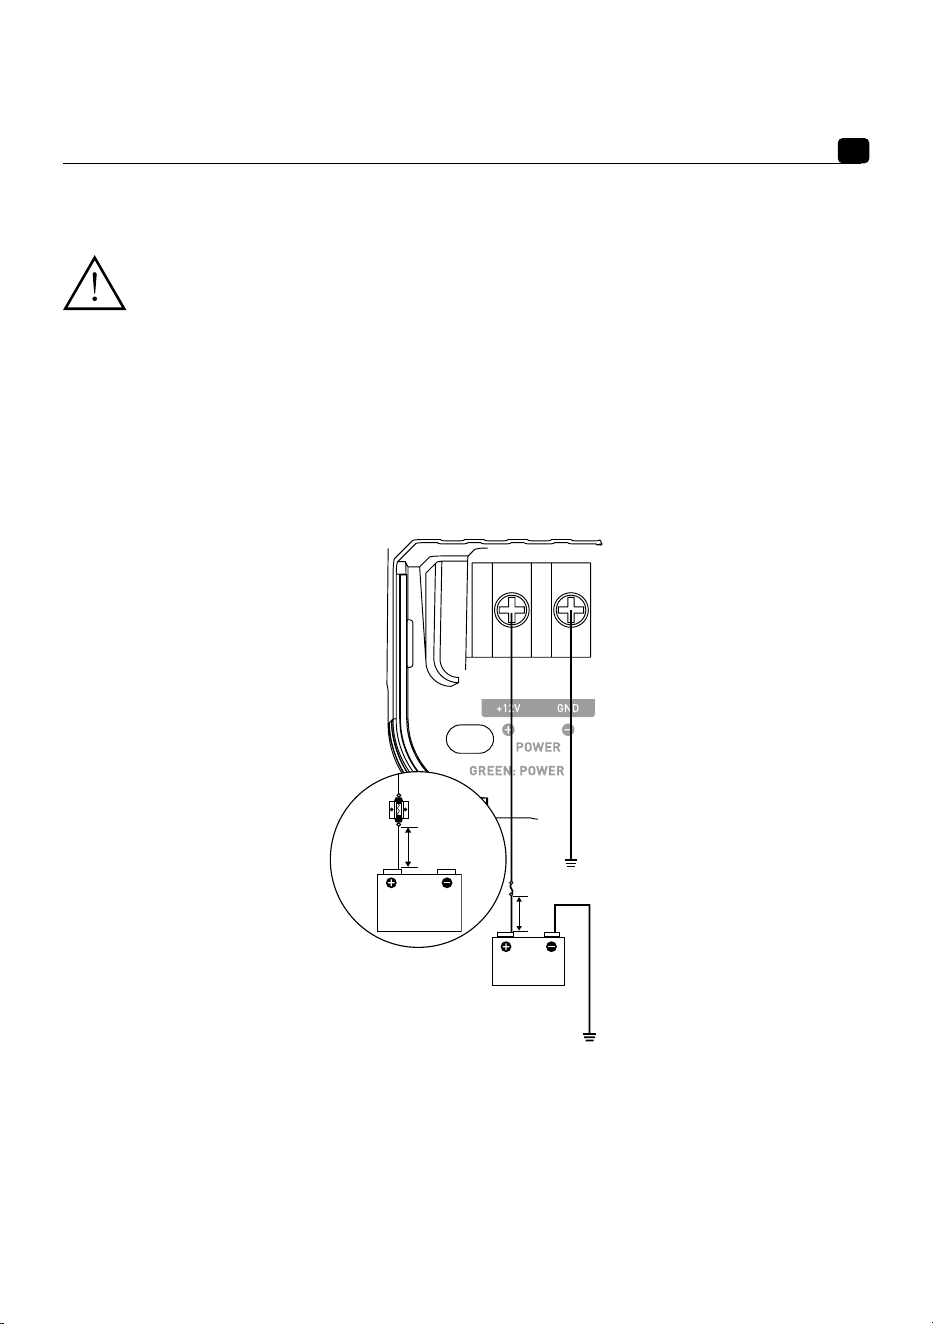
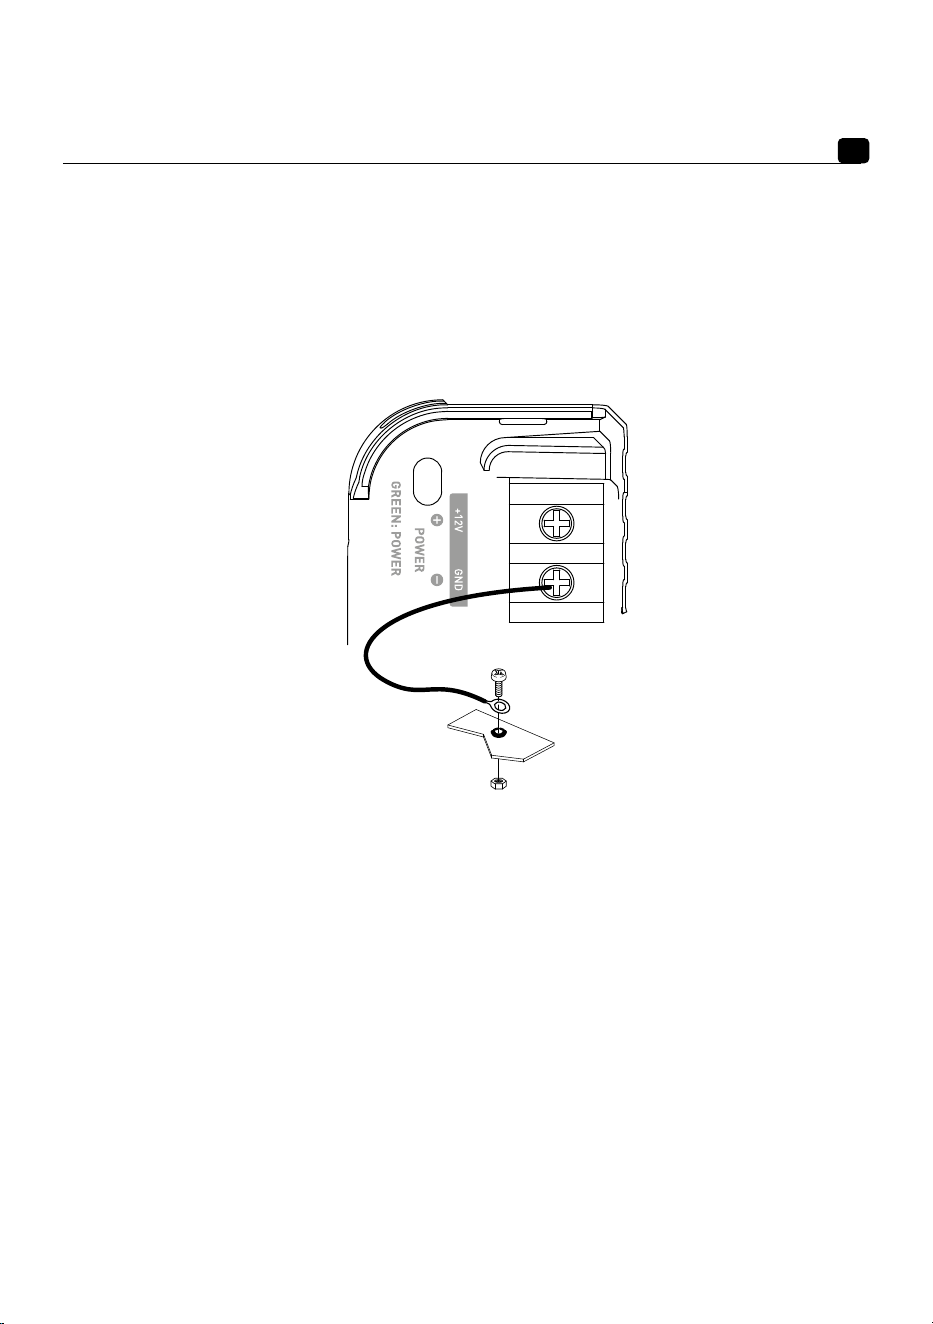
3.3.2 – Se munir du câble d’alimentation négatif (-). Ce câble doit être le plus court possible et ne doit
idéalement pas dépasser 1 mètre, afin d’assurer une parfaite liaison entre l’amplificateur et le châssis
du véhicule. Le câble et sa section doivent être conformes au tableau en 3.1. Trouver un point de masse
adéquat, puis le poncer pour enlever toute trace de peinture ou autre vernis et ainsi optimiser la qualité
du contact. Percer la tôle préalablement poncée au diamètre correspondant à la vis choisie en s’assu-
rant qu’aucun passage de câbles réservoir ou autre organe sensible du véhicule ne soit à proximité.
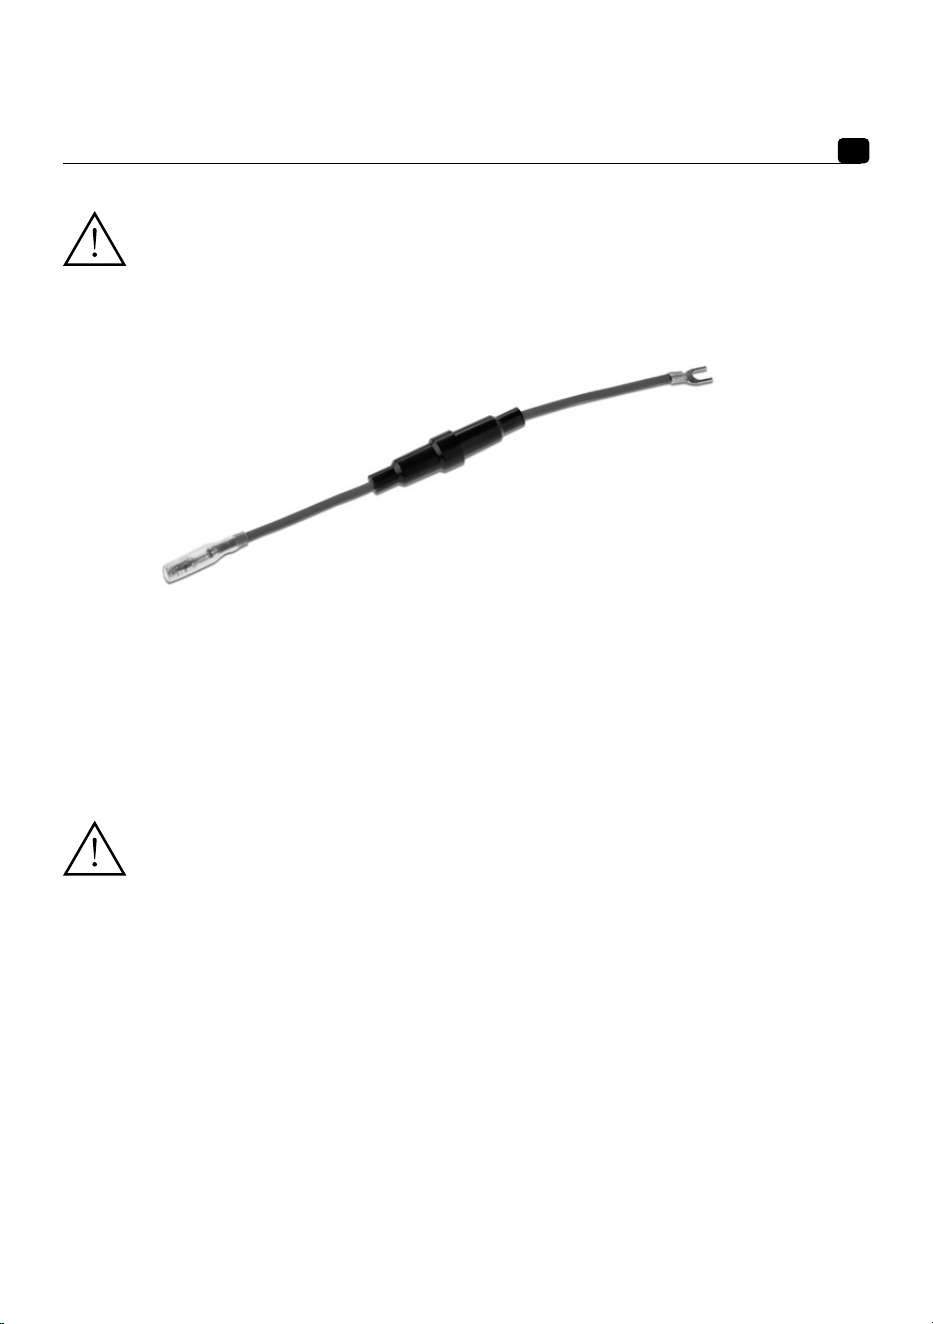
Sertir la cosse noire fournie sur l’extrémité du câble. Visser fermement la cosse sur la borne GND de
votre amplificateur FDS (fig. 2). Etamer l’autre extrémité puis sertir ou souder sur la cosse prévue à cet
eet. Insérer la cosse dans la vis, puis mettre la vis et son écrou en place et visser fermement. (fig. 2)
3.4 – Connexion des signaux d’entrée sur votre amplificateur FDS
La phase de connexion des câbles d’entrée/sortie peut débuter.
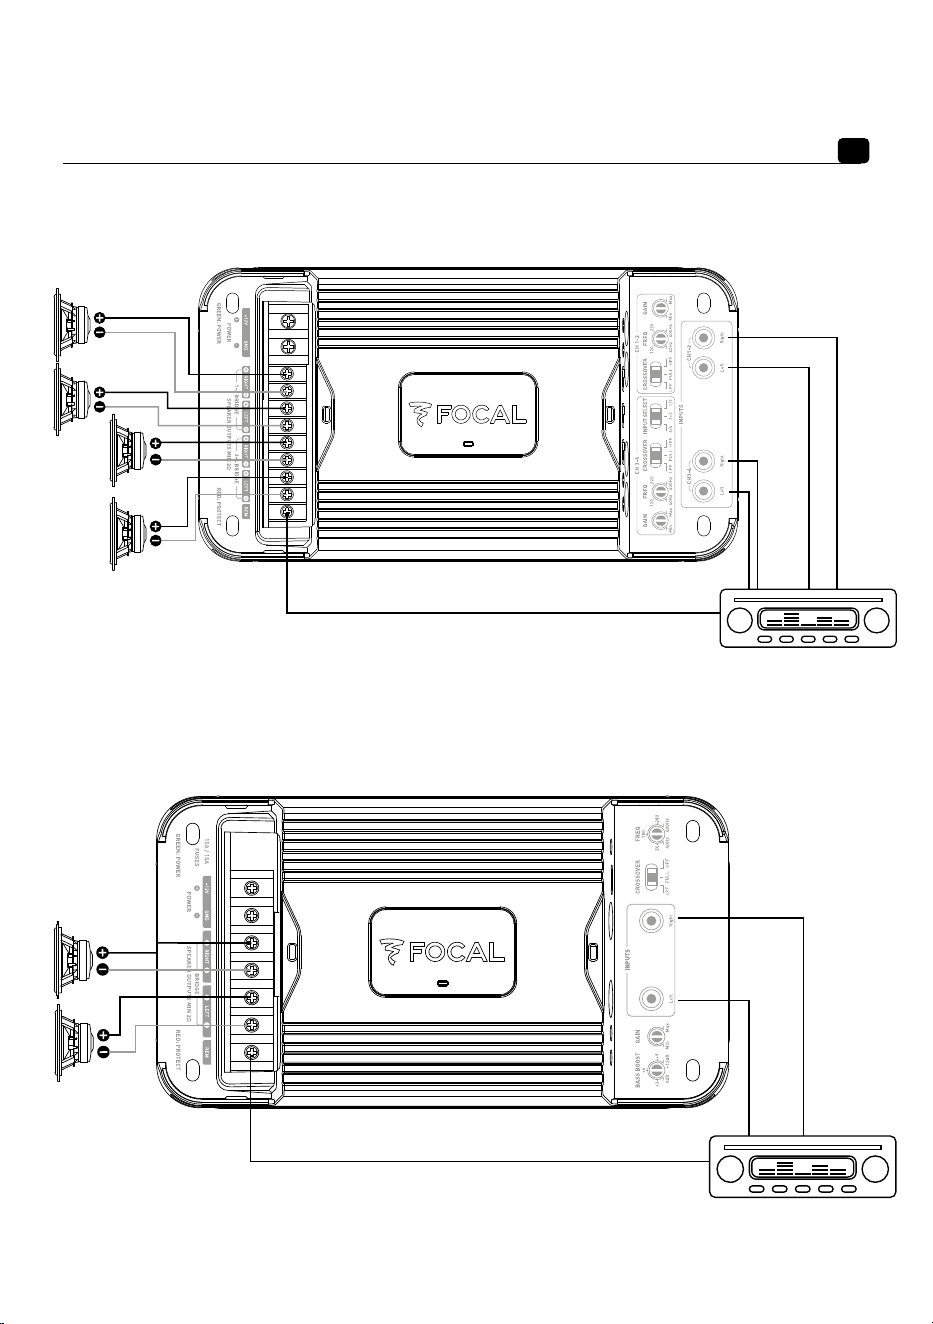
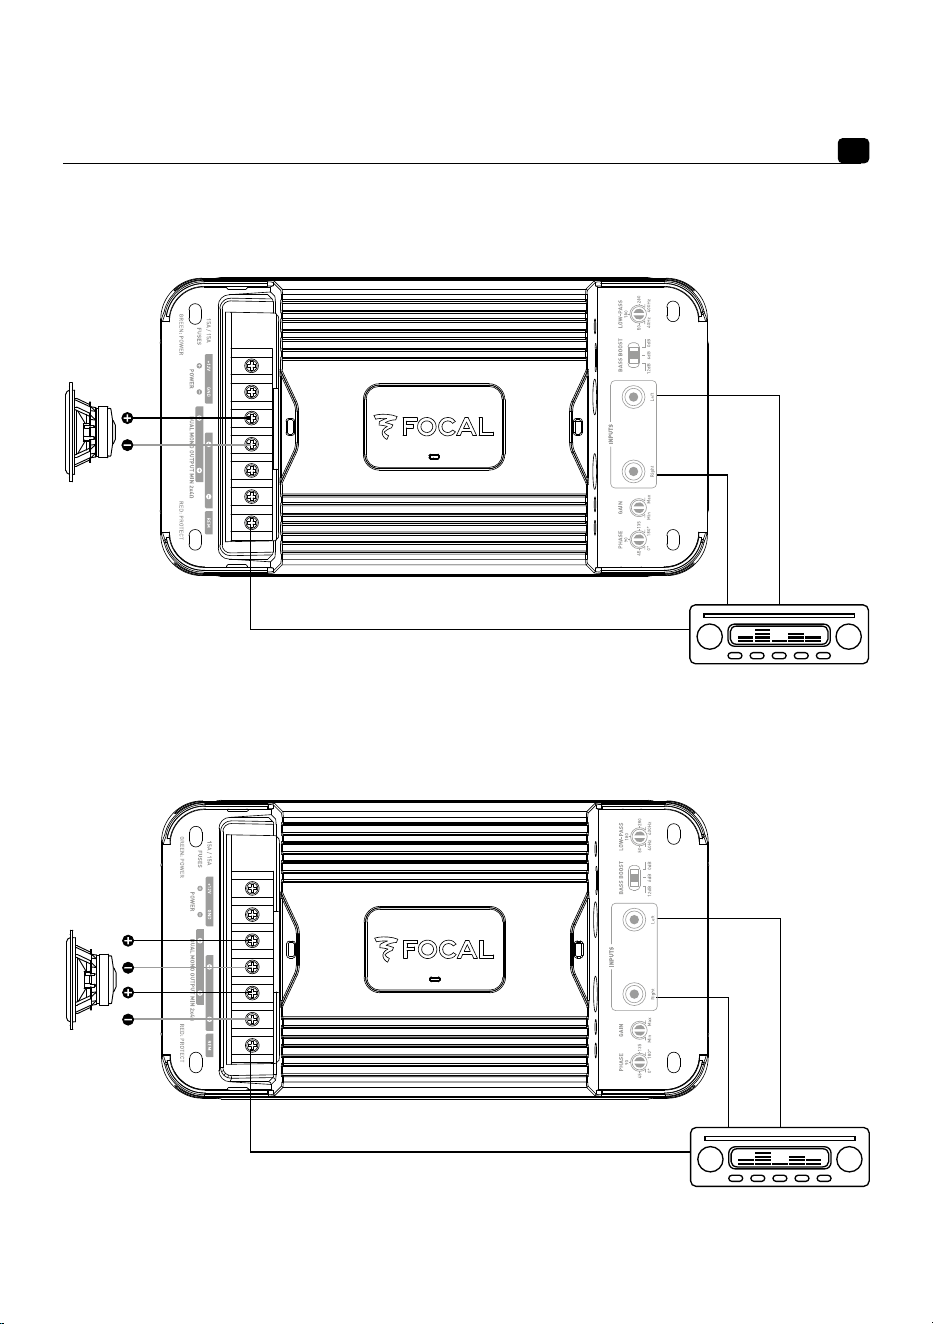
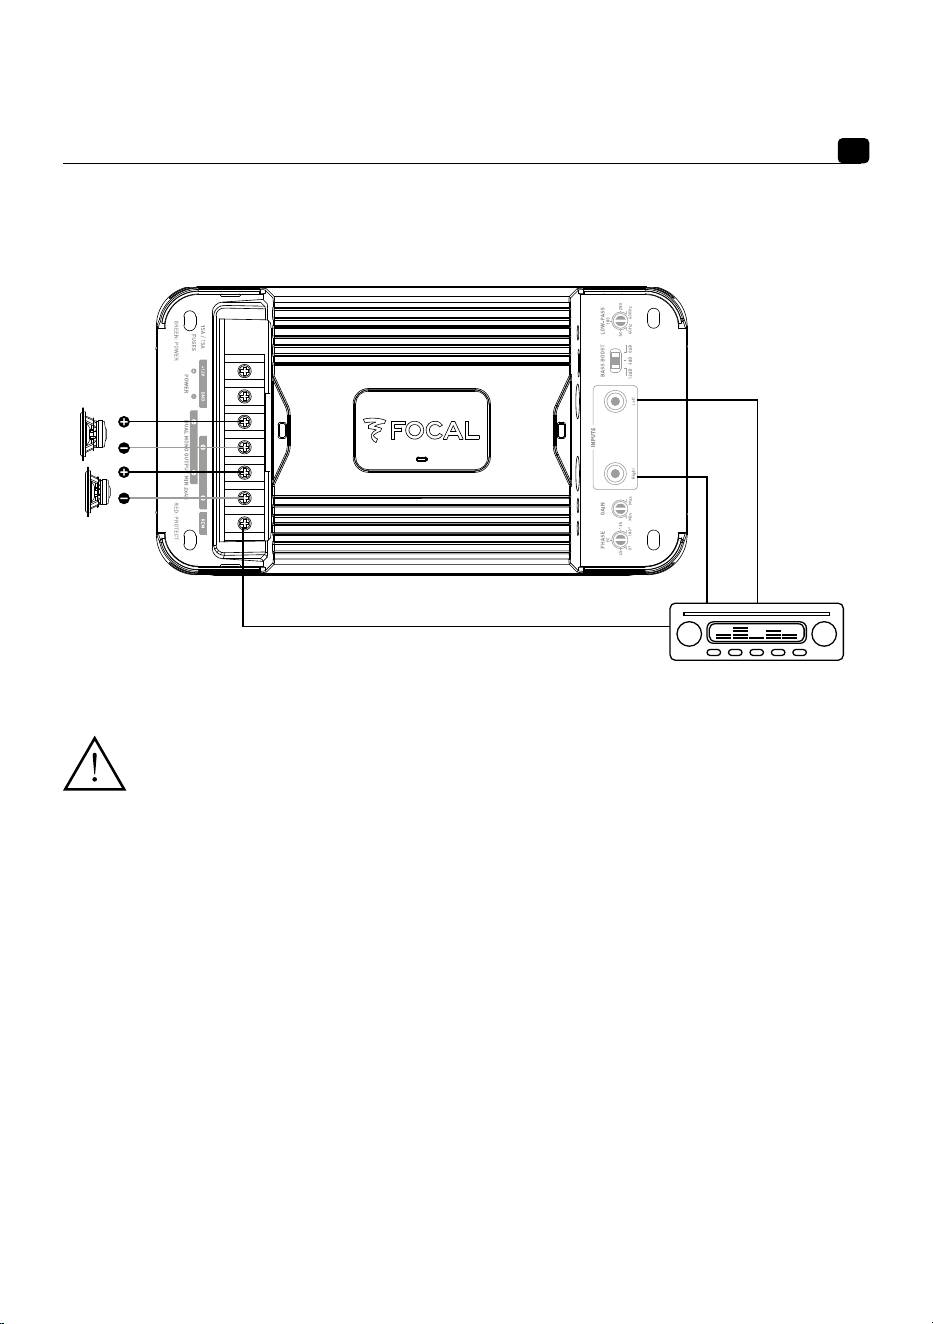
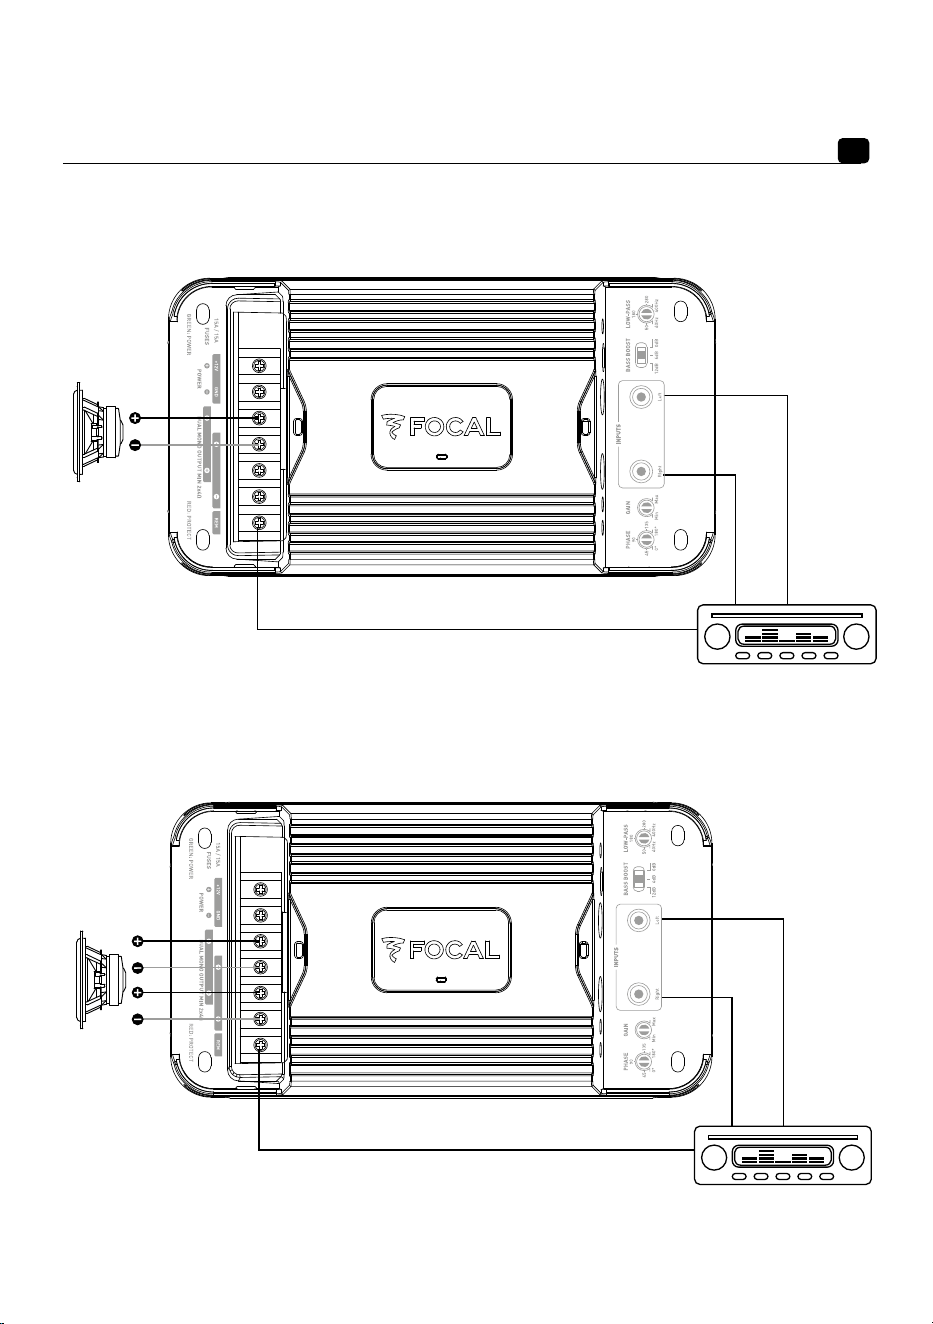
3.4.1 – Votre autoradio est équipé de sorties RCA. (fig. 3)
Connecter les RCA à l’amplificateur en respectant les polarités (INPUT Left = noir ou blanc, INPUT
Right = rouge). Connecter l’autre extrémité des RCA aux sorties RCA de l’autoradio (Left = gauche ;
Right = droite) disponibles.
Connecter ensuite le câble REMOTE à l’amplificateur (borne REM) en vissant fermement.
Connecter l’autre extrémité du câble REMOTE à la borne REMOTE de l’autoradio.
Enfin, connecter les câbles haut-parleurs à l’amplificateur en respectant les polarités (+ sur + ; - sur -)
en utilisant les fourches d’adaptation rouges et noires fournies.
fig. 2
10
AMPLIFICATEURS FDS
Manuel d'utilisation
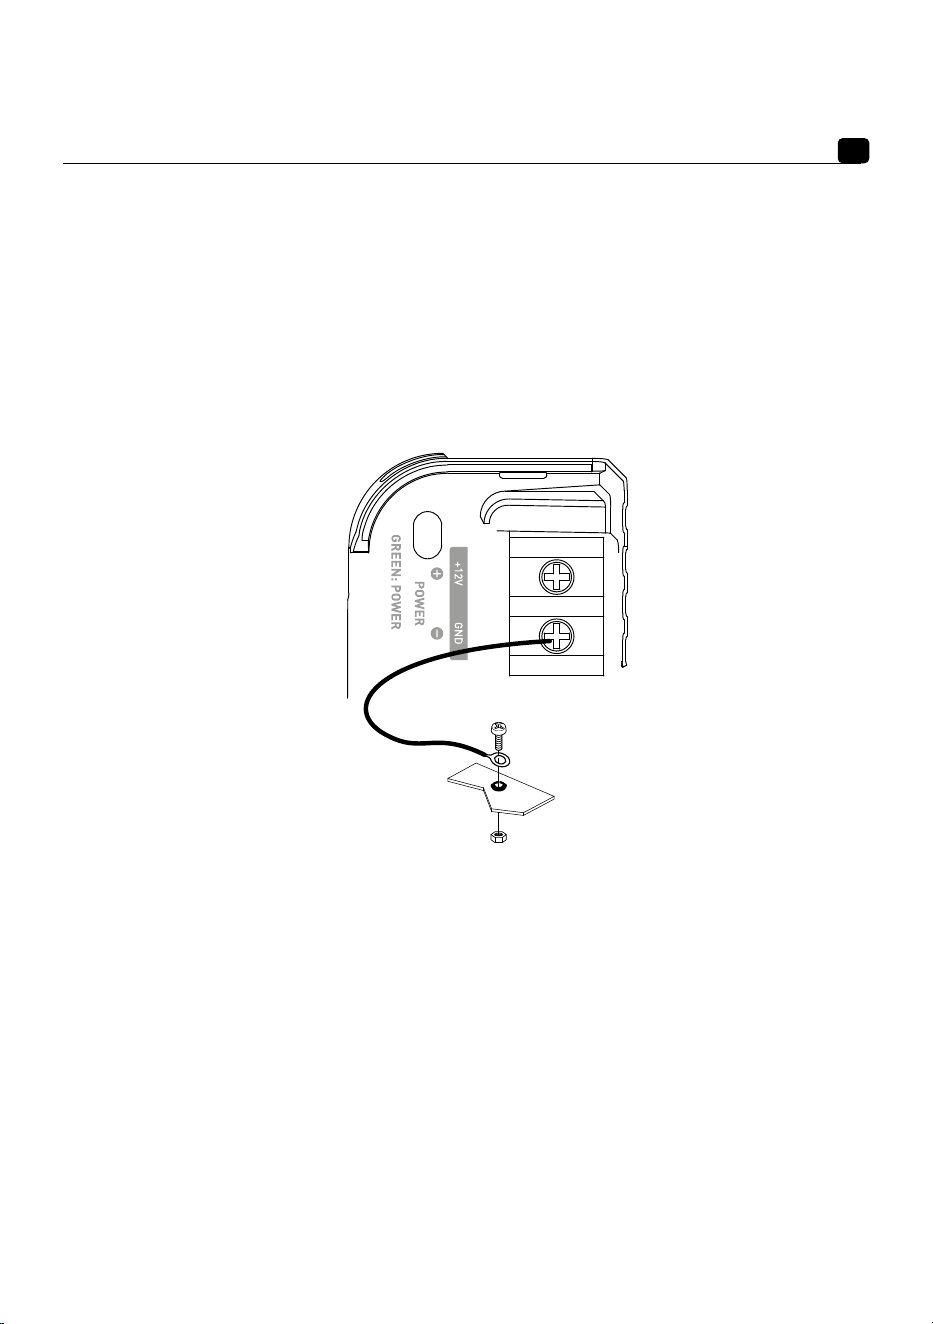
HP 1
HP 2
HP 3
HP 4
Télécommande
RCA 1/2
RCA 3/4
HP 1
HP 2
Télécommande
RCA 1/2
fig. 3.1 - FDS 4.350
fig. 3.2 - FDS 2.350
11
AMPLIFICATEURS FDS
Manuel d'utilisation
Minimum 2 Ώ
Bobine 1 -
Minimum 4 Ώ
Bobine 2 -
Minimum 4 Ώ
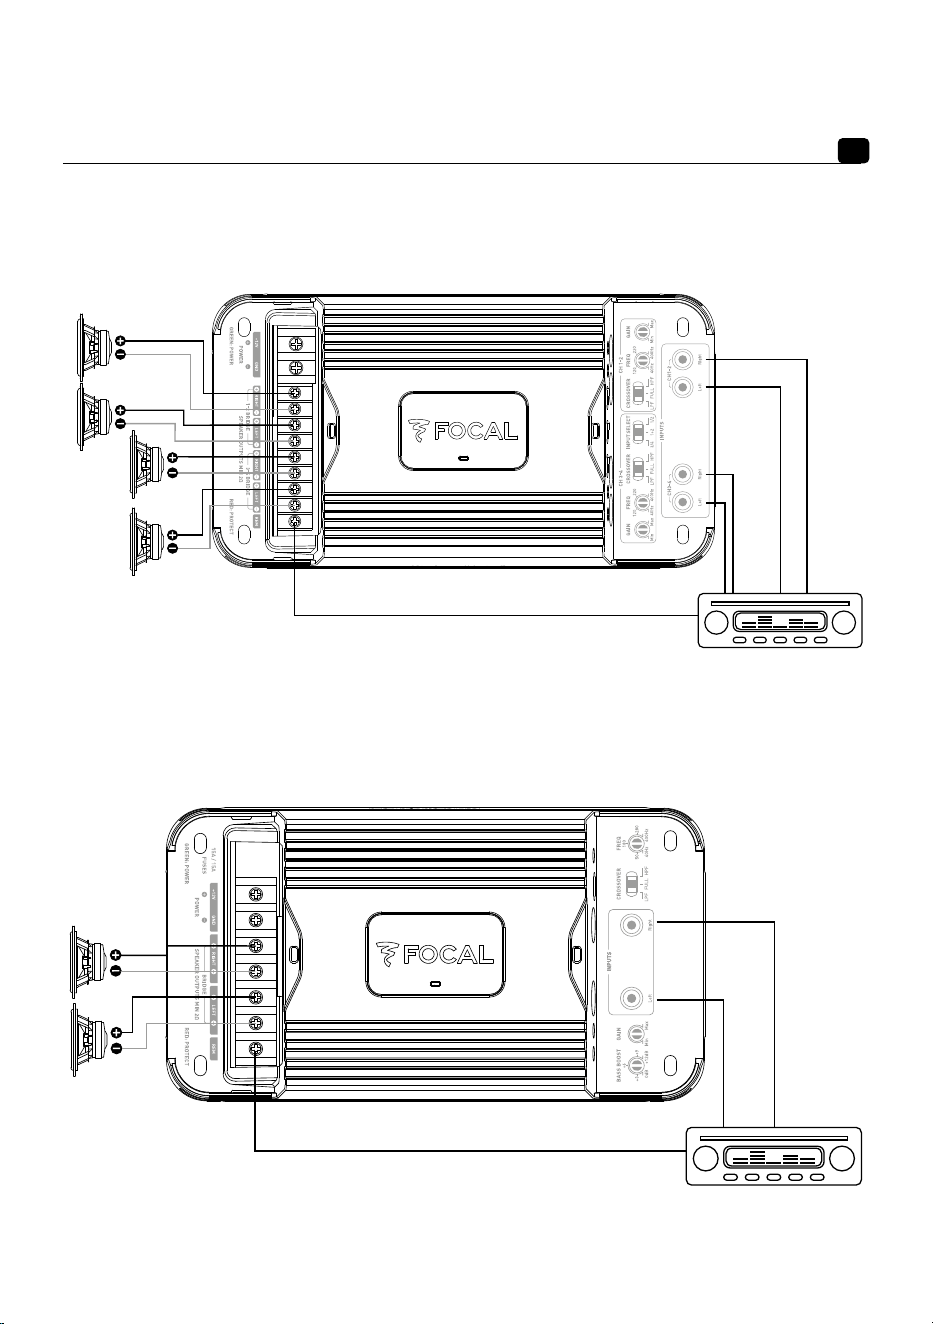
Remote
Télécommande
RCA 1/2
RCA 1/2
fig. 3.3 bis - FDS 1.350, connexion double bobine
fig. 3.3 - FDS 1.350, connexion simple bobine
Haut-parleur simple bobine
Haut-parleur double bobine
12
AMPLIFICATEURS FDS
Manuel d'utilisation
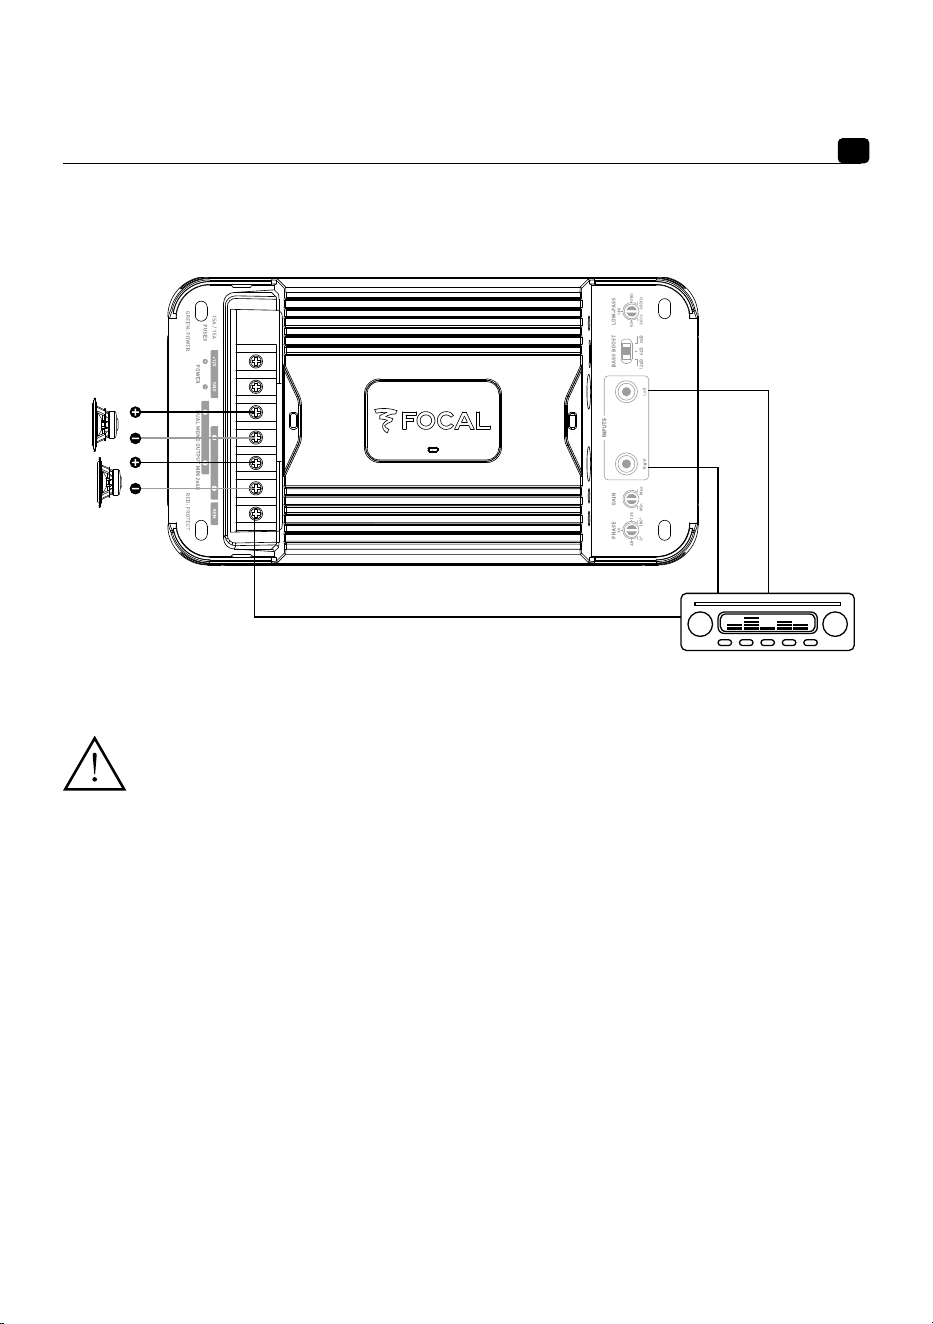
ATTENTION
Les haut-parleurs ou kits de haut-parleurs câblés sur votre amplificateur FDS doivent systématique-
ment présenter une impédance supérieure à 2 ohms.
En mode bridgé (FDS4.350 et FDS2.350) ou double sortie (pour FDS1.350), les haut-parleurs ou kits
de haut-parleurs câblés sur votre amplificateur FDS doivent systématiquement présenter une impé-
dance supérieure à 4 ohms.
Toute utilisation à des impédances inférieures entrainerait une annulation de garantie.
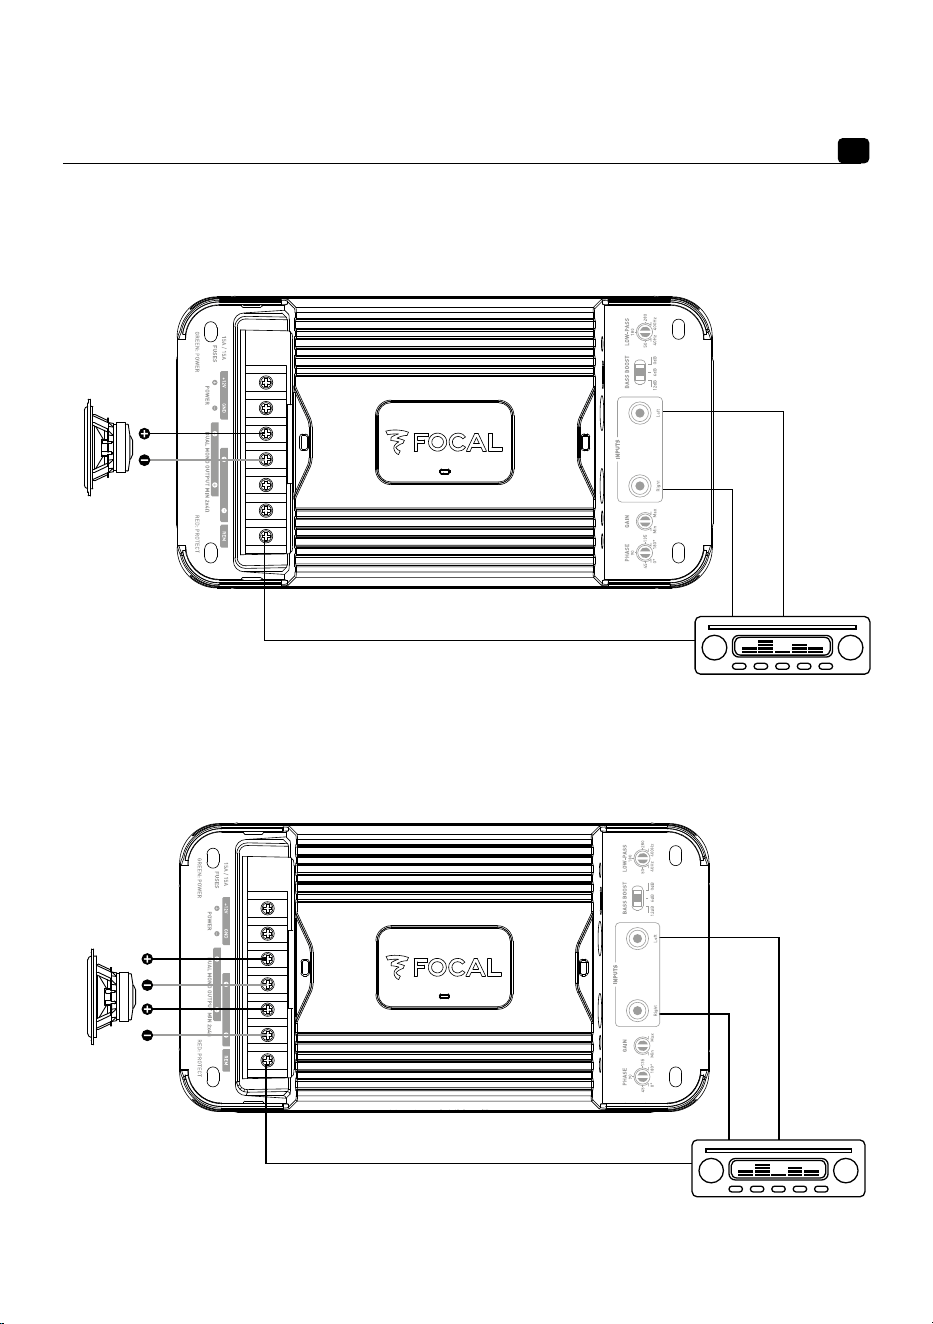
HP 1 -
Minimum 4 Ώ
HP 2 -
Minimum 4 Ώ
Télécommande
RCA 1/2
fig. 3.3 ter - FDS 1.350, connexion double haut-parleurs
Double haut-parleur

13
AMPLIFICATEURS FDS
Manuel d'utilisation
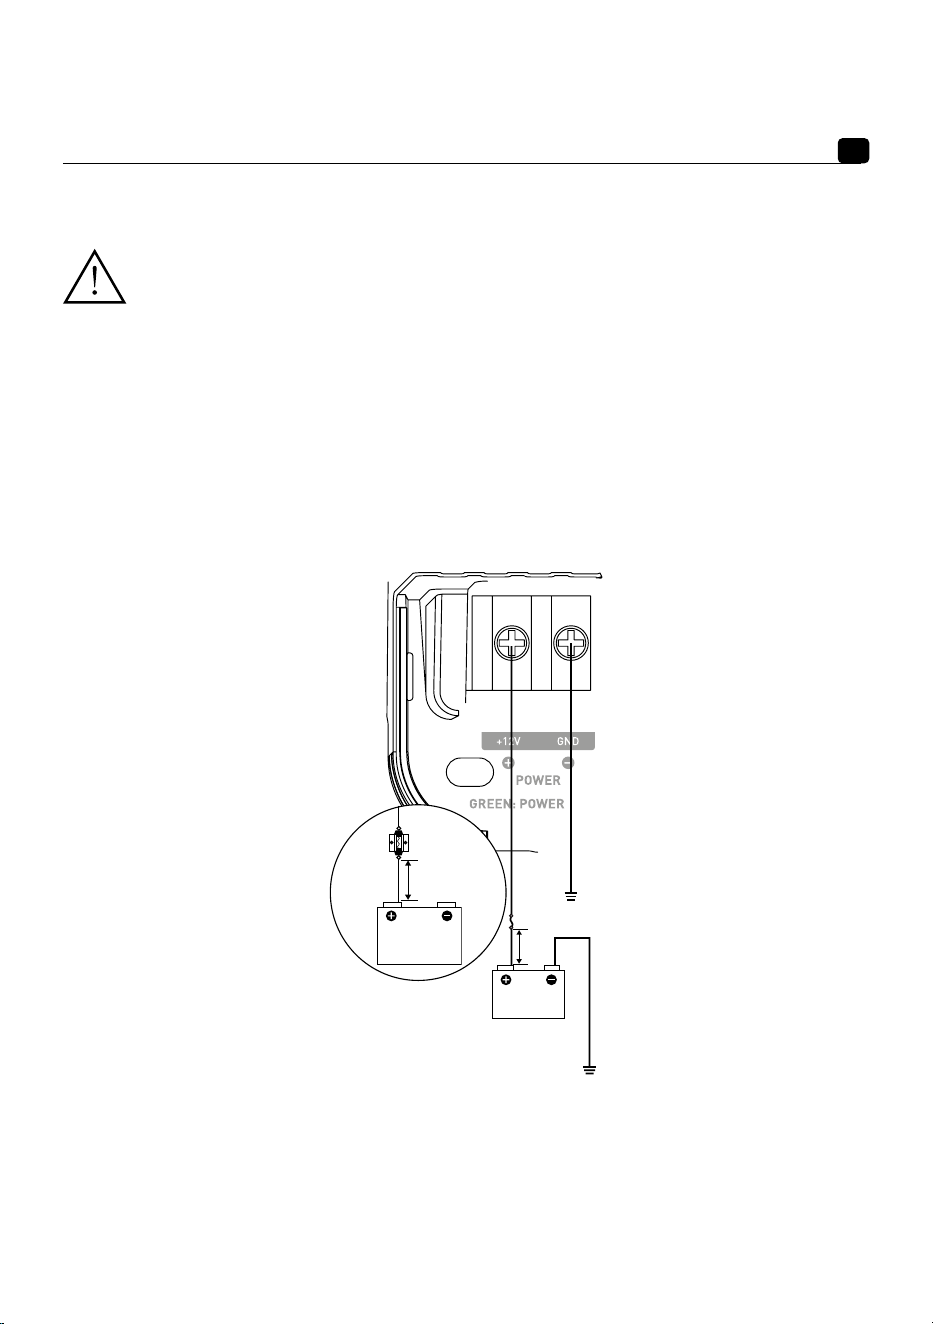
3.6 – Câblage de l’alimentation
ATTENTION
Le câble reliant la borne positive (+) de la batterie au bornier “+ BATT” de l’amplificateur doit IMPERA-
TIVEMENT comporter un fusible (valeur de l’ampérage : 30 ampères) à 40 cm ou moins de la batterie
du véhicule.
Les connexions du porte-fusible doivent être étanches.
Démonter le porte-fusible en prenant soin d’ôter le fusible. Fixer le socle du porte-fusible.
Couper une longueur de câble d’alimentation entre 10 et 40 cm (maximum). Dénuder 1 cm puis étamer.
Visser le câble dans le bornier du porte-fusible coté batterie. Sertir votre câble d’alimentation dans une
cosse prévue à cet eet et visser cette dernière sur un point d’alimentation batterie.
Sur la longueur de câble restante, dénuder 1 cm puis étamer. Visser le câble dans l’autre bornier du
porte-fusible.
40cm max
fig. 5
Préparer le câble d’alimentation positif (+) pour le relier à l’amplificateur en utilisant une fourche appro-
priée puis bloquer le câble en vissant fermement. (fig. 5)

14
AMPLIFICATEURS FDS
Manuel d'utilisation
ATTENTION
En plus de ce fusible proche de la batterie, dans le cas du FDS4.350, un fusible supplémen-
taire doit être installé au plus proche de l’amplificateur.
Utiliser le raccord fourni avec porte fusible (fig. 6).
Sertir votre câble d’alimentation dans la cosse prévue à cet eet.
fig. 6
Relier ce raccord à l’amplificateur en utilisant la fourche appropriée puis bloquer le câble en vissant
fermement.
Insérer enfin le fusible dans le(s) porte-fusible(s), puis visser fermement.
3.7 – Démarrage et vérifications
La phase de connexion est maintenant terminée. Il reste à vérifier la bonne alimentation ainsi que le bon
fonctionnement d’ensemble (autoradio / amplificateur / haut-parleurs). Mettre le gain de la source au
minimum. Positionner le gain de votre amplificateur sur 1/3 de la course totale. Mettre sous tension les
diérents éléments. Une fois l’ensemble des éléments sous tension, eectuer un test à faible volume
sonore.
ATTENTION
Le FDS4.350 fonctionne avec une séquence de démarrage particulière. Il nécessite à la fois une pré-
sence du signal REM, et de signal audio aux entrées. Assurez-vous de la présence d'un seuil de volume
susant sur votre auto-radio pour déclencher le démarrage de l'amplificateur.

15
AMPLIFICATEURS FDS
Manuel d'utilisation
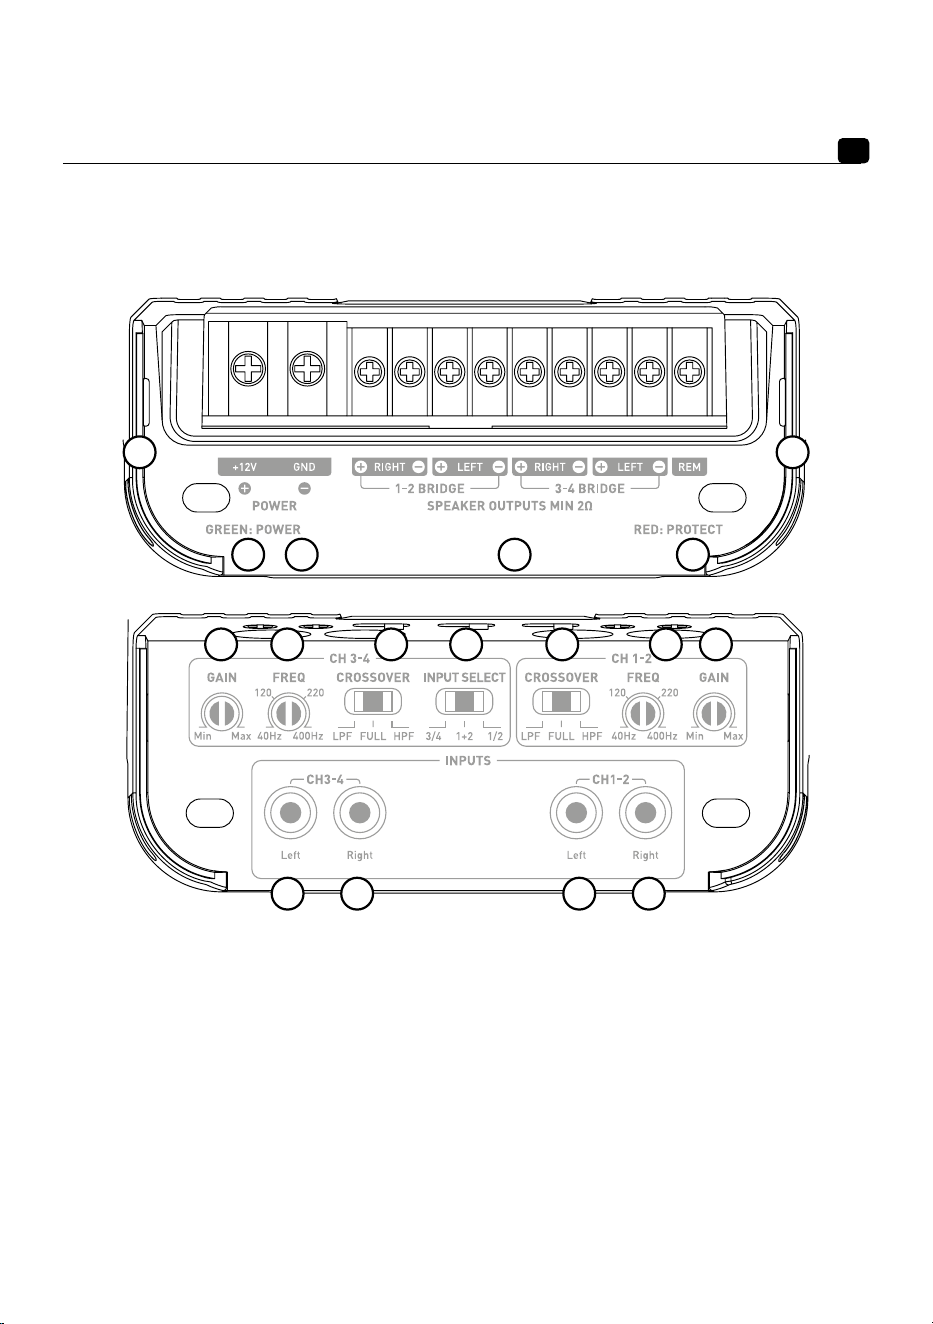
4 – Panneaux de contrôle et connexions
fig. 7.1, FDS 4.350
1 11 1
2
3
2139 910
4 6 5
10
8 8

16
AMPLIFICATEURS FDS
Manuel d'utilisation
2 1 1
7
109
3 4
6 5
8 8
11
fig. 7.2, FDS 2.350
17
AMPLIFICATEURS FDS
Manuel d'utilisation
2 1 1
7
1011
3 4 6 5
8 8
12
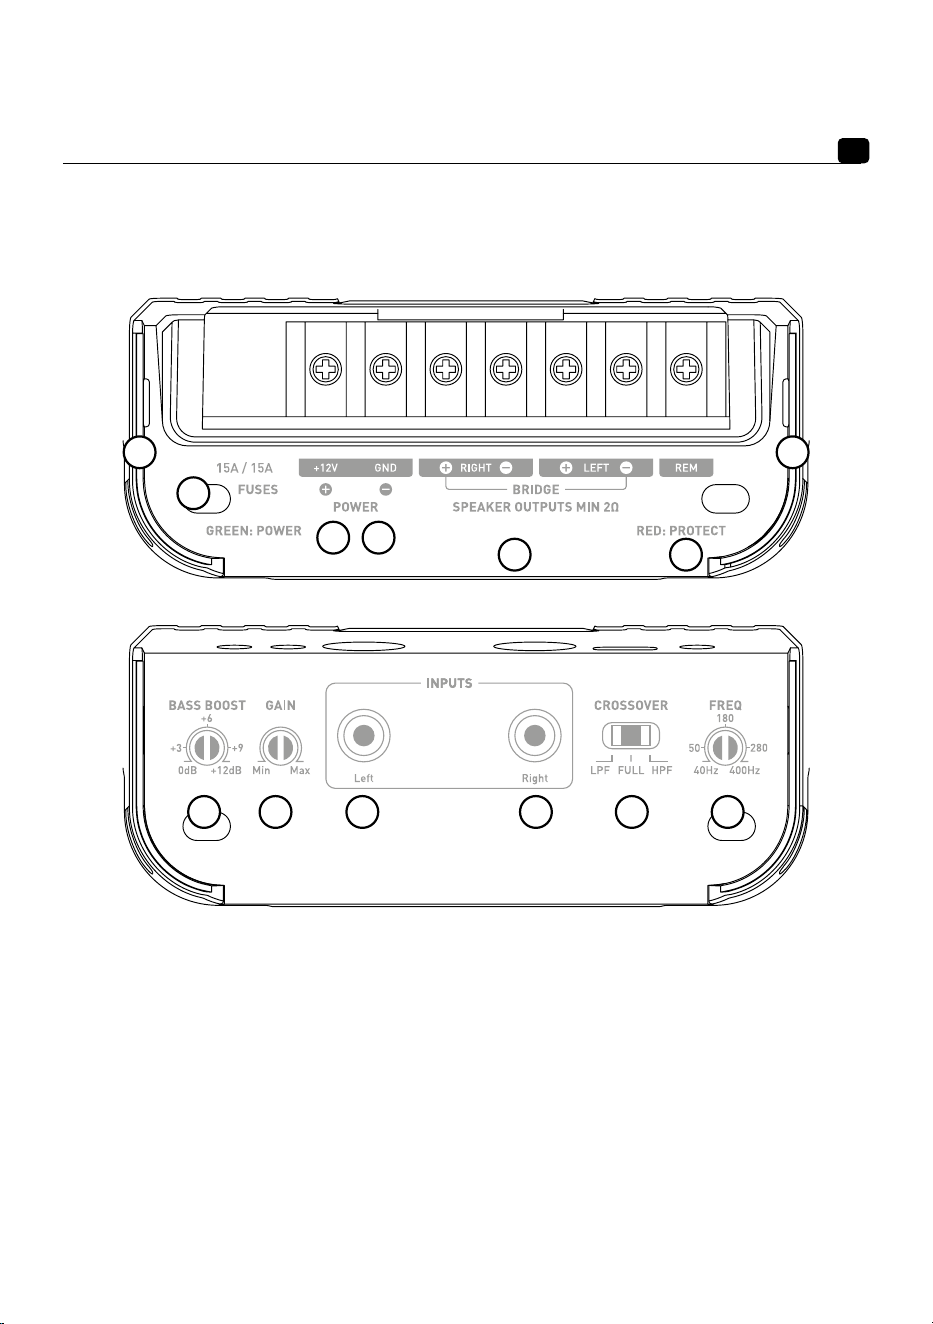
fig. 7.3, FDS 1.350

Thank you for choosing Focal and sharing our passion for sound and for music, expressed with
precision and purity: “Listen Beyond”. These high-tech speaker drivers incorporate enhanced Focal
features in speaker driver design to achieve a powerful, high-quality sound. To get the very best out
of your system and to exploit the full performance of its speaker drivers, we recommend that you
read this booklet, then store it in a safe place to refer to in the future. Any problems caused by failure
to follow the instructions may invalidate your guarantee. For optimum results, we recommend that
you have the system installed by a professional.
WARNING
This symbol indicates important instructions. Failure to comply with these instructions may
result in injury or material damage.
Contents
- 1 FDS amplifier 4.350 or FDS 2.350 or FDS 1.350
- 1 user manual
- 1 set of accessories
English
FOCAL DIRECT FET
®
PERFORMANCE
User manual
Please validate your Focal-JMlab warranty,
it is now possible to register your product online: www.focal.com/warranty
19
FDS AMPLIFIERS
User manual
WARNING
• Do not operate any functions which may distract you while driving. Functions requiring sustained
attention must only be used when the vehicle is at a complete standstill. Always make sure to stop
your vehicle in a safe place before operating these functions. Failure to do so may cause an accident.
• Keep the volume at a low level to be able to hear exterior noises while driving the vehicle. Failure
to do so may cause an accident.
• Do not open your FDS amplifier or make any modifications to the product. Failure to do so may
cause an accident, a fire or an electric shock.
• Only use your FDS amplifier with 12V mobile applications. Any use other than the intended use may
cause a fire, an electric shock or injury.
• Use fuses with the adequate amperage. Failure to do so may cause a fire or an electric shock.
• Do not obstruct the heat sink on your FDS amplifier. Internal overheating may occur and cause a fire.
• Wire the connections correctly. Make sure you use the appropriate wire gauge and type of cable.
Failure to do so may cause a fire, injury and/or material damage.
• Do not use nuts or bolts on steering or breaking systems, tanks, seat-belt anchor points or other
safety elements for connecting the ground. Using of these parts as ground may deactivate the
vehicle’s control system and cause a fire or other damage.
• Keep small parts which could be swallowed, such as bolts, accessories or screws out of the reach of
children. Swallowing such parts may cause to serious injury. If swallowed, consult a physician.
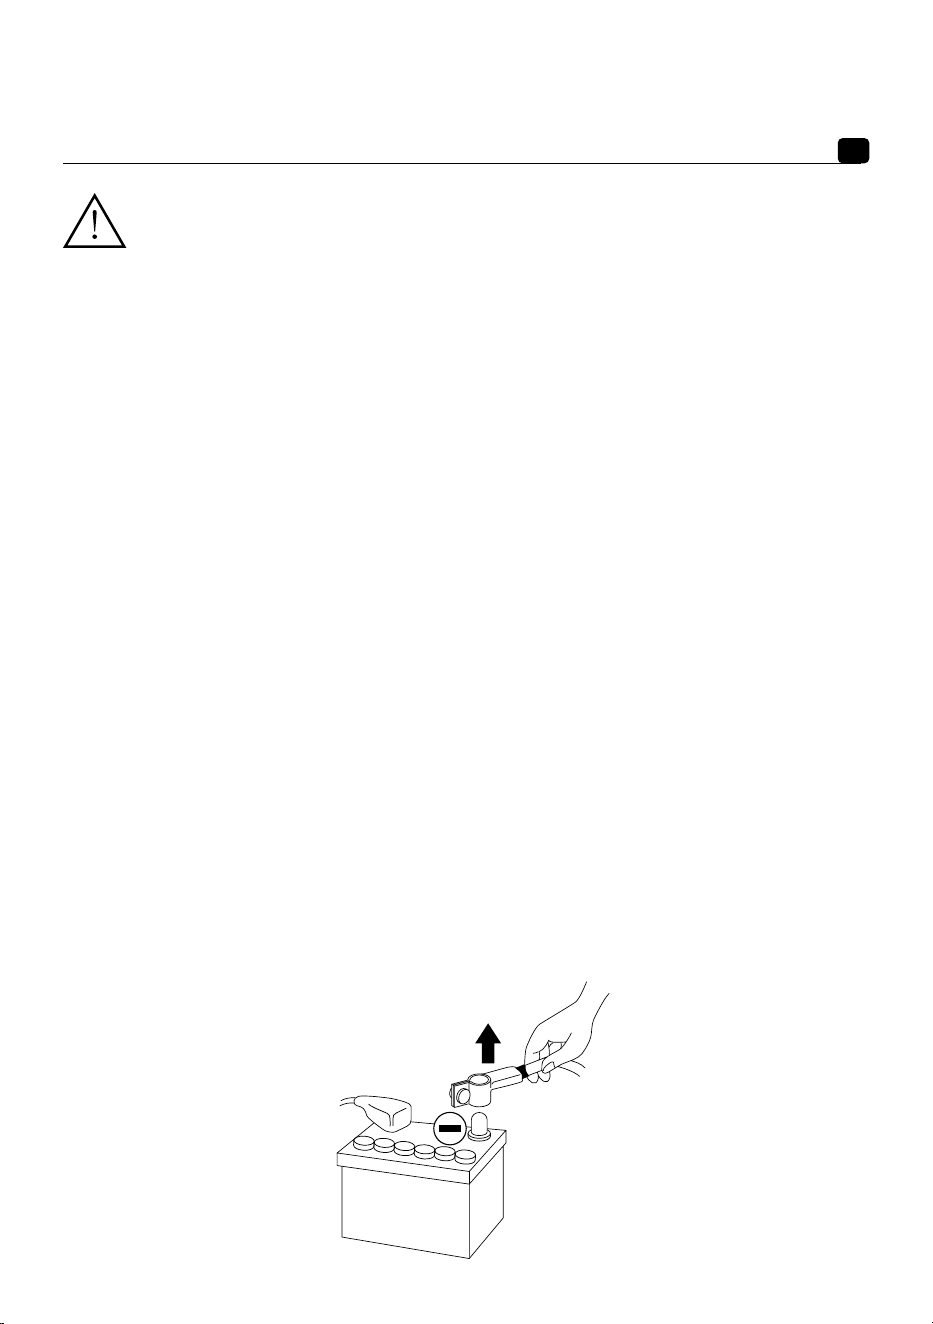
• Before beginning installation, disconnect the negative terminal of the battery to avoid any risk of
injury, fire or material damage. (fig. 1)
fig. 1

20
FDS AMPLIFIERS
User manual
CAUTION
Prolonged listening at high volumes, over 110dB, can cause long-term damage to your hearing.
Listening at volumes over 130dB, even for short periods of time, can cause permanent damage to
your hearing.
Stop operation in the event of a problem. Failure to comply with this precaution may cause injury or
material damage. If a malfunction persists, return the equipment to your Focal dealer for repair.
Use the specified accessories and be sure to install them correctly. Only use the accessories specified
in the user manual and those which are supplied in the packaging. The use of other components
could cause internal damage to the equipment, and its installation may not be carried out correctly.
The parts used may become loose and cause damage or a technical malfunction of the equipment.
Failure to do so may cause an accident, a fire or an electric shock.
Do not install in very humid or dusty places. Avoid installing the equipment in places with high levels
of humidity or with an excessive presence of dust. Humidity or dust getting inside the equipment may
cause a technical malfunction.

21
FDS AMPLIFIERS
User manual
Installing your FDS amplifier
Installation of this product requires technical knowledge and experience. If you are uncertain of your
ability to correctly install the amplifier, we strongly recommend you contact your Focal dealer who
will install it for you, so that you will be able to take full advantage of the full capabilities of your
FDS amplifier.
Wiring your FDS amplifier
Only use the cables recommended in this manual and the accessories supplied. The speaker cable must
ONLY be used for connecting the amplifier to the speaker drivers. The wire gauge of power cables
must correspond with those indicated in the table (paragraph 3.1) and is according to the power of
your amplifier and the length of cable required. Use double or triple shielded RCA cables to avoid any
interference of the low-level signal.
Operating time of your FDS amplifier
Avoid using the amplifier for extended periods of time without starting the vehicle. This may cause the
battery to become flat prematurely.
Cooling system
Do not cover the top of your FDS amplifier as this may cause overheating.
Materials required for installation (in addition to accessories supplied):
• 2 sheaths of an adequate cross section (1 sheath for the power cable, 1 sheath for the speaker cables,
REMOTE cable and RCA low-level wires)
• Multimetre (voltage/amperage)
• Soldering iron + tin solder
• Crimpers
• Wire stripper
• Wire cutter
• Spanner for battery terminal
• Hand drill and matching drill bits
• Heat-shrink tubing of adequate diameter for the different cables
• Power cable of adequate length and wire gauge
• Remote turn-on cable (REM input on amplifier) of adequate length and wire gauge
• Grounded terminal cable of adequate length and wire gauge
• Fuse holder and adequate fuse
• Spade terminal for connecting to positive (+) battery terminal
• Spade terminal for connecting to the chassis of the vehicle (-)
• Screw with a minimum 6mm screw head and its nut for grounding to the chassis of the vehicle
Installation:
The following section deals with issues related to the vehicle which must be considered for the
installation of your amplifier. You will save time by planning the layout of the system and wiring in
advance.
Please ensure during this preparatory phase, that all the settings remain accessible once the installation
is complete.

22
FDS AMPLIFIERS
User manual
Before beginning the installation, please follow these rules carefully:
1 - After thoroughly reading the user manual, make sure you have understood all the instructions before
installing the amplifier.
2 - Disconnect the negative terminal of the battery before beginning the installation. (fig.1)
3 - To facilitate the assembly, we strongly recommend you unwind all the wires before installing the
amplifier.
4 - Route all RCA, speaker and REM cables, away from the power cables in order to avoid any signal
interference.
5 - Use quality connectors and Y-type spade terminals on the amplifier terminal board to ensure a
reliable installation and to minimise any loss of signal or power.
6 – Before carrying out any operation, be extremely careful not to cut or drill through the fuel tank, fuel,
brake, hydraulic or vacuum lines, any electrical wiring or safety device.
7 - Never route a wire under the vehicle. Wiring must be installed inside the vehicle. When routing
the cables, make sure they do not impede your driving. Cables obstructing or protruding out from
areas such as the steering column or pedals (brake, accelerator, clutch, etc...) can be extremely
dangerous.
8 - Avoid routing wires over or through sharp edges. Any wire routed through metal must be protected
with a cable grommet. Route the cables well away from mobile parts (seat rails…) and sharp or
pointed edges. This will avoid damaging the wires and getting them caught which may cause a
short circuit.
9 - Always protect the battery and electric circuit from potential damage with fuses. Install a fuse
holder and adequate fuses on the 12V positive (+) power cable less than 40cm away from the
battery terminal. Ideally, this above-mentioned distance should be as short as possible (fig.5).
10 - Prepare the chassis ground by scraping off any trace of paint on the metal surface in order to
ensure proper grounding. The grounding connections should also be as short as possible and
ALWAYS connected to metal welded to the body or the chassis of the vehicle (fig. 2). The ground
point which is generally chosen is the one connecting the negative terminal of the battery to the
chassis of the vehicle.
11 - NEVER install this equipment in the engine compartment of the vehicle. This will void the warranty.
1 - Positioning of your FDS amplifier
Where to install your FDS amplifier?
Due to the power of the amplifier, heat dissipation is required for correct operation. For this reason, the
amplifier must be installed in a well-ventilated area, particularly the top of the amplifier. Avoid covering
or embedding the amplifier in its installed location.
2 - Mounting your FDS amplifier
Position your amplifier at the desired location and make matchmarks.
Locate the attachment points in your surface by removing the caps at each end.
Use the fixing screws supplied (adapted for wooden surfaces).
3 – Wiring your FDS amplifier
WARNING
If you are uncertain of your ability to correctly install the amplifier and to wire the system
properly, get a Focal dealer/installer to do it for you.
23
FDS AMPLIFIERS
User manual
CAUTION
Avoid routing power cables close to low-level input cables (LOW LEVEL INPUTS), close to
the car aerial or sensitive equipment and harnesses. High-current power cables can cause
interference that affects audio signal.
CAUTION
Keep the cables as short as possible to maximise the quality of the installation. This will also
limit signal loss.
CAUTION
Before beginning the connection phase, remove the negative (-) terminal of the battery of
the vehicle. (fig.1)
3.1 - What wire gauge should I use for the power cable?
Your FDS amplifier requires a power supply of adequate amperage.
The required wire gauge of power cables depends on the length of wiring to the battery. See
recommended wire gauge in the table below:
Length of cable to the battery in metres
Length < 3 m < 4 m < 5 m < 6 m < 7 m
Cross
sectional area
in mm
2
> 4 mm
2
> 5 mm
2
> 5 mm
2
> 5 mm
2
> 5 mm
2
AWG < 11 AWG < 10 AWG < 10 AWG < 10 AWG < 10 AWG
Compliance with these wiring rules is essential for the safety of your electrical Installation and important
for maintaining maximum performance of your FDS amplifier.
3.2 – Wiring the input and output signals on your FDS amplifier
Route the RCA low-level wires, the speaker cables and the REM cable ensuring to insulate them from
other powerful automobile accessories, particularly electric motors (windshield wiper…). Keep the
whole length of the cables, which will be adjusted later on.
3.3 – Wiring the power supply to your FDS amplifier
3.3.1 – Route the positive power cable (+) making sure when doing so to route the cable to the opposite
side of the cables that you have previously installed – this is to avoid any interference. DO NOT
CONNECT THE CABLE YET.
24
FDS AMPLIFIERS
User manual
3.3.2 – Get hold of the negative power cable (-). This cable should be as short as possible and ideally
should not be any longer than 1 metre, to ensure a perfect connection between the amplifier and the
chassis of the vehicle. The cable and wire gauge must comply with the table in section 3.1. Find a sui-
table grounding point, then sand it to remove any traces of paint or other coating to maximising the
quality of the contact point. Drill a hole in the metal that you have previously sanded, making a hole
the same diameter as the screw you are using, making sure that there are no fuel lines, cables or any
other sensitive vehicle devices nearby. Crimp the black Y-type spade terminal supplied to the end of
the cable. Screw the black Y-type spade terminal firmly to the GND terminal on your FDS amplifier (fig.
2). Tin the other end of the cable and then crimp or solder it onto the intended spade terminal. Insert
the screw through the spade terminal, then put the screw and the nut in place and screw tight. (fig. 2)
3.4 – Connecting the input signals to your FDS amplifier
You can now start the connection phase of the input/output cables.
3.4.1 – Your head unit is equipped with RCA outputs (fig. 3)
Connect the RCA cables to the amplifier. Be careful to respect the polarities (INPUT Left = black or
white, INPUT Right = red). Then connect the other end of the RCA cable(s) to the appropriate RCA*
outputs of the head unit (Left and Right).
Now connect the REMOTE cable to the amplifier (REM terminal) and screw tight. Connect the other
end of the REMOTE cable to the REMOTE terminal on the head unit. Finally, connect the speaker driver
cables to the amplifier. Be careful to respect the polarities (+ with + ; - with -) by using the red and black
Y-type spade terminals supplied.
fig. 2
25
FDS AMPLIFIERS
User manual
speaker 1
speaker 2
speaker 3
speaker 4
Remote
Remote
RCA 1/2
RCA 3/4
speaker 1
speaker 2
RCA 1/2
fig. 3.1 - FDS 4.350
fig. 3.2 - FDS 2.350
26
FDS AMPLIFIERS
User manual
Minimum 2 Ώ
Coil 1 -
Minimum 4 Ώ
Coil 2 -
Minimum 4 Ώ
Remote
Remote
RCA 1/2
RCA 1/2
fig. 3.3 bis - FDS 1.350, double voice coil wiring
fig. 3.3 - FDS 1.350, simple voice coil wiring
Simple voice coil speaker
Double voice coil speaker
27
FDS AMPLIFIERS
User manual
Speaker 1 -
Minimum 4 Ώ
Speaker 2 -
Minimum 4 Ώ
Remote
RCA 1/2
fig. 3.3 ter - FDS 1.350, speaker pair wiring
Speaker pair
CAUTION
The speaker drivers or speaker driver kits wired to your FDS amplifier must have a minimum impedance
of 2 Ohms.
In bridged mode (FDS4.350 and FDS2.350) or dual output mode (for the FDS1.350), the speaker dri-
vers or speaker driver kits wired to your FDS amplifier must have a minimum impedance of 4 Ohms.
Use of equipment with an inferior impedance will void the warranty.
28
FDS AMPLIFIERS
User manual
3.6 – Wiring power supply to your FDS amplifier
CAUTION
The cable connecting the positive (+) terminal of the battery to the “+ BATT” terminal of the amplifier
MUST be fused (ampere rating: 30 amperes) less than 40cm away from the battery of the vehicle.
The connections on the fuse holder must be fully insulated.
Open the fuse holder, removing the fuse with care. Fix the base of the fuse holder.
Cut a length of power cable between 10 and 40cm (maximum). Strip 1cm, then tin. Screw the cable to
the terminal of the fuse holder (battery side). Crimp the power cable to the intended spade terminal
and screw to battery terminal.
Strip 1cm from the remaining length of cable, then tin. Screw the cable to the other fuse holder terminal.
40cm max
fig. 5
Prepare the positive power cable (+) to connect it to the amplifier by using the adequate Y-type spade
terminal, then block the cable by screwing tight. (fig. 5)

29
FDS AMPLIFIERS
User manual
CAUTION
In addition to this fuse near the battery, the FDS4.350 has an additional fuse which requires
installation near the amplifier.
Use the connector supplied with the fuse holder (fig. 6).
Crimp the power cable to the intended spade terminal.
fig. 6
Connect the connector to the amplifier by using the adequate spade terminal, then block the cable by
screwing tight.
Insert the fuse into the fuse holder(s), and screw tight.
3.7 – Start-up and checks
The connection phase is now complete. You must now check the power supply (is correct) and that
everything is working correctly (head unit/amplifier/speaker). Set the source gain to its minimum. Set
the gain on your amplifier to 1/3 of the way. Turn on the dierent elements. Once all the elements are
on, carry out a test at low volume.
CAUTION
FDS4.350 is working with a particular starting sequence. It needs both REM signal and audio
signal at the input to start correctly. Please, check audiosignal presence with sucient vo-
lume on the head unit.

30
FDS AMPLIFIERS
User manual
4 – Control panel and connections
fig. 7.1, FDS 4.350
1 11 1
2
3
213 9 910
4 6 5
10
8 8

31
FDS AMPLIFIERS
User manual
2 1 1
7
109
3 4
6 5
8 8
11
fig. 7.2, FDS 2.350
32
FDS AMPLIFIERS
User manual
2 1 1
7
1011
3 4 6 5
8 8
12
fig. 7.3, FDS 1.350

33
FDS AMPLIFIERS
User manual
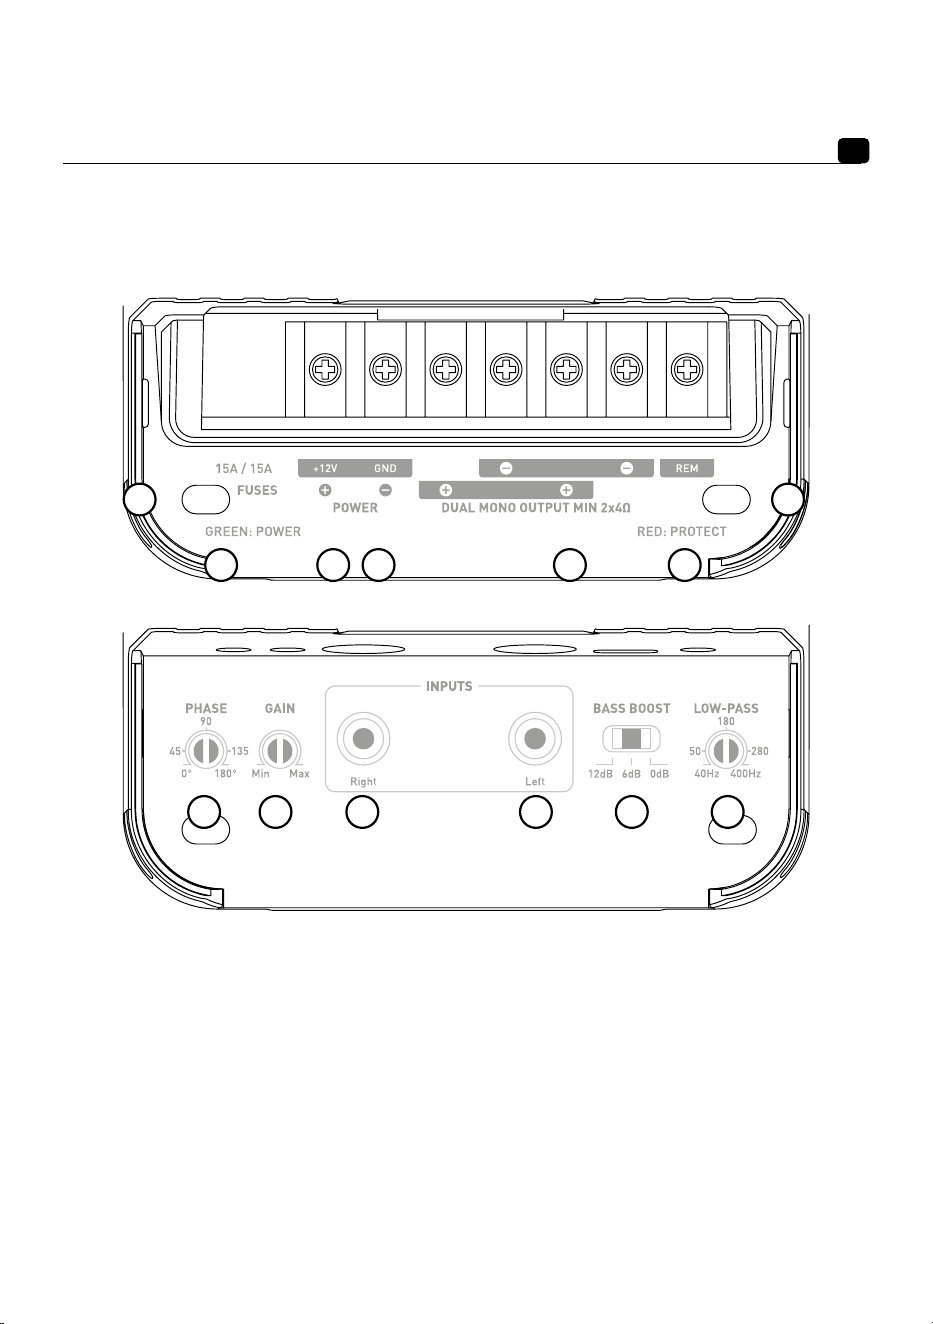
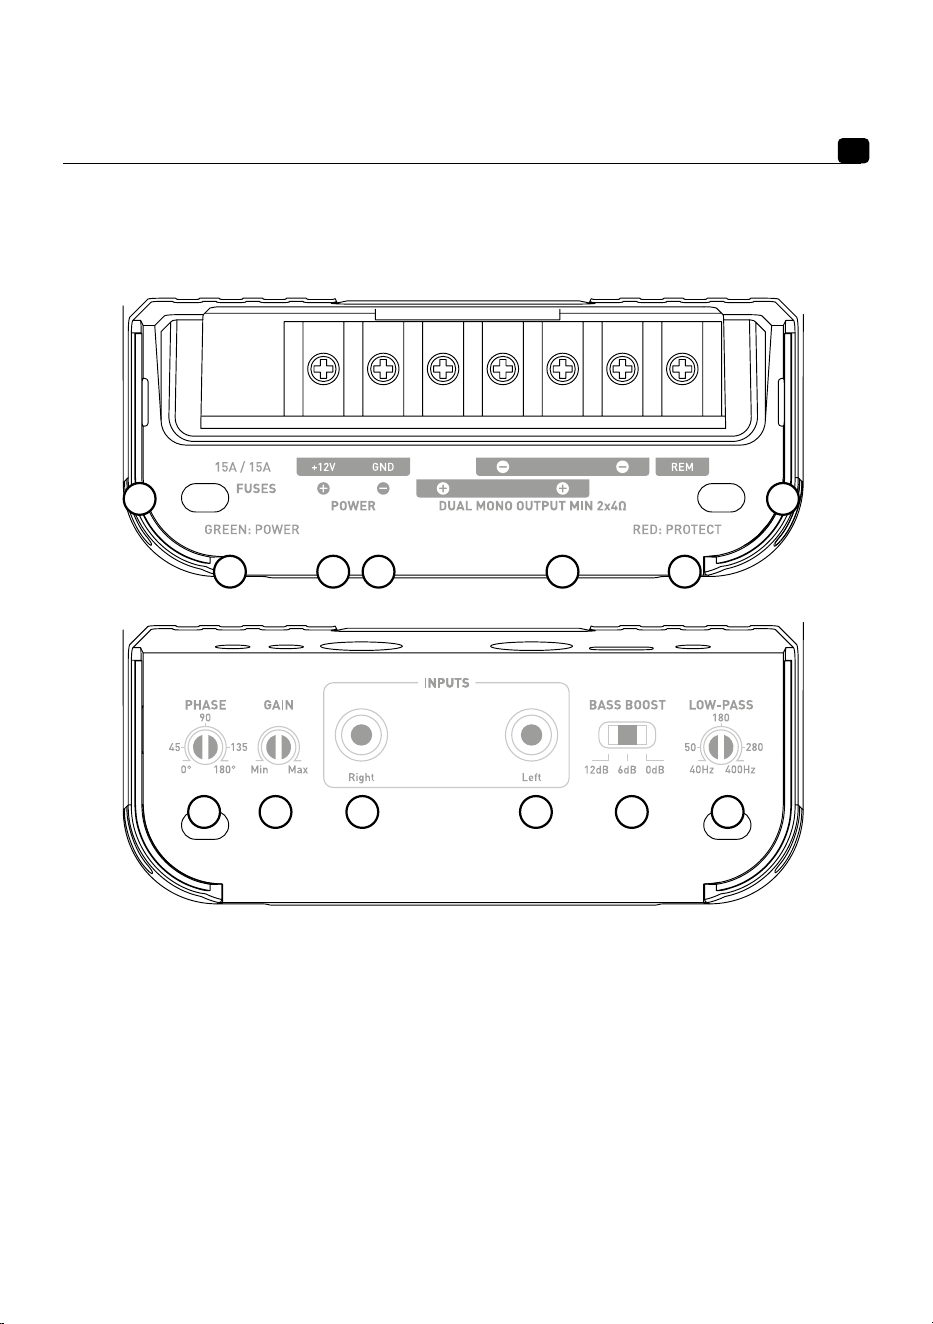
1°/ INPUT(S): The RCA plugs are dedicated to the low level signal input.
2°/ GAIN: The rotary GAIN control potentiometer allows you to adjust the incoming signal to the amplifier.
CAUTION: increasing the input gain does not mean more power, but more noise. The voltage gain
varies between 0.2V and 5V. Optimisation of the sound system consists in applying the maximum
gain as soon as possible beforehand on the sound system and then the minimum gain afterwards.
This potentiometer must be set according to the source volume (line output level). Start by setting
the amplifier gain to its lowest level. Gradually turn up the level of the source volume up to the 3/4
of the way. Turn up the amplifier gain level to the desired maximum listening level. Turn down the
level if distortion occurs.
3°/ +12V: the power connector “+BATT” is dedicated to receive the power cable connecting the amplifier to the
positive (+) terminal of the battery.
4°/ GND: the GND (ground) power connector is dedicated to receive the negative (-) power cable
connecting the amplifier to the chassis of the vehicle.
5°/ REM : the REM connector connects the amplifier to the source (head unit via a REM or REMOTE
output on the head unit. This enables the automatic turn-on of the amplifier as soon as the source
(head unit) is turned on.
6°/ SPEAKERS : the SPEAKERS connectors link the amplifier to the speaker drivers. The polarities
MUST be respected (+ amplifier + crossover or + speaker driver / - amplifier - crossover or - speaker
driver).
7°/ FUSES: The FUSE connector is dedicated to receive the amplifier fuse(s). In case of replacement,
make sure that the ampere rating is correct.
8°/ LEDs: the indicator LEDs enable you to check the amplifier is working correctly. A continuously
illuminated green LED means the equipment is working correctly. A continuously illuminated red
LED means the equipment is not working correctly. See troubleshooting section page 6.
9°/ Crossover selector: the CROSSOVER switch enables you to choose to activate a high-pass filter
(HPF), a low-pass filter (LPF) or full range mode (FULL).
10°/ Setting the crossover cut-o frequency: This rotary potentiometer enables you to adjust the
value of the high-pass or low-pass filter. The selected value determines the frequency up to which
or from which the signal will be cut o.
11°/ Bass boost : the switch or rotary potentiometer (FDS1.350 or FDS2.350 respectively) enables you
to increase the volume of the bass from 0 to 12dB.
12°/ Phase : the PHASE rotary potentiometer enables you to adjust the channel phase setting accor-
ding to the rest of the installation. Adjusting the phase of the subwoofer enables the speaker dri-
ver output to be in phase or out of phase with the other speaker drivers. On a theoretical period
of a signal, one of the sources can be adjusted slightly for the phase to be perfectly balanced at
the listening point.
13°/ Mode selector: The INPUT SELECT switch (only available on the FDS4.350 model) enables chan-
nels 1 and 2 to be played through channels 3 and 4. So, if you only have one output (one right and
one left), you can still amplify the four channels by activating the 1/2 mode.

34
FDS AMPLIFIERS
User manual
If you want to use the FDS4.350 with its independent 4-channel input configuration, select mode 3/4.
If you want to use the FDS4.350 in 3-channel mode, select mode 1+2. Channels 3/4 will then receive the
mono signal from channels 1 and 2 of your subwoofer.
5 – Troubleshooting
The state of the dierent indicator LEDs refer to the nature or the cause of a malfunction.
Check the possible causes shown below. If, despite these checks, the equipment is still not working
correctly, contact your FDS amplifier installer or dealer.
Status of indicator
LEDs
Presence of
sound
Possible cause Action
Illuminated red NO Output short circuit Turn o the sound system
Check the speaker drivers, their
minimum impedance,
their connections and the spea-
ker driver cables.
O NO No power or poor
connection
Turn o the sound system
Check power source is 12V
Check the power cables and
their polarity. Check the fuses
Flashing from red to
green
Distorted, absent
or
alternating
Overheating Turn o the sound system
Wait for your amplifier to cool
down before resuming use.
O NO No REM signal Turn on the sound system
Check power on the REM ter-
minal.
O NO Fuse failure Turn o the sound system
Check and replace the fuses if
necessary.
O / illuminated
green
YES/NO
Or distorted
Grounding defect Turn o the sound system
Check the continuity of your
connection from the GND termi-
nal to the chassis of the vehicle.
CAUTION
FDS4.350 is working with a particular starting sequence. It needs both REM signal and audio
signal at the input to start correctly. Please, check audiosignal presence with sucient vo-
lume on the head unit.

35
FDS AMPLIFIERS
User manual
6 – Technical specifications
MODEL FDS4.350
4/3/2-channel D class
amplifier
FDS2.350
Stereo D class
bridgeable amplifier
FDS1.350
Mono D class ampli-
fier
with dual output
CEA power (4 Ohms) 4 x 58 W RMS 2 x 10⁵ W RMS 1 x 210 W RMS
Power max (2 Ohms) 4 x 100 W RMS 2 x 170 W RMS 1 x 350 W RMS
Power max (4 Ohms
bridged)
2 x 200 W RMS 1 x 360 W RMS −
Bandwidth 10 Hz – 50 KHz 10 Hz – 50 KHz 10 Hz – 400 Hz
Total harmonic dis-
tortion
0,05 % 0,07 % 0,05 %
Cross-talk (1KHz) >65 dB >65 dB −
SNR (1W/A) >84 dBA >84 dBA −
High-pass/
low-pass filter
adjustable 40 Hz-400
Hz
adjustable 40 Hz-400
Hz
Low-pass 40 Hz-400
Hz
Bass boost − Linear Bass boost
centred at 85Hz (0 to
12dB)
Selective Bass boost
centred at 50Hz
(0/6dB/12dB)
Phase adjustment − − progressive (0-180°)
Full range mode √ √ −
Standby consumption
(A)
0,7 0,9 0,7
Fuse ratings 1 x 30 A 2 x 15 A 2 x 15 A
Protections Short circuit / low impedance / reversal of polarity
DC / power drop / heat protection
Dimensions (LxWxH)
inch/cm
7
3/4
x4
1/4
x1
1/2
199 x 108 x 43
7
3/4
x4
1/4
x1
1/2
199 x 108 x 43
7
3/4
x4
1/4
x1
1/2
199 x 108 x 43
Weight (g/lbs) 850/1.9 850/1.9 850/1.9
Conditions of warranty
All Focal loudspeakers are covered by warranty drawn up by the official Focal distributor in your
country. Your distributor can provide all details concerning the conditions of warranty. Warranty cover
extends at least to that granted by the legal warranty in force in the country where the original pur-
chase invoice was issued..

36
AMPLIFICATEURS FDS
Manuel d'utilisation
1°/ INPUT(S) : Les fiches RCA sont dédiées à l’entrée du signal bas niveau.
2°/ GAIN : Le potentiomètre rotatif GAIN permet d’ajuster le niveau du signal entrant dans l’amplifica-
teur. ATTENTION : augmenter le gain d’entrée ne signifie pas plus de puissance, mais plus de bruit.
Le gain en tension varie de 0,2 V à 5 V. L’optimisation des performances de la chaine audio consiste
à appliquer les gains maximums au plus tôt en amont dans la chaine audio, et les gains minimums
en aval. Ce potentiomètre doit être réglé en fonction du niveau de la source (niveau de sortie ligne).
Débuter en mettant le gain de l’amplificateur à son niveau le plus bas. Monter progressivement le
niveau (volume) de la source jusqu’au 3/4. Augmenter le niveau du gain de l’amplificateur jusqu’au
niveau d’écoute maximum souhaité. Baisser le niveau en cas de distorsion.
3°/ +12V : Le connecteur d’alimentation +BATT est dédié à recevoir le câble d’alimentation assurant la
liaison entre l’amplificateur et la borne positive (+) de la batterie.
4°/ GND : Le connecteur d’alimentation GND (ground) est dédié à recevoir le câble d’alimentation
négatif (-) assurant la liaison entre l’amplificateur et le châssis du véhicule.
5°/ REM : Le connecteur REM assure la liaison entre l’amplificateur et la source (autoradio) via une
sortie REM ou REMOTE de l’autoradio. Cela permet la mise sous tension automatique de l’amplifi-
cateur dès la mise sous tension de la source (autoradio).
6°/ SPEAKERS : les connecteurs SPEAKERS assurent la liaison entre l’amplificateur et les haut-
parleurs. Il faut IMPERATIVEMENT respecter les polarités (+ amplificateur + filtre ou + haut-parleur
/ - amplificateur - filtre ou - haut-parleur).
7°/ FUSES (fusibles) : Le connecteur FUSES est dédié à recevoir les fusibles de l’amplificateur.
En cas de remplacement, s’assurer de la parfaite correspondance de l’ampérage.
8°/ Témoins lumineux : Les témoins lumineux permettent de vérifier le bon fonctionnement de
l’amplificateur.
Une LED verte continuellement allumée indique un fonctionnement correct du produit.
Une LED rouge continuellement allumée indique un fonctionnement anormal du produit, se
reporter aux dépannages en 5.
9°/ Sélecteur de filtre : le commutateur CROSSOVER permet d’activer, au choix, un filtre passe-haut
(HPF), un filtre passe-bas (LPF) ou le mode non filtré (FULL).
10°/ Réglage de la fréquence de coupure du filtre : Ce potentiomètre rotatif permet de régler la valeur
du filtre passe-bas ou passe-haut. La valeur sélectionnée définit la fréquence jusqu’à laquelle ou à
partir de laquelle le signal sera coupé.
11°/ Bass boost : Le potentiomètre rotatif (FDS 2.350) ou sélecteur (FDS 1.350) permet de rehausser
le niveau sonore du grave de 0 à 12 dB dB.
12°/ Réglage de phase : Le potentiomètre rotatif PHASE permet d’ajuster la mise en phase du canal
avec le reste du système. Un réajustement de la phase du subwoofer permet de faire en sorte qu’à
la fréquence de raccord, le subwoofer et le reste des haut-parleurs jouent simultanément. Sur
une période théorique de signal, on vient décaler légèrement l’une des sources pour qu’au point
d’écoute la mise en phase soit parfaite.
13°/ Sélecteur de Mode : Le commutateur INPUT SELECT (uniquement disponible sur le FDS 4.350)
permet aux canaux 3 et 4 de recopier éventuellement les signaux des canaux 1 et 2. Ainsi, si vous
ne disposez que d’une sortie d’autoradio (une droite et une gauche), il vous est possible d’ampli-
fier les quatre canaux en activant le mode 1/2.

37
AMPLIFICATEURS FDS
Manuel d'utilisation
Si vous souhaitez utiliser le FDS 4.350 dans sa configuration 4 canaux indépendants en entrée, sélec-
tionnez le mode 3/4.
Si vous souhaitez utiliser le FDS 4.350 en mode 3 canaux, sélectionnez le mode 1+2. Vos canaux 3/4
reçoivent alors le signal mono sommation des voies 1 et 2 pour adresser votre subwoofer.
5 – Dépannage
L’état des diérents témoins lumineux signifie certains modes de défaillance ou origines de pannes.
Vérifier l’ensemble des cas possibles ci-dessous. Si malgré ces vérifications, le fonctionnement normal
n’est pas récupéré, s’adresser à l’installateur ou revendeur de votre amplificateur FDS.
Etat LEDs Témoins Présence de son Origine possible Dépannage
Allumée rouge NON Court-circuit en sortie Eteindre le système audio.
Vérifier les haut-parleurs,
leur impédance minimale, leurs
connexions, les câbles haut-parleur.
Eteintes NON Absence ou
mauvaise alimenta-
tion
Eteindre le système audio.
Vérifier la présence du 12 V .
Vérifier les câbles d’alimentation,
leur polarité. Vérifier les fusibles.
Allumées rouge/
verte en alternatif
Altérée, absence
ou
alternative
Surchaue Eteindre le système audio.
Attendre un refroidissement de votre
amplificateur avant de reprendre
son utilisation.
Eteintes NON Absence de signal
REM
Allumer le système audio.
Vérifier la présence d’une tension
sur la borne REM.
Eteintes NON Défaillance Fusibles Eteindre le système audio.
Vérifier les fusibles, les remplacer
si nécessaire.
Eteintes /
allumées verte
OUI/NON
Ou Altéré
Problème de masse Eteindre le système audio.
Vérifier la continuité de votre
connexion de la borne GND avec
le châssis du véhicule.
ATTENTION
Le FDS4.350 fonctionne avec une séquence de démarrage particulière. Il nécessite à la fois une pré-
sence du signal REM, et du signal audio aux entrées. Assurez-vous de la présence d'un seuil de volume
susant sur votre auto-radio pour déclencher le démarrage de l'amplificateur.

38
AMPLIFICATEURS FDS
Manuel d'utilisation
6 – Spécifications techniques
Modèle FDS4.350
Amplificateur Classe D
4/3/2 canaux
FDS2.350
Amplificateur Classe D
Stéréo bridgeable
FDS1.350
Amplificateur Classe
D
Mono double sortie
Puissance CEA (4
ohms)
4 x 58 W RMS 2 x 10⁵ W RMS 1 x 210 W RMS
Puissance max (2
ohms)
4 x 100 W RMS 2 x 170 W RMS 1 x 350 W RMS
Puissance max
(bridgé 4 ohms)
2 x 200 W RMS 1 x 360 W RMS −
Bande Passante 10 Hz – 50 KHz 10 Hz – 50 KHz 10 Hz – 400 Hz
Distorsion Harmo-
nique totale
0,05 % 0,07 % 0,05 %
Diaphonie (1KHz) >65 dB >65 dB −
SNR (1W/A) >84 dBA >84 dBA −
Filtre Passe Haut/
Passe Bas
Configurable
40 Hz-400 Hz
Configurable
40 Hz-400 Hz
Passe bas 40 Hz-400
Hz
Bass boost − Bass boost linéaire
centré à 85 Hz (0 à
12 dB)
Bass boost selectif
centré à 50 Hz (0 à
12 dB)
Reglage de Phase − − Progressif (0-180°)
Fonction Full range √ √ −
Courant de repos (A) 0,7 0,9 0,7
Fusibles 1 x 30 A 2 x 15 A 2 x 15 A
Protections Court-circuit / impédance basse /inversion de polarité
/DC/Chute de tension/Protection thermique
Dimensions en mm
(L x l x h)
199 x 108 x 43 199 x 108 x 43 199 x 108 x 43
Poids (g) 850 850 850
Conditions de garantie
La garantie pour la France sur tout matériel Focal est de 2 ans. En cas de matériel défectueux, celui-
ci doit être expédié à vos frais, dans son emballage d’origine auprès du revendeur, lequel analysera
le matériel et déterminera la nature de la panne. Si celui-ci est sous garantie, le matériel sera réparé
ou remplacé et vous sera rendu. Dans le cas contraire, un devis de réparation vous sera proposé.
La garantie ne couvre pas les dommages résultant d’une mauvaise utilisation ou d’un branchement
incorrect (bobines mobiles brûlées par exemple...). En dehors de la France, le matériel Focal est couvert
par une garantie dont les conditions sont fixées localement par le distributeur officiel Focal de chaque
pays, en accord avec les lois en vigueur sur le territoire concerné.

39
FDS 放大器
安装手册
感谢您为自己的汽车选择Focal音响系统,并分享我们的理念:“声音之灵”。该产品采用Focal在D级紧凑型放大
器领域的最先进技术。为获得最佳效果,建议您委托Focal经销商安装FDS放大器。为让您更好地使用最佳功能、尽
情享受其各项性能,建议您阅读本手册中的指引,并小心保存以备日后参考。任何因未遵守使用规则而产生的问题
都可能导致质保失效。
注意
此符号表示重要说明。不遵守这些说明可能导致人身伤害或设备损坏。
包装清单
- FDS 4.350或FDS 2.350或FDS 1.350放大器 x 1
- 使用手册 x 1
- 配件 x 1套
要激活Focal-JMlab产品的质保,
您现在可以在线注册产品:www.focal.com/garantie/
中文版
40
FDS 放大器
安装手册
警告
•驾驶车辆时,请勿开启任何可能导致注意力分散的功能 。
需要长时间注意的功能或设置只能在车辆完全停止时才可以操作。启用这些功能前,请务必将车辆停靠在安全地
点。存在引发事故的风险。
• 保持较低音量,以便在驾驶期间听到车外的声音。存在引发事故的风险。
• 请勿打开FDS放大器或对产品进行任何改装。存在导致火灾、触电或受伤的风险。
• 只可在电压为12V的车辆中使用FDS放大器。任何在指定范围之外的操作使用可能导致火灾、触电或受伤风险。
• 请使用电流适当的保险丝。存在导致火灾或放电的危险。
• 请勿遮挡FDS放大器的散热器。内部过热可能会起火并引发火灾。
• 进行正确的连接。检查电缆的截面积与类型。存在火灾、导致伤害和/或设备损坏的风险。
• 切勿使用转向或制动电路的螺母或螺栓、油箱、安全带或其它安全部件作为接地连接。将这些部件作为接地可能
致使车辆的控制系统失效并引发火灾或其他损坏。
• 将可吞食的小部件(如螺栓、配件或螺钉)放在儿童接触不到的地方。吞食这些部件会造成严重伤害。如吞食时,
请及时咨询
医生。
• 开始安装之前,请断开电池的负端,以免造成人身伤害、火灾或产品损坏。(图1)
(图1)

41
FDS 放大器
安装手册
注意
长时间聆听超过110分贝的声音会对听觉造成永久性损伤。如果音量超过130分贝,即使短时间聆听也会造成不可逆
的听觉损伤。
如果出现问题,请停止使用。否则,可能导致人身伤害或设备损坏。如果故障仍然存在,请将本机返回Focal经销商
处进行维修。
使用指定的配件并正确安装。只可使用《使用手册》中指定的配件,以及包装内提供的配件。使用其它配件可能对
产品造成内部损坏,或无法正常安装运行。使用过的配件可能会松动,造成产品损坏或技术故障。存在导致火灾、
触电或受伤的风险。
请勿安装在高湿度或粉尘环境中。避免将本机安装在车辆中湿度高或粉尘剧烈的区域。水分或灰尘渗透到产品内部
可能导致故障。

42
FDS 放大器
安装手册
安装FDS放大器
安装本产品需要足够的技术和经验。如果您不确定是否有能力安装放大器,请由Focal经销商进行安装,以充分发挥
FDS放大器的性能。
- 固定FDS放大器
只可使用《使用手册》中指定的线缆以及随附的配件。扬声器电缆只能用于将放大器连接到扬声器。电源线的截面
积必须符合表格(第3.1章节)中规定的参数,并根据电流强度和线缆长度进行选择。使用双屏蔽或三屏蔽RCA电
缆,以防止干扰低电平信号。
FDS放大器的运行时间
避免在车辆未发动的情况下长时间运行放大器。这可能导致电池过早放电。
通风
切勿覆盖FPX放大器的上部区域,以免引起过热。
完成安装所需材料(除随附的配件之外):
• 2条截面积适当的线管(1条用于电源线,1条用于扬声器线缆、REMOTE线缆、RCA调制线缆)
• 万用表(电压/电流)
• 烙铁+焊锡
• 压接钳
• 剥线钳
• 剪线器
• 电池端子钮
• 手钻及匹配的钻头
• 适用于不同直径线缆的热缩管
• 长度和截面积适当的电源线
• 长度和截面积适当的远程开机线缆(放大器REM输入)
• 长度和截面积适当的接地线缆
• 保险丝座和适当的保险丝
• 电池正端(+)的连接端子
• 连接车辆底盘(-)的连接端子
• 6毫米以上的螺丝及螺母,用于连接接地和车辆底盘
安装:
以下部分介绍安装放大器时应考虑的车辆注意事项。您可以预先规划系统和布线的布局以节省时间。
规划过程中,要确保当安装完成后所有设置都可以进行接入。

43
FDS 放大器
安装手册
开始安装之前,敬请严格遵守以下规则:
1 - 请完整阅读使用手册,确保已经了解所有说明之后再安装放大器。
2 - 开始安装前,请先断开电缆负极与电池的连接(图1)
3 - 为便于组装,建议安装放大器前将所有线缆展开。
4 - 请将所有RCA线缆、扬声器和REM线缆与电源线分开,以避免信号干扰。
5 - 在放大器的端子上使用优质连接器和叉形接头,以确保可靠安装并最大限度降低信号或功率损失。
6-在进行任何操作之前,先检查线路未切断或穿透燃料箱、燃油、制动、液压或降压管路以及电路或任何安全部件。
7 - 切勿将线缆布设于车辆下方。必须将线缆布设于车辆内部。布设线缆时确保线缆不会干扰车辆行驶。堵塞或通过
方向盘、踏板(制动、加速及离合器等)的线缆可能具有极大危险性。
8 - 避免使线路越过或穿过锋利边缘。任何穿过金属的导线必须以垫圈保护。将线缆远离可移动的部件(如座椅导轨
等)及锋利或尖锐的边缘。这样线缆就不会被卡住或损坏,避免造成电路短路。
9- 始终以保险丝保护电池和电路免受损坏。在12V电源线的正极(+)距离电池端子40厘米以内的距离安装保险丝盒和
适当的保险丝。理想情况下,该距离越短越好(图5)。
10 - 刮去金属表面上的漆面痕迹作为接地前的准备,确保良好的接地。接地连接应尽量做到最短,并始终与焊接在车
身或车辆地盘底盘上的金属部件相连接(图2) 。通常选用电池负端与车辆底盘之间的连接点作为接地点。
11 - 切勿将本产品安装在车辆的发动机舱内。这将导致质保失效。
1- - 安装FDS放大器
FDS放大器安装在哪里?
由于放大器功率较高,其运行过程需要进行散热。因此,放大器必须安装通风良好的部位,其顶部的通风尤为重
要。避免对放大器安装区域做任何封闭或覆盖。
2- 固定FDS放大器
将放大器放在所需位置并标记位置。
拆下每一端的外壳来确定支架中的固定点。使用随附的固定螺钉(适用于拧入木质支架)。
3– FDS放大器接线
警告
如果您不确定是否有能力安装放大器并正确连接系统,请由Focal经销商/安装人员进行操作。
44
FDS 放大器
安装手册
注意
避免将电源线靠近天线输入低电平线缆、设备及敏感光束。电源线输送的电流较高,可以产生对音频信
号的干扰。
注意
尽量减少线缆长度,以优化安装质量,限制信号损失。
注意
开始连接之前,请务必断开车辆电池的负端(-)(图1)。
3.1 - 应选择哪种截面积的电源线?
您的FDS放大器需要接入电流强度适当的电源。
电源线截面积选择应取决于与电池的布线距离,建议根据下表进行选择:
连接电源的线缆长度,以米为单位
长度 <3 米 <4 米 < 5 米 < 6 米 < 7 米
截面积,单位为
平方毫米
>4 mm2 > 5 平方毫米 > 5 平方毫米 > 5 平方毫米 > 5 平方毫米
AWG截面积 < 11 AWG < 10 AWG < 10 AWG < 10 AWG < 10 AWG
遵守接线规则对于电气安装安全性至关重要,也影响FDS放大器发挥最佳性能。
3.2 - 将输入信号连接到FDS放大器
布局所有调制线缆(RCA)、扬声器线缆、REM线缆,使它们远离车辆中的其它大功率部件,尤其是电机(如雨刮
器)。保留线缆的全部长度,稍后再进行调整。
3.3 – FDS放大器电源接线
3.3.1 – 布置正极(+)电源线,注意避开先前拉出的线缆,以避免干扰。此时切勿连接接通线缆。
45
FDS 放大器
安装手册
3.3.2 - 布置负极(-)电源线。该电缆应尽可能短,尽量不超过1米,以确保放大器与车辆底盘完美连接。电缆及其
截面积必须与3.1章节所列的表格相符。找到合适的接地点,然后进行打磨以除去漆面或釉面,从而提升接触质量。
钻出与选定螺丝的直径相符的孔,确保远离车辆的油箱线缆或其它敏感部件。将线缆末端压接到随附的黑色接线端
子。将接线端子拧紧至放大器的GND接地端子上(图2) 。将另一端包锡,然后压接或焊接到专用接线端子。将接
线端子插入螺钉,然后将螺钉和螺母固定到位并拧紧。(图2)
3.4 - 将FDS放大器连接输入信号
可以开始输入/输出线缆的连接。
3.4.1 – 您的车载收音机配备RCA接口。(图3)
将RCA按照正确的极性(左侧输入 = 黑或白,右侧输入 = 红)连接到放大器。将RCA的另一端连接到车载收音机的
可用RCA输出端口(Left = 左侧,Right = 右侧)。
然后将REMOTE电缆拧紧到放大器(REM端口)。将REMOTE电缆另一端连接到车载收音机的REMOTE端口。
最后,用随附的红色和黑色的接头将扬声器线缆按照正确的极性(+对应+,-对应-)连接到放大器。
(图2)

46
FDS 放大器
安装手册
HP 1
HP 2
HP 3
HP 4
遥控器
RCA 1/2
RCA 3/4
HP 1
HP 2
遥控器
RCA 1/2
图3.1 - FDS 4.350
图3.2 - FDS 2.350
47
FDS 放大器
安装手册
最低2欧姆
音圈1 - 最低4欧姆
音圈2 - 最低4欧姆
遥控
遥控器
RCA 1/2
RCA 1/2
图3.3(二次) - MSDS 1.350,双线圈连接
图3.3 - MSDS 1.350,单线圈连接
单线圈扬声器
双线圈扬声器

48
FDS 放大器
安装手册
注意
FDS放大器连接的扬声器或扬声器套件的阻抗必须高于2欧姆。
在桥接模式(FDS4.350和FDS2.350)或双输出模式(对于FDS1.350)下,FDS放大器连接的扬声器或扬声器套件
的阻抗必须高于4欧姆。
在低阻抗下使用将导致质保失效。
HP 1 -
最低4欧姆
HP 2 -
最低4欧
遥控器
RCA 1/2
图3.3(三次) - MSDS 1.350,双扬声器连接
双扬声器
49
FDS 放大器
安装手册
3.6 – 电源接线
注意
连接电池正端(+)与放大器正端(+ BATT)的电缆上必须
设置保险丝(电流强度:30安),且与电池的距离不得超过40厘米。保险丝盒的连接必须密封。
拆下保险丝座,并拆除保险丝。固定保险丝盒的底座。
切一段长度为10至40厘米(最大)的电缆。剥开1厘米并包锡。将电缆拧入电池保险丝座的端子中。将电源线压接
到专用接线端子,并将接线端子拧紧到电池的供电端。
将剩余线缆剥开1厘米并包锡。将电缆拧入保险丝座的另一端。
(图5)
准备好正极(+)电源线并使用合适的叉形接头连接放大器,用力拧紧固定电源线。(图5)
40cm max
不超过40
50
FDS 放大器
安装手册
注意
除了靠近电池的保险丝外,FDS4.350放大器必须在靠近放大器位置安装额外保险丝。
使用随附的带有保险丝盒的接头(图6)。
将电源线压接到专用接线端子。
(图6)
使用合适的叉形接头将该接头连接放大器,用力拧紧固定电源线。最后,将保险丝插入保险丝座并拧紧。
3.7 - 启动和检查
连接步骤现已完成。仍需对供电及整体(车载收音机/放大器/扬声器)运行情况进行检查。将音源的增益设置为最
低。将放大器的增益设置于总行程的1/3处。将各项部件打开。当所有部件打开后,以低音量等级进行测试。
注意
FDS4.350以特定的启动序列运行。它同时需要REM信号和输入端的音频信号。确保车载收音机有足够的
音量阈值以启动放大器。
51
FDS 放大器
安装手册
4 - 控制与连接面板
图7.1, FDS 4.350
1 11 1
2
3
2139 910
4 6 5
10
8 8
52
FDS 放大器
安装手册
2 1 1
7
109
3 4
6 5
8 8
11
图7.2, FDS 2.350

53
FDS 放大器
安装手册
2 1 1
7
1011
3 4 6 5
8 8
12
图7.3, FDS 1.350

54
FDS 放大器
安装手册
1°/ 输入:RCA接头为低电平信号输入专用。
2°/ 增益:增益旋转式电位器用于调整输入到放大器中的信号电平。注意:增加输入增益并不能产生更大功率,而
是更多噪音。电压增益在0.2 V至5 V之间变化。音频链路的性能优化包括在音频链路上游尽早应用最大增益,
以及在下游应用最小增益。必须根据音源的电平(线路输出电平)调整此电位计。首先将放大器的增益设置为
最低。将音源的电平(音量)逐渐增大至3/4。将放大器的增益提高到所需的最大收听电平。如出现失真请降
低电平。
3°/ +12V: + BATT电源连接器专用于连接与放大器和电池正端(+)相连的电源线。
4°/ 接地:GND(接地)电源连接器专用于连接放大器和车辆地盘相连的负端(-)电源线。
5°/ REM:REM连接器用于通过车载收音机的REM和REMOTE输出连接放大器和音源(车载收音机)。这样,只要
信号源(车载收音机)打开,放大器就会自动开启。
6°/ 扬声器:扬声器连接器用于连接放大器和扬声器。务必遵守极性:放大器正端(+)对应滤波器或扬声器正端
(+),放大器负端(+)对应滤波器或扬声器负端(+)。
7°/ FUSES(保险丝):FUSES保险丝连接器专用于安装放大器的保险丝。
如需更换,请确保电流强度完美适配。
8°/ 指示灯:指示灯用于显示放大器的运行情况。
绿色LED指示灯常亮表示产品运行正常。
绿色LED指示灯常亮表示产品运行异常,请参阅第5章的故障排除。
9°/ 滤波器选择器:CROSSOVER转换器用于根据选择启用高通滤波器(HPF)、低通滤波器(LPF)或无滤波器模
式(FULL)。
10°/ 根据滤波器对截止频率进行调整:该旋转式电位器可以调整低通或高通滤波器的值。所选值定义将被剪除的
信号的频率。
11°/ 低音增强:旋转式电位器(FDS 2.350)或选择器(FDS 1.350)可将低音音量级别从0增加到12 dB。
12°/ 相位调整:PHASE相位旋转式电位器可以调整通道及系统其它部分的相位。对超低音扬声器的相位进行调
整,使超低音扬声器和其它扬声器在连接频率上同时起作用。在理论信号周期内稍微偏移其中一个源,以确
保听音位置的相位配置完美。
13°/ 模式选择器:INPUT SELECT输入选择转换器(仅FDS 4.350适用)可允许通道3和4在必要时复制通道1和2的
信号。因此,如果您的车载收音机仅有一组输出(右侧和左侧各一个),您可以激活1/2模式来放大四个通
道。

55
FDS 放大器
安装手册
如果您想要使用FDS 4.350来配置4个独立输入通道,请选择3/4模式。
如果您想要以3通道模式使用FDS 4.350,请选择1+2模式。然后,3/4声道接收来自声道1和2的单声道叠加信号,
以引导超低音扬声器。
5 - 故障排除
指示灯的不同状态代表特定的故障模式或故障原因。
检查以下所有可能情况。如果将检查仍然无法恢复正常功能,请联系FDS放大器的安装人员或经销商。
LED状态指示灯 声音 可能原因 故障排除
红灯亮 无 输出短路 关闭音频系统。检查扬声器,
关闭 无 无供电或供电异常 关闭音频系统。检查12 V电源。检查电
源线及其极性。检查保险丝。
红/绿灯交替闪烁 改变,缺席或替代 过热 关闭音频系统。
等待放大器冷却后再继续使用。
关闭 无 无REM信号 打开音频系统。
检查REM端子是否存在电压。
关闭 无 保险丝失效 关闭音频系统。
检查保险丝,必要时进行更换。
关闭/绿色常亮 有/无
或失真
接地问题 关闭音频系统。检查接地端与车辆底盘
连接的通畅性。
注意
FDS4.350以特定的启动序列运行。它同时需要REM信号和输入端的音频信号。确保车载收音机有足够的
音量阈值以启动放大器。

56
FDS 放大器
安装手册
6 – 技术规格
型号 FDS4.350
4/3/2声道D类放大器
FDS2.350
立体声桥接D类放大器
FDS1.350
单声道双输出D类放大器
CEA功率(4欧姆) 4 x 58 W RMS 2 x 10⁵ W RMS 1 x 210 W RMS
最大功率(2欧姆) 4 x 100 W RMS 2 x 170 W RMS 1 x 350 W RMS
最大功率(桥接4欧姆) 2 x 200 W RMS 1 x 360 W RMS –
通带 10 Hz – 50 KHz 10 Hz – 50 KHz 10 Hz – 400 Hz
总谐波失真 0.05 % 0.07 % 0.05 %
串扰(1KHz) >65 dB >65 dB –
信噪比(1W/A) >84 dBA >84 dBA –
高通/低通滤波器 配置40 Hz-400 Hz 配置40 Hz-400 Hz 低通40 Hz-400 Hz
低音增强 – 线性居中低音增强为85
Hz(0至12dB)
可选居中低音增强为50
Hz(0至12dB)
相位调整 – – 渐进(0-180°)
全频功能 √ √ –
静止电流(A) 0.7 0.9 0.7
保险丝 1 x 30 A 2 x 15 A 2 x 15 A
保护 短路/低阻抗/极性反转/直流/电压降/过热保护
尺寸,单位为毫米(长x
宽x高)
199 x 108 x 43 199 x 108 x 43 199 x 108 x 43
重量(克) 850 850 850
质保条款
所有Focal扬声器均享受由您本国的Focal官方经销商提供的质保。您的经销商将为您提供与质保条款相关的所有具
体信息。质保范围延伸至原始购货发票所在国家现行法律规定的最低范畴。

P
Eliminação correta deste produto.
Esta marca indica que, na UE, este produto não deve ser eliminado com outro lixo doméstico. Como medida de prevenção
para o ambiente e para a saúde humana, deve ser reciclado de modo responsável, para promover a reutilização dos recursos
materiais. Para devolver o seu dispositivo usado, recorra aos sistemas de devolução e recolha ou contacte o comerciante em
que o produto foi adquirido. Este poderá proceder à reciclagem do produto com toda a segurança.
PL
Prawidłowe usuwanie produktu.
To oznaczenie informuje, że produktu nie należy usuwać wraz z innymi odpadami z gospodarstwa domowego na terenie UE.
W celu ochrony środowiska i zdrowia człowieka, należy w sposób odpowiedzialny prowadzić recykling i wspierać ponowne
wykorzystywanie materiałów. Aby zwrócić swoje urządzenie, należy skorzystać z systemu zwrotu i odbioru prowadzonego
przez sprzedawcę detalicznego, u którego produkt został nabyty. Sprzedawca będzie w stanie w sposób bezpieczny
przeprowadzić recykling produktu.
FIN
Tuotteen asianmukainen hävittäminen.
Tämä merkintä osoittaa, että EU:ssa tätä tuotetta ei saa hävittää muiden kotitalousjätteiden mukana. Kierrätä se
vastuullisesti ehkäistäksesi mahdollisia vaaroja ympäristölle tai ihmisten terveydelle ja edistääksesi aineellisten voimavarojen
uudelleenkäyttöä. Palauta käytetty laite käyttämällä saatavilla olevia palautus- ja keräysjärjestelmiä tai ota yhteys
jälleenmyyjään, jolta ostit tuotteen. He voivat kierrättää tämän tuotteen turvallisesti.
RU
Правильная утилизация продукта.
Данная маркировка указывает на то, что в пределах ЕС этот продукт не может утилизироваться вместе с бытовым
мусором. В целях предотвращения загрязнения окружающей среды и нанесения ущерба здоровью человека
утилизируйте продукт должным образом, позволяющим произвести его повторную переработку. Для того чтобы
вернуть бывшее в употреблении устройство, используйте системы возврата и сбора сырья либо обратитесь в пункт
розничной торговли, в котором вы приобретали продукт, для организации повторной переработки с соблюдением
всех норм безопасности.
NL
Correcte verwijdering van dit product.
Deze markering geeft aan dat dit product in de EU niet samen met ander huishoudelijk afval mag worden weggegooid.
Om het milieu en de gezondheid van de mens te beschermen, dient u het product op verantwoorde wijze te recyclen om
hergebruik van materiële hulpbronnen te stimuleren. U kunt uw gebruikte apparaat retourneren bij een recyclepunt of
milieustation, of neem contact op met de winkel waar u het product hebt gekocht. Zo kan het product op verantwoorde
wijze worden gerecycled.
F
Élimination correcte de ce produit.
Ce marquage indique que ce produit ne doit pas être éliminé avec les autres déchets ménagers au sein de l’UE. Par mesure
de prévention pour l'environnement et pour la santé humaine, veuillez le recycler de manière responsable, pour favoriser la
réutilisation des ressources matérielles. Pour retourner votre appareil usé, veuillez utiliser les systèmes de retour et de collecte
ou contactez le détaillant chez lequel le produit a été acheté. Celui-ci pourra procéder au recyclage du produit en toute
sécurité.
GB
Correct elimination of this product.
This marking indicates that within the EU this product should not be disposed of with other household wastes. To prevent any
risk to the environment or human health, please recycle them responsibly to encourage the reuse of material resources. To
return your used device, please use the return and collection systems available, or contact the retailer where you purchased
the product. They can recycle this product safely.
D
Ordnungsgemäße Entsorgung des Produkts.
Diese Kennzeichnung weist darauf hin, dass dieses Produkt innerhalb der EU nicht mit anderen Haushaltsabfällen entsorgt
werden darf. Als Präventivmaßnahme für die Umwelt und die menschliche Gesundheit muss auf eine verantwortungsbewusste
Wiederverwertung zur Förderung der Wiederverwendung von materiellen Ressourcen geachtet werden. Für die Rückgabe
von Gebrauchtgeräten verwenden Sie bitte zur Verfügung stehende Rückgabe- und Recyclingsysteme oder wenden Sie sich
an den Händler, bei dem Sie das Produkt erworben haben. Letzterer kann das Gerät sicher dem Wertstoffkreislauf zuführen.
E
Eliminación correcta de este producto.
Este símbolo indica que este producto no debe eliminarse con el resto de residuos domésticos dentro de la UE. Con el
objetivo de proteger el medioambiente y la salud pública, recicle de forma responsable para favorecer la reutilización de los
recursos materiales. Para devolver su aparato usado, utilice los sistemas de devolución y recogida o póngase en contacto con
el vendedor del producto. Este podrá proceder al reciclaje del producto de forma totalmente segura.
I
Corretto smaltimento di questo prodotto.
Questa marcatura indica che, nell'UE, questo prodotto non deve essere smaltito insieme agli altri rifiuti domestici. A titolo
preventivo per l'ambiente e la salute, deve essere riciclato in modo responsabile per favorire il riutilizzo delle risorse materiali.
Per mandare indietro l'apparecchio usato, si prega di utilizzare il sistema di reso e raccolta o di contattare il rivenditore da cui
è stato acquistato il prodotto, il quale potrà procedere a riciclare il prodotto in totale sicurezza.

GR
Σωστή απόρριψη αυτού του προϊόντος.
Αυτή η σήμανση υποδεικνύει ότι το προϊόν αυτό δεν πρέπει να απορρίπτεται μαζί με άλλα οικιακά απορρίμματα εντός
της ΕΕ. Για να αποφευχθεί τυχόν κίνδυνος για το περιβάλλον ή την ανθρώπινη υγεία, παρακαλείσθε να το ανακυκλώσετε
υπεύθυνα για να προωθήσετε την επαναχρησιμοποίηση των υλικών πόρων. Για να επιστρέψετε τη μεταχειρισμένη
συσκευή σας, χρησιμοποιήστε τα διαθέσιμα συστήματα επιστροφής και συλλογής ή επικοινωνήστε με το κατάστημα
από το οποίο αγοράσατε το προϊόν. Αυτοί μπορούν να ανακυκλώσουν το προϊόν με ασφάλεια.
LT
Tinkamas šio gaminio šalinimas.
Šis ženklas reiškia, kad ES šalyse šio gaminio negalima išmesti su buitinėmis atliekomis. Norėdami išvengti pavojaus aplinkai
arba žmonių sveikatai, atsakingai pasirūpinkite jo perdirbimu, kad paskatintumėte pakartotinį medžiagų panaudojimą.
Norėdami grąžinti panaudotą prietaisą, pasinaudokite esamomis atliekų grąžinimo ir surinkimo sistemomis arba kreipkitės į
pardavėją, iš kurio įsigijote gaminį. Jie gali saugiai perdirbti šį gaminį.
SK
Správna likvidácia tohto výrobku.
Toto označenie určuje, že v rámci EÚ sa tento výrobok nesmie likvidovať spolu s komunálnym odpadom z domácností. Aby
sa predišlo rizikám pre životné prostredie alebo ľudské zdravie, zabezpečte ich náležitú recykláciu, čím podporíte opätovné
využívanie prírodných zdrojov. Ak chcete použité zariadenie vrátiť, využite na to dostupné systémy zberu a recyklácie
odpadu alebo požiadajte o pomoc predajcu, u ktorého ste výrobok kúpili. Ten dokáže tento výrobok bezpečne recyklovať.
EE
Selle toote õige kõrvaldamine.
See märgis näitab, et ELis ei tohi seda toodet käidelda koos muude majapidamisjäätmetega. Ohu vältimiseks keskkonnale
või inimeste tervisele viige need vastutustundlikult ümbertöötlusse, et soodustada materjaliressursside taaskasutamist.
Oma kasutatud seadme tagastamiseks kasutage saadavalolevaid tagastus- ja kogumissüsteeme või võtke ühendust
jaemüüjaga, kellelt te toote ostsite. Müüja võib selle toote ohutult ümbertöötlusse viia.
DK
Korrekt eliminering af dette produkt.
Dette mærke indikerer, at dette produkt, i overensstemmelse med EU, ikke skal bortskaffes sammen med andet
husholdningsaffald. For at undgå enhver risiko for miljøet eller menneskers sundhed, skal du genanvende det på ansvarlig
vis og således fremme genbrug af materielle ressourcer. Hvis du ønsker at returnere din brugte enhed, skal du bruge de
returnerings- og indsamlingssystemer, der er tilgængelige, eller kontakte forhandleren, hvor du købte produktet. De kan
genbruge dette produkt på sikker vis.
SE
Korrekt avlägsnande av produkten.
Denna märkning anger att produkten inte ska kasseras med annat hushållsavfall inom EU. För att förhindra
skada på miljö och människors hälsa, vänligen återvinn produkten ansvarsfullt för att främja återanvändning av
materialresurserna. Använd tillgängliga återlämnings- och insamligssystem för att återlämna din använda anordning,
eller kontakta återförsäljaren som du köpte produkten av. De kan återvinna produkten säkert.
HU
A termék helyes ártalmatlanítása.
Ez a jelölés azt jelzi, hogy a terméket nem szabad az EU területén az egyéb háztartási hulladékkal együtt kidobni. A
lehetséges környezet- és egészségkárosodás elkerülése érdekében kérjük, hogy a hulladékot felelősen hasznosítsa újra,
ezzel segítve a nyesanyagok újrahasznosítását. A használt eszközök visszaküldéséhez használja a rendelkezésre álló
visszaküldési és gyűjtórendszereket vagy forduljon a kiskereskedőhöz, akitől a terméket vásárolta. Ők elvégzik a termék
biztonságos újrahasznosítását.
LV
Pareiza, šī produkta, likvidācija.
Šis marķējums norāda, ka Eiropas Savienībā šo produktu nedrīkst izmest kopā ar citiem sadzīves atkritumiem. Lai novērstu
jebkādu risku videi vai cilvēku veselībai, lūdzam nodot produktu otrreizējai pārstrādei, lai veicinātu materiālo resursu
otrreizējo izmantošanu. Lai atgrieztu savu lietoto ierīci, lūdzu, izmantojiet pieejamās atpakaļnodošanas un savākšanas
sistēmas, vai sazinieties ar izplatītāju, no kura iegādājāties šo produktu. Tas var droši pārstrādāt šo produktu.
SI
Pravilno odlaganje tega izdelka.
Ta oznaka pomeni, da tega izdelka v EU ni dovoljeno odlagati z drugimi gospodinjskimi odpadki. V izognitev povzročanju
morebitne škode za okolje ali človeško zdravje izdelek reciklirajte odgovorno, da omogočite ponovno uporabo materiala. Če
želite rabljeno napravo vrniti, jo vrnite prek sistemov za vračanje in zbiranje, ki so na voljo, ali pa se obrnite na trgovca, pri
katerem ste izdelek kupili, ki bo izdelek varno recikliral.
CZ
Správná likvidace tohoto výrobku.ς.
Toto označení znamená, že výrobek v EU nelze likvidovat spolu s jiným domácím odpadem. Aby se předešlo možným škodám
na životním prostředí či na lidském zdraví, výrobky zodpovědně recyklujte, podpoříte tím opětovné využívání materiálů. Pro
vrácení použitého výrobku využijte dostupné vratné a sběrné systémy nebo se spojte s maloobchodním prodejcem, kde jste
výrobek zakoupili. Ti pak mohou výrobek bezpečně recyklovat.


Focal-JMlab
®
- BP 374 - 108, rue de l'Avenir - 42353 La Talaudière cedex - France - www.focal.com
Tel. (+33) 04 77 43 57 00 - Fax (+33) 04 77 43 57 04 - SCPP-2019/11/06/ - v2 - CODO1506
