
USER GUIDE AND PRODUCT MANUAL
YOUR COMPREHENSIVE GUIDE TO THE PICASSOTAB
WELCOME
This manual is organized to help you get started quickly, understand the device’s key
features, adjust system settings, nd troubleshooting tips, and access support when
needed. Use the model-specic sections for details relevant to your table.
Note: Your tablet might look slightly dierent from the illustrations in this user guide.
Depending on the version of operating systems and programs, some user interface
instructions might not be applicable to your tablet.

2
CONTENTS
1. Getting Started
1.1. All-In-One Package…………………………………………………………………………………………………………………………..3
1.2. Setting Up Your Tablet……………………………………………………………………………………………………………………..4
1.3. Activating Your Picasso Pen……………………………………………………………………………………………….…………4
1.4. Overview of Ports and Buttons………………………………………………………………………………………….………..5
2. Device Features
2.1. Wireless Connectivity……………………………………………………………………………………………………………………..5
2.2. Managing Storage Via Storage Settings………………………………………………………………..…………………7
2.3. Connecting To An External Display……………………………………………………………..…………………………….8
2.4. Pre-Installed Software…………………………………………………………………………………………..………………………..8
3. System & Settings
3.1. Add Or Remove A Google Account………………………………………………………..……………………………….10
3.2. Setting Up Parental Controls…………………………………………………………………………………………………….10
3.3. Customization………………………………………………………………………………………………………………………………….11
3.4. Lock Screen And Security………………………………………………………………………………………….……………….12
4. Troubleshooting & Maintenance
4.1. Restart & Reset…………………………………………………………………………………………………………….………………….13
4.2. Battery Life: Tips to Make It Last Longer……………………………………………………………………………….14
4.3. Can't Unlock Your PicassoTab…………………………………………………………………………….…………………….14
4.4. Backup, Restore And Data Transfer………………………………………………………………….…………………….15
4.5. Accessing The Questions Page On The Simbans Website…………………………………..………16
5. User Support & Safety Information
5.1. Important Safety & Proper Use…………………………………………………………………………………..…………….17
5.2. Warranty Details And Contact Information…………………………………………………………………………19
5.3. Operating System Reinstallation Guide……………………………………………………………….………………19
3
1. GETTING STARTED
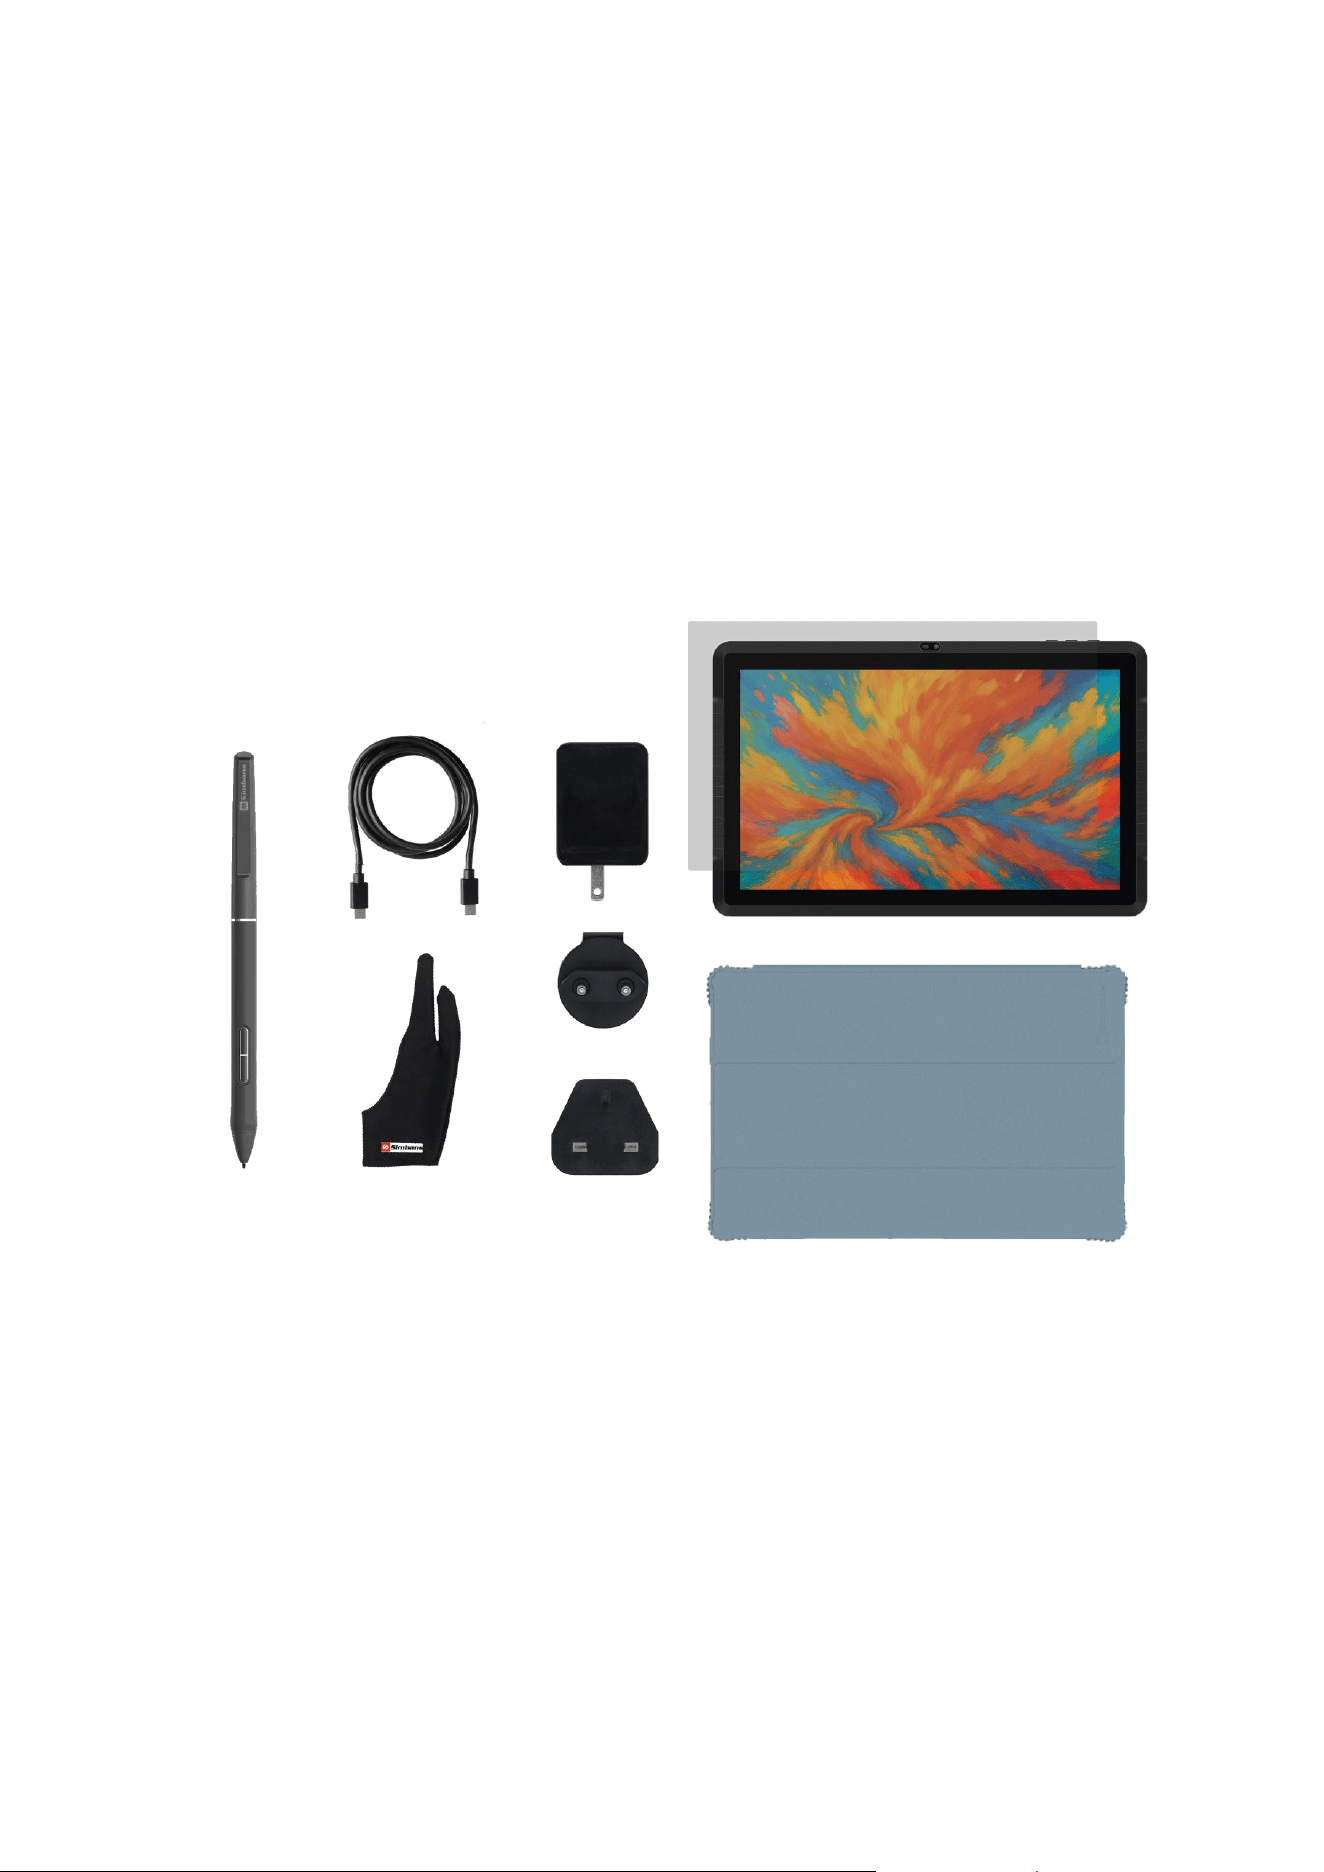
1.1. ALL-IN-ONE PACKAGE
• Tablet, Picasso Pen, Tablet Case
• Screen Protector, Drawing Glove
• Charger with Adaptors, Manual

4
1.2. SETTING UP YOUR TABLET
When you use the device for the rst time, do the following to complete the initial setup:
Attention: Use only Simbans power adapters.
1. Connect the power cord to the ac power adapter.
2. Connect the ac power adapter to the USB-C connector on your device.
3. Connect the power cord to a proper electric outlet.
4. Press the power button to turn on the computer and follow the instructions on
the screen to complete the initial setup.
1.3. ACTIVATING YOUR PICASSO PEN
NO CONFIGURATION REQUIRED
• The Picasso Pen activates instantly upon touching the screen.
• No pairing, setup, or conguration needed.
5
1.4. OVERVIEW OF PORTS AND BUTTONS
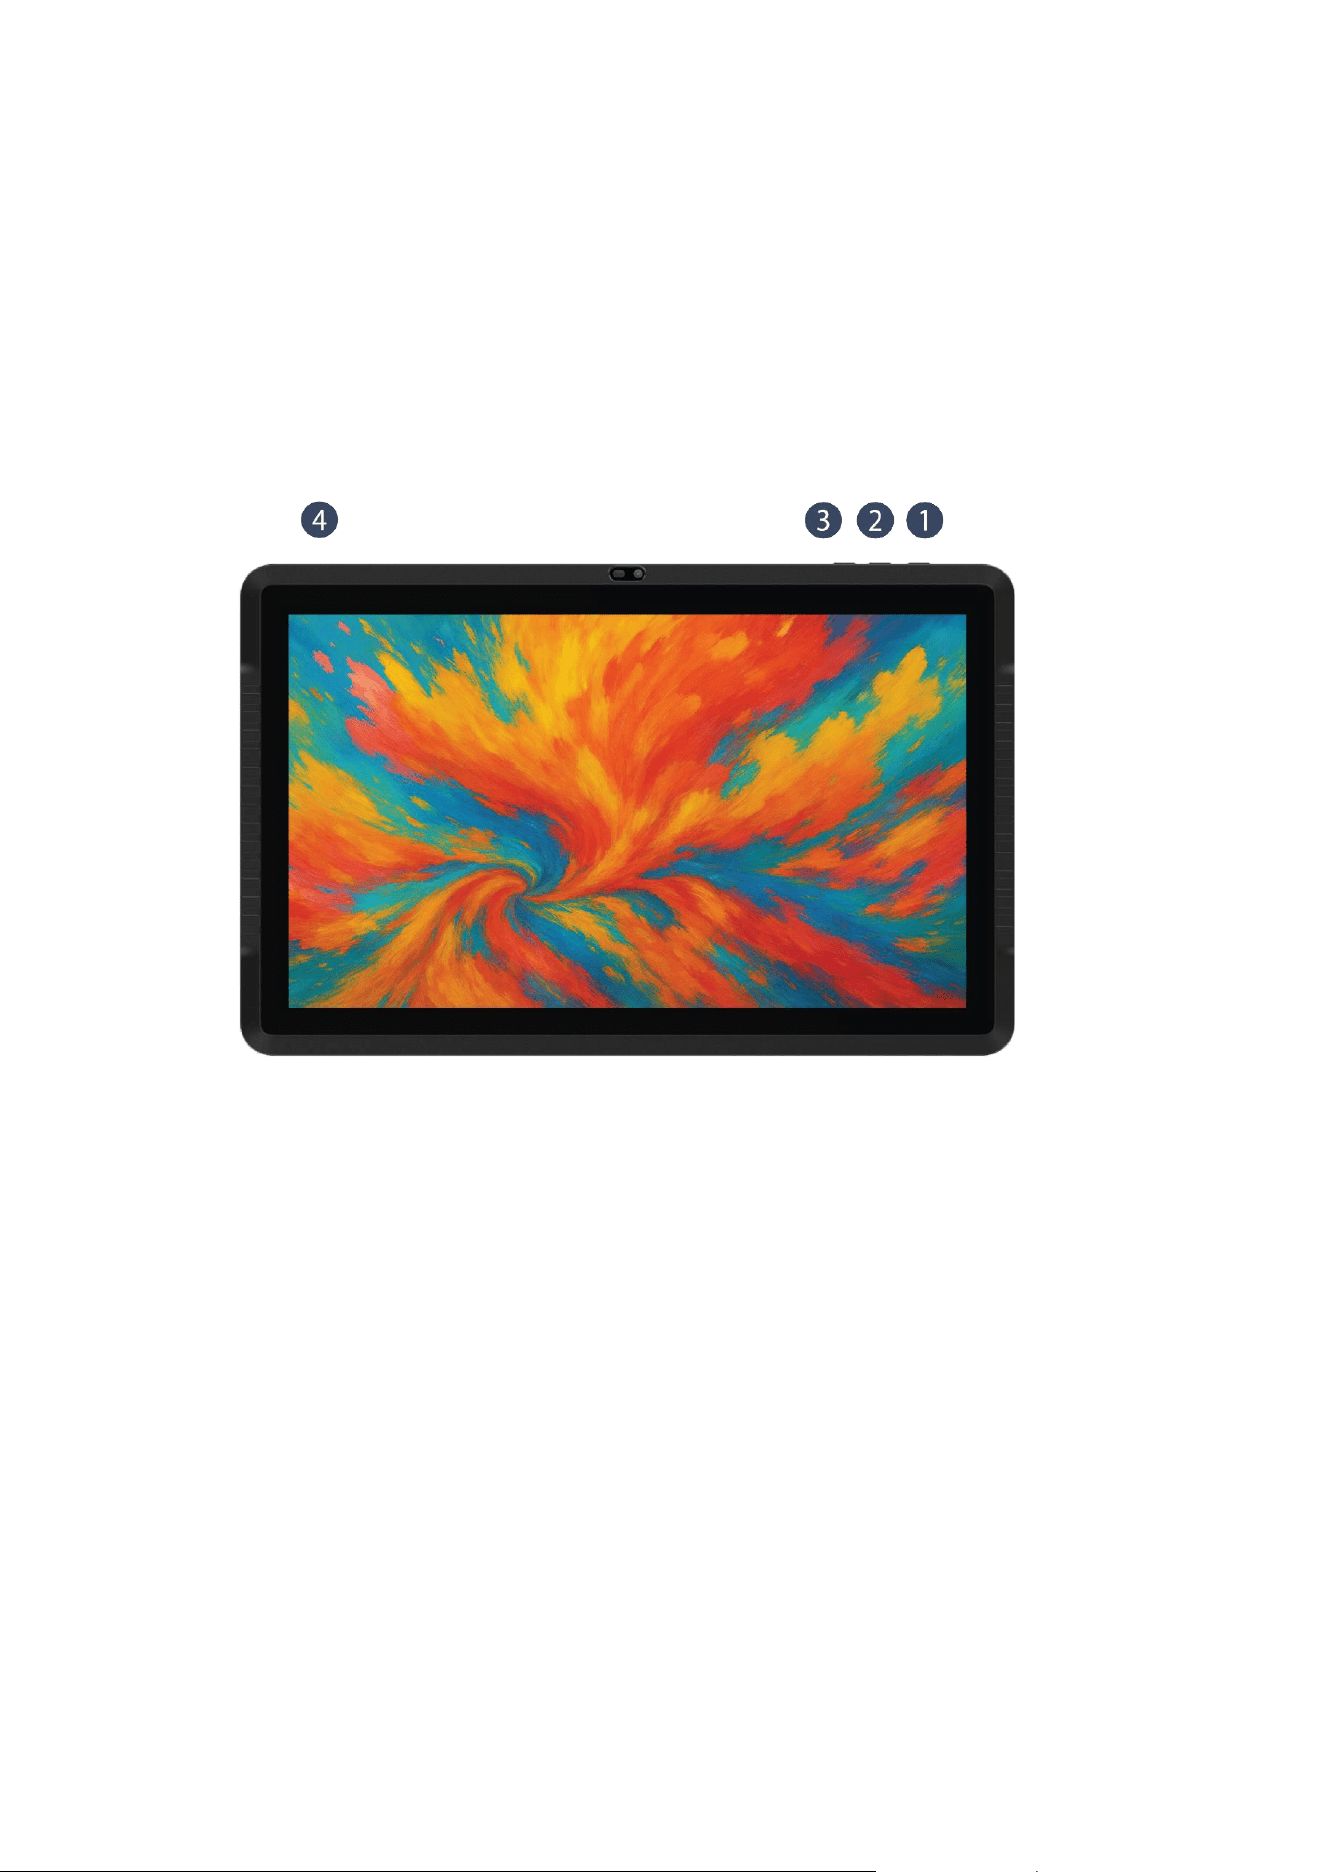
1. Power On/O Button
2. Volume Up
3. Volume Down
4. Micro SD Slot
2. DEVICE FEATURES
2.1. WIRELESS CONNECTIVITY
CONNECT TO A WI-FI NETWORK
1. Open your device's Settings app.
2. Tap Network & internet > Internet.
3. Tap a listed network. Networks that require a password have a lock icon.
Tip: After you connect, the network is "Saved." When your device is nearby and Wi-Fi is
on, your device automatically connects to this network.

6
USING BLUETOOTH DEVICES
Turn Bluetooth on or o from the Settings app:
1. From the top of the screen, swipe down.
2. Tap Bluetooth .
Tip: To save battery, turn off Bluetooth when not in use. Bluetooth is off in Airplane
mode.
Pair a Bluetooth accessory:
OPTION 1: Use the Settings app (all Bluetooth accessories)
1. From the top of the screen, swipe down.
2. Touch and hold Bluetooth .
3. Tap Pair new device.
4. If there's no "Pair new device," check under "Available devices" or tap More: >
Refresh.
5. To pair your device, tap the name of the Bluetooth device.
6. Follow the on-screen instructions.
OPTION 2: Use notifications (Fast Pair accessories only)
1. Make sure:
o Your Bluetooth accessory works with Fast Pair. Accessories that work
with Fast Pair say so on their boxes.
o Your device has Bluetooth turned on.
2. Turn on your Fast Pair accessory and put it in pairing mode.
o Make sure your accessory is near your device.
3. When you get a notification, tap to pair.
4. You'll get a "Device connected" notification.

7
2.2. MANAGING STORAGE VIA STORAGE SETTINGS
SEE WHAT’S USING STORAGE
1. Open your Settings app.
2. Tap Storage.
3. See the categories.
FREE UP STORAGE YOURSELF
To pick from a list of photos, videos, and apps that you haven't used recently:
1. Open your device's Settings app.
2. Tap Storage Free up space.
3. To pick something to delete, scroll to the category you want to delete, and
tap Select files. (If nothing is listed, tap Browse.)
4. Choose the files to delete or choose all of them.
5. Tap Move files to Trash.
STORAGE EXPANSION
OPTION 1: Using Cloud Storage (e.g., Drive)
1. Go to Settings on your tablet.
2. Tap Storage.
3. Go to All Storage > Other Storage.
4. Select your cloud service.
5. Sign in with your account if required.
6. Access and manage your cloud les from the storage menu.
OPTION 2: Using a microSD Card
To Insert a microSD Card:
1. On the side of the tablet, insert a pin into the hole next to the microSD card slot.
2. The card tray will pop out from the tablet.
3. Place the microSD card onto the tray, then carefully push the tray back into the
slot.

8
4. The tablet should automatically detect the card.
5. If not, go to Settings > Storage to locate and manage the card.
6. Follow any on-screen instructions to access or format the microSD card as
needed.
To Remove a microSD Card:
1. Unmount the memory card for safe removal: From Home screen, tap Settings >
Storage > Unmount SD Card.
2. On the side of the tablet, insert a pin into the hole next to the microSD card slot.
The tray and the memory card will pop out.
3. Remove the memory card from the tray.
4. Re-insert the tray into the slot.
Important: To avoid damage and data corruption, do not remove the memory card while
data is being written to or read from the card (for example, while playing a music le
stored on the card).
2.3. CONNECTING TO AN EXTERNAL DISPLAY
CONNECTING VIA WIRELESS SCREEN CASTING
1. Ensure the receiving device (Smart TV/adapter) supports casting and is on the
same Wi-Fi as your tablet.
2. Open casting: Settings > Connected devices > Connection preferences >
Cast or use Quick Settings (Cast/Screen Cast).
3. Select the desired device from the list and wait for connection.
4. Follow on-screen prompts (e.g., conrm PIN or allow on TV).
2.4. PRE-INSTALLED SOFTWARE
The PicassoTab comes with the following pre-installed applications, in addition to
standard system apps:
• Concepts: A exible vector-based creative workspace/sketchpad where you can
take your ideas from concept to reality.
9
• Innite Painter: A digital painting application that supports multiple brushes,
layers, and canvas settings.
• FlipaClip: An animation application for creating frame-by-frame animated
sequences.
• Artixo: A cutting-edge drawing tutorial app featuring video lessons to enhance
your drawing skills, pre-installed on your tablet so you can dive into learning right
away.
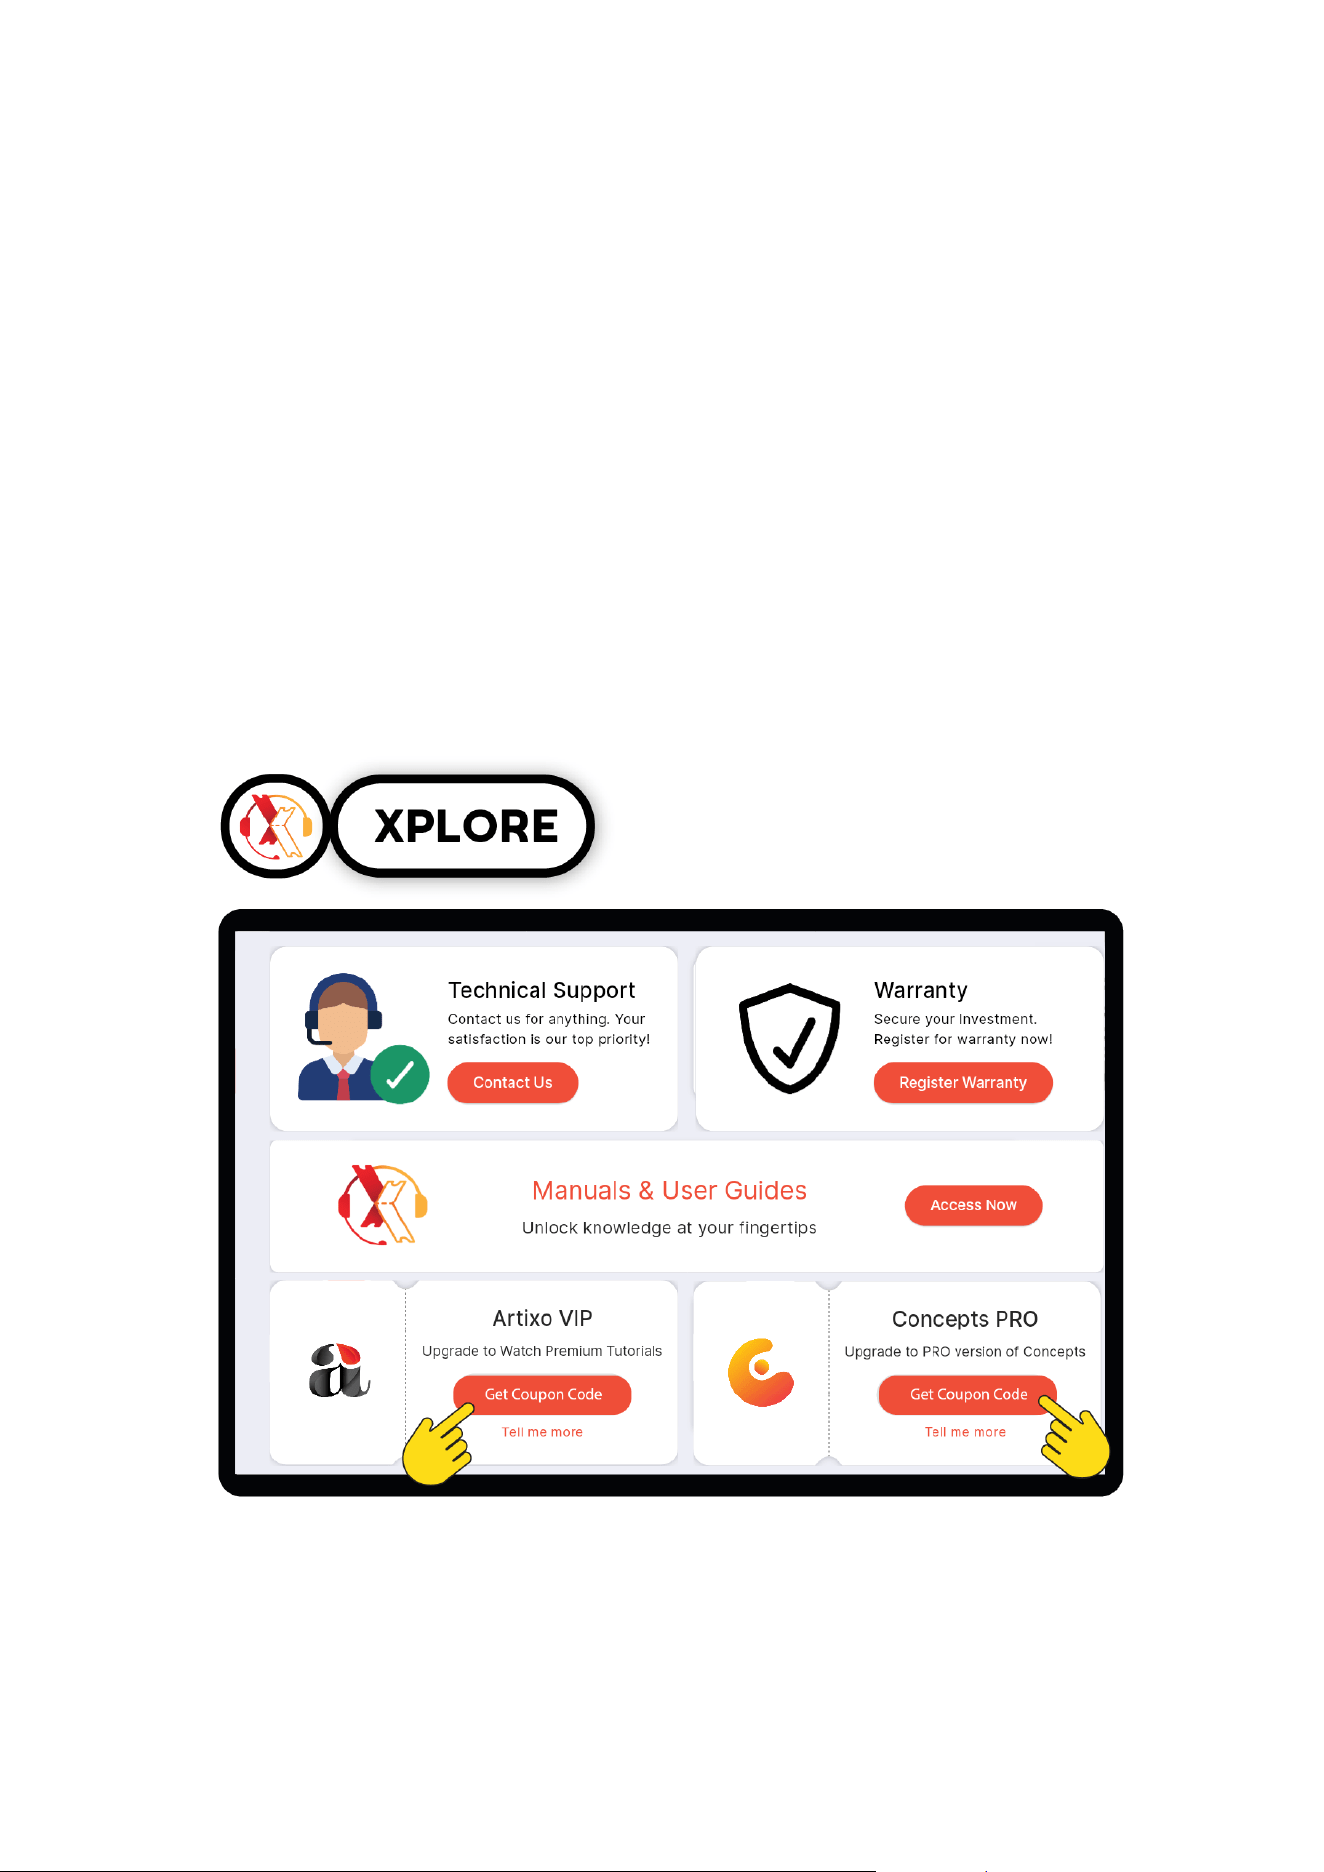
• Xplore: An Android app developed by Simbans, designed to enhance your
experience with PicassoTab and various drawing app. It brings you exclusive
upgrade oers and coupons, allowing you to unlock premium features, and
take your artwork to the next level.

10
3. SYSTEM & SETTINGS
3.1. ADD OR REMOVE A GOOGLE ACCOUNT
ADD A GOOGLE OR OTHER ACCOUNT TO YOUR PICASSOTAB
1. Open your device's Settings app.
2. Tap Passwords & accounts.
3. Under "Accounts," tap Add account.
4. To add your Google Account, tap Google. When you sign in with a Google
Account, the email, contacts, calendar events, and other data associated with
that account automatically sync with your device.
5. Follow the on-screen instructions.
6. If you're adding accounts, you may need to enter your device's pattern, PIN, or
password for security.
REMOVE A GOOGLE OR OTHER ACCOUNT FROM YOUR PICASSOTAB
1. Open your device's Settings app.
2. Tap Passwords & accounts.
3. Under "Accounts," tap the account you want to remove > Remove account.
4. To conrm, tap Remove account > Delete.
5. If this is the only Google Account on the device, you'll need to enter your device's
pattern, PIN, or password for security.
3.2. SETTING UP PARENTAL CONTROLS
HOW TO SET UP PARENTAL CONTROLS ON GOOGLE PLAY
Parental controls on your tablet allow you to restrict content downloads and purchases
from Google Play based on maturity levels. Note that purchase approval settings apply
only to transactions made through Google Play’s billing system.
Important: Parental controls do not block access to restricted content via search
results or direct links.
1. Open the Google Play app .

11
2. At the top right, tap the prole icon.
3. Tap Settings Family Parental controls.
4. Turn on Parental controls.
5. To protect parental controls, create a PIN your child doesn't know.
6. Select the type of content you want to lter.
7. Choose how to lter or restrict access.
FOR FAMILY MEMBERS WHOSE ACCOUNTS ARE MANAGED WITH FAMILY LINK
1. Open the Family Link app .
2. At the top left, select your child.
3. Tap Controls Google Play.
4. Tap the type of content you want to lter.
5. Choose how to lter or restrict access.
3.3. CUSTOMIZATION
Display: You can congure the screen brightness, timeout delay, font size, and many
other display settings.
DARK MODE
Dark mode allows you to switch to a darker theme to keep your eyes more comfortable
at night, darkening white or bright screens and notications.
• From Settings, tap Display for the following options:
▪ Light: Apply a light colour theme to your device (default).
▪ Dark: Apply a dark colour theme to your device.
▪ Dark theme settings: Customize when and where Dark mode is applied.
– Turn on as scheduled: Congure Dark mode for either Sunset to
sunrise or Custom schedule.
SCREEN BRIGHTNESS
Adjust the screen brightness according to lighting conditions or personal preference.
1. From Settings, tap Display.

12
2. Customize options under Brightness:
a. Drag the Brightness slider to set a custom brightness level.
b. Tap Adaptive brightness to automatically adjust the screen brightness
based on the lighting conditions. Adaptive brightness is on by default.
TIP You can also adjust screen brightness from the Quick settings panel.
SCREEN TIMEOUT
You can set the screen to turn o after a set amount of time.
• From Settings, tap Display > Screen timeout, and tap a time limit to set it.
NOTE Prolonged display of non-moving images, excluding Always On Display, may
result in permanent ghost-like afterimages or degraded image quality. Turn o the
display screen when not in use.
NOTIFICATIONS
You can prioritize and streamline app alerts by changing which apps send notications
and how notications alert you.
App notications
Choose which apps are allowed to send you notications.
• From Settings, tap Notications > App notications, select All apps, and then tap
to enable notications for individual apps.
3.4. LOCK SCREEN AND SECURITY
You can choose from the following screen lock types that oer high, medium, or no
security: Swipe, Pattern, PIN, Password, and None.
Set a secure screen lock
It is recommended that you secure your device using a secure screen lock (Pattern, PIN,
or Password).
1. From Settings, tap ‘Security & privacy’ > ‘Device Unlock’ > ‘Screen Lock’ and tap
a secure screen lock (Pattern, PIN, or Password).
2. Follow the on-screen instructions to complete the setup.

13
4. TROUBLESHOOTING & MAINTENANCE
4.1. RESTART & RESET
TO RESTART YOUR DEVICE
Press and hold Side button and Volume down button at the same time and tap Restart.
Conrm when prompted.
RESET YOUR ANDROID DEVICE TO FACTORY SETTINGS
Important: A factory reset erases all your data from your device.
OPTION 1: Using the factory reset option available in the Settings app.
1. Open your device's Settings app.
2. Tap System Reset options Erase all data (factory reset).
3. To erase all data from your device's internal storage, tap Erase all data.
• If needed, your device asks for your PIN. Enter your PIN and then
tap Erase all data.
4. When your device nishes the reset, follow the instructions on screen to set up
your device and restore your backed-up data.
OPTION 2: Hard Reset
1. Power o the tablet.
2. Press and hold the Power and Volume Up buttons simultaneously until the
recovery menu appears.
3. Use the volume buttons to navigate to Recovery Mode and conrm your selection
with the Power button.
4. Select Wipe data/factory reset, then conrm by selecting Yes.
5. Once the reset is complete, choose Reboot to restart the tablet.
OPTION 3: Using the Reset (R) Hole
If your device is frozen or unresponsive, you can use the small Reset (R) Hole, typically
found on the back or side of the device.

14
• Insert a paperclip or SIM ejector tool into the hole and press gently.
• This will forcibly restart the device — like holding the power button for more
than 10 seconds.
• Important: This does not erase your data or perform a factory reset. It simply
reboots the system.
4.2. BATTERY LIFE: TIPS TO MAKE IT LAST LONGER
USE BATTERY SAVER ON YOUR PICASSOTAB
To make your battery last longer, you can set Battery Saver to turn on automatically. You
can also turn on Battery Saver at any time.
TURN BATTERY SAVER ON AUTOMATICALLY
1. Open your device's Settings app.
2. Tap Battery Battery Saver Set a schedule.
3. Make sure that "Use Battery Saver" is on.
4. Slide the percentage bar to the level you want.
Tip: The next time your battery level falls to the percentage you have set; Battery Saver
will turn on automatically for you.
LET BATTERY SAVER TURN OFF WHEN YOUR PHONE IS CHARGED
Battery Saver can turn o automatically when your phone's battery reaches 90% if “Turn
o at 90%” is on.
4.3. CAN’T UNLOCK YOUR PICASSOTAB
If you are unable to unlock your PicassoTab due to a forgotten PIN, password, or pattern,
you will need to reinstall the operating system. This process will remove the screen lock
and allow you to set a new unlock method.
Important: Performing a factory reset will erase all data on your device, including apps,
settings, and personal les. Ensure you have backed up any important information
before proceeding.

15
To begin the reset and reinstallation process, please visit our OS restore page here.
4.4. BACKUP, RESTORE AND DATA TRANSFER
You can congure your device to back up, restore, or transfer data using your personal
accounts or external storage options.
BACKUP TO GOOGLE ACCOUNT
You can enable automatic backup of your device data to your Google Account. This
allows you to restore your data on any compatible device, including the PicassoTab.
Steps:
1. Go to Settings.
2. Tap Accounts and backup or Google (depending on your device).
3. Tap Back up under Backup & restore section.
4. Follow the on-screen instructions to enable or manage backups.
RESTORE DATA USING GOOGLE ACCOUNT
If your Google Account already has backup data from another device, you can restore it
when setting up the PicassoTab:
• During the initial setup of the PicassoTab, sign in with the same Google Account
that has the backup.
• When prompted, select the backup you want to restore.
• Follow the on-screen instructions to complete the restoration process.
DATA TRANSFER METHODS
You can transfer data to and from your device using the following methods:
1. Using a microSD Card
A microSD card is a simple and oline way to move les between devices.
To transfer data using a microSD card:
1. Insert a microSD card into your device.
2. Use the File Manager or My Files app to move or copy les to the SD card.

16
3. Remove the SD card and insert it into another device or a computer (using a card
reader) to access the les.
2. Using Cloud Storage (e.g., Dropbox, OneDrive)
Cloud storage services allow you to upload and access your les from any device with
internet access.
To transfer data using cloud storage:
1. Install a cloud storage app (such as Dropbox, OneDrive, or Google Drive) from
the Play Store.
2. Sign in with your account.
3. Upload the les you want to transfer.
4. On another device, sign into the same cloud service to download the les.
3. Using a USB Cable (Connecting to PC/Desktop)
You can transfer les directly between your device and a computer using a USB cable.
To transfer data using a USB cable:
1. Connect your device to a PC or desktop using a USB cable.
2. On your device, you may see a prompt — select "File Transfer" or "MTP" mode.
3. On your computer, open File Explorer (Windows).
4. Browse your device storage and copy les to or from the device.
Tip: Ensure your device is unlocked and that you allow le access when prompted.
4.5. ACCESSING THE QUESTIONS PAGE ON THE SAMBANS WEBSITE
If you need further assistance or have questions not covered in this manual, please visit
the Questions page on the oicial Simbans website. This resource includes answers to
frequently asked questions, troubleshooting tips, and useful guides for your PicassoTab.
Visit: https://www.simbans.com/pages/questions

17
5. USER SUPPORT & SAFETY INFORMATION
5.1. IMPORTANT SAFETY & PROPER USE
BATTERY
A rechargeable Li-ion battery is installed in the tablet.
• DO NOT attempt to replace the tablet battery by yourself because you may
damage the battery, which might cause overheating, re or injury.
• DO NOT dispose of tablet in a re.
• DO NOT expose the tablet battery to any heat source, direct sunlight, or high
temperature.
• Only use the ORIGINAL power adapter provided by us to charge the tablet
battery.
• We suggest you drain the battery completely once a month if only use your tablet
occasionally
• The Li-ion battery in your tablet should be serviced or recycled by an authorized
service provider and must be recycled or disposed of separately from household
waste
• Dispose of battery according to your local environmental laws and regulations.
Caution:
• RISK OF EXPLOSION IF BATTERY IS REPLACED BY AN INCORRECT TYPE.
• DISPOSE OF USED BATTERIES ACCORDING TO THE INSTRUCTIONS.
RECYCLING
This product bears the selective sorting symbol for Waste electrical and electronic
equipment (WEEE). This means that this product must be handled pursuant to
European directive 2012/19/EU to be recycled or dismantled to minimize its impact on
the environment.
User has the choice to give his product to a competent recycling organization or to the
retailer when he buys a new electrical electronic equipment.
The device complies with RF specications when the device used at 5mm from your
body.

18
CAUTION ABOUT HIGH-VOLUME USAGE
Warning:
• Exposure to loud noise from any source for an extended period may aect your
hearing.
• Do not listen at high volume levels for long periods.
• Turn the volume down if you can't hear people speaking near you.
FCC STATEMENT
This equipment has been tested and found to comply with the limits for a Class B digital
device, pursuant to part 15 of the FCC Rules. These limits are designed to provide
reasonable protection against harmful interference in a residential installation. This
equipment generates, uses, and can radiate radio frequency energy and, if not installed
and used in accordance with the instructions, may cause harmful interference to radio
communications. However, there is no guarantee that interference will not occur in a
particular installation. If this equipment does cause harmful interference to radio or
television reception, which can be determined by turning the equipment o and on, the
user is encouraged to try to correct the interference by one or more of the following
measures:
• Reorient or relocate the receiving antenna.
• Increase the separation between the equipment and receiver.
• Connect the equipment into an outlet on a circuit different from that to which the
receiver is connected.
• Consult the dealer or an experienced radio/TV technician for help.
Caution: Any changes or modifications to this device not explicitly approved by
manufacturer could void your authority to operate this equipment.
This device complies with part 15 of the FCC Rules. Operation is subject to the
following two conditions: (1) This device may not cause harmful interference, and (2)
this device must accept any interference received, including interference that may
cause undesired operation.
•
Warning: Any Changes or modications not expressly approved by the party
responsible for compliance could void the user's authority to operate the equipment.
EUROPEAN UNION COMPLIANCE STATEMENT
Simbans declares that this equipment is in compliance with Directive 2014/53/EU

19
GREAT BRITAIN COMPLIANCE STATEMENT
Simbans declares that this equipment is in compliance with CHAPTER 1 of the Radio
Equipment Regulations 2017
LEGAL NOTICES
• Simbans and PicassoTab are the trademark of Simbans Limited in United States,
other countries, or both.
• Google, Android, Google Play, and other marks are trademarks of Google LLC
Other company, products or service marks may be trademarks or service marks
of others.
5.2. WARRANTY DETAILS AND CONTACT INFORMATION
For complete information about our product warranty and options for service, please
visit the following oicial pages:
• Warranty Information:
https://www.simbans.com/pages/warranty
• Contact Us for Support or Inquiries:
https://www.simbans.com/pages/support
If you have any questions regarding warranty coverage, product registration, or need
customer assistance, feel free to reach out through the Contact Us page. Our support
team is available to assist you.
5.3. OPERATION SYSTEM REINSTALLATION GUIDE
If you need to reinstall the operating system on your device, please follow the
instructions provided on our oicial OS restore page. This resource includes:
• Model-specic folders containing:
o Step-by-step installation instructions (Instruction le)
o Required OS image les
o Necessary tools and utilities
To begin the reinstallation process, visit:

20
OS Restore Page:
https://www.simbans.com/pages/restore
Important:
Before proceeding with OS reinstallation, ensure you back up all important data. The
process will erase all existing les on your device.
©2025 SIMBANS Co., Ltd.
Specific Absorption Rate (SAR) information:
This PicassoTab_ Z13 meets the government's requirements for exposure to radio
waves. The guidelines are based on standards that were developed by independent
scientific organizations through periodic and thorough evaluation of scientific studies.
The standards include a substantial safety margin designed to assure the safety of all
persons regardless of age or health. FCC RF Exposure Information and Statement the
SAR limit of USA (FCC) is 1.6 W/kg averaged over one gram of tissue. Device types:
PicassoTab_ Z13 has also been tested against this SAR limit. This device was tested for
typical body-worn operations with the back of the table kept 0mm from the body. To
maintain compliance with FCC RF exposure requirements, use accessories that maintain
an 0mm separation distance between the user's body and the back of the table. The use
of belt clips, holsters and similar accessories should not contain metallic components in
its assembly. The use of accessories that do not satisfy these requirements may not
comply with FCC RF exposure requirements, and should be avoided.