TYPO CITROEN (OTF) LIGHT 25 PT
C4-Picasso-II_en_Chap00_couv-imprimeur_ed01-2016
Handbook
C4-Picasso-II_en_Chap00_couv-imprimeur_ed01-2016
On-line handbook
If the "MyCITROËN" function is not available on the CITROËN public website for your country,
youcanndyourhandbookatthefollowingaddress:
http://service.citroen.com/ddb/
FindyourhandbookontheCITROËNwebsite,under"MyCITROËN".
Select:
Selectoneofthefollowingmeansofaccessto
viewyourhandbookon-line...
This personal and customisable space allows you to establish direct and special contact with the
manufacturer.
thelanguage,
the vehicle, its body style,
theprinteditionofyourhandbookappropriateforthedateofregistrationofyourvehicle.
Scanthiscodefordirectaccesstoyourhandbook.
Referringtothehandbookon-linealsogives
you access to the latest information available,
easilyidentiedbythebookmark,associated
withthissymbol:

Key
Thiskeywillenableyoutoidentifythespecialfeaturesof
yourvehicle:
C4 Picasso
Grand C4 Picasso
Grand C4 Picasso with 5 seats
Grand C4 Picasso with 7 seats
CITROËN has a presence on every continent,
acompleteproductrange,
bringingtogethertechnologyandapermanentspiritofinnovation,
foramodernandcreativeapproachtomobility.
Wethankyouandcongratulateyouonyourchoice.
Happymotoring!
At the wheel of your new vehicle,
gettingtoknoweachsystem,
eachcontrol,eachsetting,
makesyourtrips,yourjourneys
morecomfortableandmoreenjoyable.
Thishandbookhasbeendesignedtohelp
youmakethemostofyourC4Picassoinall
circumstancesandincompletesafety.
Takethetimetoreadthroughitsoasto
familiariseyourselfwithyourvehicle.
Thishandbookcoversallofthevariations
in equipment available across the whole
C4Picassorange.
Your vehicle will be fitted with only some of
the equipment described in this document,
dependingonitstrimlevel,versionandthe
specification for the country in which it was
sold.
Thedescriptionsandillustrationsaregivenas
indicationsonly.
AutomobilesCITROËNreservestherightto
modify the technical characteristics, equipment
andaccessorieswithouthavingtoupdatethis
editionoftheguide.
Thisdocumentformsanintegralpartofyour
vehicle.Remembertopassitontothenew
ownerintheeventofthesaleofthevehicle.
Key
safetywarning
additional information
contributes to the protection of the environment
Contents
C4-Picasso-II_en_Chap00a_sommaire_ed01-2016
Touch screen tablet 11
Instrument panels 17
Indicatorandwarninglamps 21
Gaugesandindicators 37
Adjustmentbuttons 45
Trip computer 48
Instruments
Overview
Electronickey-remotecontrol 51
KeylessEntryandStarting 53
Centrallocking 60
Doors 61
Boot 63
Motorisedtailgate 64
Hands-freetailgateaccess 68
Alarm 70
Electricwindows 73
Access
Front seats 75
Rear seats 82
Seat modularity 89
Steeringwheeladjustment 91
Ventilation 92
Heating 94
Dual-zonemanualairconditioning 95
Dual-zoneautomaticairconditioning 97
Front demist - defrost 102
Rear screen demist - defrost 102
Scentedairfreshener 103
Interiorttings 105
Rearmultimedia 113
Courtesy lamps 121
Interiormoodlighting 122
Ease of use and comfort
Drivingrecommendations 123
Starting-switchingofftheenginewiththe
electronickey 125
Starting-switchingofftheenginewith
KeylessEntryandStarting 127
Electricparkingbrake 131
Hillstartassist 138
5-speedmanualgearbox 139
6-speedmanualgearbox 139
Automaticgearbox 140
Gear shift indicator 145
Stop & Start 146
Memorisingspeeds 149
Speedlimitrecognition 150
Speed limiter 154
Cruise control 157
Dynamic cruise control 160
Dynamic cruise control
with Stop function 167
Collisionriskalert 176
Assisted lane departure
warningsystem 178
Blind spot sensors 182
Fatiguedetectionsystem 185
Parkingsensors 187
Reversingcamera 189
360Vision 190
ParkAssist 192
Under-inationdetection 200
Driving
Eco-driving
Contents
C4-Picasso-II_en_Chap00a_sommaire_ed01-2016
Hazardwarninglamps 224
Horn 224
Emergencyorassistancecall 224
Electronic stability
control (ESC) 225
Seat belts 228
Airbags 233
Childseats 238
Deactivatingthepassenger's
frontairbag 240
ISOFIXmountings 249
Childlock 256
Safety
Fuel 257
Misfuel prevention (Diesel) 258
Snow chains 260
Very cold climate screen(s) 261
Towbarwithquickly
detachable towball 262
Towingatrailer 264
Energyeconomymode 265
Accessories 266
Changingawiperblade 268
Roof bars 269
Bonnet 271
Petrolengines 272
Dieselengines 273
Checkinglevels 274
Checks 277
AdBlue
®
additive and SCR system
(BlueHDi Diesel) 279
Practical information
Warningtriangle 283
Temporary puncture
repairkit 284
Spare wheel 291
Changingabulb 301
Changingafuse 310
12Vbattery 315
Towing 319
Runningoutoffuel(Diesel) 321
Intheeventofabreakdown
Petrolengines 322
Petrolweights 324
Dieselengines 326
Dieselweights 328
Dimensions 330
Identicationmarkings 331
Technical data
Emergencyorassistance 332
Audio and telematics
Mirrors 203
Lightingcontrols 206
Automatic illumination of headlamps 211
Automatic headlamps 212
Daytimerunninglamps 214
Direction indicators 215
Adjustingtheheadlampbeamheight 215
Directionallighting 217
Wipercontrolstalk 218
Screenwash 220
Automatic rain sensitive wipers 221
Panoramicsunroof 223
Lightingandvisibility
Alphabeticalindex
For the audio and touch screen
telematic systems, refer to the
supplementtothehandbookorgoto
thefollowinginternetaddress:
http://service.citroen.com/ddb/
4
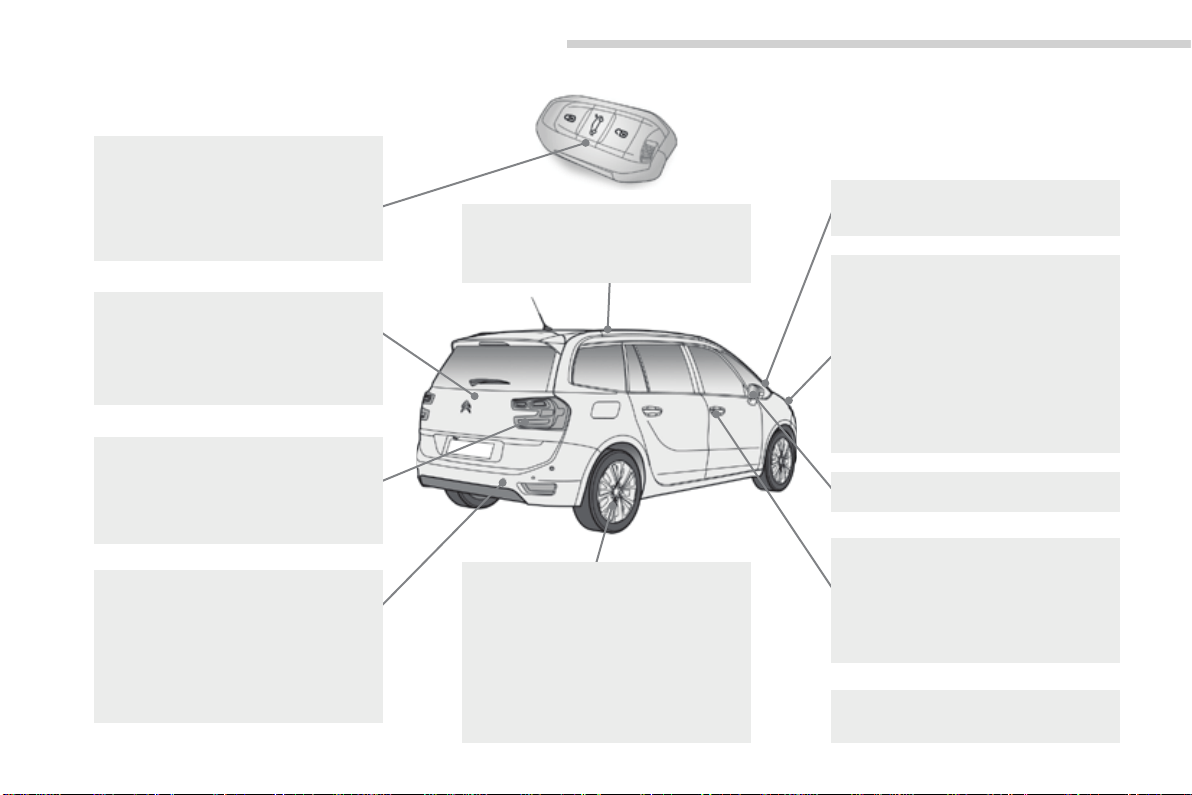
Overview
C4-Picasso-II_en_Chap00b_vue-ensemble_ed01-2016
Exterior
Fueltank,misfuel
prevention 257-259
Wipers, screenwash 218-222
Changingawiperblade 268
Exteriorwelcomelighting 214-215
Door mirror spotlamps 214
Corneringlighting 216
Directionallighting 217
Headlampbeamheightadjustment 215
Changingbulbs 301-305
- front lamps
- foglamps
- direction indicator repeaters
Very cold climate screen(s) 261
Doormirrors 203-204
Panoramicsunroof 223
Roof bars 269
Accessories 266-267
ESC:ABS,EBA,ASR,DSC 225-227
Tyre under-inflation detection 200-202
Tyrepressures 331
Temporary puncture
repairkit 284-290
Changingawheel 291-300
- tools
- spare wheel
- removing/refitting
Snow chains 260
Changingbulbs 305-309
- rear lamps
- 3rdbrakelamp
- number plate lamps
- foglamps
Parkingsensors 187-188
Reversingcamera 189
360Vision 190-191
ParkAssist 192-199
Towbar 124, 264
Towing(advice) 319-320
Towbarwithquickly
detachabletowball 262-263
Boot 63-69
- opening/closing
- emergencyrelease
Motorisedtailgate 64-67
Hands-freetailgateaccess 68-69
Electronickey/"KeylessEntryand
Starting"system 51-59
- opening/closing
- anti-theft protection
- back-upcontrol
- battery
Doors 61-62
- opening/closing
- emergencycontrol
Centrallocking 60
Alarm 70-72
Electricwindows 73-74
.
5
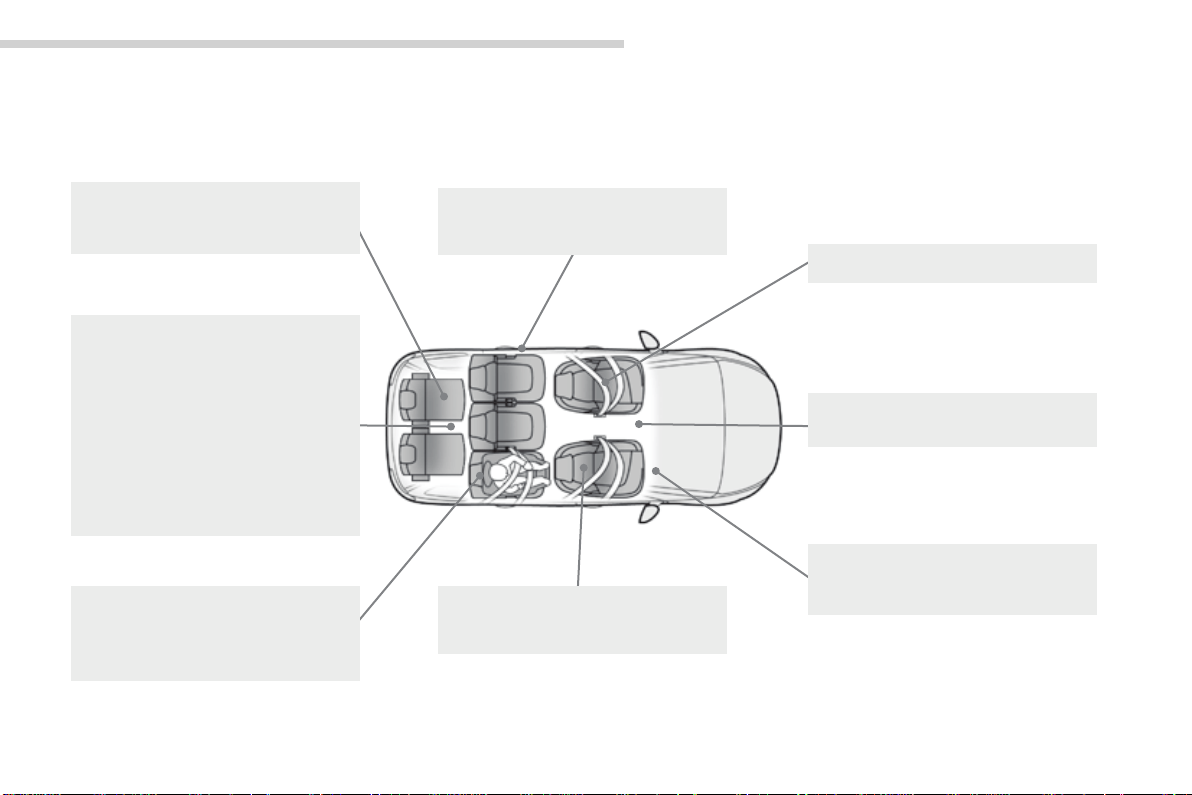
Overview
C4-Picasso-II_en_Chap00b_vue-ensemble_ed01-2016
Interior
3
rd
row rear seats 87-88
Seatmodularity/
configurations 89-90
Front seats 75-81
- manual
- electric
Interiorfittings 111-112
Side blinds 112
Seatbelts 228-232
Airbags 233-237
Deactivatingthepassenger's
frontairbag 234
Frontfittings 105-111
Mats 110
C4 Picasso boot
fittings 115-116
- rings,hooks
- boot lamp
Grand C4 Picasso
bootfittings 117-120
- rings
- boot lamp
- concertina boards
Luggagecoverroller 118-119
Warningtriangle 283
Topping-upAdBlue
®
280-282
2
nd
rowrearseats 82-83
Childseats 238-248,255
ISOFIX child seats 249-254
Childlock 256
Rearmultimedia 113-114
6
Overview
C4-Picasso-II_en_Chap00b_vue-ensemble_ed01-2016
Instruments and controls
Touchscreentablet(satellitenavigation,
multimedia audio system, Bluetooth
telephone) 11-16
Equipmentsettings 13-16
Ventilation 92-93
Heating 94
Dual-zonemanualairconditioning 95-96
Dual-zone automatic air
conditioning 97-101
Demisting/defrosting 102
Doormirrors 203-204
Electricwindows,deactivating 73-74
5/6-speedmanualgearbox 139
Automaticgearbox 140-144
Openingthebonnet 271
Courtesy lamps 121
Rear view mirror 204
Child surveillance mirror 205
Panoramicsunroof 223
Emergencyorassistance
call 224,332-333
Instrument panels 17-20
Gear shift indicator 145
Lightingdimmer 46
Warninglamps 21-36
Indicators 37-45
- service indicator
- oil level indicator
- AdBlue
®
fluidrangeindicator
Electricparkingbrake 131-137
Dashboardfuses 310-313
.
7
Overview
C4-Picasso-II_en_Chap00b_vue-ensemble_ed01-2016
Hazardwarninglamps 224
Headlampbeamheightadjustment 215
Steeringwheeladjustment 91
Horn 224
START/STOPbutton 125-130
Wiper and screenwash control
stalk 218-222
Trip computer 48-50
Lightingcontrolstalk 206-215
Direction indicators 215
Instrumentsandcontrols(cont.)
Memorisingspeeds 149
Speedlimitrecognition 150-153
Speed limiter 154-156
Cruise control 157-159
Dynamic cruise control 160-166
Dynamic cruise control
with Stop function 167-175
Inter-vehicle distance 168, 171
Blackpanel 47
Modes 19-20
8
Overview
C4-Picasso-II_en_Chap00b_vue-ensemble_ed01-2016
Maintenance - Technical data
Petrolweights 324-325
Dieselweights 328-329
Runningoutoffuel,Diesel
(primingpump) 321
Checkinglevels 274-276
- oil
- brakefluid
- coolant
- screenwash/headlampwashfluid
Checkingcomponents 277-278
- air filter
- passengercompartmentfilter
- oil filter
- electricparkingbrake
- brakepads/discs
Changingbulbs 301-309
- front
- rear
Openingthebonnet 271
Under the bonnet, petrol 272
Underthebonnet,Diesel 273
Petrolengines 322-323
Dieselengines 326-327
Identificationmarkings 331
Dimensions 330
12Vbattery 315-318
Load reduction, economy mode 265
Enginecompartment
fuses 310-311,314

.
9
Eco-driving
C4-Picasso-II_en_Chap00c_eco-conduite_ed01-2016
Optimise the use of your gearbox
Withamanualgearbox,moveoffgentlyandchangeupwithoutwaiting.
Duringaccelerationchangeupearly.
Withanautomaticgearbox,givepreferencetoautomaticmodeand
avoidpressingtheacceleratorpedalheavilyorsuddenly.
Control the use of your electrical
equipment
Beforemovingoff,ifthepassengercompartmentistoowarm,
ventilateitbyopeningthewindowsandairventsbeforeusingtheair
conditioning.
Above30mph(50km/h),closethewindowsandleavetheairvents
open.
Remembertomakeuseofequipmentthatcanhelpkeepthetemperature
inthepassengercompartmentdown(sunroofandwindowblinds...).
Switchofftheairconditioning,unlessithasautomaticregulation,as
soonasthedesiredtemperatureisattained.
Switchoffthedemistinganddefrostingcontrols,ifnotautomatic.
Switchofftheheatedseatassoonaspossible.
Switchofftheheadlampsandfrontfoglampswhentheambientlight
leveldoesnotrequiretheiruse.
Avoidrunningtheenginebeforemovingoff,particularlyinwinter;your
vehiclewillwarmupmuchfasterwhiledriving.
Asapassenger,ifyouavoidconnectingyourmultimediadevices
(film,music,videogame...),youwillcontributetowardslimitingthe
consumptionofelectricalenergy,andsooffuel.
Disconnectyourportabledevicesbeforeleavingthevehicle.
Eco-driving
Eco-drivingisarangeofeverydaypracticesthatallowthemotoristtooptimisetheirfuelconsumptionandCO
2
emissions.
Drive smoothly
Maintainasafedistancebetweenvehicles,useenginebrakingrather
thanthebrakepedal,andpresstheacceleratorprogressively.These
practices contribute towards a reduction in fuel consumption and CO
2
emissionsandalsohelpsreducethebackgroundtrafficnoise.
Ifyourvehiclehascruisecontrol,makeuseofthesystematspeeds
above25mph(40km/h)whenthetrafficisflowingwell.
Thegearshiftindicatorinvitesyouengagethemostsuitablegear:as
soon as the indication is displayed in the instrument panel, follow it
straightaway.
Forvehiclesfittedwithanautomaticgearbox,thisindicatorappears
onlyinmanualmode.

10
Eco-driving
C4-Picasso-II_en_Chap00c_eco-conduite_ed01-2016
Limit the causes of excess consumption
Spreadloadsthroughoutthevehicle;placetheheaviestitemsinthe
bottomoftheboot,ascloseaspossibletotherearseats.
Limit the loads carried in the vehicle and reduce wind resistance (roof
bars,roofrack,bicyclecarrier,trailer...).Usearoofboxinpreference.
Removeroofbarsandroofracksafteruse.
Attheendofwinter,removesnowtyresandrefityoursummertyres.
Observe the recommendations
on maintenance
Checkthetyrepressuresregularly,whencold,referringtothelabelin
thedooraperture,driver'sside.
Carryoutthischeckinparticular:
- beforealongjourney,
- ateachchangeofseason,
- afteralongperiodoutofuse.
Don'tforgetthesparewheelandthetyresonanytrailerorcaravan.
Haveyourvehicleservicedregularly(engineoil,oilfilter,airfilter,
passengercompartmentfilter...)andobservethescheduleof
operationsrecommendedinthemanufacturer'sserviceschedule.
WithaBlueHDiDieselengine,iftheSCRsystemisfaultyyourvehicle
becomespolluting;gotoaCITROËNdealeroraqualifiedworkshop
withoutdelaytohavetheemissionsofnitrousoxidesbroughtbackto
thelegallevel.
Whenrefuelling,donotcontinueafterthethirdcut-offofthenozzleto
avoidanyoverflow.
At the wheel of your new vehicle, it is only after the first 1 800 miles
(3000kilometres)thatyouwillseethefuelconsumptionsettledownto
aconsistentaverage.
1
11
Instruments
C4-Picasso-II_en_Chap01_instruments-bord_ed01-2016
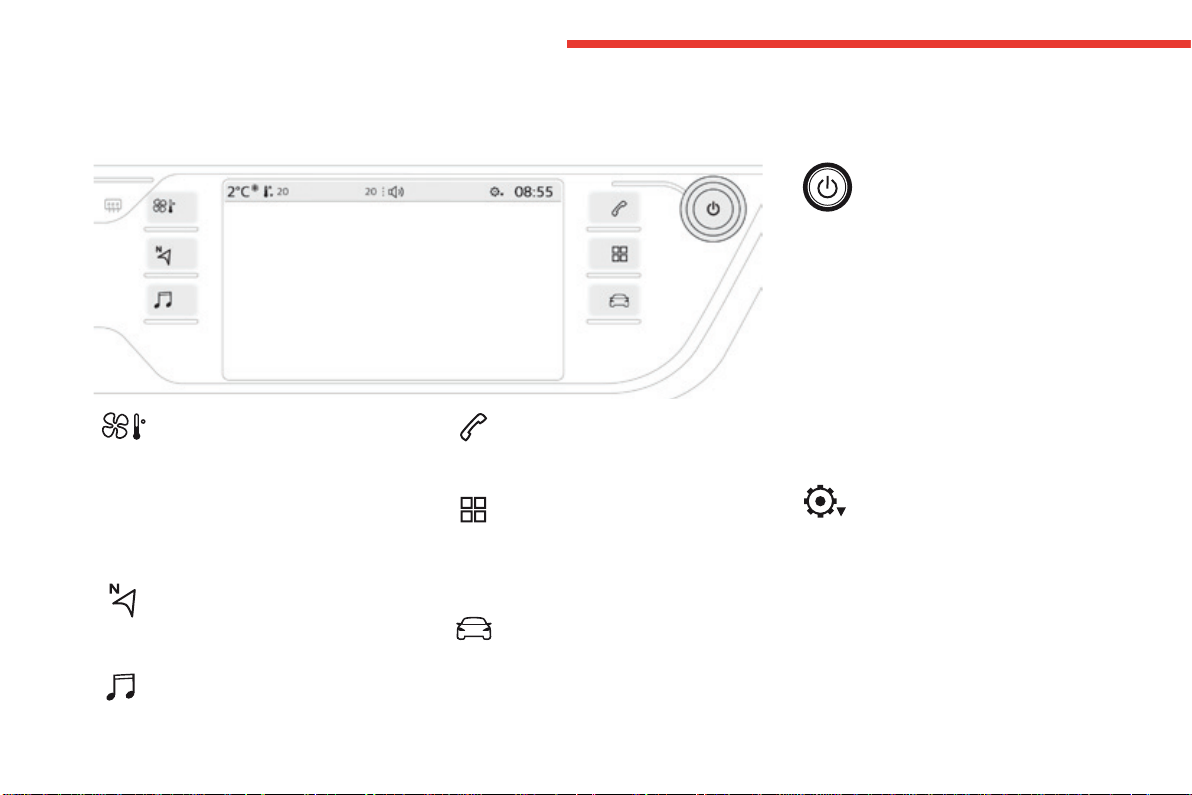
Touch screen tablet
The7-inchtouchscreentabletgivesaccessto:
- theheating/airconditioningcontrols,
- menusforadjustingsettingsforvehicle
functions and systems,
- audio system and telephone controls and
the display of associated information,
and,dependingonequipment,allows:
- thedisplayofalertmessagesandthe
visualparkingsensorsinformation,
- the permanent display of the time and the
ambienttemperature(abluewarninglamp
appearswhenthereisariskofice),
- accesstothecontrolsforthenavigation
system and Internet services, and the
displayofassociatedinformation.
For reasons of safety, the driver
should only carry out operations
that require close attention, with the
vehicle stationary.
Some functions are not accessible
whendriving.
General operation
Recommendations
Useispossibleinalltemperatures.
Donotusepointedobjectsonthetouchscreen
tablet.
Donottouchthetabletscreenwithwethands.
Uses a soft clean cloth to clean the tablet touch
screen.
Use this button to return to the
previouspage.
Usethisbuttontoconfirm.
Principles
Use the buttons on either side of the screen
for access to the menus, then press the virtual
buttonsinthetouchscreen.
Certain functions may be displayed over 1 or
2pages.
Todeactivate/activateafunction,pressOFF/ON.
Tomodifyasetting(lightingduration,...)or
access additional information, press the symbol
forthefunction.
After a few moments with no action on
thesecondarypage,theprimarypage
isdisplayedautomatically.
12
Instruments
C4-Picasso-II_en_Chap01_instruments-bord_ed01-2016
Menus
Upper bar
Certain information is always present in the
upperbarofthetouchscreentablet:
- Repeatoftheairconditioninginformation,
anddirectaccesstothecorresponding
menu.
- Repeat of information from the Radio
Media, Telephonemenusandnavigation
instructions*.
*Dependingonequipment.
Air conditioning.
Allowscontrolofthesettingsfor
temperature,airflow...
Connected navigation or Mirror
Screen*.
Seemorein"Audioandtelematics".
Radio Media.
Seemorein"Audioandtelematics".
Telephone.
Seemorein"Audioandtelematics".
Driving.
Allows the activation, deactivation and
adjustmentofsettingsforcertainfunctions.
Applications.
Allows the display of the trip
computer, with the type 1 instrument
panel.
Seemorein"Audioandtelematics".
Volume/mute.
Seemorein"Audioandtelematics".
- Access to Configuration.
For more information on Heating, Manual
air conditioning and Automatic air
conditioning,refertothecorresponding
sections.
The functions accessible from this menu are
arrangedundertwotabs:"Settings" and
"Driving assistance".
1
13
Instruments
C4-Picasso-II_en_Chap01_instruments-bord_ed01-2016
Driving menu
Settings tab
Thefunctionsaregroupedinto4families:
- Lighting.
- Vehicle access.
- Comfort.
- Driving assistance.
Button Comments
Lighting - "Directionalheadlamps":activation/deactivationofcorneringlighting/
directionallighting.
- "LEDdaytimerunninglamps"(dependingonthecountryofsale).
Vehicle
access
- "Driverplipaction":activation/deactivationofselectiveunlockingofthe
driver'sdoor.
- "Unlockbootonly":activation/deactivationofunlockingatthetailgate.
- "Motorizedtailgate":activation/deactivationofmotorizedoperationofthe
tailgate.
- "Hands-FreeTailgateAccess":activation/deactivationofthehands-free
tailgateaccesssystem.
Comfort - "Rearwiperinreverse":activation/deactivationoftherearwipercoupled
withreversegear.
- "Guide-me-homelighting":activation/deactivationofautomaticguide-me-
homelighting.
- "Welcomelighting":activation/deactivationofexteriorwelcomelighting.
- "Moodlighting":activation/deactivationofmoodlighting.
- "Automirrordippinginreverse":activation/deactivationofautomaticdipping
ofdoormirrorsinreversegear.
Driving
assistance
- "Collisionriskalertandautomaticbraking":activation/deactivationof
collisionriskalert.
- "Recommendedspeeddisplay":activation/deactivationofthespeedlimit
recognitionsystem.
- "FatigueDetectionSystem":activation/deactivationofthedriverfatigue
detectionsystem.
For more information on one of these
functions,refertothecorresponding
section.
14
Instruments
C4-Picasso-II_en_Chap01_instruments-bord_ed01-2016
Driving assistance tab
Corresponding function Comments
Speed settings Memorisationofspeedsettingsforthespeedlimiter,cruisecontrol,dynamiccruisecontrolordynamic
cruisecontrolwithstopfunction.
Under-inflation initialization Reinitializationoftheunder-inflationsystem.
Diagnostic Listofcurrentalerts.
Lane departure warning Activation/deactivationofthefunction.
Parking sensors Activation/deactivationofthefunction.
Automatic illumination
of headlamps activated
Activation/deactivationofthefunction.
Stop & Start Activation/deactivationofthefunction.
Blind spot monitoring Activation/deactivationofthefunction.
Panoramic visual aid Activation/deactivationofthefunctionthenchoiceofoptions.
Dynamic cruise control Choiceofthestandardcruisecontrolorthedynamiccruisecontrol.
Wheel anti-slip regulation Activation/Deactivationofthefunction
Formoreinformationononeofthesefunctions,refertothecorrespondingsection.

1
15
Instruments
C4-Picasso-II_en_Chap01_instruments-bord_ed01-2016
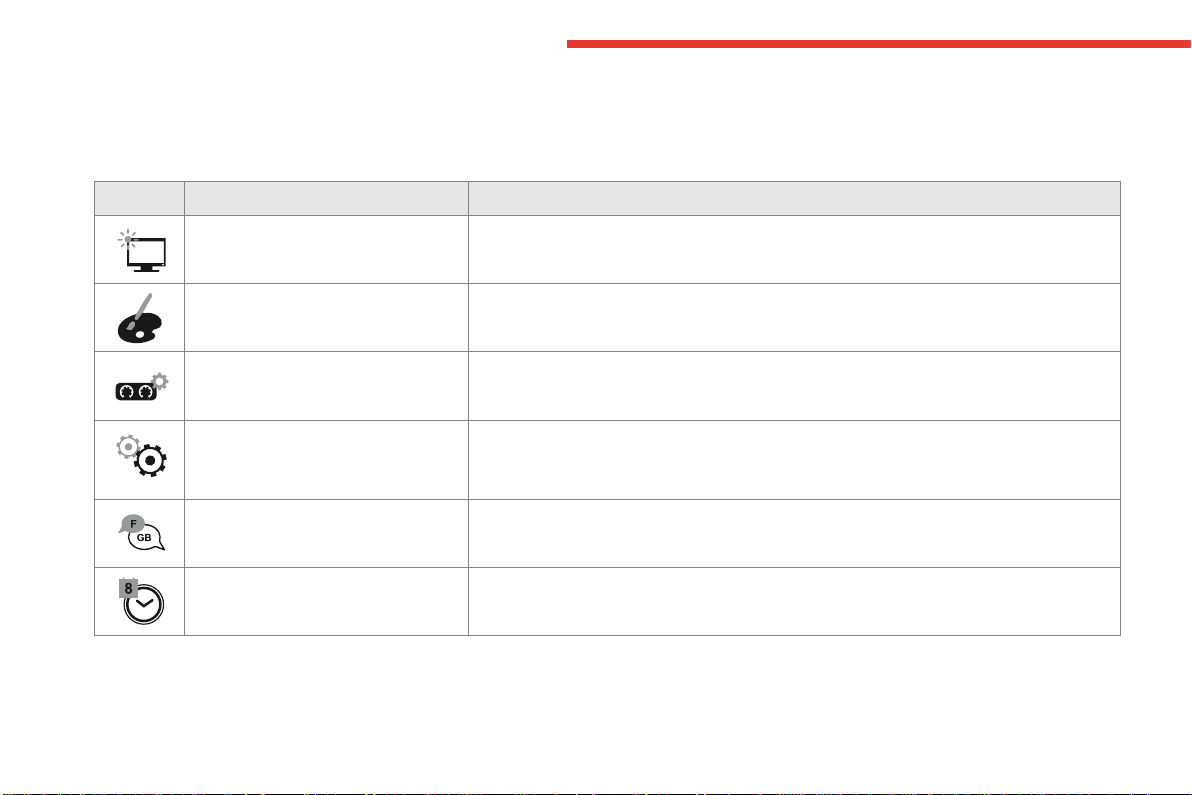
Button Comments
Turnoffthescreen.
Adjustmentofbrightness.
Choiceandsettingsforthreeprofiles.
Settingsforthetouchscreentabletandinstrumentpanel...
ActivationandadjustmentofWi-Fisettings.
Conguration
Thefunctionsavailablethroughthismenuaredetailedinthetablebelow.
16
Instruments
C4-Picasso-II_en_Chap01_instruments-bord_ed01-2016
Button Corresponding function Comments
Screen configuration Adjustmentofthedisplaysettings(scrollingoftext,animations...)andbrightness.
Ambience Selectacolourschemeforthetype2instrumentpanel.
Instrument panel perso Selectthetypeofinformationdisplayedinthetype2instrumentpanel.
System configuration Choiceofunits:
- temperature (°Celsius or °Fahrenheit)
- distanceandfuelconsumption(l/100km,mpgorkm/l).
Languages Choiceoflanguageusedforthetouchscreentabletandthetype2instrumentpanel.
Time/Date Settingthedateandtime.
1
17
Instruments
C4-Picasso-II_en_Chap01_instruments-bord_ed01-2016
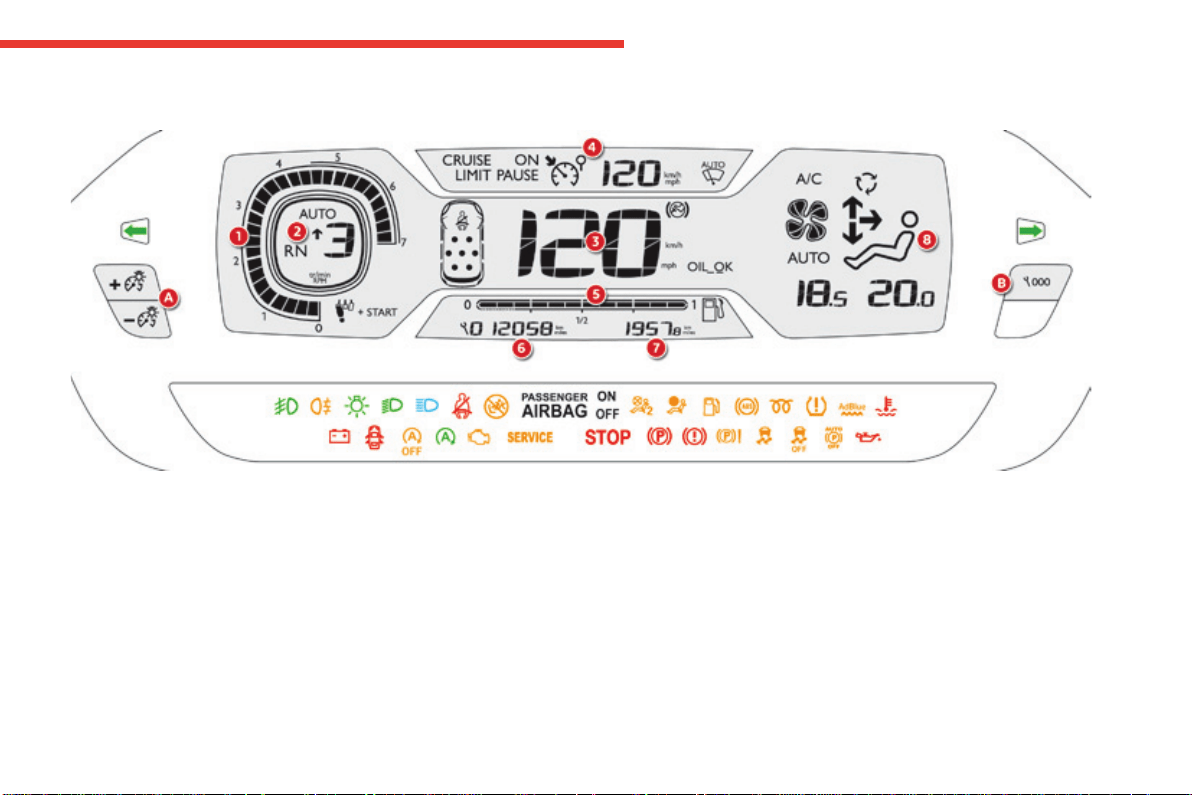
Monochromedigitalinstrumentpanel(type1)
1. Revcounter(x1000rpmortr/min),
graduationaccordingtoengine(petrolor
Diesel).
2. Gear shift indicator, selector position and
gearforanautomaticgearbox.
3. Digitalspeedometer(mphorkm/h).
4. Cruisecontrolorspeedlimitersettings.
Dials and screens
5. Fuelgauge.
6. Serviceindicator,thentotalmileage
recorder(milesorkm).
These functions are displayed in turn when
theignitionisswitchedon.
7. Tripmileagerecorder(milesorkm).
8. Repeatofairconditioningsettings.
A. Mainlightingdimmerbuttons.
B. Recallservicinginformation.
Reset the function selected to zero (service
indicatorortriprecorder).
Control buttons
18
Instruments
C4-Picasso-II_en_Chap01_instruments-bord_ed01-2016
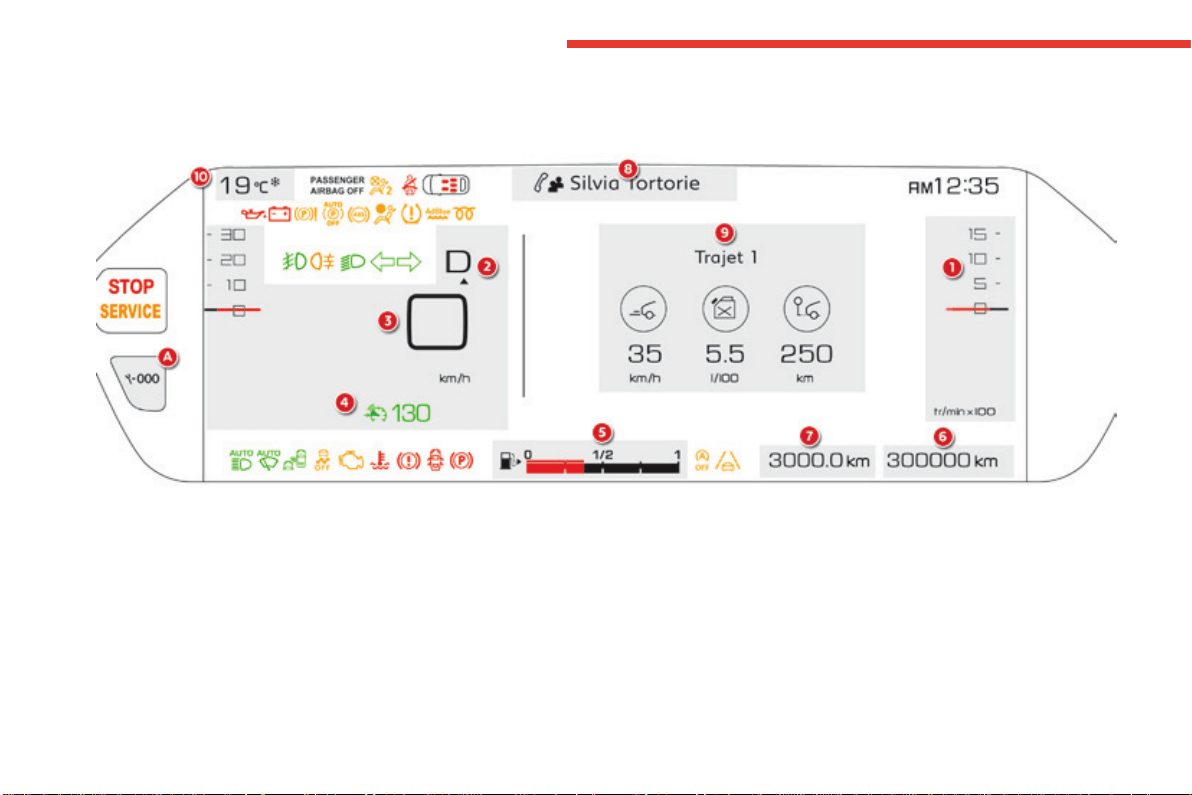
Thisinstrumentpanelcanbepersonalised.Dependingonthedisplaymodeselected,someinformationcanbehidden.
12-inch HD colour instrument panel (type 2)
1. Revcounter(x1000tr/minorrpm)("Dials"
mode).
2. Gear efficiency indicator, position of
theselectorleverandthegearwithan
automaticgearbox.
3. Digitalspeedometer(mphorkm/h).
4. Cruisecontrolorspeedlimitersetting.
A. Recallservicinginformation.
Recalltheremainingdrivingrangewiththe
SCR system and the AdBlue
®
.
Reset the function selected to zero (service
indicatorortriprecorder).
Control buttonDials and screens
5. Fuelgauge.
6. Totaldistancerecorder(milesorkm).
7. Tripdistancerecorder(milesorkm).
8. Repeat of the current media or telephone
information.
9. Repeatofthetripcomputerinformation.
10. Ambient temperature (a blue symbol
comesonifthereisariskofice).
1
19
Instruments
C4-Picasso-II_en_Chap01_instruments-bord_ed01-2016
You can modify the appearance of the
instrumentpanel,bychoosing:
- a colour scheme,
- adisplaymode.
Choosing the language
Thisdependsonthesettinginthetouchscreen
tablet.
Certainlanguagesarenotavailableforthetype2
instrumentpanel;Englishisselectedbydefault.
Each mode corresponds to the type of
informationdisplayedintheconfigurablearea.
Personalisation of the type 2 instrument panel
Choice of display mode
- "Dials":permanentdisplayofthetrip
computerandrevcounter.
Display zones
Whatever the display mode or colour scheme
chosen,theinstrumentpanelcontains:
- afixeddisplayzoneAwith:
● thespeedometer,
● thewarninglamps,
● thefuelgauge,
● thevariousrepeatedinformationand
alertmessages.
- aconfigurabledisplayzoneB.
Mostofthewarninglampsdonothaveafixed
position.
Thewarningandindicatorlampsaredisplayed
fromlefttorightinorderofimportance.
For certain functions that have indicator lamps
forbothonandoff,thereisjustonededicated
location.
Choosing the colour scheme
Tomodifyit,withthevehiclestationary:
F select the "Configuration" menu of the
touch screen tablet,
F select "Instrument panel perso",
F choose a colour scheme,
F confirm.
Thesystemrestartstotakeaccountofthe
modifications to the touch screen tablet and the
instrumentpanel.
20
Instruments
C4-Picasso-II_en_Chap01_instruments-bord_ed01-2016
- "Driving":displayoftherevcounterand
informationrelatedtodriving(inter-vehicle
time...).
- "Navigation":displayofinformationrelated
tothenavigationinprogress(mapand
instructions).
- "Minimal":noinformationdisplayed.
- "Personal":choiceofinformationtobe
displayed in each of the 2 display zones
(centre1/3andrighthand1/3)from:
● tripcomputer,
● media,
● navigation,
● drivingassistance,
● revcounter,
● coolanttemperatureindicator,
● noinformation(empty).
To modify the display mode of the instrument
panel:
F turn the thumbwheel on the left of the
steeringwheel,orpresstheendofthe
lightingcontrolstalktodisplayandrun
throughthedifferentmodesintheright
hand part of the instrument panel,
F once the selected display mode appears in
the central window, it is applied after a few
moments.
1
21
Instruments
C4-Picasso-II_en_Chap01_instruments-bord_ed01-2016
Indicatorandwarninglamps
Certainwarninglampsmaycomeonin
oneoftwomodes:fixed(continuous)or
flashing.
Onlybyrelatingthetypeofillumination
to the operation of the vehicle can it
be determined whether the situation is
normalorafaulthasoccurred.Inthe
event of a fault, the illumination of the
warninglampmaybeaccompaniedby
amessage.
Refertothetablesonthefollowing
pagesformoreinformation.
Visualindicatorsinformingthedriverofthestatusofasystem(operationordeactivationindicator
lamp)ortheexistenceofafault(warninglamp).
When the ignition is switched on
Certainwarninglampscomeonforafew
seconds in the instrument panel when the
vehicle'signitionisswitchedon.
Whentheengineisstarted,thesesame
warninglampsshouldgooff.
Iftheyremainon,beforemovingoff,refertothe
informationonthewarninglampconcerned.
Associated warnings
Theilluminationofcertainwarninglampsmay
beaccompaniedbyanaudiblesignalanda
message.
Thewarninglampsmaycomeoncontinuously
(fixed)orflash.
22
Instruments
C4-Picasso-II_en_Chap01_instruments-bord_ed01-2016
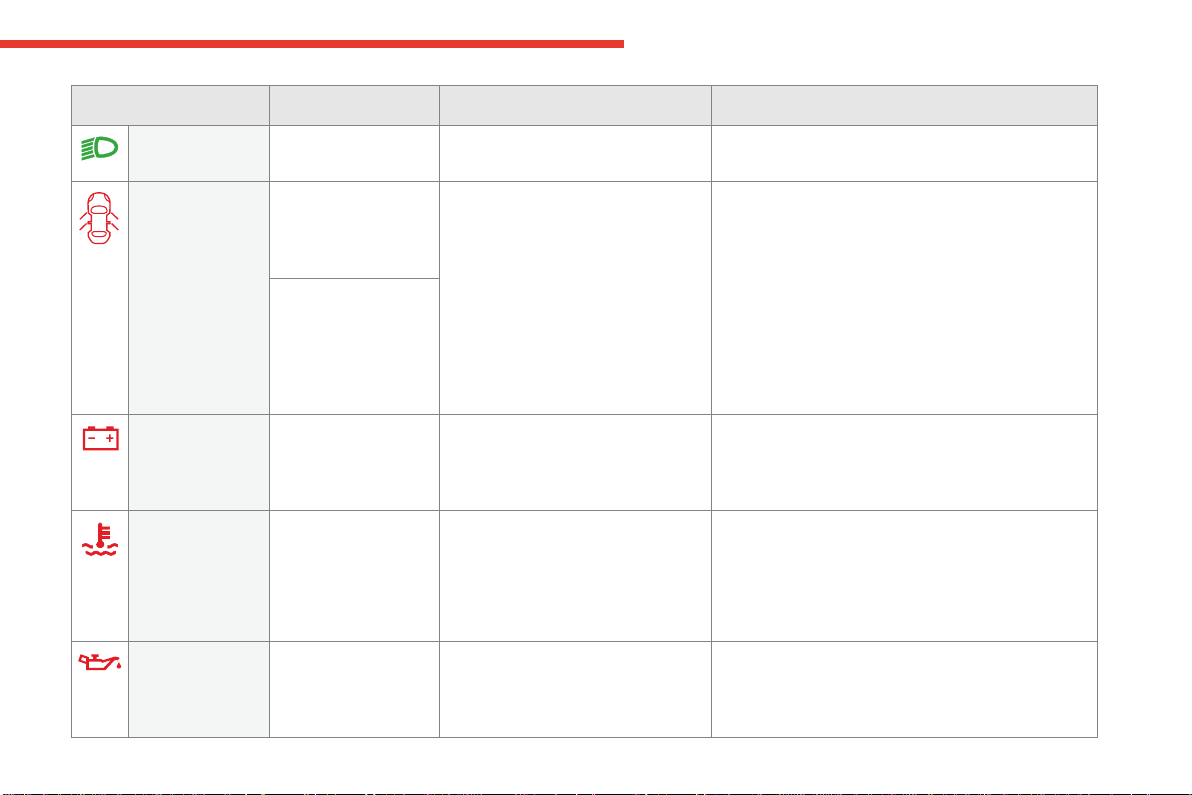
Operation indicator lamps
Ifoneofthefollowingindicatorlampscomesonintheinstrumentpanel,thisconfirmsthatthecorrespondingsystemhascomeintooperation.
Warning / indicator lamp State Cause Action / Observations
Left-hand
direction indicator
flashingwithbuzzer. Thelightingstalkispusheddown.
Right-hand
direction indicator
flashingwithbuzzer. Thelightingstalkispushedup.
Sidelamps fixed. Thelightingstalkisinthe
"Sidelamps"position.
Dipped beam
headlamps
fixed. Thelightingstalkisinthe"Dipped
beamheadlamps"position.
Main beam
headlamps
fixed. Thelightingstalkispulledtowards
you.
Pullthestalktoreturntodippedbeamheadlamps.
1
23
Instruments
C4-Picasso-II_en_Chap01_instruments-bord_ed01-2016
Automatic
headlamp
dipping
fixed. Thelightingcontrolstalkisinthe
"AUTO" position, pulled towards you,
and the function is activated (Driving
menu).
The system is in dipped beam mode
asthereissufficientambientlight
and/orthetrafficconditionsdonot
allowilluminationofmainbeam.
The camera, located at the top of the windscreen,
managestheoperationofmainbeam,dependingon
theambientlightinganddrivingconditions.
Pullingthelightingstalkagaintodeactivate.
For more information on Automatic headlamp
dipping,refertothecorrespondingsection.
fixed. Thelightingcontrolstalkisinthe
"AUTO" position, pulled towards you,
and the function is activated (Driving
menu).
The system is in main beam mode
astheambientlightingandtraffic
conditionsallowit.
Warning / indicator lamp State Cause Action / Observations
Rear foglamps fixed. Therearfoglampsareon. Turntheringonthestalkrearwardtoswitchoffthe
rearfoglamps.
Front foglamps fixed. Thefrontfoglampsareswitchedon
usingtheringonthelightingcontrol
stalk.
Turntheringonthelightingcontrolstalkrearward
oncetoswitchoffthefrontfoglamps.
For more information on the Lighting control stalk,refertothecorrespondingsection.
24
Instruments
C4-Picasso-II_en_Chap01_instruments-bord_ed01-2016
Warning / indicator lamp State Cause Action / Observations
Electric parking
brake
fixed. Theelectricparkingbrakeisapplied. Releasetheelectricparkingbraketoswitchoffthe
warninglamp:withyourfootonthebrakepedal,
brieflypushtheelectricparkingbrakecontrollever.
Observethesafetyrecommendations.
For more information on the Electric parking brake,
refertothecorrespondingsection.
Diesel engine
pre-heating
fixed. The "START/STOP" switch has been
pressed(ignitionon).
Waituntiltheindicatorlampgoesoffbeforestarting.
Onceitgoesoff,startingisimmediate,oncondition
thatyoumaintainpressureonthebrakepedalforan
automaticgearbox,ortheclutchpedalispressedfully
downforamanualgearbox.
The period of illumination of the indicator lamp is
determined by the ambient conditions (up to about
thirtysecondsinextremeconditions).
Iftheenginedoesnotstart,switchtheignitionoffand
thenon,waituntiltheindicatorlampgoesoffagain,
thenstarttheengine.
Blind spot
monitoring
system
fixed. Theblindspotmonitoringsystemhas
beenactivated.
For more information on the Blind spot monitoring
system,refertothecorrespondingsection.
Park Assist fixed. TheParkAssistfunctionhasbeen
activated.
For more information on Park Assist, refer to the
correspondingsection.
1
25
Instruments
C4-Picasso-II_en_Chap01_instruments-bord_ed01-2016
Warning / indicator lamp State Cause Action / Observations
Automatic
wiping
fixed. The wiper control is pushed
downwards.
Automaticfrontwipingisactivated.
Todeactivateautomaticwiping,operatethecontrol
stalkdownwardsorputthestalkintoanotherposition.
Passenger
airbag system
fixed.
The control switch, located at the
passenger'sendofthedashboard,isin
the "ON"position.
Thepassenger'sfrontairbagisactivated.
In this case, do not install a rearward
facingchildseatonthefrontpassenger
seat.
Turn the control switch to the "OFF" position to
deactivatethepassenger'sfrontairbag.
Youcaninstallarearwardfacingchildseat,unlessthere
isafaultwiththeairbags(airbagwarninglampon).
Stop & Start fixed. Whenthevehiclestops(redlights,
trafficjams,...)theStop&Startsystem
hasputtheengineintoSTOPmode.
Thewarninglampgoesoffandtheenginerestarts
automatically in START mode, as soon as you want to
moveoff.
flashes for a few
seconds,thengoesoff.
STOP mode is temporarily
unavailable,
or
STARTmodeisinvoked
automatically.
For more information on Stop & Start, refer to the
correspondingsection.
26
Instruments
C4-Picasso-II_en_Chap01_instruments-bord_ed01-2016
Warning / indicator lamp State Cause Action / Observations
Passenger's
airbag system
fixed. The control switch, located at the
righthandendofthedashboardis
set to the OFFposition.
Thepassenger'sfrontairbagis
deactivated.
Youcaninstallarearwardfacing
child seat, unless there is an
operatingfaultwiththeairbags
(Airbagwarninglampon).
Turn the control switch to the "ON" position to activate
thepassenger'sfrontairbag.
In this case, do not fit a child seat in the rearward
facingpositiononthefrontpassengerseat.
Wheel anti-slip fixed,accompanied
by the display of a
message.
Thewheelanti-slipregulation(ASR)
isdeactivated.
Theanti-slipregulationisautomaticallyreactivated
fromaround30mph(50km/h)oratthenextengine
start.
Reactivatethesystemmanuallybypressingthe
buttonagain.
For more information on the Electronic stability
programmeandwheelanti-slipregulation,referto
thecorrespondingsection.
Stop & Start fixed. The Stop & Start has been
deactivated.
Reactivate the function in the Drivingmenu.
Deactivation indicator lamps
Ifoneofthefollowingindicatorlampscomeson,thisconfirmsthatthecorrespondingsystemhasbeenswitchedoffintentionally.
Thisismaybeaccompaniedbyanaudiblesignalandthedisplayofamessage.
1
27
Instruments
C4-Picasso-II_en_Chap01_instruments-bord_ed01-2016
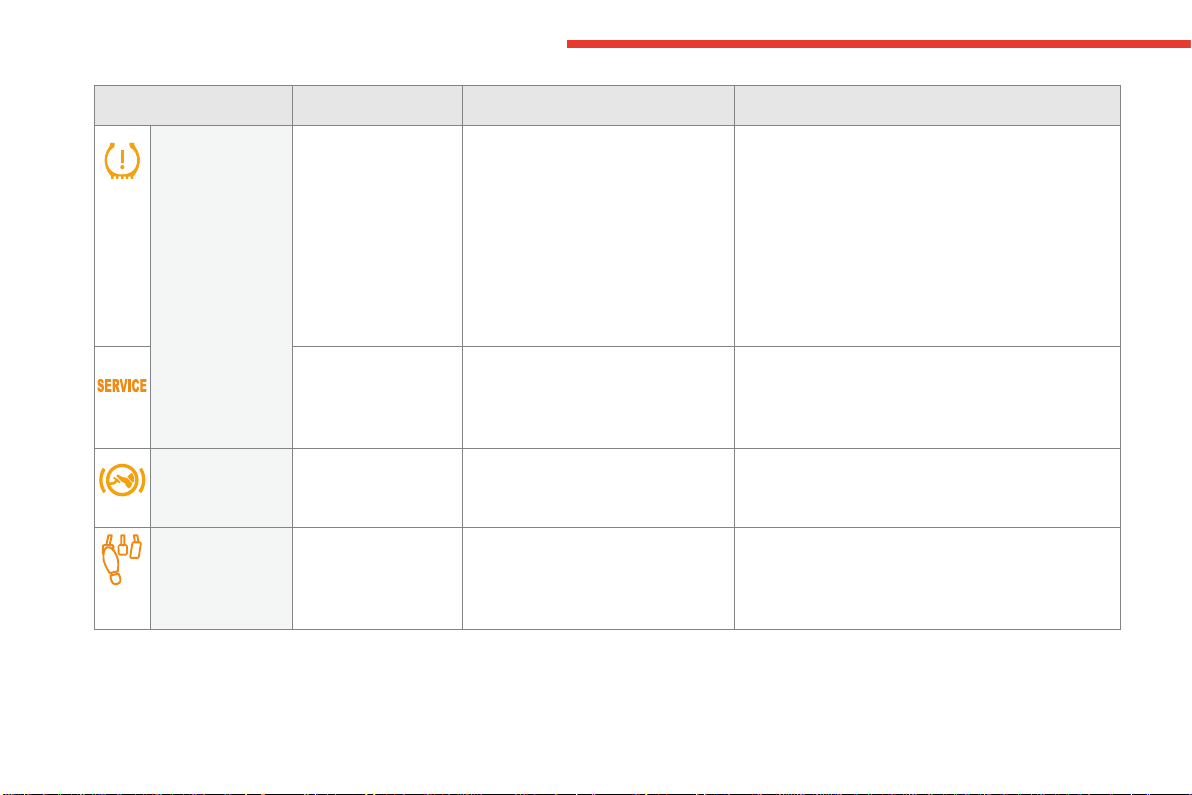
Warning lamps
Whentheengineisrunningorthevehicleisbeingdriven,illuminationofoneofthefollowingwarninglampsindicatesafaultwhichrequiresactionon
thepartofthedriver.
Anyfaultresultingintheilluminationofawarninglampmustbeinvestigatedfurtherusingtheassociatedmessage.
Ifyouencounteranyproblems,contactaCITROËNdealeroraqualifiedworkshop.
Warning / indicator lamp State Cause Action / Observations
STOP fixed,associatedwith
anotherwarninglamp,
accompanied by an
audiblesignalanda
message.
Illuminationofthiswarninglampis
related to a serious fault detected
withtheengine,thebrakingsystem,
thepowersteering,etc.,oramajor
electricalfault.
Youmuststopassoonasitissafetodoso.
Park,switchofftheignitionandcallaCITROËN
dealeroraqualifiedworkshop.
28
Instruments
C4-Picasso-II_en_Chap01_instruments-bord_ed01-2016
Assisted lane
departure
warning system
fixed. The system is not available The system has been deactivated or is on automatic
standby.
For more information on the Assisted lane departure
warning system,refertothecorrespondingsection.
flashing. You are about to cross a solid lane
markingwithoutoperatingthe
directionindicators.
Thesystemisactivated,thencorrectsthetrajectory
onthesideofthelanemarkingdetected.
For more information on the Assisted lane departure
warning system,refertothecorrespondingsection.
+ fixed,accompanied
by the display of a
message,anaudible
signalandtheService
warninglamp.
Thesystemhasafault. Bevigilantanddrivecarefully.
HavethesystemcheckedbyaCITROËNdealerora
qualifiedworkshop.
For more information on the Assisted lane departure
warning system,refertothecorrespondingsection.
Warning / indicator lamp State Cause Action / Observations
1
29
Instruments
C4-Picasso-II_en_Chap01_instruments-bord_ed01-2016
Warning / indicator lamp State Cause Action / Observations
Service temporarily,
accompanied by a
message.
One or more minor faults for which
thereisnospecificwarninglamp
havebeendetected.
Identifythecauseofthefaultusingthemessage
displayedinthescreen.
You can deal with some problems yourself, such as a
door open or the start of saturation of the particle filter
(assoonasthetrafficconditionsallow,regenerate
thefilterbydrivingataspeedofatleast40mph
(60km/h),untilthewarninglampgoesoff).
For any other problems, such as a fault with the tyre
under inflation detection system, contact a CITROËN
dealeroraqualifiedworkshop.
fixed,accompaniedby
amessage.
Oneormoremajorfaultsforwhich
thereisnospecificwarninglamp
havebeendetected.
Identifythecauseofthefaultusingthemessage
displayedinthescreen;youmustthencontacta
CITROËNdealeroraqualifiedworkshop.
fixed,associated
withtheflashingand
thenfixeddisplayof
the service indicator
spanner.
Theservicingintervalhasbeen
exceeded.
OnlyonBlueHDiDieselversions.
Yourvehiclemustbeservicedassoonaspossible.
30
Instruments
C4-Picasso-II_en_Chap01_instruments-bord_ed01-2016
Warning / indicator lamp State Cause Action / Observations
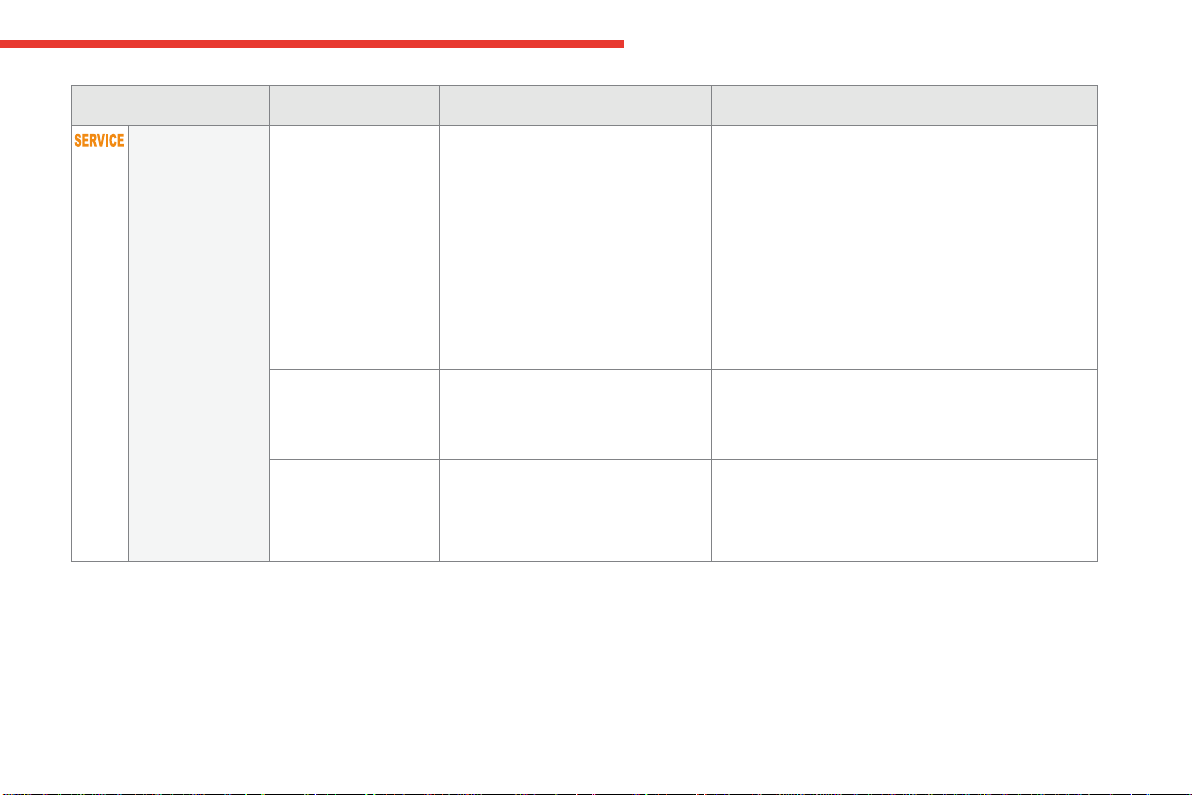
Deactivation of
the automatic
functions of the
electric parking
brake
fixed. The "automatic application" (on
switchingofftheengine)and
"automatic release" functions are
deactivatedorfaulty.
In the event of a fault, illumination of
thiswarninglampisaccompaniedby
amessage.
ContactaCITROËNdealeroraqualifiedworkshop
ifautomaticapplication/releaseisnotpossible.
Theparkingbrakecanbereleasedmanually.
For more information on the Electric parking brake
and the reactivation of the automatic functions, refer
tothecorrespondingsection.
Electric parking
brake
flashing. Whendriving:theelectricparking
brakeisnotfullyreleased.
Fullyreleasetheparkingbrakebyaquickpresson
thecontrollever.Ifthewarningpersist,stopassoon
asitissafetodoso.
ContactaCITROËNdealeroraqualifiedworkshop.
Whenstationary:parkingbrake
applied, the system does not
guaranteeimmobilisationofthe
vehicle(whenparkingonavery
steepslope,forexample).
Securetheimmobilisationofthevehiclebyengaging
agearwithamanualgearbox,byplacingthegear
selector in position Pwithanautomaticgearbox,orby
fittingachocktooneofthewheels.
Electric parking
brake fault
fixed. Theelectricparkingbrakehasafault. ContactaCITROËNdealeroraqualifiedworkshop
withoutdelay.
Theparkingbrakecanbereleasedmanually.
For more information on the Electric parking brake,
refertothecorrespondingsection.
1
31
Instruments
C4-Picasso-II_en_Chap01_instruments-bord_ed01-2016
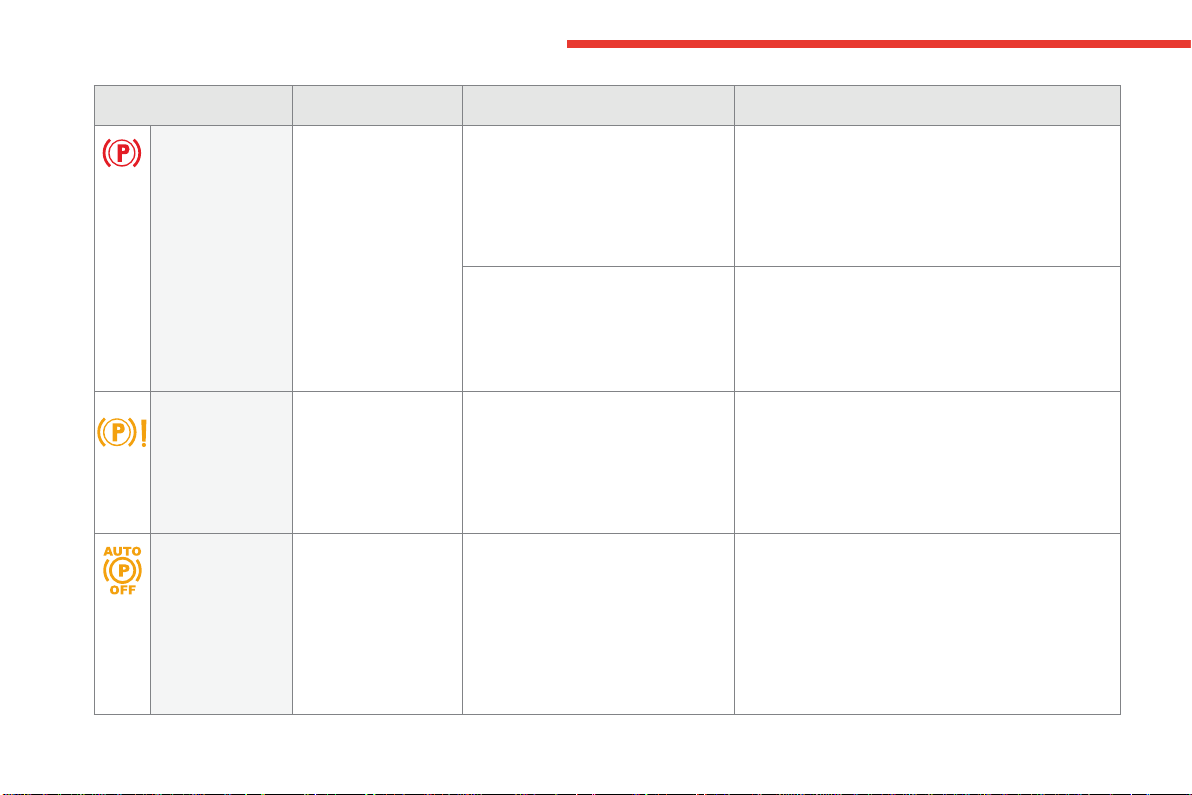
Braking fixed. Thebrakefluidlevelhasdropped
significantly.
Youmuststopassoonasitissafetodoso.
Top-upwithbrakefluidlistedbyCITROËN.
Iftheproblempersists,havethesystemcheckedby
aCITROËNdealeroraqualifiedworkshop.
+ fixed,associated
withtheABSwarning
lamp.
Theelectronicbrakeforcedistribution
(EBFD)systemhasafault.
Youmuststopassoonasitissafetodoso.
HaveitcheckedbyaCITROËNdealeroraqualified
workshop.
Warning / indicator lamp State Cause Action / Observations
Anti-lock
Braking System
(ABS)
fixed. Theanti-lockbrakingsystemhasa
fault.
Thevehicleretainsconventionalbraking.
Drive carefully at reduced speed and contact a
CITROËNdealeroraqualifiedworkshopwithout
delay.
Dynamic
stability control
(DSC/ASR)
flashing. TheDSC/ASRregulationis
operating.
The system optimises traction and improves the
directional stability of the vehicle in the event of loss of
griportrajectory.
fixed. TheDSC/ASRsystemhasafault. HavethesystemcheckedbyaCITROËNdealerora
qualifiedworkshop.
Engine
autodiagnosis
system
flashing. Theenginemanagementsystemhas
afault.
Riskofdestructionofthecatalyticconverter.
HaveitcheckedbyaCITROËNdealeroraqualified
workshop.
fixed. The emission control system has a
fault.
Thewarninglampshouldgooffwhentheengineisstarted.
Ifitdoesnotgooff,contactaCITROËNdealerorqualified
workshopwithoutdelay.
32
Instruments
C4-Picasso-II_en_Chap01_instruments-bord_ed01-2016
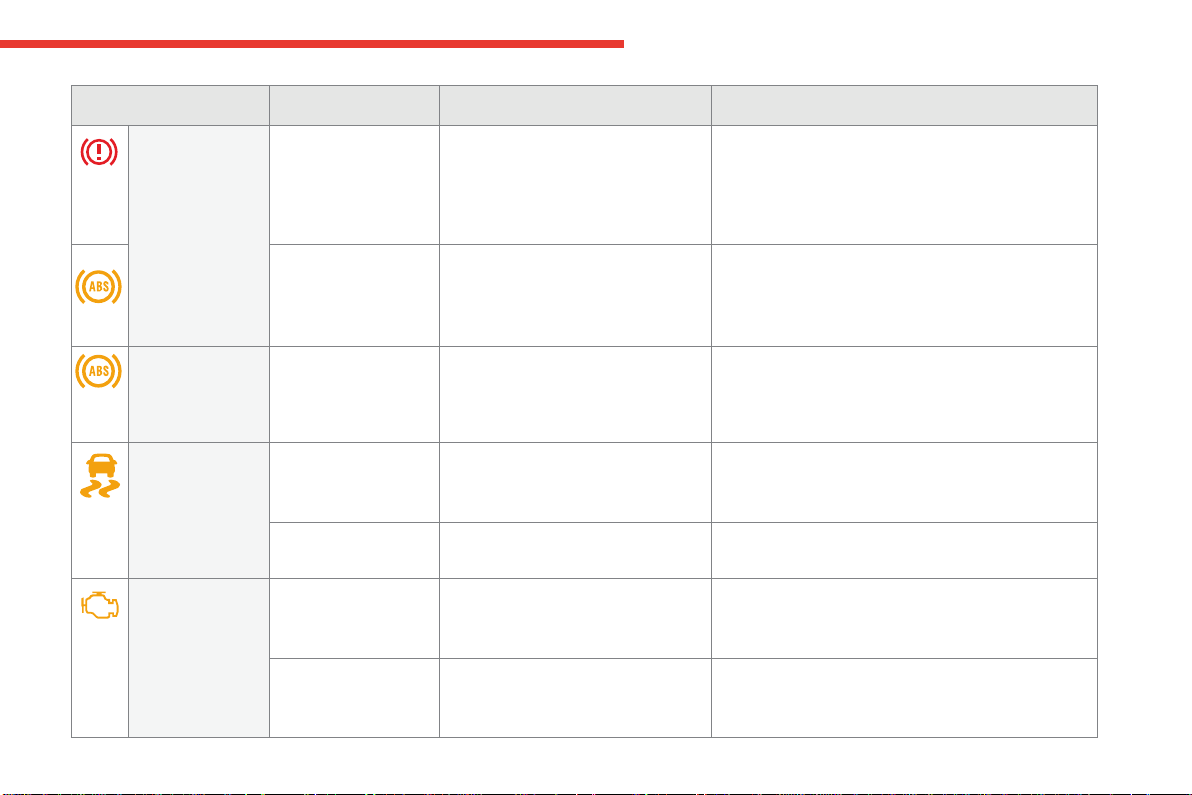
Low fuel level fixed,accompaniedby
anaudiblesignaland
amessage.
When it first comes on there remains
approximately 6 litres of fuel in the
tank.
Youarethenusingthefuelreserve.
Youmustrefuelassoonaspossibletoavoidrunning
outoffuel.
Untilsufficientfuelisadded,thiswarninglampwill
comeoneverytimetheignitionisswitchedon,
accompaniedbyanaudiblesignalandamessage.
Thisaudiblesignalandmessagearerepeatedwith
increasingfrequencyasthefuelleveldropstowards"0".
Fueltankcapacity:approximately57litres(petrol)or
55litres(Diesel).
Never continue to drive until you run out of fuel as
thiscoulddamagetheemissioncontrolandinjection
systems.
Warning / indicator lamp State Cause Action / Observations
Seat belt(s)
not fastened /
unfastened
fixed
orflashing
accompanied by an
audiblesignal.
A seat belt has not been fastened or
hasbeenunfastened.
Pullthestraptheninsertthetongueinthebuckle.
Airbags ontemporarily. Thiswarninglampcomesonfora
few seconds when you turn on the
ignition,thengoesoff.
Thiswarninglampshouldgooffwhentheengineisstarted.
Ifitdoesnotgooff,contactaCITROËNdealeroraqualified
workshop.
fixed. Oneoftheairbagorseatbelt
pretensionersystemshasafault.
HavethemcheckedbyaCITROËNdealerora
qualifiedworkshop.
Passenger
airbag system
flashing. Thepassengerairbagsystemhasa
fault.
Donothaveapassengerseatedinthefront
passengerseat.
HaveitcheckedbyaCITROËNdealeroraqualified
workshop.
1
33
Instruments
C4-Picasso-II_en_Chap01_instruments-bord_ed01-2016
Warning / indicator lamp State Cause Action / Observations
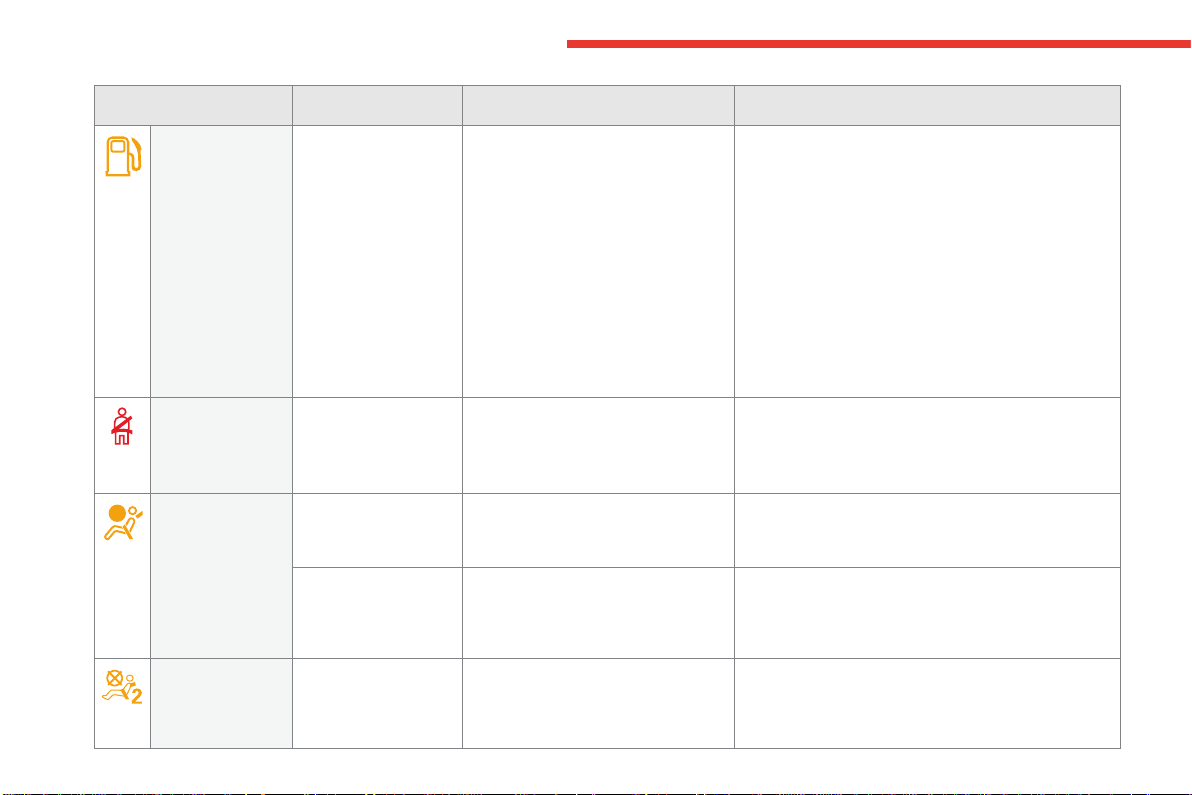
Battery charge fixed. Thebatterychargingcircuithasa
fault(dirtyorlooseterminals,slackor
cutalternatorbelt,...).
Thewarninglampshouldgooffwhentheengineis
started.
Ifitdoesnotgooff,contactaCITROËNdealerora
qualifiedworkshop.
Maximum
coolant
temperature
fixed. Thetemperatureofthecooling
systemistoohigh.
Stopassoonasitissafetodoso.
Waituntiltheenginehascooleddownbeforetopping-
upthelevel,ifnecessary.
If the problem persists, contact a CITROËN dealer or
qualifiedworkshop.
Directional
headlamps
flashing. The directional headlamps system
hasafault.
HaveitcheckedbyaCITROËNdealeroraqualified
workshop.
Door(s) open* fixed,associatedwith
amessageidentifying
the door, if the speed is
below6mph(10km/h).
Adoororthebootisstillopen. Closethedoororboot.
fixed,associatedwitha
messageidentifyingthe
door, and accompanied
byanaudiblesignal
if the speed is above
6mph(10km/h).
*Onlywiththetype1instrumentpanel.
Engine oil
pressure
fixed. Thereisafaultwiththeengine
lubricationsystem.
Youmuststopassoonitissafetodoso.
Park,switchofftheignitionandcontactaCITROËN
dealeroraqualifiedworkshop.
34
Instruments
C4-Picasso-II_en_Chap01_instruments-bord_ed01-2016
Under-inflation fixed,accompaniedby
anaudiblesignaland
amessage.
The pressure in one or more tyres is
toolow.
Checkthetyrepressuresassoonaspossible.
Thischeckshouldpreferablybecarriedoutwhenthe
tyresarecold.
Youmustreinitialisethesystemaftertheadjustment
ofoneormoretyrepressuresandafterchangingone
ormorewheels.
For more information on Under-inflation detection,
refertothecorrespondingsection.
+
flashingthenfixed,
accompanied by the
Servicewarninglamp.
Thesystemhasafault:thetyre
pressuresarenolongermonitored.
Checkthetyrepressuresassoonaspossible.
HavethesystemcheckedbyaCITROËNdealerora
qualifiedworkshop.
Warning / indicator lamp State Cause Action / Observations
Foot on the
brake pedal*
fixed. Thebrakepedalisnotpressed. Withanautomaticgearbox,pressthebrakepedalto
movethegearselectoroutofpositionP.
Foot on the
clutch*
fixed. In the STOP mode of Stop & Start,
changingtoSTARTmodeisdenied
because the clutch pedal is not fully
down.
Youmustdeclutchfullytoallowthechangetoengine
STARTmode.
*Onlywiththetype1instrumentpanel.
1
35
Instruments
C4-Picasso-II_en_Chap01_instruments-bord_ed01-2016
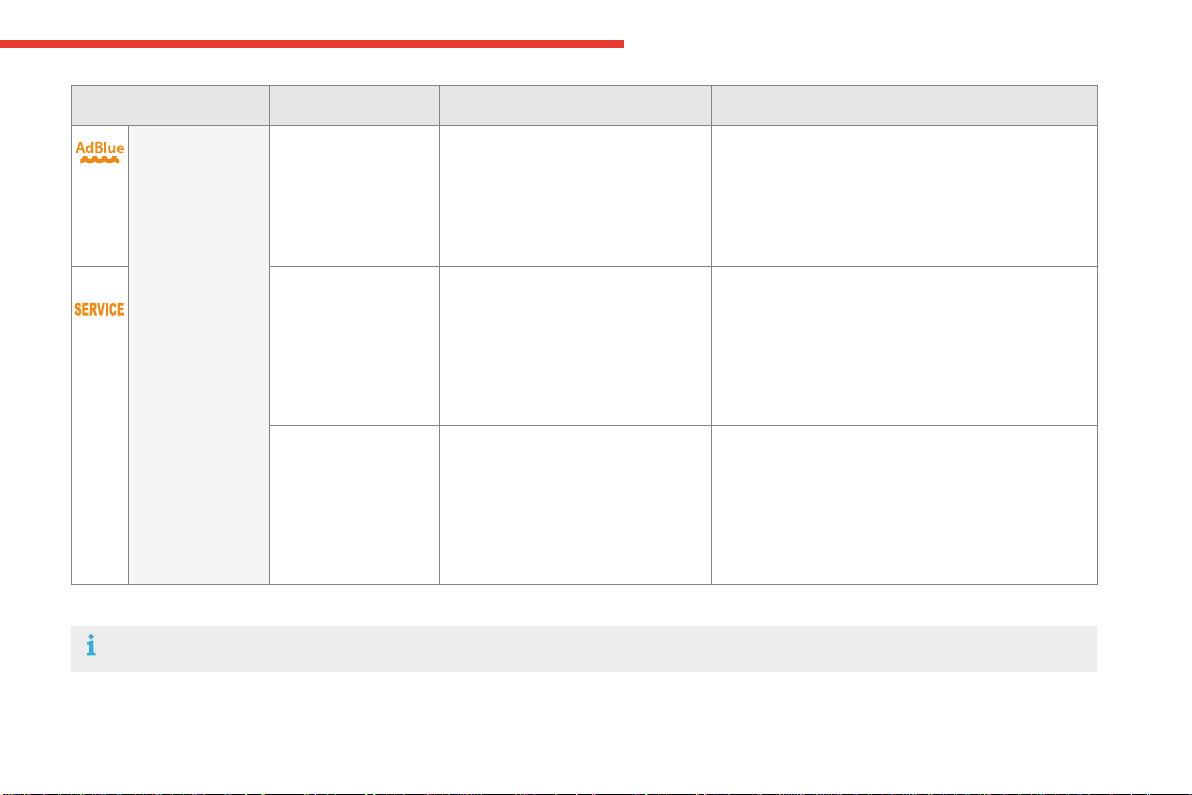
Warning / indicator lamp State Cause Action / Observations
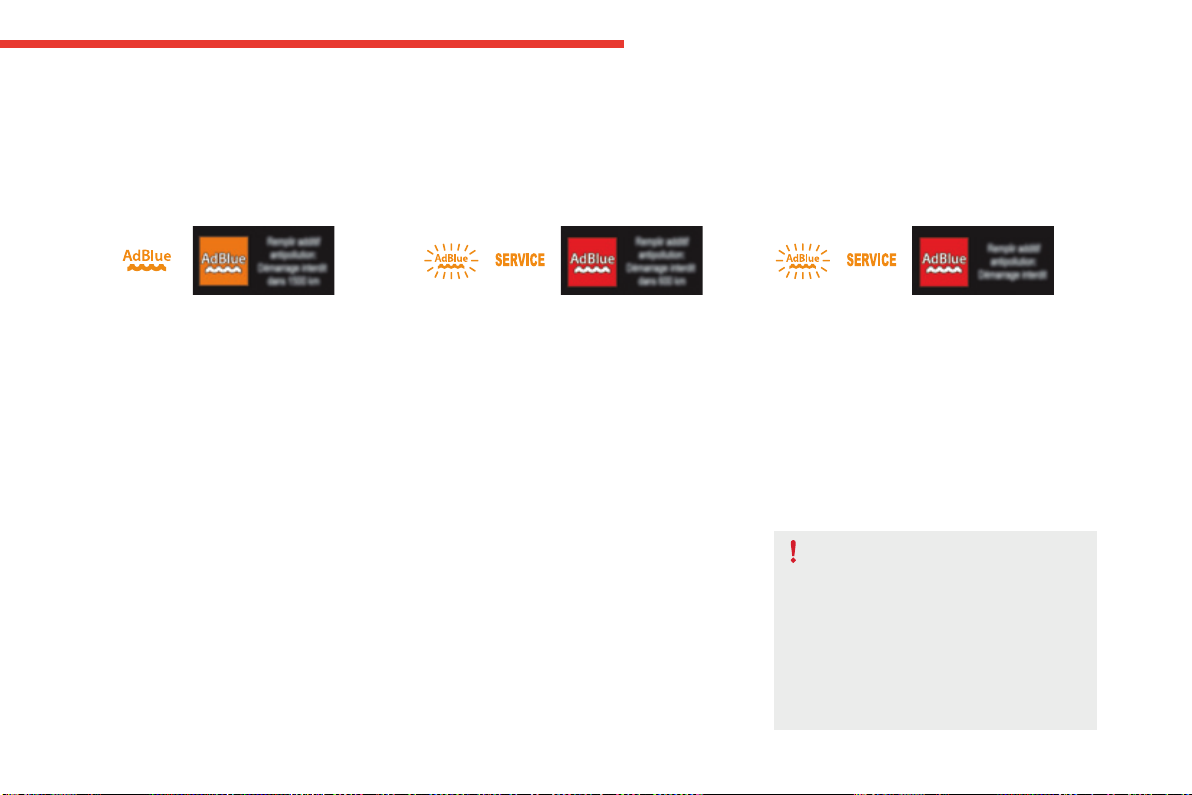
AdBlue
®
(BlueHDi Diesel)
fixed,onswitching
ontheignition,
accompanied by an
audiblesignalanda
messageindicatingthe
remainingdrivingrange.
Theremainingdrivingrangeis
between350miles(600km)and
1500miles(2400km).
Top-up the AdBlue
®
assoonaspossibleorgotoa
CITROËNdealeroraqualifiedworkshop.
+ flashing,associated
with the SERVICE
warninglamp,
accompanied by an
audiblesignalanda
messageindicatingthe
remainingdrivingrange.
Theremainingdrivingrangeis
between0and350miles(600km).
You must top-up the AdBlue
®
to avoid a breakdown
orgotoaCITROËNdealeroraqualifiedworkshop.
flashing,associated
with the SERVICE
warninglamp,
accompanied by an
audiblesignalanda
messageindicatingthat
startingisprevented.
The AdBlue
®
tankisempty:the
startinginhibitionsystemrequired
bylegislationpreventsstartingofthe
engine.
Tobeabletostarttheengine,youmusttop-up the
AdBlue
®
or call on a CITROËN dealer or a qualified
workshop.
It is essentialtoaddatleast3.8litresofAdBlue
®
to
thefluidtank
Fortopping-uporformoreinformationonAdBlue
®
and the SCR system,refertothecorrespondingsection.
36
Instruments
C4-Picasso-II_en_Chap01_instruments-bord_ed01-2016
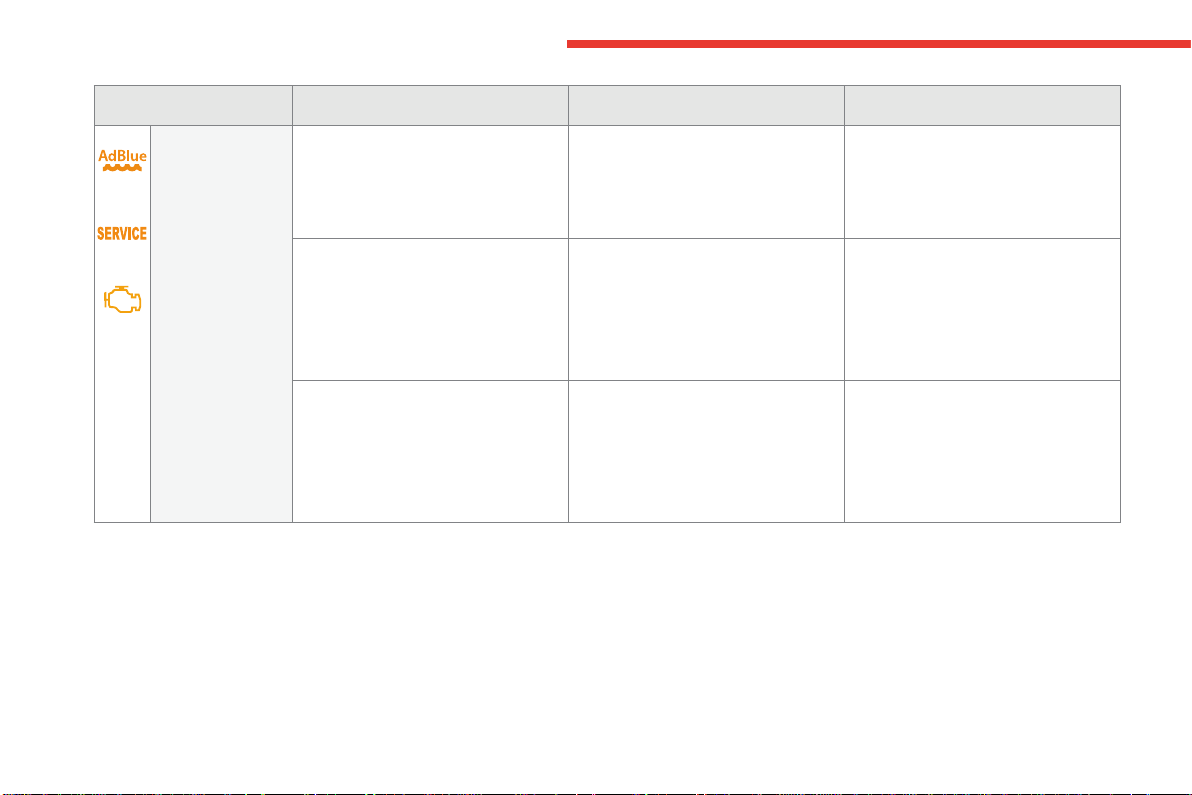
Warning / indicator lamp State Cause Action / Observations
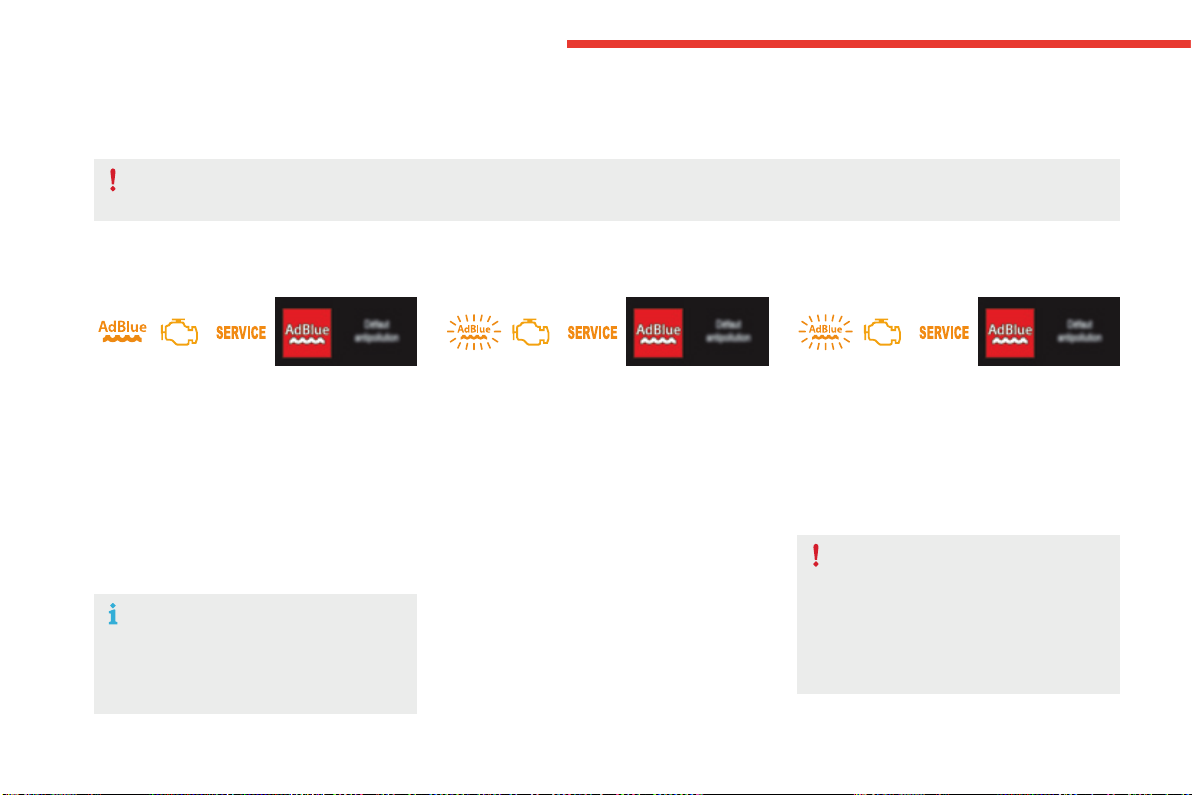
+
+
SCR emissions
control system
(BlueHDi Diesel)
fixed,onswitchingontheignition,
associated with the SERVICE and
enginediagnosticwarninglamps,
accompaniedbyanaudiblesignaland
amessage.
A fault with the SCR emissions control
systemhasbeendetected.
This alert disappears once the
exhaustemissionsreturntonormal
levels.
flashing,onswitchingontheignition,
associated with the SERVICE and
enginediagnosticwarninglamps,
accompaniedbyanaudiblesignaland
amessageindicatingtheremaining
drivingrange.
After confirmation of the fault with the
emissions control system, you can
driveforupto650miles(1100km)
beforetheenginestartinginhibition
systemistriggered.
Contact a CITROËN dealer or a
qualifiedworkshopwithout delay,
to avoid a breakdown.
flashing,onswitchingontheignition,
associated with the SERVICE and
enginediagnosticwarninglamps,
accompaniedbyanaudiblesignaland
amessage.
Youhaveexceededtheauthorised
drivinglimitfollowingconfirmation
of a fault with the emissions control
system:theenginestartinginhibition
systempreventsstartingofthe
engine.
Tobeabletostarttheengine,you
must call on a CITROËN dealer or a
qualifiedworkshop.
1
37
Instruments
C4-Picasso-II_en_Chap01_instruments-bord_ed01-2016
Service indicator
System which informs the driver when the
nextserviceisdue,inaccordancewiththe
manufacturer'sserviceschedule.
The point at which the service is due is
calculated from the last indicator zero reset,
accordingtothemileagecoveredandthetime
elapsedsincethelastservice.
ForBlueHDiDieselversions,dependingonthe
countryofsale,thedegreeofdeteriorationof
theengineoilmayalsobetakenintoaccount.
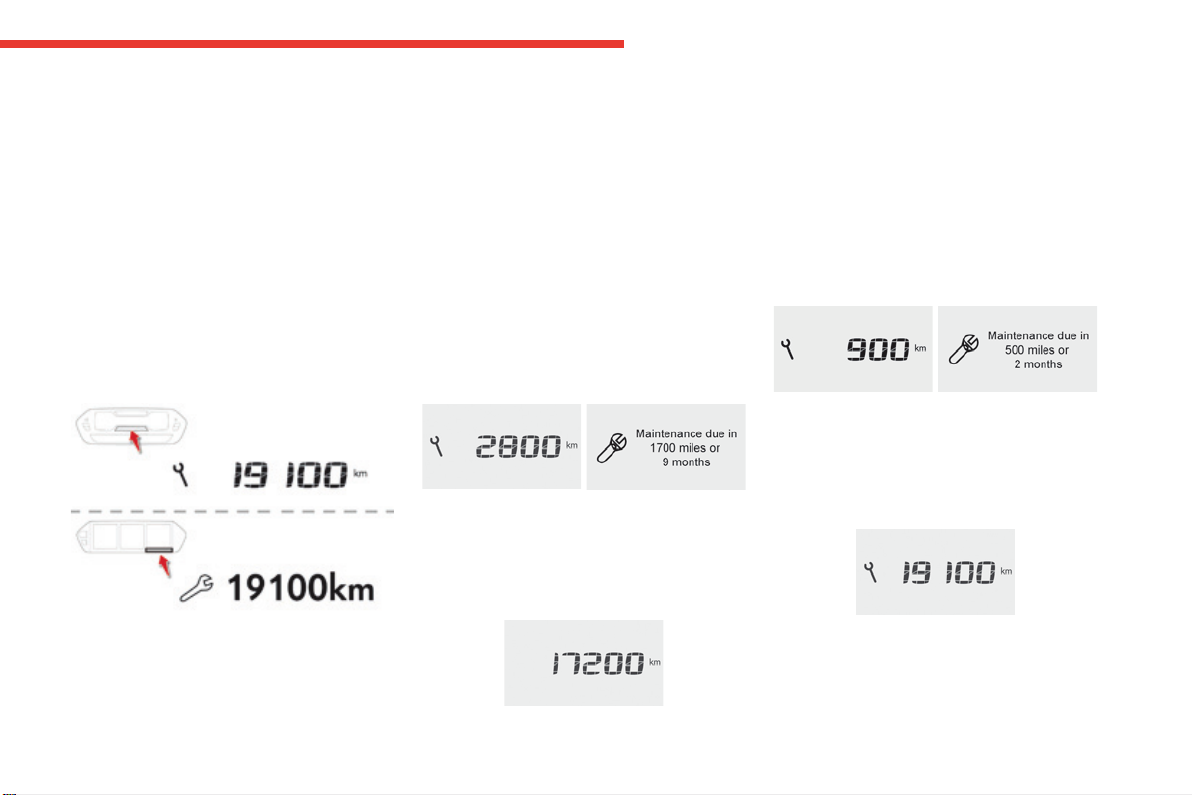
More than 1 800 miles (3 000 km)
remain before the next service is due
Whentheignitionisswitchedon,noservice
informationappearsinthescreen.
Less than 600 miles (1 000 km)
remain before the next service is due
Example:560miles(900km)remainbefore
thenextserviceisdue.
For5secondsaftertheignitionisswitchedon,
thescreenindicates:
Between 600 miles (1 000 km)
and 1 800 miles (3 000 km) remain
before the next service is due
For5secondsaftertheignitionisswitchedon,the
spannersymbolisingtheserviceoperationscomes
on.Thedistancerecorderdisplaylineindicatesthe
distanceremainingbeforethenextserviceisdue.
Example:1700miles(2800km)remainbefore
thenextserviceisdue.
For5secondsaftertheignitionisswitchedon,the
screenindicates:
5secondsaftertheignitionisswitchedon,
the spanner goes off;thedistancerecorder
resumesitsnormaloperation.Thescreenthen
indicatesthetotalandtripdistances.
5secondsaftertheignitionisswitchedon,
the distance recorder resumes its normal
operation.The spanner remains on to
indicate that a service must be carried out
soon.
Gaugesandindicators
38
Instruments
C4-Picasso-II_en_Chap01_instruments-bord_ed01-2016
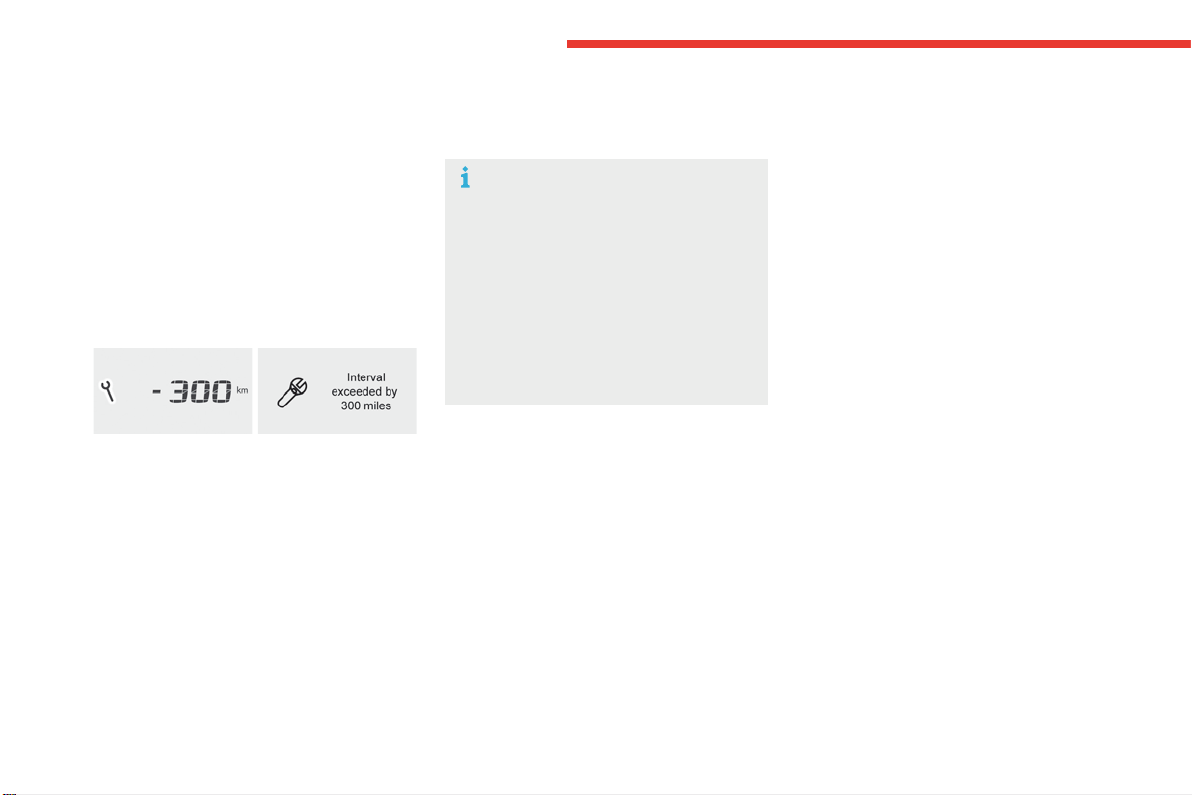
Service overdue
For5secondsaftertheignitionisswitched
on, the spanner flashes to indicate that
the service must be carried out as soon as
possible.
Example: the service is overdue by 180 miles
(300km).
For5secondsaftertheignitionisswitchedon,
thescreenindicates:
Therefore, the spanner may come on
ifyouhaveexceededtheperiodsince
the last service, as indicated in the
manufacturer'sserviceschedule.
For BlueHDi Diesel versions, the
spanner may also come on early,
accordingtothelevelofdeterioration
oftheengineoil,whichdependsonthe
drivingconditionsinwhichthevehicle
isused.
5secondsaftertheignitionisswitchedon,
the distance recorder resumes its normal
operation.The spanner remains on.
With BlueHDi Diesel versions, the Service
warninglampalsocomesonwhentheignition
isswitchedon.

1
39
Instruments
C4-Picasso-II_en_Chap01_instruments-bord_ed01-2016
Resetting the service indicator
If you have to disconnect the battery
followingthisoperation,lockthevehicle
and wait at least 5 minutes for the reset
toberegistered.
After each service, the service indicator must
beresettozero.
If you have carried out the service on your
vehicleyourself:
F switchofftheignition,
F press and hold the trip distance recorder
reset button,
F switchontheignition;thedistancerecorder
displaybeginsacountdown,
F when the display indicates "=0", release
thebutton;thespannerdisappears.
Retrieving the service
information
You can access the service information at any
time.
F Press the trip distance recorder reset
button.
The service information is displayed for a
fewseconds,thendisappears.
40
Instruments
C4-Picasso-II_en_Chap01_instruments-bord_ed01-2016
*Onlywiththetype2instrumentpanel.
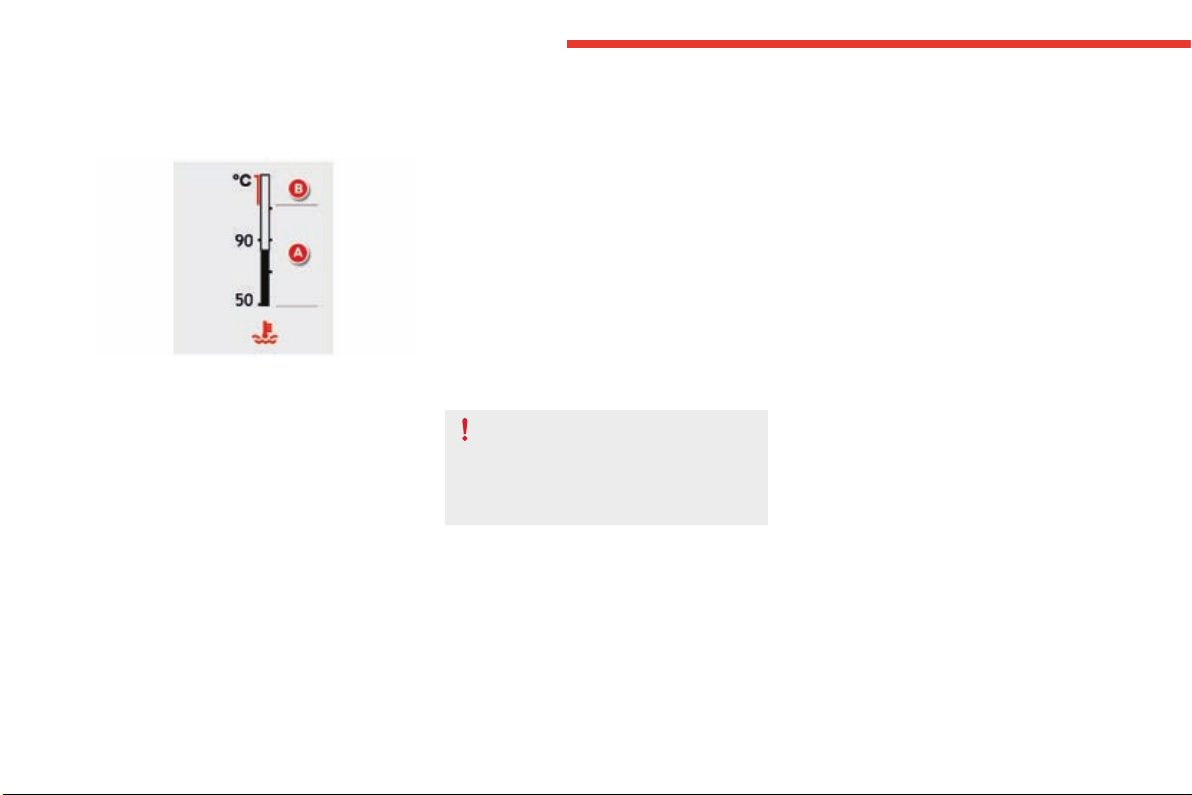
Coolant temperature gauge*
Afterdrivingforafewminutes,thetemperature
andpressureinthecoolingsystemincrease.
Totop-upthelevel:
F waitfortheenginetocool,
F unscrewthecapslightlytoallowthe
pressure to drop,
F when the pressure has dropped, remove
the cap,
F top-uptheleveltothe"MAX"mark.
Withtheenginerunning,whentheneedleis:
- in zone A, the temperature is correct,
- in zone B,thetemperatureistoohigh;
themaximumtemperatureandthe
central STOPwarninglampscomeon,
accompaniedbyanaudiblesignalanda
warningmessage.
Beawareoftheriskofburnswhen
topping-upthecoolingsystem.Donot
fillabovethemaximumlevel(indicated
ontheheadertank).
You MUST stop as soon as it is safe
to do so.
Waitafewminutesbeforeswitchingoffthe
engine.
Contact a CITROËN dealer or a qualified
workshop.
1
41
Instruments
C4-Picasso-II_en_Chap01_instruments-bord_ed01-2016
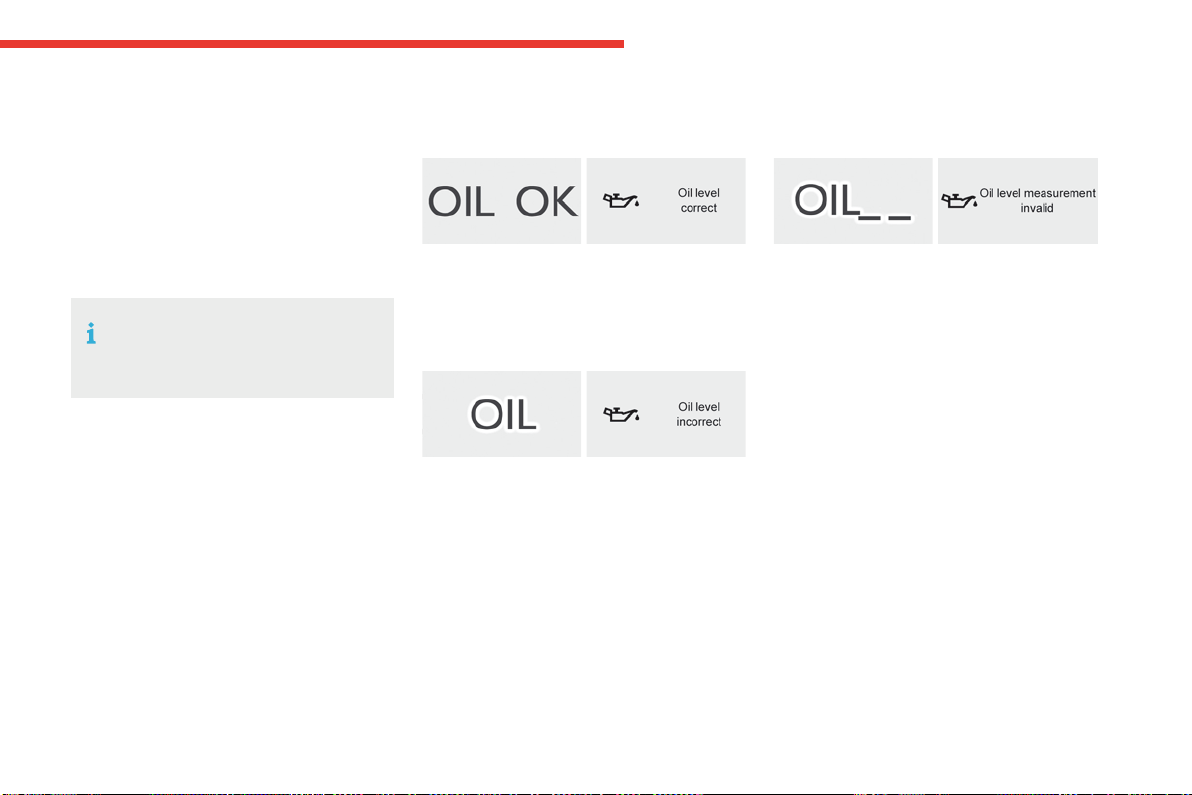
Engine oil level indicator*
On versions fitted with an electric oil level
indicator,thestateoftheengineoillevelis
displayed in the instrument panel for a few
seconds,aftertheservicinginformation.
The level read will only be correct if
thevehicleisonlevelgroundandthe
enginehasbeenoffformorethan
30minutes.
Oil level correct
Oil level incorrect
Thisisindicatedbythedisplayofthemessage
"Oil level incorrect" in the instrument panel
screen,accompaniedbytheservicewarning
lampandanaudiblesignal.
Ifthelowoillevelisconfirmedbyacheckusing
thedipstick,thelevelmustbetoppedupto
avoiddamagetotheengine.
For more information on Checking levels,
refertothecorrespondingsection.
Oil level indicator fault
Thisissignalledbythedisplayofthemessage
"Oil level measurement invalid" in the
instrumentpanel.
Contact a CITROËN dealer or a qualified
workshop.
In the event of a fault with the electric indicator,
theoillevelisnolongermonitored.
Ifthesystemisfaulty,youmustcheckthe
engineoillevelusingthemanualdipstick
locatedunderthebonnet.
For more information on Checking levels,
refertothecorrespondingsection.
*Dependingonversion.

42
Instruments
C4-Picasso-II_en_Chap01_instruments-bord_ed01-2016
AdBlue
®
fluid range indicators
Once the AdBlue
®
tankisonreserveorafter
detection of a fault with the SCR emissions
controlsystem,whentheignitionisswitched
on, an indicator displays an estimate of the
distancethatcanbecovered,therange,before
enginestartingisprevented.
In the event of simultaneous system fault and
low AdBlue
®
level,theshortestrangefigureis
theonedisplayed.
Range greater than 1 500 miles (2 400 km)
Whentheignitionisswitchedon,no
informationonrangeisdisplayedautomatically
intheinstrumentpanel.
Withthetype2instrumentpanel,pressingthis
buttontemporarilydisplaysthedrivingrange.
In the event of the risk of non-starting related to a lack of AdBlue
®
Theenginestartpreventionsystem
requiredbyregulationsisactivated
automatically once the AdBlue
®
tankis
empty.
1
43
Instruments
C4-Picasso-II_en_Chap01_instruments-bord_ed01-2016
Remaining range between 350 and 1500 miles
(600 and 2 400 km)
Whenswitchingontheignition,theAdBlue
warninglampcomesonforafewseconds,
accompaniedbyanaudiblesignalandthe
displayofamessage(e.g.:"Top-upAdBlue:
Startingimpossiblein900miles")indicating
theremainingrangeexpressedinmilesor
kilometres.
Whendriving,themessageisdisplayedevery
200miles(300km)untilthefluidlevelhasbeen
topped-up.
Go to a CITROËN dealer or a qualified
workshoptohavetheAdBlue
®
fluidtopped-up.
Youcanalsotop-upthefluidyourself.
For more information on AdBlue
®
and the SCR
system,andinparticularontopping-up,refer
tothecorrespondingsection.
Remaining range between 0 and 350 miles
(0 and 600 km)
Whenswitchingontheignition,theSERVICE
warninglampcomesonandtheAdBlue
warninglampflashes,accompaniedbyan
audiblesignalandthedisplayofamessage
(e.g."Top-upAdBlue:Startingimpossiblein
350miles")indicatingtheremainingrange
expressedinmilesorkilometres.
Whendriving,themessageisdisplayedevery
30secondsuntilthefluidlevelhasbeen
topped-up.
Go to a CITROËN dealer or a qualified
workshoptohavetheAdBlue
®
fluidtopped-up.
Youcanalsotop-upthefluidyourself.
Otherwise you will not be able to restart your
engine.
Breakdown related to a lack of AdBlue
®
Whenswitchingontheignition,theSERVICE
warninglampcomesonandtheAdBlue
warninglampflashes,accompaniedbyan
audiblesignalandthedisplayofamessage
(e.g."Top-upAdBlue:Startingimpossible").
The AdBlue
®
tankisempty:thesystemrequired
byregulationspreventsenginestarting.
Tobeabletostarttheengine,
we recommend that you call on
a CITROËN dealer or a qualified
workshopforthetop-uprequired.
If you carry out the top-up yourself, it
isessentialtoaddatleast3.8litresof
AdBlue
®
tothetank.
For more information on AdBlue
®
and the SCR
system,andinparticularontopping-up,refer
tothecorrespondingsection.
44
Instruments
C4-Picasso-II_en_Chap01_instruments-bord_ed01-2016
In the event of a fault with the SCR emissions control system
In the event of the detection of a fault
TheAdBlue,SERVICEanddiagnostic
warninglampscomeon,accompaniedbyan
audiblesignalandthedisplayofthemessage
"Emissionsfault".
Thealertistriggeredwhendrivingwhenthe
fault is detected for the first time, then when
switchingontheignitionforsubsequent
journeys,whilethefaultpersists.
During an authorised driving phase (between
650 miles and 0 miles) (1 100 km and 0 km)
If a fault with the SCR system is confirmed
(after30miles(50km)coveredwiththe
permanentdisplayofthemessagesignalling
afault),theSERVICEandenginediagnostic
warninglampscomeonandtheAdBlue
warninglampflashes,accompaniedbyan
audiblesignalandthedisplayofamessage
(e.g."Emissionsfault:Startingpreventedin
150miles")indicatingtheremainingrange
expressedinmilesorkilometres.
Whiledriving,themessageisdisplayedevery
30secondswhilethefaultwiththeSCRsystem
persists.
Thealertisrepeatedwhenswitchingontheignition.
YoushouldgotoaCITROËNdealerora
qualifiedworkshopassoonaspossible.
Otherwise, you will not be able to restart your
engine.
Asystemthatpreventsenginestartingisactivatedautomaticallyfrom650miles(1100km)afterconfirmationofafaultwiththeSCRemissions
controlsystem.HavethesystemcheckedbyaCITROËNdealeroraqualifiedworkshopassoonaspossible.
If it is a temporary fault, the alert
disappearsduringthenextjourney,
afterself-diagnosisoftheSCRsystem.
Starting prevented
Everytimetheignitionisswitchedon,the
SERVICEandenginediagnosticwarning
lampscomeonandtheAdBluewarninglamp
flashes,accompaniedbyanaudiblesignaland
thedisplayofthemessage"Emissionsfault:
Startingprevented".
Youhaveexceededtheauthorised
drivinglimit:thestartingprevention
systeminhibitsenginestarting.
Tobeabletostarttheengine,youmust
call on a CITROËN dealer or a qualified
workshop.
1
45
Instruments
C4-Picasso-II_en_Chap01_instruments-bord_ed01-2016
Distance recorders
The total and trip distances are displayed for
thirtysecondswhentheignitionisswitchedoff,
whenthedriver'sdoorisopenedandwhenthe
vehicleislockedorunlocked.
Whentravellingabroad,youmay
havetochangetheunitsofdistance:
the display of road speed must be in
theofficialunits(milesorkm)forthe
country.Thechangeofunitsisdonevia
thescreenconfigurationmenu,withthe
vehiclestationary.
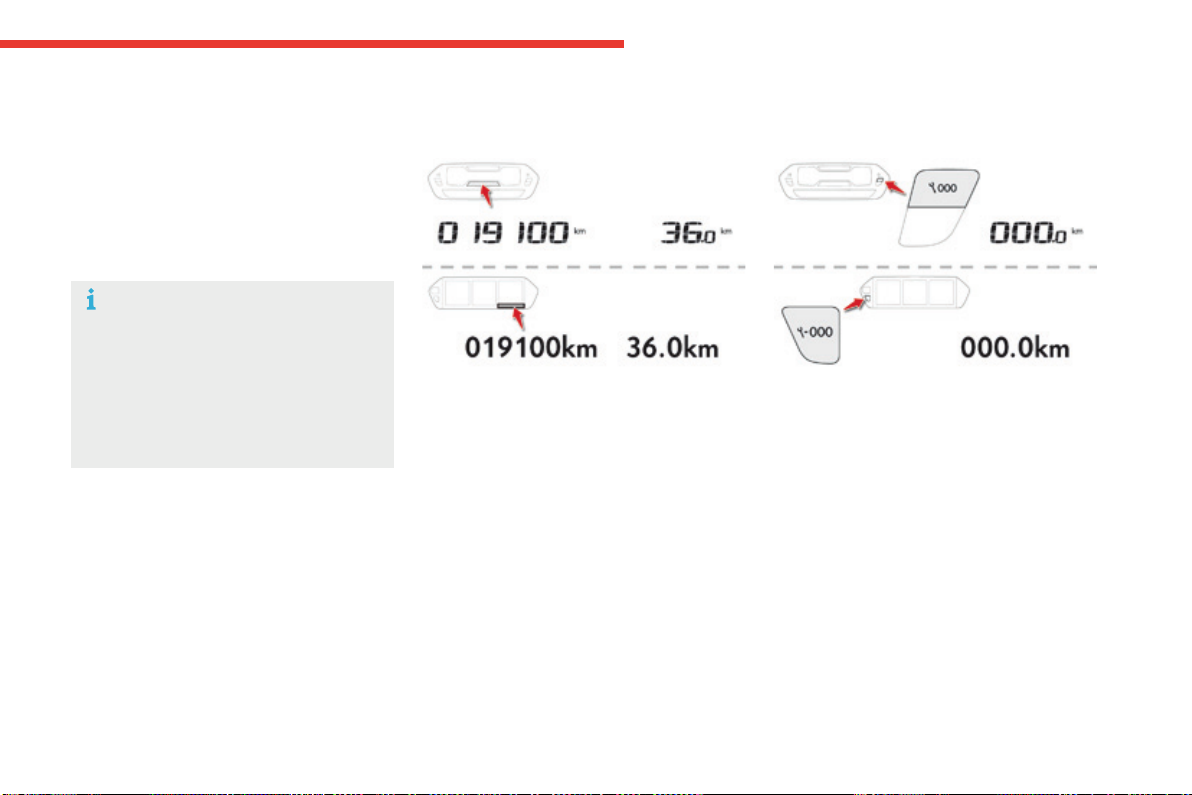
Trip distance recorder
It measures the distance travelled since it was
resettozerobythedriver.
F Withtheignitionon,pressthebuttonuntil
zerosappear.
Total distance recorder
It measures the total distance travelled by the
vehiclesinceitsfirstregistration.
46
Instruments
C4-Picasso-II_en_Chap01_instruments-bord_ed01-2016
Lighting dimmer control
Allowsthemanualadjustmentofthebrightnessoftheinstrumentpanelandtouchscreentabletto
suittheambientlightlevel.
Operatesonlywhenthevehiclelightingison,withtheexceptionofthedaytimerunninglamps.
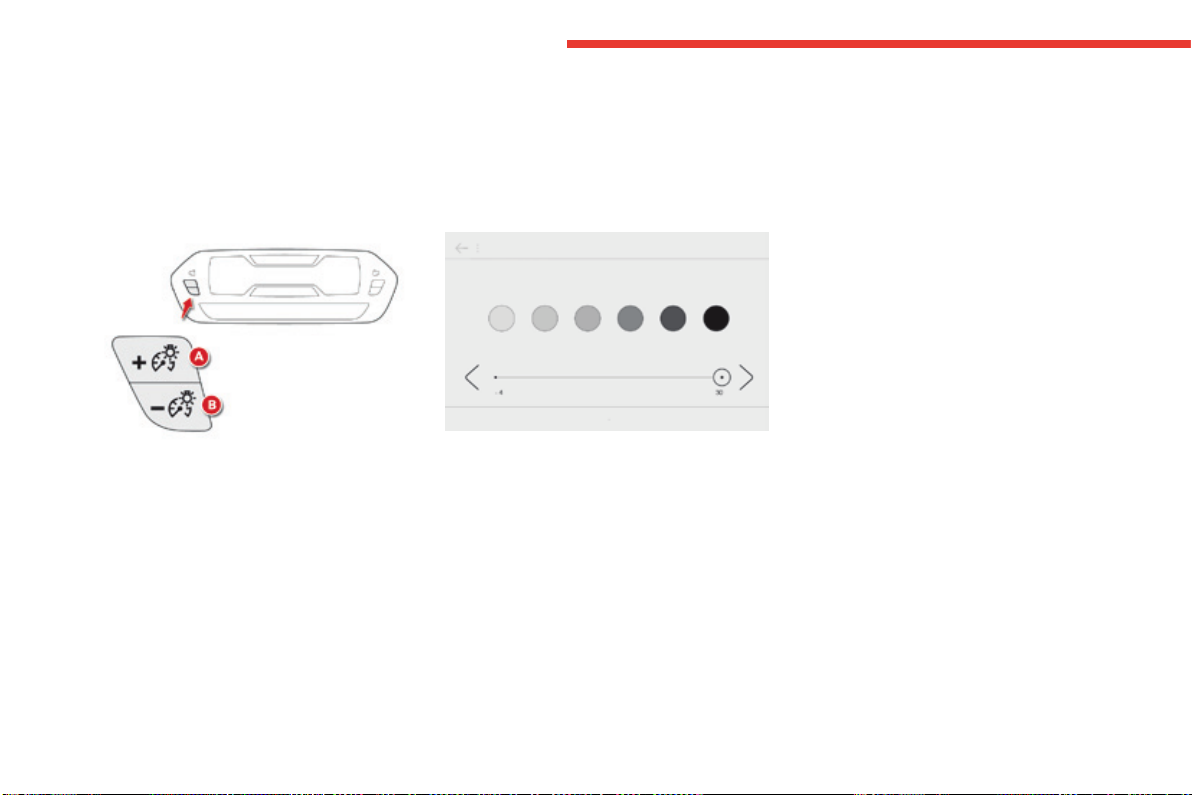
Two buttons
Withtheexteriorlightingon,pressbuttonA
toincreasethebrightnessoftheinstruments
andcontrolsandtheinteriormoodlightingor
button Btoreduceit.
Assoonasthelightingreachestherequired
levelofbrightness,releasethebutton.
Touch screen tablet
F In the Configuration menu, select
"Brightness".
F Adjustthebrightnessusingthearrowsor
bymovingthecursor.
1
47
Instruments
C4-Picasso-II_en_Chap01_instruments-bord_ed01-2016
Whendrivingatnight,thisfunctionallows
certain displays in the instrument panel to be
switchedofftoavoidvisualfatigueforthedriver.
The essential information, such as the speed of
the vehicle or the cruise control or speed limiter
indications remains displayed in the instrument
panel.
Using the steering mounted
control
F Withthevehiclelightingon,pressthis
buttonagaintoactivatetheblackpanel.
F Pressthisbuttonagaintodeactivateit.
Black screen (touch screen
tablet)
Black panel (comfortable
night driving display)
F In the Configuration menu, select "Dark".
Thescreenofthetouchscreentabletgoes
off.
F Pressthescreenagain(anywhereonits
surface)toswitchitonagain.
48
Instruments
C4-Picasso-II_en_Chap01_instruments-bord_ed01-2016
Trip computer
Type 1 instrument panel
Systemthatgivesyouinformationonthejourneyinprogress(range,fuelconsumption…).
Information display in the touch screen tablet
Permanentdisplay:
F Select the "Trip computer" in the
Applicationsmenu.
The trip computer information is displayed in
tabs.
F Press one of the buttons to display the
desiredtab.
Thecurrentfuelconsumptiontabwith:
- therange,
- the current fuel consumption,
- theStop&Starttimecounter.
The trip "1"tabwith:
- the distance travelled,
- theaveragefuelconsumption,
- theaveragespeed,
forthefirsttrip.
The trip "2"tabwith:
- the distance travelled,
- theaveragefuelconsumption,
- theaveragespeed,
forthesecondtrip.
Trip reset
F When the desired trip is displayed, press
the reset button or on the end of the wiper
controlstalk.
Trips "1" and "2" are independent but their use
isidentical.
Forexample,trip"1" can be used for daily
figures,andtrip"2"formonthlyfigures.
The information is accessible in the Drivingmenu.
Temporarydisplayinanewwindow:
F Presstheendofthewipercontrolstalkfor
access to the information and display the
differenttabs.
1
49
Instruments
C4-Picasso-II_en_Chap01_instruments-bord_ed01-2016
Trip computer
Type 2 instrument panel
Information display in the instrument panel
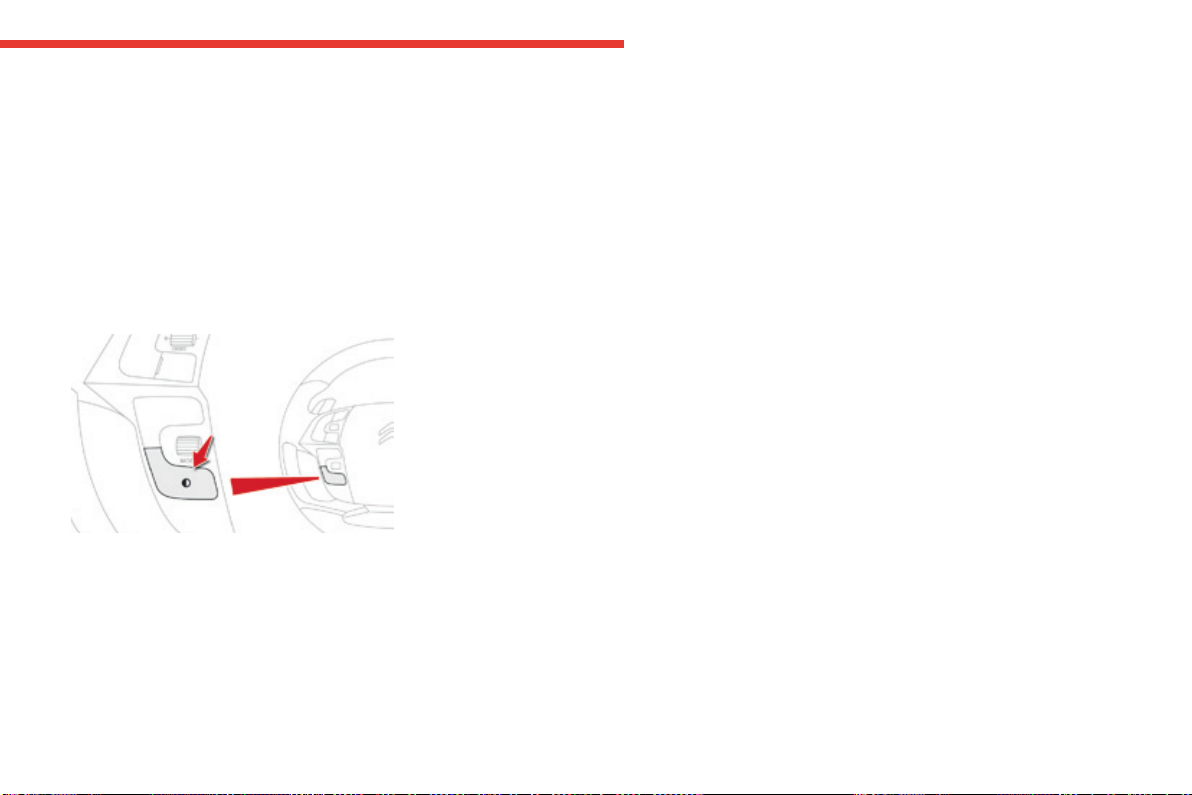
F Press the button on the end of the wiper
control stalk to display the various tabs in
succession.
- Thecurrentinformationtabwith:
● therange,
● thecurrentfuelconsumption,
● theStop&Starttimecounter.
- Trip "1"with:
● theaveragespeed,
● theaveragefuelconsumption,
● thedistancetravelled,
forthefirsttrip.
- Trip "2"with:
● theaveragespeed,
● theaveragefuelconsumption,
● thedistancetravelled,
forthesecondtrip.
Trip reset
F When the trip required is displayed, press
the control for more than two seconds
or use the left hand thumbwheel of the
steeringmountedcontrols.
Trips "1" and "2" are independent but their use
isidentical.
Forexample,trip"1" can be used for daily
figures,andtrip"2"formonthlyfigures.
Forallotherdisplaymodes,pressingtheend
ofthewiperstalkdisplaysthisinformationina
newwindow.
The display of trip computer information is
permanent when you select the "Dials" or
"Personal"displaymode.
50
Instruments
C4-Picasso-II_en_Chap01_instruments-bord_ed01-2016
Trip computer
Range
(milesorkm)
The distance which can still be
travelledwiththefuelremainingin
thetank(relatedtotheaveragefuel
consumption over the last few miles
(kilometres)travelled).
Thisvaluemayvaryfollowingachange
inthestyleofdrivingortherelief,
resultinginasignificantchangeinthe
currentfuelconsumption.
Whentherangefallsbelow20miles(30km),
dashesaredisplayed.Afterfillingwithatleast
5litresoffuel,therangeisrecalculatedandis
displayedwhenitexceeds60miles(100km).
If dashes are displayed continuously
whiledrivinginplaceofthedigits,
contact a CITROËN dealer or a
qualifiedworkshop.
This function is only displayed from
20mph(30km/h).
Current fuel consumption
(mpgorl/100kmorkm/l)
Calculatedoverthelastfewseconds.
Average fuel consumption
(mpgorl/100kmorkm/l)
Calculatedsincethelasttripreset.
Average speed
(mphorkm/h)
Calculatedsincethelasttripreset.
Distance travelled
(milesorkm)
Calculatedsincethelasttripreset.
Stop & Start time counter
(minutes/secondsorhours/minutes)
If your vehicle is fitted with Stop & Start, a time
counter calculates the time spent in STOP
modeduringajourney.
Itresetstozeroeverytimetheignitionis
switchedon.
A few definitions
51
2
Acc ess
C4-Picasso-II_en_Chap02_ouvertures_ed01-2016
Electronickey-remotecontrol
Systemwhichpermitsremotelockingorunlocking
ofthevehicleaswellasopeningthebootand,
dependingonversion,operationofthealarm.
Italsoallowsthelocationandstartingofthe
vehicleaswellasprovidingprotectionagainst
theft.
Unlocking the vehicle
F Pressthisbutton.
Unlocking the vehicle and
opening the boot
The direction indicators flash for a few
seconds.Thedoormirrorspotlamps
comeon.Dependingonversion,the
door mirrors unfold, the welcome
lightingcomesonandthealarmis
deactivated.
F Makealongpressonthis
buttontounlockthevehicle
and,dependingonversion,
releasethetailgateoropenthe
motorisedtailgate.
F Tounlocktheotherdoorsandtheboot,
pressthisbuttonagain.
Thesettingofselectiveunlockingisdonein
the Drivingmenu.
Select "Driver plip action".
Completeunlockingisactivatedbydefault.
Complete unlocking
F Tounlockonlythedriver'sdoor,
pressthisbuttononce.
Selective unlocking
Settingsforthemotorisedtailgatecanbe
adjustedintheDrivingmenu.
Motorisedoperationisactivatedbydefault.
A. Unlockingthevehicle.
B. Centrallockingthevehicle.
C. Unlockingthevehicleand,dependingon
version,releaseofthetailgateoropening
themotorisedtailgate.
Theelectronickeyincludesanintegralback-up
emergencykey.
52
Acc ess
C4-Picasso-II_en_Chap02_ouvertures_ed01-2016
Deadlockingrenderstheinteriordoor
controlsinoperative.
It also deactivates the manual central
lockingbutton.
Therefore, never leave anyone inside
thevehiclewhenitisdeadlocked.
Deadlocking
F Withthevehicleunlocked,press
thisbutton.
F Within five seconds, press this button
againtodeadlockthevehicle.
This function allows you to identify your vehicle
fromadistance,particularlyinpoorlight.Your
vehiclemustbelocked.
Locating your vehicle
F Pressthisbutton.
This will switch on the courtesy lamps and
the direction indicators will flash for about
10seconds.
F Pressthisbutton.
Holdingthebuttonallowsthe
windows to be raised to the
desiredposition.
Normal locking
If one of the doors or the boot is not
properlyclosed,lockingdoesnottake
place.
Nevertheless, the alarm (if fitted) will be
fullyactivatedafteraround45seconds.
Ifthevehicleisunlockedbymistake
andnoactionistakenonthedoorsor
boot,thevehiclewilllockitselfagain
automaticallyafteraboutthirtyseconds.
If fitted to your vehicle and the alarm is
reactivatedautomatically.
The direction indicators come on for a
fewseconds.
Dependingonyourversion,thedoor
mirrorsfold,thealarmisactivated.
Locking the vehicle
Ensurethatnothingcouldpreventthe
correctclosingofthewindows.
Beawareofchildrenwhenoperating
thewindows.
Theautomaticfoldingandunfolding
of the door mirrors can be deactivated
by a CITROËN dealer or a qualified
workshop.
53
2
Acc ess
C4-Picasso-II_en_Chap02_ouvertures_ed01-2016
Systemthatallowstheunlocking,locking
andstartingofthevehiclewhilekeepingthe
electronickeyonyourperson.
For reasons of safety and theft protection,
donotleaveyourelectronickeyinthe
vehicle,evenwhenyouareclosetoit.
Itisrecommendedthatyoukeepiton
yourperson.
Theelectronickeycanalsobeusedas
aremotecontrol.
For more information on the Electronic
key - remote control, refer to the
correspondingsection.
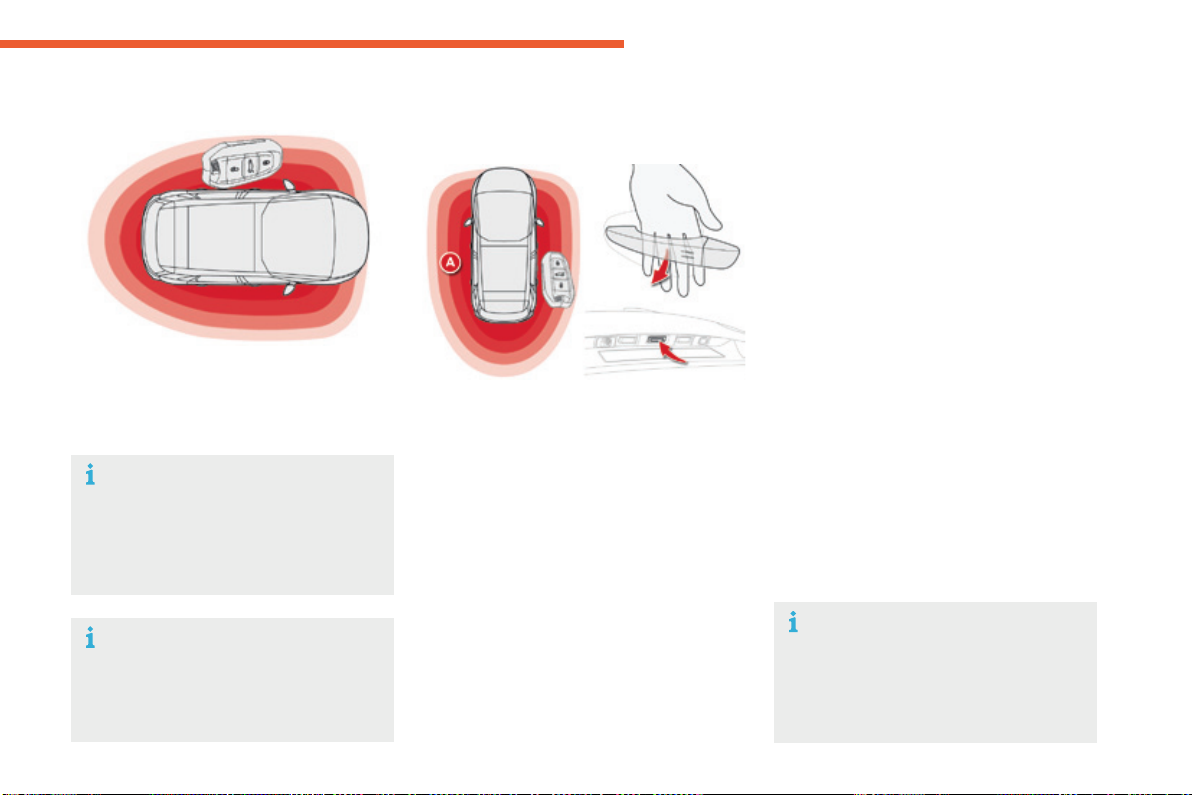
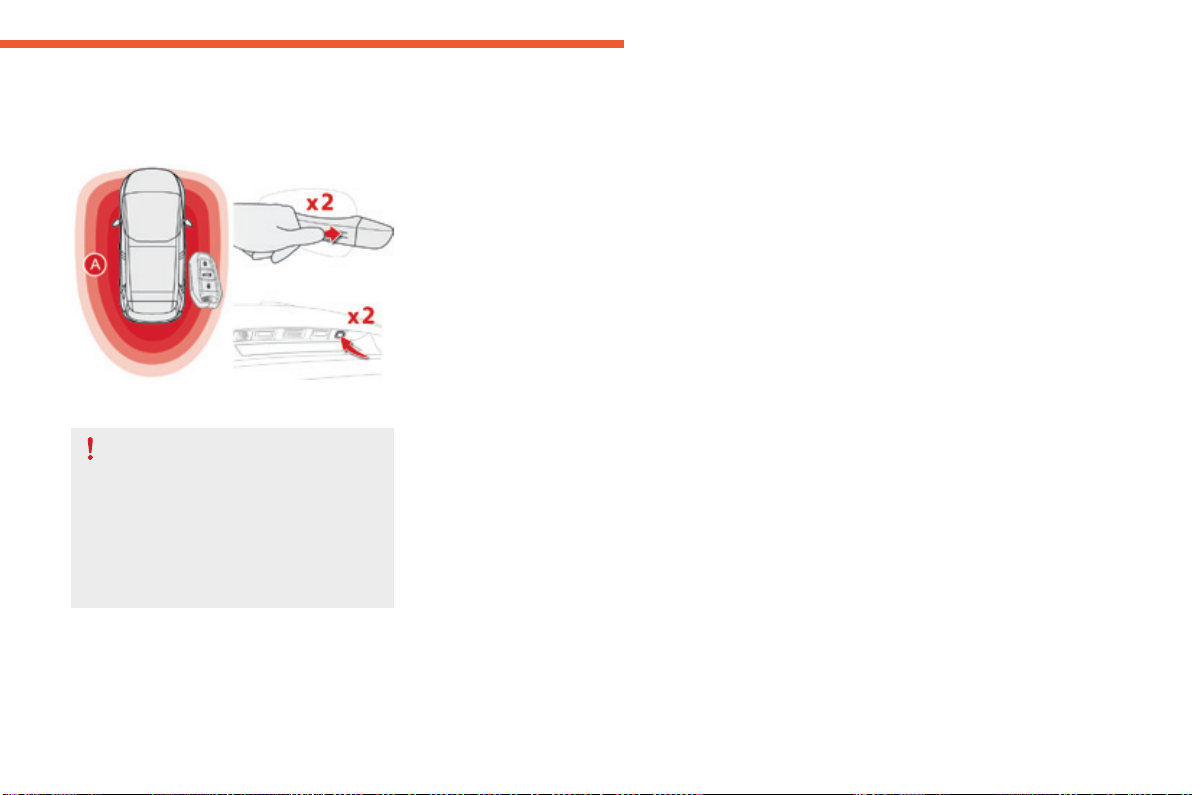
KeylessEntryandStarting
Unlocking the vehicle
Complete unlocking
F Withtheelectronickeyonyourpersonand
intherecognitionzoneA, pass your hand
behind the door handle of one of the front
doorstounlockthevehicleorpressthe
tailgateopeningcontrol(locatedcentrally).
Selective unlocking
F Tounlockonlythedriver'sdoor,withthe
electronickeyonyourperson,passyour
handbehindthedriver'sdoorhandle.
F Tounlockthecompletevehicle,passyour
handbehindthefrontpassengerdoor
handlewiththeelectronickeycloseto
thepassengerdoor,orpressthetailgate
openingcontrolwiththeelectronickey
closetotherearofthevehicle.
Activationordeactivationofselectiveunlocking
is done in the Drivingmenu.
Select "Driver plip action".
Bydefault,completeunlockingisactivated.
The direction indicators flash for a
fewseconds.
Dependingonversion,thedoormirrors
unfold, the alarm is deactivated and the
welcomelightingcomeson.
54
Acc ess
C4-Picasso-II_en_Chap02_ouvertures_ed01-2016
Ensurethatnothingcouldpreventthe
correctoperationofthewindows.
Beawareofchildrenwhenoperating
thewindows.
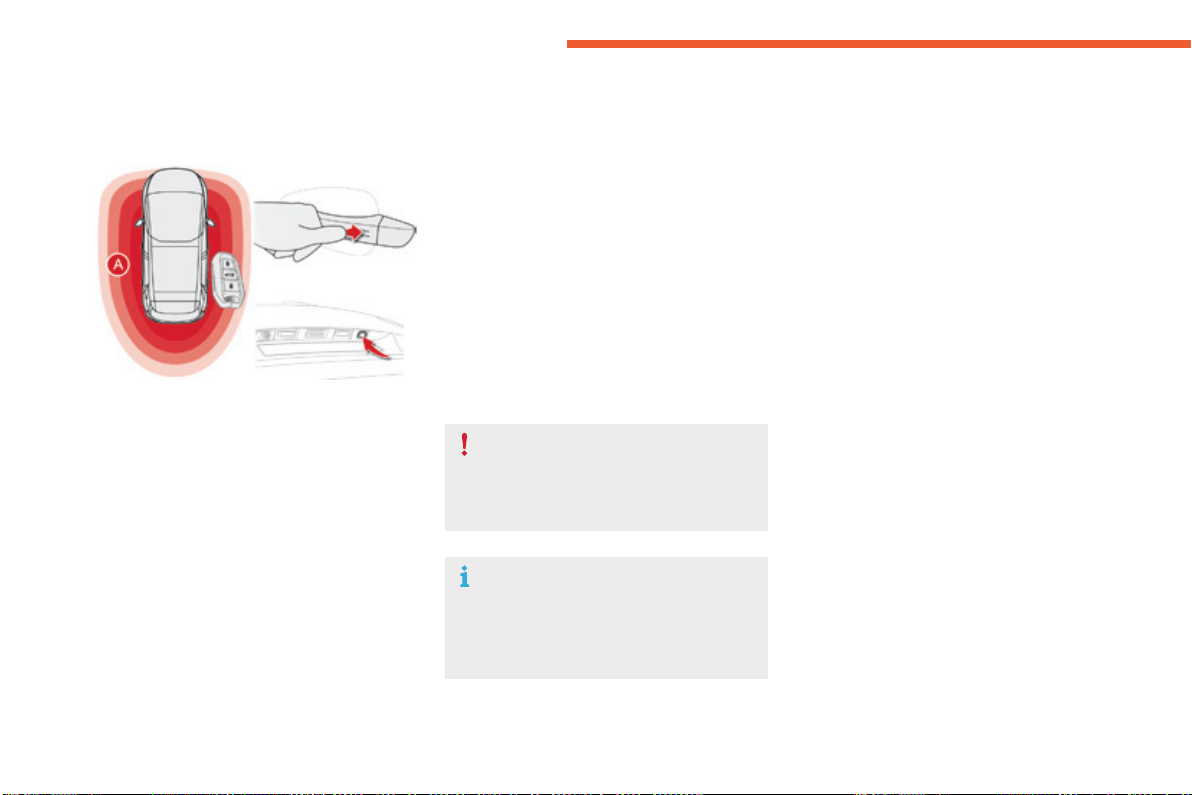
Locking the vehicle
F Withtheelectronickeyintherecognition
zone A,presswithafingerorthumb
on one of the front door handles (at the
markings)tolockthevehicleororpress
thelockingbuttonontherightofthe
tailgate.
Maintainingpressureallowsthewindowstobe
raisedtothedesiredposition.
Itisnotpossibletolockthevehicleifoneofthe
keysisleftinsidethevehicle.
The direction indicators come on for a
fewseconds.
Dependingonyourversion,thedoor
mirrorsfoldandthealarmisactivated.
Normal locking
55
2
Acc ess
C4-Picasso-II_en_Chap02_ouvertures_ed01-2016
Deadlocking
Bythedoors:
F Withtheelectronickeyintherecognition
zone A,pressafingerorthumbononeof
thefrontdoorhandles(atthemarkings)or
thelockingcontrollocatedlocatedonthe
rightofthetailgatetolockthevehicle.
F Within five seconds, press the door handle
orthelockingcontrollocatedontherightof
thetailgateagaintodeadlockthevehicle.
Deadlockingrenderstheinteriordoor
controlsinoperative.
It also deactivates the manual central
controlbutton.
Therefore, never leave anyone inside
thevehiclewhenitisdeadlocked.

56
Acc ess
C4-Picasso-II_en_Chap02_ouvertures_ed01-2016
As a safety measure (children on
board), never leave the vehicle without
takingtheelectronickeyfortheKeyless
EntryandStartingsystemwithyou,
evenforashortperiod.
Beawareoftheriskoftheftwhenthe
electronickeyfortheKeylessEntryand
Startingsystemisinoneofthedefined
zoneswiththevehicleunlocked.
If one of the doors or the boot is still
openoriftheelectronickeyforthe
KeylessEntryandStartingsystemhas
been left inside the vehicle, the central
lockingdoesnottakeplace.
However, the alarm (if fitted) will be fully
activatedafterabout45seconds.
In order to preserve the battery in the
electronickeyandthevehicle'sbattery,
the "hands-free" functions are put into
long-termstandbyafter21dayswithout
use.Torestorethesefunctions,press
one of the remote control buttons or
starttheenginewiththeelectronickey
inthereader.
Formoreinformationonstartingwith
Keyless Entry and Starting, refer to
thecorrespondingsection.
Ifthevehicleisunlockedbymistake
and with no action on the doors or boot,
thevehiclewilllockagainautomatically
afterabout30seconds.
If fitted to your vehicle, the alarm will
alsobereactivatedautomatically.
Theautomaticfoldingandunfolding
of the door mirrors can be deactivated
by a CITROËN dealer or a qualified
workshop.
Accumulations(water,dust,grime,
salt...)ontheinnersurfaceofthedoor
handlemayaffectdetection.
Ifcleaningtheinnersurfaceofthedoor
handleusingaclothdoesnotrestore
detection, contact a CITROËN dealer or
aqualifiedworkshop.
A sudden splash of water (stream of
water,highpressurejetwasher,…)
may be identified by the system as the
desiretoopenthevehicle.
57
2
Acc ess
C4-Picasso-II_en_Chap02_ouvertures_ed01-2016
Normal locking
F Turnthekeytowardstherearofthevehicle
tolockthevehiclecompletely.
Deadlocking
F Turnthekeytowardstherearinthedriver's
doorlocktolockthevehiclecompletely.
F Turnthekeytowardstherearagainwithin
fivesecondstodeadlockthevehicle.
Dependingonversion,thedirection
indicators flash for a few seconds, the
doormirrorsfold.
Forversionswithalarm:itisnotdeactivated/activatedwhenunlocking/lockingthevehicle
withtheintegralkey.
Thesirenwillsoundonopeningthedoorwiththekey(integralwiththeremotecontrol).It
stopswhentheignitionisswitchedon.
Emergencyprocedure
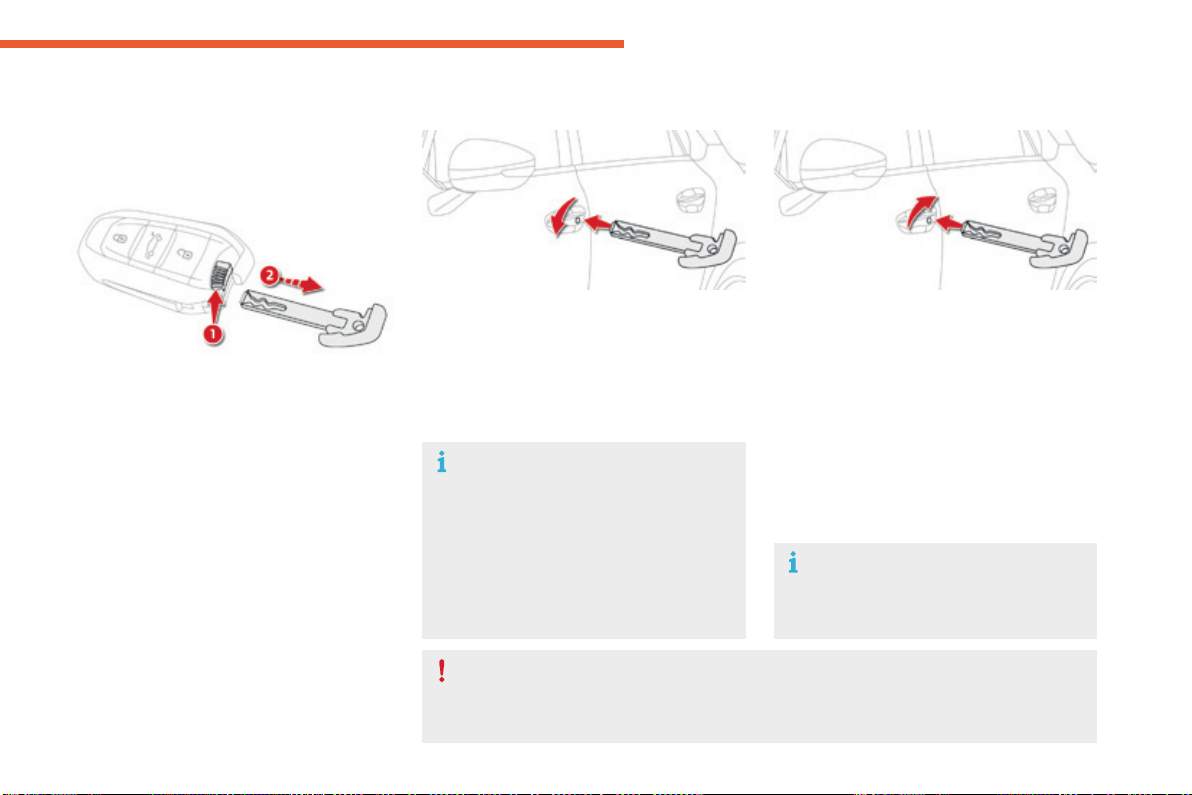
Theintegralkeyisusedtolockandunlockthe
vehiclewhentheelectronickeycannotoperate
and in the event of a fault with the Keyless
EntryandStartingsystem:
- cellbatteryflat,vehiclebatterydischarged
ordisconnected,...
- vehiclelocatedinanareawithstrong
electromagneticsignals.
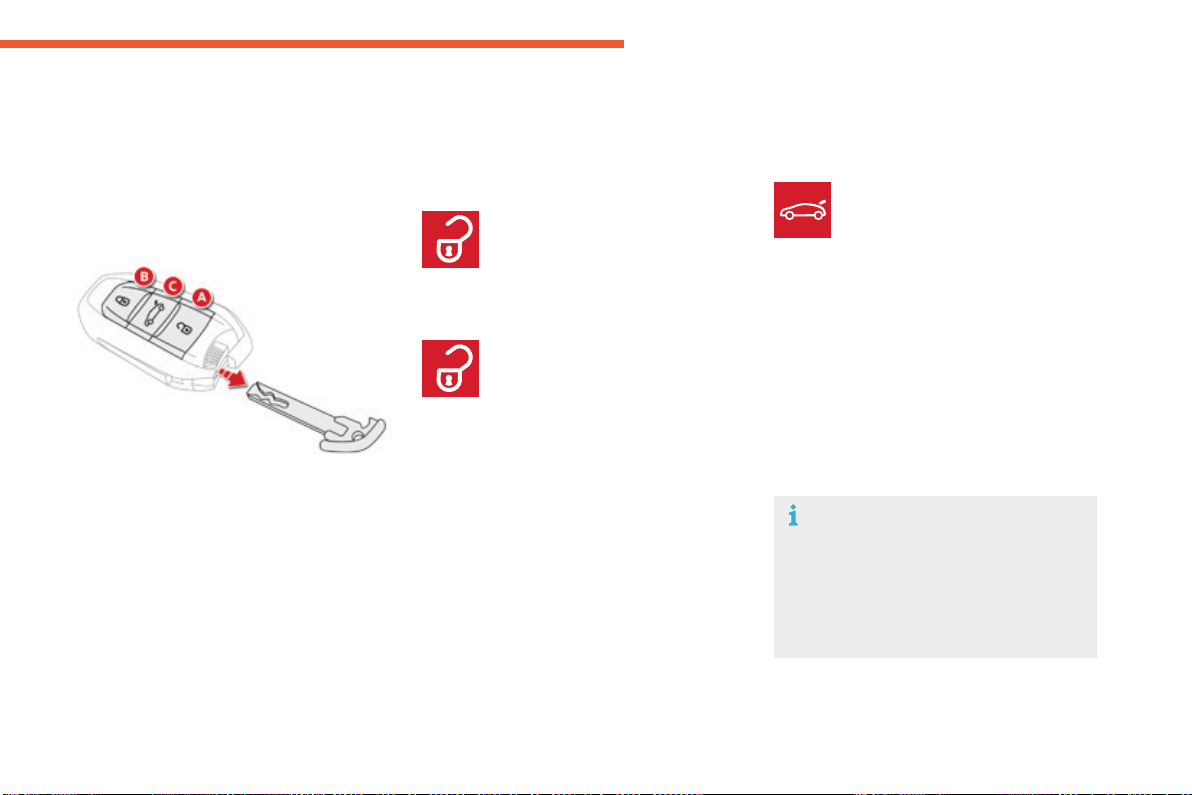
F Toextracttheemergencymechanicalkey
fromtheelectronickey,pressbutton1 and
guidethekey2out.
Theintegralkeyisalsousedtodeactivate/
reactivatethepassenger'sairbag.
Itprovidesabackupmeansoflockingthe
passengerdoors.
Italsoallowslockingofthevehiclewithout
activationofthealarm.
Emergency unlocking/locking
using the integral key
Unlocking
F Turnthekeytowardsthefrontofthe
vehicletounlockthevehicle.
Dependingonversion,thedirection
indicators flash for a few seconds, the
door mirrors unfold and the welcome
lightingcomeson.
Forversionswithalarm:thesirenwill
soundonopeningthedoorwiththekey
(intheremotecontrol).Itstopswhen
theignitionisswitchedon.
58
Acc ess
C4-Picasso-II_en_Chap02_ouvertures_ed01-2016
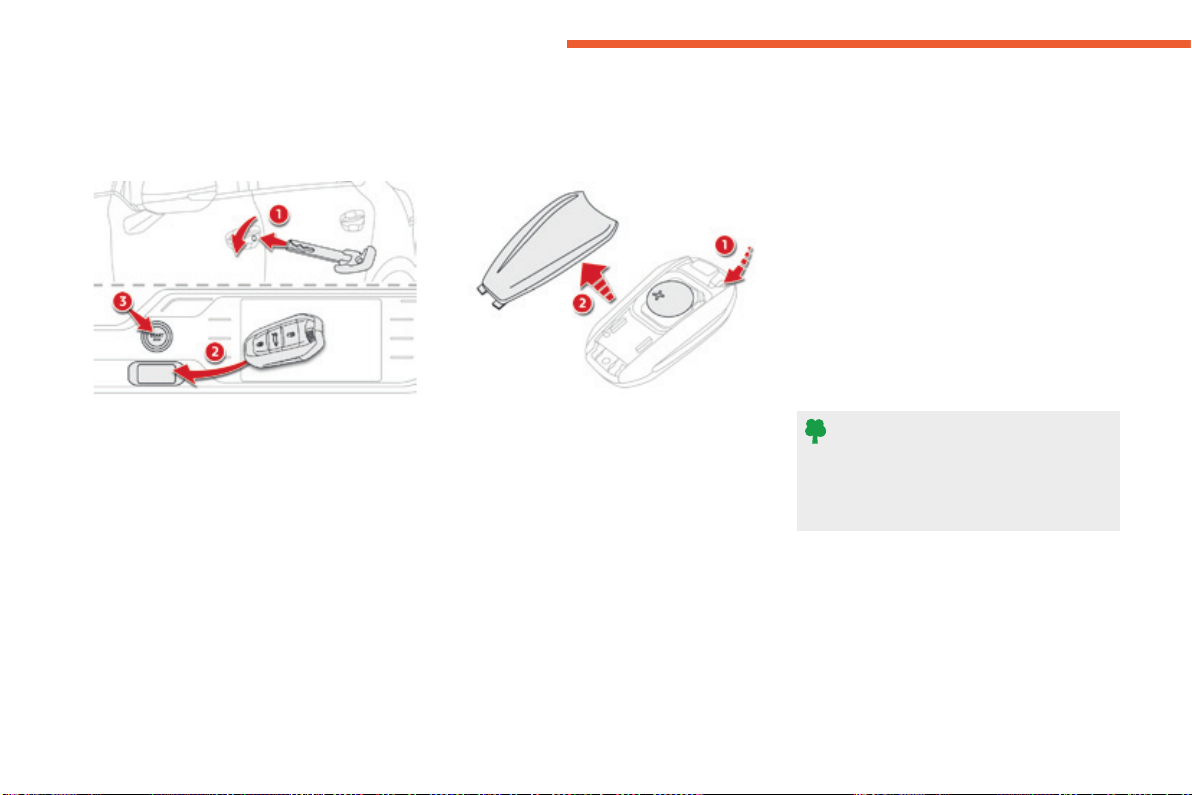
Remote control problem -
reinitialisation
Changing the battery
Followingdisconnectionofthevehiclebattery,
replacement of the remote control battery or
in the event of a remote control malfunction,
youcannolongerunlock,lockorlocate
yourvehicle.
F Placethemechanicalkey(integralwith
theremotecontrol)inthelocktounlock
yourvehicle.
F Placetheelectronickeyinthereader.
F SwitchontheignitionbypressingSTART/
STOP.
Theelectronickeyisfullyoperationalagain.
If the problem persists, contact a CITROËN
dealeroraqualifiedworkshopassoonas
possible.
Do not throw the remote control
batteries away, they contain metals
whichareharmfultotheenvironment.
Takethemtoanapprovedcollection
point.
Batteryref.:CR2032/3volts.
Batteryreplacementissignalledbythedisplay
ofamessage.
F Unclipthecoverusingasmallscrewdriver
atthecut-out.
F Liftoffthecover.
F Removetheflatbatteryfromitslocation.
F Fit the new battery into its location
observingtheoriginaldirectionoffitment.
F Clipthecoverontothecasing.

59
2
Acc ess
C4-Picasso-II_en_Chap02_ouvertures_ed01-2016
Lost electronic key
VisitaCITROËNdealerwiththevehicle'sregistrationcertificate,yourpersonalidentificationdocumentsandifpossiblethekeycodelabel.
TheCITROËNdealerwillbeabletoretrievethekeycodeandthetranspondercoderequiredtoorderanewkey.
Electronic key
Theelectronickeyisasensitivesystem;donotoperateitwhileitisinyourpocketasthereisapossibilitythatitmayunlockthevehicle,without
youbeingawareofit.
Donotrepeatedlypressthebuttonsofyourelectronickeyoutofrangeandoutofsightofyourvehicle.Youruntheriskofstoppingitfrom
workingandtheremotecontrolwouldhavetobereinitialised.
Theelectronickeycannotoperateasaremotecontrolwhenitisinthereaderorevenwhentheignitionisswitchedon.
Locking the vehicle
Drivingwiththedoorslockedmaymakeaccesstothepassengercompartmentbytheemergencyservicesmoredifficultinanemergency.
Asasafetyprecaution(withchildrenonboard),taketheelectronickeywithyouwhenyouleavethevehicle,evenforashorttime.
Electrical interference
Theelectronickeymaynotoperateifclosetocertainelectronicdevices:telephone,laptopcomputer,strongmagneticfields,...
Anti-theft protection
Donotmakeanymodificationstotheelectronicengineimmobilisersystem;thiscouldcausemalfunctions.
Don'tforgettoturnthewheeltolockthesteeringcolumn.
When purchasing a second-hand vehicle
HaveallofthekeysinyourpossessionpairedbyaCITROËNdealer,toensurethatonlyyourkeysallowyourvehicletobeunlockedand
started.
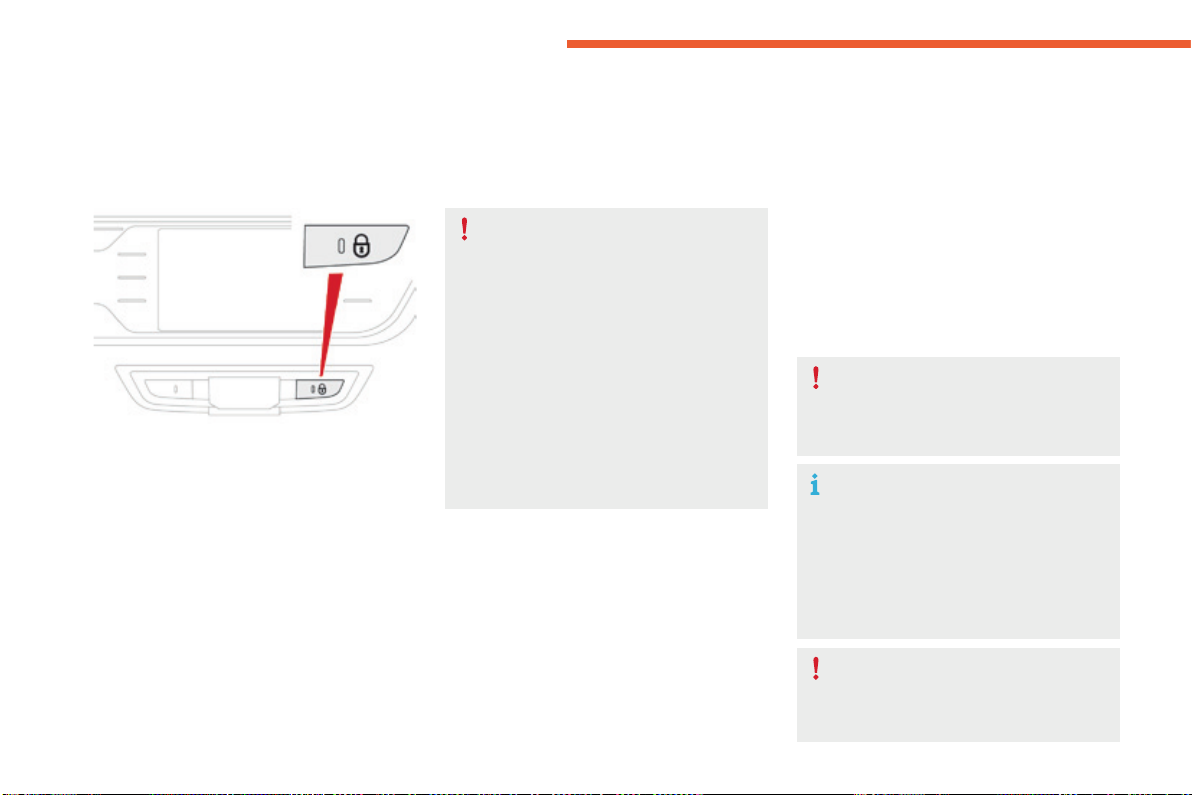
60
Acc ess
C4-Picasso-II_en_Chap02_ouvertures_ed01-2016
Manual central locking
Centrallocking
F Press this button to operate the central
lockingofthevehicle(doorsandboot)from
insidethevehicle.
F Pressingthebuttonagainunlocksthe
vehiclecompletely.
Automatic central locking
of doors (anti-intrusion
security)
Thedoorsandbootlockautomaticallywhen
driving,assoonasthespeedexceeds6mph
(10km/h).
To activate or deactivate this function (activated
bydefault):
F withtheignitionon,pressthisbuttonuntila
messageappearsintheinstrumentpanel.
When locking / deadlocking from the
outside
Ifthevehicleislockedordeadlocked
from the outside, the button is not
active.
F Afternormallocking,pulloneof
theinteriordoorhandlestounlock
thevehicle.
F Afterdeadlocking,youhavetouse
the remote control, the Keyless Entry
andStartingsystemortheintegral
keytounlockthevehicle.
If one of the doors or the boot is
open,automaticcentrallockingdoes
notcomplete:thesoundofthelocks
reboundingcanbeheard.
Transporting long or voluminous
objects
If you want to drive with the boot open
butthevehicle'ssidedoorslocked,
pressthecentrallockingcontrolbutton
tolockthedoors.
Drivingwiththedoorslockedmaymake
accesstothepassengercompartment
bytheemergencyservicesmore
difficultinanemergency.
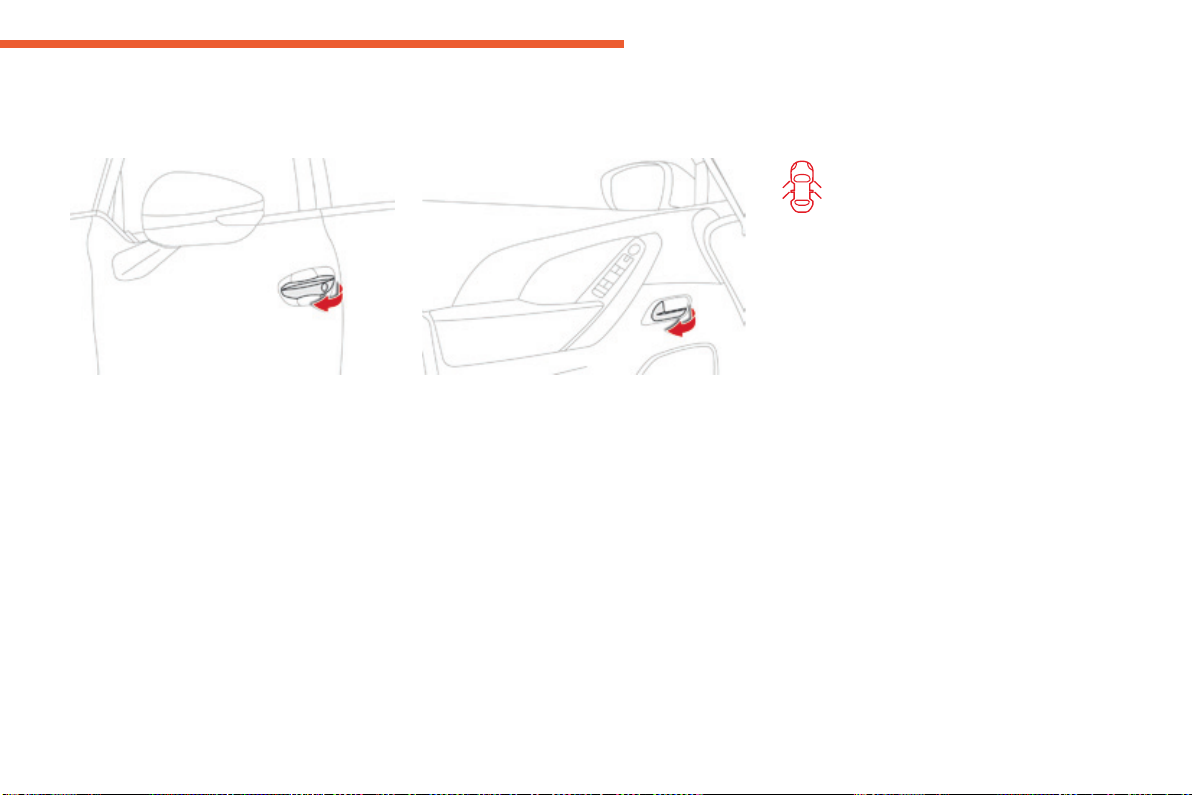
61
2
Acc ess
C4-Picasso-II_en_Chap02_ouvertures_ed01-2016
Doors
Opening
From outside
F Afterunlockingthevehicleusingthe
remote control or the Keyless Entry and
Startingsystem,pullthedoorhandle.
From inside
F Pull the front or rear door lever to open
thedoor.
Ifadoorisnotproperlyclosed:
- with the engine running, this
warninglampandamessage
appear in the instrument panel
(type 1) for a few seconds,
- when driving (speed above
6mph(10km/h)),this
warninglampandamessage,
accompanied by an audible
signal,appearintheinstrument
panel (type 1 and type 2) for a
fewseconds.
Closing
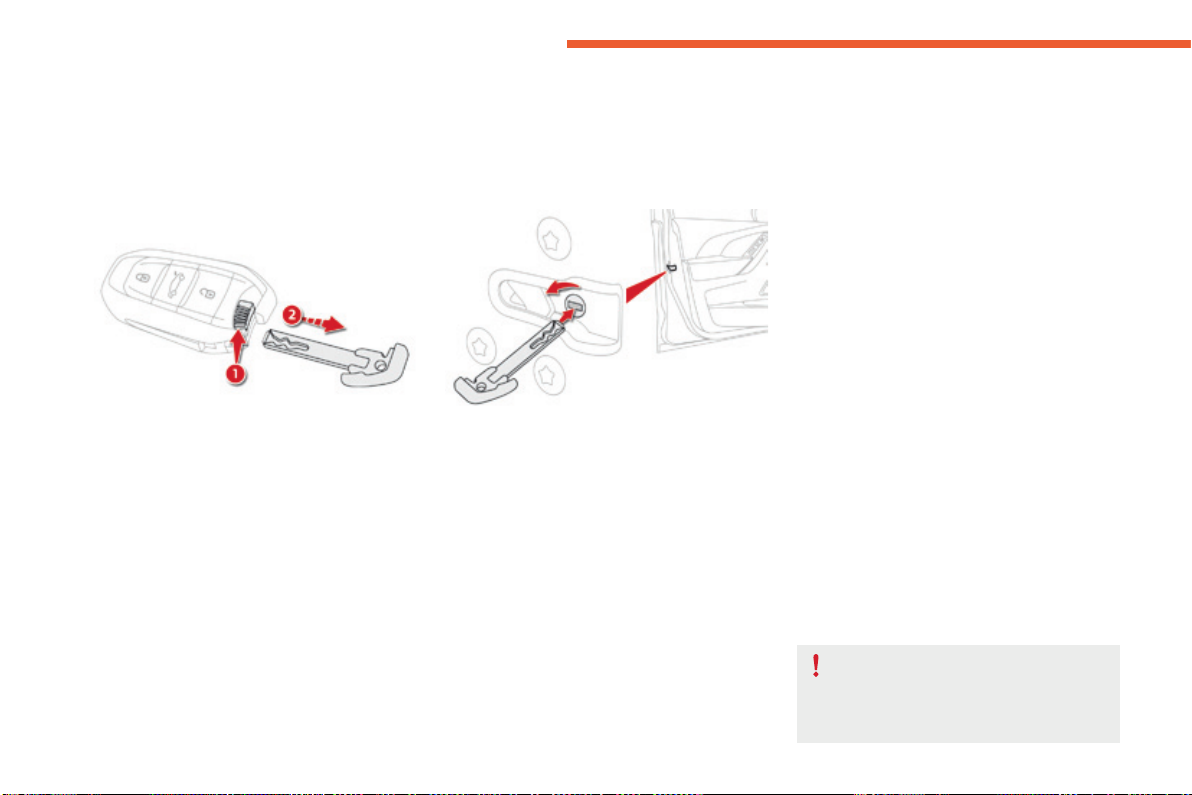
62
Acc ess
C4-Picasso-II_en_Chap02_ouvertures_ed01-2016
Back-up control
Driver's door (locking /
unlocking)
F Insertthekeyintothelockbarreltolock/
unlockthedoor.
You can also apply this procedure for the
passengerdoors.
Locking the passenger doors
F Openthedoors.
F Forthereardoors,checkthatthechildlock
isnoton.
F Insertthekeyinthelatchlocatedonthe
edgeofthedoorandturnitaneighthofa
turntotherightfortherighthanddoor,and
totheleftforthelefthanddoor.
Lockingiseffectivewhentheslotis
horizontal.
F Closethedoorsandcheckthatthevehicle
haslockedcorrectlyfromtheoutside.
Unlocking the passenger
doors
F Pulltheinteriordooropeningcontrol.
For more information on the Child lock, refer
tothecorrespondingsection.
Tomanuallylockandunlockthedoorsintheeventofacentrallockingorbatteryfailure.
Toensurecompletelockingofthe
vehicle,onlydisconnectingthebattery
inhibitsopeningofthetailgatefromthe
outside.
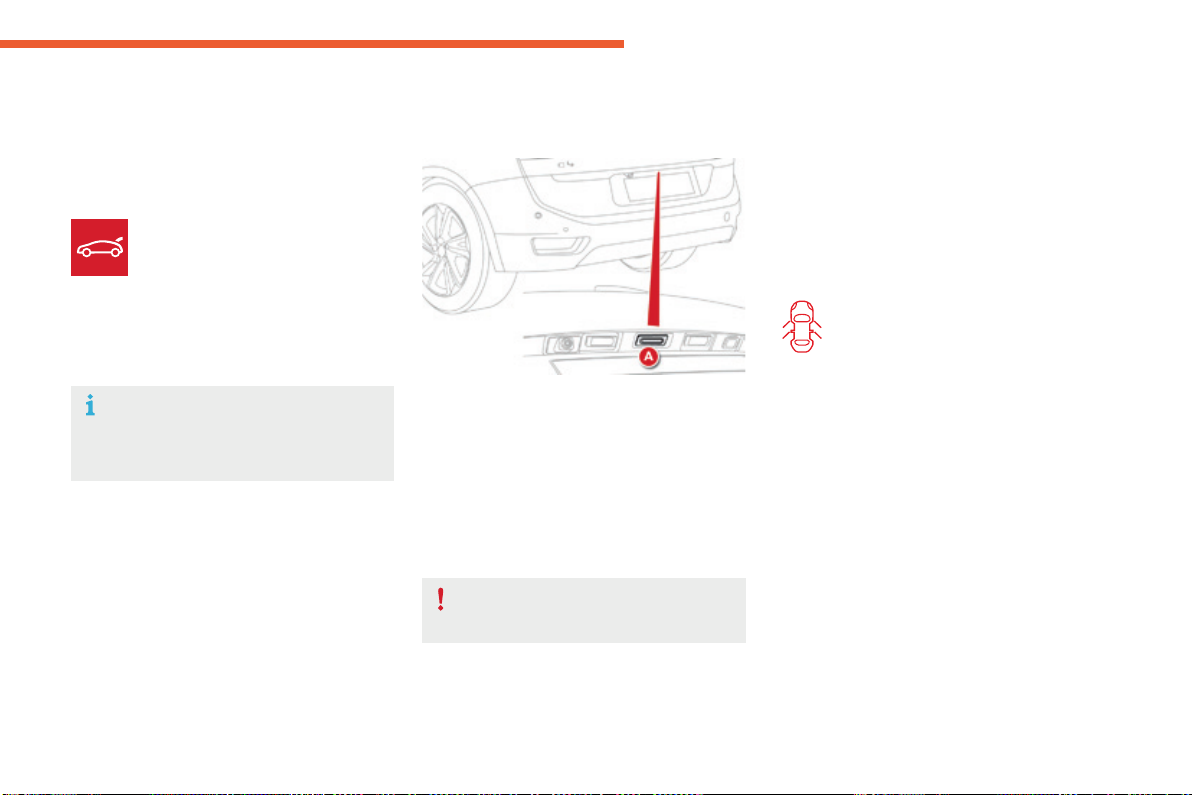
63
2
Acc ess
C4-Picasso-II_en_Chap02_ouvertures_ed01-2016
Boot
Opening the tailgate
With the electronic key /
remote control
With the tailgate opening
control
F Withthevehicleunlockedorwiththe
electronickeyoftheKeylessEntryand
Startingsysteminthezonecovered,press
thetailgatecontrolA.
F Raisethetailgate.
F Makealongpressonthisbutton
toreleasethetailgate.Ifthe
vehiclewaslocked,thisaction
firstunlocksthevehicle.
F Raisethetailgate.
Whenselectiveunlockingisactivated,
theelectronickeymustbeclosetothe
rearofthevehicle.
Closing the tailgate
F Lowerthetailgateusingtheinteriorgrips.
F Releasethegripsandpressdownonthe
outsideofthetailgatetocloseit.
Ifthetailgateisnotproperlyclosed:
Thetailgateisnotdesignedtotakea
bicyclecarrier.
- engine running,thiswarning
lampandamessageappearin
the instrument panel (type 1) for
a few seconds,
- vehicle running (speed above
6mph(10km/h)),thiswarning
lampandamessageappear
in the instrument panel (type 1
and type 2) for a few seconds,
accompanied by an audible
signal.
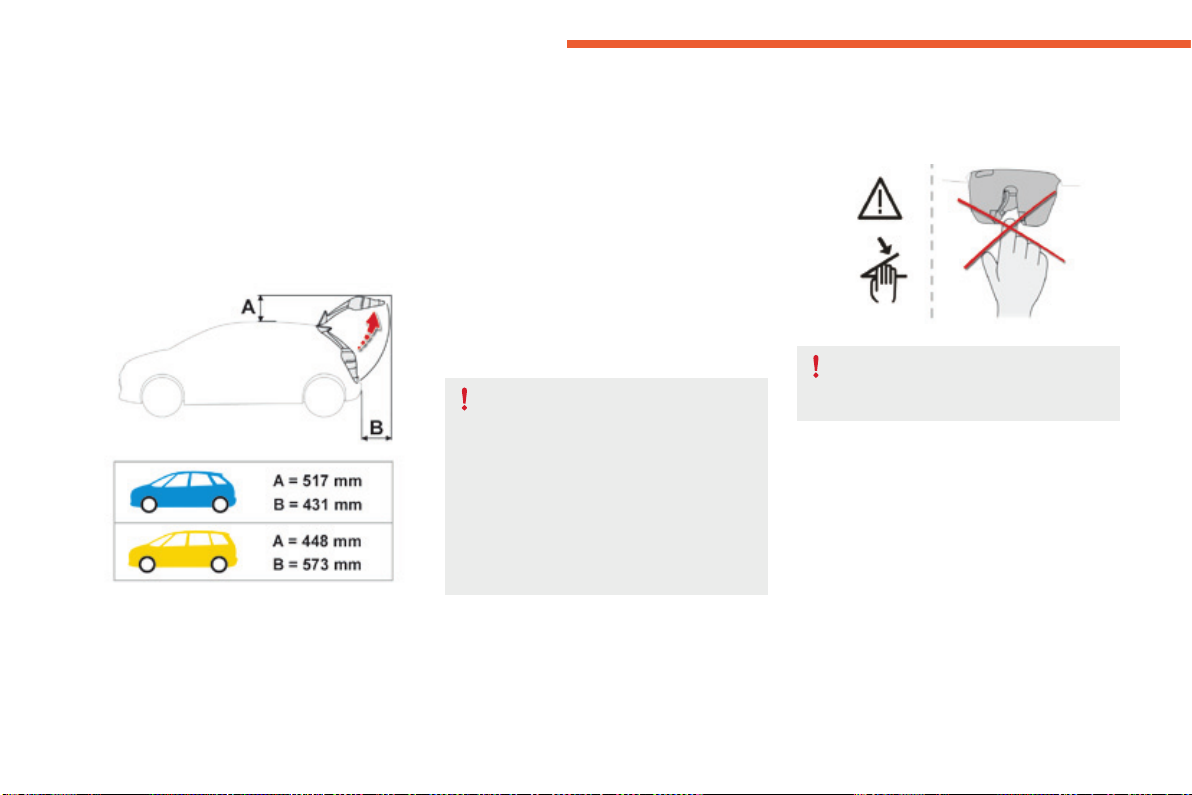
64
Acc ess
C4-Picasso-II_en_Chap02_ouvertures_ed01-2016
Motorisedtailgate
General points
Neverplaceafingerinthelocking
mechanismofthemotorisedtailgate-
Riskofseriousinjury!
Anti-pinch
Themotorisedtailgateincludesasystem
fordetectingobstacles,whichautomatically
interrupts and reverses the movement by a few
degrees,toallowtheobstacletobecleared.
Note that this anti-pinch system does not
operateattheendoftheclosingmovement
(around1cmbeforecompleteclosure).
Themotorisedoperationofthetailgatecan
beactivatedordeactivatedbyselecting
"Motorised tailgate" in the Driving menu of
thetouchscreentablet.
Bicycle carrier / Towbar
Thetailgateisnotdesignedtobefittedwitha
bicyclecarrier.
If a bicycle carrier is fitted to a towbar with a
wiringharnessconnectedtoatowbarsocket,
themotorisedoperationofthetailgateis
automaticallydeactivated.
Ifusingatowbarorbicyclecarriernotapproved
by CITROËN, it is essential to deactivate the
motorisedoperationofthetailgate.
Tailgateoperationcommandsmustbemade
withthevehiclestationary.
Ensurethatthereisenoughfreespacetoallow
themotorisedtailgatetoopen.
Toavoidtheriskofinjurythrough
pinchingortrapping,beforeandduring
operationofthetailgate:
- ensure that there is no person close
to the rear of the vehicle,
- watch the behaviour of rear
passengers,particularlychildren.
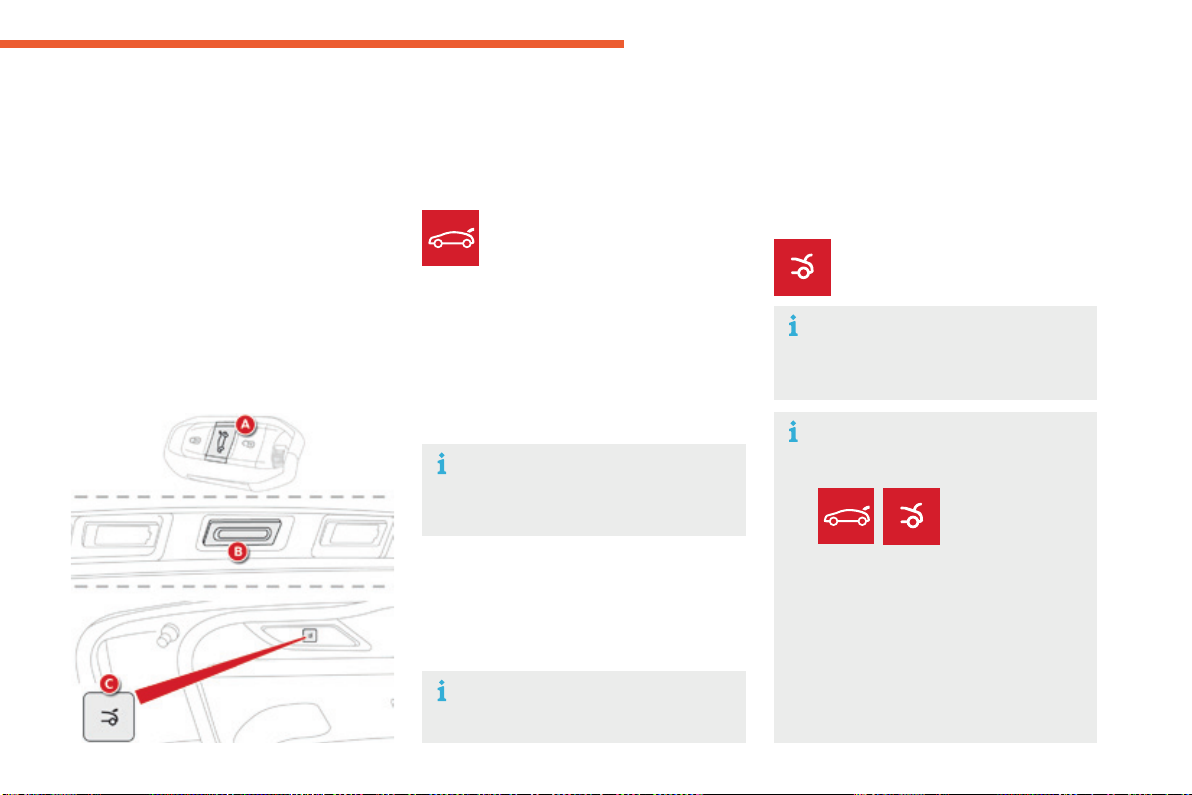
65
2
Acc ess
C4-Picasso-II_en_Chap02_ouvertures_ed01-2016
or
Opening the tailgate with the
electronic key / remote control (A)
Opening the tailgate with the
"Keyless Entry and Starting"
system "B"
Opening the tailgate
F Makealongpressontheremote
controlbutton.
F Press button Bonthetailgate,withthe
electronickeyinthezonecovered.
Whenselectivelockingisactivated,the
electronickeymustbeneartherearof
thevehicle.
Bydefault,thetailgateopens
completely or alternatively to the
memorisedposition.
F Aftercompleteunlockingofthevehicle,
press control Bonthetailgate.
The instruction is confirmed by an audible
signal.
Motorised closing
Therearetwopossibilities:
F PressandreleasetheexteriorcontrolB.
or
Themotorisedtailgatehasananti-
pinchsystemthatinterruptsclosingifit
encountersanobstacle.
F Press and then release button C.
Thereareseveralwaysofoperatingthe
motorisedtailgate:
- usingtheKeylessEntryandStarting
electronickey(A),
- usingtheexteriorcontrolonthe
tailgate(B),
- usingtheinteriorcontrolonthetailgate(C),
- by a movement of your foot, if your vehicle
hasthehands-freetailgateaccess
function.
Motorised opening
For more information on Hands-free tailgate
access,refertothecorrespondingsection.
Operation
Operationofthetailgatecanbe
interruptedatanytime:
- bypressing
one of these
two buttons,
or
- bypressingtheexteriorcontrolB.
After interruption of an operation,
another press on one of the controls
resumes the movement, with the
exceptionofapressontheremote
control button, which only allows
opening.

66
Acc ess
C4-Picasso-II_en_Chap02_ouvertures_ed01-2016
Memorising an
opening position
Whereheightisrestricted(garagewithalow
ceiling,...)itispossibletolimitandmemorise
theopeningangleofthemotorisedtailgate.
Thismemorisationisdoneasfollows:
- openthetailgatetothedesiredposition,
- press button CortheexteriorcontrolB for
morethan3seconds.
Memorisationofthemaximumopeningposition
ofthetailgateisconfirmedbyanaudiblesignal.
Tocancelthememorisedposition:
- stopthetailgateinanintermediate
position,
- press button CortheexteriorcontrolB for
morethan3seconds.
Cancellation of the memorised position is
confirmedbyanaudiblesignal.
Manual operation
Themotorisedtailgatecanbeopenedand
closed manually, even if motorised operation is
activated.
However, any manual intervention must be
donewiththetailgatestopped.
Repeatedopeningandclosingofthe
tailgatecancauseoverheatingofits
electricmotor,afterwhichopeningand
closingwillnotbepossible.
Allow 10 minutes for the motor to cool
downbeforeoperatingthetailgate
again.
If you are not able to wait, operate it
manually.
Detection of obstacles
Shouldanobstacle(personorobject)be
encountered, the anti-pinch system interrupts
theclosingmovementandraisesthetailgatea
fewcentimetrestocleartheobstacle.
Whenopeningandclosingamotorisedtailgate
manually,thereisnoassistancefromgas-filled
struts.Resistancetoopeningandclosingis
thereforeentirelynormal.
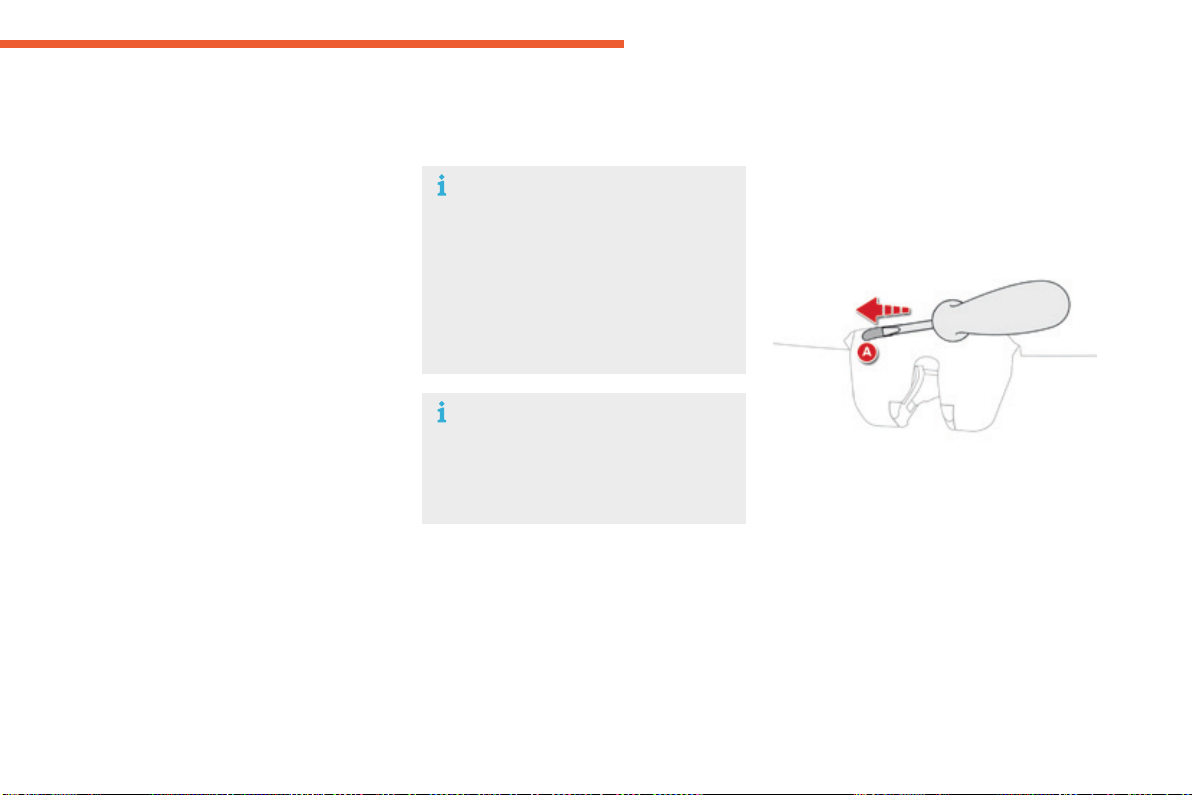
67
2
Acc ess
C4-Picasso-II_en_Chap02_ouvertures_ed01-2016
Reinitialising the motorised
tailgate
This operation is necessary where there is
no movement - after detection of an obstacle,
connectingorrechargingthebattery,...
F Openthetailgatemanually,ifnecessary.
F Manuallyclosethetailgatefully.
If the problem persists, contact a CITROËN
dealeroraqualifiedworkshop.
Precautions in use
In wintry conditions
In the event of an accumulation of snow
onthetailgate,clearthesnowbefore
commandingamotorisedopeningof
thetailgate.
Theformationoficecanblockthe
tailgateandpreventitsopening:wait
untiltheicemeltswiththeheatingof
thepassengercompartment.
When washing the vehicle
Whenwashingthevehicleinan
automaticcarwash,don'tforgetto
lockyourvehicletoavoidtheriskof
unexpectedopening.
Back-up release
Unlocking
F Foldbacktherearseatstogainaccessto
thelockfrominsidetheboot.
F Insert a small screwdriver into hole A of the
locktounlockthetailgate.
F Movethelatchtotheleft.
Locking after closing
Ifthefaultpersistsafterclosingagain,theboot
willremainlocked.
Tomanuallyunlockthebootintheeventofa
batteryorcentrallockingfailure.
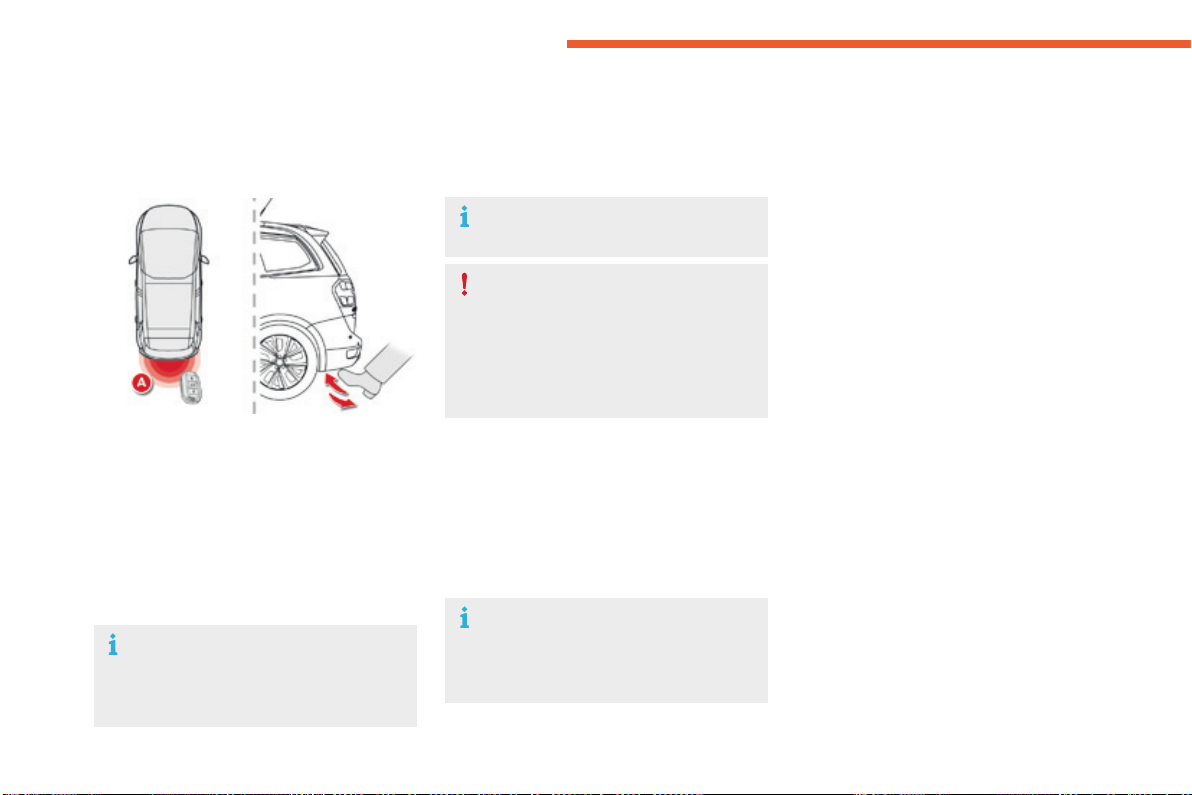
68
Acc ess
C4-Picasso-II_en_Chap02_ouvertures_ed01-2016
Hands-freetailgateaccess
Thetailgatemybeequippedwithahands-freefunction,toallowyoutoopenorclosethetailgate
whenyourhandsarefull.
For more information on the Motorised tailgate,refertothecorrespondingsection.
"Hands-free" opening
F With your hands full and the remote control
onyourpersonintherecognitionzoneA,
pass your foot rapidly below the rear
bumper.
Theinstructionisconfirmedbyflashingofthe
directionindicatorsandanaudiblesignal.
Thetailgateopenstothememorisedposition.
Passingyourfootbelowthebumperagainwhile
thetailgateisopeningstopsthemovement.
Passingyourfootbelowthebumperforathird
timereversesthedirectionofmovement.
"Hands-free" closing
F With your hands full and the remote control
onyourpersonintherecognitionzoneA,
pass your foot rapidly below the rear
bumper.
Theinstructionisconfirmedbyflashingofthe
directionindicatorsandanaudiblesignal.
Deactivation
Hands-freetailgateaccessisactivatedbydefault.
This function can be activated or deactivated
byselecting"Hands-free failgate access" in
the Drivingmenuofthetouchscreentablet.
Ensure that you are steady on your feet
beforepassingafootrapidlybelowthe
rearbumper.
Takecarenottotouchtheexhaust
system,whichmaybehot-Riskof
burns!
Ifthevehicleislocked,itisunlocked
beforeopeningthetailgate.
Automatic locking
Tohavethevehiclelockitselfafterclosingthe
tailgatebypassingafootbelowthebumper,
activate "Hands-free tailgate access self-
locking" in the Driving menu of the touch
screentablet.
Passingyourfootbelowthebumperagainwhile
thetailgateisclosingstopsthemovement.
Passingyourfootbelowthebumperforathird
timereversesthedirectionofmovement.

69
2
Acc ess
C4-Picasso-II_en_Chap02_ouvertures_ed01-2016
Operating faults
If several foot movements below the rear
bumperfailtoopenthetailgate,waita
fewsecondsbeforestartingagain.
The function is automatically deactivated in the
eventofheavyrainoraccumulationofsnow.
Ifthefunctionfailstooperate,check
thattheelectronickeyisnotexposedto
strongelectromagneticinterference(a
smartphone,...).
Thefunctionmaynotworkcorrectlywitha
prostheticleg.
Thefunctionmaynotworkcorrectlyifyour
vehicleisfittedwithatowbar.
Insomecircumstances,thetailgatemayonly
openorclose,particularlyif:
- your vehicle is fitted with a towbar,
- you hitch or unhitch a trailer,
- you fit or remove a bicycle carrier,
- you load or unload bicycles from a bicycle
carrier,
- youplaceorliftsomethingbehindthe
vehicle,
- an animal approaches the bumper,
- youarewashingyourvehicle,
- aserviceisbeingcarriedoutonyour
vehicle,
- youareaccessingthesparewheel
(dependingonversion).
Toavoidsuchoperatingproblems,keepthe
electronickeyawayfromtherecognitionzone
ordeactivate"Hands-FreeTailgateAccess".
Ensurethatnoobjectorpersonmightprevent
thecorrectopeningorclosingofthetailgate.
Be particularly aware of children when
operatingthetailgate.
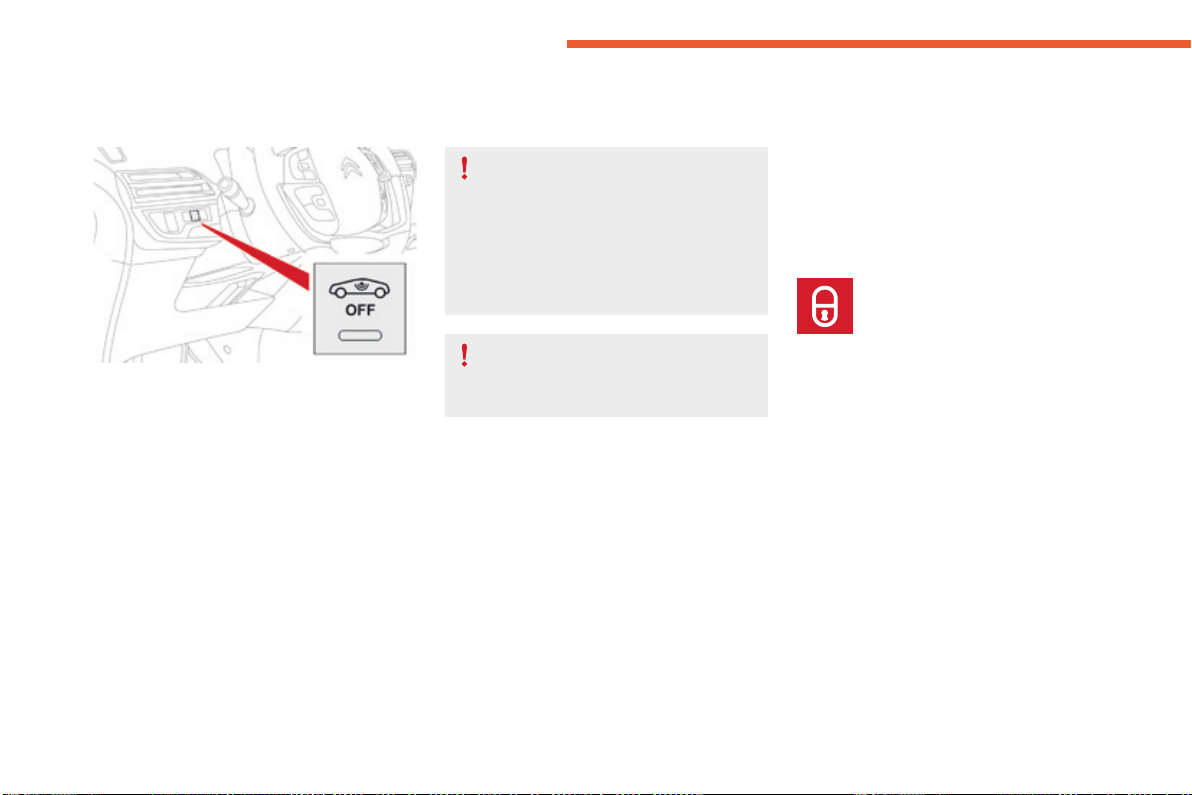
70
Acc ess
C4-Picasso-II_en_Chap02_ouvertures_ed01-2016
Forallworkonthealarmsystem,
contact a CITROËN dealer or a
qualifiedworkshop.
Alarm
Systemwhichprotectsandprovidesadeterrentagainsttheftandbreak-ins.Itprovidesthefollowingtypesofmonitoring:
- Exterior perimeter
Thesystemchecksforopeningofthevehicle.
Thealarmistriggeredifanyonetriestoopena
door,thebootorthebonnet...
- Interior volumetric
Thesystemchecksforanyvariationinthe
volumeinthepassengercompartment.
Thealarmistriggeredifanyonebreaksa
window,entersthepassengercompartmentor
movesinsidethevehicle.
Self-protection function
Thesystemchecksforthe
disconnectionofanyofitscomponents.
Thealarmistriggeredifthebattery,
thebuttonorthesirenwiringis
disconnectedordamaged.
Locking the vehicle with full
alarm system
Activation
Ifanopening(door,boot,bonnet...)isnot
closedfully,thevehicleisnotlockedbutthe
exteriorperimetermonitoringwillbeactivated
after a delay of 45 seconds, at the same time
astheinteriorvolumetricmonitoring.
F Lockthevehicleusingthe
remotecontrol.
F
Switchofftheignitionandgetoutofthevehicle.
or
F Lockthevehicleusingthe"KeylessEntry
andStarting"system.
Themonitoringsystemisactive:theindicator
lamp in the button flashes once per second
and the direction indicators come on for about
2seconds.
Afteracommandtolockthevehicleusing
the remote control or the Keyless Entry
andStartingsystem,theexteriorperimeter
monitoringisactivatedafteradelayof
5seconds,theinteriorvolumetricmonitoring
after45seconds.

71
2
OFF
Acc ess
C4-Picasso-II_en_Chap02_ouvertures_ed01-2016
Locking the vehicle with exterior perimeter
monitoring only
Deactivatetheinteriorvolumetricmonitoring
toavoidunwantedtriggeringofthealarmin
certaincasessuchas:
- leavingawindowpartiallyopen,
- washingyourvehicle,
- changingawheel,
- towingyourvehicle,
- transportonaferry.
Deactivating the volumetric
monitoring
F Switchofftheignitionandwithin
ten seconds press this button
untilitsindicatorlampisonfixed.
F Getoutofthevehicle.
F Immediatelylockthevehicleusingthe
remote control or the "Keyless Entry and
Starting"system.
Onlytheexteriorperimeterprotectionsystemis
active:theindicatorlampinthebuttonflashes
oncepersecond.
To be effective, this deactivation must be done
everytimetheignitionisswitchedoff.
Inthecaseofautomaticlockingofthe
vehicle (which occurs after a period
of30secondsifadoororthebootis
notopened),themonitoringsystemis
reactivatedautomatically.
Deactivation
F Pressoneoftheunlockingbuttonsonthe
remotecontrol:
short press
longpress
or
F Unlockthevehicleusingthe"KeylessEntry
andStarting"system.
Themonitoringsystemisdeactivated:the
indicator lamp in the button is off and the
directionindicatorsflashforabout2seconds.
Reactivating the interior
volumetric monitoring
F Deactivatetheexteriorperimeter
monitoringbyunlockingthevehicleusing
the remote control or the Keyless Entry and
Startingsystem.
Theindicatorlampinthebuttongoesoff.
F Reactivatethefullalarmsystembylocking
thevehicleusingtheremotecontrolorthe
"KeylessEntryandStarting"system.
The indicator lamp in the button flashes once
persecondagain.

72
Acc ess
C4-Picasso-II_en_Chap02_ouvertures_ed01-2016
Triggering of the alarm
Thisisindicatedbysoundingofthesiren
andflashingofthedirectionindicatorsfor
thirtyseconds.
Themonitoringfunctionsremainactiveuntil
thealarmhasbeentriggeredeleventimesin
succession.
Whenthevehicleisunlockedusingtheremote
controlortheKeylessEntryandStarting
system,rapidflashingoftheindicatorlamp
in the button informs you that the alarm was
triggeredduringyourabsence.Whenthe
ignitionisswitchedon,thisflashingstops
immediately.
Failure of the remote control
Todeactivatethemonitoringfunctions:
F Unlockthevehicleusingthekey(integral
withtheremotecontrol)inthedriver'sdoor
lock.
F Openthedoor;thealarmistriggered.
F Switchontheignition;thealarmstops.The
indicatorlampinthebuttongoesoff.
Locking the vehicle without
activating the alarm
F Lockordeadlockthevehicleusingthekey
(integralwiththeremotecontrol)inthe
driver'sdoorlock.
Operating fault
Whentheignitionisswitchedon,fixed
illumination of the indicator lamp in the button
indicatesafaultinthesystem.
HaveitcheckedbyaCITROËNdealerora
qualifiedworkshop.
Automatic activation*
2 minutes after the last door or the boot is
closed,thesystemisactivatedautomatically.
F Toavoidtriggeringthealarmonentering
thevehicle,firstpresstheunlockingbutton
ontheremotecontrolorunlockthevehicle
usingtheKeylessEntryandStarting
system.
*Dependingonthecountryofsale.
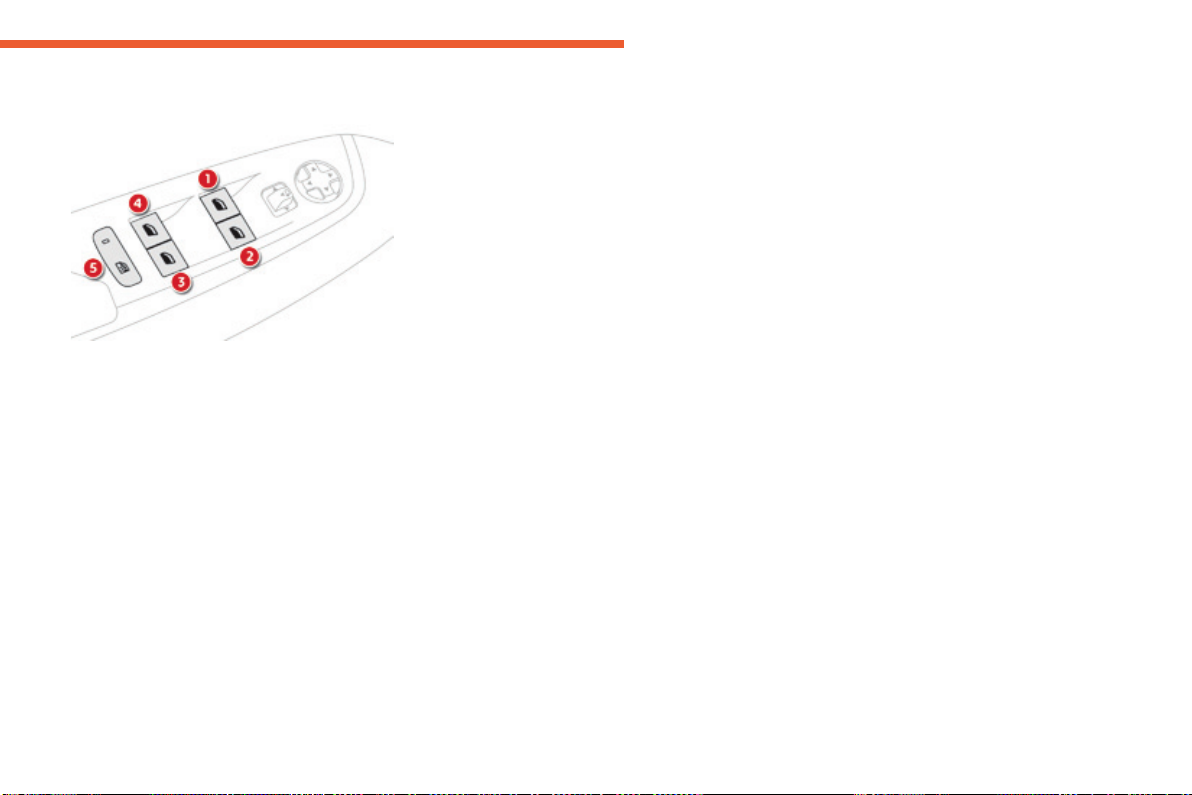
73
2
Acc ess
C4-Picasso-II_en_Chap02_ouvertures_ed01-2016
Electric windows
Manual operation
To open or close the window, press or pull the
switchgently.Thewindowstopsassoonasthe
switchisreleased.
To open or close the window, press or pull
theswitchfully:thewindowopensorcloses
completelywhentheswitchisreleased.
Pressingtheswitchagainstopsthemovement
ofthewindow.
1. Left-handfront.
2. Right-handfront.
3. Right-handrear.
4. Left-handrear.
5. Deactivate the electric window switches
locatedattherearseats.
Automatic operation
Safety anti-pinch
When the window rises and meets an obstacle,
itstopsandimmediatelypartiallylowersagain.
Intheeventofunwantedopeningofthe
windowonclosing,presstheswitchuntilthe
window opens completely, then pull the switch
immediatelyuntilthewindowcloses.Continue
toholdtheswitchforapproximatelyonesecond
afterthewindowhasclosed.
The safety anti-pinch function is not active
duringthisoperation.
The electric window switches remain
operationalforapproximately45secondsafter
switchingofftheignition.
Once this time has elapsed, the electric
windowswillnotoperate.Toreactivatethem,
switchtheignitiononagain.
74
Acc ess
C4-Picasso-II_en_Chap02_ouvertures_ed01-2016
Reinitialising the electric
windows
Deactivating the rear
controls for the rear
windows
Intheeventofcontactduringoperation
of the windows, you must reverse the
movementofthewindow.Todothis,
presstheswitchconcerned.
Whenoperatingthepassengerelectric
window switches, the driver must
ensurethatnothingispreventing
correctclosingofthewindows.
The driver must ensure that the
passengersusetheelectricwindows
correctly.
Be particularly aware of children when
operatingthewindows.
Beawareofpassengersorother
personspresentwhenclosingthe
windowsusingtheelectronickeyorthe
"KeylessEntryandStarting"system.
Followingreconnectionofthebattery,the
safetyanti-pinchfunctionmustbereinitialised.
The safety anti-pinch function is not active
duringtheseoperations.
For the safety of your children, press
switch 5 to prevent operation of the
rear windows irrespective of their
positions.
The indicator lamp in the button comes on,
accompaniedbyamessageconfirming
activation.Itremainson,aslongasthechild
lockisoff(deactivated).
Use of the rear electric windows from the
driver'scontrolsremainspossible.
Foreachwindow:
- lower the window completely, then raise it,
it will rise in steps of a few centimetres with
eachaction.Repeattheoperationuntilthe
window closes completely,
- continue to pull the switch for at least
onesecondafterreachingthisposition,
windowclosed.
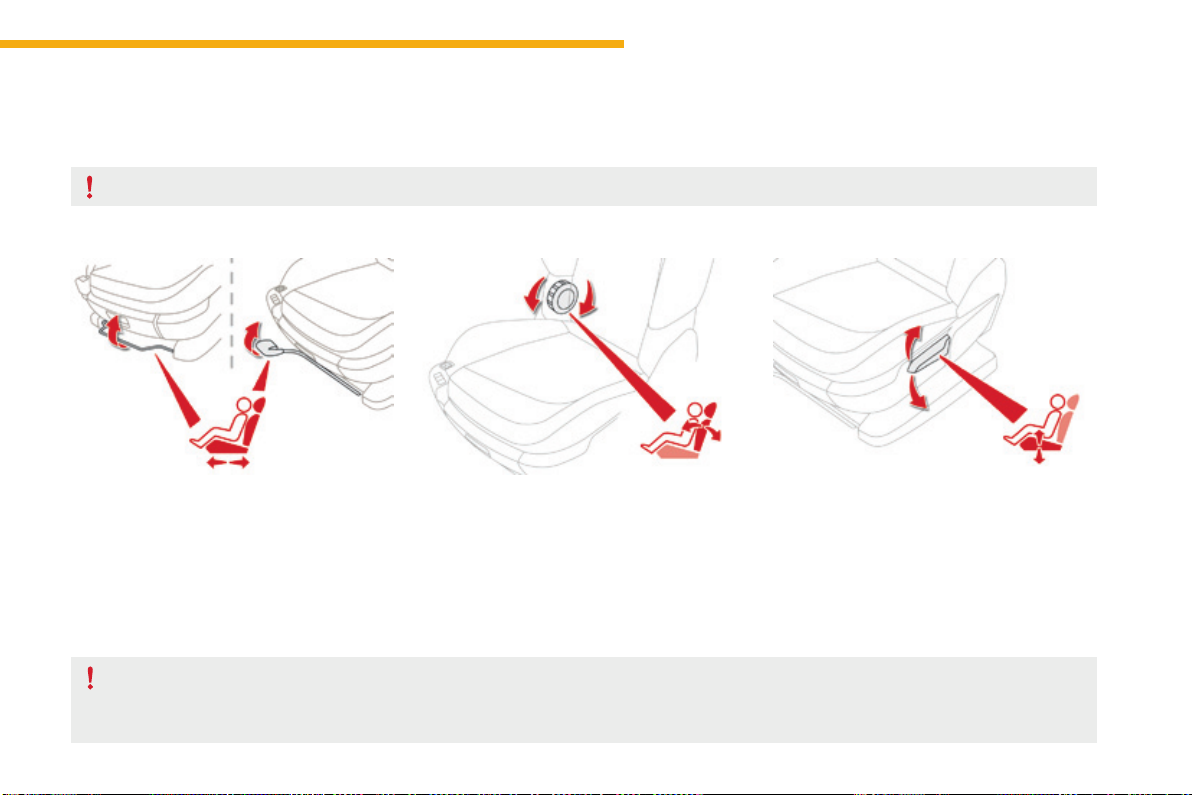
75
3
Ease of use and comfort
C4-Picasso-II_en_Chap03_ergonomie-confort_ed01-2016
Front seats
Manual adjustments
Forwards-backwards
F Raise the control bar and slide the seat
forwardsorbackwards.
When the seat is in the desired position, push
itforwardsandbackwardswithoutraisingthe
controlbartocheckthatithaslatched.
Driver's seat backrest angle
F Turntheknobtoadjusttheseatbackrest.
Asasafetymeasure,seatadjustmentsshouldonlybedonewhenstationary.
Driver's seat height
F Pull the control upwards to raise or push
it downwards to lower, as many times as
necessary,toobtainthedesiredposition.
Seatconsistingofaseatcushion,aseatbackrestandaheadrestraintwhichcanallbeadjustedtoadaptyourpositionforeaseofdrivingandcomfort.
Beforemovingtheseatbackwards,ensurethatthereisnothingthatmightpreventthefulltraveloftheseat,soastoavoidtheriskofjamming
theseatcausedbythepresenceofobjectsonthefloorbehindtheseatorrearpassengers.Iftheseatjams,stopthemovementimmediately.
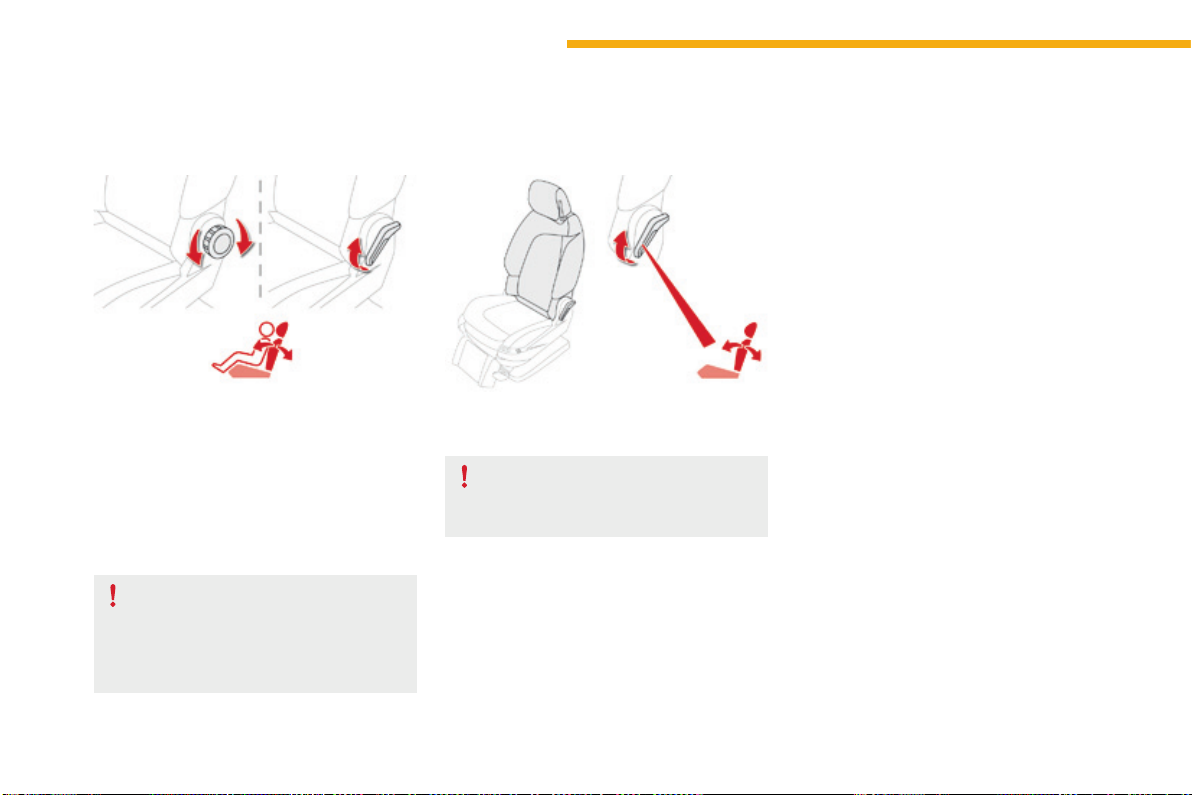
76
Ease of use and comfort
C4-Picasso-II_en_Chap03_ergonomie-confort_ed01-2016
Passenger's seat backrest angle
F Pullthecontrolupwardsorturntheknobto
adjustthebackrest.
Whenthebackrestisatthedesiredangle,
releasethecontrol.
Table position for the
passenger's seat backrest
This position, associated with the position of
therearseats,allowsyoutocarrylongobjects
insidethevehicle.
Whenthebackrestisatthedesiredangle,
releasethecontrollever.Toensurethatthe
backrestdoesnotsuddenlyfoldforwards
andhurtyou,restrainitwithyourbackor
yourhandwhileoperatingthecontrol.
Checkthatthereisnoobjectthatcould
interfere with the movement of the seat,
bothaboveandbelow.
F Place the head restraint in the low position,
raisethearmrestandfoldthefixedtable
ontothebackoftheseat.
F Pullthecontrolfullyupandtipthebackrest
forwards.
Toreturntothenormalposition,guidethe
backrestbackwardsuntilitlocks.
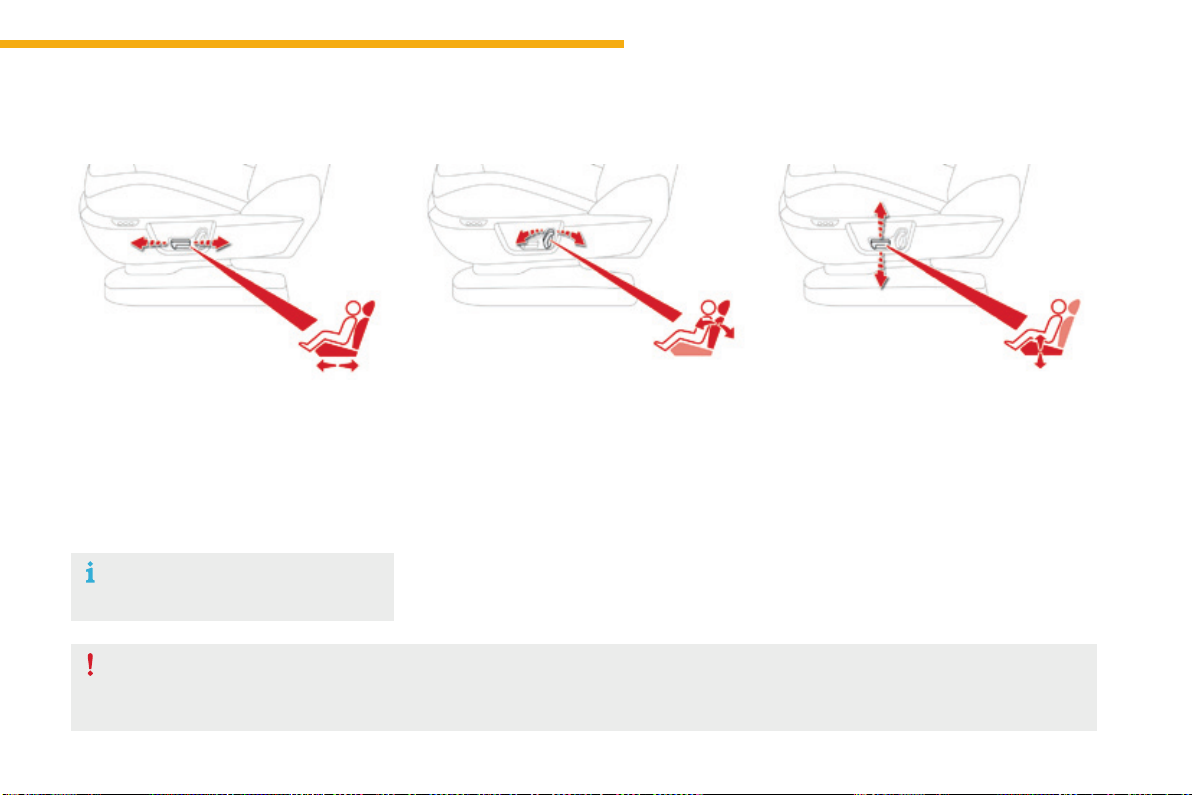
77
3
Ease of use and comfort
C4-Picasso-II_en_Chap03_ergonomie-confort_ed01-2016
Front seats
Electric adjustments
Forwards-backwards
(driver's seat)
F Push the control forwards or rearwards to
slidetheseat.
Seat backrest angle
F Tilt the control forwards or rearwards to
adjusttheangleoftheseatbackrest.
Seat cushion height and angle
F Operate the rear part of the control
upwards or downwards to obtain the
desiredheight.
F Operate the front part of the control
upwards or downwards to obtain the
desiredangle.
Toavoiddischargingthebattery,carryout
theseadjustmentswiththeenginerunning.
Beforemovingtheseatbackwards,ensurethatthereisnothingthatmightpreventthefulltraveloftheseat,soastoavoidtheriskofjamming
theseatcausedbythepresenceofobjectsonthefloorbehindtheseatorrearpassengers.Iftheseatjams,stopthemovementimmediately.
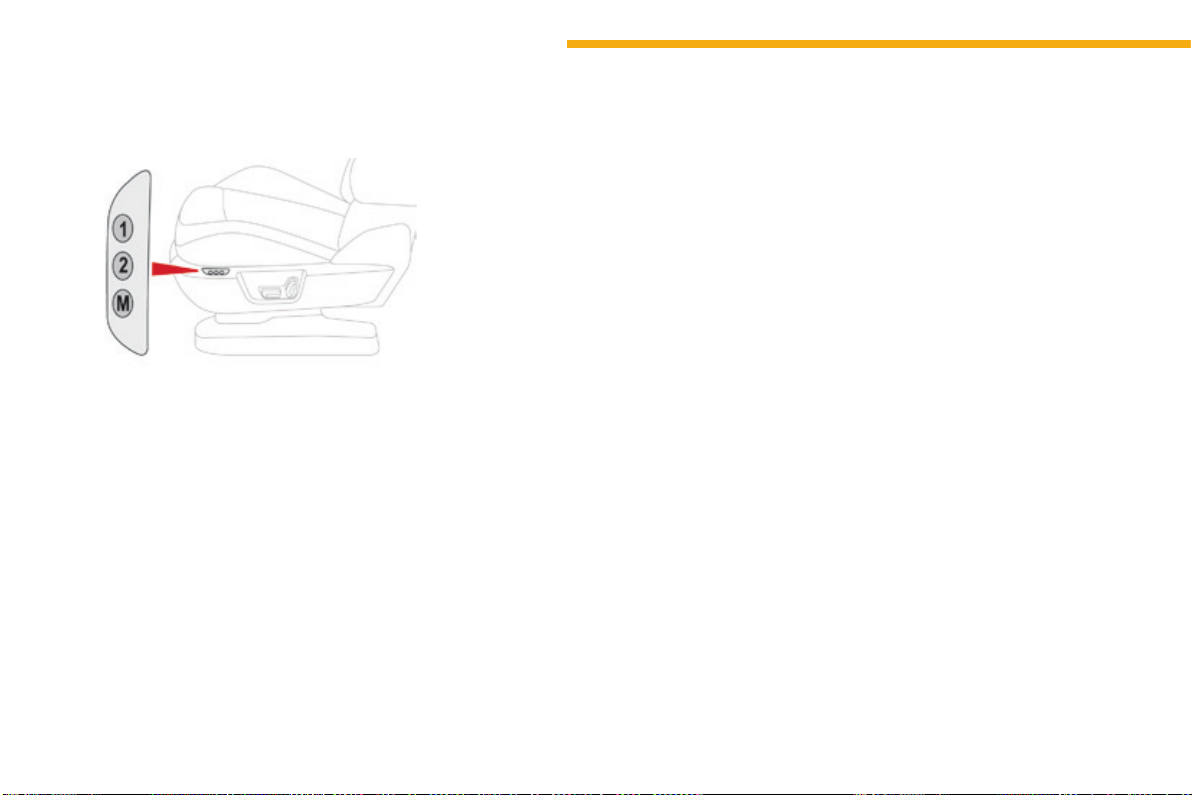
78
Ease of use and comfort
C4-Picasso-II_en_Chap03_ergonomie-confort_ed01-2016
Systemwhichregisterstheelectricalsettings
ofthedriver'sseatanddoormirrors.Itenables
youtostoreandrecalltwopositionsusingthe
buttonsonthesideofthedriver'sseat.
Storing driving positions
Storing a position
Using buttons M / 1 / 2
F Switchontheignition.
F Adjustyourseatandthedoormirrors.
F Press button M, then press button 1 or 2
withinfourseconds.
Anaudiblesignalindicatesthatthepositionhas
beenstored.
Storinganewpositioncancelstheprevious
position.
Recalling a stored position
Ignition on or engine running
F Press button 1 or 2 to recall the
correspondingposition.
Anaudiblesignalconfirmsthatadjustmentis
complete.
You can interrupt the current movement by
pressingbuttonM, 1 or 2orbyusingoneofthe
seatcontrols.
A stored position cannot be recalled while
driving.
Recallingstoredpositionsisdeactivated
45secondsafterswitchingofftheignition.
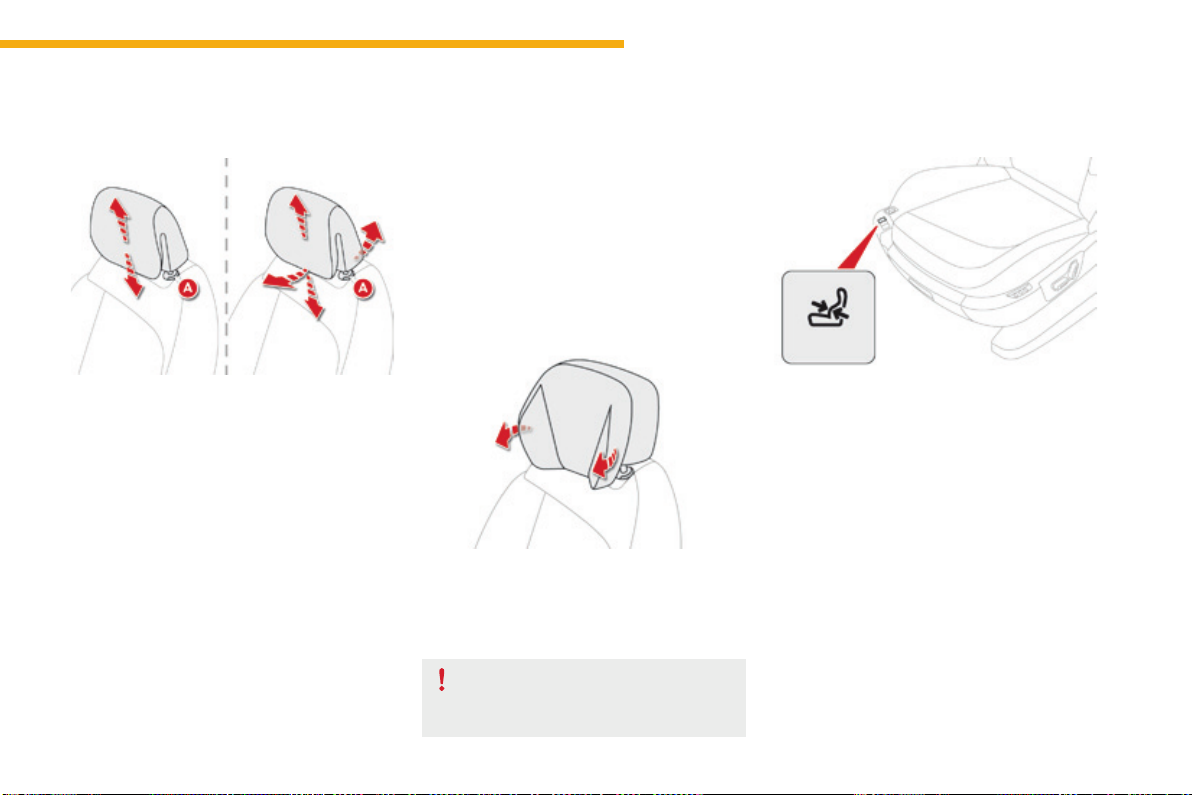
79
3
Ease of use and comfort
C4-Picasso-II_en_Chap03_ergonomie-confort_ed01-2016
Additional adjustments
Head restraint height and angle
(depending on version)
The head restraint is fitted with a frame with
notcheswhichpreventsitfromlowering;thisis
asafetydeviceincaseofimpact.
The adjustment is correct when the upper
edge of the head restraint is level with the
top of the head.
Never drive with the head restraints
removed;theymustbeinplaceand
adjustedcorrectly.
F Toraiseaheadrestraint,pullitupwards.
F
Tolowertheheadrestraint,pressthelugA and the
pushtheheadrestraintdownatthesametime.
F Toadjusttheangleoftheheadrestraint,tilt
itslowerpartforwardsorbackwards.
Removing a head restraint
F To remove the head restraint, press the
lugAandpulltheheadrestraintupwards.
F
Toputtheheadrestraintbackinplace,engage
theheadrestraintstemsintheopenings
keepingtheminlinewiththeseatbackrestand
pressthelugAatthesametime.
Relax head restraints
Dependingonversion,youcanfoldthesidesto
obtainamorecomfortableposition.
F Press the control to obtain the desired
lumbarsupport.
Electric lumbar adjustment
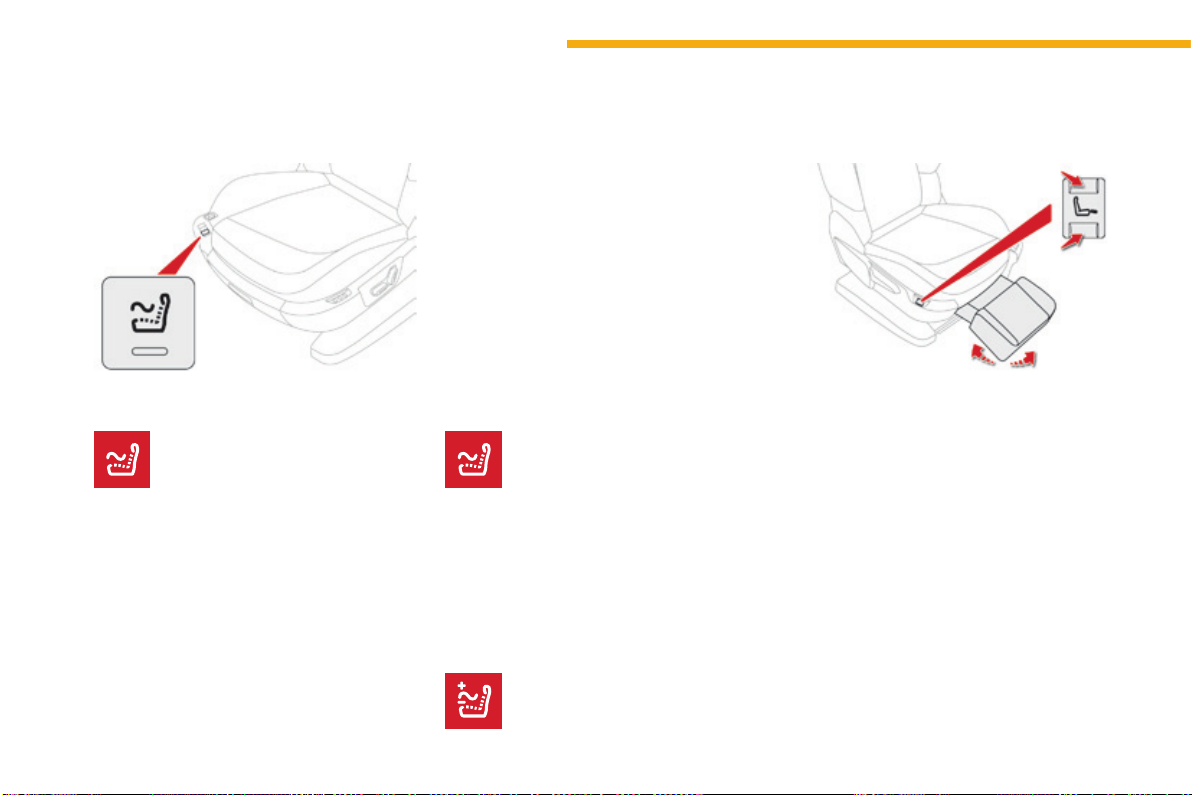
80
Ease of use and comfort
C4-Picasso-II_en_Chap03_ergonomie-confort_ed01-2016
Electric leg rest
Manual passenger seat
F Press the front or rear part of the control to
unfoldorfoldawaythelegrest.
The movement stops when you release the
control.
Youcandeactivatethemassage
functionatanytimebypressingthis
button,itsindicatorlampgoesoff.
DeactivationActivation
Massage function
This function provides the front occupants
withalumbarmassage.Itonlyoperateswhen
theengineisrunningorinSTOPmodeofthe
Stop&Startsystem.
F Pressthisbutton.
Adjustment of intensity
Press this button to select one of
thetwolevelsofmassageintensity
offered.
Itsindicatorlampcomesonandthemassage
functionisactivatedforaperiodof1hour.
Duringthistime,massageisperformedin
6cyclesof10minutes(6minutesofmassage
followedby4minutesbreak).
After one hour, the function is deactivated, the
indicatorlampgoesoff.
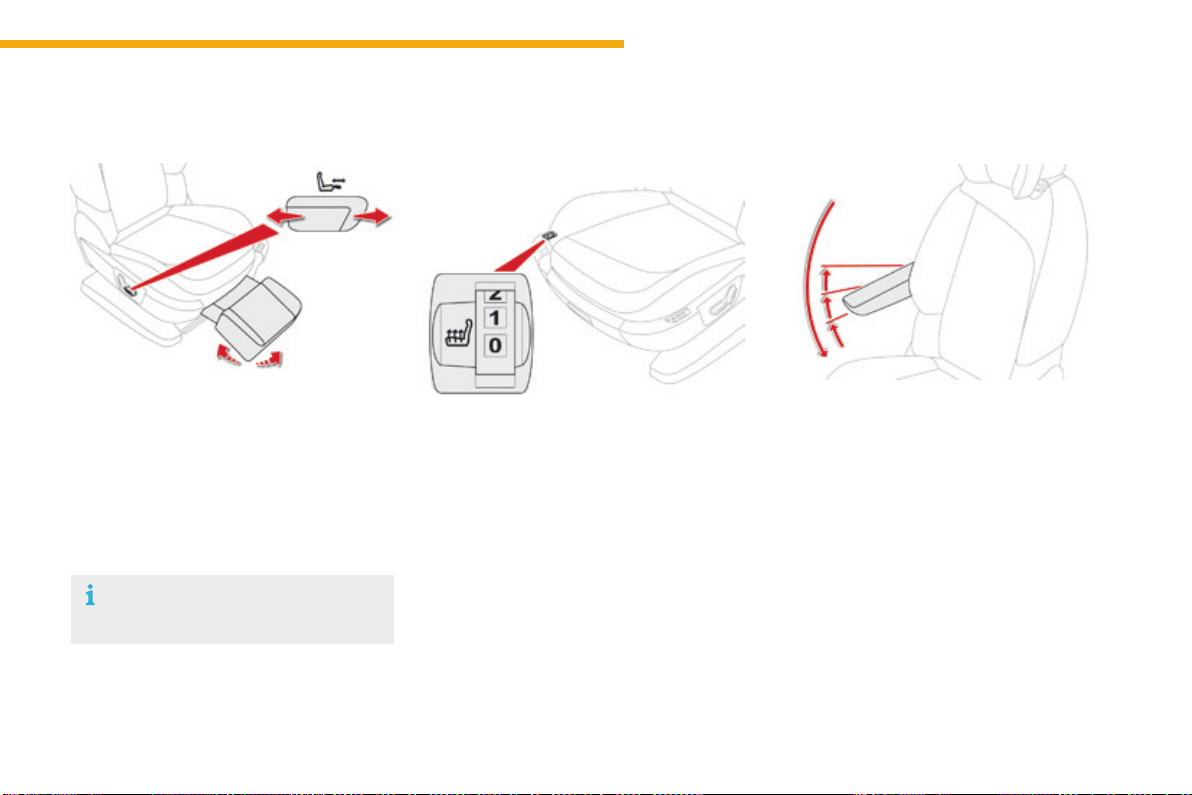
81
3
Ease of use and comfort
C4-Picasso-II_en_Chap03_ergonomie-confort_ed01-2016
Heated seats control
F Usetheadjustmentwheeltoswitchonand
selectthelevelofheatingrequired:
0:Off.
1:Low.
2:Medium.
3:High.
Withtheenginerunning,thefrontseatscanbe
heatedseparately.
Beforeoperatingthelegrest,ensure
thatnothingcouldinterferewithits
movement.
Electric passenger seat
F Pushthecontrolforwardsorbackwardsto
unfoldorfoldawaythelegrest.
The movement stops when you release the
control.
Front armrest
Height adjustment
F Fullylowerthearmrest.
F Raise it to the required position (low,
intermediateorhigh).
F Onceinthehighposition,lifttoreleaseit
andreturnittothelowposition.
Comfort system for the driver and front
passenger.
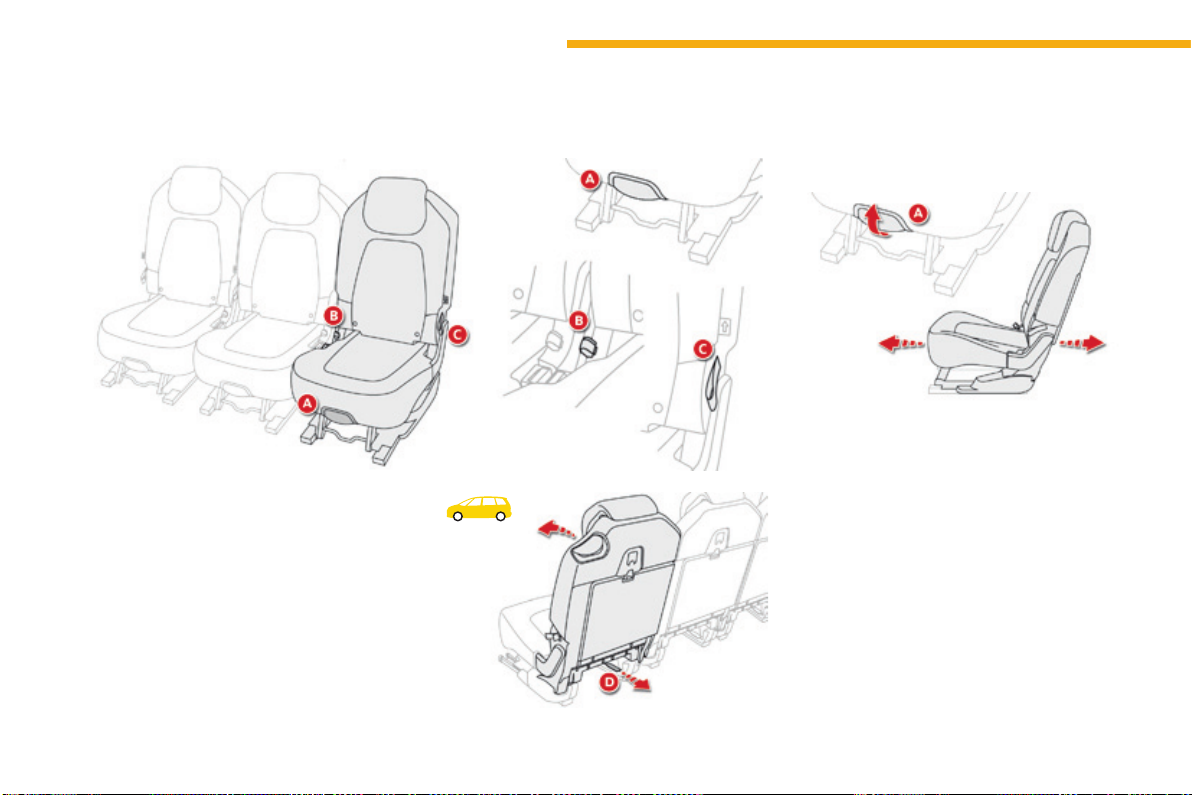
82
Ease of use and comfort
C4-Picasso-II_en_Chap03_ergonomie-confort_ed01-2016
Second-row seats
Forwards-backwards adjustment
F Raise the lever A, located at the front of
theseatcushion,andadjusttheseattothe
desiredposition.
The3seatsinthe2
nd
rowareindependentofeachotherandareallthesamewidth.Theirbackrestscanbefoldedtovarytheloadspaceintheboot.
A. Forwardsandbackwardsadjustment:raise
thelever.
B. Backrestangleadjustment:pullthestrap
andguidetheseattotherear.
C. Foldingtheseat:pullthestrapupto
releasetheseat.
D. Foldingtheseatfromtherear:pullthe
strapthenpushtheseatforward.
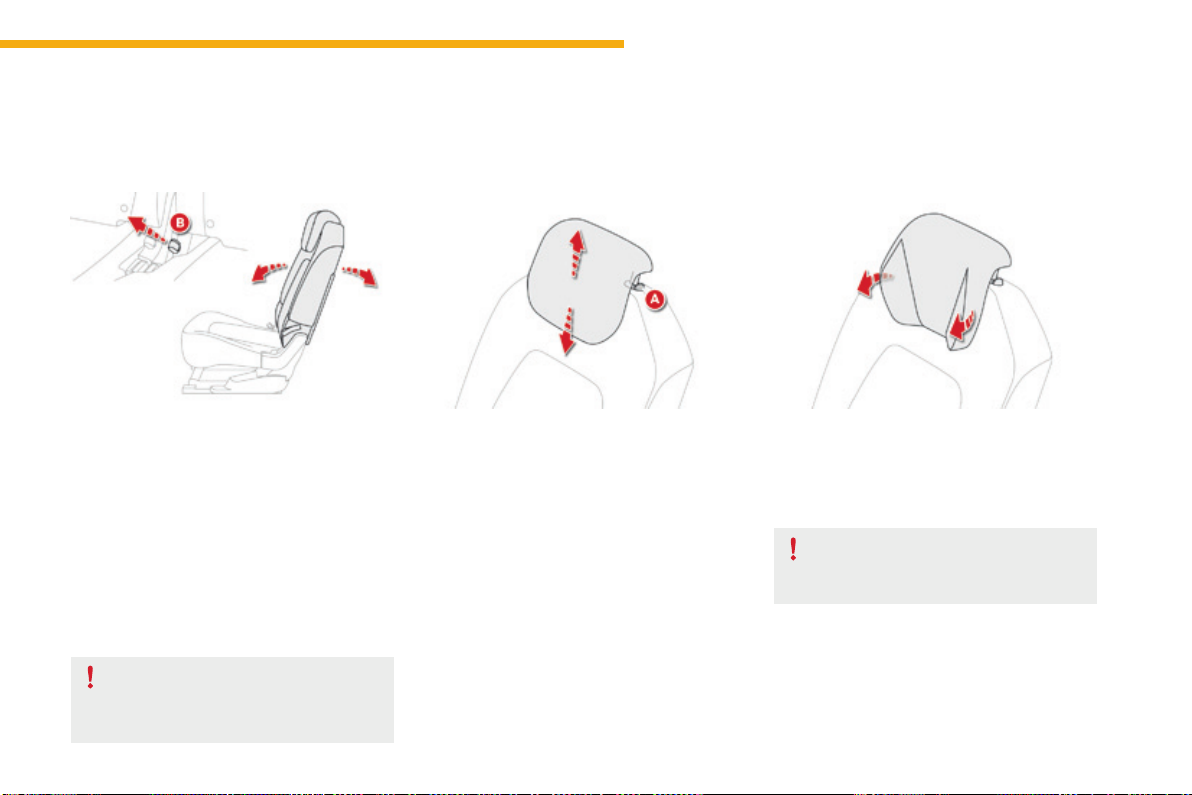
83
3
Ease of use and comfort
C4-Picasso-II_en_Chap03_ergonomie-confort_ed01-2016
F Pull the strap Bandguidetheseattothe
rear.
Thebackrestreclinesandtheseatbasepivots
slightly.
"Comfort" position
Returning the seat to the initial
position
F Pull the strap Bandguidetheseatforward.
Supervise any movements of seats
when made by children.
Toremoveit:
- movetheheadrestrainttothehighposition,
- presslugApullingtheheadrestraint
upwardsatthesametime.
The rear head restraints can be removed and
havetwopositions:
- high,positionforuse,
- low,stowedposition.
Toraiseaheadrestraint,pullitupwards.
Tolowerit,presslugAthentheheadrestraint.
Rear head restraints
Never drive with the head restraints
removed;theymustbeinplaceand
correctlyadjusted.
Torefitit:
- engagetheheadrestraintrodsinthe
apertures,keepingtheminlinewiththe
seatbackrest.
Relax head restraints
Dependingonversion,thesidescanbefolded
toobtainamorecomfortableposition.
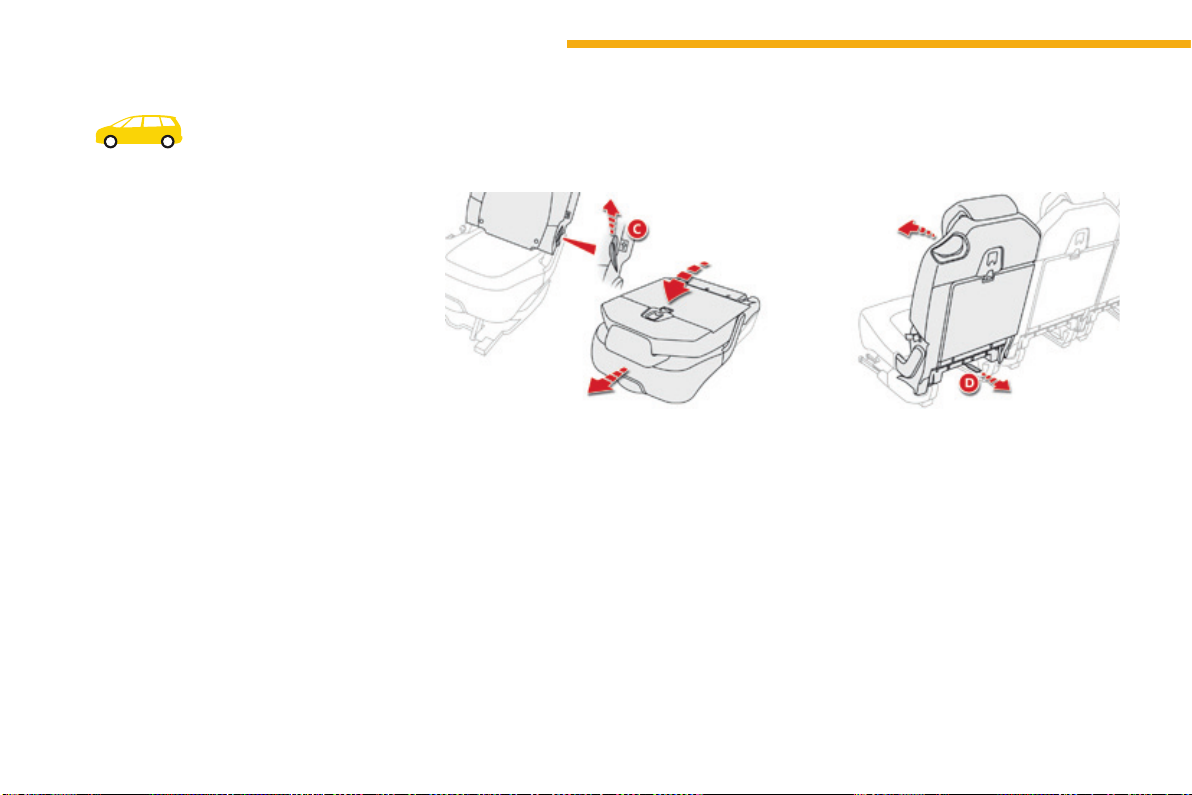
84
Ease of use and comfort
C4-Picasso-II_en_Chap03_ergonomie-confort_ed01-2016
Flat floor
Folding a seat
From the outside
F Pull firmly upwards on strap C, as indicated
bythearrow,toreleasetheseat;keep
pullinguntiltheseatisfullyfolded.
Pushtheseatbackrestgentlyforwards
sothatthebackrestfoldsontotheseat
cushion.Theassemblylowersontothe
floor.
From the boot, when loading
for example
You can fold the second-row seats from the
boot,afterfirstfoldingthethird-rowseats.
F Pull on the strap D to release the seat in
questionthenpushforwardslightlyonthe
backrest.
Toavoidanydamagetothemechanism,
the strap D unclips if too much force is
applied.Simplyclipitinplaceagainforthe
systemtobeoperationalagain.
F Placetheseatsinthefullybackposition.
Each seat can be folded onto the floor to vary
thespaceavailableintheboot.
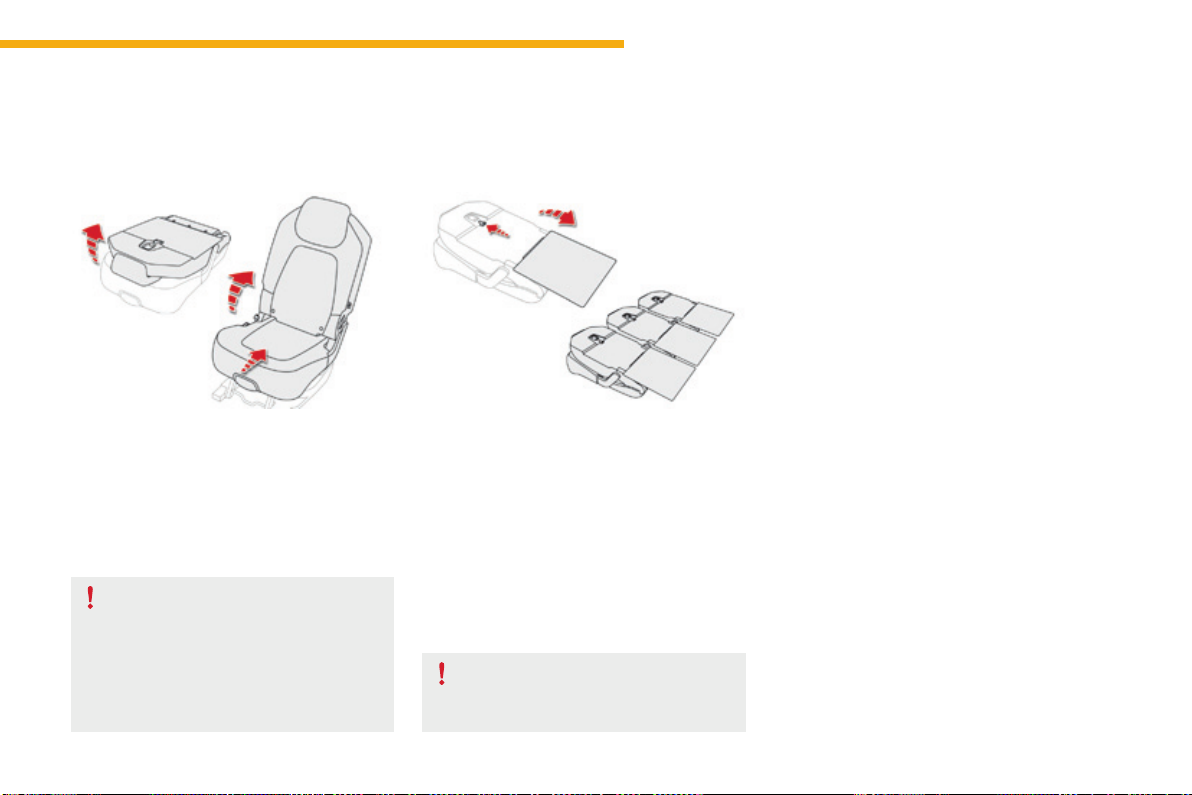
85
3
Ease of use and comfort
C4-Picasso-II_en_Chap03_ergonomie-confort_ed01-2016
Repositioning a seat
Beforeoperatingtherearseats,check
that the outer rear seat belts are not
loose,toavoiddamagingthem.The
centrebeltmustbestowed.Fixthe
tonguesofthethreebeltstotheir
anchoragepoints.
Continuity panels
These continuity panels are not
designedtosupportaweightgreater
than30kg.
Releasing / locking the continuity panels
F Beforeunfoldingthecontinuitypanels,
checkthattheseatsinthe2
nd
row are fully
back.
F Slide the continuity panel latch upwards to
release.
F Straightenthecontinuitypanel,thenslide
thelatchdownwardstolockit.
F Ifnecessary,straightenthecontinuity
panels for the seats in the 2
nd
rowandlock
theminplace.
F Raisethebackrestandpushitrearwards
untilitlocksinposition
Each seat has a continuity panel at the bottom
ofthebackrest,thatonceunfolded:
- provides a continuous load surface in the
boot, whatever the position of the seats,
- avoidsobjectsslidingundertheseatsin
the 2
nd
row.
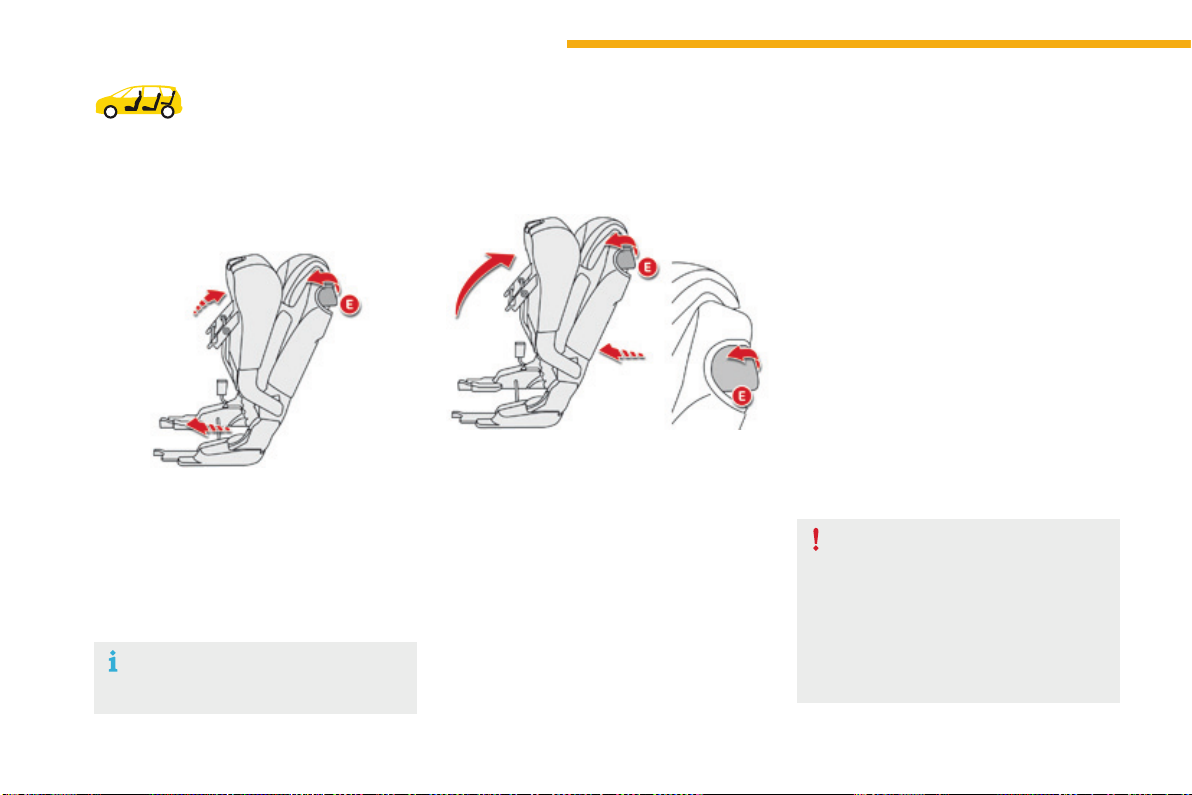
86
Ease of use and comfort
C4-Picasso-II_en_Chap03_ergonomie-confort_ed01-2016
Access to the third-row
seats
Access to the third-row seats is via the outer
second-rowseats.
F Pull the lever E.Theseatisreleasedand
theseatcushioncomesupagainstthe
backrest.
F Hold the lever E in the raised position,
pushingforwards.Thewholeseatslides
towardsthefrontseat.
Space becomes free behind the seat, the
third-rowpassengerscangettotheirseats.
Leaving the vehicle from
the third-row seats
Repositioning a seat, from
the outside, with the door
open
In the event of a failure of this system
(lever E),thepassengersinthethird
row can also leave the vehicle after first
foldingthebackrestsofthesecond-row
seatsusingthestrapD.
Do not allow children to operate the
seatswithoutsupervision.
F Lift the lever E.Theseatisreleasedand
theseatcushioncomesupagainstthe
backrest.
F Pushtheseatbackrest,stillholdingthe
lever Eintheraisedposition.
Iftherearepassengersseatedinthethirdrow:
F manually return the assembly as far
aspossiblerearwards;theseatdoes
notreturntothefullybackposition,so
astoretainlegroomforthethird-row
passengers,
F foldtheseatcushionuntilitlocks.
Ensurethatthereisnoobjectonorunderthe
seatthatyouwanttomove.
Beforeoperatingtheseats,ensurethat
thetablesonthebackofthefirst-row
seatsarefoldedaway.
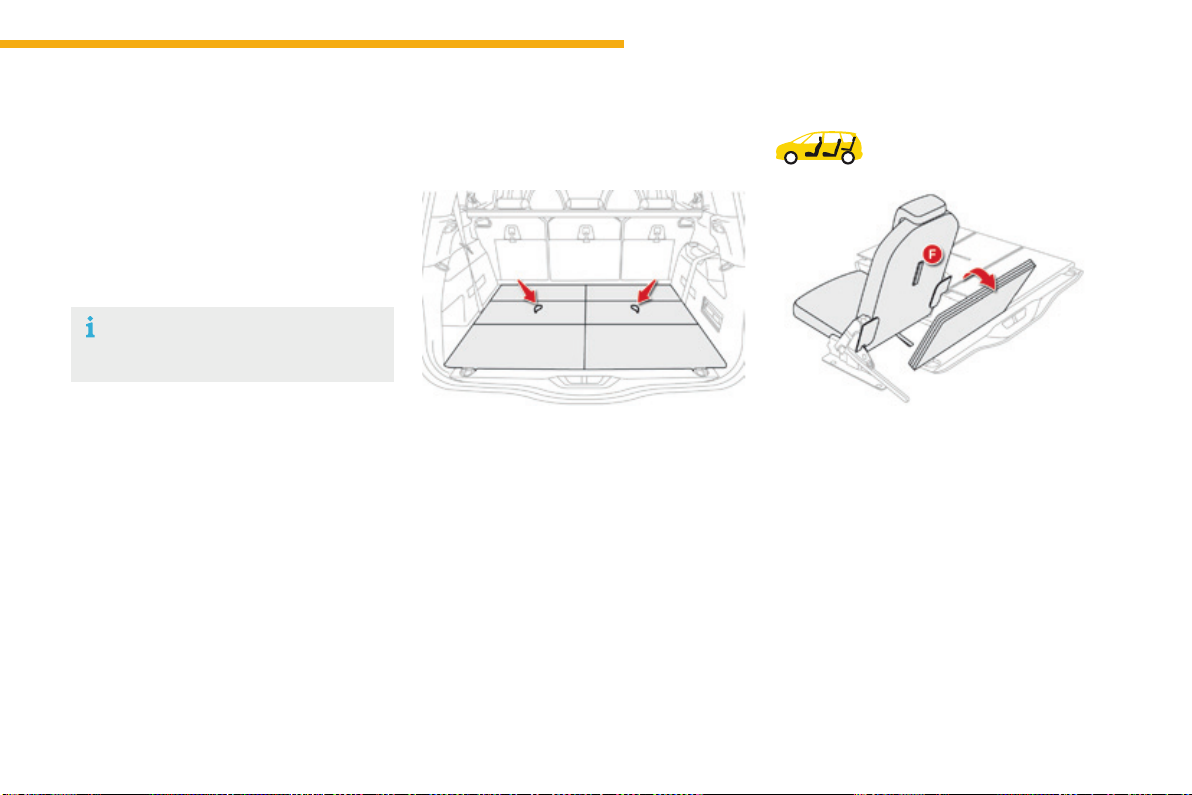
87
3
Ease of use and comfort
C4-Picasso-II_en_Chap03_ergonomie-confort_ed01-2016
Third-row seats
Concertina boards
Folding the concertina boards
F Removetheluggagenet.
Formoreinformationontheluggagenet
and the Interior fittings, refer to the
correspondingsection.
F Return the second-row continuity panels to
theirinitialpositionandlocktheminplace.
F Fold the concertina boards and position
themvertically.
F Pull on the strap F located behind the seat
backrest.Thebackrestpivotsrearwards,
pullingtheseatbasewithit.Theseatlocks
intheopenposition.
Each of the two floor panels can
supportaloadof100kg.
Pullonthecontrol,the3sectionsoftheboard
willfoldlikeaconcertina.
Whenthethird-rowseatsareupright,these
concertinaboardscanbelefteither:
- flat behind the seats,
- in the vertical position,
therebyleavingastorageareaavailable.
Repositioning the
seats
Tworigidconcertinaboards,whichcannot
be separated from the vehicle, cover the
2 third-row seats, when these are in the folded
position.
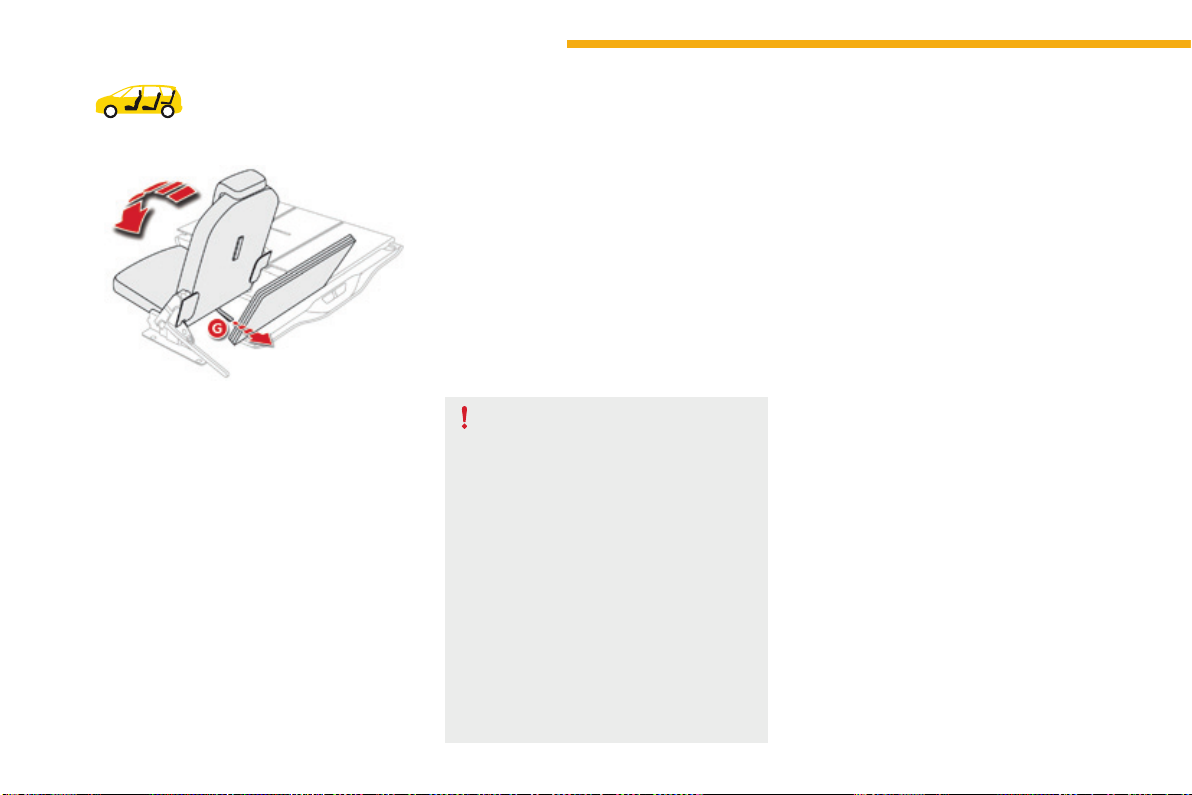
88
Ease of use and comfort
C4-Picasso-II_en_Chap03_ergonomie-confort_ed01-2016
F Return the second-row continuity panels to
theirinitialpositionandlockthem.
F Lowertheheadrestraints.
F Correctly position the concertina board
verticallybehindtheseat.
F Checkthattheseatbeltsforthe3
rd
row
seatsarecorrectlyfixedtotheloopsand
arenotfolded.
F Pull the strap G, located at the bottom of
theseatbackrest.Theseatunlocks.
Beforemovingthethird-rowseats,
returntherigidfloorplatesofthe
second-rowseatstotheuprightposition
andlocktheminplace.
Do not try to fold a third-row seat that
hasnotfirsthadthebackrestfully
lockedinplace.
Donotleaveobjectseitheronor
underneath the seat bases of the third-
rowseatswhenyouarefoldingthem.
Do not leave your hand on the control G
asyoufoldtheseats,asyourisk
trappingyourfingers.
Do not allow children to operate the
seatswithoutsupervision.
F Nextpushthebackrestgentlyforwards.
Thebackrestpivots,foldingontotheseat
base.Theseatbasethenfoldsintothe
stowageareaprovidedforthatpurpose.
F Reposition the concertina boards over the
foldedseats.
Folding the seats
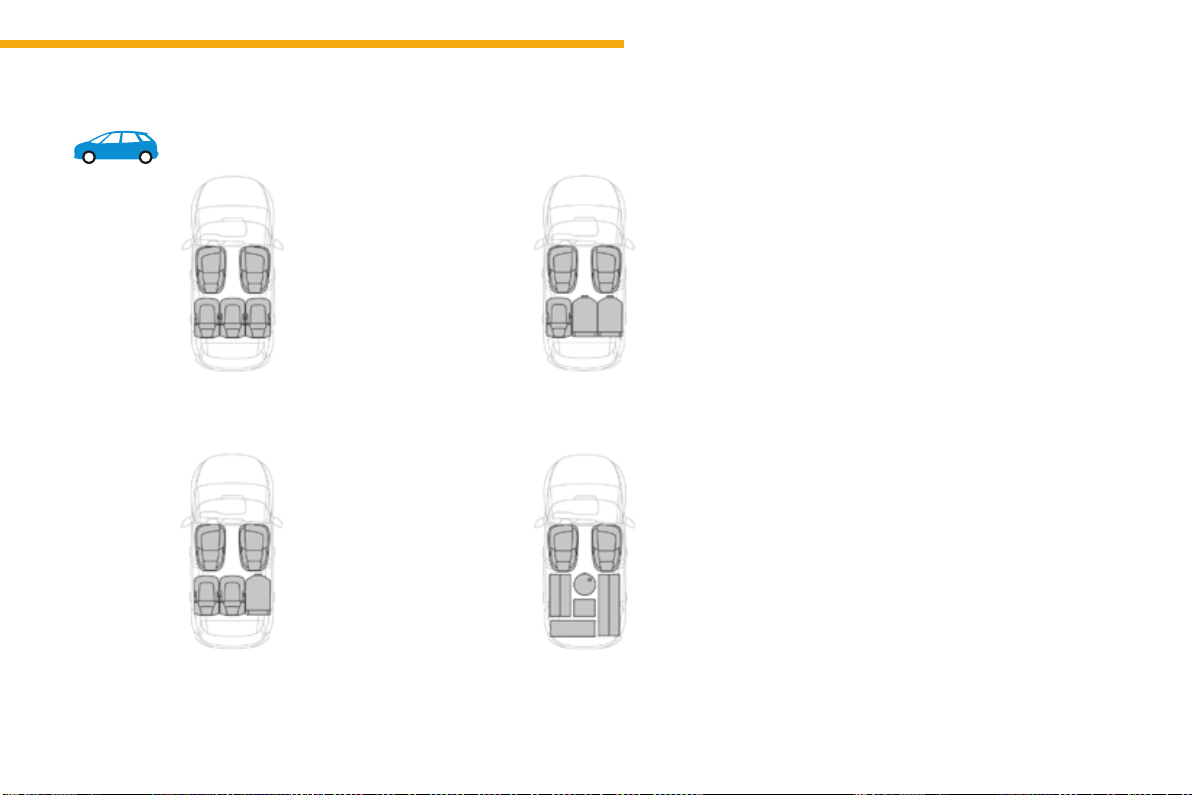
89
3
Ease of use and comfort
C4-Picasso-II_en_Chap03_ergonomie-confort_ed01-2016
Seatmodularityandcongurations
Examples of configurations
5 seats
4 seats
3 seats
Maximum loadspace
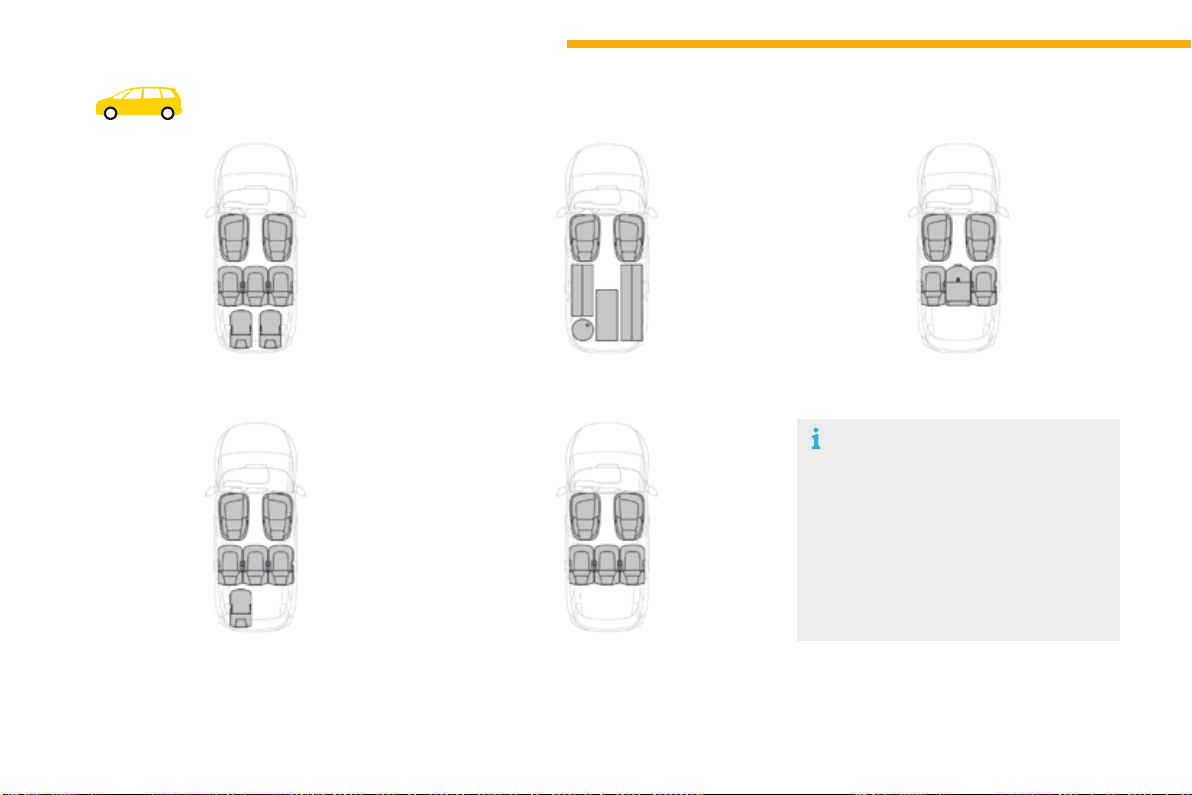
90
Ease of use and comfort
C4-Picasso-II_en_Chap03_ergonomie-confort_ed01-2016
Examples of seat configurations
7 seats
6 seats
Maximum loadspace
5 seats
4 seats
For easy modification of your
interior vehicle space, all the rear seats
canbeindividuallyfolded:ontothe
second-row floor, and under the third-
rowfloor.Youcanthenhaveaload
floor that is continuous up to the front
seatbackrests.
The seats must only be folded and
unfoldedwiththevehiclestationary.
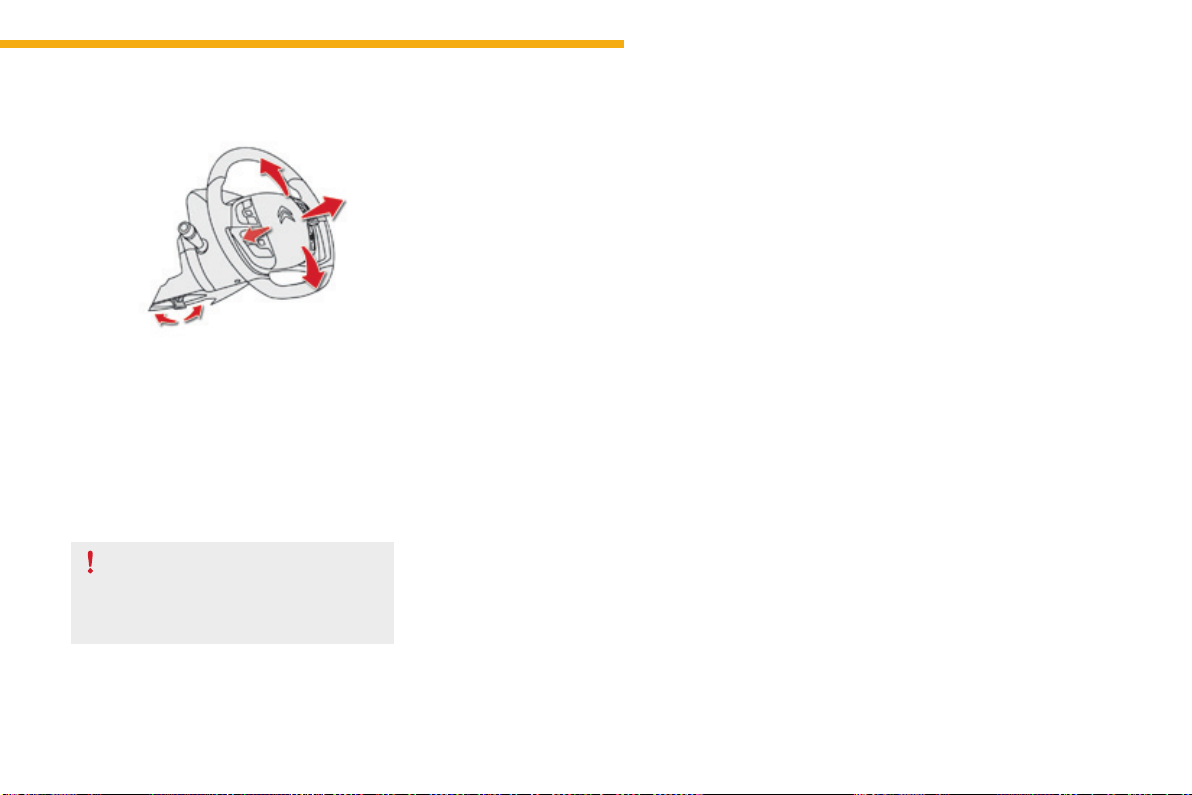
91
3
Ease of use and comfort
C4-Picasso-II_en_Chap03_ergonomie-confort_ed01-2016
Steeringwheeladjustment
F When stationary, pull the control lever to
releasetheadjustmentmechanism.
F Adjusttheheightandreachtosuityour
drivingposition.
F Pushthecontrollevertolockthe
adjustmentmechanism.
As a safety measure, these operations
should only be carried out with the
vehiclestationary.
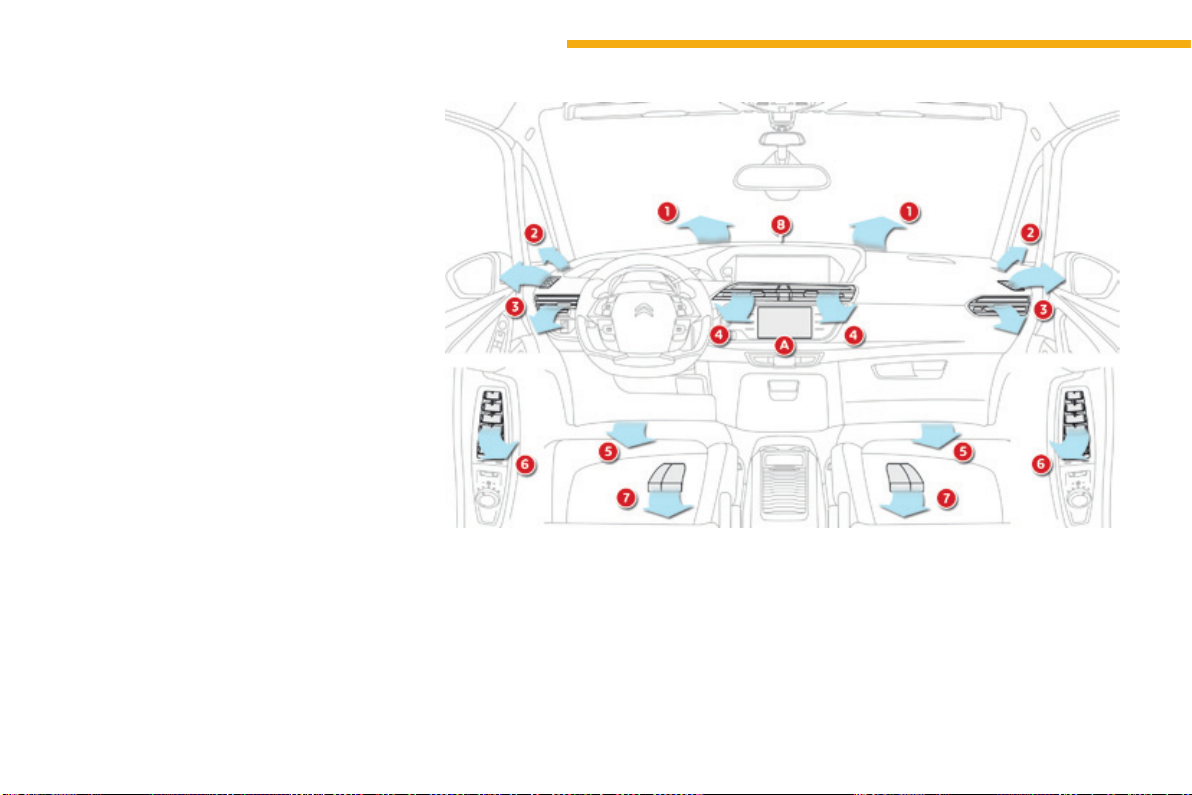
92
Ease of use and comfort
C4-Picasso-II_en_Chap03_ergonomie-confort_ed01-2016
Ventilation
Air intake
Theaircirculatinginthepassenger
compartmentisfilteredandoriginateseither
fromtheoutsideviathegrillelocatedatthe
base of the windscreen or from the inside in air
recirculationmode.
Air treatment
Theincomingairfollowsvariousroutes
dependingonthecontrolsselectedbythe
driver:
- directarrivalinthepassenger
compartment(airintake),
- passagethroughaheatingcircuit(heating),
- passagethroughacoolingcircuit(air
conditioning).
Control panel
The controls of this system are accessible in
the Air conditioning menu of the touch screen
tablet A.
Thedemisting/defrostingcontrolsforthe
windscreen and rear screen are located on the
leftofthetouchscreentablet.
1. Windscreendemisting-defrostingvents.
2. Frontquarterlightdemisting-defrosting
vents.
3. Frontsidewindowdemisting-defrosting
vents.
Adjustablesideairvents.
4. Centraladjustableairvents.
5. Airoutletsforthefrontfootwells.
6. Side vents for the 2
nd
row.
7. Air outlets for 2
nd
rowfootwells.
8. Sunshinesensor.
Air distribution
93
3
Ease of use and comfort
C4-Picasso-II_en_Chap03_ergonomie-confort_ed01-2016
In order for these systems to be fully effective, follow the operation and maintenance
guidelinesbelow:
F Toobtainanevenairdistribution,takecarenottoobstructtheexteriorairintakegrilles
located at the base of the windscreen, the nozzles, the vents and the air outlets, as well
astheairextractorlocatedintheboot.
F Donotcoverthesunshinesensor,locatedonthedashboard;thisisusedforregulation
oftheairconditioningsystem.
F Operatetheairconditioningsystemforatleast5to10minutes,onceortwiceamonth
tokeepitinperfectworkingorder.
F Ensurethatthepassengercompartmentfilterisingoodconditionandhavethefilter
elementsreplacedregularly.
Werecommendtheuseofacombinedpassengercompartmentfilter.Thankstoits
special active additive, it contributes to the purification of the air breathed by the
occupantsandthecleanlinessofthepassengercompartment(reductionofallergic
symptoms,badodoursandgreasydeposits).
F Toensurecorrectoperationoftheairconditioningsystem,youarealsoadvisedtohave
itcheckedregularlyasrecommendedinthemaintenanceandwarrantyguide.
F If the system does not produce cold air, switch it off and contact a CITROËN dealer or a
qualifiedworkshop.
Recommendationsforventilationandairconditioning
Ifafteranextendedstopinsunshine,
theinteriortemperatureisveryhigh,first
ventilatethepassengercompartmentfor
afewmoments.
Puttheairflowcontrolatasettinghigh
enoughtoquicklychangetheairinthe
passengercompartment.
Theairconditioningsystemdoesnot
contain chlorine and does not present
anydangertotheozonelayer.
The condensation created by the air
conditioningresultsinadischarge
of water under the vehicle which is
perfectlynormal.
Whentowingthemaximumloadonasteepgradientinhightemperatures,switchingoffthe
airconditioningincreasestheavailableenginepowerandsoimprovesthetowingability.
Stop & Start
Theheatingandairconditioning
systemsonlyworkwhentheengineis
running.
To maintain a comfortable temperature
inthepassengercompartment,youcan
temporarily deactivate the Stop & Start
system.
For more information on Stop & Start,
refertothecorrespondingsection.
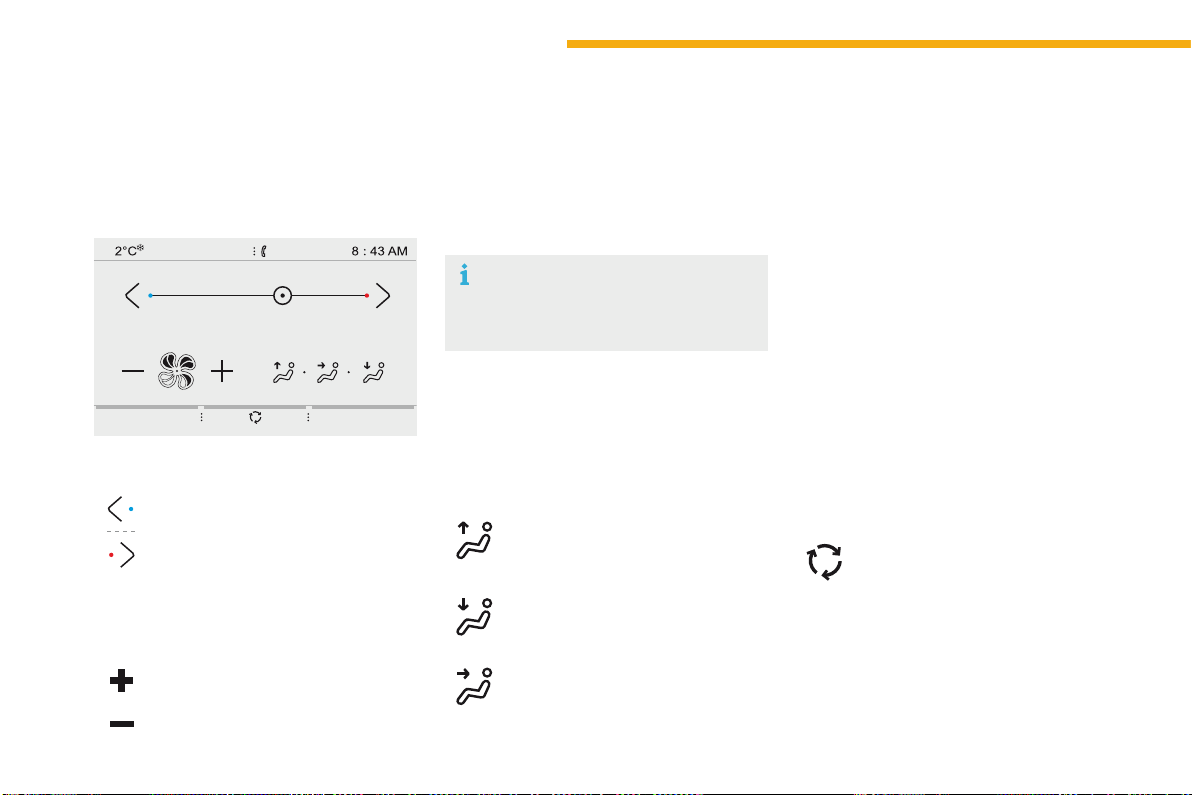
94
Ease of use and comfort
C4-Picasso-II_en_Chap03_ergonomie-confort_ed01-2016
Heating
Temperature adjustment
F Press one of the arrows, or move
the cursor from blue (cold) to red
(hot)toadjustthetemperatureto
yourwishes.
Air flow adjustment
F Press one of these buttons to
increase or decrease the speed
oftheboosterfan.
Air distribution adjustment
Therecirculationofinteriorairpreventsexterior
odoursandsmokeenteringthepassenger
compartment.
This function also allows the air in the
passengercompartmenttobeheatedorcooled
morequickly.
Windscreen.
Centreandsidevents.
Footwells.
Theairdistributioncanbevariedbyusing
morethanonebutton:illuminationofthe
button indicates that air is distributed in that
direction;noilluminationindicatesthatairisnot
distributedinthatdirection.
Pressingallthreebuttonsgivesaneven
distributioninthepassengercompartment.
Air intake / Air recirculation
F Press this button to select the
exteriorairintakemodetothe
passengercompartment.
Avoiddrivingfortoolongwithout
ventilation(riskofmistingand
deteriorationofairquality).
Theheatingsystemworksonlywhenthe
engineisrunning.
Press the button for the Air conditioning
menutodisplaythepageforthesystem
controls.
Thesymbolforairflow(afan)fillsprogressively
accordingtotheairflowsettingmade.
Byreducingtheairflowtotheminimum,you
arestoppingventilationofthepassenger
compartment.
Theairdistributioninthepassenger
compartmentcanbeadjustedbycombiningthe
useofseveralvents.
Whentheindicatorlampisoff,airistakenfrom
outsidethevehicle.Whentheindicatorlampis
on,theairinsidethepassengercompartment
isrecirculatedandtheintakeofairfromoutside
thevehicleisinhibited.
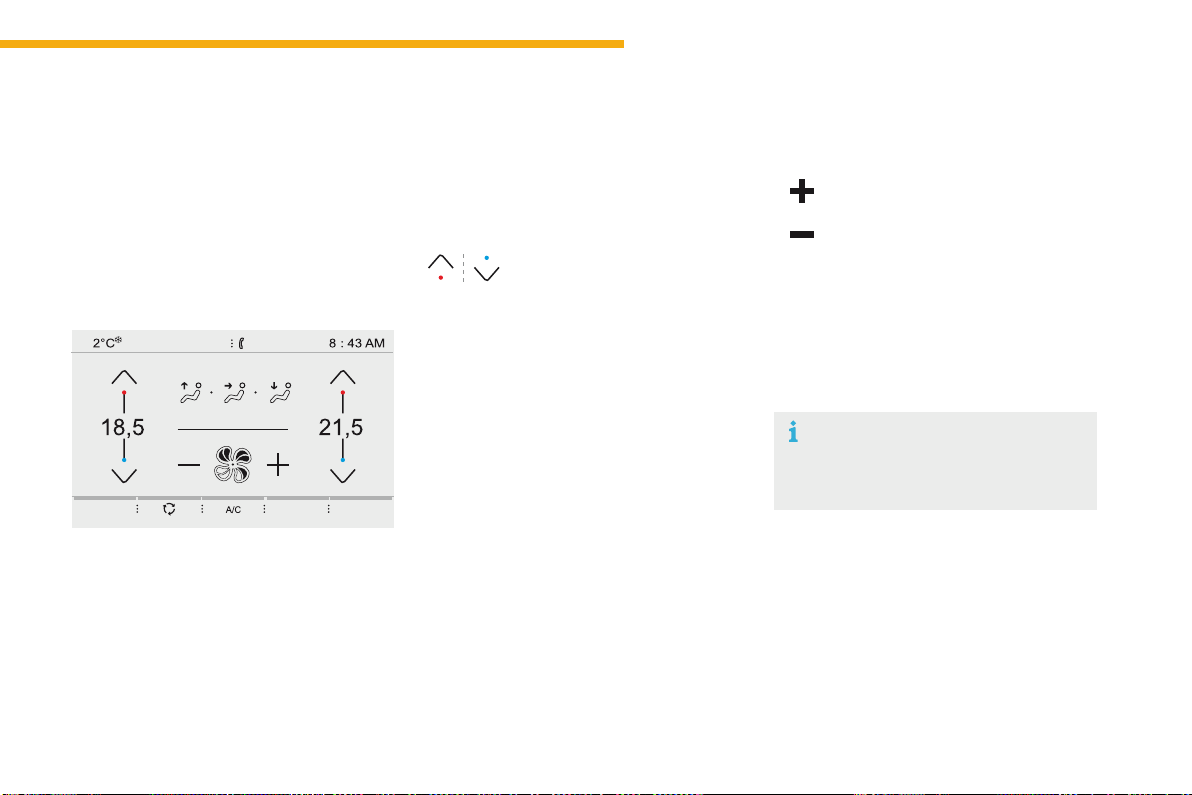
95
3
Ease of use and comfort
C4-Picasso-II_en_Chap03_ergonomie-confort_ed01-2016
Dual-zonemanualairconditioningwithtemperatureregulation
Theairconditioningsystemonlyworkswiththe
enginerunning.
The temperature at the nozzles and vents
isregulatedbythesystemaccordingtothe
temperatureinthepassengercompartment
andthetemperaturesetting.
Press the button for the Air conditioning
menutodisplaythesystemcontrolspage.
Temperature adjustment
F Press one of these buttons
to reduce (blue) or increase
(red)thevalue.
Air flow adjustment
Press one of these buttons to
increase or decrease the speed of
theairboosterfan.
Thedriverandfrontpassengercaneachadjust
thetemperatureindependently.
The value indicated corresponds to a level of
comfortandnottoatemperatureindegreesCelsius
orFahrenheit(dependingontheunitselected).
Asettingofaround21providesoptimumcomfort.
Dependingonyourrequirements,asettingbetween
18and24isnormal.
In addition, it is recommended that a difference
betweenleftandrightofmorethan3shouldbe
avoided.
Theairflowsymbol(afan)fillsprogressively
accordingtothequantityofairwanted.
Byreducingtheairflowtominimum,youare
stoppingventilation.
Avoiddrivingfortoolongwithout
ventilation(riskofmistingand
deteriorationofairquality).
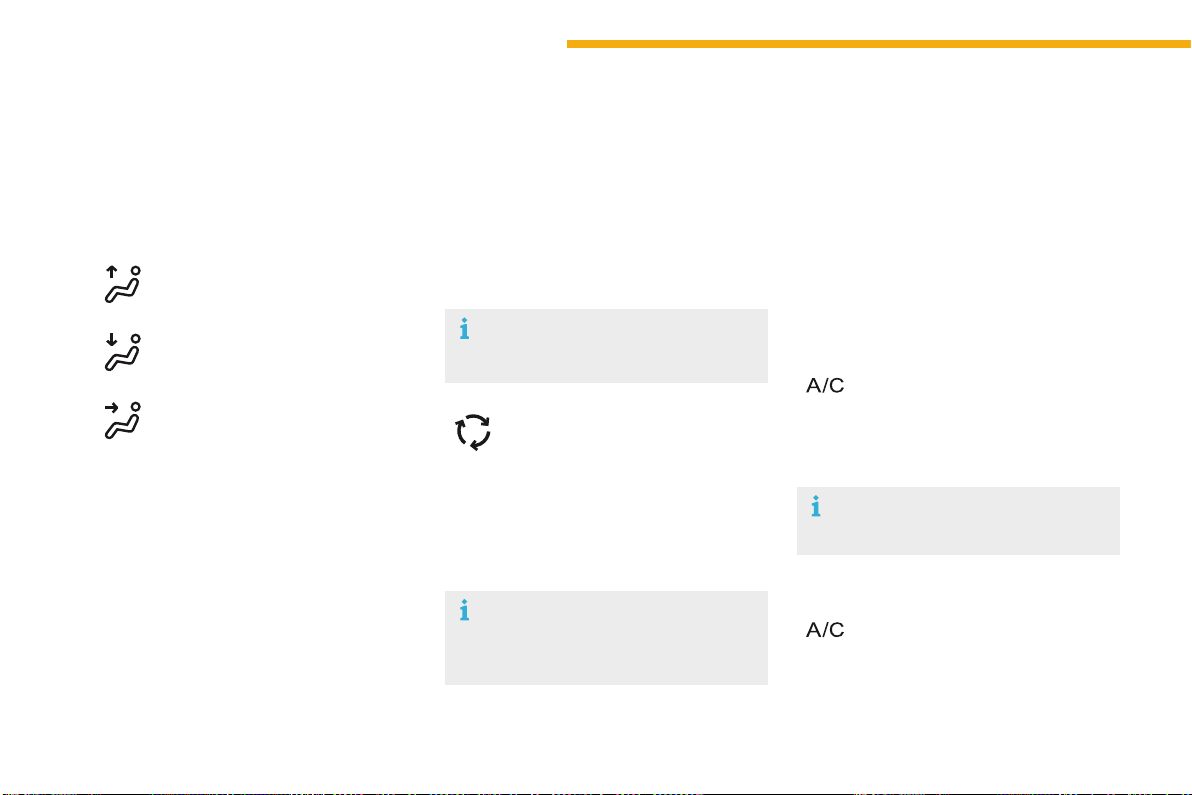
96
Ease of use and comfort
C4-Picasso-II_en_Chap03_ergonomie-confort_ed01-2016
Air intake / Air recirculation
Theintakeofexteriorairpreventstheformation
ofmistonthewindscreenandsidewindows.
The recirculation of interior air isolates the
passengercompartmentfromexteriorodours
andsmoke.
F Press the button to choose
howairentersthepassenger
compartment.
Air conditioning On / Off
Switching on
Switching off
Theairconditioningdoesnotoperate
whentheairflowadjustmentisset
tooff.
F Press this button to activate the
airconditioningsystem.
Avoiddrivingfortoolongwithout
recirculationofinteriorair(riskof
mistinganddeteriorationofairquality).
This function allows hot or cold air to be
deliveredselectivelyandmorequickly.
Theairconditioningisdesignedtooperate
effectivelyinallseasons,withthewindowsclosed.
Itenablesyouto:
- lower the temperature, in summer,
- increasetheeffectivenessofthedemistingin
winter,above3°C.
F Pressthisbuttonagainto
deactivatetheairconditioning
system.
Air distribution
adjustment
Thesebuttonsareusedtoarrange
thedistributionofairinthepassenger
compartmentbycombiningseveralairoutlets.
Windscreen.
Theairdistributioncanbeadaptedbyusing
severalbuttons:illuminationofthebutton
confirms the presence of fan boosted air in the
direction indicated, the button illumination off
indicates the absence of fan boosted air in the
directionindicated.
For a uniform distribution of air in the
passengercompartment,thethreebuttonscan
beusedsimultaneously.
Footwells.
Centralandsidevents.
Whentheindicatorlampisoff,airistakenfrom
outsidethevehicle.Whentheindicatorlampis
on, air is recirculated from inside the vehicle,
theintakeforairoutsidethevehicleisinhibited.
When the indicator lamp is on, the air
conditioningfunctionisactivated.
When the indicator lamp is off, the air
conditioningfunctionisdeactivated.
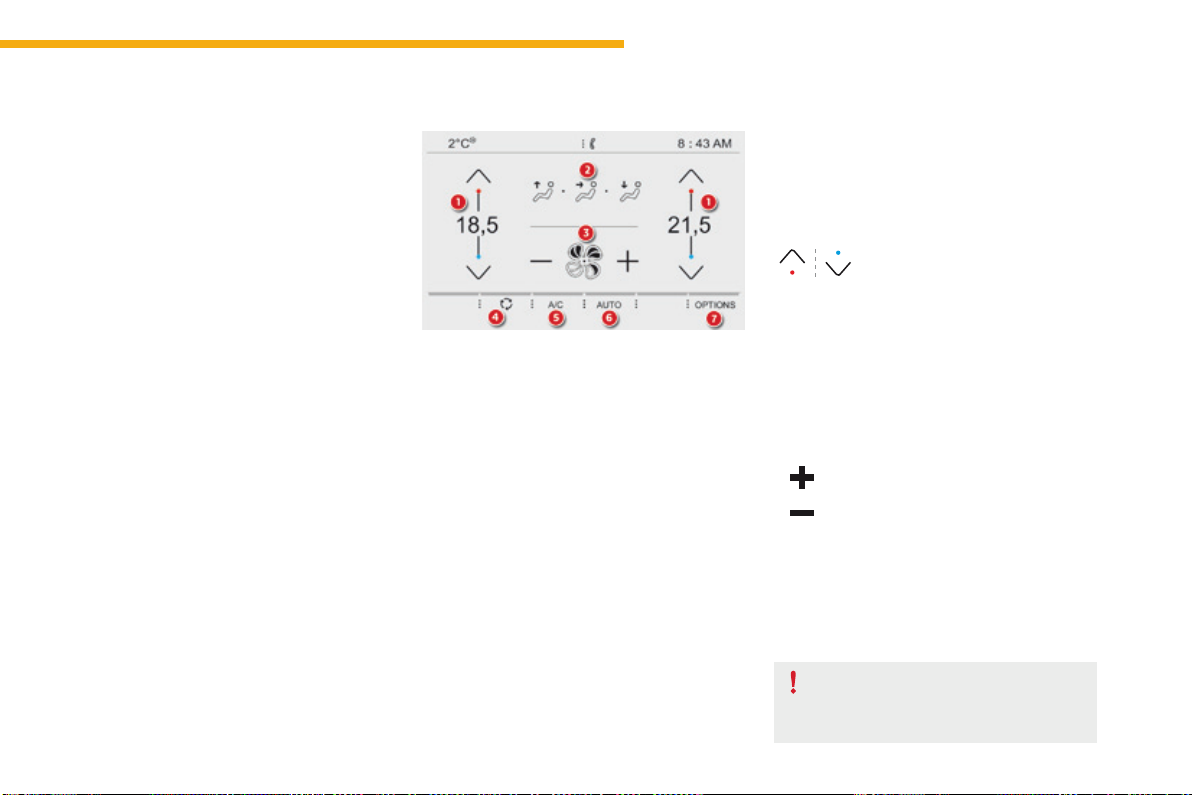
97
3
Ease of use and comfort
C4-Picasso-II_en_Chap03_ergonomie-confort_ed01-2016
Dual-zoneautomaticairconditioning
Thisairconditioningsystemoperateswith
theenginerunning,buttheventilationandits
controlsareavailablewiththeignitionon.
Operationoftheairconditioningandregulation
of temperature, air flow and air distribution in
thepassengercompartmentareautomatic.
Temperature adjustment
1. Driver/passengersidetemperature
adjustment.
2. Airdistributionadjustment.
3. Airflowadjustment.
4. Airintake/airrecirculation.
5. AirconditioningOn/Off.
6. Automaticmode.
7. Accesstothesecondarypage.
Thedriverandfrontpassengercaneachset
thetemperatureindependently.
F Press one of these buttons
to increase or decrease the
value.
The value indicated corresponds to a level of
comfortandnottoaprecisetemperature.
Itisrecommendedthatyouavoidaleft/right
settingdifferenceofmorethan3.
Press the button for the Air conditioning
menu to display the controls for the air
conditioningsystem.
Air flow adjustment
Avoiddrivingfortoolongwiththe
ventilationoff(riskofmistingand
deteriorationofairquality).
F Press one of these buttons to
increase or decrease the speed
oftheboosterfan.
The air flow symbol (a fan) is filled in
progressivelyinrelationtothequantityofair
wanted.
Byreducingtheairflowtominimum,youare
stoppingventilation.
"- - -"isdisplayed.
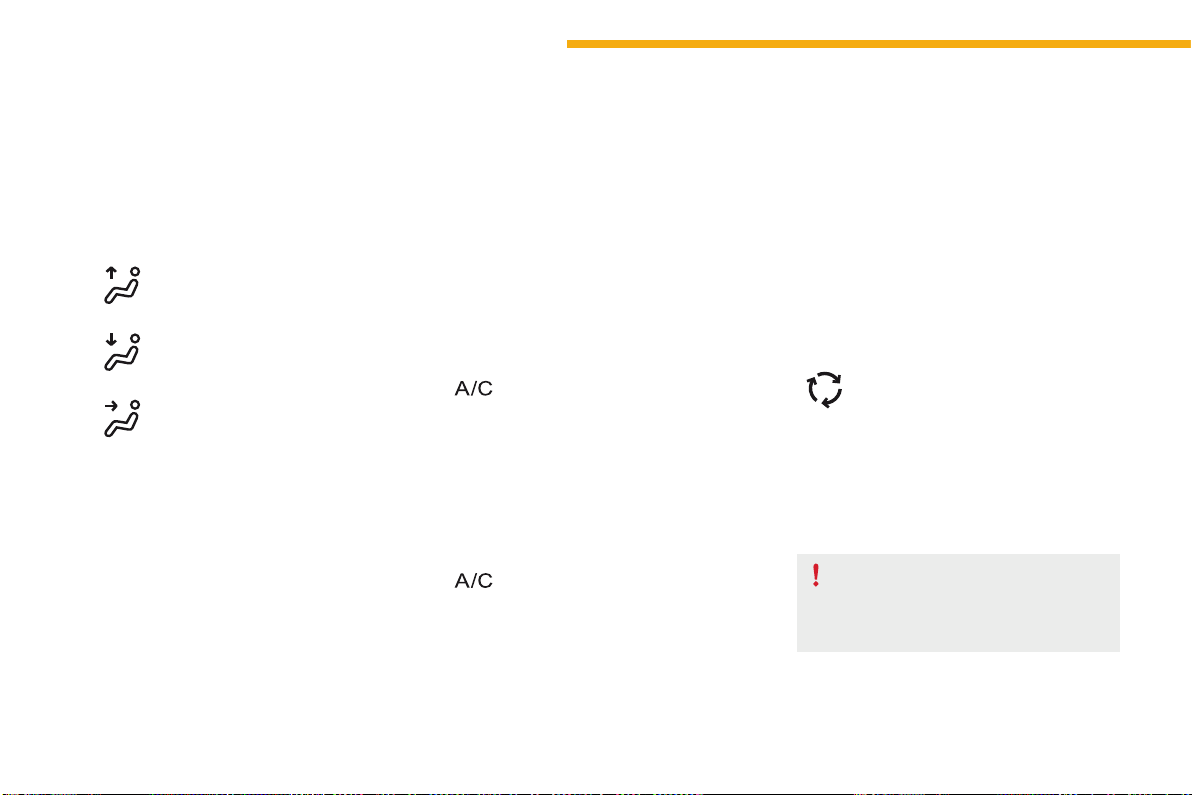
98
Ease of use and comfort
C4-Picasso-II_en_Chap03_ergonomie-confort_ed01-2016
Theairdistributioninthepassenger
compartmentcanbeadjustedbycombiningthe
useofseveralvents.
Air distribution adjustment
Windscreen.
Footwells.
Centreandsidevents.
Theairdistributioncanbevariedbyusing
morethanonebutton:illuminationofthe
button indicates that air is distributed in that
direction;noilluminationindicatesthatairisnot
distributedinthatdirection.
InAUTOmode,allthreebuttonsareoff.
Switching off
Switching on
Air conditioning On/Off
Theairconditioningisdesignedtooperate
efficiently in all seasons, with the windows
closed.
Itallowsyou:
- in summer, to lower the temperature,
- inwinter,above3°C,toimprovedemisting.
Avoidprolongedoperationoftheair
recirculationfunction(riskofmisting
andofdeteriorationoftheairquality).
Whentheindicatorlampisoff,theintakeof
exteriorairisactive.
When the indicator lamp is on, air recirculation
isactivated,theintakeofexteriorairis
inhibited.
F Press this button to choose
the mode for air entry to the
passengercompartment.
Theintakeofexteriorairavoidsmistingofthe
windscreenandsidewindows.
Airrecirculationpreventsexteriorodours
andsmokefromenteringthepassenger
compartment.
Thisfunctionalsoallowsfasterheating
orcoolingoftheairinthepassenger
compartment.
Air intake/Air recirculation
F Pressthisbuttonagaintoswitch
offtheairconditioning.
When the indicator lamp is off, the air
conditioningsystemisoff.
F Press this button to switch on the
airconditioning.
When the indicator lamp is on, the air
conditioningsystemison.
Theairconditioningcannotoperatewhenthe
airflowissettooff.
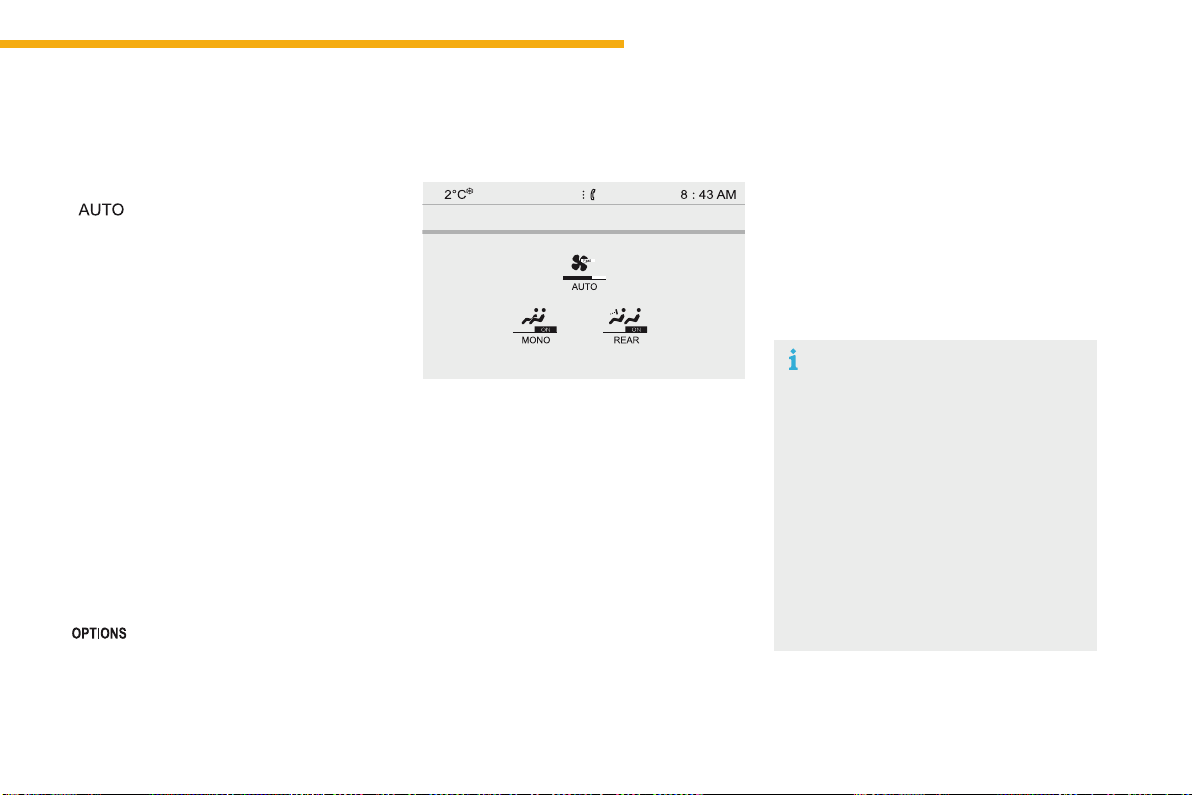
99
3
Ease of use and comfort
C4-Picasso-II_en_Chap03_ergonomie-confort_ed01-2016
Incoldweatherwiththeenginecold,
theairflowisincreasedgraduallyuntil
the system has warmed up, in order
to limit the delivery of cold air into the
passengercompartment.
Onenteringthevehicle,iftheinterior
temperature is much colder or warmer
thanthecomfortvaluesetting,there
is no need to alter the value displayed
inordertoreachmorequicklythe
requiredlevelofcomfort.Thesystem
compensates automatically and
corrects the temperature difference as
quicklyaspossible.
ThissettingisassociatedwithAUTOmode
only.However,ondeactivationofAUTOmode,
thelastsettingremainson.
ChangingthesettingdoesnotreactivateAUTO
modeifdeactivated.
When the indicator lamp in the button is on, the
airconditioningsystemoperatesautomatically:
thesystemmanagesthetemperature,air
flowandairdistributioninthepassenger
compartmentinanoptimumwayaccordingto
thecomfortlevelyouhaveselected.
Youcanalwayschoosetomodifyasetting
manually.Inthiscasetheindicatorlampinthe
buttonisoff.
F Pressthisbuttonagaintoactivatethe
automaticcomfortprogrammeagain.
F Press this button to activate or
deactivate the automatic mode of
theairconditioningsystem.
Automatic comfort
programme
Tochangethecurrentsetting,pressthebutton
todisplaythedifferentmodesinturn:
"SOFT":providessoftandquietoperationby
limitingairflow.
"NORMAL":offersthebestcompromise
between a comfortable temperature and quiet
operation(defaultsetting).
"FAST":providesstrongandeffectiveairflow.
It is possible to modulate the intensity of the
automaticcomfortprogrammebychoosingone
ofthreemodesettingsofferedinasecondary
pageoftheAir conditioningmenu.
F Pressthisbuttontogotothe
secondarypage.
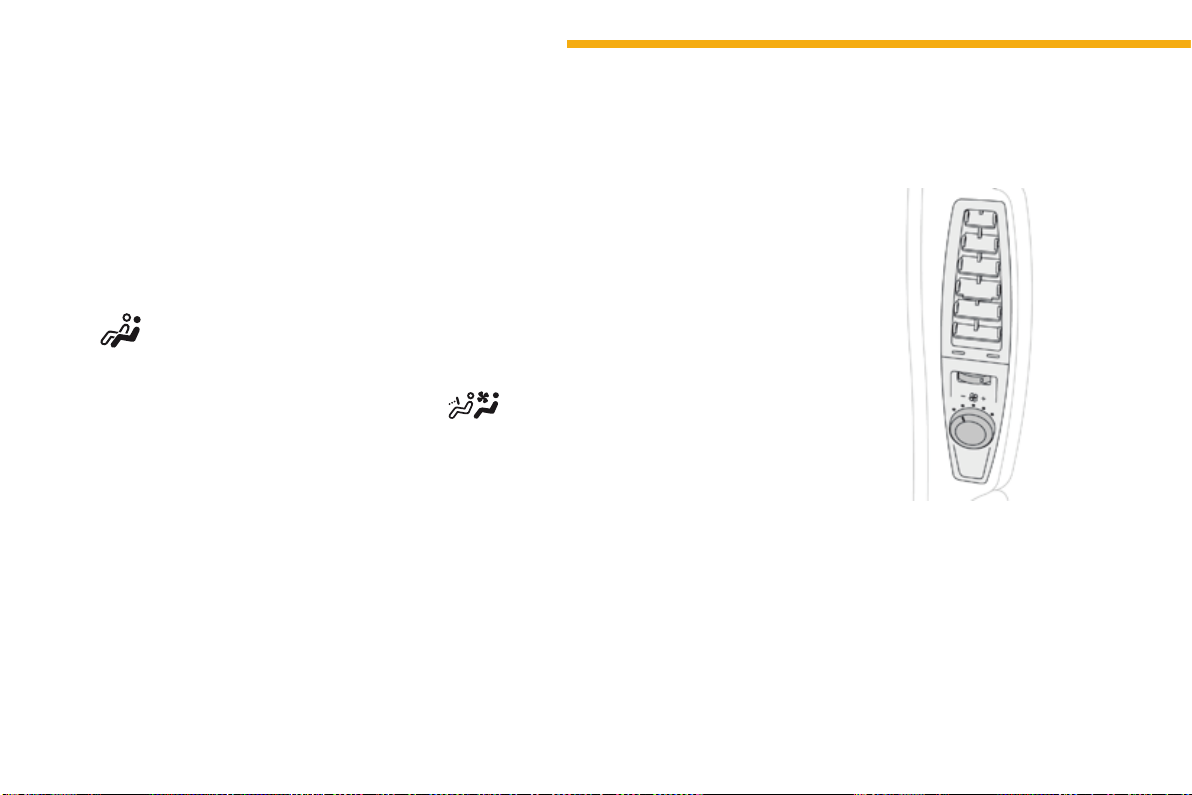
100
Ease of use and comfort
C4-Picasso-II_en_Chap03_ergonomie-confort_ed01-2016
"Rear" function
F Pressthisbuttontoactivate/
deactivatethe"Rear"function.
FromthesecondarypageoftheAir
conditioningmenu:
Thisfunctiongivesrearpassengersaccessto
theadjustmentcontrolsandallows.
- the distribution of air conditioned air to the
vents for the 2
nd
row of seats,
- the distribution of ambient air to the vents
forthe3
rd
rowofseats.
F Turn the upper wheel to open or close the
rearvent.
F Turnthelowerknobtoreduce(totheleft)
orincrease(totheright)theairflow.
Settings for passengers in
the 2
nd
row of seats
"Mono" function
Thecomfortsettingforthepassenger'sside
canbeindexedtothedriver'scomfortsetting
(mono-zone).
FromthesecondarypageoftheAir
conditioningmenu:
F Pressthisbuttontoactivate/
deactivatethe"Mono"function.
The function is deactivated automatically when
thepassengerusestheirtemperaturesetting
buttons.
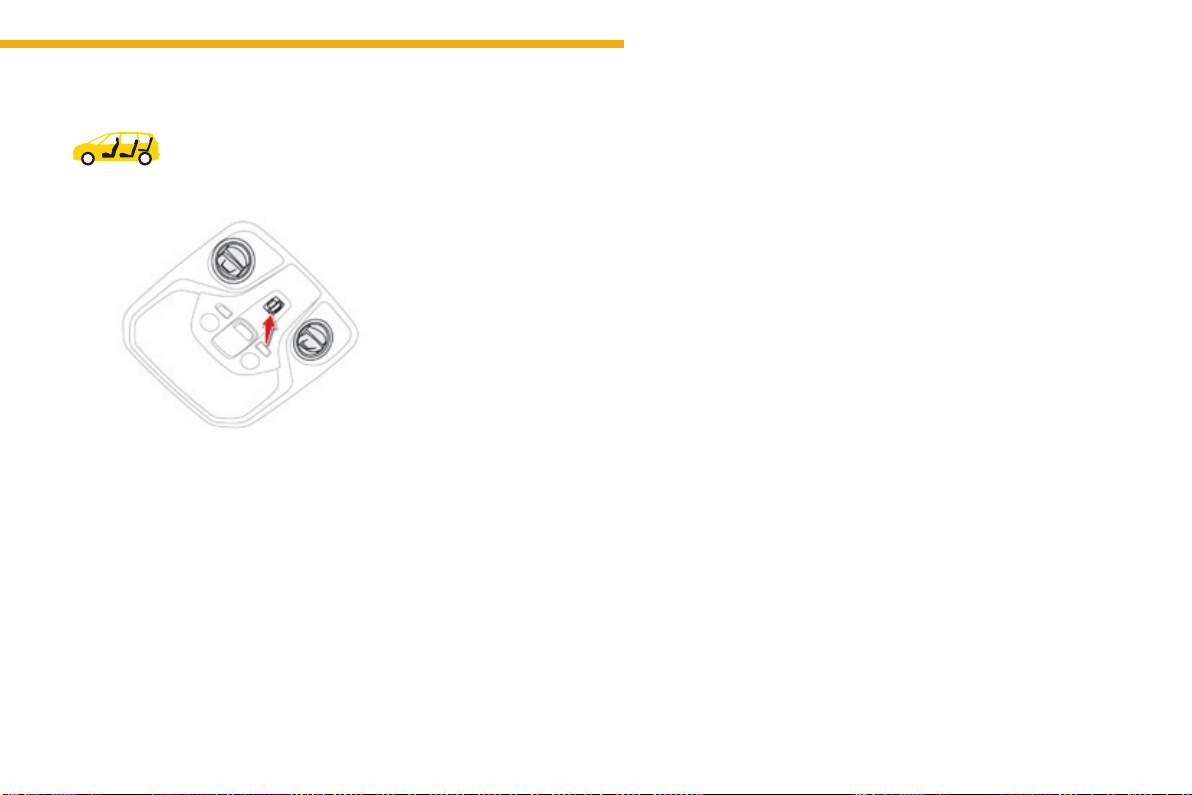
101
3
Ease of use and comfort
C4-Picasso-II_en_Chap03_ergonomie-confort_ed01-2016
Settings for
passengers in
the 3
rd
row of seats
F Presstheventcover.
F Adjusttheflowofairtothetwoventsusing
the four-position wheel (off, low, medium,
high).
F Directtheventbyturningthecover.
Ventilation with ignition on
function
Withtheignitionon,youcanusethe
ventilation system and have access to the Air
conditioningmenutoadjusttheairflowand
airdistributioninthepassengercompartment.
This function is available for a few minutes,
dependingonthestateofchargeofthebattery
ofyourvehicle.
This function does not activate the air
conditioning.
Youcanmakeuseoftheresidualheatinthe
enginetowarmthepassengercompartment
usingthetemperaturesettingbuttons.
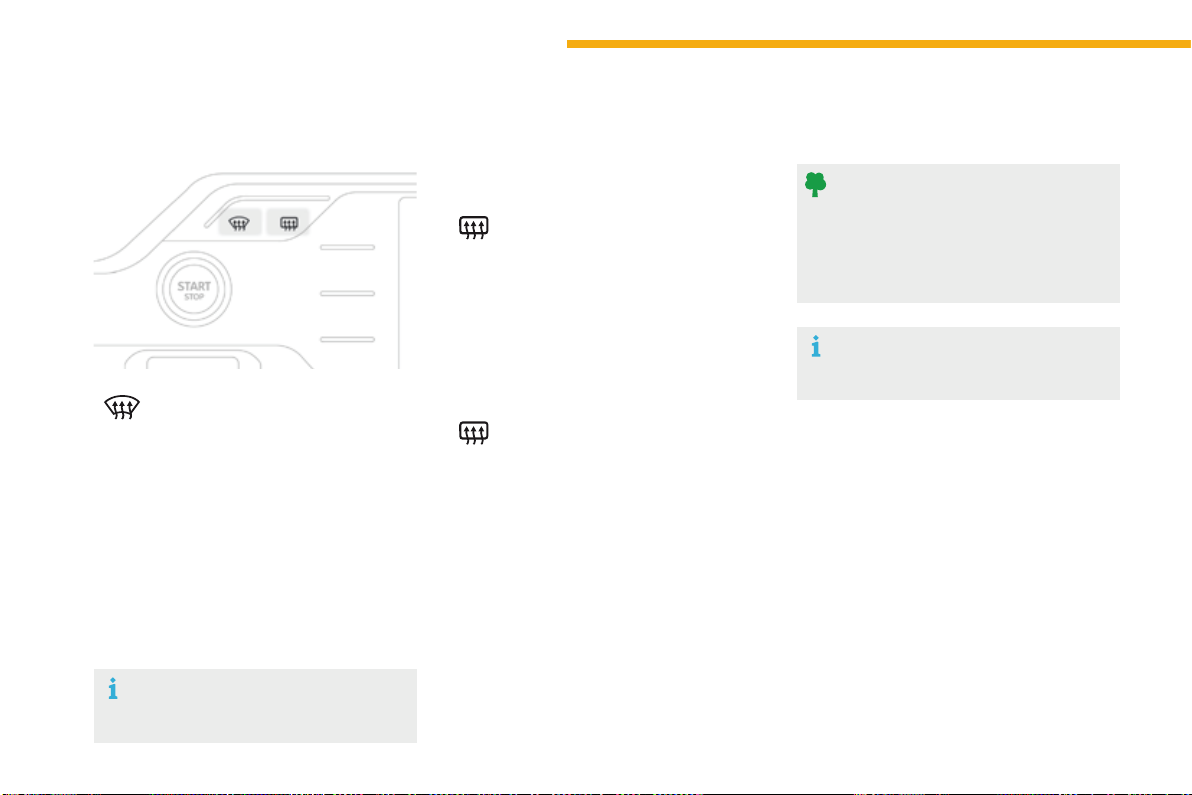
102
Ease of use and comfort
C4-Picasso-II_en_Chap03_ergonomie-confort_ed01-2016
Front demist -
defrost
F Press this button to demist or
defrost the windscreen and side
windowsasquicklyaspossible.
The indicator lamp in the button
comeson.
WithStop&Start,whendemistinghas
been activated, the STOP mode is not
available.
Thesystemautomaticallymanagestheair
conditioning(dependingonversion),air
flowandairintake,andprovidesoptimum
distribution towards the windscreen and side
windows.
F Toswitchitoffpressthisbuttonagainor
adjustthesettingforairflowordistribution.
Theindicatorlampgoesoff.
Rear screen demist -
defrost
Switching on
Switching off
F Pressthisbuttontodemist/
defrost the rear screen and
(dependingonversion)thedoor
mirrors.
Thedemisting/defrostingswitchesoffautomatically
topreventanexcessiveconsumptionofcurrent.
The rear screen demist - defrost
canonlyoperatewhentheengineis
running.
Switchofftheheatingoftherearscreen
anddoormirrorsassoonasyoujudgeit
possible,asreducingtheconsumption
of electrical current reduces fuel
consumption.
F It is possible to stop the
demisting/defrostingoperation
before it is switched off
automaticallybypressingthe
buttonagain.
The indicator lamp associated with the button
goesoff.
Theindicatorlampassociatedwiththebuttoncomeson.
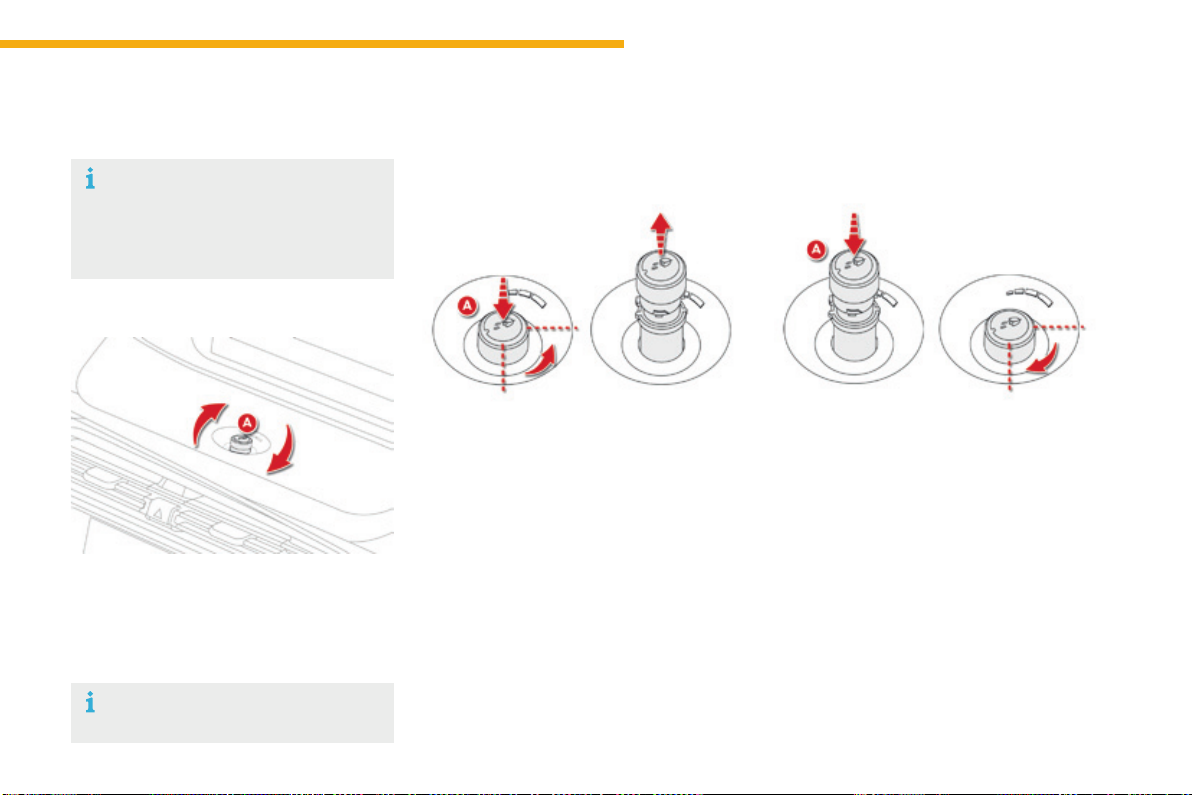
103
3
Ease of use and comfort
C4-Picasso-II_en_Chap03_ergonomie-confort_ed01-2016
Scented air freshener
Allowsafragrancetobedistributedinthepassengercompartmentviathecentralairvents.
F Rotate the button Atoadjust(totheleft
toreduce,totherighttoincrease)or
stop(maximumtotheleft)theflowof
scentedair.
Thecentralairventshavetobeopen.
F Press the button A,rotatingitaquarter
turntotheleftasfarasitwillgo.
F Remove the air freshener from the
dashboard.
F Replacethecartridge(see"Replacinga
cartridge").
To remove the air freshener
Adjustment of flow
Afterfittingorchangingacartridge:
F placetheairfreshenerbackinitshousing.
F rotateitaquarterturntotheright.
To insert the air freshener
Acartridgelastsonaverage3months,
basedononehour’susageperday.
The air freshener contains an empty
cartridgewhenyourvehicleis
delivered.Youthereforeneedtoinsert
acartridgeinordertousetheair
freshener.
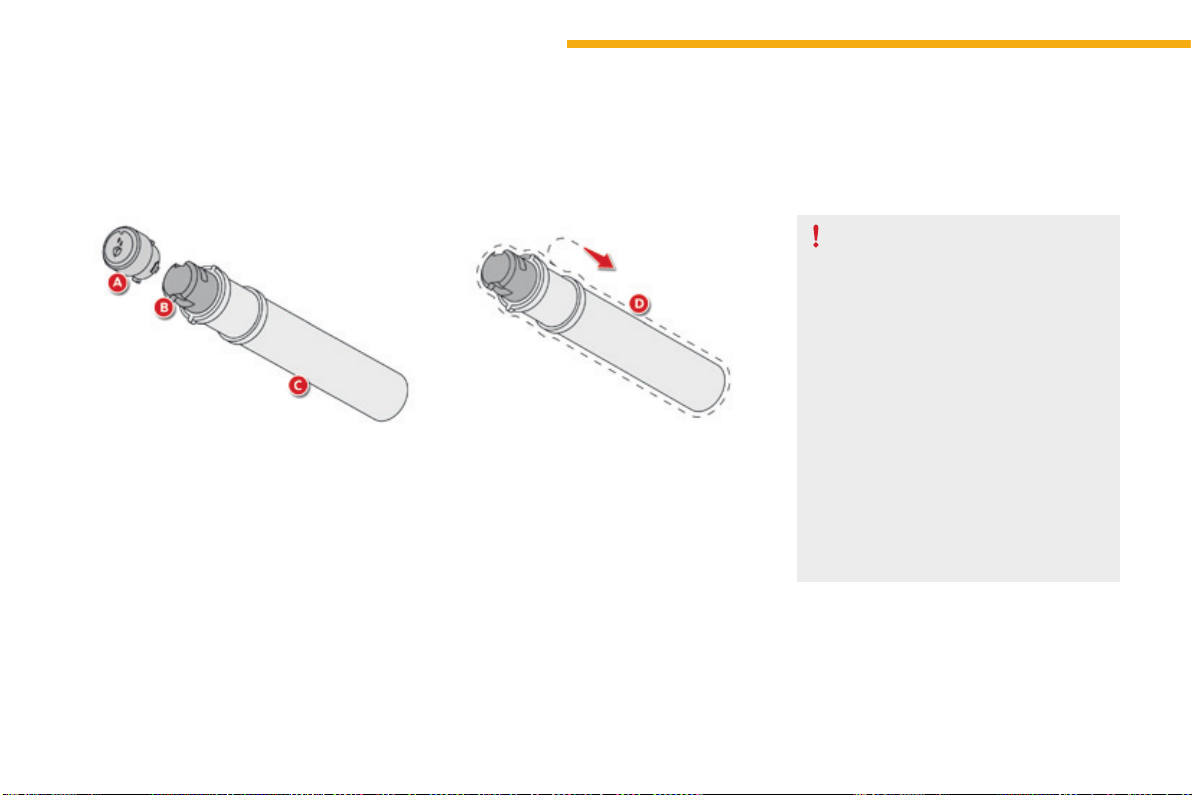
104
Ease of use and comfort
C4-Picasso-II_en_Chap03_ergonomie-confort_ed01-2016
Therechargefortheairfreshenerconsistsofa
cartridgeB and its sealed container C.
F Remove the protective film D.
F PlacetheheadofthecartridgeB on the
button Aoftheairfreshener.
F Rotateitaquarterturntolockitonthe
buttonandremovethecontainer.
F Inserttheairfreshenerintoitshousing.
Youcanchangecartridgesatanytime,keeping
theusedcartridgesintheiroriginalcontainers.
Replacing a cartridge
The air freshener button A is independent of
thecartridge.Cartridgesaresuppliedwithout
the air freshener button A.
The button of the air freshener A can only be
fitted to the centre of the dashboard with a
cartridgeattached.
Thereforealwayskeeptheairfreshener
button Aandonecartridge.
Replacementcartridgesareavailable,
dependingoncountry,eitherontheInternet
site or from a CITROËN dealer or a qualified
workshop.
Locationsareprovidedinthegloveboxfor
storingcartridgesandcontainers.
Air freshener button
Forsafety,useonlycartridgesthatare
providedforthispurpose.
Retainthecontainersforstoringused
cartridges.
Donotrechargeordismantlethe
cartridges.
Keep them out of reach of children and
animals.
Avoidallcontactwiththeskinandwith
theeyes.
Intheeventofingestion,consulta
doctor and show them the product
packagingorlabel.
Donotinstallorremoveacartridge
whileyouaredriving.
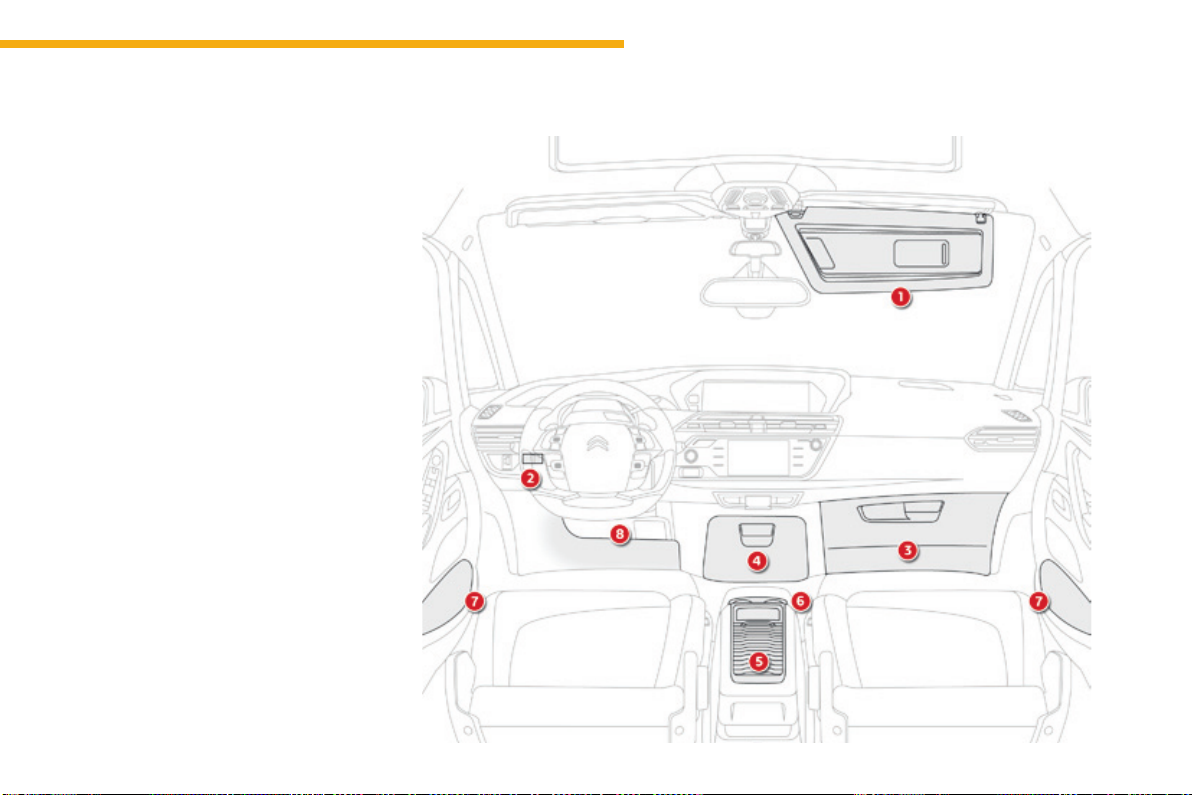
105
3
Ease of use and comfort
C4-Picasso-II_en_Chap03_ergonomie-confort_ed01-2016
Frontttings
1. Sunvisor.
2. Cardholder.
3. Glovebox.
4. Centralstorage.
Itcontainsthepowerandaudiosockets.
5. Raisedconsolewithclosedstorage,low
consoleorremovableconsole.
6. Cupholder.
7. Doorpockets.
8. Storagebelowthesteeringwheel.
(Handbookpack).

106
Ease of use and comfort
C4-Picasso-II_en_Chap03_ergonomie-confort_ed01-2016
Slidingsunvisor
Slidingblindsareprovidedforyourprotection
againstbrightsunlight.Theycanbeadjusted
manually.
F Slide the blind to the desired position by
pushingatA.
Sun visor rails
Glovebox
Dependingonequipment,itmaycontainaCD
player.
F Toopentheglovebox,raisethehandle.
Itisilluminatedwhenthelidisopened.
It is cooled by a manual directional ventilation
nozzle.
Itisconnecteddirectlytoyourvehicle'sair
conditioningsystemandissuppliedwithcool
airwhateverthetemperaturesettingforthe
passengercompartment.
Therefrigerationofyourgloveboxoperates
onlywiththeenginerunningandtheair
conditioningon.
Theblindsareextendedonthesunvisorrails.
Foldthevisordownwards,toprotectagainst
dazzletotheface.
Ifdazzleiscomingfromthesidewindows,
detachthevisorfromitshousingabovethe
centreofthewindscreenandpivotittotheside.
Thevisorsarefittedwithalockingsystemon
theircentralhousingwhentheblindisreeled
in.Todetachthevisorortorepositionit,itmust
beinaverticalposition.
Sliding blinds
Donotattachorsuspendheavyobjects
onthesliderailofthesunblind.

107
3
Ease of use and comfort
C4-Picasso-II_en_Chap03_ergonomie-confort_ed01-2016
Removable console
Theremovableconsoleisaportablestoragespacesecuredtothelowercentreconsole.
Ithasaslidinglid,anopenstoragespaceandtwocupholders.
F Raisethelockingcontrollocatedatthe
frontoftheconsole.
F With one hand, lift the front part of the
console.
F Withtheotherhand,grasptherearpartto
releasetheremovableconsole.
F Carry out these operations in reverse
order.Ensurethattheconsolehaslocked
intoplace.
Whennotfixedtoitscarrier,the
removable console should be stowed
intheboot.Itcouldbecomeaprojectile
in the event of a sudden stop or violent
impact.
Releasing the removable
console
Refitting the removable
console
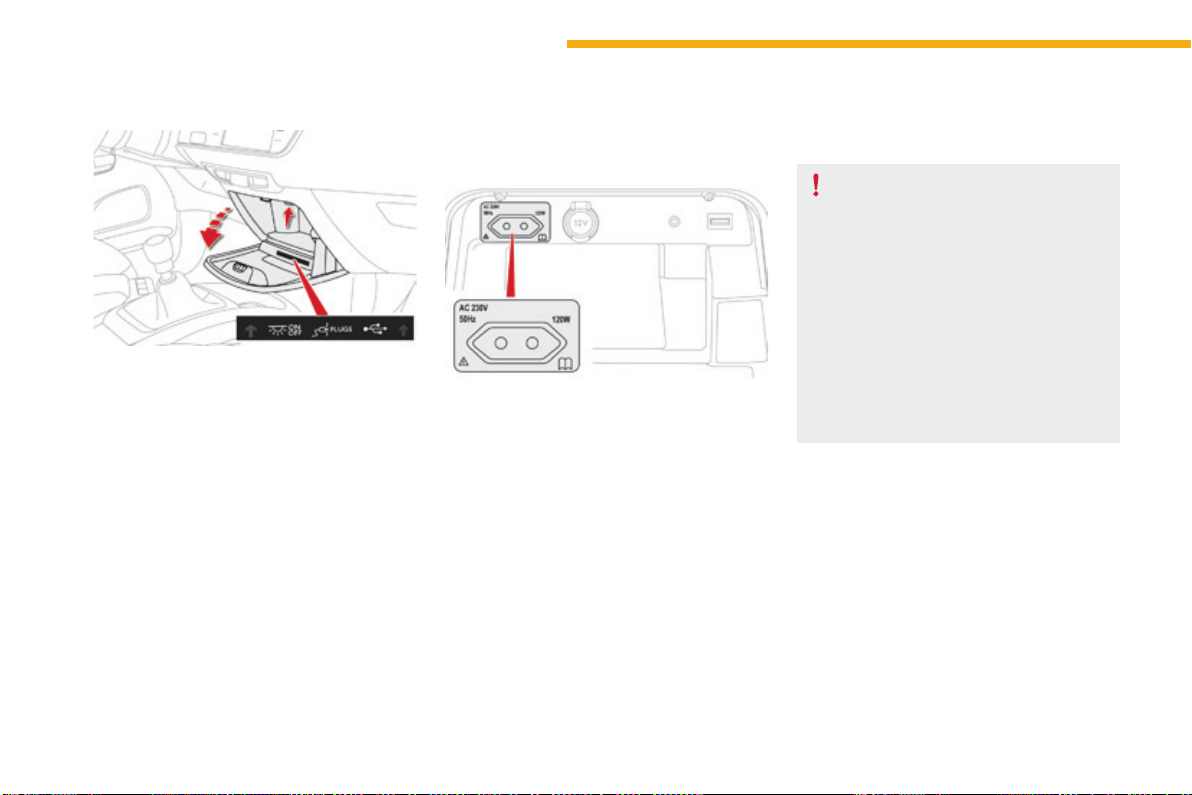
108
Ease of use and comfort
C4-Picasso-II_en_Chap03_ergonomie-confort_ed01-2016
Centralstoragecompartment
F Toopenthecentralstoragecompartment,
pullthegripandlowerthecover.
Itisilluminatedonopening.
Abuttonontheupperpartallowsthelightingto
bedeactivated.
230 V / 50 Hz power socket
A230V/50Hzsocket(maximumpower:120W)
isfittedinthecentralstoragebox.
Tousethesocket:
F openthecentralstoragebox,
F checkthatthewarninglampisongreen,
F connect your multimedia or other electrical
device(telephonecharger,laptop
computer, CD-DVD player, baby food
warmer...).
Thissocketworkswiththeenginerunning,as
wellasinSTOPmodewithStop&Start.
Dependingonequipment,itmaycontain:
- one230Vsocket,
- one12Vsocket,
- one USB port,
- oneauxiliarysocket
Intheeventofafaultwiththesocket,thegreen
warninglampflashes.
HaveitcheckedbyaCITROËNdealerora
qualifiedworkshop.
Connect only one device at a time to
thesocket(noextensionormulti-way
connector).
Connect only devices with class II
insulation(shownonthedevice).
As a safety measure, when electrical
consumptionishighandwhenrequired
bythevehicle'selectricalsystem
(particular weather conditions, electrical
overload...),thecurrentsupplytothe
socketwillbecutoff;thegreenwarning
lampgoesoff.
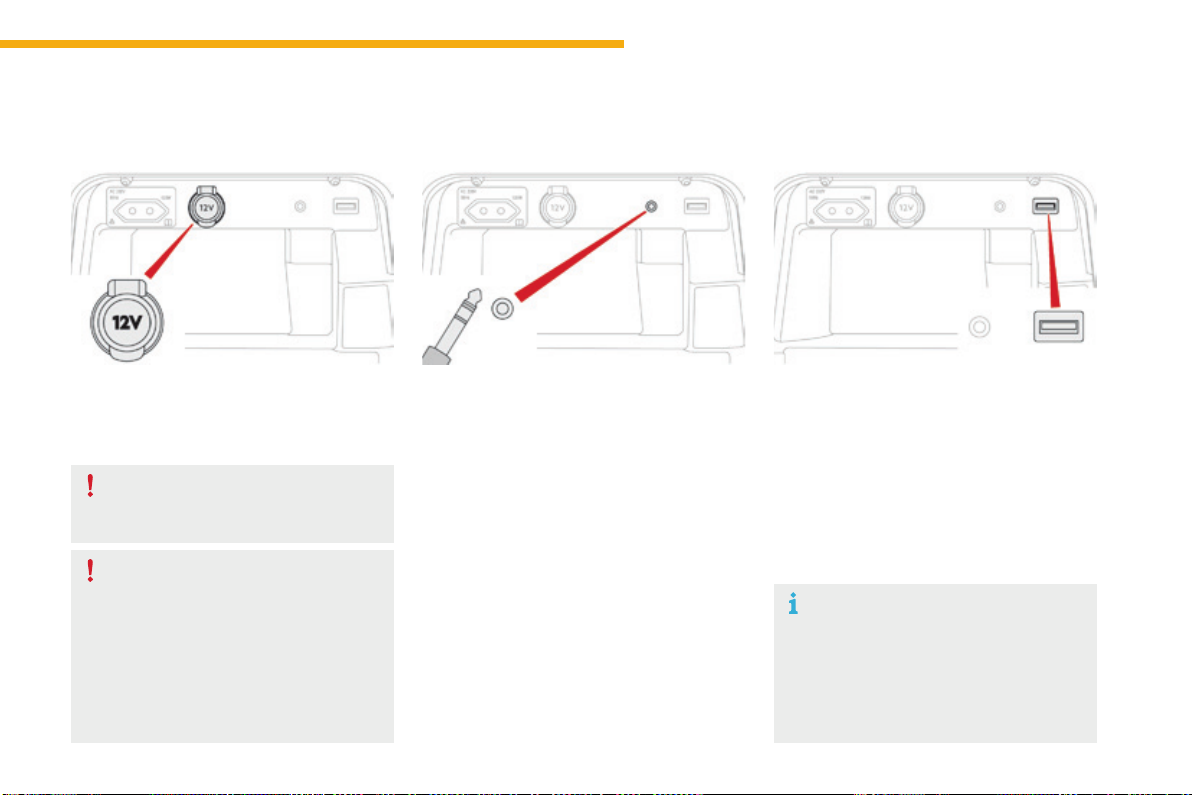
109
3
Ease of use and comfort
C4-Picasso-II_en_Chap03_ergonomie-confort_ed01-2016
When the USB port is used, the
portabledevicechargesautomatically.
Amessageisdisplayedifthepower
consumption of the portable device
exceedsthecurrentsuppliedbythe
vehicle.
12 V socket
Theauxiliarysocketislocatedinthecentral
storagebox.
It permits the connection of a portable device,
suchasadigitalaudioplayeroftheiPod
®
type,
tolistentoyourmusicfilesusingthevehicle's
speakers.
Themanagementofthefilesisdoneusingyour
portabledevice.
TheUSBportislocatedinthecentralstorage
compartment.
It allows the connection of a portable device or
aUSBmemorystick.
It plays the audio files transmitted to your audio
systemandheardviathevehicle'sspeakers.
Youcanmanagethesefilesusingthesteering
mountedortouchscreentabletcontrols.
Auxiliary socket USB port
For more information on the use of this
equipment, refer to the "Audio and telematics"
supplement.
F Toconnecta12Vaccessory(maximum
power:120Watts),liftthecoverand
connectasuitableadaptor.
Donotexceedthemaximumpower
ratingofthesocket(otherwisethereisa
riskofdamagingyourportabledevice).
The connection of an electrical device
not approved by CITROËN, such as a
USBcharger,mayadverselyaffectthe
operation of vehicle electrical systems,
causingfaultssuchaspoortelephone
reception or interference with displays
inthescreens.
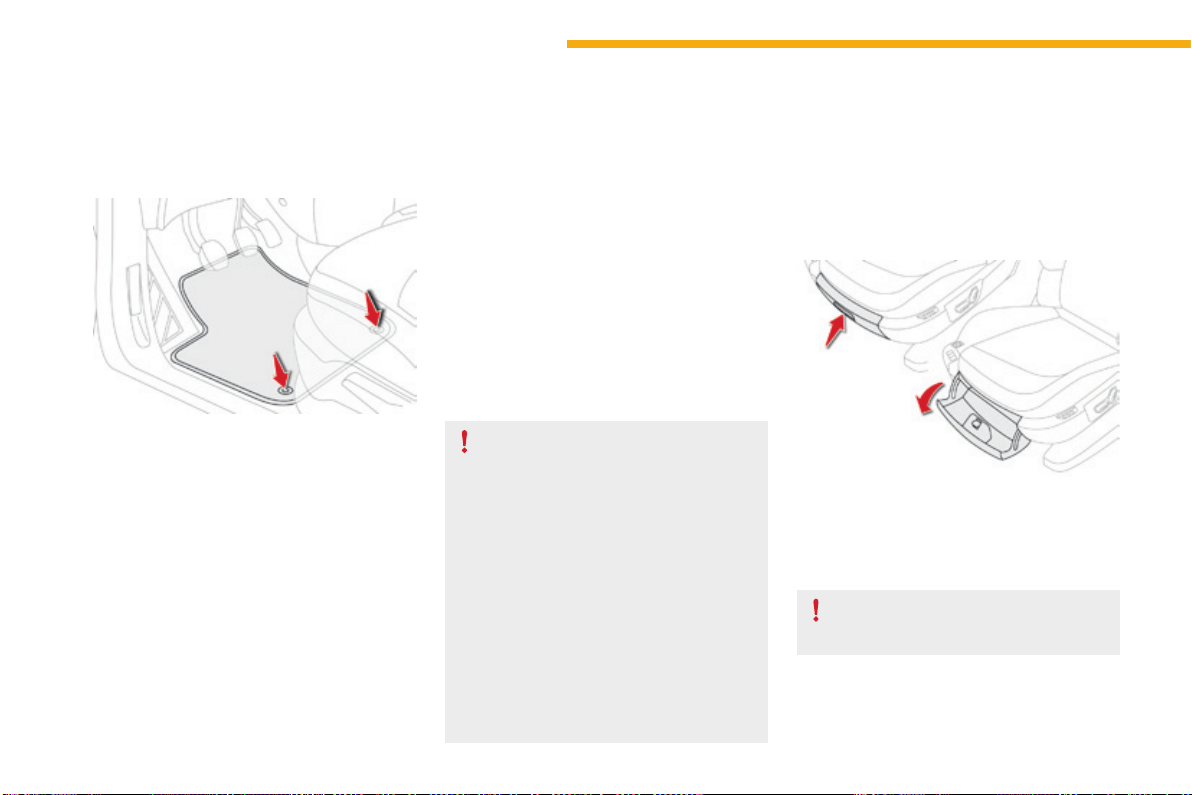
110
Ease of use and comfort
C4-Picasso-II_en_Chap03_ergonomie-confort_ed01-2016
Toremovethematonthedriver'sside:
F movetheseatasfarbackaspossible,
F unclipthefixings,
F removethemat.
Mats
Whenfittingthematforthefirsttime,onthe
driver'ssideuseonlythefixingsprovidedinthe
walletattached.
The other mats are simply placed on the
carpet.
Toavoidanyriskofjammingofthe
pedals:
- only use mats which are suited to
thefixingsalreadypresentinthe
vehicle;thesefixingsmustbeused,
- neverfitonematontopofanother.
The use of mats not approved by
CITROËN may interfere with access to
the pedals and hinder the operation of
thecruisecontrol/speedlimiter.
The mats approved by CITROËN have
twofixingslocatedbelowtheseat.
Torefitthematonthedriver'sside:
F position the mat correctly,
F refitthefixingsbypressing,
F checkthatthematissecuredcorrectly.
Fitting Removal
Retting
Storageboxes
F Raisethegripandlowerthestoragebox
cover.
Opening
Donotplaceheavyobjectsinthe
boxes.
Dependingonequipment,storageboxesare
locatedunderthefrontseats.
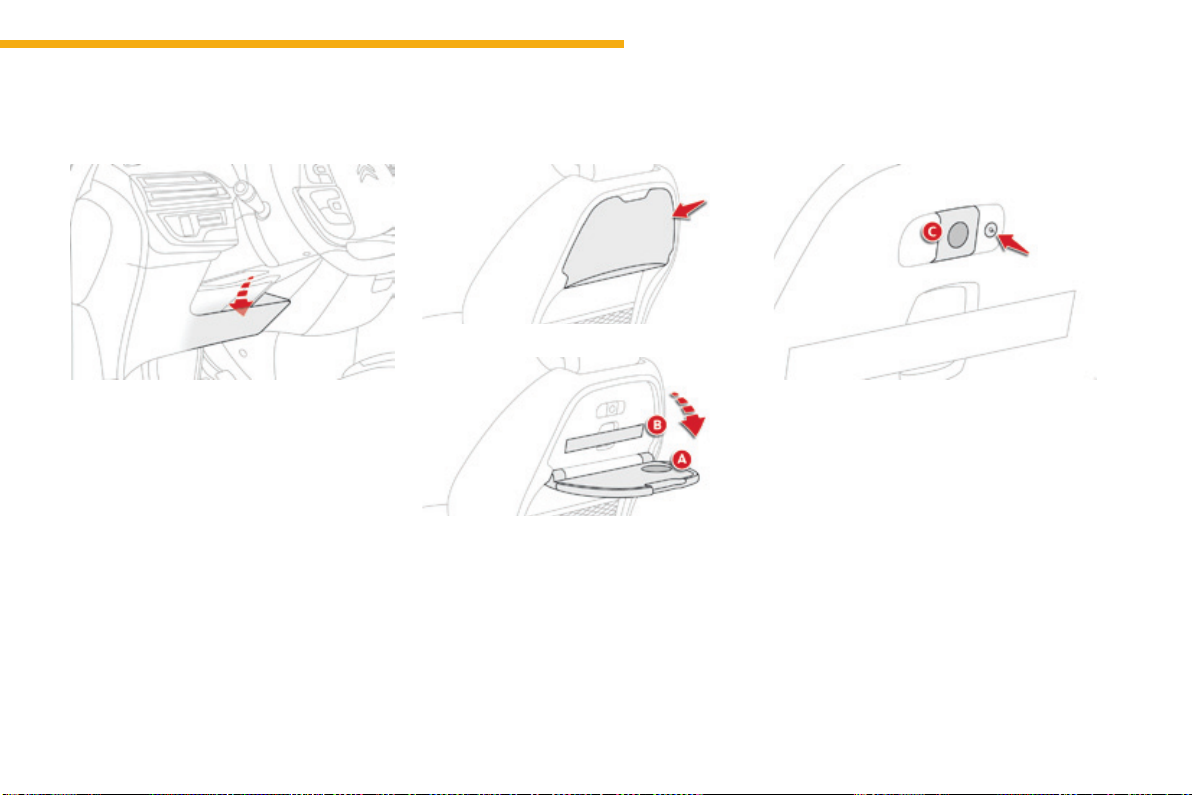
111
3
Ease of use and comfort
C4-Picasso-II_en_Chap03_ergonomie-confort_ed01-2016
Storagebelow
thesteeringwheel
Thisstoragecompartmentbelowthesteering
wheelisintendedforstowingyourvehicle's
handbookpack.
Rearttings
Aircraft-style rear tables
Thesetables,fittedtothebacksofthefront
seats, incorporate a cup-holder recess A and a
retainingstrapB.
F Pullthetabledownwardstoopen.
F To stow the table, raise it until the latch
locks.
For safety reasons, these tables collapse
downwardsifexcessivepressureisexertedon
them.
ReadinglampsC may be fitted in the front seat
backrests,behindthetables.Theyilluminate
thesurfaceofthetableswithoutdisturbingthe
otherpassengers.
Theycanbeusedonlywhilethetableisdown.
F Pressthe"on/off"buttontoturnthelamp
onoroff.
Individual reading lamps
Rear table stowed
Rear table opened
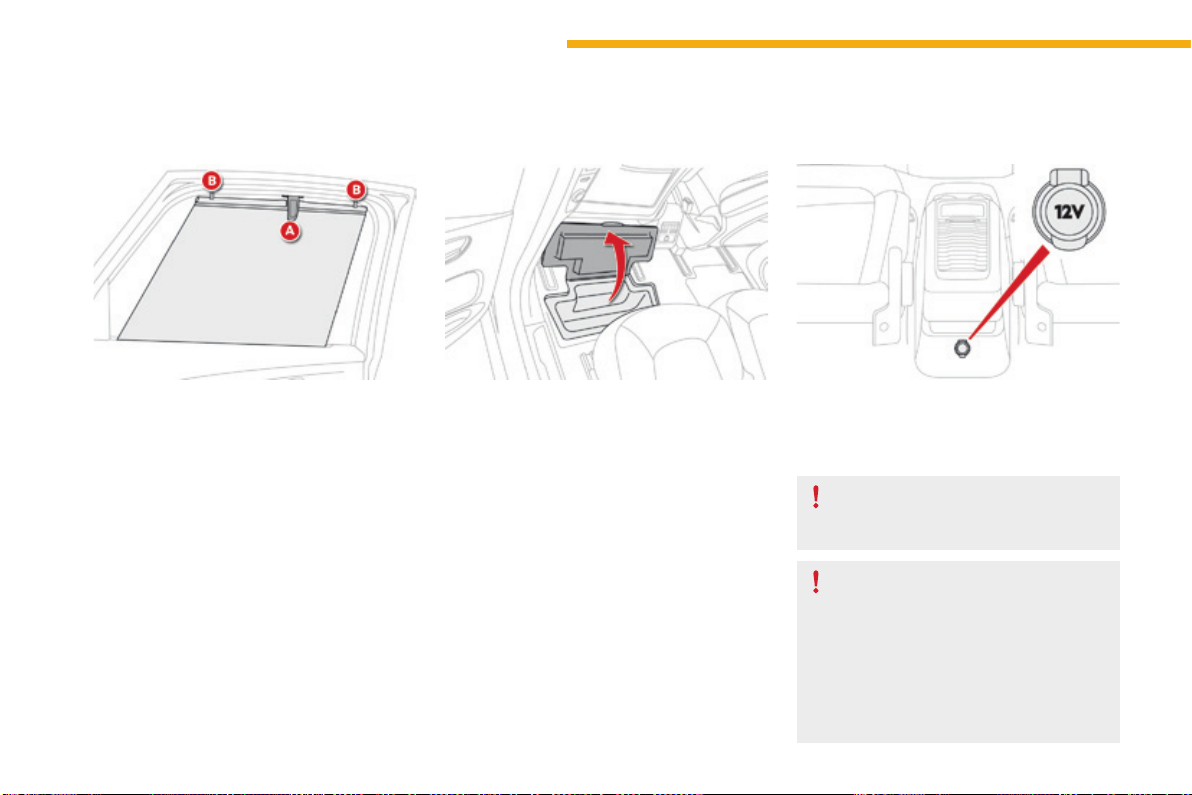
112
Ease of use and comfort
C4-Picasso-II_en_Chap03_ergonomie-confort_ed01-2016
Side blinds Storage wells
Therearetwostoragewellsundertherear
passengers'feet.
Toopenthem,liftthecoveratthecut-out.
Fitted to the windows for the 2
nd
row seats, they protect
thepassengercompartmentfromthesun'srays.
F Pull the tab A and anchor the blind on the
hookB.
12 V socket
F Toconnecta12Vaccessory(maximum
power:120Watts),liftthecoverand
connectasuitableadaptor.
Donotexceedthemaximumpower
ratingofthesocket(otherwisethereisa
riskofdamagingyourportabledevice).
The connection of an electrical device
not approved by CITROËN, such as a
USBcharger,mayadverselyaffectthe
operation of vehicle electrical systems,
causingfaultssuchaspoortelephone
reception or interference with displays
inthescreens.
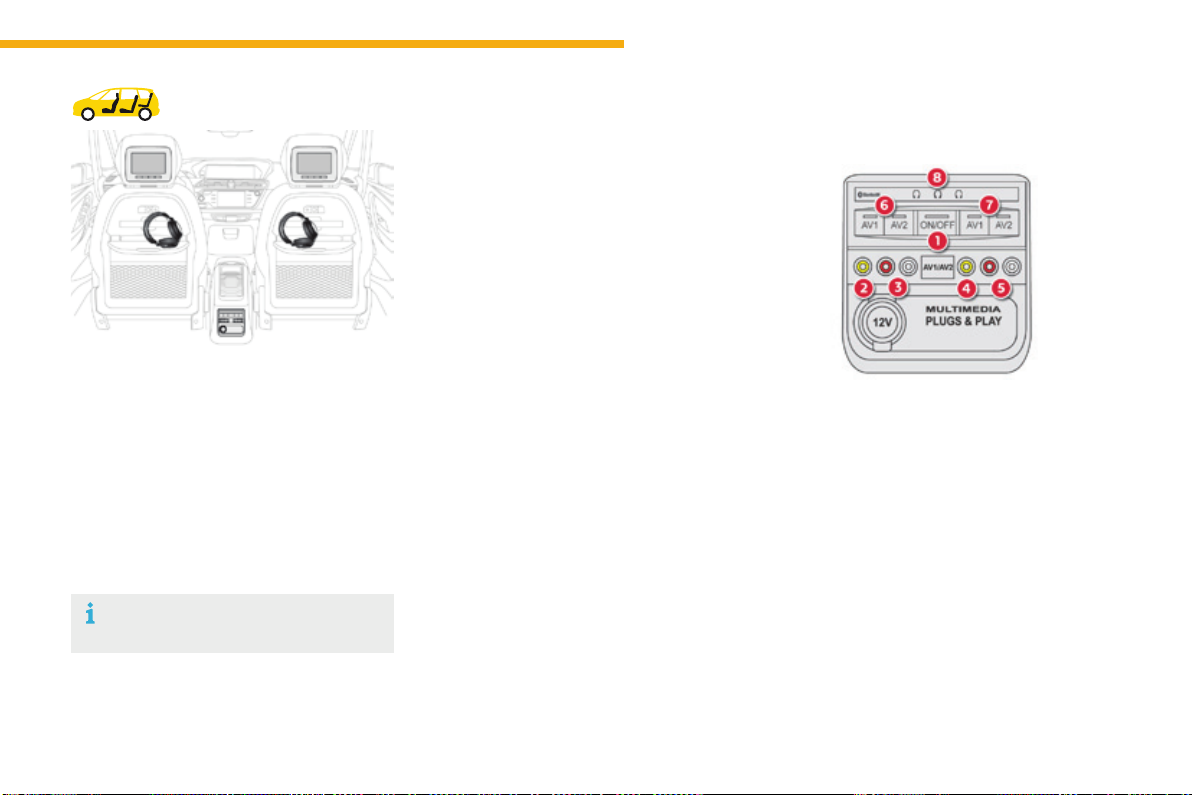
113
3
Ease of use and comfort
C4-Picasso-II_en_Chap03_ergonomie-confort_ed01-2016
Rear multimedia
Thismultimediasystemallowsrearpassengers
toconnectoneortwoexternalportable
systems(audioorvideoplayer,games
consoles,DVDplayer...).Thesoundisplayed
throughtwoBluetooth
®
wireless headphone
sets, while the video content is displayed in
two7-inchscreensbuiltintothebacksofthe
frontseatheadrestraints.
Description
This system operates only with the
enginerunning.
Thepackincludes:
- the connection and control panel fitted on
the rear face of the centre console,
- two 7-inch screens built into the front head
restraints (with protective covers),
- twowirelessBluetoothtechnology
headphonesetswithrechargeable
batteries,
- a12Vchargerwithtwooutletsallowingthe
simultaneouschargingoftwoheadphones.
1. Power switch
2. AV1videoinput(yellowRCAsocket)
3. Stereo audio input A (red and white
RCAsockets)
4. AV2videoinput(yellowRCAsocket)
5. Stereo audio input B (red and white
RCAsockets)
6. Selection of display in the left-hand screen
(AV1 or AV2)
7. Selectionofdisplayintheright-hand
screen (AV1 or AV2)
8. Connection indicator lamps for the
Bluetooth audio headphones (blue)
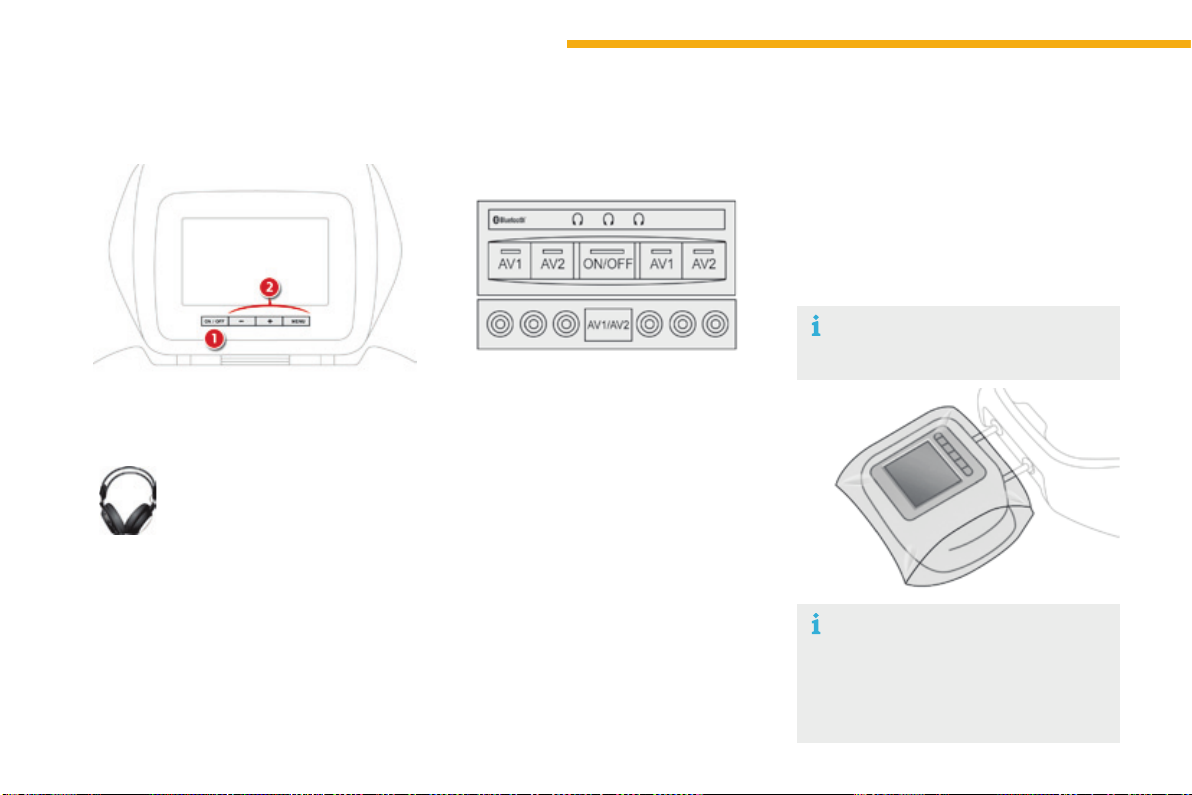
114
Ease of use and comfort
C4-Picasso-II_en_Chap03_ergonomie-confort_ed01-2016
1. Screen power switch
2. Displayadjustmentbuttons
Each headphone set has a switch,
a connection indicator lamp (blue)
andachannelselector(AorB).
F Withtheenginerunning,connectyour
portable system to the RCA connectors
(e.g.withAV1ontheleft).
F Press the switch on the control panel, the
indicator lamp comes on and
theAV1indicatorlampscomeon.
F Makealongpressontheswitch,its
indicatorlampflashesinblue.
F Makealongpressonthecontrolpanel
switch,thepairingwiththeheadphoneset
is complete when the blue indicator lamps
on the headphones and on the system are
oncontinuously.
F Repeat the operation for the other
headphoneset.
F Press the screen switch if you have a video
source.
F Startplayingyourportablesystem.
Operation
The Multimedia system allows the
connection of a third Bluetooth
headphoneset,notsupplied.
If your seat is in the table position,
positionacovertoavoiddamagingthe
screen.
These covers also conceal each
screen.
F It is possible at any time to modify the
sourceforthevideodisplay(usingbutton6
or 7onthecontrolpanel:theindicatorlamp
for the source selected comes on) as well
astheaudiochannel(usingtheselectoron
theheadphones).
115
3
Ease of use and comfort
C4-Picasso-II_en_Chap03_ergonomie-confort_ed01-2016
Bootttings
1. Rear parcel shelf
(seedetailsonafollowingpage)
2. Hooks
(seedetailsonafollowingpage)
3. Torch
(seedetailsonafollowingpage)
4. Storagenet
5. Lashingeyes
6. 12Vsocket(maximumpower:120Watts)
116
Ease of use and comfort
C4-Picasso-II_en_Chap03_ergonomie-confort_ed01-2016
Toremovetheshelf:
F unhookthetwocords,
F raisetheshelfslightly,thenremoveit.
Rear parcel shelf
Thereareseveraloptionsforstoringtheshelf:
- eitheruprightbehindthefrontseats,
- orflatatthebaseoftheboot.
Thehookscanbeusedtosecureshopping
bags.
Hooks
117
3
Ease of use and comfort
C4-Picasso-II_en_Chap03_ergonomie-confort_ed01-2016
Bootttings
1. Luggagecoverblind
(seedetailsonafollowingpage)
2. Torch
(seedetailsonafollowingpage)
3. Concertina boards
4. 12Vsocket(maximumpower:120Watts)
5. Armrestwithcupholderandstoragespace
6. Locationforstowingtheluggagecover
blind
7. Openstorage
8. Lowerlashingeyes
118
Ease of use and comfort
C4-Picasso-II_en_Chap03_ergonomie-confort_ed01-2016
Luggagecoverroller
Inthe5-seatconfiguration,itisinstalledbehind
the second-row seats, with the third-row seats
foldedaway.
Inthe7-seatconfiguration,itisstowedbehind
thethirdrowseats.
Installation
F Positiontheleftandrighthandendsofthe
roller in cut-out A, with the mobile flap at
thefront.
F Pull out the blind until it reaches the boot
pillars.
F Inserttheguidesoftheblindintotherails
on the pillars B.
Removal
F Disengagetherollerguidesfromtherails
in the pillars B.
F Guidetheblindasitisreeledin.
F Unlocktherollerbypressingoneof
thegripslocatedattheendsofthereel
support.
Themobileflapallowspassengersin
the second row to place their seats in
the"comfort"position.
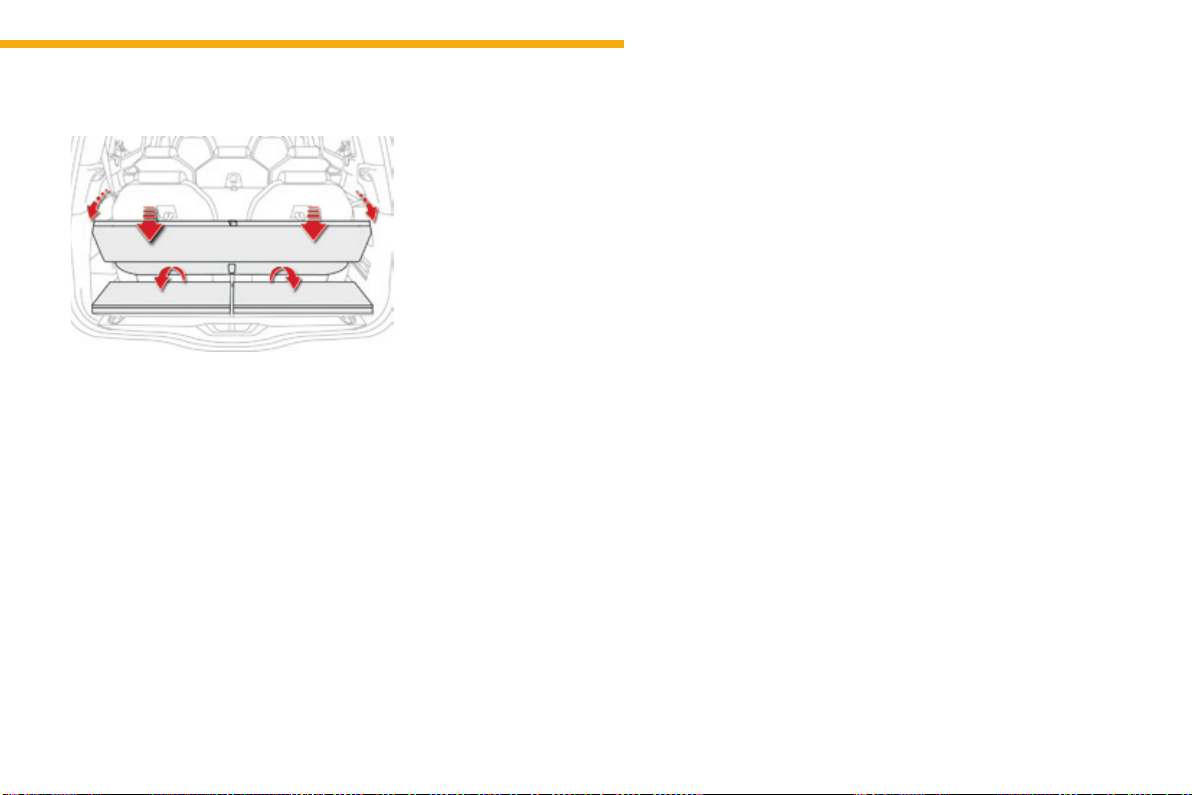
119
3
Ease of use and comfort
C4-Picasso-II_en_Chap03_ergonomie-confort_ed01-2016
Stowing behind the 3
rd
row seats
Tofoldthe3
rd
row seats with the roller
stowed at the rear, it is necessary to raise the
concertina boards in order to allow access to
theseatlockingcontrols(redstraps).
F Ensurethatthe3
rd
rowseatsarefolded.
F Foldthefirsttwoconcertinaboards.
F Install the roller in the space above the arm
rest,onesideaftertheother,incliningit
slightly.
F Slidetherollerasfarasitwillgo,uptothe
cut-outsprovidedatthebackoftheboot,
withthetwoflapsdirecteddownwards.
F Unfoldthethirdrowseats.
The folded concertina boards can be
positionedhorizontallyorvertically.
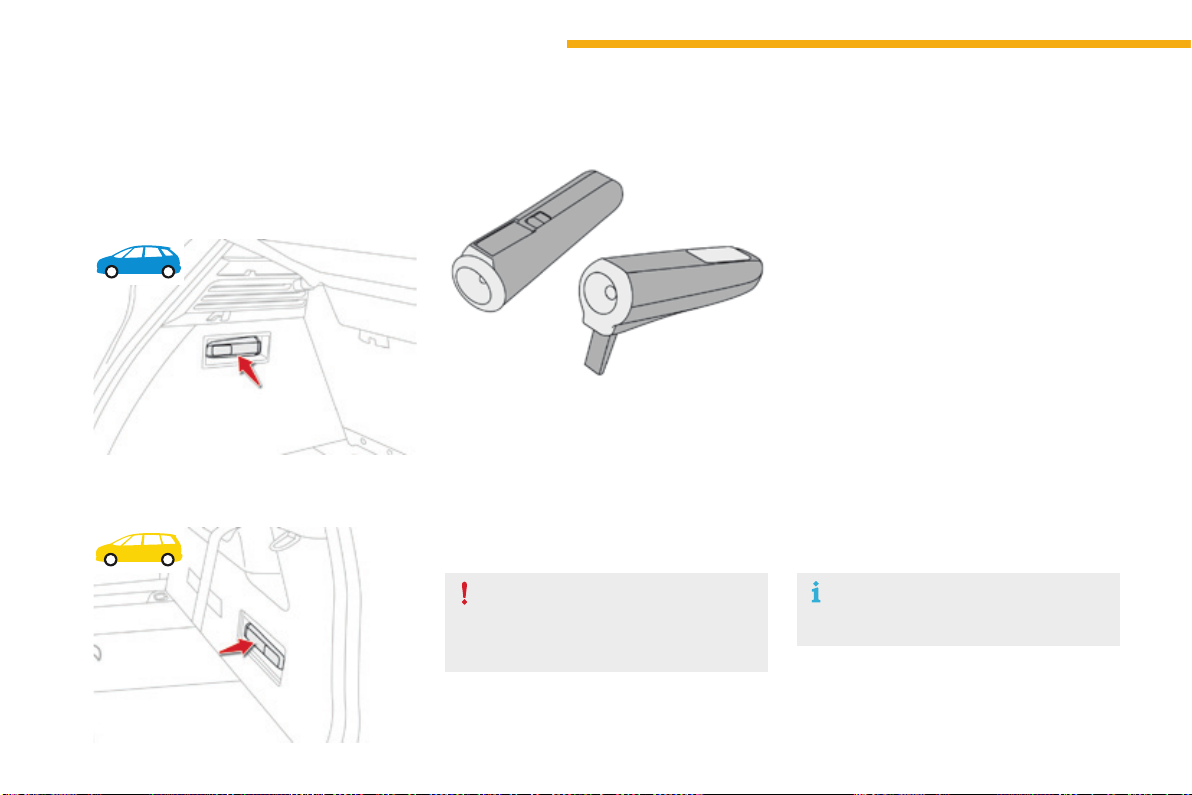
120
Ease of use and comfort
C4-Picasso-II_en_Chap03_ergonomie-confort_ed01-2016
Torch
This is a removable lamp, fitted in the side of
the boot, which can be used to illuminate the
bootorasatorch.
Operation
This torch operates with NiMH type
rechargeablebatteries.
Ithasabatterylifeofapproximately45minutes
andchargeswhileyouaredriving.
Use
F Extractthetorchfromitslocationbypulling
itfromthefront.
F Presstheswitch,locatedontheback,to
switchthetorchonoroff.
F Unfoldthesupport,locatedontheback,to
setdownandraisethetorch;forexample,
whenchangingawheel.
Storing
F Putthetorchbackinplaceinitslocation
startingwiththerear.
Ifyouhaveforgottentoswitchoffthetorch,
thisswitchesitoffautomatically.
Ifthetorchisnotengagedcorrectly,it
maynotchargeandmaynotcomeon
whenthebootisopened.
Observethepolaritieswhenfittingthe
batteries.
Neverreplacetherechargeable
batterieswithsingle-usebatteries.
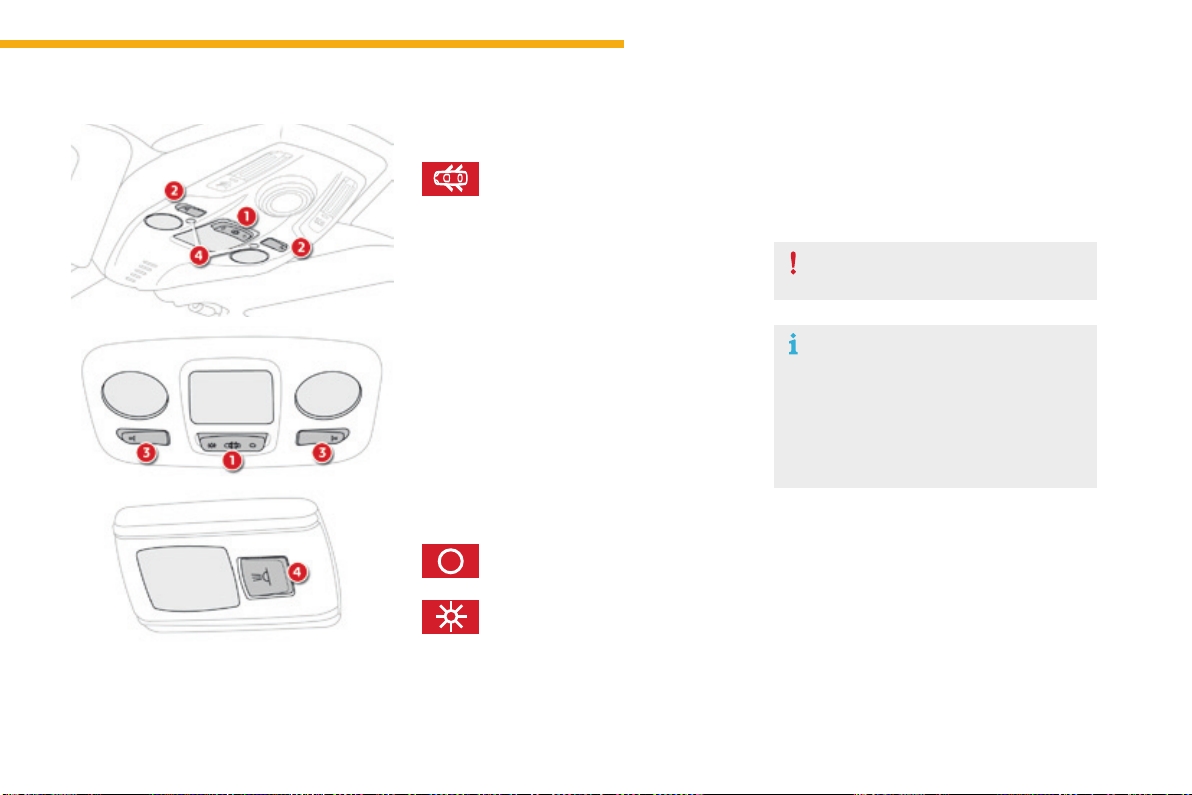
121
3
Ease of use and comfort
C4-Picasso-II_en_Chap03_ergonomie-confort_ed01-2016
Courtesy lamps
1. Front courtesy lamp
2. Frontmapreadinglamps
3. Rear courtesy lamp
4. Rearmapreadinglamps
Front - rear courtesy lamps
F Withtheignitionon,pressthe
correspondingswitch.
Front - rear map reading
lamps
Withthe"permanentlighting"mode,
thelightingtimevariesaccordingtothe
circumstances:
- withtheignitionoff,approximately
ten minutes,
- inenergyeconomymode,
approximatelythirtyseconds,
- withtheenginerunning,unlimited.
In this position, the courtesy lamp
comesongradually:
Permanentlyoff.
Permanentlighting.
- whenthevehicleisunlocked,
- whentheelectronickeyisremovedfrom
the reader,
- whenopeningadoor,
- whentheremotecontrollockingbuttonis
used,inordertolocateyourvehicle.
Illumination of the door mirror spot lamps is
only possible if the courtesy lamp is in this
position.
Itswitchesoffgradually:
- whenthevehicleislocked,
- whentheignitionisswitchedon,
- 30secondsafterthelastdoorisclosed.
Takecaretoavoidleavinganythingin
contactwiththecourtesylamps.
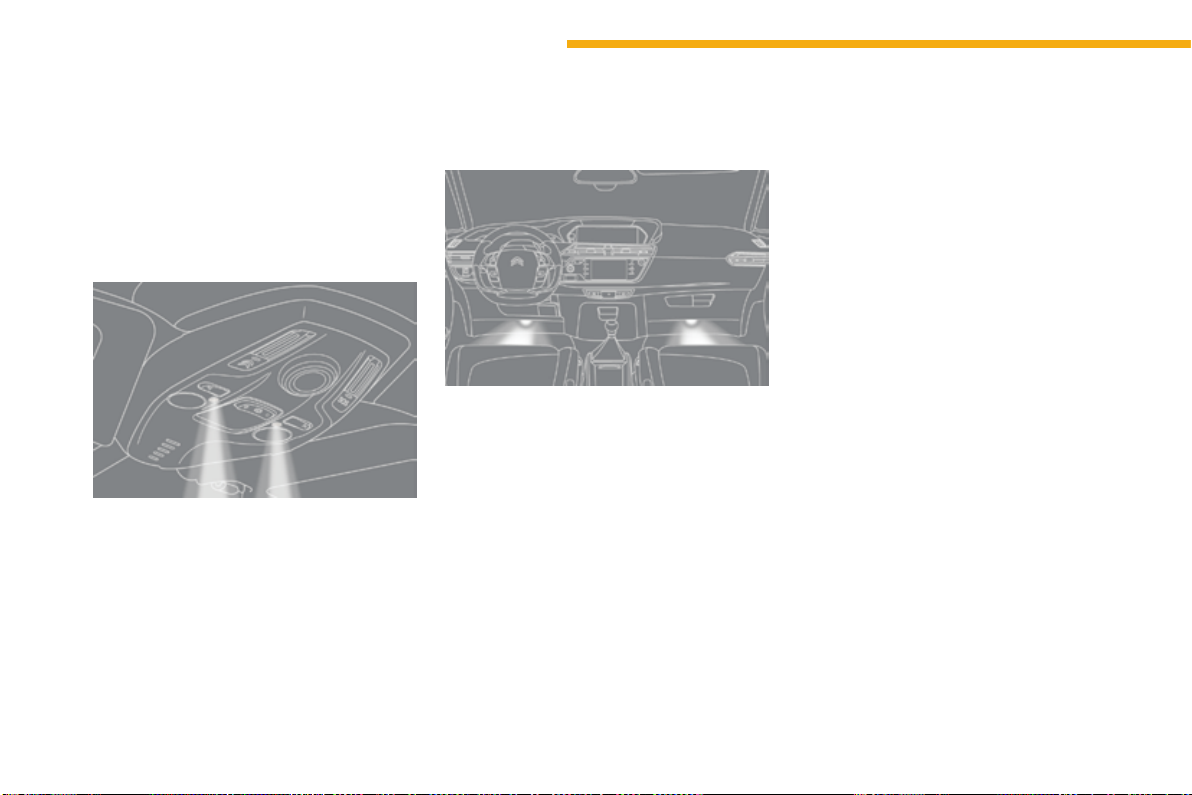
122
Ease of use and comfort
C4-Picasso-II_en_Chap03_ergonomie-confort_ed01-2016
Interior mood
lighting
Thedimmedpassengercompartmentlighting
improvesvisibilityinthevehiclewhenthelight
ispoor.
Theinteriormoodlightingcanbeactivatedor
deactivated in the Drivingmenu,byselecting
the "Settings" tab, then "Comfort" and "Mood
lighting".
Thesoftlightingprovidedbythefootwelllamps
improvesvisibilityinthevehiclewhenthelight
ispoor.
Atnight,theilluminationofthedashboard,
centre console and courtesy lamp comes on
automatically when the sidelamps are switched
on.
Theinteriormoodlightingswitchesoff
automatically when the sidelamps are
switchedoff.
Switching on
Footwelllighting
Switching on
Its operation is identical to that of the courtesy
lamps.Thelampscomeonwhenoneofthe
doorsisopened.
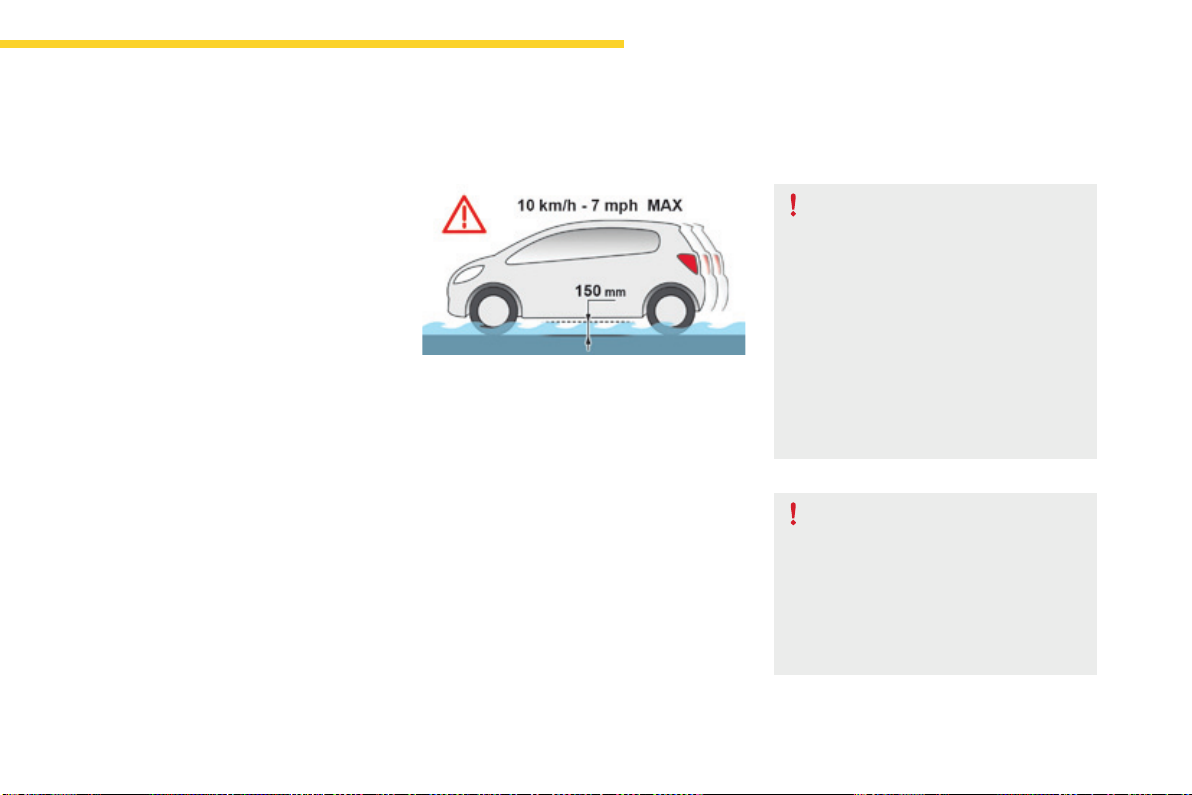
123
4
Driving
C4-Picasso-II_en_Chap04_conduite_ed01-2016
Drivingrecommendations
Observethedrivingregulationsandremain
vigilantwhateverthetrafficconditions.
Paycloseattentiontothetrafficandkeepyour
hands on the wheel so that you are ready to
reactatanytimetoanyeventuality.
Onalongjourney,abreakeverytwohoursis
stronglyrecommended.
In difficult weather, drive smoothly, anticipate
theneedtobrakeandincreasethedistance
fromothervehicles.
Driving on flooded roads
Westronglyadviseagainstdrivingonflooded
roads,asthiscouldcauseseriousdamage
totheengineorgearbox,aswellastothe
electricalsystemsofyourvehicle.
Ifyouareobligedtodrivethroughwater:
- checkthatthedepthofwaterdoesnot
exceed15cm,takingaccountofwaves
thatmightbegeneratedbyotherusers,
- deactivate the Stop & Start system,
- drive as slowly as possible without
stalling.Inallcases,donotexceed6mph
(10km/h),
- do not stop and do not switch off the
engine.
Onleavingthefloodedroad,assoonas
circumstancesallow,makeseverallightbrake
applicationstodrythebrakediscsandpads.
If in doubt on the state of your vehicle, contact
aCITROËNdealeroraqualifiedworkshop.
Important!
Neverdrivewiththeparkingbrake
applied-Riskofoverheatingand
damagetothebrakingsystem!
Riskoffire!
Astheexhaustsystemofyourvehicle
is very hot, even several minutes after
switchingofftheengine,donotpark
orruntheengineoverareaswhere
inflammable substances and materials
arepresent:grass,leaves,etc...
Never leave a vehicle unsupervised
withtheenginerunning.Ifyouhave
toleaveyourvehiclewiththeengine
running,applytheparkingbrake
andputthegearboxintoneutralor
position N or P,dependingonthetype
ofgearbox.
124
Driving
C4-Picasso-II_en_Chap04_conduite_ed01-2016
When towing
Distribution of loads
F Distribute the load in the trailer so that the
heaviest items are as close as possible to
theaxleandthenoseweightapproachesthe
maximumpermittedwithoutexceedingit.
Air density decreases with altitude, thus
reducingengineperformance.Above
1000metres,themaximumtowedloadmust
be reduced by 10 % for every 1 000 metres of
altitude.
Side wind
F Takeintoaccounttheincreasedsensitivity
tosidewind.
For more information on Weights, refer
tothecorrespondingsection.
Therearparkingsensorswillbe
deactivated automatically to avoid the
audiblesignalifagenuineCITROËN
towbarisused.
Cooling
Towingatraileronaslopeincreasesthe
temperatureofthecoolant.
Asthefaniselectricallycontrolled,itscooling
capacityisnotdependentontheenginespeed.
F Tolowertheenginespeed,reduceyour
speed.
Themaximumtowedloadonalongincline
dependsonthegradientandtheambient
temperature.
Inallcases,keepacheckonthecoolant
temperature.
F Ifthewarninglampandthe
STOPwarninglampcomeon,
stop the vehicle and switch off
theengineassoonaspossible.
Braking
Towingatrailerincreasesthebrakingdistance.
Toavoidoverheatingofthebrakes,theuseof
enginebrakingisrecommended.
Tyres
F Checkthetyrepressuresofthetowing
vehicleandofthetrailer,observingthe
recommendedpressures.
Lighting
F Checktheelectricallightingandsignalling
on the trailer and the headlamp beam
heightofyourvehicle.
For more information on Adjusting the
headlamp beam height, refer to the
correspondingsection.
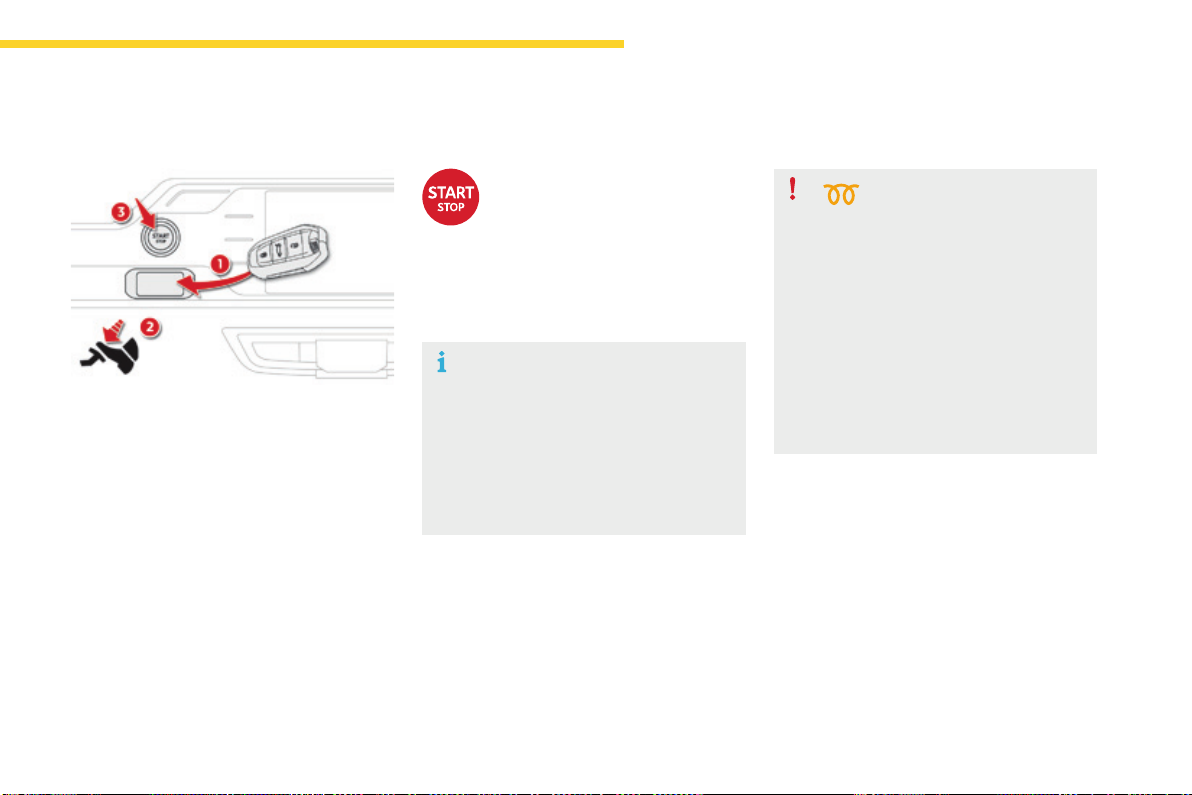
125
4
Driving
C4-Picasso-II_en_Chap04_conduite_ed01-2016
Starting-switchingofftheenginewiththeelectronickey
F PlacethegearselectorleveratP or N
forvehicleswithanautomaticgearboxor
neutralwithamanualgearbox.
F Inserttheelectronickeyinthereader.
F Pressthebrakepedalforvehicleswithan
automaticgearbox,orfullydeclutchfor
vehicleswithamanualgearbox.
Starting the engine
For Diesel vehicles, in
temperatures below zero the
enginewillnotstartuntilthe
preheaterwarninglamphas
goneoff.
Ifoneofthestartingconditionsisnot
met,aremindermessageappearsin
theinstrumentpanelscreen.Insome
circumstances, it is necessary to
turnthesteeringwheelslightlywhile
pressingthe"START/STOP"button
toassistunlockingofthesteering;
amessagewarnsyouwhenthisis
needed.
F Briefly press the "START/STOP"
button.
Thesteeringcolumnunlocksand
theenginestartsmoreorless
immediately (see the advice for
Dieselversions).
Ifthiswarninglampcomesonafter
pressing"START/STOP",youshould
holdthebrakeorclutchpedaldown
untilthewarninglampgoesoffand
donotpresstheSTART/STOPbutton
again.
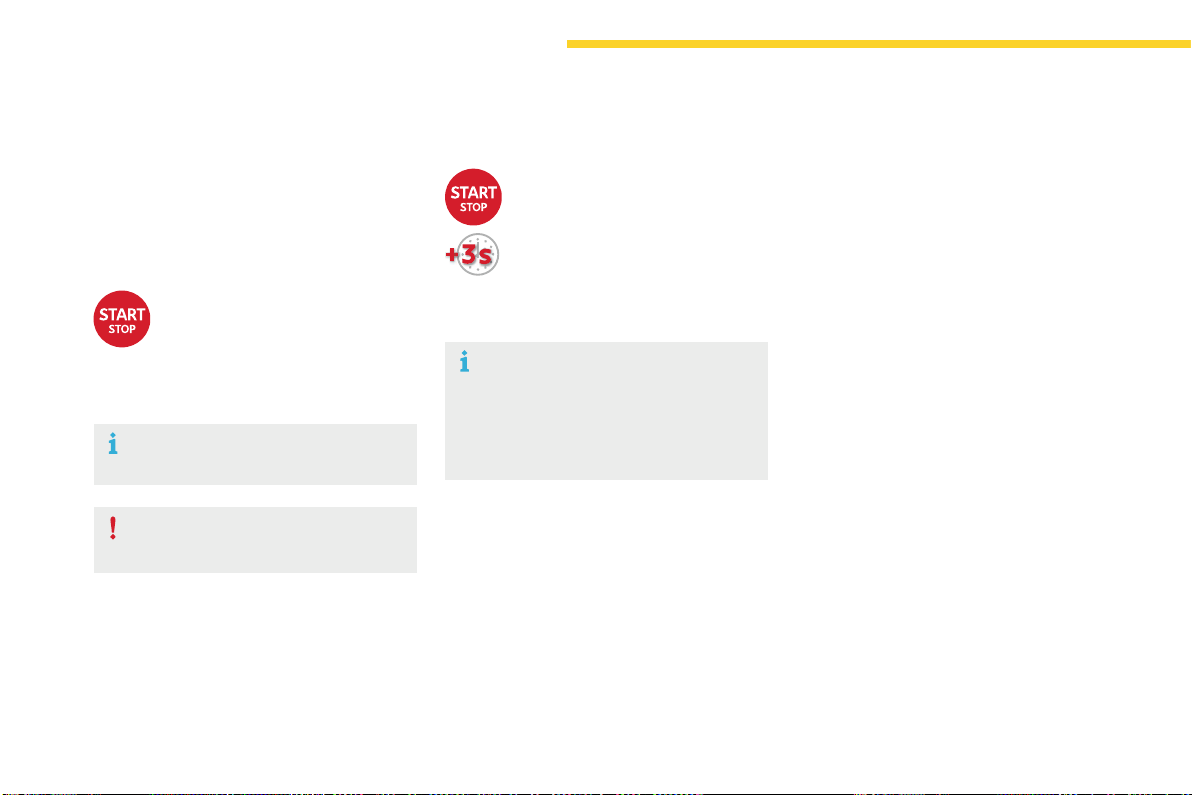
126
Driving
C4-Picasso-II_en_Chap04_conduite_ed01-2016
Electronic key left in the
reader
Iftheelectronickeyisleftinthereader,
onopeningthedriver'sdooramessage
appearstowarnyou.
Intheeventofanemergencyonly,
theenginecanbeswitchedoff
withoutanyconditions.Todothis,
pressthe"START/STOP"buttonfor
aboutthreeseconds.
Inthiscasethesteeringcolumnlocks
assoonasthevehiclestops.
Emergency stop
F Immobilisethevehicle.
F PlacethegearselectorleveratP or N for
vehicleswithanautomaticgearbox,or
neutralwithamanualgearbox.
Switching off the engine
If the vehicle is not immobilised, the
enginewillnotstop.
F Briefly press the "START/STOP"
button.
Theenginestopsandthe
steeringcolumnlocks.
F Removetheelectronickeyfromthereader.
Switchingofftheengineleadstoaloss
ofbrakingassistance.
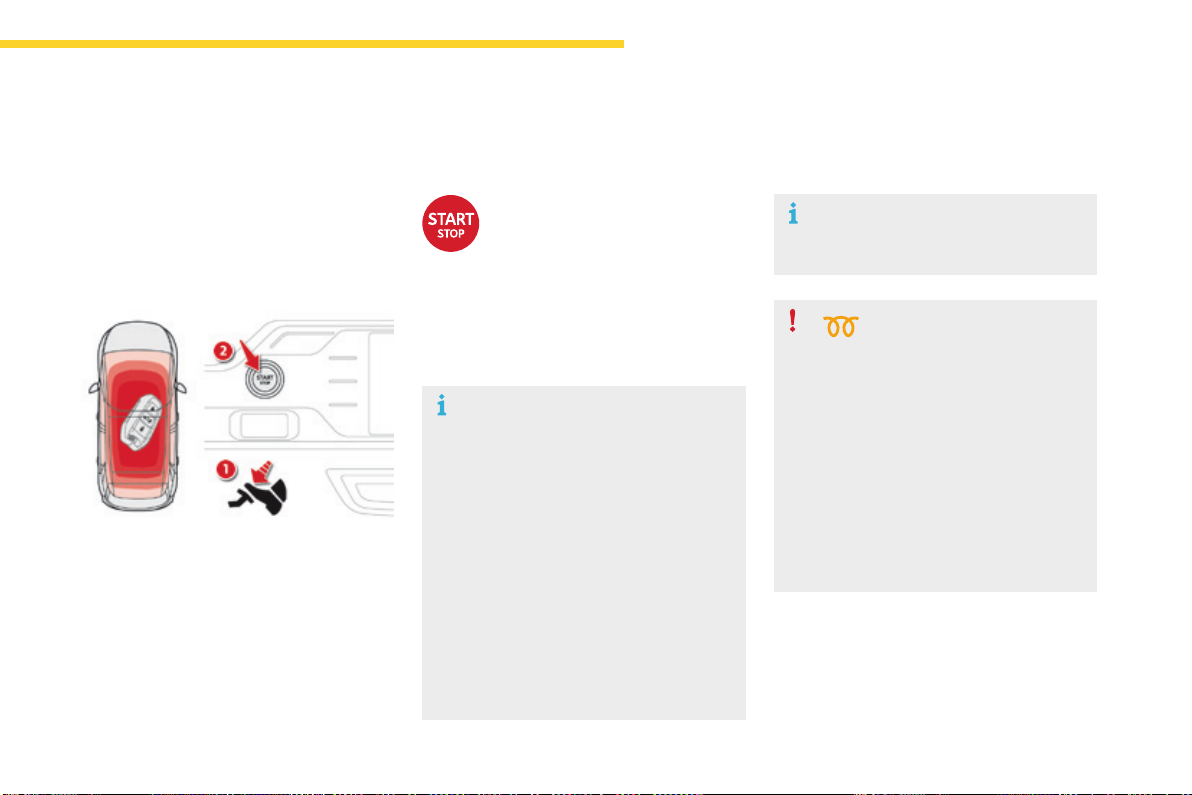
127
4
Driving
C4-Picasso-II_en_Chap04_conduite_ed01-2016
Starting-switchingofftheenginewithKeylessEntryandStarting
F PlacethegearselectorleveratP or N for
vehicleswithanautomaticgearbox,or
neutralwithamanualgearbox.
F Withtheelectronickeyinsidethevehicle,
pressthebrakepedalforvehicleswithan
automaticgearbox,orfullydeclutchfor
vehicleswithamanualgearbox.
Diesel vehicles
In temperatures below zero the
enginewillnotstartuntilthe
preheaterwarninglamphas
goneoff.
Starting the engine
The presence of the "Keyless Entry and
Starting"electronickeyintherecognitionzone
isessential.
Itisnotnecessarytoplacetheelectronickeyin
theback-upreader.
Iftheelectronickeyisnotdetected,
amessageisdisplayed.Movethe
electronickeyintotherecognitionzone
sothattheenginecanbestarted.
In the event of a problem, see "Key not
detected/Back-upstarting".
F Briefly press the "START/
STOP"buttonwhilemaintaining
pressure on the pedal until the
enginestarts.
Ifoneofthestartingconditionsisnot
met,aremindermessageappearsinthe
instrumentpanelscreen.
In some circumstances, it is necessary
toturnthesteeringwheelslightlywhile
pressingthe"START/STOP" button
toassistunlockingofthesteering;a
messagewarnsyouwhenthisisneeded.
As a safety measure, never leave the
vehiclewhiletheengineisrunning.
Thesteeringcolumnunlocksandtheengine
startsmoreorlessinstantly.
SeetheadvicebelowforDieselversions.
Ifthiswarninglampcomesonafter
pressing"START/STOP", you should
holdthebrakeorclutchpedaldown
untilthewarninglampgoesoffanddo
not press the "START/STOP" button
againbeforetheenginestarts.
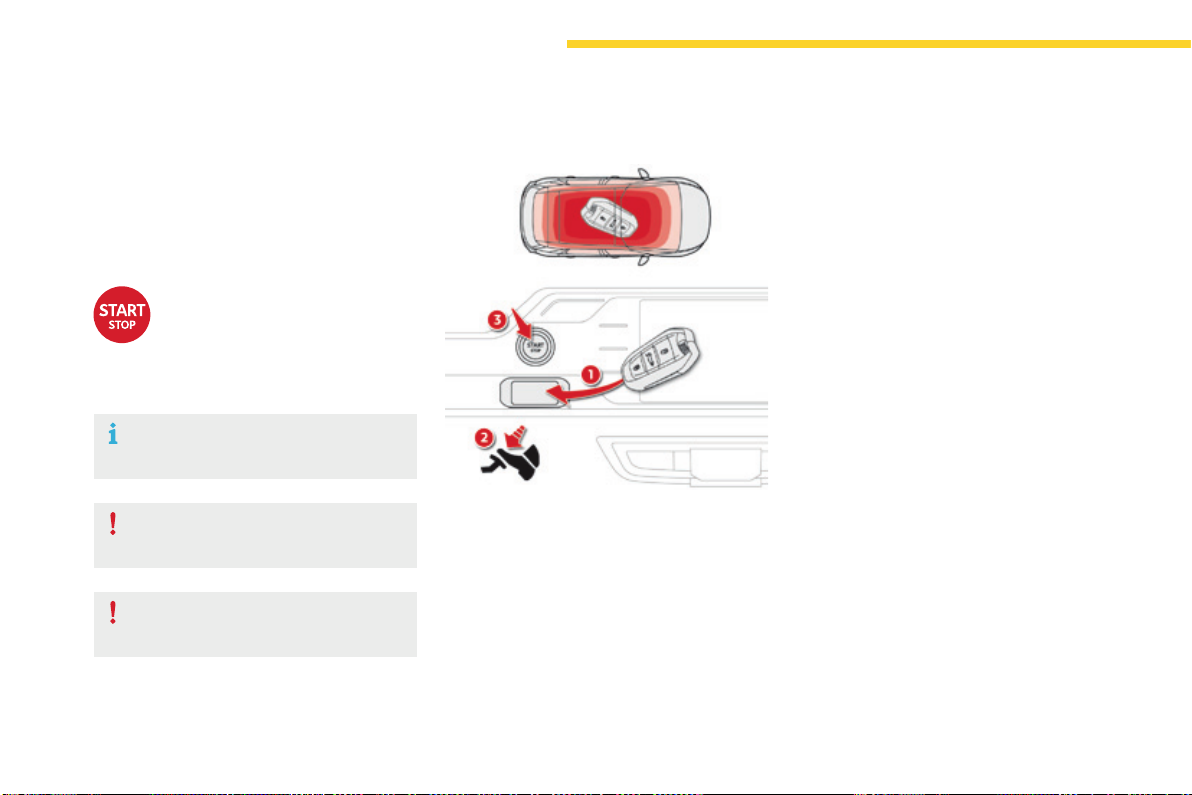
128
Driving
C4-Picasso-II_en_Chap04_conduite_ed01-2016
Key not detected
Back-up starting
Whentheelectronickeyisintherecognition
zoneand,afterpressingthe"START/STOP"
button,theenginedoesnotstart:
F PlacethegearselectoratP or N for
vehicleswithanautomaticgearboxor
neutralforvehicleswithamanualgearbox.
F Inserttheelectronickeyintheback-up
reader.
F Withtheelectronickeyinside
the vehicle, press the "START/
STOP"button.
Theenginestopsandthesteering
columnlocks.
F Immobilisethevehicle.
F PlacethegearselectoratP or N for
vehicleswithanautomaticgearbox,or
neutralwithamanualgearbox.
Switching off the engine
If the vehicle is not immobilised, the
enginewillnotstop.
Do not leave your vehicle with the
electronickeystillinside.
F Pressthebrakepedalonvehicleswithan
automaticgearbox,orfullydeclutchwitha
manualgearbox.
F Pressthe"START/STOP"button.
Theenginestarts.
Switchingofftheengineleadstoaloss
ofbrakingassistance.
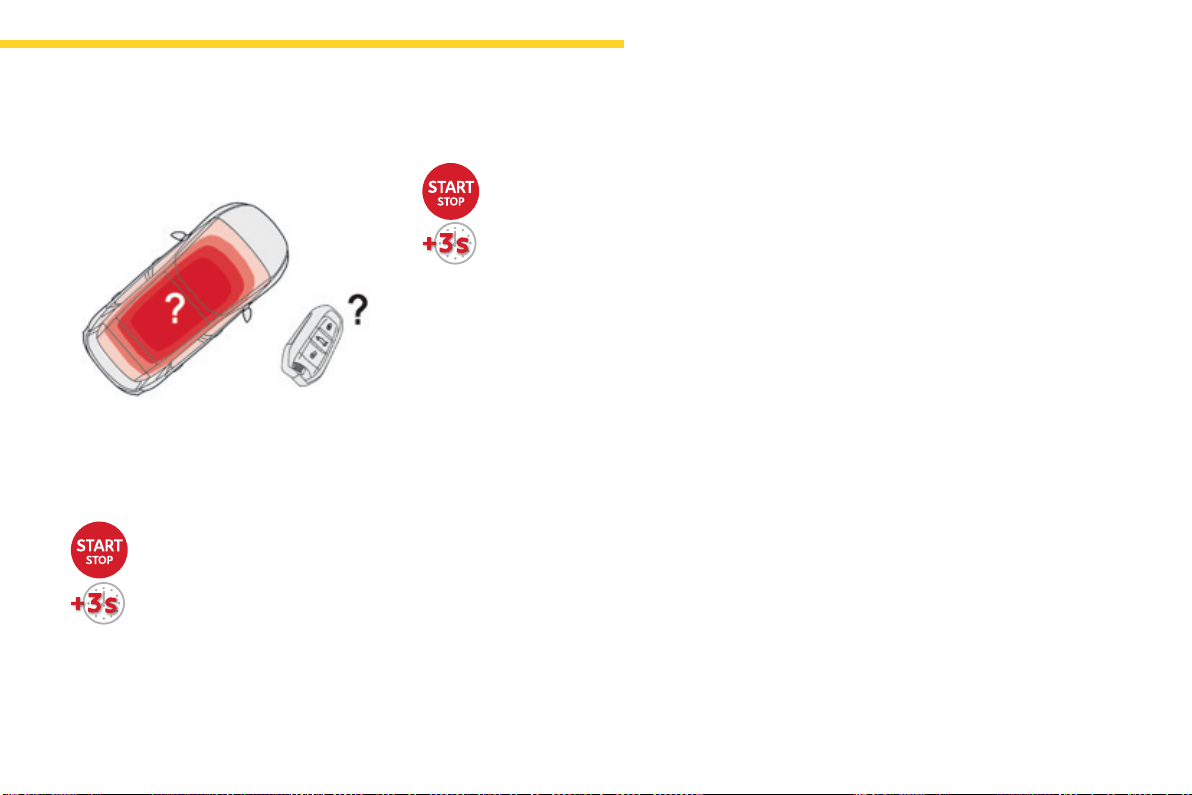
129
4
Driving
C4-Picasso-II_en_Chap04_conduite_ed01-2016
Whentheelectronickeyisnotdetectedoris
nolongerintherecognitionzone,amessage
appearsintheinstrumentpanelwhenclosinga
doorortryingtoswitchofftheengine.
Emergency switch-off
Intheeventofanemergencyonly,
theenginecanbeswitchedoff
withoutconditions.
Pressthe"START/STOP"buttonfor
about3seconds.
Inthiscasethesteeringcolumnlocksassoon
asthevehiclestops.
F To confirm the instruction to
switchofftheengine,pressthe
"START/STOP"buttonforabout
3seconds.
Back-up switch off
Intheeventofafaultwiththeelectronickey,
contact a CITROËN dealer or a qualified
workshop.
130
Driving
C4-Picasso-II_en_Chap04_conduite_ed01-2016
Switchingtheignitionon
(withoutstarting)
Withtheignitionon,thesystemgoes
intoenergyeconomymodewhen
necessary to maintain the state of
chargeofthebattery.
Withtheelectronickeyinthereaderorthe
KeylessEntryandStartingkeyinsidethe
vehicle,pressingthe"START/STOP"button,
with no action on the pedals, allows the
ignitiontobeswitchedon.
F Pressthe"START/STOP"button,
the instrument panel comes on
buttheenginedoesnotstart.
F Pressthebuttonagaintoswitchoffthe
ignitionandsoallowthevehicletobe
locked.
Anti-theft protection
Electronic engine immobiliser
Thekeyscontainanelectronicchipwhichhas
asecretcode.Whentheignitionisswitched
on,thiscodemustberecognisedinorderfor
startingtobepossible.
Thiselectronicengineimmobiliserlocksthe
enginemanagementsystemafewminutes
aftertheignitionisswitchedoffandprevents
startingoftheenginebyanyonewhodoesnot
havethekey.
In the event of a malfunction, you are informed
byamessageintheinstrumentpanelscreen.
Inthiscase,yourvehicledoesnotstart;contact
aCITROËNdealerifrequired.
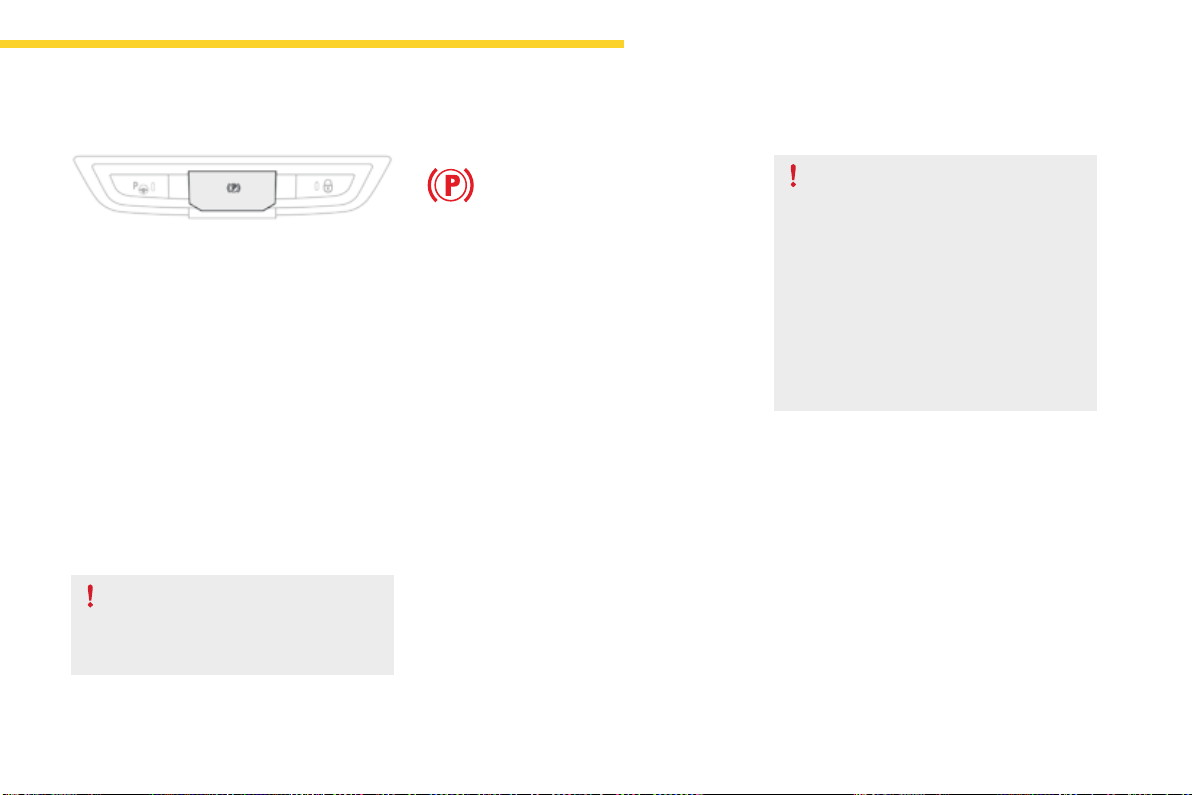
131
4
Driving
C4-Picasso-II_en_Chap04_conduite_ed01-2016
Electricparkingbrake
In the event of a battery failure, the
electricparkingbrakenolongerworks.
Asasafetymeasure,iftheparking
brakeisnotapplied,immobilisethe
vehiclebyengagingagear(witha
manualgearbox)orplacingachockat
oneofthewheels.
Contact a CITROËN dealer or a
qualifiedworkshop.
Indicator lamp
This indicator lamp comes on in the
instrument panel and in the control
lever to confirm the application of the
parkingbrake.
The system provides, in automatic operation,
theapplicationoftheparkingbrakeon
switchingofftheengineandreleaseasthe
vehiclemovesoff.
Thedrivercantakeoveratanytimetoapply
orreleasetheparkingbrake,byoperatingthe
controllever:
- by briefly pulling the control lever to apply
thebrake,
- by briefly pushing the control lever, while
pressingthefootbrake,torelease.
Automaticmodeisactivatedbydefault.
Thetechnologyadoptedfortheelectric
parkingbrakedoesnotallowthefitment
ofwheelssmallerthan16inches.
Itgoesofftoconfirmthereleaseoftheparking
brake.
The indicator lamp in the control lever flashes
duringmanualapplicationorrelease.
Aftertheparkingbrakehasbeenapplied,the
simultaneousflashingofthetwoindicator
lamps in the instrument panel and the control
lever alerts you to the need to fully secure your
vehiclebyengagingagear(withamanual
gearbox)orbyplacingthegearselectorin
positionPwithanautomaticgearbox,orby
fittingachocktooneofthewheels.(E.g.
parkingonaverysteepslopeoronaslope
withalowbattery).
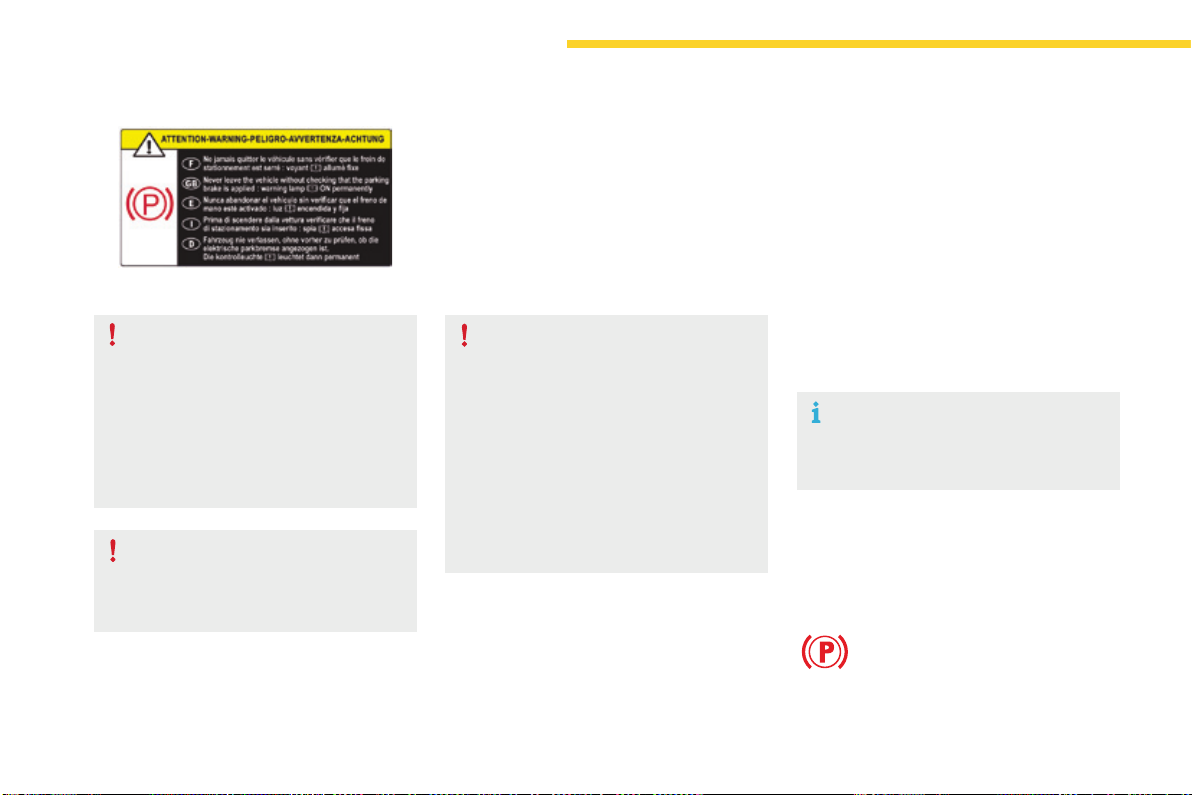
132
Driving
C4-Picasso-II_en_Chap04_conduite_ed01-2016
Label on door panel
Beforeleavingthevehicle,check
thattheparkingbrakeisapplied:the
indicator lamps in the instrument panel
andthecontrollevermustbeonfixed,
notflashing.
Iftheparkingbrakeisnotapplied,there
isanaudiblesignalandamessageis
displayedonopeningthedriver'sdoor.
Never leave a child alone inside the
vehiclewiththeignitionon,asthey
couldreleasetheparkingbrake.
Whentowing,parkingonasteepslope,
or if your vehicle is heavily laden,
turnthewheelstowardsthekerband
engageagear(withamanualgearbox)
orplacethegearselectoratpositionP
withanautomaticgearbox.
Fortowing,yourvehicleisapprovedfor
parkingonslopesofupto12%.
Manual operation
Applicationoftheparkingbrake
is confirmed by illumination of
thebrakeindicatorlampand
the P indicator lamp in the control
lever, accompanied by the display of
themessage"Parkingbrakeapplied".
Manual release
Withtheignitiononortheenginerunning,to
releasetheparkingbrake:
F pressthebrakepedal,
F whilemaintainingpressureonthebrake
pedal,brieflypushthecontrollever.
Thecompletereleaseoftheparkingbrake
isconfirmedbythebrakeindicatorlampand
the Pindicatorlampinthecontrollevergoing
off,accompaniedbythedisplayofthemessage
"Parkingbrakereleased".
If you push the control lever without
pressingthebrakepedal,theparking
brakewillnotbereleasedanda
messageisdisplayed.
Manual application
Withthevehiclestationary:brieflypullthecontrollever.
Confirmationofthecommandissignalledby
flashingoftheindicatorlampinthecontrol
lever.
133
4
Driving
C4-Picasso-II_en_Chap04_conduite_ed01-2016
Withthevehiclestationary,theparkingbrake
is automatically applied when the engine
is switched offbypressingtheSTART/STOP
button.
Applicationoftheparkingbrake
is confirmed by illumination of the
brakeindicatorlampandtheP
indicator lamp in the control lever,
accompanied by the display of the
message"Parkingbrakeapplied".
WiththeenginestalledorinSTOP
mode of Stop & Start, automatic
applicationdoesnottakeplace.
In automatic mode, you can manually
applyorreleasetheparkingbrakeusing
thecontrollever.
Automatic operation
Automatic release
Thecompletereleaseoftheparking
brakeisconfirmedbythebrake
indicator lamp and the P indicator
lampinthecontrollevergoingoff,
accompanied by the display of the
message"Parkingbrakereleased".
Whenstationarywiththeenginerunning,donot
depress the accelerator pedal unnecessarily,
youriskreleasingtheparkingbrake.
Ensurefirstthattheengineisrunningandthe
driver'sdoorisproperlyclosed.
Theelectricparkingbrakereleases
automatically and progressively when you
presstheaccelerator:
F Manualgearbox:fullydepresstheclutch
pedal,engage1
st
orreversegear;press
the accelerator pedal and let up the clutch
pedal.
F Automaticgearbox:selectpositionD, M or
Rthenpresstheaccelerator.
Automatic application
Withanautomaticgearbox,ifthebrake
doesnotreleaseautomatically,check
thatthefrontdoorsarecorrectlyclosed.
134
Driving
C4-Picasso-II_en_Chap04_conduite_ed01-2016
Special cases
Applicationoftheparkingbrake
is confirmed by illumination of
thebrakeindicatorlampand
the P indicator lamp in the control
lever, accompanied by the display of
themessage"Parkingbrakeapplied".
Thecompletereleaseoftheparking
brakeisconfirmedbythebrake
indicator lamp and the P indicator
lampinthecontrollevergoingoff,
accompanied by the display of the
message"Parkingbrakereleased".
In some situations, you may need to operate
theparkingbrakemanually.
Immobilisation of the vehicle
with the engine running
Toimmobilisethevehiclewiththeengine
running,brieflypullthecontrollever.
Parking the vehicle with the
brake released
In very cold conditions, it is
recommendedthattheparkingbrake
notbeapplied(riskoffreezing).
Toimmobiliseyourvehicle,engagea
gearorfitachocktooneofthewheels.
Immobilisation of the vehicle with the
parking brake released
F Switchofftheengine.
Illuminationofthewarninglampsinthe
instrument panel and control lever confirm
applicationoftheparkingbrake,
F Switchontheignitionagain,without
startingtheengine.
F Releasetheparkingbrakemanuallyby
pushingthecontrolleverwhilekeeping
yourfootonthebrake.
F Switchofftheignition.
135
4
Driving
C4-Picasso-II_en_Chap04_conduite_ed01-2016
Emergency braking
In the event of a failure of the main service
brakeorinanexceptionalsituation(e.g.driver
takenill,underinstruction,etc.)acontinuous
pullonthecontrolleverwillbrakethevehicle.
Brakingtakesplacewhilethecontrolleveris
beingpulled.Itisinterruptedifthecontrollever
isreleased.
The ABS and DSC systems provide stability of
thevehicleduringemergencybraking.
Iftheemergencybrakingmalfunctions,the
message"Parkingbrakecontrolfaulty"willbe
displayed.
If a failure of the ABS and DSC systems occurs,
signalledbytheilluminationofoneorboth
warninglampsintheinstrumentpanel,then
stabilityofthevehicleisnolongerguaranteed.
In this event, stability must be assured by the
driverbyrepeatingalternate"pull-release"
actions on the control lever until the vehicle is
immobilised.
Theemergencybrakingshouldonlybe
usedinanexceptionalsituation.
Repeat this procedure to reactivate automatic
operation.
Reactivation of automatic operation is
confirmed by the indicator lamp in the
instrumentpanelgoingoff.
Deactivating automatic operation
In some situations, such as very cold weather
ortowing(caravan,recovery),itmaybe
necessary to deactivate automatic operation of
thesystem.
F Starttheengine.
F Applytheparkingbrakewiththecontrol
lever,ifitisreleased.
F Takeyourfootoffthebrakepedal.
F Push and hold the control lever in the
release direction for at least 10 seconds
andnomorethan15seconds.
F Releasethecontrollever.
F Pressandholdthebrakepedal.
F Pull the control lever in the apply direction
for2seconds.
Deactivation of the automatic functions
is confirmed by illumination of this
indicatorlampintheinstrumentpanel.
F Releasethecontrolleverandthebrake
pedal.
Fromthispointtheparkingbrakecanonly
beappliedandreleasedmanuallyusingthe
controllever.
136
Driving
C4-Picasso-II_en_Chap04_conduite_ed01-2016
Operating faults
Thevariousalertsituationsaredescribedinthetablebelow.
IntheeventofafaultwiththeelectricparkingbrakeitisrecommendedthatyoucontactaCITROËNdealeroraqualifiedworkshopwithoutdelay.
Situations Consequences
Displayofthemessage"Parking brake fault" and this
warninglamp:
- Automaticreleaseisnotavailable.
- Ifyouattemptanautomaticrelease,ahelpmessageisdisplayedonacceleration
whentheparkingbrakeisapplied,promptingyoutousemanualrelease.
Displayofthemessage"Parking brake fault" and these
warninglamps:
- Secondarybrakingdoesnothavefullpower.
- Ifautomaticreleaseisnotavailable,ahelpmessageisdisplayedonacceleration
whentheparkingbrakeisapplied,promptingyoutousemanualrelease.
Displayofthemessage"Parking brake fault" and these
warninglamps:
- Automaticapplicationisnotavailable:usethecontrollever.
- Theelectricparkingbrakecanonlybeusedmanually.
- Ifautomaticreleaseisalsonotavailable,ahelpmessageisdisplayedon
accelerationwhentheparkingbrakeisapplied,promptingyoutousemanual
release.
Displayofthemessage"Parking brake fault" and these
warninglamps:
- Ifmanualapplicationandreleasedonotwork,thecontrolleverisfaulty.
- Theautomaticfunctionsmustbeusedinallcircumstances:theyare
automaticallyreactivatedintheeventoffailureofthecontrollever.
- Youcannolongerimmobilisethevehiclewiththeenginerunning.
137
4
Driving
C4-Picasso-II_en_Chap04_conduite_ed01-2016
Situations Consequences
Displayofthemessage"Parking brake fault" and these
warninglamps:
Theparkingbrakeisfaulty,themanualandautomaticfunctionsmaynotoperate.
When stationary,toimmobiliseyourvehicle:
- Pullandholdthecontrolleverforabout7to15seconds,untilthewarninglamp
comesonintheinstrumentpanel.
Ifthisproceduredoesnotwork,youshouldmakeyourvehiclesafe:
- Parkonalevelsurface.
- Engageagearwithamanualgearbox,orplacethegearselectoratpositionP
withanautomaticgearbox.
- Ifpossible,fitawheelchock.
CallonaCITROËNdealeroraqualifiedworkshop.
Displayofthemessage"Parking brake fault" and these
warninglamps:
- Theparkingbrakedoesnothaveitsfullperformancetosecurelyholdthevehicle
inallsituations.
Youshouldmakeyourvehiclesafe:
- Parkonalevelsurface.
- Engageagearwithamanualgearbox,orplacethegearselectoratpositionP
withanautomaticgearbox.
- Ifpossible,fitawheelchock.
CallonaCITROËNdealeroraqualifiedworkshop.
TheflashingofthePwarninglampsonstartingthevehicleindicatesthattheparking
brakeisnotcorrectlyapplied.
Assoonaspossible,stopthevehicleandtrytocompletelyreleasetheparkingbrake,
usingthecontrollever,withyourfootonthebrakepedal.
Displayofthemessage"Battery fault"andthiswarninglamp: - Thestateofchargeofthebatteryisverylowandrequiresimmobilisationofthe
vehicleinasafeplace:engageagearwithamanualgearboxorfitachockto
oneofthewheels.
- Oncethebatteryiscompletelydischarged,thecontrolsdonotoperate:to
releasetheparkingbrake,callonaCITROËNdealeroraqualifiedworkshop.
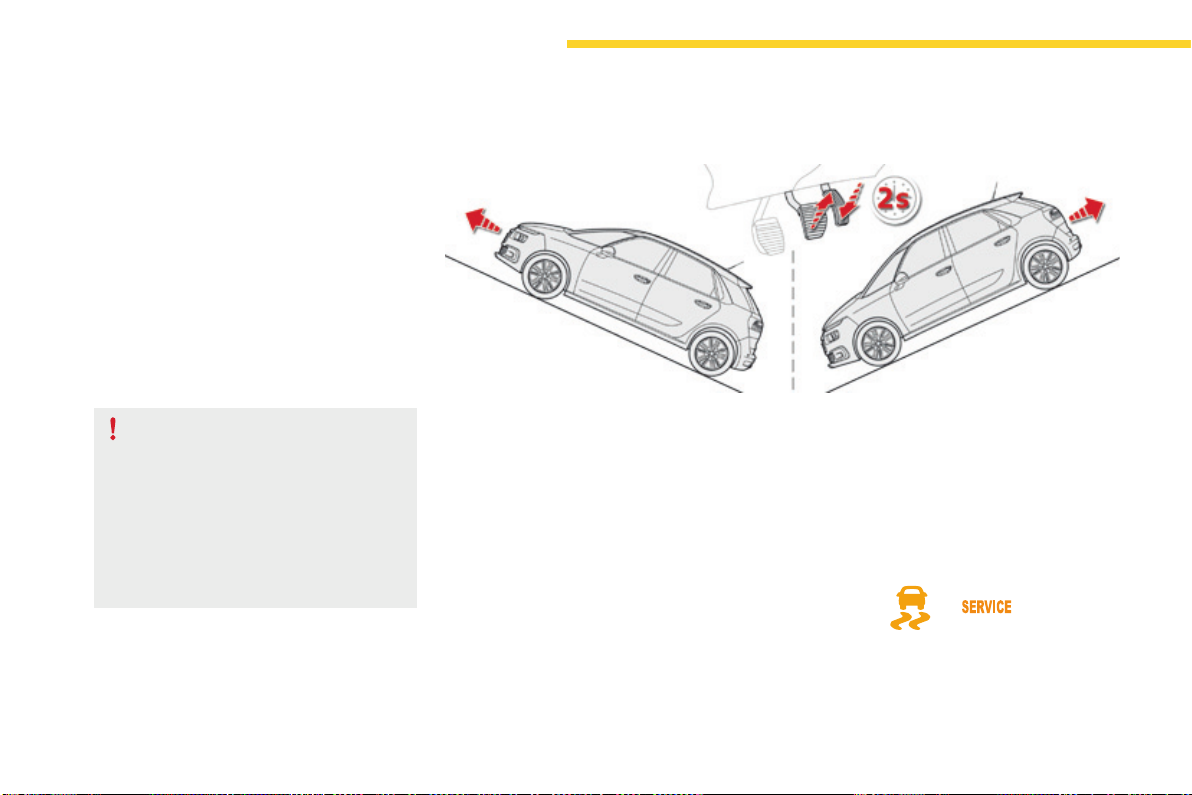
138
Driving
C4-Picasso-II_en_Chap04_conduite_ed01-2016
Hill start assist
Systemwhichkeepsyourvehicleimmobilised
temporarily(approximately2seconds)when
startingonagradient,thetimeittakesto
moveyourfootfromthebrakepedaltothe
acceleratorpedal.
Thissystemonlyoperateswhen:
- the vehicle is completely stationary, with
yourfootonthebrakepedal,
- certain conditions of slope are met,
- withthedriver’sdoorclosed.
The hill start assist system cannot be
deactivated.
On an ascending slope, with the vehicle
stationary, the vehicle is held momentarily
when you release the brake pedal:
- providedyouareinfirstgearorneutralwith
amanualgearbox,
- provided you are in position D or M with an
automaticgearbox.
Operation
On a descending slope, with the vehicle
stationary and reverse gear engaged, the
vehicle is held momentarily when you
release the brake pedal.
Operating fault
Ifafaultinthesystemoccurs,thesewarning
lamps come on, accompanied by an alert
message.ContactaCITROËNdealeror
aqualifiedworkshoptohavethesystem
checked.
Donotgetoutofthevehiclewhileitis
beingheldinthehillstartassistphase.
Ifyouneedtoexitthevehiclewith
theenginerunning,applytheparking
brakemanuallythenensurethatthe
parkingbrakewarninglamp(andthe
warninglampP in the lever of the
electricparkingbrake)areonfixed(not
flashing).
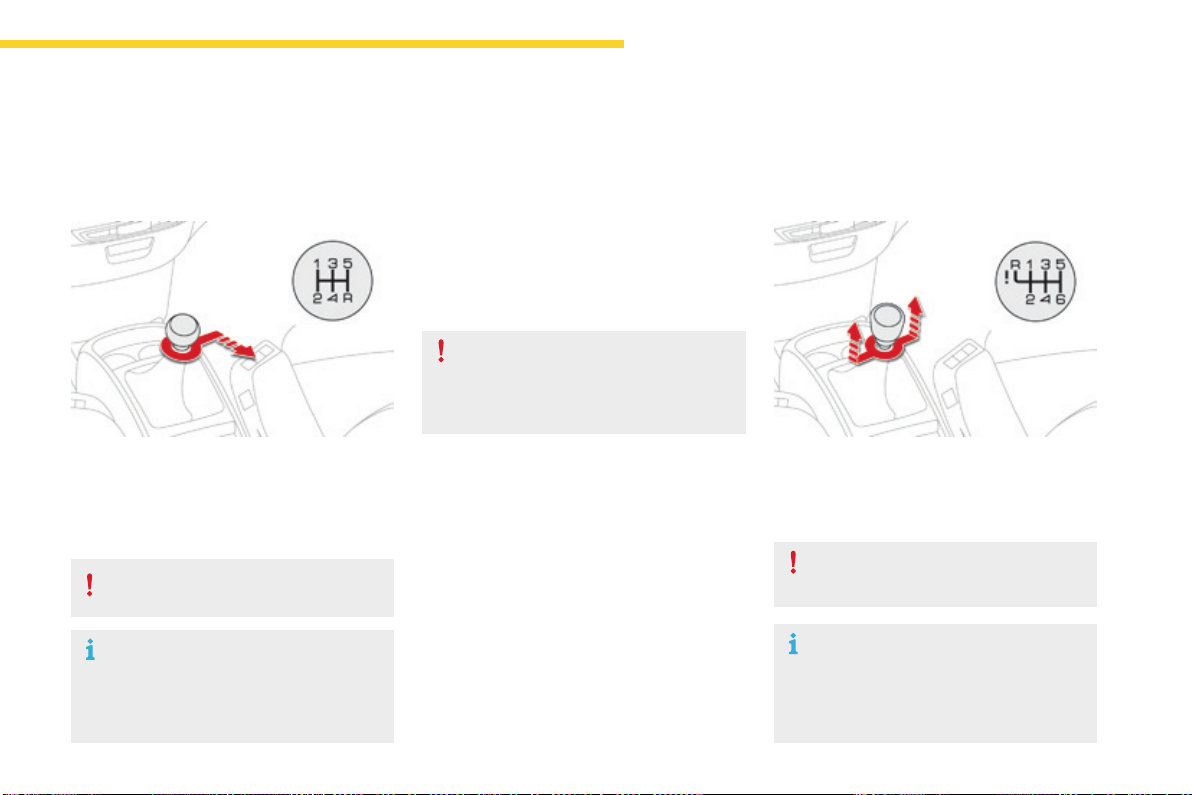
139
4
Driving
C4-Picasso-II_en_Chap04_conduite_ed01-2016
5-speed manual
gearbox
Engaging reverse gear
F With the clutch pedal fully down, place the
gearleverinneutral.
F Pushthegearlevertotherightthen
backwards.
Onlyengagereversegearwhenthe
vehicleisstationarywiththeengineatidle.
As a safety precaution and to facilitate
startingoftheengine:
- always select neutral,
- presstheclutchpedal.
6-speed manual
gearbox
Engaging 5
th
or 6
th
gear
F Movetheleverfullytotherighttoengage
5
th
or 6
th
gear.
Onlyengagereversegearwhenthe
vehicleisstationarywiththeengineatidle.
As a safety precaution and to facilitate
startingoftheengine:
- always select neutral,
- presstheclutchpedal.
Engaging reverse gear
Failure to follow this advice may cause
permanentdamagetothegearbox
(engagementof3
rd
or 4
th
gearby
mistake).
F Raisetheringundertheknobandmove
thegearlevertotheleftthenforwards.
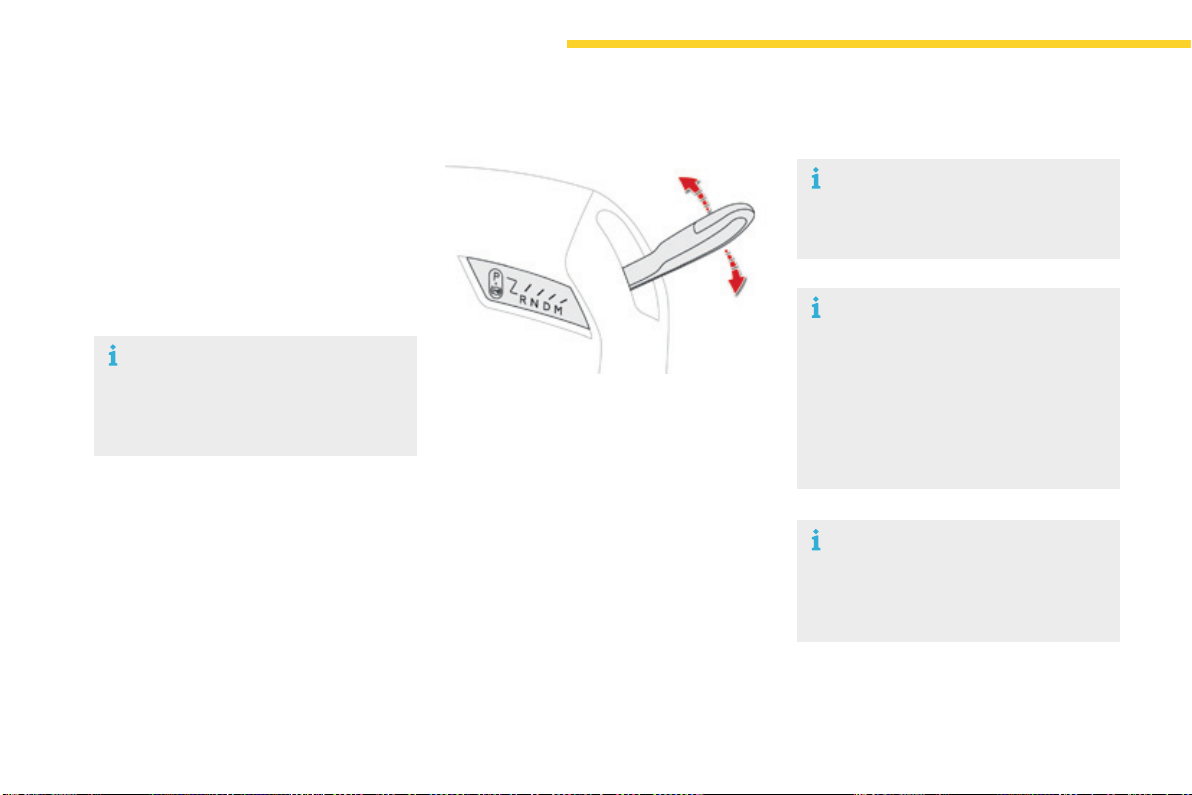
140
Driving
C4-Picasso-II_en_Chap04_conduite_ed01-2016
Automaticgearbox
Thisgearboxofferstwodrivingmodes.
- automated mode for automatic
managementofthegearsbythegearbox,
without any action on the part of the driver,
- manualmodeforsequentialgearchanging
bythedriverusingthesteeringmounted
paddles.
P. Park.
- Immobilisationofthevehicle,parkingbrake
appliedorreleased.
- Startingtheengine.
R. Reverse.
- Reversing,vehiclestationaryandengineat
idle.
N. Neutral.
- Immobilisationofthevehicle,parkingbrake
applied.
- Startingtheengine.
D. Automaticoperation.
M. Manualoperationwithsequentialchanging
ofthesixgears.
Gear selector lever
To select position P,movethegear
selectortothehighestposition
(towards R), then push it forwards and
thentotheleft.
Onlyengageitwhenthevehicleisata
completestop.Inthisposition,thefront
wheelsarelocked.Ensurethatthegear
selectoriscorrectlypositioned.
Tomovethegearselector,switchon
theignitionorstarttheengine.
Ifthebatteryisnotsufficientlycharged,
itisnotpossibletomovethegear
selector.
To come out of position P, move the
gearselectortotherighttothedesired
position,whilekeepingyourfootonthe
brakepedal.
Itispossibletochangefromonemode
totheotheratanytime.
With the automated mode, you can
temporarilytakecontrolofthegear
changesatanytime.
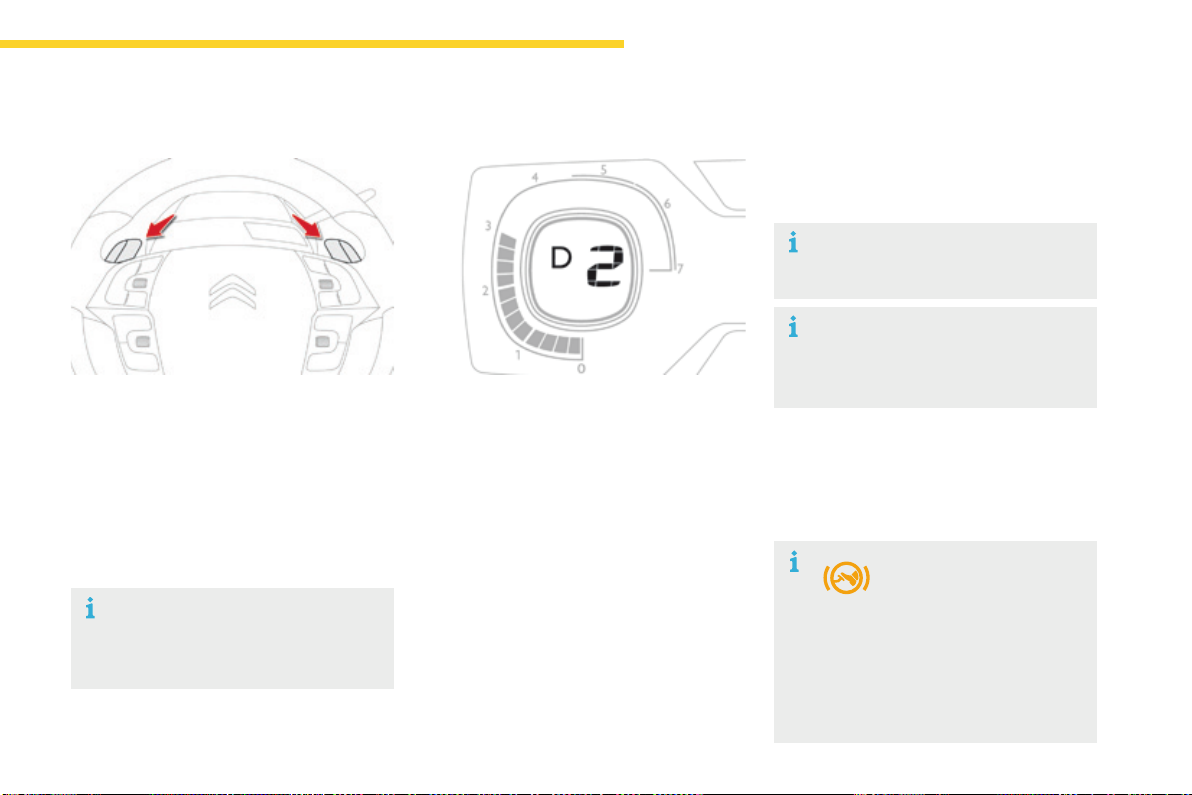
141
4
Driving
C4-Picasso-II_en_Chap04_conduite_ed01-2016
+. Controlpaddleforchangingup,totheright
ofthesteeringwheel.
F Pull the "+"paddletowardsyoutochangeup.
-. Controlpaddleforchangingdown,tothe
leftofthesteeringwheel.
F Pull the "-"paddletowardsyoutochange
down.
Steering mounted control paddles
Thesteeringmountedcontrolpaddles
cannot be used to select neutral or to
selectorcomeoutofreverse.
Whenyoumovethegearselector,thesymbol
correspondingtoitspositionisdisplayedinthe
instrumentpanel.
P. Park.
R. Reverse.
N. Neutral.
D. Drive(automaticoperation).
1 to 6.Gearsengagedinmanualoperation.
-. Invalidvalueinmanualoperation.
Displays in the instrument panel
Moving off
F Withyourfootonthebrakepedal,select
position P or N.
F Starttheengine.
If P is displayed in the instrument panel,
althoughthegearselectorisinanother
position,placethegearselectorin
position Ptobeabletostarttheengine.
F Withtheenginerunning,pressthebrake
pedal.
F Select automated mode (position D),
manual mode (position M) or reverse
(position R).
If you do not press the
brakepedaltocomeoutof
position P,thiswarninglamp
If these conditions are not met, there
isanaudiblesignalaccompaniedbya
message.
or symbol appears in the instrument
panel,accompaniedbythemessage
"PlaceautomaticgearboxinpositionP",
flashingofP in the instrument panel
andanaudiblesignal.

142
Driving
C4-Picasso-II_en_Chap04_conduite_ed01-2016
F Checkthatthesymboldisplayedinthe
instrumentpanelagreeswiththeposition
oftheselector.
F Progressivelyreleasethebrakepedal.
F Iftheparkingbrakeisreleased,thevehicle
movesoff.
Iftheparkingbrakeisappliedand
automatic operation is activated, accelerate
away.
Neverpresstheacceleratorandbrake
pedalsatthesametime.Brakingand
acceleration should be done only with
therightfoot.Pressingbothpedals
togetherrisksdamagingthegearbox.
Ifthebrakedoesnotrelease
automatically,checkthatthefrontdoors
arecorrectlyclosed.
Never leave children unsupervised in
thevehiclewhentheengineisrunning.
Whencarryingoutamaintenance
operationwiththeenginerunning,apply
theparkingbrakeandselectpositionP.
Never select position P or R unless the
vehicle is at a complete stop with the
brakeapplied.
Whenyouwanttoengagereverse,
toavoidjolts,donotaccelerate
immediatelyafterengagingR.
ChangingintopositionR is
accompaniedbyanaudiblesignal.
Never select position Nwhendriving.
If position Nisengagedinerrorwhen
moving,allowtheenginetoidle,then
engagepositionDtoaccelerate.
Whentheengineisrunningatidle,
brakesreleased,ifpositionR, D or M is
selected, the vehicle will move even if
theacceleratorisnotpressed.
143
4
Driving
C4-Picasso-II_en_Chap04_conduite_ed01-2016
Invalid value in manual operation
Thissymbolisdisplayedifagearis
notengagedcorrectly(gearselector
betweentwopositions).
Youcantemporarilytakecontrolofgear
changesusingthe"+" and "-"steeringmounted
controlpaddles.Iftheenginespeedallows,the
instructiontochangegearisactedon.
This function allows you to anticipate certain
situationssuchasovertakinganothervehicleor
approachingabend.
After a few moments with no action on the
controlpaddles,thegearboxmanagesthe
gearsautomaticallyagain.
Temporary manual control of the
gears
Manual mode
Dandthegearengagedaredisplayedinthe
instrumentpanel.
Thegearboxoperatesinauto-active
mode,withoutanyactionfromthedriver.It
continuouslyselectsthemostappropriategear
accordingtothefollowingconditions:
- optimisation of fuel consumption,
- drivingstyle,
- relief of the road,
- vehicleload.
Automated mode
F Select position D.
Formaximumacceleration,withouttouching
thegearselector,presstheacceleratorfully
down(kickdown).Thegearboxchangesdown
automaticallyandmaintainsthegearselected
untilthemaximumenginespeedisreached.
Whenbraking,thegearboxchangesdown
automaticallyformoreeffectiveenginebraking.
Whenyoutakeyourfootofftheaccelerator
pedalsuddenly,thegearboxdoesnotchange
up,soastoimprovesafety.
F Select position M.
F Use the "+" and "-"steeringmounted
controlpaddlestochangegear.
Thegearsengagedaredisplayedsuccessively
intheinstrumentpanel.
When stationary or at very low speed, the
gearboxautomaticallyengages1stgear.
In manual mode, it is not necessary to release
theacceleratorpedalwhenchanginggear.
Thechangefromonegeartoanotherisonly
effected if the conditions of vehicle speed and
enginespeedallow;otherwisetheautomatic
lawsofoperationareimposedtemporarily.
Iftheenginespeedistoohighortoolow,
thedisplayofthegearselectedflashesfora
fewseconds,thenthenewgearengagedis
displayed.
Itispossibletochangemodeatany
time,bymovingthegearselector
from D to Mortheotherwayround.
144
Driving
C4-Picasso-II_en_Chap04_conduite_ed01-2016
Beforeswitchingofftheengine,youcan
changetopositionP or Ntobeinneutral.
Ineithercase,applytheparkingbraketo
immobilisethevehicle,unlessitisprogrammed
inautomaticmode.
If the lever is not in position P,onopeningthe
driver'sdoororapproximately45secondsafter
switchingofftheignitionthereisanaudible
signalandamessageappears:
F movethegearselectortopositionP;the
audiblesignalstopsandthemessage
disappears.
Operating fault
Wheneverparking,youmustapplytheparking
braketoimmobilisethevehicle,ifautomatic
operationhasbeendeactivated.
Parking the vehicle
In all circumstances, ensure that the
gearselectorisinpositionP before
leavingyourvehicle.
In the event of a fault with the
gearbox,theservicewarninglamp
comes on in the instrument panel,
accompaniedbyamessageandan
audiblesignal.
Inthiscasethegearboxgoesintoback-up
modeandstaysin3
rd
gear.Youmaythenfeela
noticeablejoltwhengoingfromP to R and from
N to R.Thisjoltdoesnotpresentanyrisktothe
gearbox.
Donotexceed60mph(100km/h)whilealso
observinglegalspeedlimits.
HaveitcheckedbyaCITROËNdealerora
qualifiedworkshop.
In the event of a battery failure, use the
chocktoimmobilisethevehicle.
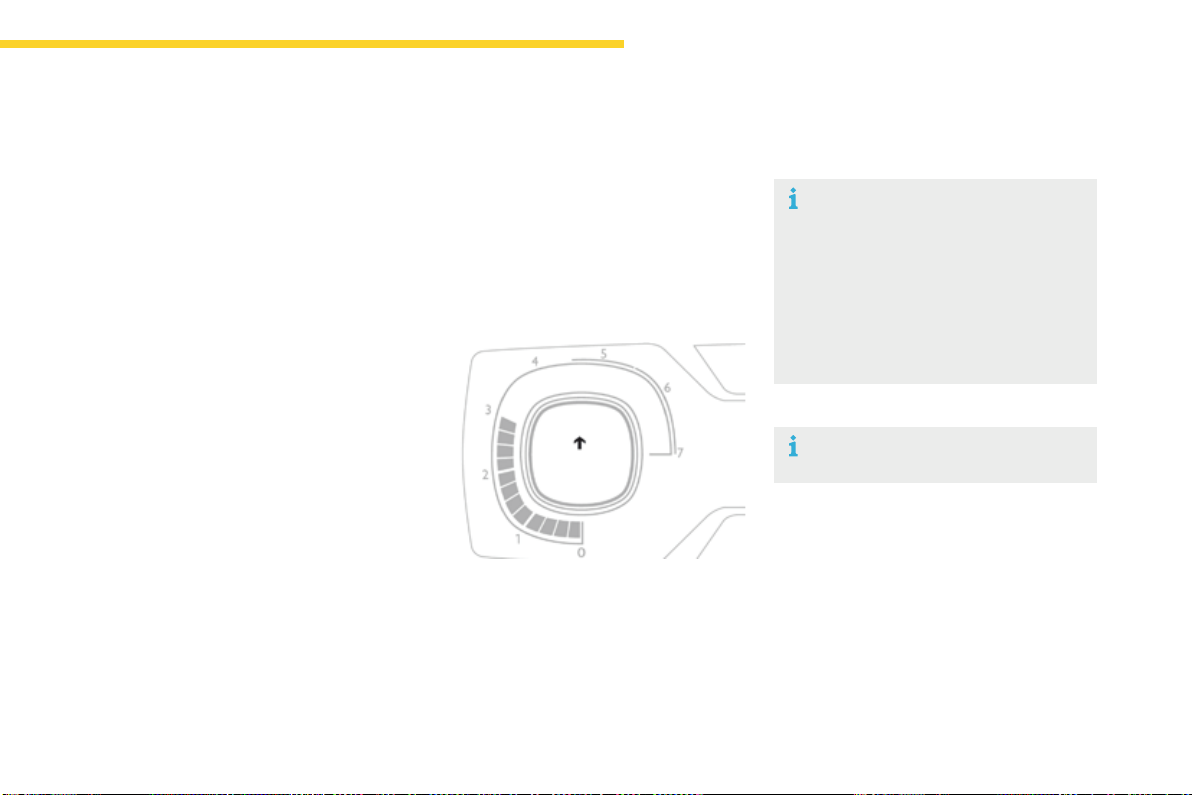
145
4
Driving
C4-Picasso-II_en_Chap04_conduite_ed01-2016
Dependingonthedrivingsituationandyour
vehicle'sequipment,thesystemmayadvise
youtoskiponeormoregears.
Youcanfollowthisinstructionwithoutgoing
throughtheintermediategears..
Gear shift indicator
Systemwhichreducesfuelconsumptionbyrecommendingthemostsuitablegear.
Thesystemadaptsitsgearchange
recommendationaccordingtothe
drivingconditions(gradient,load,...)
and the demands of the driver (power,
acceleration,braking,...).
Thesystemneversuggests:
- engagingfirstgear,
- engagingreversegear.
The information appears in the instrument
panelintheformofanarrow.
Onvehicleswithmanualgearbox,thearrow
may be accompanied by the recommended
gear.
The gear engagement recommendations
must not be considered compulsory.
This is because the configuration of the
road, traffic density and safety remain
important factors in the choice of the best
gear.
Thegearshiftindicatorsystemdoesnot
replacetheneedforvigilanceonthepartofthe
driver.
Withanautomaticgearbox,thesystemisonlyactiveinmanualmode.
OnBlueHDiDiesel135and150versionswith
manualgearbox,incertaindrivingconditions
thesystemmaysuggestchangingintoneutral
sothattheenginecangointostandby(STOP
modewithStop&Start).Inthiscase,N is
displayedintheinstrumentpanel.
Example:
Thisfunctioncannotbedeactivated.
- Youareinthirdgear.
- Youpresstheacceleratorpedal.
- Thesystemmaysuggestthatyouengage
ahighergear.
146
Driving
C4-Picasso-II_en_Chap04_conduite_ed01-2016
Stop & Start
TheStop&Startsystemputstheenginetemporarilyintostandby-STOPmode-duringstopsinthetraffic(redlights,trafficjams,orother...).The
enginerestartsautomatically-STARTmode-assoonasyouwanttomoveoff.Therestarttakesplaceinstantly,quicklyandsilently.
Operation
Going into engine STOP
mode
This indicator lamp comes on in the instrument
panelandtheenginegoesintostandby
automatically:
- with a manual gearbox, at speeds below
12mph(20km/h),orvehiclestationary
(withPureTech130,THP165and
BlueHDi 100, 115 and 120 versions), when
youplacethegearleverinneutral,andyou
release the clutch pedal,
- with an automatic gearbox, with the
vehicle stationary, when you press the
brakepedalorplacethegearselectorlever
in position N.
NeverrefuelwiththeengineinSTOP
mode;youmustswitchofftheignition
withtheSTART/STOPbutton.
Foryourcomfort,duringparking
manoeuvres, STOP mode is not
available for a few seconds after
comingoutofreversegear.
The Stop & Start system does not affect
the functionality of the vehicle, such as
forexample,braking,powersteering...
Special cases: STOP mode not
available
STOPmodeisnotinvokedwhen:
- thedriver'sdoorisopen,
- thedriver'sseatbeltisnotfastened,
- thevehiclehasnotexceeded6mph
(10km/h)sincethelastenginestartusing
theSTART/STOPbutton,
- theelectricparkingbrakeisappliedor
beingapplied,
- theengineisneededtomaintaina
comfortabletemperatureinthepassenger
compartment,
- demistingisselected,
- somespecialconditions(batterycharge,
enginetemperature,brakingassistance,
ambienttemperature...)wheretheengineis
neededtoassurecontrolofasystem.
In this case, this indicator lamp flashes
forafewsecondsthengoesoff.
This operation is perfectly normal.
Perfectforurbanuse,theStop&Startsystemreducesfuelconsumptionandexhaustemissionsaswellasthenoiselevelwhenstationary.
If your vehicle is fitted with the system, a time
counter calculates the sum of the periods in
STOPmodeduringajourney.Itresetsitselfto
zeroeverytimetheignitionisswitchedonwith
theSTART/STOPbutton.
147
4
Driving
C4-Picasso-II_en_Chap04_conduite_ed01-2016
Going into engine START mode
Thisindicatorlampgoesoffandthe
enginestartsautomatically:
- with a manual gearbox, when you fully
depress the clutch pedal,
- with an automatic gearbox:
● gearselectorinpositionD or M, when
youreleasethebrakepedal,
● orgearselectorinpositionNandbrake
pedalreleased,whenyouplacethegear
selector in position D or M,
● orwhenyouengagereverse.
STARTmodeisinvokedautomaticallywhen:
- youopenthedriver'sdoor,
- youunfastenthedriver'sseatbelt,
- thespeedofthevehicleexceeds15mph
(25km/h)withamanualgearbox(2mph
(3km/h)withPureTech130,THP165and
BlueHDi 100, 115 and 120 versions) and
2mph(3km/h)withanautomaticgearbox,
- theelectricparkingbrakeisbeingapplied,
- somespecialconditions(batterycharge,
enginetemperature,brakingassistance,
ambienttemperature...)wheretheengineis
neededforcontrolofasystem.
Special cases: START invoked
automatically
In some circumstances, such as the need to
maintain a comfortable temperature in the
passengercompartment,itmaybenecessary
todeactivatetheStop&Startsystem.
The system can be deactivated at any time,
oncetheignitionison.
IftheengineisinSTOPmode,itthenrestarts.
The Stop & Start system is automatically
reactivatedeverytimetheignitionis
switchedon.
Manual deactivation/
reactivation
In this case this indicator lamp flashes
forafewseconds,thengoesoff.
This operation is perfectly normal.
Select"Stop&Start"todeactivatethesystem.
This is confirmed by the illumination
ofthisindicatorlamp.
Usingthedynamiccruisecontrol
deactivatestheStop&Startsystem.
Deactivation of Stop & Start is done in the
Drivingmenuofthetouchscreentablet.
Select"Stop&Start"againtoreactivatethe
system.
This is confirmed by the illumination
ofthisindicatorlamp.
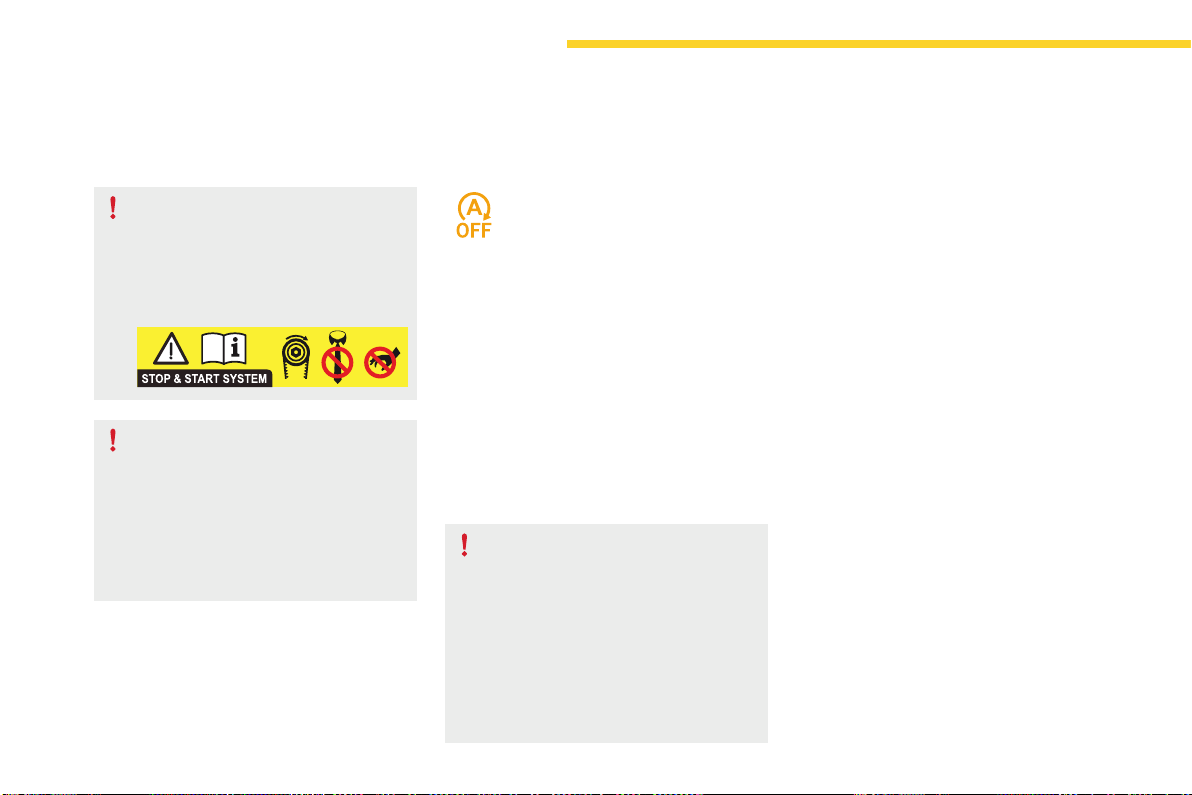
148
Driving
C4-Picasso-II_en_Chap04_conduite_ed01-2016
Operating fault
HaveitcheckedbyaCITROËNdealerora
qualifiedworkshop.
In the event of a fault in STOP mode, the vehicle
maystall.
Alloftheinstrumentpanelwarninglampscomeon.
Dependingonversion,analertmessagemay
alsobedisplayed,askingyoutoplacethegear
selector lever at position N and put your foot on
thebrakepedal.
Itisthennecessarytoswitchofftheignitionand
starttheengineagainusingthe"START/STOP"
button.
In the event of a fault with the system,
this indicator lamp flashes for a few
moments then comes on continuously,
accompaniedbyamessage.
Opening the bonnet
Beforedoinganythingunderthe
bonnet, deactivate the Stop & Start
systemtoavoidtheriskofinjuryrelated
toanautomaticchangetoSTART
mode.
Driving on flooded roads
Beforedrivingthroughafloodedroad,
itisstronglyrecommendedthatyou
deactivatetheStop&Startsystem.
For more information on Driving
advice, particularly on flooded roads,
refertothecorrespondingsection.
The Stop & Start system requires a
batteryofadvancedtechnologyand
specialcharacteristics.
Allworkonthistypeofbatterymust
only be done by a CITROËN dealer
oraqualifiedworkshop.
For more information on the
12 V battery,refertothecorresponding
section.
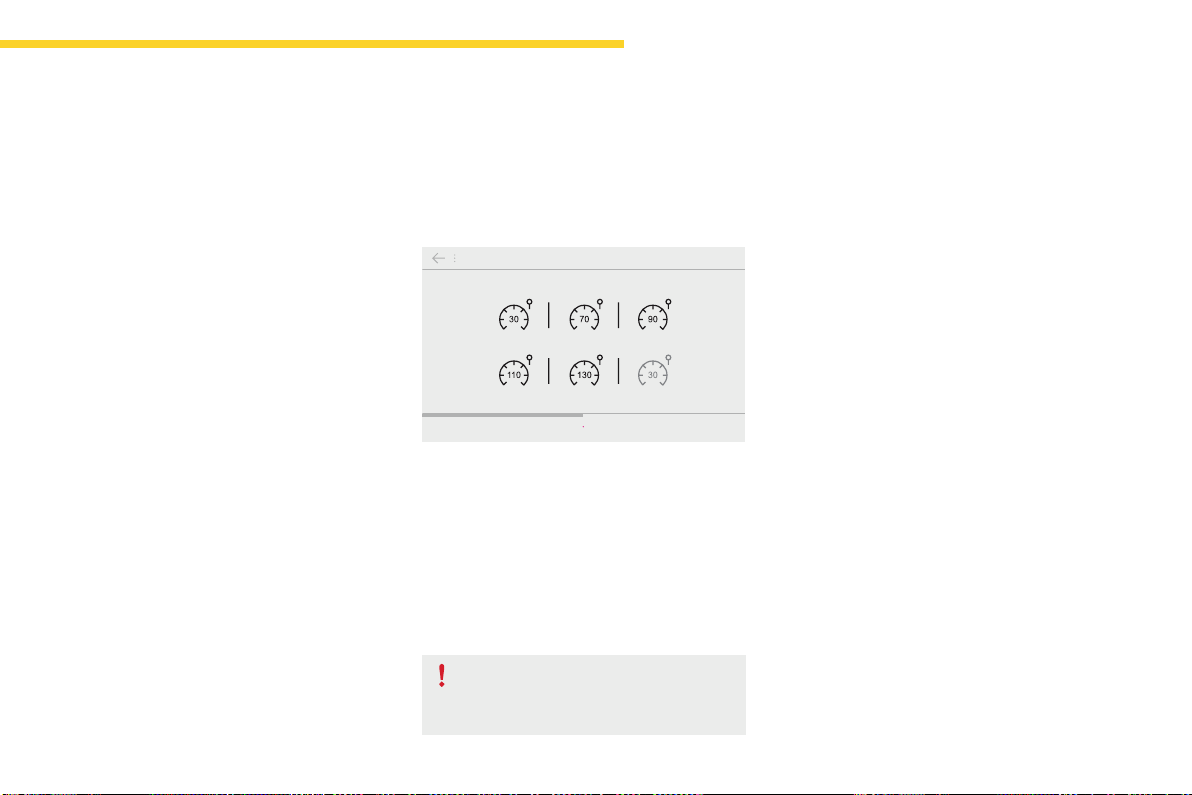
149
4
Driving
C4-Picasso-II_en_Chap04_conduite_ed01-2016
Memorisingspeeds
Memorising
Thisfunctionallowsspeedstobesaved,whichcanthenbeofferedtosetthetwosystems:thespeedlimiter(tolimitthespeedofthevehicle)orthe
cruisecontrol(foravehiclecruisingspeed).
Youcanmemoriseuptosixspeedsettingsforeachofthetwosystems.Bydefault,somespeedsettingsarealreadymemorised.
F Select the system for which you want to
memorisenewspeedsettings.
This function is accessible in the Driving menu
ofthetouchscreentablet.
F Select the "Driving assistance" tab, then
Speed settings.
F Pressthebuttoncorrespondingtothe
speedsettingyouwanttomodify.
As a safety measure, the driver must
carry out these operations when
stationary.
F Enterthenewvalueusingthenumerical
keypadandconfirm.
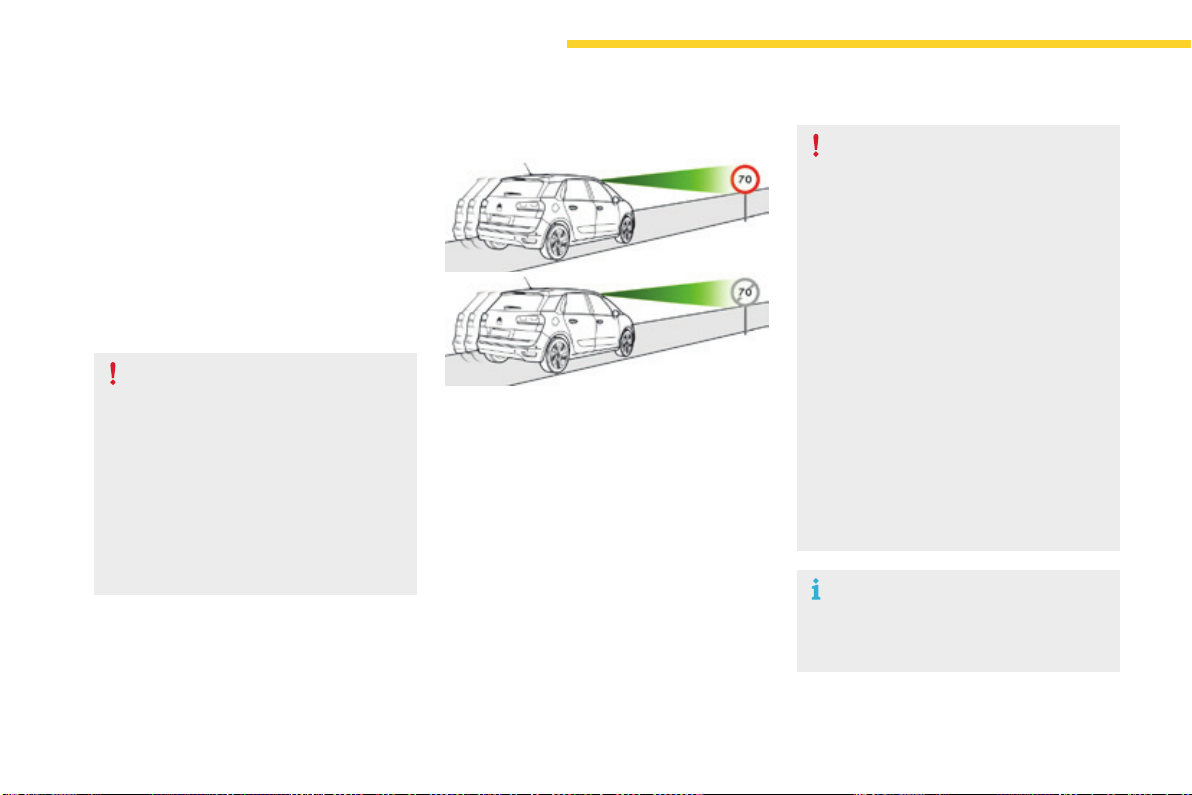
150
Driving
C4-Picasso-II_en_Chap04_conduite_ed01-2016
Speedlimitrecognition
This system allows the speed limit detected by
the camera to be displayed in the instrument
panel.
Specific speed limits, such as those for heavy
goodsvehicles,arenotdisplayed.
The display of the speed limit in the instrument
panelisupdatedasyoupassaspeedlimitsign
intendedforcars(lightvehicles).
The units for the speed limits (mph or
km/h)dependonthecountryyouare
drivingin.
Itshouldbetakenintoaccountsothat
youobservethespeedlimit.
For the system to operate correctly
whenyouchangecountry,theunitsfor
speed in the instrument panel must be
thoseforthecountryyouaredrivingin.
Theautomaticreadingofroadsignsisa
drivingassistancesystemanddoesnot
alwaysdisplayspeedlimitscorrectly.
Thespeedlimitsignspresentonthe
roadalwaystakepriorityoverthe
displaybythesystem.
The system cannot in any
circumstances replace the need for
vigilanceonthepartofthedriver.
Thedrivermustobservethedriving
regulationsandmustadaptthespeed
of the vehicle to suit the weather and
traffic.
It is possible for the system to not
display the speed limit if it does not
detectaspeedlimitsignwithinapreset
period.
Thesystemisdesignedtodetectsigns
that conform to the Vienna Convention
onroadsigns.
To maintain correct operation of the
system:regularlycleantheareainfront
ofthecamera.
Principles
Usingacameraatthetopofthewindscreen,
this system detects and reads speed limit and
endofspeedlimitsigns.
Thesystemalsotakesaccountofinformation
onspeedlimitsfromthenavigationsystem
mapping.

151
4
Driving
C4-Picasso-II_en_Chap04_conduite_ed01-2016
Display in the instrument panel
1. Indicationofthespeedlimit.
or
2. Indicationoftheendofthespeedlimit.
Display of the speed
Thesystemisactivebutisnotdetectingspeed
limitinformation.
On detection of speed limit information, the
systemdisplaysthevalue.
Thedrivercan,ifdesired,adjustthe
speedofthevehicleaccordingtothe
informationgivenbythesystem.
The system is activated or deactivated in the
Drivingmenuofthetouchscreentablet.
Select the "Settings" tab, then "Driving aids"
and "Recommended speed display".
Activation / Deactivation
It is necessary to update your
navigationmappingregularlyinorderto
receive accurate information on speed
limitsfromthesystem.
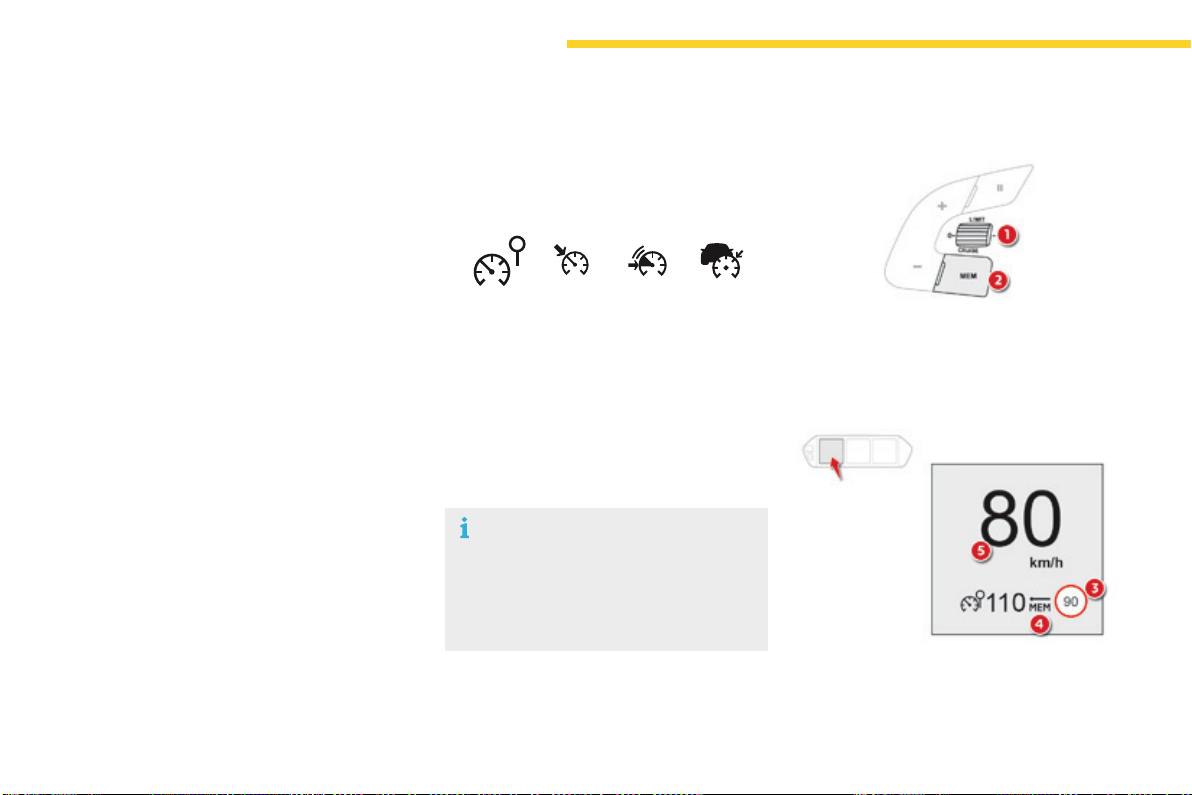
152
Driving
C4-Picasso-II_en_Chap04_conduite_ed01-2016
Memorising the speed setting
This memorisation is in addition to the display
of Speed limit recognition.
The driver can choose to adapt the speed
settingtothespeedlimitsuggested,by
pressingthememorisationbuttonatthespeed
limiter controls, with the standard cruise
control, the dynamic cruise control or the
dynamiccruisecontrolwithStopfunction.
Thisspeedsettingthenreplacestheprevious
speedsettingforthespeedlimiterand/orcruise
control.
For more information on the Speed
limiter, Cruise control, Dynamic
cruise control or Dynamic cruise
control with Stop function, refer to
thecorrespondingsections.
Steering mounted controls
1. Selectspeedlimiter/cruisecontrolmode.
2. Memoriseaspeedsetting.
Operating limits
Thelegislationonspeedlimitsisspecificto
eachcountry.
Thesystemdoesnottakeaccountofreduced
speedlimitsinthefollowingcases:
- poor weather (rain, snow),
- atmospheric pollution,
- trailer, caravan,
- drivingwithaspace-savertypespare
wheel or snow chains fitted,
- puncturerepairusingthetemporary
repairkit,
- youngdrivers,
- ...
Thesystemmaybedisruptedornotworkatall
inthefollowingsituations:
- poorvisibility(inadequatestreetlighting,
fallingsnow,rain,fog),
- windscreen area ahead of the camera dirty,
misty,frosty,coveredwithsnow,damaged
ormaskedbyasticker,
- fault with the camera,
- obsoleteorincorrectmapping,
- hiddenroadsigns(othervehicles,
vegetation,snow),
- speedlimitsignsthatdonotconformtothe
standard,aredamagedordistorted.
Display in the instrument panel
3. Speedlimiterindication.
4. Memorisethespeed.
5. Currentspeedsetting.

153
4
Driving
C4-Picasso-II_en_Chap04_conduite_ed01-2016
F Makeaninitial press on this
buttontorequestsavingofthe
speedsuggested.
F Press this button again to
confirm and save the new speed
setting.
Memorising the speed
F Switchonthespeedlimiter/cruisecontrol.
Speedlimiter/cruisecontrolinformationis
displayed.
Ondetectionofaspeedlimitsign,thesystem
displays the speed limit value and offers to
makeitanewspeedsetting.
"MEM"flashesinthescreenforafewseconds.
Ifthedifferencebetweenthespeedsetting
andspeeddisplayedbytherecognition
systemislessthan6mph(10km/h),the
MEMsymbolisnotdisplayed.
After a predetermined period, the screen
returnstothecurrentdisplay.
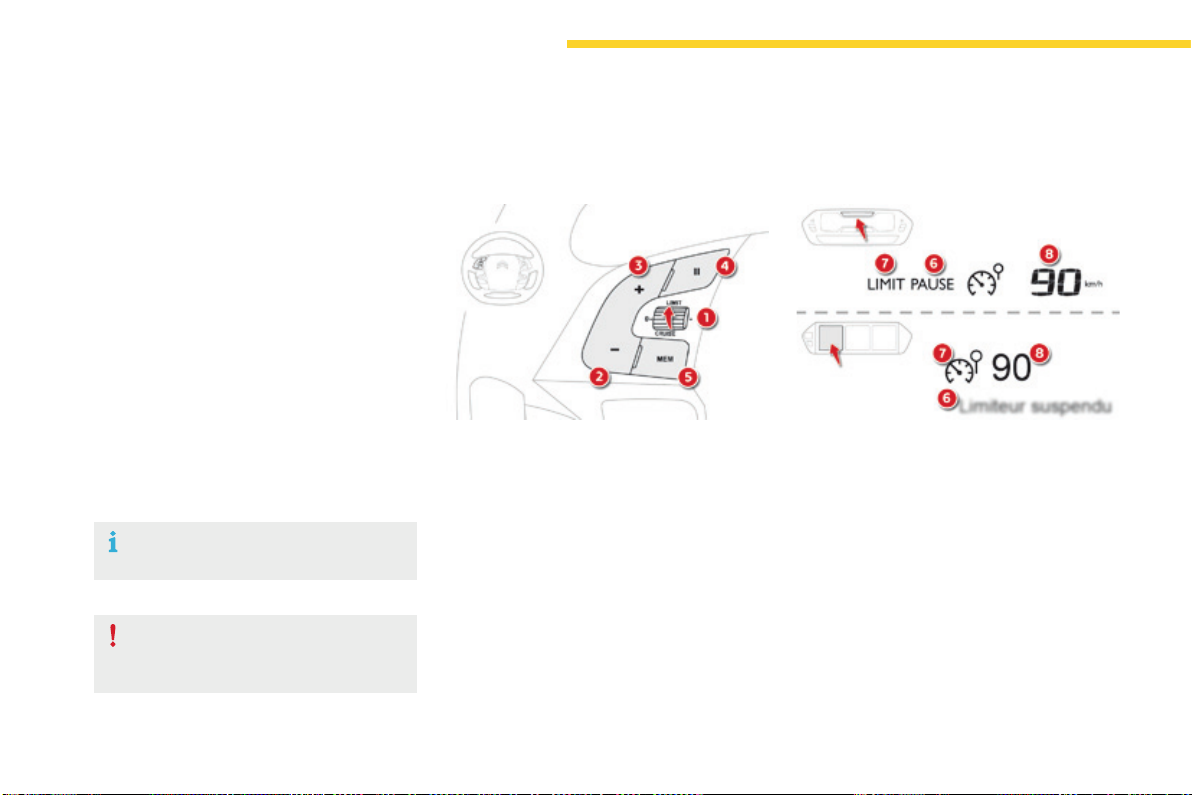
154
Driving
C4-Picasso-II_en_Chap04_conduite_ed01-2016
Steering mounted controls
6. Speedlimiteron/pauseindication.
7. Speedlimitermodeselectionindication.
8. Speedlimitersetting.
Speed limiter - "LIMIT"
Systemwhichpreventsthevehiclefromexceedingthespeedprogrammedbythedriver.
The speed limiter cannot, in any
circumstances, replace the need to
observe speed limits, nor can it replace the
needforvigilanceonthepartofthedriver.
Oncetheprogrammedspeedlimitisreached,
additional pressure on the accelerator pedal
hasnoeffect.
1. Selectspeedlimitermode.
2. Lowerprogrammedspeed.
3. Raiseprogrammedspeed.
4. Speedlimiteron/pause.
5. Display the list of memorised speeds or,
Displaythelistofmemorisedspeeds.
Displays in the instrument panel
Switching on the speed limiter requires
aprogrammedspeedofatleast20mph
(30km/h).
The speed limiter is paused by operation of the
control.
Theprogrammedspeedcanbeexceeded
temporarilybypressingtheacceleratorfirmly
beyondthepointofresistance.
Toreturntotheprogrammedspeed,simply
release the accelerator pedal until the vehicle
returnstotheprogrammedspeedlimit.
Theprogrammedspeedremainsinthe
memorywhentheignitionisswitchedoff.
For more information on Memorising speeds,
refertothecorrespondingsection.
For more information on Speed limit
recognition and memorisation, refer to the
correspondingsection.
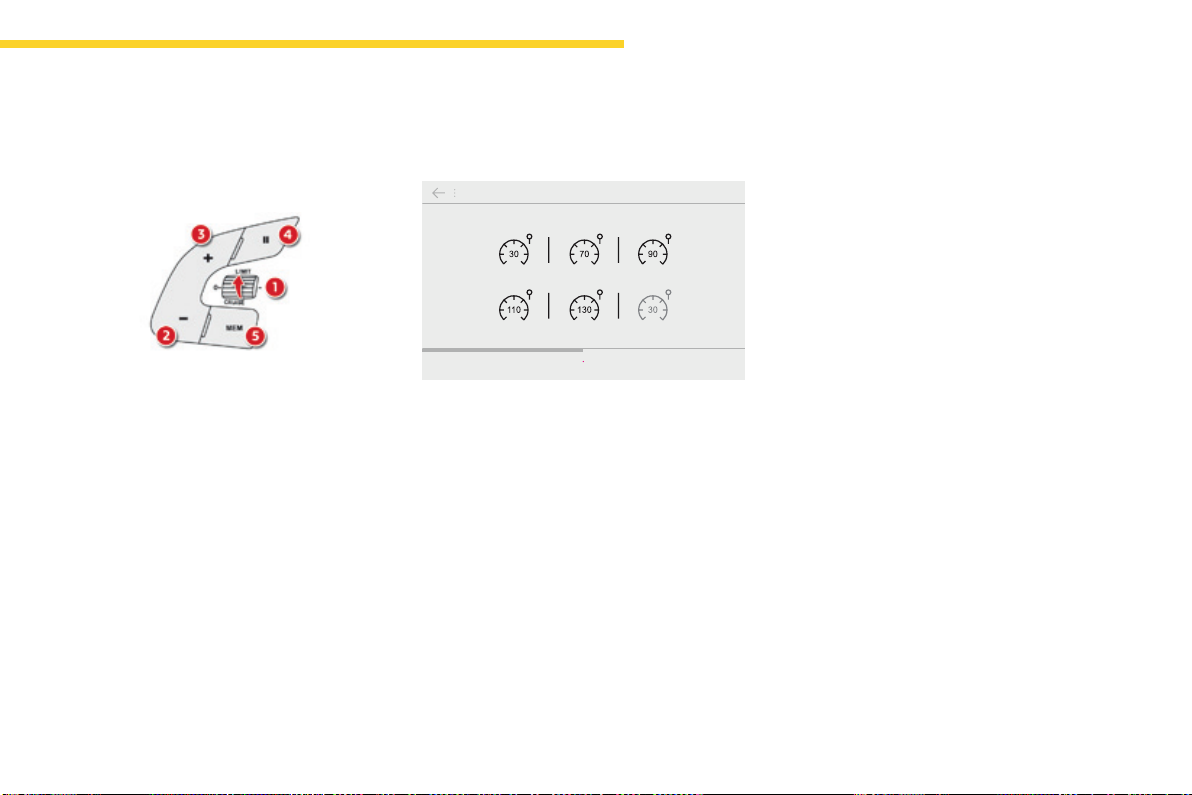
155
4
Driving
C4-Picasso-II_en_Chap04_conduite_ed01-2016
Switching on / Pause
F Turn thumbwheel 1 to the "LIMIT"position:
the speed limiter mode is selected but is
notswitchedon(Pause).
F Switchthespeedlimiterbackonby
pressingbutton4, if the speed displayed
is suitable (by default, the last speed
programmed).
F You can temporarily stop the speed limiter
bypressingbutton4again:thedisplay
confirmsthatithasbeenstopped(Pause).
You do not have to switch the speed limiter on
inordertosetthespeed.
Once the function is selected, you can modify
thespeedsettingby:
- usingbuttons2 and 3,raisingorlowering
thespeeddisplayed:
F by successive short presses, to modify
by+or-1mph(km/h),
F by a maintained press, to modify in steps
of+or-5mph(km/h).
Adjusting the speed limiter
setting
- pressingbutton5:
Fthesixspeedsmemorisedaredisplayed
in the touch screen tablet,
Fpressthebuttoncorrespondingtothe
limitspeedchosen.
Thevalueisdisplayedintheinstrumentpanel.
The selection screen closes after a few
moments.
- bypressingbutton5, if your vehicle has
speedlimitrecognition:
F the speed to memorise is displayed in
the instrument panel,
F press button 5 againtosavethespeed.
The value is then displayed in the instrument
panel.
For more information on Speed limit
recognition and memorisation, refer to the
correspondingsection.
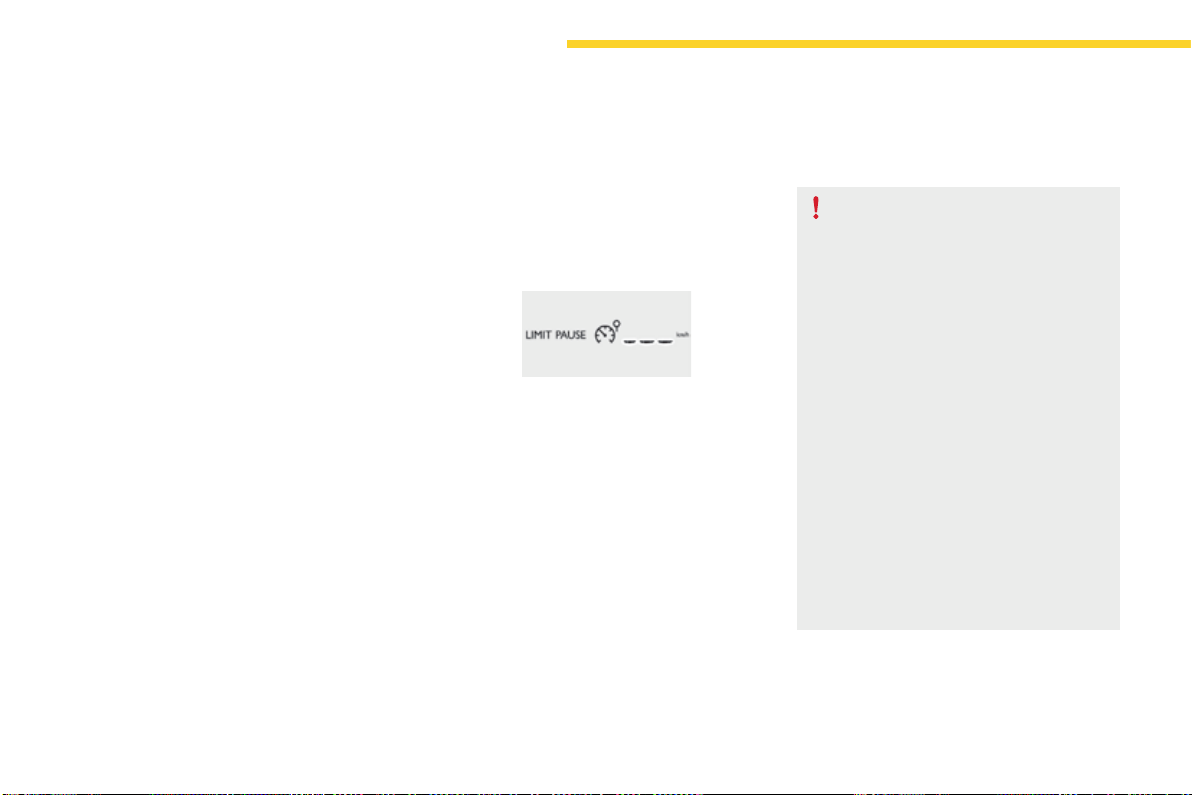
156
Driving
C4-Picasso-II_en_Chap04_conduite_ed01-2016
On sharp acceleration, as when
descendingasteephill,thespeed
limiter will not be able to prevent
thevehiclefromexceedingthe
programmedspeed.
The limiter is temporarily deactivated
andthedisplayedprogrammedspeed
flashes.
Anaudiblesignalaccompaniesthe
flashingoftheprogrammedspeed
whenexceedingthespeedisnotdueto
anactionbythedriver.
The use of mats not approved by
CITROËN may interfere with the
operationofthespeedlimiter.
Toavoidanyriskofjammingofthe
pedals:
- ensure that the mat is secured
correctly,
- donotfitonematontopofanother.
Flashingofthedashesindicatesafaultwiththe
speedlimiter.
HaveitcheckedbyaCITROËNdealerora
qualifiedworkshop.
Operating fault
F Press firmly on the accelerator pedal,
goingbeyondthepoint of resistance, to
exceedtheprogrammedspeedlimit.
The speed limiter is deactivated temporarily
andthedisplayedprogrammedspeedflashes.
Anaudiblesignalaccompaniestheflashing
oftheprogrammedspeedwhenexceeding
the speed is not due to an action by the driver
(steephill...).
Assoonasthevehicle'sspeedreturnstothe
programmedvalue,thelimiteroperatesagain:
thedisplayoftheprogrammedspeedbecomes
steadyagain.
Switching off
Temporarily exceeding the
programmed speed
F Turn the thumbwheel 1 to the "0"position.
The display of speed limiter information
disappears.
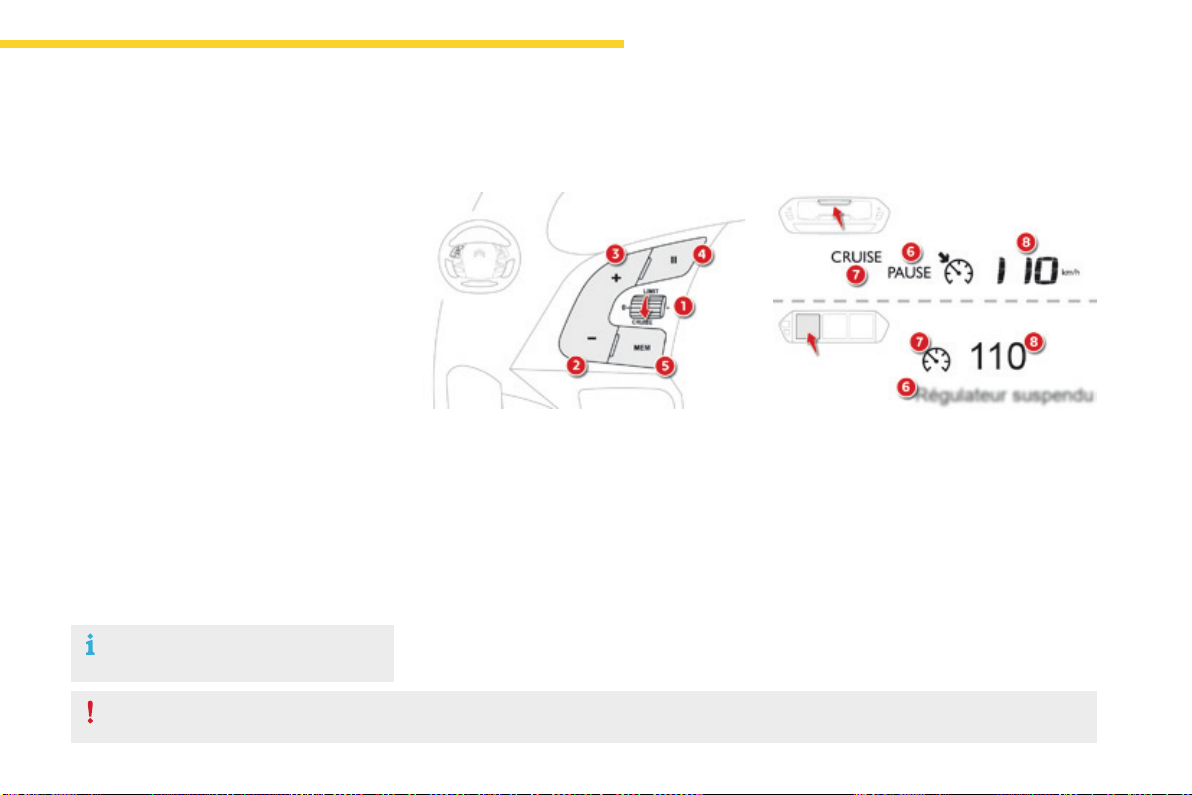
157
4
Driving
C4-Picasso-II_en_Chap04_conduite_ed01-2016
Steering mounted controls
6. Cruisecontrolpause/resumeindication.
7. Cruisecontrolmodeselectionindication.
8. Speedsetting.
Cruise control - "CRUISE"
Systemwhichautomaticallymaintainsthespeedofthevehicleatthevalueprogrammedbythedriver,withoutanyactionontheacceleratorpedal.
Thecruisecontrolsystemcannot,inanycircumstances,replacetheneedtoobservespeedlimits,norcanitreplacetheneedforvigilanceonthepartofthedriver.
Youareadvisedtokeepyourfeetnearthepedalsatalltimes.
Switching on the cruise control requires a
minimumvehiclespeedof25mph(40km/h).
Aswellasengagementof:
- fourthgearorhigheronamanualgearbox,
- secondgearorhigherinmanualmodeon
anautomaticgearbox,
- position Donanautomaticgearbox.
Thesystemremainsactiveafterchanginggear
onvehicleswithamanualgearboxand
Stop&Start.
The cruise control is pausedbypressing
button 4orthebrakepedalorontriggeringof
theESCsystemforsafetyreasons.
Itispossibletoexceedtheprogrammedspeed
temporarilybypressingtheacceleratorpedal.
Toreturntotheprogrammedspeed,simply
release the accelerator pedal until the
programmedcruisespeedisreachedagain.
1. Selectcruisecontrolmode.
2. Set the current speed of the vehicle
astheprogrammedspeed/Lowerthe
programmedspeed.
3. Set the current speed of the vehicle
astheprogrammedspeed/Raisethe
programmedspeed.
4. Pause/resumecruisecontrol.
5. Display the list of memorised speeds or,
Acceptthespeedsuggestedbythespeed
limitrecognitionsystem.
Displays in the instrument panel
Switchingofftheignitioncancelsany
programmedspeedvalue.
For more information on Memorising speeds,
refertothecorrespondingsection.
For more information on Speed limit
recognition and memorisation, refer to the
correspondingsection.
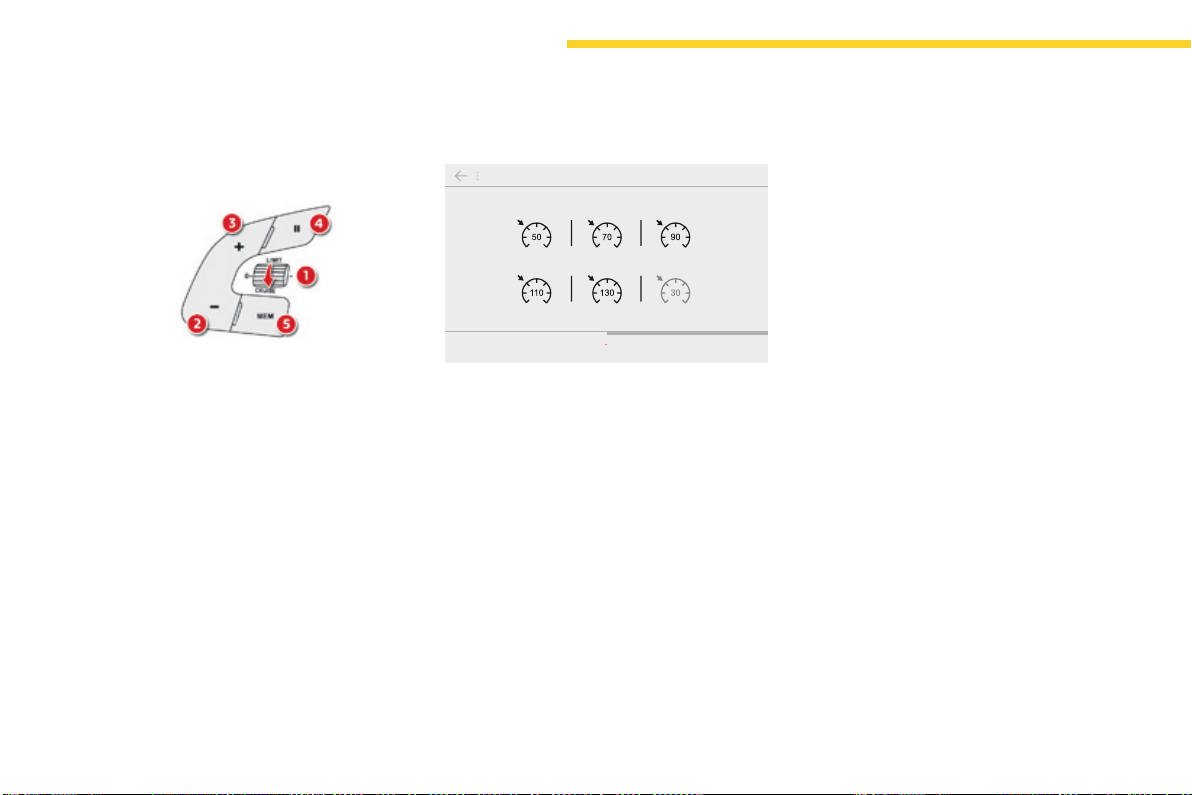
158
Driving
C4-Picasso-II_en_Chap04_conduite_ed01-2016
Exceeding the programmed
speed
Ifthecruisespeedsettingisexceeded,the
displayedspeedflashes.
Thedisplaybecomessteadyagainoncethe
vehiclereturnstothecruisespeedsetting.
Switching off
F Turn thumbwheel 1 to the "0"position.
The display of information related to the
cruisecontroldisappears.
Switching on
Once the cruise control is switched on, you
canmodifythecruisingspeedinoneofthe
followingways:
- usingbuttons2 or 3:
F by successive short presses, to modify
thespeedby+or-1mph(km/h),
Fbyalongpress,tomodifythespeedin
stepsof+or-5mph(km/h),
- bypressingbutton5:
Fthesixmemorisedspeedsaredisplayed
in the touch screen tablet,
Fchooseavalue:itisdisplayedinthe
instrumentpanel.
The selection screen closes after a few
moments.
Themodificationisthenaccepted.
F Turn thumbwheel 1 to the "CRUISE"
position:thecruisecontrolmodeis
selectedbutispaused.
F Press button 2 or 3:yourvehicle'scurrent
speedbecomesthecruisespeed.
Thecruisecontrolisactivated(ON).
Modication of the cruise speed
(speed setting)
- bypressingbutton5, if your vehicle has
speedlimitrecognition:
F the speed to memorise is displayed in
the instrument panel,
F press button 5 againtosavethespeed.
The value is then displayed in the instrument
panel.
For more information on Speed limit
recognition and memorisation, refer to the
correspondingsection.
Pause
You can pause the cruise control at any time
bypressingbutton4:thescreenconfirmsthe
pause.
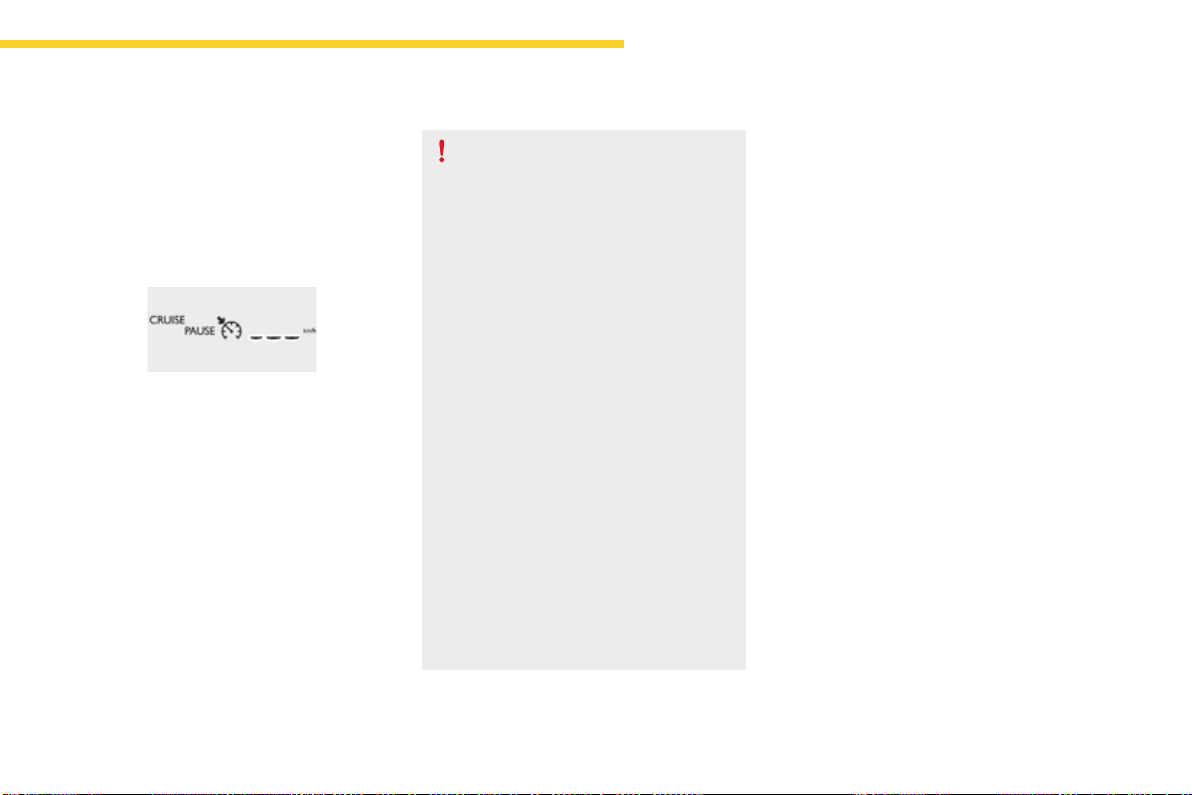
159
4
Driving
C4-Picasso-II_en_Chap04_conduite_ed01-2016
Flashingofthedashesindicatesafaultwiththe
cruisecontrol.
HaveitcheckedbyaCITROËNdealerora
qualifiedworkshop.
Operating fault
When the cruise control is switched on,
be careful if you maintain the pressure
ononeoftheprogrammedspeed
changingbuttons:thismayresultina
veryrapidchangeinthespeedofyour
vehicle.
Do not use the cruise control on
slipperyroadsorinheavytraffic.
On a steep descent, the cruise control
will not be able to prevent the vehicle
fromexceedingtheprogrammedspeed.
Onsteepclimbsorwhentowing,the
programmedspeedmaynotbereached
ormaintained.
The use of mats not approved by
CITROËN may interfere with the
operationofthecruisecontrol.
Toavoidanyriskofjammingofthe
pedals:
- ensure that the mat is secured
correctly,
- neverfitonematontopofanother.
160
Driving
C4-Picasso-II_en_Chap04_conduite_ed01-2016
Dynamic cruise control
Systemthatallows,inadditiontomaintainingyourvehicle'sspeedatavaluethatyouhavedefined,theinter-vehicletimeyouhaveselectedbetween
yourvehicleandtheoneinfronttobemaintained.
Principles of operation
Usingaradarwitharangeofabout100metres,
located at the front of the vehicle, this system
detectsavehiclerunninginfrontofyour
vehicle.
It automatically adapts the speed of the vehicle
tothatofthevehicleinfront.
Ifthevehicleinfrontisrunningmoreslowly,
thesystemprogressivelyreducesthespeedof
yourvehicleusingjustenginebraking(asifthe
driver had pressed the "-"button).
Ifyourvehicleistooclosetoorapproaching
tooquicklythevehicleinfront,thedynamic
cruisecontrolisautomaticallydeactivated.
Thedriveristhenalertedbyanaudiblesignal,
accompaniedbyamessage.
Choice of the type of cruise control
The choice between the "dynamic" and
"standard" cruise control is done in the Driving
menu.
F In the Driving menu, select the "Driving
assistance" tab, then "Dynamic cruise
control" to activate or deactivate the
dynamiccruisecontrol.
For more information on the Cruise
control,refertothecorresponding
section.
F Place the cruise control
thumbwheelat"CRUISE".
Ifthevehicleinfrontacceleratesorchanges
lane,thedynamiccruisecontrolprogressively
accelerates your vehicle to return to the
programmedspeed.
If the driver operates a direction indicator
totheleft(lefthanddrive)ortheright(right
handdrive),toovertakeaslowervehicle,the
dynamic cruise control allows your vehicle to
temporarily approach the vehicle in front to
assisttheovertakingmanoeuvre,thoughnever
exceedingtheprogrammedspeed.
161
4
Driving
C4-Picasso-II_en_Chap04_conduite_ed01-2016
The dynamic cruise control is switched on
manually:itrequiresthatthespeedofthe
vehicle be between 25 and 90 mph (40 and
150km/h),aswellastheengagementof:
- fourthgearorhigherwithamanual
gearbox,
- secondgearorhigherwithanautomatic
gearboxinmanualmode,
- position Dwithanautomaticgearbox.
Thesystemremainsactiveafterchanginggear
onvehicleswithamanualgearboxand
Stop&Start.
General points
The dynamic cruise control can be paused
manuallyorautomatically:
- bypressingbutton4,
- bypressingthebrakepedal,
- in the event of operation of the ESC, for
safety reasons,
- in the event of operation of the electric
parkingbrakecontrollever,
- when an inter-vehicle time threshold is
reached(calculatedaccordingtothe
relative speeds of your vehicle and the
vehicle in front and the inter-vehicle time
settingchosen),
- when the distance between your vehicle
and the one in front becomes too small,
- when the speed of the vehicle in front is too
low,
- when the speed of your vehicle becomes
toolow.
The dynamic cruise control cannot in any
circumstances replace the observation
ofspeedlimits,northeneedforvigilance
onthepartofthedriver.
Itisrecommendedthatyoualwayskeep
yourfeetclosetothepedals.
Ifthespeedsettingselectedisabove
90mph(150km/h),thesystemswitches
to standard cruise control operation,
withnoadjustmentoftheinter-vehicle
safedistance(amessageappearsin
theinstrumentpanel).
Theinter-vehicletimesettingiskeptin
memoryonswitchingofftheignition.
The dynamic cruise control operates by
dayandatnight,infogorinmoderate
rainfall.
Thesystemdoesnotactonthebraking
system,butworksonlywithenginebraking.
Theregulationrangeislimited:therewill
nolongerbeanyadjustmentofspeedifthe
differencebetweentheprogrammedspeed
settingandthespeedofthevehicleinfront
becomestoohigh(18mph(30km/h)).
If the difference between the
programmedspeedsettingandthe
speed of the vehicle in front is too
great,thespeedcannotbeadjusted:
the cruise control is automatically
deactivated.
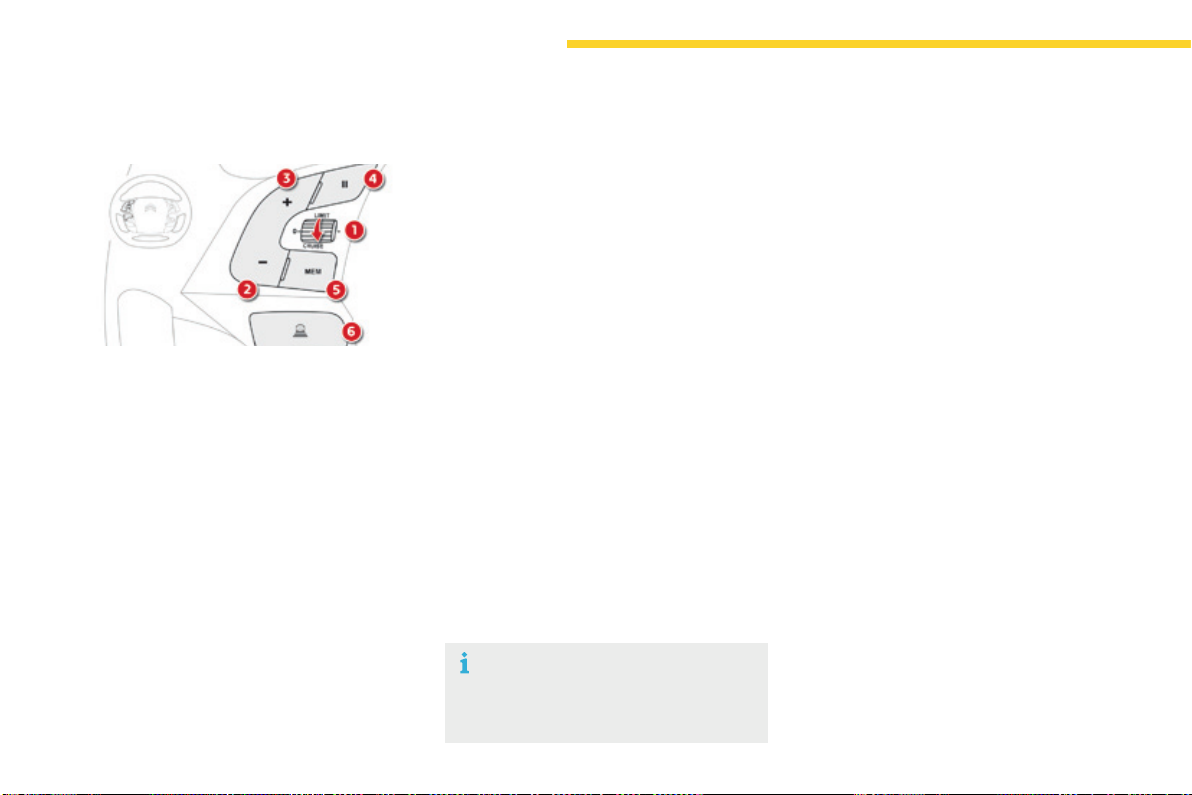
162
Driving
C4-Picasso-II_en_Chap04_conduite_ed01-2016
1. Selectcruisecontrolmode.
2. Use the current speed of the vehicle as
thecruisespeedsetting/Lowerthespeed
setting.
3. Use the current speed of the vehicle as
thecruisespeedsetting/Raisethespeed
setting.
4. Pause/Resumethecruisecontrol.
5. Display the list of memorised speeds, or
Acceptthespeedsuggestedbythespeed
limitrecognitionsystem.
6. Select the inter-vehicle distance ("Close",
"Normal", "Distant")
For more information on Memorising speeds,
refertothecorrespondingsection.
For more information on Speed limit
recognition and its memorisation, refer to the
correspondingsection.
Steering mounted controls
Switching on
The active cruise control must be selected in
the Drivingmenu.
F Turn the thumbwheel 1 to the "CRUISE"
position:cruisecontrolmodeisselected,
butispaused.
F Press one of the buttons 2 or 3:thecurrent
speed of your vehicle becomes the cruise
speedsetting.
Thecruisecontrolisactivated(ON).
By default, the inter-vehicle time is set at
2seconds.
Otherwise, the last speed value set will be used
foroperationofthesystem.
Modication of the cruise control
speed
- usingbuttons2or3:
F by successive short presses, to modify
bystepsof+or-1mph(km/h),
F by a maintained press, to modify in steps
of+or-5mph(km/h).
- bypressingbutton5:
Fthesixmemorisedspeedsettingsare
displayed in the touch screen tablet,
Fchooseaspeedsetting:itisdisplayedin
theinstrumentpanel.
The selection screen closes after a few
moments.Themodificationisthentakeninto
account.
- bypressingbutton5, if your vehicle has
speedlimitrecognition:
F the speed to memorise is displayed in
the instrument panel,
F press button 5 againtosavethespeed.
Thespeedsettingisthendisplayedinthe
instrumentpanel.
As a precaution, it is recommended that
youselectaspeedsettingclosetothe
currentspeedofyourvehicle.
Operation
For more information on Speed limit
recognition and its memorisation, refer to the
correspondingsection.
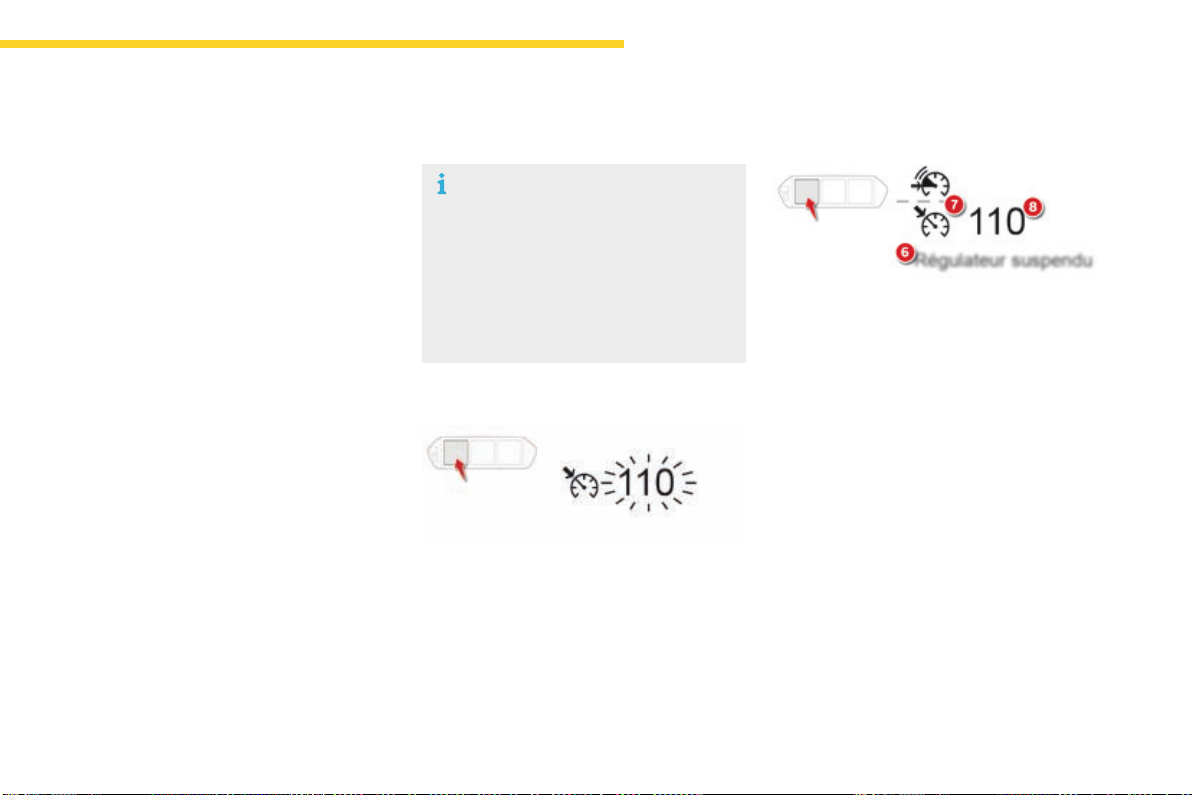
163
4
Driving
C4-Picasso-II_en_Chap04_conduite_ed01-2016
In the event of the presence of a
vehicle detected by the radar, if the
speedselectedismuchhigherthan
the speed of that vehicle, the system
isnotactivatedandthealertmessage
"Activation not possible, conditions
unsuitable"isdisplayeduntildriving
conditions are safe to allow activation of
thesystem.
Exceeding the speed setting
Theinformationisgroupedtogetherinthe
instrumentpanel.
6. Indicationofcruisecontrolpause/resume.
7. Indication of selection of cruise control
mode, or
vehiclespeedadjustmentphase.
8. Cruisespeedsetting,or
adjustedspeedlowerthanthecruise
setting.
Displays in the instrument panel
Modication of the inter-vehicle
distance
Press button 6 to choose a new inter-vehicle
distancesettingfromthe3available("Close",
"Normal", "Distant").
This value remains in memory, whatever the
stateofthesystem.
Itispossibletoexceedthespeedsetting
temporarilybydepressingtheaccelerator
pedal.
Then simply release the accelerator pedal to
returntotheprogrammedspeed.
Ifthespeedsettingisunintentionallyexceeded,
descendingasteephillforexample,thespeed
settingintheinstrumentpanelflashesasa
warning.
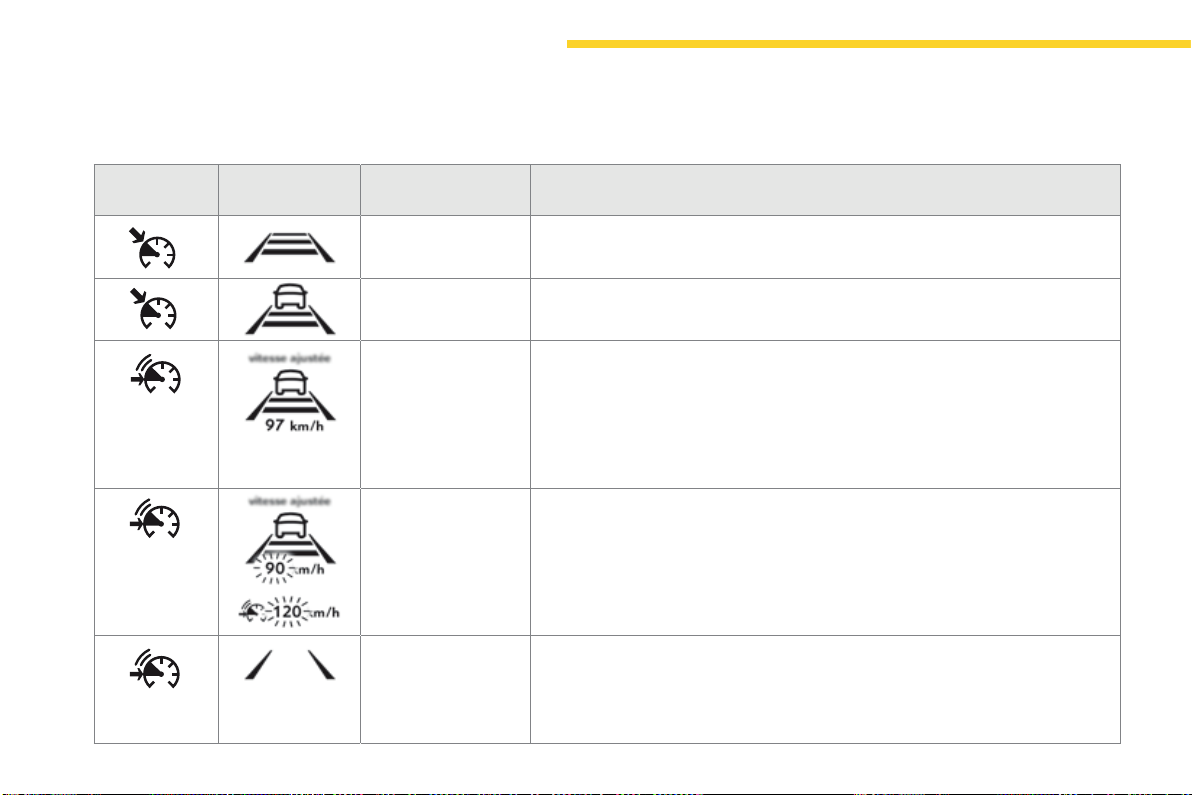
164
Driving
C4-Picasso-II_en_Chap04_conduite_ed01-2016
Symbol
Display in the
instrument panel
Associated message Comments
Novehicledetected:
thesystemoperatesasastandardcruisecontrol.
Detectionofavehicle,atthelimitoftherangeoftheradar:
thesystemoperatesasastandardcruisecontrol.
"SPEED ADJUSTED" Detectionofavehiclethatistoocloseorrunningataspeedlowerthanyour
vehicle'scruisespeedsetting.
Thesystemusesenginebrakingtoslowyourvehicleandthenholditatthespeedof
thevehicleinfrontsoastomaintaintheprogrammedinter-vehicletime.
Theregulationrangeislimitedtoamaximumdifferenceof20mph(30km/h)
betweenthespeedsettingandthespeedofthevehicleahead.
"SPEED ADJUSTED" Whentheadjustedspeedreachesthecontrollimit(speedsetting-20mph
(30km/h)),theadjustedspeedflashestogetherwiththespeedsetting,tosignalthat
automaticdeactivationofthesystemisimminent.
"Cruise control
paused"
Ifthesystemexceedsthelimitofspeedadjustmentpossiblebythesystemand
in the absence of any reaction by the driver (operation of the direction indicator,
changeoflane,reductionofthespeedofthevehicle),thesystemisautomatically
paused.
Thedisplayofthedeactivationmessageisaccompaniedbyanaudiblesignal.
Driving situations and associated alerts
Thetablebelowdescribesthealertsandthemessagesdisplayedforthedifferentdrivingsituations.
Thedisplayofthesealertsisnotsequential.
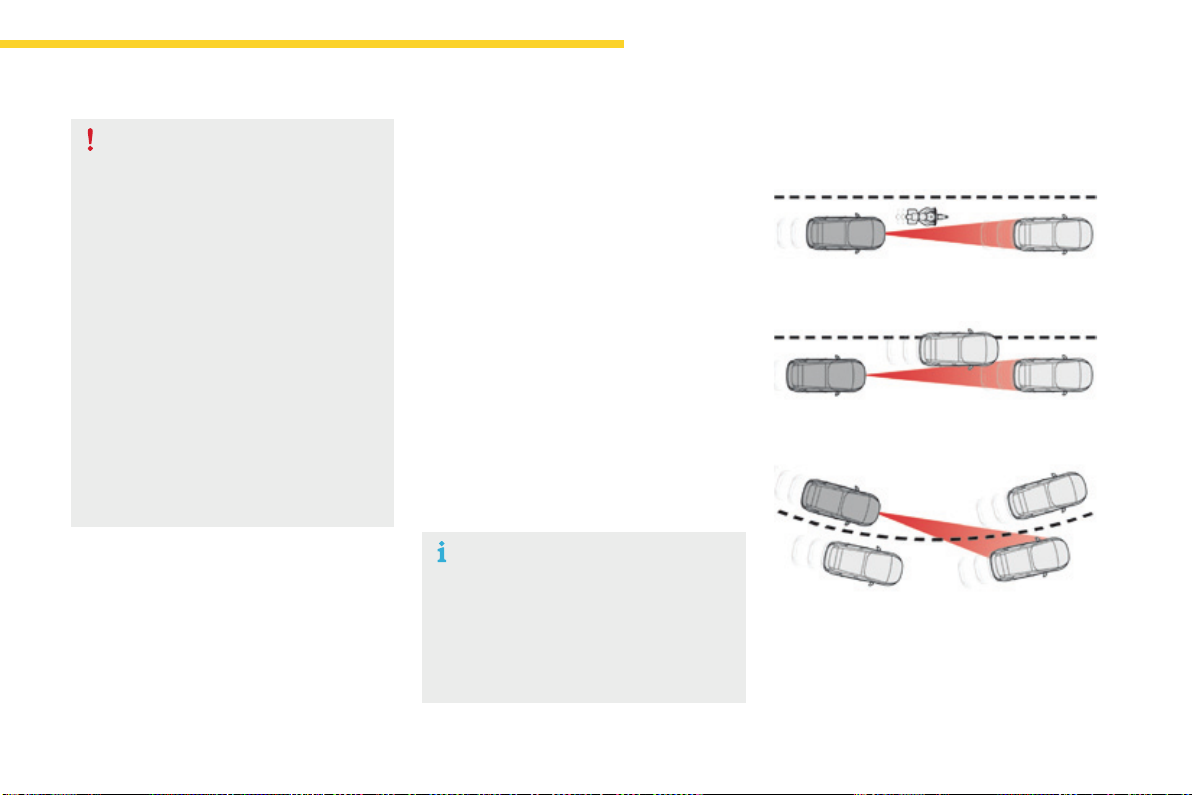
165
4
Driving
C4-Picasso-II_en_Chap04_conduite_ed01-2016
When the dynamic cruise control is
automatically paused, it can only be
reactivated when safe conditions are
restored.Themessage"Activation
not possible, conditions unsuitable"
is displayed while reactivation is not
possible.
When the conditions allow, it is
recommended that the system be
reactivatedbypressingbutton2 or 3,
whichwillmakethecurrentspeedof
your vehicle the new cruise speed
setting,ratherthanbypressingbutton4
(on/pause)whichreactivatesthesystem
usingtheoldcruisespeedsetting,
which may be very different from the
currentspeedofyourvehicle.
Thedynamiccruisecontrolusesonlyengine
brakingtoslowthevehicle.Consequentlythe
vehiclelosesspeedslowly,aswhenreleasing
theacceleratorpedal.
Thesystemispausedautomatically:
- if the vehicle in front slows down too much
or too suddenly, and the driver does not
brake,
- if a vehicle comes between your vehicle
and the vehicle in front,
- if the system does not slow the vehicle
enoughtocontinuetomaintainasafe
distance,forexamplewhendescendinga
steephill.
Limits of operation
Astheradar'sfieldofviewisquitenarrow,itis
possiblethatthesystemmaynotdetect:
Thecruisecontroldoesnottakeaccountof:
- stationary vehicles,
- vehiclesdrivingintheoppositedirection.
- vehicles of reduced width, such as
motorcycles,forexample,
- vehiclesnotrunninginthemiddleofthe
lane,
- vehiclesenteringacorner,
- vehicleschanginglaneatthelastmoment.
Theregulationrangeislimitedtoamaximum
differenceof20mph(30km/h)betweenthe
speedsettingandthespeedofthevehiclein
front.Abovethis,thesystemgoesintopauseif
asafedistanceisnotmaintained.
Severe weather conditions (very heavy
rain, accumulations of snow in front
of the radar) can interfere with the
operationofthesystem,resultingin
thedisplayofthemessage"SYSTEM
INACTIVE:Visibilityreduced".The
function remains unavailable until the
messagedisappears.
166
Driving
C4-Picasso-II_en_Chap04_conduite_ed01-2016
In the event of a fault with the dynamic cruise
control,youarealertedbyanaudiblesignal
andthedisplayofthemessage"Drivingaid
functionsfault".
HavethesystemcheckedbyaCITROËN
dealeroraqualifiedworkshop.
Whenthecruisecontrolisworking,take
careifmakingamaintainedpresson
oneofthecruisecontrolprogrammed
speedmodificationbuttons:thiscan
leadtoaveryquickchangeinthe
speedofyourvehicle.
Do not use the dynamic cruise control
onslipperysurfacesorinheavytraffic.
Whendescendingasteephill,the
cruise control may not be able to
preventthevehiclefromexceedingthe
programmedspeed.
Whenascendingasteephillorwhen
towing,itmightnotbepossibletoattain
ormaintaintheprogrammedspeed.
Operating fault
The operation of the radar, located in
the front bumper, may be disturbed by
accumulationsofgrime(dust,mud...)
or in certain weather conditions (snow,
ice...).
Themessage"SYSTEMINACTIVE:
Visibilityreduced"isdisplayedtosignal
that the system has been put into
standby.
Cleanthefrontbumperregularly.
The use of mats not approved by
CITROËN may interfere with the
operationofthecruisecontrol.
Toavoidanyriskofjammingthepedals:
- ensure that mats are secured
correctly,
- neverfitonematontopofanother.
167
4
Driving
C4-Picasso-II_en_Chap04_conduite_ed01-2016
Dynamic cruise control with Stop function
Thedynamiccruisecontrolisadriving
aid that cannot in any circumstances
replace the observation of speed limits
and safe distances, nor the need for
vigilanceonthepartofthedriver.
Itisrecommendedthatyoualwayskeep
yourfeetclosetothepedals.
Thedrivermustbereadytotakeback
control of their vehicle at any time,
usingthebrakeoracceleratorpedalas
appropriate.
Thissystemassurestwofunctions:
- automaticregulationofthespeedofthe
vehicletoavalueprogrammedbythe
driver,
- automaticadjustmentofthedistance
between your vehicle and the vehicle
ahead.
Itmanagestheaccelerationanddeceleration
ofthevehiclebyautomaticallyactingonthe
engineandthebrakingsystem.
To do this, the system has a radar, located in
themiddleofthefrontbumper,withamaximum
rangeof150metres.
Principles
Thissystemdetectsavehiclerunninginfrontof
yourvehicle,travellinginthesamedirection.
It automatically adapts the speed of your
vehicle to that of the vehicle in front, to maintain
aconstantdistance.
Ifthevehicleinfrontisrunningmoreslowly,the
systemslows,orevenstopsyourvehicle,using
enginebrakingandthebrakingsystem.
Ifthebrakingsystemisusedtodeceleratethe
vehicle,thebrakelampscomeon.
Ifthevehicleinfrontacceleratesorchanges
lane,thecruisecontrolprogressively
accelerates your vehicle to return to the
programmedspeed.
If the driver operates a direction indicator to
overtakeaslowervehicle,thedynamiccruise
control allows your vehicle to temporarily
approach the vehicle in front to assist the
overtakingmanoeuvre,thoughneverexceeding
theprogrammedspeed.
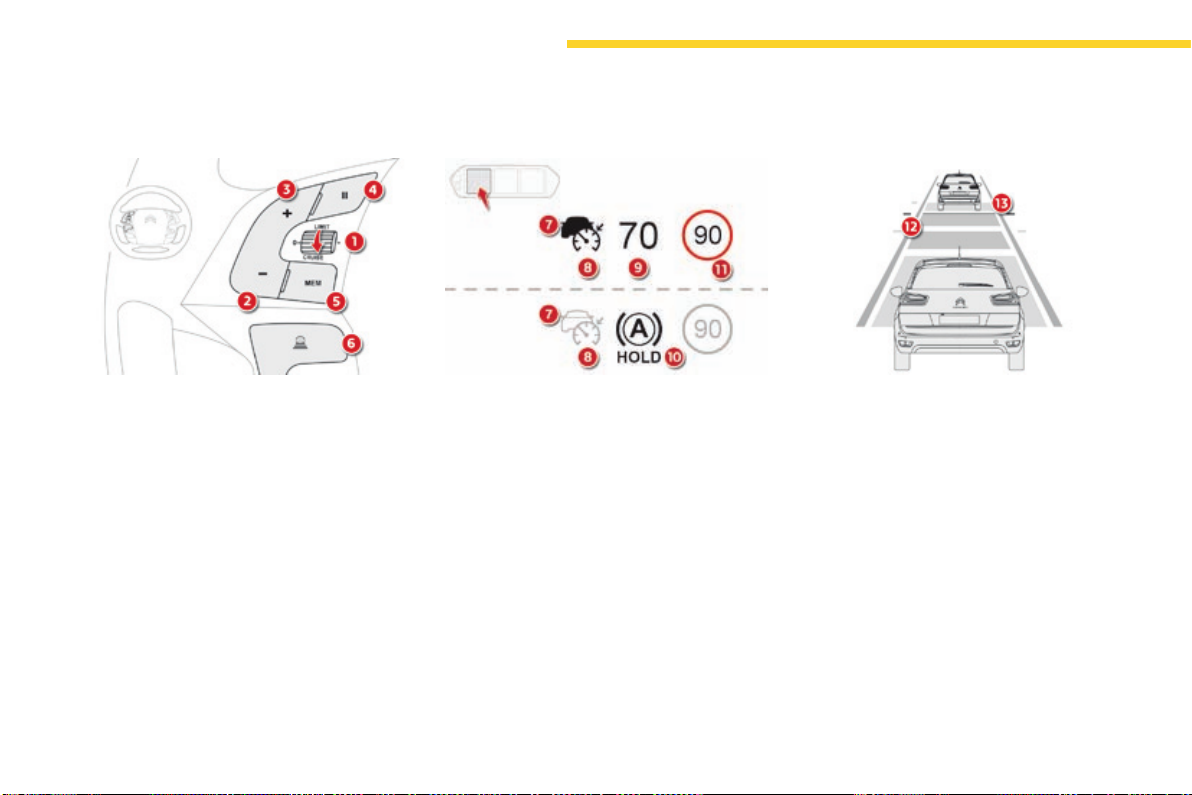
168
Driving
C4-Picasso-II_en_Chap04_conduite_ed01-2016
Steering mounted controls
1. Selectcruisecontrolmode.
2. Use the current speed as the speed
setting/Lowerthespeedsetting.
3. Use the current speed as the speed
setting/Raisethespeedsetting.
4. Pause/Resumecruisecontrol.
5. Usethespeedsuggestedbythespeed
limitrecognitionsystem.
6. Displayandadjusttheinter-vehicle
distancesetting.
For more information on Speed limit
recognition and its memorisation, refer to the
correspondingsection.
Displays in the instrument panel
7. Indicationofthepresence/absenceofa
targetvehicle.
8. Indicationofcruisecontrolactivation/
deactivation.
9. Speedsetting.
10. Indicationthatvehicleisheldstationary.
11. Speedsuggestedbythespeedlimit
recognitionsystem.
If a vehicle is detected, the symbol 7 is filled
with the colour associated with the cruise
controlmode.Bydefault,thesymbol7 is
empty.
In cruise control activated mode, the symbol 8
appearsingreen.Bydefault,thesymbol8
appearsingrey.
12. Inter-vehicledistancesetting.
13. Positionofthevehicledetectedbytheradar.
This information is visible in the instrument
panelin"Driving"displaymode.
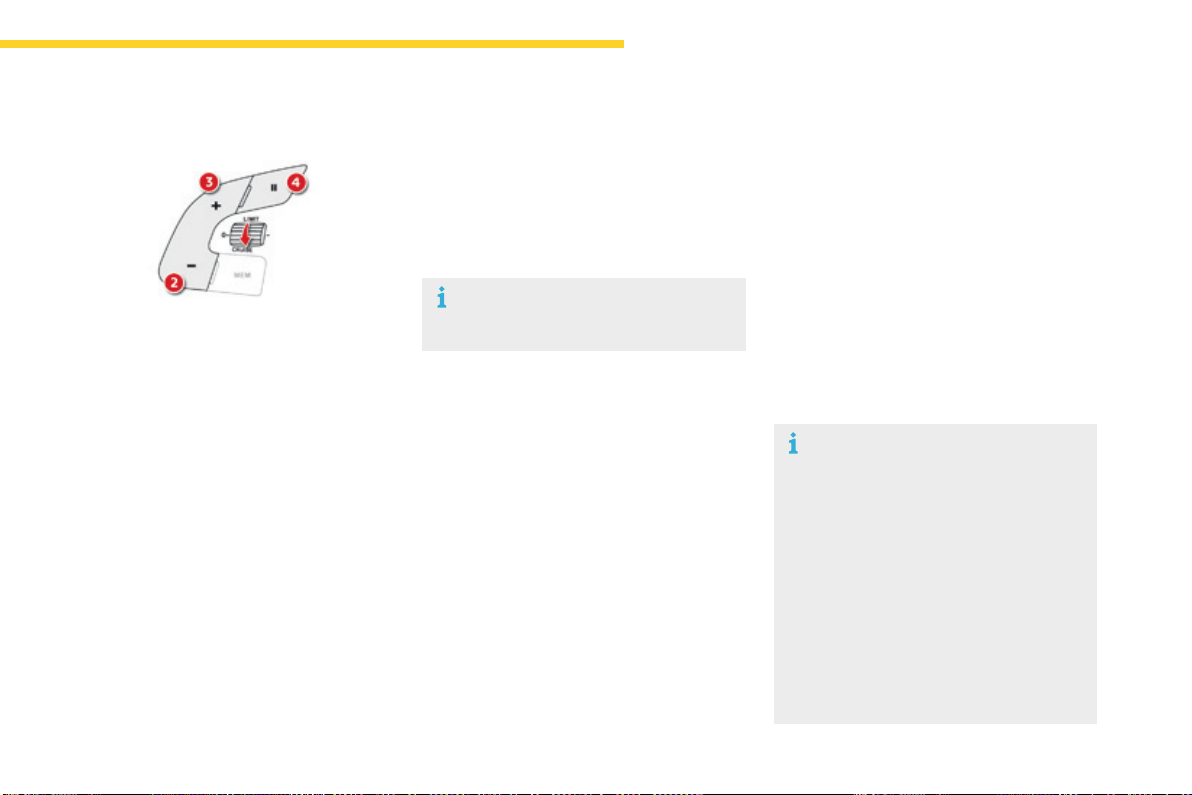
169
4
Driving
C4-Picasso-II_en_Chap04_conduite_ed01-2016
Switching on
The cruise control is switched on manually,
it requires a vehicle speed of between 18 and
112mph(30and180km/h).
AnautomaticgearboxmustbeinpositionD
or M.
Otherwise,thelastsettingmadewillbeused
whenswitchingonthesystem.
Switchingofftheignitioncancelsany
programmedspeedsetting.
Whenthecruisecontrolisoperating,
Stop & Start is automatically
deactivated.
Pause
The dynamic cruise control can be paused
manuallyby:
- actionbythedriver:
● onbutton4,
● onthebrakepedal,
● ontheelectricparkingbrakecontrol,
● whenchangingfromD to N with an
automaticgearbox.
- or automatically, if operation of the ESC
systemistriggeredforreasonsofsafety.
Followingbrakingofthevehicle
bringingittoacompletestop,the
systemholdsthevehiclestationary;
thecruisecontrolispaused.Thedriver
should press the accelerator pedal to
move off, then reactivate the system
byexceeding18mph(30km/h)and
pressingbutton2, 3 or 4.
Ifthedrivertakesnoactionfollowing
thisimmobilisation,theelectricparking
brakeisappliedautomaticallyaftera
fewminutes.
F Withtheignitionon,turnthethumbwheel1
to the "CRUISE"position:cruisecontrol
modeisselected,butnotstarted(grey).
F Vehiclemoving,pressoneofthebuttons2
or 3:thecurrentspeedofyourvehicle
becomesthecruisespeedsetting.
Thecruisecontrolisactivated(green).
By default, the inter-vehicle distance is set at
"Normal"(2dashes).
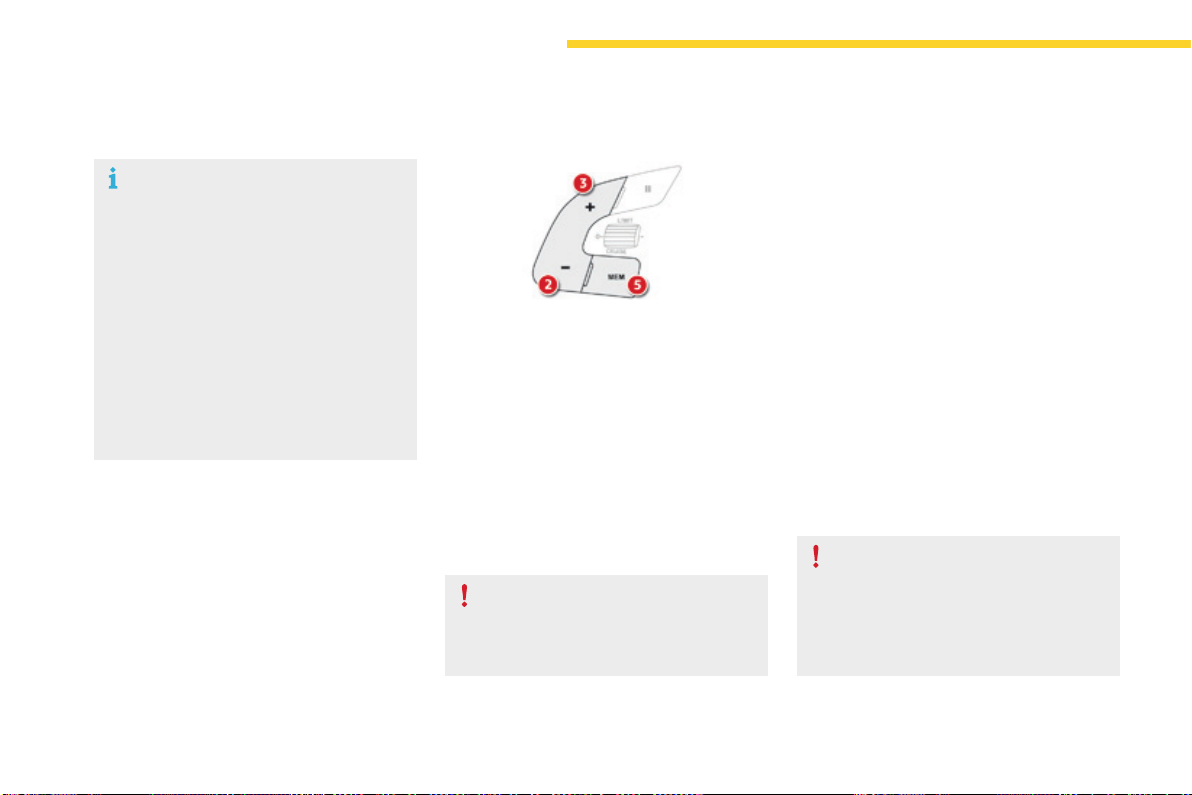
170
Driving
C4-Picasso-II_en_Chap04_conduite_ed01-2016
When the cruise control is paused,
it can only be reactivated when all of
thesafetyconditionsaremet.The
message"Activationnotpossible,
conditions unsuitable" is displayed while
reactivationisnotpossible.
Wait until the speed of the vehicle
isclosetothespeedsettingbefore
reactivatingthesystem-bypressing
button 2 or 3 - in order to set your
currentspeedasthenewspeedsetting.
Modification of the speed setting
Modication from the speed limit
recognition system
F The speed to be memorised is displayed in
theinstrumentpanel.
F Makeaninitialpressonbutton5;a
messageisdisplayedtoconfirmthe
memorisationrequest.
F Press button 5againtosavethesuggested
speed.
The speed is then displayed in the instrument
panelasthenewspeedsetting.
As a precaution, it is recommended that
youselectacruisespeedsettingclose
to the current speed of your vehicle, so
as to avoid any sudden acceleration or
decelerationofthevehicle.
For more information on Speed limit
recognition and its memorisation, refer to the
correspondingsection.
Enginerunningandcruisecontrolon(green),
youcanmodifythespeedsetting.
Modication from the current
speed
F By successive short presses on button 2 or
3,toraiseorlowerthesettinginstepsof+
or-1mph(km/h),
F By a maintained press on button 2 or 3,
toraiseorlowerthesettinginsteps
of+or-5mph(km/h).
Takecare:aprolongedpresson
button 2 or 3willcauseaveryquick
changeinthespeedofyourvehicle.
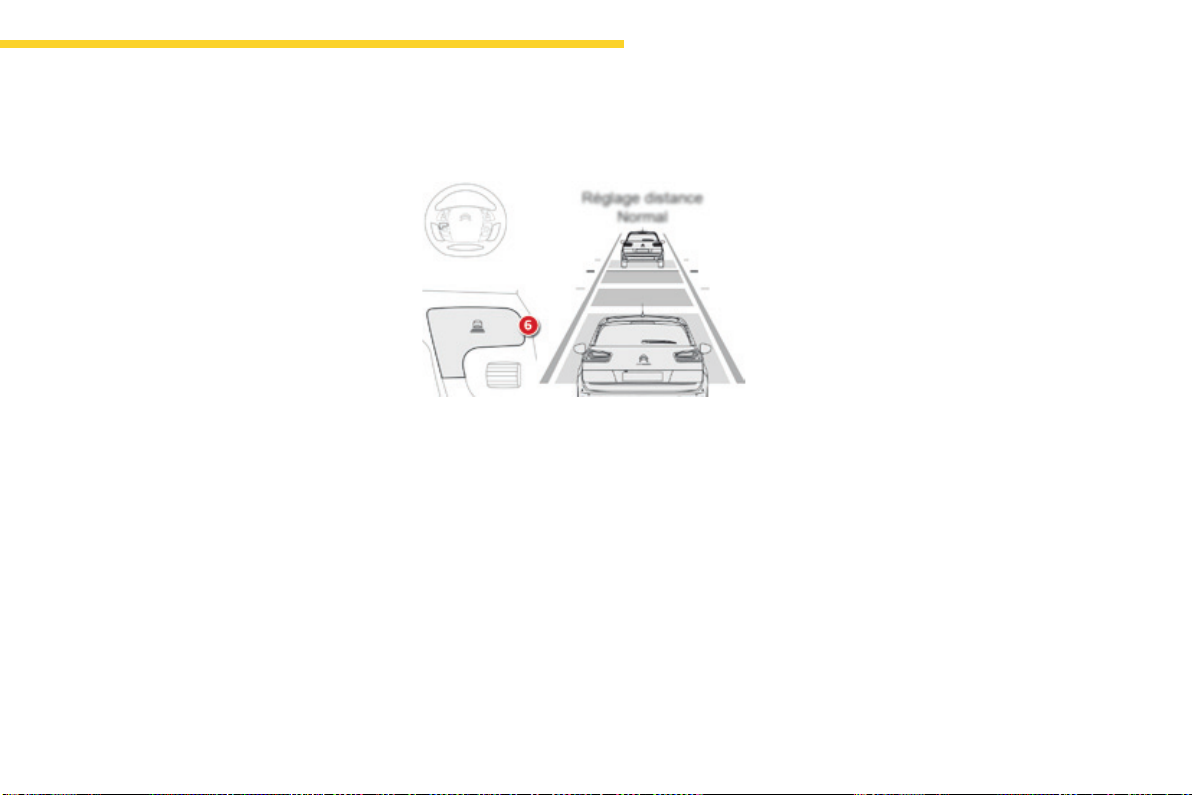
171
4
Driving
C4-Picasso-II_en_Chap04_conduite_ed01-2016
Modification of the inter-vehicle distance setting
Threepredefinedinter-vehicledistancesettings
areoffered:
- "Distant"(3dashes),
- "Normal" (2 dashes),
- "Close"(1dash).
Enginerunningandcruisecontrolselected
(grey),youcanmodifytheinter-vehicle
distancesetting:
F press button 6 to display the selection
screen for inter-vehicle distance,
F press button 6repeatedlytocyclethrough
thepredefinedsettings.
The selection screen closes after a few
seconds.
Themodificationisthentakenintoaccount.
Thissettingremainsinmemory,whateverthe
stateofthesystemandwhentheignitionis
switchedoff.
Itispossibletoexceedthespeedsetting
temporarilybydepressingtheaccelerator
pedal.
Thecruisecontrolnolongermanagesthe
brakingsystemduringthisperiod.
Simply release the accelerator pedal to return
totheprogrammedspeed.
Iftheprogrammedspeedsettingisexceeded,
thedisplayofthespeedsettingdisappears
andamessage"Cruisecontrolsuspended"
is displayed until the accelerator pedal is
released.
Exceeding the programmed
setting
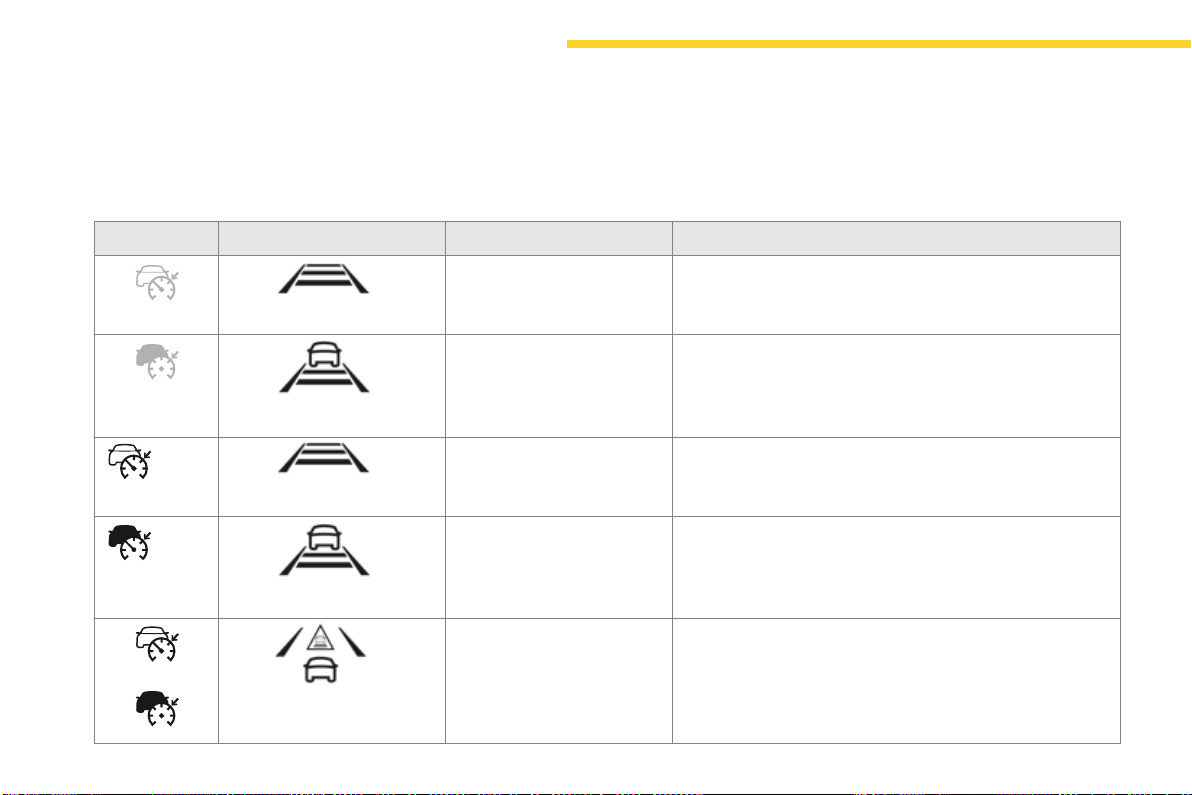
172
70
70
Driving
C4-Picasso-II_en_Chap04_conduite_ed01-2016
Driving situations and associated alerts
Tobenefitfromalloftheinformationavailableintheinstrumentpanel,youmustfirstselectthe"DRIVING"displaymode.
Thefollowingtabledescribesthealertsandthemessagesdisplayedforthedifferentdrivingsituations.
Thedisplayofthesealertsisnotsequential.
Indicator Display Associated message Comment
accordingtotheinter-vehicle
distance selected
"Cruise control paused" Systempaused.
Novehicledetected.
accordingtotheinter-vehicle
distance selected
"Cruise control paused" Systempaused.
Avehiclehasbeendetected.
accordingtotheinter-vehicle
distance selected
"Cruise control on" Systemactivated.
Novehicledetected.
accordingtotheinter-vehicle
distance selected
"Cruise control on" Systemactivated.
Avehiclehasbeendetected.
or
"Cruise control suspended" Systemactivated.
Thedriverhastemporarilytakencontrolofthevehicleby
accelerating.
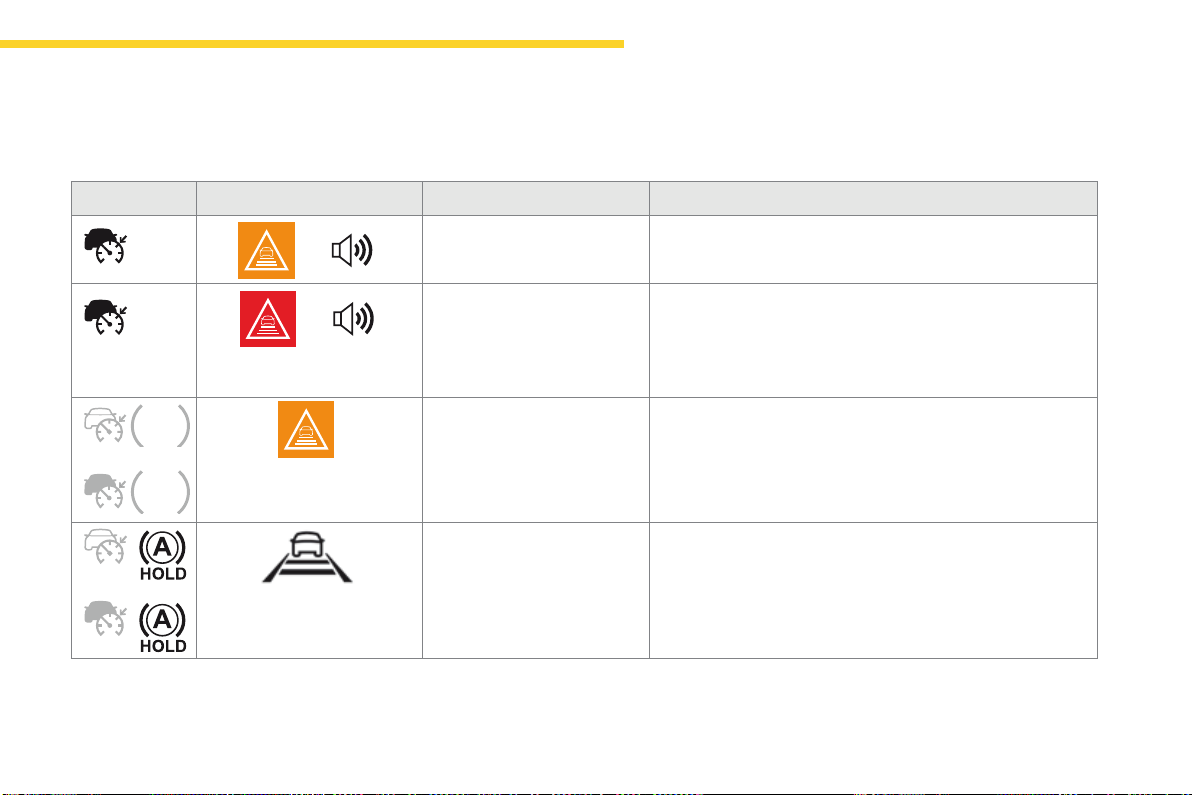
173
4
70
70
70
70
Driving
C4-Picasso-II_en_Chap04_conduite_ed01-2016
Indicator Display Associated message Comment
+
"Takebackcontrolofthe
vehicle"
Thedrivershouldtakecontrolofthevehiclebyacceleratingor
braking,dependingonthecircumstances(sharpcurve).
+
"Takebackcontrolofthe
vehicle"
Thesystemcannotmanagethecriticalsituationalone
(emergencybrakingofthetargetvehicle,rapidinsertionof
anothervehiclebetweenthetwovehicles).
The driver must immediately take back control of the
vehicle.
or
"Activation not possible,
conditions unsuitable"
The system refuses to activate the cruise control (speed outside
theoperatingrange,windingroad).
or
accordingtotheinter-vehicle
distance selected and the actual
distancefromthetargetvehicle
"Cruise control paused"
(for a few seconds)
Thesystemhasbroughtthevehicletoacompletestopandis
holdingitimmobilised.
Thedrivershouldacceleratetomoveoffagain.
The cruise control remains paused until the driver reactivates it
withthespeedofthevehicleabove18mph(30km/h).
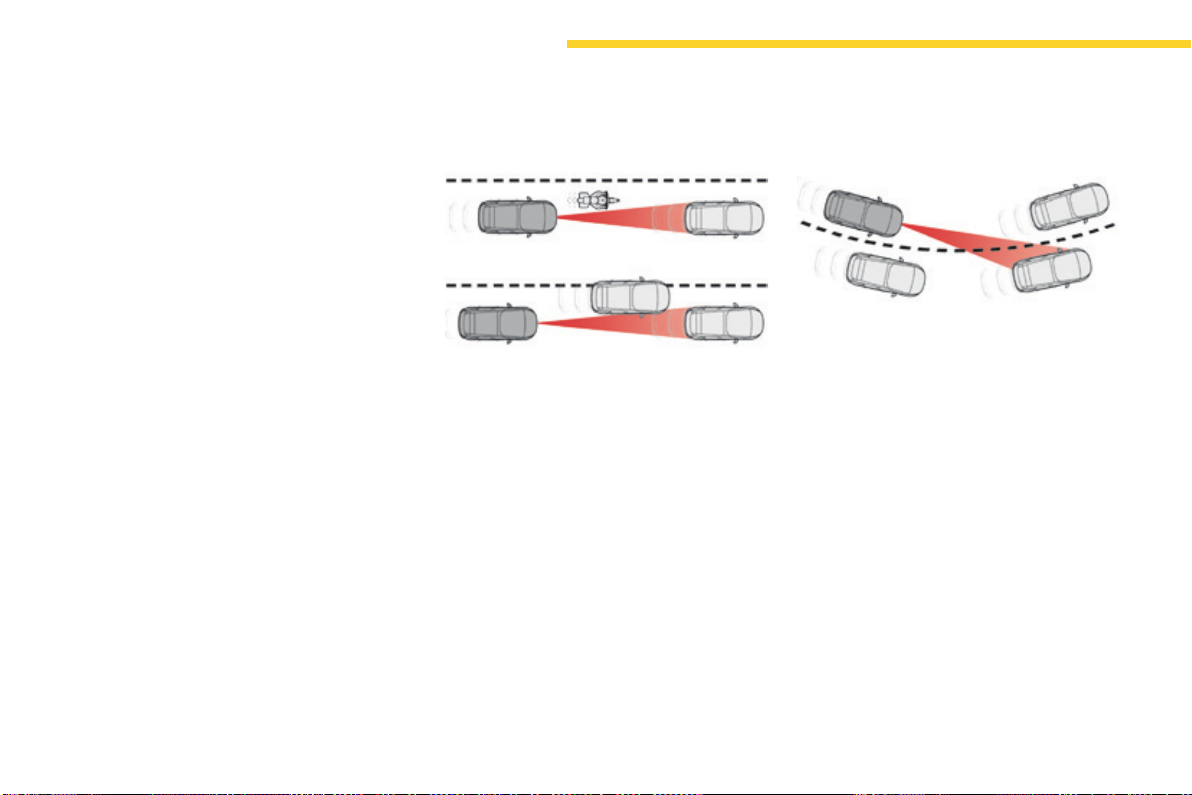
174
Driving
C4-Picasso-II_en_Chap04_conduite_ed01-2016
Limits of operation
Thesystemcannotexceedthelimitsofthe
lawsofphysics.
It is recommended that the system be
deactivated when the "space-saver" spare
wheelisinuse.
The system should not be activated when
towingatrailer.
In certain critical situations, the system will
encouragethedrivertoimmediatelytakeback
control:
- if the vehicle in front slows down too much
or too suddenly, and the driver does not
brake,
- if a vehicle comes between your vehicle
andthevehicleinfront.
Astheradar'sfieldofdetectionisquitenarrow,
itispossiblethatthesystemmaynotdetect:
- vehicles of reduced width (motorcycles,
scooters...),
- vehiclesnotrunninginthemiddleofthe
lane,
- vehiclesenteringacorner,
- vehiclessuddenlypullingout.
Thecruisecontroldoesnottakeaccountof:
- pedestrians, cyclists, animals,
- stationaryvehicles(trafficjam,redlight,
breakdown...),
- vehiclescrossingajunction,
- vehiclesdrivingintheoppositedirection.
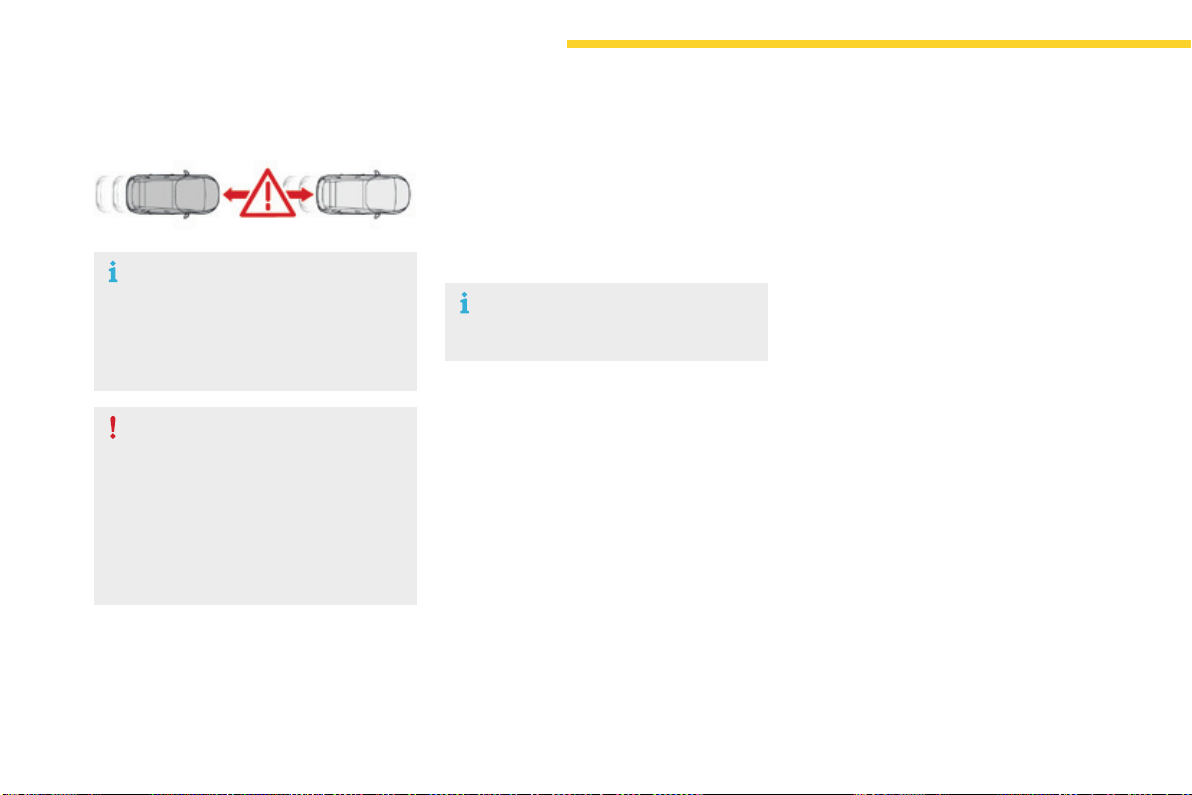
176
Driving
C4-Picasso-II_en_Chap04_conduite_ed01-2016
Collisionriskalert
Systemprovidingawarningtothedriverthattheirvehicleisatriskofcollisionwiththevehicleinfront.
Thecollisionriskalertsystemcanbeactivated
ordeactivatedinthetouchscreentablet.
In the Driving menu, select the "Settings" tab,
then "Driving aid" and "Collision risk alert".
Thissystemhasbeendesignedto
improvedrivingsafety.
It is the responsibility of the driver to
keepaconstantcheckonthestateof
the traffic, to assess the relative speed
anddistanceofothervehicles.
Thecollisionriskalertsystemcannever
replacetheneedforvigilanceonthe
partofthedriver.
This system operates from 20 mph
(30km/h),onlywhenothervehiclesare
runninginthesamedirectionasyour
vehicle;thesystemdoesnotdetect
stationaryobjects.Aradarisfittedat
thefrontofthevehicle.
The alert thresholds determine how you want to
bealertedtothepresenceofavehiclerunning
infrontofyou.
Youcanchoosefromthreethresholds:
- 1:"Distant".
- 2:"Normal".
- 3:"Close".
Setting the thresholds for
the alert
This function can be deactivated
permanently by a CITROËN dealer
oraqualifiedworkshop.
In the Driving menu, select the "Settings" tab,
then "Driving aid" and select the symbol for
the "Collision risk alert"function:
F modifythealertthresholdusingthearrows
orthecursor.
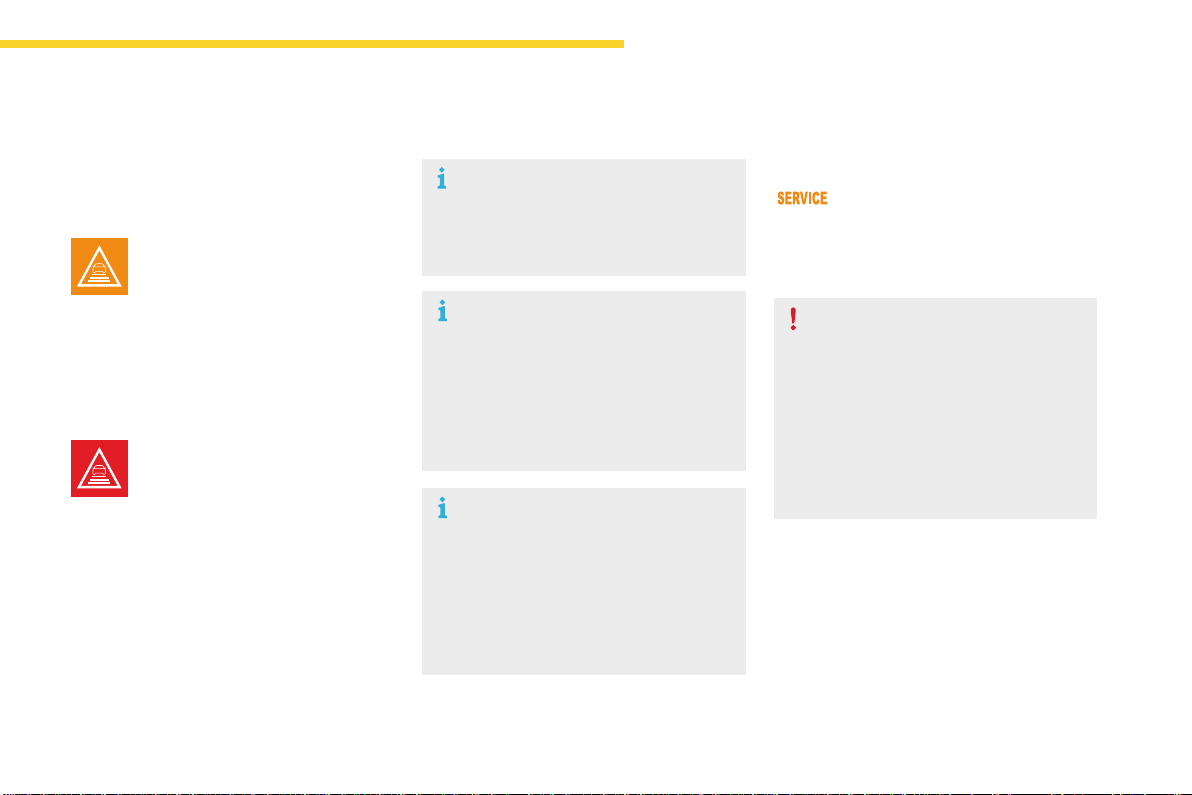
177
4
Driving
C4-Picasso-II_en_Chap04_conduite_ed01-2016
Thechangefromonelevelofalert
tothenexttakesplaceifthedriving
conditionsdonotchange(speed
unchanged,nochangeoflane...)
Severe weather conditions (very heavy
rain, accumulation of snow in front
of the radar) may interfere with the
operationofthesystem,resultingin
thedisplayofthemessage"SYSTEM
INACTIVE:Reducedvisibility".The
system remains unavailable until the
messagedisappears.
Ifthespeedofyourvehicleistoohigh
whenapproachinganothervehicle,the
firstlevelofalertmaynotbedisplayed:
the level 2 alert may be displayed
directly.
On the other hand, the level 1 alert
isneverdisplayedwiththetriggering
threshold3(close).
Alerts
Accordingtothecollisionriskdetectedbythe
system and the alert threshold chosen, three
levelsofalertcanbetriggered.
Level 1:visualalertonly(orange)
indicatingthatthevehicleinfrontis
veryclose.Themessage"Vehicle
close"isdisplayed.
Level 2:visual(red)andaudible
alertsindicatingthatacollisionis
imminent.Themessage"Brake!" is
displayed.
This level of alert is based on the inter-vehicle
timebetweenyourvehicleandtheoneinfront.
This level of alert is based on a time before
collision.Ittakesaccountofthevehicle
dynamics, the speed of your vehicle and
thespeedofthevehicleinfront,thedriving
conditions, the situation with your vehicle
(cornering,pedalspressed,etc.)totriggerthe
alertattherightmoment.
Operating fault
In the event of a fault, you are alerted
bythedisplayoftheServicewarning
lamp,accompaniedbyamessage.
Consult a CITROËN dealer or a
qualifiedworkshop.
The operation of the radar, located in
the front bumper, may be disturbed by
accumulationsofgrime(dust,mud...)
or in certain weather conditions (snow,
ice...).
Themessage"SYSTEMINACTIVE:
Visibilityreduced"isdisplayedtosignal
that the system has been put into
standby.
Cleanthefrontbumperregularly.
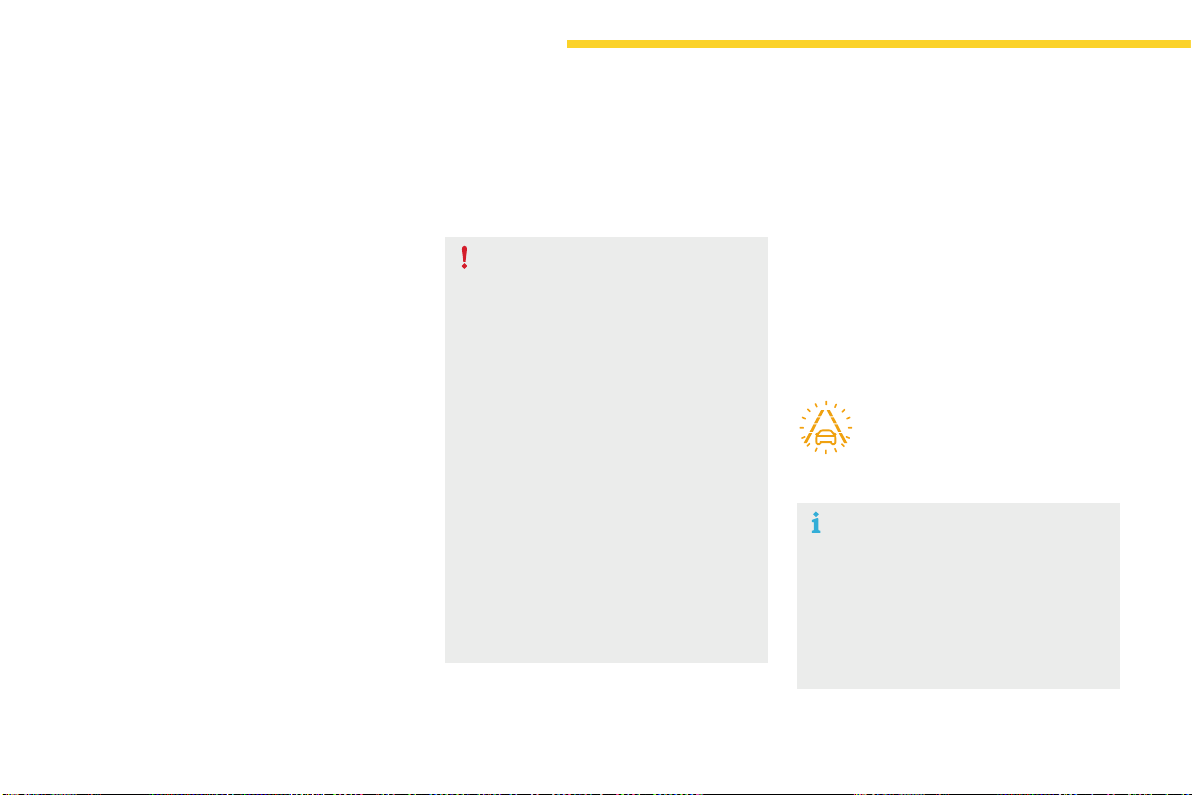
178
Driving
C4-Picasso-II_en_Chap04_conduite_ed01-2016
Assistedlanedeparturewarningsystem
Usingacameraplacedatthetopofthewindscreentoidentifylanemarkingsontheground,thissystemscorrectsthetrajectoryofthevehiclewhile
alertingthedriverifitdetectsariskofinvoluntarycrossingofaline.
Thissystemisparticularlyusefulonmotorwaysandmainroads.
Theassistedlanedeparturewarning
system cannot, in any circumstances,
replacetheneedforvigilanceonthepart
ofthedriver.
The driver remains responsible for the
vehicleinallcircumstances.Thesystem
helpsthedriveronlywhenthereisarisk
ofthevehicleinvoluntarilywandering
fromthelaneitisbeingdrivenon.
Itdoesnotmanagethesafedriving
distance, the speed of the vehicle or the
brakes.
Thedrivermustholdthesteeringwheel
inawaythatallowscontroltobetaken
backincircumstanceswherethesystem
is not able to intervene (where there are
nolanemarkings,forexample).
Itisnecessarytoobservethedriving
regulationsandtakeabreakevery
twohours.
OperationConditions for operation
The speed of the vehicle must be between 40
and112mph(65and180km/h).
Thecarriagewaymusthaveatleastonelane
marking(solidorbroken)ontheground.
The driver must hold the wheel with both
hands.
Thechangeoftrajectoryisnotaccompaniedby
operationofthedirectionindicators.
TheESCsystemmustbeactivated.
Oncethesystemidentifiesariskofthevehicle
involuntarilycrossingoneofthelanemarkings
detected,itmakesthecorrectiontothe
trajectorynecessarytoreturnthevehicletoits
initialpath.
Thedriverwillthennoticeaturningmovement
ofthesteeringwheel.
Thiswarninglampflashesduring
trajectorycorrection.
If the driver wishes to maintain the
trajectoryofthevehicle,theycan
preventthecorrectionbykeepingafirm
griponthewheel(duringanavoiding
manoeuvre,forexample).
The correction is interrupted if the
directionindicatorsareoperated.
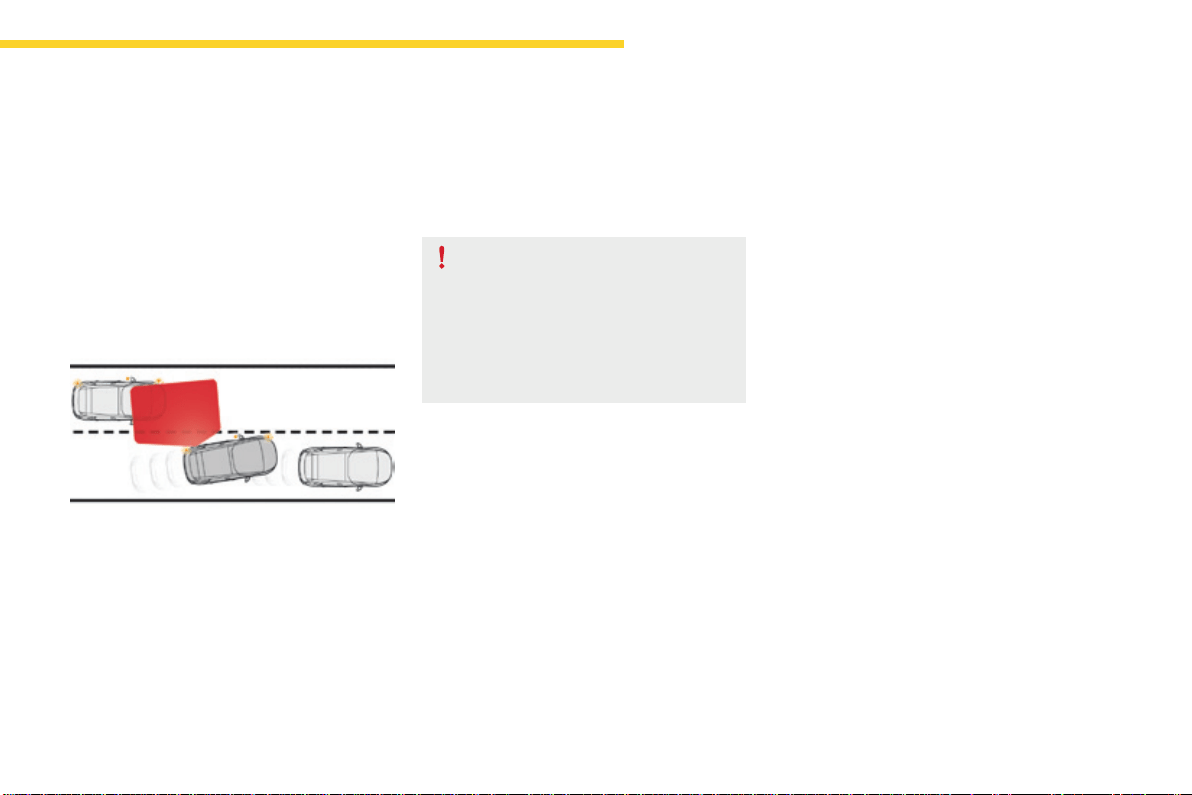
179
4
Driving
C4-Picasso-II_en_Chap04_conduite_ed01-2016
However,withthe"Blindspotmonitoring
system"activated,ifthedriverstartschanging
lane and another vehicle is detected in the
vehicle'sblindspot,thesystemwillcorrect
thetrajectoryofthevehicleeventhoughthe
directionindicatorsareon.
For more information on the Blind spot
monitoring system,refertothecorresponding
section.
If the system detects that the driver is
notholdingthewheelfirmlyenough
duringanautomaticcorrectionof
trajectory,itinterruptsthecorrection.
Analertistriggeredtoencourage
thedrivertotakebackcontrolofthe
vehicle.
Activation / Deactivation
Activation/deactivationofthesystemisdone
in the Drivingmenuofthetouchscreentablet.
Select the "Driving assistance" tab then
"Help staying in lane".
The state of the system stays in memory when
theignitionisswitchedoff.
While the direction indicators are on and for
afewsecondsafterswitchingthemoff,the
systemconsidersthatanychangeoftrajectory
isvoluntaryandnocorrectionistriggered
duringthisperiod.
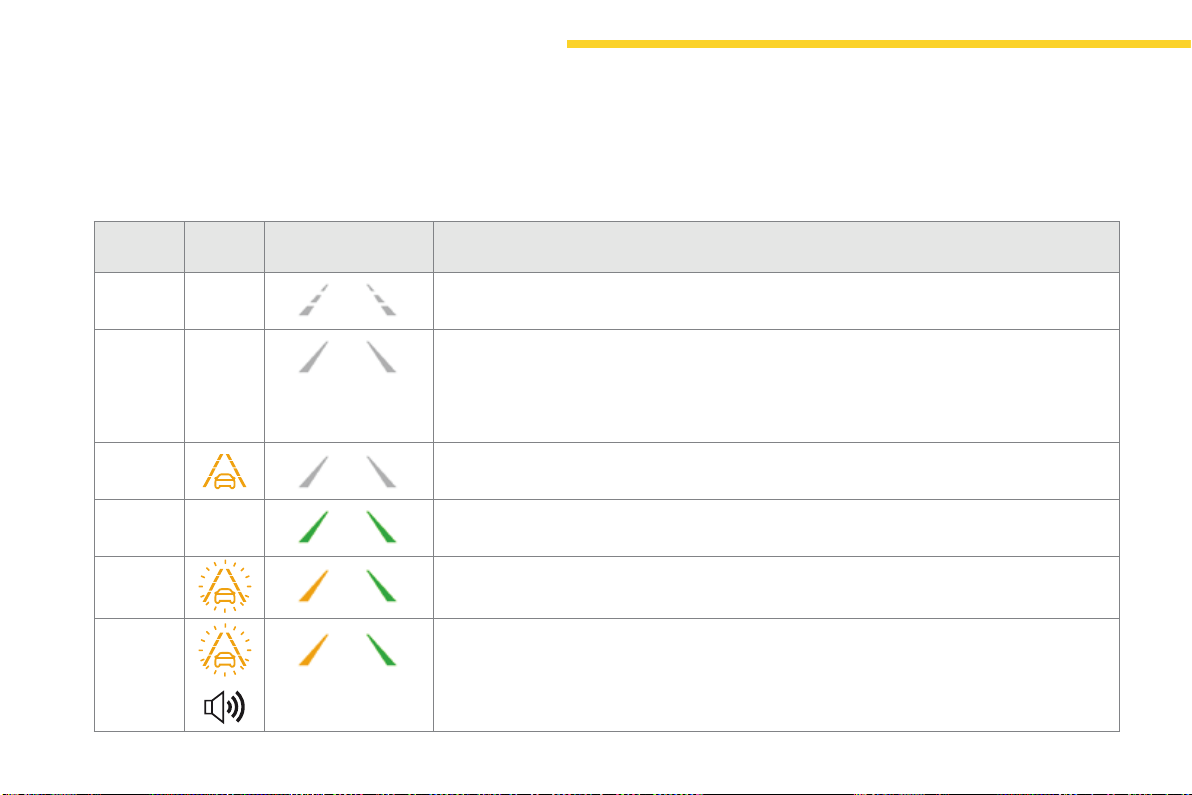
180
Driving
C4-Picasso-II_en_Chap04_conduite_ed01-2016
Driving situations and associated alerts
Tobenefitfromalloftheinformationneededintheinstrumentpanel,youmustfirstselectthe"Driving"displaymode.
Thetablebelowdescribesthealertsandmessagesdisplayedaccordingtothedrivingsituation.
Thedisplayofthesealertsisnotsequential.
State of
the system
Warning
lamp
Associated display
and message
Comment
OFF Systemdeactivated.
ON Systemactive,conditionsnotmet:
- speedbelow40mph(65km/h),
- nolanemarkingrecognised,
- ESCdeactivatedoroperationtriggered,
- "sporty"driving.
ON Automaticdeactivation/standbyofthesystem(forexample:detectionofatrailer,useofthe
"space-saver"sparewheelprovidedwiththevehicle).
ON Detectionoflanemarkings.
Speedabove40mph(65km/h).
ON Thesystemcorrectsthetrajectoryonthesideofthelanemarkingdetected.
ON
"Takebackthewheel".
- If,duringcorrection,thesystemdetectsthatthedriverhasnotheldthewheelforafew
seconds,itinterruptsthecorrectionandreturnscontroltothedriver.
- Duringcorrectionofthetrajectory,thesystemdeterminesthatthecorrectionwillnotbe
enoughandasolidlineiscrossed:thedriveriswarnedthattheymustcompletethecorrection
oftrajectory.
181
4
Driving
C4-Picasso-II_en_Chap04_conduite_ed01-2016
Limits of operation
Thesystemgoesintostandby
automaticallyinthefollowingcases:
- ESC deactivated or operation
triggered,
- speedbelow40mph(65km/h)or
above112mph(180km/h),
- connected electrically to a trailer,
- use of the "space-saver" spare
wheel detected (as detection is
not immediate, deactivation of the
system is recommended),
- dynamicdrivingstyledetected,
pressureonthebrakeor
accelerator pedal,
- drivingwheretherearenolane
markings,
- operation of the direction indicators,
- drivinginatightcorner,
- inactivity by the driver detected
duringcorrection.
The system may not operate correctly
oratallinthefollowingsituations:
- conditions of poor visibility
(inadequatestreetlighting,
snowfall,rain,fog),
- dazzle(headlampsofononcoming
vehicle, low sun, reflections on a
wetroadsurface,leavingatunnel,
alternatinglightandshade),
- area of the windscreen in front of
the camera dirty, misted, frosted,
snow-covered,damagedor
coveredbyasticker,
- roadmarkingsabsent,worn,
hidden (snow, mud) or multiple
(roadworks),
- runningclosetothevehicleinfront
(thelanemarkingsmaynotbe
detected),
- narrow,twistyroads.
Risk of undesirable operation
Deactivation of the system is recommended in
thefollowingsituations:
- drivingonaroadsurfaceinpoorcondition,
- unfavorable weather conditions,
- drivingonslipperysurfaces(blackice).
Thesystemisnotdesignedforthefollowing
drivingsituations:
- drivingonaspeedcircuit,
- drivingwithatrailer,
- drivingonarollingroad,
- drivingonunstablesurfaces.
In the event of a fault with the system, you are
alertedbytheilluminationofthesewarning
lamps in the instrument panel, accompanied by
thedisplayofamessageandanaudiblesignal.
HavethesystemcheckedbyaCITROËN
dealeroraqualifiedworkshop.
Operating fault
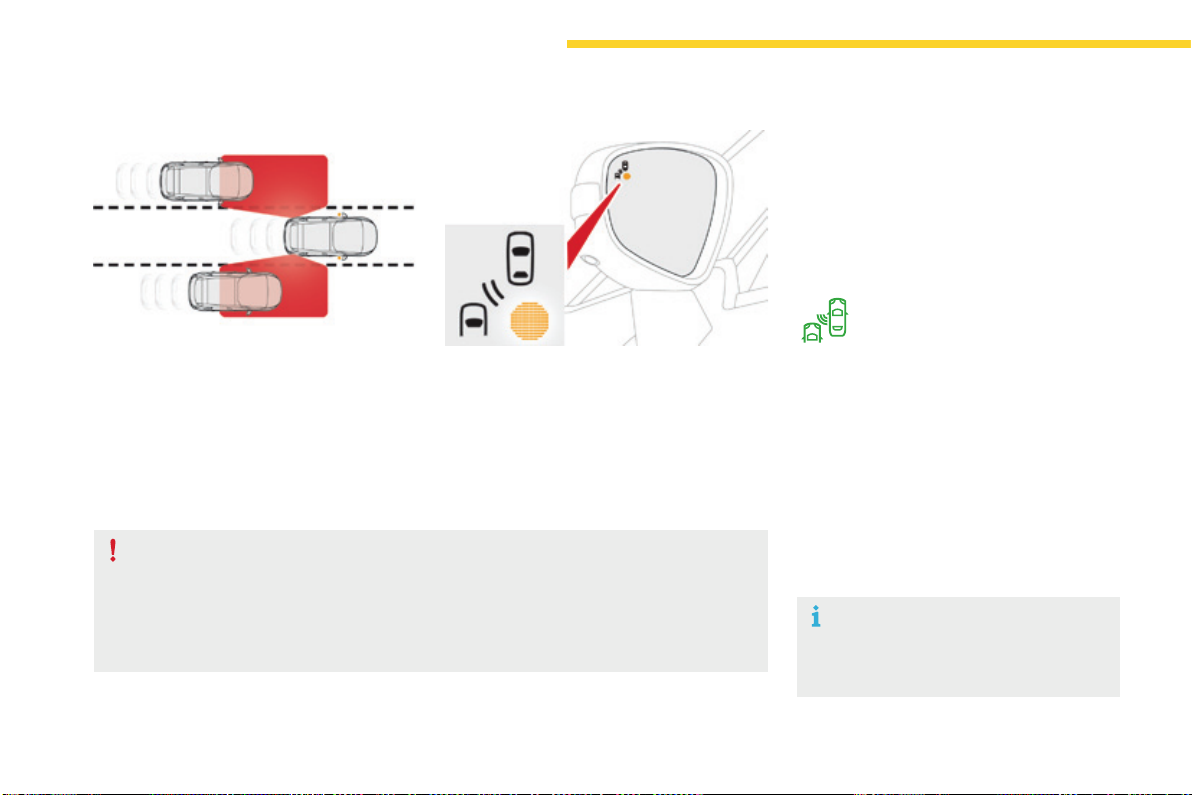
182
Driving
C4-Picasso-II_en_Chap04_conduite_ed01-2016
Blindspotmonitoringsystem
Activation / Deactivation
Awarninglampappearsinthedoormirroron
thesideinquestion:
- immediately,whenbeingovertaken,
- after a delay of about one second, when
overtakingavehicleslowly.
Thisdrivingassistancesystemwarnsthedriver
of the presence of another vehicle in the blind
spotangleoftheirvehicle(areasmaskedfrom
thedriver'sfieldofvision),assoonasthis
presentsapotentialdanger.
Sensors fitted in the front and rear bumpers
monitortheblindspots.
Thissystemisdesignedtoimprovesafetywhendrivingandisinnocircumstancesa
substitutefortheuseoftheinteriorrearviewmirroranddoormirrors.Itisthedriver's
responsibilitytoconstantlycheckthetraffic,toassessthedistancesandrelativespeedsof
othervehiclesandtopredicttheirmovementsbeforedecidingwhethertochangelane.
Theblindspotmonitoringsystemcanneverreplacetheneedforvigilanceonthepartofthe
driver.
Activation of the function is done in the touch
screentablet.
F In the Driving menu, select the "Driving
assistance" tab, then "Blind spot
monitoring".
This indicator lamp comes on in the
instrumentpanel.
The state of the system remains in memory on
switchingofftheignition.
F To deactivate the system, select "Blind
spot monitoring"againinthe"Driving
assistance" tab of the Drivingmenu.
Theindicatorlampgoesoff.
The system is automatically deactivated
whentowingwithatowbarapprovedby
CITROËN.
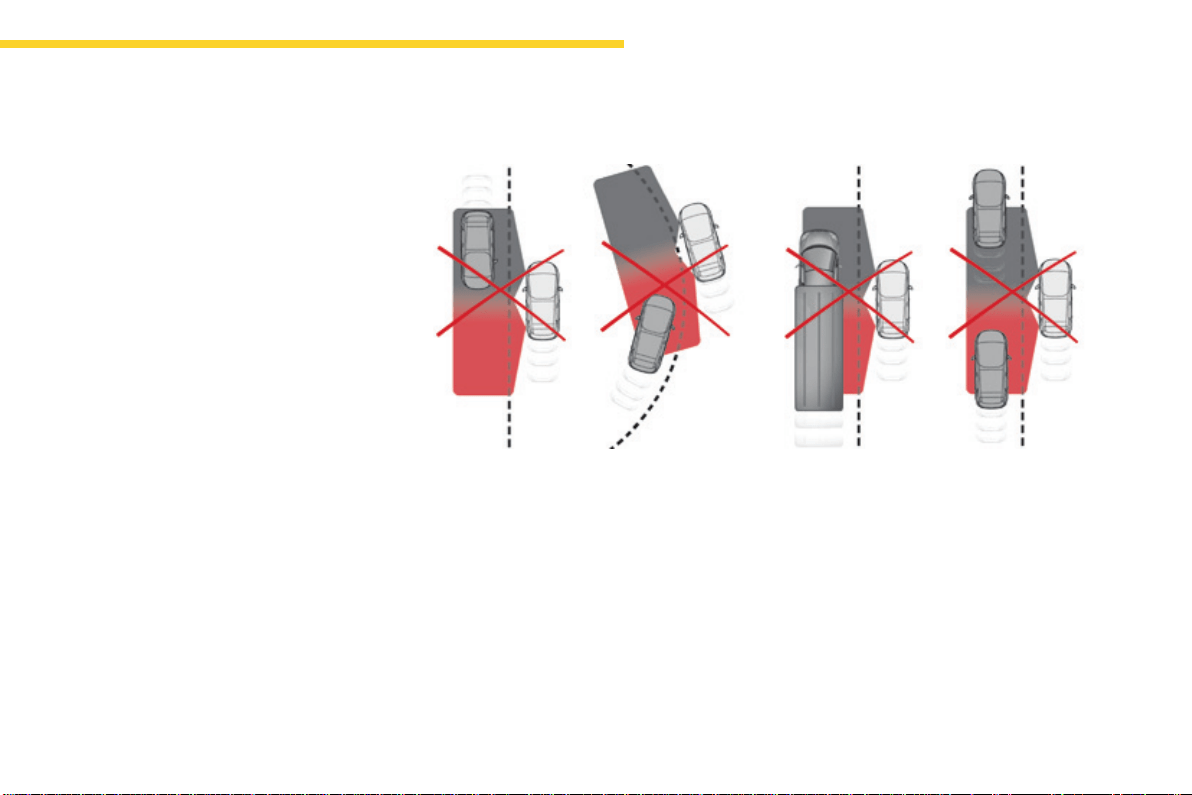
183
4
Driving
C4-Picasso-II_en_Chap04_conduite_ed01-2016
Thealertisgivenbyawarninglampwhich
comes on in the door mirror on the side in
question as soon as a vehicle - car, lorry,
bicycle-isdetectedandthefollowing
conditionsarefulfilled:
- allvehiclesaremovinginthesame
directionandinadjacentlanes,
- the speed of your vehicle is between 7 and
87mph(12and140km/h),
- youovertakeavehiclewithaspeed
differenceoflessthan6mph(10km/h),
- avehicleovertakesyouwithaspeed
differenceoflessthan15mph(25km/h),
- thetrafficisflowingnormally,
- inthecaseofanovertakingmanoeuvre,
ifthisisprolongedandthevehiclebeing
overtakenremainsintheblindspot,
- youaredrivingonastraightorslightly
curved road,
- yourvehicleisnotpullingatrailer,a
caravan...
Noalertwillbegiveninthefollowingsituations:
- inthepresenceofnon-movingobjects
(parkedvehicles,barriers,streetlamps,
roadsigns...),
- withvehiclesmovingintheopposite
direction,
- drivingonawindingroadorasharpcorner,
Operation
- whenovertaking(orbeingovertakenby)a
verylongvehicle(lorry,coach...)whichis
at the same time detected at the rear in the
blindspotangleandpresentinthedriver's
forward field of vision,
- inveryheavytraffic:vehiclesdetectedin
front and behind are confused with a lorry
orastationaryobject,
- whenovertakingquickly.
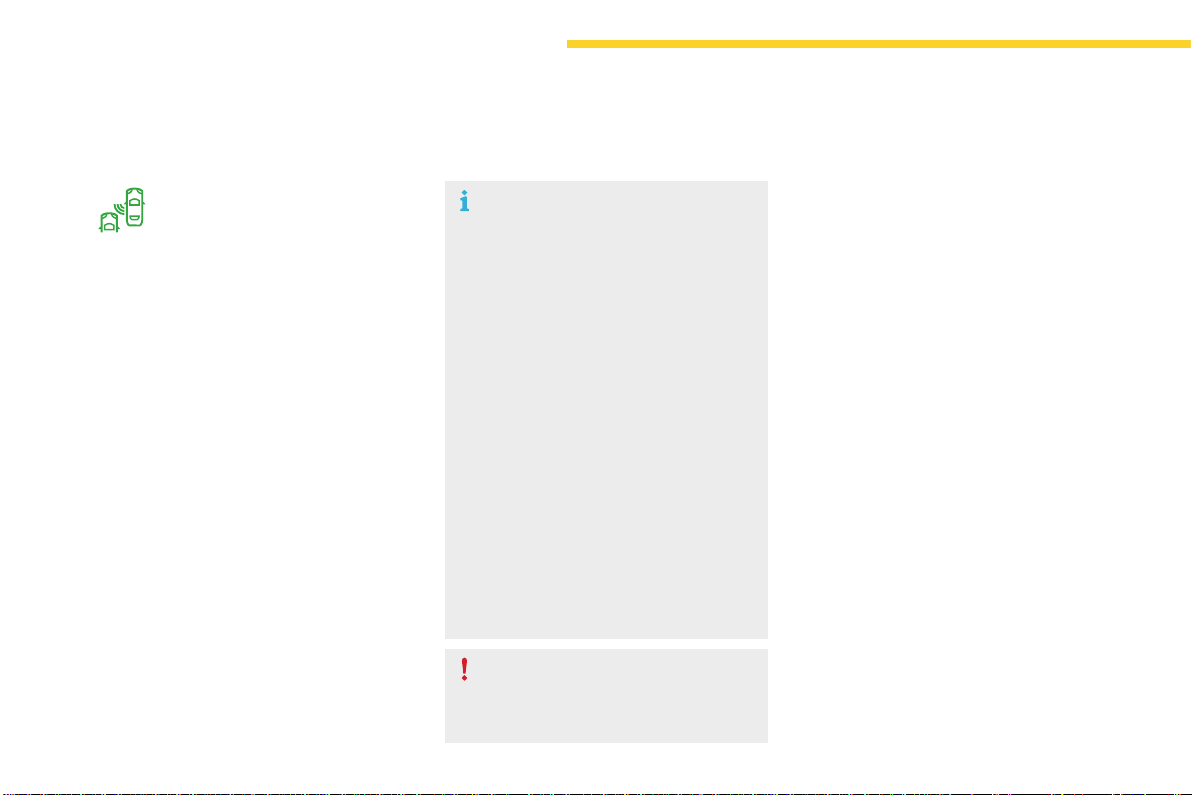
184
Driving
C4-Picasso-II_en_Chap04_conduite_ed01-2016
Intheeventofafault,thiswarning
lamp flashes for a few moments in
the instrument panel, accompanied
byamessage.
Operating fault
HaveitcheckedbyaCITROËNdealerora
qualifiedworkshop.
The system may suffer temporary
interference in certain weather
conditions(rain,hail...).
Inparticular,drivingonawetsurface
ormovingfromadryareatoawetarea
cancausefalsealerts(forexample,the
presenceofafogofwaterdropletsin
theblindspotangleisinterpretedasa
vehicle).
In bad or wintry weather, ensure that
the sensors are not covered by mud, ice
orsnow.
Takecarenottocoverthewarningzone
in the door mirrors or the detection
zones on the front and rear bumpers
withadhesivelabelsorotherobjects;
they may hamper the correct operation
ofthesystem.
High pressure jet wash
Whenwashingyourvehicle,directthe
lanceatleast30cmawayfromthe
sensors.
Inadditiontothefixedwarninglampinthedoor
mirror on the side in question, a correction of
trajectorywillbefeltifyoucrossalanemarking
with the direction indicators on, to help you
avoidacollision.
Conditions for operation
Thefollowingsystemsmustbeactivated:
- blindspotmonitoring,
- activelanedeparturewarning.
Active blind spot
monitoring system
For more information on the Blind spot
monitoring system and the Active lane
departure warning system, refer to the
correspondingsections.
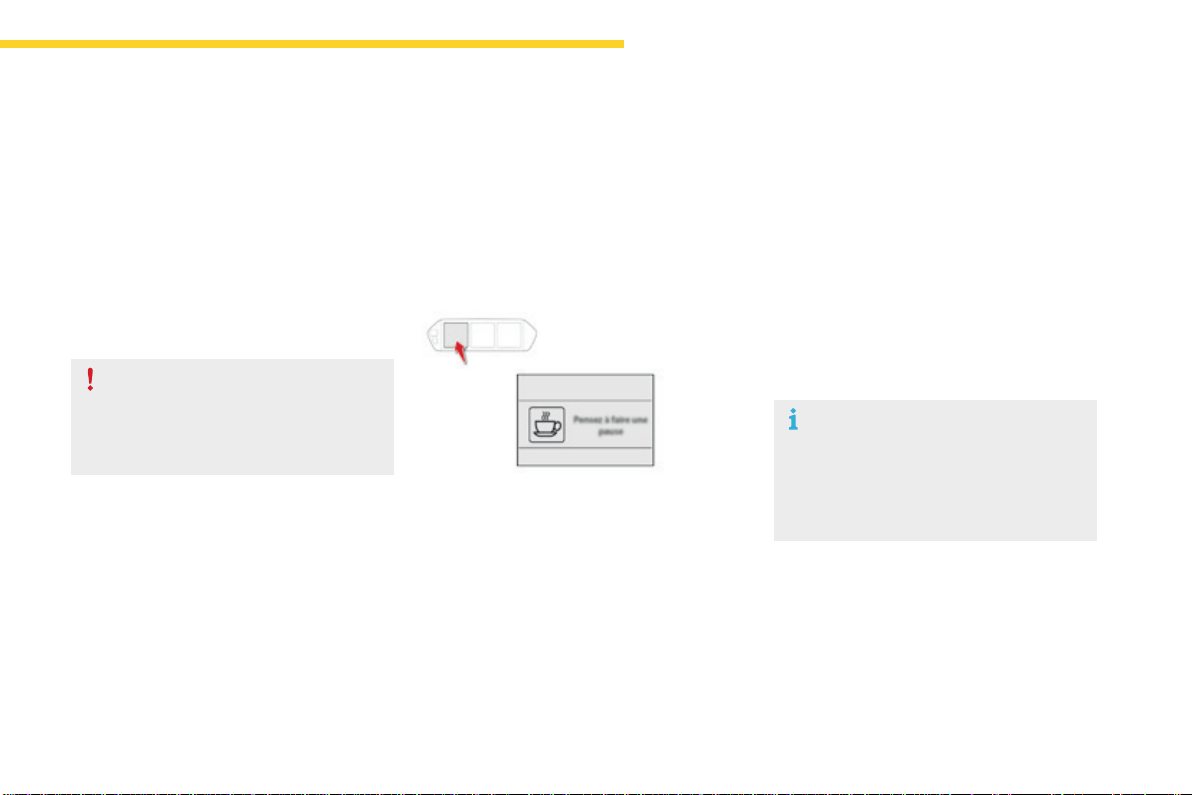
185
4
Driving
C4-Picasso-II_en_Chap04_conduite_ed01-2016
Fatiguedetectionsystem
Itisrecommendedthatyoutakeabreakassoonasyoufeeltiredoratleasteverytwohours.
Dependingonversion,thevehicleeitherhasthe"Drivingtimewarningsystem"only,orthiscombinedwiththe"Fatiguedetectionsystem".
Driving time warning
Thesystemtriggersanalertonceitdetectsthat
thedriverhasnottakenabreakaftertwohours
ofdrivingataspeedabove40mph(65km/h).
Thisalerttakestheformofthedisplayofa
messageencouragingyoutotakeabreak,
accompaniedbyanaudiblesignal.
If the driver does not follow this advice, the
alert is repeated hourly until the vehicle is
stopped.
The system cannot in any
circumstances replace the need for
vigilanceonthepartofthedriver.
Donottakethewheelifyouaretired.
As soon as the speed of the vehicle
dropsbelow40mph(65km/h),the
systemgoesintostandby.
Thedrivingtimeiscountedagainonce
thespeedisabove40mph(65km/h).
Thesystemresetsitselfifoneofthefollowing
conditionsismet:
- enginerunning,thevehiclehasbeen
stationary for more than 15 minutes,
- theignitionhasbeenswitchedoffforafew
minutes,
- thedriver'sseatbeltisunfastenedand
theirdoorisopen.
The system is activated or deactivated in the
touchscreentablet.
Activation / Deactivation
In the Driving menu, select the "Settings" tab,
then "Driving aids" and "Fatigue Detection
System".
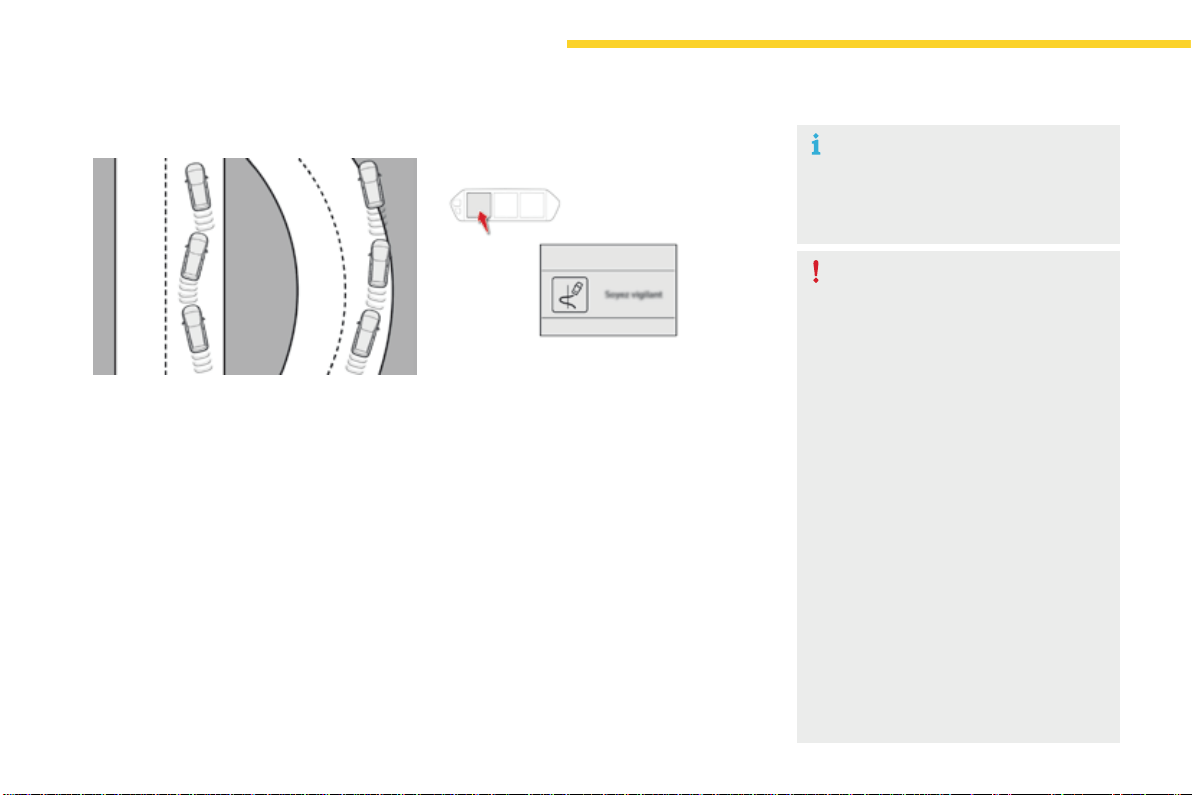
186
Driving
C4-Picasso-II_en_Chap04_conduite_ed01-2016
Fatigue detection system
Dependingonversion,the"Drivingtime
warningsystem"maybecombinedwiththe
"Fatiguedetectionsystem".
Usingacameraplacedatthetopofthe
windscreen,thesystemassessesthedriver's
levelofvigilancebyidentifyingvariationsin
trajectorycomparedtothelanemarkings.
This system is particularly suited to fast roads
(speedhigherthan40mph(65km/h)).
Once the system considers that the behaviour
ofthevehiclesuggestsacertainleveloffatigue
orinattentionbythedriver,ittriggersthefirst
levelofalert.
Thedriveristhenalertedbythemessage
"Take care!", accompanied by an audible
signal.
Afterthreefirstlevelalerts,thesystemtriggers
anewalertwiththemessage"Take a break!",
accompanied by a more pronounced audible
signal.
Incertaindrivingconditions(poorroad
surfaceorstrongwinds),thesystem
maygivealertsindependentofthe
driver'slevelofvigilance.
Thefollowingsituationsmayinterfere
with operation of the system or prevent
itworking:
- poorvisibility(inadequatelighting
oftheroadway,fallingsnow,heavy
rain,densefog,...),
- dazzle(headlampsofanoncoming
vehicle, low sun, reflections on
adamproad,leavingatunnel,
alternatingshadeandlight,...),
- windscreen area located in front
ofthecamera:dirty,misted,frost-
covered,snow-covered,damaged
orcoveredbyasticker,
- lanemarkingsabsent,worn,
masked(snow,mud)ormultiple
(roadworks,...),
- close to the vehicle ahead (lane
markingsnotdetected),
- roadsthatarenarrow,winding,...

187
4
Driving
C4-Picasso-II_en_Chap04_conduite_ed01-2016
Thissystemindicatestheproximityofan
obstacle(examples:pedestrian,vehicle,tree,
gate)whichcomeswithinthefieldofdetection
ofsensorslocatedinthebumper.
Certaintypesofobstacle(examples:stake,
roadworkscone)detectedinitiallywillnolonger
be detected at the end of the manoeuvre, if
theyarelocatedinblindspotsinthesensors'
fieldofdetection.
Parkingsensors
This system cannot in any
circumstances replace the need for
vigilanceonthepartofthedriver.
Thesystemisswitchedonbyengagingreverse
gear.
Thisisconfirmedbyanaudiblesignal.
The system is switched off when you come out
ofreversegear.
Audible assistance
Theproximityinformationisgivenbyan
intermittentaudiblesignal,thefrequencyofwhich
increasesasthevehicleapproachestheobstacle.
Thesoundemittedbythespeaker(rightorleft)
indicatesthesideonwhichtheobstacleislocated.
When the distance between the vehicle and
theobstaclebecomeslessthanapproximately
thirtycentimetres,theaudiblesignalbecomes
continuous.
Rear parking sensors
Visual assistance
Thissupplementstheaudiblesignalby
displayingbarsinthescreenortheinstrument
panelwhichmoveprogressivelynearerto
thevehicle.Whentheobstacleisnear,the
"Danger"symbolisdisplayed.
188
Driving
C4-Picasso-II_en_Chap04_conduite_ed01-2016
Front parking sensors
Thesoundemittedbythespeaker(front
or rear) indicates whether the obstacle
isinfrontorbehind.
The system will be deactivated
automaticallyifatrailerisbeing
towed or a bicycle carrier is fitted on
a towbar (vehicle fitted with a towbar
installedinlinewiththemanufacturer's
recommendations).
In bad weather or in winter, ensure
that the sensors are not covered with
mud,iceorsnow.Whenreversegearis
engaged,anaudiblesignal(longbeep)
indicatesthatthesensorsmaybedirty.
Certain sound sources (motorcycle,
lorry,pneumaticdrill,etc.)maytrigger
theaudiblesignalsoftheparking
sensorsystem.
Asanadditiontotherearparkingsensors,the
frontparkingsensorsaretriggeredwhenan
obstacle is detected in front and the speed of
thevehicleremainsbelow6mph(10km/h).
Thefrontparkingsensorsareinterruptedif
the vehicle stops for more than three seconds
inforwardgear,ifnofurtherobstaclesare
detected or when the speed of the vehicle
exceeds6mph(10km/h).
Theparkingsensorscanbedeactivatedinthe
touchscreentablet.
F In the Driving menu, select the "Driving
assistance" tab, then "Parking sensors".
Operating fault
In the event of a malfunction of
thesystem,whenreversegearis
engaged,thiswarninglampflashes
for a few moments then stays on
continuously.
This indicator comes on in the
instrumentpanel.
Anewselectionreactivatesthefunction.
High pressure jet wash
Whenwashingyourvehicle,donot
directthelancewithin30cmofthe
sensors.
Theparkingsensorsaredeactivated
whiletheParkAssistsystemis
measuringaspace.
For more information on Park Assist,
refertothecorrespondingsection.
Deactivation / Activation of
the front and rear parking
sensors
Amessageappears,accompaniedbyan
audiblesignal.
Contact a CITROËN dealer or a qualified
workshop.
189
4
Driving
C4-Picasso-II_en_Chap04_conduite_ed01-2016
Reversingcamera
Cleanthereversingcameraregularly
usingasoft,drycloth.
Thereversingcameraisactivatedautomatically
whenreversegearisengaged.
Dependingonversion,theimageisdisplayedin
thetouchscreentabletortheinstrumentpanel.
Thesuperimposedrepresentationofguide
lineshelpswiththemanoeuvre.
Thebluelinesrepresentthegeneraldirection
of the vehicle (the difference corresponds to
thewidthofyourvehiclewithoutthemirrors).
The red lines represent a distance of about
30cmbeyondtheedgeofyourvehicle'srear
bumper.
Thegreenlinesrepresentdistancesofabout1
and2metresbeyondtheedgeofyourvehicle's
rearbumper.
The turquoise blue curves represent the
maximumturningcircle.
Thereversingcameracannotinany
circumstances replace the need for
vigilanceonthepartofthedriver.
Openingthetailgatecausesthedisplay
todisappear.
Thereversingcamerafunctionmaybe
completedwithparkingsensors.
High pressure jet washing
Whenwashingyourvehicle,donot
directthelancewithin30cmofthe
cameralens.
Theyarerepresentedbylinesmarked
"ontheground"anddonotallowthe
position of the vehicle to be determined
relativetotallobstacles(forexample:
othervehicles,...).
Somedeformationoftheimageisnormal.
It is normal to be able to see part of
the number plate at the bottom of the
screen.

190
Driving
C4-Picasso-II_en_Chap04_conduite_ed01-2016
360Vision
This system provides a view in the instrument
panelofthenearsurroundingsofyourvehicle,
usingcamerasmountedatthefrontandrearof
yourvehicleandunderthedoormirrors.
Dependingontheangleofviewchosen(front
view,rearviewor360°panoramicview),
360Visionprovidesspecialvisualassistance
inparticulardrivingconditionssuchaswhen
enteringablindjunctionormanoeuvringin
areasofreducedvisibility.
Once activated, this function operates up to
9mph(15km/h).Above18mph(30km/h),the
functionisdeactivatedautomatically.
This system is a visual aid which in no
circumstances can replace the need for
vigilanceonthepartofthedriver.
Theimagesprovidedbythecameras
maybedeformedbytherelief.The
presence of areas in shade, in sunny
conditions,oroflowambientlightmay
darkentheimageandreducecontrast.
Forward vision
The camera located in the front bumper is
activated and views of the areas located at
frontleftandfrontrightappearsimultaneously
intheinstrumentpanel.
Rear vision
Thecameralocatedinthetailgateisactivated
and the view of the area behind your vehicle is
displayed in the instrument panel and behaves
likeareversingcamera,whatevertheposition
ofthegearselectorlever.
The blue lines represent the width of your
vehicle(excludingmirrors):theymove
accordingtothepositionofthesteeringwheel.
Theredlinerepresentsadistanceof30cm
fromtherearbumper,andthetwogreen
lines, 1 m and 2 m from the rear bumper,
respectively.
Rear vision is displayed automatically
whenengagingreverse,regardlessof
thestateofthesystem.
191
4
Driving
C4-Picasso-II_en_Chap04_conduite_ed01-2016
Operation
Activating the function
Withtheenginerunning:
F In the Driving menu, select the "Driving
assistance" tab, then "Panoramic visual
aid".
With this menu displayed, select one of the
threeviews:
Deactivating the function
F Acceleratesoastoexceed18mph
(30km/h).
or
F In the Driving menu, select the "Driving
assistance" tab, then "Panoramic visual
aid".
F Select"CameraOff".
Checkthecleanlinessofthecamera
lensesregularly.
High pressure jet wash
Whenwashingyourvehicle,directthe
lanceatleast30cmawayfromthe
camera.
"Frontcamera".
"360°camera".
"Rearcamera".
The view selected is displayed in the
instrumentpanel.
360 vision
The cameras located in the front and rear
bumpers and under the door mirrors are
activated and a reconstruction of the view from
aboveyourvehicleinitsimmediatesurroundings
isdisplayedintheinstrumentpanel.
Openingadoororthetailgatedisturbs
the360andrearviews.
Fittingtheverycoldconditionsscreen
affectstheimagetransmittedbythe
frontcamera.
The display in the instrument panel
disappearsabove9mph(15km/h).
Theimagetransmittedbythecamera
canbeslightlyaffectedbythepresence
oftheverycoldconditionsscreen.
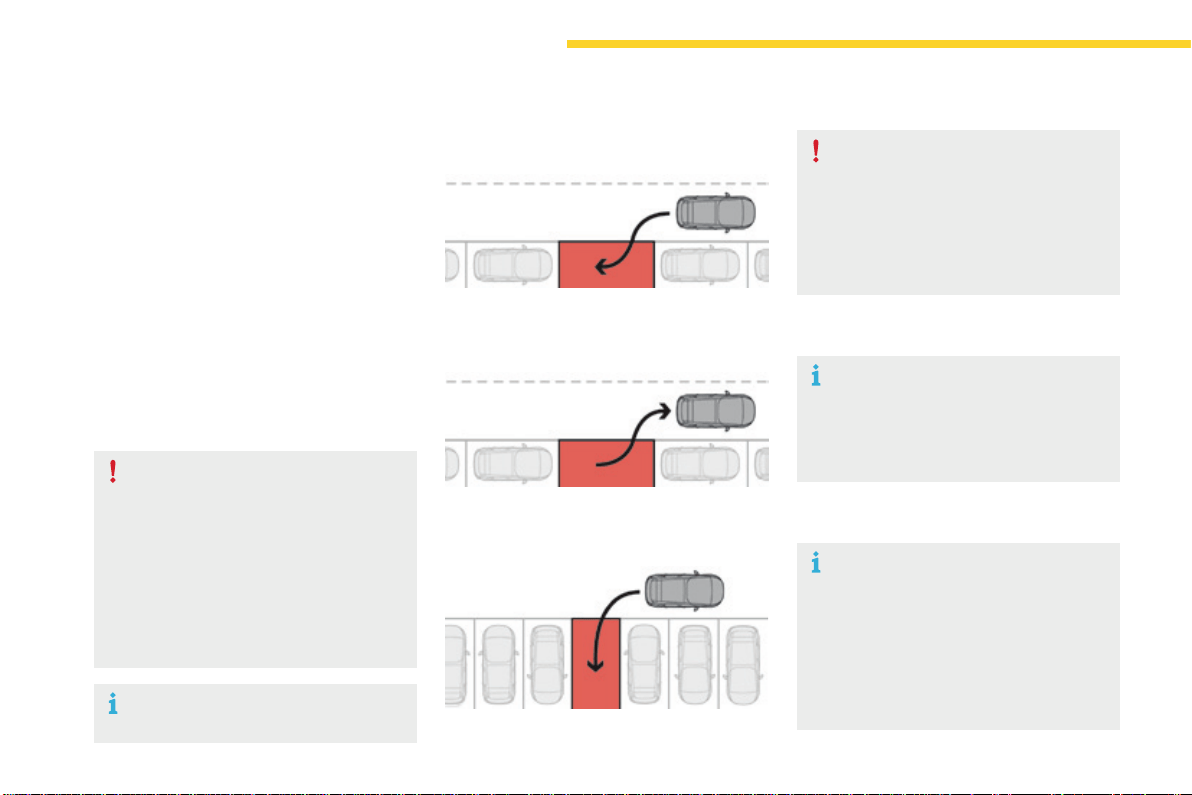
192
Driving
C4-Picasso-II_en_Chap04_conduite_ed01-2016
ParkAssist
This system provides active assistance with
parking.Itdetectsaparkingspacethen
operatesthesteeringtoparkinthespace.
Itoperatesthesteeringwhilethedriver
managestheaccelerator,brakes,gearsand
clutch(manualgearbox).Duringphasesof
entryintoandexitfromaparkingspace,the
system provides visual and audible information
tothedriverinordertomakethemanoeuvres
safe.Itmaybenecessarytomoveforwards
andbackwardsmorethanonce.
Duringamanoeuvrethesteering
wheelturnsquickly:donotholdthe
steeringwheel,donotplaceyourhands
betweenthespokesofthesteering
wheelandtakecarewithlooseand
bulkyclothing,scarves,handbags...
Thereisariskofinjury.
WhenParkAssistisactivated,it
preventsachangetoSTOPmodeof
Stop&Start.InSTOPmode,activation
ofParkAssistrestartstheengine.
TheParkAssistsystemcannotinany
circumstances replace the need for
vigilanceonthepartofthedriver.
The driver must remain in control
oftheirvehicleensuringthatthe
spaceremainsclearthroughoutthe
manoeuvre.
In some circumstances, the sensors
may not detect small obstacles located
intheirblindspots.
Thedrivercantakecontrolatanytimeby
grippingthesteeringwheel.
TheParkAssistsystemprovidesassistancefor
thefollowingmanoeuvres:
A. Entryintoaparallelparkingspace
B. Exitfromaparallelparkingspace
C. Bayparking
TheParkAssistsystemtakescontrol
ofthepowersteeringforamaximum
of4manoeuvrecycles.Thefunction
isdeactivatedafterthese4cycles.
Ifyouthinkthatyourvehicleisnot
positioned correctly, you should then
takecontrolofthesteeringtocarryout
themanoeuvre.
TheParkAssistsystemcannotwork
withtheengineoff.
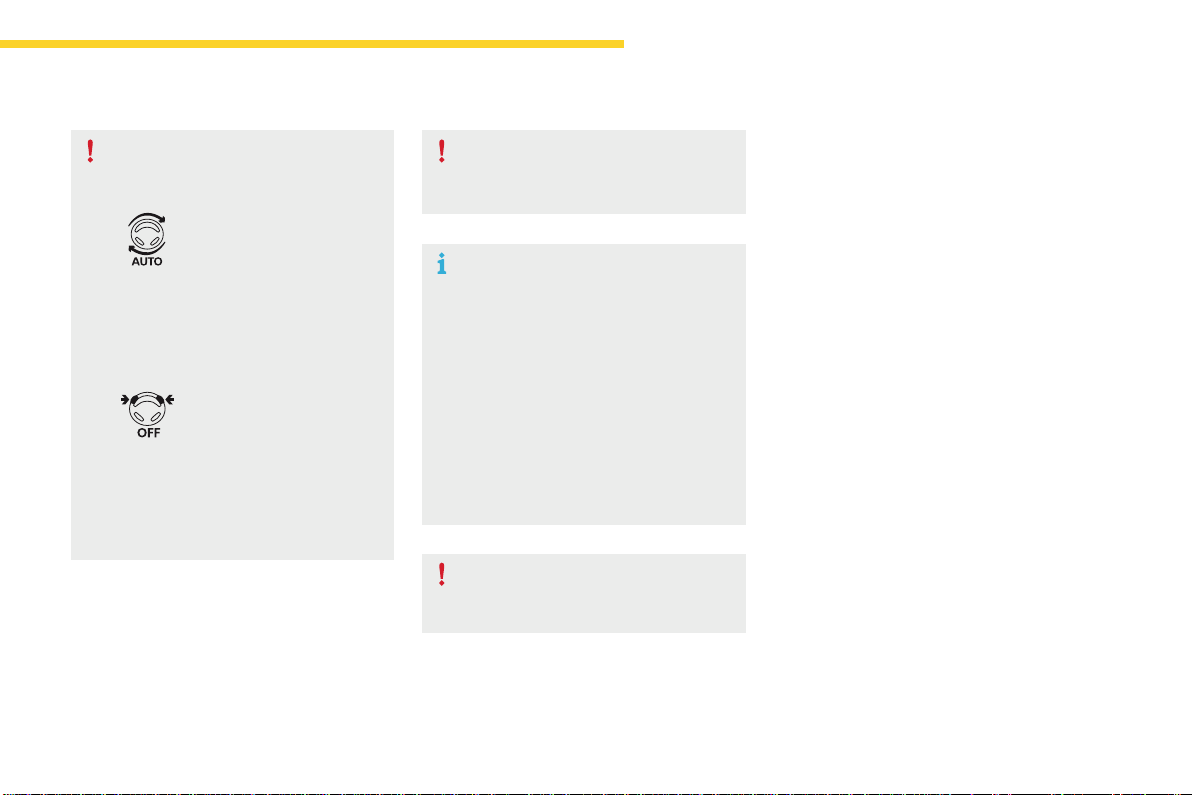
193
4
Driving
C4-Picasso-II_en_Chap04_conduite_ed01-2016
The sequence of manoeuvres and the
drivinginstructionsaredisplayedinthe
instrumentpanel.
Youshouldalwayscheckthe
surroundingsofyourvehiclebefore
startingamanoeuvre.
The assistance is
deactivated:thedisplayof
this symbol indicates that
thesteeringmanoeuvres
arenolongercontrolledby
thesystem:youmusttake
controlofthesteering.
The assistance is
activated:thedisplayofthis
symbol and a speed limit
indicatethatthesteering
manoeuvres are controlled
bythesystem:donottouch
thesteeringwheel.
Theparksensorsfunctionisnot
availableduringparkingspace
measurement.Itinterveneslaterwhen
manoeuvringtowarnyouthatyour
vehicleisapproachinganobstacle:the
audiblesignalbecomescontinuous
when the obstacle is less than thirty
centimetresaway.
Ifyouhavedeactivatedtheparking
sensors, they are automatically
reactivatedduringassistedparking
manoeuvres.
ActivationofParkAssistinhibitsthe
blindspotmonitoringsystem.
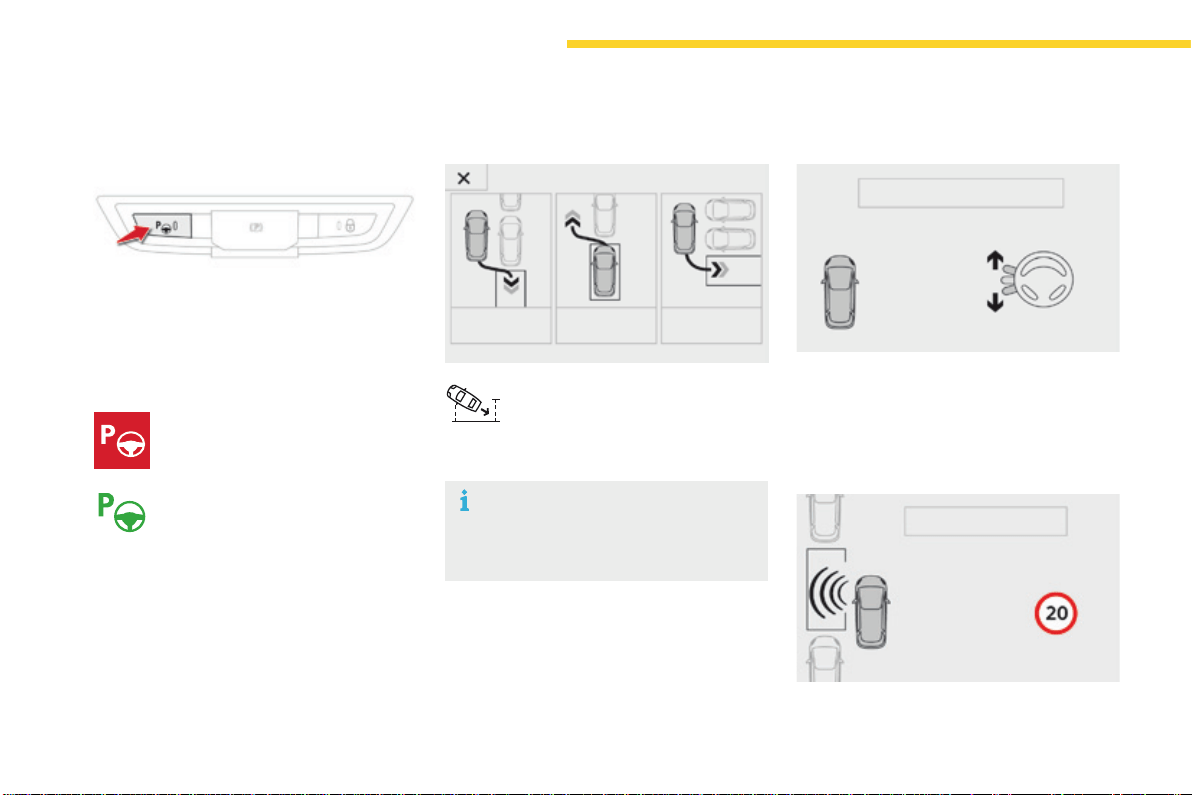
194
Driving
C4-Picasso-II_en_Chap04_conduite_ed01-2016
Operation
Assistance with parallel parking
manoeuvres
F Pressthisbutton.
Toenteraparkingspace,thesystem
does not identify spaces that are clearly
smallerorlargerthanthevehicle.
This indicator lamp comes on in the
instrument panel to confirm activation
ofthefunction.
F Limit the speed of the vehicle to
amaximumof12mph(20km/h)
and select "Enter parallel
parking space" in the touch
screentablet.
F Operate the direction indicator on the
parkingsidechosentoactivatethe
measurementfunction.Youshoulddrive
atadistanceofbetween0.5mand1.5m
fromtherowofparkedvehicles.
F Driveslowlyfollowingtheinstructionsuntil
thesystemfindsafreespace.
F Whenyouhaveidentifiedaparkingspace.
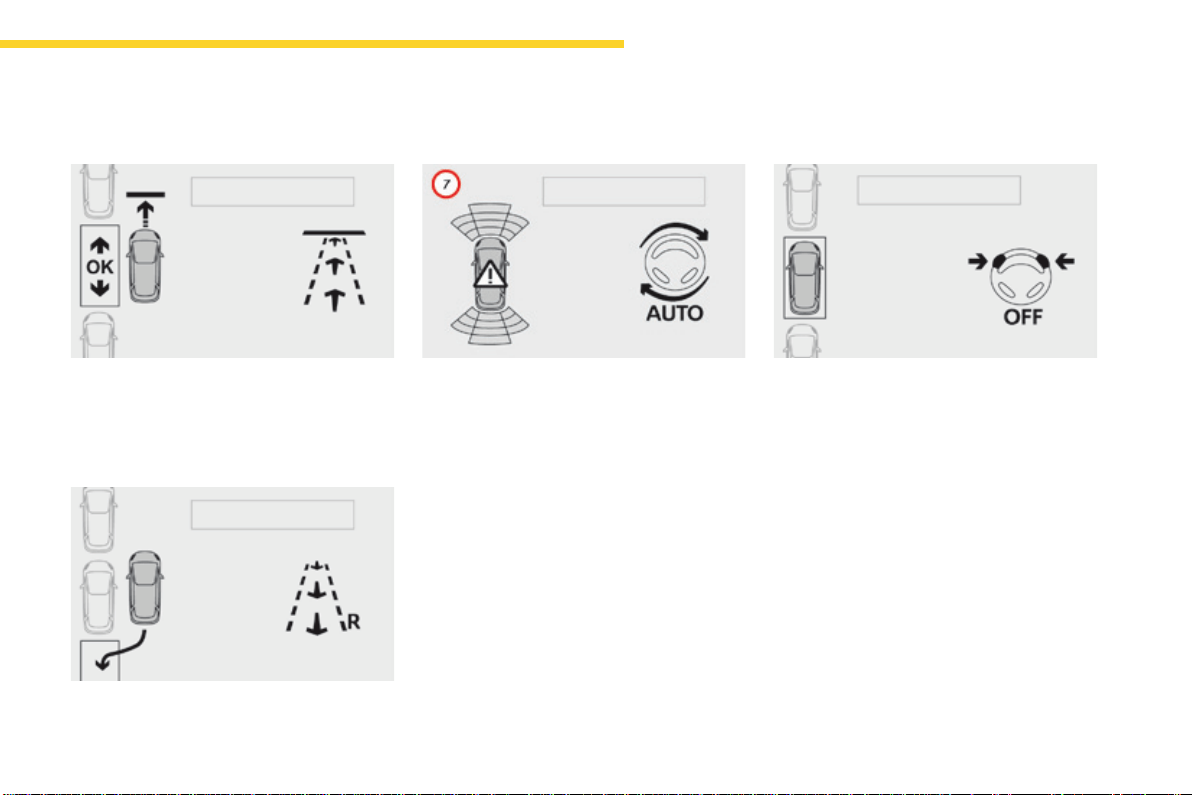
195
4
Driving
C4-Picasso-II_en_Chap04_conduite_ed01-2016
F Moveforwardsslowlyuntilamessageis
displayed, accompanied by an audible
signal,askingyoutoengagereversegear.
F Selectreverse,releasethesteeringwheel
andstartmovingwithoutexceeding4mph
(7km/h).
F Theassistedparkingmanoeuvreisin
progress.
Withoutexceeding4mph(7km/h),move
forwardsandbackwards,aidedbythe
warningsfromthe"Parkingsensors"
system, until the indication of the end of the
manoeuvre.
F Attheendofthemanoeuvre,theoperating
indicatorlampgoesoutintheinstrument
panel,accompaniedbyamessageandan
audiblesignal.
Theassistanceisdeactivated:youcan
takeovercontrol.
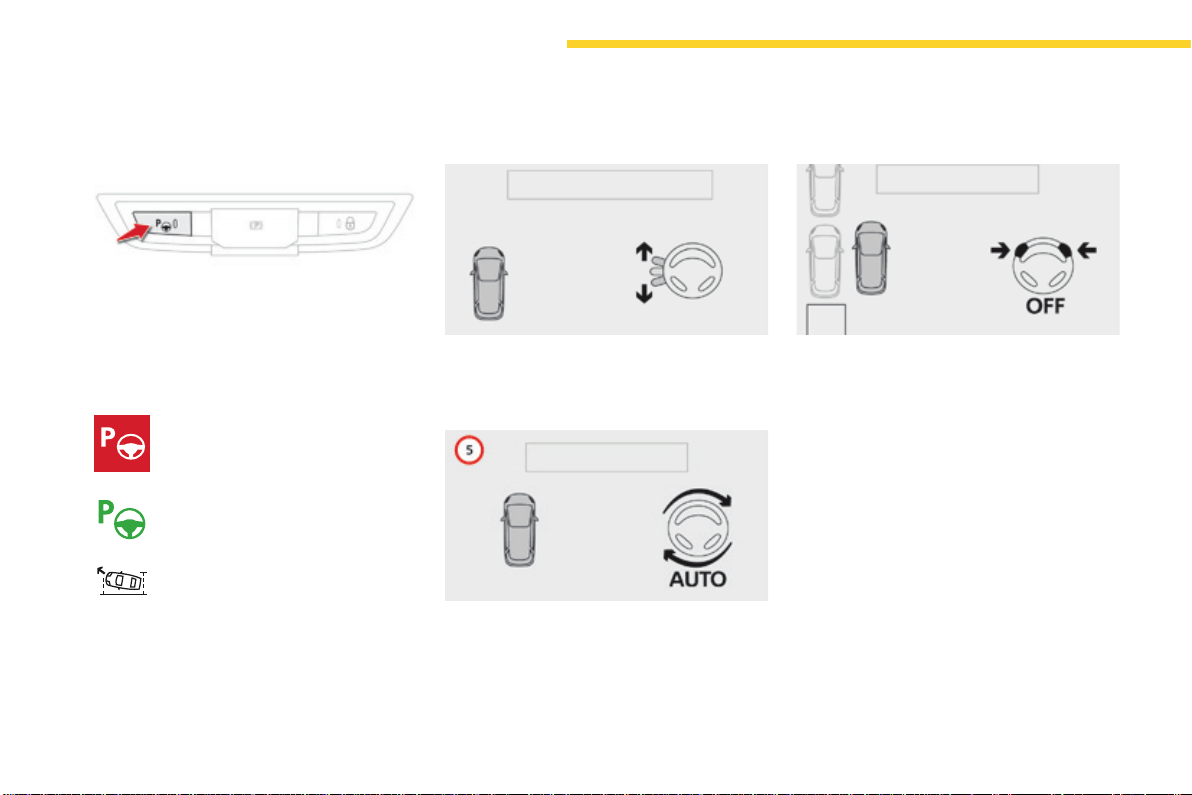
196
Driving
C4-Picasso-II_en_Chap04_conduite_ed01-2016
Assistance in exiting from a
parallel parking space
F With the vehicle stationary, press
thisbutton.
F Press on "Exit parallel parking
space" in the touch screen
tablet.
F Operatethedirectionindicatorfortheexit
sidechosen.
F Engagereverseorforwardgearand
releasethesteeringwheel.
F Theassistedparkingmanoeuvreisin
progress.Withoutexceeding3mph
(5km/h),moveforwardsandbackwards,
aidedbythewarningsfromthe"Parking
sensors" system, until the indication of the
endofthemanoeuvre.
F Whenyouwanttoleaveaparallelparking
space,starttheengine.
This indicator lamp comes on in
the instrument panel to confirm
activationofthefunction.
Themanoeuvreiscompletewhenthevehicle's
frontwheelsareclearoftheparkingspace.
At the end of the manoeuvre, the indicator lamp
intheinstrumentpanelgoesoff,accompanied
byamessageandanaudiblesignal.
Theassistanceisdeactivated:youcantake
overcontrol.
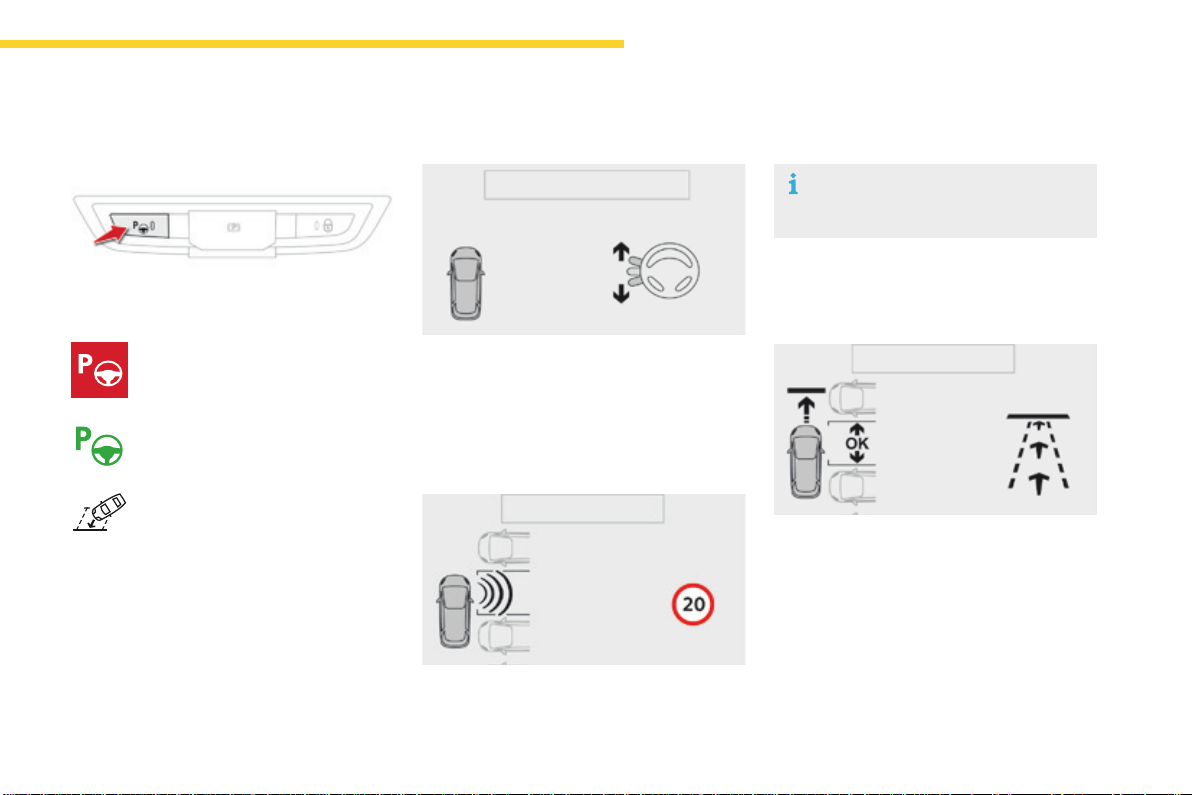
197
4
Driving
C4-Picasso-II_en_Chap04_conduite_ed01-2016
F Once you have identified a
parkingzone,pressthisbutton.
Assistance with bay parking
manoeuvres
This indicator lamp comes on in the
instrument panel to confirm activation
ofthefunction.
F Operate the direction indicator on the
parkingsidechosentoactivatethe
measurementfunction.Youshoulddrive
atadistanceofbetween0.5mand1.5m
fromtherowofparkedvehicles.
F Driveslowlyfollowingtheinstructionsuntil
thesystemfindsafreespace.
F Moveforwardsslowlyuntilamessageis
displayed, accompanied by an audible
signal,askingyoutoengagereversegear.
F Limit the speed of the vehicle to
amaximumof12mph(20km/h)
and select "Enter bay parking
space" on the touch screen
tablet.
When several successive bays are
found, the vehicle will be directed
towardsthelastone.
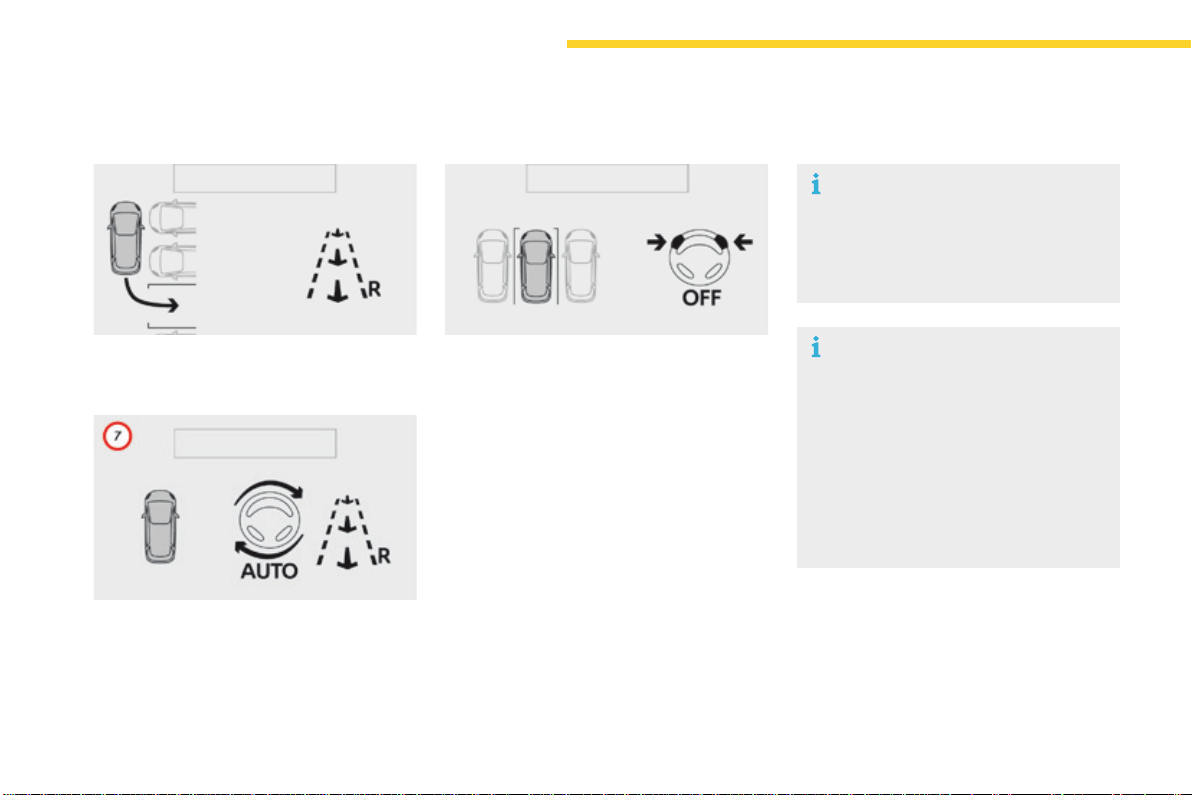
198
Driving
C4-Picasso-II_en_Chap04_conduite_ed01-2016
F Selectreverse,releasethesteeringwheel
andstartmovingwithoutexceeding4mph
(7km/h).
F Theassistedparkingmanoeuvreisin
progress.
Withoutexceeding4mph(7km/h),follow
the instructions displayed in the instrument
panel,aidedbythewarningsfromthe
"Parkingsensors"system,untilthe
indicationoftheendofthemanoeuvre.
Attheendofthemanoeuvre,theoperating
indicatorlampgoesoffintheinstrumentpanel,
accompaniedbyamessageandanaudible
signal.
Theassistanceisdeactivated:youcantake
overcontrol.
Duringparkingandexitfrom
parkingmanoeuvres,thereversing
camera function may come into
operation.Itfacilitatesmonitoringof
thesurroundingsofthevehicle,by
displayingadditionalinformationinthe
instrumentpanel.
For more information on the Reversing
camera,refertothecorresponding
section.
Duringabayparkingmanoeuvre,the
ParkAssistsystemisautomatically
deactivated once the rear of the vehicle
iswithin50cmofanobstacle.
199
4
Driving
C4-Picasso-II_en_Chap04_conduite_ed01-2016
Thesystemisdeactivatedbypressingthe
control.
Thesystemisdeactivatedautomatically:
- onswitchingofftheignition,
- iftheenginestalls,
- if no manoeuvre is started within 5 minutes
of selection of the type of manoeuvre,
- afteraprolongedstopofthevehicleduring
a manoeuvre,
- iftheroadwheelanti-slipregulation(ASR)
istriggered,
- ifthespeedofthevehicleexceedsthe
stated limit,
- when the driver interrupts movement of the
steeringwheel,
- after 4 manoeuvre cycles,
- onopeningthedriver'sdoor,
- if one of the front wheels encounters an
obstacle.
Theoperationindicatorlampgoesoffinthe
instrumentpanelandamessageisdisplayed
accompaniedbyanaudiblesignal.
Thedrivershouldthentakebackcontrolofthe
vehicle'ssteering.
Deactivation
Thesystemisswitchedoffautomatically:
- whentowingatrailer,connected
electrically,
- ifthedriver'sdoorisopened,
- if the speed of the vehicle is above 42 mph
(70km/h).
Toswitchthesystemofforaprolongedperiod,
contact a CITROËN dealer or a qualified
workshop.
Operating faults
In the event of a fault with the power
steering,thiswarninglampflashesin
the instrument panel, accompanied
byamessage.
Contact a CITROËN dealer or a qualified
workshop.
Switching off
If the lateral distance between your
vehicleandthespaceistoogreat,the
system may not be able to measure the
space.
Anythingprojectingbeyondtheenvelope
of the vehicle (a ladder on the roof, for
example)isnottakenintoaccountbythe
ParkAssistsystemduringamanoeuvre.
In bad weather or in winter, ensure that
the sensors are not covered by road
dirt,iceorsnow.
In the event of a fault, have the system
checkedbyaCITROËNdealerora
qualifiedworkshop.
Ifthesystemisdeactivatedduringa
manoeuvre, the drive should reactivate
ittorepeatthemeasurement.
Intheeventofafault,thiswarning
lamp flashes for a few seconds,
accompaniedbyanaudiblesignal.
Ifthefaultoccursduringtheuse
ofthesystem,thewarninglamp
goesoff.
High pressure jet washing
Whenwashingyourvehicle,keepthe
lanceatleast30cmawayfromthe
sensors.
200
Driving
C4-Picasso-II_en_Chap04_conduite_ed01-2016
Under-inationdetection
The system monitors the pressures in the four
tyres,oncethevehicleismoving.
Itcomparestheinformationgivenbythefour
wheel speed sensors with reference values,
which must be reinitialised every time the
tyre pressures are adjusted or a wheel
changed.
Thesystemtriggersanalertassoonasit
detects a drop in the inflation pressure of one
ormoretyres.
The under-inflation detection system
doesnotreplacetheneedforvigilance
onthepartofthedriver.
This system does not avoid the need to
checkthetyrepressures(includingthe
spare wheel) every month as well as
beforealongjourney.
Drivingwithunder-inflatedtyresimpairs
roadholding,extendsbrakingdistances
and causes premature tyre wear,
particularly under arduous conditions
(highloading,highspeed,longjourney).
Systemwhichautomaticallychecksthepressuresofthetyreswhiledriving.
The inflation pressures defined for
your vehicle can be found on the tyre
pressurelabel.
For more information on the
Identification markings, refer to the
correspondingsection.
Tyrepressuresshouldbechecked
when the tyres are "cold" (vehicle
stoppedfor1hourorafterajourneyof
lessthan6miles(10km)atmoderate
speeds).
Otherwise(whenhot),add0.3barto
thepressuresshownonthelabel.
Drivingwithunder-inflatedtyres
increasesfuelconsumption.
201
4
Driving
C4-Picasso-II_en_Chap04_conduite_ed01-2016
Under-inflation alert Reinitialisation
Thisisgivenbyfixedilluminationof
thiswarninglamp,accompaniedby
anaudiblesignaland,dependingon
equipment,thedisplayofamessage.
It is necessary to reinitialise the system every
timeoneormoretyrepressuresareadjusted,
andafterchangingoneormorewheels.
F Reduce speed immediately, avoid
excessivesteeringmovementsandsudden
braking.
F Stop the vehicle as soon as it is safe
todoso.
F In the event of a puncture, use the
temporarypuncturerepairkitorthespare
wheel(dependingonequipment),
or
F if you have a compressor, such as the one
inthetemporarypuncturerepairkit,check
the pressures of the four tyres when cold,
or
F ifitisnotpossibletomakethischeck
immediately, drive carefully at reduced
speed.
The loss of pressure detected does not
alwayscausevisiblebulgingofthetyre.
Donotsatisfyyourselfwithjustavisual
check.
The alert is maintained until the system
isreinitialised.
Snow chains
The system does not have to be
reinitialisedafterfittingorremoving
snowchains.
Beforereinitialisingthesystem,ensure
that the pressures of the four tyres are
correct for the use of the vehicle and in
line with the recommendations on the
tyrepressurelabel.
The under-inflation alert can only
be relied on if the reinitialisation of
the system has been done with the
pressures in the four tyres correctly
adjusted.
The under-inflation detection system
doesnotgiveawarningifapressureis
incorrectatthetimeofreinitialisation.
202
Driving
C4-Picasso-II_en_Chap04_conduite_ed01-2016
Reinitialisation of the system is done in the
touchscreentablet,withtheignitiononandthe
vehiclestationary.
F In the Driving menu, select the "Driving
assistance" tab then "Under-inflation
initialisation".
F Confirmtheinstructionbypressing"Yes",
anaudiblesignalandamessageconfirm
thereinitialisation.
Thenewpressuresettingsregisteredare
considered to be reference values by the
system.
Operating fault
Theflashingandthenfixedilluminationofthe
under-inflationwarninglampaccompanied
byilluminationoftheServicewarninglamp
indicatesafaultwiththesystem.
Amessageappears,accompaniedbyan
audiblesignal.
Beforedoinganythingtothesystem,
the pressures of the four tyres must be
checkedandthesystemreinitialised.
The under-inflation alert can only be
relied on if reinitialisation of the system
is done with the four tyre pressures
correctlyset.
Inthiscase,under-inflationmonitoringofthe
tyresisnolongerassured.
HavethesystemcheckedbyaCITROËN
dealeroraqualifiedworkshop.
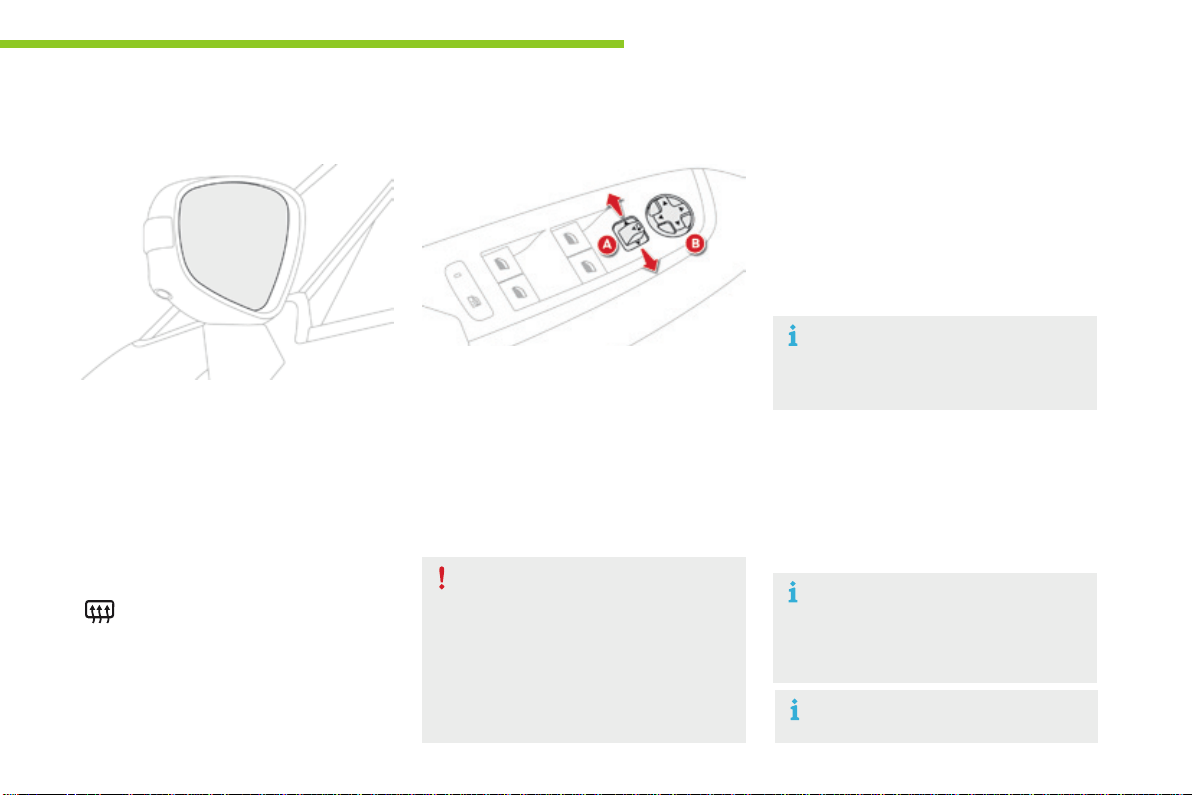
203
5
Lighting and visibility
C4-Picasso-II_en_Chap05_eclairage-visibilite_ed01-2016
Mirrors
Adjustment
F Move control Atotherightortotheleftto
selectthecorrespondingmirror.
F Move control B in all four directions to
adjust.
F Return control Atothecentralposition.
Eachfittedwithanadjustablemirrorglass
providingthelateralrearwardvisionnecessary
forovertakingorparking.
Theycanalsobefoldedforparkinginconfined
spaces.
Demisting - Defrosting
Door mirrors
Demisting-defrostingofthedoor
mirrorsoperateswiththeengine
running,byswitchingontheheated
rearscreen.
As a safety measure, the mirrors should
beadjustedtoreducethe"blindspots".
Theobjectsobservedare,inreality,
closerthantheyappear.
Takethisintoaccountinorderto
correctlyjudgethedistanceofvehicles
approachingfrombehind.
Folding
F Fromoutside:lockthevehicleusingthe
electronickeyortheKeylessEntryand
Startingsystem.
F Frominside:withtheignitionon,pullthe
control Ainthecentralpositionrearwards.
IfthemirrorsarefoldedusingcontrolA,
they will not unfold when the vehicle is
unlocked.PullagainoncontrolA.
Thefoldingandunfoldingofthedoor
mirrorsusingtheremotecontrolcanbe
deactivated by a CITROËN dealer or a
qualifiedworkshop.
F Fromoutside:unlockthevehicleusingthe
electronickeyortheKeylessEntryand
Startingsystem.
F Frominside:withtheignitionon,pullthe
control Ainthecentralpositionrearwards.
Unfolding
If necessary, it is possible to fold the
mirrorsmanually.
For more information on Demisting -
Defrosting the rear screen, refer to the
correspondingsection.
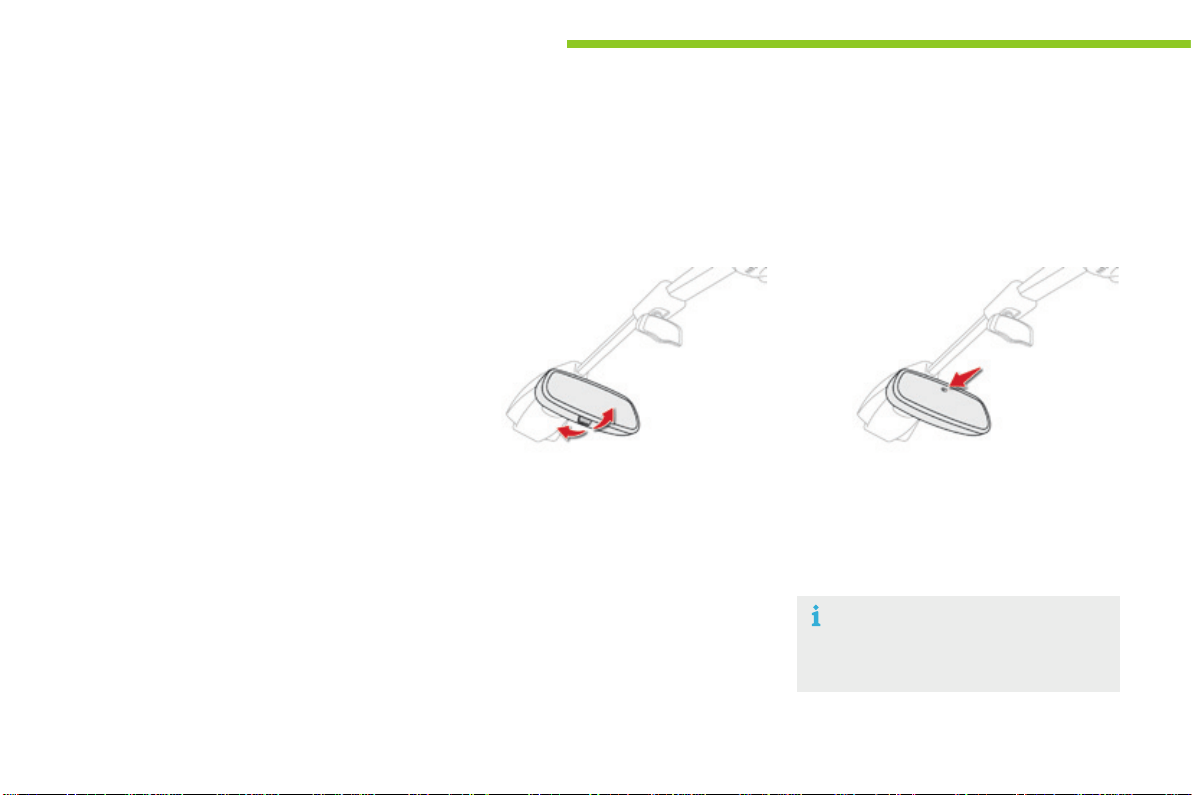
204
Lighting and visibility
C4-Picasso-II_en_Chap05_eclairage-visibilite_ed01-2016
Rear view mirror
Equippedwithananti-dazzlesystem,whichdarkensthemirrorglassandreducesthenuisanceto
thedrivercausedbythesun,headlampsfromothervehicles...
Manual model
Adjustment
F Adjustthemirrorsothattheglassis
directedcorrectlyinthe"day"position.
In order to ensure optimum visibility
duringyourmanoeuvres,themirror
lightensautomaticallywhenreverse
gearisengaged.
Day / night position
F Pullthelevertochangetothe"night"anti-
dazzleposition.
F Pushthelevertochangetothenormal
"day"position.
Automatic "electrochrome"
model
Thissystemautomaticallyandprogressively
changesbetweenthedayandnightusesby
meansofasensor,whichmeasuresthelight
fromtherearofthevehicle.
Automatic tilting in reverse gear
Withtheenginerunning,onengagingreverse
gear,themirrorglassestiltdownwards.
Theyreturntotheirinitialposition:
-
afewsecondsaftercomingoutofreversegear,
- oncethespeedofthevehicleexceeds
6mph(10km/h),
- onswitchingofftheengine.
Systemwhichprovidesaviewoftheground
duringparkingmanoeuvresinreversegear.
This function can be deactivated in the Driving
menu.
F Select the "Setting" tab then "Comfort"
and "Auto mirror dipping in reverse".
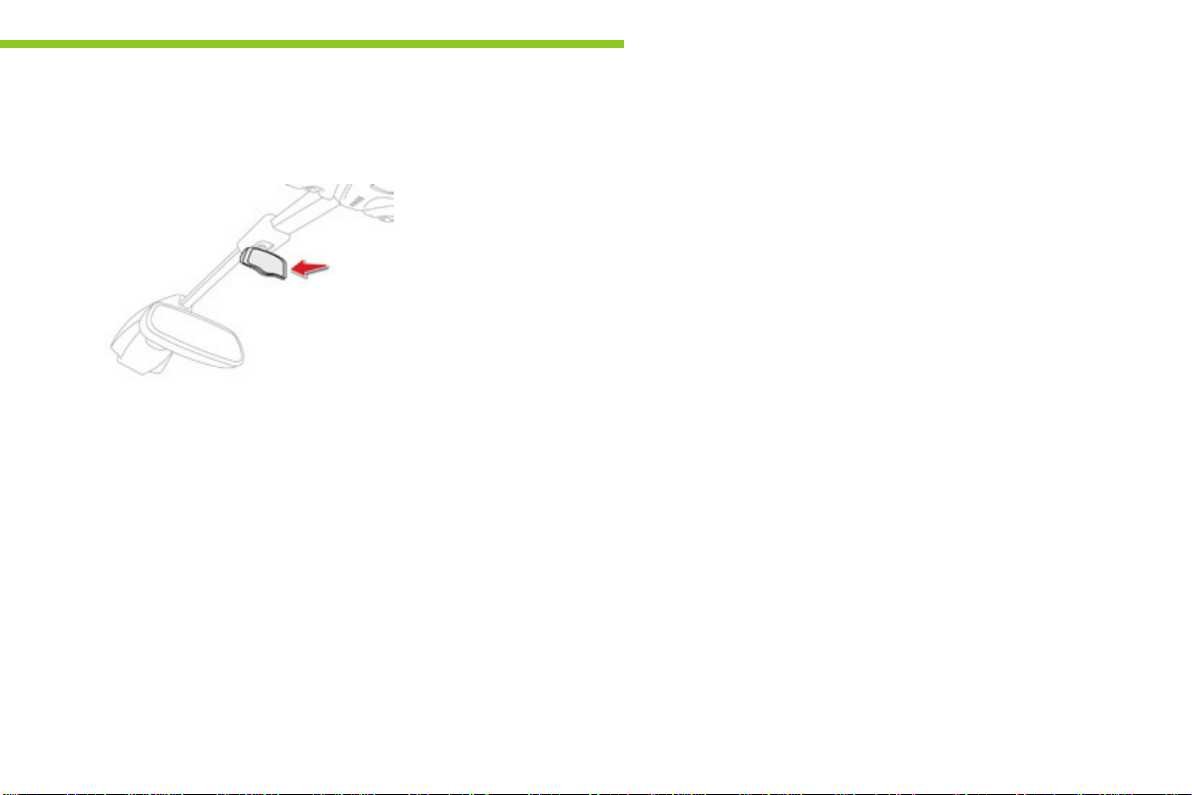
205
5
Lighting and visibility
C4-Picasso-II_en_Chap05_eclairage-visibilite_ed01-2016
Child surveillance mirror
A child surveillance mirror is fitted above the
rearviewmirror.Thisallowsyoutomonitorthe
vehicle’srearpassengers,oritcanfacilitate
conversation between the front and rear
passengerswithouttheneedtomovetherear
viewmirror.
Itcanbefoldedawaytoeliminatedazzle.

206
Lighting and visibility
C4-Picasso-II_en_Chap05_eclairage-visibilite_ed01-2016
Lightingcontrolstalk
Main lighting
The various front and rear lamps of the vehicle
aredesignedtoadaptthedriver'svisibility
progressivelyaccordingtotheclimatic
conditions:
- sidelamps, to be seen,
- daytimerunninglampstobemorevisible
duringtheday,
- dipped beam headlamps to see without
dazzlingotherdrivers,
- main beam headlamps to see clearly when
theroadisclear.
Additional lighting
Other lamps are provided to meet the
requirementsofparticulardrivingconditions:
- rearfoglamps,
- frontfoglampswithcorneringlighting,
- directional headlamps for improved
visibilitywhencornering,
- guide-me-homeandwelcomelightingto
facilitate access to the vehicle,
- parkinglampsasvehiclepositionmarkers.
Programming
Thesettingofsomefunctionscanbeadjusted:
- automatic illumination of headlamps,
- automaticheadlampdipping,
- guide-me-homelighting,
- welcomelighting,
- corneringlighting,
- directionallighting.
Insomeweatherconditions(e.g.low
temperature or humidity), the presence
ofmistingontheinternalsurfaceofthe
glassoftheheadlampsandrearlamps
isnormal;itdisappearsafterthelamps
havebeenonforafewminutes.
Travelling abroad
Halogen headlamps
Formotoringincountriesthatdrive
on the other side of the road, it is
necessarytoadapttheadjustmentof
the dipped beams so as to not dazzle
thedriversofapproachingvehicles.
Contact a CITROËN dealer or qualified
workshop.
Xenon headlamps
Thedesignofthedippedbeam
headlamps allows you to drive in a
country that drives on the other side
of the road, without the need for any
modification.
In the event of the failure of one or more
bulbs,amessageadvisesyoutocheck
thelamp(s)inquestion.
Selectionandcontrolofthevariousfrontandrearlampsprovidingthevehicle'slighting.
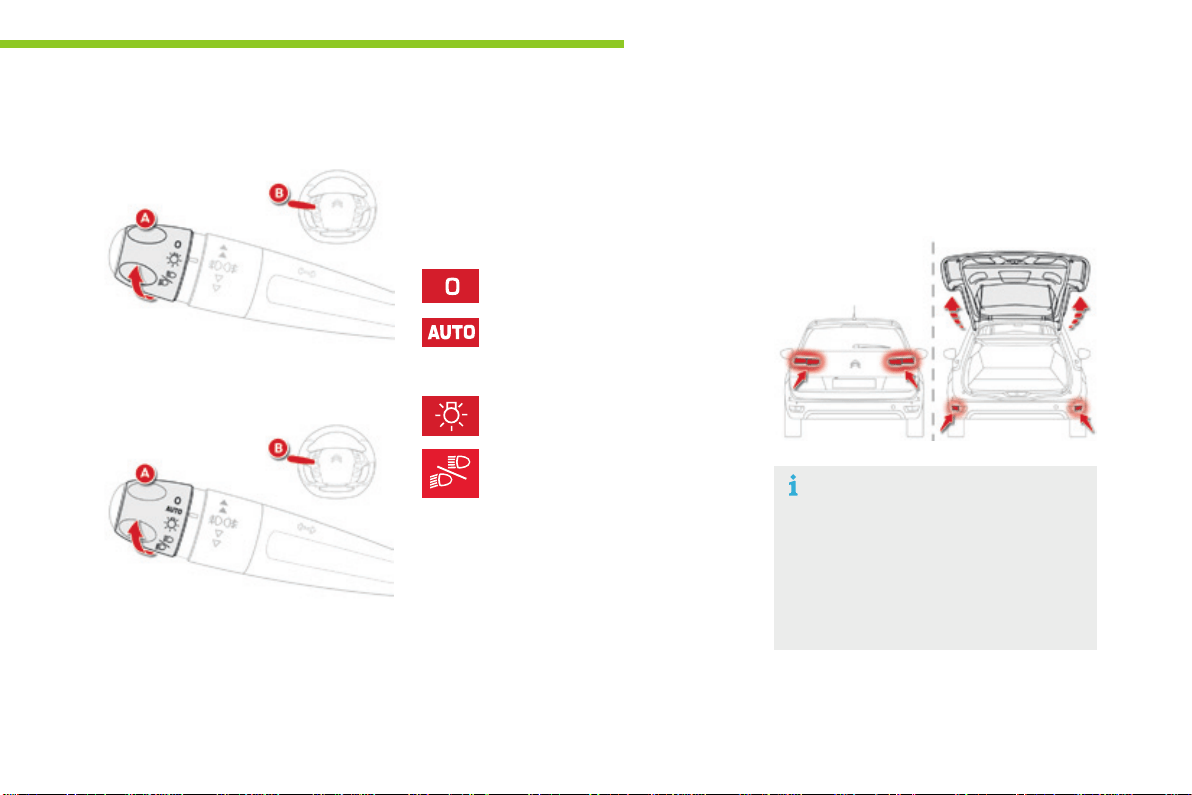
207
5
Lighting and visibility
C4-Picasso-II_en_Chap05_eclairage-visibilite_ed01-2016
Displays
Illuminationofthecorrespondingindicator
lamp in the instrument panel confirms that the
lightingselectedison.
The rear sidelamps and direction
indicatorsarelocatedonthetailgate.
Whentheyareon,openingthetailgate
automatically transfers illumination to
the lamps located in the rear bumper, to
maintainthesafetyofthevehicle.
Main lighting
Lightingoff(ignitionoff)/
Daytimerunninglamps(enginerunning).
Automaticilluminationofheadlamps.
Daytimerunninglamps/Dipped
beam/Mainbeam.
Sidelamps.
Dippedormainbeamheadlamps.
TurntheringA to place the desired symbol
againstthemark.
Selection of main lighting mode
Model without AUTO lighting
Model with AUTO lighting
Headlamp dipping
PullthestalkB towards you to switch the
lightingbetweendippedandmainbeam
headlamps or to activate automatic headlamp
dipping.
Inthelightingoffandsidelampsmodes,the
driver can switch on the main beam headlamps
temporarily("headlampflash")bymaintaininga
pullonthestalk.
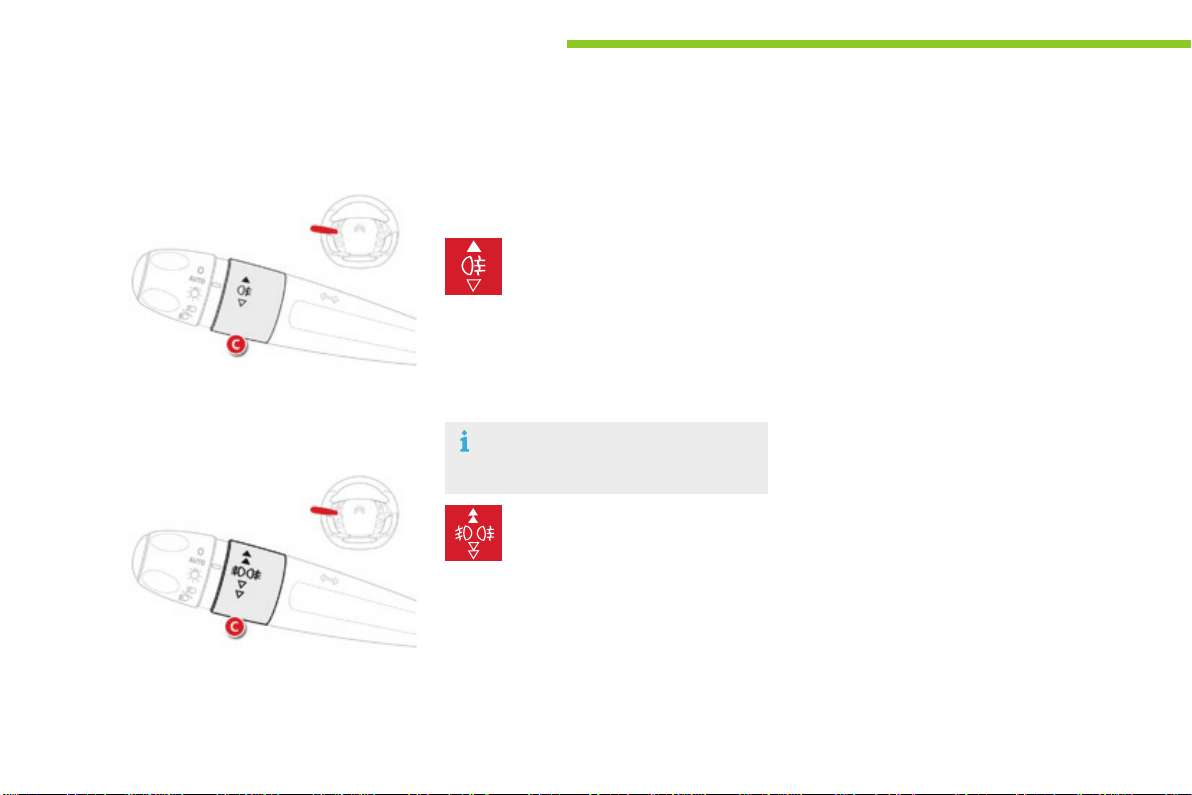
208
Lighting and visibility
C4-Picasso-II_en_Chap05_eclairage-visibilite_ed01-2016
Model with rear foglamps only
Rearfoglamps
RotateandreleasetheringC:
F forwards a first time to switch on the front
foglamps,
F forwards a second time to switch on the
rearfoglamps,
F rearwards a first time to switch off the rear
foglamps,
F rearwards a second time to switch of the
frontfoglamps.
Model with front and rear
foglamps
Foglamps
F Toswitchonthefoglamps,turntheringC
forwards.
Frontandrearfoglamps
F Toswitchoffthefoglamps,turntheringC
rearwards.
When the headlamps switch off with automatic
illumination of headlamps or when the dipped
beam headlamps are switched off manually,
thefoglampsandsidelampsremainon.
F Turntheringrearwardstoswitchoff
thefoglamps,thesidelampswillthen
switchoff.
Whenswitchingoffdippedbeam
manually,therearfoglampsalsogooff.
Thefoglampsoperatewiththedippedandmain
beamheadlamps.

209
5
Lighting and visibility
C4-Picasso-II_en_Chap05_eclairage-visibilite_ed01-2016
Operationoftherearfoglampsis
inhibitedwiththetailgateopen.
Openingthetailgatewhentheselamps
are on causes them and their indicator
lampintheinstrumentpaneltogooff.
Theydonotcomebackon
automaticallywhenthetailgateis
closed:theymustbeswitchedonagain
usingthecontrolstalk.
Ingoodorrainyweather,bybothday
andnight,thefrontfoglampsandthe
rearfoglampsareprohibited.Inthese
situations, the power of their beams
maydazzleotherdrivers.Theyshould
onlybeusedinfogorfallingsnow.
In these weather conditions, you should
switchonthefoglampsanddipped
beam headlamps manually, as the
sunshine sensor may detect sufficient
light.
Donotforgettoswitchoffthefrontand
rearfoglampswhentheyarenolonger
necessary.
Switching off the lighting
when switching off the ignition
Whentheignitionisswitchedoff,allofthe
lampsswitchoffimmediately,exceptforthe
dippedbeamheadlampsifautomaticguide-
me-homelightingisactivated.
Switching on the lighting when
switching on the ignition
Toreactivatethelightingcontrolstalk,turn
theringA to position "0"-lightingoff,then
tothepositionofyourchoice.
Whenthedriver'sdoorisopened,a
temporaryaudiblesignalwarnsyouthat
thevehicle'slightingison.
They switch off automatically after a period
whichdependsonthestateofchargeofthe
battery(entrytoenergyeconomymode).
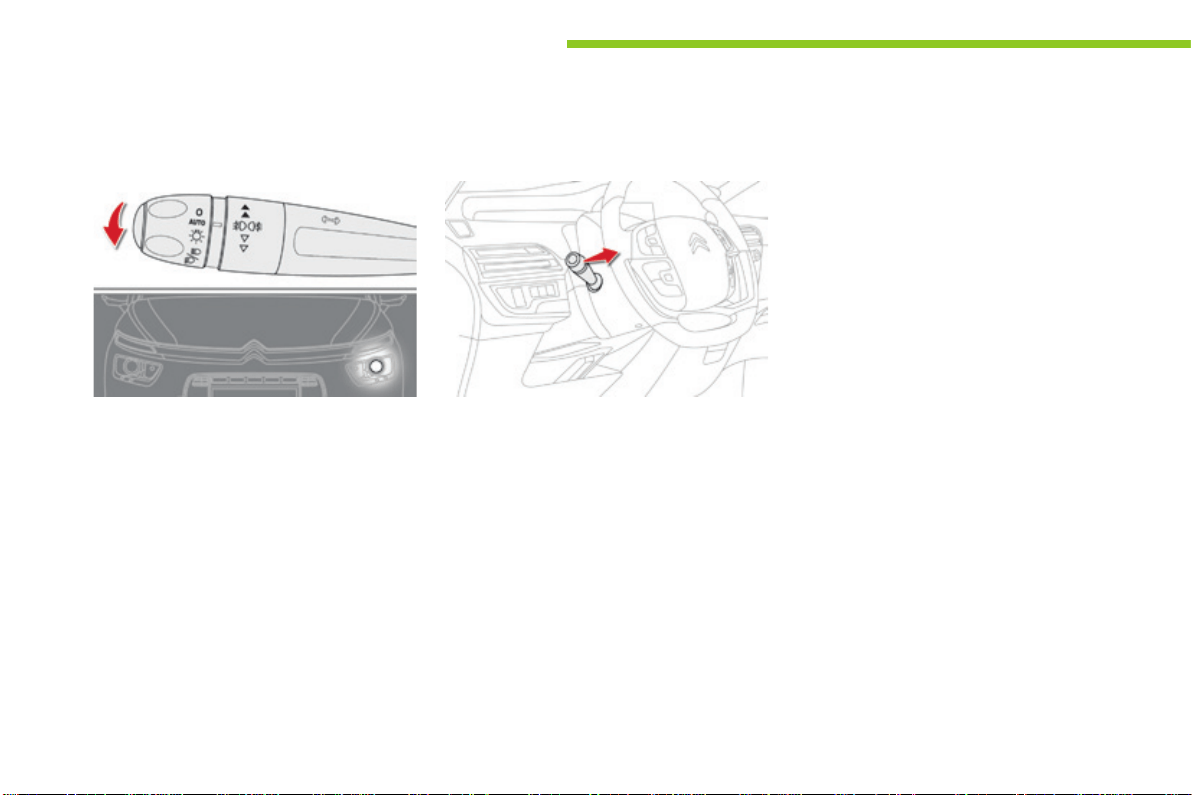
210
Lighting and visibility
C4-Picasso-II_en_Chap05_eclairage-visibilite_ed01-2016
Automatic
When the automatic illumination of headlamps
isactivated(lightingcontrolstalkatthe
AUTOposition),iftheambientlightlevelis
low, the dipped beam headlamps come on
automaticallywhenswitchingofftheignition.
Activation or deactivation of the system, as well
astheperiodofoperationoftheguide-me-
homelightingissetinthetouchscreentablet.
F In the Driving menu, select the "Settings"
tab, then "Lighting" and "Guide-me-home
lighting".
Toadjusttheperiodofoperation,selectthe
symbol for the "Guide-me-home lighting"
function.
Parking lamps Guide-me-home lighting
Manual
Deactivation
Themanualguide-me-homelightingswitches
offautomaticallyafterasettime.
The temporary illumination of the dipped beam
headlampsafterthevehicle'signitionhasbeen
switchedoffmakesthedriver'sexiteasier
whenthelightispoor.
Sidemarkersforthevehiclebyilluminationof
thesidelampsonthetrafficsideonly.
F Dependingonversion,withinoneminute
ofswitchingofftheignition,operatethe
lightingcontrolstalkupordowndepending
onthetrafficside(forexample:when
parkingontheleft;lightingcontrolstalk
upwards;therighthandsidelampsareon).
Thisisconfirmedbyanaudiblesignaland
illuminationofthecorrespondingdirection
indicatorwarninglampintheinstrumentpanel.
Toswitchofftheparkinglamps,returnthe
lightingcontrolstalktothecentralposition.
Activation
F Withtheignitionoff,"flash"theheadlamps
usingthelightingstalk.
F A further "headlamp flash" switches the
functionoff.
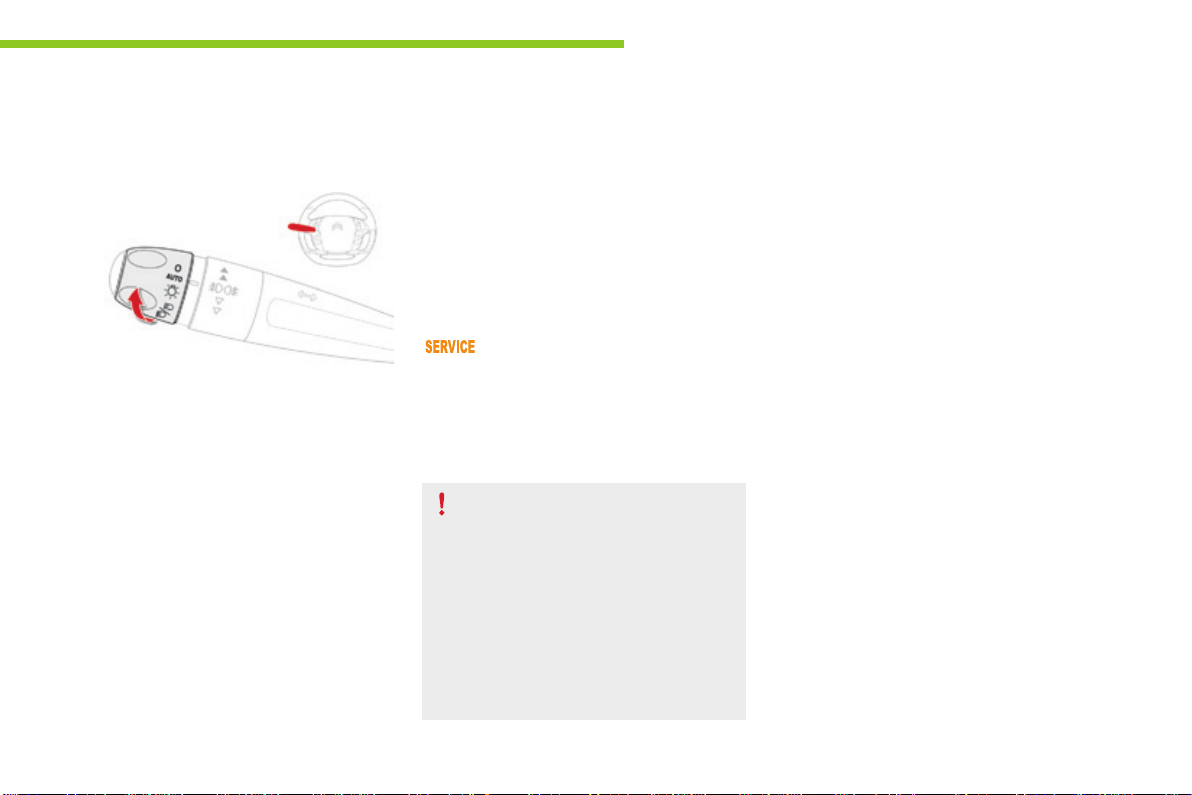
211
5
Lighting and visibility
C4-Picasso-II_en_Chap05_eclairage-visibilite_ed01-2016
Automatic illumination of
headlamps
Activation
F Turntheringtothe"AUTO"position.The
activation of the function is accompanied
bythedisplayofamessage.
Whenalowlevelofambientlightisdetected
by a sunshine sensor, the number plate lamps,
sidelamps and dipped beam headlamps are
switched on automatically, without any action
onthepartofthedriver.Theycanalsocome
on if rain is detected, at the same time as
automaticoperationofthewindscreenwipers.
Assoonasthebrightnessreturnstoa
sufficient level or after the windscreen wipers
are switched off, the lamps are switched off
automatically.
Deactivation
F Turntheringtoanotherposition.
Deactivation of the function is
accompaniedbythedisplayofamessage.
Operating fault
In the event of a malfunction of the
sunshinesensor,thelightingcomes
on,thiswarninglampisdisplayed
Infogorsnow,thesunshinesensor
maydetectsufficientlight.Inthis
case,thelightingwillnotcomeon
automatically.
Do not cover the sunshine sensor,
coupled with the rain sensor and
located in the top of the windscreen
behindtherearviewmirror;the
associatedfunctionswouldnolonger
becontrolled.
Contact a CITROËN dealer or a qualified
workshop.
in the instrument panel accompanied by an
audiblesignaland/oramessage.
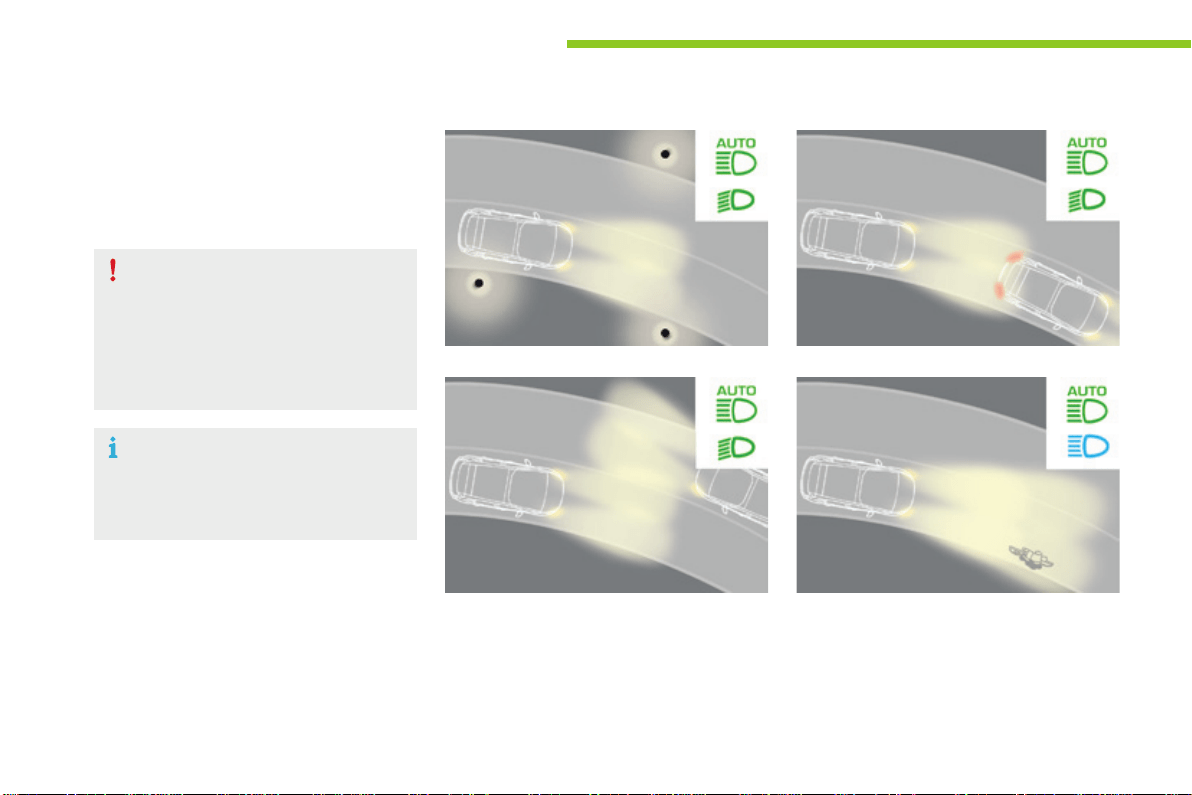
212
Lighting and visibility
C4-Picasso-II_en_Chap05_eclairage-visibilite_ed01-2016
Systemwhichautomaticallychangesbetween
dippedandmainbeamaccordingtothe
ambientlightlevelandthedrivingconditions,
usingacameralocatedatthetopofthe
windscreen.
Thissystemisadrivingaid.
The driver remains responsible for the
vehicle'slighting,itscorrectuseforthe
prevailingconditionsoflight,visibility
andtrafficandobservationofdriving
andvehicleregulations.
The system will be operational as soon
asyouhaveexceeded15mph(25km/h).
If the speed drops below 9 mph
(15km/h),thesystemnolonger
operates.
Automaticheadlampdipping
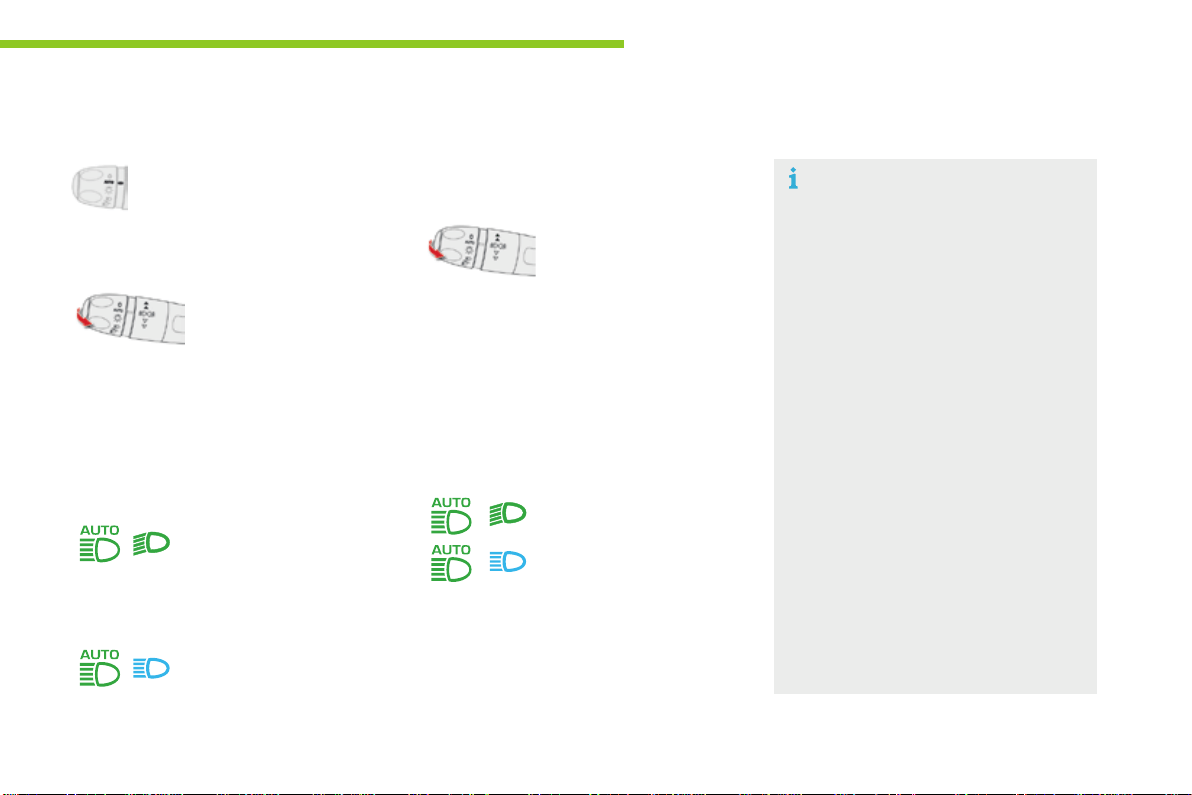
213
5
Lighting and visibility
C4-Picasso-II_en_Chap05_eclairage-visibilite_ed01-2016
The system may suffer interference or
notworkcorrectly:
- under conditions of poor visibility
(fallingsnow,heavyrainorthick
fog,...),
- if the windscreen is dirty, misted or
obscured(byasticker,...)infrontof
the camera,
- ifthevehicleisfacinghighly
reflectivesigns.
Thesystemisnotabletodetect:
- road users that do not have their
ownlighting,suchaspedestrians,
- roaduserswhoselightingis
obscured,suchasvehiclesrunning
behind a safety barrier (on a
motorway,forexample),
- road users at the top or bottom of
a steep slope, on twisty roads, on
crossroads.
Deactivation
F In the Driving menu, select the "Driving
assistance" tab, then "Automatic
headlamp dip";thesystemchangesto
"automaticilluminationheadlamps"mode.
To reactivate the system, flash the headlamps
again.
Dependingonthesituation,
these indicator lamps
comeon.
Activation
F Putthelightingcontrolstalkring
in the "AUTO"position.
F In the Driving menu, select "Driving
assistance", then "Automatic headlamp
dip".
Operation
- dipped beam is
maintained, this indicator
lamp comes on in the
instrumentpanel.
F Flash the headlamps
(goingbeyondthepoint
of resistance) to activate
thefunction.
Once the function is activated, the system
operatesasfollows:
Iftheambientlightlevelissufficientand/orif
the traffic conditions do not allow illumination of
themainbeamheadlamps:
Iftheambientlightlevelisverylowandthe
trafficconditionspermit:
- main beam comes
onautomatically:this
indicator lamp comes on in
theinstrumentpanel.
Pause
Ifthesituationrequiresachangeofheadlamp
beam,thedrivercantakeoveratanytime.
F Flashingtheheadlamps
againpausesthe
function and the system
changesto"automaticilluminationof
headlamps"mode:
- if the "AUTO" and "Dipped beam"
indicator lamps are on, the system
changestomainbeam,
- if the "AUTO" and "Main beam" indicator
lampsareon,thesystemchangesto
dippedbeam.
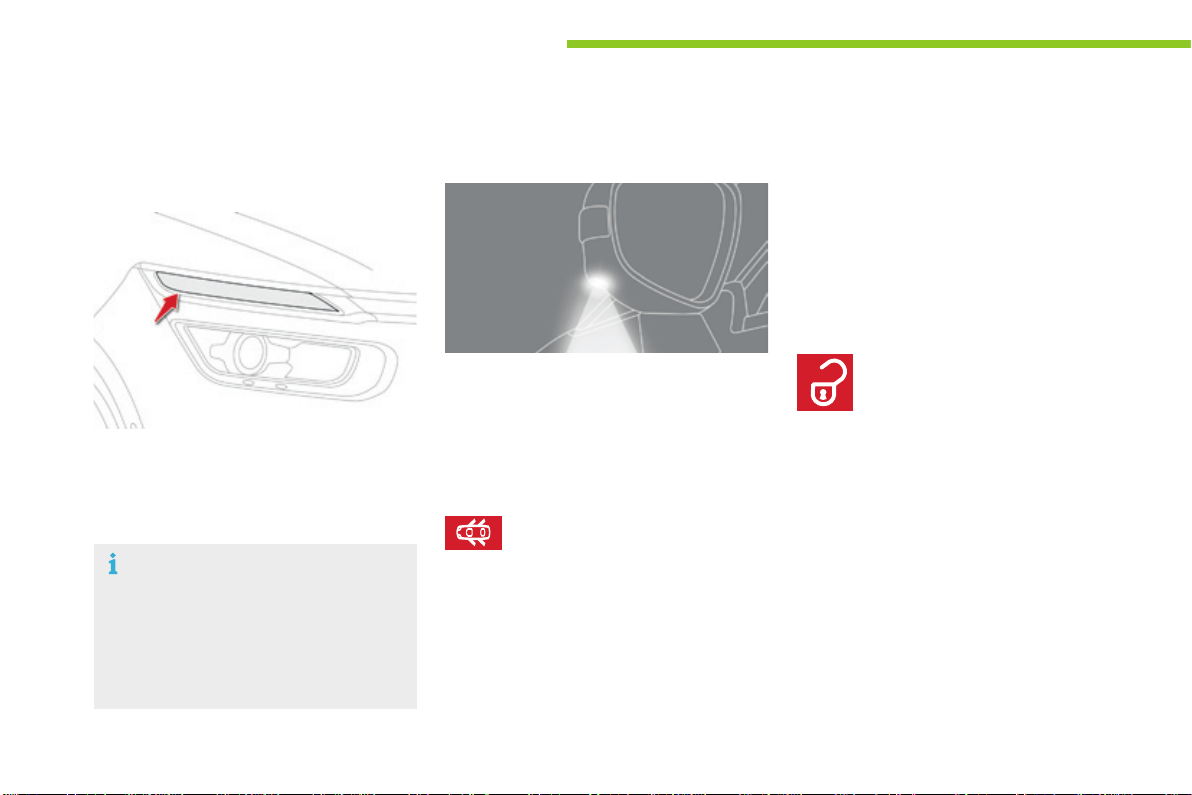
214
Lighting and visibility
C4-Picasso-II_en_Chap05_eclairage-visibilite_ed01-2016
Tomakeyourapproachtothevehicleeasier,
theseilluminate:
- thezonesfacingthedriver’sand
passenger’sdoors,
- the zones forward of the door mirrors and
rearwardofthefrontdoors.
Door mirror spotlamps
Switching on
Switching off
Theygooffautomaticallyafter30seconds.
Exterior welcome lighting
Switching on
F Presstheopenpadlockonthe
remote control or one of the front
door handles with Keyless Entry
andStarting.
Front daytime running
lamps
(light-emitting diodes)
Theycomeonautomaticallywhentheengine
isstarted,whenthelightingcontrolstalkisin
position "0" or "AUTO".
Insomeweatherconditions(e.g.low
temperature or humidity), the presence
ofmistingontheinternalsurfaceofthe
glassoftheheadlampsandrearlamps
isnormal;itdisappearsafterthelamps
havebeenonforafewminutes.
Theremoteswitchingonofthelightingmakes
your approach to the vehicle easier in poor
light.Itisactivatedwhenthelightingcontrol
is in the "AUTO"positionandtheleveloflight
detectedbythesunshinesensorislow.
Switching off
Theexteriorwelcomelightingswitchesoff
automaticallyafterasettime,whentheignition
isswitchedonoronlockingthevehicle.
When the courtesy lamp is in this
position, the spotlamps come on
automatically:
- whenyouunlockthevehicle,
- whenyouremovetheelectronickeyfrom
the reader,
- when you open a door,
-
whenyouusetheremotecontroltolocatethevehicle.
The dipped beam headlamps and sidelamps
comeon;yourvehicleisalsounlocked.
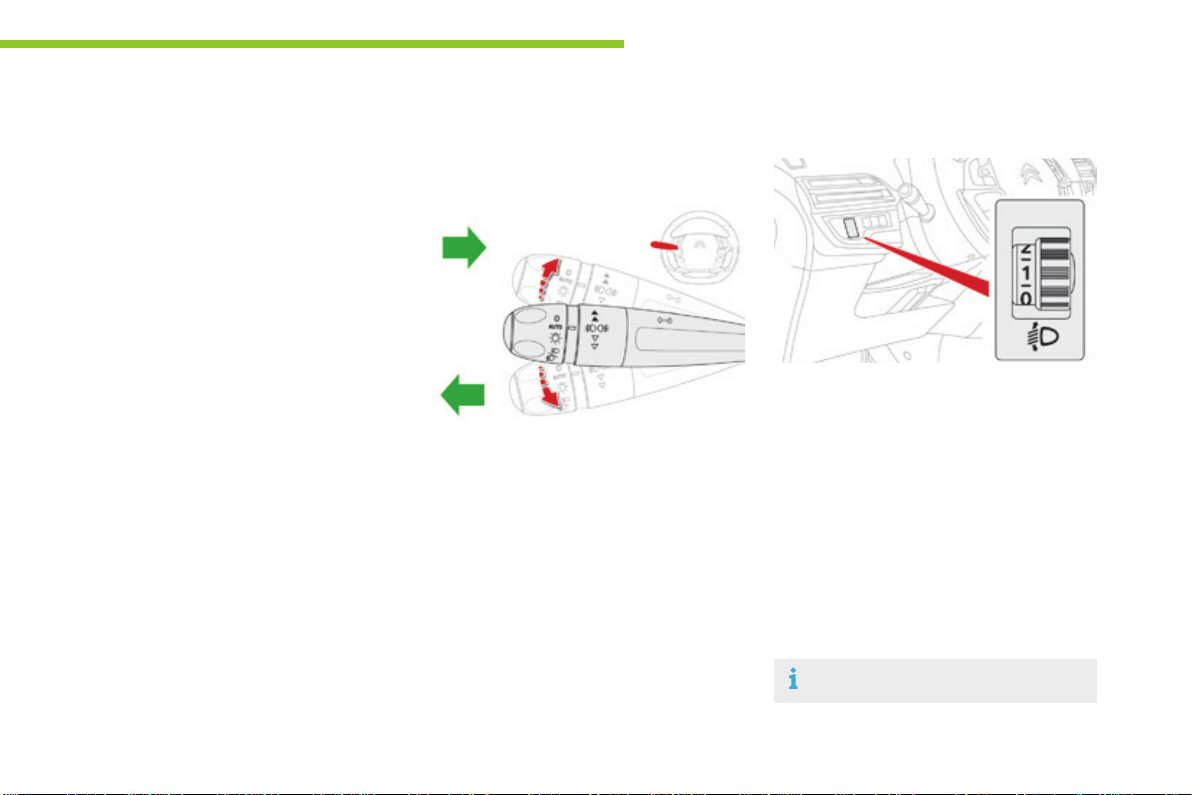
215
5
Lighting and visibility
C4-Picasso-II_en_Chap05_eclairage-visibilite_ed01-2016
Toavoidcausinganuisancetootherroad
users,theheadlampsshouldbeadjusted
accordingtotheloadinthevehicle.
0. 1or2peopleinthefrontseats.
-. Intermediatesetting.
1. 5people+maximumauthorisedload.
-. Intermediatesetting.
2. Driver+maximumauthorisedload.
-. Intermediatesetting.
3. 5people+maximumloadintheboot.
Adjustingtheheadlamp
beamheight
Theinitialsettingisposition"0".
Programming
The activation, deactivation and choice of
welcomelightingdurationaredoneinthetouch
screentablet.
In the Driving menu, select the "Settings"
tab then "Lighting" and select "Welcome
lighting".
Usethearrowsorthecursortoadjustthe
durationofthelighting.
Direction indicators
F Left:lowerthelightingstalkpassingthe
pointofresistance.
F Right:raisethelightingstalkpassingthe
pointofresistance.
Three ashes of the direction
indicators
F Press briefly upwards or downwards,
withoutgoingbeyondthepointof
resistance;thedirectionindicatorswill
flash3times.
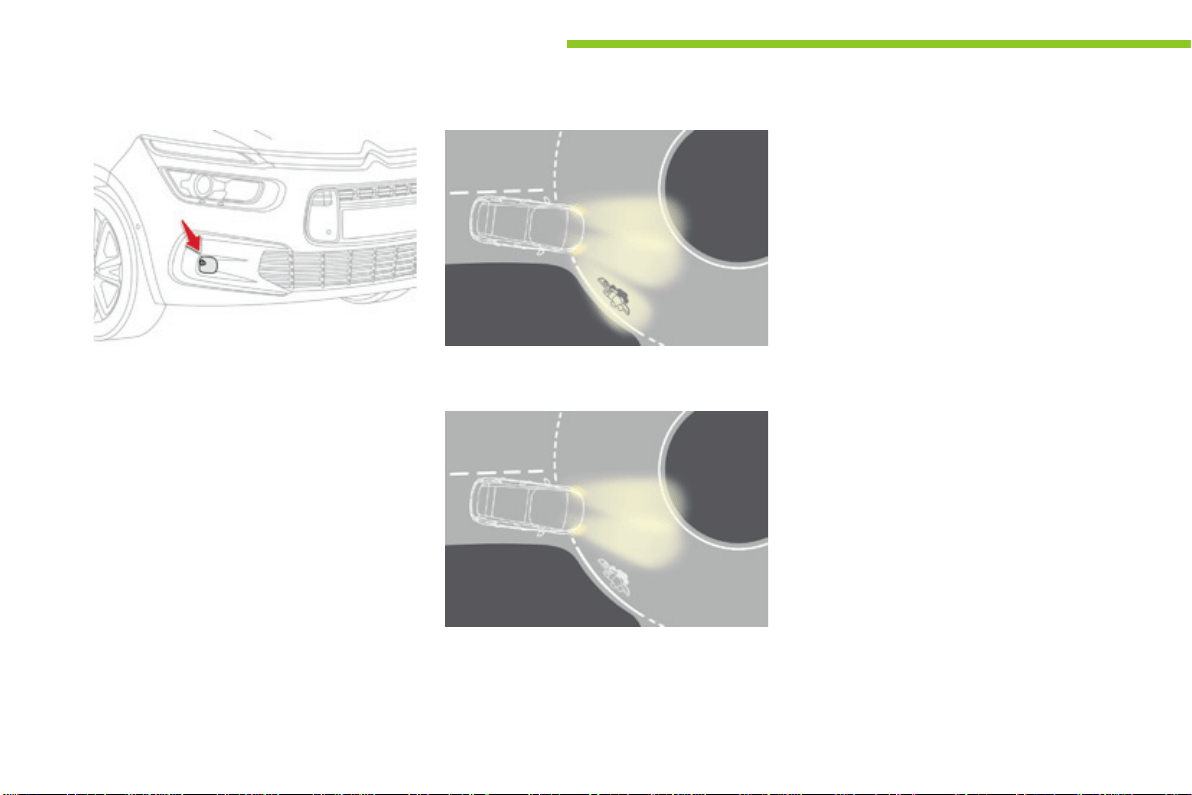
216
Lighting and visibility
C4-Picasso-II_en_Chap05_eclairage-visibilite_ed01-2016
Corneringlighting
Thissystem,iffittedtoyourvehicle,makes
useofthebeamfromafrontfoglampto
illuminate the inside of a bend, when the
main or dipped beam headlamps are on and
thevehiclespeedisbelow25mph(40km/h)
(urbandriving,windingroad,junctions,parking
manoeuvres...).
with cornering lighting
without cornering lighting
Switching on
Thissystemstarts:
- whenthecorrespondingdirectionindicator
is switched on,
or
- fromacertainangleofrotationofthe
steeringwheel.
Switching off
Thesystemdoesnotoperate:
- belowacertainangleofrotationofthe
steeringwheel,
- above25mph(40km/h),
- whenreversegearisengaged.
Thecorneringlightingcanbeactivatedor
deactivated in the Drivingmenu.
F Select the "Settings" tab, then "Lighting"
and "Directional headlamps".

217
5
Lighting and visibility
C4-Picasso-II_en_Chap05_eclairage-visibilite_ed01-2016
Directionallighting
When the dipped or main beam headlamps are
on,thissystemallowsthelightbeamstobetter
followtheroad.
Associatedwithxenonheadlamps,thissystem
improvesthequalityoflightingwhencornering.
with directional lighting
without directional lighting
Operating fault
Thissystemisinactive:
- when stationary or at low speeds,
- whenreverseisengaged.
Ifafaultoccurs,thesewarninglamps
come on in the instrument panel,
accompaniedbyanaudiblesignal
andamessage.
Contact a CITROËN dealer or a qualified
workshop.
Thedirectionallightingcanbeactivatedor
deactivatedinthetouchscreentablet.
In the Driving menu, select the "Settings"
tab, then "Lighting" and select "Directional
headlamps".
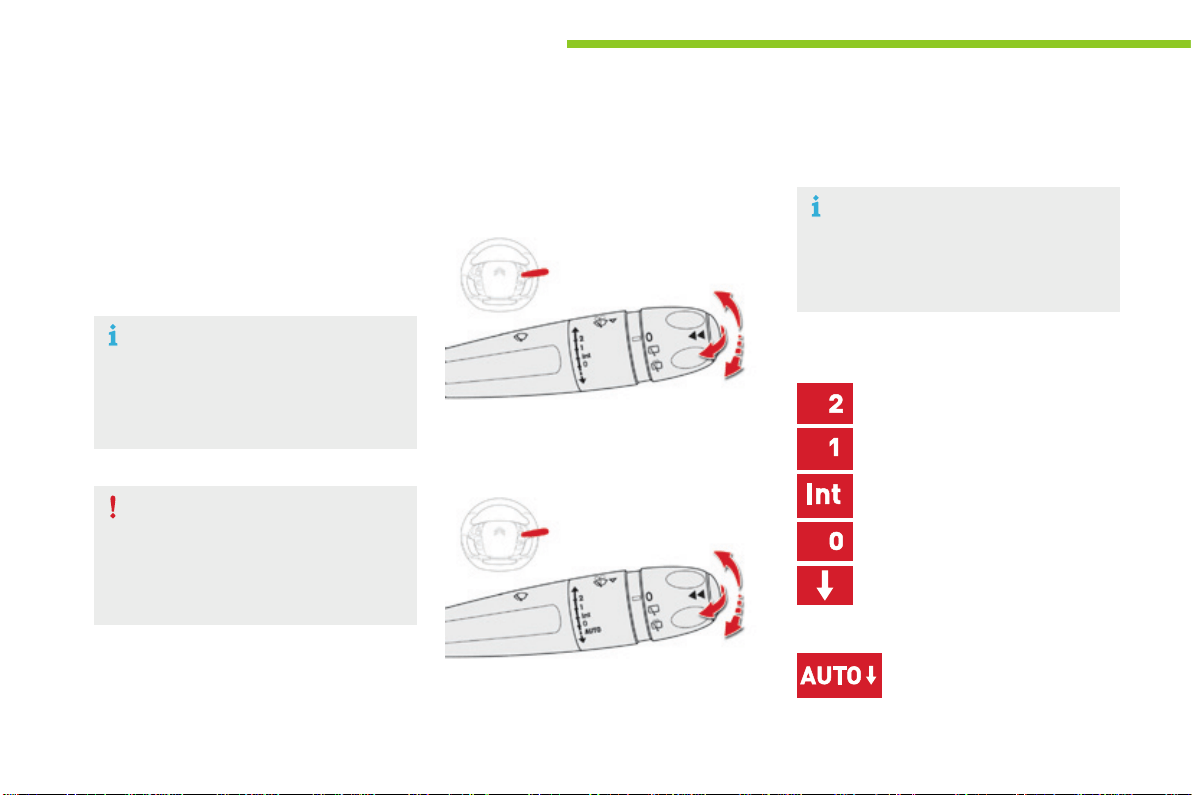
218
Lighting and visibility
C4-Picasso-II_en_Chap05_eclairage-visibilite_ed01-2016
Wipercontrolstalk
Programming
Your vehicle may also include some functions
thatcanbeconfigured:
- automatic rain sensitive windscreen wipers,
- rearwipingonengagingreversegear.
Manual controls
Windscreen wipers
Fastwipe(heavyrain).
Normalwipe(moderaterain).
Intermittent wipe (proportional to the
speedofthevehicle).
Park.
Automaticwiping(pressdown,
thenrelease).
Singlewipe(pullthestalkbriefly
towardsyou).
Thewipersarecontrolleddirectlybythedriver.
Wipingspeedcontrolstalk:raiseorlowerthe
stalktothedesiredposition.
Model without AUTO wiping
Model with AUTO wiping
Singlewipe(pressdownwardsorpull
thestalkbrieflytowardsyou,then
release).
or
In wintry conditions, remove snow, ice
or frost present on the windscreen,
around the wiper arms and blades and
thewindscreenseal,beforeoperating
thewipers.
Do not operate the wipers on a dry
windscreen.Underextremelyhotor
cold conditions, ensure that the wiper
bladesarenotstucktothewindscreen
beforeoperatingthewipers.
The front wiper system includes a
safety device which can temporarily
inhibit operation if it detects obstacles
suchasiceorsnow.

219
5
Lighting and visibility
C4-Picasso-II_en_Chap05_eclairage-visibilite_ed01-2016
Rear wiper
Park.
Ifasignificantaccumulationofsnowor
ice is present, deactivate the automatic
rearwiper.
Intermittentwipe.
Wash-wipe(setduration).
Rearwiperselectionring:
Reverse gear
Whenreversegearisengaged,therearwiper
will come into operation if the windscreen
wipersareoperating.
This function can be deactivated in the Driving
menu.
Select the "Settings" tab, then "Driving aids"
and "Rear wiper in reverse".

220
Lighting and visibility
C4-Picasso-II_en_Chap05_eclairage-visibilite_ed01-2016
Screenwash and washer jets
Windscreen wash and headlamp wash
Adjusting the jets
Thefrontwashersincludeanadjustmentforthe
heightofdeliveryfromthejets.
Ifyouwanttomodifythefactorysetting,turn
thescrewoneachjetanti-clockwise,towards
the"+"toraisethejetorclockwise,towards
the"-"tolowerit.
Headlamp wash
F Pullthewindscreenwiperstalktowards
you.Thewindscreenwashthenthe
windscreenwipersoperateforafixed
period.
Afewmomentsafterreleasingthewiperstalk,
there is a last wipe to clear any runs from the
screen.
The headlamps operate when the vehicle is
movingandwhenthedippedbeamheadlamps
areon.However,toreducetheconsumption
of screenwash fluid, the headlamp wash only
operates with every 7th use of the screenwash
oronceevery25miles(40km),duringagiven
journey.
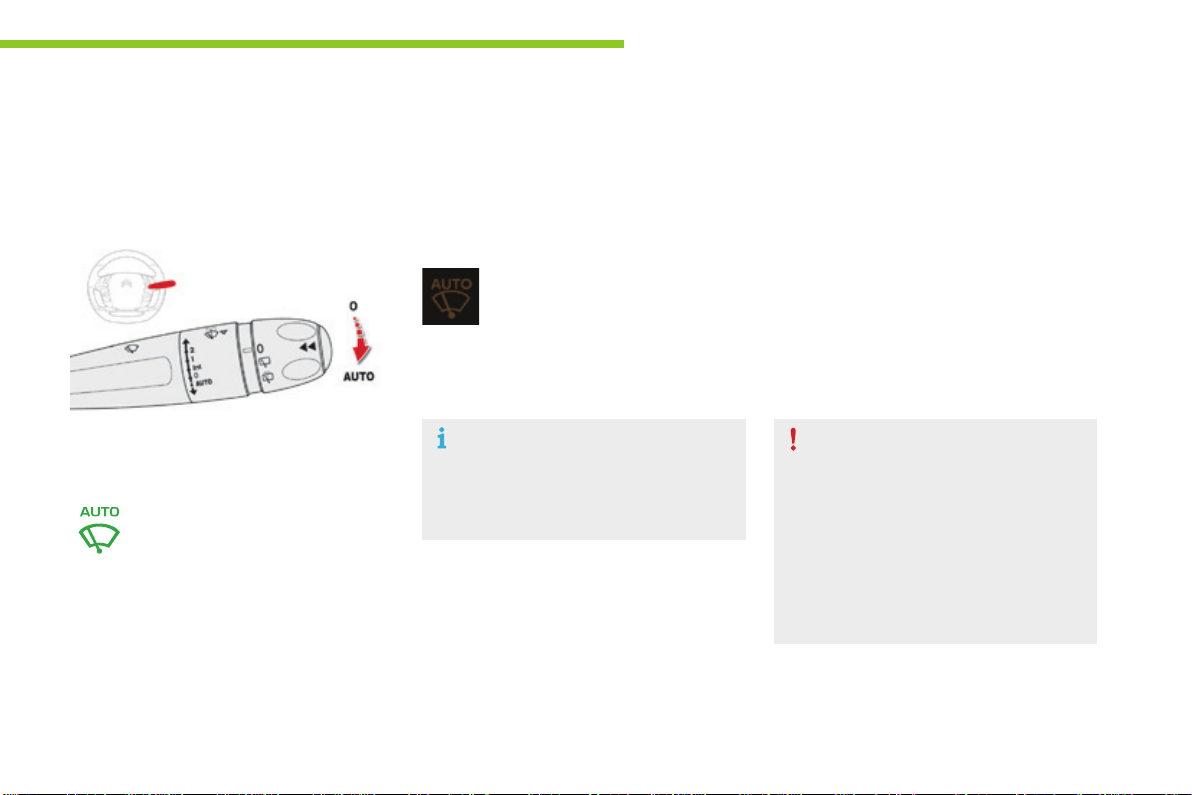
221
5
Lighting and visibility
C4-Picasso-II_en_Chap05_eclairage-visibilite_ed01-2016
Donotcovertherainsensor,linkedwith
the sunshine sensor and located in the
centre of the windscreen behind the rear
viewmirror.
Switch off the automatic rain sensitive
wiperswhenusinganautomaticcarwash.
In winter, it is advisable to wait until the
windscreen is completely clear of ice
beforeactivatingtheautomaticrain
sensitivewipers.
Operating fault
If a fault occurs with the automatic rain
sensitive wipers, the wipers will operate in
intermittentmode.
HaveitcheckedbyCITROËNdealerora
qualifiedworkshop.
The windscreen wipers operate automatically, without any action on the part of the driver, if rain is
detected(sensorbehindtherearviewmirror),adaptingtheirspeedtotheintensityoftherainfall.
Switching on
Switching off
The automatic rain sensitive windscreen
wipersmustbereactivatedbypushing
thecontrolstalkdownwards,ifthe
ignitionhasbeenoffformorethan
oneminute.
Brieflypushthecontrolstalk
downwards.
Awipingcycleconfirmsthatthe
instructionhasbeenaccepted.
Thiswarninglampcomesoninthe
instrumentpanelandamessageis
displayed.
Brieflypushthecontrolstalk
downwardsagain,orplace
thecontrolstalkinanother
position(Int,1or2).
Automatic rain sensitive windscreen wipers
Thiswarninglampgoesoffintheinstrument
panelandamessageisdisplayed.
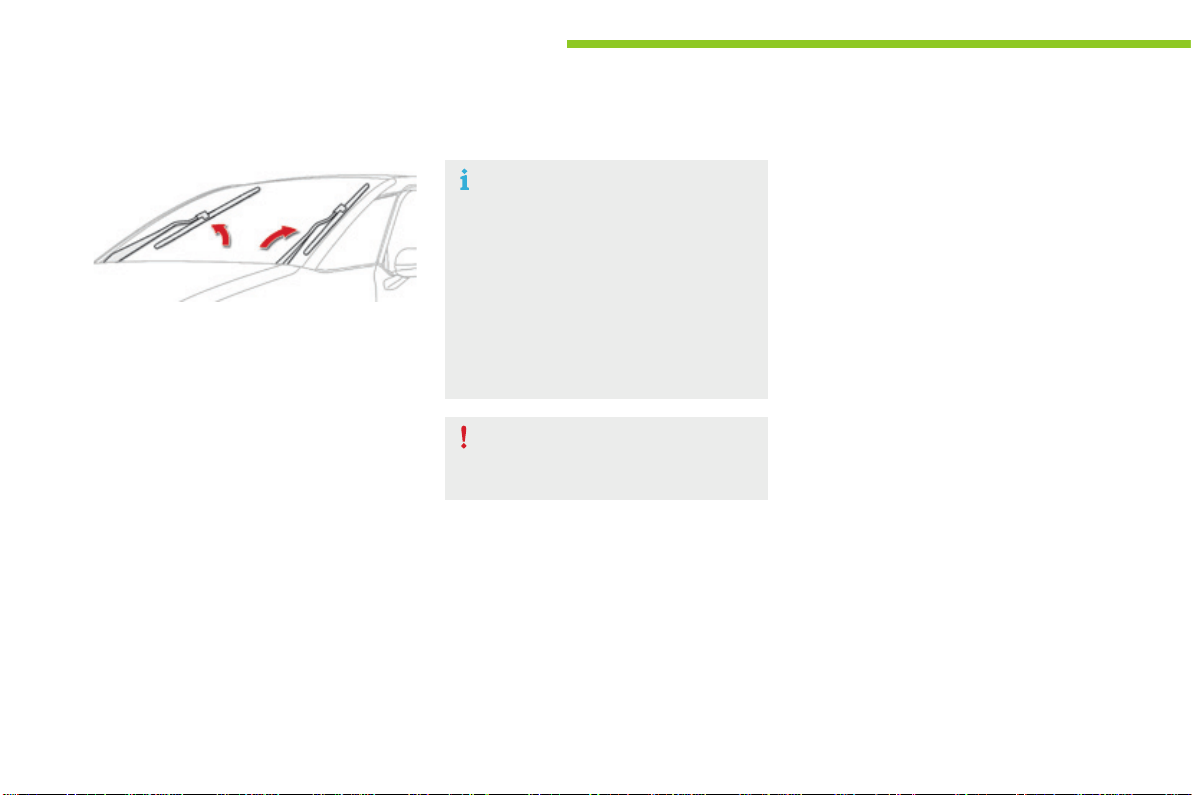
222
Lighting and visibility
C4-Picasso-II_en_Chap05_eclairage-visibilite_ed01-2016
Special position of the windscreen wipers
To maintain the effectiveness of the
"flat-blade" type of wiper blades, it is
advisableto:
- handle them with care,
- cleanthemregularlyusingsoapy
water,
- avoidusingthemtoretain
cardboard on the windscreen,
- replacethematthefirstsignsof
wear.
This position permits release of the windscreen
wiperblades.
Itisusedforcleaningorreplacementofthe
wiperblades.Itcanalsobeuseful,inwinter,to
detachthewiperbladesfromthewindscreen.
Onswitchingofftheignition:
F anyactiononthewiperstalkintheminute
afterswitchingofftheignitionplacesthe
wiperbladesverticallyonthescreen.
Whenthesystemisnolongerpowered-at
leastoneminuteafterswitchingoffthe
ignition-itispossibletomovethearms
manually.
F Toparkthebladesagain,switchonthe
ignitionandoperatethewiperstalk.
Replacement of the arms must only
be done by a CITROËN dealer or a
qualifiedworkshop.
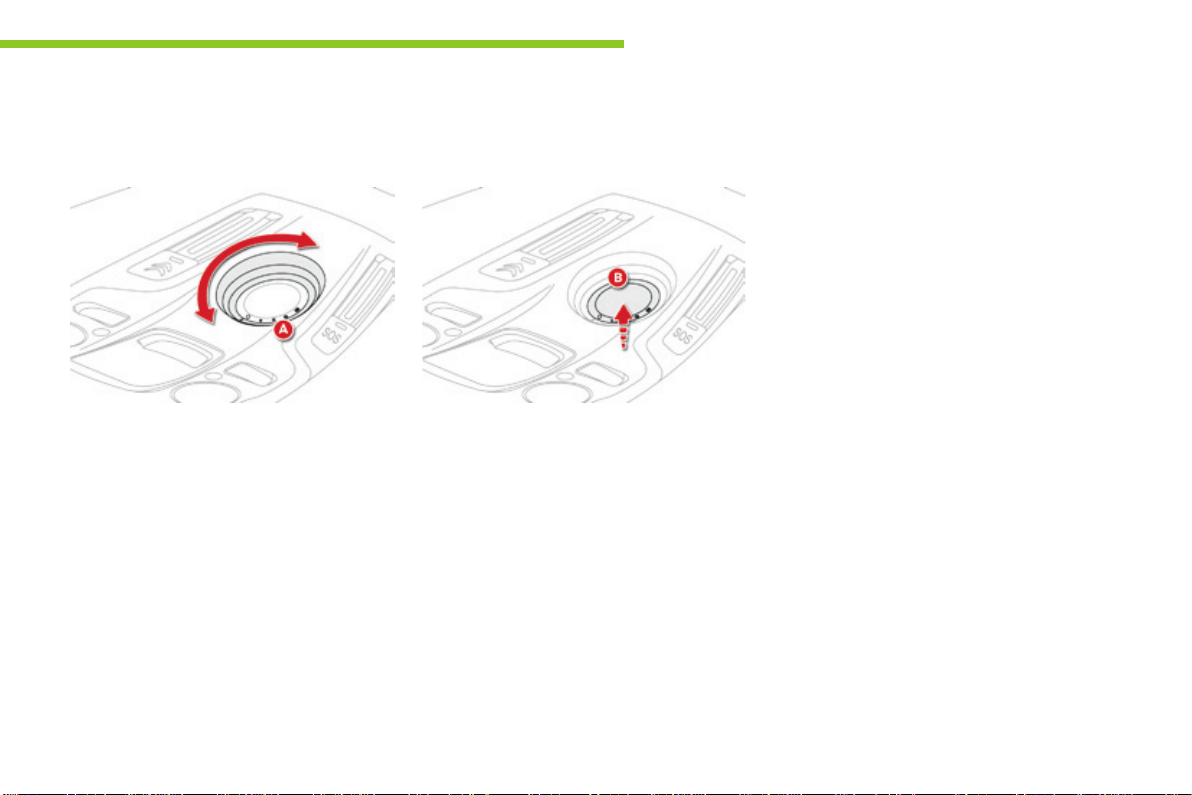
223
5
Lighting and visibility
C4-Picasso-II_en_Chap05_eclairage-visibilite_ed01-2016
Panoramic sunroof
F Rotate the control A to slide the roof blind
to the desired position (positions 1 to 4).
Closing the roof blind
Anti-pinch
Itisfittedwithanelectricallycontrolledblind.
Opening the roof blind
F Rotate the control A to position 0 to close
theroofblind.
Theblindhasananti-pinchfunction.
At the end of its travel, when the blind
encountersanobstacleonclosing,itstopsand
movesbackslightly.
Followingafaultorafterabattery
disconnectionduringthemovementoftheblind
or after it has stopped, you must re-initialise the
anti-pinchfunction:
F place the blind in the closed position,
F presscontrolknobBforapproximately
twoseconds.
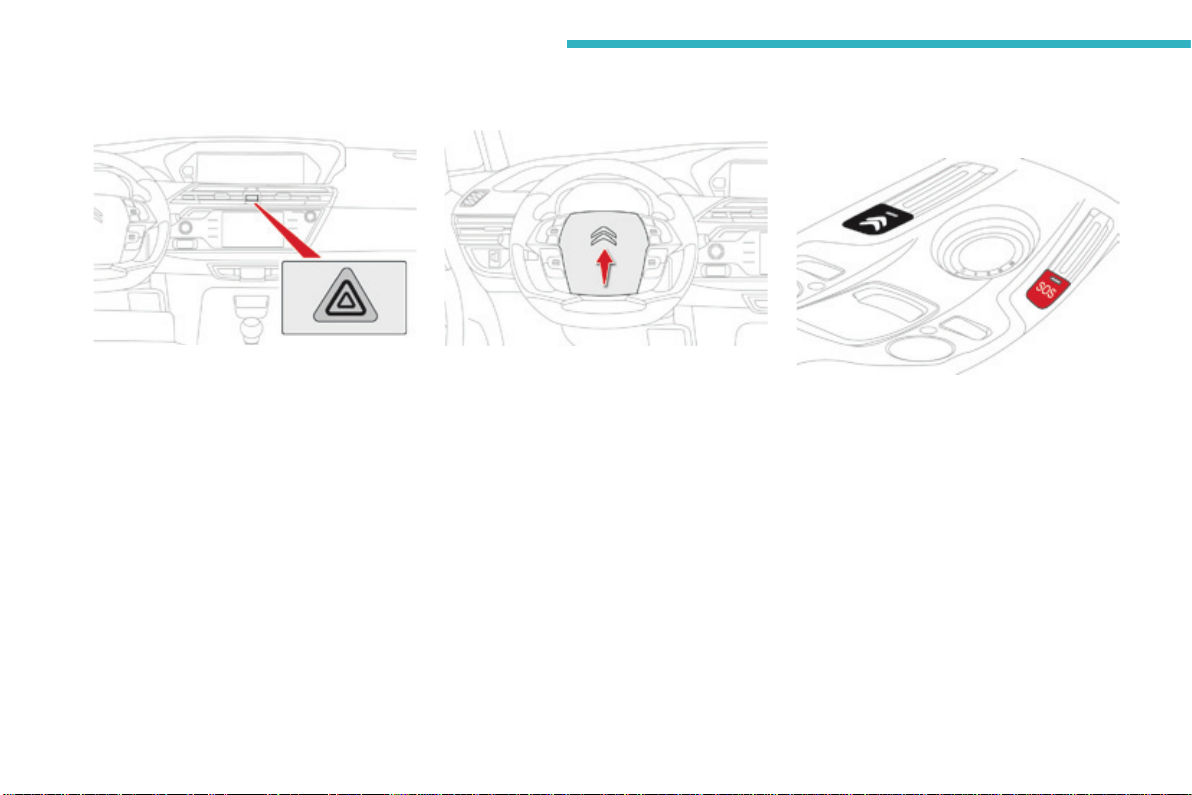
224
Safety
C4-Picasso-II_en_Chap06_securite_ed01-2016
Hazardwarninglamps
Visualwarningwithallofthedirection
indicatorsflashingtoalertotherroaduserstoa
vehiclebreakdown,towingoraccident.
F Press this button, all of the direction
indicatorsflash.
Theycanoperatewiththeignitionoff.
Automatic operation of
hazard warning lamps
Whenbrakinginanemergency,dependingon
thedeceleration,thehazardwarninglamps
comeonautomatically.
They switch off automatically the first time you
accelerate.
F Youcanalsoswitchthemoffbypressing
thebutton.
Horn
F Pressthecentralpartofthesteering
wheel.
Thissystemallowsyoutomakeanemergency
orassistancecalltotheemergencyservicesor
tothededicatedCITROËNservice.
Emergencyor
assistance call
For more information on the use of this
function, refer to the "Audio and telematics"
section.

225
6
Safety
C4-Picasso-II_en_Chap06_securite_ed01-2016
Electronicstabilitycontrol(ESC)incorporating
thefollowingsystems:
- anti-lockbrakingsystem(ABS)and
electronicbrakeforcedistribution(EBFD),
- emergencybrakingassistance(EBA),
- wheelanti-slipregulation(ASR)ortraction
control,
- dynamicstabilitycontrol(DSC).
Electronic stability control (ESC)
Definitions
Anti-lock braking system (ABS)
and electronic brake force
distribution (EBFD)
This system improves the stability and
manoeuvrabilityofyourvehiclewhenbraking
and contributes towards improved control on
corners, in particular on poor or slippery road
surfaces.
TheABSpreventswheellockintheeventof
emergencybraking.
TheEBFDmanagesthebrakingpressure
wheelbywheel.
Emergency braking assistance
(EBA)
Inanemergency,thissystemenablesyouto
reachtheoptimumbrakingpressuremore
quicklyandthereforereducethestopping
distance.
Itistriggeredaccordingtothespeedatwhich
thebrakepedalispressed.Thisisfeltbya
reduction in the resistance of the pedal and an
increaseintheeffectivenessofthebraking.
Anti-slip regulation (ASR)
TheASRsystem(alsoknownasTraction
Control) optimises traction in order to limit
wheelslipbyactingonthebrakesofthedriving
wheelsandontheengine.Italsoimproves
the directional stability of the vehicle on
acceleration.
Dynamic stability control (DSC)
If there is a difference between the path
followed by the vehicle and that required by
the driver, the DSC monitors each wheel and
automaticallyactsonthebrakeofoneormore
wheelsandontheenginetoreturnthevehicle
to the required path, within the limits of the laws
ofphysics.
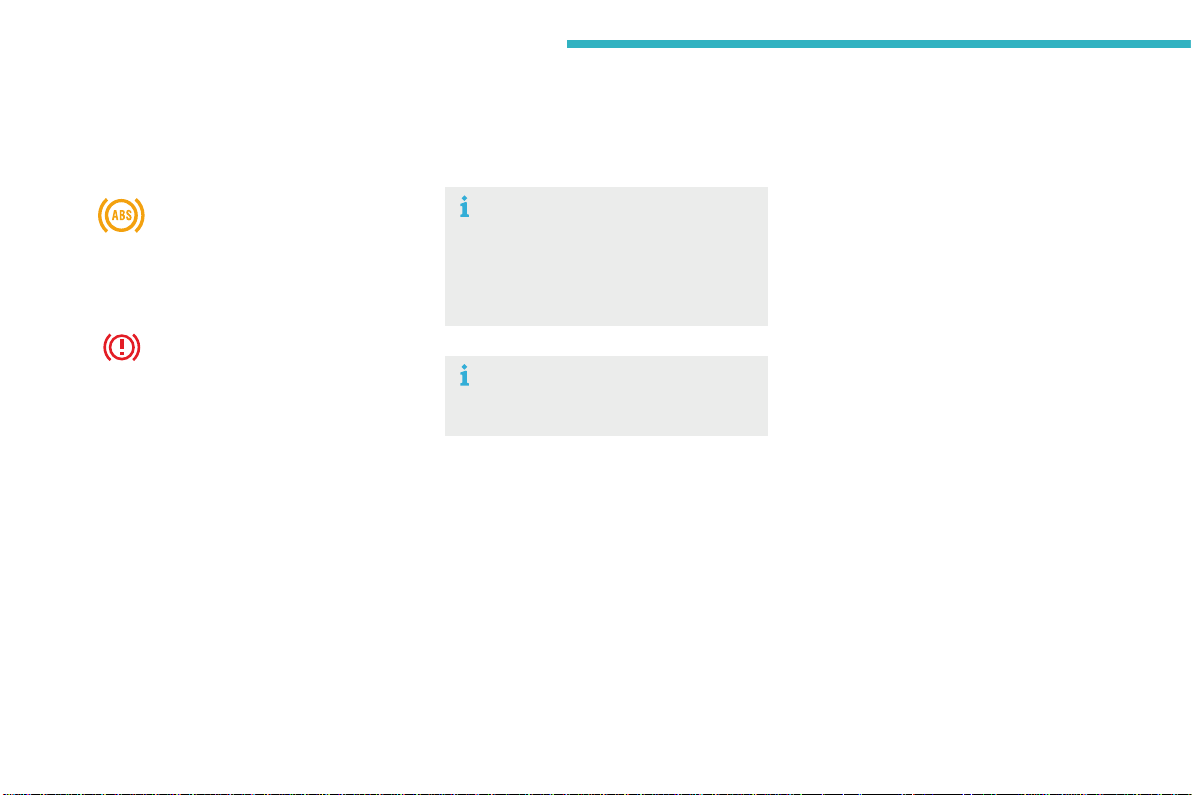
226
Safety
C4-Picasso-II_en_Chap06_securite_ed01-2016
Intelligent traction control
system ("Snow motion")
Whenthiswarninglampcomeson,
coupled with the STOPandABSwarning
lamps,accompaniedbyanaudiblesignal
andamessage,itindicatesthatthere
isafaultwiththeelectronicbrakeforce
distribution(EBFD).
Anti-lock braking system (ABS) and electronic brake force
distribution (EBFD)
Thefixedilluminationofthiswarning
lamp indicates that there is a fault
withtheABS.
Dependingonversion,yourvehiclehasa
systemtohelpdrivingonsnow:intelligent
traction control.
This system detects situations of difficult
surfaceadhesionthatcouldmakeitdifficultto
moveofformakeprogressondeepfreshsnow
orcompactedsnow.
In these situations, the intelligent traction
control limits the amount of wheel slip to
providethebesttractionandtrajectorycontrol
foryourvehicle.
Theuseofsnowtyresisstrongly
recommendedonsurfacesofferinglowlevels
ofadhesion.
Whenchangingwheels(tyresand
rims), ensure that these are approved
foryourvehicle.
NormaloperationoftheABSmaymake
itselffeltbyslightvibrationsofthebrake
pedal.
In emergency braking, press very
firmly and maintain this pressure.
You must stop as soon as it is safe to do so.
Inbothcases,havethesystemcheckedbya
CITROËNdealeroraqualifiedworkshopas
soonaspossible.
Thevehicleretainsconventionalbraking.Drive
carefullyatmoderatespeed.
227
6
Safety
C4-Picasso-II_en_Chap06_securite_ed01-2016
Anti-slip regulation (ASR)
Activation
This system is activated automatically each
timethevehicleisstarted.
It comes into operation in the event of a
problemofgrip.
Deactivation
Inexceptionalconditions(startingavehicle
whichisboggeddown,stuckinsnow,onsoft
ground...),itmaybeadvisabletodeactivate
the DSC and ASR, so that the wheels can turn
freelyandregaingrip.
Thisisindicatedbytheflashingof
thiswarninglampintheinstrument
panel.
Reactivate the systems as soon as the level of
grippermits.
F In the Driving menu, select the "Driving
assistance" tab, then "Anti-slip
regulation".
This indicator lamp comes on in the
instrumentpanel.
TheASRsystemwillnolongeract
ontheoperationoftheengineand
onthebrakesintheeventofan
involuntarychangeoftrajectory.
Afteranimpact,havethesystemcheckedbya
CITROËNdealeroraqualifiedworkshop.
Operating fault
Reactivation
The system is reactivated automatically every
timetheignitionisswitchedbackonorfrom
30mph(50km/h).
Below30mph(50km/h),youcanreactivateit
manually:
F In the Driving menu, select the "Driving
assistance" tab, then "Anti-slip
regulation".
Illuminationofthiswarninglamp,
accompaniedbyanaudiblesignal
andamessage,indicateafaultwith
thesystem.
Contact a CITROËN dealer or a qualified
workshoptohavethesystemchecked.
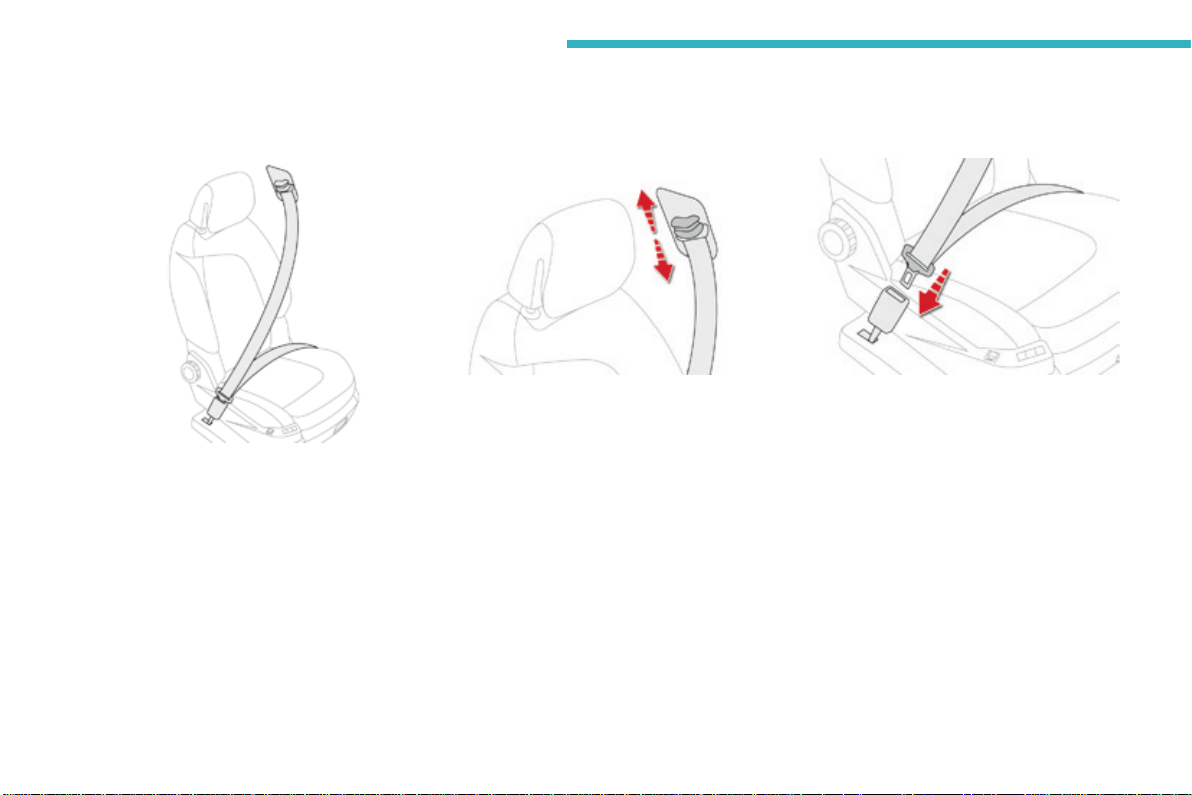
228
Safety
C4-Picasso-II_en_Chap06_securite_ed01-2016
Seat belts
Front seat belts
The front seat belts are fitted with a
pretensioningandforcelimitingsystem.
This system improves safety in the front
seatsintheeventofafrontorsideimpact.
Dependingontheseverityoftheimpact,the
pretensioningsysteminstantlytightenstheseat
beltsagainstthebodyoftheoccupants.
Thepretensioningseatbeltsareactivewhen
theignitionison.
The force limiter reduces the pressure of the
seat belt on the chest of the occupant, so
improvingtheirprotection.
Front seat belt anchorage height
adjustment
F Toadjusttheheightoftheanchoragepoint,
squeeze the control and slide it up or down
tothedesirednotch.
Fastening
F Pullthestrap,theninsertthetongueinthe
buckle.
F Checkthattheseatbeltisfastened
correctlybypullingthestrap.
Unfastening
F Presstheredbuttononthebuckle.
F Guidetheseatbeltasitreelsin.

229
6
Safety
C4-Picasso-II_en_Chap06_securite_ed01-2016
2
nd
row seat belts
The rear seats are each fitted with a seat belt,
three-pointanchorageswithinertiareeland
forcelimiter(exceptforthecentrerearseat).
Guide the belt as it reels in and place the
tongueonthemagnetatthesideanchorage
point.
2
nd
row outer seat belts
(stowing)
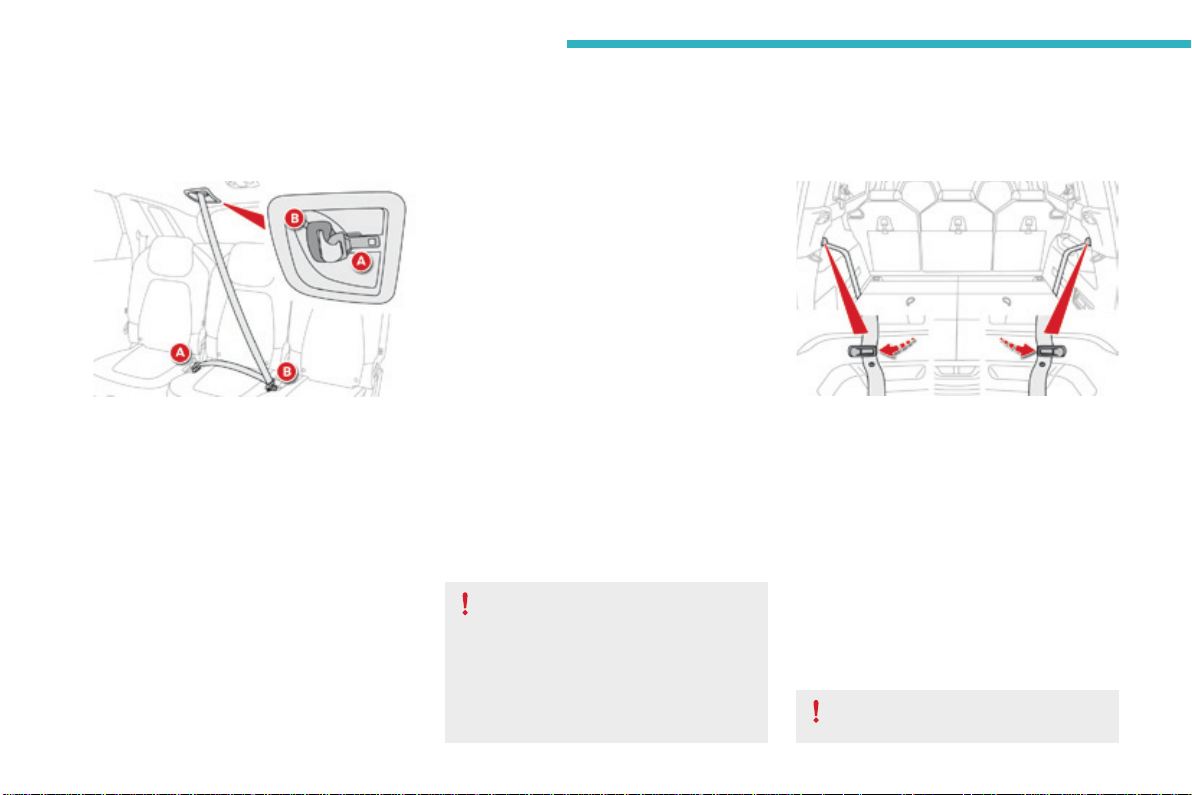
230
Safety
C4-Picasso-II_en_Chap06_securite_ed01-2016
2
nd
row centre seat belt
Theseatbeltforthecentrerearseatisbuiltintotheroof.
Fastening
F PullthestrapandinsertthetongueA into
therighthandbuckle.
F InserttongueBintothelefthandbuckle.
F Checkthateachbuckleiscorrectly
fastenedbypullingonthebeltwebbing.
Unfastening
F PresstheredbuttoninbuckleB, then
buckleA.
F Guide the seat belt as it reels in and place
thetongueB and then Aonthemagnetin
theroofanchoragepoint.
Before any operation of the rear seats,
toavoiddamagetotheseatbelts
checkthatthereisnoslackintheouter
beltsandsecuretheirtonguesonthe
anchoragepoints.Thecentreseatbelt
mustbefullyreeledin.
3
rd
row seat belts
Fastening
F Detachtheseatbeltstrapfromitsretaining
looplocatedonthesidetrimoftheboot.
F Pullonthestrapandinsertthetongueinto
thebuckle.
F Checkthatthebuckleiscorrectlyfastened
bypullingonthebeltstrap.
Unfastening and stowing
F Presstheredbuttoninbuckle.
F Guidetheseatbeltstrapasitreelsin.
F Securethestrap,flatintheretainingloop.
Ensure that the seat belts are secured
whennotinuse.
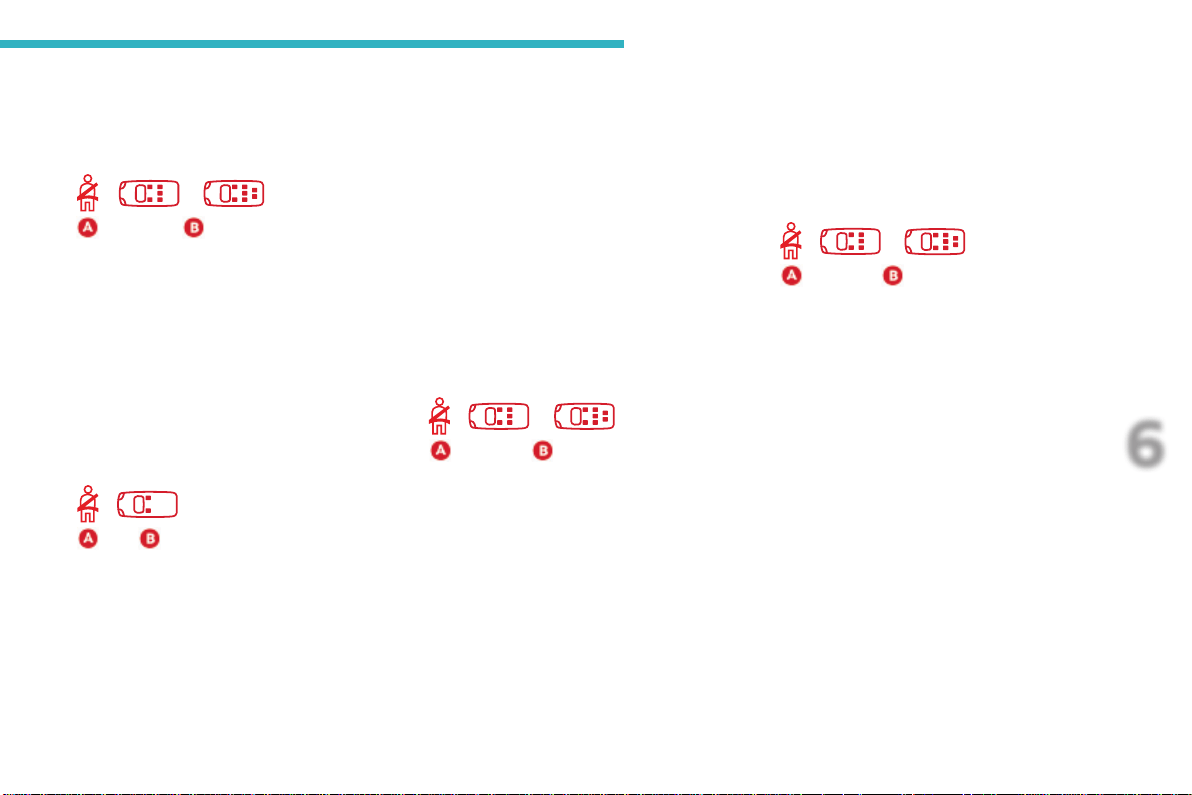
231
6
Safety
C4-Picasso-II_en_Chap06_securite_ed01-2016
Seat belt not fastened and unfastened alerts
Rear seat belts not fastened
alert
The instrument panel includes a seat belt not-
fastenedwarninglampA as well as an indicator
of the location of the non-fastened belts B.
When the system detects a non-fastened
orunfastenedseatbelt,thewarninglampA
comesonaswellasthecorrespondingpoints
in the indicator B.
Onswitchingontheignition,enginerunning
or the vehicle at a speed of up to 12 mph
(20km/h),thewarninglampA as well as the
correspondingpointsintheindicatorB come
on for about thirty seconds, if one or more rear
passengershavenotfastenedtheirseatbelt.
Seat belts unfastened alert
Front seat belts not fastened
alert
Onswitchingontheignition,thewarning
lamp A comes on, as well as the
correspondingpointsintheindicatorB, if the
driverand/orfrontpassengerhavenotfastened
theirseatbelt.
Atspeedsabove12mph(20km/h),these
alertsflash,accompaniedbyanaudiblesignal
fortwominutes.Afterthisperiod,thesealerts
remainonfixed,whilethefrontseatbeltsare
notfastened.
Onswitchingontheignition,thewarning
lamp A remains on, as well as the
correspondingpointsintheindicatorB, if the
driverand/oroneormorepassengershavenot
fastenedtheirseatbelt.
Atspeedsabove12mph(20km/h),these
alertsflash,accompaniedbyamessageand
anaudiblesignalfortwominutes.Afterthis
period,thesealertsremainonfixed,whilethe
seatbeltsarenotfastened.
232
Safety
C4-Picasso-II_en_Chap06_securite_ed01-2016
Thedrivermustensurethatpassengersuse
the seat belts correctly and that they are all
fastenedbeforesettingoff.
Wherever you are seated in the vehicle,
always fasten your seat belt, even for short
journeys.
Donotinterchangetheseatbeltbucklesas
theywillnotfulfilltheirrolefully.
The seat belts are fitted with an inertia reel
permittingautomaticadjustmentofthe
lengthofthestraptoyoursize.Theseatbelt
isstowedautomaticallywhennotinuse.
Before and after use, ensure that the seat
beltisreeledincorrectly.
The lower part of the strap must be
positionedaslowaspossibleonthepelvis.
The upper part must be positioned in the
hollowoftheshoulder.
The inertia reels are fitted with an automatic
lockingdevicewhichcomesintooperationin
theeventofacollision,emergencybraking
orifthevehiclerollsover.Youcanrelease
thedevicebypullingthestrapfirmlyand
thenreleasingitsothatitreelsinslightly.
Recommendations for children
Useasuitablechildseatifthepassengeris
less than 12 years old or shorter than one
andahalfmetres.
Never use the same seat belt to secure more
thanoneperson.
Neverallowachildtotravelonyourlap.
For more information on Child seats, refer
tothecorrespondingsection.
Inordertobeeffective,aseatbeltmust:
- betightenedasclosetothebodyas
possible,
- be pulled in front of you with a smooth
movement,checkingthatitdoesnot
twist,
- be used to restrain only one person,
- notbearanytraceofcutsorfraying,
- not be converted or modified to avoid
affectingitsperformance.
In the event of an impact
Depending on the nature and
seriousness of the impact, the
pretensioningdevicemaybedeployed
beforeandindependentlyoftheairbags.
Deployment of the pretensioners is
accompaniedbyaslightdischargeof
harmlesssmokeandanoise,duetothe
activationofthepyrotechniccartridge
incorporatedinthesystem.
Inallcases,theairbagwarninglampcomes
on.
Followinganimpact,havetheseatbelts
systemchecked,andifnecessaryreplaced,
by a CITROËN dealer or a qualified
workshop.
In accordance with current safety
regulations,forallrepairsonyourvehicle's
seatbelts,gotoaqualifiedworkshopwith
theskillsandequipmentneeded,whicha
CITROËNdealerisabletoprovide.
Haveyourseatbeltscheckedregularlyby
aCITROËNdealeroraqualifiedworkshop,
particularlyifthestrapsshowsignsof
damage.
Clean the seat belt straps with soapy
wateroratextilecleaningproduct,soldby
CITROËNdealers.
Afterfoldingormovingaseatorrearbench
seat, ensure that the seat belt is positioned
andreeledincorrectly.
Advice
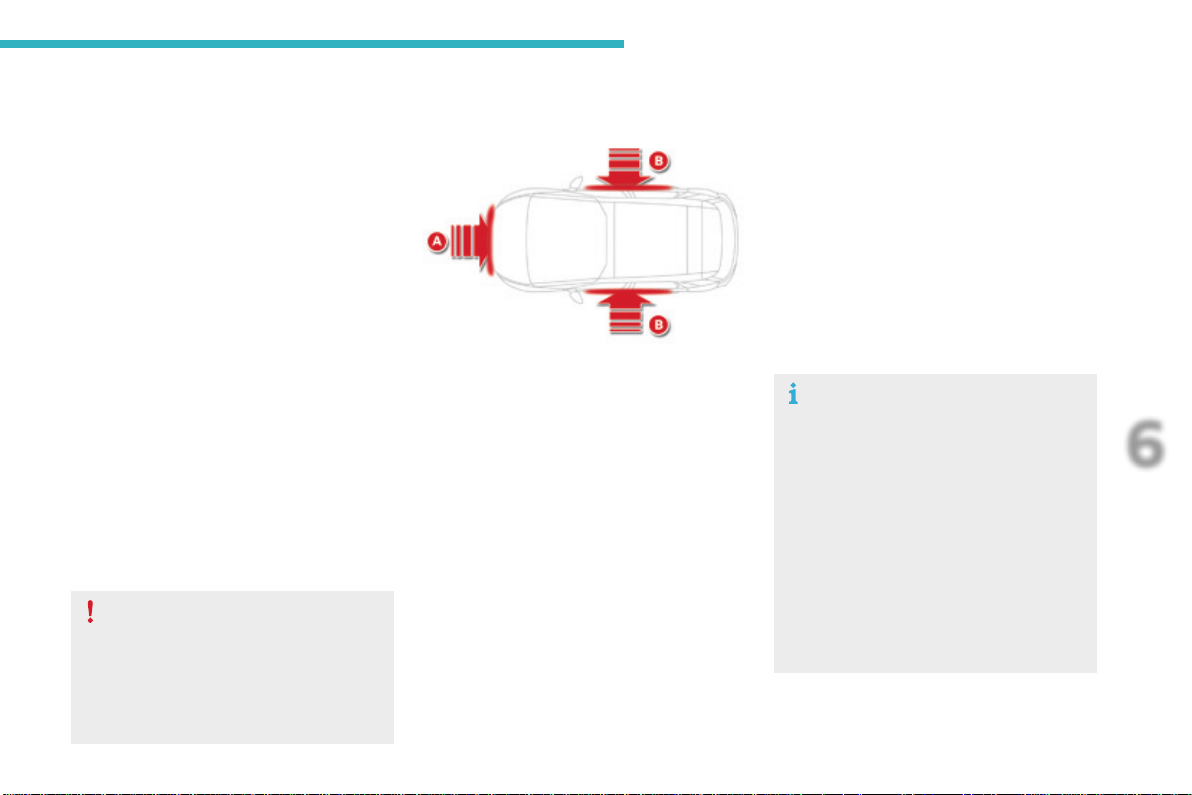
233
6
Safety
C4-Picasso-II_en_Chap06_securite_ed01-2016
Airbags
Systemdesignedtocontributetowards
improvingthesafetyoftheoccupants(with
theexceptionoftherearcentrepassenger)
intheeventofviolentcollisions.Theairbags
supplementtheactionoftheforce-limiting
seatbelts(withtheexceptionoftherearcentre
passenger).
If a collision occurs, the electronic detectors
record and analyse the front and side impacts
sustainedintheimpactdetectionzones:
- inthecaseofaseriousimpact,theairbags
are deployed instantly and contribute
towards better protection of the occupants
ofthevehicle(withtheexceptionofthe
rearcentrepassenger);immediatelyafter
theimpact,theairbagsdeflaterapidlyso
thattheydonothindervisibilityortheexit
of the occupants,
- in the case of a minor or rear impact or in
certainroll-overconditions,theairbags
maynotbedeployed;theseatbelt
alonecontributestowardsensuringyour
protectioninthesesituations.
The airbags do not operate when the
ignition is switched off.
Thisequipmentwillonlydeployonce.
Ifasecondimpactoccurs(duringthe
same or a subsequent accident), the
airbagwillnotbedeployedagain.
Deployment of one or more of the
airbagsisaccompaniedbyaslight
emissionofsmokeandanoise,due
to the activation of the pyrotechnic
cartridgeincorporatedinthesystem.
Thissmokeisnotharmful,butsensitive
individualsmayexperienceslight
irritation.
The noise of detonation related to the
deploymentofoneormoreairbagsmay
resultinaslightlossofhearingfora
shorttime.
Impact detection zones
A. Frontimpactzone.
B. Sideimpactzone.
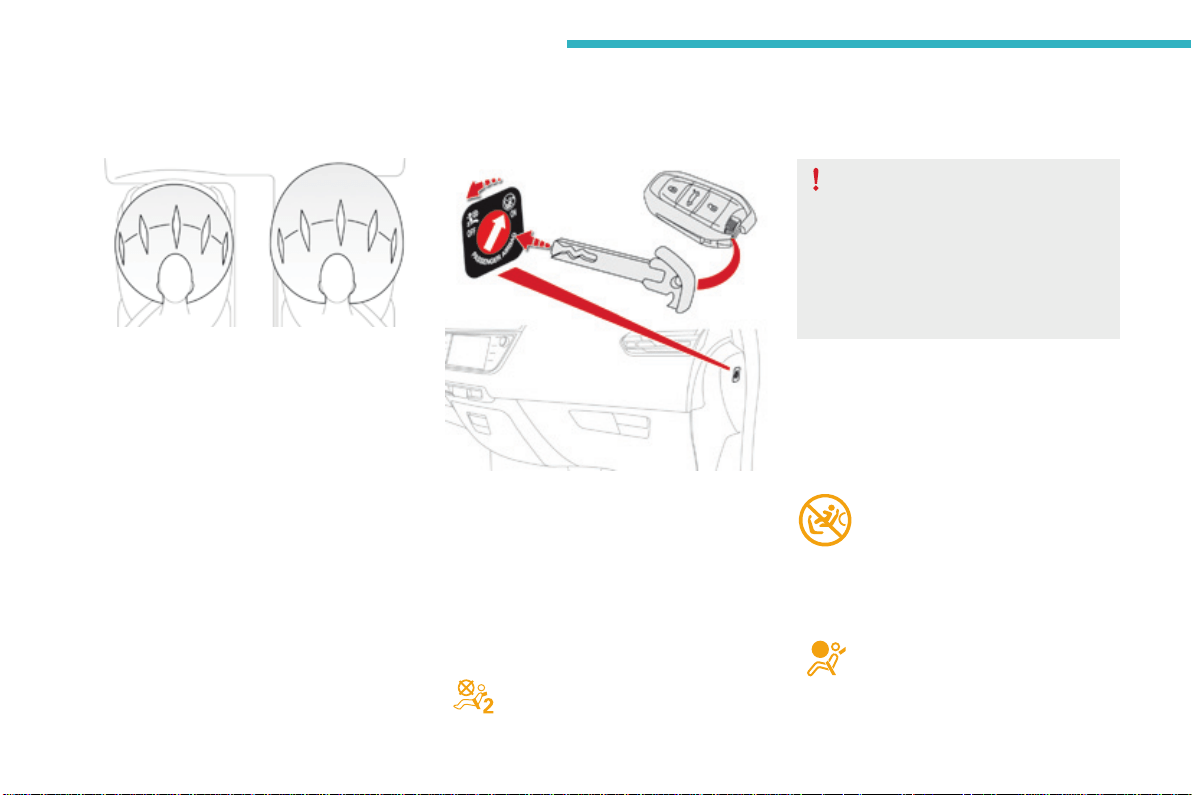
234
Safety
C4-Picasso-II_en_Chap06_securite_ed01-2016
Deactivation
Whentheignitionison,thiswarning
lamp comes in the instrument
panel.Itstaysonwhiletheairbagis
deactivated.
Front airbags
Deployment
Theairbagsaredeployed,exceptthe
passenger'sfrontairbagifitisdeactivated,inthe
event of a serious front impact to all or part of the
front impact zone A,inthelongitudinalcentreline
of the vehicle on a horizontal plane and directed
fromthefronttotherearofthevehicle.
Thefrontairbaginflatesbetweenthethoraxand
head of the front occupant of the vehicle and the
steeringwheel,driver'sside,andthedashboard,
passenger'ssidetocushiontheirforward
movement.
System which protects the driver and front
passengerintheeventofaseriousfrontimpact
inordertolimittheriskofinjurytotheheadand
thorax.
Thedriver'sairbagisfittedinthecentreofthe
steeringwheel;thefrontpassenger'sairbagis
fittedinthedashboardabovetheglovebox.
Onlythepassenger'sfrontairbagcanbe
deactivated.
F With the ignition off,insertthekeyinthe
passengerairbagdeactivationswitch.
F Turn it to the "OFF"position.
F Removethekeykeepingtheswitchinthe
newposition.
To assure the safety of your child,
thepassenger'sfrontairbagmustbe
deactivated when you install a rearward
facingchildseatonthefrontpassenger
seat.
Otherwise,thechildwouldriskbeing
seriouslyinjuredorkillediftheairbag
weredeployed.
Reactivation
Whenyouremovetherearwardfacingchild
seat, with the ignition off, turn the switch to
the "ON"positiontoreactivatetheairbagand
soassurethesafetyofyourfrontpassengerin
theeventofanimpact.
Whentheignitionisswitchedon,
thiswarninglampcomesoninthe
instrumentpanelforapproximately
oneminutetosignalthatthefront
airbagisactivated.
Operating fault
Ifthiswarninglampcomesoninthe
instrument panel, you must contact
a CITROËN dealer or a qualified
workshoptohavethesystemchecked.
Theairbagsmaynolongerbedeployed
intheeventofaseriousimpact.
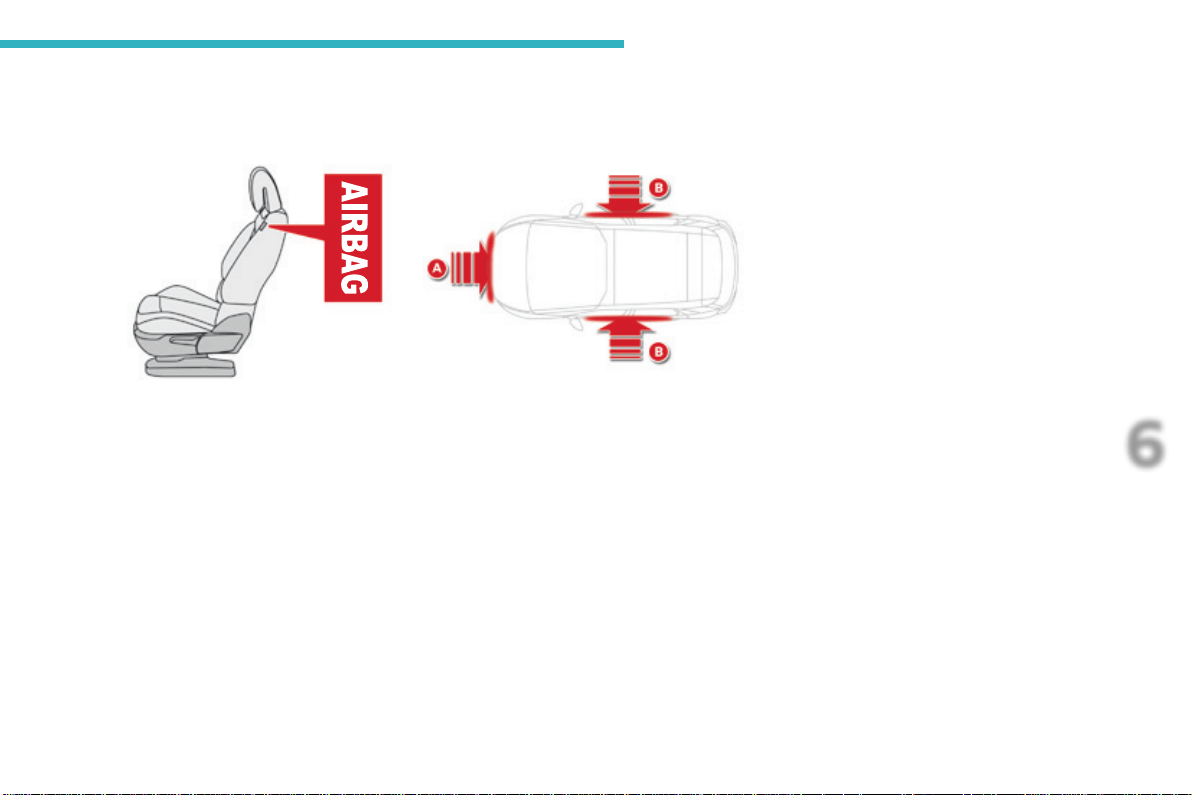
235
6
Safety
C4-Picasso-II_en_Chap06_securite_ed01-2016
Lateral airbags
Deployment
Alateralairbagisdeployedunilaterallyinthe
event of a serious side impact applied to all or
part of the side impact zone B, perpendicular
tothelongitudinalcentrelineofthevehicleona
horizontal plane and directed from the outside
towardstheinsideofthevehicle.
Thelateralairbaginflatesbetweenthehipand
shoulder of the front occupant of the vehicle
andthecorrespondingdoortrimpanel.
System which protects the driver and front
passengerintheeventofaserioussideimpact
inordertolimittheriskofinjurytothechest,
betweenthehipandtheshoulder.
Eachlateralairbagisfittedintheseatbackrest
frame,doorside.
Impact detection zones
A. Frontimpactzone.
B. Sideimpactzone.
236
Safety
C4-Picasso-II_en_Chap06_securite_ed01-2016
In the event of a minor impact or bump
on the side of the vehicle or if the
vehiclerollsover,theairbagsmaynot
bedeployed.
In the event of a rear or front collision,
noneofthelateralairbagsisdeployed.
Systemcontributingtowardsgreaterprotection
forthedriverandpassengers(withthe
exceptionoftherearcentrepassenger)inthe
event of a serious side impact in order to limit
theriskofinjurytothesideofthehead.
Eachcurtainairbagisbuiltintothepillarsand
theupperpassengercompartmentarea.
Curtain airbags
Deployment
Thecurtainairbagisdeployedatthesame
timeasthecorrespondinglateralairbaginthe
event of a serious side impact applied to all or
part of the side impact zone B, perpendicular
tothelongitudinalcentrelineofthevehicleona
horizontal plane and directed from the outside
towardstheinsideofthevehicle.
Thecurtainairbaginflatesbetweenthefrontor
rearoccupantofthevehicleandthewindows.
Ifthiswarninglampcomesoninthe
instrument panel, you must contact
a CITROËN dealer or a qualified
workshoptohavethesystemchecked.
Operating fault
Theairbagsmaynolongerbedeployedinthe
eventofaseriousimpact.
237
6
Safety
C4-Picasso-II_en_Chap06_securite_ed01-2016
Sitinanormaluprightposition.
Wearacorrectlyadjustedseatbelt.
Donotleaveanythingbetweenthe
occupantsandtheairbags(achild,pet,
object...),norfixorattachanythingcloseto
theinflationtrajectoryoftheairbags;this
couldcauseinjuriesduringtheirdeployment.
Nevermodifytheoriginaldefinitionofyour
vehicle, particularly in the area directly
aroundtheairbags.
After an accident or if the vehicle has been
stolenorbrokeninto,havetheairbag
systemschecked.
Allworkontheairbagsystemmustbe
carried out by a CITROËN dealer or a
qualifiedworkshop.
Even if all of the precautions mentioned
areobserved,ariskofinjuryorofminor
burns to the head, chest or arms when an
airbagisdeployedcannotberuledout.The
baginflatesalmostinstantly(withinafew
milliseconds) then deflates within the same
timedischargingthehotgasviaopenings
providedforthispurpose.
Front airbags
Donotdriveholdingthesteeringwheelbyits
spokesorrestingyourhandsonthecentre
partofthewheel.
Passengersmustnotplacetheirfeetonthe
dashboard.
Donotsmokeasdeploymentoftheairbags
cancauseburnsortheriskofinjuryfroma
cigaretteorpipe.
Neverremoveorpiercethesteeringwheelor
hititviolently.
Donotfitorattachanythingtothesteering
wheel or dashboard, this could cause
injurieswithdeploymentoftheairbags.
Advice
Lateral airbags
Use only approved covers on the seats,
compatible with the deployment the lateral
airbags.Forinformationontherangeofseat
covers suitable for your vehicle, you can
contactaCITROËNdealer.
For more information on Accessories, refer
tothecorrespondingsection.
Donotfixorattachanythingtotheseat
backs(clothing...).Thiscouldcauseinjury
tothechestorarmsifthelateralairbagis
deployed.
Do not sit with the upper part of the body any
nearertothedoorthannecessary.
Curtain airbags
Donotfixorattachanythingtotheroof.This
couldcauseinjurytotheheadifthecurtain
airbagisdeployed.
If fitted on your vehicle, do not remove the
grabhandlesinstalledontheroof,theyplay
apartinsecuringthecurtainairbags.
For the airbags to be fully effective, observe the safety recommendations below:
238
Safety
C4-Picasso-II_en_Chap06_securite_ed01-2016
Generalpointsrelatingtochildseats
Formaximumsafety,pleaseobservethe
followingrecommendations:
- inaccordancewithEuropeanregulations,
all children under the age of 12 or less
than one and a half metres tall must
travel in approved child seats suited to
their weight, on seats fitted with a seat
beltorISOFIXmountings*,
- statistically, the safest seats in your
vehicle for carrying children are the
rear seats,
- a child weighing less than 9 kg must
travel in the rearward facing position
both in the front and in the rear.
CITROËN recommends that children
should travel on the rear seats of your
vehicle:
- rearward facinguptotheageof3,
- forward facingovertheageof3.
AlthoughoneofCITROËN'smaincriteriawhendesigningyourvehicle,thesafetyofyourchildren
alsodependsonyou.
*Theregulationsoncarryingchildrenare
specifictoeachcountry.Refertothe
legislationinforceinyourcountry.
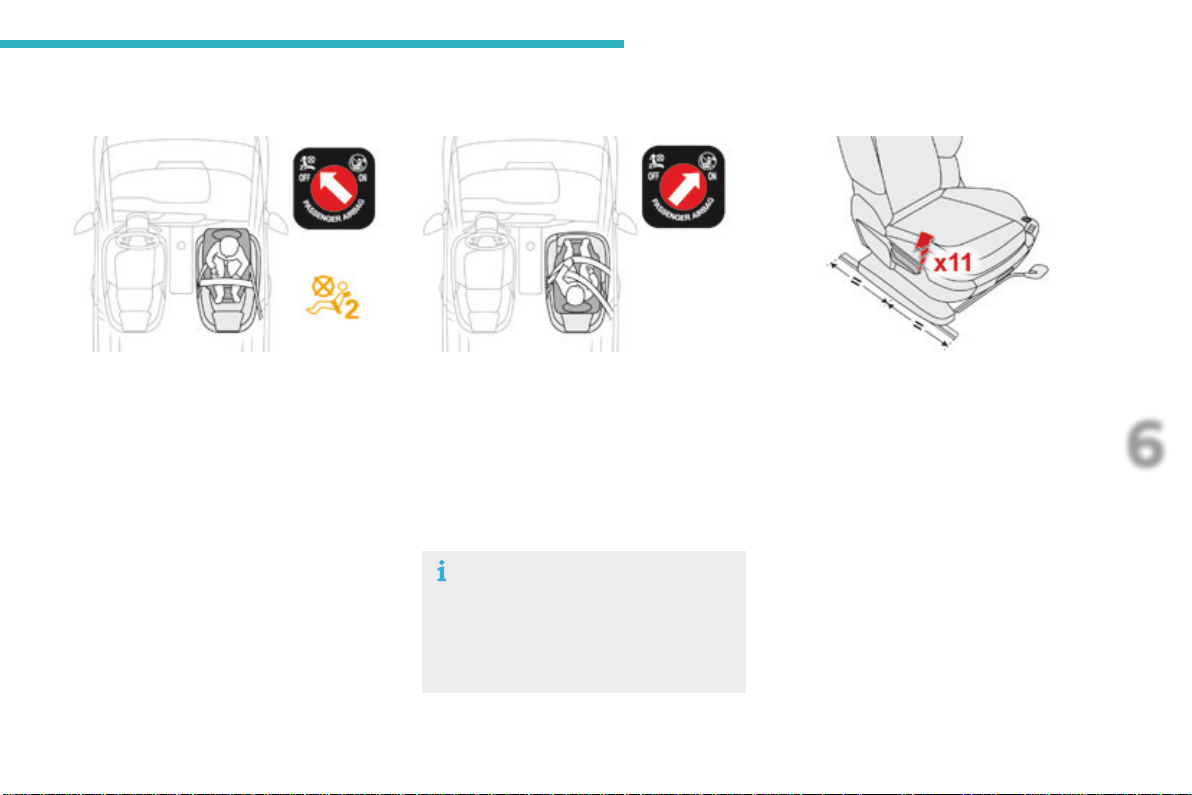
239
6
Safety
C4-Picasso-II_en_Chap06_securite_ed01-2016
Child seat at the front*
Rearward facing
Whenarearwardfacingchildseatisinstalled
on the front passenger seat,adjustthe
vehicleseattothemidwaylongitudinal
position,thelowestheightposition,backrest
straightened.Thenpulltheheightcontrollever
11times.
Thepassenger'sfrontairbagmustbe
deactivated.Otherwise,the child risks being
seriously injured or killed if the airbag is
deployed.
Forward facing
Whenaforwardfacingchildseatisinstalledon
the front passenger seat,adjustthevehicle
seattothemidwaylongitudinalposition,the
lowestheightposition,backreststraightened.
Thenpulltheheightcontrollever11times.
Leavethepassenger'sairbagactive.
Passengerseatinthemidwaylongitudinal
position,thelowestheightposition,thenthe
heightcontrolleverpulled11times.
Ensure that the seat belt is properly
tightened.
Forchildseatswithasupportleg,
ensure that this is in firm and steady
contactwiththefloor.Ifnecessary,
adjustthepassenger'sseat.
*Refertothelegislationinforceinyourcountry
beforeinstallingachildseatonthisseating
position.
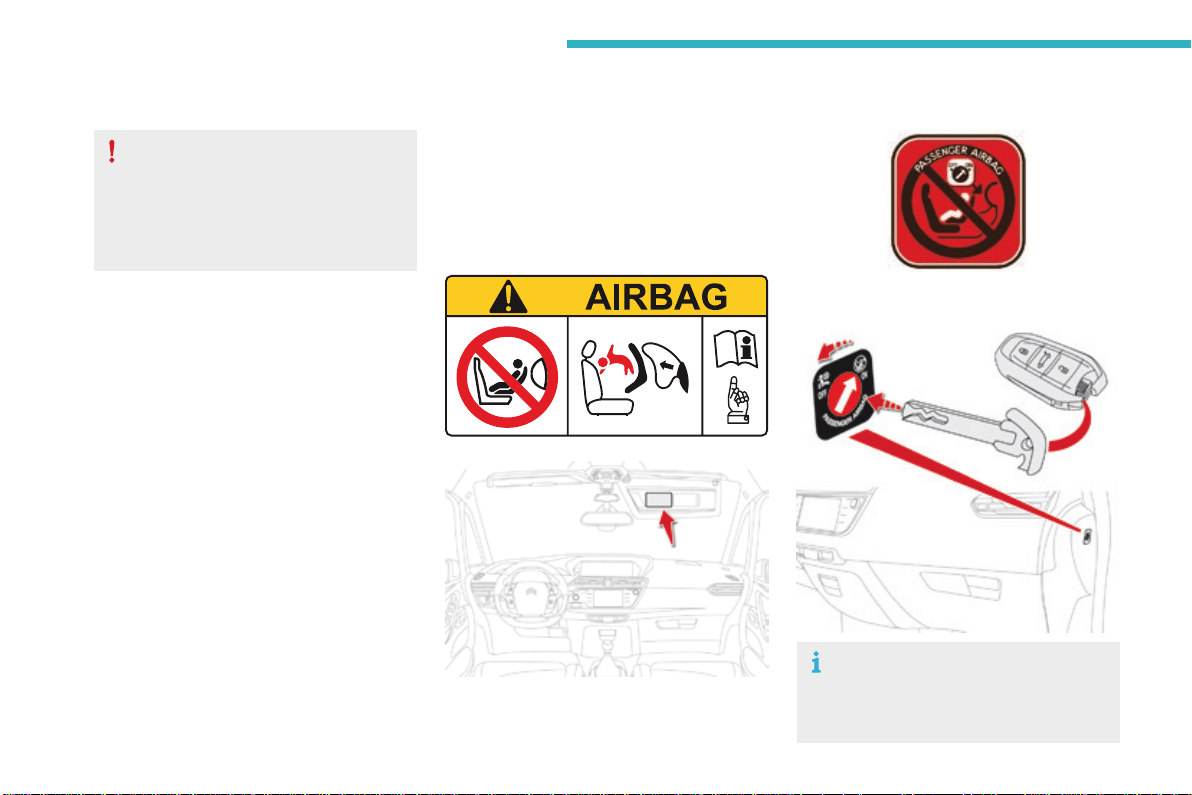
240
Safety
C4-Picasso-II_en_Chap06_securite_ed01-2016
Deactivatingthepassenger'sfrontairbag
Passenger airbag OFF
Forinformationondeactivatingthe
passenger'sfrontairbag,refertothe
"Airbags"section.
Neverinstallarearwardfacingchild
restraint system on a seat protected by
anactivefrontairbag.Thiscouldcause
thedeathofthechildorseriousinjury.
Thewarninglabelpresentonbothsidesofthe
passenger'ssunvisorrepeatsthisadvice.In
linewithcurrentlegislation,thefollowingtables
containthiswarninginallofthelanguages
required.
241
6
AR
BG
НИКОГАНЕинсталирайтедетскостолченаседалкасАКТИВИРАНАпреднаВЪЗДУШНАВЪЗГЛАВНИЦА.Товаможедапричини
СМЪРТилиСЕРИОЗНОНАРАНЯВАНЕнадетето.
CS
NIKDYneumisťujtedětskézádržnézařízeníorientovanésměremdozadunasedadlochráněnéAKTIVOVANÝMčelnímAIRBAGEM.Hrozí
nebezpečíSMRTIDÍTĚTEneboVÁŽNÉHOZRANĚNÍ.
DA
BrugALDRIGenbagudvendtbarnestolpåetsæde,dererbeskyttetafenAKTIVAIRBAG.BARNETrisikereratbliveALVORLIGT
KVÆSTETellerDRÆBT.
DE
MontierenSieaufeinemSitzmitAKTIVIERTEMFront-AirbagNIEMALSeinenKindersitzodereineBabyschaleentgegenderFahrtrichtung,
dasKindkönnteschwereodersogartödlicheVerletzungenerleiden.
EL
ΜηχρησιμοποιείτεΠΟΤΕπαιδικόκάθισμαμετηνπλάτητουπροςτοεμπρόςμέροςτουαυτοκινήτου,σεμιαθέσηπουπροστατεύεταιαπό
ΜΕΤΩΠΙΚΟαερόσακοπουείναιΕΝΕΡΓΟΣ.ΑυτόμπορείναέχεισανσυνέπειατοΘΑΝΑΤΟήτοΣΟΒΑΡΟΤΡΑΥΜΑΤΙΣΜΟτουΠΑΙΔΙΟΥ.
EN
NEVERusearearwardfacingchildrestraintonaseatprotectedbyanACTIVEAIRBAGinfrontofit,DEATHorSERIOUSINJURYtothe
CHILDcanoccur.
ES
NOINSTALARNUNCAunsistemaderetenciónparaniñosdeespaldasalsentidodelamarchaenunasientoprotegidomedianteun
AIRBAGfrontalACTIVADO,yaquepodríacausarlesionesGRAVESoinclusolaMUERTEdelniño.
ET
ÄrgeMITTEKUNAGIpaigaldage"seljagasõidusuunas"lapseistetjuhikõrvalistmele,milleESITURVAPADIonAKTIVEERITUD.Turvapadja
avaneminevõiblastTÕSISELTvõiELUOHTLIKULTvigastada.
FI
ÄLÄKOSKAANasetalapsenturvaistuintaselkäajosuuntaanistuimelle,jonkaedessäsuojanaonkäyttöönaktivoituTURVATYYNY.Sen
laukeaminenvoiaiheuttaaLAPSENKUOLEMANtaiVAKAVANLOUKKAANTUMISEN.
FR
NEJAMAISinstallerdesystèmederetenuepourenfantsfaisantfaceversl’arrièresurunsiègeprotégéparunCOUSSINGONFLABLE
frontalACTIVÉ.
CelapeutprovoquerlaMORTdel’ENFANTouleBLESSERGRAVEMENT.
HR
NIKADAnepostavljatidječjusjedaliculeđimausmjeruvožnjenasjedalozaštićenoUKLJUČENIMprednjimZRAČNIMJASTUKOM.Tobi
moglouzrokovatiSMRTiliTEŠKUOZLJEDUdjeteta.
HU
SOHAnehasználjonmenetiránynakháttalbeszereltgyermeküléstAKTIVÁLT(BEKAPCSOLT)FRONTLÉGZSÁKKALvédettülésen.Eza
gyermekHALÁLÁTvagySÚLYOSSÉRÜLÉSÉTokozhatja.
IT
NONinstallareMAIseggioliniperbambiniposizionatiinsensocontrarioaquellodimarciasuunsedileprotettodaunAIRBAGfrontale
ATTIVATO.CiòpotrebbeprovocarelaMORTEoFERITEGRAVIalbambino.
LT
NIEKADAneįrenkitevaikoprilaikymopriemonėssuatgalatgręžtuvaikuantsėdynės,kurisaugomaVEIKIANČIOSpriekinėsORO
PAGALVĖS.IšsiskleidusoropagalveivaikasgalibūtiMIRTINAIarbaSUNKIAITRAUMUOTAS.
LV
NEKADNEuzstādietuzaizmugurivērstubērnusēdeklītipriekšējāpasažierasēdvietā,kurāirAKTIVIZĒTSpriekšējaisDROŠĪBASGAISA
SPILVENS.
TasvarizraisītBĒRNANĀVIvairadītNOPIETNUSIEVAINOJUMUS.
Safety
C4-Picasso-II_en_Chap06_securite_ed01-2016

242
MT
Qattm’ghandekthallitifel/tiflamarbutf’siggudahrulejnl-Airbagattiva,ghaliextista’tikkawzakorrimentserjujewankemewtlit-tifel/tifla.
NL
PlaatsNOOITeenkinderzitjemetderuginderijrichtingopeenzitplaatswaarvandeAIRBAGisINGESCHAKELD.Bijhetafgaanvande
airbagkanhetKINDLEVENSGEVAARLIJKGEWONDRAKEN.
NO
InstallerALDRIetbarnesetemedryggenmotkjøreretningenietsetesomerbeskyttetmedenfrontalAKTIVERTKOLLISJONSPUTE,
BARNETrisikereråbliDREPTellerHARDTSKADET.
PL
NIGDYnieinstalowaćfotelikadziecięcegowpozycji"tyłemdokierunkujazdy"nasiedzeniuwyposażonymwCZOŁOWĄPODUSZKĘ
POWIETRZNĄwstanieAKTYWNYM.MożetodoprowadzićdoŚMIERCIDZIECKAlubspowodowaćuniegoPOWAŻNEOBRAŻENIA
CIAŁA.
PT
NUNCAinstaleumsistemaderetençãoparacriançasdecostasparaaestradanumbancoprotegidoporumAIRBAGfrontalACTIVADO.
EstainstalaçãopoderáprovocarFERIMENTOSGRAVESouaMORTEdaCRIANÇA.
RO
NuinstalatiNICIODATAunsistemderetinerepentrucopii,dispuscuspateleindirectiademers,peunlocdinvehiculprotejatcuAIRBAG
frontalACTIVAT.AceastaarputeaprovocaMOARTEACOPILULUIsauRANIREAluiGRAVA.
RU
ВОВСЕХСЛУЧАЯХЗАПРЕЩАЕТСЯиспользоватьобращенноеназаддетскоеудерживающееустройствонасиденье,
защищенномФУНКЦИОНИРУЮЩЕЙПОДУШКОЙБЕЗОПАСНОСТИ,установленнойпередэтимсиденьем.
ЭтоможетпривестикГИБЕЛИРЕБЕНКАилиНАНЕСЕНИЮЕМУСЕРЬЕЗНЫХТЕЛЕСНЫХПОВРЕЖДЕНИЙ.
SK
NIKDYneinštalujtedetskézádržnézariadenieorientovanésmeromdozadunasedadlochránenéAKTIVOVANÝMčelnýmAIRBAGOM.
MohlobydôjsťkSMRTEĽNÉMUaleboVÁŽNEMUPORANENIUDIEŤAŤA.
SL
NIKOLInenameščajteotroškegasedežashrbtomvsmerivožnje,čejeVARNOSTNABLAZINApredsprednjimsopotnikovimsedežem
AKTIVIRANA.TakšnanamestitevlahkopovzročiSMRTOTROKAaliHUDEPOŠKODBE.
SR
NIKADAnekoristitedečjesedištekojeseokrećeunazadnasedištuzaštićenimAKTIVNIMVAZDUŠNIMJASTUKOMisprednjega,jer
mogunastupitiSMRTiliOZBILJNAPOVREDADETETA.
SV
PassagerarkrockkuddenframMÅSTEvaraavaktiveradomenbakåtvändbilbarnstolinstalleraspådennaplats.Annarsriskerarbarnetatt
DÖDASellerSKADASALLVARLIGT.
TR
KESİNLKLEHAVAYASTIĞIAKTİFolanönkoltuğayüzüarkayadönükbirçocukkoltuğuyerleştirmeyiniz.BuÇOCUĞUNÖLMESİNEveya
ÇOKAĞIRYARALANMASINAsebepolabilir.
Safety
C4-Picasso-II_en_Chap06_securite_ed01-2016
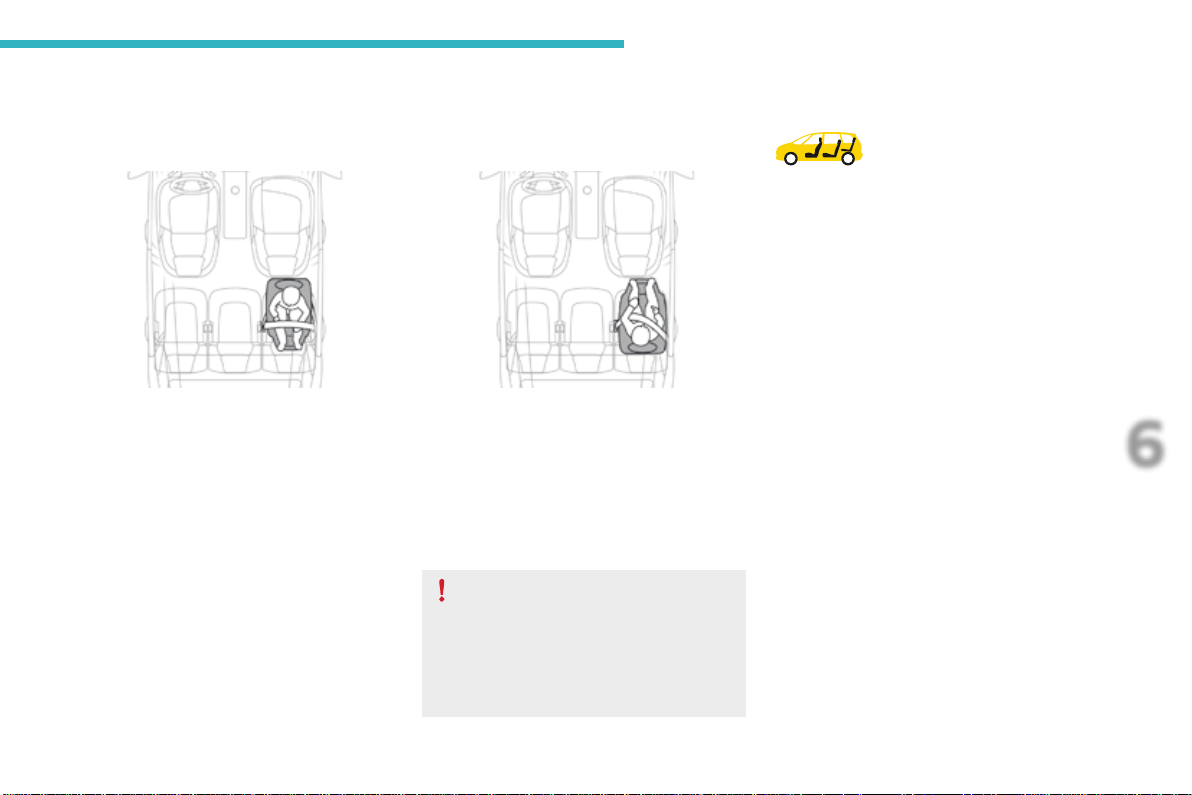
243
6
Safety
C4-Picasso-II_en_Chap06_securite_ed01-2016
Child seat at the rear
Rearward facing
Whenarearwardfacingchildseatisinstalled
on a rear passenger seat,movethevehicle's
frontseatforwardandstraightenthebackrest
sothattherearwardfacingchildseatdoesnot
touchthevehicle'sfrontseat.
When a child seat is installed on a 3
rd
row
passenger seat, move the 2
nd
row seat
forwardsandstraightenthebackrestsothat
thechildseatandthelegsofthechilddonot
touch the 2
nd
rowseat.
Achildseatwithasupportlegmustneverbe
installed on a 3
rd
row passenger seat.
Seats in the 3
rd
row
Forward facing
Whenaforwardfacingchildseatisinstalled
on a rear passenger seat,movethevehicle's
frontseatforwardandstraightenthebackrest
sothatthelegsofthechildintheforward
facingchildseatdonottouchthevehicle'sfront
seat.
Ensure that the seat belt is correctly
tensioned.
Forchildseatswithasupportleg,
ensure that this is in firm contact with
thefloor.Ifnecessary,adjustthefront
seatofthevehicle.
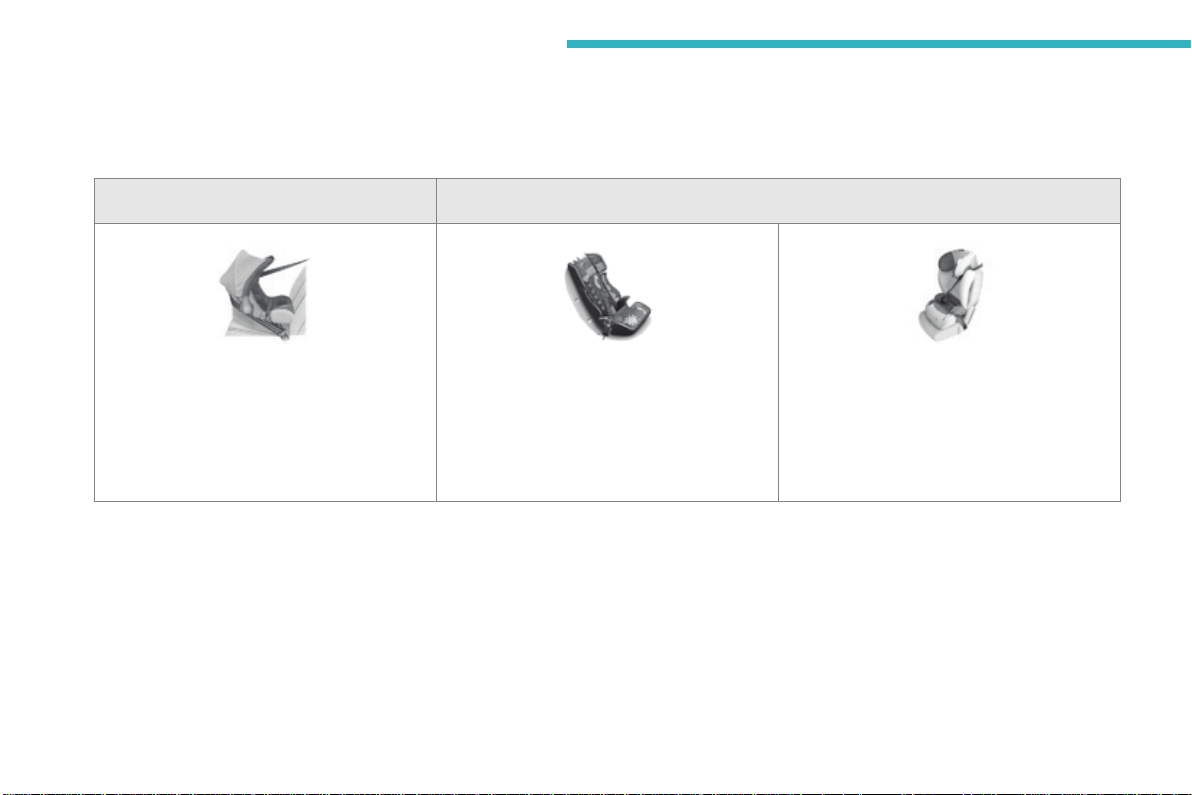
244
Safety
C4-Picasso-II_en_Chap06_securite_ed01-2016
Child seats recommended by CITROËN
Group 0+: from birth to 13 kg Groups 2 and 3: from 15 to 36 kg
L1
"RÖMER Baby-Safe Plus"
Installedintherearwardfacingposition.
L4
"KLIPPAN Optima"
From22kg(approximately6years),
theboosterisusedonitsown.
L5
"RÖMER KIDFIX"
Canbefittedtothevehicle'sISOFIX
mountings.
Thechildisrestrainedbytheseatbelt.
CITROËNoffersarangeofrecommendedchildseatswhicharesecuredusingathree point seat belt.
245
6
Safety
C4-Picasso-II_en_Chap06_securite_ed01-2016
Installationofchildseatssecuredusingtheseatbelt
Seat
Weight of the child /indicativeage
Groups 0 (b) and 0+
Birth to 13 kg
Group 1
From 9 to 18 kg
Group 2
From 15 to 25 kg
Group 3
From 22 to 36 kg
1
st
row
Frontpassengerseat(c)
- fixed U U U U
- heightadjustable U(R) U(R) U(R) U(R)
2
nd
row
Fixedouterrear
seats (d)
U U U U
Outer rear seats with
longitudinaladjustment(d) (e)
U U U U
Centre rear seat (d) U U U U
InaccordancewithEuropeanregulations,thistableindicatestheoptionsforinstallingchildseatssecuredusingtheseatbeltanduniversally
approved (a)inrelationtotheweightofthechildandtheseatinthevehicle.
246
Safety
C4-Picasso-II_en_Chap06_securite_ed01-2016
(a)Universalchildseat:childseatwhichcanbe
installedinallvehiclesusingtheseatbelt.
(b)Group0:frombirthto10kg.Infantcarseats
and "car cots" cannot be installed on the
frontpassengerseat.Wheninstalledinthe
2
nd
row, they may prevent use of the other
seats.
(c)Consultthelegislationinforceinyour
countrybeforeinstallingyourchildonthis
seat.
(d) To install a child seat on a rear seat,
rearwardfacingorforwardfacing,move
thefrontseatforward,thenstraightenthe
backresttoallowenoughspaceforthechild
seatandthechild'slegs.
(e) To install a child seat on a rear seat,
rearwardfacingorforwardfacing,adjustthe
rearseattothefullybackposition,withthe
backrestupright.
Remove and stow the head restraint
beforeinstallingachildseatona
passengerseat.Refittheheadrestraint
oncethechildseathasbeenremoved.
U:seatsuitablefortheinstallationofachild
seatsecuredusingtheseatbeltand
universallyapprovedrearwardfacingand/
orforwardfacing,withthepassengerseat
adjustedtothemidwaylongitudinalposition.
U(R):sameasU,withthepassenger's
seatadjustedtothelowpositionwith
11actionsontheheightcontrolleverand
inthemidwaylongitudinalposition.
247
6
Safety
C4-Picasso-II_en_Chap06_securite_ed01-2016
Installationofchildseatssecuredusingtheseatbelt
InaccordancewithEuropeanregulations,thistableindicatestheoptionsforinstallingchildseatssecuredusingtheseatbeltanduniversally
approved (a)inrelationtotheweightofthechildandtheseatinthevehicle.
Seat
Weight of the child /indicativeage
Groups 0 (b) and 0+
Birth to 13 kg
Group 1
From 9 to 18 kg
Group 2
From 15 to 25 kg
Group 3
From 22 to 36 kg
1
st
row
Frontpassengerseat(c)
- fixed U U U U
- heightadjustable U(R) U(R) U(R) U(R)
2
nd
row
Fixedouterrearseats(d) U U U U
Outer rear seats with
longitudinaladjustment(d) (e)
U U U U
Centre rear seat (d) U U U U
3
rd
row Rear seats U U U U
248
Safety
C4-Picasso-II_en_Chap06_securite_ed01-2016
(a)Universalchildseat:childseatwhichcanbe
installedinallvehiclesusingtheseatbelt.
(b)Group0:frombirthto10kg.Infantcarseats
and "car cots" cannot be installed on the
frontpassengerseatorinthe3
rd
row.When
installed in the 2
nd
row, they may prevent
useoftheotherseats.
(c)Consultthelegislationinforceinyour
countrybeforeinstallingyourchildonthis
seat.
(d) To install a child seat on a rear seat,
rearwardfacingorforwardfacing,move
thefrontseatforward,thenstraightenthe
backresttoallowenoughspaceforthechild
seatandthechild'slegs.
(e) To install a child seat on a rear seat,
rearwardfacingorforwardfacing,adjustthe
rearseattothefullybackposition,withthe
backrestupright.
Remove and stow the head restraint
beforeinstallingachildseatona
passengerseat.Refittheheadrestraint
oncethechildseathasbeenremoved.
U:seatsuitablefortheinstallationofachild
seatsecuredusingtheseatbeltand
universallyapprovedrearwardfacingand/
orforwardfacing,withthepassengerseat
adjustedtothemidwaylongitudinalposition.
U(R):sameasU,withthepassenger's
seatadjustedtothelowposition
with11actionsontheheightcontrollever
andinthemidwaylongitudinalposition.
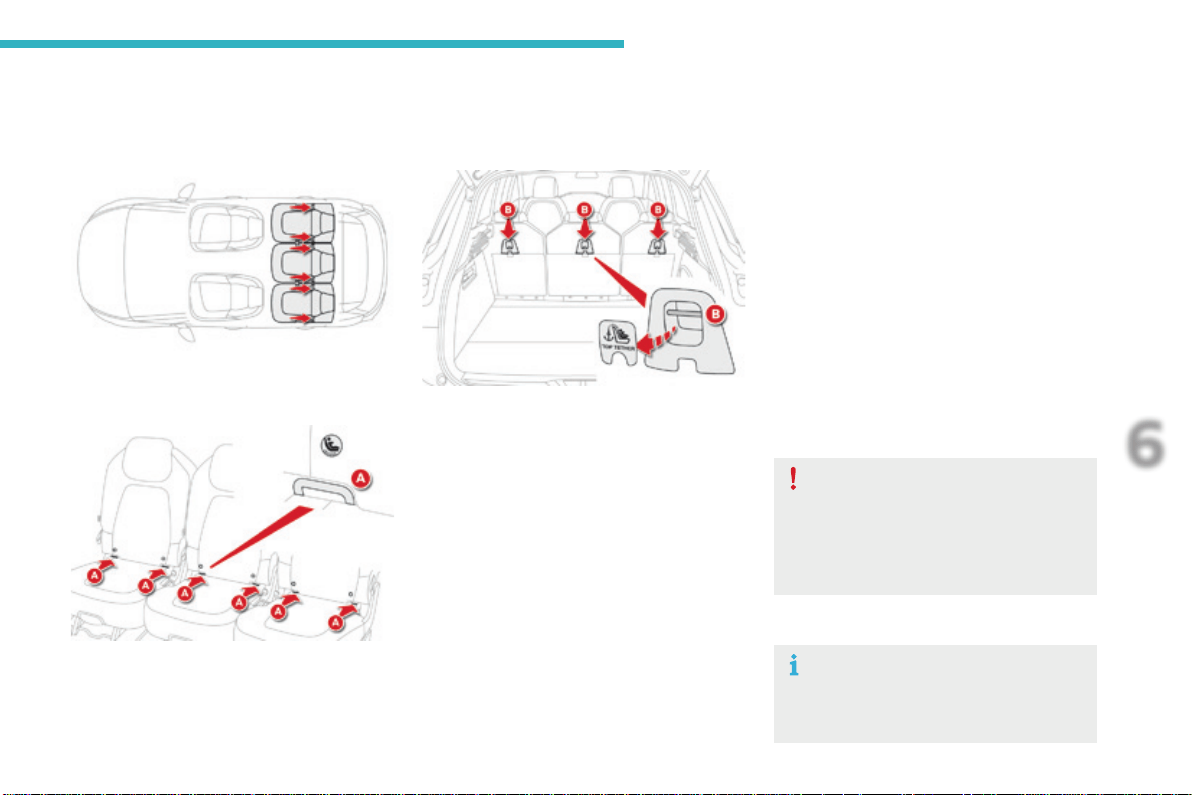
249
6
Safety
C4-Picasso-II_en_Chap06_securite_ed01-2016
"ISOFIX"mountings
Your vehicle has been approved in accordance with the latest ISOFIX regulations.
Theseats,representedbelow,arefittedwithregulationISOFIXmountings:
- tworingsA, located between the vehicle
seatbackrestandcushion,indicatedbya
marking,
-
aringB,locatedunderacoverontheback
ofthetopoftheseatbackrest,referredtoas
the TOP TETHERforfixingtheupperstrap.
Itspositionisindicatedbyamarking.
Locatedonthebackoftheseatbackrest,the
TOP TETHER is used to secure the upper strap
ofchildseatsthathaveone.Thisdevicelimits
forwardtippingofthechildseat,intheeventof
afrontimpact.
The incorrect installation of a child seat
inavehiclecompromisesthechild's
protectionintheeventofanaccident.
Observestrictlythefittinginstructions
providedwiththechildseat.
For information on the possibilities
forfittingISOFIXchildseatstoyour
vehicle,refertothetableofseating
positions.
TheISOFIXmountingsarethreeringsforeachseat:
ThisISOFIXmountingsystemensuresfast,
reliableandsafefittingofthechildseatinyour
vehicle.
The ISOFIX child seats are fitted with two
latches which are secured easily on the two
ringsA.
Some also have an upper strap which is
attachedtoringB.
To secure the child seat to the TOP TETHER:
- remove and stow the head restraint before
installingthechildseatonthisseat(refitit
after the child seat has been removed),
- remove the TOP TETHERcoverbypulling
at its cut-out,
- pass the child seat strap behind the seat
backrest,centredbetweentheholesforthe
head restraint rods,
- securetheupperstrapfixingtotheringB,
- tightentheupperstrap.

250
Safety
C4-Picasso-II_en_Chap06_securite_ed01-2016
"RÖMER Baby-Safe Plus" and
its ISOFIX base
(sizecategory:E)
Group 0+: from birth to 13 kg
InstalledrearwardfacingusinganISOFIX
basewhichisattachedtotheringsA.
Thebasehasasupportleg,adjustablefor
height,whichsitsonthevehicle'sfloor.
This child seat can also be secured with a
seatbelt.Inthiscase,onlytheshellisused
andattachedtothevehicle'sseatbythe
three-pointseatbelt.
ISOFIX child seats recommended by CITROËN
CITROËNoffersarangeofISOFIXchildseatslistedandtypeapprovedforyourvehicle.
Referalsotothechildseatmanufacturer'sfittinginstructionsforinformationoninstallingandremovingtheseat.
Baby P2C Mini and its ISOFIX base
(sizecategories:C, D, E)
Group 0+: from birth to 13 kg
InstalledrearwardfacingusinganISOFIX
basewhichisattachedtotheringsA.
Thebasehasasupportleg,adjustablefor
height,whichsitsonthevehicle'sfloor.
This seat can also be secured with a seat
belt.
In this case only the seat shell is used and is
attachedtothevehicle'sseatbythethree-
pointseatbelt.
"Baby P2C Midi" and its ISOFIX base
(sizecategories:D, C, A, B, B1)
Group 1: from 9 to 18 kg
InstalledrearwardfacingusinganISOFIX
basewhichisattachedtotheringsA.
Thebasehasasupportleg,adjustablefor
height,whichsitsonthevehicle'sfloor.
This child seat can also be used forward
facing.
This seat can not be secured with a seat
belt.
We recommend that you use the seat in the
rearwardfacingpositionuptotheageof
3years.
251
6
Safety
C4-Picasso-II_en_Chap06_securite_ed01-2016
LocationsforinstallingISOFIXchildseats
InaccordancewithEuropeanRegulations,thistableindicatestheoptionsforinstallingISOFIXchildseatsonseatsinthevehiclefittedwithISOFIX
mountings.
Inthecaseofuniversalandsemi-universalISOFIXchildseats,theISOFIXsizecategory,determinedbyaletterfromA to G, is indicated on the child
seatnexttotheISOFIXlogo.
Weight of the child/indicativeage
Less than 10 kg
(group 0)
Uptoapprox.
6 months
Less than 10 kg
(group 0)
Less than 13 kg
(group 0+)
Uptoapprox.1year
From 9 to 18 kg (group 1)
Fromapprox.1to3years
Type of ISOFIX child seat Sleeper cot* rearward facing rearward facing forward facing
ISOFIX size category F G C D E C D A B B1
Frontpassengerseat Not ISOFIX
Outerrearseats,fixed IL-SU** IL-SU IL-SU X IUF / IL-SU
Outerrearseats,adjustablelongitudinally IL-SU** IL-SU IL-SU
IUF / IL-SU
(1)
IUF / IL-SU
Centre rear seat X IL-SU IL-SU IUF / IL-SU IUF / IL-SU
*Sleepercotscannotbefittedtothefrontpassenger'sseat. **TheISOFIXsleepercot,securedtothelowerringsofanISOFIXseat,
occupiesthefullwidthoftherearseats.
252
Safety
C4-Picasso-II_en_Chap06_securite_ed01-2016
IUF: seat suitable for the installation of an
ISOFIX Universal seat, Forwardfacing
securedusingtheupperstraptothetop
tetheronISOFIXseats.
IL-SU: seat suitable for the installation of an
IsofixSemi-Universalseateither:
- rearwardfacingfittedwithanupperstrap
orasupportleg,
- forwardfacingfittedwithasupportleg,
- a sleeper cot fitted with an upper strap or a
supportleg.
Remove and stow the head restraint
beforeinstallingachildseatona
passengerseat.Refittheheadrestraint
oncethechildseathasbeenremoved.
For more information on ISOFIX mountings
andinparticularonsecuringtheupperstrap,
refertothecorrespondingsection.
X: seat not suitable for the installation of a
childseatorsleepercotfortheweightgroup
indicated.
(1):Theouterseatinrow2mustbeadjusted
to3notchesbackfromthefullyforward
position.
253
6
Safety
C4-Picasso-II_en_Chap06_securite_ed01-2016
LocationsforinstallingISOFIXchildseats
InaccordancewithEuropeanRegulations,thistableindicatestheoptionsforinstallingISOFIXchildseatsonseatsinthevehiclefittedwithISOFIX
mountings.
Inthecaseofuniversalandsemi-universalISOFIXchildseats,theISOFIXsizecategory,determinedbyaletterfromA to G, is indicated on the child
seatnexttotheISOFIXlogo.
*Sleepercotscannotbefittedtothefrontpassenger'sseat. **AnISOFIXsleepercot,securedtothelowerringsofanISOFIXseat,
occupiesthefullwidthoftherearseats.
Weight of the child/indicativeage
Less than 10 kg
(group 0)
Uptoapprox.
6 months
Less than 10 kg
(group 0)
Less than 13 kg
(group 0+)
Uptoapprox.1year
From 9 to 18 kg (group 1)
Fromapprox.1to3years
Type of ISOFIX child seat Sleeper cot* rearward facing rearward facing forward facing
ISOFIX size category F G C D E C D A B B1
Frontpassengerseat Not ISOFIX
Outerrearseats,fixed IL-SU** IL-SU IL-SU IUF / IL-SU IUF / IL-SU
Outerrearseats,adjustablelongitudinally IL-SU** IL-SU IL-SU IUF / IL-SU IUF / IL-SU
Centre rear seat X IL-SU IL-SU IUF / IL-SU IUF / IL-SU
Rearseatinthe3
rd
row Not ISOFIX
254
Safety
C4-Picasso-II_en_Chap06_securite_ed01-2016
IUF: seat suitable for the installation of an
ISOFIX Universal seat, Forwardfacing
securedusingtheupperstraptothetop
tetheronISOFIXseats.
IL-SU: seat suitable for the installation of an
IsofixSemi-Universalseateither:
- rearwardfacingfittedwithanupperstrap
orasupportleg,
- forwardfacingfittedwithasupportleg,
- a sleeper cot fitted with an upper strap or a
supportleg.
Remove and stow the head restraint
beforeinstallingachildseatona
passengerseat.Refittheheadrestraint
oncethechildseathasbeenremoved.
For more information on ISOFIX mountings
andinparticularonsecuringtheupperstrap,
refertothecorrespondingsection.
X: seat not suitable for the installation of a
childseatorsleepercotfortheweightgroup
indicated.
255
6
Safety
C4-Picasso-II_en_Chap06_securite_ed01-2016
Child seats
The incorrect installation of a child seat in a
vehiclecompromisesthechild'sprotectionin
theeventofanaccident.
Checkthatthereisnoseatbeltorseatbelt
buckleunderthechildseatasthiscould
destabiliseit.
Remember to fasten the seat belts or the
child seat harnesses keeping the slack in
relationtothechild'sbodyto a minimum,
evenforshortjourneys.
Fortheinstallationofachildseatusinga
seat belt, ensure that this is well tensioned
onthechildseatandthatitisholdingthe
childseatfirmlyagainsttheseatofyour
vehicle.Ifyourfrontpassengerseatis
adjustable,moveitforwardifnecessary.
At the rear seats, always leave sufficient
spacebetweenthefrontseatand:
- arearwardfacingchildseat,
- the feet of a child seated in a forward
facingchildseat.
Recommendations
For this, move the front seat forward and if
necessarystraightenitsbackrest.
Foroptimuminstallationoftheforwardfacing
childseat,ensurethatthebackofthechild
seatisascloseaspossibletothebackrest
ofthevehicle'sseat,orincontactifpossible.
The head restraint must be removed before
installingachildseatwithabackrestonthe
passengerseat.
Ensure that the head restraint is stowed or
attached securely so that it is not thrown
around the vehicle in the event of sharp
braking.
Refit the head restraint as soon as the child
seatisremoved.
Installing a booster
cushion
Asasafetyprecaution,donotleave:
- one or more children alone and
unsupervised in a vehicle,
- a child or an animal in a vehicle which
isexposedtothesun,withthewindows
closed,
- thekeyswithinreachofchildreninside
thevehicle.
Topreventaccidentalopeningofthedoors,
usethechildlock.
Takecarenottoopentherearwindowsby
morethanonethird.
Toprotectyoungchildrenfromtheraysof
thesun,fitsideblindsontherearwindows.
The chest part of the seat belt must be
positionedonthechild'sshoulderwithout
touchingtheneck.
Ensure that the lap part of the seat belt
passescorrectlyoverthechild'sthighs.
CITROËN recommends the use of a booster
seatwhichhasaback,fittedwithaseatbelt
guideatshoulderlevel.
Thelegislationoncarryingachildonthe
frontpassengerseatisspecifictoeach
country.Refertothelegislationinforcein
thecountryinwhichyouaredriving.
Deactivatethepassenger'sfrontairbag
whenarearwardfacingchildseatisinstalled
onthefrontpassengerseat.Otherwise,the
childwouldriskbeingseriouslyinjuredor
killediftheairbagweredeployed.
Children at the front
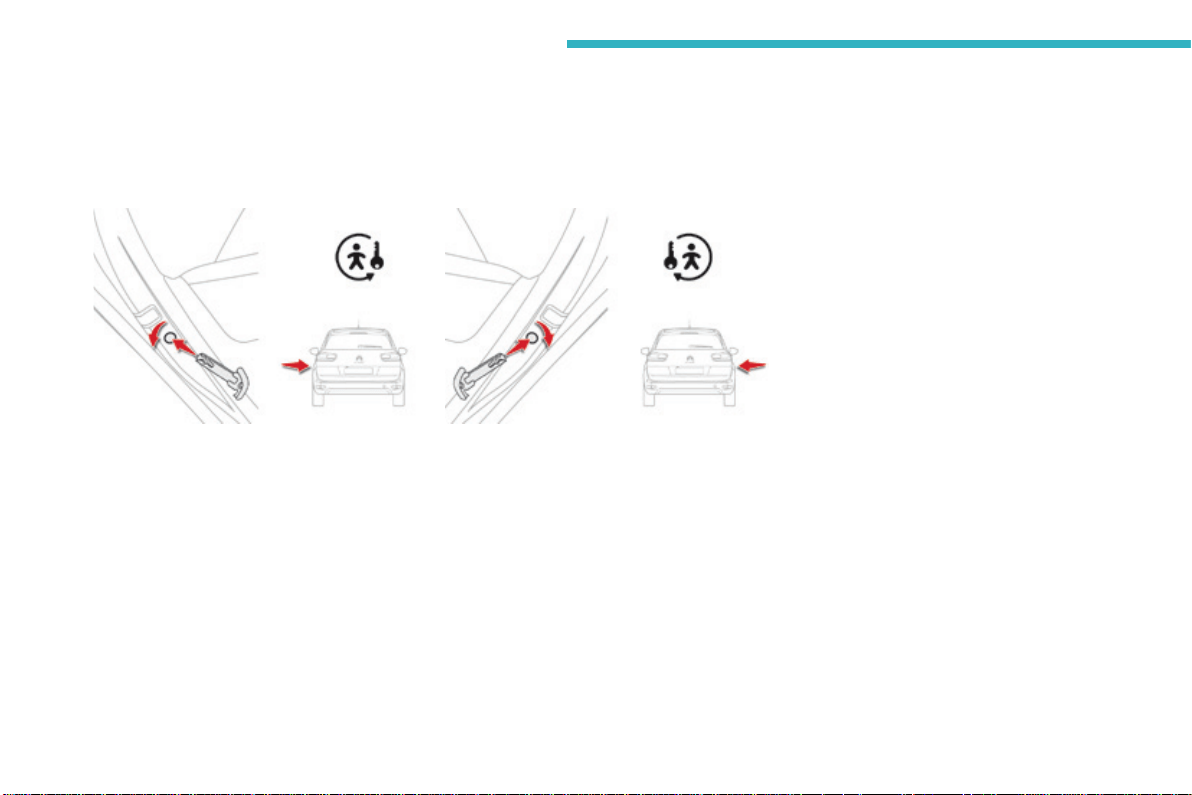
256
Safety
C4-Picasso-II_en_Chap06_securite_ed01-2016
Childlock
Thismechanicalsystempreventsopeningofareardoorusingitsinteriorcontrol.
Thecontrolislocatedontheedgeofeachreardoorandlockingisindependentforeachdoor.
Locking
F Usingtheintegralignitionkey,turnthecontrolasfarasitwillgo:
- to the left on the left-hand rear door,
- totherightontheright-handreardoor.
Unlocking
F Usingtheintegralignitionkey,turnthecontrolasfarasitwillgo:
- totherightontheleft-handreardoor,
- totheleftontheright-handreardoor.
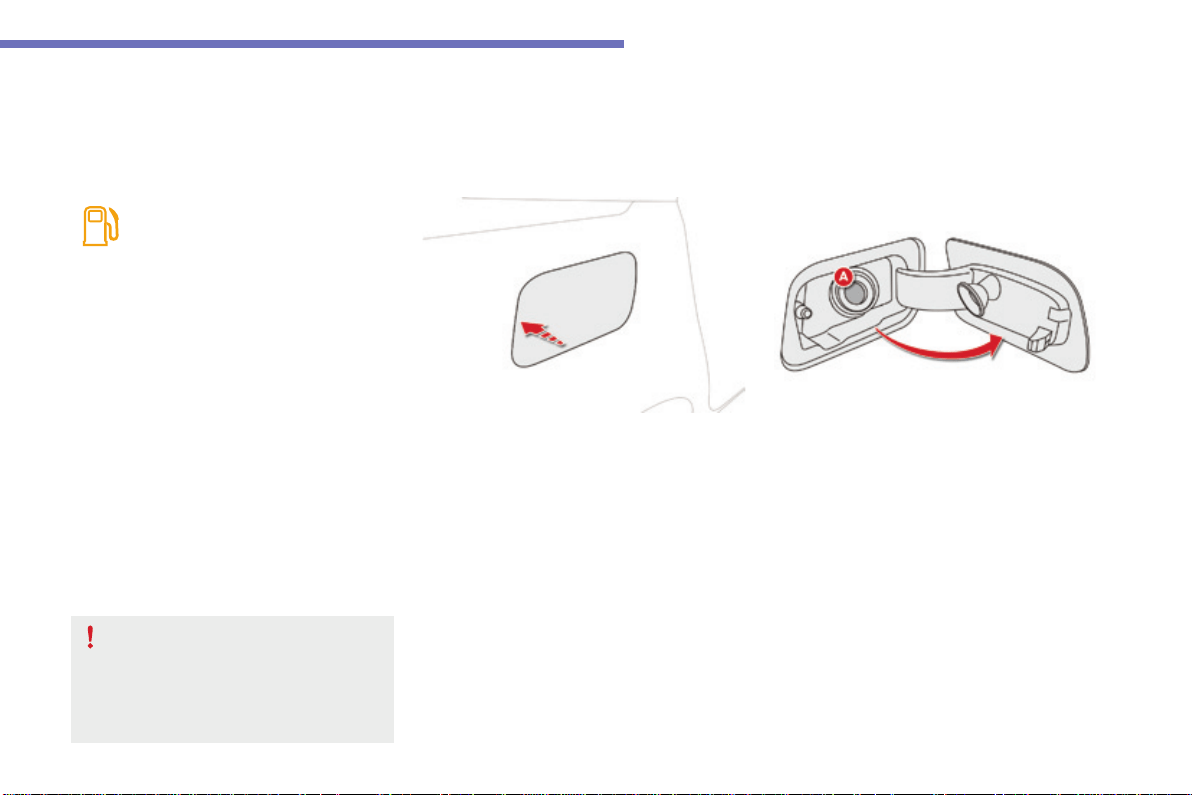
257
7
Practical information
C4-Picasso-II_en_Chap07_info-pratiques_ed01-2016
Fuel
Capacityofthetank:approximately57litres(petrol)or55litres(Diesel).
Low fuel level
Refuelling
When the low fuel level is reached,
thiswarninglampcomesoninthe
instrument panel, accompanied by an
audiblewarningandamessageand
thelastbarofthefuelgaugecomes
oninorange.
F Takecaretoselectthepumpthatdelivers
thecorrecttypeoffuelforyourvehicle.
F Introduce the nozzle so as to push in the
metal non-return flap A.
F Makesurethatthenozzleispushedinas
faraspossiblebeforestartingtorefuel
(riskofblowback).
F Maintainthispositionthroughoutthe
refuellingoperation.
F Pushthefuelflaptocloseit.
If you are filling your tank to the top, do
not persist after the 3rd cut-off; this could
cause malfunctions.
A label on the inside of the fuel filler flap
reminds you of the type of fuel to use,
dependingonyourenginetype.
Additions of fuel must be of at least 5 litres to
beregisteredbythefuelgauge.
When it first comes on, about 6 litres of fuel
remaininthetank.
Until sufficient fuel has been added, this
warninglampappearseverytimetheignition
is switched on, accompanied by an audible
warningandamessage.Thisaudiblewarning
andmessagearerepeatedwithincreasing
frequency as the fuel level drops towards "0".
Refuelassoonaspossibletoavoidrunningout.
Openingthefillerflapmayresultinaninrushof
air.Thisisentirelynormalandresultsfromthe
sealingofthefuelsystem.
F Withthevehicleunlocked,presstherear
edgeoftheflaptoopenit(thefillercapisa
partofit).
With Stop & Start, never refuel with the
systeminSTOPmode;youmustswitch
offtheignitionwiththeSTART/STOP
button.
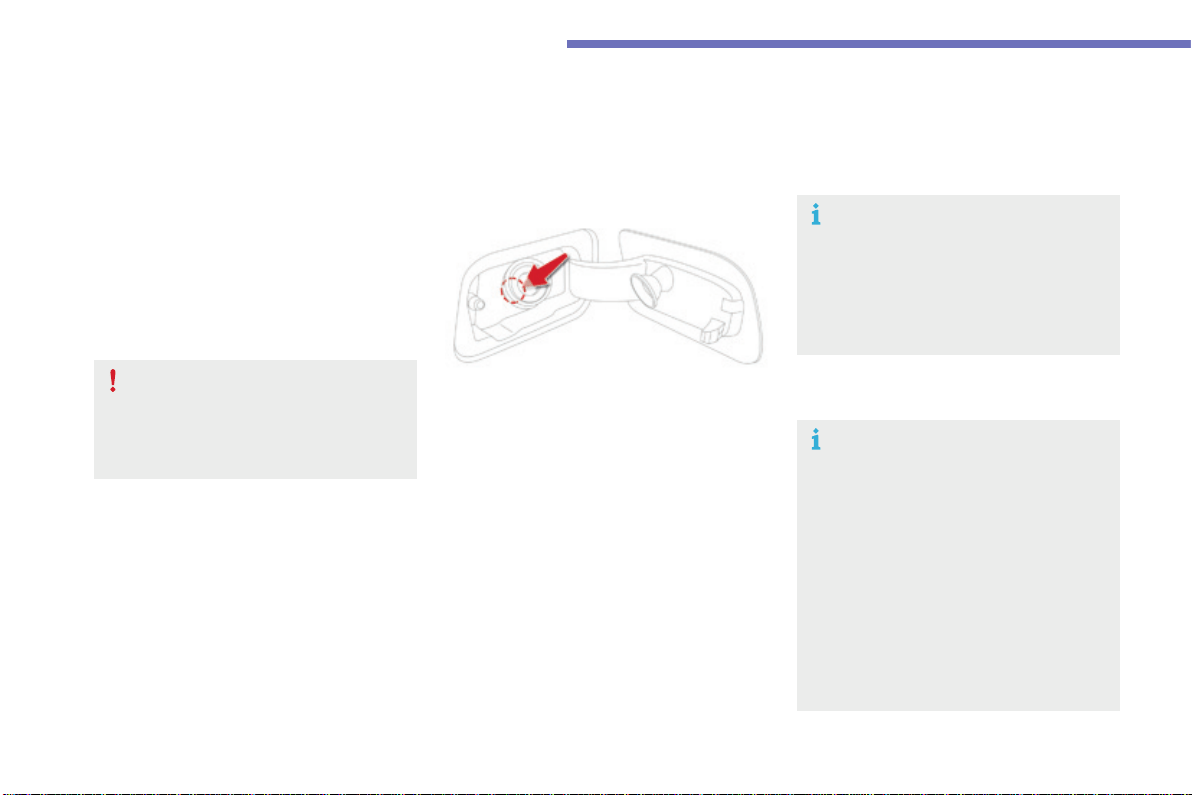
258
Practical information
C4-Picasso-II_en_Chap07_info-pratiques_ed01-2016
ThepetrolorDieselengineofyourvehicleis
fitted with a catalytic converter, a device which
helps to reduce the level of harmful emissions
intheexhaustgases.
For petrol engines, you must use unleaded
fuel.
Thefillerneckisnarrower,allowingonly
unleadedpetrolnozzlestobeintroduced.
If you have put in the wrong fuel
for your vehicle, you must have the
fuel tank drained and filled with
the correct fuel before starting the
engine.
Fuel cut-off
Your vehicle is equipped with a safety device
which cuts off the fuel supply in the event of a
collision.
Misfuel prevention (Diesel)*
Operation
When a petrol filler nozzle is introduced into the
fuelfillerneckofyourDieselvehicle,itcomes
intocontactwiththeflap.Thesystemremains
closedandpreventsfilling.
Do not persist but introduce a Diesel type
filler nozzle.
MechanicaldevicewhichpreventsfillingthetankofaDieselvehiclewithpetrol.Itavoidstheriskof
enginedamagethatcanresultfromfillingwiththewrongfuel.
It remains possible to use a fuel can to
fillthetank.
Inordertoensureagoodflowoffuel,
do not place the nozzle of the fuel can
in direct contact with the flap of the
misfuel prevention device and pour
slowly.
Travelling abroad
As Diesel fuel pump nozzles may
be different in other countries, the
presence of the misfuel prevention
devicemaymakerefuellingimpossible.
Beforetravellingabroad,we
recommendthatyoucheckwiththe
CITROËNdealernetwork,whetheryour
vehicle is suitable for the fuel pumps in
thecountryinwhichyouwanttotravel.
*Dependingonthecountryofsale.
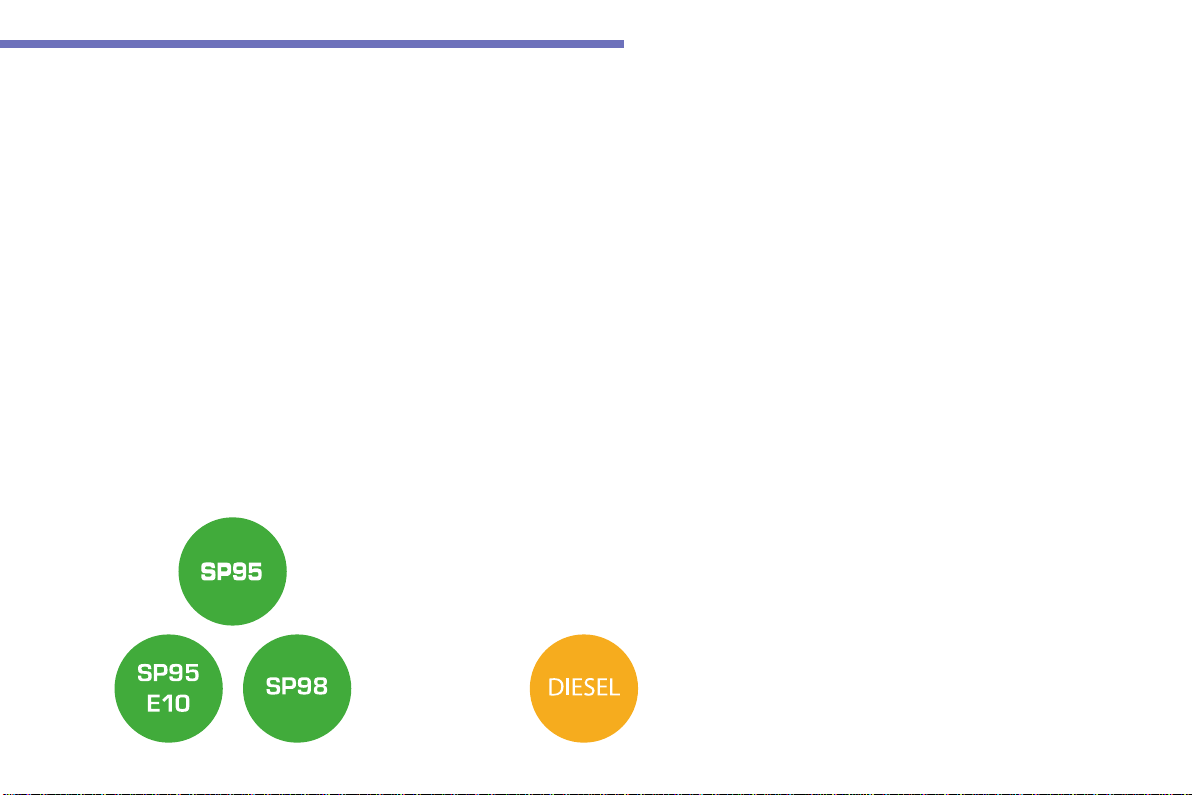
259
7
Practical information
C4-Picasso-II_en_Chap07_info-pratiques_ed01-2016
Fuel used for petrol engines
Thepetrolenginesarecompatiblewith
E10bio-petrol(containing10%ethanol),
conformingtoEuropeanstandardsEN228and
EN15376.
E85typefuels(containingupto85%ethanol)
arereservedexclusivelyforvehiclesmarketed
fortheuseofthistypeoffuel(BioFlex
vehicles).Thequalityoftheethanolmust
complywithEuropeanstandardEN15293.
Fuel used for Diesel
engines
TheDieselenginesarecompatiblewith
biofuels available at the pumps which meet
currentandfutureEuropeanstandards:
- Diesel fuel that meets standard EN 590
mixedwithabiofuelthatmeetsstandard
EN 14214,
- DieselfuelthatmeetsstandardEN16734
mixedwithabiofuelthatmeetsstandard
EN14214(possiblycontainingupto10%
Fatty Acid Methyl Ester),
- Paraffinic Diesel fuel that meets standard
EN15940mixedwithabiofuelthatmeets
standardEN14214(possiblycontainingup
to7%FattyAcidMethylEster).
TheuseofB20orB30fuelmeetingstandard
EN16709ispossibleinyourDieselengines.
However, this use, even occasional, requires
strictapplicationofthespecialservicing
conditionsreferredtoas"Arduousconditions".
For more information, contact a CITROËN
dealeroraqualifiedworkshop.
The use of any other type of (bio)fuel
(vegetableoranimaloils,pureordiluted,
domesticfuel...)isstrictlyprohibited(riskof
damagetotheengineandfuelsystem).
Only the use of Diesel fuel additives that meet
thestandardB715000isauthorised.
260
Practical information
C4-Picasso-II_en_Chap07_info-pratiques_ed01-2016
Originaltyresize Type of chain
205/60R16
Maximumlinksize:
9 mm
205/55R17
225/45R18
THULE model
K-SummitK34only
For more information on snow chains, contact a
CITROËNdealeroraqualifiedworkshop.
Useonlychainsdesignedtobefittedthetype
ofwheelonyourvehicle:
Snow chains
Inwintryconditions,snowchainsimprovetractionaswellasthebehaviourofthevehiclewhenbraking.
The snow chains must be fitted only
tothefrontwheels.Theymustnever
be fitted to "space-saver" type spare
wheels.
Advice on installation
F Ifyouhavetofitthechainsduringa
journey,stopthevehicleonaflatsurface
onthesideoftheroad.
F Applytheparkingbrakeandpositionany
wheelchockstopreventmovementofyour
vehicle.
F Fitthechainsfollowingtheinstructions
providedbythemanufacturer.
F Moveoffgentlyanddriveforafew
moments,withoutexceeding30mph
(50km/h).
F Stopyourvehicleandcheckthatthesnow
chainsarecorrectlytightened.
Takeaccountofthelegislationinforce
in your country on the use of snow
chainsandthemaximumrunningspeed
authorised.
Avoiddrivingwithsnowchainsonroads
that have been cleared of snow, to
avoiddamagingyourvehicle'styresand
theroadsurface.Ifyourvehicleisfitted
withalloywheels,checkthatnopartof
thechainoritsfixingsisincontactwith
thewheelrim.
Itisstronglyrecommendedthatbefore
youleave,youpractisefittingthesnow
chainsonalevelanddrysurface.
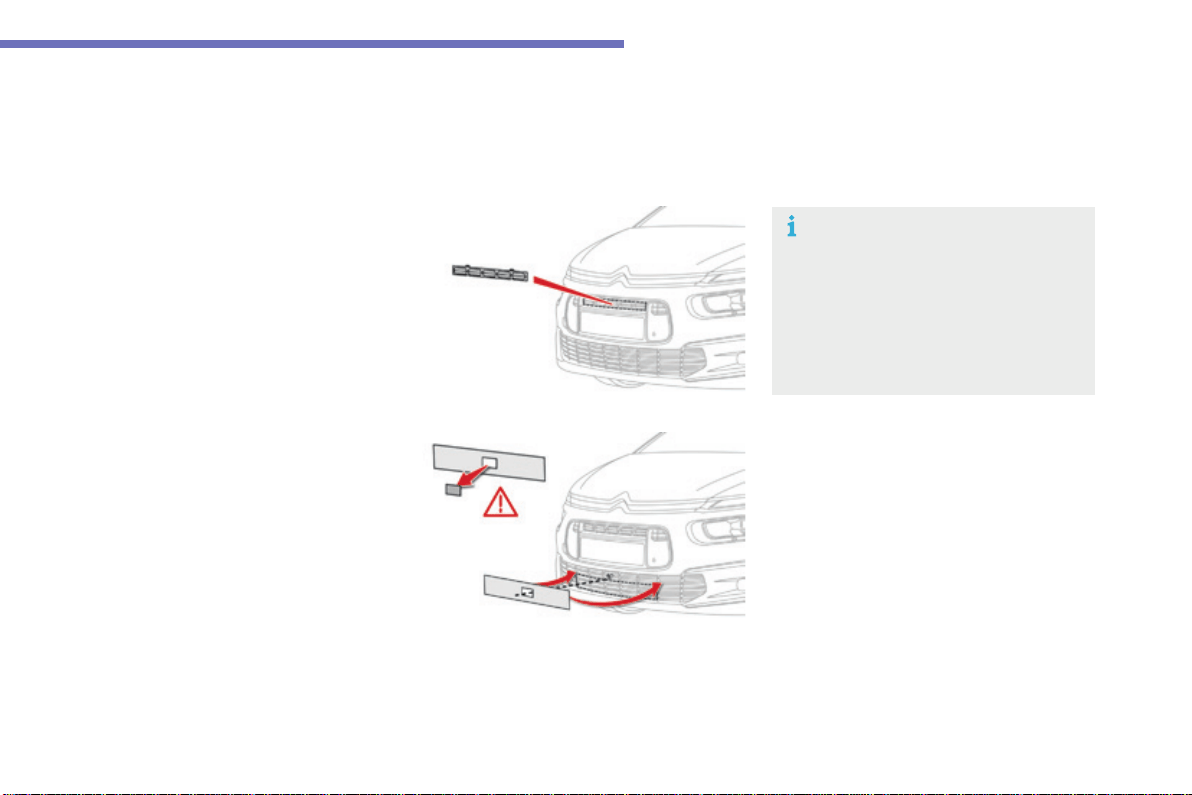
261
7
Practical information
C4-Picasso-II_en_Chap07_info-pratiques_ed01-2016
Very cold climate screen(s)*
Removableprotectivescreenswhichpreventtheaccumulationofsnowattheradiatorcoolingfan.
Dependingonversion,youwillhaveoneortwoscreens.
F Offerupthecorrespondingverycold
climate screen to the upper or lower
sectionofthefrontbumper.
F Pressaroundtheedgeofeachscreento
engageitsfixingclipsonebyone.
F Use a screwdriver as a lever to release the
fixingclipsinturnoneachscreen.
Donotforgettoremovetheverycoldclimate
screen(s)when:
- theambienttemperatureexceeds10°C,
- towing,
- drivingatspeedsabove75mph(120km/h).
Removal
Fitting
360 Vision system
The pre-cut zone must be removed
beforefittingthescreentothefront
bumper, to allow operation of the
camera.
When the very cold climate screen
isfitted,theimageprovidedbythe
cameraisslightlydifferent.
*Dependingonthecountryofsale.
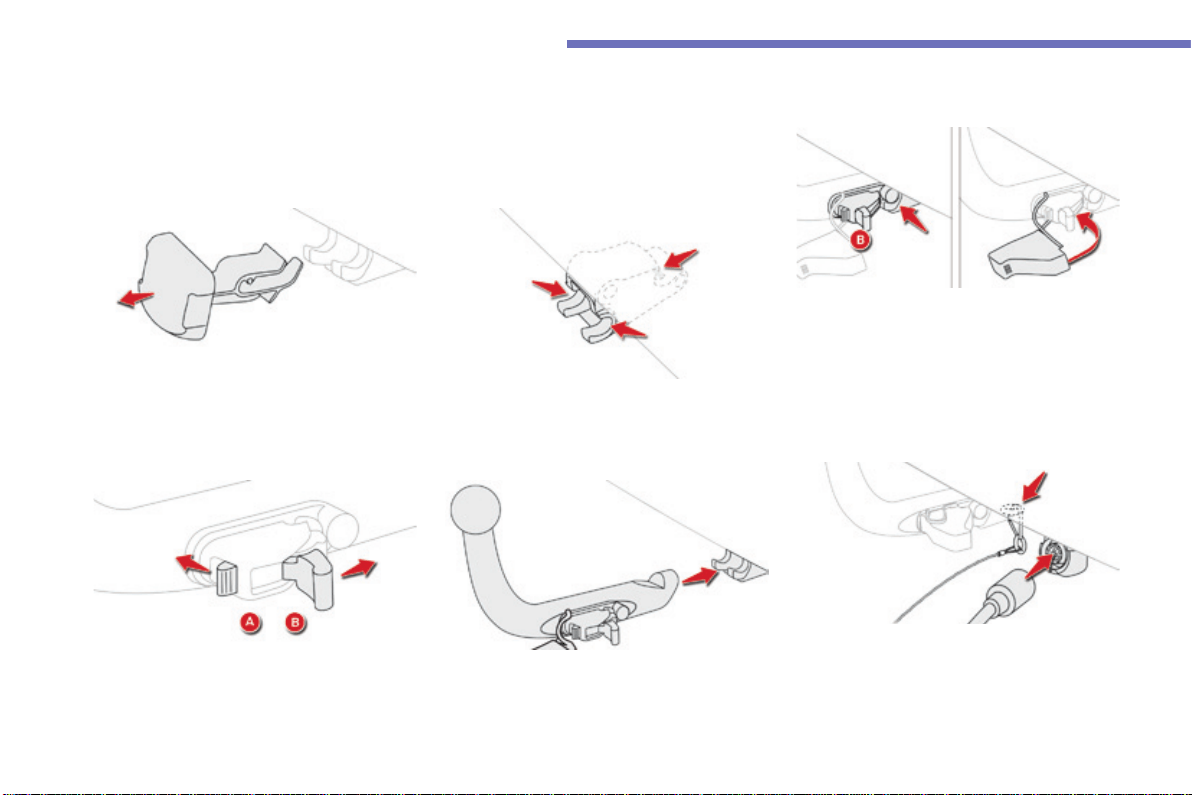
262
Practical information
C4-Picasso-II_en_Chap07_info-pratiques_ed01-2016
Towbarwithquicklydetachabletowball
Fitting
F Below the rear bumper, unclip and remove
theprotectivecoveronthecarrier.
F Beforefittingthetowball,checkthatthe
points of contact, indicated by the arrows,
areclean.
Useasoftcleancloth.
F Ensurethatthetowballisfullyengaged.
The two pins must be in contact with
the cut-outs in the carrier and the
triggerB must have returned to the
"locked"position.
F Install and clip in place the protective
cover,byrotatingittotheleft.
F On the towball, press and hold control A.
F Releasethelockingmechanismby
pressingthetriggerB.
F Put the end of the towball into the carrier,
locatedbelowthebumper,asfarasitwillgo.
Notoolsarerequiredtoinstallorremovethetowballonthisgenuinetowbarsystem.
F Connectthetrailerplugtothe13-way
socketprovided,locatednexttothecarrier.
F Makethetrailersafebyattachingitssafety
cable to the eye provided for this purpose,
locatedonthecarrier.
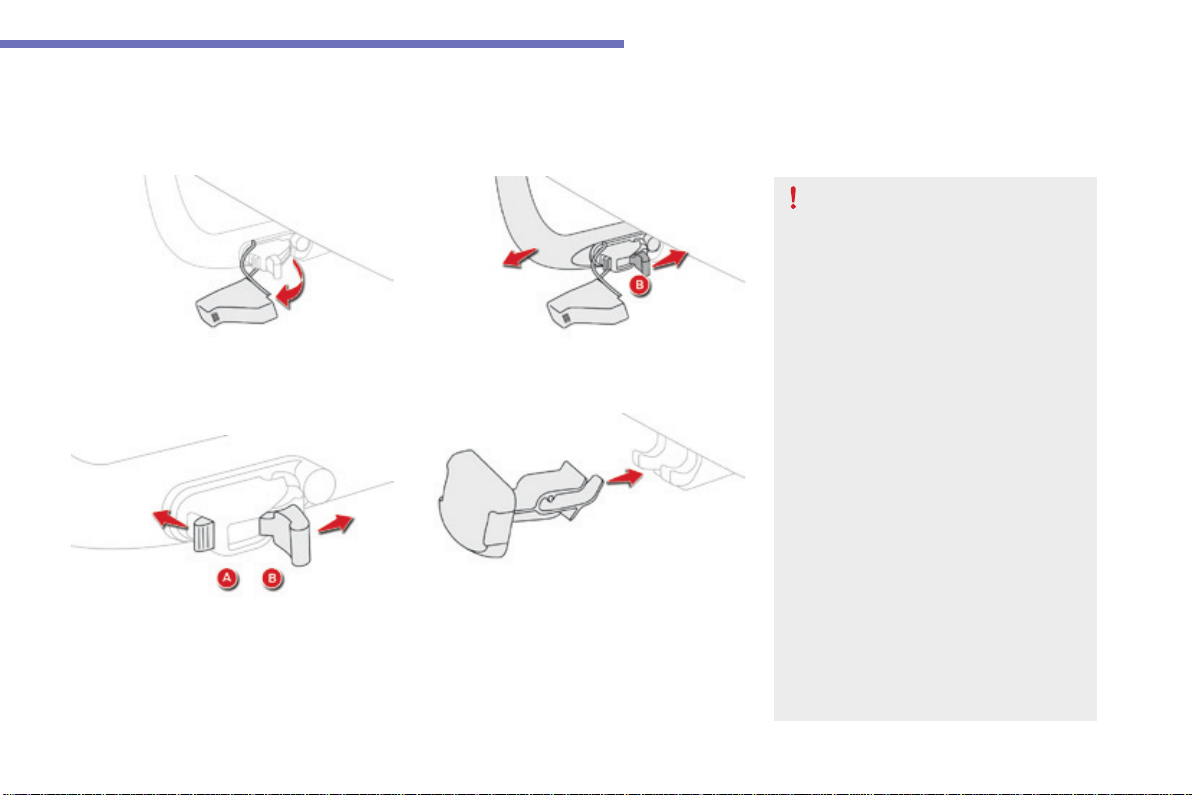
263
7
Practical information
C4-Picasso-II_en_Chap07_info-pratiques_ed01-2016
F Unclip and remove the protective cover, by
turningittotheright.
Removing
F PressthetriggerB and remove the towball
bypullingittowardsyou.
F On the towball, press and hold control A.
F Releasethelockingmechanismby
pressingthetriggerB.
Ifthetowballisnotlockedinplace,the
trailercouldseparate.Thereisariskof
anaccident.
Alwayslockthetowballintheway
described.
Observethelegislationinforceinthe
countryinwhichyouaredriving.
Removethetowballwhenitisnotbeing
used.
Beforesettingoff,checkthatthetrailer
lightingandsignallingworkscorrectly.
Maximumauthorisednoseweight:
70kg.
Formoreinformationonyourvehicle's
Weights,refertothecorresponding
section.
Carryingsystem(boxorbicyclecarrier).
Youmustnotexceedthemaximum
noseweightonthetowbar:ifthisweight
isexceeded,thedevicecoulddetach
from the vehicle and cause a serious
accident.
F Clip the protective cover in place on the
carrierlocatedbelowthebumper.

264
Practical information
C4-Picasso-II_en_Chap07_info-pratiques_ed01-2016
Towingatrailer
Werecommendtheuseofgenuine
CITROËN towbars and their harnesses
that have been tested and approved
fromthedesignstageofyourvehicle,
andthatthefittingofthetowbaris
entrusted to a CITROËN dealer or a
qualifiedworkshop.
If the towbar is not fitted by a
CITROËN dealer, it must still be
fitted in accordance with the vehicle
manufacturer'sinstructions.
Yourvehicleisprimarilydesignedfor
transportingpeopleandluggage,butitmay
alsobeusedfortowingatrailer.
Drivingwithatrailerplacesgreater
demandsonthetowingvehicleandthe
drivermusttakeparticularcare.
For more information on Driving
advice,particularlywhentowing,refer
tothecorrespondingsection.
For more information on Weights (and
the towed loads which apply to your
vehicle)refertothecorresponding
section.
Youmustobservethemaximumtrailer
weight,indicatedontheregistration
certificate or in the technical
specificationforyourvehicle.
Whennottowingatrailer,removethe
quickly-detachabletowballbefore
driving.
Thelanedeparturewarningsystemis
deactivatedwhileatrailerisconnected.

265
7
Practical information
C4-Picasso-II_en_Chap07_info-pratiques_ed01-2016
Exiting economy mode
These functions are reactivated automatically
nexttimethevehicleisdriven.
In order to restore the use of these functions
immediately,starttheengineandletitrun:
- for less than ten minutes, to use the
equipmentforapproximatelyfiveminutes,
- for more than ten minutes, to use the
equipmentforuptoapproximately
thirtyminutes.
Lettheenginerunforthedurationspecifiedto
ensurethatthebatterychargeissufficient.
Do not repeatedly and continuously restart the
engineinordertochargethebattery.
Aflatbatterypreventstheenginefromstarting.
For more information on the 12 V battery, refer
tothecorrespondingsection.
Load reduction mode
Systemwhichmanagestheuseofcertain
functionsaccordingtothelevelofcharge
remaininginthebattery.
Whenthevehicleisbeingdriven,theload
reduction function temporarily deactivates
certainfunctions,suchastheairconditioning,
theheatedrearscreen...
The deactivated functions are reactivated
automaticallyassoonasconditionspermit.
Energyeconomymode
Switching to economy
mode
Amessageappearsintheinstrumentpanel
screenindicatingthatthevehiclehasswitched
to economy mode and the active functions are
putonstandby.
Ifatelephonecallisbeingmadeatthistime,it
will be maintained for around 10 minutes with
the Bluetooth hands-free system of your audio
system.
Systemwhichmanagesthedurationofuseofcertainfunctionstoconserveasufficientlevelof
chargeinthebattery.
Aftertheenginehasstopped,youcanstillusefunctionssuchastheaudioandtelematics
system,windscreenwipers,dippedbeamheadlamps,courtesylamps,etc.foramaximum
combineddurationofaboutfortyminutes.

266
Practical information
C4-Picasso-II_en_Chap07_info-pratiques_ed01-2016
Accessories
AwiderangeofaccessoriesandgenuinepartsisavailablefromtheCITROËNdealernetwork.
TheseaccessoriesandpartsareallsuitableforyourvehicleandbenefitfromCITROËN'srecommendationandwarranty.
"Comfort"
Door deflectors, sun blind, insulated module,
coathangerfixedtoheadrestraint,mobile
readinglamp,mirrorforcaravan,frontandrear
parkingsensors,programmableadditional
heating,smoker'skit,solarfilmforreardoor
windows,portablescentedairfreshener...
"Transport systems"
Boot carpet, boot liner, boot net, boot
spacers,transverseroofbars,skicarrier,roof
boxes,towbars,towbarwiringharnesses,
bicycle carriers for towbar and roof bars,
towbarswithfixedanddetachabletowball,
separationnet,slidingcarrier,bootorganiser
(GrandC4Picasso)...
Ifatowbarandwiringharnessarefitted
outsidetheCITROËNdealernetwork,the
installation must be done strictly in line with the
manufacturer'srecommendations.
If your vehicle has a detachable towball, it is
recommended that the ball be removed when
nottowing.
"Styling"
Gearleverknobs,aluminiumfootrest,alloy
wheels, door sill finishers, interior mirror
shells...
"Security and safety"
Anti-intrusionalarm,vehicletrackingsystem,
child seats and booster cushions, breathalyser,
firstaidkit,fireextinguisher,warningtriangle,
highvisibilityvest,wheelsecuritybolts,snow
chains,non-slipcovers,wintertyres,foglamp
kit,securityfilmforfrontdoorwindows,dog
guard,petseatbelt...
"Protection"
Mats*, seat covers compatible with lateral
airbags,mudflaps,doorprotectivemouldings,
bumper protection strips, vehicle cover, boot
sill protector, door sill protectors, seat and boot
protectivecoversforpets...
Therearbodyworkhasbeendesignedtoavoid
spray.
* Toavoidanyriskofjammingthepedals:
- ensure that mats are correctly positioned
and secured,
- neverfitonematontopofanother.

267
7
Practical information
C4-Picasso-II_en_Chap07_info-pratiques_ed01-2016
Thefittingofelectricalequipment
or accessories which are not
recommended by CITROËN may result
inafailureofyourvehicle'selectronic
systemandexcessiveelectrical
consumption.
Contact a CITROËN dealer
forinformationontherangeof
recommended equipment and
accessories.
Installation of radio
communication
transmitters
Beforeinstallinganyafter-marketradio
communication transmitter, you can
contact a CITROËN dealer for the
specification of transmitters which can
befitted(frequency,maximumpower,
aerial position, specific installation
requirements), in line with the Vehicle
ElectromagneticCompatibility
Directive(2004/104/EC).
Dependingonthelegislationinforcein
the country, certain safety equipment
maybecompulsory:highvisibility
safetyvests,warningtriangles,
breathalyzers, spare bulbs, spare fuses,
fireextinguisher,firstaidkit,mudflaps
attherearofthevehicle.
"Multimedia"
Portablesatellitenavigationsystem,driving
assistancesystems,reversingcamera,
portable video screen, portable video carrier,
smartphone carrier, Bluetooth
®
hands-freekit,
two-screenvideopack,portablevideoplayer,
CDplayer,230V/50Hzsocket,230V/12V
adaptor,iPhone/iPadcharger...
ByvisitingaCITROËNdealeryoucanalso
obtaincleaningandmaintenanceproducts
(interiorandexterior)-includingecological
productsinthe"TECHNATURE"range,
productsfortopping-up(screenwash...),paint
touch-uppensandaerosolsfortheexact
colourofyourvehicle,refills(sealantcartridge
forthetemporarypuncturerepairkit...),...
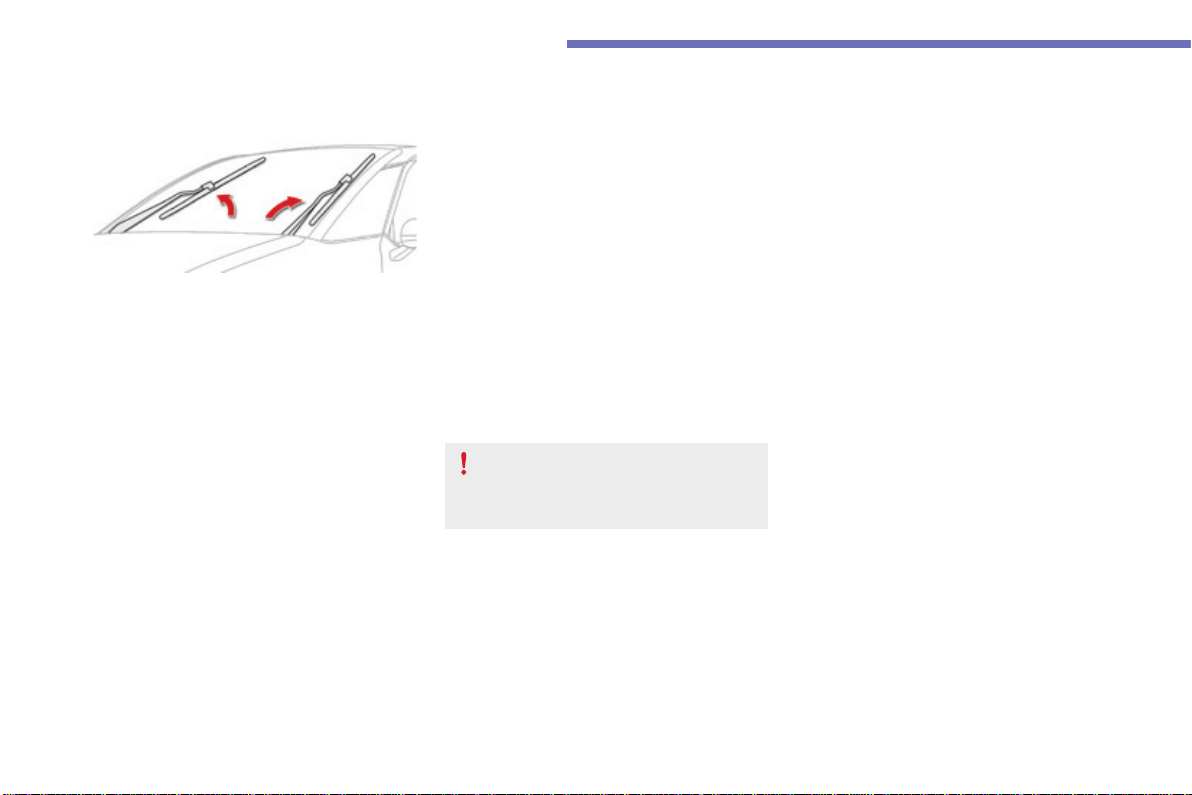
268
Practical information
C4-Picasso-II_en_Chap07_info-pratiques_ed01-2016
Changingawiperblade
Before removing a front
wiper blade
F Withinoneminuteafterswitchingoff
theignition,operatethewiperstalkto
position the wiper blades vertically on the
windscreen,
or
F Fromoneminuteafterswitchingoffthe
ignition,repositionthearmsmanually.
Removing
F Raisethecorrespondingwiperarm.
F Unclipthewiperbladeandremoveit.
Fitting
F Putthecorrespondingnewwiperbladein
placeandclipit.
F Folddownthewiperarmcarefully.
After fitting a front wiper
blade
F Switchontheignition.
F Operatethewiperstalkagaintoparkthe
wiperblades.
Replacement of the arms must be done
by a CITROËN dealer or a qualified
workshop.
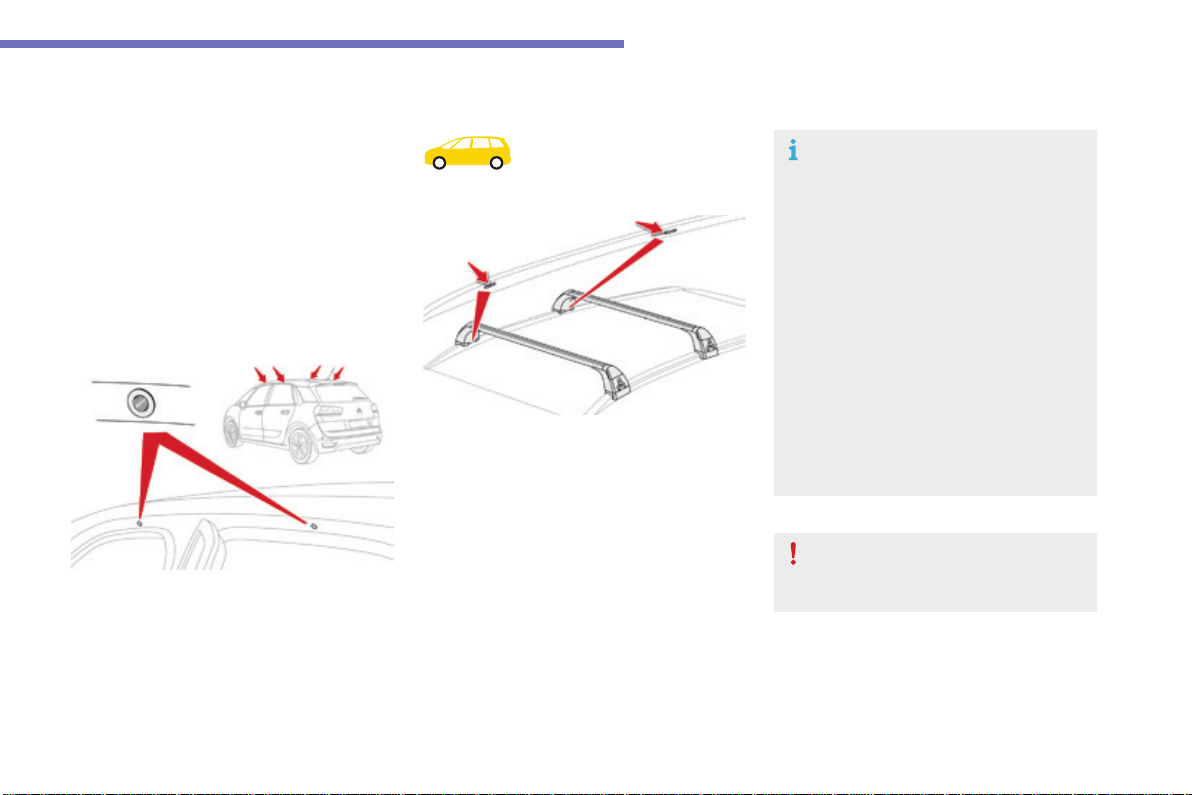
269
7
Practical information
C4-Picasso-II_en_Chap07_info-pratiques_ed01-2016
Roof bars
Forsafetyreasonsandtoavoiddamagingthe
roof, it is essential to use transverse roof bars
thatareapprovedforyourvehicle.
Observethefittinginstructionsandthe
conditionsofusegivenintheinformation
providedwiththeroofbars.
Version with
longitudinal bars
To install the roof bars, you must secure
themonlytothefouranchoragepointsinthe
roofframe.Thesepointsaremaskedbythe
vehicle'sdoorswhenclosed.
Theroofbarfixingsincludeastudthatshould
be introduced into the aperture at each
anchoragepoint.
Version without longitudinal
bars
You must fit the transverse bars to the
longitudinalbarsatthefixingpointsindicated
byengravedmarkingsonthelongitudinalbars.
Recommendations
F Distributetheloadevenly,avoiding
overloadingononeside.
F Arrangetheheaviestpartoftheloadas
closeaspossibletotheroof.
F Anchortheloadsecurelyandfitawarning
flagifpartofitoverhangsthevehicle.
F Drivegently,asthevehiclewillbemore
liable to the effects of side winds (vehicle
stabilitymaybeaffected).
F Remove the roof bars as soon as they are
nolongerneeded.
Maximumload,distributedovertheroof
bars,foraloadingheightnotexceeding
40cm:80 kg.
Thisvalueissubjecttochange,please
checkthemaximumloadstatedinthe
instructionsprovidedwithheroofbars.
Iftheheightexceeds40cm,adaptthe
speed of the vehicle to the profile of the
roadtoavoiddamagingtheroofbars
andthefixingsonthevehicle.
Pleaserefertonationallegislationsoas
tomeettherequirementsoncarrying
objectsthatarelongerthanthevehicle.
Whencarryinglongobjects,itis
recommended that you deactivate the
motorisedoperationofthetailgate.
270
Practical information
C4-Picasso-II_en_Chap07_info-pratiques_ed01-2016
TOTAL & CITROËN
Partners in performance and
protecting the environment
Innovation in the search for
performance
For over 40 year, the TOTAL Research and
Development departments have developed lubricants
for CITROËN, to match the latest technical innovations
on CITROËN vehicles, both for competition and for
everydaymotoring.
For you, this is an assurance that you will obtain the
bestperformancefromyourengine.
Optimum protection for
your engine
ByhavingyourCITROËNvehicle
serviced with TOTAL lubricants, you are
contributingtowardsimprovingthelife
andperformanceofyourengine,while
alsoprotectingtheenvironment.
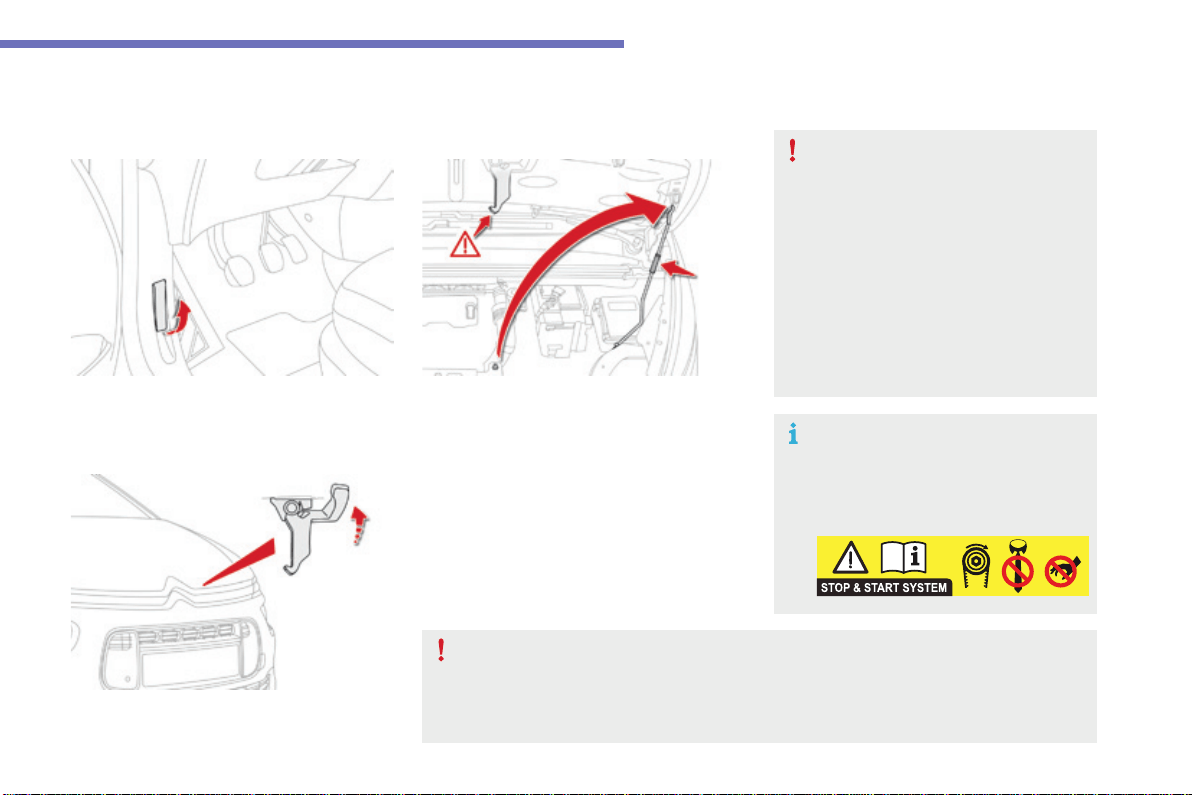
271
7
Practical information
C4-Picasso-II_en_Chap07_info-pratiques_ed01-2016
Bonnet
F Openthelefthandfrontdoor.
F Liftthesafetycatchandraisethebonnet.
F Unclipthestayfromitshousingandplace
it in the support slot to hold the bonnet
open.
Opening
F Pull the release lever, located at the bottom
ofthedooraperture,towardsyou.
Beforedoinganythingunderthe
bonnet, switch off the Stop & Start
systemtoavoidanyriskofinjury
resultingfromanautomaticchangeto
STARTmode.
The cooling fan may start after switching off the engine: take care with articles and
clothing that might be caught by the fan blades.
Do not open the bonnet under very
windyconditions.
The location of the interior bonnet
releaseleverpreventsopeningofthe
bonnet when the left hand front door
isshut.
Whentheengineishot,handlethe
exteriorsafetycatchandthestaywith
care(riskofburns),usingtheprotected
area.
Whenthebonnetisopen,takecarenot
todamagethesafetycatch.
Because of the presence of electrical equipment under the bonnet, it is recommended that
exposuretowater(rain,washing,...)belimited.
Closing
F Takethestayoutofitssupportslot.
F Clipthestaybackintoitshousing.
F Lower the bonnet and release it at the end
ofitstravel.
F Pullonthebonnettocheckthatithas
latchedcorrectly.
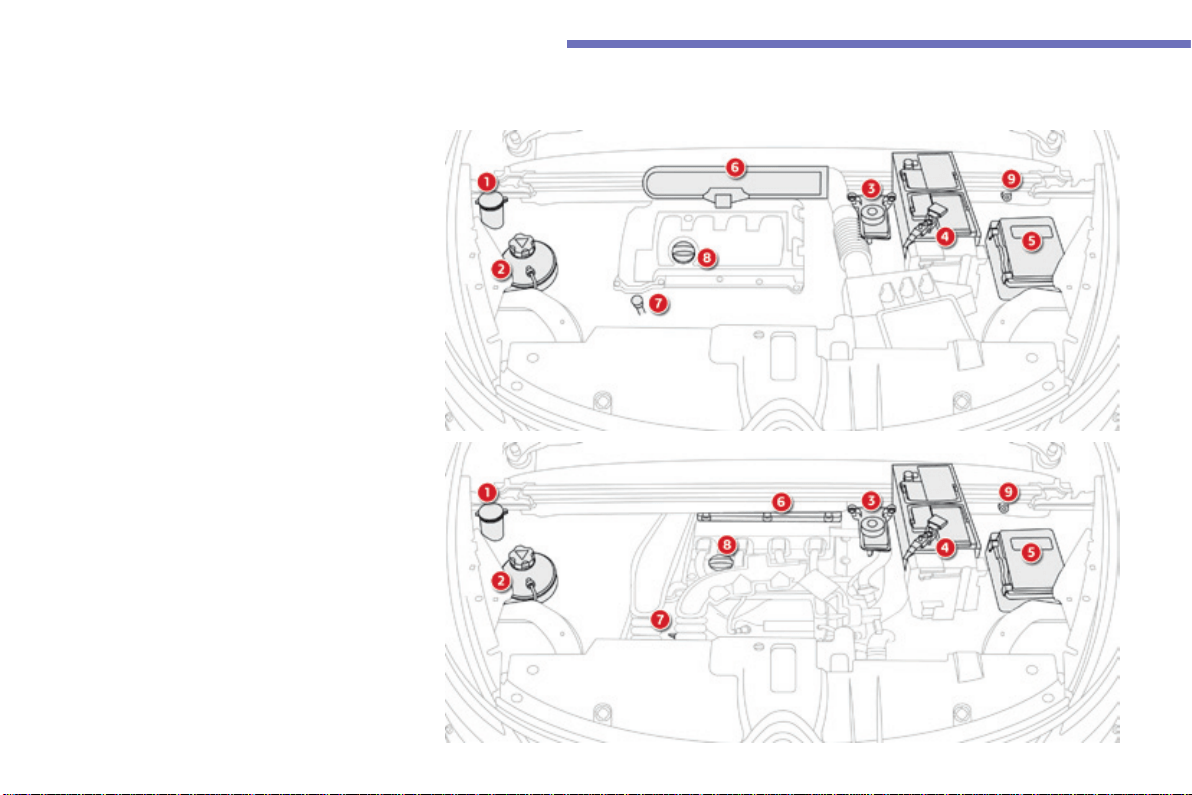
272
Practical information
C4-Picasso-II_en_Chap07_info-pratiques_ed01-2016
1. Screenwashandheadlampwashreservoir.
2. Coolantreservoir.
3. Brakefluidreservoir.
4. Battery/Fuses.
5. Fusebox.
6. Airfilter.
7. Engineoildipstick.
8. Engineoilfillercap.
9. Remoteearthpoint.
Petrolengines
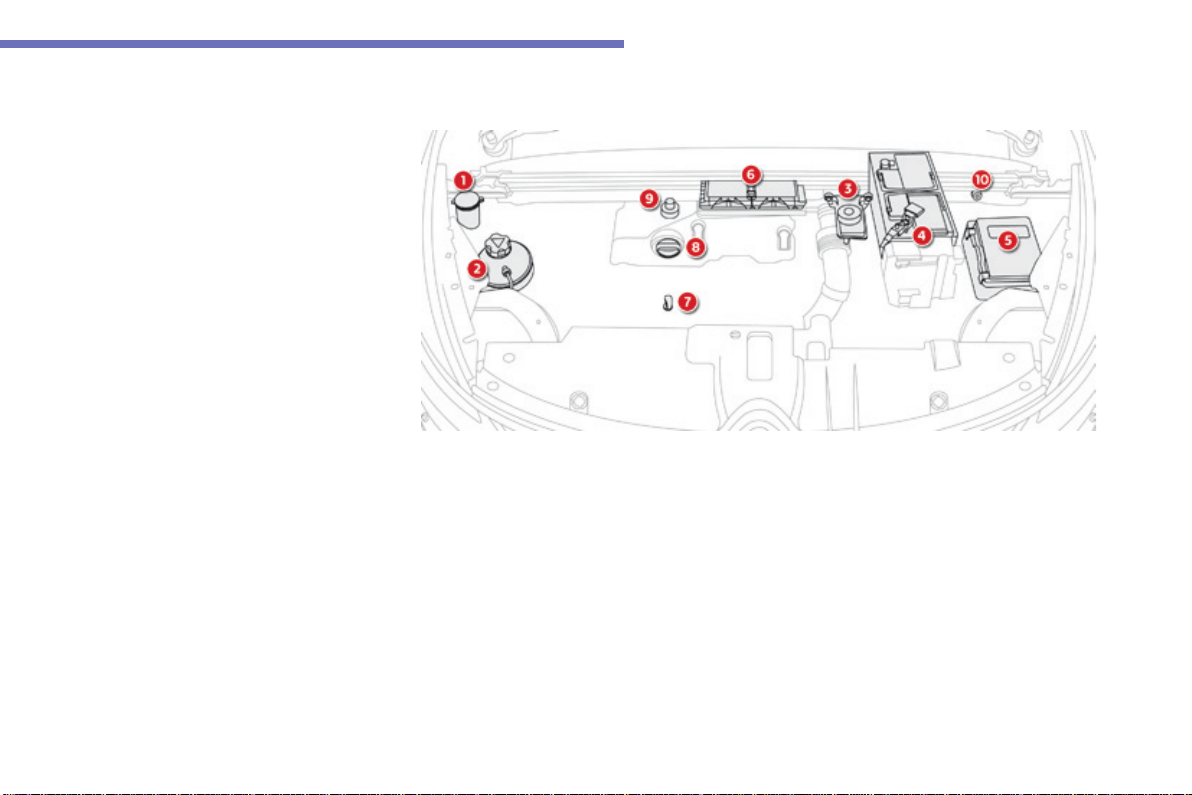
273
7
Practical information
C4-Picasso-II_en_Chap07_info-pratiques_ed01-2016
1. Screenwashandheadlampwashreservoir.
2. Coolantreservoir.
3. Brakefluidreservoir.
4. Battery/Fuses.
5. Fusebox.
6. Airfilter.
7. Engineoildipstick.
8. Engineoilfillercap.
9. Primingpump*.
10. Remoteearthpoint.
Dieselengines
*Accordingtoengine.

274
Practical information
C4-Picasso-II_en_Chap07_info-pratiques_ed01-2016
Checkinglevels
Takecarewhenworkingunderthebonnet,ascertainareasoftheenginemaybeextremelyhot(riskofburns)andthecoolingfancouldstartat
anytime(evenwiththeignitionoff).
Engine oil level
Thecheckiscarriedouteitherwhen
theignitionisswitchedonusingthe
oil level indicator in the instrument
panel for vehicles so equipped, or
usingthedipstick.
Checking using the dipstick
Thelocationofthedipstickisshowninthe
correspondingunderbonnetlayoutview.
F Takethedipstickbyitscolouredgripand
removeitcompletely.
F Wipetheendofthedipstickusingaclean
non-fluffycloth.
F Refitthedipstickandpushfullydown,then
pullitoutagaintomakethevisualcheck:
thecorrectlevelisbetweenthemarksA
and B.
It is normal to top-up the oil level between
twoservices(oroilchanges).CITROËN
recommendsthatyoucheckthelevel,andtop-
upifnecessary,every3000miles(5000kms).
Checkalloftheselevelsregularly,inlinewiththemanufacturer'sserviceschedule.Topthemupifnecessary,unlessotherwiseindicated.
Ifaleveldropssignificantly,havethecorrespondingsystemcheckedbyaCITROËNdealeroraqualifiedworkshop.
Toensurethatthereadingiscorrect,
yourvehiclemustbeparkedonalevel
surfacewiththeenginehavingbeenoff
formorethan30minutes.
A = MAX
B = MIN
If you find that the level is above the Amarkor
below the Bmark,do not start the engine.
- If the level is above the MAXmark(risk
ofdamagetotheengine),contacta
CITROËNdealeroraqualifiedworkshop.
- If the level is below the MINmark,you
musttop-uptheengineoil.
275
7
Practical information
C4-Picasso-II_en_Chap07_info-pratiques_ed01-2016
Thebrakefluidlevelshouldbeclose
tothe"MAX"mark.Ifitisnot,check
thebrakepadwear.
Brake fluid level
Changing the uid
Refertothemanufacturer'sserviceschedule
fordetailsoftheintervalforthisoperation.
Fluid specication
Thebrakefluidmustconformtothe
manufacturer'srecommendations.
Topping-up the engine oil level
The location of the oil filler cap is shown in the
correspondingunderbonnetlayoutview.
F Unscrew the oil filler cap to reveal the filler
aperture.
F Addoilinsmallquantities,avoidingany
spillsonenginecomponents(riskoffire).
F Waitafewminutesbeforecheckingthe
levelagainusingthedipstick.
F Addmoreoilifnecessary.
F Aftercheckingthelevel,carefullyrefitthe
oilfillercapandthedipstickinitstube.
Engine oil change
Refertothemanufacturer'sserviceschedule
fordetailsoftheintervalforthisoperation.
Inordertomaintainthereliabilityoftheengine
and emission control system, never use
additivesintheengineoil.
Aftertopping-uptheoil,thecheckwhen
switchingontheignitionwiththeoil
level indicator in the instrument panel
isnotvalidduringthe30minutesafter
toppingup.
Oil grade
Beforetopping-uptheoilorchangingtheoil,
checkthattheoilisthecorrectgradeforyour
engineandconformstothemanufacturer's
recommendations.
276
Practical information
C4-Picasso-II_en_Chap07_info-pratiques_ed01-2016
Coolant level
The coolant level should be close
tothe"MAX"markbutshouldnever
exceedit.
Inaddition,asthecoolingsystemispressurised,
waitatleastonehourafterswitchingoffthe
enginebeforecarryingoutanywork.
Toavoidanyriskofscalding,unscrewthecap
bytwoturnstoallowthepressuretodrop.
When the pressure has dropped, remove the
capandtop-upthelevel.
Fluid specication
The coolant must conform to the
manufacturer'srecommendations.
The cooling fan may start after switching
off the engine: take care with articles and
clothing that might be caught by the fan
blades.
Whentheengineiswarm,thetemperatureof
thecoolantisregulatedbythefan.
Topping-up
The reservoir must be topped-up without delay
byaCITROËNdealeroraqualifiedworkshop.
Diesel fuel additive level
(Diesel with particle filter)
The additive reservoir low level is
indicatedbyfixedilluminationofthis
warninglamp,accompaniedbyan
audiblesignalandamessagethat
the particle filter additive level is
toolow.
Thewarninglampcomesonwhentheignition
isswitchedon,oreverytimethestalkis
operated,untilthereservoirisrefilled.
Nexttimeyoustop,refillthescreenwash/
headlampwashreservoir.
Screenwash/headlamp
wash level low
In the case of vehicles fitted with
headlamp washers, when the fluid
reservoir low level is reached this
warninglampcomesoninthe
instrument panel, accompanied by an
audiblesignalandamessage.
Avoidprolongedcontactofusedoilor
fluidswiththeskin.
Most of these fluids are harmful to
healthorindeedverycorrosive.
Do not discard used oil or fluids into
sewersorontotheground.
TakeusedoiltoaCITROËNdealeror
aqualifiedworkshop(France)ortoan
authorisedwastedisposalsite.
Used products
277
7
Practical information
C4-Picasso-II_en_Chap07_info-pratiques_ed01-2016
Checks
12 V battery
The battery does not require any
maintenance.
However,checkthattheterminals
arecleanandcorrectlytightened,
particularlyinsummerandwinter.
Refertothemanufacturer's
service schedule for details of the
replacement intervals for these
components.
Air filter and passenger compartment filter
Replace the oil filter each time the
engineoilischanged.
Refertothemanufacturer's
service schedule for details of
the replacement interval for this
component.
Oil filter
The presence of this label, in particular
with the Stop & Start system, indicates
the use of a specific 12 V lead-acid
batterywithspecialtechnologyand
specification.
The involvement of a CITROËN dealer
oraqualifiedworkshopisessentialwhen
replacingordisconnectingthebattery.
Unlessotherwiseindicated,checkthesecomponentsinaccordancewiththemanufacturer'sservicescheduleandaccordingtoyourengine.
Otherwise,havethemcheckedbyaCITROËNdealeroraqualifiedworkshop.
Dependingontheenvironment(e.g.dusty
atmosphere) and the use of the vehicle
(e.g.citydriving),replace them twice as often
if necessary.
Acloggedpassengercompartmentfiltermay
have an adverse effect on the performance
oftheairconditioningsystemandgenerate
undesirableodours.
Particle filter (Diesel)
The start of saturation of the particle
filterisindicatedbythefixed
illuminationofthiswarninglamp
accompaniedbyawarningmessage.
As soon as the traffic conditions permit,
regeneratethefilterbydrivingata
speedofatleast40mph(60km/h)until
thewarninglampgoesoff.
Ifthewarninglampstayson,this
indicatesalowadditivelevel.
For more information on Checking
levels and the Diesel additive level in
particular,refertothecorresponding
section.
On a new vehicle, the first particle
filterregenerationoperationsmaybe
accompaniedbya"burning"smell,
whichisperfectlynormal.
Followingprolongedoperationofthe
vehicle at very low speed or at idle,
youmay,inexceptionalcircumstances,
notice the emission of water vapour at
theexhaustonacceleration.Thisdoes
not affect the behaviour of the vehicle
ortheenvironment.
Whencarryingoutworkonthebattery,refer
to the "12 V battery" section for details of the
precautionstobetakenbeforedisconnecting
thebatteryandfollowingitsreconnection.
278
Practical information
C4-Picasso-II_en_Chap07_info-pratiques_ed01-2016
Brakeweardependsonthestyle
ofdriving,particularlyinthecase
of vehicles used in town, over short
distances.Itmaybenecessarytohave
theconditionofthebrakeschecked,
evenbetweenvehicleservices.
Brake pads
Forinformationoncheckingbrake
disc wear, contact a CITROËN dealer
oraqualifiedworkshop.
Brake disc wear
Only use products recommended by
CITROËN or products of equivalent
qualityandspecification.
In order to optimise the operation of
units as important as those in the
brakingsystem,CITROËNselectsand
offersveryspecificproducts.
Afterwashingthevehicle,dampness,
or in wintry conditions, ice can form
onthebrakediscsandpads:braking
efficiencymaybereduced.Makelight
brakeapplicationstodryanddefrost
thebrakes.
Electric parking brake
For more information, refer to the "Electric
parking brake - Operating faults"section.
This system does not require any
routineservicing.However,inthe
event of a problem, have the system
checkedbyaCITROËNdealerora
qualifiedworkshop.
Manual gearbox
Thegearboxdoesnotrequireany
maintenance(nooilchange).
Refertothemanufacturer'sservice
scheduleforthecheckingintervalfor
thiscomponent.
Automatic gearbox
Thegearboxdoesnotrequireany
maintenance(nooilchange).
Refertothemanufacturer'sservice
schedule for details of the level
checkingintervalforthiscomponent.
Toavoiddamagingtheelectricalunits,
never useahighpressurejetwashin
theenginecompartment.
Unlessthereisaleakinthecircuit,adropin
thebrakefluidlevelindicatesthatthebrake
padsareworn.
279
7
Practical information
C4-Picasso-II_en_Chap07_info-pratiques_ed01-2016
AdBlue
®
additive and SCR system
forBlueHDiDieselengines
To assure respect for the environment and
conformity with the new Euro 6 emissions
standard,withoutadverselyaffectingthe
performance or fuel consumption of Diesel
engines,CITROËNhastakenthedecisionto
equip its vehicles with an effective system that
associates SCR (Selective Catalytic Reduction)
with a particle filter (FAP) for the treatment of
exhaustgases.
Presentation of the SCR system
UsingafluidcalledAdBlue
®
containingurea,a
catalyticconverterturnsupto85%ofnitrogen
oxides(NOx)intonitrogenandwater,whichare
harmlesstohealthandtheenvironment.
The AdBlue
®
additive is held in a special
tanklocatedunderthebootattherearof
thevehicle.Ithasacapacityof17litres:this
providesadrivingrangeofabout12500miles
(20000km),afterwhichanalertistriggered
warningyouwhenthereserveremainingis
enoughforjust1500miles(2400km).
Duringeachscheduledserviceofyourvehicle
byaCITROËNdealeroraqualifiedworkshop,
the AdBlue
®
additivetankisrefilledinorderto
allownormaloperationoftheSCRsystem.
Iftheestimatedmileagebetweentwoservices
isgreaterthan12500miles(20000km),we
recommendthatyougotoaCITROËNdealer
oraqualifiedworkshoptohavethenecessary
top-upcarriedout.
Once the AdBlue
®
tankisempty,
asystemrequiredbyregulations
preventsstartingoftheengine.
If the SCR is faulty, the level of
emissions from your vehicle will no
longermeettheEuro6standard:you
vehiclebecomespolluting.
In the event of a confirmed fault
withtheSCRsystem,youmustgo
to a CITROËN dealer or a qualified
workshopassoonaspossible:after
arunningdistanceof650miles
(1100km),asystemwillbetriggered
automaticallytopreventenginestarting.
280
Practical information
C4-Picasso-II_en_Chap07_info-pratiques_ed01-2016
Freezing of the AdBlue
®
additive
The AdBlue
®
additive freezes at
temperaturesbelowaround-11°C.
The SCR system includes a heater
for the AdBlue
®
tank,allowingyouto
continuedrivinginverycoldconditions.
Topping-up the AdBlue
®
FillingtheAdBlue
®
tankisanoperation
included in every routine service on your
vehicle by a CITROËN dealer or a qualified
workshop.
Nevertheless,giventhecapacityofthetank,it
may be necessary to top-up the fluid between
services,moreparticularlyifanalert(warning
lampsandamessage)signalstherequirement.
YoucangotoaCITROËNdealeroraqualified
workshop.
Ifyouenvisagetopping-upyourself,please
readthefollowingwarningscarefully.
Precautions in use
Use only AdBlue
®
fluid that meets the
ISO22241standard.
AdBlue
®
isaurea-basedsolution.Thisliquidis
non-flammable,colourlessandodourless(kept
inacoolarea).
Intheeventofcontactwiththeskin,wash
theaffectedareawithsoapandwater.Inthe
eventofcontactwiththeeyes,wash(irrigate)
theeyeswithlargeamountsofwaterorwith
aneyewashsolutionforatleast15minutes.
Ifaburningsensationorirritationpersists,get
medicalattention.
If swallowed, immediately wash out the mouth
withcleanwaterandthendrinkplentyofwater.
Incertainconditions(highambient
temperature,forexample),theriskofreleaseof
ammoniacannotbeexcluded:donotinhalethe
fluid.Ammoniavapourhasanirritanteffecton
mucousmembranes(eyes,noseandthroat).
The supply in a non-drip bottle simplifies
topping-up.Youcanobtain1.89litre(halfaUS
gallon)bottlesfromaCITROËNdealerora
qualifiedworkshop.
Never dilute AdBlue
®
withwater.
Never pour AdBlue
®
into the Diesel fuel
tank.
Never top-up from an AdBlue
®
dispenserreservedforheavygoods
vehicles.
Keep AdBlue
®
out of the reach of
children,initsoriginalbottle.
Never transfer AdBlue
®
to another
container:itwouldloseitspurity.

281
7
Practical information
C4-Picasso-II_en_Chap07_info-pratiques_ed01-2016
Recommendations on storage
AdBlue
®
freezes at about -11°C and
deterioratesabove25°C.Itisrecommended
that bottles be stored in a cool area and
protectedfromdirectsunlight.
Undertheseconditions,thefluidcanbekept
foratleastayear.
If the additive has frozen, it can be used once it
hascompletelythawedout.
Procedure
Beforetopping-up,ensurethatthevehicleis
parkedonaflatandlevelsurface.
In wintry conditions, ensure that the
temperatureofthevehicleisabove-11°C.
Otherwise,byfreezing,theAdBlue
®
cannot
bepouredintoitstank.Parkyourvehicleina
warmer area for a few hours to allow the top-up
tobecarriedout.
F PresstheSTART/STOPbuttontoswitch
offtheengine.
F For access to the AdBlue
®
tank,raisethe
boot floor, or on 7-seat versions, unfold the
righthandseatinthethirdrow.
Never store bottles of AdBlue
®
in your
vehicle.
F Withoutpressing,turntheblackcapa
quarterturnanti-clockwiseandliftitoff.
F Turn the blue cap a 6
th
of a turn anti-
clockwise.
F Liftoffthecap.
F Obtain a bottle of AdBlue
®
.Afterfirst
checkingtheuse-bydate,readcarefully
the instructions on use on the label before
pouringthecontentsofthebottleintoyour
vehicle'sAdBlue
®
tank.
282
Practical information
C4-Picasso-II_en_Chap07_info-pratiques_ed01-2016
Important:ifyourvehicle'sAdBlue
®
tankiscompletelyempty-whichis
confirmedbythealertmessagesand
theimpossibilityofstartingtheengine,
youmustaddatleast3.8litresoffluid.
Important:when topping-up after
running out of AdBlue
®
,signalled
bythemessage"Top-upAdBlue:
Startingprevented",youmustwait
forapproximately5minutesbefore
switchingontheignition,without
opening the driver's door, unlocking
the vehicle, placing the key of the
"Keyless Entry and Starting" system
inside the vehicle or inserting the
electronic key in the reader.
Switchontheignition,waitfor
10seconds,thenstarttheengine.
If any fluid is spilt or splashed, wash
immediately with cold water or wipe with
adampcloth.
If the fluid has crystallised, clean it off
usingaspongeandhotwater.
F Afteremptyingthebottle,wipeawayany
spillagearoundthetankfillerusingadamp
cloth.
F Refitthebluecaptothetankandturnita
6
th
ofaturnclockwise,toitsstop.
F Refittheblackcapandturnitaquarterof
aturnclockwisewithoutpressing.Ensure
that the indicator on the cap lines up with
theindicatoronthesupport.
F Dependingonequipment,returnthespare
wheeland/orthestorageboxtothebottom
oftheboot.
F Refitthebootcarpetandclosethetailgate.
Do not dispose of AdBlue
®
bottles in
thehouseholdwaste.Placethemina
container provided for this purpose or
takethemtoyourdealer.
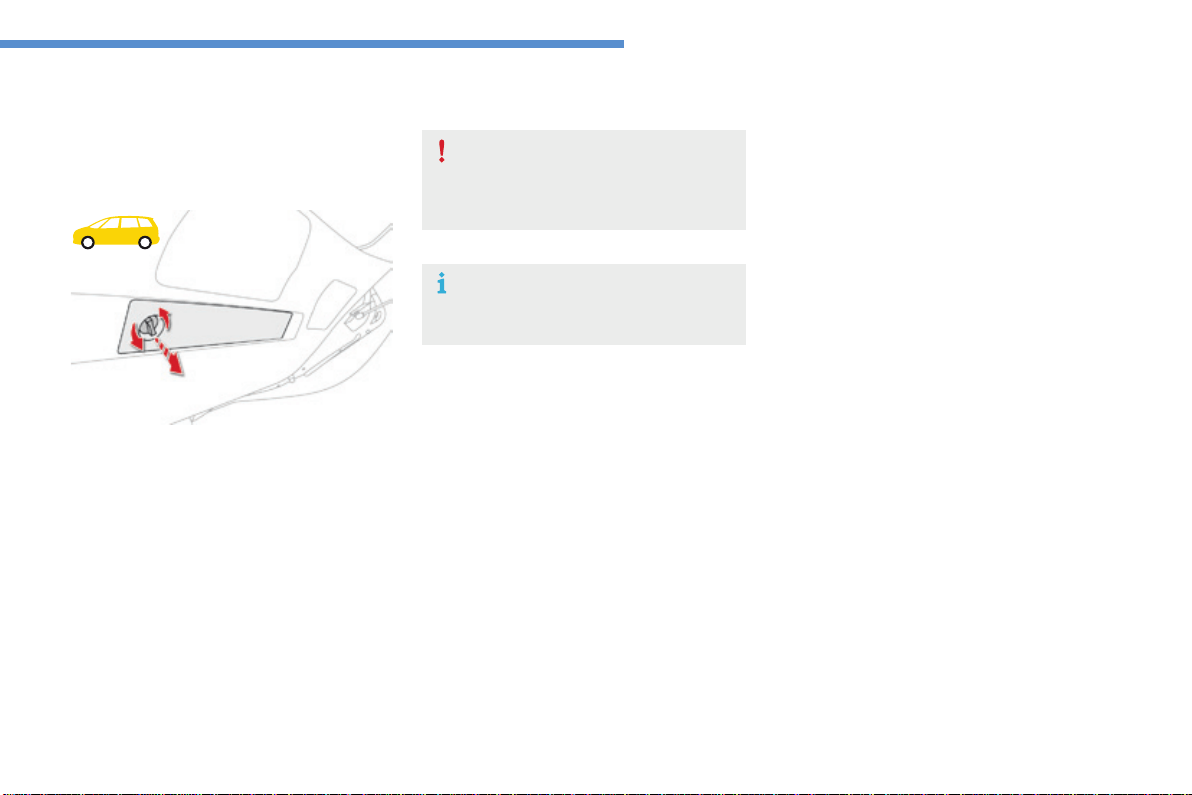
283
8
In the event of a breakdown
C4-Picasso-II_en_Chap08_en-cas-panne_ed01-2016
Warningtriangle
This safety device should be used in addition to
thehazardwarninglamps.
Itspresenceinthevehicleismandatory.
Alocationforstowingthewarningtriangleis
providedinthetailgateinteriortrim.
Placing the triangle in the road
F Placethetrianglebehindthevehicle,as
requiredbythelegislationinforceinyour
country.
Beforeleavingyourvehicletosetup
andinstallthetriangle,switchonthe
hazardwarninglampsandputonyour
highvisibilityvest.
Refer to the instructions provided by the
supplieronfoldingandunfoldingthe
triangle.
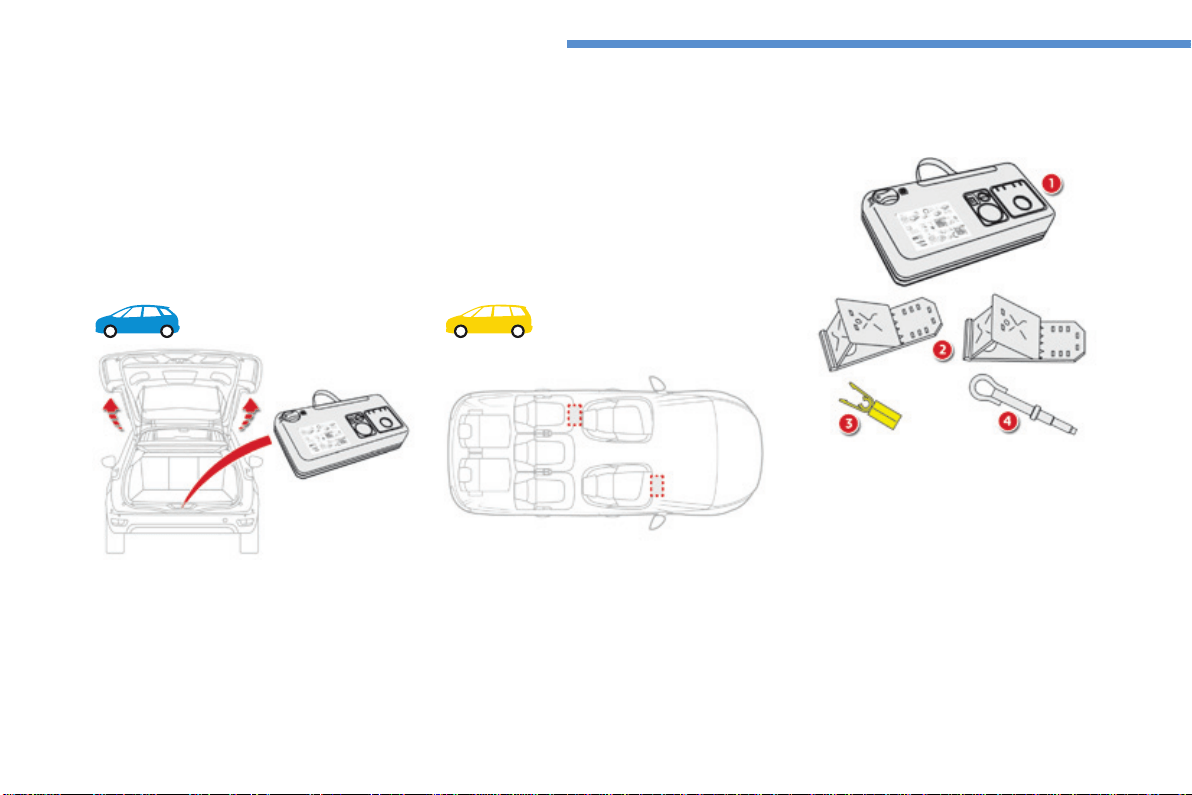
284
In the event of a breakdown
C4-Picasso-II_en_Chap08_en-cas-panne_ed01-2016
Thiskitisinstalledinthestoragebox,underthe
bootfloor.
Thiskitconsistsofacompressorandasealantcartridge.
It allows the temporary repairofatyre.
Youarethenabletogotothenearestgarage.
Itisdesignedtorepairmostpunctureswhichcouldaffectthetyre,locatedonthetyretreador
shoulder.
Itscompressorcanbeusedtocheckandadjustthepressureofthetyre.
Temporarypuncturerepairkit
Access to the kit
Dependingonversion,thekitisstowedunder
thefrontpassenger'sseatorinthestoragebox
underthesecondrowfootwell.
List of tools
*Dependingonequipment.
All of these tools are specific to your vehicle
andcanvaryaccordingtoequipment.Donot
usethemforotherpurposes.
1. 12Vcompressor.
Containsasealantcartridgeforthe
temporary repair of a tyre and can also be
usedforadjustingtyrepressures.
2. Chocks*toimmobilisethewheelsofthe
vehicle.
3. Wheelboltcoverremover*.
Forremovingthewheelboltcoversonalloy
wheels.
4. Removabletowingeye.
For more information on Towing, refer to the
correspondingsection.

285
8
In the event of a breakdown
C4-Picasso-II_en_Chap08_en-cas-panne_ed01-2016
A. "Sealant"or"Air"positionselector.
B. On "I"/off"O"switch.
C. Deflationbutton.
D. Pressuregauge(inbarsandpsi).
E. Compartmenthousingacablewithan
adaptorfora12Vsocket.
Description of the kit
ThespeedlimitstickerImustbeaffixed
tothevehicle'ssteeringwheeltoremind
youthatawheelisintemporaryuse.
Donotexceedaspeedof50mph
(80km/h)whendrivingwithatyre
repairedusingthistypeofkit.
F. Sealantcartridge.
G. Whitepipewithcapforrepair.
H. Blackpipeforinflation.
I. Speedlimitsticker.
Thetyreinflationpressuresaregivenonthis
label.
Thevehicle'selectricsystemallowsthe
connectionofthecompressorforlong
enoughtoinflateatyreafterapuncture
repair.
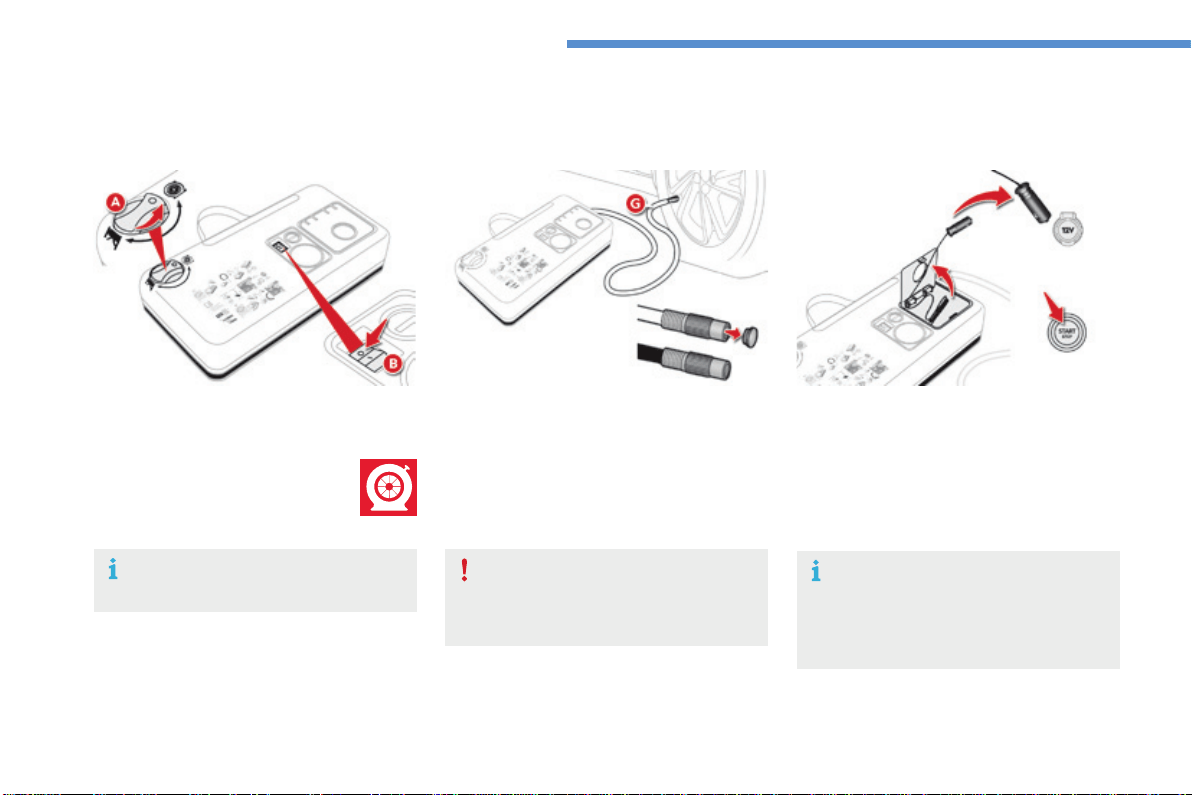
286
In the event of a breakdown
C4-Picasso-II_en_Chap08_en-cas-panne_ed01-2016
1. Sealing
Repair procedure
Avoidremovinganyforeignbodies
whichhavepenetratedintothetyre.
F Uncoil the white pipe Gfully.
F Unscrewthecapfromthewhitepipe.
F Connect the white pipe to the valve of the
tyretoberepaired.
F Switchofftheignition.
F Turn the selector A to the "sealant"
position.
F CheckthattheswitchB is in
position "O".
F Connectthecompressor'selectricplugto
thevehicle's12Vsocket.
F Startthevehicleandleavetheengine
running.
Takecare,thisproductisharmfulif
swallowedandcausesirritationtotheeyes.
Keep this product out of the reach of
children.
Do not start the compressor before
connectingthewhitepipetothetyre
valve:thesealantproductwouldbe
expelledthroughthepipe.
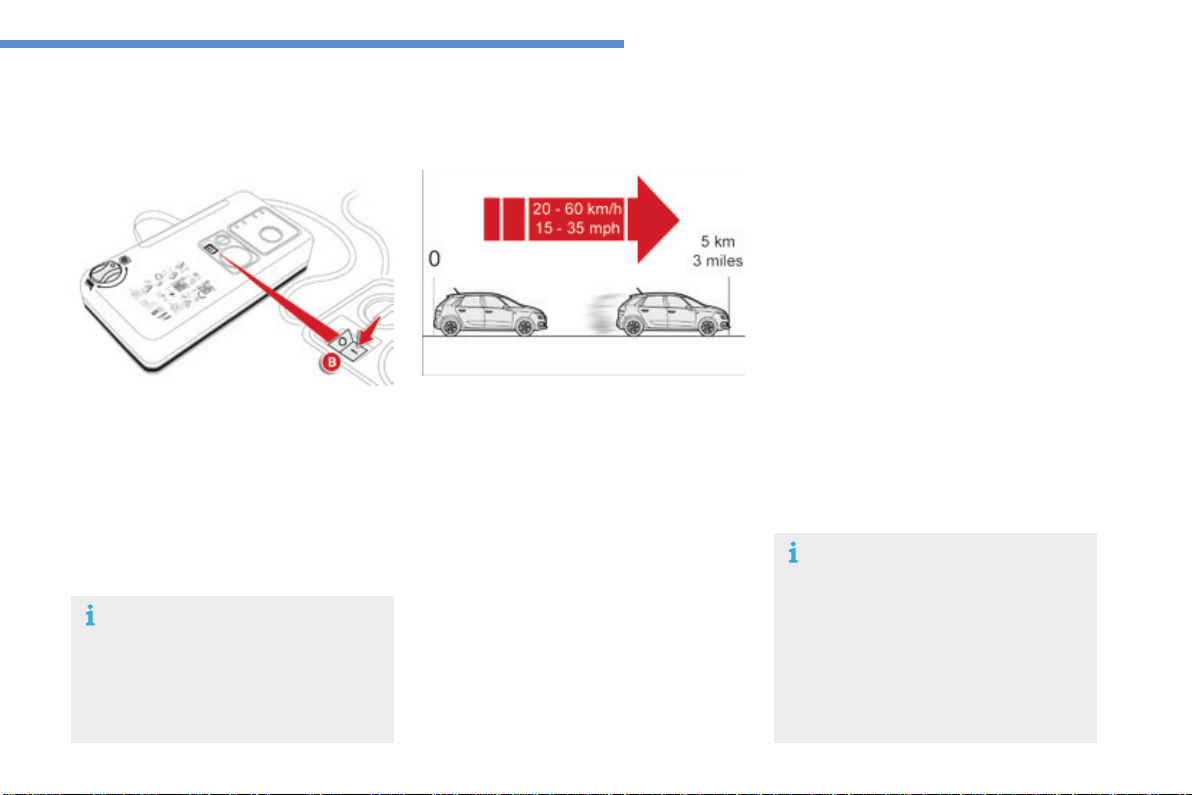
287
8
In the event of a breakdown
C4-Picasso-II_en_Chap08_en-cas-panne_ed01-2016
F Switchonthecompressorbymoving
the switch B to position "I" until the tyre
pressurereaches2.0bars.
Thesealantisinjectedintothetyreunder
pressure;donotdisconnectthepipefrom
thevalveduringthisoperation(riskof
splashing).
If after around 5 to 7 minutes the
pressure is not attained, this indicates
thatthetyreisnotrepairable;contact
a CITROËN dealer or a qualified
workshopforassistance.
F Removethekitandscrewthecapbackon
thewhitepipe.
Takecaretoavoidstainingyourvehicle
withtracesoffluid.Keepthekittohand.
F Driveimmediatelyforapproximately
threemiles(fivekilometres),atreduced
speed(between15and35mph
(20and60km/h)),toplugthepuncture.
F Stoptochecktherepairandthetyre
pressureusingthekit.
Tyre under-ination detection
Afterrepairofthetyre,thewarning
lamp will remain on until the system is
reinitialised.
For more information on Under-
inflation detection, refer to the
correspondingsection.
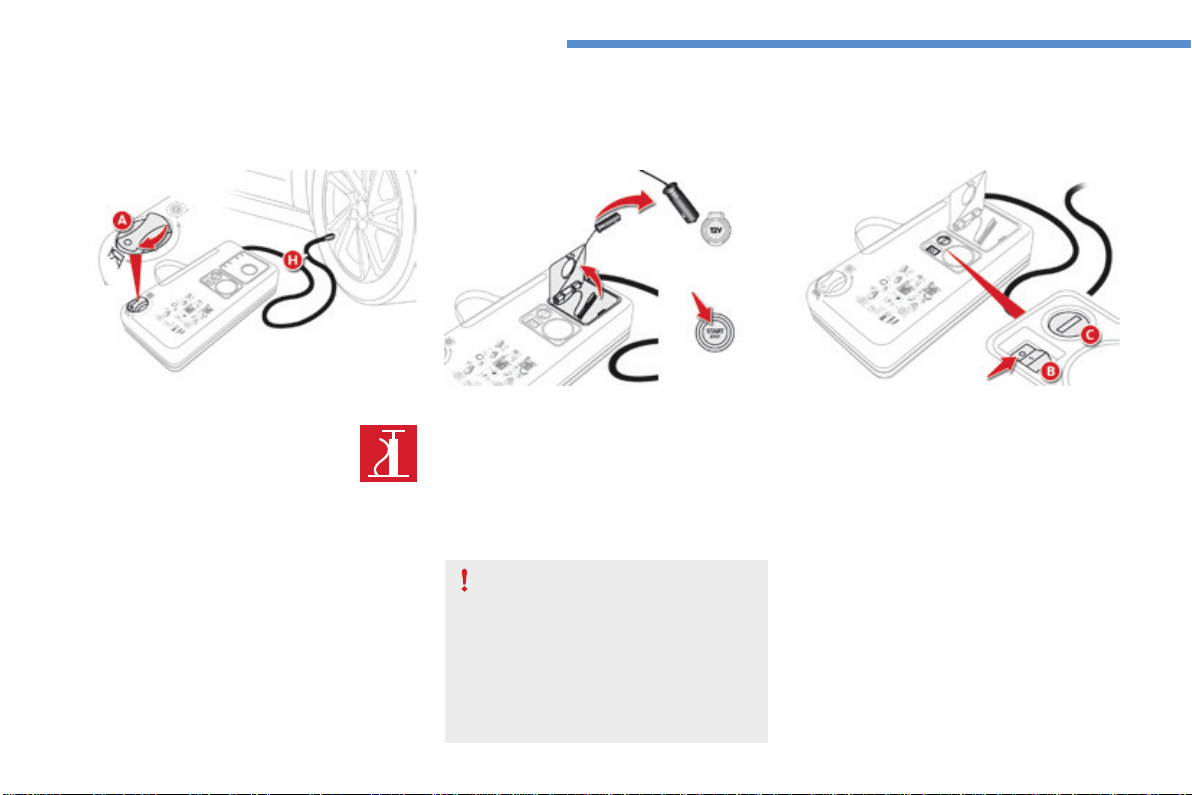
288
In the event of a breakdown
C4-Picasso-II_en_Chap08_en-cas-panne_ed01-2016
2. Ination
F Turn the selector A to the "Air"
position.
F UncoiltheblackpipeHfully.
F Connecttheblackpipetothe
valveofthewheel.
F Connectthecompressor'selectricplugto
thevehicle's12Vsocket.
F Startthevehicleagainandleavethe
enginerunning.
Assoonaspossible,gotoaCITROËN
dealeroraqualifiedworkshop.
You must inform the technician that you
haveusedthiskit.Afterinspection,the
technician will advise you on whether
the tyre can be repaired or if it must be
replaced.
F Adjustthepressureusingthecompressor
(toinflate:switchB in position "I";
todeflate:switchB in position "O" and
press button C), in accordance with the
vehicle'styrepressurelabel(locatedonthe
lefthanddooraperture).
A loss of pressure indicates that the
puncturehasnotbeenfullyplugged;
contact a CITROËN dealer or qualified
workshopforassistance.
F Removeandstowthekit.
F Driveatreducedspeed(50mph[80km/h]
max)limitingthedistancetravelledto
approximately120miles(200km).
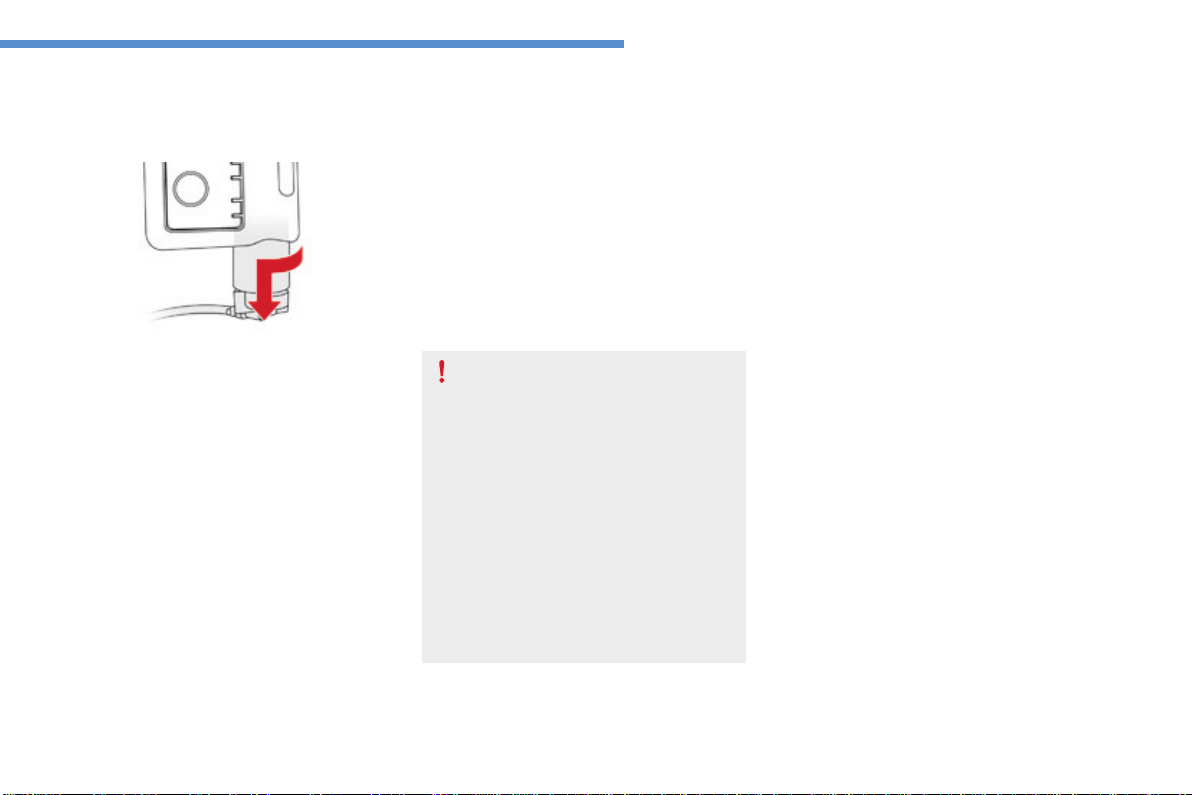
289
8
In the event of a breakdown
C4-Picasso-II_en_Chap08_en-cas-panne_ed01-2016
Removing the cartridge
F Stowtheblackpipe.
F
Detachtheangledbasefromthewhitepipe.
F Supportthecompressorvertically.
F Unscrewthecartridgefromthebottom.
Bewareofdischargesoffluid.
Theexpirydateofthefluidisindicated
onthecartridge.
Thesealantcartridgeisdesignedfor
singleuse;evenifonlypartlyused,it
mustbereplaced.
Afteruse,donotdiscardthecartridge
intotheenvironment,takeittoan
authorised waste disposal site or a
CITROËNdealer.
Donotforgettoobtainanewsealant
cartridge,availablefromCITROËN
dealersorfromaqualifiedworkshop.
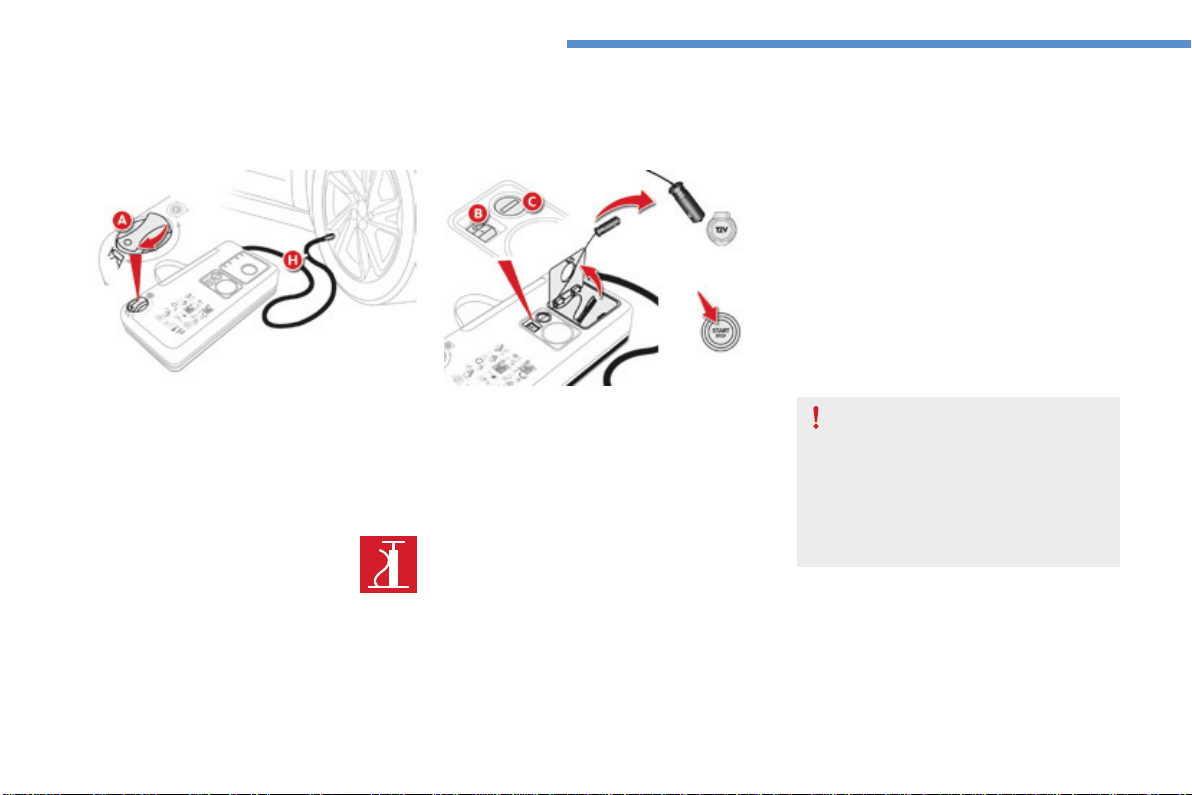
290
In the event of a breakdown
C4-Picasso-II_en_Chap08_en-cas-panne_ed01-2016
Checking /adjusting tyre pressures
You can also use the compressor without
injectinganyproduct,tocheckandifnecessary
adjustyourtyrepressures.
F Turn the selector A to the "Air"
position.
F UncoiltheblackpipeHfully.
F Connecttheblackpipetothe
tyrevalve.
F Connectthecompressor'selectrical
connectortothevehicle's12Vsocket.
F Startthevehicleandlettheenginerun.
F Adjustthepressureusingthecompressor
(toinflate:switchB in position "I";
todeflate:switchB in position "O" and
press button C),accordingtothevehicle's
tyrepressurelabel.
F Removethekitthenstowit.
Should the pressure of one or more
tyresbeadjusted,itisnecessaryto
reinitialise the under-inflation detection
system.
For more information on Under-
inflation detection, refer to the
correspondingsection.
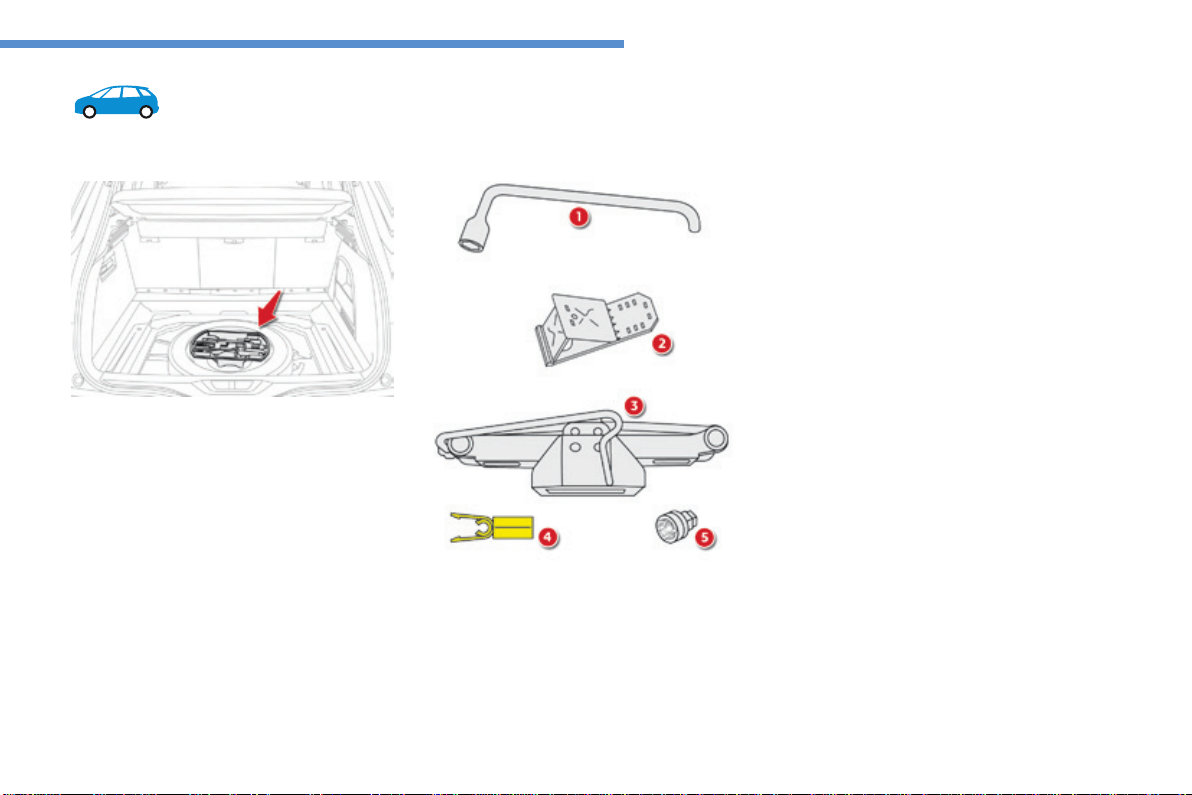
291
8
In the event of a breakdown
C4-Picasso-II_en_Chap08_en-cas-panne_ed01-2016
Spare wheel
The tools are installed in the boot under the
floor.
Removethebootcarpetforaccesstothem.
Access to the tools
List of tools*
Procedureforchangingawheelwithapuncturedtyreforthesparewheelusingthetoolsprovidedwiththevehicle.
All of these tools are specific to your
vehicleandcanvaryaccordingtothelevel
ofequipment.Donotusethemforother
purposes.
1. Wheelbrace.
Forremovingthewheeltrimandremoving
thewheelbolts.
2. Chockforimmobilisingthevehicle(except
versionswithmanualgearbox).
3. Jackwithintegralhandle.
Forraisingthevehicle.
4. Wheelboltcoverremover.
Forremovingthewheelboltcoversonalloy
wheels.
5. Socketforthesecuritybolts(locatedinthe
glovebox).
Foradaptingthewheelbracetothespecial
"security"bolts.
*Accordingtoequipment.
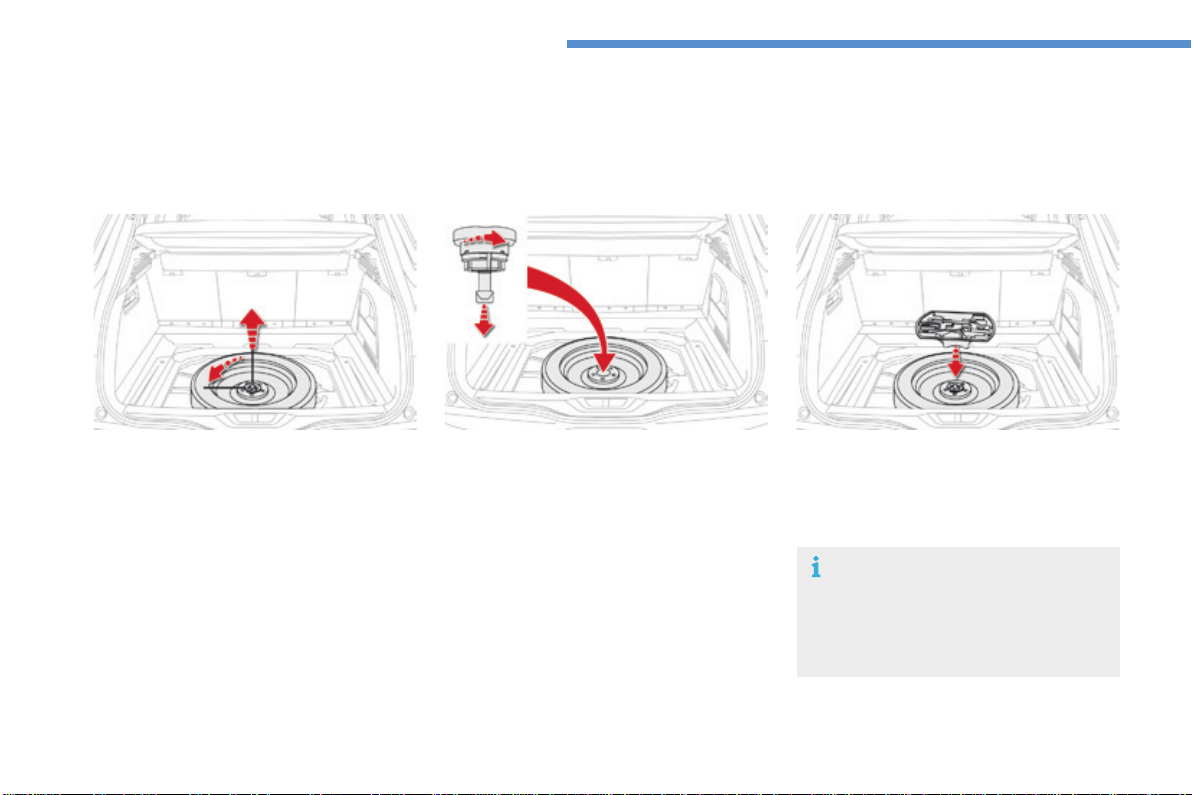
292
In the event of a breakdown
C4-Picasso-II_en_Chap08_en-cas-panne_ed01-2016
Taking out the wheel
F Unscrewthecentralnut.
F Removethefixing(nutandscrew).
F Lift the spare wheel towards you from the
rear.
F Removethewheelfromtheboot.
As the spare wheel is narrower than the
wheels on the vehicle, in the event of a
puncture, the punctured wheel must be
carriedintheboot.
Thesparewheelislocatedinthebootunderthefloor.
Access to the spare wheel
Putting the spare wheel back in
place
F Returnthewheeltoitshousing.
F Unscrewthenutafewturnsonthescrew.
F Positionthefixing(nutandscrew)inthe
middleofthewheel.
F Fullytightenthecentralnuttosecurethe
wheelcorrectly.
F Returntheboxtoitspositioninthemiddle
ofthewheel.
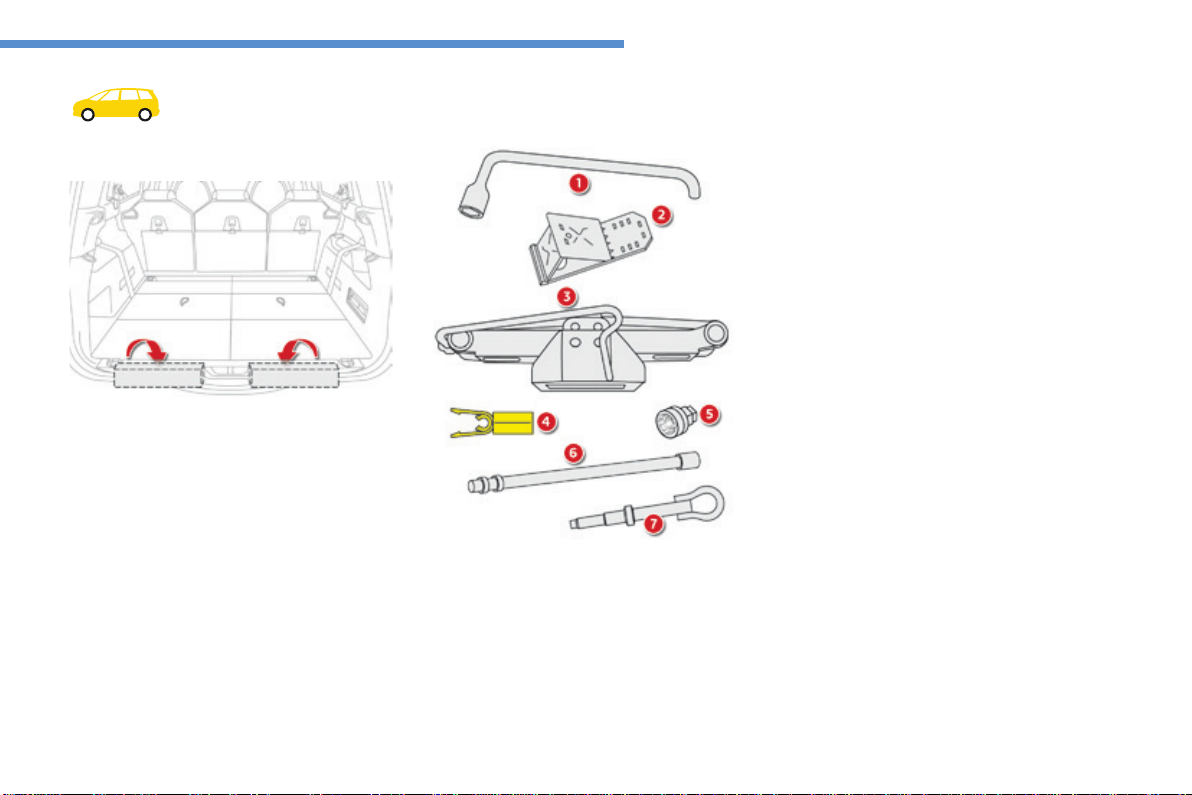
293
8
In the event of a breakdown
C4-Picasso-II_en_Chap08_en-cas-panne_ed01-2016
Spare wheel
Procedureforchangingawheelwithapuncturedtyreforthesparewheelusingthetoolsprovidedwiththevehicle.
Some of the tools are accessible from inside
theboot.
Thewheelchock2 as well as the wheelbrace
extension6arestowedundertherighthand
bootsilltrim.
The wheelbrace 1andthetowingeye7 are
stowedunderthelefthandbootsill.
Access to the tools*
2. Wheelchockforimmobilisingthevehicle
(exceptversionswithmanualgearbox).
3. Jackwithintegralhandle.
Forraisingthevehicle.
4. Wheelboltcoverremover.
Forremovingthewheelboltcoversonalloy
wheels.
5. Socketforthesecuritybolts(stowedinthe
glovebox).
Foradaptingthewheelbracetothespecial
securitybolts.
6. Wheelbraceextension.
Forlowering/raisingthesparewheel
carrier.
7. Towingeye.
Wheel with trim
When removing the wheel, detach the trim
firstusingthewheelbrace1pullingatthevalve
passagehole.
When refitting the wheel, refit the trim
startingbyplacingitsnotchfacingthevalve
andpressarounditsedgewiththepalmofyour
hand.
List of tools*
All of these tools are specific to your vehicle
andcanvaryaccordingtoequipment.Donot
usethemforotherpurposes.
1. Wheelbrace.
Forremovingthewheeltrimandthewheel
fixingbolts.
*Dependingonversion.Acompletesetoftools
isprovidedwiththesparewheel.
Theothertools,thejack3 and the tool for
removingthewheelboltcoversonalloy
wheels 4,arestowedinaboxattachedtothe
sparewheel.
The assembly is secured under the vehicle in
acarrier.
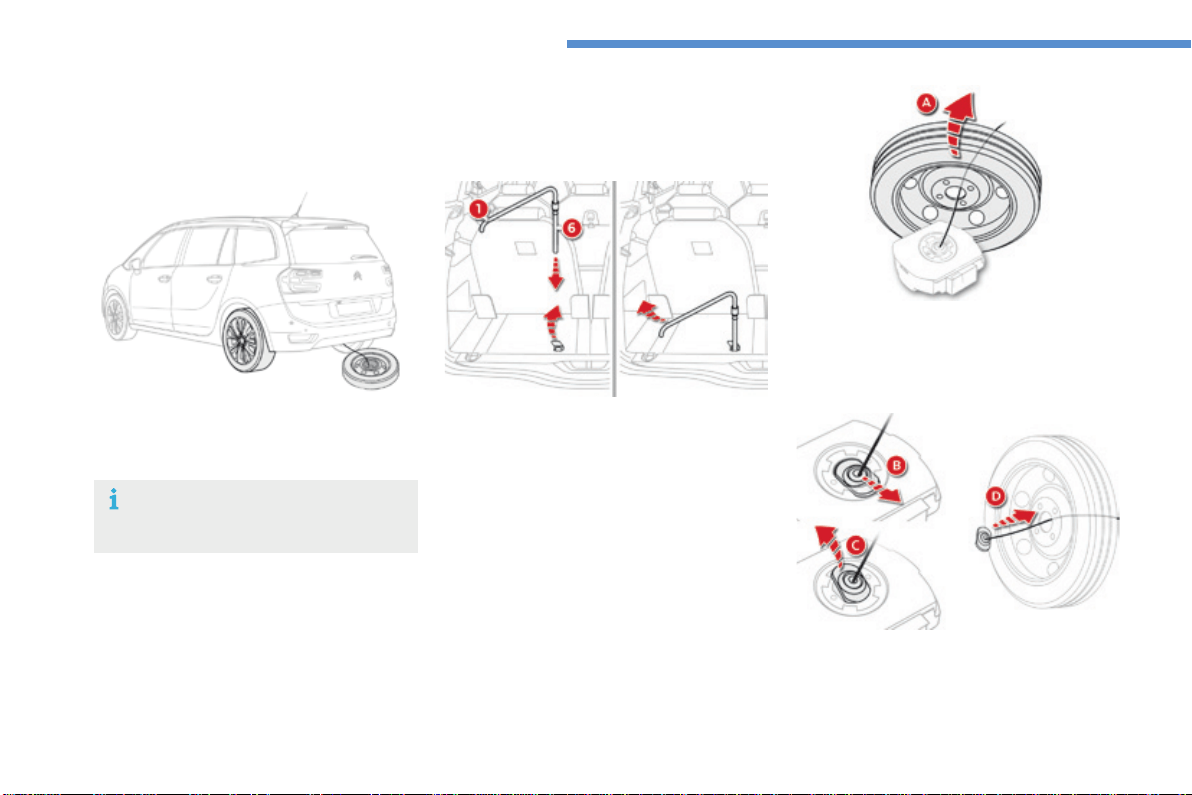
294
In the event of a breakdown
C4-Picasso-II_en_Chap08_en-cas-panne_ed01-2016
Taking out the spare wheel
The spare wheel is supported by a carrier
underneaththevehicle.
Access to the spare wheel*
F Takeoutthewheel/toolboxassembly
fromtherearofthevehicle.
F Straightenthesparewheelforaccessto
the tools (A).
F Fold the concertina board and put the left
hand third row seat into position (if your
vehiclehasthem).
F Raise the pre-cut section of carpet to
exposethenutforoperatingthespare
wheelcarrier.
F Usingtheextension6 fitted to the end of
the wheelbrace 1,turnthenutclockwise
to unwind the carrier cable until the spare
wheelreachestheground.Unwindthe
lengthneededforaccesstothewheel.
Only a "space-saver" type of spare
wheelcanbefittedunderthevehicle.
*Dependingonversion.
F Detachthelinkpiecefromthetool
boxlid(B - C).
F Passthelinkpiecethroughthemiddleof
the wheel to free it (D).
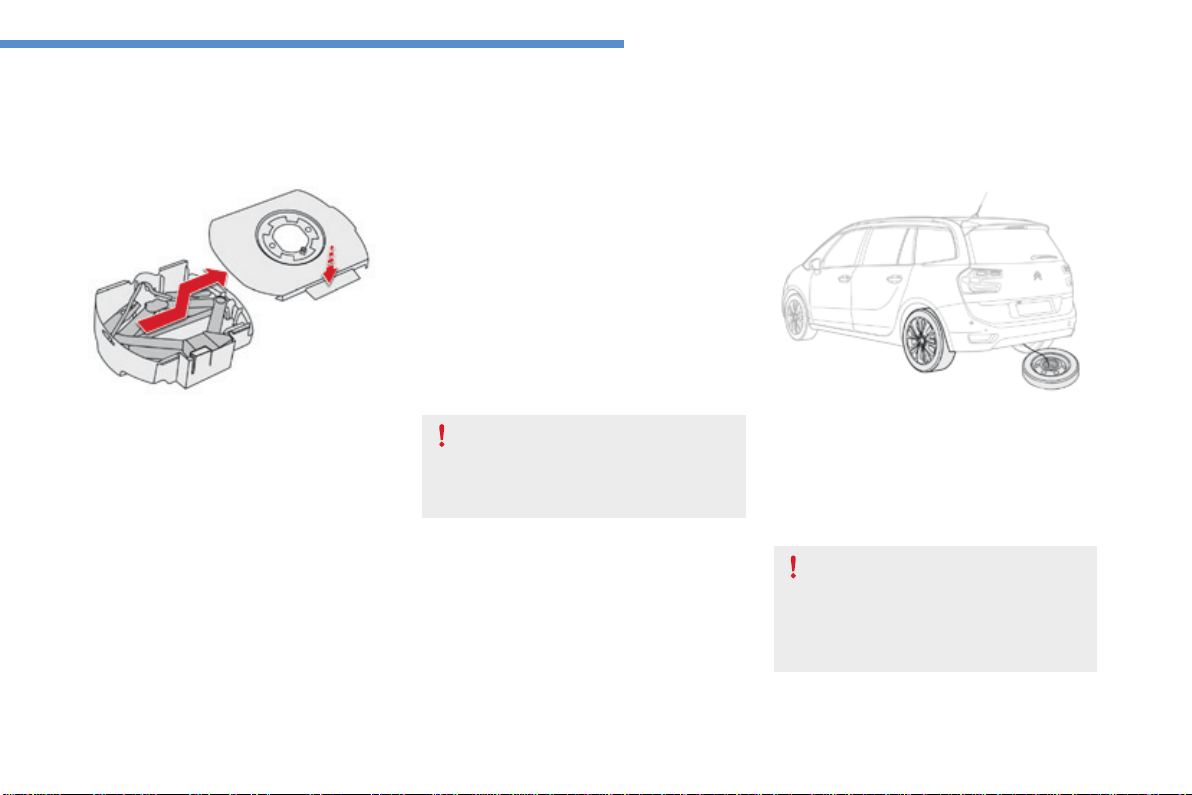
295
8
In the event of a breakdown
C4-Picasso-II_en_Chap08_en-cas-panne_ed01-2016
A punctured wheel from the vehicle
cannotbefittedunderthevehicle.It
mustbecarriedintheboot.Useacover
toprotecttheboot.
F Pressthetongue,slidethetoolboxcover
to the centre and remove it for access to
theothertools(jackandwheelboltcover
removerforalloywheels).
Putting the carrier and spare
wheel back in place
F Stowthecorrespondingtoolsinthebox
andclosethecover.
F Positionthetoolboxontheground.
Stowing the tools
F Returnthetoolstotheboxandstowthe
boxinthevehicle'sboot.
F Windinthecarrierbyturningthe
wheelbraceclockwise:oncethecableis
fullywoundinyoushouldnolongerfeel
anyresistance.
F Stow the other tools in the locations
providedintheboot.
When the spare wheel is fitted in place
of a punctured wheel, it is essential
to return the carrier and tools to their
normal position under the vehicle
beforemovingoff.

296
In the event of a breakdown
C4-Picasso-II_en_Chap08_en-cas-panne_ed01-2016
F Insertthelinkpieceintheapertureinthe
toolbox(B - C).
F Insertthecentreguideintothemiddleof
thewheel.
F Placethewheel/toolboxassemblyunder
therearofthevehicle.
F Centre and position the spare wheel on the
toolbox(D).
F Raisethewheel/toolboxassembly
underneaththevehiclebyturningthe
carrierdrivenutanticlockwiseusingthe
wheelbraceandtheextension.
F Tightenfully.Whenthecableisfullywound
in,rotationofthenutnolongerpresents
anyresistance.
F Checkthatthewheelishorizontallyflat
againstthefloor.
F Straightenthewheel.
F Passthelinkpiecethroughthemiddleof
the wheel (A).
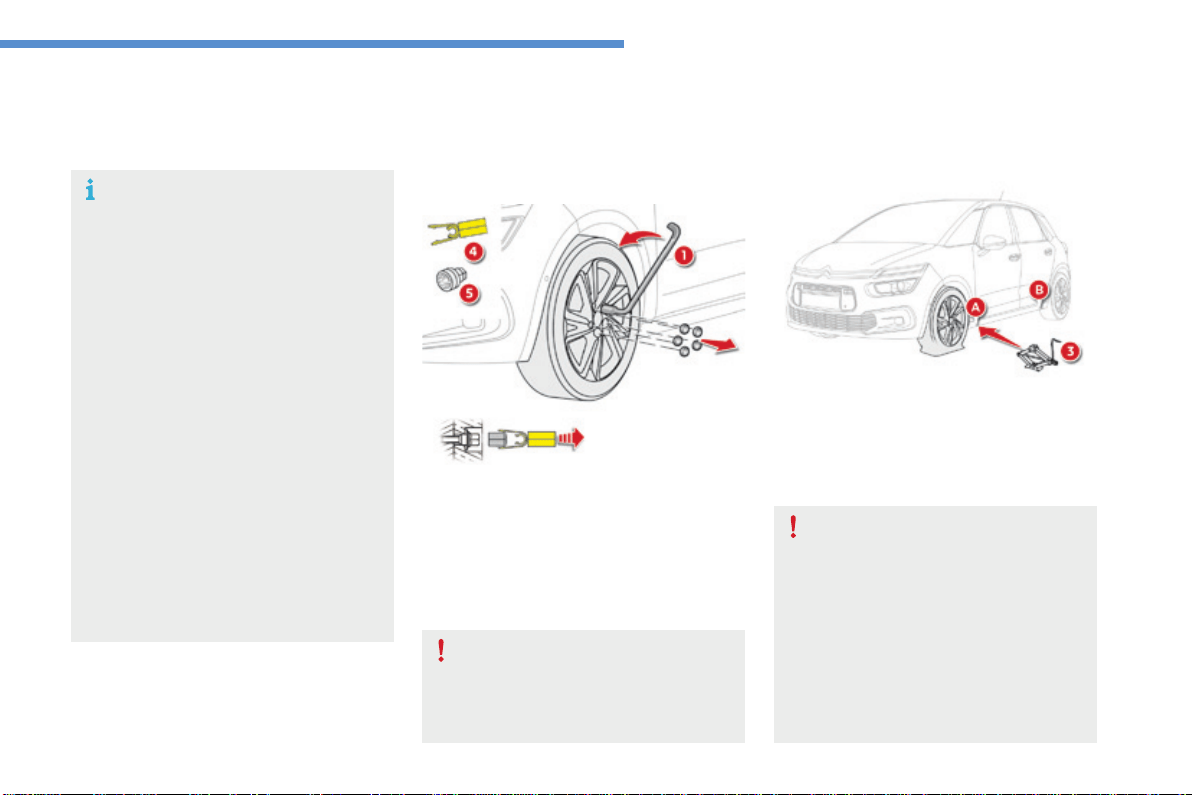
297
8
In the event of a breakdown
C4-Picasso-II_en_Chap08_en-cas-panne_ed01-2016
Removing a wheel
Parking the vehicle
Immobilise the vehicle where it does not
blocktraffic:thegroundmustbelevel,
stableandnotslippery.
Applytheparkingbrakeunlessithas
beenprogrammedtoautomaticmode,
switchofftheignitionandengagefirst
gear*toblockthewheels.
Checkthatthebrakingwarninglamp
and the Pwarninglampintheparking
brakecontrollevercomeon.
Forgreatersafety,placethechock2
againstthewheeloppositetotheone
beingchanged.
Theoccupantsmustgetoutofthe
vehicleandwaitwheretheyaresafe.
Nevergounderneathavehicle
supportedbyajack;useanaxlestand.
List of operations
F Removethewheelboltcover(s)usingthe
tool 4(dependingonequipment).
F Fitthesecuritysocket5 on the
wheelbrace 1toslackenthesecuritybolt
(iffitted).
F Slackentheotherbolts(nomorethana
1/4turn)usingthewheelbrace1only.
* Position Pforanautomaticgearbox.
Donotuse:
- thejackforanypurposeotherthan
liftingthevehicle,
- anyotherjackthantheone
suppliedbythemanufacturer.
F Placethefootofthejack3ontheground
andcheckthatitisdirectlybelowthe
front A or rear Bjackingpointprovidedon
the underbody, whichever is closest to the
wheeltobechanged.
Ensurethatthejackisstable.Ifthe
groundisslipperyorloose,thejack
mayslipordrop-Riskofinjury!
Ensurethatthejackispositionedonly
atoneofthejackingpointsA or B
underthevehicle,makingsurethatthe
vehicle'scontactsurfaceiscentredon
theheadofthejack.Otherwisethereis
ariskofdamagetothevehicleand/orof
thejackdropping-Riskofinjury!
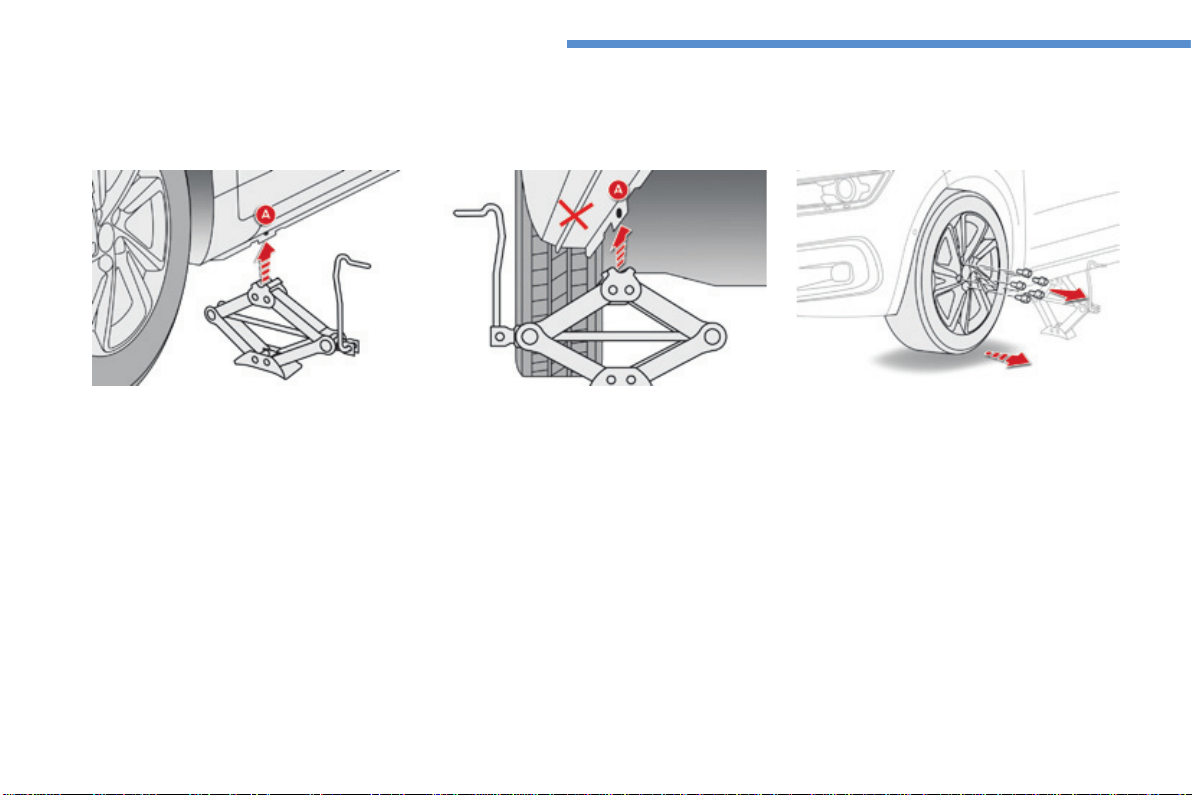
298
In the event of a breakdown
C4-Picasso-II_en_Chap08_en-cas-panne_ed01-2016
F Extendthejack3untilitsheadcomesintocontactwiththejackingpointA or Bused;the
vehicle'scontactsurfaceA or Bmustengagewiththecentralpartoftheheadofthejack
F Raisethevehicleuntilthereissufficientspacebetweenthewheelandthegroundtoadmitthe
spare(notpunctured)wheeleasily.
F Remove the bolts and store them in a clean
place.
F Removethewheel.
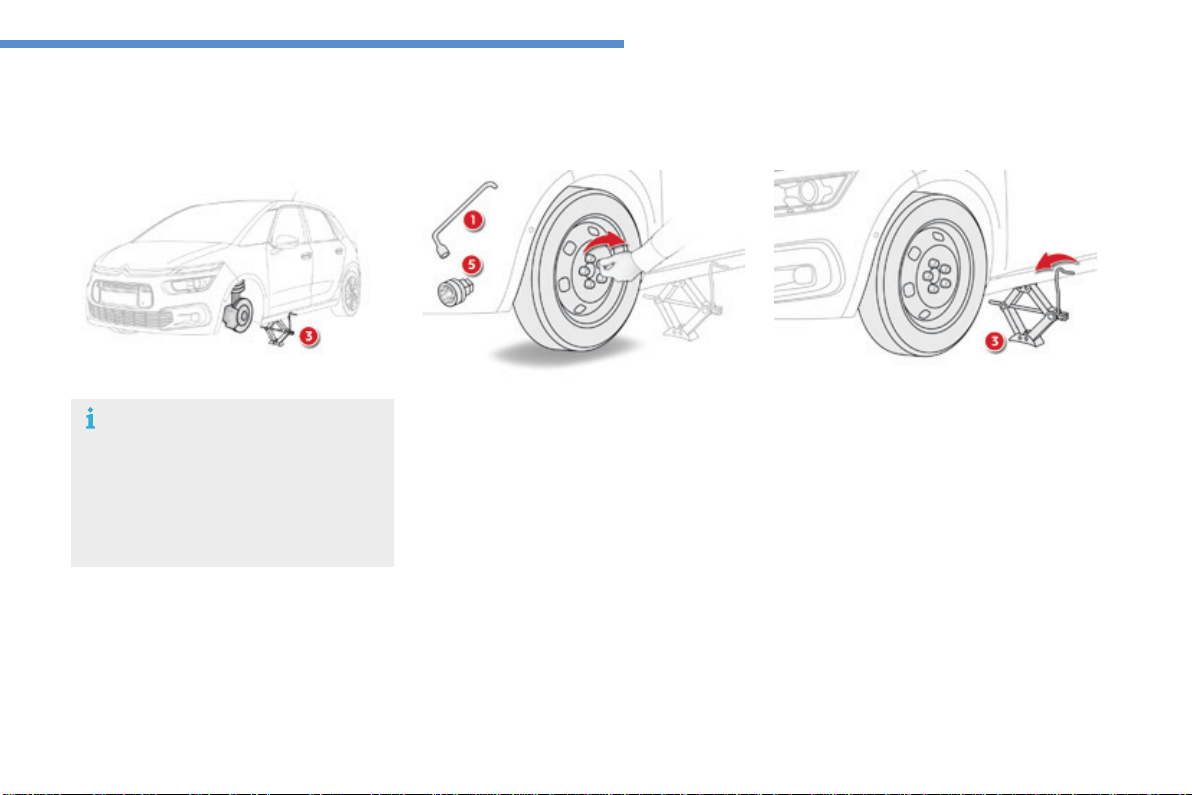
299
8
In the event of a breakdown
C4-Picasso-II_en_Chap08_en-cas-panne_ed01-2016
Fitting a wheel
F Lowerthevehiclefully.
F Foldthejack3anddetachit.
List of operations
F Putthewheelinplaceonthehub.
F Screwintheboltsfullybyhand.
F Pre-tightenthesecurityboltusingthe
wheelbrace 1 fitted with the security
socket5(dependingonequipment).
F Pre-tightentheotherboltsusingthe
wheelbrace 1only.
Thejackmustonlybeusedtochangea
wheelwithadamagedtyre.
Thejackdoesnotrequireany
maintenance.
ThejackconformstoEuropean
legislation,suchasdefinedinthe
MachineryDirective2006/42/CE.
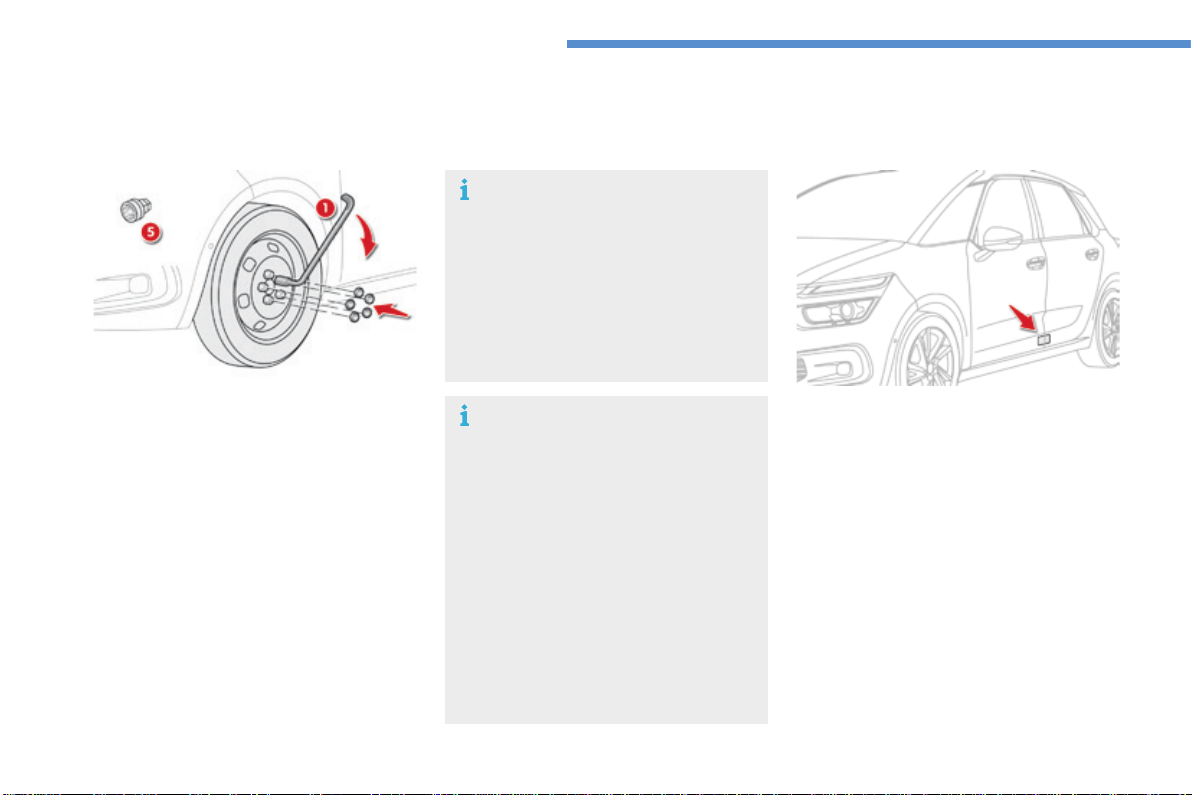
300
In the event of a breakdown
C4-Picasso-II_en_Chap08_en-cas-panne_ed01-2016
Fitting the "space-saver"
spare wheel
If your vehicle is fitted with alloy wheels,
whentighteningtheboltsonfitting,it
is normal to notice that the washers
do not come into contact with the
"space-saver"sparewheel.Thewheel
is secured by the conical surface of
eachbolt.
After changing a wheel
To correctly store the punctured wheel
in the boot (not in the location for the
space-saver wheel), first remove the
centralcover.
Whenusingthe"space-saver"type
sparewheel,donotexceed50mph
(80km/h).
Havethetighteningoftheboltsandthe
pressureofthesparewheelchecked
by a CITROËN dealer or a qualified
workshopwithoutdelay.
Have the punctured wheel repaired
and refitted to the vehicle as soon as
possible.
F Tightenthesecurityboltusingthe
wheelbrace 1 fitted with the security
socket5(dependingonequipment).
F Tightentheotherboltsusingthe
wheelbrace 1only.
F Refitthewheelboltcover(s)(dependingon
equipment).
F Stowthetoolsinthebox.
Thetyreinflationpressuresaregivenonthis
label.
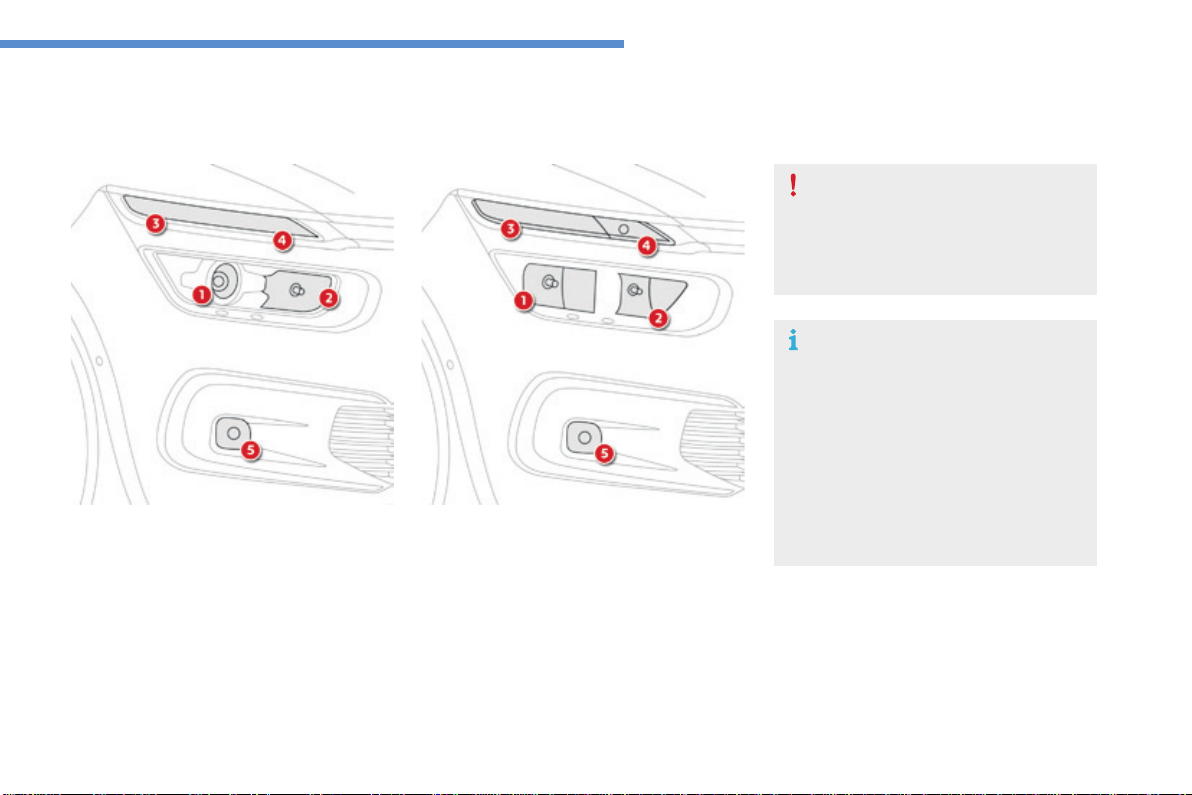
301
8
In the event of a breakdown
C4-Picasso-II_en_Chap08_en-cas-panne_ed01-2016
Changingabulb
ForH7typebulbswithlugs...takecare
to observe their correct installation
soastoensurethebestlighting
performance.
Risk of electrocution
Xenon bulbs (D5S-25W) must be
replaced by a CITROËN dealer or a
qualifiedworkshop.
Front lamps
Model with xenon headlamps
1. Directional dipped beam headlamps
(D5S-25W).
2. Mainbeamheadlamps(H7-55W).
3. Daytimerunninglamps/sidelamps
(6lightemittingdiodes-LEDs).
4. Direction indicators
(6lightemittngdiodes-LEDs).
5. Frontfoglamps(H11-55W).
Model with halogen headlamps
1. Dippedbeamheadlamps(H7-55W).
2. Mainbeamheadlamps(H7-55W).
3. Daytimerunninglamps/sidelamps
(4lightemittingdiodes-LEDs).
4. Directionindicators(PWY24W).
5. Foglamps(H11-55W).
Insomeweatherconditions(e.g.low
temperature or humidity), the presence
ofmistingontheinternalsurfaceofthe
glassoftheheadlampsandrearlamps
isnormal;itdisappearsafterthelamps
havebeenonforafewminutes.
Light-emitting diodes - LEDs
For replacement, contact a CITROËN dealer or
qualifiedworkshop.
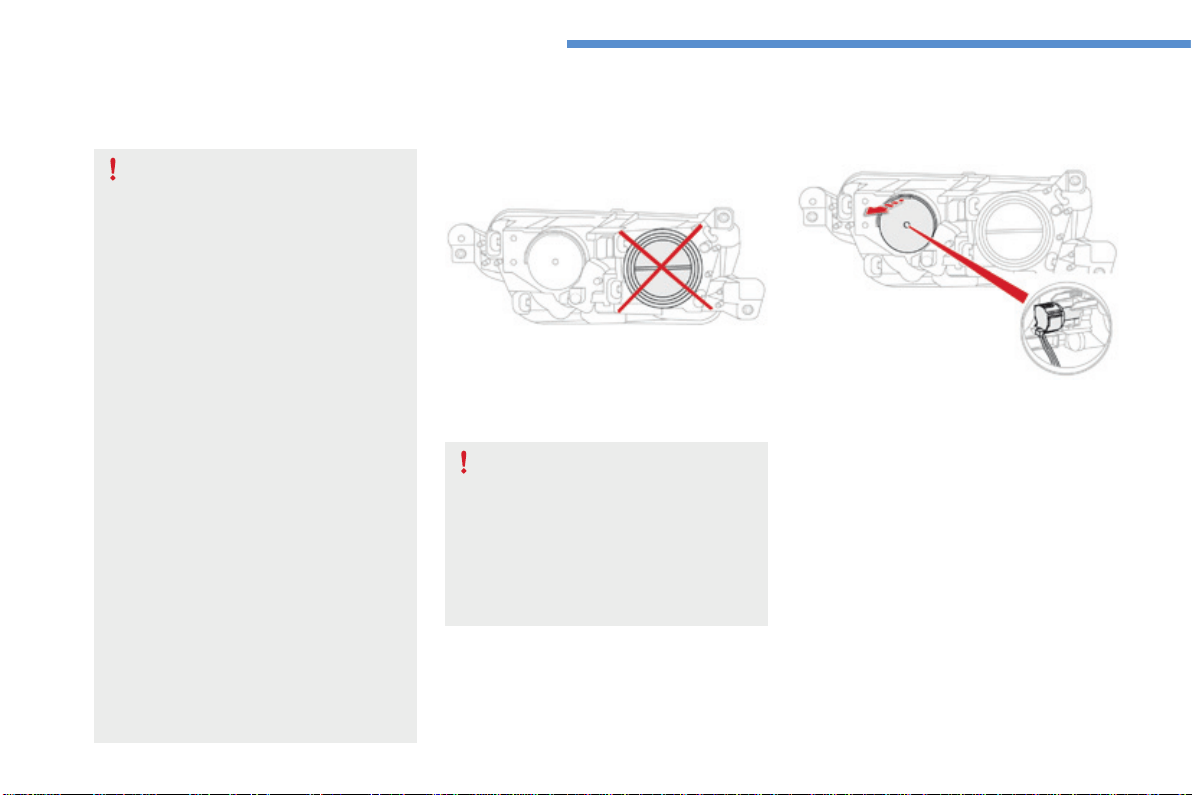
302
In the event of a breakdown
C4-Picasso-II_en_Chap08_en-cas-panne_ed01-2016
Directional dipped beam
headlamps (xenon model)
Main beam headlamps (xenon model)
F Remove the protective plastic cover by
pullingthetab.
F Pushtheconnector.
F Removethebulbandchangeit.
For reassembly, carry out these operations in
reverseorder.
D5Sxenonbulbsmustbechanged
by a CITROËN dealer or a qualified
workshop,asthereisariskof
electrocution.
In the event of failure of one
of the D5S bulbs, it is recommended
that the bulb on the other side be
changedatthesametime.
The headlamps have polycarbonate
lenseswithaprotectivecoating:
F do not clean them using a dry
or abrasive cloth, nor with a
detergent or solvent product,
F useaspongeandsoapywaterora
pH neutral product,
F whenusingahighpressurewasher
onpersistentmarks,donotkeep
the lance directed towards the
lampsortheiredgesfortoolong,
soasnottodamagetheirprotective
coatingandseals.
Changingabulbshouldonlybedone
after the headlamp has been switched
offforseveralminutes(riskofserious
burns).
F Do not touch the bulb directly with
yourfingers,usealint-freecloth.
It is imperative to use only anti-
ultraviolet (UV) type bulbs to avoid
damagingtheheadlamp.
Always replace a failed bulb with a
new bulb with the same type and
specification.

303
8
In the event of a breakdown
C4-Picasso-II_en_Chap08_en-cas-panne_ed01-2016
Dipped beam headlamps
(halogen model)
F Remove the protective plastic cover by
pullingthetab.
F Pushtheconnector.
F Removethebulbandchangeit.
For reassembly, carry out these operations in
reverseorder.
Main beam headlamps
(halogen model)
F Turn the protective plastic cover to
removeit.
F Disconnecttheconnector.
F Releasetheclips.
F Removethebulbandchangeit.
For reassembly, carry out these operations in
reverseorder.
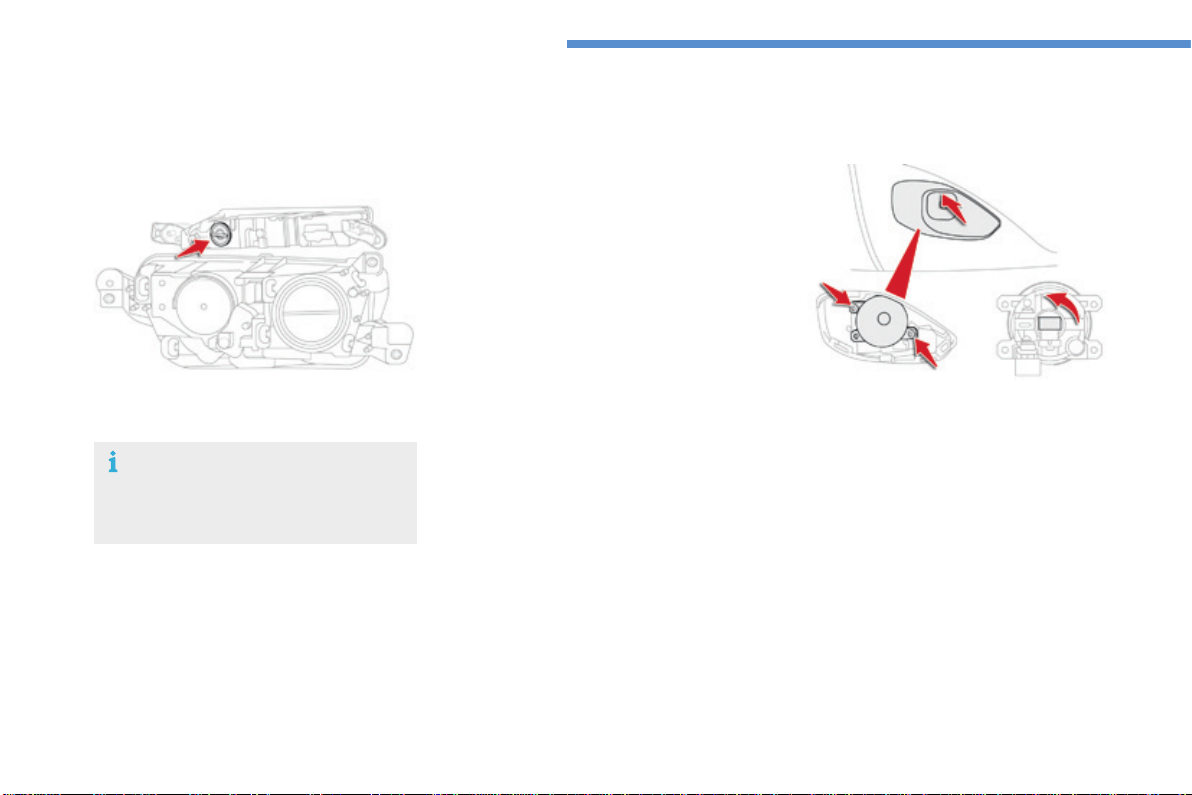
304
In the event of a breakdown
C4-Picasso-II_en_Chap08_en-cas-panne_ed01-2016
The direction indicator bulb is located below
thefrontlamp.
F Turn the bulb holder a quarter turn anti-
clockwise.
F Removethebulbholder.
F Changethefailedbulb.
For reassembly, carry out these operations in
reverseorder.
Direction indicators Front foglamps
F Unclipthefinisherbypullingatthetop.
F Removethetwoscrewstoremovetheunit.
F Turnthebulbholderaquarterturn.
F Removethebulbholder.
F Changethefailedbulb.
For reassembly, carry out these operations in
reverseorder,pressingonthefinishertorefitit.
Fasterflashingofadirectionindicator
warninglamp(leftorright)indicatesa
failedbulbonthatside.
Direction indicators (light
emitting diodes - LED)
For the replacement of this type of lamp,
contact a CITROËN dealer or a qualified
workshop.
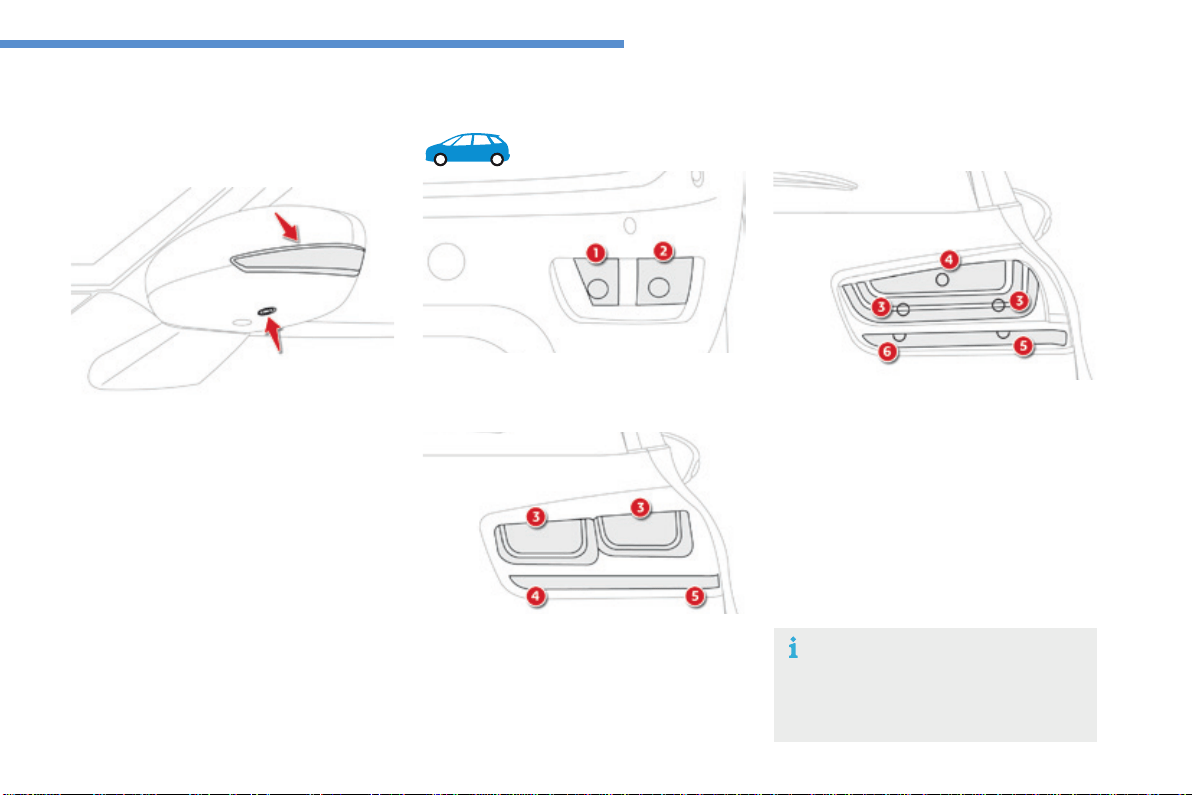
305
8
In the event of a breakdown
C4-Picasso-II_en_Chap08_en-cas-panne_ed01-2016
You should contact a CITROËN dealer or a
qualifiedworkshopforthereplacementofthe
light-emittingdiode-LED.
Door mirror spotlamps
Integrated direction indicator
side repeaters
You should contact a CITROËN dealer or a
qualifiedworkshopforthereplacementofthese
bulbs.
1. Direction indicators (PY21W amber).
2. Sidelamps/foglamps(P21/5W).
Rear lamps
Light-emitting diodes -
LEDs
For replacement, contact a CITROËN
dealerorqualifiedworkshop.
3. Brakelamps/sidelamps(light-emitting
diodes-LEDs).
4. Reversinglamps(W16W).
5. Directionindicators(PY21W).
Model with LED lamps
3. Sidelamps(5W5).
4. Brakelamps(P21/W).
5. Directionindicators(WY16W).
6. Reversinglamps(W16W).
Model with conventional bulb lamps
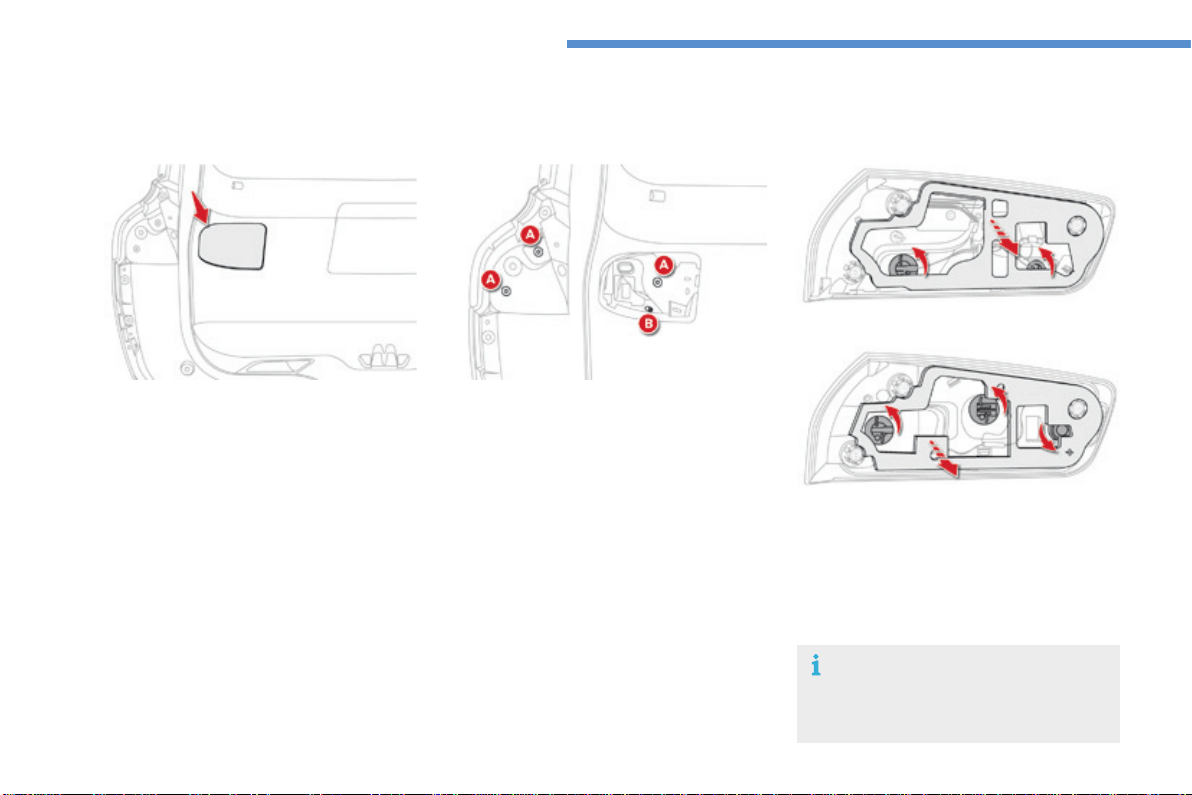
306
In the event of a breakdown
C4-Picasso-II_en_Chap08_en-cas-panne_ed01-2016
Lamps on the tailgate
Contact a CITROËN dealer or a
qualifiedworkshopforthereplacement
ofreversinglampanddirectionindicator
bulbs.
Identifythefailedbulb.
F Opentheboot.
F Removetheaccesscover.
F RemovethethreelampfixingscrewsA.
F Disconnectthelampconnector.
F Carefully remove the lamp from the outside
bypressingtheretainingclipB.
F Turn the bulb holder a quarter of a turn
anti-clockwiseandpullthebulbout.
F Changethebulb.
For reassembly, carry out these operations in
reverseorder.
Model with LED lamps
Model with conventional bulb lamps
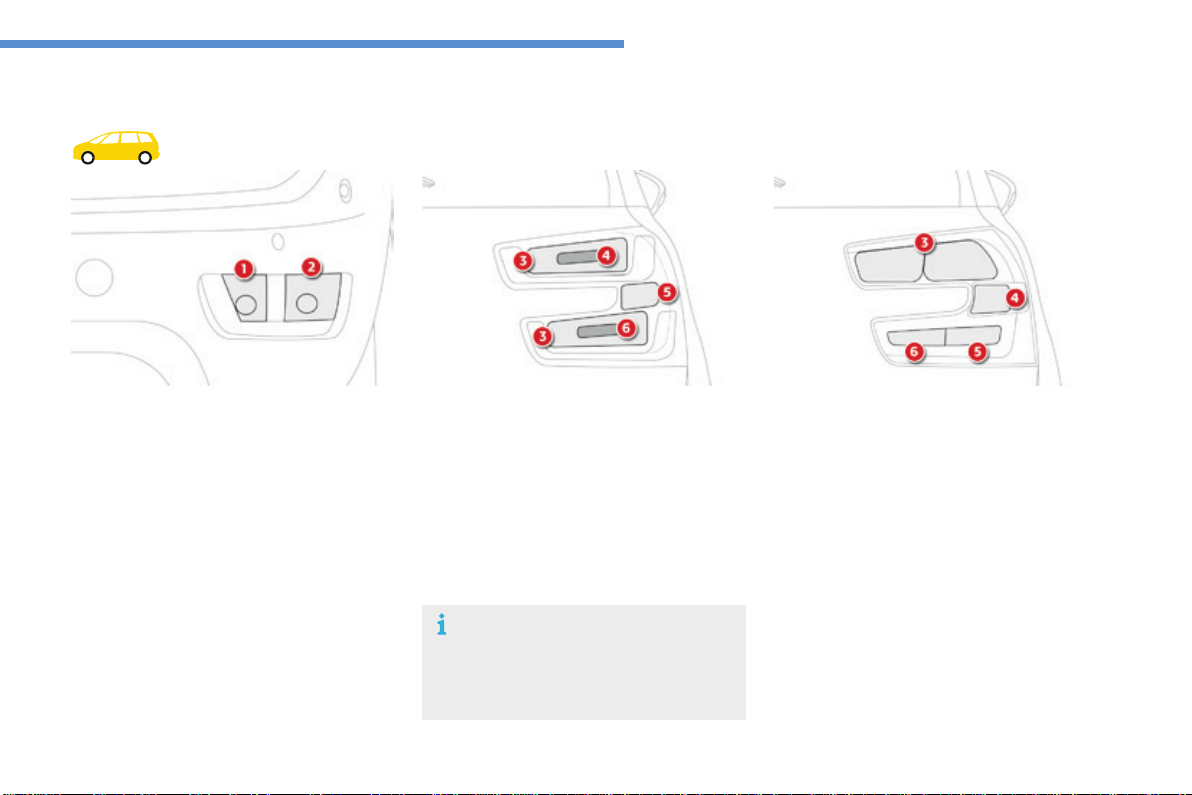
307
8
In the event of a breakdown
C4-Picasso-II_en_Chap08_en-cas-panne_ed01-2016
1. Directionindicators(PY21Wamber).
2. Sidelamps/foglamps(P21/5W).
Rear lamps
3. Sidelamps(light-emittingdiodes-LEDs).
4. Brakelamps(light-emittingdiodes-LEDs).
5. Directionindicators(PY21W).
6. Reversinglamps(light-emittingdiodes-
LEDs).
Model with LED lamps
3. Sidelamps(W5W).
4. Brakelamps/sidelamps(P21W).
5. Directionindicators(WY16W).
6. Reversinglamps(W16W).
Model with conventional bulb lamps
Light-emitting diodes -
LEDs
For replacement, contact a CITROËN
dealerorqualifiedworkshop.
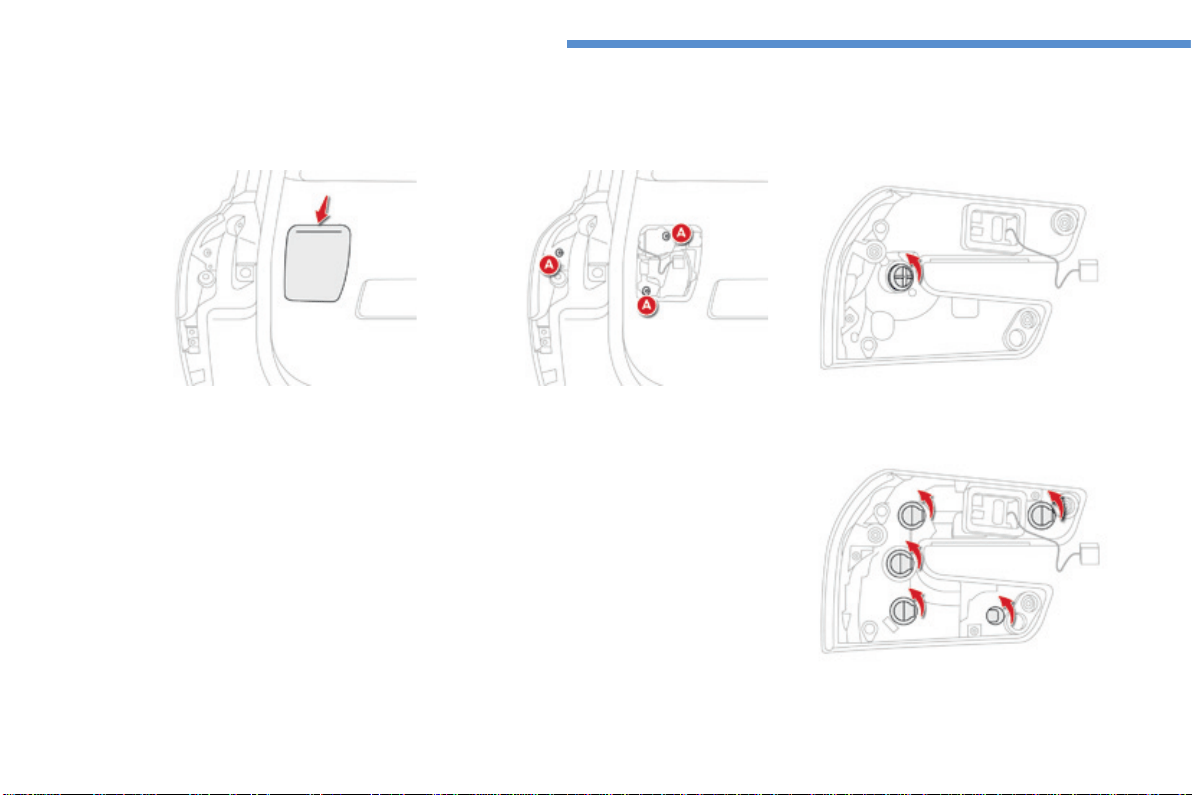
308
In the event of a breakdown
C4-Picasso-II_en_Chap08_en-cas-panne_ed01-2016
Lamps on the tailgate
Model with LED lamps
Model with conventional bulb lamps
Identifythefailedbulb.
F Opentheboot.
F Removetheaccesscover.
F RemovethethreelampfixingscrewsA.
F Disconnectthelampconnector.
F Carefullyremovethelampfromitshousing.
F Turn the bulb holder a quarter of a turn
anti-clockwiseandpullthebulbout.
F Changethebulb.
For reassembly, carry out these operations in
reverseorder.
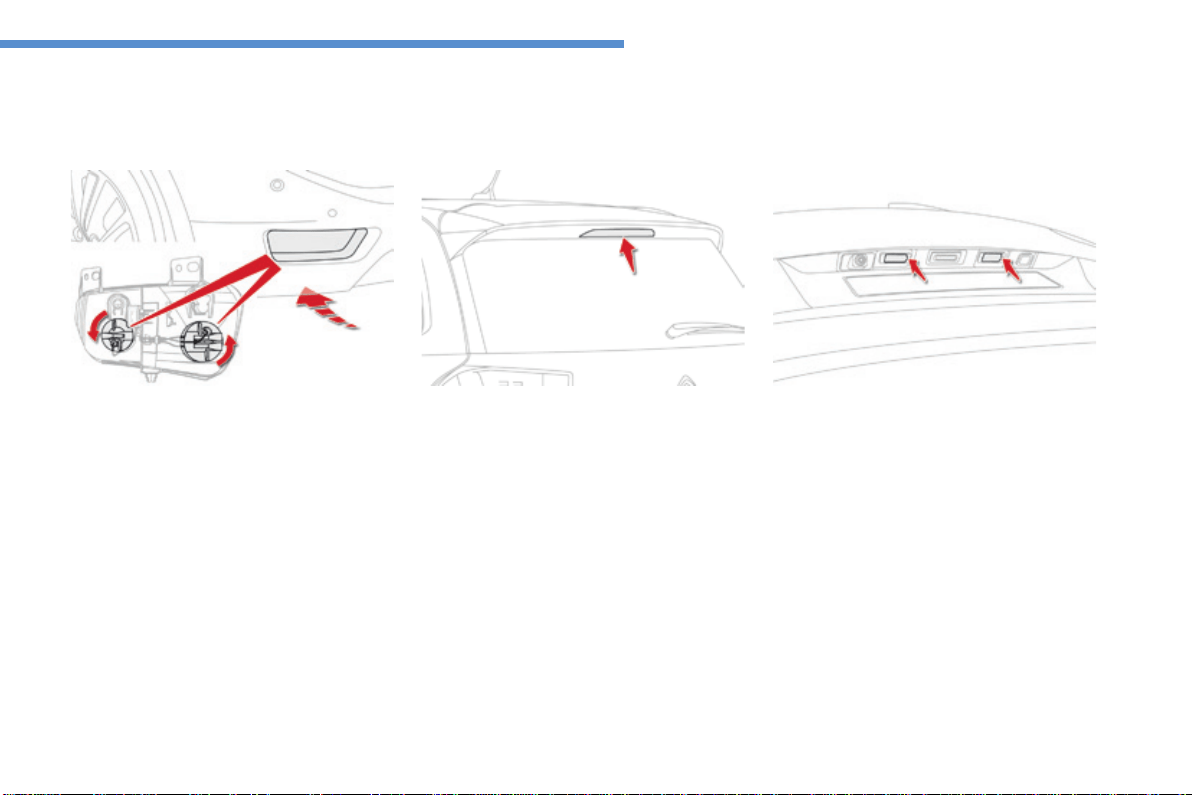
309
8
In the event of a breakdown
C4-Picasso-II_en_Chap08_en-cas-panne_ed01-2016
Direction indicator, sidelamp and
foglamp
Accessisbypassingahandunderthebumper.
F Turn the bulb holder a quarter of a turn and
pullitout.
F Changethebulb.
For reassembly carry out these operations in
reverseorder.
You can also contact a CITROËN dealer or a
qualifiedworkshopforthereplacementofthese
bulbs.
For the replacement of this type of lamp,
contact a CITROËN dealer or a qualified
workshop.
Third brake lamp (light emitting
diodes-LED)
Number plate lamps (W5W)
Torefit,pressonthelenstoclipitinplace.
F Insert a thin screwdriver into one of the cut-
outsinthelens.
F Pushitoutwardstounclipit.
F Removethelens.
F Changethefaultybulb.
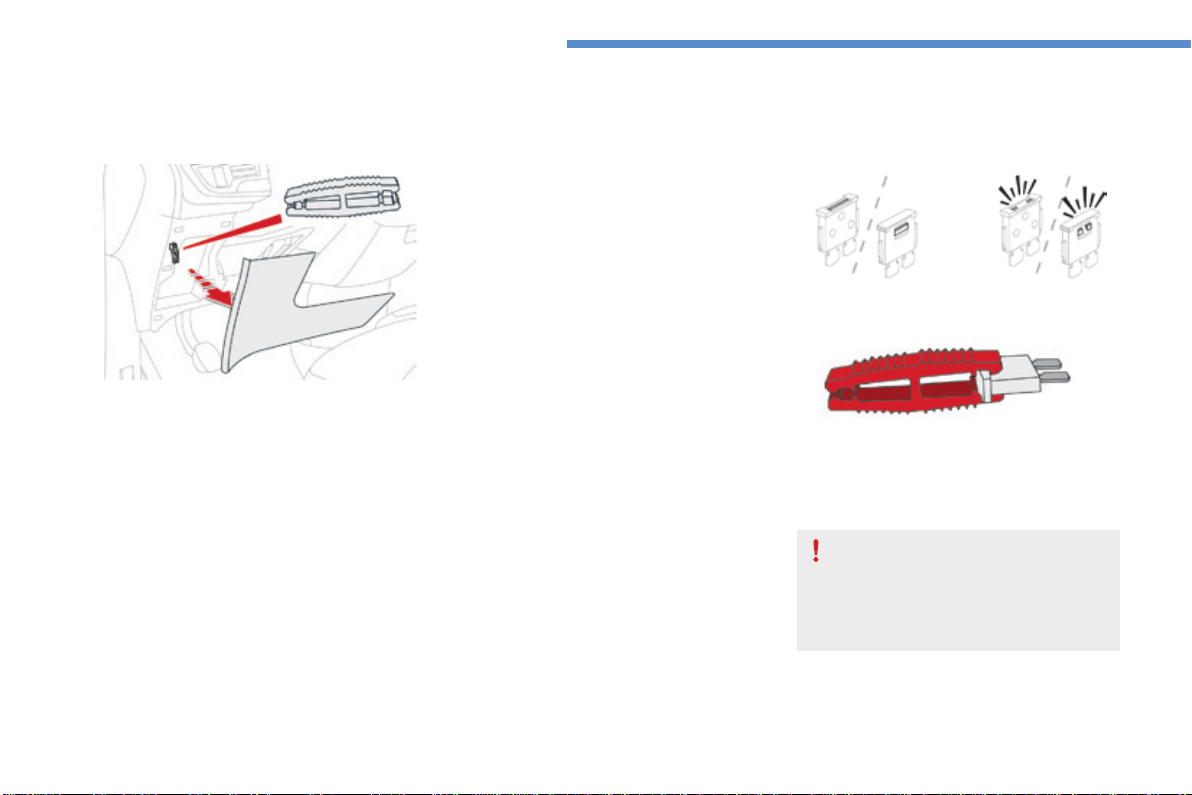
310
In the event of a breakdown
C4-Picasso-II_en_Chap08_en-cas-panne_ed01-2016
Beforechangingafuse:
F the cause of the failure must be identified
and rectified,
F all electrical consumers must be switched
off,
F the vehicle must be immobilised with the
ignitionoff,
F identifythefailedfuseusingthetablesand
layoutdrawingsinthefollowingpages.
Changing a fuse
Good Failed
The replacement of a fuse not shown in
the tables below may cause a serious
malfunctionofyourvehicle.Contact
a CITROËN dealer or a qualified
workshop.
Tweezer
Changingafuse
Theextractiontweezerislocatedinthe
dashboardfuseboxcompartment.
Foraccesstoit:
F unclipthecoverbypullingatthetopright,
then left,
F disengagethecovercompletely,by
carefullypullinginthedirectionindicated
by the arrow,
F removethetweezer.
Access to the tools
Toreplaceafuse,youmust:
F usethespecialtweezertoextractthefuse
fromitshousingandchecktheconditionof
itsfilament.
F always replace the failed fuse with a fuse of
thesamerating(samecolour);usingafuse
ofadifferentratingcouldcausefaults(risk
offire).
Ifthefusefailsagainsoonafterreplacement,
havethevehicle'selectricalsystemcheckedby
aCITROËNdealeroraqualifiedworkshop.

311
8
In the event of a breakdown
C4-Picasso-II_en_Chap08_en-cas-panne_ed01-2016
CITROËN will not accept responsibility
forthecostincurredinrepairingyour
vehicleorforrectifyingmalfunctions
resultingfromtheinstallationof
accessories not supplied and not
recommended by CITROËN and
not installed in accordance with its
instructions, in particular when the
combined consumption of all of the
additional equipment connected
exceeds10milliamperes.
Installing electrical
accessories
Yourvehicle'selectricalsystemis
designedtooperatewithstandardor
optionalequipment.
Beforeinstallingotherelectrical
equipment or accessories on your
vehicle, contact a CITROËN dealer or a
qualifiedworkshop.
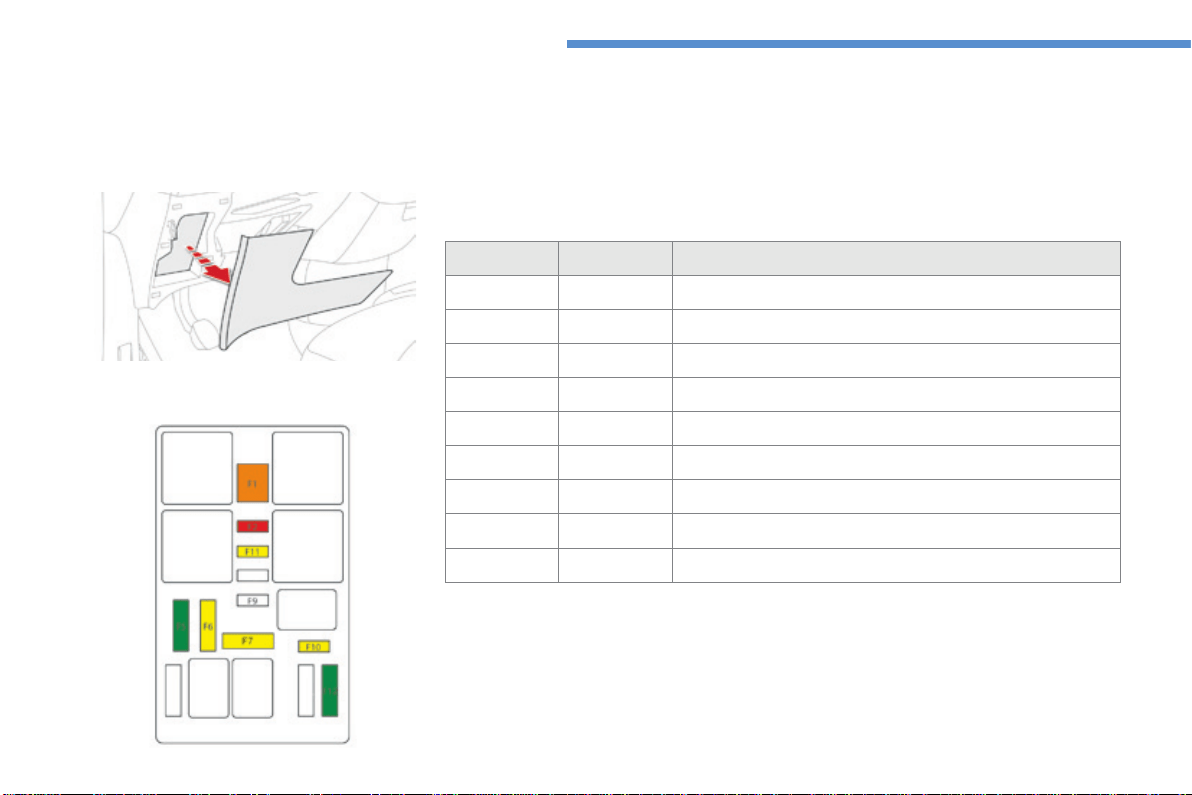
312
In the event of a breakdown
C4-Picasso-II_en_Chap08_en-cas-panne_ed01-2016
Dashboard fuses
Thetwofuseboxesarelocatedinthelowerdashboard(left-handside).
Access to the fuses
F Referto"Accesstothetools".
Fuse tables
Fusebox 1
Fuse N° Rating Functions
F1 40 A Heatedrearscreen.
F2 20 A Electricdoormirrors.
F5 30 A Panoramic sunroof blind
F6 20 A 12Vsocket,rearmultimedia.
F7 20 A 230Vsocket.
F9 25 A Heatedseats.
F10 20 A Trailerinterfaceunit.
F11 20 A Airconditioningfan.
F12 30 A Electricwindowmotors.
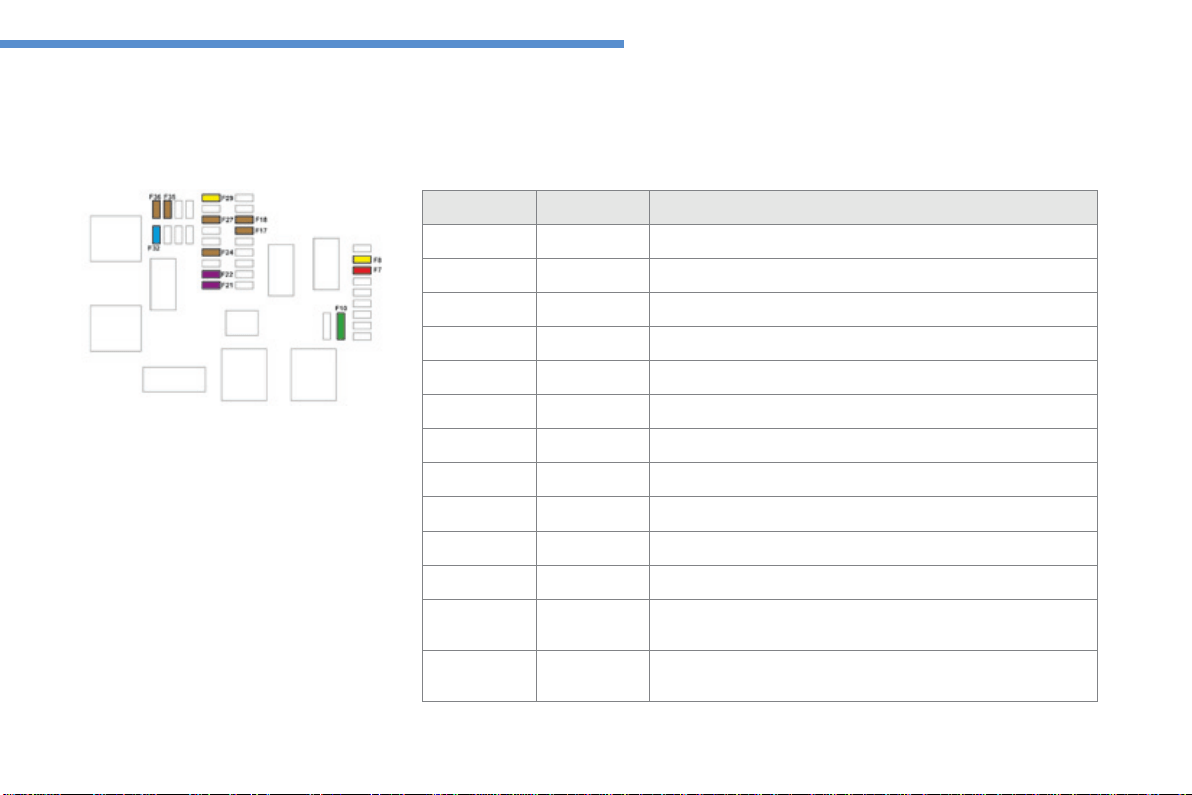
313
8
In the event of a breakdown
C4-Picasso-II_en_Chap08_en-cas-panne_ed01-2016
Fusebox 2
Fuse N° Rating Functions
F7 10 A Boot12Vsocket,rearmultimedia.
F8 20 A Rearwiper.
F10 30 A Locks.
F17 5 A Instrumentpanel.
F18 5 A Automaticgearboxgearselector.
F21 3 A START/STOPbutton.
F22 3 A Rainandsunshinesensor,windscreencamera.
F24 5 A Parkingsensors,panoramicvisualaid.
F27 5 A Automaticgearbox.
F29 20 A Audioandtelematicsystems.
F32 15 A 12Vsockets.
F35 5 A Headlampbeamheightadjustment,heatedrearscreen,radar.
F36 5 A
Interiorlighting:glovebox,centralstorage,readinglamps,
courtesylamps.
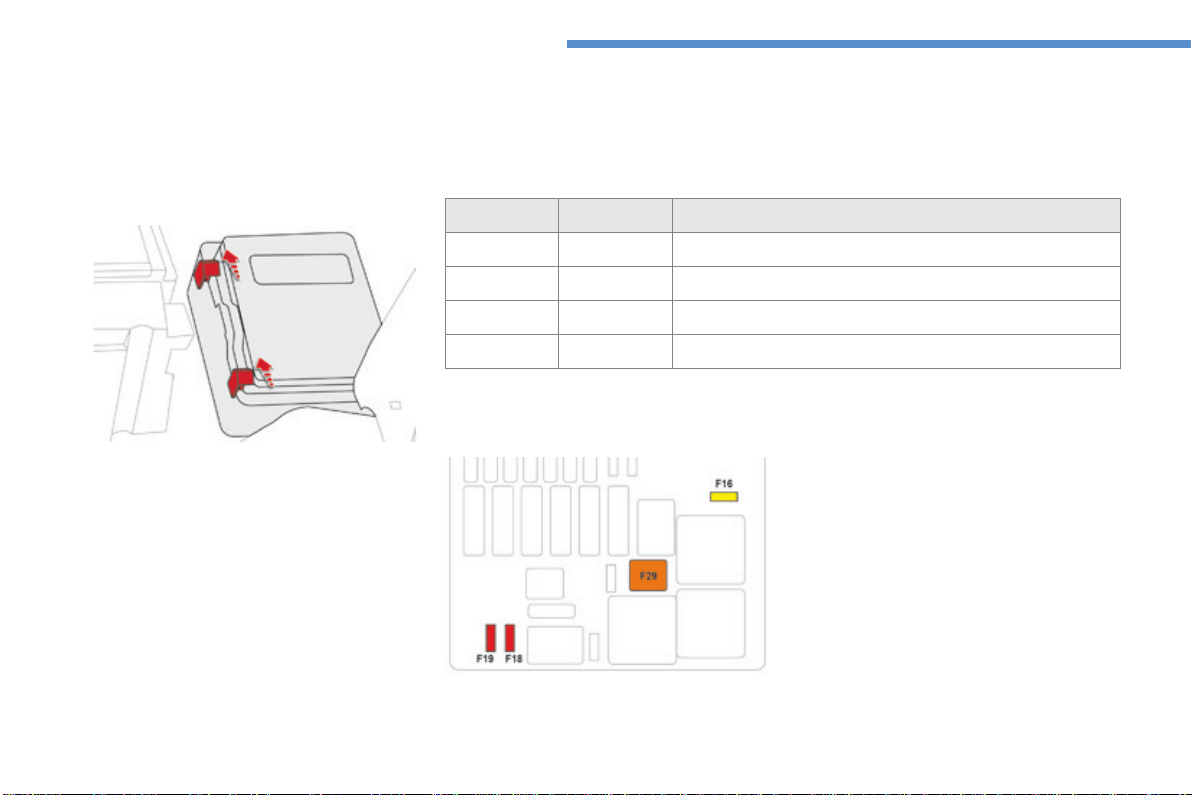
314
In the event of a breakdown
C4-Picasso-II_en_Chap08_en-cas-panne_ed01-2016
Engine compartment fuses
Thefuseboxisplacedintheengine
compartmentnearthebattery.
Fuse N° Rating Functions
F16 20 A Headlampwash.
F18 10 A Righthandmainbeam.
F19 10 A Lefthandmainbeam.
F29 40 A Wipers.
Fuse table
Access to the fuses
F Unclipthecover,bypushingthetwored
latchestowardstherearofthevehicle.
F Changethefuse.
F When you have finished, close the cover
carefullytoensurecorrectsealingofthe
fusebox.
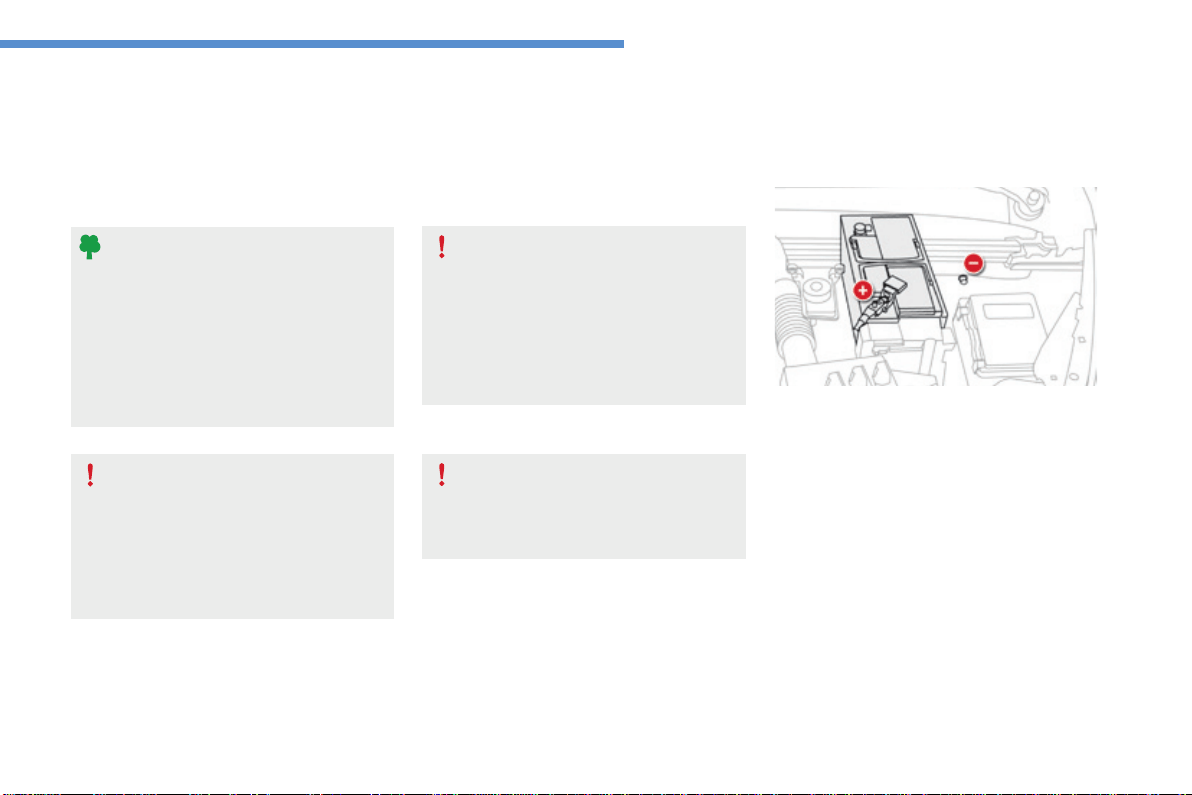
315
8
In the event of a breakdown
C4-Picasso-II_en_Chap08_en-cas-panne_ed01-2016
12 V battery
Thebatteryislocatedunderthebonnet.
Foraccesstothe(+)terminal:
F releasethebonnetusingtheinteriorlever,
thentheexteriorsafetycatch,
F raise the bonnet and secure it with its stay,
F lift the plastic cover for access to the (+)
terminal.
Access to the battery
Procedureforstartingtheengineusinganotherbatteryorchargingadischargedbattery.
Protect your eyes and face before
handlingthebattery.
All operations on the battery must be
carried out in a well ventilated area and
awayfromnakedflamesandsources
ofsparks,soastoavoidtheriskof
explosionorfire.
Washyourhandsafterwards.
Versions equipped with Stop & Start are
fitted with a 12 V lead-acid battery of
specifictechnologyandspecification.
Its replacement should be carried out
only by a CITROËN dealer or a qualified
workshop.
Batteries contain harmful substances
suchassulphuricacidandlead.
They must be disposed of in
accordancewithregulationsandmust
not, in any circumstances, be discarded
withhouseholdwaste.
Takeusedremotecontrolbatteriesand
vehicle batteries to a special collection
point.
General points
Lead-acid starter batteries
If your vehicle has an automatic
gearbox,donottrytostarttheengine
bypushingthevehicle.
The(-)batteryterminalisnotaccessible.
Aremoteearthpointislocatedathighlevel
underthebonnet(alongsidethebattery).
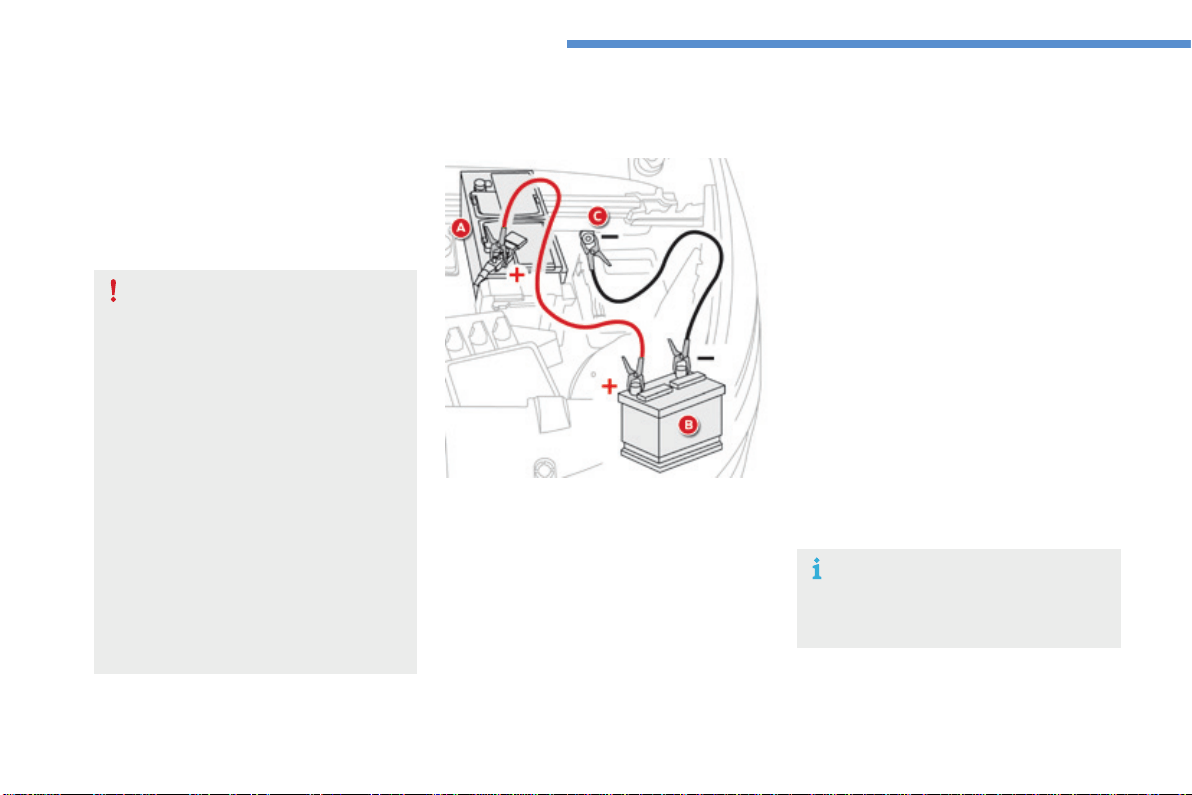
316
In the event of a breakdown
C4-Picasso-II_en_Chap08_en-cas-panne_ed01-2016
F Starttheengineofthevehiclewiththe
goodbatteryandleaveitrunningforafew
minutes.
F Operatethestarteronthebrokendown
vehicleandlettheenginerun.
Iftheenginedoesnotstartstraightaway,
switchofftheignitionandwaitafew
momentsbeforetryingagain.
F Waituntiltheenginereturnstoidlethen
disconnectthejumpleadcablesinthe
reverseorder.
F Refit the plastic cover to the (+) terminal, if
yourvehiclehasone.
F Allowtheenginetorunforatleast
30minutes,bydrivingorwiththevehicle
stationary, so that the battery reaches an
adequatestateofcharge.
Starting using another battery
Somefunctions,includingStop&Start,
are not available if the battery is not
sufficientlycharged.
F Raise the plastic cover on the (+) terminal,
ifyourvehiclehasone.
F Connect the red cable to the positive
terminal (+) of the flat battery A (at the metal
elbow) then to the positive terminal (+) of the
slave battery Borthebooster.
F Connectoneendofthegreenorblack
cabletothenegativeterminal(-)ofthe
slave battery B or the booster (or earth
pointontheothervehicle).
F Connecttheotherendofthegreenorblack
cable to the earth point Conthebroken
downvehicle.
Nevertrytostarttheengineby
connectingabatterycharger.
Neverusea24Vorhigherbattery
booster.
Firstcheckthattheslavebatteryhasa
nominalvoltageof12Vandacapacity
atleastequaltothatofthedischarged
battery.
The two vehicles must not be in contact
witheachother.
Switch off the electrical consumers on
both vehicles (audio system, wipers,
lighting,...).
Ensurethatthejumpleadcablesdo
notpassclosetomovingpartsofthe
engine(coolingfan,belts,...).
Do not disconnect the (+) terminal when
theengineisrunning.
Whenyourvehicle'sbatteryisdischarged,the
enginecanbestartedusingaslavebattery
(externaloronanothervehicle)andjumplead
cablesorabatterybooster.
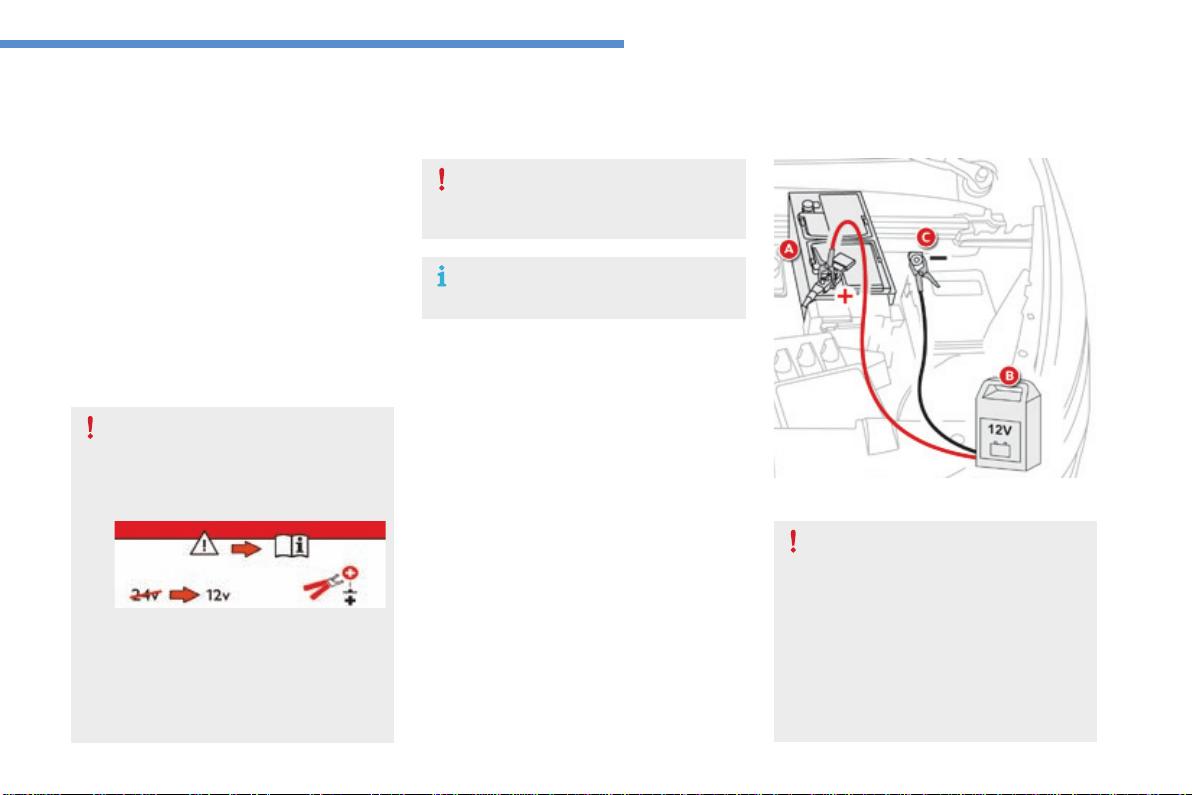
317
8
In the event of a breakdown
C4-Picasso-II_en_Chap08_en-cas-panne_ed01-2016
Nevertrytochargeafrozenbattery.
If the battery has been frozen, have
itcheckedbyaCITROËNdealerora
qualifiedworkshop,whowillcheckthat
the internal components have not been
damagedandthecasingisnotcracked,
whichcouldcausealeakoftoxicand
corrosiveacid.
F Switchofftheignition.
F Switch off all electrical consumers (audio
system,lighting,wipers,...).
F SwitchoffthechargerBbeforeconnecting
the cables to the battery, so as to avoid any
dangeroussparks.
F Ensurethatthechargercablesareingood
condition.
F Raise the plastic cover, if your vehicle has
one,onthe(+)terminal.
F ConnectthechargerBcablesasfollows:
- the positive (+) red cable to the (+) terminal
of the battery A,
- thenegative(-)blackcabletotheearth
point Conthevehicle.
F Attheendofthechargingoperation,switch
offthechargerBbeforedisconnectingthe
cables from the battery A.
It is not necessary to disconnect the
battery.
Ifyouenvisagechargingyourvehicle's
batteryyourself,useonlyacharger
compatible with lead-acid batteries of a
nominalvoltageof12V.
Follow the instructions for use provided
bythemanufacturerofthecharger.
Neverreversepolarities.
Charging the battery using a battery charger
If this label is present, it is essential
touseonlya12Vcharger,toavoid
causingirreversibledamagetothe
electrical components related to the
Stop&Startsystem.
For optimum service life of the battery, it is
essential to maintain an adequate state of
charge.
In some circumstances it may be necessary to
chargethebattery:
- if you use your vehicle essentially for short
journeys,
- ifthevehicleistobetakenofftheroadfor
severalweeks.
Contact a CITROËN dealer or a qualified
workshop.
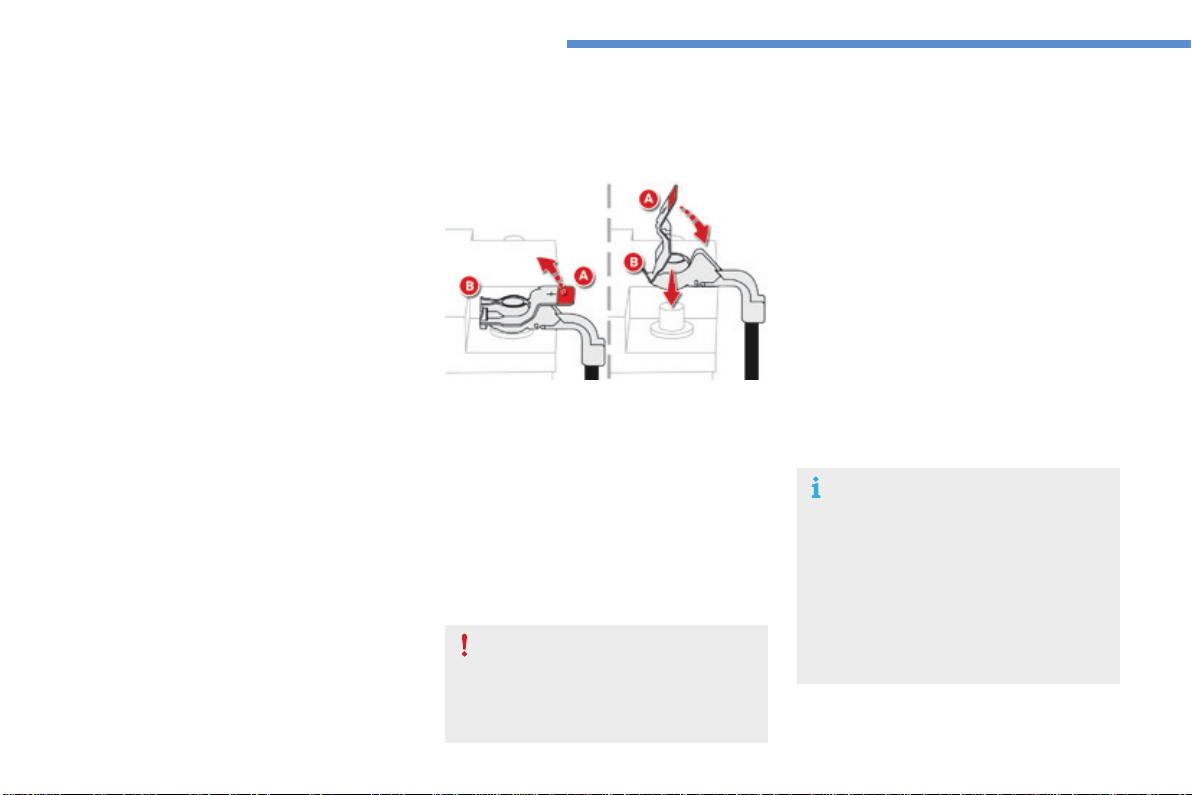
318
In the event of a breakdown
C4-Picasso-II_en_Chap08_en-cas-panne_ed01-2016
The Stop & Start system may not be
operationalduringthetripfollowingthe
firstenginestart.
In this case, the system will only be
availableagainafteracontinuous
period of immobilisation of the vehicle,
a period which depends on the ambient
temperatureandthestateofchargeof
thebattery(uptoabout8hours).
Donotforcetheleveraslockingwill
not be possible if the clamp is not
positionedcorrectly;starttheprocedure
again.
Disconnecting the (+) terminal
F Raise the lever A fully to release the
clamp B.
Reconnecting the (+) terminal
F Position the open clamp B of the cable on
thepositivepost(+)ofthebattery.
F Press down on the clamp to position it
correctlyonthebatterypost.
F LocktheclampbyloweringtheleverA.
Disconnecting the battery
In order to maintain an adequate state
ofchargeforstartingtheengine,itis
recommended that the battery be disconnected
ifthevehicleistakenoutofserviceforalong
period.
Beforedisconnectingthebattery:
F closeallopenings(doors,boot,windows,
roof),
F switch off all electrical consumers (audio
system,wipers,lighting,...),
F switchofftheignitionandwaitforfour
minutes.
Atthebattery,detachjustthe(+)terminal.
Following reconnection of the battery
Followingreconnectionofthebattery,switchon
theignitionandwait1minutebeforestartingto
permitinitialisationoftheelectronicsystems.
However,ifproblemsremainfollowingthis
operation, contact a CITROËN dealer or a
qualifiedworkshop.
Referringtothecorrespondingsection,you
mustyourselfreinitialise(dependingon
version):
- theremotecontrolkey,
- the electric blind(s),
- ...
Quick release terminal
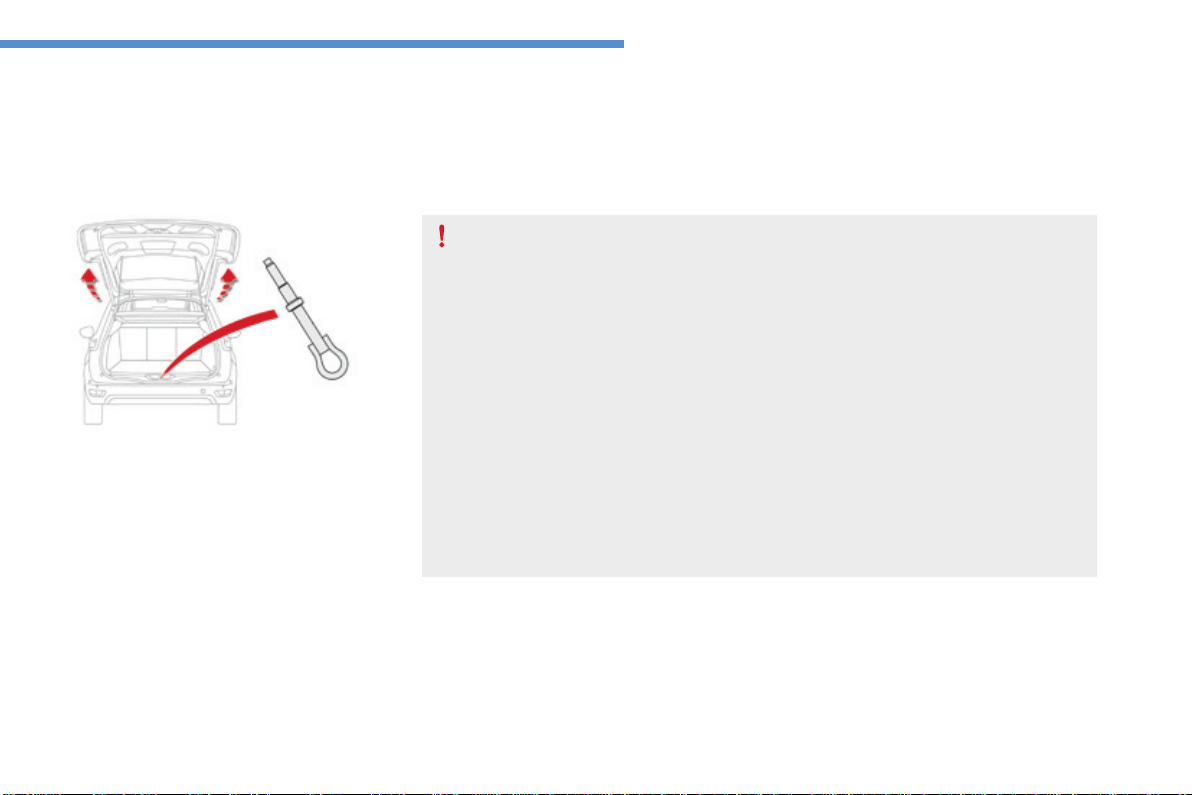
319
8
In the event of a breakdown
C4-Picasso-II_en_Chap08_en-cas-panne_ed01-2016
Towing
Thetowingeyeisinstalledinthebootunder
thefloor.
Togainaccesstoit:
F open the boot,
F lift the floor and remove it,
F removethetowingeyefromitshousing.
General recommendations
Observethelegislationinforceinyourcountry.
Ensurethattheweightofthetowingvehicleishigherthanthatofthetowedvehicle.
Thedrivermustremainatthewheelofthetowedvehicleandmusthaveavaliddrivinglicence.
Whentowingavehiclewithallfourwheelsontheground,alwaysuseanapprovedtowing
arm;ropeandstrapsareprohibited.
Thetowingvehiclemustmoveoffgently.
Whentowingavehiclewiththeengineoff,thereisnolongeranypowerassistancefor
brakingorsteering.
Inthefollowingcases,youmustalwayscallonaprofessionalrecoveryservice:
- vehiclebrokendownonamotorwayorfastroad,
- four-wheel drive vehicle,
- whenitisnotpossibletoputthegearboxintoneutral,unlockthesteering,orrelease
theparkingbrake,
- towingwithonlytwowheelsontheground,
- wherethereisnoapprovedtowingarmavailable...
Procedureforhavingyourvehicletowedorfortowinganothervehicleusingthetowingeye.
Access to the tools
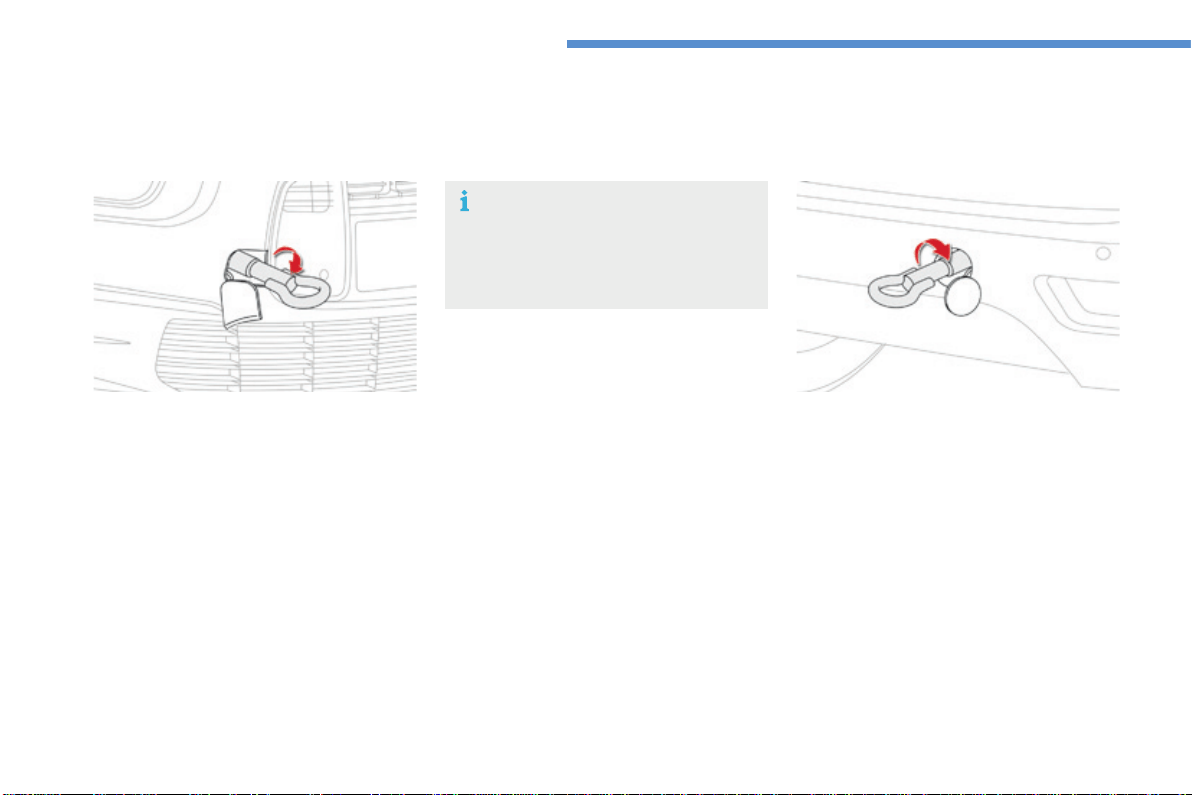
320
In the event of a breakdown
C4-Picasso-II_en_Chap08_en-cas-panne_ed01-2016
Towing another vehicle
F On the rear bumper, unclip the cover by
pressingatthebottom.
F Screwthetowingeyeinfully.
F Installthetowingbar.
F Switchonthehazardwarninglampson
bothvehicles.
F Moveoffgently,driveslowlyandforashort
distance.
F On the front bumper, unclip the cover by
pressingontheleft.
F Screwthetowingeyeinfully.
F Installthetowingbar.
F Placethegearleverinneutral(positionN
withanautomaticgearbox).
Towing your vehicle
Failure to observe this instruction could
resultindamagetocertaincomponents
(braking,transmission...)andthe
absenceofbrakingassistancethenext
timetheengineisstarted.
F Unlockthesteeringbyturningthekey
intheignitiononenotchandreleasethe
parkingbrake.
F Switchonthehazardwarninglampson
bothvehicles.
F Moveoffgently,driveslowlyandforashort
distance.
321
8
In the event of a breakdown
C4-Picasso-II_en_Chap08_en-cas-panne_ed01-2016
Runningoutoffuel(Diesel)
OnvehiclesfittedwithDieselengines,thefuel
systemmustbeprimedifyourunoutoffuel.
For all versions other than BlueHDi, refer to the
correspondingenginecompartmentview.
Other HDi engines
(except BlueHDi version)
For more information on Diesel misfuel
prevention,refertothecorresponding
section.
Iftheenginedoesnotstartfirsttime,
don'tkeeptryingbutstarttheprocedure
againfromthebeginning.
BlueHDi engines
F Fillthefueltankwithatleastfivelitresof
Diesel.
F Switchontheignition(withoutstartingthe
engine).
F Wait around 6 seconds and switch off the
ignition.
F Repeattheoperation10times.
F Operatethestartertoruntheengine.
F Add at least five litres of Diesel fuel to the
tank.
F Openthebonnet.
F Ifnecessary,unclipthestylingcoverfor
accesstotheprimingpump.
F Squeezeandreleasetheprimingpump
repeatedly until resistance is felt (there
mayberesistanceatthefirstpress).
F Operatethestartertostarttheengine
(iftheenginedoesnotstartatthefirst
attempt, wait around 15 seconds before
tryingagain).
F Iftheenginedoesnotstartafterafew
attempts,operatetheprimingpumpagain
thenstarttheengine.
F Refitthestylingcoverandclipitinplace.
F Closethebonnet.
322
Technical data
C4-Picasso-II_en_Chap09_caracteristiques-techniques_ed01-2016
Petrol engine PureTech 110 S&S PureTech 130 S&S
Gearbox Manual (6-speed) Manual (6-speed) EAT6 automatic (6-speed)
Model code
3D 3D...3E...3A... 3D...3E...3A...
HNX...
M/1S-M/2SM
HNY…
M/1S-M/2SM
HNY…
T/1S-T/2S
Cubic capacity (cc) 1 199
Borexstroke(mm) 75x90.5
Maxpower*:EUstandard(kW) 96
Maxpowerenginespeed(rpm) 5 500
Maxtorque:EUstandard(Nm) 230
Maxtorqueenginespeed(rpm) 1 750
Fuel Unleaded
Catalytic converter yes
Engineoilcapacity,withfilterreplacement
(in litres)
4.25
Petrolenginesandgearboxes
3D...:CITROËNC4Picasso(5-seat). 3A...:CITROËNGrandC4Picasso(7-seat).
3E...:CITROËNGrandC4Picasso(5-seat).
*Themaximumpowercorrespondstothevaluetype-approvedonatestbed,underconditionsdefinedinEuropeanlegislation(Directive1999/99/EC).

9
323
Technical data
C4-Picasso-II_en_Chap09_caracteristiques-techniques_ed01-2016
3D...:CITROËNC4Picasso(5-seat). 3A...:CITROËNGrandC4Picasso(7-seat).
3E...:CITROËNGrandC4Picasso(5-seat).
*Themaximumpowercorrespondstothevaluetype-approvedonatestbed,underconditionsdefinedinEuropeanlegislation(Directive1999/99/EC).
Petrol engine THP 150 / 160 THP 165 S&S
Gearbox EAT6 automatic (6-speed) EAT6 automatic (6-speed)
Model code
3D...3E...3A... 3D...3E...3A...
5GX-5GY...
A-A/1-A/2-A/D-A/1D-A/2D-Y-Y/1-Y/2
5GZT/S
Cubic capacity (cc) 1 598 1 598
Borexstroke(mm) 77x85.8 77x85.8
Maxpower*:EUstandard(kW) 110/121 121
Maxpowerenginespeed(rpm) 6 000 6 000
Maxtorque:EUstandard(Nm) 240 240
Maxtorqueenginespeed(rpm) 1 400 1 400
Fuel Unleaded Unleaded
Catalytic converter yes yes
Engineoilcapacity(inlitres)
(with filter replacement)
4.25 4.25

324
Technical data
C4-Picasso-II_en_Chap09_caracteristiques-techniques_ed01-2016
*Theweightvaluesarecalculatedwithatowbar.
**Thekerbweightisequaltotheunladenweight+driver(75kg).
***Theweightofthebrakedtrailercanbeincreased,withintheGTWlimit,iftheGVWofthetowingvehicleisreducedbyanequalamount;warning,
towingusingalightlyloadedtowingvehiclemayhaveanadverseeffectonitsroadholding.
Petrol engine PureTech 110 S&S* PureTech 130 S&S*
Gearbox Manual (6-speed) Manual (6-speed) EAT6 automatic (6-speed)
Model code
3D 3D...3E...3A... 3D...3E...3A...
HNX...
M/1S-M/2SM
HNY…
M/1S-M/2SM
HNY…
T/1S-T/2S
Unladenweight 1 280 1 280 - 1 295 - 1 297 1298-1315-1317
Kerbweight** 1355 1355-1370-1372 1373-1390-1392
Grossvehicleweight(GVW) 1 905 1 905 - 2 075 - 2 125 1918-1957-2136
Grosstrainweight(GTW)
ona12%gradient
3035 3175-3125-3175 3188-3007-3186
Brakedtrailer(withintheGTWlimit)
ona10%or12%gradient
1130 1 270 - 1 050 - 1 050 1 270 - 1 050 - 1 050
Brakedtrailer***
(with load transfer within the GTW limit)
1330 1470-1350-1350 1470-1350-1350
Unbrakedtrailer 640 640 - 647 - 648 640 - 647 - 648
Recommendednoseweight 70 70 70
Petrolweightsandtowedloads(inkg)
TheGTWandtowedloadvaluesindicatedarevaliduptoamaximumaltitudeof1000metres;thetowedloadmentionedmustbereducedby10%for
eachadditional1000metresofaltitude.
Whentowing,thespeedmustneverexceed60mph(100km/h)(complywiththelegislationinforceinyourcountry).
Highambienttemperaturesmayresultinareductionintheperformanceofthevehicletoprotecttheengine;iftheambienttemperatureisabove37°C,
limitthetowedload.
9
325
Technical data
C4-Picasso-II_en_Chap09_caracteristiques-techniques_ed01-2016
Theweightofthebrakedtrailercanbeincreased,withintheGTWlimit,iftheGVWofthetowingvehicleisreducedbyanequalamount;warning,
towingusingalightlyloadedtowingvehiclemayhaveanadverseeffectonitsroadholding.
Whentowing,thespeedmustneverexceed60mph(100km/h)(complywiththelegislationinforceinyourcountry).
Highambienttemperaturesmayresultinareductionintheperformanceofthevehicletoprotecttheengine;iftheambienttemperatureisabove37°C,
limitthetowedload..
Petrol engine THP 150 / 160 THP 165 S&S
Gearbox EAT6 automatic (6-speed) EAT6 automatic (6-speed)
Model code
3D...3E...3A... 3D...3E...3A...
5GX-5GY...
A-A/1-A/2-A/D-A/1D-A/2D-Y-Y/1-Y/2
5GZT/S
Unladenweight 1405-1428-1430 1310-1318-1320
Kerbweight* 1480-1503-1505 1385-1393-1395
Grossvehicleweight(GVW) 1 940 - 2 140 - 2 160 1930-2100-2150
Grosstrainweight(GTW)
ona12%gradient
2 740 - 2 940 - 2 960 3330-3350-3350
Brakedtrailer(withintheGTWlimit)
ona10%or12%gradient
800 1 400 - 1 250 - 1 200
Brakedtrailer**
(with load transfer within the GTW limit)
800 1 600 - 1 550 - 1 500
Unbrakedtrailer 600 685 - 690 - 690
Recommendednoseweight 70 70
*Thekerbweightisequaltotheunladenweight+driver(75kg).
**Theweightofthebrakedtrailercanbeincreased,withintheGTWlimit,iftheGVWofthetowingvehicleisreducedbyanequalamount;warning,
towingusingalightlyloadedtowingvehiclemayhaveanadverseeffectonitsroadholding.

326
Technical data
C4-Picasso-II_en_Chap09_caracteristiques-techniques_ed01-2016
Dieselenginesandgearboxes
.../S:e-HDimodelfittedwithStop&Start.
3D...:CITROËNC4Picasso(5-seat).
3E...:CITROËNGrandC4Picasso(5-seat).
3A...:CITROËNGrandC4Picasso(7-seat).
Diesel engine HDi 115 BlueHDi 100 S&S
Gearbox Manual (6-speed) Manual (6-speed)
Model code
3D...3E...3A... 3D...3E...3A...
9HC...
8-8/1
BHY...
6/1S-6/2SM
Cubic capacity (cc) 1 560 1 560
Borexstroke(mm) 75x88.3 75x88.3
Maxpower*:EUstandard(kW) 85 73
Maxpowerenginespeed(rpm) 3600 3750
Maxtorque:EUstandard(Nm) 270 254
Maxtorqueenginespeed(rpm) 1 750 1 750
Fuel Diesel Diesel
Catalytic converter yes yes
Particle filter no yes
Engineoilcapacity,withfilterreplacement
(in litres)
3.75 3.75
*Themaximumpowercorrespondstothevaluetype-approvedonatestbed,underconditionsdefinedinEuropeanlegislation(Directive1999/99/EC).

9
327
Technical data
C4-Picasso-II_en_Chap09_caracteristiques-techniques_ed01-2016
Dieselenginesandgearboxes
.../S:e-HDimodelfittedwithStop&Start.
3D...:CITROËNC4Picasso(5-seat).
3E...:CITROËNGrandC4Picasso(5-seat).
3A...:CITROËNGrandC4Picasso(7-seat).
Diesel engine BlueHDi 115/120 S&S BlueHDi 135/150 S&S
Gearbox Manual (6-speed)
EAT6 automatic
(6-speed)
Manual (6-speed)
EAT6 automatic
(6-speed)
Model code
3D...3E...3A... 3D...3E...3A... 3D...3E...3A... 3D...3E...3A...
BHZ-BHX...
M/S-M/1S
BHZ-BHX...
T/1S-T/2S
AHX-AHR-AHV-AHS...
M/S-M/1S
AHX...
T/S-T/1S
Cubic capacity (cc) 1 560 1 997
Borexstroke(mm) 75x88.3 85x88
Maxpower*:EUstandard(kW) 85/88 110
Maxpowerenginespeed(rpm) 3500 3750
Maxtorque:EUstandard(Nm) 300 370
Maxtorqueenginespeed(rpm) 1 750 1 750
Fuel Diesel Diesel
Catalytic converter yes yes
Particle filter yes yes
Engineoilcapacity,withfilterreplacement
(in litres)
3.75 6.1
*Themaximumpowercorrespondstothevaluetype-approvedonatestbed,underconditionsdefinedinEuropeanlegislation(Directive1999/99/EC).
328
Technical data
C4-Picasso-II_en_Chap09_caracteristiques-techniques_ed01-2016
Dieselweightsandtowedloads(inkg)
TheGTWandtowedloadvaluesindicatedarevaliduptoamaximumaltitudeof1000metres;thetowedloadmentionedmustbereducedby10%for
eachadditional1000metresofaltitude.
Whentowing,thespeedmustneverexceed60mph(100km/h)(complywiththelegislationinforceinyourcountry).
Highambienttemperaturesmayresultinareductionintheperformanceofthevehicletoprotecttheengine;iftheambienttemperatureisabove37°C,
limitthetowedload.
Diesel engine HDi 115 BlueHDi 100 S&S*
Gearbox Manual (6-speed) Manual (6-speed)
Model code
3D...3E...3A... 3D...3E...3A... 3D...3E...3A...
9HC8 9HC8/1
BHY...
6/1S-6/2SM
Unladenweight 1290-1310-1312 1298-1318-1320 1296-1318-1320
Kerbweight** 1365-1385-1387 1373-1393-1395 1371-1393-1395
Grossvehicleweight(GVW) 1 940 - 2 110 - 2 150 1 940 - 2 110 - 2 150 1 950 - 2 120 - 2 175
Grosstrainweight(GTW)
ona12%gradient
3340-3350-3350 2 740 - 2 910 - 2 950 3150-3120-3175
Brakedtrailer(withintheGTWlimit)
ona10%or12%gradient
1 400 - 1240 - 1 200 800 1 200 - 1 000 - 1 000
Brakestrailer***
(with load transfer within the GTW limit)
1 600 - 1 540 - 1 500 800 1400-1300-1300
Unbrakedtrailer 680 - 690 - 690 685 - 695 - 695 645 - 659 - 660
Recommendednoseweight 70 70 70
*Theweightsarecalculatedwithatowbarfitted.
**Thekerbweightisequaltotheunladenweight+driver(75kg).
***Theweightofthebrakedtrailercanbeincreased,withintheGTWlimit,iftheGVWofthetowingvehicleisreducedbyanequalamount;warning,
towingusingalightlyloadedtowingvehiclemayhaveanadverseeffectonitsroadholding.

9
329
Technical data
C4-Picasso-II_en_Chap09_caracteristiques-techniques_ed01-2016
Dieselweightsandtowedloads(inkg)
*Thekerbweightisequaltotheunladenweight+driver(75kg).
**Theweightofthebrakedtrailercanbeincreased,withintheGTWlimit,iftheGVWofthetowingvehicleisreducedbyanequalamount;warning,
towingusingalightlyloadedtowingvehiclemayhaveanadverseeffectonitsroadholding.
TheGTWandtowedloadvaluesindicatedarevaliduptoamaximumaltitudeof1000metres;thetowedloadmentionedmustbereducedby10%for
eachadditional1000metresofaltitude.
Whentowing,thespeedmustneverexceed60mph(100km/h)(complywiththelegislationinforceinyourcountry).
Highambienttemperaturesmayresultinareductionintheperformanceofthevehicletoprotecttheengine;iftheambienttemperatureisabove37°C,
limitthetowedload.
Diesel engine BlueHDi 115/120 S&S BlueHDi 135/150 S&S
Gearbox Manual (6-speed)
EAT6 automatic
(6-speed)
Manual (6-speed)
EAT6 automatic
(6-speed)
Model code
3D...3E...3A... 3D...3E...3A... 3D...3E...3A... 3D...3E...3A...
BHZ-BHX...
M/S-M/1S
BHZ-BHX...
T/1S-T/2S
AHX-AHR-AHV-
AHS...
M/S-M/1S
AHX...
T/S-T/1S
Unladenweight 1320-1345-1347 1320-1357-1359 1415-1428-1430 1435-1474-1476
Kerbweight* 1395-1420-1422 1395-1432-1434 1490-1503-1505 1 510 - 1 549 - 1 551
Grossvehicleweight(GVW) 1 950 - 2 100 - 2 175 1 975 - 2 025 - 2 205 2030-2200-2250 2030-2200-2280
Grosstrainweight(MTRA)
ona12%gradient
3350-3350-3375 3375-3225-3405 3530-3560-3650 3530-3580-3580
Brakedtrailer(withinGTWlimit)
ona10%or12%gradient
1 400 - 1 250 - 1 200 1 400 - 1 200 - 1 200 1 500 - 1 450 - 1 400 1500-1380-1300
Brakedtrailer**
(with load transfer within the GTW limit)
1 600 - 1 550 - 1 500 1 600 - 1 500 - 1 500 1 700 - 1 750 - 1 700 1 700 - 1 680 - 1 600
Unbrakedtrailer 660 - 672 - 674 660 - 675 - 675 745 - 750 - 750 750
Recommendednoseweight 70 70 70 70
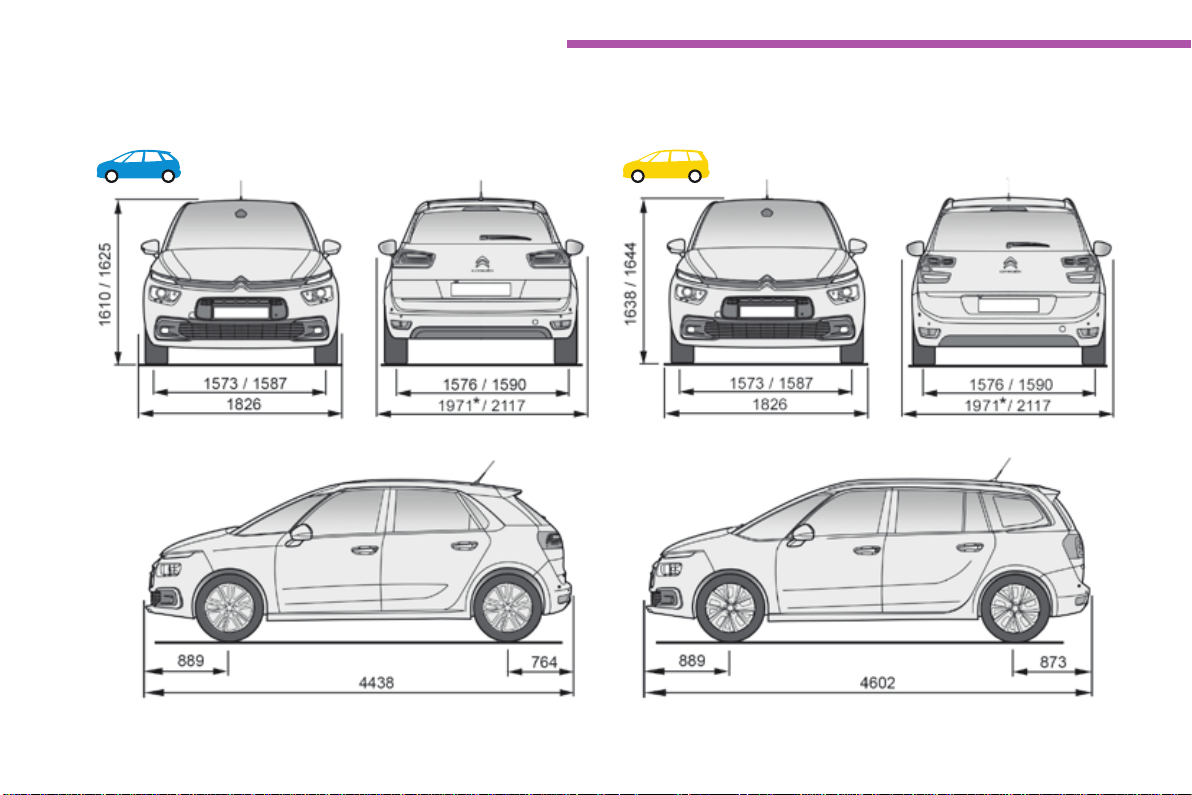
330
Technical data
C4-Picasso-II_en_Chap09_caracteristiques-techniques_ed01-2016
Dimensions (in mm)
Thesedimensionshavebeenmeasuredonanunladenvehicle.
*Mirrorsfolded.
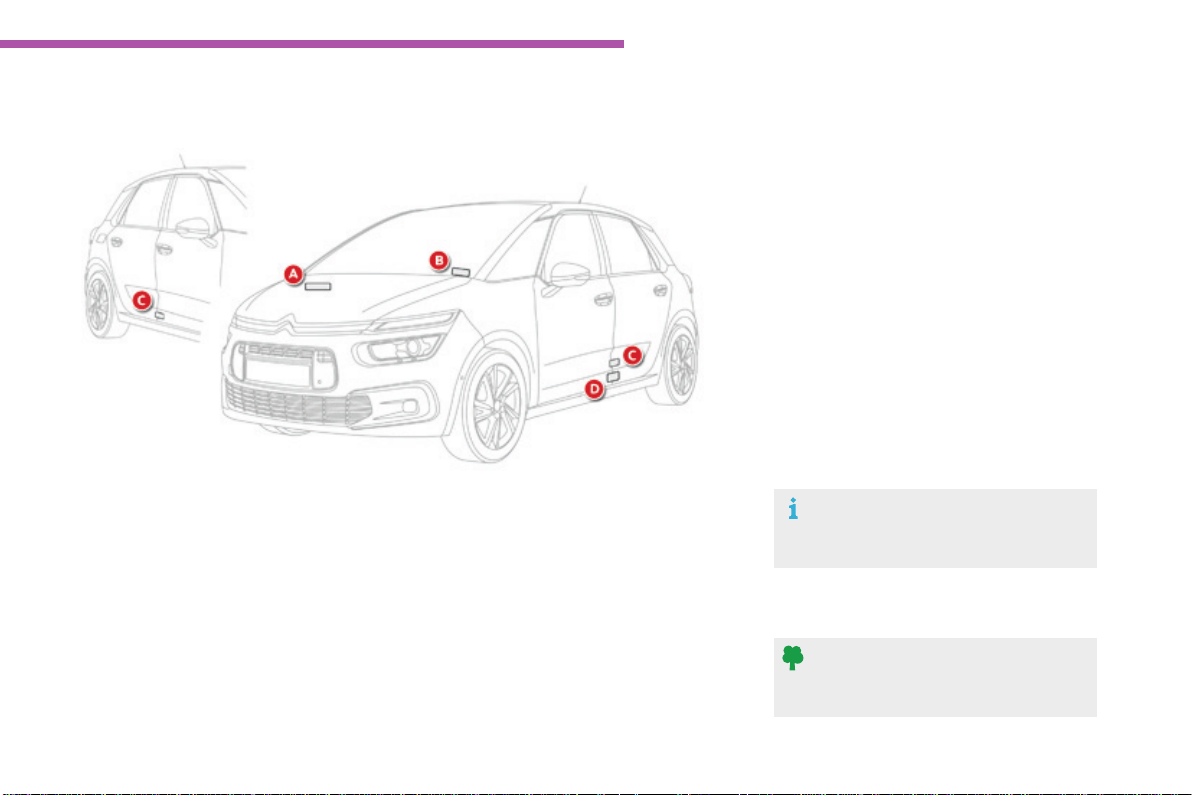
9
331
Technical data
C4-Picasso-II_en_Chap09_caracteristiques-techniques_ed01-2016
Identicationmarkings
Variousvisiblemarkingsfortheidentificationofyourvehicle.
A. Vehicle Identification Number (VIN)
under the bonnet.
Thisnumberisengravedonthechassis
neartherighthandfrontwheelarch.
Thetyrepressuresmustbechecked
when the tyres are cold, at least once
amonth.
If the tyre pressures are too low, this
increasesfuelconsumption.
C. Manufacturer's label.
Thisself-destroyinglabelonthemiddle
doorpillar,rightorlefthandside,contains
thefollowinginformation:
- themanufacturer'sname,
-
the European whole vehicle type approval number,
- the vehicle identification number (VIN),
- themaximumauthorisedweight(gross
vehicleweight),
- themaximumauthorisedweightwith
trailer(grosstrainweight),
- themaximumfrontaxleweight,
- themaximumrearaxleweight.
D. Tyre/paint label.
Thislabelonthemiddledoorpillar,driver's
side,containsthefollowinginformation:
- the tyre inflation pressures, laden and
unladen,
- thetyresizes(includingthetyreload
indexandspeedrating),
- the inflation pressure for the spare
wheel,
- thepaintcolourcode.
B. Vehicle Identification Number (VIN) on
the windscreen lower cross member.
This number is indicated on a self-
adhesivelabelwhichisvisiblethroughthe
windscreen.
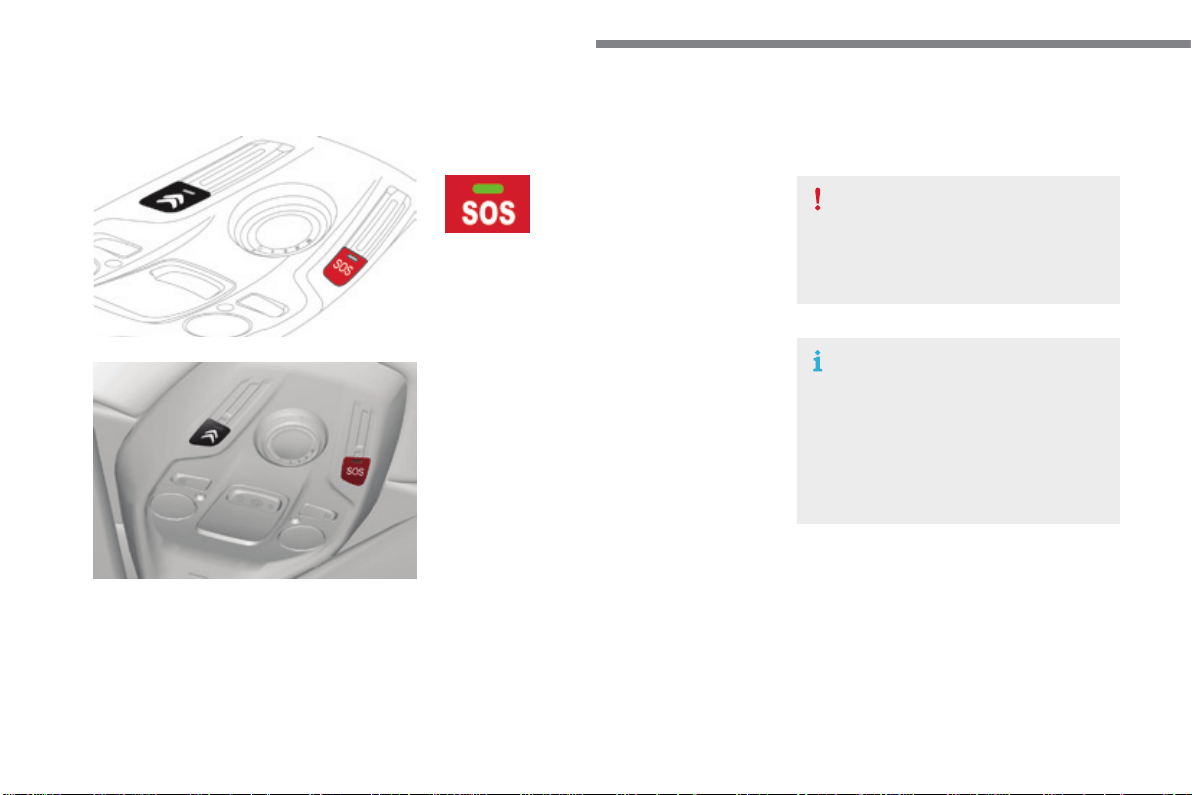
Audio and Telematics
332
C4-Picasso-II_en_Chap10a_BTA_ed01-2016
Emergencyorassistancecall
Ifanimpactisdetectedbytheairbag
control unit, and independently of
thedeploymentofanyairbags,an
emergencycallismadeautomatically.
Localised Emergency Call
Inanemergency,pressthis
buttonformorethan2seconds.
FlashingofthegreenLEDand
avoicemessageconfirmthat
the call has been made to the
"LocalisedEmergencyCall"*
service.
Pressingthisbuttonagainimmediatelycancels
therequest.
ThegreenLEDgoesoff.
ThegreenLEDremainson(withoutflashing)
whencommunicationisestablished.
Itgoesoffattheendofcommunication.
This call is dealt with by the "Localised
EmergencyCall"centrewhichreceiveslocating
information from the vehicle and can send a
detailedalerttotheappropriateemergency
services.
In countries in which the team is not
operational,orwhenthelocatingservice
hasbeenexpresslydeclined,thecallisdealt
withdirectlybytheemergencyservices(112)
withoutthevehiclelocation.
*Theseservicesaresubjecttoconditionsand
availability.
ConsultaCITROËNdealer.
If you benefit from the CITROËN
ConnectBoxofferwiththeSOSand
assistancepackincluded,thereare
additional services available to you in
your MyCITROËN personal space, via
the CITROËN Internet website in your
country,accessibleonwww.citroen.com.

.
Audio and Telematics
333
C4-Picasso-II_en_Chap10a_BTA_ed01-2016
Localised Assistance Call
If you purchased your vehicle outside
theCITROËNdealernetwork,we
inviteyoutohaveadealercheckthe
configurationoftheseservicesand,if
desired,modifiedtosuityourwishes.
Inamulti-lingualcountry,configuration
is possible in the official national
languageofyourchoice.
For technical reasons, particularly
to improve the quality of Telematic
services to customers, the
manufacturerreservestherightto
carryoutupdatestothevehicle's
on-boardtelematicsystem.
A fault with the system does not
preventthevehiclebeingdriven.
Press this button for more than
2 seconds to request assistance
ifthevehiclebreaksdown.
Avoicemessageconfirmsthat
thecallhasbeenmade*.
Pressingthisbuttonagainimmediatelycancels
therequest.
The cancellation is confirmed by a voice
message.
TheorangeLEDisoncontinuously:thebackup
batterymustbereplaced.
Ineithercase,theemergencyandassistance
callsservicemaynotfunction.
Contact a qualified repairer as soon as
possible.
Operation of the system
Whentheignitionisswitched
on,thegreenLEDcomeson
for3secondsindicatingthatthe
systemisoperatingcorrectly.
TheorangeLEDflashesthen
goesoff:thereisasystemfault.
*Theseservicesaresubjecttoconditionsand
availability.
ConsultaCITROËNdealer.

334
Alphabetical index
C4-Picasso-II_en_Chap11_index-alpha_ed01-2016
ABS...............................................................225
Accessories..................................................266
Accessory position.......................................130
Accesstothe3rdrow.....................................86
AdBlue
®
.......................................18,35,42,279
Adjustingheadrestraints..........................79,83
Adjustingseats........................75, 77, 82, 84, 87
Adjustingtheairdistribution.............. 94, 96, 98
Adjustingtheairflow...........................94, 95, 97
Adjustingtheheightandreach
ofthesteeringwheel....................................91
Adjustingtheseatbeltheight.......................228
Adjustingthetemperature..................94, 95, 97
Advice on care and maintenance.................278
Adviceondriving..................................123,124
Airbags....................................................32,233
Airbags,curtain.....................................236,237
Airbags,front.........................................234,237
Airbags,lateral......................................235,237
Airconditioning...............................9,93,95,97
Airconditioning,automatic............................ 97
Airconditioning,manual.................................95
Airintake............................................ 94, 96, 98
Air vents..........................................................92
Alarm...............................................................70
Anti-lockbrakingsystem(ABS)....................225
Anti-pinch................................................73,223
Anti-theft.................................................59,130
Armrest, front..................................................81
ASR...............................................................225
Assistance call......................................224,332
Assistance,emergencybraking...................225
Audiblewarning............................................224
Automatic headlamps.............................23,212
Battery...........................................277,315-318
Battery,charging........................................... 317
Battery, remote control.............................58, 59
Blackpanel......................................................47
Blackscreen...................................................47
Blankingscreen(snowshield)......................261
Blind, panoramic sunroof..............................223
Blind spot sensors..................................24, 182
Blinds, side................................................... 112
BlueHDi...........................................42,279,321
Bonnet...........................................................271
Boot.................................................................63
Boot(fittings)................................................. 117
Boot(opening).................................................51
Brakediscs/pads...........................................278
Brakelamps..........................................305-308
Brakewarninglamp..................................31,34
Braking,dynamicemergency.......................135
Bulbs(changing)...........................301,305-308
Checkingtheengineoillevel..................41,234
Checkingthelevels................................274-276
Checkingtyrepressures
(usingthekit)..............................................290
Checks...................................................272-278
Checks,routine.....................................277, 278
Childlock.......................................................256
Children......................... 245,247,250,251,253
Children (safety)....................232,234,238-256
Child seats, conventional..............................244
Child seats, ISOFIX......................................250
CITROËNConnectBox...............................332
CITROËN Localised
EmergencyCall..........................................332
Closingtheboot..............................................63
Closingthedoors............................... 52, 54, 56
Collisionriskalert.........................................176
Configurations,seats......................................89
Configuration,vehicle.....................................13
Control,emergencybootrelease...................67
Control,emergencydoor................................62
Control, heated seats......................................81
Controlstalk,lighting..............................23,206
Controlstalk,wipers.....................218, 219, 221
Courtesy lamps.............................................121
Cruise control................ 149, 152, 157, 160, 167
Cruise control, dynamic........................160, 167
Cruise control by speed
limitrecognition..........................................150
Cup holder.....................................................105
A
Capacity,fueltank........................................257
Cap, fuel filler................................................257
Cartridge,fragrance.....................................103
Centrallocking....................................51,53,60
Changingabulb............................................301
Changingafuse............................................310
Changingawheel.........................................291
Changingawiperblade....................... 222, 268
Changingtheremotecontrolbattery..............58
C
B

.
335
Alphabetical index
C4-Picasso-II_en_Chap11_index-alpha_ed01-2016
Daytimerunninglamps.........................214,301
Deactivatingthepassengerairbag...............234
Deadlocking........................................52, 55, 57
Demisting/defrosting,
front and rear..............................................102
Diesel.....................................................24 , 259
Dimensions...................................................330
Dipstick......................................................... 274
Direction indicators............... 215,301,304-308
Display screen,
instrument panel............................. 17, 18, 145
Distance alert................................................176
Doors...............................................................61
Driver’sattentionwarning.....................185, 186
Drivingeconomically.........................................9
Drivingpositions(storing)...............................78
Drivingtimewarning.............................185, 186
Dynamic stability control (DSC)..............31,225
EBA...............................................................225
Eco-driving.......................................................9
Electronicbrakeforcedistribution
(EBFD)........................................................225
Emergencycall.....................................224,332
Emergencywarninglamps...................224,283
Emissions control system,
SCR......................................................36,279
F
Fatiguedetection..................................185, 186
Fillingthefueltank.................................257-259
Filter, air........................................................277
Filter, oil.........................................................277
Filter, particle........................................276, 277
Filter,passenger
compartment..............................................277
Fittingawheel...............................................299
Fittingroofbars.............................................269
Fittings,boot................................................. 117
Fittings,interior.....................................105, 106
Fittings,rear.................................................. 111
Flap, fuel filler........................................257, 258
Flashingindicators................................210, 215
Floor, concertina.............................................87
Foglamps,front.................... 208,216,301,304
Foglamps,rear..................................... 208,309
Foldingtherearseats.................. 82, 84, 86, 87
Fuel................................................................259
E
D
Energyeconomymode.................................265
Enginecompartment............................272,273
Engine,
Diesel......................... 259,273,321,326,327
Engine,petrol............................... 259,272,322
Environment........................................9,58,93,
102,200,276,282,315
ESC/ASR.......................................................225
Fuel consumption........................................9, 50
Fueltank........................................................258
Fusebox,dashboard.....................................312
Fusebox,engine
compartment..............................................314
Fuses.............................................................310
Gauge,fuel........................................ 17, 18, 257
Gearbox,automatic..............140,146,278,315
Gearbox,manual......................9,139,146,278
Gearlever,manualgearbox.........................139
Gear shift indicator.......................................145
Glovebox..............................................105, 106
Hands-freetailgateaccess.............................68
Hazardwarninglamps..........................224,283
Headlampadjustment...................................215
Headlamps, automatic
dipping........................................................212
Headlamps, automatic illumination...... 207, 211
G
H

336
Alphabetical index
C4-Picasso-II_en_Chap11_index-alpha_ed01-2016
Identification, vehicle....................................331
Ignition...........................................................130
Immobiliser, electronic............................59,130
Indicator, AdBlue
®
range.................................42
Indicator, coolant temperature........................40
Indicator,engineoillevel........................ 41, 274
Indicatorandwarning
lamps...................................................... 21-36
Indicators, direction......................................215
Inflatingtyres............................................9,331
Inflatingtyresandaccessories
(usingthekit)..............................................290
Instrument panels......................................17-19
IntelligentTractionControl............................226
ISOFIX..........................................................240
Key, electronic......................................... 51,130
KeylessEntryandStarting.....................53,130
Kit, temporary puncture repair......................284
Labels, identification.....................................331
Lamp, boot....................................................120
Lamps,parking.............................................210
Lanedeparturewarning,assisted................178
LEDs-light-emittingdiodes.........301,305,307
Legrest,electric.............................................80
Level, AdBlue
®
additive...........................35,279
Level,brakefluid.....................................31,275
Level, Diesel additive..............................29, 276
Level,enginecoolant..............................40, 276
Level,engineoil...................................... 41, 274
Level, headlamp wash............................29, 276
Levelsandchecks.................................272-276
Level, screenwash fluid................................276
Light-emittingdiodes-LEDs........301,305,307
Lighting....................................................23,206
Lighting,directional............................... 216, 217
Lighting,guide-me-home.............................210
Lighting,interior............................................121
Lighting,mood..............................................122
Lighting,welcome.........................................214
Loading.............................................................9
Load reduction mode....................................265
Localised Assistance Call.............................332
Locatingyourvehicle......................................52
Lockingfromtheinside...................................60
Low fuel level................................................257
Lumbar......................................................32,80
I
K
L
Jack....................................................... 291-294
Jumpstarting................................................316
J
Headlamps,dipped/main
beam.................................... 23,206,301,302
Headlamps, directional......................... 217,301
Headlamps, Xenon.......................................301
Headlamp wash............................................220
Head restraints, front......................................79
Head restraints, rear.......................................83
Heating................................................94, 95, 97
Hill start assist...............................................138
Hooks............................................................ 116
Horn...............................................................224

.
337
Alphabetical index
C4-Picasso-II_en_Chap11_index-alpha_ed01-2016
Net................................................................. 118
Number plate lamps......................................309
Oil consumption............................................274
OIl,engine.....................................................274
Openingthebonnet......................................271
Safety, children.....................232,234,238-256
Scented air freshener...................................103
Openingtheboot................................51,53,63
Openingthedoors....................................51,53
Openingthepanoramicsunroofblind..........223
Pads,brake...................................................278
Paint colour code..........................................331
Panoramicglasssunroof..............................223
Parcel shelf, rear....................................111, 116
ParkAssist....................................................192
Parkingbrake,
electric................................................ 131,278
Parkingsensors,front...................................188
Parkingsensors,rear....................................187
Plates, identification......................................331
Port, USB......................................................109
Pressures, tyres................... 285,290,300,331
Pre-tensioning
seat belts....................................................232
Primingthefuel
system.........................................................321
Protectingchildren................232,234,238-256
Puncture........................................................284
P
N
O
S
Maintenance, routine........................................9
Mapreadinglamps.......................................121
Markings,identification.................................331
Massagefunction...........................................80
Mats............................................................... 110
Memorisingaspeed.....................................149
Mirror, child surveillance...............................205
Mirror, rear view............................................204
Mirrors, door......................... 102,182,203,204
Misfuel prevention.........................................258
Modularity, seats.............................................89
Motorisedtailgate.....................................64-66
Mountings,Isofix...........................................249
Multimedia, rear............................................ 113
M
Range..............................................................50
Range,AdBlue................................................42
Readinglamps,rear...................................... 111
Rearscreen,demisting.................................102
Rechargingthebattery.................................317
Recirculation, air................................ 94, 96, 98
Reduction of electrical load..........................265
Regenerationoftheparticlefilter.................277
Reinitialisation of the under-inflation
detection system.........................................201
Reinitialisingtheremotecontrol.....................58
Remote control...........................................51-59
Removingawheel........................................297
Removingthemat......................................... 110
Replacingbulbs............................................301
Replacingfuses............................................310
Replacingtheairfilter...................................277
Replacingtheoilfilter...................................277
Replacingthepassenger
compartment filter......................................277
Resettingtheserviceindicator.......................39
Resettingthetriprecorder..............................45
Reversingcamera.........................................189
Reversinglamp.....................................305-308
Roof bars.......................................................269
Runningoutoffuel(Diesel)..........................321
R

338
Alphabetical index
C4-Picasso-II_en_Chap11_index-alpha_ed01-2016
Screen, cold climate.....................................261
Screenwash, front.........................................220
Screenwash, rear..........................................219
SCR (Selective Catalytic Reduction)............279
Seat belts............................................. 228, 244
Seats, electric.................................................77
Seats, front.......................................... 75, 77, 78
Seats, heated..................................................81
Seats, rear.................................... 82, 84, 86, 87
Selector,gear................................................140
Serial number, vehicle..................................331
Service indicator.............................................37
Servicing...........................................................9
Settings,equipment.................................. 11,13
Sidelamps............ 206,210,301,303,305,307
Side repeater................................................305
Snow chains..................................................260
Socket,12Vaccessory................ 105, 109, 112
Sockets,audio..............................................109
Speed limiter.................................149, 152, 154
Speedlimitrecognition.................................150
Spotlamps, side....................................214,305
Stability control (ESC)...................................225
Startingthevehicle....................... 125, 127, 128
Startingusinganotherbattery......................316
Stay, bonnet..................................................271
Steeringwheel,adjustment............................91
Stop.................................................................27
Stoppingthevehicle..................... 125, 127, 128
Stop & Start................25,50,93,102,146,147,
257,271,277,315,318
Stop(warninglamp)........................................27
Storage.......................................... 106, 110, 112
Storingdrivingpositions.................................78
Sun visor.......................................................106
Sun visor flap................................................106
Synchronisingtheremotecontrol...................58
W
Warningandindicatorlamps.................... 21-36
Warninglamp,brakingsystem.......................31
Warninglamp,Dieselenginepre-heater.......24
Warninglamp,SCRemissionscontrol
system...........................................................36
Warninglamp,Service....................................29
Warninglamp,Stop........................................27
Washing(advice)...........................................278
Weights.........................................324,328,329
Wheel, spare......................................... 291-294
Window controls.............................................73
Wiperblades(changing)...................... 222, 268
Wiper, rear.....................................................219
Wipers.............................................25, 218, 221
Wipers, automatic rain sensitive...........218, 221
Under-inflation (detection)............. 34,200,290
Unlocking.................................................. 51,53
Unlockingfromtheinside...............................60
Unlockingtheboot..........................................51
Unlockingthedoors........................................60
Urea...............................................................279
U
T V
Tableofweights............................324,328,329
Tablesofengines......................... 322,326,327
Tables of fuses..............................................310
Tailgate......................................................63,65
Tank,AdBlue
®
additive.................................279
Tank,fuel...............................................257, 258
Technical data....................................... 322-330
Temperature, coolant......................................40
Three flashes (direction indicators)..............215
Tools...................................................... 291-294
Torch.............................................................120
Total distance recorder...................................45
Touch screen tablet........................................11
Towbar...........................................124, 262, 264
Towed loads..................................324,328,329
Towinganothervehicle.................................320
Traction control (ASR)..............26,31,225,227
Trailer............................................124,264,319
Triangle,warning...........................................283
Trip computer............................................ 48-50
Trip distance recorder.....................................45
Tyres..........................................................9,331
Tyre under-inflation
detection.............................. 34,200,202,290
Ventilation.............................. 92,93,94,95,97
Visibility.........................................................102
Vision360°....................................................190


C4-Picasso-II_en_Chap11_index-alpha_ed01-2016

C4-Picasso-II_en_Chap11_index-alpha_ed01-2016
16B78.0010
Arial Bold
12 pt
03-16
4DCONCEPT
DIADEIS
Interak
Labelsareappliedatvariouspointsonyourvehicle.They
carrysafetywarningsaswellasvehicleidentication
information.Donotremovethem:theyformanintegralpart
ofyourvehicle.
Automobiles CITROËN declares, by application of the
provisionsoftheEuropeanlegislation(Directive2000/53)
relatingtoEndofLifeVehicles,thatitachievesthe
objectivessetbythislegislationandthatrecycledmaterials
areusedinthemanufactureoftheproductsthatitsells.
Reproduction or translation of all or part of this document
is prohibited without written authorisation from Automobiles
CITROËN.
Wedrawyourattentiontothefollowingpoints:
- Thettingofelectricalequipmentoraccessoriesnot
listed by CITROËN may cause faults and failures
withtheelectricalsystemofyourvehicle.Contact
aCITROËNdealerforinformationontherangeof
recommendedaccessories.
- Asasafetymeasure,accesstothediagnosticsocket,
usedforthevehicle'selectronicsystems,isreserved
strictlyforCITROËNdealersorqualiedworkshops,
equippedwiththespecialtoolsrequired(riskof
malfunctionsofthevehicle'selectronicsystemsthat
couldcausebreakdownsorseriousaccidents).The
manufacturer cannot be held responsible if this advice is
notfollowed.
- Anymodicationoradaptationnotintendedor
authorised by Automobiles CITROËN or carried out
withoutmeetingthetechnicalrequirementsdenedby
the manufacturer would lead to the suspension of the
legalandcontractualwarranties.
Printed in the EU
Anglais
Foranyworkonyourvehicle,useaqualiedworkshop
thathasthetechnicalinformation,skillsandequipment
required,allofwhichaCITROËNdealerisabletoprovide.
*SubjecttoofcialpublicationoftheresultsbytheFIA.
16B78.0010
Arial Bold
12 pt
C4-Picasso-II_en_Chap00_couv-imprimeur_n_ed01-2016
16B78.0040
Anglais
*16B78.0040*
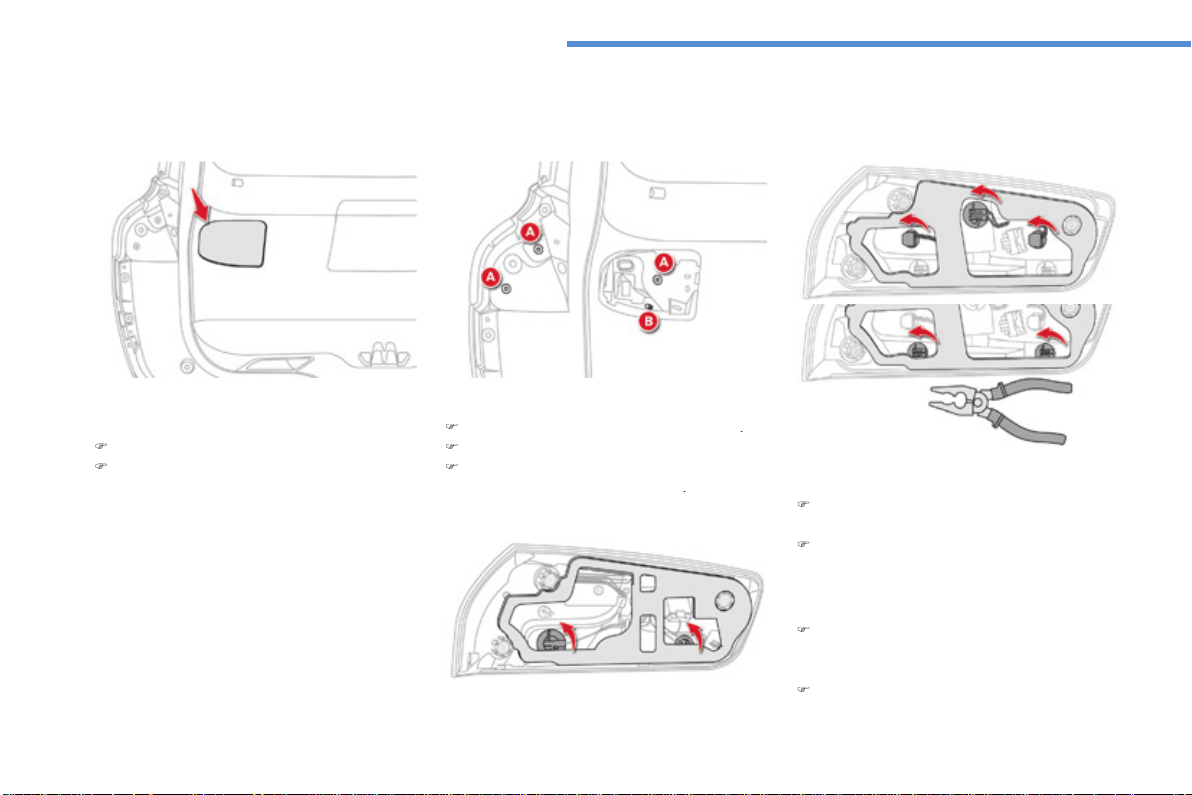
306
In the event of a breakdown
C4-Picasso_II_en_Chap08_en_cas_panne_p306_ed01-2016
Lamps on the tailgate
For reassembly, carry out these operations in
reverse order.
Identify the failed bulb.
Open the boot.
Remove the access cover.
Remove the three lamp fixing screws
A
.
Disconnect the lamp connector.
Carefully remove the lamp from the outside
by pressing the retaining clip
B
.
To change a reversing lamp or direction
indicator bulb:
Use a standard pair of pliers to turn the
bulb holder a quarter turn anticlockwise,
and pull it out.
Change the bulb.
Model with LED lamps
Model with conventional bulb lamps
To change a sidelamp and brake lamp bulb:
Turn the bulb holder a quarter of a turn
anti-clockwise and pull the bulb out.
Change the bulb.
Transversal-Citroen_en_Chap00_debut
AUDIO AND TELEMATICS GUIDE

Transversal-Citroen_en_Chap00_debut
On-line handbook
If the "MyCITROËN" function is not available on the CITROËN public
website for your country, you can fi nd your handbook at the following
address:
http://service.citroen.com/ddb/
Find your handbook and the audio and telematic systems on the
CITROËN website, under "MyCITROËN".
Find your handbook and the audio and telematic systems on the
CITROËN website, under "MyCITROËN".
Find your handbook and the audio and telematic systems on the
Select:
Select one of the following means of access to view your handbook on-
line...
the language,
the vehicle, its body style,
the print edition of your handbook appropriate for the date of
registration of your vehicle.
Referring to the handbook on-line also gives you access to the latest
information available, easily identifi ed by the bookmark, associated with
this symbol:
1
.
Audio and Telematics
CITROËN Connect Nav
GPS satellite navigation - Applications - Multimedia audio - Bluetooth
®
GPS satellite navigation - Applications - Multimedia audio - Bluetooth
®
GPS satellite navigation - Applications - Multimedia audio - Bluetooth
telephone
®
telephone
®
Contents
First steps 2
Steering mounted controls 5
Menus 6
Voice commands 8
Navigation 14
Connected navigation 30
Applications 40
Radio Media 54
Telephone 66
Settings 78
Frequently asked questions 88
The system is protected in such a way
that it will only operate in your vehicle.
Displaying of the
Energy Economy
Mode
message signals that a change
to standby is imminent.
The different functions and settings
described vary according to the version
and configuration of your vehicle.
The link below gives access to OSS
(Open Source Software) codes for the
system.
http://www.psa-peugeot-citroen.com/oss
As a safety measure and because it
requires sustained attention by the
driver, the pairing of a Bluetooth mobile
telephone with the Bluetooth hands-
free system of your audio system must
be done with the
vehicle stationary
and the ignition on.
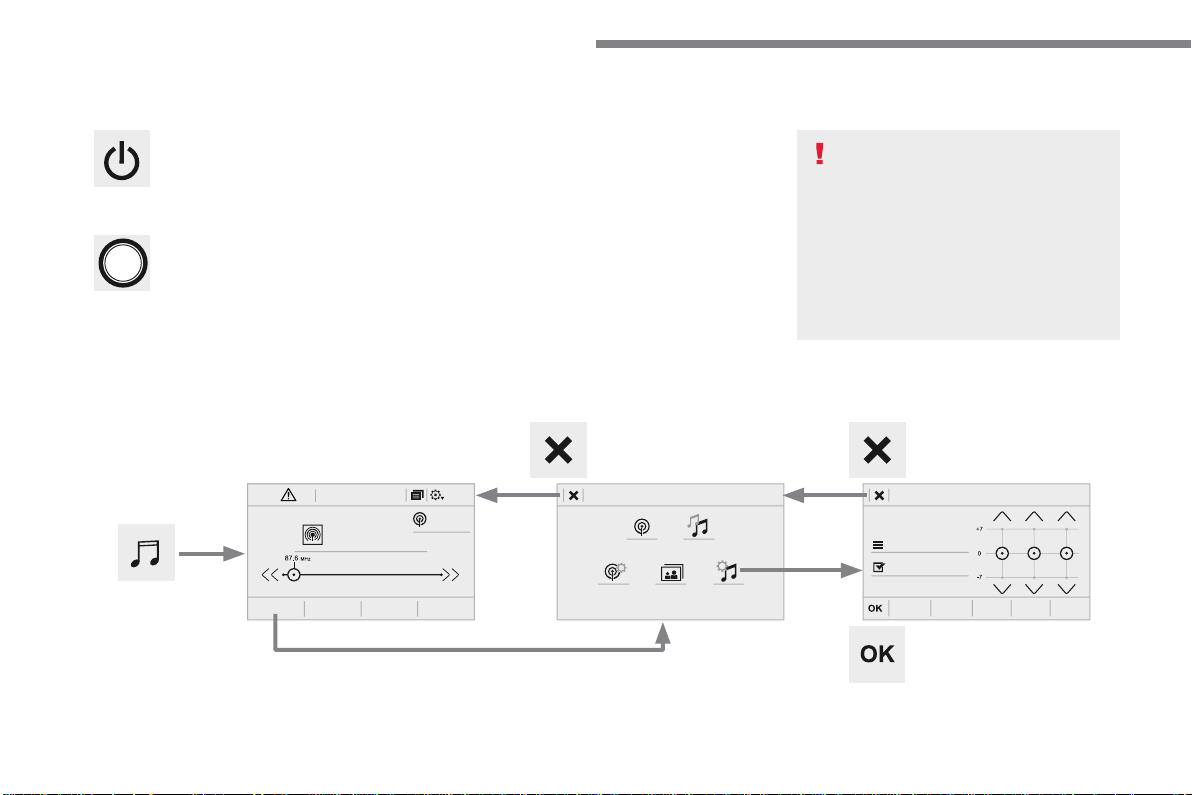
2
FM/87.5 MHz
87.5MHz
12:1318,5 21,523 °C
Audio and Telematics
First steps
With the engine running, a press
mutes the sound.
With the ignition off, a press turns the
system on.
Volume.
Use the buttons either side of or below the
touch screen for access to the menus, then
press the virtual buttons in the touch screen. All
of the touch areas of the screen are white.
Press the cross to go back a level.
Press "OK" to confirm.
The touch screen is of the "capacitive"
type.
To clean the screen, use a soft, non-
abrasive cloth (spectacles cloth) with
no additional product.
Do not use sharp objects on the
screen.
Do not touch the screen with wet
hands.
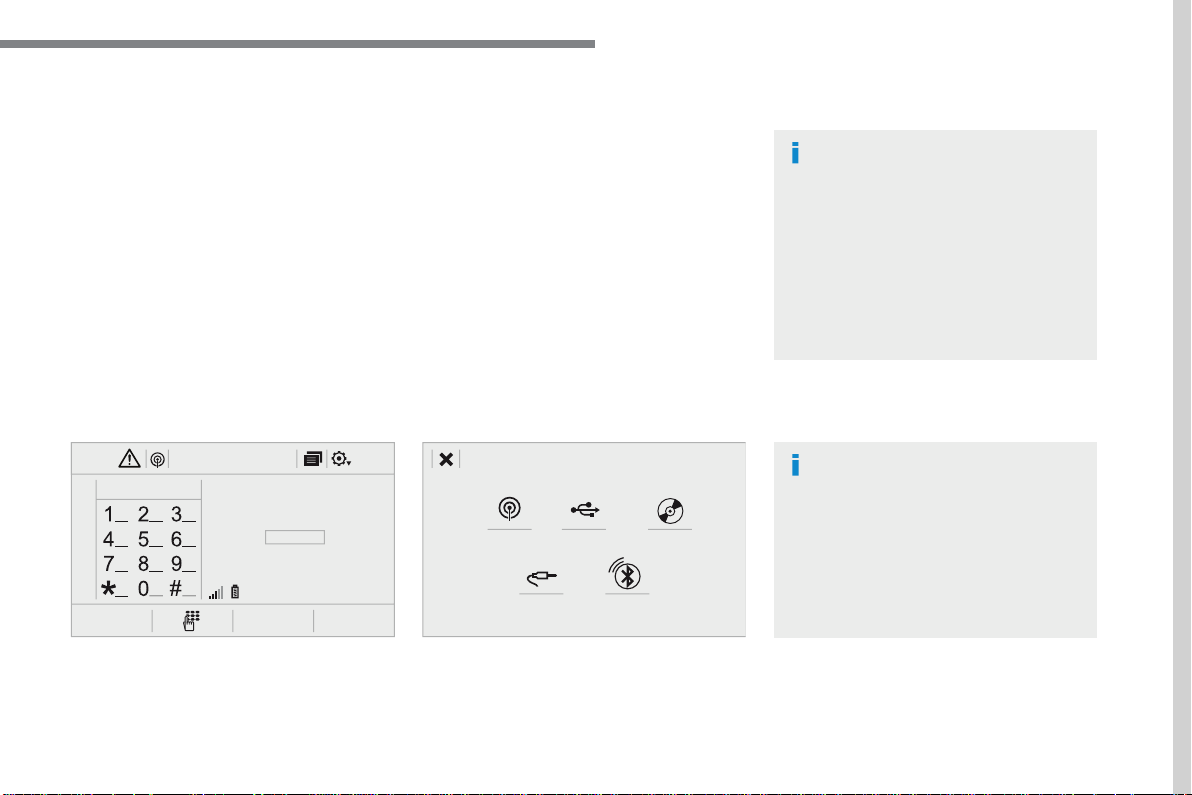
3
.
12:1318,5 21,523 °C
Audio and Telematics
Select the audio source (depending on
version):
- FM / DAB * / AM * radio stations.
- USB memory stick.
- CD player.
- Media player connected via the auxiliary
socket (Jack, cable not supplied).
- Telephone connected by Bluetooth * using
Bluetooth * audio streaming.
* Depending on equipment.
Certain information is displayed permanently in
the upper band of the touch screen:
- Reminder of the air conditioning
information and direct access to the
corresponding menu.
- Go directly to the selection of the audio
source, to the list of radio stations (or list of
titles depending on the source).
- Go to the message notifications, emails,
map updates and, depending on the
services, the navigation notifications.
- Go to the settings for the touch screen and
the digital instrument panel.
In very hot conditions, the volume may
be limited to protect the system. It may
go into standby (screen and sound off)
for at least 5 minutes.
The return to normal takes place when
the temperature in the passenger
compartment has dropped.
In the "Settings" menu you can create
a profile for just one person or a group
of people with common points, with
the possibility of entering a multitude
of settings (radio presets, audio
settings, navigation history, contact
favourites, ...); these settings are taken
into account automatically.

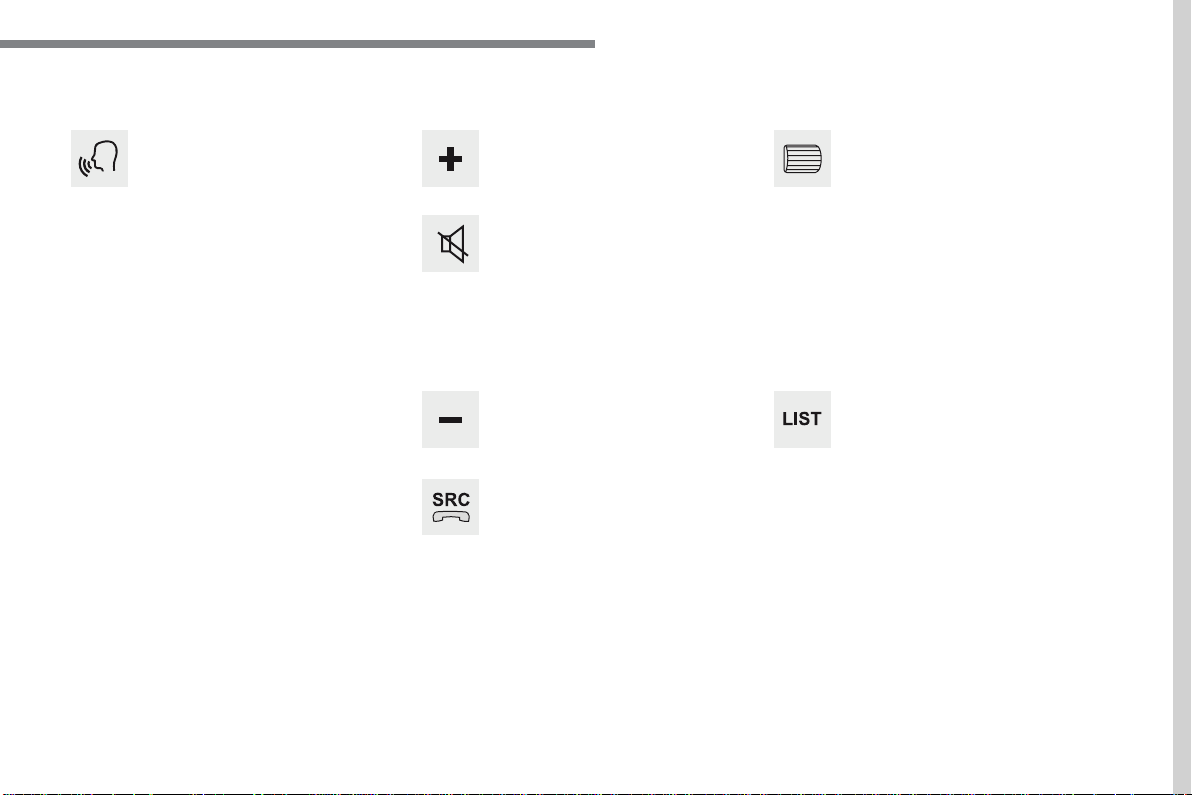
5
.
Audio and Telematics
Steering mounted controls
Media
(short press): change the
multimedia source.
Telephone
(short press): call.
Call in progress
(short press):
access to telephone menu.
Telephone
(long press): reject an
incoming call, end call, access to
telephone menu.
Decrease volume.
Voice commands
:
Short press, system voice
commands.
Long press, smartphone voice
commands via the system.
Mute / Restore the sound.
Or
Mute by pressing the volume
increase and decrease buttons
simultaneously.
Restore the sound by pressing one of
the two volume buttons.
Radio
(rotate): automatic search for
the previous / next station.
Media
(rotate): previous / next track,
move in a list.
Short press
: confirm a selection;
other than selection, access to
presets.
Radio
: display the list of stations.
Media
: display the list of tracks.
Radio
(press and hold): update the
list of stations received.
Increase volume.
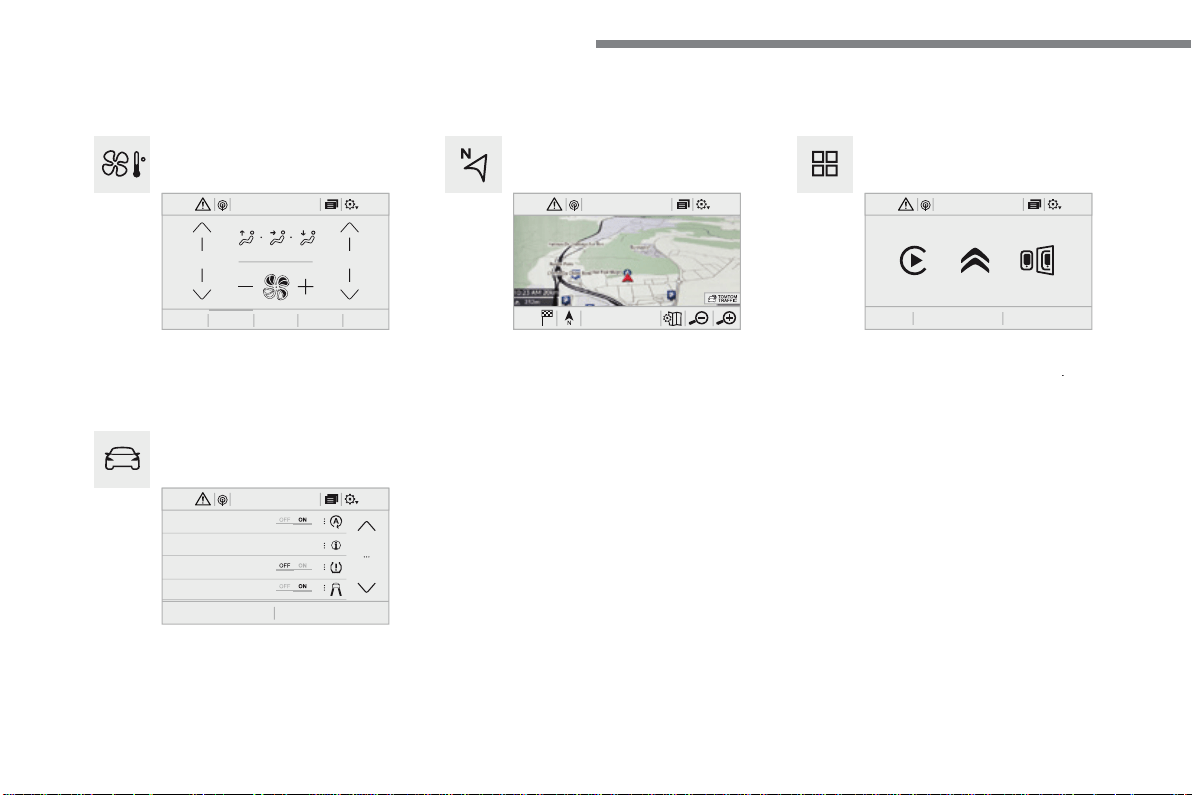
6
12:1318,5 21,523 °C
21,518,5
12:1323 °C 12:1318,5 21,523 °C
12:1318,5 21,523 °C
Audio and Telematics
Connected navigation
Driving
Applications
Enter navigation settings and choose a
destination.
Use services available in real time, depending
on equipment.
Activate, deactivate and configure certain
vehicle functions.
Operate certain applications on a smartphone
connected via CarPlay
®
or MirrorLink
®
or MirrorLink
®
TM
.
Check the state of the Bluetooth
®
and Wi-Fi
®
and Wi-Fi
®
connections.
Menus
Air conditioning
Manage the various temperature and air flow
settings.
A c c o r d i n g t o v e r s i o n
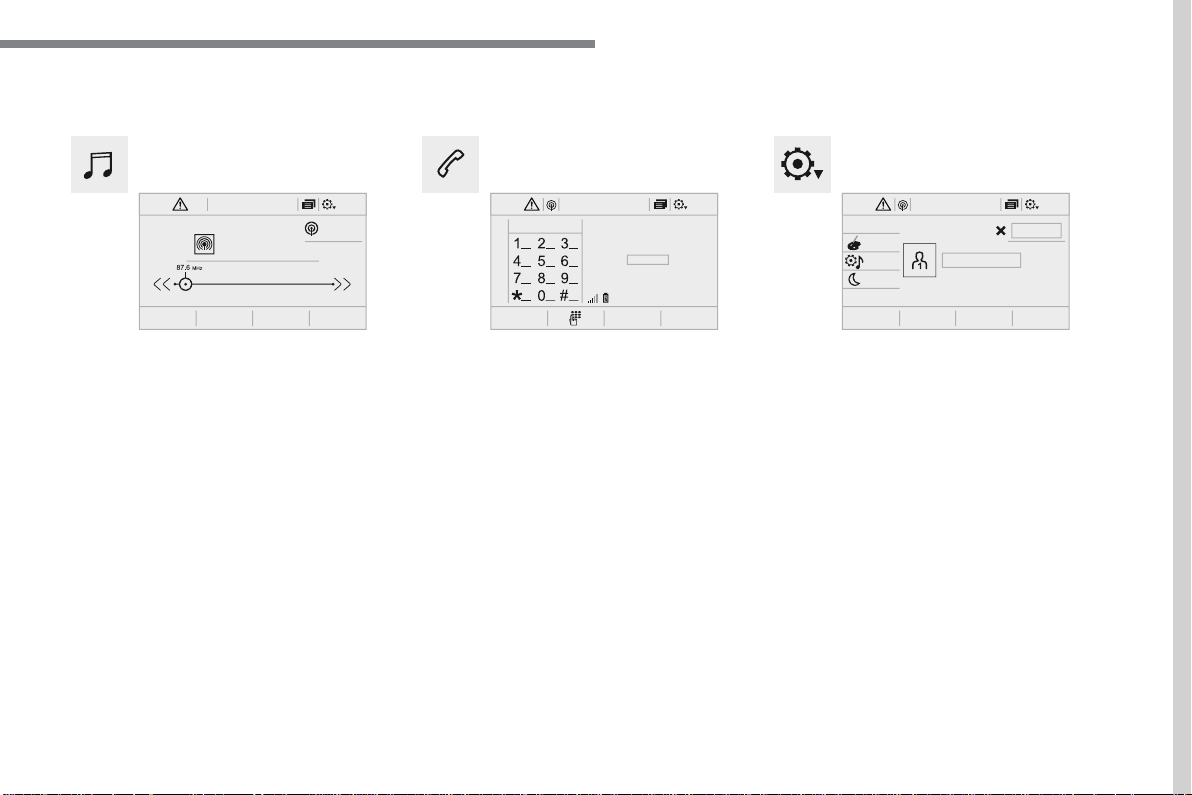
7
.
FM/87.5 MHz
87.5MHz
12:1318,5 21,523 °C 12:1318,5 21,523 °C 12:1318,5 21,523 °C
Audio and Telematics
Settings
Radio Media
Telephone
Configure a personal profile and/or configure
the sound (balance, ambience, ...) and the
display (language, units, date, time, ...).
Select an audio source, a radio station, display
photographs.
Connect a telephone by Bluetooth
®
, read
messages and emails and send quick
messages.
8
Audio and Telematics
Voice commands
First steps
Steering mounted controls
Information - Using the system
Press the Push To Talk
button and tell me what you'd
like after the tone. Remember
you can interrupt me at any
time by pressing this button. If you
press it again while I'm waiting for you
to speak, it'll end the conversation. If
you need to start over, say "cancel".
If you want to undo something, say
"undo". And to get information and tips
at any time, just say "help". If you ask
to me do something and there's some
information missing that I need, I'll
give you some examples or take you
through it step by step. There's more
information available in "novice" mode.
You can set the dialogue mode to
"expert" when you feel comfortable.
To ensure that voice commands are
always recognised by the system,
please observe the following
recommendations:
- speak in a normal tone without
breaking up words or raising your
voice.
- always wait for the "beep" (audible
signal) before speaking.
- for best operation, it is
recommended that the windows
and opening roof be closed to
avoid extraneous interference
(according to version).
- before making a voice command,
ask other passengers to not speak.
The voice commands, with a choice
of 12 languages (English, French,
Italian, Spanish, German, Dutch,
Portuguese, Polish, Turkish, Russian,
Arabic, Brazilian), are made using the
language previously chosen and set in
the system.
The voice commands in Arabic for:
"Navigate to address" and "Display POI
in the city", are not available.
Alternative synonyms can be used for
some voice commands.
E.g. Guide to / Navigate to / Go to /...
Example of a "voice command" for
navigation:
"Navigate to address 11 Regent
Street, London"
.
Example of a "voice command" for
the radio and media:
"Play artist Madonna"
.
Example of a "voice command" for
the telephone:
"Call David Miller"
.
Pressing this button activates the
voice commands function.
9
.
Audio and Telematics
Global voice commands
These commands can be made from any screen page after pressing the "Voice command" or "Telephone" button located on the steering
wheel, as long as there is no telephone call in progress.
"Voice command"
Help message
Help
There are lots of topics I can help you with.
You can say: "help with phone", "help with navigation", "help with media" or "help with
radio". For an overview on how to use voice controls, you can say "help with voice
controls".
Voice command help
Navigation help
Radio help
Media help
Telephone help
Set dialogue mode as <...>
Select "beginner" or "expert" mode.
Select profile <...>
Select profile 1, 2 or 3.
Yes
Say "yes" if I got that right. Otherwise, say "no" and we'll start that again.
No
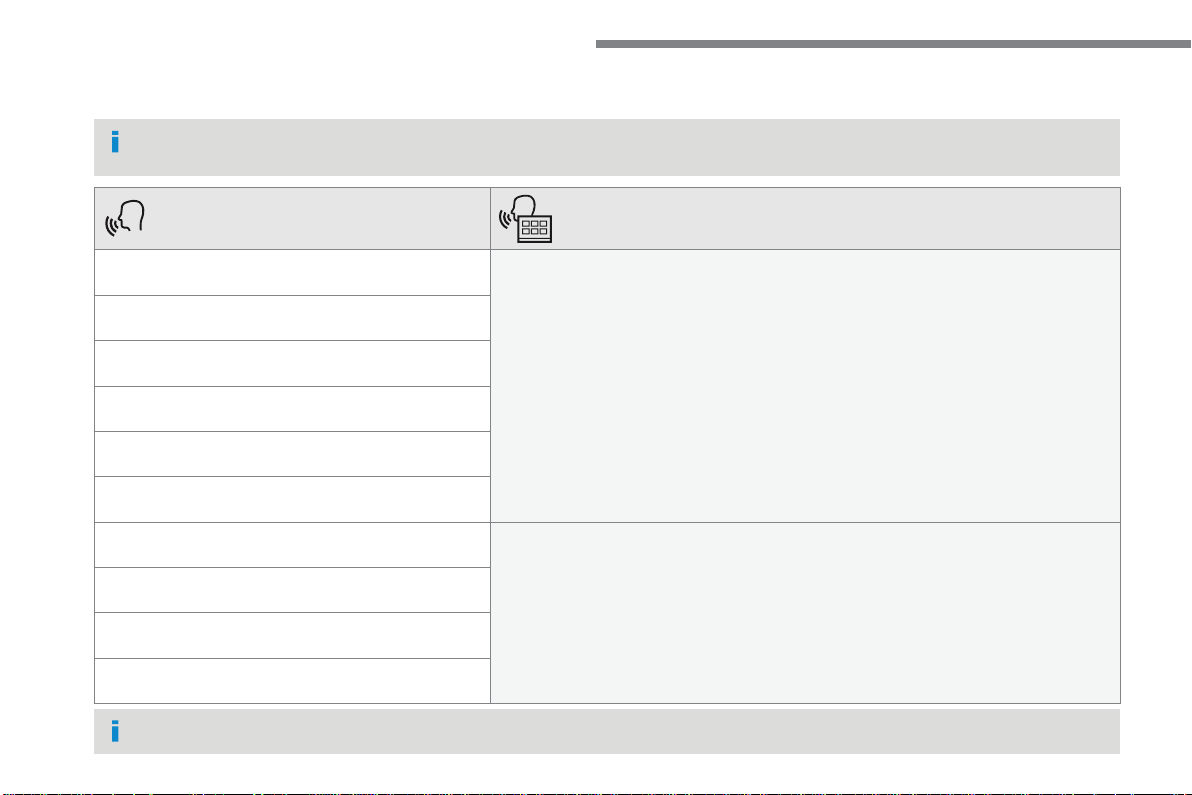
10
Audio and Telematics
"Navigation" voice commands
These commands can be issued from any screen page after pressing the "Voice command" or "Telephone" button on the steering wheel, as
long as there is no telephone call in progress.
Depending on the country, give the destination instructions (address) in the language used by the system.
"Voice command"
Help message
Navigate home
To start guidance or add a stopover, say "navigate to" and then the address or contact
name.
For example, "navigate to address 11 Regent Street, London", or "navigate to contact, John
Miller".
You can specify if it's a preferred or recent destination.
For example, "navigate to preferred address, Tennis club", "navigate to recent destination,
11 Regent Street, London". Otherwise, just say, "navigate home".
To see points of interest on a map, you can say things like "show hotels in Banbury" or
"show nearby petrol station".
For more information you can ask for "help with route guidance".
Navigate to work
Navigate to preferred address <...>
Navigate to contact <…>
Navigate to address <...>
Show nearby POI <...>
Remaining distance
To get information about your current route, you can say "tell me the remaining time",
"distance" or "arrival time".
Try saying "help with navigation" to learn more commands.
Remaining time
Arrival time
Stop route guidance
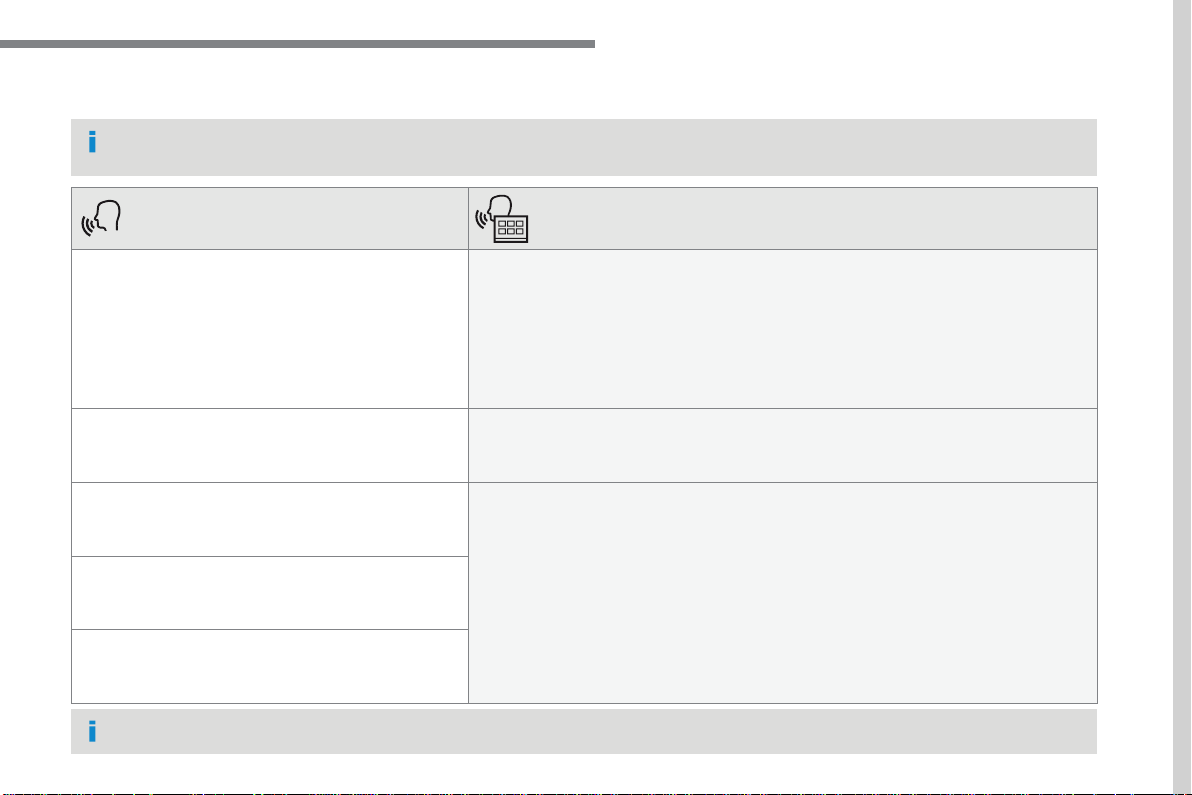
11
.
Audio and Telematics
"Radio Media" voice commands
These commands can be issued from any screen page after pressing the "Voice command" or "Telephone" button on the steering wheel, as
long as there is no telephone call in progress.
"Voice command"
Help message
Tune to channel <...>
You can pick a radio station by saying "tune to" and the station name or frequency.
For example "tune to channel Talksport" or "tune to 98.5 FM". To listen to a preset radio
station, say "tune to preset number". For example "tune to preset number five".
What's playing
To display the details of the current "track", "artist" and "album", you can say "What's
playing"
Play song <...>
Use the command "play" to select the type of music you'd like to hear.
You can pick by "song", "artist", or "album".
Just say something like "play artist, Madonna", "play song, Hey Jude", or "play album,
Thriller".
Play artist <…>
Play album <...>
Media voice commands are available only for a USB connection.
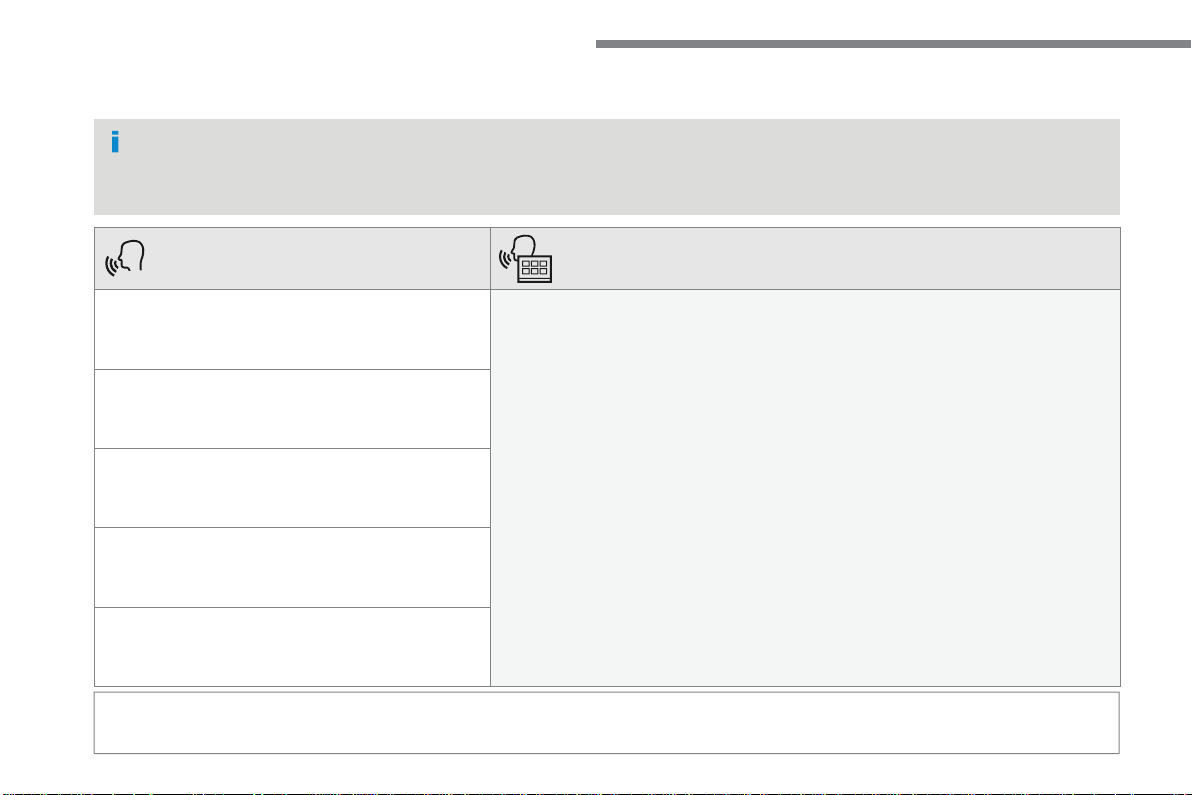
12
Audio and Telematics
"Voice command"
Help message
Call contact <...>
*
To make a phone call, say "call" followed by the contact name, for example: "Call David
Miller".
You can also include the phone type, for example: "Call David Miller at home". To make a
call by number, say "dial" followed by the phone number, for example,
"Dial 107776 835 417".
You can check your voicemail by saying "call voicemail".
To send a text, say "send quick message to", followed by the contact, and then the name of
the quick message you'd like to send.
For example, "send quick message to David Miller, I'll be late". To display the list of calls,
say "display calls".
For more information on SMS, you can say "help with texting".
Dial <...> *
Display contacts
*
Display calls
*
Call (message box | voicemail)
*
* This function is available only if the telephone connected to the system supports downloading of contacts and recent calls and if the download has
been done.
"Telephone" voice commands
If a telephone is connected to the system, these voice commands can be issued from any main screen page after pressing the "Telephone"
button on the steering wheel, as long as there is no telephone call in progress.
If there is no telephone connected by Bluetooth, a voice message announces: "Please first connect a telephone" and the voice session will be
closed.
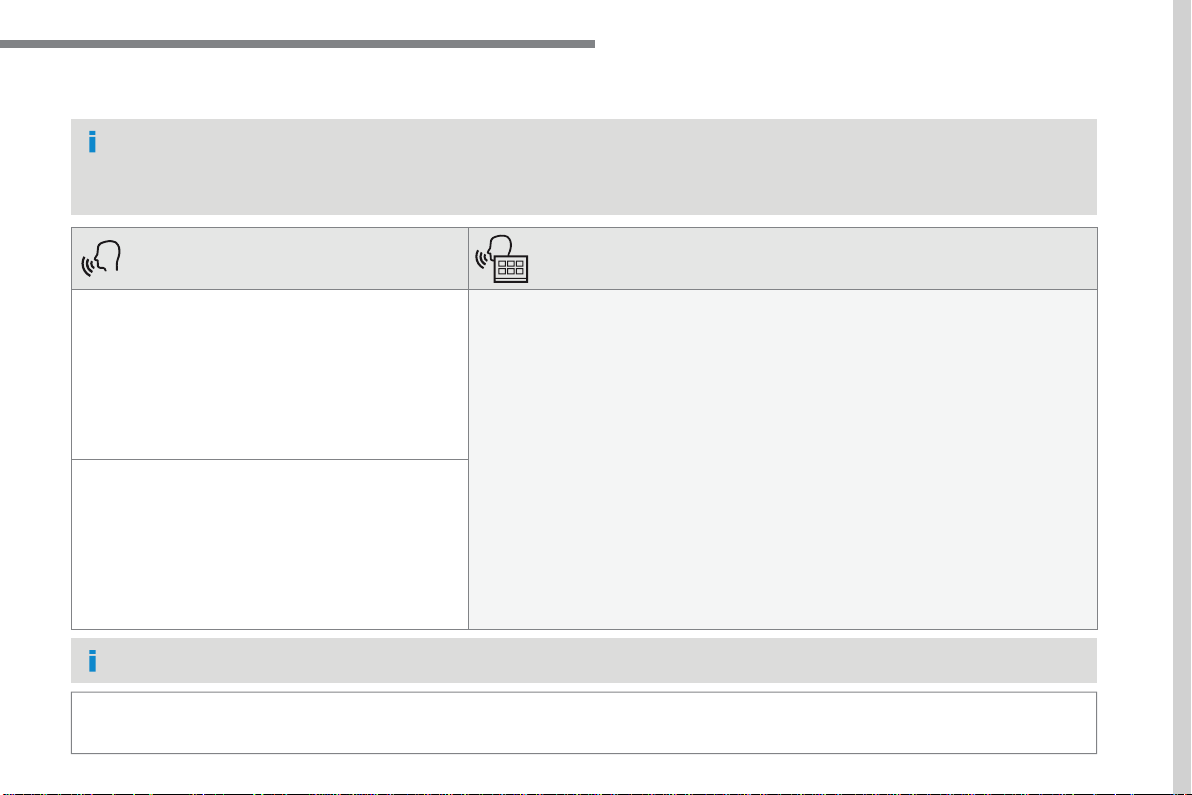
13
.
Audio and Telematics
"Voice command"
Help message
Send text to <...>
To hear your messages, you can say "listen to most recent message".
When you want to send a text, there's a set of quick messages ready for you to use. Just
use the quick message name and say something like "send quick message to Bill Carter,
I'll be late".
Check the phone menu for the names of the supported messages.
Please say "call" or "send quick message to", and then select a line from the list.
To move around a list shown on the display, you can say "go to start", "go to end", "next
page" or "previous page". To undo your selection, say "undo".
To cancel the current action and start again, say "cancel".
Listen to most recent message
*
"Test message" voice commands
If a telephone is connected to the system these voice commands can be issued from any main screen page after pressing the "Telephone"
button on the steering wheel, as long as there is no telephone call in progress.
If no telephone has been connected by Bluetooth, a voice message announces: "Please first connect a telephone" and the voice session will be
closed.
* This function is only available if the telephone connected to the system supports downloading of contacts and recent calls and if the download has
been done.
The system only sends pre-recorded "Quick messages".
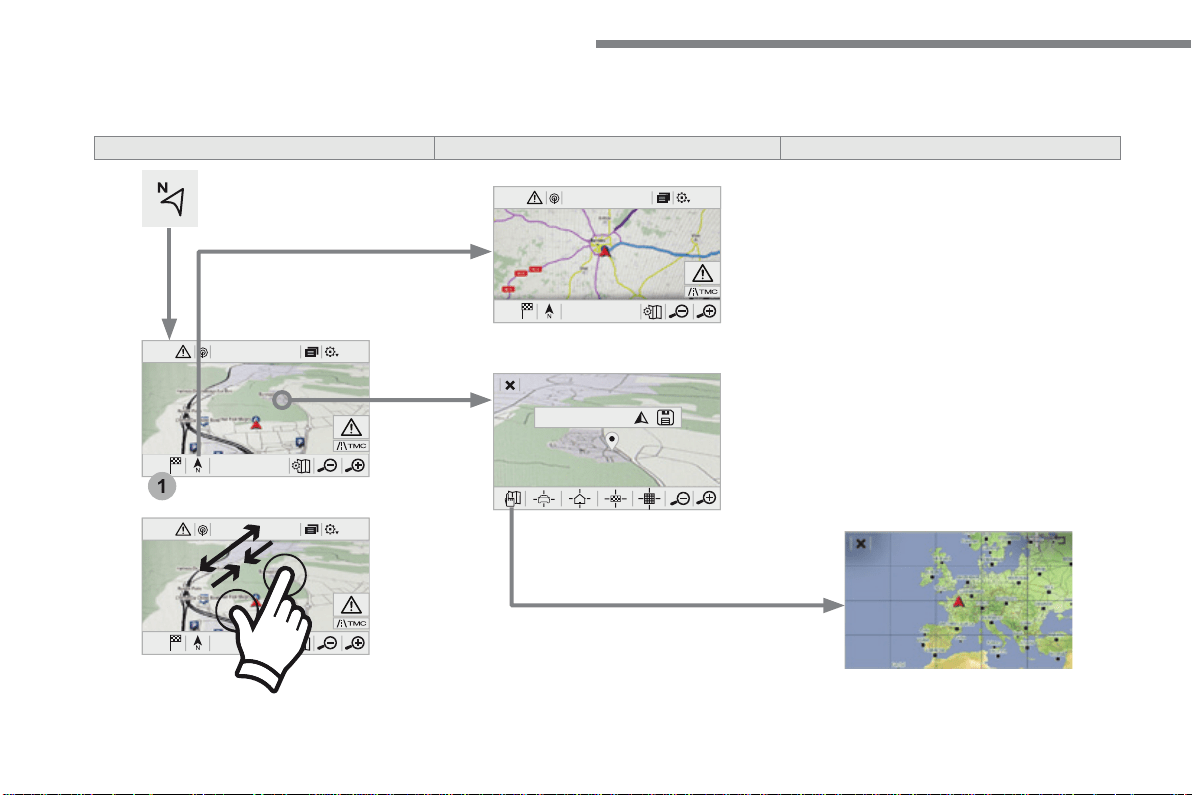
14
12:1318,5 21,523 °C
12:1318,5 21,523 °C
1
12:1318,5 21,523 °C
Audio and Telematics
Navigation
A c c o r d i n g t o v e r s i o n
Level 1
Level 2
Level 3
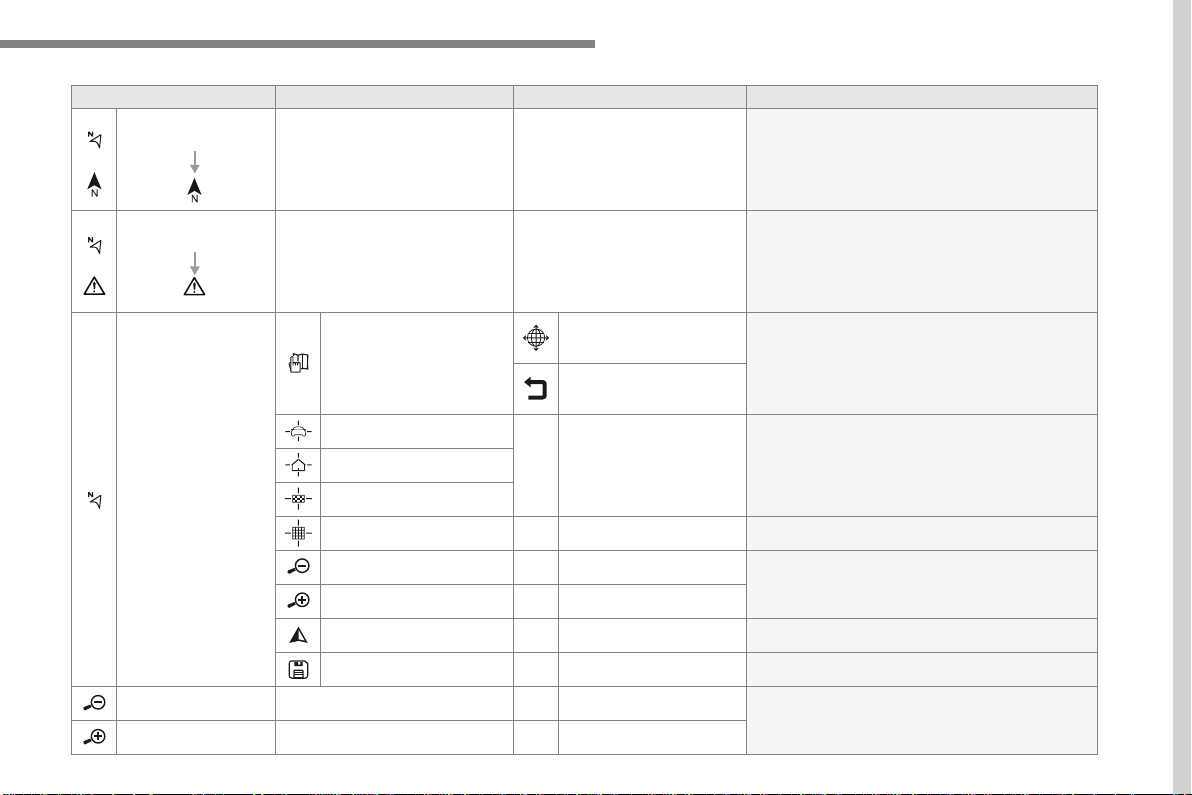
15
.
Audio and Telematics
Level 1
Level 2
Level 3
Comments
Navigation
Select the orientation of the map; north up,
vehicle direction up or perspective.
Navigation
Display the traffic information available.
Navigation
World map
Manually locate an area on the world map or enter
the latitude and longitude coordinates.
Around the vehicle
Display the location criteria selected.
Around home
Around the destination
2D mode
Switch to a 2D map.
Zoom out / zoom in using the touch buttons or
with two fingers on the screen.
Start navigation to the current address.
Save the current address.
Zoom out / zoom in using the touch buttons or
with two fingers on the screen.

16
12:1318,5 21,523 °C
1
2
3
4
5
6
7
12:1318,5 21,523 °C
Audio and Telematics
Level 1
Level 2
Level 3

17
.
7
2
3
4
5
6
Audio and Telematics
Level 1
Level 2
Level 3
Comments
Navigation
Stations
Activate or deactivate the content available
(stations, car parks, risk areas and danger areas).
Car park
Danger area
Map color
Select day or night mode for display of the map.
POI on map
Travel
Select the POIs available.
Active life
Commercial
Public
Geographic
Select all
Select or deselect all.
Save your choice or selection.
View map
Modify city
Select or modify a city.
Weather
Display on the map the content available in non-
connected mode.
Petrol Station
Car park
Traf fic
Danger area
Select POI
Select from the POIs available.
Zoom out / zoom in using the touch buttons or
with two fingers on the screen.
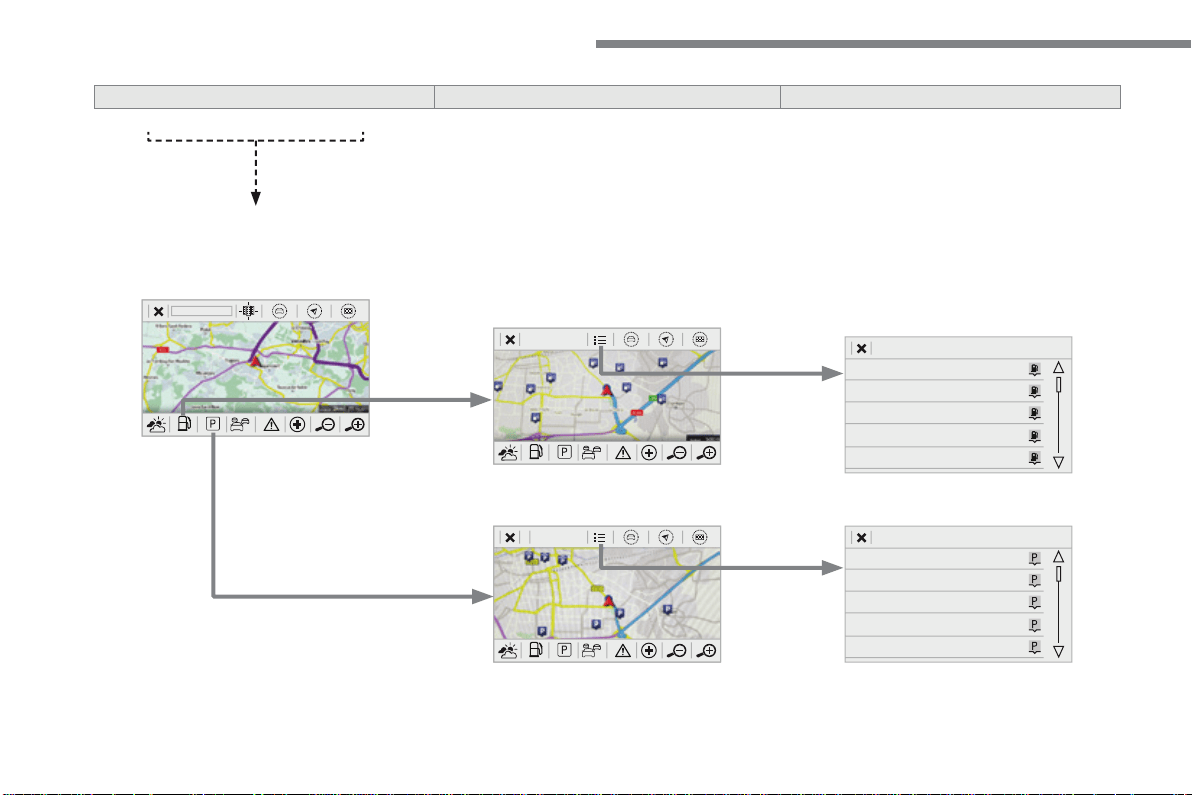
18
Audio and Telematics
Level 3
Level 4
Level 5
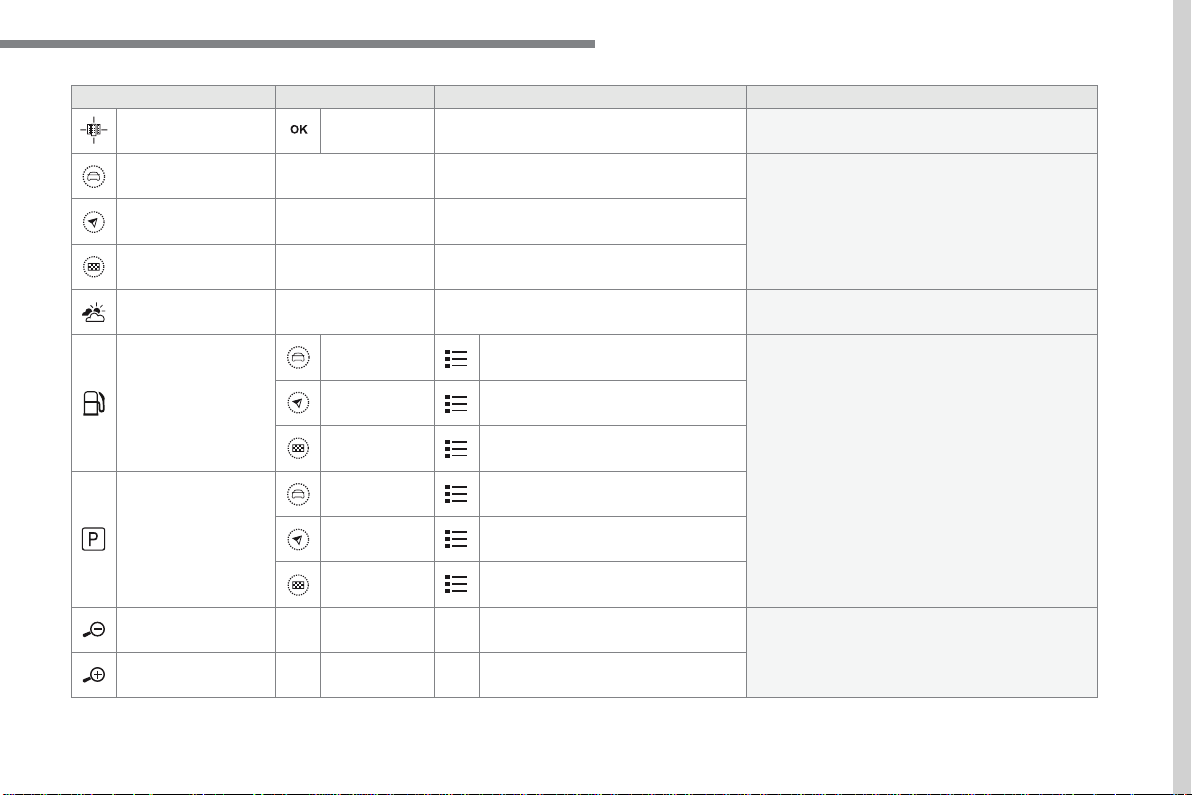
19
.
Audio and Telematics
Level 3
Level 4
Level 5
Comments
Zoom in
Zoom in around the city selected.
Around the vehicle
Select a location option.
On the route
At the destination
Weather
Weather information transmitted in TMC mode.
Filling stations
Filling stations around the vehicle
Display the list of POIs.
Filling stations on the route
Filling stations at the destination
Car park
Car parks around the vehicle
Car parks on the route
Car parks at the destination
Zoom out / zoom in using the touch buttons or
with two fingers on the screen.
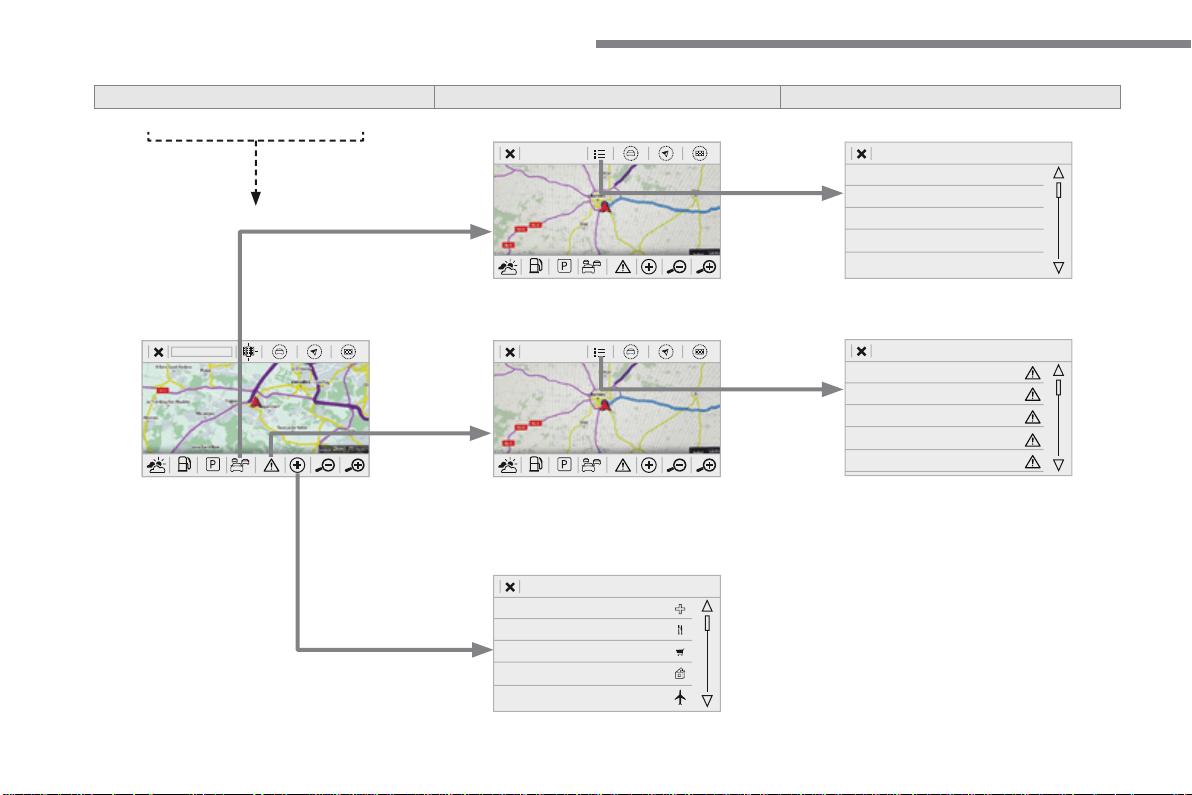
20
Audio and Telematics
Level 3
Level 4
Level 5
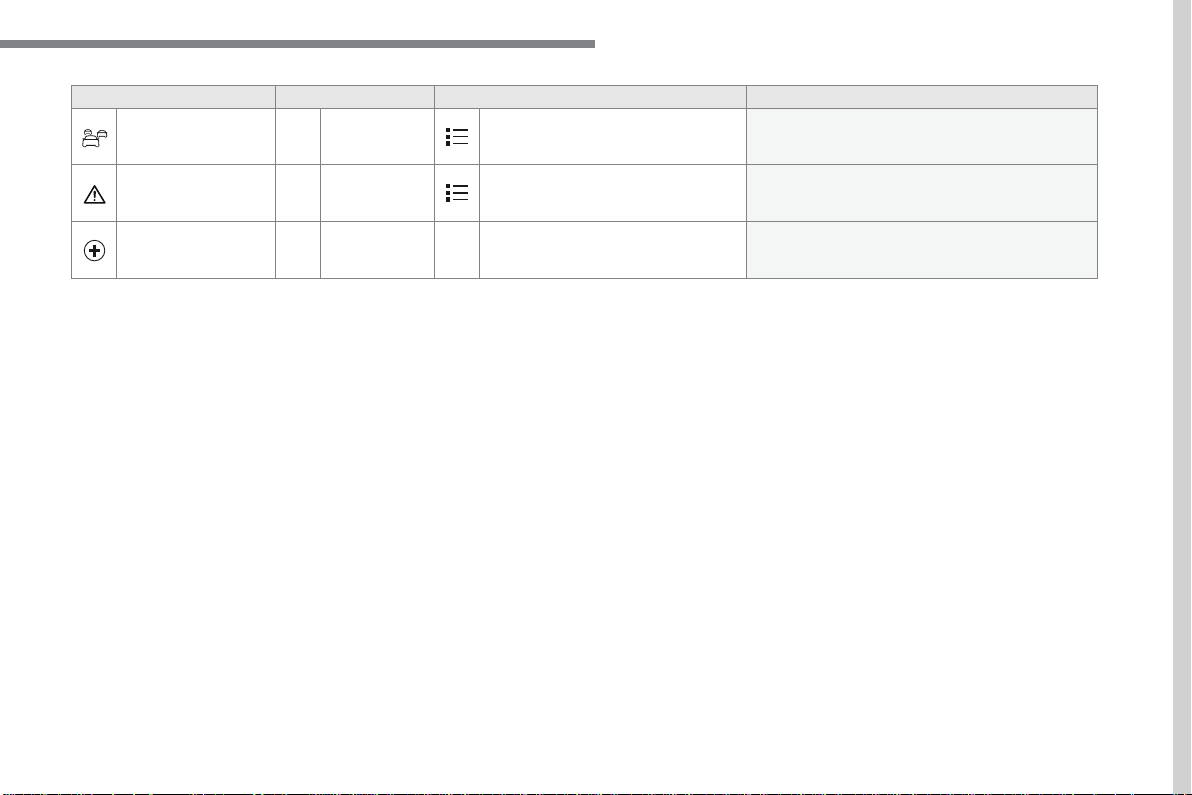
21
.
Audio and Telematics
Level 3
Level 4
Level 5
Comments
Traf fic
Traffic observed
Traffic information sent in real time.
Danger area
List of danger areas
Display the list of danger areas (roadworks,
breakdowns, accidents, ...).
Select POI
Configure a category of POI to display.
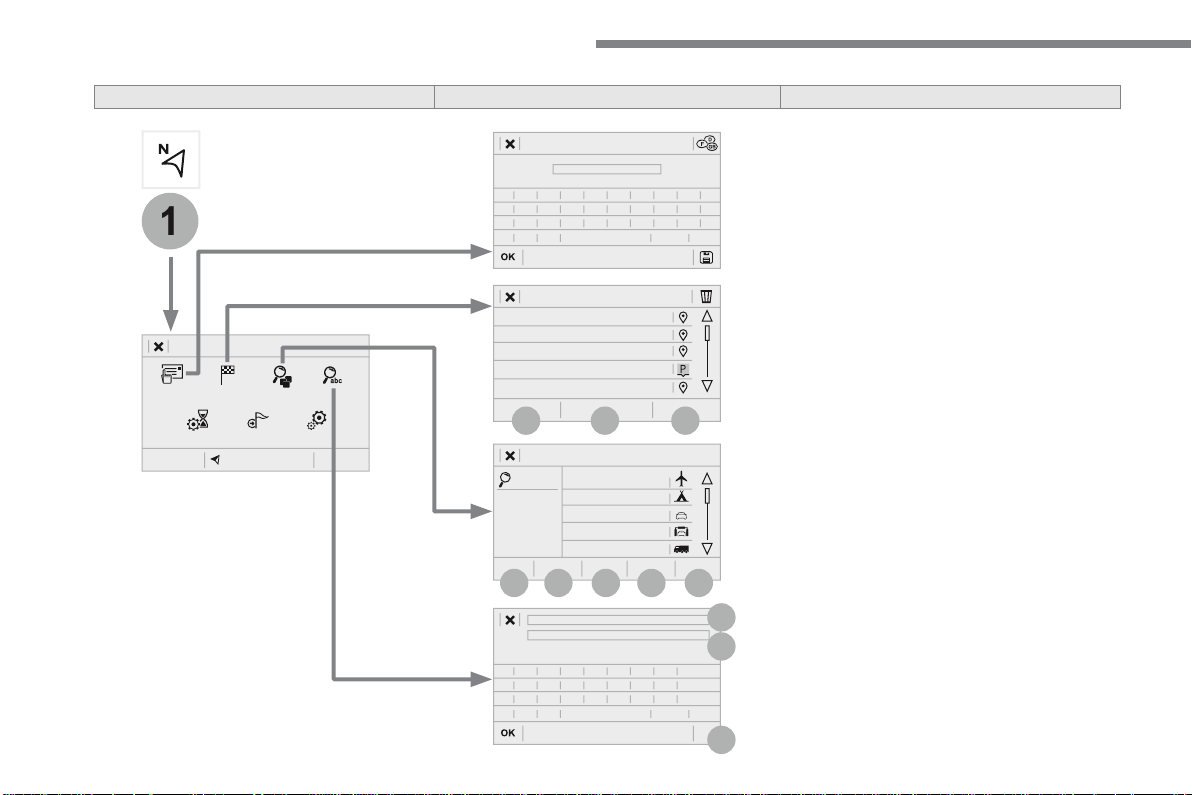
22
1
17
18
8
11
9
12
10
13
16
14
15
Audio and Telematics
Level 2
Level 3
Level 4
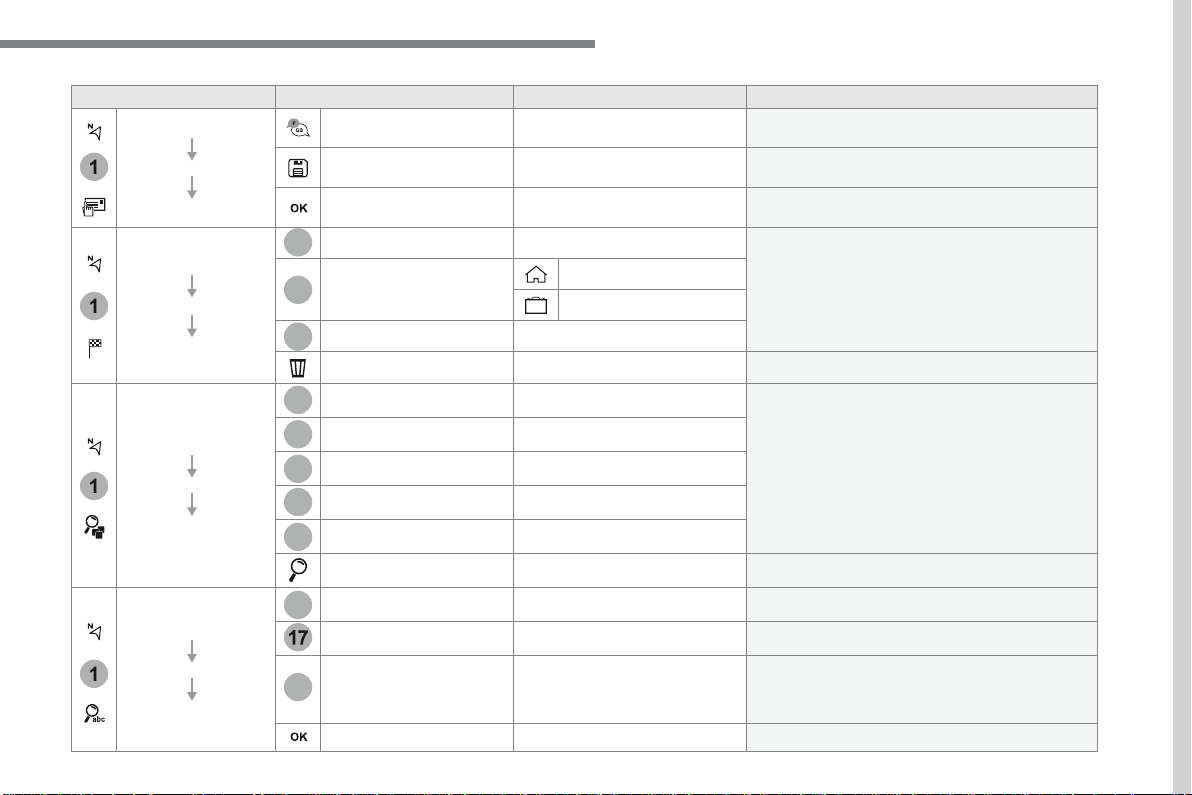
23
.
1
1
1
1
17
18
8
11
9
12
10
13
16
14
15
Audio and Telematics
Level 2
Level 3
Level 4
Comments
Navigation
MENU
Enter address
Select the country.
Save the current address.
Confirm the current address.
Navigation
MENU
My destinations
Recent
Display the lists of destinations and start
navigation.
Preferred
My home
My work
Contact
Delete one or more destinations.
Navigation
MENU
Points of interest
Travel
List of categories available.
After selection of category, select the point of
interest.
Active life
Commercial
Public
Geographic
Search
Search for a point of interest.
Navigation
MENU
Search
Point of interest
Enter a point of interest.
Address
Enter the address of a point of interest.
Local
/
Connected
Enter settings for the POI search mode in a local
or connected database depending on the services
subscribed to.
Confirm the entry.
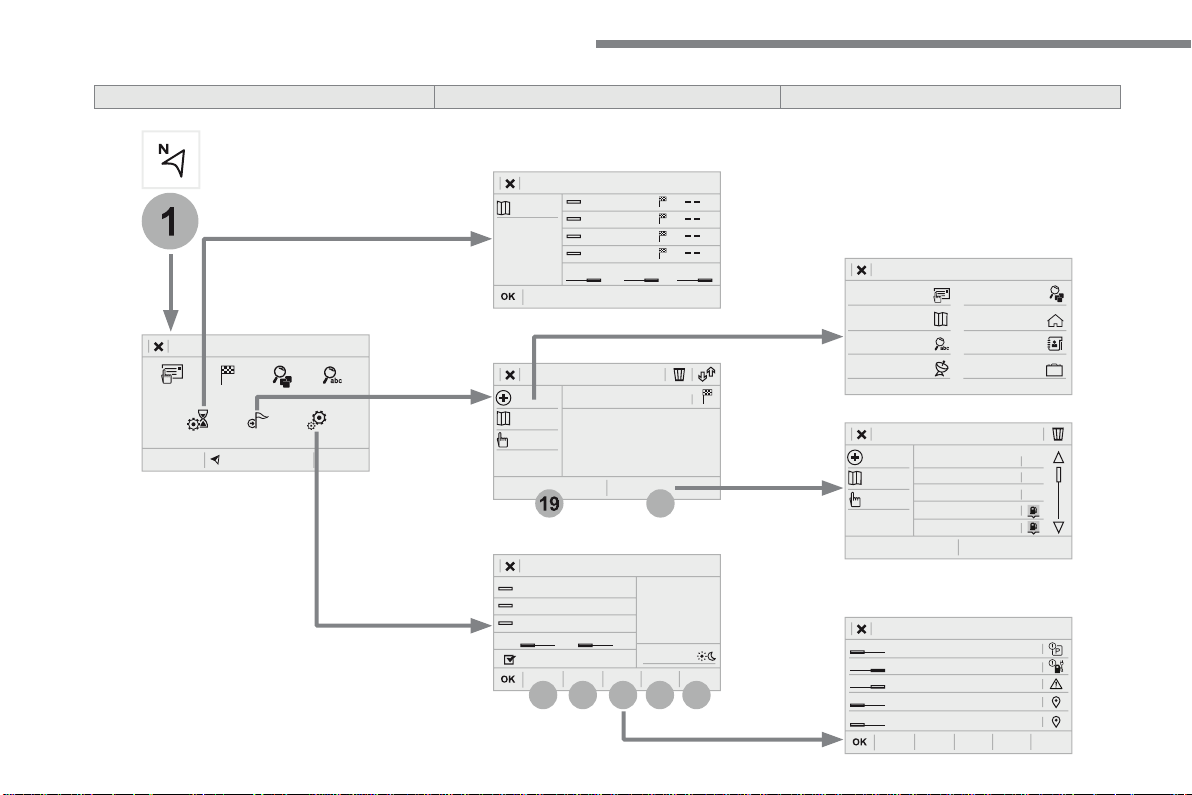
24
1
19
21
20
22
23
24
25
Audio and Telematics
Level 2
Level 3
Level 4
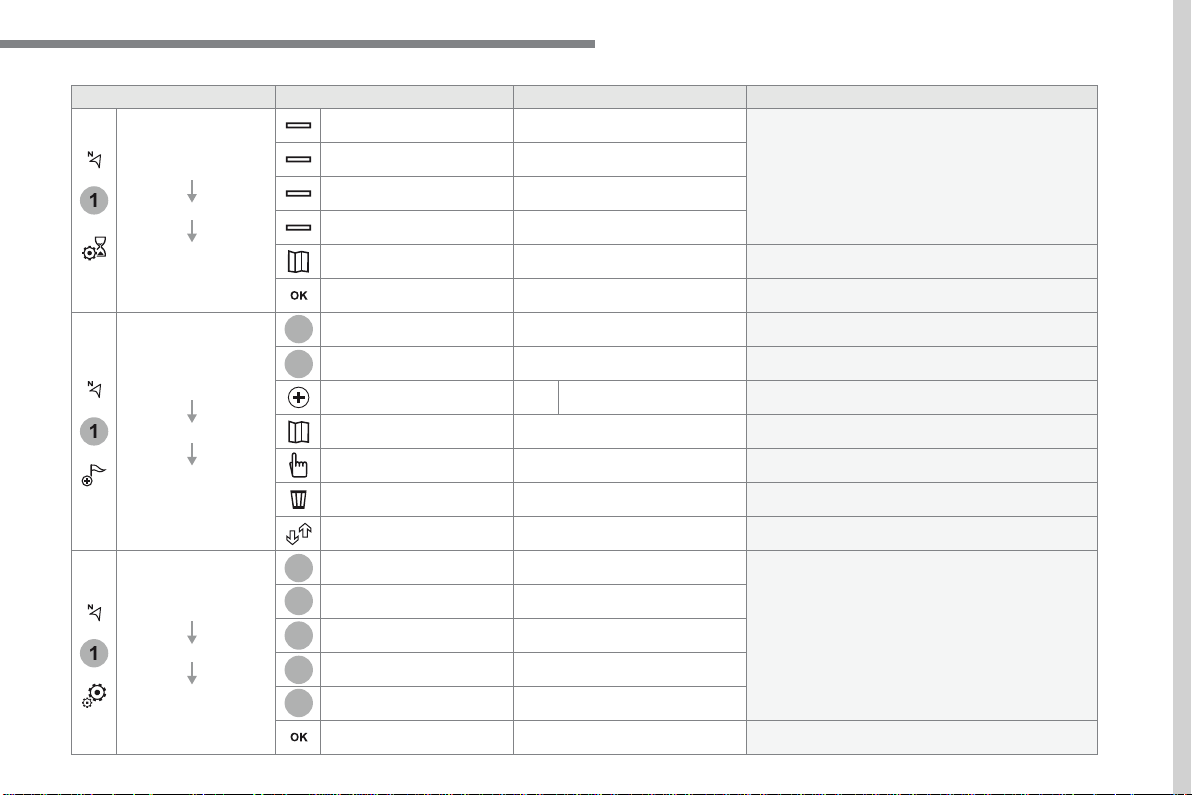
25
.
1
1
1
19
21
20
23
22
24
25
Audio and Telematics
Level 2
Level 3
Level 4
Comments
Navigation
MENU
Guidance criteria
Fast
Select the guidance criteria (motorways, tolls and
how traffic is taken into account).
Short
Compromise
Ecological
See on map
Display the route selected using the criteria.
Save your selections.
Navigation
MENU
Routes / waypoints
Waypoints
Display the waypoints saved.
Route
Display details of the route.
Add waypoint
Add a waypoint
Add a waypoint from a list offered.
Preview
Display the map.
Finish
Press to calculate the route.
Delete one or more waypoints.
Move a waypoint in the list.
Navigation
MENU
Settings
Aspects
Enter choices and select the volume for the voice
and stating the names of streets.
Options
Alerts
Vocal
Mapping
Save the selections adopted.
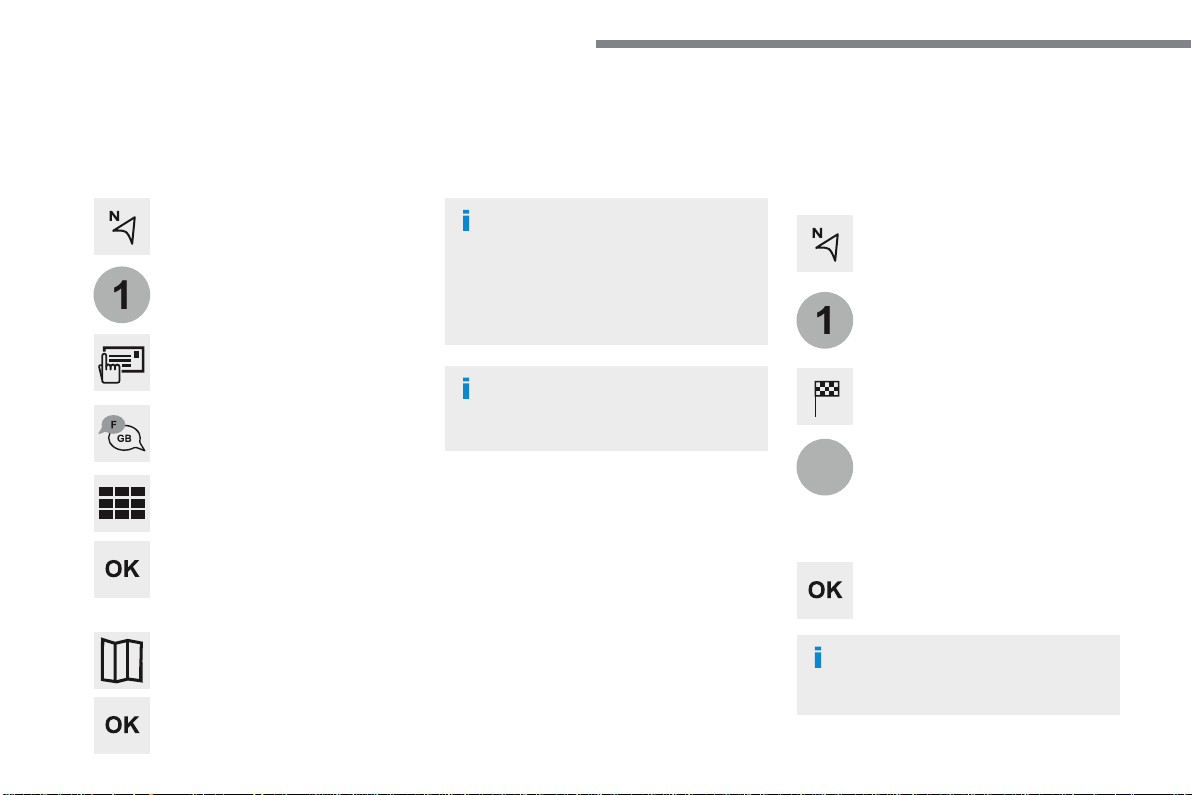
26
1
1
8
Audio and Telematics
Choosing a new destination
Select "
Enter address
".
Select "
See on map
" to select the
"
Guidance criteria
".
Select the "
Country
".
Press "
OK
" to select the "
Guidance
criteria
".
Press "
OK
" to start navigation.
Press "
OK
" to start navigation.
And / Or
Press
Navigation
to display the
primary page.
Press the "
MENU
" button to go to the
secondary page.
Towards a new destination
Towards a recent destination
Select "
My destinations
".
Press
Navigation
to display the
primary page.
Press the "
MENU
" button to go to the
secondary page.
Enter the "
City
", the "
Street
" and the
"
Number
" and confirm by pressing
on the suggestions displayed.
Select the "
Recent
" tab.
Select the address chosen in the list to display
the "
Guidance criteria
".
To use the navigation system, it is
necessary to enter the "
City
", the
"
Street
" and the "
Number
" using the
virtual keypad, or to take them from the
list of "
Contacts
" or from the "
History
"
of addresses.
Without confirmation of the street
number, you will be guided to one end
of the street.
Select "
Position
" to see the point of
arrival geographically.
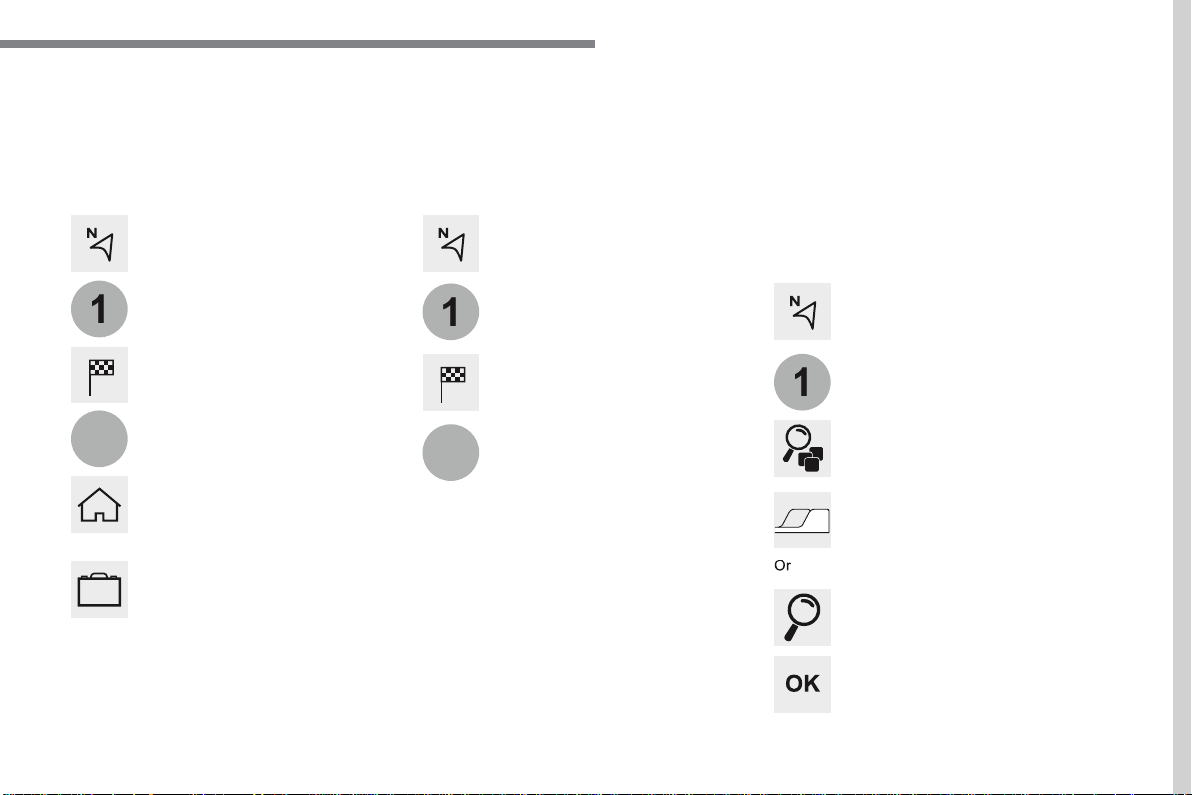
27
.
1
10
1
1
9
Audio and Telematics
Or
Towards a contact
Select "
My destinations
".
Select the "
Contact
" tab.
Press
Navigation
to display the
primary page.
Press the "
MENU
" button to go to the
secondary page.
Select a contact in the list offered to start
navigation.
Press "
OK
" to start calculation of the
route.
Towards points of interest (POI)
Points of Interest (POI) are listed in different
categories.
Press
Navigation
to display the
primary page.
Press the "
MENU
" button to go to the
secondary page.
Select "
Points of interest
".
Select "
Search
" to enter the name
and address of a POI.
Select the "
Travel
", or "
Leisure
"
or "
Commercial
" or "
Public
" or
"
Geographic
" tab.
Or
Or
Towards "My home" or "My
work"
Select "
My destinations
".
Press
Navigation
to display the
primary page.
Press the "
MENU
" button to go to the
secondary page.
Select the "
Preferred
" tab.
Select "
My home
".
Select "
My work
".
Select a previously saved favourite destination.
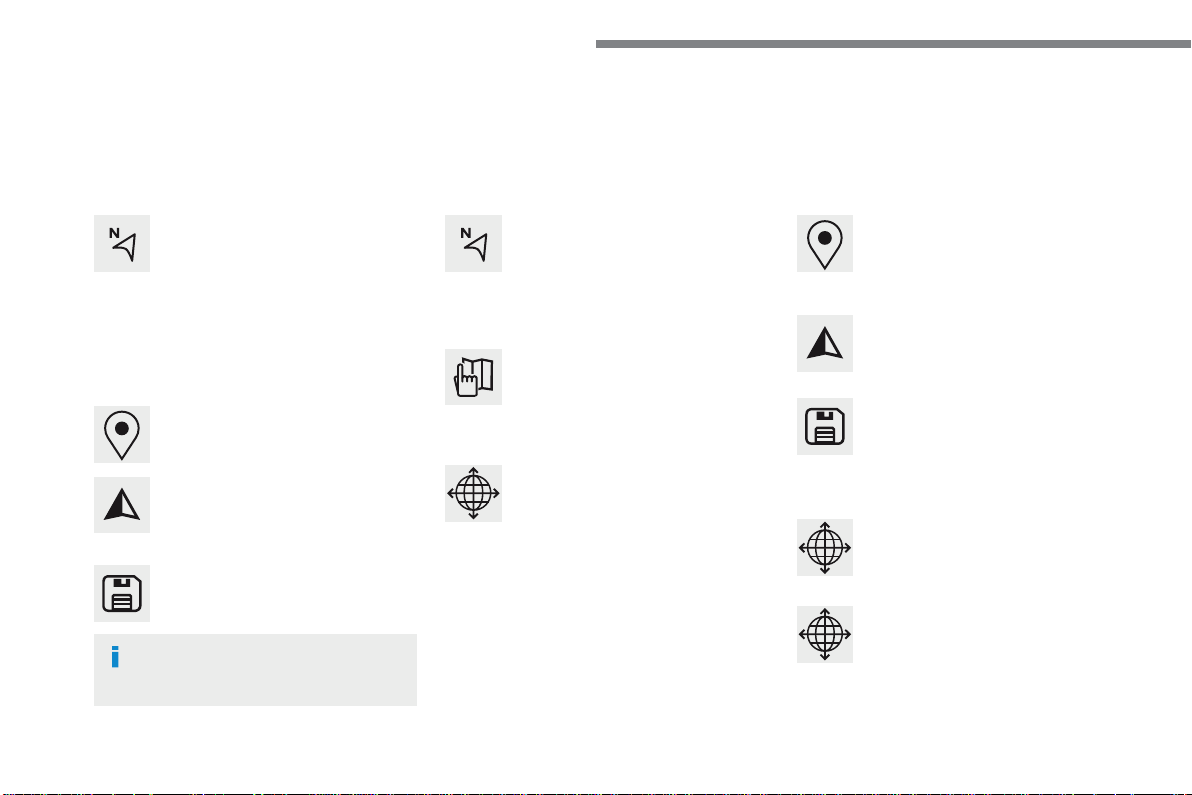
28
Audio and Telematics
Towards GPS coordinates
Towards a point on the map
Press
Navigation
to display the
primary page.
Press
Navigation
to display the
primary page.
Explore the map by sliding a finger on the
screen.
Explore the map by sliding a finger on the
screen.
Tap the screen to place a marker and
display the sub-menu.
Or
Or
Or
And
Select the destination by pressing on the map.
Press this button to start navigation.
Press this button to start navigation.
Press this button to display the world
map.
Using the grid, select by zoom the
desired country or region.
Press this button to save the address
displayed
Press this button to save the address
displayed.
Press this button to enter the GPS
coordinates.
Press this button to enter the value
for "
Latitude
" using the virtual
k e y p a d .
Press this button to enter the value
for "
Longitude
" using the virtual
k e y p a d .
A marker is displayed in the middle of
the screen, with the "
Latitude
" and
"
Longitude
" coordinates.
A long press on a point opens a list of
POIs nearby.
29
.
Audio and Telematics
TMC (Traffic Message
Channel)
TMC (Traffic Message Channel)
messages are linked to a European
standard on the broadcasting of traffic
information via the RDS system on FM
radio, transmitting traffic information in
real time.
The TMC information is then displayed
on a GPS Navigation system map and
taken into account straight away during
navigation, so as to avoid accidents,
traffic jams and closed roads.
The display of danger areas depends
on the legislation in force and
subscription to the service.
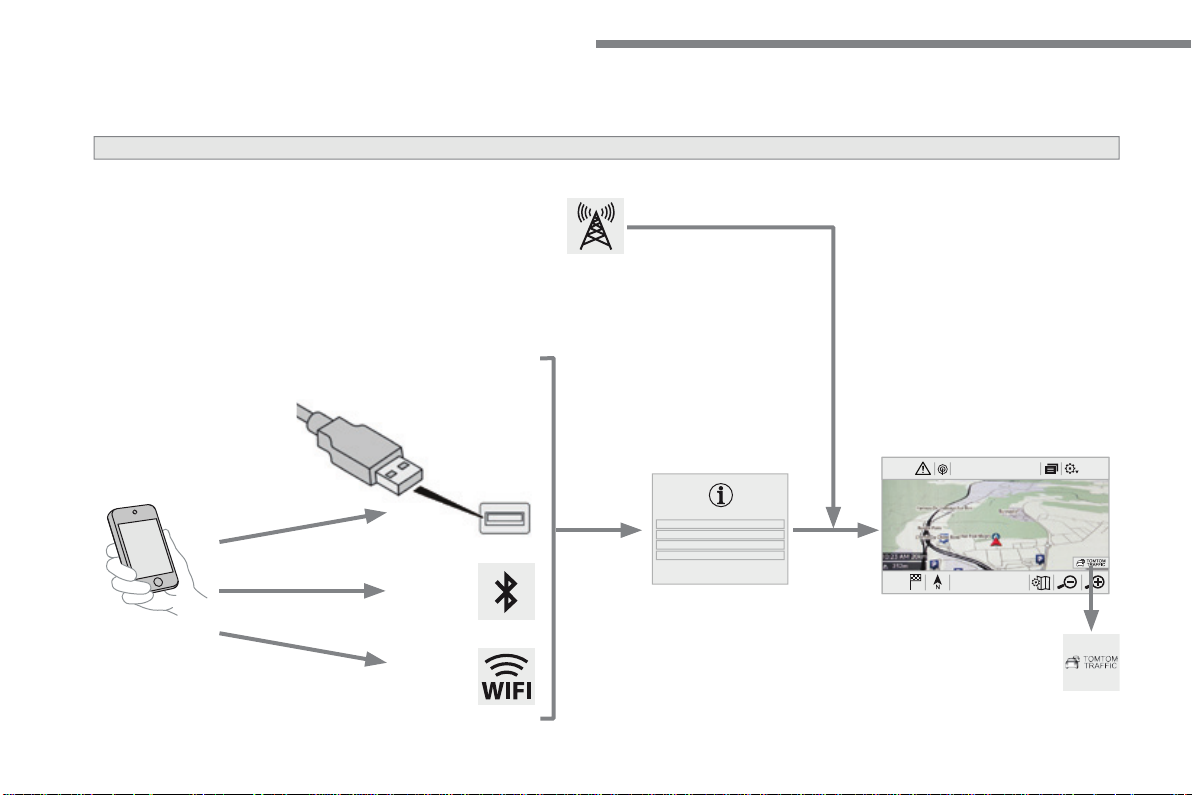
30
12:1318,5 21,523 °C
Audio and Telematics
Connected navigation
Network connection provided by the vehicle
OR
Network connection provided by the user
Depending on the equipment level of the vehicle
According to version
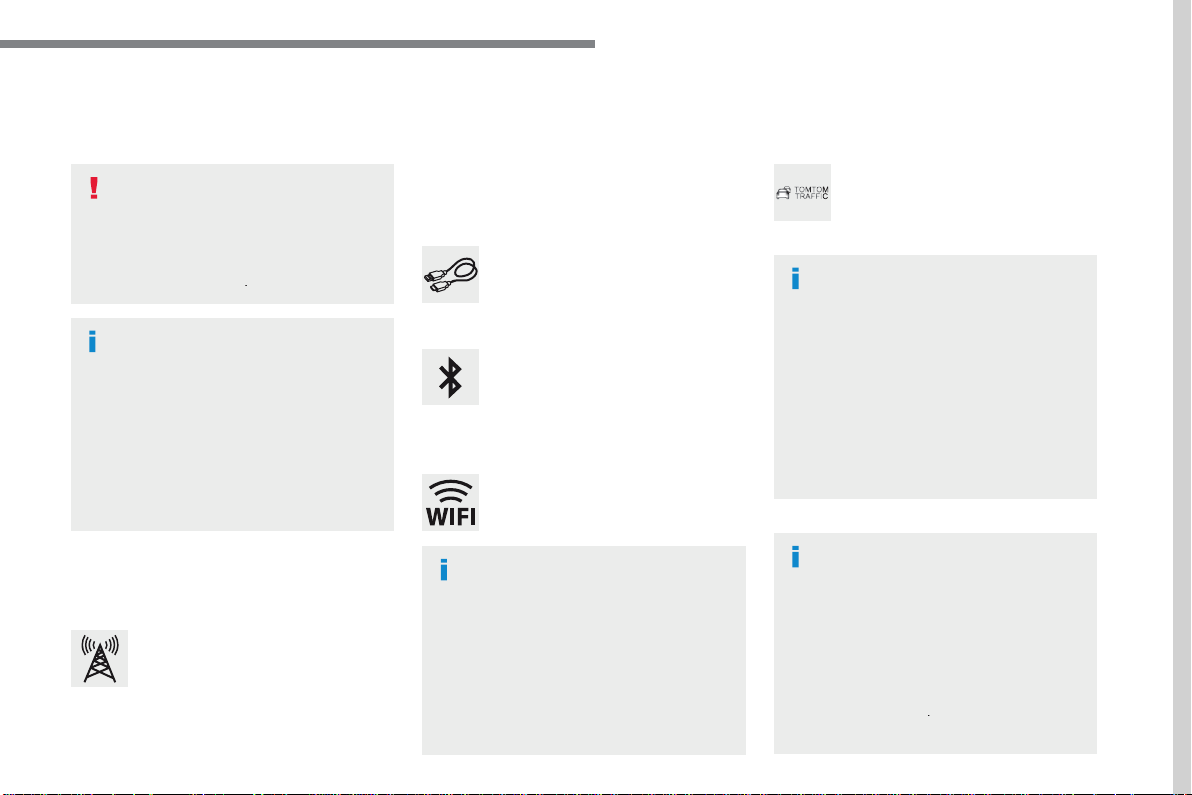
31
.
Audio and Telematics
As a safety measure and because it
requires sustained attention by the
driver, using a smartphone when
driving is prohibited.
All operations must be done with the
vehicle stationary
.
vehicle stationary . vehicle stationary
Connected navigation connection
The principles and standards
are constantly changing. For
communication between your
smartphone and the system to operate
correctly, we recommend that you
keep your smartphone's operating
system up to date, and the time and
date on your smartphone and the
system correct
.
The services offered with connected
navigation are as follows.
A Connected Services pack:
- Weather,
- Filling stations,
- Car park,
- Traffic,
- POI, local search.
A Danger area pack (option).
Activate the Bluetooth function on
the telephone and ensure that it is
visible to all (see the "Connect-App"
section).
Connect the USB cable.
The smartphone is in charge mode
when connected by USB cable.
The system is automatically
connected to the modem included
for the "Emergency or assistance
calls" services and does not require
a connection provided by the user via
their smartphone.
On the arrival of "TOMTOM
TRAFFIC", the services are
available.
For access to connected navigation, you
can use the connection provided by the
vehicle via the "Emergency or assistance
call" services or use your smartphone as
a modem.
Activate and enter settings for
sharing the smartphone connection.
Restrictions of use:
- With CarPlay
®
, connection sharing is
only with a Wi-Fi connection.
- W i t h M i r r o r L i n k
TM
, connection
sharing is only with a USB
connection.
The quality of services depends on the
quality of the network connection.
Select a Wi-Fi connection found by
the system and connect to it (see the
"Connect-App" section).
USB connection
Network connection provided by
the vehicle
Network connection provided by
the user
Bluetooth connection
Wi-Fi connection
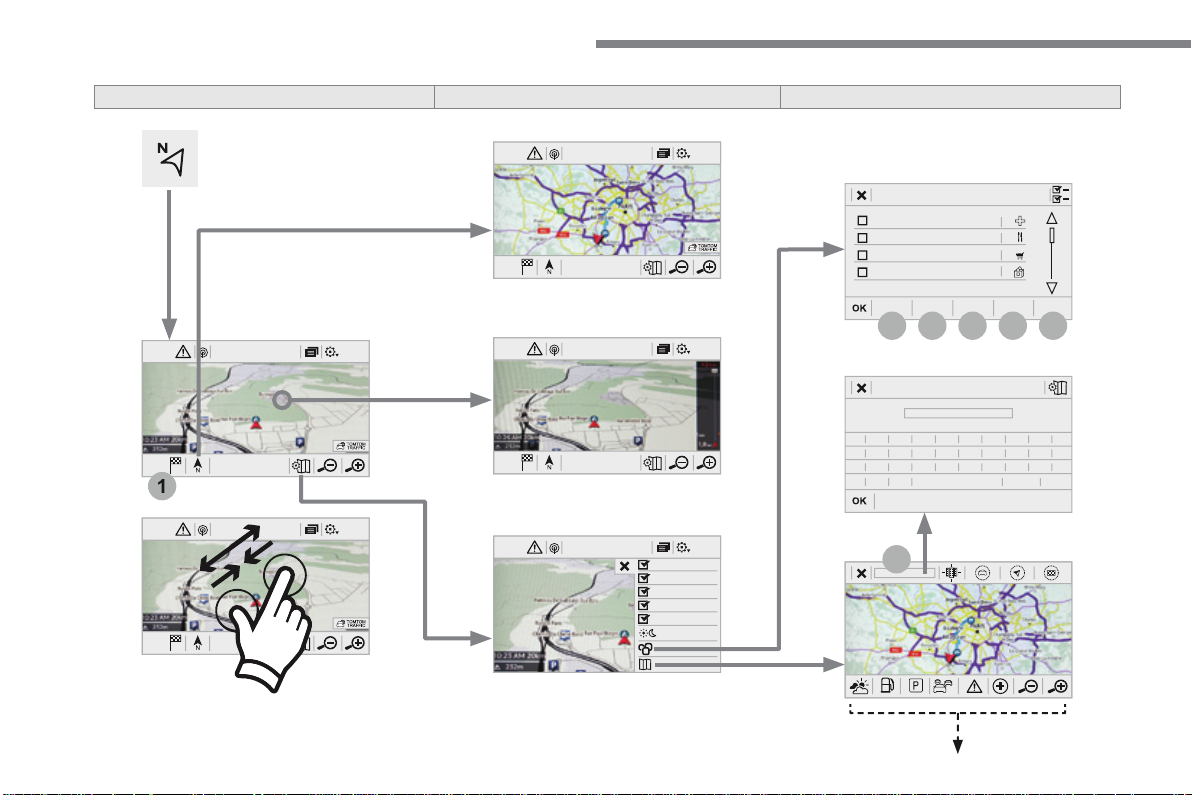
32
12:1318,5 21,523 °C
12:1318,521,523 °C
12:1318,521,523 °C
1
12:1318,5 21,523 °C
12:1318,5 21,523 °C
7
27
28
26
29
30
Audio and Telematics
Level 1
Level 2
Level 3
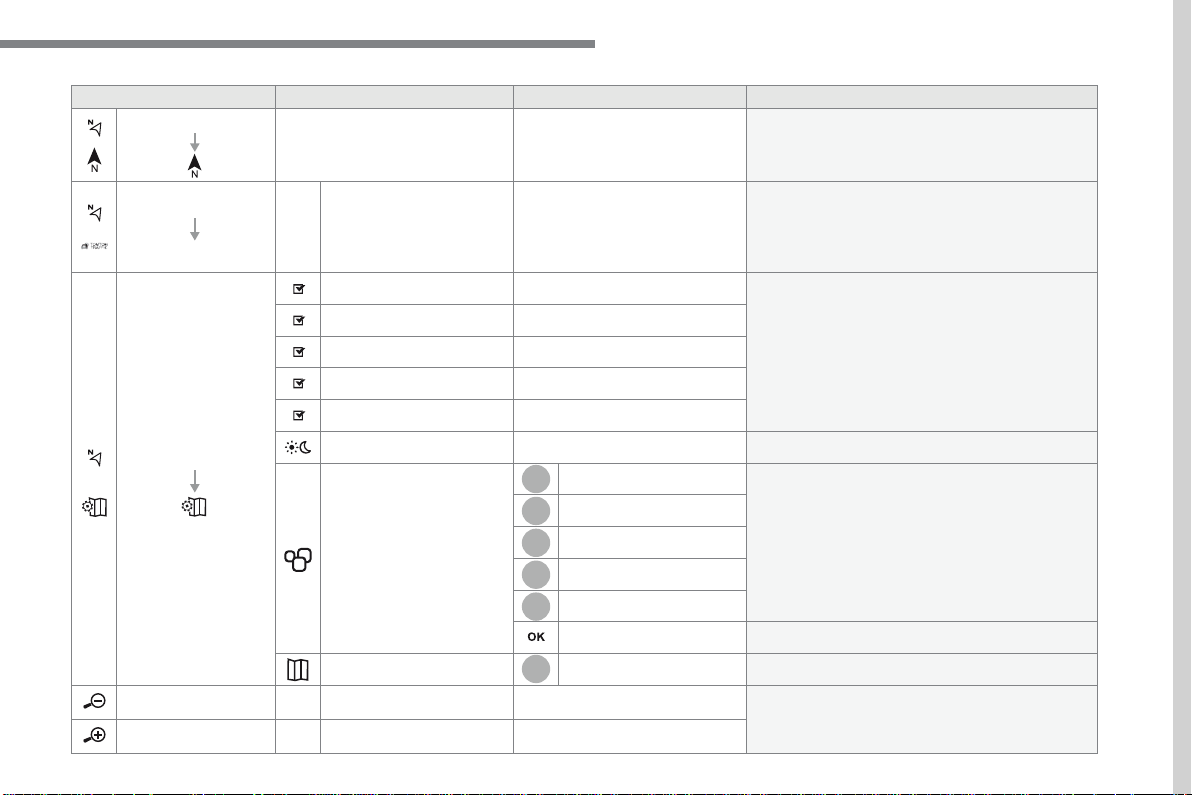
33
.
7
28
27
26
29
30
Audio and Telematics
Level 1
Level 2
Level 3
Comments
Navigation
Select the orientation of the map; north up,
vehicle direction up or perspective.
Navigation
TOMTOM TRAFFIC
On connection of the system to a network,
"TOMTOM TRAFFIC" is displayed instead of
"TMC", for use of all of the options available, in
real time.
Navigation
Weather
Select the options.
The map display the route chosen, depending on
options.
Stations
Car park
Traffic
Danger area
Map color
Select the display mode for the map.
POI on map
Commercial
Select the POIs available.
Geographic
Leisure
Public
Travel
Save the options.
View map
Modify city
Select or change a city.
Zoom out / zoom in using the touch buttons or
with two fingers on the screen.
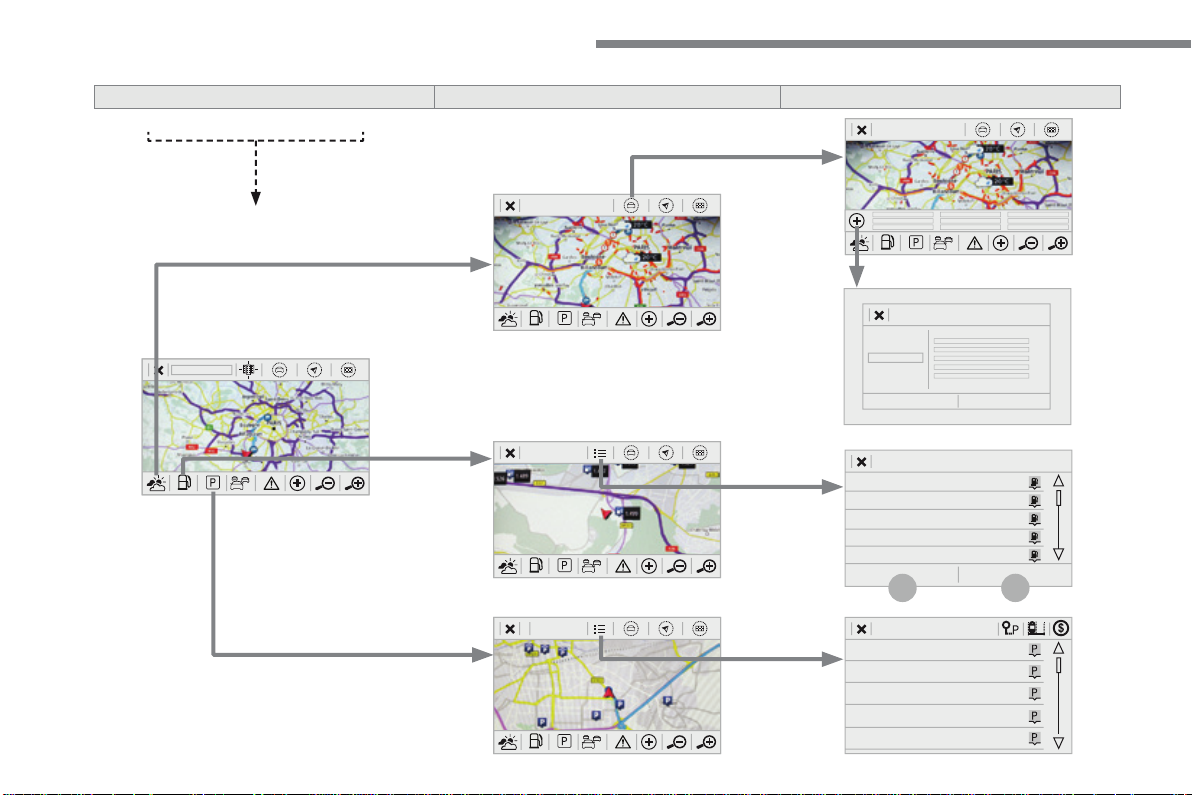
34
31
32
Audio and Telematics
Level 3
Level 4
Level 5
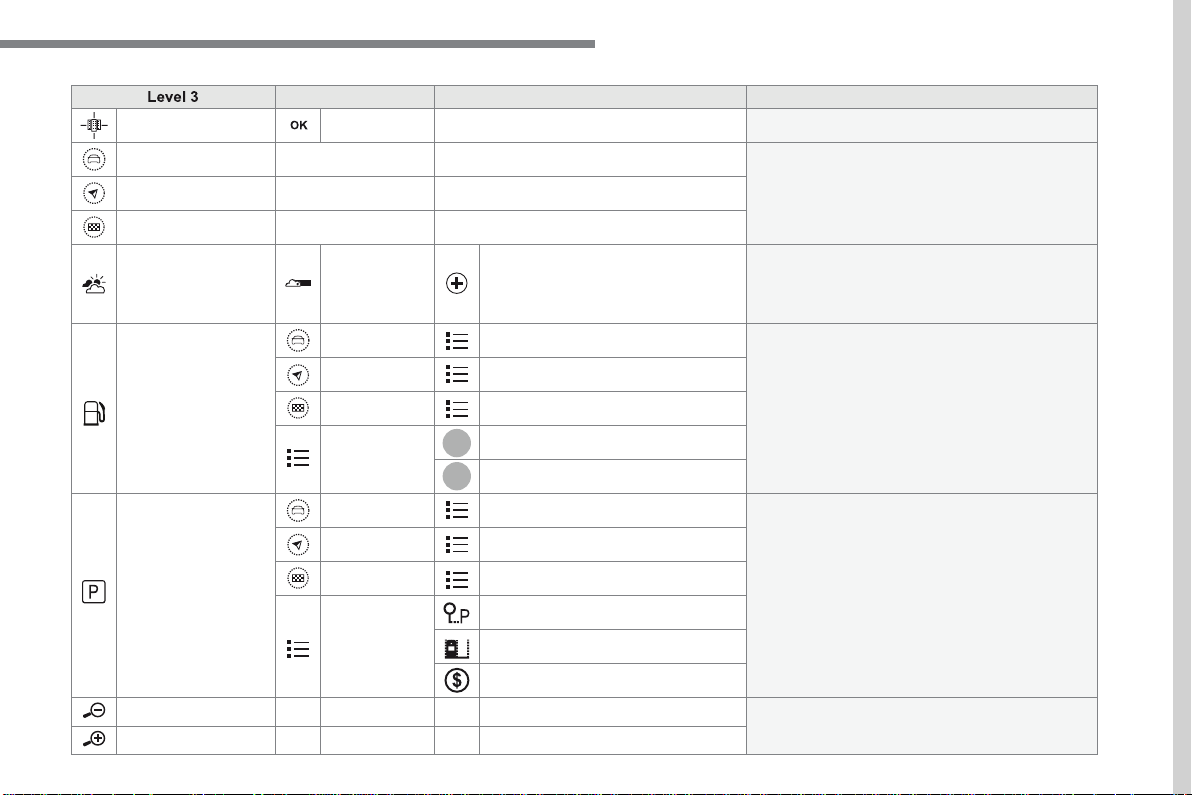
35
.
31
32
Audio and Telematics
Level 3
Level 4
Level 5
Comments
Select city
Select or change a city.
Around the vehicle
Select or change a city.
On the route
At the destination
Weather
Weather information
Display the weather forecast for the day or the
following days.
Filling stations
Filling stations around the vehicle
Display the list of filling stations and the
associated information (address, prices, fuels, ...).
Filling stations on the route
Filling stations at the destination
By distance
By price
Car park
Car parks around the vehicle
Display the list of car parks and the associated
information (address, distance, spaces available,
price, ...).
Car parks on the route
Car parks at the destination
Sort by distance
Sort by spaces
Sort by price
Zoom out / zoom in using the touch buttons or
with two fingers on the screen.
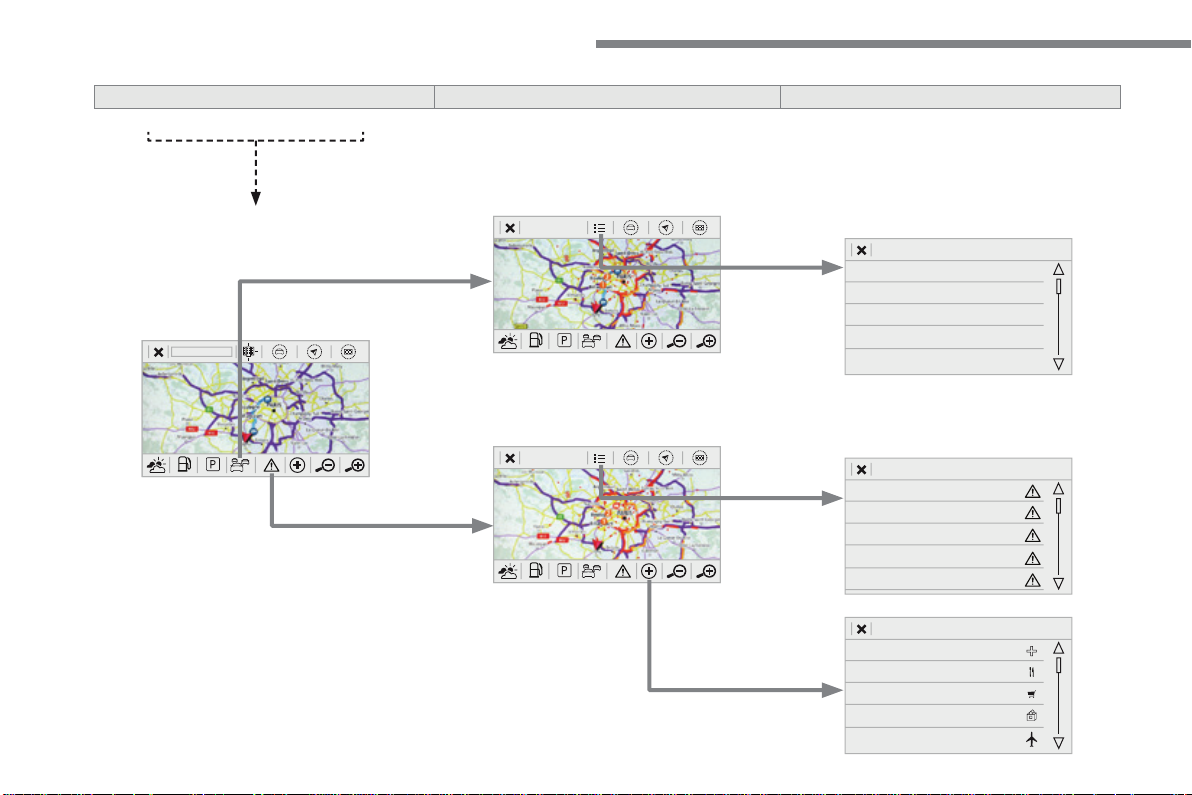
36
Audio and Telematics
Level 3
Level 4
Level 5
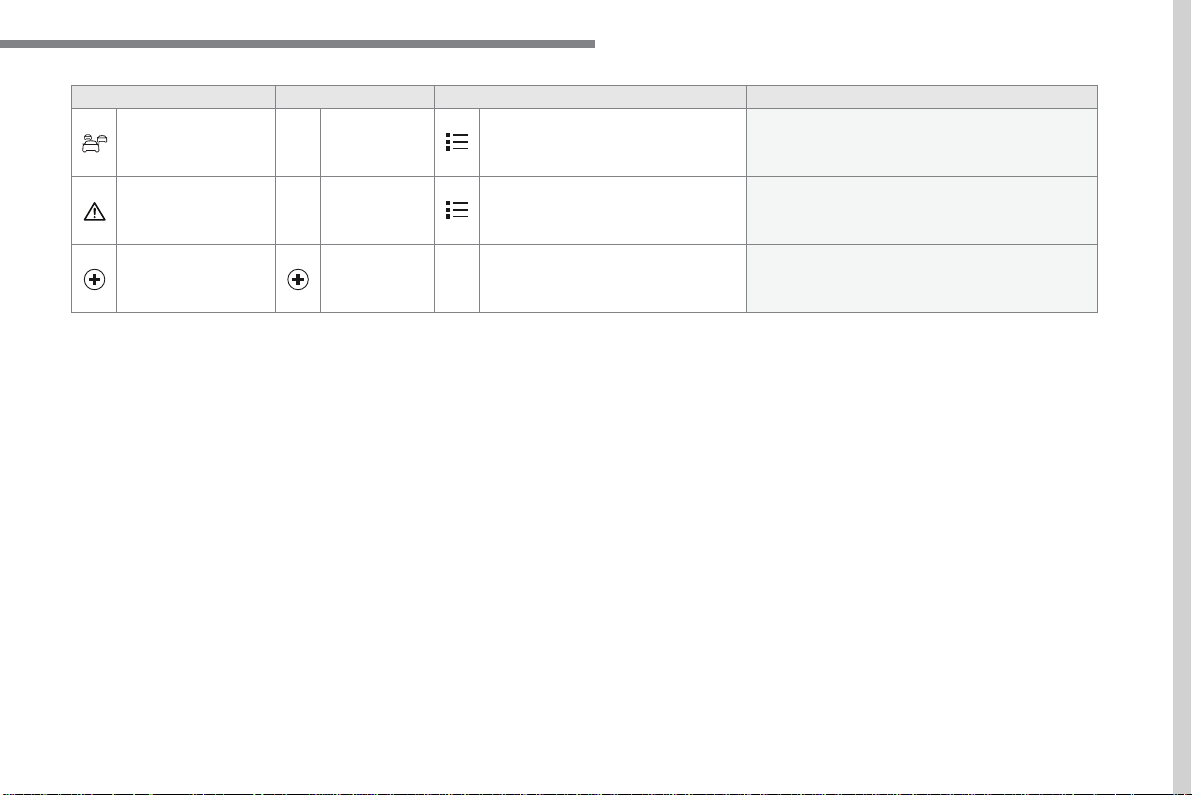
37
.
Audio and Telematics
Level 3
Level 4
Level 5
Comments
Traf fic
Traffic observed
Display traffic information in real time: type,
description and duration (in minutes).
Danger areas
List of danger areas
Display danger areas (roadworks, breakdowns,
accidents, ...) in real time.
Points of interest
Points of
interest
Select POI
Display the list of POIs for the location selected.
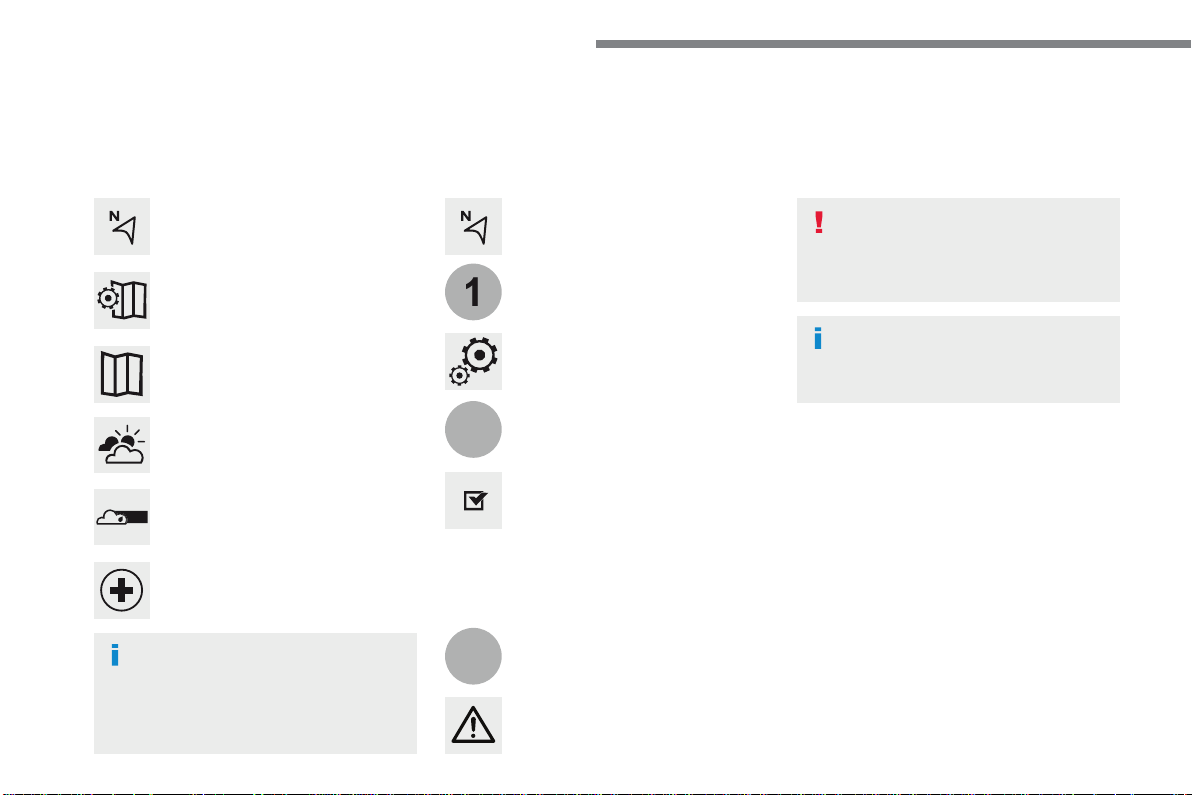
38
22
23
1
Audio and Telematics
Settings specific to
connected navigation
For access to connected navigation,
you have to select the option:
"
Authorise sending information
".
Select "
Options
".
Select "
Alerts
".
- "
Allow declaration of danger
areas
"
- "
Guidance to final destination
on foot
"
- "
Authorise sending
information
"
Activate or deactivate:
Activate or deactivate "
Warn of
danger zones
".
The display of danger zones is
conditioned by the legislation in force
and subscription to the service.
The temperature displayed at 6 o'clock in the
morning will be the maximum temperature for the
day.
The temperature displayed at 6 o'clock in the evening
will be the minimum temperature for the night.
Select "
Settings
".
Press
Navigation
to display the
primary page.
Press the "
MENU
" button to go to the
secondary page.
Display the weather
Select "
Weather
".
Press this button to display the first
level of information.
Press this button to display the
detailed weather information.
Select "
View map
".
Press
Navigation
to display the
primary page.
Press this button to display the list of
services.
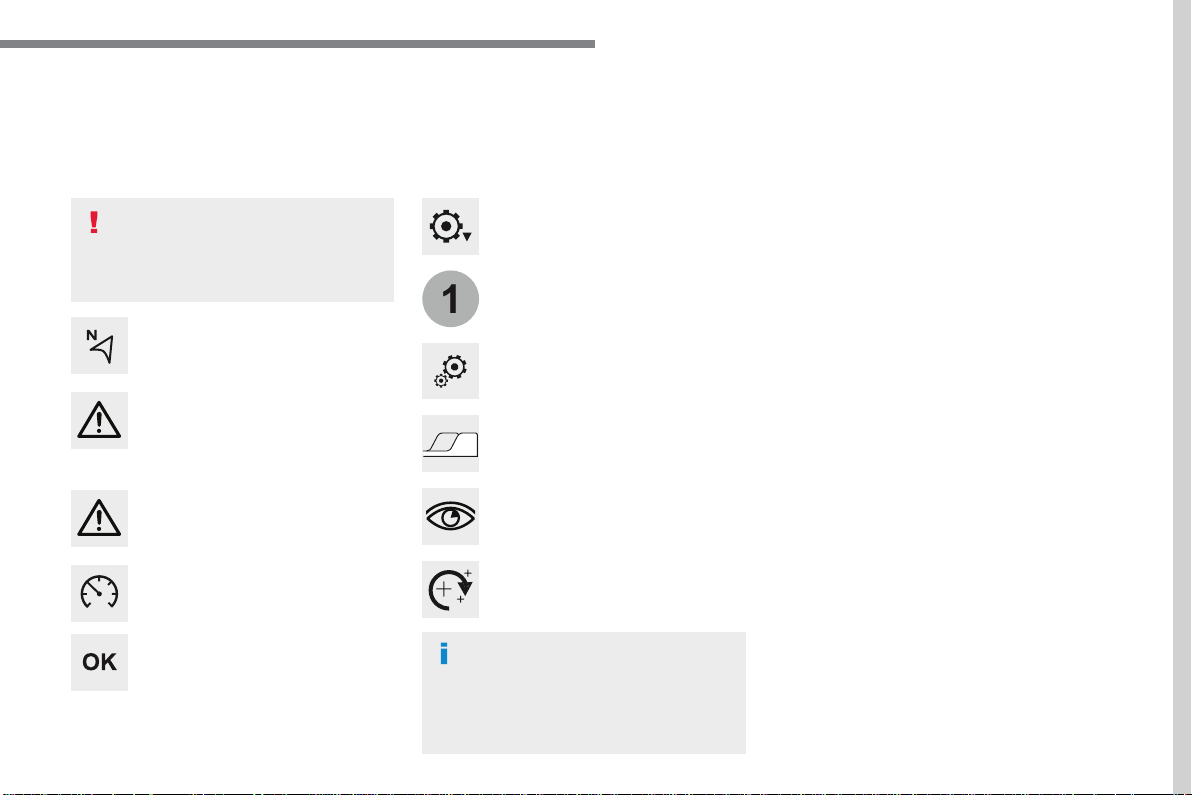
39
.
1
Audio and Telematics
To distribute information on the
declaration of danger zones, you
should check the option: "
Allow
declaration of danger areas
".
Declaration of "Danger
areas"
Press
Navigation
to display the
primary page.
Press the "
Declare a new danger
area
" button located in the upper bar
of the touch screen.
Select the option "
Type
" to choose
the type of "Danger area".
Select the "
Speed
" option and enter
it using the virtual keypad.
Press "
OK
" to save and distribute the
information.
You can download the system and map
updates from the Brand's website.
The update procedure can also be
found on the website.
"Danger areas" pack
updates
Press
Settings
to display the primary
page.
Press the "
OPTIONS
" button to go to
the secondary page.
Select "
System settings
".
Select "
View
" to view the version of
the various modules installed in the
system.
Select "
Update(s) due
".
Select the "
System info
" tab.
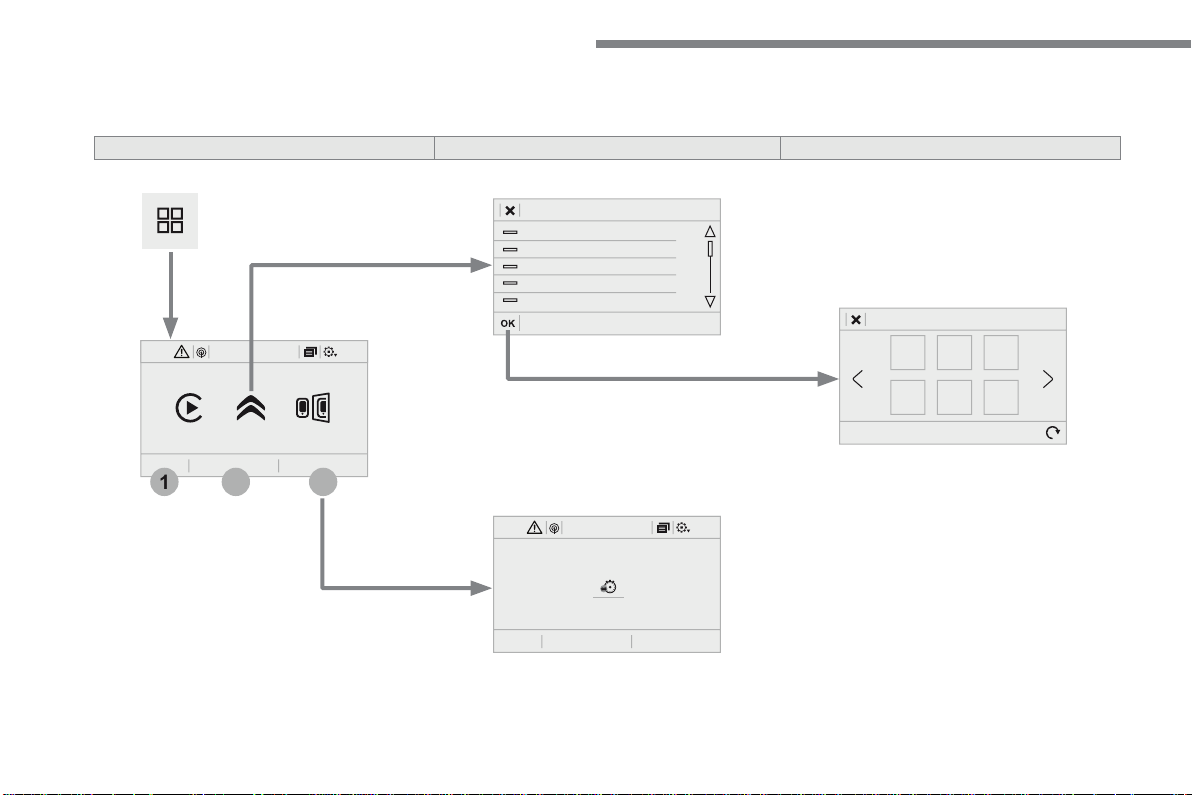
40
12:1318,5 21,523 °C
3
2
1
12:1318,5 21,523 °C
Audio and Telematics
Applications
According to version / according to equipment
Level 1
Level 2
Level 3
41
.
2
2
3
Audio and Telematics
Internet Browser
Connectivity
Applications
Press "
Internet Browser
" to display
the browser home page.
Select your country of residence.
Press "
Connectivity
" to go to the
CarPlay
®
or
®
or
®
MirrorLink
TM
function.
Press "
Connectivity
" to go to the
"
Internet Browser
" function.
Press "
Applications
" to display the
applications home page.
Connection to the internet is via one of
the network connections provided by
the vehicle or the user.
Press
Applications
to display the
primary page.
Press
Applications
to display the
primary page.
Press
Applications
to display the
primary page.
Press "
OK
" to save and start the
browser.
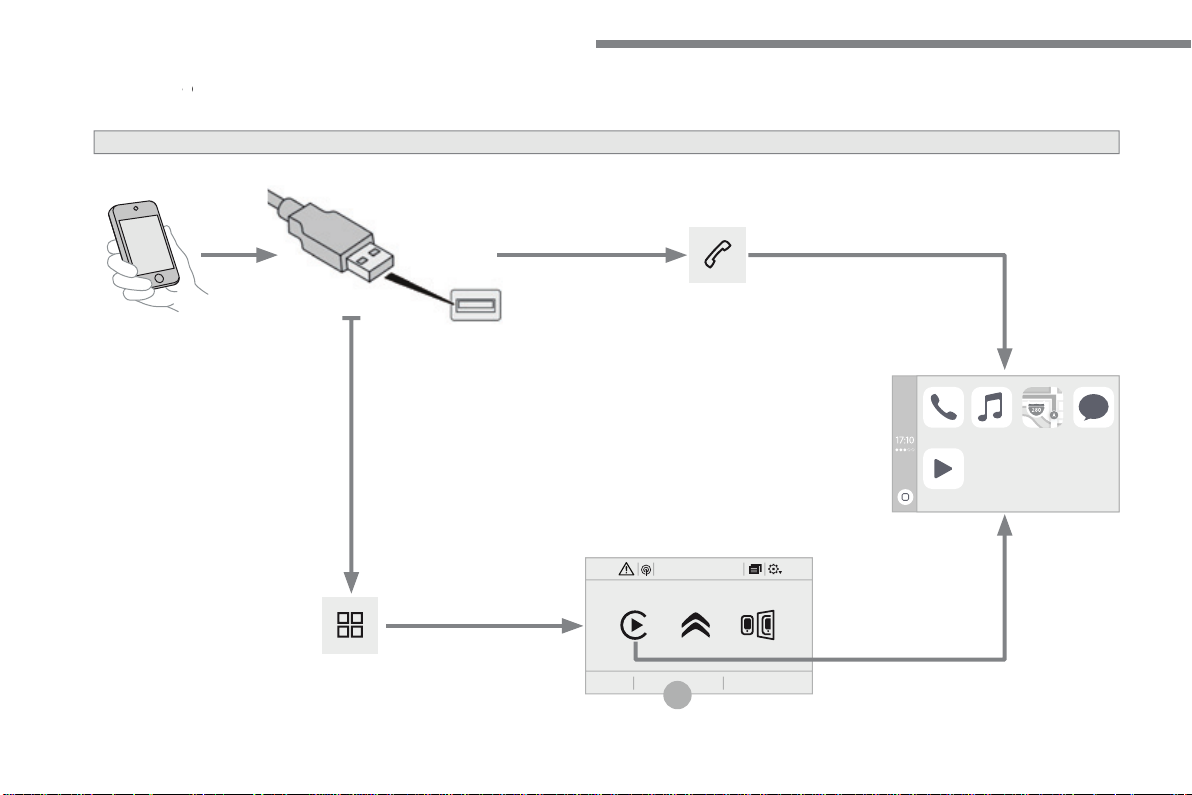
42
12:1318,5 21,523 °C
2
Audio and Telematics
CarPlay
®
CarPlay
®
CarPlay
smartphone connection
®
smartphone connection
®
43
.
2
Audio and Telematics
As a safety measure and because it
requires the sustained attention of
the driver, using a smartphone when
driving is prohibited.
Operation must be with the
vehicle
stationary
.
stationary . stationary
The synchronisation of a smartphone
allows applications on a smartphone that
are adapted to the CarPlay
®
technology
®
technology
®
to be displayed in the vehicle's screen,
having first activated the CarPlay
®
function in the smartphone.
As the principles and standards are
constantly changing,
it is recommended
that you keep your smartphone's
operating system updated
.
For the list of eligible smartphones, go
to the Brand's internet website in your
country.
Connect a USB cable. The
smartphone charges when
connected by a USB cable.
Connect a USB cable. The
smartphone charges when connecte
d by a USB cable.
Press "
Telephone
" to display the
CarPlay
®
interface.
®
interface.
®
Press "
CarPlay
" to display the
CarPlay
®
interface
®
interface
®
On connecting the USB cable, the
CarPlay
®
function deactivates the
®
function deactivates the
®
system's Bluetooth
®
mode.
®
mode.
®
In the system, press "
Applications
"
to display the primary page.
Or
Press "
Connectivity
" to go to the
CarPlay
®
function.
®
function.
®
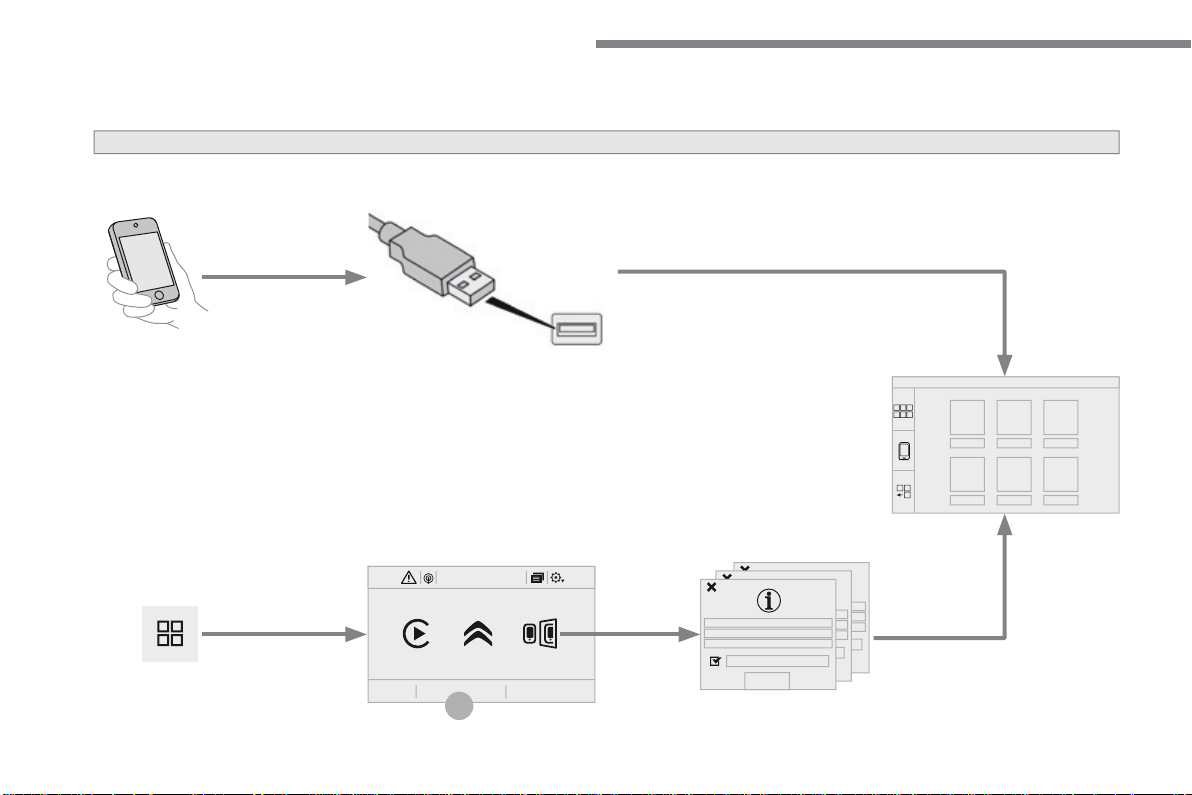
44
12:1318,5 21,523 °C
2
Audio and Telematics
MirrorLink
TM
smartphone connection
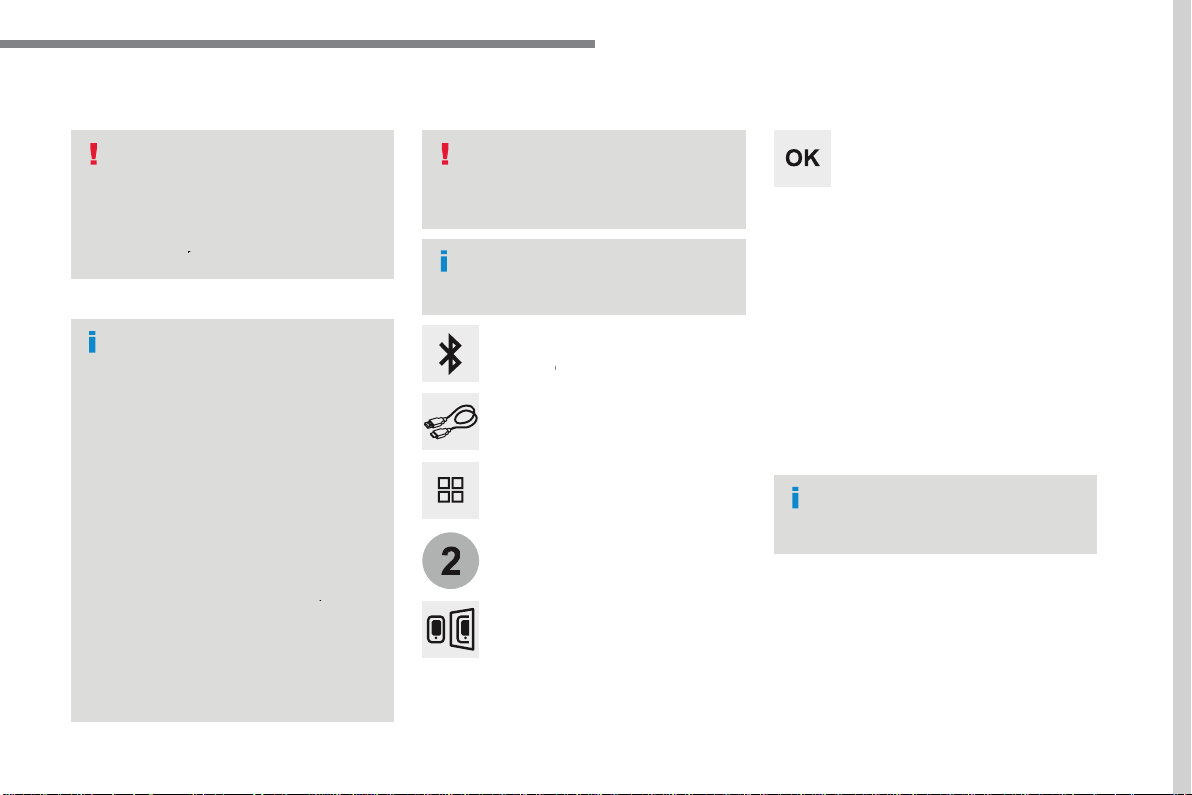
45
.
2
Audio and Telematics
As a safety measure and because it
requires the sustained attention of
the driver, using a smartphone when
driving is prohibited.
Operation must be with the
vehicle
stationary
.
stationary . stationary
The synchronisation of a
smartphone allows applications on a
smartphone that are adapted to the
MirrorLink
TM
technology to be displayed
in the vehicle's screen.
The principles and standards
are constantly evolving. For the
communication process between
the smartphone and the system to
work correctly, the smartphone must
be unlocked;
update the operating
system of your smartphone as
well as the date and time in the
smartphone and the system
.
For the list of eligible smartphones,
connect to the Brand's internet website
in your country.
The "
MirrorLink
TM
" function requires
the use of a compatible smartphone
and applications.
There may be a wait for the availability
of applications, depending on the
quality of your network.
When connecting a smartphone to
the system, it is recommended that
Bluetooth
®
be started on the smartphone
®
be started on the smartphone
®
Depending on the smartphone, it may be
necessary to activate the "
MirrorLink
TM
"
function.
During the procedure, several screen
pages relating to certain functions
are displayed.
Accept to start and end the
connection.
Connect a USB cable. The
smartphone charges when
connected by a USB cable.
Press "
MirrorLink
TM
" to start the
system's application.
Once connection is established, a page
is displayed with the applications already
downloaded to your smartphone and adapted
to MirrorLink
TM
t e c h n o l o g y .
Access to the different audio sources remains
accessible in the margin of the MirrorLink
TM
display, using touch buttons in the upper bar.
Access to the menus for the system is possible
at any time using the dedicated buttons
From the system, press on
"
Applications
" to display the primary
page.
As a safety measure, applications
can only be viewed with the vehicle
stationary; display is interrupted once
the vehicle is moving.
Press "
Connectivity
" to go to the
MirrorLink
TM
function.
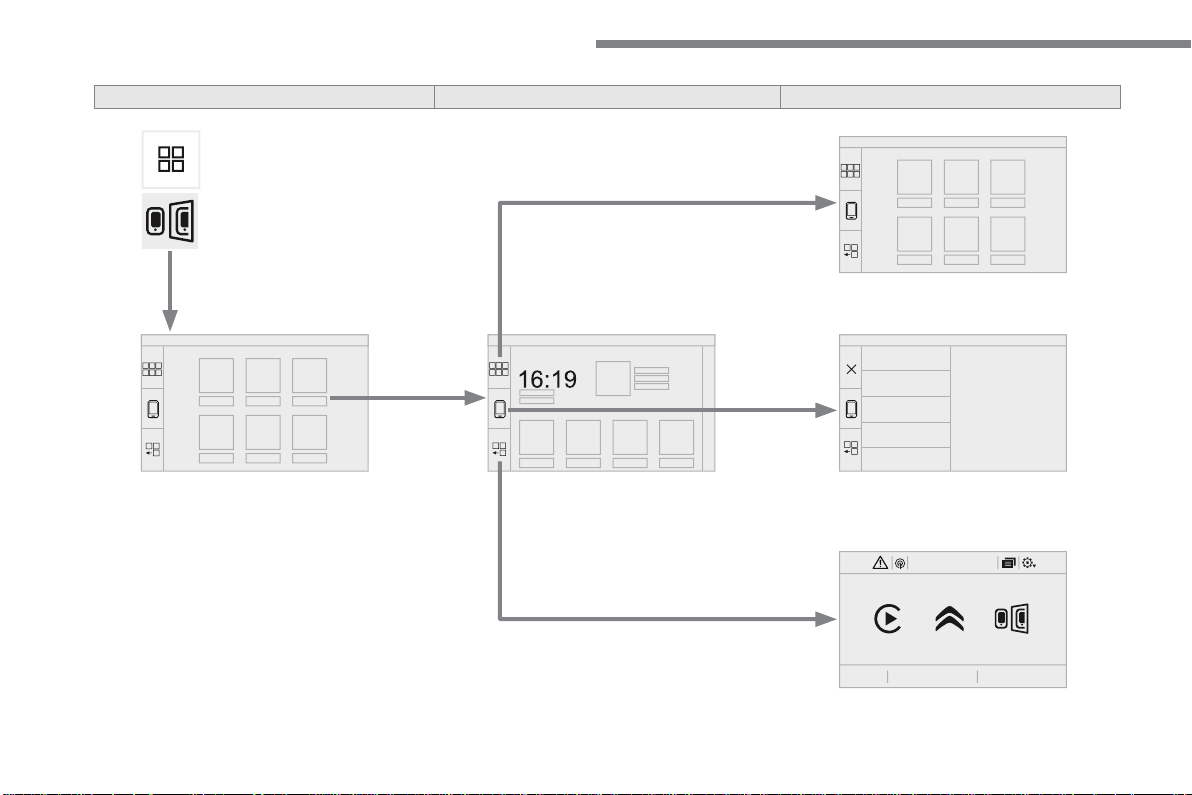
46
12:1318,521,523 °C
Audio and Telematics
Level 1
Level 2
Level 3
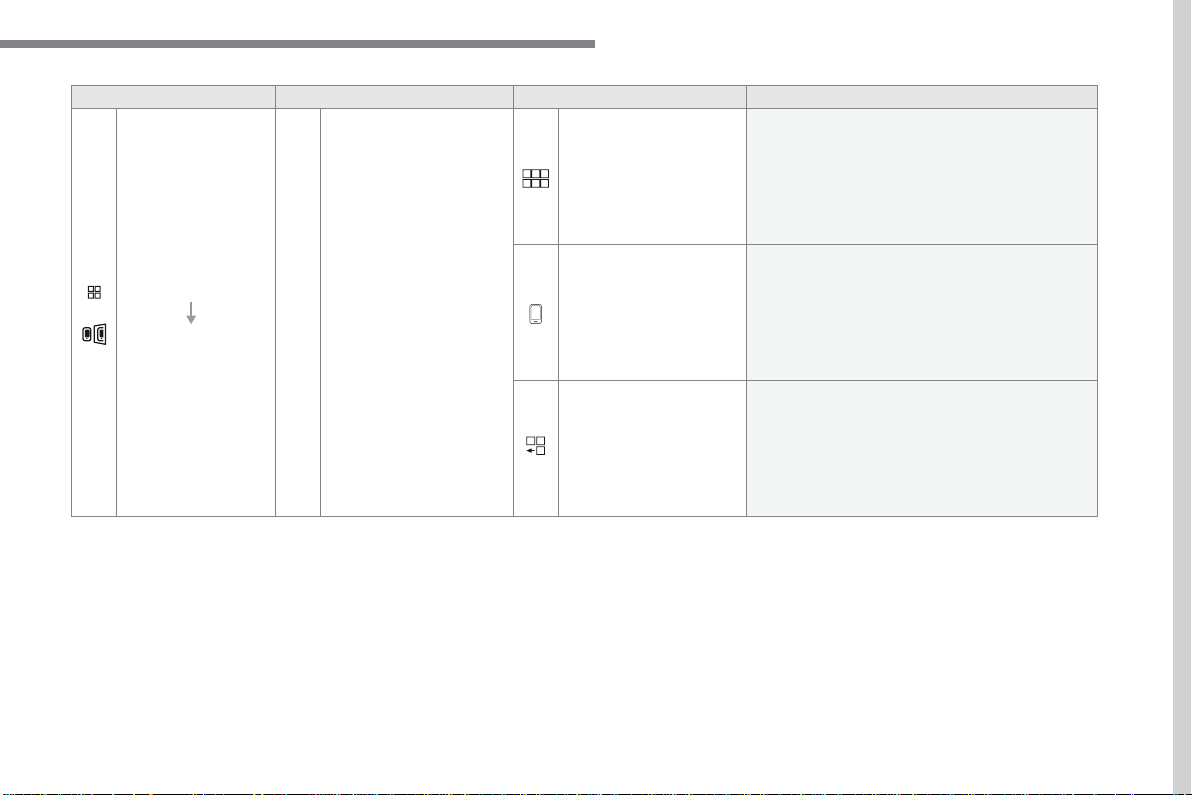
47
.
Audio and Telematics
Level 1
Level 2
Level 3
Comments
Applications
MirrorLink
TM
Go to or return to the applications already
downloaded to your smartphone and adapted to
MirrorLink
TM
technology.
Go to a menu list depending on the application
chosen.
"Back": abandon the current operation, go up one
level.
"Home": go to or return to the "Car mode" page on
your smartphone.
Go to the primary page of the "Applications"
menu.
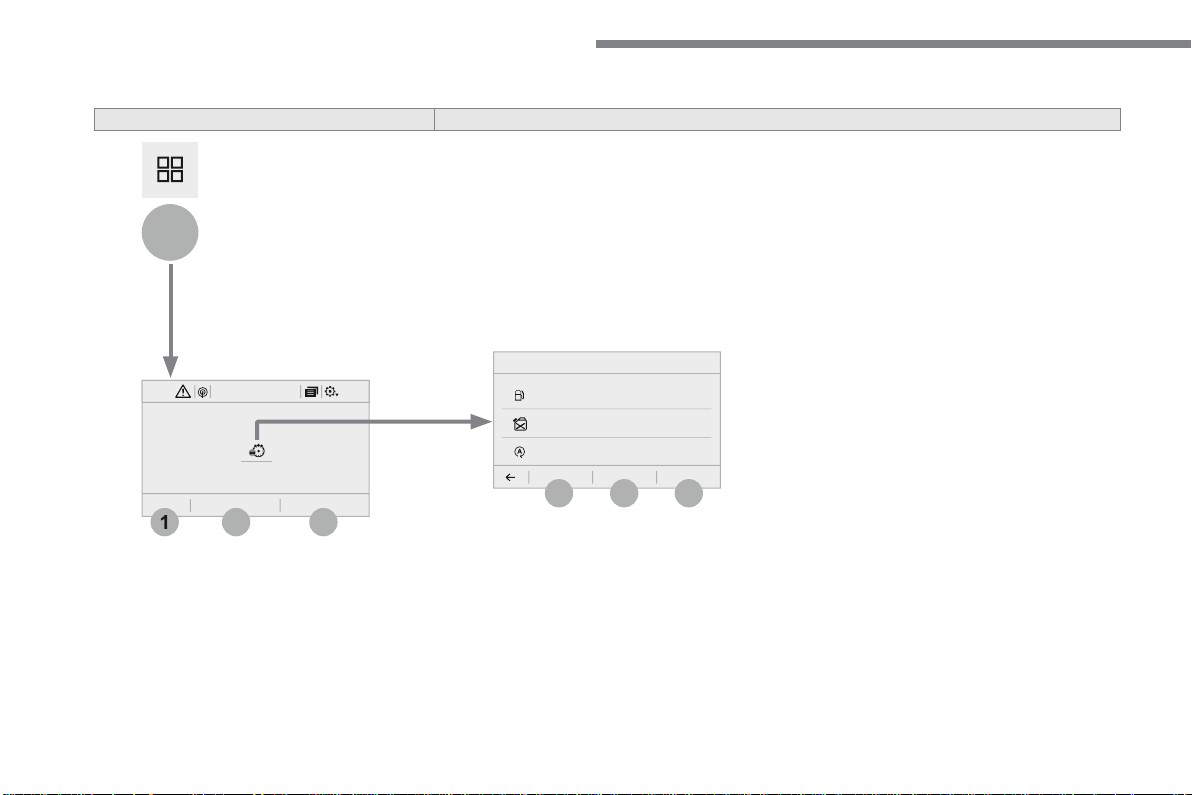
48
12:1318,5 21,523 °C
3
3
2
1
4
6
5
Audio and Telematics
According to equipment
Level 2
Level 3
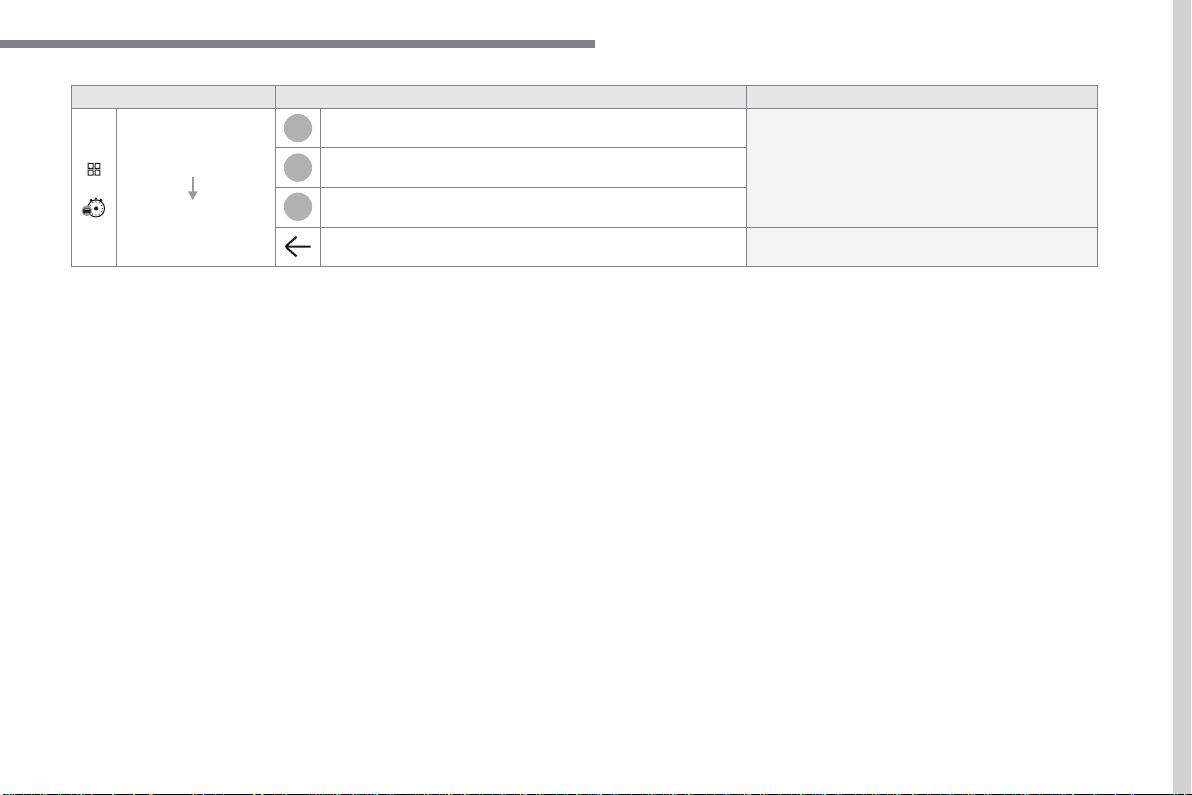
49
.
4
5
6
Audio and Telematics
Level 2
Level 3
Comments
Applications
Trip computer
Instant
System providing information about the current
journey (range, fuel consumption…).
Trip 1
Trip 2
Back to the Applications page.
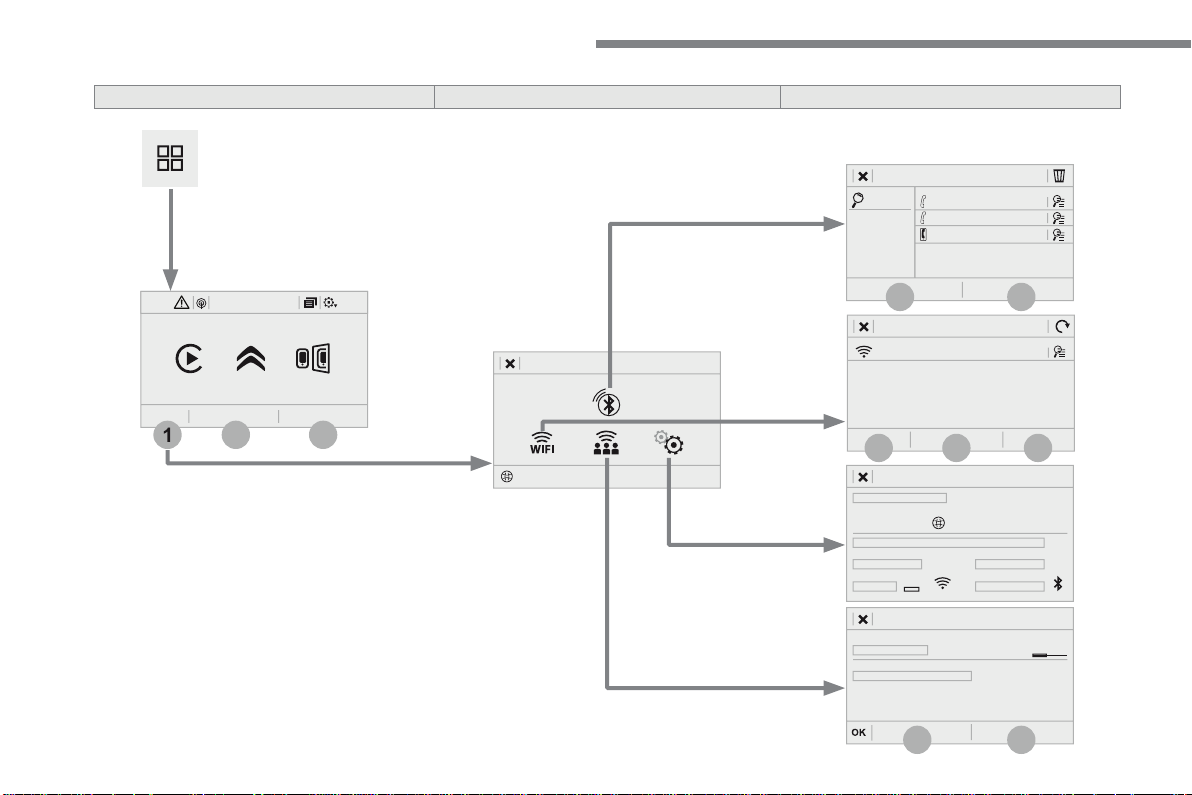
50
12:1318,5 21,523 °C
7
12
8
13
9
11
10
1
3
2
Audio and Telematics
Level 1
Level 2
Level 3
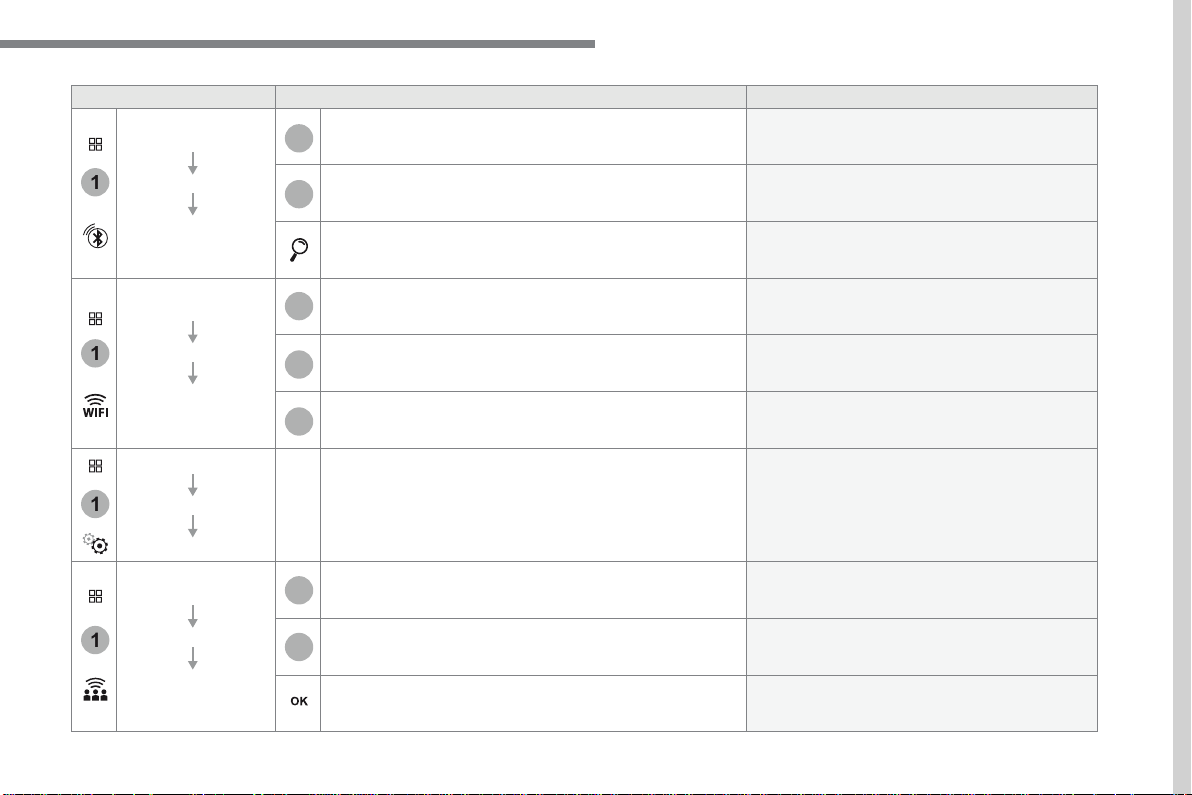
51
.
1
1
1
1
11
12
13
7
8
9
10
Audio and Telematics
Level 2
Level 3
Comments
Applications
OPTIONS
Bluetooth
connection
All
Display all telephones detected and saved.
Connected
Display all telephones connected.
Search
Start the search for a device to be connected.
Applications
OPTIONS
Wi-Fi network
connection
Secured
Display the secured Wi-Fi networks.
Not secured
Display the not secured Wi-Fi networks.
Stored
Display the stored Wi-Fi networks.
Applications
OPTIONS
Manage connection
Display the status of the subscription to the
connected services, the status of the network
connection and the connection mode.
Applications
OPTIONS
Share Wi-Fi
connection
Activation
Activate or deactivate the Wi-Fi connection
sharing.
Settings
Select a Wi-Fi network found by the system and
connect.
Save the settings.
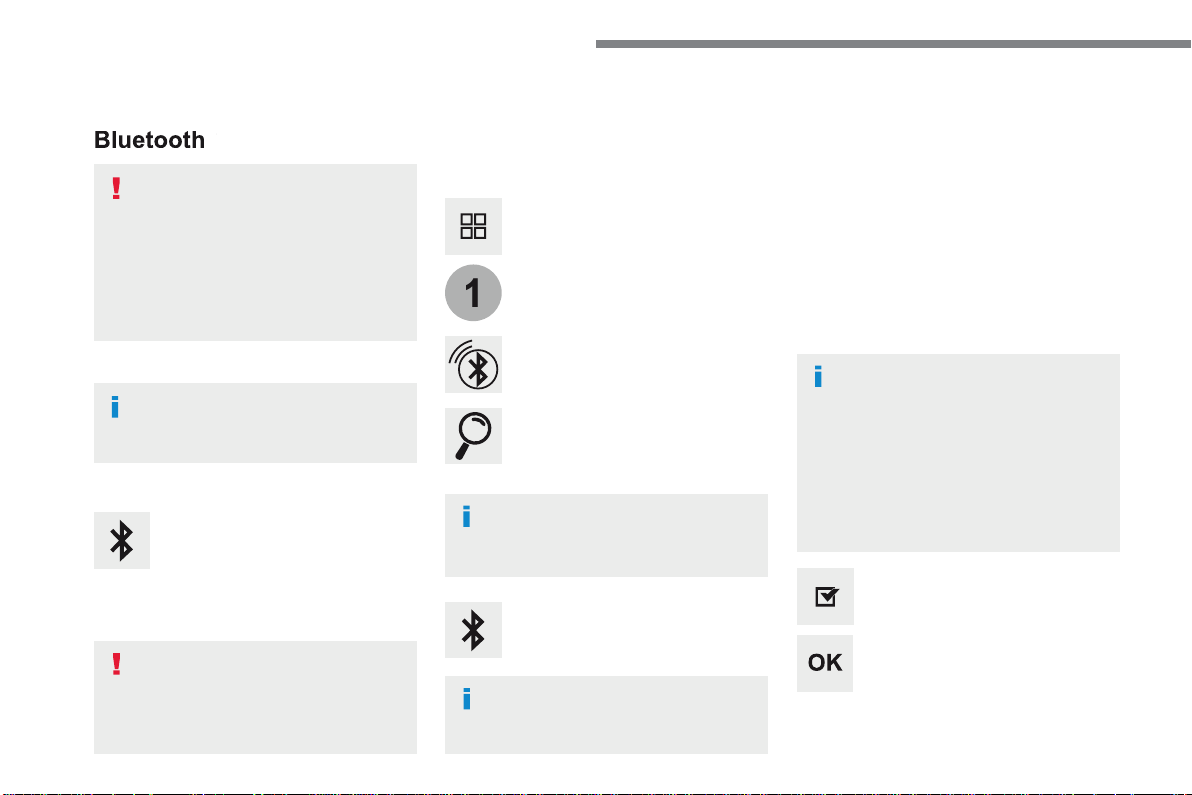
52
1
Audio and Telematics
Bluetooth
®
connection
®
connection
®
Procedure from the system
Connection sharing
Press on "
Connect-App
" to display
the primary page.
Press on "
Bluetooth connection
".
Select "
Search
".
The list of detected telephones is
displayed.
If the pairing procedure fails, it is recommended
that you deactivate and then reactivate the
"Bluetooth" function in your telephone.
The "
Mobile internet data
" profile
must be activated for connected
navigation (where the vehicle does not
have "Emergency and assistance call"
services), having first activated sharing
of this connection on your smartphone.
The system offers to connect the
telephone with 3 profiles:
- "
Telephone
" (hands-free kit, telephone
only),
- "
Streaming
" (wireless play of audio files
on the telephone),
- "
Mobile internet data
".
Select the name of the chosen
telephone in the list.
Press "
OK
" to confirm.
Select one or more profiles.
Press the "
OPTIONS
" button to go to
the secondary page.
As a safety measure and because it
requires sustained attention by the
driver, the pairing of a Bluetooth mobile
telephone with the Bluetooth hands-
free system of your audio system must
be done with the
vehicle stationary
and the ignition on.
Procedure from the telephone
Select the name of the system in the
list of devices detected.
In the system, accept the connection request
from the telephone.
Activate the Bluetooth function on the
telephone and ensure that it is "visible
to all" (telephone configuration).
To complete the pairing, whichever
procedure used (from the telephone or
from the system), ensure that the code
is the same in the system and in the
telephone.
Depending on the type of telephone,
you may be asked to accept or not the
transfer of your contacts and messages.
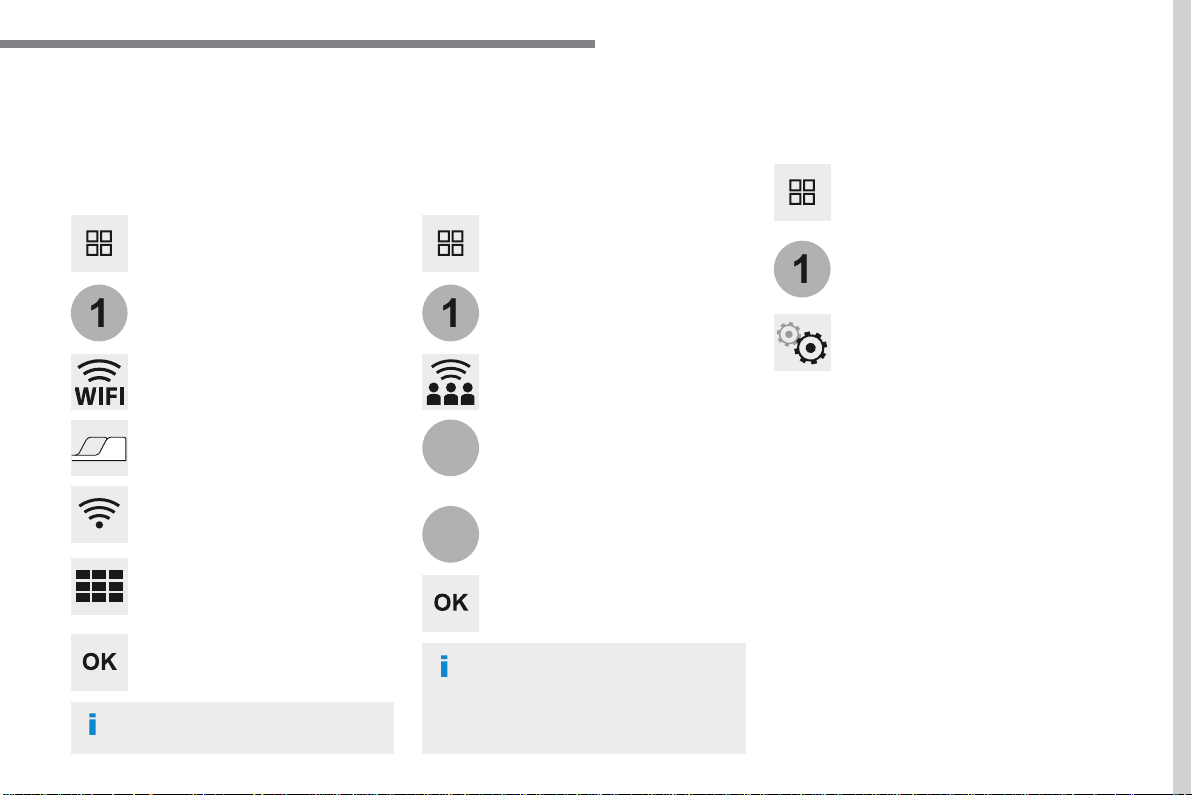
53
.
1
1
1
12
13
Audio and Telematics
Wi-Fi connection
Sharing the Wi-Fi connection
Managing connections
To protect from any piracy and provide
maximum security for your systems,
it is recommended that you use a
security code or a complex password.
The Wi-Fi connection and the sharing
of the Wi-Fi connection are exclusive.
Press "
OK
" to confirm.
Press "
OK
" to start the connection.
Press "
Connect-App
" to display the
primary page.
Network connection by the smartphone Wi-Fi.
Creation of a local Wi-Fi network by the
system.
Press
Connect-App
to display the
primary page.
Press
Connect-App
to display the
primary page.
Press the "
OPTIONS
" button to go to
the secondary page.
Press the "
OPTIONS
" button to go to
the secondary page.
Press the "
OPTIONS
" button to go to
the secondary page.
Select "
Wi-Fi network connection
".
Select "
Share Wi-Fi connection
".
Select "
Manage connection
".
And / Or
Select the "
Secured
", "
Not secured
"
or "
Stored
" tab.
Select the "
Activation
" tab to
activate or deactivate sharing of the
Wi-Fi connection.
Select the "
Settings
" to change the
name of the system network and the
password.
With this function you can view the access
to connected services, the availability of
connected services and modify the connection
mode.
Using the virtual keypad, enter the
"
Key
" for the Wi-Fi network and the
"
Password
".
Select a network.
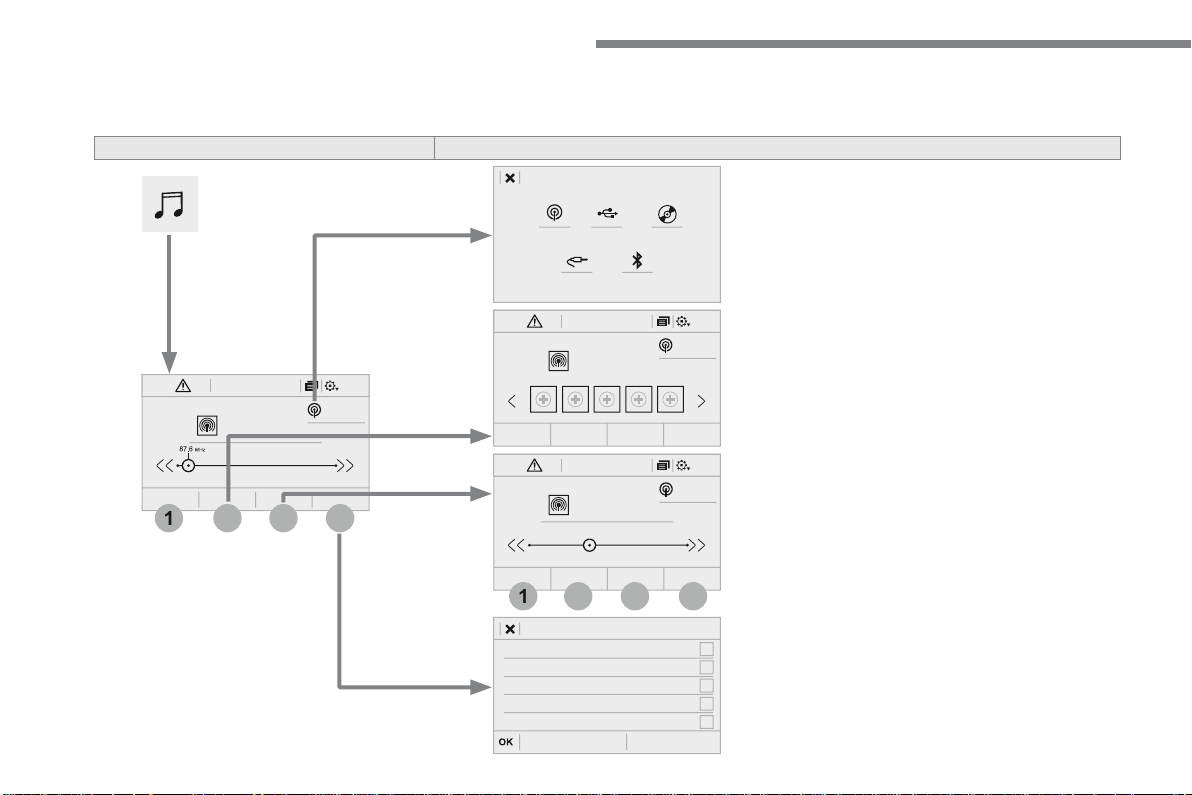
54
FM/87.5 MHz
87.5MHz
12:1318,5 21,523 °C
2
1
4
3
FM/87.5 MHz
87.5MHz
12:1318,5 21,523 °C
AM/531 kHz
PO
kHz
12:1318,5 21,523 °C
2
1
3
4
Audio and Telematics
Radio Media
A c c o r d i n g t o v e r s i o n
Level 1
Level 2
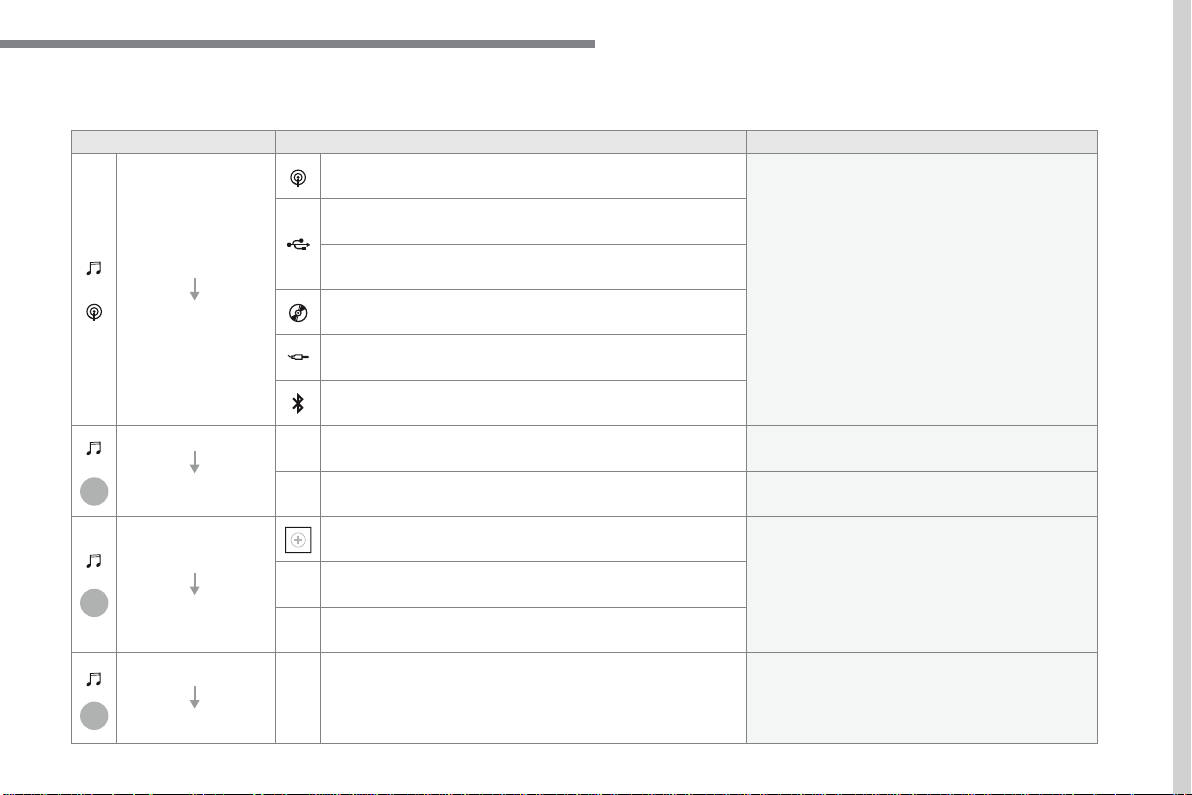
55
.
3
2
4
Audio and Telematics
Level 1
Level 2
Comments
Radio Media
Source
Radio
Select change of source.
USB
iPod
CD
AUX
Bluetooth
Radio Media
Frequency / Presets
Frequency
Carry out an automatic or manual search for radio
stations.
Presets
Make a long press on an empty location to preset
a station.
Radio Media
Band
FM
Press the Band button to change waveband.
DAB
AM
Radio Media
List
Radio stations
Open the list and press a radio station to select it.
56
1
9
6
7
8
5
10
11
13
14
15
12
9
9
6
6
7
7
8
8
5
5
Audio and Telematics
Level 2
Level 3
57
.
5
12
8
6
13
14
15
9
7
10
11
1
1
1
Audio and Telematics
Level 2
Level 3
Comments
Radio Media
OPTIONS
Audio settings
Ambience
Select the sound ambience.
Distribution
Sound distribution by the Arkamys
®
system.
®
system.
®
Sound
Adjust the volume or activate volume linked to
speed.
Voice
Adjust the voice volume.
Ringtone
Adjust the ringtone volume.
Save settings.
Radio Media
OPTIONS
Radio settings
General
Activate or deactivate settings.
Announcements
Save settings.
Radio Media
OPTIONS
Radio stations
FM
Display the list of radio stations for the band
selected.
DAB
AM
Presets
Select a preset radio station.
Frequency
Enter a frequency manually.
Change the screen display mode.
Update the list according to reception.
58
21
1
17
18
19
20
16
Audio and Telematics
Level 2
Level 3
59
.
17
20
18
21
19
1
1
16
Audio and Telematics
Level 2
Level 3
Comments
Radio Media
OPTIONS
Music files
Albums
Choose a selection mode.
Artists
Genres
Playlists
Folders
Radio Media
OPTIONS
Managing photos
USB
Display photos.
The system supports the following image formats:
.gif, .jpg, .jpeg, .bmp, .png, .raw and .tiff with a
maximum file size of 10 Mb per image.
61
.
1
2
2
2
Audio and Telematics
Press
Radio Media
to display the
menu.
Press the "
OPTIONS
" button to go to
the secondary page.
Press "
Frequency
".
Press "
Frequency
".
Enter the values using the virtual
keypad.
First enter the units then click on the
decimals zone to enter the figures
after the decimal point.
Press one of the buttons for an
automatic search for radio stations.
Press
Radio Media
to display the
primary page.
Radio
Selecting a station
Radio reception may be affected by
the use of electrical equipment not
approved by the Brand, such as a USB
charger connected to the 12 V socket.
The exterior environment (hills,
buildings, tunnel, car park, below
ground...) may prevent reception,
even in RDS station tracking mode.
This phenomenon is normal in the
propagation of radio waves and is in no
way indicative of a fault with the audio
system.
Select "
Radio stations
" in the
secondary page.
Or
Or
Move the cursor for a manual search
for frequencies up or down.
Select a radio station or frequency.
(refer to the corresponding section)
Press "
Presets
".
Make a long press on one of the
buttons to preset the station.
Preset a station
Press "
OK
" to confirm.
62
1
1
10
10
11
Audio and Telematics
Press
Radio Media
to display the
primary page.
Press
Radio Media
to display the
primary page.
Press the "
OPTIONS
" button to go to
the secondary page.
Press the "
OPTIONS
" button to go to
the secondary page.
Select "
Radio settings
".
Select "
Radio settings
".
Select "
General
".
Select "
General
".
Select "
Announcements
".
Activate/deactivate "
Station follow
".
Activate / Deactivate "
Display radio
text
".
Activate / Deactivate "
Traffic
announcement
".
Activate/ Deactivate RDS
RDS, if activated, allows you to continue
listening to the same station by automatic
retuning to alternative frequencies.
However, in certain conditions, coverage
of an RDS station may not be assured
throughout the entire country as radio
stations do not cover 100 % of the
territory. This explains the loss of
reception of the station during a journey.
Press "
OK
" to confirm.
Press "
OK
" to confirm.
Press "
OK
" to confirm.
The "Radio Text" function allows
information transmitted by the radio
station, relating to the station or the
song playing, to be displayed.
Display text information
Play TA messages
The TA (Traffic Announcement)
function gives priority to TA alert
messages. To operate, this function
needs good reception of a radio station
that carries this type of message. While
traffic information is being broadcast,
the current media is automatically
interrupted so that the TA message can
be heard. Normal play of the media
previously playing is resumed at the
end of the message.
63
.
1
10
3
Audio and Telematics
Select the audio source.
Press
Radio Media
to display the
primary page.
Press "
Band
" to select the "
DAB
"
waveband.
Press
Radio Media
to display the
primary page.
Press the "
OPTIONS
" button to go to
the secondary page.
DAB-FM auto tracking
"DAB" does not cover 100% of the
territory.
When the digital radio signal is poor,
"DAB-FM auto tracking" allows you to
continue listening to the same station,
by automatically switching to the
corresponding "FM" analogue station
(if there is one).
If "DAB-FM auto tracking" is activated,
there is a difference of a few seconds
when the system switches to "FM"
analogue radio with sometimes a
variation in volume.
Once the digital signal is restored, the
system automatically changes back to
" D A B " .
Digital radio provides higher quality
reception.
The different multiplexes offer a
choice of radio stations arranged in
alphabetical order.
If the "DAB" station being listened to
is not available on "FM" ("
DAB-FM
"
option greyed out), or "DAB/FM auto
tracking" is not activated, the sound
will cut out while the digital signal is too
w e a k .
Select "
Radio settings
".
Select "
General
".
Activate / Deactivate "
Station
follow
".
Press "
OK
".
DAB radio (Digital Audio Broadcasting)
Terrestrial Digital Radio
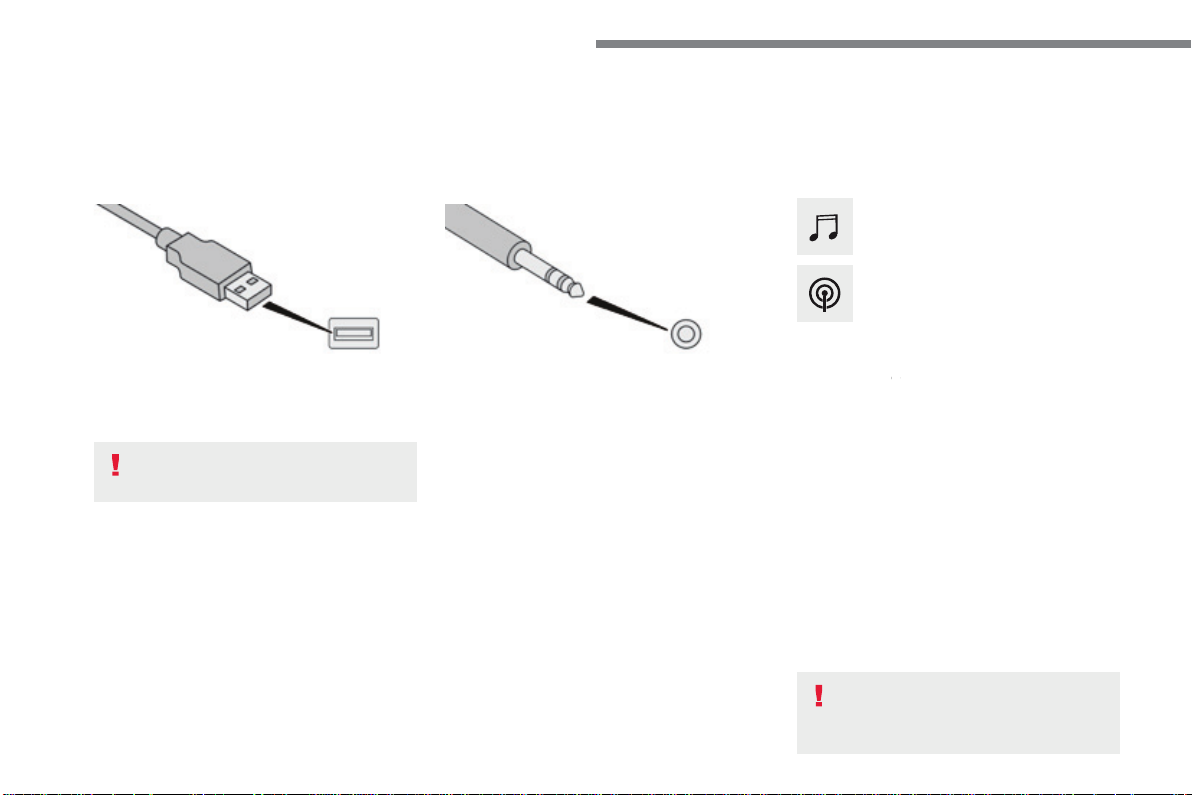
64
Audio and Telematics
Media
USB port
Selecting the source
Select "
Source
".
Press
Radio Media
to display the
primary page.
The system builds playlists (in temporary
memory), an operation which can take from
a few seconds to several minutes at the first
connection.
Reduce the number of non-music files and the
number of folders to reduce the waiting time.
The playlists are updated every time the
ignition is switched off or connection of a USB
memory stick. The lists are memorised: if they
are not modified, the subsequent loading time
will be shorter.
Insert the USB memory stick into the USB port
or connect the USB device to the USB port
using a suitable cable (not supplied).
Auxiliary (AUX) socket
First adjust the volume of your portable device
(to a high level). Then adjust the volume of your
audio system.
Display and management of the controls are
via the portable device.
This source is only available if "Auxiliary input"
has been checked in the audio settings.
(depending on equipment)
Connect the portable device (MP3 player…) to
the auxiliary Jack socket using an audio cable
(not supplied).
Choose the source.
Bluetooth
®
Bluetooth
®
Bluetooth
audio streaming
®
audio streaming
®
Streaming allows you to listen to music from
your telephone.
The Bluetooth profile must be activated. First
adjust the volume on your portable device (to a
high level).
Then adjust the volume of your audio system.
If play does not start automatically, it may be
necessary to start the audio playback from the
telephone.
Control is from the portable device or by using
the system's touch buttons.
Once connected in streaming mode,
the telephone is considered to be a
media source.
To protect the system, do not use a
USB hub.
CD player
(depending on equipment)
Insert the CD in the player.
65
.
Audio and Telematics
Connecting Apple
®
Connecting Apple
®
Connecting Apple
players
®
players
®
Connect the Apple
®
player to the USB port
®
player to the USB port
®
using a suitable cable (not supplied).
Play starts automatically.
Control is via the audio system.
The classifications available are those
of the portable device connected
(artists / albums / genres / playlists /
audiobooks / podcasts).
The default classification used is by
artist. To modify the classification used,
return to the first level of the menu
then select the desired classification
(playlists for example) and confirm
to go down through the menu to the
desired track.
The version of software in the audio system
may not be compatible with the generation of
your Apple
®
player.
®
player.
®
The audio equipment will only play audio
files with ".wma, .aac, .flac, .ogg and .mp3"
file extensions and with a bit rate of between
32 Kbps and 320 Kbps.
It also supports VBR (Variable Bit Rate) mode.
No other type of file (.mp4, ...) can be played.
".wma" files must be of the standard wma 9
type.
The sampling rates supported are 32, 44 and
48 KHz.
In order to be able to play a burned CDR or
CDRW, when burning it is preferable to select
standards ISO 9660 level 1, 2 or Joliet.
If the disc is burned in another format, it may
not be played correctly.
It is recommended that the same burning
standard is always used on an individual disc,
with as low a speed as possible (4x maximum)
for the best sound quality.
In the particular case of a multi-session CD, the
Joliet standard is recommended.
It is advisable to restrict file names to
20 characters, without using of special
characters (e.g.: " " ? ; ù) to avoid any playing
and displaying problems.
Information and advice
Use only USB memory sticks formatted FAT 32
(file allocation table).
The system supports USB mass
storage devices, BlackBerry
®
devices
®
devices
®
or Apple
®
players via USB ports. The
®
players via USB ports. The
®
adaptor cable is not supplied.
Control of the peripheral device is with
the audio system controls.
Other peripherals, not recognised on
connection, must be connected to the
auxiliary socket using a Jack cable (not
supplied) or via Bluetooth streaming,
depending on compatibility.
It is recommended that the original USB
cable for the portable device is used.
To protect the system, do not use a
USB hub.
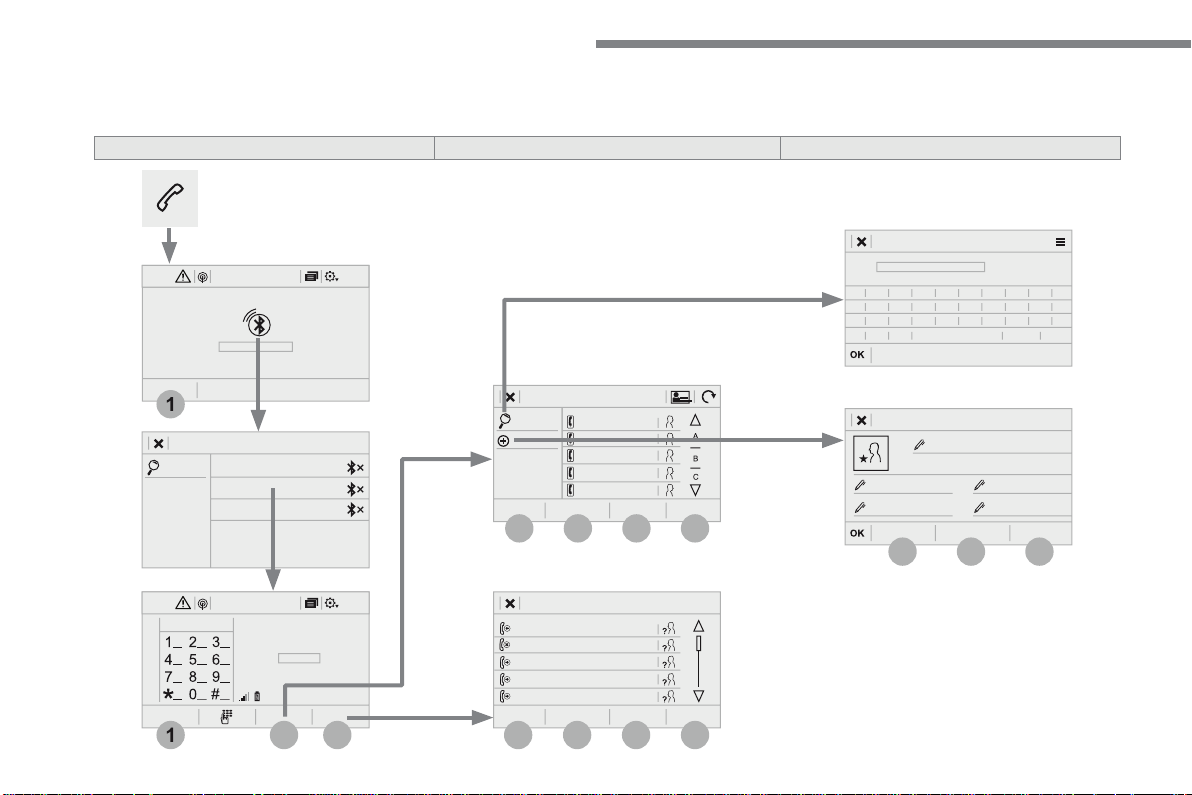
66
12:1318,5 21,523 °C
12:1318,5 21,523 °C
4
1
1
8
14
5
3
9
12
6
2
10
7
11
13
Audio and Telematics
Telephone
A c c o r d i n g t o v e r s i o n
Level 1
Level 2
Level 3
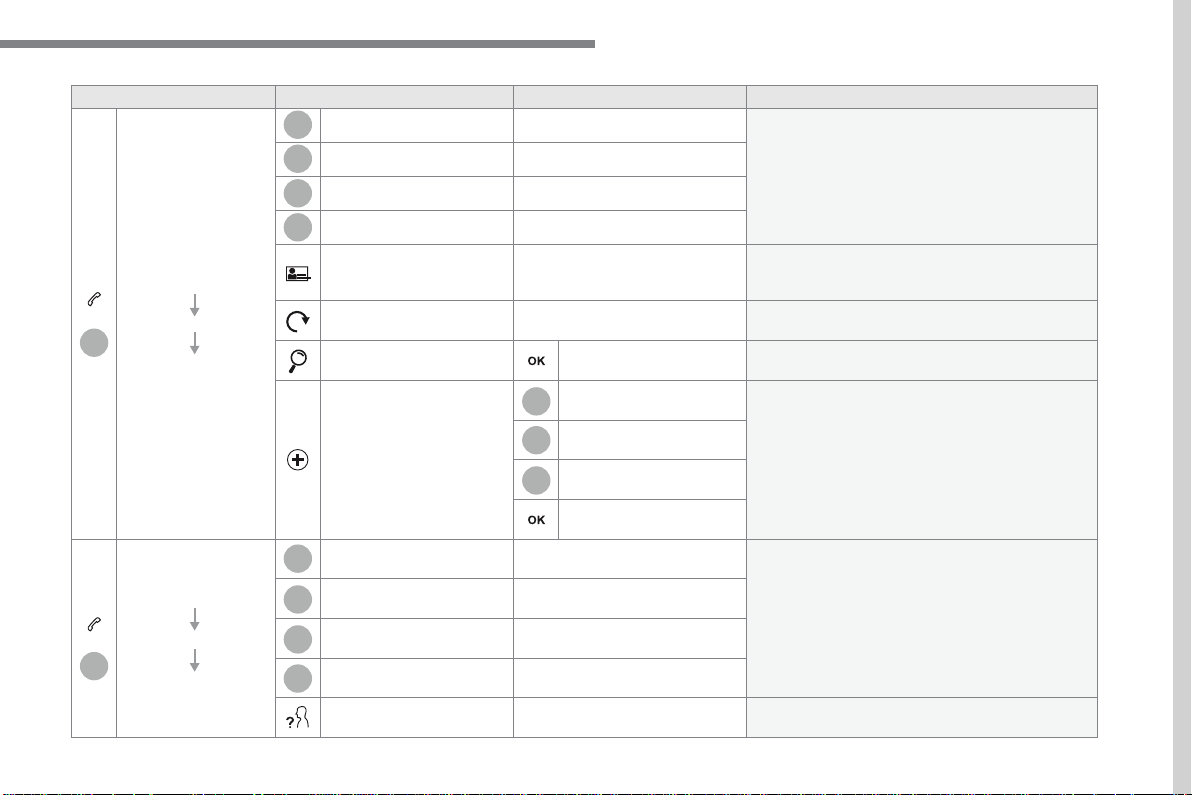
67
.
14
12
13
3
2
5
6
7
4
8
9
10
11
Audio and Telematics
Level 1
Level 2
Level 3
Comments
Telephone
Bluetooth
Contact
All
View contacts according to presentation choices.
Select a contact or a favourite saved in the
system via the profile selected to start the call.
Telephone
Address
Favourites
Sort the contacts by Surname-First name or First
name-Surname.
Update the contacts from the telephone.
Search
Search for a contact in the directory.
Create
Telephone
Create a new contact in the system.
Address
Email
Telephone
Bluetooth
Calls
All
View calls according to choice of presentation.
Select a contact to start the call.
Incoming
Outgoing
Missed
View details for the contact.
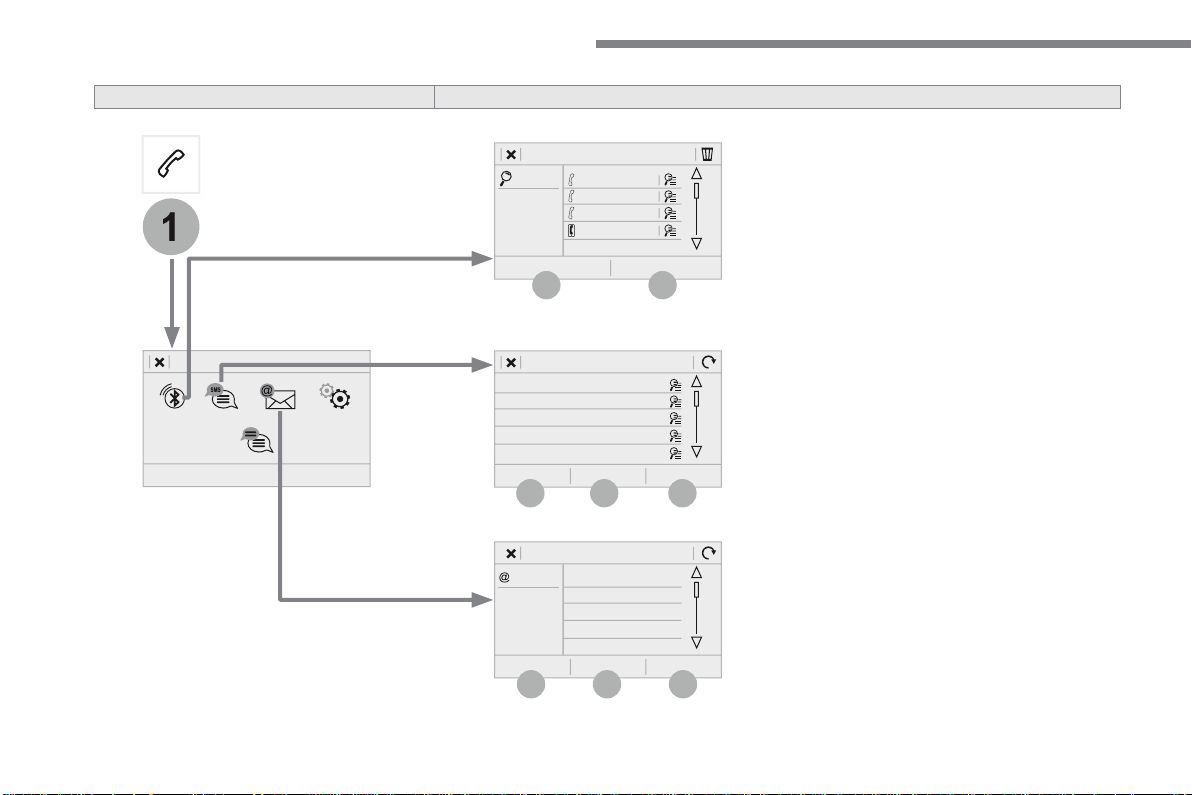
68
19
20
21
22
1
15
16
17
18
Audio and Telematics
Level 2
Level 3
69
.
1
1
1
19
20
21
22
15
16
17
18
Audio and Telematics
Level 2
Level 3
Comments
Telephone
OPTIONS
Bluetooth
connection
All
Display all telephones detected and saved.
Connected
Display all connected telephones.
Search
Start the search for a device to connect.
Telephone
OPTIONS
Messages
All
Display messages according to the choice made.
Received
Sent
Telephone
OPTIONS
Email
Received
Display emails according to the choice made.
Sent
Not read
Mailbox
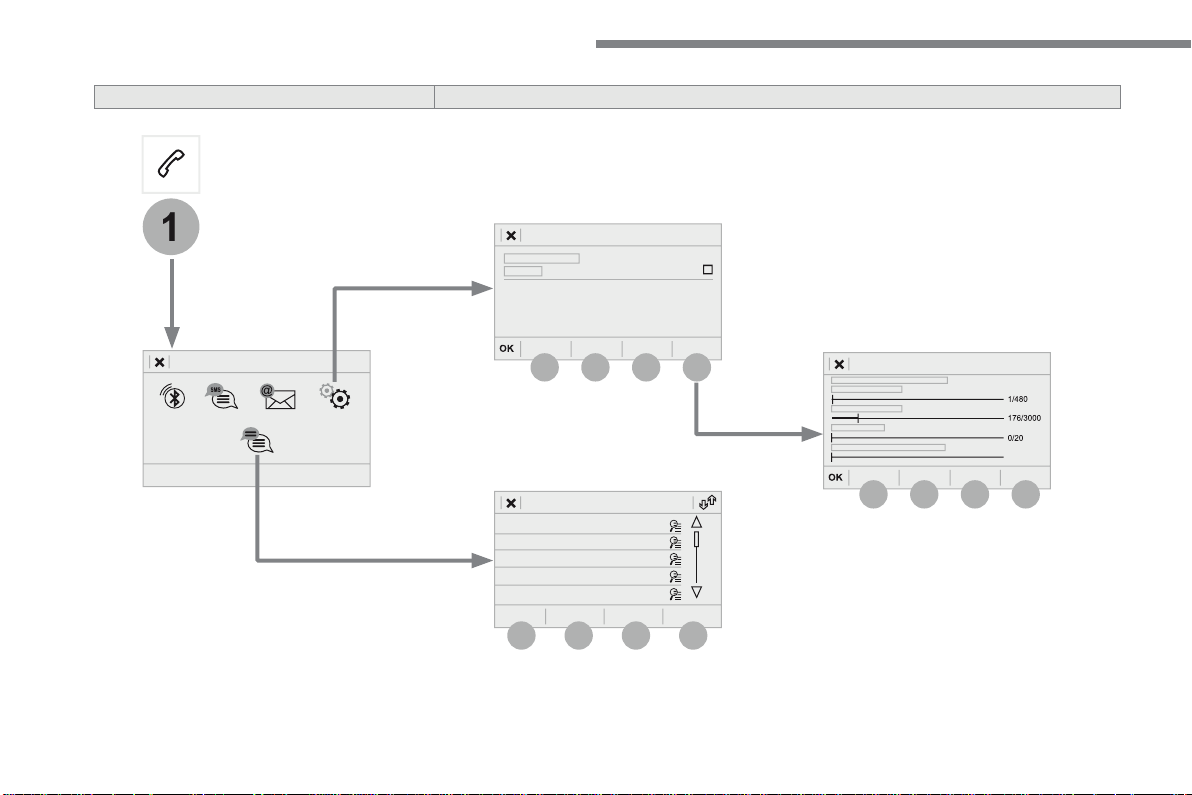
70
23
27
24
28
25
29
26
30
1
23
24
25
26
Audio and Telematics
Level 2
Level 3
71
.
1
1
27
28
29
30
23
24
25
26
Audio and Telematics
Level 2
Level 3
Comments
Telephone
OPTIONS
Settings
Security
Make driving safe.
Voicemail
Enter and save the number for the telephone
voicemail.
Ringtone
Adjust the ringtone volume.
Statistics
Display data for the telephone connected.
Save the options.
Telephone
OPTIONS
Quick messages
Delayed
Select a quick message from the categories, as
required.
My arrival
Not available
Other
72
Audio and Telematics
Pairing a Bluetooth
®
Pairing a Bluetooth
®
Pairing a Bluetooth
telephone
®
telephone
®
As a safety measure and because it
requires sustained attention by the
driver, the pairing of a Bluetooth mobile
telephone with theBluetooth hands-free
system of your audio system must be
done with the
vehicle stationary
and
the ignition on.
Procedure from the telephone
Select the system name in the list of
devices detected.
In the system, accept the connection request
from the telephone.
Procedure from the system
Press on
Telephone
to display the
primary page.
Press on "
Bluetooth search
".
Select "
Search
".
The list of telephones detected is
displayed.
If the pairing procedure fails, it is recommended
that you deactivate and then reactivate the
"Bluetooth" function in your telephone.
The system offers to connect the telephone
with 3 profiles:
-
Telephone
(hands-free kit, telephone
only),
-
Streaming
(wireless play of audio files on
the telephone),
-
Mobile internet data
.
Depending on the type of telephone,
you may be asked to accept or not
the transfer of your contacts and
messages.
Select the name of the chosen
telephone in the list.
Press "
OK
" to confirm.
Select one or more profiles.
Or
Activate the Bluetooth function on the
telephone and ensure that it is "visible
to all" (telephone configuration).
To complete the pairing, whichever
procedure used (from the telephone or
from the system), ensure that the code
is the same in the system and in the
telephone.
The "
Mobile internet data
" profile
must be activated for connected
navigation, having first activated
sharing of the connection on your
smartphone.
Connection sharing
73
.
1
Audio and Telematics
Press
Telephone
to display the
primary page.
Select "
Bluetooth connection
" to
display the list of paired devices.
On return to the vehicle, if the last
telephone connected is present again,
it is automatically recognised and
within about 30 seconds of switching
on the ignition, the connection is
established without any action on your
part (Bluetooth activated).
The services available depend on
the network, the SIM card and the
compatibility of the Bluetooth devices
used. Check in your telephone's
manual and with your service provider
for the services available to you.
The ability of the system to connect
with just one profile depends on the
telephone.
All three profiles may connect by default.
Go to the Brand's website for more information
(compatibility, additional help, ...).
To modify the connection profile
:
Automatic reconnection
Press the "details" button.
Press the "
OPTIONS
" button to go to
the secondary page.
Press "
OK
" to confirm.
Select one or more profiles.
The profiles compatible with the system
are HFP, OPP, PBAP, A2DP, AVRCP,
MAP and PAN.
74
1
Audio and Telematics
Receiving a call
An incoming call is announced by a ring and a
superimposed display in the screen.
Make a short press on the steering
mounted
TEL
button to accept an
incoming call.
Make a long press
on the steering mounted
TEL
button
to reject the call.
Or
And
Select "
End call
".
Press on the name of the telephone
chosen in the list to disconnect it.
Press again to connect it.
Select the basket at top right of the
screen to display a basket alongside
the telephone chosen.
Press the basket alongside the
telephone chosen to delete it.
Managing paired telephones
This function allows the connection or
disconnection of a peripheral device as
well as the deletion of a pairing.
Press
Telephone
to display the
primary page.
Press the "
OPTIONS
" button to go to
the secondary page.
Select "
Bluetooth connection
" to
display the list of paired peripheral
devices.
Deleting a telephone
75
.
2
3
Audio and Telematics
on the steering mounted button.
Using the telephone is not
recommended while driving.
Park the vehicle.
Make the call using the steering
mounted controls.
Making a call
Calling a new number
Press
Telephone
to display the
primary page.
Enter the phone number using the
digital keypad.
Press "
Call
" to start the call.
Calling a contact
Press
Telephone
to display the
primary page.
Or make a long press
on the steering mounted
TEL
button.
Select "
Contact
".
Select the desired contact from the list offered.
Select "
Call
".
Calling a recently used number
Press
Telephone
to display the
primary page.
Make a long press
Select "
Calls
".
Select the desired contact from the list offered.
It is always possible to make a call
directly from the telephone; as a safety
measure, first park the vehicle.
Or
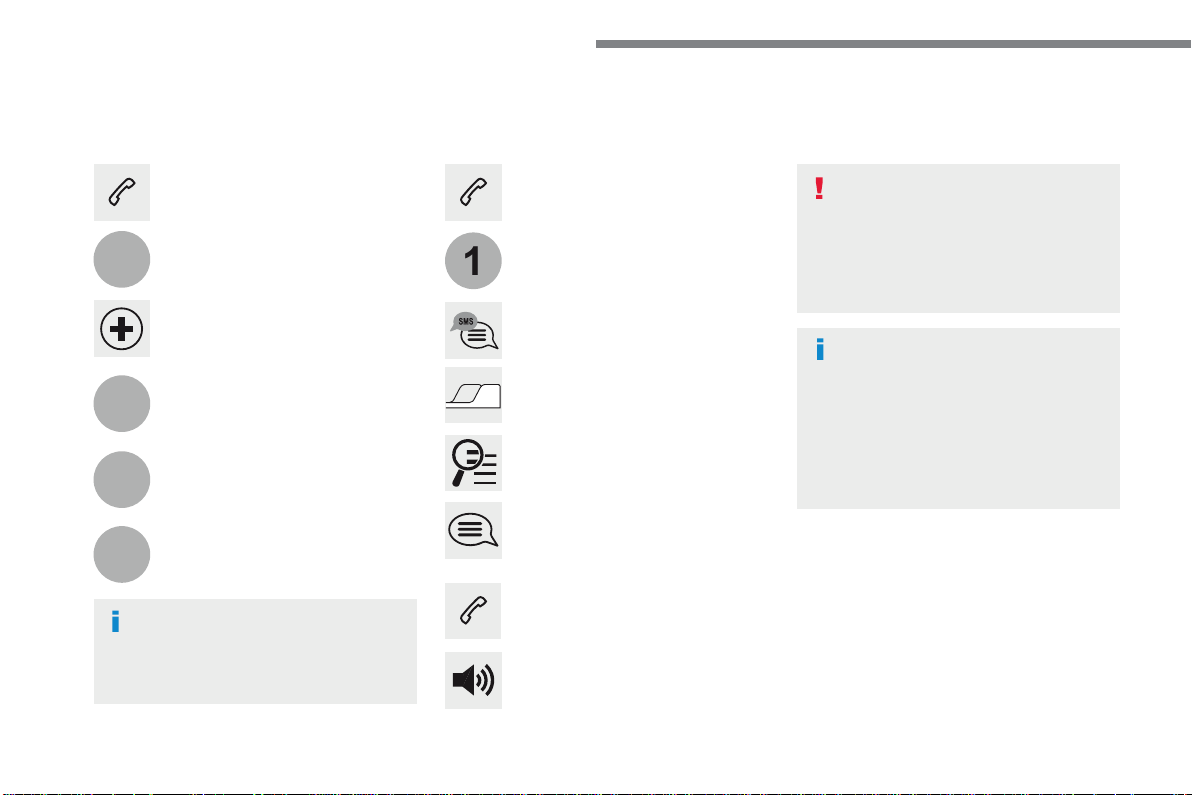
76
2
12
13
14
1
Audio and Telematics
The access to "
Messages
" depends on
the compatibility of the smartphone and
the integral system.
Depending on the smartphone, access
to your messages or email may be
slow.
Managing messages
The "
Email
" function allows email
addresses to be entered for a contact,
but the system is not able to send
emails.
Managing contacts / entries
Press
Telephone
to display the
primary page.
Select "
Contact
".
Select "
Create
" to add a new contact.
In the "
Telephone
" tab, enter the
telephone numbers for the contact.
In the "
Address
" tab, enter the
addresses for the contact.
In the "
Email
" tab, enter the email
addresses for the contact.
Press "
Answer
" to send a quick
message stored in the system.
Press
Telephone
to display the
primary page.
Press the "
OPTIONS
" button to go to
the secondary page.
Select "
Messages
" to display the list
of messages.
Select the "
All
" or "
Received
" or
"
Sent
" tab.
Select the detail of the message
chosen in one of the lists
Press "
Call
" to start the call.
Press "
Play
" to hear the message.
The services available depend on
the network, the SIM card and the
compatibility of the Bluetooth devices
used.
Check in the manual for your
smartphone and with your service
provider for the services available to
you.
77
.
1
1
Audio and Telematics
Managing email
Press
Telephone
to display the
primary page.
Press the "
OPTIONS
" button to go to
the secondary page.
Select "
Email
" to display the list of
messages.
Select the "
Received
" or "
Sent
" or
"
Not read
" tab.
Select the email chosen in the list.
Press "
Play
" to start playing the
email.
Access to "
Email
" depends on the
compatibility of the smartphone and the
integral system.
Managing quick messages
Press
Telephone
to display the
primary page.
Press on the "
OPTIONS
" button to
go to the secondary page.
Select "
Quick messages
" to display
the list of messages.
Select the "
Delayed
" or "
My arrival
"
or "
Not available
" or "
Other
" tab
with the possibility of creating new
messages.
Select the message chosen in one of
the lists.
Press "
Create
" to write a new
message.
Press "
Transfer
" to select the
addressee(s).
Press "
Play
" to start playing the
m e s s a g e .
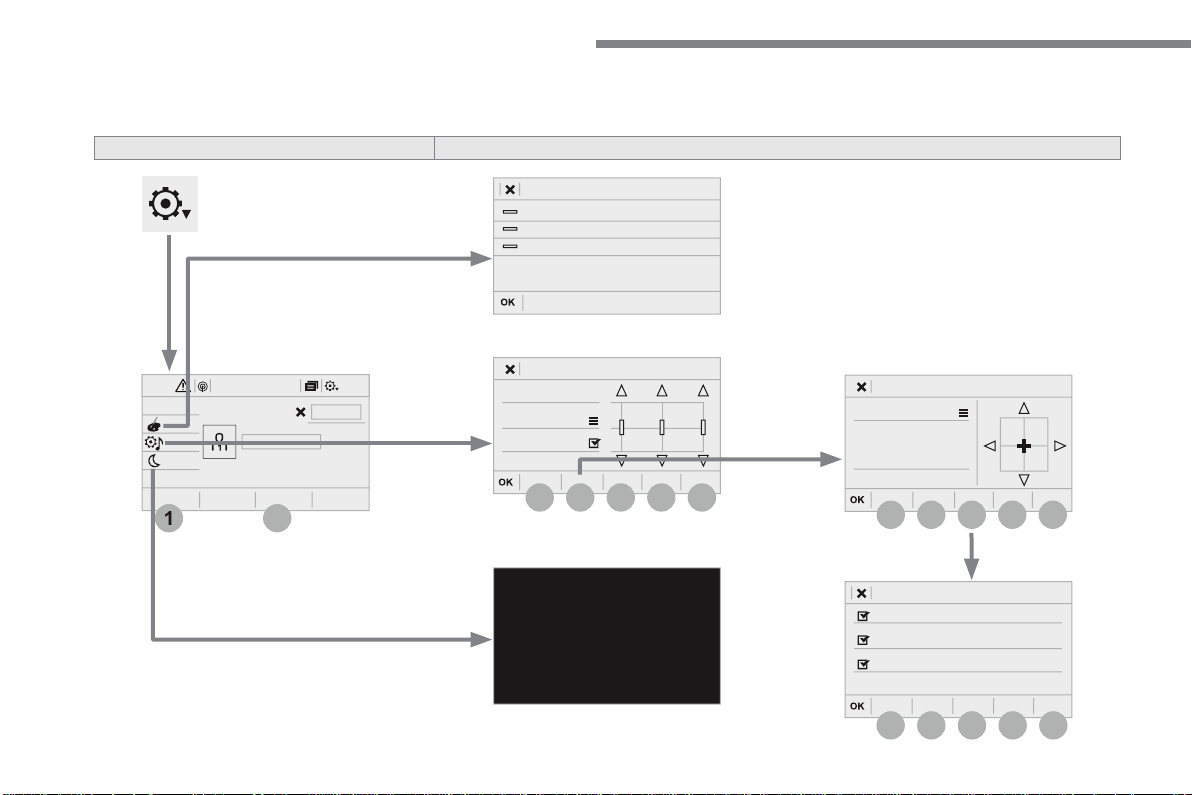
78
12:1318,5 21,523 °C
1
2
3
3
4
4
5
5
6
6
7
7
3
4
5
6
7
Audio and Telematics
S e t t i n g s
A c c o r d i n g t o v e r s i o n
Level 1
Level 2
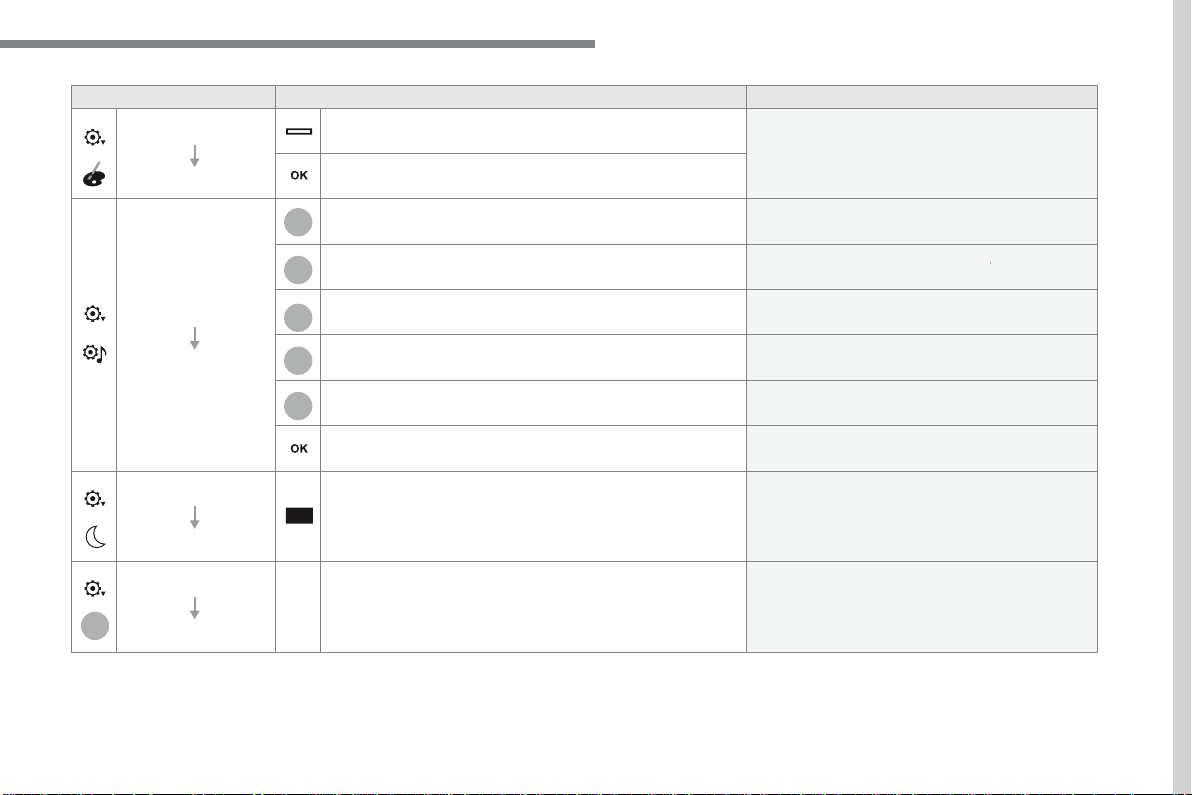
79
.
2
5
6
7
3
4
Audio and Telematics
Level 1
Level 2
Comments
Settings
Color schemes
Color schemes: 1,2,3, ...
Having chosen the color scheme, save the
setting.
Settings
Audio settings
Ambience
Select the sound ambience.
Distribution
Sound distribution by the Arkamys
©
system.
©
system.
©
Sound
Adjust the volume or activate linked to speed.
Voice
Adjust the voice volume.
Ringtone
Adjust the ringtone volume.
Save the settings.
Settings
Turn off screen
Function allowing the display to be switched off.
Pressing the screen reactivates it.
Settings
Profile (1, 2, 3)
Activate the profile selected.
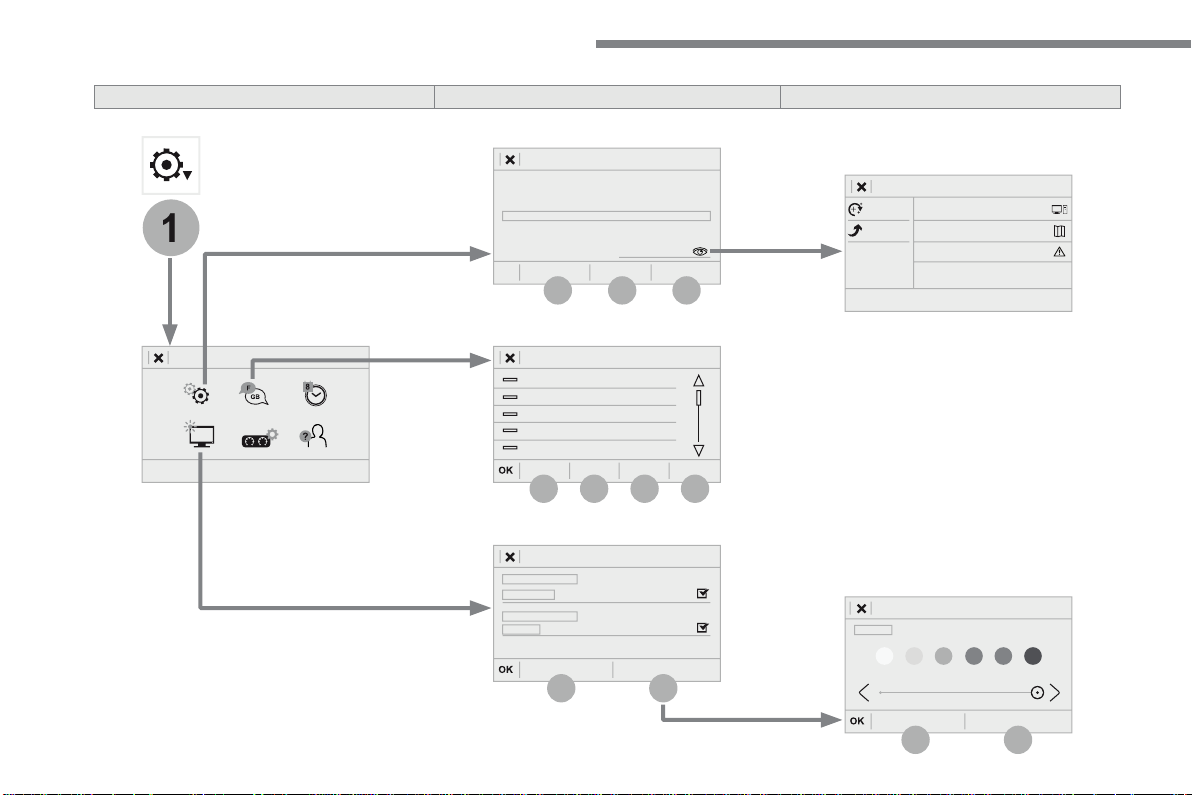
80
1
15
16
15
16
9
8
10
11
12
13
14
Audio and Telematics
Level 2
Level 3
Level 4
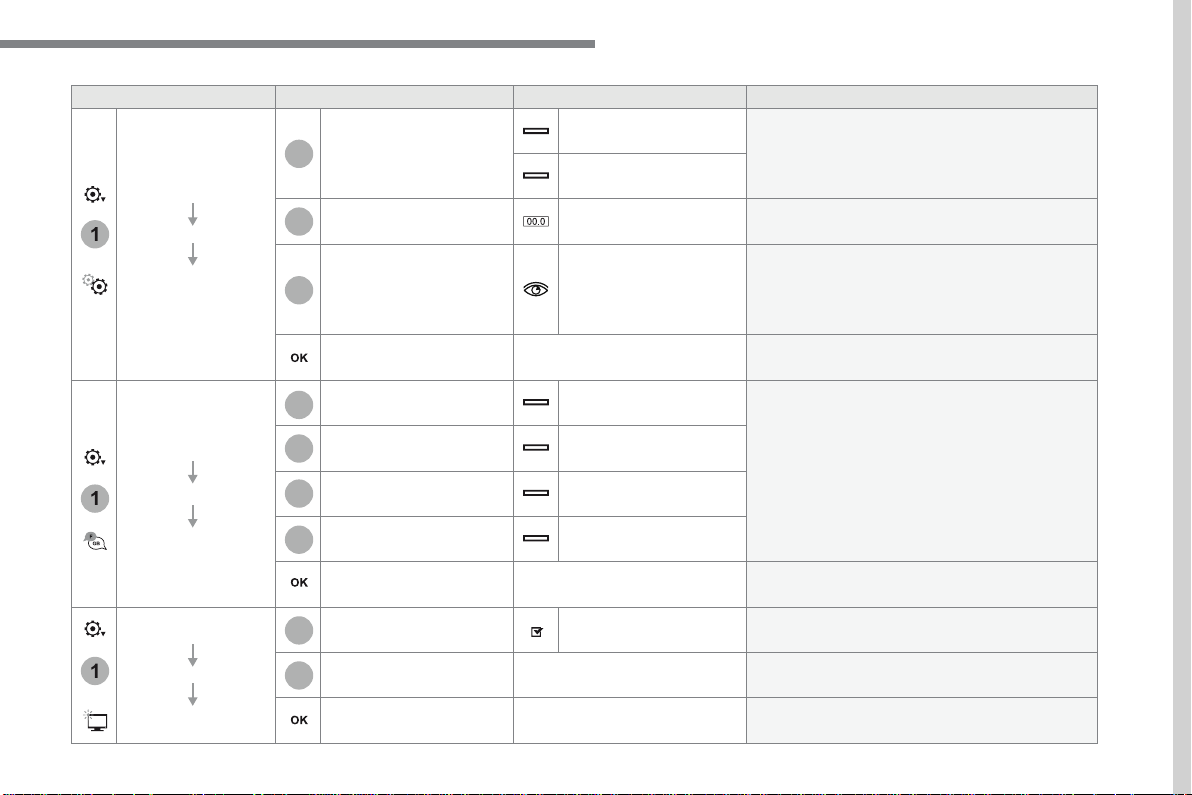
81
.
1
15
16
1
1
11
12
13
14
9
8
10
Audio and Telematics
Level 2
Level 3
Level 4
Comments
Settings
OPTIONS
System settings
Units
Distance and fuel
consumption
Set the units used for distance, fuel consumption
and temperature.
Temperature
Factory settings
Reinitialize
Restore the factory settings.
System info
View
View the versions of the different modules
(system, mapping, risk areas) installed in the
system as well as the updates available.
Save the settings.
Settings
OPTIONS
Languages
All
Select the language then confirm.
Europe
Asia
America
Having selected the language, save the setting.
Settings
OPTIONS
Screen configuration
Animation
Activate or deactivate settings.
Brightness
Move the cursor to adjust the brightness of the
screen and/or of the instrument panel.
Save the settings.
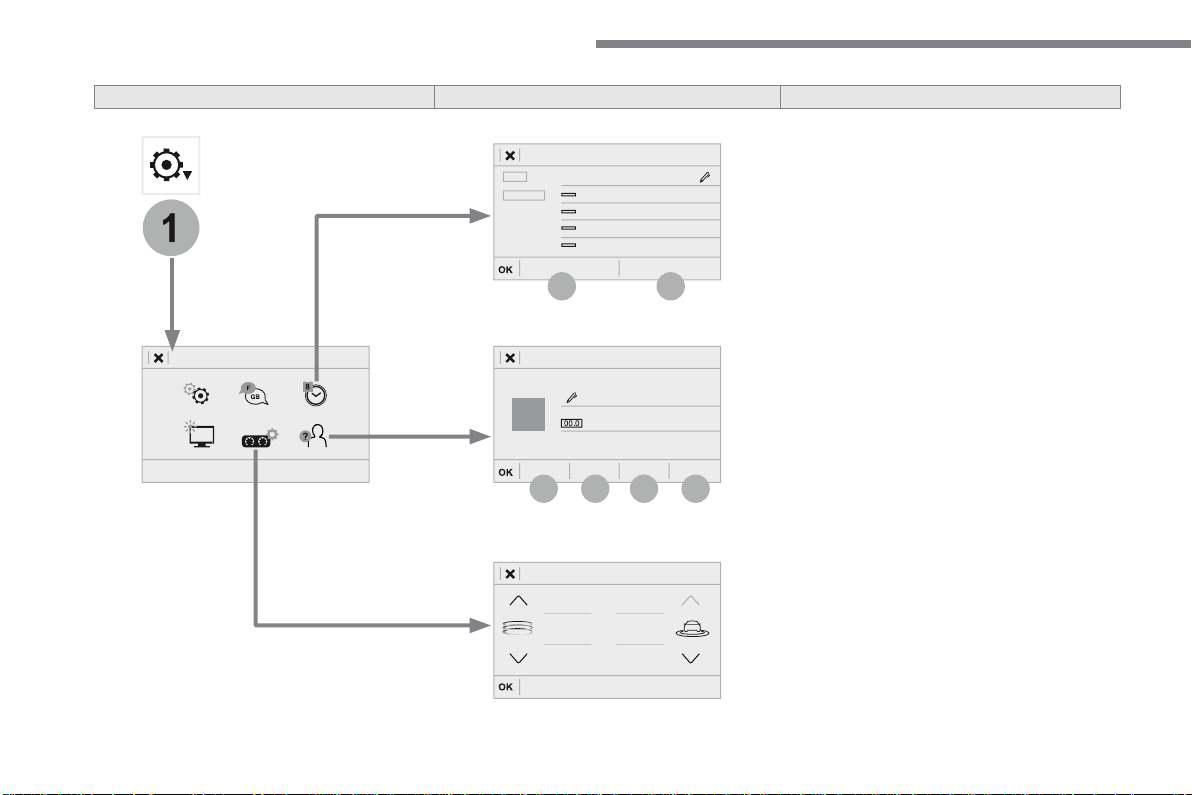
82
1
17
18
19
20
21
22
Audio and Telematics
Level 2
Level 3
Level 4
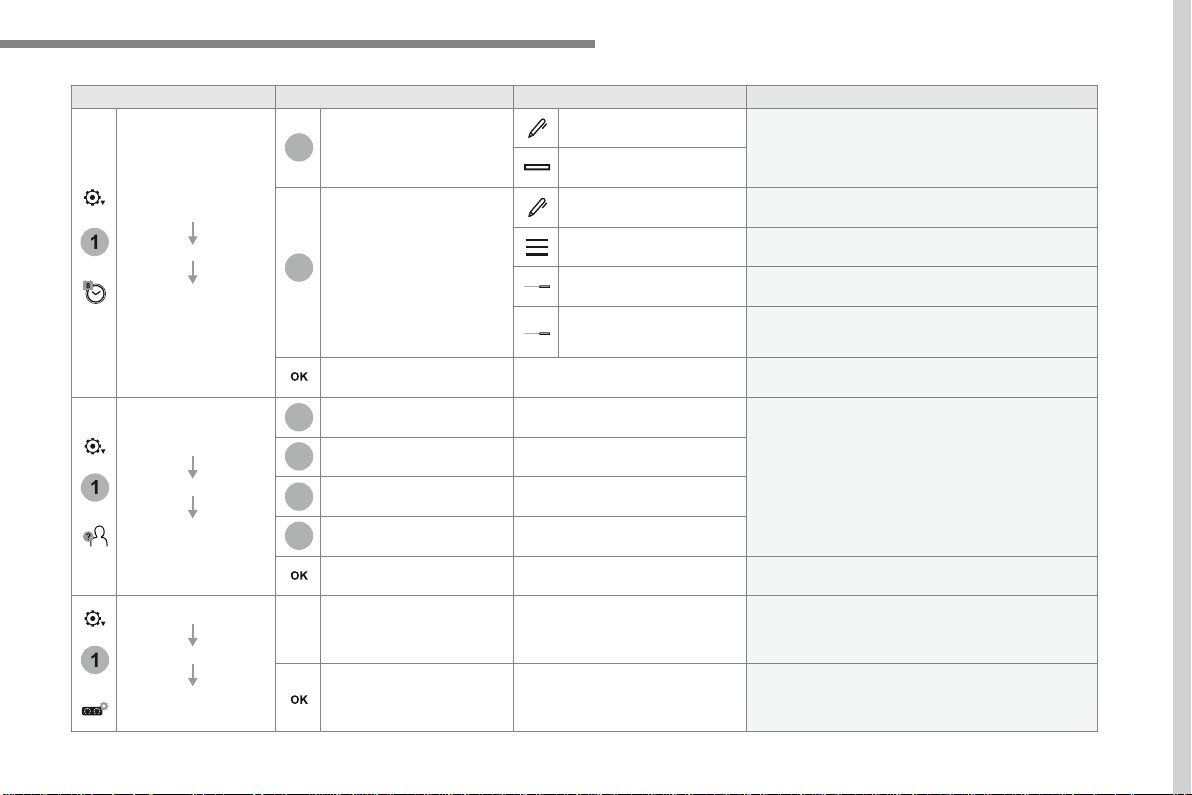
83
.
1
17
18
1
1
20
19
21
22
Audio and Telematics
Level 2
Level 3
Level 4
Comments
Settings
OPTIONS
Setting
the time-date
Date
Date
Enter the date and select the date format.
Date format:
Time
Time
Set the time.
Time Zone
Define the time zone.
Time format:
Select the time format: 12h / 24h.
Synchronisation with
GPS (UTC):
Activate or deactivate synchronisation with the
satellites.
Save the settings.
Settings
OPTIONS
Setting of the
profiles
Profile 1
Enter settings for the profiles.
Profile 2
Profile 3
Common profile
Save the settings.
Settings
OPTIONS
Driver screen
configuration
Personalisation of the
dashboard
Choose and select the display information
required on the dashboard.
Confirm the selections.
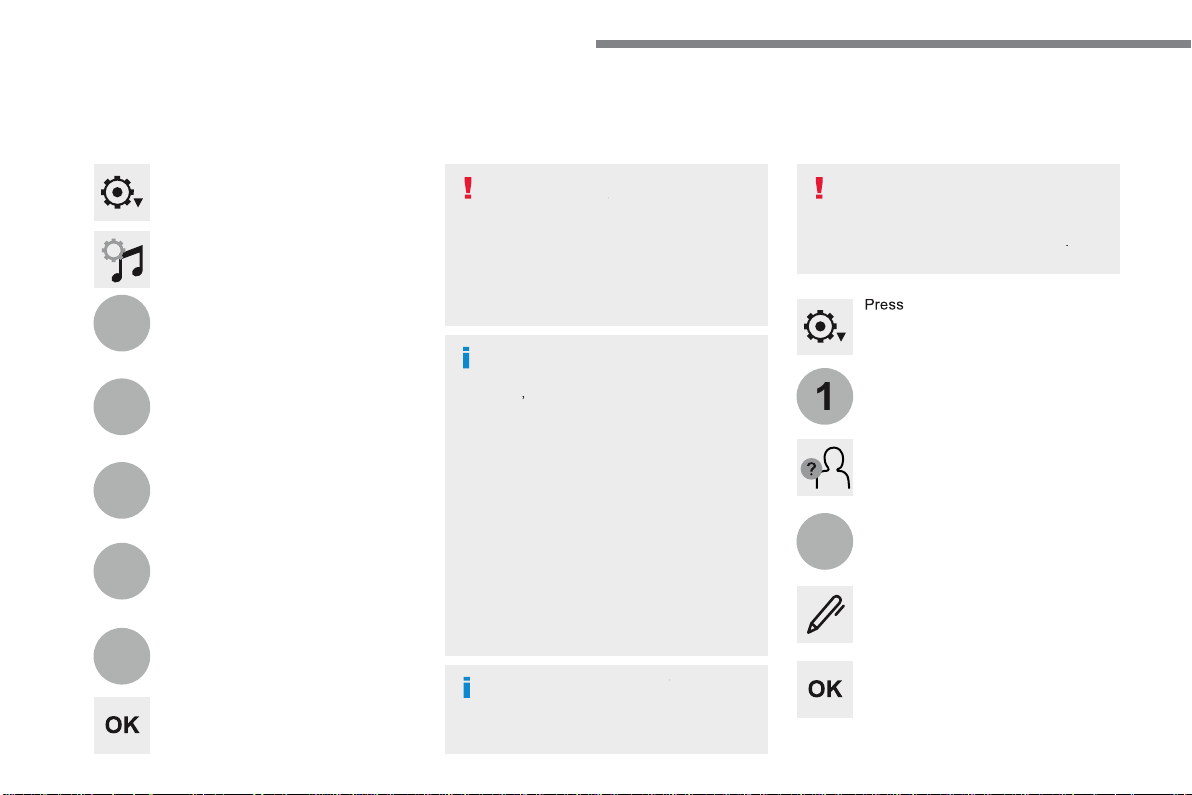
84
3
4
5
6
7
1
19
Audio and Telematics
Press
Settings
to display the primary
page.
Profile settings
Audio settings
Press
Settings
to display the primary
page.
Select "
Audio settings
".
Select "
Ambience
".
Or
"
Position
".
Or
"
Sound
".
Or
"
Voice
".
Or
"
Ringtone
".
On-board audio: Arkamys
©
Sound
©
Sound
©
Staging optimises the distribution of
sound in the passenger compartment.
The settings for "
Position
" (All
passengers, Driver and Front only) are
common to all sources.
Activate or Deactivate "
Touch tones
",
"
Volume linked to speed
" and
"
Auxiliary input
".
The sound distribution (or spatialisation
with the Arkamys
©
system) is audio
©
system) is audio
©
processing that allows the quality of the
sound to be adapted according to the
number of passengers in the vehicle.
Available only with the front and rear
speakers configuration.
The audio
Ambience
settings
(6 ambiences available) as well as the
Bass
,
Medium
and
Treble
settings
are different and independent for each
sound source.
Activate or Deactivate "
Loudness
".
Press "
OK
" to save the settings.
Press "
OK
" to confirm.
Press the "
OPTIONS
" button to go to
the secondary page.
Select "
Profile 1
", "
Profile 2
",
"
Profile 3
" or "
Common profile
".
Select "
Setting of the profiles
".
Press this button to enter a name for
the profile using the virtual keypad.
As a safety measure and because it
requires the sustained attention of the
driver, changes to settings must only be
done with the
vehicle stationary
.
vehicle stationary . vehicle stationary
85
.
3
2
4
5
6
7
Audio and Telematics
Select a "
Profile
" (1 or 2 or 3) to
associate the "
Audio settings
" with
it.
Select "
Audio settings
".
Select "
Ambience
".
Or
"
Distribution
".
Or
"
Sound
".
Or
"
Voice
".
Or
"
Ringtone
".
The location for the photograph is
square; the system deforms the original
photograph if in another format.
Initialisation of the profile selected
activates the English language by default.
Press "
OK
" to save the settings.
Press "
OK
" to accept the transfer of
the photograph.
Press "
OK
" again to save the
settings.
Press this button to add a photograph
to the profile.
Insert a USB memory stick containing
the photograph in the USB port.
Select the photograph.
Press this button to initialise the
profile selected.
86
1
1
1
8
9
10
15
16
1
Audio and Telematics
Press
Settings
to display the primary
page.
Press
Settings
to display the primary
page.
Press
Settings
to display the primary
page.
Press the "
OPTIONS
" button to go to
the secondary page.
Press the "
OPTIONS
" button to go to
the secondary page.
Press the "
OPTIONS
" button to go to
the secondary page.
Select "
System settings
".
Select "
Screen configuration
".
Select "
Units
" to change the units
for distance, fuel consumption and
temperature.
Select "
Languages
" to change the
language.
Activate or deactivate "
Automatic
scrolling
".
Move the cursor to adjust the
brightness of the screen and/or of the
instrument panel.
Select "
Factory settings
" to return
to the initial settings.
Select "
System info
" to display the
versions of the different modules
installed in the system.
Modifying system settings
Returning the system to factory settings
activates the English language by
default.
Select "
Animation
".
Select "
Brightness
".
Select the language
Press
Settings
to display the primary
page.
Press the "
OPTIONS
" button to go to
the secondary page.
Select "
Setting the time-date
".
Setting the date
87
.
1
17
18
Audio and Telematics
Press
Settings
to display the primary
page.
Press the "
OPTIONS
" button to go to
the secondary page.
Select "
Date
".
Select "
Time
".
Select "
Setting the time-date
".
Adjustment of the time and date is only
available if "GPS synchronisation" is
deactivated.
The change between winter and
summer time is done by changing the
time zone.
The system does not automatically
manage the change between winter
and summer time (depending on
country).
Setting the time
Press this button to define the date.
Press this button to adjust the time
using the virtual keypad.
Press "
OK
" to confirm.
Press "
OK
" to confirm.
Press "
OK
" to confirm.
Press this button to define the time
z o n e .
Select the display format of the date.
Select the display format for the time
(12h / 24h).
Activate or deactivate
synchronisation with the satellites
(UTC).
Every time the color scheme is
changed, the system restarts,
temporarily displaying a black screen.
As a safety measure, the procedure
for changing the color scheme is only
possible with the vehicle stationary.
Press
Settings
to display the primary
page.
Select "
Color schemes
".
Select a color scheme in the list then
press "
OK
" to confirm.
Color schemes

88
Audio and Telematics
The following table groups together the answers to the most frequently asked questions concerning your audio system.
QUESTION
ANSWER
SOLUTION
The route calculation is not
successful.
The route settings may conflict with the current location (exclusion of
toll roads on a toll motorway).
Check the route settings in the "Navigation"
menu.
The POIs do not appear.
The POIs have not been selected.
Select the POIs in the list of POIs.
The audible warning of
"Danger areas" does not
work.
The audible warning is not active.
Activate audible warnings (without the possibility
of adjusting the volume) in the "Navigation" menu.
The system does not
suggest a detour around an
incident on the route.
The guidance criteria do not take account of TMC messages.
Select setting for the "Traffic info" function in
the list of route settings (Without, Manual or
Automatic).
I receive a "Danger area"
alert which is not on my
route.
Other than guidance, the system announces all "Danger areas"
positioned in a cone located in front of the vehicle. It may provide an
alert for "Danger areas" located on nearby or parallel roads.
Zoom in on the map to view the exact position of the
"Danger area". Select "On the route" to no longer
receive alerts other than navigation instructions or
to reduce the time for the announcement.
Frequently asked questions
Navigation

89
.
Audio and Telematics
QUESTION
ANSWER
SOLUTION
Certain traffic jams along
the route are not indicated
in real time.
On starting, it is several minutes before the system begins to receive
the traffic information.
Wait until the traffic information is being received
correctly (display of the traffic information icons
on the map).
In certain countries, only major routes (motorways...) are listed for
the traffic information.
This phenomenon is normal. The system is
dependent on the traffic information available.
The altitude is not
displayed.
On starting, the initialisation of the GPS may take up to 3 minutes to
receive more than 4 satellites correctly.
Wait until the system has started up completely so
that there is GPS coverage by at least 4 satellites.
Depending on the geographical environment (tunnel...) or the
weather, the conditions of reception of the GPS signal may vary.
This phenomenon is normal. The system
is dependent on the GPS signal reception
conditions.
90
Audio and Telematics
Radio
QUESTION
ANSWER
SOLUTION
The quality of reception of
the radio station listened
to gradually deteriorates
or the stored stations do
not function (no sound,
87.5 Mhz is displayed...).
The vehicle is too far from the transmitter used by the station
listened to or there is no transmitter in the geographical area
through which the vehicle is travelling.
Activate the "RDS" function by means of the
short-cut menu to enable the system to check
whether there is a more powerful transmitter in
the geographical area.
The environment (hills, buildings, tunnels, basement car parks...)
block reception, including in RDS mode.
This phenomenon is normal and does not indicate
a fault with the audio system.
The aerial is absent or has been damaged (for example when going
through a car wash or into an underground car park).
Have the aerial checked by a franchised dealer.
I cannot find some radio
stations in the list of
stations received.
The station is not received or its name has changed in the list.
Press on the "Update list" button in the "Radio
stations" secondary menu.
Some radio stations send other information in place of their name
(the title of the song for example).
The system interprets this information as the name of the station.
The name of the radio
station changes.

91
.
Audio and Telematics
Media
QUESTION
ANSWER
SOLUTION
Playback of my USB
memory stick starts only
after a very long wait
(around 2 to 3 minutes).
Some files supplied with the memory stick may greatly slow down
access to reading the memory stick (multiplication by 10 of the
catalogue time).
Delete the files supplied with the memory stick
and limit the number of sub-folders in the file
structure on the memory stick.
The CD is ejected
automatically or is not
played by the player.
The CD is inserted upside down, is unplayable, does not contain any audio
data or contains an audio format which the player does not recognise.
Check that the CD is inserted in the player the
right way up.
Check the condition of the CD: the CD cannot be
played if it is too badly damaged.
Check the content in the case of a recorded CD:
refer to the advice in the "AUDIO" section.
The audio system's CD player does not play
DVDs.
Some recorded CDs will not be played by the
audio system because they are not of adequate
quality.
The CD has been recorded in a format that is not compatible with the player (udf, ...).
The CD is protected by an anti-pirating protection system which is
not recognised by the audio system.
There is a long waiting
period following the
insertion of a CD or
connection of a USB
memory stick.
When a new medium is inserted, the system reads a certain
amount of data (directory, title, artist, etc.). This may take from a few
seconds to a few minutes.
This phenomenon is normal.
The CD player sound is
poor.
The CD used is scratched or of poor quality.
Insert good quality CDs and store them in suitable
conditions.
The audio equipment settings (bass, treble, ambiences) are
unsuitable.
Set the treble or bass level to 0, without selecting
an ambience.

92
Audio and Telematics
QUESTION
ANSWER
SOLUTION
I cannot connect my
Bluetooth telephone.
The telephone's Bluetooth function may be switched off or the
telephone may not be visible.
Check that your telephone's Bluetooth function is
switched on.
Check in the telephone settings that it is "visible
to all".
The Bluetooth telephone is not compatible with the system.
You can check the compatibility of your telephone
at the Brand's website (services).
The volume of the
telephone connected
in Bluetooth mode is
inaudible.
The volume depends both on the system and on the telephone.
Increase the volume of the audio system, to
maximum if required, and increase the volume of
the telephone if necessary.
The ambient noise level has an influence on the quality of telephone
communication.
Reduce the ambient noise level (close the windows,
reduce the booster fan speed, slow down, ...).
Telephone
QUESTION
ANSWER
SOLUTION
Some characters in the
media information are not
displayed correctly while
playing.
The audio system does not display some types of characters.
Use standard characters to name tracks and
folders.
Playing of streaming files
does not start.
The peripheral device connected does not support automatic play.
Start the playback from the device.
The names of tracks and
the track length are not
displayed on the screen
when streaming audio.
The Bluetooth profile does not allow the transfer of this information.

93
.
Audio and Telematics
QUESTION
ANSWER
SOLUTION
Some contacts are
duplicated in the list.
The options for synchronizing contacts are synchronizing the
contacts on the SIM card, the contacts on the telephone, or both.
When both synchronizations are selected, some contacts may be
duplicated.
Select "Display SIM card contacts" or "Display
telephone contacts".
Contacts are not shown in
alphabetical order.
Some telephones offer display options. Depending on the settings
chosen, contacts can be transferred in a specific order.
Modify the display setting in the telephone
directory.
The system does not receive
SMS text messages.
The Bluetooth mode does not permit sending SMS text messages to
the system.
QUESTION
ANSWER
SOLUTION
In changing the setting
of treble and bass the
equalizer setting is
deselected.
The selection of an equalizer setting imposes the settings for treble
and bass and vice-versa.
Modify the treble and bass or equalizer settings
to obtain the desired musical ambience.
In changing the equalizer
setting, treble and bass
return to zero.
When changing the
balance settings, the
distribution setting is
deselected.
The selection of a distribution setting imposes the balance settings
and vice-versa.
Modify the balance or distribution settings to
obtain the desired musical ambience.
When changing an
distribution setting,
the balance setting is
deselected.
Settings

94
Audio and Telematics
QUESTION
ANSWER
SOLUTION
There is a difference in
sound quality between the
different audio sources.
For optimum sound quality, the audio settings can be adapted to
the different sound sources, which may result in audible differences
when changing source.
Check that the audio settings are adapted to the
sources listened to. Adjust Balance, Treble, Bass
to the middle position, select the "None" musical
ambience and set the loudness correction to the
"Active" position in CD mode or to the "Inactive"
position in radio mode.
With the engine off, the
system switches off after a
few minutes of use.
When the engine is switched off, the system's operating time
depends on the state of charge of the battery.
The switch-off is normal: the system switches to economy mode
and switches off to prevent discharging of the vehicle's battery.
Start the vehicle's engine to increase the battery
charge.
The date and time cannot
be set.
Setting of the date and time is only available if the synchronisation
with the satellites is deactivated.
Settings menu / Options / Time-Date setting.
Select the "Time" tab and deactivate the "GPS
synchronisation" (UTC).
95
.
Audio and Telematics
Transversal-Citroen_en_Chap02_RCC-2-2-0_ed01-2016
CITROËN Connect Radio
Multimedia audio system - Applications - Bluetooth
®
Multimedia audio system - Applications - Bluetooth
®
Multimedia audio system - Applications - Bluetooth
telephone
®
telephone
®
Contents
First steps 96
Steering mounted controls - Type 1 98
Steering mounted controls - Type 2 99
Menus 100
Applications 102
Radio Media 106
Telephone 118
Settings 132
Frequently asked questions 143
The system is protected in such a way
that it will only operate in your vehicle.
The display of the
Energy Economy
Mode
message signals that a change
to standby is imminent.
The different functions and settings
described vary according to the version
and configuration of your vehicle.
The link below gives access to OSS
(Open Source Software) codes for the
system.
http://www.psa-peugeot-citroen.com/oss
As a safety measure and because it
requires sustained attention by the
driver, the pairing of a Bluetooth mobile
telephone with the Bluetooth hands-
free system of your audio system must
be done with the
vehicle stationary
and the ignition on.
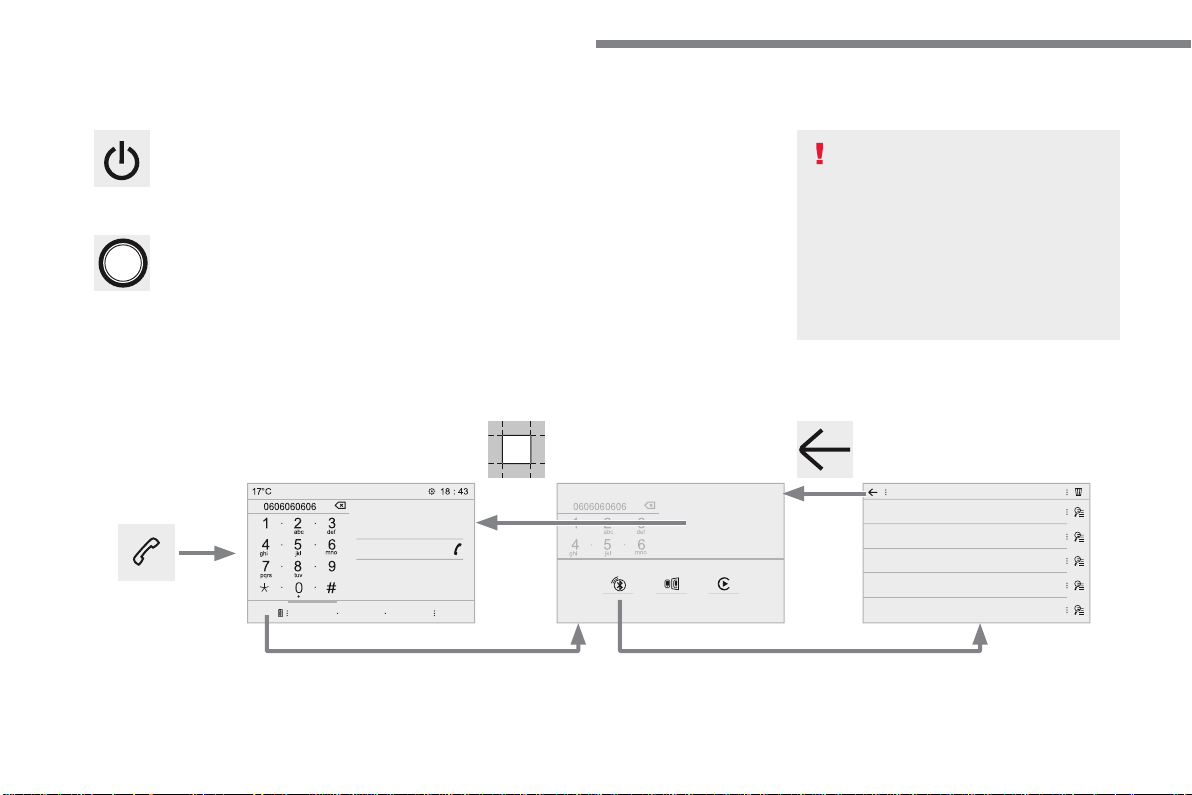
96
Audio and Telematics
Transversal-Citroen_en_Chap02_RCC-2-2-0_ed01-2016
First steps
With the engine running, a press
mutes the sound.
With the ignition off, a press turns the
system on.
Volume.
Use the buttons either side of or below the
touch screen for access to the menus, then
press the virtual buttons in the touch screen. All
of the touch areas of the screen are white.
Press in the grey zone to go back a level or
confirm.
Press the back arrow to go back a level or
confirm.
The touch screen is of the "capacitive"
type.
To clean the screen, use a soft, non-
abrasive cloth (spectacles cloth) with
no additional product.
Do not use sharp objects on the
screen.
Do not touch the screen with wet
hands.
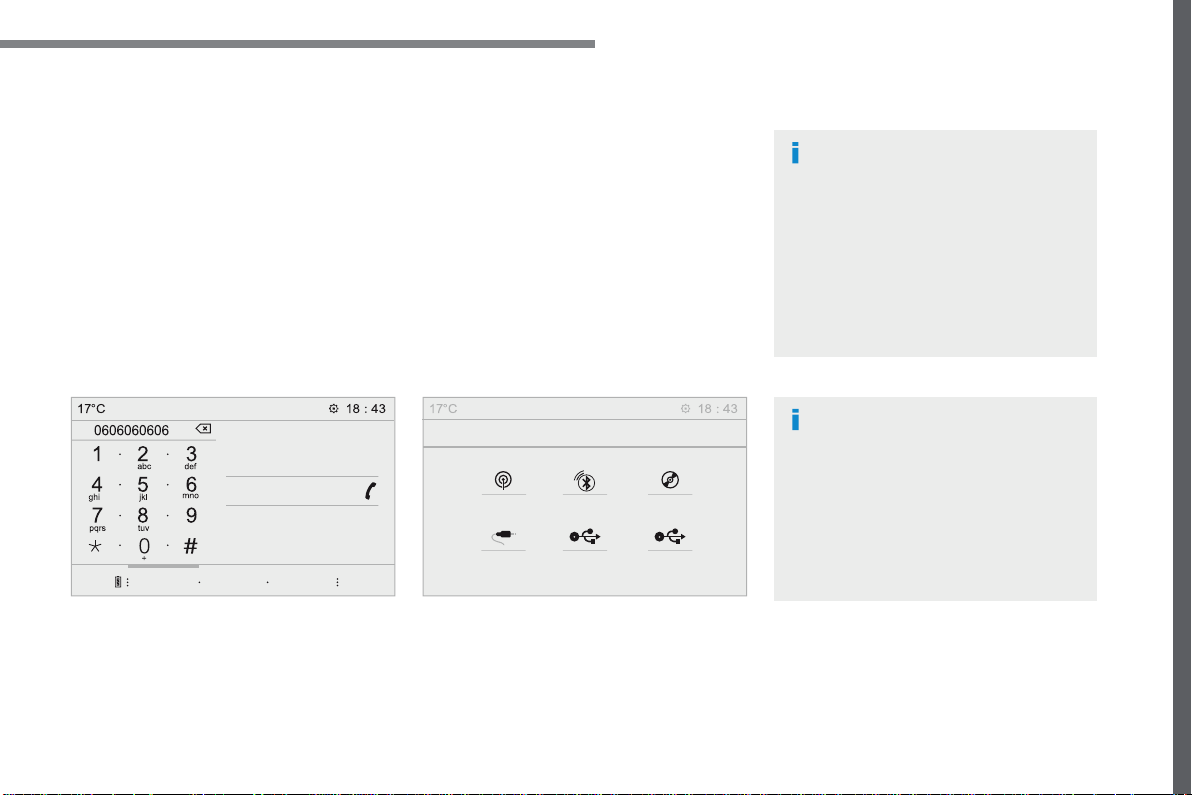
97
.
Audio and Telematics
Transversal-Citroen_en_Chap02_RCC-2-2-0_ed01-2016
Select the audio source (depending on
version):
- FM / DAB * / AM * stations.
- Telephone connected by Bluetooth * and
using Bluetooth * audio streaming.
- CD player.
- USB memory stick.
- Media player connected to the auxiliary
socket (Jack, cable not supplied).
* Depending on equipment.
Certain information is displayed permanently in
the upper band of the touch screen:
- Reminder of the air conditioning
information, and direct access to the
corresponding menu.
- Reminder of the Radio Media and
Telephone menu information.
- Access to the Settings of the touch screen
and digital instrument panel.
In very hot conditions, the volume may
be limited to protect the system. It may
go into standby (screen and sound off)
for at least 5 minutes
The return to normal takes place when
the temperature in the passenger
compartment has dropped.
In the "Settings" menu you can create
a profile for just one person or a group
of people with common points, with the
possibility of entering a multitude of
settings (radio presets, audio settings,
ambiences, ...); these settings are
taken into account automatically.
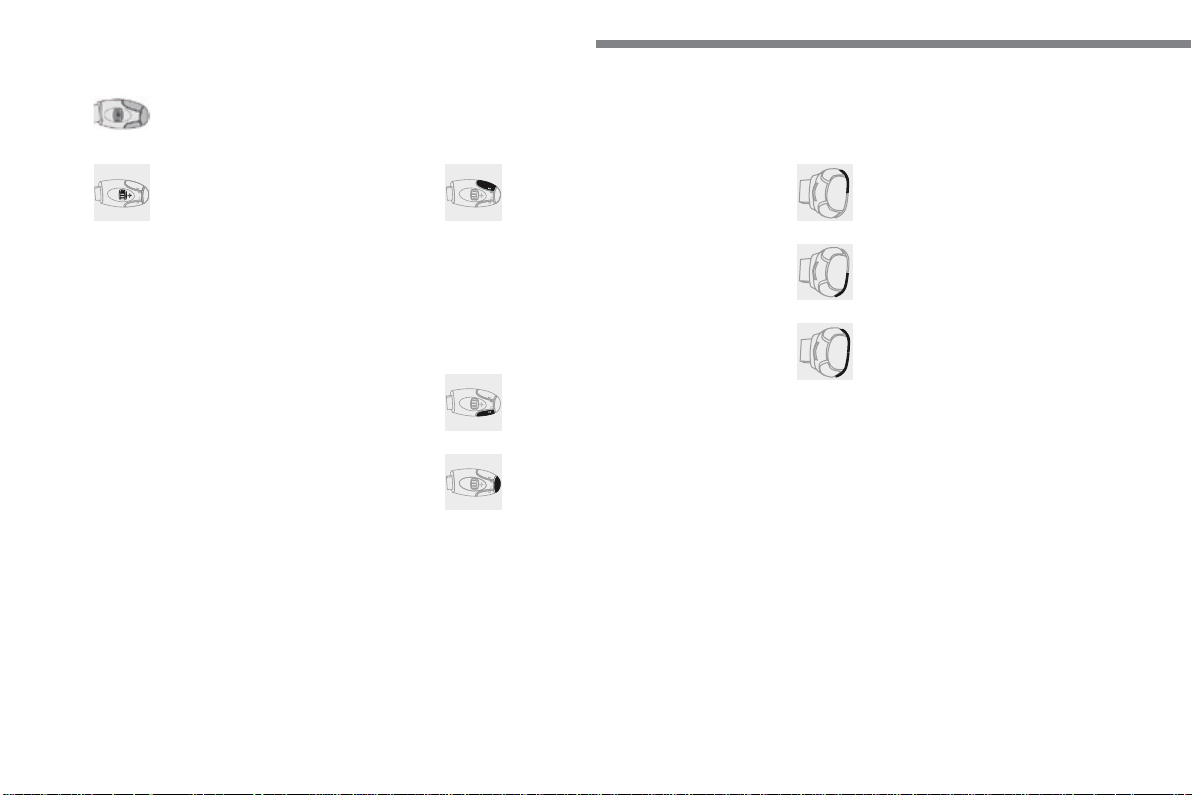
98
Audio and Telematics
Transversal-Citroen_en_Chap02_RCC-2-2-0_ed01-2016
Steering mounted controls - Type 1
Radio
:
Short press: display the list of radio
stations.
Long press: update the list.
Media
:
Short press: display the list of folders.
Long press: display the sorting
options.
Decrease volume.
Radio :
Select the previous / next preset
radio station.
Select the previous / next item in a
menu or a list.
Media:
Select of the previous / next track
Select the previous / next item in a
menu or a list.
Mute / Restore sound by
simultaneously pressing the increase
and decrease volume buttons.
Change audio source (Radio; USB;
AUX (if a device is connected); CD;
Streaming)
Confirm a selection.
Increase volume.
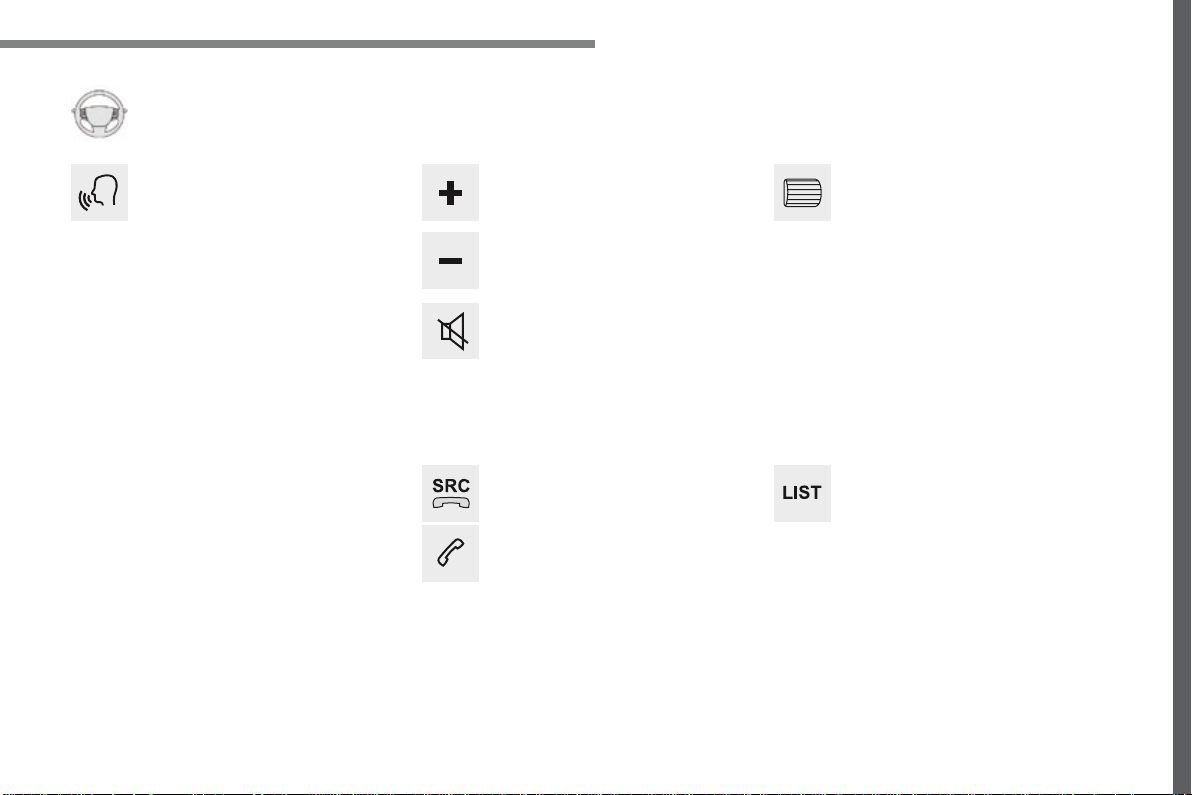
99
.
Audio and Telematics
Transversal-Citroen_en_Chap02_RCC-2-2-0_ed01-2016
Media
(short press): change the
multimedia source.
Telephone
(short press): call.
Call in progress
(short press):
access to telephone menu.
Telephone
(long press): reject an
incoming call, end call, access to
telephone menu.
Decrease volume.
Voice commands
:
Short press, smartphone voice
commands via the system.
Mute/ Restore the sound.
Or
Mute by pressing the volume
increase and decrease buttons
simultaneously.
Restore the sound by pressing one of
the two volume buttons.
Radio
(rotate): previous / next preset.
Media
(rotate): previous / next track,
move in a list.
Short press
: confirm a selection;
other than selection, access to
presets.
Radio
: display the list of stations.
Media
: display the list of tracks.
Radio
(press and hold): update the
list of stations received.
Increase volume.
Steering mounted controls - Type 2
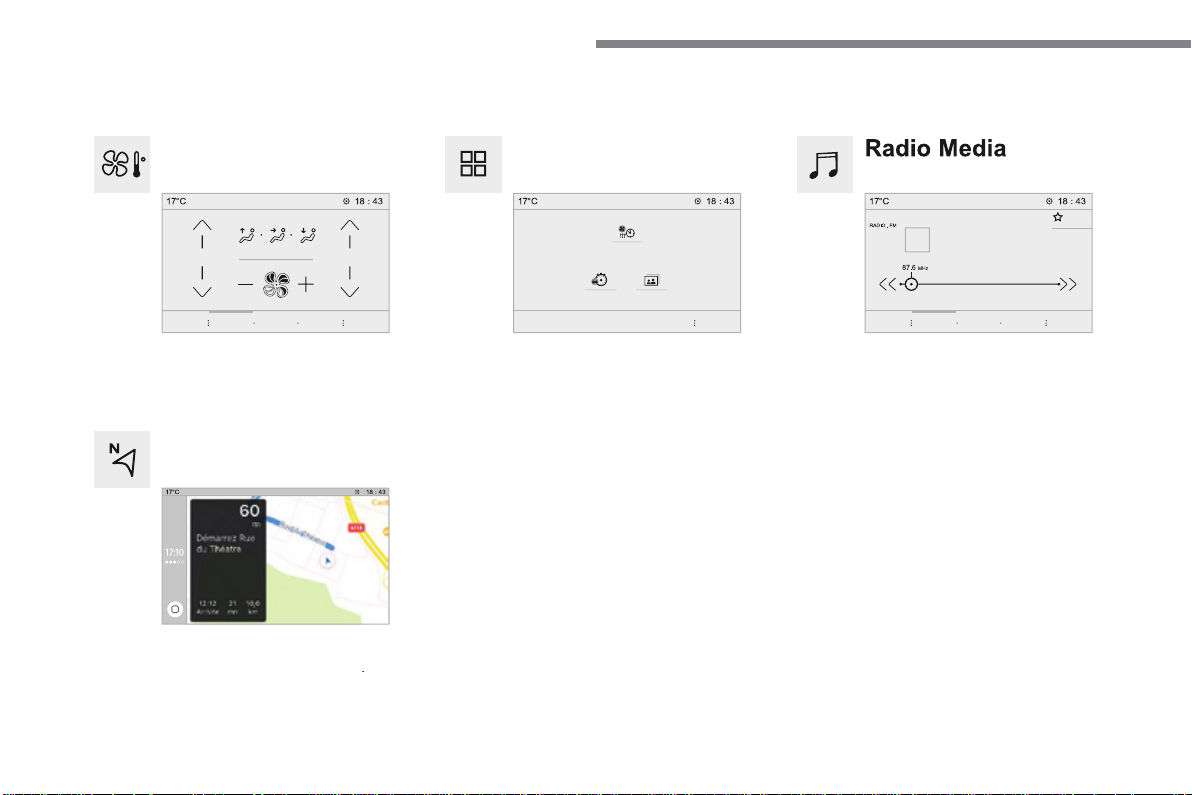
100
21,518,5
Audio and Telematics
Transversal-Citroen_en_Chap02_RCC-2-2-0_ed01-2016
Menus
Radio Media
Applications
Select an audio source or radio station.
Access configurable equipment.
Air conditioning
Manage the different temperature and air flow
settings.
Navigation
Configure the guidance and select your
destination via MirrorLink
TM
or CarPlay
®
.
According to version.
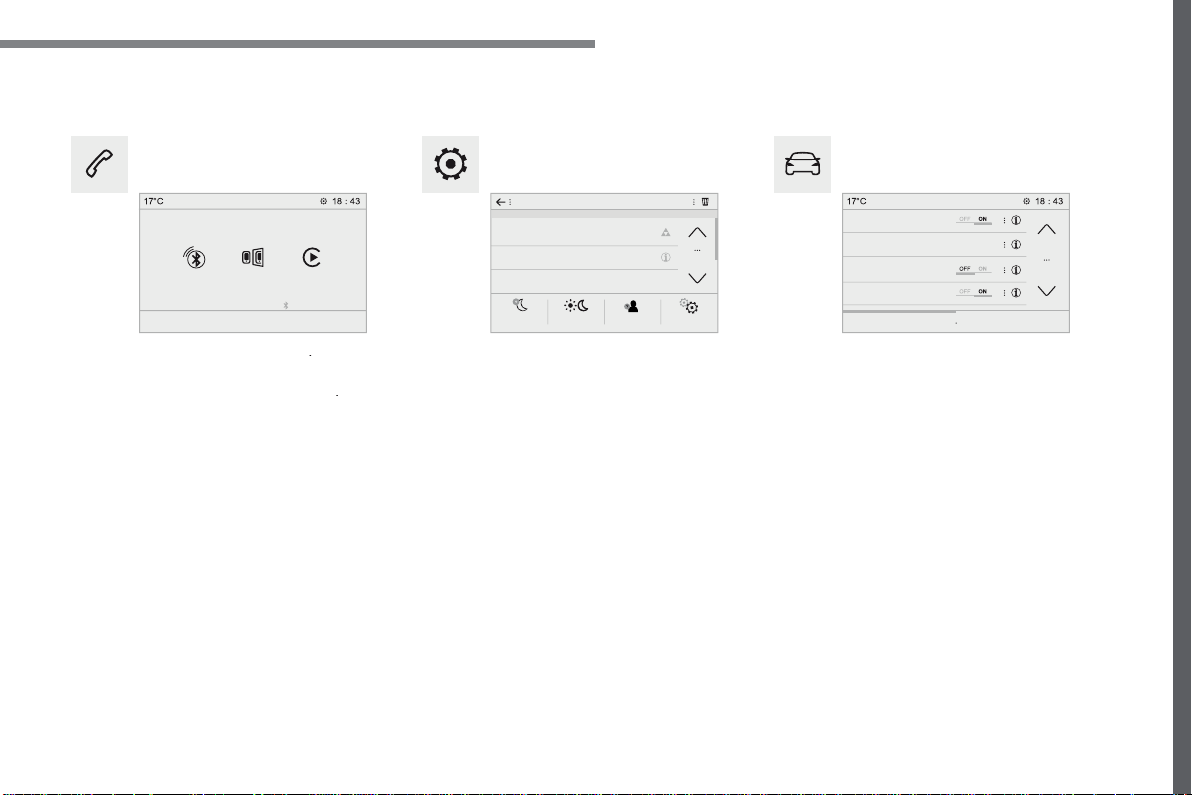
101
.
Audio and Telematics
Transversal-Citroen_en_Chap02_RCC-2-2-0_ed01-2016
Settings
Driving
Telephone
Configure a personal profile and/or configure
the sound (balance, ambience, ...) and the
display (language, units, date, time, ...).
Activate, deactivate or configure certain vehicle
functions.
Connect a telephone by Bluetooth
®
.
Operate certain applications on a smartphone
connected via MirrorLink
TM
or CarPlay
®
.
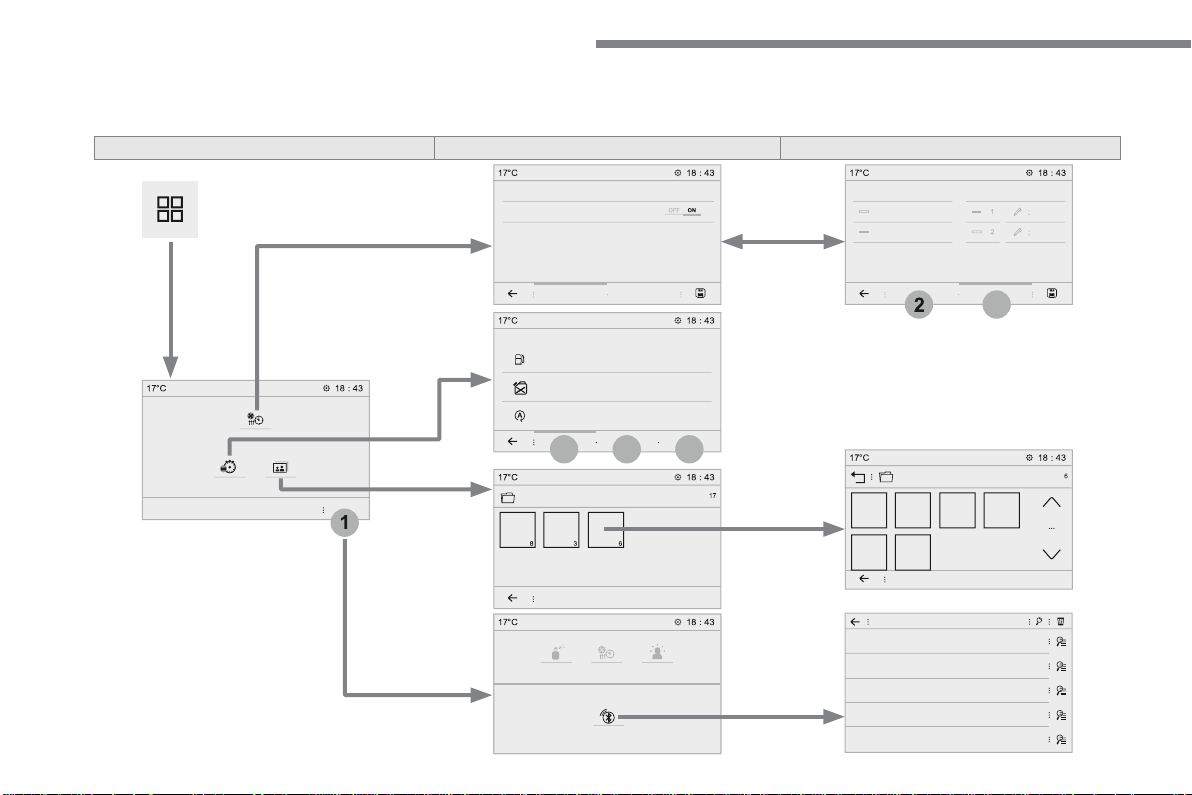
102
1
5
6
4
2
3
Audio and Telematics
Transversal-Citroen_en_Chap02_RCC-2-2-0_ed01-2016
Applications
According to version / according to equipment
Level 1
Level 2
Level 3
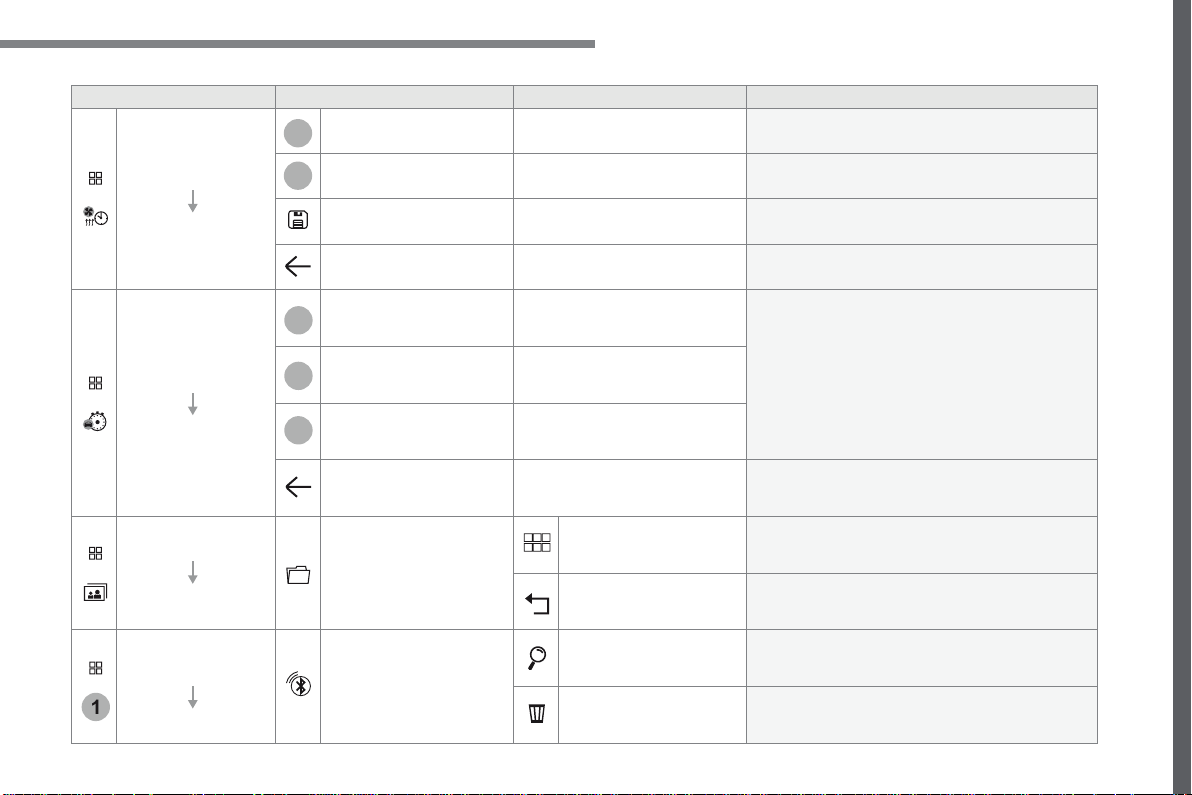
103
.
1
4
5
6
2
3
Audio and Telematics
Transversal-Citroen_en_Chap02_RCC-2-2-0_ed01-2016
Level 1
Level 2
Level 3
Comments
Applications
Temperature
conditioning
State
Activate / deactivate the temperature conditioning.
Settings
Configure the pre-conditioning.
Save the parameters.
Confirm the settings.
Applications
Trip computer
Instant
System providing information about the current
journey (range, consumption…).
Trip 1
Trip 2
Go back to the Applications page.
Applications
Photos
Photo gallery
Photos
Go to the photo gallery.
Go back a level.
Applications
OPTIONS
Bluetooth connection
Search
Start the search for a device to be connected.
Delete
Delete one or more devices.
105
.
Audio and Telematics
Transversal-Citroen_en_Chap02_RCC-2-2-0_ed01-2016
Insert a USB memory stick in the USB port.
The system can read folders and image files in
the formats: .tiff; .gif; .jpg/jpeg; .bmp; .png.
Viewing photos
Press
Applications
to display the
primary page.
Press "
Photos
".
Select a folder.
Press this button to display the
details of the photo.
Press the back arrow to go back a
level.
Select an image to view.
To protect the system, do not use a
USB hub.

106
2
1
3
4
5
Audio and Telematics
Transversal-Citroen_en_Chap02_RCC-2-2-0_ed01-2016
Radio Media
According to version
Level 1
Level 2
107
.
1
2
3
4
5
Audio and Telematics
Transversal-Citroen_en_Chap02_RCC-2-2-0_ed01-2016
Level 1
Level 2
Comments
Radio Media
SOURCES
Radio
Select change of source.
Bluetooth
CD
AUX
USB
iPod
Radio Media
Frequency
FM / DAB / AM
Display the current radio station.
Radio Media
List
Update the list according to the stations received.
Preset
Make a short press to preset the station.
Radio Media
Preset
Select a preset station or preset a station.
Radio Media
OPTIONS
AM band / DAB band / FM band
Press the Band button to change waveband.
Audio settings
Configure the audio settings.
News
Activate or deactivate the options.
TA
RDS
FM-DAB Follow-up
Radio Media
87.5 MHz
Enter a frequency of the FM and AM bands on the
virtual keypad.
108
1
2
3
4
5
5
5
Audio and Telematics
Transversal-Citroen_en_Chap02_RCC-2-2-0_ed01-2016
Level 1
Level 2
Level 3
109
.
1
1
1
2
3
4
5
5
5
Audio and Telematics
Transversal-Citroen_en_Chap02_RCC-2-2-0_ed01-2016
Level 1
Level 2
Level 3
Comments
Radio Media
SOURCES
Radio
Frequency
Display the current radio station.
List
Display the list of stations received.
Preset
Select a preset station or preset a station.
OPTIONS
FM band / DAB band /
AM band
Press the band button to change band.
Audio settings
Configure the audio settings.
News
Activate or deactivate the options.
TA
RDS
FM-DAB Follow-up
Radio Media
SOURCES
Bluetooth
OPTIONS
Audio settings
Configure the audio settings.
Radio Media
SOURCES
CD
Display the details of the music being played.
OPTIONS
Audio settings
Configure the audio settings.
110
1
5
5
6
7
8
Audio and Telematics
Transversal-Citroen_en_Chap02_RCC-2-2-0_ed01-2016
Level 1
Level 2
Level 3
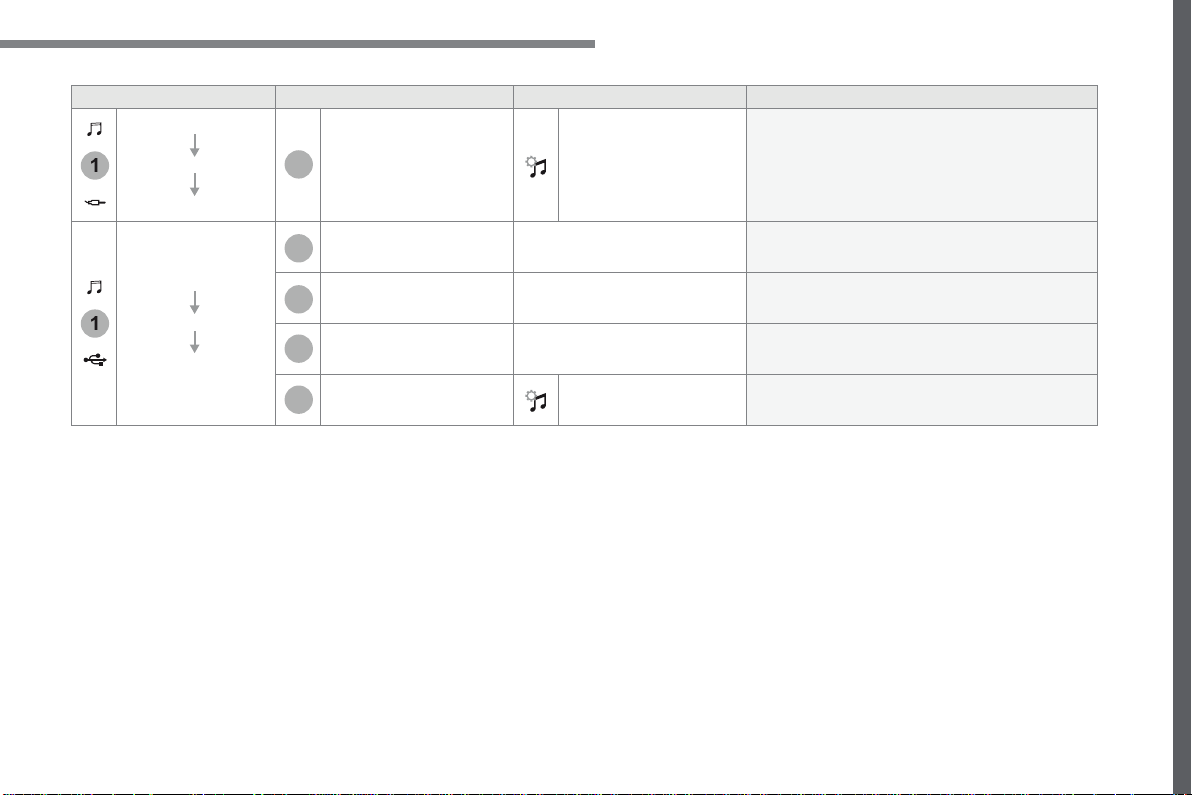
111
.
1
1
6
7
5
5
8
Audio and Telematics
Transversal-Citroen_en_Chap02_RCC-2-2-0_ed01-2016
Level 1
Level 2
Level 3
Comments
Radio Media
SOURCES
AUX
OPTIONS
Audio settings
Configure the audio settings.
Radio Media
SOURCES
USB
Player
Display the details of the music being played.
Tracks list
Display the current selection.
Library
Display the music library.
OPTIONS
Audio settings
Configure the audio settings.

112
4
5
Audio and Telematics
Transversal-Citroen_en_Chap02_RCC-2-2-0_ed01-2016
Press
Radio Media
to display the
menu.
Press
Radio Media
to display the
primary page.
Press the frequency.
Enter the FM and AM waveband
values using the virtual keypad.
Press one of the buttons for an
automatic search for radio stations.
Radio
Selecting a station
Radio reception may be affected by
the use of electrical equipment not
approved by the Brand, such as a USB
charger connected to the 12V socket.
The exterior environment (hills,
buildings, tunnel, car park, below
ground...) may prevent reception,
even in RDS station tracking mode.
This phenomenon is normal in the
propagation of radio waves and is in no
way indicative of a fault with the audio
system.
Or
Or
Or
Move the cursor for a manual search
for frequencies up or down.
Select a radio station or frequency.
Select a radio station or frequency.
Press "
Preset
".
Press the "
OPTIONS
" button to go to
the secondary page.
Make a short press on the star
outline. If the star is solid, the radio
station is already preset.
Make a long press on one of the
buttons to preset the station.
Press "
Band
" to change waveband.
Press in the grey zone to confirm.
Preset a station
Changing waveband
Press "
OK
" to confirm.
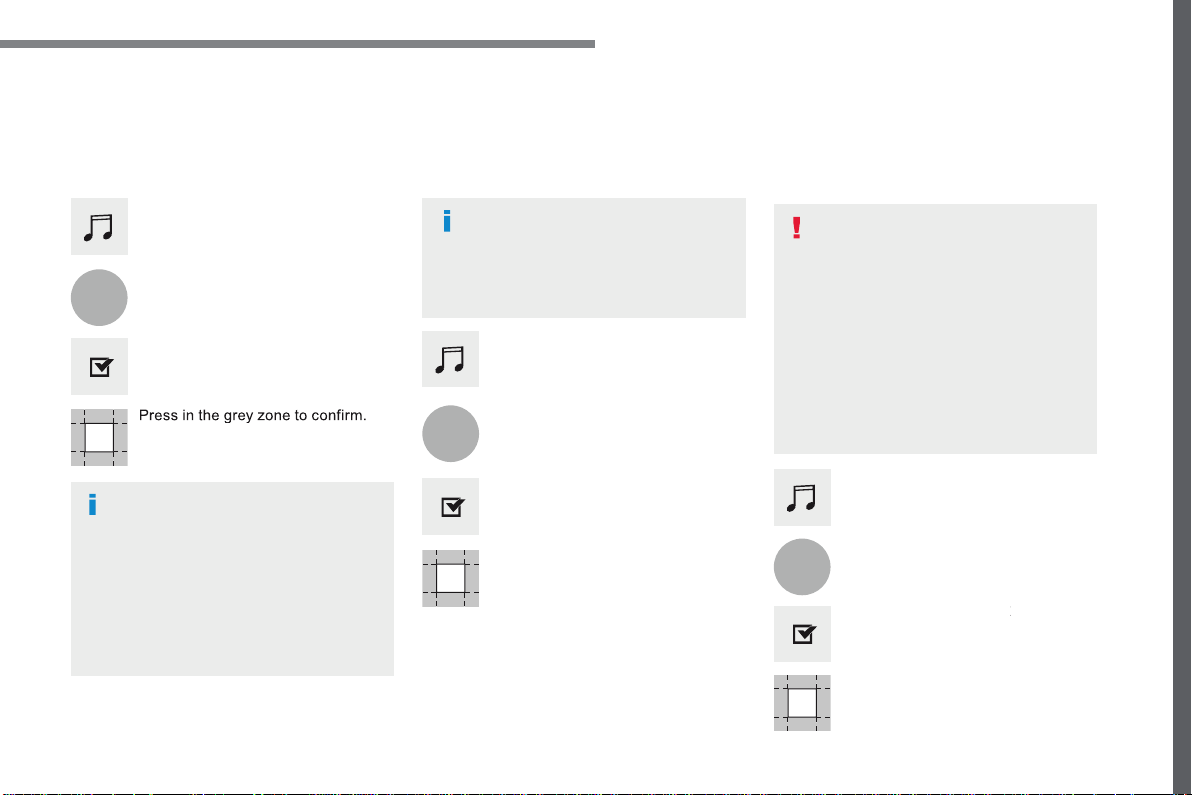
113
.
5
5
5
Audio and Telematics
Transversal-Citroen_en_Chap02_RCC-2-2-0_ed01-2016
Press in the grey zone to confirm.
Press in the grey zone to confirm.
Press in the grey zone to confirm.
Press
Radio Media
to display the
primary page.
Press
Radio Media
to display the
primary page.
Press
Radio Media
to display the
primary page.
Press the "
OPTIONS
" button to go to
the secondary page.
Press the "
OPTIONS
" button to go to
the secondary page.
Press the "
OPTIONS
" button to go to
the secondary page.
Activate/deactivate "
RDS
".
Activate / Deactivate "
NEWS
".
Activate / Deactivate "
TA
".
TA ". TA
Activate/ Deactivate RDS
RDS, if activated, allows you to continue
listening to the same station by automatic
retuning to alternative frequencies.
However, in certain conditions, coverage
of an RDS station may not be assured
throughout the entire country as radio
stations do not cover 100 % of the
territory. This explains the loss of
reception of the station during a journey.
The "Radio Text" function allows
information transmitted by the radio
station and related to the station or the
song playing to be displayed.
Display text information
Play TA messages
The TA (Traffic Announcement)
function gives priority to TAalert
messages. To operate, this function
needs good reception of a radio station
that carries this type of message. While
traffic information is being broadcast,
the current media is automatically
interrupted so that the TA message can
be heard. Normal play of the media
previously playing is resumed at the
end of the message.
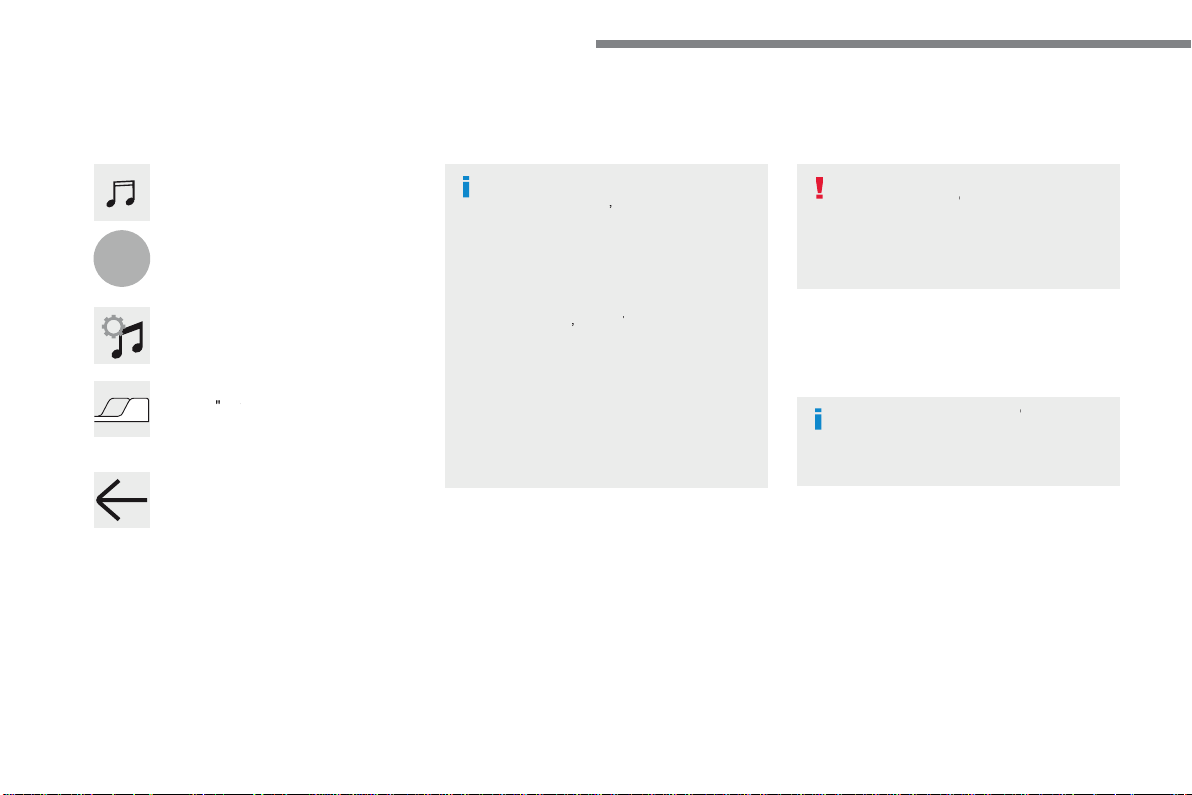
114
5
Audio and Telematics
Transversal-Citroen_en_Chap02_RCC-2-2-0_ed01-2016
Audio settings
Press
Radio Media
to display the
primary page.
Press "
Audio settings
".
On-board audio: Arkamys
©
Sound
©
Sound
©
Staging optimises the distribution of
sound in the passenger compartment.
The sound distribution (or spatialisation
with the Arkamys
©
system) is audio
©
system) is audio
©
processing that allows the quality of the
sound to be adapted according to the
number of passengers in the vehicle.
On the "
Tone
" tab, the
Ambience
audio
settings and
Bass
,
Medium
and
Treble
are different and independent for each
audio source.
On the "
Balance
" tab, the
All
passengers
,
Driver
and
Driver and Driver
Front only
settings are common to all sources.
On the "
Sound
" tab, activate or
deactivate "
Volume linked to speed
",
"
Auxiliary input
" and "
Touch tones
".
Press the "
OPTIONS
" button to go to
the secondary page.
Select the "
Tone
" or "
Balance
" or
"
Sound
"
or
"
or " or
Ringtones
" tab to
configure the audio settings.
Press the back arrow to confirm.
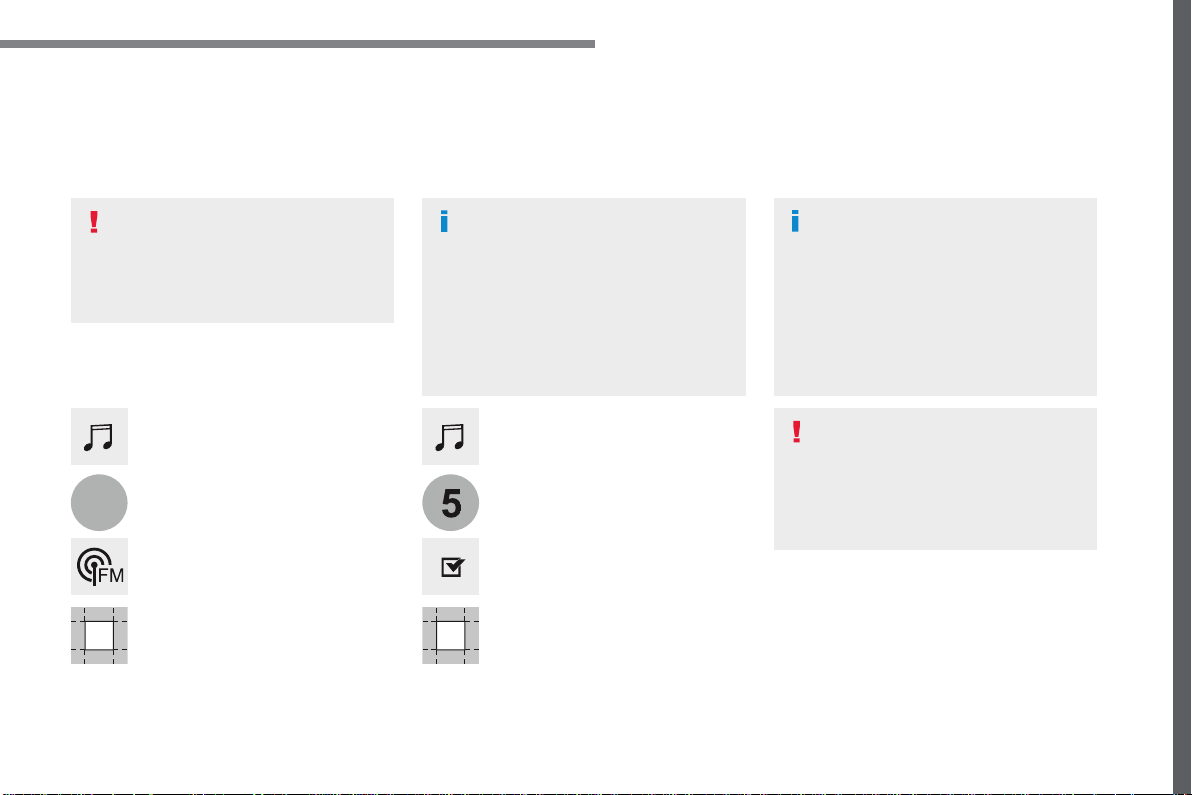
115
.
5
5
Audio and Telematics
Transversal-Citroen_en_Chap02_RCC-2-2-0_ed01-2016
DAB radio (Digital Audio Broadcasting)
Press
Radio Media
to display the
primary page.
Press the "
OPTIONS
" button to go to
the secondary page.
FM-DAB Follow-up
Terrestrial Digital Radio
"DAB" does not cover 100% of the
territory.
When the digital radio signal is poor,
the "FM-DAB Follow-up" allows you to
continue listening to the same station,
by automatically switching to the
corresponding "FM" analogue station
(if there is one).
If the "FM-DAB Follow-up" is activated,
there is a difference of a few seconds
when the system switches to "FM"
analogue radio with sometimes a
variation in volume.
Once the digital signal is restored, the
system automatically changes back to
" D A B " .
Digital radio provides higher quality
reception.
The different multiplexes offer a
choice of radio stations arranged in
alphabetical order.
If the "DAB" station being listened
to is not available on "FM", or if the
"FM-DAB Follow-up" is not activated,
the sound will cut out while the digital
signal is too weak.
Activate / Deactivate "
FM-DAB
Follow-up
".
Press
Radio Media
to display the
primary page.
Press the "
OPTIONS
" button to go to
the secondary page.
Press "
Band
" to select "
DAB band
".
Press in the grey zone to confirm.
Press in the grey zone to confirm.
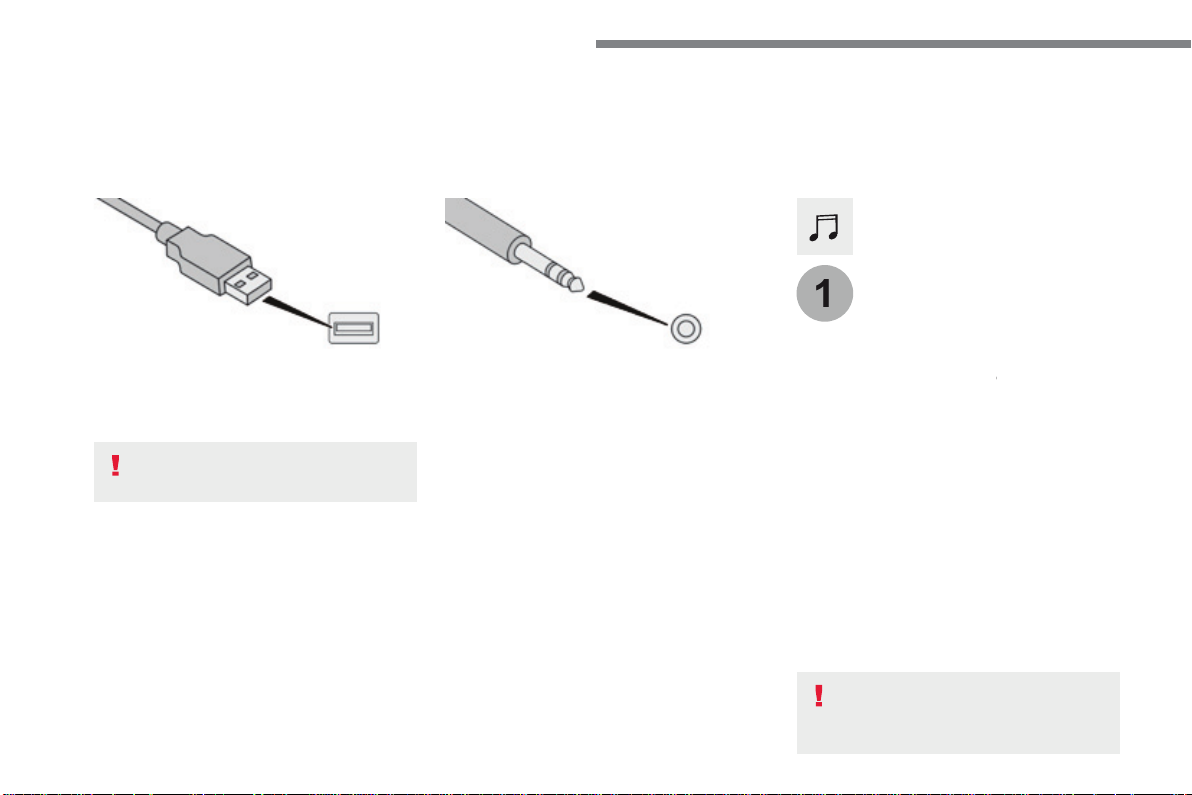
116
1
Audio and Telematics
Transversal-Citroen_en_Chap02_RCC-2-2-0_ed01-2016
Media
USB port
Selecting the source
Press the "
SOURCES
" button.
Press
Radio Media
to display the
primary page.
The system builds playlists (in temporary
memory), an operation which can take from
a few seconds to several minutes at the first
connection.
Reduce the number of non-music files and the
number of folders to reduce the waiting time.
The playlists are updated every time the
ignition is switched off or connection of a USB
memory stick. The lists are memorised: if they
are not modified, the subsequent loading time
will be shorter.
Insert the USB memory stick in the USB port or
connect the USB device to the USB port using
a suitable cable (not supplied).
Auxiliary socket (AUX)
First adjust the volume of your portable device
(to a high level). Then adjust the volume of your
audio system.
Display and management of the controls are
via the portable device.
This source is only available if "Auxiliary input"
has been checked in the audio settings.
Connect the portable device (MP3 player…) to
the auxiliary Jack socket using an audio cable
(not supplied).
Choose the source.
Bluetooth Streaming
®
Bluetooth Streaming
®
Bluetooth Streaming
Streaming allows you to listen to music from
your telephone.
The Bluetooth profile must be activated. First
adjust the volume on your portable device (to a
high level).
Then adjust the volume of your system.
If play does not start automatically, it may be
necessary to start the audio playback from the
smartphone.
Control is from the portable device or by using
the system's touch buttons.
Once connected in Streaming mode,
the smartphone is considered to be a
media source.
To protect the system, do not use a
USB hub.
117
.
Audio and Telematics
Transversal-Citroen_en_Chap02_RCC-2-2-0_ed01-2016
Connecting Apple
®
Connecting Apple
®
Connecting Apple
players
®
players
®
Connect the Apple
®
player to the USB port
®
player to the USB port
®
using a suitable cable (not supplied).
Play starts automatically.
Control is via the audio system.
The classifications available are those
of the portable device connected
(artists / albums / genres / playlists /
audiobooks / podcasts), you can also
use a classification structured in the
form of a library.
The default classification used is by
artist. To modify the classification used,
return to the first level of the menu
then select the desired classification
(playlists for example) and confirm
to go down through the menu to the
desired track.
The version of software in the audio system
may not be compatible with the generation of
your Apple
®
player.
®
player.
®
The audio equipment will only play audio
files with ".wav, .wma, .aac, .ogg and .mp3"
file extensions and with a bit rate of between
32 Kbps and 320 Kbps.
It also supports VBR (Variable Bit Rate) mode.
No other type of file (.mp4, ...) can be played.
".wma" files must be of the
standard wma 9 type.
The sampling rates supported are 11, 22, 44
and 48 KHz.
It is advisable to restrict file names to
20 characters, without using of special
characters (e.g.: " " ? ; ù) to avoid any playing
and displaying problems.
In order to be able to play a burned CDR or
CDRW, select standards ISO 9660 level 1, 2 or
Joliet if possible when burning the CD.
If the disc is burned in another format, it may
not be played correctly.
It is recommended that the same burning
standard is always used on an individual disc,
with the lowest speed possible (4x maximum)
for the best acoustic quality.
In the particular case of a multi-session CD, the
Joliet standard is recommended.
Information and advice
Use only USB memory sticks formatted FAT 32
(file allocation table).
The system supports USB Mass
Storage devices, BlackBerry
®
devices
®
devices
®
or Apple
®
players via USB ports. The
®
players via USB ports. The
®
adaptor cable is not supplied.
Control of the peripheral device is with
the audio system controls.
Other peripherals, not recognised on
connection, must be connected to the
auxiliary socket using a Jack cable (not
supplied) or via Bluetooth streaming,
depending on compatibility.
It is recommended that the original USB
cable for the portable device is used.
To protect the system, do not use a
USB hub.
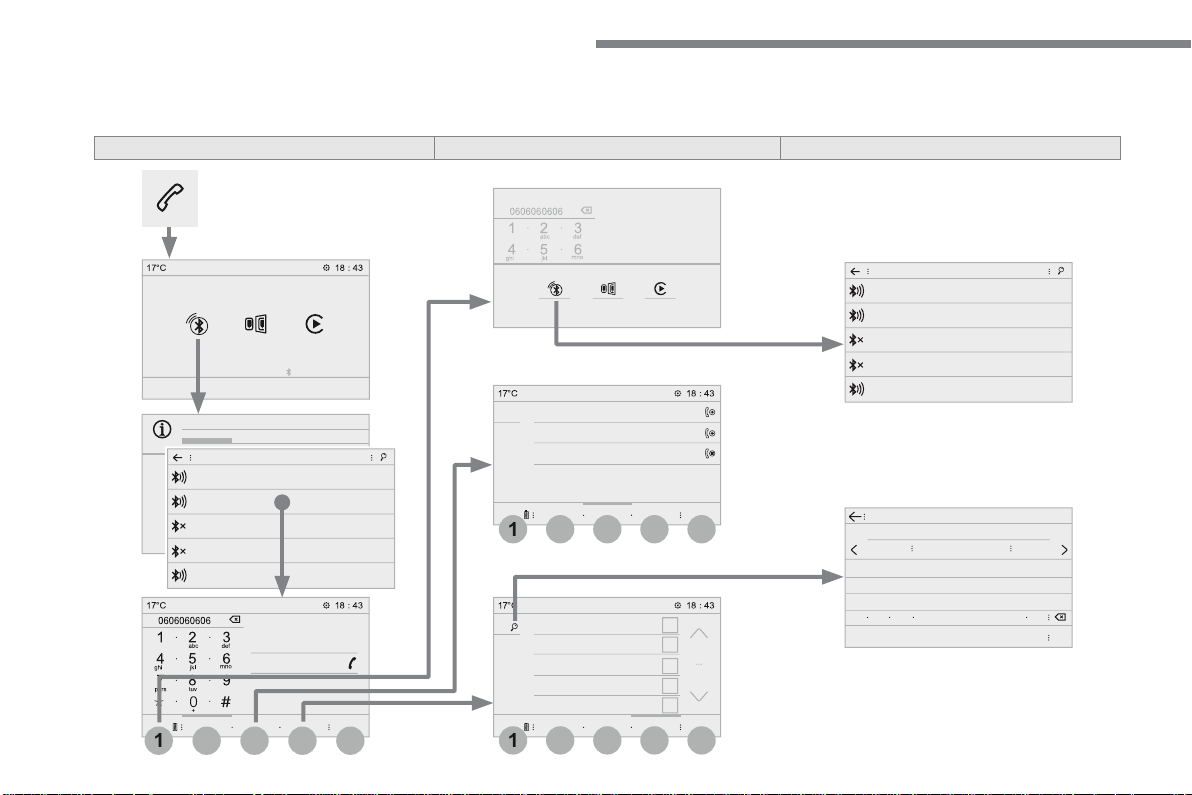
118
4
4
4
1
1
1
5
5
5
3
3
3
2
2
2
Audio and Telematics
Transversal-Citroen_en_Chap02_RCC-2-2-0_ed01-2016
Telephone
According to version
Level 1
Level 2
Level 3
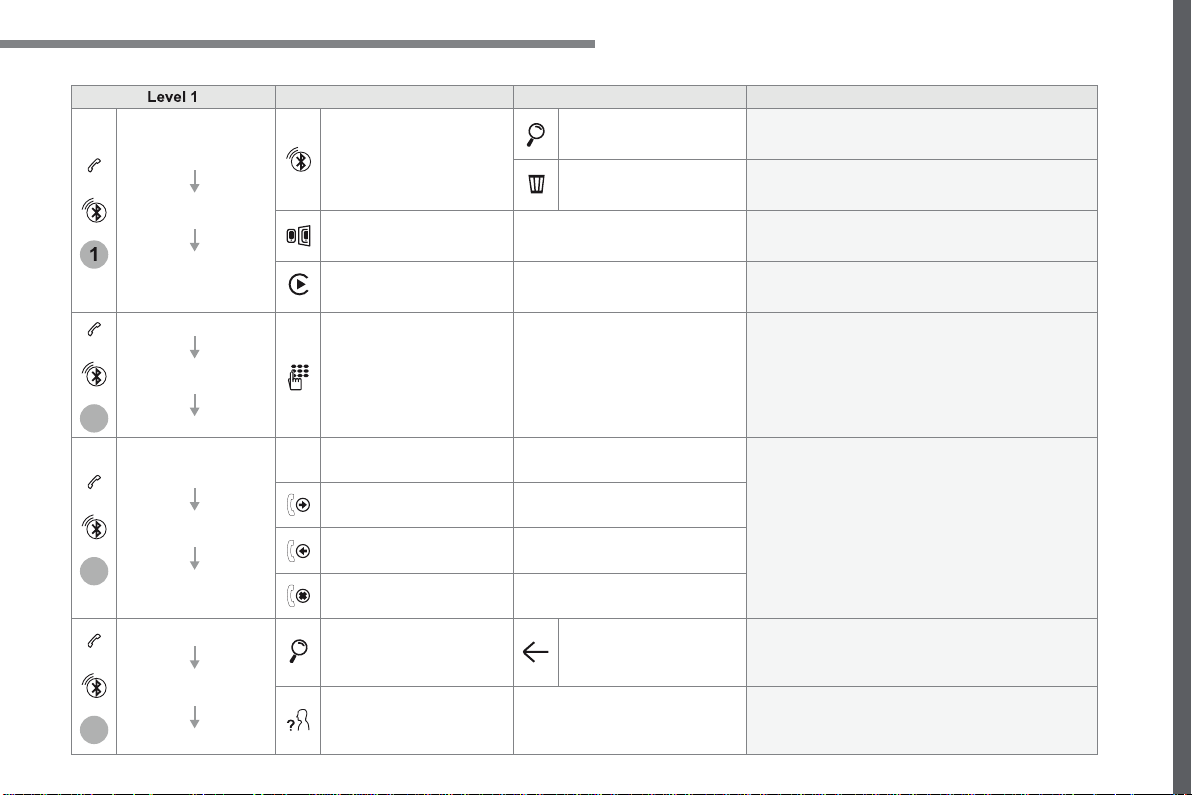
119
.
1
2
3
4
Audio and Telematics
Transversal-Citroen_en_Chap02_RCC-2-2-0_ed01-2016
Level 1
Level 2
Level 3
Comments
Telephone
Bluetooth
search
PHONE
Bluetooth connection
Search
Start the search for a device to be connected.
Delete
Delete one or more devices.
MirrorLink
Open the MirrorLink function.
CarPlay
Open the CarPlay function.
Telephone
Bluetooth
search
Keypad
Enter a telephone number.
Telephone
Bluetooth
search
Recent calls
All
View the calls according to the presentation
selected.
Select a contact to make the call.
Outgoing
Missed
Incoming
Telephone
Bluetooth
search
Contacts
Search
Confirm
Search for a contact in the contacts directory.
Telephone
Go to the details of the contact sheet.
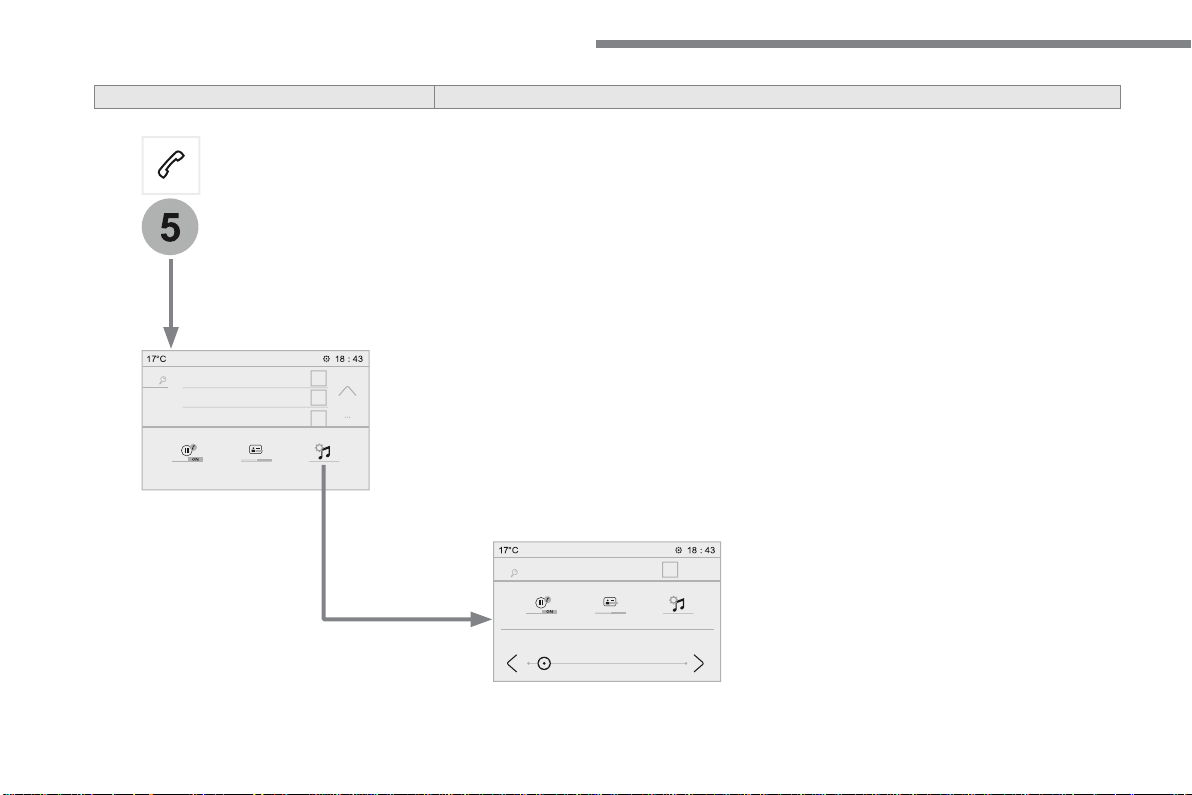
120
5
Audio and Telematics
Transversal-Citroen_en_Chap02_RCC-2-2-0_ed01-2016
Level 1
Level 2
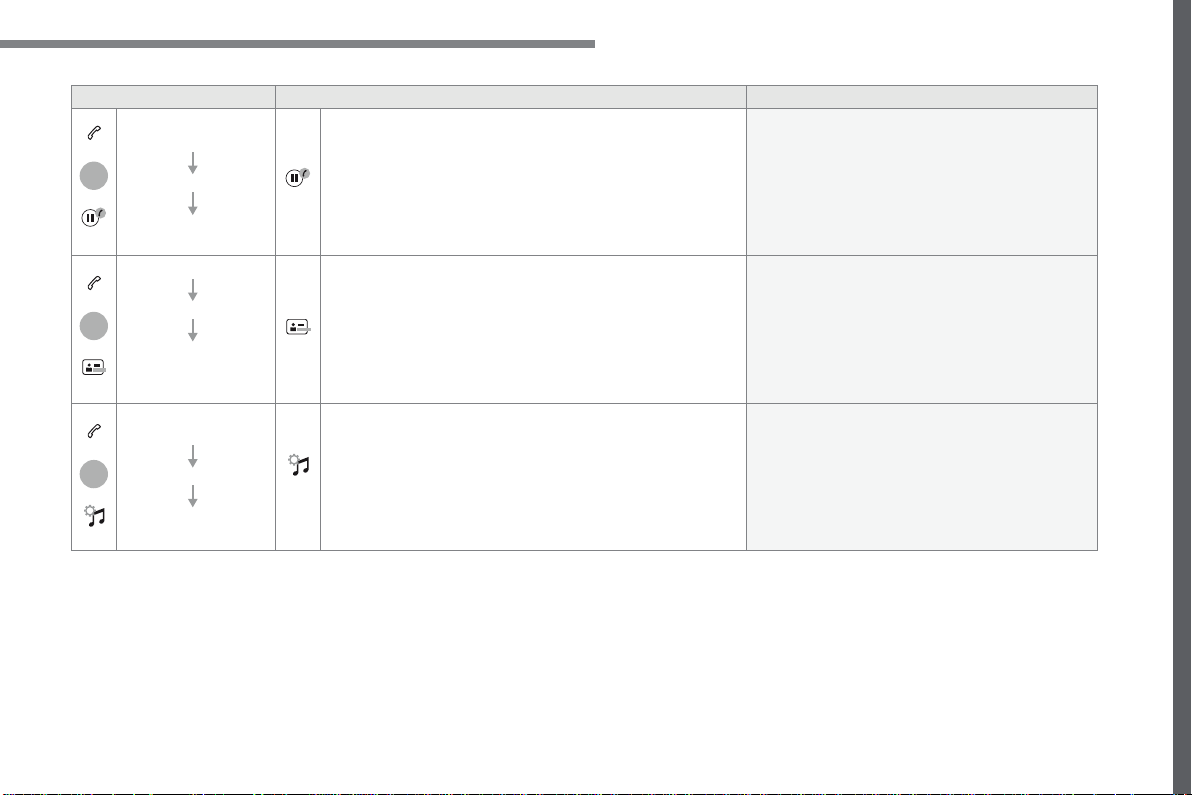
121
.
5
5
5
Audio and Telematics
Transversal-Citroen_en_Chap02_RCC-2-2-0_ed01-2016
Level 1
Level 2
Comments
Telephone
OPTIONS
On hold (auto)
ON - OFF
Activate or deactivate the automatic placing on
hold of the current conversation.
Telephone
OPTIONS
Sort contacts by name
Sort contacts by
first name
Sort the contacts by Surname-first name or First
name-surname.
Telephone
OPTIONS
Ring volume
Adjust the volume of the ringtone.
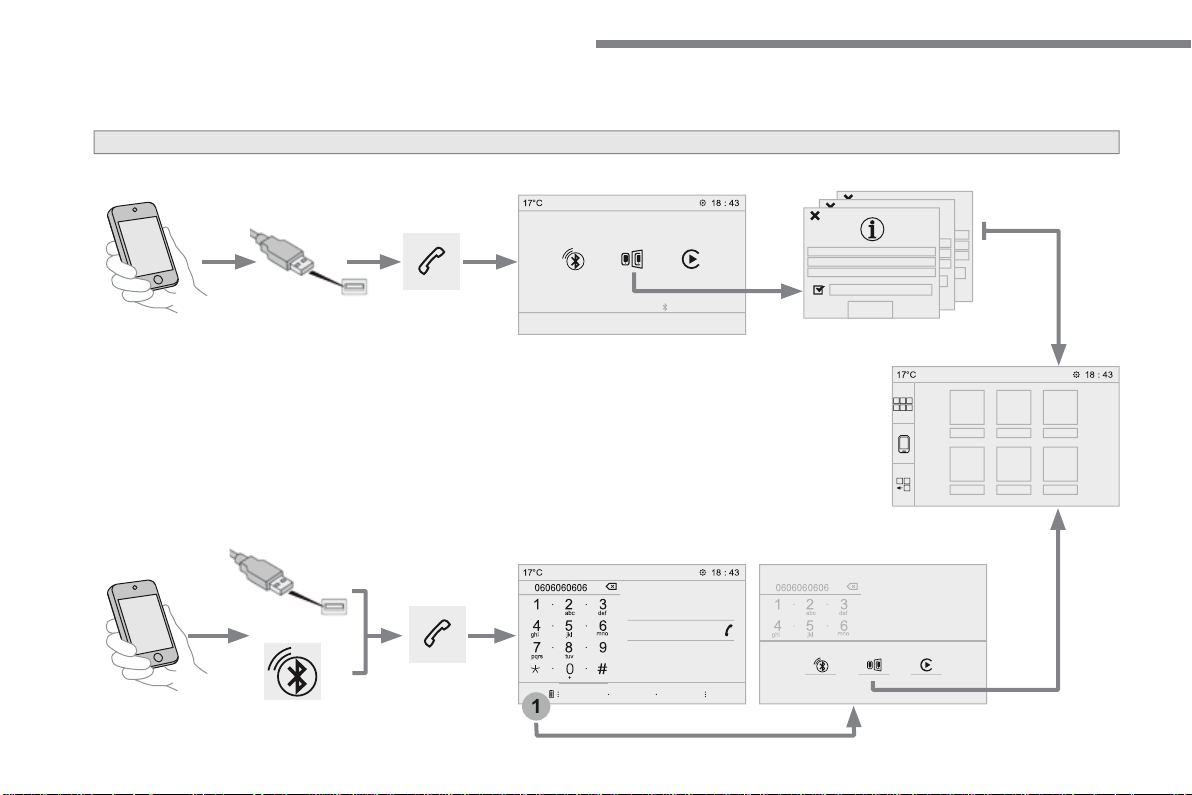
122
1
Audio and Telematics
Transversal-Citroen_en_Chap02_RCC-2-2-0_ed01-2016
MirrorLink
TM
smartphone connection
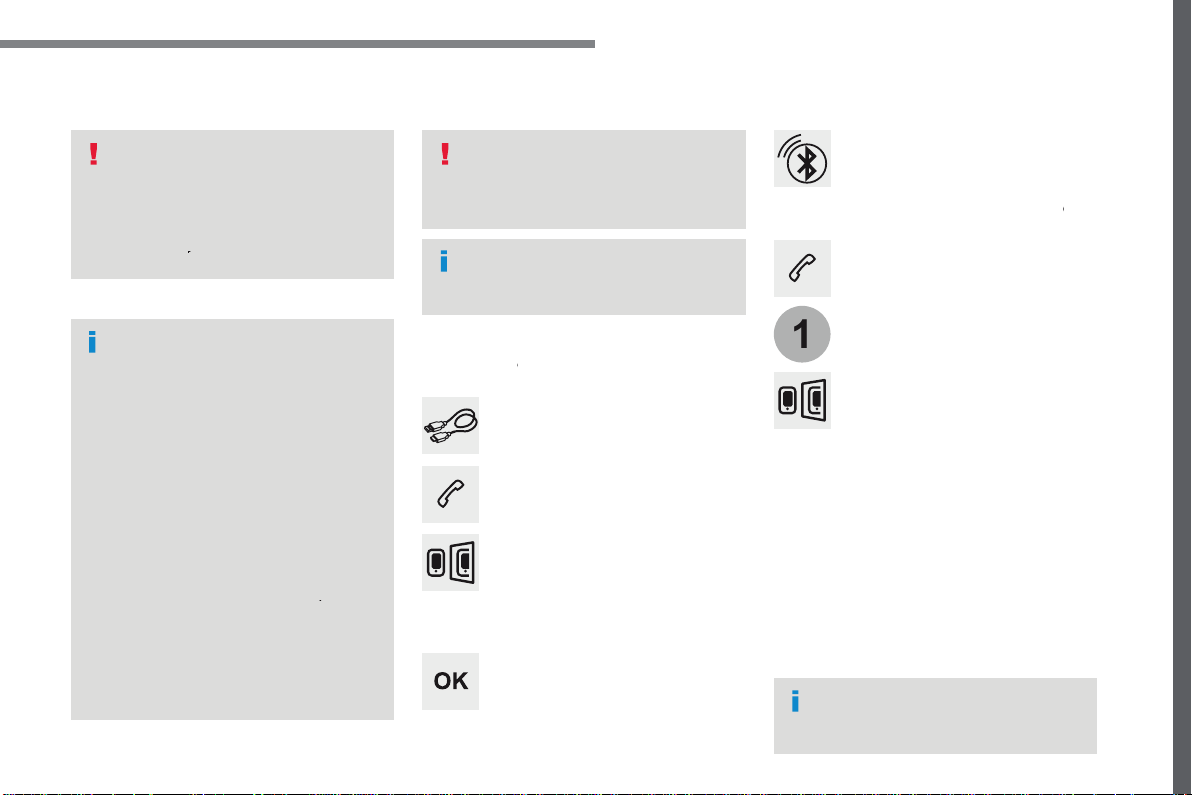
123
.
1
Audio and Telematics
Transversal-Citroen_en_Chap02_RCC-2-2-0_ed01-2016
As a safety measure and because it
requires the sustained attention of
the driver, using a smartphone when
driving is prohibited.
Operation must be with the
vehicle
stationary
.
stationary . stationary
The synchronisation of a
smartphone allows applications on a
smartphone that are adapted to the
MirrorLink
TM
technology to be displayed
in the vehicle's screen.
The principles and standards
are constantly evolving. For the
communication process between
the smartphone and the system to
work correctly, the smartphone must
be unlocked;
update the operating
system of your smartphone as
well as the date and time in the
smartphone and the system
.
For the list of eligible smartphones,
connect to the Brand's internet website
in your country.
T h e " M i r r o r L i n k
TM
" function requires
a compatible smartphone and
applications.
There may be a wait for the availability
of applications, depending on the
quality of your network.
When connecting a smartphone to the
system, it is recommended that "Bluetooth"
®
be started on the smartphone
Depending on the smartphone, it may be necessary
to activate the "
MirrorLink
TM
" function.
During the procedure, several screen
pages relating to certain functions
are displayed.
Accept to start and end the
connection.
Connect the USB cable. The
smartphone charges when
connected by a USB cable.
Press "
MirrorLink
TM
"
to start the
application in the system.
Once connection is established, a page
is displayed with the applications already
downloaded to your smartphone and adapted
to the MirrorLink
TM
t e c h n o l o g y .
Access to the different audio sources remains
accessible in the margin of the MirrorLink
TM
display, using touch buttons in the upper bar.
Access to the menus for the system is possible
at any time using the dedicated buttons
Telephone not connected by
Bluetooth
®
Bluetooth
®
Bluetooth
Telephone connected by Bluetooth
®
Telephone connected by Bluetooth
®
Telephone connected by Bluetooth
From the system, press "
Telephone
"
to display the primary page.
From the system, press "
Telephone
"
to display the primary page.
As a safety measure, applications
can only be viewed with the vehicle
stationary; display is interrupted once
the vehicle is moving.
Press the "
PHONE
" button to display
the secondary page.
Press "
MirrorLink
TM
" to start the
application in the system.
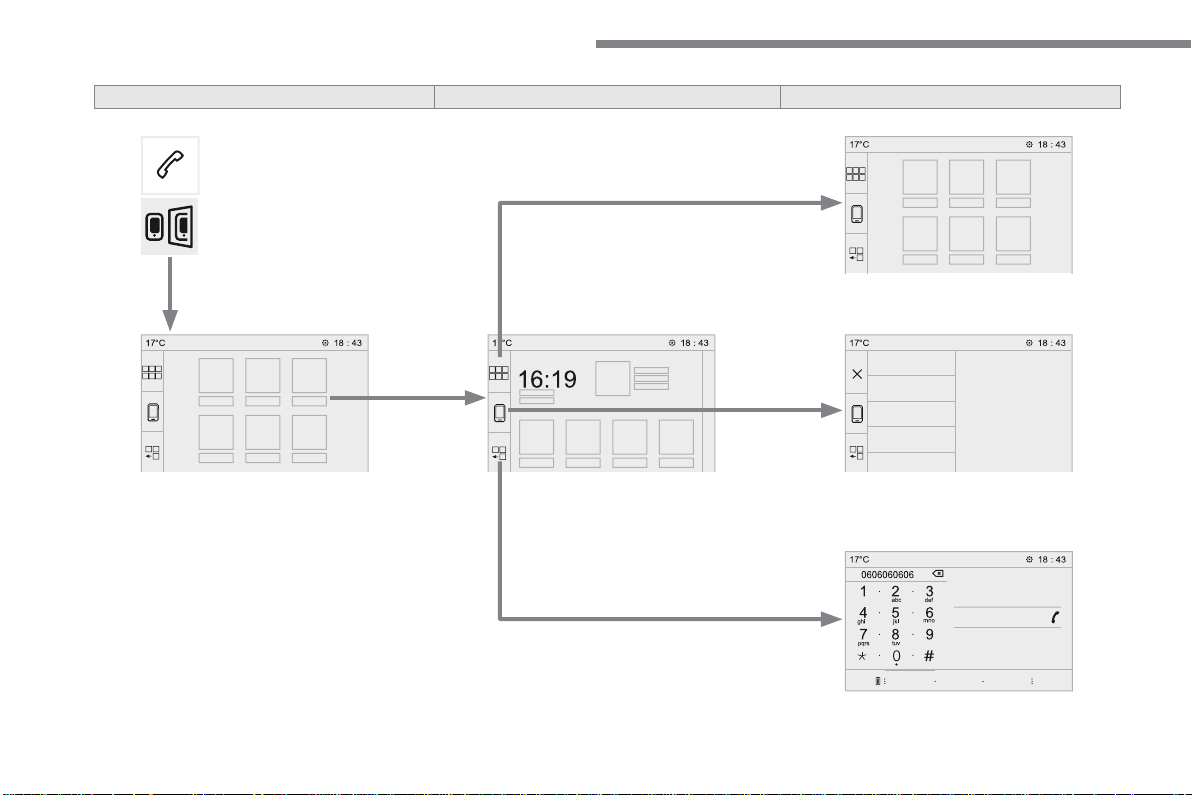
124
Audio and Telematics
Transversal-Citroen_en_Chap02_RCC-2-2-0_ed01-2016
Level 1
Level 2
Level 3

125
.
Audio and Telematics
Transversal-Citroen_en_Chap02_RCC-2-2-0_ed01-2016
Level 1
Level 2
Level 3
Comments
Telephone
MirrorLink
TM
Go to or return to the applications already
downloaded to your smartphone and adapted to
the MirrorLink
TM
technology.
Go to a menu list depending on the application
chosen.
"Back": abandon the current operation, go up one
level.
"Home": go to or return to the "Car mode" page on
your smartphone.
Go to the primary page of the "Telephone" menu.
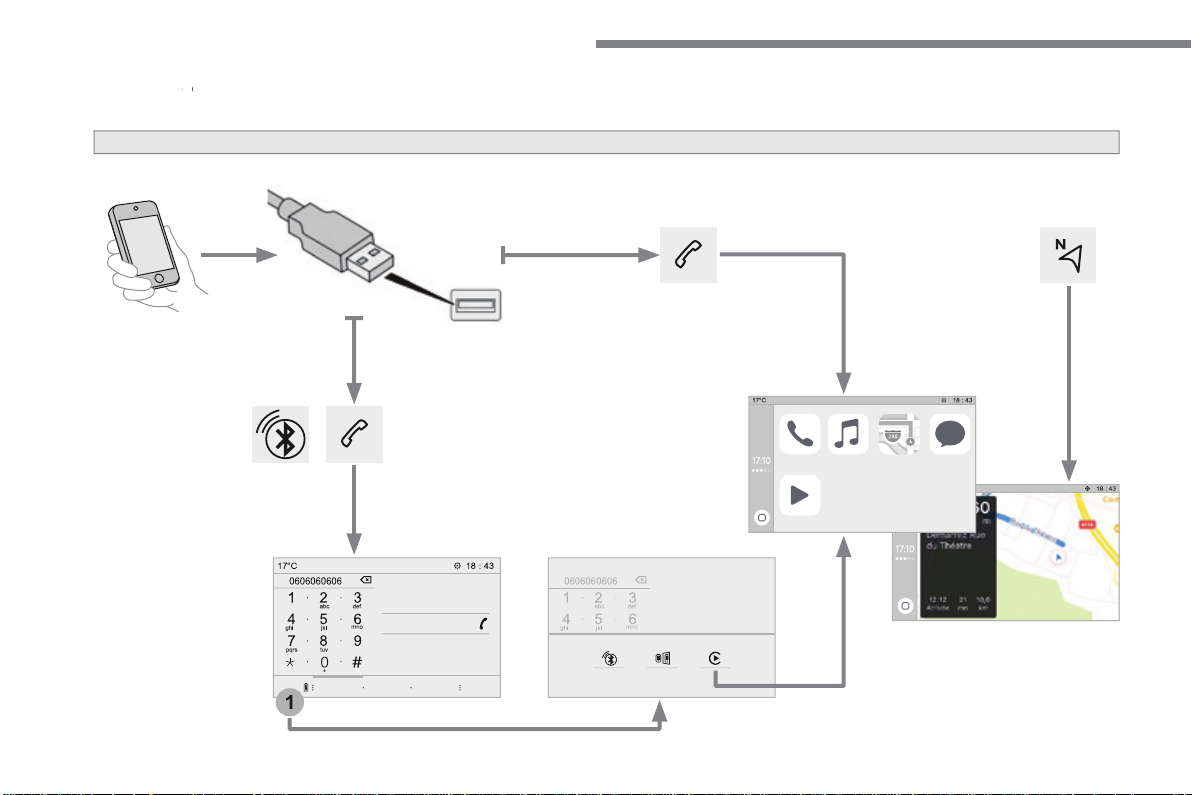
126
1
Audio and Telematics
Transversal-Citroen_en_Chap02_RCC-2-2-0_ed01-2016
CarPlay
®
CarPlay
®
CarPlay
smartphone connection
®
smartphone connection
®
127
.
1
Audio and Telematics
Transversal-Citroen_en_Chap02_RCC-2-2-0_ed01-2016
As a safety measure and because it
requires the sustained attention of
the driver, using a smartphone when
driving is prohibited.
Operation must be with the
vehicle
stationary
.
stationary . stationary
The synchronisation of a
smartphone allows applications on a
smartphone that are adapted to the
CarPlay
®
technology to be displayed
®
technology to be displayed
®
in the vehicle's screen, having first
activated the CarPlay
®
function in the
®
function in the
®
smartphone.
As the principles and standards are
constantly changing,
it is recommended
that you keep your smartphone's
operating system updated
.
For the list of eligible smartphones, go
to the Brand's internet website in your
country.
Connect the USB cable. The
smartphone charges when
connected by a USB cable.
Connect the USB cable. The
smartphone charges when
connected by a USB cable.
From the system, press
Telephone
to display the Carplay
®
interface.
®
interface.
®
Press "
CarPlay
" to display the
CarPlay
®
interface.
®
interface.
®
On connecting the USB cable, the
CarPlay
®
function deactivates the
®
function deactivates the
®
system's Bluetooth
®
mode.
®
mode.
®
From the system, press
Telephone
to display the primary page.
Press the "
PHONE
" button to go to
the secondary page.
Or
If the smartphone is already
connected by Bluetooth
®
.
You can go to the CarPlay
®
navigation at any time by pressing
the system's
Navigation
button.
128
Audio and Telematics
Transversal-Citroen_en_Chap02_RCC-2-2-0_ed01-2016
Pairing a Bluetooth
®
Pairing a Bluetooth
®
Pairing a Bluetooth
telephone
®
telephone
®
As a safety measure and because it
requires sustained attention by the
driver, the pairing of a Bluetooth mobile
telephone with the Bluetooth hands-
free system of your audio system must
be done with the
vehicle stationary
and the ignition on.
Procedure from the telephone
Select the name of the system in the
list of devices detected.
In the system, accept the connection request
from the telephone.
Procedure from the system
Press
Telephone
to display the
primary page.
Press "
Bluetooth search
".
The list of telephones detected is
displayed.
If the pairing procedure fails, it is recommended
that you deactivate and then reactivate the
Bluetooth function in your telephone.
Depending on the type of telephone,
you may be asked to accept or not
the transfer of your contacts and
messages.
Select the name of the chosen
telephone in the list.
Activate the Bluetooth function on the
telephone and ensure that it is "visible
to all" (telephone configuration).
To complete the pairing, whichever
procedure used (from the telephone or
from the system), ensure that the code
is the same in the system and in the
telephone.
129
.
1
Audio and Telematics
Transversal-Citroen_en_Chap02_RCC-2-2-0_ed01-2016
Press
Telephone
to display the
primary page.
Press "
Bluetooth connection
" to
display the list of paired devices.
On return to the vehicle, if the last
telephone connected is present again,
it is automatically recognised and
within about 30 seconds of switching
on the ignition, the connection is
established without any action on your
part (Bluetooth activated).
The services available depend on
the network, the SIM card and the
compatibility of the Bluetooth devices
used. Check in your telephone's
manual and with your service provider
for the services available to you.
The ability of the system to connect with
just one profile depends on the telephone.
All three profiles may connect by default.
Go to the Brand's website for more information
(compatibility, additional help, ...).
To modify the connection profile
:
Automatic reconnection
Press the "details" button of a paired
device.
Press the "
PHONE
" button to go to
the secondary page.
Press "
OK
" to confirm.
Select one or more profiles.
The profiles compatible with the system
are HFP, OPP, PBAP, A2DP, AVRCP,
MAP and PAN.
The system offers to connect the telephone
with 3 profiles:
- "
Telephone
" (hands-free kit, telephone
only),
- "
Streaming
" (wireless playing of the audio
files on the telephone),
- "
Internet data
".
130
1
Audio and Telematics
Transversal-Citroen_en_Chap02_RCC-2-2-0_ed01-2016
Receiving a call
An incoming call is announced by a ring and a
superimposed display in the screen.
Make a short press on the steering
mounted
PHONE
button to accept an
incoming call.
Make a long press
on the steering mounted
PHONE
button to reject the call.
Or
And
Press "
End call
".
Press on the name of the telephone
chosen in the list to disconnect it.
Press again to connect it.
Press the basket at the top right
of the screen to display a basket
alongside the telephone chosen.
Press the basket alongside the
telephone chosen to delete it.
Managing paired telephones
This function allows the connection or
disconnection of a peripheral device as
well as the deletion of a pairing.
Press
Telephone
to display the
primary page.
Press the "
PHONE
" button to go to
the secondary page.
Press "
Bluetooth connection
" to
display the list of paired peripheral
devices.
Deleting a telephone
Using the telephone is not
recommended while driving.
Park the vehicle.
Make the call using the steering
mounted controls.
Making a call
Calling a new number
Press
Telephone
to display the
primary page.
Enter the phone number using the
digital keypad.
Press "
Call
" to start the call.
131
.
4
3
5
Audio and Telematics
Transversal-Citroen_en_Chap02_RCC-2-2-0_ed01-2016
on the steering mounted button.
Calling a contact
Setting the ringtone
Press
Telephone
to display the
primary page.
Or make a long press
on the steering mounted
PHONE
button.
Press "
Contacts
".
Select the desired contact from the list offered.
Press "
Call
".
Calling a recently used number
Press
Telephone
to display the
primary page.
Make a long press
Press "
Recent calls
".
Select the desired contact from the list offered.
It is always possible to make a call
directly from the telephone; as a safety
measure, first park the vehicle.
Or
Press
Telephone
to display the
primary page.
Press "
Ring volume
" to display the
volume bar.
Press the arrows or move the cursor
to set the ring volume.
Press the "
OPTIONS
" button to go to
the secondary page.
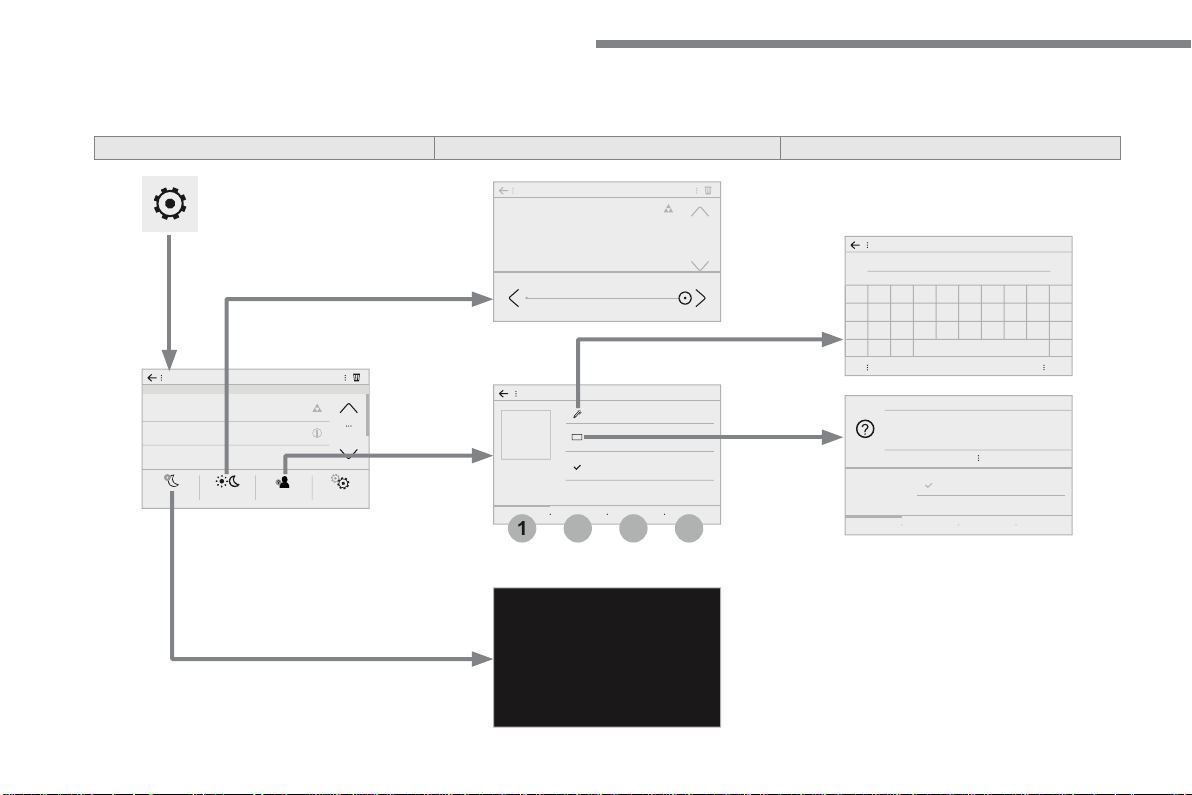
132
3
4
1
2
Audio and Telematics
Transversal-Citroen_en_Chap02_RCC-2-2-0_ed01-2016
S e t t i n g s
According to version / according to equipment
Level 1
Level 2
Level 3
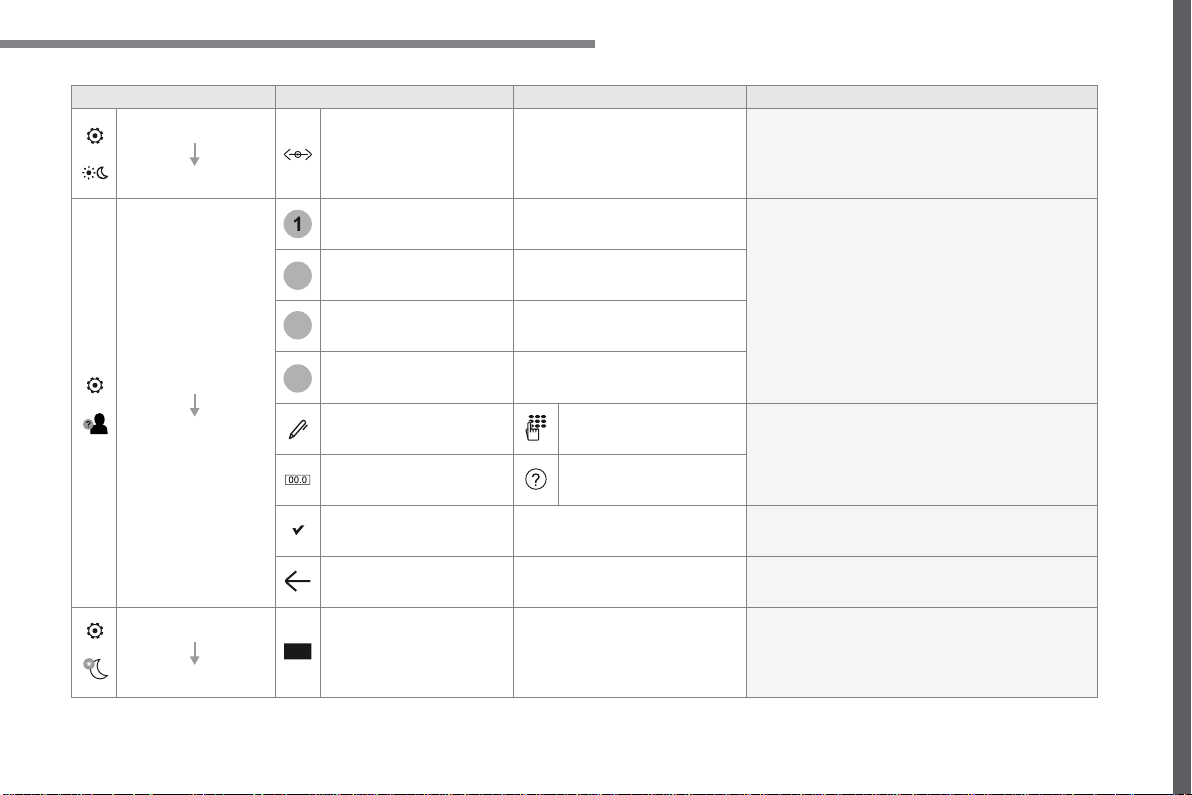
133
.
1
2
3
4
Audio and Telematics
Transversal-Citroen_en_Chap02_RCC-2-2-0_ed01-2016
Level 1
Level 2
Level 3
Comments
Settings
Brightness
Ambience
Move the cursor to adjust the brightness of the
screen and/or of the instrument panel.
Settings
Profiles
Profile 1
Select a profile.
Profile 2
Profile 3
Common profile
Name:
Profile name
modification
Configure the profiles.
Reset the profile
Yes / No
Profile activated
Activate/deactivate the profile selected.
Save the settings.
Settings
Dark
Function which switches off the lit display.
Pressing the screen reactivates it.
134
Audio and Telematics
Transversal-Citroen_en_Chap02_RCC-2-2-0_ed01-2016
According to equipment
Level 1
Level 2
135
.
Audio and Telematics
Transversal-Citroen_en_Chap02_RCC-2-2-0_ed01-2016
Level 1
Level 2
Comments
Settings
Configuration
System configuration
Configure certain system parameters.
Ambience
Select an ambience for the screen integrated in
the system.
Language
Select the display language for the the screen
and/or the instrument panel.
Screen configuration
Set the configuration of the screen and/or the
instrument panel.
Customization
Configure the instrument panel for a personalised
display.
Date and time
Set the date and time and select the display
format.
136
6
5
7
8
9
10
11
Audio and Telematics
Transversal-Citroen_en_Chap02_RCC-2-2-0_ed01-2016
Level 1
Level 2
Level 3
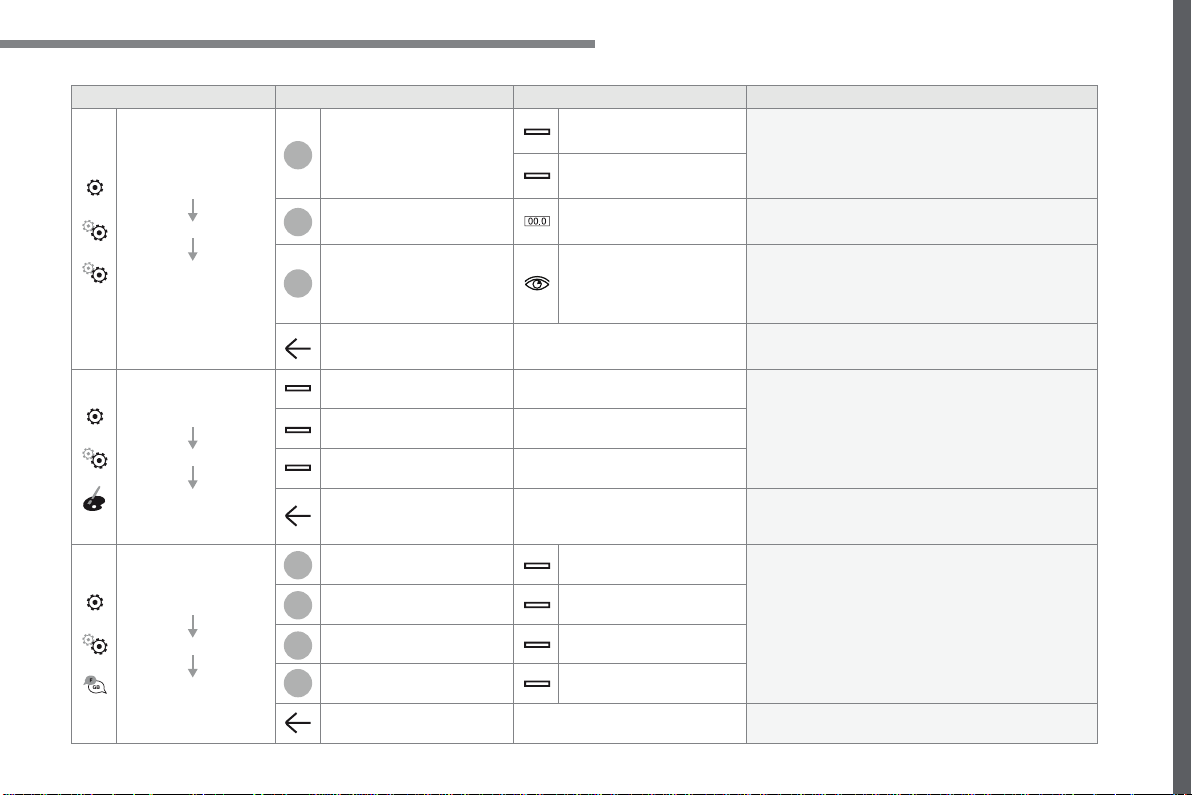
137
.
6
5
7
8
9
10
11
Audio and Telematics
Transversal-Citroen_en_Chap02_RCC-2-2-0_ed01-2016
Level 1
Level 2
Level 3
Comments
Settings
Configuration
System
configuration
Units
Distance and fuel
consumption
Configure the display units for the distance,
consumption and temperature.
Temperatures
Factory settings
Reset
Restore the original settings.
System info
View
Consult the version of the different modules
installed in the system.
Save the parameters.
Settings
Configuration
Ambience
Select an ambience for the screen integrated in
the system.
Confirm the selection and start the change of
ambience.
Settings
Configuration
Language
All
Select the display language for the screen and/or
the instrument panel.
Europe
Asia
America
Save the parameter.
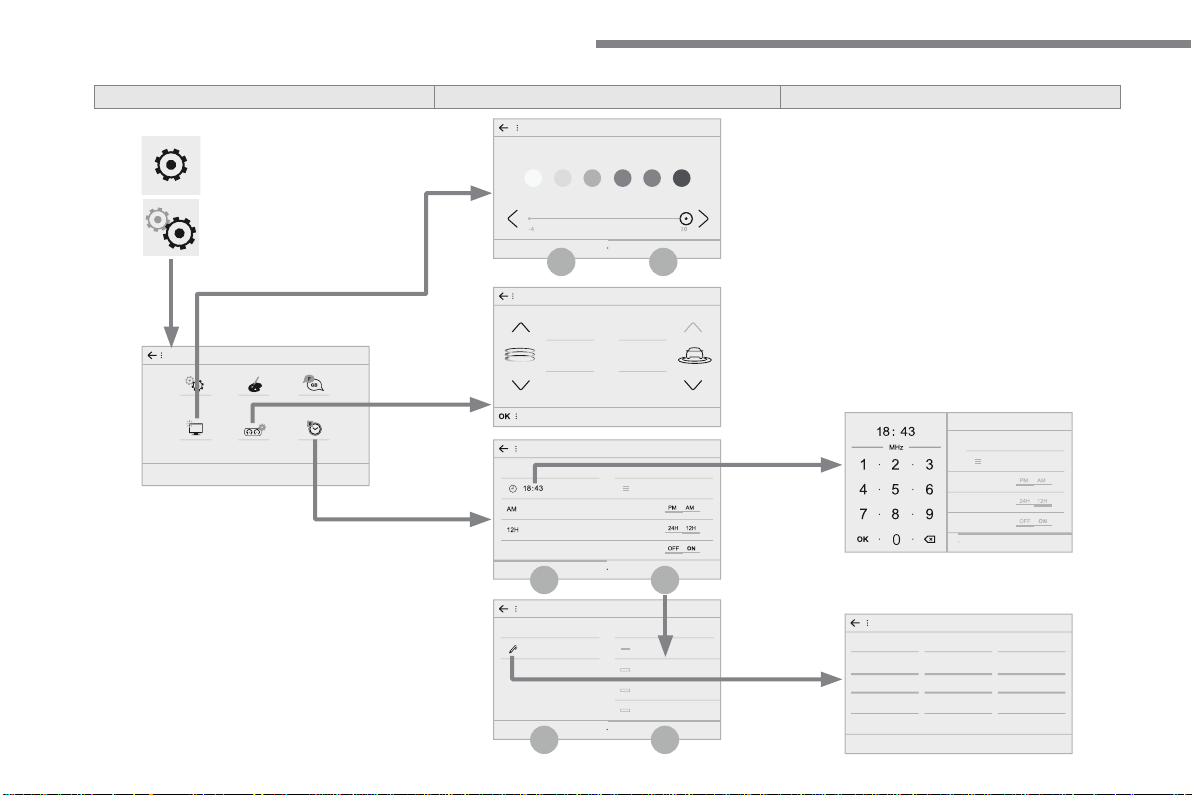
138
14
15
14
15
12
13
Audio and Telematics
Transversal-Citroen_en_Chap02_RCC-2-2-0_ed01-2016
Level 1
Level 2
Level 3
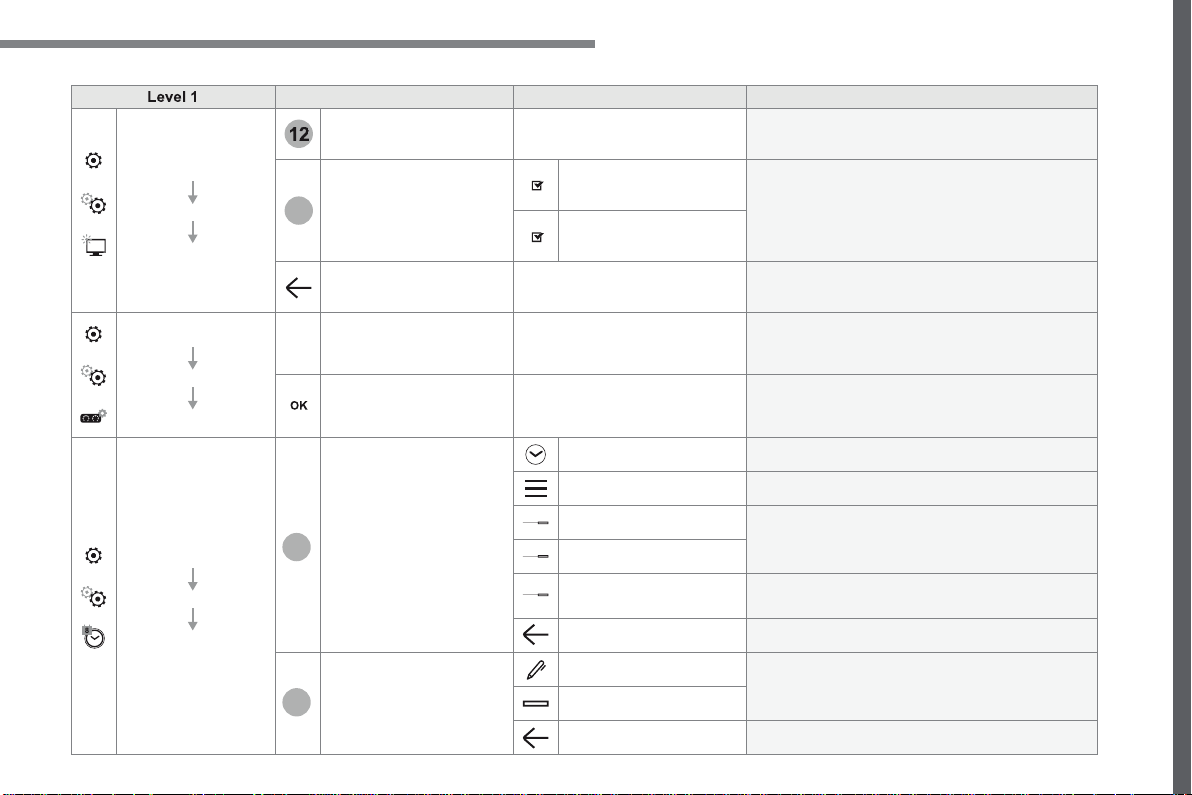
139
.
12
13
14
15
Audio and Telematics
Transversal-Citroen_en_Chap02_RCC-2-2-0_ed01-2016
Level 1
Level 2
Level 3
Comments
Settings
Configuration
Screen
configuration
Brightness
Select the display brightness level.
Animation
Automatic scrolling
Activate or deactivate the parameters.
Animated transitions
Save the parameters.
Settings
Configuration
Temperature conditioning
Customization
Choose and select the display information
required.
Confirm
Confirm the selections.
Settings
Configuration
Date and time
Time
Time
Set the time.
Time Zone
Set the time zone.
AM
Select the display format.
12h
GPS Synchronisation
Activate or deactivate the synchronisation with the
satellites.
Save the settings.
Date
Date
Set the date and select the display format.
Setting the date
Save the settings.
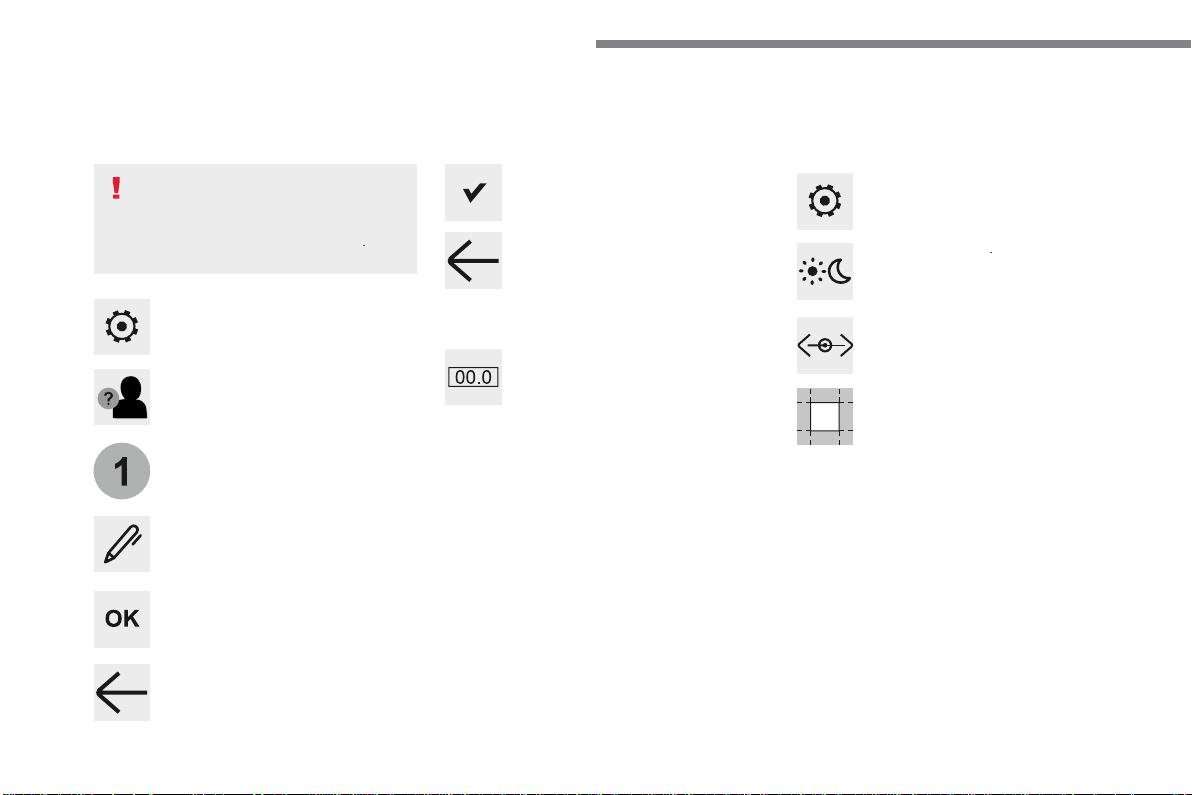
140
1
Audio and Telematics
Transversal-Citroen_en_Chap02_RCC-2-2-0_ed01-2016
Press
Settings
to display the primary
page.
Profile settings
Adjust the brightness
Press "
OK
" to save.
Select "
Profile 1
" or "
Profile 2
" or
"
Profile 3
" or "
Common profile
".
Press "
Profiles
".
Press this button to enter a name for
the profile using the virtual keypad
As a safety measure and because it
requires the sustained attention of the
driver, changes to settings must only be
done with the
vehicle stationary
.
vehicle stationary . vehicle stationary
Press this button to activate the
profile.
Press this button to initialise the
profile selected.
Press
Settings
to display the primary
page.
Move the cursor to adjust the brightness
of the screen and/or of the instrument
panel (according to version).
Press
Brightness
.
Press in the grey zone to confirm.
Press the back arrow to confirm.
Press the back arrow again to
confirm.
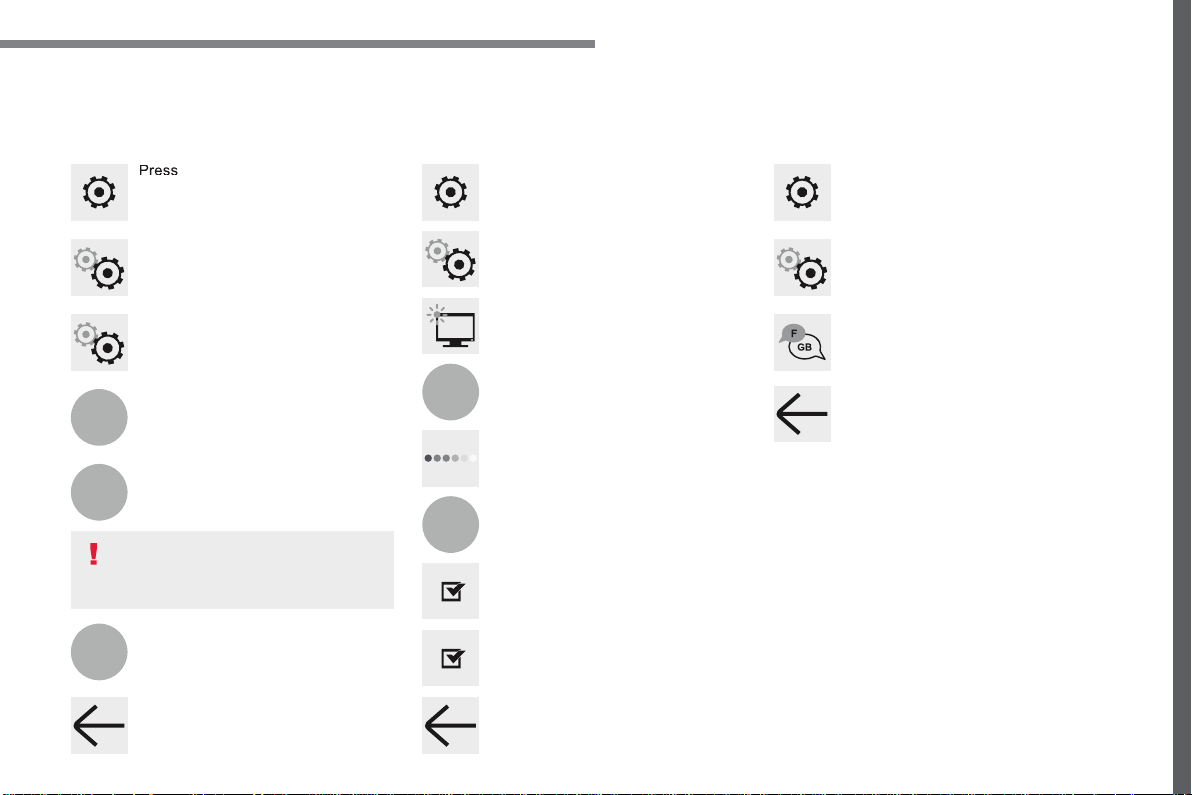
141
.
5
6
7
12
13
Audio and Telematics
Transversal-Citroen_en_Chap02_RCC-2-2-0_ed01-2016
Press
Settings
to display the primary
page.
Press
Settings
to display the primary
page.
Press
Settings
to display the primary
page.
Press "
Configuration
" to go to the
secondary page.
Press "
Configuration
" to go to the
secondary page.
Press "
Configuration
" to go to the
secondary page.
Press "
System configuration
".
Press "
Screen configuration
".
Press "
Units
" to change the units
for distance, fuel consumption and
temperature.
Select "
Language
" to change the
language.
Activate or deactivate: "
Automatic
scrolling
".
Select "
Animated transitions
".
Move the cursor to set the brightness
of the screen and/or instrument panel
(according to version).
Press "
Factory settings
" to return to
the initial settings.
Press "
System info
" to display the
versions of the different modules
installed in the system.
Modifying system settings
Returning the system to factory settings
activates the English language by
default (according to version).
Press "
Animation
".
Press "
Brightness
".
Select the language
Press the back arrow to confirm.
Press the back arrow to confirm.
Press the back arrow to confirm.

142
15
14
Audio and Telematics
Transversal-Citroen_en_Chap02_RCC-2-2-0_ed01-2016
Press
Settings
to display the primary
page.
Select "
Date
".
Select "
Time
".
Press "
Date and time
".
Adjustment of the time and date is only
available if "GPS Synchronisation:" is
deactivated.
The change between winter and
summer time is done by changing the
time zone.
The system does not automatically
manage the change between winter
and summer time (depending on the
country of sale).
Setting the time
Press this button to define the date.
Press this button to adjust the time
using the virtual keypad.
Press the back arrow to save the
date.
Press this button to define the time
z o n e .
Select the display format of the date.
Select the display format for the time
(12h / 24h).
Activate or deactivate
synchronisation with satellites (UTC).
Press
Settings
to display the primary
page.
Press "
Date and time
".
Setting the date
Press "
Configuration
" to go to the
secondary page.
Press "
Configuration
" to go to the
secondary page.
Press "
OK
" to save the time.
Press the back arrow to save the
settings.
Press the back arrow again to
confirm.

143
.
Audio and Telematics
Transversal-Citroen_en_Chap02_RCC-2-2-0_ed01-2016
Radio
QUESTION
ANSWER
SOLUTION
The quality of reception of
the radio station listened
to gradually deteriorates
or the stored stations do
not function (no sound,
87.5 Mhz is displayed...).
The vehicle is too far from the transmitter used by the station
listened to or there is no transmitter in the geographical area
through which the vehicle is travelling.
Activate the "RDS" function by means of the
upper band to enable the system to check
whether there is a more powerful transmitter in
the geographical area.
The environment (hills, buildings, tunnels, basement car parks...)
block reception, including in RDS mode.
This phenomenon is normal and does not indicate
a fault with the audio system.
The aerial is absent or has been damaged (for example when going
through a car wash or into an underground car park).
Have the aerial checked by a franchised dealer.
I cannot find some radio
stations in the list of
stations received.
The station is not received or its name has changed in the list.
Press the round arrow on the "List" tab of the
"Radio" page.
Some radio stations send other information in place of their name
(the title of the song for example).
The system interprets this information as the name of the station.
The name of the radio
station changes.
Frequently asked questions
The following table groups together the answers to the most frequently asked questions concerning your audio system.

144
Audio and Telematics
Transversal-Citroen_en_Chap02_RCC-2-2-0_ed01-2016
Media
QUESTION
ANSWER
SOLUTION
Playback of my USB
memory stick starts only
after a very long wait
(around 2 to 3 minutes).
Some files supplied with the memory stick may greatly slow down
access to reading the memory stick (multiplication by 10 of the
catalogue time).
Delete the files supplied with the memory stick
and limit the number of sub-folders in the file
structure on the memory stick.
Some characters in the
media information are not
displayed correctly while
playing.
The audio system does not display some types of characters.
Use standard characters to name tracks and
folders.
Playing of streaming files
does not start.
The peripheral device connected does not support automatic play.
Start the playback from the device.
The names of tracks and
the track length are not
displayed on the screen
when streaming audio.
The Bluetooth profile does not allow the transfer of this information.

145
.
Audio and Telematics
Transversal-Citroen_en_Chap02_RCC-2-2-0_ed01-2016
QUESTION
ANSWER
SOLUTION
I cannot connect my
Bluetooth telephone.
The telephone's Bluetooth function may be switched off or the
telephone may not be visible.
Check that your telephone's Bluetooth function is
switched on.
Check in the telephone settings that it is "visible
to all".
The Bluetooth telephone is not compatible with the system.
You can check the compatibility of your telephone
at the Brand's website (services).
The volume of the
telephone connected
in Bluetooth mode is
inaudible.
The volume depends both on the system and on the telephone.
Increase the volume of the audio system, to
maximum if required, and increase the volume of
the telephone if necessary.
The ambient noise level has an influence on the quality of telephone
communication.
Reduce the ambient noise level (close the
windows, reduce the booster fan speed, slow
down, ...).
Contacts are not shown in
alphabetical order.
Some telephones offer display options. Depending on the settings
chosen, contacts can be transferred in a specific order.
Modify the display setting in the telephone
directory.
Telephone

146
Audio and Telematics
Transversal-Citroen_en_Chap02_RCC-2-2-0_ed01-2016
QUESTION
ANSWER
SOLUTION
In changing the setting
of treble and bass the
equalizer setting is
deselected.
The selection of an equalizer setting imposes the settings for treble
and bass and vice-versa.
Modify the treble and bass or equalizer settings to
obtain the desired musical ambience.
In changing the equalizer
setting, treble and bass
return to zero.
When changing the
balance settings, the
distribution setting is
deselected.
The selection of a distribution setting imposes the balance settings
and vice-versa.
Modify the balance or distribution settings to
obtain the desired musical ambience.
When changing a
distribution setting,
the balance setting is
deselected.
There is a difference in
sound quality between the
different audio sources.
For optimum sound quality, the audio settings can be adapted to
the different sound sources, which may result in audible differences
when changing source.
Check that the audio settings are adapted to the
sources listened to. Adjust the audio functions to
the middle position.
With the engine off, the
system switches off after a
few minutes of use.
When the engine is switched off, the system's operating time
depends on the state of charge of the battery.
The switch-off is normal: the system switches to economy mode and
switches off to prevent discharging of the vehicle's battery.
Start the vehicle's engine to increase the battery
charge.
Settings
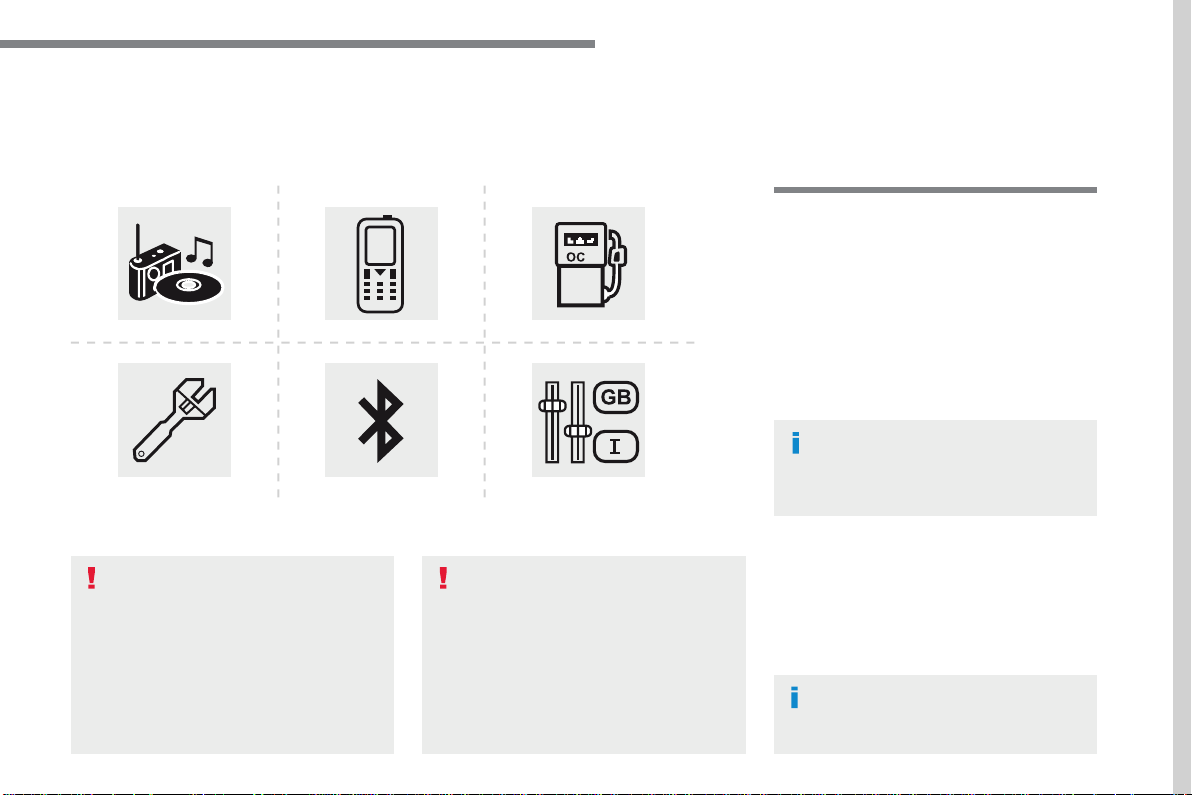
147
.
Audio and Telematics
Transversal-Citroen_en_Chap03_RD6_ed01-2016
B l u e t o o t h
®
audio system
Contents
First steps 148
Steering mounted controls - Type 1 149
Steering mounted controls - Type 2 150
Menus 151
Radio 152
DAB (Digital Audio Broadcasting) radio 154
Media 156
Telephone 161
Frequently asked questions 166
Your audio system is coded in such
a way that it will only operate in your
vehicle.
All work on the system must be
carried out exclusively by a dealer or
qualified workshop, to avoid any risk of
electrocution, fire or mechanical faults.
To avoid discharging the battery, the
audio system may switch off after a few
minutes if the engine is not running.
The different functions and adjustments
described vary according to the version
and configuration of your vehicle.
As a safety measure and because it
requires the sustained attention of the
driver, the pairing of your Bluetooth
telephone to the Bluetooth hands-free
audio system must only be carried out
with the
vehicle stationary
and the
ignition on.
148
Audio and Telematics
First steps
Press: On / Off
Rotate: adjust volume.
Short press: change audio source
(Radio; USB; AUX (if a device is
connected); CD; Streaming).
Long press: display the
Telephone
menu (if a telephone is connected).
Radio
:
Short press: display the list of radio
stations.
Long press: update the list.
Media:
Short press: display the list of folders.
Long press: display the sorting
options.
Select the screen display mode,
between:
Date; Audio functions; Trip computer;
Telephone.
Adjust audio settings:
Front/rear fader; left/right balance;
bass/treble; loudness; audio
ambience.
Activation / Deactivation of automatic
volume adjustment (linked to the
speed of the vehicle).
Radio
:
Manual step by step search up /
down for radio stations.
Select previous / next MP3 track.
Media:
Select previous / next folder / genre /
artist / playlist on the USB device.
Scroll in a list.
Abandon the current operation.
Go up one level (menu or folder).
Confirm or display contextual menu.
Buttons 1 to 6.
Short press: select the preset radio
station.
Long press: preset a station.
Radio:
Automatic step by step search up /
down for radio stations.
Media:
Select previous / next CD, USB,
streaming track.
Scroll in a list.
Access to main menu.
Activate / Deactivate TA (traffic
announcements)
Long press: select type of
announcement.
Select waveband: FM / DAB / AM.
149
.
Audio and Telematics
Transversal-Citroen_en_Chap03_RD6_ed01-2016
Steering mounted controls - Type 1
Radio
:
Short press: display the list of radio
stations.
Long press: update the list.
Media
:
Short press: display the list of folders.
Long press: display the sorting
options.
Decrease volume.
Radio
:
Select the previous / next preset
radio station.
Select the previous / next item in a
menu or a list.
Media
:
Select of the previous / next track.
Select the previous / next item in a
menu or a list.
Mute / Restore sound by
simultaneously pressing the increase
and decrease volume buttons.
Other than telephone calls
:
Short press: change audio source
(Radio; USB; AUX (if a device is
connected); CD; Streaming), confirm
if the "
Telephone
" menu is open.
Long press: open the "
Telephone
"
menu.
In the event of a telephone call
:
Short press: accept the call.
Long press: reject the call.
During a telephone call:
Short press: open the contextual
telephone menu.
Long press: end the call.
Confirm a selection.
Increase volume.
150
Audio and Telematics
Steering mounted controls - Type 2
Decrease volume.
Mute / Restore sound.
Other than telephone call
:
Short press: change audio source
(Radio; USB; AUX (if a device is
connected); CD; Streaming), confirm
if the "
Telephone
" menu is open.
Long press: open the "
Telephone
"
menu.
In the event of a telephone call:
Short press: accept the call.
Long press: reject the call.
During a telephone call:
Short press: open the contextual
telephone menu.
Long press: end the call.
Increase volume.
Access to the main menu.
Start voice recognition of your
smartphone via the system.
Radio
:
Short press: display the list of radio
stations.
Long press: update the list.
Media:
Short press: display the list of folders.
Long press: display the sorting
options.
Radio:
Select the previous / next preset
radio station.
Select the previous / next item in a
menu or a list.
Media:
Select the previous / next track.
Select the previous / next item in a
menu or a list.
Press the thumbwheel: confirm.
151
.
Audio and Telematics
Transversal-Citroen_en_Chap03_RD6_ed01-2016
Menus
"
Multimedia
": Media settings, Radio
settings.
D e p e n d i n g o n v e r s i o n .
Move from one menu to another.
Enter a menu.
"
Trip computer
".
"
Maintenance
": Diagnosis, Warning
log, ...
"
Connections
": Manage
connections, search for devices.
"
Telephone
": Call, Directory
management, Telephone
management, End call.
"
Personalisation-configuration
":
Define the vehicle settings, Choice
of language, Display configuration,
Choice of units, Date and time
adjustment.
Press the "
MENU
" button.
152
Audio and Telematics
RDS
Short procedure
Long procedure
The external environment (hills,
buildings, tunnels, basement car
parks, ...) may block reception,
including in RDS mode. This is a
normal effect of the way in which radio
waves are transmitted and does not
indicate any failure of the audio system.
Press the "
MENU
" button.
Select "
Audio functions
".
Press
OK
.
Select the "
FM waveband
preferences
" function.
Press
OK
.
Select "
RDS
".
Press
OK
, RDS is displayed in the
screen.
In "
Radio
" mode, press the
OK
button to
activate or deactivate RDS directly.
RDS, if activated, enables you to continue
listening to the same station by automatic
retuning to alternative frequencies.
However, in certain conditions, coverage
of an RDS station may not be assured
throughout the country as radio stations
do not cover 100 % of the territory. This
explains the loss of reception of a station
that can occur during a journey.
If RDS is not available, the RDS symbol
appears barred in the screen.
Radio
Selecting a station
Press the
SOURCE
button
repeatedly and select the radio.
Press this button to select a
waveband (FM / AM / DAB).
Press one of the buttons to carry
out an automatic search for radio
stations.
Press one of the buttons to carry out
a manual search up / down for radio
frequencies.
Press this button to display the list of
stations received locally.
To update this list, press for more
than two seconds. The sound is cut
while updating.
153
.
Audio and Telematics
Transversal-Citroen_en_Chap03_RD6_ed01-2016
Receiving TA messages
Press the
TA
button to activate or
deactivate traffic messages.
The TA (Traffic Announcement)
function gives priority to TA alert
messages. To operate, this function
needs good reception of a radio station
transmitting this type of message.
When a traffic report is transmitted, the
current audio source (Radio, CD, ...)
is interrupted automatically to play the
TA message. Normal playback of the
audio source resumes at the end of the
transmission of the message.
Take care when increasing the volume
while listening to TA messages. The
volume may prove too high on return to
the original audio source.
Select "
RadioText (TXT) display
"
and confirm
OK
to save.
Select or deselect categories.
With the radio displayed on the
screen, press
OK
to display the
contextual menu.
Make a long press on this button to
display the list of categories.
Receiving INFO messages
The INFO function gives priority to TA
traffic announcements. To be active,
this function needs good reception
of a radio station that transmits this
type of message. When a message is
transmitted, the current audio source
(Radio, CD, USB, ...) is interrupted
automatically to receive the INFO
message. Normal play resumes at the
end of the message transmission.
Radio text is information transmitted by
the radio station related to the current
programme or song.
Display RADIO TEXT
Activate or deactivate the reception of
the corresponding messages.
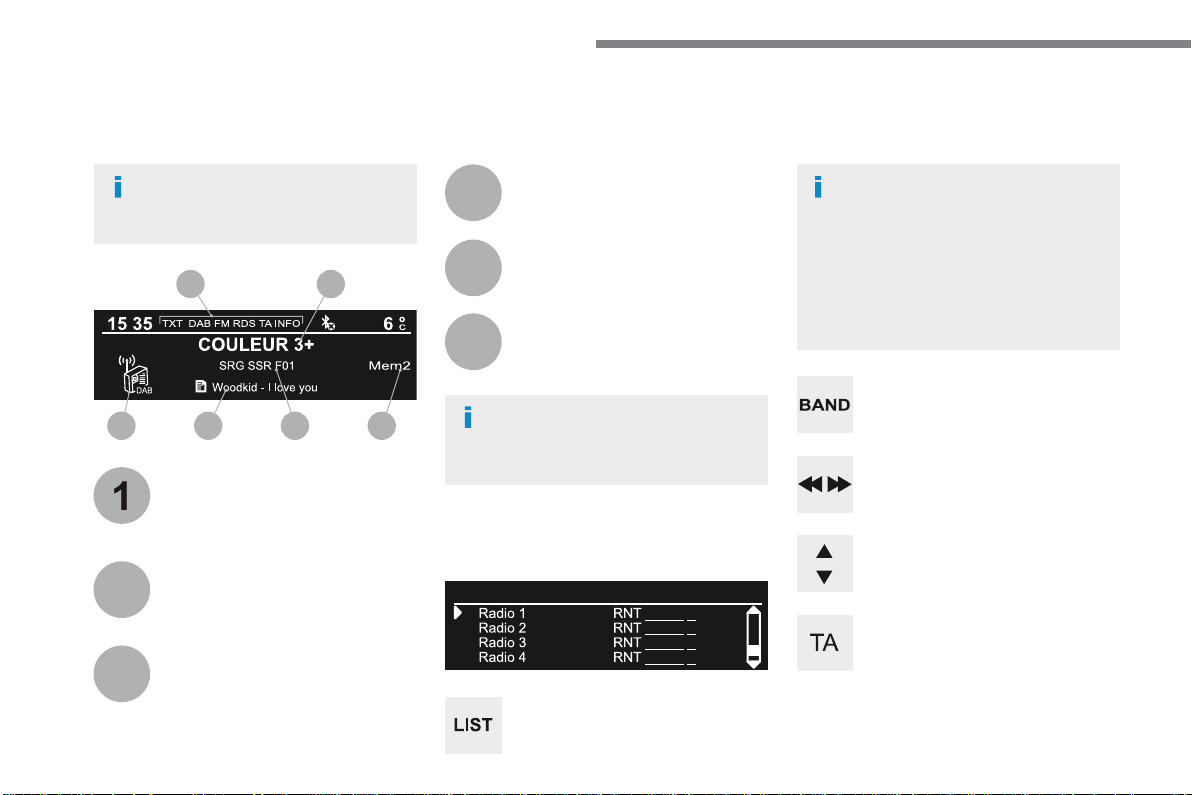
154
1
3
5
2
4
6
6 5 4 3
21
Audio and Telematics
Long press: select the desired
categories of announcements from
Transport, News, Entertainment and
Flash special (availability according
to the station).
Change of station within the same
"multiplex service".
Starting of a search for the previous /
next "multiplex service".
Change of band (FM1, FM2, DAB,...)
Digital radio provides a superior audio
quality and also additional categories of
traffic announcements (TA INFO).
The different "multiplex services"
offer a choice of radio stations in
alphabetical order.
Terrestrial digital radio
DAB (Digital Audio Broadcasting) radio
Display options:
if active but not available, the display
will be struck out.
A c c o r d i n g t o v e r s i o n
Preset radio station, buttons 1 to 6.
Short press: select the preset radio
station.
Long press: preset a radio station.
Display the name of the multiplex
service being used.
Display the list of all radio stations
and "multiplexes".
Represents the signal strength for
the band being listened to.
Display RadioText (TXT) for the
current radio station.
Display the name of the current radio
station.
If the current "DAB" radio station is not
available on "FM", "DAB FM" is struck out.
When changing region, an update
of the list of preset radio stations is
advisable.
155
.
Audio and Telematics
Transversal-Citroen_en_Chap03_RD6_ed01-2016
Select "
Multimedia
" and confirm.
Select "
DAB / FM auto tracking
"
and confirm
Press the "
MENU
" button.
When the radio station is displayed in
the screen, press on "
OK
" to display
the contextual menu.
(Frequency search (RDS), DAB / FM
auto tracking, RadioText (TXT) display,
Information on the station, ...)
DAB / FM tracking
"DAB" does not have 100% coverage of
the country.
When the digital signal is weak,
"DAB / FM auto tracking" allows you to
continue listening to the same station,
by automatically switching to the
corresponding analogue "FM" station
(if there is one).
When "DAB / FM auto tracking" is
active, the DAB station will be selected
automatically.
If "DAB / FM auto tracking" is
activated, there will be a difference of
a few seconds in the programme when
the system changes to analogue "FM"
radio, with sometimes a variation in
volume.
If the "DAB" station you are listening
to is not available on "FM" ("
DAB/FM
"
option barred), or if "DAB / FM auto
tracking" is not on, the sound will be cut
when the digital signal is too weak.
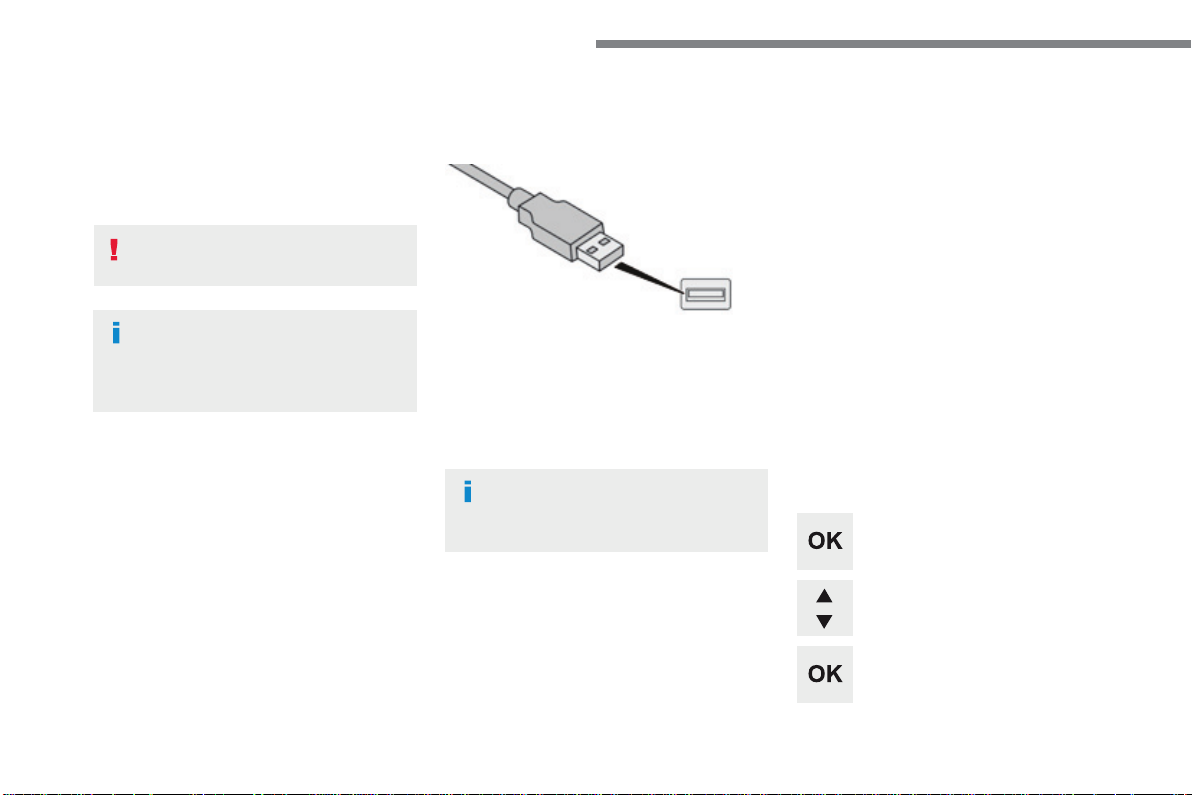
156
Audio and Telematics
Media
USB port
This unit consists of a USB port and an
auxiliary Jack socket, depending on version.
Insert a USB memory stick into the USB port
or connect a USB peripheral device to the USB
port using a suitable cable (not supplied).
The system changes automatically to "USB"
source.
The system creates playlists (temporary
memory), which can take from a few seconds
to several minutes on the first connection.
Reducing the number of non-music files and
the number of folders reduces this waiting
time. Playlists are updated every time a new
USB memory stick is connected.
Press this button to display the
contextual menu for the Media
function.
Press this button to select the play
mode.
Press this button to confirm.
Play mode
The play modes available are:
-
Normal
: the tracks are played in order,
depending on the classification of the
selected files.
-
Random
: the tracks in an album or folder
are played in a random order.
-
Random on all media
: all of the tracks
saved in the media are played in random
order.
-
Repeat
: the tracks played are only those
from the current album or folder.
The choice made is displayed at the top of the
screen.
While connected by USB, the portable
device may be charged automatically.
To protect the system, do not use a
USB hub.
Any additional equipment connected
to the system must conform to
the standard of the product or
standard IEC 60950-1.
157
.
Audio and Telematics
Transversal-Citroen_en_Chap03_RD6_ed01-2016
Choosing a track to play
F i l e c l a s s i fi c a t i o n
P l a y i n g fi l e s
Make a long press on this button to
display the different classifications.
Choose by "
Folder
" / "
Artist
" /
"
Genre
" / "
Playlist
" * .
Press
OK
to select the desired
classification, then press
OK
again
to confirm.
Make a long press on this button to
display the chosen classification.
Navigate in the list using the left /
right and up / down buttons.
Confirm the selection by
pressing
OK
.
Press one of these buttons to go to
the previous / next track in the list.
Press and hold one of these buttons
for fast forward or fast back.
Press one of these buttons to go
to the next "
Folder
" / "
Artist
" /
"
Genre
" / "
Playlist
" * in the list.
* Depending on availability and the type of
device used.
Press one of these buttons to go to
the previous / next track.
Press one of these buttons to go to
the previous / next folder.
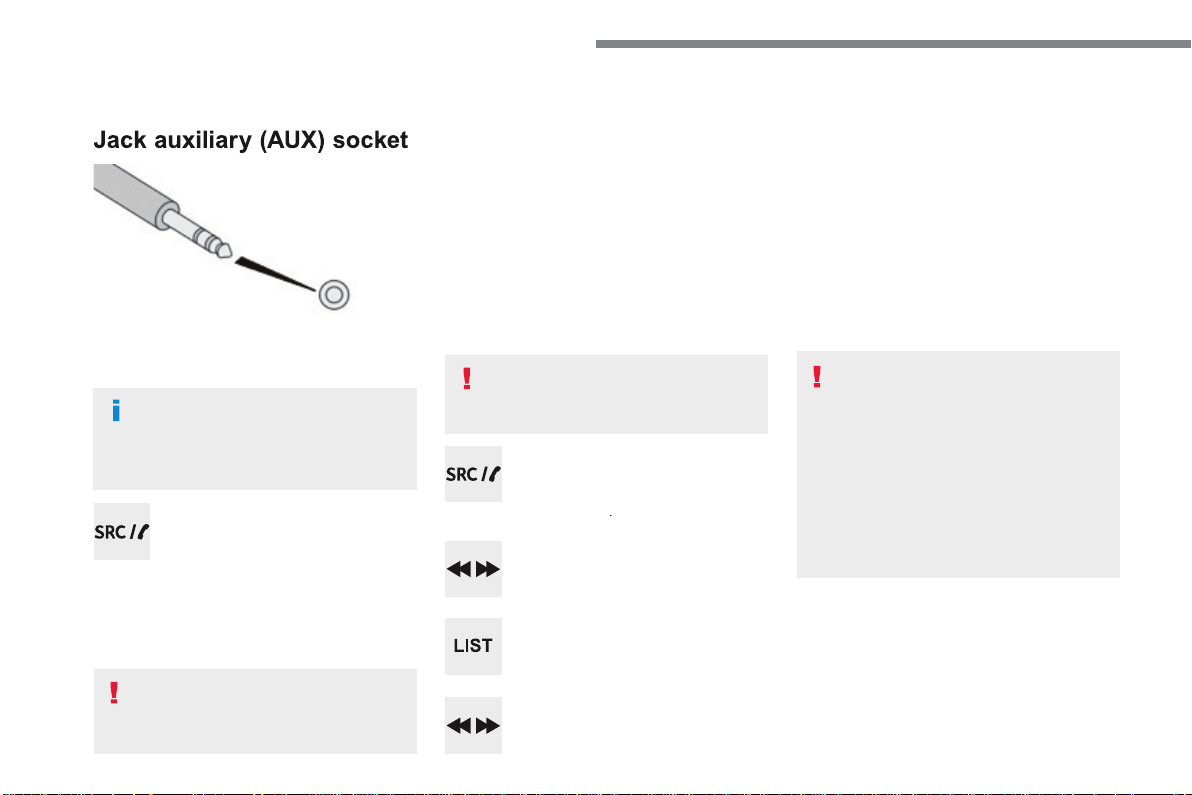
158
Audio and Telematics
Jack auxiliary (AUX) socket
Connect the portable device (MP3 player, …) to
the auxiliary Jack socket using an audio cable
(not supplied).
Press the
SOURCE
button several
times in succession and select
"
AUX
".
First adjust the volume on your portable device
(to a high level). Then adjust the volume on
your audio system. Operation of controls is via
the portable device.
Do not connect a device to both the
Jack auxiliary socket and the USB port
at the same time.
CD player
Insert circular compact discs only.
Some anti-pirating systems, on original discs
or CDs copied using a personal recorder, may
cause faults which are no reflection on the
quality of the vehicle's player.
Insert a CD in the player, play begins
automatically.
To play a disc which has already
been inserted, press the
SOURCE
button several times in succession
and select
CD
.
Press one of the buttons to select a
track on the CD.
Press the
LIST
button to display the
list of tracks on the CD.
Press and hold one of the buttons for
fast forward or fast back.
Playing an MP3 compilation
Insert an MP3 CD compilation in the player.
The audio equipment searches for all of the
music tracks, which may take anything between
a few seconds and several tens of seconds,
before play begins.
On a single disc, the CD player can
read up to 255 MP3 files spread over
8 folder levels.
However, it is advisable to keep to a
limit of two levels to reduce the access
time before the CD is played.
While the CD is being played, the folder
structure is not followed.
All of the files are displayed on a single
level.
External CD players connected via the
USB port are not recognised by the
system.
Any additional equipment connected
to the system must conform to the
standard of the product or standard
IEC 60950-1.
159
.
Audio and Telematics
Transversal-Citroen_en_Chap03_RD6_ed01-2016
To play a disc which has already
been inserted, press the
SOURCE
button several times in succession
and select
CD
.
Press one of the buttons to select a
folder on the CD.
Press one of the buttons to select a
track on the CD.
Press the
LIST
button to display
the list of directories of the MP3
compilation.
Press and hold one of the buttons for
fast forward or backward play.
Bluetooth
®
Bluetooth
®
Bluetooth
audio streaming
®
audio streaming
®
Streaming allows music files on the telephone
to be played via the audio system.
Connect the telephone.
(Refer to the "
Pairing a telephone
" section).
Audio files can be selected using the buttons
on the audio system control panel and the
steering mounted controls ** . Contextual
information may be displayed in the screen.
Activate the streaming source by
pressing the
SOURCE
* b u t t o n .
Connecting Apple
®
Connecting Apple
®
Connecting Apple
players
®
players
®
Connect the Apple
®
player to the USB port
®
player to the USB port
®
using a suitable cable (not supplied).
Play starts automatically.
Control is via the audio system.
The classifications available are those of the
portable device connected (artists / albums /
genres / playlists).
The version of software in the audio system
may not be compatible with the generation of
your Apple
®
player.
®
player.
®
* In certain cases, play of the audio files must
be initiated from the keypad.
** If the telephone supports the function. The
audio quality depends on the quality of
transmission by the telephone.
160
Audio and Telematics
The CD player can play files with .mp3, .wma,
.wav and .aac file extensions, with a bit rate of
of 32 to 320 Kbps.
It also supports TAG mode (ID3 tag, WMA TAG).
Other file types (mp4, ...) may be played.
Files of the ".wma" type should be to the
wma9 standard.
The sampling rates supported are 11, 22, 44
and 48 KHz.
Via the USB port, the system can play audio
files with the extension ".mp3, .wma, .wav, .cbr,
.vbr" with a bit rate of 32 to 320 Kbps.
No other file types (.mp4, ...) can be played.
Files of the ".wma" type should be to the
wma9 standard.
The sampling rates supported are 11, 22, 44
and 48 KHz.
File names should have less than
20 characters, avoiding special characters
(e.g.: " ? ; ù) so as to avoid any reading or
display problems.
In order to be able to play a recorded CDR or
CDRW, the ISO 9660 level 1. 2 or Joliet file
format is recommended when recording.
If the disc is recorded in another format, it may
not be played correctly.
It is recommended that the same recording
format is always used for an individual disc,
with as low a speed as possible (4x maximum)
for optimum sound quality.
In the particular case of a multi-session CD, the
Joliet format is recommended.
Information and advice
To protect the system, do not use a USB hub.
It is recommended that you use
genuine Apple
®
USB cables for correct
®
USB cables for correct
®
operation.
Use only USB memory sticks formatted
FAT32 (File Allocation Table).
161
.
Audio and Telematics
Transversal-Citroen_en_Chap03_RD6_ed01-2016
Telephone
Pairing a Bluetooth
®
Pairing a Bluetooth
®
Pairing a Bluetooth
telephone
®
telephone
®
As a safety measure and because it
requires the sustained attention of the
driver, the pairing of your a Bluetooth
telephone to the Bluetooth hands-free
audio system must only be carried
out with the vehicle stationary and the
ignition on
The services available depend on
the network, the SIM card and the
compatibility of the Bluetooth telephone
used.
Refer to the instructions for your
telephone and to your service provider
for the services available to you.
Activate the telephone's Bluetooth
function and ensure that it is "visible to
all" (telephone configuration).
Go to the Brand's website for more
information (compatibility, more
help, ...).
* If your telephone is fully compatible.
The "
Telephone
" menu gives access to the
following functions in particular: "
Directory
" * ,
"
Calls list
", "
View paired devices
".
Depending on the type of telephone, you may
be asked to accept or confirm access by the
system to each of these functions.
If pairing fails, the number of attempts is not
restricted.
A message appears in the screen confirming
the pairing.
Procedure from the telephone
Completing the pairing
Procedure from the system
Select the name of the system in the
list of devices detected.
To complete the pairing, whichever
procedure is used (from the telephone
or from the system), check that the
code displayed in the system and the
telephone is the same and confirm.
Press the
MENU
button.
Select the "
Connections
" menu.
Confirm with
OK
.
A window is displayed with a search in progress
message.
In the list of devices detected, select a
telephone to pair. Only one telephone can be
paired at a time.
Confirm with
OK
.
Select "
Search for a Bluetooth
device
".
Information and advice
162
Audio and Telematics
Confirm with
OK
.
Confirm with
OK
.
Confirm with
OK
.
Confirm with
OK
.
The telephone connection
automatically includes hands-free
operation and audio streaming.
The ability of the system to connect
to just one profile depends on the
telephone. Both profiles may connect
by default.
A number indicates the profile of the
connection with the system:
- 1 for media or 1 for telephone.
- 2 for media and telephone.
When you delete a pairing in the
system, remember to delete it from your
telephone as well.
Indicates that a device is connected.
Indicates the audio streaming profile.
Indicates the hands-free telephone
profile.
Press the
MENU
button.
Managing connections
Select "
Connections
".
Select "
Connections management
"
and confirm. The list of paired
devices is displayed.
Select a telephone.
Then select and confirm:
- "
Connect telephone
" /
"
Disconnect telephone
":
to connect / disconnect the
telephone or the hands-free kit
only.
- "
Connect media player
" /
"
Disconnect media player
":
to connect / disconnect
streaming only.
- "
Connect telephone +
media player
" / "
Disconnect
telephone + media player
":
to connect / disconnect the
telephone (hands-free kit and
streaming).
- "
Delete connection
": to delete
the pairing.
163
.
Audio and Telematics
Transversal-Citroen_en_Chap03_RD6_ed01-2016
Receiving a call
An incoming call is announced by a ring and a
superimposed display in the screen.
Select the "
YES
Select the " YES Select the "
" tab in the screen
using the buttons.
Confirm with
OK
.
Confirm with
OK
.
Press this button at the steering
mounted controls to accept the call.
Making a call
In the "
Telephone
" menu.
Select "
Call
".
Select "
Calls list
".
Select "
Dial
".
Or
Or
Select "
Directory
".
Press this button for more than
two seconds for access to your
directory, then navigate using the
thumb wheel.
In the "
Telephone
" menu.
Select "
End call
".
Ending a call
During a call, press one of the
buttons for more than 2 seconds.
Confirm with
OK
to end the call.
The system accesses the telephone's
contacts directory, depending on its
compatibility, and while it is connected
by Bluetooth
With certain telephones connected by
Bluetooth, you can send a contact to
the directory of the audio system.
Contacts imported in this way are
saved in a permanent directory
visible to all, whatever the telephone
connected.
The menu for the directory is not
accessible if it is empty.
164
Audio and Telematics
During a call, press
OK
to display the
contextual menu.
In the contextual menu, select "
End
call
" to end the call.
Managing calls
Hang up
(so that the caller cannot hear)
In the contextual menu:
- select "
Micro OFF
" to switch off
the microphone.
- deselect "
Micro OFF
" to switch
the microphone on.
In the contextual menu:
- select "
Telephone mode
" to
transfer the call to the telephone
(for example, to leave the vehicle
while continuing a conversation).
- deselect "
Telephone mode
" to
transfer the call to the vehicle.
Microphone off
Telephone mode
If the contact has been cut off, when you
reconnect on returning to the vehicle,
the Bluetooth connection will be restored
automatically and sound returned to the
system (depending on the compatibility of the
telephone).
In some cases telephone mode must be
activated from the telephone.
From the contextual menu, select
"
DTMF tones
" and confirm to use
the digital keypad to navigate in the
interactive voice response menu.
From the contextual menu, select
"
Switch
" and confirm to return to a
call left on hold.
Interactive voice response
Dual call
Confirm with
OK
.
Confirm with
OK
.
Confirm with
OK
.
Confirm with
OK
.
Confirm with
OK
.
165
.
Audio and Telematics
Transversal-Citroen_en_Chap03_RD6_ed01-2016
To modify the contacts saved in the
system, press
MENU
then select
"
Telephone
" and confirm.
Select "
Directory management
"
and confirm.
You can:
- "
Consult an entry
",
- "
Delete an entry
",
- "
Delete all entries
".
Make a long press on
SRC/TEL
.
The system accesses the telephone's
contacts directory, depending on
its compatibility, and while it is
connected by Bluetooth.
With certain telephones connected
by Bluetooth you can send a contact
to the directory of the audio system.
Contacts imported in this way are
saved in a permanent directory
visible to all, whatever the telephone
connected.
The menu for the directory is not
accessible if it is empty.
Select "
Directory
" to see the list of
contacts.
Directory
Confirm with
OK
.
OR
Voice recognition
This function allows you to use your
smartphone's voice recognition via the system.
To start voice recognition, depending on the
type of steering mounted controls:
Make a long press on the end of the lighting
control stalk.
Press this button.
Voice recognition requires the use of a
compatible smartphone first connected
to the vehicle by Bluetooth.

166
Audio and Telematics
The table below gives answers to the most frequently asked questions on your audio system.
QUESTION
ANSWER
SOLUTION
With the engine off, the
audio system switches off
after a few minutes of use.
When the engine is switched off, the audio system operating time
depends on the state of charge of the battery.
The switch-off is normal: the audio equipment switches to economy
mode and switches off to prevent discharging of the vehicle's
battery.
Start the vehicle's engine to increase the battery
charge.
The message "the audio
system is overheated"
appears on the display.
In order to protect the installation if the surrounding temperature
is too high, the audio system switches to an automatic thermal
protection mode leading to a reduction in volume or CD play
stopping.
Switch the audio system off for a few minutes to
allow the system to cool.
Frequently asked questions
QUESTION
ANSWER
SOLUTION
There is a difference in
sound quality between the
different audio sources
(radio, CD...).
For optimum sound quality, the audio settings (Volume, Bass,
Treble, Ambience and Loudness) can be adapted to the different
sound sources, which may result in audible differences when
changing source (radio, CD...).
Check that the audio settings (Volume, Bass,
Treble, Ambience and Loudness) are adapted to
the sources listened to. It is advisable to set the
audio functions (Bass, Treble, Front-Rear Balance
and Left-Right Balance) to the middle position,
select the musical ambience "None" and set the
loudness correction to the "Active" position in CD
mode or to the "Inactive" position in radio mode.
Radio
167
.
Audio and Telematics
Transversal-Citroen_en_Chap03_RD6_ed01-2016
QUESTION
ANSWER
SOLUTION
The preset stations do
not function (no sound,
87.5 Mhz is displayed...).
An incorrect waveband is selected.
Press the BAND button to return to the waveband
(FM, FM2, DAB, AM) on which the stations are
preset.
The traffic announcement
(TA) is displayed. I do
not receive any traffic
information.
The radio station is not part of the regional traffic information
network.
Tune to a radio station which broadcasts traffic
information.
The quality of reception of
the radio station listened
to gradually deteriorates
or the stored stations do
not function (no sound,
87.5 Mhz is displayed...).
The vehicle is too far from the transmitter used by the station
listened to or there is no transmitter in the geographical area
through which the vehicle is travelling.
Activate the RDS function to enable the system
to check whether there is a more powerful
transmitter in the geographical area.
The environment (hills, buildings, tunnels, underground car parks...) block
reception, including in RDS mode.
This phenomenon is normal and does not indicate
a fault in the audio system.
The aerial is absent or has been damaged (for example when going
through an automatic car wash or into an underground car park).
Have the aerial checked by a franchised dealer.
Sound cut-outs of 1 to
2 seconds in radio mode.
During this brief sound cut-out, the RDS searches for another
frequency giving better reception of the station.
Deactivate the RDS function if the phenomenon is
too frequent and always on the same route.

168
Audio and Telematics
Media
QUESTION
ANSWER
SOLUTION
The Bluetooth connection
is broken.
The state of charge of the device may be too low.
Charge the battery of the portable device.
The message "USB device
error" is displayed in the
screen.
The USB memory stick is not recognised.
The USB memory stick may be corrupt.
Reformat the USB memory stick.
The CD is ejected every
time or is not played.
The CD is upside down, cannot be read, does not contain audio
files or contains audio files of a format not recognised by the audio
system.
The CD is protected by an anti-pirating system not recognised by
the audio system.
- Check that the CD is inserted in the player the
right way up.
- Check the condition of the CD: the CD cannot
be played if it is too damaged.
- Check the content in the case of a recorded
CD: consult the advice in the "Audio" section.
- Due to their quality level, certain writeable
CDs will not be played by the audio system.
The sound from the CD is
poor.
The CD used is scratched or of poor quality.
Insert a good quality CD and store them in
suitable conditions.
The audio settings (base, treble, ambience) are unsuitable.
Return bass and treble settings to 0, without
selecting an ambience.
I am unable to play
the music files on my
smartphone via the USB
port.
Depending on the smartphone, access by the audio system to music
on the smartphone may have to be approved on the latter.
Manual activate the MTP profile on the
smartphone (USB settings menu).
169
.
Audio and Telematics
Transversal-Citroen_en_Chap03_RD6_ed01-2016
QUESTION
ANSWER
SOLUTION
I am unable to access my
voicemail.
Few telephones or service providers allow the use of this function.
Call your voicemail box, via the telephone menu,
using the number supplied by your service
provider.
I am unable to access my
directory of contacts.
Check the compatibility of your telephone.
You did not give access to your contacts when pairing the telephone.
Accept or confirm access by the system to the
contacts on your telephone.
I am unable to continue a
conversation when getting
into my vehicle.
Telephone mode is activated.
Deselect telephone mode to transfer the call to
the vehicle.
I am unable to pair my
telephone by Bluetooth.
Telephones (models, versions of operating systems) have their own
specific aspects in the pairing procedure and some telephones are
not compatible.
Before starting the pairing procedure, delete the
pairing of the telephone from the system AND of
the system from the telephone, so as to see the
compatibility of the telephones.
Telephone
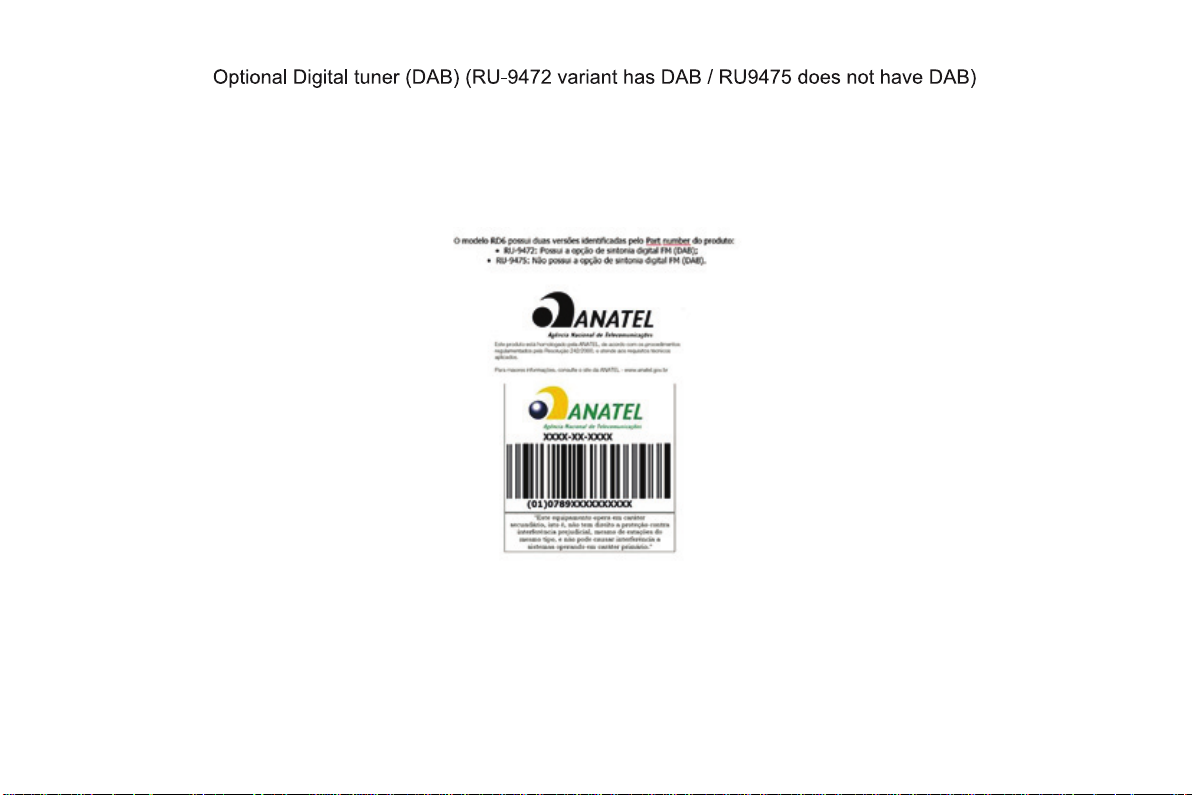


05-16
I 06-16
Transversal-Citroen_en_Chap04_fi n
4Dconcept
Diadeis
Interak
Transversal-Citroen_en_Chap04_fi n
16SYSCC040
Anglais
*16SYSCC040*