
USER GUIDE
NZ AU
FRONT LOADER
WASHING MACHINE
WH8060J5 & WH9060J5 models


3
CONTENTS
Safety and warnings 4
Get to know your washer 7
Control panel 8
First use 9
Add detergent or softener 10
Sort your items 11
Understand fibre types 12
Load the washer 13
Select a fibre type 14
Select an item type 15
Select a treatment 16
Select a colour 17
Select a soil level 18
Select a dispensing option 19
Set the cycle 20
Customise cycle settings 21
Save favourite cycles 22
Set delay start 23
Wash options 24
Change cold wash default 25
Adjust Auto Dose amount 26
Wash temperatures and spin treatments 27
Choose a detergent 28
Wi-Fi connection and Remote Mode 29
Clean and maintain your appliance 31
Clean the dispenser drawer 32
Run the Drum Clean cycle 33
Unlock the door 34
Clean the pump filter 35
Troubleshooting 37
Faults and alerts 40
Compliance information 41
Manufacturer’s Warranty and Service Guide 42

4
SAFETY AND WARNINGS
WARNING!
Electric Shock Hazard
Failure to follow this advice may result in
electric shock or death.
• If you are using an extension cord or a portable
electrical outlet device (e.g. multi-socket outlet
box), ensure that it is positioned so that it does
not come into contact with water or moisture.
READ AND SAVE THIS GUIDE
WARNING!
Read Safety Guide. Failure to follow all guides and rules could cause personal injury or
property damage. Use this appliance only for the intended purpose as described in the
user guide and installation guide of this appliance. When using this appliance, always
exercise basic safety precautions including the following:
General
z
This product has been designed for personal, family or household use. This product is
not designed for any commercial use.
z
Do not touch or operate the appliance with wet hands or with bare feet.
z
A damaged power cord must be replaced by a Fisher & Paykel trained and supported
service technician or similarly qualified person in order to avoid a hazard. Do not use
the machine until it has been repaired to avoid a risk of electric shock.
z
Do not operate this appliance if it has been damaged during transport. Contact your
Fisher & Paykel dealer or Fisher & Paykel trained and supported service technician.
z
This appliance is not intended for use by persons (including children) with reduced
physical, sensory or mental capabilities, or lack of experience and knowledge,unless
they are supervised or given instructions on how to use the applianceby someone
responsible for their safety.
z
Keep children away from the washing machine while it is in operation.
z
Supervise children to ensure they do not play with the appliance or climb inside
thedrum.
z
Do not swing on or put weight on the door.
z
Check and remove all objects from pockets, e.g. lighters and matches.
z
The washing machine should only be used for washing and rinsing of textiles where this
isindicated on the care label.
z
Do not add petrol, dry-cleaning solvents, or other flammable or explosive substances to
the wash water. These substances give off vapours that could ignite or explode.
z
Do not wash articles that have been previously cleaned in, washed in, soaked in,
or spotted with gasoline, dry-cleaning solvents, or other flammable or explosive
substances as they give off vapours that could ignite or explode.
z
The door will be locked from the start of the cycle until the cycle is complete for safety
reasons. It is possible to open the door during the cycle under certain conditions. Never
force the door open.
z
Do not touch the door during a cycle as the door can become hot.

5
SAFETY AND WARNINGS
z
Keep children away from the washing machine.
z
Do not open the detergent dispenser during the cycle as hot water may come outofit.
z
Read and follow the detergent manufacturer’s instructions carefully. Instructions on
how to use the detergent will be clearly indicated on the pack. Remember to store your
detergents out of the reach of children.
z
Do not wash an electric blanket in your washing machine unless the care label
specifically states it is safe to do so.
z
Do not wash curtains in this washing machine, as sunlight makes them brittle and they
may disintegrate during washing.
z
Do not put dripping wet clothes on top of the washer as this could create an
electrical hazard.
z
The only user-removable parts of the washing machine are the inlet hose(s), dispenser
drawer and pump filters. No other parts are designed to be removed by anyone other
than a Fisher&Paykel trained and supported service technician.
z
Do not overload your washing machine beyond its rated capacity.
MODEL CODE MAXIMUM CAPACITY* (KG)
WH8060J5; WH9060J5 8kg; 9kg
*Capacity refers to the maximum dry weight of items the washing machine can wash at any one time
Installation
z
Install the appliance on a solid and level floor surface. Ensure it has at least 12mm
clearance on each side and at the top, and at least 30mm clearance at the rear.
z
The appliance must not be installed on any textured floor coverings (e.g. carpet, rugs).
z
This appliance can be installed on a compatible Fisher & Paykel plinth. To ensure
stability, the plinth must be fitted correctly with the appliance. For installation
instructions and compatible plinth models, refer to your installation guide.
z
Do not install or operate this appliance on any other plinth or structure.
z
Ensure the installation provides accessibility to the plug or incorporate a switch in the
fixed wiring in accordance with the wiring rules to allow disconnection of the appliance
from the supply after installation.
z
Do not attempt to lift appliance on your own as this could cause harm or injury. Always
lift appliance with at least two people.
z
Ensure any transit bolts have been removed before operating appliance.
Water supply requirements:
z
Inlet water pressure: Max. 1MPa (145psi), Min. 50kPa (7.3psi)
z
Inlet water flow rate: Min. 6litres/minute
z
A pressure-reducing valve must be installed if pressure is higher than 1MPa.
z
For optimum wash performance check the supply pressure is within the
recommendedrange.
z
New hose sets provided should be used to connect the appliance to the water mains. Old
hose sets should not be re-used.
z
We recommend the inlet hose(s) are changed every 5 years. WARNING: Failure to do
so may result in a flood and damage to property.
z
The hot water temperature should not exceed 65°C and the cold water temperature
should not exceed35°C. Temperatures above these may cause the appliance to fault or
cause damage to it.

6
SAFETY AND WARNINGS
Disposal
z
When disposing of this appliance, the door should be removed to avoid children getting
trapped inside, and that the electrical cable is cut off close to the cabinet.
For more detailed information and comprehensive user and installation instructions,
download the user and installation guides via www.fisherpaykel.com
7
GET TO KNOW YOUR WASHER
Get the app for a smarter experience
z
Access extra features and information
z
Track and run cycles from your phone
z
Customise your favourite cycles
z
Get the latest software updates
z
Register your product for streamlined support
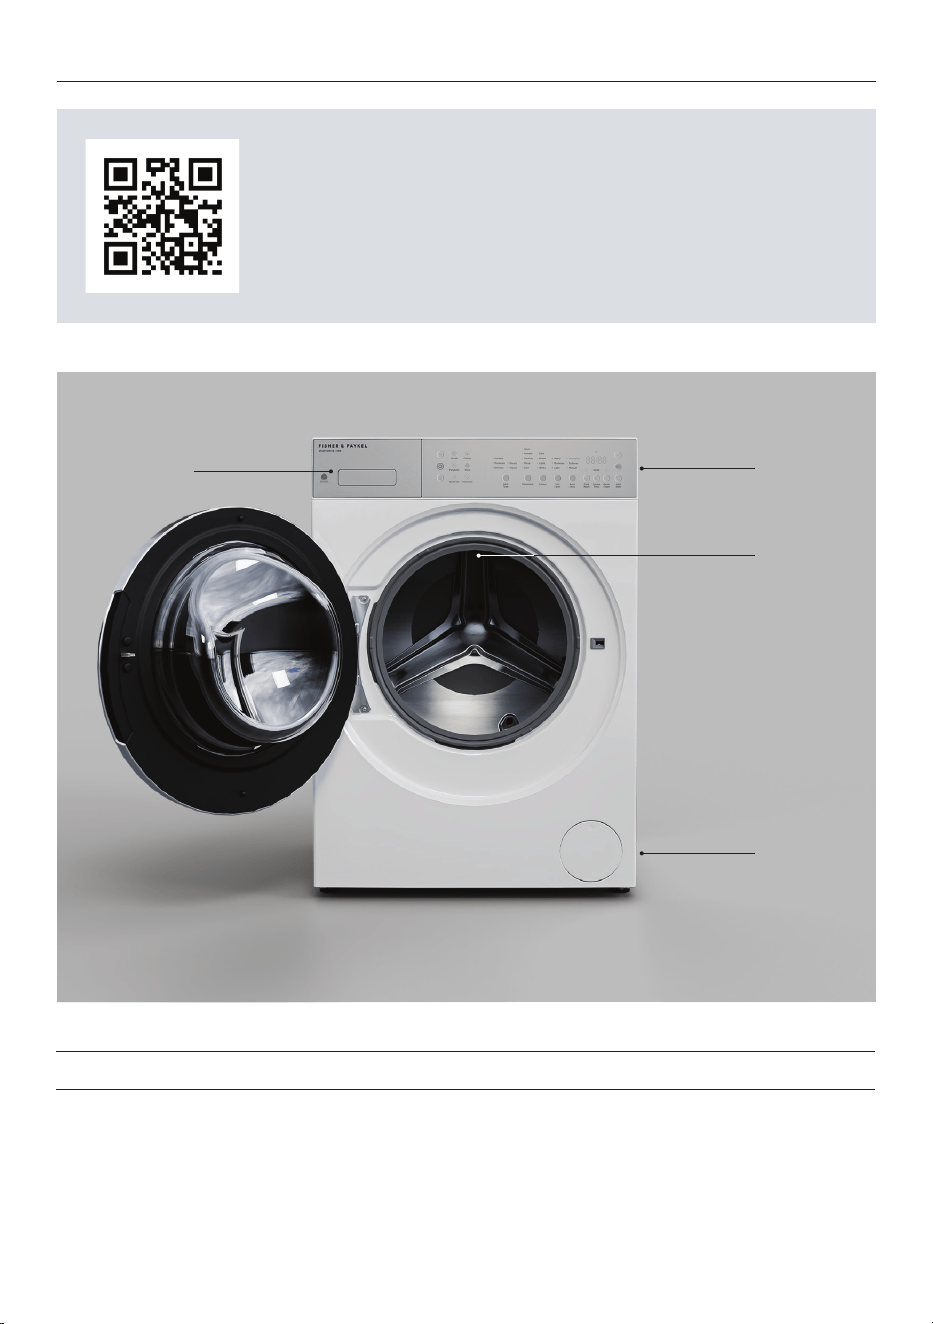
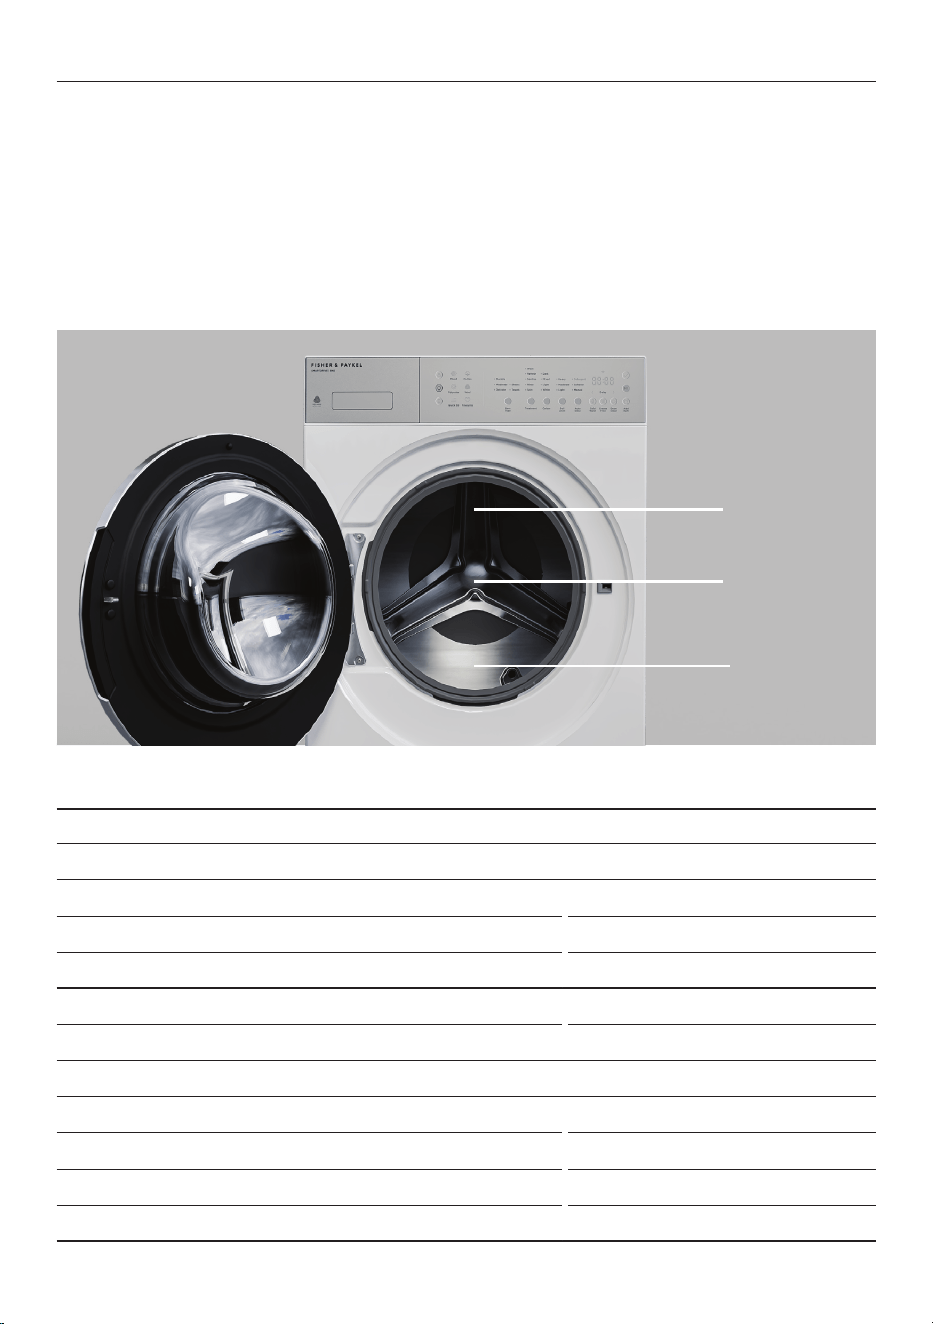
FEATURES AND ACCESSORIES
1
Detergent/Softener dispenser drawer
2
Control panel
3
Drum light (inside drum)
4
Pump filter
2
4
1
3
8
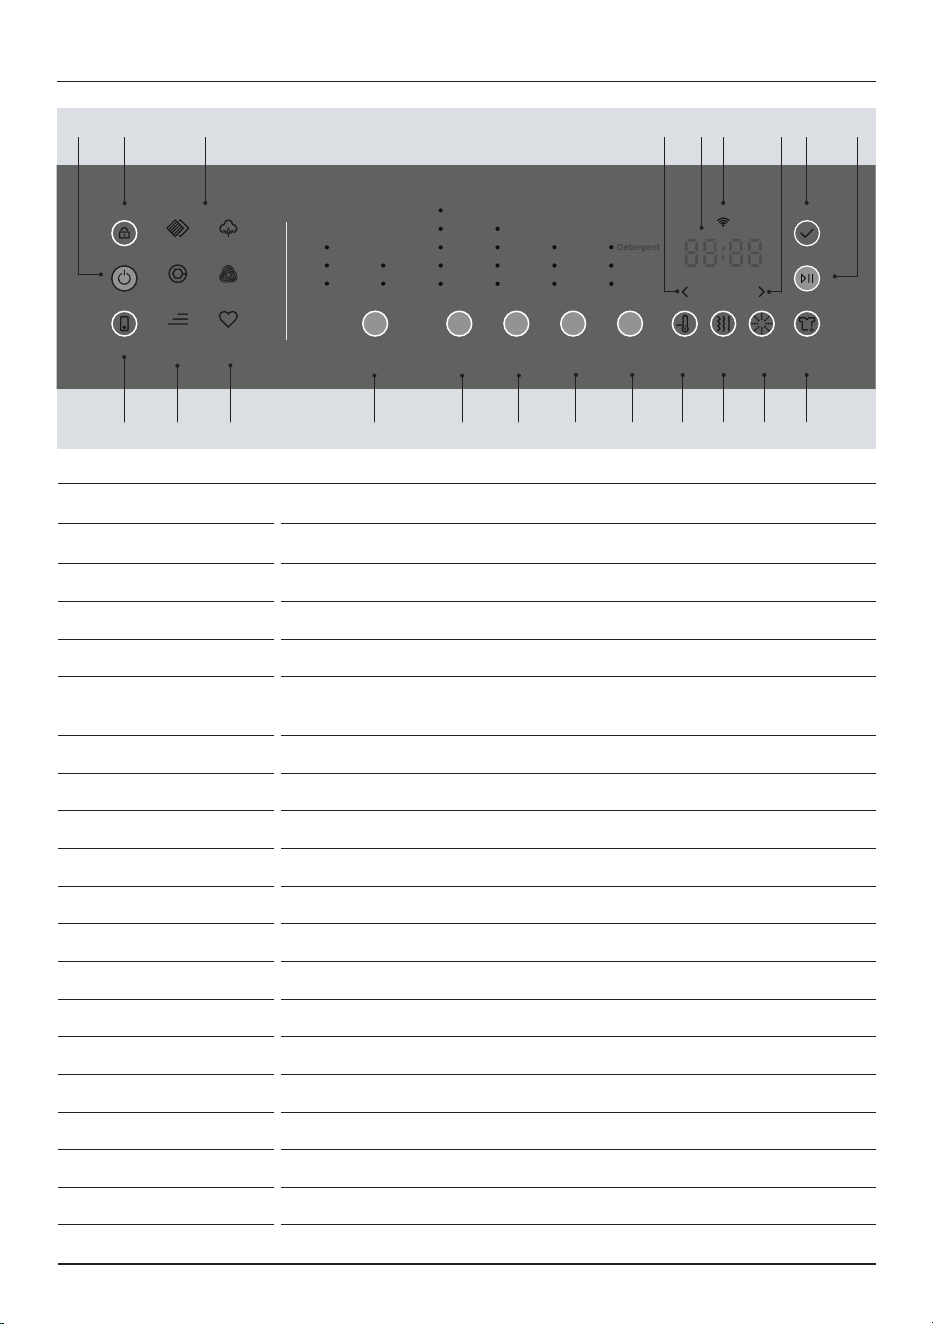
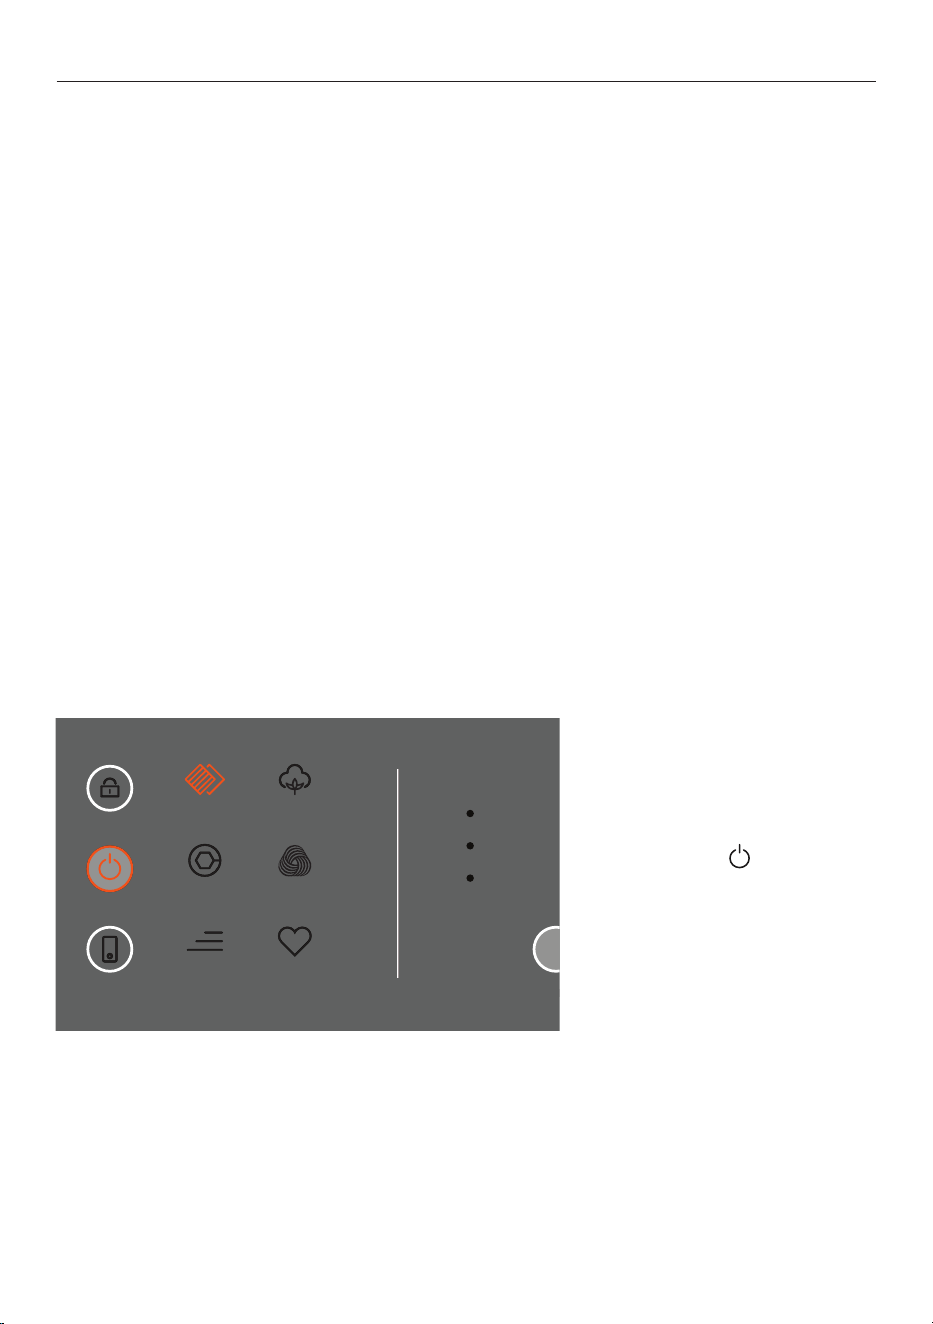
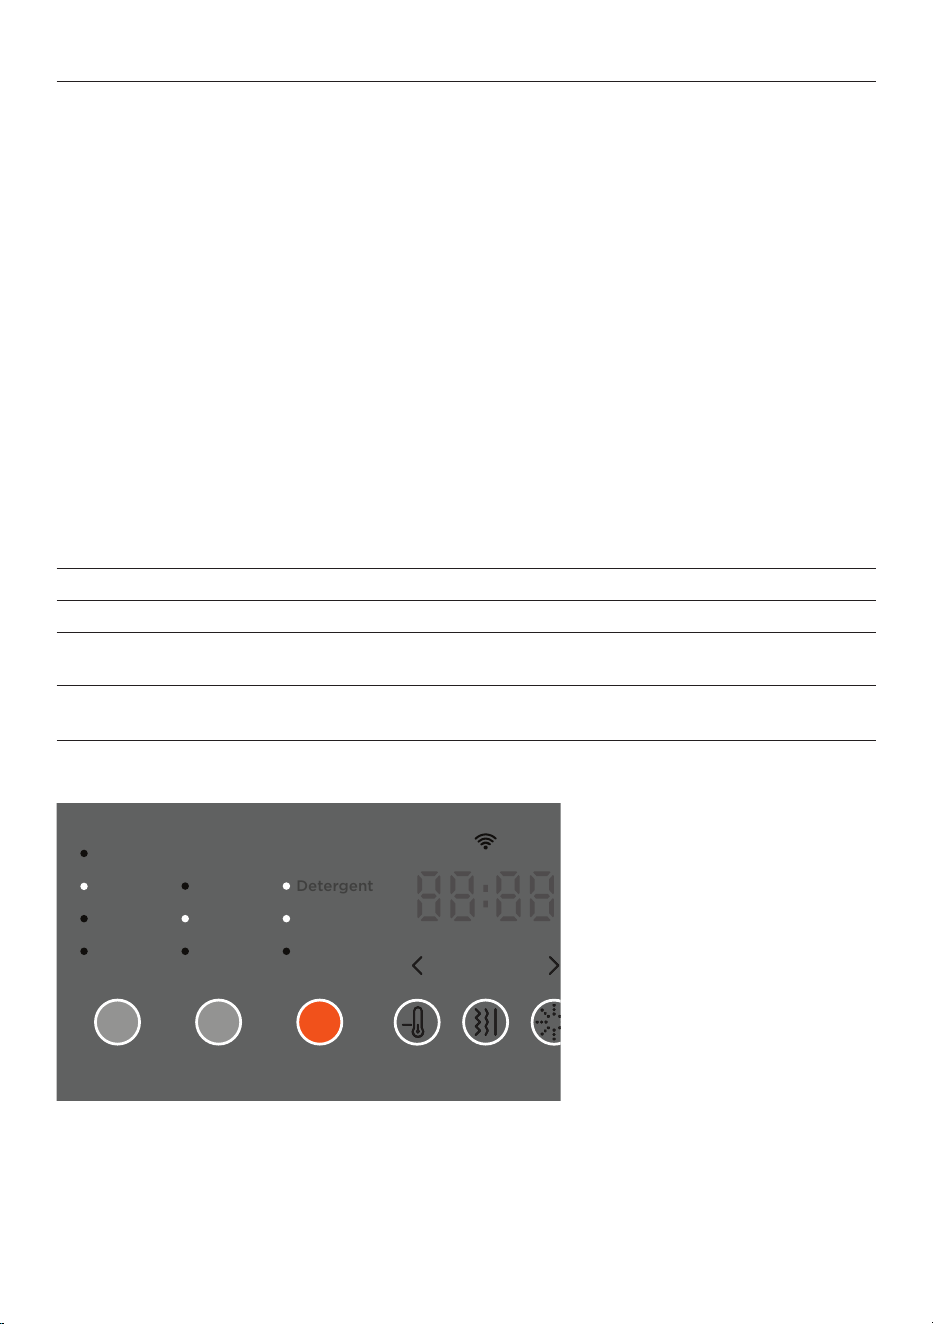
CONTROL PANEL
1 Power Press and hold to turn the washer ON/OFF.
2 Key lock Press and hold to lock controls to prevent accidental use.
3 Remote Press to connect appliance to your mobile device and operate it via the app.
4 Fibre Types Press to select a fibre type.
5 Quick 30 Press to run a 30-minute wash cycle for mixed items.
6 Favourite Press to run a saved Favourite cycle. Set as QUICK 15 cycle by default. See ‘Save
Favourite cycles’ for how to set a new Favourite.
7 Item Type selector Press to select an item type.
8 Treatment selector Press to select a treatment.
9 Colour selector Press to select a colour.
!0 Soil Level selector Press to select a soil level.
!1 Auto Dose selector Press to select an Auto Dose option.
!2 Time display Displays cycle duration and messages.
!3 Delay adjust Press to increase or decrease time delay.
!4 Wi-Fi Indicates when appliance is connected to Wi-Fi.
!5 Cold Wash Press to turn Cold Wash ON/OFF.
!6 Crease Free Press to turn Crease Free ON/OFF.
!7 Drum Clean Press to select Drum Clean cycle.
!8 Add Item Press to pause the cycle and add an item.
!9 Confirm Press to confirm settings.
@0 Start/Pause
Press to start or pause a cycle.
Mixed Cotton
Polyester
Wool
Quick 30
Favourite
Moderate
Durable
Delicate
Refresh
Wash
Spin
Sanitise
Rinse
Detergent
Softener
Manual
Heavy
Moderate
Light
Mixed
Light
White
Dark
Towels
Sheets
Item
Type
Add
Item
Soil
Level
Auto
Dose
Cold
Wash
Drum
Clean
Crease
Free
Delay
Treatment Colour
Mixed Cotton
Polyester
Wool
Quick 30
Favourite
Moderate
Durable
Delicate
Refresh
Wash
Spin
Sanitise
Rinse
Detergent
Softener
Manual
Heavy
Moderate
Light
Mixed
Light
White
Dark
Towels
Sheets
Item
Type
Add
Item
Soil
Level
Auto
Dose
Cold
Wash
Drum
Clean
Crease
Free
Delay
Treatment Colour
2 4
53 6 7 8 9
1
!3 !3!4!2 !9 @0
!5!0 !1 !6 !7 !8
9
FIRST USE
Before you wash your first load, we recommend running a QUICK 15 cycle. This will prime
the Auto Dose detergent dispenser and enable you to check that the hoses are connected
properly and the washer is sitting level.
2. Press
FAVOURITE to start
a QUICK 15 cycle.
FAVOURITE is set to
QUICK 15 by default. See
‘Save Favourite cycle’ for
information about how to
change this.
Mixed Cotton
Polyester
Wool
Quick 30
Favourite
Moderate
Durable
Delicate
Item
Type
Mixed Cotton
Polyester
Wool
Quick 30
Favourite
Moderate
Durable
Delicate
Item
Type
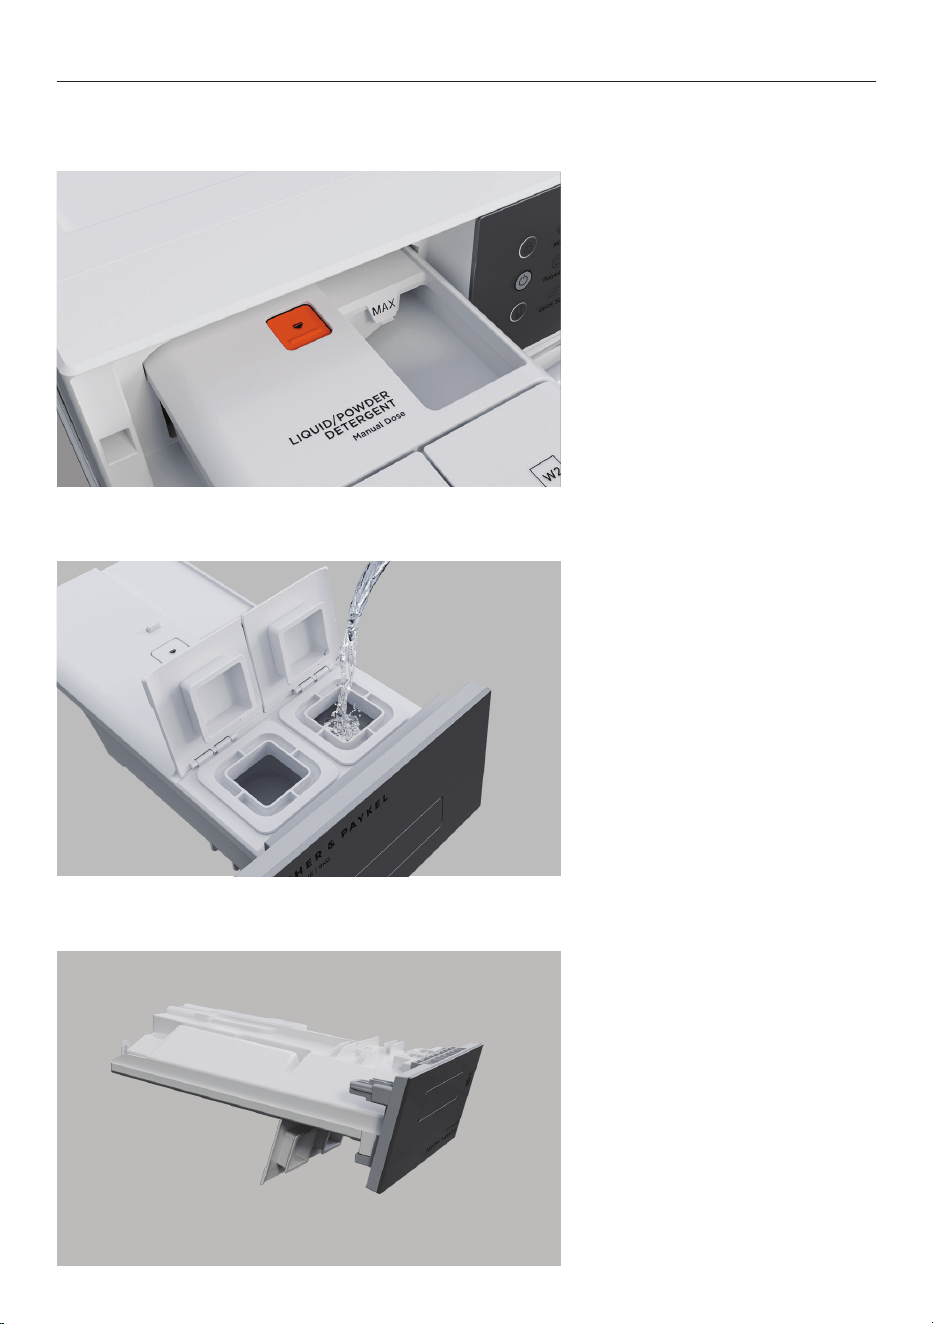
1. Add liquid detergent
to Tank 1.
Skip this step if you are not
using the Liquid Detergent
Auto Dose tank. The manual
dispenser does not need to
be primed.
What to look for
z
If the washer is leaking,
check the hose connections.
z
If the washer is moving
around, adjust the feet to
level it.
See the ‘Installation guide’
for instructions.
10
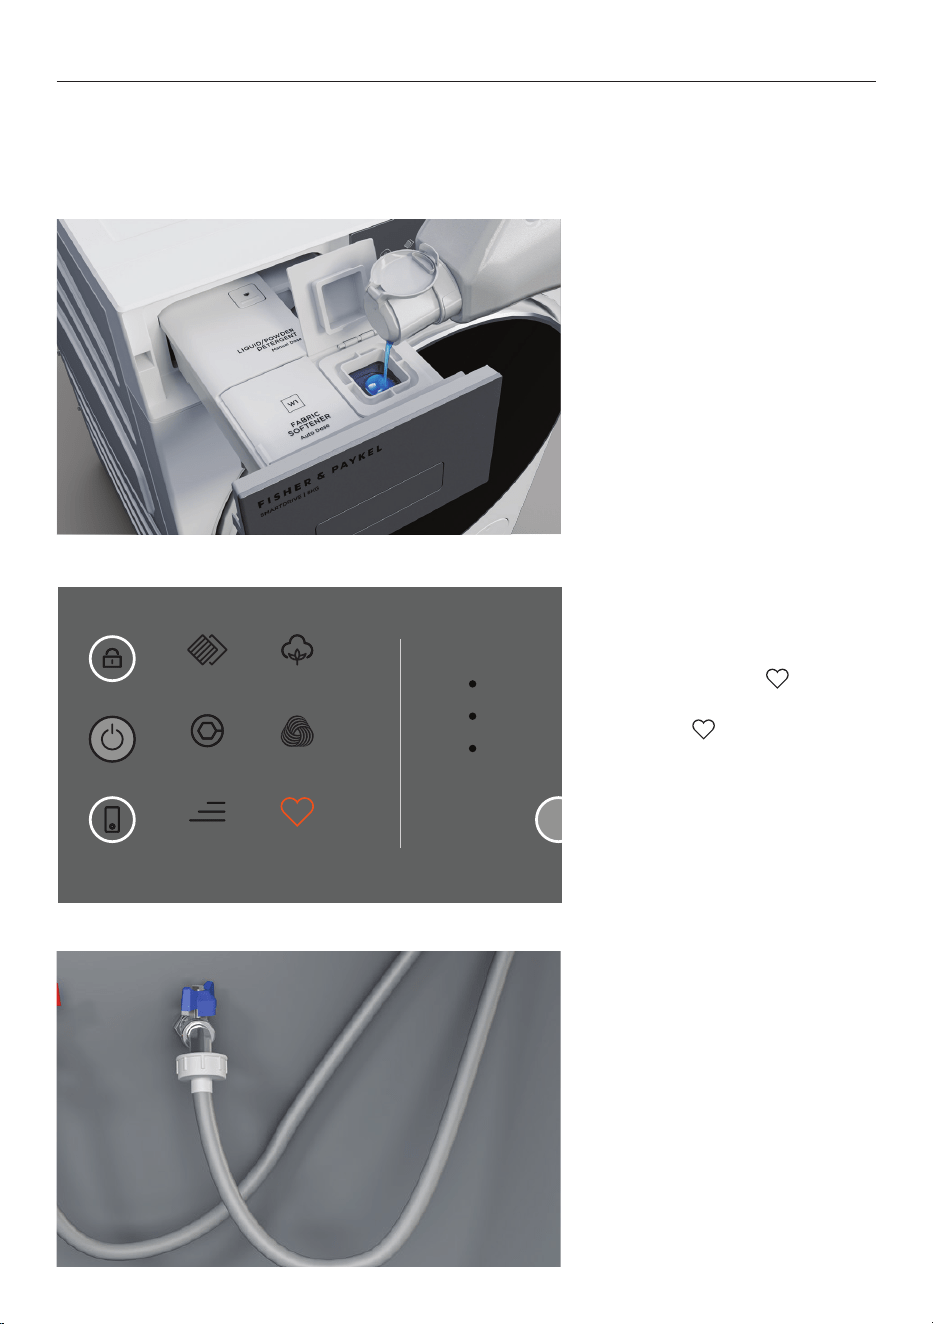
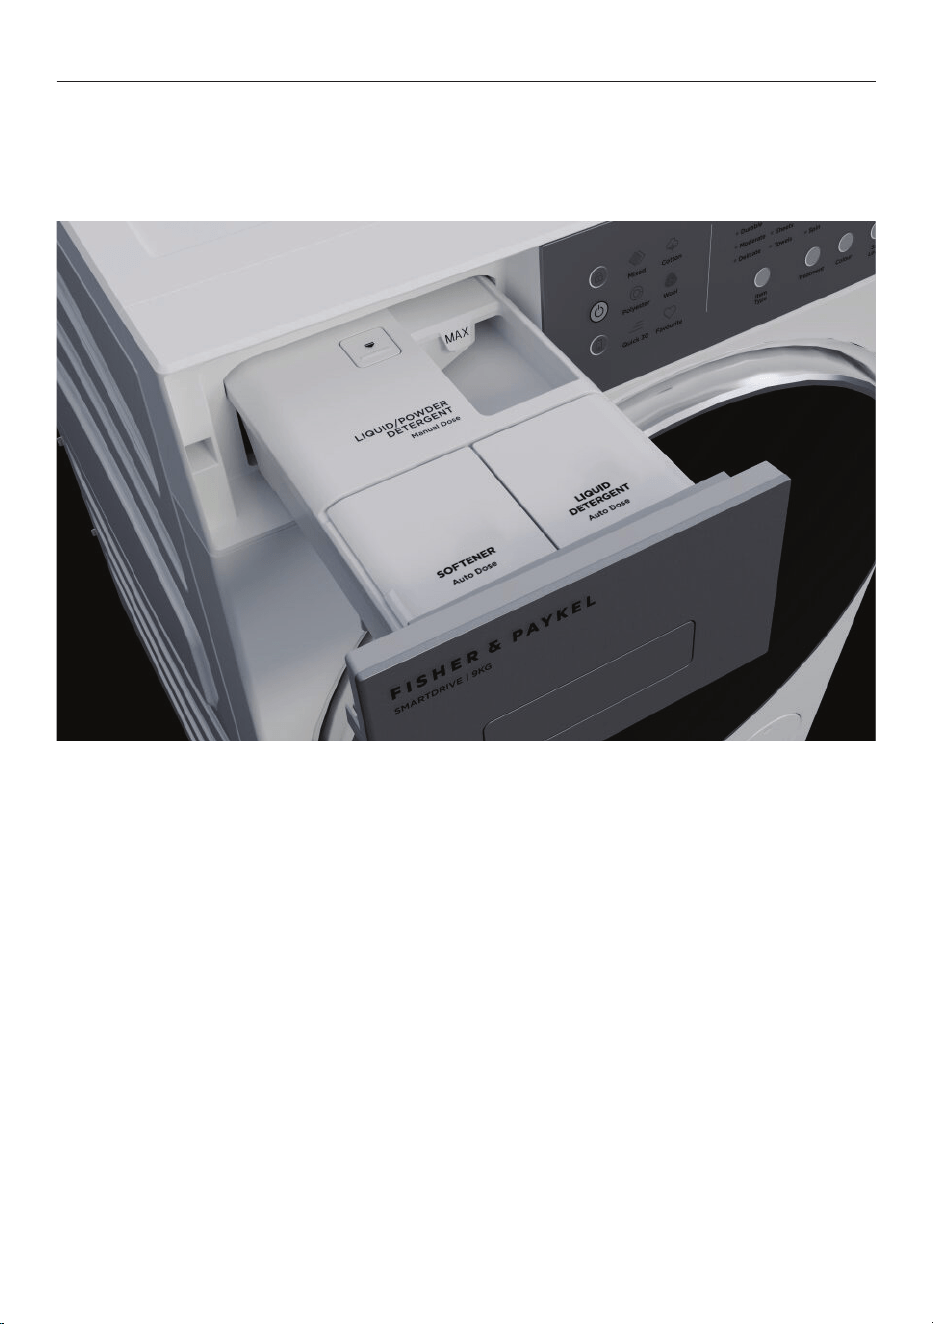
ADD DETERGENT OR SOFTENER
Your washer has three dispenser tanks for automatic and manual dispensing, giving you the
flexibility to use a combination of detergents and softener. See ‘Select a dispensing option’
for how to switch between Auto Dose and Manual dispensing.
Each Auto Dose tank lasts for multiple cycles. When the tanks need to be refilled, the Auto
Dose indicators will flash and
Lo will show on the display.
Manual dose tank
The Manual dose tank dispenses liquid or powder detergent. The dosage is determined by
the amount of detergent you add to the tank, so only add as much detergent to the Manual
tank as you need for that load.
Auto Dose tanks
Auto Dose tanks automatically dispense liquid detergent or fabric softener during a cycle.
The dosage will adjust depending on the fibre, item type and treatment selected, as well
as the load size and soil level. See ‘Adjust Auto Dose amount’ to change default dosage
amounts.
Tank 1 For everyday liquid detergent Tank 2 For softener
11
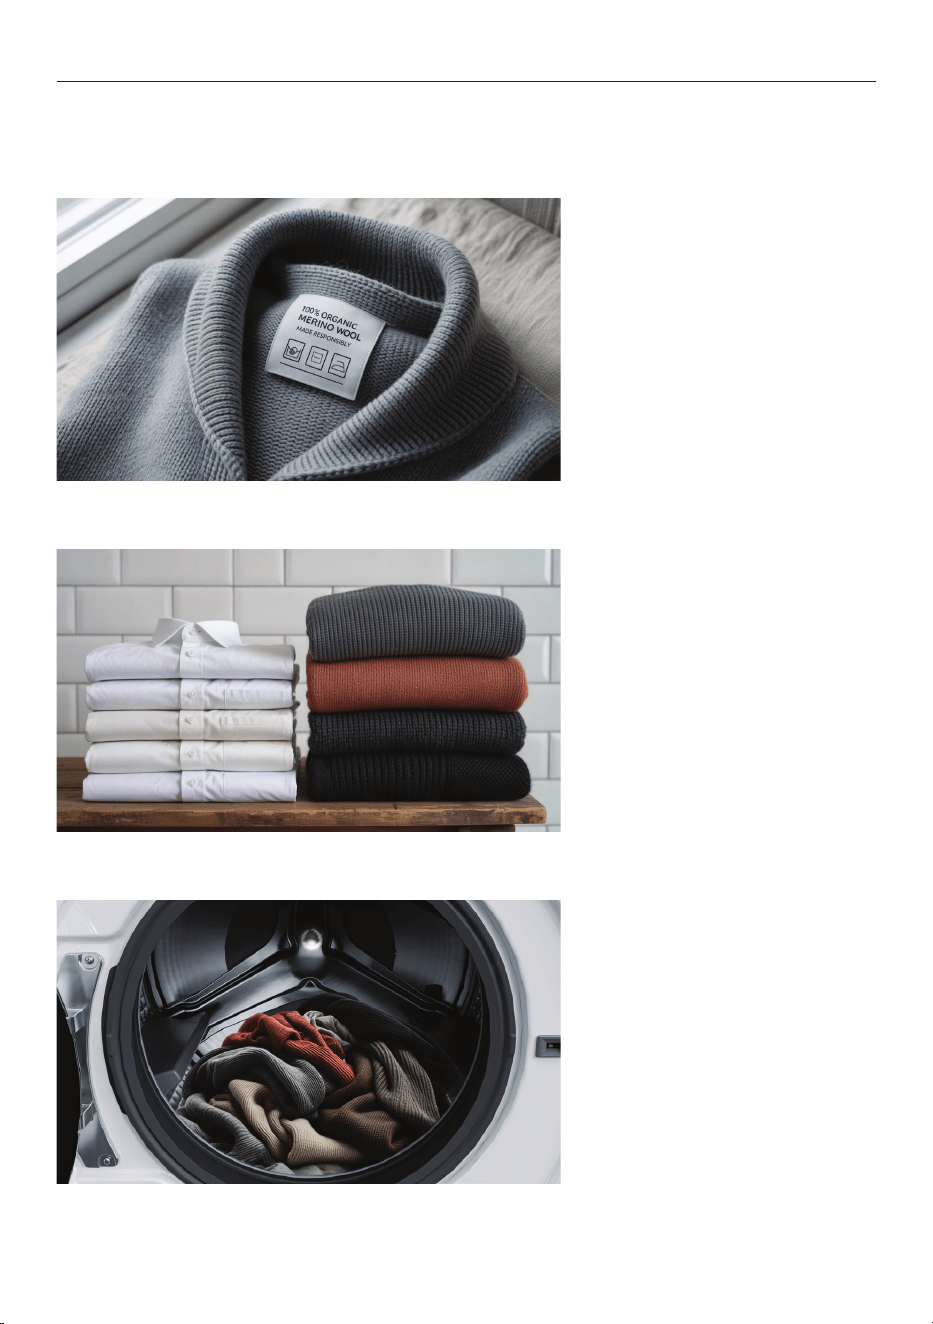
SORT YOUR ITEMS
Sorting your items well is essential for taking care of your clothes and getting the best
results from your appliance. Follow these steps every time you use the washer.
1. Check each care label to
see the fibre composition and
how each garment should
be washed. See ‘Understand
fibre types.’
2. Sort itemsintoloads of
similar fibre, item type and
item colour.
3. Check pockets, close
fasteners and zippers, and
untangle items before loading.
Use a small washbag for
delicate items, and be careful
not to overfill it.

12
UNDERSTAND FIBRE TYPES
Every cycle starts with fibre type
Each fibre type responds differently to washing and drying. This appliance uses a fibre-led
system and precision sensing to wash your items, so selecting the right fibre type for each
load is key to setting the best cycle each time.
Treat for the most delicate fibre
Items may be a blend of multiple fibres — some more delicate than others. The care label
on an item will tell you what fibre or fibres the item is made of and how to care for it.
Select the fibre type on your washer that applies to the most sensitive or delicate fibre in
the blend, even if it is only a small percentage.
Identify delicate fibres
This table helps identify the most delicate or sensitive fibres commonly found on
care labels. It also offers alternative cycle suggestions for most specialist fibres.
Recommendations may not suit all items — always check your care label first.
For best results, use a detergent designed for the most delicate fibre. See ‘Choose a
detergent’ for more information.
SENSITIVITY COMMON FIBRES FIBRE TYPE ITEM TYPE
High Cashmere
Not suited for machine washing
in this model.
Down
Silk
Wool, Merino Wool
Elastane, Lycra Polyester
Delicate
Viscose, Bamboo, Rayon, Modal
Cotton
Lyocell, Tencel™
Acrylic Polyester
Linen
Cotton
Ramie
Nylon, Polyamide Polyester
Polyester Polyester, Mixed
Low Cotton Cotton, Mixed
13
LOAD THE WASHER
Your washer performs best when it has the right sized load for the item types. After sorting
your load, place items carefully in the washer to ensure the load is balanced.
Always wash small, delicate items in a wash bag, and wash large items on their own.
Maximum load size
The maximum load size changes based on the type of items in a load. Follow the guide
below to avoid overfilling the appliance and maintain good wash performance.
ITEM TYPES MAX LOAD SIZE
Mixed, Cotton, Polyester
Delicate
Small
Moderate, Durable
Large
Sheets, Towels
Large
Wool
Delicate (Woolmark)
Small
Other Treatments
Favourite - Quick 15
Small
Quick 30
Medium
Refresh
1 or 2 Items
Sanitise
As per fibre/item type
Large
Medium
Small
14
SELECT A FIBRE TYPE
Select the specific fibre type that matches the load or choose the fibre type that applies to
the most delicate fibre. The wash cycle will adjust to suit. See ‘Understanding fibre types’ if
you are not sure which fibre type to select for your load.
Mixed
For everyday loads with a mixture of fibres and for cotton-polyester blends.
Cotton
For 100% cotton items, cotton blends and compatible fibre types.
Polyester
For 100% polyester items and compatible fibre types.
Wool
For 100% woollen items and wool blends. This cycle meets the Woolmark requirements for
drying and washing items labelled ‘Machine wash’.
Most woollen handcrafted garments are not made of machine washable wool and we recommend
that you wash them by hand only. Hand-washed woollens may still be spun in your washer, but
ensure they have been well wrung out before placing them in the washer.
Washing underlays and sheepskins is not recommended because they could produce excessive
amounts of lint that may cause pump blockages.
1. Press POWER to turn
the washer on, then select a
fibre type.
Mixed Cotton
Polyester
Wool
Quick 30
Favourite
Moderate
Durable
Delicate
Item
Type
Mixed Cotton
Polyester
Wool
Quick 30
Favourite
Moderate
Durable
Delicate
Item
Type

15
SELECT AN ITEM TYPE
Item Type relates to the durability of items in your load. Wash garments and items of similar
durability together.
Durable
Strong and resilient items like workwear and outerwear.
Moderate
Everyday items like t-shirts, shirts, shorts and pants.
Delicate
Light and easily damaged items like blouses, dresses and other items.
Sheets
Items such as bed sheets, pillow cases and duvet covers.
Towels
High absorbency towelling fabric items like bath, beach and hand towels.
2. Select an item type.
Moderate
Durable
Delicate
Refresh
Wash
Spin
Sanitise
Rinse
Heavy
Moderate
Light
Mixed
Light
White
Dark
Towels
Sheets
Item
Type
Soil
Level
Treatment Colour
Moderate
Durable
Delicate
Refresh
Wash
Spin
Sanitise
Rinse
Heavy
Moderate
Light
Mixed
Light
White
Dark
Towels
Sheets
Item
Type
Soil
Level
Treatment Colour

16
SELECT A TREATMENT
Treatment lets you select from a range of specialised wash treatments to suit your needs.
Wash
A tailored wash, rinse and spin based on fibre and item type selection to remove soils.
Detergent dose, water temperature, wash times, tumble patterns and spin speeds are
optimised based on fibre type, item type and load size to ensure perfect results.
Refresh
Designed to refresh dry items using steam and tumbling to reduce creases and odours. For
best results use this cycle for one or two items at a time. Ideal for items like dress shirts to
refresh before ironing.
Sanitise
An extra hot treatment designed to eliminate bacteria. Ideal for sanitising items that can
handle high temperatures, like tea towels, dishcloths, towels and sheets, but unsuitable for
delicate items.
Rinse
A tailored rinse and spin based on fibre and item selection. Removes detergent and
prepares items for drying.
Spin
A tailored spin based on fibre and item selection. Items are spun at an optimised speed to
remove excess moisture. Ideal for preparing clothes for drying.
3. Select a treatment.
Moderate
Durable
Delicate
Refresh
Wash
Spin
Sanitise
Rinse
Heavy
Moderate
Light
Mixed
Light
White
Dark
Towels
Sheets
Item
Type
Soil
Level
Treatment Colour
Moderate
Durable
Delicate
Refresh
Wash
Spin
Sanitise
Rinse
Heavy
Moderate
Light
Mixed
Light
White
Dark
Towels
Sheets
Item
Type
Soil
Level
Treatment Colour

17
Different colours require different care. Colour selection adjusts the wash temperature
automatically to suit the items in the load.
Dark
Designed to care for dark-coloured items, with a cooler wash to help preserve vibrancy and
prevent fading.
Mixed
Designed to care for loads with a mixture of colours. Ideal for everyday laundry
loads, providing a balanced wash temperature to preserve vibrancy and help prevent
colour transfer.
Light
Designed to care for light-coloured items, with an optimised wash temperature to help
maintain brightness.
White
Designed to care for white items, with an optimised wash temperature to help
maintain whiteness.
SELECT A COLOUR
4. Select a colour.
Moderate
Durable
Delicate
Refresh
Wash
Spin
Sanitise
Rinse
Heavy
Moderate
Light
Mixed
Light
White
Dark
Towels
Sheets
Item
Type
Soil
Level
Treatment Colour
Moderate
Durable
Delicate
Refresh
Wash
Spin
Sanitise
Rinse
Heavy
Moderate
Light
Mixed
Light
White
Dark
Towels
Sheets
Item
Type
Soil
Level
Treatment Colour

18
SELECT A SOIL LEVEL
Soil Level adjusts the wash cycle based on how soiled or stained items are. Select a soil
level to suit the load. The wash time and detergent dose will automatically adjust to suit
your selection.
Heavy
For items with high levels of soiling, using higher detergent dosage and longer wash times.
Moderate
Ideal for everyday laundry loads, providing a balanced wash cycle with optimal detergent
dosage and wash time.
Light
For items with low levels of soiling, reducing detergent dosage and wash time.
5. Select a soil level.
Moderate
Durable
Delicate
Refresh
Wash
Spin
Sanitise
Rinse
Heavy
Moderate
Light
Mixed
Light
White
Dark
Towels
Sheets
Item
Type
Soil
Level
Treatment Colour
Moderate
Durable
Delicate
Refresh
Wash
Spin
Sanitise
Rinse
Heavy
Moderate
Light
Mixed
Light
White
Dark
Towels
Sheets
Item
Type
Soil
Level
Treatment Colour
19
SELECT A DISPENSING OPTION
Refresh
Wash
Sanitise
Detergent
Softener
Manual
Heavy
Moderate
Light
Mixed
Light
White
Dark
Soil
Level
Auto
Dose
Cold
Wash
Drum
Clean
Crease
Free
Delay
Treatment
Colour
Refresh
Wash
Sanitise
Detergent
Softener
Manual
Heavy
Moderate
Light
Mixed
Light
White
Dark
Soil
Level
Auto
Dose
Cold
Wash
Drum
Clean
Crease
Free
Delay
Treatment
Colour
6. Press AUTO DOSE as required
to toggle between the different
dispensing options.
Detergent Everyday liquid detergent in Tank 1.
Detergent and Softener Everyday liquid detergent in Tank 1 and softener in Tank 2.
Manual
Your choice of liquid or powder detergent in the Manual tank, or
a detergent pod added directly to the washer drum.
Manual
and Softener
Your choice of detergent in the Manual tank and softener
in Tank 2.
You can select between Auto Dose dispensing options and Manual dispensing on your
washer. Choose the correct dispensing method to ensure detergent is dispensed into the
washer.
Auto Dose
Dispenses a controlled dosage of detergent or detergent and softener from the selected
Auto Dose tanks. Auto Dose tanks do not need to be refilled until they start to run low. Your
washer will display an alert when the tanks have only 2 or 3 doses remaining.
Manual
Dispenses all detergent in the Manual tank. Add the correct dose of detergent to the
Manual tank before each manual cycle.
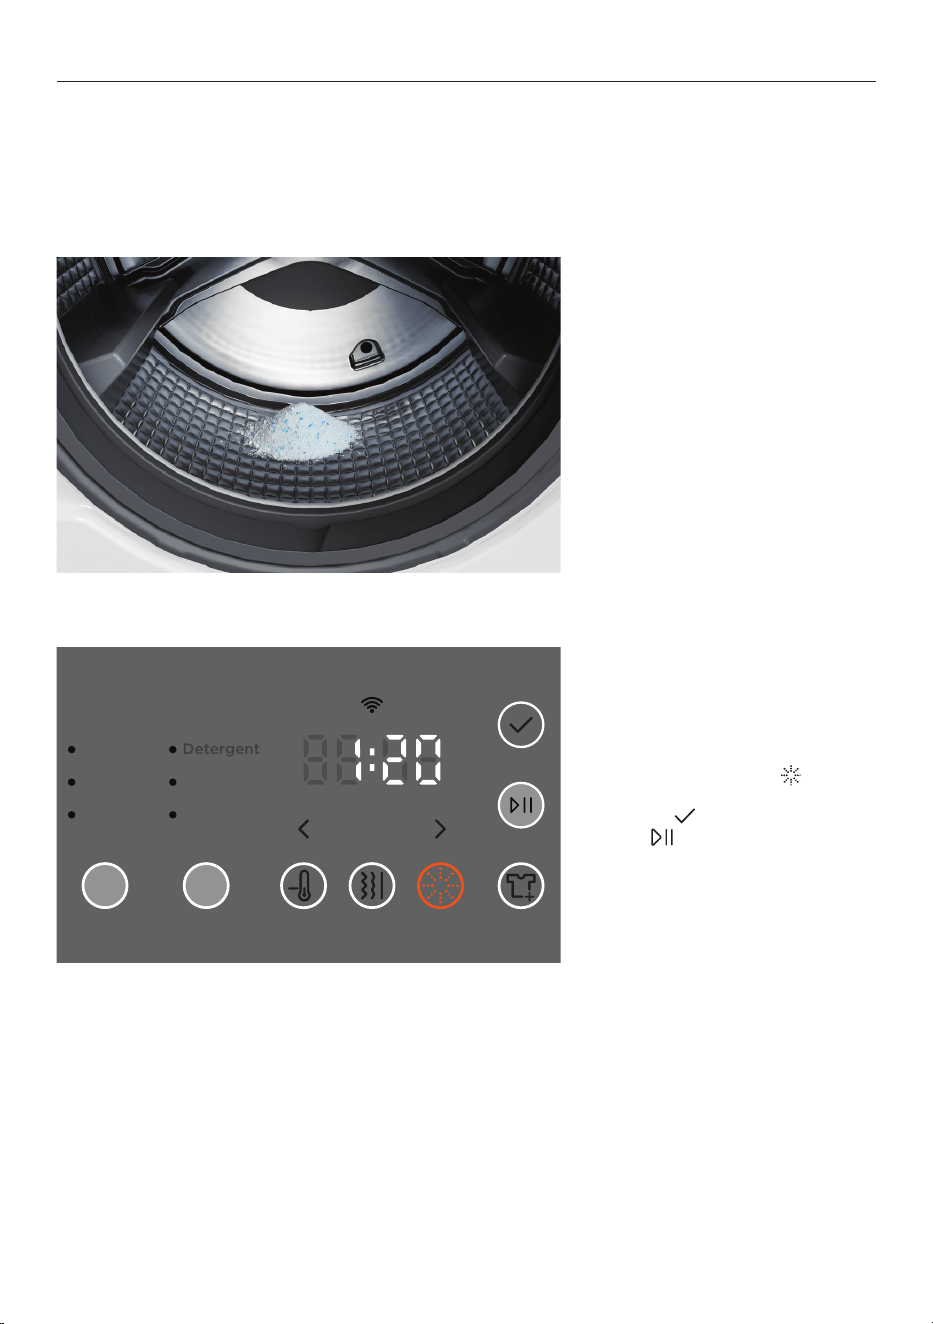
Select Manual for detergent pods
If using
a detergent pod, set AUTO DOSE to MANUAL, add the pod directly to the washer drum
and put your items on top of it.
20
SET THE CYCLE
Detergent
Softener
Manual
Heavy
Moderate
Light
Add
Item
Soil
Level
Auto
Dose
Cold
Wash
Drum
Clean
Crease
Free
Delay
Detergent
Softener
Manual
Heavy
Moderate
Light
Add
Item
Soil
Level
Auto
Dose
Cold
Wash
Drum
Clean
Crease
Free
Delay
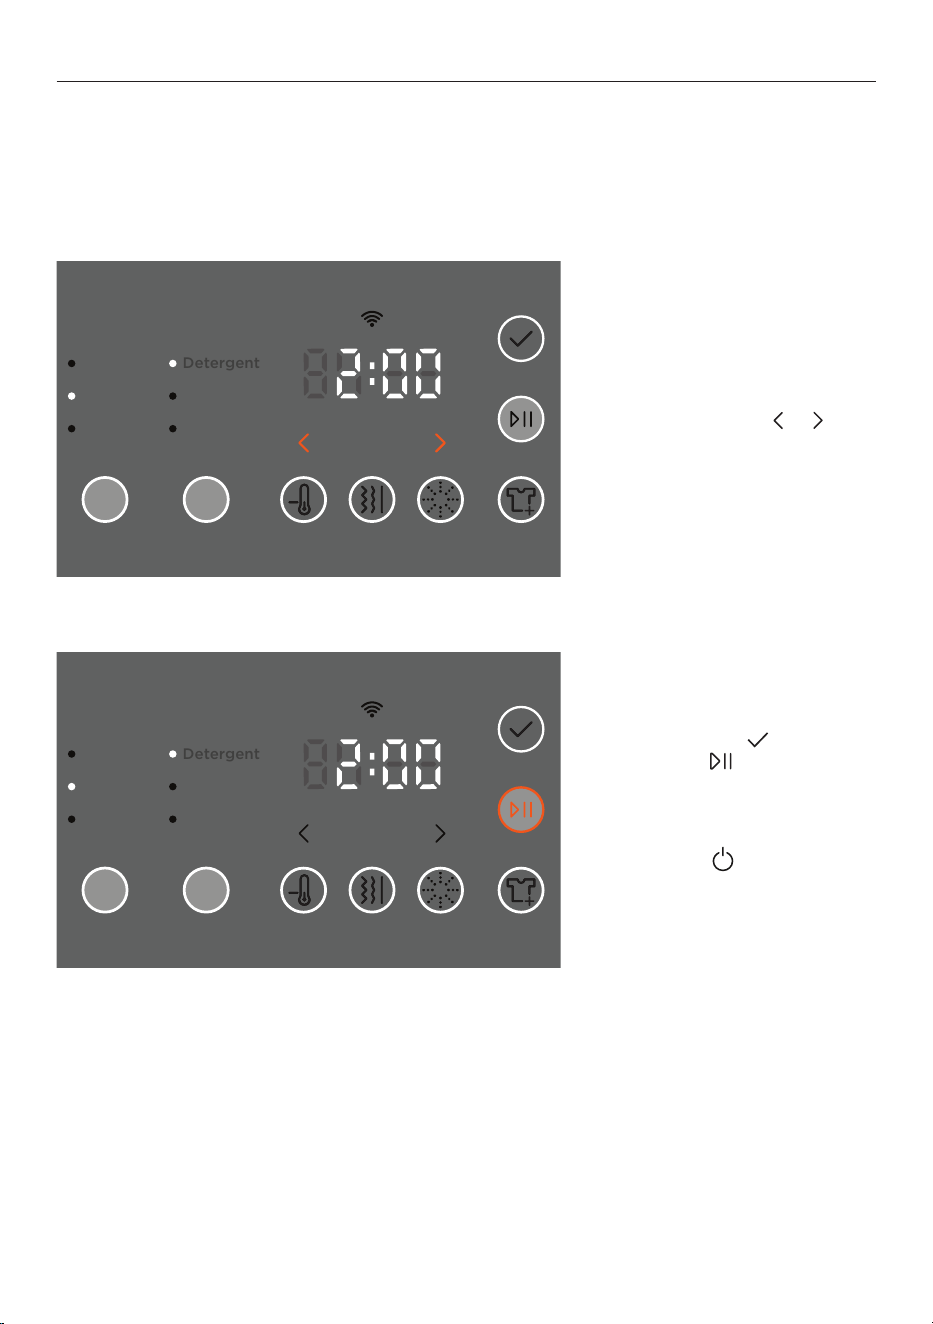
7. Press CONFIRM to
confirm settings.
See ‘Setting delayed start’ if you
want to delay the beginning of
the wash cycle.
8. Press
START/PAUSE to start
the cycle.
Detergent
Softener
Manual
Heavy
Moderate
Light
Add
Item
Soil
Level
Auto
Dose
Cold
Wash
Drum
Clean
Crease
Free
Delay
Detergent
Softener
Manual
Heavy
Moderate
Light
Add
Item
Soil
Level
Auto
Dose
Cold
Wash
Drum
Clean
Crease
Free
Delay
Cancelling the cycle
Press
POWER to turn the
washer off and cancel the cycle.
Mixed Cotton
Polyester
Wool
Quick 30
Favourite
Moderate
Durable
Delicate
Item
Type
Mixed Cotton
Polyester
Wool
Quick 30
Favourite
Moderate
Durable
Delicate
Item
Type
21
CUSTOMISE CYCLE SETTINGS
You can customise the default cycle settings for each fibre type to save time if you regularly
use the same settings.
Mixed Cotton
Polyester
Wool
Quick 30
Favourite
Moderate
Durable
Delicate
Refresh
Wash
Spin
Sanitise
Rinse
Detergent
Softener
Manual
Heavy
Moderate
Light
Mixed
Light
White
Dark
Towels
Sheets
Item
Type
Soil
Level
Auto
Dose
Cold
Wash
Drum
Clean
Crease
Free
Delay
Treatment Colour
Mixed Cotton
Polyester
Wool
Quick 30
Favourite
Moderate
Durable
Delicate
Refresh
Wash
Spin
Sanitise
Rinse
Detergent
Softener
Manual
Heavy
Moderate
Light
Mixed
Light
White
Dark
Towels
Sheets
Item
Type
Soil
Level
Auto
Dose
Cold
Wash
Drum
Clean
Crease
Free
Delay
Treatment Colour
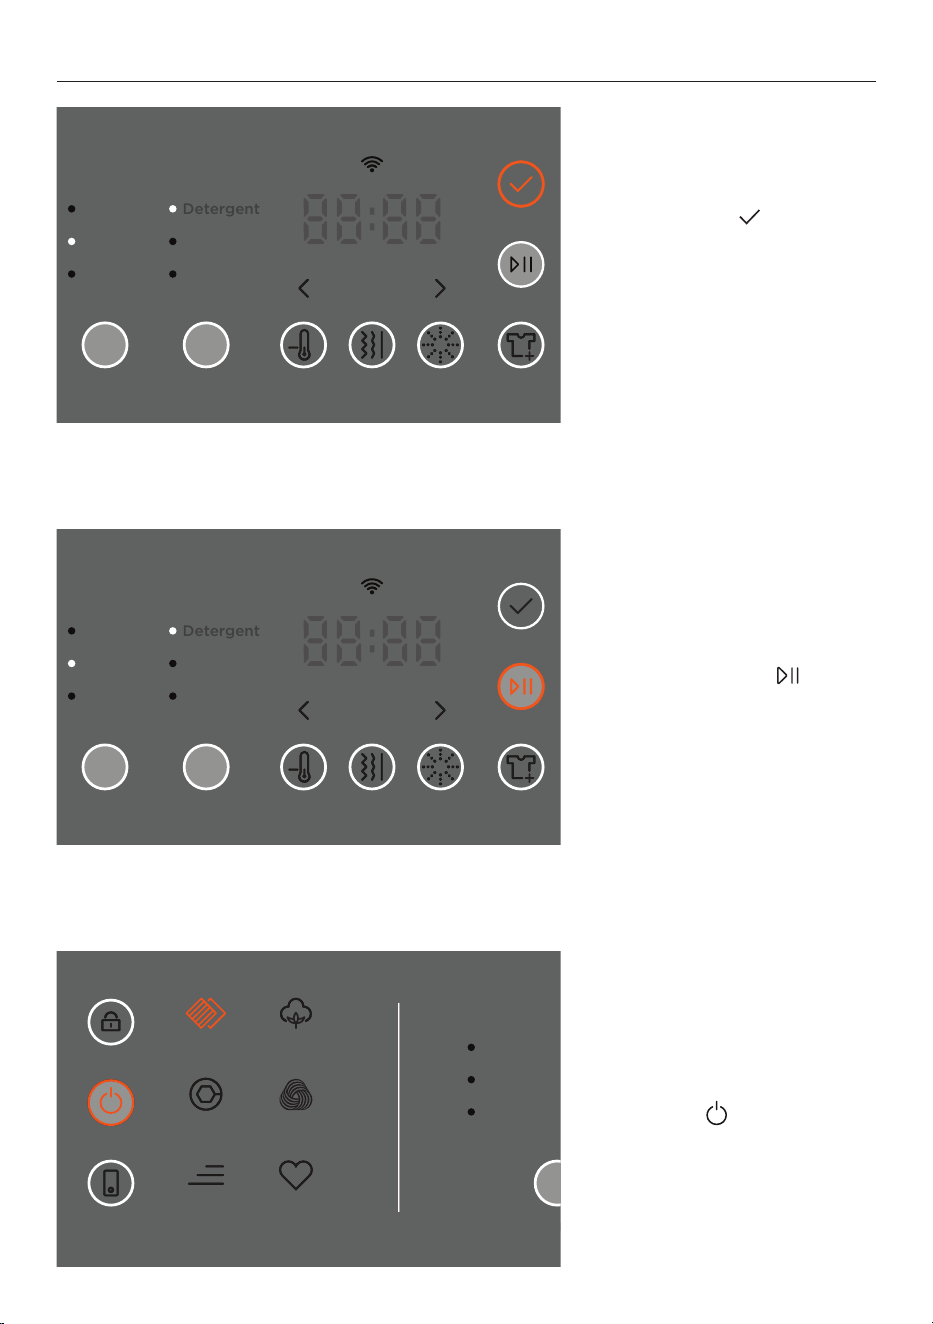
1. Set your Fibre and other
settings that you want to save,
and press CONFIRM .
Press and hold the selected
Fibre button until
SEt shows on
the display and you hear a tone.
The new settings for that fibre
type are now saved.
Mixed Cotton
Polyester
Wool
Quick 30
Favourite
Moderate
Durable
Delicate
Refresh
Wash
Spin
Sanitise
Rinse
Detergent
Softener
Manual
Heavy
Moderate
Light
Mixed
Light
White
Dark
Towels
Sheets
Item
Type
Soil
Level
Auto
Dose
Treatment Colour
Mixed Cotton
Polyester
Wool
Quick 30
Favourite
Moderate
Durable
Delicate
Refresh
Wash
Spin
Sanitise
Rinse
Detergent
Softener
Manual
Heavy
Moderate
Light
Mixed
Light
White
Dark
Towels
Sheets
Item
Type
Soil
Level
Auto
Dose
Treatment Colour
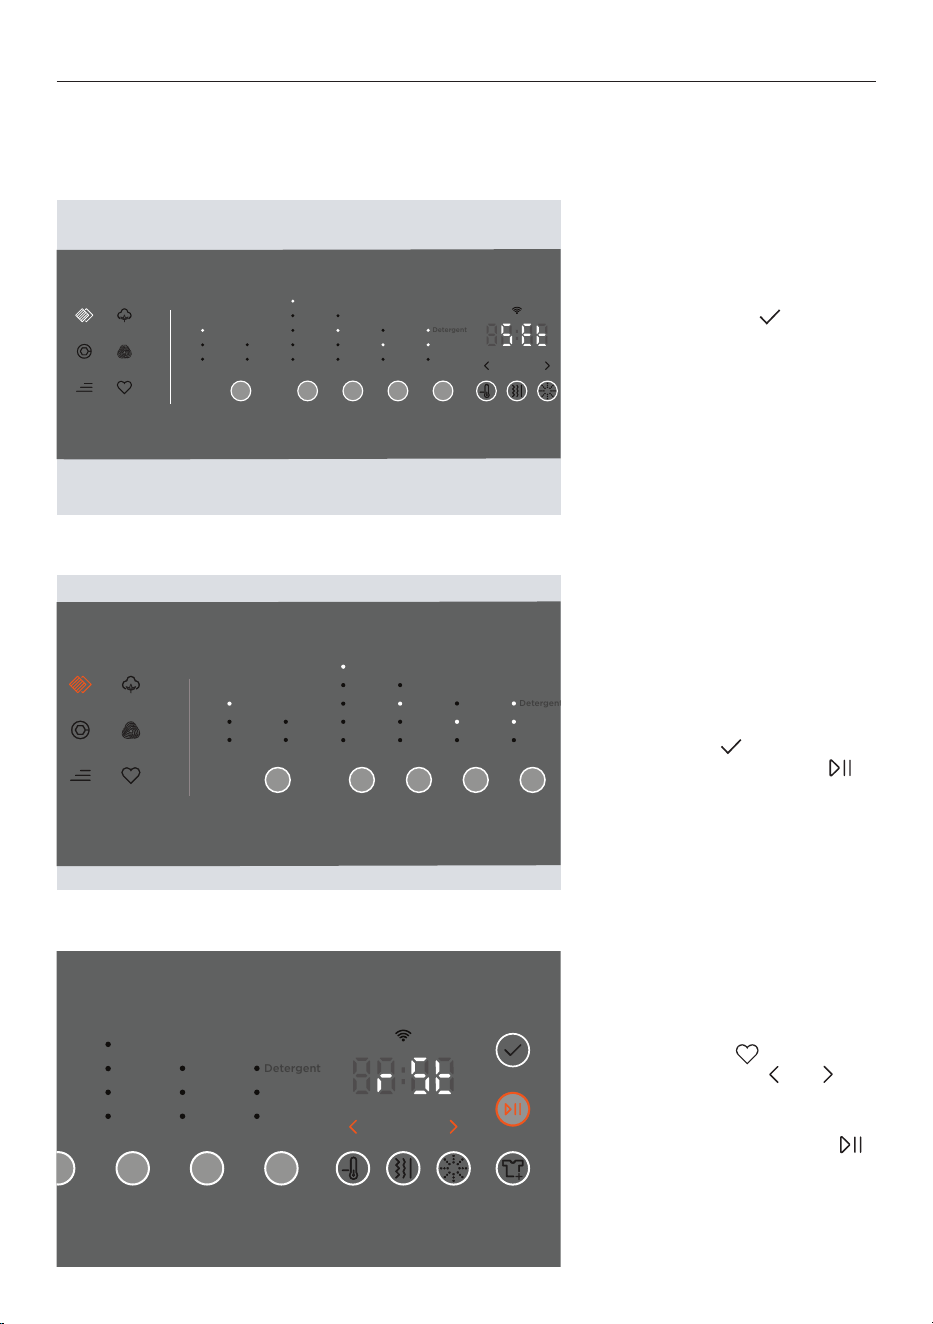
2. At next use, select the fibre
type. The new settings will be
selected automatically.
Press
CONFIRM to confirm
settings, then START/PAUSE
to start the cycle.
Refresh
Wash
Spin
Sanitise
Rinse
Detergent
Softener
Manual
Heavy
Moderate
Light
Mixed
Light
White
Dark
Add
Item
Soil
Level
Auto
Dose
Cold
Wash
Drum
Clean
Crease
Free
Delay
Treatment
Colour
Refresh
Wash
Spin
Sanitise
Rinse
Detergent
Softener
Manual
Heavy
Moderate
Light
Mixed
Light
White
Dark
Add
Item
Soil
Level
Auto
Dose
Cold
Wash
Drum
Clean
Crease
Free
Delay
Treatment
Colour
Clear all saved cycles
and favourites
Press
FAVOURITE , then press
and hold the arrows and
until an alert sounds and rSt
shows on the display.
Press and hold
START/PAUSE
to confirm the reset.
This also resets cycles saved in
the app.
22
SAVE FAVOURITE CYCLES
FAVOURITE is set to QUICK 15 by default, but you can save a different favourite cycle on
the appliance and up to 14 more in the app. See ‘Customise cycle settings’ for how to reset
all favourites.
Save a new Favourite
1. Set your Fibre and other
settings as normal, and press
CONFIRM .
Mixed Cotton
Polyester
Wool
Quick 30
Favourite
Moderate
Durable
Delicate
Refresh
Wash
Spin
Sanitise
Rinse
Detergent
Softener
Manual
Heavy
Moderate
Light
Mixed
Light
White
Dark
Towels
Sheets
Item
Type
Soil
Level
Auto
Dose
Cold
Wash
Drum
Clean
Crease
Free
Delay
Treatment Colour
Mixed Cotton
Polyester
Wool
Quick 30
Favourite
Moderate
Durable
Delicate
Refresh
Wash
Spin
Sanitise
Rinse
Detergent
Softener
Manual
Heavy
Moderate
Light
Mixed
Light
White
Dark
Towels
Sheets
Item
Type
Soil
Level
Auto
Dose
Cold
Wash
Drum
Clean
Crease
Free
Delay
Treatment Colour
2. Press and hold
FAVOURITE until SEt shows
on the display and you hear
a tone.
Your
FAVOURITE is now saved.
Mixed
Cotton
Polyester
Wool
Quick 30
Favourite
Moderate
Durable
Delicate
Refresh
Wash
Spin
Sanitise
Rinse
Detergent
Softener
Manual
Heavy
Moderate
Light
Mixed
Light
White
Dark
Towels
Sheets
Item
Type
Soil
Level
Auto
Dose
Cold
Wash
Drum
Clean
Crease
Free
Delay
Treatment Colour
Mixed
Cotton
Polyester
Wool
Quick 30
Favourite
Moderate
Durable
Delicate
Refresh
Wash
Spin
Sanitise
Rinse
Detergent
Softener
Manual
Heavy
Moderate
Light
Mixed
Light
White
Dark
Towels
Sheets
Item
Type
Soil
Level
Auto
Dose
Cold
Wash
Drum
Clean
Crease
Free
Delay
Treatment Colour
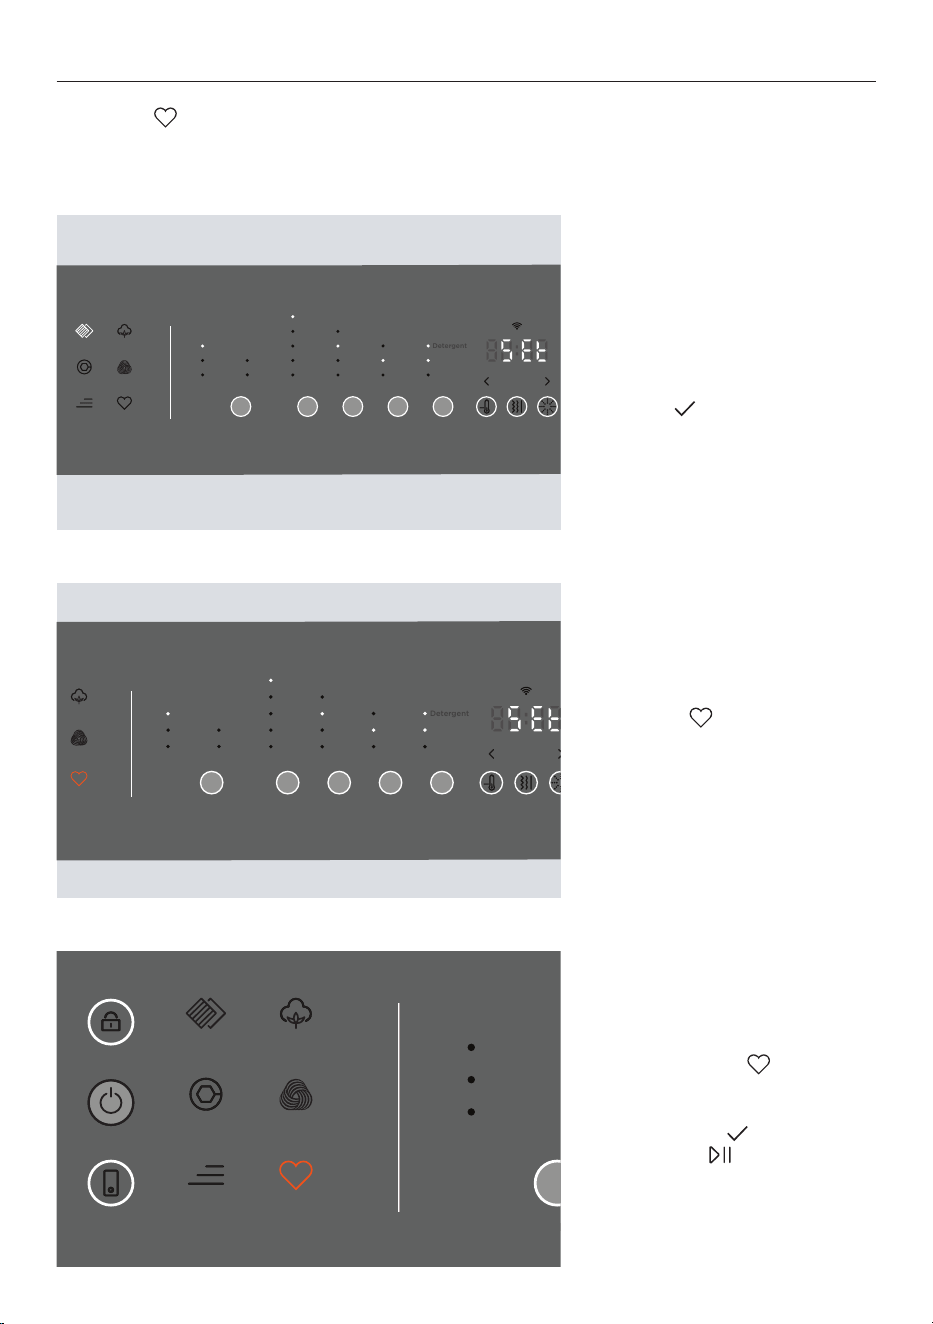
3. To use your saved Favourite,
select FAVOURITE instead of
FIBRE. The other settings will be
selected automatically.
Press
CONFIRM , then
START/PAUSE to start
the cycle.
Mixed Cotton
Polyester
Wool
Quick 30
Favourite
Moderate
Durable
Delicate
Item
Type
Mixed Cotton
Polyester
Wool
Quick 30
Favourite
Moderate
Durable
Delicate
Item
Type
23
SET DELAY START
DELAY START allows you to set a cycle to begin after a set duration.
Times available for selection are 15 minutes, 30 minutes, 1 hour and further increments of an
hour up to 12 hours.
The displayed duration is approximate.
1. After setting and confirming
the wash cycle, press
DELAY,
then use the arrows or
to set your preferred
delay duration.
Detergent
Softener
Manual
Heavy
Moderate
Light
Add
Item
Soil
Level
Auto
Dose
Cold
Wash
Drum
Clean
Crease
Free
Delay
Detergent
Softener
Manual
Heavy
Moderate
Light
Add
Item
Soil
Level
Auto
Dose
Cold
Wash
Drum
Clean
Crease
Free
Delay
2. Press CONFIRM then
START/PAUSE to start the
delay countdown. The wash
cycle will begin when the
countdown ends.
Press
POWER to turn off the
washer and cancel the delay.
Detergent
Softener
Manual
Heavy
Moderate
Light
Add
Item
Soil
Level
Auto
Dose
Cold
Wash
Drum
Clean
Crease
Free
Delay
Detergent
Softener
Manual
Heavy
Moderate
Light
Add
Item
Soil
Level
Auto
Dose
Cold
Wash
Drum
Clean
Crease
Free
Delay
24
WASH OPTIONS
Cold Wash
Press
COLD WASH to select a
cool wash temperature.
This uses cold inlet water for
the cycle to minimise energy
usage. Not available on
all cycles.
See ‘Change Cold Wash default’
to fix cold water at 20°C.
Detergent
Softener
Manual
Heavy
Moderate
Light
Add
Item
Soil
Level
Auto
Dose
Cold
Wash
Drum
Clean
Crease
Free
Delay
Detergent
Softener
Manual
Heavy
Moderate
Light
Add
Item
Soil
Level
Auto
Dose
Cold
Wash
Drum
Clean
Crease
Free
Delay
Detergent
Softener
Manual
Heavy
Moderate
Light
Add
Item
Soil
Level
Auto
Dose
Cold
Wash
Drum
Clean
Crease
Free
Delay
Detergent
Softener
Manual
Heavy
Moderate
Light
Add
Item
Soil
Level
Auto
Dose
Cold
Wash
Drum
Clean
Crease
Free
Delay
Crease free
Press
CREASE FREE to turn
CREASE FREE on or off.
This tumbles the load
periodically after the cycle to
reduce creases in items.
Runs for 12 hours or until
turned off.
Detergent
Softener
Manual
Heavy
Moderate
Light
Add
Item
Soil
Level
Auto
Dose
Cold
Wash
Drum
Clean
Crease
Free
Delay
Detergent
Softener
Manual
Heavy
Moderate
Light
Add
Item
Soil
Level
Auto
Dose
Cold
Wash
Drum
Clean
Crease
Free
Delay
Add Item
Press
ADD ITEM to pause the
wash and add an item. For best
results, add within 10 minutes
of starting the cycle. The
washer may drain slightly so
door can open safely.
Not available on all cycles.
Press
CONFIRM , then START/
PAUSE
to resume the cycle.
Access extra wash options and optimisers in the app
z
COLD PRE-WASH - Add a pre wash to remove excess soil and ensure optimal wash results.
z
SOAK - Use cold wash to minimise energy usage.
z
EXTRA RINSE - Add an extra rinse to the cycle. Ideal for people with sensitive skin, or for
heavily soiled items.
z
Optimise the cycle as required to save energy, reduce wash time or reduce noise. Select from
BALANCED, ENERGY, TIME and SOUND.
25
CHANGE COLD WASH DEFAULT
The default setting for the COLD WASH temperature is determined by the cold water
supplied to your washing machine. If you live in a colder climate, you can change the
COLD WASH temperature to a fixed 20°C so wash performance is not affected.
Detergent
Softener
Manual
Heavy
Moderate
Light
Add
Item
Soil
Level
Auto
Dose
Cold
Wash
Drum
Clean
Crease
Free
Delay
Detergent
Softener
Manual
Heavy
Moderate
Light
Add
Item
Soil
Level
Auto
Dose
Cold
Wash
Drum
Clean
Crease
Free
Delay
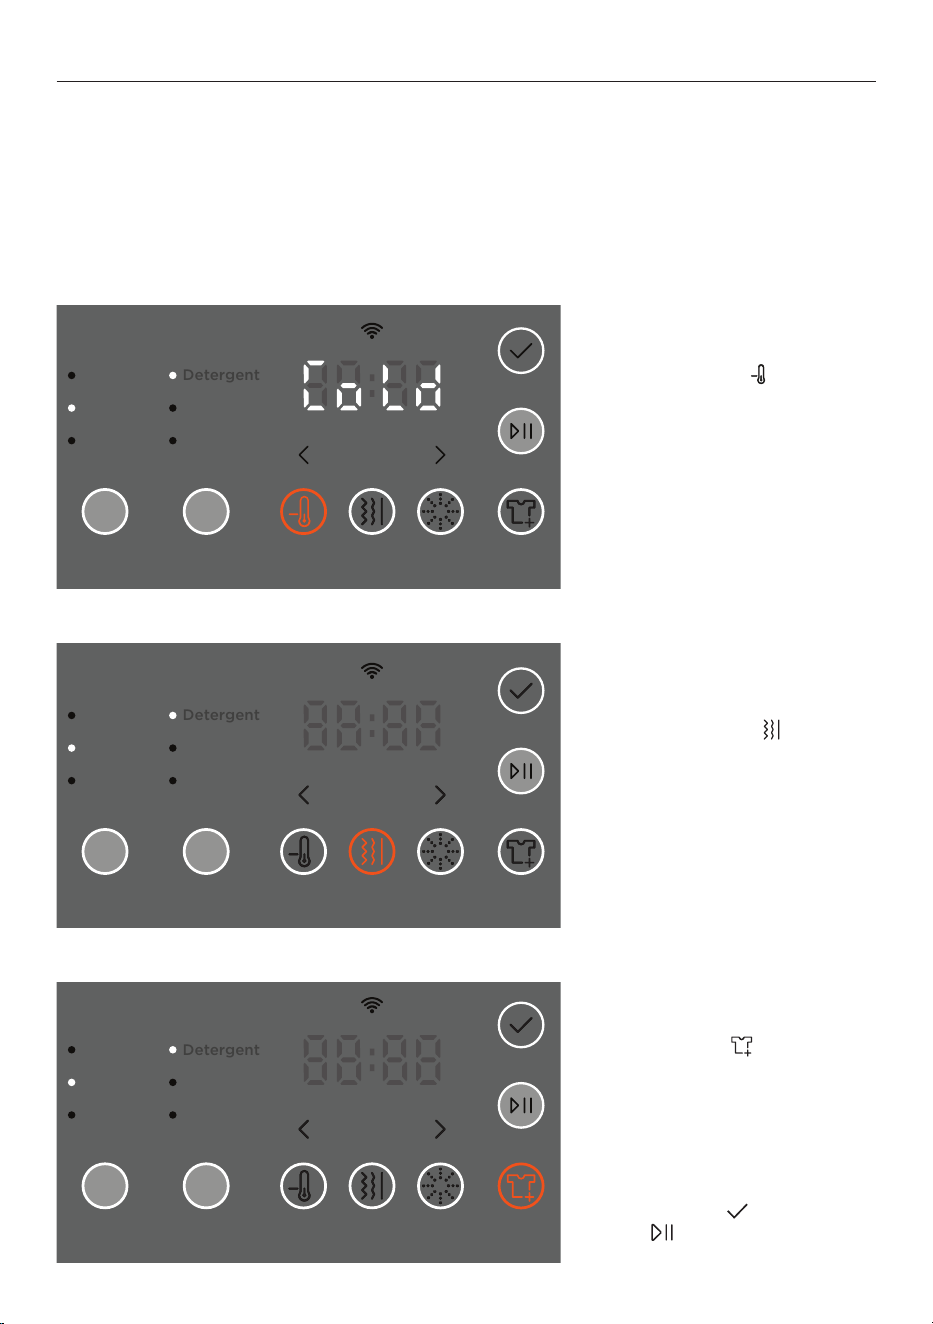
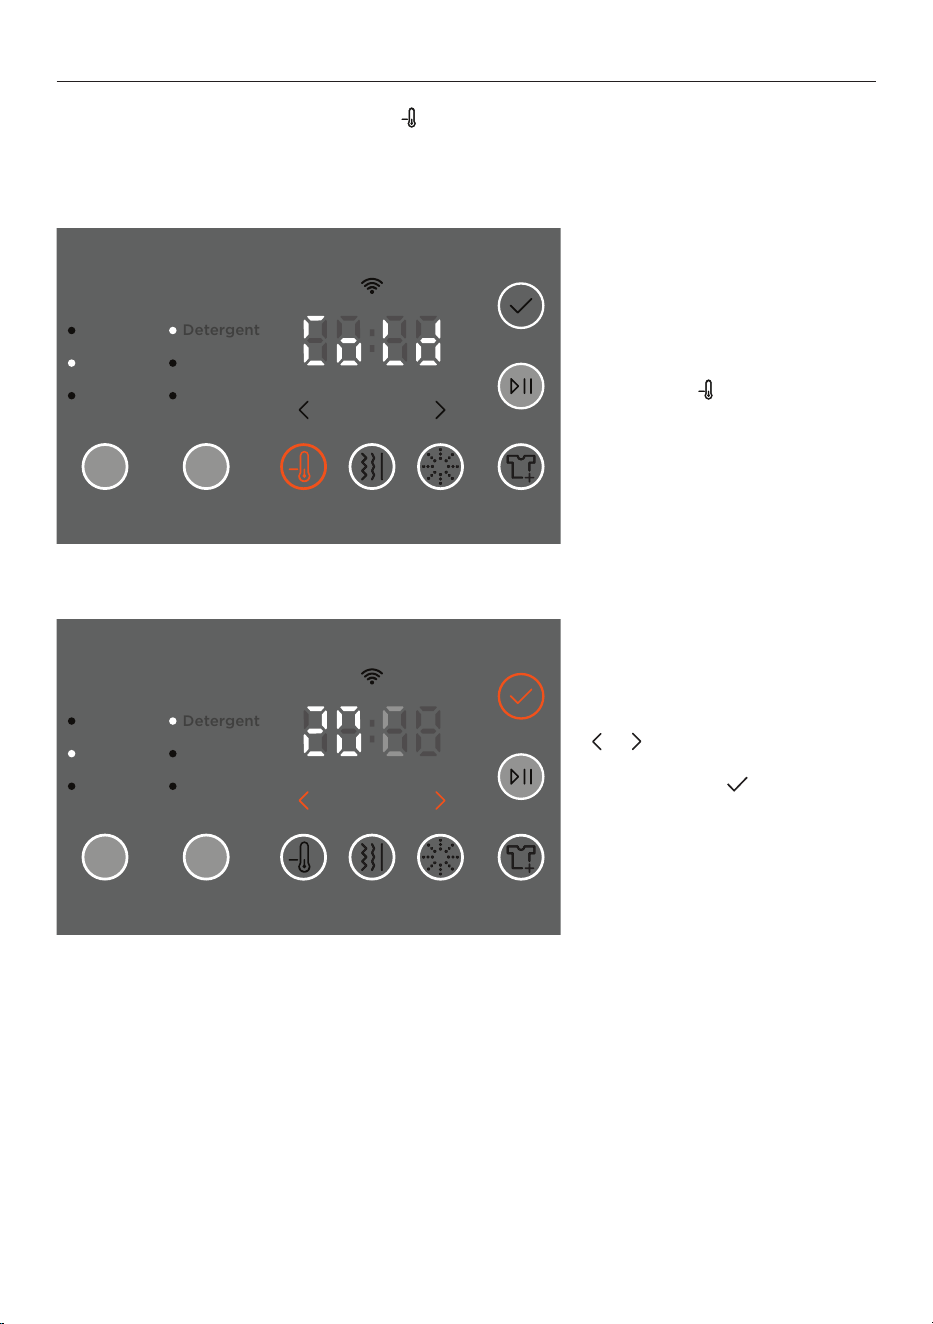
1. Press and hold
COLD WASH until CoLd shows
on the display.
Detergent
Softener
Manual
Heavy
Moderate
Light
Add
Item
Soil
Level
Auto
Dose
Cold
Wash
Drum
Clean
Crease
Free
Delay
Detergent
Softener
Manual
Heavy
Moderate
Light
Add
Item
Soil
Level
Auto
Dose
Cold
Wash
Drum
Clean
Crease
Free
Delay
2. Use the delay buttons
or to toggle until 20 C
shows on the display, then
press CONFIRM .
Repeat the steps to
change it back to
CoLd.
26
ADJUST AUTO DOSE AMOUNT
The default dosage amounts for detergent and softener can be adjusted between five levels
from 1 to Hi. Your washer is set by default to level 3 for both detergent and softener.
Detergent
Softener
Manual
Heavy
Moderate
Light
Add
Item
Soil
Level
Auto
Dose
Cold
Wash
Drum
Clean
Crease
Free
Delay
Detergent
Softener
Manual
Heavy
Moderate
Light
Add
Item
Soil
Level
Auto
Dose
Cold
Wash
Drum
Clean
Crease
Free
Delay
Adjusting Detergent dosage
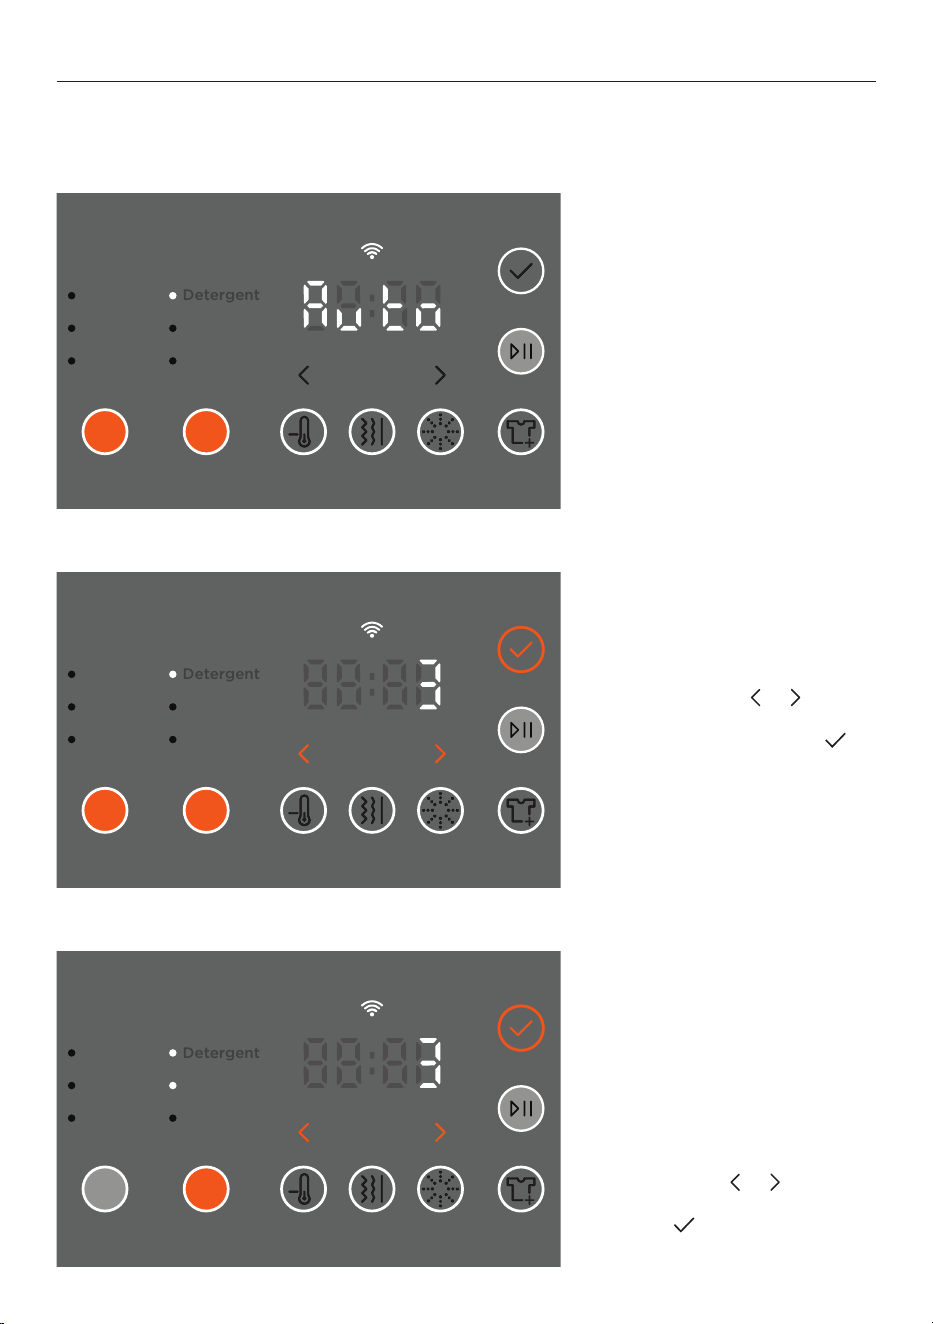
1. Press and hold
SOIL LEVEL
and AUTO DOSE until the display
switches from auto to det
to the current dosage. The
DETERGENT indicator will flash.
Detergent
Softener
Manual
Heavy
Moderate
Light
Add
Item
Soil
Level
Auto
Dose
Cold
Wash
Drum
Clean
Crease
Free
Delay
Detergent
Softener
Manual
Heavy
Moderate
Light
Add
Item
Soil
Level
Auto
Dose
Cold
Wash
Drum
Clean
Crease
Free
Delay
2. Use the arrows or to
adjust the dosage level from 1
to Hi, then press CONFIRM .
Setwill show on the display.
Detergent
Softener
Manual
Heavy
Moderate
Light
Add
Item
Soil
Level
Auto
Dose
Cold
Wash
Drum
Clean
Crease
Free
Delay
Detergent
Softener
Manual
Heavy
Moderate
Light
Add
Item
Soil
Level
Auto
Dose
Cold
Wash
Drum
Clean
Crease
Free
Delay
Adjusting Softener dosage
3. Press and hold
SOIL LEVEL
and AUTO DOSE until auto
shows on the display. Press
AUTO DOSE to select SOFTENER.
The display will switch from
soft to the current dosage
and the SOFTENER indicator
will flash.
Use the arrows
or to
adjust the dosage level. Press
CONFIRM to save new level.
Setwill show on the display.

27
WASH TEMPERATURES AND SPIN TREATMENTS
Wash temperatures and spin speeds are set automatically based on your fibre, item type
and colour selections. This ensures the best wash results for your items.
See below for how colour selection affects wash temperature and how item type affects
spin speed.
DARK MIXED
WASH TEMPERATURE
LIGHT
20°C
WHITE SANITISE
40°C >70°C30°C
DELICATE/QUICK
SPIN SPEED
SPORT
800
MODERATE/DURABLE
14001100

28
CHOOSE A DETERGENT
Specialised detergents provide the best wash peformance for different items. We
recommend using a specialised detergent type where relevant.
If switching detergents, we recommend cleaning the dispenser drawer to remove unsuitable
detergent before washing items with a new detergent. See ‘Clean the dispenser drawer’.
Everyday
For your everyday items that do not require specialised care.
Darks
Dark detergents are specially designed to keep darks vibrant and prevent dye transfer
during the wash. Avoid using darks detergents with white or light-coloured items.
Whites
Whites detergents are designed to brighten your white items as they typically contain
whitening agents. Avoid using whites detergents with dark-coloured items.
Sensitive
For items of users with sensitive skin. Sensitive detergents are typically free from fragrance
and colourants, safer for those with allergies or asthma, and ideal for baby clothes.
Delicates
For delicate and ultra-delicate fabrics. Delicate detergents preserve fibres while
maintaining softness.
Wool
Wool detergents are ideal for all types of woollen items to gently clean and
maintain softness.
Softener
Softeners are for conditioning items, giving them a softer feel. Softeners are dispensed
during the rinse phase to prevent mixing with detergents.
29
WI-FI CONNECTION AND REMOTE MODE
Your appliance may be connected to your home wireless network and operated remotely
using the app. Connect your appliance to ensure it stays up to date with the latest software
and features.
Getting started
z
Ensure your home Wi-Fi network and Bluetooth on your mobile device are turned on.
z
You will be given step-by-step guidance on your mobile device.
z
It may take up to 10 minutes to connect your appliance.
z
For further guidance and troubleshooting, please refer to the app.
On your mobile device:
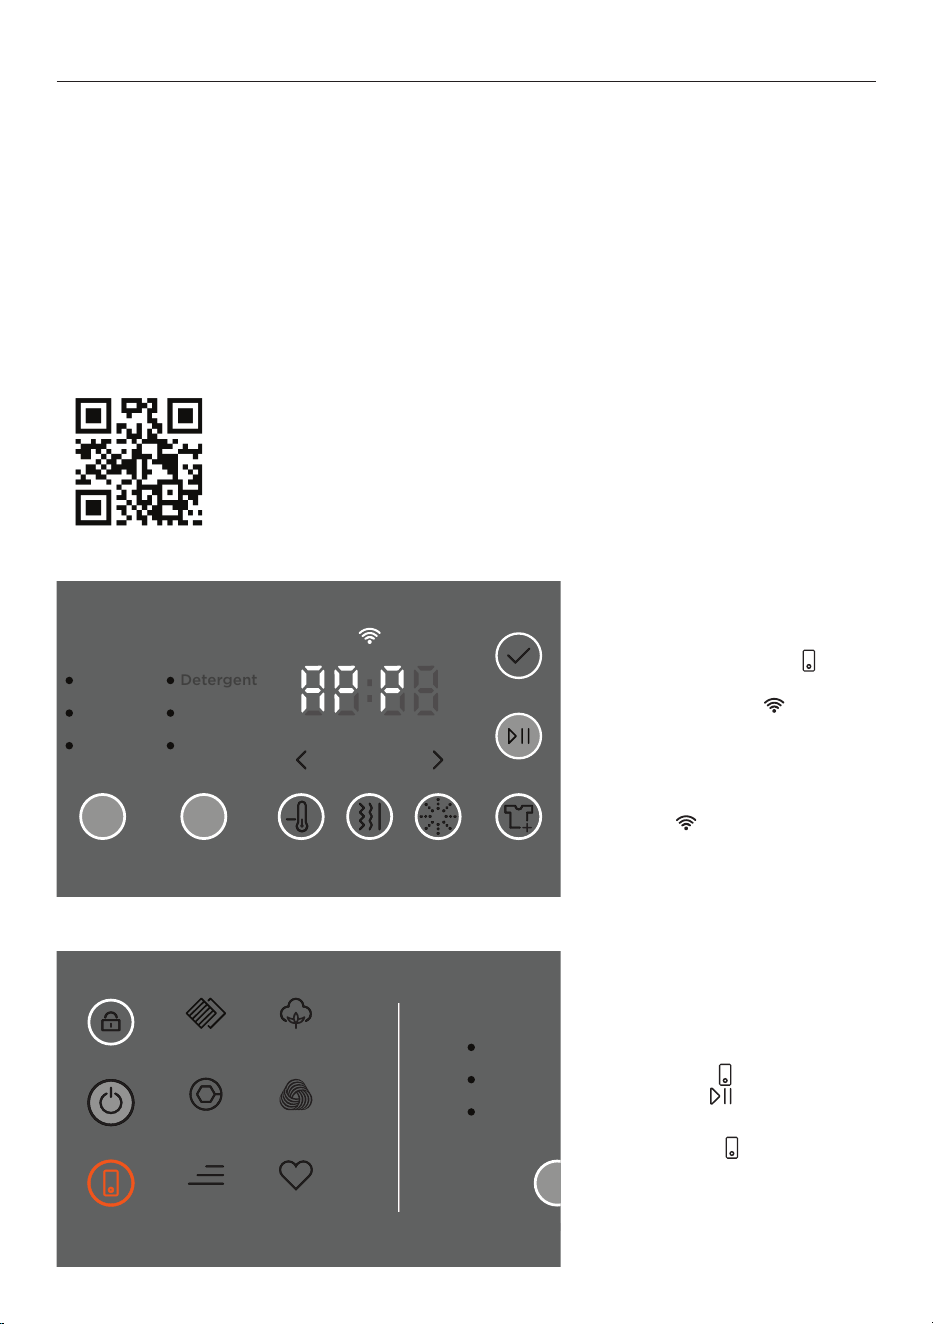
1 Download the app. Scan the QR code or go to
www.fisherpaykel.com/connect
2 Register and create an account.
3 Add your appliance and set up the Wi-Fi connection.
Turning Remote mode on/off
Press
REMOTE , then press
START/PAUSE to confirm.
When in remote
mode
, REMOTE will stay
illuminated.
Connecting to Wi-Fi
Press and hold
REMOTE until
APP shows on the display and
the Wi-Fi indicator starts to
flash. Follow the instructions
in the app to complete
the connection.
Once connected, the Wi-Fi
indicator
will stop flashing
and remain illuminated.
Mixed Cotton
Polyester
Wool
Quick 30
Favourite
Moderate
Durable
Delicate
Item
Type
Mixed Cotton
Polyester
Wool
Quick 30
Favourite
Moderate
Durable
Delicate
Item
Type
Detergent
Softener
Manual
Heavy
Moderate
Light
Add
Item
Soil
Level
Auto
Dose
Cold
Wash
Drum
Clean
Crease
Free
Delay
Detergent
Softener
Manual
Heavy
Moderate
Light
Add
Item
Soil
Level
Auto
Dose
Cold
Wash
Drum
Clean
Crease
Free
Delay

30
WI-FI CONNECTION AND REMOTE MODE
Updating software
You will be notified in the app
when a software update is
available. Software cannot be
updated when the product
is running.
Follow the instructions in the
app to begin the update. While
updating,
boot will show on
the display.
Detergent
Softener
Manual
Delay
Detergent
Softener
Manual
Delay

31
CLEAN AND MAINTAIN YOUR APPLIANCE
Surfaces and accessories
Wipe with a damp cloth and dishwashing liquid, then dry with a clean, lint-free cloth. We do
not recommend using the following cleaning products as they may cause damage:
z
Plastic or stainless steel scouring pads
z
Abrasive, solvent, household cleaners
z
Acid or alkaline cleaners
z
Handwash or soap
z
Stainless steel cleaners or polishes
z
Laundry detergents or disinfectants
Cleaning the drum and the door
z
Run a regular Drum Clean cycle.
z
Wipe the rubber seal around the door to prevent odours. Remove any items or lint and
wipe out any water.
z
Remove dirt or lint from the drum and wipe it clean. Do not leave metal objects in the
drum as these may rust and cause staining.
z
Leave the door open when not in use to prevent odours. Keep children and pets away
from the washer so they cannot become trapped inside it.
Cleaning the hose(s)
Each hose contains a filter to stop contaminants in the water from entering your washer.
Occasionally, disconnect the hoses where they connect to the taps and wash out any dirt
build-up.
Moving your washer
z
Remove the dispenser drawer and empty out any detergent or softener. Refer to
‘Cleaning the dispenser drawer.’
z
Clean the pump filter and ensure any water in the washer is drained. Refer to ‘Cleaning
the pump filter’.
Products that might damage your washer
z
Concentrated bleaches, laundry pre-soakers/sanitisers, stain removers and hydrocarbon
solvents (eg petrol and paint thinners) can cause damage to the surfaces eg control
panel, and other components of your washer.
z
Be careful when washing items stained with solvents as they are flammable. DO NOT put
them in your dryer.
z
Use of dyes in your washer may cause staining of the plastic components. The dye will
not damage the washer but we suggest you thoroughly clean your washer afterwards.
We do not recommend the use of dye strippers in your washer.
z
Nappy sanitisers and bleach are very corrosive to metal surfaces. DO NOT tip the
contents of a nappy bucket into your washer. Rinse and wring items out thoroughly
before placing them in the washer.
32
CLEAN THE DISPENSER DRAWER
Check and clean the dispenser drawer regularly to remove build-up.
2. Drain residual detergent,
then fill the compartments with
warm water and shake lightly
to clear residue.
1. Pull the dispenser drawer
towards you and push down
on the tab to the left of the
MANUAL DOSE compartment.
Remove the drawer from
the washer.
3. Drain all water from the
compartments and allow to dry
before refitting the dispenser
drawer to thewasher.
33
RUN THE DRUM CLEAN CYCLE
DRUM CLEAN is a hot water cycle designed to be used with Washing Machine Cleaner to
remove any buildup and odours. A reminder will display after 100 cycles.
Run the drum clean cycle when you see the reminder or more frequently if you use Eco or
liquid detergents and low-temperature cycles.
Detergent
Softener
Manual
Heavy
Moderate
Light
Add
Item
Soil
Level
Auto
Dose
Cold
Wash
Drum
Clean
Crease
Free
Delay
Detergent
Softener
Manual
Heavy
Moderate
Light
Add
Item
Soil
Level
Auto
Dose
Cold
Wash
Drum
Clean
Crease
Free
Delay
2. Press DRUM CLEAN
to select the cycle. Press
CONFIRM then START/
PAUSE
to start the cycle.
1. Ensure the drum is empty,
then add Washing Machine
Cleaner directly into the drum.
Follow the manufacturer’s
instructions for recommended
dosage.
34
UNLOCK THE DOOR
In a power failure, you can use the door release tab to unlock the washer door and
remove items.
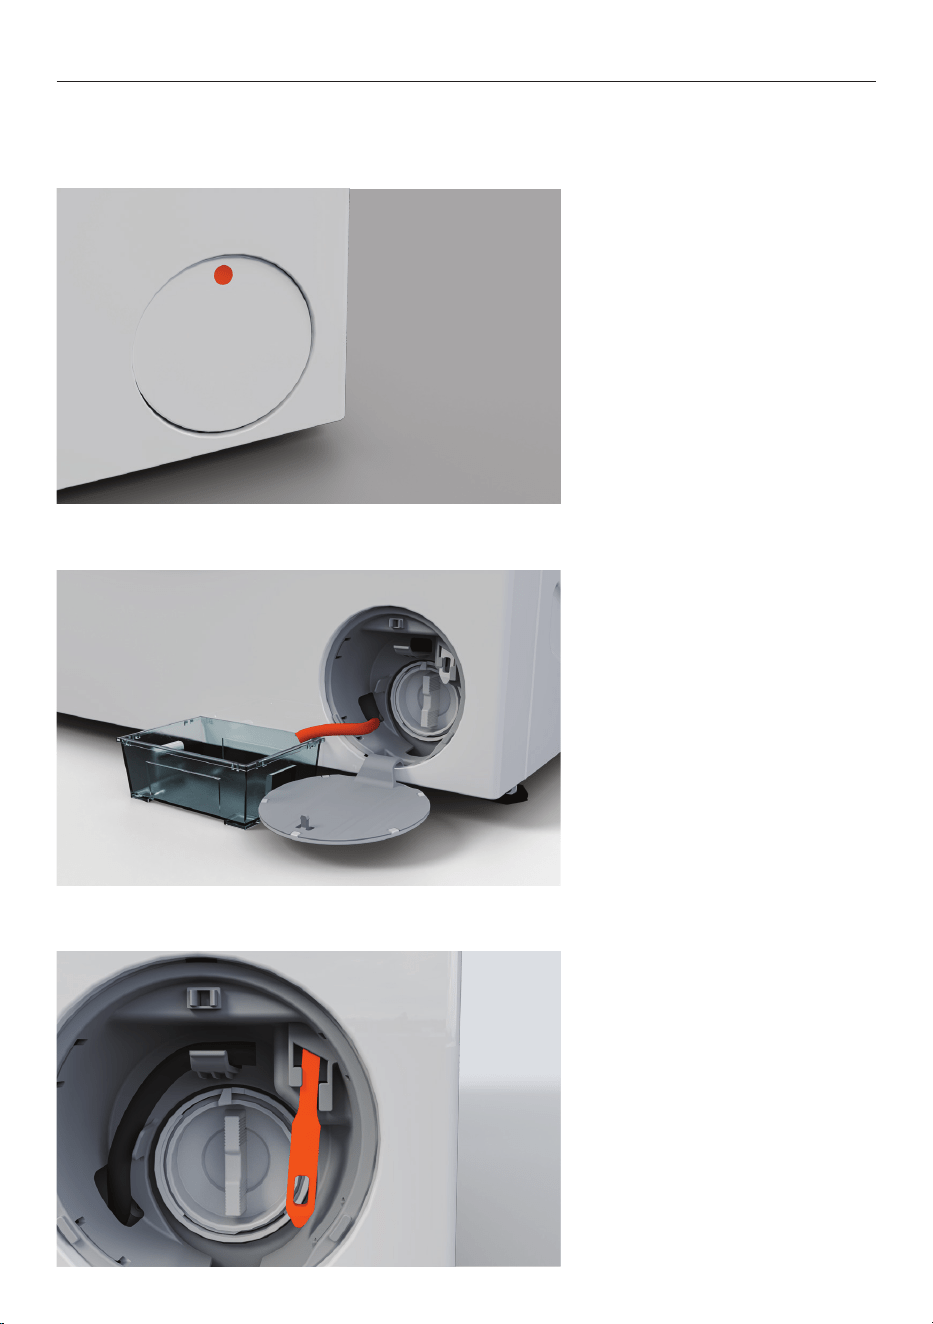
1. Push the centre of the filter
cover to open.
2. Drain the appliance to ensure
it is safe to open thedoor.
See ‘Clean the pump filter’
for details.
3. Use a tool to pull the tab
down and release the door.
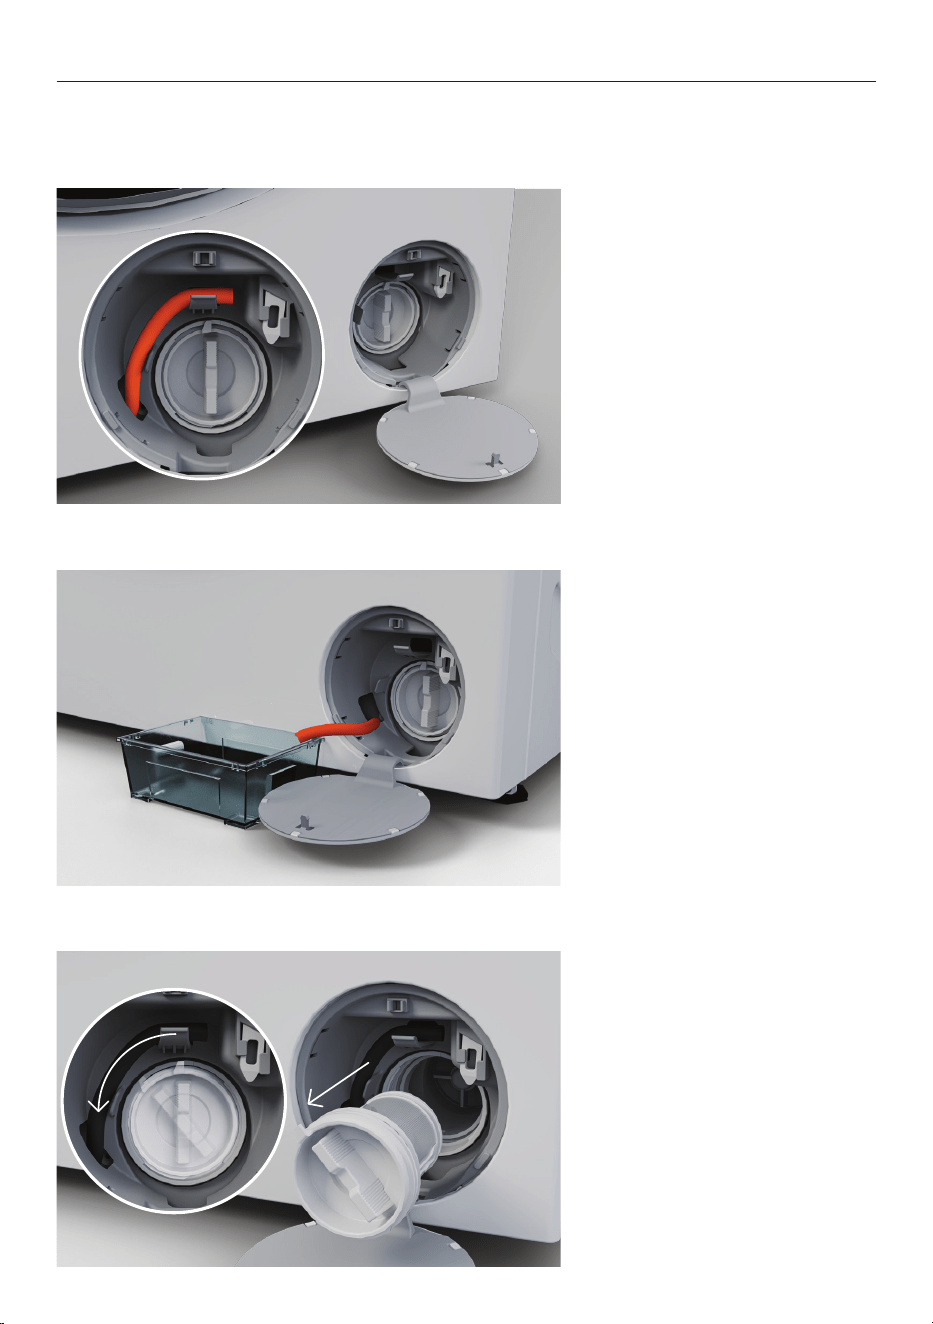
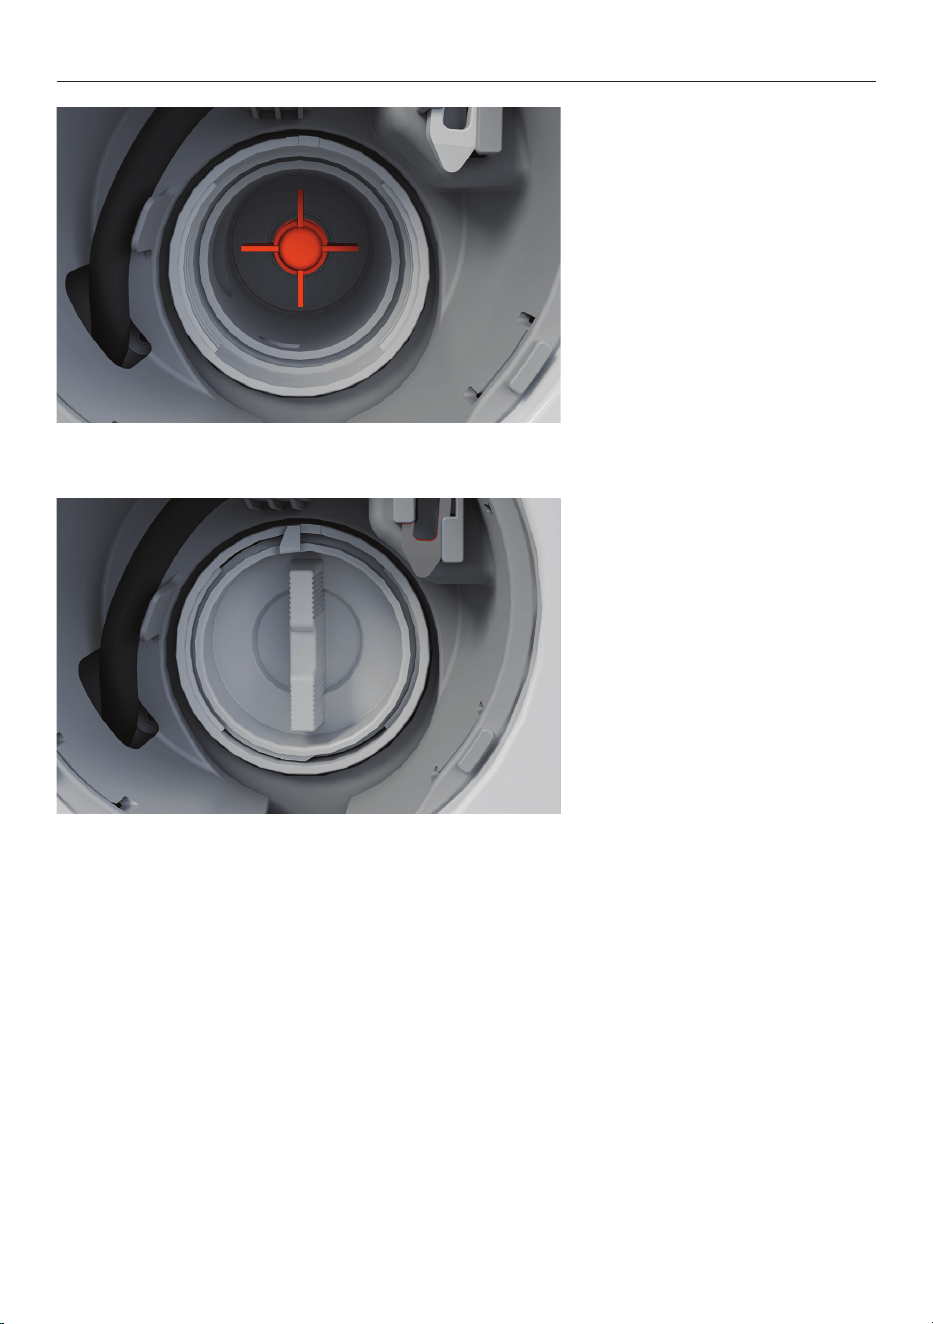
35
CLEAN THE PUMP FILTER
Check and clean the pump filter if you notice the washer is not draining. Disconnect washer
from the power supply before you remove any parts.
1. Push the centre of the filter
cover to open, then unhook the
hose and pull it out.
2. Remove the hose plug, and
drain water into a shallow dish.
After draining, replace the
plug and refit the hose in
the housing.
3. Turn the filter anti-clockwise
to remove. Some water may
leak from it.
Clean and rinse the filter.
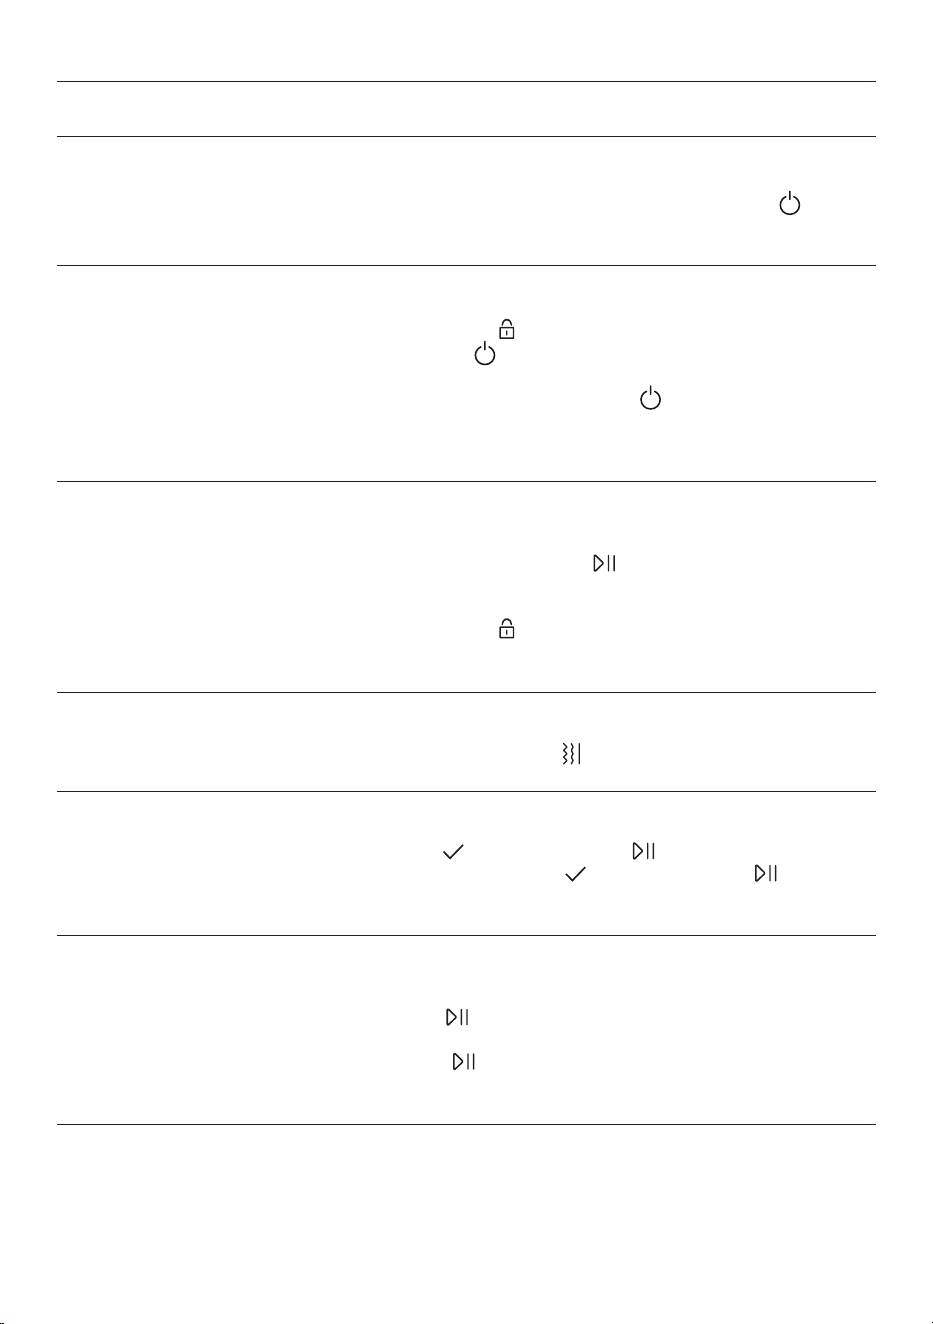
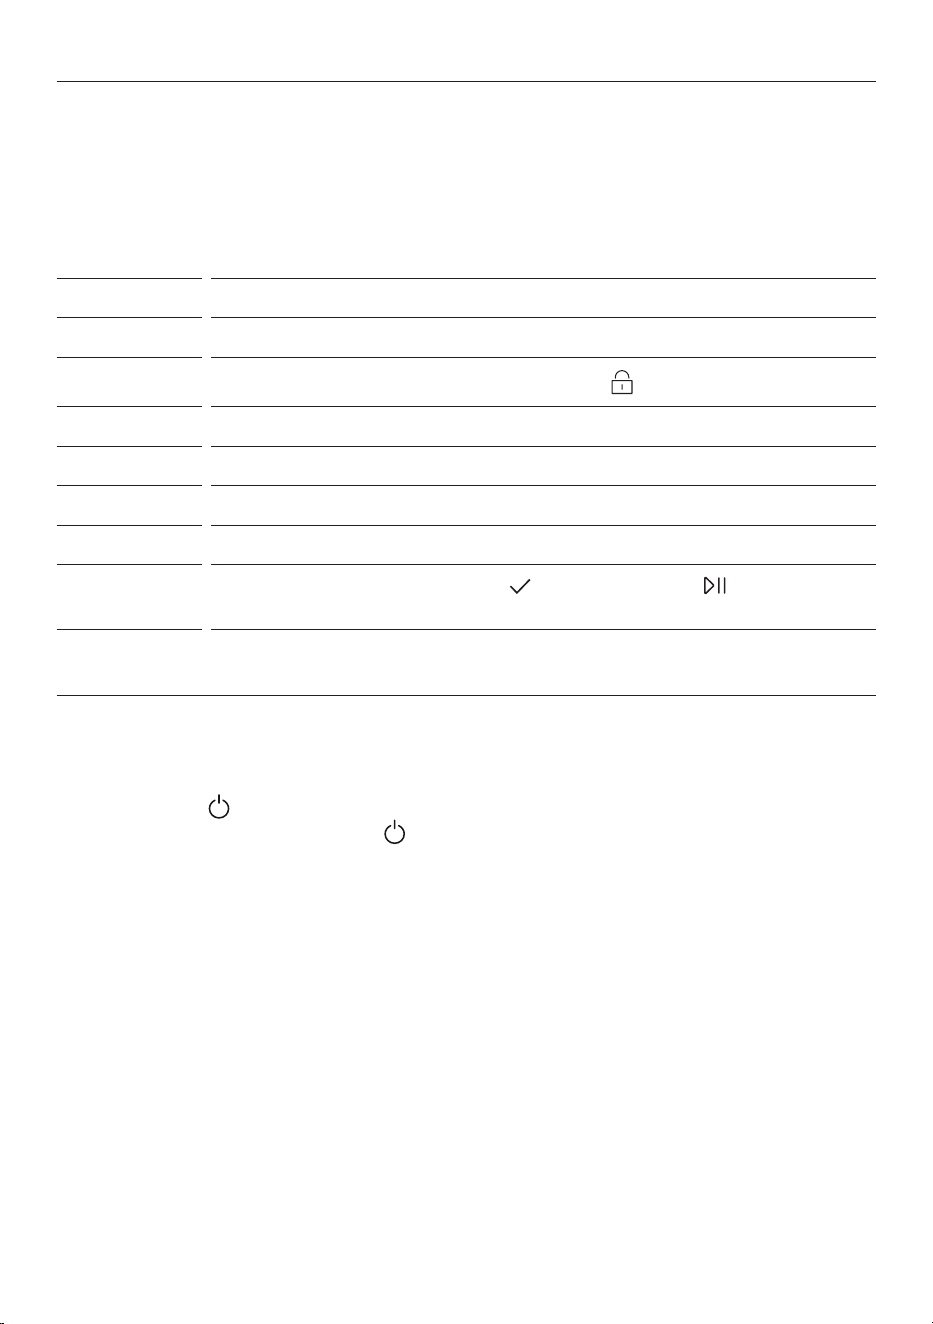
36
CLEAN THE PUMP FILTER
4. Check and clear the cavity
behind the filter, and check that
the impeller behind the filter
moves freely.
5. Refit the filter and turn it
clockwise until the handle is in
the vertical position.
37
TROUBLESHOOTING
General use
Why will the appliance not turn on?
z
No power. Check the appliance is connected to the power supply. Press POWER to
turn the appliance on.
Why is the display not responding?
z
The controls are locked. Press and hold LOCK .
z
Appliance needs to be reset. Press POWER to turn the appliance off. Wait a few
seconds, then turn it back on. If the problem persists, disconnect from the power
supply, wait a few seconds, then reconnect and press POWER to turn it on.
z
Appliance may require a software update. Connect it to Wi-Fi and check for updates
in the app.
Why is the washer not starting?
z
Door not closed. Check nothing is obstructing the door, and close it firmly.
z
Cycle confirmed but not started. Press the START/PAUSE button to start the cycle.
z
Washer is overloaded. Remove some items and restart the cycle.
z
Delay start is set. See ‘Set Delay start’.
z
The controls are locked. Press and hold LOCK .
z
There is a fault. See ‘Faults and alerts’.
Why is the washer stopping and starting?
The
CREASE FREE setting is turned on. Press CREASE FREE to turn off.
Why did the washer stop mid-cycle?.
z
Cycle has been paused. Press CONFIRM then START/PAUSE to resume the cycle.
z
The door is open. Close the door and press CONFIRM then START/PAUSE to
resume the cycle.
Why is the washer vibrating or making noises?
z
Transit bolts may still be in place. Refer to installation guide for how to remove them.
z
Washer overloaded. Press START/PAUSE to pause the cycle and remove some items.
z
Washer not level. Refer to installation guide for instructions about levelling the washer.
z
Load out of balance. Press START/PAUSE to pause the cycle and redistribute items.
z
Washer has a fault. See ‘Faults and alerts’.

38
TROUBLESHOOTING
Why is the wash cycle taking so long?
z
Washer is overloaded. Pause the cycle and remove some items.
z
Items are tangled. Untangle the items and resume the cycle.
z
Incorrect settings for the load. Check the selected fibre type, item type and treatment
and adjust if required.
z
Washer is not draining. Check the drain hose for blockages and correct if possible. If
the problem persists contact Customer Care.
Why is the fabric damaged after a wash cycle?
z
Cycle settings not appropriate for the load type. Follow instructions on care labels
and sort items accordingly. See ‘Sort your items’.
z
Metal parts on the items or inthe load may catch on fabric. Always fasten zips, velcro
and other clasps beforeplacing items in the washer.
Why do items keep getting tangled?
z
Loads not separated before going in the washer. Load items individually and try
separating larger items from smaller items.
z
Load size is too large. Try washing smaller loads. See ‘Load the washer’.
z
Wash big items like sheets and duvet covers separately and use the Sheets item type.
z
Cycle settings not the best option for the load type.
z
Delicate items not separated. Wash pantyhose, bras and stockings in a small washbag.
Why do items keep getting creased?
z
Items have been left in the washer after the cycle ended. Turn CREASE FREE on at
the start of the cycle to minimise creasing.
z
Washer is overloaded. Press ADD ITEM to pause the wash and remove some items.
z
Select the Delicate item type. This will reduce spin speed and minimise creases.
Why is dye transferring between my items?
z
Items not sorted before going in the washer. Separate white and coloured items into
separate loads.
z
Cycle settings not appropriate for load type. Select the relevant COLOUR option for
your load.
Why is the washer not draining?
z
Pump filter needs to be cleaned. See ‘Clean the pump filter.’
z
Drain hose not connected correctly. See the installation guide for instructions.
z
Drain hose or drain is blocked. Check the drain hose and drain for blockages and
correct if possible. If the problem persists contact Customer Care.

39
TROUBLESHOOTING
Why is the washer beeping?
z
The cycle has ended. Items can be removed.
z
Washer has a fault. See ‘Fault codes’.
Why is water coming from under the washer?
z
Door not closed. Check nothing is obstructing the door, and close it firmly.
z
Dispenser drawer not closed. Close it firmly.
z
Drain hose or drain is blocked. Check the drain hose and drain for blockages and
correct if possible. If the problem persists contact Customer Care.
z
Drain hose not connected correctly. See the installation guide for instructions.
Why is my washing wetter than I expect at the end of the cycle?
z
Out of Balance load affecting spin speed. Redistribute the load and run a spin
treatment to remove excess water.
z
Quick or delicate cycles have slower spin speed and can result in wetter washing at
the end of the cycle. Select Moderate and Durable item types as these have faster and
longer spin times.
Why are my clothes not as clean as I expected?
z
Incorrect settings for the load. Select a higher SOIL LEVEL.
z
Not enough detergent. Increase detergent amount by increasing SOIL LEVEL or
adjusting AUTO DOSE amount.
z
Washer overloaded so can’t wash items properly. See ‘Load the washer’ for maximum
load capacity guidance.
z
Ineffective detergent. Use a good quality detergent for best results.
z
Washer still has residual dirt from previous wash. After washing particularly soiled
clothing, empty the washer and run a RINSE cycle to remove residual dirt.
Why is the remaining cycle time not accurate?
Cycle time is an estimate based on load size and water flow rates. It adjusts throughout
the cycle to give you an estimation of minutes remaining. The time shown is not the
Declared Program Time.
Why does my item have wet patches on after a
REFRESH cycle?
This is normal and helps remove wrinkles. Remove the item from the washer immediately
at the end of the cycle and hang up to dry for a few minutes before wearing.
Why does my washer smell after a cycle?
z
Drum and door need to be cleaned. See ‘Clean and maintain your appliance’.
z
Try using a different detergent.
z
Leave the washer door open slightly after a cycle so it can dry out.
40
FAULTS AND ALERTS
How do I know if there is a problem?
Your washer will beep and an alert will show in the display.
What to do
First try to fix the issue and clear the alert according to the onscreen instructions or the
steps in the following table.
ALERT WHAT TO DO
LOC
Door is locked. Wait for cycle to end.
KEY LOC
Controls are locked. Press and hold KEY LOCK to unlock.
OVER FILL
Water level is too high. Cycle will resume when water level goes down.
CLR FLTR
Pump filter is blocked. See ‘Clean the pump filter’ for how to clean the filter.
DOOR
Door is open. Close door fully.
NO TAP
No water. Check that taps are on and hoses are connected.
NO LOC
Door cannot lock. Press CONFIRM , then START/PAUSE to lock the door
and start the cycle.
OUT OF
BALANCE
App alert only. Out of balance load has reduced spin speed. Redistribute
load and run a spin treatment to remove excess water.
‘E’ fault codes
You may be able to clear the fault by resetting the washer. Follow the steps below:
1 Press
POWER to turn the appliance off.
2 Wait a few seconds, then
POWER to turn the appliance back on.
If the fault code has disappeared, you can continue to use your washer.
If the problem persists
3 Note down the fault code.
4 Contact Customer Care.

41
COMPLIANCE INFORMATION
Registration cycle
The cycle for energy and water labelling in accordance with AS/NZS: 2040.2 and
AS/NZS:6400 is as follows: Cotton, Item: Durable, Colour: White, AutoDose: Manual. This
cycle is the recommended energy and water saving for normally soiled everyday washing,
equal to the rated capacity.
Note for Testing Laboratories: The powder detergent is placed directly into the bottom
of the drum. The maximum amount of anti-foaming agent is then placed into the bottom
of the drum followed by the PBIS solution. The load is then added as per AS/NZS2040.1
requirements.
Hot sanitise
This cycle complies with the bacterial removal requirements of GB 21551.5-2010. Average
elimination rate for the following bacteria, Staphylococcus aureus & Escherichia coli >99.9%.
Fibre: MIXED, Item Type: MODERATE: Treatment: SANITISE, Colour: MIXED, Soil Level:
MODERATE, AutoDose: MANUAL
Woolmark
The wool wash cycle of this machine has been approved by The Woolmark
Company for the washing of machine washable wool products provided that
the products are washed according to the instructions on the garment label
and those issued by the manufacturer of these washing machines M2529.
(WH8060J5, WH9060J5). The capacity of this cycle is 2kg.
Fibre: WOOL, Item Type: DELICATE, Treatment: WASH, Colour: WHITE, Soil Level:
LIGHT, AutoDose: MANUAL.
42
MANUFACTURER’S WARRANTY AND SERVICE GUIDE
To access your Warranty and Service Guide
Scan the QR code with your smartphone to access your warranty
and book a service, or view online at https://www.fisherpaykel.
com/nz/help-and-support/warranty-information
This product has been designed for use in a domestic (residential) environment. This
product is not designed for any commercial use. Any commercial use by the customer will
affect this product’s Manufacturer’s Warranty.
To access your Warranty and Service Guide
Scan the QR code with your smartphone to access your warranty
and book a service, refer to your separate warranty and service
book or view online at https://www.fisherpaykel.com/au/help-and-
support/warranty-information
NZ
AU
Complete and keep for safe reference:
Model
Serial No.
Purchase Date
Purchaser
Dealer
Suburb
Tow n
Country
433048A 10.25
FISHERPAYKEL.COM

433048A 10.25
FISHERPAYKEL.COM
© Fisher & Paykel Appliances 2025. All rights reserved.
The models shown in this guide may not be available in all markets
and are subject to change at any time.
The product specifications in this guide apply to the specific products and
models described at the date of issue. Under our policy of continuous product
improvement, these specifications may change at any time.
For current details about model and specification availability in your country,
please go to our website or contact your local Fisher&Paykel dealer.
