Start Recording
Charge
START
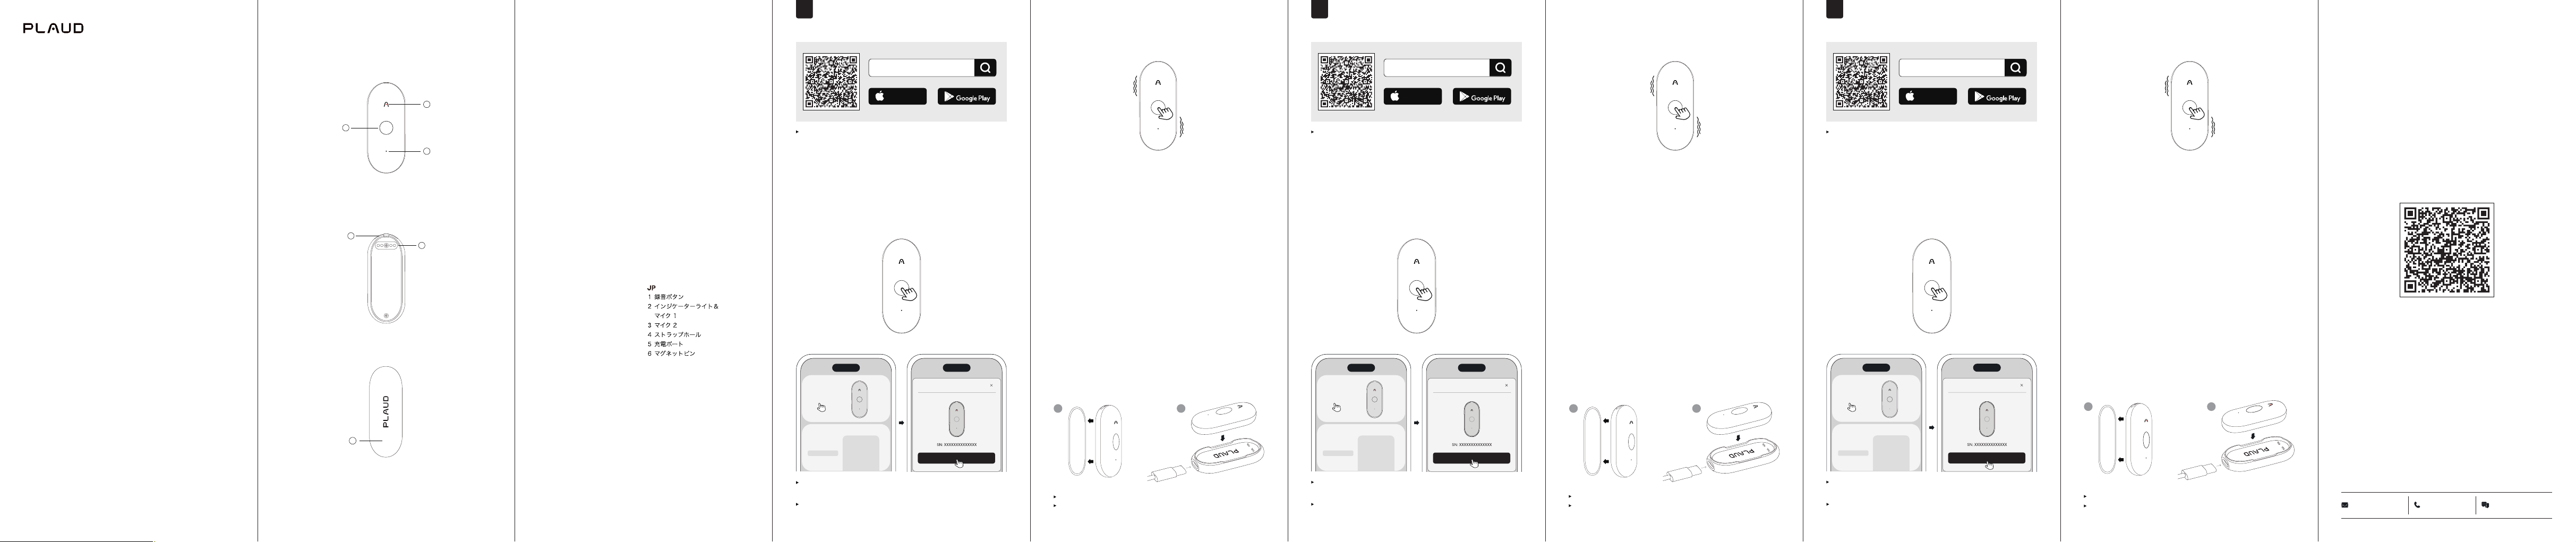
Long-press the Record Button and hold it for 1 second
until you feel 1 vibration, indicating that the recording has
started.
END
Long-press the Record Button and hold it for 1 second until
you feel 2 vibrations, indicating that the recording has
ended.
Press to Highlight
While recording, short-press the Record Button to instantly
highlight a specic moment.
1
2
1
2
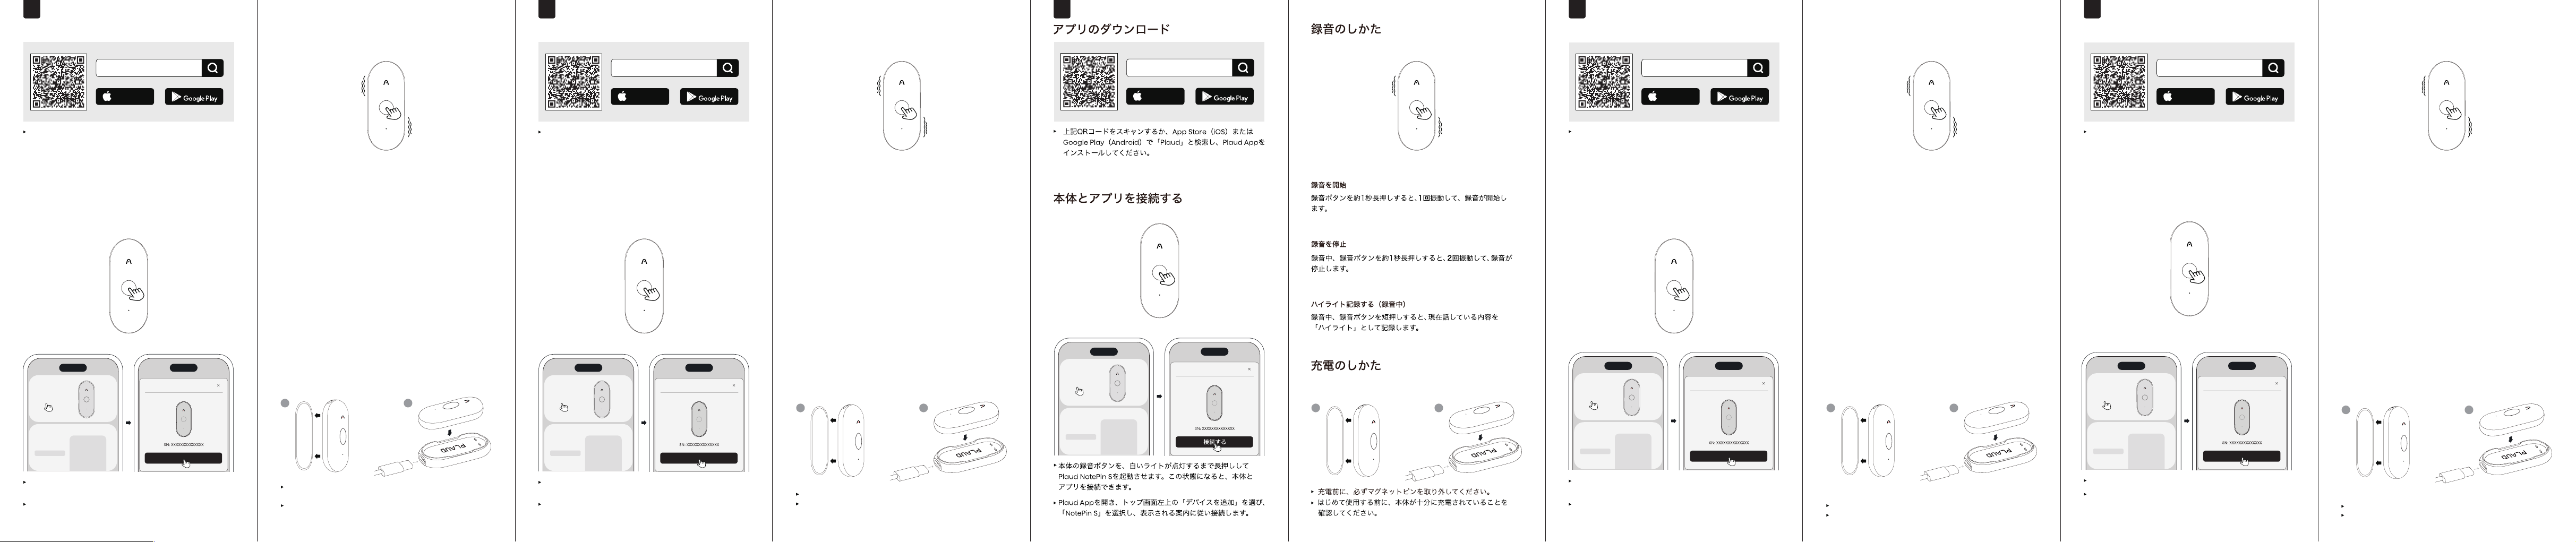
Téléchargez l'App
Plaud
Association et Connexion
Scannez le code QR ou recherchez "
Plaud
" dans
l'App Store (iOS) ou le Google Play Store (Android).
Appuyez jusqu'à ce que le voyant blanc clignote,
indiquant que le NotePin S est prêt pour l'association.
Ouvrez l'App
Plaud
et suivez les instructions à
l'écran pour compléter le processus d'association.
Please remove the Magnetic Pin before charging.
Please fully charge the device before using it for the first
time.
Plaud
NotePin S
Connectez-vous
FR
Commencez l'Enregistrement
Recharge
DÉMARRER
Maintenez le bouton d’enregistrement enfoncé pendant 1
seconde jusqu’à ce que vous ressentiez 1 vibration, indiquant
que l’enregistrement a commencé.
FIN
Maintenez le bouton d’enregistrement enfoncé pendant
1 seconde jusqu’à ce que vous ressentiez 2 vibrations,
indiquant que l’enregistrement est terminé.
Mise en évidence
Pendant l’enregistrement, appuyez brièvement sur le Bouton
d’enregistrement pour mettre un moment particulier en
évidence.
Veuillez retirer l'Épingle Magnétique avant la charge.
Veuillez charger l’appareil à 100 % avant la première
utilisation.
Plaud
App herunterladen
Bindung und Verbindung
Scannen Sie den QR-Code oder suchen Sie im App Store
(iOS) oder Google Play Store (Android) nach „
Plaud
.
Drücken Sie, bis das weiße Licht blinkt, was darauf
hinweist, dass der NotePin S zur Verbindung bereit ist.
Önen Sie die
Plaud
App und folgen Sie den Anweisungen
auf dem Bildschirm, um den Bindungsprozess abzuschließen.
Plaud
NotePin S
Verbinden
DE
Start der Aufnahme
Laden
START
Drücken und halten Sie die Aufnahmetaste für 1 Sekunde,
bis Sie 1 Vibration spüren, was anzeigt, dass die Aufnahme
gestartet wurde.
ENDE
Drücken und halten Sie die Aufnahmetaste für 1 Sekunde, bis
Sie 2 Vibrationen spüren, was anzeigt, dass die Aufnahme
beendet wurde.
Markieren
Drücke während der Aufnahme kurz auf die Aufnahmetaste,
um einen bestimmten Moment zu markieren.
Bitte entfernen Sie den Magnet-Pin vor dem Laden.
Bitte lade das Gerät vor der ersten Benutzung vollständig
auf.
1
2
Plaud
NotePin S
Quick Start Guide
1
2
3
6
4
5
EN
1 Record Button
2 Indicator Light
Microphone 1
3 Microphone 2
4 Lanyard Slot
5 Charging Port
6 Magnetic Pin
IT
1 Pulsante di registrazione
2 Spia luminosa
Microfono 1
3 Microfono 2
4 Slot per cordoncino
5 Porta di ricarica
6 Pin magnetico
DE
1 Aufnahmetaste
2 Kontrollleuchte
Mikrofon 1
3 Mikrofon 2
4 Schlaufenschlitz
5 Ladeanschluss
6 Magnetischer Pin
FR
1 Bouton d'enregistrement
2 Voyant lumineux
Microphone 1
3 Microphone 2
4 Emplacement pour cordon
5 Port de chargement
6 Broche magnétique
KR
1
녹음버튼
2
표시등
마이크
1
3
마이크
2
4
끈구멍
5
충전포트
6
자석흡착판
ES
1 Botón de grabación
2 Luz indicadora
Micrófono 1
3 Micrófono 2
4 Ranura para cordón
5 Puerto de carga
6 Pin magnético
TC
1
錄音按鍵
2
指示燈
麥克風
1
3
麥克風
2
4
項鍊線槽
5
充電端口
6
磁吸片
Download
Plaud
App
Binding and Connection
Scan the QR code or search for "
Plaud
" in the
App Store (iOS) or Google Play Store (Android).
Press until the white light flashes, indicating that the
NotePin S is ready for connection.
Open the
Plaud
App and follow the on-screen instructions
to complete the binding process.
Plaud
App Store
Download on the
GET IT ON
Plaud
App Store
Download on the
GET IT ON
Plaud
App Store
Download on the
GET IT ON
EN
Plaud
NotePin S
Connect
support@
Plaud
.ai +1 307-620-5674
Plaud
App or
Plaud
.ai
Model:
PN0210
32PS110002 V1.0
For software features and detailed instructions, refer to
the
Plaud
App or visit https://support.
Plaud
.ai.
Informationen zu den Softwarefunktionen und detaillierte
Anweisungen findest du in der
Plaud
-App oder unter
https://support.
Plaud
.ai.
Pour connaître les fonctionnalités du logiciel et obtenir des
instructions détaillées, consultez
Plaud
App ou
rendez-vous sur https://support.
Plaud
.ai.
Scan to Download
Plaud
App
IT
Scarica l'App
Plaud
Collegamento e Connessione
Scansiona il codice QR o cerca "
Plaud
" nell'App
Store (iOS) o Google Play Store (Android).
Plaud
NotePin S
Connetti
Inizio Registrazione
Carica
INIZIO
Premi e tieni premuto il pulsante di registrazione per 1
secondo fino a quando avverti 1 vibrazione, indicando che
la registrazione è iniziata.
FINE
Premi e tieni premuto il pulsante di registrazione per 1
secondo fino a quando avverti 2 vibrazioni, indicando che
la registrazione è terminata.
Evidenzia
Durante la registrazione, premi brevemente il pulsante
Registra per evidenziare un momento specico.
Si prega di rimuovere il Perno magnetico prima della
ricarica.
Carica completamente il dispositivo prima di utilizzarlo
per la prima volta.
ES
Descargar la App de
Plaud
Emparejamiento y Conexión
Escanea el código QR o busca "
Plaud
" en la App
Store (iOS) o en Google Play Store (Android).
Premere no a quando la luce bianca lampeggia,
indicando che NotePin S è pronto per la connessione.
Apri l'App
Plaud
e segui le istruzioni a schermo per
completare il processo di collegamento.
Presiona hasta que la luz blanca parpadee, indicando
que el NotePin S está listo para conectarse.
Abre la App de
Plaud
y sigue las instrucciones en
pantalla para completar el proceso de emparejamiento.
Plaud
NotePin S
Conectar
Inicio de Grabación
Cargar
INICIO
Mantenga presionado el botón de grabación durante 1
segundo hasta que sienta 1 vibración, lo que indica que la
grabación ha comenzado.
FIN
Mantenga presionado el botón de grabación durante 1
segundo hasta que sienta 2 vibraciones, lo que indica que
la grabación ha finalizado.
Destaca momentos clave
Durante la grabación, pulsa brevemente el botón de
grabación para destacar un momento especíco.
Por favor retire el Pin magnético antes de cargar.
Carga por completo el dispositivo antes de utilizarlo por
primera vez.
JP
TC
下載
Plaud
應用
綁定與連接
掃描二維碼或在
App Store (iOS)
或
Google Play Store
(Android)
搜索“
Plaud
”。
按下直到白色指示燈閃爍,表示
NotePin S
已準備好連接。
打開
Plaud
App
,按照屏幕上的說明完成綁定過程。
Plaud
NotePin S
連接
開始錄音
充電
開始錄音
長按錄音按鈕並保持 1 秒鐘,直到感受到一次震動,表示錄音已開始。
結束錄音
長按錄音按鈕並保持 1 秒鐘,直到感受到兩次震動,表示錄音已結束。
一鍵標記
在錄音期間,短按「錄音」按鈕以標記特定時刻。
充電前請先取下磁吸片。
首次使用前,請先為裝置充飽電力。
1
2
1
2
1
2
1
2
Plaud
App Store
Download on the
GET IT ON
Plaud
App Store
Download on the
GET IT ON
Plaud
App Store
Download on the
GET IT ON
Plaud
App Store
Download on the
GET IT ON
Plaud
앱 다운로드
연결 및 바인딩
QR
코드를 스캔하거나 앱스토어
(iOS)
또는 구글 플레이
스토어
(Android)
에서 "
Plaud
" 를 검색하세요 .
(Android)
搜索
“
Plaud
”。
흰색 빛이 깜박일 때까지 누르세요 ,
NotePin S
이 연결 준비
가 된 것을 나타냅니다 .
Plaud
앱을 열고 화면의 지시에 따라 바인딩 과정을
완료하세요 .
Plaud
NotePin S
기기연결
KR
Plaud
App Store
Download on the
GET IT ON
녹음 시작
충전
녹음 시작
녹음 버튼을 길게 누르고 진동이 1회 느껴질 때까지 1초 동안 유지하세요.
녹음이 시작되었다는 뜻입니다.
녹음 종료
녹음 버튼을 길게 누르고 진동이 2회 느껴질 때까지 1초 동안 유지하세요.
녹음이 종료되었다는 뜻입니다.
강조 표시
녹음 중 녹음 버튼을 짧게 누르면 특정 순간을 강조 표시할 수 있습니다 .
충전하기 전에 자석 플러그핀을 제거하십시오 .
첫 사용 전에 장치를 완전히 충전해 주세요 .
1
2
Plaud
NotePin S
Per le funzionalità del software e le istruzioni dettagliate,
fai riferimento a
Plaud
App o visita il sito
https://support.
Plaud
.ai.
Para conocer las funciones de software y obtener
instrucciones detalladas, consulta
Plaud
App o accede a
https://support.
Plaud
.ai.
ソフトウェアの機能や詳しい使い方については、
Plaud
App または
ヘ ル プ セ ン タ ー( https://support.
Plaud
.ai)を ご 確 認 く だ さ い 。
소프트웨어 기능 및 상세 지침은
Plaud
App을 확인하시거나
https://support.
Plaud
.ai로 방문해 주세요.
有關軟體功能與詳細說明,請參閱
Plaud
App 或造訪
https://support.
Plaud
.ai。