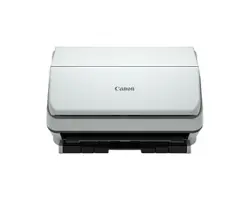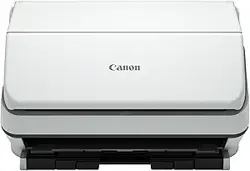
User Manual
• Please read this manual before operating this
scanner.
• After you finish reading this manual, store it in a safe
place for future reference.
3
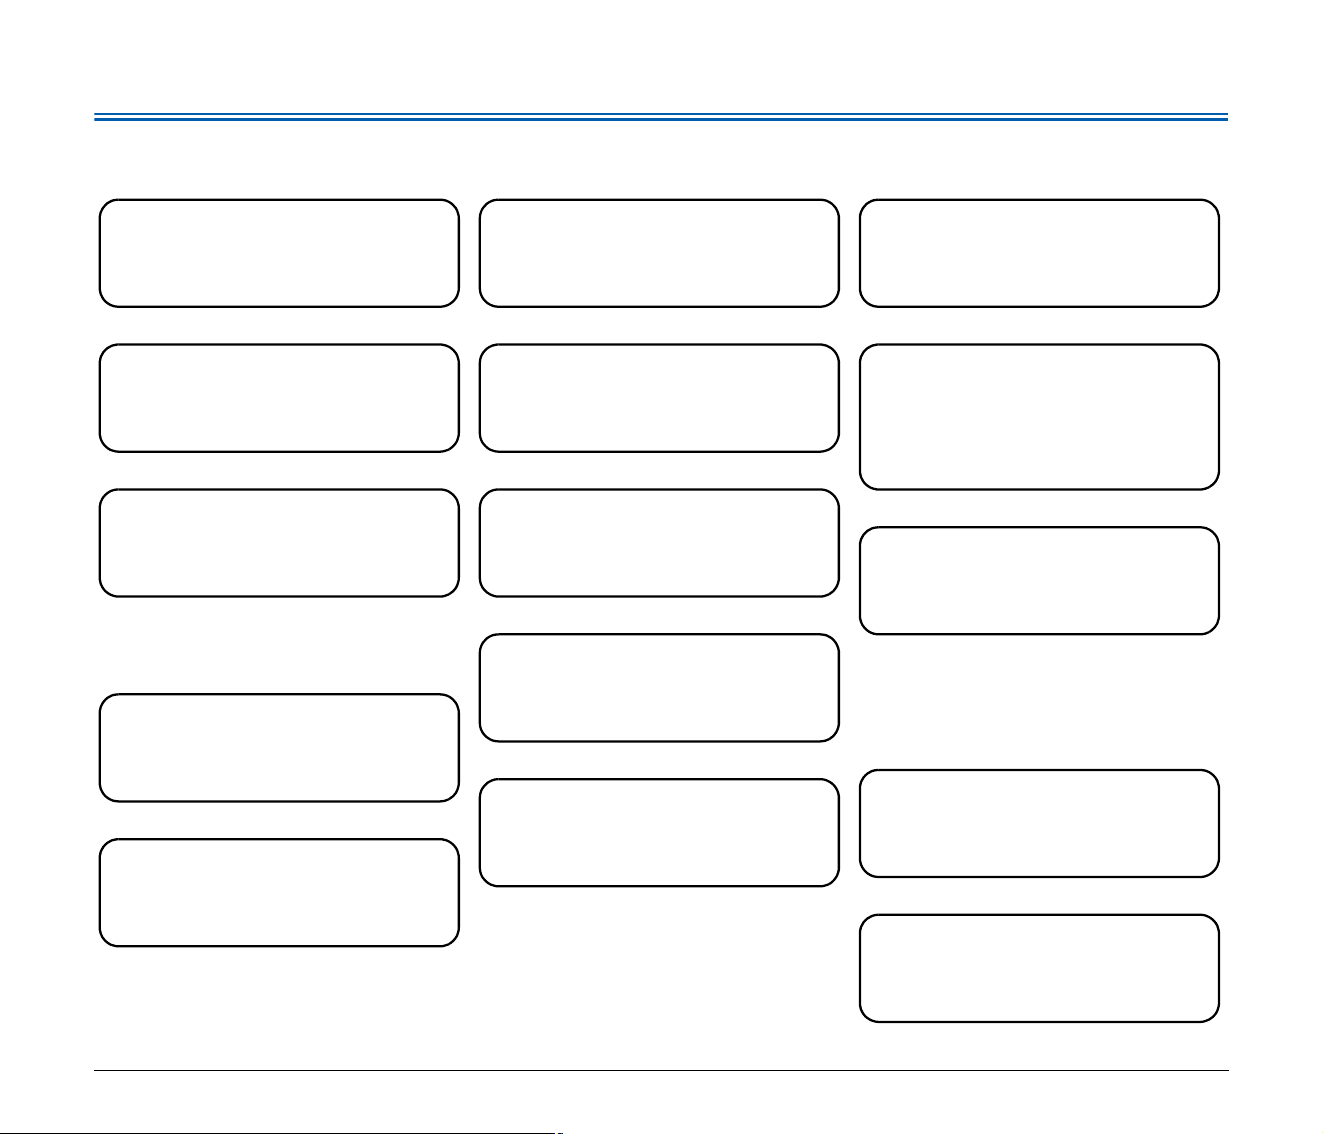
Frequently Asked Questions
■ Before Using
■ Feeding
■ Scanning ■ Scanned image
■ Replacing Consumable
Parts
The scanner will not turn
ON
➜P. 61
The scanner is not
recognized
➜P. 61
Scanning application
does not start
➜P. 61
Documents feed askew
➜P. 61
Documents jam (or
double-feed)
➜P. 62
Scanned image does not
appear on the application
➜P. 62
Pages are missing
➜P. 62
Scanning is too slow
➜P. 64
There is a display glitch
on the UI screen
➜P. 64
Memory becomes
Insufficient
➜P. 63
White lines or streaks
appear
➜P. 61
Scanned multiple pages
cannot be saved to a
single file
➜P. 62
Scanned files cannot be
opened in an application
➜P. 64
Replacing the Feed Roller
➜P. 56
Replacing the Retard
Roller
➜P. 56

4
Contents details
Contents............................................................................... 2
Frequently Asked Questions.............................................. 3
Contents details ..................................................................4
Introduction ......................................................................... 5
Symbols Used in This Manual...................................................... 5
Before Using the Scanner............................ 6
System Requirements of Software............................... 6
Important Safety Instructions....................................... 7
Installation Location ................................................................ 7
AC Adapter.............................................................................. 7
Moving the Scanner ................................................................ 8
Handling.................................................................................. 8
Disposal .................................................................................. 9
When sending the scanner for repairs .................................... 9
Features of the Scanner.............................................. 10
Names and Functions of Parts ................................... 11
Basic Operation ......................................... 14
Power Supply ............................................................... 14
Turning the Power ON .......................................................... 14
Turning the Power OFF......................................................... 15
Documents ................................................................... 16
How to Place Documents............................................ 18
Scanning multiple documents ............................................... 18
Placing Cards........................................................................ 19
Detecting a document double feed ....................................... 20
Scanning methods ..................................... 22
Scanning with CaptureOnTouch Lite......................... 22
What is CaptureOnTouch Lite?............................................. 22
Scanning Procedure.............................................................. 22
Starting and Exiting CaptureOnTouch Lite............................ 27
Operations for the scanned image edit window .................... 29
Setting the scan mode .......................................................... 32
Setting the output.................................................................. 35
Setting the Advanced Settings Dialog Box ............... 37
Configuration and Functions of the Advanced Settings
Dialog Box............................................................................. 37
Setting Basic Scanning Conditions ....................................... 40
Function Restrictions Depending on Mode Setting ............... 44
Configuring Scanner Settings According to Purpose ............ 46
Maintenance .............................................. 53
Daily Maintenance........................................................ 53
Cleaning the Scanner............................................................ 53
Cleaning the Inside of the Scanner ....................................... 53
Cleaning the Sensor Glass and the Rollers .......................... 53
Replacing Consumable Parts................................................ 56
Removing the Document Feed Tray ..................................... 60
Updating CaptureOnTouch Lite............................................. 60
Troubleshooting ......................................... 61
Common Problems and Solutions.............................. 61
Software Troubleshooting........................................... 64
Useful tips..................................................................... 65
Clearing a Paper Jam................................................... 67
Appendix .................................................... 69
Specifications............................................................... 69
Replacement parts ................................................................ 70
Dimensions............................................................................ 70
Index...............................................................................71
Regulations....................................................................72
5
Introduction
Thank you for purchasing the Canon imageFORMULA Document
Scanner.
Please read the following manuals carefully and familiarize yourself
with the functions of the scanner before use to ensure you sufficiently
understand the functions and make the most of the scanner’s
capabilities. After reading the manuals, store them in a safe place for
future reference.
Manuals for the Scanner
Documentation for this scanner consists of the following manuals.
● Product Safety Guide
Before using the scanner, be sure to read and follow these
instructions.
● Setup Guide
This describes setup procedures for the scanner. Read this manual
when you first use the scanner.
● User Manual (this manual)
This manual contains complete explanations for operations on the
scanner.
It can be displayed by clicking the [manual] icon on the pop-up
screen when the scanner is turned ON. For details, see p. 23.
You can also see the user manual at the following website.
https://software.canon-elec.co.jp/ims/r30/
Symbols Used in This Manual
The following symbols are used in this manual to explain procedures,
restrictions, handling precautions, and instructions that should be
observed for safety.
WARNING
Indicates a warning concerning operations that may lead to death
or injury to persons if not performed correctly. To use the scanner
safely, always pay attention to these warnings.
CAUTION
Indicates a caution concerning operations that may lead to injury to
persons, or damage to property if not performed correctly. To use
the scanner safely, always pay attention to these cautions.
IMPORTANT
Indicates operational requirements and restrictions. Be sure to
read these items carefully to operate the scanner correctly, and
avoid damaging the scanner.
Hint
Indicates a clarification of an operation, or contains additional
explanations for a procedure. Reading these notes is highly
recommended.
6
Before Using the Scanner
System Requirements of Software
To use the scanner, your computer must satisfy the following system
requirements.
Computer
CPU: Intel Core 2 Duo 1.66GHz or faster
Intel Core i7 2.3GHz or faster
Memory: 1 GB or more
8 GB or more
Hard disk: 3 GB or more available space required for
installation of all software
USB interface: Hi-Speed USB2.0
Monitor: Resolution of 1024 × 768 (XGA) or better
recommended.
Operating system
• Microsoft Windows 10 (32-bit and 64-bit editions)
• Microsoft Windows 11
• macOS 11
• macOS 12
• macOS 13
This is the environment as of February 2023.
For the latest software support information, go to the Products page
on the Canon website.
IMPORTANT
• Use the USB interface provided as standard with your computer.
However, normal operation is not guaranteed with all USB
interfaces, even if present as standard equipment on the computer.
For details, consult your local authorized Canon dealer.
• Scanning speeds are lower if your computer’s standard USB
interface is USB Full-Speed (equal to USB 1.1.)
• The USB cable you are using should be the one originally included
with the scanner.
• If the CPU, memory, interface card, and other specifications do not
satisfy the installation requirements, the scanning speed may be
greatly reduced and transmission may take a long time.
• Even if the computer satisfies the system requirements, the
scanning speed may vary, depending on the specification of the
computer and the environment.
• In Windows 10 tablet mode, the software may disrupt the display.
Precautions for Use in 64-bit Operating Systems
(Windows only)
Scanning speed may vary depending on the specifications of your
computer.
7
Important Safety Instructions
To ensure the safe operation of this scanner, be sure to read the
safety warnings and precautions described below.
Installation Location
The performance of this scanner is affected by the environment in
which it is installed. Make sure that the location where the scanner is
installed meets the following environmental requirements.
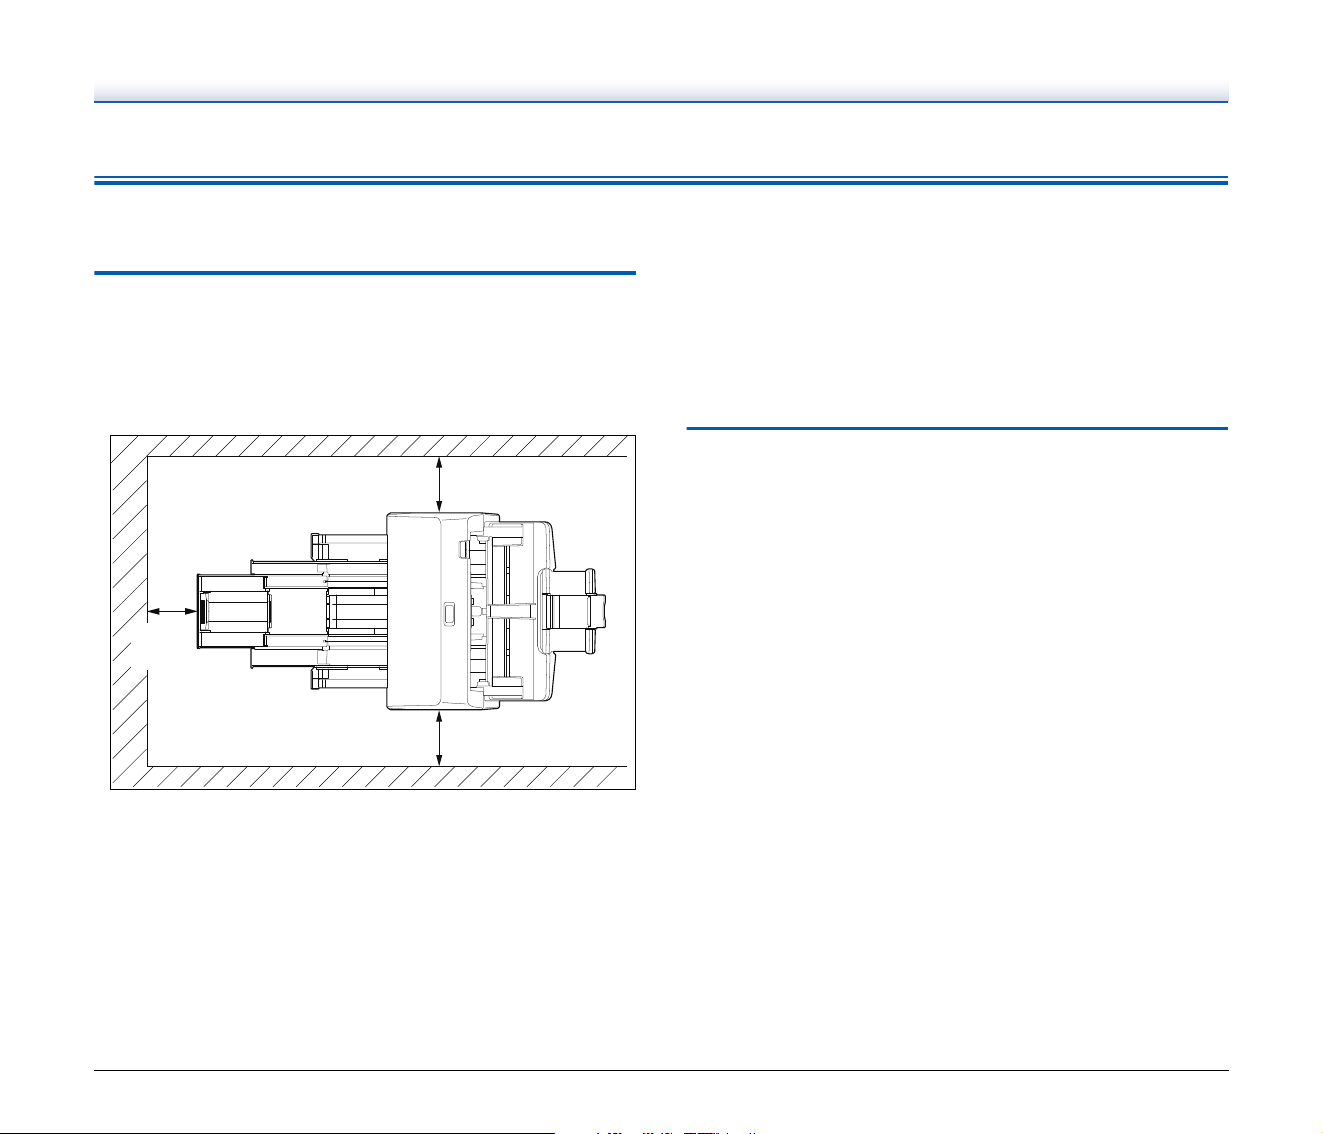
● Provide adequate space around the scanner for operation,
maintenance, and ventilation.
● Provide adequate space in front of the scanner for documents
output after being scanned.
● Avoid installing the machine in direct sunlight. If this is unavoidable,
use curtains to shade the scanner.
● Avoid locations where a considerable amount of dust accumulates
as dust may adversely affect the inside of the scanner.
● Avoid warm or humid locations, such as in the vicinity of a water
faucet, water heater, or humidifier. Avoid locations where ammonia
gas is emitted. Avoid locations near volatile or flammable materials,
such as alcohol or paint thinner.
● Avoid locations that are subject to vibration.
● Avoid exposing the scanner to rapid changes in temperature. If the
room in which the scanner is installed is cold but rapidly heated,
water droplets (condensation) may form inside the scanner. This
may result in a noticeable degradation in scanning quality. The
following conditions are recommended for optimal scanning quality:
Room temperature: 10 °C to 32.5 °C (50 °F to 90.5 °F)
Humidity: 20% to 80% RH
● Avoid installing the scanner near equipment that generates a
magnetic field (e.g. speakers, televisions, or radios.)
AC Adapter
● Connect only to a power outlet of the rated voltage and power
supply frequency (120 V, 60 Hz or 220-240 V, 50/60 Hz depending
on your region).
● Do not connect other electrical equipment to the same power outlet
to which the scanner is connected. Also, when using an extension
cord, make sure that the extension cord is rated for the current
requirements of the scanner.
● Never try to take the AC adapter apart or modify it in any way, as
this is dangerous.
● The power cord may become damaged if it is often stepped on or if
heavy objects are placed on it.
● Do not use the power cord while it is coiled.
● Do not pull directly on the power cord. When disconnecting the
power cord, grasp the plug and remove it from the outlet.
● Keep the area around the power cord clear of objects so that the
power cord can be disconnected easily in an emergency.
● Do not use an AC adapter other than the one provided with the
scanner. Do not use the AC adapter provided with the scanner with
other products.
● If you have any questions regarding the power supply, contact your
local authorized Canon dealer or service representative for further
information.
100mm
(3.94")
100mm (3.94")
100mm (3.94")
8
Moving the Scanner
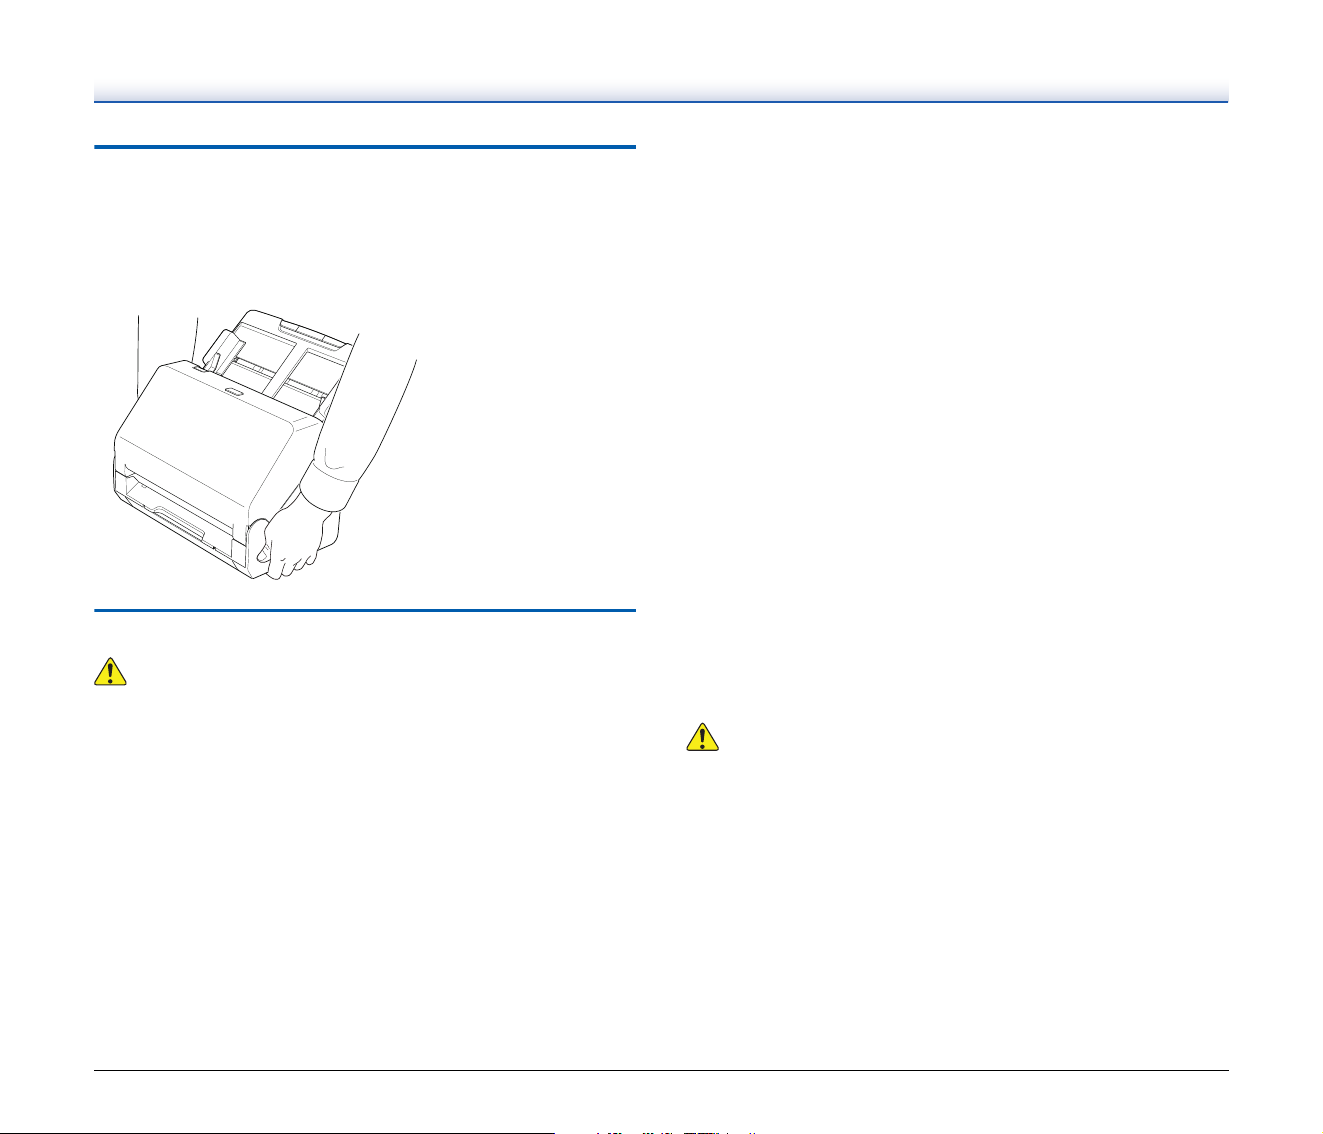
● When moving the scanner, always hold it with both hands to avoid
dropping it.
● Make sure to disconnect the interface cable and AC adapter before
moving the scanner. If the scanner is transported with these items
connected, the plugs and connectors may be damaged.
Handling
WARNING
Note the following precautions whenever using the scanner. Failure to
do so may result in a fire or electric shock.
● Never use alcohol, benzene, paint thinner, aerosol sprays, or any
other highly flammable substance near the scanner.
● Do not cut, damage, or modify the power cord. Do not place heavy
objects on the power cord, and do not pull or excessively bend the
power cord.
● Never connect the power cord when your hands are wet.
● Do not connect the scanner to a multi plug power strip.
● Do not knot or coil the power cord as this may result in a fire or
electric shock. When connecting the power cord, make sure that the
power plug is securely and completely inserted into the power
outlet.
● The supplied power cord set is intended for use with this scanner
only. Do not use it with other electronic equipment. In addition, do
not use power cord sets other than the one supplied with the
scanner. Doing so may result in fire or electric shock.
● Do not take the scanner apart or modify it.
● Never try to take the AC adapter apart or modify it in any way, as
this is dangerous.
● Do not use flammable spray near the scanner.
● When cleaning the scanner, push the power button to turn it OFF
and disconnect the power cord from the power supply.
● Clean the scanner using a slightly dampened cloth which has been
well wrung out. Never use alcohol, benzene, paint thinner, or any
other flammable substances.
● If the scanner makes strange noises, or gives off smoke, heat, or
strange odors, or the scanner does not function or other
abnormalities occur when you use the machine, immediately push
the power button to turn it off, and disconnect the power plug from
the power outlet. Then, contact your local authorized Canon dealer
or service representative to have the unit serviced.
● Do not drop the scanner, or subject it to impact or strong shock.
Should the scanner ever become damaged, immediately push the
power button to turn it OFF, and disconnect the power plug from the
power outlet. Then, contact your local authorized Canon dealer or
service representative to have the unit serviced.
● Before moving the scanner, be sure to push the power button to turn
it OFF, and disconnect the power plug from the power outlet
CAUTION
● Do not install the scanner on a surface that is unstable or tilted, or
in an area subject to excessive vibrations, as this may cause the
scanner to fall, resulting in personal injury or damage to the
scanner.
● Never place small metal objects such as staples, paper clips, or
jewelry on the scanner. These items may fall into the scanner, and
cause a fire or electric shock. Should such objects ever fall inside
the scanner, immediately push the power button to turn it OFF, and
disconnect the power plug from the power outlet. Then, contact
your local authorized Canon dealer or service representative to
have the unit serviced.
● Do not install the scanner in a humid or dusty location. Doing so
might cause a fire or electric shock.

9
● Do not place objects on top of the scanner. Such objects may tip or
fall over, resulting in personal injury.
● Connect only to a power outlet of the rated voltage and power
supply frequency (120 V, 60 Hz or 220-240 V, 50/60 Hz depending
on your region). Doing so might cause a fire or electric shock.
● When unplugging the power cord, grasp it firmly by its plug. Do not
pull directly on the power cord, as this may damage or expose the
cord’s internal wiring, resulting in a fire or electric shock.
● Leave sufficient space around the power plug so that it can be
unplugged easily. If objects are placed around the power plug, you
will be unable to unplug it in an emergency.
● Do not allow water or flammable substances (alcohol, paint thinner,
benzene, etc.) to spill into the scanner, as this may result in a fire or
electric shock. Doing so might cause a fire or electric shock.
● Push the power button to turn the scanner OFF for safety when not
using the scanner for a long period of time, such as overnight. Also,
push the power button to turn it OFF, and disconnect the power cord
from the power outlet for safety when the machine will not be used
for an extended period of time, such as during consecutive
holidays.
● Do not wear loose clothing or jewelry that may get caught in the
scanner while you are using it, as this may result in personal injury.
Be extra careful of neckties and long hair. If anything becomes
caught in the scanner, immediately disconnect the power cord to
stop the scanner.
● Be careful when loading paper into the scanner and when removing
jammed paper, as it is possible to cut your hand on the edge of a
sheet of paper.
Disposal
When disposing of this scanner, be sure to follow all local ordinances
and laws or consult with the retailer who sold you the scanner.
When sending the scanner for repairs
When a request is made for repairs, the scanner needs to be sent to
the specified address. When sending the scanner, use the packing
box in which it came. Firmly secure the scanner with packaging
material when you place it in the packing box.

10
Features of the Scanner
The main features of the scanner are described below.
Ready to use right out of the box
Normally, scanners cannot scan documents without installing the
driver and scanning application software into PC in advance. The
application software “CaptureOnTouch Lite” is pre-installed on the
R30, and you can scan documents only by connecting to PC via USB
cable. This is Canon’s unique technology, and realizes shortest time
needed to your 1st scan.
Simple, easy-to-use built-in software
You just select document type and output. CaptureOnTouch Lite
achieves simple & intuitive operation.
Single pass double-sided scanning
The scanner can provide comfortable scanning environment due to
single pass double-sided scanning function.
Card scan
You can scan business or ID cards.
Full Auto Mode
A Full Auto Mode is provided in CaptureOnTouch Lite to allow
scanning under automatically determined conditions. Scanning
conditions such as the color mode and page size are set automatically
based on the document being scanned.
Auto Resolution Detection
When enabled in the CaptureOnTouch Lite settings, this function
detects the content of documents and determines the scanning
resolution automatically.
Deskew
The scanner is equipped with a deskew function that straightens
images before saving them when documents are scanned askew. The
scanned images are straightened, as opposed to the actual document
sheets.
Support different type of document
The scanner can scan A4 document, legal, receipts, business cards,
plastic or embossed cards, reports and more. Also the scanner
automatically adjusts multiple feature settings to deliver optimal
images.
Eco-friendly
Maximum power consumption is only 10W. Also, the scanner is
designed to save energy by automatically entering the sleep mode if
10 minutes elapse without scanning or another operation being
performed.
11
Names and Functions of Parts
Front View (With the Eject Tray Pushed In)
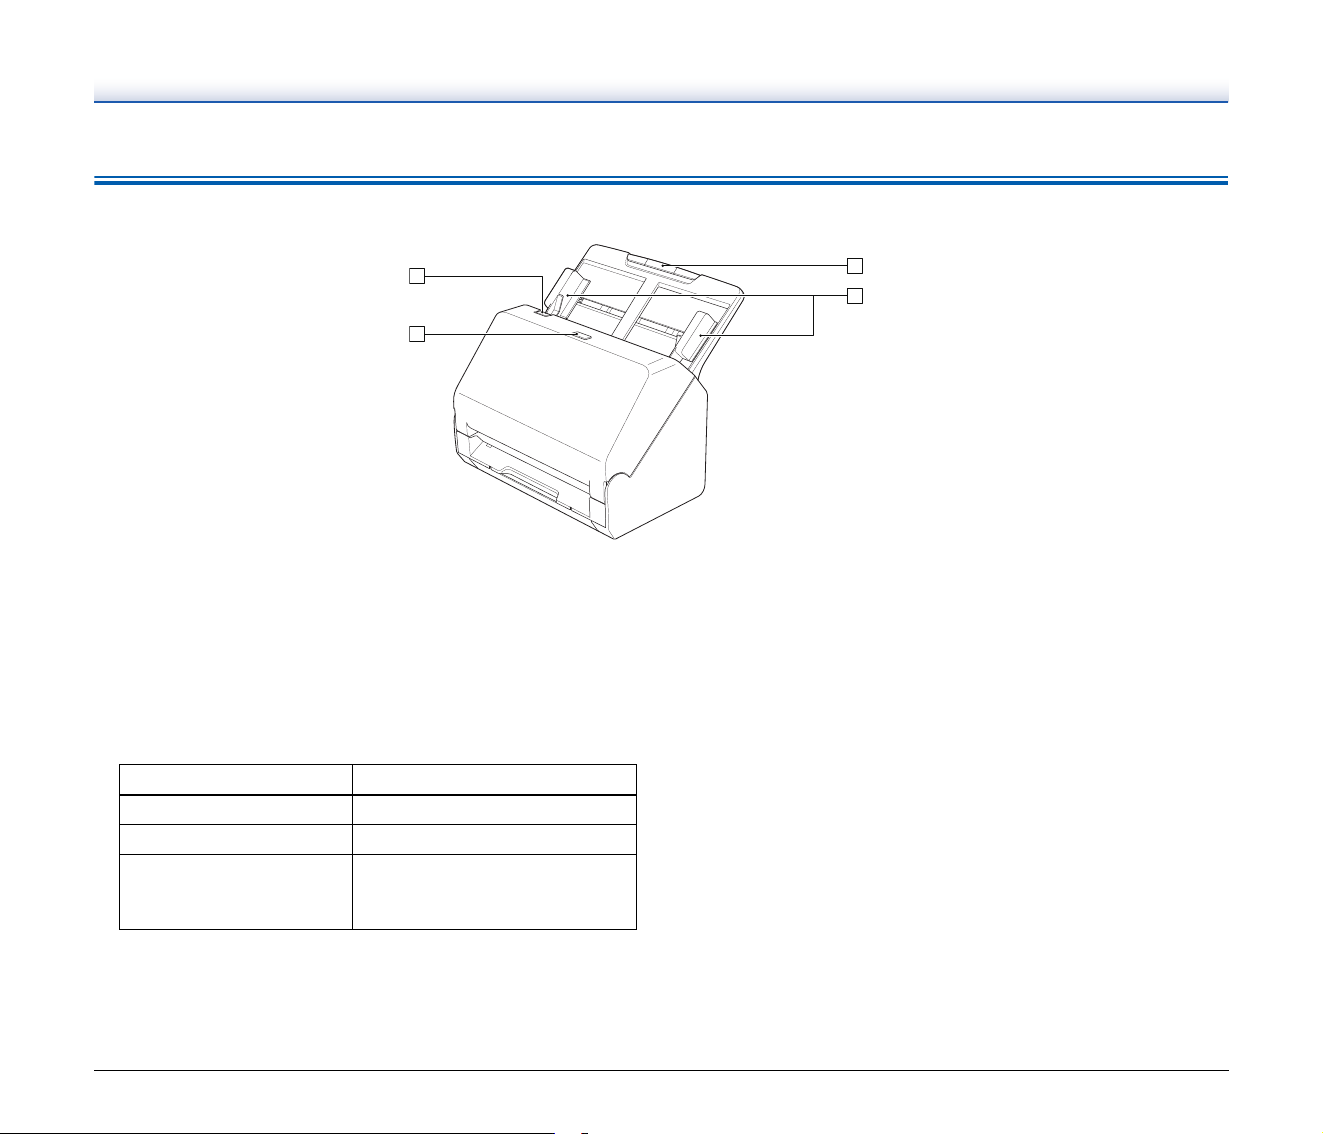
A OPEN Lever
Pull this toward you to open the front unit.
B Power button
Press this to turn on the scanner. When pressed, the power
indicator is lit.
Press this button again to turn off the power.
The power button lights or flashes as follows depending on the
scanner status.
C Document Feed Tray
Place the document.
D Document Guides
Align the document guides with both edges of the document to
ensure that the document feeds straightly.
Power Button Indication Description
Lit Power is on
Flashing (slowly) Sleep mode
Flashing (quickly)
An error (paper jam, front unit is
open, double feed, etc.) has
occurred
12
Front View (With the Eject Tray Pulled Out)
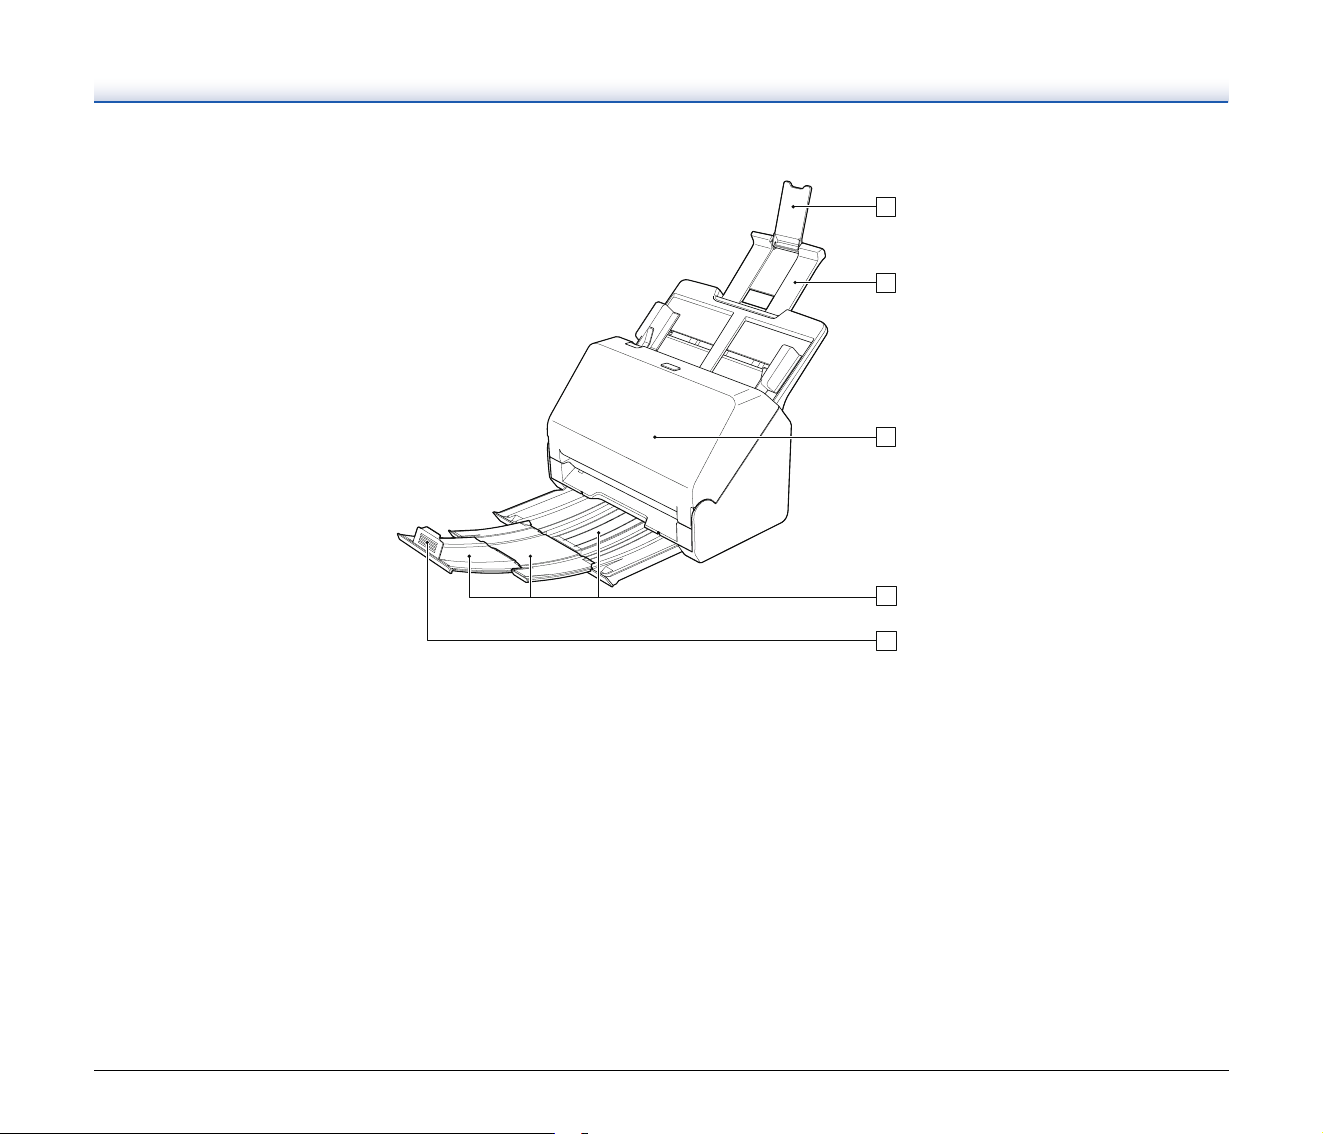
A Feed Extension Support
Open this when placing long paper in the scanner.
B Feed Support
Pull this out to support loaded documents.
C Front Unit
Open this when cleaning the inside of the scanner or replacing
rollers.
D Document Eject Tray
Pull this out to scan documents. Scanned documents are output
here.
When scanning multiple documents of varying sizes at one time,
pulling out and lifting up this tray locks the angle of the tray, so the
documents ejected onto the tray are aligned.
E Document Eject Stopper
This prevents the document coming out of the document eject tray
and aligns the leading edges of the ejected document. It can be
moved to any position on the document eject tray to match the
length of the document.
13
Back View
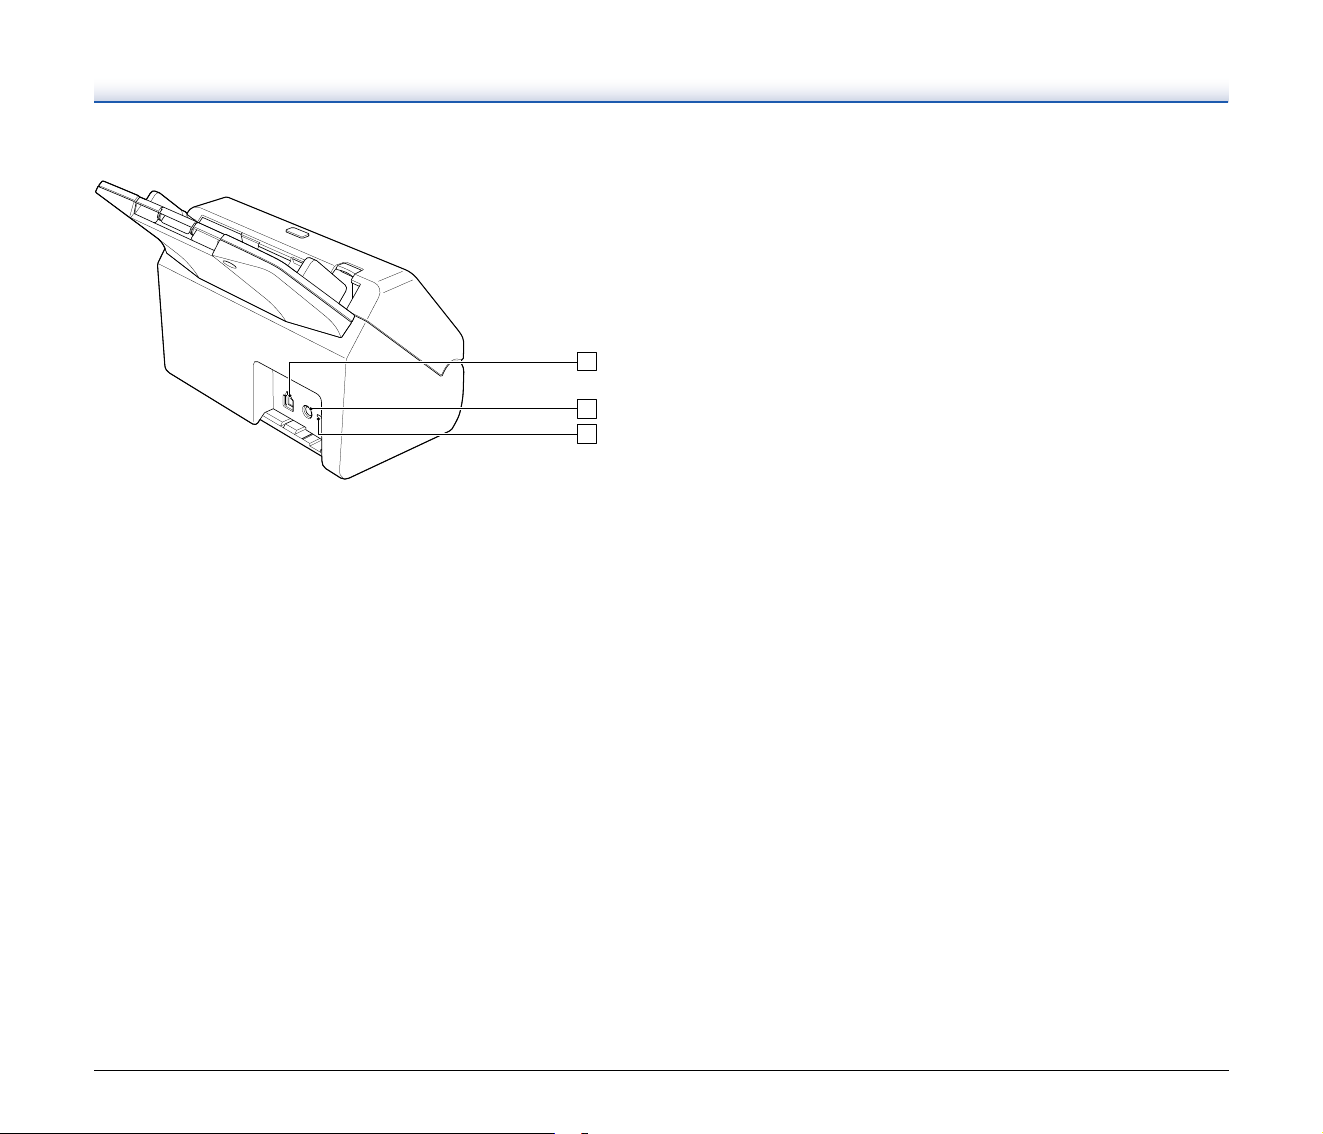
A USB Connector
Connect the supplied USB cable to this connector.
B Power Connector
Connect the supplied AC adapter to this connector.
C Theft Prevention Hole (Security Slot)
Connect an anti-theft key chain or the like.
14
Basic Operation
Power Supply
The power of the scanner can be turned ON and OFF with the power
button on the front of the scanner.
Turning the Power ON
1
Make sure that the scanner and computer are connected
properly.
2
Press the power button.
The power button lights blue when the power turns ON.
Hint
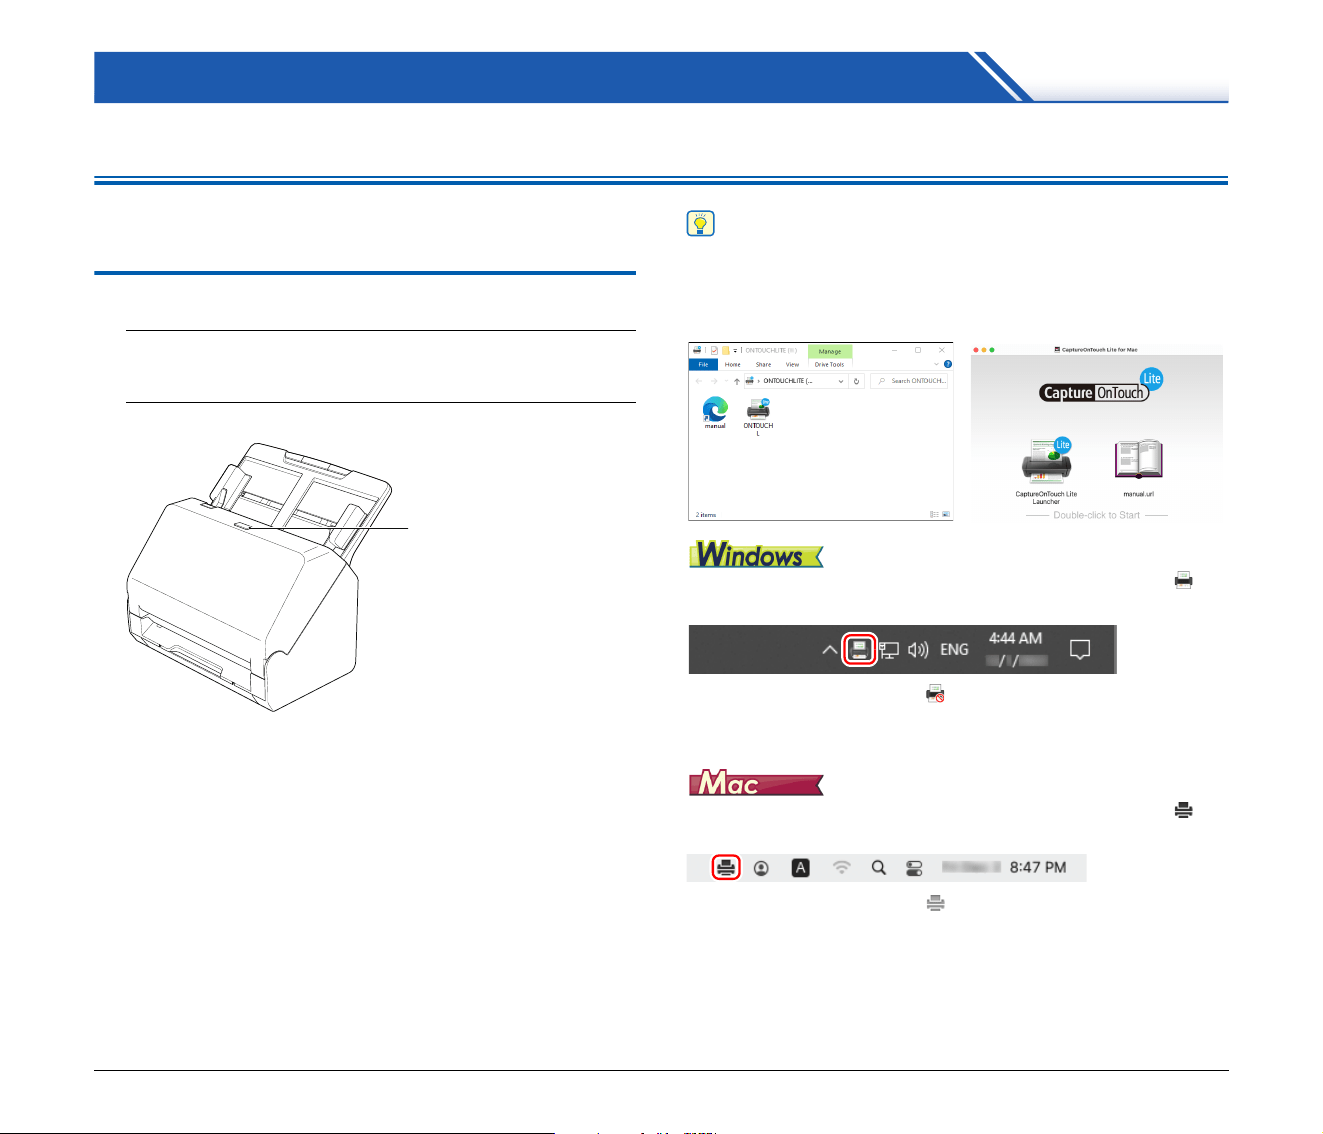
When the scanner is turned ON while the operating system of the
computer is running, a screen for starting CaptureOnTouch Lite is
displayed on the computer. For details on screen operations, see
“Scanning with CaptureOnTouch Lite” on p. 22.
When the scanner is properly connected to the computer, the
(CaptureOnTouch Lite) icon appears on the taskbar as follows.
If the taskbar icon appears as , the scanner is not properly
connected to the computer. Check the status of the power button and
USB cable.
When the scanner is properly connected to the computer, the
(CaptureOnTouch Lite) icon appears on the taskbar as follows.
If the taskbar icon appears as , the scanner is not properly
connected to the computer. Check the status of the power button and
USB cable.
Power button

15
Turning the Power OFF
Press and hold the power button until the indicator goes out.
IMPORTANT
• After turning the scanner off, wait at least 10 seconds before turning
it back on.
• If you will not be using the scanner for an extended period, you
should disconnect the power cord from the AC outlet for safety.
Hint
The scanner’s auto power off setting is enabled by default, and the
scanner will turn off automatically if it is not operated for 4 hours.
16
Documents
The scanner can scan documents ranging in size from business cards
to LTR/A4. The document sizes that this scanner can scan are shown
below.
Plain Paper
Size
Width: 50.8 mm to 216 mm (2" to 8.5")
Length: 54 mm to 356 mm (2.1" to 14")
Paper thickness
27 to 209 g/m
2
(7 to 56 lb bond) 0.04 mm to 0.25 mm (0.00157"
to 0.00984")
Loading capacity
A4 size or smaller: 60 sheets (80g/m
2
(22 lb bond))
Larger than A4 size: 40 sheets (80g/m
2
(22 lb bond))
Make sure stacks do not exceed 6 mm in height for either of the
above.
IMPORTANT
The documents to be scanned must satisfy certain criteria. Read the
following items carefully.
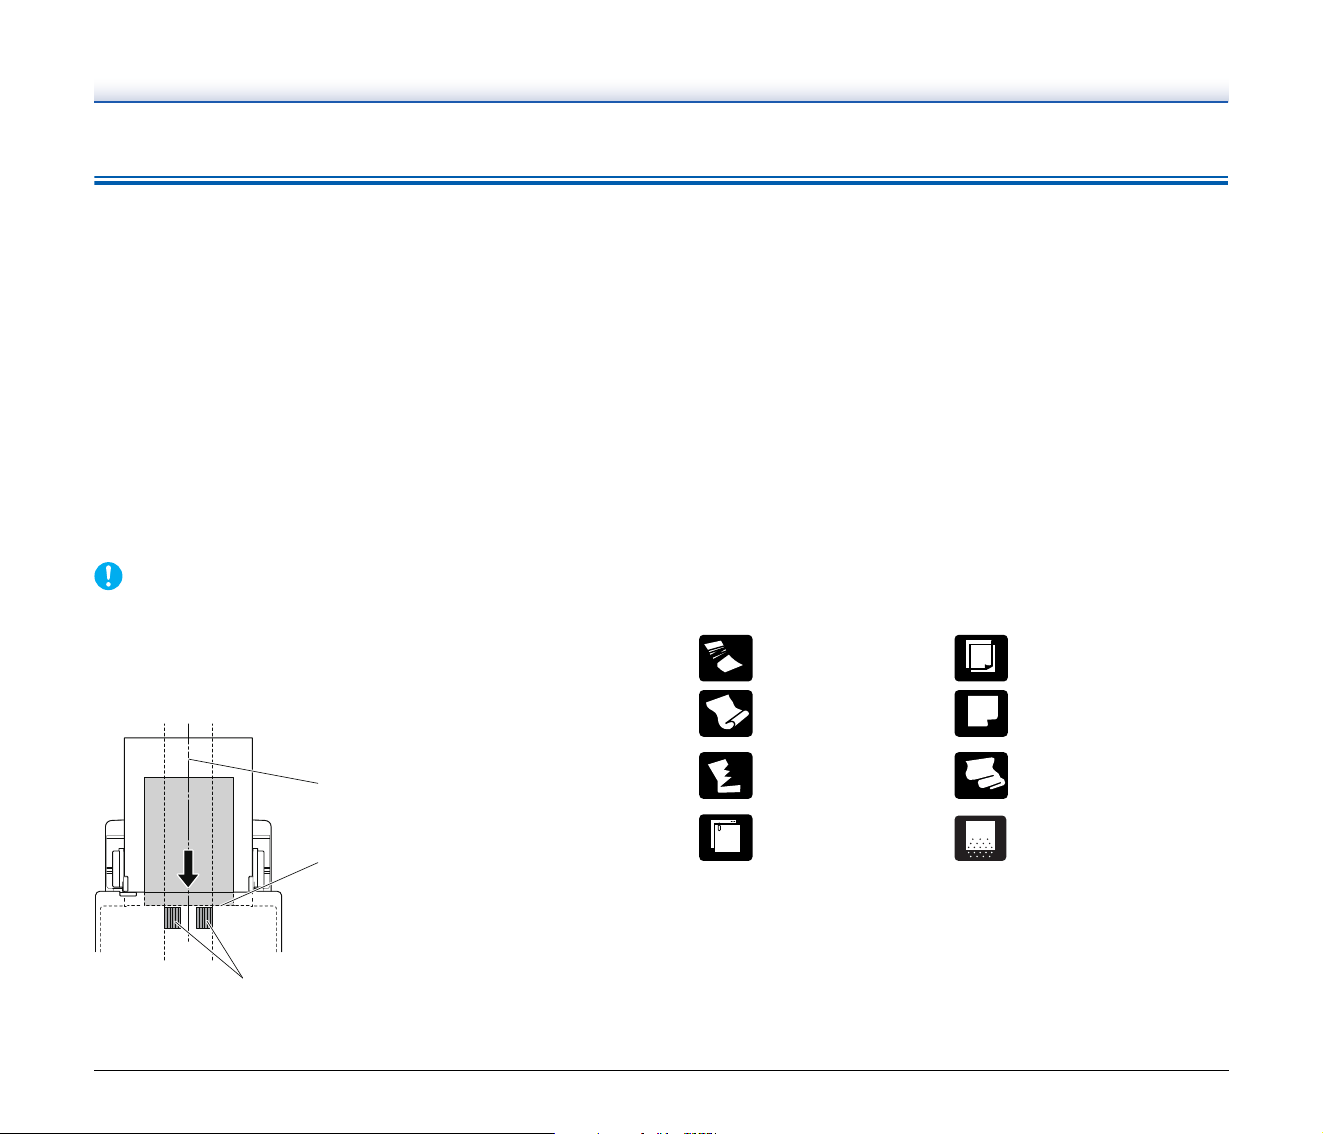
• When scanning multiple documents of different sizes, place the
documents so that they cover the entire span of the feed rollers by
aligning the centers and leading edges of the documents.
• It is recommended that documents exceeding 356 mm (14") size
are fed one sheet at a time.
• Scanning documents before the ink is dry can cause problems with
the scanner. Always make sure that the ink on a document is dry
before scanning it.
• Scanning documents that are written in pencil or similar material
may make the rollers and scanning glass dirty, which can lead to
smudges on the scanned image and transfer the dirt to subsequent
documents. Always clean the internal parts of the scanner after
scanning such documents.
• When scanning a two-sided document that is printed on thin paper,
the image on the opposite side of each page may show through. In
this case, adjust the scanning intensity in the application software
before scanning the document.
• Laminated documents may not be scanned correctly, depending
on the document.
• Scanning the following types of documents can cause a paper jam
or malfunction. To scan such a document, make a photocopy of the
document and then scan the photocopy.
Feed roller
Align the leading edges
Align the centers
There are creases or
fold lines.
Carbon paper
There are curls. The surface is coated.
There are tears.
Extremely thin document
such as semi-transparent
thin paper.
There are clips or
staples.
Documents with excessive
paper dust particles.
17
Business Card
Size: 50 mm x 85 mm (1.97" x 3.35") or larger
Paper thickness: 255 g/m
2
(68 lb bond) 0.3 mm (0.0118") or
smaller
IMPORTANT
If a stack of business cards cannot be fed properly, reduce the
number of cards in the stack.
Card (plastic)
Size: 54 mm x 86 mm (2.12" x 3.37") (ISO standard)
Card thickness: 1.4 mm (0.055") or smaller
Orientation: Horizontal feeding only
Embossed cards can be scanned.
Loading capacity: 3 cards (non-embossed), 1 card (embossed)
CAUTION
• When scanning cards, place them to be fed horizontally. If you
place cards to be fed vertically, they may not be ejected properly,
and cards that get jammed may be damaged when you remove
them.
• Embossed cards may not be able to be scanned correctly,
depending on the type of embossment.
18
How to Place Documents
Scanning multiple documents
Standard paper feeding should be used when scanning multiple
documents of a standard size at one time. Standard paper feeding
enables multiple documents to be fed while separating each page.
1
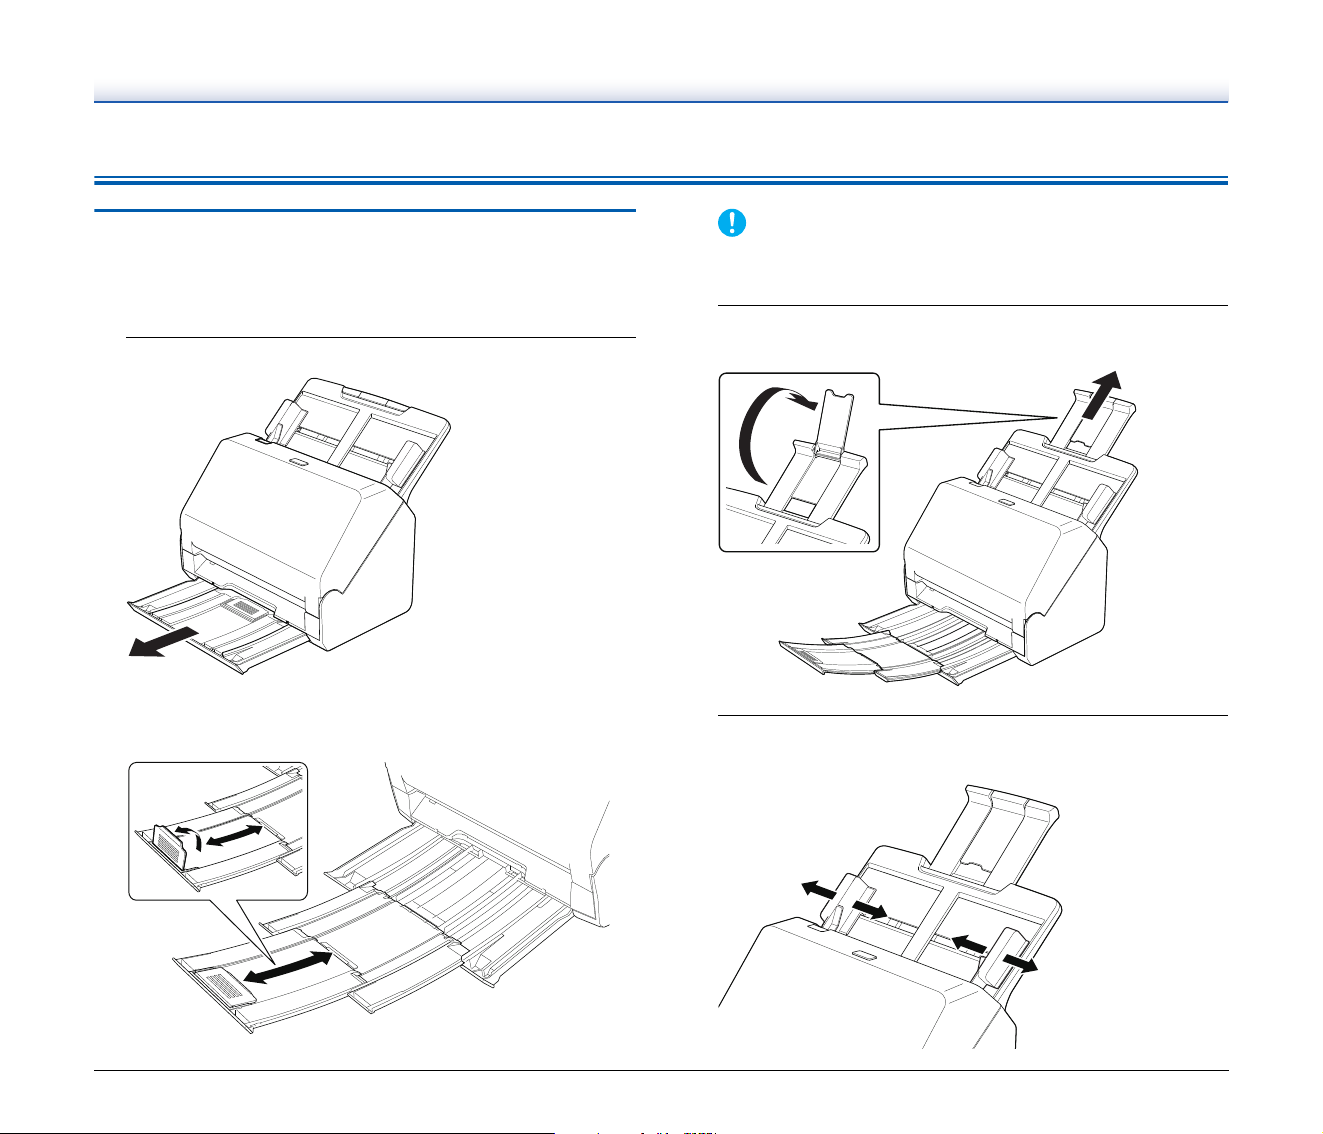
Pull out the document eject tray.
The document eject tray can be adjusted to 3 lengths. Pull out the
document eject tray according to the length of the document. Also,
erect the document eject stopper on the front edge if necessary.
IMPORTANT
Pull the document eject tray forward according to the various
lengths.
2
Pull out the feed support.
Open the feed extension support when placing long documents.
3
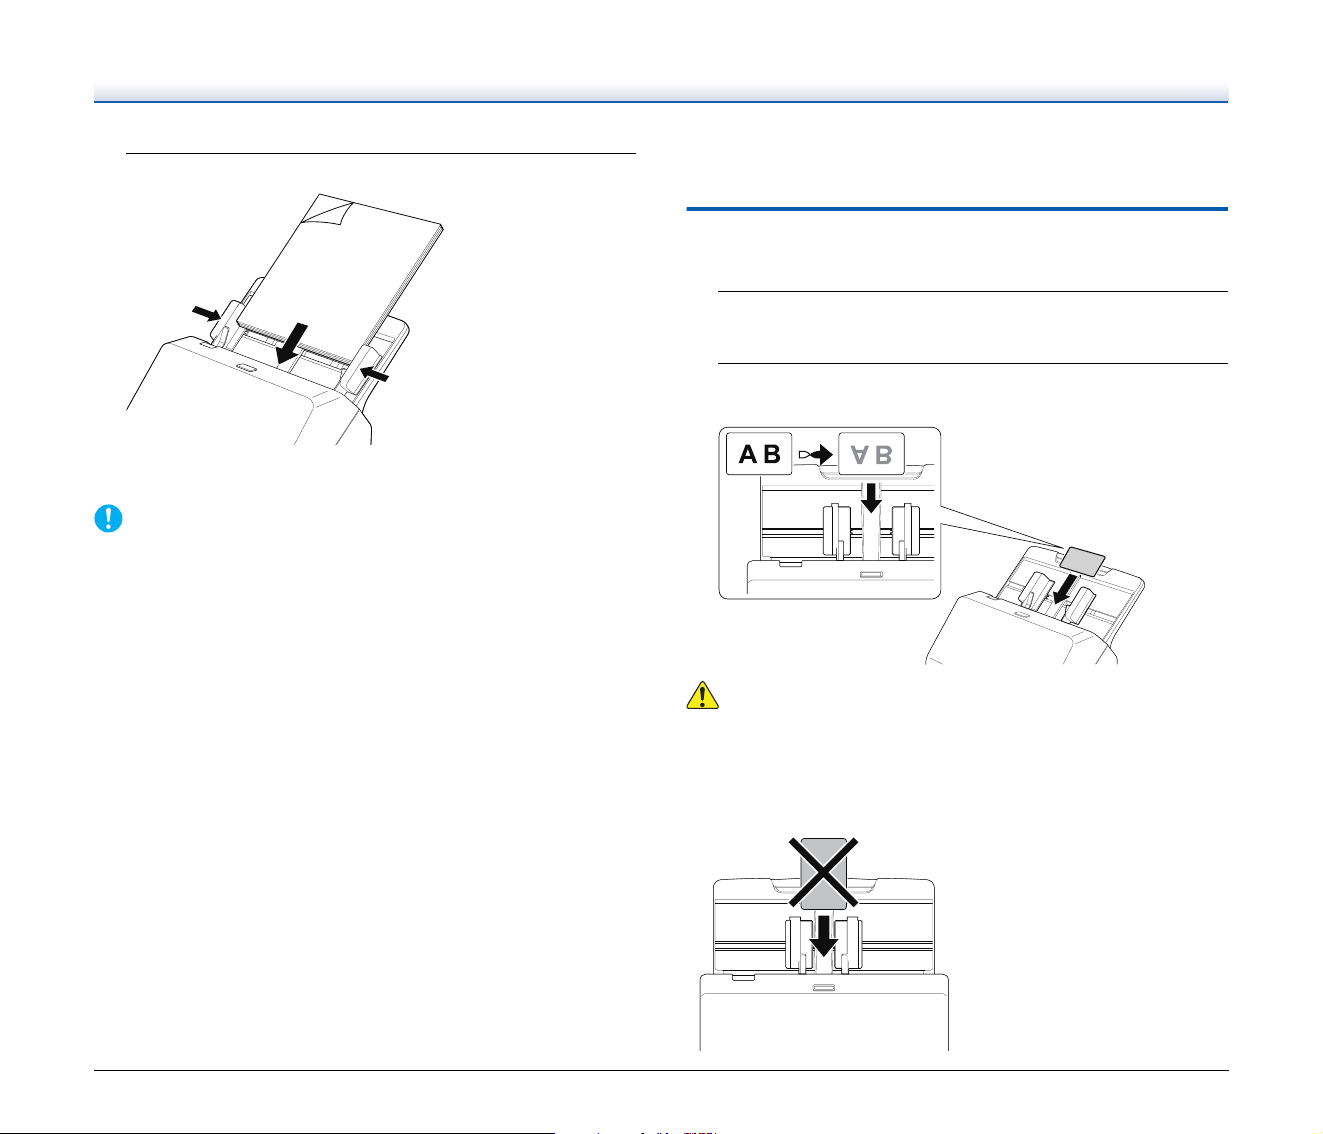
Adjust the document guides to fit the width of the
document to be scanned.
19
4
Place the document.
After placing the document, align the document guides with both
edges of the document.
IMPORTANT
• When placing documents into the feed tray, take care not to cut
your hand on the edges of the paper.
• Before you place a document, check to make sure it does not
contain paper clips, staples, or other small metal objects. These
items may cause a fire or electrical shock, damage the document,
or cause a paper jam or scanner malfunction.
• Do not wear loose clothing or jewelry that may get caught in the
scanner while you are using it, as this may result in personal injury.
Be extra careful of neckties and long hair. If anything gets caught in
the scanner, immediately turn OFF the power button, and
disconnect the power cord from the power outlet to stop scanning.
• Always smooth out any folds or curls in your documents before
placing them into the feeder. If the leading edge of a document is
curled, it may cause a paper jam.
• If feeding stops due to a system error or paper jam while the
scanner is scanning, resolve the problem, make sure that the
scanned image of the last page that was successfully fed has been
stored, and then resume scanning the remaining document pages.
• After you finish scanning, push in the document eject tray to prevent
damage to the scanner while it is not being used.
• When scanning multiple page documents that are fastened
together, such as invoices, place the documents so that the edge
that is fastened together is facing down.
• If double-feeding occurs, reduce the number of pages that you load
into the scanner at one time.
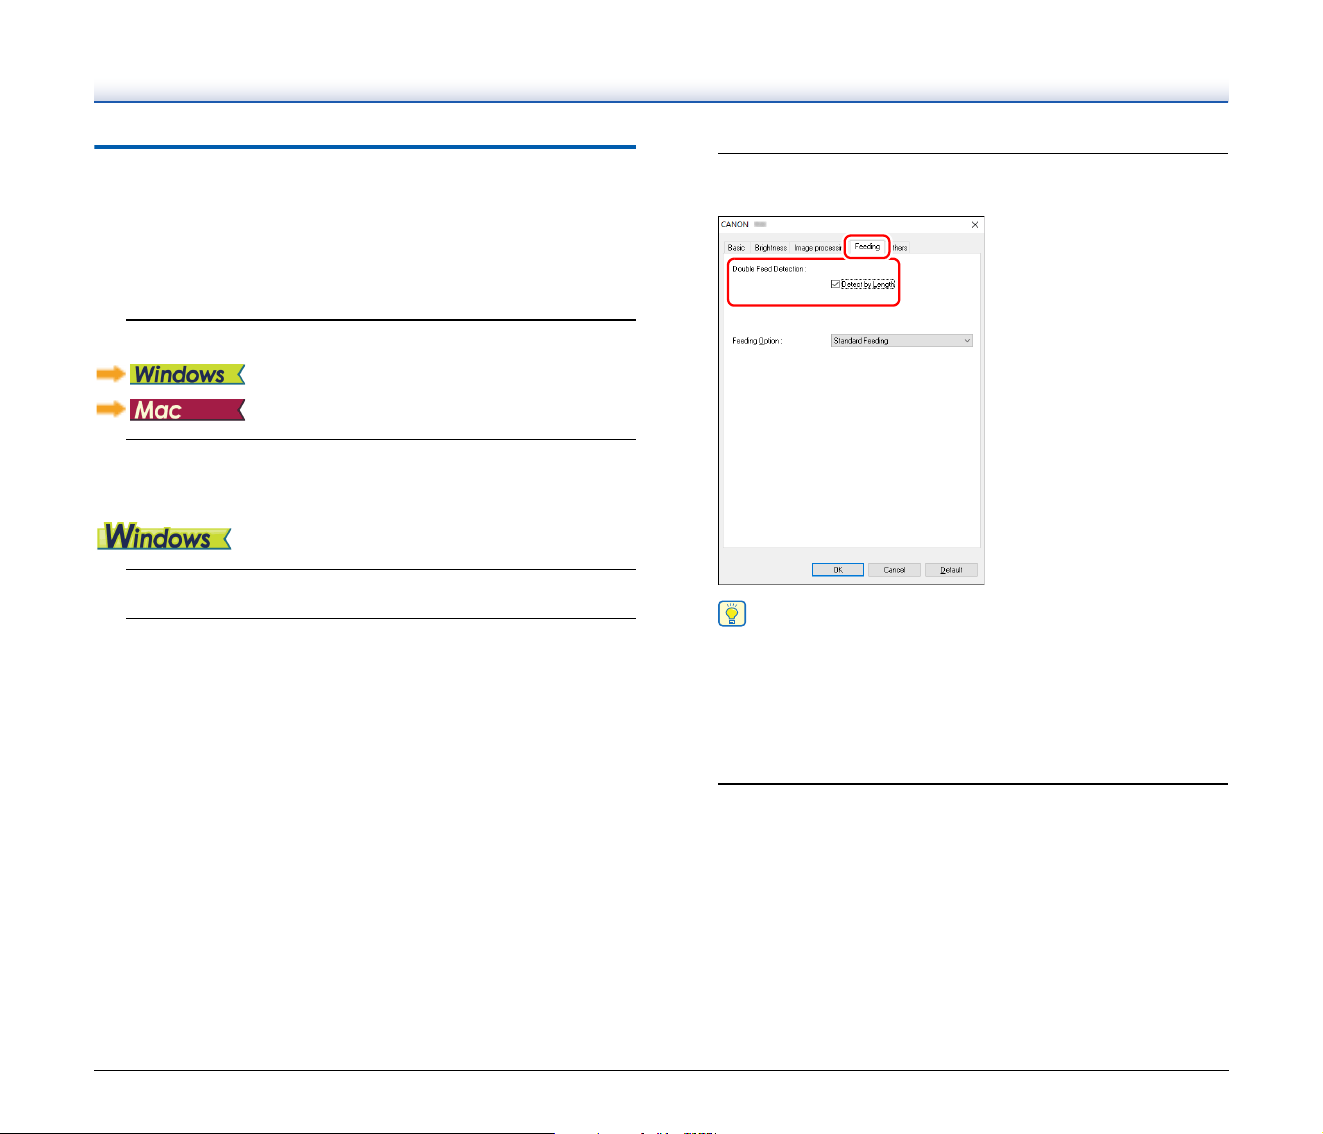
Placing Cards
When scanning cards, place one card at a time horizontally.
1
Adjust the document guides to fit the width of the card to
be scanned.
2
Place the card horizontally, with the reverse side facing
you, and the top of the card facing down.
CAUTION
• Place the cards one at a time.
• When scanning cards, place them to be fed horizontally. If you
place cards to be fed vertically, they may not be ejected properly,
and cards that get jammed may be damaged when you remove
them.
20
Detecting a document double feed
This scanner includes a function to detect document double feeds. By
using this function, the scanner will automatically stop when it detects
that multiple documents have been fed at the same time.
Setting procedure
1
Set the scanning conditions.
2
Place the document as described in the “Scanning
multiple documents” procedure on p. 18.
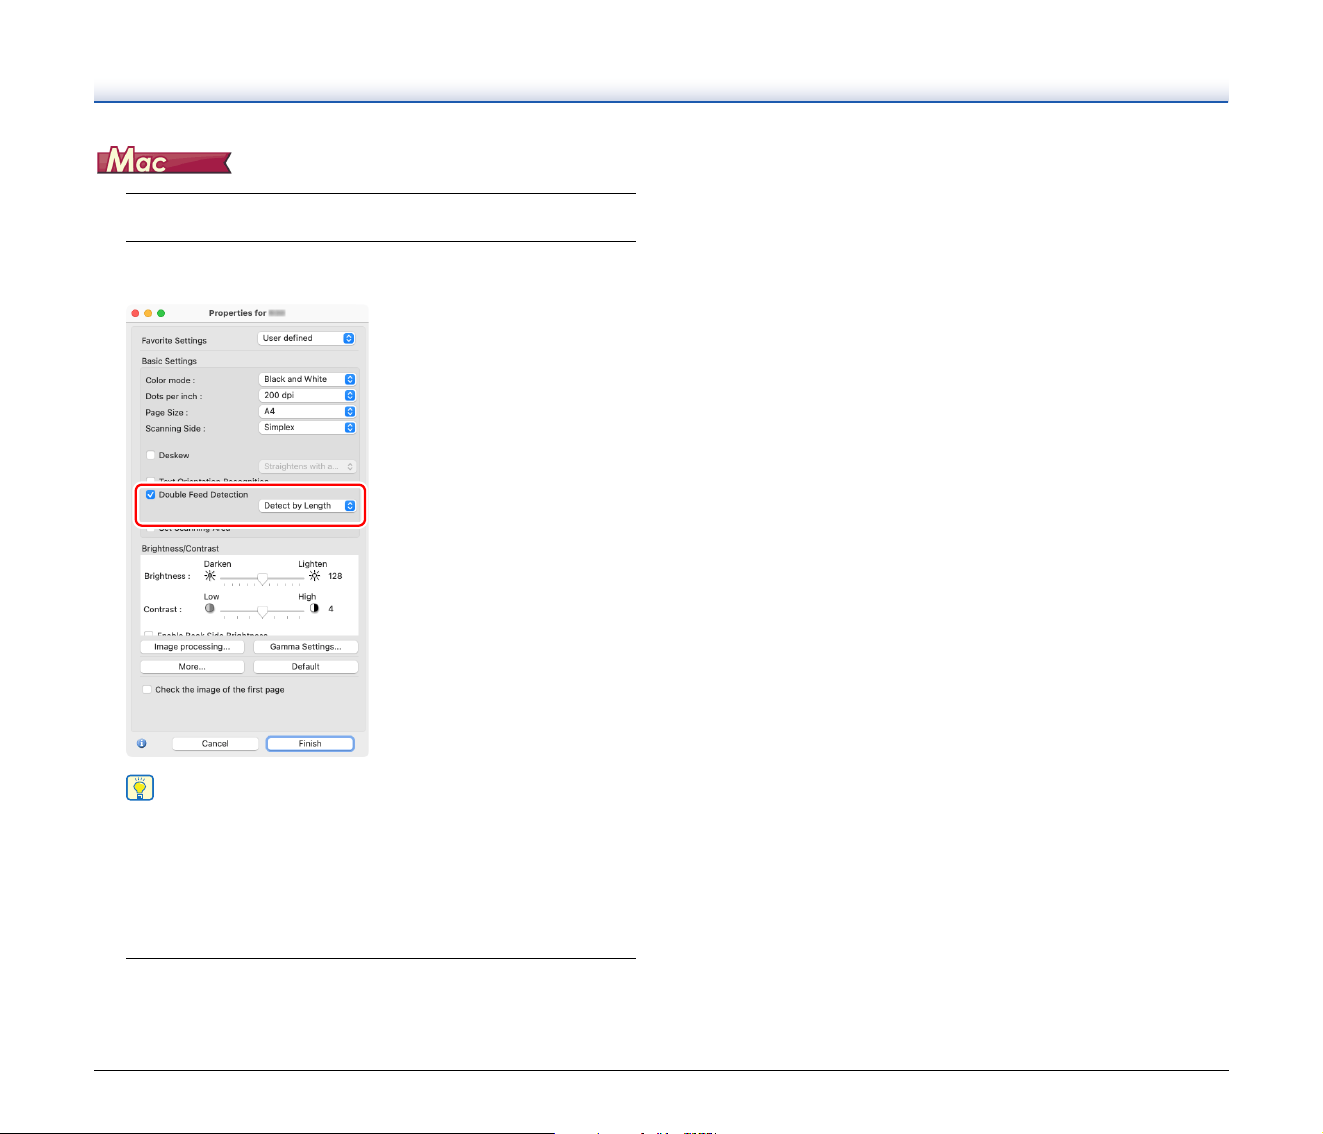
1
Open the advanced settings dialog box. (See p. 37)
2
Click the [Feeding] tab.
3
Select the [Double Feed Detection] check box on the
[Feeding] tab. You can enable the [Detect by Length].
Hint
Stops document transport when a transported document is
detected to be 35 mm (1.38") longer (or shorter) than the length
of the first fed document and a double feed is judged to have
occurred. Ideal when scanning a batch of identical size
documents. It may not work properly when scanning a batch of
varying size documents.
4
Click the [OK] button and close the settings screen.
Feeding >
Double Feed Detection >
Detect by Length : ON
21
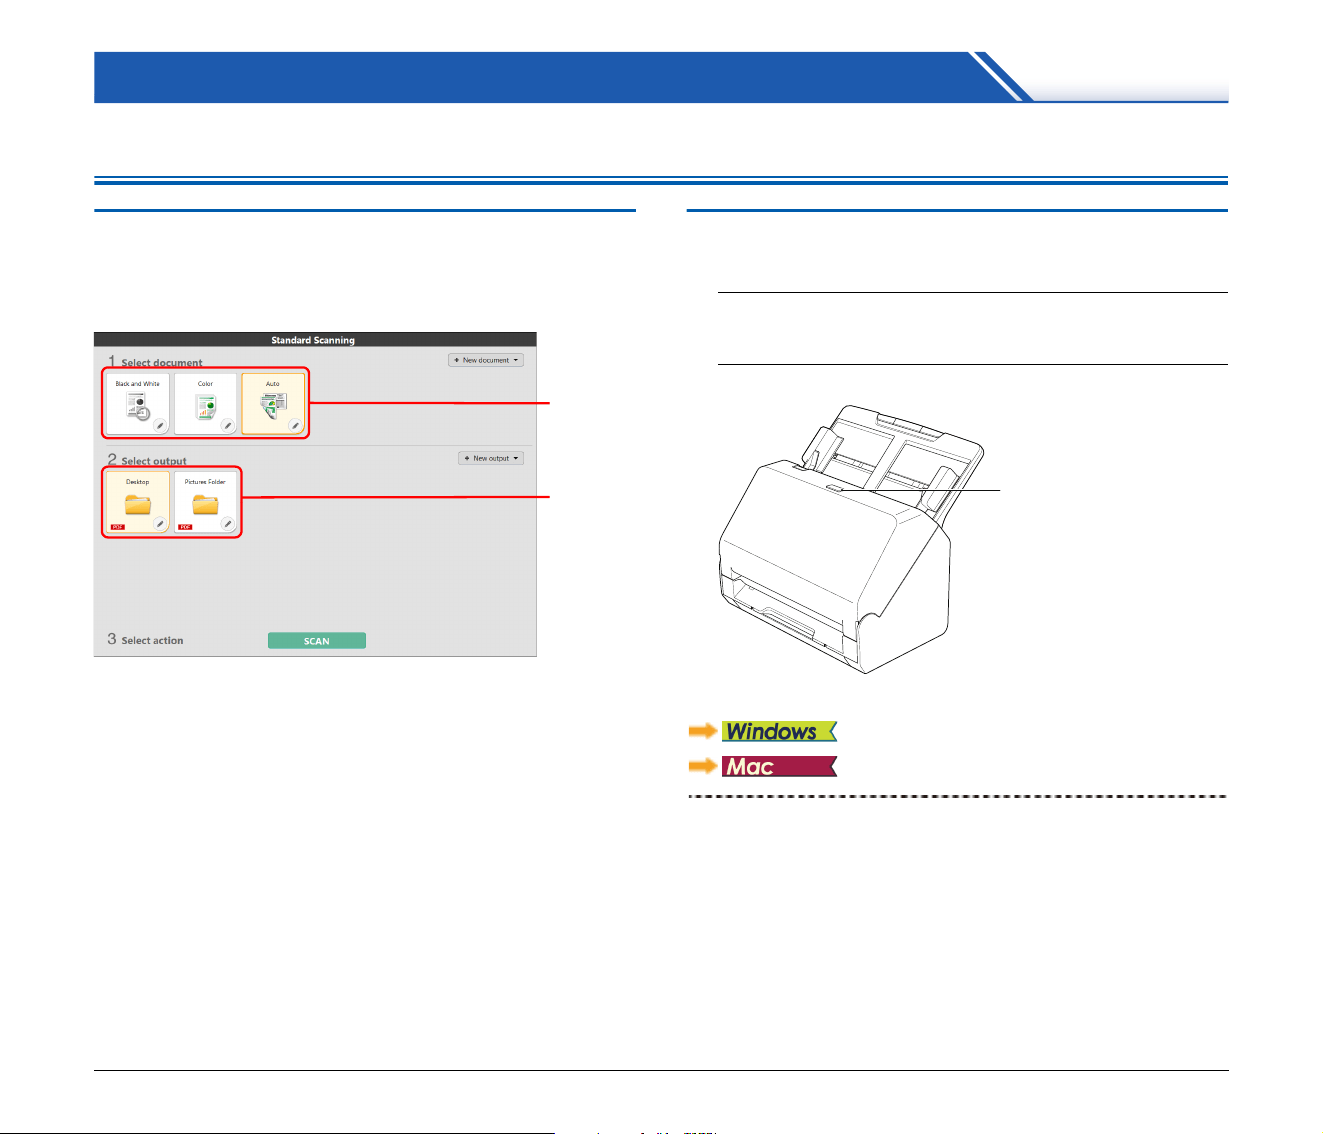
1
Open the advanced settings dialog box. (See p. 39)
2
Select the [Double Feed Detection] check box, and then
select the [Detect by Length].
Hint
Stops document transport when a transported document is
detected to be 35 mm (1.38") longer (or shorter) than the length
of the first fed document and a double feed is judged to have
occurred. Ideal when scanning a batch of identical size
documents. It may not work properly when scanning a batch of
varying size documents.
3
Click the [Finish] button and close the dialog box.
Double Feed Detection : ON
22
Scanning methods
Scanning with CaptureOnTouch Lite
What is CaptureOnTouch Lite?
CaptureOnTouch Lite is a scanning application that comes
preinstalled in the scanner. It can be used on a computer that does not
have the scanner driver installed.
Click the scan mode and output panels, and then click the [SCAN]
button to scan the document. You can select the scan method
according to the document type and purpose of use before scanning.
Scanning Procedure
This section describes how to scan when using CaptureOnTouch Lite.
1
Make sure that the scanner and computer are connected
properly.
2
Press the power button, and then load the document.
For details, see “How to Place Documents” on p. 18.
Scan
mode
panel
Output
panel
Power button
23
When you turn ON the scanner, the Power button on the scanner
lights and the window shown below opens automatically.
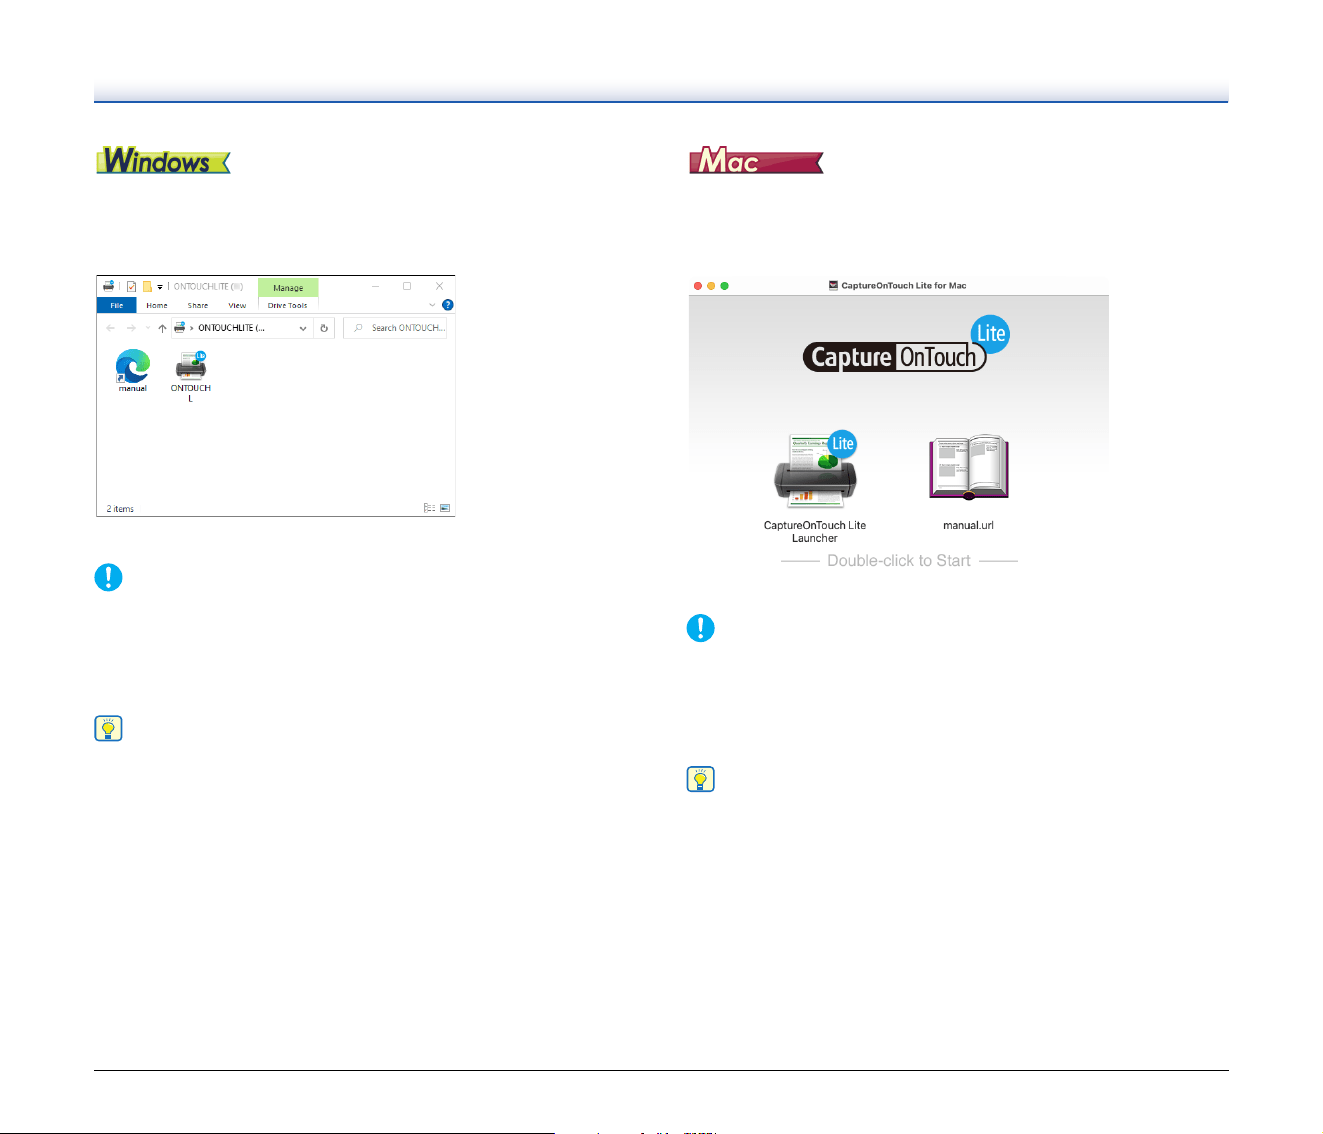
If you double-click the [ONTOUCH L] icon, CaptureOnTouch Lite
starts up and the main screen opens.
If you double-click the [manual] icon, the User Manual appears.
IMPORTANT
If you close the screen that the [ONTOUCH L] icon is displayed,
press and hold the power button to turn the power OFF. Then press
the power button again to turn the power ON.
* An error message may appear when you turn the power off, but
ignore the message.
Hint
• The [ONTOUCHLITE] screen may not appear in some operating
environments. In such cases, open the [ONTOUCHLITE] drive in
Windows Explorer, for example, and start the application directly by
double-clicking [ONTOUCHL.exe].
Depending on your operating system, the drive name may not be
[ONTOUCHLITE]. Open the drive on which [ONTOUCHL.exe] is
located, and start the application directly.
• Depending on your operating system, [CaptureOnTouch Lite] may
appear in the [AutoPlay] screen. In such cases, double-click
[CaptureOnTouch Lite] to start CaptureOnTouch Lite.
When you turn ON the scanner, the Power button on the scanner
lights and the Finder window shown below opens automatically.
If you click the [CaptureOnTouch Lite Launcher] icon,
CaptureOnTouch Lite starts up and the main screen opens.
If you click the [manual.url] icon, the User Manual appears.
IMPORTANT
If you close the screen that the [CaptureOnTouch Lite Launcher] icon
is displayed, press and hold the power button to turn the power OFF.
Then press the power button again to turn the power ON.
* An error message may appear when you turn the power off, but
ignore the message.
Hint
• To run CaptureOnTouch Lite, both the [CaptureOnTouch Lite for
Mac] folder and the [ONTOUCHLITE] folder must be mounted.
• In macOS, when you start CaptureOnTouch Lite for the first time,
message screens appear regarding access to the removable
volume. Click [OK] to continue. For details, see “When using
macOS” on p. 26.
24
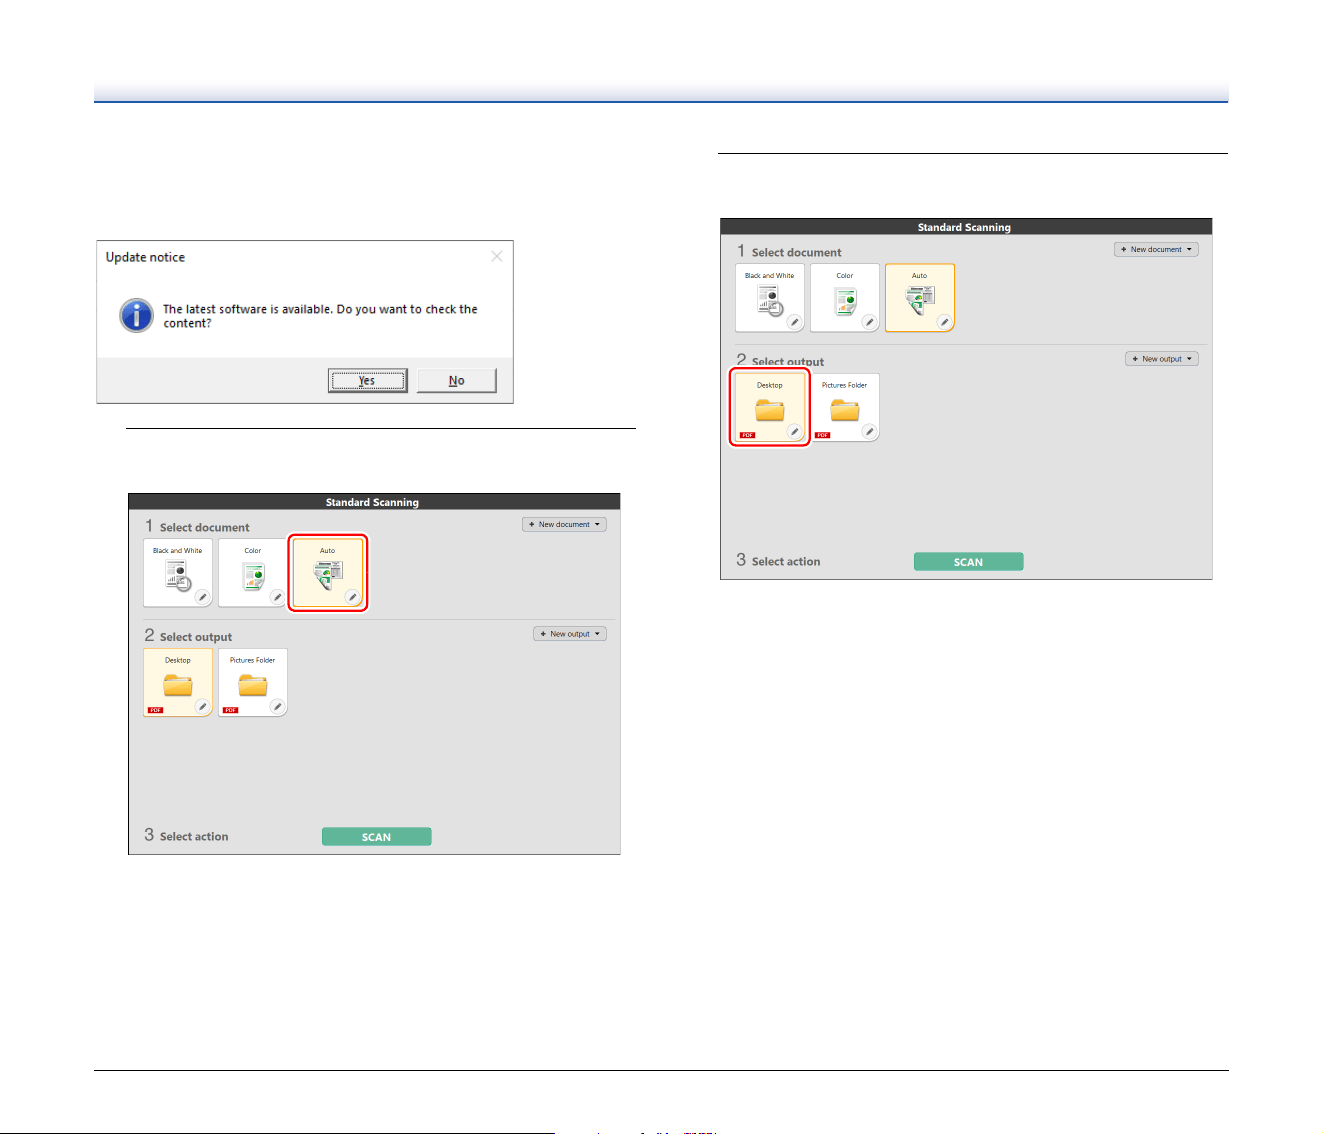
If there is an update for CaptureOnTouch Lite when the computer is
connected to the Internet, the software update notice screen appears.
For details on updating, see “Updating CaptureOnTouch Lite” on
p. 60.
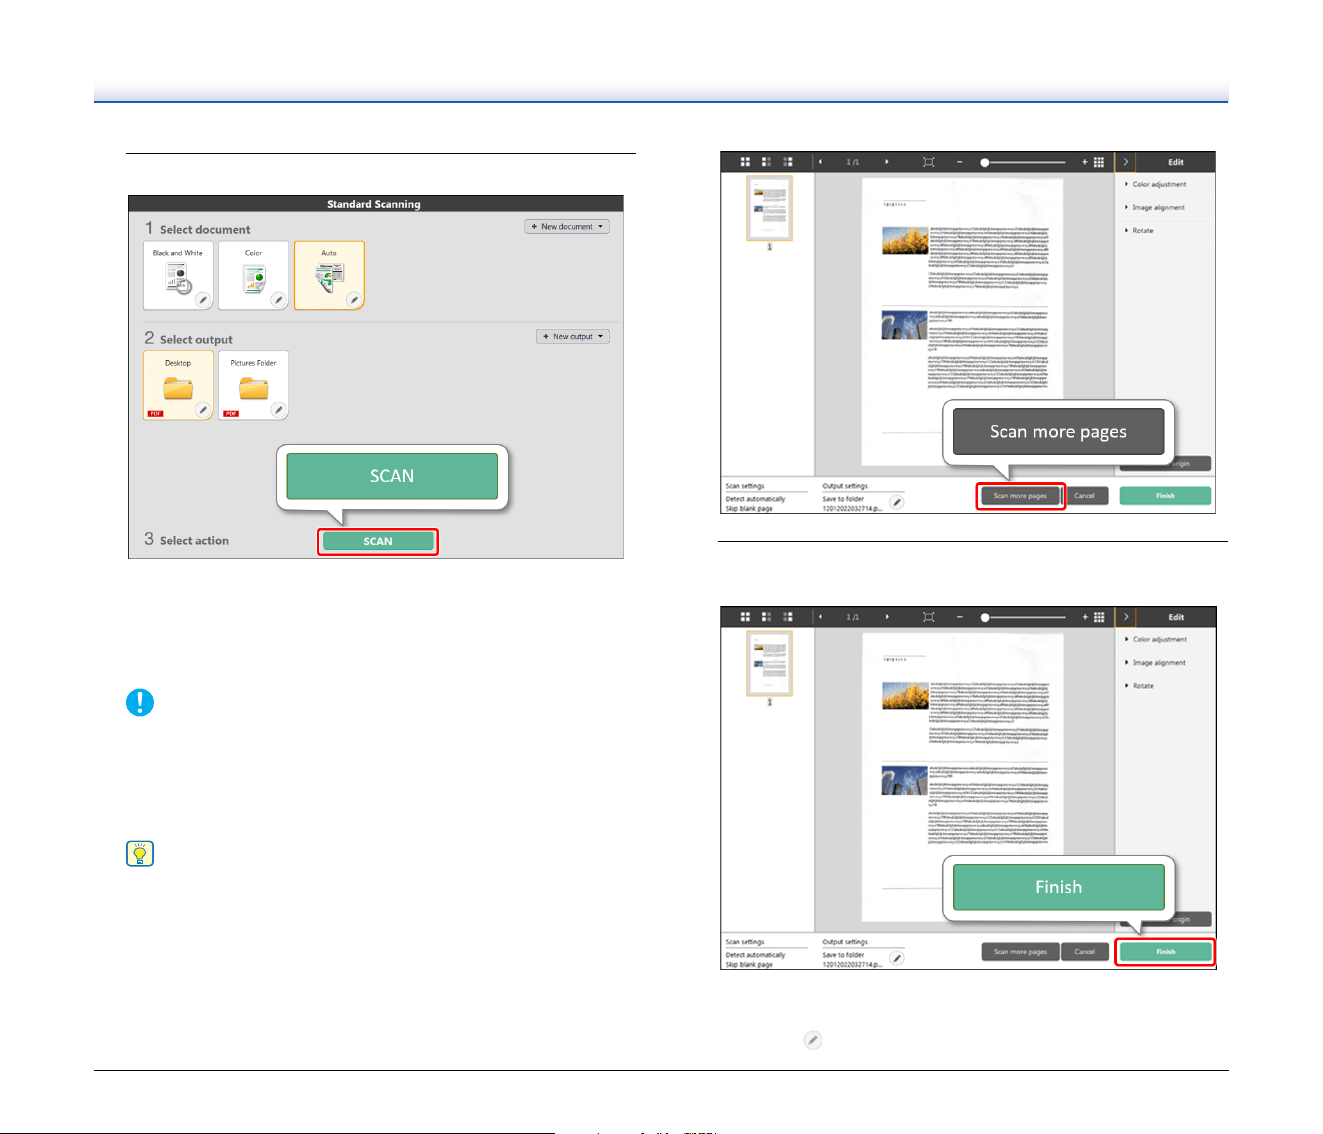
3
Click the scan mode panel appropriate for the document
to be scanned in [1 Select document].
The selected Scan mode panel will be displayed in orange. To edit
the Scan mode panel, see “Setting the scan mode” on p. 32.
4
Click the output panel for the scan image application from
[2 Select output].
The selected output panel will be displayed in orange. To edit the
output panel, see “Setting the output” on p. 35.
25
5
Click the [SCAN] button.
The document is scanned. While scanning is in progress, the
number of pages scanned is displayed in addition to the scanner
settings.
When the scan is finished, the Scanned image preview screen
opens.
IMPORTANT
If you configure scanning conditions that consume a large
amount of the computer's memory, scanning may stop because
of insufficient memory. If an error message appears due to
insufficient memory while scanning is in progress, stop scanning,
change the scanning conditions, and then try scanning again.
Hint
If scanning continuously, set the next document, and click the
[Scan more pages] button to start the document scan.
6
After confirming the scanned image, click the [Finish]
button.
To edit scan images, see “Operations for the scanned image edit
window” on p. 29.
Click the [ ] button to edit the output settings.
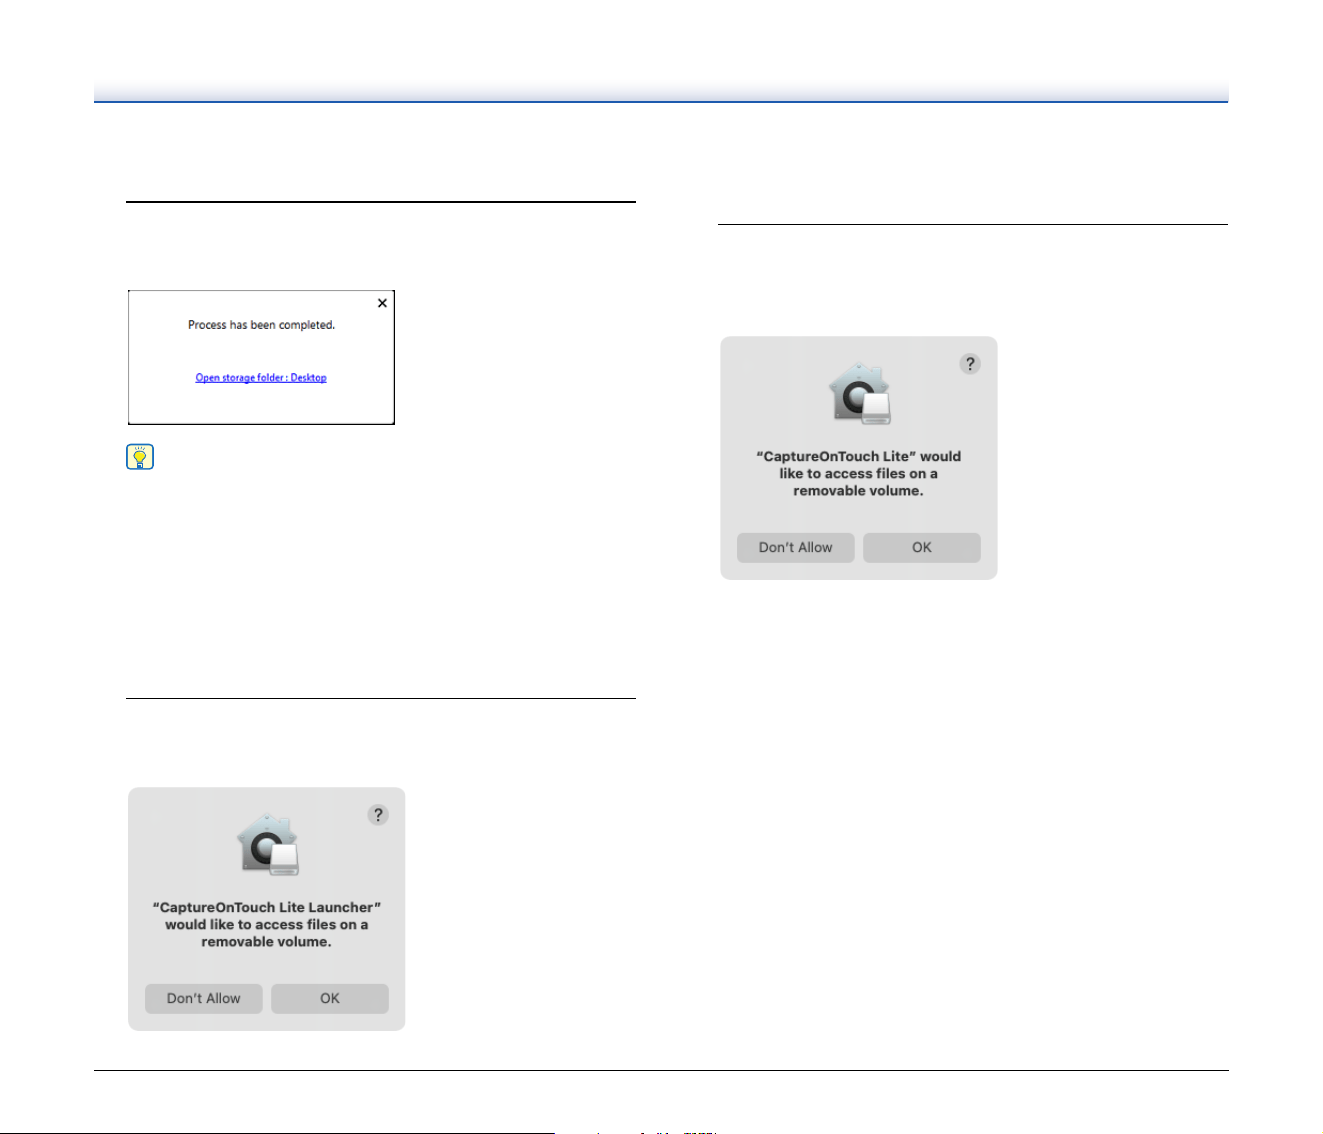
26
Click the [Cancel] button to discard the scanned image and return
to the main window.
7
When the output has finished, a popup window will be
displayed. If saving the scanned image, a link to open the
save destination folder will be displayed.
Hint
If you specify an output method other than Print or E-mail
attachment, the [Open storage folder] button appears. This
button opens the folder where the saved scanned images were
saved.
When using macOS
In macOS, when you start CaptureOnTouch Lite for the first time, two
message screens appear before the application launches. Click [OK]
on both screens. The procedure is as follows.
1
When launching CaptureOnTouch Lite Launcher, the
following screen appears. Click [OK] to close the screen
and proceed to the next step.
If [Don’t Allow] is clicked, an error message appears and
CaptureOnTouch Lite Launcher cannot be launched. See
“macOS System Preferences” on p. 27.
2
When launching CaptureOnTouch Lite via
CaptureOnTouch Lite Launcher, the following screen
appears. As in the previous step, click [OK] to close the
screen. CaptureOnTouch Lite launches.
If [Don’t Allow] is clicked, CaptureOnTouch Lite still launches but
an error message appears and scanning operations are disabled.
See “macOS System Preferences” on p. 27.
27
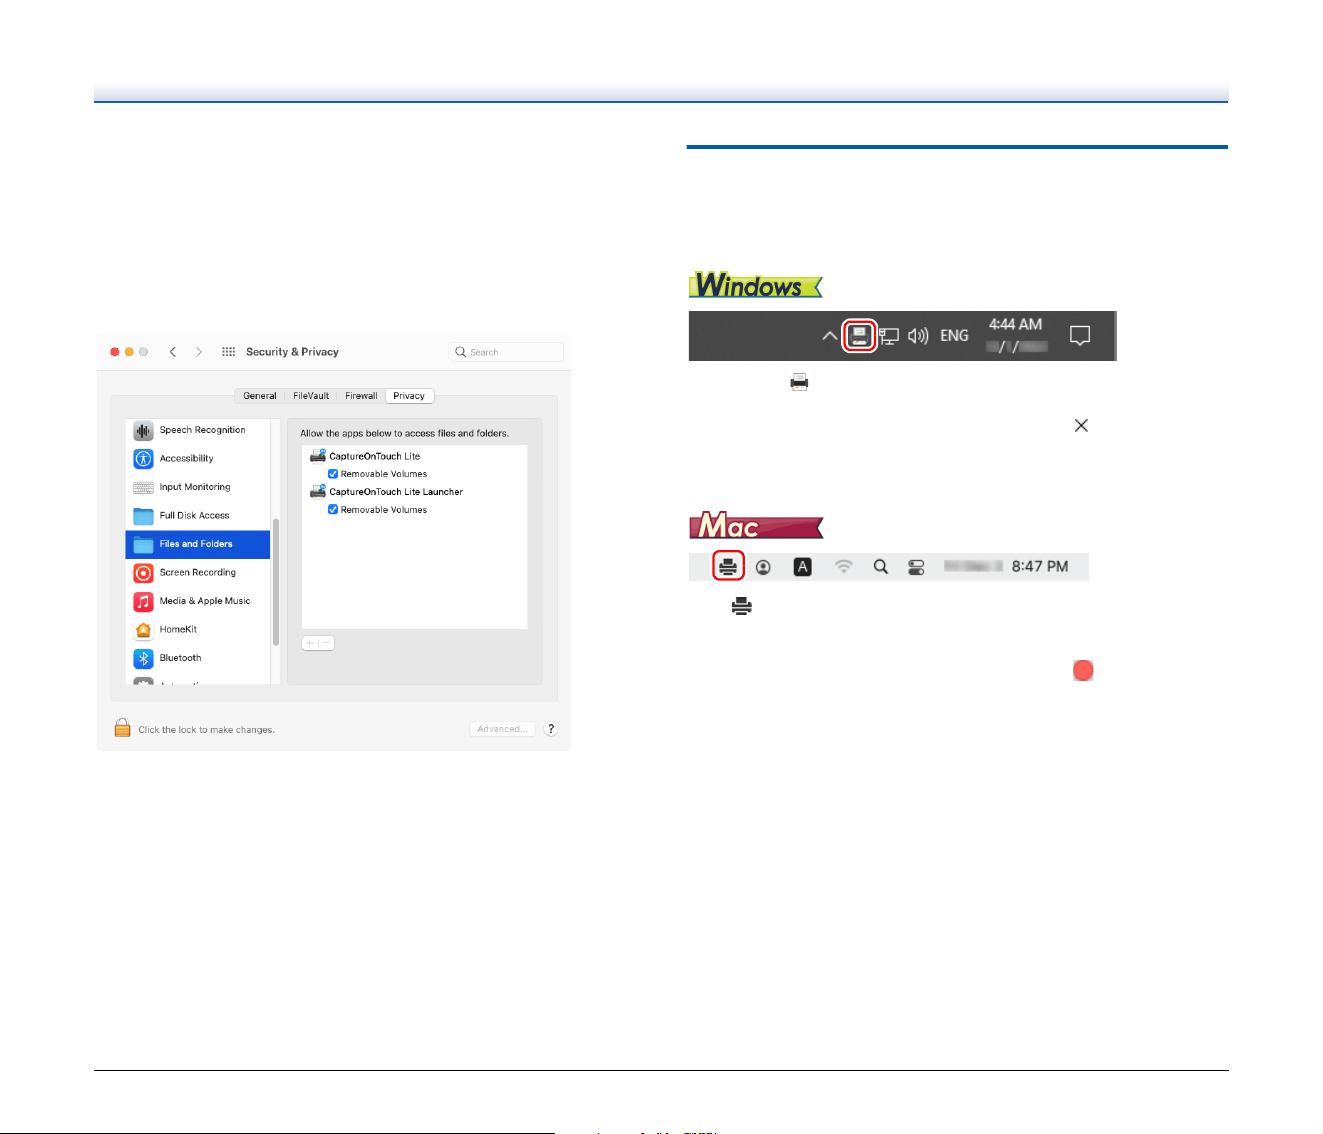
macOS System Preferences
If [Don’t Allow] is clicked on the message screen displayed when
CaptureOnTouch Lite Launcher is launched for the first time, then
CaptureOnTouch Lite cannot be used. In this case, open [System
Preferences], and click [Security & Privacy] > [Privacy] tab > [Files and
Folders]. Place a check mark in [Removable Volumes] for both
[CaptureOnTouch Lite Launcher] and [CaptureOnTouch Lite] in the
list.
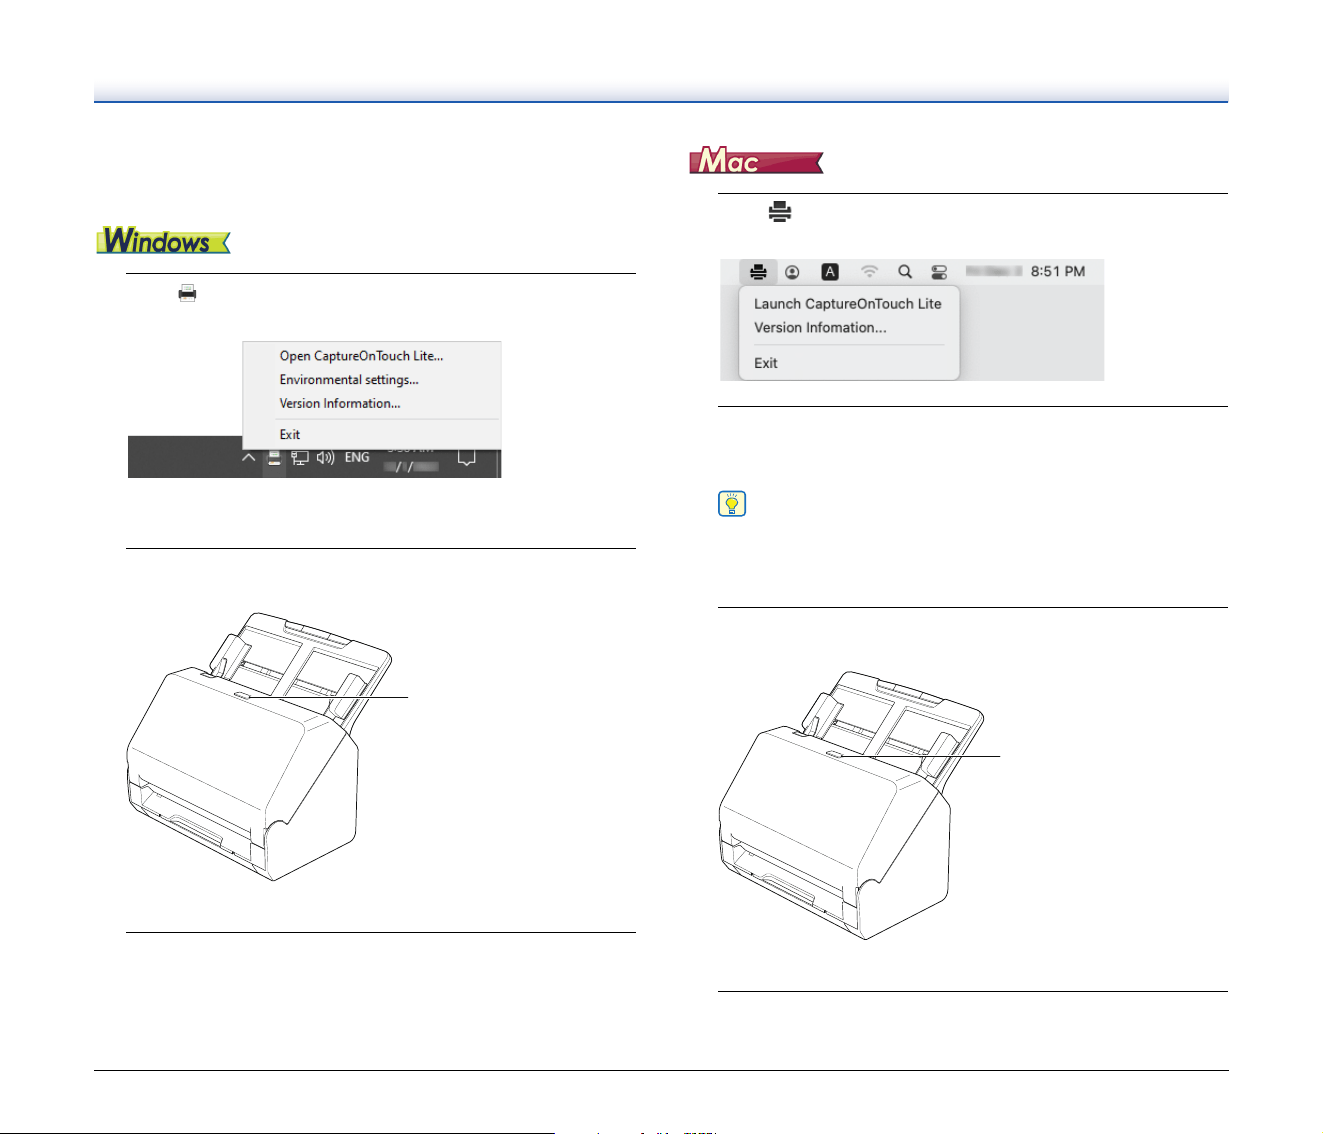
Starting and Exiting CaptureOnTouch
Lite
Once you start CaptureOnTouch Lite it remains present in the system.
Double-click (CaptureOnTouch Lite icon) in the taskbar to start
CaptureOnTouch Lite and display the main window.
To close the CaptureOnTouch Lite window, click at the top of the
window. This closes the window, but CaptureOnTouch Lite will
continue to reside in the system.
Click
(CaptureOnTouch Lite icon) in the menu bar and then click
[Launch CaptureOnTouch] from the menu which appears to start
CaptureOnTouch Lite and display the main window.
To close the CaptureOnTouch Lite window, click at the top of the
window. This closes the window, but CaptureOnTouch Lite will
continue to reside in the system.
28
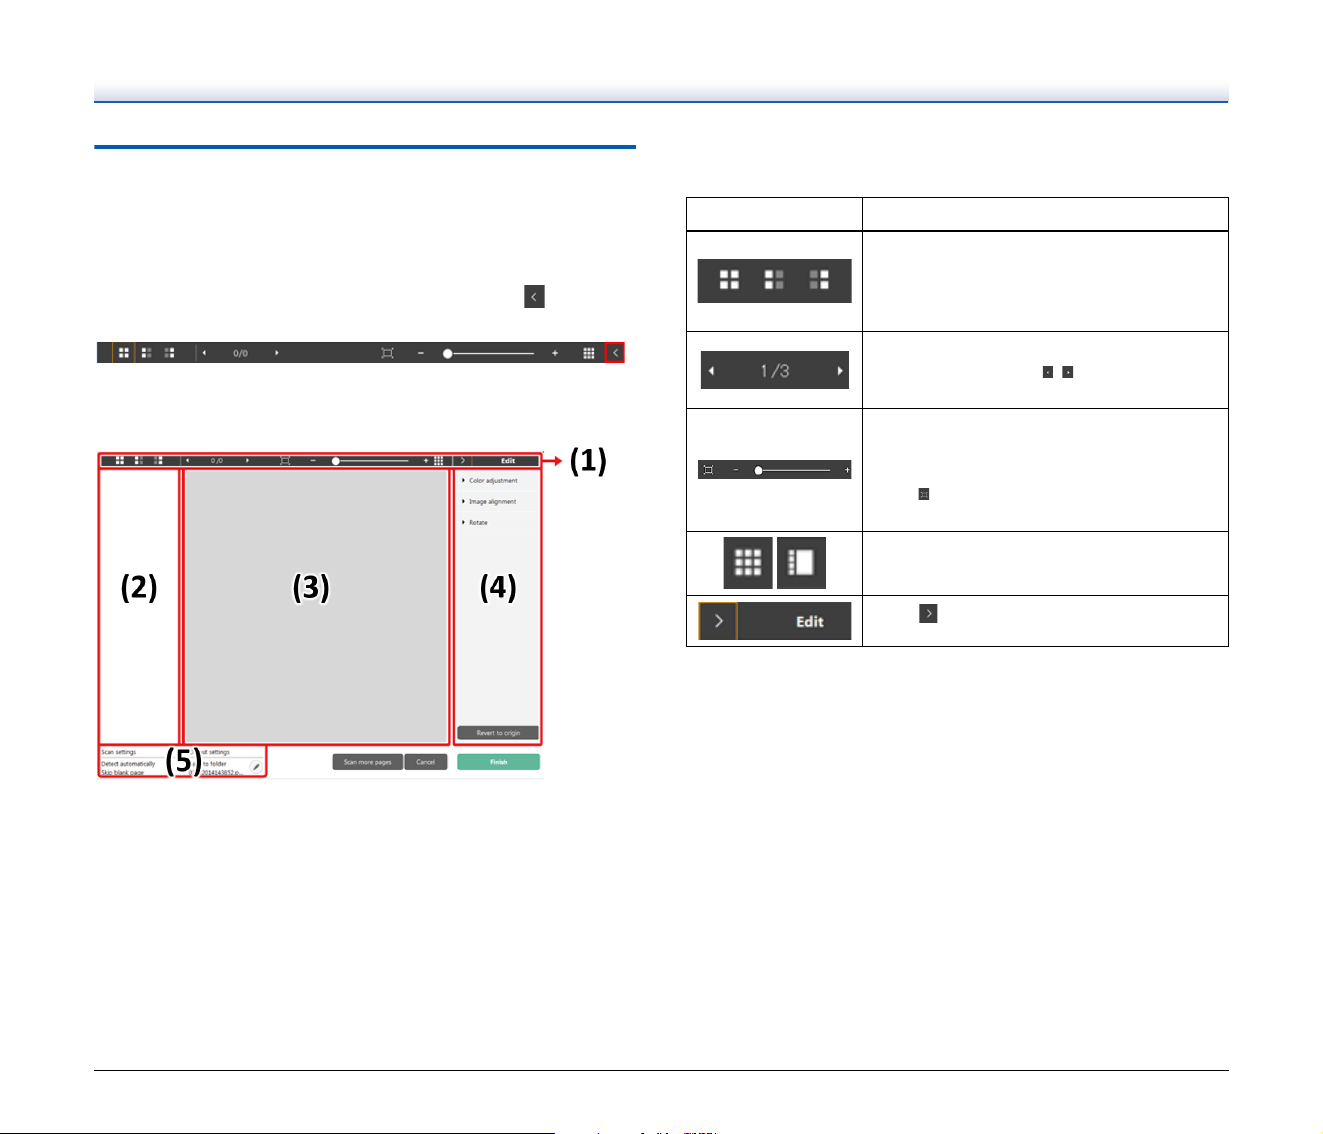
To quit the residence of the
CaptureOnTouch Lite application
1
Click (CaptureOnTouch Lite icon) in the taskbar, and
then from menu select [Exit].
CaptureOnTouch Lite is no longer resident in the system and the
icon disappears from the taskbar.
2
Press and hold the power button until the indicator goes
out.
The scanner turns OFF.
3
Disconnect the USB cable from the scanner and
computer.
1
Click (CaptureOnTouch Lite icon) in the menu bar, and
select [Exit] from the menu.
2
Drag and drop the [ONTOUCHLITE] folder and
[CaptureOnTouch Lite for Mac] folder onto the [Trash]
icon.
Hint
If a message appears when moving the folder to the Trash, click
[Force Eject]. This operation will not affect the operation of
CaptureOnTouch Lite.
3
Press and hold the power button until the indicator goes
out.
The scanner turns OFF.
4
Disconnect the USB cable from the scanner and
computer.
Power button
Power button
29
Operations for the scanned image
edit window
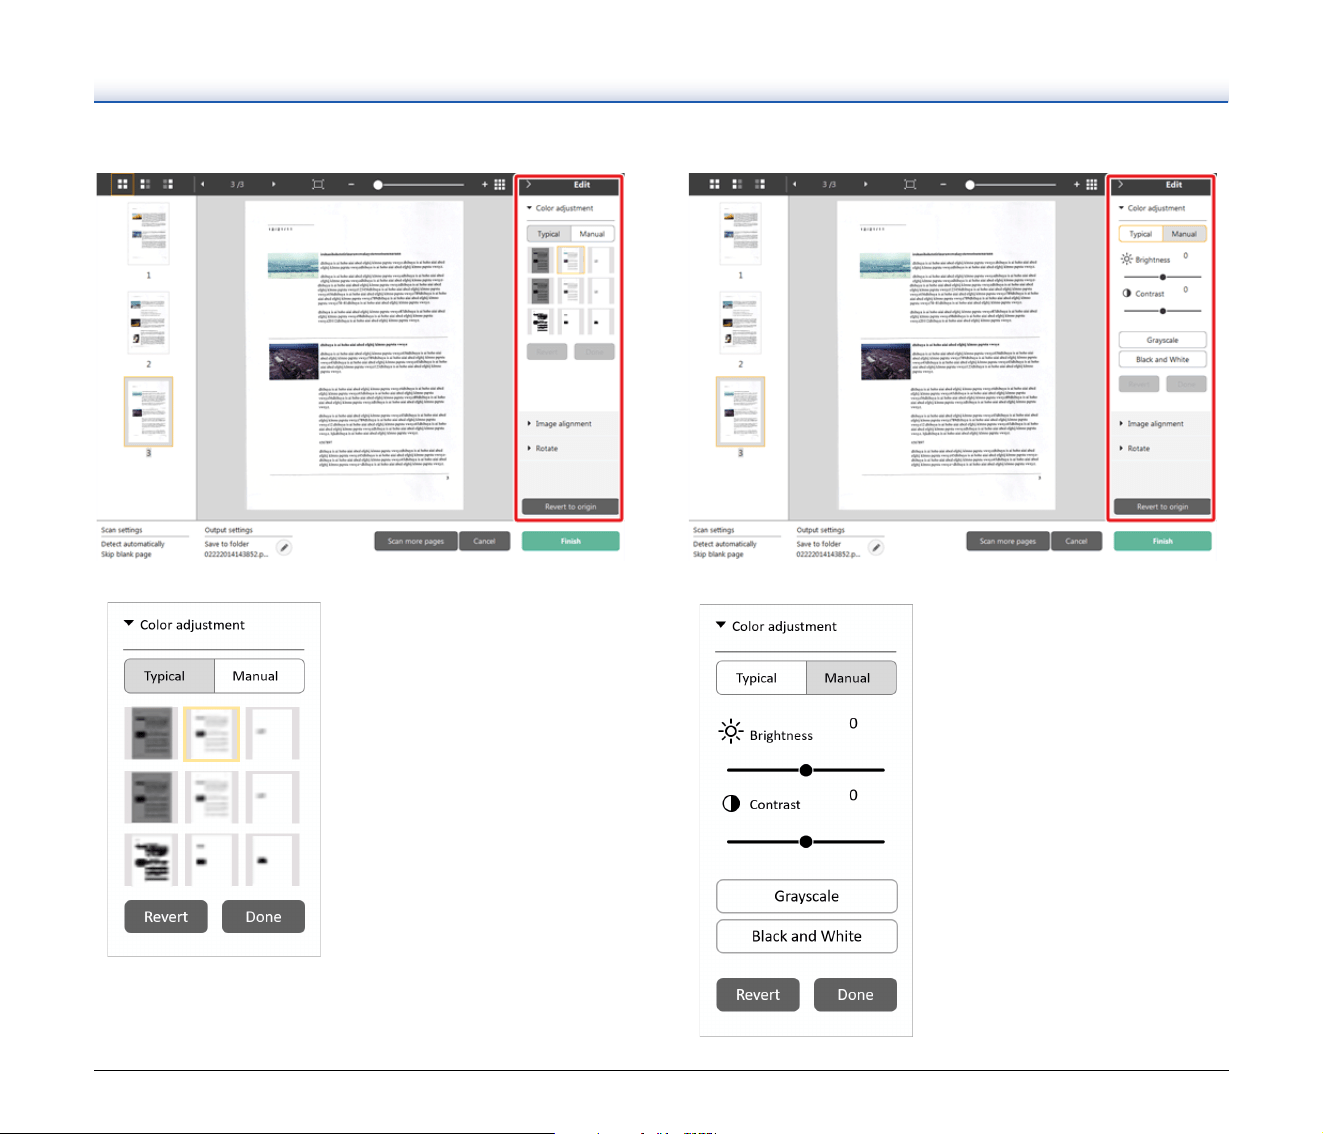
When scanning has finished, a preview window of the scanned image
will be displayed.
To display the edit window in the preview window, click on the tool
bar.
Scanned image preview screen
(1) Toolbar
This tool bar enables operations to thumbnails and preview images.
(2) Thumbnail Display Area
Thumbnails of the scanned documents will be displayed. You can
implement the following operations.
Click a thumbnail to display a preview of the scanned image in the
preview window.
Drag a thumbnail to change pages.
(3) Preview Area
The preview images of scanned documents are displayed.
(4) Edit window
You can edit scanned documents.
Click an item to open the edit window.
Click the [Revert to origin] button to discard the edit results and return
to the previous scan image.
Tools Description
Switches the image selection for the
thumbnail area.
These buttons mean “All pages”, “Odd
pages” and “Even pages” from the left.
Indicates the page of the image displayed
on the preview. Click to change the
page to be displayed.
Changes the display magnification. Move
the slider to + (plus) or - (minus) to enlarge
or reduce the preview image.
Click to make the display magnification of
the preview enlarged to full-screen.
Click to display or hide the preview area.
Click to display or hide the Edit window.
30
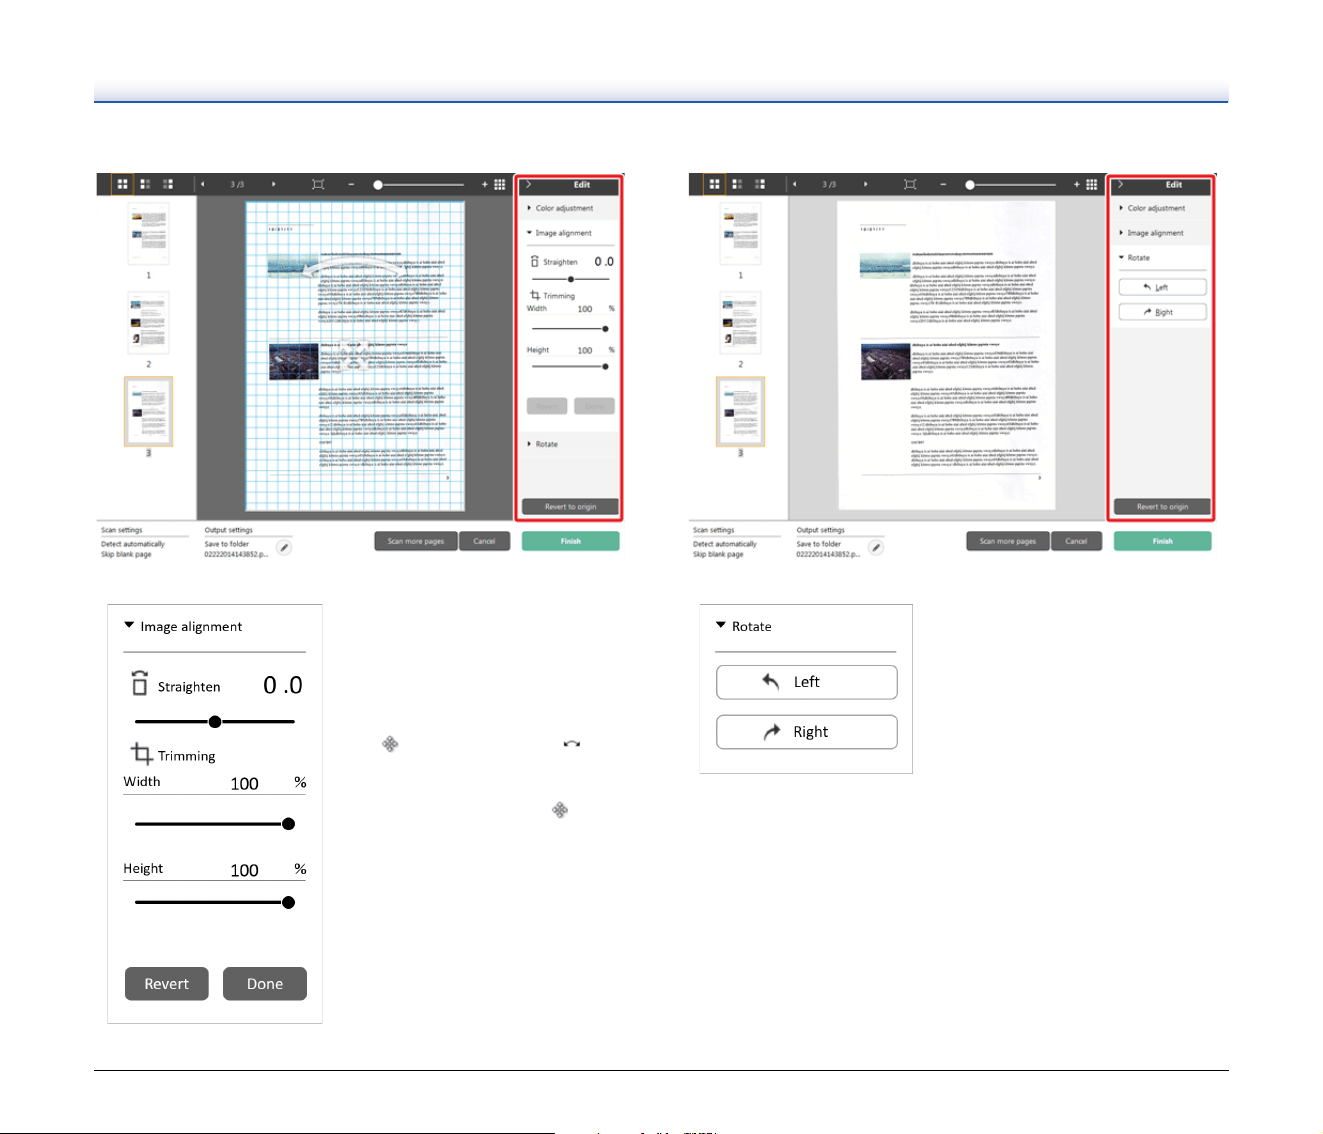
[Color adjustment] (Typical settings) [Color adjustment] (Manual settings)
Click [Color adjustment] to display
the default.
Click the button to toggle between
the typical settings and manual
settings displays.
Click a thumbnail in typical color
adjustment to select the most
suitable preview image that is
displayed.
9 thumbnail patterns are displayed
for the relevant image in color, and
6 patterns in grayscale.
When adjustment is finished, click
the [Done] button. To cancel the
adjustment, click the [Revert]
button.
Move the slider to the left or right to
adjust the brightness and contrast
of the image, checking the preview
image.
Click the [Grayscale] button to
render the image in grayscale.
Click the [Black and White] button to
render the image using 2 values:
black and white.
When adjustment is finished, click
the [Done] button. To cancel the
adjustment, click the [Revert]
button.
31
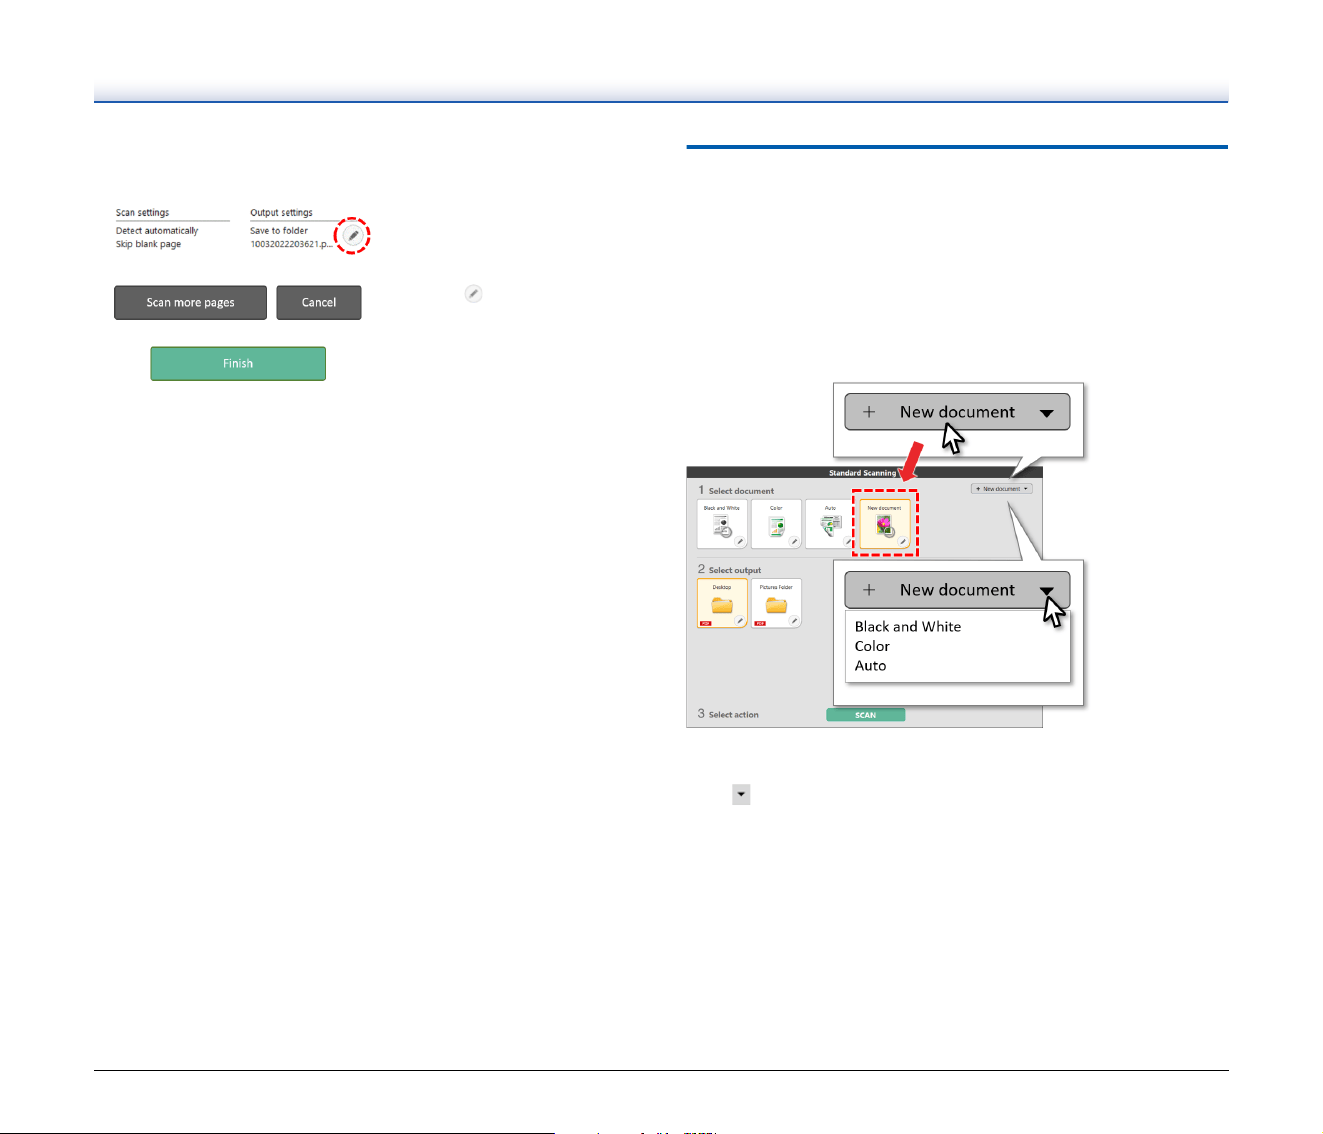
[Image alignment] [Rotate]
Click [Image alignment] to display.
The preview image or the slider can
be used for the straightening and
the trimming.
In the preview image, drag the Move
grip , the Straighten grip and/
or the trimming frame directly. To
change the extent of the trimmed
image, drag the Move grip on the
preview.
When adjustment is finished, click
the [Done] button. To cancel the
adjustment, click the [Revert]
button.
Click [Rotate] to display.
The scanned image can be rotated
in 90 degrees to the left or the right.
The rotation can be adjusted
according to the preview image.
32
(5) Information Display Area
Setting the scan mode
By default, CaptureOnTouch Lite enables the [Full auto] scan setting,
so shortcut scans saved to the folder are implemented using the scan
conditions that match the document.
To specify the document size, color mode, and other settings, set the
desired scan condition by editing the scan mode panel.
Creating new Scan mode panels
Click the [New document] button of [Select document] in the [Standard
Scanning] screen to add a [New document] panel.
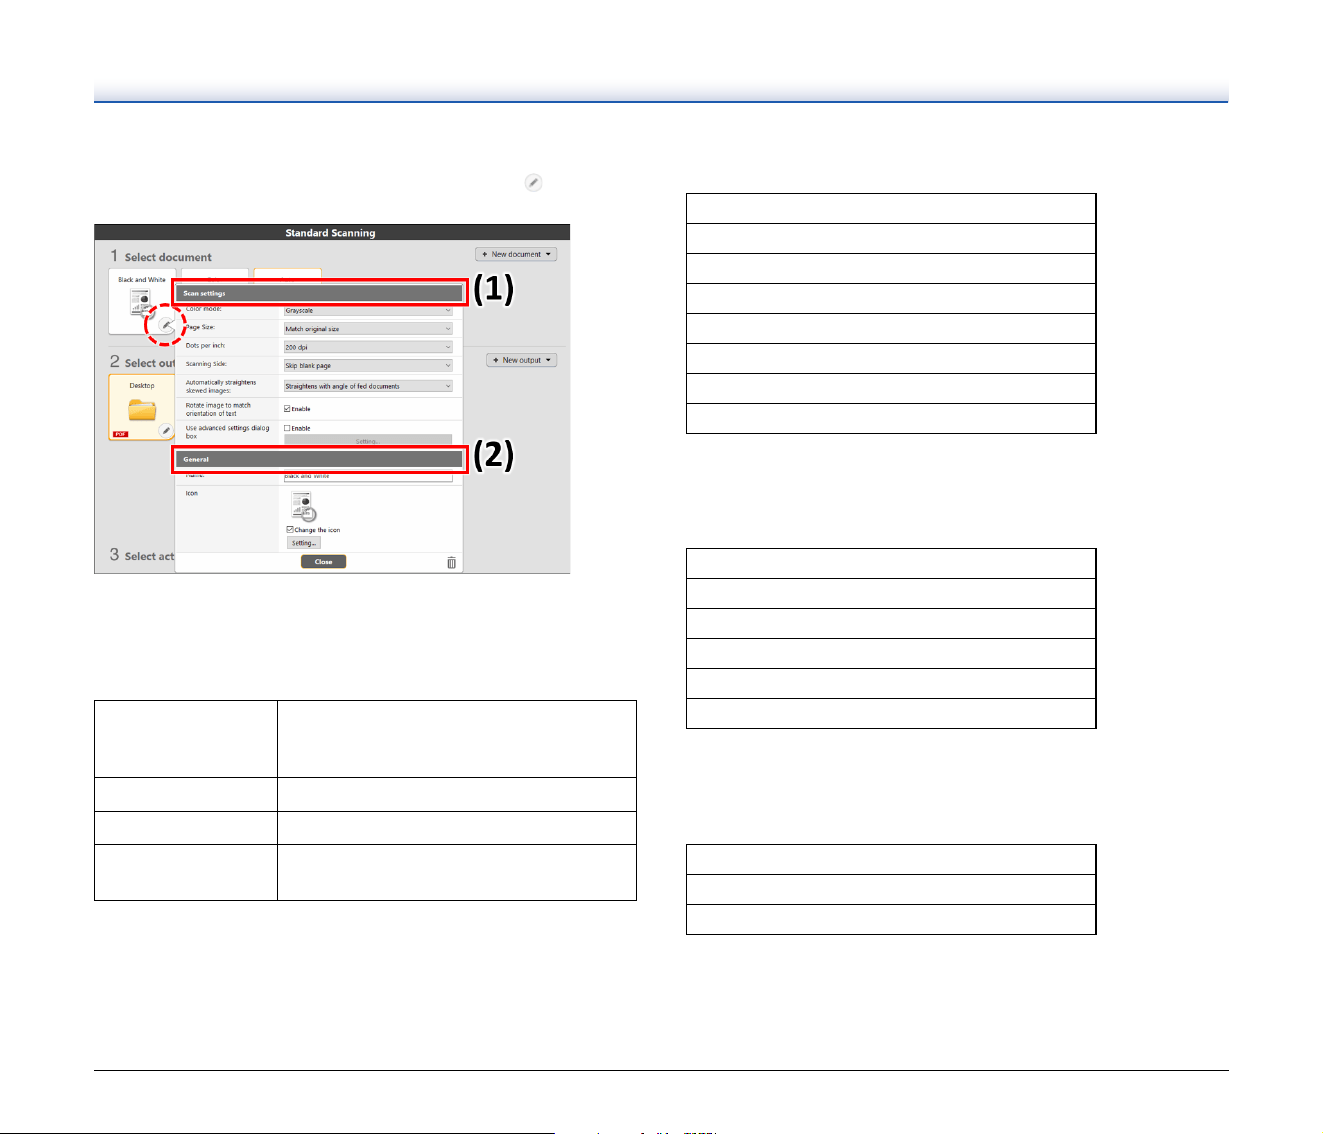
Click to display the list of panel types. The selected type of the
panel is created.
The information regarding the
scan settings and output
settings is displayed.
Click the button, and the
Output Settings dialog will
appear.
Click the [Scan more pages]
button to continue the
scanning.
Clicking the [Cancel] button
will destroy the scanned
images and return to the top
screen.
When clicking the [Finish]
button, the output processing
will start. After it is completed,
the screen will return to the top
screen.
33
Edit Scan mode panel
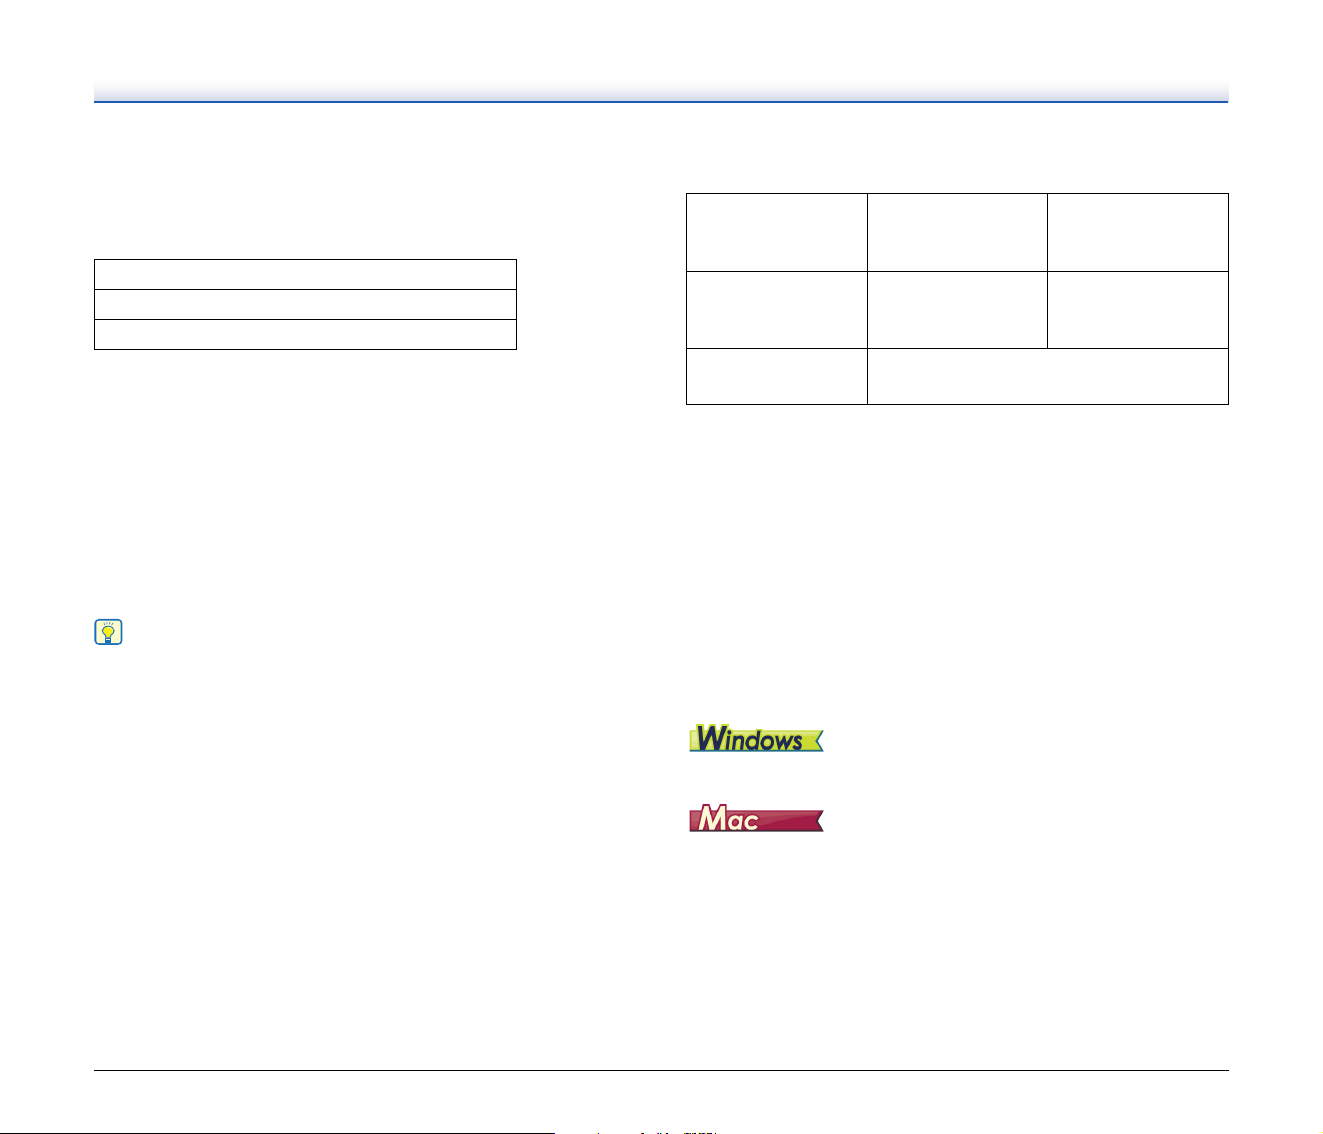
The scan mode edit screen opens when you click the [ ] button in
the scan mode panel.
(1) Scan settings
Makes the scan settings.
[Color mode]
Select the color mode for scanning from below.
[Page Size]
Select the paper size of the document to be scanned.
If you specify [Match original size], the page size of the scanned
document is detected and the images are saved at the detected size.
[Dots per inch]
Select the resolution.
Select [Detect automatically] and the software will automatically scan
the document at the optimum resolution.
[Scanning Side]
Select the scanning side of the document.
If you select [Skip blank page], scanned images of blank pages are not
saved.
Detect automatically
Automatically determines the color mode
based on the document content and scans
accordingly.
24-bit Color Scans the document in color.
Grayscale Scans the document in Grayscale.
Black and White
Scans the document in black and white
(binary).
Match original size
A4
A5
A6
B5
B6
LEGAL
LETTER
Detect automatically
150 dpi (Speed Priority)
200 dpi
300 dpi
400 dpi
600 dpi (Quality Priority)
Skip blank page
Simplex
Duplex
34
[Automatically straightens skewed images]
If a document is not straight when fed, the scanner detects that the
document is not straight from the scanned image and straightens the
skewed image.
Select the setting from below.
[Rotate image to match orientation of text]
Check [Enable] on to rotate the image in the same direction with the
characters.
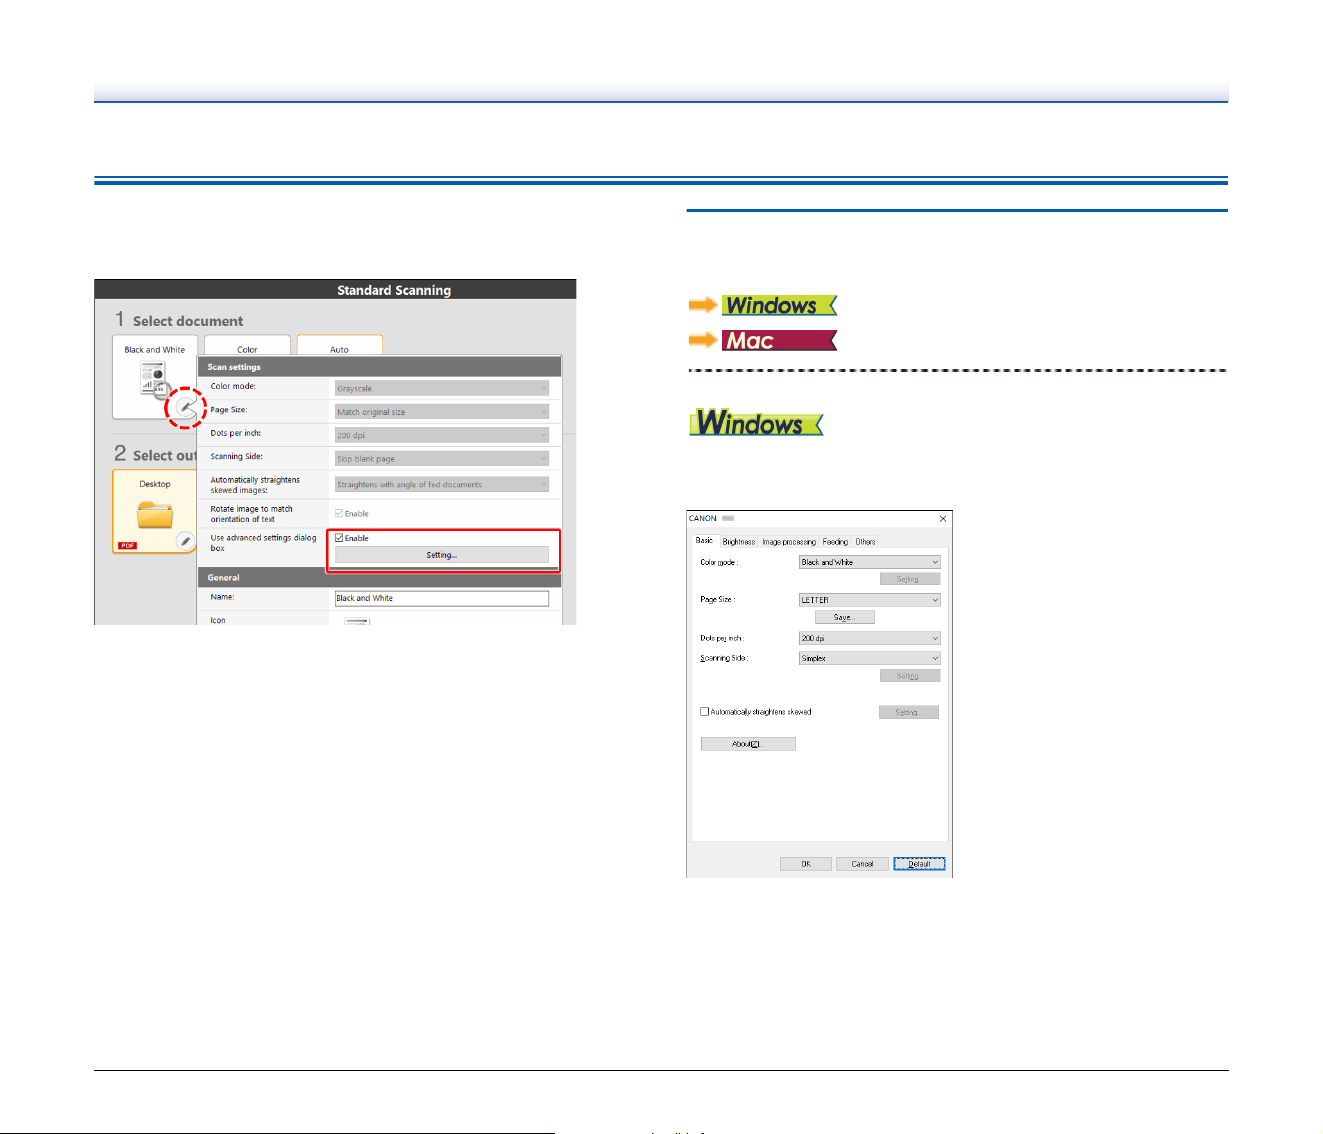
[Use advanced settings dialog box]
Scan mode settings include basic items that are configured in [Scan
settings], and the settings that are configured in the advanced settings
dialog box. The settings in the advanced settings dialog box are
applied for settings other than the basic items.
If you set the [Enable] checkbox of [Use advanced settings dialog box]
to ON and click the [Setting] button, the advanced settings dialog box
appears.
Hint
The advanced settings dialog box includes setting items that are the
same as the basic items in [Scanner setting], but the setting for each
of the them is stored separately.
Which settings are used during scanning differs as follows depending
on the setting of the [Use advanced settings dialog box] check box.
For details on the advanced settings dialog box, see “Configuration
and Functions of the Advanced Settings Dialog Box” on p. 37.
(2) General
Set the following items as occasion demands.
[Name]
Enter the name to be displayed in the Scan mode panel.
[Icon]
You can change the icon displayed in the scan mode panel.
Enable [Change the icon] to enable the [Setting] button and select the
file.
The file formats that can be selected as icon files are described below.
• .ico, .exe, .jpg, .png
• .icns, .app, .jpg, .png
OFF
Straightens with angle of fed documents
Straightens with angle & contents of fed documents
Setting of [Use
advanced settings
dialog box]
Basic items
Other than basic
items
OFF
Settings of
[Scanner setting]
Settings of the
advanced settings
dialog box
ON
Settings of the advanced settings dialog
box
35
Setting the output
By default, CaptureOnTouch Lite enables the settings to converts the
scanned images to PDF file and save to a folder.
To specify the output method and save location, edit the output panel
and set the desired output.
Create new Output panel
Click the [New output] button to add a [New output] panel.
Click to display the list of panel types. The selected type of the
panel is created.
Edit Output panel
The Edit output screen opens when you click the [ ] button in the
Output panel.
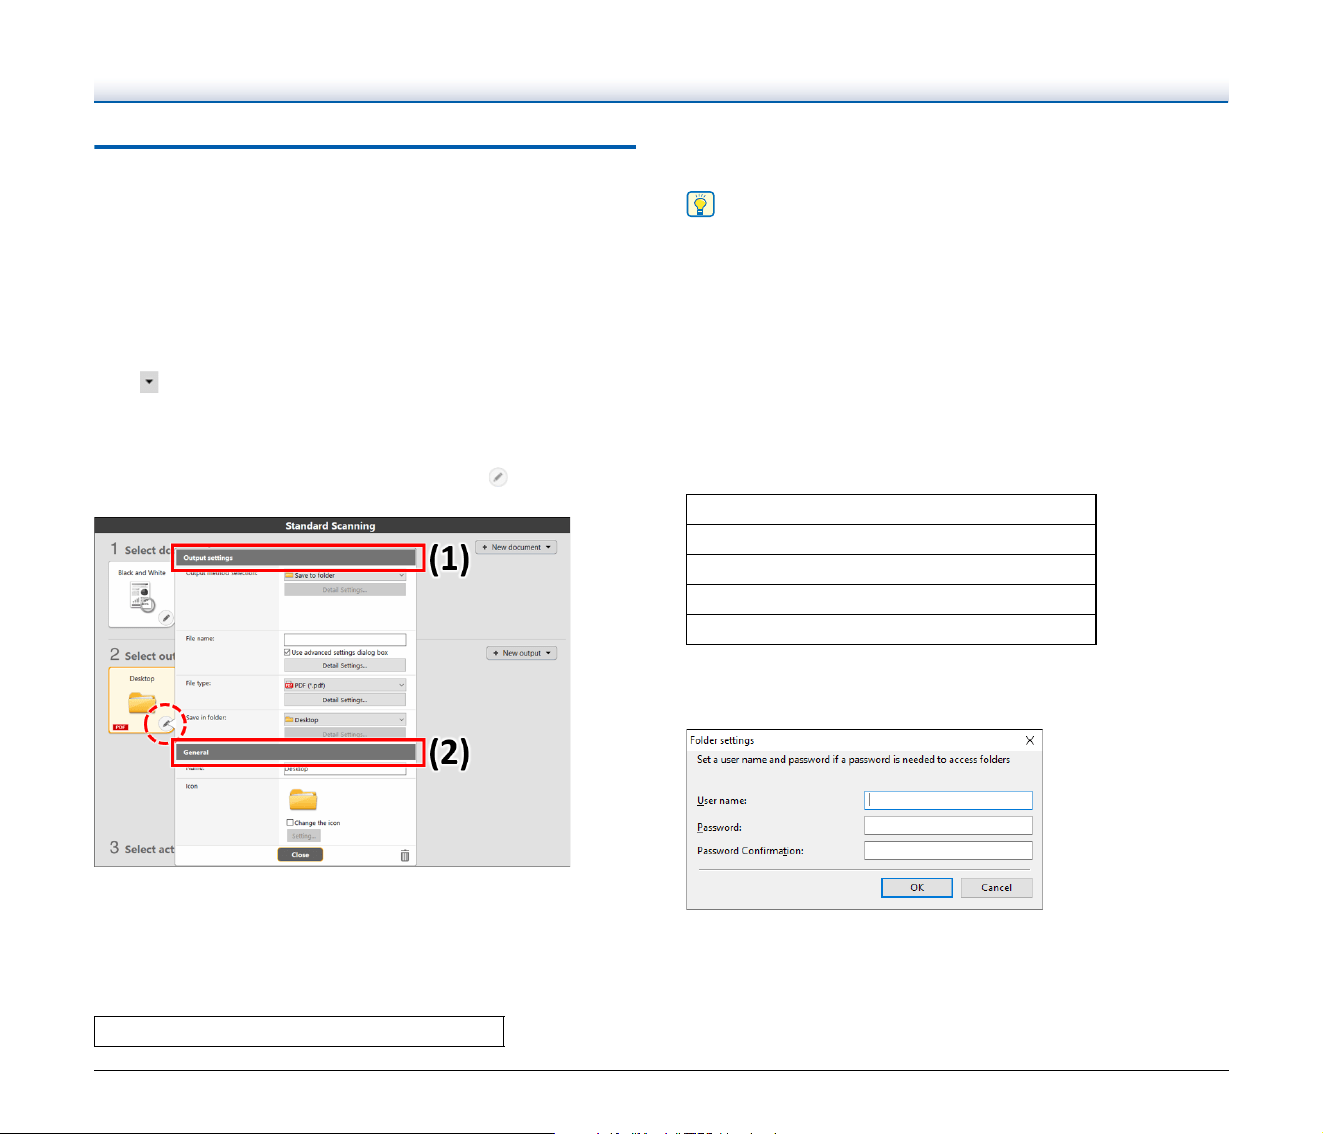
(1) Output settings
Makes the output settings.
[Output method selection]
Only [Save to folder] is available for the method to output scanned
images.
[File name]
Enter the file name of scanned image. Maximum: 64 characters.
Hint
• ¥ / : * ? < > | “ characters cannot be used.
• Click [Detail Settings] button to configure the file name generation
rule.
[File type]
Specify the file format for saving the scanned image.
If PDF, JPEG, TIFF, or PPTX is selected, [Detail Settings] button is
enabled and the details of file type can be configured.
[Save in folder]
Specify the storage location for scanned images.
It hides if the output method other than [Save to folder] is selected.
Select the saving location from below.
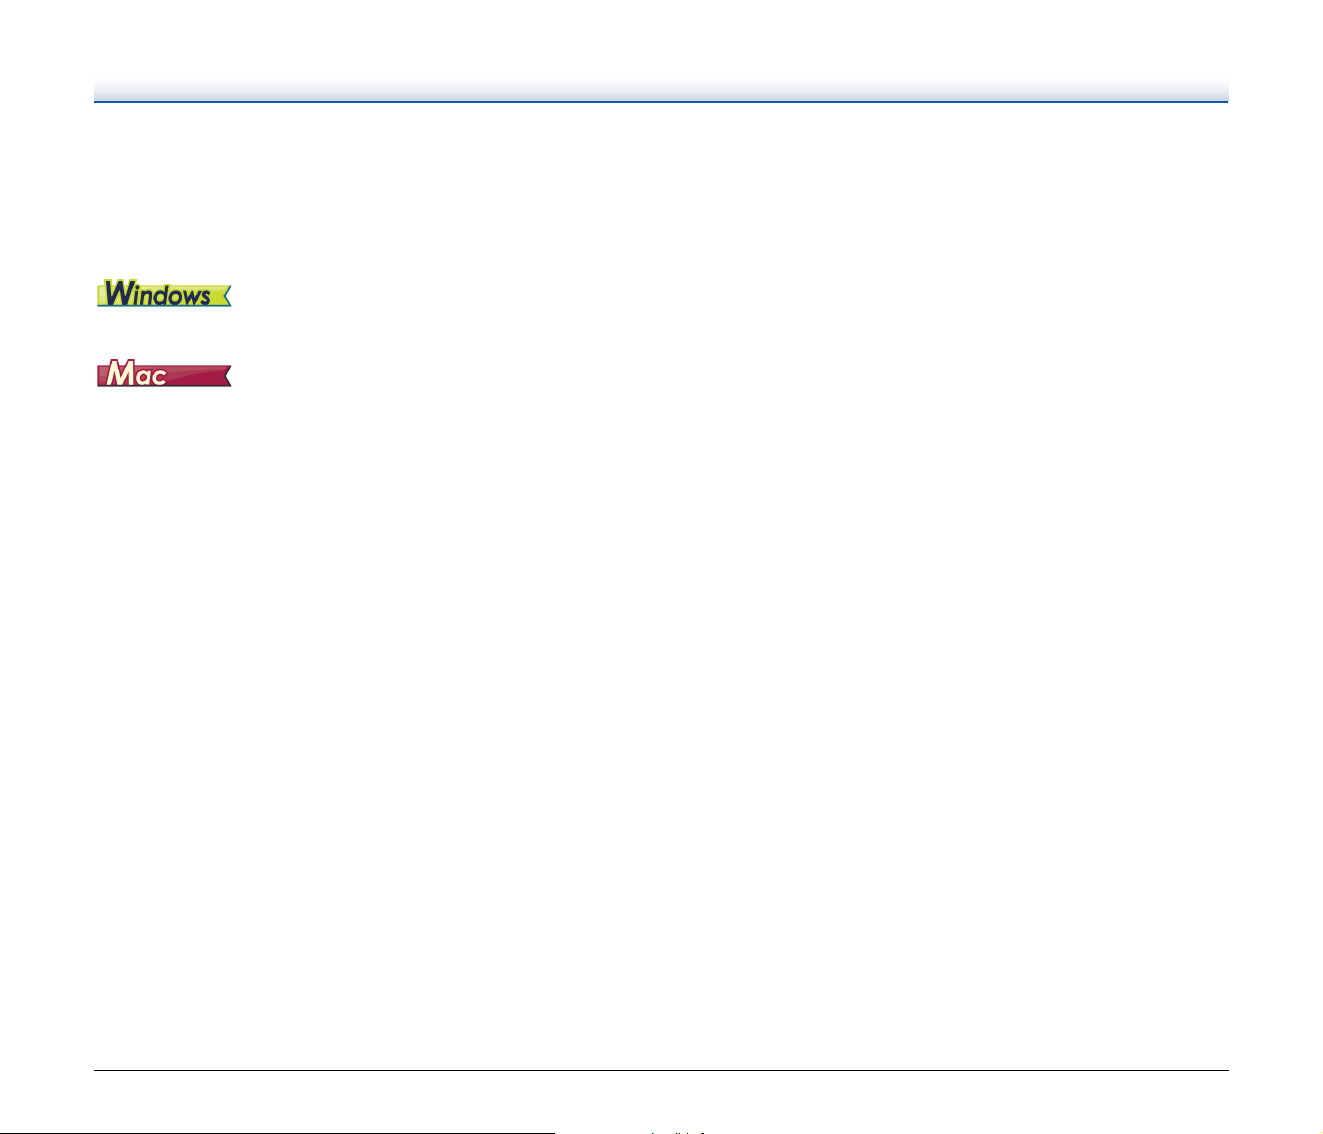
Click [Detail Settings] button to display [Folder settings] dialog. You
can configure the credentials (user name and password) for the
access to the specified folder.
(2) General
Set the following items as occasion demands.
[Name]
Enter the name to be displayed in the Output panel.
Save to folder
Pictures
Documents
Desktop
(Specified folder path)
Browse
36
[Icon]
You can change the icon displayed in the Output panel.
Enable [Change the icon] to enable the [Setting] button and select the
file.
The file formats that can be selected as icon files are described below.
• .ico, .exe, .jpg, .png
• .icns, .app, .jpg, .png
37
Setting the Advanced Settings Dialog Box
If you enable [Use advanced settings dialog box] of [Scan settings]
and then click the [Setting] button when setting the scan mode in
CaptureOnTouch Lite, the advanced settings dialog box appears.
Configuration and Functions of the
Advanced Settings Dialog Box
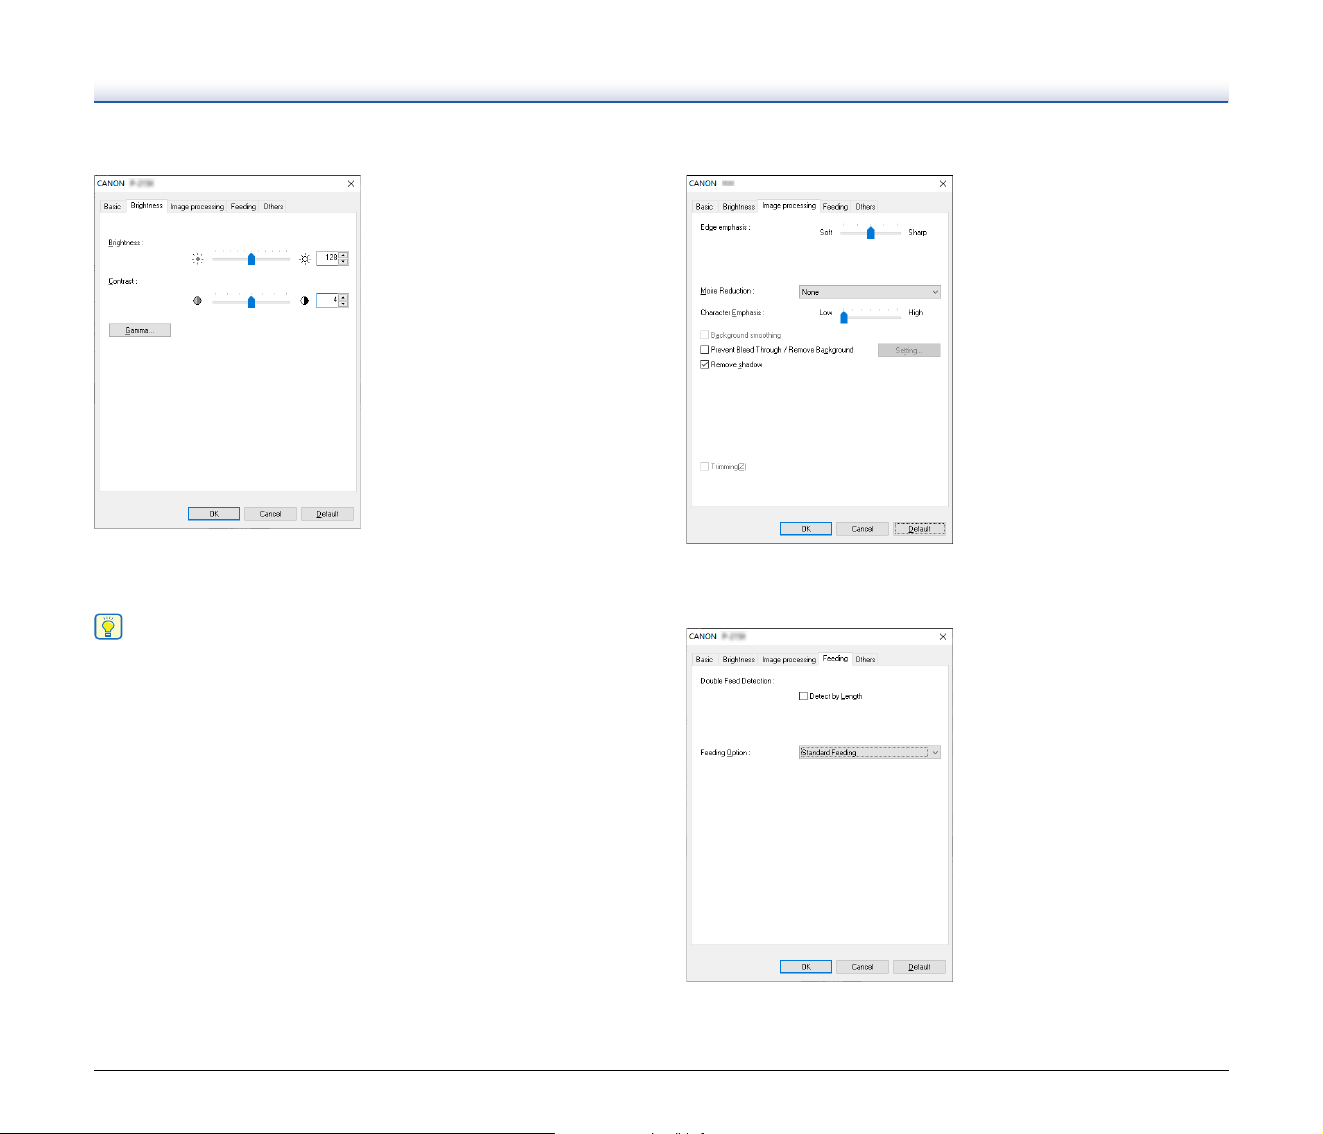
The advanced settings dialog box consists of the following tabs.
[Basic] tab
Configure basic scanning conditions such as the mode, page size,
resolution, and scanning side.
38
[Brightness] tab
Adjust the brightness and contrast of scanned images.
In addition, you can also click [Gamma] and set the gamma correction
value for scanned images.
Hint
• Gamma correction is set when the color tone of the scanned image
is different from that of the image displayed on the monitor.
• For information on your monitor's gamma value, see the instruction
manual that came with the monitor.
[Image processing] tab
Set the processing method for scanned images.
[Feeding] tab
Specify scanner operations related to document feeding.
39
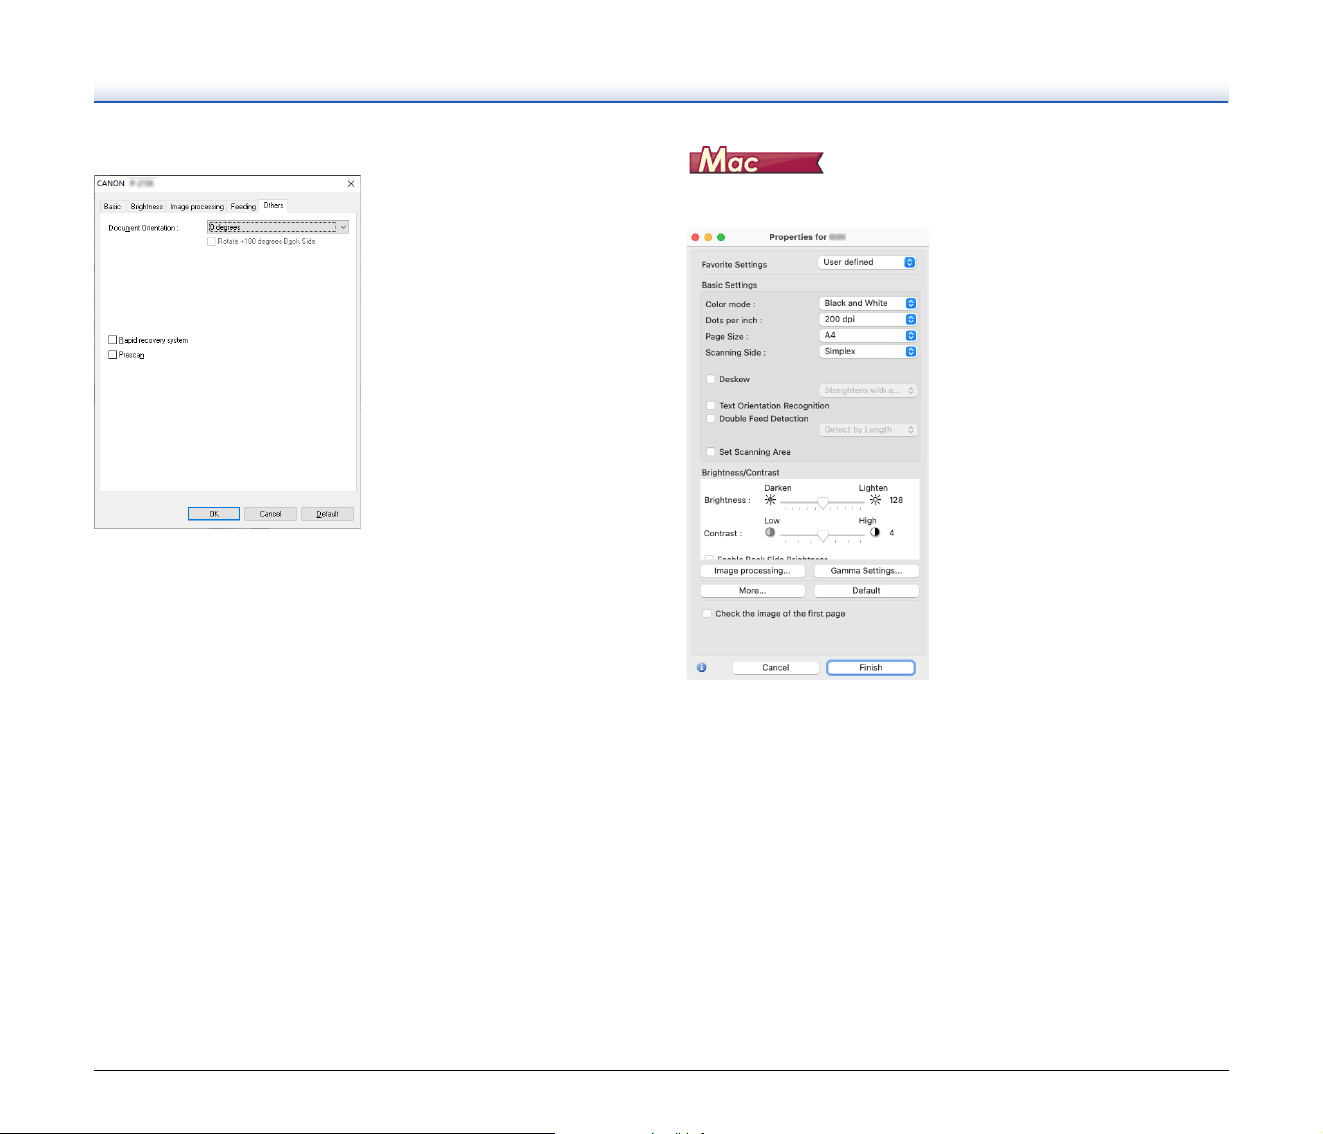
[Others] tab
Configure special scan method and image processing settings.
When the advanced settings dialog box is opened from
CaptureOnTouch Lite, the following settings screen appears.
40
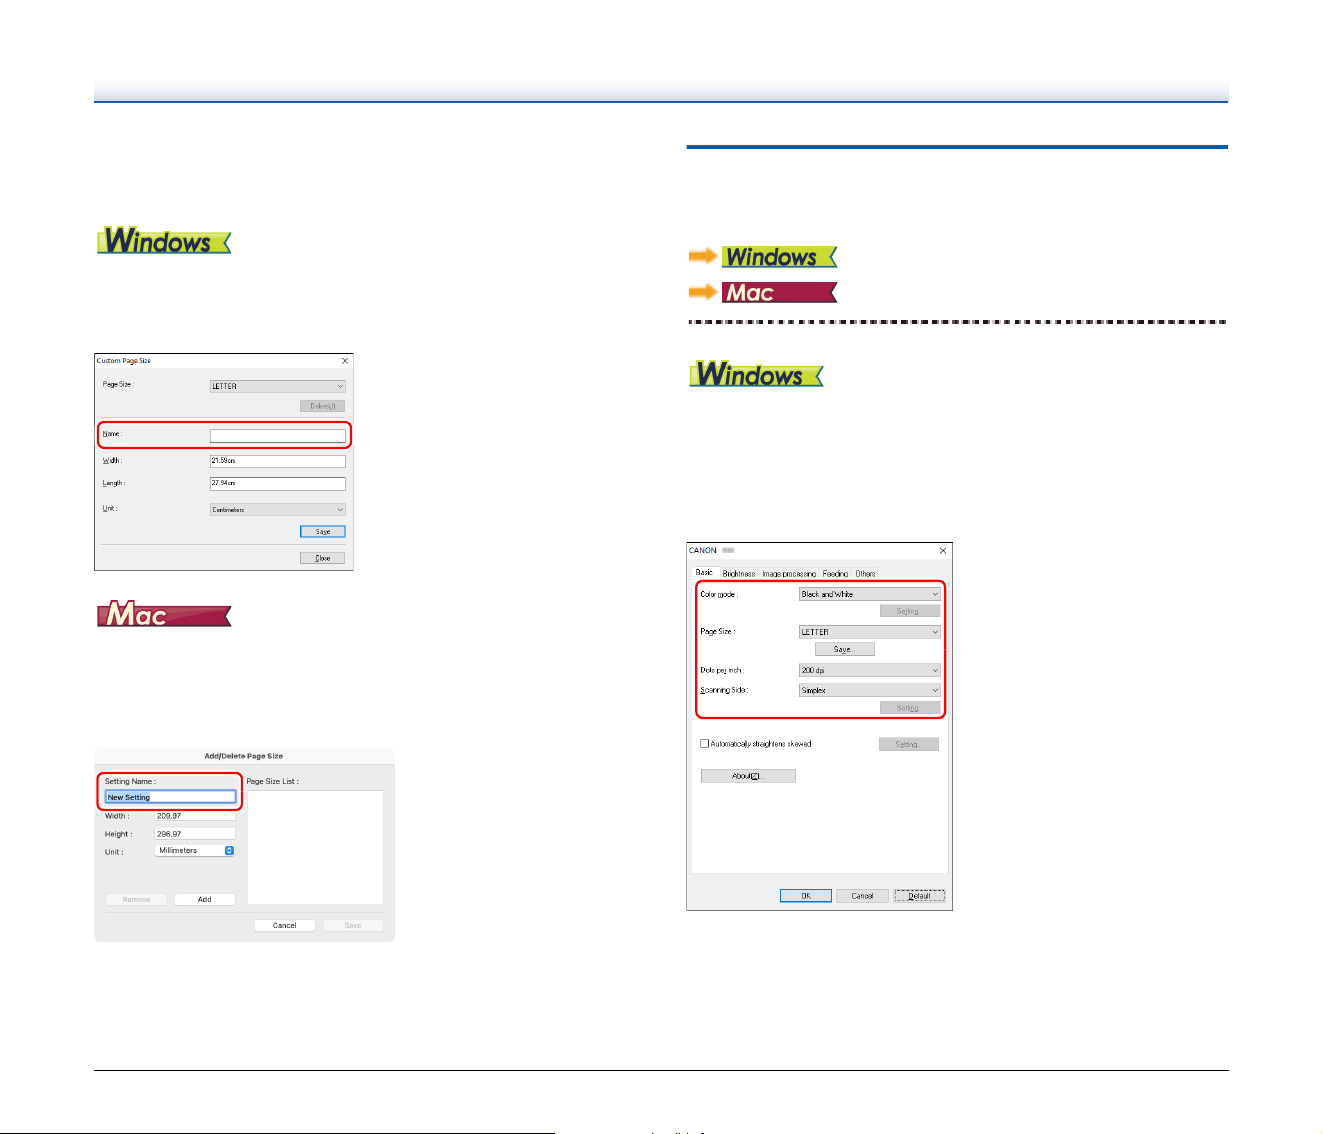
Scanning Documents of Unregistered
Page Sizes
You can register a non-standard page size that has not been
registered as a page size by naming and registering it as a custom
page size in the Custom Paper Size dialog box, which is opened from
the [Save] button on the [Basic] tab.
Configuring the following settings allows you to scan a document of an
unregistered page size.
When scanning a document of a non-standard page size, select [Add/
Delete] for [Page Size] to display the [Add/Delete Page Size] dialog
box. Name and register the unregistered page size in [Page Size].
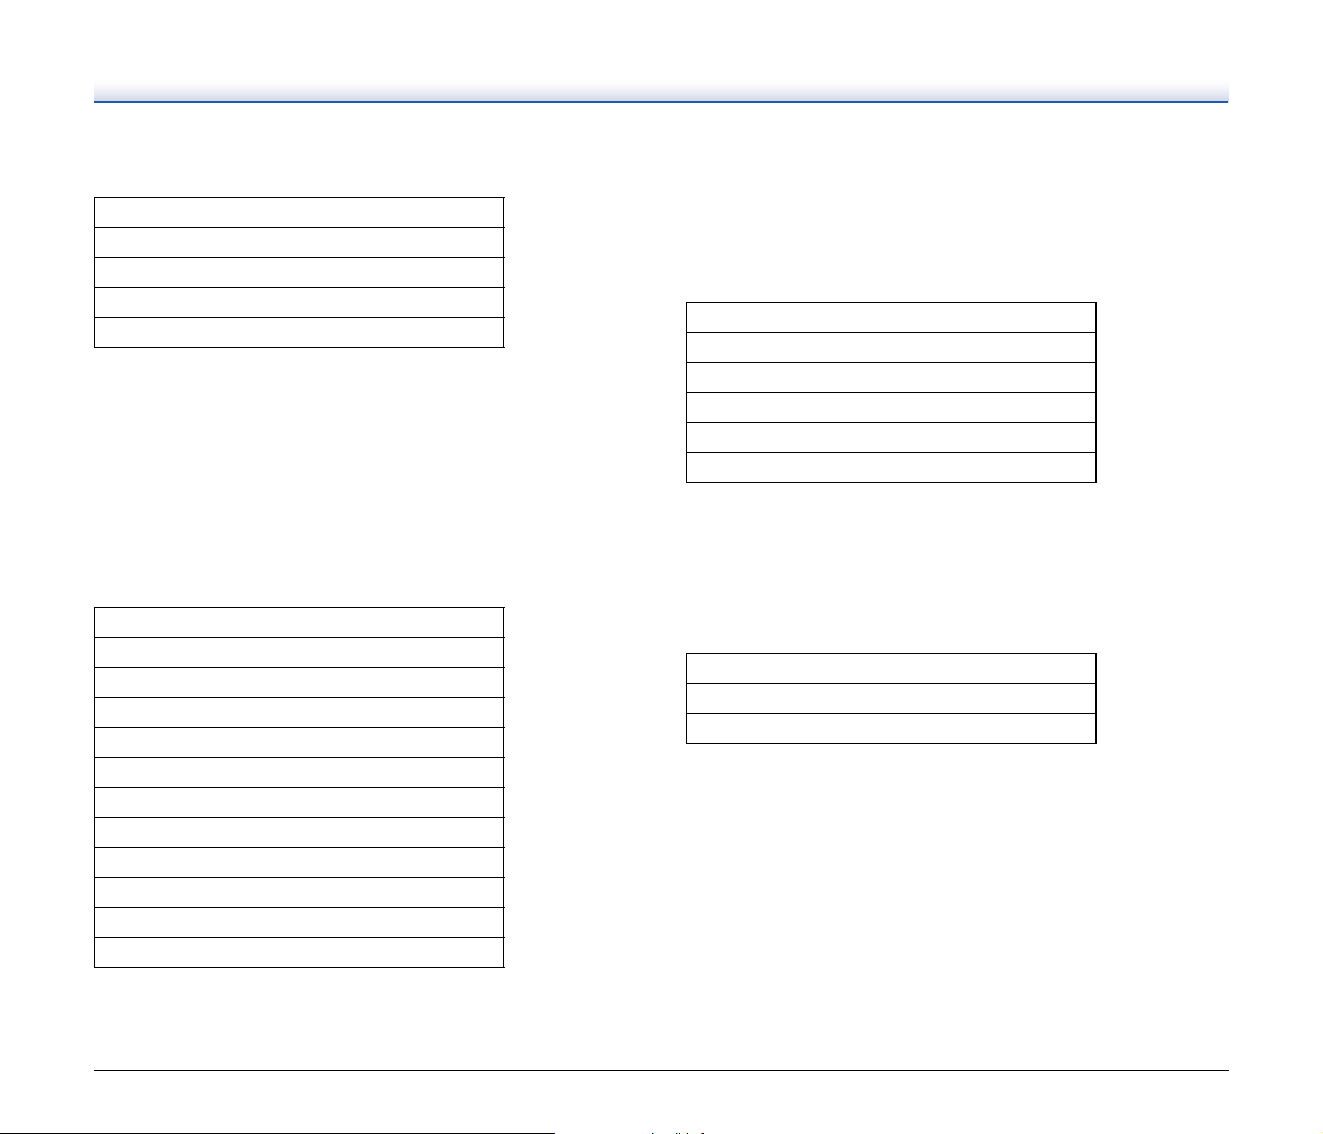
Setting Basic Scanning Conditions
This section provides an overview of the basic setting items that are
the minimum requirements when configuring the scanner settings.
Confirming Basic Conditions for
Scanning
When you scan a document, make sure you confirm the [Color mode],
[Page Size], [Dots per inch], and [Scanning Side] basic conditions in
the advanced settings dialog box.
41
Color mode
Select the scanning mode.
• [Advanced Text Enhancement II] removes or processes the
background color and background surrounding text to enhance the
text for easy reading. When [Advanced Text Enhancement II] is
selected, you can make the text in scanned images easier to read by
adjusting the contrast on the [Brightness] tab.
• [Detect automatically] detects whether the document is in color,
grayscale, or black and white. You can configure advanced settings
related to the detection method by clicking [Setting].
Page Size
Select the page size that matches the document to be scanned.
If [Match original size] is selected, the edges of the document are
detected and images that match the size of the document are saved.
Further, [Trimming] in the [Image processing] tab is enabled only
when [Match original size] is selected.
Dots per inch
Select the scanning resolution.
• Higher resolutions provide clearer images but result in larger file
sizes and slower scanning.
• When [Detect automatically] is specified, the resolution is detected
automatically from the content printed in the document.
Scanning Side
Select which of the sides of the document to scan.
If the scanning side is set to [Skip blank page], the images of blank
pages are deleted when images are saved.
Detect automatically
Black and White
Advanced Text Enhancement II
256-level Gray
24-bit Color
Match original size
A4
A5
A5R
A6
A6R
B5
B6
B6R
LEGAL
LETTER
Scanner's Maximum
Detect automatically
150 dpi
200 dpi
300 dpi
400 dpi
600 dpi
Skip blank page
Simplex
Duplex
42
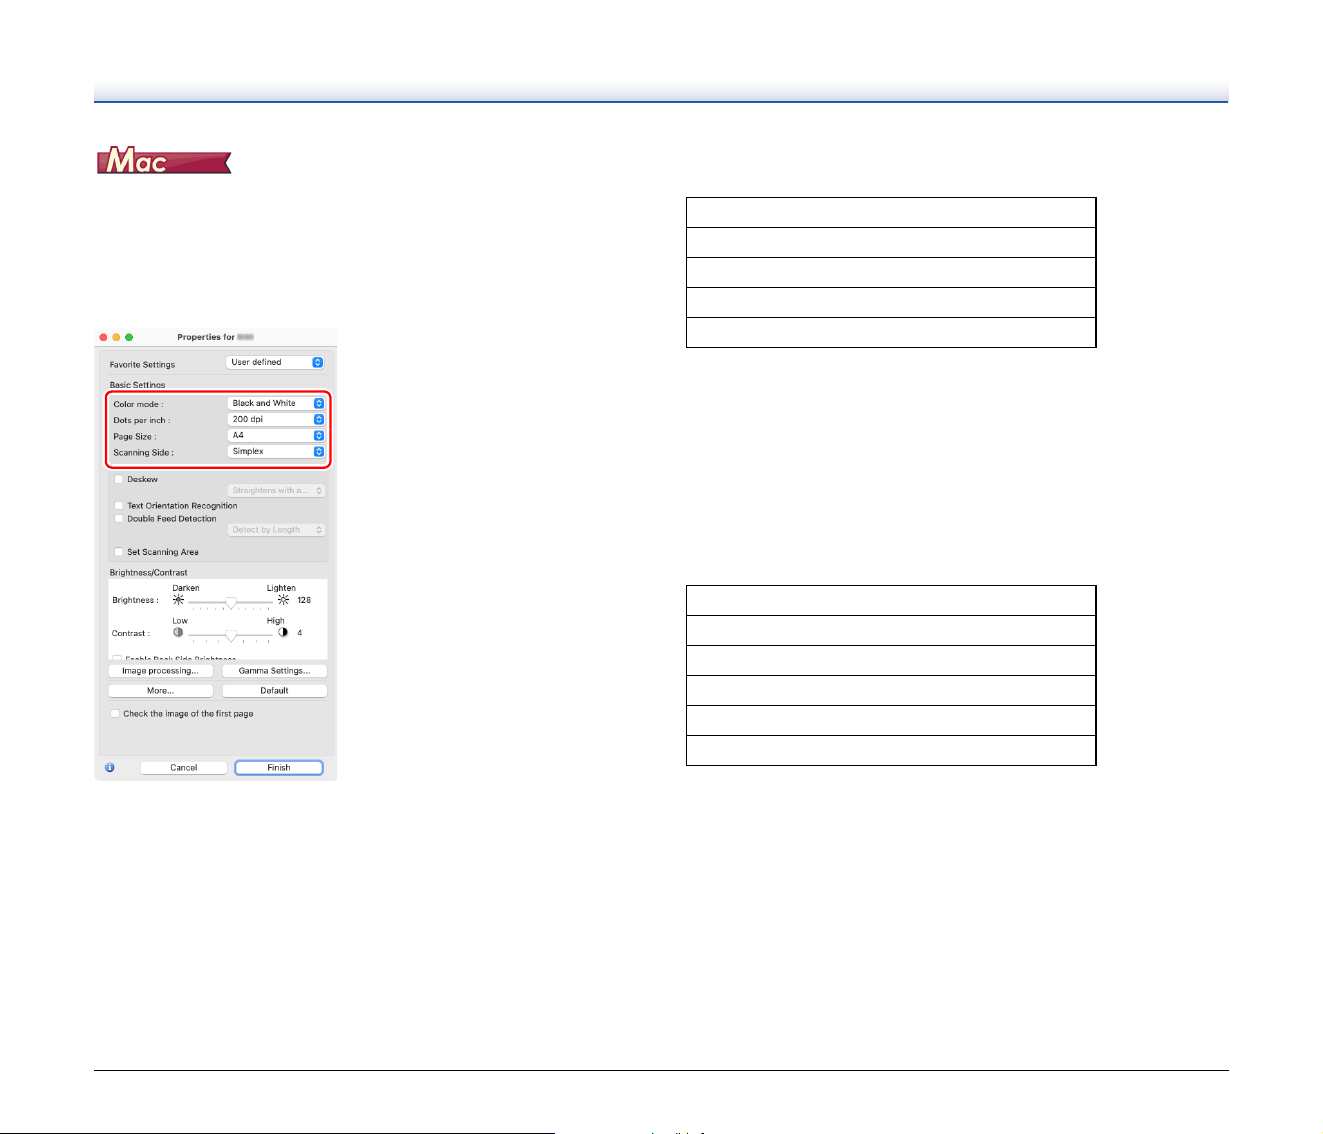
Confirming Basic Conditions for
Scanning
When you scan a document, make sure you confirm the [Color mode],
[Dots per inch], [Page Size], and [Scanning Side] basic conditions in
the advanced settings dialog box.
Color mode
Select the scanning mode.
• [Advanced Text Enhancement II] removes or processes the
background color and background surrounding text to enhance the
text for easy reading.
• [Detect automatically] detects whether a document is color,
grayscale, or black and white based on its content. When this is
selected, you can configure detailed settings for the detection
method.
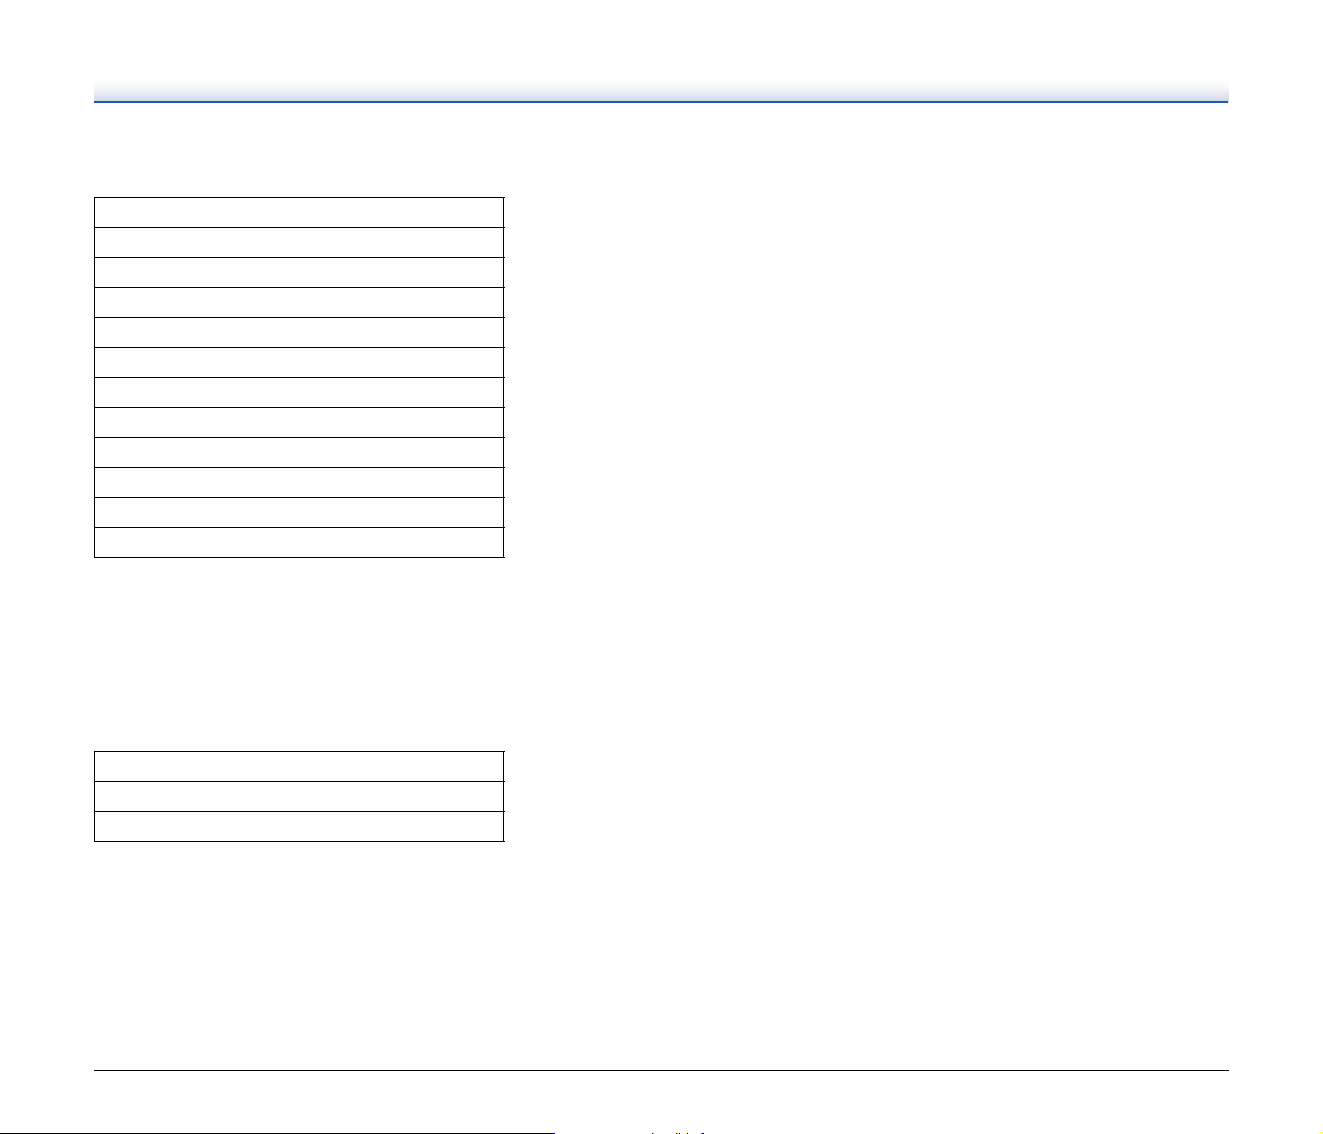
Dots per inch
Select the scanning resolution.
• Higher resolutions provide clearer images but result in larger file
sizes and slower scanning.
• When [Detect automatically] is specified, the resolution is detected
automatically from the content printed in the document.
Detect automatically
Black and White
Advanced Text Enhancement II
256-level Gray
24-bit Color
Detect automatically
150 dpi
200 dpi
300 dpi
400 dpi
600 dpi
43
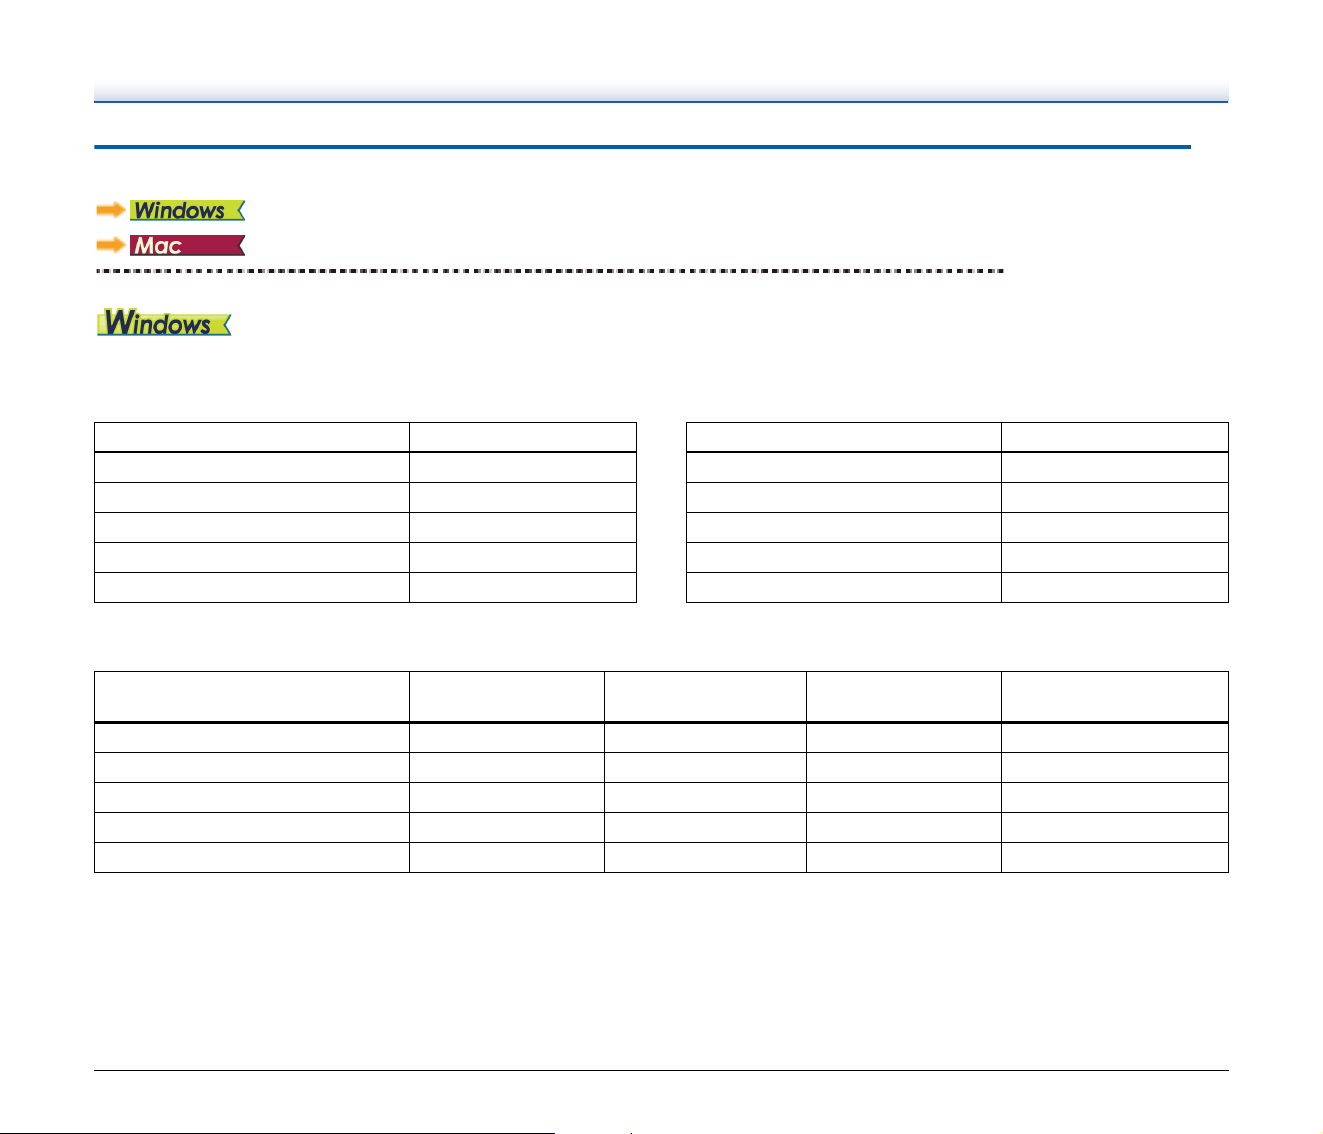
Page Size
Select the page size that matches the document to be scanned.
If [Detect automatically] is selected, the edges of the document are
detected and images that match the size of the document are saved.
Further, the [Trimming] dialog box displayed when you click [More] in
the advanced settings dialog box is enabled only when [Detect
automatically] is selected.
Scanning Side
Select which of the sides of the document to scan.
If the scanning side is set to [Skip blank page], the images of blank
pages are deleted when images are saved.
Detect automatically
A4
A5
A5R
A6
A6R
B5
B6
B6R
LEGAL
LETTER
Scanner's Maximum
Skip blank page
Simplex
Duplex
44
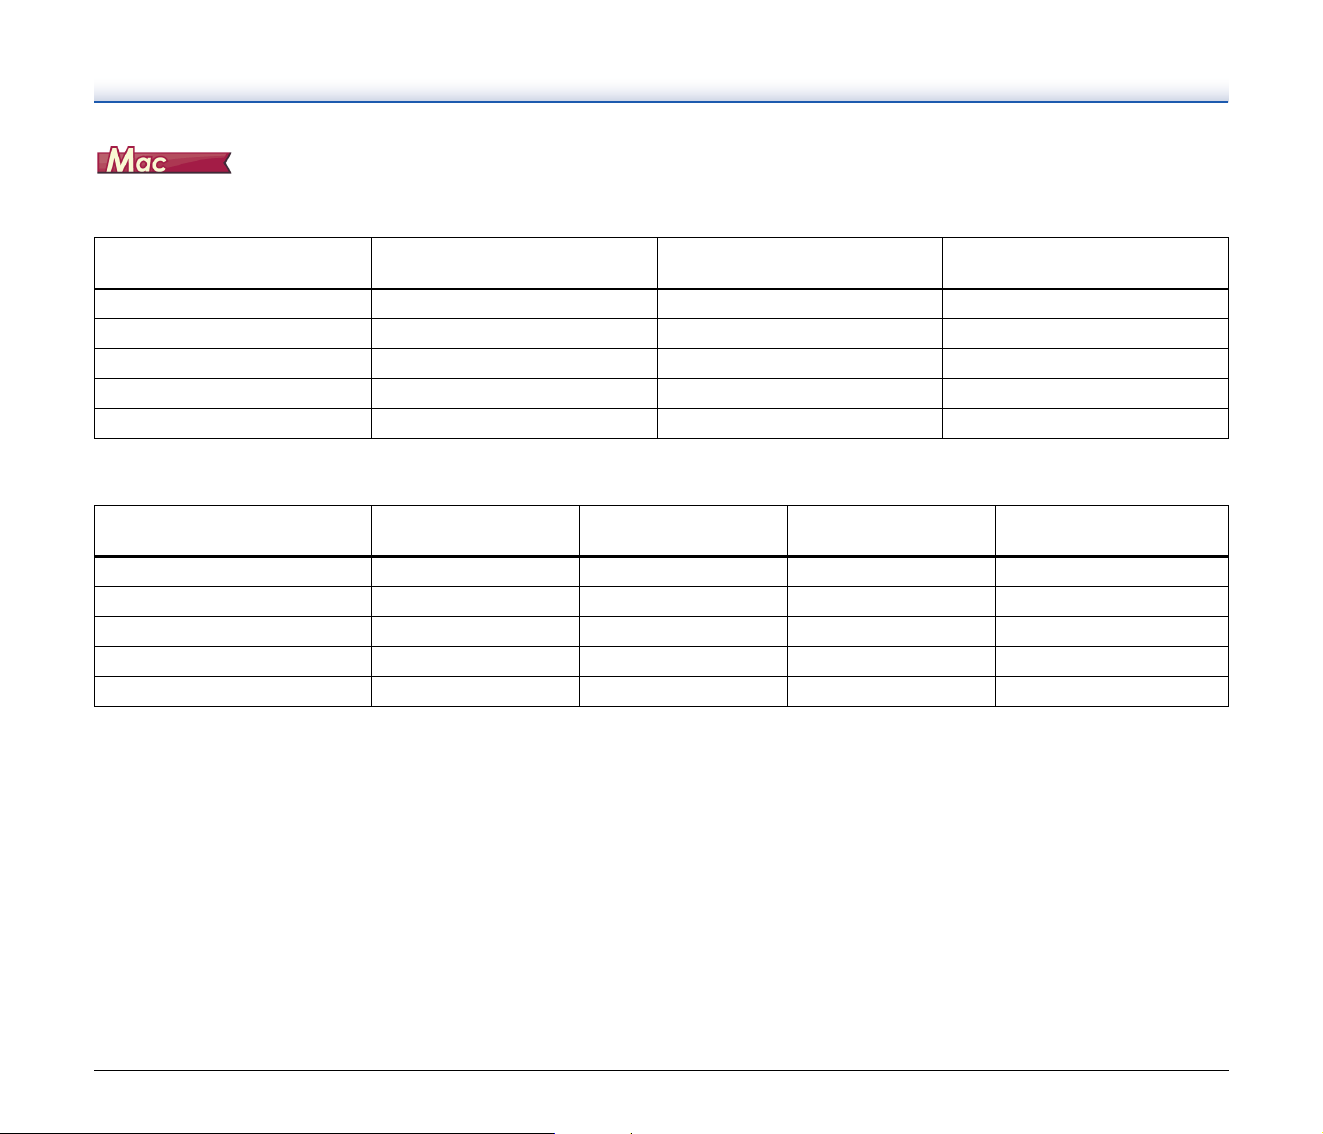
Function Restrictions Depending on Mode Setting
Some of the setting items in each of the advanced settings dialog box tabs are disabled as follows depending on the setting for [Color Mode] on
the [Basic] tab.
[Brightness] tab
: Available for setting Blank: Not available for setting
[Others] Tab
: Available for setting Blank: Not available for setting
[Image processing] tab
: Available for setting Blank: Not available for setting
1)
Not available for setting if all of the following conditions in the [Auto Image Type Detection Settings] dialog box are met.
• [Detection Mode] is not set to [Color or Gray]
• [Mode in case of binary] in the [Settings for in case of binary] tab is set to [Advanced Text Enhancement II]
2)
Not available for setting when [Detection Mode] is set to [Color or Gray] in the [Auto Image Type Detection Settings] dialog box.
Setting value Contrast
Detect automatically
Black and White
Advanced Text Enhancement II
256-level Gray
24-bit Color
Setting value Prescan
Detect automatically
Black and White
Advanced Text Enhancement II
256-level Gray
24-bit Color
Setting value Edge emphasis Character Emphasis
Background
smoothing
Prevent Bleed Through /
Remove Background
Detect automatically
2)
2)
1)
1)
Black and White
Advanced Text Enhancement II
256-level Gray
24-bit Color
45
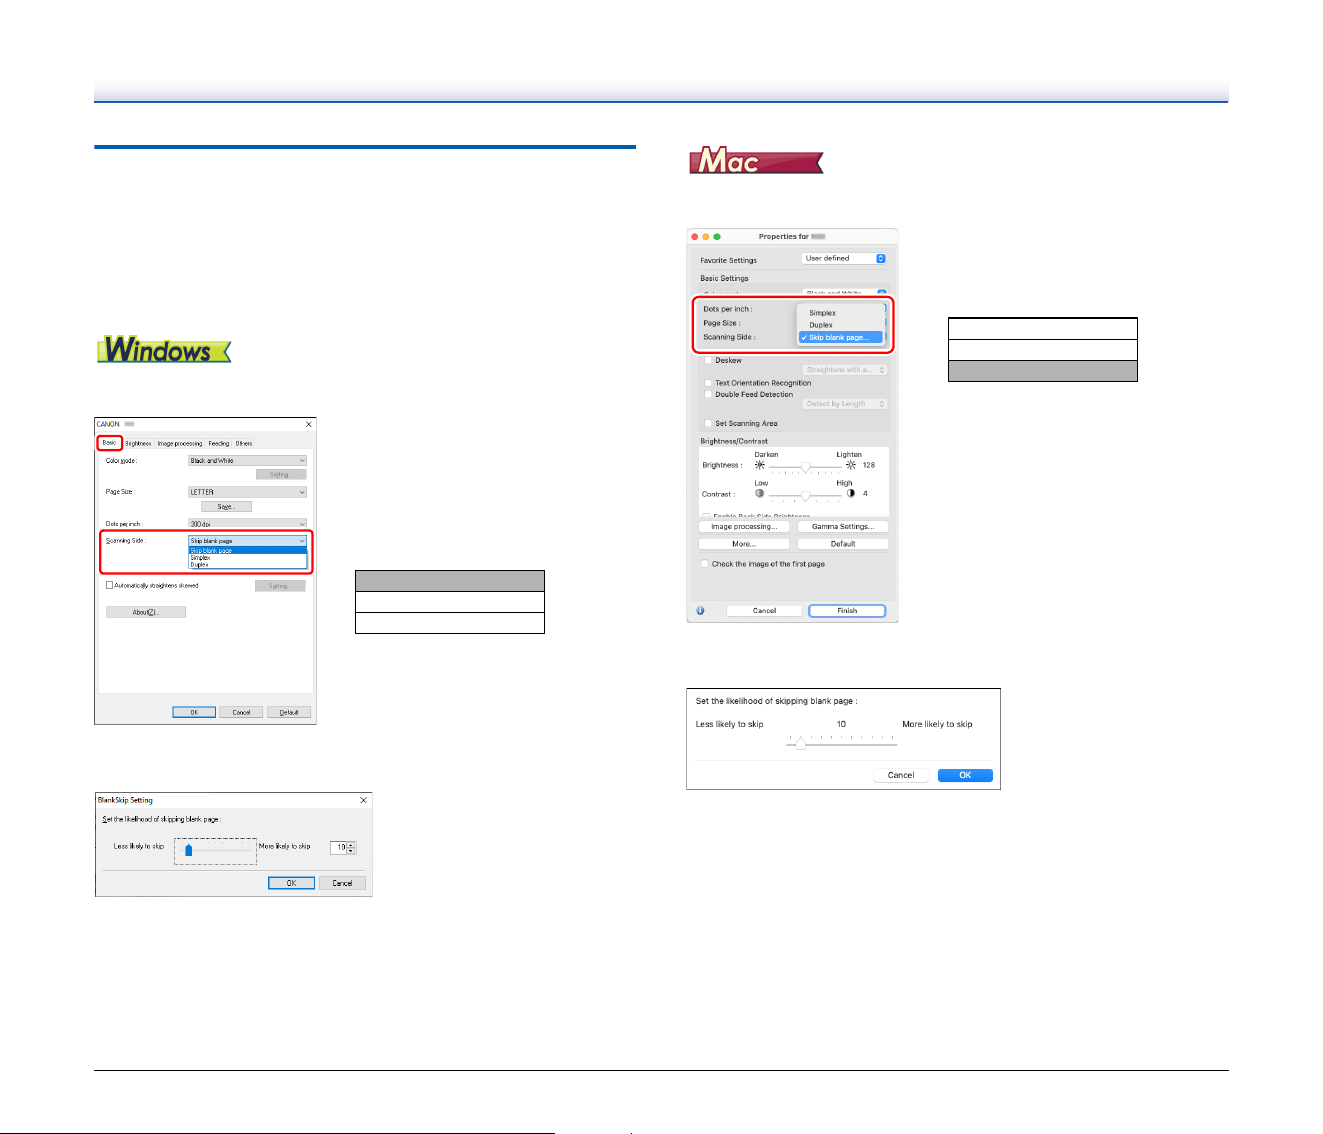
Some of the setting items are disabled as follows depending on the setting for [Color Mode] in the advanced settings dialog box.
[Properties for R30] dialog box
: Available for setting Blank: Not available for setting
[Image processing] dialog box
: Available for setting Blank: Not available for setting
1)
Only when [Detection mode] is set to [Color or Gray] in the settings screen that appears after [Detect automatically] is selected.
Setting value Enable Back Side Brightness Enable Back Side Contrast
Check the image of the first
page
Detect automatically
Black and White
Advanced Text Enhancement II
256-level Gray
24-bit Color
Setting value Edge emphasis
Background
smoothing
Character Emphasis
Prevent Bleed Through /
Remove Background
Detect automatically
1)
1)
Black and White
Advanced Text Enhancement II
256-level Gray
24-bit Color
46
Configuring Scanner Settings
According to Purpose
Set the scanning conditions according to the scanning purpose.
When you want to delete the images of the blank pages in
two-sided documents
Set the scanning side setting to [Skip blank page] on the [Basic] tab to
delete the images of the blank pages in the document.
If [Skip blank page] is selected, the [Setting] button is enabled, and
you can adjust the level for judging whether pages are blank.
Set the scanning side setting to [Skip blank page] to delete the images
of the blank pages in the document.
If [Skip blank page] is selected, you can adjust the level for judging
whether pages are blank.
Basic >
Scanning Side :
Skip blank page
Simplex
Duplex
Scanning Side :
Simplex
Duplex
Skip blank page
47
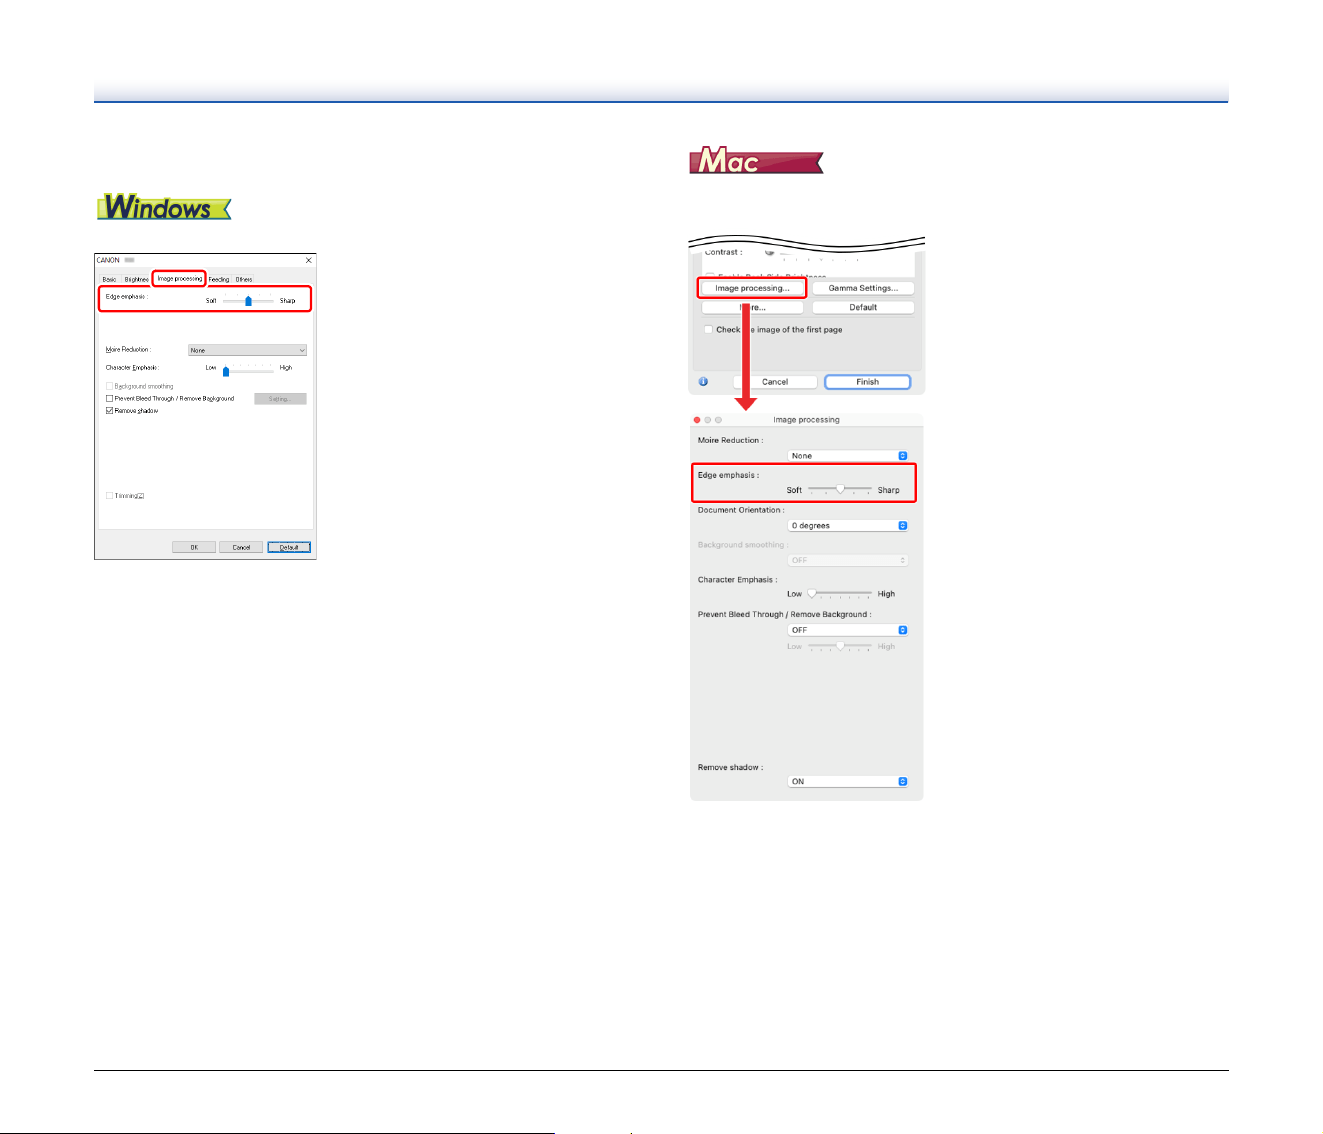
When you want to enhance contours in images
Adjust the edge emphasis setting on the [Image processing] tab.
Click [Image processing] and adjust the edge emphasis settings in the
dialog box which appears.
Image processing >
Edge emphasis :
Image processing >
Edge emphasis :
48
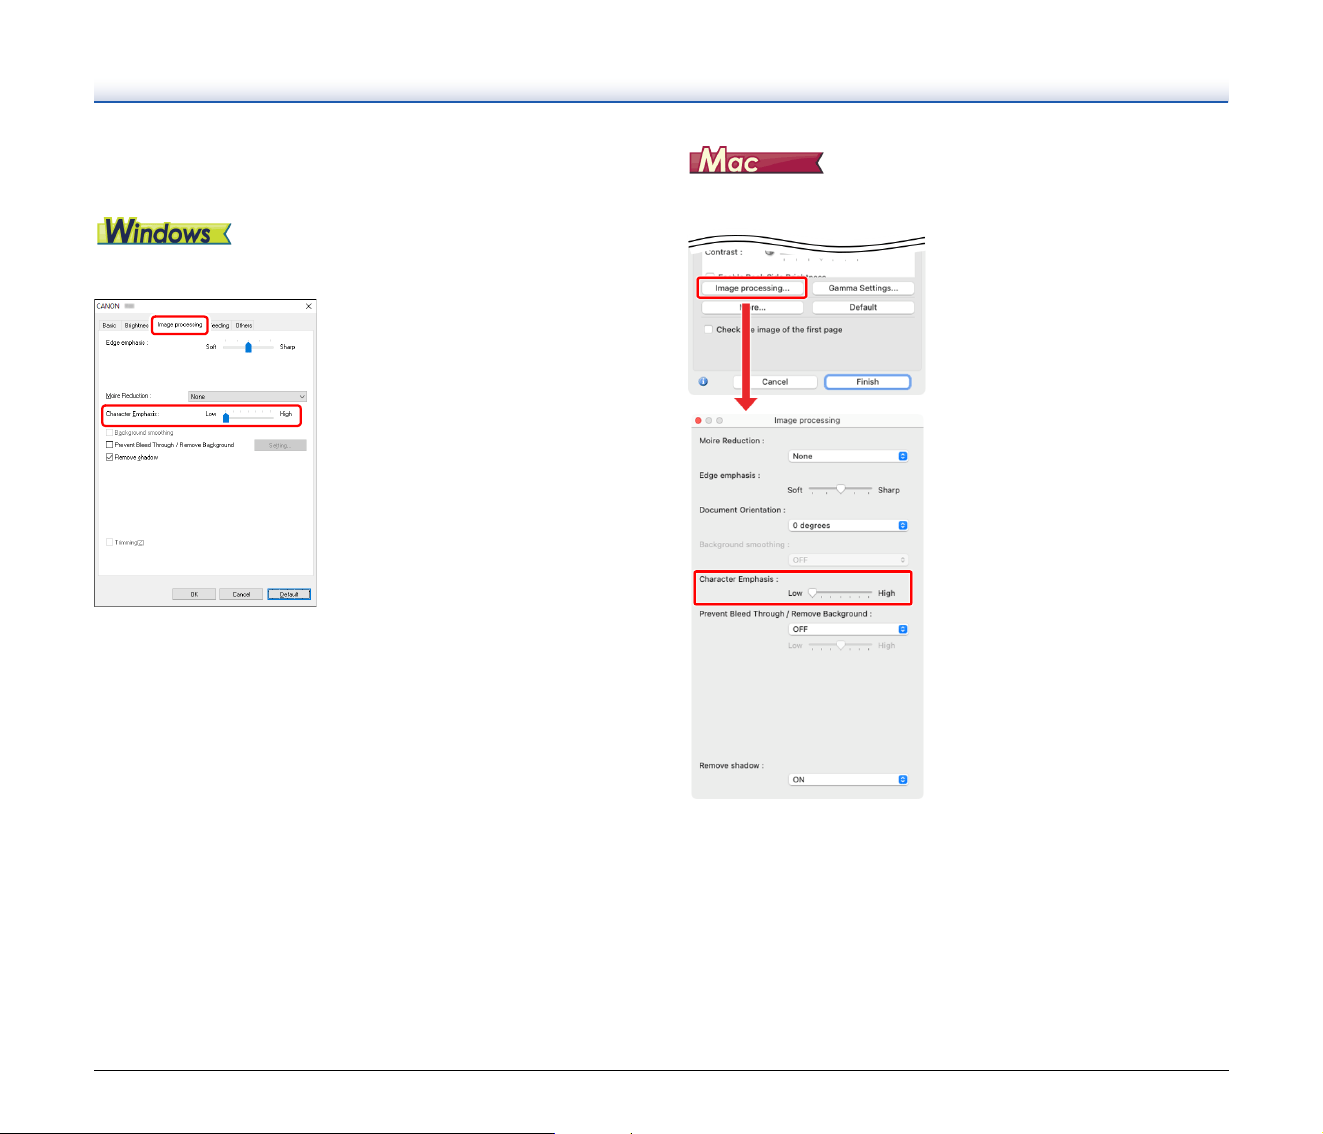
When you want to make lines and text in scanned images
thicker or thinner
Drag the [Character Emphasis] slider in the [Image processing] tab to
make lines and text in the scanned images thicker or thinner.
Click [Image processing], and in the dialog box that appears adjust
letter and line thickness settings.
Image processing >
Character Emphasis :
Image processing >
Character Emphasis :
49
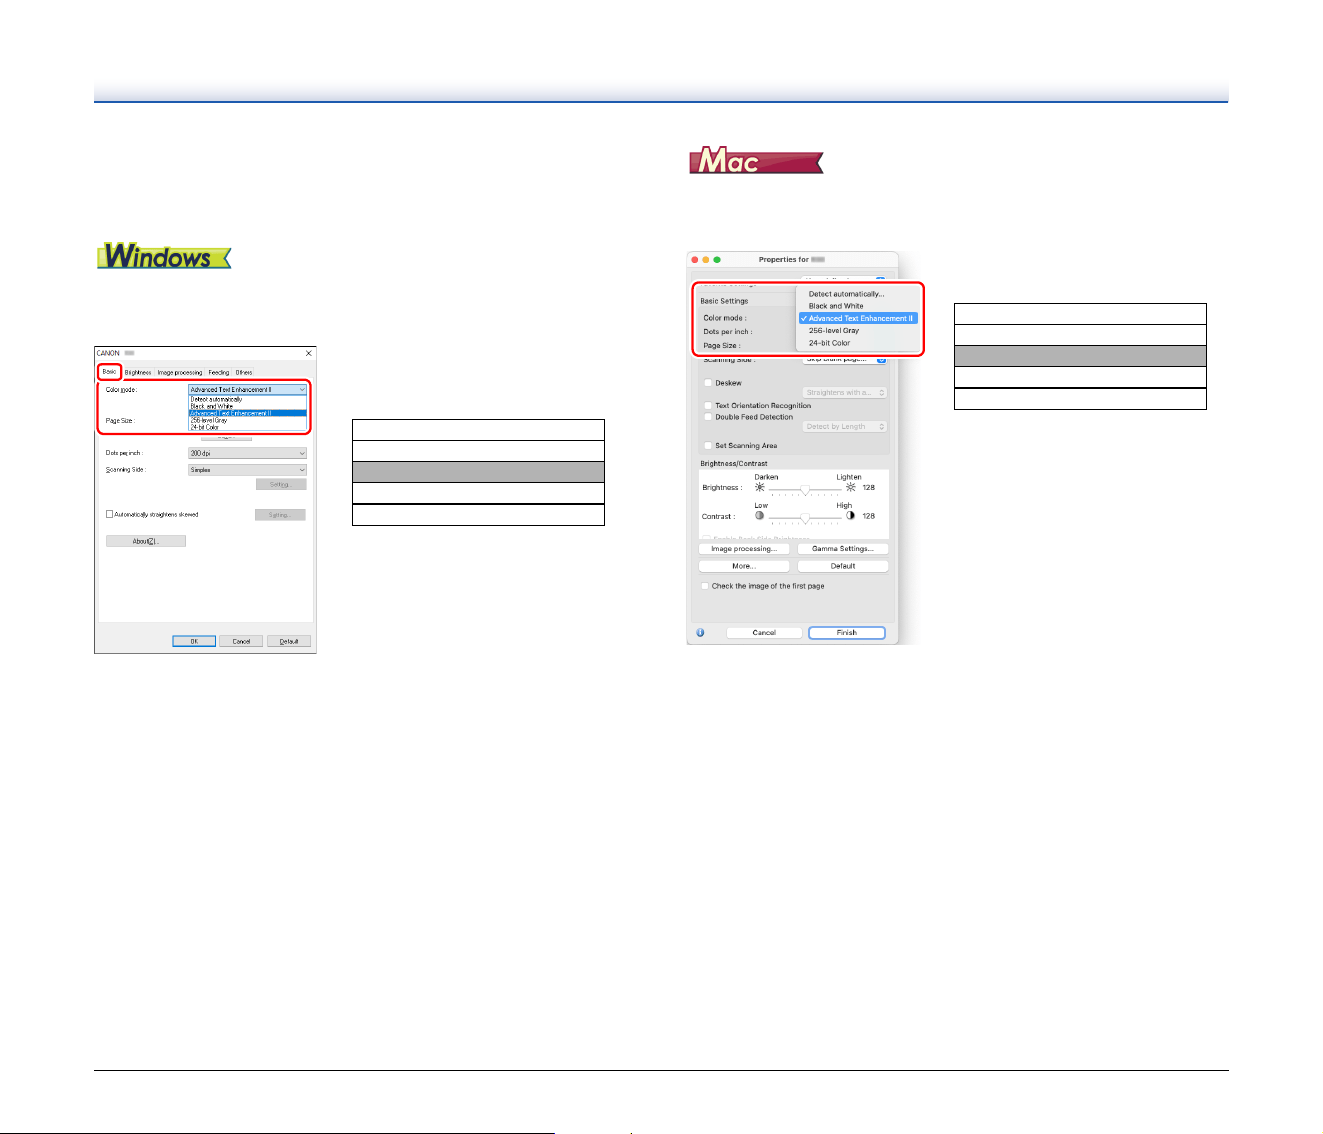
When you want to enhance text that is difficult to read
because of factors such as the background of the
scanned document
Select [Advanced Text Enhancement II] in the mode setting on the
[Basic] tab. The background behind the text is removed or processed
so that the text is emphasized for better readability.
Advanced Text Enhancement II is suitable for scanning a document
with a uniform background color and light text and background. If the
background is non-uniform, such as a pattern, the background may
not be able to be completely removed and the text may become
difficult to read. If necessary, you can make the text in scanned
images easier to read by adjusting the contrast on the [Brightness]
tab.
Select [Advanced Text Enhancement II] in the [Color mode] setting.
The background behind the text is removed or processed so that the
text is emphasized for better readability.
Basic >
Color mode :
Detect automatically
Black and White
Advanced Text Enhancement II
256-level Gray
24-bit Color
Color mode :
Detect automatically
Black and White
Advanced Text Enhancement II
256-level Gray
24-bit Color
50
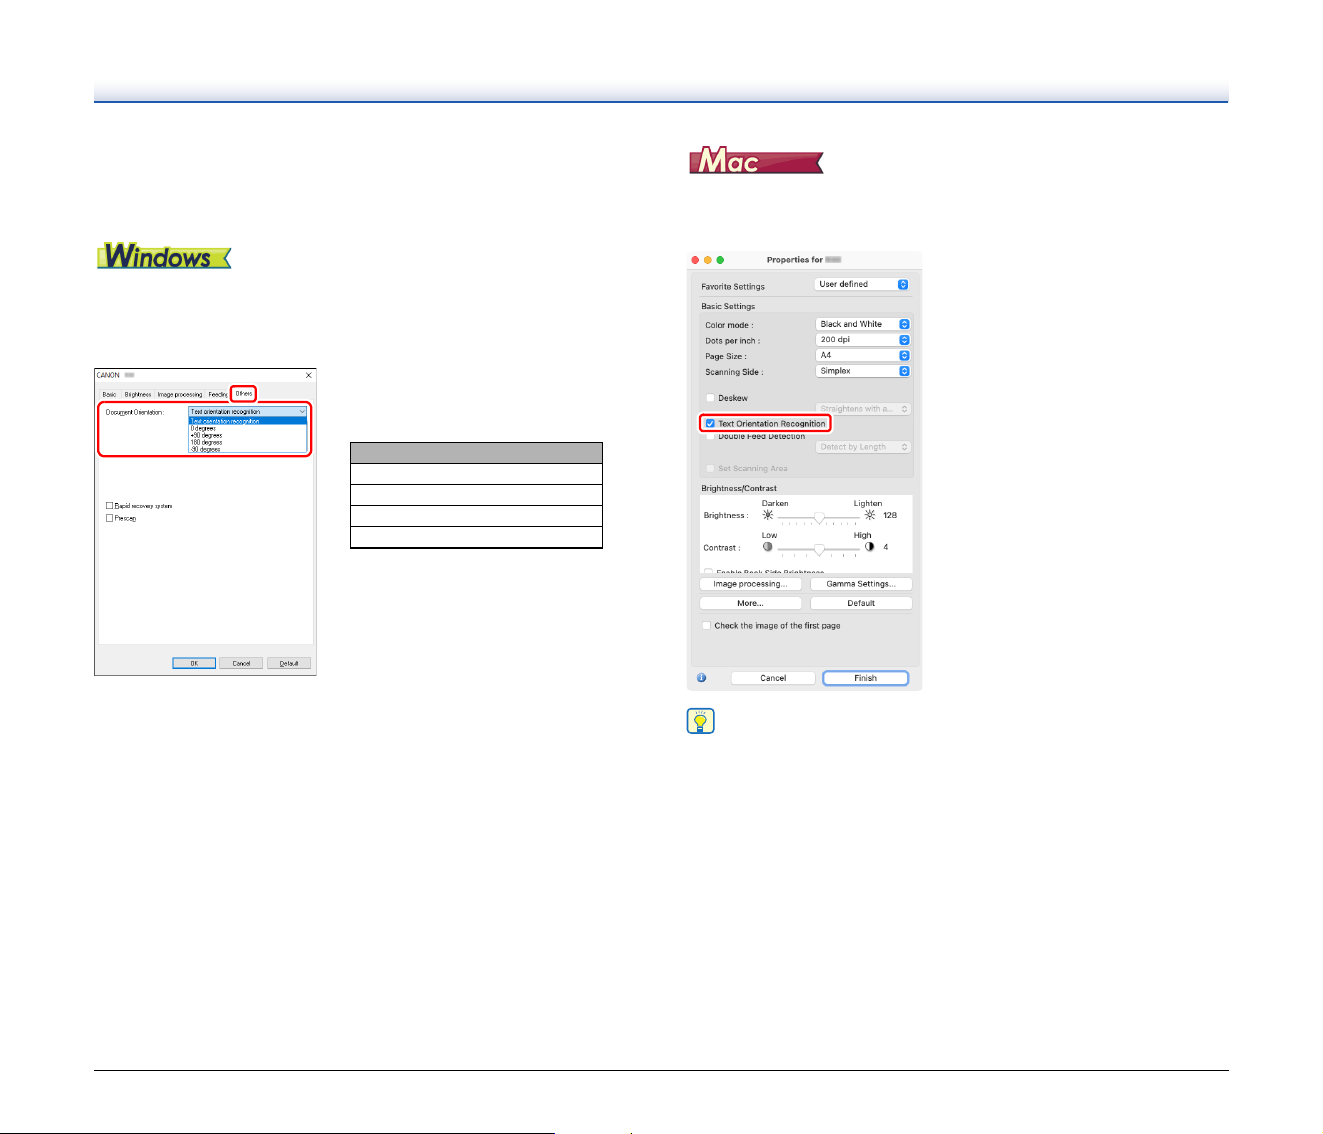
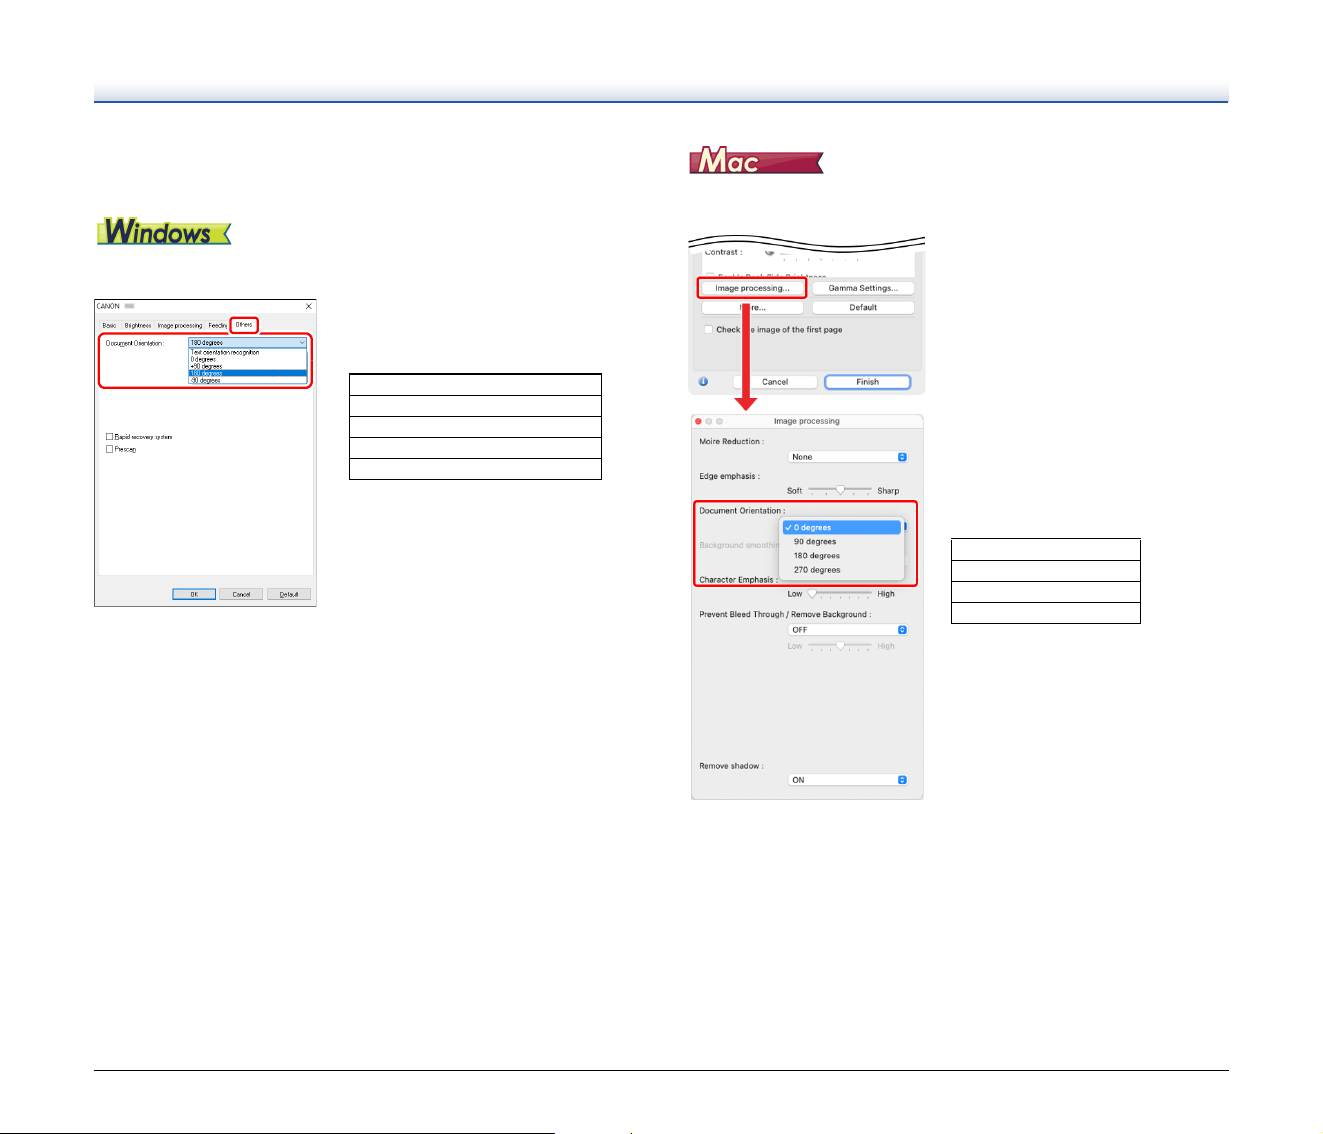
When you want to match the orientation of images to the
text when scanning a mixture of pages with different text
orientations
Select [Text orientation recognition] in [Document Orientation] on the
[Others] tab. The text orientation on each page is detected, and the
scanned image is rotated in 90-degree increments to correct the
orientation.
Select the [Text Orientation Recognition] check box. The text
orientation on each page is detected, and the scanned image is
rotated in 90-degree increments to correct the orientation.
Hint
When the [Text Orientation Recognition] check box is selected,
[Document Orientation] is unavailable.
Others >
Document Orientation :
Text orientation recognition
0 degrees
+90 degrees
180 degrees
-90 degrees
Text Orientation Recognition : ON
51
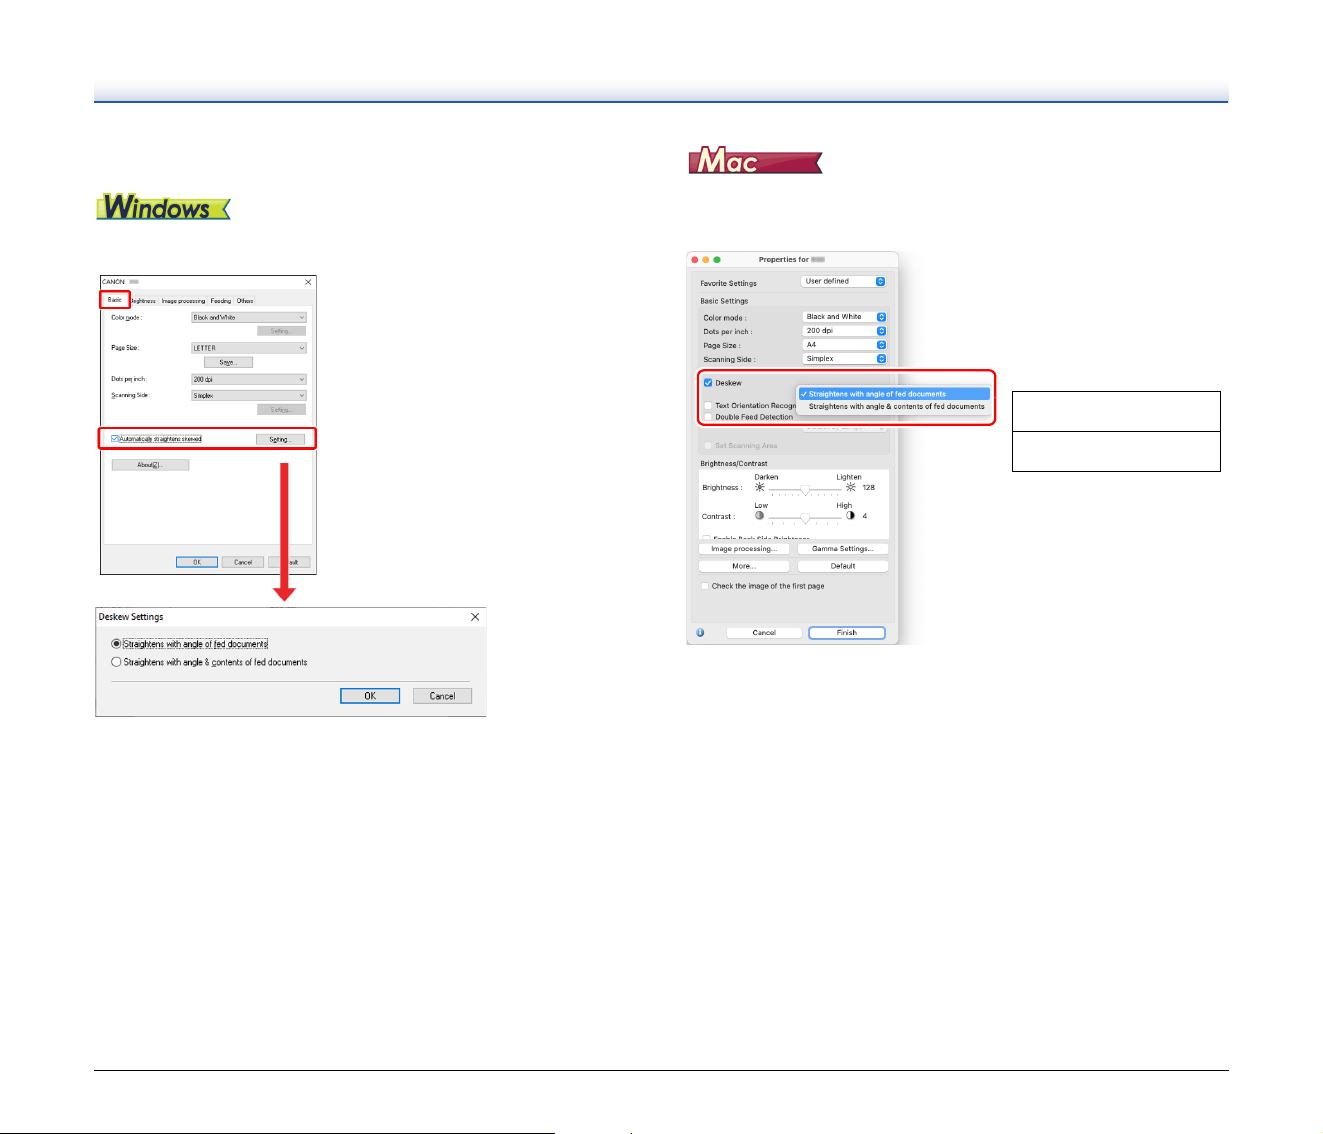
When you want to rotate the images of a document placed
horizontally to correct the orientation
Specify the rotation angle in [Document Orientation] on the [Others]
tab.
Click [Image processing] and specify the rotation angle in [Document
Orientation] in the dialog box that appears.
Others >
Document Orientation :
Text orientation recognition
0 degrees
+90 degrees
180 degrees
-90 degrees
Image processing >
Document Orientation :
0 degrees
90 degrees
180 degrees
270 degrees
52
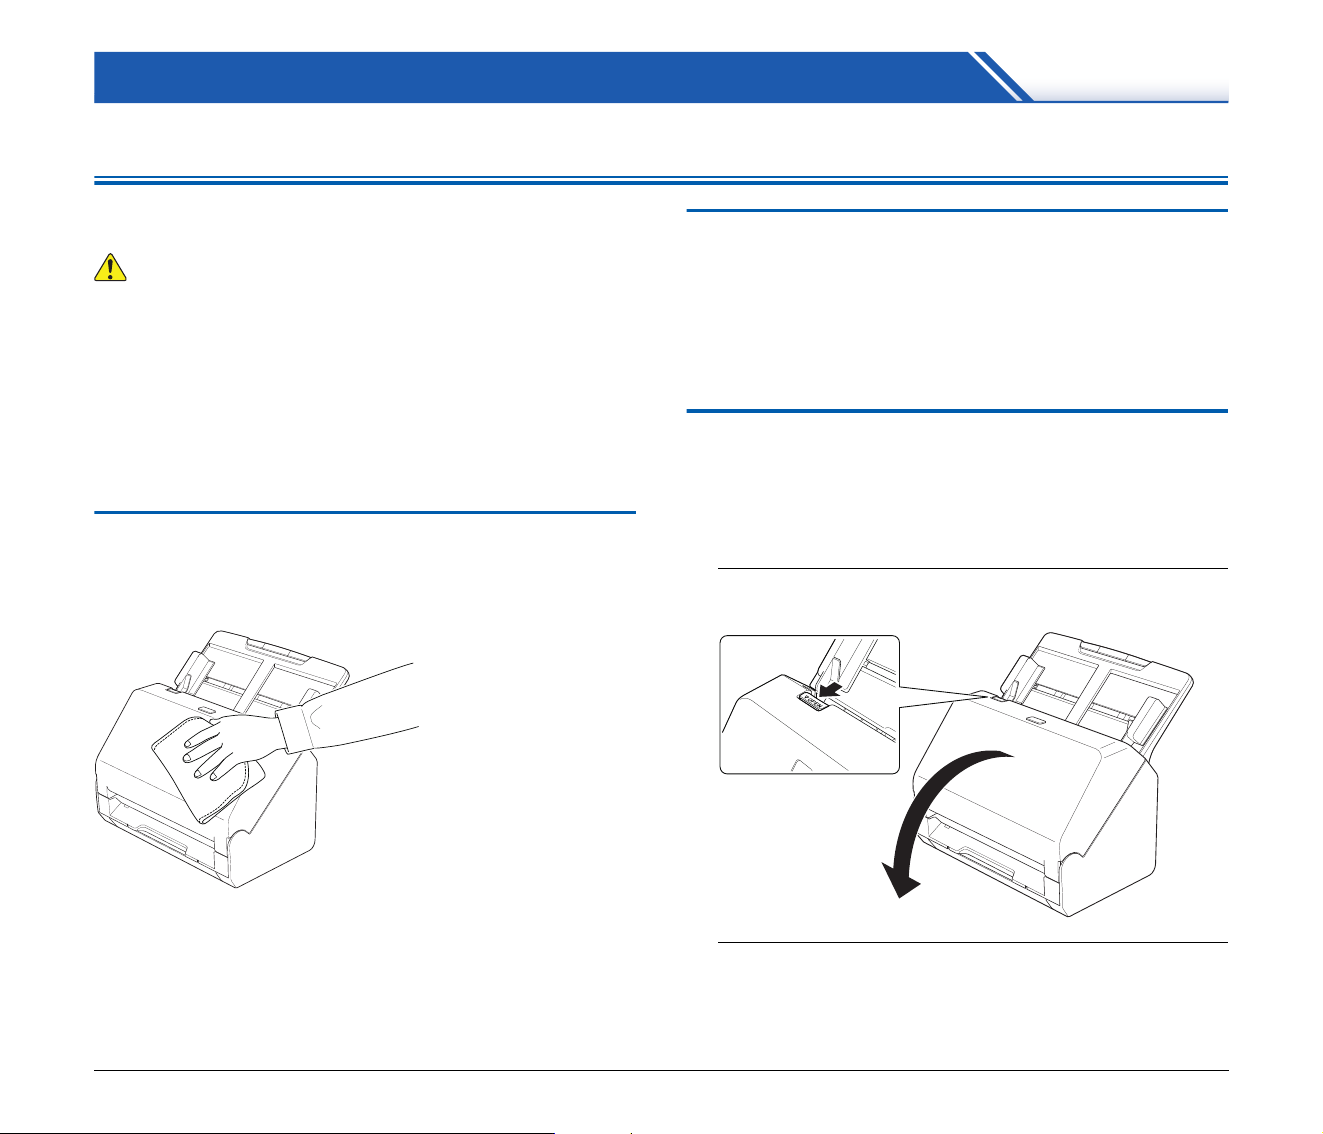
To correct tilted documents and images
Place a check in [Automatically straightens skewed] under the [Basic]
tab, and then click [Setting] to display the [Deskew Settings] screen.
Select a correction method and click [OK].
Click the [Deskew] check box to ON. You can select either
[Straightens with angle of fed documents] or [Straightens with angle &
contents of fed documents].
Basic >
Automatically straightens skewed
: ON
Deskew :
Straightens with angle of
fed documents
Straightens with angle &
contents of fed documents
53
Maintenance
Daily Maintenance
Clean the scanner on a regular basis, as described below, to maintain
peak scanning quality.
CAUTION
• When cleaning the scanner and the inside of the scanner, turn OFF
the power button and disconnect the power cord from the power
outlet.
• Do not use spray cleaners to clean the scanner. Precision
mechanisms, such as the light source, may get wet, and cause a
malfunction.
• Never use paint thinner, alcohol, or other organic solvents to clean
the scanner. The exterior of the scanner may become deformed,
discolored, or melted. It may also cause a fire or electric shock.
Cleaning the Scanner
To clean the outside of the scanner, wipe off any dirt with a cloth that
has been dampened with water and thoroughly wrung out, and then
wipe the scanner dry with a clean dry cloth.
Cleaning the Inside of the Scanner
Dust or paper particles inside the scanner may cause lines or
smudges to appear on scanned images. Use compressed air to
periodically clean dust and paper particles from the document feed
opening and the inside of the scanner. After finishing a large scanning
job, turn OFF the scanner and then clean out any paper particles
remaining inside the scanner.
Cleaning the Sensor Glass and the
Rollers
If scanned images contain streaks, or if the scanned documents
become dirty, the sensor glass or rollers inside the scanner may be
dirty. Clean them periodically.
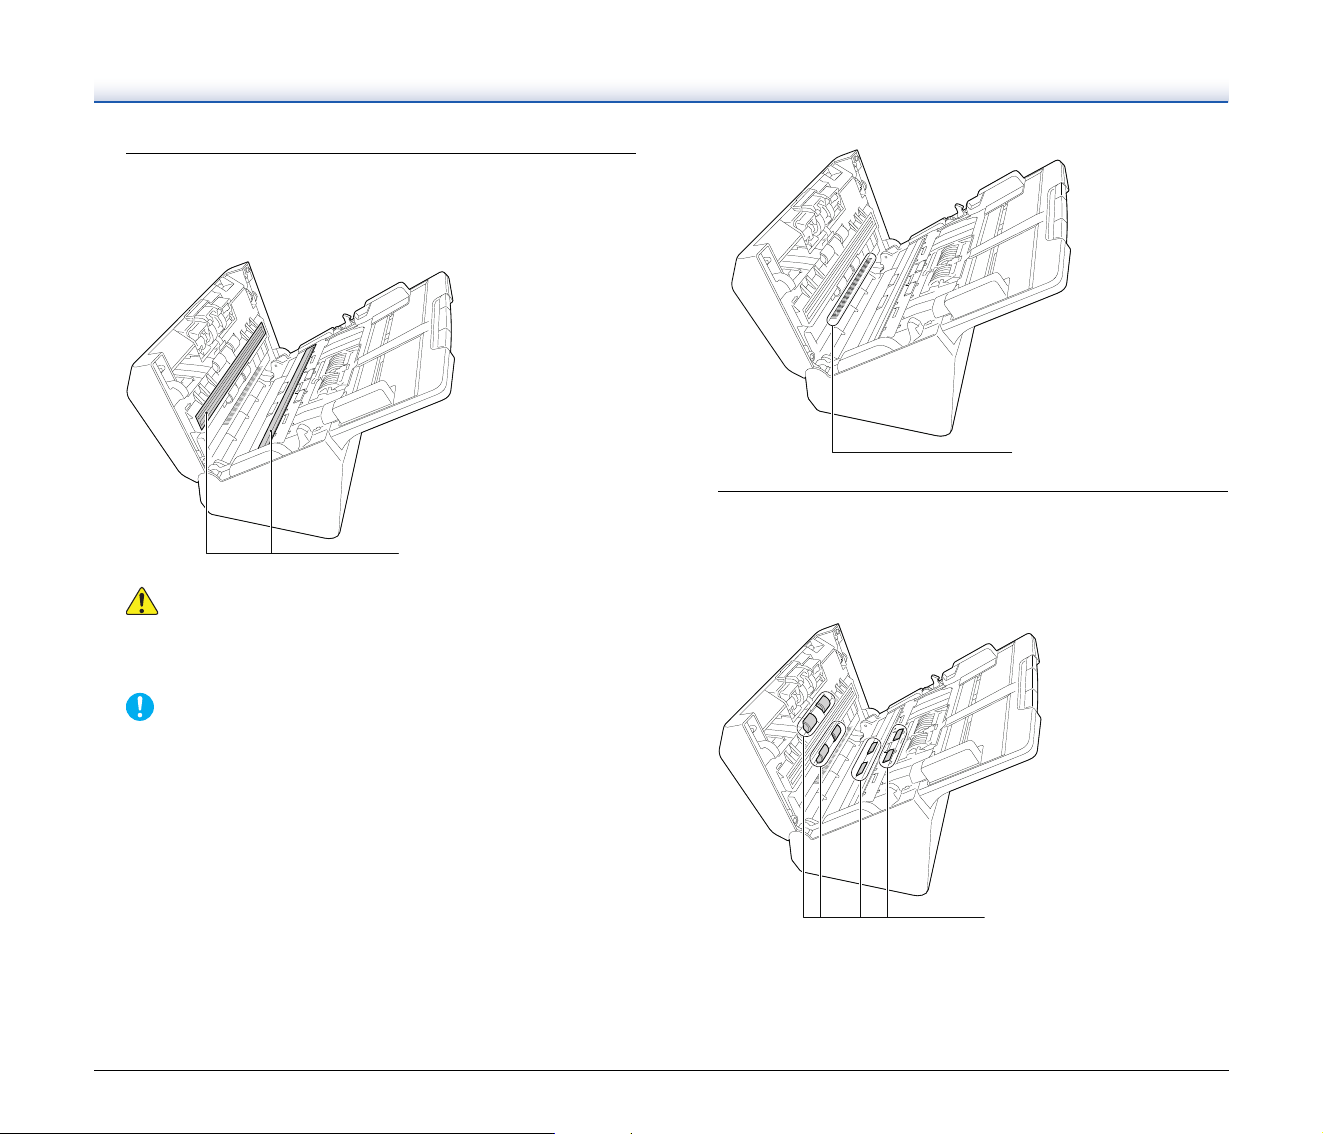
1
Pull the OPEN lever and pull open the front unit toward
you.
2
Use compressed air to remove dust and paper particles
from the inside of the scanner.
54
3
Wipe any dirt off the scanning glass.
Wipe any dirt off the scanning glass with a cloth that has been
dampened with water and thoroughly wrung out, and then wipe
the glass dry with a clean, dry and soft cloth.
CAUTION
Do not spray water or neutral detergent directly on the scanner.
Precision mechanisms, such as the light source, may get wet,
and cause a malfunction.
IMPORTANT
• Scratches on the sensor glass may cause marks on the images,
as well as feeding errors. If there are scratches on the sensor
glass, contact your local authorized Canon dealer or service
representative.
• Take care to ensure the anti-static brush in the front unit does
not become deformed.
4
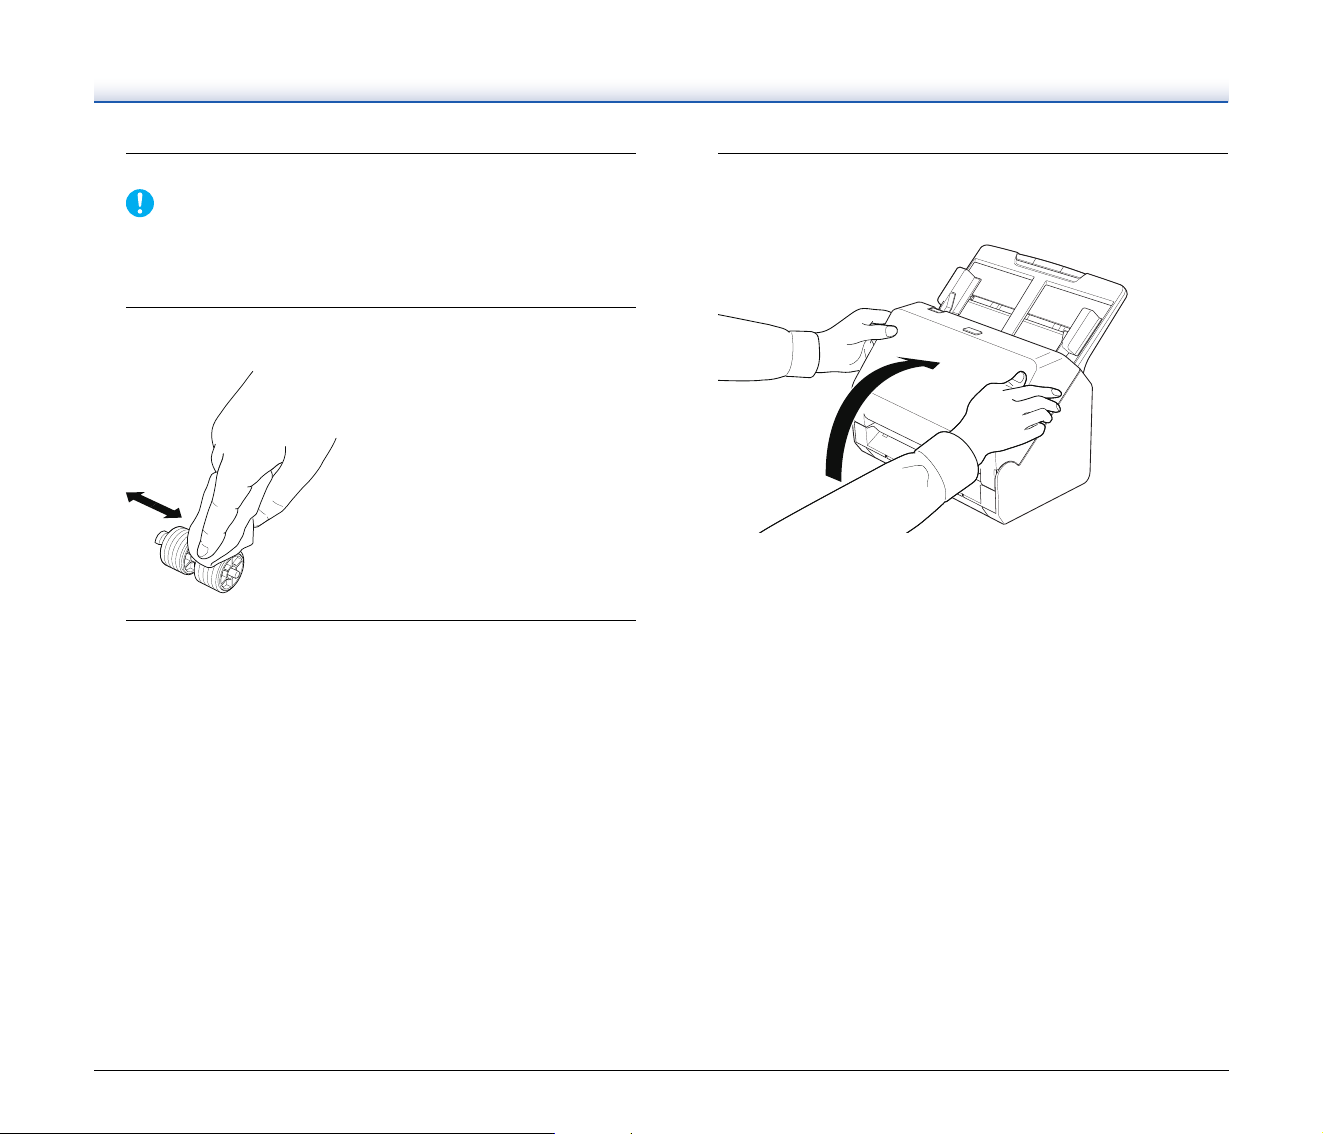
Clean the rollers.
Clean the rollers while turning them.
Wipe the rollers with a cloth that has been dampened with water
and thoroughly wrung out, and then use a clean, dry and soft cloth
to wipe away any moisture.
Scanning Glass
Anti-Static brush
Rollers
55
5
Remove the retard roller and feed roller. (See p. 57, p. 58)
IMPORTANT
Remove the retard roller and feed roller from the scanner to clean
them, and be sure to reattach them to the scanner when cleaning
is finished.
6
Wipe the removed rollers with a cloth that has been
dampened with water and thoroughly wrung out.
7
Reattach the retard roller and feeding roller. (See p. 57,
p. 58)
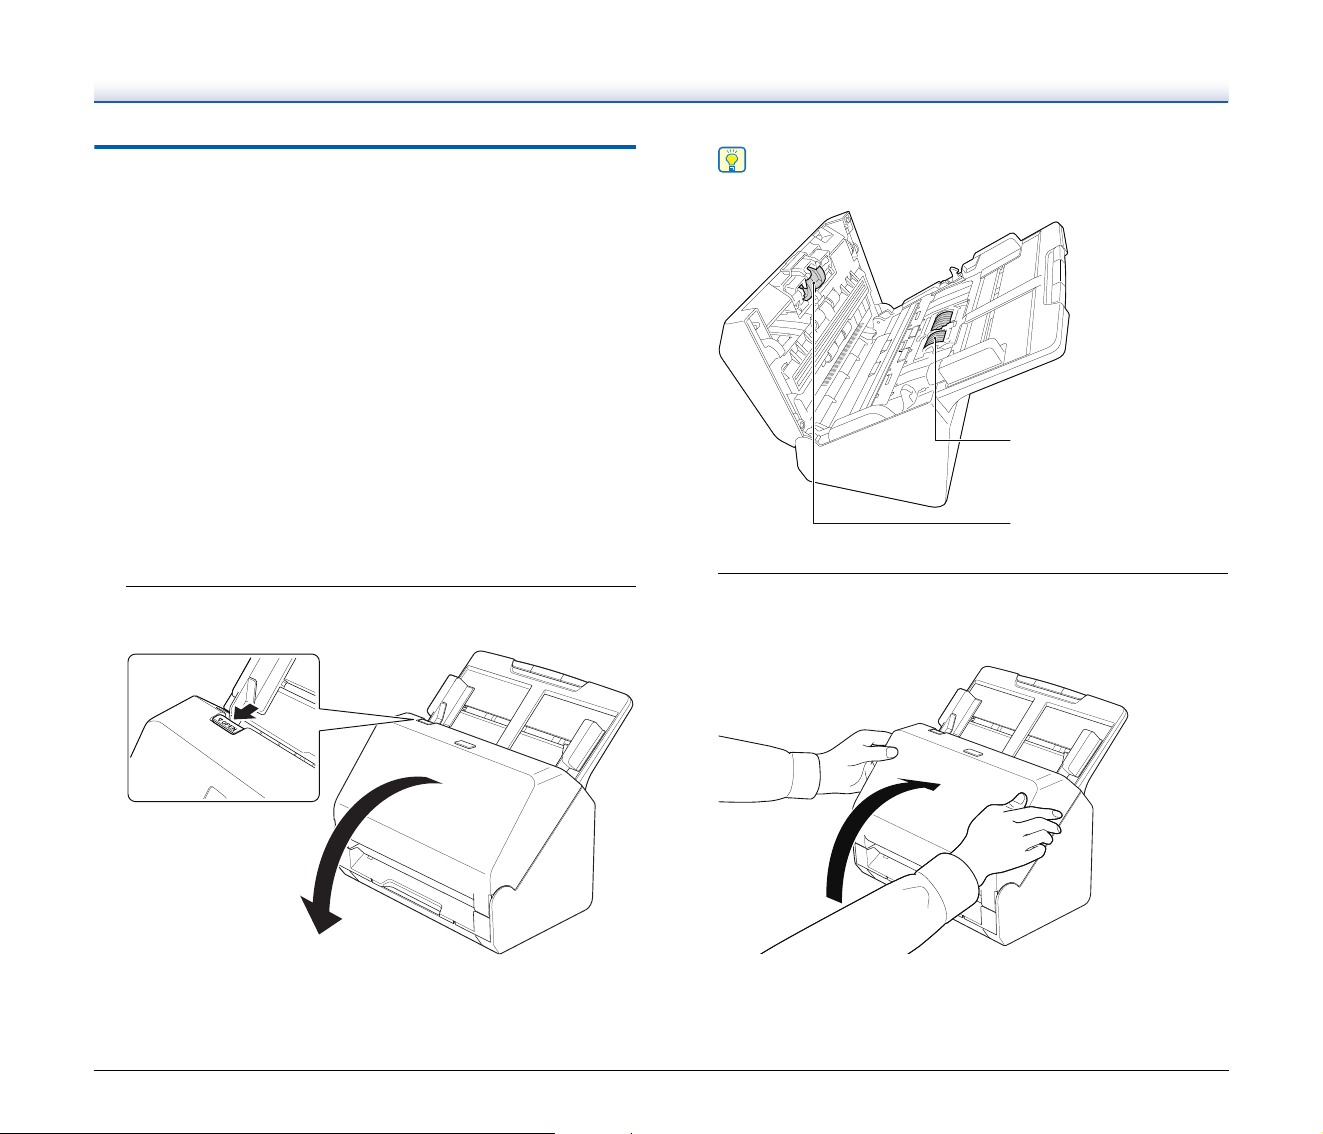
8
Close the front unit by gently pushing it up on both sides
until it clicks into place. Make sure that the front unit is
completely closed by pushing until you hear a click.
56
Replacing Consumable Parts
The two rollers (feed roller and retard roller) installed in the scanner
are consumable parts. The feed roller and retard roller wear with
scanning. If the feed roller and retard roller are worn, documents may
not feed correctly and paper jams and double feeds may occur.
When the total number of pages fed by the scanner exceeds the
number of pages for the service life of the rollers, a message
prompting you to replace the rollers is displayed when the computer is
started.
If this message begins to be displayed at startup, purchase an
exchange roller kit and replace the worn parts with the consumable
parts included in the kit (feed roller and retard roller). See p. 70 for
details about the exchange roller kit.
Furthermore, the counter in the scanner that records the number of
pages fed also needs to be reset when you replace the rollers. (See
p. 59)
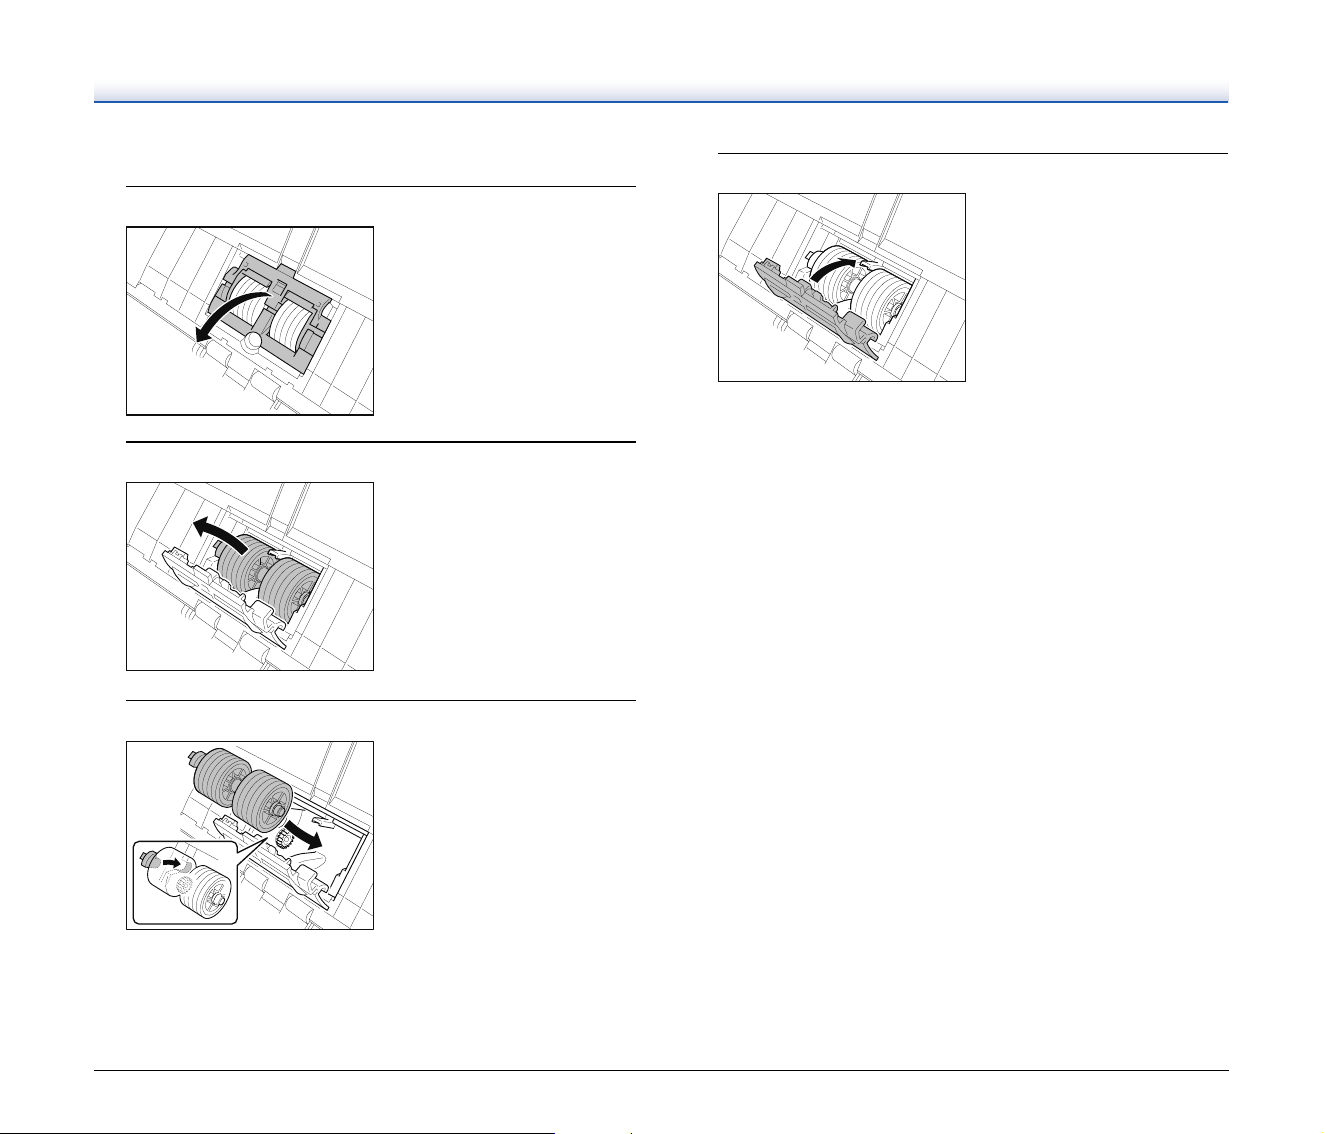
Opening and Closing the Front Unit
1
Pull the OPEN lever and pull open the front unit toward
you.
Hint
The location of each of the consumable parts is shown below.
2
When closing the front unit, make sure that it is
completely closed by gently pressing the left and right
until you hear a click.
Retard roller (inside
the front unit)
Feed Roller
57
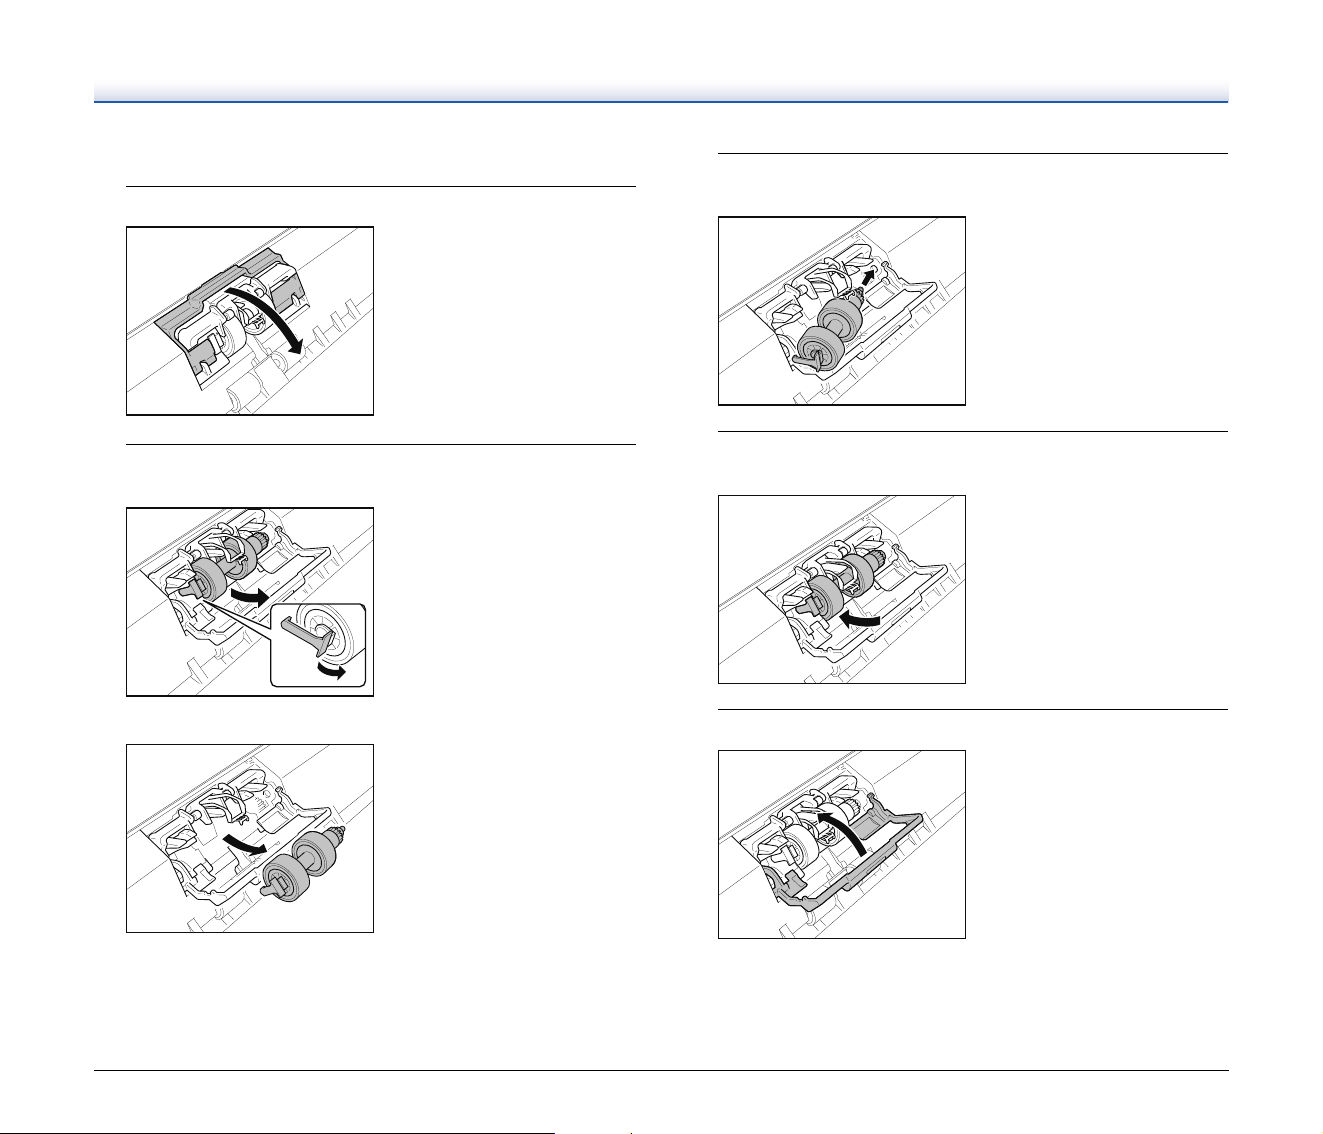
Replacing the Feed Roller
1
Open the roller cover.
2
Remove the feed roller.
3
Install the new feed roller.
4
Close the roller cover.
58
Replacing the Retard Roller
1
Open the roller cover.
2
Pull the left lever that secures the retard roller to the
scanner, and remove the roller.
▼
3
Install the new retard roller by inserting the right side
first.
4
Push the left side of the retard roller to secure it to the
scanner.
5
Close the roller cover.
59
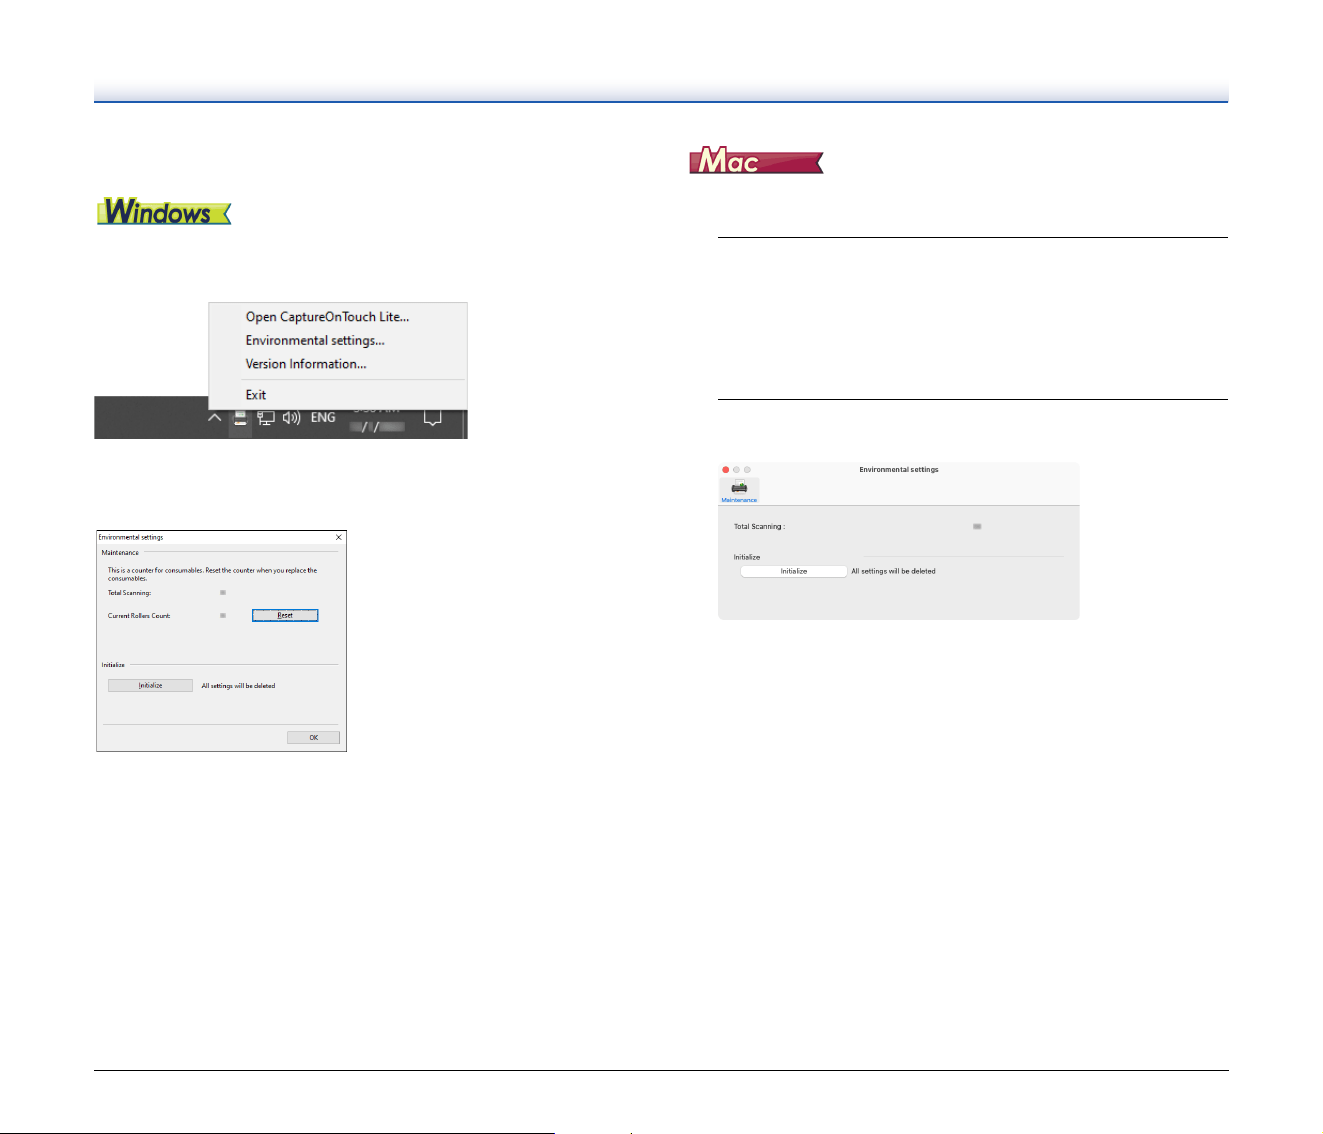
Resetting the counter
If you click CaptureOnTouch Lite icon on the taskbar and then click
[Environmental settings] from the menu, the [Environmental settings]
dialog box appears.
In the [Environmental settings] dialog box, you can configure settings
related to CaptureOnTouch Lite operations and perform scanner
maintenance.
Maintenance
View the total number of pages scanned with the scanner, and view
counters for the roller and separation pad. When you replace the roller
and separation pad, you can reset the counters here.
Initialize
Return all settings to their default condition.
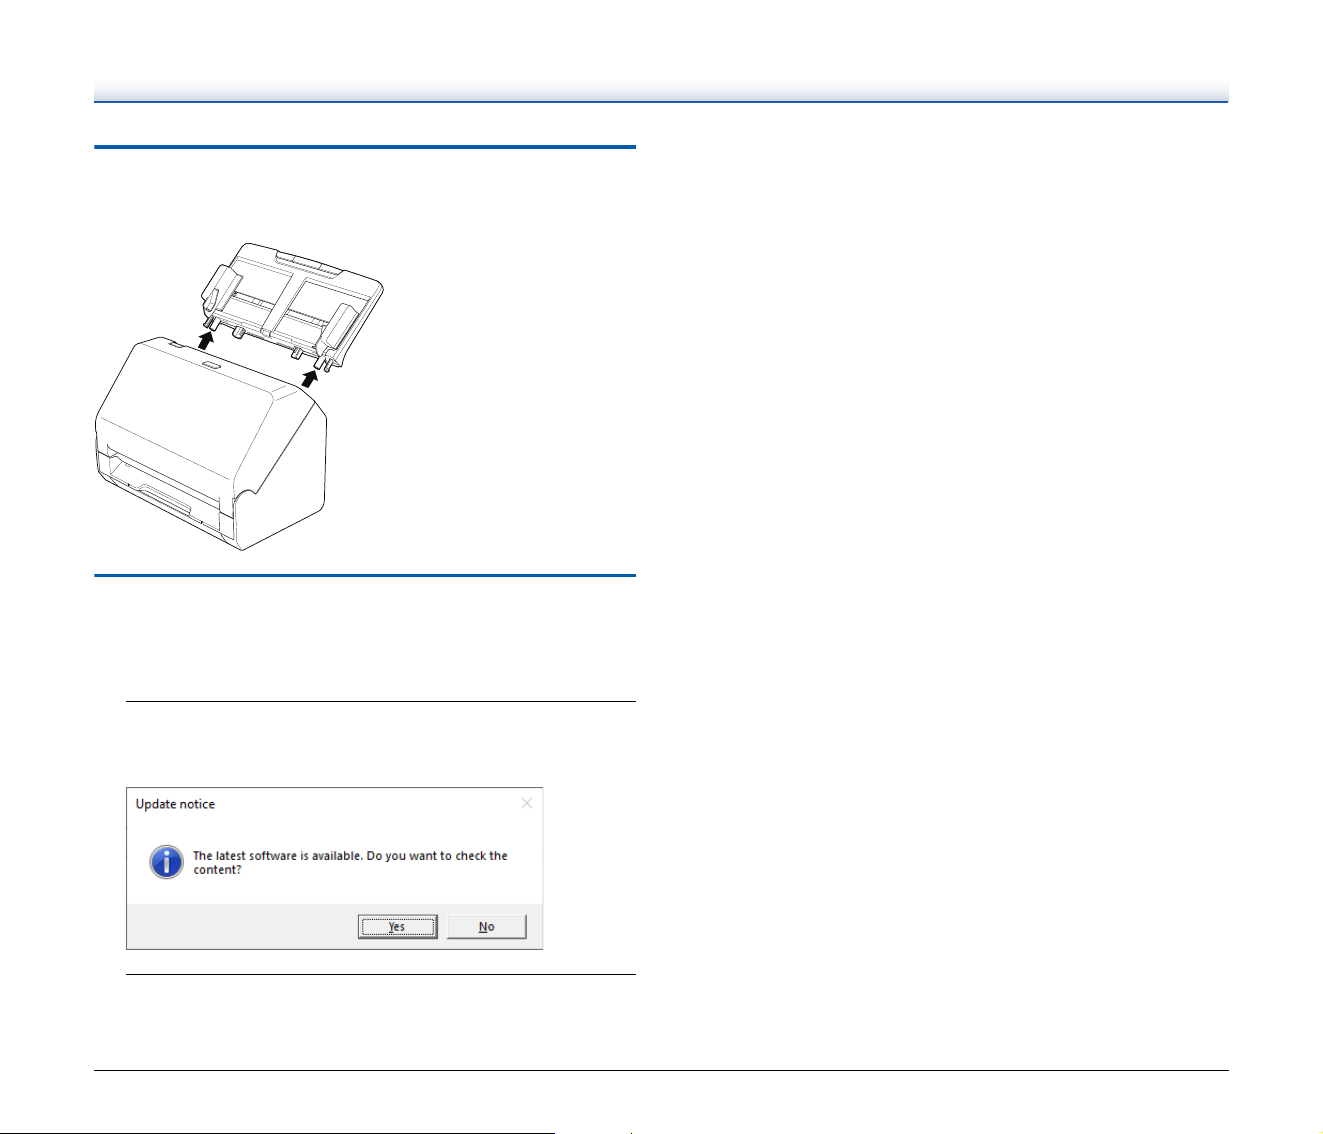
Open the [Environmental settings] dialog box to configure settings
related to CaptureOnTouch Lite operations.
1
Start CaptureOnTouch Lite.
If CaptureOnTouch Lite does not start, double-click
[CaptureOnTouch Lite Launcher] in the [CaptureOnTouch Lite for
Mac] folder.
If you closed the main window after starting CaptureOnTouch Lite,
open it again from the menu bar.
2
Click [Preferences] in the [CaptureOnTouch Lite] menu.
The [Environmental settings] dialog box appears.
You can configure the following in this dialog box.
[Maintenance] Tab
[Initialize]
Return all settings to their default condition.
60
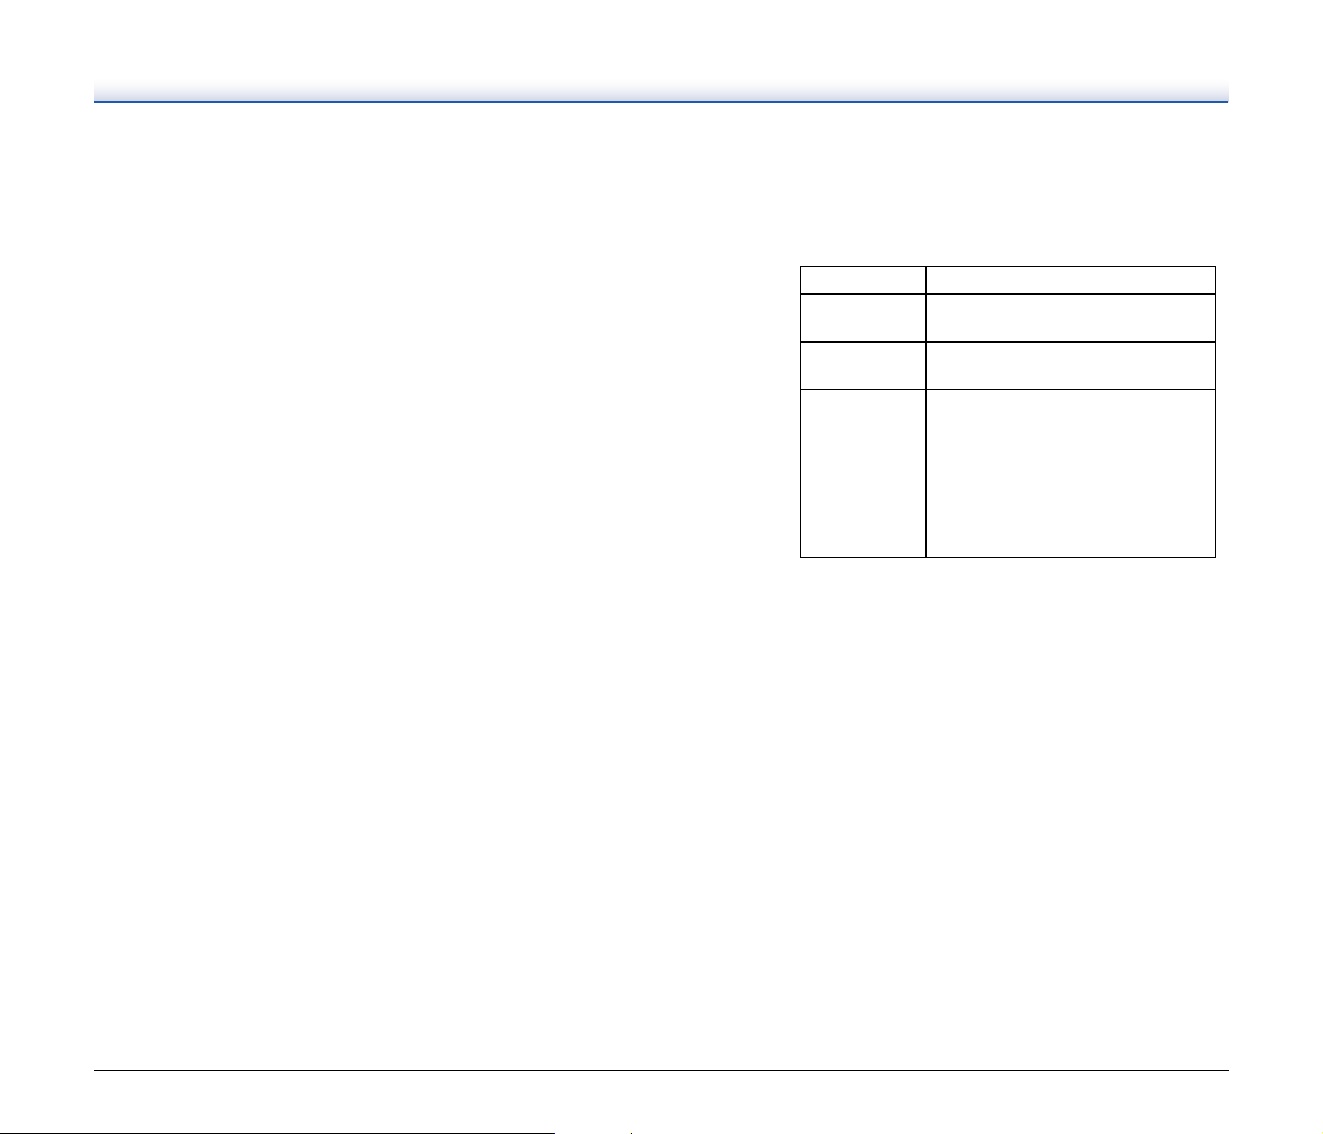
Removing the Document Feed Tray
When you will store or otherwise not use the scanner for a long period
of time, remove the document feed tray.
Updating CaptureOnTouch Lite
The update notice screen appears when there is an update for
CaptureOnTouch Lite and CaptureOnTouch Lite started while the
computer is connected to the Internet.
1
Click the [Yes] button in the update notice screen.
The Web browser starts, and downloading of the update file
begins.
2
Following the instructions on the screen, install the
update.

61
Troubleshooting
Common Problems and Solutions
This section provides recommended solutions to common problems.
If you have a problem that is not solved by the following, contact your
local authorized Canon dealer.
Problem 1 The scanner will not turn on.
Solutions Confirm that the AC adapter is plugged firmly into a
power outlet.
Problem 2 The scanner is not recognized.
Solutions (1) Confirm that the scanner is properly connected to
the computer with a USB cable.
(2) Confirm that the scanner is turned on. See the
previous problem (1) if the scanner does not turn
on.
(3) The computer’s USB interface may not support the
scanner. The scanner cannot be guaranteed to
work with all USB interfaces.
(4) Confirm that the supplied USB cable is used to
connect the scanner to the computer. The scanner
cannot be guaranteed to work with all available
USB cables.
(5) If the scanner is connected to the computer via a
USB hub, try removing the hub and connecting
directly to the computer.
(6) Check the configuration of your security software to
see whether access to USB devices is prohibited.
Problem 3 Documents feed askew (scanned images are
slanted).
Solutions (1) Align the document guides to fit the documents as
closely as possible, and load the documents so that
they feed straightly. See “How to Place
Documents” on p. 18.
(2) Open the document feed extension support and
place the document. See “How to Place
Documents” on p. 18.
(3) Set [Automatically straightens skewed images] to
other than [OFF] in the scan mode settings.
(4) If many pages have been scanned since roller
cleaning, clean the rollers. If documents still feed
askew, roller replacement or other maintenance
may be needed. See “Maintenance” on p. 53 for
roller replacement procedures.
Problem 4 CaptureOnTouch Lite does not start.
Solutions If access to USB devices is blocked by security
software, you may not be able to use CaptureOnTouch
Lite.
Problem 5 The [ONTOUCH L] screen (Windows) /
[CaptureOnTouch Lite for Mac] screen (macOS) of
CaptureOnTouch Lite is not displayed.
Solutions The computer may be configured so that the folder
screen is not displayed automatically when a USB
device is connected. Check the configuration of your
computer.
Problem 6 If white lines or streaks appear in scanned images.
Solutions Clean both sides of the scanner glass, and the rollers.
If a sticky substance such as glue or correction fluid is
found, carefully wipe with just enough pressure to clean
the area where the lines appear. If the problem cannot
be solved by cleaning, the internal glass may be
scratched. Contact your local authorized Canon dealer.
62
Problem 7 Pages are missing.
Solutions When the advanced settings dialog box’s [Scanning
Side] setting is [Skip Blank Page], documents with very
little black may be unintentionally skipped. Decrease
the Set the likelihood of skipping blank page value
("When you want to delete the images of the blank
pages in two-sided documents" on p. 46) or set the
[Scanning Side] to another mode, such as simplex or
duplex.
If pages are skipped due to the document double
feeding, see “Problem 8 Documents jam (or double-
feed).”
Problem 8 Documents jam (or double-feed).
Solutions (1) If the roller has been installed correctly, clean it if
necessary.
(2) Proper scanning may not be possible when
document pages stick together due to static
electricity. Fan the documents before you load
them.
(3) Manually feed the scanner one page at a time.
Problem 9 The scanner detects double-feeding even though
the documents are fed properly.
Solutions The [Detect by Length] option of [Double Feed
Detection] may not work properly when scanning a
batch of varying size documents. Disable [Detect by
Length]. See “Detecting a document double feed” on
p. 20.
Problem 10 Multiple pages of scanned images cannot be saved
to a single file.
Solutions Depending on the file format, multiple scanned image
pages cannot be saved as a single file with
CaptureOnTouch Lite.
Problem 11 All of the placed documents have been scanned,
but the scanned image does not appear on the
application.
Solutions When [Automatic Feeding] is selected as the document
feeding method on the advanced settings dialog box,
scanning will continue even after all documents have
been scanned because the scanner is waiting for
additional documents. Click the [Cancel] button that
appears on the bottom right of the computer screen to
finish the operation and send the scanned images to
the application.
Problem 12 Scanning is slowed down.
Solutions Try scanning again after specifying a lower resolution
for [Dots per inch].
File type Processing for multiple pages
BMP, JPEG
Scanned images are always saved one
page per file.
PPTX
Multi-page images are always saved to
a single file.
TIFF, PDF
You can specify whether to save
scanned images as multi- or single-
page files in the dialog box displayed by
clicking the [Detail settings] button of
[File type] in the edit screen of the
output panel.
For the edit screen of the output panel,
see “Setting the output” on p. 35.

63
Problem 13 Memory becomes insufficient and scanning stops.
Solutions If you configure scanning conditions that use a large
amount of the computer’s memory, scanning may stop
because of insufficient memory. Although this depends
on the computer’s memory size, the possibility of
insufficient memory increases if any of the following
scanning conditions overlap.
• [Color Mode] is set to [24-bit Color]
• A large page size (e.g. Legal) is specified as the
[Page Size]. Alternatively, the page size is set to
[Scanner’s Maximum].
• A high resolution (600dpi etc.) is specified for [Dots
per inch].
If an error message appears due to insufficient memory
while scanning is in progress, exit the application,
change the scanning conditions (e.g. reduce the
resolution or page size) and then try scanning again. In
addition, the amount of memory used can be contained
by turning off [Moire Reduction] and [Prevent Bleed
Through/Remove Background] if they are set to on.

64
Software Troubleshooting
This section describes troubleshooting problems and solutions for
operating the supplied software (CaptureOnTouch Lite).
If scanning is too slow
(1) Close other running programs, if any.
(2) Scanning can be slowed down by memory shortage caused by
memory-resident applications such as anti-virus programs. Close
such memory-resident programs if necessary to free up memory
space.
(3) When insufficient hard disk space is available, the scanner may
be unable to create the necessary temporary files for scanned
data. Delete unneeded data on the hard disk to free up more
space.
(4) Scanning is slow if the computer’s USB port is not Hi-Speed USB
2.0 compliant.
(5) If using a common USB cable that is not Hi-Speed USB 2.0
compliant, replace the cable with the supplied compliant cable.
(6) When the scanner is connected to the computer via a USB hub
that is not Hi-Speed USB 2.0 compliant, remove the hub and
connect the scanner directly to the computer.
If scanned image files cannot be opened in an application
(1) Scanned images saved as multi-page TIFF files can be opened
only by programs that support this file format.
(2) Images saved as compressed TIFF files (single- as well as multi-
page) can only be opened by programs that support the
compressed format. This can occur with programs that are not
compatible with CaptureOnTouch Lite. In this case, select “None”
as the image file compression format before scanning.
There is a display glitch on the UI screen of CaptureOnTouch
Lite.
Depending on the computer that you are using, a display glitch may
occur on the UI screen when there are too many Scan mode panels,
Output panels. Delete any panel that you will not use.
65
Useful tips
Here are some useful tips for scanning documents.
Where are scanned images saved? Can the save destination be
changed?
Images are saved to the following locations, according to program
settings. All destination locations can be changed to other folders.
• CaptureOnTouch Lite
Images are saved to the output destination set in the output panel.
How are the scan settings configured?
• CaptureOnTouch Lite
By clicking the Edit button ([ ]) in the [Select document] panel, you
can edit the scan settings when the [Select document edit screen]
opens.
How do I save multiple pages in one file, or save one file per
page?
When scanned images are saved in BMP, PNG, JPEG, or PPTX
format, each image is always saved in a separate file.
When scanned images are saved in PDF or TIFF format, you can
specify multi- or single-page files. See also “Problem 10” in “Common
Problems and Solutions”.
Can I copy or back up scanner setting configurations?
Backup is not possible.
What rules apply to scanned image file names?
• CaptureOnTouch Lite
The file names of scanned images are set based on the settings in the
Output panel. Click the Edit button ([ ]) in the Output panel and
then set the file name in [File name] in the displayed screen.
If you enable [Use advanced settings dialog box] of [File name] and
then click the [Detail Settings] button, the [File name settings] dialog
box appears. The scanned image file name is determined by setting
some or all of the three items in this dialog box.
A sample file name is displayed as the [File name] in the [File name
settings] dialog box.
How can I skip blank pages, and scan only non-blank pages?
Specify [Skip Blank Page] in the edit screen or advanced settings
dialog box of the scan mode panel, then scan.
How do I scan cards?
Set a card in landscape orientation in the scanner. Specify the same
size as the card (or [Auto]), then scan. For details, see p. 19.
How do I load and scan documents with mixed sizes?
Set [Page size] to [Match original size] ([Detect automatically] in the
advanced settings dialog box of macOS) in the edit screen or
advanced settings dialog box of the scan mode panel, then scan.
What's the best way to scan business cards?
Set [Page size] to [Match original size] ([Detect automatically] in the
advanced settings dialog box of macOS) in the edit screen or
advanced settings dialog box of the scan mode panel, then scan.
Setting Description
File name
Any specified text string to be included in the file
name.
Add date and
time
Appends the date and time to file names. Select
the date format from the list box. YYYY = year,
MM = month, and DD = day of month. The time
is appended after the date.
Add counter to
file name
Append serial numbers in the order of scanned
image saving. Specify the number of digits and
starting number.
66
Scanned image edges are lost when scanning while setting
[Page Size] to [Match original size] (Windows) or [Detect
automatically] (macOS) in the advanced settings dialog box.
How can I scan correctly without any loss of edges?
Set the check box of [Trimming] in the [Image processing] tab to OFF
(Windows)/Set the check box of the [Trimming] dialog box displayed
when you click [More] to OFF (macOS) in the advanced settings
dialog box. Alternatively, set [Page size] to [Match original size]
([Detect automatically] in the advanced settings dialog box of macOS)
in the edit screen or advanced settings dialog box of the scan mode
panel, then scan.
How do I use the automatic document color detection function?
CaptureOnTouch Lite includes a function that automatically detects
the color mode from the contents of a document.
The modes that can be detected by this automatic detection function
differ depending on the screen for setting the automatic detection
function.
Condition Modes that can be detected
When [Color mode] in the edit
screen of the scan mode panel
of CaptureOnTouch Lite is set
to [Detect automatically]
[Color or Gray]
When [Color mode] for the
advanced settings dialog box is
set to [Detect automatically]
and advanced settings for auto-
detection are set
One of the following can be
selected:
• [Color or Gray]
• [Color or Binary]
• [Color, Gray or Binary]
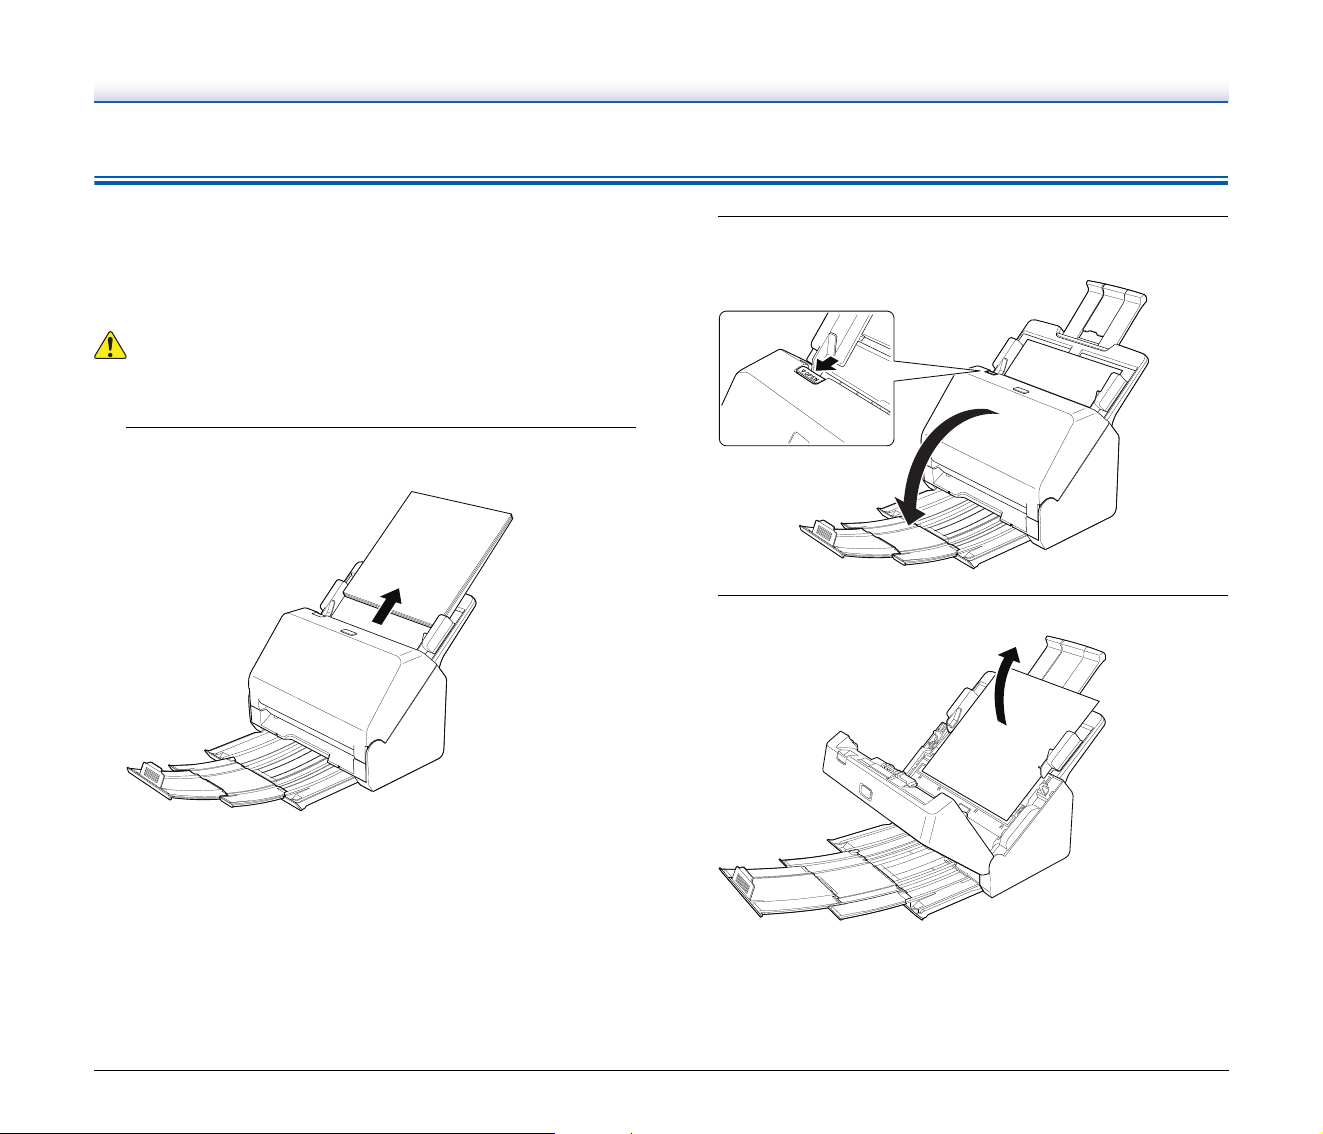
67
Clearing a Paper Jam
When paper jams are detected during scanning, the following
scanning is interrupted.
When a paper jam or double feed occurs during scanning, use the
following procedures to clear them.
CAUTION
Be careful when removing jammed paper. take care not to cut your
hand on the edges of the paper.
1
Remove any documents that have been left in the feed
Tray.
2
Pull the OPEN lever and pull open the front unit toward
you.
3
Remove the jammed document.
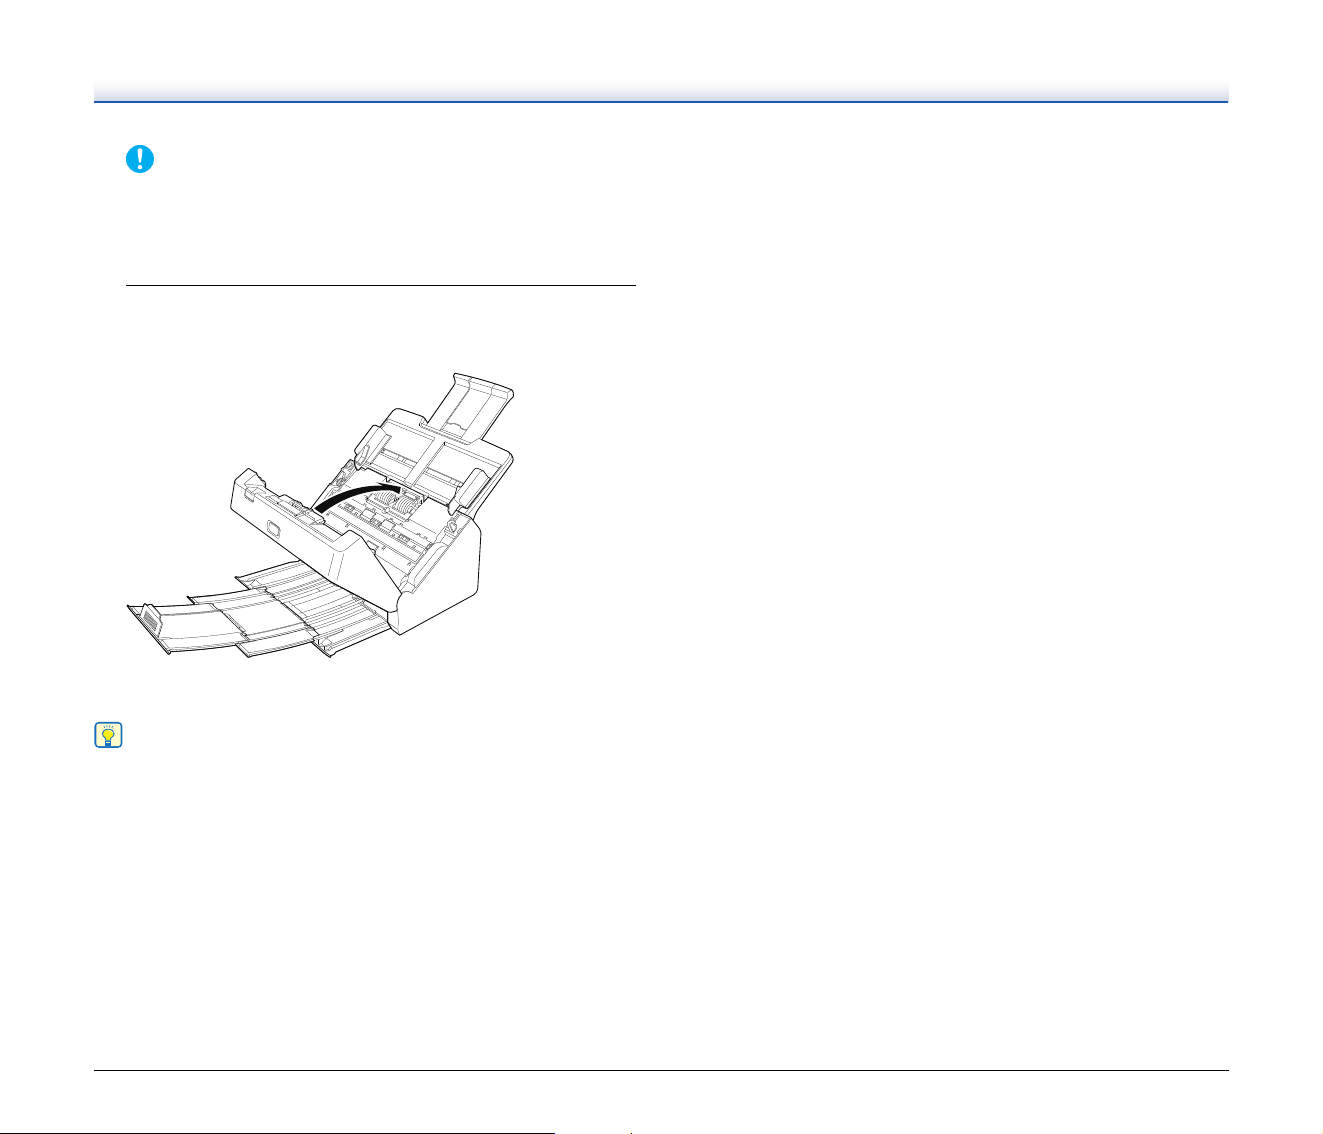
68
IMPORTANT
Make sure to pull the document out carefully, without applying too
much force. If the jammed paper tears while you are pulling it out,
make sure to remove any remaining pieces from inside the
scanner.
4
Close the front unit by gently pushing it up on both sides
until it clicks into place. Make sure that the front unit is
completely closed by pushing until you hear a click.
After removing the jammed paper, check to see if the last page
was scanned correctly, and then continue scanning.
Hint
When the [Rapid recovery system] check box is enabled in the
advanced settings dialog box, you can resume a scanning operation
even if it is interrupted by a paper jam by removing the document and
resuming from the document that was being fed when the interruption
occurred.
As the image of the document that was being fed at the time of the
interruption may not be saved in such cases, be sure to verify the last
scanned image before resuming the operation.

69
Appendix
Specifications
Main Unit
Type Desktop sheetfed scanner
Scanning Document Size
Plain Paper
Size: Width: 50.8 mm to 216 mm (2" to 8.5")
Length: 54 mm to 356 mm (2.1" to 14")
Paper weight: 27 to 209 g/m
2
(7 to 56 lb bond) 0.04 mm to 0.25
mm (0.00157" to 0.00984")
Loading capacity:
A4 size or smaller: 60 sheets (80g/m
2
(22 lb
bond))
Larger than A4 size: 40 sheets (80g/m
2
(22 lb
bond))
Make sure stacks do not exceed 6 mm in height for
either of the above.
Business Card
Size: 50 mm x 85 mm (1.97" x 3.35") or larger
Paper thickness:
255 g/m
2
(68 lb bond) 0.3 mm (0.0118") or smaller
Card
Size: 54 mm x 86 mm (2.12" x 3.37") (ISO standard)
Card thickness: 1.4 mm (0.055") or smaller
Orientation: Horizontal feeding only
Embossed cards can be scanned.
Loading capacity:
3 cards (non-embossed), 1 card (embossed)
Scanning Sensor Contact image sensor
Light source LED
Scanning Side Simplex/duplex
Scanning modes Black and White, 256-level Grayscale, Advanced
Text Enhancement II, 24-bit Color
Optical Resolution
Maximum 600dpi
Output Resolution
150dpi/200dpi/300dpi/400dpi/600dpi
Scanning Speed (Conditions: Core i7-9700 3.00GHz CPU, 16 GB
memory, A4 document size)
up to 25 pages/min
Interface Hi-Speed USB 2.0
External Dimensions
293 mm (11.54")(W) x 251 mm (9.88") (D) x 245
mm (9.65") (H) (With the feed tray attached and
the document eject tray pushed in)
293 mm (11.54")(W) x 600 mm (23.62")(D) x
382
mm (15.04")(H) (With the feed tray attached and
the document eject tray pulled out)
Weight (without AC adapter)
Approximately 3.0 kg (6.61 lb)
Power Supply (using AC adapter)
DC16V 0.6A
Power Consumption
Scanning: Maximum 10W
In the Sleep mode: 1.0W
With power switch OFF: Maximum 0.1W
Operating Environment
Temperature: 10°C to 32.5°C (50°F to 90.5°F)
Humidity: 20% to 80% RH
AC Adapter (100 to 240 V type)
Model Number MG1-5042 (16V)
Input AC100 to 240V, 50/60 Hz, 0.57 to 0.32 A
Output DC16V 1.6A
Weight Approximately 0.2kg (0.44 lb)
Specifications are subject to change without notice due to product
improvements.
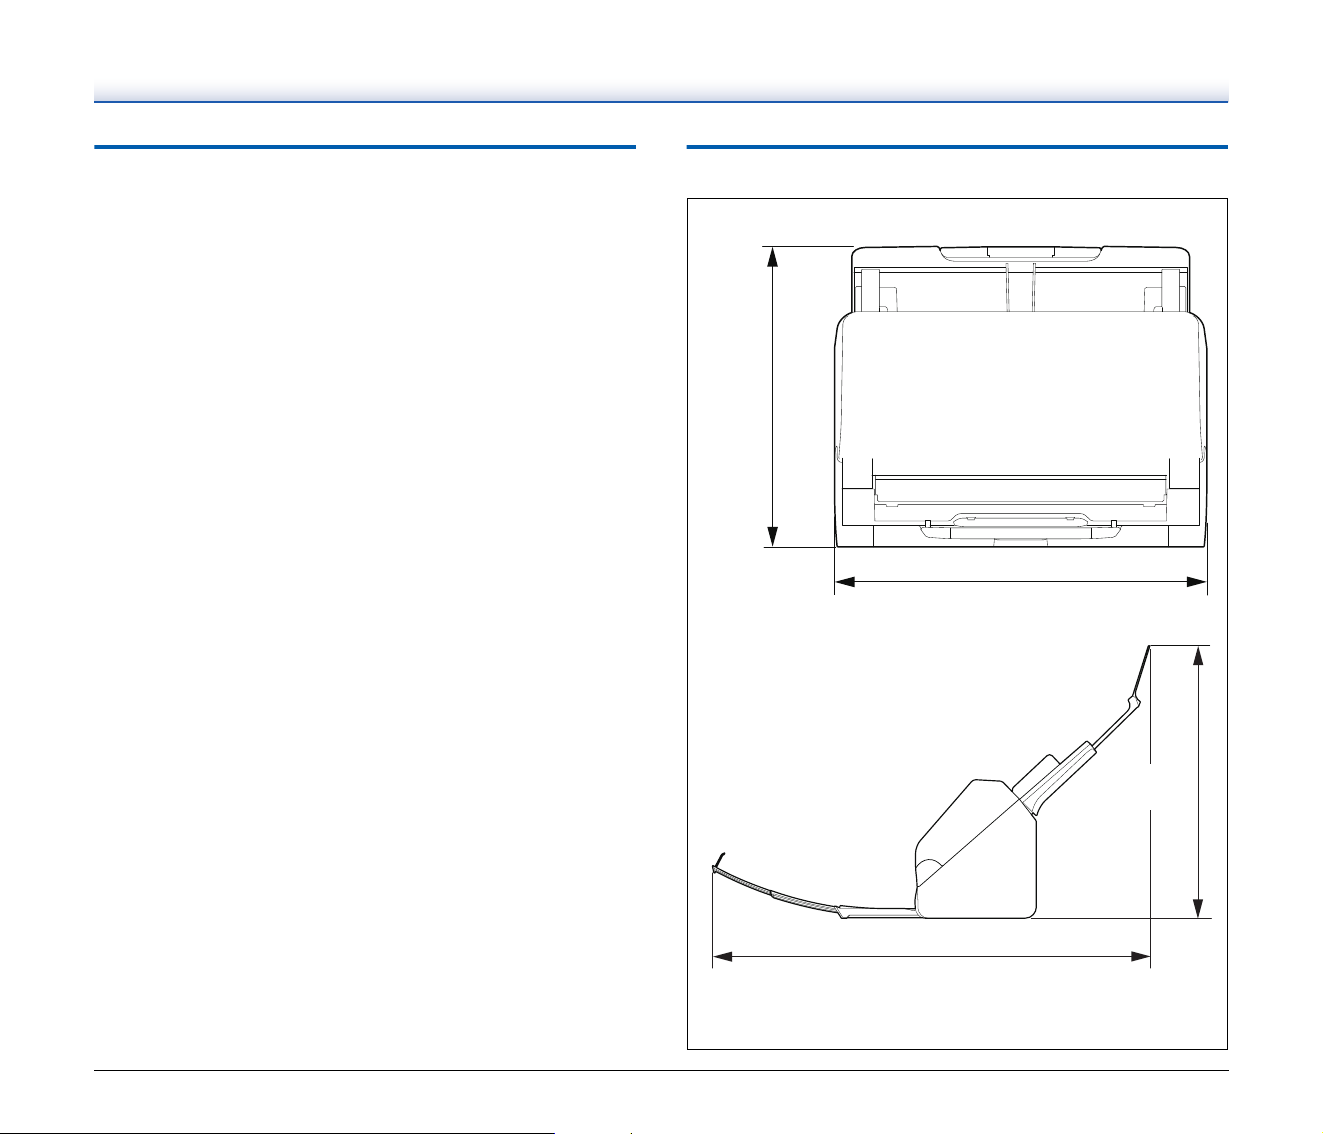
70
Replacement parts
Exchange roller kit (product code: 5595C001)
Kit to replace the rollers (feed roller, retard roller).
• For the replacement procedure, see “Replacing Consumable Parts”
on p. 56.
• Contact your local authorized Canon dealer or service
representative for detailed information about the replacement parts.
Dimensions
245 mm
(9.65")
293 mm (11.54")
600 mm (23.62")
382 mm
(15.04")

71
Index
A
Advanced Settings Dialog Box ................................................... 37
Basic settings
....................................................................... 40
Settings suitable for intended use
........................................ 46
C
CaptureOnTouch Lite ................................................................. 22
Card
Loading method
................................................................... 19
Care and cleaning
...................................................................... 53
Counter
...................................................................................... 59
Custom paper size
..................................................................... 40
D
Document ................................................................................... 16
Card
..................................................................................... 19
Loading method
................................................................... 18
Double Feed Detection
.............................................................. 20
F
Feed roller ............................................................................56, 57
Front unit
.................................................................................... 56
P
Paper jam ................................................................................... 67
Power supply
.............................................................................. 14
R
Resetting the counter ................................................................. 59
Retard roller
.........................................................................56, 58
Roller
.......................................................................................... 54
Cleaning
............................................................................... 53
Replace
................................................................................ 56
S
Scanning glass ........................................................................... 54
Cleaning
............................................................................... 53
U
Updating ..................................................................................... 60

72
Regulations
FCC REGULATIONS (For 120V model)
Document Scanner, Model 6130260
Note: This equipment has been tested and found to comply with the
limits for a Class B digital device, pursuant to Part 15 of the FCC
Rules. These limits are designed to provide reasonable protection
against harmful interference in a residential installation. This
equipment generates, uses, and can radiate radio frequency energy
and, if not installed and used in accordance with the instructions, may
cause harmful interference to radio communications. However, there
is no guarantee that interference will not occur in a particular
installation. If this equipment does cause harmful interference to radio
or television reception, which can be determined by turning the
equipment OFF and ON, the user is encouraged to try to correct the
interference by one or more of the following measures:
– Reorient or relocate the receiving antenna.
– Increase the separation between the equipment and receiver.
– Connect the equipment into an outlet on a circuit different from that
to which the receiver is connected.
– Consult the dealer or an experienced radio/TV technician for help.
Use of shielded cable is required to comply with Class B limits in
Subpart B of Part 15 of FCC Rules.
Do not make any changes or modifications to the equipment unless
otherwise specified in the manual. If such changes or modifications
should be made, you could be required to stop operation of the
equipment.
Canon U.S.A. Inc.
ONE CANON PARK, MELVILLE, NY 11747, U.S.A.
Tel. No. 1-800-652-2666
ENERGY STAR
®
Office Equipment Program
This program is for U.S.A and Canada.
As an ENERGY STAR
®
Partner, CANON
ELECTRONICS INC. has determined that this
machine meets the ENERGY STAR
®
Program
guidelines for energy efficiency.
The ENERGY STAR
®
Office Equipment Program is
an international program that promotes energy saving through the use
of computers and other office equipment. The program backs the
development and dissemination of products with functions that
effectively reduce energy consumption. It is an open system in which
business proprietors can participate voluntarily. The targeted products
are office equipment, such as computers, monitors, printers, fax,
machine, copiers, and scanners. The standards and logos are uniform
among participating nations.
This model doesn’t provide setting options for power management.

73
Model Names
The following name may be provided for the safety regulations in each
sales region of the Document Scanner.
R30: Model 6130260
Reproduction Warning
This device is designed to be used in a legal manner, in accordance
with all applicable laws, including, but not limited to, counterfeit and
copyright laws, as well as laws pertaining to national security.
Any person(s) found to have reproduced any of the following materials
(regardless of whether such reproduction was intentional or not) for
the purpose of misrepresenting such material as the original may be
prosecuted in accordance with the applicable laws and regulations.
• Paper money or bank notes (domestic and foreign)
• Postage stamps, revenue stamps, or other similar stamps
• Stock certificates, bond certificates, promissory notes, cheques, or
other valuable certificates
• Passports, licenses, or other certificates or documents issued by
government officials or agencies
This is not an exhaustive list.
Canon is not responsible for how this scanner is used by an individual.
Please note that certain intellectual property is protected by copyright
law, and copyrighted items may not be reproduced without the
express permission of the copyright holder except for personal or
household use under limited circumstances.
Trademarks
• Canon and the Canon logo are registered trademarks, of Canon Inc.
in the United States and may also be trademarks or registered
trademarks in other countries.
• imageFORMULA is a trademark of CANON ELECTRONICS INC.
• Microsoft, Windows, PowerPoint, and SharePoint are registered
trademarks or trademarks of Microsoft Corporation in the United
States and other countries.
• Microsoft product screen shot(s) reprinted with permission from
Microsoft Corporation.
• macOS is a trademark of Apple Inc., registered in the U.S. and other
countries.
• ENERGY STAR
®
is a registered trademark of the United States
Environmental Protection Agency.
• Other product and company names herein may be the trademarks
of their respective owners. However, the
TM
and
®
symbols are not
used in this document.
Copyright
Copyright 2022 by CANON ELECTRONICS INC. All rights reserved.
No part of this publication may be reproduced or transmitted in any
form or by any means, electronic or mechanical, including
photocopying and recording, or by any information storage or retrieval
system without the prior written permission of CANON
ELECTRONICS INC.

74
Disclaimers
The information in this document is subject to change without notice.
CANON ELECTRONICS INC. MAKES NO WARRANTY OF ANY
KIND WITH REGARD TO THIS MATERIAL, EITHER EXPRESS OR
IMPLIED, EXPECT AS PROVIDED HEREIN, INCLUDING WITHOUT
LIMITATION, THEREOF, WARRANTIES AS TO MARKETABILITY,
MERCHANTABILITY, FITNESS FOR A PARTICULAR PURPOSE
OF USE OR NON-INFRINGEMENT. CANON ELECTRONICS INC.
SHALL NOT BE LIABLE FOR ANY DIRECT, INCIDENTAL, OR
CONSEQUENTIAL DAMAGES OF ANY NATURE, OR LOSSES OR
EXPENSES RESULTING FROM THE USE OF THIS MATERIAL.
CANON ELECTRONICS INC. IS NOT LIABLE FOR THE STORAGE
AND HANDLING OF DOCUMENTS SCANNED WITH THIS
PRODUCT, OR THE STORAGE AND HANDLING OF RESULTING
SCANNED IMAGE DATA.
IF YOU INTEND TO DISCARD THE ORIGINALS OF SCANNED
DOCUMENTS, YOU THE CUSTOMER ARE RESPONSIBLE FOR
INSPECTING THE SCANNED IMAGES AND VERIFYING THAT
DATA IS INTACT.
THE MAXIMUM LIABILITY OF CANON ELECTRONICS INC.
UNDER THIS WARRANTY IS LIMITED TO THE PURCHASE PRICE
OF THE PRODUCT COVERED BY THE WARRANTY.

75
WEEE CAUTION
English
Only for European Union and EEA (Norway, Iceland and
Liechtenstein)
This symbol indicates that this product is not to be disposed of with
your household waste, according to the WEEE Directive (2012/19/EU)
and national legislation. This product should be handed over to a
designated collection point, e.g., on an authorized one-for-one basis
when you buy a new similar product or to an authorized collection site
for recycling waste electrical and electronic equipment (EEE).
Improper handling of this type of waste could have a possible negative
impact on the environment and human health due to potentially
hazardous substances that are generally associated with EEE. At the
same time, your cooperation in the correct disposal of this product will
contribute to the effective usage of natural resources. For more
information about where you can drop off your waste equipment for
recycling, please contact your local city office, waste authority,
approved WEEE scheme or your household waste disposal service.
For more information regarding return and recycling of WEEE
products, please visit www.canon-europe.com/sustainability/
approach/.
Only for the United Kingdom
This symbol indicates that this product is not to be disposed of with
your household waste, according to the UK Waste Electrical and
Electronic Equipment Regulations. This product should be handed
over to a designated collection point, e.g., on an authorized one-for-
one basis when you buy a new similar product or to an authorized
collection site for recycling waste electrical and electronic equipment
(EEE). Improper handling of this type of waste could have a possible
negative impact on the environment and human health due to
potentially hazardous substances that are generally associated with
EEE. At the same time, your cooperation in the correct disposal of this
product will contribute to the effective usage of natural resources. For
more information about where you can drop off your waste equipment
for recycling, please contact your local city office, waste authority,
approved WEEE scheme or your household waste disposal service.
For more information regarding return and recycling of WEEE
products, please visit www.canon-europe.com/sustainability/
approach/.
Français
Union Européenne, Norvège, Islande et Liechtenstein
uniquement.
Ce symbole indique que ce produit ne doit pas être jeté avec les
ordures ménagères, conformément à la directive DEEE (2012/19/UE)
et à la réglementation de votre pays. Ce produit doit être confié au
distributeur à chaque fois que vous achetez un produit neuf similaire,
ou à un point de collecte mis en place par les collectivités locales pour
le recyclage des Déchets des Équipements Électriques et
Électroniques (DEEE). Le traitement inapproprié de ce type de déchet
risque d'avoir des répercussions sur l'environnement et la santé
humaine, du fait de la présence de substances potentiellement
dangereuses généralement associées aux équipements électriques
et électroniques. Parallèlement, votre entière coopération dans le
cadre de la mise au rebut correcte de ce produit favorisera une
meilleure utilisation des ressources naturelles. Pour plus
d'informations sur les points de collecte des équipements à recycler,
contactez vos services municipaux, les autorités locales
compétentes, le plan DEEE approuvé ou le service d'enlèvement des

76
ordures ménagères. Pour plus d'informations sur le retour et le
recyclage des produits DEEE, consultez le site: www.canon-
europe.com/sustainability/approach/.
Deutsch
Nur für Europäische Union und EWR (Norwegen, Island
und Liechtenstein)
Dieses Symbol weist darauf hin, dass dieses Produkt gemäß der EU-
Richtlinie über Elektro- und Elektronik-Altgeräte (2012/19/EU) und
nationalen Gesetzen nicht über den Hausmüll entsorgt werden darf.
Dieses Produkt muss bei einer dafür vorgesehenen Sammelstelle
abgegeben werden. Dies kann z. B. durch Rückgabe beim Kauf eines
ähnlichen Produkts oder durch Abgabe bei einer autorisierten
Sammelstelle für die Wiederaufbereitung von Elektro- und Elektronik-
Altgeräten geschehen. Der unsachgemäße Umgang mit Altgeräten
kann aufgrund potentiell gefährlicher Stoffe, die generell mit Elektro-
und Elektronik-Altgeräten in Verbindung stehen, negative
Auswirkungen auf die Umwelt und die menschliche Gesundheit
haben. Durch die umweltgerechte Entsorgung dieses Produkts tragen
Sie außerdem zu einer effektiven Nutzung natürlicher Ressourcen
bei. Informationen zu Sammelstellen für Altgeräte erhalten Sie bei
Ihrer Stadtverwaltung, dem öffentlich-rechtlichen Entsorgungsträger,
einer autorisierten Stelle für die Entsorgung von Elektro- und
Elektronik-Altgeräten oder Ihrem örtlichen Entsorgungsunternehmen.
Weitere Informationen zur Rückgabe und Entsorgung von Elektro-
und Elektronik-Altgeräten finden Sie unter www.canon-europe.com/
sustainability/approach/.
Zusatzinformationen für Deutschland:
Dieses Produkt kann durch Rückgabe an den Händler unter den in der
Verordnung des Elektro- und Elektronikgerätegesetzes
beschriebenen Bedingungen abgegeben werden.
Als Endbenutzer und Besitzer von Elektro- oder Elektronikgeräten
sind Sie verpflichtet:
• diese einer vom unsortierten Siedlungsabfall getrennten Erfassung
zuzuführen,
• Altbatterien und Altakkumulatoren, die nicht von Altgerät
umschlossen sind, sowie Lampen, die zerstörungsfrei aus dem
Altgerät entnommen werden können, vor der Abgabe an einer
Erfassungsstelle vom Altgerät zerstörungsfrei zu trennen,
• personenbezogener Daten auf den Altgeräten vor der Entsorgung
zu löschen.
Die Bedeutung von dem Symbol der durchgestrichenen Abfalltonne
auf Rädern finden Sie oben in dieser Beschreibung.
Die Vertreiber von Elektro- oder Elektronikgeräten haben die Pflicht
zur unentgeltlichen Rücknahme von Altgeräten. Die Vertreiber haben
die Endnutzer über die von ihnen geschaffenen Möglichkeiten der
Rückgabe von Altgeräten zu informieren.
Italiano
Solo per Unione Europea e SEE (Norvegia, Islanda e
Liechtenstein)
Questo simbolo indica che il prodotto deve essere oggetto di raccolta
separata in conformità alla Direttiva RAEE (2012/19/UE) e alla
normativa locale vigente. Il prodotto deve essere smaltito presso un
centro di raccolta differenziata, un distributore autorizzato che applichi
il principio dell'"uno contro uno", ovvero del ritiro della vecchia
apparecchiatura elettrica al momento dell'acquisto di una nuova, o un
impianto autorizzato al riciclaggio dei rifiuti di apparecchiature
elettriche ed elettroniche. La gestione impropria di questo tipo di rifiuti
può avere un impatto negativo sull'ambiente e sulla salute umana
causato dalle sostanze potenzialmente pericolose che potrebbero
essere contenute nelle apparecchiature elettriche ed elettroniche. Un
corretto smaltimento di tali prodotti contribuirà inoltre a un uso efficace
delle risorse naturali ed eviterà di incorrere nelle sanzioni
amministrative di cui all'art. 255 e successivi del Decreto Legislativo
n. 152/06. Per ulteriori informazioni sullo smaltimento e il recupero dei
Rifiuti di Apparecchiature Elettriche ed Elettroniche, consultare la
Direttiva RAEE, rivolgersi alle autorità competenti, oppure visitare il
sito www.canon-europe.com/sustainability/approach/
.

77
Español
Sólo para la Unión Europea y el Área Económica Europea
(Noruega, Islandia y Liechtenstein)
Este símbolo indica que este producto no debe desecharse con los
desperdicios domésticos, de acuerdo con la directiva RAEE (2012/19/
UE) y con la legislación nacional. Este producto debe entregarse en
uno de los puntos de recogida designados, como por ejemplo,
entregándolo en el lugar de venta al comprar un producto similar o
depositándolo en un lugar de recogida autorizado para el reciclado de
residuos de aparatos eléctricos y electrónicos (RAEE). La
manipulación inapropiada de este tipo de desechos podría tener un
impacto negativo en el entorno y la salud humana, debido a las
sustancias potencialmente peligrosas que normalmente están
asociadas con los RAEE. Al mismo tiempo, su cooperación a la hora
de desechar correctamente este producto contribuirá a la utilización
eficaz de los recursos naturales. Para más información sobre cómo
puede eliminar el equipo para su reciclado, póngase en contacto con
las autoridades locales, con las autoridades encargadas de los
desechos, con un sistema de gestión RAEE autorizado o con el
servicio de recogida de basuras doméstico. Si desea más información
acerca de la devolución y reciclado de RAEE, visite la web
www.canon-europe.com/sustainability/approach/
.
Nederlands
Uitsluitend bestemd voor de Europese Unie en EER
(Noorwegen, IJsland en Liechtenstein)
Dit symbool geeft aan dat dit product in overeenstemming met de
AEEA-richtlijn (2012/19/EU) en de nationale wetgeving niet mag
worden afgevoerd met het huishoudelijk afval. Dit product moet
worden ingeleverd bij een aangewezen, geautoriseerd inzamelpunt,
bijvoorbeeld wanneer u een nieuw gelijksoortig product aanschaft, of
bij een geautoriseerd inzamelpunt voor hergebruik van elektrische en
elektronische apparatuur (EEA). Een onjuiste afvoer van dit type afval
kan leiden tot negatieve effecten op het milieu en de volksgezondheid
als gevolg van potentieel gevaarlijke stoffen die veel voorkomen in
elektrische en elektronische apparatuur (EEA). Bovendien werkt u
door een juiste afvoer van dit product mee aan het effectieve gebruik
van natuurlijke hulpbronnen. Voor meer informatie over waar u uw
afgedankte apparatuur kunt inleveren voor recycling kunt u contact
opnemen met het gemeentehuis in uw woonplaats, de
reinigingsdienst, of het afvalverwerkingsbedrijf. U kunt ook het
schema voor de afvoer van afgedankte elektrische en elektronische
apparatuur (AEEA) raadplegen. Ga voor meer informatie over het
inzamelen en recyclen van afgedankte elektrische en elektronische
apparatuur naar www.canon-europe.com/sustainability/approach/
.
Dansk
Gælder kun i Europæiske Union og EØS (Norge, Island og
Liechtenstein)
Dette symbol angiver, at det pågældende produkt ikke må bortskaffes
sammen med dagrenovation jf. direktivet om affald af elektrisk og
elektronisk udstyr (WEEE) (2012/19/EU) og gældende national
lovgivning. Det pågældende produkt skal afleveres på et nærmere
specificeret indsamlingssted, f.eks. i overensstemmelse med en
godkendt én-til-én-procedure, når du indkøber et nyt tilsvarende
produkt, eller produktet skal afleveres på et godkendt indsamlingssted
for elektronikaffald. Forkert håndtering af denne type affald kan
medføre negative konsekvenser for miljøet og menneskers helbred på
grund af de potentielt sundhedsskadelige stoffer, der generelt kan
forefindes i elektrisk og elektronisk udstyr. Når du foretager korrekt
bortskaffelse af det pågældende produkt, bidrager du til effektiv brug
af naturressourcerne. Yderligere oplysninger om, hvor du kan
bortskaffe dit elektronikaffald med henblik på genanvendelse, får du
hos de kommunale renovationsmyndigheder. Yderligere oplysninger
om returnering og genanvendelse af affald af elektrisk og elektronisk
udstyr får du ved at besøge www.canon-europe.com/sustainability/
approach/.
Norsk
Gjelder kun den europeiske union og EØS (Norge, Island
og Liechtenstein)
Dette symbolet indikerer at dette produktet ikke skal kastes sammen
med husholdningsavfall, i henhold til WEEE-direktiv (2012/19/EU) og
nasjonal lov. Produktet må leveres til et dertil egnet innsamlingspunkt,

78
det vil si på en autorisert en-til-en-basis når du kjøper et nytt lignende
produkt, eller til et autorisert innsamlingssted for resirkulering av avfall
fra elektrisk og elektronisk utstyr (EE-utstyr). Feil håndtering av denne
typen avfall kan være miljø- og helseskadelig på grunn av potensielt
skadelige stoffer som ofte brukes i EE-utstyr. Samtidig bidrar din
innsats for korrekt avhending av produktet til effektiv bruk av
naturressurser. Du kan få mer informasjon om hvor du kan avhende
utrangert utstyr til resirkulering ved å kontakte lokale myndigheter, et
godkjent WEEE-program eller husholdningens renovasjonsselskap.
Du finner mer informasjon om retur og resirkulering av WEEE-
produkter på www.canon-europe.com/sustainability/approach/
.
Suomi
Vain Euroopan unionin sekä ETA:n (Norja, Islanti ja
Liechtenstein) alueelle.
Tämä tunnus osoittaa, että sähkö- ja elektroniikkalaiteromua koskeva
direktiivi (SER-direktiivi, 2012/19/EU) sekä kansallinen lainsäädäntö
kieltävät tuotteen hävittämisen talousjätteen mukana. Tuote on
vietävä asianmukaiseen keräyspisteeseen, esimerkiksi
kodinkoneliikkeeseen uutta vastaavaa tuotetta ostettaessa tai
viralliseen sähkö- ja elektroniikkalaiteromun keräyspisteeseen.
Sähkö- ja elektroniikkalaiteromun virheellinen käsittely voi
vahingoittaa ympäristöä ja ihmisten terveyttä, koska laitteet saattavat
sisältää ympäristölle ja terveydelle haitallisia aineita. Lisäksi tuotteen
asianmukainen hävittäminen säästää luonnonvaroja. Lisätietoja
sähkö- ja elektroniikkalaiteromun keräyspisteistä saat kaupunkien ja
kuntien tiedotuksesta, jätehuoltoviranomaisilta, sähkö- ja
elektroniikkalaiteromun kierrätysjärjestelmän ylläpitäjältä ja
jätehuoltoyhtiöltä. Lisätietoja sähkö- ja elektroniikkalaiteromun
keräyksestä ja kierrätyksestä on osoitteessa www.canon-
europe.com/sustainability/approach/.
Svenska
Endast för Europeiska unionen och EES (Norge, Island
och Liechtenstein)
Den här symbolen visar att produkten enligt WEEE-direktivet (2012/
19/EU) och nationell lagstiftning inte får sorteras och slängas som
hushållsavfall. Den här produkten ska lämnas in på en därför avsedd
insamlingsplats, t.ex. på en återvinningsstation auktoriserad att
hantera elektrisk och elektronisk utrustning (EE-utrustning) eller hos
handlare som är auktoriserade att byta in varor då nya, motsvarande
köps (en mot en). Olämplig hantering av avfall av den här typen kan
ha en negativ inverkan på miljön och människors hälsa på grund av
de potentiellt farliga ämnen som kan återfinnas i elektrisk och
elektronisk utrustning. Din medverkan till en korrekt avfallshantering
av den här produkten bidrar dessutom till en effektiv användning av
naturresurserna. Kontakta ditt lokala kommunkontor, berörd
myndighet, företag för avfallshantering eller ta del av en godkänd
WEEE-organisation om du vill ha mer information om var du kan
lämna den kasserade produkten för återvinning. För mer information
om inlämning och återvinning av WEEE-produkter, se www.canon-
europe.com/sustainability/approach/.
Português
Apenas para a União Europeia e AEE (Noruega, Islândia e
Liechtenstein)
Este símbolo indica que o produto não deve ser colocado no lixo
doméstico, de acordo com a Diretiva REEE (2012/19/UE) e a
legislação nacional. Este produto deverá ser colocado num ponto de
recolha designado, por exemplo, num local próprio autorizado quando
adquirir um produto semelhante novo ou num local de recolha
autorizado para reciclar resíduos de equipamentos eléctricos e
eletrónicos (EEE). O tratamento inadequado deste tipo de resíduo
poderá causar um impacto negativo no ambiente e na saúde humana
devido às substâncias potencialmente perigosas normalmente
associadas aos equipamentos elétricos e electrónicos.
Simultaneamente, a sua cooperação no tratamento correto deste
produto contribuirá para a utilização eficaz dos recursos naturais.
Para mais informações sobre os locais onde o equipamento poderá

79
ser reciclado, contacte os serviços locais, a autoridade responsável
pelos resíduos, o esquema REEE aprovado ou o serviço de
tratamento de lixo doméstico. Para mais informações sobre a
devolução e reciclagem de produtos REEE, vá a www.canon-
europe.com/sustainability/approach/.
Česká
Pouze Evropská unie a EHP (Norsko, Island a
Lichtenštejnsko)
Tento symbol znamená, že podle směrnice o OEEZ (2012/19/EU) a
podle vnitrostátních právních předpisů nemá být tento výrobek
likvidován s odpadem z domácností. Tento výrobek má být vrácen do
sběrného místa, např. v rámci autorizovaného systému odběru
jednoho výrobku za jeden nově prodaný podobný výrobek nebo v
autorizovaném sběrném místě pro recyklaci odpadních elektrických a
elektronických zařízení (OEEZ). Nevhodné nakládání s tímto druhem
odpadu by mohlo mít negativní dopad na životní prostředí a lidské
zdraví, protože elektrická a elektronická zařízení zpravidla obsahují
potenciálně nebezpečné látky. Vaše spolupráce na správné likvidaci
tohoto výrobku současně napomůže efektivnímu využívání přírodních
zdrojů. Další informace o místech sběru vašeho odpadního zařízení k
recyklaci vám sdělí místní úřad vaší obce, správní orgán vykonávající
dozor nad likvidací odpadu, sběrny OEEZ nebo služba pro odvoz
komunálního odpadu. Další informace týkající se vracení a recyklace
OEEZ naleznete na adrese www.canon-europe.com/sustainability/
approach/.
Eλληνικά
Μόνο για την Ευρωπαϊκή Ένωση και τον ΕΟΧ (Νορβηγία,
Ισλανδία και Λιχτενστάιν)
Αυτό το σύμβολο υποδηλώνει ότι αυτό το προϊόν δεν πρέπει να
απορρίπτεται μαζί με τα οικιακά απορρίμματα, σύμφωνα με την
Οδηγία σχετικά με τα Απόβλητα Ηλεκτρικού και Ηλεκτρονικού
Εξοπλισμού (ΑΗΗΕ) (2012/19/ΕΕ) και την εθνική σας νομοθεσία.
Αυτό το προϊόν πρέπει να παραδίδεται σε καθορισμένο σημείο
συλλογής, π.χ. σε μια εξουσιοδοτημένη βάση ανταλλαγής όταν
αγοράζετε ένα νέο παρόμοιο προϊόν ή σε μια εξουσιοδοτημένη θέση
συλλογής για την ανακύκλωση των αποβλήτων Ηλεκτρικού και
Ηλεκτρονικού Εξοπλισμού (ΗΗΕ). Ο ακατάλληλος χειρισμός αυτού
του τύπου αποβλήτων μπορεί να έχει αρνητικό αντίκτυπο στο
περιβάλλον και την υγεία του ανθρώπου, λόγω δυνητικώς
επικίνδυνων ουσιών που γενικά συνδέονται με τον ΗΗΕ. Ταυτόχρονα,
η συνεργασία σας όσον αφορά τη σωστή απόρριψη αυτού του
προϊόντος θα συμβάλει στην αποτελεσματική χρήση των φυσικών
πόρων. Για περισσότερες πληροφορίες σχετικά με τα σημεία όπου
μπορείτε να απορρίψετε τον εξοπλισμό σας για ανακύκλωση,
επικοινωνήστε με το τοπικό γραφείο της πόλης σας, την υπηρεσία
απορριμμάτων, το εγκεκριμένο σχήμα ΑΗΗΕ ή την υπηρεσία
απόρριψης οικιακών αποβλήτων. Για περισσότερες πληροφορίες
σχετικά με την επιστροφή και την ανακύκλωση των προϊόντων ΑΗΗΕ,
επισκεφθείτε την τοποθεσία www.canon-europe.com/sustainability/
approach/.
Polski
Tylko dla krajów Unii Europejskiej oraz EOG (Norwegia,
Islandia i Liechtenstein)
Ten symbol oznacza, że zgodnie z dyrektywą WEEE dotyczącą
zużytego sprzętu elektrycznego i elektronicznego (2012/19/UE) oraz
przepisami lokalnymi nie należy wyrzucać tego produktu razem z
odpadami gospodarstwa domowego. Produkt należy przekazać do
wyznaczonego punktu gromadzenia odpadów, np. firmie, od której
kupowany jest nowy, podobny produkt lub do autoryzowanego punktu
gromadzenia zużytego sprzętu elektrycznego i elektronicznego w celu
poddania go recyklingowi. Usuwanie tego typu odpadów w
nieodpowiedni sposób może mieć negatywny wpływ na otoczenie i
zdrowie innych osób ze względu na niebezpieczne substancje
stosowane w takim sprzęcie. Jednocześnie pozbycie się zużytego
sprzętu w zalecany sposób przyczynia się do właściwego
wykorzystania zasobów naturalnych. Aby uzyskać więcej informacji
na temat punktów, do których można dostarczyć sprzęt do recyklingu,
prosimy skontaktować się z lokalnym urzędem miasta, zakładem
utylizacji odpadów, skorzystać z instrukcji zatwierdzonej dyrektywą
WEEE lub skontaktować się z przedsiębiorstwem zajmującym się
wywozem odpadów domowych. Więcej informacji o zwracaniu i
recyklingu zużytego sprzętu elektrycznego i elektronicznego znajduje
się w witrynie www.canon-europe.com/sustainability/approach/
.

80
Magyar
Csak az Európai Unió és az EGT (Norvégia, Izland és
Liechtenstein) országaiban
Ez a szimbólum azt jelzi, hogy a helyi törvények és a WEEE-irányelv
(2012/19/EU) szerint a termék nem kezelhető háztartási hulladékként.
A terméket a kijelölt nyilvános gyűjtőpontokon kell leadni, például
hasonló cserekészülék vásárlásakor, illetve bármelyik, elektromos és
elektronikai berendezésekből származó hulladék (WEEE) átvételére
feljogosított gyűjtőponton. Az ilyen jellegű hulladékok a nem
megfelelő kezelés esetén a bennük található veszélyes anyagok
révén ártalmasak lehetnek a környezetre és az emberek
egészségére. Továbbá, a termékből származó hulladék megfelelő
kezelésével hozzájárulhat a természetes nyersanyagok hatékonyabb
hasznosításához. A berendezésekből származó, újrahasznosítható
hulladékok elhelyezésére vonatkozó további tudnivalókért forduljon a
helyi önkormányzathoz, a közterület-fenntartó vállalathoz, a
háztartási hulladék begyűjtését végző vállalathoz, illetve a hivatalos
WEEE-képviselethez. További tudnivalókat a WEEE-termékek
visszajuttatásáról és újrahasznosításáról a www.canon-europe.com/
sustainability/approach/.
Slovenský
Platí len pre štáty Európskej únie a EHP (Nórsko, Island a
Lichtenštajnsko)
Tento symbol znamená, že podľa Smernice 2012/19/EÚ o odpade z
elektrických a elektronických zariadení (OEEZ) a podľa platnej
legislatívy Slovenskej republiky sa tento produkt nesmie likvidovať
spolu s komunálnym odpadom. Produkt je potrebné odovzdať do
určenej zberne, napr. prostredníctvom výmeny za kúpu nového
podobného produktu, alebo na autorizované zberné miesto, ktoré
spracúva odpad z elektrických a elektronických zariadení (EEZ).
Nesprávna manipulácia s takýmto typom odpadu môže mať negatívny
vplyv na životné prostredie a ľudské zdravie, pretože elektrické a
elektronické zariadenia obsahujú potenciálne nebezpečné látky.
Spoluprácou na správnej likvidácii produktu prispejete k účinnému
využívaniu prírodných zdrojov.
Ďalšie informácie o mieste recyklácie opotrebovaných zariadení
získate od miestneho úradu, úradu životného prostredia, zo
schváleného plánu OEEZ alebo od spoločnosti, ktorá zaisťuje
likvidáciu komunálneho odpadu. Viac informácií nájdete aj na webovej
stránke: www.canon-europe.com/sustainability/approach/
.
български
Само за Европейския съюз и ЕИП (Норвегия,
Исландия и Лихтенщайн)
Този символ показва, че този продукт не трябва да се изхвърля
заедно с битовите отпадъци, съгласно Директивата за ИУЕЕО
(2012/19/ЕC) и Вашето национално законодателство. Този
продукт трябва да бъде предаден в предназначен за целта пункт
за събиране, например на база размяна, когато купувате нов
подобен продукт, или в одобрен събирателен пункт за
рециклиране на излязло от употреба електрическо и електронно
оборудване (ИУЕЕО). Неправилното третиране на този тип
отпадъци може да доведе до евентуални отрицателни
последствия за околната среда и човешкото здраве поради
потенциално опасните вещества, които обикновено са свързани
с ЕЕО. В същото време Вашето съдействие за правилното
изхвърляне на този продукт ще допринесе за ефективното
използване на природните ресурси. Повече информация относно
местата, където може да предавате излязло от употреба
оборудване за рециклиране, може да получите от местните
власти, от органа, отговорен за отпадъците и от одобрена
система за излязло от употреба ЕЕО или от Вашата местна
служба за битови отпадъци. За повече информация относно
връщането и рециклирането на продукти от излязло от употреба
ЕЕО посетете www.canon-europe.com/sustainability/approach/
.
Română
Doar pentru Uniunea Europeană şi EEA (Norvegia,
Islanda şi Liechtenstein)
Acest simbol indică faptul că acest produs nu trebuie aruncat o dată
cu reziduurile menajere, în conformitate cu Directiva DEEE (Directiva
privind deşeurile de echipamente electrice şi electronice) (2012/19/

81
UE) şi legile naţionale. Acest produs trebuie transportat la un punct de
colectare special, de exemplu un centru care preia produsele vechi
atunci când achiziţionaţi un produs nou similar, sau la un punct de
colectare autorizat pentru reciclarea deşeurilor provenite de la
echipamentele electrice şi electronice (EEE). Mânuirea
necorespunzătoare a acestor tipuri de deşeuri poate avea un impact
negativ asupra mediului înconjurător şi sănătăţii indivizilor, din cauza
substanţelor potenţial nocive care sunt în general asociate cu EEE. În
acelaşi timp, cooperarea dvs. la reciclarea corectă a acestui produs va
contribui la utilizarea efectivă a resurselor naturale. Pentru mai multe
informaţii privind locurile de reciclare a deşeurilor provenite de la
echipamente, contactaţi biroul primăriei locale, autoritatea
responsabilă cu colectarea deşeurilor, schema DEEE aprobată sau
serviciul de colectare a deşeurilor menajere. Pentru mai multe
informaţii privind returnarea şi reciclarea produselor DEEE, vizitaţi
www.canon-europe.com/sustainability/approach/
.
Slovenčina
Samo za Evropsko unijo in EGP (Norveška, Islandija in
Lihtenštajn)
Ta simbol pomeni, da tega izdelka v skladu z direktivo OEEO (2012/
19/EU) in državno zakonodajo ne smete odvreči v gospodinjske
odpadke. Ta izdelek morate odložiti na ustrezno zbiralno mesto, na
primer pri pooblaščenem prodajalcu, ko kupite podoben nov izdelek
ali na zbiralno mesto za recikliranje električne in elektronske opreme.
Neprimerno ravnanje s takšnimi odpadki lahko negativno vpliva na
okolje in človekovo zdravje zaradi nevarnih snovi, ki so povezane z
električno in elektronsko opremo. S pravilno odstranitvijo izdelka
hkrati prispevate tudi k učinkoviti porabi naravnih virov. Če želite več
informacij o tem, kje lahko odložite odpadno opremo za recikliranje,
pokličite občinski urad, komunalno podjetje ali službo, ki skrbi za
odstranjevanje odpadkov, ali si oglejte načrt OEEO. Če želite več
informacij o vračanju in recikliranju izdelkov v skladu z direktivo
OEEO, obiščite www.canon-europe.com/sustainability/approach/
.
Hrvatski
Samo za Europsku uniju i EEA (Norveška, Island i
Lihtenštajn)
Ovaj simbol pokazuje da se ovaj proizvod ne smije odlagati s
komunalnim i ostalim otpadom sukladno WEEE Direktivi (2012/19/
EC) i Pravilniku o gospodarenju otpadnim električnim i elektroničkim
uređajima i opremom. Ovaj proizvod je potrebno predati ovlaštenom
skupljaču EE otpada ili prodavatelju koji je dužan preuzeti otpadni
proizvod po sistemu jedan za jedan, ukoliko isti odgovara vrsti te je
obavljao primarne funkcije kao i isporučena EE oprema. Nepropisno
rukovanje ovom vrstom otpada može imati negativan učinak na
okolinu i zdravlje ljudi zbog supstanci koje su potencijalno opasne za
zdravlje, a općenito se povezuju s EEE. Istovremeno, vaša će
suradnja kroz propisno odlaganje ovog proizvoda doprinijeti efektivnoj
uporabi prirodnih resursa. Za više informacija o tome gdje možete
odložiti svoj otpad za recikliranje obratite se vašem lokalnom
gradskom uredu, komunalnoj službi, odobrenom WEEE programu ili
službi za odlaganje kućnog otpada. Ostale informacije o vraćanju i
recikliranju WEEE proizvoda potražite na www.canon-europe.com/
sustainability/approach/.
Català
Només per a la Unió Europea i a l’Espai Econòmic
Europeu (Noruega, Islàndia i Liechtenstein)
Aquest símbol indica que aquest producte no s’ha de llençar a les
escombraries de la llar, d’acord amb la Directiva RAEE (2012/19/UE)
i la legislació nacional. Aquest producte s’hauria de lliurar en un dels
punts de recollida designats, com per exemple, intercanviant-lo un per
un en comprar un producte similar o lliurant-lo en un lloc de recollida
autoritzat per al reciclatge de residus d’aparells elèctrics i electrònics
(AEE). La manipulació inadequada d’aquest tipus de residus podria
tenir un impacte negatiu en l’entorn i en la salut humana, a causa de
les substàncies potencialment perilloses que normalment estan
associades als AEE. Així mateix, la vostra cooperació a l’hora de
llençar correctament aquest producte contribuirà a la utilització
efectiva dels recursos naturals. Per a més informació sobre els punts
on podeu lliurar aquest producte per procedir al seu reciclatge,

82
adreceu-vos a la vostra oficina municipal, a les autoritats
encarregades dels residus, al pla de residus homologat per la RAEE
o al servei de recollida de deixalles domèstiques de la vostra localitat.
Per a més informació sobre la devolució i el reciclatge de productes
RAEE, visiteu www.canon-europe.com/sustainability/approach/
.
Eesti
Üksnes Euroopa Liit ja EMP (Norra, Island ja
Liechtenstein)
See sümbol näitab, et antud toodet ei tohi vastavalt elektri- ja
elektroonikaseadmete jäätmeid käsitlevale direktiivile (2012/19/EL)
ning teie riigis kehtivatele õigusaktidele utiliseerida koos
olmejäätmetega. Antud toode tuleb anda selleks määratud
kogumispunkti, nt müügipunkt, mis on volitatud üks ühe vastu
vahetama, kui ostate uue sarnase toote, või elektri- ja
elektroonikaseadmete jäätmete ümbertöötlemiseks mõeldud
kogumispunkti. Täiendava teabe saamiseks elektri- ja
elektroonikaseadmetest tekkinud jäätmete tagastamise ja
ümbertöötlemise kohta võtke ühendust kohaliku omavalitsusega,
asjakohase valitsusasutusega, asjakohase
tootjavastutusorganisatsiooniga või olmejäätmete käitlejaga.
Lisateavet leitate ka Interneti-leheküljelt www.canon-europe.com/
sustainability/approach/.
Latviešu
Tikai Eiropas Savienībai un EEZ (Norvēģijai, Islandei un
Lihtenšteinai)
Šis simbols norāda, ka atbilstoši ES Direktīvai (2012/19/ES) par
elektrisko un elektronisko iekārtu atkritumiem (EEIA) un vietējiem
tiesību aktiem no šī izstrādājuma nedrīkst atbrīvoties, izmetot to kopā
ar sadzīves atkritumiem. Šis izstrādājums ir jānodod piemērotā
savākšanas vietā, piemēram, apstiprinātā veikalā, kur iegādājaties
līdzīgu jaunu produktu un atstājat veco, vai apstiprinātā vietā izlietotu
elektrisko un elektronisko iekārtu pārstrādei. Nepareiza šāda veida
atkritumu apsaimniekošana var apdraudēt vidi un cilvēka veselību
tādu iespējami bīstamu vielu dēļ, kas parasti ir elektriskajās un
elektroniskajās iekārtās. Turklāt jūsu atbalsts pareizā šāda veida
atkritumu apsaimniekošanā sekmēs efektīvu dabas resursu
izmantošanu. Lai saņemtu pilnīgāku informāciju par vietām, kur
izlietoto iekārtu var nodot pārstrādei, sazinieties ar vietējo pašvaldību,
atkritumu savākšanas atbildīgo dienestu, pilnvarotu EEIA struktūru vai
sadzīves atkritumu apsaimniekošanas iestādi. Lai saņemtu plašāku
informāciju par elektrisko un elektronisko iekārtu nodošanu
pārstrādei, apmeklējiet tīmekļa vietni www.canon-europe.com/
sustainability/approach/.
Lietuvių
Tik Europos Sąjungai ir EEE (Norvegijai, Islandijai ir
Lichtenšteinui)
Šis ženklas reiškia, kad gaminio negalima išmesti su buitinėmis
atliekomis, kaip yra nustatyta Direktyvoje (2012/19/ES) ir
nacionaliniuose teisė aktuose dėl EEĮ atliekų tvarkymo. Šį gaminį
reikia atiduoti į tam skirtą surinkimo punktą, pvz., pagal patvirtintą
keitimo sistemą, kai perkamas panašus gaminys, arba į elektros ir
elektroninės įrangos (EEĮ) atliekų perdirbimo punktą. Netinkamas
tokios rūšies atliekų tvarkymas dėl elektros ir elektroninėje įrangoje
esančių pavojingų medžiagų gali pakenkti aplinkai ir žmonių sveikatai.
Padėdami užtikrinti tinkamą šio gaminio šalinimo tvarką, kartu
prisidėsite prie veiksmingo gamtos išteklių naudojimo. Jei reikia
daugiau informacijos, kaip šalinti tokias atliekas, kad jos būtų toliau
perdirbamos, kreipkitės į savo miesto valdžios institucijas, atliekų
tvarkymo organizacijas, patvirtintų EEĮ atliekų sistemų arba jūsų
buitinių atliekų tvarkymo įstaigų atstovus. Išsamesnės informacijos
apie EEĮ atliekų grąžinimo ir perdirbimo tvarką galite rasti apsilankę
tinklalapyje www.canon-europe.com/sustainability/approach/
.
Srpski
Ovaj simbol označava da ovaj proizvod ne sme da se odlaže sa
ostalim kućnim otpadom, u skladu sa WEEE Direktivom (2012/19/EU)
i nacionalnim zakonima. Ovaj proizvod treba predati određenom
centru za prikupljanje, npr. na osnovi "jedan-za-jedan" kada kupujete
sličan novi proizvod, ili ovlašćenom centru za prikupljanje za reciklažu
istrošene električne i elektronske opreme (EEE). Nepravilno
rukovanje ovom vrstom otpada može da ima moguće negativne
posledice po životnu sredinu i ljudsko zdravlje usled potencijalno

83
opasnih materijala koji se uglavnom vezuju za EEE. U isto vreme,
vaša saradnja na ispravnom odlaganju ovog proizvoda će doprineti
efikasnom korišćenju prirodnih resursa. Za više informacija o tome
gde možete da predate vašu staru opremu radi recikliranje, vas
molimo, da kontaktirate lokalne gradske vlasti, komunalne službe,
odobreni plan reciklaže ili Gradsku čistoću. Za više informacija o
vraćanju i recikliranju WEEE proizvoda, posetite stranicu www.canon-
europe.com/sustainability/approach/.
Српски
Ovaj simbol označava da ovaj proizvod ne sme da se odlaže sa
ostalim kućnim otpadom, u skladu sa WEEE Direktivom (2012/19/EU)
i nacionalnim zakonima. Ovaj proizvod treba predati određenom
centru za prikupljanje, npr. na osnovi "staro za novo" kada kupujete
sličan novi proizvod, ili ovlašćenom centru za reciklažu istrošene
električne i elektronske opreme (EEE). Nepravilno rukovanje ovom
vrstom otpada može da ima moguće negativne uticaje po životnu
sredinu i ljudsko zdravlje usled potencijalno opasnih materijala koje se
uglavnom vezuju za EEE. U isto vreme, vaša saradnja na ispravnom
odlaganju ovog proizvoda će doprineti efikasnom korišćenju prirodnih
resursa. Za više informacija o tome gde možete da predate vašu staru
opremu radi recikliranje, molimo Vas da kontaktirate lokalne gradske
vlasti, komunalne službe, odobreni plan reciklaže ili Gradsku čistoću.
Za više informacija o vraćanju i recikliranju WEEE proizvoda, posetite
stranicu www.canon-europe.com/sustainability/approach/
.

CANON ELECTRONICS INC.
3-5-10 SHIBAKOEN, MINATO-KU, TOKYO 105-0011, JAPAN
CANON U.S.A. INC.
ONE CANON PARK, MELVILLE, NY 11747, U.S.A.
CANON CANADA INC.
8000 Mississauga Road Brampton, Ontario L6Y 5Z7, CANADA
CANON EUROPA N.V.
BOVENKERKERWEG 59, 1185 XB AMSTELVEEN, THE NETHERLANDS
CANON AUSTRALIA PTY. LTD.
BUILDING A, THE PARK ESTATE, 5 TALAVERA ROAD, MACQUARIE PARK, NSW 2113, AUSTRALIA
CANON SINGAPORE PTE. LTD.
1 FUSIONOPOLIS PLACE, #14-10, GALAXIS, SINGAPORE 138522
CANON KOREA INC.
607, TEHERAN-RO, GANGNAM-GU, SEOUL, KOREA
CANON INDIA PVT. LTD
7TH FLOOR, TOWER B DLF CYBER TERRACES DLF PHASE III GURGAON - 122002 HARYANA, INDIA
PUB. 6T3-0157-E1.10 © CANON ELECTRONICS INC. 2022