

25002-10-UD1-001
Canon
CaptureOnTouch Scan to
QuickBooks Online Plugin Pro
Version 1.0
User’s Guide

2 CaptureOnTouch Scan to QuickBooks Online Plugin Pro User’s Guide
This page is intentionally left blank.

CaptureOnTouch Scan to QuickBooks Online Plugin Pro User’s Guide 3
Contents
Preface ............................................................................................... 5
Symbols Used in This Manual ..................................................................................... 5
How to Use This Manual .............................................................................................. 5
Buttons Used in This Manual ................................................................................... 6
Displays Used in This Manual .................................................................................. 6
Hyperlinks ................................................................................................................ 6
Legal Notices ............................................................................................................... 7
Trademarks .............................................................................................................. 7
Copyright .................................................................................................................. 7
Disclaimers ............................................................................................................... 7
Chapter 1 Overview ............................................................................... 9
1.1 System Requirements ................................................................................... 9
1.2 Hardware and Software Requirements ........................................................ 10
Chapter 2 Installing/Uninstalling the Plugin ...................................... 13
2.1 Downloading the Plugin ............................................................................... 13
2.2 Installing the Plugin ..................................................................................... 17
2.2.1 Installing the Software ................................................................................ 17
2.2.2 License System Overview .......................................................................... 21
2.2.3 Registering a License ................................................................................. 26
2.3 Releasing a License .................................................................................... 32
2.4 Uninstalling the Plugin ................................................................................. 37
Chapter 3 Using CaptureOnTouch for QuickBooks Online Plugin Pro
............................................................................................. 41
3.1 CaptureOnTouch Settings for Scanning to QuickBooks Online ................... 41
3.2 Scanning Documents Using CaptureOnTouch ............................................ 48
3.3 Editing and Submitting Documents for Your QuickBooks Online Account ... 63
3.4 Displaying the Plugin Version Information ................................................... 76
Chapter 4 Troubleshooting ................................................................. 77

4 CaptureOnTouch Scan to QuickBooks Online Plugin Pro User’s Guide
Appendix A. Plugin PDF Controls .......................................................... 79
A.1. Panel Controls ............................................................................................. 80
A.2. View Controls .............................................................................................. 81
A.3. Zoom Controls ............................................................................................. 82
A.4. Pan Controls ................................................................................................ 82
A.5. Select Controls ............................................................................................ 82
A.6. Menu Controls ............................................................................................. 82
Appendix B. Disabling the Plugin ........................................................ 83

CaptureOnTouch Scan to QuickBooks Online Plugin Pro User’s Guide 5
Preface
Thank you for using the CaptureOnTouch Plugin for QuickBooks Online. Please read this
manual thoroughly before using the product. After reading this manual, store it in a safe place
for future reference.
Symbols Used in This Manual
The following symbols are used in this manual to explain procedures, restrictions, and
instructions that should be observed for safety.
IMPORTANT
Indicates operational requirements and restrictions. Be sure to read these items
carefully to operate the machine correctly, and avoid damaging the machine.
How to Use This Manual
This manual describes how to use the CaptureOnTouch Plugin for QuickBooks Online.
Users must have a QuickBooks Online account, own a supported imageFORMULA
scanner which supports CaptureOnTouch, and know how to use it.
6 CaptureOnTouch Scan to QuickBooks Online Plugin Pro User’s Guide
Buttons Used in This Manual
Buttons on the CaptureOnTouch Plugin for QuickBooks Online screens that you
should click are outlined, and represented as shown below.
Buttons on the Plugin UI:
[Button Name]
Examples:
[Connect]
[Sign in]
When multiple buttons can be clicked on a screen, all buttons are marked.
Example:
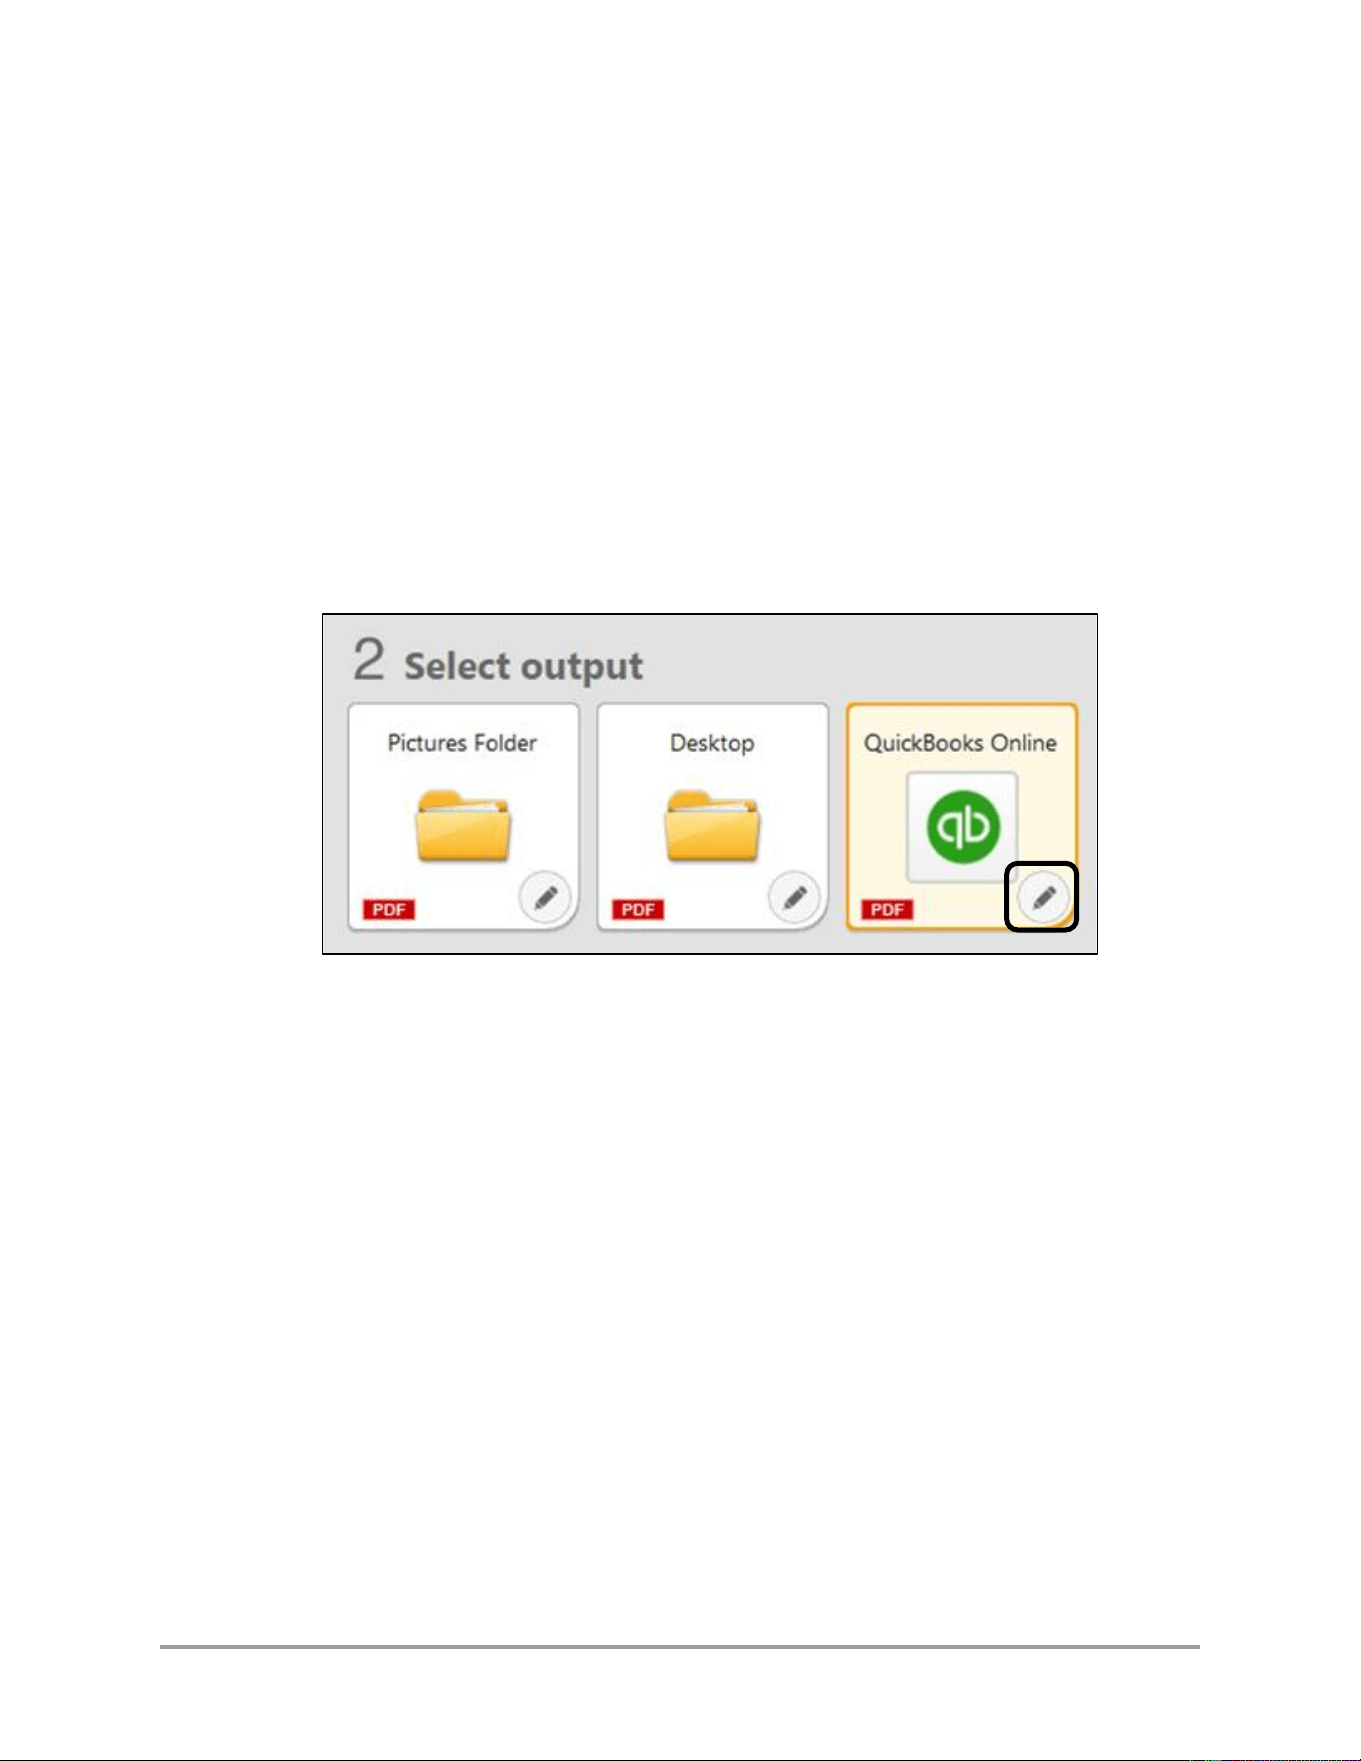
1. Click on the pencil icon for the QuickBooks function.
Displays Used in This Manual
Screen shots of the software used in this manual are those taken when the plugin is
running with CaptureOnTouch V4/V4Pro/V5 Pro on a Microsoft Windows 11 device,
and may appear slightly different from what you see on your machine. However, the
procedural steps shown for all Canon software are identical for all supported
machines unless specifically stated. Operating-system-specific procedures may vary
with developer updates. See the OS developer’s documentation for updated
procedures.
Hyperlinks
When this manual is in its native PDF form, the blue underlined text represents a
hyperlink to the corresponding sections of this manual or to external Web sites.
For example: See Chapter 1, “Overview,” on p. 9.
Likewise, all entries in the Table of Contents are hyperlinks.

CaptureOnTouch Scan to QuickBooks Online Plugin Pro User’s Guide 7
Legal Notices
Trademarks
Canon and the Canon logo are registered trademarks, of Canon Inc. in the United
States and may also be trademarks or registered trademarks in other countries.
imageFORMULA and CaptureOnTouch are trademarks of Canon Electronics Inc.
Intuit and QuickBooks are registered trademarks of Intuit Inc.
Microsoft, Windows, Windows Server, and Edge are registered trademarks of
Microsoft Corporation in the United States and are trademarks or registered
trademarks of Microsoft Corporation in other countries.
Apple, Mac, and macOS are registered trademarks of Apple Inc.
Adobe and Adobe Acrobat are trademarks of Adobe Systems Incorporated.
Other product and company names herein are, or may be, the trademarks of their
respective owners.
Copyright
Copyright 2025 by Canon U.S.A., Inc. All rights reserved.
No part of this publication may be reproduced or transmitted in any form or by any
means, electronic or mechanical, including photocopying and recording, or by any
information storage or retrieval system without the prior written permission of Canon
U.S.A., Inc.
Disclaimers
The information in this document is subject to change without notice.
CANON U.S.A., INC. MAKES NO WARRANTY OF ANY KIND WITH REGARD
TO THIS MATERIAL, EITHER EXPRESS OR IMPLIED, EXCEPT AS
PROVIDED HEREIN, INCLUDING WITHOUT LIMITATION, THEREOF,
WARRANTIES AS TO MARKETABILITY, MERCHANTABILITY, FITNESS FOR
A PARTICULAR PURPOSE OR USE OR NON-INFRINGEMENT. CANON
U.S.A., INC. SHALL NOT BE LIABLE FOR ANY DIRECT, INCIDENTAL, OR
CONSEQUENTIAL DAMAGES OF ANY NATURE, OR LOSSES OR EXPENSES
RESULTING FROM THE USE OF THIS MATERIAL

8 CaptureOnTouch Scan to QuickBooks Online Plugin Pro User’s Guide
This page is intentionally left blank.

CaptureOnTouch Scan to QuickBooks Online Plugin Pro User’s Guide 9
Chapter 1 Overview
The CaptureOnTouch Scan to QuickBooks Online Plugin Pro enables you to scan directly
from the CaptureOnTouch application (using your supported imageFORMULA scanner) to
your QuickBooks Online account. This plugin allows you to scan expenses (receipts and
invoices), automatically extract expense contents, and upload both the scanned images and
extracted expense contents directly into your QuickBooks Online account.
To use the CaptureOnTouch Scan to QuickBooks Online Plugin Pro, you must install the
latest driver package for your scanner, the CaptureOnTouch application, and the plugin
installer package. Visit http://usa.canon.com/support, and search for your imageFORMULA
scanner model to download the latest driver package, the CaptureOnTouch application, and
the plugin installer package. You must have a valid QuickBooks Online account.
To learn more about the supported imageFORMULA scanners (with accompanying
CaptureOnTouch application), see “Hardware and Software Requirements,” on p. 10.
IMPORTANT
This plugin is designed to be used by a single user account (i.e. the person who installed
the plugin). Use of the plugin with a different account may have unexpected results.
1.1 System Requirements
Operating systems that are supported by the CaptureOnTouch application and the plugin
are listed below
• Microsoft Windows 11 64-bit with the latest updates, .NET Framework 4.8

10 CaptureOnTouch Scan to QuickBooks Online Plugin Pro User’s Guide
1.2 Hardware and Software Requirements
This section describes the supported imageFORMULA scanners and CaptureOnTouch
versions that can be used with the CaptureOnTouch Scan to QuickBooks Online Plugin
Pro.
Note: Check your scanner’s documentation and installation to verify CaptureOnTouch is
supported.
For all supported models, you must download the installer package from the Canon
U.S.A., Inc website and install it separately. For some models, if you want to use the
plugin beyond a short trial period, you must purchase a permanent license and supply the
license information to the plugin. See the table below for the list of scanners which do
and do not require a separately-purchased license.
imageFORMULA Series
Scanner
CaptureOnTouch Version
License Required
R40 Receipt Edition
Standard V4.X
No
R40
R50
RS40
Standard V4.X
YES
P-208II
P-215II
DR-C225II
Standard V4.X
YES
IMPORTANT
Visit http://usa.canon.com/support, and search for your imageFORMULA scanner
model to download the latest driver and CaptureOnTouch application.
Note: CaptureOnTouch Pro is not supported.
CaptureOnTouch Scan to QuickBooks Online Plugin Pro User’s Guide 11
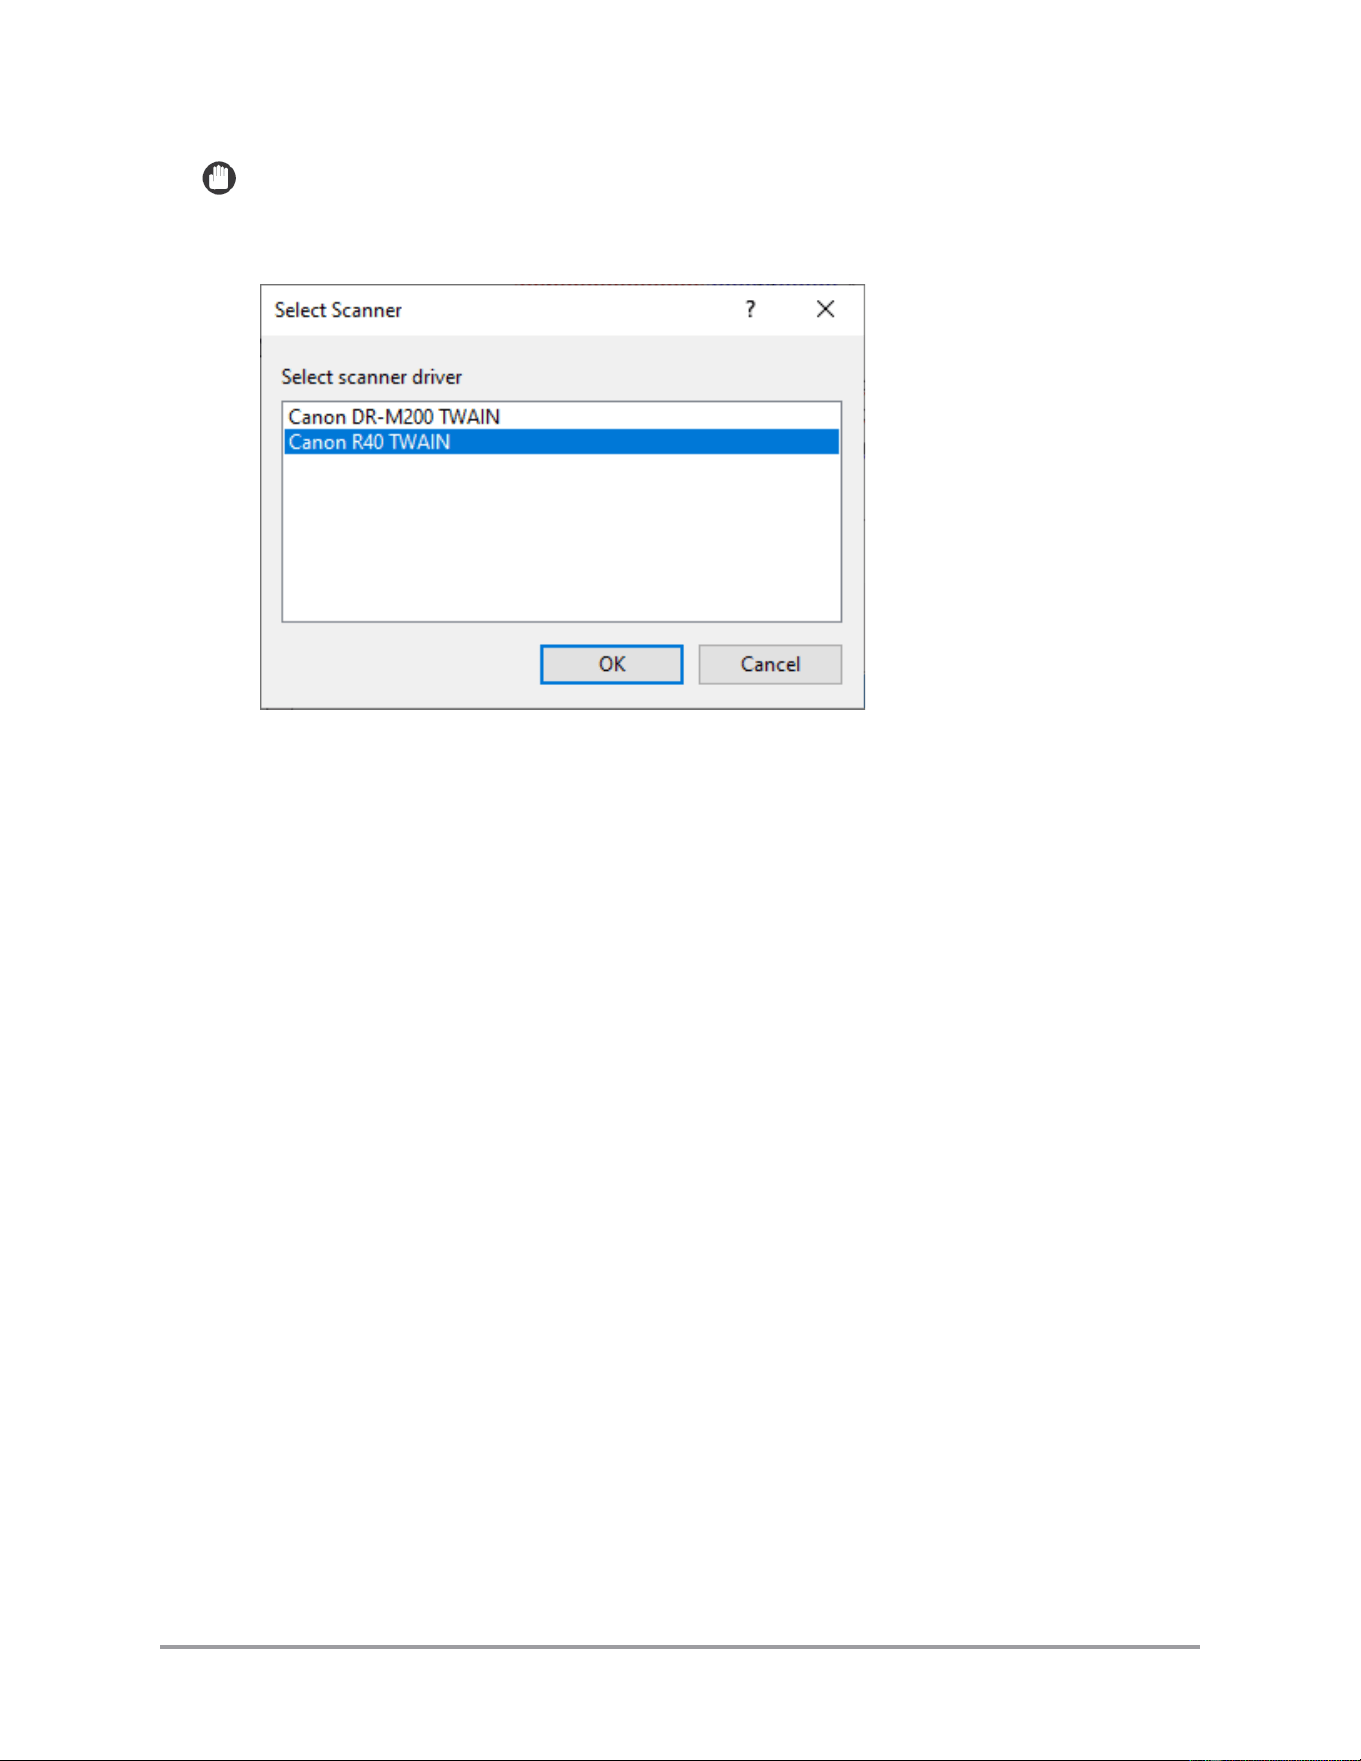
IMPORTANT
If multiple scanners are powered ON and connected to a single PC, select which
scanner to use through CaptureOnTouch and the plugin software.

12 CaptureOnTouch Scan to QuickBooks Online Plugin Pro User’s Guide
This page is intentionally left blank.
CaptureOnTouch Scan to QuickBooks Online Plugin Pro User’s Guide 13
Chapter 2 Installing/Uninstalling the Plugin
This chapter lists the procedures for downloading, installing, and uninstalling the plugin.
2.1 Downloading the Plugin
This section lists the procedure for downloading the plugin from the public support site.
The screen shots below use the imageFORMULA R40 connected to a Windows 11
machine as an example.
Note: The URL and the download/support screens may vary from the procedure below.
Use the latest online help resources to assist you in getting a license, or call the toll-free
help number: 1-800-385-2155.
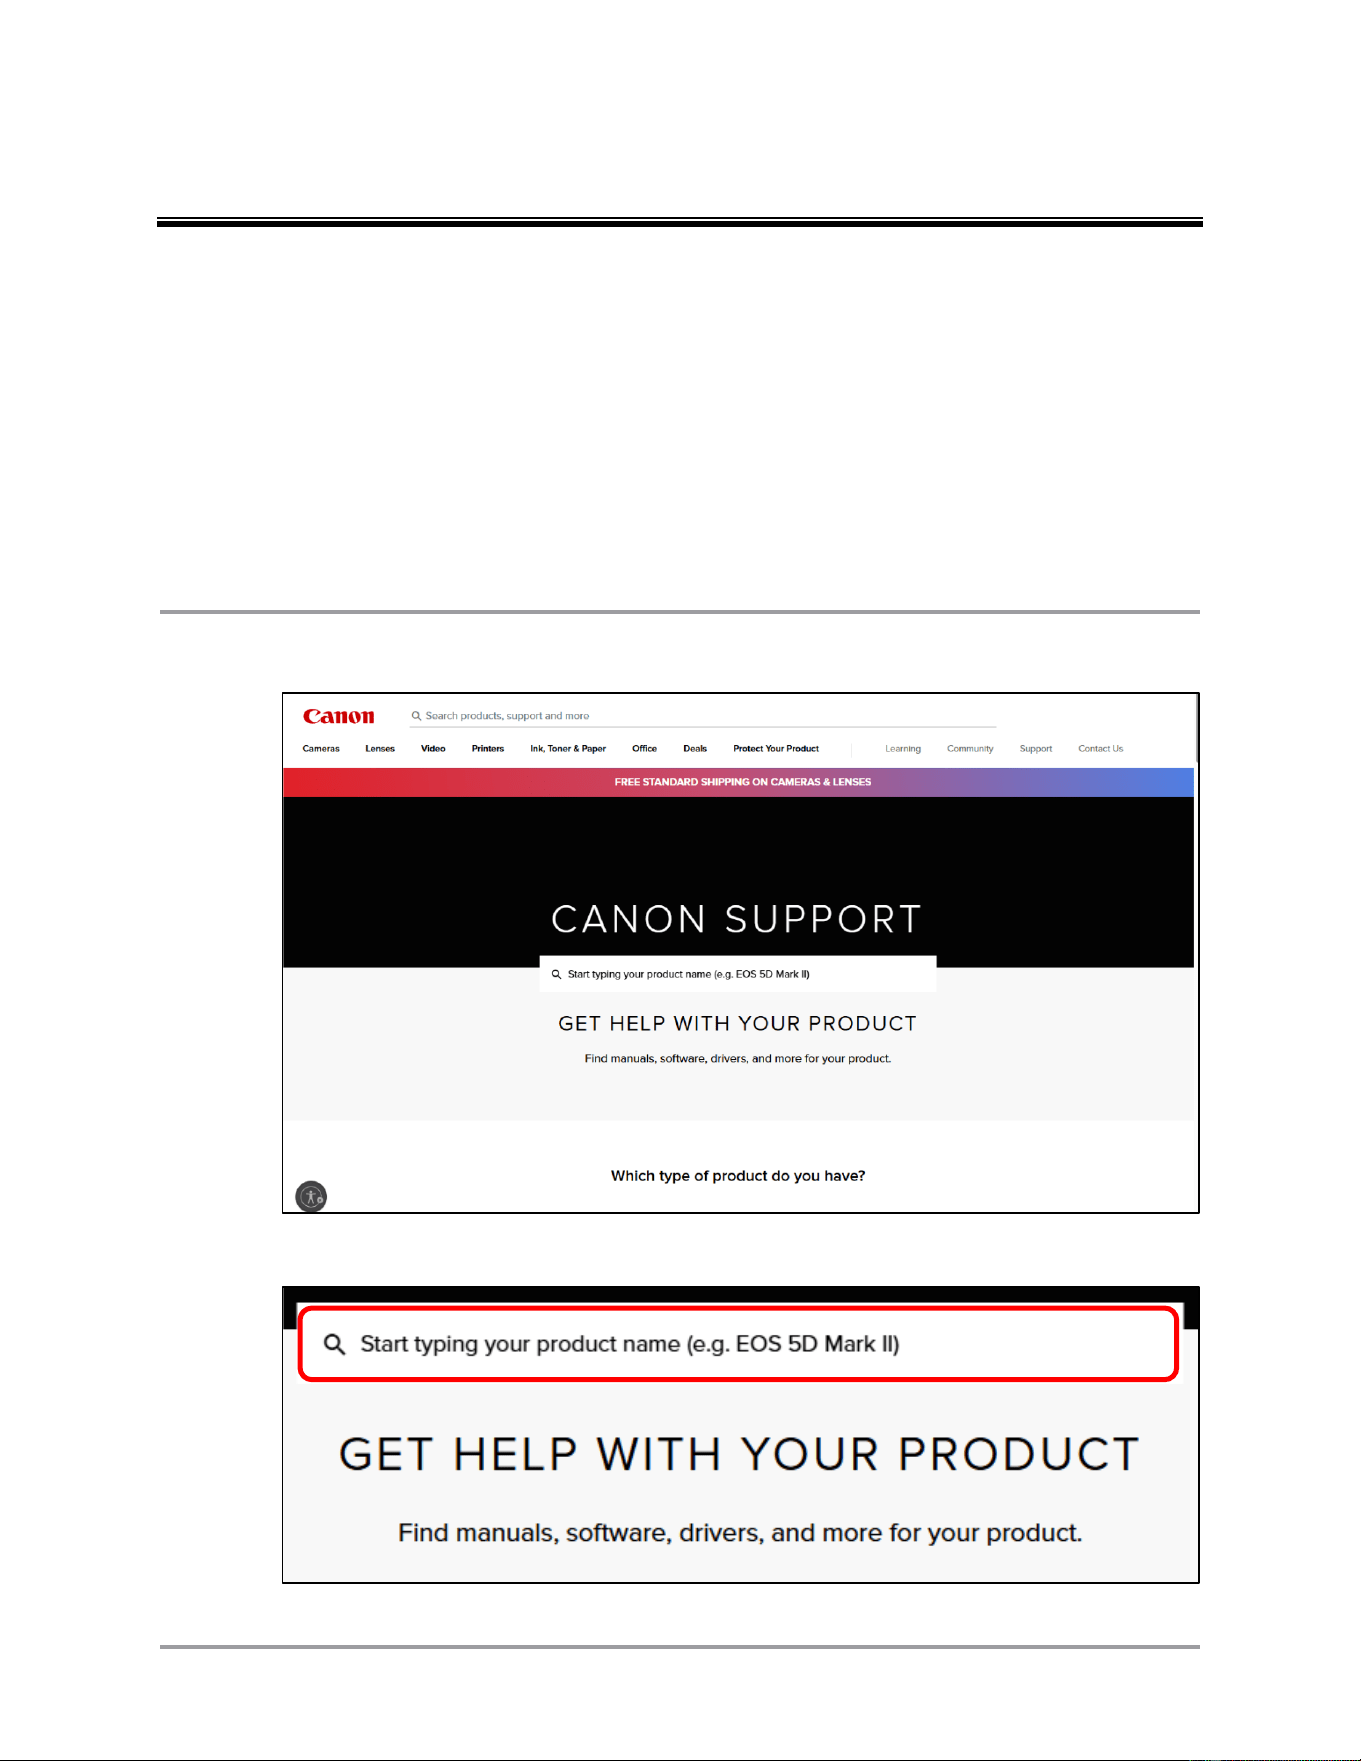
1. In a web browser, go to http://usa.canon.com/support.
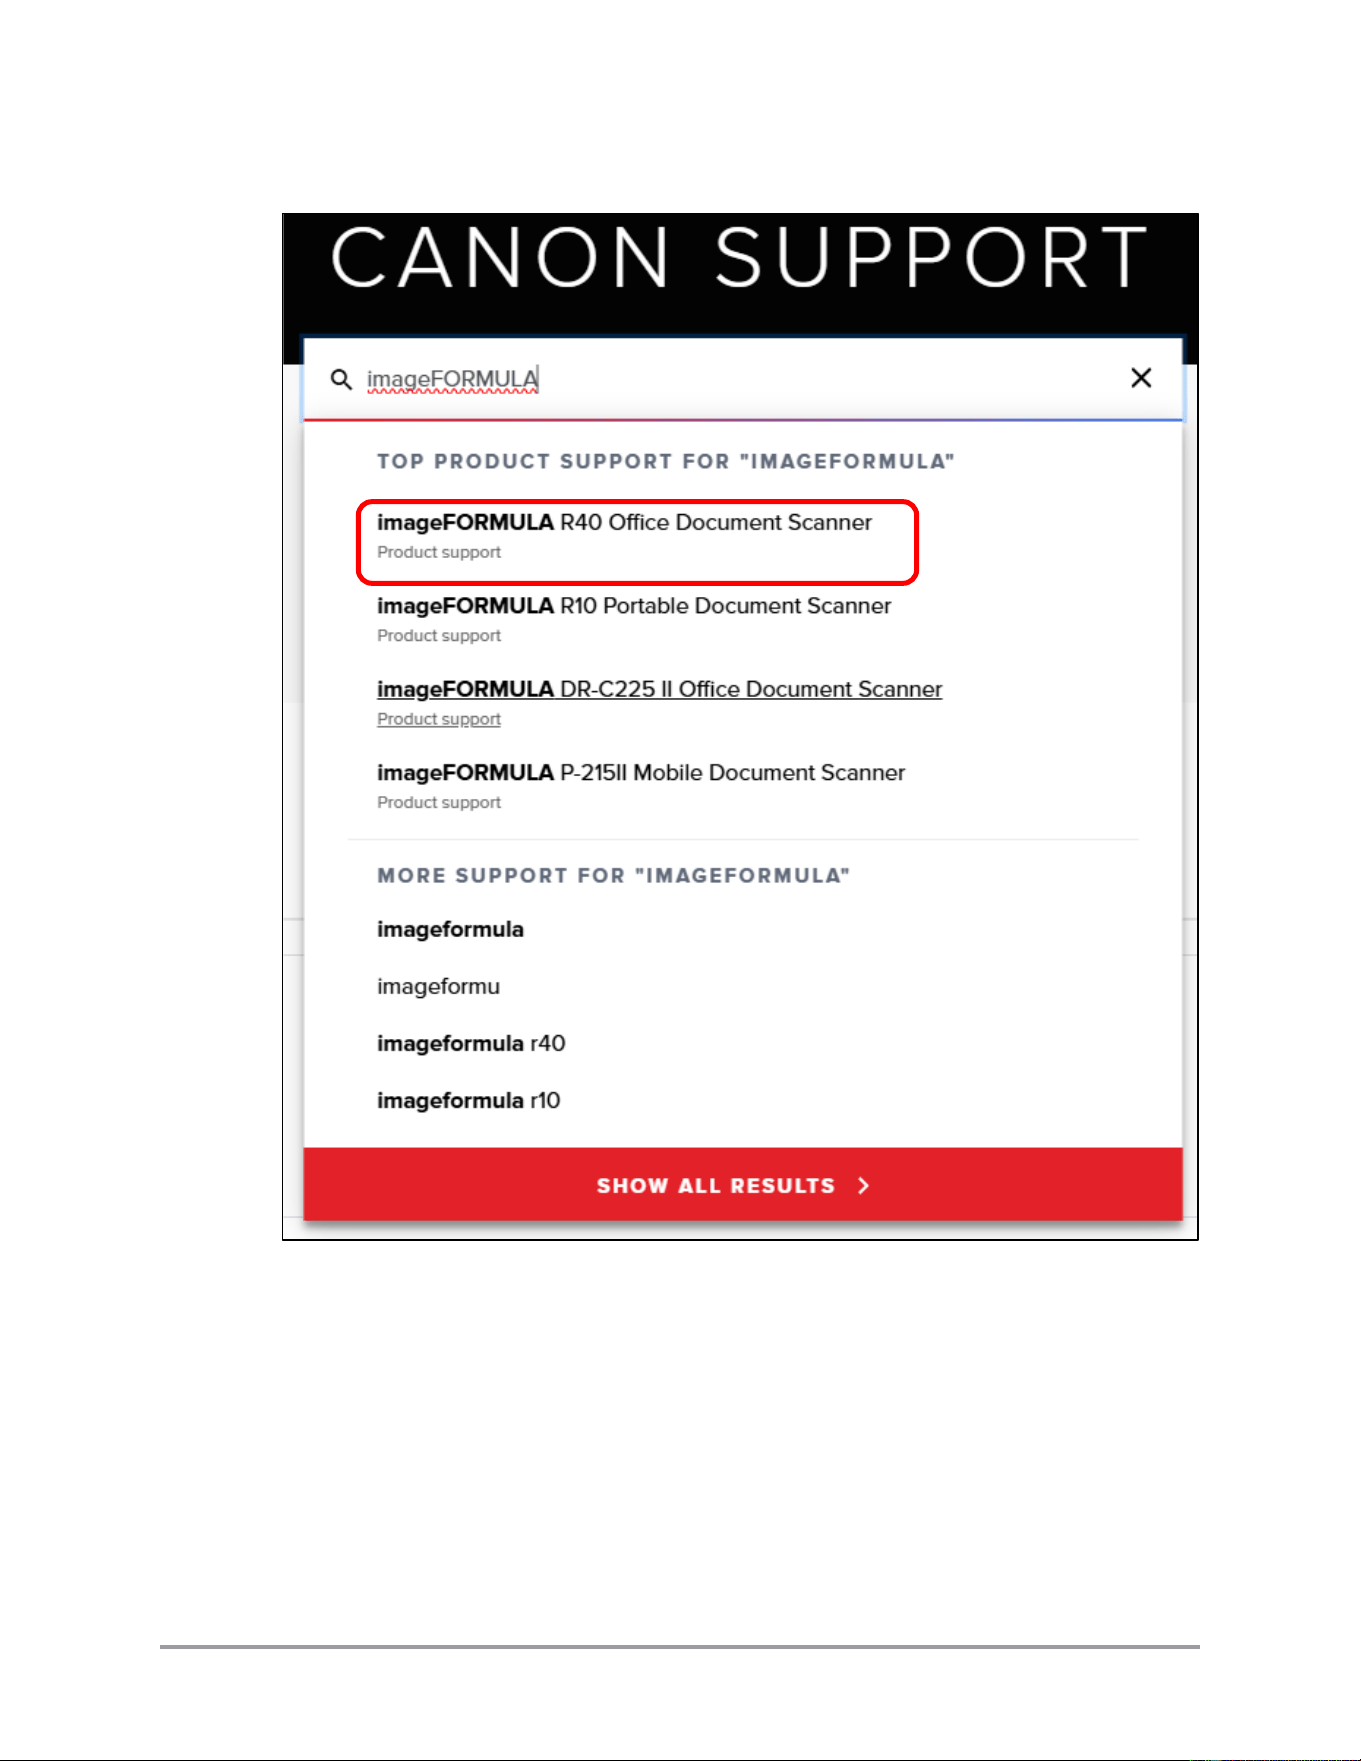
2. Enter your device’s product name in the search field.
14 CaptureOnTouch Scan to QuickBooks Online Plugin Pro User’s Guide
3. Select your product name from the list.

CaptureOnTouch Scan to QuickBooks Online Plugin Pro User’s Guide 15
4. Click “Software and Drivers”.
5. If not automatically detected, select your computer’s Operating Systems and Version.

16 CaptureOnTouch Scan to QuickBooks Online Plugin Pro User’s Guide
6. Click [Download] for the plugin entry.
Note: If an entry for the plugin does not appear in the initial list, scroll to the bottom
of the list and click [Load More].
7. Click [Yes] to agree to the terms and conditions.
8. Save the install package to the desired location on your computer.
CaptureOnTouch Scan to QuickBooks Online Plugin Pro User’s Guide 17
2.2 Installing the Plugin
2.2.1 Installing the Software
This section describes how to install the CaptureOnTouch Scan to QuickBooks
Online Plugin Pro once downloaded from the Canon website.
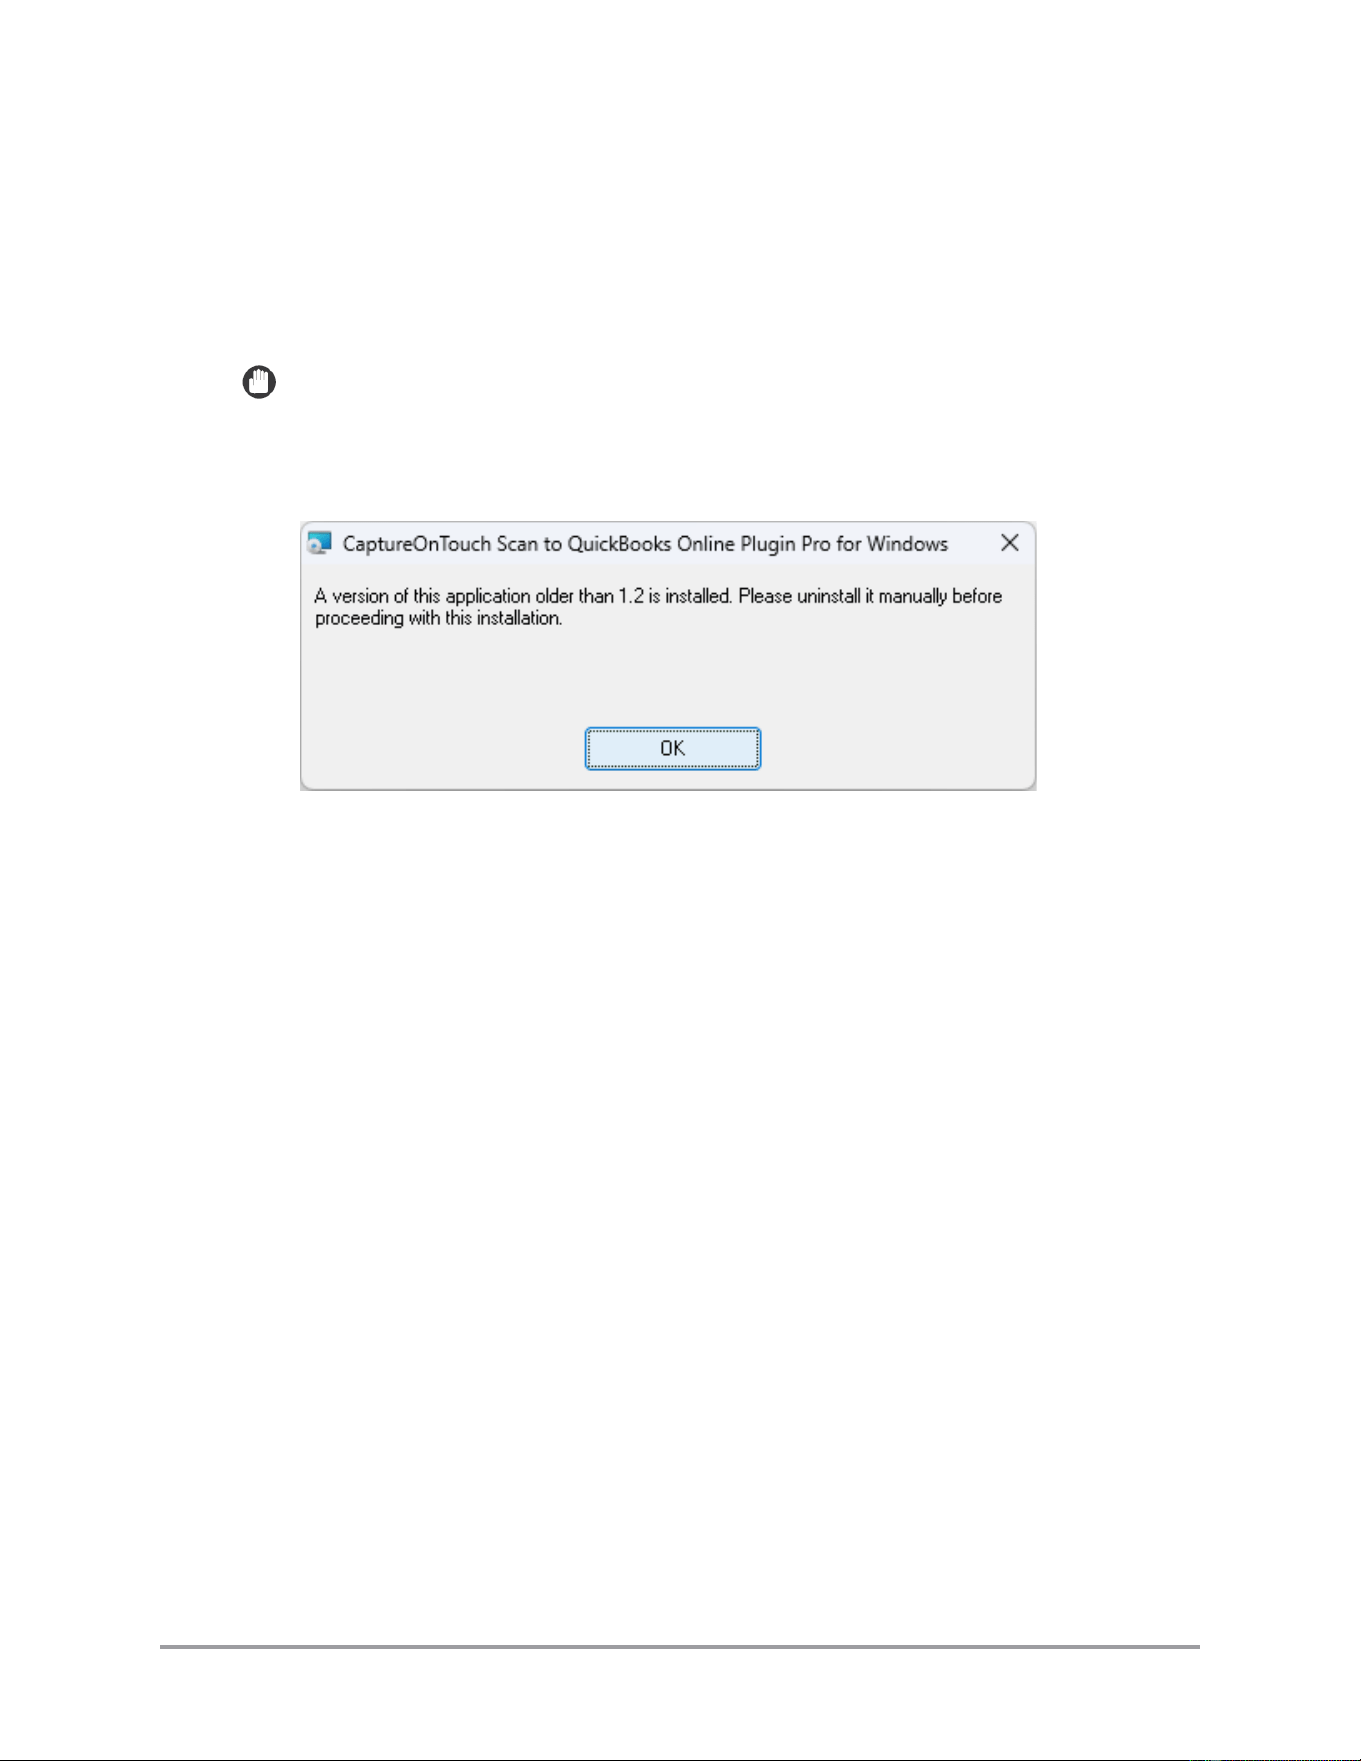
IMPORTANT
If your CaptureOnTouch application is using a previous version of the plugin, you
must uninstall the older plugin before installing the Pro version. The installer
displays a dialog box if it detects an older version:
Uninstall the previous version, and re-install this version. See your operating system
instructions for uninstalling software packages.
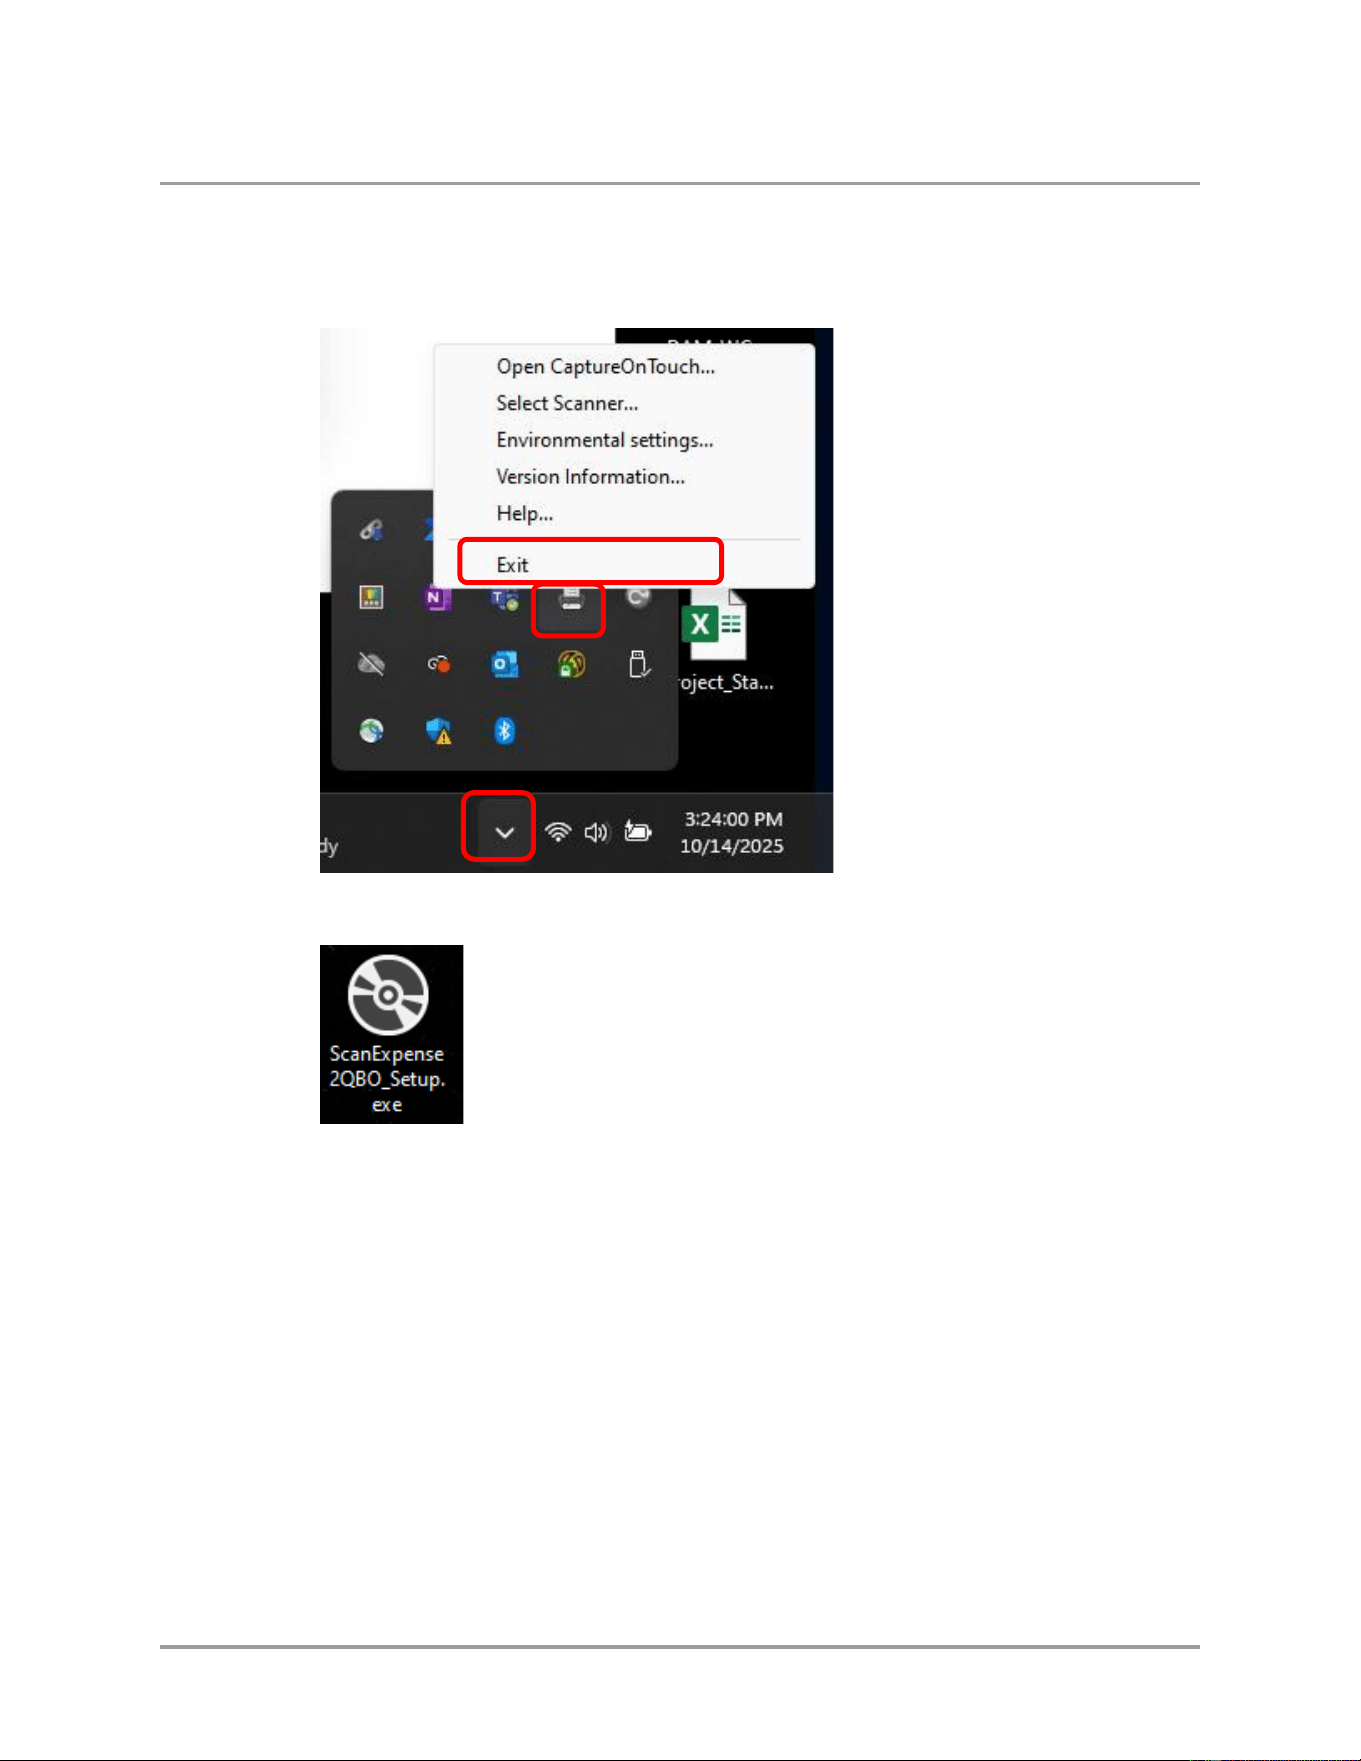
Note: If CaptureOnTouch is running, exit the program before installing the plugin.
See the CaptureOnTouch documentation for the procedure to exit the program.
CaptureOnTouch may also be running as a background task.
18 CaptureOnTouch Scan to QuickBooks Online Plugin Pro User’s Guide
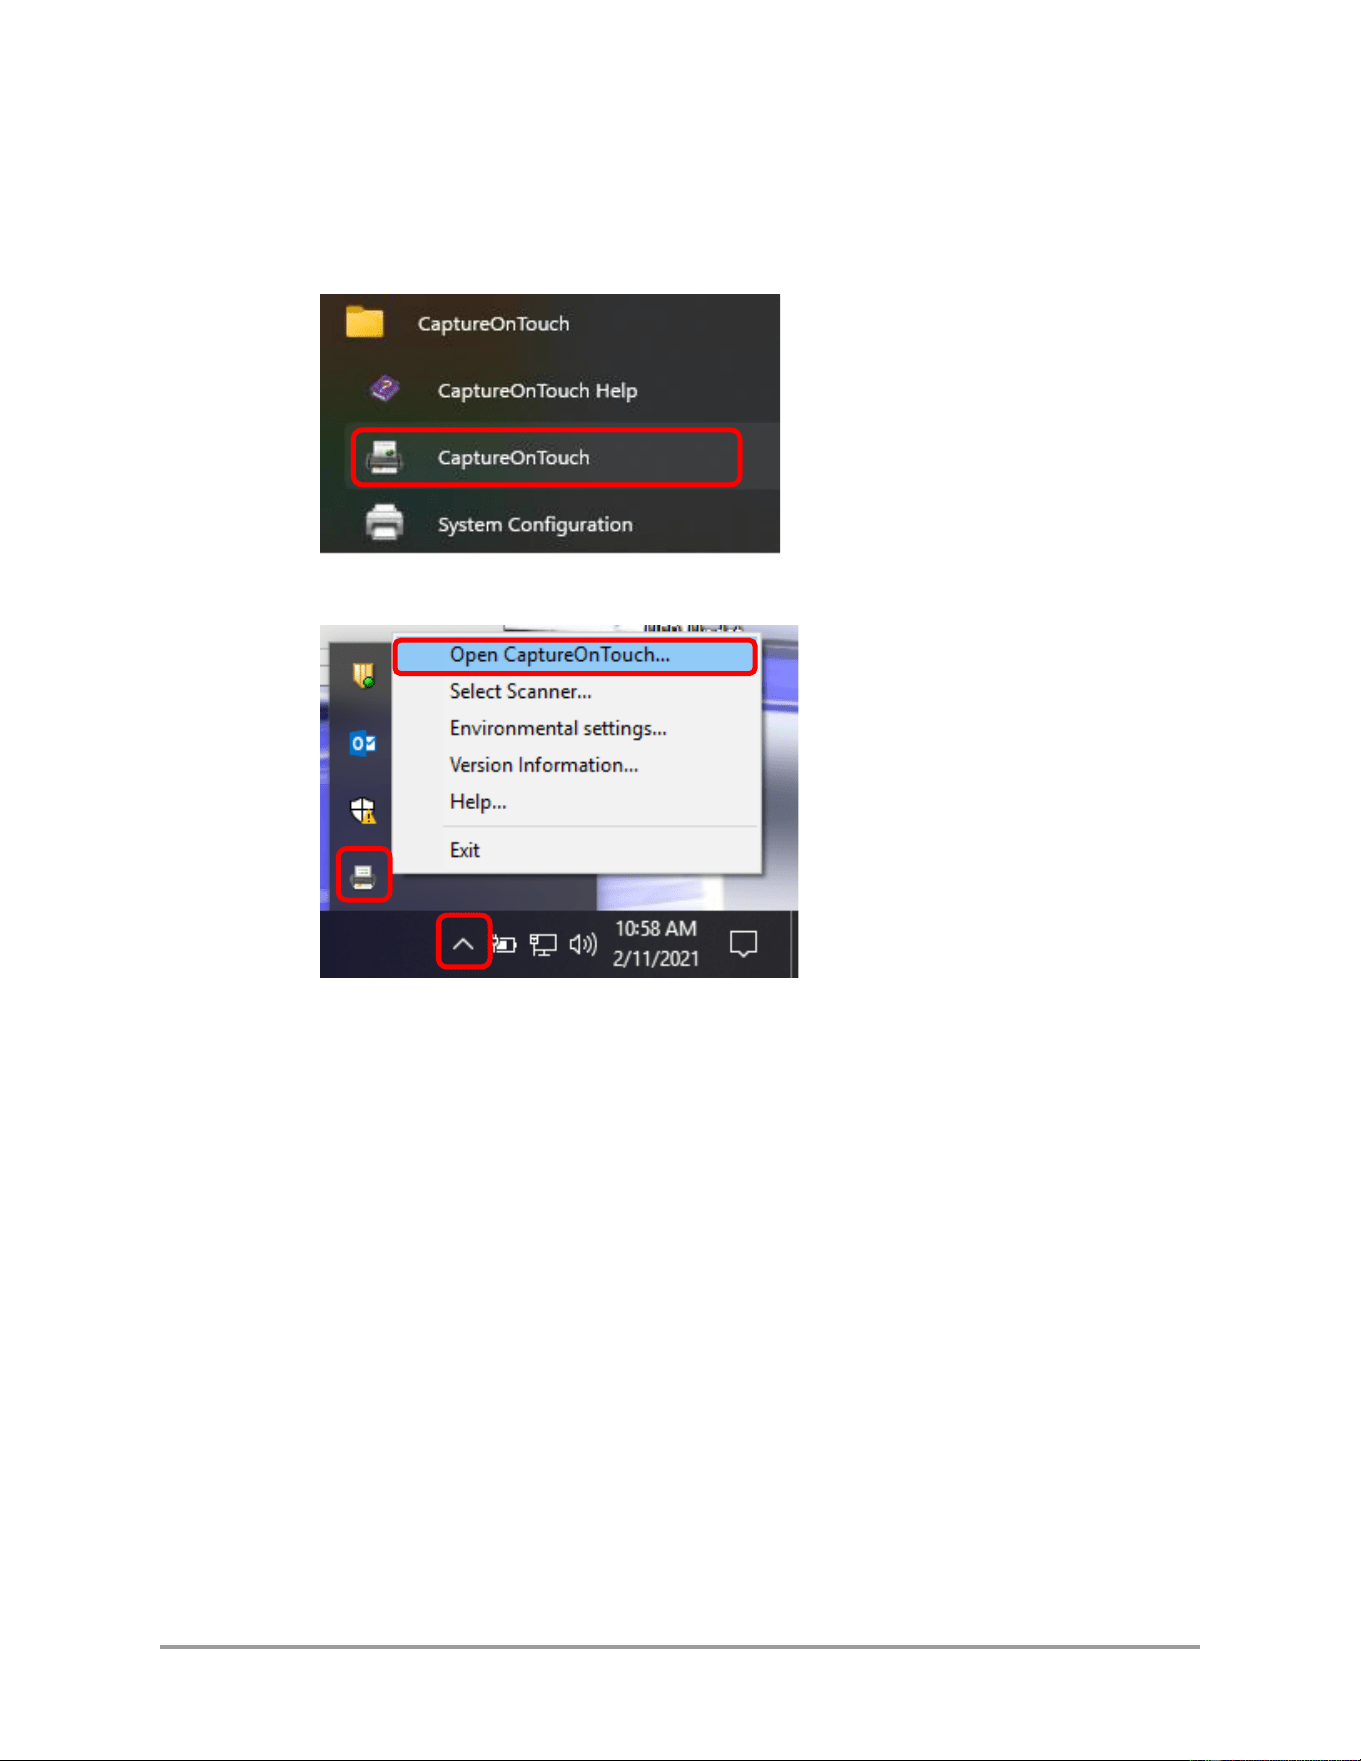
1. If CaptureOnTouch is running, exit the program before installing the plugin.
Access CaptureOnTouch through the windows hidden icons menu and exit the
program.
2. Double click on the installation icon.
CaptureOnTouch Scan to QuickBooks Online Plugin Pro User’s Guide 19
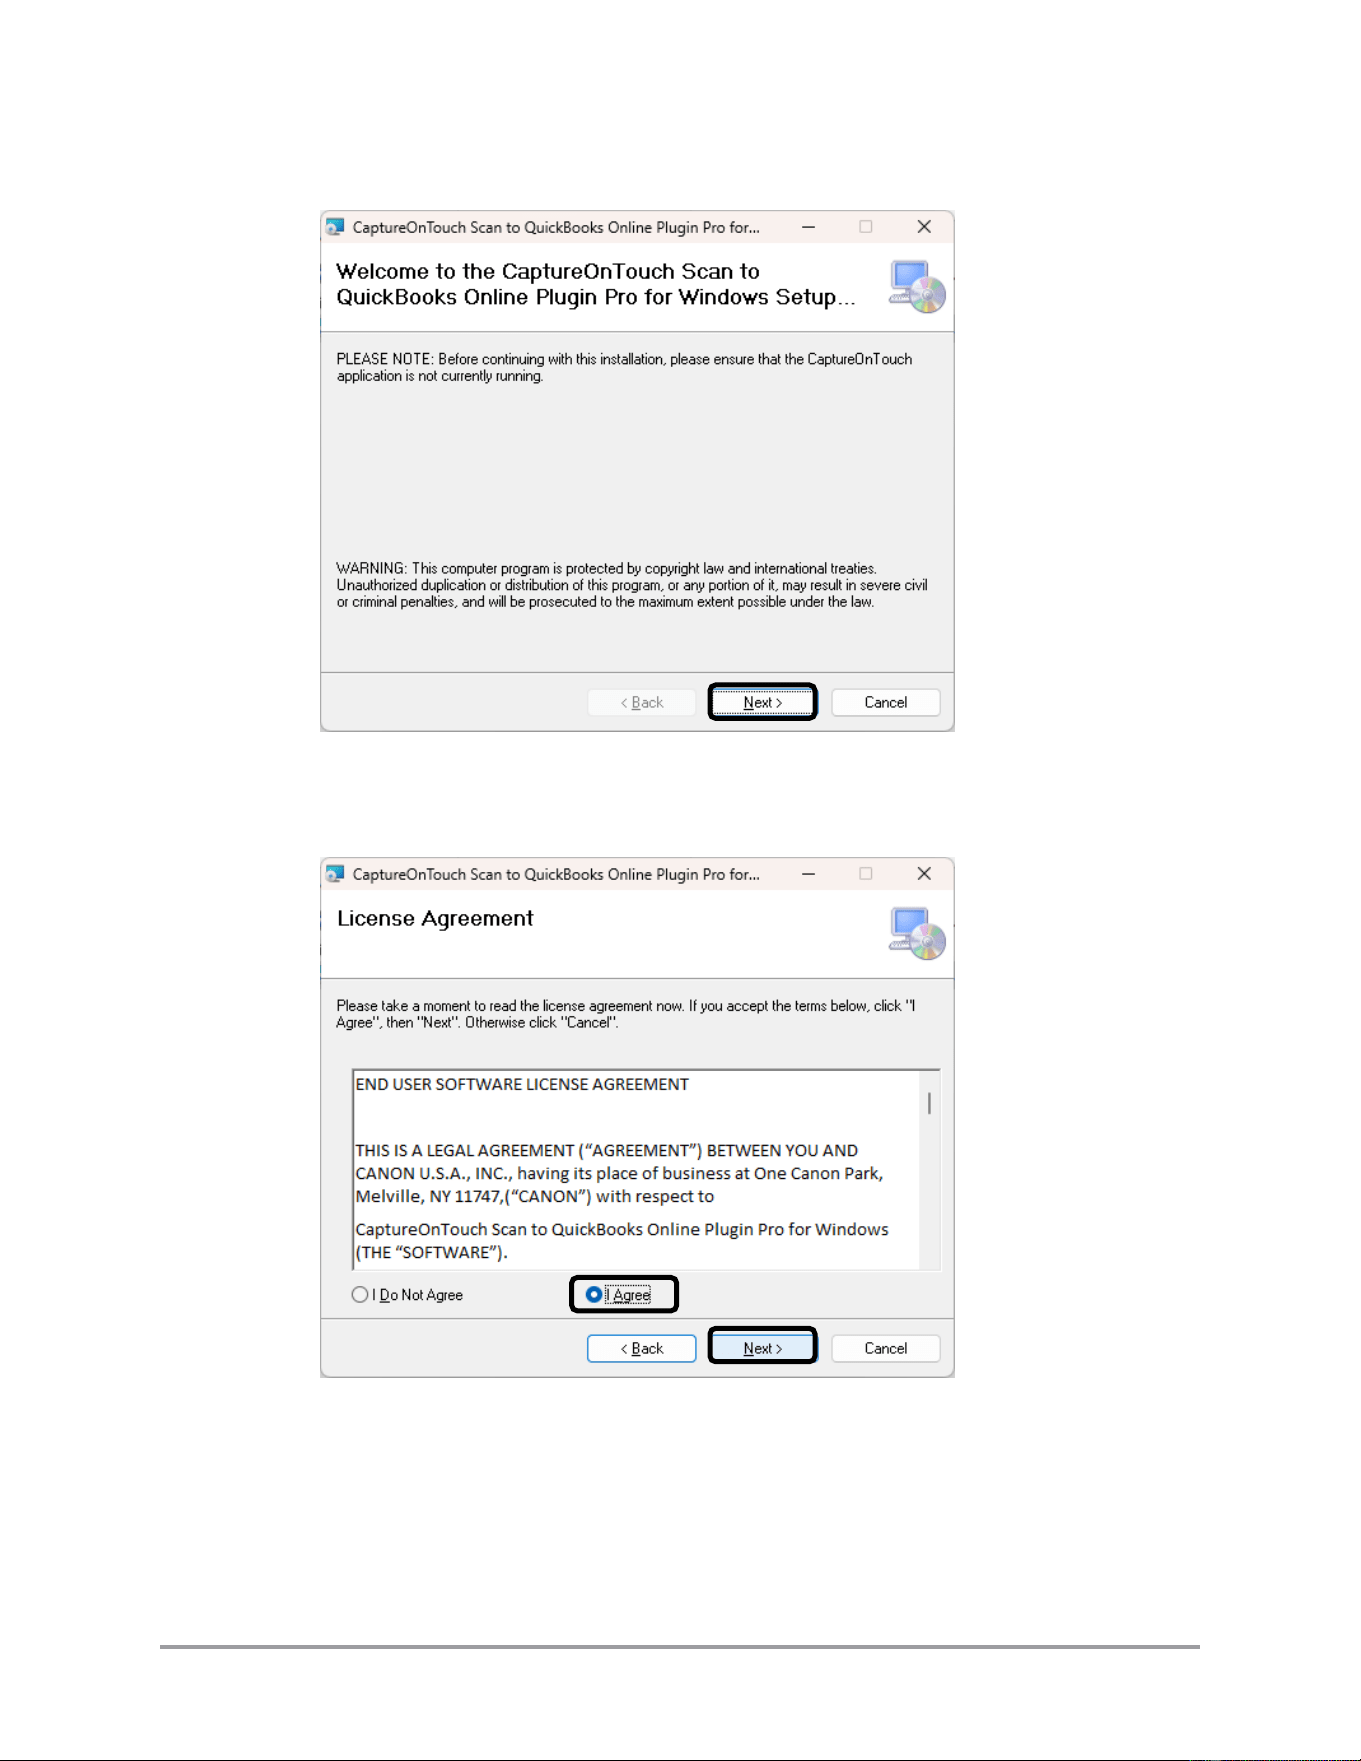
3. Click [Next] at the Welcome screen.
Click [Cancel] to quit the installation.
4. Click [I agree] ➞ [Next] at the License Agreement screen.
Click [Back] to return to the Welcome screen. Click [Cancel] to quit the
installation.
20 CaptureOnTouch Scan to QuickBooks Online Plugin Pro User’s Guide
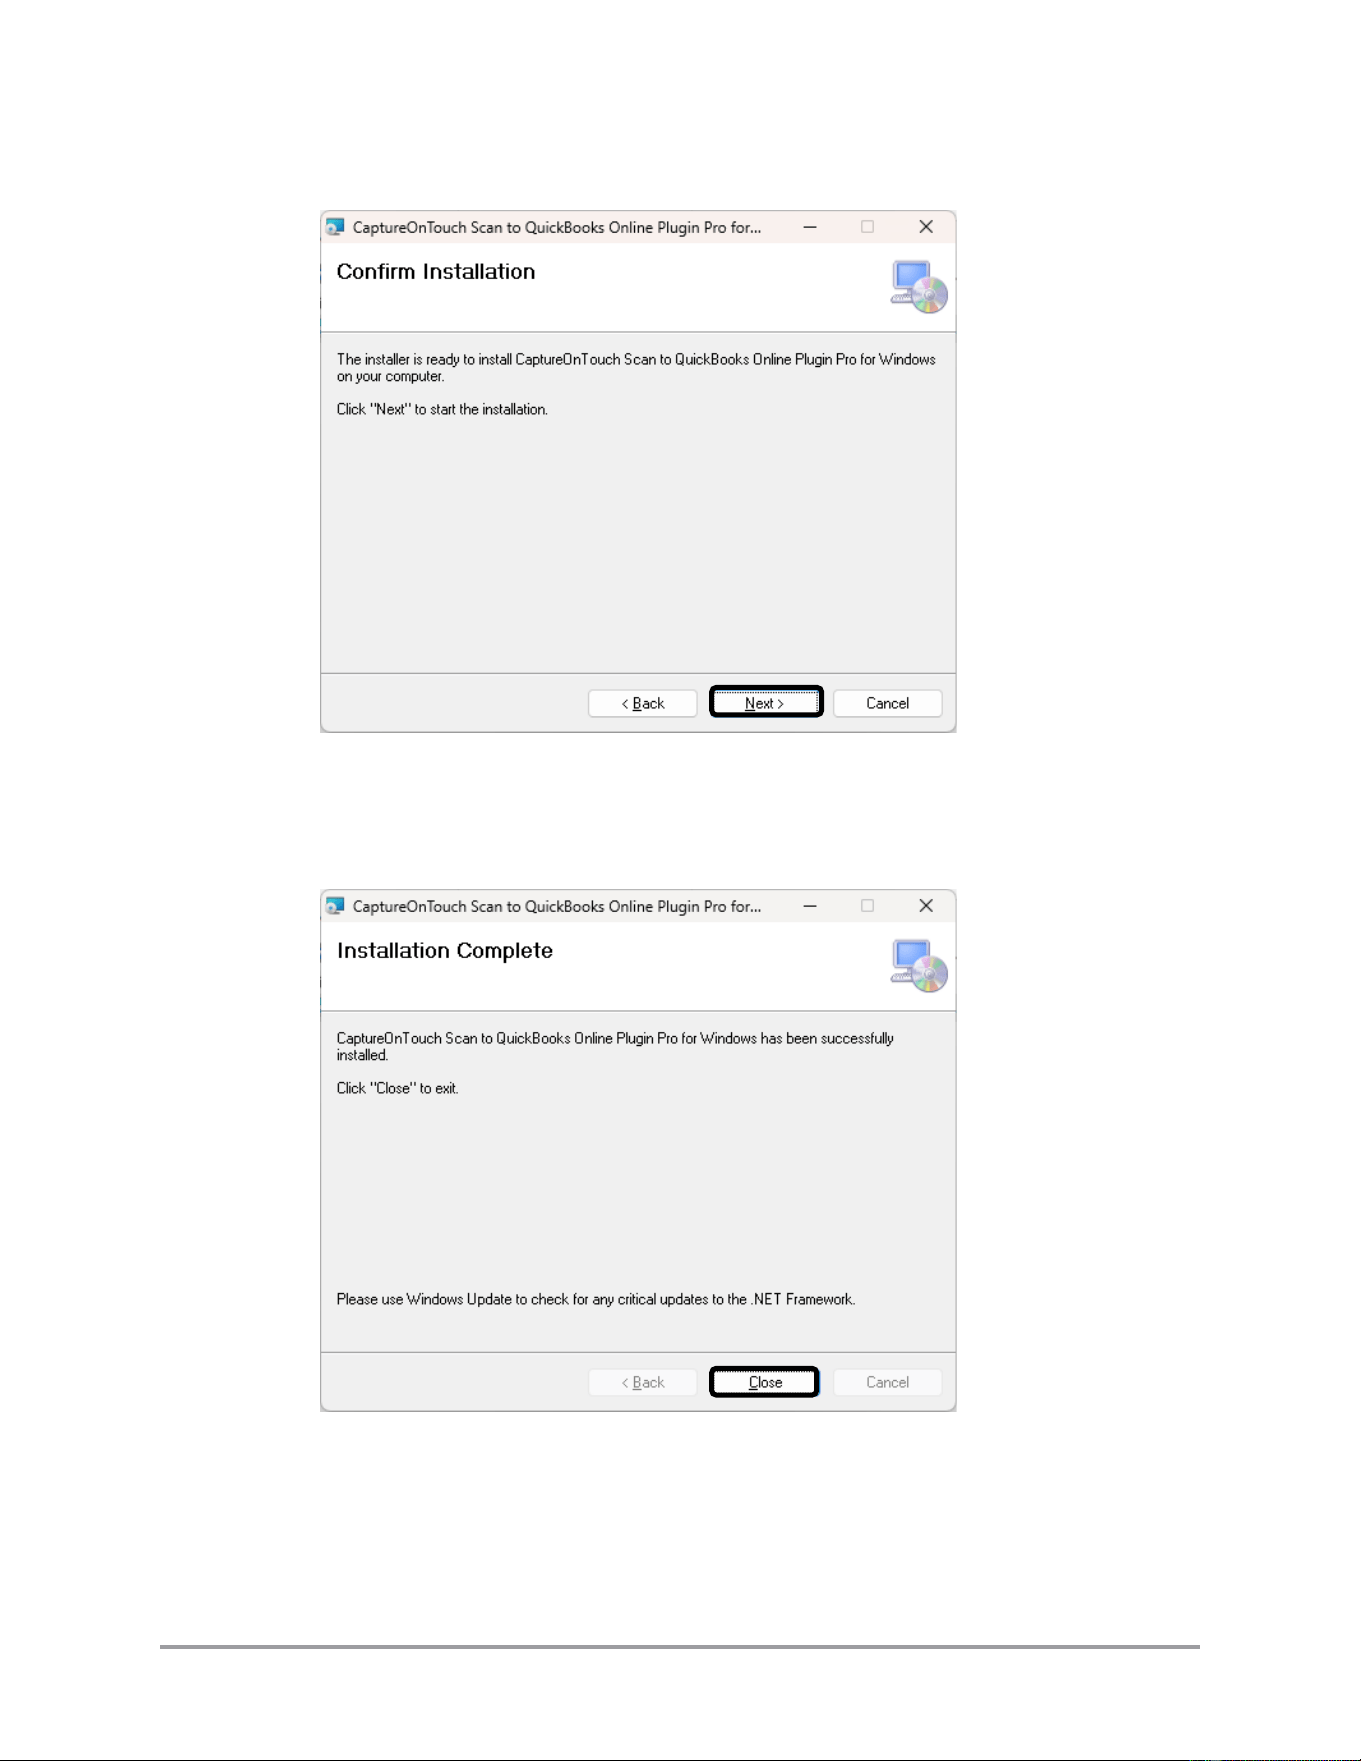
5. Click [Next] to continue the installation.
Click [Back] to return to the License screen. Click [Cancel] to quit the
installation.
6. Click [Close] to complete the installation.
7. Re-start CaptureOnTouch.

CaptureOnTouch Scan to QuickBooks Online Plugin Pro User’s Guide 21
2.2.2 License System Overview
IMPORTANT
The imageFORMULA R40 Receipt Edition does not need to separately get/install a
license. Skip this section for this model.
Note: CaptureOnTouch and the plugin must be installed and running to view the
license information.
The plugin has a 15 day trial period. The trial period starts from the first time you
scan using the plugin. The plugin automatically displays a countdown dialog when
you are within five (5) days of the trial license expiring.
Once the trial license expires, you must purchase a permanent license to keep using
the plugin.
Purchase a permanent license from the Canon web store. See the next section for
instructions on purchasing and registering a permanent license.
22 CaptureOnTouch Scan to QuickBooks Online Plugin Pro User’s Guide
If you need support from Canon during the trial period (before you purchase a
permanent license), you need to give the support team the trial license number.
Follow the procedure below to access the trial license information.
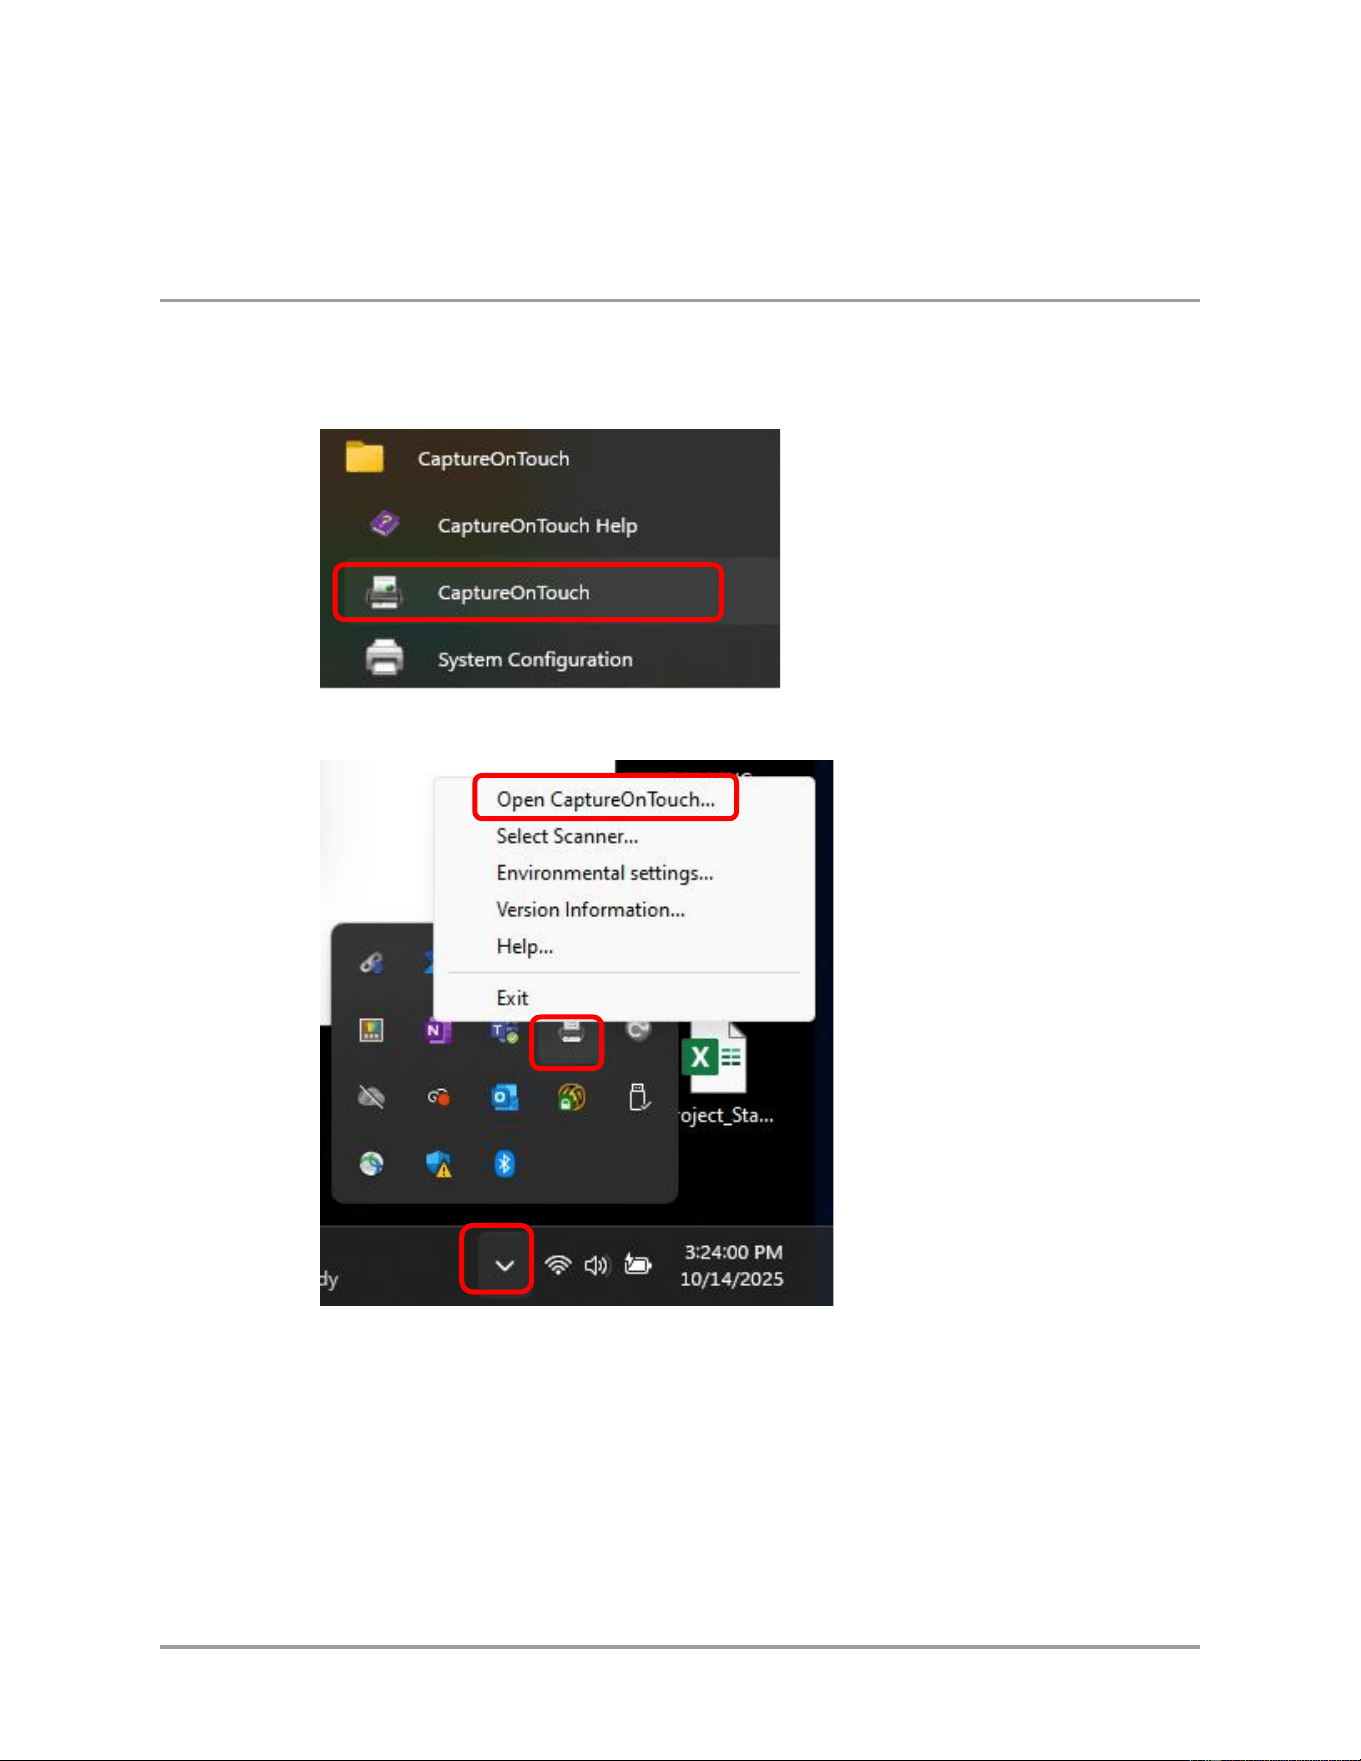
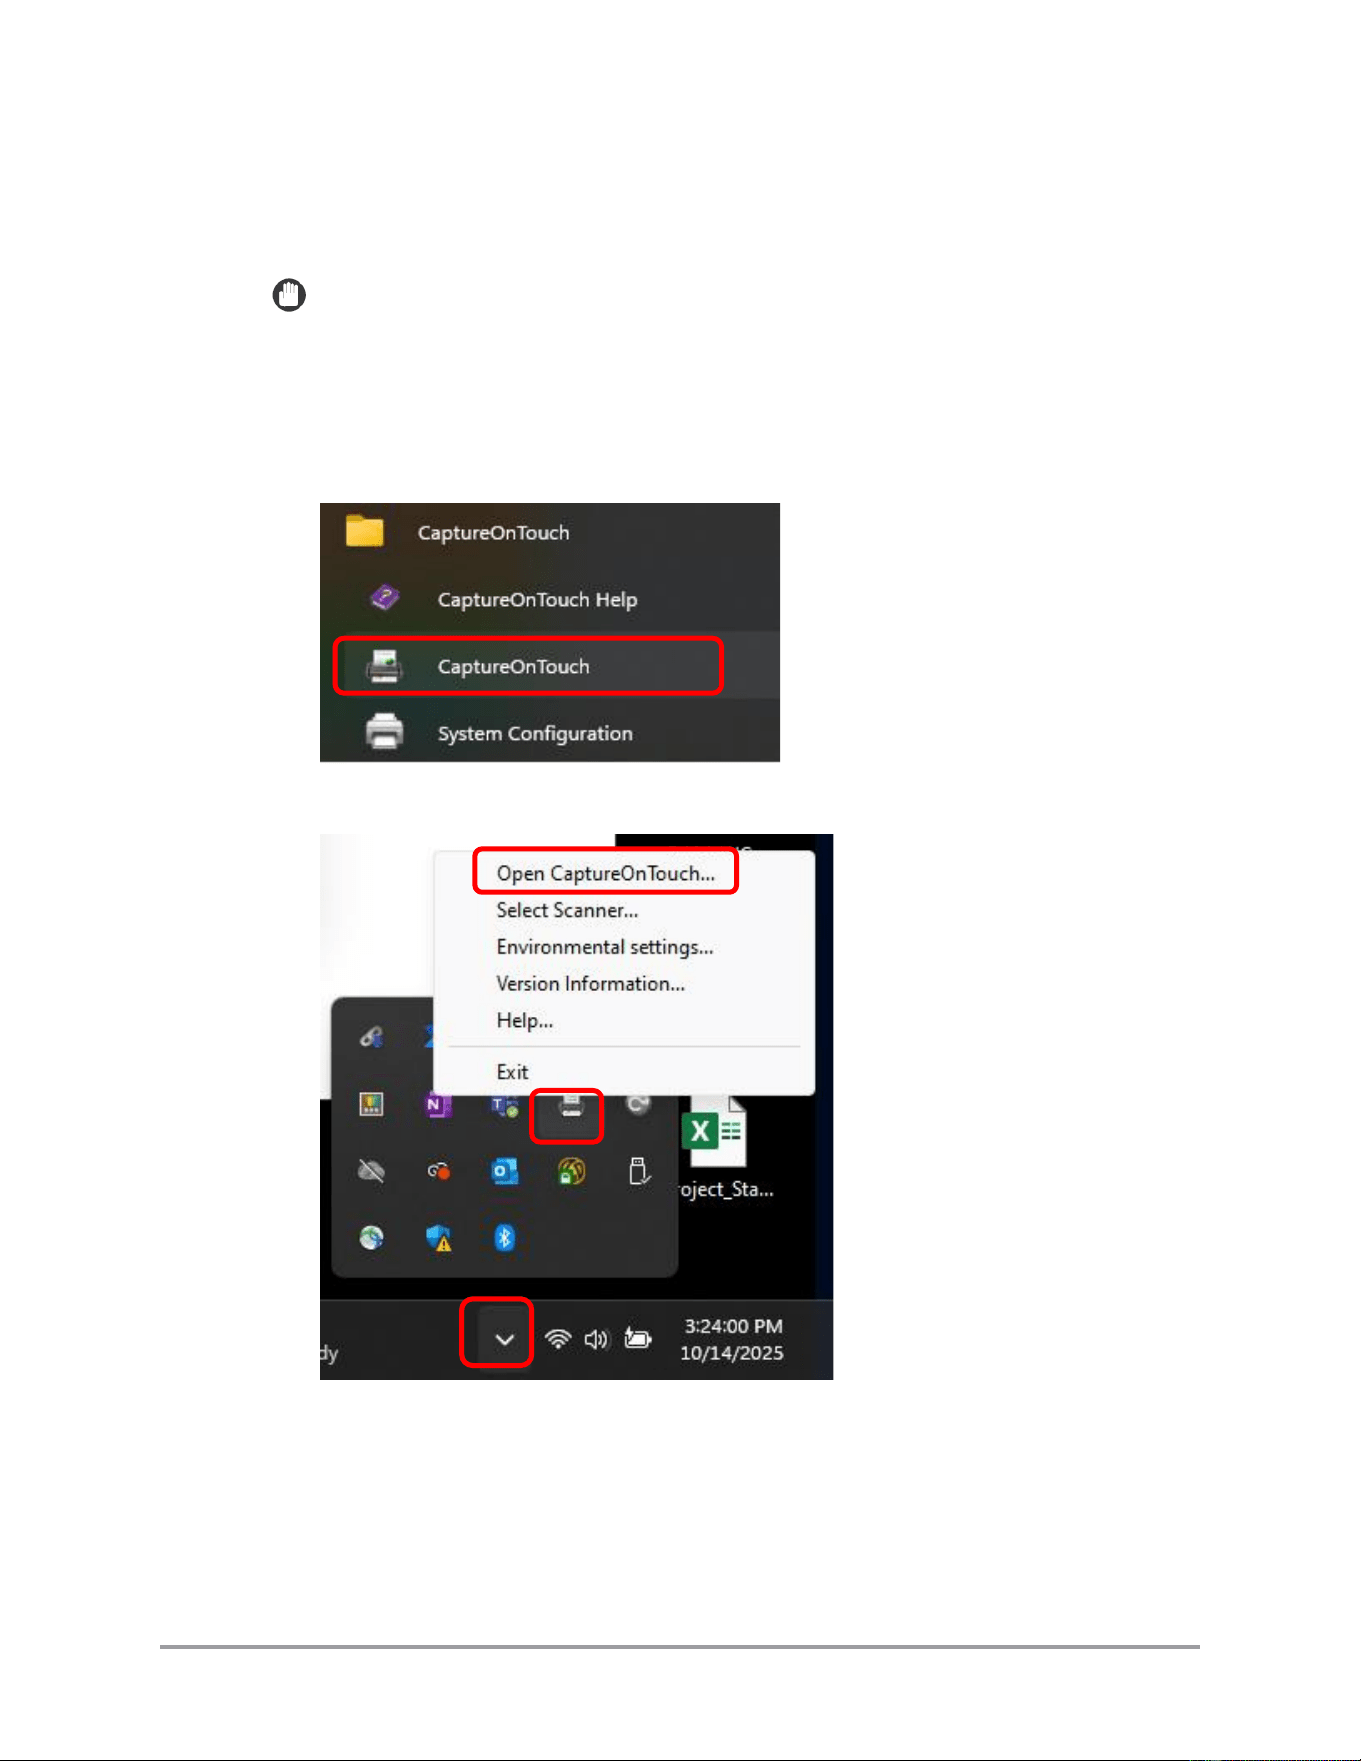
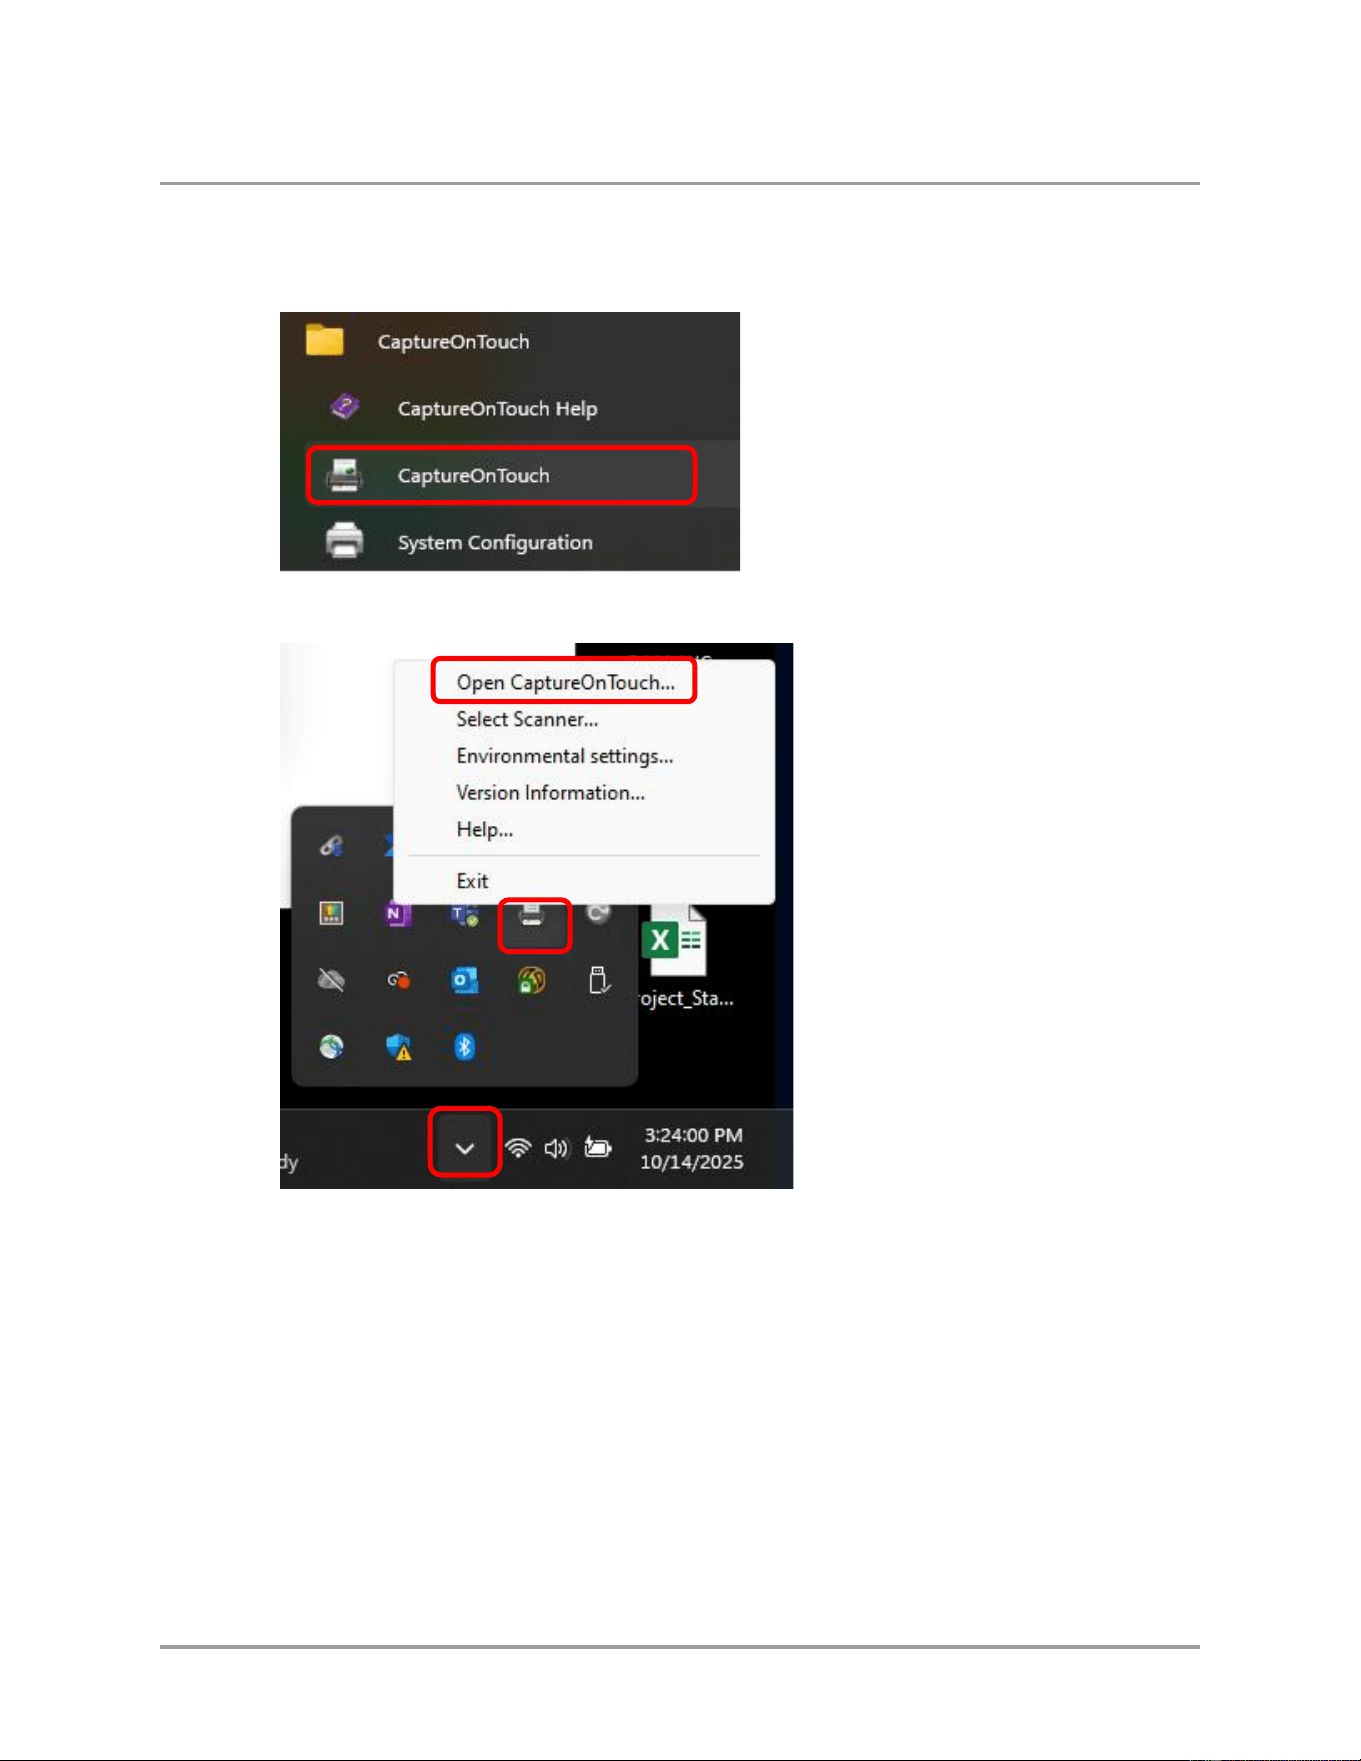
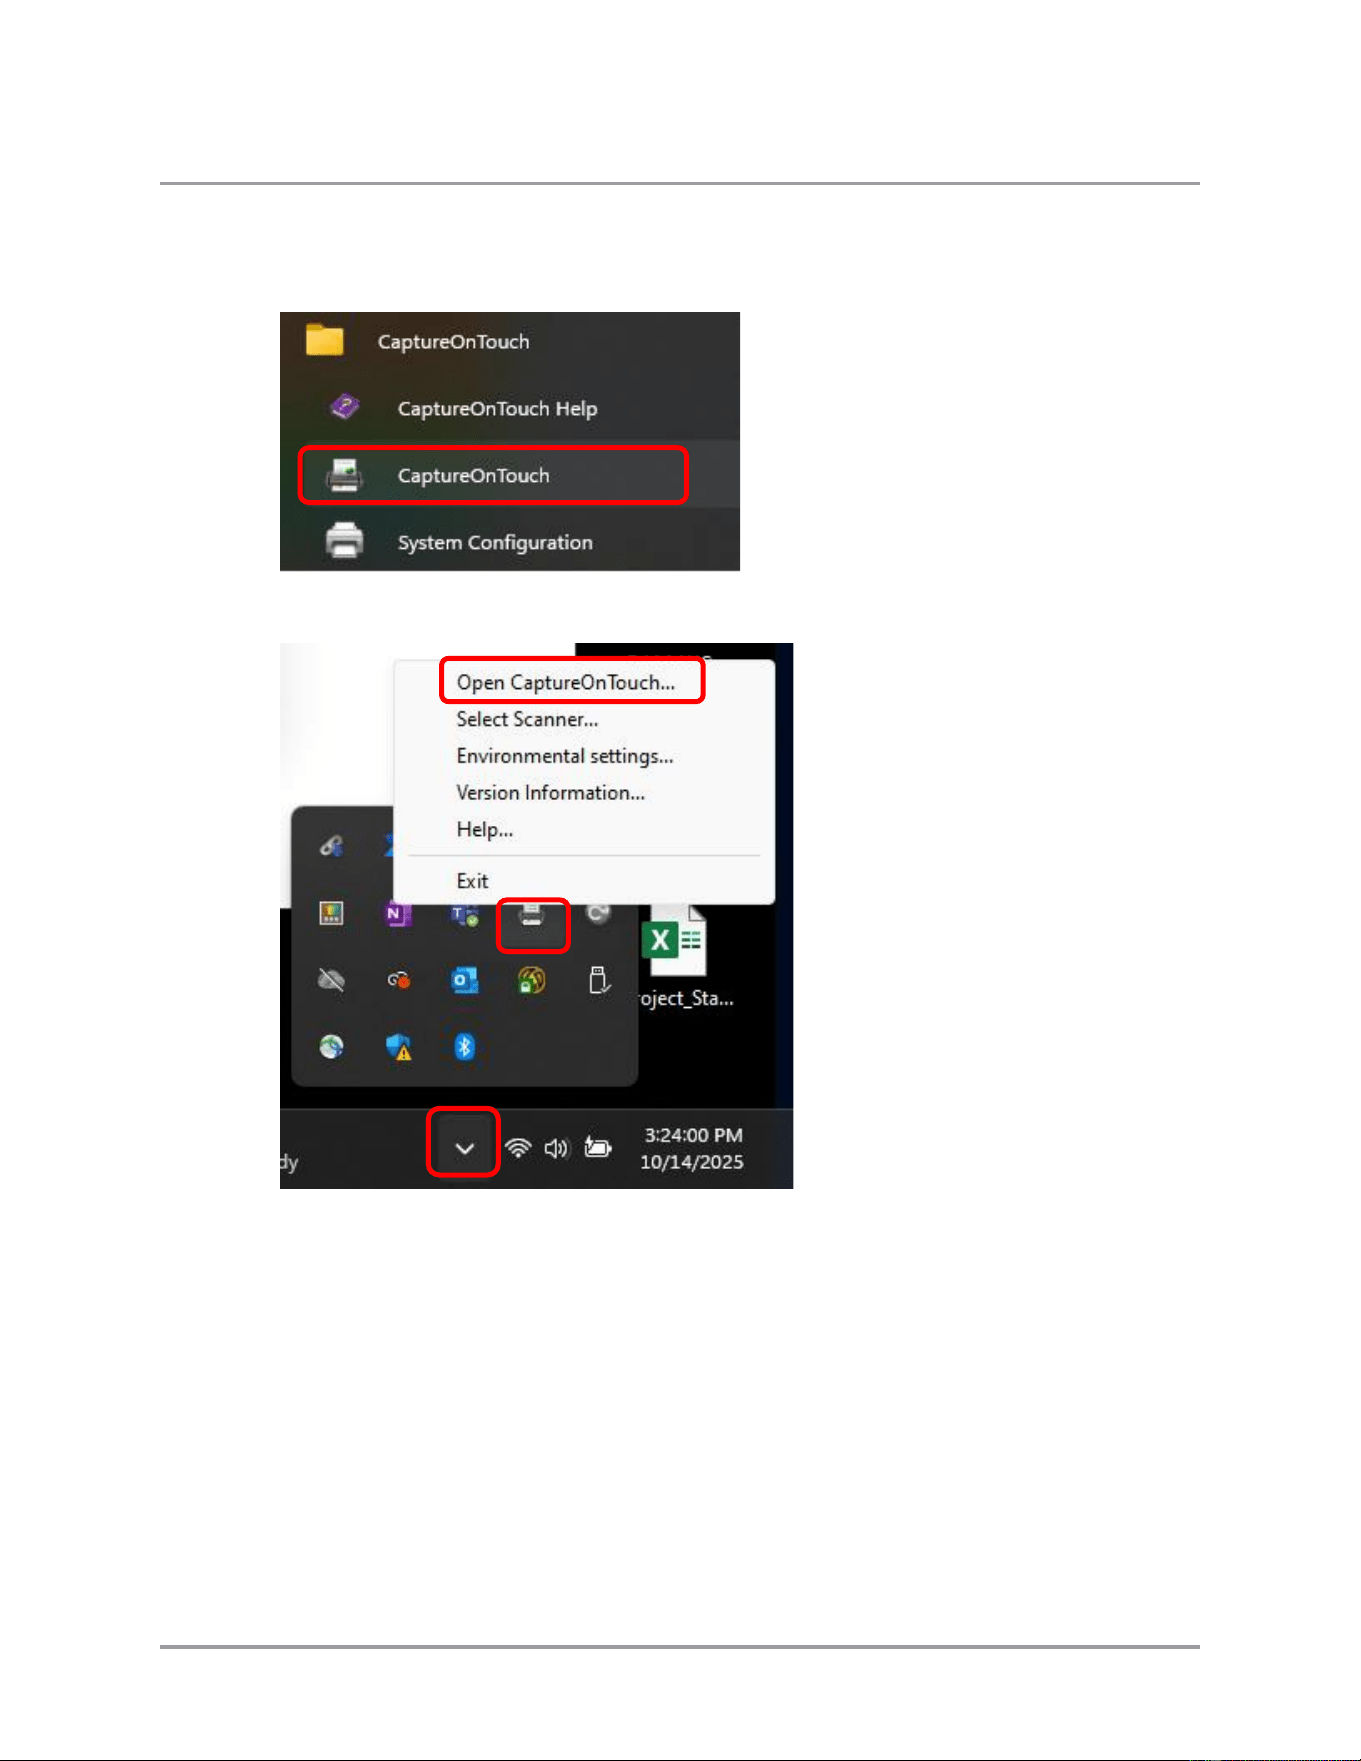
1. Open CaptureOnTouch.
Windows Start menu
Windows hidden icons

CaptureOnTouch Scan to QuickBooks Online Plugin Pro User’s Guide 23
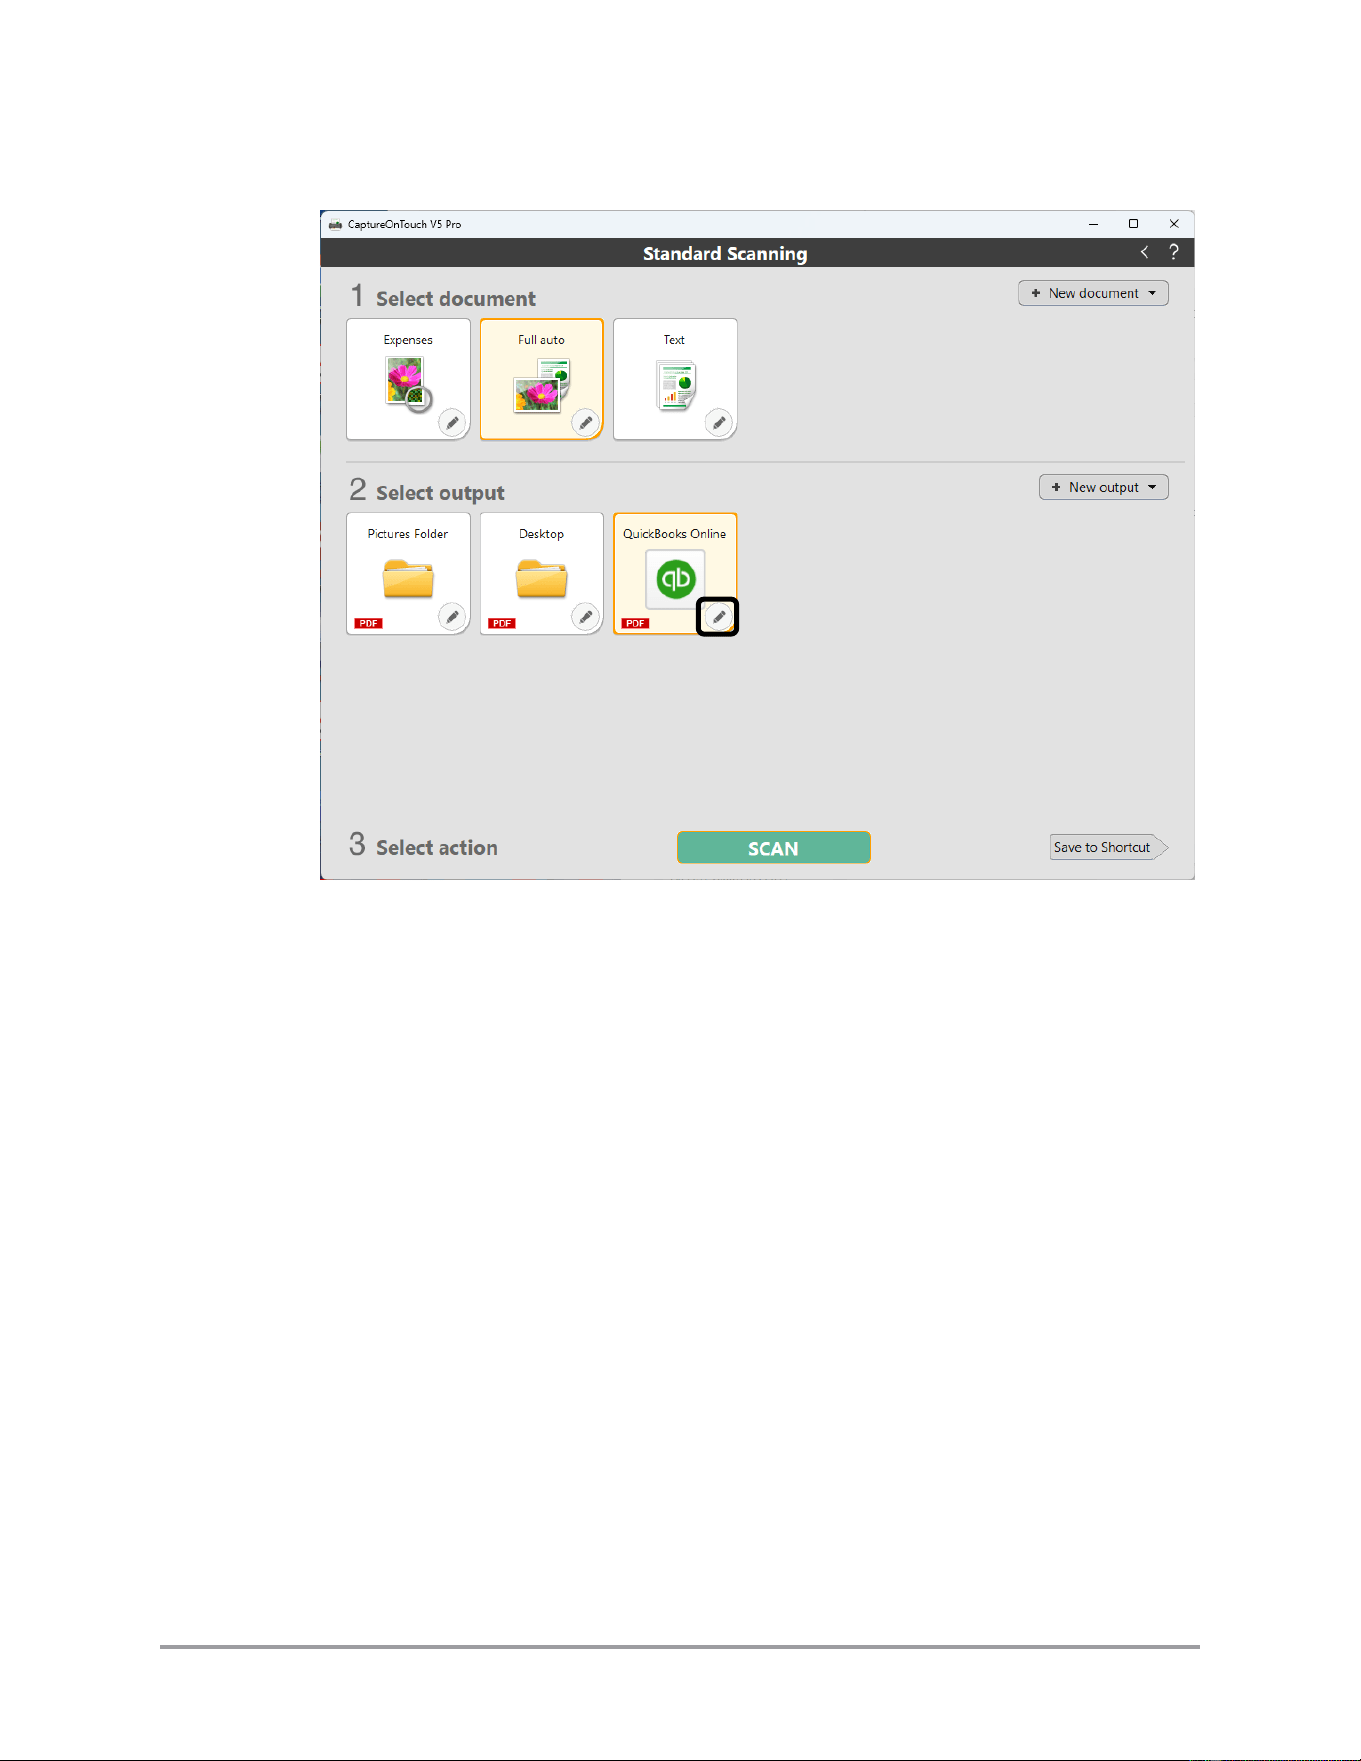
2. Click on the pencil icon for the QuickBooks function.

24 CaptureOnTouch Scan to QuickBooks Online Plugin Pro User’s Guide
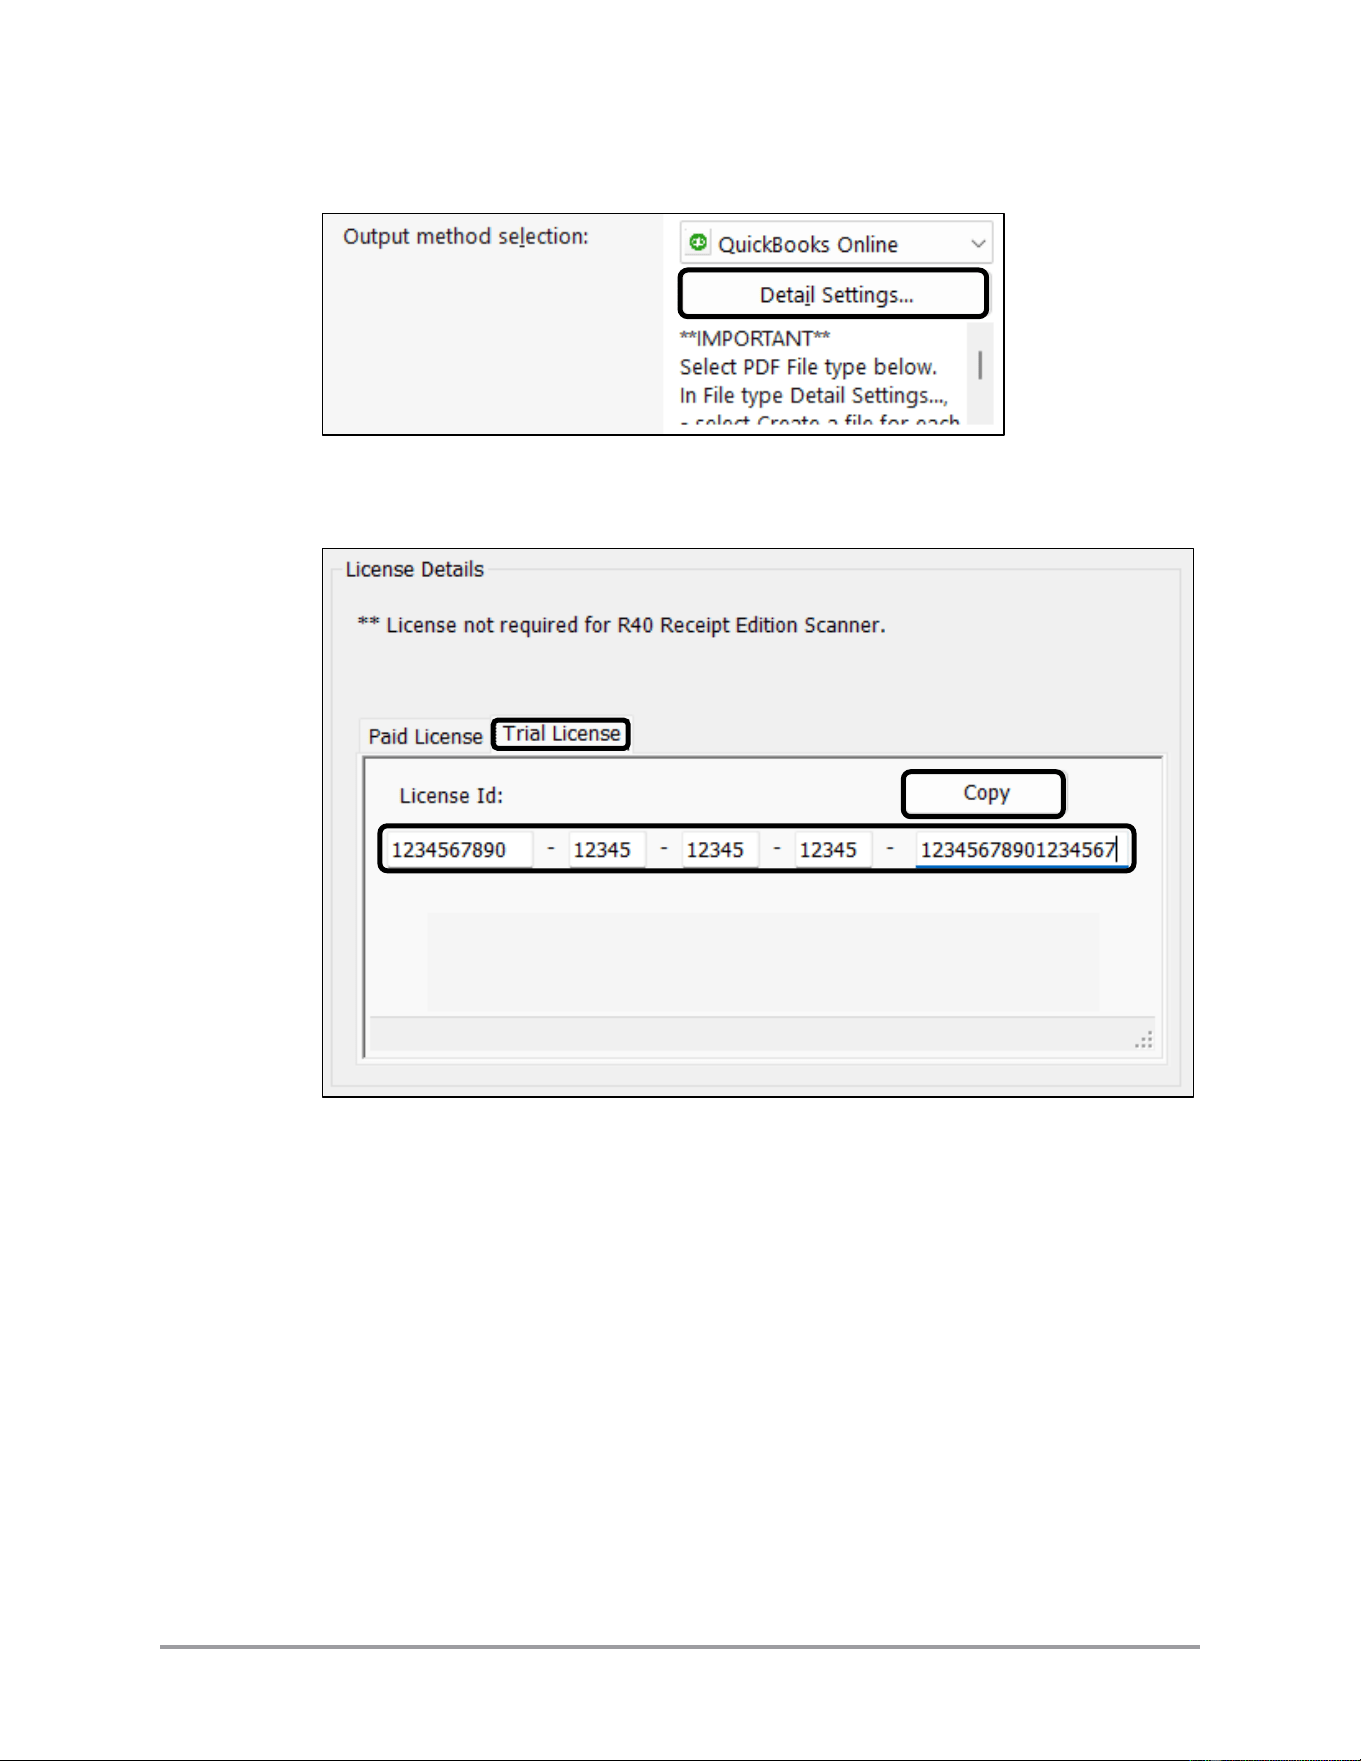
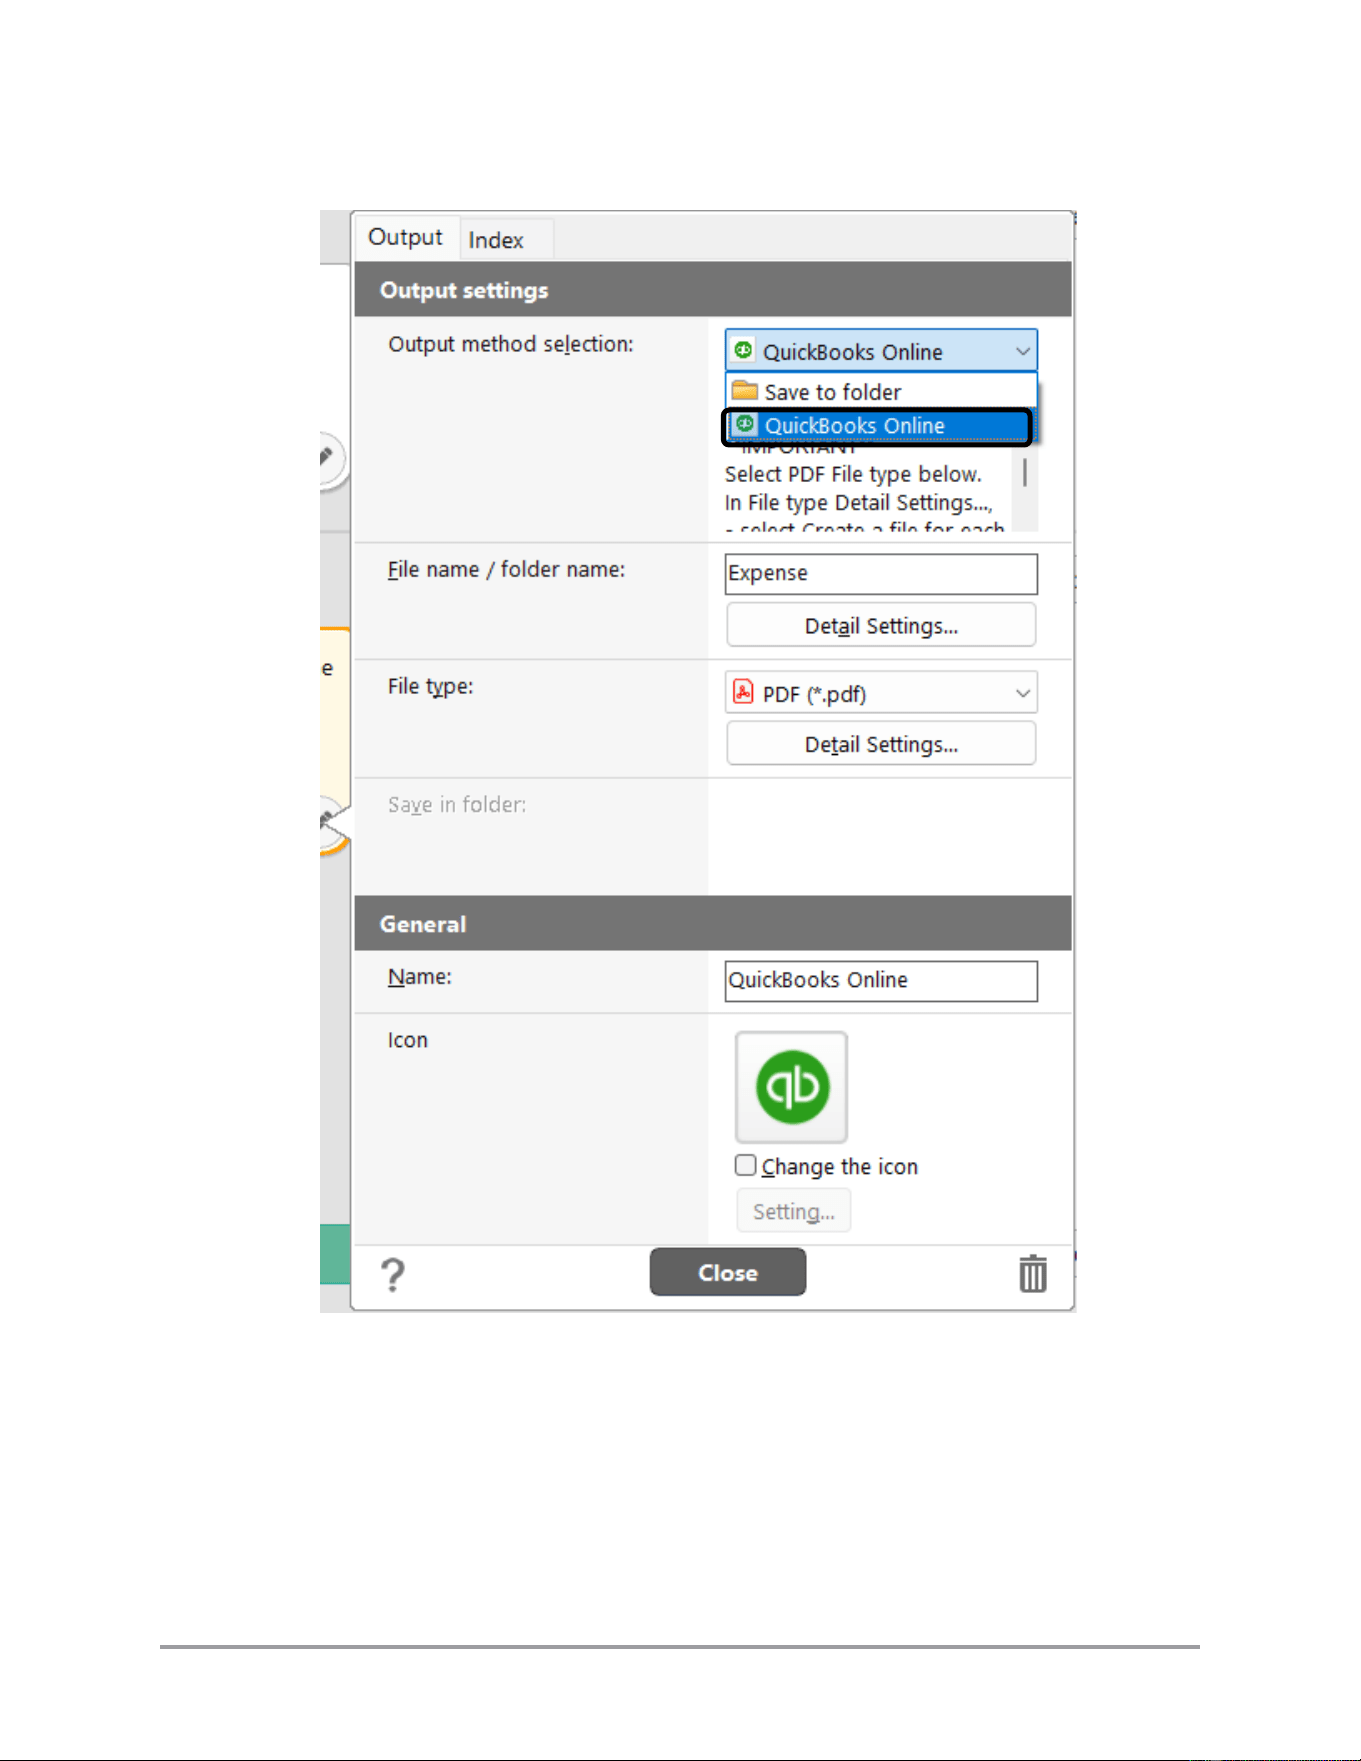
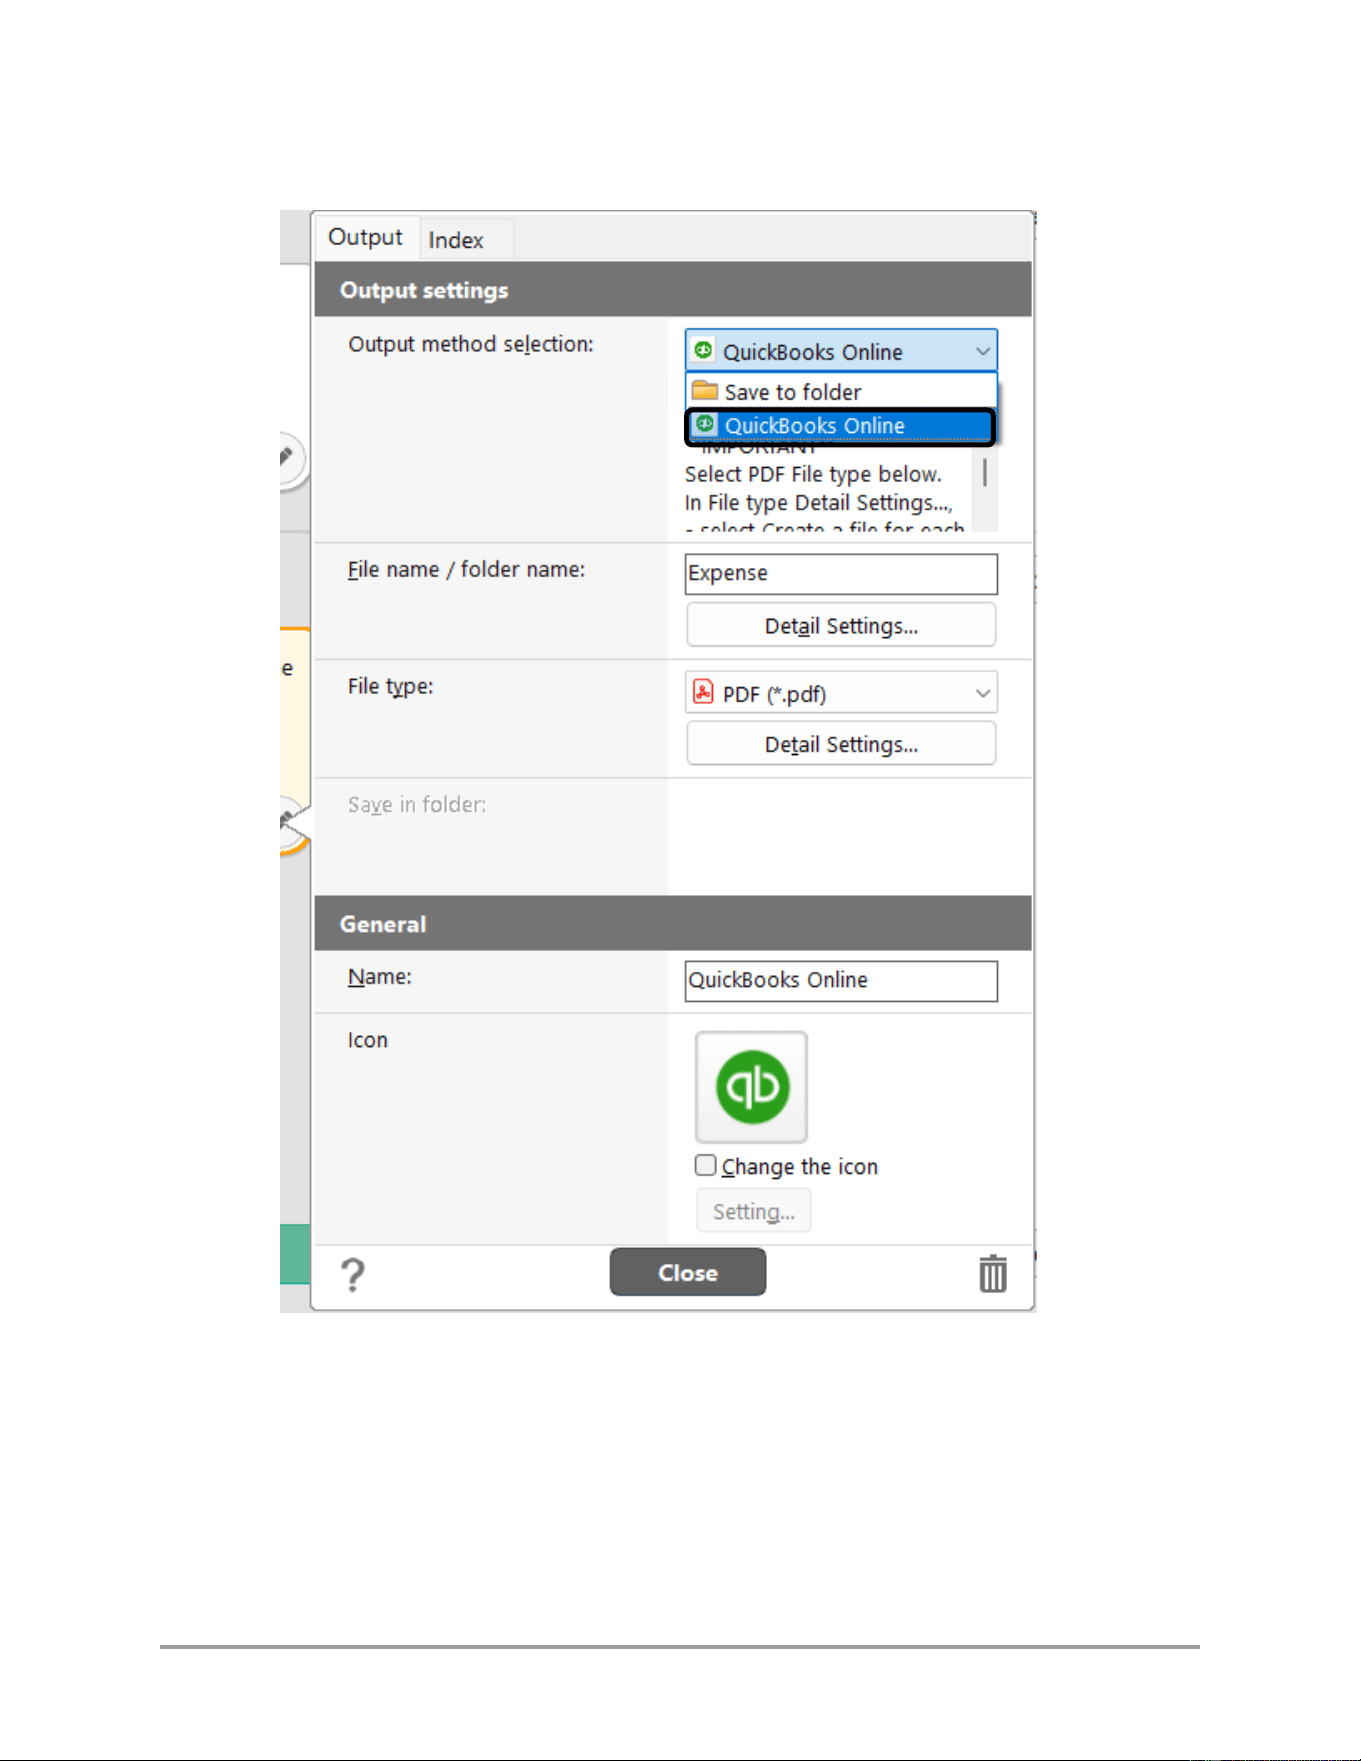
3. Select [QuickBooks Online] from the [Output Method Selection] pull-down list.
CaptureOnTouch Scan to QuickBooks Online Plugin Pro User’s Guide 25
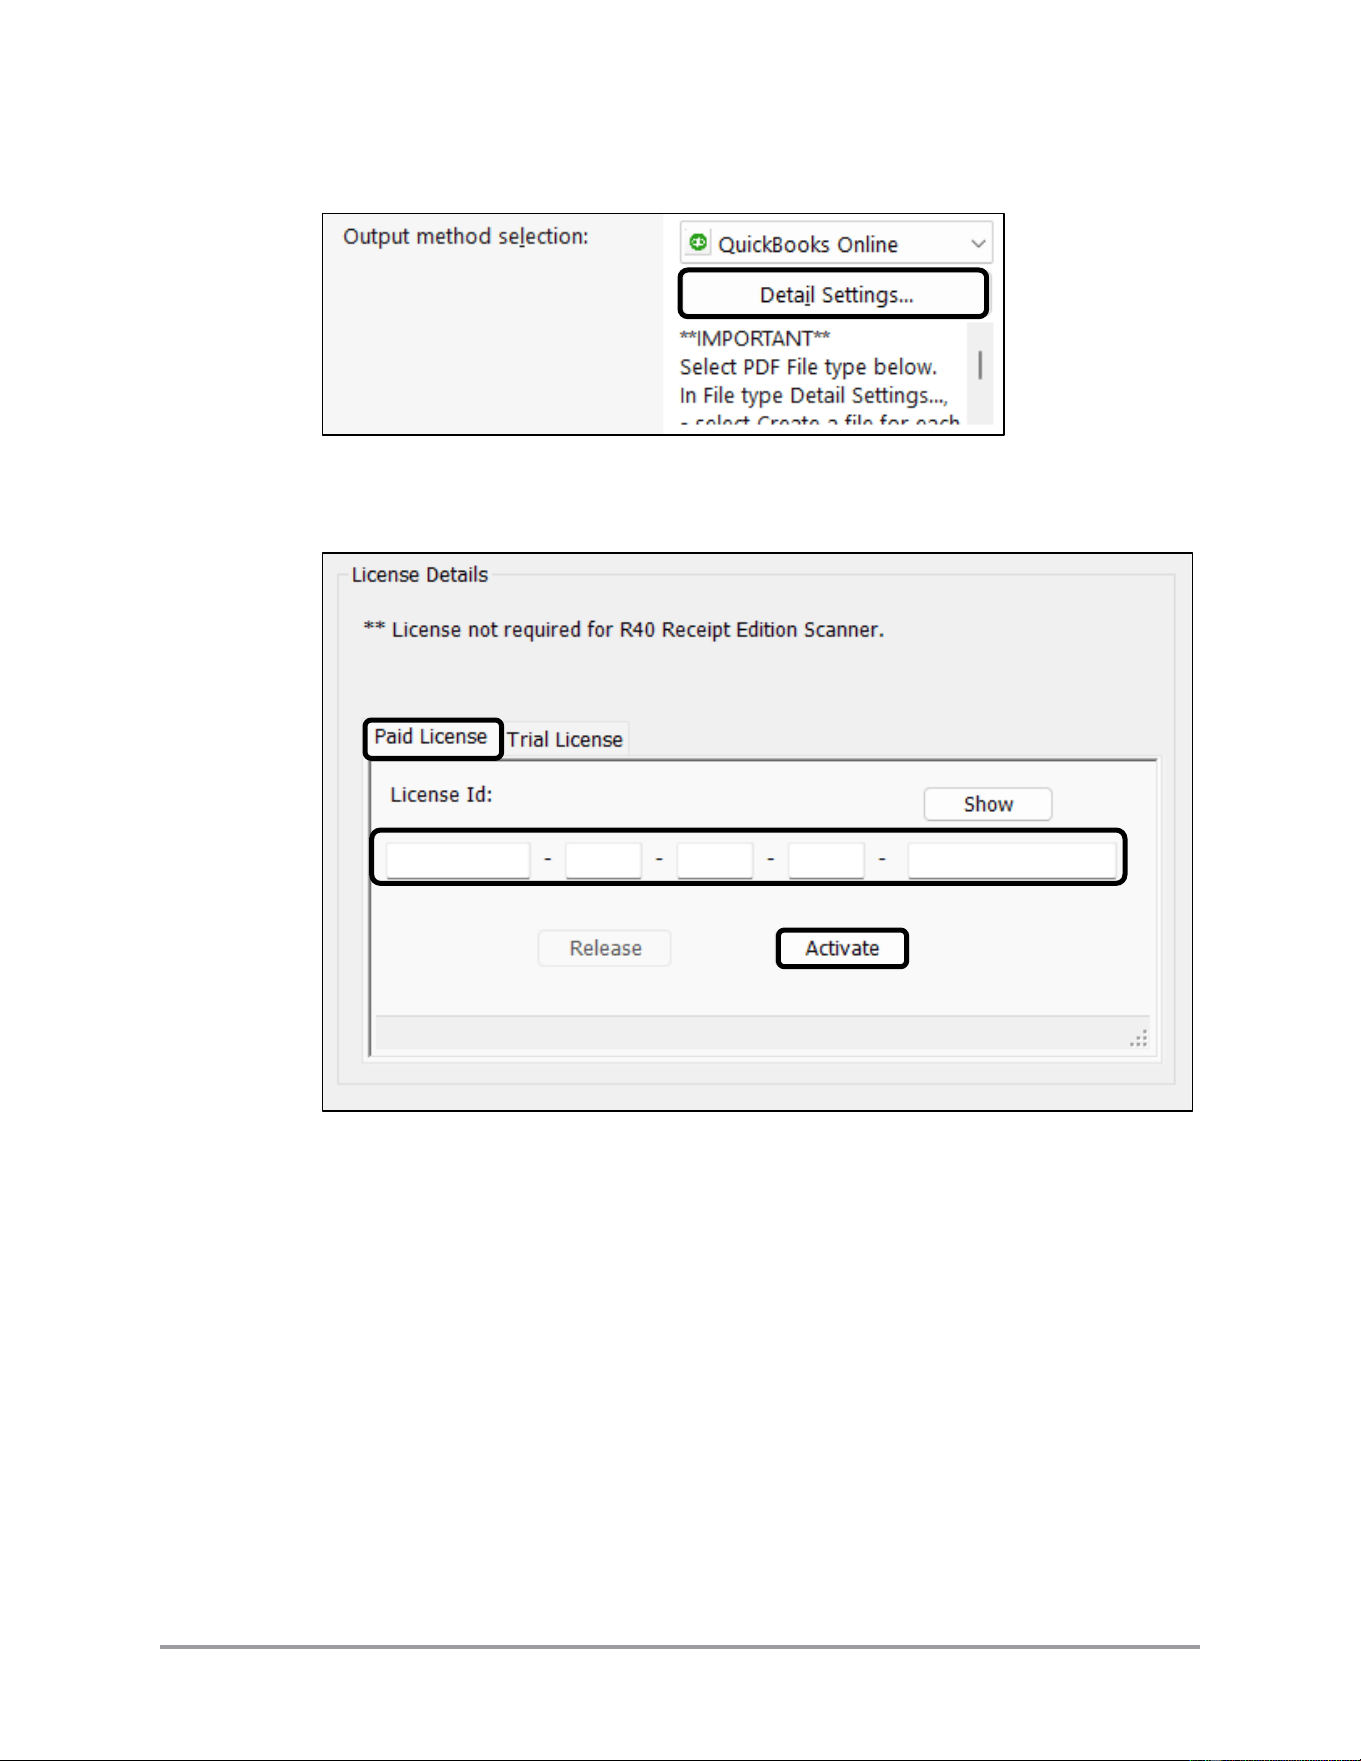
4. Click [Detail Settings…].
5. In the “License Details’ section, click on [Trial License] tab ➞ click [Copy] to
copy the license number to the clipboard.
The License Details section also displays the number of days left on the trial
license.
26 CaptureOnTouch Scan to QuickBooks Online Plugin Pro User’s Guide
2.2.3 Registering a License
IMPORTANT
The imageFORMULA R40 Receipt Edition does not need to separately get/install a
license. Skip this section for this model.
Note: CaptureOnTouch and the plugin must be installed and running to update the
license information.
Note: If you do not have a Canon account, you will need to supply contact
information and a payment type (credit/debit card, PayPal, etc.).
Note: The URL and the payment screens may vary from the procedure below. Use the
latest online help resources to assist you in getting a license, or call the toll-free help
number: 1-800-385-2155.
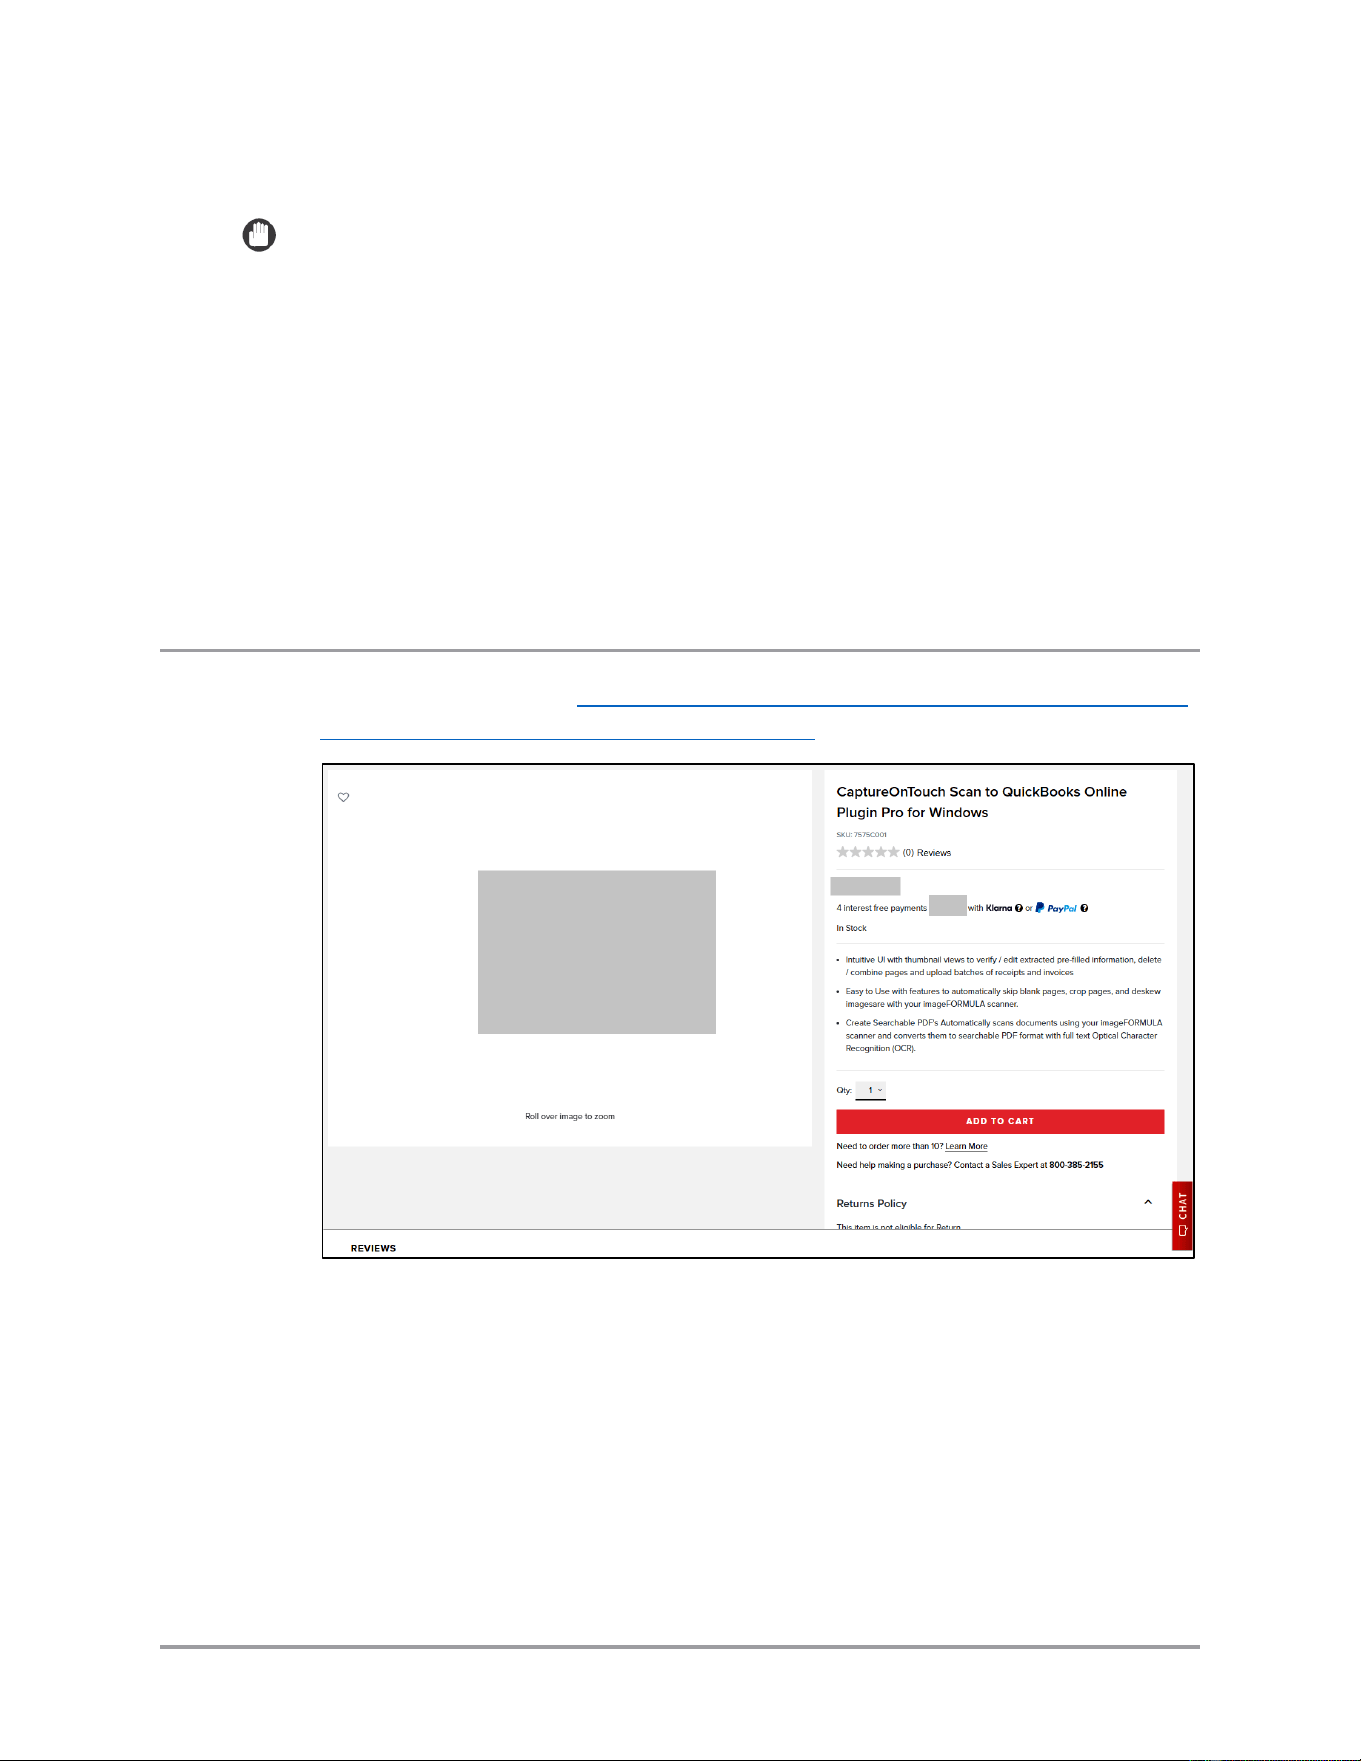
1. In a web browser, go to https://www.usa.canon.com/shop/p/captureontouch-scan-
to-quickbooks-online-plugin-pro-for-windows
CaptureOnTouch Scan to QuickBooks Online Plugin Pro User’s Guide 27
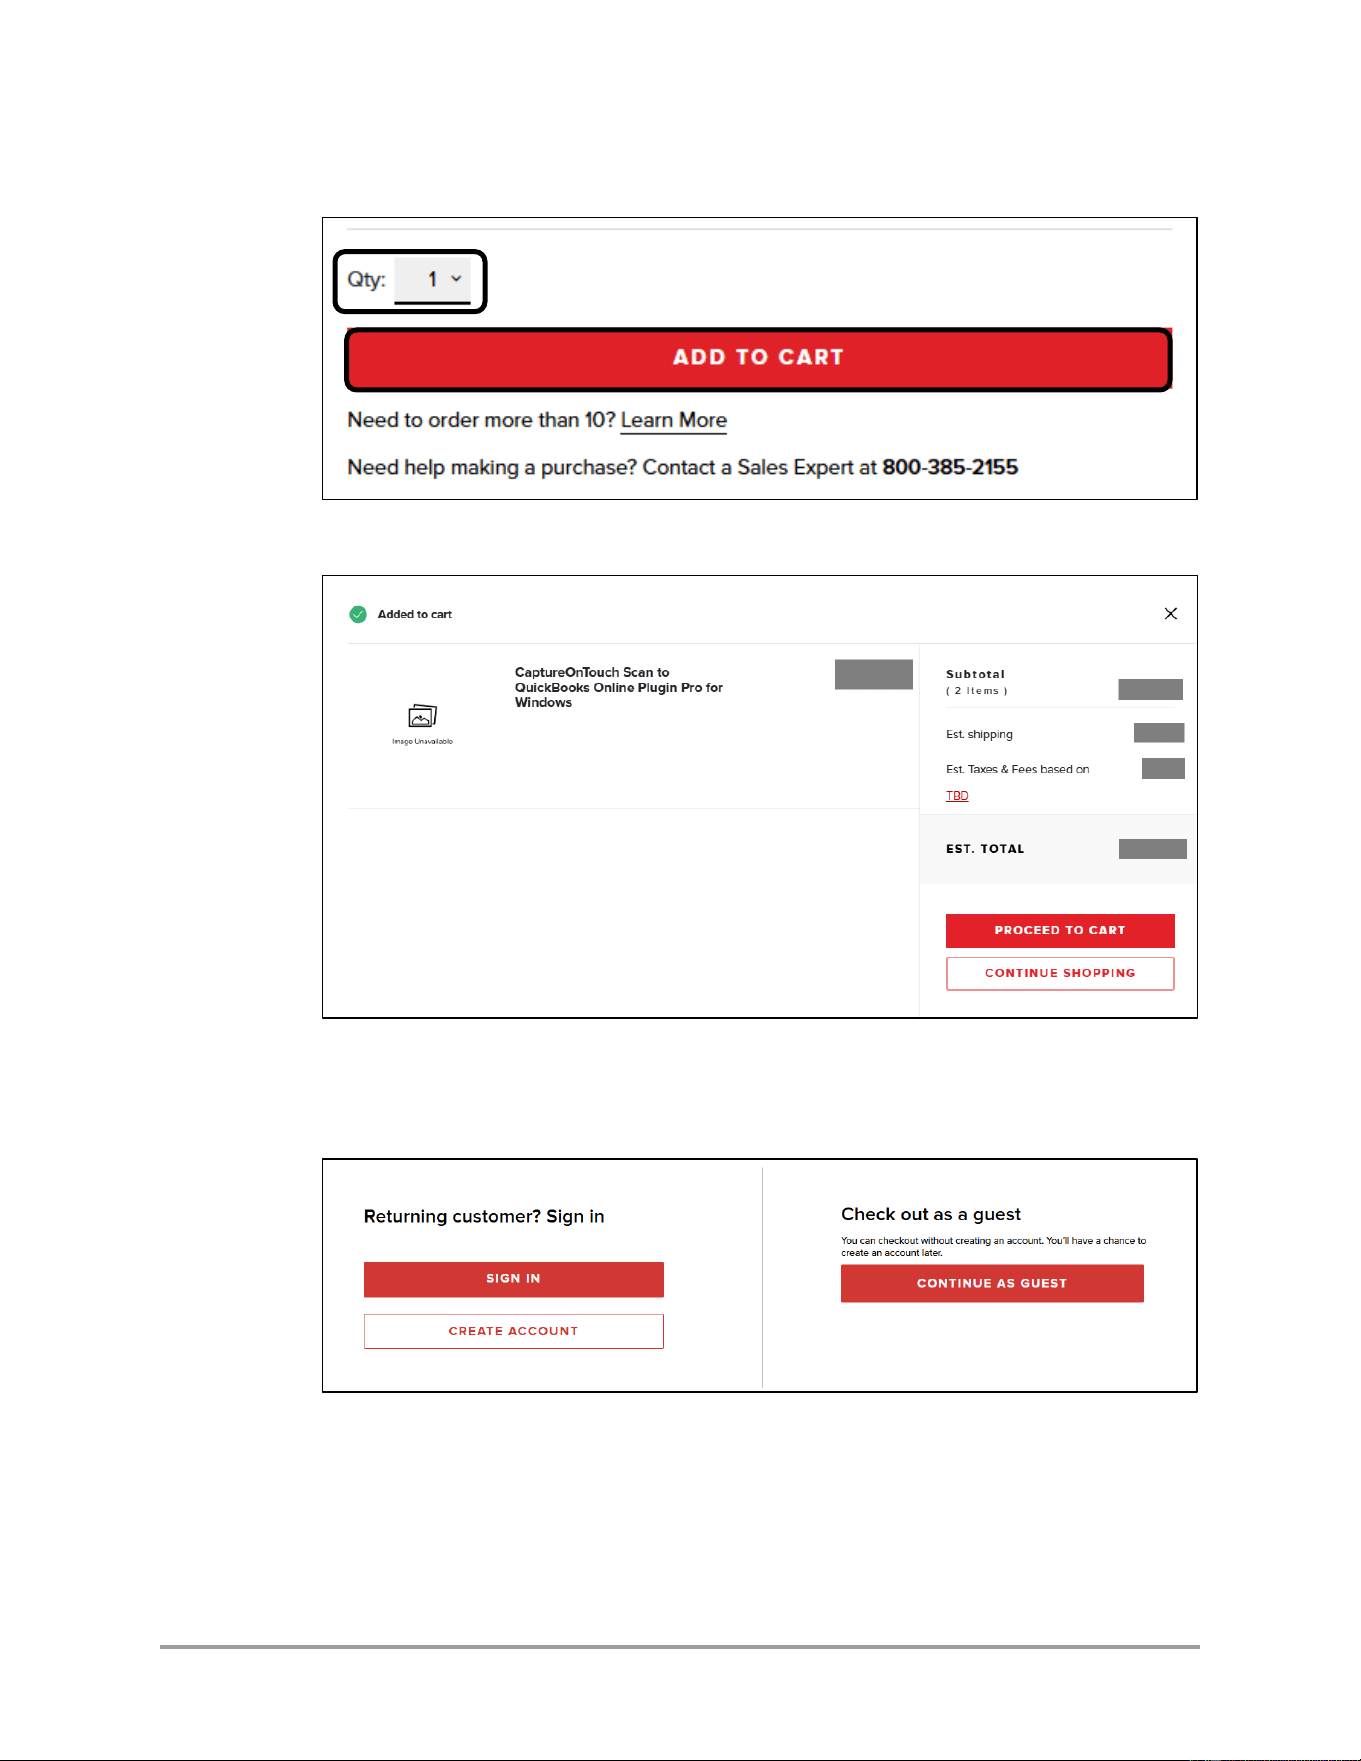
2. Select the number of licenses ➞ click [Add to Cart].
3. Continue shopping or start the checkout process.
Note: The checkout process varies if you have a Canon account or you want to
check out as a guest without creating an account. Follow the online instructions
for either case.
28 CaptureOnTouch Scan to QuickBooks Online Plugin Pro User’s Guide
4. When the checkout completes and the payment finishes processing, Canon sends
two emails. One email confirms the purchase and one email contains the license
information.
IMPORTANT
Archive the license email or write down the license information to prevent it
from being lost. You may need the license information in the future.
5. Open CaptureOnTouch.
Windows Start menu
Windows hidden icons
CaptureOnTouch Scan to QuickBooks Online Plugin Pro User’s Guide 29
6. Click on the pencil icon for the QuickBooks function.
30 CaptureOnTouch Scan to QuickBooks Online Plugin Pro User’s Guide
7. Select [QuickBooks Online] from the [Output Method Selection] pull-down list.
CaptureOnTouch Scan to QuickBooks Online Plugin Pro User’s Guide 31
8. Click [Detail Settings…].
9. In the “License Details’ section, click on [Paid License] tab ➞ enter the license
ID from the email (copy/paste is available) ➞ click [Activate].
By default, the license number is masked. Click on [Show] to unmask the number
as you enter it. Click on [Hide] to re-mask the number as you enter it.
10. The license activates. You can now use the plugin with no license expiration.

32 CaptureOnTouch Scan to QuickBooks Online Plugin Pro User’s Guide
2.3 Releasing a License
This section describes how to release the CaptureOnTouch Scan to QuickBooks Online
Plugin Pro license.
A CaptureOnTouch Scan to QuickBooks Online Plugin Pro license is specific to the
computer on which it is installed. Once registered, the license cannot be used to activate
the plugin on another computer. Other plugin installations are limited by the trial license
period.
If you need to transfer the license to a different machine (i.e. you upgraded your
computer and need to re-install all software), you must first release the license before it
can be transferred.
IMPORTANT
It is highly recommended to release the license BEFORE the plugin is removed from
the old computer. The license is automatically released when you uninstall the plugin.
However, if there are problems with the uninstallation, the license may remain
registered to the old computer and you will need to contact Canon for assistance with
transferring the license.
CaptureOnTouch Scan to QuickBooks Online Plugin Pro User’s Guide 33
1. Open CaptureOnTouch.
Windows Start menu
Windows hidden icons

34 CaptureOnTouch Scan to QuickBooks Online Plugin Pro User’s Guide
2. Click on the pencil icon for the QuickBooks function.
CaptureOnTouch Scan to QuickBooks Online Plugin Pro User’s Guide 35
3. Select [QuickBooks Online] from the [Output Method Selection] pull-down list.

36 CaptureOnTouch Scan to QuickBooks Online Plugin Pro User’s Guide
4. Click [Detail Settings…].
5. In the “License Details’ section, click on [Paid License] tab ➞ enter the license ID
from the email ➞ click [Release].
By default, the license number is masked. Click on [Show] to unmask the number as
you enter it. Click on [Hide] to re-mask the number as you enter it.
6. The license is released. You can now install and register the plugin on another device
using the same license information.
CaptureOnTouch Scan to QuickBooks Online Plugin Pro User’s Guide 37
2.4 Uninstalling the Plugin
This section describes how to uninstall the CaptureOnTouch Scan to QuickBooks Online
Plugin Pro.
Note: The procedure below may vary, based on updates to Windows. See the Windows
documentation for updated instructions on uninstalling software.
Note: Uninstallation removes only the CaptureOnTouch Scan to QuickBooks Online
Plugin. CaptureOnTouch remains installed on your computer.
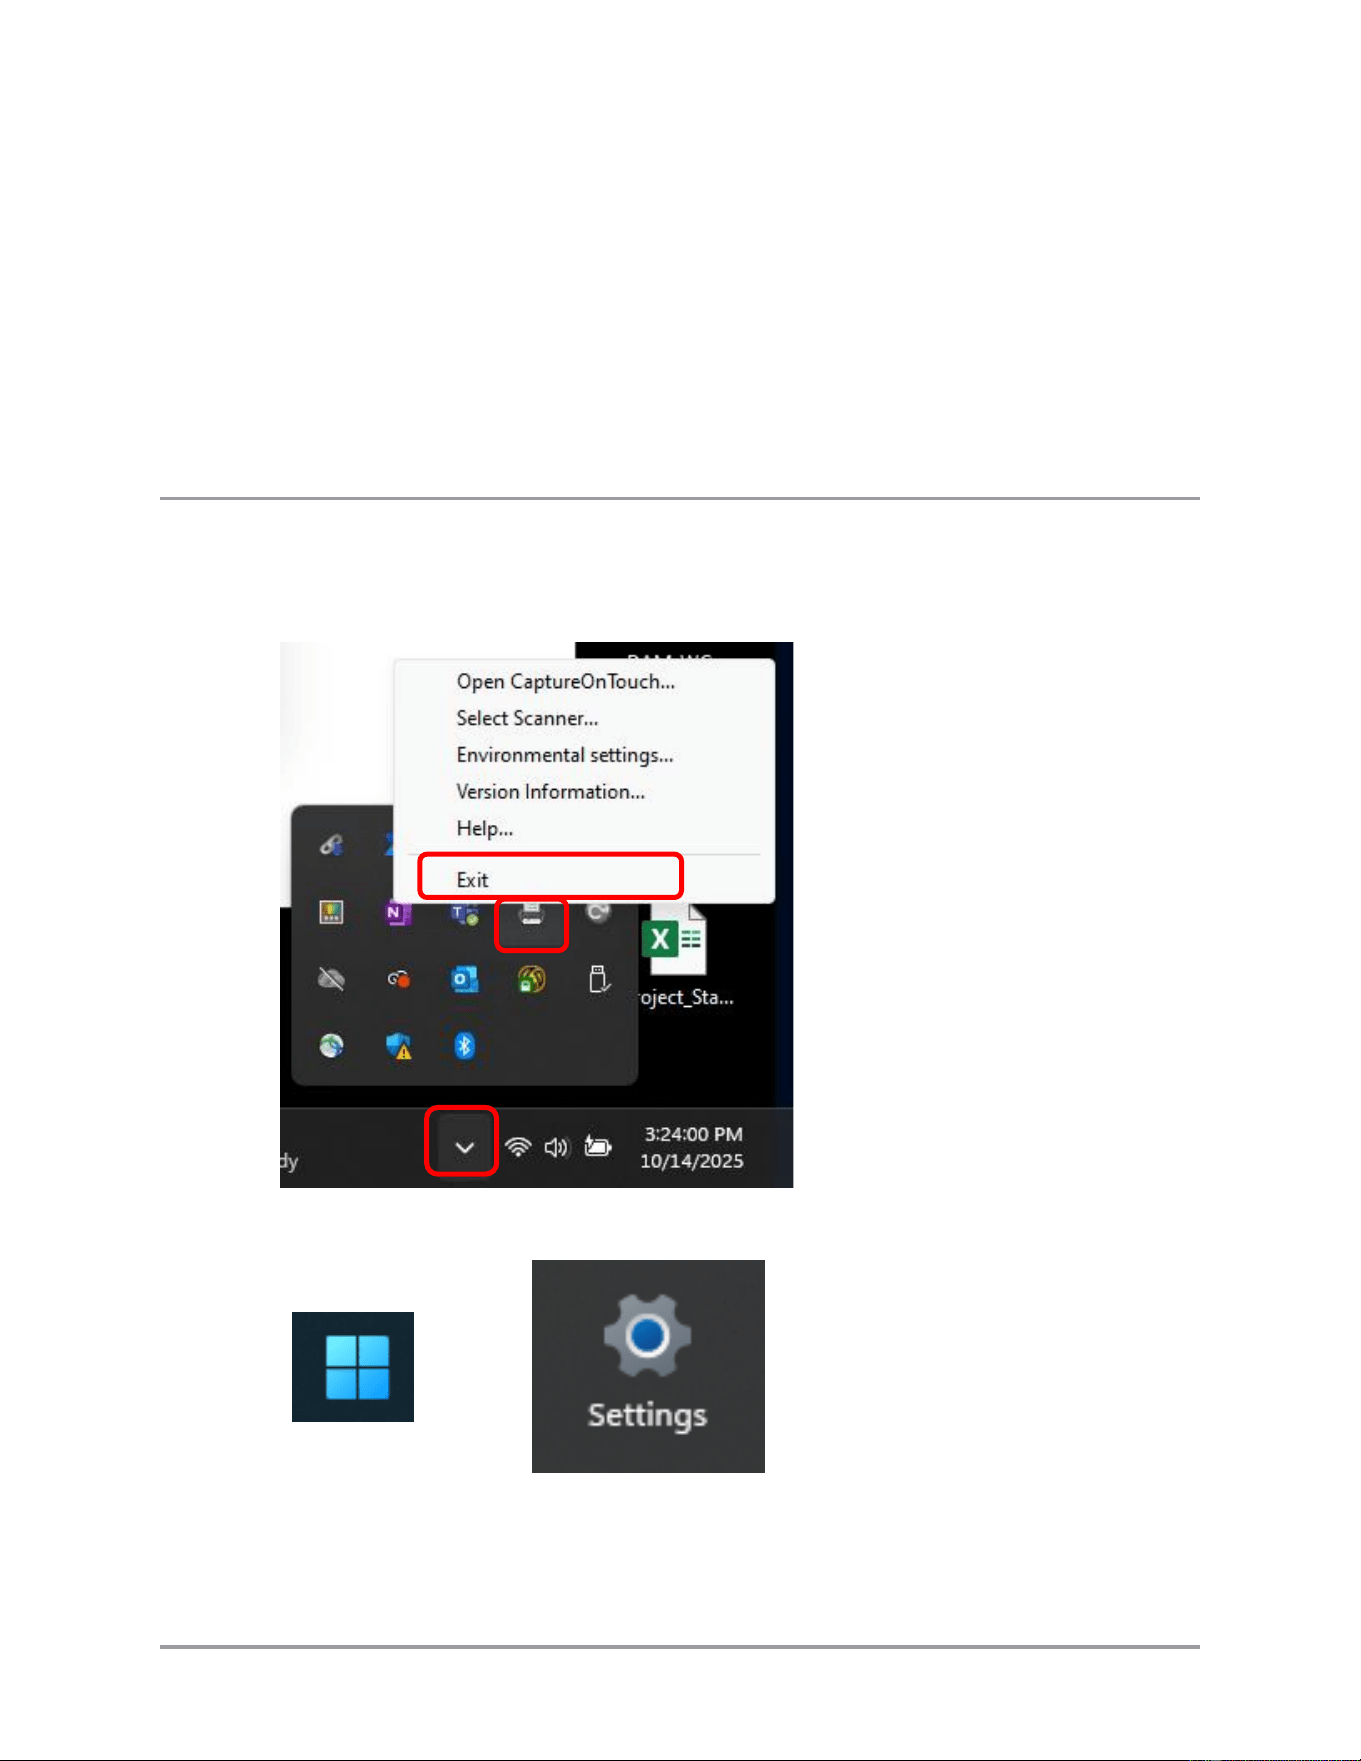
1. If CaptureOnTouch is running, exit the program before uninstalling the plugin.
Access CaptureOnTouch through the windows hidden icons menu and exit the
program.
2. From the Windows Start Menu, select [Settings]
➞
38 CaptureOnTouch Scan to QuickBooks Online Plugin Pro User’s Guide
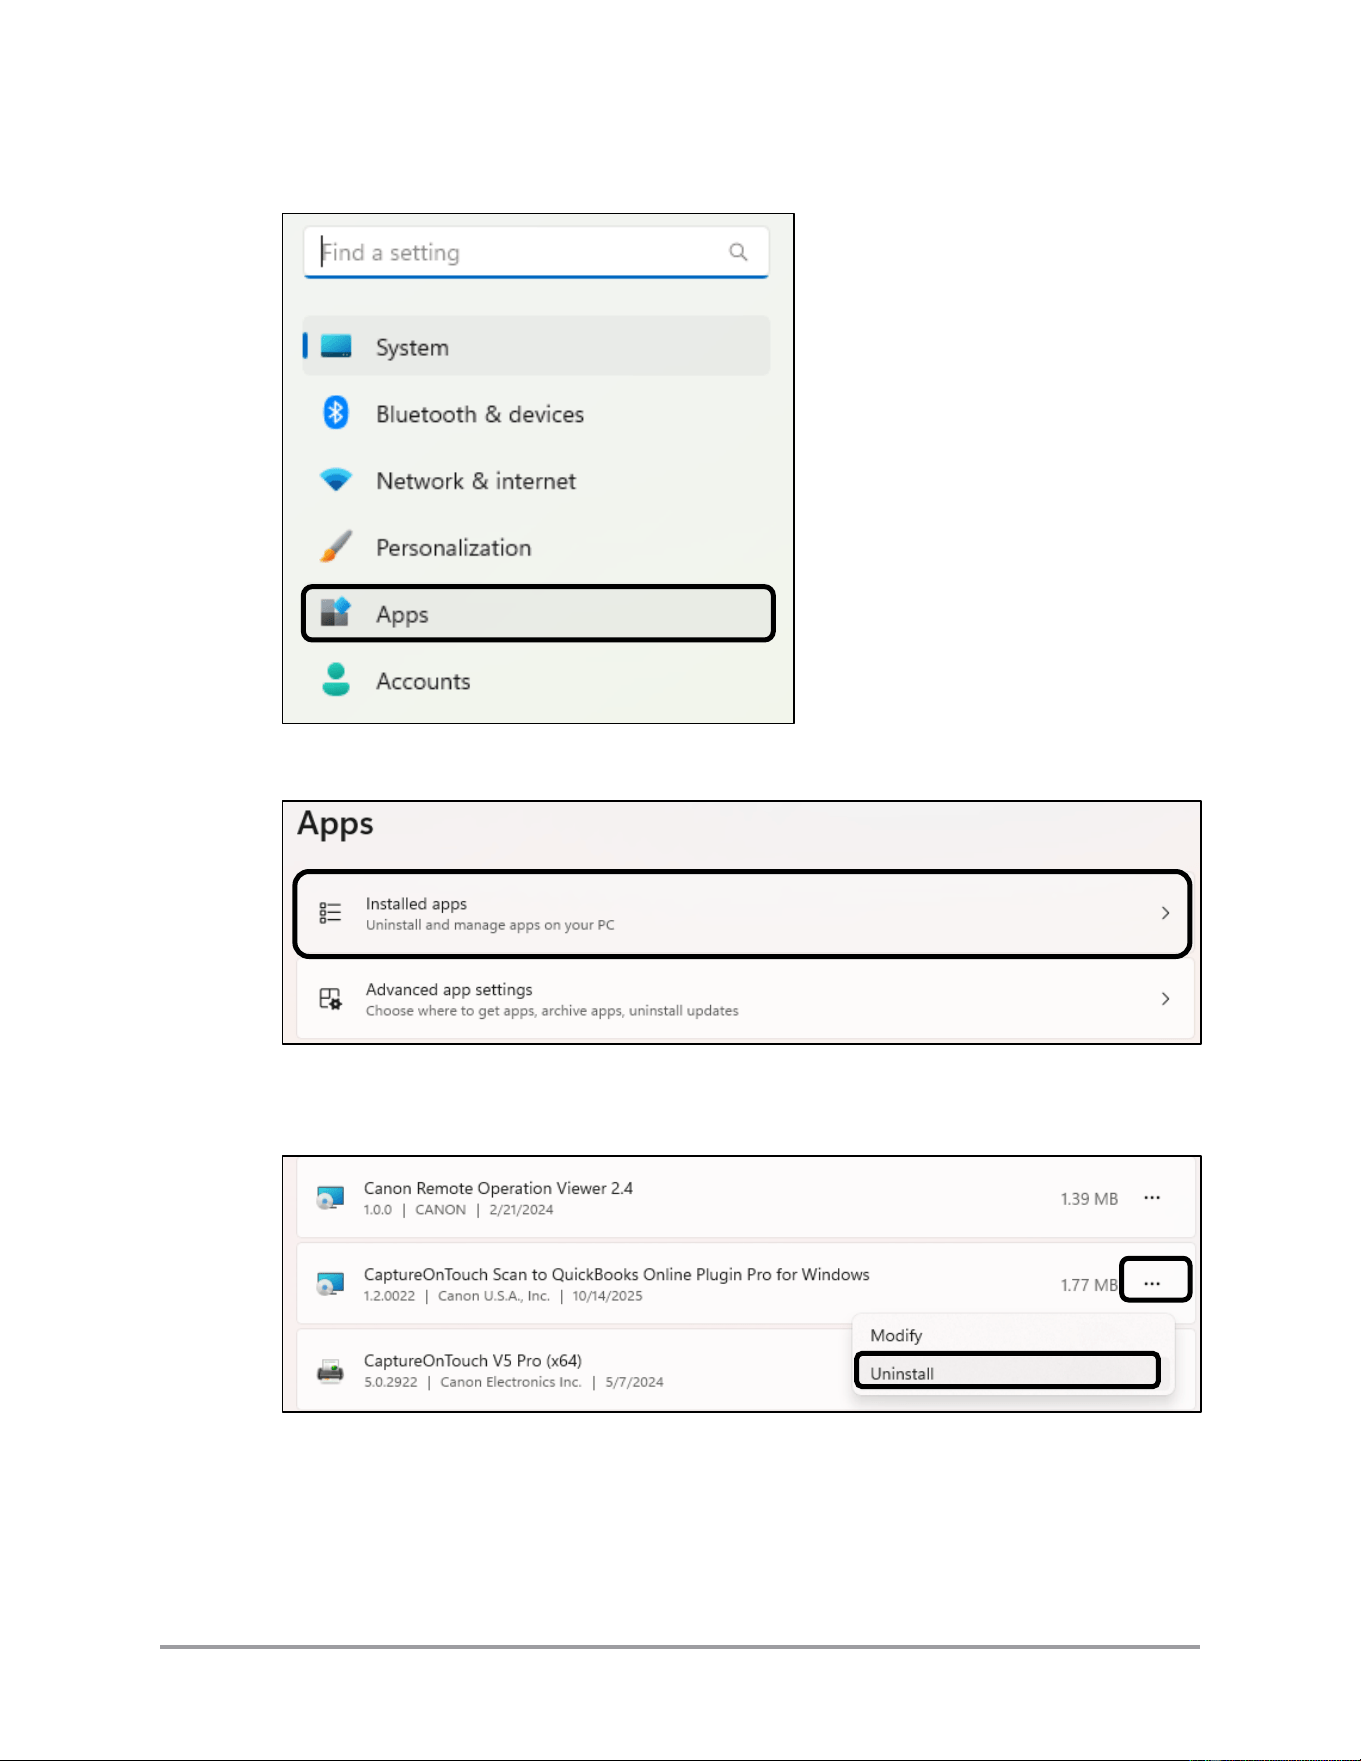
3. Select [Apps].
4. Select [Installed apps].
5. Click on the ellipsis (…) next to the CaptureOnTouch Plugin Pro entry ➞ select
[Uninstall].
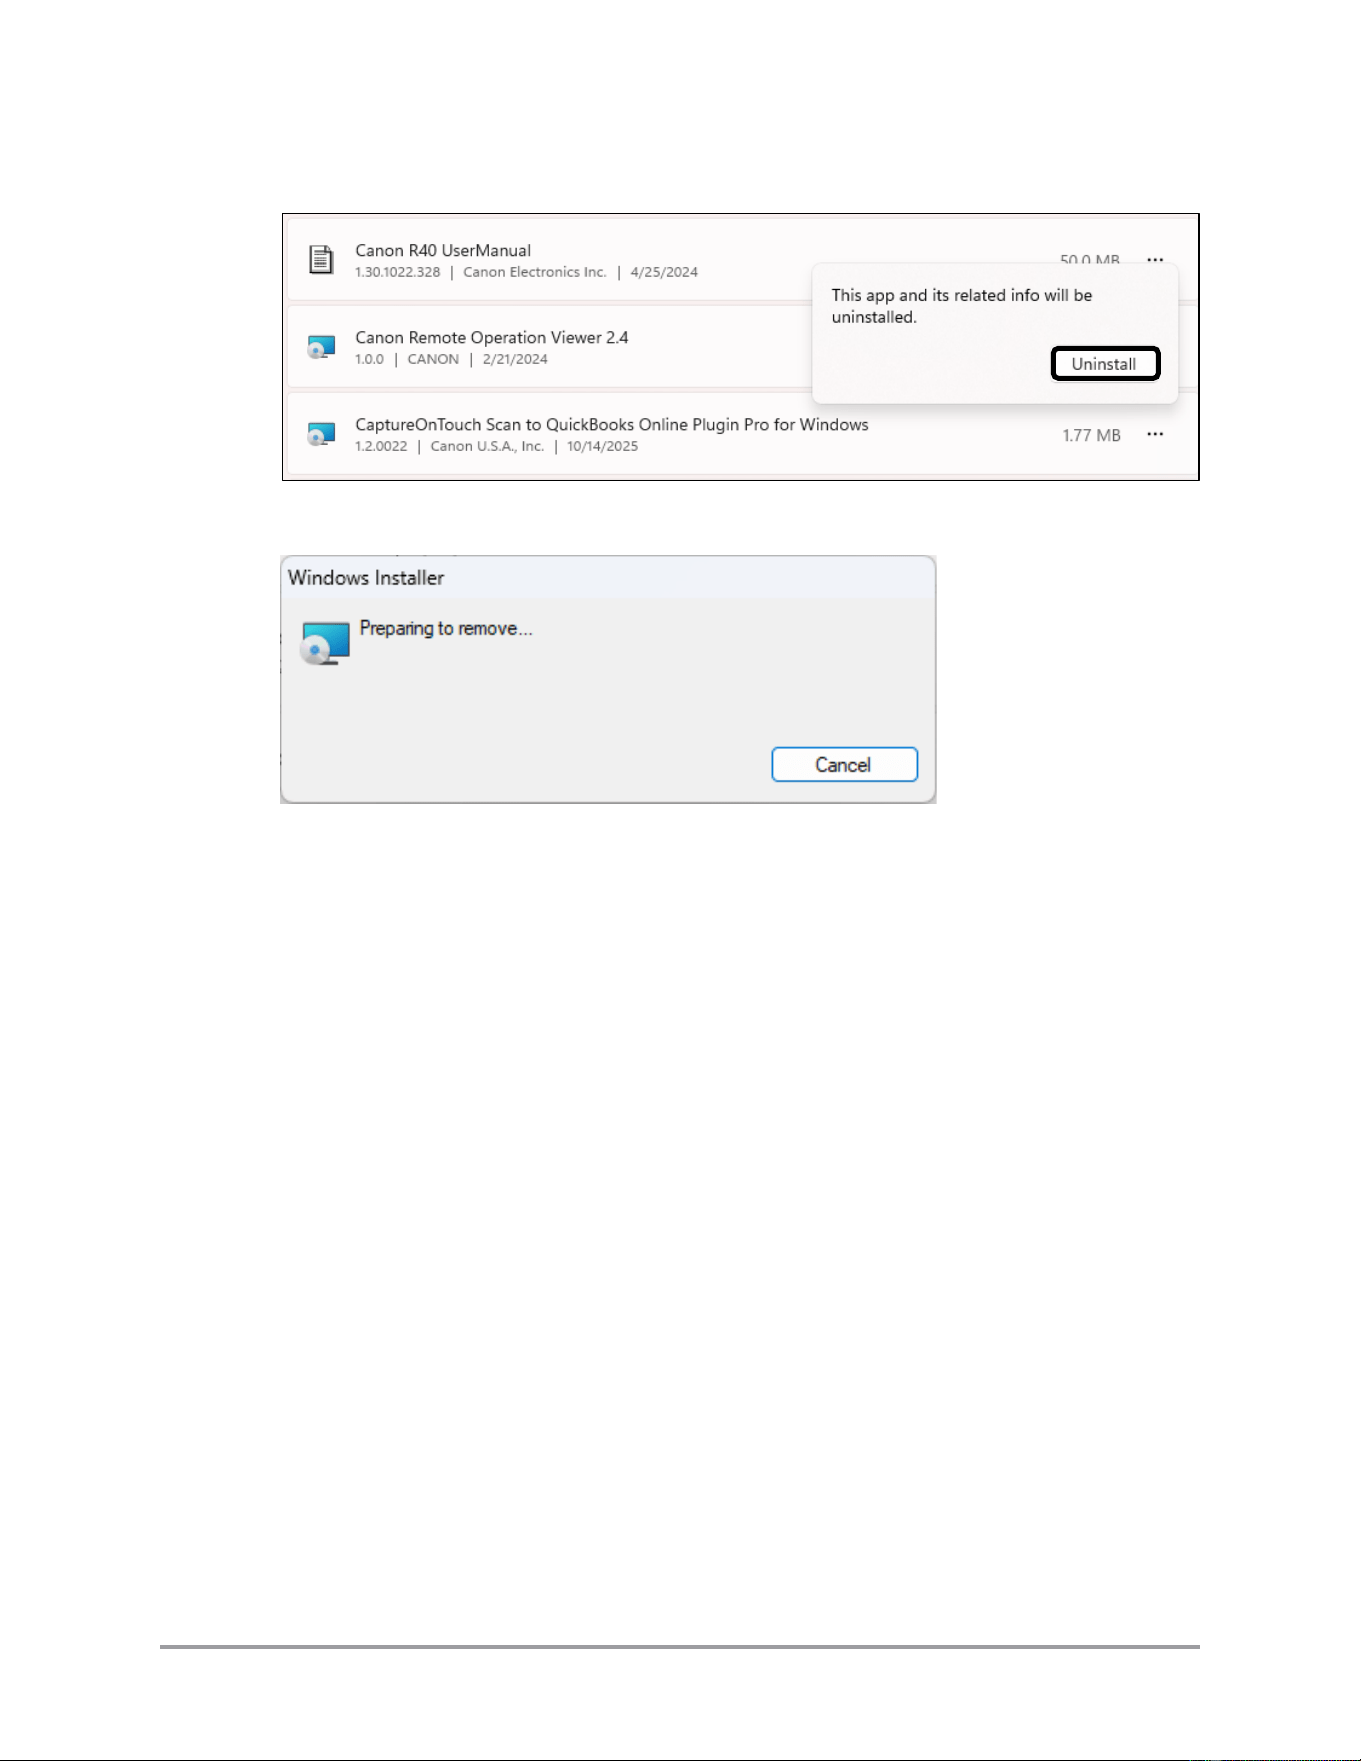
CaptureOnTouch Scan to QuickBooks Online Plugin Pro User’s Guide 39
6. Click [Uninstall].
7. Plugin removal starts.
Click [Cancel] to stop the uninstallation.
8. The Plugin is removed. You can re-start the CaptureOnTouch application.

40 CaptureOnTouch Scan to QuickBooks Online Plugin Pro User’s Guide
This page is intentionally left blank.

CaptureOnTouch Scan to QuickBooks Online Plugin Pro User’s Guide 41
Chapter 3 Using CaptureOnTouch for
QuickBooks Online Plugin Pro
This chapter describes how to use the CaptureOnTouch Scan to QuickBooks Online Plugin
Pro with a supported imageFORMULA scanner
IMPORTANT
You must have a QuickBooks Online account to use the CaptureOnTouch Scan to
QuickBooks Online Plugin Pro.
Note: The appearance of QuickBooks Online may vary from what is shown in this manual,
depending on updates made by the site developer. Refer to the latest QuickBooks Online
documentation for the latest information.
3.1 CaptureOnTouch Settings for Scanning to
QuickBooks Online
This section describes how CaptureOnTouch settings should be configured to work with
the plugin and upload the scan to QuickBooks Online.
Many of the scan output file format settings can be changed just before submitting the
scan job to the plugin for uploading to QuickBooks Online. However, it may help make
scanning more efficient to set specific options for all QuickBooks Online scans.
Use the procedure below to pre-set options for the Send to QuickBooks function.
42 CaptureOnTouch Scan to QuickBooks Online Plugin Pro User’s Guide
1. Start CaptureOnTouch.
Windows Start menu
Windows hidden icons
CaptureOnTouch Scan to QuickBooks Online Plugin Pro User’s Guide 43
2. Click on the pencil icon for the QuickBooks function.

44 CaptureOnTouch Scan to QuickBooks Online Plugin Pro User’s Guide
3. Select [QuickBooks Online] from the [Output Method Selection] pull-down list.
CaptureOnTouch Scan to QuickBooks Online Plugin Pro User’s Guide 45
4. If desired, click on [Detail Settings] in the “Output method selection” section to
change some Operating System specific settings.
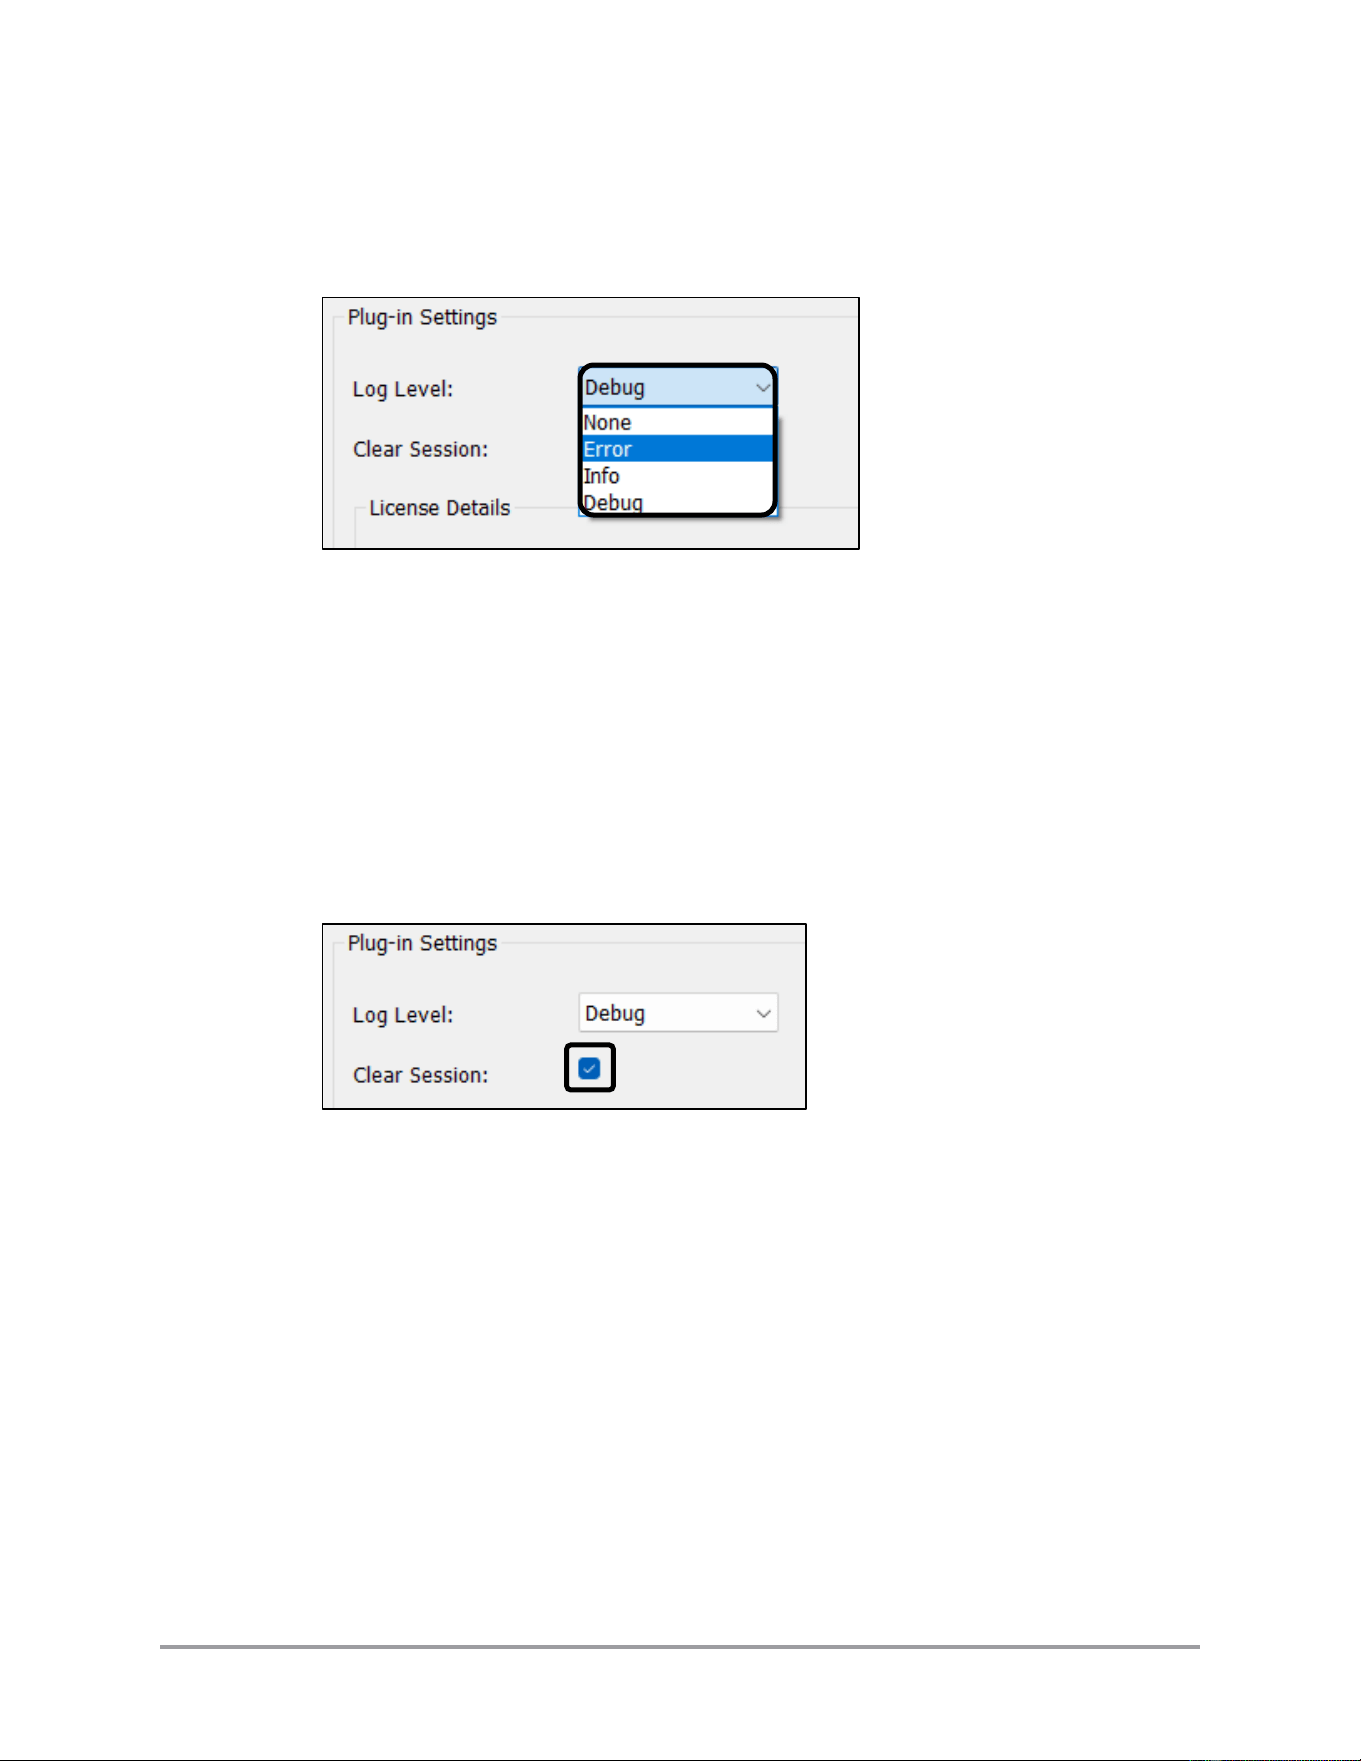
4.1 Set the log level using the [Log level] pull-down list.
None:
No logging
Error:
Errors only (default)
Info:
Information messages and errors
Debug
Debugging, information messages, and errors.
4.2 Clear the current web session’s cache before the next web session begins by
selecting the [Clear session] check box.
4.3 Click [OK] to accept the changes.
Click [Cancel] to discard your updates.
46 CaptureOnTouch Scan to QuickBooks Online Plugin Pro User’s Guide
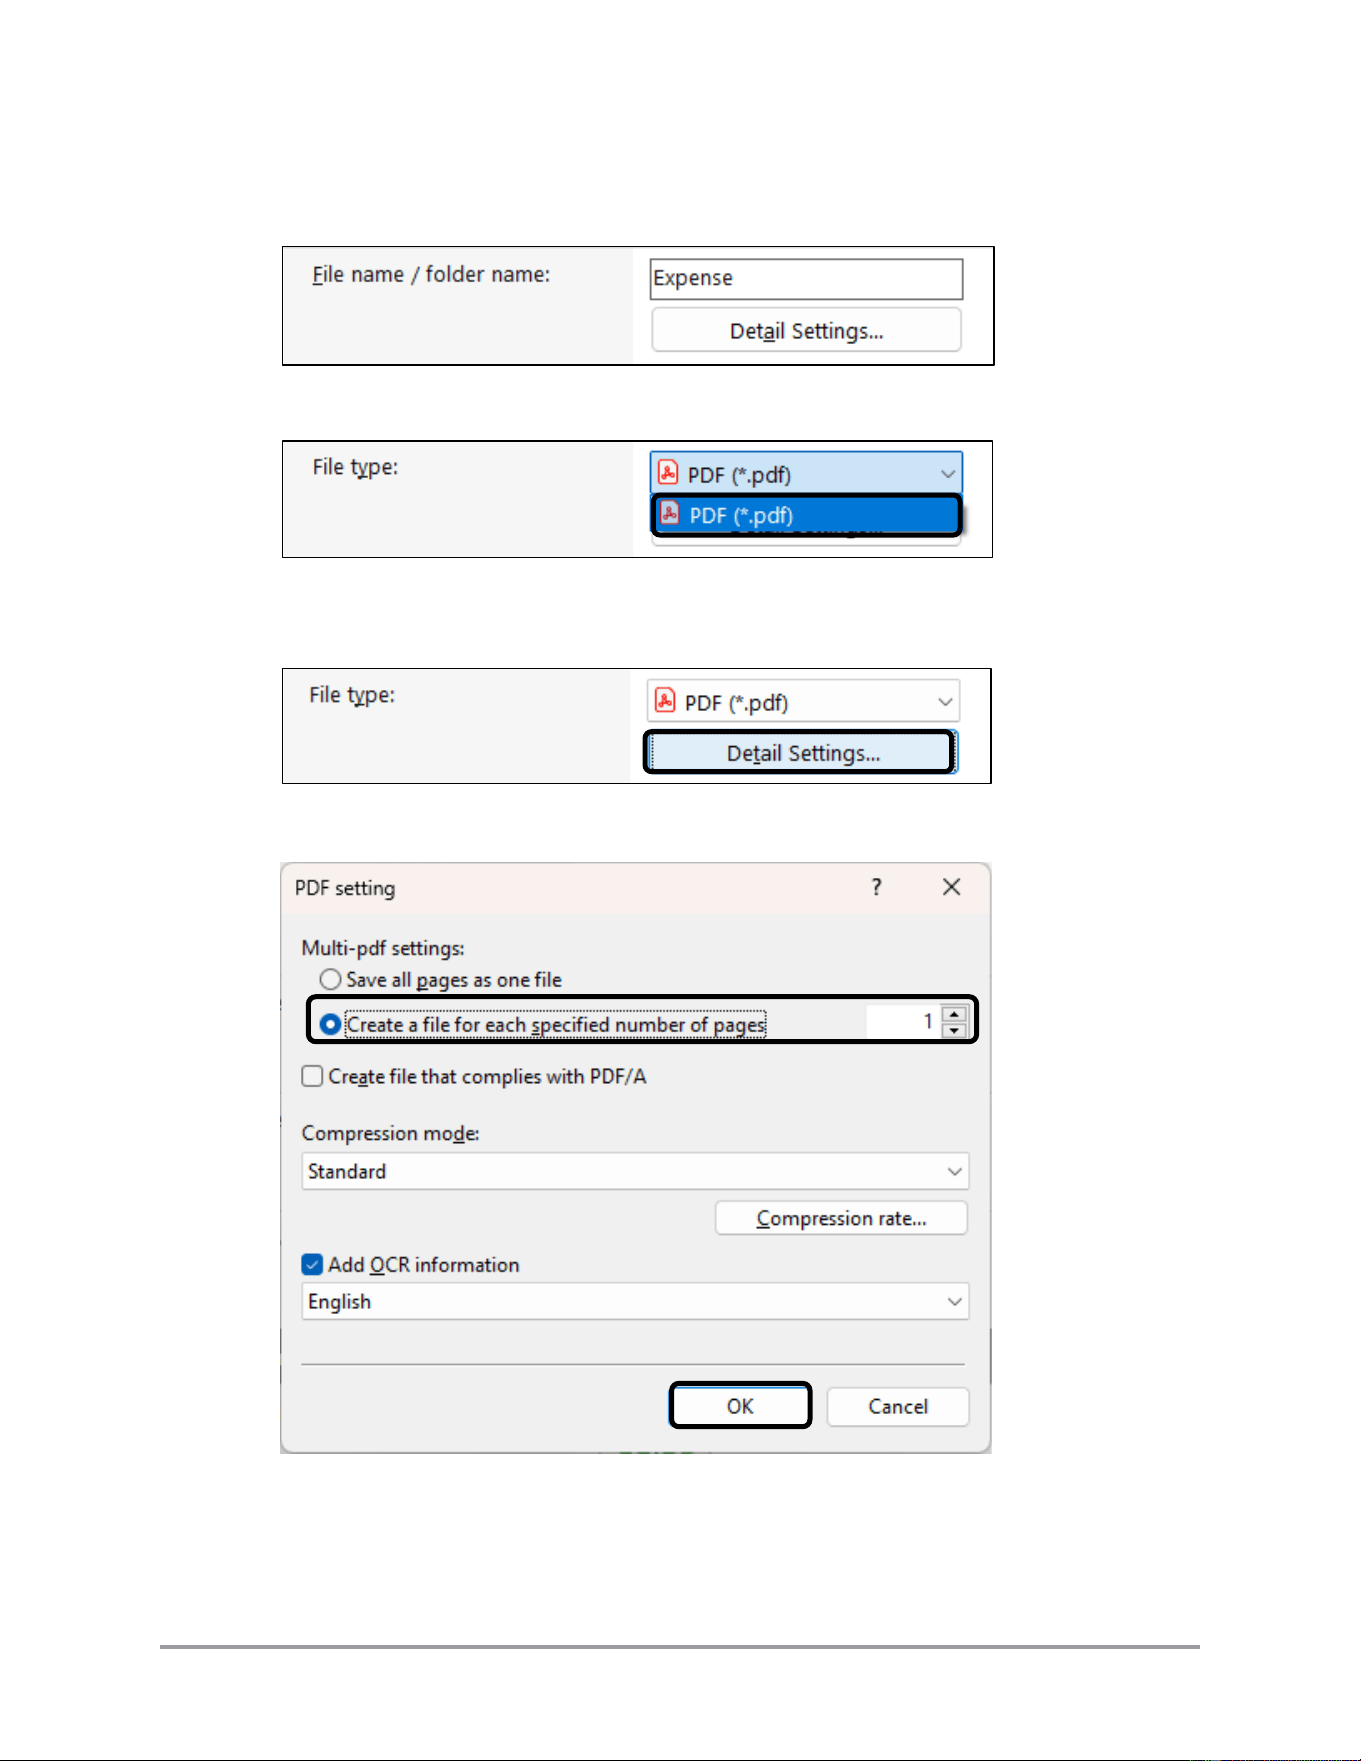
5. If desired, you can set the File name/folder name based on characteristics of the scan.
See the CaptureOnTouch online help for more information:
6. In the [File type] section, select [PDF] from the file type pull-down list.
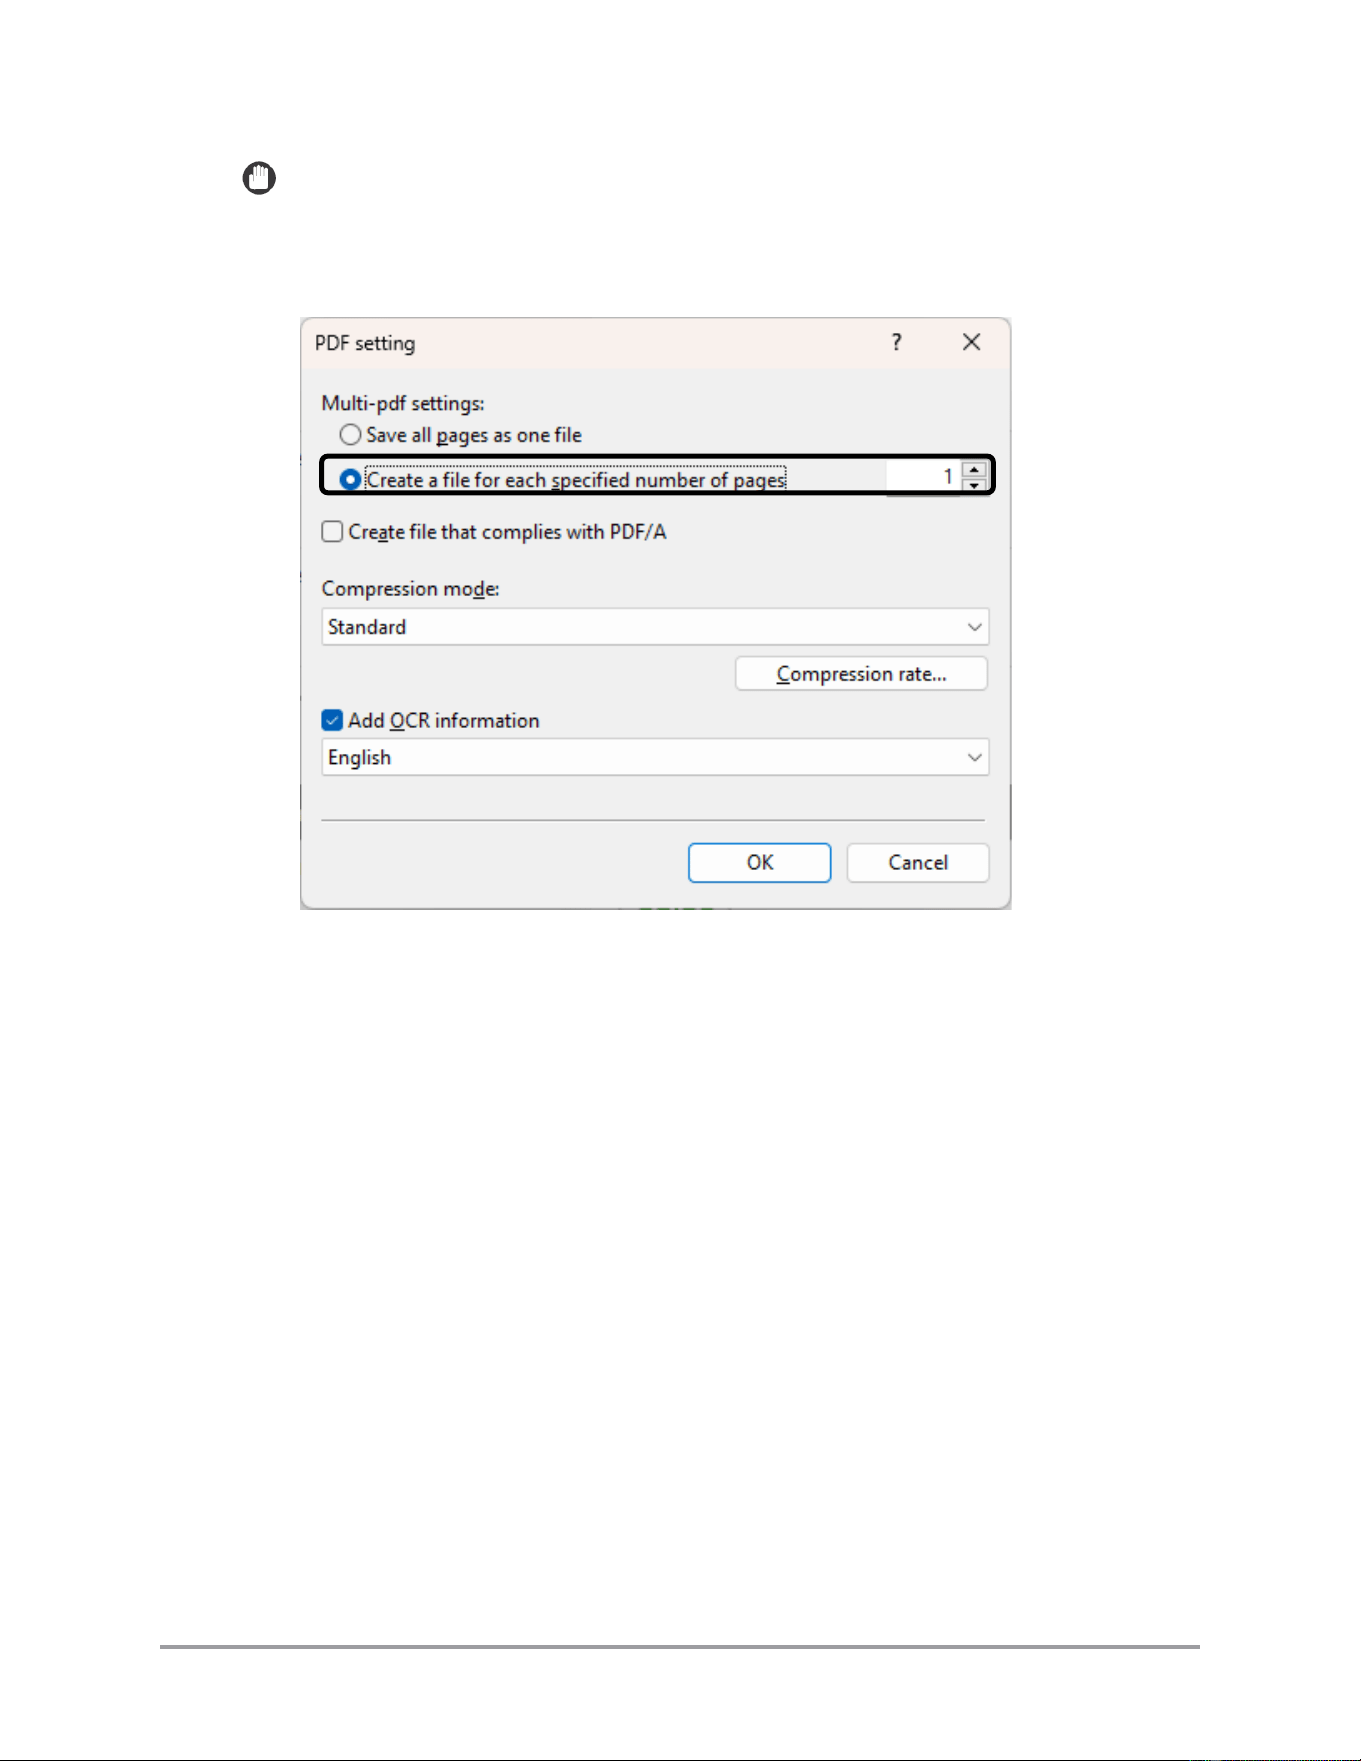
7. If desired, click [Detail Settings…] in the “File type” section to change the PDF
settings.
8. Set the [Multi-pdf settings] to the desired number of pages ➞ click [OK].
CaptureOnTouch Scan to QuickBooks Online Plugin Pro User’s Guide 47
9. Click [Close] to return to the CaptureOnTouch main screen.
48 CaptureOnTouch Scan to QuickBooks Online Plugin Pro User’s Guide
3.2 Scanning Documents Using CaptureOnTouch
This section describes how to scan a document using the CaptureOnTouch software.
1. Turn on your scanner, connect your scanner to your computer, and place a document
in your scanner.
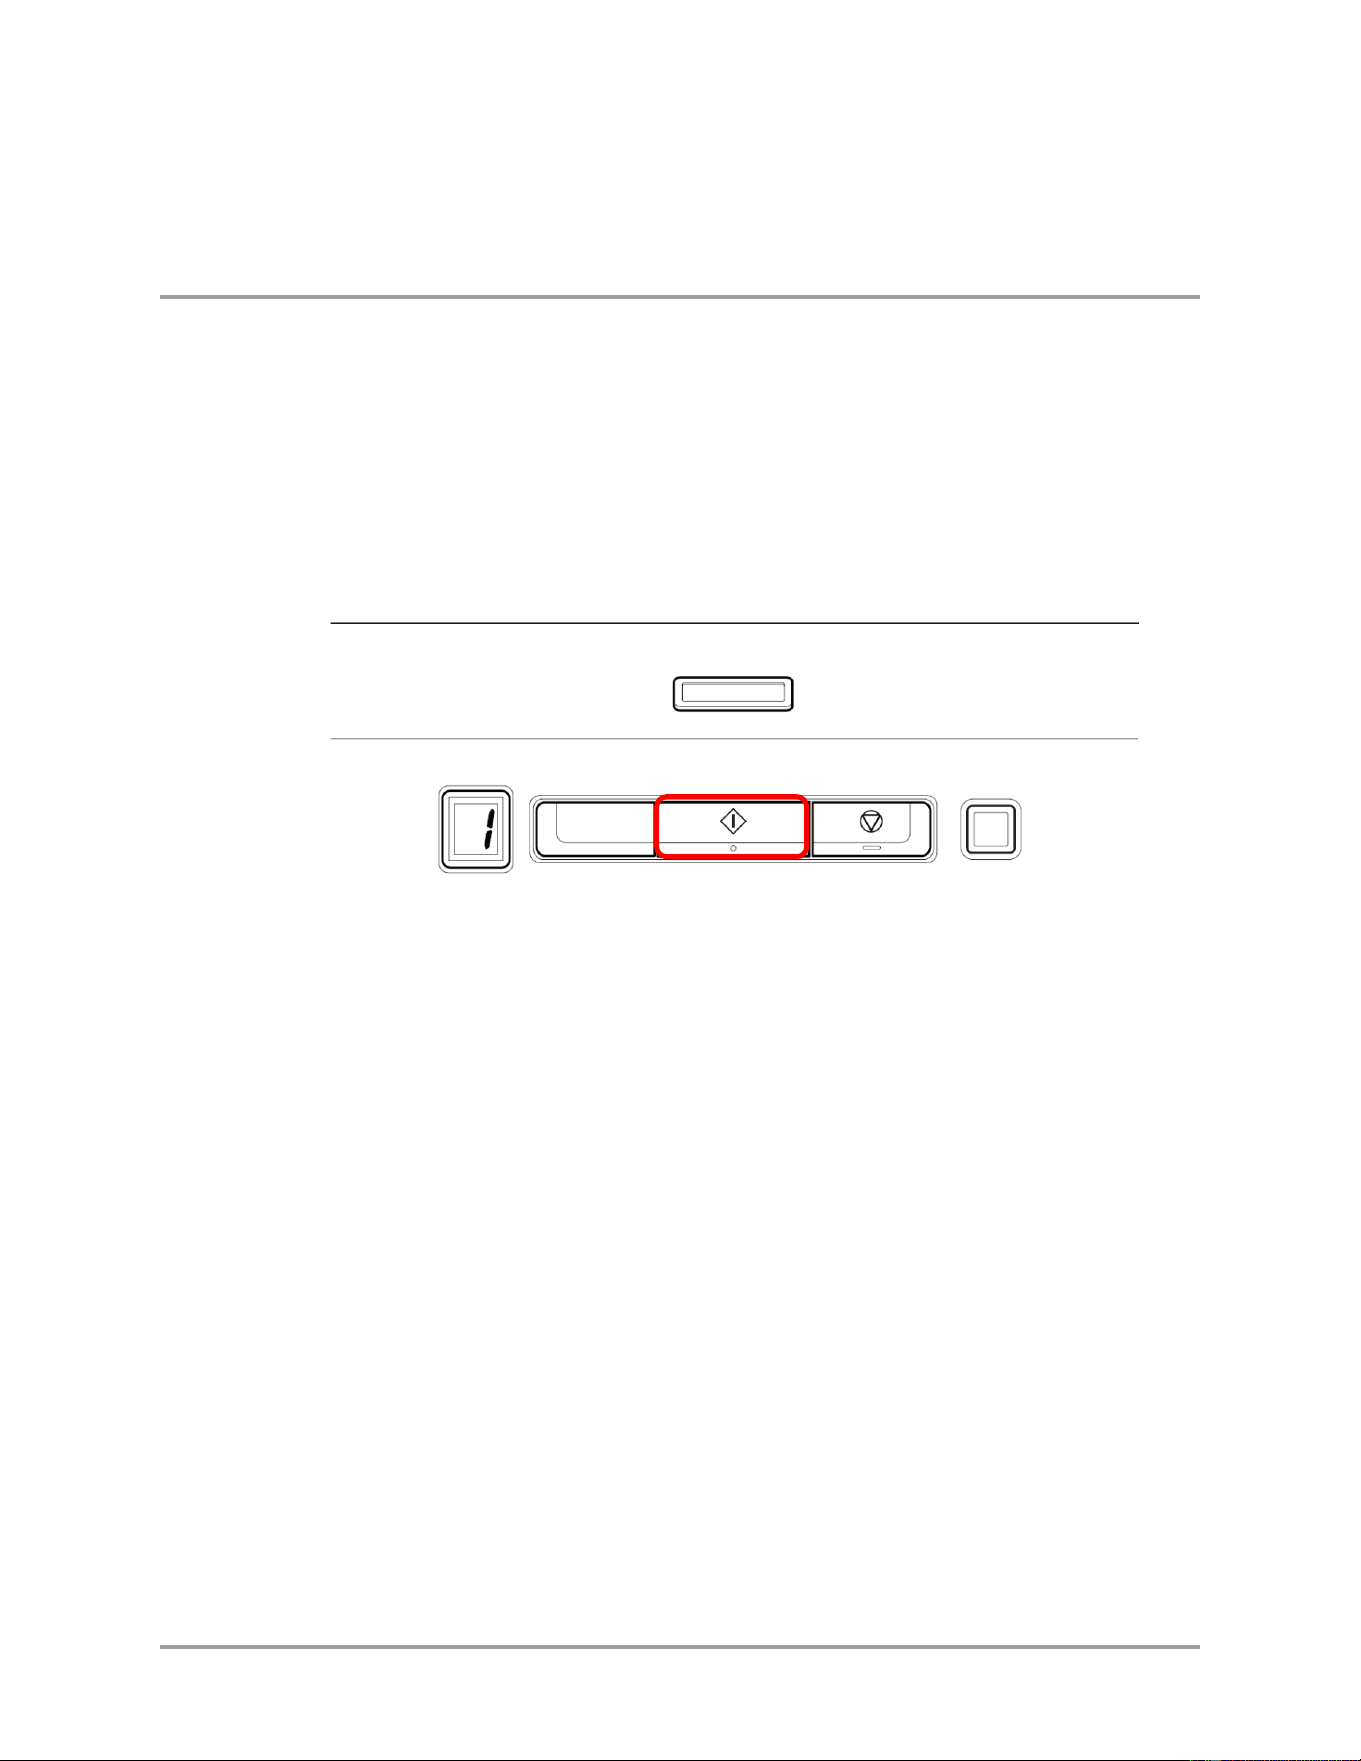
2. Scan the document.
2.1 If your scanner can automatically start CaptureOnTouch, press the Scan button on
the scanner console. Continue to step 3. The figure below is for the
imageFORMULA R40. Location and appearance of the scan button varies on
model and series. See your scanner’s documentation for information.
Note: Some scanner models may allow buttons to be set up as shortcuts.
Depending on how you configured your scanner, you may be able to initiate a
scan using more than one button. Use whatever button you most commonly use to
initiate a scan which starts CaptureOnTouch without sending the job to a specific
destination.
CaptureOnTouch Scan to QuickBooks Online Plugin Pro User’s Guide 49
2.2 If your scanner cannot automatically start CaptureOnTouch, start
CaptureOnTouch.
Windows Start Menu
Windows Hidden Icons
Or press the [Start] button on the scanner.
50 CaptureOnTouch Scan to QuickBooks Online Plugin Pro User’s Guide
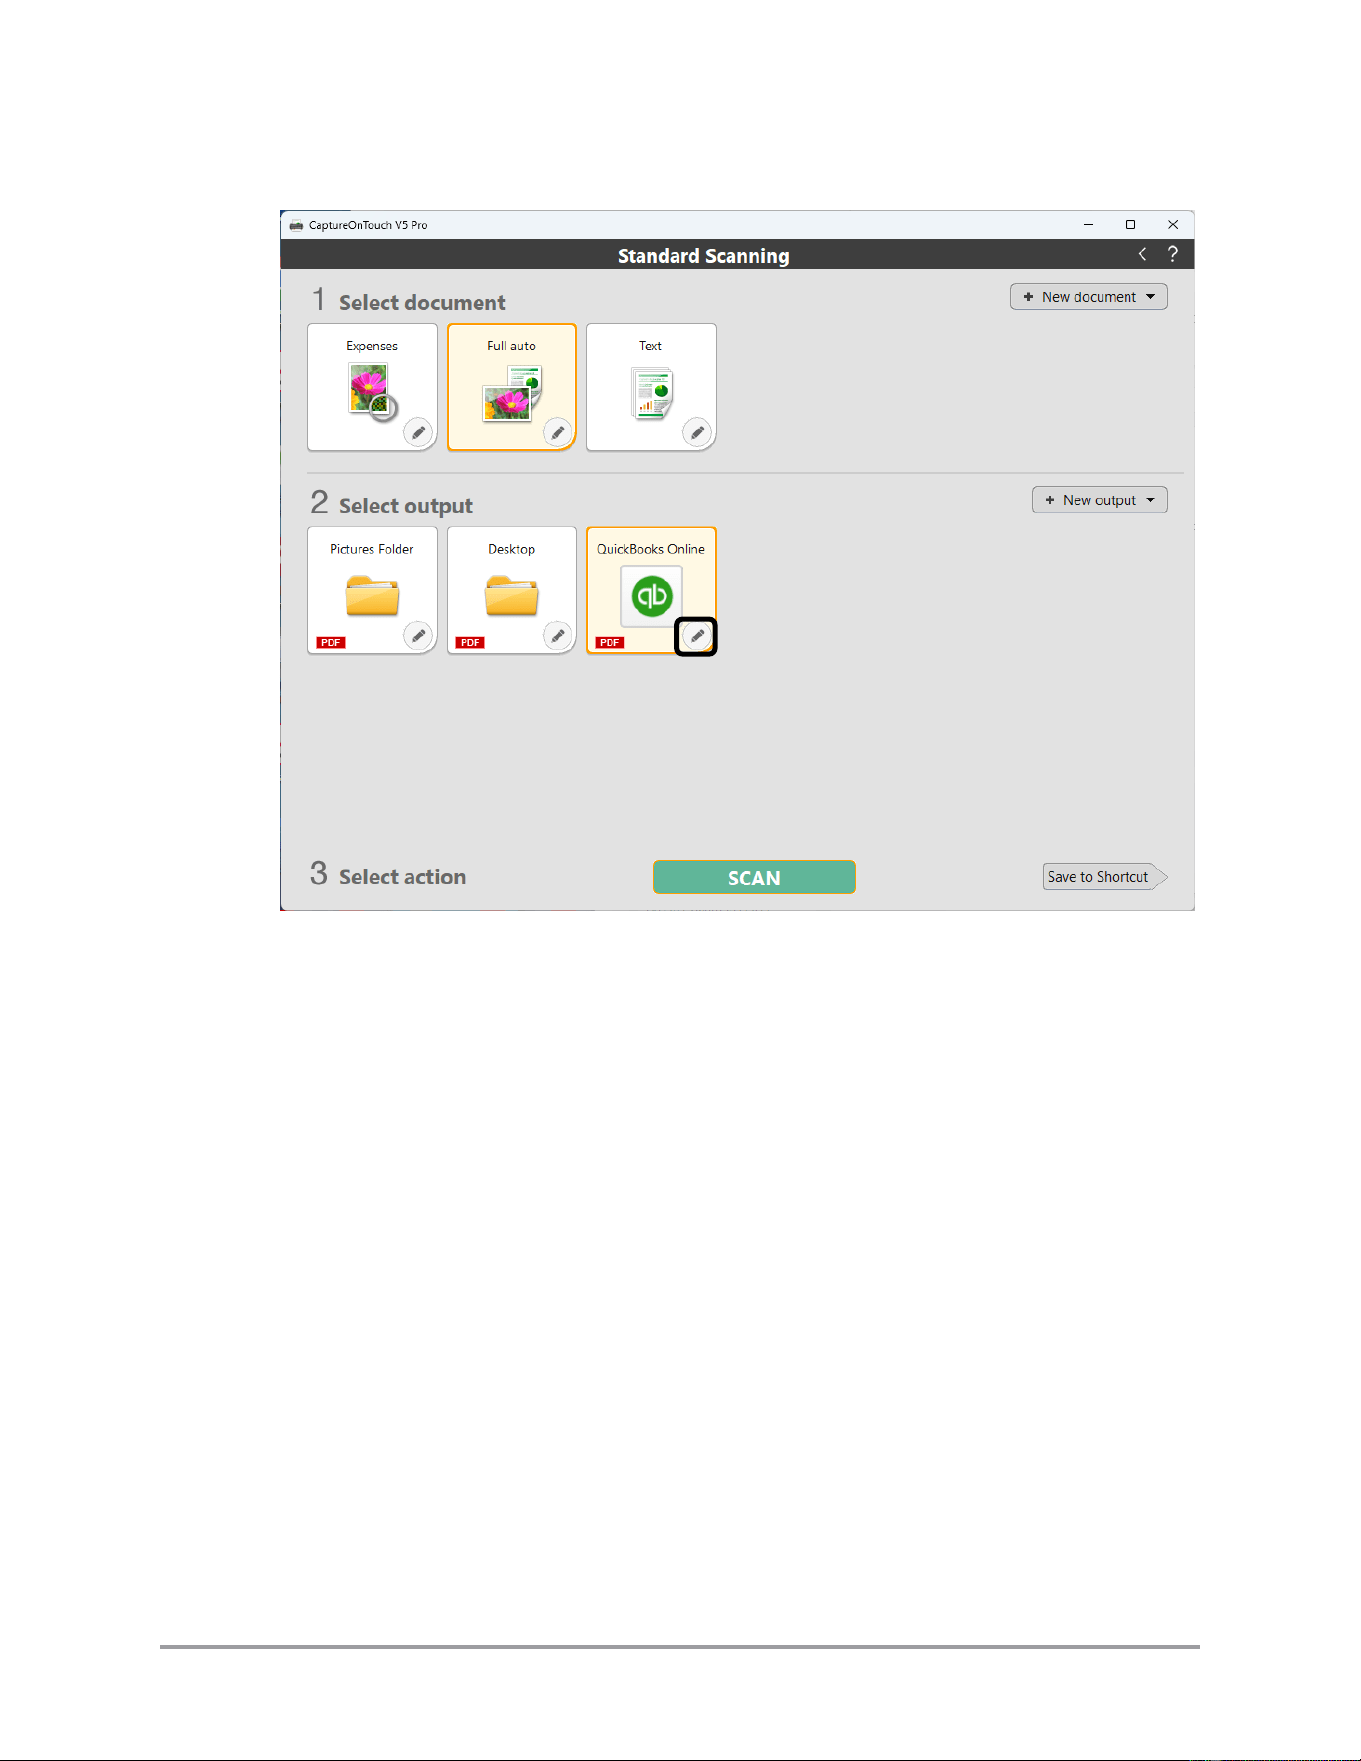
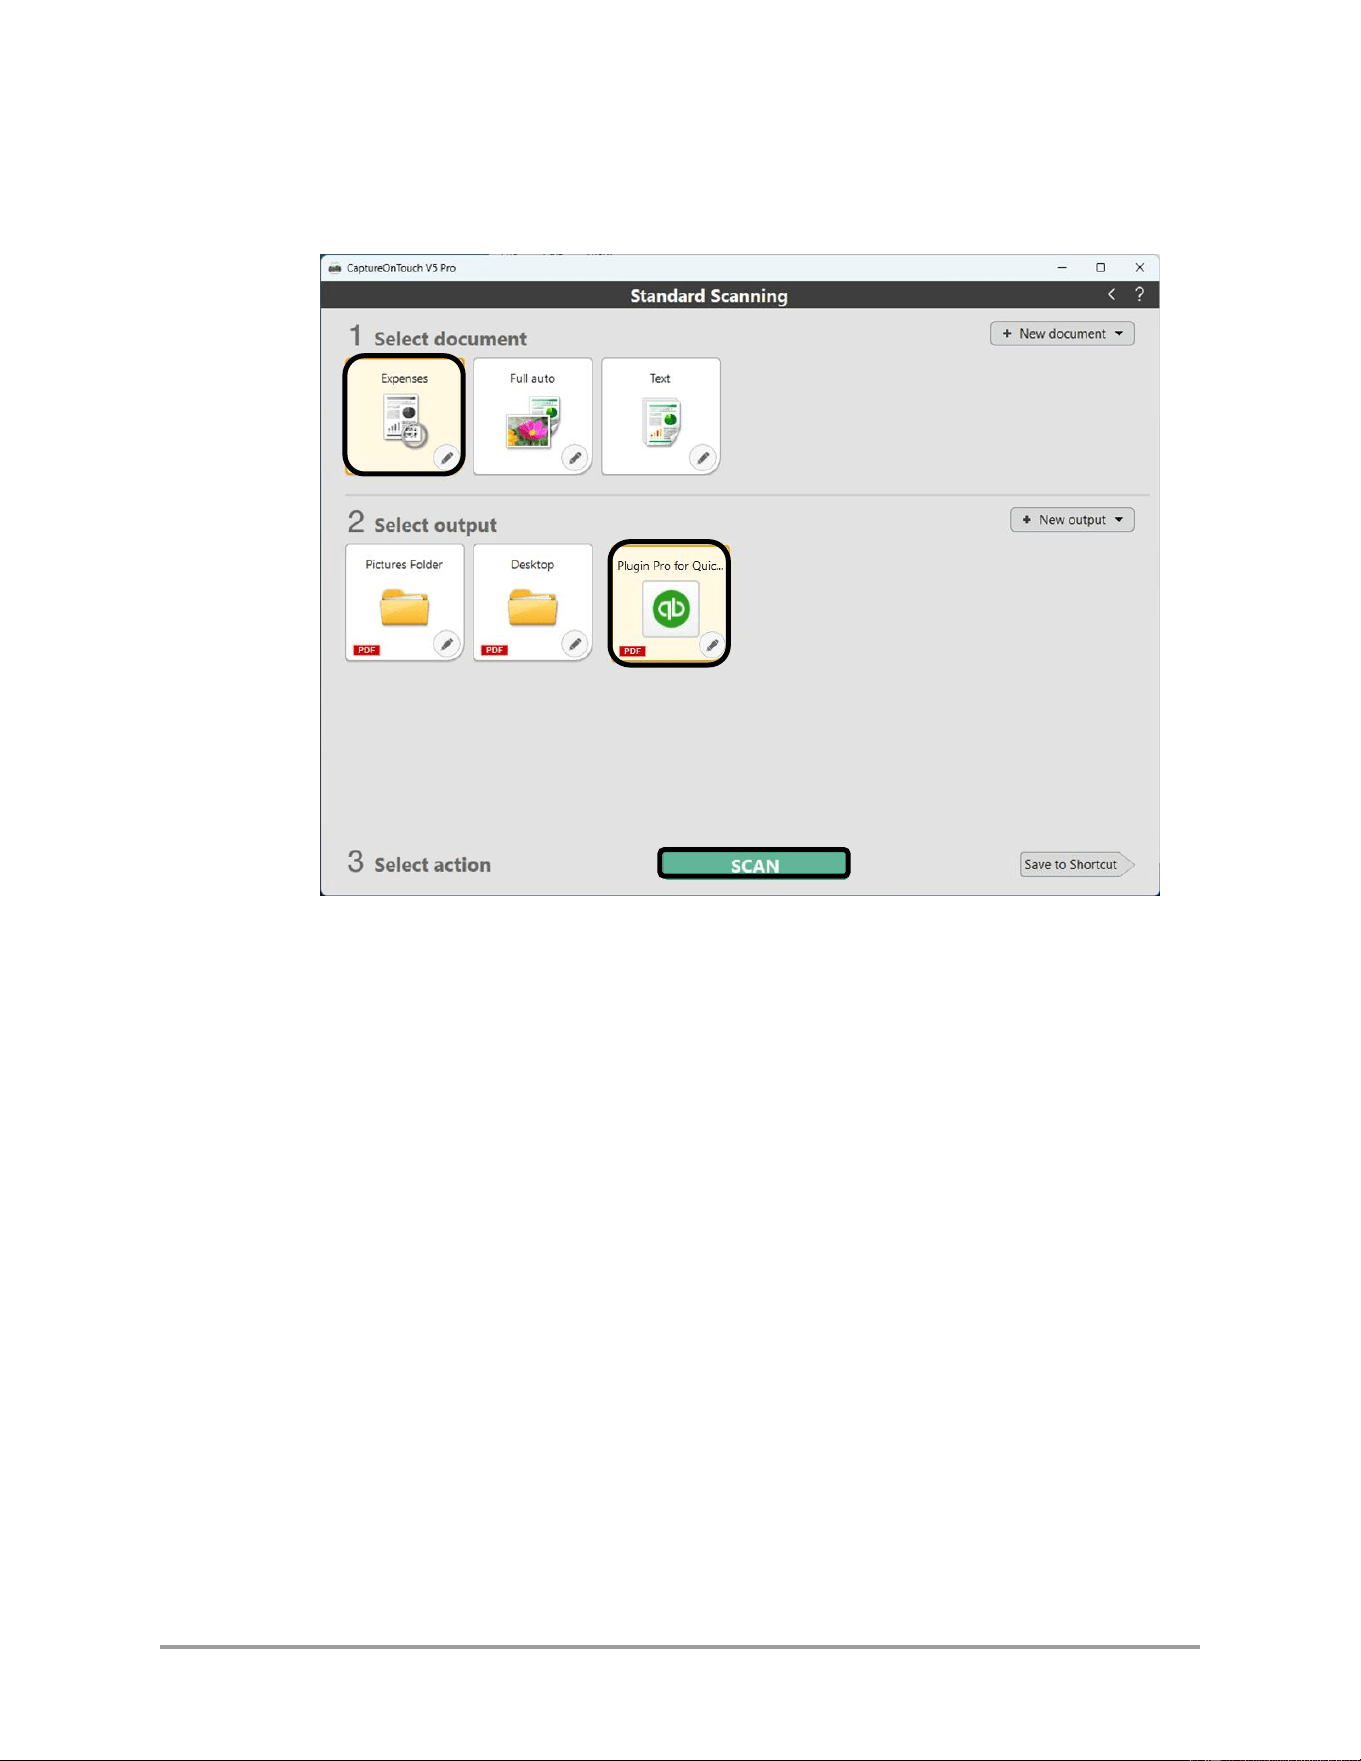
2.3 Select the document type ➞ select [Plugin Pro for QuickBooks Online] as the
output ➞ click [Scan].
The Expense document type may not be available as a document type icon by
default. Click the [New document] pull down list and select ”Expense” to set the
document type.
The QuickBooks Plugin Pro may not be available as an output icon by default.
Click the [New output] pull-down list and select “Plugin Pro for QuickBooks
Online” to set the output type.
Select [Plugin Pro for QuickBooks Online] as the output, and click [SCAN] to
start.
Note: If you set up a scanning shortcut (i.e. “One Touch Scan”) for scanning to
QuickBooks Online, you only need to click on the shortcut. Scanning starts
automatically. CaptureOnTouch will also automatically start the QuickBooks plug
in. You will not be able to change any settings of the scan job.
CaptureOnTouch Scan to QuickBooks Online Plugin Pro User’s Guide 51
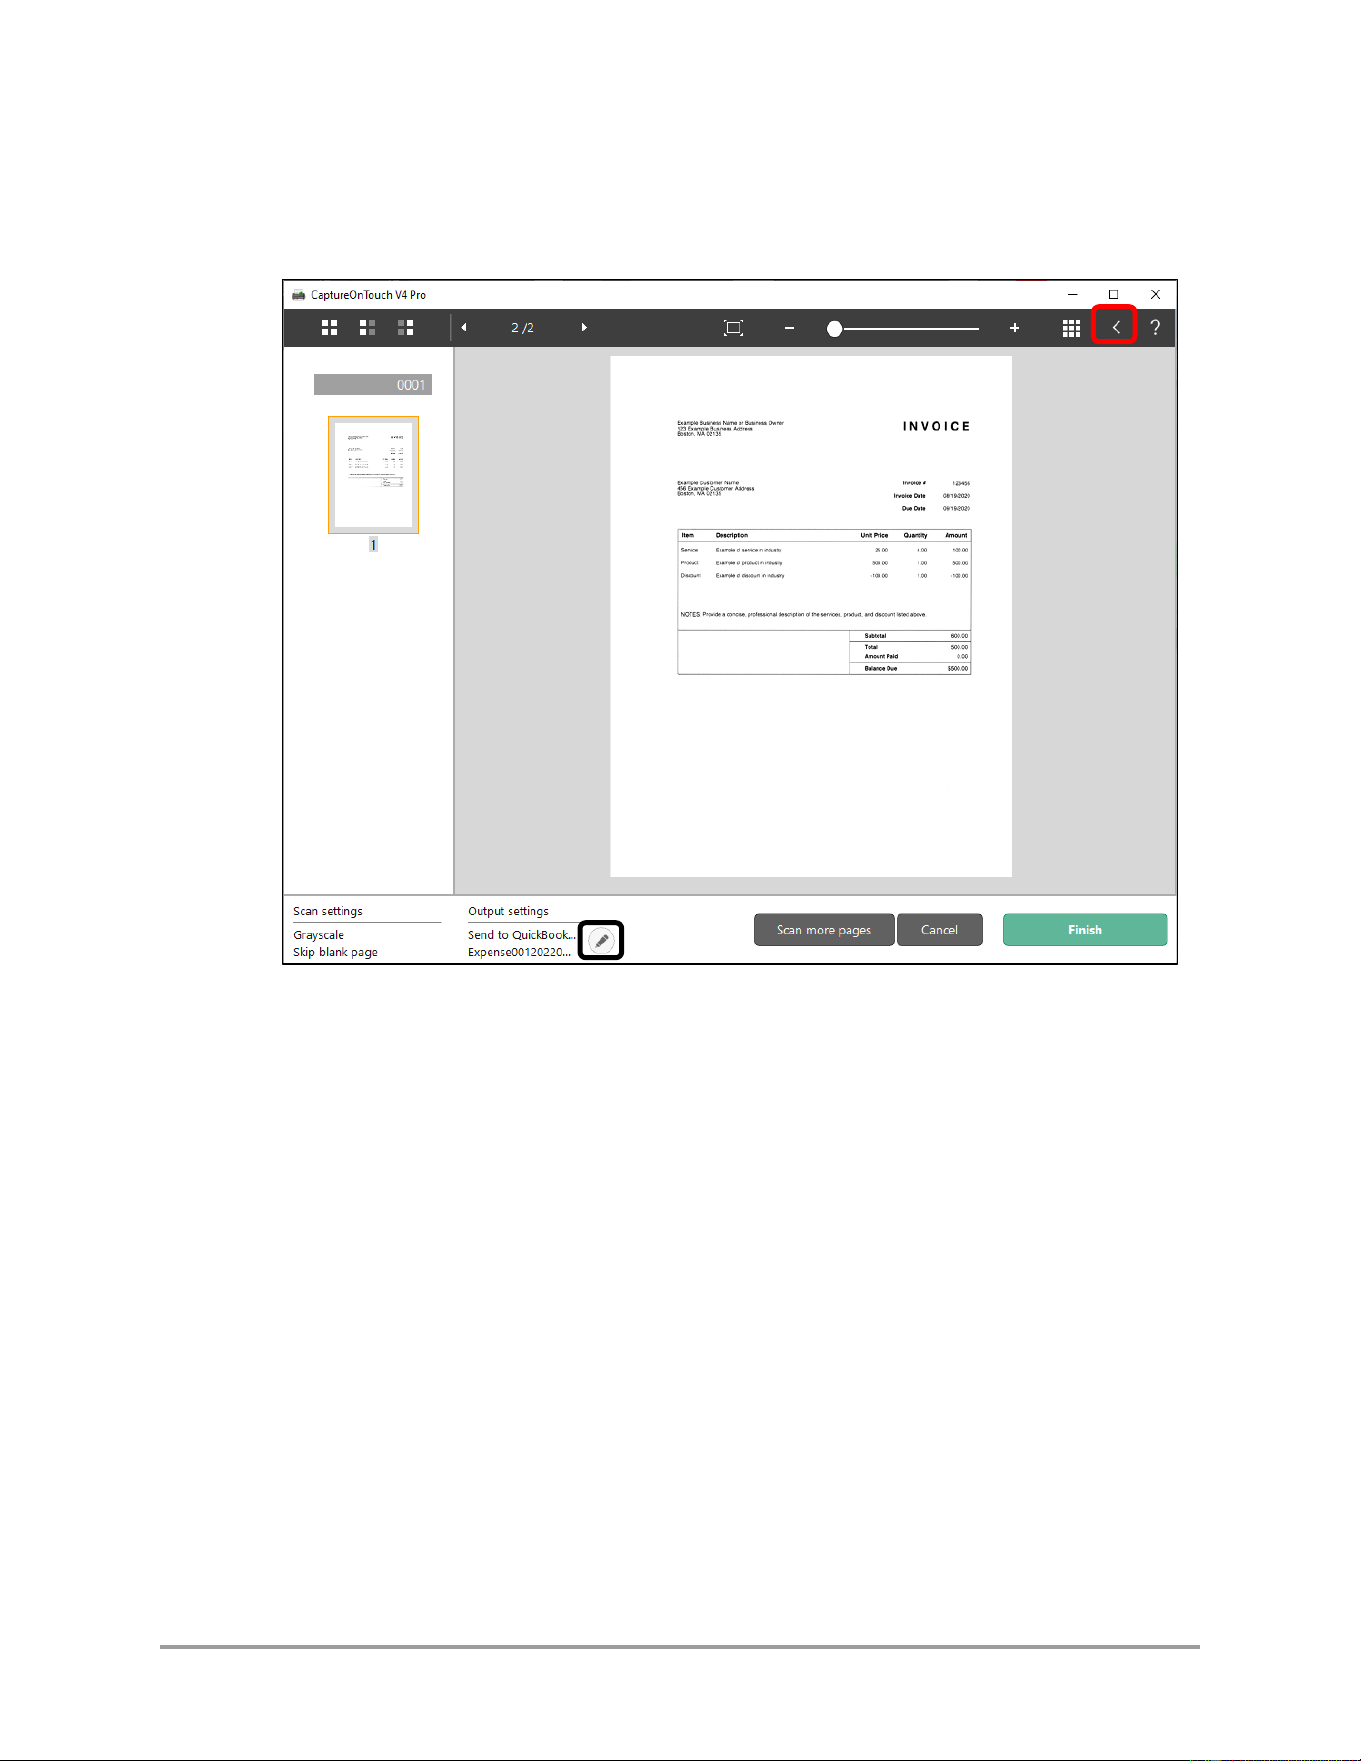
3. If you want to make any changes to the format or settings of the scan job (and you did
not use a One Touch Scan shortcut), click on the pencil under “Output settings”, or
click on the arrow (“<”) in the top toolbar to open the “Edit” menu.
52 CaptureOnTouch Scan to QuickBooks Online Plugin Pro User’s Guide
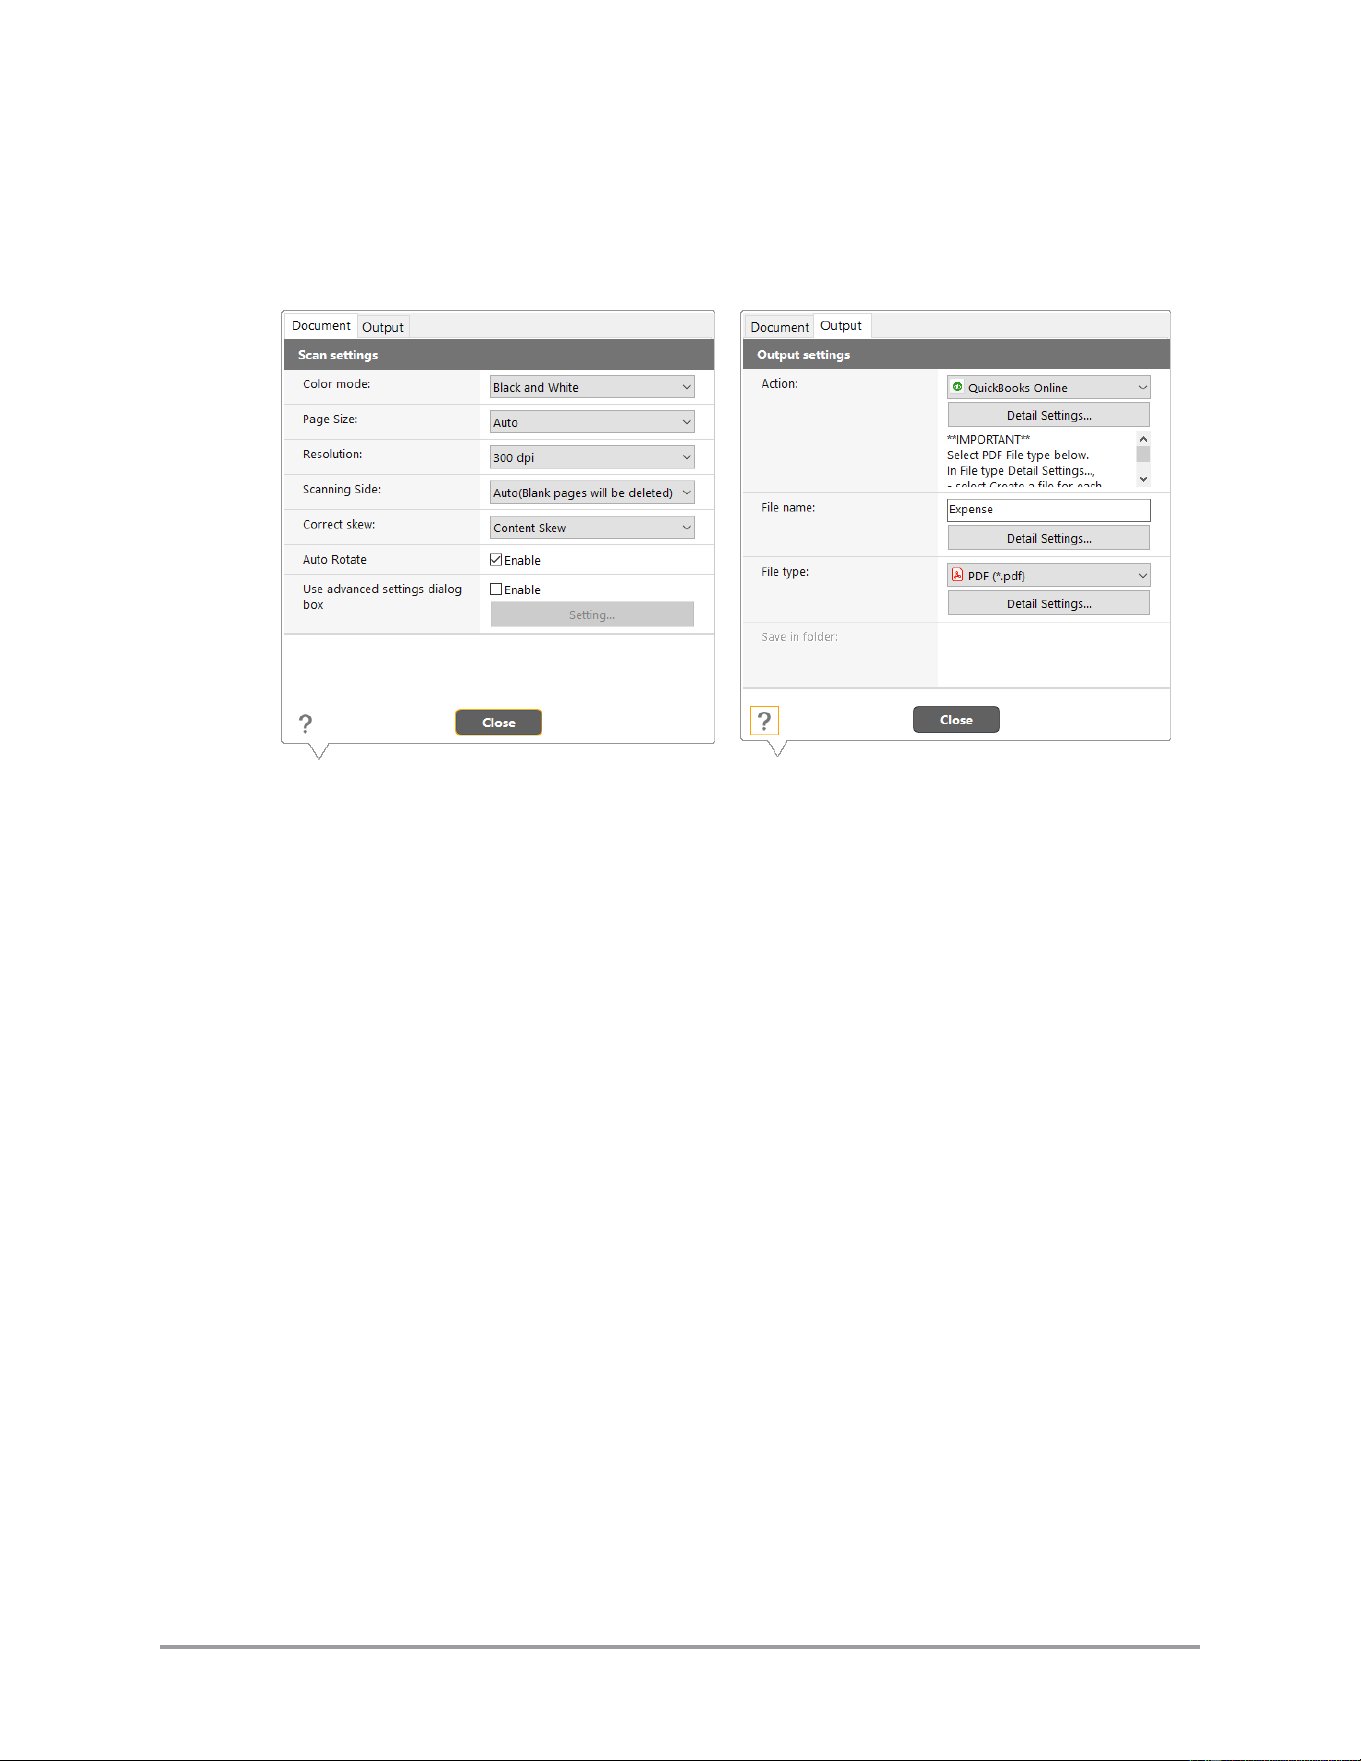
You can change several settings for the scan job. Click on the [Document] and
[Output] tabs to access the settings. Refer to the CaptureOnTouch documentation for
more information about all of the settings. These changes also affect any future scans
you make.
CaptureOnTouch Scan to QuickBooks Online Plugin Pro User’s Guide 53
IMPORTANT
The file type must be set to PDF. In the PDF detail settings, the [Output Settings]
must be set to create 1 file per page. If these settings are not as described, the plugin
rejects the submitted scan job.
54 CaptureOnTouch Scan to QuickBooks Online Plugin Pro User’s Guide
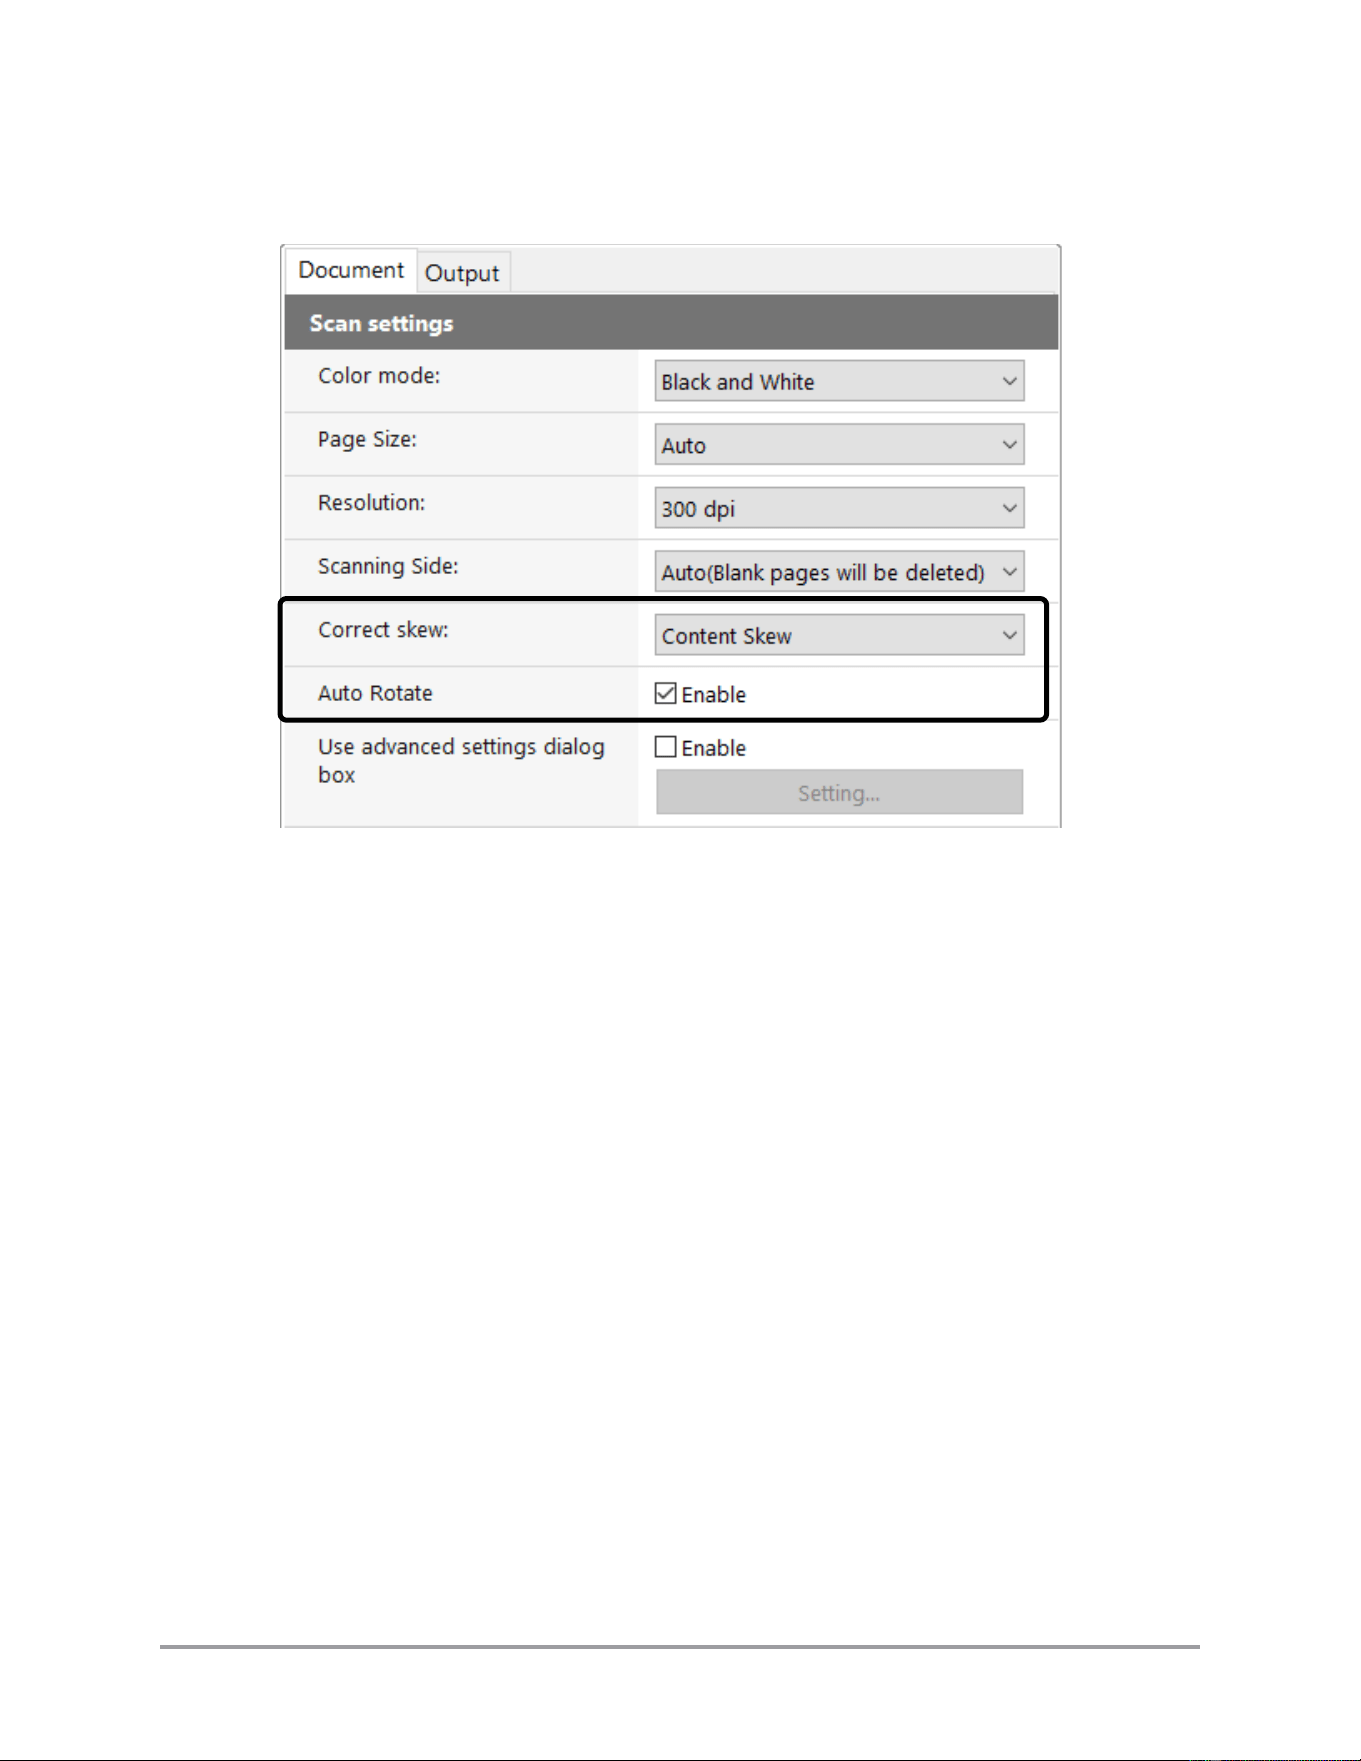
Note: In the Document tab, it is recommended to enable the [Correct skew] (select
one of the options other than “Off”) and [Auto Rotate] features.
Click [Close] when done making changes to the settings.
CaptureOnTouch Scan to QuickBooks Online Plugin Pro User’s Guide 55
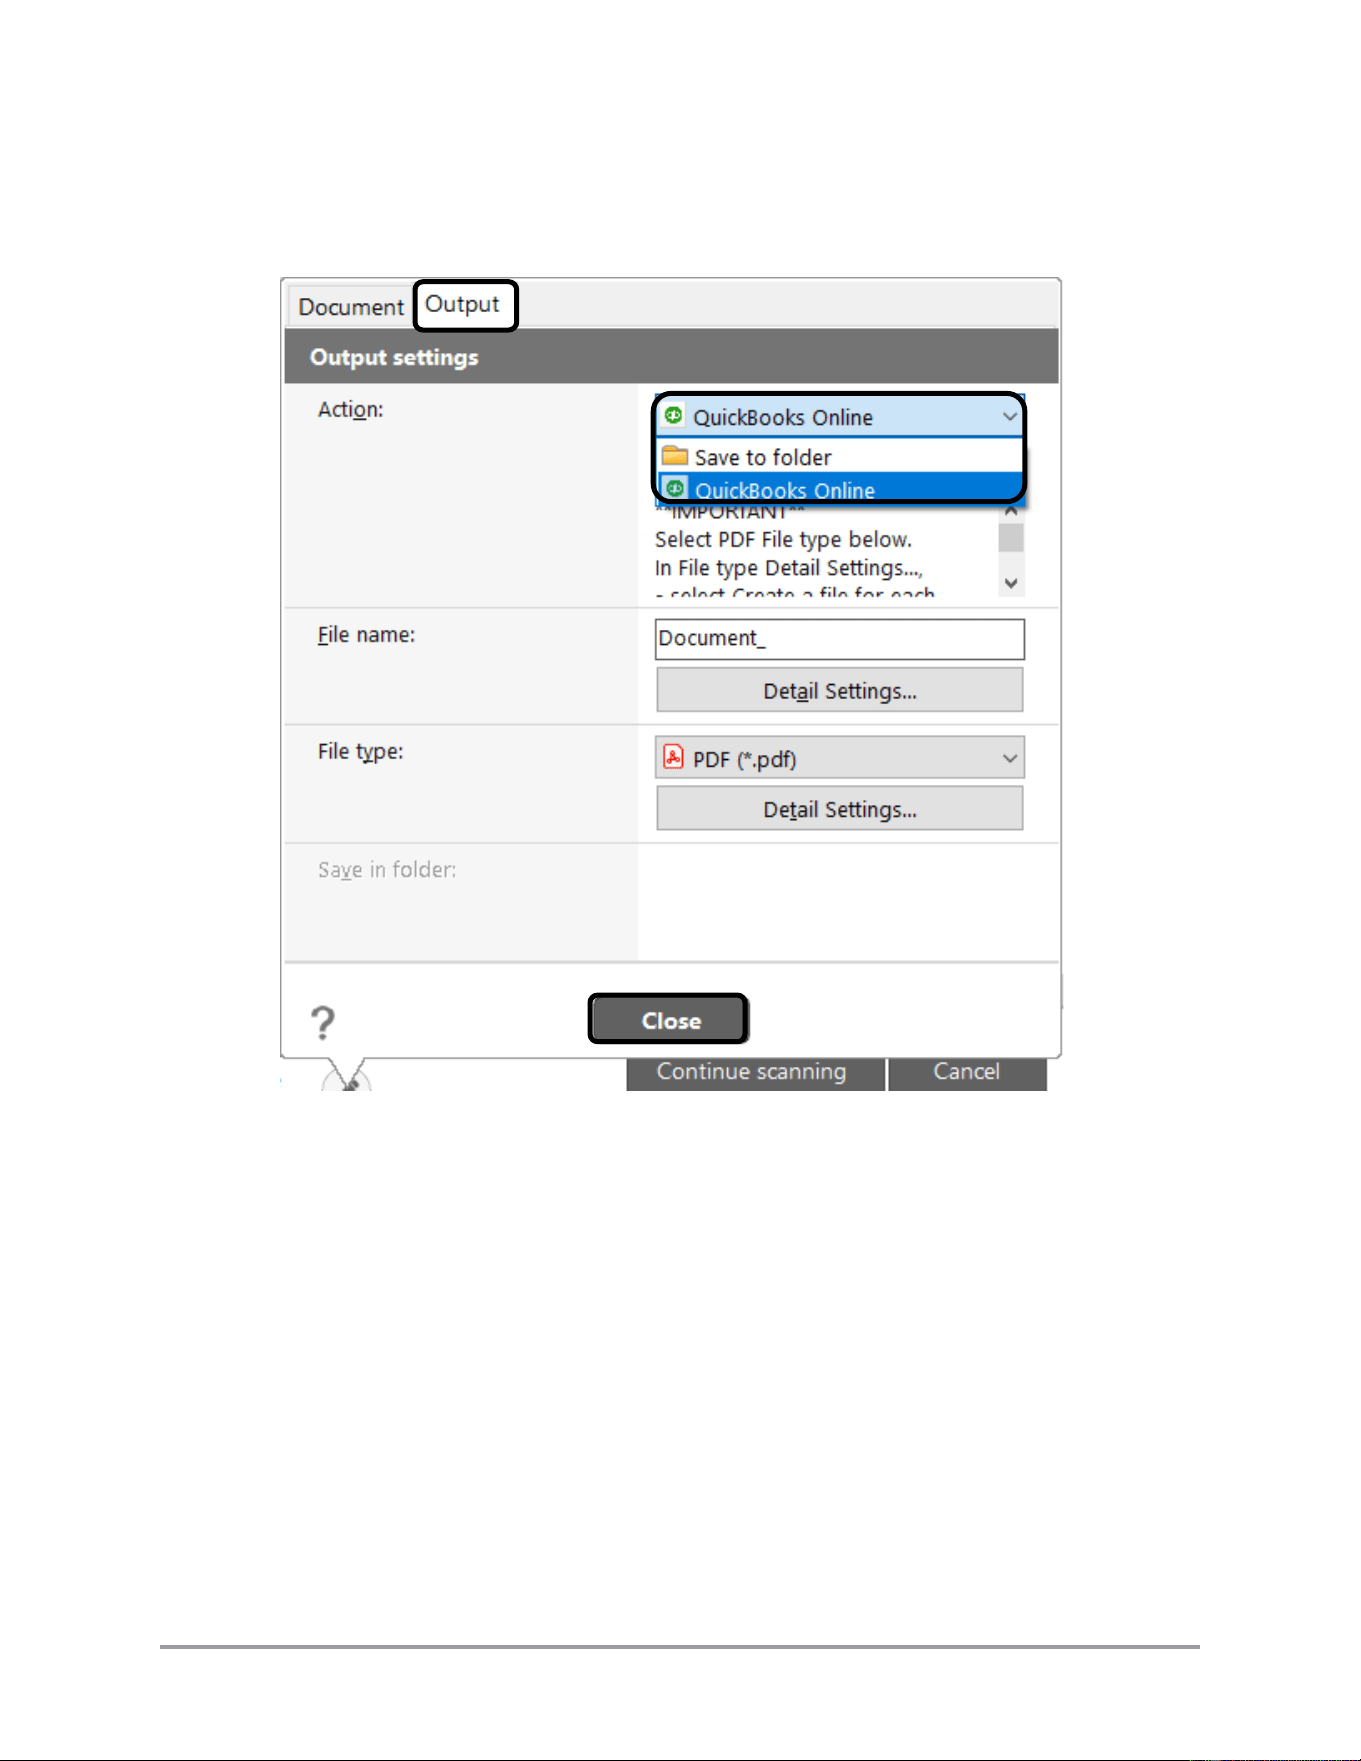
Note: If you scanned your document by pressing the [Scan] button on the scanner and
did not use CaptureOnTouch, verify that the target destination is QuickBooks Online.
The destination is listed in the Output settings in the [Output] tab.
If the Output method selection is anything other than “QuickBooks Online”, select
“QuickBooks Online” from the pull-down list and click [Close].
56 CaptureOnTouch Scan to QuickBooks Online Plugin Pro User’s Guide
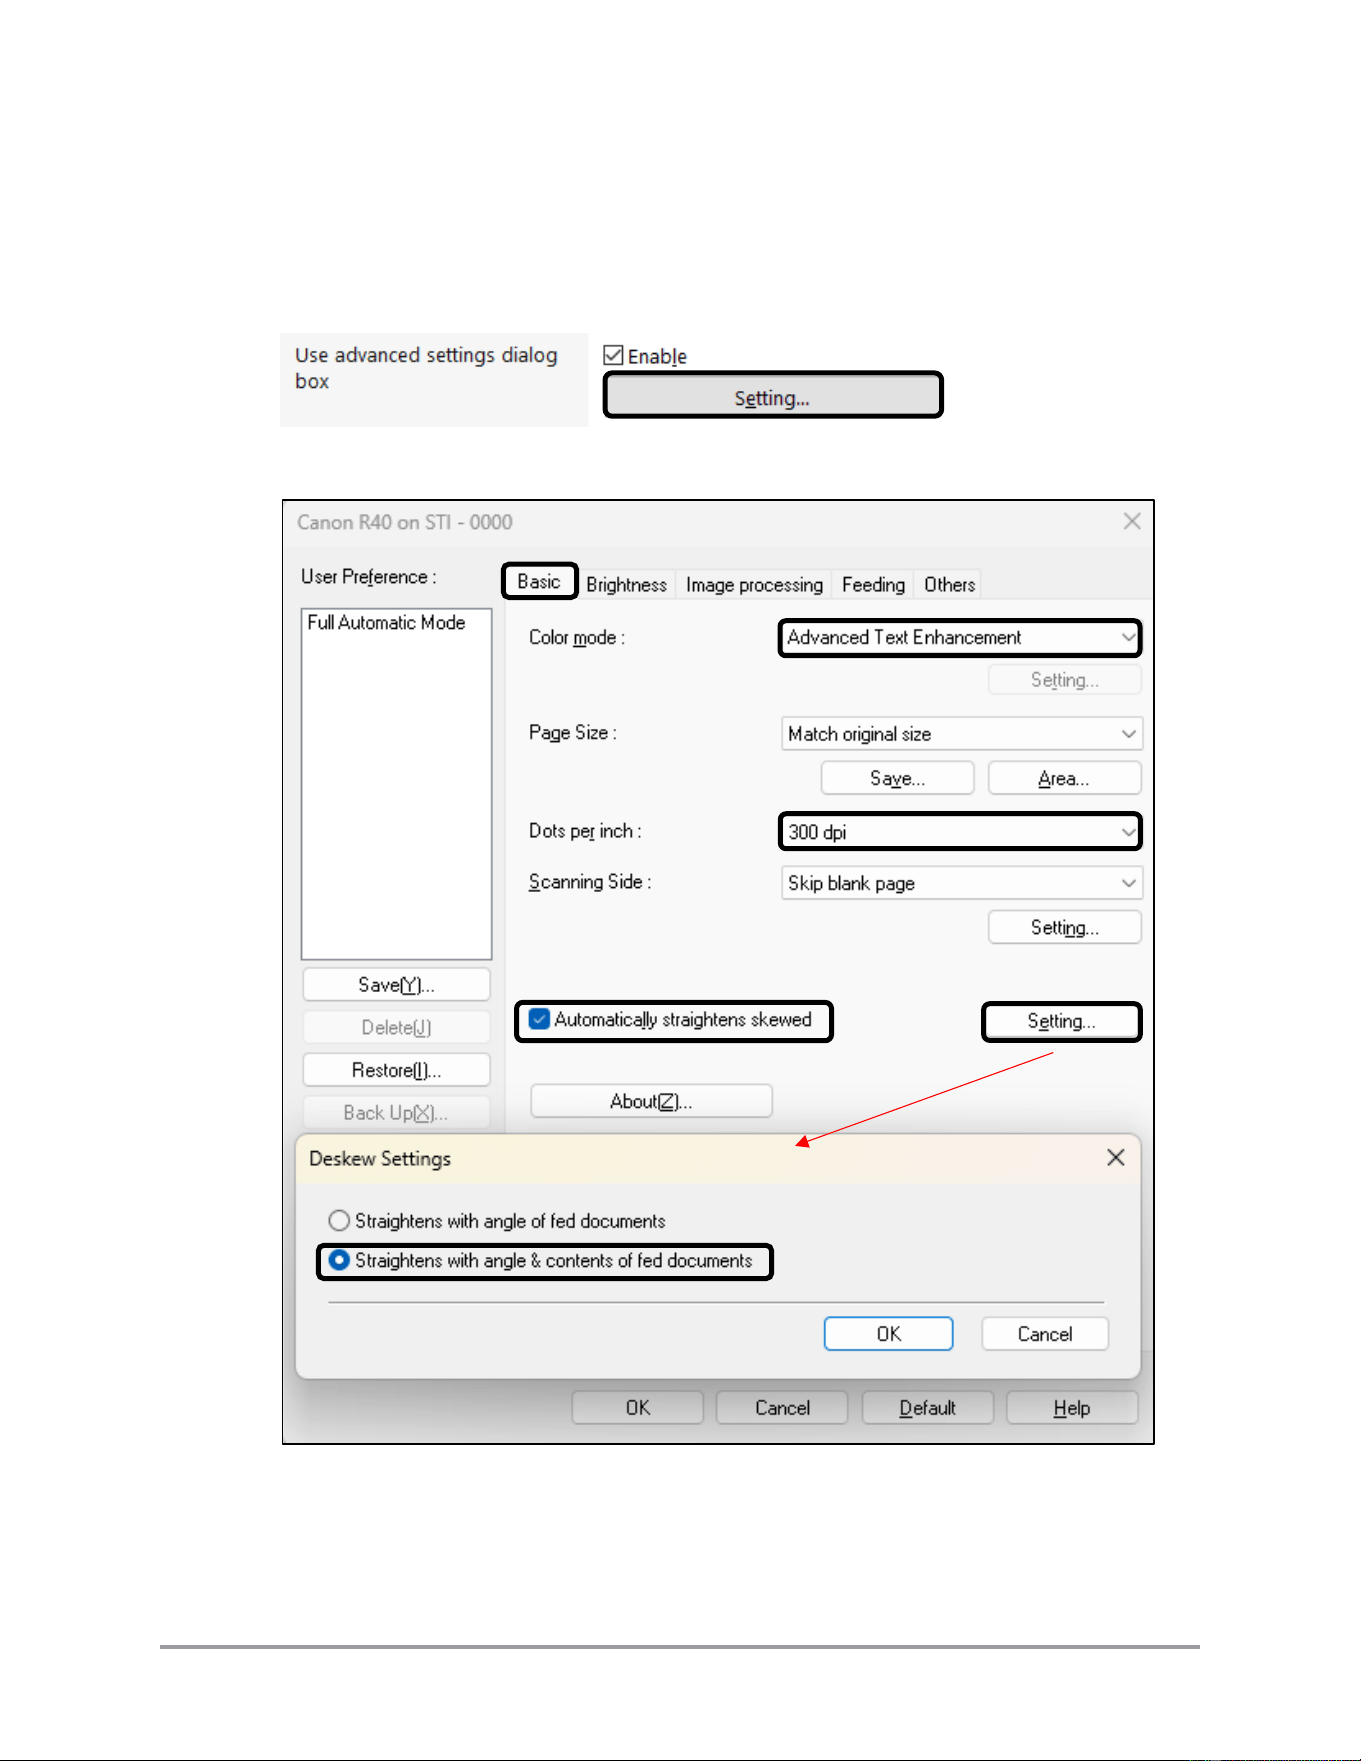
Note: To optimize the Optical Character Recognition accuracy, make the following
settings changes:
In the “Document” tab, select the [Enable] check box in “Use advance settings dialog
box” ➞ click [Setting].
Set the highlighted options in the “Basic” tab below.
CaptureOnTouch Scan to QuickBooks Online Plugin Pro User’s Guide 57
Color Mode:
Advanced Text Enhancement (NOT Advanced “Text
Enhancement II”)
Dots per inch:
300 dpi
Automatically
straightens skewed:
Selected
[Setting]:
Straightens with angle & contents of fed documents
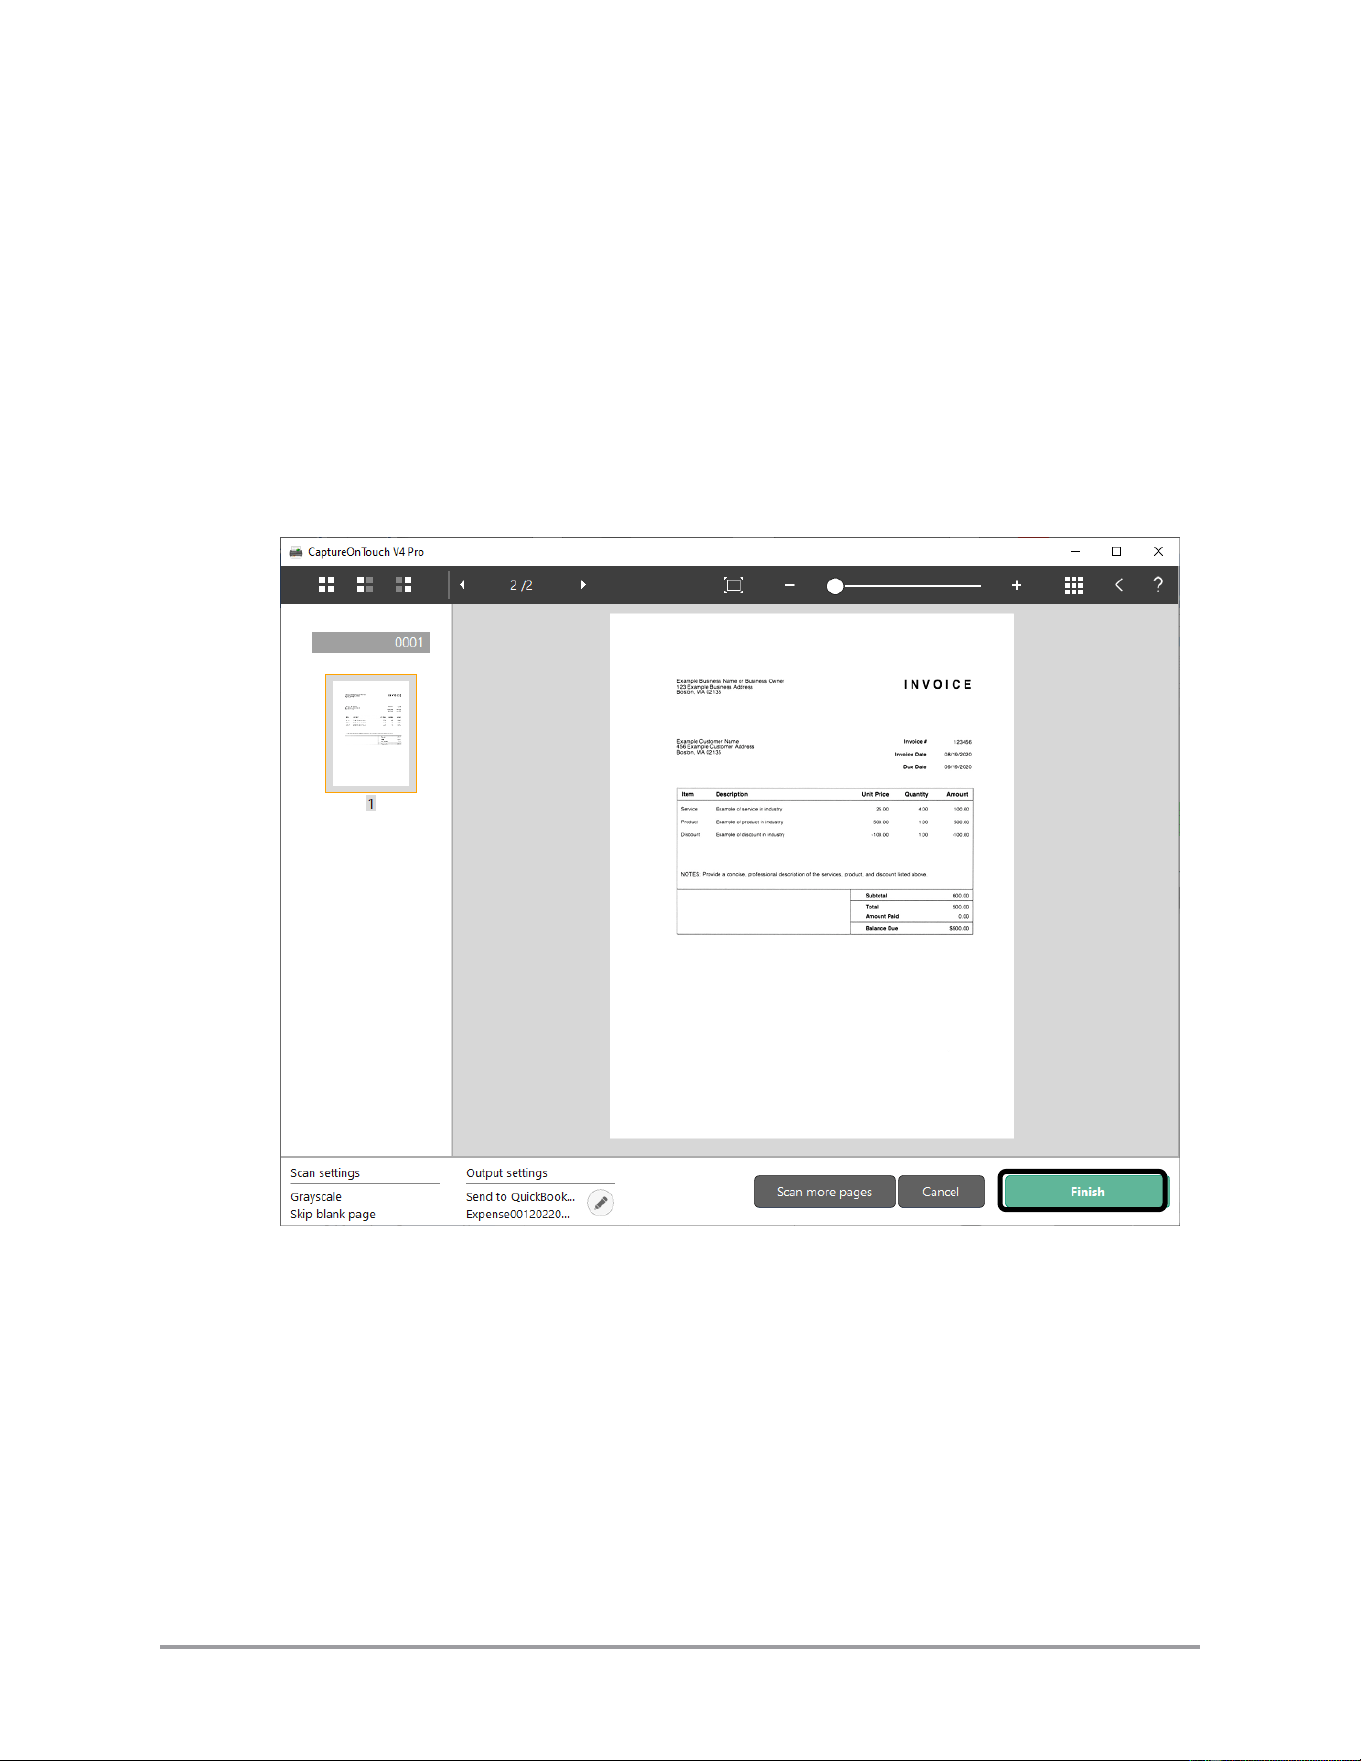
4. Click [Finish] to start sending the document to the plugin for processing.
If the feature is enabled, click [Scan more pages] to add more pages to your scan job
prior to sending to the plugin.
Click [Cancel] to return to the main CaptureOnTouch screen.
58 CaptureOnTouch Scan to QuickBooks Online Plugin Pro User’s Guide
5. If no one has logged into QuickBooks Online on your computer recently, you will
need to supply your QuickBooks Online credentials.
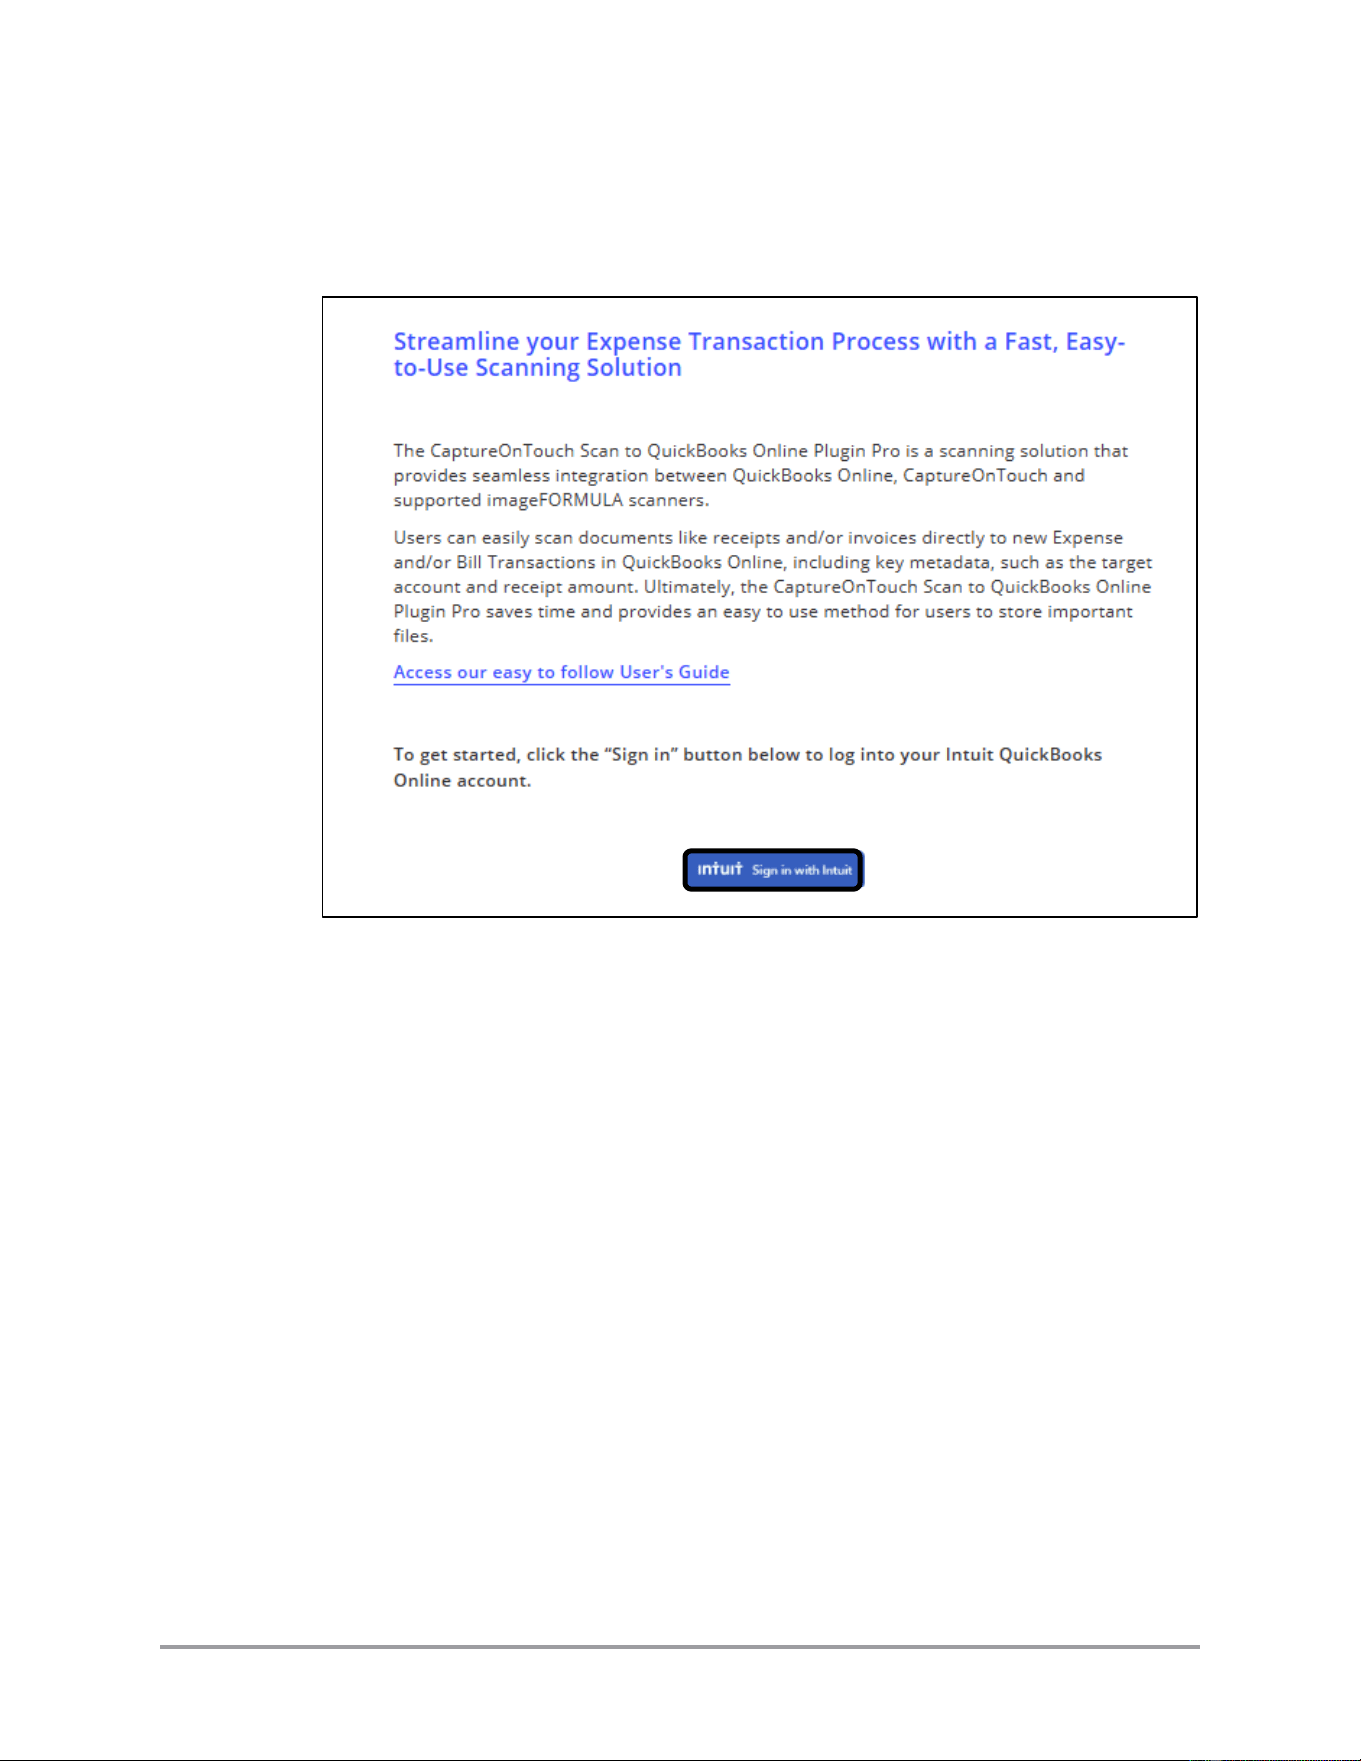
5.1 Click [Sign in with Intuit] to continue.
CaptureOnTouch Scan to QuickBooks Online Plugin Pro User’s Guide 59
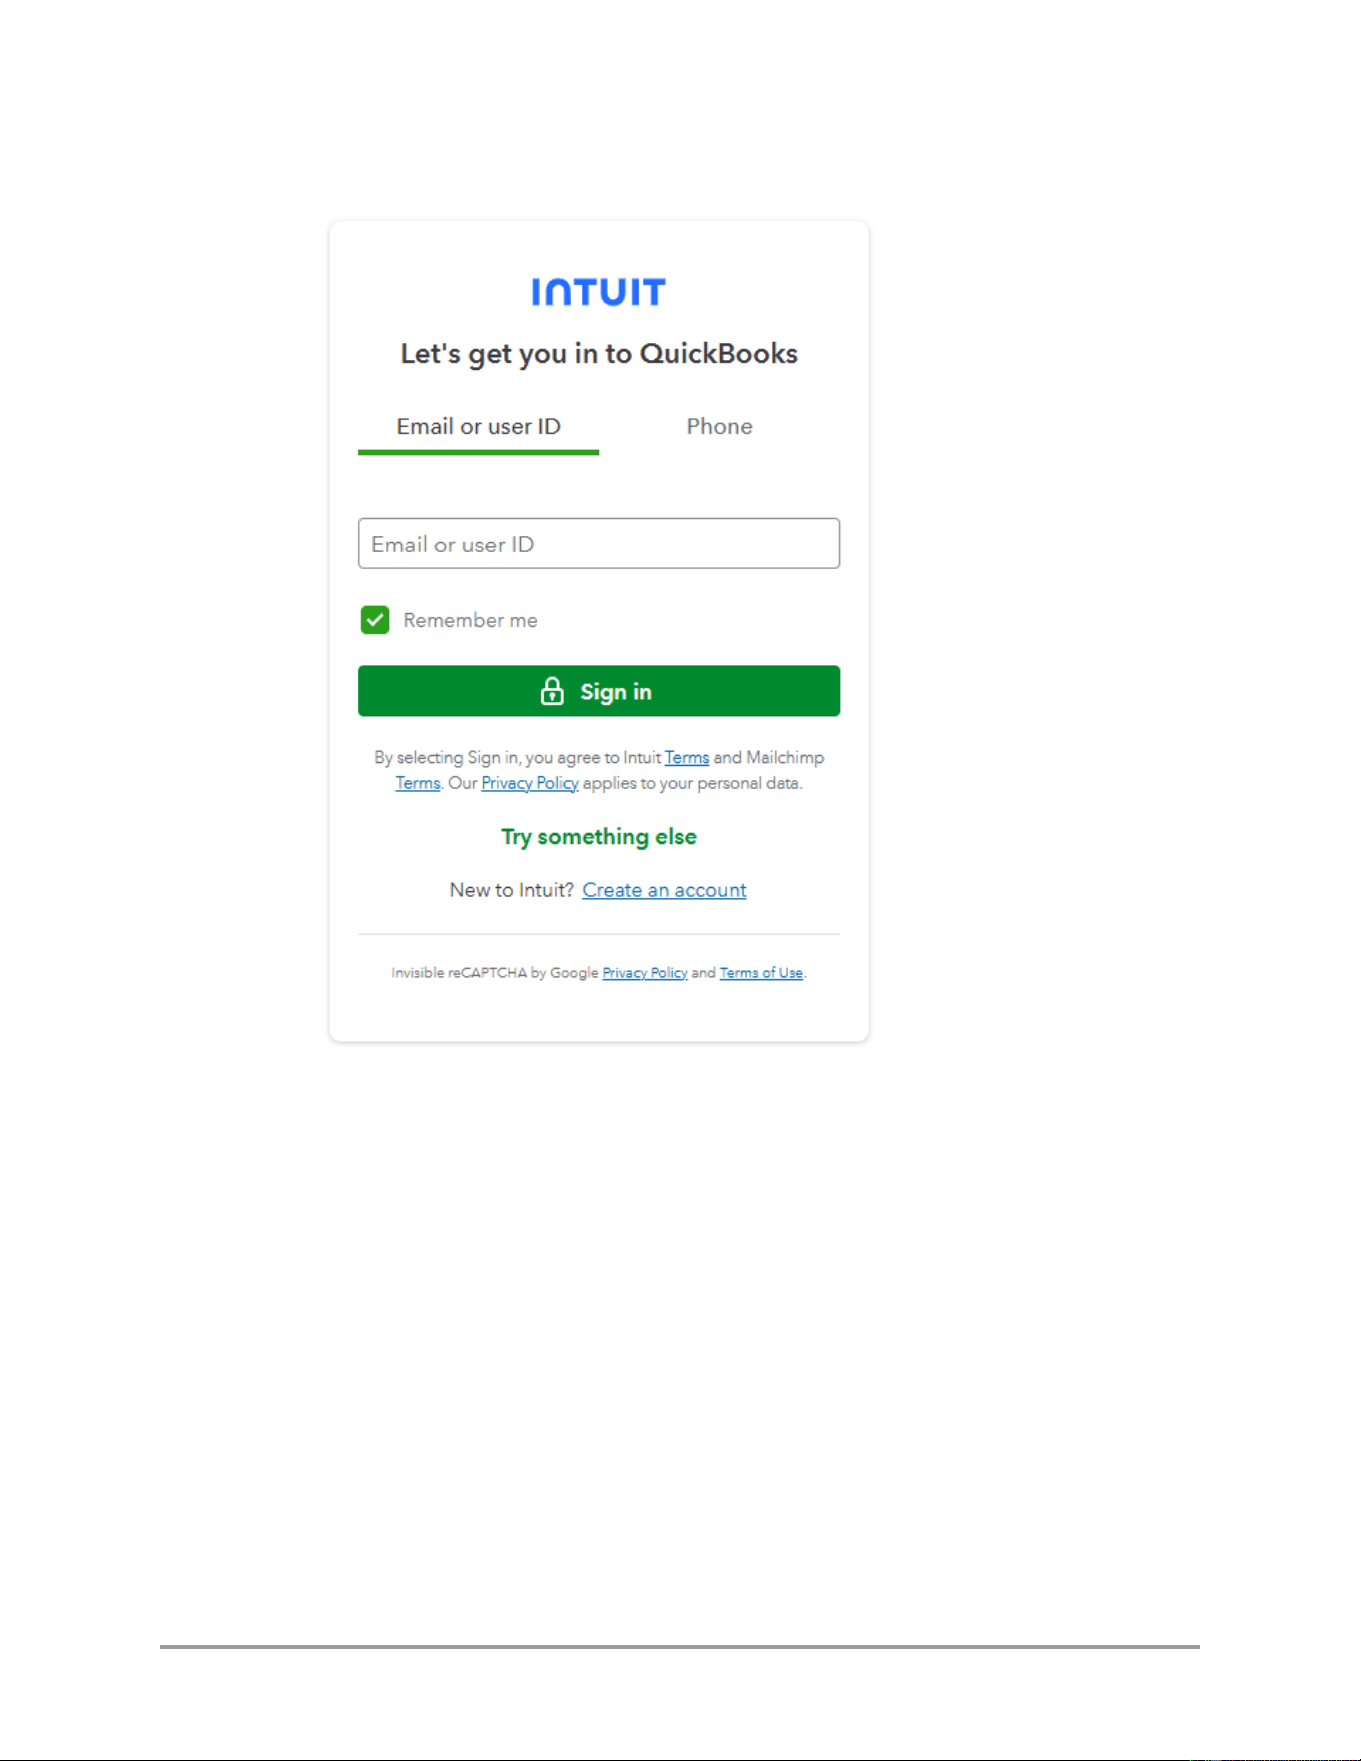
5.2 Enter your QuickBooks Online credentials and sign in to QuickBooks Online.
Note: Actual display of Intuit credentials screen may differ from that shown
above. The credentials screen is developed and maintained by Intuit and may
change without notice. Contact Intuit if you have questions about the sign in
process.
Note: QuickBooks Online may require a separate verification code sent to you by
Intuit. Select the method to receive the code, and enter the code when received.
The methods available depend on what information you supplied when setting up
your QuickBooks Online account.
60 CaptureOnTouch Scan to QuickBooks Online Plugin Pro User’s Guide
5.3 If you have multiple accounts, select the company for which you are submitting
expenses. See Intuit documentation for procedures on selecting a specific
company to use with the plugin.
5.4 When requested, click [Connect] to authorize the plugin to access your
QuickBooks Online account.
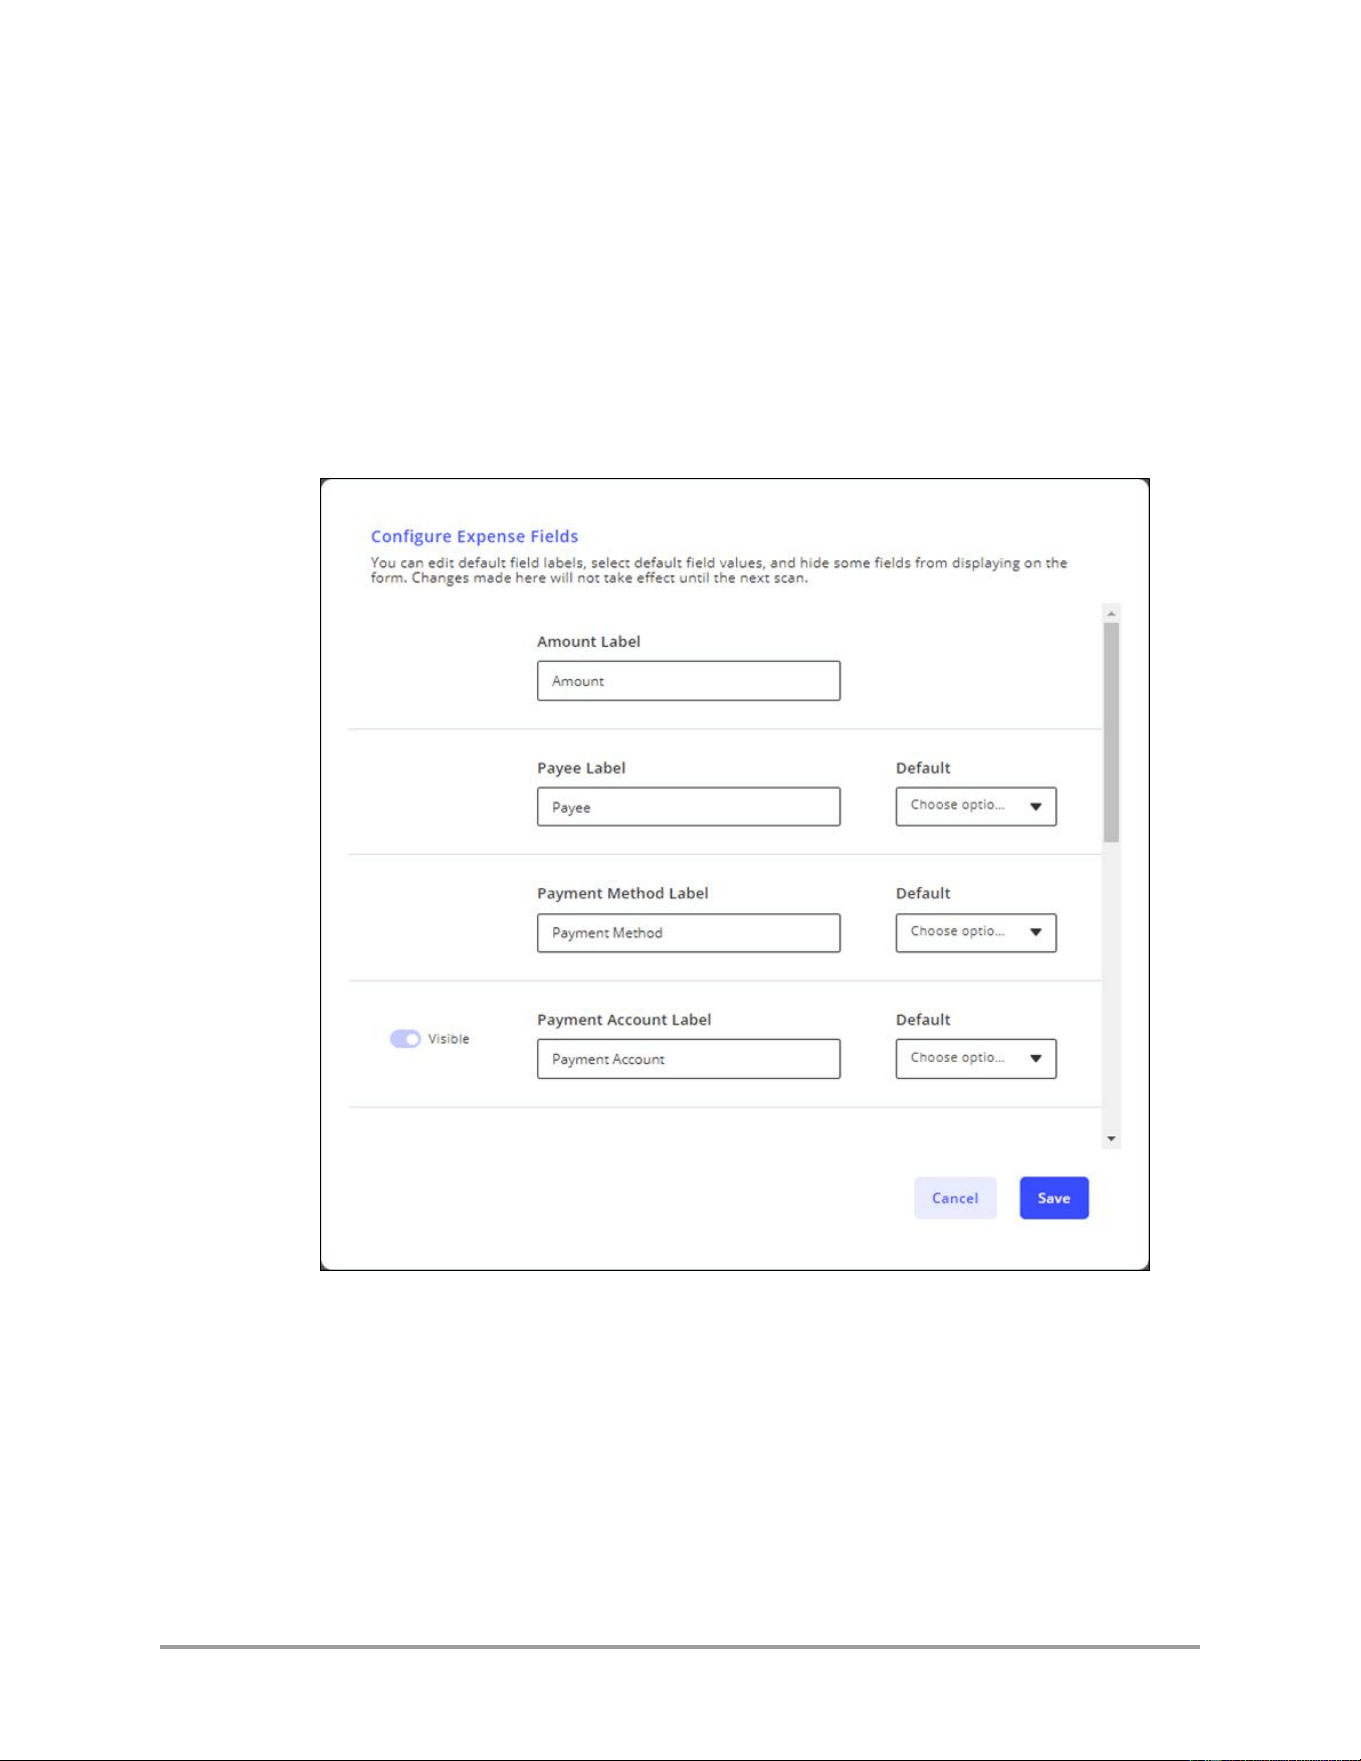
5.5 If you have not previously set up the account with the plugin (i.e. it is a shared
account which can be accessed by multiple people), the plugin requires you to
specify default names and values for expense fields.
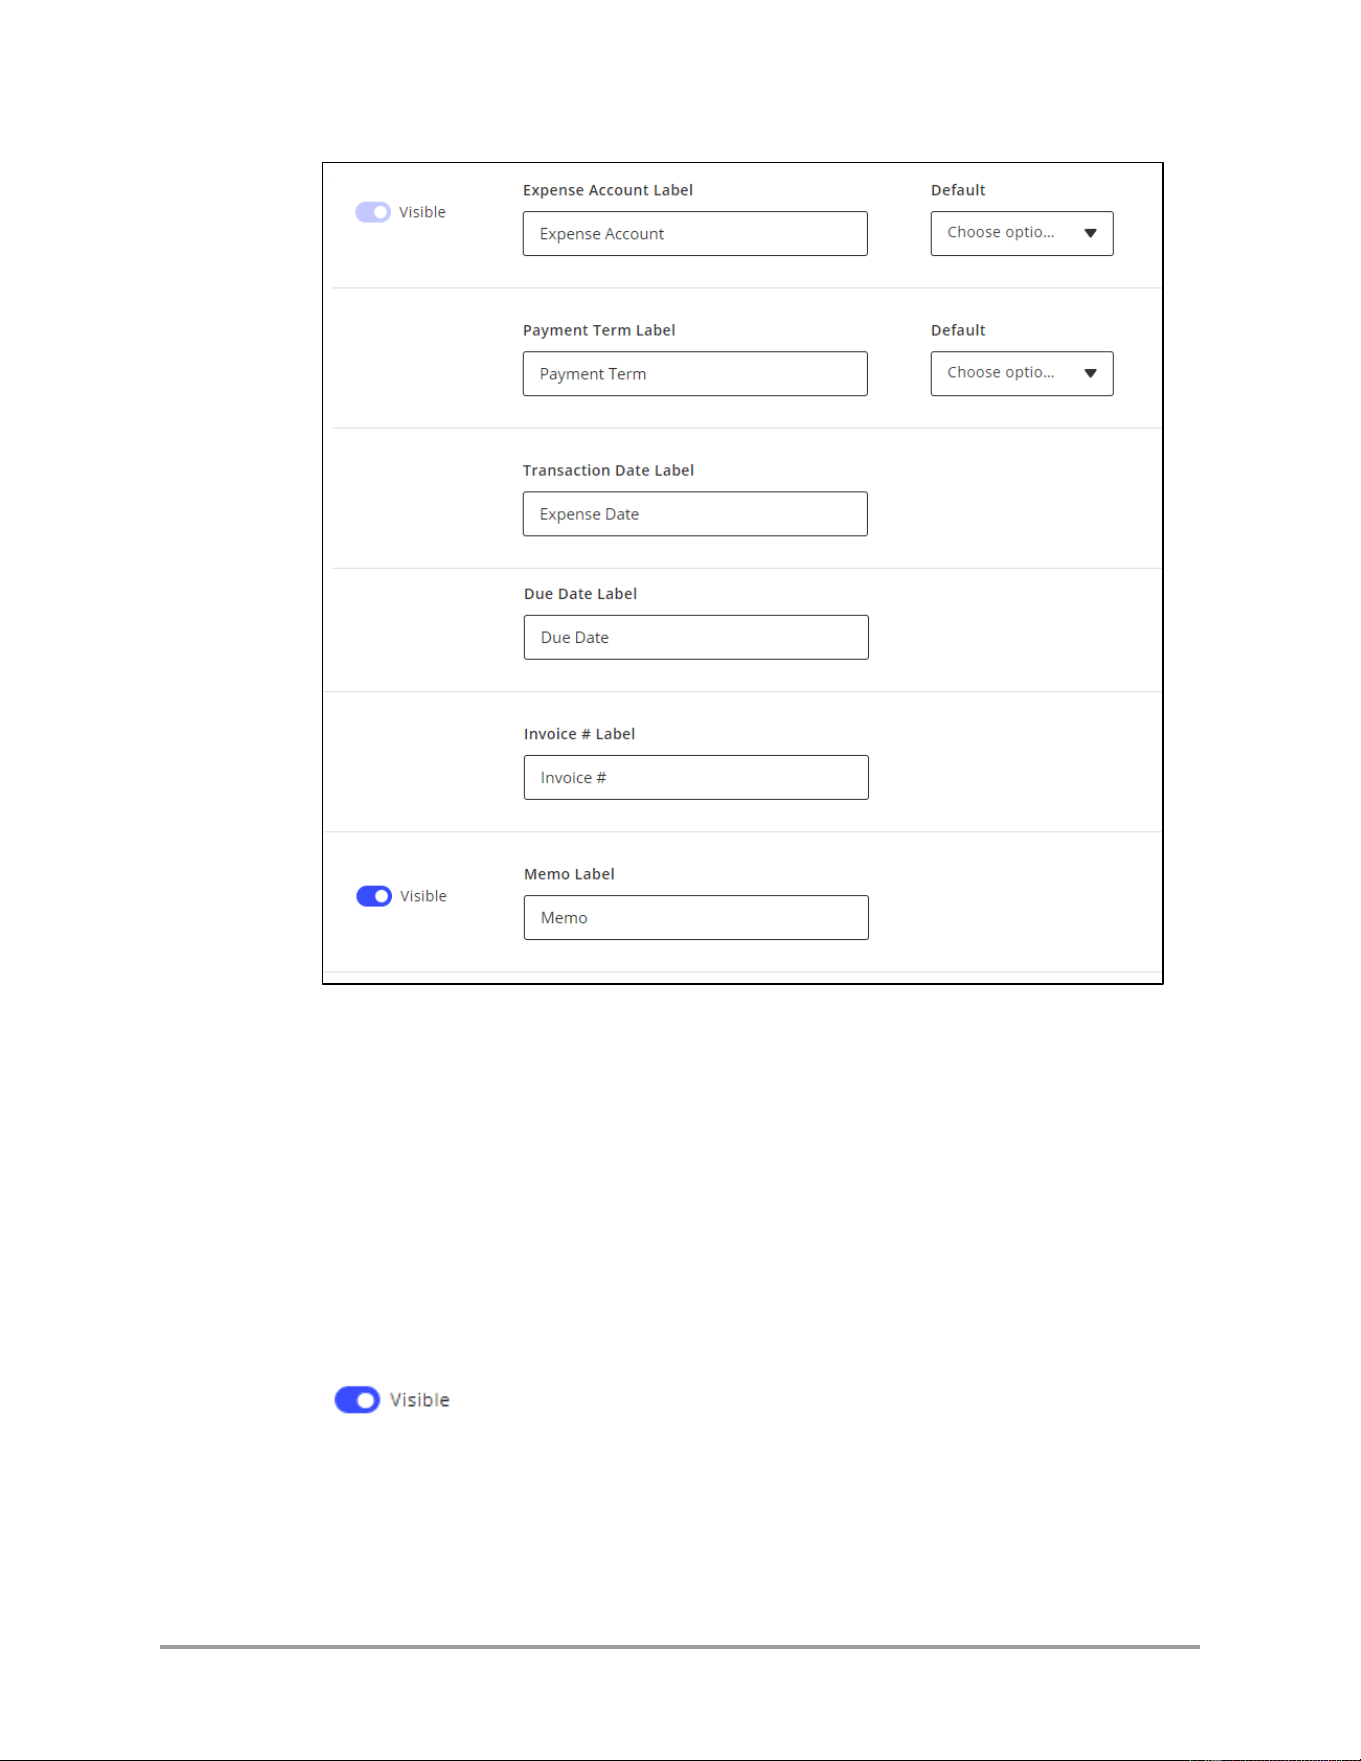
CaptureOnTouch Scan to QuickBooks Online Plugin Pro User’s Guide 61
The text boxes represent how the labels appear when preparing a scan to transfer
to QuickBooks Online. The default pull-down lists are for the default values that
first appear when you edit the scan. Default values for the Amount, Payee, and
Transaction/Expense Date are overridden with any values detected (via OCR) by
the plugin.
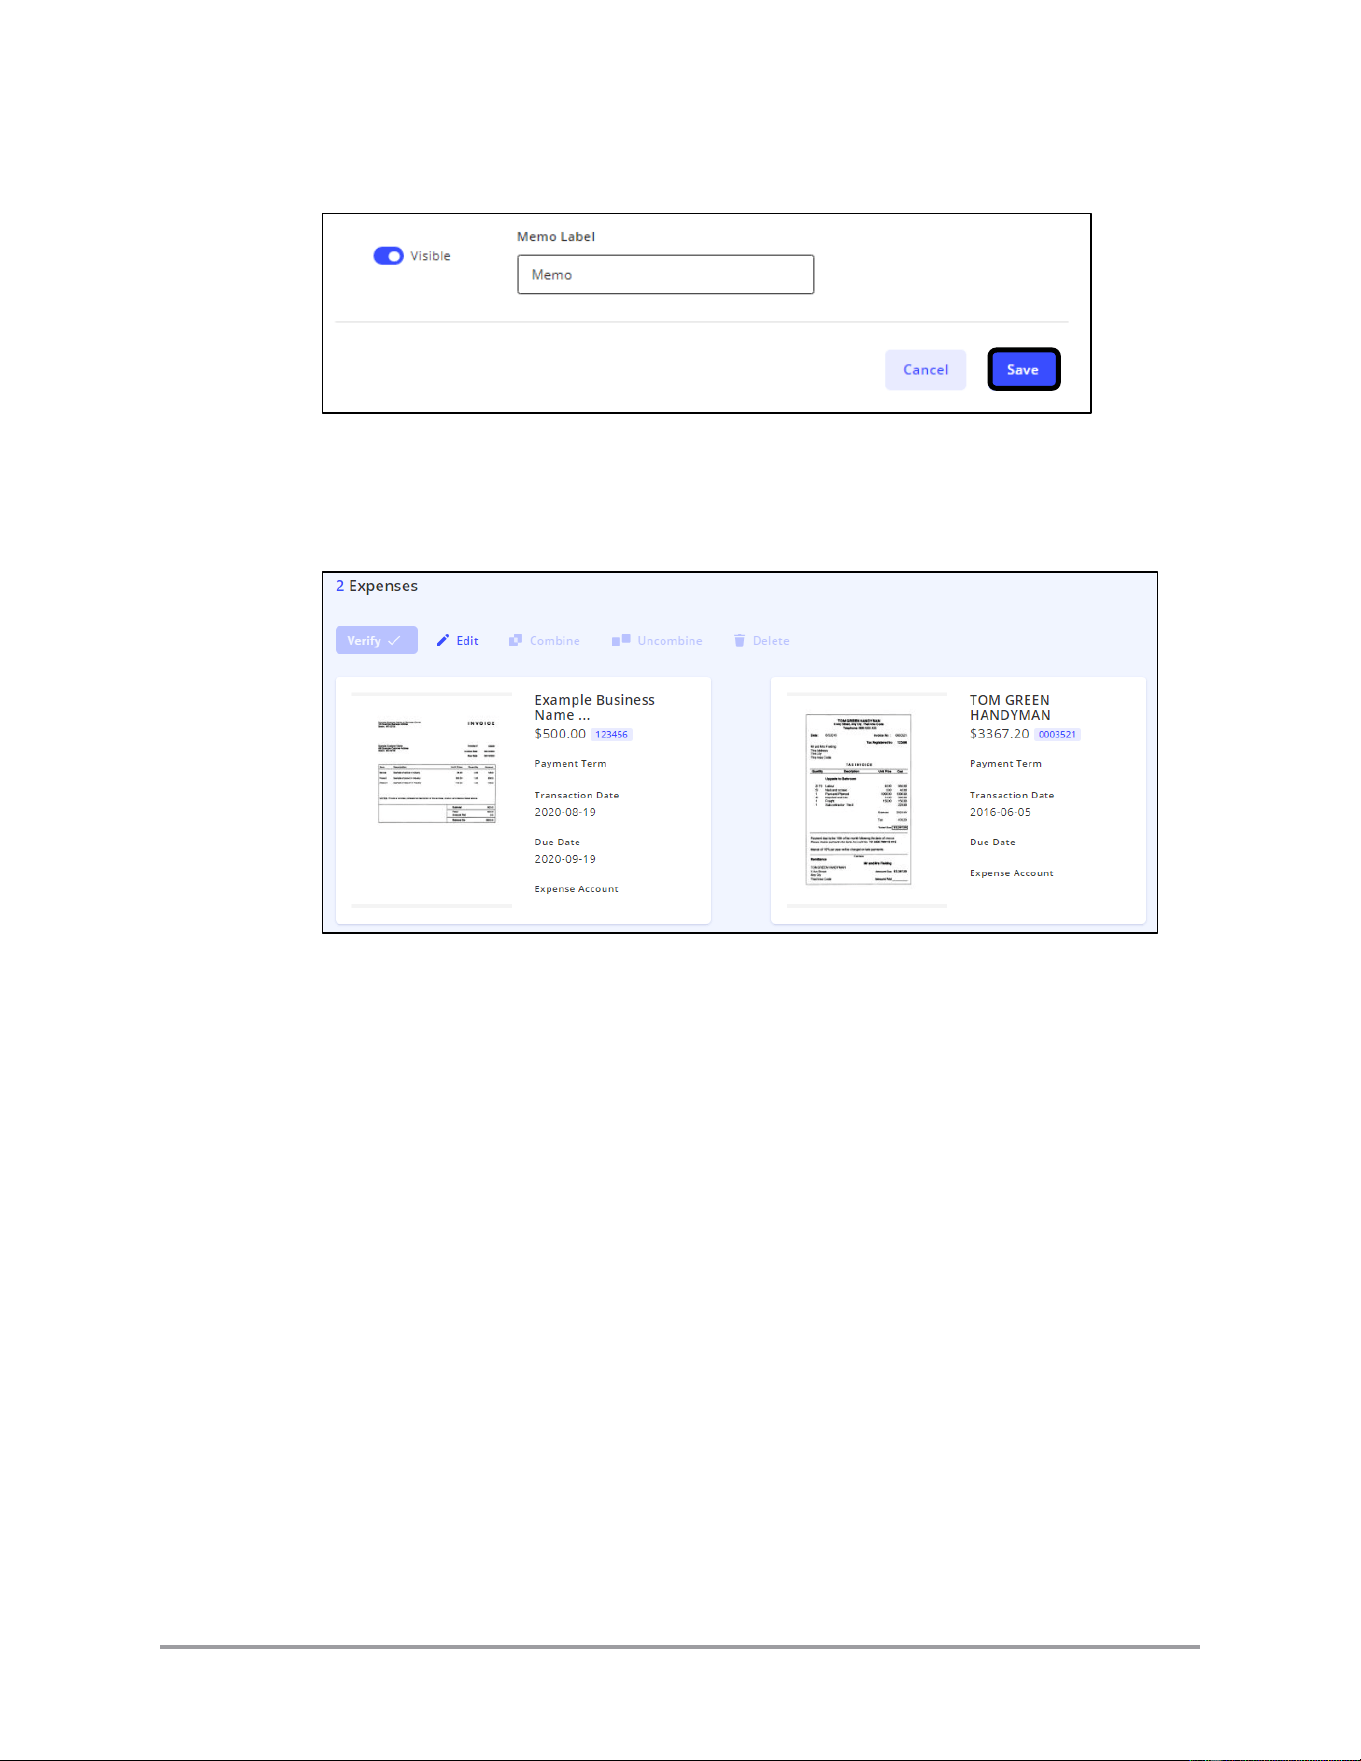
Note: You can choose to not display some optional fields when the plugin is
processing the scans. Optional fields which can be hidden are identified by the
[Visible] switch. Click the switch to enable and disable display of the field in the
plugin. The setting has no effect on field display in other pages, such as “View
All” or “Send Confirmation”.
62 CaptureOnTouch Scan to QuickBooks Online Plugin Pro User’s Guide
5.6 Click [Save] to save your configuration.
Click [Cancel] to return to the previous screen.
Your documents appear and are ready to edit before submitting to QuickBooks
Online.
CaptureOnTouch Scan to QuickBooks Online Plugin Pro User’s Guide 63
3.3 Editing and Submitting Documents for Your
QuickBooks Online Account
This section describes how to edit your document properties and send it to QuickBooks
Online.
Note: This section assumes you have already scanned your documents and are currently
viewing them in the plugin. Refer to the previous section for instructions on scanning
documents using CaptureOnTouch.
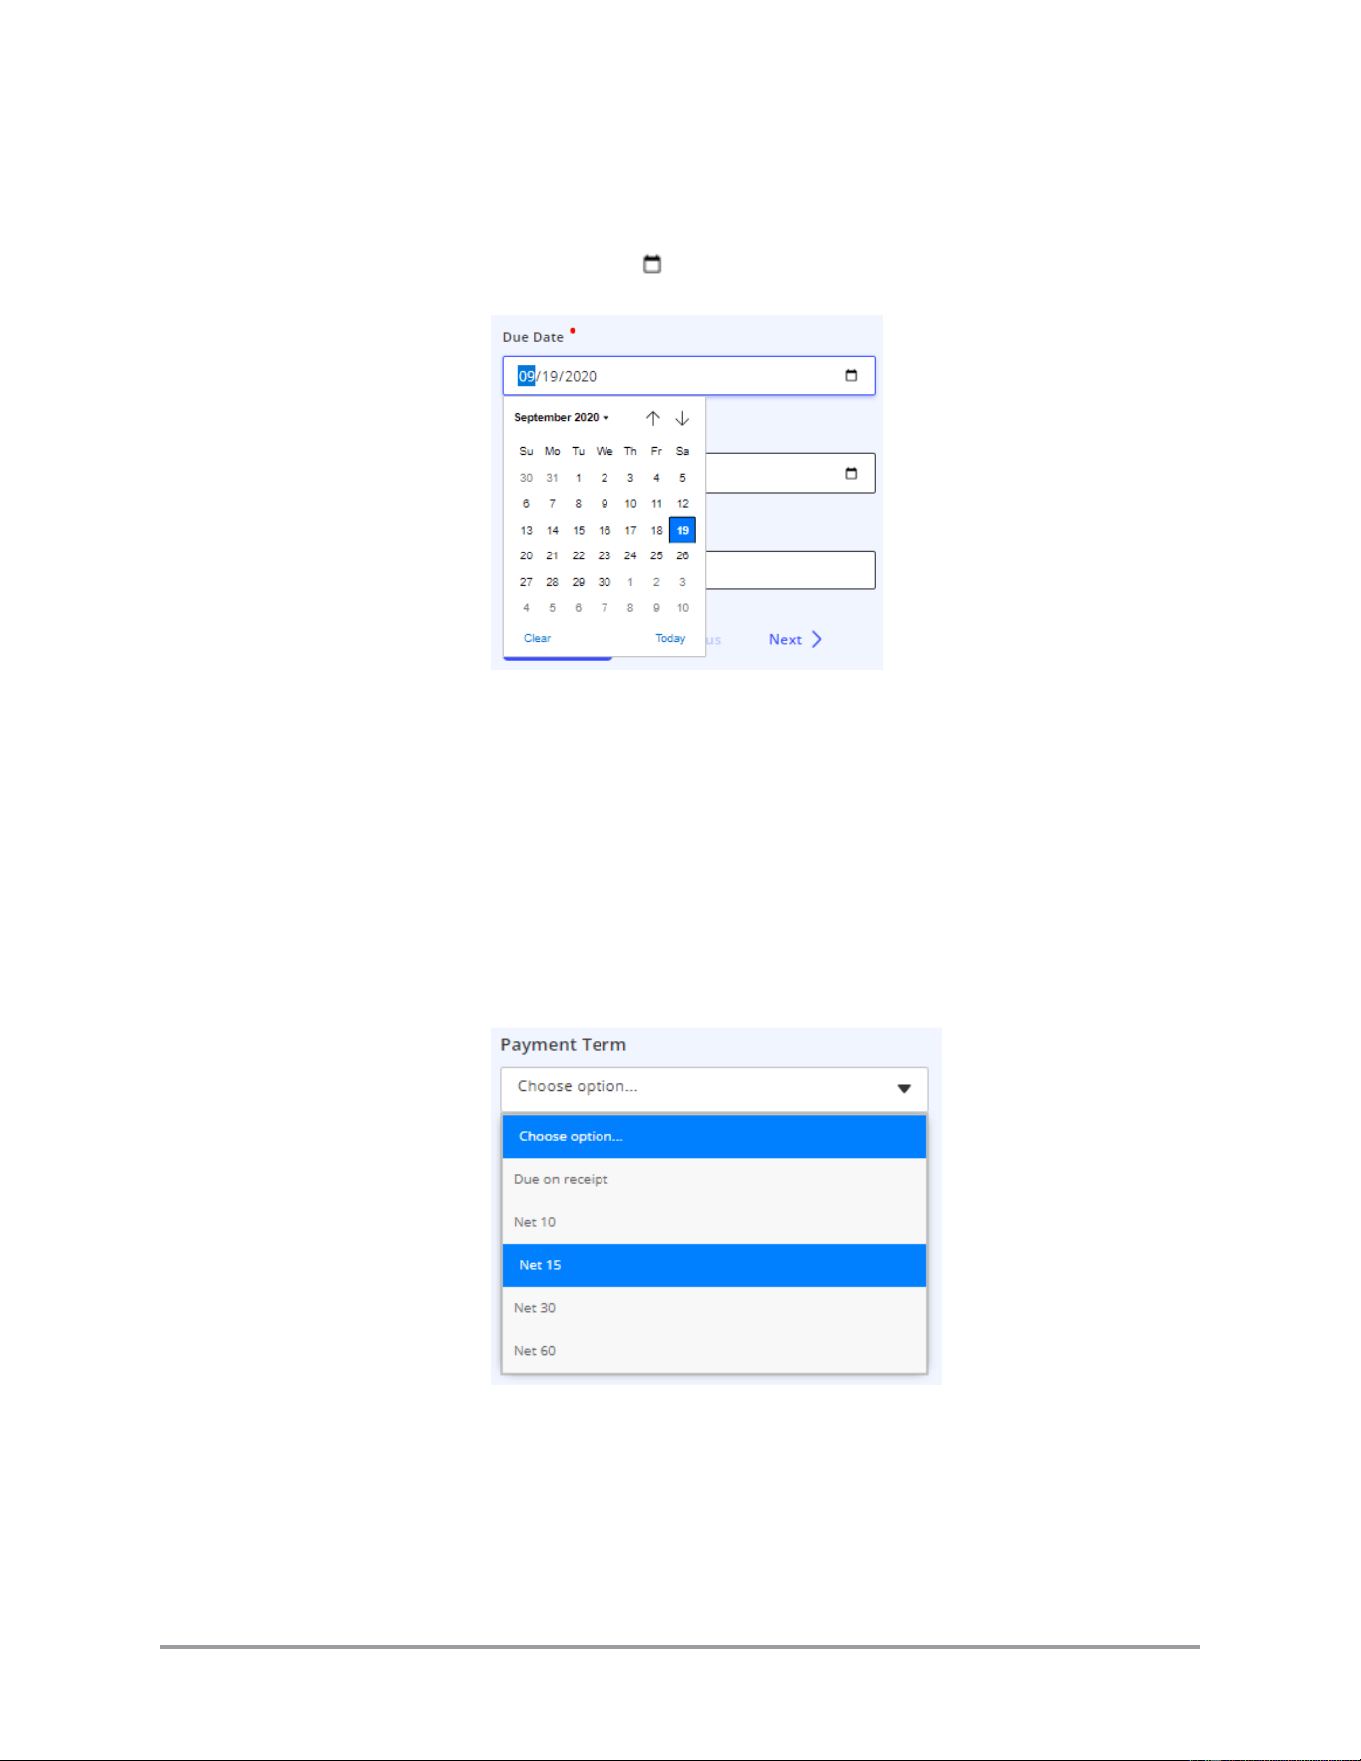
The plugin uses OCR (Optical Character Recognition) to read the scanned documents and
attempts to automatically extract the document creator, transaction date of the document,
due date (invoice only), invoice number (invoice only), payment method, the total cost,
and determine the type of document (receipt or invoice).
The plugin labels any fields which it could not read from the document. You will have to
manually enter these fields during document editing.
You must edit each document to fill in necessary information before you can submit them
to QuickBooks Online.
Automatically taken from
scanned document
Could not be read from
scanned document

64 CaptureOnTouch Scan to QuickBooks Online Plugin Pro User’s Guide
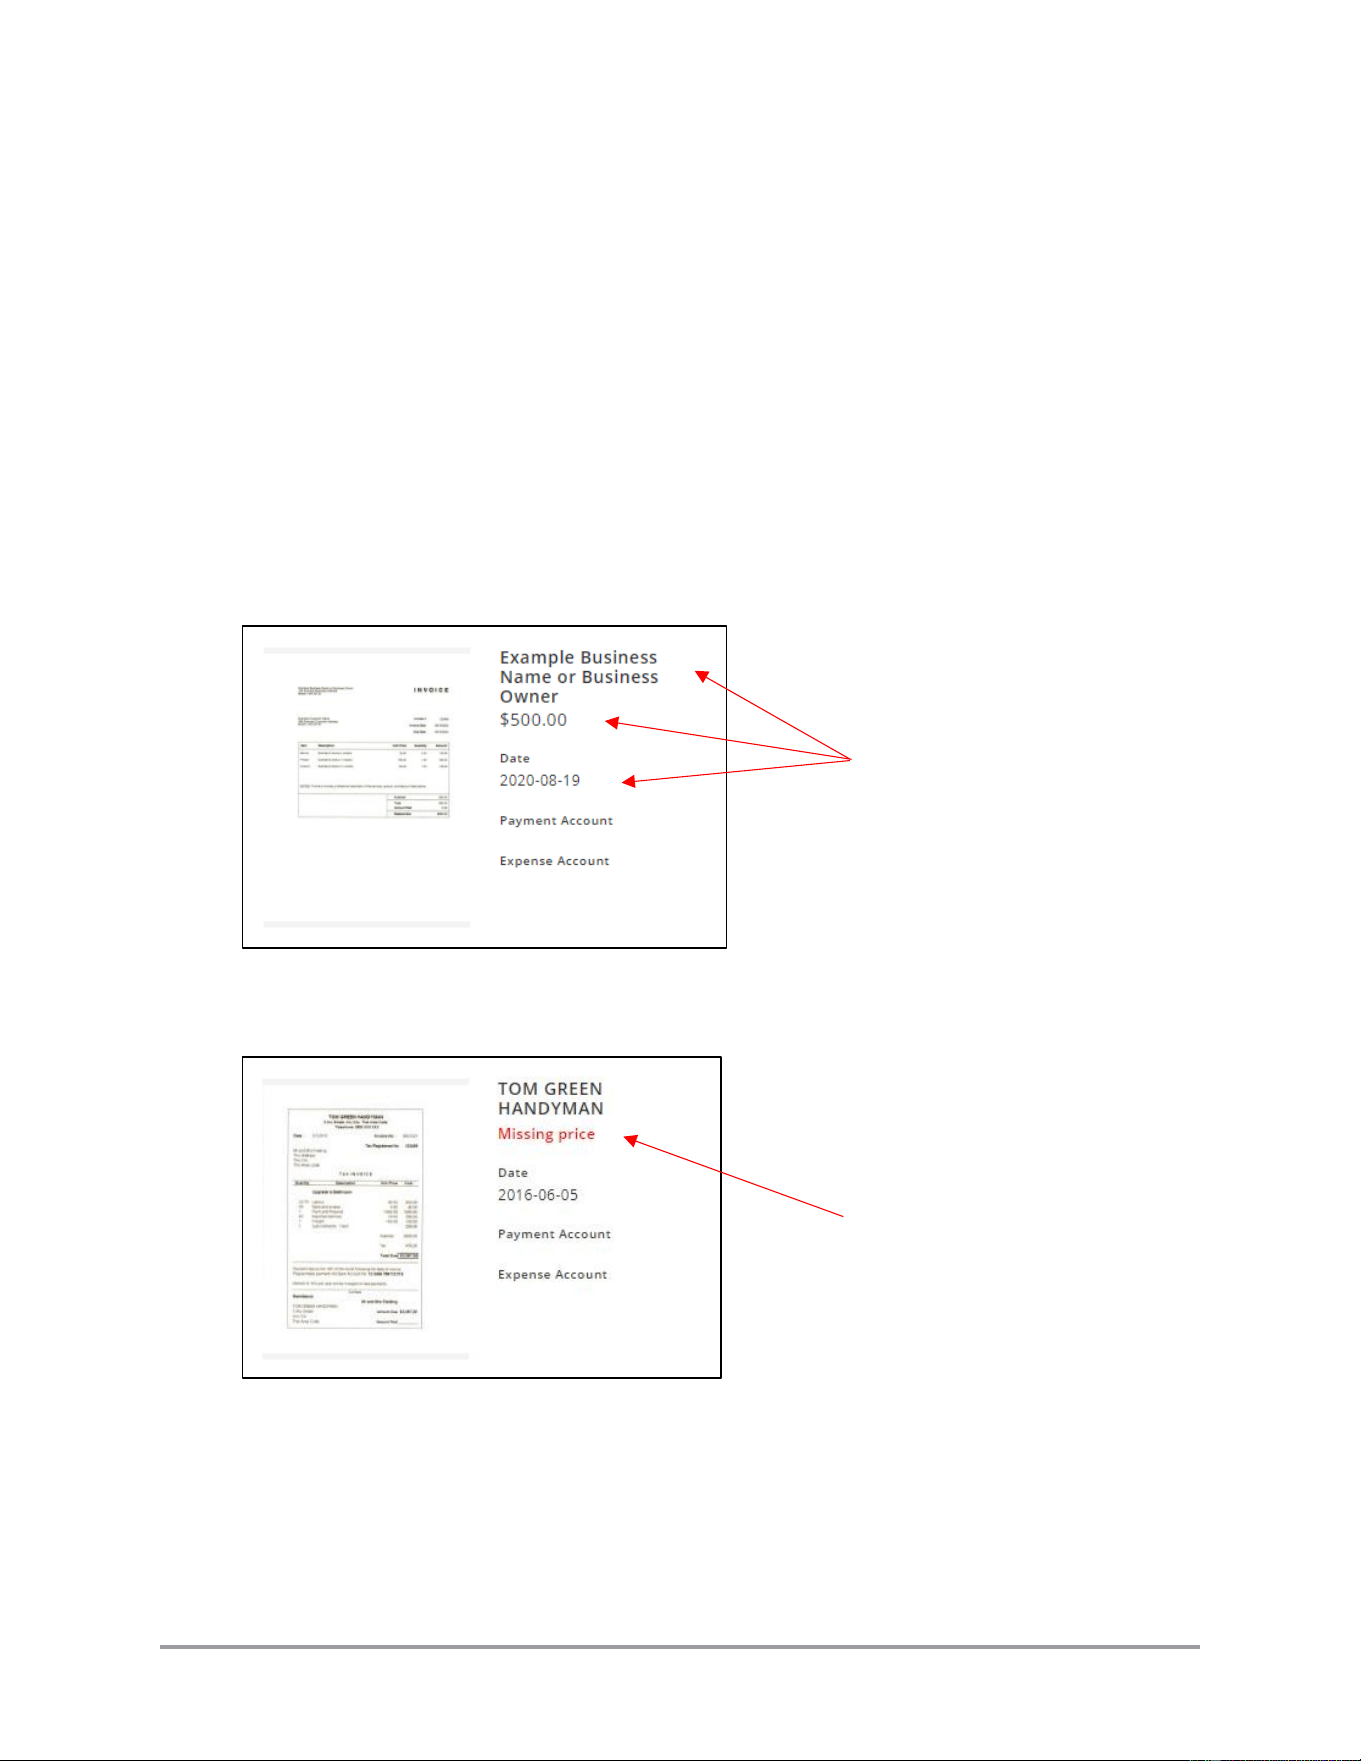
The plugin displays the number of documents ready for submission in the upper right
corner of the window.
Note: The field names below are the defaults set by the plugin. During initial installation
and configuration, you or someone else who has access to the account may have changed
the field names as they will display in the plugin.
For the imageFORMULA R40 Receipt Edition, the plugin tries to identify the type of
document scanned: a receipt or an invoice. The type of information retrieved from the
document depends on the document type identified.
The [Send to QuickBooks] button does not enable until you have at least one document
ready to send. The following fields must be filled out before it is considered ready for
upload to QuickBooks:
Amount:
An open text field for the total amount of the expense. The
plugin automatically attempts to extract this information.
Payee:
An open text field for the company/person who produced the
expense. The plugin automatically attempts to extract this
information.
Payment Method:
(Receipt only) A pull-down menu for the payment method
used to pay for good/services. The available options depend
on how you have configured your QuickBooks Online
account. The plugin automatically attempts to extract this
information.
Payment Account:
(Receipt only) A pull-down menu for the account from which
the funds will be pulled. The available options depend on how
you have configured your QuickBooks Online account.
Expense Account:
A pull-down menu for the type of expense account from
which the funds will be pulled. The available options depend
on how you have configured your QuickBooks Online
account.
CaptureOnTouch Scan to QuickBooks Online Plugin Pro User’s Guide 65
Due Date:
(Invoice only) The date in MM/DD/YY format for the day on
which the expense is due. The plugin automatically attempts
to extract this information. If this is not available, click on the
calendar icon and select the date.
The following fields are optional:
Invoice #:
(Invoice only) An open text field for the invoice number. The
plugin automatically attempts to extract this information.
Payment Term:
(Invoice only) A pull-down menu for the payment term. The
available options depend on how you have configured your
QuickBooks Online account. The plugin automatically
attempts to extract and match this information with the
account options.
66 CaptureOnTouch Scan to QuickBooks Online Plugin Pro User’s Guide
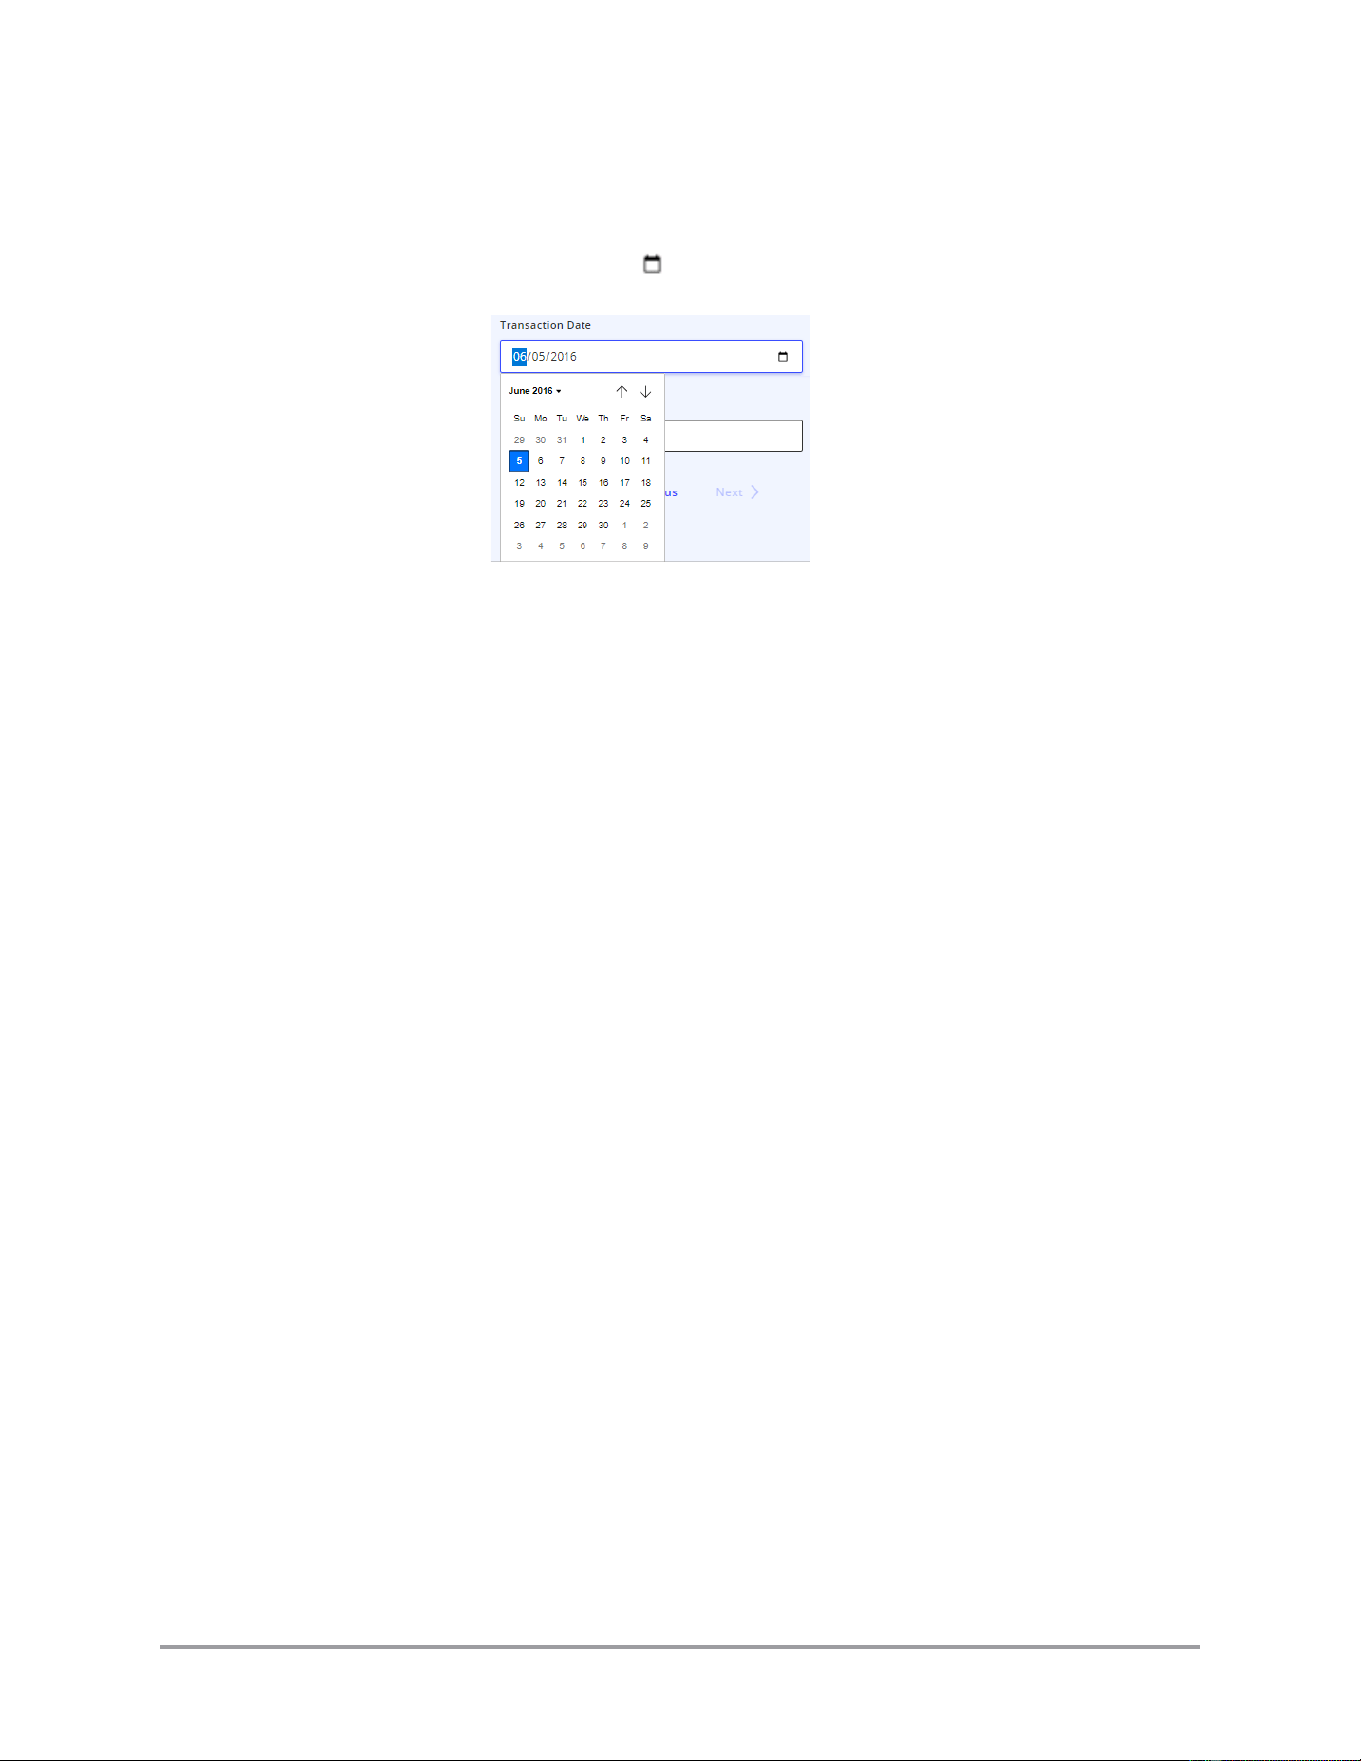
Transaction Date:
The date in MM/DD/YYYY format for the day on which the
document was printed. The plugin automatically attempts to
extract this information. If this is not available, click on the
calendar icon and select the date.
Click on the up and down (Windows) arrows to change
months. Click on the date to select it.
If you do not enter a date, the plugin sends the current date to
QuickBooks Online.
Memo:
An open text field for the company/person who produced the
document. The plugin automatically attempts to extract this
information.
Follow the procedures below to edit and submit your documents.
Note: You have a maximum of approximately six (6) hours from when you scan the
documents to when you need to submit them to QuickBooks Online. If you take too long
between scanning and submitting, the process times out and you will have to re-start the
procedure starting with scanning.
CaptureOnTouch Scan to QuickBooks Online Plugin Pro User’s Guide 67
1. For each document, click on the document to edit ➞ click [Edit]. When selected, the
document is surrounded by a blue border.
No document is selected
Blue border of selected document
68 CaptureOnTouch Scan to QuickBooks Online Plugin Pro User’s Guide
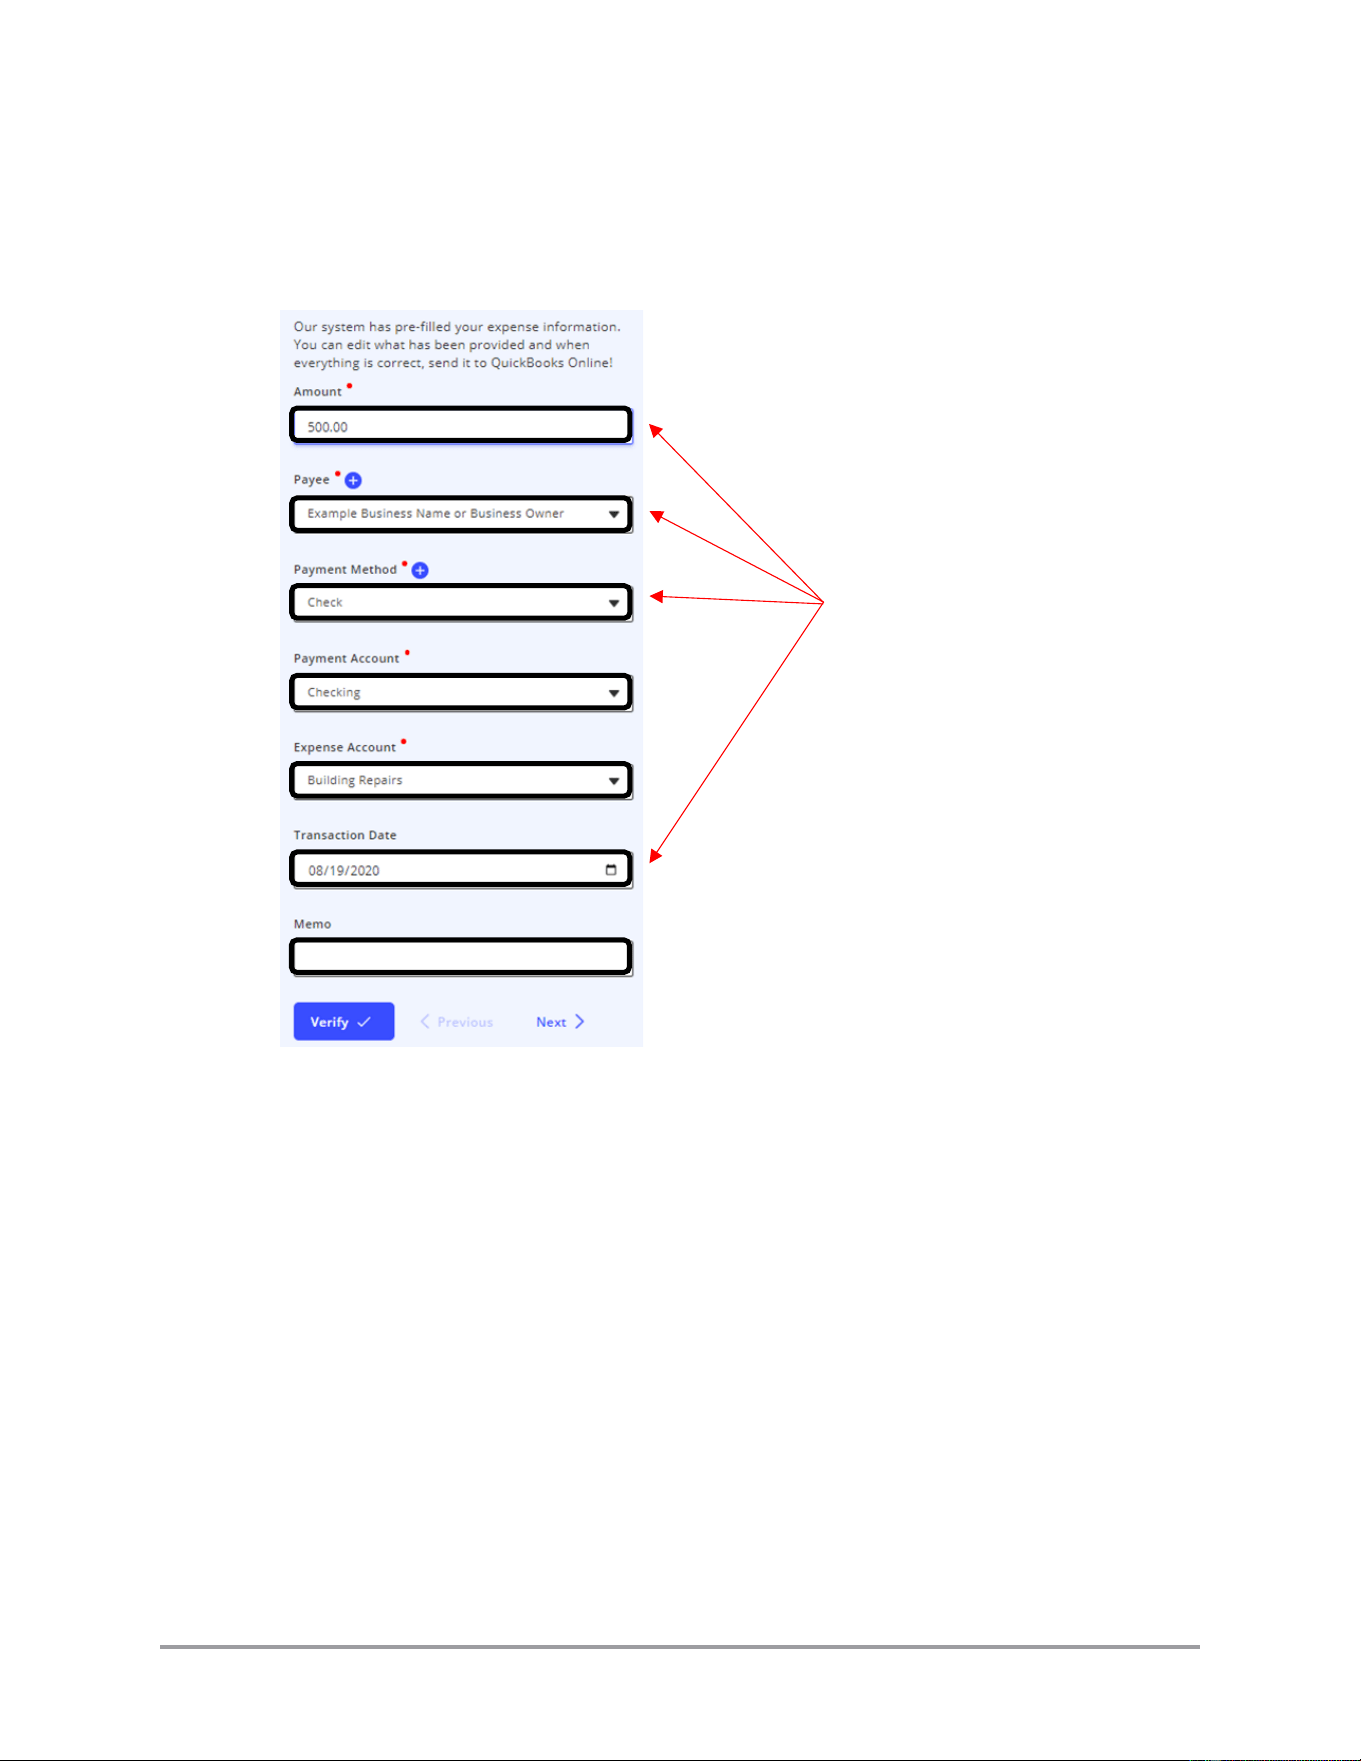
2. Fill in all of the information in the form fields. Fields with an asterisk next to their
names are required. All other fields are optional. The plugin attempts to pre-fill the
Amount, Invoice number (Invoices only), Payee, Payment Method (Receipts only),
and Transaction Date fields using OCR.
Plugin tries to pre-fill these
fields using OCR (for a
receipt)
CaptureOnTouch Scan to QuickBooks Online Plugin Pro User’s Guide 69
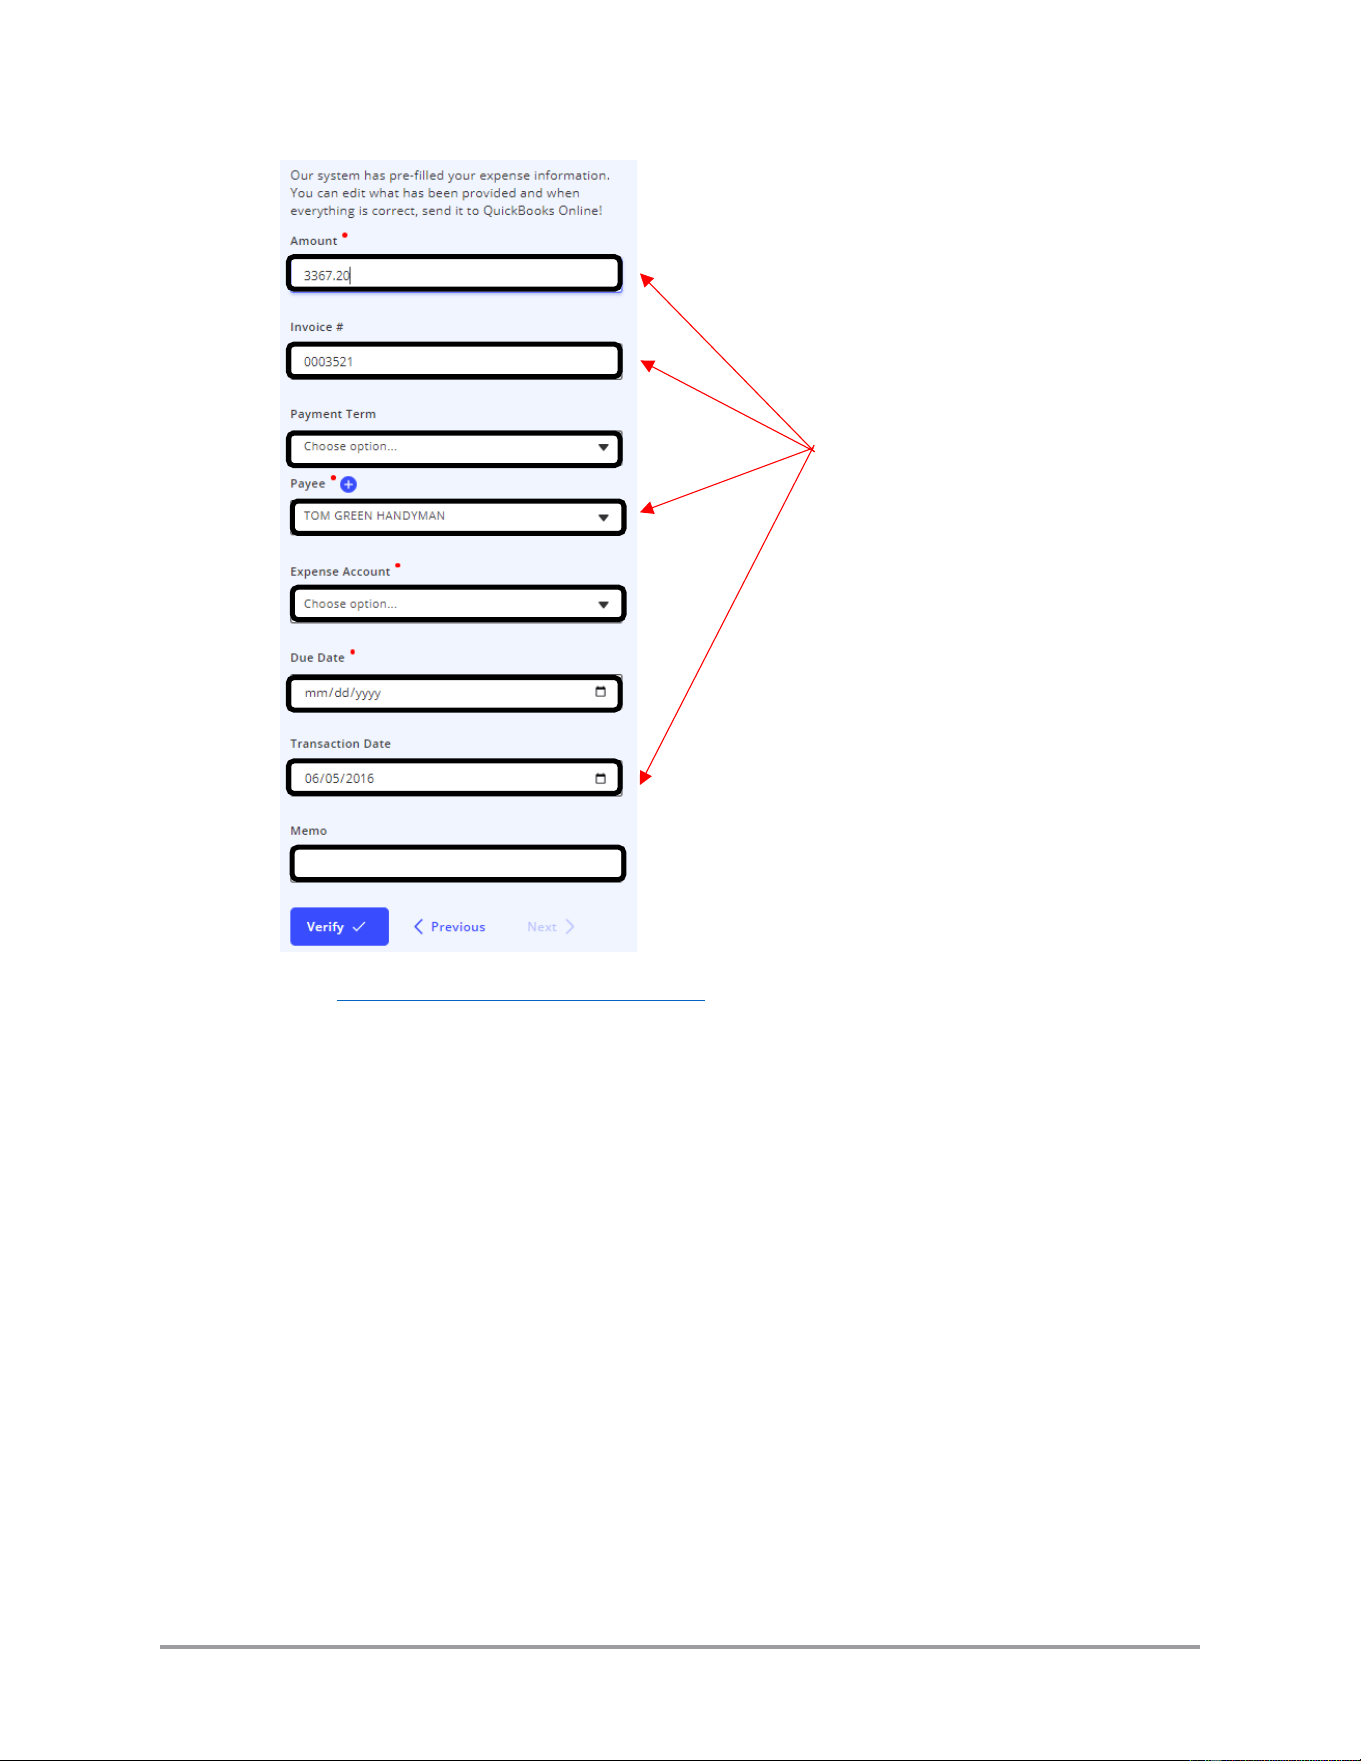
See “Appendix A: Plugin PDF Controls,” on page 79 for details on available PDF
controls. These controls do not affect the documents or the fields associated with
them.
Plugin tries to pre-fill these
fields using OCR (for an
invoice)
70 CaptureOnTouch Scan to QuickBooks Online Plugin Pro User’s Guide
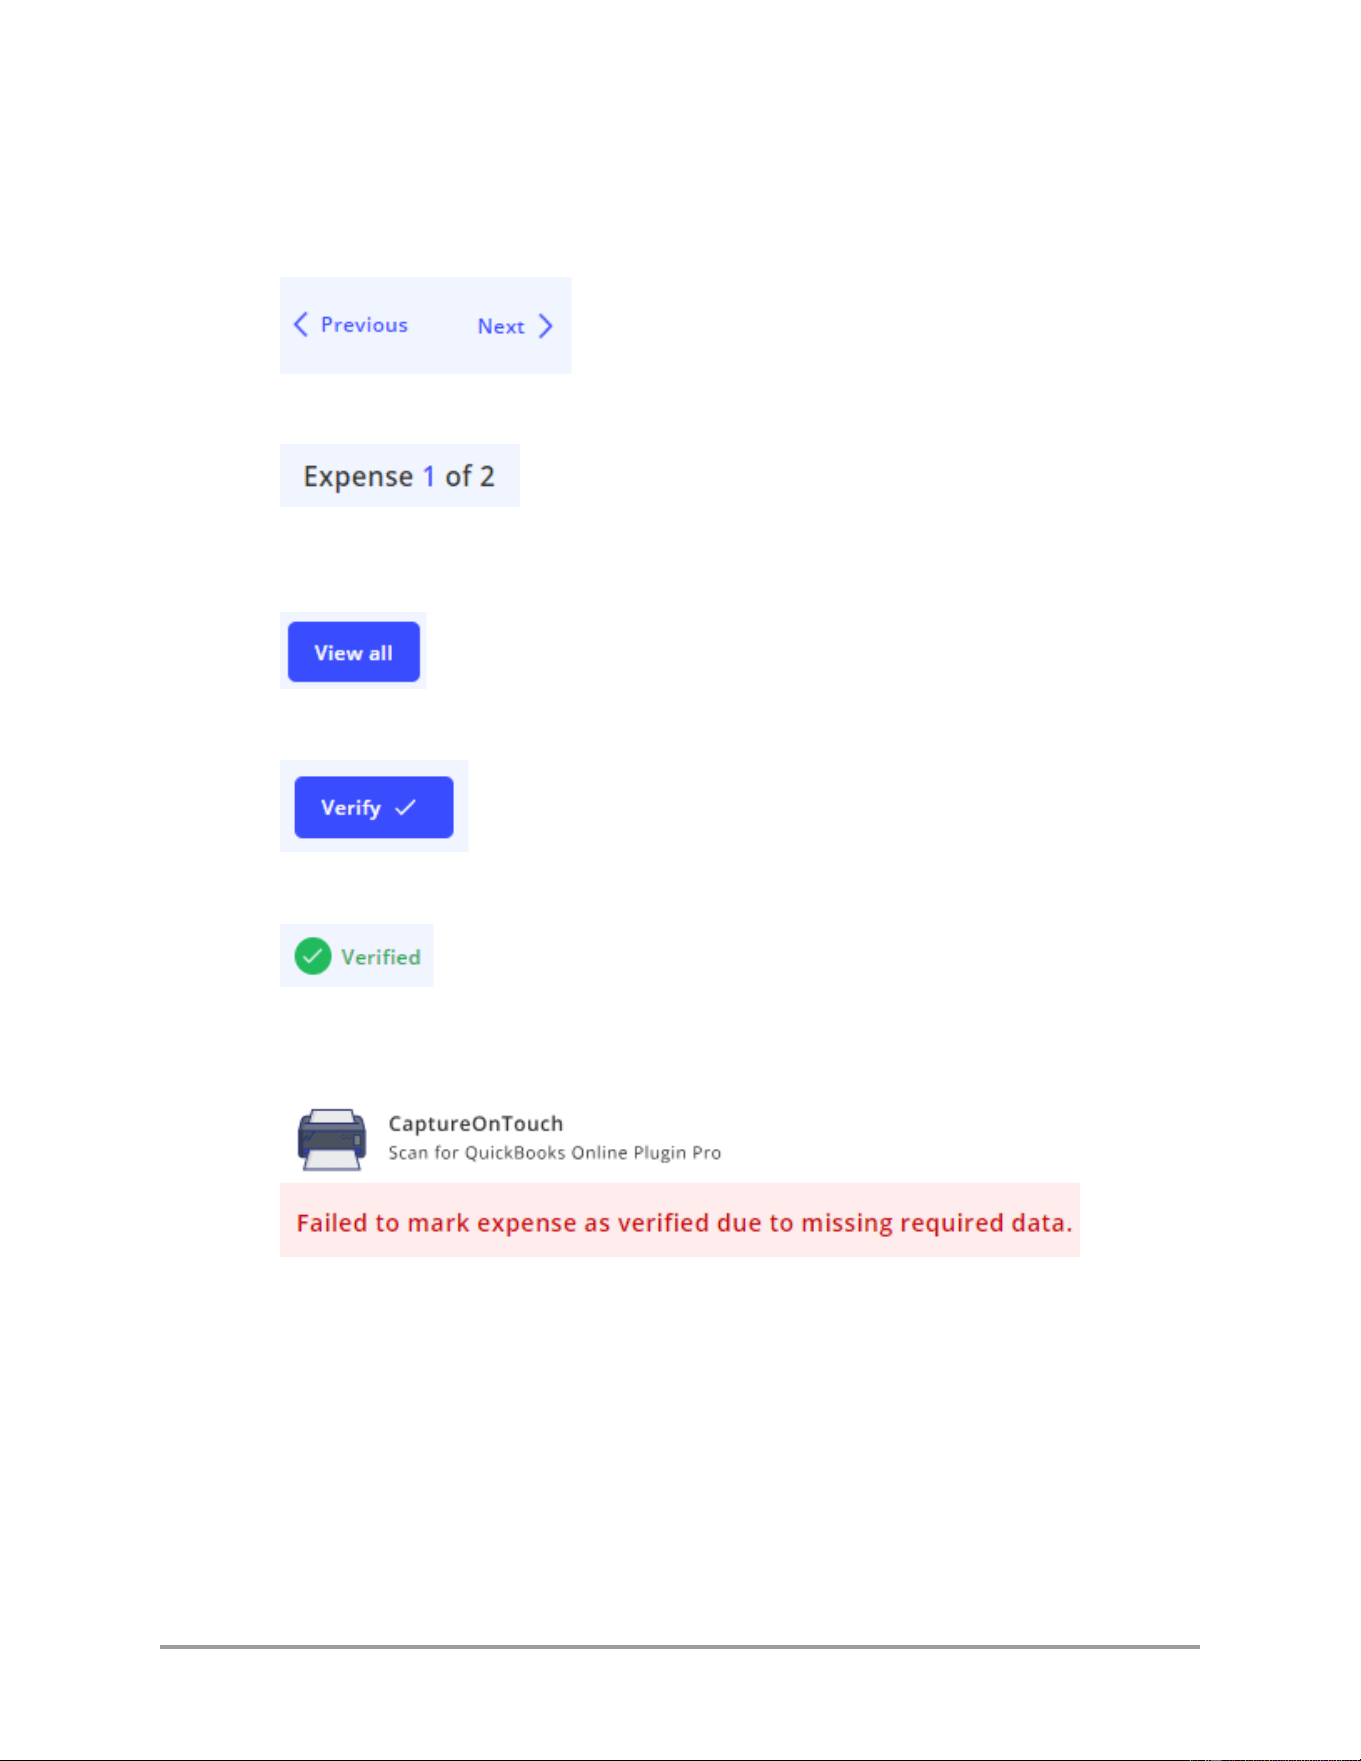
3. If you have multiple documents, you can click on [Previous] and [Next] to navigate
between them. You do not have to complete one document before navigating to
another one.
The expense number displays in the top left corner of the window.
Note: Alternatively, you can navigate between multiple documents by clicking on
[View all], selecting the next document to edit, and clicking on [Edit]
4. Click [Verify] when you are done filling out the form fields.
The status in the upper left corner of the window changes to Verified.
If you are missing any required field data, the plugin notifies you after you click
[Verify].
CaptureOnTouch Scan to QuickBooks Online Plugin Pro User’s Guide 71
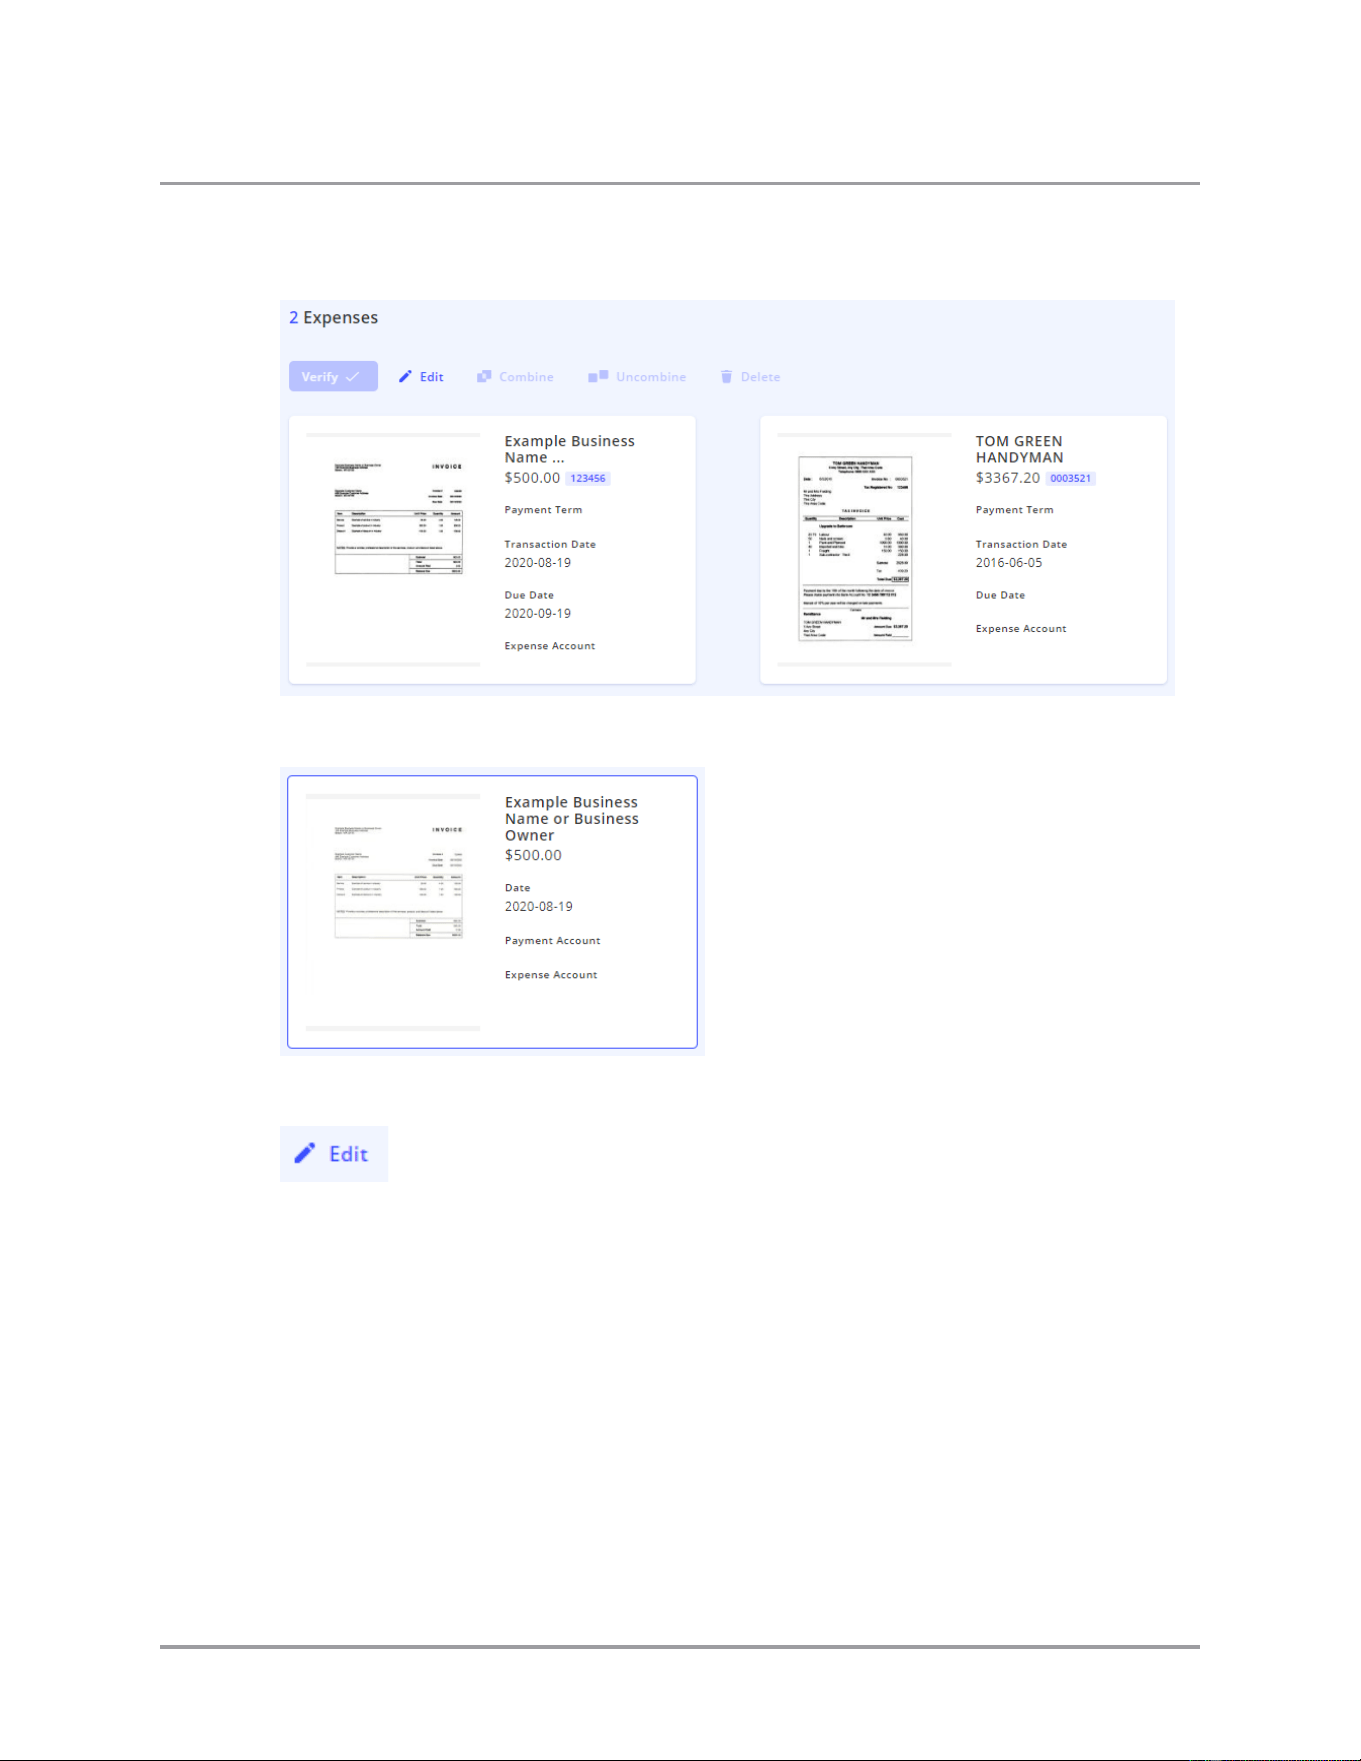
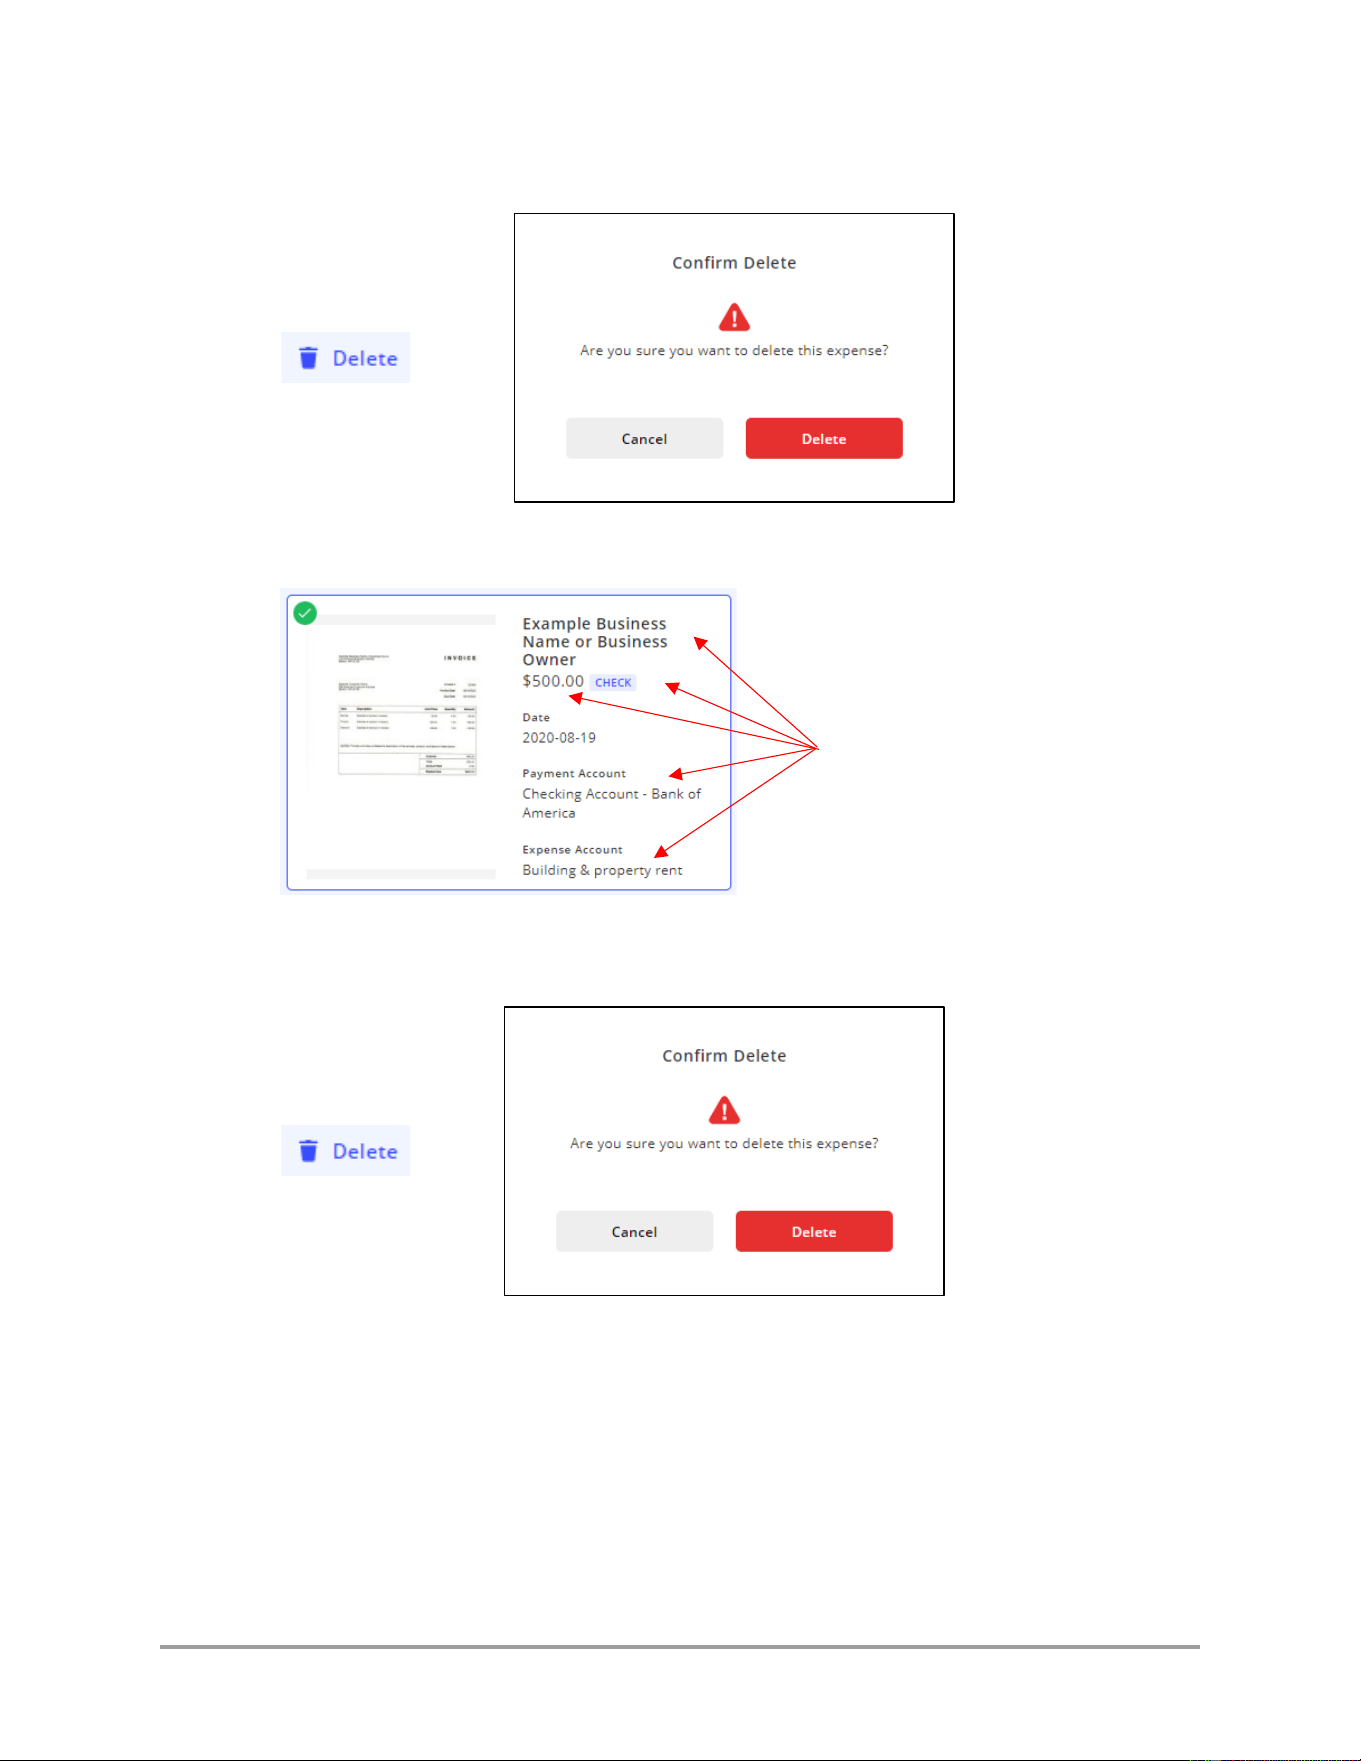
If you want to delete the current document, click [Delete] and confirm.
➞
5. Re-verify that all information has been entered correctly and completely for all
documents.
If you want to delete a document before submitting the entire scan job, click on the
document to select it ➞ click [Delete] and confirm.
➞
All fields should have entries
(date is optional)
72 CaptureOnTouch Scan to QuickBooks Online Plugin Pro User’s Guide
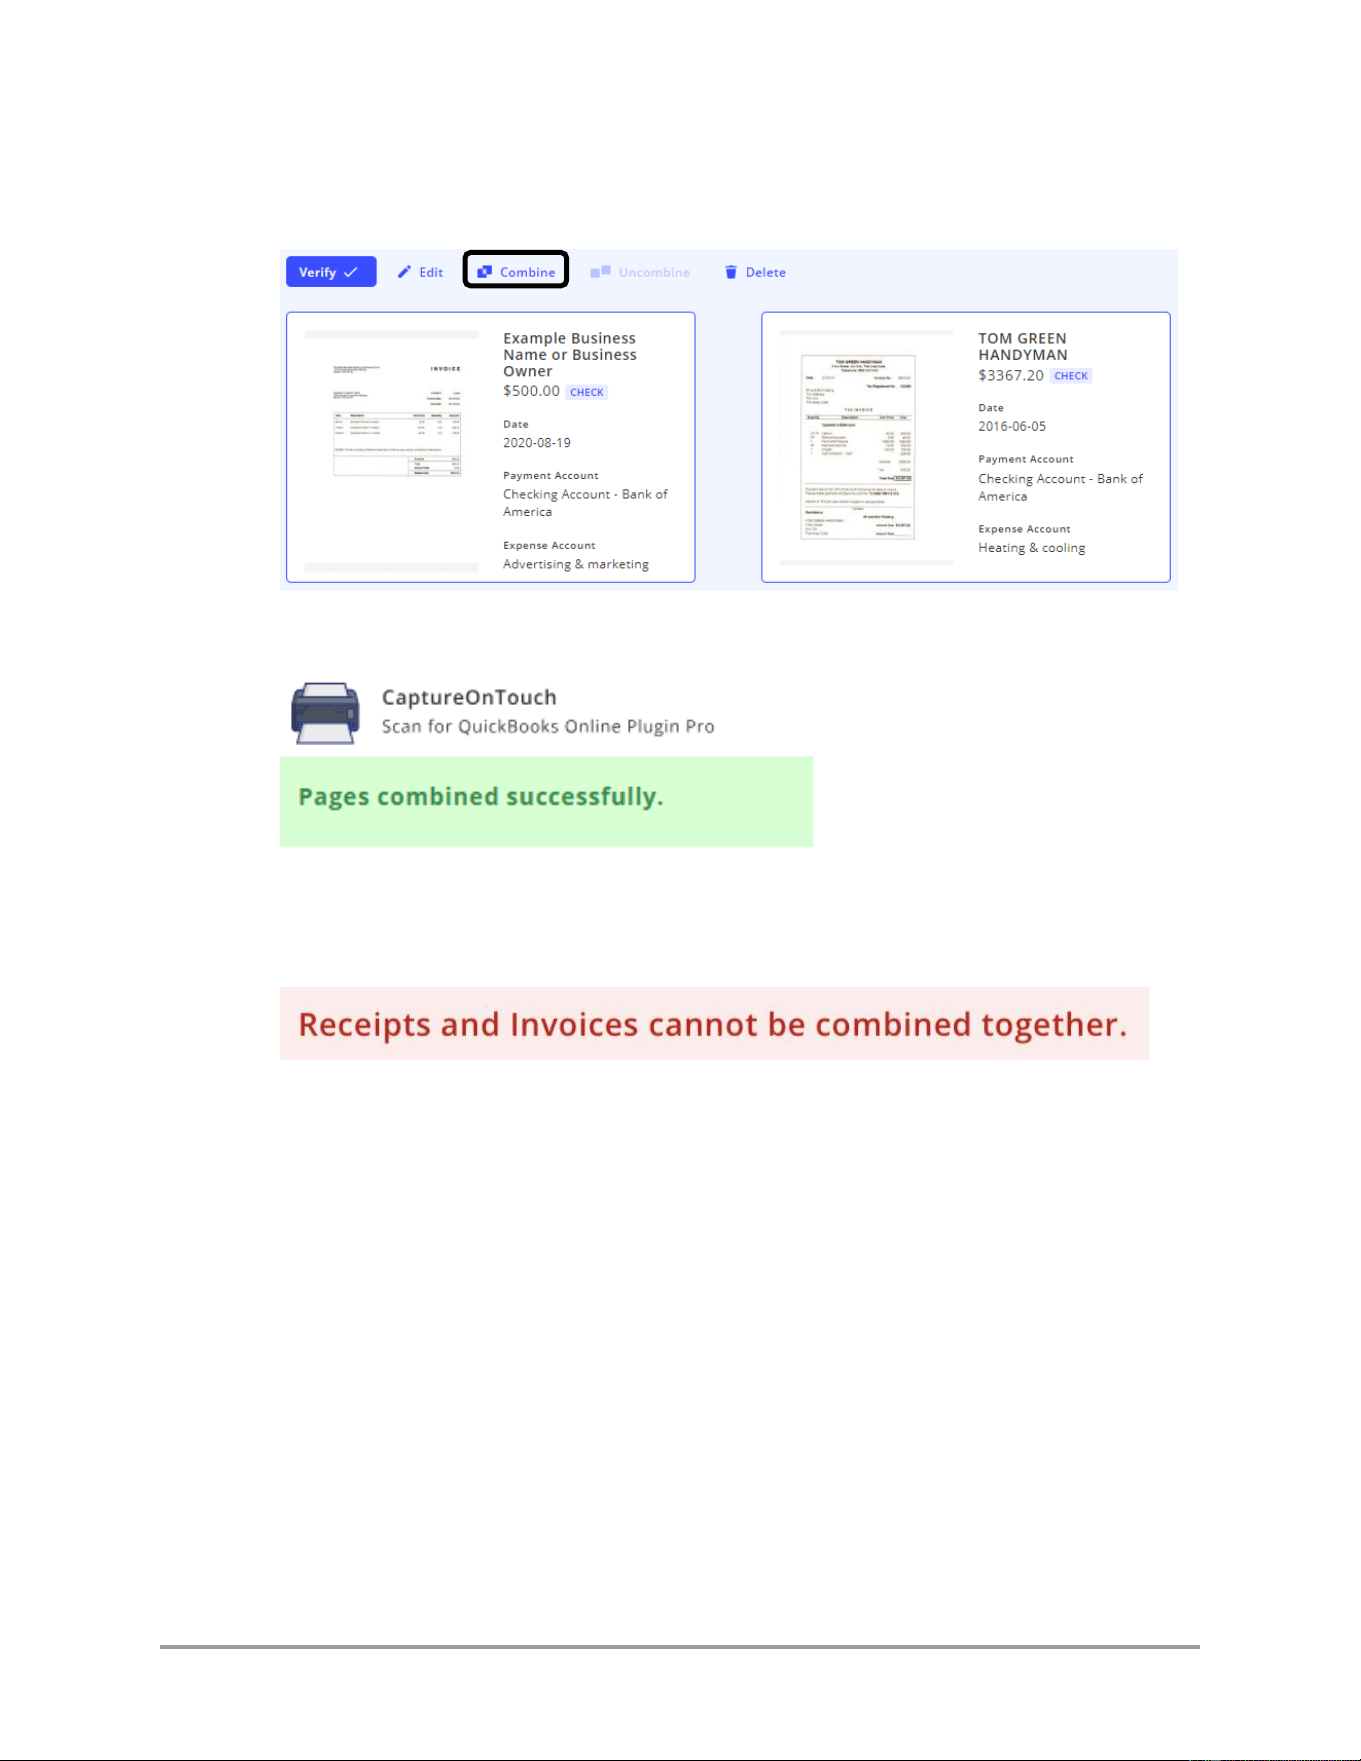
6. If you have a document with multiple pages and want to combine them into one PDF
document, click on the documents to select them ➞ click on [Combine].
The plugin displays when the documents are combined.
Note: Only documents of like type (Invoices and Receipts) can be combined. The
plugin displays an error if you try to mix Invoices and Receipts into a combined
document.
CaptureOnTouch Scan to QuickBooks Online Plugin Pro User’s Guide 73
Note: Combined documents are considered a single document when sent to
QuickBooks Online. A single set of fields apply to all pages in the combined
document. If you combine documents, be sure all of the documents use the same field
information for identification information (such as Payee, Payment Method, Payment
Account, Expense Account, and Date). In a case such as a multi-page hotel receipt,
the plugin will usually extract the total from the last page of the scan. When
combined, the plugin uses the total from the last page by default (when a total is not
listed on the other pages).
If you are using the combine feature to group individual documents, you must
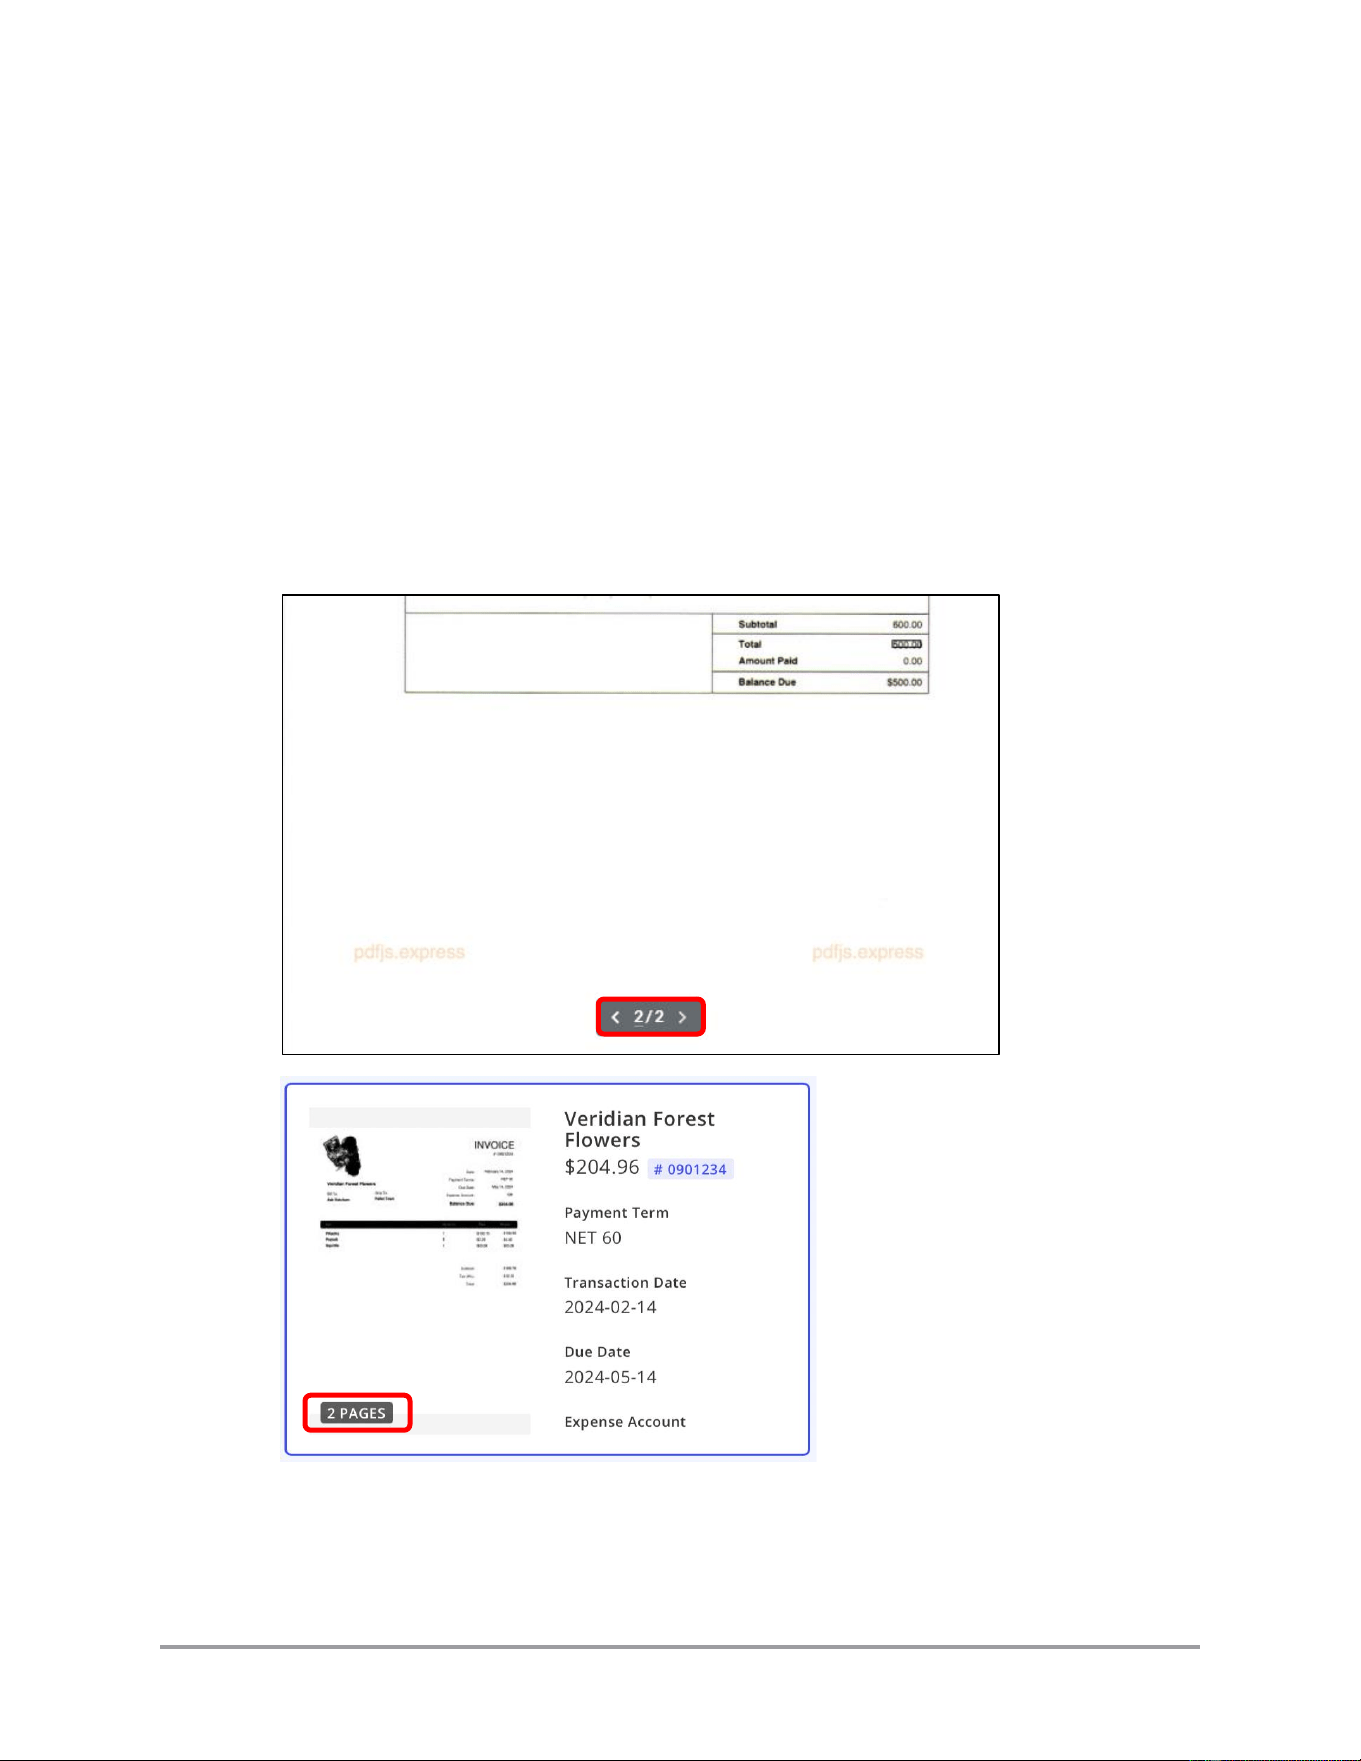
manually enter the sum total of all pages in the combined document. You can scroll
through the pages in the combined document by mousing over the page image and
using the left and right arrows at the bottom of the image.
74 CaptureOnTouch Scan to QuickBooks Online Plugin Pro User’s Guide
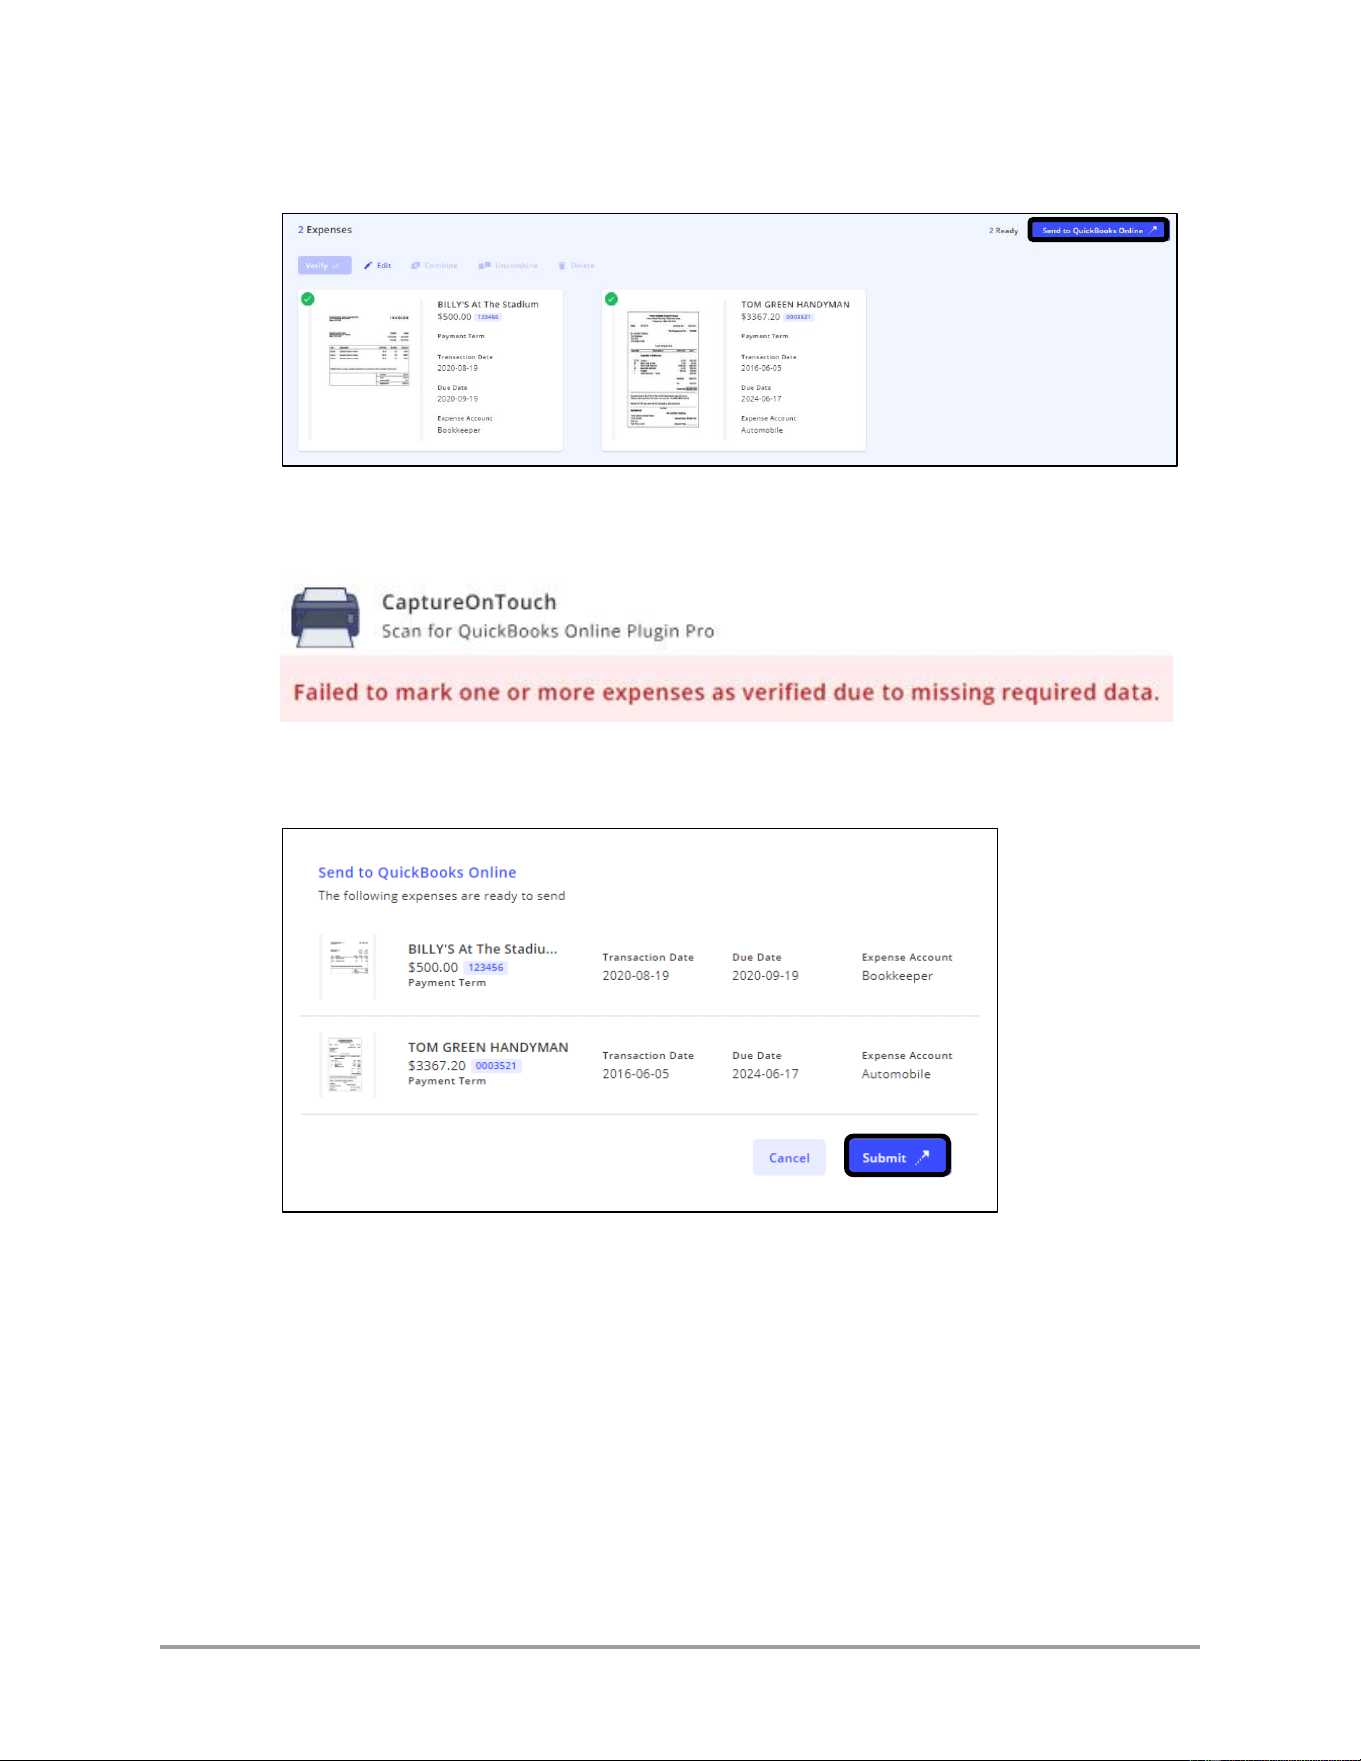
7. Click on [Send to QuickBooks] to send all verified documents.
If any of the documents have not been completed and verified, the plugin displays a
warning and will not send anything to QuickBooks Online.
8. Re-check documents to be sent. Click [Submit] to verify that you want to send the
documents as they are.
CaptureOnTouch Scan to QuickBooks Online Plugin Pro User’s Guide 75
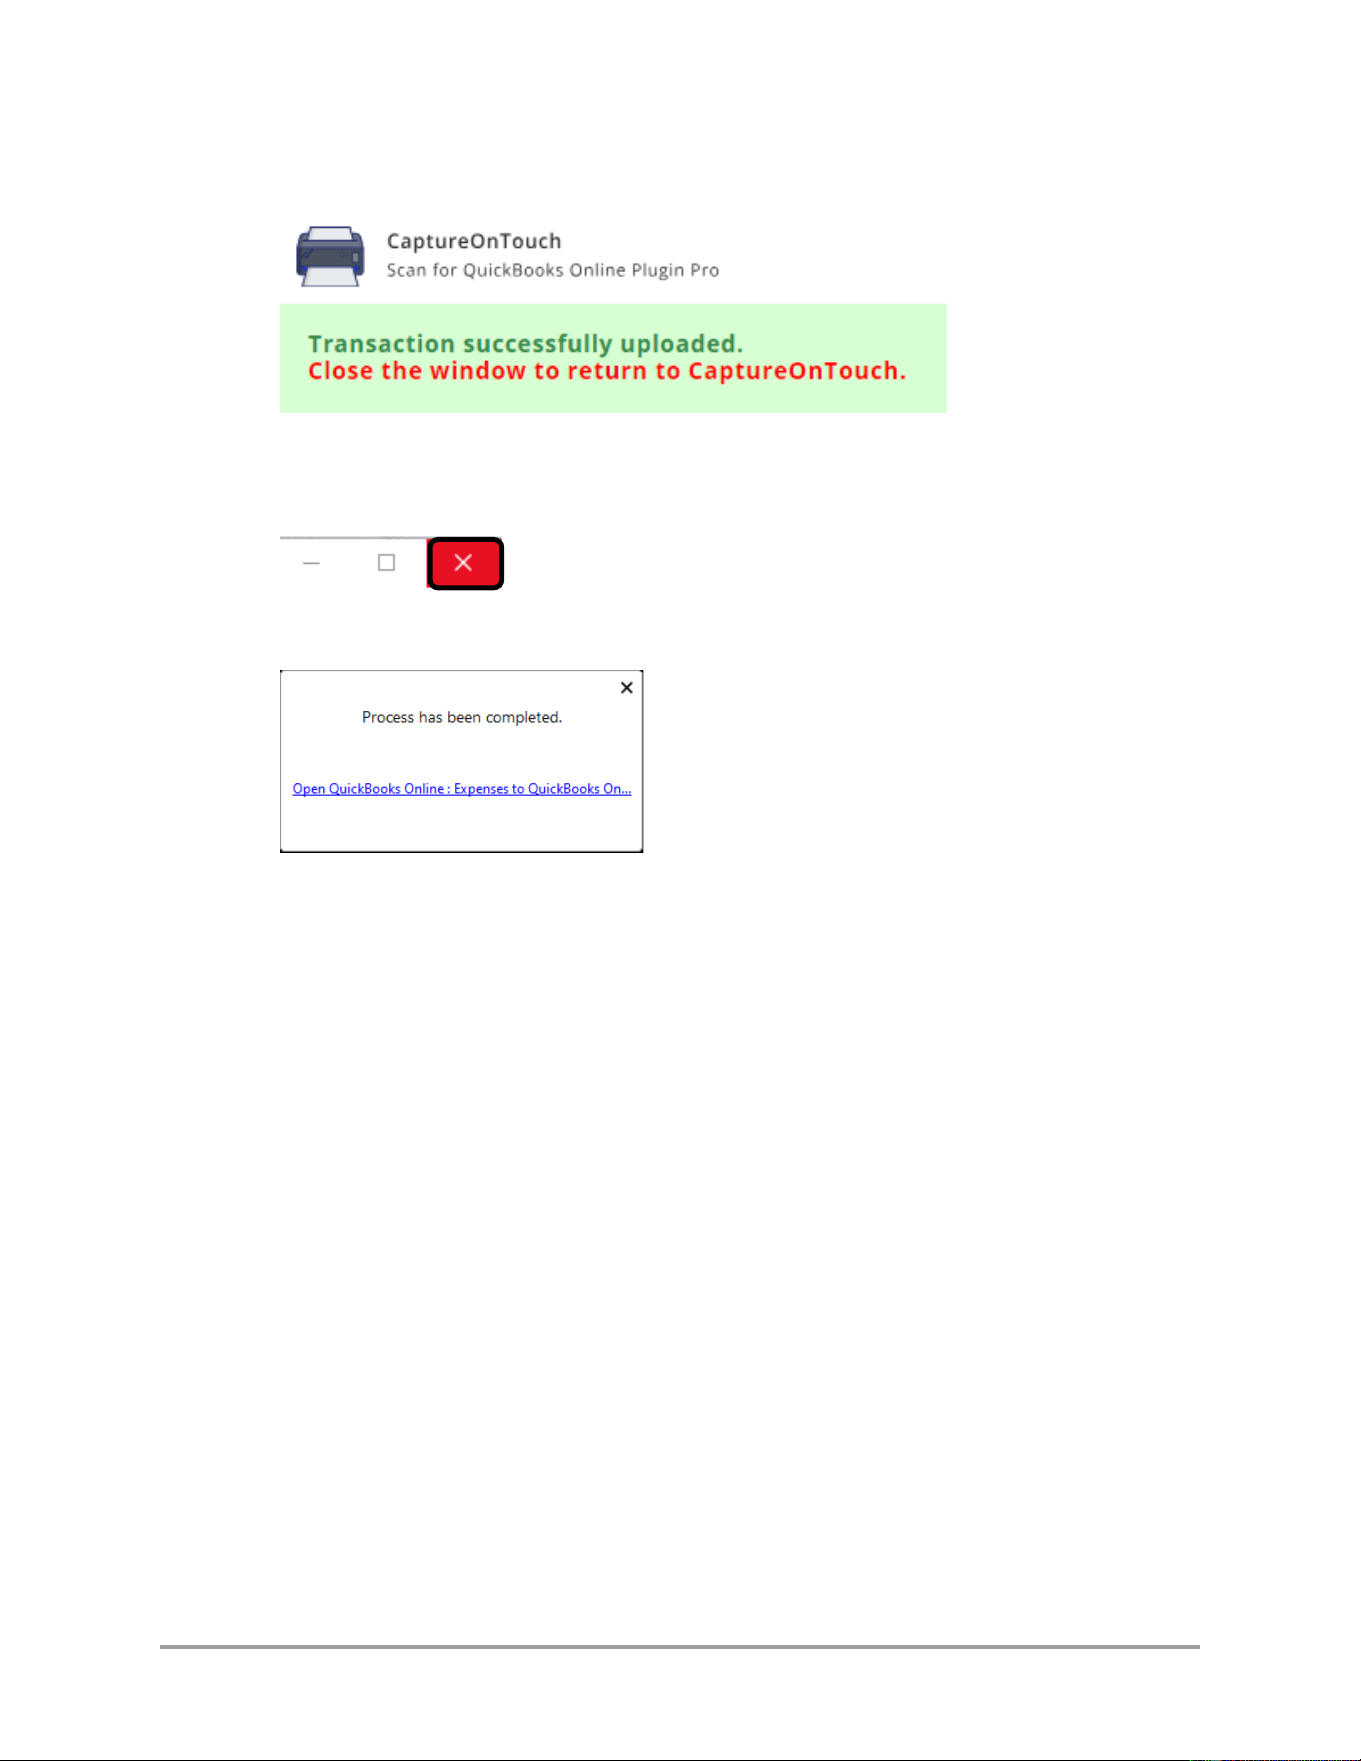
The plugin displays a successful transaction message.
9. Close the plugin window.
For Windows, click on the [X] in the upper right corner.
10. An alert dialog box displays when the job completes.
The dialog box should disappear on its own. If it doesn’t, click the [X] in the upper
right corner.
76 CaptureOnTouch Scan to QuickBooks Online Plugin Pro User’s Guide
3.4 Displaying the Plugin Version Information
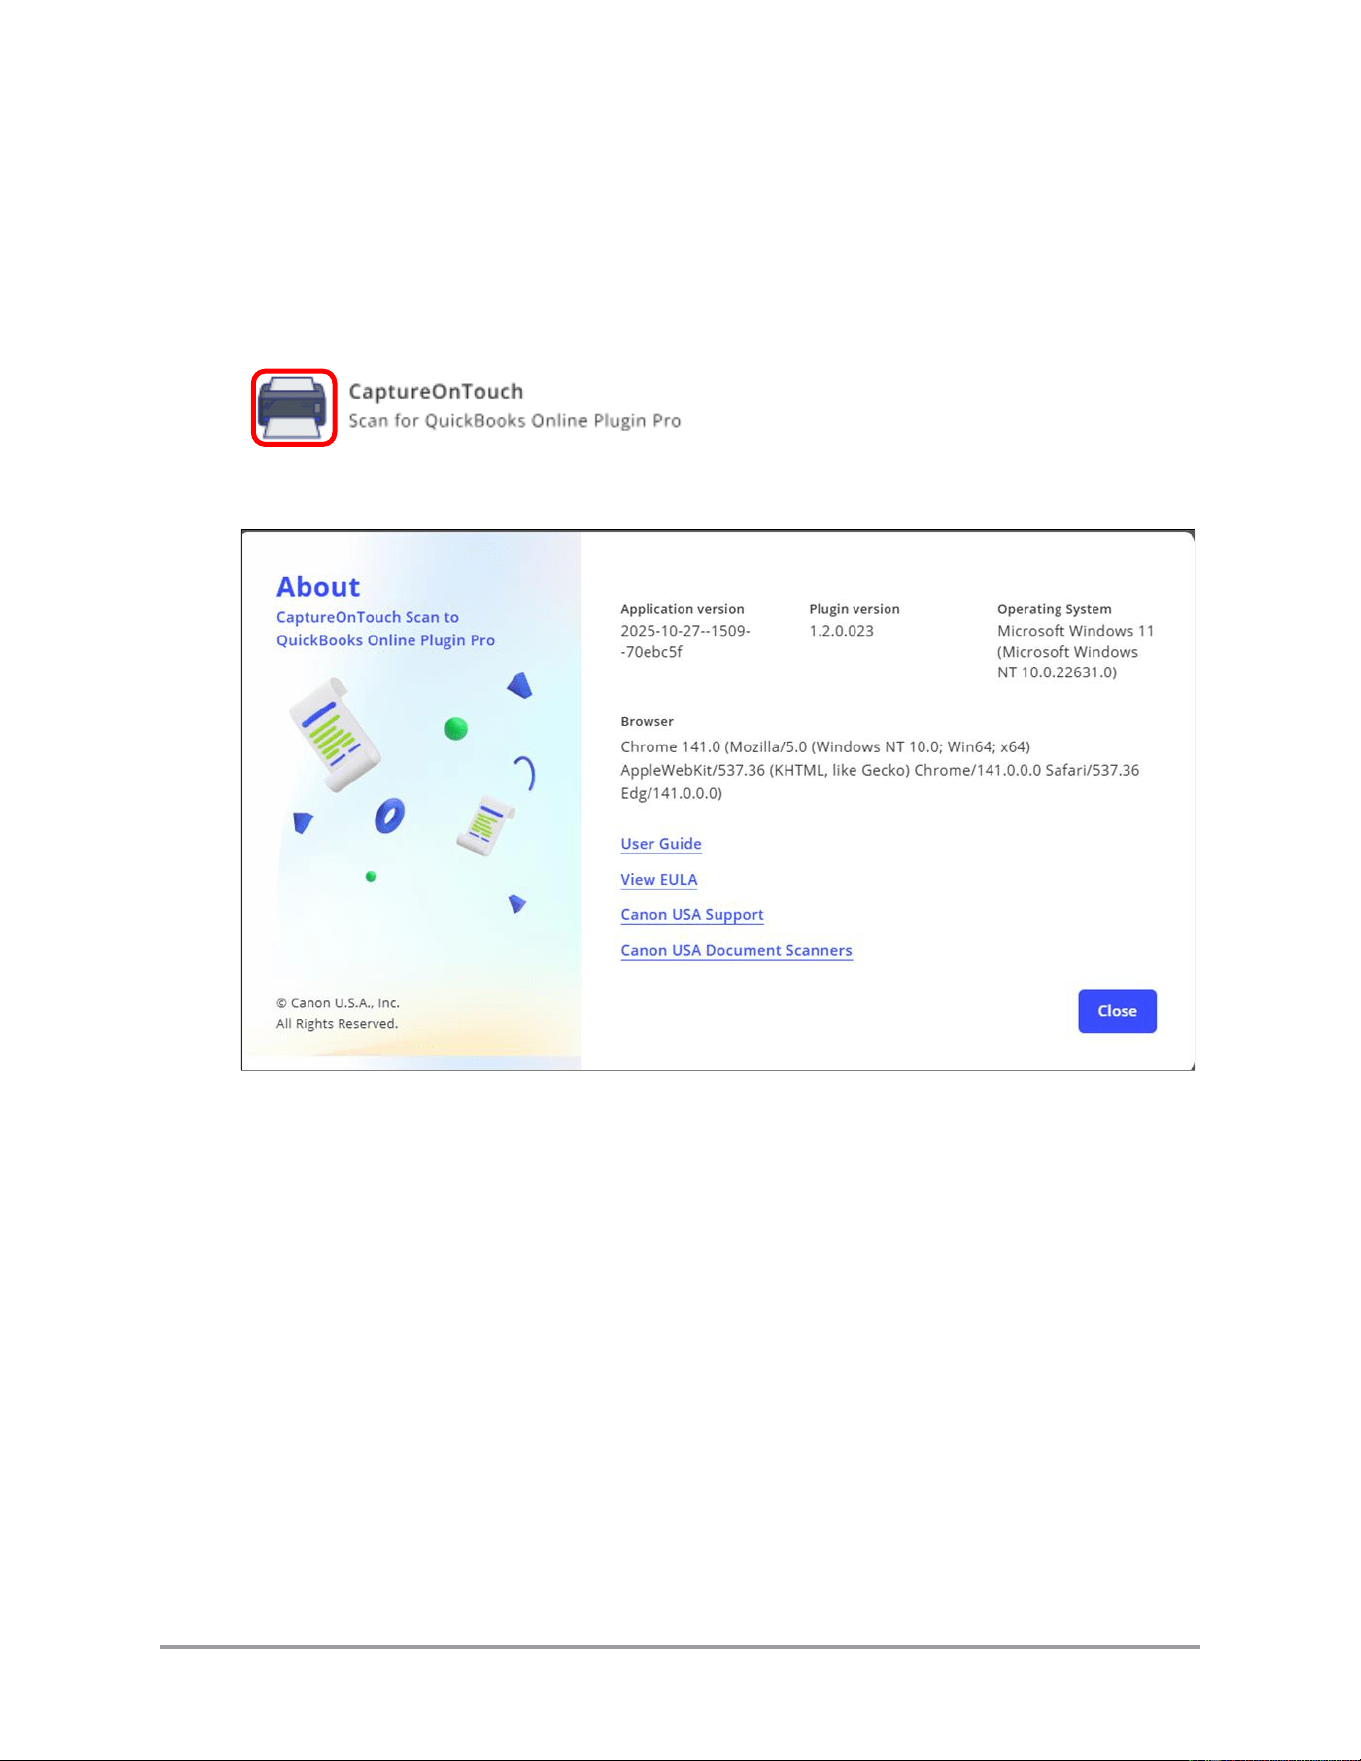
This section describes how to display the plugin information.
When the plugin is active, click on the scanner icon in the upper left corner to display the
plugin information.
The “About” dialog box displays.
The About dialog also contains active links to this document in PDF form, the End User
License Agreement, the main Canon U.S.A., Inc. support page, and the Canon U.S.A.,
Inc. document scanner mini-site.
Click [Close] to exit the About dialog.

CaptureOnTouch Scan to QuickBooks Online Plugin Pro User’s Guide 77
Chapter 4 Troubleshooting
This chapter explains the various issues that may arise when installing and using the
CaptureOnTouch for QuickBooks Online Plugin Pro, along with their possible causes and
remedies.
Problem
You receive the error message “A network error occurred transferring the
scanned document to QuickBooks Online”.
Remedy
Check if file sharing is being blocked by your local or network firewall.
For local firewall:
1. Temporarily disable your local firewall.
2. Attempt scanning again.
3. Re-enable your local firewall.
If the scan to QuickBooks Online succeeded, follow your firewall
instructions to enable File Sharing to scan.ciis.canon.com.
If the scan to QuickBooks Online failed with the same issue, follow “For
network firewall” instructions below.
For network firewall, ask your IT group to change the network access policy
to enable File Sharing to scan.ciis.canon.com
Problem
You cannot preview the scanned document.
Remedy
Verify that you have Adobe Acrobat Reader or another PDF-compatible
reader installed on your system.
Problem
The CaptureOnTouch plugin fails to upload the document(s) to QuickBooks
Online.
Remedy
The plugin has a 19 MB file size limit. Your upload may exceed this limit.
Separate your scans/uploads into smaller, multiple uploads.

78 CaptureOnTouch Scan to QuickBooks Online Plugin Pro User’s Guide
Problem
When you access the Transaction Date or Due Date (Invoice only) field, the
calendar does not automatically pop up and the field is not correctly
highlighted.
Remedy
Restart the scan.
Problem
CaptureOnTouch does not close its preview screen after closing the
QuickBooks Online expense plugin. This may occur if the plugin has been
open for extended time periods (approximately longer than 30 minutes).
Remedy
Manually close the window. Click on for Windows.
Problem
CaptureOnTouch does not send the scan to QuickBooks online and displays
“license expired” message.
Remedy
The 15 day trial license period has expired. Go to the Canon web shop and
purchase a permanent license.
If you purchased a permanent license and still see a “license expired”
message, contact Canon support.
Problem
You receive the error message “This submission timed out, however, the
selected items below may have successfully been sent to your QBO account.
Please check your QBO account before submitting again to avoid
duplicates.”
Remedy
The server timed out when uploading a large number of expenses to
QuickBooks Online. Log into QuickBooks Online and verify what, if any,
expenses did not upload. Re-scan the missing expenses.
Problem
You receive scanner error popup messages during scanning.
Remedy
There are multiple scanner drivers installed on the computer. Delete or
disable any unnecessary or unused scanner drivers, reboot the computer, and
try scanning again. If the error continues, contact Canon technical support.
CaptureOnTouch Scan to QuickBooks Online Plugin Pro User’s Guide 79
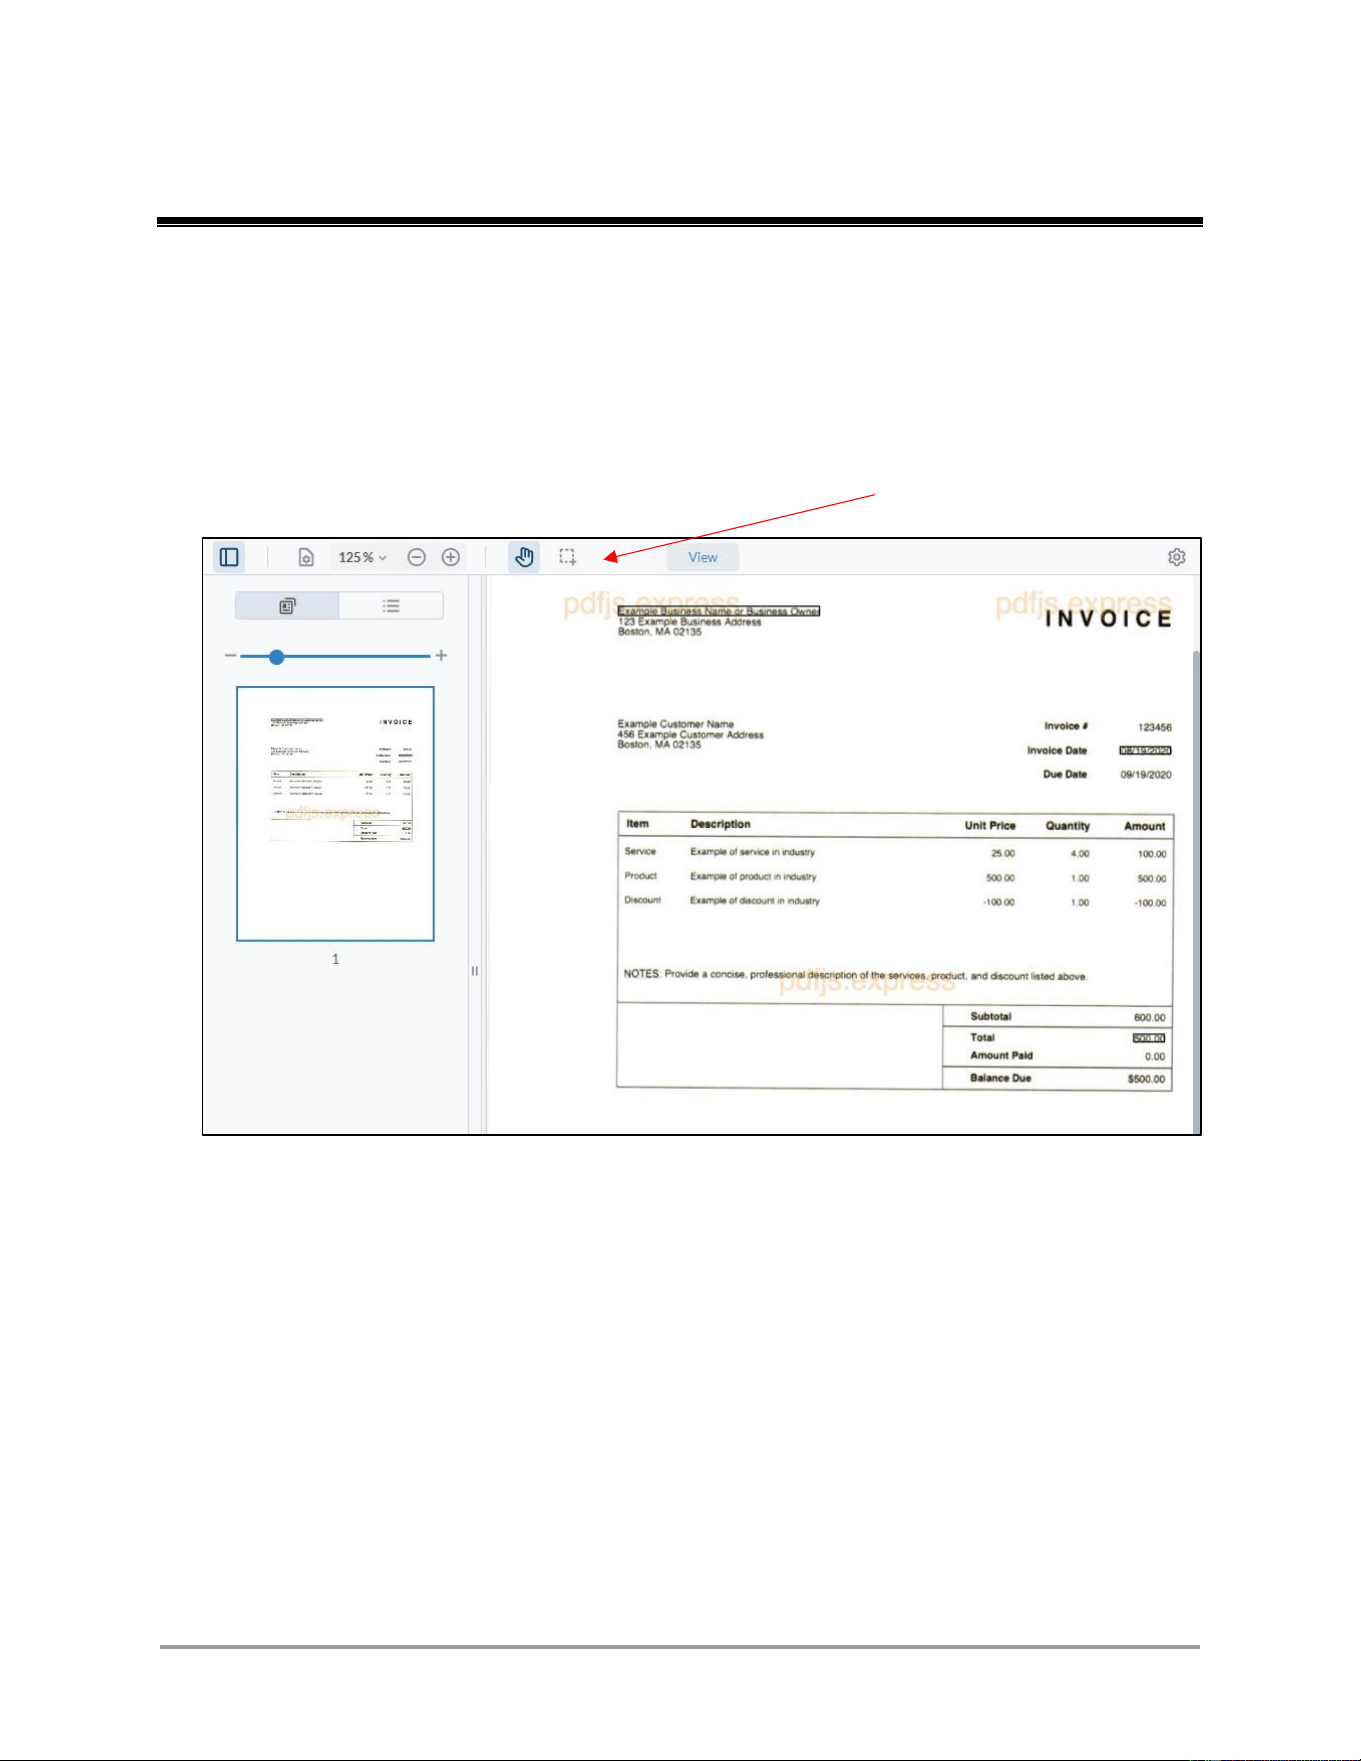
Appendix A. Plugin PDF Controls
This appendix outlines the PDF controls available when viewing a document in the plugin.
The PDF controls do not affect the contents of the PDF, or the contents of the document data
fields processed by the plugin.
The PDF controls are located in the bar above the PDF image.
Bar with controls
80 CaptureOnTouch Scan to QuickBooks Online Plugin Pro User’s Guide
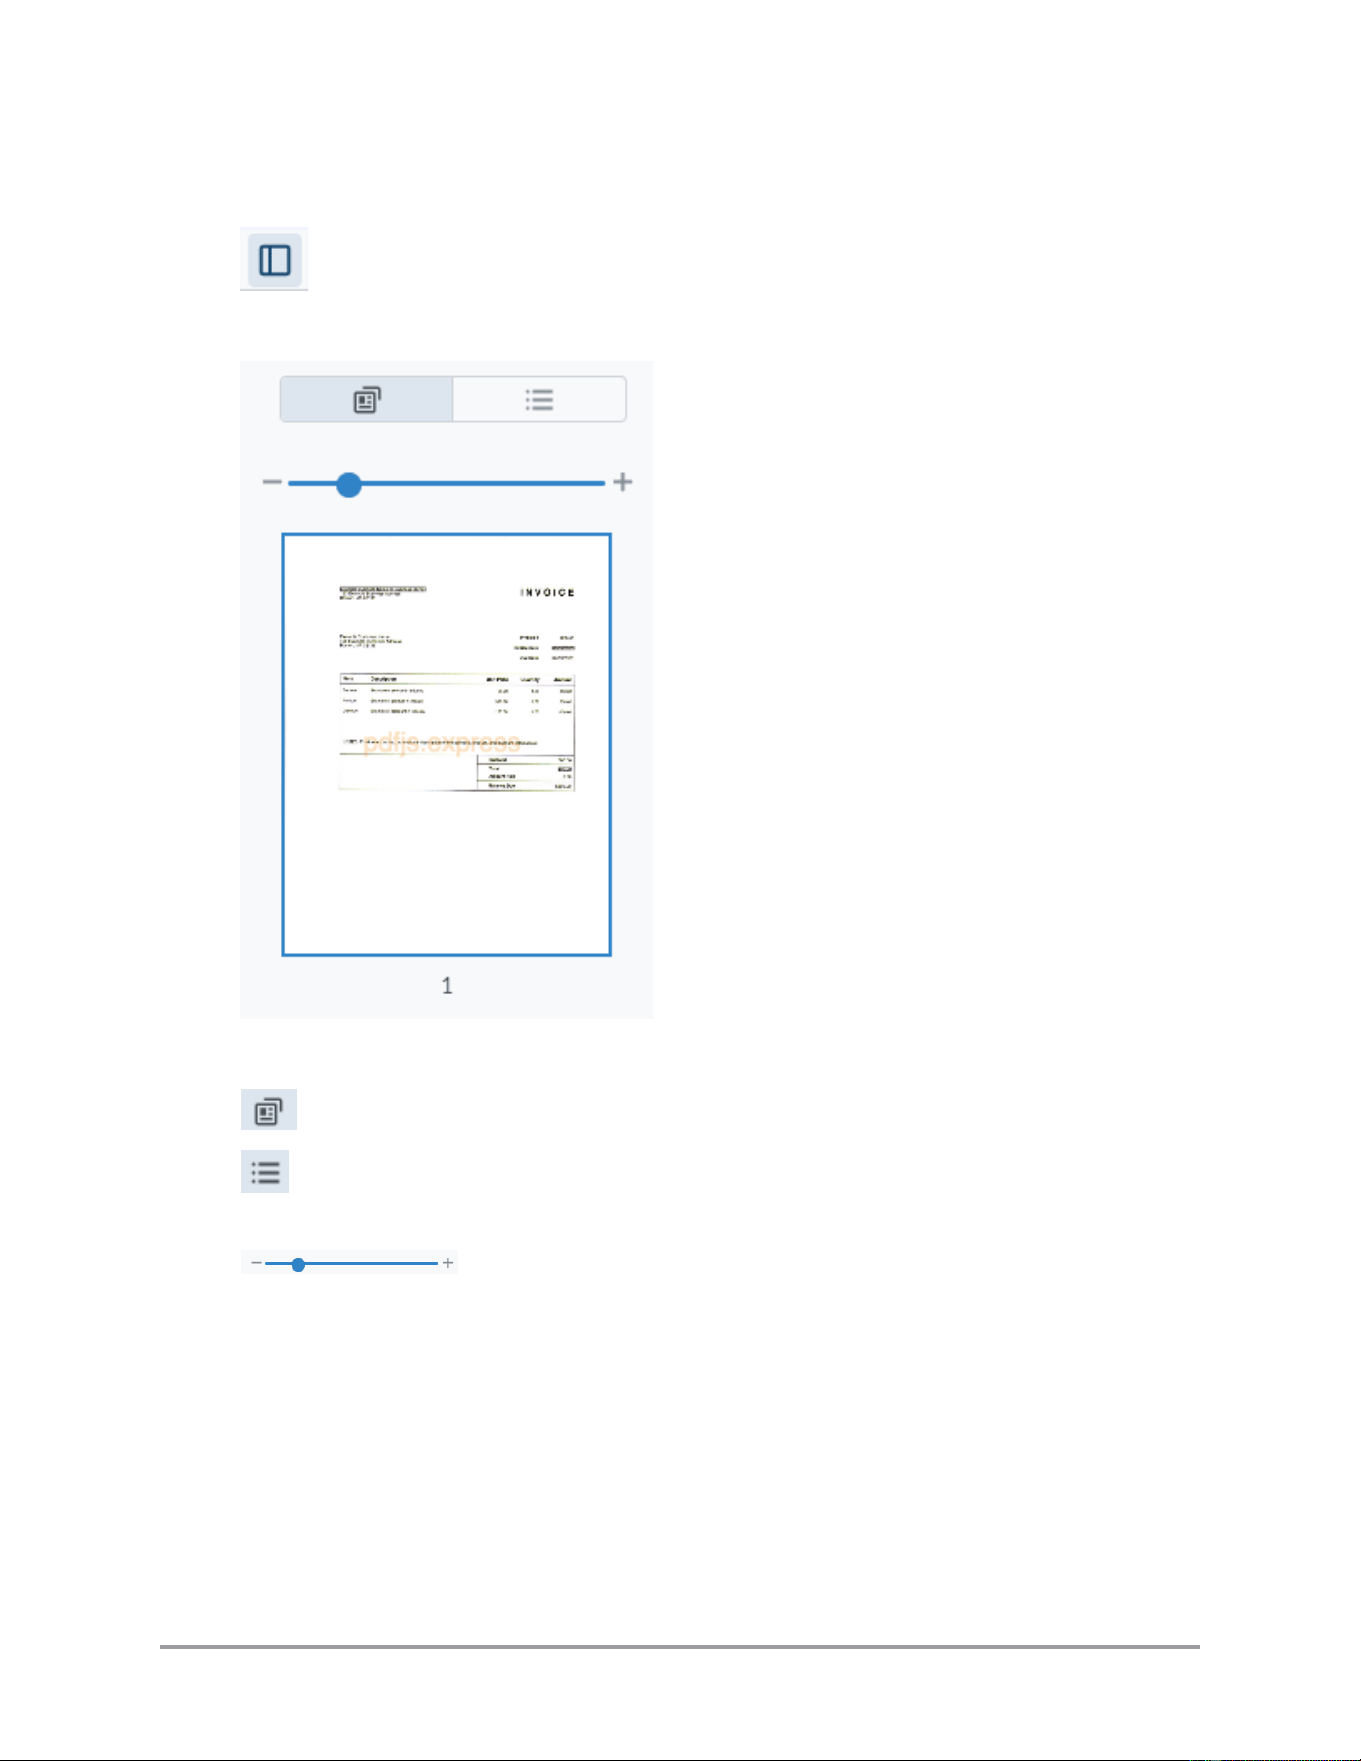
A.1. Panel Controls
The panel controls open on the left side of the PDF view.
Display the PDF pages as thumbnail images.
Display the PDF outline. CaptureOnTouch and the plugin do
not create outlines for scanned document PDFs.
Zoom display of the PDF page thumbnail images. This
control is only visible and active when the display thumbnail
control is active (see above).

CaptureOnTouch Scan to QuickBooks Online Plugin Pro User’s Guide 81
A.2. View Controls
The view controls open a pull-down list of options for displaying the PDF images.
Page Transition
Continuous Page:
When scrolling through pages, the end of the current page
slowly gives way to the start of the following page.
Page by Page:
When scrolling through pages, only the full view of the
page(s) displays.
Page Orientation
Rotate Clockwise:
Rotate the view 90 degrees to the right.
Rotate
Counterclockwise:
Rotate the view 90 degrees to the left.
Note: The rotate controls only change the view of the PDF.
The PDF sent to QuickBooks Online is in the same
orientation in which it was originally scanned.
Page Layout
Single Page:
View only one page at a time.
Double Page:
View two pages at a time. When scrolling through pages, the
page display moves to the left.
Cover Facing Page:
View two pages at a time, but in format as if you were reading
a book. Two facing pages are shown, never two pages that are
back-to-back.

82 CaptureOnTouch Scan to QuickBooks Online Plugin Pro User’s Guide
A.3. Zoom Controls
The pull-down list allows you to select from a set of pre-defined zoom/view levels. The
(+) and (-) buttons zoom in and out respectively by smaller increments.
A.4. Pan Controls
If the entire page (or two pages) does not fit in the current display, the pan control allows
you to click, hold, and drag the view to see other areas of the page(s).
A.5. Select Controls
If the entire page (or two pages) does not fit in the current display, the pan control allows
you to click, hold, and drag the view to see other areas of the page(s).
A.6. Menu Controls
The menu controls provide extra functionality and options for the display.
Full Screen:
Set the PDF page image to take up the maximum amount of
room in the window.
Print:
Print the current PDF. The available print destinations depend
on what you have connected to your computer (either local or
remote/network printers).
Dark Mode:
Change the color scheme of the display to darker colors.
CaptureOnTouch Scan to QuickBooks Online Plugin Pro User’s Guide 83
Appendix B. Disabling the Plugin
This appendix lists the procedures to disable the CaptureOnTouch Scan to QuickBooks
Online Plugin Pro.
IMPORTANT
After disabling the plugin, the output destination changes to “Save to Folder”.
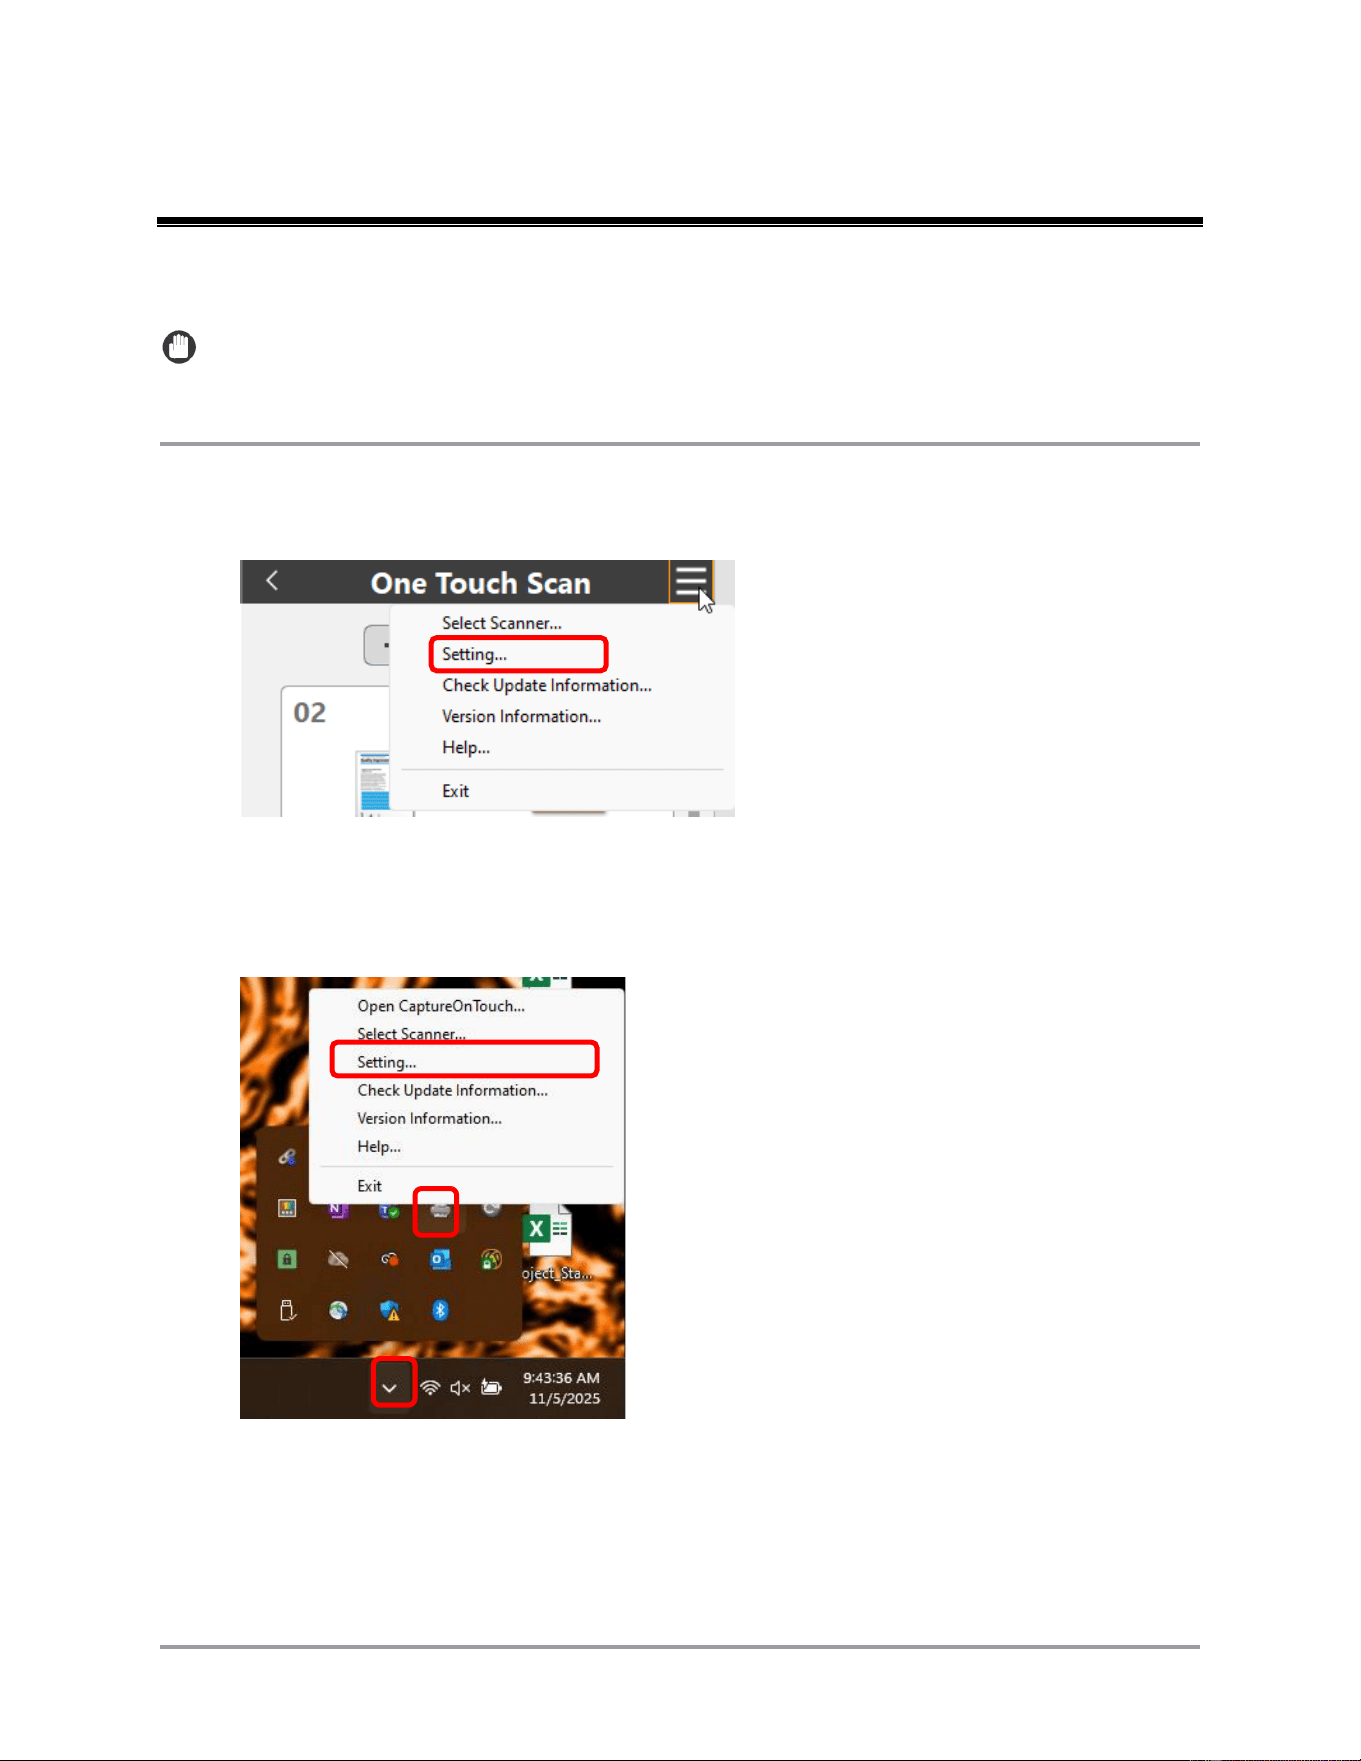
1. From the CaptureOnTouch main window, select the “hamburger” pull-down menu in the
main window ➞ select [Setting].
-or-
From the hidden icons in the system tray, right click on the CaptureOnTouch icon ➞
select [Setting].
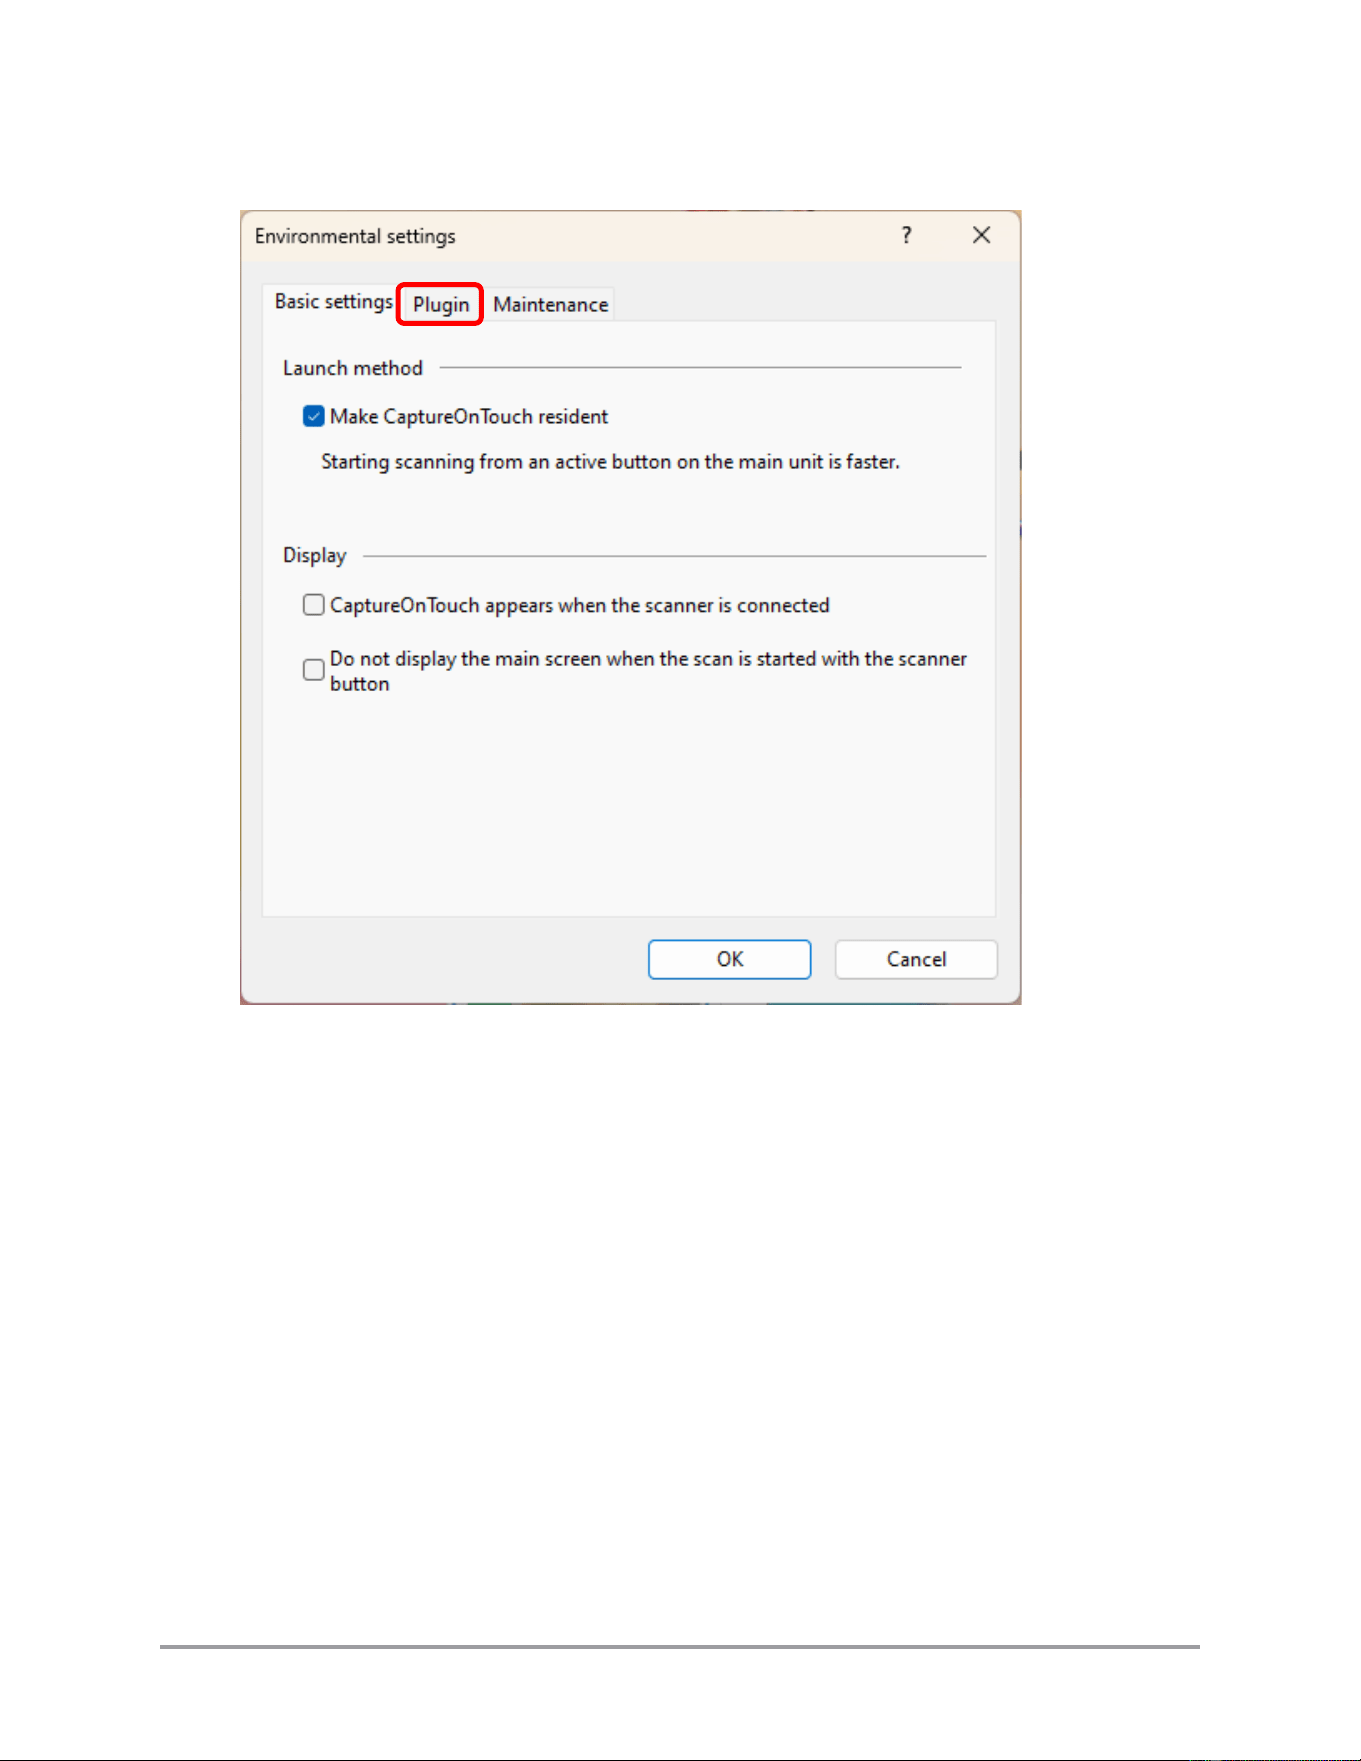
84 CaptureOnTouch Scan to QuickBooks Online Plugin Pro User’s Guide
2. In the Environmental Settings window, select the [Plugin] tab.
CaptureOnTouch Scan to QuickBooks Online Plugin Pro User’s Guide 85
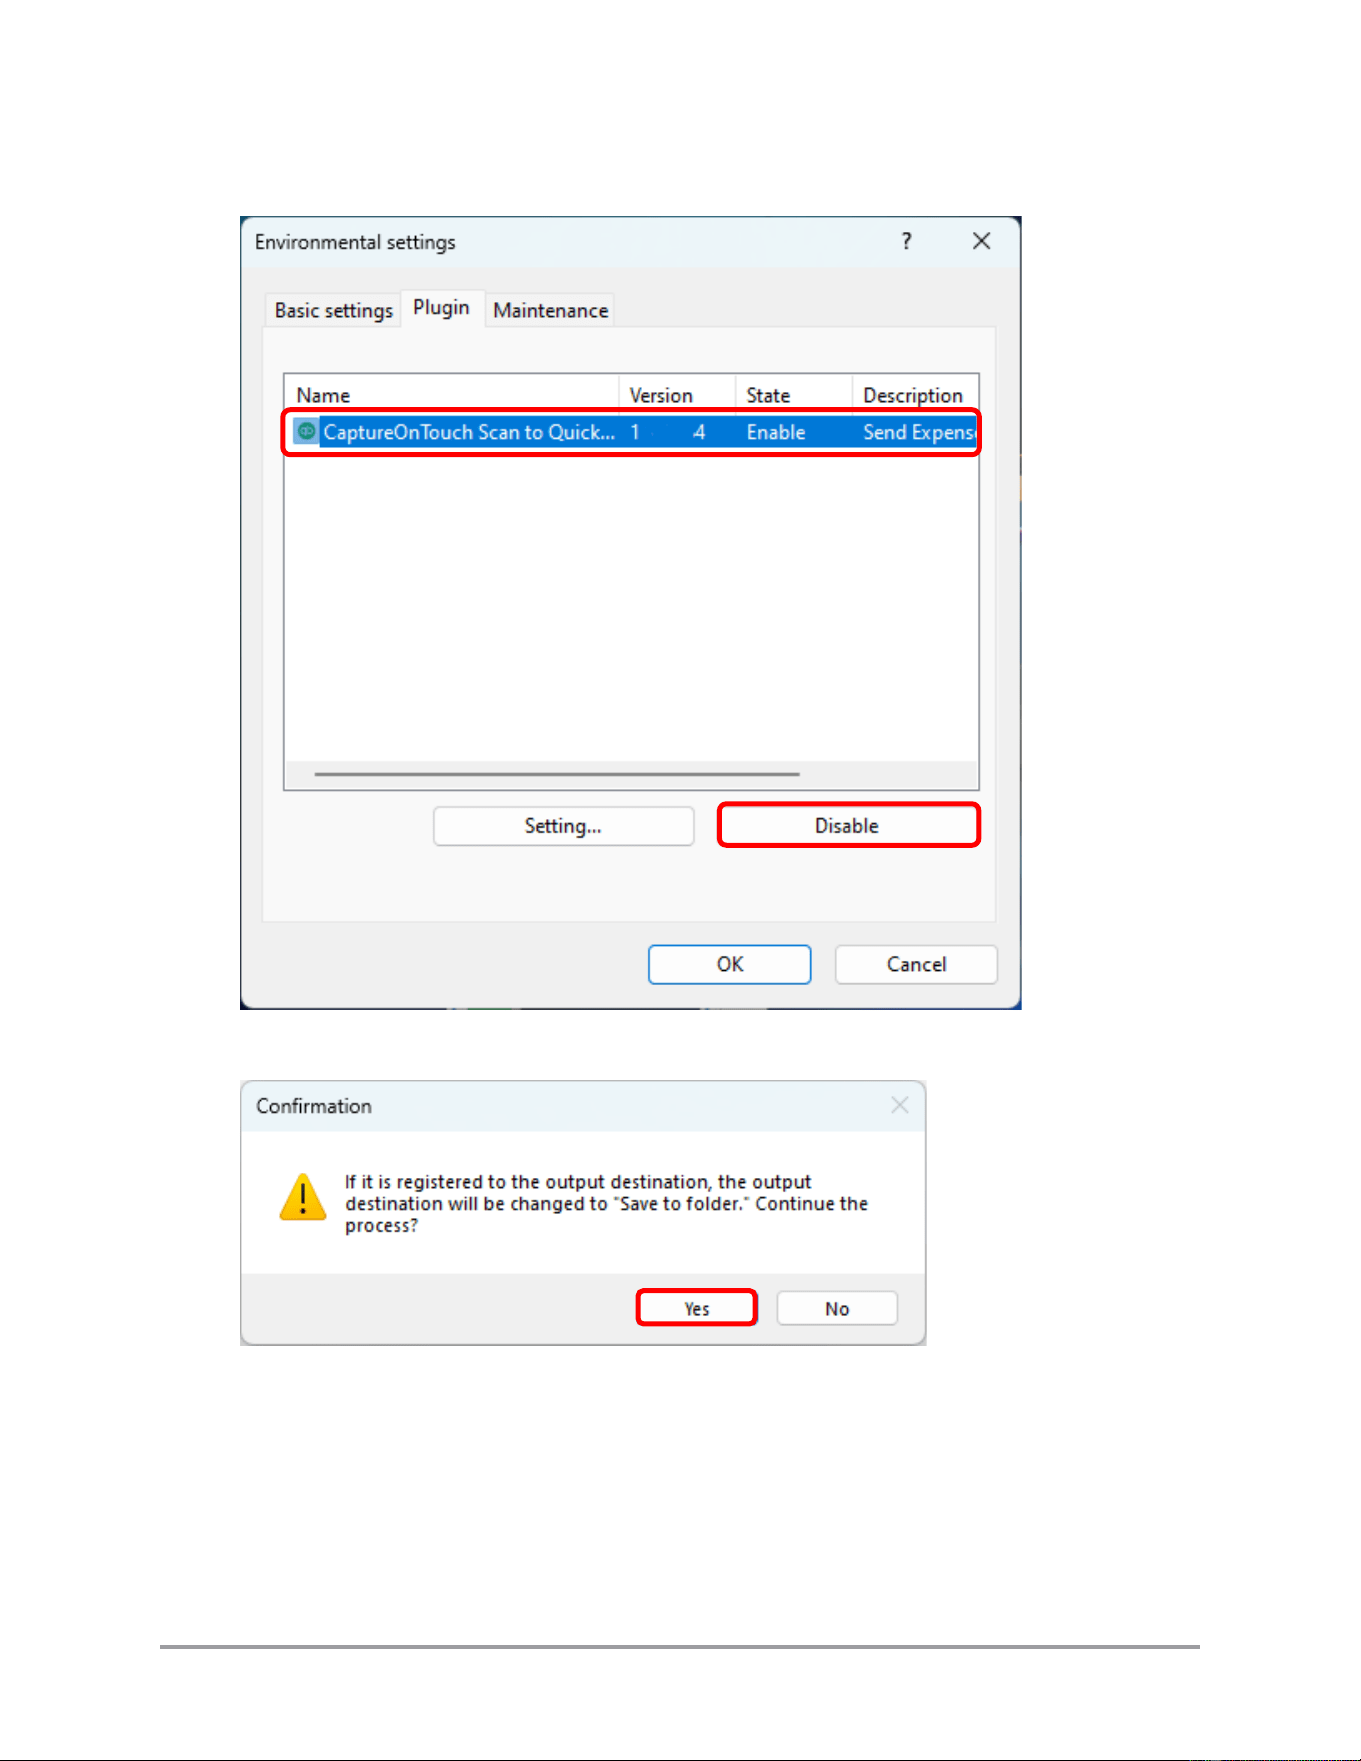
3. Select the CaptureOnTouch Scan to QuickBooks Online plugin ➞ click [Disable].
4. Click [Yes] in the confirmation dialog box.
Click [No] to return to the plugin window without disabling the plugin.

86 CaptureOnTouch Scan to QuickBooks Online Plugin Pro User’s Guide
This page is intentionally left blank.
