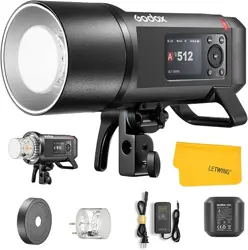
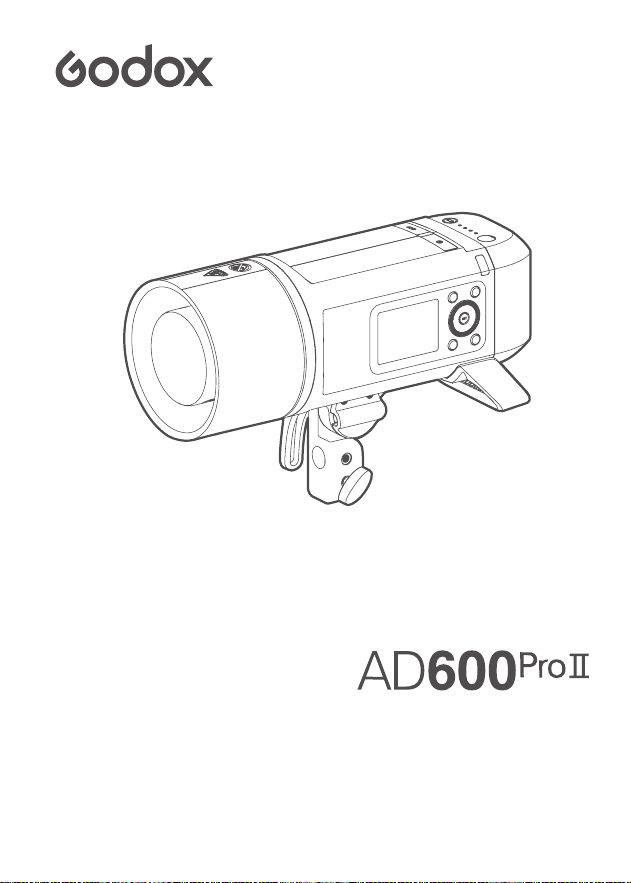
使用手册
Instruction Manual
一体式外拍闪光灯
All-in-One Outdoor Flash

01
说明书安全提示
重要安全提示
本产品属于专业摄影设备,需要专业人员操作使用。使用时必须遵守以下基本安全预防措施:
使用前必须拆除产品上的所有运输保护材料和包装。
使用本产品前,请仔细阅读并完全理解产品说明书,严格按照说明书中的安全提示操作。
否则,可能导致死亡、严重伤害、产品损坏或其他财产损失的安全隐患。
闪光灯工作时存在高电压,关机后设备内部电容仍将持续带电一段时间。
本产品为专业灯具,儿童禁止使用。儿童接近时,成人必须密切监督,防止儿童碰撞灯具
或私自使用灯具,造成人身伤害。
本灯具并非普通灯具,不可用于普通照明,任何有过眼部损伤或眼部敏感的人群均应避
免使用本灯具或直视本灯具。
使用时必须小心,严禁接触如闪光管等高温部件,以避免烫伤。
任何情况下均禁止将闪光灯直接对准人眼(特别是婴儿眼睛),否则短时间内可能导致视
力损伤。如感到眼睛不适,应立即关闭灯具,停止使用并及时就医。
闪光管损坏时,应立即停止使用,及时联系制造商、服务代理商或合格维修人员更换,以
防发生事故。
严禁使用损坏的设备或配件,必须等待专业维修人员检查维修并确认设备正常后,才可
继续使用。
更换灯管、保护玻璃或保险丝前,必须断开电源或者拆下电池(如装有电池),确保灯具
与电源完全断开。更换灯管前让其冷却 10 分钟,操作时需戴绝缘 / 或隔热手套。
拔插灯头插头时必须关闭产品电源,插入插头时务必检查是否完全卡入。
使用过程中,如果产品因跌落、挤压或强力冲击导致外壳破裂,应立即停止使用,避免接
触内部电子部件而触电受伤。
部分产品电源线较长,请合理放置,避免接触热源或绊倒他人。建议使用原装电源线。非
原装线造成的损坏不在保修范围内。
进行清洁和维修前,请先从电源插座上拔出设备电源插头。不要拉扯电源线强行拔出,正
确方法是用双手抓住插头端头拔出。
本设备不防水,请保持干燥,不能浸入水或其他液体;应安装在通风干燥位置,避免在雨天、
潮湿、多尘或过热环境中使用。不要在设备上方放置物品,或让液体流入内部,防止发生
危险。
未经授权,请不要自行拆卸本产品。产品若出现故障,必须由本公司或授权维修人员检查
和维修。
存放设备前,请确保设备已完全冷却,拔下电源线,放入设备包内或通风干燥位置。
请勿将设备放置在酒精、汽油等易燃挥发性溶剂或气体如甲烷、乙烷等附近。
本设备禁止在有爆炸危险的环境中使用或存放。
严禁覆盖设备散热口!
请勿使用未经本公司认可的配件,以免造成火灾、触电或人身伤害。
1.
2.
3.
4.
5.
6.
7.
8.
9.
10.
11.
12.
13.
14.
15.
16.
17.
18.
19.
20.

03
前言
主要特点
警告
部件名称
物料清单
可另购附件
装卸反光罩 / 闪光灯管
调整闪光灯角度
开关机
显示屏
电池说明
高速同步
M: 手动闪光
Multi: 频闪闪光
T T L :自 动 闪 光
无 线 电( 2 . 4 G )传 输
闪光模式
神牛 2.4G 无线漏闪原因及解决办法
造型灯
自定义功能
同步插孔触发
保护功能
规格参数
固件升级
维护保养
04
04
05
06
07
07
08
09
10
10
11
13
13
16
17
18
21
21
22
23
24
24
26
27
27
目录

05
警告
请保持干燥。
请勿私自拆卸产品,如产品出现故障须由本公司或授权的维修人员进行检查维修。
禁止拆卸、撞击、挤压或投入火中,若出现严重鼓胀,请勿继续使用。
请勿将本产品放置在超过 50 度的高温环境中。
请勿将闪光灯头正对人眼闪光 ( 特别是婴儿的眼睛 ),否则可能会在短时间内造成视力障
碍。
请勿在化学品、可燃性气体或其他特殊物质附近使用闪光灯,这些物质在特殊情况下可
能对闪光灯发出的瞬间强光敏感,有可能导致火灾或电磁干扰。在这些场合下,请注意
相关警告标识。
本产品不能防水,在雨天及潮湿环境下请注意防水。
使用本产品前请先取下灯头保护盖
07
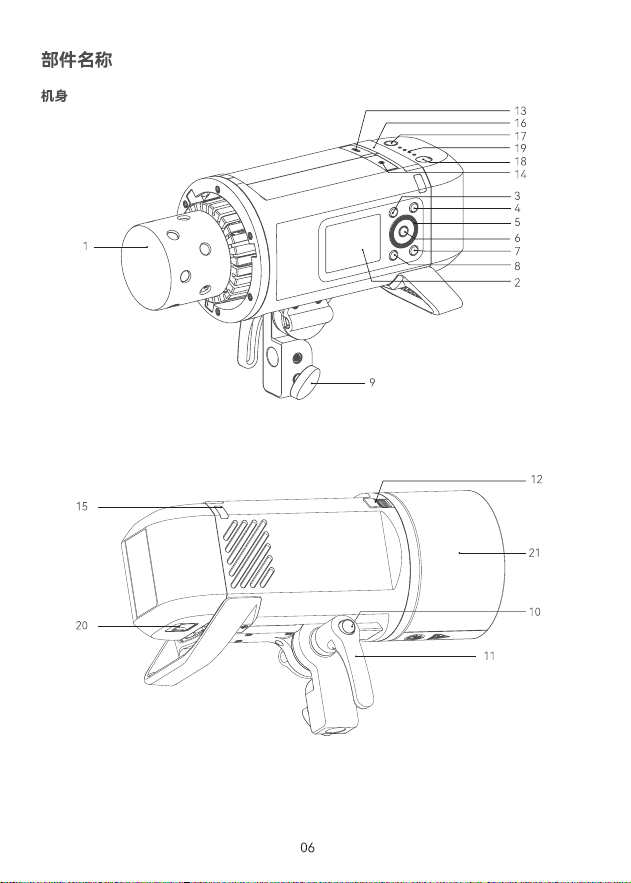
1. 闪光灯管
2. 彩屏
3. MENU 按键
4. MODE 按键
5. 调节拨盘
6. SET 按键
7. 开关 / 试闪按键
8. 造型灯按键
灯头:H600P 便携灯头。
供电:AC26 交流电源、UC46USB 充电器。
引闪器:XPro、XProII、X2T、X3 系列。
光效附件:伞式快开柔光箱、球形灯笼柔光箱、快装抛物线柔光箱、雷达罩、折叠柔光伞、
束光筒和灯架等。
9. 支架锁紧旋钮
10. 手柄固定件
11. 手柄
12. 卡口推制
13. USB-C 固件升级接口
14. 3.5mm 同步插孔
15. 组别指示灯
×
2
16. 光控接收器
17. 电池电量显示按键
18. 电池充电孔
19. 电池电量显示灯
20. 电池盒推制
21. 伞用反光罩
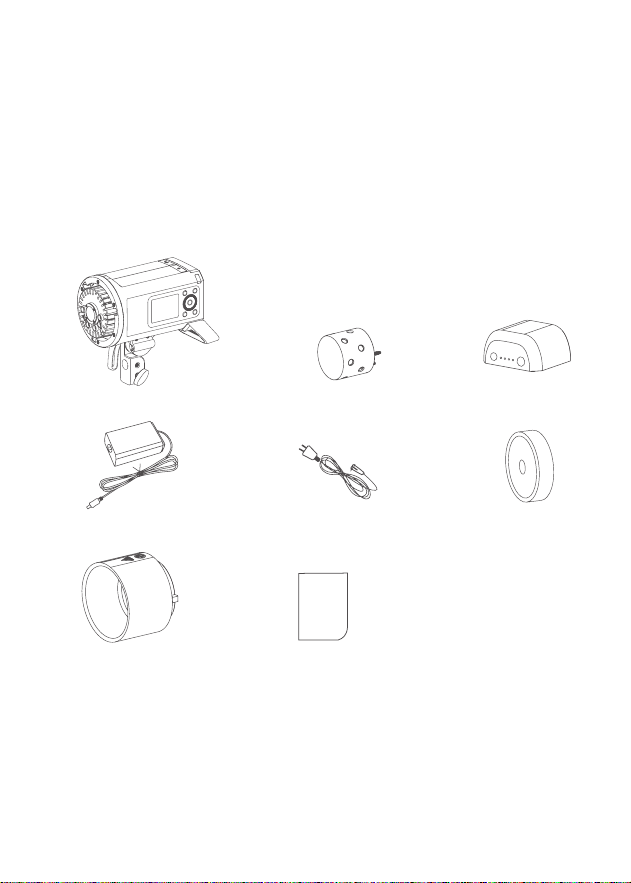
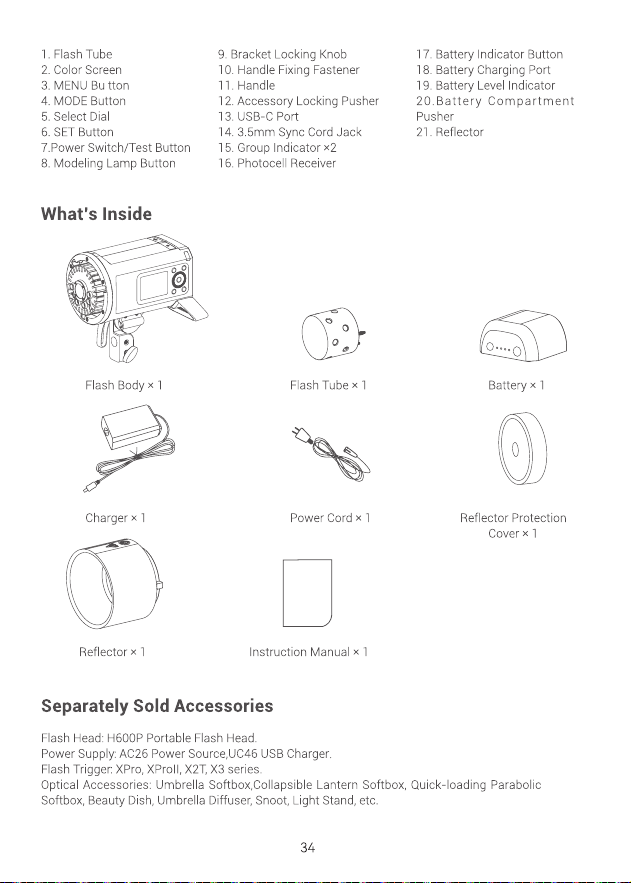
物料清单
可另购附件
灯体 × 1 灯管 × 1
伞用反光罩 × 1
伞罩保护盖 × 1
电池 × 1
充电器 × 1
电源线 × 1
说明书 × 1
09
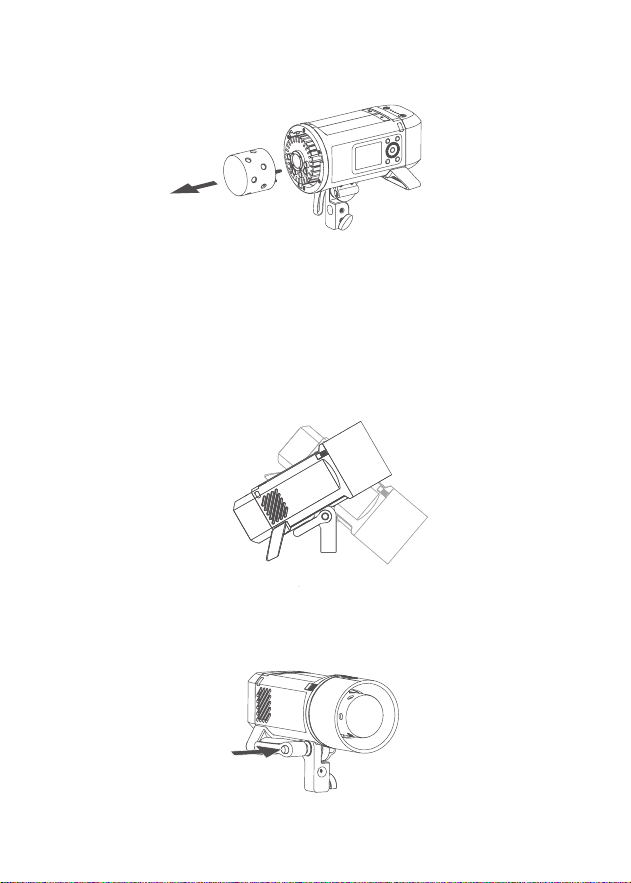
调整闪光灯角度
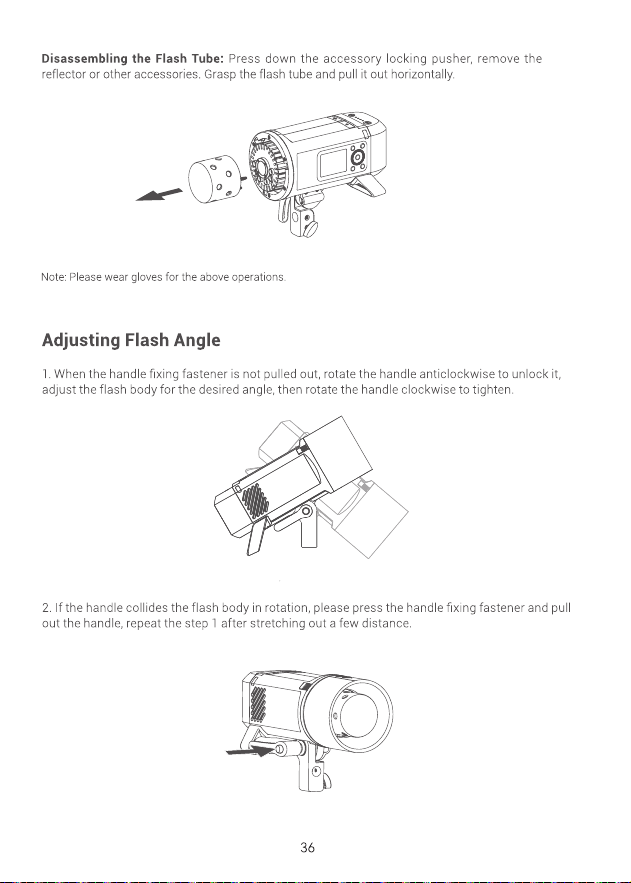
拆卸灯管:
按住卡口推制,卸下反光罩或其他附件后,握住闪光灯管平行拔出。
注:装卸闪光灯管时,请务必佩戴手套以确保安全。
1. 手柄固定件未拔出状态下,逆时针旋转手柄解锁,调整机身需要的角度后,顺时针旋转手
柄锁紧即可固定。
2. 如果旋转手柄时触碰到灯体阻碍,可按住手柄固定件将手柄拔出,拉宽一些距离之后继
续上述的动作 1。
11
电池说明
装卸电池
特性
1. 本品采用锂电池 , 支持反复充放电 300 次 , 使用寿命长。
2. 安全可靠 , 内置电路有过充保护、过放保护、过流保护、短路保护。
3. 使用标配电池充电器,从低电量到满电的充电时长只需 2 个小时左右。
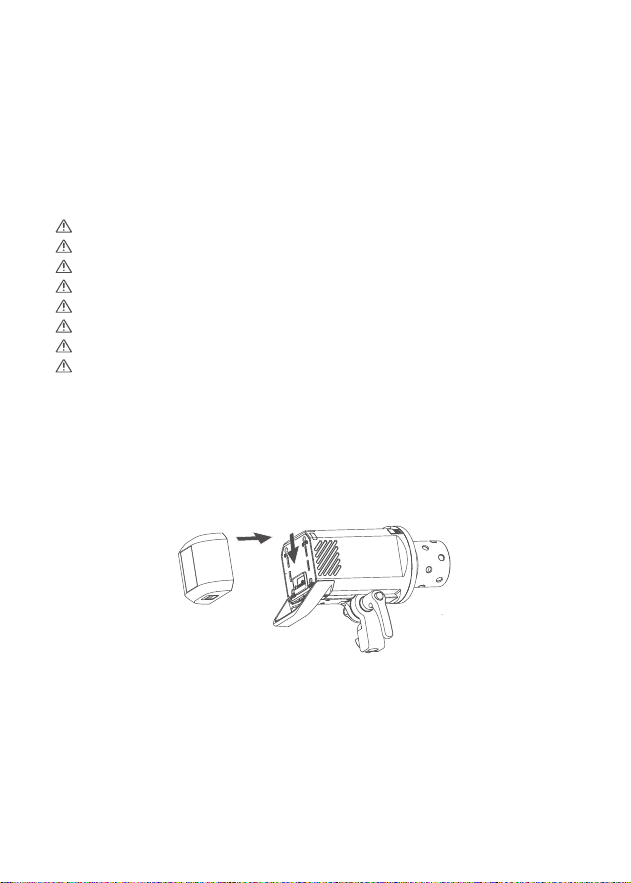
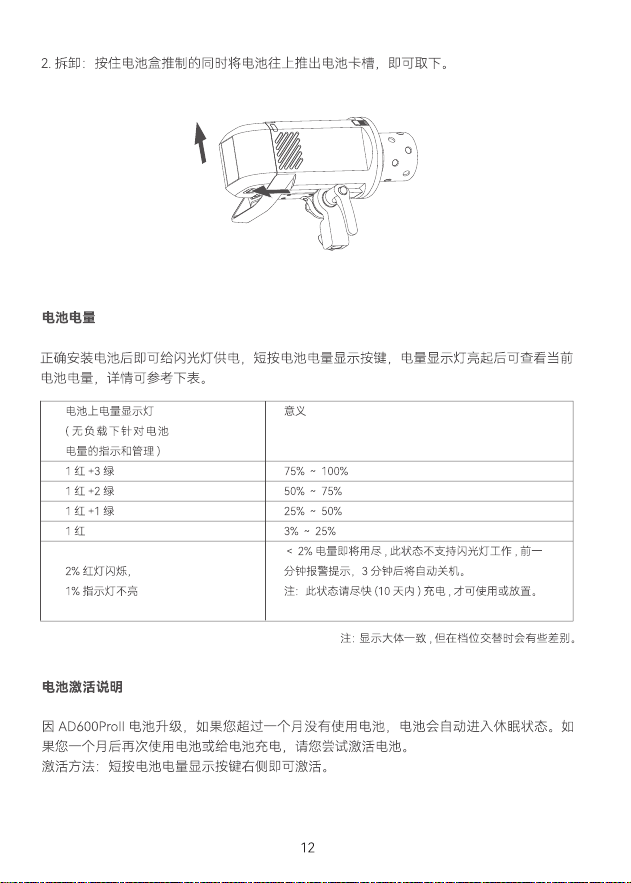
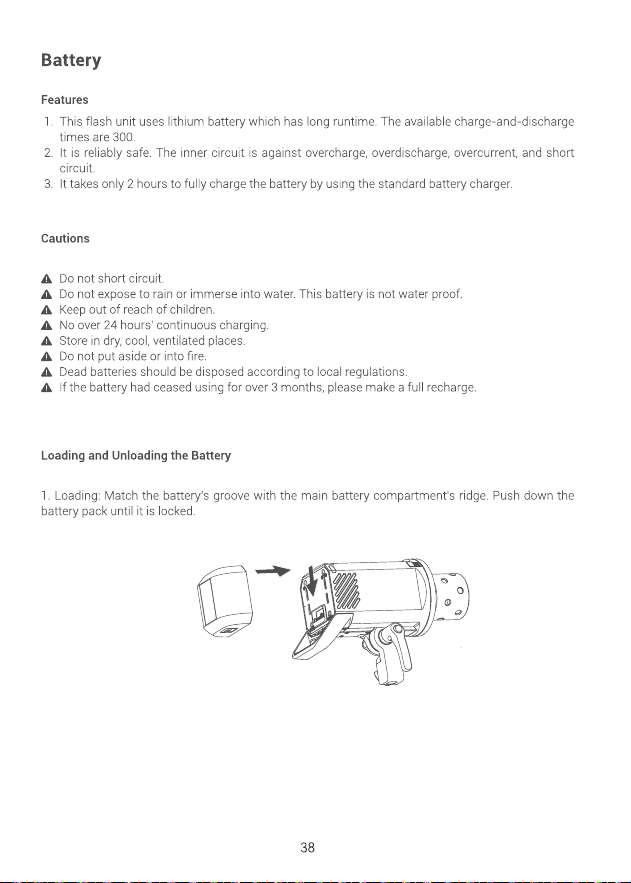
1. 安装:将电池卡槽与主体电池槽对好,往下推直至扣件卡住。
注意事项
避免正负极短路。
电池没有防水功能 , 不要把电池浸泡在雾、水中。
放置于儿童不易接触的地方。
电池充电不要放置超过 24 小时。
电池应放置于凉爽、干燥及通风的地方存储。
电池不要靠近和放置于火中。
电池使用报废后请按当地的规定处理。
如果电池超过 3 个月不使用 , 请对电池进行满电充电。
13
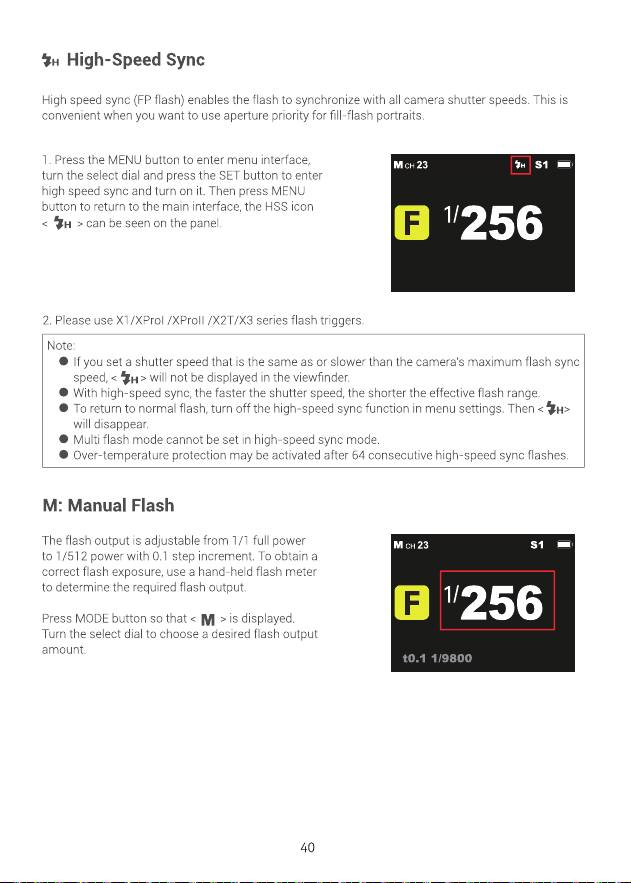
使用高速同步(FP 闪光),您可以在所有的快门速度下同步使用闪光灯。高速同步模式下,
使用光圈优先对人像进行填充闪光时特别方便。
高速同步
M: 手动闪光
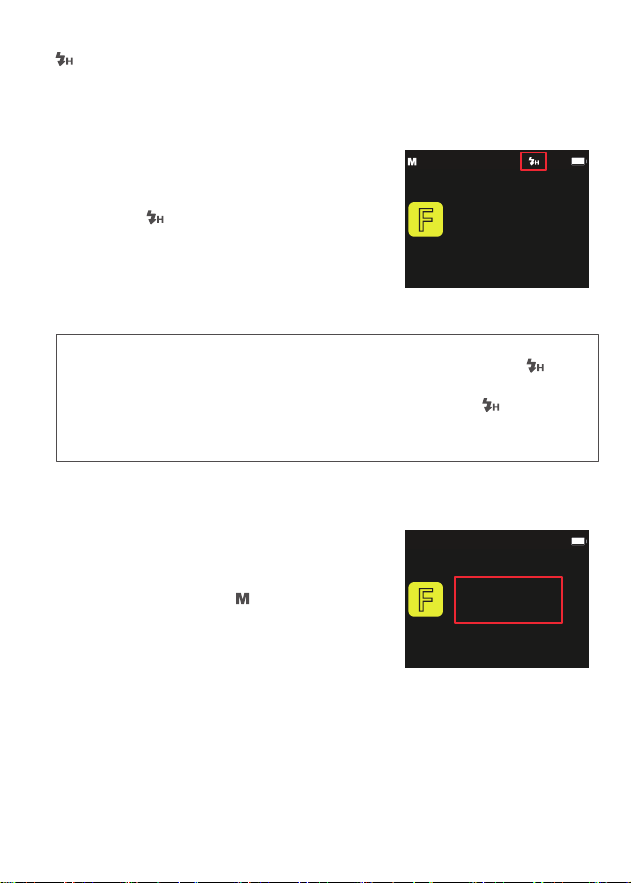
1. 短按 MENU 按键进入菜单,旋转拨盘选中高
速同步,短按 SET 按键并旋转拨盘可选开启或关
闭,设置完毕短按 MENU 按键返回主界面,上
方状态栏可见 ( )。
F
256
1
/
S1
CH 23
2. 请使用 X1 系列 /XProI 系列 /XProII 系列 /X2T/X3 系列引闪器
如果设置快门速度等于或慢于相机的最大闪光同步速度 , 取景器中将不显示 图标。
使用高速同步 , 快门速度越高 , 有效的闪光范围就越小。
要恢复普通闪光,请进入菜单栏将高速同步功能关闭,主界面中 < > 图标会消失。
在高速同步模式下 , 无法设置频闪闪光。
连续高速同步闪光 64 次后 , 闪光灯热保护功能可能会被激活。
您可以在 1/512 功率至 1/1 全功率间以 0.1 档为
增量设置闪光输出。为获得正确的闪光曝光 , 请
使用手持的闪光测光表确定所需的闪光输出。
短按 MODE 按键令屏幕显示 <
>,旋转拨盘
设置闪光输出功率。
●
●
●
●
●
注:
F
t0.1 1/9800
256
1
/
S1M
CH 23
15
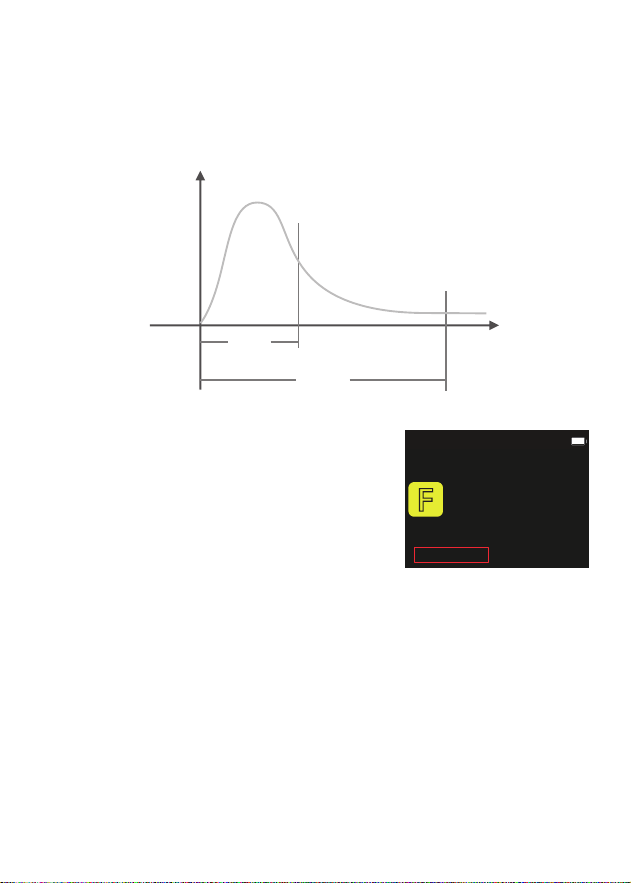
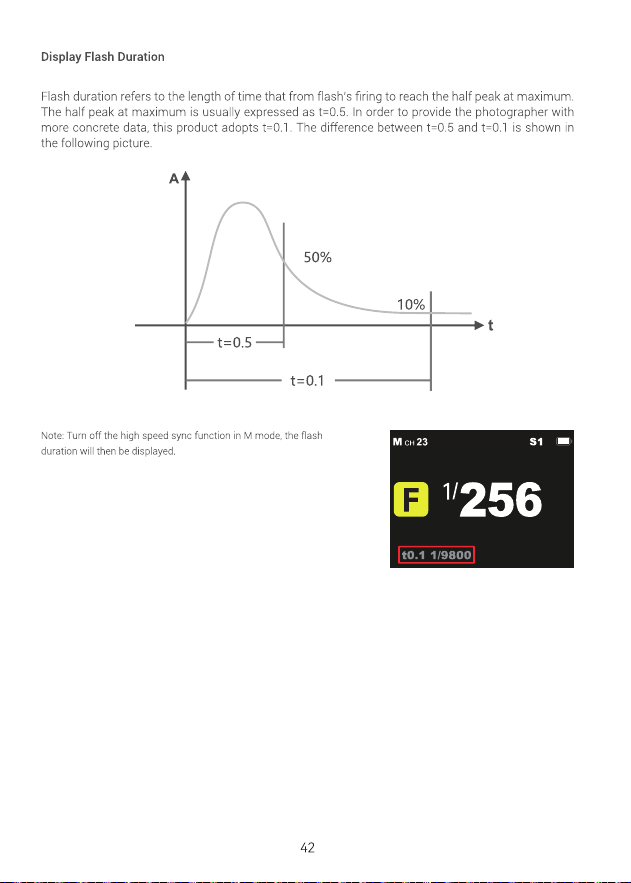
显示闪光持续时间
闪光持续时间是指闪光灯从开始发光到达发光半峰值的时间长度。半峰值的表示为 t=0.5。
为了给摄影师提供更详细的拍摄数值 , 本产品采用 t=0.1。如下图:t=0.5 与 t=0.1 区别。
A
t
50%
10%
t=0.5
t=0.1
F
t0.1 1/9800
256
1
/
S1M
CH 23
注:只有在 M 模式并关闭高速同步时 , 才会显示闪光持续
时间。
17
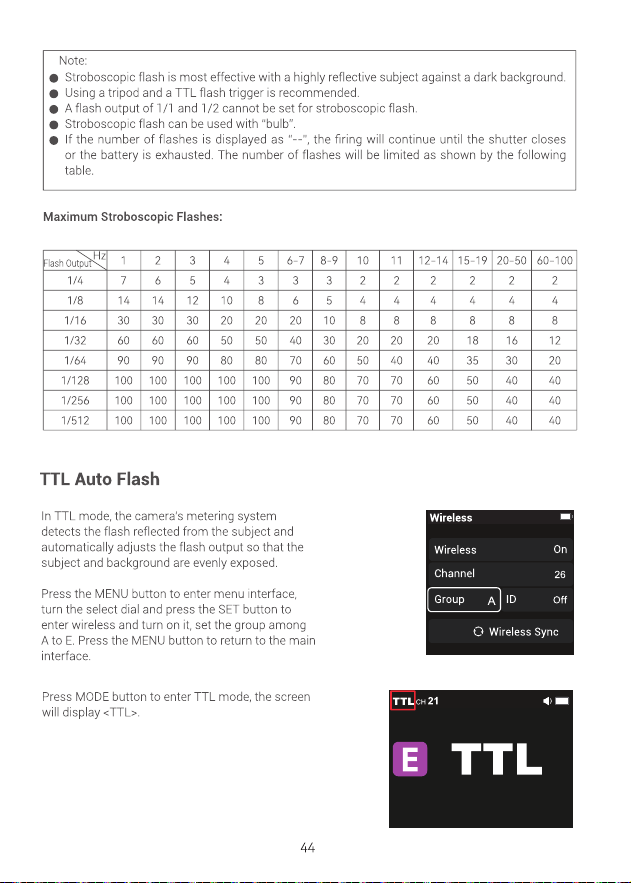
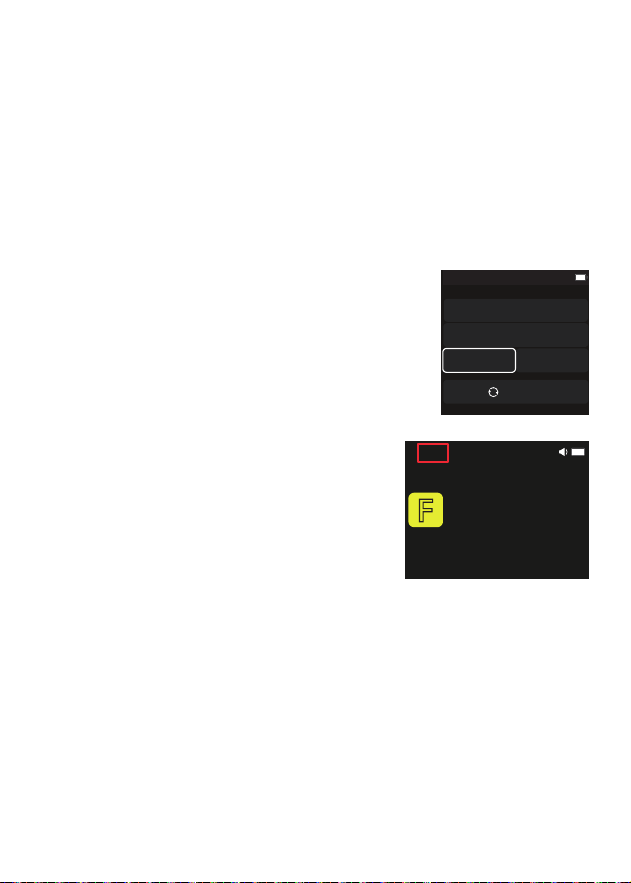
在 TTL 模式下,相机的测光系统会侦查从主体反
射回来的闪光照明,从而自动调节闪光输出量,
使主体和背景得到均衡曝光。通过短按 MENU 按
键进入菜单开启无线功能,将组别设置为 A 至 E
中的任意一个,设置完毕短按两次 MENU 回到主
界面。
短按 MODE 按键令屏幕显示 <TTL>,可以使闪光
灯进入 TTL 模式。
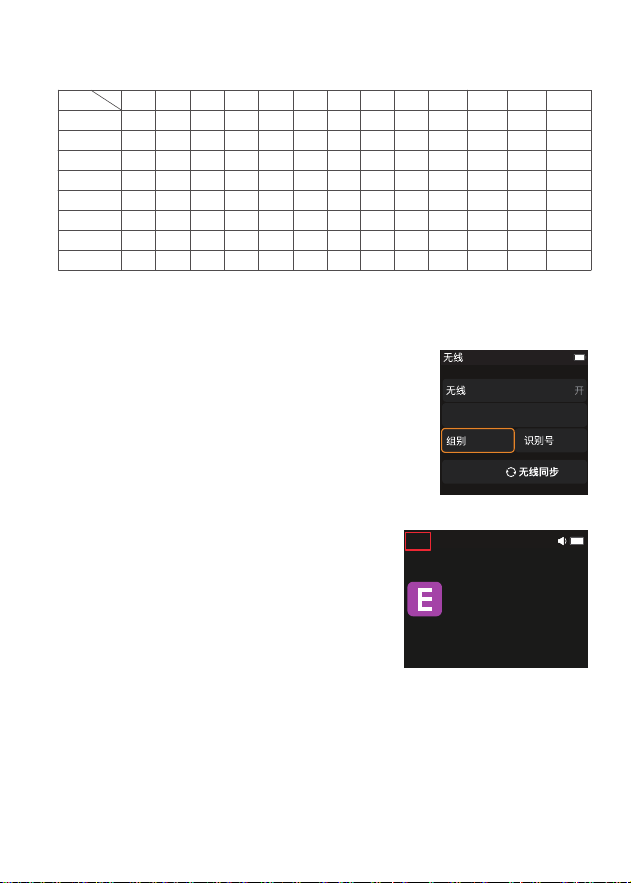
最大频闪闪光次数
TTL:自动闪光
1
7
14
30
60
90
100
100
100
1/4
1/8
1/16
1/32
1/64
1/128
1/256
1/512
闪光输出
Hz
2
6
14
30
60
90
100
100
100
3
5
12
30
60
90
100
100
100
4
4
10
20
50
80
100
100
100
5
3
8
20
50
80
100
100
100
6-7
3
6
20
40
70
90
90
90
8-9
3
5
10
30
60
80
80
80
10
2
4
8
20
50
70
70
70
60-100
2
4
8
12
20
40
40
40
20-50
2
4
8
16
30
40
40
40
15-19
2
4
8
18
35
50
50
50
12-14
2
4
8
20
40
60
60
60
11
2
4
8
20
40
70
70
70
1
关
频道
E
TTL
CH 21
TTL

19
设置通讯频道
如果在拍摄现场不止一个无线闪光系统 , 您可以通过更改通讯频道或设置识别号来防止信号
干扰,保证主控单元和从属单元设置为相同的频道编号即可。
无线
频道
组别
识别号
无线同步
开/关
1-32
0-9、A-F
关闭、1-99
短按 SET 按键进行无线同步
关闭相机电源,将引闪器放置于相机热靴插座上,打开引闪器电源开关和相机电源。
设置引闪器 X3:从顶端往下滑动屏幕,令屏幕显示 < 设置 >,点击 < 设置 > 进入自定
义菜单,点击无线设置进入频道、识别号设置。从左侧往右滑动屏幕可回到主界面,在
主界面可设置组别的闪光模式或闪光功率档位。
设置闪光灯 AD600ProII:短按 MENU 按键选中无线,进入无线设置开启此功能,将频道、
识别号设置成同引闪器一致。
点击引闪器上的无线同步,闪光灯选中无线同步后短按SET 按键即可设置双方无线频道、
识别号为一样号码。
按下相机快门即可引闪。
使用方法以 X3 引闪器为例:
1.
2.
3.
4.
5.
21
闪光模式
短按 MENU 按键进入菜单,旋转拨盘选中闪光模式,短按 SET 按键并旋转拨盘可选标准 /
色温 / 凝固。
标准
色温
凝固
标准闪光,主界面无指示。
色温恒定,开启后主界面出现图标( ),组别指示灯会闪烁,蜂鸣器开启
状态下会响一分钟,此时请按试闪按键放电,即可正常使用。仅在 M 模式并
关闭高速同步时支持开启,使用此功能全档位色温漂移在 ±100K 左右。
凝固模式,开启后主界面出现图标( ),闪光时间比标准模式要短,功率
对比标准模式也较小,仅在 M 模式和 Multi 模式下支持开启。
神牛 2.4G 无线漏闪原因及解决办法
1. 外部环境 2.4G 信号干扰 ( 如无线基站、2.4Gwi 路由、蓝牙设备等 )
→请调节引闪器的频道 CH 设置 ( 建议 +10) 找到无干扰的频道,或者在工作时关闭其他 2.4G
设备。
2. 请确认闪光灯是否已经回电或回电速度是否跟上连拍速度,并且没有处于过热保护或者
其他异常状态中。
→请下调闪光灯档位,如是 TTL 模式请尝试改为 M 模式 (TTL 模式下需要预闪一次 )。
3. 是否引闪器和闪光灯距离太近(距离 <0.5m)
→请在引闪器上打开“近距离无线模式”
X1 系列:按住引闪按钮不放,然后开机,直至指示灯闪 2 次。
Xpro、X2T 系列:设置 C.Fn-DIST 为 0-30m。
X3 系列:设置引闪距离为 0-30m。
4. 是否引闪器和接收端设备在低电状态
→请更换电池或充电处理,确保引闪器和闪光灯设备电量充足。
23
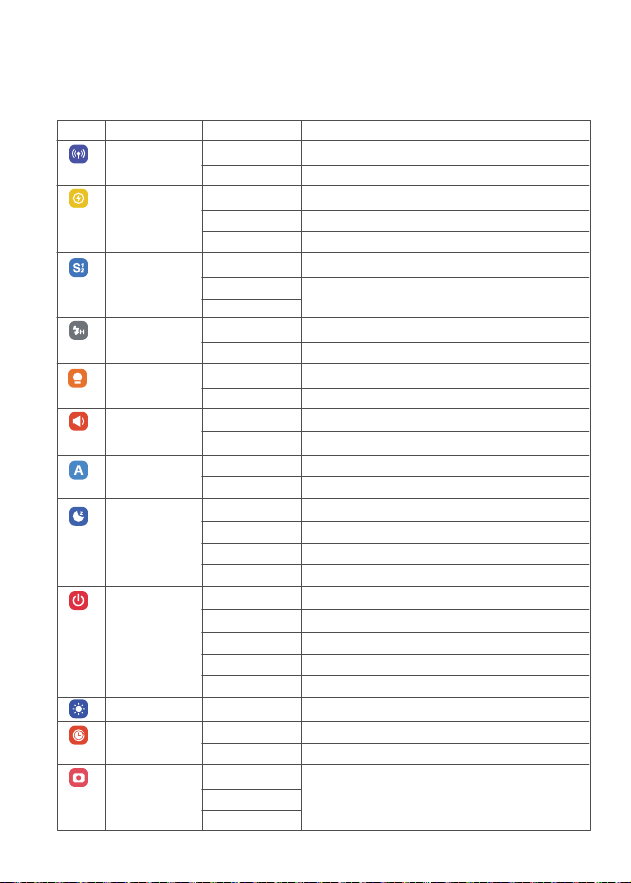
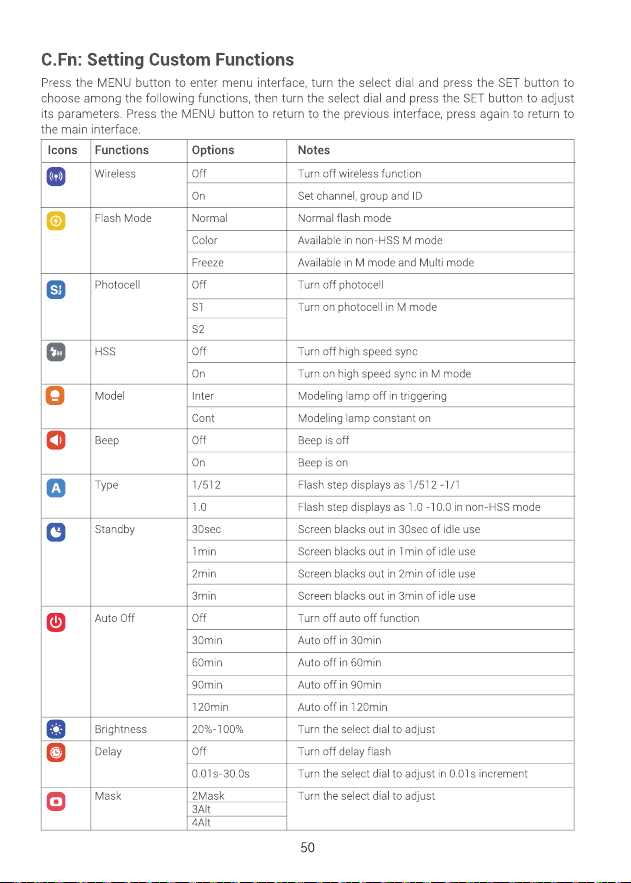
自定义功能
无线
闪光模式
光控引闪
高速同步
造型灯
蜂鸣器
功率显示
屏幕待机
自动关机
屏幕亮度
延时闪光
蒙版
关
开
标准
色温
凝固
关
S1
S2
关
开
闪灭
持续
关
开
1/512
1.0
30 秒
1 分钟
2 分钟
3 分钟
关
30 分钟
60 分钟
90 分钟
120 分钟
20%-100%
关
0.01-30.0 秒钟
2 蒙板
3 排序
4 排序
关闭无线设置
设置通讯频道
标准闪光
M 非高速模式下支持开启
M 模式和 Multi 模式下支持开启
关闭光控引闪
M 模式下支持开启
关闭高速同步
M 模式下支持开启
闪光灯回电灭
常亮
蜂鸣器关闭
蜂鸣器开启
机器闪光档位显示为 1/512-1/1
非高速模式下机器闪光档位显示为 1.0-10.0
超过 30 秒无人操作,屏幕进入休眠
超过 1 分钟无人操作,屏幕进入休眠
超过 2 分钟无人操作,屏幕进入休眠
超过 3 分钟无人操作,屏幕进入休眠
关闭自动关机
30 分钟后自动关机
60 分钟后自动关机
90 分钟后自动关机
120 分钟后自动关机
旋转拨盘设置亮度值
关闭延时闪光
以 0.01 秒钟为增量
旋转拨盘设置
功能图标 选项 说明
25
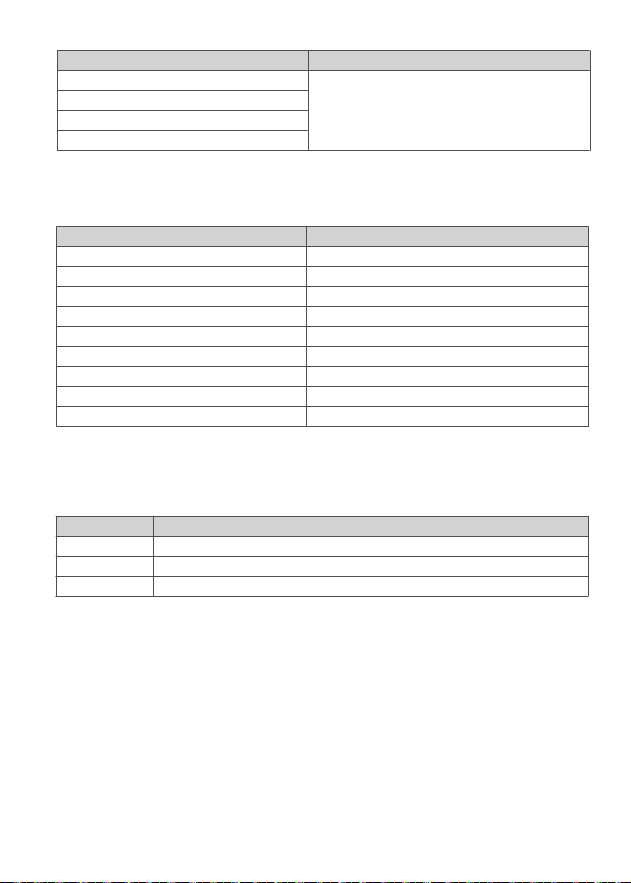
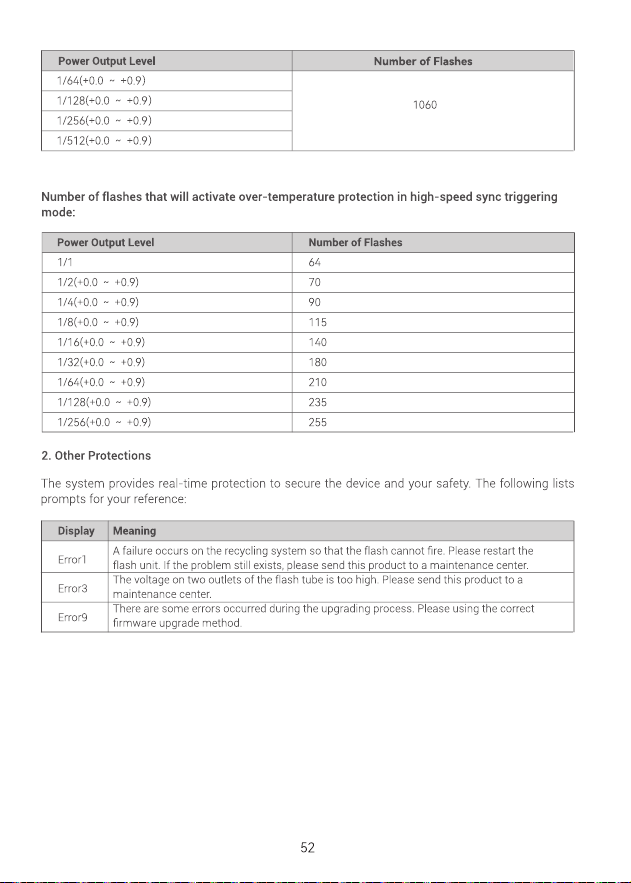
功率
1/64(+0.0 ~ +0.9)
1/128(+0.0 ~ +0.9)
1/256(+0.0 ~ +0.9)
1/512(+0.0 ~ +0.9)
次数
1060
为了保证设备安全的工作 , 系统时刻进行预防保护 , 以下提示符号供您参考:
高速同步模式下, 激活热保护功能的连续闪光次数:
2. 其他保护
功率
1/1
1/2(+0.0 ~ +0.9)
1/4(+0.0 ~ +0.9)
1/8(+0.0 ~ +0.9)
1/16(+0.0 ~ +0.9)
1/32(+0.0 ~ +0.9)
1/64(+0.0 ~ +0.9)
1/128(+0.0 ~ +0.9)
1/256(+0.0 ~ +0.9)
次数
64
70
90
115
140
180
210
235
255
屏幕显示
Error1
Error3
Error9
警示内容
闪光灯回电系统出现问题 , 无法回电引闪 , 请重新开机 , 如无法解决请维修
闪光灯管两端电压过高,请维修
固件升级有误 , 请进行正确固件升级
27
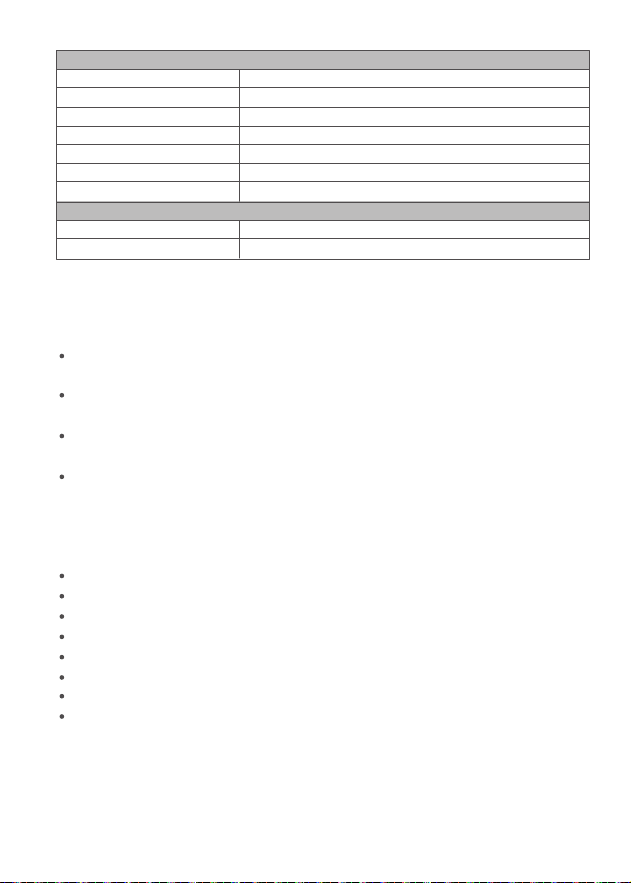
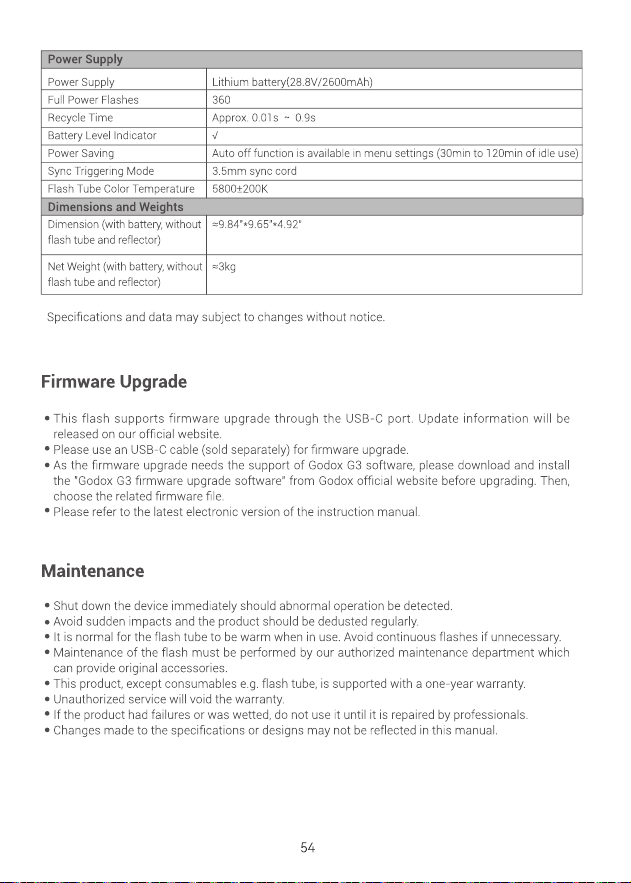
电源
电源
全功率闪光次数
回电时间
电池电量显示灯
节能
同步触发方式
闪光管色温
尺寸和重量
尺寸(含电池、不含灯管、反光罩)
净重(含电池、不含灯管、反光罩)
锂电池(28.8V/2600mAh)
360 次
约 0.01 ~ 0.9 秒
√
可设置闪光灯在无人操作时 30 分钟~ 120 分钟自动关闭电源
3.5mm 同步线
5800±200K
≈ 250×245×125mm
≈ 3kg
固件升级
维护保养
本机通过 USB-C 固件升级接口可进行固件升级,软件最新公告及说明将会发布在官方网
站上。
本品出厂不配 USB 升级线,请另行购买。本产品 USB 接口为 USB-C 接口,请使用
USB-C 线。
产品升级固件需要 Godox G3 程序软件支持,升级固件前请先到神牛官网下载安装“Godox
G3 固件升级软件”再选择相应的固件文件。
由于产品进行固件升级,说明书请以最新电子版为准。
闪光灯在工作时 , 如发现异常 , 应立即关掉电源 , 查明原因。
灯体应避免震动 , 平时注意表面除尘。
灯体稍有发热为正常现象 , 无特别需要时 , 勿连续引闪。
闪光灯的所有维修一概由本厂指定可供原厂配件之维修部负责。
1 年保修 , 消耗品如灯管等不在 1 年保修范围。
经发现 , 擅自检修此闪光灯的 , 将取消闪光灯之一年保修期 , 维修需要收取相关费用。
如果本品出现故障或者被水淋湿 , 在专业人员维修后方可继续使用。
如有技术更改 , 恕不另行通知。

29
Do not use or store this device in potentially explosive environments.
Do not cover the heat dissipation port!
Do not use accessories not been approved by our company, as this may cause re, electric
shock or personal injury.
Clean gently with a dry cloth. Do not use a wet cloth as it may damage the device.
Some products are equipped with protective covers that must be removed before use.
This instruction manual is based on rigorous testing. Changes in design and specications
are subject to change without notice. Check ofcial website for latest instruction manual and
product updates.
Use only specied charger and follow proper usage instructions for certain products with built-
in lithium batteries, within the rated voltage and temperature range.
Some products are powered by lithium batteries, who have limited lifespans and will gradually
lose their charging capacities, which is irreversible. As the battery ages, the product's battery
life will decrease. The lifespan of lithium battery is estimated to be 2 to 3 years. Please regularly
check the battery, and if the charging time signicantly increases or the battery life signicantly
decreases, consider replacing the battery.
Some products are equipped with lithium batteries. The following are the storage
recommendations: Charge the battery to about 50% before storage. Charge it to about 50%
at least every six months. Removable batteries should be stored separately. The storage
temperature should be between 0°C and 40°C.
Some products are powered by lithium batteries. Please note:
Conrm and comply with all relevant local laws and regulations when handling any batteries.
The warranty period for this device as a whole is one year. Consumables (such as batteries),
adapters, power cords, and other accessories are not covered by the warranty.
Unauthorized repairs will void the warranty and will incur charges.
Failures from improper operation is not covered under warranty.
18.
19.
20.
21.
22.
23.
24.
25.
26.
27.
28.
29.
30.
31.
•
•
•
•
•
•
•
•
•
Do not disassemble, crush, or puncture the battery;
Avoid short-circuiting the battery contacts;
Do not expose the battery to re or water;
Do not expose the battery to temperatures above 60°C;
Keep out of reach of children;
Protect the battery from excessive shock or vibration;
Do not use a damaged battery;
If the battery leaks, avoid contact with the leaking fluid;
If the battery fluid comes into contact with your eyes, immediately rinse with water for
at least 15 minutes. Lift your eyelids until there are no signs of fluid and seek medical
attention promptly.

31
Foreword
Thank you for purchasing!
AD600ProII has strong power, detachable lithium battery pack and great portability. When using
Godox 2.4G wireless X system, it can be triggered by XPro/XProII/X2T/X3 series flash trigger in M/
Multi/TTL mode. With transmitter & receiver functions, AD600ProII can also use in combination
with Godox camera flashes, outdoor flashes, studio flashes, etc. With this flash, your shooting will
become simpler. With high-speed shooting throughout the process, single xture overshadowing
the sunlight, bare flash tube and reflector make a perfect match for outdoor and live shooting,
AD600ProII is an ideal light source for freelance commercial photographers, journalists, photography
enthusiasts, wedding documentary photographers, etc.
Main Features
Quick Recycle Time: 0.01s~0.9s (max. power).
Stable Color Temperature: shift around ±100K over the entire power range with this function.
LED Modeling Lamp: 40W bi-color large LED modeling light freely adjusts brightness and CCT.
Studio Quality Light: up to 600Ws, GN 87 (m ISO 100, with efcient reflector), 360 full power flashes,
1/8000s high-speed sync.
Precise Power Adjustment: from full power 1/1 to 1/512 with 0.1 increment each step.
Wide Compatibility: fully support M, Multi and wireless TTL flash systems of Canon, Nikon, Fujilm,
Olympus, Sony, Leica, Pentax, etc. Workable as a receiver unit in a wireless flash group.
Wireless Control: with built-in 2.4G wireless X system to achieve remote control by optional Godox
flash triggers, and 3.5mm sync cord jack to achieve various sync triggering modes.
Distinct Group Colors: 16 groups with different colors to quickly distinguish even in remote distance
usage.
Simple Operation: 2.8" color screen together with steplessly rotatable select dial, detachable battery
pack design.
Wide-range Accessories: Bowens mount has wide compatibility and versatility.
•
•
•
•
•
•
•
•
•
•
33
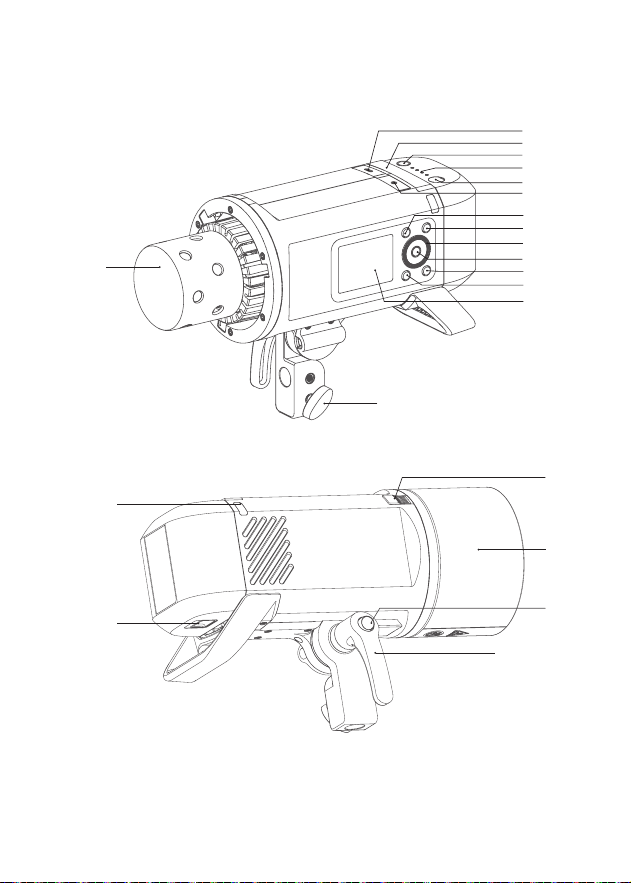
Name of Parts
Flash Body
1
2
9
14
13
16
17
19
18
3
4
5
6
7
8
11
10
21
12
15
20
35
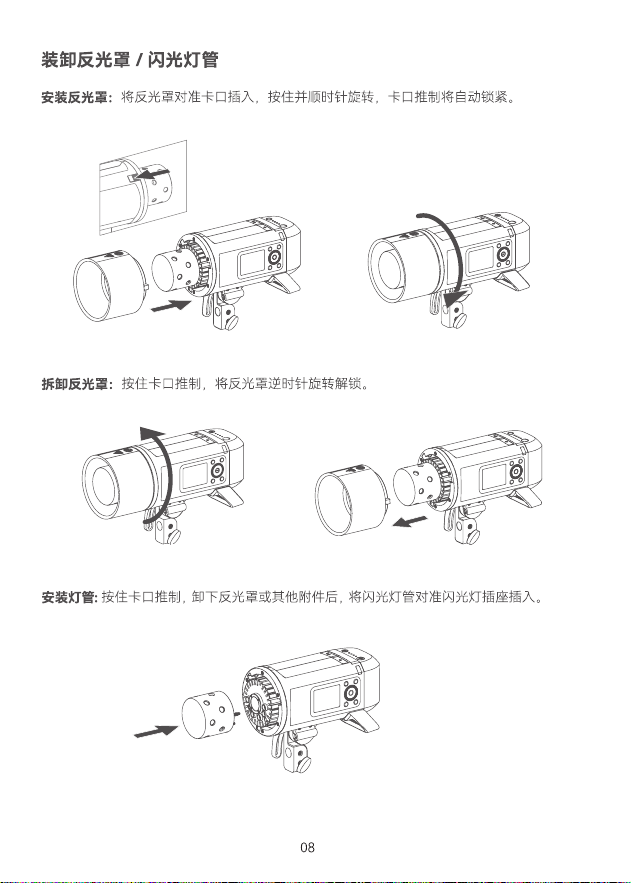
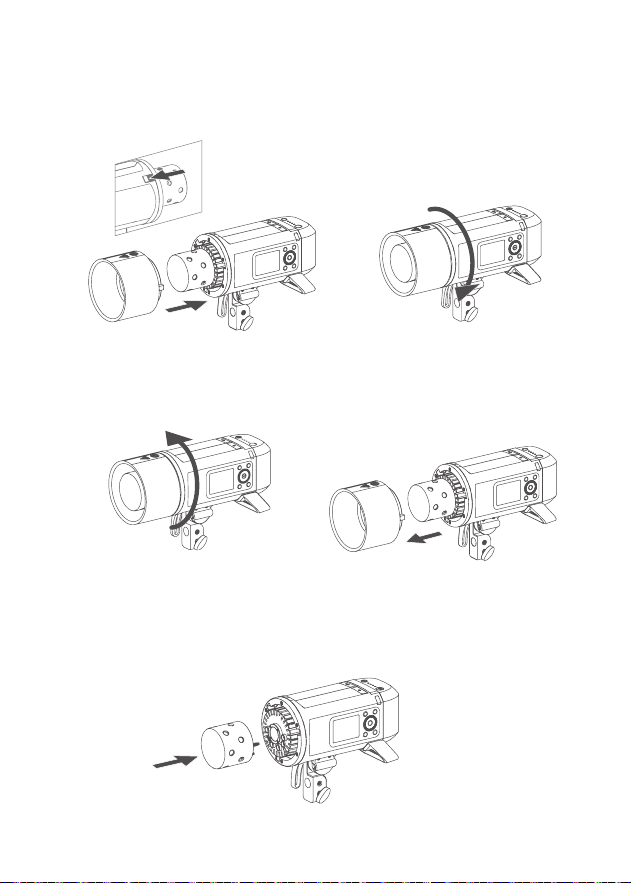
Installing and Disassembling Reflector/Flash Tube
Installing the Flash Tube: Press down the accessory locking pusher, remove the reflector or
other accessories. Match the flash tube in the tube socket and push until it is securely seated
into the socket.
Installing the Reflector: Insert the reflector into the accessory mount , press and hold then rotate
clockwise, the accessory locking pusher will lock up.
Disassembling the Reflector: Press down the accessory locking pusher, rotate the reflector
anticlockwise to unlock.
37
F
t0.1 1/11760
512
1
/
S1M
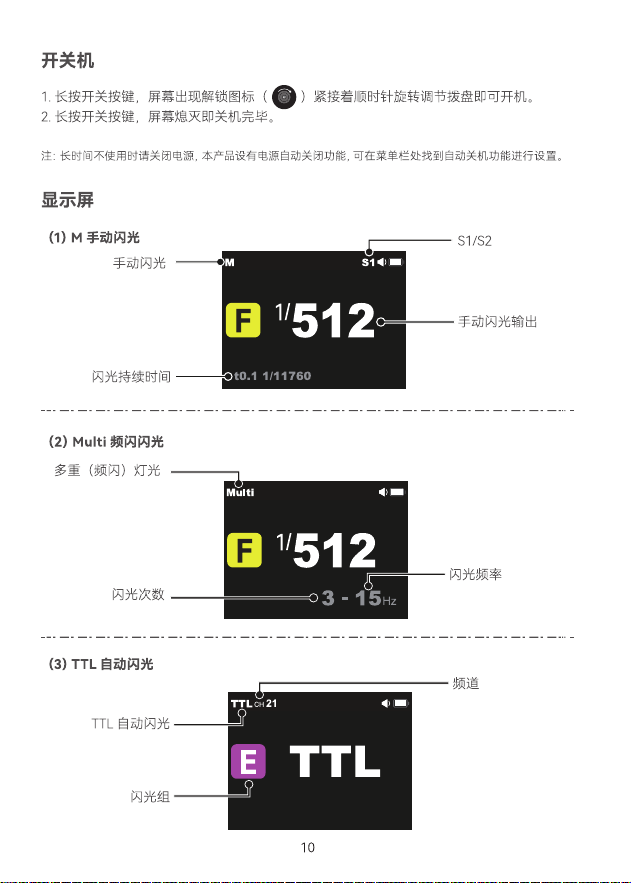
Power Switch
Color Screen
1. Long press the power switch button until the unlock icon <
> is displayed on the panel, then
rotate the select dial clockwise to turn on the device.
2. Long press the power switch button for until panel black out to turn off the device.
Note: Turn off the device if it will not be used for an extended period. This device is designed with an automatic
power off function, which can be set in menu settings.
(
1
)
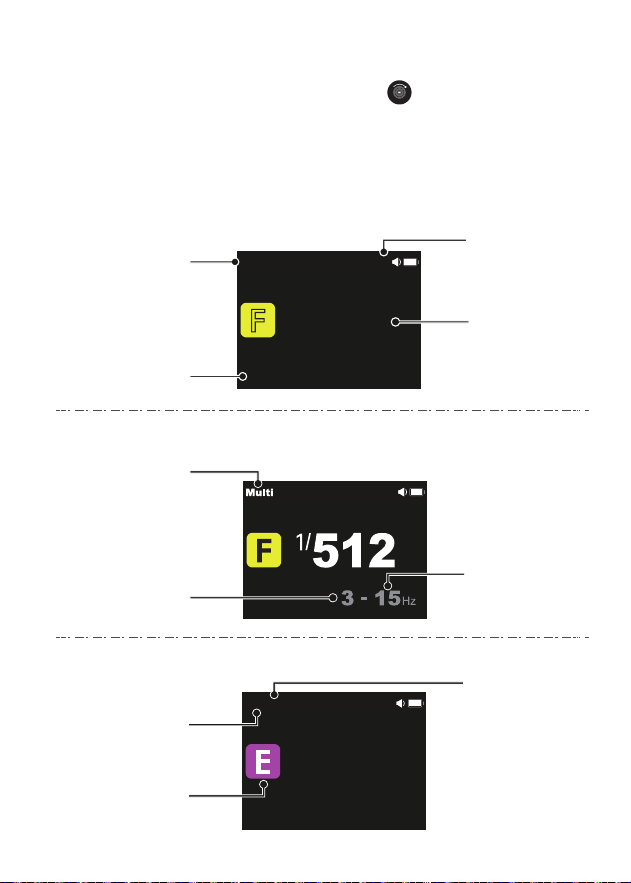
M (Manual) Flash
(
2
)
Multi Flash
(3)
TTL Auto Flash
Manual Flash
Manual Flash Output
Flash Duration
S1/S2
Flash Frequency
Number of Flashes
TTL Auto Flash
Flash Group
Multi:Stroboscopic Flash
TTL
CH
21
TTL
Channel
39
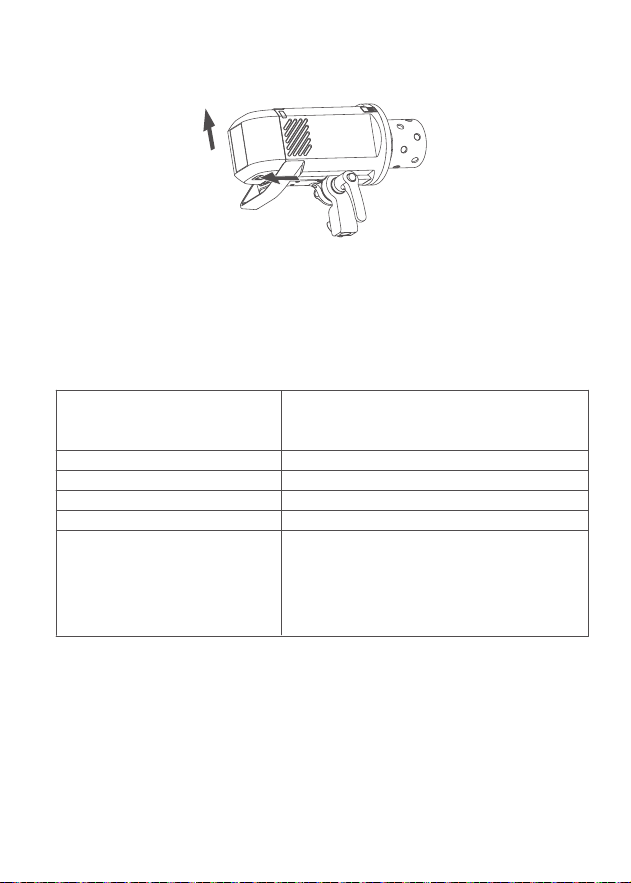
2. Unloading: Push the battery compartment pusher and the battery pack upward at the same time
to unload it.
Battery Level Indication
Battery Activation Instructions
Attach the battery pack to the flash correctly. Check the battery level by pressing the battery
indicator button and lightening the battery level indicator as the following table shows.
Meaning/Percentage of Battery Level
75% ~ 100%
50% ~ 75%
25% ~ 50%
3% ~ 25%
<
2%
The battery level is going to be used out immediately. And
the flash will alarm for 1 minute and auto power off in 3
minutes.
Note: Please recharge the battery as soon as possible (within
10 days). Then, the battery can be used or be placed for long
period.
LED Battery Level Indication on the
Battery
(Indicating battery level and management
of non-loaded battery)
1 red grid +3 green grids
1 red grid +2 green grids
1 red grid +1 green grid
1 red grid
2% flash red, 1% off
Due to the battery upgrade, if you haven’t used the battery for more than a month, it will
automatically go to sleep. please try to activate it if you use or charge again after a month.
Activation method: Short press the right side of battery indicator button to activate.
Note: The indications are almost the same except for the grids shift.
41
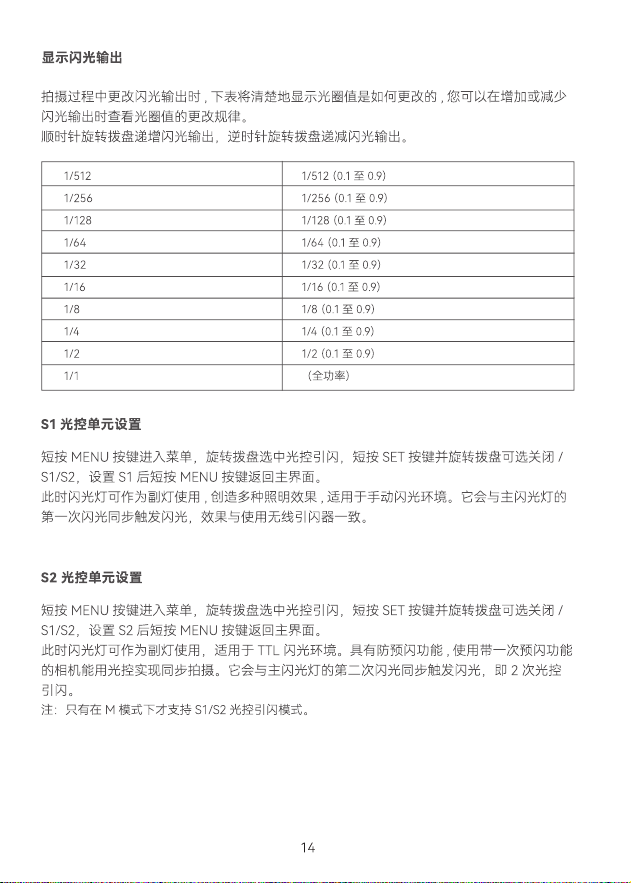
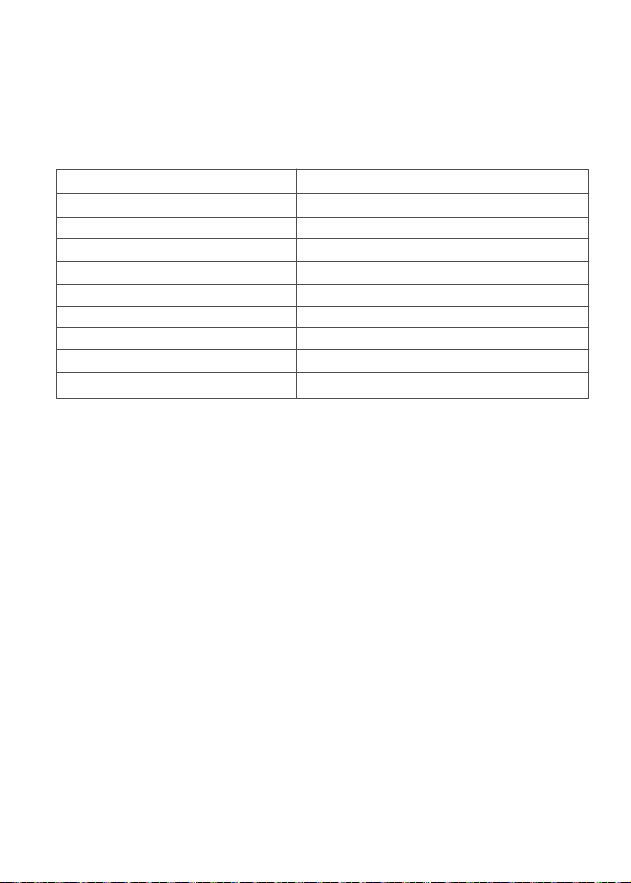
The following table makes it easier to see how the step changes in terms of aperture value when
you increase or decrease the flash output.
Turn the select dial clockwise to increase the flash output, while turn it anticlockwise to decrease
the flash output.
Press MENU button to enter photocell and choose S1 function, so that this flash can function as
an optical S1 secondary flash with optical sensor in M manual flash mode. Then press then MENU
button to return to the main interface. With this function, the flash will re synchronously when the
main flash res, the same effect as that by the use of wireless triggers. This helps create multiple
lighting effects.
Press MENU button to enter photocell and choose S2 function, so that this flash can also function
as an optical S2 secondary flash with optical sensor in M manual flash mode. Then press then
MENU button to return to the main interface. This is useful when cameras have pre-flash function.
With this function, the flash will ignore a single “preflash” from the main flash and will only re in
response to the second, actual flash from the main unit.
Flash Output Range
1/512
1/256
1/128
1/64
1/32
1/16
1/8
1/4
1/2
1/1
1/512
(
0.1 to 0.9
)
1/256
(
0.1 to 0.9
)
1/128
(
0.1 to 0.9
)
1/64
(
0.1 to 0.9
)
1/32
(
0.1 to 0.9
)
1/16
(
0.1 to 0.9
)
1/8
(
0.1 to 0.9
)
1/4
(
0.1 to 0.9
)
1/2
(
0.1 to 0.9
)
(
full power
)
Optical S1 Secondary Unit Setting
Optical S2 Secondary Unit Setting
Note: S1 and S2 optical triggering is only available in M manual flash mode.
43
Multi: Stroboscopic Flash
Calculating the Shutter Speed
With stroboscopic flash, a rapid series of flashes is red. It can be used to capture multiple images
of a moving subject in a single photograph. You can set the flash output, number of flashes, and
flash frequency (number of flashes per sec. expressed as Hz).
During stroboscopic flash, the shutter remains open until the ring stops. Use the formula below to
calculate the shutter speed and set it with the camera.
Number of Flashes / Flash Frequency = Shutter Speed
For example, if the number of flashes is 10 and the ring frequency is 5 Hz, the shutter speed should
be at least 2 seconds.
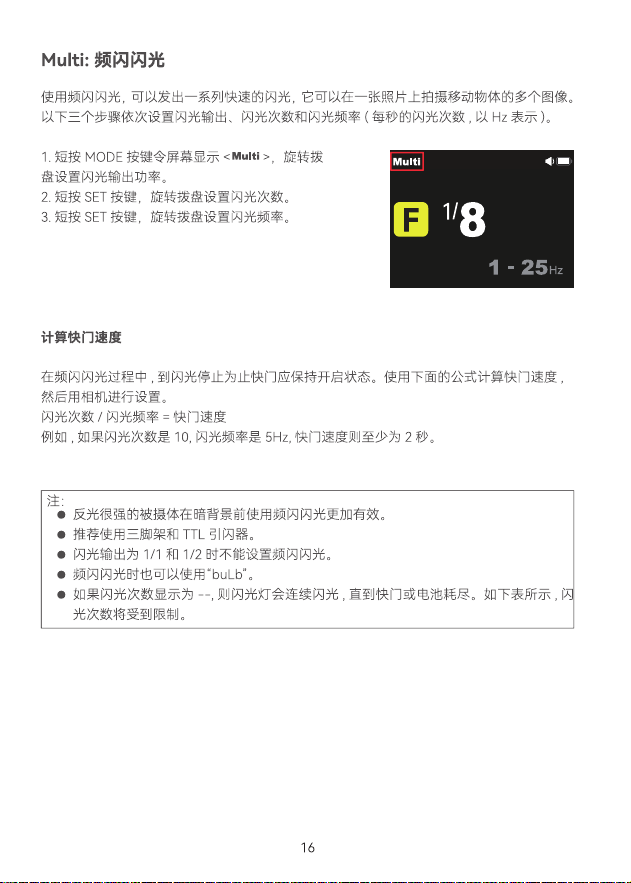
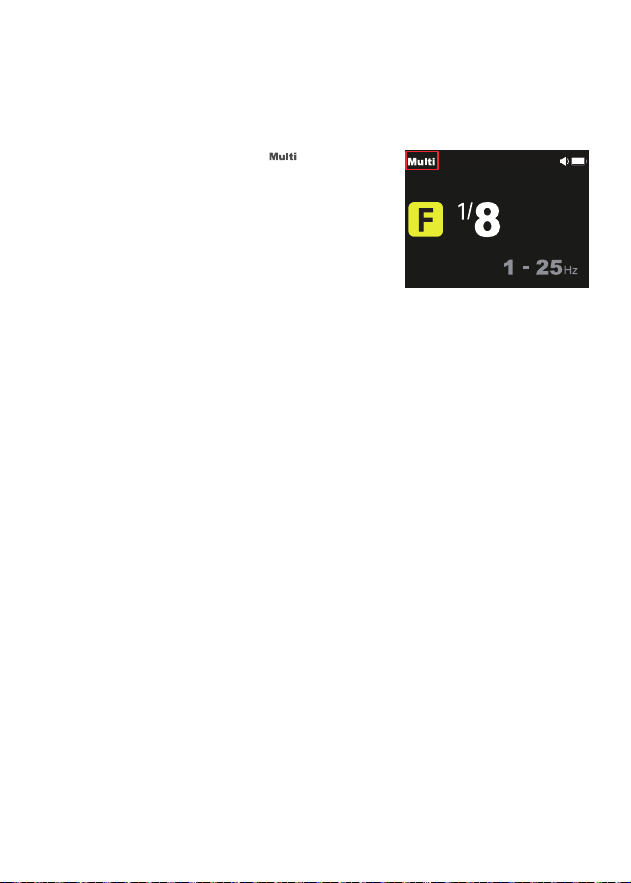
1. Press the MODE button so that < >
is displayed, turn the select dial to choose a
desired ash output.
2. Press the SET button and turn the select dial
to set the number of ashes.
3. Press the SET button and turn the select dial
to set the ash frequency.
45
Wireless Settings
Wireless (2.4G) Transmission
AD600ProII adopts 2.4G wireless X system, which has good compatibility with other Godox
products. It can automatically switch to receiver unit according to the transmitter unit instead
of setting manually. The compatible cameras include Canon, Nikon, Sony, Olympus, Panasonic,
Fujilm, Pentax, Leica, etc.
As a receiver unit, AD600ProII can be controlled by the following transmitter units: XPROII series/X3
series /X2T series /V1Pro series /V1 series /V860III series.
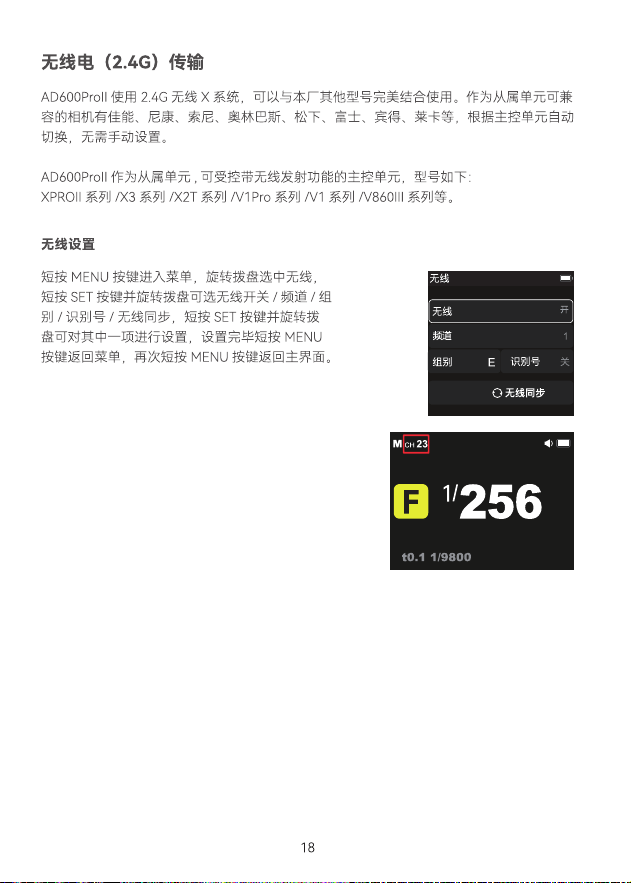
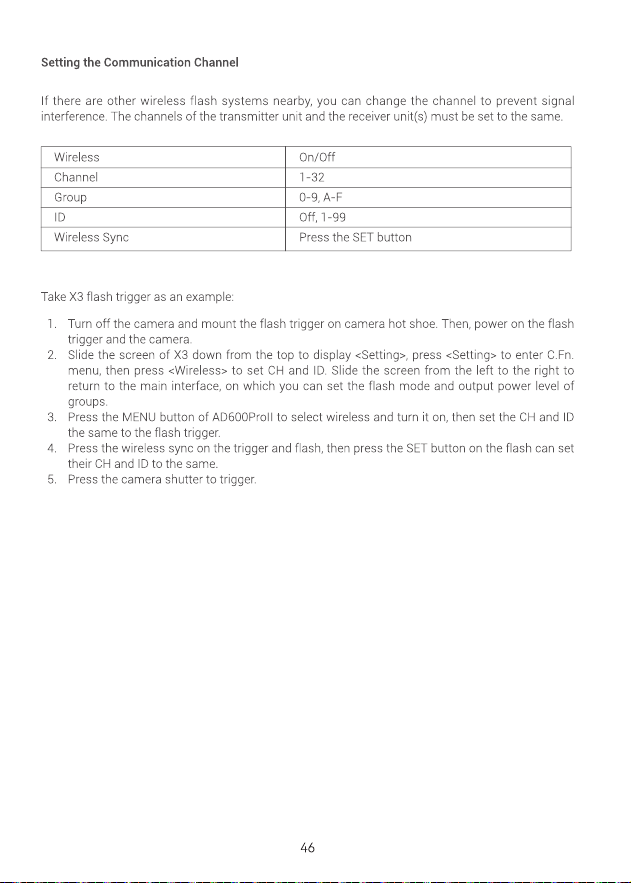
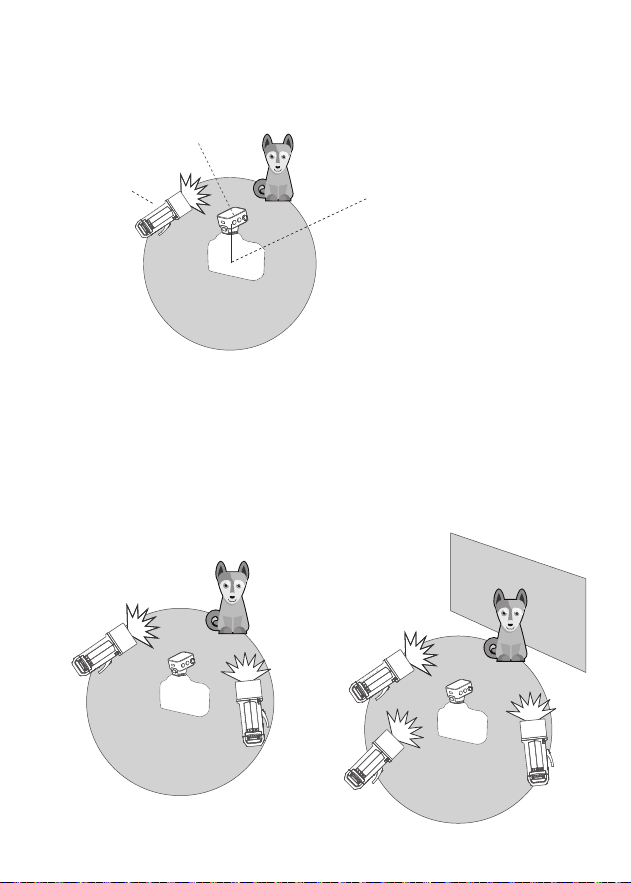
Press the MENU button to enter menu interface, turn
the select dial and press the SET button to choose
among wireless/channel/group/ID/wireless sync,
then turn the select dial and press the SET button
to adjust the parameters. Press the MENU button to
return to the previous menu, press again to return to
the main interface.
F
t0.1 1/9800
256
1
/
M
CH 23
26
Off
Channel
Group
Wireless Sync
ID
A
Wireless
Wireless
On
47
Wireless Flash Shooting
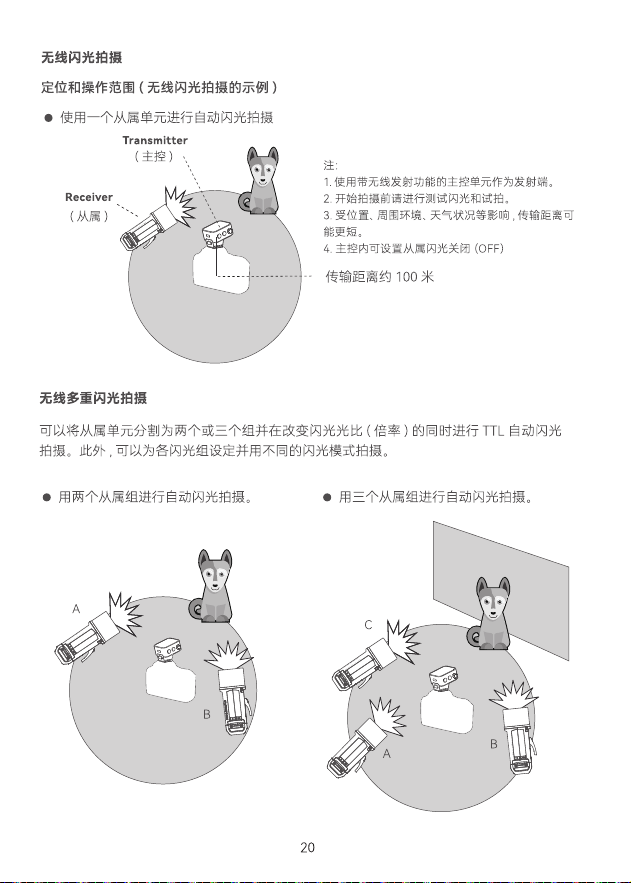
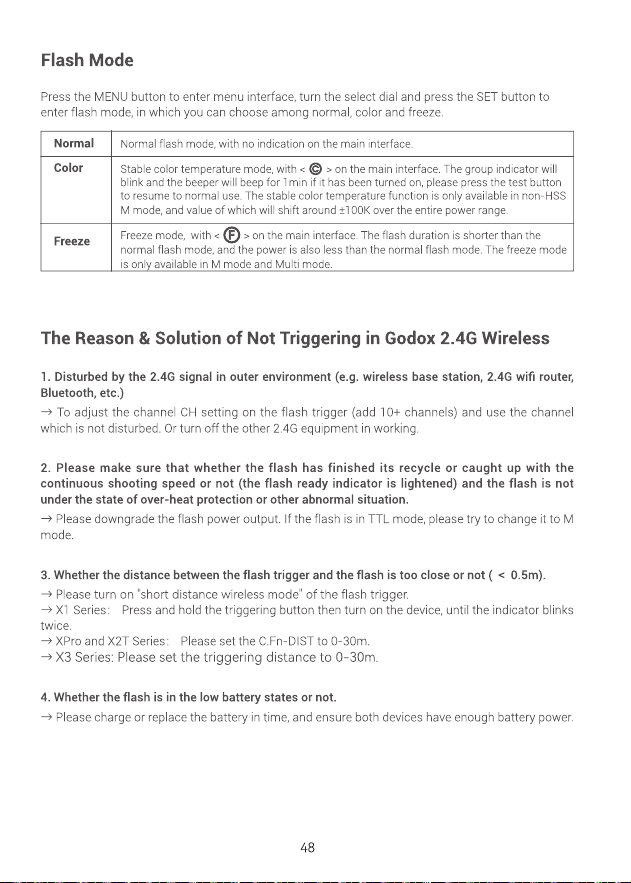
Positioning and Operation Range (Example of wireless flash shooting)
Auto flash shooting with one receiver unit
Transmitter
Receiver
Note:
1. Please use the transmitter unit with wireless
transmission function.
2. Before shooting, perform a test flash and
test shooting.
3. The transmission distance might be
shorter depending on the conditions such as
positioning of receiver units, the surrounding
environment and weather conditions.
4. The receiver unit can be turned off on the
transmitter unit.
●
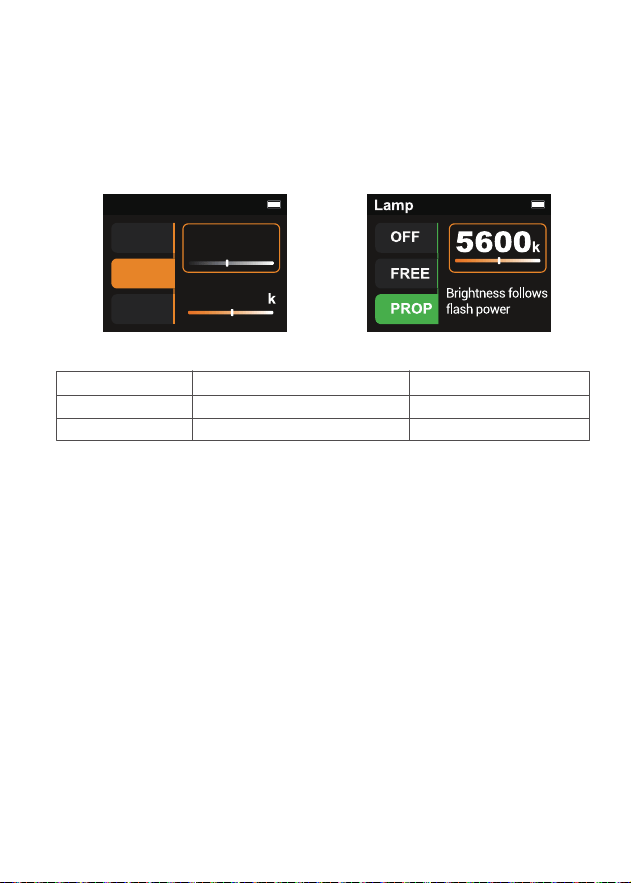
Wireless Multiple Flash Shooting
You can divide the receiver units into two or three groups and perform TTL auto flash while
changing the flash ratio (factor). In addition, you can set and shoot with a different flash mode for
each ring group.
Auto flash shooting with two receiver units
Auto flash shooting with three receiver units
● ●
A
A
C
B
B
Transmission distance is about 100m
49
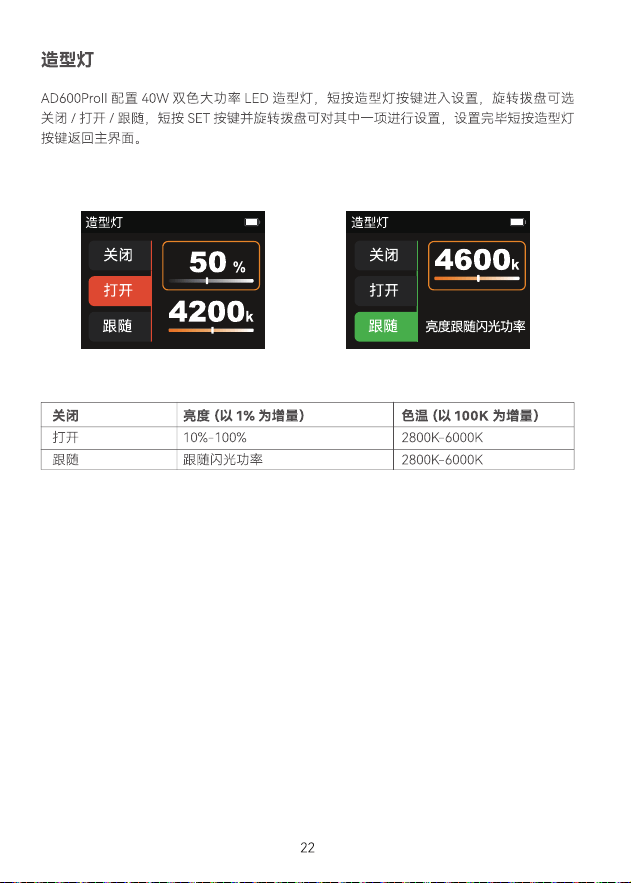
Modeling Lamp
AD600ProII is equipped with 40W bi-color LED modeling lamp. Press the modeling lamp button
to enter modeling lamp settings, turn the select dial to choose among off/free/prop, then turn the
select dial and press the SET button to adjust the parameters. Press the modeling lamp button to
return to the main interface.
OFF
FREE
PROP
Brightness
(
in 1% increment
)
10%-100%
Brightness follows flash power
CCT
(
in 100K increment
)
2800K-6000K
2800K-6000K
O
F
F
FREE
PR
OP
L
am
p
12 %
5600
51
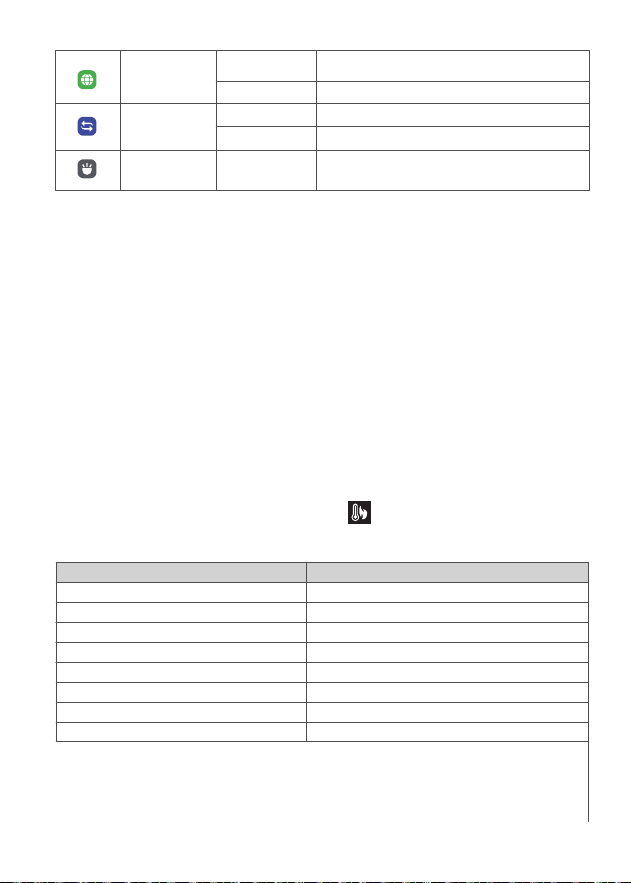
Language
Reset
Device Info
Chinese
English
Yes
No
Simplied Chinese operating system
English operating system
Factory reset
Cancel factory reset
Display the current model and version
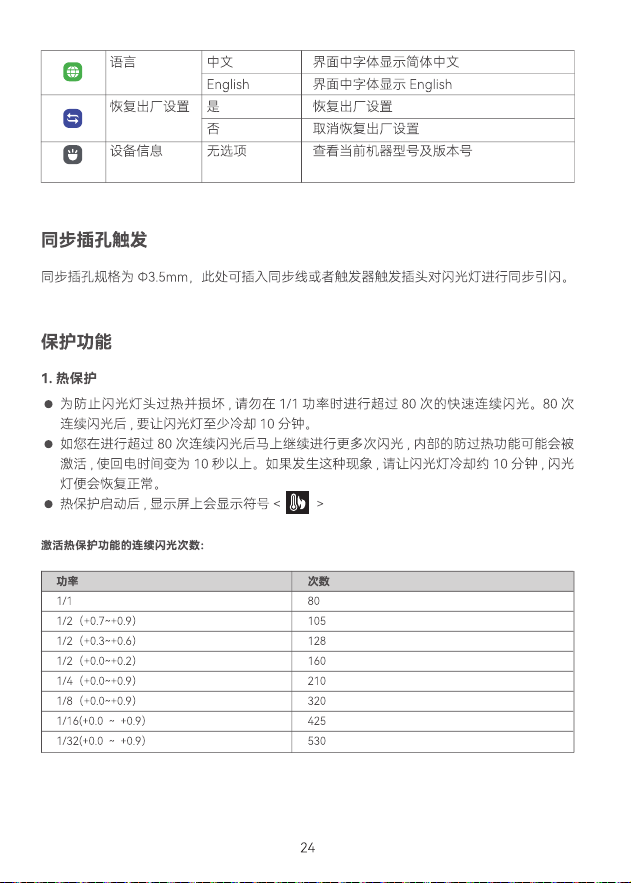
Sync Triggering
Protection Function
The sync cord jack is a Φ3.5mm plug. Insert a trigger plug in and the flash will be fired
synchronously with the camera shutter.
1. Over-Temperature Protection
To avoid overheating and deteriorating the flash head, do not fire more than 80 continuous
flashes in fast succession at 1/1 full power. After 80 continuous flashes, allow a rest time of at
least 10 minutes.
If you re more than 80 continuous flashes and then re more flashes in short intervals, the
inner over-temperature protection function may be activated and make the recycling time over
10 seconds. If this occurs, allow a rest time of about 10 minutes, and the flash unit will then
return to normal.
When the over-temperature protection is started, <
> is shown on the screen.
●
●
●
Number of flashes that will activate over-temperature protection:
Power Output Level
1/1
1/2(+0.7~+0.9)
1/2(+0.3~+0.6)
1/2(+0.0~+0.2)
1/4(+0.0~+0.9)
1/8(+0.0~+0.9)
1/16(+0.0 ~ +0.9)
1/32(+0.0 ~ +0.9)
Number of Flashes
80
105
128
160
210
320
425
530
53
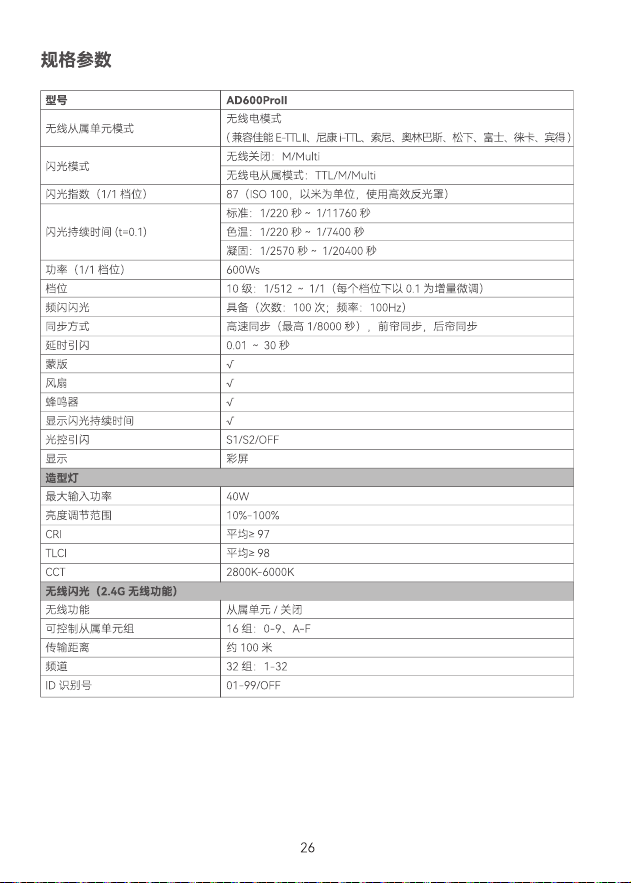
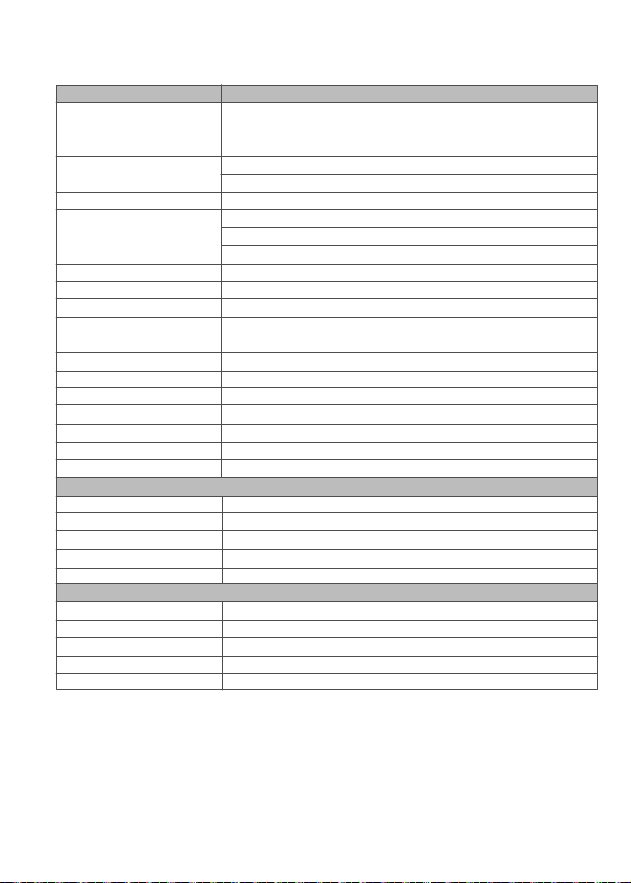
Technical Data
AD600ProII
Wireless Mode
(compatible with Canon E-TTL II, Nikon i-TTL, Sony, Olympus, Panasonic,
Fujilm,Leica, Pentax)
Wireless off
:
M/Multi
Wireless receiver mode
:
TTL/M/Multi
87
(
ISO 100,in meters,with efcient reflector)
Normal:1/220s
~
1/11760s
Color: 1/220s
~
1/7400s
Freeze:1/2570s
~
1/20400s
600Ws
10 steps
:
1/512
~
1/1(with 0.1 increment each step)
Provided (up to 100 times, 100Hz)
High-speed sync (up to 1/8000 seconds), rst-curtain sync, and second-
curtain sync
0.01
~
30s
√
√
√
√
S1/S2/OFF
Color screen
40W
10%-100%
Average≥97
Average≥98
2800K-6000K
Receiver, Off
16
:
0-9, A-F
Approx. 100m
32
:
1-32
01-99/OFF
Model
Wireless Receiver Unit Mode
Flash Mode
Guide No. (1/1 step)
Flash Duration (t=0.1)
Power (1/1 step)
Power Output
Stroboscopic Flash
Sync Mode
Delay Flash
Mask
Fan
Beep
Flash Duration Indication
Photocell
Display
Modeling Lamp
Max. Input Power
Brightness Range
CRI
TLCI
CCT
Wireless Function
Controllable Receiver Groups
Transmission Range
Channels
ID
Wireless Flash (2.4G transmission)

55
FCC Statement
Warning
Declaration of Conformity
This device complies with part 15 of the FCC Rules. Operation is subject to the following two
conditions:
(1) This device may not cause harmful interference, and
(2) this device must accept any interference received, including interference that may cause
undesired operation.
Any Changes or modications not expressly approved by the party responsible for compliance could
void the user's authority to operate the equipment.
Note: This equipment has been tested and found to comply with the limits for a Class B digital
device, pursuant to part 15 of the FCC Rules. These limits are designed to provide reasonable
protection against harmful interference in a residential installation. This equipm..ent generates
uses and can radiate radio frequency energy and, if not installed and used in accordance with
the instructions, may cause harmful interference to radio communications. However, there is no
guarantee that interference will not occur in a particular installation. If this equipment does cause
harmful interference to radio or television reception, which can be determined by turning the
equipment off and on, the user is encouraged to try to correct the interference by one or more of the
following measures:
-Reorient or relocate the receiving antenna.
-Increase the separation between the equipment and receiver.
-Connect the equipment into an outlet on a circuit different from that to which the receiver is
connected.
-Consult the dealer or an experienced radio/TV technician for help.
The device has been evaluated to meet general RF exposure requirement.
The device can be used in portable exposure condition without restriction.
Operating frequency:2412.99MHz – 2464.49MHz (only receive)
GODOX Photo Equipment Co.,Ltd. hereby declares that this equipment are in compliance with the
essential requirements and other relevant provisions of Directive 2014/53/EU. In accordance with
Article 10(2) and Article 10(10), this product is allowed to be used in all EU member states.For more
information of DoC, Please click this web link:
https://www.godox.com/eu-declaration-of-conformity/
The device complies with RF specications when the device used at 0mm from your body.
如产品存在下列情况,本文件项下的保证和服务将不适用 : ①产品或部件超过相应保修期;②错误
或不适当使用、维护或保管导致的故障或损坏,如:不当搬运;非按产品合理预期用途使用;不当
插拨外接设备;跌落或外力挤压;接触或暴露于不适当温度、溶剂、酸碱、水浸或潮湿环境;③由
非神牛授权机构或人员安装、修理、更改、添加或拆卸造成的故障或损坏;④产品或部件原有识别
信息被修改变更或除去;⑤无有效保修卡;⑥使用非合法授权、非标准或非公开发行的软件造成的
故障或损坏;⑦因不可抗力或意外事件造成的故障或损坏;⑧其他非因产品本身质量问题导致的故
障或损坏。遇上述情况,您应向相关责任方寻求解决,神牛对此不承担任何责任。因非在保修期或
保修范围内的部件、附件或软件导致产品不能正常使用的,不是保修范围内的故障。产品使用过程
中正常的脱色,磨损和消耗,不是保修范围内的故障。
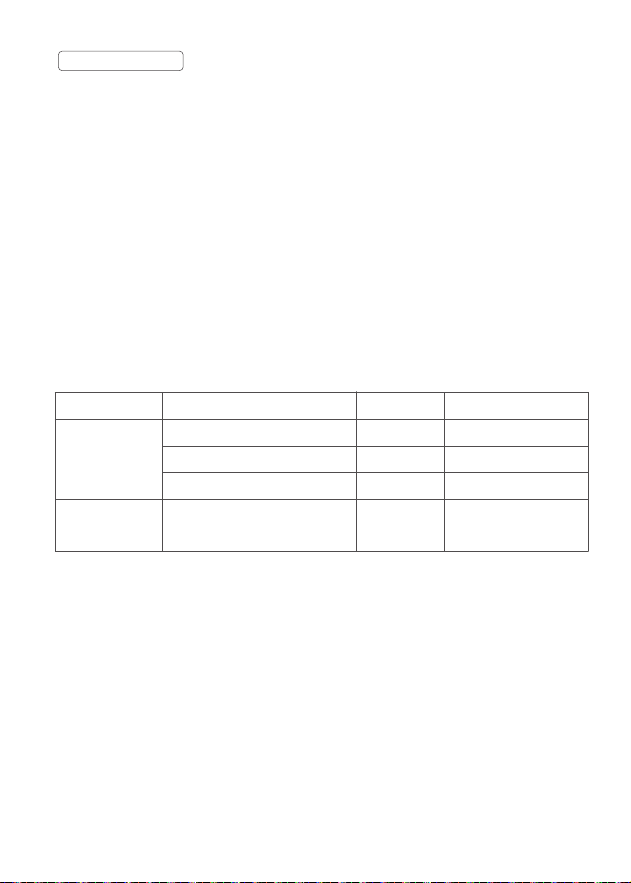
产品类别
部件
其他
选件名称
电路板
电池
充电器等带电性能的部件。
如闪光管、造型灯泡、外壳、保护
罩、锁紧装置、包装等。
保修期(月)
12
3
12
无
神牛产品售后服务电话 0755-29609320-8062
不适用保修情況
产品保修和服务支持信息
产品的保修期和服务类型按以下《产品保修信息》执行:
保修服务类型
客户送修
客户送修
客户送修
无保修
The guarantee and service offered by this document are not applicable in the following cases:
①
The product or accessory has expired its warranty period;
②
Breakage or damage caused by
inappropriate usage, maintenance or preservation, such as improper packing, improper usage,
improper plugging in/out external equipment, falling off or squeezing by external force, contacting
or exposing to the improper temperature, solvent, acid, base, flooding and damp environments, etc;
③
Breakage or damage caused by non-authorized institution or staff in the process of installation,
maintenance, alternation, addition and detachment;
④
The original identifying information of
product or accessory is modied, alternated, or removed;
⑤
No valid warranty card;
⑥
Breakage
or damage caused by using illegally authorized, nonstandard or non-public released software;
⑦
Breakage or damage caused by force majeure or accident;
⑧
Breakage or damage that could not
be attributed to the product itself. Once met these situations above, you should seek solutions
from the related responsible parties and Godox assumes no responsibility. The damage caused
by parts, accessories and software that beyond the warranty period or scope is not included in our
maintenance scope. The normal discoloration, abrasion and consumption are not the breakage
within the maintenance scope.
Godox After-sale Service Call +86-755-29609320(8062)
Inapplicable Cases
Maintenance and Service Support Information
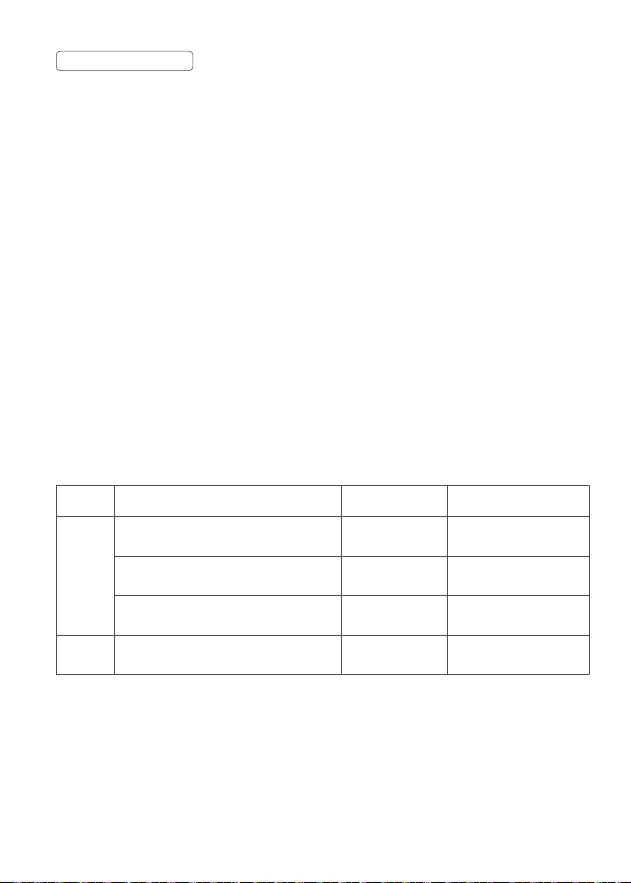
The warranty period and service types of products are implemented according to the following Product
Maintenance Information:
Product
Type
Parts
Other
Items
Flash tube, modeling lamp, lamp body,
lamp cover, locking device, package, etc.
Electrical pas e.g.batte charger, etc.
Batte
Circuit board
Name
Maintenance
Period(month)
3
12
3
No
Customer sends the
product to
designated site
Customer sends the
product to
designated site
Customer sends the
product to
designated site
Without warranty
Warranty
Service Type