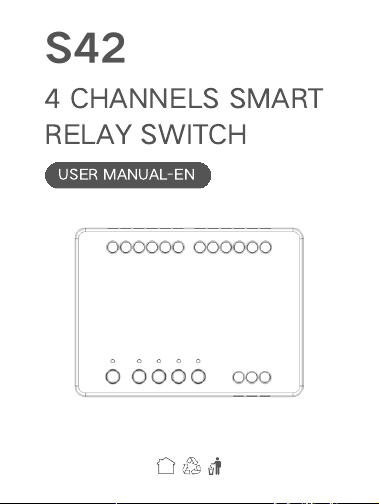
S42
4 CHANNELS SMART
RELAY SWITCH
USER MANUAL-EN
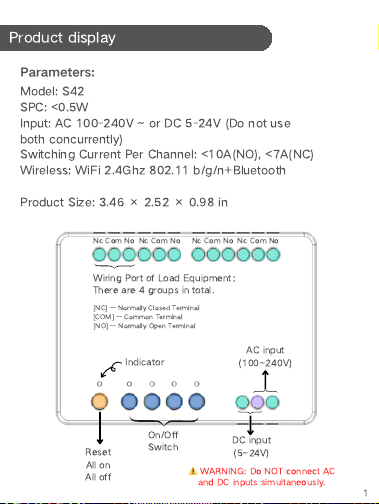
.ylsuoenatlumis stupni CD dna
CA tcennoc TON oD :GNINRAW
⚠
DC input
(5~24V)
Product display
Nc Com NoNc Com NoNc Com NoNc Com No
Parameters:
Model: S42
SPC: <0.5W
Input: AC 100-240V ~ or DC 5-24V (Do not use
both concurrently)
Switching Current Per Channel: <10A(NO), <7A(NC)
Wireless: WiFi 2.4Ghz 802.11 b/g/n+Bluetooth
Product Size: 3.46 × 2.52 × 0.98 in
Wiring Port of Load Equipment
;
There are 4 groups in total.
AC input
(100~240V)
Indicator
On/Off
Switch
Reset
All on
All off
1
[NC] -- Normally Closed Terminal
[COM] -- Common Terminal
[NO] -- Normally Open Terminal
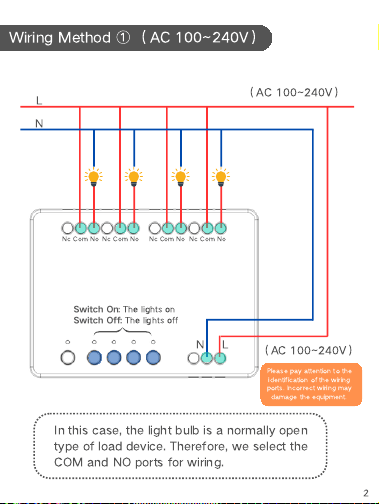
Wiring Method
①
(
AC 100~240V
)
Nc Com No
Nc Com No
Nc Com No
Nc Com No
L
N
N
L
(
AC 100~240V
)
(
AC 100~240V
)
In this case, the light bulb is a normally open
type of load device. Therefore, we select the
COM and NO ports for wiring.
Switch On
: The lights on
Switch Off
: The lights off
Please pay attention to the
identification of the wiring
ports. Incorrect wiring may
damage the equipment.
2
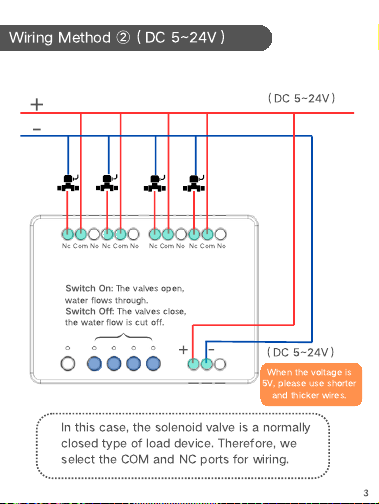
Wiring Method
②
(
DC 5~24V
)
Nc Com No
Nc Com No
Nc Com No
Nc Com No
+
-
-
+
(
DC 5~24V
)
In this case, the solenoid valve is a normally
closed type of load device. Therefore, we
select the COM and NC ports for wiring.
(
DC 5~24V
)
Switch On
: The valves open,
water flows through.
Switch Off
: The valves close,
the water flow is cut off.
3
When the voltage is
5V, please use shorter
and thicker wires.
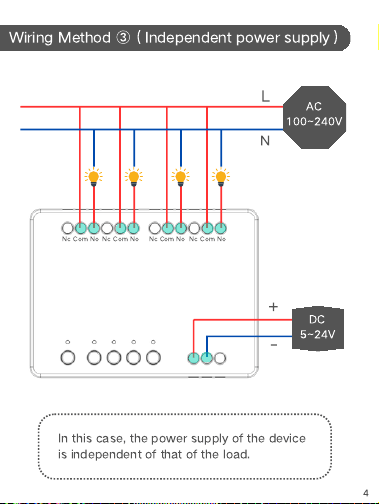
Wiring Method
③
(
Independent power supply
)
Nc Com No
Nc Com No
Nc Com No
Nc Com No
N
L
DC
5~24V
AC
100~240V
In this case, the power supply of the device
is independent of that of the load.
+
-
4
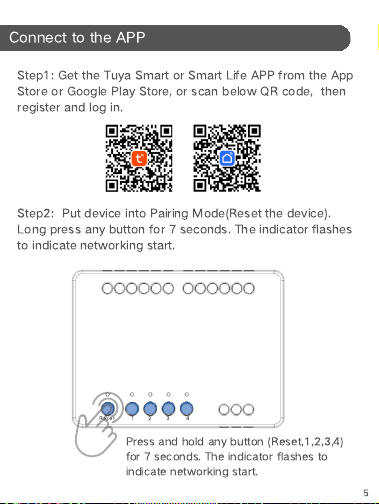
Connect to the APP
Step1: Get the Tuya Smart or Smart Life APP from the App
Store or Google Play Store, or scan below QR code, then
register and log in.
Step2: Put device into Pairing Mode(Reset the device).
Long press any button for 7 seconds. The indicator flashes
to indicate networking start.
Reset
1
2
3
4
Press and hold any button (Reset,1,2,3,4)
for 7 seconds. The indicator flashes to
indicate networking start.
5
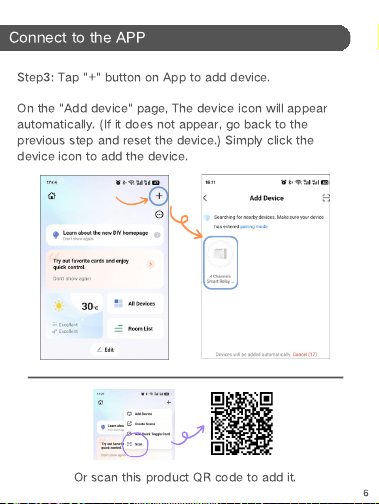
Connect to the APP
Step3: Tap "+" button on App to add device.
On the "Add device" page, The device icon will appear
automatically. (If it does not appear, go back to the
previous step and reset the device.) Simply click the
device icon to add the device.
Or scan this product QR code to add it.
6
Precautions
Regarding Networking:
> The device only supports 2.4Ghz Wi-Fi for networking
and does not support 5Ghz Wi-Fi.
> Ensure that the location where the device is placed has
sufficient Wi-Fi signal coverage.
> Ensure smartphone Bluetooth is enabled and within 3
meters of the device
Others:
> When using the device, do not exceed its maximum
power.
> Operating temperature: -10°C to 40°C (14°F to
104°F) at 5%-95% RH non-condensing
> When wiring, pay attention to the instructions for the
wiring terminals and avoid incorrect connections to prevent
damaging the device.
> Please place the device in a safe location, away from
children and humid environments.
7
After-sales Service
For product network configuration, APP usage, etc., you
can visit the official service website of Tuya for inquiry:
https://support.tuya.com/en/help
FCC Caution:
This device complies with part 15 of the FCC Rules. Operation is subject to the
following two conditions: (1) this device may not cause harmful interference, and (2)
this device must accept any interference received, including interference that may
cause undesired operation.
Any changes or modifications not expressly approved by the party responsible for
compliance could void the user's authority to operate the equipment.
NOTE: This equipment has been tested and found to comply with the limits for a
Class B digital device, pursuant to Part 15 of the FCC Rules. These limits are
designed to provide reasonable protection against harmful interference in a
residential installation. This equipment generates, uses and can radiate radio
frequency energy and, if not installed and used in accordance with the instructions,
may cause harmful interference to radio communications. However, there is no
guarantee that interference will not occur in a particular installation.
If this equipment does cause harmful interference to radio or television reception,
which can be determined by turning the equipment off and on, the user is encouraged
to try to correct the interference by one or more of the following measures:
-- Reorient or relocate the receiving antenna.
-- Increase the separation between the equipment and receiver.
-- Connect the equipment into an outlet on a circuit different
from that to which the receiver is connected.
-- Consult the dealer or an experienced radio/TV technician for help.
To maintain compliance with FCC’s RF Exposure guidelines, This equipment
should be installed and operated with minimum distance between 20cm the radiator
your body: Use only the supplied antenna.