
Thanks for choosing our product. In order to safeguard your rights
and interests, please carefully read this instruction before you use the
product. And after reading, please keep it carefully for future reference.
Ice Cream Machine Operating Instructions

Table of Contents
1. Usage and features........................................................(1)
2. Security precautions.............................................................(1)
3. Product structure diagram........................................................(2-3)
4. Installation and debugging........................................................(4-5)
5. Operating instructions..............................................................(5-6)
6. Ice cream making method.........................................................(6-7)
7. Maintenance and repair...........................................................(7-8)
8. Common troubles and their solutions...................................(9-11)
9. Electric principle diagram.........................................................(11)
10. Attached accessories...............................................................(11)
11. Technical parameters..............................................................(11)

1. Usage and features
With little investment and high returns, it is a wise choice for you to purchase our product.
This series of products can be used in the pubs, hotels, cold drink specialty shops, net bars,
dancing halls, coffee houses, western restaurants, holiday villages, and other entertainment and
leisure places. All of our commercial ice cream machines adopt the digital computer control
system, with LCD or digital display. As our commercial ice cream machines are made of high
quality and stable electrical elements, and matched with advanced production technology, it is easy,
safe and reliable to operate. In addition, our products are equipped with compressors of
world-famous brand, which ensures stable and reliable refrigerating system, large production
capacity and low electricity consumption. The ice cream made by our machines tastes crispy and
tender, with a high puffing rate.
2. Security precautions
1. When you carry or move the machine, the tilting angle should not be more than 45°.
2. As vibration cannot be avoided in the course of carrying the machine, it’d better place down the
machine for more than 4 hours before you use it.
3. When the stirring shaft is in the empty cylinder, it is not allowed to switch on the automatic key,
nor switch on it when there is water in the cylinder.
4. Check the nameplate (technical parameters) on the back panel of the machine whether the
voltage required is conformity with that of the local power supply.
5. Please ensure the power supply socket be effectively connected to the grounding line.
6. When stop using the machine, or dismantling its parts or cleaning the machine, please cut off
the power supply.
7. To prevent electric shock, please don’t make the plug, motor or other electrical parts wet or spill
liquids on them.
8. If the power cord is damaged, it must be replaced by the manufacturer, or its service center or
other similar qualified professionals to avoid dangers.
(1)
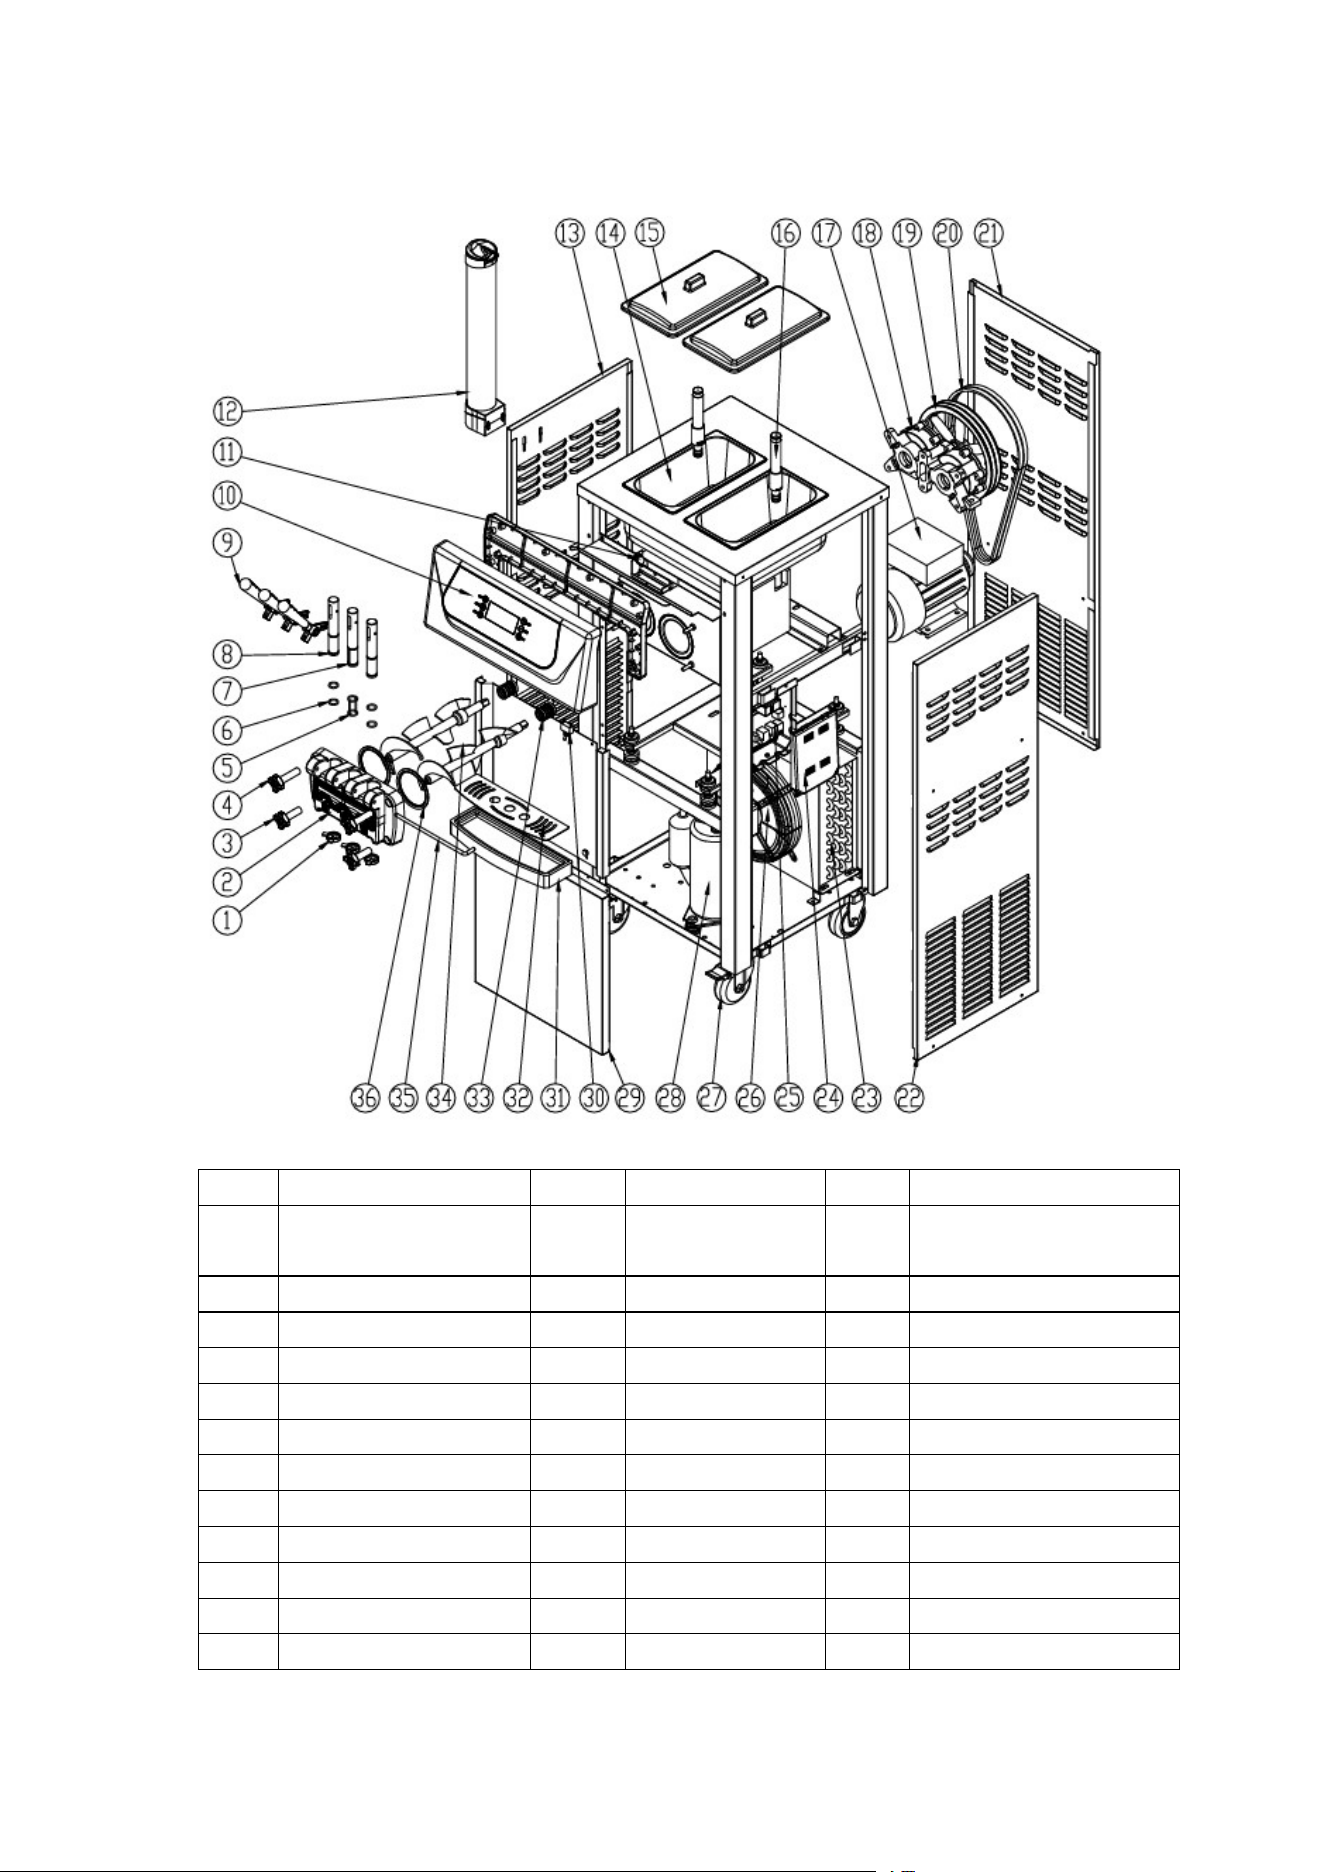
3. Product structure diagram
I. Structure diagram of vertical type
No. Name No. Name No. Name
1
Hexagram Star
Modeling Cap
13
Panel-Side-Left
25
Motherboard
2
Liquid outlet valve
14
Hopper
26
Fan motor
3
Short fixing nuts
15
Cover-Hopper
27
Caster
4
Long fixing nuts
16
Puffing tube
28
Compressor
5
I shape seal ring
17
Motor
29
Panel-Side-Front
6
O shape seal ring
18
Reducer
30
Switch
7
I shape piston
19
Pulley
31
Tray-Drip
8
O shape piston
20
Belt
32
Water receiver cover
9
Handle
21
Panel-Rear
33
Bellows seal
10
Operating panel
22
Panel -Side-Right
34
Stirring shaft
11
Discharge switch
23
Condenser
35
Handle fixing rod
12
Cone holder
24
Motherboard box
36
Liquid outlet valve sea
(2)

II. Structure diagram of table type
No. Name No. Name No. Name
1
Hexagram Star
Modeling Cap
13
Panel-Side-Left
25
Condenser
2
Liquid outlet valve
14
Motherboard box
26
Fan motor
3
Short fixing nuts
15
Motherboard
27
Compressor
4
Long fixing nuts
16
Hopper
28
Seat pad
5
I shape seal ring
17
Cover-Hopper
29
Panel-Side-Front
6
O shape seal ring
18
Puffing tube
30
Switch
7
I shape piston
19
Motor
31
Tray-Drip
8
O shape piston
20
Reducer
32
Water receiver cover
9
Handle
21
Pulley
33
Bellows seal
10
Operating panel
22
Belt
34
Stirring shaft
11
Discharge switch
23
Panel-Rear
35
Handle fixing rod
12
Cone holder
24
Panel -Side-Right
36
Liquid outlet valve sea
(3)

4. Installation and debugging
1) Installation
a. Cut off and dismantle the packing belt of the fastened carton. Get rid of the carton and take
down the packaging bag to check whether the appearance of the machine is damaged and whether
the accessories are complete with reference to the list.
b. The machine should be placed evenly and stably, and after then please lock the brake of the
front wheel tight.
c. Install the handle to the liquid outlet valve against the product structure diagram, Then install
the assembled liquid outlet valve on the machine, and tighten it with the fixing nuts.
d. Working conditions:
Ambient temperature: 5-40℃; material feeding temperature: 2-35℃ (Note: The material
feeding temperature will directly influence the refrigerating capacity and outputs.)
Supply voltage: 110-120v(The deviation of rated supply voltage cannot be too high or too
low. If it is too high or too low, the machine will alarm (buzzing) and the machine cannot start.).
Supply frequency: 60±1 Hz
e. Placing conditions:
The machine should be placed at a cool and ventilated location and avoid heat source and
direct sunshine. The distance between the air exhausting side of the machine and wall or other
similar obstacles should be over 1m, and the rest sides of the machine should be over 0.3m away
from the wall or other similar obstacles, so that the cool air can flow in the machine and exhaust
the hot gas to ensure condensation cycle of the machine.
The machine should not be located at a dusty place. Please keep the place clean and tidy,
and regularly clear away the dust on the condenser.
f. Requirements for power supply wiring:
Please ensure the the power supply circuit of the machine is equipped with the short-circuit
protection and earth leakage protection devices.
Please ensure the power line should not be less than 2.5mm
2
and be the copper core wire
(excluding the exceptional high-power machine, whose power line should not be less than 4.0mm
2
and be the copper core wire.), and the power line shouldn’t be too long. When the power line is
too small or too long, its load will become too large and causes voltage drop, thus affecting the
service life of the machine’s components.
2) Debugging
a. Switch on the power plug and push the power switch to the “ON” position. Then you will hear a
“Beep” sound and the display screen at the same time is on. The machine now is entering the
standby state.
b. As you press the “Wash” key, the machine enters the washing state, and the stirring system
begins to run at the same time. Press the “Stop” key and the machine will stop its running.
c. As you press the “Auto” key, the machine enters the moulding stage, and the stirring system
begins to run at the same time. After 10 seconds delay, the refrigerating system also begins to start.
Press the “Stop” key and the machine will stop its operation.
(4)
3) Cleaning and disinfection
When the machine is used for its first time, the cleaning and disinfection work should be carefully
made. The steps are as follows:
a. Take about 10L of warm water (40-50℃) and add appropriate amount of foodstuff cleaning
solution to the water, making them to the disinfectant. Then pour the disinfectant into the two
material cylinders, and let the disinfectant flow into the refrigerating cylinder.
b. Press the “Wash” key to run for 5 minutes. Pull down the handle to discharge the cleaning
solution.
c. Add clear water to the material cylinders and rinse 2-3 times. It is OK.
Notes: a. In the course of cleaning and disinfection, you cannot press the “Auto” key, and
you must observe the the display screen.
b. After cleaning, you must discharge the water in the cylinders completely. Otherwise, the
water will frozen to freeze the cylinder during refrigerating and the stirring shaft will be damaged.
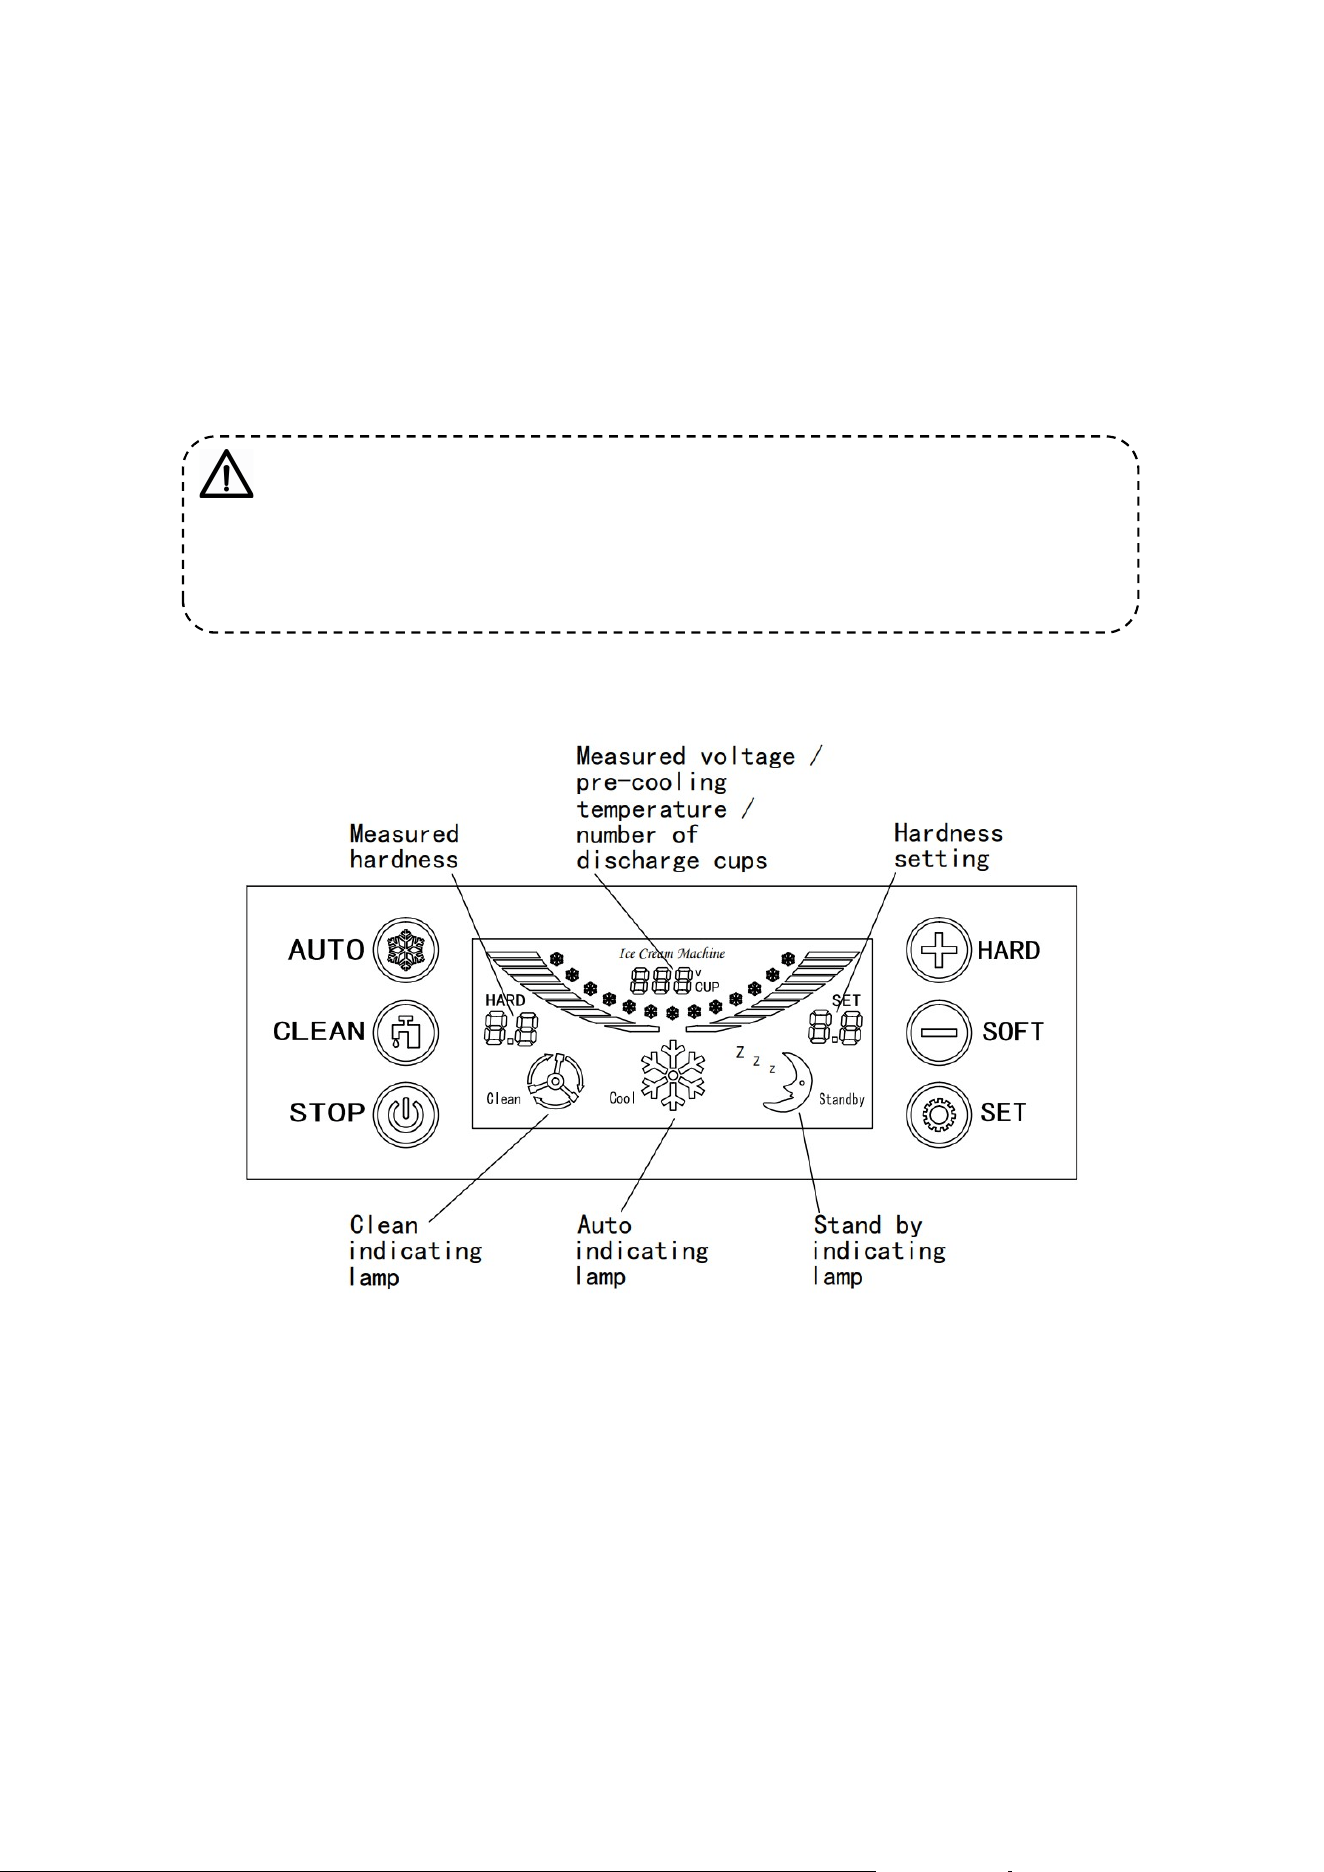
5. Operating instructions
a.The “AUTO” key
As you press the “AUTO” key, the buzzer will twitter a short sound and the Auto indicating lamp
be on at the same time. The machine enters the automatic working state, and the stirring motor
begins to run. The actual measured hardness shows the present current value of the stirring motor.
After 10 seconds, the compressor, draught fan and solenoid valve begins to work and the machine
enters the full automatic mode. When the actual measured hardness reaches the set hardness, the
machine will automatically stop and enter the auto standby mode. When the stopping time reaches
the set time, the machine begins to work again and repeats the same cycle. If you want to stop the
machine, just press the “STOP” key.
(5)

b. The “CLEAN” key
As you press the “Clean” key, the buzzer will twitter a short sound and the cleaning indicating
lamp be on at the same time. The machine enters the cleaning state, and the stirring motor begins
to run. The actual measured hardness shows the present current value of the stirring motor. When
you press the “Stop” key, the machine will stop its operation and enter the standby state.
c.The “STOP” key
Whether the machine is at the cleaning state or automatic working state, as long as you press the
“Stop” key, the machine will stop its operation and return to the standby state.
d. The “SET” key
The restart time can be set by pressing the “SET” key. As you press it every time, the time will
increase 1 minute. The larger the value is, the longer time of the restart time. The cycle is 3-9
minutes. After the setting is finished, the time will be automatically saved after 5 seconds.
e. Hardness setting
As you press the “Hardness+” or “Hardness-” key and hold it for 2s, the hardness setting LED
flashes. At the time you can adjust the hardness of the ice cream. The bigger the number is, the
harder of the ice cream, and vice versus. After the setting is finished, the hardness value can be
automatically saved in 5s.
f. Output cups
Zero cleaning of output cups
As you press the “Stop” key and hold it for 5s, you enter the menu of inputing zero cleaning
password (The initial zero cleaning password is 8888,). At the time as you press the Plus key, you
can move the password, and as you press the Minus key, you can change the password value. After
the password is correctively input, as you press the “Stop” key again, the zero cleaning of output
cups is made and exits.
Revision of the zero cleaning password
Press the “Time” key and hold it for 5s. Then you enter the menu of inputting the password. Input
the initial zero cleaning password, and at the time as you press the Plus key, you can move the
password and as you press the Minus key, you can change the password value. After you finish
revising the password, as you press the “Time” key again, the zero cleaning password is saved and
exits.
6. Ice cream making method
1) At present in China the ice cream is usually made by mixing the ice cream materials with water.
Please mix them in strict accordance with the ratio as printed on the ice cream bag (Generally 1
kilogram of ice cream material should be mixed with 2.5-3 kilograms of purified water.).
2) Place down the mixed ice cream pulp for 15 minutes and then evenly pour it two the two
material cylinders on the top of the machine. It is required that the pulp cannot caking in order that
the pulp can smoothly flow into the refrigerating cylinder through the feeding hole of the puffing
tube.
3) Pull down the left and right handles in order to let the two discharge holes flow out 2-3 cups of
ice cream pulp in a natural manner. Then pour it into the top material cylinders to prevent water
freezing at the discharge mouth, for it will influence the making of ice cream.
4) Switch on the power supply. As the machine enters the standby state, press the “Cleaning” key
and let the machine run about 3-5 minutes. After that press the “Stop” key to stop the machine.
(6)

5) Press the “Auto” key. As the machine enters the refrigeration and moulding state, press the
“Soft or Hard” key to choose the hardness of the ice cream as you want (Notes: At the prior
cleaning state, you must closely observe the current hardness value displayed. If the current value
is displayed as 3.5, then the hardness of the ice cream should be set between 4.5-5.5. If it is
displayed as 4.0, then the hardness should be set between 5.0-5.5.).
6) When the actual measured hardness of the ice cream reaches the set value, the machine will
automatically stop operation and enter the standby state. At the time you can press the “SET”key
to set the time as required for the cycle of automatic refrigerating. The automatic refrigerating
cycle is set as 3-9 minutes. As you press the key every time, 1 minute is increased. Until it reaches
9 minutes, as you press the key again, the machine will return to the 3 minutes state. (Note: when
it is hot, you’d better set the stop time shorter and vice versus.)
7) Take one ice cream cone or cup and place it at the valve outlet. As you pull down the material
discharge handle, the ice cream will be extruded. After a while pull back the handle, and it is OK.
7. Maintenance and repair
To guarantee the health of ice cream consumers, improve the service life of the machine
components, and avoid unnecessary troubles, you must clean the refrigerating cylinder one time
every day.
1) The cleaning of the refrigerating cylinder
a. Press the “CLEAN” key to discharge all the pulp inside the cylinder. Press the “STOP” key to
stop the machine.
b. Add appropriate amount of disinfectant to the warm water. Then pour the mixture into the two
material cylinders respectively, each being with basically the same amount of solution.
c. Press the “CLEAN” key again and let the machine stir for about 5 minutes. Then discharge the
cleaning solution.
d. Clean the machine 2-3 times with clear water and then stop the machine.
e. Switch off the power supply. Dismantle the components and clean them.
f. Screw off the four nuts used to fix the liquid outlet valves and dismantle the valve components.
g. Pull out the handle steady pins, handle, piston and valve seal in turn from the liquid outlet valve
components.
h. Pull out the stirring shaft from the refrigerating cylinder.
i. Clean all the dismantled components and timely replace the damaged ones if there is any.
j. After cleaning, daub vaseline on the components that need lubrication in accordance with the
following diagram. Then assemble the components according to the adverse order of
dismantlement
(7)
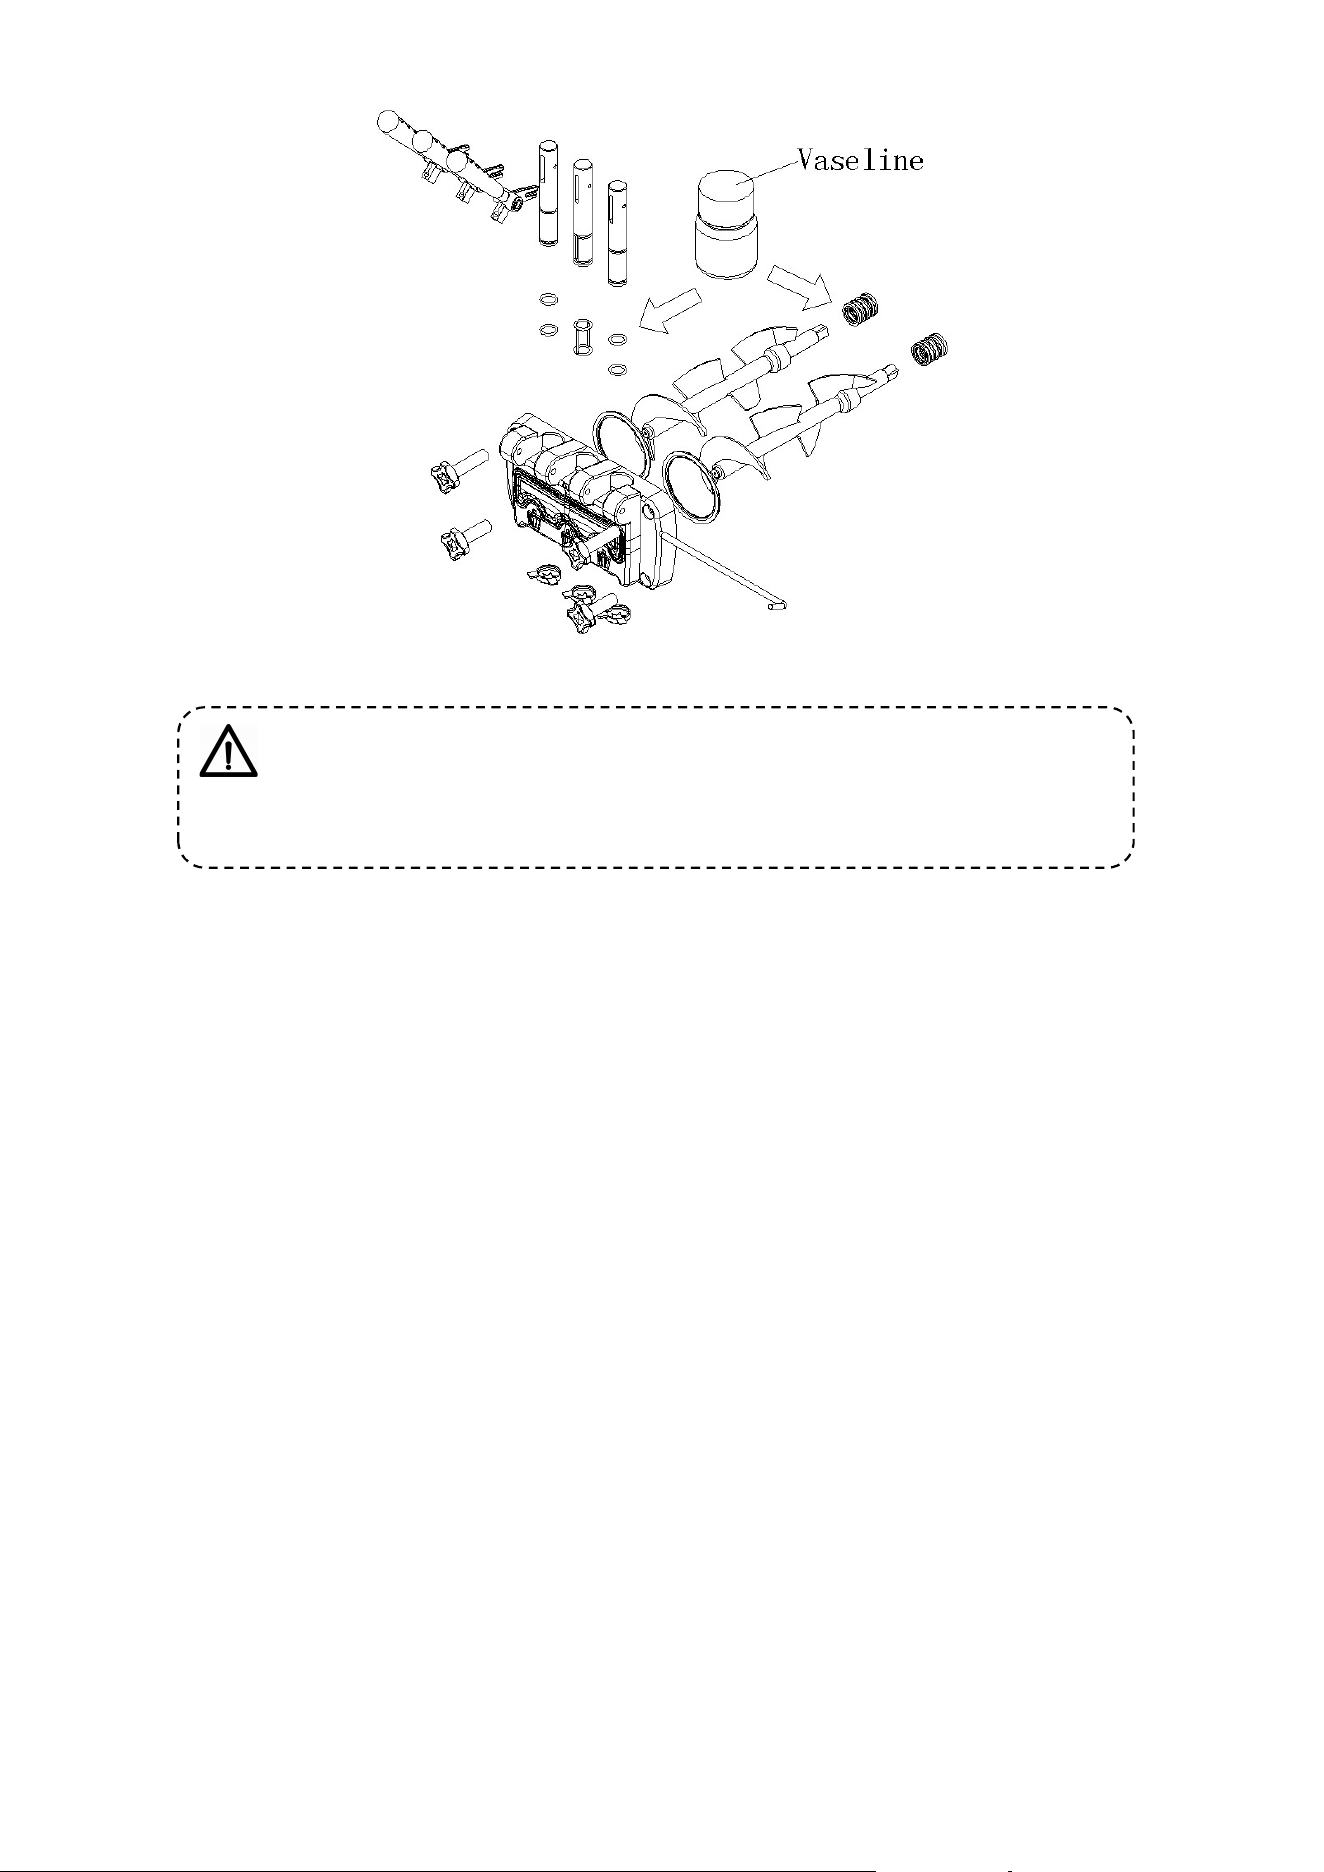
Note: Daub vaseline at the corresponding places when installing the pistons, piston seals,
stirring shaft and bellmouth seals, for often using vaseline can prolong the service life of the
components.
2) Body cleaning
Since the consumers require beautiful appearance, clean and sanitary machine, please keep the
appearance clean at any time. You can use the warm towel to scrub the body to remove the dirts
and spots, but avoid washing it directly with waer in case the appliance breaks down.
3) Condenser cleaning
After the machine works a period of time, the condenser will be covered with dusts, thus
affecting the heat dissipation and making the refrigerating effect worse (which embodies: the
output of ice cream drops in the same time or it is hard to take shape.). Please have it cleaned one
time every three months (If the working environment is poor, please clean it once every month.)
by professional workers. Before clean the condenser, please switch off the power supply and note
not damaging the condenser fins.
4) Adjustment of the belt
After the machine works a period of time, the driving belt of the stirring system may be pulled
longer, so timely adjustment to the belt should be made by professionals. Before adjustment, you
must cut off the power supply. Then dismantle the enclosure plates to adjust the belt tension nuts
and ensure appropriate tightness. If you still feel the belt is still to loose after adjustment, please
replace it with the same typed belt.
Notes: After a long time of use, it is normal that the driving belt wears down, which shall not
be included in the after-sales service of our products. When the driving belt becomes longer, the
following phenomena may occur: unwork of the machine, changed hardness, big noise, glue smell,
etc. Please have it adjustment timely by yourself or by professionals. If necessary, please replace it.
The time interval for adjustment and replacement depends on the machine’s utilization rate.
(8)
8. Common troubles and their solutions
Thank you very much for choosing our equipment. The ice cream machine belongs to a
professional mechatronics equipment, integrating computer program control, mechanical
transmission, and highly efficient refrigerating system. The following table shows the common
troubles that may occur to the machine and their causes and solutions. The simple troubles can be
treated in accordance with the solutions listed in the table. If they still cannot be removed, please
consult the dealer or the manufacturer for direction. Should the troubles be difficult and complex,
please invite the professionals to repair.
(9)
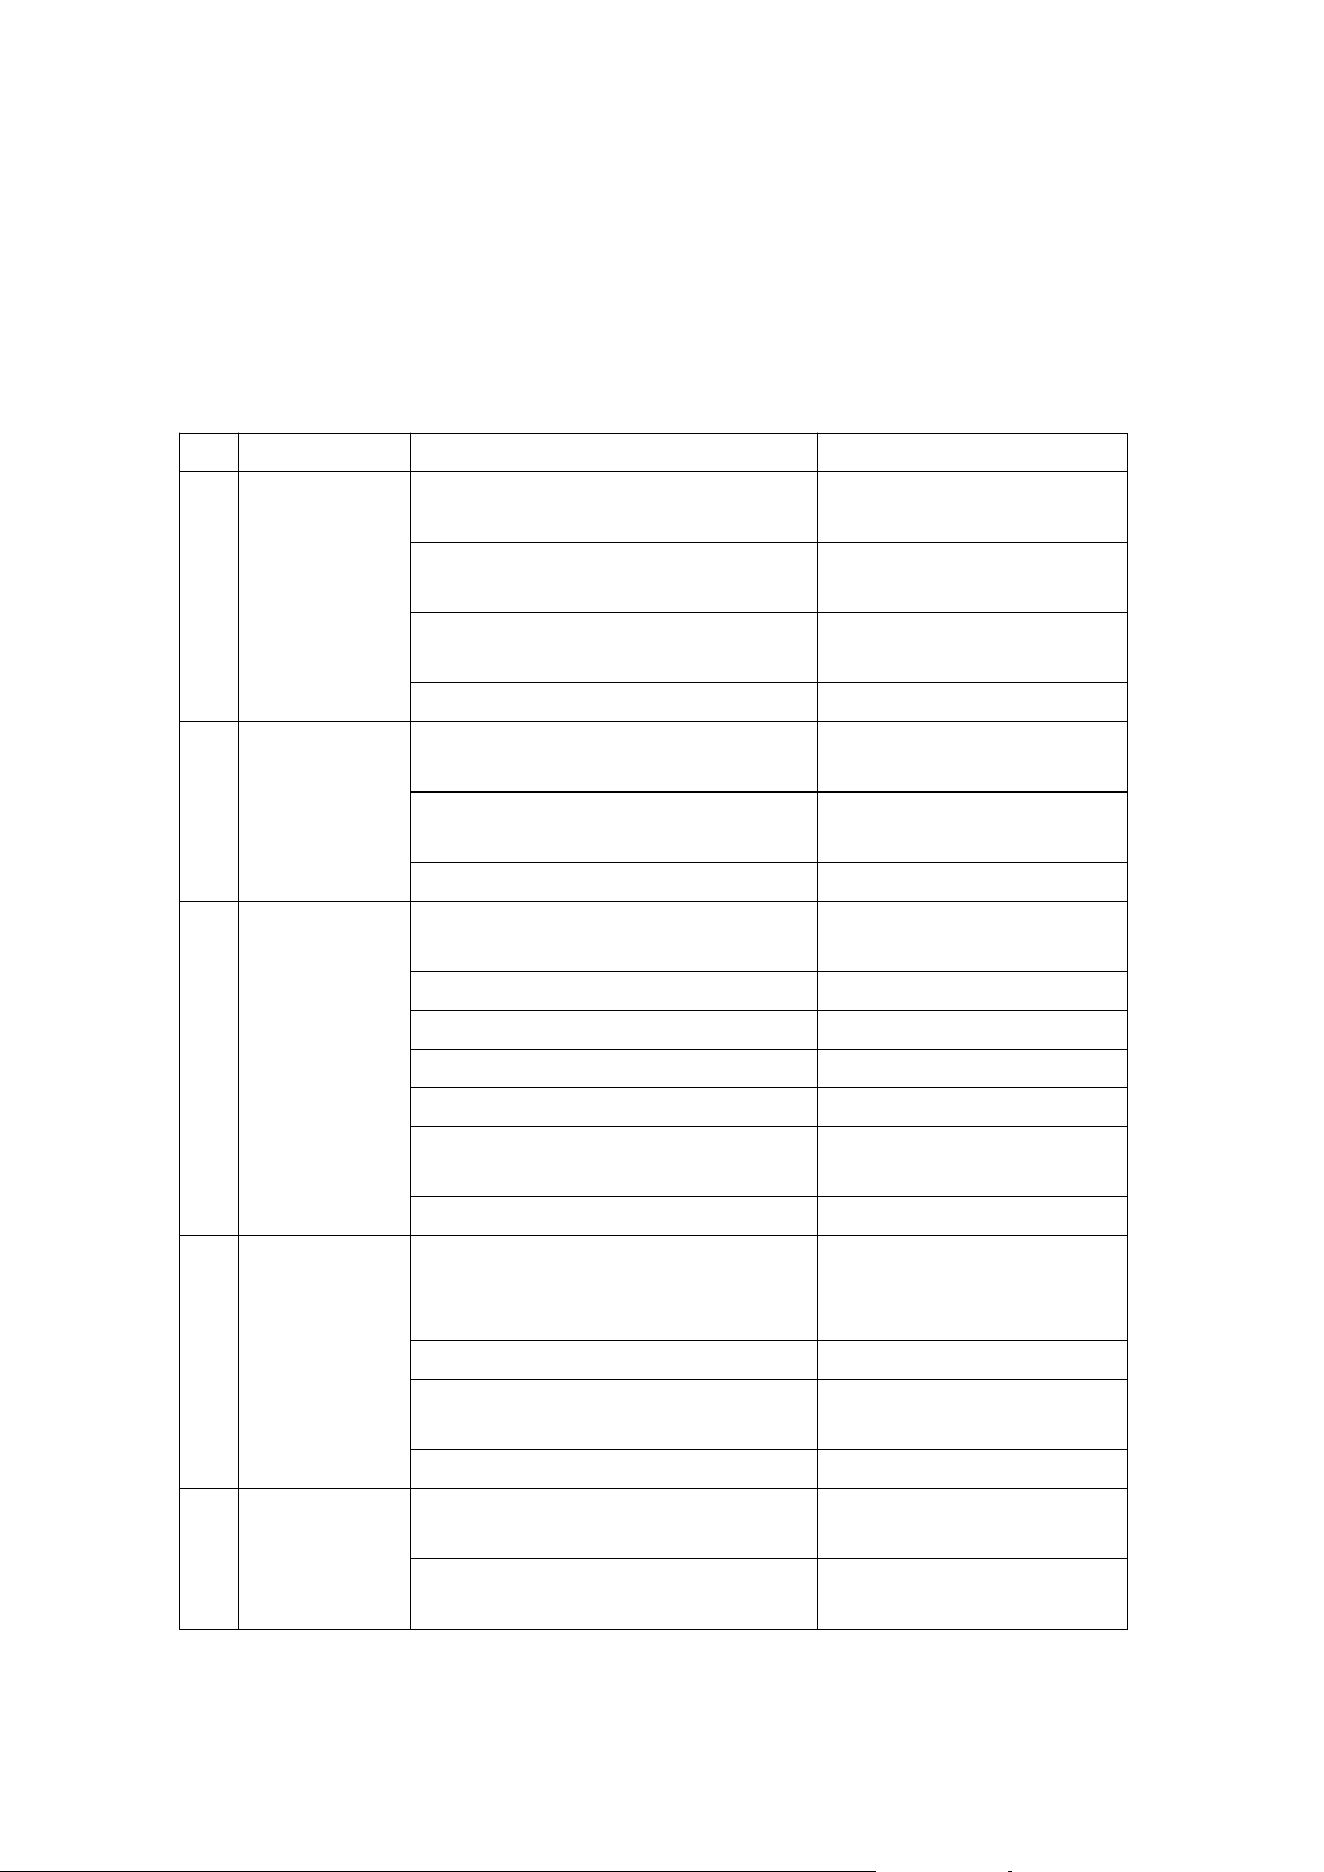
No. Troubles Possible causes Solutions
1
The machine
cannot start.
Whether the power switch is on or off.
Switch on the power switch
by yourself.
The power line is not well connected.
Check the power line and
connect it well.
The protection circuit works.
Restart the machine after clear
the trouble.
The control board is problematic. Replace the control board.
2
The cleaning
funtion doesn’t
work.
The connection line is loose.
Check the connection line and
connect it firmly
The stirring motor or capacitance is
damaged.
Repair or replace the
capacitance or motor.
The ac contactor is damaged. Replace the ac contactor.
3
The
compressor
doesn’t run.
The connection line is loose.
Check the connection line and
connect it firmly.
The voltage is too low. Check the power voltage.
The contactor is damaged. Replace the contactor.
The control board is problematic. Replace the control board.
The compressor capacitance is damaged. Replace the capacitance.
The over-load protection for the
compressor works.
Find out the causes and
romove them.
The compressor is damaged. Replace the compressor.
4
Refrigerating
don’t work.
The refrigerating fluid leaks.
Find out the leakage location
and repair it well. Fill the
refrigerant under vacuum.
The solenoid valve is damaged. Replace the solenoid valve.
The draught fan doesn’t run.
Repair or replace the draught
fan.
The compressor runs abnormally. Check the compressor.
5 The belt skids.
The belt is too loose.
Adjust the tightness of the belt
or replace the belt.
Freezing cylinder, broken stirring draft
Adjust the hardness and
replace the stirring shaft.
(10)
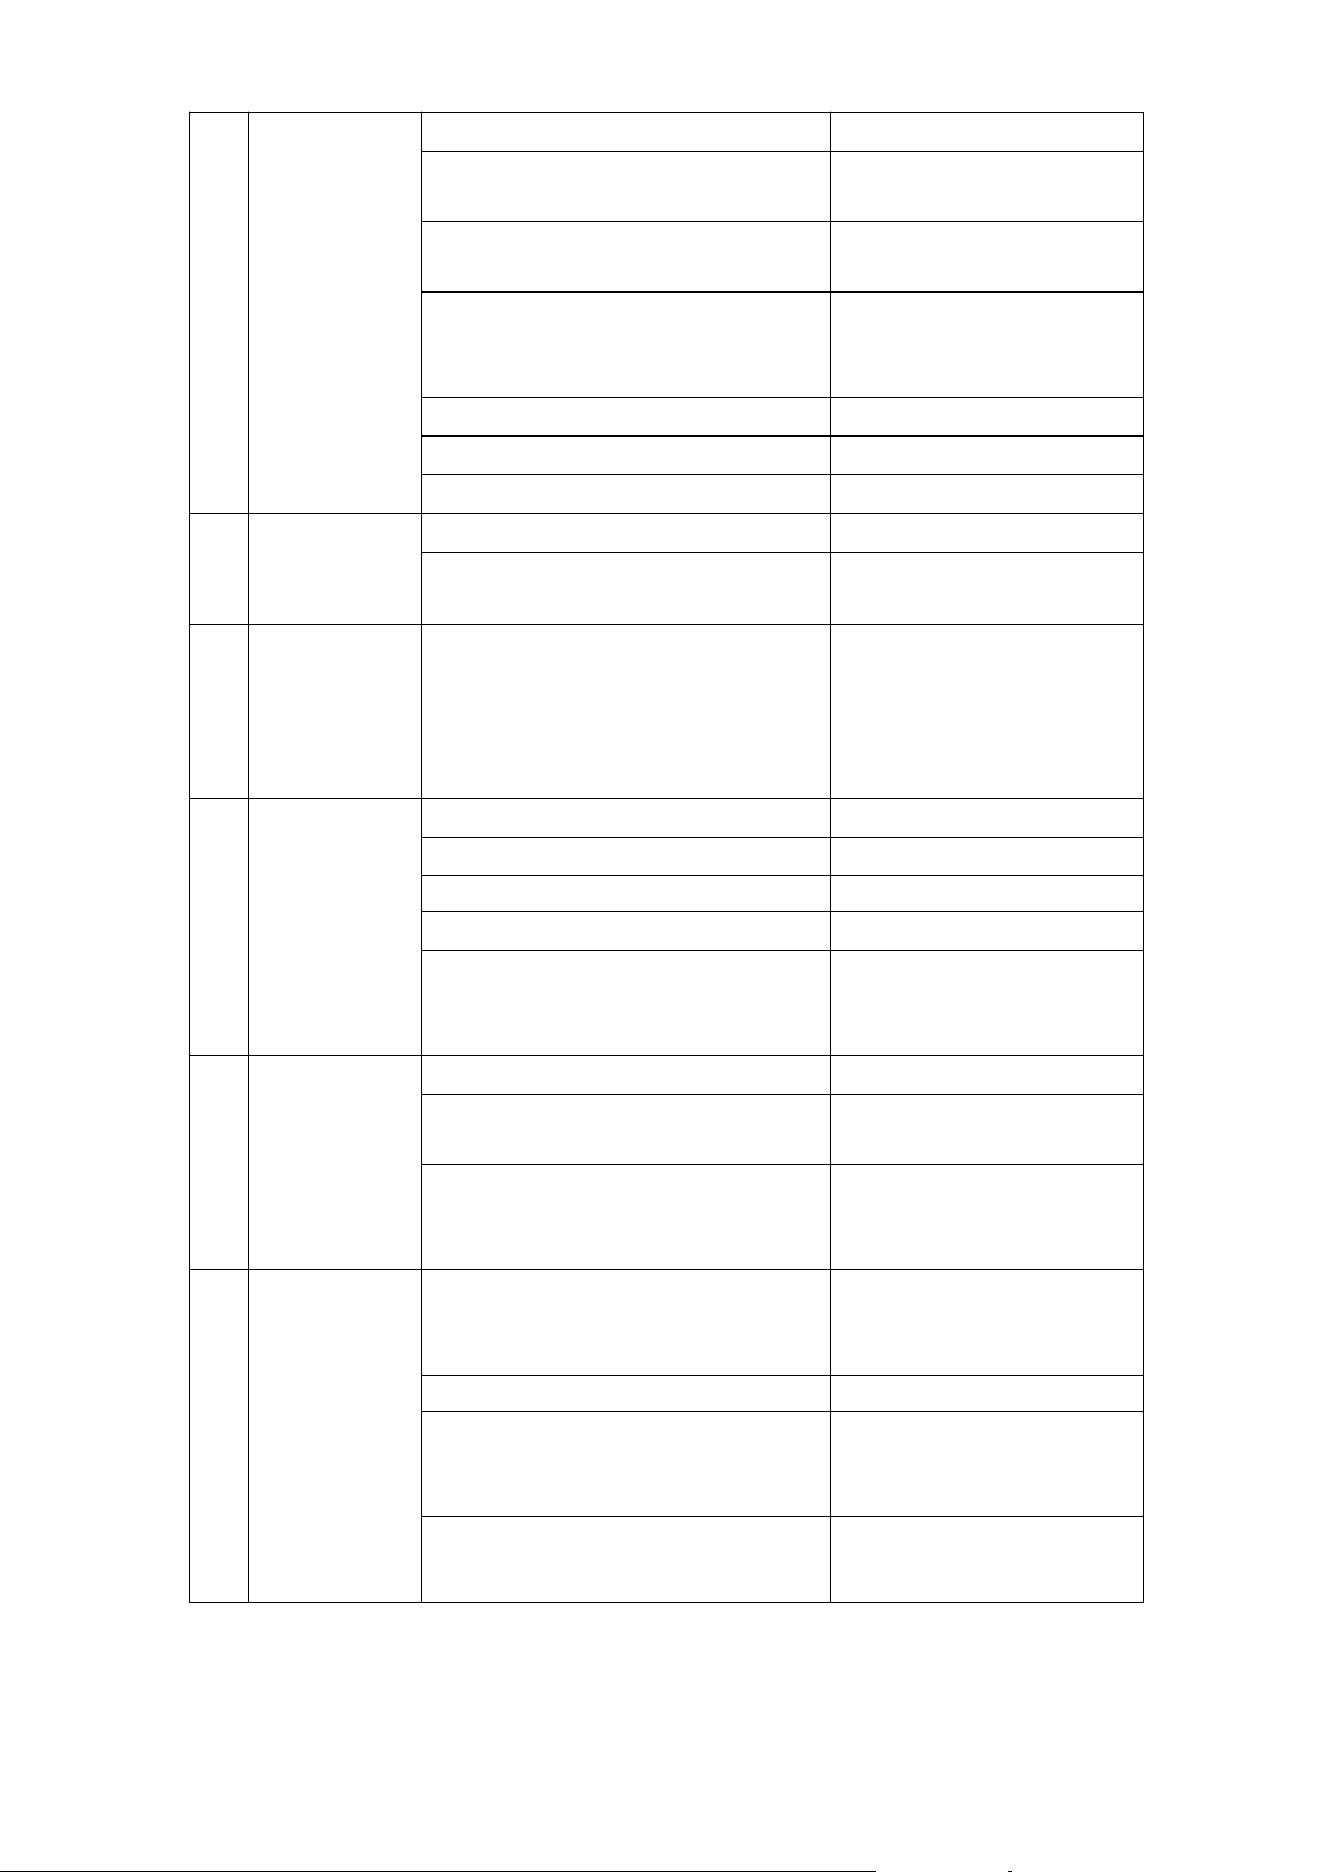
6
The ice cream
cannot come
out.
No material in the cylinder Replenish the pulp.
The puffing tube is blocked.
Pull out the buffing pipe and
clean it.
Wrong ratio of the pulp, which causes
freezing cylinder.
Make the qualified pulp again.
The material discharge switch on the
panel is damaged or the connection line
is short-circuit.
Connect the line again or
replace the discharge switch.
The belt is too loose and skids. Adjust the belt or replace it.
The reducer is problematic. Repair or replace the reducer.
The stirring shaft is worn out. Replace the stirring shaft.
7 Poor puffing
The puffing tube is not inserted. Insert the puffing tube again.
The raw material of the ice cream is poor
in quality.
Improve the raw material
quality.
8
After starting,
electric leakage
occurs.
Induced electricity of the shell
Check whether the power line
is firmly connected to the
earth. If it is not, please have it
connected by the
professionals.
9
The ice cream
is too soft.
Wrong mixing ratio of the pulp Make qualified pulp again.
Improper setting of the hardness Reset the hardness.
Unsteady voltage Adjust the voltage.
Loose belt Adjust the belt or replace it.
The material discharge is too frequent.
After the actual hardness is
over 1, make the ice cream
then.
10
Non-stop of the
machine
The hardness is set too big. Adjust down the set hardness.
Poor refrigeration
Check the refrigerating
system.
The discharge switch is damaged or the
connection line is short-circuit.
Connect the line again or
replace the material discharge
switch.
11 Leaky material
Leaky liquid outlet valve
Replace the liquid outlet valve
and lock it with the fixing
nuts.
Leaky discharge hole Replace the piston seal.
Leaky liquid joining pipe
Replace the bellmouth seal
and lock it with the fixing
nuts.
Leaky inside the machine
Replace the cylinder’s
connection pipe.
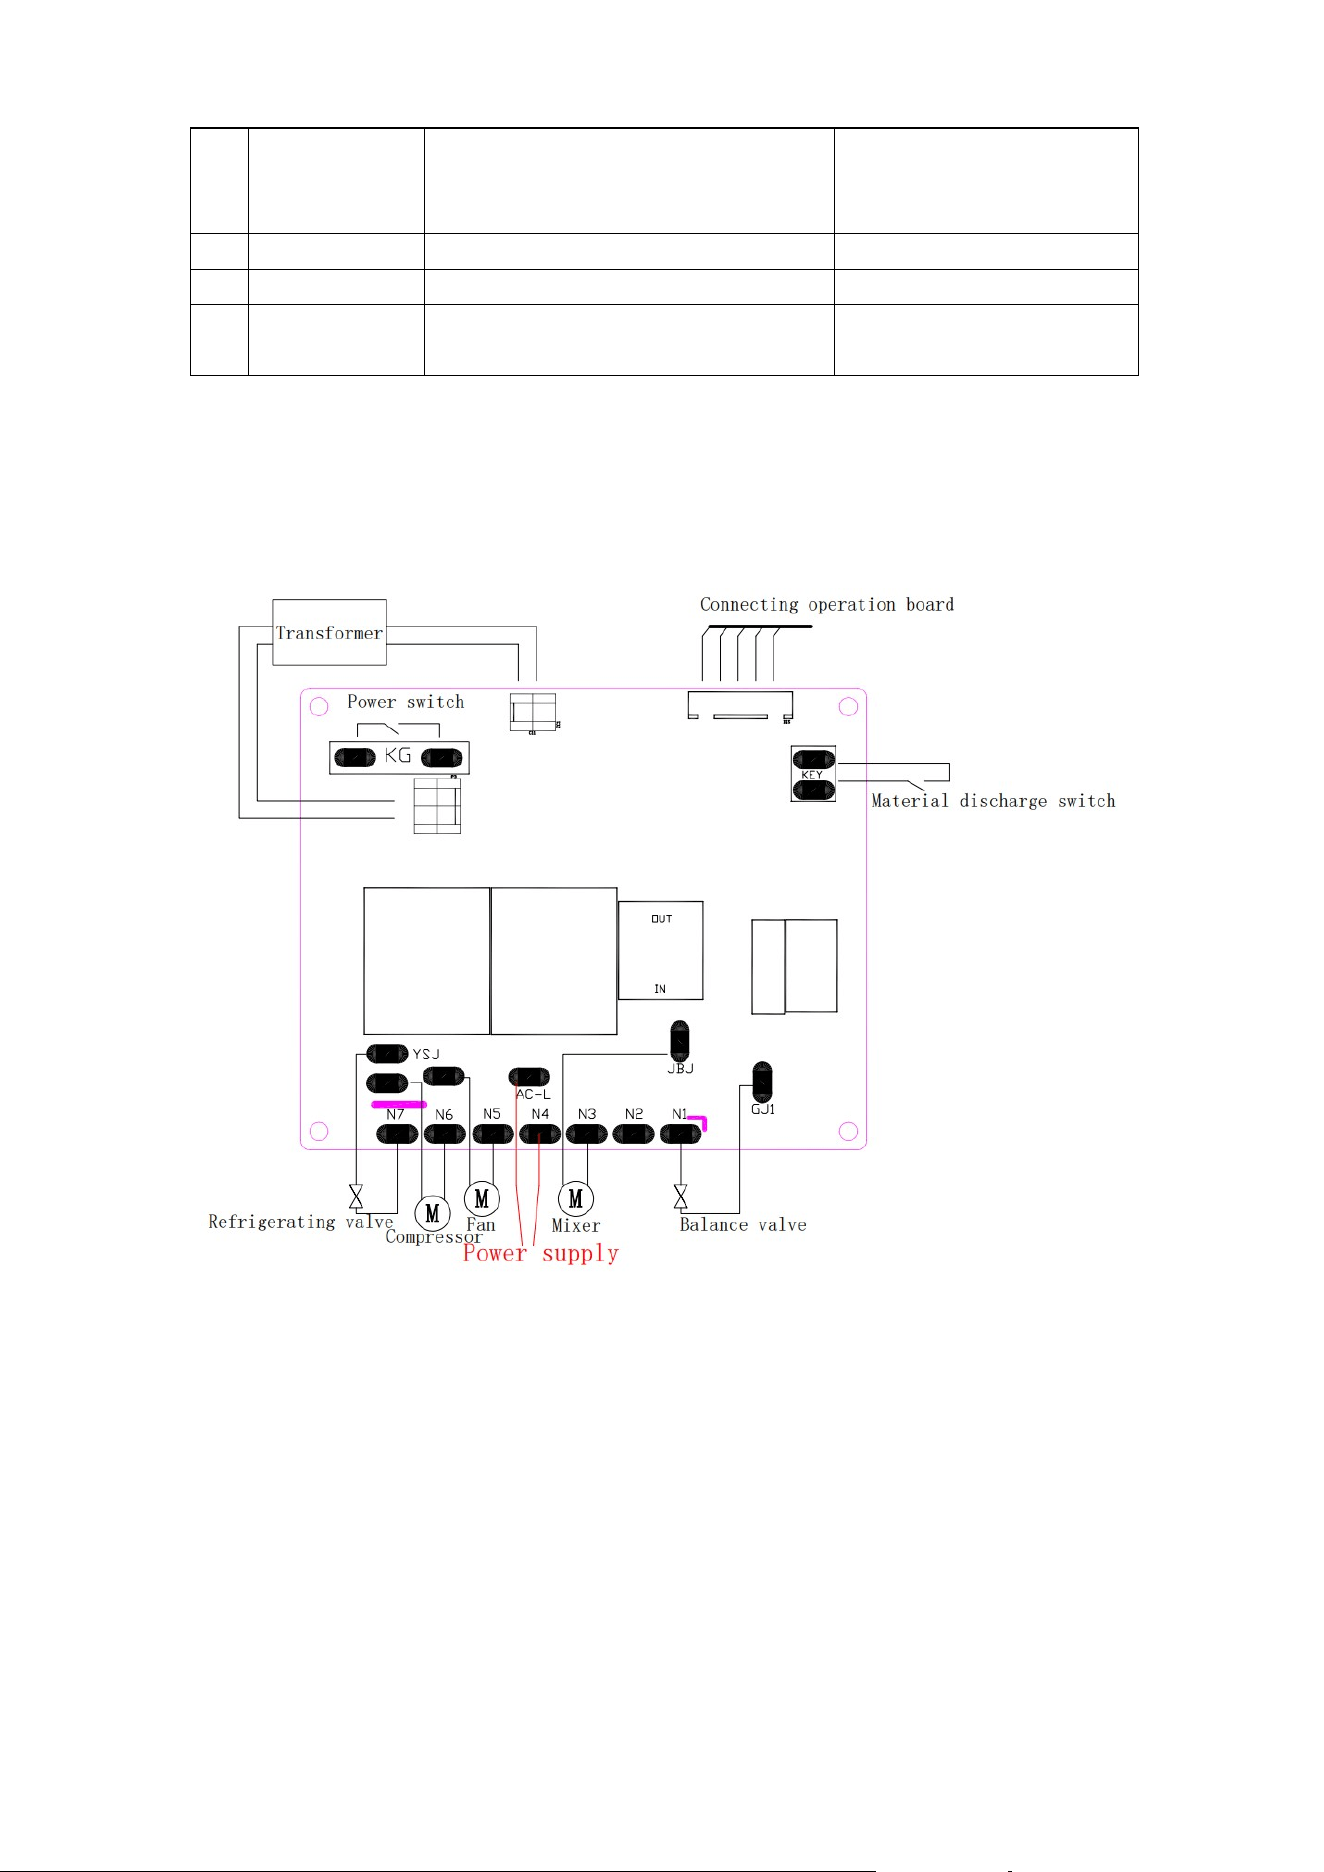
9. Electric principle diagram
10. Attached accessories
1) Seals:1 set 2) Edible vaseline: 1 bottle
3) Liquid outlet valve: 1 set 4) Handle: 3 pieces
5) Water receiver: 1 set 6) Cylinder cover: 2 pieces
7) Stirring shaft: 2 pieces 8) Fixing nuts: 5 pieces
9) Puffing tube: 2 pieces 10) Instructions: 1 copy
11. Technical parameters
The specific technical parameters are shown on the nameplate of the machine.
Should any change appear in the instructions, please kindly forgive us without prior notice!
(11)
12 “JJ” alarms
The current of the stirring motor is too
high.
Check the belt’s tightness, the
stirring motor and
capacitance.
13 “UH” alarms Too high voltage Check the power voltage.
14 “UL” alarms Too low voltage Check the power voltage.
15 “Cb” alarms
The material discharge switch closes in
succession over 3 minutes.
Restore the material
discharge switch or replace it.
