INSTRUCTIO N MANUAL
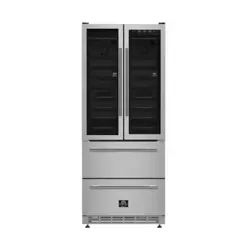
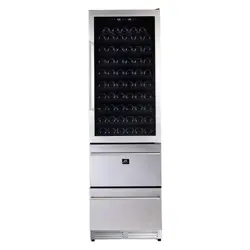
24" WINE CELLAR
MODEL:FWCDR6628-24S
3155528
BEFORE USE, PLEASE READ AND FOLLOW ALL SAFETY RULES AND OPERATING INSTRUCTIONS.
®
SET
LIGHT
CF/
LOWERUPPER
FWCDR6628-24BLK
FWCDR6628-24WHT


Table of Contents
Customer Care
.....................................................................................................................................................................
4
Diagram and Description
.....................................................................................................................................................
5
Important Safety instructions
..............................................................................................................................................
6
Safety Tips
............................................................................................................................................................................
7
Parts list
................................................................................................................................................................................
9
Installation Instructions
.......................................................................................................................................................
10
Anti-Tip Bracket Installation
.................................................................................................................................................
10
Installing The Handle
............................................................................................................................................................
12
Operation Instructions
.........................................................................................................................................................
12
Setting Temperature
............................................................................................................................................................
13
Care and Maintenance
.........................................................................................................................................................
13
Racking Configuration
..........................................................................................................................................................
14
Moving Racks
.......................................................................................................................................................................
15
Reverse the door
..................................................................................................................................................................
16
Troubleshooting..................................................................................................................................................................18
Wire diagram
................................................................................................................................................................
19
Warranty
....................................................................................................................................................................
....
.
......
.. 20
........
appliance for the first time. Whether you are an occasional user or an expert, it will be beneficial to familiarize yourself
with the safety practices, features, operation and care recommendations of your appliance.
Both the model and serial number are listed inside the product. For warranty purposes, you will also need the date of
purchase .
Services in Canada and Untied States
Keep the instruction manual handy to answer your questions. If you don’t understand something or need more
assistance, please visit our website for fast support. Please provide us your name, number, address,serial number
of the product that troubleshooting, proof of purchase, and a short description of the issue. A customer service
representative will contact you as soon as possible. All warranty work needs to be authorized by FORNO customer
service. All our authorized service providers are carefully selected and rigorously trained by us.
Product Information Service Information
Model Number : _________________________________________
Use these numbers in any
correspondence or services calls
concerning your product.
If you received a damaged product,
immediately contact Forno.
To save time and money, before
you call for serviced, check the
troubleshooting guide. It listed the
causes of minor operation problems
that you can correct yourself.
Serial Number : __________________________________________
Date of Purchase :________________________________________
Purchase Address And Phone : _____________________________
_______________________________________________________
_______________________________________________________
Customer Care
“Need some quick help? Simply scan the qr code and get access
to our fast support form. We’re always here to assist you with any
questions or concerns you may have. So, don’t hesitate to reach out!”
4
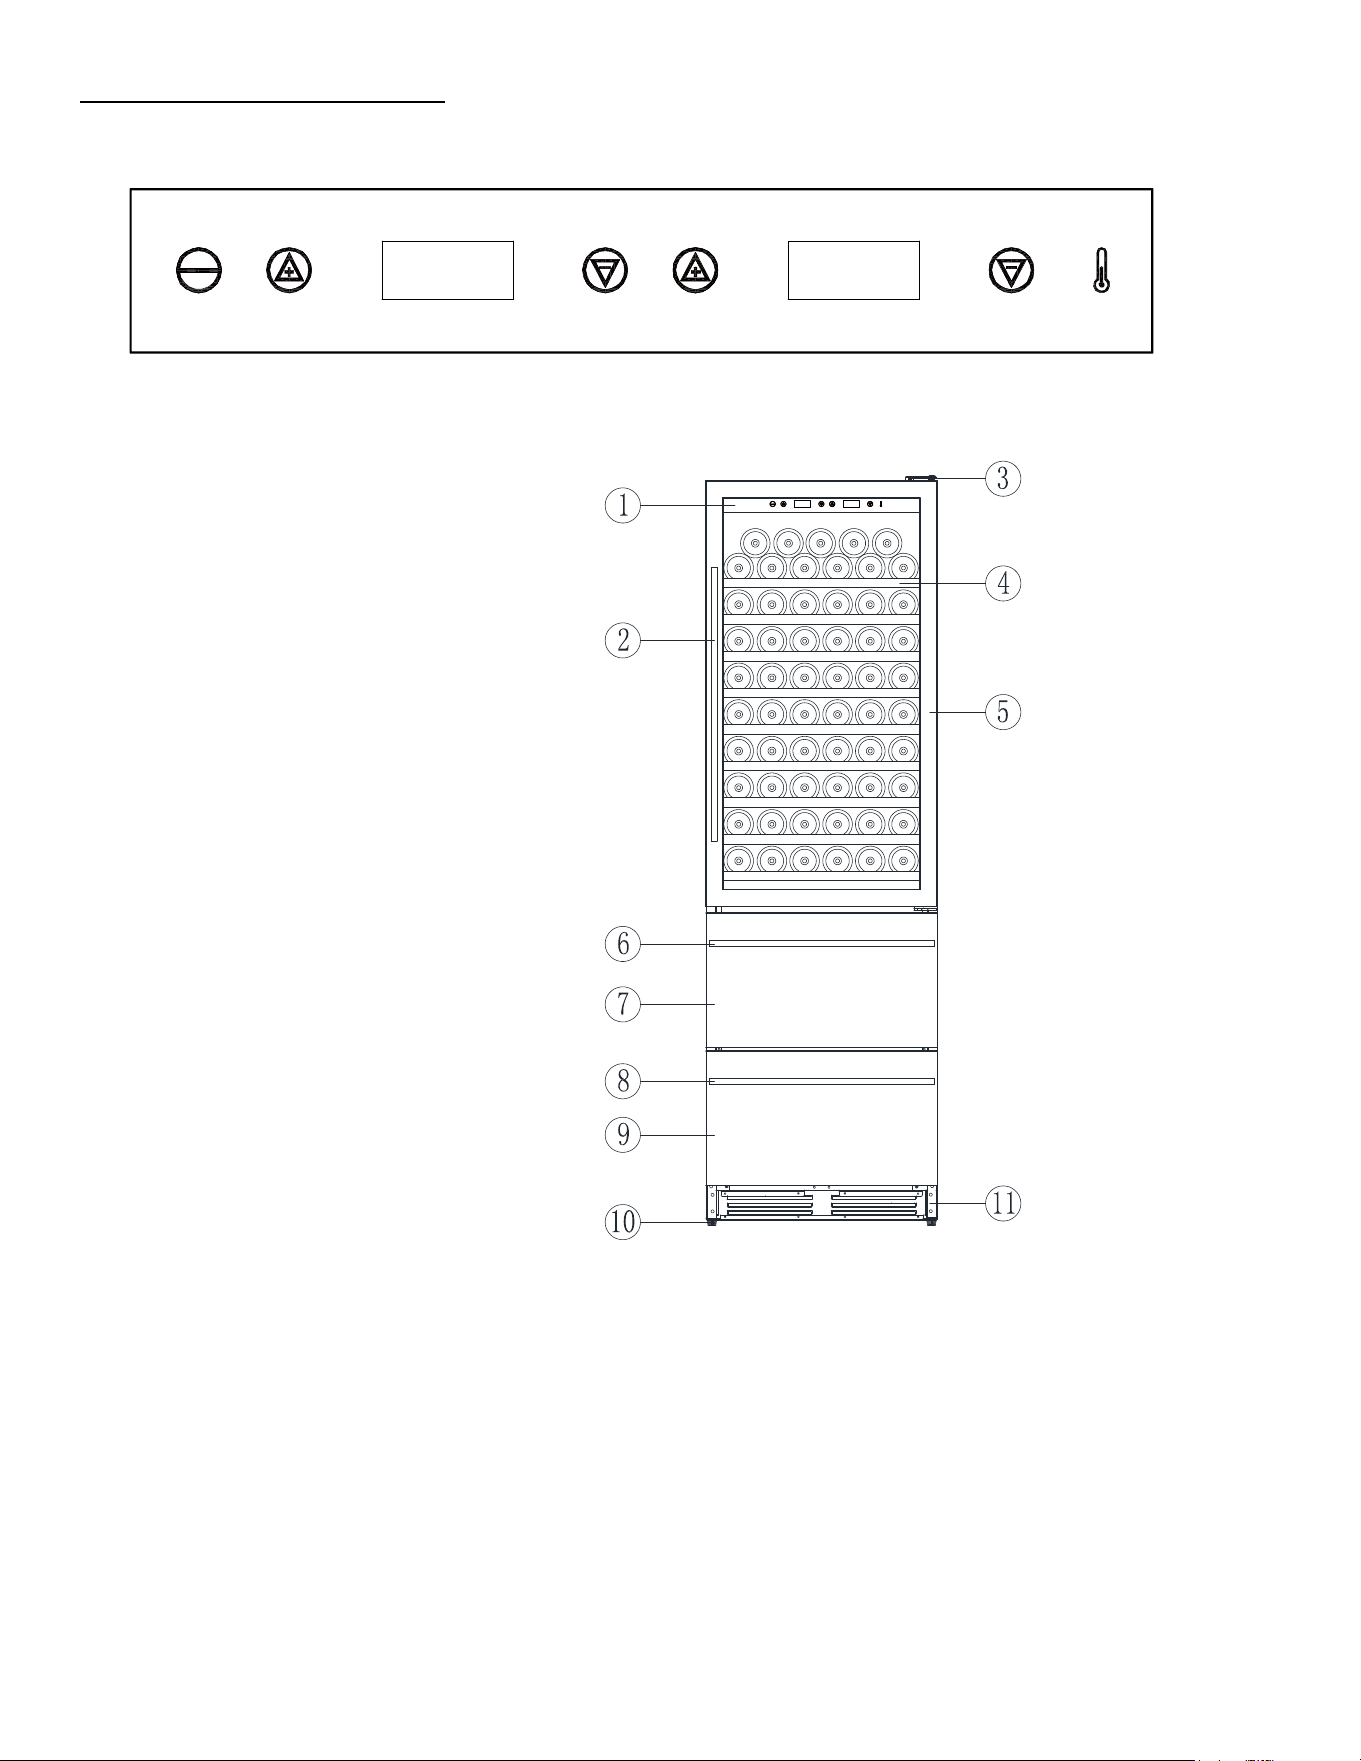
Diagram and Desc ri ption
1. Control Panel
2. Glass Door Handle
3. Door Hinge
4. Storage Shelf
5. Glass Door
6. 54L Drawer Handle
7. 54L Drawer Door
8. 45L Drawer Handle
9. 45L Drawer Door
10. Adjustable Feet
11. Kick plate
SET
LIGHT
CF/
LOWERUPPER
SET
LIGHT
C F/
LOWERUPPER
5

Important Safe ty Instruc ti ons
-The appliance is intended to be used exclusively for storage of wine.
-Make sure the voltage/current marked on the rating label corresponds with your supply voltage. Plug into a grounded
3-pin outlet, do not remove grounding pin, do not use an adapter, and do not use an extension cord.
-Do not co nnect or disconnect the electric plug when your hands are wet.
-Ensure enough peoples to move and install the appliance to avoid any damage to the appliance or injury t o the peoples.
-T
o ensure proper ventilation for the appliance, the front of the unit must be completely unobstructed. Locate the unit
aw
ay from direct sunlight and sources of heat (stove, heater, radiator, etc.).
-This appliance is not intended for use by young children.
-Do not use this appliance for other than its intended purpose.
-The use of attachments not recommended by the manufacturer may be hazardous.
-When you dispose the appliance, take off the door and leave the shelves in place so that children may not easily climb
in
side. And make sure the coolant circuit, particularly the heat exchanger at the back/bottom of the unit not be
damaged. The
symbol on the product or its packaging indicates that this product is not to be handled as normal
household waste and it is to be taken to a recycling collection point for electrical and electronic goods.
-Component parts shall be replaced with like components and that servicing shall be done by factory authorized service
personnel.
IMPORTANT SAFETY INFORMATION
DANGER! RISK OF C HILD ENTRAPMENT
Before you throw away your old appliance:
1. Take off the doors.
2. Leave the she
lves in place so that children may not easily climb inside.
CA
UTION:To prevent a child from being entrapped, keep out of reach of children and not in the vicinity or appliance.
Refrigerants
R600a is a kind of high performance green refrigerants, derived from natural ingredients, does not damage the ozone
layer, without the greenhouse effect. Its characteristic is the strong cooling performance, low power consumption. All
refrigeration products contain refrigerants,
which under federal law must be removed prior to product disposal. If you
ar
e getting rid of an old refrigeration product, check with a qualified disposal company for instructions.
This appliance must be grounded. In the ev ent of an electrical short circuit, grounding reduces the risk of electric shock
by providing an e scape wire for the electric current. This appliance is equipped with a cord having a grounding wire with
a grounding plug. The plug must be plugged into an out
let that is properly insta
lled and grounded.
WARNING- Improper use of grounding can result in a risk of electric shock.
1. Consult a qualified electrician or serviceman if the grounding instructions are not completely understood or if doubt
exists as t o whether the appliance is properly grounded.
6
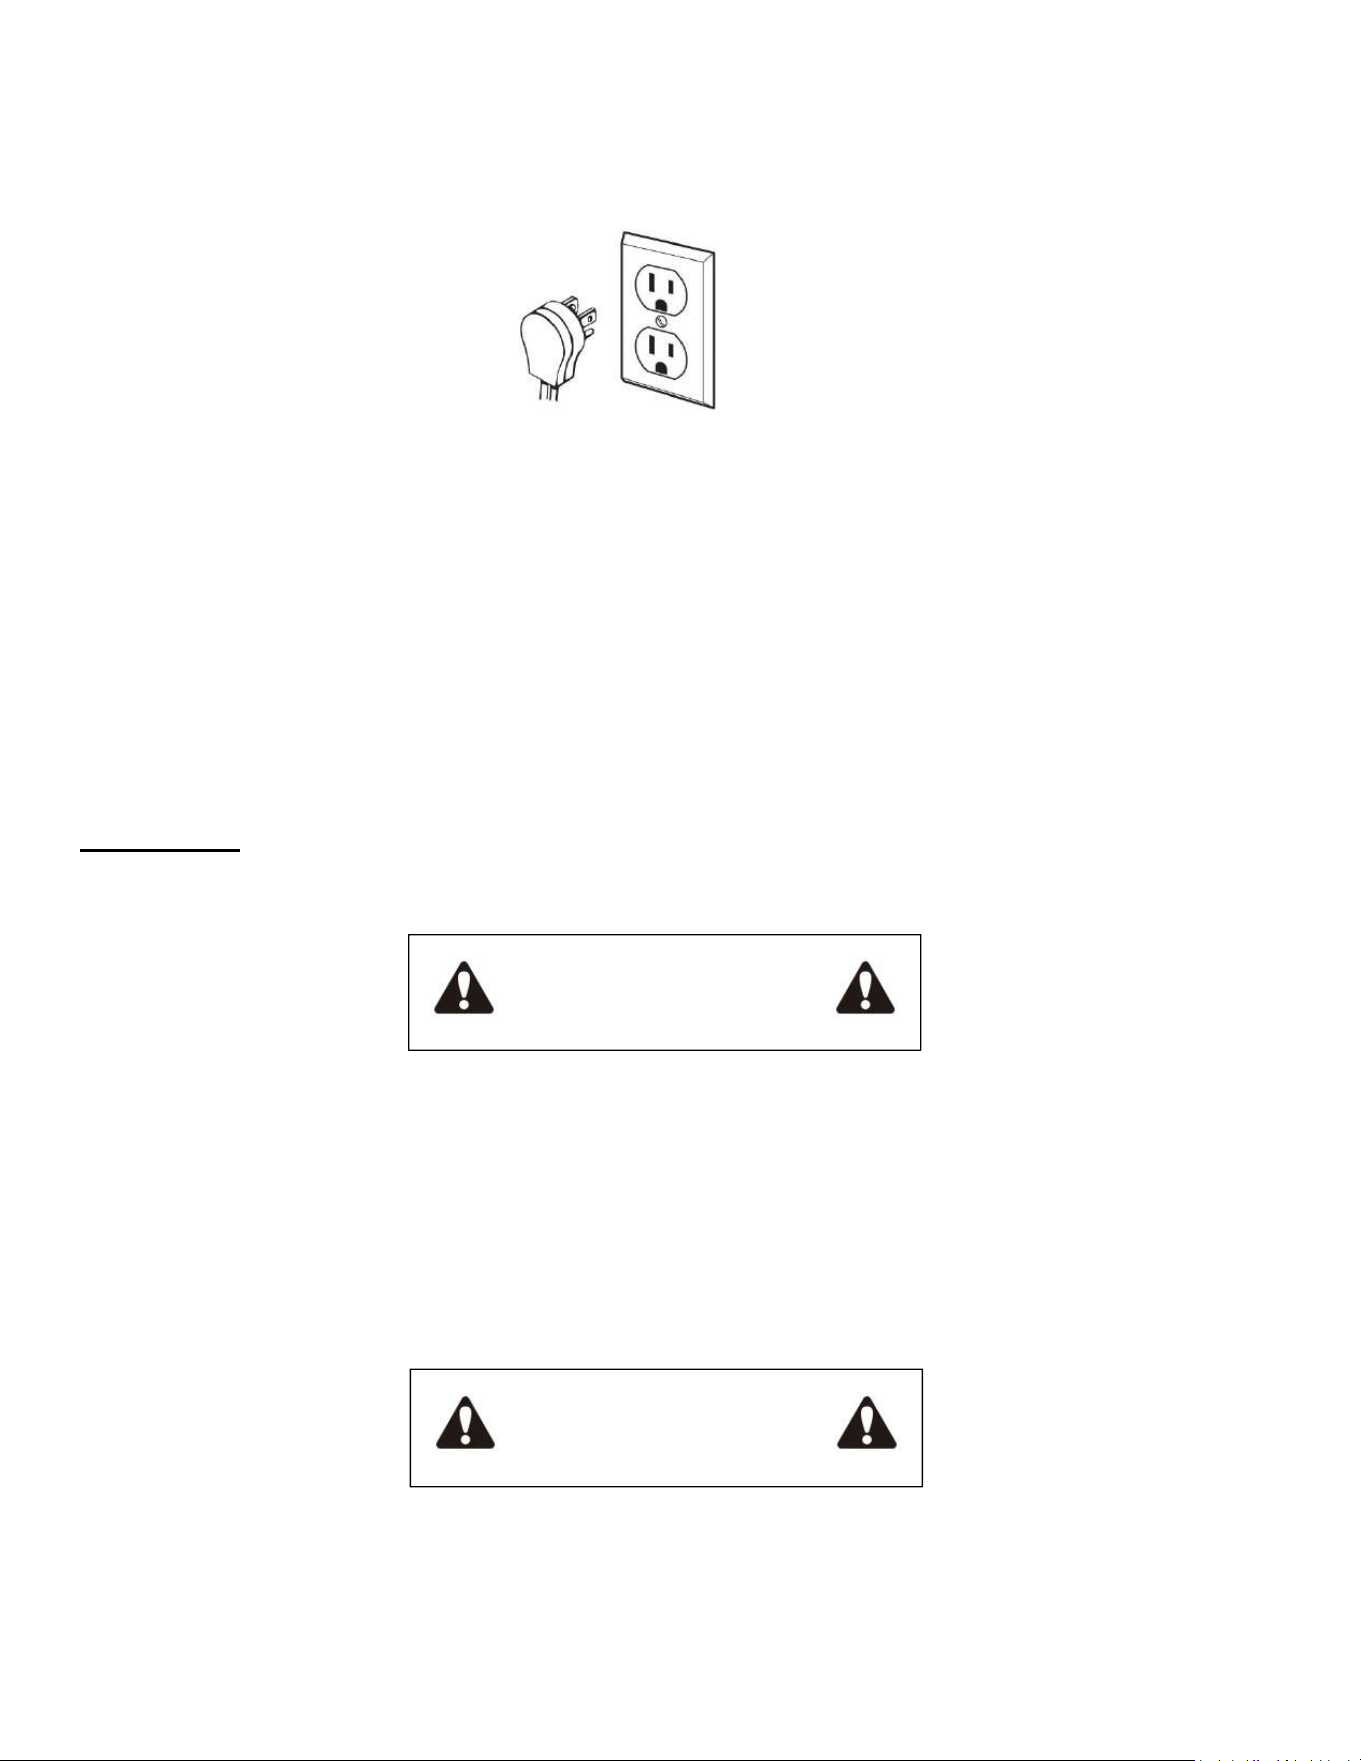
2. If it is necessary to use an extension cord, use only a 3-wire extension co rd that has a 3-blade grounding plug, and a 3-
slot receptacle that will accept the plug on the appliance. The marked electrical rating of the extension cord shall be not
less than 120V, 5A.
Three-pronged (grounding plug)
Properly polarized and grounded outlet
MOVING THE APPLIANCE
1. Turn off the wine cooler and unplug from the outlet.
2. Securely tape down all loose items inside.
3. Close the do or.
4. Do not lift or pull the do or or door handle during transportation.
5. When moving, the appliance can not be tilted over 45 degrees as possible damage to the sealed system could occur.
6. Take care to avoid strong vibration or impact to the appliance.
7. When moving the wine cooler, do take care and avoid to damage the refrigerant tube, risk o
f fire or explosio
n.
Safety Tips
Before using this ap pliance, it must be properly positioned and installed as described in this manual, so please read
carefully. To reduce the risk of fire, electrical shock or injury when using the appliance, follow th ese basic precautions.
WARNING
Plug into a grounded outlet. Do not under any circumstances cut or remove the t hird ground prong from
the power cord supplied, do not use an adapter, and do not use an extension cord.
It is recommended that a separate circuit, serving only your appliance be used. Do not use outlets that can
be turned off by a switch or pull chain.
Never clean appliance parts with flammable fluids and do not store or use gasolin e or other flammable vapors and
liquids in the vicinity of this or an y other appliance. The fumes c an create a fire hazard or explosion.
Unplug the appliance or disconnect power before cleaning or servicing. Failure to do so can result in electrical
shock or death.
Do not attempt to repair or replace any part of your appliance unless it is specifically recommended in this
manual. All other servicing should be referred to a qualified technician.
WARNING
Use two o r more people to move and install appliance. Failure to do so can result in back or other injury.
To ensure proper ve ntilation for your appliance, the front of the unit must be completely unobstructed. Choose
a well-ventilated area with temperatures above 60°F (16°C) and below 90°F (32°C). This unit must be installed
in an area protected from the element, such as wind, rain, water spray or drips.
The appliance should not be located next to ovens, grills or other high he
at sources or in areas of extreme cold.
7

The appliance must be installed in accordance with state and local codes. A standard electrical supply (120VAC only, 60 Hz),
properly grounded in accordance with the National Electrical Code and local ordinances is required. Do not kink or pinch the
power supply cord of appliance.
The fuse (or circuit breaker) size should be 15 amperes.
It is important for the appliance to be leveled in order to work properly. You may need to make several adjustments to level it.
Never allow children to operate, play with or crawl inside the appliance. Child entrapment and suffocation are not just
problems of the past, junked or abandoned appliances are still dangerous. When
no longer
using your
old wine cellar, take off
the door and leave the shelves in place so that children may not climb inside easily. Do not use solvent-based cleansers or
abrasives on the interior as they may damage or discolor the interior.
Because of potential safety hazards under certain conditions, it is strongly recommended that you do not use an extension
cord with this appliance.
If the appliance is going to be used in an area that is prone to power surges/outages, it is suggested that you use a power surge
protector. The surge protector that you select must have a surge block high enough to protect the appliance it is connected to.
Damages due to power surges are not considered a manufacturer covered defect and will void your product warranty.
The cord should be secured behind the appliance and not left exposed or dangling to prevent accidental injury. Never unplug
the appliance by pulling the power cord. Always grip the plug firmly and pull straight out from the receptacle. Repair or replace
immediately all power cords that have become frayed or otherwise damaged. Do not use a cord with cracks or abrasion
damage along its length or at either end. When moving the appliance, be careful not to damage the power cord.
Do not use this appliance for other than its intended purpose.
Failure to heed these safety warnings may result in extensive product damage, serious personal injury, or death. Do
not store explosive substances such as
aerosol cans with a flammable propellant in this appliance.
This appliance is intended to be used in household and similar applications such as
-staff kitchen areas in shops, offices and other working environments;
-farm houses and by clients in hotels, motels and other
residential type environments;
-bed and breakfast type environments;
-catering and similar non-retail applications.
If the supply cord is damaged, it must be replaced by the manufacturer, its service agent or similarly qualified persons in order
to
avoid a hazard.
The following requirements shall be followed at all times when using wine cabinet:
(1) use in strict accordance with the provisions of
the wine cabinet.
(2) do not pull the plug out of the socket by holding the power cord, but pull it out from the wall socket by holding the plug.
(3) if the power cord is broken, please repair or replace it immediately. Do not use cracked or aged power cord.
(4) children are not allowed to climb the cabinet to avoid damaging the cabinet and causing harm to the body.
(5) do not use power distribution.
(6) danger warning:
A. This product is a food refrigerator, it is strictly prohibited to store inflammable, explosive, corrosive, toxic, radiation and
other dangerous goods, please comply with the local food safety laws when storing food.
B. When throwing away the old wine
cabinet, please remove the cabinet door and put the cabinet shelf in place where
children are not easy to contact.
C. Some cabinet doors are equipped with locks. Please take care of the key and install it in a place where children are not easy
to touch.
8
Parts list
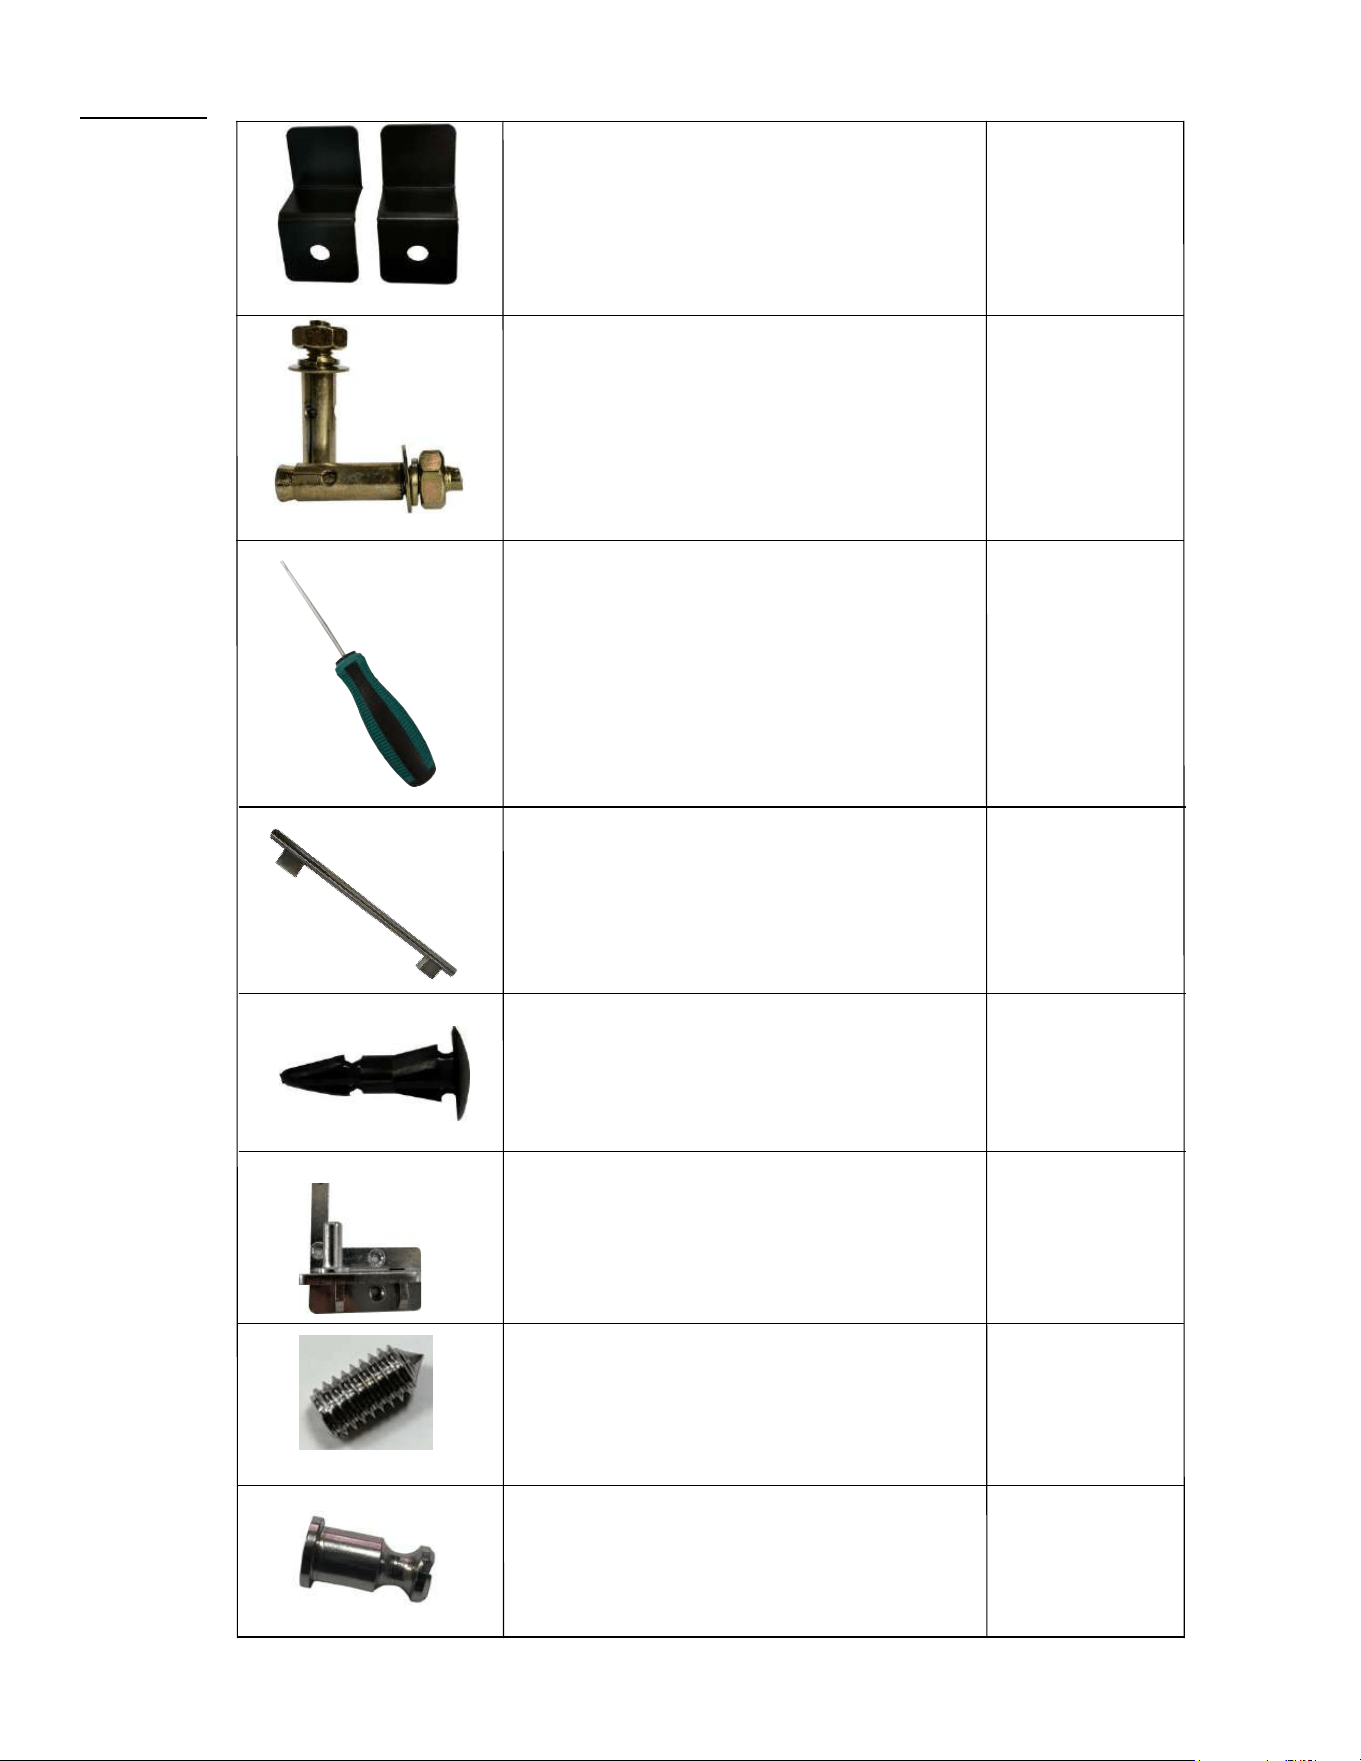
Anti-tip bracket 2 pcs
Expansion bolt 2 pcs
Hexagon wrench 1 pc
Handle 3 pcs
Plastic cap 3 pcs
Middle left hinge
1 pc
Screws for the handle
2 pcs
Handle bolt
2 pcs
9
Installation Instructions
Remove the exterior and interior packaging. Check the part list to make sure you have all components, such as
shelf, instruction, etc. If the bits of the shelf or support shelf fall during transportation, please install them
according to the relevant items on the instruction manual. . Check whether the wine cabinet is damaged or
deformed.
If there is nothing wrong with the wine cabinet after inspection, put it in the designated position.
Before connecting the unit to the pow
er source, let it stand upright for approximately 8 hours. This will reduce
th
e possibility of a malfunction in the cooling system from handling during transportation.
Clean the interior surface with lukewarm water using a soft cloth.
This appliance is designed for freestanding use. Ensure that there is 5cm of air space on both sides, and 8cm in
back.
Place the unit on a flat, solid floor that is strong enough to support it when it is fully loaded. To level the
appliance, adjust the front leveling leg at the bottom of the unit.
Whe
n moving your wine cellar, please do not incline it more than 45 degrees.
Locate the appliance away from direct sunlight and sources of heat (stove, heater, radiator, etc.). Direct sunlight
may affect the acrylic coating and heat sources may increase electrical consumption. Extreme cold ambient
temperatures may also cause the unit to perform improperly. The optimal ambient temperature range is
64.4°F(18°C) - 78.8°F(2
6°C)
Avoid locat
ing the unit in damp areas.
Plug the wine cellar into an exclusive, properly installed and grounded wall outlet. Do not under any
circumstances cut or remove the third (ground) prong from the power cord. Any questions concerning power
and/or electrical grounding should be directed to a certified electrician or authorized products service center.
After plugging the appliance into a wall outlet, allow the unit to cool down for 3 to 4 hours before placing
wine bottles or beverage can
s in the appliance.
Anti-Tip Bracket Installation
WARNINGTo avoid the risk of serious personal injury or damage to the appliance due to the instability of the appliance,
it must be fixed to the floor with anti-tip brackets and screws (supplied). Before installing, carefully read these instructions.
A. Take the fixing brackets (2pcs) and screws (2pcs) out of the instruction packet.
B
. Drill holes into the floor according to the dimensions shown below. This will allow you to fix the brackets to the
floor.
According to size and location, the hole punched on the floor should be Ø0.47 (12mm)" .
10
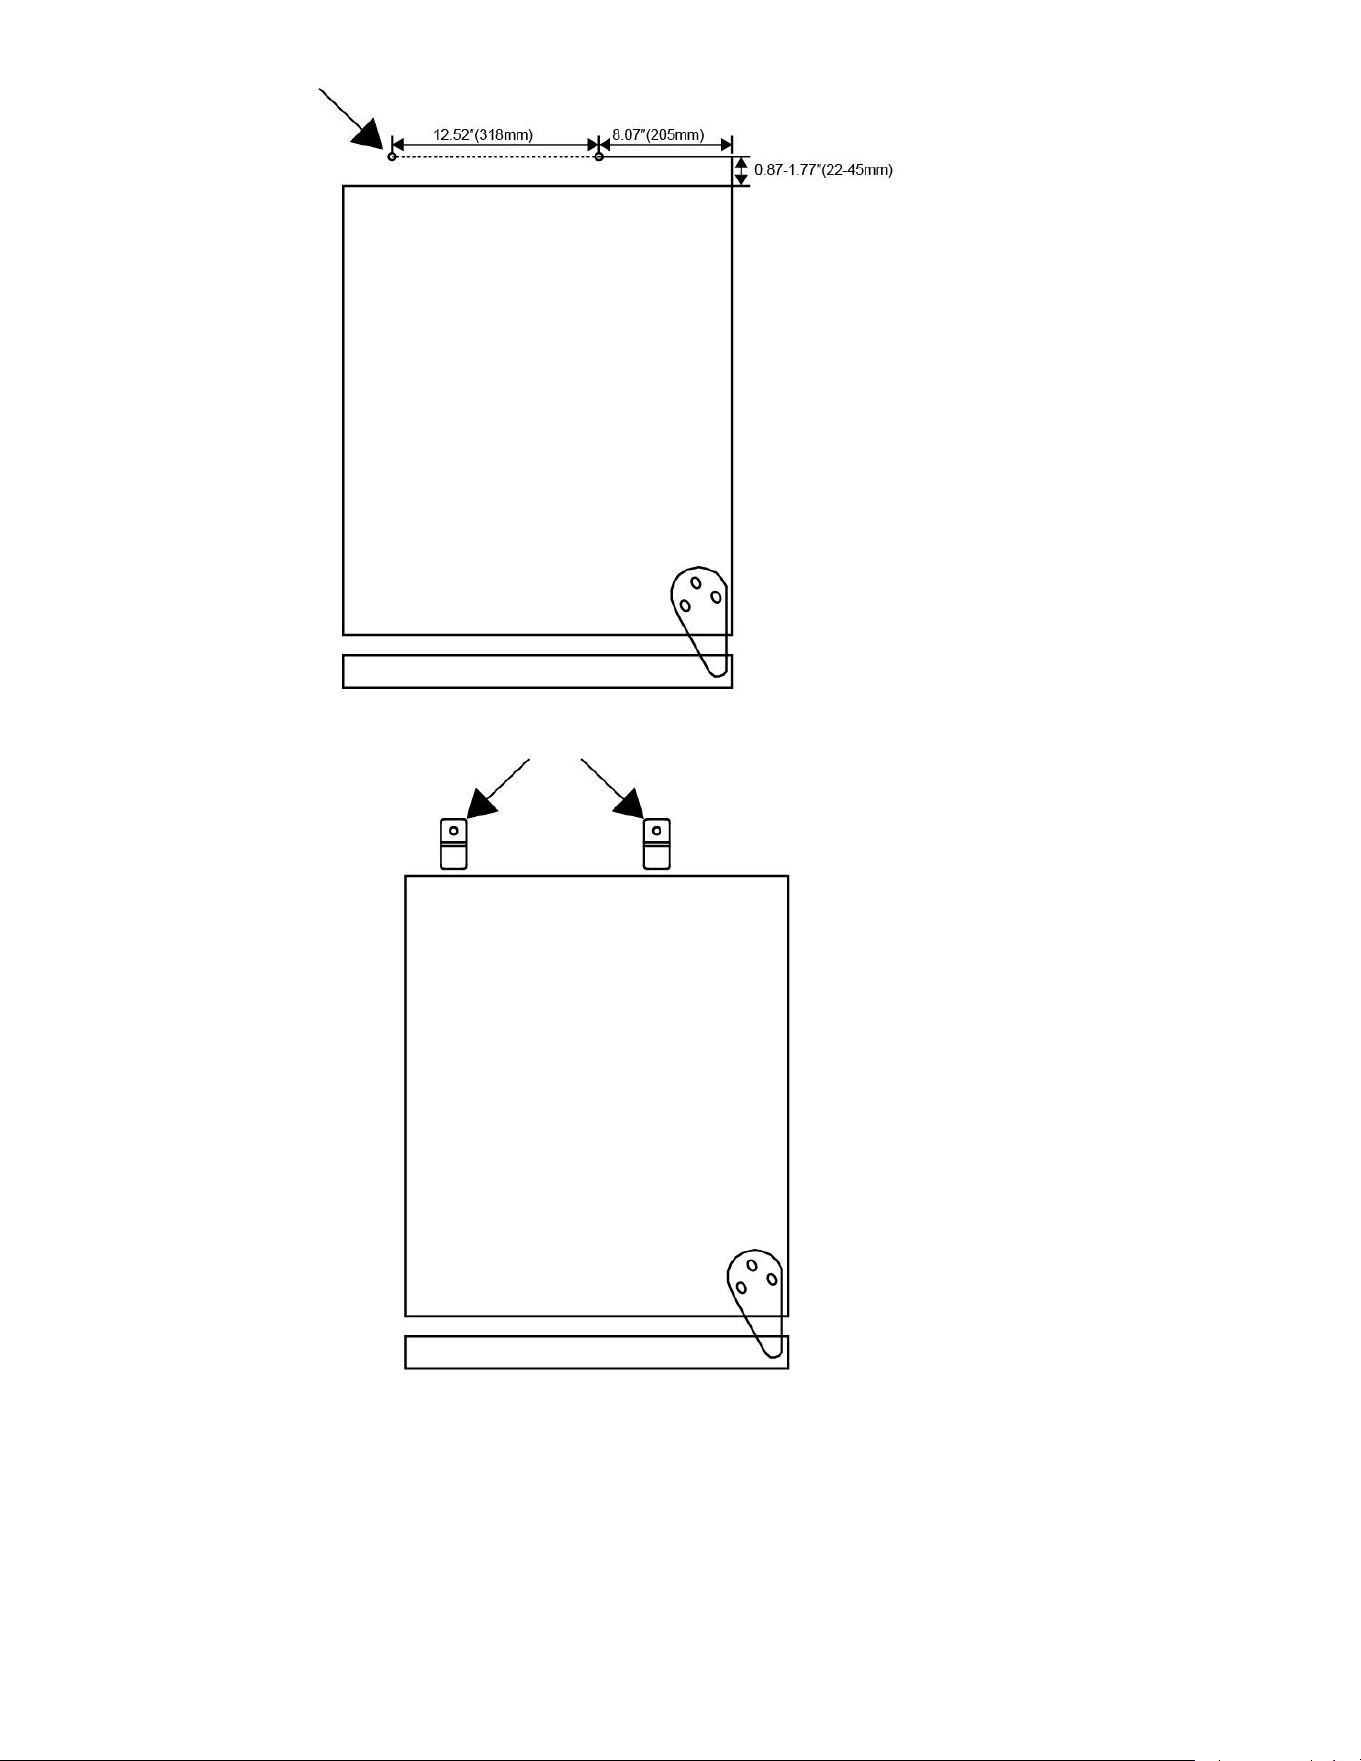
Use two expansion screws to fix feet on the floor
C. Push the appliance into its place of installation.
11
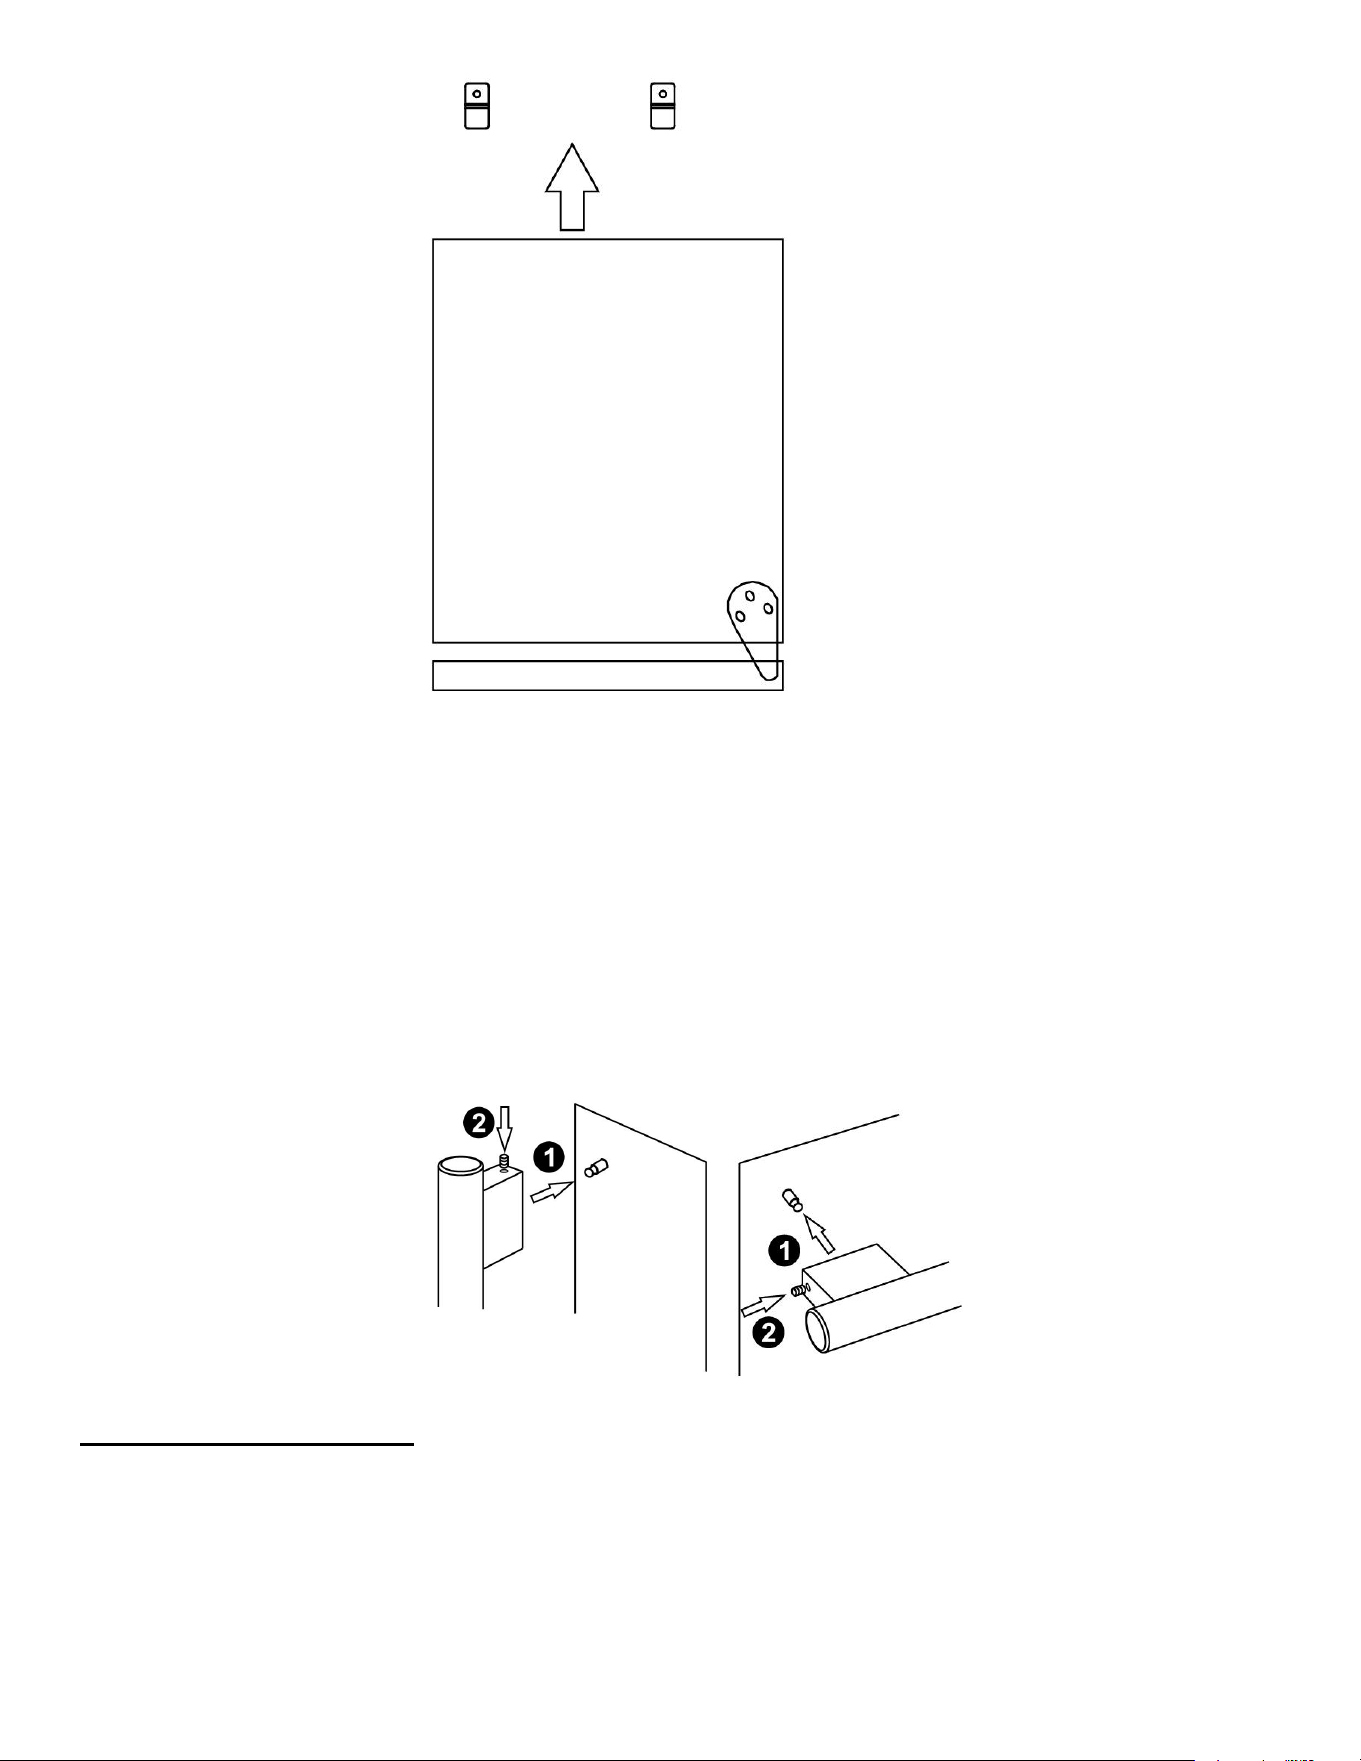
D. If the unit is not stable, pull out the appliance and repeat the previous step until th e u nit is stable.
Note:
If the unit is relocated , the bracket must be removed and installed in th e new location.
Installing The Handle
1. Locate the handle over the pins on the door panel.
2. Fix the handle by tighten the screw.
Operation Instructions
The wine cellar should be placed in an area where the ambient temperature range is between 18-26 °C(64.4°F - 78.8°F).
If the ambient temperature is above or below this range, the performance of t he unit may be affected. For example,
placing your unit in extreme cold or hot conditions may cause interior temperatures to fluctuate.
Displays the desired t emperature on an LED display 5-22°C(41°F - 72°F) for upper zone, 1-8°C(34°F-46°F) for lower zone.
Push the appliance into its place of installation.
12
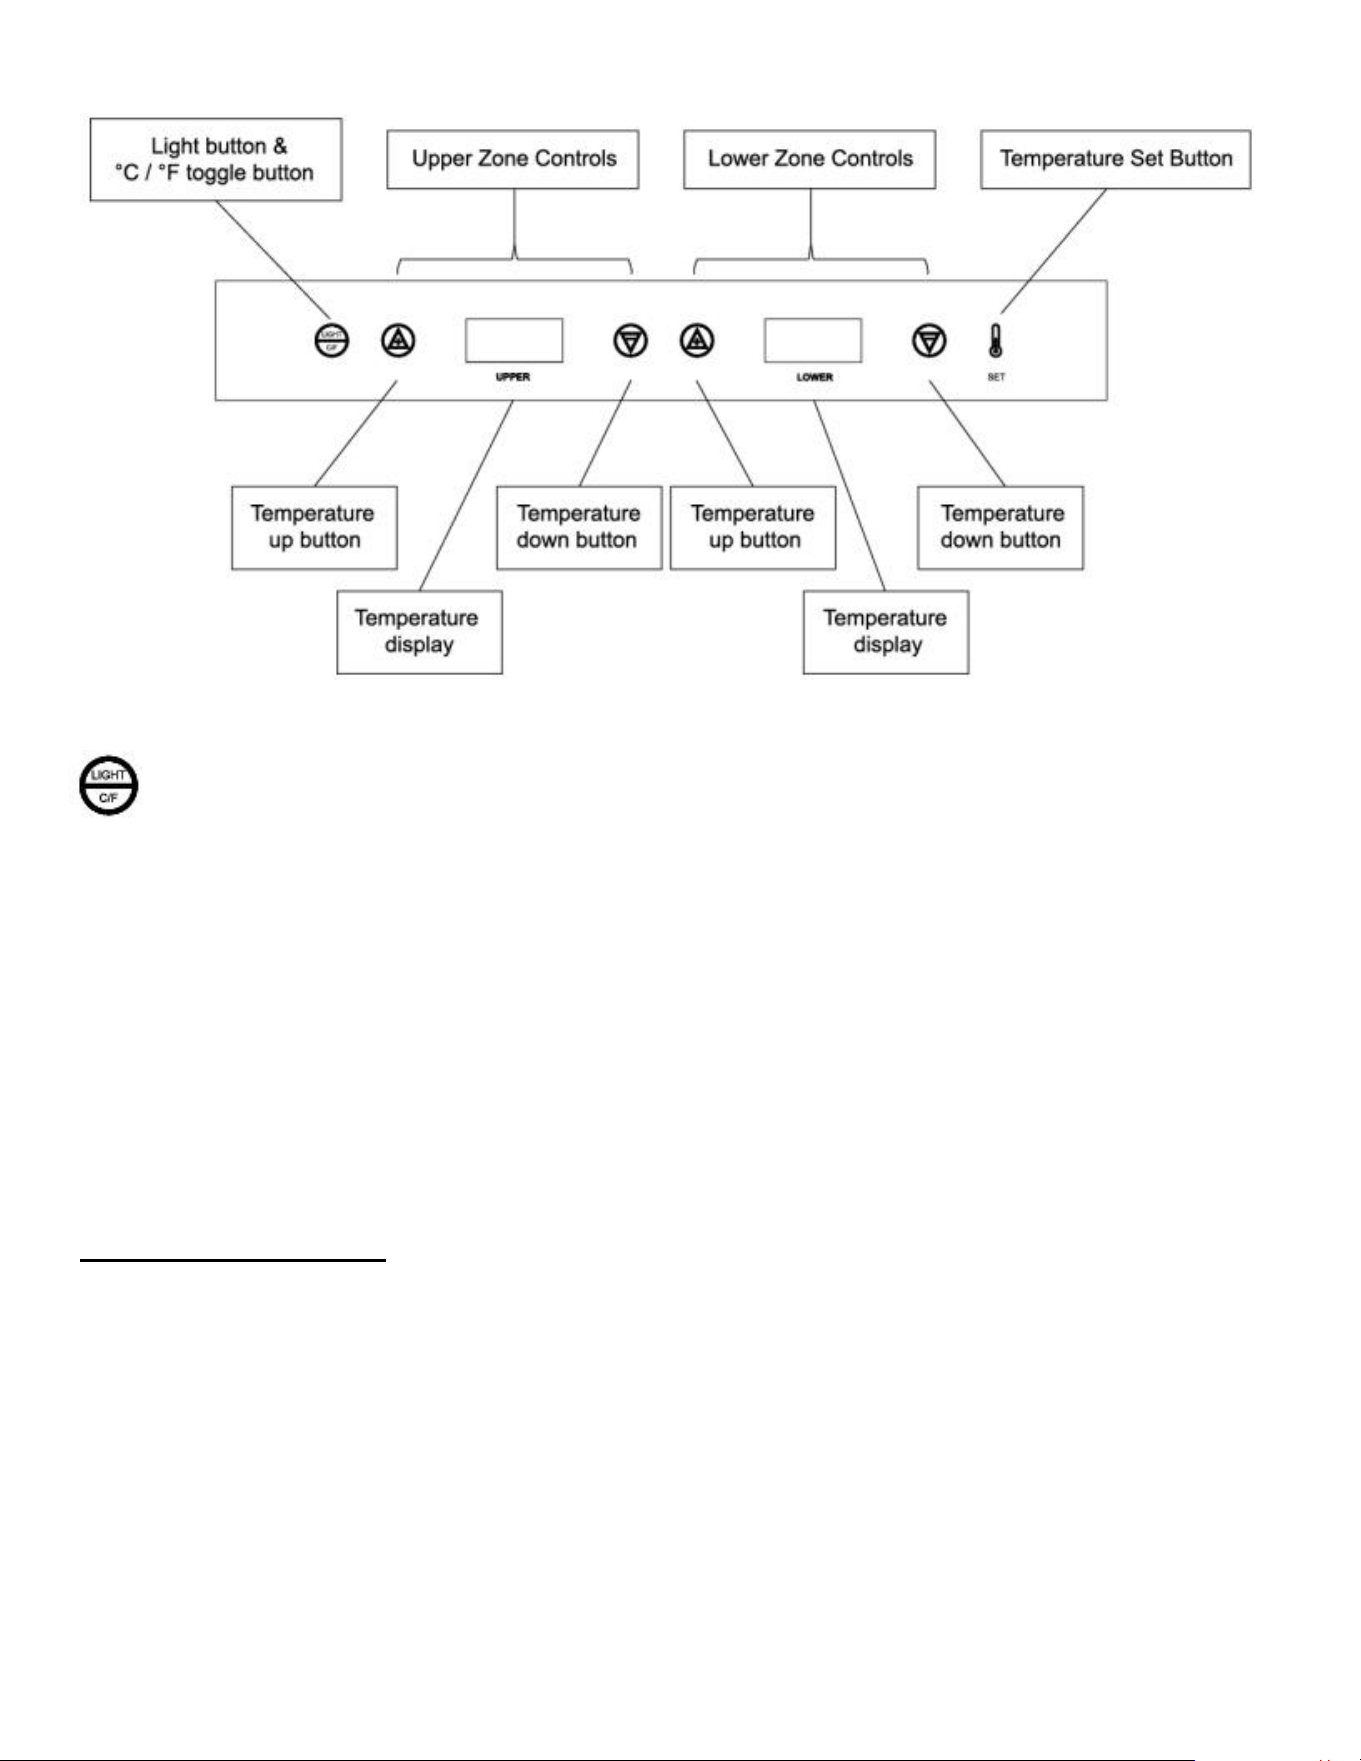
Using the control panel
To set the desired temperature for the upper or lower zone, press the Temperature Set button, and then use the
Temperature up and down buttons to set the zo ne to the desired temperature.
Light: Turns the interior light on or off
°C / °F – To toggle the temperature display between Celsius and Fahrenheit, press the button for 3 seconds.
NOTE: If the unit is unplugged, power lost, or turned off, you must wait 3 to 5 minutes befo re restarting the unit. The
unit contains compressor protection which will prevent the unit from starting until this time period has elapsed.
Whe
n you use the wine cooler for the first time or restart t he wine cooler after having been shut off for a long time,
there could be a few degrees variance between the temperature you select and the one indicated on the LED readout.
This is normal and once the wine cooler is running for a few hours the display will be correct.
STORAGE CAPACITY
Many bottles may differ in size and dimensions. The actual number of bottles you may be able to sto
re may vary from
the amount quoted.
Bottle capacities are approximate maximums when storing traditional 750ml bottles and include bulk storage.
Setting Temperatu re
The Wine Cellar has a wide enough temperature range to store either red or white wine, depending on your preference.
Different varietals of wine require different temperature settings. Red wine is generally stored between 10°C(50°F) and
18°C(65°F) , while white wines are stored between 4°C( 40°F) and 10°C (50°F) . White wine can be stored at red wine
temperatures for a short period of time (less than three months), and flash chilled before se rving.
You can set the temperature as you desir
e by touching the UP or D OWN button. When you touch the buttons for the
first time, the LED readout will show the original temperature set at the manufacturing facility. Each push of the button
will adjust t he temperature by one degree in the desired direction. Please be aware that the desired temperatures may
fluctuate depending on whether the interior light is ON or OFF and depending on the orientation of t he bottles.
13
PLEASE NOTE:
In the event of a power interruption, all previous temperature settings will be automatically saved and
each compartment will return to the previous temperature setting.
If the unit is unplugged, loses power, or is turned off, you must wait 3 to 5 minutes before restarting. Attempting
to restart the wine cellar before t his time has elapsed may prevent it from starting.
When you use the wine cellar for the first time or restart the wine cellar after having been shu
t off for a long
time, there will be a few degrees variance b
etween the temperature you select and the one indicated on the
LED readout for the first few hours of operation. After a few hours of operation, the temperature will normalize
to the displayed temperature.
Care and Maintenance
Cleaning your wine cellar:
Turn off the power, unplug the appliance, and remove all ite ms including all shelves.
Wash the inside surfaces with warm water and baking soda solution. The solution should be about
2 tablespoons of baking soda to a quart o f water.
Wash the shelves with a mild detergent solution.
Wring excess water out of the sponge or cloth when cleaning area of the controls, or any electrical parts.
Wash the outside cabinet with warm water and mild liquid detergent. Rinse and wipe dry wit h a clean soft cloth.
Du
st the front grill and back of the unit twice yearly. Make sure the power is off before cleaning.
It is recommended to clean the unit completely inside and out yearly to maximize the longevity of the product.
Moving your wine cellar:
Remove all bottles and any other items you may have inside the unit.
Securely tape down all loose items (shelves) inside your appliance and tape the door shut.
Turn the adjustable leg up to the base t o avoid damage.
Be sur
e the appliance stays secure in t he upright position during transportation.
Protect the outside of the appliance with a blanket or similar item
Racking Configuration
Disperse your bottles evenly throughout the unit so as not to concentrate weight in any one area. This also helps to
provide an even temperature range throughout the unit. Make sure that bottles are not all grouped together either at
the top or bottom of the cabinet. The maximum capacity per shelf is 20kgs. Never try to pull out more than one rolling
shelf at a time as it can cause the appliance to tip forward.
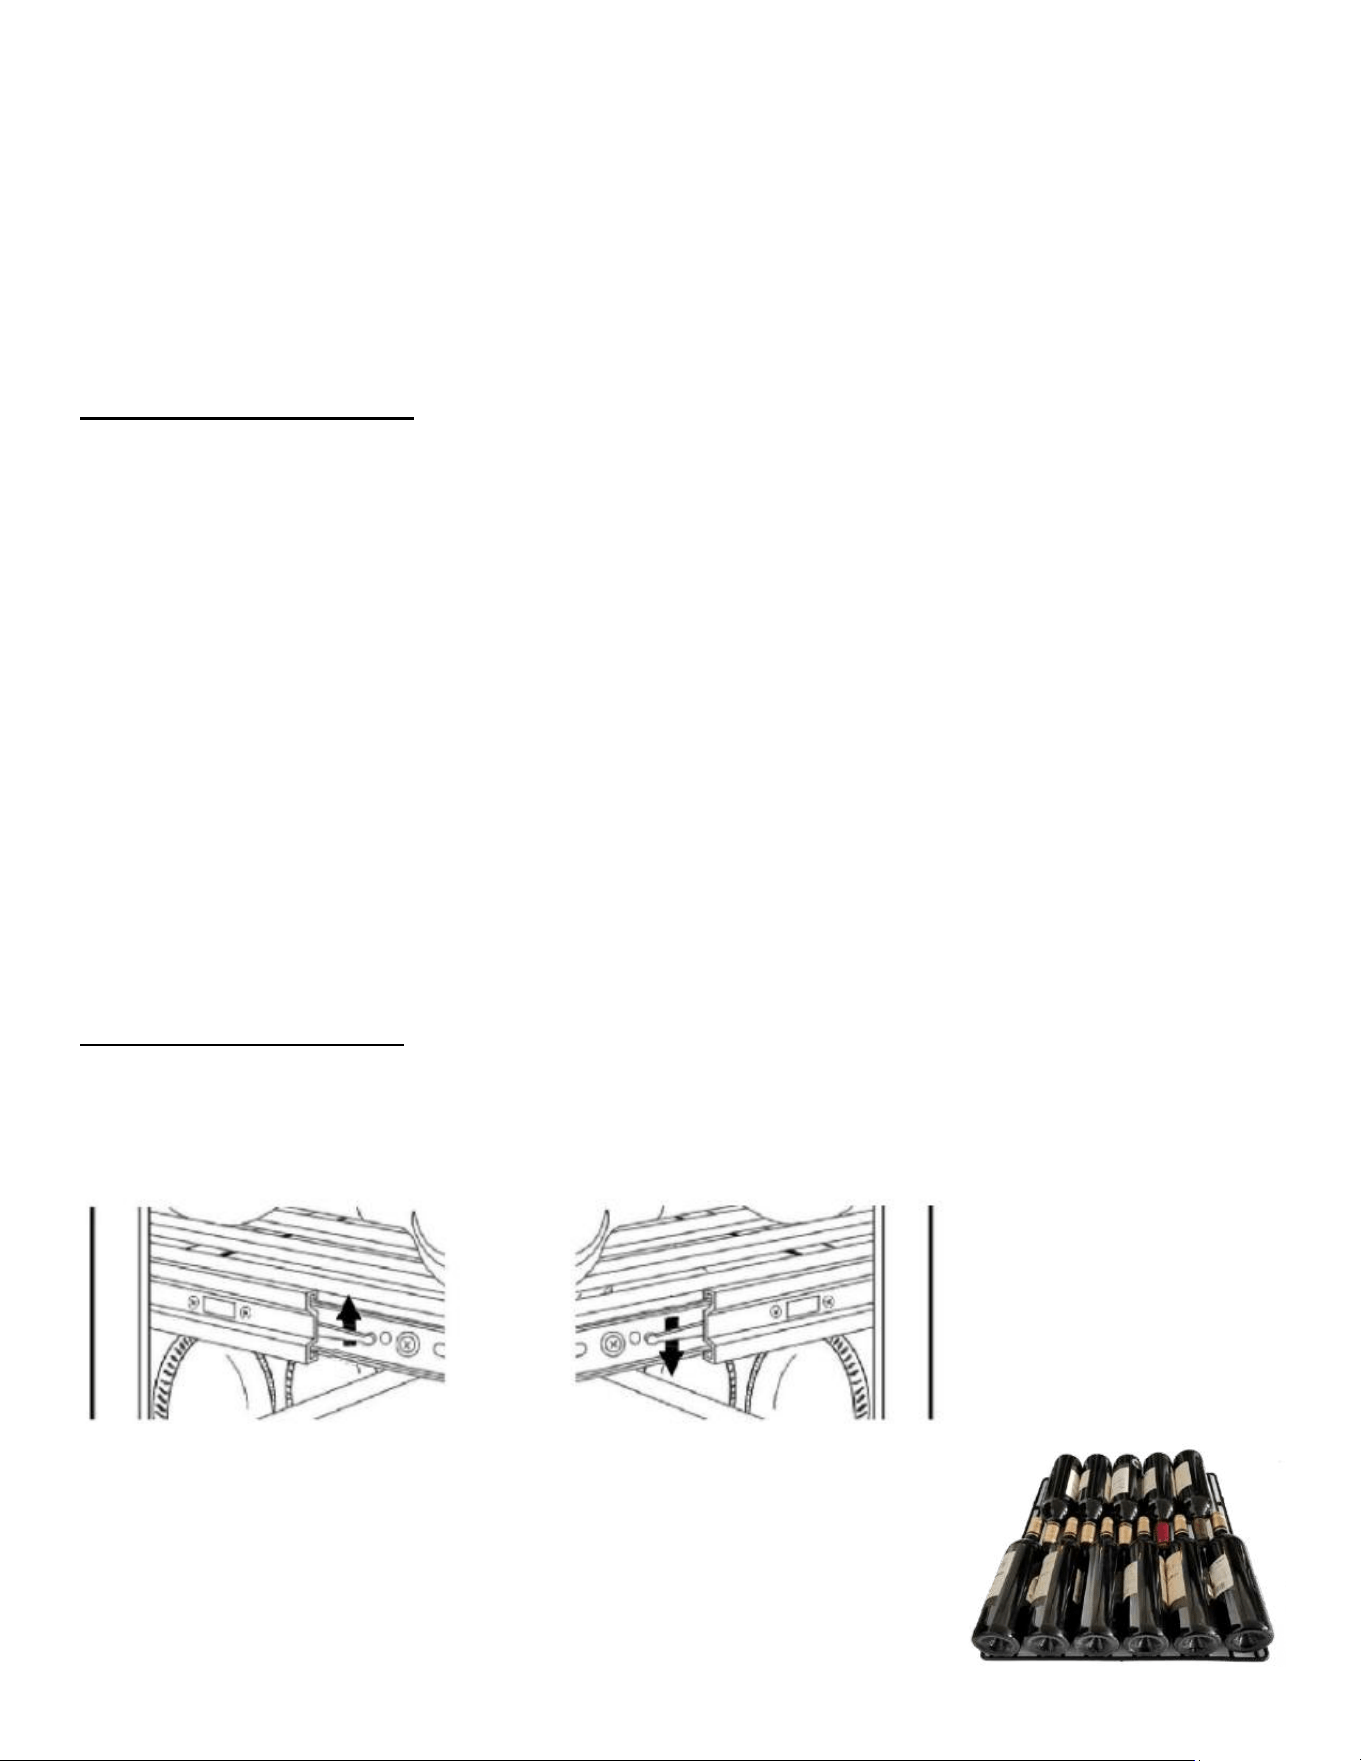
You can remove a shelf to accommodate larger diameter bottles on the shelf below
it. To remove a shelf, pull it out as far as you can. There are levers on each side of
the shelf near the rollers. One side up and the other side down to remove the
shelf from the tracks.
This wine cellar has 9 shelves that can hold up to 1 1 bottles.
14
Moving Racks
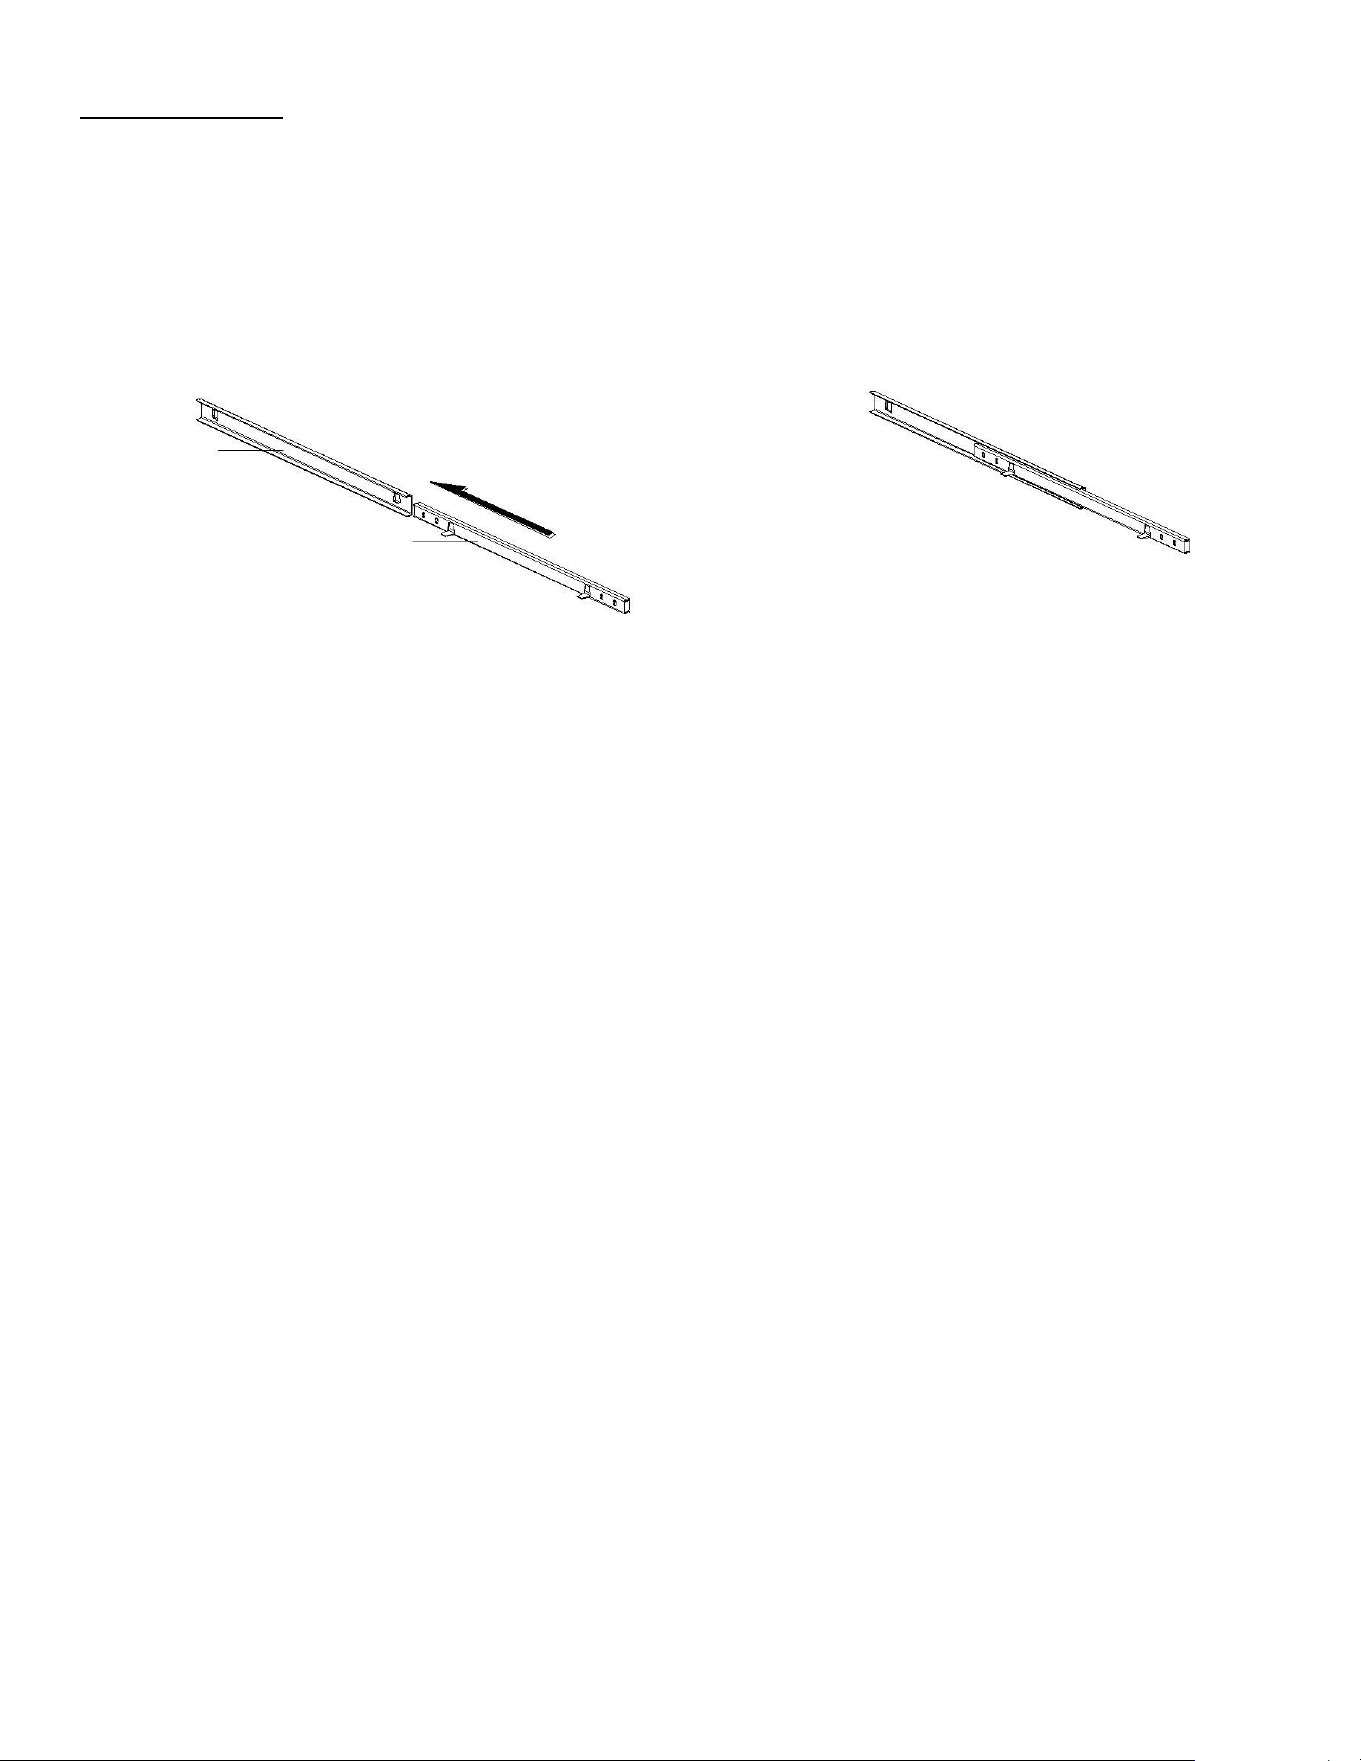
The shelves have smooth glide-out rollers that are adjustable in 1 1/4" increments to accommodate larger bottles
according to your needs. To move a sliding shelf, first remove all bottles, and then remove the sliding shelf by sliding
guides from walls, making sure not to mix up the right and left guides.
These adjustable shelves allow you to customize the interior of the cabinet to accommodate your specific collection.
Then refit the sliding shelf as shown below:
GUIDE
SLIDING SH
15
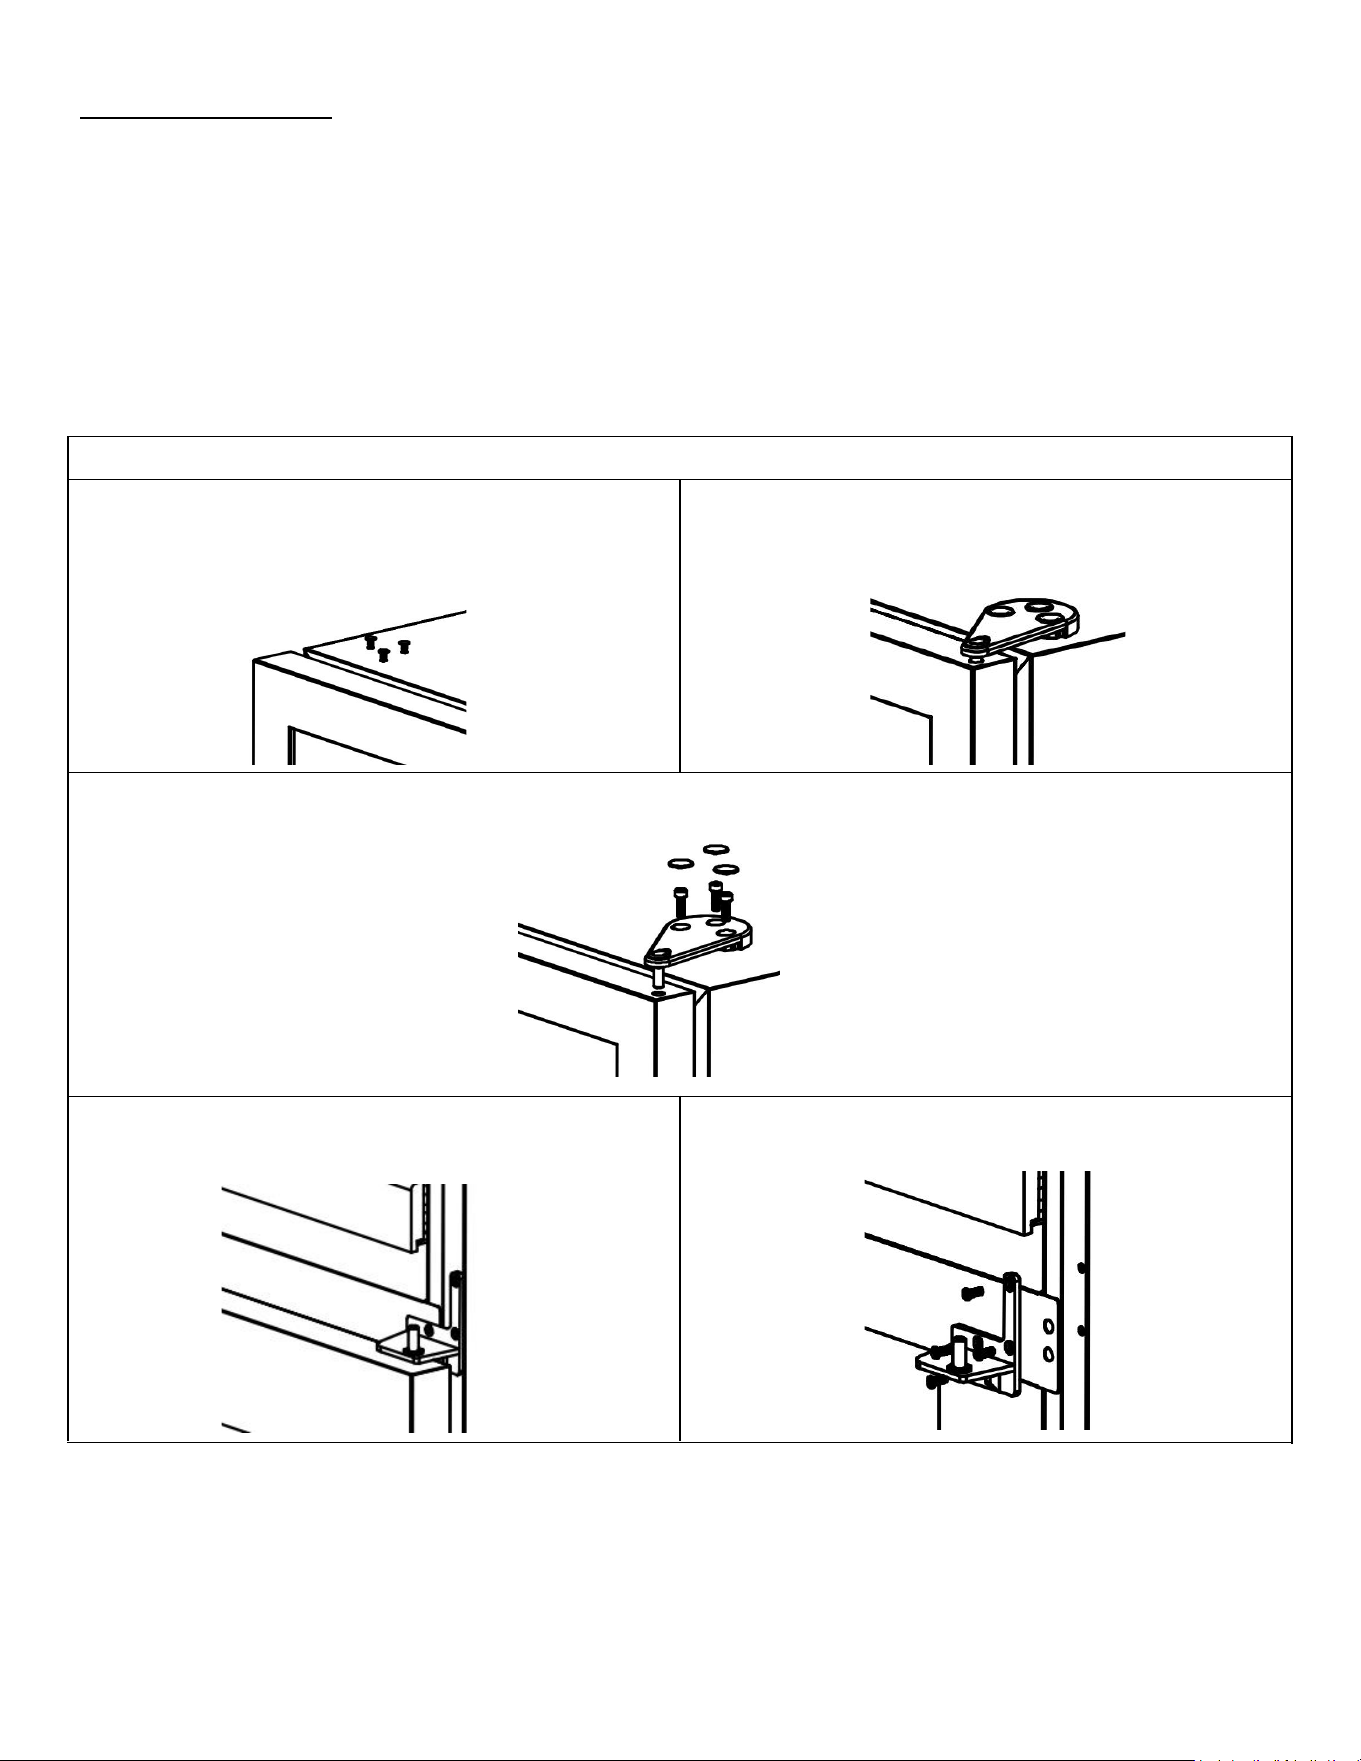
Reverse the door
This appliance is designed with a reversible door feature. You may configure the opening direction the left or from the right as
you like. Please fol l o w the operations below to rever se the door.
NOTE: If desired, please change the door swing prior to installation of the appliance.
CAUTION: To avoid per sonal injury to yourself and/ o r damage to property, it is high l y recommended that someone assist you
during the door reversal operations.
Removing the door
1. Turn o ff the unit and disconnect the power plug from the wall outlet.
2. Remove the plastic caps on the left side top of the unit.
(Keep the plastic caps and use for covering holes on the right
side after the door is reversed.
3.
Remove t he plastic cap fro m the upper hinge cover.
4. Hold the door, loosen the screws and remove the upper hinge. Make sure to hold the door during this step.
5. Lift the door and take it out from the lower hinge and
place it on a padded surface to avoid damage and
scratches.
6. Unscrew and remove the lower hinge and door pin.
Keep the hinge and pin in accessory bag for future use.
16
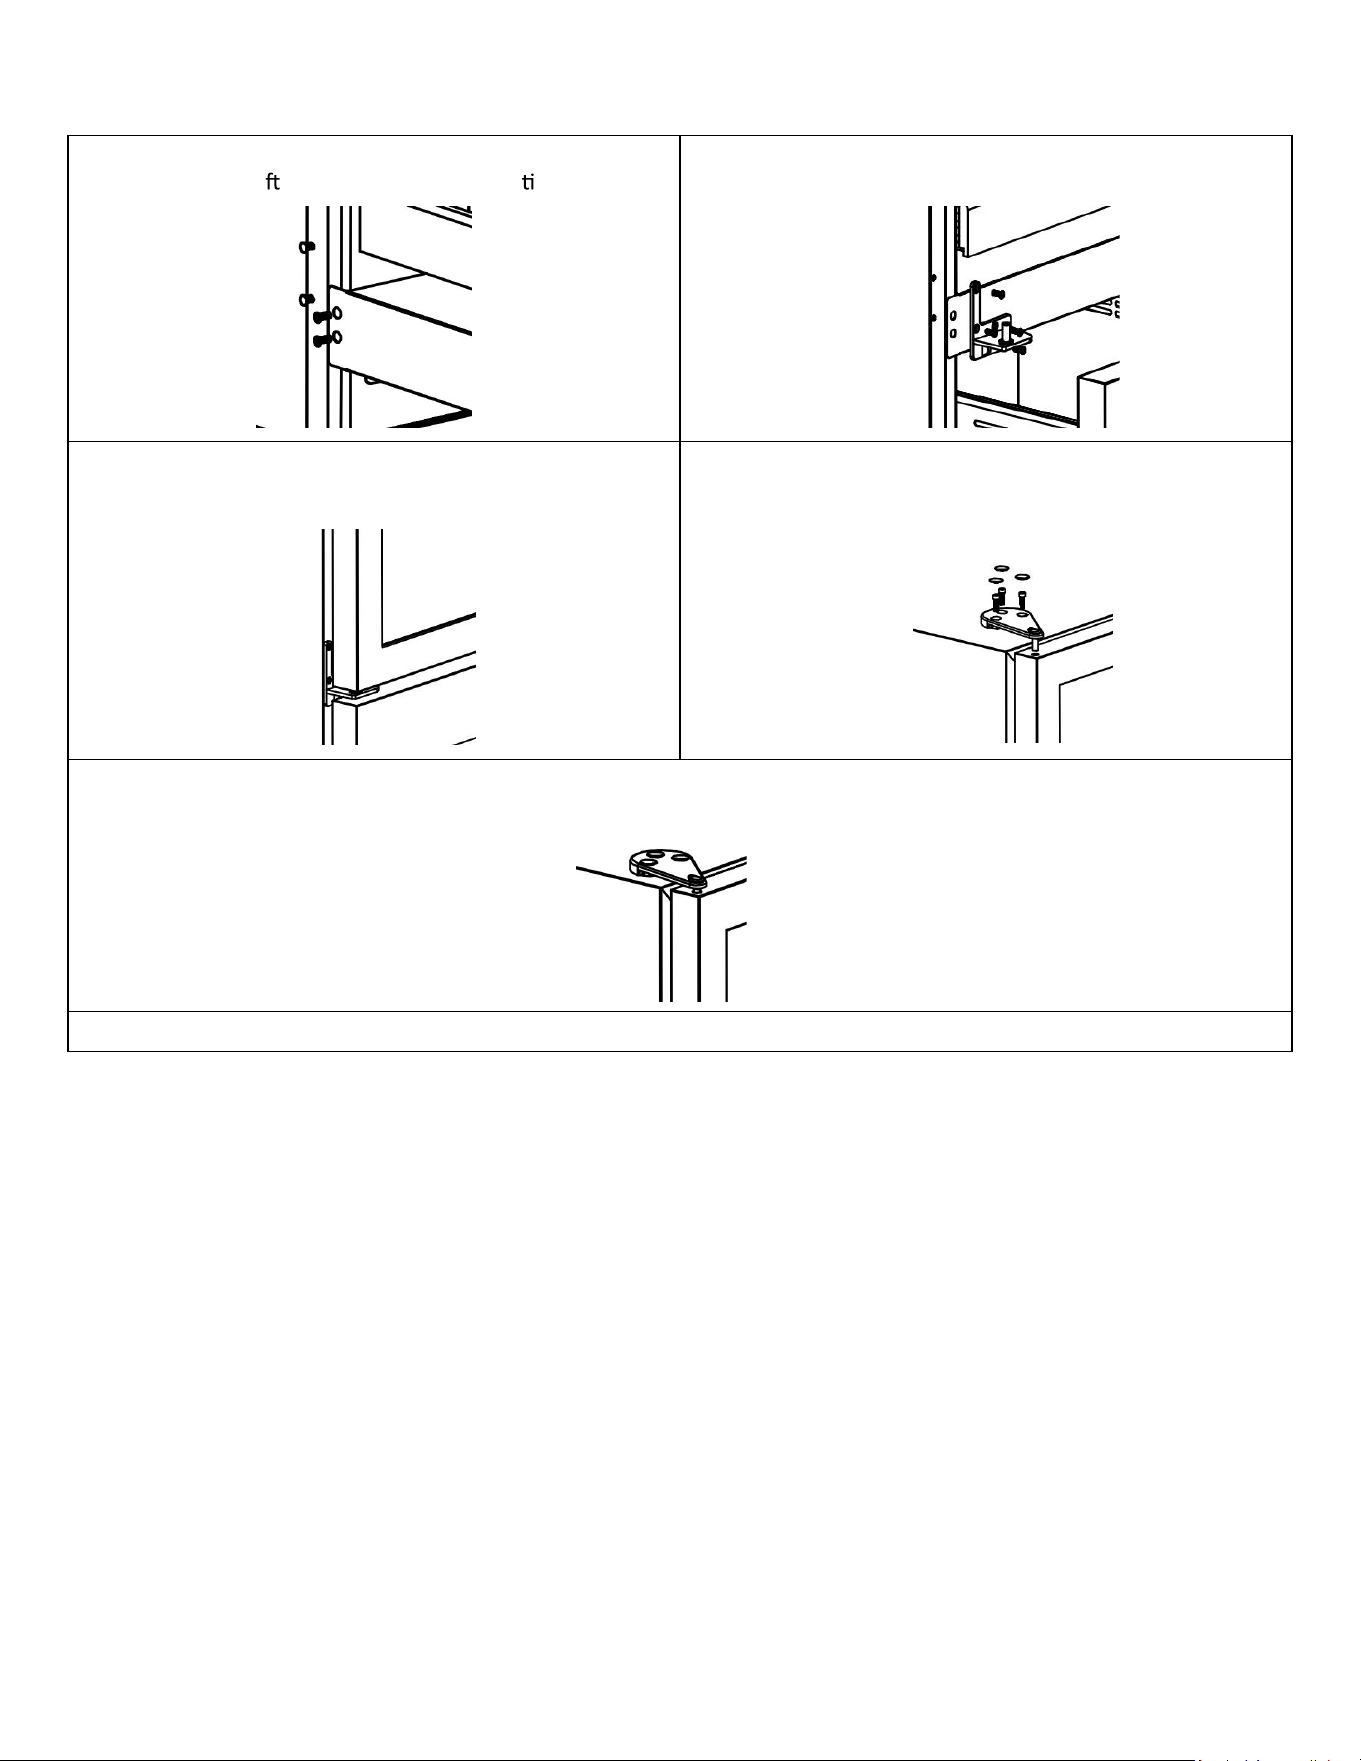
Installing the door
2. Take the lower hinge for left side from the accessory
bag. Install it to the left side lower hinge position.
3. Turn the door 180° and put it onto the left side lower
hinge and hold it at close position.
4. Reverse the upper hinge direction, and fix it on the top
of the door. Do not fully tighten the screws until the top of
the door is level with the top of the unit.
5. Fix the upper hinge on the top of the unit. Adjust the door to make sure it is level with the top of the unit. Then
tighten all the screws. Put on the hinge cover.
6. Put on the plastic caps to cover the holes on the other side.
the holes on the le side of lower hinge posi on.
1. Remove two screws and two rubber caps covering
17
Troubleshooti ng
There are many common issues you may experience with your wine cellar that can be solved very easily, wit hout
the need of a service call. Try the tips below to troubleshoot your unit should you experience any problems:
PROBLEM POSSIBLE CAUSE
Wine cellar does not operate
Not plugged in or the appliance is turned off
The circuit breaker tripped or a fuse has blown out
Wine cellar is not cold enough
Check the temperature control setting
External environment may require a higher setting
The door is opened too often
The door is not closed completely
The door gasket is not se aling properly
Wine cellar is turning on and off frequently
The room temperature is hotter than normal.
The door is opened too often.
The door is not closed completely.
The temperature control is not set correctly.
The door gasket doe s not seal properly.
The light does not work
Not plugged in.
The circuit breaker tripped or a fuse has blown.
The light bulb has burned out.
The light button is “OFF”.
Vibrations
Check to assure that the Wine cellar is on a level surface.
The wine cellar seems to make too much noise
A faint humming no ise may come from the flow o f the
refrigerant, which is normal.
As each cycle ends, you may hear gurgling sounds caused by
the flow of refrigerator in your wine cellar.
Contraction and expansion of the inside walls may cause
popping and crackling noises.
The wine cellar is not on a level surface.
The door will not close properly
The wine cellar is not on a level surface.
The gasket is dirty.
The shelves are out of position.
Condensation forming inside of the cabinet
Condensation occurs when too much ambient air gets into the
cabinet. Wipe off the doors and walls and leave door closed
as lo ng as possible.
Check that the door gasket and the charcoal filter are properly
in place.
For troubleshoo�ng videos, please scan the QR code below
18
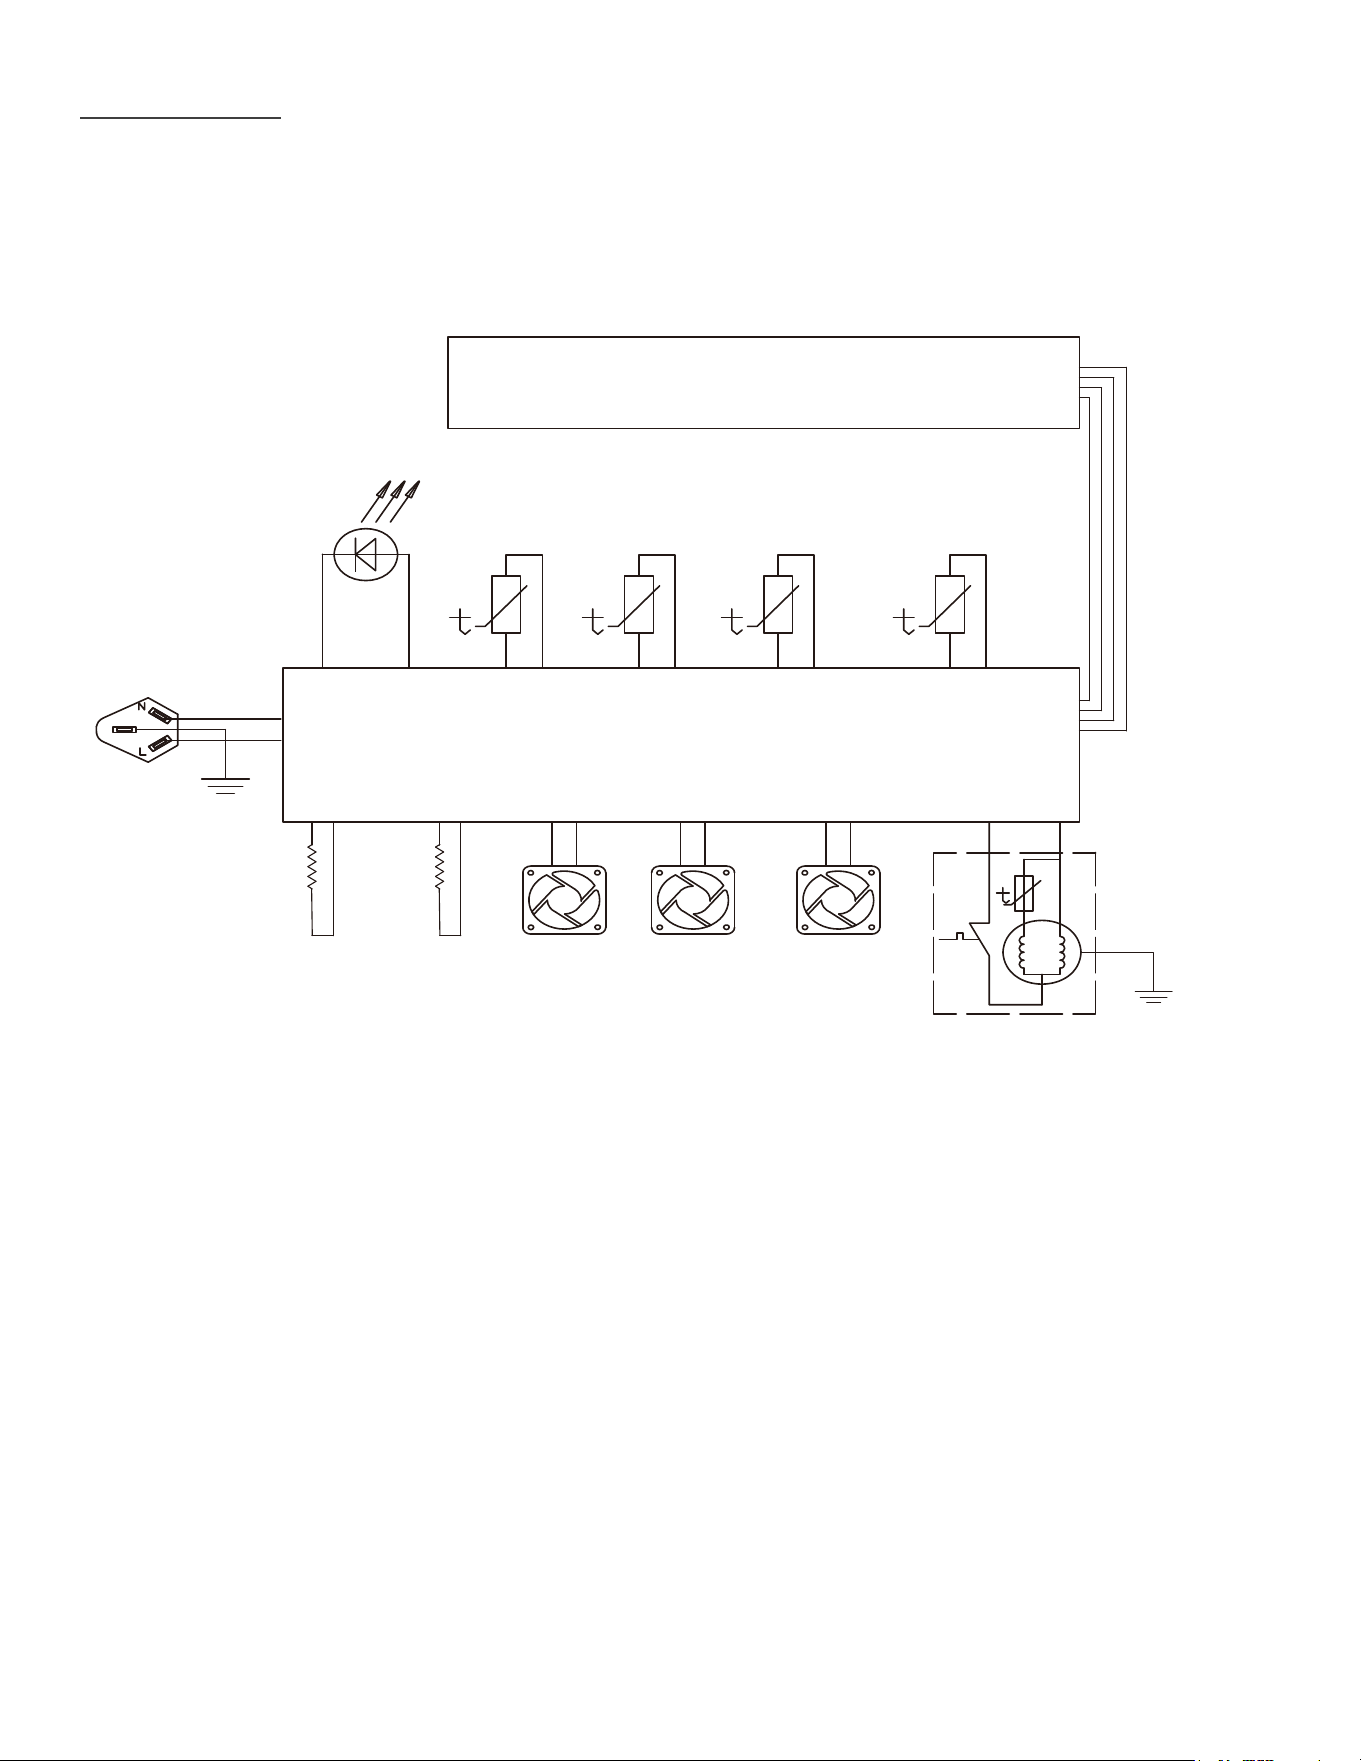
Wire diagram
AC115V/60Hz
LED LIGHT
CONTROL PCB
POWER PANEL
COMPRESSOR
DEFROSTING
SENSOR
DEFROSTING
SENSOR
UPPER
SENSOR
LOWER
SENSOR
UPPER
FAN
LOWER
FAN
CONDENSER
FAN
UPPER
PTC
HEATER
LOWER
PTC
HEATER
19
Warranty
What this limited warranty covers:
The Warranty coverage provided by Forno
Appliances in
appliance (“Product”) sold to the consumer (“Purchaser”) by
and installed in the United States or Canada, and which has
always remained within the original country of purchase (the
United States or Canad
a). Warranty coverage is activated on
the date of the Product’s original retail purchase and has a
duration of two (2) years.
Warranty coverage is non-transferable. In the event of
replacement of parts or of the entire product, the replacement
Product (or parts) shall assume the remaining original
Warranty activated with the original retail purchase document.
replacement. Forno Appliances will repair or replace any
component/part which fails or proves defective due to
materials and/or workmanship within 2 years of the date of
the original retail purch
ase and under conditions of ordinary
residential, non-commercial use. Repair or replacement
will be free of charge, including labor at standard rates and
Product reasonably accessible for service. Repair service
during normal working
hours.
Important
Retain proof of original purchase to establish warranty period.
Forno’
s liability on any claim of any kind, with respect to the
value of the goods or service or part there of which has given
rise to the claim.
30-Day Cosmetic W
arranty
The Purchaser must inspect the product at the time of
delivery. Forno warrants that the Product is free from
manufacturing defects in materials and workmanship for
a period of thirty (30) days from date of the original retail
purchase of the Product.
This coverage includes:
•
Paint blemishes
• Chips
•
Cosmetic warranty does NOT cover:
•
Issues resulting from incorrect transport, handling and/
or installation (e.g.: dents, broken, warped or deformed
structures or components, cracked or otherwise damaged
glass components)
;
• Slight color variations on painted/enameled components;
•
location or other analogous factors; > stains/corrosion/
How to receive service
T
o receive warranty services, the Purchaser must contact the
Forno Support department in order to determine the problem
and the required service procedures. Troubleshooting with
a customer service representative will be necessary before
moving forward with the service. Model number, serial number
and date of original retail purchase will be requested.
Warranty Exclusions: What Is Not Covered.
• Use of the Product in any non-residential, commercial
application.
• Use of the Product for anything other than its intended
purpose.
• Repair services provided by anyone other than a Forno
• Damages or repair services to correct services provided
• Installation not in accordance with local/state/city/county
building codes, laws or regulations.
• Defects or damage due to improper storage of the
Product.
• Defects, damage or missing parts on products sold out of
the original factory packaging or from displays. > Service
calls or repairs to correct an incorrect installation of the
Product and/or related accessories.
• Replacement of parts/service calls to connect, convert
or otherwise repair the electrical wiring and/or gas line in
order to properly use the product.
• Replacement of parts/service calls to provide instructions
and information on the use of the Product.
• Replacement of parts/service calls to correct issues
arising from the product being used in a manner other
than what is normal and customary for residential use.
• Replacement of parts/service calls due to wear and tear
of components such as seals, knobs, pan supports,
shelving, cutlery baskets, buttons, touch displays,
scratched or broken ceramic-glass tops.
• Replacement of parts/service calls for lack of/improper
maintenance, including but not limited to: build up of
residues, stains, scratches, discoloration, corrosion.
• Defects and damages arising from accidents, alteration,
misuse, abuse or improper installation.
• Defects and damages arising from Product transport,
logistics and handling. Inspection of the product must be
made at time of delivery. Following receipt and inspection,
any issues arising from handling, transport and logistics.
•
beyond the control of Forno Appliances, including but
failures surrounding the appliance and other acts of God.
• Products whose serial number has been altered/
damaged/tampered with. In no case shall Forno be held
liable or responsible for damage to surrounding property,
structures surrounding the Product. Forno is neither liable
nor responsible for the Product if it is located in a remote
not reasonably available. Purchaser must bear any
transportation and delivery costs of the Product to the
This warranty does not cover
installation at the time of purchase or during replacement.
20

THERE ARE NO EXPRESS WARRANTIES OTHER THAN THOSE LISTED AND DESCRIBED ABOVE, AND NO WARRANTIES, EITHER EXPRESS OR IMPLIED,
INCLUDING, BUT NOT LIMITED TO, ANY IMPLIED WARRANTIES OF MERCHANTABILITY OR FITNESS FOR A PARTICULAR PURPOSE THAT SHALL APPLY
AFTER THE EXPRESS WARRANTY PERIODS STATED ABOVE, AND NO OTHER EXPRESS WARRANTY OR GUARANTEE GIVEN BY ANY PERSON, FIRM
OR CORPORATION WITH RESPECT TO THIS PRODUCT SHALL BE BINDING ON FORNO. FORNO SHALL NOT BE LIABLE FOR LOSS OF REVENUE OR
PROFITS, FAILURE TO REALIZE SAVINGS OR OTHER BENEFITS, TIME AWAY FROM WORK, MEALS, LOSS OF FOOD OR BEVERAGES, TRAVELING OR
HOTEL EXPENSES, EXPENSES TO RENT OR PURCHASE APPLIANCES, REMODELING/CONSTRUCTION EXPENSES IN EXCESS OF DIRECT DAMAGES
WHICH ARE UNDENIABLY CAUSED EXCLUSIVELY BY FORNO OR ANY OTHER SPECIAL, INCIDENTAL OR CONSEQUENTIAL DAMAGES CAUSED BY THE
USE, MISUSE OR INABILITY TO USE THIS PRODUCT, REGARDLESS OF THE LEGAL THEORY ON WHICH THE CLAIM IS BASED, AND EVEN IF FORNO
HAS BEEN ADVISED OF THE POSSIBILITY OF SUCH DAMAGES. NOR SHALL RECOVERY OF ANY KIND AGAINST FORNO BE GREATER IN AMOUNT
THAN THE PURCHASE PRICE OF THE PRODUCT SOLD BY FORNO AND CAUSING THE ALLEGED DAMAGE. WITHOUT PREJUDICE TO THE FOREGOING,
PURCHASER ASSUMES ALL RISK AND LIABILITY FOR LOSS, DAMAGE OR INJURY TO PURCHASER AND PURCHASER’S PROPERTY AND TO OTHERS
AND THEIR PROPERTY ARISING FROM THE USE, MISUSE, OR INABILITY TO USE THIS PRODUCT SOLD BY FORNO THAT IS NOT A DIRECT RESULT OF
NEGLIGENCE ON THE PART OF FORNO THIS LIMITED WARRANTY SHALL NOT EXTEND TO ANYONE OTHER THAN THE ORIGINAL PURCHASER OF THIS
PRODUCT, IS NON-TRANSFERABLE, AND STATES YOUR EXCLUSIVE REMEDY.
Warranty (continued)
21